
Gebruikershandleiding
User Guide
LG-E975
MFL67781247 (1.0) www.lg.com
NEDERLANDS
E N G L I S H


Gebruikershandleiding
•Deschermafbeeldingenenillustratieswijken
mogelijkafvanwatudaadwerkelijkopdetelefoon
ziet.
•Hetkanzijndateendeelvandezehandleiding
nietvantoepassingisopuwtelefoon.Dithangt
afvandesoftwareofvanuwserviceprovider.Alle
informatieinditdocumentkanzonderkennisgeving
wordengewijzigd.
•Dezehandsetisvanwegehettoetsenbordophet
aanraakschermnietgeschiktvoormensenmeteen
visuelehandicap.
•Copyright©2014LGElectronics,Inc.Alle
rechtenvoorbehouden.LGenhetLG-logozijn
geregistreerdehandelsmerkenvanLGGroupen
diensgelieerdepartners.Alleanderehandelsmerken
zijnheteigendomvanhunrespectieveeigenaren.
•Google™,GoogleMaps™,Gmail™,Hangouts™
enPlayStore™zijnhandelsmerkenvanGoogle,
Inc.
Nederlands

2
Inhoud
Richtlijnen voor veilig en efficiënt
gebruik ......................................................5
Belangrijke melding ...............................18
Meer informatie over uw telefoon ..........25
Overzicht van de telefoon.......................25
De Micro-USIM-kaart plaatsen ...............27
De telefoon opladen ...............................28
Het scherm vergrendelen en
ontgrendelen .........................................28
Het basisscherm .....................................29
Tips voor het aanraakscherm .................29
Basisscherm ..........................................30
Hetbeginschermaanpassen................31
Terugkeren naar recent gebruikte
applicaties .............................................32
Meldingen .............................................32
Hetnoticatiepaneelopenen.................33
Indicatiepictogrammenopdestatusbalk33
Schermtoetsenbord ...............................35
Tekensmetaccenteninvoeren..............35
Google-account instellen .......................36
Verbinden met netwerken
en apparaten ...........................................37
Wi-Fi .....................................................37
VerbindingmakenmetWi-Fi-netwerken37
Wi-Fiinschakelenenverbindingmaken
meteenWi-Fi-netwerk.........................37
Bluetooth ...............................................38
De dataverbinding van uw telefoon
delen .....................................................39
Wi-Fi Direct ...........................................41
PC-verbindingen met een USB-kabel .....41
Oproepen .................................................43
Een oproep plaatsen ..............................43
Uw contacten bellen ..............................43
Een oproep beantwoorden of weigeren ..43
Belvolume aanpassen ............................44
Een tweede oproep plaatsen ..................44
Oproeplogboeken tonen .........................45
Oproep ..................................................45
Contacten ................................................46
Een contact zoeken ...............................46
Een nieuw contact toevoegen ................46
Favoriete contacten ...............................46
Een groep maken ..................................47
Berichten .................................................48
Een bericht verzenden ...........................48
Gegroepeerd vak ..................................49
De instellingen van uw berichten
wijzigen .................................................49
E-mail ......................................................50
Een e-mailaccount beheren ...................50
Accountmappen gebruiken ....................50
E-mailberichten schrijven en verzenden .51
Camera ....................................................52
Meer informatie over de beeldzoeker .....52

3
De geavanceerde instellingen gebruiken 53
Snel een foto maken .............................54
Nadat u een foto hebt gemaakt ..............54
Opgeslagen foto’s tonen ........................56
Videocamera ...........................................57
Meer informatie over de beeldzoeker .....57
De geavanceerde instellingen gebruiken 58
Snel een video maken ...........................58
Na het opnemen van een video ..............59
Uw opgeslagen video’s bekijken ............59
Het volume aanpassen tijdens de
weergave van een video ........................59
Unieke functie van LG .............................60
Functie QuickMemo ...............................60
DeoptiesvanQuickMemogebruiken....61
DeopgeslagenQuickMemotonen........61
Functie Notebook ...................................62
Eennotitiemaken................................62
Meerinformatieoverhetnotitieblok......62
Boekenplank.......................................62
Pagina-Eigenschappenpanelen............63
Hetopgeslagennotitiebloktonen..........63
QuickTranslator .....................................64
Functie Live-zoomen .............................65
Functie QSlide .......................................66
Functie Dual play ...................................67
Spiegelen............................................67
Dualplay.............................................67
LG SmartWorld ......................................68
Hoeumetuwtelefoonop
LGSmartWorldkomt:...........................68
Multimedia ..............................................70
Galerij ....................................................70
Foto'stonen........................................70
Video'safspelen..................................71
Foto's/video'sbewerken.......................71
Beeldenwissen...................................71
Alsachtergrondinstellen......................71
Video .....................................................71
Videoafspelen.....................................72
Video Editor ...........................................73
Video Wiz ...............................................74
Muziek ..................................................75
Eennummerafspelen..........................76
Accessoires .............................................78
Het alarm instellen .................................78
De rekenmachine gebruiken ..................78
Een gebeurtenis toevoegen aan uw
agenda ..................................................78
Voice recorder .......................................79
Eengeluidofstemopnemen................79
Eenspraakopnameverzenden..............79
Taakbeheer ............................................79
Taken ....................................................80
Polaris Office 4 ......................................80
Backup ..................................................80
Informatieoverhetmakenenterugzetten
vanback-upsvandatavan
smartphones.......................................80
Back-upmaken...................................82

4
Back-upplannen.................................82
Bestandsherstelen-beheer..................82
Google+ ................................................83
Spraakgestuurd zoeken .........................83
Downloads ............................................83
Het web ...................................................84
Internet ..................................................84
Debrowserwerkbalkgebruiken.............84
Webpagina'stonen..............................84
Eenpaginaopenen..............................85
Ophetwebzoekenmetbehulp
vanspraak..........................................85
Favorieten...........................................85
Geschiedenis.......................................85
Pop-upbrowsergebruiken....................85
Chrome .................................................86
Webpagina'stonen..............................86
Eenpaginaopenen..............................86
Ophetwebzoekenmetbehulp
vanspraak..........................................86
Synchroniserenmetandereapparaten..86
Opties ......................................................87
DRAADLOOS EN NETWERKEN ................87
APPARAAT .............................................90
PERSOONLIJK ........................................93
SYSTEEM ...............................................95
PC-software (LG PC Suite)......................97
Software-update voor telefoon ............100
Software-update voor telefoon .............100
Informatie over deze
gebruikershandleiding .........................102
Informatie over deze
gebruikershandleiding .........................102
Handelsmerken ...................................103
DivX-HD ..............................................103
Dolby Mobile .......................................103
Accessoires ...........................................104
Problemen oplossen .............................105
Veelgestelde vragen .............................109
Inhoud

5
Symbool
Omschrijving
Leesdezeinstructiesoverveiliggebruikvanditdraadlozeapparaatgoed
door.
Umoetaltijdextreemvoorzichtigzijnalsueenvoertuigbestuurtomzode
kansopongelukkenteverkleinen.Gebruikgeendraadloosapparaattijdens
hetrijden.
Ditapparaatisgetestvoorgebruikopeenafstandvan1,5cmtussende
achterkantvandetelefoonenhetlichaamvandegebruiker.
OmtevoldoenaandeFCC-regelgevingmetbetrekkingtotblootstelling
aanradiofrequentiesmoetertenminste1cmruimtezijntussenhet
lichaamvandegebruikerendeachterkantvandetelefoon.Ziede
gebruikershandleidingvoormeerinformatie.
Houdhetapparaatenbijbehorendeaccessoiresbuitenbereikvan
kleinekinderenenlaatzeernietmeespelen.Ditapparaatbevatkleine
onderdelenmetscherperandjesdiekunnenafbreken,meternstigletselof
verstikkingtotgevolg.
Ditapparaatkaneenhardgeluidproduceren
Fabrikantenvanpacemakersradeneenminimaleafstandvan15cmaan
tussenandereapparateneneenpacemakerommogelijkestoringvande
pacemakertevoorkomen.
Schakeluwdraadlozetelefoonuitinziekenhuizen,kliniekenen
gezondheidscentrawanneeruverzochtwordtdittedoen.
Ditverzoekisbedoeldommogelijkestoringmetgevoeligemedische
apparatuurtevoorkomen.
Richtlijnen voor veilig en efficiënt gebruik

6
Symbool
Omschrijving
Schakeluwdraadlozetelefoonuitineenvliegtuigwanneeruverzocht
wordtdittedoendoordebemanning.Neemcontactopmetdebemanning
voormeerinformatieoverhetgebruikvandraadlozeapparatenaanboord
vaneenvliegtuig.Alsuwapparaateen"vliegtuigmodus"heeft,moetdeze
geactiveerdwordenvoordatuaanboordvaneenvliegtuiggaat.
Omtevoorkomendatuexplosiewerkzaamhedenhindert,
dientuuwapparaatuitteschakelenalsuzichindebuurtvan
explosiewerkzaamhedenbevindtofalsuzichopplekkenbevindtwaareen
voorschriftgeldtomelektronischeapparatenofapparatenmetzend-en
ontvangsysteemuitteschakelen.
Gebiedenmetpotentieelexplosiegevaarzijnbijvoorbeeldtankplaatsen,
scheepsruimen,locatieswaarbrandstoffenofchemicaliënworden
opgeslagenofgetransporteerd,enplaatsenwaarerzichchemicaliënof
anderedeeltjes(zoalsgraan,stofofmetaal)indeluchtbevinden.
Hettoestelkaneenfelofknipperendlichtproduceren
Steluwapparaatendeaccessoiresnietblootaanopenvuur.
Steluwapparaatendeaccessoiresnietblootaanmagnetischemedia
(floppydisks,creditcards,etc.).
Steluwapparaatendeaccessoiresnietblootaanextremetemperaturen
lagerdan-5enhogerdan+55°C.
Steluwapparaatendeaccessoiresnietblootaanvloeistoffenofvocht.
Haalhetapparaatofdeaccessoiresnietzelfuitelkaar,alleenbevoegd
personeelkanditdoen.
Richtlijnen voor veilig en efficiënt gebruik

7
Symbool
Omschrijving
Ditapparaatgebruikt,netalsalleanderedraadlozeapparaten,
radiosignalendienietinalleomstandighedenverbindinggaranderen.
Vertrouwinnoodsituatiesdaaromnooitalleenopdraadlozeapparaten.
Gebruikalleengoedgekeurdeaccessoires
Leesdezeeenvoudigerichtlijnendoor.Hetkangevaarlijkofverbodenzijndeze
richtlijnenniettevolgen.
Eriseenhulpprogrammaopuwapparaatgeïnstalleerddateventuelefoutenregistreert.
Dithulpprogrammaregistreertalleenspecifiekegegevensmetbetrekkingtotde
fout,zoalssignaalsterkte,deCellIDPositionbijhetonverwachtwegvallenvaneen
telefoongesprekengeactiveerdeapps.
Hetlogboekkanalsreferentiewordengebruiktbijhetbepalenvandeoorzaakvaneen
fout.
Delogbestandenzijngecodeerd.AlleenmedewerkersvanLGRepairCentreshebben
toegangtotdezebestanden.Zijzullendezebestandenraadplegenalsuuwapparaat
terreparatieopstuurt.
Blootstelling aan radiogolven
DITAPPARAATVOLDOETAANDEINTERNATIONALERICHTLIJNENVOOR
BLOOTSTELLINGAANRADIOGOLVEN
Ditmobieleapparaatiseenradiozenderen-ontvanger.Hetapparaatiszoontwikkelden
geproduceerddathetvoldoetaandeemissiebeperkingenvoorradiofrequentiesignalen
(RF-signalen)diedoorinternationalerichtlijnen(ICNIRP)wordenaanbevolen.Deze
beperkingenmakendeeluitvanuitgebreiderichtlijnenendefiniërenhettoegestane
niveauvoorRF-energievoordealgemenebevolking.Dezerichtlijnenzijnontwikkeld
dooronafhankelijkewetenschappelijkeorganisatiesdoormiddelvanperiodiekeen
grondigeevaluatiesvanwetenschappelijkestudies.Indezerichtlijneniseengrote

8
veiligheidsmargeingebouwdomdeveiligheidvanallepersonentekunnenwaarborgen,
ongeachtdeleeftijdofgezondheidstoestand.
Destandaardvoorblootstellingaanmobieleapparatuurwordtuitgedruktinde
maateenheidSAR(SpecificAbsorptionRate).DeSAR-limietdiewordtvermeldinde
internationalerichtlijnenis2,0W/kg*.BijtestsvoorSARwordendestandaardposities
gebruikt,waarbijhetapparaatinallegemetenfrequentiebandenhethoogsttoegestane
energieniveaugebruikt.HoeweldeSARwordtbepaaldophethoogsttoegestaneniveau,
kanhetwerkelijkeSAR-niveauvanhetapparaattijdensgebruikaanzienlijklagerliggen
dandemaximumwaarde.Ditkomtdoordathetapparaatisontworpenvoorgebruik
bijverschillendeenergieniveaus,zodatnietmeerenergiewordtgebruiktdannodigis
omverbindingtemakenmethetnetwerk.Overhetalgemeengeldtdathoedichter
uzichbijeenzendmastbevindt,hoeminderenergiehetapparaatgebruikt.Alvorens
eenbepaaldtypemobieletelefoonindeverkoopkomt,moetwordenbepaaldofdeze
voldoetaandeEuropeseR&TTE-richtlijn.Dezerichtlijnkentalseenvandevoornaamste
eisendatdegezondheidvandegebruikeralsmedevaniedereenindebuurtdaarvante
allentijdegewaarborgddienttezijn.
DehoogsteSAR-waardedieditapparaatheeftbereikttijdenstestsvoorgebruiknaast
hetooris0.838W/kg.
DitapparaatvoldoetaanderichtlijnenvoorblootstellingaanRF-signalenwanneerhet
opnormalewijzetegenhetoorwordtgehoudenofwanneerhetzichopeenafstand
vanminimaal1,5cmvanhetlichaambevindt.Wanneerhetapparaatophetlichaam
wordtgedragenineendraagtasje,riemclipofhouder,moetendezehulpmiddelen
geenmetaalbevattenenmoethetproductzichopeenafstandvanminimaal1,5
cmvanhetlichaambevinden.Voorhetoverbrengenvandatabestandenofberichten,
moetditapparaatkunnenbeschikkenovereengoedeverbindingmethetnetwerk.
Insommigegevallenkanhetoverbrengenvandatabestandenofberichtenvertraging
oplopentoteendergelijkeverbindingbeschikbaaris.Houduaandebovenstaande
afstandsrichtlijnentotdegegevensoverdrachtisvoltooid.DehoogsteSAR-waardedie
ditapparaatheeftbereikttijdenstestsvoorgebruikophetlichaamis0.737W/kg.
*DeSAR-limietdievoormobieleapparatuurvoorhetpubliekwordtgehanteerd,is
Richtlijnen voor veilig en efficiënt gebruik

9
2,0watt/kilogram(W/kg)evenredigverdeeldovertiengramlichaamsweefsel.Inde
richtlijneniseenaanzienlijkeveiligheidsmargeingebouwd,voorextrabeschermingen
omeventuelemeetvariatiesteondervangen.SAR-waardenkunnenvariëren,afhankelijk
vannationalerapportage-eisenendenetwerkband.
Informatie over FCC SAR
Hetontwerpvanuwmobieleapparaatvoldoetaandevereistenvoorblootstellingaan
radiogolvenzoalsvastgestelddoordeFederalCommunicationsCommission(USA)en
IndustryCanada.DezevereistenstelleneenSAR-limietvangemiddeld1,6W/kgper
gramlichaamsweefsel.DehoogsteSAR-waardedieisgeregistreerdconformdeze
normtijdensdeproductcertificeringvoorgebruiknaasthetooris0.75W/kgenvoor
gebruikophetlichaamis1.49W/kg.
Daarnaastisditapparaatgetestvoorveelvoorkomendehandelingenwaarbijdeafstand
tussendeachterzijdevanhetapparaatenhetlichaamvandegebruiker1cmis.
OmaandeFCCRF-vereistenvoorblootstellingtevoldoen,moetdeafstandtussenhet
lichaamvandegebruikerendeachterzijdevandetelefoon1cmzijn.
* FCC-verklaring en waarschuwing
Opmerking!
Ditapparaatvoldoetaandeel15vandeFCC-regelgeving.Hetgebruikisafhankelijkvan
devolgendevoorwaarden:
(1)Ditapparaatmaggeenschadelijkeinterferentieveroorzaken.
(2)Ditapparaatmoetontvangeninterferentieaccepteren,inclusiefinterferentiedieleidt
totongewenstgebruik.
Let op!
Doorwijzigingenofmodificatiesdienietexplicietdoordefabrikantzijngoedgekeurd,
kandegebruikerzijnbevoegdheidverliezenomdeapparatuurtegebruiken.

10
Onderhoud van het product
WAARSCHUWING
Gebruik alleen batterijen, laders en accessoires die voor gebruik bij dit type
telefoon zijn goedgekeurd. Het gebruik van andere typen batterijen kan
gevaarlijk zijn en kan ertoe leiden dat de garantie vervalt.
•Demonteerhetapparaatniet.Laateventuelenoodzakelijkereparatiesuitvoerendoor
eengekwalificeerdonderhoudstechnicus.
•ReparatiesdienabeoordelingvanLGonderdegarantievallen,omvattenmogelijk
vervangendeonderdelenofkaartendieofwelnieuwofwelgereviseerdzijn,op
voorwaardedatdezeonderdelenofkaarteneengelijkwaardigewerkinghebbenalsde
onderdelendiewordenvervangen.
•Houdhetapparaatuitdebuurtvanelektrischeapparatenzoalstv's,radio'senpc's.
•Houdhetapparaatuitdebuurtvanwarmtebronnenzoalsradiatorenenkookplaten.
•Laathetapparaatnietvallen.
•Stelhetapparaatnietblootaanmechanischetrillingenofschokken.
•Schakeldetelefoonuitwanneerditdoorspecialevoorschriftenwordtvereist.Gebruik
detelefoonbijvoorbeeldnietinziekenhuizen,aangeziendoorhetgebruikgevoelige
medischeapparatuurbeschadigdkanrakenofkanwordenbeïnvloed.
•Houddetelefoontijdenshetopladennietmetnattehandenvast.Hierdoorzou
unamelijkelektrischeschokkenkunnenoplopenendetelefoonzoukunnen
beschadigen.
•Laadeentelefoonnietopindebuurtvanbrandbarematerialen.Detelefoonkanheet
worden,waardoorbrandkanontstaan.
•Gebruikeendrogedoekomhettoestelaandebuitenzijdetereinigen(gebruikgeen
oplosmiddelenzoalsbenzeen,verdunnersofalcohol).
•Laaddetelefoonnietopwanneerdezeopzachtebekledingligt.
•Laaddetelefoonopineengoedgeventileerderuimte.
Richtlijnen voor veilig en efficiënt gebruik

11
•Stelhetapparaatnietblootaanextremeomstandighedenmetrookenstof.
•Bewaardetelefoonnietindebuurtvancreditcards,bibliotheekpasjesendergelijke,
omdatdetelefoondeinformatieopdemagnetischestripkanbeïnvloeden.
•Tiknietophetschermmeteenscherpvoorwerp,ombeschadigingvandetelefoonte
voorkomen.
•Steldetelefoonnietblootaanvloeistoffenenvocht.
•Gabehoedzaamommetdeaccessoires,zoalsoordopjes.Raakdeantenneniet
onnodigaan.
•Gebruiknooitgebroken,gesplinterdofgebarstenglas,raakhetnietaanenprobeer
hetnietteverwijderenofterepareren.Schadeaanhetglazenweergaveschermten
gevolgevanverwaarlozingofverkeerdgebruikwordtnietdoordegarantiegedekt.
•Uwtelefooniseenelektronischapparaatdattijdensnormaalgebruikwarmte
genereert.Langdurigdirectcontactmetdehuidzondervoldoendeventilatieleidt
mogelijktotongemakofkleinebrandwonden.Weesdaaromvoorzichtigtijdensen
vlaknahetgebruikvanuwtelefoon.
•Alsuwtelefoonnatisgeworden,koppeltudezedanonmiddellijklosenlaathet
toestelvolledigopdrogen.Probeerdetelefoonnietsnelleroptedrogenmetbehulp
eenexternehittebron,zoalseenoven,magnetronofhaardroger.
•Doorhetvochtinuwnattetelefoonverandertdekleurvanhetproductlabelbinnen
inuwtelefoon.Schadeaanhetapparaattengevolgevanblootstellingaanvloeistof
wordtnietdoordegarantiegedekt.
Efficiënt telefoongebruik
Elektronische apparaten
Allemobieletelefoonskunnenstoringenopvangendiedewerkingkunnenbeïnvloeden.
•Vraageersttoestemmingvoordatuuwtelefoonindebuurtvanmedischeapparatuur
gebruikt.Bewaardetelefoonnietindebuurtvaneenpacemaker(zoalsinuw
borstzak).Gabijuwartsnaofuwtelefoonstoringvanuwmedischeapparatuurkan
veroorzaken.

12
•Sommigehoortoestellenzijngevoeligvoorstoringdoormobieletelefoons.
•EengeringestoringkanalvaninvloedzijnopTV's,radio's,PC'senz.
•Gebruikdetelefoonindienmogelijkbijtemperaturentussen0°Cen40°C.
Blootstellingvanuwtelefoonaanextreemlageofhogetemperaturenkanleidentot
schade,storingenofzelfseenexplosie.
Pacemakers
Fabrikantenvanpacemakersradeneenminimaleafstandvan15cmaantussen
uwmobieletelefoonenuwpacemakerommogelijkestoringvandepacemakerte
voorkomen.Omstoringtevoorkomen,dientuuwmobieletelefoontegebruikenaanhet
oordatzichtegenoverdepacemakerbevindt.Bovendienmagudetelefoonnietinuw
borstzakdragen.
Ziekenhuis
Schakeluwdraadlozeapparaatuitinziekenhuizen,kliniekenengezondheidscentra
wanneerugevraagdwordtdittedoen.Ditverzoekisbedoeldommogelijkestoringmet
gevoeligemedischeapparatuurtevoorkomen.
Veiligheid onderweg
Steluopdehoogtevandewettenenvoorschriftenvoorhetgebruikvanmobiele
telefoonsindegebiedenwaarurijdt.
•Gebruiktijdenshetrijdengeenhandheld-telefoon.
•Concentreeruophetrijden.
•Verlaatdewegenparkeerdeautovoordatueenoproepbeantwoordt,alsde
verkeerssituatiedatvereist.
•RF-energiekanbepaaldeelektronischesystemenindeautoontregelen,zoalsstereo-
Richtlijnen voor veilig en efficiënt gebruik

13
apparatuurenveiligheidsfuncties.
•Alsuwautoisvoorzienvaneenairbag,magudezenietdoorgeïnstalleerdeof
draagbare,draadlozeapparatuurblokkeren.Alsuditweldoet,kanditertoeleiden
datdeairbagnietofnietgoedfunctioneertmetmogelijkernstigeverwondingentot
gevolg.
•Zethetvolumeniettehoogalsubuitenshuisnaarmuziekluistert,zodatude
geluidenuituwomgevingnogkunthoren.Ditisvooralbelangrijkinhetverkeer.
Voorkom gehoorbeschadiging
Vermijd lang muziek luisteren op hoge geluidsniveaus om mogelijke
gehoorschade te voorkomen.
Gehoorbeschadigingkanoptredenalsutelangaanhardgeluidwordtblootgesteld.
Daaromradenwijuaandehandsetniettedichtbijuworeninofuitteschakelen.Zet
hetmuziek-engespreksvolumeniettehoog.
•Alsueenhoofdtelefoongebruikt,zethetvolumedanlaagalsupersonendievlakbij
ustaannietkuntverstaanofalsdepersoondienaastuzit,kanhorenwaarunaar
luistert.
OPMERKING: hoge geluidsniveaus en overmatige druk van uw oordopjes
en hoofdtelefoon kunnen leiden tot gehoorbeschadiging.
Onderdelen van glas
Bepaaldeonderdelenvanuwmobieletelefoonzijnvanglas.Ditglaskanbrekenalsu
uwmobieletelefoonopeenhardoppervlaklaatvallenofalsheteenhardeklapkrijgt.
Raakgebrokenglasnietaanenprobeerhetnietteverwijderen.Gebruikuwmobiele
telefoonniettotdathetglasdooreengeautoriseerdeserviceproviderisvervangen.

14
Explosiewerkzaamheden
Gebruikdetelefoonnietindebuurtvanexplosiewerkzaamheden.Neembeperkende
maatregeleninachtenhouduaanregelsenvoorschriften.
Explosiegevaar
•Gebruikdetelefoonnietbijpompstations.
•Gebruikdetelefoonnietindebuurtvanbrandstoffenenchemicaliën.
•Vervoergeenbrandbaregassen,vloeistoffenenexplosievenensladezeooknietop
indezelfderuimtevaneenvoertuigwaarinzichookdemobieletelefooneneventuele
accessoiresbevinden.
In vliegtuigen
Draadlozeapparatenkunnenstoringenveroorzakeninvliegtuigen.
•Schakeluwmobieletelefoonuitvoordatuaanboordvaneenvliegtuiggaat.
•Gebruikhettoestelnietophetterreinvandeluchthavenzondertoestemmingvande
bemanning.
Kinderen
Bewaardetelefoonopeenveiligeplaats,buitenhetbereikvankleinekinderen.
Detelefoonbevatkleineonderdelendie,indienlosgemaakt,verstikkingkunnen
veroorzaken.
Richtlijnen voor veilig en efficiënt gebruik

15
Noodoproepen
Noodoproepenzijnmogelijknietviaalledraadlozenetwerkenbeschikbaar.Udient
daaromvoornoodoproepennooitvolledigafhankelijktezijnvandetelefoon.Vraagdit
nabijuwplaatselijkeserviceprovider.
Batterij en onderhoud
•Debatterijhoeftnietvolledigontladentezijnvoordatudezeweerkuntopladen.In
tegenstellingtotanderetypenbatterijenheeftdebatterijgeengeheugendatvan
invloedisopdeprestaties.
•GebruikalleenbatterijenenladersvanLG.DeladersvanLGzijnzodanigontwikkeld
datdezedelevensduurvandebatterijoptimaliseren.
•Demonteerdebatterijnietenvoorkomkortsluiting.
•Vervangdebatterijwanneerdezenietmeervoldoendepresteert.Debatterijkan
honderdenkerenwordenopgeladen,voordatdezemoetwordenvervangen.
•Laaddebatterijopnieuwopalsdezegedurendelangeretijdnietisgebruikt,omde
levensduurteverlengen.
•Steldebatterijladernietblootaandirectzonlichtengebruikdezenietinvochtige
ruimtenzoalseenbadkamer.
•Bewaardebatterijnietinergwarmeofkouderuimten;datkantenkostegaanvande
prestatiesvandebatterij.
•Erbestaatexplosiegevaaralsdebatterijwordtvervangendooreenbatterijvaneen
verkeerdtype.
•Verwijdergebruiktebatterijenvolgensdeinstructiesvandefabrikant.Zorgindien
mogelijkvoorrecycling.Doegebruiktebatterijennietbijhetgewonehuishoudelijk
afval.
•Alsdebatterijmoetwordenvervangen,kuntuditlatendoenbijhetdichtstbijzijnde
erkendeLGElectronics-servicepuntofdedichtstbijzijndedealervanLGElectronics.

16
•Haaldestekkervandeladeruithetstopcontactalsdebatterijvandetelefoon
volledigisopgeladen,omtevoorkomendatdeladeronnodigenergieverbruikt.
•Dewerkelijkelevensduurvandebatterijhangtafvandenetwerkconfiguratie,de
productinstellingen,degebruikspatronenendeomstandighedenwaarindebatterij
wordtgebruikt.
•Zorgdatergeenscherpevoorwerpenzoalstandenennagelsvanhuisdierenin
contactkomenmetdebatterij.Ditkanbrandveroorzaken.
VERKLARING VAN OVEREENSTEMMING
Hierbij verklaart LG Electronics dat dit LG-E975-product voldoet aan de
belangrijkste voorschriften en andere relevante bepalingen van richtlijn 1999/5/
EC. U vindt een kopie van de verklaring van overeenstemming op
http://www.lg.com/global/declaration
Regelgeving en veiligheid
Ga voor informatie over regelgeving en veiligheid naar "Systeeminstellingen
> Over de telefoon > Regelgevend en veiligheid"
Kantoor voor contact omtrent de naleving van dit product:
LG Electronics Inc.
EU Representative, Krijgsman 1,
1186 DM Amstelveen, The Netherlands
Richtlijnen voor veilig en efficiënt gebruik

17
Batterijen wegdoen
1 Ditsymboolkanwordengebruiktincombinatiemetchemischesymbolenvoor
kwik(Hg),cadmium(Cd)oflood(Pb)alsdebatterijmeerdan0,0005%kwik,
0,002%cadmiumof0,004%loodbevat.
2 Alleaccu'smogennietwordenmeegegevenmethethuishoudelijkafval,maar
moetenwordeningeleverdbijspecialeinzamelingspuntendiedoordelokaleof
landelijkeoverheidzijnaangewezen.
3 Decorrecteverwijderingvanuwoudebatterijenhelptnegatievegevolgenvoor
hetmilieuendegezondheidvanmensendiervoorkomen.
4 Neemvoormeerinformatieoverdeverwijderingvanuwoudebatterijencon-
tactopmetdeplaatselijkeautoriteiten,deafvalophaaldienstofdewinkelwaar
uhetproducthebtgekocht.
Uw oude toestel wegdoen
1 Elektrischeenelektronischeproductenmogennietwordenmeege-
gevenmethethuishoudelijkafval,maarmoetenwordeningeleverdbij
specialeinzamelingspuntendiedoordelokaleoflandelijkeoverheidzijn
aangewezen.
2 Decorrecteverwijderingvanuwoudetoestelhelptnegatievegevolgen
voorhetmilieuendemenselijkegezondheidvoorkomen.
3 Wiltumeerinformatieoverdeverwijderingvanuwoudetoestel?Neem
dancontactopmetuwgemeente,deafvalophaaldienstofdewinkelwaar
uhetproducthebtgekocht.

18
Belangrijke melding
Controleerofdeproblemendieuhebtervarenmetuwtelefooninditgedeelteworden
beschrevenvoordatudetelefoonterugbrengtmeteenserviceverzoekofvoordatude
klantenservicebelt.
1. Telefoongeheugen
Alserminderdan10%ruimtebeschikbaarisinuwtelefoongeheugen,kanuwtelefoon
geennieuweberichtenontvangen.Udientuwtelefoongeheugentecontrolerenendata,
zoalsapplicatiesofberichten,tewissenomruimtevrijtemakeninhetgeheugen.
Applicaties verwijderen:
1 Tikop >tabbladApplicaties>Opties>Applicaties indecategorieAP-
PARAAT.
2 Alsalleapplicatieswordengetoond,bladertuerdoorheenenkiestudeapplicatie
dieuwiltverwijderen.
3 TikopWissen.
2. De levensduur van de batterij optimaliseren
Ukuntdelevensduurvanuwbatterijverlengendoorfunctiesuitteschakelendie
unietconstantopdeachtergrondnodighebt.Ukuntbijhoudenhoeapplicatiesen
systeembronnenenergieverbruiken.
Levensduur van de batterij van uw telefoon verlengen:
•Schakelradiocommunicatieuitdieunietgebruikt.SchakelWi-Fi,BluetoothofGPSuit
alsudezenietgebruikt.
•Verlaagdehelderheidvanhetschermensteleenkorteretime-outvanhetschermin.
Lees de volgende informatie voordat u uw telefoon
gaat gebruiken!

19
•SchakelautomatischsynchroniserenmetGoogleMail,Agenda,Contactenenandere
applicatiesuit.
•Sommigeapplicatiesdieuhebtgedownload,verkortenmogelijkdelevensduurvan
uwbatterij.
Het batterijniveau controleren:
•Tikop >tabbladApplicaties>Opties > Over de telefoonindecategorie
SYSTEEM>Batterij.
Debatterijstatus(opladenofontladen)enhetbatterijniveau(percentageopgeladen)
wordenbovenaanhetschermgetoond.
Controleren en instellen hoe de batterijstroom wordt gebruikt:
•Tikop >tabbladApplicaties > Opties > Over de telefoon indecategorie
SYSTEEM>Batterij > Accugebruik.
Degebruiksduurvandebatterijwordtophetschermgetoond.Erwordtgetoond
hoeveeltijdisverstrekensindsdetelefoonvoorhetlaatstisopgeladenof,tijdenshet
opladen,detijddieisverstrekensindsdetelefoonopdebatterijfunctioneerde.Het
schermlaatzienwelkeapplicatiesofservicesbatterijstroomgebruiken,opvolgordevan
hetgrootsteverbruiknaarhetkleinsteverbruik.
3. Voordat u een open source-applicatie en
besturingssysteem installeert:
WAARSCHUWING
Als u een ander besturingssysteem installeert en gebruikt dan door de
fabrikant is meegeleverd, werkt uw telefoon mogelijk niet goed. Bovendien
wordt uw telefoon in dat geval niet gedekt door de garantie.

20
WAARSCHUWING
Download applicaties alleen vanuit vertrouwde bronnen zoals Play Store™
om uw telefoon en persoonlijke gegevens te beschermen. Als er zich onjuist
geïnstalleerde applicaties op uw telefoon bevinden, werkt de telefoon mogelijk
niet naar behoren of kan er een ernstige fout optreden. Verwijder dergelijke
applicaties en alle bijbehorende data en instellingen van de telefoon.
4. Een ontgrendelingspatroon gebruiken
Steleenontgrendelingspatrooninomuwtelefoontebeveiligen.Tikop >tabblad
Applicaties>Opties>Scherm vergrendelenindecategorieAPPARAAT>Kies
scherm slot>Patroon.Erwordteenschermgeopenddatuhelptbijhettekenenvan
eenontgrendelingspatroon.Umoeteenback-upPINmakenalsveiligheidsmaatregel
wanneeruhetontgrendelingspatroonbentvergeten.
Let op: maak een Google-account voordat u een ontgrendelingspatroon instelt
en onthoud de back-up PIN die u hebt ingevoerd bij het aanmaken van uw
ontgrendelingspatroon.
WAARSCHUWING
Voorzorgsmaatregelen bij het gebruik van een ontgrendelingspatroon.
Het is van groot belang dat u het ontgrendelingspatroon dat u instelt,
onthoudt. Als u vijf keer een onjuist patroon invoert, hebt u geen toegang
meer tot uw telefoon. U kunt vijf keer proberen uw ontgrendelingspatroon,
PIN of wachtwoord in te voeren. Als u deze vijf mogelijkheden hebt gebruikt,
kunt u het na 30 seconden opnieuw proberen.
Belangrijke melding

21
Ga als volgt te werk als u uw ontgrendelingspatroon, PIN-code of wachtwoord
bent vergeten:
< Als u uw patroon bent vergeten >
AlsuzichopdetelefoonbijuwGoogle-accounthebtaangemeld,maarvijfkeereen
onjuistpatroonhebtingevoerd,druktuopdeknopPatroon vergeten?onderaanhet
scherm.UmoetudanaanmeldenmetuwGoogle-accountofuwback-upPINinvoeren
dieubijhetmakenvanuwontgrendelingspatroonhebtingevoerd.
AlsugeenGoogle-accountopdetelefoonhebtgemaaktofdeback-upPINbent
vergeten,moetueenvolledigeresetuitvoeren.
< Als u uw PIN of wachtwoord bent vergeten >
AlsuuwPINofwachtwoordbentvergeten,moetueenvolledigeresetuitvoeren.
Let op: wanneer u een volledige reset uitvoert, worden alle gebruikersapplicaties
en -data gewist.
OPMERKING: als u zich niet hebt aangemeld met uw Google-account en u
uw ontgrendelingspatroon bent vergeten, moet u uw back-up PIN invoeren.
5. Volledige reset gebruiken (fabrieksinstellingen
terugzetten)
Alsuwtelefoonnietteruggaatnaardeoorspronkelijkestaat,gebruikdaneenvolledige
reset(fabrieksinstellingenterugzetten)omhetapparaatteinitialiseren.
1 Zethetapparaatuit.
2 HouddetoetsAan-uit/Vergrendelen+detoetsvolume omlaagopdetelefoon
ingedrukt.
3 LaatdetoetsAan-uit/VergrendelenalleenloswanneerhetLG-logowordt
getoondenhoudvervolgensonmiddellijkdetoetsAan-uit/Vergrendelenweer
ingedrukt.

22
4 LaatalletoetsenloswanneerhetschermFabrieksinstellingenwordtweerge-
geven.
5 DrukopdeVolumetoetsomnaardegewensteoptietegaanendrukvervolgens
opdetoetsAan-uit/Vergrendelen omtebevestigen.
WAARSCHUWING
Wanneer u een volledige reset uitvoert, worden alle gebruikersapplicaties,
-data en uw DRM-licenties gewist. Maak een back-up van alle belangrijke
data voordat u een volledige reset uitvoert.
Fabrieksinstellingen-hiermeewordenalledataopdetelefoongewist,behalveinde
volgendegevallen.Inhetgevalvanstoringoffout,kanuwtoestelineenfoutenlogboek
informatieopslaanoverdestatusvanhettoestelophetmomentvandestoring.
Deinformatiedieisopgenomeninhetfoutenlogboekkangegevensbevattenover
toepassingsnamenenhetnummervandemobieletelefoonendelocatiewaarop
dezewerdgebruikt,deGPS-status,hetgeheugengebruikenandereniet-persoonlijke
statusinformatieoverhettoestel.Dezeinformatiewordtopgeslagenopuwtelefoon
enisvoorLGalleenbereikbaaralsdetelefoonzelfwordtteruggestuurdnaarLGvoor
reparatieenservice.DeinformatieinhetfoutenlogboekwordtalleendoorLGgebruikt
voordiagnose,reparatieenverbeteringvanLG-productenen-diensten.
6. Applicaties openen en tussen applicaties schakelen
Multi-taskingiseenvoudigmetAndroidomdatumeerdereapplicatiestegelijkkunt
uitvoeren.Uhoefteenapplicatieniettesluitenomeenanderetekunnenopenen.U
kuntverschillendeapplicatiestegelijkgebruikenentussendezeapplicatiesschakelen.
Androidbeheertelkeapplicatie,enbeëindigtenstartdezewanneerditnodigis,zodat
ongebruikteapplicatiesnietonnodigenergieverbruiken.
Belangrijke melding

23
1 HouddetoetsThuis ingedrukt.Erwordteenlijstmetrecentgebruikteap-
plicatiesgetoond.
2 2.Tikvervolgensopdeapplicatiedieuwiltopenen.Devorigeapplicatieblijftop
deachtergrondactiefopdetelefoon.TikopdetoetsTerug omeenapplicatie
nagebruikaftesluiten.
•Omapplicatiestestoppen,tiktuvanuitdelijstmetrecenteapplicatiesop
TaakbeheerentiktuvervolgensopStoppenofAllesstoppen.
•Uverwijderteenapplicatieuitdelijstmetrecenteapplicatiesdoorhet
applicatievoorbeeldnaarlinksofrechtstevegen.Uwistalleapplicatiesdoortetikken
opAlles wissen.
7. Muziek, foto's en video's overbrengen met
Mediasynchronisatie (MTP)
1 Tikop >tabbladApplicaties>Instellingen>Opslagruimteomde
opslagmediatecontroleren.
2 SluitdetelefoonmetdeUSB-kabelaanopdecomputer.
3 Kies USB-verbindingsmethodewordtweergegevenophetschermvanuw
telefoon.KiesdeoptieMediasynchronisatie (MTP).
4 OpendemapvanhetgeheugenopuwPC.Ukuntdeinhoudophetapparaatvoor
massaopslagbekijkenopuwPCendebestandenoverbrengenvandePCnaarde
mapvanhetexternegeheugenvanhetapparaatenomgekeerd.

24
8. Houd de telefoon rechtop
Houduwmobiletelefoonrechtop,netalseengewonetelefoon.Uwtelefoonbeschikt
overeeninterneantenne.Zorgdatuditdeelvandeachterzijdenietbekrastof
beschadigt.Ditkandewerkingbeïnvloeden.
Houdtijdensgesprekkenofhetverzendenofontvangenvandatahetonderstedeel
vandetelefoon,waardeantennezichbevindt,nietvast.Ditkandegesprekskwaliteit
nadeligbeïnvloeden.
9. Wanneer het scherm niet reageert
Ga als volgt te werk wanneer de telefoon niet reageert op uw handelingen of als
het scherm niet reageert:
HouddetoetsAan-uit/Vergrendelen10secondeningedruktomuwtelefoonuitte
schakelen.
Alshetschermdaarnanognietreageert,neemdancontactopmethetservicecenter.
Belangrijke melding

25
Overzicht van de telefoon
Oortelefoon
Cameralens aan de voorzijde
Nabijheids-/helderheidssensor
Toets Home
•Hiermeekeertuvanafelkwillekeurigschermterugnaarhetbasisscherm.
Toets Terug
•Hiermeekeertuterugnaarhetvorigescherm.Hiermeesluitueen
applicatienagebruikaf.
Toets Aan-uit/Vergrendelen
•Doordetoetsingedrukttehouden,schakeltuuwtelefooninofuit
•Kortindrukkenomhetschermtevergrendelen/ontgrendelen
Toets Menu
•Controlerenwelkeoptiesbeschikbaarzijn.
•GanaarGoogleSearch™dooropdezetoetstetikkenendetoets
ingedrukttehouden.
Aanraakscherm
Meldings-LED
OPMERKING: nabijheidssensor
Als u oproepen plaatst en ontvangt, schakelt de nabijheidssensor automatisch de
verlichting uit en vergrendelt de sensor het aanraakscherm wanneer wordt gedetecteerd
dat de telefoon bij het oor wordt gehouden. Dit verlengt de batterijduur en voorkomt dat
u het scherm per ongeluk activeert tijdens telefoongesprekken.
WAARSCHUWING
Als u een zwaar object op de telefoon plaatst of op de telefoon gaat zitten, kan het LCD-
scherm beschadigd raken en werkt het aanraakscherm mogelijk niet meer. Bedek de
nabijheidssensor niet met beschermfolie. De sensor functioneert dan mogelijk niet meer
naar behoren.
Meer informatie over uw telefoon

26
Volumetoetsen
•In het basisscherm:hiermeeregeltuhetbeltoonvolume
•Tijdens een oproep:hiermeeregeltuvolumevanuwoortelefoon
•Tijdens het afspelen van een nummer:hiermeeregeltuhetvolume
TIP! Functie QuickMemo
Houd beide volumetoetsen 1 seconde ingedrukt om de functie
QuickMemo te gebruiken.
Toets Aan-uit/Vergrendelen
SIM-kaartsleuf
WAARSCHUWING
• Hierin bevindt het batterijvak. Open de achterzijde niet.
• Zorg dat u het NFC-aanraakpunt op de telefoon niet beschadigt, het
aanraakpunt maakt deel uit van de NFC-antenne.
Aansluiting
oordopjes
Flitser
Luidspreker
Lader/USB-/MHL-poort
Microfoon
Cameralens
Microfoon
NFC-
aanraakpunt
Meer informatie over uw telefoon

27
De Micro-USIM-kaart plaatsen
Voordatuuwnieuwetelefoongaatverkennen,kuntudeMicro-USIM-kaartplaatsen.
Deknopvooruitwerpeniseenkleine,rondeopeningnetbovendekaarthouder.Een
nieuweMicro-USIM-kaartplaatsen:
1 SteekdeMicro-USIM-verwijdertooldiebijdetelefoonisgeleverd(ofeenpaper-
clip)indeopeningvandeknopvooruitwerpenenduwdetoolvoorzichtigmaar
stevigindeopeningtotdatdehouderwordtuitgeworpen.
2 VerwijderdehouderenplaatsdeMicro-USIM-kaarterinmetdecontactpunten
naarbovenendeafgerondehoeknaarrechts.Dekaartkanmaaropéénmanier
indehouderwordengeplaatst.
3 Plaatsdehoudervoorzichtigterugindesleufenduwdehoudervoorzichtiginde
telefoon.
OPMERKING: zorg ervoor dat het goudkleurige contactpunt van de kaart
naar beneden is geplaatst.
Opening van de knop
voor uitwerpen

28
De telefoon opladen
Deopladeraansluitingbevindtzichaandeonderkantvandetelefoon.Sluithetene
uiteindevanhetlaadsnoeraanopdetelefoonenhetandereuiteindeopeenstopcontact.
Het scherm vergrendelen en ontgrendelen
Alsudetelefoonenigetijdnietgebruikt,wordthetschermautomatischuitgeschakeld
envergrendeld.Hiermeevoorkomtudatudoortikkenperongelukeenfunctieactiveert
enbespaartubatterijstroom.
Alsuuwtelefoonnietgebruikt,kuntudezevergrendelendooropdetoetsAan-uit/
Vergrendelen tedrukken.
Alsernogprogramma'swordenuitgevoerdwanneeruhetschermvergrendelt,worden
dezeindevergrendeldemodusmogelijknogsteedsuitgevoerd.Hetwordtaanbevolen
omalleprogramma'saftesluitenvoordatudevergrendeldemodusinschakeltom
onnodigekostenvoorbijvoorbeeldgesprekken,webtoegangendatacommunicatiete
voorkomen.
DrukopdeAan-uit/Vergrendelen omdetelefoonuitdeslaapstandtehalen.Het
vergrendelschermwordtweergegeven.Tikopenverschuifhetvergrendelschermin
willekeurigerichtingomhetbasisschermteontgrendelen.Hetlaatsteschermdatu
hebtbekeken,wordtgeopend.
OPMERKING: laad de batterij de
eerste keer volledig op, dit verlengt
de levensduur van de batterij.
Meer informatie over uw telefoon

29
Het basisscherm
Tips voor het aanraakscherm
Hiervolgenenkeletipsoverhoeuopuwtelefoonkuntnavigeren.
Tikken–meteenenkelevingeraanrakingkuntuitems,koppelingen,sneltoetsenen
lettersophetschermtoetsenbordselecteren.
Tikken en vasthouden–houdeenitemophetschermvastdooreroptetikkenenhet
vasttehoudentotdateenactieplaatsvindt.Alsubijvoorbeelddebeschikbareopties
vooreencontactwiltopenen,houdtuhetcontactindelijstmetcontactenvasttotdat
hetcontextmenuwordtgeopend.
Slepen–tikopeenitemenhoudheteenmomentvastenverplaatsvervolgenszonder
uwvingeroptetillenuwvingeroverhetschermtotdatudegewensteplaatshebt
bereikt.Ukuntitemsophetbasisschermverslepenomdezeandersintedelen.
Vegen of schuiven–ukuntvegenofschuivendooruwvingersneloverhet
schermoppervlaktebewegen.Pauzeernietwanneeruhetschermvoorheteerst
aanraakt(anderswordthetitemgesleept).Ukuntbijvoorbeeldhetschermomhoogof
omlaagschuivenomdooreenlijsttebladeren,ofvanlinksnaarrechts(enandersom)
vegenomdoordediversebasisschermentebladeren.
Dubbeltikken–tiktweemaalomopeenwebpaginaofeenkaarttezoomen.Tik
bijvoorbeeldsneltweemaalopeendeelvaneenwebpaginaomdatdeelaantepassen
aandebreedtevanhetscherm.Ukuntooktweemaaltikkenomin-enuittezoomen
wanneerueenfotomaakt(metdecamera)enwanneerukaartengebruikt.
Zoomen met uw vingers–schuifuwwijsvingerenduimnaarelkaartoeofvanelkaar
afomindebrowser,opeenkaartofopfoto'sinofuittezoomen.
Het scherm roteren–vanuitveleapplicatiesenmenu'swordtderichtingvanhet
schermaangepastaandefysiekerichtingvanhettoestel.
OPMERKING:
•Tik op het midden van een pictogram om een item te selecteren.
•U hoeft niet hard te drukken; het aanraakscherm is gevoelig genoeg om een
lichte maar vaste druk te herkennen.
•Raak de gewenste optie met een vingertop aan. Zorg dat u niet op andere opties tikt.

30
Basisscherm
Hethomescreenishetstartpuntvoorveleapplicatiesenfuncties.Hieropkuntu
pictogrammenvanapplicaties,sneltoetsenenGoogle-widgetstoevoegenvoor
rechtstreeksetoegangtotinformatieenapplicaties.Ditishetstandaardschermenhet
istoegankelijkviaelkmenudooropdetoetstetikken .
Statusbalk
Destatusbalktoontinformatieoverdeapparaatstatus,
waaronderdetijd,signaalsterkte,batterijstatusen
pictogrammenvoornotificaties.
Widget
Widgetszijnonafhankelijkeapplicatiesdiekunnen
wordengeopendviahetschermApplicatiesofop
hethomescreenofeenuitgebreidhomescreen.In
tegenstellingtoteensneltoetswordteenwidgetalseen
applicatieophetschermweergegeven.
Applicatiepictogrammen
Tikopeenpictogram(applicatie,map,enz.)omdezete
openenentegebruiken.
Indicator locatie
Geeftaanwelkhomescreenubekijkt.
Sneltoetsgedeelte
Hiermeehebtumetéénkeertikkentoegangtotdealle
functiesinhethomescreen.
Uitgebreid homescreen
Hetbesturingssysteembiedtmeerderehomescreenenzodatumeerruimtehebtvoor
hettoevoegenvanpictogrammen,widgetsennogveelmeer.
Schuifmetuwvingernaarlinksofrechtsoverhethomescreen.
Het basisscherm

31
Het beginscherm aanpassen
Ukunthethomescreenaanpassendoorapplicaties,widgetsofachtergrondentoete
voegen.
Items toevoegen aan uw basisscherm:
1 Houdhetlegegedeeltevanhetbasisschermlangingedrukt.
2 KieshetitemdatuwilttoevoegeninhetmenuAddMode(Toevoegmodus).Uziet
hettoegevoegdeiteminhetbasisscherm.
3 Sleephetnaardegewenstelocatieentiluwvingerop.
TIP! Als u een applicatiepictogram uit het menu Applicaties aan het
basisscherm wilt toevoegen, tikt u op de gewenste applicatie en houdt u
deze vast.
Een item verwijderen van het basisscherm:
•Basisscherm>houdhetpictogramvastdatuwiltverwijderen>sleephetnaar
TIP! Mappen gebruiken
U kunt diverse applicatiepictogrammen in een map combineren. Als u in een
basisscherm een applicatiepictogram op een ander neerzet, worden de twee
pictogrammen gecombineerd.
OPMERKING: detoetsApplicatieskannietwordenverwijderd.
Applicatiepictogrammen op het homescreen aanpassen
1 Tikopeenapplicatiepictogramenhoudditingedrukttothetwordtontgrendeld
vanzijnhuidigelocatie.Laathetpictogramlosophetscherm.
Hetbewerkingspictogram wordtweergegeveninderechterbovenhoekvan
deapplicatie.
2 Tiknogmaalsophetapplicatiepictogramenkieshetgewensteontwerpende
groottevoorhetpictogram.
3 TikopOKomdewijzigingopteslaan.

32
Terugkeren naar recent gebruikte applicaties
1 HouddetoetsHome ingedrukt.Inhetschermwordtnueenpop-upvenster
getoondmetpictogrammenvanapplicatiesdieuonlangshebtgebruikt.
2 Tikopeenpictogramomdebijbehorendeapplicatieteopenen.Oftikopde
Terug- toetsomterugtekerennaarhetvorigescherm.
Meldingen
Notificatiesinformerenuovernieuweberichten,agendagebeurtenissenenalarmen,en
overactievegebeurtenissen,bijvoorbeeldwanneeruingesprekbent.
Ophetmeldingenpaneelkuntudehuidigestatusvanuwtelefoonenhuidigemeldingen
tonen.
Wanneerereenmeldingbinnenkomt,verschijnthetbijbehorendepictogramboven
aanhetscherm.Pictogrammenvoorhuidigemeldingenwordenaandelinkerkant
weergegevenensysteempictogrammen,zoalsdesterktevanhetWi-Fi-signaalofde
batterij,aanderechterkant.
OPMERKING: de beschikbare opties zijn afhankelijk van de regio of
serviceprovider.
Huidige
meldingen
Bluetooth-, Wi-Fi-
en batterijstatus
De statusbalk

33
Het notificatiepaneel openen
Veegvanafdestatusbalknaarbenedenomhetnotificatiepaneelteopenen.
Wisseltoetsgedeelte
Tikopelkewisseltoetsomdezeinofuitteschakelen.
Houddetoetsingedruktomhetinstellingenmenuvan
defunctieteopenen.Veegnaarlinksofnaarrechts
voormeerwisseltoetsen.Tikop
omwisseltoetsente
wissen,toetevoegenofteverplaatsen.
QSlide-applicaties
TikopeenQSlide-applicatieomdezeineenklein
vensteropuwschermteopenen.Tikop
tom
QSlide-applicatiestewissen,toetevoegenofte
verplaatsen.
Tikhieropomallenotificatiestewissen.
Notificaties
Dehuidigenotificatieswordenelkmeteenkorte
beschrijvingweergegeven.Tikopeenberichtomdeze
tetonen.
Sleephettabbladnaardebovenkantvanhetscherm
omhetnotificatiepaneeltesluiten.
Indicatiepictogrammen op de statusbalk
Indicatiepictogrammenverschijnenopdestatusbalkbovenaanhetschermomgemiste
oproepen,nieuweberichten,agendameldingen,apparaatstatusenmeeraantegeven.
Degetoondepictogrammenbovenaanhetschermverschaffeninformatieoverde
statusvanhetapparaat.Indeonderstaandetabelstaanenkeleveelvoorkomende
pictogrammen.

34
Pictogram
Omschrijving
Pictogram
Omschrijving
GeenMicro-USIM-kaart Trilfunctie
Geensignaal Batterijvolledigopgeladen
Flightmode Batterijwordtopgeladen
VerbondenmeteenWi-Fi-
netwerk
Datadownloaden
Bekabeldeheadset Datauploaden
Actieveoproep GPSzoektverbinding
Oproepinwacht
Locatiedataontvangenvan
GPS
Gemisteoproep Datawordtgesynchroniseerd
Bluetoothisaan NieuwGmail-bericht
Systeemwaarschuwing NieuwHangouts-bericht
Alarmisingesteld Nieuwbericht
Nieuwevoicemail
TelefoonisviaUSB-kabel
opPCaangeslotenofUSB-
tetheringisactief
Belsignaalisuit
DraagbareWi-Fi-hotspotis
actief
De statusbalk

35
NFCisaan
ZowelUSB-tetheringals
Draagbarehotspotzijnactief
Nummerwordtafgespeeld
OPMERKING: de pictogrammen op de statusbalk kunnen verschillen,
afhankelijk van de functie of service.
Schermtoetsenbord
Ukunttekstinvoerenmetbehulpvanhetschermtoetsenbord.Hetschermtoetsenbord
wordtautomatischophetschermgetoondwanneerutekstmoetinvoeren.Alsuhet
toetsenbordhandmatigwilttonen,tikdangewoonopeentekstveldwaarutekstwilt
invoeren.
Het toetsenbord gebruiken en tekst invoeren
Tikeenmaalomdevolgendeletteralshoofdlettertetypen.Tiktweemaalomvan
allelettershoofdletterstemaken.
Tikhieropomtewisselentussenhetnumerieketoetsenbordenhet
symbolentoetsenbord.
Tikhieropomeenspatieintevoeren.
Klikhieropomeennieuweregeltemaken.
Tikhieropomhetvorigetekentewissen.
Tekens met accenten invoeren
AlsuFransofSpaansalstekstinvoertaalkiest,kuntuspecialeFranseofSpaanse
tekensinvoeren(bijvoorbeeld"á").
Alsubijvoorbeeld"á"wiltinvoeren,houddandetoets"a"ingedrukttotdeinzoomtoets
groterwordtentekensuitverschillendetalenwordengetoond.
Kiesvervolgenshetgewenstespecialeteken.

36
Google-account instellen
Wanneerudetelefoonvoorheteerstinschakelt,ishethandigomhetnetwerkte
activeren,zodatuzichkuntaanmeldenbijuwGoogle-accountenkuntaangevenhoeu
bepaaldeservicesvanGooglewiltgebruiken.
Uw Google-account instellen:
•MelduaanbijeenGoogle-accountviahetinstellingenschermdatwordtgetoond.
OF
•Tikop >tabbladApplicaties>kieseenGoogle-applicatiezoalsGmail>kies
Nieuwomeennieuwaccounttemaken.
AlsueenGoogle-accounthebt,tiktuopBestaand,voertuuwe-mailadresen
wachtwoordinentiktuop .
NadatuhetGoogle-accountopdetelefoonhebtingesteld,wordtdetelefoon
automatischgesynchroniseerdmetuwGoogle-accountophetweb.
Uwcontacten,Gmail-berichten,agendagebeurtenissenenandereinformatieuitdeze
applicatiesenservicesophetwebwordengesynchroniseerdmetuwtelefoon.(Ditis
afhankelijkvanuwsynchronisatie-instellingen.)
Nadatuzichhebtaangemeld,kuntuGmail™enandereGoogle-servicesopuw
telefoongebruiken.

37
Verbinden met netwerken en apparaten
Wi-Fi
ViaWi-Fikuntueensnelleinternetverbindinggebruikenbinnenhetdekkingsgebiedvan
hetdraadlozetoegangspunt(AP).MetWiFikuntugebruikmakenvandraadloosinternet
zonderextrakosten.
Verbinding maken met Wi-Fi-netwerken
AlsuWi-Fiopuwtelefoonwiltgebruiken,hebtutoegangnodigtoteendraadloos
toegangspuntofeen'hotspot'.Sommigetoegangspuntenzijnopenbaartoegankelijk.
Ukunthiermeegewoonverbindingmaken.Anderetoegangspuntenzijnverborgenof
wordenbeveiligd.Umoetuwtelefoonconfigurerenomverbindingtekunnenmaken
metdergelijketoegangspunten.
SchakelWi-Fiuitwanneerudatnietgebruikt,zodatulangergebruikkuntmakenvan
debatterij.
OPMERKING: als u zich buiten de Wi-Fi-zone bevindt of Wi-Fi op Uit hebt
gezet, worden er mogelijk extra kosten in rekening gebracht door uw mobiele
provider voor het gebruik van mobiele data.
Wi-Fi inschakelen en verbinding maken met een Wi-Fi-
netwerk
1 Tikop >tabbladApplicaties>Opties>Wi-FiophettabbladDRAADLOOS
ENNETWERKEN.
2 StelWi-FiinopAANomWi-Fiinteschakelenenhetscannennaarbeschikbare
Wi-Fi-netwerkentestarten.
3 TiknogmaalsophetmenuWi-FiomeenlijstmetactieveenbereikbareWi-Fi-
netwerkentebekijken.
•Beveiligdenetwerkenwordenaangegevenmeteenvergrendelingspictogram.
4 Tikopeennetwerkomerverbindingmeetemaken.

38
•Alshetnetwerkisbeveiligd,wordtugevraagdeenwachtwoordofandere
aanmeldingsgegevensintevoeren.(Raadpleeguwnetwerkbeheerdervoormeer
informatie.)
5 DestatusbalkgeeftpictogrammenweerdiedeWi-Fi-statusaangeven.
Bluetooth
UkuntdataverzendenviaBluetoothdooreenapplicatievoorhetverzendenvandata
testarten,maarnietvanuithetBluetooth-menu,zoalsbijdemeesteanderemobiele
telefoons.
OPMERKING:
•LG is niet verantwoordelijk voor het verlies, onderscheppen of misbruik van
gegevens die worden verzonden of ontvangen via de Bluetooth-functie.
•Zorg er altijd voor dat u data deelt en ontvangt met apparaten die vertrouwd
en goed beveiligd zijn. Als er obstakels zijn tussen de apparaten, kan de
afstand tussen de apparaten worden verkort.
•Sommige apparaten, vooral apparaten die niet zijn getest of goedgekeurd
door Bluetooth SIG, zijn mogelijk niet compatibel met uw apparaat.
Bluetooth inschakelen en uw telefoon koppelen aan een Bluetooth-apparaat
Umoetuwapparaateerstaaneenanderapparaatkoppelenvoordatuverbindingmet
datapparaatkuntmaken.
1 Tikop >tabbladApplicaties>Opties>Stel BluetoothinopAANophet
tabbladDRAADLOOSENNETWERKEN.
2 TiknogmaalsophetmenuBluetooth.Deoptieomuwtelefoonzichtbaarte
makenendeoptieomapparatentezoekenwordengetoond.TikopZoek ap-
paratenomtezienwelkeapparatenzichbinnenhetBluetooth-bereikbevinden.
3 Kieshetapparaatwaarmeeudekoppelingtotstandwiltbrengenindelijst.
Alshetkoppelenisgelukt,wordtuwapparaatmethetapparaatverbonden.
Verbinden met netwerken en apparaten

39
OPMERKING: sommige apparaten, vooral headsets of handsfree autokits,
hebben mogelijk een vaste PIN-code voor Bluetooth, bijvoorbeeld 0000. Als
het andere apparaat een PIN-code heeft, wordt u gevraagd deze in te voeren.
Data verzenden met de draadloze Bluetooth-functie
1 Kieseenbestandofitem,zoalseencontact,eenagendagebeurtenisofeen
mediabestanduiteengeschikteapplicatieofuitDownloads.
2 SelecteerdeoptievoorhetverzendenvandataviaBluetooth.
OPMERKING: de methode voor het kiezen van een optie kan per datatype
afwijken.
3 ZoekeenBluetooth-apparaatenmaakeenkoppeling.
Data ontvangen met de draadloze Bluetooth-functie
1 Tikop >tabbladApplicaties>Instellingen>StelBluetoothinopAAN.
2 TiknogmaalsophetmenuBluetoothenschakelhetselectievakjeboveninhet
scherminomdetelefoonzichtbaartemakenvoorandereapparaten.
OPMERKING: tik op > Time-out zichtbaarheid als u wilt kiezen hoe
lang uw toestel zichtbaar is.
3 KiesKoppelenomtebevestigendatudatavanhetapparaatwiltontvangen.
De dataverbinding van uw telefoon delen
USB-tetheringendraagbareWi-Fi-hotspotzijnfantastischefunctieswanneerergeen
draadlozeverbindingenbeschikbaarzijn.Ukuntdemobieledataverbindingvanuw
telefoondelenmetééncomputerviaeenUSB-kabel(USB-tethering).Ukunttevensde
mobieledataverbindingvanuwtelefoondelenmetmeerdereapparatentegelijk,door
vanuwtelefooneendraagbareWi-Fi-hotspottemaken.
Wanneeruwtelefoondedataverbindingdeeltwordteenpictogramindestatusbalken
alseenactievemeldingindemeldingsbalkgetoond.

40
Bezoekhttp://www.android.com/tethervoordelaatsteinformatieovertetheringen
draagbarehotspots,waaronderondersteundebesturingssystemenenandereinformatie.
Instellingen voor Wi-Fi-tethering wijzigen:
1 Tikop >ophettabbladApplicaties>Instellingen>Tethering en
netwerken>Wi-Fi hotspotenschakelinomteactiveren.
2 VoereenwachtwoordinentikopOpslaan.
TIP! Als uw computer Windows 7 of een recente Linux-distributie
(bijvoorbeeld Ubuntu) als besturingssysteem heeft, hoeft u uw computer
waarschijnlijk niet voor te bereiden voor tethering. Als u echter een oudere
Windows-versie of een ander besturingssysteem gebruikt, moet u uw
computer mogelijk voorbereiden om een netwerkverbinding via USB tot
stand te kunnen brengen. Bezoek http://www.android.com/tether voor de
meest actuele informatie over welke besturingssystemen USB-tethering
ondersteunen en hoe u deze moet configureren.
Uw draagbare hotspot hernoemen of beveiligen
UkuntdeWi-Fi-netwerknaam(SSID)vanuwtelefoonwijzigenenhetWi-Fi-netwerk
beveiligen.
1 Tikop >ophettabbladApplicaties>Instellingen>Tethering en
netwerken>Wi-Fi hotspot.
2 TikopWi-Fi hotspot instellen.
•HetdialoogvensterWi-Fi hotspot instellenwordtgeopend.
•UkuntdeNetwerk SSID(netwerknaam)dieanderecomputerszienbijhetzoeken
naarWi-Fi-netwerken,wijzigen.
•UkuntooktikkenophetmenuBeveiligingomhetnetwerkteconfigurerenmet
WPA2-beveiliging(Wi-FiProtectedAccess2)meteenvoorafgedeeldesleutel
(presharedkey,PSK).
•AlsuopdebeveiligingsoptieWPA2 PSKtikt,wordteenwachtwoordveld
toegevoegdaanhetdialoogvensterWi-Fi hotspot instellen.Alsueenwachtwoord
invoert,moetudatwachtwoordsteedsinvoerenwanneeruvanafeencomputer
Verbinden met netwerken en apparaten

41
ofeenanderapparaatverbindingmaaktmetdehotspotvandetelefoon.Ukunt
OpeninhetmenuBeveiliginginstellenomdebeveiligingvanhetWi-Fi-netwerk
ongedaantemaken.
3 TikopOpslaan.
LET OP! Als u als beveiligingsoptie Open instelt, kunt u niet voorkomen dat
anderen zonder toestemming gebruik maken van onlineservices en worden
mogelijk extra kosten in rekening gebracht. Om onbevoegd gebruik te
voorkomen, raden wij aan de beveiligingsoptie ingeschakeld te laten.
Wi-Fi Direct
MetWi-FiDirectkuntueendirecteverbindingmakentussenWi-Fi-apparatenzonder
eentoegangspunt.Vanwegehethogeaccugebruikradenwijuaanuwtelefoonaante
sluitenopeenstopcontactwanneerugebruikmaaktvanWi-FiDirect.Controleervooraf
ofdegebruikerszijnverbondenmetuwWi-Fi-ofWi-FiDirect-netwerk.
PC-verbindingen met een USB-kabel
LeerhettoestelviaeenUSB-kabelmeteenPCteverbindenindeUSB-
verbindingsmodus.
Muziek, foto's en video's synchroniseren met de USB-modus voor massaopslag
1 SluituwtelefoonmeteenUSB-kabelopeenPCaan.
2 AlsuhetstuurprogrammavoorhetLGAndroid-platformnietopuwcomputer
hebtgeïnstalleerd,moetudeinstellingenhandmatigwijzigen.KiesSys-
teeminstellingen>PC-verbinding>USB-verbindingstypeenkiesvervolgens
Mediasynchronisatie (MTP).
3 UkuntnudeinhoudvanhetapparaatvoormassaopslagbekijkenopuwPCende
bestandenoverbrengen.

42
Synchroniseren met Windows Media Player
ZorgdatWindowsMediaPlayeropuwPCisgeïnstalleerd.
1 GebruikdeUSB-kabelomdetelefoonaantesluitenopdePCwaaropWindows
MediaPlayerisgeïnstalleerd.
2 KiesdeoptieMediasynchronisatie (MTP).Alshettoestelisverbonden,wordtop
dePCeenpop-upvenstergetoond.
3 OpenWindowsMediaPlayerommuziekbestandentesynchroniseren.
4 Bewerkoftypdenaamvanhettoestelinhetpop-upvenster(indiennodig).
5 Kiesdegewenstemuziekbestandenensleepdezenaardesynchronisatielijst.
6 Startdesynchronisatie.
•VoorsynchronisatiemetWindowsMediaPlayergeldendevolgendevereisten.
Items Vereiste
Besturingssysteem MicrosoftWindowsXPSP2,Vistaofhoger
WindowsMedia
Player-versie
WindowsMediaPlayer10ofhoger
•AlsdeWindowsMediaPlayer-versielagerisdan10,installeerdanversie10ofhoger.
Verbinden met netwerken en apparaten

43
Oproepen
Een oproep plaatsen
1 Tikop omhettoetsenblokteopenen.
2 Voerhetnummerinmethettoetsenblok.Tikop omeencijfertewissen.
3 Tikop omeenoproepteplaatsen.
4 TikophetpictogramOphangen omeenoproeptebeëindigen.
TIP! Als u een + wilt invoeren voor een internationale oproep, tik dan op
en houd deze toets ingedrukt.
Uw contacten bellen
1 Tikhieropomuwlijstmetcontactenteopenen.
2 Bladerdoordecontactenlijstofvoerdeeerstepaarlettersinvanhetcontactdat
uwiltbellendooropContact zoekentetikken.
3 Tikindelijsttweemaalophetcontactdatuwiltbellenoftikop .
Een oproep beantwoorden of weigeren
Wanneerueenoproepontvangtwanneeruwtoestelisvergrendeld,veegtu in
willekeurigerichtingomdeinkomendeoproepteAntwoord.
Veeg inwillekeurigerichtingomeeninkomendeoproepteWeigeren.
HoudhetpictogramAfwijzen met berichtvastensleepditnaarbovenalsueen
berichtwiltverzenden.
TIP! Afwijzen met bericht
Met deze functie kunt u snel een bericht verzenden. Dit is handig wanneer u
tijdens een vergadering een oproep moet weigeren met een bericht.

44
Belvolume aanpassen
UkunttijdenseengesprekhetvolumeaanpassendooropdetoetsVolumeomhoog/
omlaagaandelinkerkantvanuwtelefoontedrukken.
Een tweede oproep plaatsen
1 TiktijdensuweersteoproepopMenu>Oproep toevoegenenkieshetnummer.
Ukuntooknaardelijstmetonlangsgekozennummersgaandoorop te
tikken,ofukuntcontactenzoekendoorop tetikkenenhetcontacttekiezen
datuwiltbellen.
2 Tikop omdeoproepteplaatsen.
3 Beideoproepenwordenophetoproepschermgetoond.Heteerstegesprekwordt
vergrendeldenindewachtstandgezet.
4 Tikophetgetoondegetalomtussendeoproepenteschakelen.Oftikop
Samenvoegenomeenvergaderingtestarten.
5 Alsueenactieveoproepwiltbeëindigen,tiktuopOphangenoftiktuopde
toetsHome,schuiftudemeldingsbalknaarbenedenenkiestuhetpictogram
Ophangen .
OPMERKING: voor elk gesprek worden kosten in rekening gebracht.
Oproepen

45
Oproeplogboeken tonen
Tikinhetbasisschermop enkieshettabbladOproepinfo .
Eenweergavevandevolledigelijstmetallegekozen,ontvangenengemisteoproepen
bekijken.
TIP! Als u op een afzonderlijk gegeven in de oproepgeschiedenis tikt, worden
de datum, het tijdstip en de duur van de oproep weergegeven.
TIP! Tik op de toets Menu en tik op Alles wissen om alle opgeslagen
items te wissen.
Oproep
Ukuntoproepinstellingenvoordetelefoonconfigureren,zoalshetdoorschakelenvan
oproepenenanderespecialeservicesvanuwprovider.
1 Tikinhetbasisschermop .
2 Tikop .
3 TikopOproepenkiesdeoptiesdieuwiltaanpassen.

46
Contacten
Ukuntcontactenopuwtelefoontoevoegenenzesynchroniserenmetdecontacten
inuwGoogle-accountofandereaccountsdiedesynchronisatievancontacten
ondersteunen.
Een contact zoeken
In het basisscherm
1 Tikhieropomuwlijstmetcontactenteopenen.
2 TikopContact zoekenenvoermethettoetsenborddenaamvanhetcontactin.
Een nieuw contact toevoegen
1 Tikop ,voerhetnummervanhetnieuwecontactinentikopdetoetsMenu
.TikopToevoegen aan contacten>Nieuw contact maken.
2 Tikophetafbeeldingsgedeeltealsueenfotowilttoevoegenaanhetnieuwe
contact.
KiesuitEen foto nemenofKies uit de galerij.
3 Kieshettypecontactdoortetikkenop .
4 Tikopeencategoriecontactgegevensenvoerdegegevensoverhetcontactin.
5 TikopOpslaan.
Favoriete contacten
Ukuntcontactendieuvaakbelttoevoegenalsfavorietecontacten.
Een contact toevoegen aan uw favorieten
1 Tikhieropomuwlijstmetcontactenteopenen.
2 Tikopeencontactomdebijbehorendegegevenstetonen.
3 Tikopdesterrechtsvandenaamvanhetcontact.Desterwordtnugeel.

47
Een contact in de lijst met favorieten wissen
1 Tikhieropomuwlijstmetcontactenteopenen.
2 Tikophettabblad enkieshetcontactwiensgegevensuwilttonen.
3 Tikopdegelesterrechtsvandenaamvanhetcontact.Desterwordtgrijsenhet
contactwordtuitdefavorietenverwijderd.
Een groep maken
1 Tikhieropomuwlijstmetcontactenteopenen.
2 TikopGroepenentikopdetoetsMenu .KiesNieuwe groep.
3 Voereennaaminvoordenieuwegroep.Ukuntookeenbeltooninstellenvoorde
nieuwegroep.
4 TikopOpslaanomdegroepopteslaan.
Opmerking: als u een groep verwijdert, gaan de gegevens van de contacten
in die groep niet verloren. Ze blijven in uw contacten staan.

48
Berichten
UwtelefooncombineertSMSenMMSinéénintuïtief,eenvoudigtegebruikenmenu.
Een bericht verzenden
1 Tikinhetbasischermop entikop omeenleegberichtteopenen.
2 VoerdenaamofhettelefoonnummervanhetcontactinhetveldAanin.Terwijl
udenaamvanhetcontactinvoert,wordenovereenkomendecontactengetoond.
Ukuntopeenvoorgesteldegeadresseerdetikken.Ukuntmeerderecontacten
toevoegen.
OPMERKING: als u een SMS naar meerdere personen stuurt, worden per
persoon kosten in rekening gebracht.
3 Tikophetveld'Bericht invoeren'enschrijfuwbericht.
4 Tikop omhetmenuOptiesteopenen.KiesuitSnel bericht,Smiley invoe-
gen,Afspraak verzenden,Onderwerp toevoegen,enOngedaan maken.
TIP! U kunt op het pictogram tikken om het bestand dat u wilt delen met
uw bericht toe te voegen.
5 TikopZendenomuwberichtteverzenden.
6 Reactieswordenophetschermgetoond.Wanneerumeerberichtenbekijkten
verzendt,wordteenberichtenthreadgemaakt.
WAARSCHUWING: de limiet van 160 tekens verschilt per land en is
afhankelijk van de codering en de taal van de SMS.
WAARSCHUWING: als u een afbeelding-, video- of geluidbestand
toevoegt aan een SMS, wordt het bericht automatisch omgezet in een MMS
en worden de daarbij behorende kosten in rekening gebracht.

49
Gegroepeerd vak
Ukuntberichten(SMS,MMS)dieumetanderenhebtuitgewisseldinchronologische
volgordetonenzodatueenvoudigeenoverzichtvanuwconversatiekuntzien.
De instellingen van uw berichten wijzigen
Deberichtinstellingenvanuwtelefoonzijnvoorafgedefinieerd,zodatudirectberichten
kuntverzenden.Ukuntdeinstellingenaanpassenaanuwvoorkeuren.
•TikophetpictogramBerichteninhetbasisscherm,tikop entikopOpties.

50
E-mail
UkuntdeapplicatieE-mailgebruikenome-mailberichtenvanserviceszoalsGmailte
lezen.DeapplicatieE-mailondersteuntdevolgendetypenaccounts:POP3,IMAPen
Exchange.
Debenodigdeaccountinstellingenkuntubijuwserviceproviderofsysteembeheerder
opvragen.
Een e-mailaccount beheren
WanneerudeapplicatieE-mailvoorheteerstopent,verschijntereenwizardwaarmee
ueene-mailaccountkuntinstellen.
NahetinstellenwordtdeinhoudvanuwPostvakINweergegeveninE-mail.Alsumeer
danéénaccounthebttoegevoegd,kuntutussenaccountsschakelen.
Een andere e-mailaccount toevoegen:
•Tikop >tabblad Applicaties>E-mail>tikop >Opties > Account
toevoegen.
De instellingen van een e-mailaccount wijzigen:
•Tikop >tabblad Applicaties>E-mail>tikop >Opties >Algemene
instellingen.
Een e-mailaccount wissen:
•Tikop >tabblad Applicaties>E-mail>tikop >Opties>tikop
>Account verwijderen > Kieshetaccountdatuwiltverwijderen>Wissen>kies
Ja.
Accountmappen gebruiken
Tikop >tabbladApplicaties>E-mail,tikop enkiesMappen.
ElkaccountbeschiktoverdemappenPostvakIN,PostvakUIT,VerzondenenConcepten.
Erkunnennoganderemappenzijn,afhankelijkvandefunctiesdiewordenondersteund
dooruwserviceprovider.

51
E-mailberichten schrijven en verzenden
Een e-mailbericht schrijven en verzenden
1 TikindeapplicatieE-mailop .
2 Voerhetadresvandeontvangerin.Terwijlutekstinvoert,wordenovereen-
komendee-mailadressenuituwcontactengetoond.Scheidmeerderee-
mailadressenmetpuntkomma's.
3 TikophetveldCC/BCComeenCC/BCCtoetevoegenentikop omzonodig
bestandenbijtevoegen.
4 Voerdetekstvanhetberichtin.
5 Tikop .
Alsugeenverbindinghebtmeteennetwerk,bijvoorbeeldwanneeruinight-
modewerkt,wordendeteverzendenberichtenopgeslagenindemapPostvak
uittotdatuweerverbindinghebtmeteennetwerk.AlshetPostvakuitberichten
bevatdienogmoetenwordenverzonden,wordtdemapweergegeveninhet
schermAccounts.
TIP! Als er een nieuw e-mailbericht in uw Postvak IN verschijnt, wordt dit
gemeld via een geluidssignaal of de trilfunctie. Tik op de e-mailmelding om
deze te beëindigen.

52
Camera
TikopCamera inhetbasisschermomdeapplicatieCamerateopenen.
Meer informatie over de beeldzoeker
Flitser–kiesuitUit ,Aan ,Auto .
Camera wisselen–schakelentussendecameralensaandeachterzijdeende
cameralensaandevoorzijde.
Fotomodus–ukuntkiezenuitNormaal,Dynamisch,Panorama,Reeksopname,
Verfraaide foto,Time catch,SportofNacht.
Instellingen–tikopditpictogramomhetinstellingenmenuteopenen.
Videomodus–tikopditpictogramenschuifhetomlaagomoverteschakelennaar
devideomodus.
Opnameknop
Galerij–tikhieropomdelaatstefototetonendieuhebtgemaakt.Hiermeekuntu
degalerijopenenenopgeslagenfoto'sindecameramodusbekijken.
OPMERKING: zorg ervoor dat de lens van de camera schoon is voordat u
foto's gaat maken.

53
De geavanceerde instellingen gebruiken
Tikindezoekerop omalleoptiesvoorgeavanceerdeinstellingentetonen.Blader
doordelijstomdecamera-instellingentewijzigen.TikopdetoetsTerugnadatude
optiehebtgekozen.
Omeenfototemaken,zegtu'Cheese','Smile','Whiskey','Kimchi'of'LG'.
Hiermeebepaaltudehoeveelheidzonlichtineenfoto.
Tikhieropomdefocusmodetekiezen.
Hiermeekuntudefotoresolutiekiezen.Alsueenhogeresolutiekiest,wordt
hetbestandsformaatgroter,waardooruminderfoto'sinhetgeheugenkunt
opslaan.
DeISO-waardebepaaltdegevoeligheidvandelichtsensorvandecamera.
HoehogerdeISO-waarde,hoegevoeligerdecamera.Datishandigonder
omstandighedenmetweiniglichtwaarinudeflitsernietkuntgebruiken.
Hiermeekuntudekleurkwaliteitonderverschillende
belichtingsomstandighedenverbeteren.
Hiermeekuntuuwfoto'seenartistieketintgeven.
Hiermeekuntueenvertraginginstellennahetindrukkenvande
opnameknop.Ditisideaalalsuzelfopdefotowiltstaan.
Schakeldezefunctieinomdelocatiegebaseerdeservicesvanuwtelefoon
tegebruiken.
OPMERKING: deze functie is alleen beschikbaar wanneer de
GPS-functie aan staat of wanneer uw toestel met een netwerk is
verbonden
Hiermeekuntueensluitergeluidkiezen.

54
Steldevolumetoetsinvoorvastleggenofzoomen.
Hiermeeopentudehandleidingomtewetenhoeeenfunctiewerkt.
Hersteltallestandaardinstellingenvandecamer
TIP!
•Als u de camera afsluit, worden bepaalde instellingen weer ingesteld op hun
standaardwaarde, zoals de witbalans, kleureffect, timer en scènemodus.
Controleer deze instellingen voordat u een nieuwe foto maakt.
•Het instellingenmenu ligt over de beeldzoeker. Wanneer u onderdelen van
de fotokleur of -kwaliteit wijzigt, is het resultaat meteen zichtbaar.
Snel een foto maken
1 OpendeapplicatieCamera.
2 Houddetelefoonhorizontaalenrichtdelensophetonderwerpdatuwiltfoto-
graferen.
3 Erverschijnteenscherpstelvakinhetmiddenvandebeeldzoeker.Ukuntookop
eenwillekeurigeplekophetschermtikkenomopdieplekscherptestellen.
4 Alshetscherpstelvakgroenwordt,heeftdecamerascherpgesteldophet
onderwerp.
5 Tikop omdefototemaken.
Nadat u een foto hebt gemaakt
Tikopdeminiatuurweergaveonderaanhetcameraschermomdelaatstgenomenfoto
tebekijken.
Tikhieropommeteennogeenfototemaken.
Camera

55
Tikhieropomuwfotonaaranderenteverzendenofomuwfototedelenvia
socialenetwerken.
Tikomdefototewissen.
TikhieropomuwfototedelenmetbehulpvandefunctieSmartShare.
TIP! Als u een SNS-account hebt en dit instelt op uw telefoon, kunt u uw foto
met uw SNS-community delen.
OPMERKING: er kunnen extra kosten in rekening worden gebracht wanneer
MMS-berichten worden gedownload tijdens het roamen.
Tik op de Menu-toets om alle opties voor geavanceerde instellingen te tonen
Instellen als –TikomdefototegebruikenalsContactfoto,Homescreen,
Achtergrond vergrendelingsscherm of Achtergrond.
Verplaatsen–tikhieropomdefotonaareenanderelocatieteverplaatsen.
Kopiëren–tikhieropomdegeselecteerdefototekopiërenenineenanderalbumop
teslaan.
Kopiëren naar de Clip-lade–tikhieropomdefototekopiërenenopteslaanopde
Clip-lade.
Naam wijzigen –tikhieropomdenaamvandegeselecteerdefototebewerken.
Linksom/rechtsomdraaien–links-ofrechtsomdraaien.
Bijsnijden –uwfotobijsnijden.Beweeguwvingeroverhetschermomhetgebiedte
selecterendatbijgesnedenmoetworden.
Bewerken–defotobekijkenenbewerken.
Diashow–toontdefoto'sindehuidigemapautomatischachterelkaar.
Locatie toevoegen–decameraisnietingesteldopGeotaggen.Erwordengeen
locatiegegevenstoegevoegdaanfoto's.Dezegegevenskunnenwordentoegevoegd.
Locatie verwijderen–decameraisingesteldopGeotaggen.Erworden

56
locatiegegevenstoegevoegdaanfoto's.Dezegegevenskunnenwordenverwijderd.
Op kaart weergeven–decameraisingesteldopGeotaggen.Erworden
locatiegegevenstoegevoegdaanfoto's.Ukuntdebetreffendelocatieopdekaart
bekijken.
Details–hierleestumeerinformatieoverdeinhoud.
Opgeslagen foto’s tonen
Tikop Galerij.
•Scrollnaarlinksofrechtsommeerfoto'stebekijken.
•Ominenuittezoomen,tiktutweemaalophetschermofplaatstutweevingersop
hetschermenbeweegtuzeuitelkaar(ofnaarelkaartoeomuittezoomen).
Camera

57
Videocamera
Meer informatie over de beeldzoeker
Flitser–kiesuitUit ,Aan .
Camera wisselen–schakelentussendecameralensaandeachterzijdeende
cameralensaandevoorzijde.
Opnamemodus–kies uit NormaalofLive-effect.
Instellingen–tikopditpictogramomhetinstellingenmenuteopenen.
Cameramodus–tikopditpictogramenschuifhetomhoogomoverteschakelen
naardecameramodus.
Opnemen starten
Galerij–tikhieropomdelaatstevideodieuhebtopgenomentetonen.Hiermee
kuntudegalerijopenenenopgeslagenvideo'sindevideomodusbekijken.
TIP!
Plaats tijdens het opnemen van een video twee vingers op het scherm en
breng ze naar elkaar toe om de zoomfunctie te gebruiken.

58
De geavanceerde instellingen gebruiken
Tikindezoekerop omalleoptiesvoorgeavanceerdeinstellingenweertegeven.
Tikhieropomdegrootte(inpixels)intestellenvoordevideodieuopneemt.
Hiermeebepaaltudehoeveelheidzonlichtindelens.Schuifde
helderheidsindicatorlangsdebalknaar'-'vooreenlagerehelderheidofnaar
'+'vooreenvideometmeerhelderheid.
Hiermeekuntudekleurkwaliteitonderverschillende
belichtingsomstandighedenverbeteren.
Hiermeekuntudekleurtintkiezendieuvooruwnieuweweergavewiltgebruiken
.
Schakeldezefunctieinomdelocatiegebaseerdeservicesvanuwtelefoon
tegebruiken.
OPMERKING:dezefunctieisalleenbeschikbaarwanneerdeGPS-functie
aanstaatofwanneeruwtoestelmeteennetwerkisverbonden.
Steldevolumetoetsinomoptenemenoftezoomen.
Hiermeeopentudehandleidingomtewetenhoeeenfunctiewerkt.
Hersteltallestandaardinstellingenvandecamera.
Snel een video maken
1 OpendeapplicatieCameraentikopdeknopVideomodus.
2 Dezoekervandevideocamerawordtophetschermgetoond.
3 Houddetelefoonvastenrichtdelensophetonderwerpdatuwiltlmen.
4 Tikeenmaalop omdeopnametestarten.
5 Indelinkerbovenhoekvandebeeldzoekerverschijnteenroodlampje.Hierzietu
ookeentimerdiedelengtevandevideoaangeeft.
6 Tikop ophetschermomhetopnementebeëindigen.
Videocamera

59
TIP!
– tik hierop om een beeld vast te leggen tijdens het opnemen van een video.
– tik hierop om het opnemen van een video te pauzeren.
Na het opnemen van een video
ErverschijnteenafbeeldingvandevideoophetschermalsAutom.controleis
ingeschakeld.
Tikhieropommeteennogeenvideooptenemen.
Tikhieropomuwvideonaaranderenteverzendenofomuwvideotedelen
viasocialenetwerken
Tikhieropomdevideotewissen.
TikhieropomuwvideotedelenmetbehulpvandefunctieSmartShare.
OPMERKING: er kunnen extra kosten in rekening worden gebracht wanneer
MMS-berichten worden gedownload tijdens het roamen.
Uw opgeslagen video’s bekijken
1 Tikindebeeldzoekerop .
2 Degalerijwordtgetoondophetscherm.
3 Tikopeenvideoomdezeautomatischaftespelen.
Het volume aanpassen tijdens de weergave van een video
Ukuntmetbehulpvandelinkertoetsenopdetelefoonhetvolumeaanpassenvaneen
videodieubekijkt.

60
Unieke functie van LG
Functie QuickMemo
MetdefunctieQuickMemokuntutijdenseengesprekoppraktischeenefficiëntewijze
memo'smeteenopgeslagenfotoofophethuidigetelefoonschermmaken.
OF
1 OpenhetschermQuickMemo
doordevolumetoetsenomhoogen
omlaagéénsecondeingedruktte
houdenophetschermdatuwilt
vastleggen.
OF
Tikopdestatusbalk,schuifdezeomlaag
entikvervolgensop
.
2 Kiesdegewenstemenuoptie(Pen
type,KleurofGum)enmaakeen
memo.

61
3 Tikop inhetmenuBewerkenen
kieshetomdememoopteslaanmet
hethuidigescherm.
OPMERKING:gebruik uw vingertoppen wanneer u de functie QuickMemo
gebruikt. Gebruik niet uw nagels.
De opties van QuickMemo gebruiken
WanneerudefunctieQuickMemogebruikt,hebtuooktoegangtotoptiesvan
QuickMenu.
Tikhieropomdehuidigememoophetschermtehoudenendetelefoon
tegelijkertijdteblijvengebruiken.
Hiermeekuntualdanniethetachtergrondschermgebruiken.
Ukuntuwhandelingongedaanmakenofopnieuwuitvoeren.
Ukunthetpentypeendekleurkiezen.
Hiermeewistudememodieuhebtgemaakt.
Tikhieropomuwmemonaaranderenteverzendenofomuwmemote
delenviasocialenetwerken.
UkuntdememoopslaanmethethuidigeschermindeGalerij/Notebook.
De opgeslagen QuickMemo tonen
TikopGalerij/NotebookenkieshetalbumQuickMemo.

62
Functie Notebook
MetdeapplicatieNotebookkuntueengrootaantalgegevensbeherenen
personaliseren.MetNotebookkuntuuweigenspecialenotitiesmakenmettekeningen,
afbeeldingen,kaartenenstickers.
Een notitie maken
1 Tikop > tabblad Applicaties>Notebook.
2 TikopNieuwe notitieomeennieuwenotitietemaken.
3 Kiesdegewenstemodus(Boekomslag, Titel, Papier, Papierkleur)entik
vervolgensopOK.
4 Maakeeneenvoudigenotitieopeenlegepagina.
Meer informatie over het notitieblok
Pagina-Eigenschappen panelenBoekenplank
Boekenplank
Hiermeekuntunaarpagina'svannotitieszoeken.
HiermeekuntuhetnotitieblokdelenalsNotebook-bestand,PDF-bestandof
afbeeldingsbestandviaE-mail/Gmail.
Unieke functie van LG

63
Hiermeewistuhetopgeslagennotitieblokvandeboekenplank.
Pagina-Eigenschappen panelen
UkuntdemodusAlleenlezenofBewerkenkiezen.
Ukuntuwhandelingongedaanmakenofopnieuwuitvoeren.
Tikopdezeknopomteschrijven.
UkunthetPentype,Dikte,DoorzichtigheidenKleurvandepenkiezen.
Hiermeewistueengemaaktememo.
Tikhieropombestandenaandenotitietoetevoegen.
Tikhieropomuwnotitienaaranderenteverzendenofomuwnotitietedelen
viasocialenetwerken.
Ukuntdenotitieopslaanmethethuidigescherm.
Kiesditomdethuistoetstevergrendelenofteontgrendelen.
Tikopdezeknopomhetinvoergebiedtevergroten.
Het opgeslagen notitieblok tonen
•Uvindtdeopgeslagenmemo'svanuwnotitieblokopdeboekenplank.
•Alsumemo'sinQuickMemoopslaat,wordterautomatischeenQuickMemo-notitie
gemaaktenopdeboekenplankopgeslagen.
OPMERKING: voor meer informatie uit de Notebook-handleiding raadpleegt
u Notebook > Notebook Handleiding.

64
QuickTranslator
Richtdecameravanuwsmartphoneopdebuitenlandsezindieuwiltvertalen.Ukunt
devertalinginreal-timeoveralenaltijdopvragen.
BijGooglePlayStorekuntuextrawoordenboekenkopenvoorofflinevertaling.
Brontaal.
Doeltaal.
Vertalingvanwoord.
Vertalingvanzin.
Vertalingvanblok.
Instellingen.
1 Tikop >tabbladApplicaties>QuickTranslator.
2 TikopWoord,LijnofParagraaf.
3 Tikenkiesdegewenstetaal.
4 Richtdetelefooneenpaarsecondenophetonderwerpdatuwiltvertalen.
OPMERKING: er is slechts één woordenboek gratis. Aanvullende
woordenboeken moeten worden aangeschaft. Kies in de onderstaande lijst
het woordenboek dat u als uw gratis woordenboek wilt installeren.
OPMERKING: de herkenningssnelheid verschilt per grootte, kleur, helderheid,
hoek en lettertype van de letters van woorden die moeten worden vertaald.
Unieke functie van LG

65
Functie Live-zoomen
MetLive-zoomenkuntuopeendeelvaneenafgespeeldevideo-opnamein-of
uitzoomenomdegewenstescangroterofkleinertelatenlijken.
OPMERKING:
•Schuif in de video-afspeelmodus het scherm naar boven of beneden om de
helderheid van het scherm (links) of het volume (rechts) aan te passen.
•Wanneer u een video afspeelt, kunt u het volume aanpassen door het
scherm naar links of naar rechts te schuiven.
OPMERKING: u hoeft niet hard te drukken; het aanraakscherm is gevoelig
genoeg om een lichte maar vaste druk te herkennen.

66
Functie QSlide
Metdefunctie QSlidekuntueenoverlaymakenophetdisplayvanuwtelefoon,zodat
ueenvoudigermetmeerderevensterskuntwerken.
OR
TikomdefunctieQSlideafte
sluitenenterugtekerennaar
volledigvenster.
Tikomdetransparantieaante
passen.
TikomdefunctieQSlideafte
sluiten.
Tikomdegroottetewijzigen.
1 Tikopdestatusbalkenschuifdezeomlaag>tikopQSlideof
tikop alsueenfunctie
gebruiktdiedoorQSlidewordtondersteund.Defunctiewordtvoortdurendals
kleinvensteropuwschermgetoond.
2 Ukuntbellen,webpagina'sbekijkenofanderetelefoonoptieskiezen.Ukuntook
hetschermvandekleinevenstersgebruikenoferoptikkenwanneerdetranspar-
antiebalkniethelemaalvolis .
OPMERKING: de functie QSlide ondersteunt maximaal twee vensters tegelijk.
TIP!
Tik op het meldingenpaneel en schuif het omlaag met uw vinger.
Tik op
> om de "Snel instellingen" of "QSlide" op het
meldingenpaneel te beheren.
Unieke functie van LG

67
Functie Dual play
Ukuntverschillendeschermentonenopdetweedisplaysdiedraadloosofviaeenkabel
zijnverbonden.
1 UkuntdemodusDualplayuitvoerendooropdetoetsHome tetikkenwan-
neeruinhoudophetdisplayvanhetexterneapparaatafspeelt.
2 Ukunthetafspelenvaninhoudophetdisplayvanhetexterneapparaatstopzetten
viahetmeldingenpaneel.
OPMERKING:
•Sluit uw smartphone draadloos (Miracast) of via een kabel (MHL-kabel) op
een display aan.
•Sommige videobestanden worden mogelijk niet ondersteund door de
functie Dual play.
•De beschermde MHL-kabel van LG wordt aanbevolen.
•Uw gebruikte display moet MHL of Miracast ondersteunen.
Spiegelen
∙∙∙∙∙
Dual play
∙∙∙∙∙

68
OPMERKING:
•Dual play wordt ondersteund door 3 applicaties - Video's, Media Home
(alleen MHL), Polaris Office 4.
•De minimale TV-resolutie voor Dual play is 720p (1280x720)
LG SmartWorld
LGSmartWorldbiedteenassortimentvaninteressanteinhoud-lettertypen,thema's,
gamesenapplicaties.
Hoe u met uw telefoon op LG SmartWorld komt:
1 Tikop >tabbladApplicaties>tikophetpictogram omLG SmartWorld
teopenen.
2 TikopAanmeldenenvoerdegebruikersnaamenhetwachtwoordvoorLG
SmartWorldin.Alsuzichnogniethebtgeregistreerd,tiktuopRegistrerenomlid
tewordenvanLGSmartWorld.
3 Downloadhetmateriaaldatuwilt.
•Alsueenmobielnetwerkgebruikt,wordenmogelijkkostenberekendopbasisvan
hetdata-abonnementdatuhebtbijuwprovider.
•LGSmartWorldismogelijknietbijalleprovidersofinallelandenbeschikbaar.
Unieke functie van LG

69
OPMERKING: wat moet ik doen als er geen pictogram is?
1 Open LG SmartWorld met een mobiele webbrowser(www.lgworld.com) en
kies uw land.
2 Download de LG SmartWorld-app.
3 Voer het gedownloade bestand uit en installeer het.
4 Open LG SmartWorld door op het pictogram
te tikken.
Speciale voordelen alleen in LG SmartWorld
1 Creëer uw eigen stijl op uw smartphone. Gebruik Thuisthema,
Toetsenbordthema en Lettertype van LG SmartWorld (Deze service is
voor specifieke toestellen beschikbaar). Controleer op de LG SmartWorld-
website of het beschikbaar is of niet)
2 Profiteer van de speciale service van LG SmartWorld door deel te nemen
aan de doorlopende promotie.

70
Galerij
Ukuntmultimediabestandenopeeninternegeheugenkaartopslaan,zodatu
eenvoudigtoeganghebttotaluwmultimediabestanden.Gebruikdezeapplicatieom
multimediabestandenzoalsfoto'senvideo'stetonen.
1 Tikop >tabbladApplicaties>Galerij.
Openeenlijstmetgroepsoptiesvoorhetopslaanvanuwmultimediabestanden.
OPMERKING:
•Sommige bestandsindelingen worden niet ondersteund, afhankelijk van de
software die op het toestel is geïnstalleerd.
•Sommige bestanden worden mogelijk niet goed afgespeeld, afhankelijk van
hoe ze zijn gecodeerd.
Foto's tonen
AlsuGalerijstart,zietuuwbeschikbaremappen.Wanneerueenfotoineenandere
applicatie,zoalsE-mailopslaat,wordterautomatischeendownloadmapgemaaktvoor
defoto.Opdezelfdemanierwordterautomatischeenmapvoorschermafbeeldingen
gemaaktalsueenschermafbeeldingmaakt.Kieseenmapomdezeteopenen.
Foto'swordenopaanmaakdatumgetoondineenmap.Kieseenfotoomdezeophet
volledigeschermtetonen.Bladernaarlinksofrechtsomdevolgendeofvorigefotote
tonen.
In- en uitzoomen
Gebruikeenvandevolgendemethodenomopeenfotointezoomen:
•Tiktweemaalopeenwillekeurigeplekomintezoomen.
•Beweegtweevingersopeenwillekeurigeplekuitelkaaromintezoomen.Schuifuw
vingersnaarelkaartoeomuittezoomenoftiktweemaalomterugtekeren.
Multimedia

71
Video's afspelen
Inhetvoorbeeldschermvanvideobestandenwordthetpictogram getoond.Kiesde
videodieuwiltbekijkenentikop .DeapplicatieVideowordtgestart.
Foto's/video's bewerken
Wanneerueenfoto/videobekijkt,tiktuopdetoetsMenu engebruiktude
geavanceerdebewerkingsopties.
•Diashow:starteendiavoorstellingmetdebeeldenindehuidigemap.
Beelden wissen
Gebruikeenvandevolgendemethoden:
•Tikineenmapop enkiesfoto's/video'sdoortetikkenenvervolgensopWissen
tetikken.
•Tikbijweergavevaneenfoto/videoop .
Als achtergrond instellen
TikbijweergavevaneenfotoopdetoetsMenu >Stel beeld in alsomhetbeeld
alsachtergrondintestellenofhetbeeldaaneencontacttoetewijzen.
OPMERKING:
•Sommige bestandsindelingen worden niet ondersteund, afhankelijk van de
software op het toestel.
•Als de bestandsgrootte de hoeveelheid beschikbaar geheugen overschrijdt,
kan er een fout optreden bij het openen van bestanden.
Video
Uwtelefoonisvoorzienvaneeninternevideospeler.Hiermeekuntualuwfavoriete
video'safspelen.Tikop >tabbladApplicaties>Videoomdevideospelerte
openen.

72
Video afspelen
1 Tikop >tabbladApplicaties>Video.
2 Kiesdegewenstevideoomaftespelen.
Tikomhetafspelenvandevideotepauzeren.
Tikom10secondenvooruittegaan.
Tikom10secondenachteruittegaan.
Tikomhetvideovolumeteregelen.
Tikomdeverhoudingvanhetvideoschermtewijzigen.
Tikhieropomeenbeeldvastteleggentijdenshetafspelenvan
eenvideo.
TikomQSlidetegebruiken.
TikopomSmartShare.
Tikomeenvideoschermtevergrendelen/ontgrendelen.
Multimedia

73
Ukunttijdensdeweergavevaneenvideohetvolumeaanpassendoorde
volumetoetsenlinksopdetelefoonintedrukken(omhoogenomlaag).
Tikopeenvideoindelijstenhouddezevast.Deopties Delen,Wissen,Knippenen
Detailswordengetoond.
Video Editor
Ukuntdefoto'sofvideo'sdieopdetelefoonzijnopgeslagenbewerken.
OPMERKING: de videobewerkingsfuncties worden alleen ondersteund voor
foto's of video's die met deze telefoon zijn gemaakt.
< Scherm met lijst van projecten >
Gebied met
knoppen
Gebied met
lijst van
projecten
Help
Projectmaken
Projectenmoetenwordengeëxporteerd,zodatzekunnenwordenafgespeeld
inapplicatieszoalsVideo's
Projectafspelen
Projectwissen
ProjectdelenmetapplicatiezoalsYouTube

74
< Scherm voor bewerken van projecten >
Gebied met
tijdlijn
Weergavegebied
Verplaatsennaarschermmetlijstvanprojecten.Hetprojectdatmomenteel
wordtbewerkt,wordtautomatischopgeslagen.
Videoclipintweehelftenverdelenlangsdeafspeelbalk
Geluidseffecttoevoegen
Video-,beeld-ofaudiocliptoevoegen
Eenhandelingongedaanmaken
Eenhandelingopnieuwuitvoeren
Teksttoevoegenaanvideo-ofbeeldclip
Video Wiz
Ukuntuweigenfilmmakenmetuwafbeeldingen/videoenmuziek.
1 Tikop >tabbladApplicaties>Video Wiz.
2 LeesdekorteinleidingoverdeuittevoerenstappenentikvervolgensopOK.
Multimedia

75
3 Tikop omafbeeldingenofvideo'saanuwlmtoetevoegen.
4 Tikopdegewensteafbeeldingenofvideo'sentikop .
•Tikop enkiesdegewenstebestanden> omafbeeldingenofvideo'stewissen.
•Tikopeenafbeelding/videoenhouddezevast.Sleepdeafbeelding/videonaarde
gewenstepositieomdeafbeelding/videoteherschikken.
5 TikopKies stijlomdegewenstelmstijltekiezen.
•Bladernaardegewenstestijlenkiesdeze.Terwijludoordestijlenbladert,wordter
eenvoorbeeldgetoond.
6 TikopMuziek selecterenomdeachtergrondmuziekintestellen.
7 Tikop omuwlmaftespelen.
8 Tikop omdevideocliptebewerkenmetTekst,StikkerofMagischespot.
•Tikop alsuklaarbentmethetbewerkenvandevideo.
9 Tikop omdevideoopteslaan.
10 Tikop omdehelpinformatieoverhetgebruikvandezefunctietetonen.
Muziek
Uwtelefoonbeschiktovereeningebouwdemuziekspelerwaaropualuwfavoriete
nummerskuntafspelen.Tikop >tabbladApplicaties>Muziekomde
muziekspelerteopenen.

76
Een nummer afspelen
1 Tikop >tabbladApplicaties>Muziek.
2 TikopNummers.
3 Selecteerhetgewenstenummer.
/
Tikomhetafspelentepauzeren/hervatten.
Tikomnaarhetvolgendenummerineenalbum,afspeellijstof
willekeurigeafspeellijsttegaan.Tikenhoudingedruktomsnelvooruit
tespoelen.
Tikomhethuidigenummeropnieuwtestartenofomhetvorige
nummerinhetalbum,deafspeellijstofhetwillekeurigafspelenover
teslaan.Tikenhoudingedruktomsnelterugtespoelen.
Tikomdeschuifbalkvoorhetvolumeweertegevenenpas
vervolgenshetafspeelvolumeopdeschuifbalkaan.
TikomGeluidseffectenintestellen.
Multimedia

77
TikomdebestandenviaYouTubeoptezoeken.
Tikomdehuidigeafspeellijstteopenen.
Tikomhetnummeraanuwfavorietentoetevoegen.
Tikomdehuidigeafspeellijstinwillekeurigevolgordeaftespelen
(nummerswordendoorelkaarafgespeeld).
Tikomteschakelentussendeherhaalmodiomallenummersherhaaldaf
tespelen,hethuidigenummerherhaaldaftespelenofomhetherhaald
afspelenuitteschakelen.
SmartShare.
Ukunttijdenshetafspelenvanmuziekhetvolumeaanpassendoordevolumetoetsen
linksopdetelefoonintedrukken(omhoogenomlaag).Tikopeennummerinde
lijstenhoudhetvast.DeoptiesAfspelen,Toevoegen aan playlist,Delen, Beltoon
instellen, Wissen, DetailsenZoekenwordenweergegeven.
OPMERKING:
•Sommige bestandsindelingen worden niet ondersteund, afhankelijk van de
software op het toestel.
•Als de bestandsgrootte de hoeveelheid beschikbaar geheugen overschrijdt,
kan er een fout optreden bij het openen van bestanden.
OPMERKING:
de auteursrechten van muziekbestanden zijn mogelijk
beschermd door internationale verdragen en nationale wetgeving met betrekking
tot auteursrechten. Het kan daarom gebeuren dat u toestemming of een
licentie dient aan te vragen om muziek te reproduceren of te kopiëren. Volgens
de nationale wetgeving van bepaalde landen is het verboden kopieën voor
privégebruik te maken van auteursrechtelijk beschermd materiaal. Controleer de
wetgeving van het betreffende land met betrekking tot het gebruik van dergelijk
materiaal, voordat u het bestand gaat downloaden of kopiëren.

78
Het alarm instellen
1 Tikop >tabbladApplicaties>Alarm/Klok> .
2 Nadatuhetalarmhebtingesteld,wordtopuwtelefoongetoondhoeveeltijder
nogverstrijktvoordathetalarmafgaat.
3 StelHerhalen,Snooze-duur,Trilfunctie,Alarmsignaal, Alarmvolume, Auto
App. Starter, Puzzelvergrendeling en Memoin.TikopOpslaan.
OPMERKING als u de alarminstellingen in het alarmlijstscherm wilt wijzigen,
tikt u op de toets Menu en kiest u Opties.
De rekenmachine gebruiken
1 Tikop >tabbladApplicaties>Calculator.
2 Tikopdenumerieketoetsenomcijfersintevoeren.
3 Tikvooreenvoudigeberekeningenopdegewenstefunctie(+,–,xof÷)en
vervolgensop=.
4 Voorcomplexereberekeningenschuiftunaarlinksenkiestusin,cos,tan,log,
etc.
5 Voordegeschiedenis,raaktu ,aanenselecteertuBerekengeschiedenis.
Een gebeurtenis toevoegen aan uw agenda
1 Tikop >tabbladApplicaties>Agenda.
2 Ophetschermzietudeverschillendeweergavetypenvandeagenda(Dag,Week,
Maand,Agenda).
3 Tikopdedatumwaaraanueengebeurteniswilttoevoegenentikop .
4 TikopAfspraaknaamenvoerdenaamvandegebeurtenisin.
5 TikopLocatieenvoerdelocatiein.Controleerdedatumengeefdebegin-en
eindtijdvoordegebeurtenisop.
Accessoires

79
6 Alsueennotitieaandegebeurteniswilttoevoegen,tiktuopOmschrijvingen
voertudedetailsin.
7 Alsuhetalarmwiltherhalen,steltuHERHALENen,indiengewenst,HERINNERINGEN
in.
8 TikopOpslaanomdegebeurtenisindeAgendaopteslaan.
Voice recorder
Metdespraakrecorderkuntuspraakmemo'sofanderegeluidsbestandenopnemen.
Een geluid of stem opnemen
1 Tikop >hettabbladApplicatiesenkiesVoice recorder.
2 Tikop omdeopnametestarten.
3 Tikop omdeopnametebeëindigen.
4 Tikop omdeopnametebeluisteren.
OPMERKING: tik op om uw album te openen. U kunt luisteren naar
de opgeslagen opname. De beschikbare opnametijd kan afwijken van de
daadwerkelijke opnametijd.
Een spraakopname verzenden
1 Nahetopnemenkuntudeaudioclipverzendendoorop tetikken.
2 UkuntkiezenuitBluetooth,Station,E-mail,Gmail,Memo,Berichtenof
SmartShare Beam.Alsukiest,wordtdespraakopnametoegevoegdaanhet
bericht.Ukunthetberichtnunetalsandersschrijvenenverzenden.
Taakbeheer
UkuntuwapplicatiesbeherenviaTaakbeheer.Ukunteenvoudighetaantalactieve
applicatiescontrolerenenbepaaldeapplicatiesafsluiten.Ukuntookdeapplicaties
wissendieuopuwapparaathebtgeïnstalleerd.

80
Taken
DezetaakkanwordengesynchroniseerdmeteenMSExchange-account.Ukunt
detaakmaken,aanpassenenverwijdereninMSOutlookofMSOfficeOutlookWeb
Access.
MS Exchange synchroniseren
1 Tikinhetbasisschermop >Opties.
2 TikopAccounts en synchronisatie>ACCOUNT TOEVOEGEN.
3 TikopMicrosoft Exchangeomeene-mailadresenwachtwoordtemaken.
4 SchakelhetselectievakjebijSynctask(Taaksynchroniseren)in.
Polaris Office 4
PolarisOfficeiseenprofessionele,mobieleOffice-oplossingwaarmeegebruikers
verschillendetypenOffice-documenten,zoalsWord-,Excel-enPowerPoint-bestanden,
altijdenoveralophunmobieletelefoonkunnenbekijken.
Tikop >tabbladApplicaties>Polaris Office 4.
Bestanden tonen
Mobielegebruikerskunnentegenwoordigvanafhunmobieleapparaatprobleemloos
eengrootaantalverschillendebestandstypenbekijken,zoalsMicrosoftOffice-en
AdobePDF-documenten.DocumentendiewordengetoondinPolarisOffice,behouden
dezelfdeobjectenenlay-outalsdeorigineledocumenten.
Backup
Informatie over het maken en terugzetten van back-ups van
data van smartphones
Uwordtaangeradenomregelmatigeenback-upbestandtemakenenopteslaan
Accessoires

81
opdeinterneopslag,metnamevoordatudesoftwarevanhettoestelbijwerkt.Door
middelvaneenrecenteback-upopeenopslagmediumkuntudatavanuwsmartphone
herstellenalsuhettoestelhebtverloren,alshettoestelwordtgestolenofdefectraakt.
Dezeback-upapplicatiewordtondersteunddoorsmartphonesvanLGenandere
softwareversiesenbesturingssystemen.AlsudenieuwesmartphonevanLGaanschaft,
kuntudusdedatavanuwhuidigetelefoonoverzettenopuwnieuwetelefoon.
AlsdeapplicatieBackupopuwsmartphonevoorafisgeïnstalleerd,kuntumet
behulpvandezeapplicatieback-upsmakenvandemeestedataopuwsmartphone,
Applicatiesinclusiefniet-beschermdeapplicatiesendeinstellingenhiervan,
Applicaties (Gedownload), toepassingen (Voor-geinstalleerde), Favorieten,
Kalender,Gesprekkenlijst,Contacten,Startscherm, SMS-berichten en
Systeeminstellingenendezeherstellen.Ukunt:
•Handmatigeenback-upmakenvandedataopuwsmartphone.
•Hetmakenvanautomatischeback-upsvandedataopuwsmartphoneplannen.
•Datavanuwsmartphoneherstellen.
OPMERKING: de functie Back-up ondersteunt geen back-ups van
gebruikersdata en mediadata (afbeeldingen/video's/muziek). Gebruik
Mediasynchronisatie (MTP) om een back-up van deze bestanden te maken.
Sluit uw telefoon met behulp van een USB-kabel aan op uw computer en tik
op Mediasynchronisatie (MTP).
WAARSCHUWING
Zorg ervoor dat de batterij altijd volledig is opgeladen om te voorkomen dat
het apparaat tijdens een back-up of tijdens herstelbewerkingen onverwacht
wordt uitgeschakeld wegens een te laag batterijniveau.

82
Back-up maken
1 Tikop >tabbladApplicaties>LGBackup>Back-up.
2 Schakelhetselectievakjeinnaasthetitemwaarvanueenback-upwiltmakenen
tikopVolgendeomeenback-uptemaken.
3 TikopinterneOpslag>Start.
4 Alsvanallegeselecteerdebestandeneenback-upisgemaakt,tiktuopGereed
omhetback-upprocesafteronden.
Back-up plannen
Ukuntookautomatischeback-upsvandataopuwsmartphonevolgenseenbepaald
schemainstellen.Volghiervoordevolgendestappen:
Tikop >tabbladApplicaties>LGBackup>Back-up plannen.
Bestandsherstel en -beheer
Ukunteenback-upbestandterugzettennaardedoorugewenstestatus.
Omdatateherstellenophetinternegeheugenvanuwtoestel,dientmassaopslagte
zijnuitgeschakeld.
Tikop >tabbladApplicaties>LGBackup >Bestandsherstel en -beheer>
Interne opslag.
OPMERKING:
•alle bestanden die op uw telefoon zijn opgeslagen, worden gewist voordat
het back-upbestand wordt hersteld.
•de data op uw telefoon worden overschreven door de inhoud van uw back-
up.
•voor extra beveiliging kunt u codering inschakelen om uw back-
upbestanden te coderen.
Accessoires

83
Google+
Gebruikdezeapplicatieomcontacttehoudenmetanderenviadesociale-
netwerkservicevanGoogle.
•Tikop >tabbladApplicaties>Google +.
OPMERKING: afhankelijk van uw regio of serviceprovider is deze applicatie
mogelijk niet beschikbaar.
Spraakgestuurd zoeken
Gebruikdezeapplicatieommetbehulpvanspraaknaarinternetpagina'stezoeken.
1 Tikop >tabbladApplicaties>Spraakgestuurd zoeken.
2 WanneerNu sprekenophetschermverschijnt,zegtueentrefwoordofzin.Kies
eenvandevoorgesteldetrefwoordendiewordenweergegeven.
OPMERKING: afhankelijk van uw regio of serviceprovider is deze applicatie
mogelijk niet beschikbaar.
Downloads
Gebruikdezeapplicatieomtezienwelkebestandenzijngedownloadviadeapplicaties.
•Tikop >tabbladApplicaties>Downloads.
OPMERKING: afhankelijk van uw regio of serviceprovider is deze applicatie
mogelijk niet beschikbaar.

84
Het web
Internet
Gebruikdezeapplicatieomophetwebtebladeren.Debrowseropentdewegnaarde
snelle,kleurrijkewereldvangames,muziek,nieuws,sport,entertainmentennogveel
meer,rechtstreeksopuwmobieletelefoon-waarenwanneerumaarwilt.
Opmerking: er worden extra kosten in rekening gebracht als u verbinding
met deze services maakt en inhoud downloadt. Vraag uw netwerkprovider
naar de tarieven.
1 Tikop >tabbladApplicaties>Internet.
De browserwerkbalk gebruiken
Tikopdebrowserwerkbalkenhouddezevast.Schuifdebalkmetuwvingernaar
bovenomdezeteopenen.
Tikhieropomeenpaginaterugtegaan.
Tikhieropomeenpaginaverdertegaan,naardepaginawaarmeenade
huidigepaginawasverbonden.AlsuopdetoetsTerugtikt,gebeurthet
tegenovergestelde:dangaatunamelijkterugnaardevorigepagina.
Tikhieropomterugtegaannaardestartpagina.
Tikomeennieuwvensterteopenen.
Tikomdefavorietenteopenen.
Webpagina's tonen
Tikophetadresveld,voerhetwebadresinentikopGa.

85
Een pagina openen
Omnaareennieuwepaginategaan,tiktuop
Omnaareenanderewebpaginategaan,tiktuop ,bladertunaarbenedenenkiest
udepaginadooreroptetikken.
Op het web zoeken met behulp van spraak
Tikophetadresveld,tikop ,zegeentrefwoordenkiesvervolgenseenvande
voorgesteldetrefwoordendiewordenweergegeven.
OPMERKING: afhankelijk van uw regio of serviceprovider is deze applicatie
mogelijk niet beschikbaar.
Favorieten
Tikop > Toevoegen aan Favorieten >OKomdehuidigewebpaginaalsfavoriet
opteslaan.
Tikop enkieseenfavorietewebpaginaomdezeteopenen.
Geschiedenis
Tikop >Geschiedenisomeenwebpaginateopenenuiteenlijstvanonlangs
bezochtewebpagina's.TikopMenu Volledige geschiedenis wissenomde
geschiedenistewissen.
Pop-upbrowser gebruiken
Gebruikdezefunctieomtoegangtekrijgentotinternetzonderdehuidigeapplicatiete
sluiten.
Ukuntterwijluinhoudbekijkt,zoalscontactenofopmerkingendiewebadressen
bevatten,eenwebadreskiezenenvervolgensopPopupBrowsertikkenomdepop-
upbrowserteopenen.Ukuntdebrowsernaareenanderelocatieverplaatsendoorop
debrowsertetikkenendezeteverslepen.
Tikop omdebrowserschermvullendtetonen.
Tikop omdebrowsertesluiten.

86
Chrome
GebruikChromeominformatieoptezoekenennaarwebpagina'stebladeren.
1 Tikop >tabbladApplicaties>Chrome.
OPMERKING: afhankelijk van uw regio en serviceprovider is deze applicatie
mogelijk niet beschikbaar.
Webpagina's tonen
TikophetveldAdresenvoervervolgenseenwebadresofzoekcriteriain.
Een pagina openen
Tikop +Nieuwe tabomnaareennieuwepaginategaan.
Omnaareenanderewebpaginategaan,tiktuop ,bladertunaarbovenofnaar
benedenenkiestudepaginadooreroptetikken.
Op het web zoeken met behulp van spraak
Tikophetadresveld,tikop ,zegeentrefwoordenkieseenvandevoorgestelde
trefwoordendiewordenweergegeven.
Synchroniseren met andere apparaten
UkuntopentabbladenenfavorietensynchroniserenvoorgebruikmetChromeopeen
anderapparaatalsumethetzelfdeGoogle-accountbentaangemeld.
TikopMenu Andere apparaten.
Kiesdewebpaginadieuwiltopenen.
Tikop omfavorietentetonen.
Het web

87
Opties
Inditgedeeltewordteenoverzichtgegevenvandeitemsdieukuntwijzigenviade
menu'svoordesysteeminstellingenvanuwtelefoon.
U opent als volgt het menu Instellingen:
1 Tikinhetbasisschermop >tabbladApplicaties>Opties.
of
Tikinhetbasisschermop >Systeeminstellingen.
2 Kieseeninstellingencategorieenkiesvervolgenseenoptie.
DRAADLOOS EN NETWERKEN
HierkuntudeinstellingenvoorWi-FienBluetoothbeheren.Ookkuntumobiele
netwerkeninstellenendeflightmodeactiveren.
< Wi-Fi >
Wi-Fi–hiermeeschakeltuWi-FiinomverbindentemakenmetbeschikbareWi-Fi-
netwerken.
TIP! Een MAC-adres verkrijgen
Voor het instellen van een verbinding in sommige draadloze netwerken met
een MAC-filter moet u mogelijk het MAC-adres van uw telefoon opgeven in
de router.
U vindt het MAC-adres als volgt: tik op het tabblad Applicaties > Opties >
Wi-Fi >
> Geavanceerd > MAC-adres.
< Bluetooth >
SchakeldeBluetooth-functieinofuitomBluetoothtegebruiken.
< Dataverbinding >
Toonthetdatagebruik.Hiersteltudelimietinvoorhetmobiele-gegevensgebruik.
< Oproep >
Configureeroproepinstellingenvoordetelefoon,zoalshetdoorschakelenvanoproepen
enanderespecialeservicesvanuwprovider.

88
Voicemail–hiermeekuntudevoicemailservicevanuwproviderkiezen.
Vaste nummers–schakeldezefunctieinensteleenlijstsamenmetnummersdie
vanafuwtelefoonkunnenwordengebeld.HiervoorhebtudePIN2-codenodig.Dezeis
verkrijgbaarbijuwprovider.Alleennummersdieindelijstzijnopgenomen,kunnenmet
detelefoonwordengebeld.
Binnenkomende oproep pop-up-weergavevanpop-upvoorbinnenkomendeoproep
wanneereenapplicatieingebruikis.
Oproep afwijzen–hiermeekuntudefunctievoorhetweigerenvanoproepen
instellen.KiesuitdemodusOproep-weigerenofAfwijslijst.
Afwijzen met bericht–wanneerueeninkomendeoproepwiltafwijzen,kuntumet
dezefunctiesneleenafwijsberichtverzenden.Ditishandigwanneerutijdenseen
vergaderingeenoproepmoetweigeren.
Privacy Bewaarder–hiermeewordtdenaamvandebellerenhetnummervaneen
inkomendeoproepverborgen.
Oproep doorschakelen–stelinwanneeruoproepenwiltdoorschakelen:altijd,
wanneerdelijnbezetis,wanneerudeoproepnietbeantwoordtofwanneerugeen
bereikhebt.
Automatisch beantwoorden–hiermeesteltudetijdinvoordateenverbonden
handsfree-apparaatautomatischeeninkomendeoproepopneemt.Ukuntkiezenuit
Uitschakelen,1seconde,3secondenen5seconden.
Trilfunctie inschakelen–uwtelefoontriltwanneerdeanderdeoproepbeantwoordt.
Bewaar onbekende nummers–voegonbekendenummersnaeenoproepaanuw
contactentoe.
Aan-/uittoets beëindigt oproep–hiermeekuntukiezenhoeueenoproepbeëindigt.
Oproep blokkeren–hiermeewordeninkomende,uitgaandeofbuitenlandseoproepen
geblokkeerd.
Gespreksduur–hiermeekuntudeduurbekijkenvan:laatsteoproep,alleoproepen,
gekozenoproepenenontvangenoproepen.
Overige oproepinstellingen–hiermeekuntudevolgendeinstellingenwijzigen:
Opties

89
Beller-ID:geefopofuwiltdatuwnummerwordtweergegevenwanneeruiemand
belt.
Wisselgesprek:alsWisselgesprekisgeactiveerd,krijgtueennotificatievaneen
inkomendeoproepwanneerueenandergesprekaanhetvoerenbent(afhankelijk
vanuwnetwerkprovider).
<Share & Connect>
NFC –uwmobieletelefoonisgeschiktvoorNFC.NFC(NearFieldCommunication)is
eentechnologievoordraadlozeverbindingendiecommunicatietussenelektronische
apparatenintweerichtingenmogelijkmaakt.Ditwerktbijeenafstandvaneenpaar
centimeter.UkuntuwinhouddelenmeteenNFC-tagofeenanderapparaatdatNFC
ondersteuntdooruwtoestelbijdeNFC-tagtehouden.AlsuuwtoestelbijeenNFC-tag
houdt,wordtdeinhoudvandetagopuwtoestelgetoond.
NFC in-of uitschakelen:tikinhetbasisschermopdenotificatiepaneelenschuif
dezemetuwvingeromlaag,kiesvervolgenshetNFC-pictogramomNFCinte
schakelen.
OPMERKING: wanneer de flightmode actief is, kan de NFC-applicatie
worden gebruikt.
NFC gebruiken:omNFCtegebruiken,moetuervoorzorgendatuwapparaatis
ingeschakeldenmoetuNFCinschakelenalsdezefunctieisuitgeschakeld.
Android Beam–wanneerdezefunctieisingeschakeld,kuntuapplicatie-inhoudnaar
een ander NFC–apparaatverzendendoordeapparatendichtbijelkaartehouden.
Houddeapparatendichtbijelkaar(meestalmetdeachterkantnaarelkaartoe)entik
opuwscherm.Deapplicatiebepaaltwaterverzondengaatworden.
SmartShare Beam–hiermeekuntubestandenvanLG-telefoonsontvangen.
Mediaserver–hiermeedeeltumedia-inhoudopuwtelefoonviaDLNAmeteentoestel
indebuurt.
Miracast–metMiracastkuntuuwtelefoonschermen-geluiddraadloosspiegelenop
eenMiracast-dongleofTV.

90
Draadloze opslag –bestandenviaWi-FidelenmeteenPC.
< Tethering & Netwerken >
Wi-Fi hotspot –ukuntuwtelefoongebruikenomeenmobielebreedbandverbinding
totstandtebrengen.Maakeenhotspotendeeluwverbinding.Raadpleeg"De
dataverbindingvanuwtelefoondelen"voormeerinformatie.
Bluetooth-tethering –hiermeekuntuinstellenofuwtelefoondeinternetverbinding
deeltofniet.
Help-tikhieropomhelpinformatietebekijkenoverdeWi-Fi-hotspotendeBluetooth-
tetheringfuncties.
Flightmode–nahetinschakelenvandeflightmodezijnalledraadlozeverbindingen
uitgeschakeld.
OPMERKING: u moet een vergrendelscherm, PIN of wachtwoord instellen,
voordat u de opslag van referenties kunt gebruiken.
Mobiele netwerken–hierkuntuoptiesinstellenvoordata-roaming,netwerkmodus
enmobieleproviders,namenvantoegangspunten(APN's),enzovoort.
Standaard SMS-app –hiermeekuntudestandaardSMS-appinstellen.
VPN – hiermeewordtdelijstmetVPN's(VirtualPrivateNetworks)dieueerderhebt
geconfigureerd,getoond.HierkuntuverschillendesoortenVPN'stoevoegen.
APPARAAT
< Geluid >
Profielen –kiesGeluid,AlleentrilfunctieofStil.
Volumes–ukunthetvolumevandebeltoon,hetnotificatiegeluid,tikterugkoppeling&
systeem,muziek,video,spellenenanderemediabeheren.
Rustige tijden–hierkuntutijdeninstellenwaaropallegeluidenzijnuitgeschakeld,
metuitzonderingvanhetalarmenmedia.
Beltoon telefoon–hiermeekuntudestandaardbeltoonvoorinkomendeoproepen
instellen.
Opties

91
Smart beltoon –hiermeekuntuhetvolumevandebeltoonautomatischverhogenin
luidruchtigeomgevingen.
Beltonen met trilfunctie–detelefoontriltbijoproepenennotificaties.
Notificatie geluid–hiermeekuntuhetstandaardwaarschuwingssignaalvoor
notificatiesinstellen.
Touch feedback & systeem –hiermeekuntudeterugkoppeling(beltonenen/of
trillen)tijdenshetgebruikvandetelefooninstellen.
< Weergave >
Helderheid–hiermeepastudehelderheidvanhetschermaan.
Time-out scherm–detime-outtijdvoorhetscherminstellen.
Auto-rotate scherm–schakeldezeoptieinalshetschermautomatischmoet
meedraaienmetdestandvandetelefoon(staandofliggend).
Dagdromen–tikopdeschakeloptieDagdromenomtewisselentussenin-en
uitgeschakeld.Alsdezeoptieisingeschakeld,wordtdeingesteldescreensavergetoond
wanneerdetelefoonzichindeslaapstandbevindtalsdieinhetdockstaaten/ofwordt
opgeladen.
Lettertype–hiermeekuntuhetlettertypewijzigen.
Lettergrootte–hiermeekuntudegroottevanhetlettertypewijzigen.
Smartscreen–schakeldezefunctieinomhetschermaantelatenwanneerde
telefoonuwgezichtherkent.
Touchtoets verlichting voorzijde–hiermeekuntudetijdsduurinstellenvoorde
verlichtingvandeThuistoets.
Notificatieflits–denotificatie-LEDbevindtzichlinksvandecameraaandevoorkant.
DekleineLED-indicatorbrandtwanneerdetelefoonwordtopgeladenofwanneerueen
notificatiekrijgtalshetLCD-schermwordtuitgeschakeld.Ukuntdenotificatieflitsin-of
uitschakelen.Ukuntdiverseoptiesindelijstmetitemsvoordenotificatieflitsinstellen.
< Basisscherm >
HiermeesteltuThema,Achtergrond,Schermveegeffect,Herhaald basisscherm
toestaanofEnkel Portret uitzichtin.KiesdezeoptieomHome back-up maken &

92
herstellenintestellen.
< Scherm vergrendelen >
Schermvergrendeling kiezen–hiermeesteltueenschermvergrendelinginomuw
telefoontebeveiligen.Erwordeneenaantalschermengeopenddiehelpenbijhet
tekenenvaneenontgrendelingspatroon.StelGeen,Schuiven,Face Unlock,Patroon,
PINofWachtwoordin.
Alsueenontgrendelingspatroonhebtwanneeruuwtelefooninschakeltofhetscherm
uitdeslaapstandhaalt,wordtugevraagduwontgrendelingspatroontetekenenomhet
schermteontgrendelen.
< Gestures >
Mute binnenkomend gesprek–keerhetapparaatomalsueeninkomendgesprek
wiltdempen.
Snooze of stop alarm–keerhetapparaatomalsueenalarmwiltuitschakelenofwilt
sluimeren.
Pauzeer video–keerhetapparaatomalsueenvideowiltpauzerentijdenshet
afspelen.
Help–helpvoorgebaarfuncties.
Kalibratie van bewegingssensor–hiermeekuntudenauwkeurigheidvanhet
kantelenendesnelheidvandesensorverbeteren.
< Opslagruimte >
INTERNE OPSLAG –hetinterneopslaggebruikbekijken.
< Batterij >
BATTERIJ-INFORMATIE
Debatterij-informatiewordtweergegevenineenafbeeldingmethetpercentage
resterendvermogenendestatus.
RaakhetpictogramBatterijopladenaanomhetschermBatterijgebruikweertegeven
omhetbatterijgebruiksniveauendegegevensomtrenthetbatterijgebruiktebekijken.In
ditschermstaatwelkeonderdelenenapplicatiesdemeestebatterijvoedinggebruiken.
Opties

93
Tikopeenvandeitemsvoorgedetailleerdereinformatie.
Accuniveau op statusbalk–schakeldezeoptieinomhetaccuniveauopde
statusbalknaasthetbatterijpictogramtetonen.
BATTERIJBESPARING
TikopdeschakeloptieBatterijbesparingomdezeoptieinofuitteschakelen.Tikop
Batterijbesparingomdevolgendeinstellingenteopenen:
Spaarstand–hiermeesteltuinbijwelkaccuniveaudespaarstandautomatischwordt
ingeschakeld.
Eco-modus–hiermeeschakeltudeEco-modusinomdelevensduurvanuwaccute
verlengendoorhetbeheerbeleidvandeCPUdynamischteoptimaliseren.
Help–tikhieropomhelpinformatieweertegevenoverhetbesparenvanaccuvoeding.
< Applicaties >
Uwapplicatiestonenenbeheren.
<Tik & betalen>
WanneerNFCisingeschakeld,kuntudefunctieTik&betalengebruikenals
betaalmethode.Uhoefthiervooralleenmaaruwtelefoontegeneenlezeraantehouden
bijdekassa.Wanneeruwapparaatgeenstandaard-appheeft,kuntuopGooglePlay
anderebetaal-appsvinden.
PERSOONLIJK
< Accounts en synchronisatie >
Hiermeekunnenapplicatiesopdeachtergronddatasynchroniseren,ongeachtofu
dieapplicatiesopdatmomentgebruikt.Doordezeinstellinguitteschakelenkuntu
batterijstroombesparenenwordthetdatagebruikkleiner(maarnietnul).
< Cloud >
VoegeencloudaccounttoeomsnelengemakkelijkcloudservicesbijLG-applicatieste
kunnengebruiken.

94
< Locatie >
Wanneerdelocatieserviceisingeschakeld,bepaaltuwtelefoonbijbenaderinguw
locatiemiddelsGPS,Wi-Fienmobielenetwerken.
Modus–HiermeesteltudelocatiemodusinopHoge nauwkeurigheid,Spaarstand
ofAlleen apparaatsensoren.
< Beveiliging >
Telefoon versleutelen–hiermeekuntuuitveiligheidsoverwegingendedataopde
telefoonversleutelen.IndatgevalmoetueenPINofwachtwoordinvoerenomde
telefoontedecoderenwanneerudetelefooninschakelt.
SIM-vergrendeling instellen–hiermeesteltudemicro-USIM-kaartvergrendelinginof
wijzigtudemicro-USIMPIN.
Wachtwoord typen zichtbaar–hiermeetoontutijdenshettypenhetlaatsteteken
vanhetverborgenwachtwoord.
Apparaatbeheerders –apparaatbeheerderstonenofuitschakelen.
Onbekende bronnen–standaardinstellingvoordeinstallatievanniet-Market-
applicaties.
Applicaties controleren–hiermeesteltuindatschadelijkeapplicatiesnietkunnen
wordengeïnstalleerdofdatuvoordergelijkeapplicatieswordtgewaarschuwdwanneer
uapplicatiesgaatinstalleren.
Toegang tot notificatie–hiermeegeeftunotificatiesweer.
Opslagtype–hiermeegeeftuhetopslagtypeweer.
Vertrouwde referenties–betrouwbareCA-certificatenweergeven.
Installeer vanuit opslagruimte –kiesdezeoptieomgecodeerdecertificatente
installeren.
Opslag wissen –allecertificatenverwijderen.
< Taal en invoer >
GebruikdeinstellingenvoorTaaleninvoeromdetaalvoordetekstopuwtelefoonin
testellenenomhetschermtoetsenbordteconfigureren,inclusiefwoordendieuhebt
toegevoegdaanhetwoordenboek.
Opties

95
< Back-up & reset >
Wijzigdeinstellingenomuwinstellingenendatatebeheren.
Back-up maken–schakeldezeoptieinomeenback-upvanuwinstellingenen
applicatiedatatemakenopdeGoogle-server.
Back-upaccount–schakeldezeoptieineenback-upvanuwaccounttemaken.
Automatisch terugzetten–schakeldezeoptieinomuwinstellingenenapplicatiedata
terugtezettenwanneerdeapplicatiesopnieuwopuwapparaatwordengeïnstalleerd.
LG-back-upservice –hiermeekuntueenback-upmakenvanalleinformatiedieop
detelefoonstaat,endieinformatieterugzetteningevalvanverliesvandataofwanneer
datamoetwordenvervangen.
Fabrieksinstellingen–hersteldefabrieksinstellingenvanhetapparaatenverwijder
alledata.Alsudefabrieksinstellingenvandetelefoonopdezewijzeherstelt,wordt
ugevraagdomdezelfdesoortgegevensintevoerenalsbijuweerstegebruikvan
Android.
SYSTEEM
< Datum en tijd >
MetDatum en tijdinstellingenkuntuinstellenhoeeendatumwordtweergegeven.U
kuntdezeinstellingenookgebruikenomuweigentijdentijdzoneintestelleninplaats
vandehuidigetijdvanafhetmobielenetwerktehalen.
< Toegankelijkheid >
UkuntdeinstellingenbijToegankelijkheidgebruikenomeventuele
toegankelijkheidsplug-insteconfigurerendieuopuwtelefoonhebtgeïnstalleerd.
OPMERKING: er zijn extra plug-ins nodig om deze optie te kunnen kiezen.

96
< PC-verbinding >
Methode USB-verbinding kiezen–hiermeesteltudegewenstemodusin:Alleen
opladen,Mediasynchronisatie (MTP), Tethering, LG-softwareofAfbeeldingen
verzenden (PTP).
Vragen bij aansluiten – vraaginUSB-verbindingsmoduswanneerdetelefoonis
aangeslotenopeencomputer.
Help–helpvoorUSB-verbinding.
PC Suite–schakeldezeoptieinomLGPCSuiteviaeenWi-Fi-verbindingte
gebruiken.
HetWi-Fi-netwerkmoetviaeenWi-Fi-verbindingzijnverbondenmetLGPCSuitevia
Draadloosennetwerken.
Help–helpvoorLGsoftware
<Afdrukken>
Hiermeekuntudeinhoudvanbepaaldeschermen(zoalsinChromeweergegeven
webpagina's)afdrukkenviaeenprinterdieverbondenismethetzelfdeWi-Fi-netwerk
alsuwAndroid-toestel.
< Over de telefoon >
Juridischeinformatie,telefoonstatusensoftwareversieweergeven.
Opties

97
DePC-software"LGPCSuite"helptuomuwapparaatviaeenUSB-kabelenWi-FimeteenPCte
verbinden.Alsdeverbindingeenmaaltotstandisgebracht,kuntudefunctiesvanhetapparaatop
uwPCgebruiken.
Met uw PC-software "LG PC Suite" kunt u...
•Uwmedia-inhoud(muziek,films,foto's)beherenenafspelenopuwPC.
•Multimedianaaruwapparaatsturen.
•Data(agenda's,contacten,favorieten)synchroniserentussenuwapparaatenPC.
•Back-upmakenvandeapplicatiesopuwapparaat.
•Softwareopuwapparaatbijwerken.
•Back-upmakenvandataendezeherstellen.
•MultimediaopuwPCafspelenvanafuwapparaat.
•Memo'smakenenbewerken,enback-upsmakenvanuwmemo'sopuwapparaat.
OPMERKING: u kunt het menu Help in de applicatie gebruiken voor meer
informatie over het gebruik van de PC-software "LG PC Suite".
PC-software "LG PC Suite" installeren
DePC-software“LGPCSuite”kanwordengedownloadvandewebsitevanLG.
1 Ganaarwww.lg.comenkieseenland.
2 2GanaarOndersteuning> MOBIELE ONDERSTEUNING >Mobiele LG-
telefoons>Selecteer het model
of
GanaarOndersteuning>Mobiel>kieshetmodel.
3 KlikonderHANDLEIDING & DOWNLOAD opPC SyncenklikopDOWNLOADom
dePC-software"LGPCSuite"tedownloaden.
Systeemvereisten voor de PC-software "LG PC Suite"
•OS:WindowsXP(Servicepack3)32-bits,WindowsVista,Windows7,Windows8
•CPU:1GHz-processorofsneller
•Geheugen:minimaal512MB
•Grafischekaart:resolutie1024x768,32-bitskleurenofhoger
PC-software (LG PC Suite)

98
•Vasteschijf:minimaal500MBvrijeruimteopdevasteschijf(afhankelijkvande
hoeveelheidopgeslagendatakanermeerruimtenodigzijn.)
•Benodigdesoftware:geïntegreerdeLG-stuurprogramma's,WindowsMediaPlayer10
ofhoger
OPMERKING: geïntegreerd LG-stuurprogramma voor USB
Het geïntegreerde LG-stuurprogramma voor USB is nodig om een LG-telefoon
met een PC te verbinden, en wordt automatisch geïnstalleerd bij het installeren
van de PC-software-applicatie "LG PC Suite".
Uw apparaat synchroniseren met een PC
DatavanuwtoestelenPCkunneneenvoudigenhandigwordengesynchroniseerd
metdePC-software"LGPCSuite".Contacten,agenda'senfavorietenkunnenworden
gesynchroniseerd.
Deprocedureisalsvolgt:
1 SluithetapparaataanopdePC.(GebruikeenUSB-kabelofWi-Fi-verbinding.)
2 SelecteerdeUSB-connectiemethodeverschijnt.KiesLG-software.
3 Starthetprogrammanadatuverbindinghebtgemaaktenkieshetappara-
atgedeelteuitdecategorieaandelinkerkantvanhetscherm.
4 KlikopPersoonlijkeinfoomtekiezen.
5 Schakelhetselectievakinvandeinhouddieuwiltsynchroniserenenklikopde
knopSync.
OPMERKING: als u uw telefoon wilt synchroniseren met uw PC, dient u
LG PC Suite te installeren op uw PC. Zie de voorgaande pagina's voor het
installeren van LG PC Suite.
Contacten van een oude telefoon naar de nieuwe telefoon verplaatsen
1 ExporteerdecontactenmetbehulpvaneenPC-synchronisatieprogrammaals
CSV-bestandvanuwoudeapparaatnaardePC.
2 Installeereerst"LGPCSuite"opuwPC.Voerhetprogrammauitensluituw
mobieleAndroid-telefoonmetdeUSB-kabelaanopdePC.
PC-software (LG PC Suite)

99
3 InhetbovenstemenuselecteertuTelefoon>Contacten importeren/export-
eren>Exporteren.
4 Erverschijnteenpop-upvensteromhetbestandstypeenhetteexporteren
bestandteselecteren.
5 Klikinhetpop-upvensteropEen bestand kiezen.WindowsVerkennerwordt
geopend.
6 KieshetbestandmetcontactendatuwiltexportereninWindowsVerkenneren
klikopOpenen.
7 klikopExporten.
8 Hetpop-upvenster Velden toewijzenverschijntomdecontacteninuwapparaat
endegegevensvandenieuwecontactentekoppelen.
9 AlsereenconictistussendecontactgegevensvanuwPCenhettoestel,maak
dandenoodzakelijkekeuzesofaanpassingeninLGPCSuite.
10 KlikopOK.

100
Software-update voor telefoon
Software-update voor mobiele telefoons van LG via internet
Gavoormeerinformatieoverdezefunctienaarhttp://update.lgmobile.comofhttp://
www.lg.com/common/index.jsp kiesuwlandentaal.
Metdezefunctiekuntudefirmwarevanuwtelefooneenvoudigviainternetnaar
denieuwereversiebijwerkenzonderdatudaarvoornaareenservicecenterhoeftte
gaan.DezefunctieisalleenbeschikbaaralsLGeennieuwereversievandefirmware
beschikbaarsteltvooruwtoestel.
Defirmware-updatevoordemobieletelefoonvereistvolledigeaandachtvande
gebruikergedurendehetgeheleupdateproces.Leesalleinstructiesenopmerkingen
voordatudoorgaatnaardevolgendestap.Letop:verwijderdeUSB-datakabelniet
tijdensdeupgrade.Hierdoorkanuwmobieletelefoonernstigbeschadigdraken.
OPMERKING: LG behoudt zich het recht voor om naar eigen inzicht
updates alleen beschikbaar te stellen voor bepaalde modellen en kan de
beschikbaarheid van de nieuwere versie van de firmware niet garanderen voor
alle handset-modellen.
Software voor mobiele telefoons van LG via Over-the-Air (OTA) bijwerken
MetdezefunctiekuntudesoftwarevanuwtelefooneenvoudigviaOTAnaarde
nieuwereversiebijwerkenzonderdatudaarvooreenUSB-datakabelhoeftaante
sluiten.DezefunctieisalleenbeschikbaaralsLGeennieuwereversievandefirmware
beschikbaarsteltvooruwtoestel.
Controleereerstdesoftwareversieopuwmobieletelefoon:Instellingen>Over de
telefoon>Update Center>Software Update>Nu controleren op update.
Software-update voor telefoon

101
OPMERKING: uw persoonlijke data in het interne telefoongeheugen kunnen
verlorengaan terwijl u de software van uw telefoon bijwerkt. Het betreft onder
andere informatie over uw Google-account en andere accounts, systeem/
applicatiedata en instellingen, gedownloade applicaties en uw DRM-
licentie. LG adviseert u daarom een back-up te maken van uw persoonlijke
gegevens voordat u de software van uw telefoon bijwerkt. LG aanvaardt geen
verantwoordelijkheid voor eventueel verlies van persoonlijke data.
OPMERKING: de beschikbaarheid van deze functie is afhankelijk van uw
netwerkprovider, regio en land.

102
Informatie over deze gebruikershandleiding
•Leesdezehandleidingzorgvuldigdoorvoordatuhetapparaatgaatgebruiken.
Hiermeezorgtuervoordatuuwtelefoonopveiligeenjuistewijzegebruikt.
•Sommigeafbeeldingenenschermafbeeldingenindezehandleidingzieneropuw
telefoonmogelijkandersuit.
•Uwinhoudkanafwijkenvanhetuiteindelijkeproductofvandesoftwarediedoor
uwserviceprovideroftelefoonmaatschappijwordtgeleverd.Dezeinhoudkanzonder
kennisgevingwordengewijzigd.Gavoordenieuwsteversievandezehandleidingnaar
dewebsitevanLG(www.lg.com).
•Deapplicatiesenfunctiesopuwtelefoonkunnenperland,regioof
hardwarespecificatiesvariëren.LGisnietaansprakelijkvoormogelijke
prestatieproblemendoorhetgebruikvanapplicatiesdiedoorandereprovidersdanLG
zijnontwikkeld.
•LGisnietaansprakelijkvoorprestatie-ofincompatibiliteitsproblemendieontstaan
doorhetbewerkenvanregisterinstellingenofhetwijzigenvansysteemsoftware.
Alsuprobeertuwbesturingssysteemaantepassen,werkenhetapparaatende
bijbehorendeapplicatiesmogelijknietlangernaarbehoren.
•Delicentievandesoftware,audio,achtergronden,afbeeldingenenanderemedia
diebijuwapparaatzijngeleverd,isvoorbeperktgebruik.Alsuditmateriaaluitpakt
envoorcommerciëleofanderedoeleindengebruikt,overtreedtumogelijkde
auteursrechtelijkewetgeving.Ubentalsgebruikervolledigverantwoordelijkvoorhet
onwettiggebruikvanmedia.
•Aandataservices,zoalsberichten,uploadenendownloaden,auto-synchronisatie
ofhetgebruikvanlocatiedienstenzijnmogelijkextrakostenverbonden.Kieseen
abonnementdatbijupastomaanvullendekostentevoorkomen.Neemcontactop
metuwserviceprovidervoormeerinformatie.
Informatie over deze gebruikershandleiding

103
Handelsmerken
•LGenhetLG-logozijngedeponeerdehandelsmerkenvanLGElectronics.
•Alleanderehandelsmerkenenauteursrechtenzijnheteigendomvanhunrespectieve
eigenaren.
DivX-HD
OVER DIVX-VIDEO:DivX
®
iseendigitaalvideoformaatdatisontwikkelddoorDivX,LLC,
eendochterbedrijfvanRoviCorporation.DitiseenofficieelDivXCertified
®
-apparaat
waarmeeuDivX-video'skuntafspelen.Ganaardivx.comvoormeerinformatieen
softwareomuwbestandenomtezetteninDivX-video's.
OVER DIVX VIDEO-ON-DEMAND: dit DivX Certified
®
-apparaatmoetworden
geregistreerdomgekochteDivXVideo-on-Demand-films(VOD)tekunnenafspelen.
VoorderegistratiecodegaatunaarhetgedeelteDivXVODinhetinstellingenmenuvan
hetapparaat.Ganaarvod.divx.comvoormeerinformatieoverhetvoltooienvanuw
registratie.
DivX Certified
®
voor het afspelen van DivX
®
-video's tot HD 720p, inclusief
overige inhoud.
DivX
®
, DivX Certified
®
en bijbehorende logo's zijn handelsmerken van Rovi
Corporation of haar dochterbedrijven en worden onder licentie gebruikt.
Dolby Mobile
Geproduceerd onder licentie van Dolby Laboratories. Dolby en het dubbele
D-logo zijn handelsmerken van Dolby Laboratories.
Opmerking: open sourcesoftware
Ga voor de bijbehorende broncode onder GPL, LGPL, MPL en andere open
source-licenties naar http://opensource.lge.com/
Alle genoemde licentievoorwaarden, disclaimers en opmerkingen kunnen
samen met de broncode worden gedownload.

104
Dezeaccessoireszijnbeschikbaarvoorgebruikmetuwtelefoon.(Onderstaande items
zijn mogelijk optioneel.)
Reisadapter Stereoheadset
Snelstartgids Datakabel
Micro-USIM-
verwijdertool
Accessoires
OPMERKING:
• Gebruik altijd originele LG-accessoires.
• Als u dit niet doet, kan de garantie vervallen.
• Accessoires kunnen per regio variëren.

105
Problemen oplossen
Indithoofdstukwordenproblemenbehandeldwaarmeeumogelijktemakenkrijgt
tijdenshetgebruikvanuwtelefoon.Voorsommigeproblemendientucontactopte
nemenmetuwserviceprovider,maardemeesteproblemenkuntueenvoudigzelf
verhelpen.
Bericht
Mogelijke
oorzaken
Mogelijke oplossingen
Micro-
USIM-fout
Er is geen Micro-
USIM-kaart
in de telefoon
geplaatst of de
kaart is verkeerd
geplaatst.
Plaats de Micro-USIM-kaart op de
juiste manier.
Netwerk
niet
beschikbaar/
netwerkverbinding
uitgevallen
Signaal is zwak
of u bent buiten
het bereik van het
netwerk.
Ga naar een raam of een open
ruimte. Ga na in welke gebieden de
netwerkprovider dekking heeft.
Beheerder heeft
nieuwe services
toegepast.
Controleer of de Micro-USIM-kaart
meer dan 6~12 maanden oud is.
Wissel uw Micro-USIM-kaart om
bij uw netwerkprovider als dit het
geval is. Neem contact op met uw
serviceprovider.

106
Bericht
Mogelijke
oorzaken
Mogelijke oplossingen
Codes
komen niet
overeen
Als u een andere
beveiligingscode
wilt instellen, dient
u de nieuwe code
te bevestigen door
deze opnieuw in
te voeren.
Neem contact op met uw
serviceprovider als u de code bent
kwijtgeraakt.
De twee door u
ingevoerde codes
komen niet met
elkaar overeen.
Er kunnen
geen
applicaties
worden
ingesteld
Geen
ondersteuning
door
serviceprovider
of registratie is
vereist.
Neem contact met uw serviceprovider
op.
Oproepen
niet
beschikbaar
Fout tijdens kiezen Nieuw netwerk niet toegestaan.
Nieuwe Micro-
USIM-kaart
geplaatst.
Controleer op nieuwe beperkingen.
Prepaidlimiet
bereikt.
Neem contact op met de
serviceprovider of stel limiet opnieuw in
met PIN2.
Problemen oplossen

107
Bericht
Mogelijke
oorzaken
Mogelijke oplossingen
Telefoon
kan niet
worden
ingeschakeld
Aan-uitknop te
kort ingedrukt.
Druk minimaal twee seconden op de
aan-uitknop.
Batterij is niet
geladen.
Laad de batterij op. Controleer de
laadindicator op het scherm.
Fout tijdens
laden
Batterij is niet
geladen.
Laad de batterij op.
De
buitentemperatuur
is te hoog of te
laag.
Zorg ervoor dat de telefoon bij een
normale temperatuur wordt opgeladen.
Probleem bij
contactpunten
Controleer de lader en de aansluiting
op de telefoon.
Geen voeding
Gebruik een ander stopcontact voor
de oplader.
Storing bij lader Vervang de lader.
Verkeerde lader
Gebruik alleen originele
LG-accessoires.
Nummer
niet
toegestaan
De functie Vast
oproepnummer is
ingeschakeld.
Controleer het menu Instellingen en
schakel de functie uit.

108
Bericht
Mogelijke
oorzaken
Mogelijke oplossingen
Ontvangen/
verzenden
van SMS en
foto's lukt
niet
Geheugen vol
Verwijder enkele berichten van uw
telefoon.
Bestanden
worden niet
geopend
Bestandsindeling
wordt niet
ondersteund
Controleer de ondersteunde
bestandsindelingen.
Het scherm
wordt niet
ingeschakeld
wanneer ik
een oproep
ontvang.
Probleem met
nabijheidssensor
Als u gebruikmaakt van beschermtape
of een beschermhoes, controleer
dan of het gedeelte rond de
nabijheidssensor is bedekt. Zorg dat
het gedeelte rond de nabijheidssensor
niet is bedekt.
Geen geluid Trilfunctie
Controleer in het geluidsmenu of u
de trilfunctie of de stille modus hebt
ingeschakeld.
Het toestel
loopt vast
Zo nu en dan
problemen met
software
Probeer de software bij te werken via
de website.
Problemen oplossen

109
Controleerofdeproblemendieuhebtervarenmetuwtelefoon,inditgedeelteworden
beschrevenvoordatudetelefoonterugbrengtmeteenserviceverzoekofbeltnaarde
klantenservice.
Categorie
Subcategorie
Vraag Antwoord
BT
Bluetooth
Apparaten
Welke functies zijn
beschikbaar via
Bluetooth?
U kunt een Bluetooth-audioapparaat
zoals een stereo/monoheadset of
carkit verbinden en foto's, video's,
contacten, enz. delen via het menu
Galerij/Contacten. Wanneer een
FTP-server is verbonden met een
compatibel apparaat, kunt u ook de
inhoud op het opslagmedium (intern
geheugen of MicroSD) delen.
BT
Bluetooth
Headset
Als mijn Bluetooth-
hoofdtelefoon is
verbonden, kan ik dan
ook naar mijn muziek
luisteren via mijn
hoofdtelefoon met 3,5
mm-aansluiting?
Als er een Bluetooth-hoofdtelefoon
is aangesloten, worden alle
systeemgeluiden via die hoofdtelefoon
afgespeeld. Daardoor kunt u niet via
uw hoofdtelefoon met kabel naar uw
muziek luisteren.
Data
Contacten
Back-up
maken
Hoe maak ik een
back-up van mijn
contacten?
De contactdata op de telefoon
kunnen worden gesynchroniseerd met
Gmail™.
Data
Synchronisatie
Is het mogelijk om
in één richting te
synchroniseren,
namelijk naar Gmail?
Alleen synchronisatie in twee richtingen
is mogelijk.
Veelgestelde vragen

110
Categorie
Subcategorie
Vraag Antwoord
Data
Synchronisatie
Is het mogelijk alle
e-mailmappen te
synchroniseren?
Het Postvak IN wordt automatisch
gesynchroniseerd. U kunt andere
mappen bekijken door op de toets
Menu te tikken en Mappen te
kiezen om een map te kiezen.
Google™-
service
Aanmelden
bij Gmail
Moet ik me altijd
aanmelden bij Gmail
als ik Gmail wil
openen?
Als u eenmaal bent aangemeld bij
Gmail hoeft u zich niet opnieuw bij
Gmail aan te melden.
Google™-
service
Google-
account
Is het mogelijk om
e-mailberichten te
filteren?
Nee, het filteren van e-mailberichten
wordt niet ondersteund op de telefoon.
Telefoonfuncties
E-mail
Wat gebeurt er als ik
een andere applicatie
start terwijl ik een
e-mailbericht schrijf?
Uw bericht wordt automatisch als
concept opgeslagen.
Telefoonfuncties
Beltoon
Is er een limiet voor
de bestandsgrootte
van een MP3-bestand
dat ik als beltoon wil
gebruiken?
Er is geen limiet voor de
bestandsgrootte.
Telefoonfuncties
Berichttijd
Mijn telefoon geeft de
ontvangsttijd niet weer
van berichten ouder
dan 24 uur. Hoe kan ik
dit wijzigen?
U kunt alleen de tijden zien voor
berichten die dezelfde dag zijn
ontvangen.
Veelgestelde vragen

111
Categorie
Subcategorie
Vraag Antwoord
Telefoonfuncties
Navigatie
Is het mogelijk
een andere
navigatieapplicatie
op mijn telefoon te
installeren?
Elke applicatie die beschikbaar is bij
Android Market™ en die compatibel
is met de hardware kan worden
geïnstalleerd en gebruikt.
Telefoonfuncties
Synchroniseren
Is het mogelijk de
contacten van al mijn
e-mailaccounts te
synchroniseren?
Alleen contacten van Gmail en MS
Exchange-server (bedrijfsmailserver)
kunnen worden gesynchroniseerd.
Telefoonfuncties
Wachten en
Pauze
Is het mogelijk om een
contactpersoon op te
slaan met Wacht en
Pauze in de nummers?
Als u een contactpersoon met W&P-
functie in het nummer hebt gekopieerd,
kunt u die functie niet gebruiken. U
moet elk nummer opnieuw opslaan.
Opslaan met Wacht en Pauze:
1. Tik in het basisscherm op het
pictogram Telefoon .
2. Kies het nummer en tik vervolgens
op de toets Menu .
3. Tik op Pauze van 2 seconden
toevoegen of Wachten toevoegen.
Telefoonfuncties
Beveiliging
Wat zijn de
beveiligingsfuncties
van de telefoon?
U kunt de telefoon zodanig instellen
dat er een ontgrendelingspatroon
is vereist om de telefoon te kunnen
gebruiken.

112
Categorie
Subcategorie
Vraag Antwoord
Telefoonfuncties
Ontgrendelings-
patroon
Hoe maak ik een
ontgrendelingspatroon?
1. Tik in het basisscherm op de toets
Menu .
2. Tik op Systeeminstellingen >
Scherm vergrendelen.
3. Tik op Kies scherm slot >
Patroon. Wanneer u dit voor het
eerst doet, verschijnt er een korte
instructie voor het maken van een
ontgrendelingspatroon.
4. Maak een patroon door dit een keer
te tekenen en daarna ter bevestiging
nog een keer te tekenen.
Voorzorgsmaatregelen bij het gebruik
van het ontgrendelingspatroon.
Het is van groot belang dat u het
ontgrendelingspatroon dat u instelt,
onthoudt. Als u vijf keer een onjuist
patroon invoert, hebt u geen toegang
meer tot uw telefoon. U kunt vijf keer
proberen uw ontgrendelingspatroon,
PIN of wachtwoord in te voeren.
Als u deze vijf mogelijkheden hebt
gebruikt, kunt u het na 30 seconden
opnieuw proberen. (Als u de back-up
PIN vooraf instelt, kunt u de back-up
PIN-code gebruiken om het patroon te
ontgrendelen)
Veelgestelde vragen

113
Categorie
Subcategorie
Vraag Antwoord
Telefoonfuncties
Ontgrendelings-
patroon
Wat moet ik
doen als ik het
ontgrendelingspatroon
ben vergeten en geen
Google-account op de
telefoon heb gemaakt?
Als u het patroon bent vergeten:
Als u zich op de telefoon bij uw
Google-account hebt aangemeld,
maar vijf keer een onjuist patroon hebt
ingevoerd, tikt u op de knop Patroon
vergeten? Vervolgens moet u zich
aanmelden bij uw Google-account om
de telefoon te ontgrendelen. Als u geen
Google-account op de telefoon hebt
gemaakt of de aanmeldingsgegevens
bent vergeten, moet u een volledige
reset uitvoeren.
Let op: wanneer u de
fabrieksinstellingen opnieuw instelt,
worden alle gebruikersapplicaties en
-data gewist. Maak een back-up van
alle belangrijke data voordat u de
fabrieksinstellingen opnieuw instelt.
Telefoonfuncties
Geheugen
Hoe weet ik wanneer
het geheugen vol is?
U ontvangt dan een melding.
Telefoonfuncties
Taalondersteuning
Kan ik de taal van mijn
telefoon wijzigen?
De telefoon heeft meertalige
mogelijkheden.
Zo wijzigt u de taal:
1. Tik in het basisscherm op
de toets Menu en tik op
Systeeminstellingen.
2. Tik op Taal en invoer > Kies taal.
3. Tik op de gewenste taal.

114
Categorie
Subcategorie
Vraag Antwoord
Telefoonfuncties
VPN
Hoe stel ik een VPN
in?
Hoe u VPN configureert, hangt af van
uw bedrijf. Als u VPN-toegang op het
apparaat wilt configureren, dient u de
benodigde informatie op te vragen
bij de netwerkbeheerder van uw
werkgever.
Telefoonfuncties
Time-out van
beeldscherm
Het scherm wordt
al na 15 seconden
uitgeschakeld. Hoe
kan ik de instelling van
de time-out wijzigen
zodat het scherm na
een andere periode
wordt uitgeschakeld?
1. Tik in het basisscherm op de toets
Menu .
2. Tik op Systeeminstellingen >
Weergave.
3. Tik in de weergave-instellingen op
Time-out scherm.
4. Tik op de gewenste periode
waarna het scherm moet worden
uitgeschakeld.
Telefoonfuncties
Wi-Fi en
Mobiele
netwerken
Van welke service
maakt de telefoon
gebruik als zowel Wi-Fi
als Mobiele netwerken
beschikbaar zijn?
Als u gebruikmaakt van data kan
de telefoon standaard voor de
Wi-Fi-verbinding kiezen (als Wi-Fi-
verbindingen op de telefoon is
ingeschakeld). U ontvangt echter geen
melding als de telefoon naar de andere
service overschakelt.
Als u wilt weten welke dataverbinding
wordt gebruikt, kijk dan naar het
pictogram voor Mobiele netwerken of
Wi-Fi boven in het scherm.
Veelgestelde vragen

115
Categorie
Subcategorie
Vraag Antwoord
Telefoonfuncties
Basisscherm
Is het mogelijk een
applicatie uit het
beginscherm te
verwijderen?
Ja. Houd het pictogram vast totdat de
prullenbak bovenaan in het midden
van het scherm verschijnt. Sleep het
pictogram dan zonder uw vinger op te
tillen naar de prullenbak.
Telefoonfuncties
Applicatie
Ik heb een applicatie
gedownload die veel
fouten veroorzaakt.
Hoe kan ik die
applicatie verwijderen?
1. Tik in het basisscherm op de toets
Menu .
2. Tik op Applicatie-instellingen >
GEDOWNLOAD.
3. Tik op de applicatie en tik op
Wissen.
Telefoonfuncties
Lader
Kan ik mijn telefoon
opladen met een
USB-datakabel zonder
het nodige USB-
stuurprogramma te
installeren?
Ja, de telefoon wordt opgeladen via
de USB-kabel, ongeacht of de juiste
stuurprogramma's zijn geïnstalleerd.
Telefoonfuncties
Alarm
Kan ik
muziekbestanden
gebruiken voor mijn
alarm?
Ja. Nadat u een muziekbestand hebt
opgeslagen als beltoon, kunt u deze
als uw alarm gebruiken.
1. Houd een nummer ingedrukt in
een bibliotheeklijst. Tik in het menu
dat wordt geopend op Beltoon
instellen.
2. Kies het nummer als beltoon in het
alarminstellingenscherm.

116
Categorie
Subcategorie
Vraag Antwoord
Telefoonfuncties
Alarm
Is het alarm hoorbaar
of gaat het af als
de telefoon is
uitgeschakeld?
Nee, dit wordt niet ondersteund.
Telefoonfuncties
Alarm
Als mijn belvolume
is ingesteld op Uit of
Trillen, hoor ik dan het
alarm wel?
Alarmen zijn standaard ook in
dergelijke situaties hoorbaar.
Hersteloplossingen
Volledige
reset
(fabrieksinstellingen
terugzetten)
Hoe kan ik de
fabrieksinstellingen
herstellen als ik het
instellingenmenu van
de telefoon niet kan
opvragen?
Als uw telefoon niet teruggaat naar
de oorspronkelijke staat, gebruik dan
een volledige reset (fabrieksinstellingen
terugzetten) om het apparaat te
initialiseren.
Veelgestelde vragen

User Guide
• Screen displays and illustrations may differ from
those you see on actual phone.
• Some of the contents of this guide may not apply
to your phone, depending on the software and your
service provider. All information in this document is
subject to change without notice.
• This handset is not suitable for people who have a
visual impairment due to the touch screen keyboard.
• Copyright ©2014 LG Electronics, Inc. All rights
reserved. LG and the LG logo are registered
trademarks of LG Group and its related entities. All
other trademarks are the property of their respective
owners.
• Google™, Google Maps™, Gmail™, Hangouts™
and Play Store™ are trademarks of Google, Inc.
ENGLISH

2
Table of contents
Guidelines for safe and efficient use .......5
Important notice .....................................17
Getting to know your phone ...................23
Phone overview .....................................23
Installing the Micro-USIM card ...............25
Charging the phone ...............................26
Locking and unlocking the screen ..........26
Your Home screen ...................................27
Touch Screen tips ..................................27
Home screen .........................................28
Customizing the Home screen ..............29
Returning to recently-used applications .30
Notifications ..........................................30
Opening the notifications panel .............31
Indicator icons on the Status Bar ..........31
On-screen keyboard ..............................33
Entering accented letters ......................33
Google account setup .............................34
Connecting to Networks and Devices ....35
Wi-Fi .....................................................35
Connecting to Wi-Fi networks ...............35
Turning Wi-Fi on and connecting to a Wi-Fi
network ...............................................35
Bluetooth ...............................................36
Sharing your phone's data connection ...37
Wi-Fi Direct ...........................................39
PC connections with a USB cable ...........39
Calls ........................................................41
Making a call .........................................41
Calling your contacts .............................41
Answering and rejecting a call ...............41
Adjusting the in-call volume ...................42
Making a second call .............................42
Viewing your call logs ............................43
Call settings ...........................................43
Contacts ..................................................44
Searching for a contact ..........................44
Adding a new contact ............................44
Favorite contacts ...................................44
Creating a group ....................................45
Messaging ...............................................46
Sending a message ...............................46
Threaded box .......................................47
Changing your message settings ...........47
E-mail ......................................................48
Managing an email account ...................48
Working with account folders .................48
Composing and sending email ...............49
Camera ....................................................50
Getting to know the viewfinder ..............50
Using the advanced settings ..................51
Taking a quick photo .............................52
Once you've taken a photo.....................53
From your Gallery ..................................54

3
Video camera ..........................................55
Getting to know the viewfinder ..............55
Using the advanced settings ..................56
Recording a quick video .........................56
After recording a video...........................57
Watching your saved videos ..................57
Adjusting the volume when viewing a
video .....................................................57
LG Unique Function.................................58
QuickMemo function ..............................58
Using the QuickMemo options ..............59
Viewing the saved QuickMemo ............59
Notebook function .................................60
Making a note .....................................60
Getting to know the Notebook ...............60
Bookshelf ............................................60
Pages-Property panels .........................61
Viewing the saved notebook .................61
QuickTranslator .....................................62
Live Zooming function ...........................63
QSlide function ......................................64
Dual Play function ..................................64
Mirroring .............................................65
Dual Play .............................................65
LG SmartWorld ......................................66
How to Get to LG SmartWorld from Your
Phone .................................................66
On-Screen Phone ..................................67
On-Screen Phone icons ........................67
On-Screen Phone features ...................67
How to install On-Screen Phone on your
PC ......................................................68
Multimedia ..............................................69
Gallery ...................................................69
Viewing pictures ..................................69
Playing videos .....................................70
Editing photos/videos ...........................70
Deleting images ...................................70
Setting as wallpaper ............................70
Videos ...................................................71
Playing a video ....................................71
Video Editor ...........................................72
Video Wiz ...............................................73
Music ....................................................75
Playing a song .....................................75
Add music files to your phone ...............76
Transfer music using Media sync (MTP) 77
Utilities ....................................................78
Setting your alarm .................................78
Using your calculator .............................78
Adding an event to your calendar ...........78
Voice Recorder ......................................79
Recording a sound or voice ..................79
Sending the voice recording .................79
Task Manager ........................................80
Tasks .....................................................80
Polaris Office 4 ......................................80
Backup ..................................................81
About backing up and restoring smart
phone data ..........................................81

4
Backup ...............................................82
Scheduling backup ..............................82
File restore & management ..................82
Google+ ................................................83
Voice Search..........................................83
Downloads ............................................84
The Web ..................................................85
Internet ..................................................85
Using the Web toolbar ..........................85
Viewing webpages ...............................85
Opening a page ...................................86
Searching the web by voice ..................86
Bookmarks ..........................................86
History ................................................86
Using Popup Browser ...........................86
Chrome .................................................87
Viewing webpages ...............................87
Opening a page ...................................87
Syncing with other devices ...................87
Settings ...................................................88
WIRELESS & NETWORKS .......................88
DEVICE ..................................................91
PERSONAL .............................................93
SYSTEM .................................................95
PC software (LG PC Suite) ......................97
Phone software update ..........................99
Phone software update ..........................99
About this user guide ...........................101
About this user guide ...........................101
Trademarks .........................................101
DivX HD ..............................................102
Dolby Mobile .......................................102
Accessories ...........................................103
Troubleshooting ....................................104
FAQ ........................................................108
Table of contents

5
Symbol Description
Read these instructions for safe use of this wireless device
You must always exercise extreme caution when driving in order to reduce
the risk of accidents. Do not use your wireless device while driving.
This device, moreover, has been tested for use at a distance of 1.5 cm
between the back of the phone and the user's body.
To comply with RF exposure requirements established by the FCC, you must
maintain a minimum distance of 1 cm between the user's body and the back
of the phone. See the user manual for more information.
Do not leave the device or its accessories within the reach of children and do
not allow to play with. The device contains small parts with sharp edges that
may cause injury or break off and give rise to danger of suffocation.
This device may produce a loud sound
Pacemaker manufacturers recommend that you leave at least 15 cm
of space between other devices and a pacemaker to avoid potential
interference with the pacemaker.
Switch off your phone when prompted to do so in hospitals, clinics or health
care facilities.
These requests are designed to prevent possible interference with sensitive
medical devices.
Turn off your wireless device when prompted to do so by airport personnel
or aircraft. For information on the use of wireless devices on board aircraft,
contact the crew. If the device has a "flight mode", this must be activated
before boarding an aircraft.
Guidelines for safe and efficient use

6
Symbol Description
Turn off the device or wireless device when in any area in which they occur
explosions or areas where there are reports that indicate to "turn off two-way
radio" or "electronic devices" to avoid interfering with the operation of trigger
explosions.
Among the areas with potentially explosive atmospheres include fueling
areas are, the holds of ships, facilities for the transportation or storage of fuel
and chemicals, areas where the air contains chemicals or particles such as
grain, dust or metal powders.
This device may produce a bright or flashing light
Do not expose your device or its accessories to open flames.
Do not expose your device or its accessories to magnetic media (floppy
disks, credit cards, etc).
Do not expose your device or its accessories to extreme temperatures, ie
below -5 and above +55 ° C.
Do not expose your device or its accessories to liquid or moisture.
Not groped to disassemble the device or its accessories, only authorized
personnel can do it.
This device, like any wireless device, operates using radio signals which, by
their nature, are not able to guarantee connection in all conditions. Therefore,
for emergency communications, never rely solely upon any wireless device.
Only use approved accessories
Guidelines for safe and efficient use

7
Please read these simple guidelines. Not following these guidelines may be dangerous
or illegal.
Should a fault occur, a software tool is built into your device that will gather a fault log.
This tool gathers only data specific to the fault, such as signal strength, cell ID position
in sudden call drop and applications loaded.
The log is used only to help determine the cause of the fault.
These logs are encrypted and can only be accessed by an authorized LG Repair centre
should you need to return your device for repair.
Exposure to radio frequency energy
THIS DEVICE MEETS INTERNATIONAL GUIDELINES FOR EXPOSURE TO RADIO WAVES
Your mobile device is a radio transmitter and receiver. It is designed and manufactured
not to exceed the limits for exposure to radio frequency (RF) recommended by
international guidelines (ICNIRP). These limits are part of comprehensive guidelines and
establish permitted levels of RF energy for the general population.
The guidelines were developed by independent scientific organisations through periodic
and thorough evaluation of scientific studies. The guidelines include a substantial safety
margin designed to assure the safety of all persons, regardless of age or health.
The exposure standard for mobile devices employs a unit of measurement known as
the Specific Absorption Rate, or SAR. The SAR limit stated in the international guidelines
is 2.0 W/kg*. Tests for SAR are conducted using standard operating positions with the
device transmitting at its highest certified power level in all tested frequency bands.
Although the SAR is determined at the highest certified power level, the actual SAR
of the device while operating can be well below the maximum value. This is because
the device is designed to operate at multiple power levels so as to use only the power
required to reach the network. In general, the closer you are to a base station, the lower
the power output of the device.
Before a phone model is available for sale to the public, compliance with the European
R&TTE directive must be shown. This directive includes as one essential requirement

8
the protection of the health and the safety for the user and any other person.
The highest SAR value for this device when tested for use at the ear is 0.838 W/kg.
This device meets RF exposure guidelines when used either in the normal use position
against the ear or when positioned at least 1.5 cm away from the body. When a
carry case, belt clip or holder is used for body-worn operation, it should not contain
metal and should position the product at least 1.5 cm away from your body. In order
to transmit data files or messages, this device requires a quality connection to the
network. In some cases, transmission of data files or messages may be delayed until
such a connection is available. Ensure the above separation distance instructions are
followed until the transmission is completed.
The highest SAR value for this device when tested for use at the body is 0.737 W/kg.
* The SAR limit for mobile devices used by the public is 2.0 watts/ kilogram (W/
kg) averaged over ten grams of body tissue. The guidelines incorporate a substantial
margin of safety to give additional protection for the public and to account for any
variations in measurements.
SAR values may vary depending on national reporting requirements and the network
band.
FCC SAR information
Your mobile device is also designed to meet the requirements for exposure to radio
waves established by the Federal Communications Commission (USA) and Industry
Canada.
These requirements set a SAR limit of 1.6 W/kg averaged over 1 gram of tissue. The
highest SAR value reported under this standard during product certifi cation for use at
the ear is 0.75 W/kg and when properly worn on the body is 1.49 W/kg.
Additionally, this device was tested for typical body-worn operations with the back of the
phone kept 1cm (0.39 inches) between the users body and the back of the phone.
To comply with FCC RF exposure requirements, a minimum separation distance of 1cm
(0.39 inches) must be maintained between the user’s body and the back of the phone.
Guidelines for safe and efficient use

9
* FCC Notice & Caution
Notice!
This device complies with part 15 of the FCC Rules. Operation is subject to the
following two conditions:
(1) This device may not cause harmful interference, and
(2) this device must accept any interference received, including interference that may
cause undesired operation.
Caution!
Change or Modifications that are not specifically approved by the manufacturer could
void the user’s authority to operate the equipment.
Product care and maintenance
WARNING
Only use batteries, chargers and accessories approved for use with this
particular phone model. The use of any other types may invalidate any
approval or warranty applying to the phone and may be dangerous.
•Do not disassemble this unit. Take it to a qualified service technician when repair
work is required.
•Repairs under warranty, at LG's discretion, may include replacement parts or boards
that are either new or reconditioned, provided that they have functionality equal to
that of the parts being replaced.
•Keep away from electrical appliances such as TVs, radios and personal computers.
•The unit should be kept away from heat sources such as radiators or cookers.
•Do not drop.
•Do not subject this unit to mechanical vibration or shock.
•Switch off the phone in any area where you are required to by special regulations.

10
For example, do not use your phone in hospitals as it may affect sensitive medical
equipment.
•Do not handle the phone with wet hands while it is being charged. It may cause an
electric shock and can seriously damage your phone.
•Do not charge a handset near flammable material as the handset can become hot
and create a fire hazard.
•Use a dry cloth to clean the exterior of the unit (do not use solvents such as benzene,
thinner or alcohol).
•Do not charge the phone when it is on soft furnishings.
•The phone should be charged in a well ventilated area.
•Do not subject this unit to excessive smoke or dust.
•Do not keep the phone next to credit cards or transport tickets; it can affect the
information on the magnetic strips.
•Do not tap the screen with a sharp object as it may damage the phone.
•Do not expose the phone to liquid or moisture.
•Use accessories like earphones cautiously. Do not touch the antenna unnecessarily.
•Do not use, touch or attempt to remove or fix broken, chipped or cracked glass.
Damage to the glass display due to abuse or misuse is not covered under the
warranty.
•Your phone is an electronic device that generates heat during normal operation.
Extremely prolonged, direct skin contact in the absence of adequate ventilation may
result in discomfort or minor burns. Therefore, use care when handling your phone
during or immediately after operation.
•If your phone gets wet, immediately unplug it to dry off completely. Do not attempt
to accelerate the drying process with an external heating source, such as an oven,
microwave or hair dryer.
•The liquid in your wet phone, changes the color of the product label inside your
phone. Damage to your device as a result of exposure to liquid is not covered under
your warranty.
Guidelines for safe and efficient use

11
Efficient phone operation
Electronics devices
All mobile phones may receive interference, which could affect performance.
•Do not use your mobile phone near medical equipment without requesting
permission. Avoid placing the phone over pacemakers, for example, in your breast
pocket. Please consult your doctor to determine if operation of your phone may
interfere with the operation of your medical device.
•Some hearing aids might be disturbed by mobile phones.
•Minor interference may affect TVs, radios, PCs etc.
•Use your phone in temperatures between 0ºC and 40ºC, if possible. Exposing your
phone to extremely low or high temperatures may result in damage, malfunction, or
even explosion.
Pacemakers
Pacemaker manufacturers recommend that a minimum separation of 15cm be
maintained between a mobile phone and a pacemaker to avoid potential interference
with the pacemaker. To achieve this use the phone on the opposite ear to your
pacemaker and do not carry it in a breast pocket.

12
Hospitals
Switch off your wireless device when requested to do so in hospitals, clinics or health
care facilities. These requests are designed to prevent possible interference with
sensitive medical equipment.
Road safety
Check the laws and regulations on the use of mobile phones in the area when you drive.
•Do not use a hand-held phone while driving.
•Give full attention to driving.
•Pull off the road and park before making or answering a call if driving conditions so
require.
•RF energy may affect some electronic systems in your vehicle such as car stereos
and safety equipment.
•When your vehicle is equipped with an air bag, do not obstruct with installed or
portable wireless equipment. It can cause the air bag to fail or cause serious injury
due to improper performance.
•If you are listening to music whilst out and about, please ensure that the volume is
at a reasonable level so that you are aware of your surroundings. This is of particular
importance when near roads.
Avoid damage to your hearing
To prevent possible hearing damage, do not listen at high volume levels for
long periods.
Damage to your hearing can occur if you are exposed to loud sound for long periods of
time. We therefore recommend that you do not turn on or off the handset close to your
Guidelines for safe and efficient use

13
ear. We also recommend that music and call volumes are set to a reasonable level.
•When using headphones, turn the volume down if you cannot hear the people speaking
near you, or if the person sitting next to you can hear what you are listening to.
NOTE: Excessive sound pressure from earphones and headphones can
cause hearing loss.
Glass Parts
Some parts of your mobile device are made of glass. This glass could break if your
mobile device is dropped on a hard surface or receives a substantial impact. If the glass
breaks, do not touch or attempt to remove it. Stop using your mobile device until the
glass is replaced by an authorised service provider.
Blasting area
Do not use the phone where blasting is in progress. Observe restrictions and follow any
regulations or rules.
Potentially explosive atmospheres
•Do not use your phone at a refueling point.
•Do not use near fuel or chemicals.
•Do not transport or store flammable gas, liquid or explosives in the same
compartment of your vehicle as your mobile phone or accessories.
In aircraft
Wireless devices can cause interference in aircraft.
•Turn your mobile phone off before boarding any aircraft.

14
•Do not use it on the ground without permission from the crew.
Children
Keep the phone in a safe place out of the reach of small children. It includes small parts
which may cause a choking hazard if detached.
Emergency calls
Emergency calls may not be available on all mobile networks. Therefore you should
never depend solely on your phone for emergency calls. Check with your local service
provider.
Battery information and care
•You do not need to completely discharge the battery before recharging. Unlike other
battery systems, there is no memory effect that could compromise the battery's
performance.
•Use only LG batteries and chargers. LG chargers are designed to maximise the
battery life.
•Do not disassemble or short-circuit the battery.
•Replace the battery when it no longer provides acceptable performance. The battery
pack may be recharged hundreds of times before it needs replacing.
•Recharge the battery if it has not been used for a long time to maximise usability.
•Do not expose the battery charger to direct sunlight or use it in high humidity, such as
in the bathroom.
•Do not leave the battery in hot or cold places, as this may deteriorate battery
performance.
•There is risk of explosion if the battery is replaced with an incorrect type.
Guidelines for safe and efficient use

15
•Dispose of used batteries according to the manufacturer's instructions. Please recycle
when possible. Do not dispose as household waste.
•If you need to replace the battery, take it to the nearest authorised LG Electronics
service point or dealer for assistance.
•Always unplug the charger from the wall socket after the phone is fully charged to
save unnecessary power consumption of the charger.
•Actual battery life will depend on network configuration, product settings, usage
patterns, battery and environmental conditions.
•Make sure that no sharp-edged items such as animal’s teeth or nails, come into
contact with the battery. This could cause a fire.
DECLARATION OF CONFORMITY
Hereby, LG Electronics declares that this LG-E975 product is in compliance
with the essential requirements and other relevant provisions of Directive
1999/5/EC. A copy of the Declaration of Conformity can be found at
http://www.lg.com/global/declaration
Regulatory and Safety
Go to "System settings > About phone > Regulatory and Safety" to get
regulatory and safety information
Contact office for compliance of this product :
LG Electronics Inc.
EU Representative, Krijgsman 1,
1186 DM Amstelveen, The Netherlands

16
Disposal of waste batteries/accumulators
1 This symbol may be combined with chemical symbols for mercury (Hg), cad-
mium (Cd) or lead (Pb) if the battery Contains more than 0.0005% of mercury,
0.002% of cadmium or 0.004% of lead.
2 All batteries/accumulators should be disposed separately from the municipal
waste stream via designated collection facilities appointed by the government or
the local authorities.
3 The correct disposal of your old batteries/accumulators will help to prevent
potential negative consequences for the environment, animal and human health.
4 For more detailed information about disposal of your old batteries/ accumula-
tors, please contact your city office, waste disposal service or the shop where
you purchased the product.
Disposal of your old appliance
1 All electrical and electronic products should be disposed of separately
from the municipal waste stream via designated collection facilities ap-
pointed by the government or the local authorities.
2 The correct disposal of your old appliance will help prevent potential nega-
tive consequences for the environment and human health.
3 For more detailed information about disposal of your old appliance, please
contact your city office, waste disposal service or the shop where you
purchased the product.

17
Important notice
Please check to see whether any problems you encountered with your phone are
described in this section before taking the phone in for service or calling a service
representative.
1. Phone memory
When there is less than 10% of space available in your phone memory, your phone
cannot receive new messages. You need to check your phone memory and delete some
data, such as applications or messages, to make more memory available.
To uninstall applications:
1 Touch > Apps tab > Settings > Apps.
2 Once all applications appear, scroll to and select the application you want to
uninstall.
3 Touch Uninstall.
2. Optimizing battery life
Extend your battery's life between charges by turning off features that you don't need
to having running constantly in the background. You can monitor how applications and
system resources consume battery power.
Extending your phone's battery life:
• Turn off radio communications you are not using. If you are not using Wi-Fi, Bluetooth
or GPS, turn them off.
• Reduce screen brightness and set a shorter screen timeout.
• Turn off automatic syncing for Gmail, Calendar, Contacts and other applications.
• Some applications you have downloaded may reduce battery power.
Please read this before you start using your phone!

18
To check the battery power level:
• Touch > Apps tab > Settings > About phone > Battery.
The battery status (charging or discharging) and battery level (percentage charged) is
displayed at the top of the screen.
To monitor and control how battery power is being used:
• Touch > Apps tab > Settings > About phone > Battery > Battery use.
Battery usage time is displayed on the screen. It tells you how long it has been since
you last connected your phone to a power source or, if currently connected, how long
the phone was last running on battery power. The screen shows the applications or
services using battery power, listed in order from the greatest to smallest amount used.
3. Before installing an open source application and OS
WARNING
If you install and use an OS other than the one provided by the manufacturer
it may cause your phone to malfunction. In addition, your phone will no longer
be covered by the warranty.
WARNING
To protect your phone and personal data, only download applications from
trusted sources, such as Play Store™. If there are improperly installed
applications on your phone, the phone may not work normally or a serious
error may occur. You must uninstall those applications and all associated data
and settings from the phone.
Important notice

19
4. Using an unlock pattern
Set an unlock pattern to secure your phone. Touch > Apps tab > Settings > Lock
screen > Select screen lock > Pattern. This opens a screen that will guide you
through how to draw a screen unlock pattern. You have to create a Backup PIN as a
safety measure in case you forget your unlock pattern.
Caution: Create a Google account before setting an unlock pattern and
remember the Backup PIN you created when creating your pattern lock.
WARNING
Precautions to take when using pattern lock.
It is very important to remember the unlock pattern you set. You will not be
able to access your phone if you use an incorrect pattern 5 times. You have 5
opportunities to enter your unlock pattern, PIN or password. If you have used
all 5 opportunities, you can try again after 30 seconds.
When you can’t recall your unlock Pattern, PIN, or Password:
< If you have forgotten your pattern >
If you logged in to your Google account on the phone but failed to enter the correct
pattern 5 times, press the Forgot pattern? button at the bottom of the screen. You are
then required to log in with your Google Account or you have to enter the Backup PIN
which you entered when creating your Pattern Lock.
If you have not created a Google account on the phone or you forgot Backup PIN, you
have to perform a hard reset.
< If you have forgotten your PIN or Password >
If you forget your PIN or Password, you will need to perform a hard reset.
Caution: If you perform a hard reset, all user applications and user data will be
deleted.
NOTE: If you have not logged into your Google Account and have forgotten
your Unlock Pattern, you will need to enter your Backup PIN.

20
5. Using the hard reset (Factory reset)
If your phone does not restore to its original condition, use a Hard Reset (Factory Reset)
to initialize it.
1 Turn the power off.
2 Press and hold the Power/Lock key + Volume Down key on the phone.
3 Release the Power/Lock Key only when the LG logo is displayed, then immedi-
ately press and hold the Power/Lock Key again.
4 Release all keys when the Factory data reset screen is displayed.
5 Press the Volume Key to scroll to the desired option, then press the Power/Lock
Key to confirm.
WARNING
If you perform a Hard Reset, all user applications, user data and DRM
licenses will be deleted. Please remember to backup any important data
before performing a Hard Reset.
Factory data reset - Erases all data on the phone, except as follows. In the event
of device failure or error, your device may record in an error log information about the
device’s status at the time of the error event. The information recorded in the error log
may include data about application names and usage, cell phone location and number,
GPS status, memory usage and other non-personal device status information. This
information is stored on your phone, and can only be accessed by LG if the phone is
physically returned to LG for repair and service. The error log information is used by LG
only to diagnose, repair, and improve LG’s products and services.
Important notice

21
6. Opening and switching applications
Multi-tasking is easy with Android, you can keep more than one application running at
the same time. There is no need to quit an application before opening another one. Use
and switch between several open applications.
Android manages each application, stopping and starting them as needed to ensure
that idle applications don't consume resources unnecessarily.
1 Press and hold the Home Key . A list of recently used applications will be
displayed.
2 Tap the application you want to access. This does not stop the previous app run-
ning in the background on the phone. Make sure to tap Back Key to exit an
app after using it.
• To stop applications, tap Task Manager from the recent apps list, then tap Stop or
Stop all.
• To remove an app from the recent apps list, swipe the app preview to the left or right.
To clear all apps, tap Clear all.
7. Transferring music, photos and videos using Media
sync (MTP)
1 Touch > Apps tab > Settings > Storage to check out the storage media.
2 Connect the phone to your PC using the USB cable.
3 Select USB connection method will appear on your phone screen, select the
Media sync (MTP) option.
4 Open the memory folder on your PC. You can view the mass storage content on
your PC and transfer the files from PC to Device memory folder or vice versa.

22
8. Hold your phone upright
Hold your cell phone vertically, as you would a regular phone. Your phone has an
internal antenna. Be careful not to scratch or damage the back of the phone, as this
may affect performance.
When making/receiving calls or sending/receiving data, avoid holding the lower part of
the phone where the antenna is located. Doing so may affect call quality.
9. When the screen freezes
If the screen freezes or the phone does not respond when you try to operate it:
Press and hold the Power/Lock key for 10 seconds to turn your phone off.
If it still does not work, please contact the service center.
Important notice

23
Phone overview
Earpiece
Front-Facing Camera lens
Proximity / Luminance Sensor
Home key
• Return to the Home screen from any screen.
Back key
• Return to the previous screen. Exit an app after using it.
Power/Lock key
• Switch your phone on/off by pressing and holding this key
• Short press to lock/unlock the screen
Menu key
• Check what options are available.
Touch screen
Notification LED
NOTE: Proximity sensor
When receiving and making calls, the proximity sensor automatically turns
the backlight off and locks the touch screen by sensing when the phone is
near your ear. This extends battery life and prevents you from unintentionally
activating the touch screen during calls.
WARNING
Placing a heavy object on the phone or sitting on it can damage the LCD
and touch screen functions. Do not cover the LCD proximity sensor with
protective film. This could cause the sensor to malfunction.
Getting to know your phone

24
Volume keys
• On the Home screen: Controls ringer volume
• During a call: Controls your earpiece volume
• When playing a track: Controls volume continuously
TIP! QuickMemo function
Press and hold the Volume Up and Volume Down Keys for one
second to use the QuickMemo function.
Power/Lock key
SIM card tray
WARNING
• This part encloses the battery compartment. Please do not open the back
cover.
• Be careful not to damage the NFC touch point on the phone, which is part
of the NFC antenna.
Earphone Jack
Flash
Speaker
Charger/USB/MHL port
Microphone
Camera lens
Microphone
NFC touch
point
Getting to know your phone

25
Installing the Micro-USIM card
Before you start exploring your new phone, you may choose to insert the Micro-USIM
card.
The eject button is a small round aperture just above the tray door. To install a new
Micro-USIM card:
1 Insert the Micro-USIM ejection tool that comes with the phone (or a thin pin) into
the eject button aperture, and push gently but firmly until the tray pops out.
2 Remove the tray and place the Micro-USIM card inside it, with the contacts out
and the angled corner to the right. There is only one possible way to fit the card
snugly into the tray.
3 Carefully reposition the tray in the slot and push it gently back into the phone.
NOTE: Make sure the gold contact area on the card is facing downwards.
Eject button aperture

26
Charging the phone
The charger connector is at the bottom of the phone. Insert one end of the charging
cable into the phone and plug the other end into an electrical outlet.
NOTE: The battery must be fully charged initially to improve battery lifetime.
Locking and unlocking the screen
If you do not use the phone for a while, the screen will be automatically turned off and
locked. This helps to prevent accidental touches and saves battery power.
When you are not using the your phone, press the Power/Lock key to lock your
phone.
If there are any programs running when you lock your screen, they may be still running
in Lock mode. It is recommended that you exit all programs before entering Lock mode
to avoid unnecessary charges (e.g. phone calls, web access and data communications).
To wake up your phone, press the Power/Lock key . The Lock screen will appear.
Touch and slide the Lock screen in any direction to unlock your Home screen. The last
screen you viewed will open.
Getting to know your phone

27
Your Home screen
Touch Screen tips
Here are some tips on how to navigate on your phone.
Tap or touch – A single finger tap selects items, links, shortcuts and letters on the
on-screen keyboard.
Touch and hold – Touch and hold an item on the screen by touching it and not lifting
your finger until an action occurs. For example, to open a contact's available options,
touch and hold the contact in the Contacts list until the context menu opens.
Drag – Touch and hold an item for a moment and then, without lifting your finger, move
your finger on the screen until you reach the target position. You can drag items on the
Home screen to reposition them.
Swipe or slide – To swipe or slide, quickly move your finger across the surface of the
screen, without pausing when you first touch it (so you don’t drag an item instead). For
example, you can slide the screen up or down to scroll through a list, or browse through
the different Home screens by swiping from left to right (and vice versa).
Double-tap – Double-tap to zoom on a webpage or a map. For example, quickly
double-tap a section of a webpage to adjust that section to fit the width of the screen.
You can also double-tap to zoom in and out after taking a picture (using the Camera),
and when using Maps.
Pinch-to-Zoom – Use your index finger and thumb in a pinching or spreading motion
to zoom in or out when using the browser or Maps, or when browsing pictures.
Rotate the screen – From many applications and menus, the orientation of the screen
adjusts to the device's physical orientation.
NOTE:
• To select an item, touch the center of the icon.
• Do not press too hard; the touch screen is sensitive enough to pick up a
light, yet firm touch.
• Use the tip of your finger to touch the option you want. Be careful not to
touch any other keys.

28
Home screen
The Home screen is the starting point for many applications and functions, and it allows
you to add items like application shortcuts, or Google widgets to give you instant access
to information and applications. This is the default canvas and accessible from any
menu by tapping .
Status bar
Shows phone's status information including the time,
signal strength, battery status, and notification icons.
Widget
Widgets are self-contained applications that can be
accessed through the Apps screen or on the Home
screen or an extended home screen. Unlike a shortcut,
the Widget appears as an on-screen application.
Application Icons
Tap an icon (application, folder, etc.) to open and use it.
Location Indicator
Indicates which Home screen canvas you are viewing.
Quick Key Area
Provides one-touch access to the function in any home
screen canvas.
Extended home screen
The operating system provides multiple Home screen canvases to provide more space
for adding icons, widgets, and more.
Slide your finger left or right across the Home screen.
Your Home screen

29
Customizing the Home screen
You can customize your Home screen by adding apps, widgets or changing wallpapers.
To add items on your Home screen:
1 Touch and hold the empty part of the Home screen.
2 In the Add Mode menu, select the item you wish to add. You will then see this
added item on the Home screen.
3 Drag it to the desired location and lift your finger.
TIP! To add an application icon to the Home screen from the Apps menu,
touch and hold the application you want to add.
To remove an item from the Home screen:
• Home screen > touch and hold the icon you want to remove > drag it to
TIP! Using folders
You can combine several app icons in a folder. Drop one app icon over
another one on a Home screen, and the two icons will be combined.
NOTE: Apps key cannot be removed.
To customize apps icons on the Home screen
1 Touch and hold an application icon until it is unlocked from its current position.
Then drop it on the screen.
The editing icon will appear in the upper right corner of the application.
2 Tap the application icon again and select the desired icon design and size.
3 Tap OK to save the change.

30
Returning to recently-used applications
1 Touch and hold the Home key . The screen displays a pop-up containing the
icons of applications you used recently.
2 Touch an icon to open the application. Or touch the Back key to return to your
previous screen.
Notifications
Notifications alert you to the arrival of new messages, calendar events, and alarms, as
well as to ongoing events, such as when you are on a call.
From the notifications panel, you can view your phone’s current status and pending
notifications.
When a notification arrives, its icon appears at the top of the screen. Icons for pending
notifications appear on the left, and system icons showing things like Wi-Fi or bat tery
strength on the right.
NOTE: The available options may vary depending on the region or service
provider.
Pending
notifications
Bluetooth, Wi-Fi, &
battery status
Your Home screen

31
Opening the notifications panel
Swipe down from the status bar to open the notifications panel.
Quick Toggle Area
Tap each quick toggle key to turn it on/off. Touch
and hold the key to access the settings menu of the
function. To see more toggle keys, swipe left or right.
Tap
to remove, add, or rearrange toggle keys.
QSlide Apps
Tap a QSlide app to open as a small window on your
screen. Tap
to remove, add, or rearrange QSlide
apps.
Tap to clear all the notifications.
Notifications
The current notifications are listed, each with a brief
description. Tap a notification to view it.
To close the notifications panel, touch and drag the tab
toward the top of the screen.
Indicator icons on the Status Bar
Indicator icons appear on the status bar at the top of the screen to report missed calls,
new messages, calendar events, device status and more.
The icons displayed at the top of the screen provide information about the status of the
device. The icons listed in the table below are some of the most common ones.

32
Icon Description Icon Description
No Micro-USIM card Vibrate mode
No signal Battery fully charged
Airplane mode Battery is charging
Connected to a Wi-Fi network Downloading data
Wired headset Uploading data
Call in progress GPS is acquiring
Call hold
Receiving location data from
GPS
Missed call Data is syncing
Bluetooth is on New Gmail
System warning New Hangouts message
Alarm is set New message
New voicemail
Phone is connected to PC via
USB cable or USB tethering
is active
Ringer is silenced
Portable Wi-Fi hotspot is
active
Your Home screen

33
Icon Description Icon Description
NFC is on
Both USB tethering and
portable hotspot are active
Song is playing
NOTE: The icons location in the status bar may differ according to the
function or service.
On-screen keyboard
You can enter text using the on-screen keyboard. The on-screen keyboard appears
automatically on the screen when you need to enter text. To manually display the
keyboard, simply touch a text field where you want to enter text.
Using the keypad & entering text
Tap once to capitalize the next letter you type. Double-tap for all caps.
Tap to switch to the numbers and symbols keyboard.
Tap to enter a space.
Tap to create a new line
Tap to delete the previous character.
Entering accented letters
When you select French or Spanish as the text entry language, you can enter special
French or Spanish characters (e.g. "á").
For example, to input "á", touch and hold the "a" key until the zoom-in key grows
bigger and displays characters from different languages.
Then select the special character you want.

34
Google account setup
When you first turn on your phone, you have the opportunity to activate the network, to
sign into your Google Account and select how you want to use certain Google services.
To set up your Google account:
• Sign into a Google Account from the prompted set-up screen.
OR
• Touch > Apps tab > select a Google application, such as Gmail > select New to
create a new account.
If you have a Google account, touch Existing, enter your email address and password,
then touch .
Once you have set up your Google account on your phone, your phone automatically
synchronizes with your Google account on the Web.
Your contacts, Gmail messages, Calendar events and other information from these
applications and services on the Web are synchronized with your phone. (This will
depend on your synchronization settings.)
After signing in, you can use Gmail™ and take advantage of Google services on your
phone.

35
Connecting to Networks and Devices
Wi-Fi
With Wi-Fi, you can use high-speed Internet access within the coverage of the wireless
access point (AP). Enjoy wireless Internet using Wi-Fi, without extra charges.
Connecting to Wi-Fi networks
To use Wi-Fi on your phone, you need to access a wireless access point or ‘hotspot’.
Some access points are open and you can simply connect to them. Others are hidden
or use security features; you must configure your phone to be able to connect to them.
Turn off Wi-Fi when you're not using it to extend the life of your battery.
NOTE: If you are out of the Wi-Fi zone or have set Wi-Fi to OFF, additional
charges may be applied by your mobile operator for mobile data use.
Turning Wi-Fi on and connecting to a Wi-Fi network
1 Touch > Apps tab > Settings > Wi-Fi.
2 Set Wi-Fi to ON to turn it on and start scanning for available Wi-Fi networks.
3 Tap the Wi-Fi menu again to see a list of active and in-range Wi-Fi networks.
• Secured networks are indicated by a lock icon.
4 Touch a network to connect to it.
• If the network is secured, you are prompted to enter a password or other
credentials. (Ask your network administrator for details)
5 The status bar displays icons that indicate Wi-Fi status.

36
Bluetooth
You can use Bluetooth to send data by running a corresponding application, but not
from the Bluetooth menu as on most other mobile phones.
NOTE:
• LG is not responsible for the loss, interception or misuse of data sent or
received via the Bluetooth wireless feature.
• Always ensure that you share and receive data with devices that are trusted
and properly secured. If there are obstacles between the devices, the
operating distance may be reduced.
• Some devices, especially those that are not tested or approved by
Bluetooth SIG, may be incompatible with your device.
Turning on Bluetooth and pairing up your phone with a Bluetooth device
You must pair your device with another device before you connect to it.
1 Touch > Apps tab > Settings > set Bluetooth to ON.
2 Tap the Bluetooth menu again. You will see the option to make your phone visible
and option to search devices Now tap Search for devices to view the devices in
the bluetooth Range.
3 Choose the device you want to pair with from the list.
Once the paring is successful, your device will connect to the device.
NOTE: Some devices, especially headsets or hands-free car kits, may have a
fixed Bluetooth PIN, such as 0000. If the other device has a PIN, you will be
asked to enter it.
Connecting to Networks and Devices

37
Send data using the Bluetooth wireless feature
1 Select a file or item, such as a contact, calendar event, or media file, from an ap-
propriate application or from Downloads.
2 Select the option for sending data via Bluetooth.
NOTE: The method for selecting an option may vary by data type.
3 Search for and pair with a Bluetooth-enabled device.
Receive data using the Bluetooth wireless feature
1 Touch > Apps tab > Settings > set Bluetooth to ON
2 Tap the Bluetooth menu again and mark the checkbox at the top of the screen to
make your phone visible to other devices.
NOTE: To select the length of time that your device will be visible, touch >
Visibility timeout.
3 Select Pair to confirm that you are willing to receive data from the device.
Sharing your phone's data connection
USB tethering and portable Wi-Fi hotspot are great features when there are no wireless
connections available. You can share your phone's mobile data connection with a
single computer via a USB cable (USB tethering). You can also share your phone's data
connection with more than one device at a time by turning your phone into a portable
Wi-Fi hotspot.
When your phone is sharing its data connection, an icon appears in the status bar and
as an ongoing notification in the notifications drawer.
For the latest information about tethering and portable hotspots, including supported
operating systems and other details, visit http://www.android.com/tether.

38
To change Portable Wi-Fi hotspot settings:
1 Touch > Apps tab > Settings > Tethering & networks > Wi-Fi hotspot
switch to activate.
2 Enter a password and tap Save.
TIP! If your computer is running Windows 7 or a recent distribution of some
flavours of Linux (such as Ubuntu), you will not usually need to prepare your
computer for tethering. But, if you are running an earlier version of Windows
or another operating system, you may need to prepare your computer to
establish a network connection via USB. For the most current information
about which operating systems support USB tethering and how to configure
them, visit http://www.android.com/tether.
To rename or secure your portable hotspot
You can change the name of your phone's Wi-Fi network name (SSID) and secure its
Wi-Fi network.
1 Touch > Apps tab > Settings > Tethering & networks > Wi-Fi hotspot.
2 Touch Set up Wi-Fi hotspot.
• The Set up Wi-Fi hotspot dialogue box will open.
• You can change the Network SSID (name) that other computers see when
scanning for Wi-Fi networks.
• You can also touch the Security menu to configure the network with Wi-Fi
Protected Access 2 (WPA2) security using a pre-shared key (PSK).
• If you touch the WPA2 PSK security option, a password field is added to the Set
up Wi-Fi hotspot dialogue box. If you enter a password, you will need to enter
that password when you connect to the phone's hotspot with a computer or other
device. You can set Open in the Security menu to remove security from your Wi-Fi
network.
3 Tap Save.
Connecting to Networks and Devices

39
ATTENTION! If you set the security option as Open, you cannot prevent
unauthorised usage of online services by other people and additional charges
may be incurred. To avoid unauthorized usage, you are advised to keep the
security option active.
Wi-Fi Direct
Wi-Fi Direct supports a direct connection between Wi-Fi enabled devices without an
access point. Due to the high battery usage of Wi-Fi direct, it is recommended that you
plug your phone into a power outlet while using the Wi-Fi Direct feature. Check your
Wi-Fi & Wi-Fi Directed network in advance and make sure the users are connected to
the same network.
PC connections with a USB cable
Learn to connect your device to a PC with a USB cable in USB connection modes.
Transferring music, photos and videos using the USB mass storage mode
1 Connect your phone to a PC using a USB cable.
2 If you haven't installed the LG Android Platform Driver on your PC, you will need to
manually change the settings. Choose System settings > PC connection > USB
connection method, then select Media sync (MTP).
3 You can now view the mass storage content on your PC and transfer the files.

40
Synchronize with Windows Media Player
Ensure that Windows Media Player is installed on your PC.
1 Use the USB cable to connect the phone to a PC on which Windows Media Player
has been installed.
2 Select the Media sync (MTP) option. When connected, a pop-up window will
appear on the PC.
3 Open Windows Media Player to synchronize music files.
4 Edit or enter your device’s name in the pop-up window (if necessary).
5 Select and drag the music files you want to the sync list.
6 Start synchronization.
• The following requirements must be satisfied to synchronize with Windows Media
Player.
Items Requirement
OS Microsoft Windows XP SP2, Vista or higher
Window Media Player version Windows Media Player 10 or higher
• If the Windows Media Player version is lower than 10, install version 10 or higher.
Connecting to Networks and Devices

41
Calls
Making a call
1 Touch to open the keypad.
2 Enter the number using the keypad. To delete a digit, touch the .
3 Touch to make a call.
4 To end a call, touch the End icon .
TIP! To enter "+" to make international calls, touch and hold .
Calling your contacts
1 Touch to open your contacts.
2 Scroll through the contact list or enter the first few letters of the contact you want
to call by touching Search contacts.
3 In the list, touch the contact twice or touch the you want to call.
Answering and rejecting a call
When you receive a call in Lock state, swipe the in any direction to Answer the
incoming call.
Swipe the in any direction to Decline an incoming call.
Hold and slide the Decline with message icon from the bottom if you want to send a
message.
TIP! Decline with message
You can send a message quickly using this function. This is useful if you need
to reject a call with message during a meeting.

42
Adjusting the in-call volume
To adjust the in-call volume during a call, use the Volume up and down keys on the left-
hand side of the phone.
Making a second call
1 During your first call, touch Menu > Add call and dial the number. You can also
go to the recently dialled numbers list by touching or can search contacts by
touching and selecting the contact you want to call.
2 Touch to make the call.
3 Both calls are displayed on the call screen. Your initial call is locked and put on
hold.
4 Touch the displayed number to toggle between calls. Or touch Merge calls to
start a conference call.
5 To end active calls, touch End or touch the Home key and slide the notification bar
down and select the End call icon .
NOTE: You are charged for each call you make.
Calls

43
Viewing your call logs
On the Home screen, touch and choose the Call logs tab .
View a complete list of all dialled, received and missed calls.
TIP! Touch any call log entry to view the date, time and duration of the call.
TIP! Touch the Menu key , then touch Delete all to delete all the
recorded items.
Call settings
You can configure phone call settings such as call forwarding, as well as other special
features offered by your carrier.
1 On the Home screen, touch .
2 Touch .
3 Tap Call settings and choose the options that you wish to adjust.

44
Contacts
Add contacts to your phone and synchronize them with the contacts in your Google
account or other accounts that support contact syncing.
Searching for a contact
On the Home screen
1 Touch to open your contacts.
2 Touch Search contacts and enter the contact name using the keyboard.
Adding a new contact
1 Touch , enter the new contact's number, then touch the Menu key . Touch
Add to Contacts > Create new contact.
2 If you want to add a picture to the new contact, touch the image area.
Choose from Take photo or Select from Gallery.
3 Select the contact type by touching .
4 Touch a category of contact information and enter the details about your contact.
5 Touch Save.
Favorite contacts
You can classify frequently called contacts as favorites.
Adding a contact to your favorites
1 Touch to open your contacts.
2 Touch a contact to view its details.
3 Touch the star to the right of the contact's name. The star will turn yellow color.

45
Removing a contact from your favorites list
1 Touch to open your contacts.
2 Touch the tab, and choose a contact to view its details.
3 Touch the yellow color star to the right of the contact's name. The star turns grey
and the contact is removed from your favorites.
Creating a group
1 Touch to open your contacts.
2 Touch Groups and touch the Menu key . Select New group.
3 Enter a name for the new group. You can also set a ringtone for the newly created
group.
4 Touch Save to save the group.
NOTE: If you delete a group, the contacts assigned to that group will not be
lost. They will remain in your contacts.

46
Messaging
Your phone combines SMS and MMS into one intuitive, easy-to-use menu.
Sending a message
1 Touch on the Home screen and touch to open a blank message.
2 Enter a contact name or contact number in the To field. As you enter the contact
name, matching contacts will appear. You can touch a suggested recipient. You
can add more than one contact.
NOTE: You will be charged for a text message for every person to whom you
send the message.
3 Touch the Enter message field and begin composing your message.
4 Touch to open the Options menu. Choose from Quick message, Insert
smiley, Schedule sending, Add subject, and Discard.
TIP! You can touch the icon to attach the file you want to share to your
message.
5 Touch Send to send your message.
6 Responses will appear on the screen. As you view and send additional messages,
a message thread is created.
WARNING: The 160-character limit may vary from country to country,
depending on the language and how the SMS is coded.
WARNING: If an image, video or audio file is added to an SMS
message, it is automatically converted into an MMS message and you are
charged accordingly.

47
Threaded box
Messages (SMS, MMS) exchanged with another party can be displayed in chronological
order so that you can conveniently see an overview of your conversation.
Changing your message settings
Your phone message settings are pre-defined, so you can send messages immediately.
You can change the settings according to your preferences.
• Touch the Messaging icon on the Home screen, touch and then tap Settings.

48
E-mail
You can use the E-mail application to read emails from services like Gmail. The E-mail
application supports the following account types: POP3, IMAP and Exchange.
Your service provider or system administrator can provide you with the account settings
you need.
Managing an email account
The first time you open the E-mail application, a set-up wizard opens to help you to set
up an email account.
After the initial set-up, E-mail displays the contents of your inbox. If you have added
more than one account, you can switch among accounts.
To add another email account:
• Touch > Apps tab > E-mail > tap > Settings > Add account.
To change an email account's settings:
• Touch > Apps tab > E-mail > tap > Settings > General settings.
To delete an email account:
• Touch > Apps tab > E-mail > tap > Settings > tap
> Remove account > Select the account to delete > Remove > select Yes.
Working with account folders
Touch > Apps tab > E-mail, tap and select Folders.
Each account has an Inbox, Outbox, Sent and Drafts folder. Depending on the features
supported by your account's service provider, you may have additional folders.

49
Composing and sending email
To compose and send a message
1 While in the E-mail application, touch the .
2 Enter an address for the message's intended recipient. As you enter text, matching
addresses will be proposed from your Contacts. Separate multiple addresses using
semicolons.
3 Touch the Cc/Bcc field to add a Cc/Bcc and Touch to attach files, if required.
4 Enter the text of the message.
5 Touch .
If you aren't connected to a network, for example, if you're working in airplane
mode, the messages that you send will be stored in your Outbox folder until you
connect to a network again. If it contains any pending messages, the Outbox will
be displayed on the Accounts screen.
TIP! When a new email arrives in your Inbox, you will be notified by a sound
or vibration.

50
Camera
To open the Camera application, Touch > Apps tab > .
Getting to know the viewfinder
Flash – Choose from Off , On , Auto .
Swap camera – Switch between the rear–facing camera lens and the front–facing
camera lens.
Shot mode – Choose from Normal, Dynamic tone, Panorama, Continuous shot,
Beauty shot, Time catch shot, Sports or Night.
Settings – Tap this icon to open the settings menu.
Video mode – Tap and slide down this icon to switch to video mode.
Capture button
Gallery – Tap to view the last photo you captured. This enables you to access your
gallery and view saved photos while in camera mode.
NOTE: Please ensure the camera lens is clean before taking pictures.

51
Using the advanced settings
In the viewfinder, tap to open the advanced options. You can change the camera
settings by scrolling through the list. After selecting the option, tap the Back key.
To take a photo, say one of the following words: Cheese, Smile, Whiskey,
Kimchi or LG.
Defines and controls the amount of sunlight entering the photo.
Tap to select the focus mode.
Selects photo resolution. If you choose high resolution, file size will increase,
which means you will be able to store fewer photos in the memory.
The ISO rating determines the sensitivity of the camera's light sensor. The
higher the ISO, the more sensitive the camera. This is useful in darker
conditions when you cannot use the flash.
Improves color quality in various lighting conditions.
Applies artistic effects to your pictures.
Sets a delay after the capture button is pressed. This is ideal if you want to
be in the photo.
Activate this to use your phone's location-based services.
NOTE: This function is available when the GPS function is active or
connected network.
Selects a shutter sound.
Set the Volume Key whether to use for the capture or zoom.
Opens the help guide to know how a function operates.
Restores all camera default settings.

52
TIP!
• When you exit the camera, some settings return to their defaults, such as
white balance, color effect, timer and scene mode. Check these before you
take your next photo.
• The setting menu is superimposed over the viewfinder, so when you change
photo color or quality elements, you will see a preview of the changed
image behind the Settings menu.
Taking a quick photo
1 Open the Camera application.
2 Holding the phone horizontally, point the lens towards the subject you want to
photograph.
3 A focus box will appear in the center of the viewfinder screen. You can also tap
anywhere on the screen to focus on that spot.
4 When the focus box turns green, the camera has focused on your subject.
5 Touch to capture the photo.
Camera

53
Once you've taken a photo
Tap the image thumbnail at the bottom of the Camera screen to view the last photo you
took.
Tap to take another photo immediately.
Tap to send your photo to others or share it via social network services.
Tap to delete the photo.
Tap to share photo using the SmartShare function.
TIP! If you have an SNS account and set it up on your phone, you can share
your photo with your SNS community.
NOTE: Additional charges may apply when MMS messages are downloaded
while roaming.
Touch the Menu key to open all advanced options.
Set image as – Touch to use the photo as a Contact photo, Home screen Wallpaper,
Lock screen wallpaper or Wallpaper.
Move – Touch to move the photo to another place.
Copy – Touch to copy the selected photo and save it to another album.
Copy to Clip Tray – Tap to copy the photo and store in the Clip Tray.
Rename – Touch to edit the name of the selected photo.
Rotate left/right – To rotate left or right.
Crop – Crop your photo. Move your finger across the screen to select the area to be
cropped.
Edit – View and edit the photo.

54
Slideshow – Automatically shows you the images in the current folder one after the
other.
Add location – Camera setup is set to off, the Geotagging, picture location information
is missing, the location information may be added.
Remove location – Camera setup is set to on Geotagging, photographs of the location
information , the location information can be deleted.
Show on map – Camera setup is set to on Geotagging, picture position information,
the corresponding location on the map can be viewed.
Details – Find out more information about the contents.
From your Gallery
Tap Gallery.
• To view more photos, scroll left or right.
• To zoom in or out, double-tap the screen or place two fingers and spread them apart
(move your fingers closer (move your fingers closer together to zoom out).
Camera

55
Video camera
Getting to know the viewfinder
Flash – Choose from Off , On .
Swap camera – Switch between the rear–facing camera lens and the front-facing
camera lens.
Recording mode – Choose from Normal or Live effect.
Settings – Tap this icon to open the settings menu.
Camera mode – Tap and slide up this icon to switch to camera mode.
Start recording
Gallery – Tap to view the last video you recorded. This enables you to access your
gallery and view your saved videos while in video mode.
TIP!
When recording a video, place two fingers on the screen and pinch to use the
Zoom function.

56
Using the advanced settings
Using the viewfinder, touch to open all the advanced options.
Tap to set the size (in pixels) of the video you are recording.
Defines and controls of the amount of sunlight entering the lens. Slide the
brightness indicator along the bar towards “-” for a lower brightness video or
towards “+” for a higher brightness video.
Improves color quality in various lighting conditions.
Choose a colour tone to use for your new view.
Activate this to use your phone's location-based services.
NOTE: This function is available when the GPS function is active or
connected network.
Set the Volume Key whether to use for the record or zoom.
Opens the help guide to know how a function operates.
Restores all camera default settings.
Recording a quick video
1 Open the Camera application and touch the Video mode button.
2 The video camera viewfinder appears on the screen.
3 Holding the phone, point the lens towards the subject you wish to capture in your
video.
4 Touch once to start recording.
5 A red light will appear at the top left corner of the viewfinder with a timer showing
the length of the video.
6 Touch on the screen to stop recording.
Video camera

57
TIP!
– Tap to capture an image during recording a video.
– Tap to pause recording a video.
After recording a video
In the viewfinder, tap the video thumbnail at the bottom of the screen to view the last
video you took.
Tap to record another video immediately.
Tap to send your video to others or share it via social network services.
Tap to delete the video.
Tap to share video using the SmartShare function.
NOTE: Additional charges may apply when MMS messages are downloaded
while roaming.
Watching your saved videos
1 In the viewfinder, tap .
2 Your Gallery will appear on the screen.
3 Tap a video to play it automatically.
Adjusting the volume when viewing a video
To adjust the volume of a video while it is playing, use the volume keys on the left side
of the phone.

58
LG Unique Function
QuickMemo function
Use the QuickMemo function to practically and efficiently create memos during a call,
with a saved picture or on the current phone screen.
OR
1 Enter the QuickMemo function
screen by pressing both the Volume
up and down keys for one second on
the screen you want to capture.
OR
Touch and slide the status bar downward
and touch
.
2 Select the desired menu option from
Pen type, Color, Eraser, and create
a memo.

59
3 Touch in the Edit menu and select
it to save the memo with the current
screen.
NOTE: Please use a fingertip while using the QuickMemo function. Do not
use your fingernail.
Using the QuickMemo options
You can easily use the QuickMenu options when using the QuickMemo function.
Touch to keep the current memo on the screen and use the phone
simultaneously.
Selects whether to use the background screen or not.
Undo or Redo.
Selects the pen type and the colour.
Erases the memo that you created.
Touch to send your memo to others or share it via social network services.
Saves the memo with the current screen in the Gallery/Notebook.
Viewing the saved QuickMemo
Touch Gallery/Notebook and select the QuickMemo album.

60
Notebook function
With the Notebook application, you can manage and personalize a wide variety of
information. Notebook allows you to create your own special notes with drawings,
images, maps and stickers.
Making a note
1 Touch > Apps tab > Notebook.
2 Touch New note to create a new note.
3 Select the desired mode (Cover, Title, Paper, Paper color) and then tap on OK.
4 Create a simple note on an empty page.
Getting to know the Notebook
Pages-property panelsBookshelf
Bookshelf
Search for pages of notes.
Share as Notebook file, a PDF file or Image file via E-mail/Gmail.
Delete the saved notebook from the Bookshelf.
LG Unique Function

61
Pages-Property panels
Select the Read-only or edit mode.
Undo or Redo.
Tap this button to write.
Select the Pen type, Thickness, Opacity and Color.
Erase the memo that you created.
Touch to attach files to the note.
Touch to send your note to others or share it via social network services.
Save the note with the current screen.
Select to lock or unlock the Front key.
Tap this button to enlarge the input area.
Viewing the saved notebook
• Saved Notebook memos are on the Bookshelf.
• If you save memos from QuickMemo, a QuickMemo note will be created and saved
on the Bookshelf automatically.
NOTE: For more information of the Notebook guide, please see Notebook >
Notebook guide.

62
QuickTranslator
Simply aim the camera of your smart phone at the foreign sentence you want to
understand. You can get the real-time translation anywhere and anytime.
You can buy additional dictionaries for offline translation from the Google Play Store.
Home language.
Destination language
Translation of word.
Translation of sentence.
Translation of block.
Settings.
1 Touch > Apps tab > QuickTranslator.
2 Touch Word, Line or Block.
3 Touch and select the desired language.
4 Hold the phone toward the subject you want to translate for a few seconds.
NOTE: Only one dictionary is provided free of charge. Additional dictionaries
must be purchased. Please select from the list below the dictionary you would
like to install as your complimentary dictionary.
NOTE: There may be a difference in the rate of recognization depending
on the size, font, color, brightness and angle of the letters that need to be
translated.
LG Unique Function

63
Live Zooming function
Live Zooming allows you to zoom in or zoom out on a portion of a video that is being
played to make the desired scan appear larger or smaller.
NOTE:
• When in video playback mode, slide the screen up or down,
the screen brightness (Left side), the Volume (Right side) will be adjusted.
• When in video playback mode, when you slide the screen left or right, the
playback position will be adjusted.
NOTE: Do not press too hard; the touch screen is sensitive enough to pick
up a light, but firm touch.

64
QSlide function
The QSlide function enables an overlay on your phone’s display for easy multi-window
viewing.
OR
Touch to exit the QSlide function
and return to full window.
Tap to adjust transparency.
Tap to end the QSlide function.
Tap to adjust the size.
1 Touch and slide the status bar downward > touch QSlide apps or when
using a function
supported by the QSlide function > touch . The function will be continuously
displayed as a small window on your screen.
2 You can make a call, browse the Web, or choose other phone options. You can also
use and tap the screen of the small windows when the transparency bar is not full
.
NOTE: The QSlide function can support up to two windows at the same time.
TIP!
Touch and slide the notification panel down with your finger.
Touch
to manage the "Quick settings" or "QSlide" in the notification panel.
Dual Play function
You can display different screens on the two displays connected wirelessly or by cable.
1 Dual play mode is executed by tapping the Home key when playing content on
the external display.
LG Unique Function

65
2 You can stop playing the content on the external display using the notification
panel.
NOTE:
• Connect your smart phone to a display wirelessly (Miracast) or by cable
(MHL cable).
• Some video files may not be supported by the dual play function.
• The Shielded LG MHL cable is recommended.
Mirroring
∙∙∙∙∙
Dual Play
∙∙∙∙∙
NOTE:
• Dual Play is supported by 3 applications - Videos, Media Home (MHL only),
Polaris Office 4.
• The minimum TV resolution required for dual play is 720p (1280x720)

66
LG SmartWorld
LG SmartWorld offers an assortment of exciting content - fonts, themes, games and
applications.
How to Get to LG SmartWorld from Your Phone
1 Touch > Apps tab > tap the icon to access LG SmartWorld.
2 Tap Sign in and enter ID/PW for LG SmartWorld. If you have not signed up yet, tap
Register to receive your LG SmartWorld membership.
3 Download the content you want.
• When you use Cellular network, data fee could be charged by data plan that you
signed- up with carrier.
• LG Smartworld may not be available from all carriers or in all countries.
NOTE: What if there is no icon?
1 Using a mobile Web browser, access LG SmartWorld (www.lgworld.com)
and select your country.
2 Download the LG SmartWorld App.
3 Run and install the downloaded file.
4 Access LG SmartWorld by tapping the
icon.
Special benefit only LG SmartWorld
1 Decorate your own style on your Smartphone, Use Home Theme &
keyboard Theme & Font that provided on LG SmartWorld (However this
service is available to specific device. please check in LG SmartWorld
website whether it is feasible or not whether it is feasible or not)
2 Enjoy LG SmartWorld's special service by joining promotion that
consistently provided
LG Unique Function

67
On-Screen Phone
On-Screen Phone allows you to view your mobile phone screen from a PC via a USB
or Wi-Fi connection. You can also control your mobile phone from your PC, using the
mouse or keyboard.
On-Screen Phone icons
Connects your mobile phone to your PC, or disconnects it.
Changes the On-Screen Phone preferences.
Exits the On-Screen Phone programme.
Maximises the On-Screen Phone window.
Minimize the On-Screen Phone window.
On-Screen Phone features
• Real-time transfer and control: displays and controls your mobile phone screen when
connected to your PC.
• Mouse control: allows you to control your mobile phone by using the mouse to click
and drag on your PC screen.
• Text input with keyboard: allows you to compose a text message or note using your
computer keyboard.
• File transfer (mobile phone to PC): sends files from your mobile phone (e.g. photos,
videos, music and POLARIS Viewer 5 files) to your PC. Simply right-click on the file
which you want to send to PC and click on "Save to PC".
• File transfer (PC to mobile phone): sends files from your PC to your mobile phone.
Just select the files you wish to transfer and drag and drop them into the On-Screen
Phone window. The files sent are stored in internal SD card.

68
• Real-time event notifications: prompts a pop-up to inform you of any incoming calls or
text/multimedia messages.
How to install On-Screen Phone on your PC
1 Visit LG Home (www.lg.com) and select a country of your choice.
2 Go to Support > Mobile Phone Support > Select the Model (LG-E975) >
ClickOSP ( On-Screen Phone ) to download. You can install the On-Screen Phone
on your PC.
LG Unique Function

69
Gallery
You can store multimedia files in internal memory for easy access to all your multimedia
files. Use this application to view multimedia files like pictures and videos.
1 Touch > Apps tab > Gallery.
You can manage and share all your image and video files with Gallery.
NOTE:
• Some file formats are not supported, depending on the software installed
on the device.
• Some files may not play properly, depending on how they are encoded.
Viewing pictures
Launching Gallery displays your available folders. When another application, such as
Email, saves a picture, the download folder is automatically created to contain the
picture. Likewise, capturing a screenshot automatically creates the Screenshots folder.
Select a folder to open it.
Pictures are displayed by creation date in a folder. Select a picture to view it full screen.
Scroll left or right to view the next or previous image.
Zooming in and out
Use one of the following methods to zoom in on an image:
• Double-tap anywhere to zoom in.
• Spread two fingers apart on any place to zoom in. Pinch to zoom out, or double-tap
to return.
Multimedia

70
Playing videos
Video files show the icon in the preview. Select a video to watch it and tap . The
Videos application will launch.
Editing photos/videos
When viewing an photo/video, tap the Menu key and use the advanced editing
options.
• Slideshow: start a slideshow with the images in the current folder.
Deleting images
Use one of the following methods:
• In a folder, tap and select photos/videos by ticking, and then tap on Delete.
• When viewing a photo/Video, tap .
Setting as wallpaper
When viewing a photo, touch the Menu key > Set image as to set the image as
wallpaper or to assign it to a contact.
NOTE:
• Some file formats are not supported, depending on the device software.
• If the file size exceeds the available memory, an error can occur when you
open files.
Multimedia

71
Videos
Your phone has a built-in video player that lets you play all of your favorite videos. To
access the video player, touch > Apps tab > Videos.
Playing a video
1 Touch > Apps tab > Videos.
2 Select the video you want to play.
Touch to pause/resume video playback.
Touch to go 10 seconds forward.
Touch to go 10 seconds backward.
Touch to manage the video volume.
Touch to change the ratio of the video screen.
Tap to capture image during playing a video.
Touch to use QSlide.
Touch to Smart Share
Touch to lock/unlock a video screen.

72
To change the volume while watching a video, press the up and down volume keys on
the left-hand side of the phone.
Touch and hold a video in the list. The Share, Delete, Trim and Details options will be
displayed.
Video Editor
You can edit the photos or videos stored on the phone.
NOTE: Video Editing function is supported only for photos or videos which
recorded with this phone.
< Project list screen >
Buttons area
Project list
area
Help
Creat project
Projects should be exported to play in applications such as videos
Play project
Delete project
Share project with application such as YouTube
Multimedia

73
< Project edit screen >
Timeline
area
Viewer area
Move to project list screen. Currently edited project is save automatically
Split video clip into two portions over the playhead
Add sound effect
Add video, image or audio clip
Undo an action
Redo an action
Add text to video or image clip
Video Wiz
You can make your own movie using your images/video and music.
1 Touch > Apps tab > Video Wiz.
2 After seeing the brief introduction on the steps to follow, tap OK.

74
3 Tap to add images or video to your movie.
4 Tap the desired images or videos, then tap .
• To remove images or videos, tap and select the desired files > .
• To rearrange them, touch and hold an image/video, and drag and drop it to the
desired position.
5 Tap Select style to select the desired movie style.
• Scroll through and select the style you want. As you scroll through the styles, a
preview will be displayed.
6 Tap Select music to set the background music.
7 Tap to play your movie.
8 Tap to edit the video clip using Text, Sticker or Magic Spot.
• After editing the video, tap .
9 Tap to save the video.
10 Tap to view the help information on using this feature.
Multimedia

75
Music
Your phone has a built-in music player that lets you play all your favorite tracks. To
access the music player, touch > Apps tab > Music.
Playing a song
1 Touch > Apps tab > Music.
2 Touch Songs.
3 Select the song you want to play.
/
Tap to pause/ resume playback.
Tap to skip to the next track in the album, playlist, or shuffle. Touch and
hold to fast forward.
Tap to restart the current track or skip to the previous track in the
album, playlist, or shuffle. Touch and hold to rewind.

76
Tap to display the Volume slider bar, then adjust the playback volume
on the slider bar.
Touch to set Sound Effects.
Tap to find the files with YouTube.
Tap to open the current playlist.
Tap to add the song to your favourites.
Tap to play the current playlist in shuffle mode (tracks are played in
random order).
Tap to toggle through the repeat modes to repeat all songs, repeat
current song, or repeat off.
SmartShare.
To change the volume while listening to music, press the up and down volume keys on
the left-hand side of the phone.
Touch and hold any song in the list. The Play, Add to playlist, Share, Set as ringtone,
Delete, Details and Search options will be displayed.
Add music files to your phone
Start by transferring music files to your phone:
• Transfer music using Media sync (MTP).
• Download from the wireless Web.
• Synchronize your phone to a computer.
• Receive files via Bluetooth.
Multimedia

77
Transfer music using Media sync (MTP)
1 Connect the phone to your PC using the USB cable.
2 Select the Media sync (MTP) option. Your phone will appear as another hard drive
on your computer. Click on the drive to view it. Copy the files from your PC to the
drive folder.
3 When you’re finished transferring files, swipe down on the Status Bar and touch
USB connected > Charge only. You may now safely unplug your device.
NOTE:
• Some file formats are not supported, depending on the device software.
• If the file size exceeds the available memory, an error can occur when you
open files.
NOTE: Music file copyrights may be protected by international treaties and
national copyright laws.
Therefore, it may be necessary to obtain permission or a licence to reproduce
or copy music.
In some countries, national laws prohibit private copying of copyrighted
material. Before downloading or copying the file, check the national laws of
the relevant country concerning the use of such material.

78
Setting your alarm
1 Touch > Apps tab > Alarm/Clock > .
2 After you set the alarm, your phone lets you know how much time is left before the
alarm will go off.
3 Set Repeat, Snooze duration, Vibration, Alarm sound, Alarm volume, Auto
app starter, Puzzle lock and Memo. Touch Save.
NOTE: To change alarm settings in the alarm list screen, touch and
select Settings.
Using your calculator
1 Touch > Apps tab > Calculator.
2 Touch the number keys to enter numbers.
3 For simple calculations, touch the function you want to perform (+, –, x or ÷)
followed by =.
4 For more complex calculations, slide the left then choose sin, cos, tan, log etc.
5 To check the history, touch , select calculation history.
Adding an event to your calendar
1 Touch > Apps tab > Calendar.
2 On the screen, you can find the different view types for the Calendar (Day, Week,
Month, Agenda).
3 Tap on the date for which you wish to add an event and touch .
4 Touch Event name and enter the event name.
5 Touch Location and enter the location. Check the date and enter the time you
wish your event to start and finish.
6 If you wish to add a note to your event, touch Description and enter the details.
Utilities

79
7 If you wish to repeat the alarm, set REPEAT and set REMINDERS, if necessary.
8 Touch Save to save the event in the calendar.
Voice Recorder
Use the voice recorder to record voice memos or other audio files.
Recording a sound or voice
1 Touch > the Apps tab and select Voice Recorder.
2 Touch to begin recording.
3 Touch to end the recording.
4 Touch to listen to the recording.
NOTE: Touch to access your album. You can listen to the saved
recording. The available recording time may differ from actual recording time.
Sending the voice recording
1 Once you have finished recording, you can send the audio clip by touching .
2 Choose from Bluetooth, Drive, E-mail, Gmail, Memo, Messaging or
SmartShare Beam. When you select, the voice recording is added to the
message. You may then write and send the message as you usually would.

80
Task Manager
You can manage your applications using Task Manager. You can easily check the
number of applications that are currently running and shut down certain applications.
Tasks
This task can be synchronized with MS Exchange account. You can create task, revise it
and delete it in MS outlook or MS Office Outlook Web Access.
To Synchronize MS Exchange
1 From the Home Screen, Touch > Settings.
2 Touch Accounts & sync > Add account.
3 Touch Microsoft Exchange to create Email address and Password.
4 Make sure if you checkmark Sync task.
Polaris Office 4
Polaris Office is a professional mobile office solution that lets users conveniently view
various types of office documents, including Word, Excel and PowerPoint files, anywhere
or anytime, using their mobile devices.
Touch > Apps tab > Polaris Office 4.
Viewing files
Mobile users can now easily view a wide variety of file types, including Microsoft Office
documents and Adobe PDF, right on their mobile devices. When viewing documents
using Polaris Office, the objects and layout remain the same as in the original
documents.
Utilities

81
Backup
About backing up and restoring smart phone data
It is recommended that you regularly create and save a backup file on the internal
storage, especially before updating any software. Maintaining a current backup file in
storage memory may allow you to recover smart phone data if your smart phone is lost,
stolen, or corrupted by an unforeseen issue.
This Backup application is supported between LG smart phones, other S/W versions or
OSs. As a result so, when you buy the new LG smart phone, you can backup the current
Your phone data to your new phone.
If you have preloaded Backup application on your smart phone, you can backup
and restore most of your smart phone data, Applications including unprotected
applications, their settings, Applications (Downloaded), Applications (Pre-installed),
Bookmarks, Calendar, Call log, Contacts, Home screen, Messages and System
settings using this application You may:
• Perform a manual backup of your smart phone data.
• Schedule automatic backups of your smart phone data.
• Restore your smart phone data.
NOTE: Please note that the Backup function does not support the backup of
User data & Media data (Picture/Video/Music). Please backup those files using
the Media sync (MTP). Connect your phone to your computer using a USB
cable and touch Media sync (MTP).

82
WARNING
To protect against unexpected shutoff during backup or restore operations, due
to insufficient battery power, you should always keep your battery fully charged.
Backup
1 Touch > Apps tab > LG Backup > Backup.
2 Select the check box next to the item you want to backup and tap Next to backup.
3 Touch Internal Storage > Start.
4 When all selected files have been backed up, you can touch Done to finish the
back up.
Scheduling backup
You can also program automatic backups for the data on your smart phone according
to your schedule setting. To do this, complete the following steps:
Touch > Apps tab > LG Backup > Schedule backup.
File restore & management
You can set to Backup file restore to desired status.
To restore data that is in your on-board device memory, mass storage mode must be
turned off.
Touch > Apps tab > LG Backup > File restore & management > Internal
Storage.
Utilities

83
NOTE:
• All files that are stored on your smart phone are deleted before the backup file is
restored.
• Please note that your phone data will be overwritten with the content of your
backup.
• You can set Enable encryption to encrypt your backup files for extra protection.
Google+
Use this application to stay connected with people via Google’s social network service.
• Touch > Apps tab > Google +.
NOTE: This application may not be available depending on the region or
service provider.
Voice Search
Use this application to search webpages using voice.
1 Touch > Apps tab > Voice Search.
2 Say a keyword or phrase when Speak now appears on the screen. Select one of
the suggested keywords that appear.
NOTE: This application may not be available depending on the region or
service provider.

84
Downloads
Use this application to see what files have been downloaded through the applications.
• Touch > Apps tab > Downloads.
NOTE: This application may not be available depending on the region or
service provider.
Utilities

85
The Web
Internet
Use this application to browse the Internet. Browser gives you a fast, full-color world of
games, music, news, sports, entertainment and much more, right on your mobile phone
wherever you are and whatever you enjoy.
NOTE: Additional charges apply when connecting to these services and
downloading content. Check data charges with your network provider.
1 Touch > Apps tab > Internet.
Using the Web toolbar
Touch and hold the Web toolbar and slide it upwards with your finger to open.
Touch to go back one page.
Touch to go forward one page, to the page you connected to after the current
one. This is the opposite of what happens when you touch the Back key,
which takes you to the previous page.
Touch to go to the Home page.
Touch to add a new window.
Touch to access bookmarks.
Viewing webpages
Tap the address field, enter the web address and tap Go.

86
Opening a page
To go to new page, tap
To go to another webpage, tap , scroll up or down, and tap the page to select it.
Searching the web by voice
Tap the address field, tap , speak a keyword, and then select one of the suggested
keywords that appear.
NOTE: This feature may not be available depending on the region or service
provider.
Bookmarks
To bookmark the current webpage, touch > Add to bookmarks > OK.
To open a bookmarked webpage, tap and select one.
History
Tap > History to open a webpage from the list of recently-visited webpages. To
clear the history, tap Menu Clear all history.
Using Popup Browser
Use this feature to access the Internet without closing the current application.
While viewing content, such as contacts or notes that include web addresses, select a
web address, and then tap Popup Browser to open the pop-up browser. Tap and drag
the browser to move it to another location.
To view the browser in full screen, tap .
To close the browser, tap .
The Web

87
Chrome
Use Chrome to search for information and browse webpages.
1 Touch > Apps tab > Chrome.
NOTE: This application may not be available, depending on your region and
service provider.
Viewing webpages
Tap the Address field, and then enter a web address or search criteria.
Opening a page
To go to a new page, tab > New tab.
To go to another webpage, tap , scroll up or down and tap the page to select it.
Syncing with other devices
Sync open tabs and bookmarks to use with Chrome on another device when you are
logged in with the same Google account.
To view open tabs on other devices, tap > Other devices.
Select a webpage to open.
To view bookmarks, tap .

88
Settings
This section provides an overview of items you can change using your phone's System
settings menus.
To access the Settings menu:
1 On the Home screen, touch > Apps tab > Settings.
or
On the Home screen, touch > System settings.
2 Select a setting category and select an option.
WIRELESS & NETWORKS
Here, you can manage Wi-Fi and Bluetooth. You can also set up mobile networks and
switch to airplane mode.
< Wi-Fi >
Wi-Fi – Turns on Wi-Fi to connect to available Wi-Fi networks.
TIP! How to obtain the MAC address
To set up a connection in some wireless networks with MAC filters, you may
need to enter the MAC address of your phone in the router.
You can find the MAC address in the following user interface: touch Apps tab
> Settings > Wi-Fi >
> Advanced Wi-Fi > MAC address.
< Bluetooth >
Turn the Bluetooth wireless feature on or off to use Bluetooth.
< Mobile data >
Displays the data usage and set mobile data usage limit.
< Call >
Configure phone call settings such as call forwarding and other special features offered
by your carrier.
Voicemail – Allows you to select your carrier’s voicemail service.

89
Fixed dialing numbers – Turn on and compile a list of numbers that can be called
from your phone. You’ll need your PIN2, which is available from your operator. Only
numbers within the fixed dial list can be called from your phone.
Incoming voice call pop-up – Display incoming voice call pop-up when an app is in
use.
Call reject – Allows you to set the call reject function. Choose from Call reject mode
or Rejection list.
Decline with message – When you want to reject a call, you can send a quick
message using this function. This is useful if you need to reject a call during a meeting.
Privacy keeper – Hides the caller name and number for an incoming call.
Call forwarding – Choose whether to divert all calls when the line is busy, when there
is no answer or when you have no signal.
Auto answer – Set the time before a connected hands-free device automatically
answers an incoming call. Choose from Disable, 1 second, 3 seconds, and 5 seconds.
Connection vibration – Vibrates your phone when the other party answers the call.
Save unknown numbers – Add unknown numbers to contacts after a call.
Power key ends call – Allows you to select your end call.
Call barring – Lock incoming, outgoing or international calls.
Call duration – View the duration of calls including Last call, All calls, Dialled calls and
Received calls.
Additional settings – Allows you to change the following settings:
Caller ID: Choose whether to display your number in an outgoing call.
Call waiting: If call waiting is activated, the handset will notify you of an incoming call
while you are on a call (depending on your network provider).
<Share & Connect>
NFC – Your phone is an NFC-enabled mobile phone. NFC (Near Field Communication)
is a wireless connectivity technology that enables two-way communication between
electronic devices. It operates over a distance of a few centimeters. You can share your

90
content with an NFC tag or another NFC support device by simply touching it with your
device. If you touch an NFC tag with your device, it will display the tag content on your
device.
To switch NFC on or off: From the Home screen, touch and slide the notification
panel down with your finger, then select the NFC icon to turn it on.
NOTE: When airplane mode is activated, the NFC application can be used.
Using NFC: To use NFC, make sure your device is switched on, and activate NFC if
disabled.
Android Beam – When this feature is turned on, you can beam app content to another
NFC-capable device by holding the devices close together.
Just bring the device together(typically back to back) and then touch your screen. The
app determines what gets beamed.
SmartShare Beam – Enable to receive files from LG phones.
Media server – Share media content on your phone with nearby device via DLNA.
Miracast – With Miracast, you can wirelessly mirror your phone screen and sound onto
a Miracast dongle or TV
Wireless storage – Share files with computer via Wi-Fi.
< Tethering & networks >
Wi-Fi hotspot – You can also use your phone to provide a mobile broadband
connection. Create a hotspot and share your connection. Please read "Sharing your
phone's data connection" for more information.
Bluetooth tethering – Allows you to set your phone whether you are sharing the
Internet connection or not.
Help – Tap to view help information on the Wi-Fi hotspot and Bluetooth tethering
functions.
Airplane mode – After switching to Airplane mode, all wireless connections are
disabled.
Settings

91
NOTE: You must set a lock screen PIN or password before you can use
credential storage.
Mobile networks – Set options for data roaming, network mode & operators, access
point names (APNs) etc.
Default SMS app – Allows you to set the default SMS app.
VPN – Displays the list of Virtual Private Networks (VPNs) that you've previously
configured. Allows you to add different types of VPNs.
DEVICE
< Sound >
Sound profile – Choose the Sound, either Vibrate only or Silent.
Volumes – Manage the volume of Phone ringtone, Notification sound, Touch feedback
& system, Music, video, games and other media.
Quiet time – Set times to turn off all sounds except alarm and media.
Phone ringtone – Allows you to set your default incoming call ringtone.
Smart ringtone – Allows you to set increase phone ringtone volume automatically in
noisy environments.
Ringtone with vibration – Vibration feedback for calls and notifications.
Notification sound – Allows you to set your default notification ringtone.
Touch feedback & system – Allows you to set the feedback (tones and/or vibration)
while using your device.
< Display >
Brightness – Adjust the screen brightness.
Screen timeout – Set the time for screen timeout.
Auto-rotate screen – Checkmark to set the phone to automatically rotate the screen
based on the phone orientation (portrait or landscape).
Daydream – Tap the Daydream switch to toggle it On or Off. On allows the set

92
screensaver to be displayed when the phone is sleeping while docked and/or charging.
Font type – Change the type of display font.
Font size – Change the size of the display font.
Smart Screen – Checkmark to allow the screen to stay on when phone detects your
face.
Front touch key light – Set the front key light duration.
Notification flash – The Notification LED is located to the left of the front camera.
You can see the small LED light on when the phone is charging or when you receive a
notification if LCD screen turns off. You can configure the Notification flash to turn on/
off. You can set the various options from the list of notification flash items.
< Home screen >
Set the Theme, Wallpaper, Screen swipe effect, Allow Home screen looping or
Portrait view only. Select the option to set Home backup & restore.
< Lock screen >
Select screen lock – Set a screen lock type to secure your phone. Opens a set of
screens that guide you through drawing a screen unlock pattern. Set None, Swipe,
Face Unlock, Pattern, PIN or Password.
If you have enabled a Pattern lock type when you turn on your phone or wake up the
screen, you will be asked to draw your unlock pattern to unlock the screen.
< Gestures >
Silence incoming calls – Flip the device to mute incoming calls.
Snooze or stop alarm – Flip the device to snooze or stop alarm.
Pause video – Flip the device to pause playing video.
Help – Help for gesture functions.
Motion sensor calibration – Allows you to improve the accuracy of the tilt and speed
of the sensor.
< Storage >
INTERNAL STORAGE – View the internal storage usage.
Settings

93
< Battery >
BATTERY INFORMATION
The Battery charge information is displayed on a battery graphic along with the
percentage of the remaining charge and its status.
Touch the Battery charge icon to display the Battery use screen to see battery usage
level and battery use details. It displays which components and applications are using
the most battery power. Tap one of the entries to see more detailed information.
Battery percentage on status bar – Checkmark to display the battery level
percentage on the Status Bar next to the battery icon.
BATTERY SAVER
Tap the Battery saver switch to toggle it On or Off. Tap Battery saver to access the
following settings:
Battery saver – Sets the battery charge percent level that will automatically turn on
Battery saver.
Eco mode – Set the Eco mode to extend battery life by dynamically optimizing the CPU
control policy.
Help – Tap to view help information on the battery saver tips.
< Apps >
View and manage your applications.
<Tap & pay>
When NFC is turned on, you can use the tap & pay feature to pay for items just by
touching your phone to a reader at a register. If your device doesn’t have a default app,
you can browse Google Play for other payment apps.
PERSONAL
< Accounts & sync >
Permits applications to synchronize data in the background, whether or not you are

94
actively working in them. Deselecting this setting can save battery power and lower (but
not eliminate) data usage.
< Cloud >
Add a cloud account to quickly and easily use cloud service on LG apps.
< Location >
Turn on location service, your phone determines your approximate location using GPS,
Wi-Fi and mobile networks.
Mode – Set the location mode from High accuracy, Battery saving and Device
sensors only.
< Security >
Encrypt phone – Allows you to encrypt data on the phone for security. You will be
required to enter a PIN or password to decrypt your phone each time you power it on.
Set up SIM card lock – Set up Micro-USIM card lock or change the Micro-USIM card PIN.
Password typing visible – Show the last character of the hidden password as you
type.
Phone administrators – View or deactivate phone administrators.
Unknown sources – Default setting to install non-market applications.
Verify apps – Disallow or warn before installation of apps that may cause harm.
Notification access – Display the notifications.
Storage type – Display the storage type.
Trusted credentials – Display trusted CA certificates.
Install from storage – Choose to install encrypted certificates.
Clear credentials – Remove all certificates.
< Language & input >
Use the Language & input settings to select the language for the text on your phone
and to configure the on-screen keyboard, including words you've added to its dictionary.
< Backup & reset >
Change the settings for managing your settings and data.
Settings

95
Backup my data – Set to backup your settings and application data to the Google
server.
Backup account – Set to backup your account.
Automatic restore – Set to restore your settings and application data when the
applications are reinstalled on your device.
LG Backup service – Backs up all information on the device and restores it in the event of
data loss or replacement.
Factory data reset – Reset your settings to the factory default values and delete all
your data. If you reset the phone this way, you are prompted to re-enter the same
information as when you first started Android.
SYSTEM
< Date & time >
Use Date & time settings to set how dates will be displayed. You can also use these
settings to set your own time and time zone rather than obtaining the current time from
the mobile network.
< Accessibility >
Use the Accessibility settings to configure accessibility plug-ins you have installed on
your phone.
NOTE: Requires additional plug-ins to become selectable.
< PC connection >
Select USB connection method – Set the desired mode: Charge only, Media sync
(MTP), Tethering, LG software or Send images (PTP).
Ask upon connection – Ask in USB connection mode when connecting to a computer.
Help – Help for USB connection.
PC Suite – Checkmark this to use LG PC Suite with your Wi-Fi connection.

96
Please note that Wi-Fi network should be connected to LG PC Suite via a Wi-Fi
connection through WIRELESS & NETWORKS.
Help – Help for LG software.
<Printing>
Allows you to print the content of certain screens (such as web pages displayed in
Chrome) to a printer connected to the same Wi-Fi network as your Android device.
< About phone >
View legal information and check your phone status and software version.
Settings

97
"LG PC Suite" PC software is a program that helps you connect your device to a PC via a USB
cable and Wi-Fi. Once connected, you can use the functions of your device from your PC.
With your "LG PC Suite" PC Software, You Can...
• Manage and play your media contents (music, movie, picture) on your PC.
• Send multimedia contents to your device.
• Synchronizes data (schedules, contacts, bookmarks) in your device and PC.
• Backup the applications in your device.
• Update the softwares in your device.
• Backup and restore the device data.
• Play multimedia contents of your PC from your device.
• Backup and create and edit the memos in your device
NOTE: You can use the Help menu from the application to find out how to
use your "LG PC Suite" PC software.
Installing "LG PC Suite" PC Software
"LG PC Suite" PC software can be downloaded from the webpage of LG.
1 Go to www.lg.com and select a country of your choice.
2 Go to Support > MOBILE SUPPORT > LG Mobile Phones > Select the Model
or
Go to Support > Mobile > Select the Model.
3 Click PC SYNC from MANUALS & DOWNLOAD and click DOWNLOAD to down-
load "LG PC Suite" PC software.
System Requirements for "LG PC Suite" PC software
• OS: Windows XP (Service pack 3) 32bit, Windows Vista, Windows 7, Windows 8
• CPU: 1 GHz or higher processors
• Memory: 512 MB or higher RAMs
• Graphic card: 1024 x 768 resolution, 32 bit color or higher
• HDD: 500 MB or more free hard disk space (More free hard disk space may be
needed depending on the volume of data stored.)
• Required software: LG integrated drivers, Windows Media Player 10 or later
PC software (LG PC Suite)

98
NOTE: LG Integrated USB Driver
LG integrated USB driver is required to connect an LG device and PC and is
installed automatically when you install "LG PC Suite" PC software application.
Synchronizing your Device to a PC
Data from your device and PC can be synchronized easily with "LG PC Suite" PC software for
your convenience. Contacts, schedules and bookmarks can be synchronized.
The procedure is as follows:
1 Connect your device to PC. (Use a USB cable or Wi-Fi connection.)
2 The Select USB connection method will appear, then select LG software.
3 After connection, run the program and select the device section from the category
on the left side of the screen.
4 Click Personal information to select.
5 Select the checkbox of contents to synchronize and click the Sync button.
NOTE: To synchronize your phone with your PC, you need to install LG PC
Suite onto your PC. Please refer to previous pages to install LG PC Suite.
Moving contacts from your Old Device to your New Device
1 Export your contacts as a CSV file from your old device to your PC using a PC sync program.
2 Install "LG PC Suite" on the PC first. Run the program and connect your Android
mobile phone to the PC using a USB cable.
3 On the top menu, select Phone > Import/Export contacts > Export to your
phone.
4 A popup window to select the file type and a file to export will appear.
5 On the popup, click the Select a file and Windows Explorer will appear.
6 Select the contacts file to export in Windows Explorer and click the Open.
7 Click Export.
8 A Field mapping popup to link the contacts in your device and new contacts data will appear.
9 If there is a conflict between the data in your PC contacts and device contacts,
make the necessary selections or modifications in LG PC Suite.
10 Click OK.
PC software (LG PC Suite)

99
Phone software update
LG Mobile phone software update from the Internet
For more information about using this function, please visit
http://www.lg.com/common/index.jsp select your country and language.
This feature allows you to conveniently update the firmware on your phone to a newer
version from the Internet without needing to visit a service center. This feature will only
be available if and when LG makes a newer firmware version available for your device.
Because the mobile phone firmware update requires the user's full attention for the
duration of the update process, please make sure you check all instructions and notes
that appear at each step before proceeding. Please note that removing the USB data
cable during the upgrade may seriously damage your mobile phone.
NOTE: LG reserves the right to make firmware updates available only for
selected models at its own discretion and does not guarantee the availability
of the newer version of the firmware for all handset models.
LG Mobile Phone software update via Over-the-Air (OTA)
This feature allows you to conveniently update your phone's software to a newer
version via OTA, without connecting using a USB data cable. This feature will only be
available if and when LG makes a newer firmware version available for your device.
You should first check the software version on your mobile phone: Settings > About
phone > Update Center > Software update > Check now for update.
Phone software update

100
NOTE: Your personal data from internal phone storage—including
information about your Google account and any other accounts, your system/
application data and settings, any downloaded applications and your DRM
licence—might be lost in the process of updating your phone's software.
Therefore, LG recommends that you backup your personal data before
updating your phone's software. LG does not take responsibility for any loss
of personal data.
NOTE: This feature depends on your network service provider, region and
country.
Phone software update

101
About this user guide
• Before using your device, please carefully read this manual. This will ensure that you
use your phone safely and correctly.
• Some of the images and screenshots provided in this guide may appear differently on
your phone.
• Your content may differ from the final product, or from software supplied by service
providers or carriers, This content may be subject to change without prior notice. For
the latest version of this manual, please visit the LG website at www.lg.com.
• Your phone's applications and their functions may vary by country, region, or
hardware specifications. LG cannot be held liable for any performance issues resulting
from the use of applications developed by providers other than LG.
• LG cannot be held liable for performance or incompatibility issues resulting from
edited registry settings being edited or operating system software being modified. Any
attempt to customize your operating system may cause the device or its applications
to not work as they should.
• Software, audio, wallpaper, images, and other media supplied with your device are
licensed for limited use. If you extract and use these materials for commercial or
other purposes is, you may be infringing copyright laws. As a user, you are fully are
entirely responsible for the illegal use of media.
• Additional charges may be applied for data services, such as messaging, uploading
and downloading, auto-syncing, or using location services. To avoid additional
charges, select a data plan to is suitable for your needs. Contact your service provider
to obtain additional details.
Trademarks
• LG and the LG logo are registered trademarks of LG Electronics.
• All other trademarks and copyrights are the property of their respective owners.
About this user guide

102
DivX HD
ABOUT DIVX VIDEO: DivX
®
is a digital video format created by DivX, LLC, a subsidiary
of Rovi Corporation. This is an official DivX Certified
®
device that plays DivX video. Visit
divx.com for more information and software tools to convert your files into DivX videos.
ABOUT DIVX VIDEO-ON-DEMAND: This DivX Certified
®
device must be registered
in order to play purchased DivX Video-on-Demand (VOD) movies. To obtain your
registration code, locate the DivX VOD section in your device setup menu. Go to vod.
divx.com for more information on how to complete your registration.
DivX Certified
®
to play DivX
®
video up to HD 720p, including premium content.
DivX
®
, DivX Certified
®
and associated logos are trademarks of Rovi Corporation
or its subsidiaries and are used under license.
Dolby Mobile
Manufactured under license from Dolby Laboratories. Dolby and the double-D
symbol are trademarks of Dolby Laboratories.
Notice: Open Source Software
To obtain the corresponding source code under GPL, LGPL, MPL and other
open source licences, please visit http://opensource.lge.com/
All referred licence terms, disclaimers and notices are available for download
with the source code.
About this user guide

103
These accessories are available for use with the your phone. (Items described below
may be optional.)
Travel adaptor Stereo headset
Quick Start Guide Data cable
Micro-USIM
ejection tool
Accessories
NOTE:
• Always use genuine LG accessories.
• Failure to do this may void your warranty.
• Accessories may vary in different regions.

104
Troubleshooting
This chapter lists some problems you might encounter when using your phone. Some
problems require you to call your service provider, but most are easy to fix yourself.
Message Possible causes Possible corrective measures
Micro-USIM
error
There is no
Micro-USIM card
in the phone
or it is inserted
incorrectly.
Make sure that the Micro-USIM card is
correctly inserted.
No network
connection/
Dropped
network
Signal is weak or
you are outside the
carrier network.
Move toward a window or into
an open area. Check the network
operator coverage map.
Operator applied
new services.
Check whether the Micro-USIM card
is more than 6~12 months old. If
so, change your Micro-USIM at your
network provider's nearest branch.
Contact your service provider.
Codes do
not match
To change a
security code,
you will need
to confirm the
new code by
re-entering it.
If you forget the code, contact your
service provider.
The two codes
you have entered
do not match.

105
Message Possible causes Possible corrective measures
No
applications
can be set
Not supported by
service provider
or registration
required.
Contact your service provider.
Calls not
available
Dialling error New network not authorized.
New Micro-USIM
card inserted.
Check for new restrictions.
Pre-paid charge
limit reached.
Contact service provider or reset limit
with PIN2.
Phone
cannot be
switched on
On/Off key
pressed too briefly.
Press the On/Off key for at least two
seconds.
Battery is not
charged.
Charge battery. Check the charging
indicator on the display.

106
Message Possible causes Possible corrective measures
Charging
error
Battery is not
charged.
Charge battery.
Outside
temperature is too
hot or cold.
Make sure phone is charging at a
normal temperature.
Contact problem
Check the charger and its connection
to the phone.
No voltage Plug the charger into a different socket.
Charger defective Replace the charger.
Wrong charger Use only original LG accessories.
Number not
allowed
The Fixed dialling
number function
is on.
Check the Settings menu and turn the
function off.
Impossible
to receive /
send SMS
& photos
Memory full
Delete some messages from your
phone.
Files do not
open
Unsupported file
format
Check the supported file formats.
Troubleshooting

107
Message Possible causes Possible corrective measures
The screen
does not
turn on
when I
receive a
call.
Proximity sensor
problem
If you use a protection tape or case,
make sure it has not covered the area
around the proximity sensor. Make
sure that the area around the proximity
sensor is clean.
No sound Vibration mode
Check the settings status in the sound
menu to make sure you are not in
vibration or silent mode.
Hangs up
or freezes
Intermittent
software problem
Try to perform a software update via
the website.

108
Please check to see if any problems you have encountered with your phone are
described in this section before taking the phone in for service or calling a service
representative.
Category
Sub-
Category
Question Answer
BT
Bluetooth
Devices
What are the
functions available via
Bluetooth?
You can connect a Bluetooth audio
device such as a Stereo/Mono headset
or Car Kit to share pictures, videos,
contacts, etc. via Gallery/Contacts
menu. Also, when the FTP server is
connected to a compatible device,
you can share content stored on the
storage media.
BT
Bluetooth
Headset
If my Bluetooth
headset is connected,
can I listen to my
music through
my 3.5 mm wired
headphones?
When a Bluetooth headset is
connected, all system sounds are
played over the headset. As a result,
you will not be able to listen to music
through your wired headphones.
Data
Contacts
Backup
How can I backup
Contacts?
The Contacts data can be
synchronized between your phone and
Gmail™.
Data
Synchronization
Is it possible to set up
one-way sync with
Gmail?
Only two-way synchronization is
available.
FAQ

109
Category
Sub-
Category
Question Answer
Data
Synchronization
Is it possible to
synchronize all email
folders?
The Inbox is automatically
synchronized. You can view other
folders by Touching the Menu Key
and select Folders to choose a folder.
Google™
Service
Gmail Log-In
Do I have to log into
Gmail whenever I want
to access Gmail?
Once you have logged into Gmail, you
will not need to log into Gmail again.
Google™
Service
Google
Account
Is it possible to filter
emails?
No, email filtering is not supported via
the phone.
Phone
Function
Email
What happens when
I execute another
application while
writing an email?
Your email will automatically be saved
as a draft.
Phone
Function
Ringtone
Is there a file size
limitation for when I
want to use an. MP3
file as a ring tone?
There is no file size limitation.
Phone
Function
Message
Time
My phone does not
display the time of
receipt for messages
older than 24 hrs. How
can I change this?
You will only be able to see the times
for messages received the same day.
Phone
Function
Navigation
Is it possible to install
another navigation
application on my
phone?
Any application that is available at
Android Market™ and is compatible
with the hardware can be installed and
used.

110
Category
Sub-
Category
Question Answer
Phone
Function
Synchronisation
Is it possible to
synchronize my
contacts from all my
email accounts?
Only Gmail and MS Exchange server
(company email server) contacts can
be synchronized.
Phone
Function
Wait and
Pause
Is it possible to save a
contact with Wait and
Pause in the numbers?
If you transferred a contact with the W
& P functions saved into the number,
you will not be able to use those
features. You will need to re-save each
number.
How to save with Wait and Pause:
1. From the Home screen, touch the
Phone icon .
2. Dial the number, then touch the
Menu Key .
3. Touch Add 2-sec pause or Add
wait.
Phone
Function
Security
What are the phone’s
security functions?
You are able to set the phone to
require that an Unlock Pattern be
entered before the phone can be
accessed or used.
FAQ

111
Category
Sub-
Category
Question Answer
Phone
Function
Unlock
Pattern
How do I create the
Unlock Pattern?
1. From the Home screen, touch the
Menu Key .
2. Touch System settings > Lock
screen.
3. Touch Select screen lock >
Pattern. The first time you do this,
a short tutorial about creating an
Unlock Pattern will appear.
4. Set up by drawing your pattern
once, and once again for
confirmation.
Precautions to take when using the
pattern lock.
It is very important to remember the
unlock pattern you set. You will not
be able to access your phone if you
use an incorrect pattern five times.
You have five chances to enter your
unlock pattern, PIN or password. If you
have used all 5 opportunities, you can
try again after 30 seconds. (Or, if you
preset the backup PIN, you can use
the backup PIN code to unlock the
pattern.)

112
Category
Sub-
Category
Question Answer
Phone
Function
Unlock
Pattern
What should I do if
I forget the unlock
pattern and I didn’t
create my Google
account on the
phone?
If you have forgotten your pattern:
If you logged into your Google account
on the phone but failed to enter the
correct pattern 5 times, touch the
forgot pattern button. You are then
required to log in with your Google
account to unlock your phone. If you
have not created a Google account on
the phone or you have forgottenn it,
you will have to perform a hard reset.
Caution: If you perform a factory reset,
all user applications and user data
will be deleted. Please remember to
backup any important data before
performing a factory reset.
Phone
Function
Memory
Will I know when my
memory is full?
Yes, you will receive a notification.
Phone
Function
Language
Support
Is it possible to change
my phone's language?
The phone has multilingual capabilities.
To change the language:
1. From the Home screen, touch the
Menu Key and touch System
settings.
2. Touch Language & input > Select
language.
3. Touch the desired language.
FAQ

113
Category
Sub-
Category
Question Answer
Phone
Function
VPN
How do I set up a
VPN?
VPN access configuration is different
for each company. To configure VPN
access from your phone, you must
obtain the details from your company’s
network administrator.
Phone
Function
Screen time
out
My screen turns off
after only 15 seconds.
How can I change the
amount of time for the
backlight to turn off?
1. From the Home screen, press the
Menu Key .
2. Touch System settings > Display.
3. Under Display settings, touch
Screen timeout.
4. Touch the preferred screen backlight
timeout time.
Phone
Function
Wi-Fi &
mobile
network
When Wi-Fi and
mobile network are
both available, which
service will my phone
use?
When using data, your phone may
default to the Wi-Fi connection (if
Wi-Fi connectivity on your phone is
set to On). However, there will be no
notification when your phone switches
from one to the other.
To know which data connection is
being used, view the mobile network or
Wi-Fi icon at the top of your screen.
Phone
Function
Home
screen
Is it possible to remove
an application from the
Home screen?
Yes. Just touch and hold the icon until
the dustbin icon appears at the top
and center of the screen. Then, without
lifting your finger, drag the icon to the
trash can.

114
Category
Sub-
Category
Question Answer
Phone
Function
Application
I downloaded an
application and it
causes a lot of errors.
How do I remove it?
1. From the Home screen, press the
Menu Key .
2. Touch App settings >
DOWNLOADED.
3. Touch the application, then touch
Uninstall.
Phone
Function
Charger
Is it possible to charge
my phone using a USB
data cable without
installing the necessary
USB driver?
Yes, the phone will be charged by the
USB cable regardless of whether the
necessary drivers are installed or not.
Phone
Function
Alarm
Can I use music files
for my alarm?
Yes. After saving a music file as a
ringtone, you can use it as your alarm.
1. Touch and hold a song in a library
list. In the menu that opens, touch
Set as ringtone.
2. In the alarm clock setting screen,
select the song as a ringtone.
Phone
Function
Alarm
Will my alarm be
audible or will it go off
if the phone is turned
off?
No, this is not supported.
Phone
Function
Alarm
If my ringer volume is
set to Off or Vibrate,
will I hear my alarm?
Your alarm is programmed to be
audible even in these scenarios.
FAQ

115
Category
Sub-
Category
Question Answer
Recovery
Solution
Hard Reset
(Factory
Reset)
How can I perform a
factory reset if I can’t
access the phone’s
setting menu?
If your phone does not restore to its
original condition, use a hard reset
(factory reset) to initialize it.

Este equipo puede utilizarse en todos los países europeos.
La banda de 5150 - 5350 MHz se restringe únicamente al uso en
interiores.
Wi-Fi (WLAN)
This equipment may be operated in all European countries.
The 5150 - 5350 MHz band is restricted to indoor use only.
Wi-Fi (WLAN)

A QUESTION ABOUT
YOUR MOBILE PHONE?
local tariff
local tariff
015 - 200 2550900 - 543 5454
Our Customer Service is there to support you:
-
 1
1
-
 2
2
-
 3
3
-
 4
4
-
 5
5
-
 6
6
-
 7
7
-
 8
8
-
 9
9
-
 10
10
-
 11
11
-
 12
12
-
 13
13
-
 14
14
-
 15
15
-
 16
16
-
 17
17
-
 18
18
-
 19
19
-
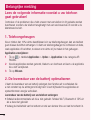 20
20
-
 21
21
-
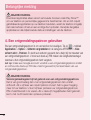 22
22
-
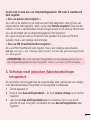 23
23
-
 24
24
-
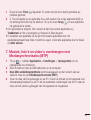 25
25
-
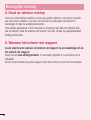 26
26
-
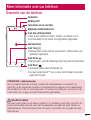 27
27
-
 28
28
-
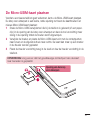 29
29
-
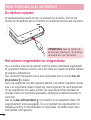 30
30
-
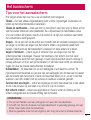 31
31
-
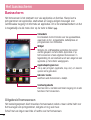 32
32
-
 33
33
-
 34
34
-
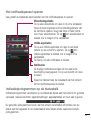 35
35
-
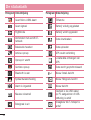 36
36
-
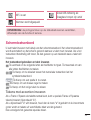 37
37
-
 38
38
-
 39
39
-
 40
40
-
 41
41
-
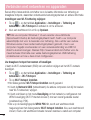 42
42
-
 43
43
-
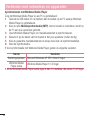 44
44
-
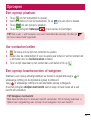 45
45
-
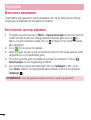 46
46
-
 47
47
-
 48
48
-
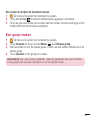 49
49
-
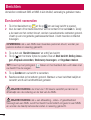 50
50
-
 51
51
-
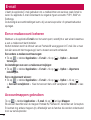 52
52
-
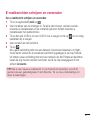 53
53
-
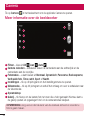 54
54
-
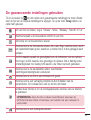 55
55
-
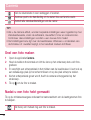 56
56
-
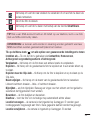 57
57
-
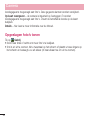 58
58
-
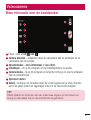 59
59
-
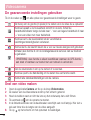 60
60
-
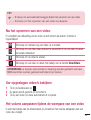 61
61
-
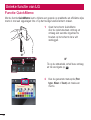 62
62
-
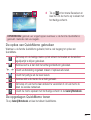 63
63
-
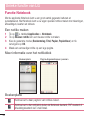 64
64
-
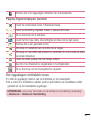 65
65
-
 66
66
-
 67
67
-
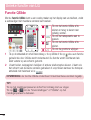 68
68
-
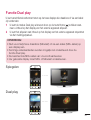 69
69
-
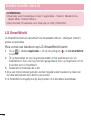 70
70
-
 71
71
-
 72
72
-
 73
73
-
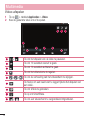 74
74
-
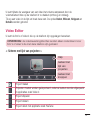 75
75
-
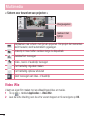 76
76
-
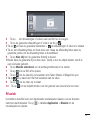 77
77
-
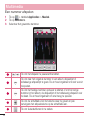 78
78
-
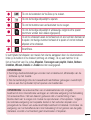 79
79
-
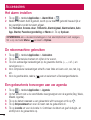 80
80
-
 81
81
-
 82
82
-
 83
83
-
 84
84
-
 85
85
-
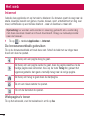 86
86
-
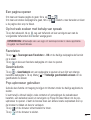 87
87
-
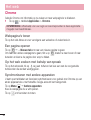 88
88
-
 89
89
-
 90
90
-
 91
91
-
 92
92
-
 93
93
-
 94
94
-
 95
95
-
 96
96
-
 97
97
-
 98
98
-
 99
99
-
 100
100
-
 101
101
-
 102
102
-
 103
103
-
 104
104
-
 105
105
-
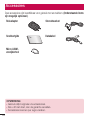 106
106
-
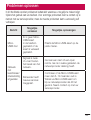 107
107
-
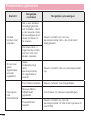 108
108
-
 109
109
-
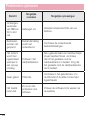 110
110
-
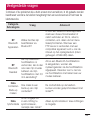 111
111
-
 112
112
-
 113
113
-
 114
114
-
 115
115
-
 116
116
-
 117
117
-
 118
118
-
 119
119
-
 120
120
-
 121
121
-
 122
122
-
 123
123
-
 124
124
-
 125
125
-
 126
126
-
 127
127
-
 128
128
-
 129
129
-
 130
130
-
 131
131
-
 132
132
-
 133
133
-
 134
134
-
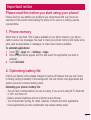 135
135
-
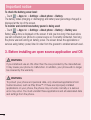 136
136
-
 137
137
-
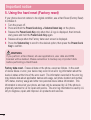 138
138
-
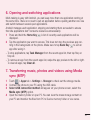 139
139
-
 140
140
-
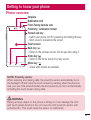 141
141
-
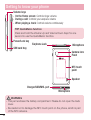 142
142
-
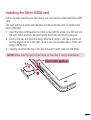 143
143
-
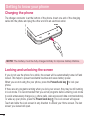 144
144
-
 145
145
-
 146
146
-
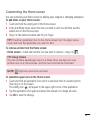 147
147
-
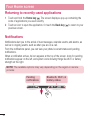 148
148
-
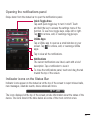 149
149
-
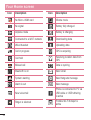 150
150
-
 151
151
-
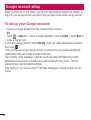 152
152
-
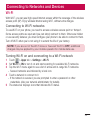 153
153
-
 154
154
-
 155
155
-
 156
156
-
 157
157
-
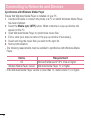 158
158
-
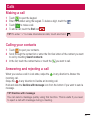 159
159
-
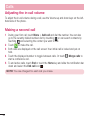 160
160
-
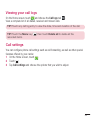 161
161
-
 162
162
-
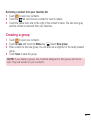 163
163
-
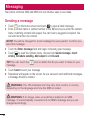 164
164
-
 165
165
-
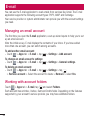 166
166
-
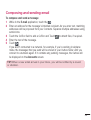 167
167
-
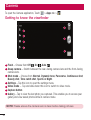 168
168
-
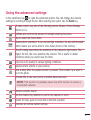 169
169
-
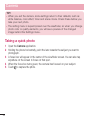 170
170
-
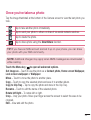 171
171
-
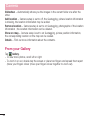 172
172
-
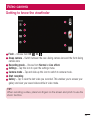 173
173
-
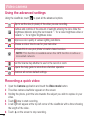 174
174
-
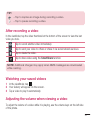 175
175
-
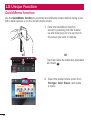 176
176
-
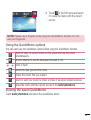 177
177
-
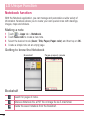 178
178
-
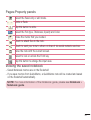 179
179
-
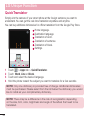 180
180
-
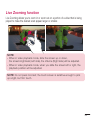 181
181
-
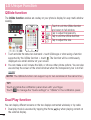 182
182
-
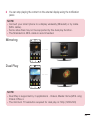 183
183
-
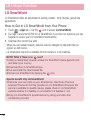 184
184
-
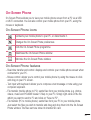 185
185
-
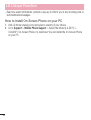 186
186
-
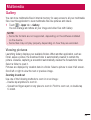 187
187
-
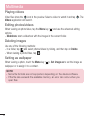 188
188
-
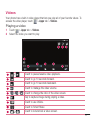 189
189
-
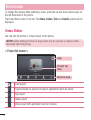 190
190
-
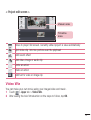 191
191
-
 192
192
-
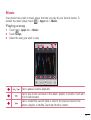 193
193
-
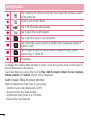 194
194
-
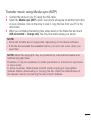 195
195
-
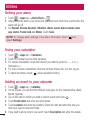 196
196
-
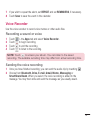 197
197
-
 198
198
-
 199
199
-
 200
200
-
 201
201
-
 202
202
-
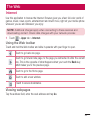 203
203
-
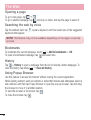 204
204
-
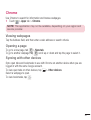 205
205
-
 206
206
-
 207
207
-
 208
208
-
 209
209
-
 210
210
-
 211
211
-
 212
212
-
 213
213
-
 214
214
-
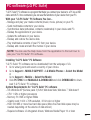 215
215
-
 216
216
-
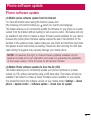 217
217
-
 218
218
-
 219
219
-
 220
220
-
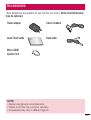 221
221
-
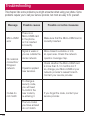 222
222
-
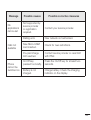 223
223
-
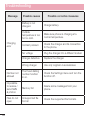 224
224
-
 225
225
-
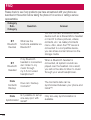 226
226
-
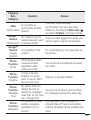 227
227
-
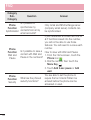 228
228
-
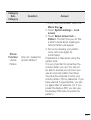 229
229
-
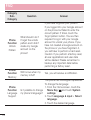 230
230
-
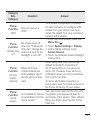 231
231
-
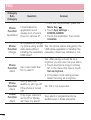 232
232
-
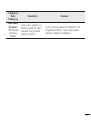 233
233
-
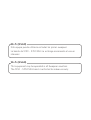 234
234
-
 235
235


in andere talen
- English: LG E975 User manual
Gerelateerde papieren
Andere documenten
-
Polaroid PRO4006PR001.BT de handleiding
-
 Bluetech MID700 GBT001 Handleiding
-
 Bluetech MID700 GBT001 Handleiding
-
Lenco Xemio 768 de handleiding
-
-
-
Difrnce MP1575 de handleiding
-
Panasonic DMC-TZ61 de handleiding
-
HP Pocket Playlist Handleiding
-
Prestigio Smartbook 133S Handleiding

