Pagina wordt geladen...
Pagina wordt geladen...

2
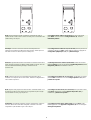
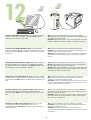
426 mm (16.7 in)
410 mm (16.14 in)
474 mm
(18.6 in)
309 mm
(12.17 in)
165 mm
(6.5 in)
17˚ - 25˚C
(62.6˚ - 77˚F)
381 mm (15.0 in)
89 mm (3.5 in)
89 mm (3.5 in)
254 mm (10 .0 in)
178 mm
(7.0 in)
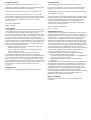
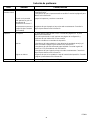
Select a sturdy, well-ventilated, dust-free area to
position the printer.
Choisissez une zone résistante, bien aérée et
exempte de poussière pour placer l’imprimante.
Stellen Sie den Drucker auf einer stabilen Fläche in
einem gut belüfteten, staubfreien Raum auf.
Posizionare la stampante su una superficie solida,
in un'area ventilata e priva di polvere
appositamente selezionata.
Coloque la impresora en una zona firme con
buena ventilación y sin polvo.
Plaats de printer op een stevig oppervlak in een
goed geventileerde, stofvrije omgeving.

3
1
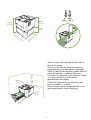
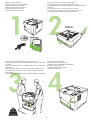
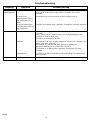
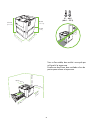
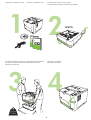
Check the contents of the box.
Vérifiez le contenu du carton d’emballage.
Überprüfen Sie den Packungsinhalt.
Verificare il contenuto della confezione.
Compruebe el contenido de la caja.
Controleer de inhoud van de doos.
2
Q7817A
If you have a tray 3, remove the tape and cardboard.
Si vous disposez d’un bac 3, retirez la bande et le carton.
Wenn Sie über ein Fach 3 verfügen, entfernen Sie den Klebestreifen und
den Karton.
Se è presente il vassoio 3, rimuovere il nastro e il cartone.
Si cuenta con una bandeja 3, quite la cinta adhesiva y el cartón.
Als u een lade 3 hebt, verwijdert u de tape en het karton.
3
16 Kg.
35 lbs.
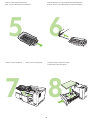
If the printer came with a tray 3, place the printer on top of it.
Si l’imprimante est livrée avec un bac d’alimentation 3, placez l’imprimante
sur ce bac.
Wenn der Drucker mit einem Fach 3 geliefert wurde, setzen Sie den Drucker
auf das Fach.
Se la stampante è dotata del vassoio 3, posizionarla sopra tale vassoio.
Si la impresora se suministra con una bandeja 3, coloque la impresora
encima de ésta.
Als de printer is geleverd met een lade 3, plaatst u de printer hier bovenop.
4
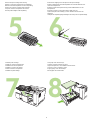
Remove all of the orange tape.
Retirez l’ensemble de la bande orange.
Entfernen Sie alle orangefarbenen Klebestreifen.
Rimuovere il nastro arancione.
Quite toda la cinta adhesiva naranja.
Verwijder alle oranje tape.
Pagina wordt geladen...

EnglishFrançaisDeutschItalianoEspañolNederlands
5
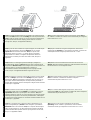
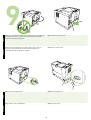
9.1) If you are connecting using a USB, plug the cable into the printer but
wait until you are prompted to install it into the computer during software
installation.
9.2) Connect the network cable.
9.1) Si vous vous connectez à l'aide d’un câble USB, branchez le câble
dans l'imprimante, puis attendez d’être invité à installer cette dernière sur
l’ordinateur lors de l’installation logicielle.
9.2) Connectez le câble réseau.
9.1) Wenn Sie einen USB-Anschluss verwenden, verbinden Sie das Kabel
mit dem Drucker, warten Sie jedoch, bis Sie während der
Softwareinstallation zum Anschluss am Computer aufgefordert werden.
9.2) Schließen Sie das Netzwerkkabel an.
9.1) Se si utilizza un collegamento USB, inserire un'estremità del cavo
nella stampante e, quando richiesto durante l'installazione del software,
inserire l'altra estremità nel computer.
9.2) Collegare il cavo di rete.
9.1) Si la conexión se va a realizar mediante USB, conecte el cable a la
impresora pero espere hasta que se le solicite si desea instalarla en el
equipo durante la instalación del software.
9.2) Conecte el cable de red.
9.1) Als u verbinding maakt via een USB-kabel, sluit u de kabel aan op de
printer. Sluit de kabel pas op de computer aan als u hierom tijdens de
installatie van de software wordt gevraagd.
9.2) Sluit de netwerkkabel aan.
Pagina wordt geladen...

EnglishFrançaisDeutschItalianoEspañolNederlands
7
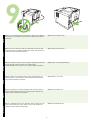
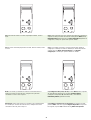
9.5) If you are prompted at the control panel, enter the language, date, and
time.
9.6) If you are connected to a network, print a configuration page and
check for a valid IP Address. On the control panel, touch Menu,
Information Menu, and Print Configuration. The IP address appears
below “TCP/IP”.
9.5) Dans le panneau de commande, indiquez la langue, la date et l’heure
si vous y êtes invité.
9.6) Si vous êtes connecté à un réseau, imprimez une page de
configuration et vérifiez que l’adresse IP est valide. Sur le panneau de
commande, appuyez sur Menu, Menu Informations et Imprimer la
configuration. L’adresse IP apparaît en dessous de « TCP/IP ».
9.5) Geben Sie die Sprache, das Datum und die Uhrzeit ein, wenn Sie
über das Bedienfeld dazu aufgefordert werden.
9.6) Drucken Sie bei einer Netzwerkverbindung eine Konfigurationsseite
aus, und überprüfen Sie, ob eine gültige IP-Adresse verwendet wird.
Wählen Sie auf dem Bedienfeld Menü, Menü „Informationen“ und
Konfigurationsseite drucken. Die IP-Adresse wird unterhalb von
„TCP/IP“ angezeigt.
9.5) Se richiesto sul pannello di controllo, specificare lingua, data e ora. 9.6) Se la periferica è collegata in rete, stampare una pagina di
configurazione e verificare la presenza di un indirizzo IP valido. Sul
pannello di controllo, toccare Menu, Menu Informazioni, quindi Stampa
configurazione. L'indirizzo IP viene visualizzato sotto "TCP/IP".
9.5) Si se le solicita en el panel de control, introduzca el idioma, la fecha y
la hora.
9.6) Si el equipo está conectado a una red, imprima una página de
configuración y busque una dirección IP válida. En el panel de control,
pulse Menú, Menú Información e Imprimir configuración. La dirección
IP aparece debajo de “TCP/IP”.
9.5) Voer de taal, datum en tijd in als u hierom in het bedieningspaneel
wordt gevraagd.
9.6) Als u bent aangesloten op een netwerk, drukt u een
configuratiepagina af en controleert u of het IP-adres juist is. Raak in het
bedieningspaneel Menu, Menu Informatie en Configuratie afdrukken
aan. Het IP-adres wordt weergegeven onder “TCP/IP”.
?
Ready Data Attention
Menu Stop
?
Ready Data Attention
Menu Stop

8
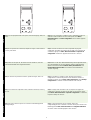
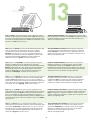
Note: Several networks provide IP addresses automatically. If the IP
address shows a series of zeros, make sure that you are connected to the
network and go to step 9.7.
9.7) Configure the IP address (if necessary). On the control panel,
press Menu. Scroll to and touch Configure Device, I/O, and then
Embedded Jetdirect.
Remarque : Plusieurs réseaux fournissent automatiquement les
adresses IP. Si l’adresse IP affiche une série de zéros, vérifiez que vous
êtes bien connecté au réseau et passez à l’étape 9.7.
9.7) Configuration de l’adresse IP (si nécessaire). Dans le panneau de
commande, appuyez sur Menu. Faites défiler les options et appuyez sur
Configuration périphérique, E/S, puis JetDirect intégré.
Hinweis: Einige Netzwerke stellen automatisch IP-Adressen bereit. Wenn
die IP-Adresse eine Reihe von Nullen enthält, stellen Sie sicher, dass Sie
über eine Netzwerkverbindung verfügen, und fahren Sie mit
Schritt 9.7 fort.
9.7) Konfiguration der IP-Adresse (bei Bedarf). Wählen Sie auf dem
Bedienfeld Menü. Suchen Sie die Optionen Gerät konfigurieren, E/A und
Integrierter Jetdirect, und wählen Sie sie aus.
Nota: numerose reti forniscono automaticamente gli indirizzi IP. Se
l'indirizzo IP è composto da una serie di zero, verificare il collegamento in
rete e andare al punto 9.7.
9.7) Configurare l'indirizzo IP (se necessario). Sul pannello di controllo,
premere Menu. Individuare e toccare Configura periferica, I/O, quindi
Jetdirect incorporato.
Nota: Algunas redes proporcionan direcciones IP automáticamente. Si en
la dirección IP aparece una serie de ceros, asegúrese de que el equipo
está conectado a la red y vaya al paso 9.7.
9.7) Configure la dirección IP (si es necesario). En el panel de control,
pulse Menú. Desplácese y pulse Configurar dispositivo, E/S y, a
continuación, Jetdirect incorporado.
Opmerking: verschillende netwerken verlenen automatisch IP-adressen.
Als het IP-adres een aantal nullen weergeeft, controleert u of u bent
aangesloten op het netwerk en gaat u naar stap 9.7.
9.7) Configureer het IP-adres (indien nodig). Druk op Menu op het
bedieningspaneel. Raak Apparaat configureren, I/O aan en vervolgens
Geïntegreerde jetdirect.
?
Ready Data Attention
Menu Stop
?
Ready Data Attention
Menu Stop
Pagina wordt geladen...

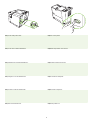
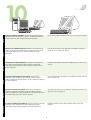
10
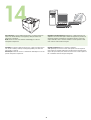
Install the software. 11.1) Insert the CD that came with the printer. On
the welcome screen, click Install Printer. The Setup Wizard appears.
Note: If the welcome screen does not appear, click Start, and then Run.
Type X:SETUP (replace X with CD-ROM drive letter), and click OK.
11.2) Follow the onscreen instructions in the Setup Wizard.
Installez le logiciel. 11.1) Insérez le CD fourni avec l’imprimante. Sur
l’écran de bienvenue, cliquez sur Installer l’imprimante. L’assistant de
configuration apparaît. Remarque : Si l’écran de bienvenue n’apparaît
pas, cliquez sur Démarrer, puis sur Exécuter. Saisissez X:SETUP (en
remplaçant X par la lettre du lecteur de CD-ROM), puis cliquez sur OK.
11.2) Suivez les instructions qui apparaissent sur l’écran de l’assistant de
configuration.
Installation der Software. 11.1) Legen Sie die im Lieferumfang des
Druckers enthaltene CD ein. Klicken Sie auf dem Begrüßungsbildschirm
auf Drucker installieren. Der Setup-Assistent wird aufgerufen.
Hinweis: Wenn der Begrüßungsbildschirm nicht angezeigt wird, klicken
Sie auf Start und anschließend auf Ausführen. Geben Sie X:SETUP ein,
wobei X für den Laufwerkbuchstaben des CD-ROM-Laufwerks steht.
Klicken Sie dann auf OK.
11.2) Folgen Sie den Anweisungen des Setup-Assistenten auf dem
Bildschirm.
Installazione del software. 11.1) Inserire il CD fornito con la stampante.
Nella schermata di benvenuto, fare clic su Installa stampante. Viene
visualizzata l'Installazione guidata. Nota: se la schermata di benvenuto
non viene visualizzata, fare clic su Start, quindi su Esegui. Digitare
X:SETUP (sostituire X con la lettera dell'unità CD-ROM), quindi fare clic su
OK.
11.2) Seguire le istruzioni visualizzate nell'Installazione guidata.
Instale el software. 11.1) Inserte el CD que se suministró con la
impresora. En la pantalla de bienvenida, haga clic en Instalar impresora.
Aparecerá el Asistente para la instalación. Nota: Si la pantalla de
bienvenida no aparece, haga clic en Inicio y, a continuación, en Ejecutar.
Escriba X:SETUP (sustituya la X por la letra correspondiente a la unidad
de CD-ROM) y haga clic en Aceptar.
11.2) Siga las instrucciones que aparezcan en la pantalla del Asistente
para la instalación.
Installeer de software. 11.1) Plaats de cd die bij de printer is geleverd.
Klik in het welkomstvenster op Printer installeren. De installatiewizard
wordt weergegeven.
Opmerking: als het welkomstvenster niet wordt
weergegeven, klikt u op Start en vervolgens op Uitvoeren. Typ X:SETUP
(vervang X door de letter van het cd-romstation) en klik op OK.
11.2) Volg de instructies op het scherm in de installatiewizard.

EnglishFrançaisDeutschItalianoEspañolNederlands
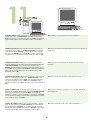
11
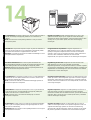
11.3) If prompted, connect a USB cable to the computer. Note: HP does
not recommend using USB hubs. Use a USB cable that is no longer than
2 meters (6.5 feet).
11.4) Click Finish. If prompted, restart the computer. Go to step 13 on
page 14.
11.3) Si vous y êtes invité, connectez un câble USB à l’ordinateur.
Remarque : HP recommande de ne pas utiliser de concentrateurs USB.
Utilisez un câble USB de moins de 2 mètres.
11.4) Cliquez sur Terminer. Si vous y êtes invité, redémarrez l’ordinateur.
Passez à l’étape 13, page 14.
11.3) Schließen Sie bei einer entsprechenden Aufforderung ein USB-
Kabel an den Drucker an. Hinweis: Die Verwendung von USB-Hubs wird
von HP nicht empfohlen. Das USB-Kabel sollte nicht länger als 2 Meter
sein.
11.4) Klicken Sie auf Fertig stellen. Starten Sie bei entsprechender
Aufforderung den Computer neu. Fahren Sie mit Schritt 13 auf Seite 14
fort.
11.3) Se richiesto, collegare un cavo USB al computer. Nota: HP
sconsiglia l'uso di hub USB. Utilizzare un cavo USB di lunghezza non
superiore a 2 metri (6,5 piedi).
11.4) Fare clic su Fine. Se richiesto, riavviare il computer. Andare al
punto 13 a pagina 14.
11.3) Si se le solicita, conecte un cable USB al equipo. Nota: HP no
recomienda el uso de concentradores USB. Utilice un cable USB que no
mida más de 2 metros (6,5 pies).
11.4) Haga clic en Finalizar. Si se le solicita, reinicie el equipo. Vaya al
paso 13 en la página 14.
11.3) Als u hierom wordt gevraagd, sluit u de USB-kabel aan op de
computer. Opmerking: wij raden u aan geen USB-hubs te gebruiken.
Gebruik een USB-kabel van maximaal 2 meter.
11.4) Klik op Voltooien. Als hierom wordt gevraagd, start u de computer
opnieuw op. Ga naar stap 13 op pagina 14.

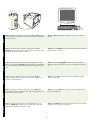
12
Connect to a Macintosh computer. 12.1) Place the CD in the CD-ROM
drive and run the installer. Complete an easy install. Note: Install the
software before connecting the USB cable.
12.2) Connect a USB cable between the printer and the computer.
Note: HP does not recommend using USB hubs. Use a USB cable that is
no longer than 2 meters (6.5 feet).
Important: Perform steps 12.3-12.7 only if the USB cable was connected
before the software was installed. Otherwise, go to step 13 on page 14.
Connexion à un ordinateur Macintosh. 12.1) Placez le CD dans le
lecteur de CD-ROM et exécutez le programme d’installation. Effectuez une
installation standard. Remarque : Installez le logiciel avant de connecter
le câble USB.
12.2) Connectez un câble USB reliant l’imprimante et l’ordinateur.
Remarque : HP recommande de ne pas utiliser de concentrateurs USB.
Utilisez un câble USB de moins de 2 mètres .
Important : Effectuez les étapes 12.3 à 12.7 uniquement si le câble USB
était connecté avant l’installation du logiciel. Sinon, passez à l’étape 13,
page 14.
Verbindung mit einem Macintosh-Computer. 12.1) Legen Sie die CD in
das CD-ROM-Laufwerk ein, und führen Sie das Installationsprogramm
aus. Führen Sie eine einfache Installation aus. Hinweis: Installieren Sie
die Software bevor Sie das USB-Kabel anschließen.
12.2) Schließen Sie ein USB-Kabel zwischen Drucker und Computer an.
Hinweis: Die Verwendung von USB-Hubs wird von HP nicht empfohlen.
Das USB-Kabel sollte nicht länger als 2 Meter sein.
Wichtig: Führen Sie die Schritte 12.3-12.7 nur dann aus, wenn das USB-
Kabel vor der Installation der Software angeschlossen wurde. Fahren Sie
andernfalls mit Schritt 13 auf Seite 14 fort.
Collegamento a un computer Macintosh. 12.1) Inserire il CD nell'unità
CD-ROM, quindi eseguire il programma di installazione. Portare a termine
un'installazione facile. Nota: installare il software prima di collegare il cavo
USB.
12.2) Collegare la stampante e il computer mediante un cavo USB.
Nota: HP sconsiglia l'uso di hub USB. Utilizzare un cavo USB di
lunghezza non superiore a 2 metri (6,5 piedi).
Importante: eseguire le operazioni descritte nei punti 12.3-12.7 solo se il
cavo USB è stato collegato prima dell'installazione del software. In caso
contrario, andare al punto 13 a pagina 14.
Conexión de la impresora a un equipo Macintosh. 12.1) Introduzca el
CD en la unidad de CD-ROM y ejecute el instalador. Realice una
instalación sencilla. Nota: Instale el software antes de conectar el cable
USB.
12.2) Conecte un cable USB entre la impresora y el equipo. Nota: HP no
recomienda el uso de concentradores USB. Utilice un cable USB que no
mida más de 2 metros (6,5 pies).
Importante: Realice los pasos del 12.3 al 12.7 sólo si el cable USB se ha
conectado antes de que se haya instalado el software. De lo contrario,
vaya al paso 13 en la página 14.
Aansluiten op een Macintosh-computer. 12.1) Plaats de cd in het
cd-romstation en voer het installatieprogramma uit. Voer een
standaardinstallatie uit. Opmerking: installeer de software voordat u de
USB-kabel aansluit.
12.2) Sluit een USB-kabel aan tussen de printer en de computer.
Opmerking: wij raden u aan geen USB-hubs te gebruiken. Gebruik een
USB-kabel van maximaal 2 meter.
Belangrijk: Voer stap 12.3-12.7 alleen uit als de USB-kabel is
aangesloten voordat de software is geïnstalleerd. Ga anders naar stap 13
op pagina 14.
Macintosh
Macintosh

EnglishFrançaisDeutschItalianoEspañolNederlands
13
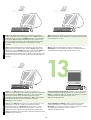
12.3) From Apple System Preferences (available in the Apple drop-down
menu) click Print, and then click the Printing tab at the top of the window.
12.4) To add your printer, click the “+” icon to launch the Printer Browser.
By default, the Printer Browser displays printers that are connected
through USB, Bonjour, and AppleTalk networking.
12.5) From the Printer Browser window, select the HP printer. Note: If
HP software is installed, the software should automatically be configured
for Macintosh OS X V 10.4.
12.3) A partir de l’écran Préférences Système d'Apple (accessible depuis
le menu déroulant Apple), cliquez sur Imprimer, puis sur l’onglet
Impression situé en haut de la fenêtre. 12.4) Pour ajouter votre
imprimante, cliquez sur l’icône « +» afin de lancer le navigateur
d’imprimantes. Par défaut, le navigateur d’imprimantes affiche les
imprimantes connectées par le biais des réseaux USB, Bonjour et
AppleTalk.
12.5) Depuis la fenêtre du navigateur d’imprimantes, sélectionnez
l’imprimante HP. Remarque : Si le logiciel HP est installé, ce dernier doit
automatiquement être configuré pour Macintosh OS X v 10.4.
12.3) Klicken Sie in den Apple-Systemeinstellungen (verfügbar im
Dropdown-Menü „Apple“) auf Druck und dann oben im Fenster auf die
Registerkarte Drucken. 12.4) Zum Hinzufügen Ihres Druckers klicken Sie
auf das Symbol „+“, um den Druckerbrowser zu starten. Im
Druckerbrowser werden standardmäßig Drucker angezeigt, die über
USB-, Bonjour- und AppleTalk-Netzwerke angeschlossen sind.
12.5) Wählen Sie im Druckerbrowser-Fenster den HP Drucker aus.
Hinweis: Wenn HP Software installiert ist, sollte die Software automatisch
für Macintosh OS X 10.4 konfiguriert werden.
12.3) Da Preferenze di Sistema (selezionabile nel menu a discesa Apple),
fare clic su Stampa, quindi sulla scheda Stampa nella parte superiore
della finestra. 12.4) Per aggiungere la stampante, fare clic sull'icona "+"
per avviare il browser delle stampanti. Per impostazione predefinita, il
browser delle stampanti visualizza le stampanti collegate in rete mediante
USB, Bonjour e AppleTalk.
12.5) Nella finestra Browser Stampanti, selezionare la stampante HP.
Nota: se è installato, il software HP dovrebbe configurarsi
automaticamente per Macintosh OS X V 10.4.
12.3) En Preferencias del Sistema de Apple (situadas en el menú
desplegable Apple) haga clic en Imprimir y, a continuación, en la ficha
Imprimiendo situada en la parte superior de la ventana. 12.4) Para
agregar la impresora, haga clic en el icono del signo más “+” para ejecutar
el Navegador de Impresoras. De manera predeterminada, el Navegador
de Impresoras muestra impresoras conectadas mediante sistemas de red
USB, Bonjour y AppleTalk.
12.5) En la ventana del Navegador de Impresoras, seleccione la
impresora HP. Nota: Si se ha instalado el software HP, debe configurarse
automáticamente para Macintosh OS X V 10.4.
12.3) Klik in het Apple-menu Systeemvoorkeuren (beschikbaar in de
Apple-vervolgkeuzelijst) op Druk af en klik vervolgens op het tabblad
Afdrukken boven aan het venster. 12.4) Als u uw printer wilt toevoegen,
klikt u op het pictogram “+” om de Printerselectie te starten. Standaard
geeft de Printerselectie printers weer die zijn aangesloten via een USB-,
Bonjour- en AppleTalk-netwerk.
12.5) Selecteer in het venster Printerselectie de HP-printer.
Opmerking: als HP-software is geïnstalleerd, moet de software
automatisch worden geconfigureerd voor Macintosh OS X V 10.4.
Macintosh Macintosh

14
12.6) Click Add to create a printer queue, and then follow the prompt to
manually configure the printer’s installable options. Note: Macintosh OS X
V 10.2 and V 10.3 might require you to manually select the printer model
from the Printer Model drop-down menu. 12.7) Under Model Name, select
the printer, click Add, and go to step 13.
Test the software installation. Print a page from any program to make
sure that the software is installed correctly. Note: If the page failed to print,
reinstall the software. If the page fails to print after reinstalling, go to
www.hp.com/support/LJP3005.
12.6) Cliquez sur Ajouter pour créer une file d’attente d’impression, puis
suivez les instructions qui apparaissent à l’écran pour configurer
manuellement les options de l’imprimante pouvant être installées.
Remarque : Macintosh OS X v 10.2 et v 10.3 peuvent nécessiter de
sélectionner manuellement le modèle de l’imprimante à partir du menu
déroulant Modèle d’imprimante. 12.7) Sous Modèle, sélectionnez
l’imprimante, cliquez sur Ajouter, puis passez à l’étape 13.
Test de l’installation du logiciel. Imprimez une page à partir d’un
programme quelconque pour vérifier que le logiciel est correctement
installé. Remarque : si l’impression échoue, réinstallez le logiciel. Si
l’impression échoue encore après la réinstallation du logiciel, allez sur
www.hp.com/support/LJP3005.
12.6) Klicken Sie auf Hinzufügen, um eine Druckerwarteschlange zu
erstellen, und folgen Sie dann der Aufforderung zur manuellen
Konfiguration der Optionen, die für den Drucker installiert werden können.
Hinweis: Für Macintosh OS V 10.2 und 10.3 müssen Sie eventuell das
Druckermodell manuell aus dem Dropdown-Menü „Druckermodell“
auswählen. 12.7) Wählen Sie unter „Modellname“ den Drucker aus,
klicken Sie auf Hinzufügen, und fahren Sie mit Schritt 13 fort.
Prüfen der Softwareinstallation. Drucken Sie eine Seite über ein
beliebiges Programm aus, um sicherzustellen, dass die Software
ordnungsgemäß installiert wurde. Hinweis: Installieren Sie bei
Fehlschlagen des Ausdrucks der Seite die Software erneut. Wenn die
Seite nach einer erneuten Installation nicht ausgedruckt werden kann,
informieren Sie sich unter www.hp.com/support/LJP3005.
12.6) Fare clic su Aggiungi per creare una coda di stampa, quindi seguire
le indicazioni per configurare manualmente le opzioni installabili della
stampante. Nota: in Macintosh OS X V 10.2 e V 10.3, è possibile che
venga richiesto di selezionare manualmente il modello della stampante nel
menu a discesa Modello Stampante. 12.7) In Nome Modello, selezionare
la stampante, fare clic su Aggiungi, quindi andare al punto 13.
Test dell'installazione del software. Stampare una pagina da un
programma qualsiasi per assicurarsi che il software sia installato
correttamente. Nota: se la pagina non viene stampata, reinstallare il
software. Se la pagina non viene stampata successivamente alla
reinstallazione, visitare il sito Web www.hp.com/support/LJP3005.
12.6) Haga clic en Añadir para crear una cola de impresión y siga a
continuación las instrucciones para configurar manualmente las opciones
instalables de la impresora. Nota:
Es posible que para Macintosh OS X
V 10.2 y V 10.3 tenga que seleccionar manualmente el modelo de la
impresora en el menú desplegable Modelo de impresora. 12.7) En la lista
de modelos de impresora, seleccione la impresora, haga clic en Añadir y
vaya al paso 13.
Pruebe la instalación del software. Imprima una página desde cualquier
programa para asegurarse de que el software se instaló correctamente.
Nota: Si la página no se imprime correctamente, vuelva a instalar el
software. Si después de reinstalarlo, la página sigue sin imprimirse, visite
www.hp.com/support/LJP3005.
12.6) Klik op Voeg toe als u een printerwachtrij wilt maken en volg de
aanwijzingen voor het handmatig configureren van de installeerbare opties
van de printer. Opmerking: voor Macintosh OS X V 10.2 en V 10.3 kan
het nodig zijn dat u het printermodel handmatig moet selecteren in de
vervolgkeuzelijst Printermodel. 12.7) Selecteer onder Modelnaam de
printer, klik op Voeg toe en ga naar stap 13.
Test de installatie van de software. Druk een pagina af vanuit een
willekeurig programma om te controleren of de software correct is
geïnstalleerd. Opmerking: als de pagina niet kan worden afgedrukt,
installeert u de software opnieuw. Als de pagina na het opnieuw
installeren niet kan worden afgedrukt, gaat u naar
www.hp.com/support/LJP3005.
Macintosh

EnglishFrançaisDeutschItalianoEspañolNederlands
15
Congratulations! The printer is ready to use. The user guide is located on
the CD. See www.hp.com/support/LJP3005 for more information or
support.
Note: Save the boxes and the packing materials in case you need to
transport the printer.
Register your printer. Register at www.register.hp.com. This is the
quickest and easiest way for you to register to receive the following
information: technical support updates, enhanced support options, ideas
and ways to use your new HP printer, and news about emerging
technologies.
Félicitations ! L’imprimante est prête à l’emploi. Le guide de l’utilisateur se
trouve sur le CD. Rendez-vous sur le site www.hp.com/support/LJP3005
pour obtenir des informations supplémentaires ou de l’aide.
Remarque : Conservez les cartons et les matériaux d’emballage en cas de
transport éventuel de l’imprimante.
Enregistrement de l’imprimante. Enregistrez l’imprimante sur
www.register.hp.com. Il s’agit de la méthode la plus simple et la plus
rapide pour enregistrer l’imprimante afin de recevoir les informations
suivantes : mises à jour de l’assistance technique, options d’assistance
avancées, idées et méthodes d’utilisation de votre nouvelle
imprimante HP, ainsi que des nouvelles sur les technologies émergentes.
Herzlichen Glückwunsch! Der Drucker ist jetzt einsatzbereit. Das
Benutzerhandbuch befindet sich auf der CD. Weitere Informationen oder
Unterstützung erhalten Sie unter www.hp.com/support/LJP3005.
Hinweis: Bewahren Sie die Kartons und das Verpackungsmaterial auf,
falls Sie den Drucker transportieren müssen.
Registrierung des Druckers. Registrieren Sie Ihren Drucker unter
www.register.hp.com. Dies ist die schnellste und einfachste
Registrierungsmethode, um folgende Informationen zu erhalten: Updates
zur technischen Unterstützung, erweiterte Unterstützung, Vorschläge und
Möglichkeiten zur Verwendung Ihres neuen HP Druckers sowie aktuelle
Informationen zu neuen Technologien.
Congratulazioni. La stampante è pronta per l'uso. La Guida dell'utente è
contenuta nel CD. Per ulteriori informazioni o assistenza, visitare il sito
Web www.hp.com/support/LJP3005.
Nota: conservare le confezioni e il materiale di imballaggio qualora sia
necessario trasportare la stampante.
Registrazione della stampante. Registrarsi al sito www.register.hp.com è
il modo più veloce e facile di registrare i propri dati e ricevere le seguenti
informazioni: aggiornamenti su assistenza tecnica, opzioni di assistenza
avanzate, idee e modi di utilizzare la nuova stampante HP, nonché novità
su tecnologie emergenti.
¡Enhorabuena! La impresora está lista para su uso. La guía del usuario
se encuentra en el CD. Consulte www.hp.com/support/LJP3005 para
obtener más información o asistencia técnica.
Nota: Guarde las cajas y el material de embalaje por si necesita
transportar la impresora.
Registre la impresora. Regístrese en www.register.hp.com. Éste es el
modo más rápido y sencillo de registrarse para recibir la siguiente
información: actualizaciones de asistencia técnica, opciones de asistencia
mejoradas, ideas y modos de usar su nueva impresora HP y novedades
sobre las tecnologías emergentes.
Gefeliciteerd! De printer is klaar voor gebruik. De gebruikershandleiding
vindt u op de cd. Raadpleeg www.hp.com/support/LJP3005 voor meer
informatie of ondersteuning.
Opmerking bewaar de dozen en het verpakkingsmateriaal voor het geval
u de printer moet vervoeren.
Registreer de printer. Registreer op www.register.hp.com. Dit is de
snelste en eenvoudigste manier om uw printer te registreren zodat u de
volgende informatie krijgt: updates voor technische ondersteuning,
geavanceerde ondersteuningsopties, ideeën en manieren om de nieuwe
HP-printer te gebruiken en informatie over de nieuwste technologieën.
Pagina wordt geladen...
Pagina wordt geladen...
Pagina wordt geladen...
Pagina wordt geladen...
Pagina wordt geladen...

21
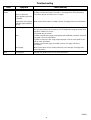
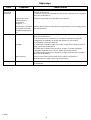
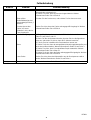
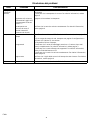
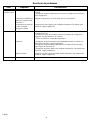
Probleemoplossing
Omgeving Symptoom Oorzaak/oplossing
Display van
bedieningspaneel
Leeg 1) Controleer of de stroomkabel is aangesloten op een werkend stopcontact.
2) Controleer of de printer is ingeschakeld. Zie pagina 6 voor meer
informatie.
De knop op het
aanraakscherm wordt in
grijs weergegevn met “!”-
tekens
Schakel de printer uit en schakel de printer vervolgens weer in.
De printer herkent geen
Letter-/A4-papier dat in de
lade is geplaatst
Controleer of het papier goed is geplaatst. Zie pagina 4 voor meer informatie.
Afdrukken Niet afdrukken 1) Controleer het netwerk of de USB-kabel. Zie pagina 5 of 11 voor meer
informatie.
2) Als u afdrukt via een netwerk, drukt u een configuratiepagina af en
controleert u of het IP-adres juist is.
3) Installeer de printerdriver opnieuw.
Storingen 1) Controleer of de oranje verpakkingstape en het karton zijn verwijderd. Zie
pagina 3 voor meer informatie.
2) Controleer of u ondersteund papier gebruikt. Raadpleeg de
gebruikershandleiding op de cd voor meer informatie.
3) Controleer of het papier goed is geplaatst. Zie pagina 4 voor meer
informatie.
Lege pagina’s Controleer of de strip is verwijderd van de printcartridge. Zie pagina 4 voor
meer informatie.
Overig Alle symptomen Raadpleeg de gebruikershandleiding op de cd voor meer informatie.
NLWW
Pagina wordt geladen...
Pagina wordt geladen...
Pagina wordt geladen...
Pagina wordt geladen...
Pagina wordt geladen...
Pagina wordt geladen...
Pagina wordt geladen...
Pagina wordt geladen...
Pagina wordt geladen...
Pagina wordt geladen...
Pagina wordt geladen...
Pagina wordt geladen...
Pagina wordt geladen...
Pagina wordt geladen...
Documenttranscriptie
17˚ - 25˚C (62.6˚ - 77˚F) 309 mm (12.17 in) 474 mm (18.6 in) 165 mm (6.5 in) 42 6 mm (1 6. in 4 ) 10 mm 254 mm (10.0 in) 89 mm 7 (1 (3.5 i n) 6. 14 in ) 89 m m Select a sturdy, well-ventilated, dust-free area to position the printer. Choisissez une zone résistante, bien aérée et exempte de poussière pour placer l’imprimante. Stellen Sie den Drucker auf einer stabilen Fläche in einem gut belüfteten, staubfreien Raum auf. Posizionare la stampante su una superficie solida, in un'area ventilata e priva di polvere appositamente selezionata. Coloque la impresora en una zona firme con buena ventilación y sin polvo. Plaats de printer op een stevig oppervlak in een goed geventileerde, stofvrije omgeving. (3.5 i n) mm 8 ) 7 1 in 0 (7. n) 1 38 mm i .0 (15 2 Check the contents of the box. Vérifiez le contenu du carton d’emballage. Überprüfen Sie den Packungsinhalt. Verificare il contenuto della confezione. Compruebe el contenido de la caja. Controleer de inhoud van de doos. If you have a tray 3, remove the tape and cardboard. Si vous disposez d’un bac 3, retirez la bande et le carton. Wenn Sie über ein Fach 3 verfügen, entfernen Sie den Klebestreifen und den Karton. Se è presente il vassoio 3, rimuovere il nastro e il cartone. Si cuenta con una bandeja 3, quite la cinta adhesiva y el cartón. Als u een lade 3 hebt, verwijdert u de tape en het karton. 1 2 If the printer came with a tray 3, place the printer on top of it. Si l’imprimante est livrée avec un bac d’alimentation 3, placez l’imprimante sur ce bac. Wenn der Drucker mit einem Fach 3 geliefert wurde, setzen Sie den Drucker auf das Fach. Se la stampante è dotata del vassoio 3, posizionarla sopra tale vassoio. Si la impresora se suministra con una bandeja 3, coloque la impresora encima de ésta. Als de printer is geleverd met een lade 3, plaatst u de printer hier bovenop. Q7817A Remove all of the orange tape. Retirez l’ensemble de la bande orange. Entfernen Sie alle orangefarbenen Klebestreifen. Rimuovere il nastro arancione. Quite toda la cinta adhesiva naranja. Verwijder alle oranje tape. 4 3 16 Kg. 35 lbs. 3 9.2) Connect the network cable. 9.1) Si vous vous connectez à l'aide d’un câble USB, branchez le câble dans l'imprimante, puis attendez d’être invité à installer cette dernière sur l’ordinateur lors de l’installation logicielle. 9.2) Connectez le câble réseau. 9.1) Wenn Sie einen USB-Anschluss verwenden, verbinden Sie das Kabel mit dem Drucker, warten Sie jedoch, bis Sie während der Softwareinstallation zum Anschluss am Computer aufgefordert werden. 9.2) Schließen Sie das Netzwerkkabel an. 9.1) Se si utilizza un collegamento USB, inserire un'estremità del cavo nella stampante e, quando richiesto durante l'installazione del software, inserire l'altra estremità nel computer. 9.2) Collegare il cavo di rete. 9.1) Si la conexión se va a realizar mediante USB, conecte el cable a la impresora pero espere hasta que se le solicite si desea instalarla en el equipo durante la instalación del software. 9.2) Conecte el cable de red. 9.1) Als u verbinding maakt via een USB-kabel, sluit u de kabel aan op de printer. Sluit de kabel pas op de computer aan als u hierom tijdens de installatie van de software wordt gevraagd. 9.2) Sluit de netwerkkabel aan. Nederlands Español Italiano Deutsch Français English 9.1) If you are connecting using a USB, plug the cable into the printer but wait until you are prompted to install it into the computer during software installation. 5 ? ? Menu Ready Stop Data Menu Attention Ready Stop Data Attention 9.6) If you are connected to a network, print a configuration page and check for a valid IP Address. On the control panel, touch Menu, Information Menu, and Print Configuration. The IP address appears below “TCP/IP”. 9.5) Dans le panneau de commande, indiquez la langue, la date et l’heure si vous y êtes invité. 9.6) Si vous êtes connecté à un réseau, imprimez une page de configuration et vérifiez que l’adresse IP est valide. Sur le panneau de commande, appuyez sur Menu, Menu Informations et Imprimer la configuration. L’adresse IP apparaît en dessous de « TCP/IP ». 9.5) Geben Sie die Sprache, das Datum und die Uhrzeit ein, wenn Sie über das Bedienfeld dazu aufgefordert werden. 9.6) Drucken Sie bei einer Netzwerkverbindung eine Konfigurationsseite aus, und überprüfen Sie, ob eine gültige IP-Adresse verwendet wird. Wählen Sie auf dem Bedienfeld Menü, Menü „Informationen“ und Konfigurationsseite drucken. Die IP-Adresse wird unterhalb von „TCP/IP“ angezeigt. 9.5) Se richiesto sul pannello di controllo, specificare lingua, data e ora. 9.6) Se la periferica è collegata in rete, stampare una pagina di configurazione e verificare la presenza di un indirizzo IP valido. Sul pannello di controllo, toccare Menu, Menu Informazioni, quindi Stampa configurazione. L'indirizzo IP viene visualizzato sotto "TCP/IP". 9.5) Si se le solicita en el panel de control, introduzca el idioma, la fecha y la hora. 9.6) Si el equipo está conectado a una red, imprima una página de configuración y busque una dirección IP válida. En el panel de control, pulse Menú, Menú Información e Imprimir configuración. La dirección IP aparece debajo de “TCP/IP”. 9.5) Voer de taal, datum en tijd in als u hierom in het bedieningspaneel wordt gevraagd. 9.6) Als u bent aangesloten op een netwerk, drukt u een configuratiepagina af en controleert u of het IP-adres juist is. Raak in het bedieningspaneel Menu, Menu Informatie en Configuratie afdrukken aan. Het IP-adres wordt weergegeven onder “TCP/IP”. Nederlands Español Italiano Deutsch Français English 9.5) If you are prompted at the control panel, enter the language, date, and time. 7 ? ? Menu Ready Stop Data Menu Attention Ready Stop Data Attention Note: Several networks provide IP addresses automatically. If the IP address shows a series of zeros, make sure that you are connected to the network and go to step 9.7. 9.7) Configure the IP address (if necessary). On the control panel, press Menu. Scroll to and touch Configure Device, I/O, and then Embedded Jetdirect. Remarque : Plusieurs réseaux fournissent automatiquement les adresses IP. Si l’adresse IP affiche une série de zéros, vérifiez que vous êtes bien connecté au réseau et passez à l’étape 9.7. 9.7) Configuration de l’adresse IP (si nécessaire). Dans le panneau de commande, appuyez sur Menu. Faites défiler les options et appuyez sur Configuration périphérique, E/S, puis JetDirect intégré. Hinweis: Einige Netzwerke stellen automatisch IP-Adressen bereit. Wenn die IP-Adresse eine Reihe von Nullen enthält, stellen Sie sicher, dass Sie über eine Netzwerkverbindung verfügen, und fahren Sie mit Schritt 9.7 fort. 9.7) Konfiguration der IP-Adresse (bei Bedarf). Wählen Sie auf dem Bedienfeld Menü. Suchen Sie die Optionen Gerät konfigurieren, E/A und Integrierter Jetdirect, und wählen Sie sie aus. Nota: numerose reti forniscono automaticamente gli indirizzi IP. Se l'indirizzo IP è composto da una serie di zero, verificare il collegamento in rete e andare al punto 9.7. 9.7) Configurare l'indirizzo IP (se necessario). Sul pannello di controllo, premere Menu. Individuare e toccare Configura periferica, I/O, quindi Jetdirect incorporato. Nota: Algunas redes proporcionan direcciones IP automáticamente. Si en la dirección IP aparece una serie de ceros, asegúrese de que el equipo está conectado a la red y vaya al paso 9.7. 9.7) Configure la dirección IP (si es necesario). En el panel de control, pulse Menú. Desplácese y pulse Configurar dispositivo, E/S y, a continuación, Jetdirect incorporado. Opmerking: verschillende netwerken verlenen automatisch IP-adressen. Als het IP-adres een aantal nullen weergeeft, controleert u of u bent aangesloten op het netwerk en gaat u naar stap 9.7. 9.7) Configureer het IP-adres (indien nodig). Druk op Menu op het bedieningspaneel. Raak Apparaat configureren, I/O aan en vervolgens Geïntegreerde jetdirect. 8 Install the software. 11.1) Insert the CD that came with the printer. On the welcome screen, click Install Printer. The Setup Wizard appears. Note: If the welcome screen does not appear, click Start, and then Run. Type X:SETUP (replace X with CD-ROM drive letter), and click OK. 11.2) Follow the onscreen instructions in the Setup Wizard. Installez le logiciel. 11.1) Insérez le CD fourni avec l’imprimante. Sur l’écran de bienvenue, cliquez sur Installer l’imprimante. L’assistant de configuration apparaît. Remarque : Si l’écran de bienvenue n’apparaît pas, cliquez sur Démarrer, puis sur Exécuter. Saisissez X:SETUP (en remplaçant X par la lettre du lecteur de CD-ROM), puis cliquez sur OK. 11.2) Suivez les instructions qui apparaissent sur l’écran de l’assistant de configuration. Installation der Software. 11.1) Legen Sie die im Lieferumfang des Druckers enthaltene CD ein. Klicken Sie auf dem Begrüßungsbildschirm auf Drucker installieren. Der Setup-Assistent wird aufgerufen. Hinweis: Wenn der Begrüßungsbildschirm nicht angezeigt wird, klicken Sie auf Start und anschließend auf Ausführen. Geben Sie X:SETUP ein, wobei X für den Laufwerkbuchstaben des CD-ROM-Laufwerks steht. Klicken Sie dann auf OK. 11.2) Folgen Sie den Anweisungen des Setup-Assistenten auf dem Bildschirm. Installazione del software. 11.1) Inserire il CD fornito con la stampante. Nella schermata di benvenuto, fare clic su Installa stampante. Viene visualizzata l'Installazione guidata. Nota: se la schermata di benvenuto non viene visualizzata, fare clic su Start, quindi su Esegui. Digitare X:SETUP (sostituire X con la lettera dell'unità CD-ROM), quindi fare clic su OK. 11.2) Seguire le istruzioni visualizzate nell'Installazione guidata. Instale el software. 11.1) Inserte el CD que se suministró con la impresora. En la pantalla de bienvenida, haga clic en Instalar impresora. Aparecerá el Asistente para la instalación. Nota: Si la pantalla de bienvenida no aparece, haga clic en Inicio y, a continuación, en Ejecutar. Escriba X:SETUP (sustituya la X por la letra correspondiente a la unidad de CD-ROM) y haga clic en Aceptar. 11.2) Siga las instrucciones que aparezcan en la pantalla del Asistente para la instalación. Installeer de software. 11.1) Plaats de cd die bij de printer is geleverd. Klik in het welkomstvenster op Printer installeren. De installatiewizard wordt weergegeven. Opmerking: als het welkomstvenster niet wordt weergegeven, klikt u op Start en vervolgens op Uitvoeren. Typ X:SETUP (vervang X door de letter van het cd-romstation) en klik op OK. 11.2) Volg de instructies op het scherm in de installatiewizard. 10 11.4) Click Finish. If prompted, restart the computer. Go to step 13 on page 14. 11.3) Si vous y êtes invité, connectez un câble USB à l’ordinateur. Remarque : HP recommande de ne pas utiliser de concentrateurs USB. Utilisez un câble USB de moins de 2 mètres. 11.4) Cliquez sur Terminer. Si vous y êtes invité, redémarrez l’ordinateur. Passez à l’étape 13, page 14. 11.3) Schließen Sie bei einer entsprechenden Aufforderung ein USBKabel an den Drucker an. Hinweis: Die Verwendung von USB-Hubs wird von HP nicht empfohlen. Das USB-Kabel sollte nicht länger als 2 Meter sein. 11.4) Klicken Sie auf Fertig stellen. Starten Sie bei entsprechender Aufforderung den Computer neu. Fahren Sie mit Schritt 13 auf Seite 14 fort. 11.3) Se richiesto, collegare un cavo USB al computer. Nota: HP sconsiglia l'uso di hub USB. Utilizzare un cavo USB di lunghezza non superiore a 2 metri (6,5 piedi). 11.4) Fare clic su Fine. Se richiesto, riavviare il computer. Andare al punto 13 a pagina 14. 11.3) Si se le solicita, conecte un cable USB al equipo. Nota: HP no recomienda el uso de concentradores USB. Utilice un cable USB que no mida más de 2 metros (6,5 pies). 11.4) Haga clic en Finalizar. Si se le solicita, reinicie el equipo. Vaya al paso 13 en la página 14. 11.3) Als u hierom wordt gevraagd, sluit u de USB-kabel aan op de computer. Opmerking: wij raden u aan geen USB-hubs te gebruiken. Gebruik een USB-kabel van maximaal 2 meter. 11.4) Klik op Voltooien. Als hierom wordt gevraagd, start u de computer opnieuw op. Ga naar stap 13 op pagina 14. Nederlands Español Italiano Deutsch Français English 11.3) If prompted, connect a USB cable to the computer. Note: HP does not recommend using USB hubs. Use a USB cable that is no longer than 2 meters (6.5 feet). 11 Macintosh Macintosh Connect to a Macintosh computer. 12.1) Place the CD in the CD-ROM drive and run the installer. Complete an easy install. Note: Install the software before connecting the USB cable. 12.2) Connect a USB cable between the printer and the computer. Note: HP does not recommend using USB hubs. Use a USB cable that is no longer than 2 meters (6.5 feet). Important: Perform steps 12.3-12.7 only if the USB cable was connected before the software was installed. Otherwise, go to step 13 on page 14. Connexion à un ordinateur Macintosh. 12.1) Placez le CD dans le lecteur de CD-ROM et exécutez le programme d’installation. Effectuez une installation standard. Remarque : Installez le logiciel avant de connecter le câble USB. 12.2) Connectez un câble USB reliant l’imprimante et l’ordinateur. Remarque : HP recommande de ne pas utiliser de concentrateurs USB. Utilisez un câble USB de moins de 2 mètres . Important : Effectuez les étapes 12.3 à 12.7 uniquement si le câble USB était connecté avant l’installation du logiciel. Sinon, passez à l’étape 13, page 14. Verbindung mit einem Macintosh-Computer. 12.1) Legen Sie die CD in das CD-ROM-Laufwerk ein, und führen Sie das Installationsprogramm aus. Führen Sie eine einfache Installation aus. Hinweis: Installieren Sie die Software bevor Sie das USB-Kabel anschließen. 12.2) Schließen Sie ein USB-Kabel zwischen Drucker und Computer an. Hinweis: Die Verwendung von USB-Hubs wird von HP nicht empfohlen. Das USB-Kabel sollte nicht länger als 2 Meter sein. Wichtig: Führen Sie die Schritte 12.3-12.7 nur dann aus, wenn das USBKabel vor der Installation der Software angeschlossen wurde. Fahren Sie andernfalls mit Schritt 13 auf Seite 14 fort. Collegamento a un computer Macintosh. 12.1) Inserire il CD nell'unità CD-ROM, quindi eseguire il programma di installazione. Portare a termine un'installazione facile. Nota: installare il software prima di collegare il cavo USB. 12.2) Collegare la stampante e il computer mediante un cavo USB. Nota: HP sconsiglia l'uso di hub USB. Utilizzare un cavo USB di lunghezza non superiore a 2 metri (6,5 piedi). Importante: eseguire le operazioni descritte nei punti 12.3-12.7 solo se il cavo USB è stato collegato prima dell'installazione del software. In caso contrario, andare al punto 13 a pagina 14. Conexión de la impresora a un equipo Macintosh. 12.1) Introduzca el CD en la unidad de CD-ROM y ejecute el instalador. Realice una instalación sencilla. Nota: Instale el software antes de conectar el cable USB. 12.2) Conecte un cable USB entre la impresora y el equipo. Nota: HP no recomienda el uso de concentradores USB. Utilice un cable USB que no mida más de 2 metros (6,5 pies). Importante: Realice los pasos del 12.3 al 12.7 sólo si el cable USB se ha conectado antes de que se haya instalado el software. De lo contrario, vaya al paso 13 en la página 14. Aansluiten op een Macintosh-computer. 12.1) Plaats de cd in het cd-romstation en voer het installatieprogramma uit. Voer een standaardinstallatie uit. Opmerking: installeer de software voordat u de USB-kabel aansluit. 12.2) Sluit een USB-kabel aan tussen de printer en de computer. Opmerking: wij raden u aan geen USB-hubs te gebruiken. Gebruik een USB-kabel van maximaal 2 meter. Belangrijk: Voer stap 12.3-12.7 alleen uit als de USB-kabel is aangesloten voordat de software is geïnstalleerd. Ga anders naar stap 13 op pagina 14. 12 12.5) From the Printer Browser window, select the HP printer. Note: If HP software is installed, the software should automatically be configured for Macintosh OS X V 10.4. 12.3) A partir de l’écran Préférences Système d'Apple (accessible depuis le menu déroulant Apple), cliquez sur Imprimer, puis sur l’onglet Impression situé en haut de la fenêtre. 12.4) Pour ajouter votre imprimante, cliquez sur l’icône « + » afin de lancer le navigateur d’imprimantes. Par défaut, le navigateur d’imprimantes affiche les imprimantes connectées par le biais des réseaux USB, Bonjour et AppleTalk. 12.5) Depuis la fenêtre du navigateur d’imprimantes, sélectionnez l’imprimante HP. Remarque : Si le logiciel HP est installé, ce dernier doit automatiquement être configuré pour Macintosh OS X v 10.4. 12.3) Klicken Sie in den Apple-Systemeinstellungen (verfügbar im Dropdown-Menü „Apple“) auf Druck und dann oben im Fenster auf die Registerkarte Drucken. 12.4) Zum Hinzufügen Ihres Druckers klicken Sie auf das Symbol „+“, um den Druckerbrowser zu starten. Im Druckerbrowser werden standardmäßig Drucker angezeigt, die über USB-, Bonjour- und AppleTalk-Netzwerke angeschlossen sind. 12.5) Wählen Sie im Druckerbrowser-Fenster den HP Drucker aus. Hinweis: Wenn HP Software installiert ist, sollte die Software automatisch für Macintosh OS X 10.4 konfiguriert werden. 12.3) Da Preferenze di Sistema (selezionabile nel menu a discesa Apple), fare clic su Stampa, quindi sulla scheda Stampa nella parte superiore della finestra. 12.4) Per aggiungere la stampante, fare clic sull'icona "+" per avviare il browser delle stampanti. Per impostazione predefinita, il browser delle stampanti visualizza le stampanti collegate in rete mediante USB, Bonjour e AppleTalk. 12.5) Nella finestra Browser Stampanti, selezionare la stampante HP. Nota: se è installato, il software HP dovrebbe configurarsi automaticamente per Macintosh OS X V 10.4. 12.3) En Preferencias del Sistema de Apple (situadas en el menú desplegable Apple) haga clic en Imprimir y, a continuación, en la ficha Imprimiendo situada en la parte superior de la ventana. 12.4) Para agregar la impresora, haga clic en el icono del signo más “+” para ejecutar el Navegador de Impresoras. De manera predeterminada, el Navegador de Impresoras muestra impresoras conectadas mediante sistemas de red USB, Bonjour y AppleTalk. 12.5) En la ventana del Navegador de Impresoras, seleccione la impresora HP. Nota: Si se ha instalado el software HP, debe configurarse automáticamente para Macintosh OS X V 10.4. 12.3) Klik in het Apple-menu Systeemvoorkeuren (beschikbaar in de Apple-vervolgkeuzelijst) op Druk af en klik vervolgens op het tabblad Afdrukken boven aan het venster. 12.4) Als u uw printer wilt toevoegen, klikt u op het pictogram “+” om de Printerselectie te starten. Standaard geeft de Printerselectie printers weer die zijn aangesloten via een USB-, Bonjour- en AppleTalk-netwerk. 12.5) Selecteer in het venster Printerselectie de HP-printer. Opmerking: als HP-software is geïnstalleerd, moet de software automatisch worden geconfigureerd voor Macintosh OS X V 10.4. Nederlands Español Français English 12.3) From Apple System Preferences (available in the Apple drop-down menu) click Print, and then click the Printing tab at the top of the window. 12.4) To add your printer, click the “+” icon to launch the Printer Browser. By default, the Printer Browser displays printers that are connected through USB, Bonjour, and AppleTalk networking. Deutsch Macintosh Italiano Macintosh 13 Macintosh 12.6) Click Add to create a printer queue, and then follow the prompt to manually configure the printer’s installable options. Note: Macintosh OS X V 10.2 and V 10.3 might require you to manually select the printer model from the Printer Model drop-down menu. 12.7) Under Model Name, select the printer, click Add, and go to step 13. Test the software installation. Print a page from any program to make sure that the software is installed correctly. Note: If the page failed to print, reinstall the software. If the page fails to print after reinstalling, go to www.hp.com/support/LJP3005. 12.6) Cliquez sur Ajouter pour créer une file d’attente d’impression, puis suivez les instructions qui apparaissent à l’écran pour configurer manuellement les options de l’imprimante pouvant être installées. Remarque : Macintosh OS X v 10.2 et v 10.3 peuvent nécessiter de sélectionner manuellement le modèle de l’imprimante à partir du menu déroulant Modèle d’imprimante. 12.7) Sous Modèle, sélectionnez l’imprimante, cliquez sur Ajouter, puis passez à l’étape 13. Test de l’installation du logiciel. Imprimez une page à partir d’un programme quelconque pour vérifier que le logiciel est correctement installé. Remarque : si l’impression échoue, réinstallez le logiciel. Si l’impression échoue encore après la réinstallation du logiciel, allez sur www.hp.com/support/LJP3005. 12.6) Klicken Sie auf Hinzufügen, um eine Druckerwarteschlange zu erstellen, und folgen Sie dann der Aufforderung zur manuellen Konfiguration der Optionen, die für den Drucker installiert werden können. Hinweis: Für Macintosh OS V 10.2 und 10.3 müssen Sie eventuell das Druckermodell manuell aus dem Dropdown-Menü „Druckermodell“ auswählen. 12.7) Wählen Sie unter „Modellname“ den Drucker aus, klicken Sie auf Hinzufügen, und fahren Sie mit Schritt 13 fort. Prüfen der Softwareinstallation. Drucken Sie eine Seite über ein beliebiges Programm aus, um sicherzustellen, dass die Software ordnungsgemäß installiert wurde. Hinweis: Installieren Sie bei Fehlschlagen des Ausdrucks der Seite die Software erneut. Wenn die Seite nach einer erneuten Installation nicht ausgedruckt werden kann, informieren Sie sich unter www.hp.com/support/LJP3005. 12.6) Fare clic su Aggiungi per creare una coda di stampa, quindi seguire le indicazioni per configurare manualmente le opzioni installabili della stampante. Nota: in Macintosh OS X V 10.2 e V 10.3, è possibile che venga richiesto di selezionare manualmente il modello della stampante nel menu a discesa Modello Stampante. 12.7) In Nome Modello, selezionare la stampante, fare clic su Aggiungi, quindi andare al punto 13. Test dell'installazione del software. Stampare una pagina da un programma qualsiasi per assicurarsi che il software sia installato correttamente. Nota: se la pagina non viene stampata, reinstallare il software. Se la pagina non viene stampata successivamente alla reinstallazione, visitare il sito Web www.hp.com/support/LJP3005. 12.6) Haga clic en Añadir para crear una cola de impresión y siga a continuación las instrucciones para configurar manualmente las opciones instalables de la impresora. Nota: Es posible que para Macintosh OS X V 10.2 y V 10.3 tenga que seleccionar manualmente el modelo de la impresora en el menú desplegable Modelo de impresora. 12.7) En la lista de modelos de impresora, seleccione la impresora, haga clic en Añadir y vaya al paso 13. Pruebe la instalación del software. Imprima una página desde cualquier programa para asegurarse de que el software se instaló correctamente. Nota: Si la página no se imprime correctamente, vuelva a instalar el software. Si después de reinstalarlo, la página sigue sin imprimirse, visite www.hp.com/support/LJP3005. 12.6) Klik op Voeg toe als u een printerwachtrij wilt maken en volg de aanwijzingen voor het handmatig configureren van de installeerbare opties van de printer. Opmerking: voor Macintosh OS X V 10.2 en V 10.3 kan het nodig zijn dat u het printermodel handmatig moet selecteren in de vervolgkeuzelijst Printermodel. 12.7) Selecteer onder Modelnaam de printer, klik op Voeg toe en ga naar stap 13. Test de installatie van de software. Druk een pagina af vanuit een willekeurig programma om te controleren of de software correct is geïnstalleerd. Opmerking: als de pagina niet kan worden afgedrukt, installeert u de software opnieuw. Als de pagina na het opnieuw installeren niet kan worden afgedrukt, gaat u naar www.hp.com/support/LJP3005. 14 English Français Deutsch Italiano Español Nederlands Congratulations! The printer is ready to use. The user guide is located on the CD. See www.hp.com/support/LJP3005 for more information or support. Note: Save the boxes and the packing materials in case you need to transport the printer. Register your printer. Register at www.register.hp.com. This is the quickest and easiest way for you to register to receive the following information: technical support updates, enhanced support options, ideas and ways to use your new HP printer, and news about emerging technologies. Félicitations ! L’imprimante est prête à l’emploi. Le guide de l’utilisateur se trouve sur le CD. Rendez-vous sur le site www.hp.com/support/LJP3005 pour obtenir des informations supplémentaires ou de l’aide. Remarque : Conservez les cartons et les matériaux d’emballage en cas de transport éventuel de l’imprimante. Enregistrement de l’imprimante. Enregistrez l’imprimante sur www.register.hp.com. Il s’agit de la méthode la plus simple et la plus rapide pour enregistrer l’imprimante afin de recevoir les informations suivantes : mises à jour de l’assistance technique, options d’assistance avancées, idées et méthodes d’utilisation de votre nouvelle imprimante HP, ainsi que des nouvelles sur les technologies émergentes. Herzlichen Glückwunsch! Der Drucker ist jetzt einsatzbereit. Das Benutzerhandbuch befindet sich auf der CD. Weitere Informationen oder Unterstützung erhalten Sie unter www.hp.com/support/LJP3005. Hinweis: Bewahren Sie die Kartons und das Verpackungsmaterial auf, falls Sie den Drucker transportieren müssen. Registrierung des Druckers. Registrieren Sie Ihren Drucker unter www.register.hp.com. Dies ist die schnellste und einfachste Registrierungsmethode, um folgende Informationen zu erhalten: Updates zur technischen Unterstützung, erweiterte Unterstützung, Vorschläge und Möglichkeiten zur Verwendung Ihres neuen HP Druckers sowie aktuelle Informationen zu neuen Technologien. Congratulazioni. La stampante è pronta per l'uso. La Guida dell'utente è contenuta nel CD. Per ulteriori informazioni o assistenza, visitare il sito Web www.hp.com/support/LJP3005. Nota: conservare le confezioni e il materiale di imballaggio qualora sia necessario trasportare la stampante. Registrazione della stampante. Registrarsi al sito www.register.hp.com è il modo più veloce e facile di registrare i propri dati e ricevere le seguenti informazioni: aggiornamenti su assistenza tecnica, opzioni di assistenza avanzate, idee e modi di utilizzare la nuova stampante HP, nonché novità su tecnologie emergenti. ¡Enhorabuena! La impresora está lista para su uso. La guía del usuario se encuentra en el CD. Consulte www.hp.com/support/LJP3005 para obtener más información o asistencia técnica. Nota: Guarde las cajas y el material de embalaje por si necesita transportar la impresora. Registre la impresora. Regístrese en www.register.hp.com. Éste es el modo más rápido y sencillo de registrarse para recibir la siguiente información: actualizaciones de asistencia técnica, opciones de asistencia mejoradas, ideas y modos de usar su nueva impresora HP y novedades sobre las tecnologías emergentes. Gefeliciteerd! De printer is klaar voor gebruik. De gebruikershandleiding vindt u op de cd. Raadpleeg www.hp.com/support/LJP3005 voor meer informatie of ondersteuning. Opmerking bewaar de dozen en het verpakkingsmateriaal voor het geval u de printer moet vervoeren. Registreer de printer. Registreer op www.register.hp.com. Dit is de snelste en eenvoudigste manier om uw printer te registreren zodat u de volgende informatie krijgt: updates voor technische ondersteuning, geavanceerde ondersteuningsopties, ideeën en manieren om de nieuwe HP-printer te gebruiken en informatie over de nieuwste technologieën. 15 Probleemoplossing Omgeving Display van bedieningspaneel Afdrukken Overig Symptoom Oorzaak/oplossing Leeg 1) Controleer of de stroomkabel is aangesloten op een werkend stopcontact. 2) Controleer of de printer is ingeschakeld. Zie pagina 6 voor meer informatie. De knop op het aanraakscherm wordt in grijs weergegevn met “!”tekens Schakel de printer uit en schakel de printer vervolgens weer in. De printer herkent geen Letter-/A4-papier dat in de lade is geplaatst Controleer of het papier goed is geplaatst. Zie pagina 4 voor meer informatie. Niet afdrukken 1) Controleer het netwerk of de USB-kabel. Zie pagina 5 of 11 voor meer informatie. 2) Als u afdrukt via een netwerk, drukt u een configuratiepagina af en controleert u of het IP-adres juist is. 3) Installeer de printerdriver opnieuw. Storingen 1) Controleer of de oranje verpakkingstape en het karton zijn verwijderd. Zie pagina 3 voor meer informatie. 2) Controleer of u ondersteund papier gebruikt. Raadpleeg de gebruikershandleiding op de cd voor meer informatie. 3) Controleer of het papier goed is geplaatst. Zie pagina 4 voor meer informatie. Lege pagina’s Controleer of de strip is verwijderd van de printcartridge. Zie pagina 4 voor meer informatie. Alle symptomen Raadpleeg de gebruikershandleiding op de cd voor meer informatie. NLWW 21-
 1
1
-
 2
2
-
 3
3
-
 4
4
-
 5
5
-
 6
6
-
 7
7
-
 8
8
-
 9
9
-
 10
10
-
 11
11
-
 12
12
-
 13
13
-
 14
14
-
 15
15
-
 16
16
-
 17
17
-
 18
18
-
 19
19
-
 20
20
-
 21
21
-
 22
22
-
 23
23
-
 24
24
-
 25
25
-
 26
26
-
 27
27
-
 28
28
-
 29
29
-
 30
30
-
 31
31
-
 32
32
-
 33
33
-
 34
34
-
 35
35
-
 36
36


in andere talen
- English: HP LaserJet User manual
- italiano: HP LaserJet Manuale utente
- français: HP LaserJet Manuel utilisateur
- español: HP LaserJet Manual de usuario
- Deutsch: HP LaserJet Benutzerhandbuch
- português: HP LaserJet Manual do usuário
Gerelateerde papieren
-
HP 3000 Handleiding
-
HP M5025MFP Snelstartgids
-
HP 2700 Series Handleiding
-
-
HP LaserJet 9040 Printer series Snelstartgids
-
-
-
-
-