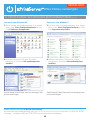
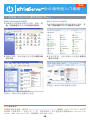
Lantronix xPrintServer Office: Enterprise Mobile Printing Snelstartgids
- Categorie
- Routers
- Type
- Snelstartgids

Ofce Edition
Quick Start Guide
AirPrint™ AirPrint enables you to wirelessly print photos,
e-mail, web pages, and documents from your iPad, iPhone,
and iPod touch without the need to install a driver.

Ofce Edition Quick Start Guide
English ..................................................................................................................................................... 1
Nederlands ............................................................................................................................................. 7
Français ................................................................................................................................................. 13
Deutsch .................................................................................................................................................. 19
Italiano ................................................................................................................................................. 25
Português .............................................................................................................................................. 31
Español ................................................................................................................................................. 37
中文 ..................................................................................................................................................... 43
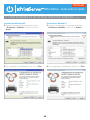
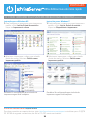
TABLE OF CONTENTS

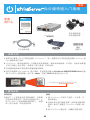
WHAT’S
INSIDE
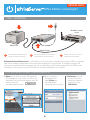
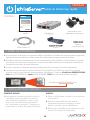
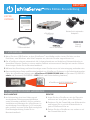
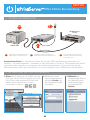
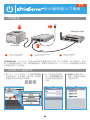
Power supply
3’ Ethernet Cable
Mounting Bracket
& 2 Screws
xPrintServerQuick Start Guide
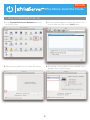
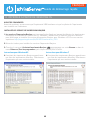
1 BEFORE YOU BEGIN
2 HARDWARE INSTALLATION
1. If you intend to connect a USB printer to the xPrintServer™, please be sure to test the printer from the
Windows or Mac computer that it is directly attached to before proceeding.
2. xPrintServer will auto-discover all network (wired and wireless) printers located on the same subnet.
Printers on a different subnet must be manually configured. Refer to the User’s Guide for instructions.
3. Internet access is required during set-up and when adding new printers.
4.
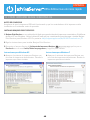
Custom Set-Up & xPrintServer User Guide: Using a web browser log into your xPrintServer admin interface at
xPrintServer-XXXXXXXXXXXX.local with USER ID = admin and PASSWORD = PASS (both case sensitive)
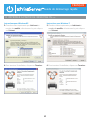
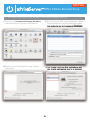
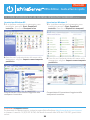
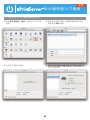
RACK MOUNT
1. A versatile mounting bracket and screws
are supplied to assist in easily installing and
mounting xPrintServer into a server rack
in various orientations (e.g., horizontal or
vertical). Refer to the User’s Guide for mounting
instructions.
DESKTOP
1. Place the xPrintServer upside down on a
smooth, flat surface.
2. Peel off the rubber feet from the adhesive strip
and place them adhesive-side down onto each
corner of the xPrintServer.
3. Turn the xPrintServer over so that it is resting
on the rubber feet.
Ofce Edition
Quick Start Guide
AirPrint AirPrint enables you to wirelessly print photos,
e-mail, web pages, and documents from your iPad, iPhone,
and iPod touch without the need to install a driver.
13266xPrintQSG_OfficeEd_resize_16.indd 1 9/30/13 9:23 AM
Of ce Edition Quick Start Guide
Mounting Bracket
xPrintServer
Rubber
Feet (4)
ENGLISH
1
xPrintServer-XXXXXXXXXXXX.local

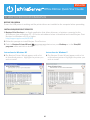
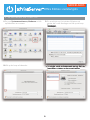
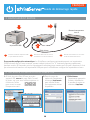
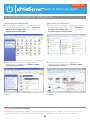
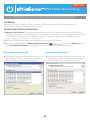
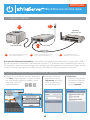
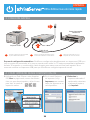
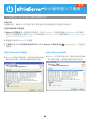
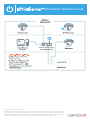
3 QUICK CONNECT
1
USB Printer
Network Cable
Wireless Router/
Switch
2
3
1
Connect USB printer cable to USB
port of xPrintServer (if any).
2
Connect network cable from wireless
router/switch to xPrintServer.
3
Power on the xPrintServer with
supplied power adapter.
Auto Set-Up Process: The xPrintServer will automatically set-up your printers (USB & network) as soon it
is connected, as shown above. The glowing “X” will blink quickly for about 30 seconds, then it will pulse
slowly to show it’s ready for printing. Connecting a USB printer is not required for the xPrintServer to
set-up network printers.
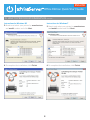
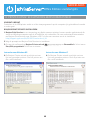
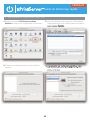
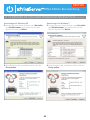
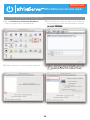
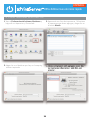
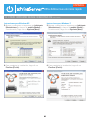
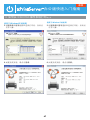
2. From the Printer
Options menu, choose
Printer to display all
available networked
printers.
1. Using your iPad, iPhone or other iOS device,
Open the web page, email, photo, etc. that
you wish to print and choose the icon to open
the native print menu:
3. Select the appropriate
printer. Then, select
the number of copies
and choose Print.
4 HOW TO PRINT FROM iOS DEVICES
Of ce Edition Quick Start Guide
ENGLISH
2

3
Of ce Edition Quick Start Guide
ENGLISH
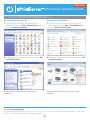
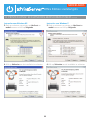
5 HOW TO PRINT FROM MAC OS
1. Go to System Preferences, Hardware and click
on Print & Scan.
2. Click on the + button on the lower left corner
3. A list of printers appear. Select the printer you
wish to add and click on the Add button.
4. The printer is now added in your available list of
printers and is ready to print.

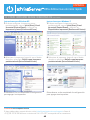
Instructions for Windows XP
4. The Bonjour Printer Wizard appears with a list
of discovered printers. Highlight the printer you
wish to install.
Instructions for Windows 7
4. The Bonjour Printer Wizard appears with a list
of discovered printers. Highlight the printer you
wish to install.
6 HOW TO PRINT FROM WINDOWS OS
BEFORE YOU BEGIN
Ensure the USB printer is working and the printer drivers are installed on the computer before proceeding.
INSTALL BONJOUR PRINT SERVICES
1. Bonjour Print Services is an Apple application that allows discovery of printers connected to the
xPrintServer from a Windows PC. Go to the web address below to download and install Bonjour Print
Services for Windows v2.0.2 or higher
http://support.apple.com/kb/DL999
2. Follow the prompts to install Bonjour Print Services
3. Find the Bonjour Printer Wizard shortcut on your Desktop or in the Start/All
programs menu and click to launch
Ofce Edition Quick Start Guide
ENGLISH
4

Ofce Edition Quick Start Guide
ENGLISH
Instructions for Windows XP
5. Search and select your printer by manufacturer
and model number and click Next.
6. To complete the installation, click Finish.
Instructions for Windows 7
5. Search and select your printer by manufacturer
and model number and click Next.
6. To complete the installation, click Finish.
6 HOW TO PRINT FROM WINDOWS OS continued
5

Contact Technical Support
For technical support queries, visit http://www.lantronix.com/support or call (800) 422-7044 Monday – Friday from
6:00 a.m. – 5:00 p.m. Pacific Time, excluding holidays.
Ofce Edition Quick Start Guide
ENGLISH
6
Instructions for Windows XP
7. If you wish to configure the printer as the
default printer go to: Start, Control Panel and
click on Printers and Faxes
8. Select the printer and right click and select Set
as default printer
Congratulations! Add printer setup is now
complete.
Instructions for Windows 7
7. If you wish to configure the printer as the
default printer go to: Start, Control Panel and
click on Devices and Printers
8. Select the printer and right click and select Set
as default printer
Congratulations! Add printer setup is now
complete.
6 HOW TO PRINT FROM WINDOWS OS continued

WAT
ZIT ER
BINNENIN
Stroomvoorziening
met regionale adapters
Ethernet-kabel
van 3 inch
Montagehaak
en 2 schroeven
xPrintServerSnelstartgids
1 VOORDAT U BEGINT
2 INSTALLATIE VAN DE HARDWARE
1. Als u van plan bent om een USB-printer met de xPrintServer™ te verbinden, test dan eerst de printer
met de Windows- of Mac-computer waarmee de printer is verbonden voordat u verder gaat.
2. xPrintServer vindt automatisch alle netwerkprinters (bedraad en draadloos) die op hetzelfde subnet
zitten. Printers die op een ander subnet zitten moeten handmatig worden geconfigureerd. Refereer
naar de gebruikershandleiding voor instructies.
3. Internettoegang is vereist tijdens het opstellen en het toevoegen van nieuwe printers.
4.
Gebruikershandleiding Aangepaste installatie en xPrintServer: Meld u met gebruik van een
webbrowser aan bij uw xPrintServer-beheerinterface op xPrintServer-XXXXXXXXXXXX.local met
GEBRUIKERSID = admin en WACHTWOORD = PASS (beide hoofdlettergevoelig)
REKMONTAGE
1. Een veelzijdige montagehaak en schroeven
zijn geleverd voor een gemakkelijke installatie
en om de xPrintServer in een serverrek te
plaatsen op verschillende manieren (bijv.
horizontaal of verticaal). Refereer naar de
gebruikershandleiding voor montageinstructies.
DESKTOP
1. Plaats de xPrintServer ondersteboven op een
effen en vlak oppervlak.
2. Verwijder de plakstrip van de rubberen voetjes
en plaats ze met het plakgedeelte naar beneden
in elke hoek van de xPrintServer.
3. Draai de xPrintServer om zodat deze steunt op
de rubberen voetjes.
Of ce Edition snelstartgids
Montagehaak
xPrintServer
Rubberen
voetje (4)
NEDERLANDS
7
Ofce Edition
Quick Start Guide
AirPrint AirPrint enables you to wirelessly print photos,
e-mail, web pages, and documents from your iPad, iPhone,
and iPod touch without the need to install a driver.
13266xPrintQSG_OfficeEd_resize_16.indd 1 9/30/13 9:23 AM
xPrintServer-XXXXXXXXXXXX.local

3 SNEL VERBINDEN
Automatisch installatieproces: De xPrintServer zal uw printers automatisch instellen (USB en netwerk)
zodra deze worden aangesloten zoals hierboven aangegeven. De gloeiende ‘X’ knippert ongeveer 30
seconden en pulseert daarna langzaam om aan te geven dat er kan worden afgedrukt. Een USB-printer
verbinden is niet vereist voor de xPrintServer om netwerkprinters in te stellen
2. Kies in het menu
Printeropties de
optie Printer om
alle beschikbare
netwerkprinters te tonen.
1. Open op uw iPad of ander iOS-apparaat
de webpagina, e-mail, foto, etc. die u wilt
afdrukken en kies het pictogram voor het
openen van het
standaardafdrukmenu:
3. Selecteer de juiste
printer. Selecteer
daarna het aantal
kopieën en kies
Afdrukken.
4 AFDRUKKEN VANAF iOS-APPARATEN
1
2
3
1 2 3
USB-printer
Netwerkkabel
Draadloze router/
switch
Sluit de USB-printerkabel aan op de
USB-aansluiting van xPrintServer.
Sluit de netwerkkabel van de draadloze
router/switch aan op de xPrintServer.
Schakel de xPrintServer in met de
meegeleverde stroomadapter.
NEDERLANDS
Of ce Edition snelstartgids
8

1. Ga naar Systeemvoorkeuren, Hardware en klik
op Afdrukken en scannen.
2. Klik op de knop + linksonder
3. Er verschijnt een lijst printers.Selecteer de
printer die u wilt toevoegen en klik op de knop
Toevoegen.
4. De printer wordt nu toegevoegd aan uw lijst van
beschikbare printers en kan nu afdrukken.
Toevoegen
.
4.
De printer wordt nu toegevoegd aan uw lijst van
beschikbare printers en kan nu afdrukken.
beschikbare printers en kan nu afdrukken.
5 AFDRUKKEN MET MAC OS
NEDERLANDS
Of ce Edition snelstartgids
9

Instructies voor Windows XP
4. De Bonjour Printer-wizard verschijnt met een
lijst van gevonden printers. Geef de printer aan
die u wilt installeren.
Instructies voor Windows 7
4. De Bonjour Printer-wizard verschijnt met een
lijst van gevonden printers. Geef de printer aan
die u wilt installeren.
6 PRINTEN VANAF EEN WINDOWS-BESTURINGSSYSTEEM
VOORDAT U BEGINT
Controleer of de USB-printer werkt en of de stuurprogramma’s op de computer zijn geïnstalleerd voordat
u verder gaat.
BONJOUR PRINT SERVICES INSTALLEREN
1. Bonjour Print Services is een toepassing van Apple waarmee printers kunnen worden gedetecteerd die
vanaf een Windows-computer met de xPrintServer zijn verbonden. Ga naar onderstaand internetadres
om Bonjour Print Services voor Windows v2.0.2 of voor een recentere versie te installeren
http://support.apple.com/kb/DL999?viewlocale=nl_NL
2. Volg de prompts om Bonjour Print Services te installeren
3. Ga naar de snelkoppeling Bonjour Printer-wizard op uw Bureaublad of in het menu
Start/Alle programma’s en klik om te starten
NEDERLANDS
Ofce Edition snelstartgids
10

NEDERLANDS
Ofce Edition snelstartgids
Instructies voor Windows XP
5. Zoek en selecteer uw printer op fabrikant en
modelnummer en klik op Volgende.
6. Klik op Voltooien om de installatie te voltooien.
Instructies voor Windows 7
5. Zoek en selecteer uw printer op fabrikant en
modelnummer en klik op Volgende.
6. Klik op Voltooien om de installatie te voltooien.
6 PRINTEN VANAF EEN WINDOWS-BESTURINGSSYSTEEM vervolgd
11

Neem contact op met Technische ondersteuning
Ga voor technische ondersteuning naar http://www.lantronix.com/support of bel met +31 (0)76 52 36 740
maandag – vrijdag van 9.00 tot 17.00 CET met uitzondering van feestdagen.
NEDERLANDS
Ofce Edition snelstartgids
12
6 PRINTEN VANAF EEN WINDOWS-BESTURINGSSYSTEEM vervolgd
Instructies voor Windows XP
7. Om de printer als standaardprinter in te stellen
gaat u naar: Start, Configuratiescherm en klikt
u op Printers en faxapparaten
8. Selecteer de printer, klik met de rechter
muisknop en selecteer Als standaardprinter
instellen
Gefeliciteerd! U bent klaar met het toevoegen van
printerinstellingen.
Instructies voor Windows 7
7. Om de printer als standaardprinter in te stellen
gaat u naar: Start, Configuratiescherm en klikt
u op Apparaten en printers
8. Selecteer de printer, klik met de rechter
muisknop en selecteer Als standaardprinter
instellen
Gefeliciteerd! U bent klaar met het toevoegen van
printerinstellingen.
6 PRINTEN VANAF EEN WINDOWS-BESTURINGSSYSTEEM vervolgd

Guide de démarrage rapide
FRANÇAIS
CONTENU
Alimentation avec
adaptateurs régionaux
Câble Ethernet 3’
Support de fixation
& 2 vis
xPrintServer
Guide de démarrage
rapide
1 AVANT DE COMMENCER
2 INSTALLATION DU MATÉRIEL
1. Si vous prévoyez de brancher une imprimante USB au xPrintServer™, veuillez vous assurer de tester l’imprimante
à partir de l’ordinateur Windows ou Mac auquel elle est directement connectée avant de continuer.
2. xPrintServer détectera automatiquement toutes les imprimantes réseau (câblées et sans fil) situées sur le même
sous-réseau. Les imprimantes se trouvant sur un sous-réseau différent devront être configurées manuellement.
Consultez les instructions du guide d’utilisation.
3. Un accès à Internet est nécessaire pendant la configuration et lors de l’ajout de nouvelles imprimantes.
4.
Configuration personnalisée & guide d’utilisation de xPrintServer: À l’aide d’un navigateur Internet,
connectez-vous à votre interface d’administrateur xPrintServer à l’adresse xPrintServer-XXXXXXXXXXXX.
local avec ID D’UTILISATEUR = admin et MOT DE PASSE = PASS (tous deux sont sensibles à la casse)
MONTAGE EN RACK
1. Un support de fixation polyvalent et des vis
sont fournis pour vous aider à installer et
fixer facilement xPrintServer dans un rack
de serveurs sous différentes orientations
(ex : horizontale ou verticale). Consultez les
instructions de fixation du guide d’utilisation.
BUREAU
1. Posez le xPrintServer à l’envers sur une surface
lisse et plane.
2. Retirez la bande adhésive des pieds en
caoutchouc et posez ces derniers, du côté
adhésif, à chaque coin du xPrintServer.
3. Retournez le xPrintServer de manière à ce qu’il
repose sur les pieds en caoutchouc.
Support de fixation
xPrintServer
Pieds en
caoutchouc (4)
13
Ofce Edition
Quick Start Guide
AirPrint AirPrint enables you to wirelessly print photos,
e-mail, web pages, and documents from your iPad, iPhone,
and iPod touch without the need to install a driver.
13266xPrintQSG_OfficeEd_resize_16.indd 1 9/30/13 9:23 AM
xPrintServer-XXXXXXXXXXXX.local

Guide de démarrage rapide
FRANÇAIS
3 BRANCHEMENT RAPIDE
Processus de configuration automatique : Le xPrintServer configurera automatiquement vos imprimantes
(USB & réseau) dès qu’il sera connecté, comme indiqué ci-dessus. Le “X” lumineux clignotera rapidement
pendant environ 30 secondes, puis les clignotements ralentiront pour montrer qu’il est prêt à imprimer. Il n’est
pas nécessaire de brancher une imprimante USB pour que le xPrintServer configure les imprimantes réseau.
2. Dans le menu des
options de l’imprimante,
choisissez Imprimante
pour afficher toutes
les imprimantes réseau
disponibles.
1. À l’aide de votre iPad, iPhone ou autre
appareil iOS, ouvrez la page Web, l’e-mail,
la photo, etc. que vous voulez imprimer et
choisissez l’icône
pour ouvrir le menu
d’impression natif :
3. Sélectionnez
l’imprimante appropriée.
Ensuite, sélectionnez
le nombre de copies et
choisissez Imprimer.
4 IMPRIMER À PARTIR D’UN APPAREIL iOS
1
2
3
1 2 3
Imprimante USB
Câble réseau
Branchez le câble de l'imprimante USB
au port USB de xPrintServer.
Branchez le câble réseau du routeur/
commutateur sans fil à xPrintServer.
Branchez le xPrintServer sur le courant
à l'aide de l'alimentation fournie.
Routeur/commutateur
sans fil
14

Guide de démarrage rapide
FRANÇAIS
1. Rendez-vous dans Préférences système,
Matériel et cliquez sur Imprimantes et scanners.
2. Cliquez sur le bouton + dans le coin inférieur
gauche
3. Une liste d’imprimantes apparaît. Sélectionnez
l’imprimante que vous voulez ajouter et cliquez
sur le bouton Ajouter.
4. L’imprimante est maintenant ajoutée à votre
liste des imprimantes disponibles et elle est
prête à imprimer.
sur le bouton
Ajouter
.
4.
L’imprimante
est
maintenant ajoutée à votre
liste des imprimantes disponibles et elle est
prête à imprimer.
5 IMPRIMER À PARTIR DE MAC OS
15

Guide de démarrage rapide
FRANÇAIS
Instructions pour Windows XP
4. L’assistant des imprimantes Bonjour apparaît avec
une liste des imprimantes détectées. Sélectionnez
l’imprimante que vous voulez installer.
Instructions pour Windows 7
4. L’assistant des imprimantes Bonjour apparaît avec
une liste des imprimantes détectées. Sélectionnez
l’imprimante que vous voulez installer.
6 IMPRIMER À PARTIR DE WINDOWS OS
AVANT DE COMMENCER
Avant de continuer, assurez-vous que l’imprimante USB fonctionne et que les pilotes de l’imprimante
sont installés sur l’ordinateur.
INSTALLEZ LES SERVICES D’IMPRESSION BONJOUR
1. Les services d’impression Bonjour sont une application Apple qui permet de détecter les imprimantes
connectées au xPrintServer à partir d’un PC Windows. Rendez-vous à l’adresse Internet ci-dessous
pour télécharger et installer les services d’impression Bonjour pour Windows v2.0.2 ou une version
supérieure http://support.apple.com/kb/DL999?viewlocale=fr_FR 9
2. Suivez les invites pour installer les services d’impression Bonjour
3. Cherchez le raccourci Assistant Imprimante Bonjour sur votre Bureau ou dans le
menu Démarrer/Tous les programmes, puis cliquez dessus pour le lancer
16

Guide de démarrage rapide
FRANÇAIS
Instructions pour Windows XP
5. Cherchez votre imprimante par fabricant et
numéro de modèle, sélectionnez-la, puis cliquez
sur Suivant.
6. Pour terminer l’installation, cliquez sur Terminer.
Instructions pour Windows 7
5. Cherchez votre imprimante par fabricant et
numéro de modèle, sélectionnez-la, puis cliquez
sur Suivant.
6. Pour terminer l’installation, cliquez sur Terminer.
6 IMPRIMER À PARTIR DE WINDOWS OS suite
17

Guide de démarrage rapide
FRANÇAIS
Contactez l’assistance technique
Si vous avez des questions pour l’assistance technique, rendez-vous à l’adresse http://www.lantronix.com/
support ou appelez le +31 (0)76 52 36 740 du lundi au vendredi, de 9h à 17h, CET, hors vacances.
18
6 IMPRIMER À PARTIR DE WINDOWS OS suite
Instructions pour Windows XP
7. Si vous voulez configurer l’imprimante en tant
qu’imprimante par défaut, allez à : Démarrer,
Panneau de configuration, puis cliquez sur
Imprimantes et télécopies
8. Sélectionnez l’imprimante, cliquez avec le
bouton droit et sélectionnez Définir comme
imprimante par défaut
Félicitations ! L’ajout d’imprimante est maintenant
terminé.
Instructions pour Windows 7
7. Si vous voulez configurer l’imprimante en tant
qu’imprimante par défaut, allez à : Démarrer,
Panneau de configuration, puis cliquez sur
Périphériques et imprimantes
8. Sélectionnez l’imprimante, cliquez avec le
bouton droit et sélectionnez Définir comme
imprimante par défaut
Félicitations ! L’ajout d’imprimante est maintenant
terminé.

Of ce Edition-Kurzanleitung
DEUTSCH
LIEFER-
UMFANG
Netzteil mit regionalen
Adaptern
3’ Ethernetkabel
Halterung
und 2 Schrauben
xPrintServer
Kurzanleitung
1 VOR BEGINN
2 INSTALLATION DER HARDWARE
1. Wenn Sie einen USB-Drucker an den xPrintServer™ anschließen wollen, testen Sie bitte vor dem
Fortfahren, vom Windows- oder Mac-Computer aus, dass der Drucker angeschlossen ist.
2. Der xPrintServer erkennt automatisch alle (schnurgebundenen und drahtlosen) Netzwerkdrucker in
demselben Subnetz. Drucker in einem anderen Subnetz müssen manuell konfiguriert werden. Nähere
Anweisungen finden Sie im Benutzerhandbuch.
3. Während der Einrichtung und beim Hinzufügen neuer Drucker muss ein Internetzugang vorhanden sein.
4.
Benutzerdefiniertes Setup und Benutzerhandbuch zu xPrintServer: Einloggen in die Administrationsober-
fläche des xPrintServers erfolgt unter xPrintServer-XXXXXXXXXXXX.local mit (Benutzer-ID) USER ID =
admin und (Kennwort) PASSWORD = PASS (Groß- und Kleinschreibung beachten)
RACK-MONTAGE
1. Im Lieferumfang sind eine Halterung mit
verschiedenen Anbringungsmöglichkeiten
sowie Schrauben enthalten, die eine einfache
Installation und Montage des xPrintServers in
verschiedenen Ausrichtungen (z. B. horizontal
oder vertikal) in einem Server-Rack ermöglicht.
Eine Montageanleitung finden Sie im
Benutzerhandbuch.
DESKTOP
1. Legen Sie den xPrintServer mit der Oberseite
zuunterst auf eine glatte, ebene Oberfläche.
2. Entfernen Sie die Gummifüße vom Klebestreifen
und bringen Sie sie mit der Klebstoffseite in
jeder xPrintServer-Ecke an.
3. Drehen Sie den xPrintServer um, sodass er auf
den Gummifüßen steht.
Halterung
xPrintServer
Gummi-
füße (4)
19
Ofce Edition
Quick Start Guide
AirPrint AirPrint enables you to wirelessly print photos,
e-mail, web pages, and documents from your iPad, iPhone,
and iPod touch without the need to install a driver.
13266xPrintQSG_OfficeEd_resize_16.indd 1 9/30/13 9:23 AM
xPrintServer-XXXXXXXXXXXX.local

Of ce Edition-Kurzanleitung
DEUTSCH
3 SCHNELLER ANSCHLUSS
Automatisches Setup: Der xPrintServer richtet Ihre Drucker (USB und Netzwerk) automatisch ein,
sobald er – wie oben dargestellt – verbunden ist. Das leuchtende „X“ blinkt ca. 30 Sekunden lang schnell
und pulsiert dann langsam, um anzuzeigen, dass das Gerät druckbereit ist. Für die Einrichtung von
Netzwerkdruckern durch den xPrintServer ist es nicht erforderlich, einen USB-Drucker anzuschließen.
2. Wählen Sie aus dem
Menü „Druckeroptionen“
die Option Drucker, um
alle verfügbaren Drucker
anzuzeigen.
1. Öffnen Sie die Webseite, die E-Mail oder das
Foto usw., das Sie drucken wollen, mit Ihrem
iPad, iPhone oder anderem iOS-Gerät und
wählen Sie das Symbol aus, um das
Druckmenü zu öffnen:
3. Wählen Sie den
entsprechenden Drucker
aus. Wählen Sie dann
die Anzahl der Kopien
aus und wählen Sie
Drucken.
4 SO DRUCKEN SIE VON iOS-GERÄTEN:
1
2
3
1 2 3
Schließen Sie das USB-Druckerkabel am
USB-Anschluss von xPrintServer an.
Schließen Sie das Netzwerkkabel vom
WLAN-Router/-Switch am xPrintServer an.
USB-Drucker
Netzwerkkabel
WLAN-Router/
-Switch
Legen Sie über den im Lieferumfang
enthaltenen Netzadapter Spannung
am xPrintServer an.
20

Of ce Edition-Kurzanleitung
DEUTSCH
1. Gehen Sie zu Systemeinstellungen, Hardware
und klicken Sie auf „Drucken und Scannen“.
2. Klicken Sie auf das Symbol + in der unteren
linken Ecke
3. Eine Liste der Drucker wird eingeblendet. Wählen
Sie den Drucker aus, den Sie hinzufügen wollen,
und klicken Sie auf die Schaltfläche Hinzufügen.
4. Der Drucker wird nun Ihrer verfügbaren Liste
der Drucker hinzugefügt und ist druckbereit.
und klicken Sie auf die Schaltfläche
Hinzufügen
.
4.
Der Drucker wird nun Ihrer verfügbaren Liste
der Drucker hinzugefügt und ist druckbereit.
5 SO DRUCKEN SIE AUS EINEM MAC-BETRIEBSSYSTEM:
21

Ofce Edition-Kurzanleitung
DEUTSCH
Anweisungen für Windows XP
4. Der Bonjour-Druckerassistent wird mit einer Liste
der erkannten Drucker eingeblendet. Markieren
Sie den Drucker, der installiert werden soll.
Anweisungen für Windows 7
4. Der Bonjour-Druckerassistent wird mit einer Liste
der erkannten Drucker eingeblendet. Markieren
Sie den Drucker, der installiert werden soll.
6 SO DRUCKEN SIE AUS EINEM WINDOWS-BETRIEBSSYSTEM:
VOR BEGINN
Stellen Sie vor dem Fortfahren sicher, dass der USB-Drucker korrekt funktioniert und dass die
Druckertreiber auf dem Computer installiert sind.
BONJOUR PRINT SERVICES INSTALLIEREN
1. Bonjour Print Services ist eine Apple-Anwendung, mit der sich Drucker, die mit dem xPrintServer
verbunden sind, über einen Windows-PC erkennen lassen. Gehen Sie zur nachstehenden Webadresse,
um die Bonjour Print Services für Windows ab v2.0.2 herunterzuladen und zu installieren http://
support.apple.com/kb/DL999?viewlocale=de_DE
2. Befolgen Sie die Anweisungen zur Installation der Bonjour Print Services
3. Suchen Sie die Verknüpfung Bonjour-Druckerassistent auf Ihrem Desktop oder im
Menü Start/Alle Programme und klicken Sie darauf, um den Assistenten aufzurufen
22

Ofce Edition-Kurzanleitung
DEUTSCH
Anweisungen für Windows XP
5. Suchen Sie nach Ihrem Drucker nach Hersteller
und Modellnummer und wählen Sie ihn aus.
Klicken Sie dann aufWeiter.
6. Zum Abschluss der Installation klicken Sie auf
Fertig stellen.
Anweisungen für Windows 7
5. Suchen Sie nach Ihrem Drucker nach Hersteller
und Modellnummer und wählen Sie ihn aus.
Klicken Sie dann auf Weiter.
6. Zum Abschluss der Installation klicken Sie auf
Fertig stellen.
6 SO DRUCKEN SIE AUS EINEM WINDOWS-BETRIEBSSYSTEM: (Fortsetzung)
23

Ofce Edition-Kurzanleitung
DEUTSCH
An den Technischen Kundendienst wenden
Besuchen Sie für Anfragen beim technischen Support http://www.lantronix.com/support oder rufen Sie uns
an unter +31 (0)76 52 36 740, montags bis freitags von 9.00 Uhr bis 17.00 CET, außer an Feiertagen.
24
6 SO DRUCKEN SIE AUS EINEM WINDOWS-BETRIEBSSYSTEM: (Fortsetzung)
Anweisungen für Windows XP
7. Wenn Sie den Drucker als Standarddrucker
konfigurieren wollen, wechseln Sie zu: Start,
Systemsteuerung und klicken Sie auf
Drucker und Faxgeräte
8. Wählen Sie den Drucker aus und klicken Sie mit
der rechten Maustaste. Wählen Sie dann Als
Standarddrucker festlegen
Herzlichen Glückwunsch! Der Drucker wurde
erfolgreich hinzugefügt.
Anweisungen für Windows 7
7. Wenn Sie den Drucker als Standarddrucker
konfigurieren wollen, wechseln Sie zu: Start,
Systemsteuerung und klicken Sie auf Geräte
und Drucker
8. Wählen Sie den Drucker aus und klicken Sie mit
der rechten Maustaste. Wählen Sie dann Als
Standarddrucker festlegen
Herzlichen Glückwunsch! Der Drucker wurde
erfolgreich hinzugefügt.

CONTENUTO
Alimentatore con
adattatori locali
Cavo Ethernet da 91 cm
Staffe di montaggio
e 2 viti
xPrintServer
Guida all‘avvio rapido
1 PRIMA DI INIZIARE
2 INSTALLAZIONE HARDWARE
1. Se si prevede di collegare una stampante USB a xPrintServer™, assicurarsi di testare la stampante dal
computer Windows o Macintosh direttamente a cui è direttamente collegata prima di procedere.
2. xPrintServer individuerà automaticamente tutte le stampanti di rete (collegate e wireless) che
si trovano nella stessa subnet. Le stampanti che si trovano in una subnet diversa devono essere
configurate manualmente. Per istruzioni, fare riferimento alla Guida dell’utente.
3. Durante la configurazione e l’aggiunta di nuove stampanti è necessario disporre di accesso a Internet.
4.
Guida dell‘utente per la configurazione personalizzata e xPrintServer: Utilizzando un browser, accedere
all‘interfaccia di amministrazione di xPrintServer all‘indirizzo xPrintServer-XXXXXXXXXXXX.local con
ID UTENTE = admin e PASSWORD = PASS (con distinzione tra maiuscole e minuscole)
MONTAGGIO SU RACK
1. Vengono fornite una staffa di montaggio
versatile e le viti per semplificare l’installazione e
il montaggio di xPrintServer in un rack di server
utilizzando orientamenti diversi, ad esempio
orizzontale o verticale. Per istruzioni, fare
riferimento alla Guida dell’utente.
DESKTOP
1. Posizionare xPrintServer capovolto su una
superficia piana e uniforme.
2. Rimuovere la striscia adesiva dai piedini in
gomma e posizionare i piedini girati verso il lato
adesivo su ogni angolo di xPrintServer.
3. Ricapovolgere xPrintServer in modo che poggi
sui piedini in gomma.
Staffe di montaggio
xPrintServer
Piedini in
gomma (4)
Of ce Edition - Guida all’avvio rapido
ITALIANO
25
Ofce Edition
Quick Start Guide
AirPrint AirPrint enables you to wirelessly print photos,
e-mail, web pages, and documents from your iPad, iPhone,
and iPod touch without the need to install a driver.
13266xPrintQSG_OfficeEd_resize_16.indd 1 9/30/13 9:23 AM
xPrintServer-XXXXXXXXXXXX.local

Of ce Edition - Guida all’avvio rapido
ITALIANO
3 COLLEGAMENTI RAPIDI
Processo di configurazione automatica: xPrintServer configurerà automaticamente le stampanti (USB e
di rete) non appena collegato, come illustrato sopra. La “X” illuminata lampeggerà rapidamente per circa
30 secondi, quindi più lentamente per indicare che è possibile stampare. Non è necessario collegare una
stampante USB perché xPrintServer configuri le stampanti di rete.
2. Dal menu Opzioni
stampante scegliere
Stampante per
visualizzare tutte le
stampanti disponibili
in rete.
1. Utilizzando un iPad, un iPhone o un altro
dispositivo iOS, aprire (Apri) la pagina Web, il
messaggio di posta elettronica, la foto o un altro
elemento che si desidera stampare e fare clic
sull’icona per aprire il
menu di stampa nativo:
3. Selezionare la
stampante appropriata.
Selezionare quindi
il numero di copie e
scegliere Stampa.
4 COME STAMPARE DA DISPOSITIVI iOS
1
2
3
1 2 3
Stampante USB
Cavo di rete
Router o switch wireless
Collegare il cavo della stampante USB
alla porta USB di xPrintServer.
Collegare il cavo di rete dal router/
switch wireless a xPrintServer.
Accendere xPrintServer con
l'alimentatore fornito.
26

Of ce Edition - Guida all’avvio rapido
ITALIANO
1. Passare a Preferenze di Sistema, Hardware e
fare clic su Stampa e Scanner.
2. Fare clic sul pulsante + nell’angolo in basso a
sinistra.
3. Viene visualizzato un elenco di stampanti.
Selezionare la stampante che si desidera
aggiungere e fare clic sul pulsante Aggiungi.
4. La stampante viene aggiunta all’elenco delle
stampanti disponibili ed è pronta per stampare.
aggiungere e fare clic sul pulsante
Aggiungi
.
4.
La stampante viene aggiunta all’elenco delle
stampanti disponibili ed è pronta per stampare.
5 COME STAMPARE DA MAC OS
27

Of ce Edition - Guida all’avvio rapido
ITALIANO
Istruzioni per Windows XP
4. Viene visualizzata l’Installazione guidata stampante
Bonjour, con un elenco delle stampanti individuate.
Evidenziare la stampante che si desidera installare.
Istruzioni per Windows 7
4. Viene visualizzata l’Installazione guidata stampante
Bonjour, con un elenco delle stampanti individuate.
Evidenziare la stampante che si desidera installare.
6 COME STAMPARE DA UN SISTEMA OPERATIVO WINDOWS
PRIMA DI INIZIARE
Prima di procedere, assicurarsi che la stampante USB sia funzionante e che nel computer siano installati
i driver della stampante.
INSTALLARE SERVIZI DI STAMPA BONJOUR
1. Servizi di stampa Bonjour è un’applicazione Apple che consente di individuare le stampanti collegate a
xPrintServer da un PC Windows. Accedere all’indirizzo Web di seguito per scaricare e installare Servizi
di stampa Bonjour per Windows v2.0.2 o versione successiva
http://support.apple.com/kb/DL999?viewlocale=it_IT
2. Seguire le indicazioni per installare Servizi di stampa Bonjour
3. Individuare il collegamento dell’Installazione guidata stampante Bonjour sul
Desktop o nel menu Start/Tutti i programmi e fare clic per avviarla
28

Of ce Edition - Guida all’avvio rapido
ITALIANO
Istruzioni per Windows XP
5. Cercare e selezionare la stampante in base
a Produttore e Modello e quindi fare clic su
Avanti.
6. Per completare l’installazione, fare clic su Fine.
Istruzioni per Windows 7
5. Cercare e selezionare la stampante in base a
Produttore e Modello e fare clic su Avanti.
6. Per completare l’installazione, fare clic su Fine.
6 COME STAMPARE DA UN SISTEMA OPERATIVO WINDOWS continua
29

Of ce Edition - Guida all’avvio rapido
ITALIANO
Contattare il supporto tecnico
Per domande al supporto tecnico, visitare la pagina Web all’indirizzo http://www.lantronix.com/support
o chiamare il numero +31 (0)76 52 36 740, dal lunedì al venerdì dalle 9.00 alle 17.00 CET, giorni festivi
esclusi.
30
6 COME STAMPARE DA UN SISTEMA OPERATIVO WINDOWS continua
Istruzioni per Windows XP
7. Se si desidera configurare la stampante come
predefinita, passare a: Start, Pannello di
controllo e fare clic su Stampanti e fax
8. Fare clic con il pulsante destro del mouse sulla
stampante e scegliere Imposta come stampante
predefinita
Congratulazioni! L’operazione di aggiunta della
stampante è terminata.
Istruzioni per Windows 7
7. Se si desidera configurare la stampante come
predefinita, passare a: Start, Pannello di
controllo e fare clic su Dispositivi e stampanti
8. Fare clic con il pulsante destro del mouse sulla
stampante e scegliere Imposta come stampante
predefinita
Congratulazioni! L’operazione di aggiunta della
stampante è terminata.

Of ce Edition Guia de início rápido
PORTUGUÊS
ITENS
INCLUSOS
Fonte de energia com
adaptadores regionais
Cabo Ethernet de 7,6 cm (3’)
Suporte de montagem
e dois parafusos
xPrintServer
Guia de início rápido
1 ANTES DE COMEÇAR
2 INSTALACIÓN DEL HARDWARE
1. Se você pretende conectar uma impressora USB ao xPrintServer™, certifique-se de testar a impressora
a partir do computador Windows ou Mac ao qual ela está conectada diretamente antes de prosseguir.
2. O xPrintServer vai descobrir automaticamente todas as impressoras em rede (com ou sem fio)
localizadas na mesma sub-rede. As impressoras em uma sub-rede diferente devem ser configuradas
manualmente. Consulte as instruções no guia do usuário.
3. O acesso à internet é necessário durante a configuração e ao adicionar impressoras novas.
4.
Guia de usuário do xPrintServer e configuração personalizada: Usando um navegador da Web, faça logon
na interface de administração do xPrintServer em xPrintServer-XXXXXXXXXXXX.local com o nome de
usuário admin e a senha PASS (ambas fazem distinção entre maiúsculas e minúsculas)
MONTAJE DEL BASTIDOR
1. Se proporciona un versátil soporte de montaje
y tornillos para ayudarle a instalar y montar
xPrintServer en un bastidor del servidor en
diferentes orientaciones (por ejemplo, horizontal
o vertical). Para ver las instrucciones de
montaje, consulte la Guía del usuario.
ESCRITORIO
1. Coloque xPrintServer boca abajo sobre una
superficie plana y sin irregularidades.
2. Quite las patas de goma de la tira adhesiva y
colóquelas con la parte adhesiva hacia abajo en
cada esquina de xPrintServer.
3. Dé la vuelta al xPrintServer para que quede
sobre las patas de goma.
Suporte de montagem
xPrintServer
Pés de
borracha (4)
31
Ofce Edition
Quick Start Guide
AirPrint AirPrint enables you to wirelessly print photos,
e-mail, web pages, and documents from your iPad, iPhone,
and iPod touch without the need to install a driver.
13266xPrintQSG_OfficeEd_resize_16.indd 1 9/30/13 9:23 AM
xPrintServer-XXXXXXXXXXXX.local

Of ce Edition Guia de início rápido
PORTUGUÊS
3 CONEXÃO RÁPIDA
Processo de configuração automática: O xPrintServer configurará automaticamente as impressoras (USB e
de rede) logo que for conectado, como mostrado a seguir. O “X” brilhante piscará rapidamente por cerca de
30 segundos e depois pulsará lentamente para mostrar que o equipamento está pronto para impressão. Não
é preciso conectar uma impressora USB para que o xPrintServer configure impressoras em rede.
2. No menu Opções da
impressora, escolha
Impressora para exibir
todas as impressoras
em rede disponíveis.
1. Usando seu iPad, iPhone ou outro dispositivo
iOS, abra a página da Web, o e-mail, a foto etc.
que você deseja imprimir e escolha o ícone
para abrir o menu de
impressão nativa:
3. Selecione a
impressora apropriada.
Em seguida, selecione
o número de cópias e
escolha Imprimir.
4 COMO IMPRIMIR USANDO DISPOSITIVOS iOS
1
2
3
1 2 3
Impressora USB
Cabo de rede
Roteador/
Switch sem fio
Conecte o cabo da impressora USB
à porta USB do xPrintServer.
Conecte o cabo de rede do roteador/
switch sem fio ao xPrintServer.
Ligue o xPrintServer com o
adaptador de energia fornecido.
32

Of ce Edition Guia de início rápido
PORTUGUÊS
1. Vá até Preferências do sistema, Hardware e
clique em Impressão e escaneamento.
2. Clique no botão +, no canto inferior esquerdo.
3. Será exibida uma lista de impressoras. Selecione
a impressora que você deseja adicionar e clique
no botão Adicionar.
4. Agora a impressora aparece incluída na sua lista
de impressoras disponíveis e está pronta para
imprimir.
no botão
Adicionar
.
4.
Agora a impressora aparece incluída na sua lista
de impressoras disponíveis e está pronta para
5 COMO IMPRIMIR PELO MAC OS
33

Of ce Edition Guia de início rápido
PORTUGUÊS
Instruções para o Windows XP
4. O Assistente de impressora do Bonjour é
exibido com a lista de impressoras detectadas.
Destaque a impressora que você deseja instalar.
Instruções para o Windows 7
4. O Assistente de impressora do Bonjour é exibido
com a lista de impressoras detectadas. Destaque
a impressora que você deseja instalar.
6 COMO IMPRIMIR PELO SISTEMA OPERACIONAL WINDOWS
ANTES DE COMEÇAR
Antes de prosseguir, certifique-se de que a impressora USB esteja funcionando e de que os drivers de
impressora estejam instalados no computador.
INSTALAÇÃO DOS SERVIÇOS DE IMPRESSÃO DO BONJOUR
1. Serviços de impressão do Bonjour é um aplicativo da Apple que permite a detecção de impressoras conectadas
ao xPrintServer por meio de um PC Windows. Visite o endereço da Web listado a seguir e baixe e instale o Serviços
de impressão do Bonjour para Windows v2.0.2 ou superior http://support.apple.com/kb/DL999?viewlocale=pt_PT
2. Siga as instruções para instalar os Serviços de impressão do Bonjour
3. Localize o atalho do Assistente de impressora do Bonjour na sua área de trabalho
ou no menu Iniciar/Todos os programas e clique para iniciar
34

Of ce Edition Guia de início rápido
PORTUGUÊS
Instruções para o Windows XP
5. Pesquise e selecione sua impressora pelo fabricante
e pelo número do modelo e clique em Avançar.
6. Para completar a instalação, clique em Concluir.
Instruções para o Windows 7
5. Pesquise e selecione sua impressora pelo fabricante
e pelo número do modelo e clique em Avançar.
6. Para completar a instalação, clique em Concluir.
6 COMO IMPRIMIR PELO SISTEMA OPERACIONAL WINDOWS continuação
35

Entre em contato com o Suporte técnico
Para fazer consultas ao suporte técnico, visite http://www.lantronix.com/support ou telefone para +31 (0)76
52 36 740 de segunda a sexta-feira, das 9h às 17h, CET, exceto em feriados.
Of ce Edition Guia de início rápido
PORTUGUÊS
36
6 COMO IMPRIMIR PELO SISTEMA OPERACIONAL WINDOWS continuação
Instruções para o Windows XP
7. Para configurar a impressora como impressora
padrão, vá até: Iniciar, Painel de controle e
clique em Impressoras e faxes
8. Selecione a impressora e clique com o botão
direito do mouse. Selecione Definir como
impressora padrão
Parabéns! A configuração para inclusão de
impressora agora está completa.
Instruções para o Windows 7
7. Para configurar a impressora como impressora
padrão, vá até: Iniciar, Painel de controle e
clique em Dispositivos e impressoras
8. Selecione a impressora e clique com o botão
direito do mouse. Selecione Definir como
impressora padrão
Parabéns! A configuração para inclusão de
impressora agora está completa.

Of ce Edition Guía de inicio rápido
ESPAÑOL
ITENS
INCLUSOS
Cable de alimentación con
adaptadores regionales
Cable de ethernet de 3 pies
Soporte de montaje
y 2 tornillos
xPrintServer
Guía de inicio rápido
1 ANTES DE COMENZAR
2 INSTALACIÓN DEL HARDWARE
1. Si intenta conectar una impresora USB a xPrintServer™, asegúrese de probar la impresora desde el
ordenador Windows o Mac que está directamente conectado antes de continuar.
2. xPrintServer descubrirá automáticamente todas las impresoras en red (inalámbricas y con
cables) ubicadas en la misma subred. Las impresoras de una subred diferente deben configurarse
manualmente. Para ver las instrucciones, consulte la Guía del usuario.
3. Es necesario tener acceso a Internet durante la configuración y al agregar nuevas impresoras.
4.
Configuración personalizada y Guía del usuario de xPrintServer: Uso de un registro de explorador web en su
interfaz de administración de xPrintServer en xPrintServer-XXXXXXXXXXXX.local con la ID DE USUARIO
= admin y la CONTRASEÑA = PASS (ambas distinguen entre mayúsculas/minúsculas).
MONTAJE DEL BASTIDOR
1. Se proporciona un versátil soporte de montaje
y tornillos para ayudarle a instalar y montar
xPrintServer en un bastidor del servidor en
diferentes orientaciones (por ejemplo, horizontal
o vertical). Para ver las instrucciones de
montaje, consulte la Guía del usuario.
ESCRITORIO
1. Coloque xPrintServer boca abajo sobre una
superficie plana y sin irregularidades.
2. Quite las patas de goma de la tira adhesiva y
colóquelas con la parte adhesiva hacia abajo en
cada esquina de xPrintServer.
3. Dé la vuelta al xPrintServer para que quede
sobre las patas de goma.
Soporte de montaje
xPrintServer
Patas de
goma (4)
37
Ofce Edition
Quick Start Guide
AirPrint AirPrint enables you to wirelessly print photos,
e-mail, web pages, and documents from your iPad, iPhone,
and iPod touch without the need to install a driver.
13266xPrintQSG_OfficeEd_resize_16.indd 1 9/30/13 9:23 AM
xPrintServer-XXXXXXXXXXXX.local

Of ce Edition Guía de inicio rápido
ESPAÑOL
3 CONEXIÓN RÁPIDA
2. En el menú Opciones
de impresora, elija
Impresora para mostrar
todas las impresoras en
red disponibles.
1. Utilizando su iPad, iPhone u otro dispotivo
iOS, Abra la página web, correo electrónico,
foto, etc. que desee imprimir y elija el icono
para abrir el menú de
impresión nativo:
3. Seleccione la
impresora adecuada. A
continuación, seleccione
el número de copias y
elija Imprimir.
4 CÓMO IMPRIMIR DESDE DISPOSITIVOS iOS
1
2
3
1 2 3
Impresora USB
Cable de red
Router/conmutador
inalámbrico
Conecte el cable de la impresora USB
al puerto USB de xPrintServer.
Conecte el cable de red desde el router/
conmutador inalámbrico a xPrintServer.
Alimente el xPrintServer con el
adaptador de corriente incluido.
Proceso de configuración automática: xPrintServer configurará automáticamente sus impresoras (USB y en
red) en cuanto esté conectado, tal y como se muestra más arriba. La "X" luminosa parpadeará rápidamente
durante 30 segundos y, a continuación, latirá despacio para marcar que está listo para imprimir. No es
necesario conectar una impresora USB para que xPrintServer configure impresoras en red.
38

Of ce Edition Guía de inicio rápido
ESPAÑOL
1. Vaya a Preferencias del sistema, Hardware y
haga clic en Impresion y Escaneado
2. Haga clic en el botón + que hay en la esquina
inferior izquierda.
3. Aparecerá una lista de impresoras. Seleccione
la impresora que desee agregar y haga clic en
el botón Añadir.
4. Ahora la impresora está agregada en su lista
de impresoras disponibles y está lista para
imprimir.
que hay en la esquina
4.
Ahora la impresora está agregada en su lista
de impresoras disponibles y está lista para
imprimir.
5 COMO IMPRIMIR PELO MAC OS
39

Of ce Edition Guía de inicio rápido
ESPAÑOL
6 CÓMO IMPRIMIR DESDE WINDOWS OS
ANTES DE COMENZAR
Asegúrese de que la impresora USB esté funcionando y que los controladores de la impresora estén
instalados en el ordenador antes de proceder.
INSTALAR BONJOUR PRINT SERVICES
1. Bonjour Print Services es una aplicación de Apple que permite descubrir impresoras conectadas a xPrintServer
desde un PC con Windows. Vaya a la dirección web que hay a continuación para descargar e instalar Bonjour
Print Services para Windows v2.0.2 o posterior http://support.apple.com/kb/DL999?viewlocale=es_ES
2. Siga las instrucciones para instalar Bonjour Print Services
3. Encuentre el acceso directo del Asistente de impresora Bonjour que hay en su
Escritorio o en el menú Inicio/Todos los programas y haga clic para iniciarlo
Instrucciones para Windows XP
4. Aparece el asistente de impresora Bonjour con
una lista de impresoras descubiertas. Resalte la
impresora que desee instalar.
Instrucciones para Windows 7
4. Aparece el asistente de impresora Bonjour con
una lista de impresoras descubiertas. Resalte la
impresora que desee instalar.
40

Of ce Edition Guía de inicio rápido
ESPAÑOL
Instrucciones para Windows XP
5. Busque y seleccione su impresora por fabricante
(Manufacturer) y número de modelo (Model) y,
a continuación, haga clic en Siguiente (Next).
6. Para completar la instalación, haga clic en
Finalizar (Finish).
Instrucciones para Windows 7
5. Busque y seleccione su impresora por fabricante
(Manufacturer) y número de modelo (Model) y,
a continuación, haga clic en Siguiente (Next).
6. Para completar la instalación, haga clic en
Finalizar (Finish).
6 CÓMO IMPRIMIR DESDE WINDOWS OS continuación
41

Of ce Edition Guía de inicio rápido
ESPAÑOL
Contacto con el soporte técnico
Si tiene dudas sobre soporte técnico, visite http://www.lantronix.com/support o llame al
+31 (0)76 52 36 740 de lunes a viernes de 9 h a 17 h CET, a excepción de las vacaciones.
42
6 CÓMO IMPRIMIR DESDE WINDOWS OS continuación
Instrucciones para Windows XP
7. Si desea configurar la impresora como
predeterminada, vaya a: Inicio (Start), Panel
de control (Control Panel) y haga clic en
Impresoras y faxes (Printers and Faxes)
8. Seleccione la impresora, haga clic con el botón
derecho y seleccione Definir como impresora
predeterminada (Set as Default Printer)
Enhorabuena, se ha completado la configuración
para agregar una impresora.
Instrucciones para Windows 7
7. Si desea configurar la impresora como
predeterminada, vaya a: Inicio (Start), Panel
de control (Control Panel) y haga clic en
Dispositivos e impresoras (Devices and Printers)
8. Seleccione la impresora, haga clic con el botón
derecho y seleccione Definir como impresora
predeterminada (Set as Default Printer)
Enhorabuena, se ha completado la configuración
para agregar una impresora.

办公版快速入门指南
中文
里面
有什么
带区域适配器
的电源适配器
3’以太网电缆
安装支架
2 颗螺钉
xPrintServer
快速入门指南
1 开始之前
2 硬件安装
1. 如果您打算将 USB 打印机连接到 xPrintServer™,请一定要先从打印机直接连接的 Windows 或
Mac 电脑测试打印机。
2. xPrintServer 将自动发现同一子网络中的所有网络(有线和无线网络)打印机。必须手动配置
不同子网络上的打印机。请参阅《用户指南》中的说明。
3. 在设置和添加新打印机期间需要连接互联网。
4.
自定义设置和 xPrintServer 用户指南: 在浏览器中输入 xPrintServer-XXXXXXXXXXXX.local 以登
录 xPrintServer 管理界面,用户名 = admin,密码 = PASS (两者均区分大小写)
机架安装
1. 随附了一个多用途安装支架和螺钉,可帮助
您轻松在各种方向(如水平或垂直方向)上
把 xPrintServer 安装到服务器机架上。 请参
阅《用户指南》中的安装说明。
桌面
1. 将 xPrintServer 正面向下放在一个光滑、平
整的表面上。
2. 从粘合带中剥下橡胶支脚,然后将支脚带粘
胶的一面向下放置在 xPrintServer 的每个角
落。
3. 将 xPrintServer 翻过来,由橡胶支脚支撑。
安装支架
xPrintServer
橡胶
支脚 (4)
43
Ofce Edition
Quick Start Guide
AirPrint AirPrint enables you to wirelessly print photos,
e-mail, web pages, and documents from your iPad, iPhone,
and iPod touch without the need to install a driver.
13266xPrintQSG_OfficeEd_resize_16.indd 1 9/30/13 9:23 AM
xPrintServer-XXXXXXXXXXXX.local

办公版快速入门指南
中文
3 快速连接
2. 从“打印机选项”菜单
中,选择打印机以显
示所有可用的网络打
印机。
1. 用 iPad、iPhone 或其它 iOS 设备来打开要
打印的网页、电子邮件、照片等,然后选
择图标以打开本地打印菜单:
3. 选 择 相应的打印机。
然后,选择打印份数
并选择打印。
4 如何从 iOS 设备打印
1
2
3
1 2
㔥㒓
ᇚ USB ᠧॄᴎ㒓㓚䖲ࠄ
xPrintServer ⱘUSB ッষDŽ
ᇚ㔥㒓Ң᮴㒓䏃⬅఼/Ѹᤶᴎ
䖲ࠄ xPrintServerDŽ
⫼䱣䰘ⱘ⬉⑤䗖䜡఼Ў
xPrintServer կ⬉DŽ
3
USB ᠧॄᴎ
᮴㒓䏃⬅఼/Ѹᤶᴎ
自动设置过程:xPrintServer 连接之后即自动设置您的打印机 (USB 和网络),如上图所示。发光
的 “X” 将快速闪烁约 30 秒,然后缓慢脉冲,表明可以开始打印。 xPrintServer 设置网络打印机时
不需要连接 USB 打印机。
44

办公版快速入门指南
中文
1. 转至系统首选项,硬件,然后点击“打印和
扫描”。
2. 点击左下角的 + 按钮
3. 将出现打印机列表。选择要添加的打印机,
然后点击添加 按钮。
4. 打印机现已添加到您的可用打印机列表中并
可以开始打印。
4.
打印机现已添加到您的可用打印机列表中并
5 如何从 MAC 操作系统打印
45

办公版快速入门指南
中文
6 如何从 WINDOWS 操作系统打印
开始之前
在继续之前,确保 USB 打印机工作正常并且打印机驱动程序已安装在计算机中。
安装 BONJOUR 打印服务
1. Bonjour 打印服务是一款苹果应用程序,可从 Windows PC 发现连接到 xPrintServer 的打印机。
请访问下面的网址并安装 Bonjour 打印服务的 Windows v2.0.2 或更高版本 http://support.apple.
com/kb/DL999?viewlocale=zh_CN
2. 按照提示安装 Bonjour 打印服务
3. 在桌面快捷方式或开始/所有程序菜单中找到 Bonjour 打印机向导 ,然后点击
以启动
适用于 Windows XP 的说明
4. Bonjour 打印机向导出现,同时还出现已发现
的打印机列表。高亮显示要安装的打印机。
适用于 Windows 7 的说明
4. Bonjour 打印机向导出现,同时还出现已发现
的打印机列表。高亮显示要安装的打印机。
46

办公版快速入门指南
中文
适用于 Windows XP 的说明
5. 按制造商和型号搜索和选择打印机,然后点
击下一步。
6. 如要完成安装,请点击完成。
适用于 Windows 7 的说明
5. 按制造商和型号搜索和选择打印机,然后点
击下一步。
6. 如要完成安装,请点击安装。
6 如何从 WINDOWS 操作系统打印续上页
47

办公版快速入门指南
中文
联系技术支持
如需咨询技术支持,请访问 http://www.lantronix.com/support 或致电 (800) 422-7044(太平洋
时间周一至周五早 6 点至下午 5 点,节假日除外)大中国区用户请联系www.lantronix.hk
<http://www.lantronix.hk> 或者致电 400-606-1129。
48
6 如何从 WINDOWS 操作系统打印续上页
适用于 Windows XP 的说明
7. 如要将打印机配置为默认打印机,转至:开
始,控制面板然后点击打印机和传真机
8. 选择打印机,然后右键点击并选择设置为默
认打印机
恭喜您!添加打印机设置现已完成。
适用于 Windows 7 的说明
7. 如要将打印机配置为默认打印机,转至:开
始,控制面板然后点击设备和打印机
8. 选择打印机,然后右键点击并选择设置为
默认打印机
恭喜您!添加打印机设置现已完成。


© 2015 Lantronix, Inc. All Rights Reserved
Lantronix and xPrintServer are trademarks or registered trademarks of Lantronix Inc. in the U.S. and other countries. iPad,
iPhone and iPod touch are trademarks of Apple Inc., registered in the U.S. and other countries. AirPrint and the AirPrint logo
are trademarks of Apple Inc. Windows is a trademark or registered trademark of Microsoft Corporation, in the U.S. and other
countries. All other trademarks and trade names are the property of their respective holders. 900-695-R Rev C
Office
Network
Router / Switch / LAN
Ofce Edition Quick Start Guide
-
 1
1
-
 2
2
-
 3
3
-
 4
4
-
 5
5
-
 6
6
-
 7
7
-
 8
8
-
 9
9
-
 10
10
-
 11
11
-
 12
12
-
 13
13
-
 14
14
-
 15
15
-
 16
16
-
 17
17
-
 18
18
-
 19
19
-
 20
20
-
 21
21
-
 22
22
-
 23
23
-
 24
24
-
 25
25
-
 26
26
-
 27
27
-
 28
28
-
 29
29
-
 30
30
-
 31
31
-
 32
32
-
 33
33
-
 34
34
-
 35
35
-
 36
36
-
 37
37
-
 38
38
-
 39
39
-
 40
40
-
 41
41
-
 42
42
-
 43
43
-
 44
44
-
 45
45
-
 46
46
-
 47
47
-
 48
48
-
 49
49
-
 50
50
-
 51
51
-
 52
52


Lantronix xPrintServer Office: Enterprise Mobile Printing Snelstartgids
- Categorie
- Routers
- Type
- Snelstartgids
in andere talen
- italiano: Lantronix xPrintServer Office: Enterprise Mobile Printing Guida Rapida
- français: Lantronix xPrintServer Office: Enterprise Mobile Printing Guide de démarrage rapide
- español: Lantronix xPrintServer Office: Enterprise Mobile Printing Guía de inicio rápido
- Deutsch: Lantronix xPrintServer Office: Enterprise Mobile Printing Schnellstartanleitung
- português: Lantronix xPrintServer Office: Enterprise Mobile Printing Guia rápido
Andere documenten
-
Apple MAC MINI M1 512GO de handleiding
-
HP Color LaserJet Pro MFP M277 series Handleiding
-
-
HP Color LaserJet Pro MFP M477 series Handleiding
-
-
HP LaserJet P3005 Printer series Handleiding
-
HP Color LaserJet Pro MFP M476 series Handleiding
-
-
-