
TECHNIPOLAR 1

2
CONTENTS
DEUTSCH ........................................................................................3-28
ENGLISH ........................................................................................29-54
FRANÇAIS .....................................................................................55-80
ITALIANO ..................................................................................... 81-106
NEDERLANDS ...........................................................................107-132
POLSKE .......................................................................................133-157

Bedienungsanleitung
TECHNIPOLAR 1
Mobile Klimaanlage zum Kühlen und Heizen, mit Ventilator und
Entfeuchterfunktion.

4
1 Inhaltsverzeichnis
1 Inhaltsverzeichnis ..................................................................................................... 4
2 Vorwort ........................................................................................................................ 5
3 Sicherheitshinweise ................................................................................................. 6
3.1 Verwendete Zeichen und Symbole .................................................................................... 6
3.2 Bestimmungsgemäßer Gebrauch ........................................................................................7
3.3 Sicherer Umgang mit Klimageräten .................................................................................... 7
3.4 Entsorgungshinweise ................................................................................................................ 9
4 Abbildungen ............................................................................................................. 10
5 Installationsanweisungen ......................................................................................11
5.1 Ableiten der Ablu .................................................................................................................... 11
5.2 Fenster-Kit installieren ............................................................................................................ 12
5.3 Aufstellungsort ............................................................................................................................13
6 Bedienung ................................................................................................................. 14
6.1 Bedieneinheit .............................................................................................................................. 14
6.2 Ein-und Ausschalten ................................................................................................................14
6.3 Kühlmodus ....................................................................................................................................15
6.4 Heizmodus ....................................................................................................................................15
6.5 Entfeuchtungsmodus .............................................................................................................. 16
6.6 Lüermodus .................................................................................................................................17
6.7 Automatikmodus ........................................................................................................................17
7 Timermodus ...............................................................................................................17
7.1 Timer programmieren ..............................................................................................................17
8 Bedienung mit der Fernbedienung ................................................................... 18
8.1 Baerien einlegen .................................................................................................................... 18
8.2 Übersicht ....................................................................................................................................... 19
8.3 Spezielle Funktionen mit der Fernbedienung ............................................................ 20
8.3.1 Lüungsauslass ....................................................................................................................... 20
8.3.2 Umschaltung der Temperatureinheit.............................................................................. 20
8.3.3 Nachtmodus ............................................................................................................................... 20
9 Service und Wartung ............................................................................................. 21
9.1 Kondenswasser ablassen ...................................................................................................... 21
9.2 Gerät reinigen .............................................................................................................................22
9.3 TÄTIGKEITEN ZUM START/ENDE DER SAISON ...............................................................22
10 Fehlersuche...............................................................................................................23
11 Technische Daten ....................................................................................................25
12 Rechliche Hinweise .................................................................................................26
12.1 Servicehinweise..........................................................................................................................26
13 Notizen ....................................................................................................................... 27

5
DE
EN
FR
IT
NL
PL
2 Vorwort
Sehr geehrte Kunden,
vielen Dank, dass Sie sich für ein Klimagerät von TechniSat entschieden haben.
Die vorliegende Bedienungsanleitung soll Ihnen helfen, die umfangreichen
Funktionen Ihres neuen Gerätes kennen zu lernen und optimal zu nutzen. Sie hil
Ihnen beim bestimmungsgemäßen und sicheren Gebrauch. Sie richtet sich an jede
Person, die das Gerät installiert, bedient, reinigt oder entsorgt.
Bewahren Sie die Bedienungsanleitung für einen späteren Gebrauch sorgfältig auf.
Eine aktuelle Version der Bedienungsanleitung finden Sie im Downloadbereich Ihres
Produktes auf der TechniSat-Webseite
www.technisat.de.
Wir wünschen Ihnen viel Freude mit Ihrem
TechniSat Produkt!
Ihr
TechniSat Team

6
3 Sicherheitshinweise
3.1 Verwendete Zeichen und Symbole
In dieser Bedienungsanleitung:
Kennzeichnet einen Sicherheitshinweis, der bei Nichtbeachtung zu schweren
Verletzungen oder zum Tod führen kann. Beachten Sie die folgenden
Signalwörter:
GEFAHR - Schwere Verletzungen mit Todesfolge
WARNUNG - Schwere Verletzungen, eventuell mit Todesfolge
ACHTUNG - Verletzungen
Kennzeichnet einen Hinweis, den Sie zur Vermeidung von Gerätedefekten,
Datenverlusten/-missbrauch oder ungewolltem Betrieb unbedingt beachten
sollten. Des Weiteren beschreibt er weitere Funktionen zu Ihrem Gerät.
Warnung vor elektrischer Spannung. Befolgen Sie alle Sicherheitshinweise,
um einen elektrischen Schlag zu vermeiden. Önen Sie niemals das Gerät.
Auf dem Gerät:
Warnung vor Feuergefährlichen Stoen. Befolgen Sie alle Sicherheitshinweise.
Unachtsamkeiten in der Nähe von entzündlichen Stoen können zu Bränden
führen.
Beachten Sie alle Hinweise und Sicherheitshinweise in der
Bedienungsanleitung.
Benutzung in Innenräumen - Geräte mit diesem Symbol sind nur für die
Verwendung in Innenräumen geeignet.
Schutzklasse II - Elektrogeräte der Schutzklasse II sind Elektrogeräte die
durchgehende doppelte und/oder verstärkte Isolierung besitzen und keine
Anschlussmöglichkeiten für einen Schutzleiter haben. Das Gehäuse eines
isolierstoumschlossenen Elektrogerätes der Schutzklasse II kann teilweise
oder vollständig die zusätzliche oder verstärkte Isolierung bilden.
Ihr Gerät trägt das CE-Zeichen und erfüllt alle erforderlichen EU-Normen.
Elektronische Geräte gehören nicht in den Hausmüll, sondern müssen -
gemäß Richtlinie 2002/96/EG des Europäischen Parlaments und Rates vom
27. Januar 2003 über Elektro- und Elektronik-Altgeräte - fachgerecht entsorgt
werden. Bie geben Sie dieses Gerät am Ende seiner Verwendung zur
Entsorgung an den dafür vorgesehenen öentlichen Sammelstellen ab.

7
DE
EN
FR
IT
NL
PL
3.2 Bestimmungsgemäßer Gebrauch
Das TechniSat Klimagerät TECHNIPOLAR 1 ist zum Kühlen oder Heizen von
Wohninnenräumen von mindestens 13 m² bis max. 35 m² ausgelegt.
3.3 Sicherer Umgang mit Klimageräten
Bie beachten Sie die nachfolgend aufgeführten Hinweise, um Sicherheitsrisiken
zu minimieren, Beschädigungen am Gerät zu vermeiden, sowie einen Beitrag zum
Umweltschutz zu leisten.
Lesen Sie bie alle Sicherheitshinweise sorgfältig durch und bewahren Sie diese
für spätere Fragen auf. Befolgen Sie immer alle Warnungen und Hinweise in dieser
Bedienungsanleitung und auf der Rückseite des Gerätes.
WARNUNG!
Feuergefährliche Stoe. Das Gerät ist mit Propangas R290 befüllt. Beachten
Sie unbedingt die Herstellerrichtlinien zur Reparatur oder Servicearbeiten. Der
Service darf nur von geschultem Fachpersonal durchgeführt werden.
WARNUNG!
Önen Sie niemals das Gerät!
Das Berühren Spannung führender Teile ist lebensgefährlich!
Beachten Sie alle nachfolgenden Hinweise zur bestimmungsgemäßen
Nutzung des Gerätes und um Gerätedefekten und Personenschäden
vorzubeugen.
> Das Gerät ist nicht dafür bestimmt, von Personen (einschließlich Kindern) mit
eingeschränkten physischen, sensorischen oder geistigen Fähigkeiten oder
mangelnder Erfahrung und/oder mangelndem Wissen benutzt zu werden,
es sei denn, sie werden durch eine für ihre Sicherheit zuständige Person
beaufsichtigt oder erhalten von ihr Anweisungen, wie das Gerät zu benutzen
ist.
> Kinder sollten beaufsichtigt werden, um sicherzustellen, dass sie nicht mit
dem Gerät spielen.
> Verwenden Sie dieses Gerät nicht für andere als die in dieser
Bedienungsanleitung beschriebenen Funktionen.
> Wenn das Netzkabel abgenutzt oder beschädigt ist, darf es nur von einem
qualifizierten Servicetechniker unter Verwendung von Original-Ersatzteilen
ersetzt werden.
> Der Stecker muss fest und vollständig in die Steckdose eingesteckt sein. Es
besteht die Gefahr eines Stromschlags oder eines Brandes.
> Schließen Sie keine anderen Geräte an dieselbe Steckdose an, es besteht die
Gefahr eines Stromschlags.
> Weder Klimagerät noch Netzkabel darf zerlegt oder verändert werden, da
andernfalls die Gefahr eines Stromschlags oder eines Brandes besteht.
Alle anderen Arbeiten an dem Gerät müssen von an einem qualifizierten
Techniker durchgeführt werden.

8
> Platzieren Sie weder Netzkabel noch Klimagerät in die Nähe einer Heizung,
eines Heizkörpers oder einer anderen Wärmequelle. Es besteht die Gefahr
eines Stromschlags oder eines Brandes.
> Das Gerät ist mit einem Kabel mit geerdetem Leiter ausgestaet, der mit
einem Erdungssti oder einer Erdungslasche verbunden ist. Der Stecker muss
in eine ordnungsgemäß installierte und geerdete Steckdose gesteckt werden.
Unter keinen Umständen darf der geerdete Sti oder die Erdungslasche von
diesem Stecker abgeschnien oder entfernt werden.
> Das Gerät ist so zu verwenden oder zu lagern, dass es vor Feuchtigkeit wie z.
B. Kondenswasser, Spritzwasser usw. geschützt ist.
> Transportieren Sie Ihr Klimagerät in vertikaler Position und stellen Sie es
während des Gebrauchs auf eine stabile, ebene Fläche. Wird das Gerät auf
der Seite liegend transportiert, so sollte es 6 Stunden lang aufrecht stehen
und erst dann an die Stromversorgung angeschlossen werden.
> Schalten Sie das Gerät oder die Fernbedienung über den Schalter am
Bedienfeld aus. Starten oder stoppen Sie den Betrieb nicht durch Einstecken
oder Ziehen des Netzkabels. Es besteht Stromschlaggefahr.
> Drücken Sie die Tasten auf dem Bedienfeld nicht mit nassen oder feuchten
Fingern.
> Verwenden Sie keine gefährlichen Chemikalien, um das Gerät zu reinigen,
und halten Sie diese von dem Gerät fern. Um Schäden an der Oberfläche
zu vermeiden, verwenden Sie zur Reinigung des Klimageräts nur ein
weiches Tuch. Verwenden Sie weder Wachs, Verdünner noch ein starkes
Reinigungsmiel. Verwenden Sie das Gerät nicht in Gegenwart von
brennbaren Stoen oder Dämpfen wie Alkohol, Insektiziden, Benzin usw.
> Wenn das Klimagerät ungewöhnliche Geräusche macht oder Rauch bzw.
einen ungewöhnlichen Geruch abgibt, ziehen Sie sofort den Stecker aus der
Steckdose.
> Das Gerät nicht mit Wasser reinigen. Wasser kann in das Gerät eindringen
und die Isolierung beschädigen, wodurch die Gefahr von Stromschlägen
entsteht. Wenn Wasser in das Gerät eingetreten ist, zeihen Sie sofort den
Netzstecker und setzen Sie sich mit dem Kundendienst in Verbindung.
> Das Gerät sollte mit mindestens zwei Personen gehoben und installiert
werden.
> Stellen Sie sicher, dass alle Zubehörteile vor Gebrauch aus der Verpackung
entfernt werden.
> Berühren Sie beim Aus- und Einbau des Filters nicht die Metallteile des
Klimageräts, um Schniverletzungen zu vermeiden. Es besteht die Gefahr von
Personenschäden.
> Versperren Sie nicht den Lueintri oder -austri des Klimagerätes. Ein
reduzierter Ludurchsatz führt zu schlechter Leistung und kann das Gerät
beschädigen.

9
DE
EN
FR
IT
NL
PL
> Fassen Sie immer am Stecker an, wenn Sie das Klimagerät ein- oder
ausstecken. Ziehen Sie niemals den Stecker aus der Steckdose, indem Sie am
Kabel ziehen. Andernfalls besteht die Gefahr eines Stromschlags und es kann
zu Beschädigungen kommen.
> Stellen Sie das Klimagerät auf einem stabilen, ebenen Untergrund auf, der bis
zu 50 kg tragen kann. Die Aufstellung auf einem nicht soliden oder unebenen
Untergrund kann zu Sach- und Personenschäden führen.
> Schließen Sie für einen möglichst ezienten Betrieb alle Türen und Fenster
zu dem Raum. Achten Sie darauf, dass der Abluschlauch nach aussen
geführt wird, um einen ezienten Betrieb zu gewährleisten.
WICHTIG - ERDUNGSMETHODE
Dieses Produkt ist werkseitig mit einem Netzkabel ausgestaet, das über einen
dreipoligen geerdeten Stecker verfügt. Es darf nur an eine Steckdose angeschlossen
werden, die gemäß dem National Electrical Code und den anwendbaren örtlichen
Vorschrien und Verordnungen zur Erdung ausgestaet ist. Wenn der Stromkreis
keine geerdete Steckdose besitzt, liegt es in der Verantwortung und Verpflichtung
des Kunden, die vorhandene Steckdose gemäß dem National Electrical Code und
den geltenden örtlichen Vorschrien und Verordnungen auszutauschen. Die drie
Erdungskontakt darf auf keinen Fall abgeschnien oder entfernt werden. Benutzen
Sie niemals das Kabel, den Stecker oder das Gerät, wenn es Beschädigungen
aufweist. Verwenden Sie Ihr Gerät nur dann mit einem Verlängerungskabel,
wenn es von einem qualifizierten Elektrofachbetrieb geprü und getestet wurde. Bei
unsachgemäßem Anschluss des geerdeten Steckers besteht in Verbindung mit dem
Gerät Brand-, Stromschlag- und/oder Verletzungsgefahr für Personen. Wenden Sie
sich an einen qualifizierten Servicetechniker, wenn Sie Zweifel haben, ob das Gerät
ordnungsgemäß geerdet ist.
ELEKTRISCHE ANSCHLÜSSE
Bevor Sie das Gerät in die Netzsteckdose stecken, überprüfen Sie Folgendes:
> Die Netzspannung entspricht dem Wert, der auf dem Typenschild auf der
Geräterückseite angegeben ist.
> Steckdose und Stromkreis sind für das Gerät geeignet.
> Die Netzsteckdose passt zum Stecker. Sollte dies nicht der Fall sein, lassen Sie
den Stecker austauschen.
> Die Netzsteckdose ist ausreichend geerdet. Die Nichtbeachtung dieser
wichtigen Sicherheitshinweise entbindet den Hersteller von jeglicher Haung.
3.4 Entsorgungshinweise
Wichtige Hinweise für die fachgerechte Entsorgung des Produktes gemäß EG-
Richtlinie 2012119/EG.
Am Ende der Nutzungsdauer darf das Produkt nicht als Siedlungsabfall entsorgt
werden. Es muss zu einer speziellen kommunalen Sammelstelle oder zu einem
Händler, der diese Dienstleistung anbietet, gebracht werden.

10
Durch die getrennte Entsorgung von Haushaltsgeräten werden mögliche negative
Auswirkungen auf Umwelt und Gesundheit durch unsachgemäße Entsorgung
vermieden. Außerdem wird dadurch die Wiederverwendung von Bestandteilen
ermöglicht, sodass signifikante Energie- und Ressourceneinsparungen erzielt
werden können. Zur Erinnerung an die Notwendigkeit, Haushaltsgeräte getrennt
zu entsorgen, ist das Produkt mit einer durchgestrichenen Mülltonne auf Rädern
ekennzeichnet.
4 Abbildungen
1 Lüerönung
2 Bedienfeld
3 Grimulden (beidseitig)
4 Rollen
5 Netzanschlusskabel
6 Filtereinheit Lueinlass
7 Abluanschluss
8 Lueinlass
9 Unterer Kondenswasser
Abfluss
10 Oberer Kondenswasser
Abfluss

11
DE
EN
FR
IT
NL
PL
5 Installationsanweisungen
5.1 Ableiten der Ablu
Im Kühl- oder Heizmodus muss das Gerät in der Nähe eines Fensters oder einer
Önung aufgestellt werden, damit die warme bzw. kalte Ablu nach außen geleitet
werden kann.
Stellen Sie das Gerät auf einem ebenen Boden auf und achten Sie darauf, dass um
das Gerät herum ein Mindestabstand von 30 cm eingehalten wird und dass es sich
in der Nähe einer Schutzkontaktsteckdose befindet.
1. Verlängern Sie den Schlauch, indem
Sie ihn auseinanderziehen, auf die
gewünschte Länge (Abb. 1)
2. Schrauben Sie ihn am Schlaucheinlass an
(Abb. 2).
3. Schrauben Sie den Schlauchauslass an
das andere Ende des Schlauches an (Abb.
3).
4. Montieren Sie den Schlaucheinlass am
Abluanschluss (7) (Abb. 4).
5. Befestigen Sie den Schlauchauslass
am Fenster-Kit (siehe „5.2 Fenster-Kit
installieren“).
Aufstecken
Verriegeln

12
5.2 Fenster-Kit installieren
Das Fenster-Kit ist zum abdichten von Kipp-Fenstern vorgesehen. Zur Installation
gehen Sie Folgendermaßen vor:
Kleben Sie das Kle-Band auf
den Fensterrahmen.
Kleben Sie das Kle-Band auf
den Rahmen des Fensters.
Kürzen Sie das Kle-Band an
den Ecken.
Achten Sie darauf, dass die
Ecken bündig aneinander
liegen.
Befestigen Sie die
Fensterabdichtung.
Achten Sie darauf, dass beide
Hälen gerade zueinander
ausgerichtet sind.
Önen Sie den Reißverschluss
an der Seite.
Stecken Sie den Abluschlauch
in die entstandene Önung und
schließen Sie den Reißverschluss.

13
DE
EN
FR
IT
NL
PL
5.3 Aufstellungsort
> Das Gerät sollte auf festem Untergrund aufgestellt werden, um Geräusche
und Vibrationen zu minimieren. Um einen sicheren Stand zu gewährleisten,
stellen Sie das Gerät auf einen glaen, ebenen Boden, der solide genug ist,
um das Gerät zu tragen.
> Das Gerät ist mit Rollen ausgestaet, um die Aufstellung zu erleichtern.
Allerdings sollte es nur auf glaen, ebenen Flächen gerollt werden. Seien
Sie vorsichtig, wenn Sie es auf Teppichböden rollen. Seien Sie vorsichtig und
schützen Sie die Böden, wenn Sie über Holzfußböden rollen. Versuchen Sie
nicht, das Gerät über Gegenstände zu rollen.
> Das Gerät muss in Reichweite einer ordnungsgemäß bemessenen
Schutzkontaktsteckdose aufgestellt werden.
> Stellen Sie niemals irgendwelche Hindernisse um den Lu ein- oder -austri
des Geräts herum auf.
> Lassen Sie mindestens 45 cm Abstand zur Wand, um eine eziente
Klimatisierung zu erreichen.
> Der Schlauch kann verlängert werden, sollte aber so kurz wie möglich
gehalten werden. Achten Sie auch darauf, dass der Schlauch keine Knicke hat
und auch nicht durchhängt.

14
6 Bedienung
Das Bedienfeld befindet sich auf der Oberseite des Geräts.
Um das volle Potenzial des Geräts auszuschöpfen, müssen Sie jedoch die
Fernbedienung verwenden.
6.1 Bedieneinheit
1 2 3 4 5 6
7 8 9 10 11 12 13 14 15 16
1 Betriebsmodus-Umschaltung
2 Zeitsteuerung (Timer)
3 Temperaturwahl (wärmer)
4 Temperaturwahl (kälter)
5 Gebläsestufe
6 Ein-/Ausschalter
7 Heizfunktion aktiv
8 Kühlfunktion aktiv
9 Luentfeuchtung aktiv
10 Lüermodus aktiv
11 Zeitsteuerung aktiv
12 Display
13 Gebläsestufe hoch
14 Gebläsestufe miel
15 Gebläsestufe niedrig
16 Automatische Klimasteuerung aktiv
6.2 Ein-und Ausschalten
Stecken Sie den Netzstecker in die Netzsteckdose. Auf dem Display erscheint „ - - „.
Drücken Sie einmal die Taste POWER (6), um das Gerät einzuschalten.
Drücken Sie erneut die Taste POWER, um das Gerät auszuschalten.
Schalten Sie das Klimagerät nie aus, indem Sie den Netzstecker ziehen.
Schalten Sie das Klimagerät immer erst durch drücken der Taste POWER
aus und warten Sie einige Minuten, bevor Sie den Stecker ziehen. Dadurch
kann das Gerät einen Kontrollzyklus durchführen und ordnungsgemäß
herunterfahren.

15
DE
EN
FR
IT
NL
PL
Schalten Sie das Klimagerät nicht sofort nach dem ausschalten wieder ein,
sondern warten Sie ein paar Minuten.
6.3 Kühlmodus
Ideal für heißes, schwüles Weer, wenn es darum geht, den Raum zu kühlen und
Gleichzeitig zu entfeuchten.
> Drücken Sie die Taste MODE (1) mehrmals, bis „Cool“ (8) leuchtet.
> Wählen Sie die Soll-Temperatur (18 °C bis 32 °C), indem Sie die Taste
Temperaturwahl wärmer/kälter (3, 4) so o drücken, bis der entsprechende
Wert im Display angezeigt wird.
Nach dem Einschalten und aktivieren der Kühl-Funktion, kann es einen
Augenblick dauern, bis der Kompressor startet und das Gerät kühlt.
> Wählen Sie durch mehrmaliges Drücken der Taste FAN (5) die gewünschte
Lüerdrehzahl aus, wobei High (Hoch), Medium (Miel), Low (Niedrig)
und Auto (automatische Regelung) ausgewählt werden können. Je nach
gewählter Lüerdrehzahl verändert sich auch das Betriebsgeräusch des
Klimagerätes. Bevorzugen Sie einen möglichst leisen Betrieb, wählen Sie Low.
Aktivieren Sie den Kühlmodus direkt nach dem der Heizmodus aktiv war,
kann es bis zu 5 Minuten dauern, bis das Gerät mit dem Kühlen beginnt.
Die für den Raum am besten geeignete Temperatur während des Sommers
liegt zwischen 24 °C und 27 °C. Es wird jedoch empfohlen, keine Temperatur
einzustellen, die weit unter der Außentemperatur liegt.
Beide Abflusskappen (9, 10) müssen in diesem Modus geschlossen sein, um
eine eziente Kühlung zu ermöglichen.
6.4 Heizmodus
Möchten Sie, vorzugsweise in der kälteren Jahreszeit, einen Raum aueizen, wählen
Sie den Heizmodus.
> Drücken Sie die Taste MODE (1) mehrmals, bis „Heat“ (7) leuchtet.
> Wählen Sie die Soll-Temperatur (13 °C bis 27 °C), indem Sie die Taste
Temperaturwahl wärmer/kälter (3, 4) so o drücken, bis der entsprechende
Wert im Display angezeigt wird..
> Wählen Sie durch mehrmaliges Drücken der Taste FAN (5) die gewünschte
Lüerdrehzahl aus, wobei High (Hoch), Medium (Miel), Low (Niedrig)
und Auto (automatische Regelung) ausgewählt werden können. Je nach
gewählter Lüerdrehzahl verändert sich auch das Betriebsgeräusch des
Klimagerätes. Bevorzugen Sie einen möglichst leisen Betrieb, wählen Sie Low.
Aktivieren Sie den Heizmodus direkt nach dem der Kühlmodus aktiv war,
kann es bis zu 5 Minuten dauern, bis das Gerät mit dem Heizen beginnt.
Der Lu wird Wasser entzogen und im Tank aufgefangen. Wenn der Tank voll
ist, schaltet sich das Gerät ab und im Display erscheint Ft (voller Tank).

16
Die untere Abflusskappe (9) muss entfernt und der Tank entleert werden.
Lassen Sie alles Wasser in ein Auangbehälter laufen. Wenn das gesamte
Wasser abgelassen wurde, setzen Sie die Kappe wieder auf. Nach dem
Entleeren des Tanks startet das Gerät wieder.
Bei Betrieb in sehr kalten Räumen wird das Gerät automatisch abgetaut,
wodurch der Normalbetrieb kurzzeitig unterbrochen wird. Im Display
erscheint Lt. Während dieses Vorgangs ist es normal, dass sich die Geräusche
des Geräts ändern.
> In diesem Modus müssen Sie unter Umständen einige Minuten warten, bevor
das Gerät mit der Abgabe von heißer Lu beginnt.
> In diesem Modus kann der Lüer kurzzeitig arbeiten, obwohl die eingestellte
Temperatur bereits erreicht ist.
6.5 Entfeuchtungsmodus
Ideal zur Reduzierung der Raumlufeuchtigkeit (Frühling und Herbst, Feuchträume,
Regenperioden, usw.).
Beachten Sie, dass im Entfeuchtungsmodus die Lu entfeuchtet wird. Das
Kondenswasser wird über den oberen Abfluss (10) nach außen geführt.
Leiten Sie das Wasser in ein geeignetes Gefäß und leeren Sie es, je nach
Größe, regelmäßig aus.
> Entfernen Sie die obere Abflusskappe (1.).
> Schließen Sie den mitgelieferten oder einen geeigneten Schlauch am
Anschluss an (2.) und führen Sie ihn in geeignetes Gefäß.
Kappe
Schlauch
anschließen
1. 2.
> Drücken Sie die Taste MODE (1) so o, bis Dry (9) leuchtet und gleichzeitig
das Symbol für den automatischen Lüer Auto (16) leuchtet.
In diesem Modus wird die Lüerdrehzahl vom Gerät automatisch ausgewählt
und kann nicht manuell eingestellt werden.
Achten Sie darauf, den Kondenswasserschlauch nicht zu knicken.

17
DE
EN
FR
IT
NL
PL
6.6 Lüermodus
Wenn Sie das Gerät in diesem Modus verwenden, muss der Abluschlauch nicht
angeschlossen werden.
> Drücken Sie die Taste MODE (1) mehrmals, bis Fan (10) leuchtet. Wählen Sie
durch mehrmaliges Drücken der Taste FAN (5) die gewünschte Lüerdrehzahl
aus, wobei High (Hoch), Medium (Miel) oder Low (Niedrig) ausgewählt
werden können.
Die automatische Regelung steht in diesem Modus nicht zur Verfügung.
6.7 Automatikmodus
Im Automatikmodus entscheidet das Gerät selbstständig anhand der aktuellen
Raumtemperatur, in welchem Modus es arbeitet:
- Bis 20 °C Raumtemperatur = Heizmodus
- Zwischen 20 °C und 23 °C = Lüermodus
- Über 23 °C Raumtemperatur = Kühlmodus
> Drücken Sie die Taste MODE (1) mehrmals, bis alle Modus-LEDs ausgeschaltet
sind und im Display ein rotierender Balken erscheint.
> Wählen Sie durch mehrmaliges Drücken der Taste FAN (5) die gewünschte
Lüerdrehzahl aus, wobei High (Hoch), Medium (Miel) oder Low (Niedrig)
ausgewählt werden können.
7 Timermodus
Mit dem Timer lässt sich das Einschalten oder Abschalten des Geräts automatisieren.
Durch die eziente Nutzung des Timer-Betriebs, kann Strom gespart werden, da
das Gerät nur zu den eingestellten festen Zeiten im Betrieb ist.
7.1 Timer programmieren
Verzögertes Einschalten
> Wählen Sie zuerst im Betrieb den Modus und die gewünschten Einstellungen
(Lüerdrehzahl, Temperatur). Schalten Sie dann das Gerät aus.
> Drücken Sie im ausgeschalteten Zustand die Taste TIMER (2). Darauin
blinken die Timer-LED (11) und die Stundenzahl im Display.
> Drücken Sie innerhalb von 5 Sekunden die Taste TIMER erneut mehrmals,
um die Stunden einzustellen, um die das Einschalten des Geräts verzögert
werden soll.
Der Timer kann in 1-Stunden-Intervallen von 1 Stunde bis zu 24 Stunden
eingestellt werden.

18
> Ca. 5 Sekunden nach der Zeitwahl wird die Einstellung gespeichert, die Timer-
LED leuchtet und das Display zeigt an, dass sich das Gerät im Standby-Modus
befindet (--).
> Nach ablauf der eingestellten Zeit startet das Gerät im zuletzt eingestellten
Betriebsmodus.
Um die Einstellung zu löschen, drücken Sie die Timer-Taste erneut. Die
Timeranzeige erlischt.
Verzögertes Ausschalten
> Drücken Sie im eingeschalteten Zustand die Taste TIMER (2). Darauin
blinken die Timer-LED (11) und die Stundenzahl im Display.
> Drücken Sie innerhalb von 5 Sekunden die Taste TIMER erneut mehrmals,
um die Stunden einzustellen, um die das Ausschalten des Geräts verzögert
werden soll.
Der Timer kann in 1-Stunden-Intervallen von 1 Stunde bis zu 24 Stunden
eingestellt werden.
> Ca. 5 Sekunden nach der Zeitwahl wird die Einstellung gespeichert, die Timer-
LED leuchtet.
> Nach ablauf der eingestellten Zeit schaltet das Gerät in den Standbymodus.
Um die Einstellung zu löschen, drücken Sie die Timer-Taste erneut. Die
Timeranzeige erlischt.
8 Bedienung mit der Fernbedienung
8.1 Baerien einlegen
> Önen Sie den Deckel des Baeriefaches auf der Rückseite der
Fernbedienung durch leichten Druck auf die markierte Stelle und schieben
Sie den Deckel auf.
> Die Baerien (LR03, AAA, 1,5 V) unter Beachtung der richtigen Polung
(Kennzeichnung im Baeriefach sichtbar) einlegen.
> Baeriefach wieder schließen.
Wichtiger Hinweis zur Entsorgung von Baerien:
Baerien können Gistoe enthalten, die die Umwelt schädigen. Entsorgen
Sie Baerien deshalb unbedingt entsprechend der geltenden gesetzlichen
Bestimmungen. Werfen Sie Baerien niemals in den normalen Hausmüll.
Sie können verbrauchte Baerien bei Ihrem Fachhändler oder an speziellen
Entsorgungsstellen unentgeltlich entsorgen.
Achten Sie darauf, dass Baerien nicht in die Hände von Kindern gelangen.
Kinder könnten Baerien in den Mund nehmen und verschlucken. Dies kann
zu ernsthaen Gesundheitsschäden führen. In diesem Fall sofort einen Arzt
aufsuchen! Bewahren Sie deshalb Baerien für Kleinkinder unerreichbar auf.

19
DE
EN
FR
IT
NL
PL
Das Gerät nur mit den für dieses Gerät zugelassenen Baerien betreiben.
Normale Baerien dürfen nicht geladen werden. Baerien dürfen nicht mit
anderen Mieln reaktiviert, nicht auseinandergenommen, erhitzt oder ins
oene Feuer geworfen werden (Explosionsgefahr!).
Baeriekontake und Gerätekontakte vor dem Einlegen reinigen. Bei falsch
eingelegter Baerien besteht Explosionsgefahr!
8.2 Übersicht
Ein/Ausschalten
Temperatur
erhöhen
Temperatur
verringern
Timermodus
Umschaltung
Temperatureinheit
Lüermodus
Betriebsmodus
Luauslass
Nachtmodus
> Die Grundsätzliche Bedienung mit der Fernbedienung erfolgt wie im Kapitel
„6 Bedienung“ beschrieben. Drücken Sie die entsprechend beschriete Taste,
analog der Geräteoberseite.

20
> Richten Sie die Fernbedienung auf die Oberseite des Klimagerätes. Beachten
Sie den maximalen Abstand von 7 Metern.
8.3 Spezielle Funktionen mit der Fernbedienung
8.3.1 Lüungsauslass
Der obere Lüungsauslass önet und schließt sich leicht im gleichbleibenden
Rhythmus. Möchten Sie den Lüungsauslass in einer Position arretieren, drücken Sie
die Taste Luauslass auf der Fernbedienung.
Drücken Sie die Taste erneut, um das Schwenken automatisch zu regulieren.
8.3.2 Umschaltung der Temperatureinheit
Drücken Sie die Taste Umschaltung Temperatureinheit, um die Temperatureinheit,
die im Display angezeigt wird, zwischen Grad/Celsius und Fahrenheit umzuschalten.
8.3.3 Nachtmodus
Im Nachtmodus werden das Display und die LED auf der Geräteoberseite gedimmt.
> Wählen Sie den Heiz, Kühl oder Automatik-Modus.
> Drücken Sie die Taste Nachtmodus auf der Fernbedienung.
Die anzeigen werden nun gedimmt und der Lüer läu mit niedrigster
Drehzahl.
Im Kühlmodus wird die Temperatureinstellung für jede der ersten 2 Stunden
schriweise auf 1 °C über der ursprünglichen Solltemperatur erhöht. Dann
hält das Gerät 6 Stunden lang die gleiche Temperatur und wechselt danach
in den Standby-Modus.
Im Heizmodus wird die Temperatureinstellung für jede der ersten 3 Stunden
schriweise auf 1 °C unter die ursprüngliche Solltemperatur abgesenkt. Dann
hält das Gerät 5 Stunden lang die gleiche Temperatur und wechselt danach
In den Standby-Modus.

21
DE
EN
FR
IT
NL
PL
9 Service und Wartung
9.1 Kondenswasser ablassen
Mit der Zeit sammelt sich im Tank des Klimagerätes Kondenswasser. Ist der Tank voll,
stoppt das Gerät und im Display erscheint Ft (Full-Tank = Voller Tank).
Kondenswasser manuell ablassen:
> Ziehen Sie den Netzstecker des Klimagerätes.
> Stellen Sie ein geeignetes Gefäß unter den unteren Kondenswasser Abfluss
(9, Seite 8).
> Nehmen Sie die Kappe des Abflusses ab und lassen Sie das Wasser
vollständig in den Auangbehälter laufen.
> Ist das Wasser abgelaufen, stecken Sie die Kappe wieder auf den
Kondenswasser Abfluss.
> Nehmen Sie das Klimagerät wieder in Betrieb.
Kondenswasser automatisch kontinuierlich ablassen:
Im Entfeuchtungsbetrieb muss das Kondenswasser kontinuierlich nach außen
geführt werden. Hierfür ist der obere Kondenswasser Abfluss (10, Seite 8)
vorgesehen.
> Ziehen Sie den Netzstecker des Klimagerätes.
> Stellen Sie ein geeignetes Gefäß unter den oberen Kondenswasser Abfluss
(10, Seite 8).
> Nehmen Sie die Kappe des Abflusses ab und montieren Sie einen geeigneten
Schlauch am Abflussstutzen.
> Der Schlauch sollte nun gerade nach unten in den Auangbehälter geführt
werden. Achten Sie darauf, den Schlauch nicht zu knicken.
> Nehmen Sie das Klimagerät wieder in Betrieb und aktivieren Sie den
Entfeuchtungsbetrieb.
Im Kühlmodus muss der obere Kondenswasser Abfluss verschlossen sein, um
einen ezienten Betrieb zu gewährleisten.

22
9.2 Gerät reinigen
Schalten Sie das Gerät vor der Reinigung oder Wartung aus, indem Sie die
POWER Taste auf dem Bedienfeld oder der Fernbedienung drücken. Warten
Sie einige Minuten und ziehen Sie dann den Netzstecker aus der Steckdose.
REINIGUNG DES GERÄTS
> Reinigen Sie das Gerät mit einem leicht feuchten Tuch und trocknen Sie es
anschließend mit einem trockenen Tuch vollständig ab.
Reinigen Sie die Klimaanlage niemals mit Wasser. Verwenden Sie niemals
Benzin, Alkohol oder Lösungsmiel zur Reinigung des Geräts. Versprühen Sie
niemals Insektizid-Flüssigkeiten oder ähnliches.
REINIGUNG DES FILTER
Damit Ihre Klimaanlage ezient arbeitet,
sollten Sie den Filter jede Betriebswoche
reinigen.
> Der Filter kann wie in der Abbildung
rechts gezeigt ausgebaut werden.
> Entfernen Sie Staubansammlungen auf
dem Filtern mit einem Staubsauger.
> Tauchen Sie ihn bei starker
Verschmutzung in warmes Wasser und
spülen Sie mehrmals nach. Das Wasser
sollte lauwarm sein.
> Lassen Sie den Filter nach dem Waschen
vollständig trocknen und setzen Sie sie
wieder ein.
Verwenden Sie niemals einen
noch feuchten Filter. Dies kann zu
Beschädigungen führen.
ACHTUNG!
Fassen Sie bei oenen Filtergehäuse nicht an die Kühlrippen im Gerät. Diese
sind scharantig und können zu Schniverletzungen führen.
9.3 TÄTIGKEITEN ZUM START/ENDE DER SAISON
Start der Saison:
> Überprüfen Sie das Netzanschlusskabel und den Netzstecker auf
Beschädigungen. Überprüfen Sie die Grundsätzliche Installation des Gerätes
und den Standort gemäß dieser Anleitung.

23
DE
EN
FR
IT
NL
PL
Ende der Saison:
Wenn die Klimaanlage über einen längeren Zeitraum hinweg nicht benutzt wird:
> Entleeren Sie den Kondenswasserauangbehälter vollständig und lassen
Sie die untere Abflusskappe so lange oen, bis das Restwasser abgeflossen
ist. Sobald der Tank vollständig entleert ist und kein Wasser mehr austri,
bringen Sie den Gummistopfen wieder an.
> Entfernen und reinigen Sie den Filter, lassen Sie ihn vollständig trocknen und
setzen Sie ihn dann wieder ein.
> Entfernen Sie die Baerien aus der Fernbedienung.
> Lagern Sie das Klimagerät an einem kühlen, trockenen Ort, fern von direkter
Sonneneinstrahlung, extremen Temperaturen und übermäßigem Staub.
10 Fehlersuche
Problem Ursache Lösung
Das Klimagerät startet
nicht /schaltet nicht ein.
Keine Stromversorgung. Überprüfen Sie die
Stromversorgung.
Netzkabel nicht
verbunden.
Stecken Sie das Netzkabel
in eine Netzsteckdose.
Schutzschaltung aktiv. Warten Sie 30 Minuten
und versuchen Sie
es erneut. Tri der
Fehler weiterhin auf,
verständigen Sie den
Service.
Das Klimagerät läu nur
kurze Zeit.
Der Abluschlauch ist
geknickt oder falsch
angeschlossen.
Beachten Sie die
Hinweise in der
Bedienungsanleitung zum
verlegen/anschließen des
Abluschlauches
Der Luauslass /
Abluschlauch ist
verstop.
Überprüfen Sie
Luauslass /
Abluschlauch
auf mögliche
Verunreinigungen.

24
Das Klimagerät arbeitet,
Kühlt aber nicht.
Fenster /Gardinen /
Vorhänge sind geönet.
Riegeln Sie den
Raum gegen
Sonneneinstrahlung ab
und schließen Sie alle
Fenster.
Andere Geräte im Raum
verursachen Hitze (z.B.
Fernseher, Öfen, Föhn).
Schalten Sie alle
zusätzlichen Geräte im
Raum ab.
Der Abluschlauch wurde
nicht installiert oder nicht
nach außen geführt.
Installieren Sie den
Abluschlauch korrekt.
Die Kühlleistung ist nicht
für den Raum geeignet,
in dem das Klimagerät
betrieben wird.
Beachten Sie die
Technischen Daten des
Klimagerätes.
Während dem Betrieb
treten unangenehme
Gerüche auf.
Lufilter ist verstop oder
dreckig.
Entfernen Sie den
Lufilter, reinigen Sie ihn
nach Anweisung.
Nach einem Neustart,
dauert es 3 Minuten, bis
das Gerät wieder arbeitet.
Die Schutzschaltung des
Kompressors verhindert
einen sofortigen start,
nachdem das Gerät aus
und wieder eingeschaltet
wurde.
Warten Sie 3 Minuten.
Das Gerät arbeitet danach
normal.
Im Display
erscheinen folgende
Fehlermeldungen:
Lt
PF
Ft
Die Selbdiagnose hat
einen Fehler erkannt.
Lt - Temperatur im Raum
zu gering. Die De-Frost
Funktion startet.
PF - Sensor-Fehler.
Verständigen Sie den
Service
Ft - Kondenswassertank
ist voll. Entleeren Sie
den Tank wie in dieser
Anleitung beschrieben.
Im Kühlmodus tri sehr
viel Kondenswasser aus.
Im Kühlmodus darf
der Kondenswasser-
Ablassschlauch nicht
montiert sein. In diesem
Modus wird das Wasser
intern gesammelt und
über einen Verdampfer
der Umgebungslu
wieder zugeführt.
Entfernen Sie im
Kühlmodus den
Kondenswasser-
Ablassschlauch und
bringen Sie den Stopfen
an der Önung an.

25
DE
EN
FR
IT
NL
PL
11 Technische Daten
Kühlleistung 11000 BTU/h / 3.2 kW
Heizleistung 10000 BTU/h / 2.9 kW
Modi Kühlen, Heizen, Ventilator, Entfeuchten,
Timer
Temperaturbereich: 18 - 27 °C
Raumgröße 25 - 35 m²
Entfeuchtungsleistung 36 Liter pro 24 Stunden
Luumwälzung 250 - 300 m³/h
Lautstärke 53 - 65 dB
Kühlmiel R290 (260g)
GWP Kühlmiel 3
Leistungsaufnahme Kühlen 1.23 kW/h
ERR 2.62 (Kälteleistungszahl)
Energieklasse Kühlen A
Leistungsaufnahme Heizen 1.04 kW/h
COP 2.8 (Heizleistungszahl)
Energieklasse Heizen A+
Leistungsaufnahme im
Bereitschaszustand
0,5 W
Leistungsaufnahme im Betriebszustand
„Temperaturregler aus“
-
Ansaugdruck 1.2 MPa
Auslassdruck 2.3 MPa
Länge Abluschlauch 1.5 m (max.)
Durchmesser Abluschlauch 13 cm
CO₂-Äquivalent 0.0008 t
Kompressor LRA 23,5 A
Schutzklasse IPX0
Display Typ: 7-Segment, 2-stellig
Abemssungen (BxHxT) 445 x 720 x 375 mm
Gewicht 31,00 kg
Stromversorgung Netzteil: intern
Nennleistung: 1640 W
Frequenz: 50 Hz
Nennspannung: AC 220 - 240 V

26
Lieferumfang Mobiles Klimagerät.
Bedienungsanleitung, Fernbedienung,
Ablu- und Kondenswasserschlauch,
Fensterabdichtung
12 Rechliche Hinweise
TechniSat ist nicht für Produktschäden auf Grund von äußeren Einflüssen,
Verschleiß oder unsachgemäßer Handhabung, unbefugter Instandsetzung,
Modifikationen oder Unfällen habar.
Änderungen und Druckfehler vorbehalten. Stand 11/23.
Abschri und Vervielfältigung nur mit Genehmigung des Herausgebers. Die
jeweils aktuelle Version der Anleitung erhalten Sie im PDF-Format im
Downloadbereich der TechniSat-Homepage unter www.technisat.de.
TechniSat und TECHNIPOLAR 1 sind eingetragene Warenzeichen der:
TechniSat Digital GmbH
TechniPark
Julius-Saxler-Straße 3
D-54550 Daun/Eifel
www.technisat.de
Namen der erwähnten Firmen, Institutionen oder Marken sind Warenzeichen oder
eingetragene Warenzeichen der jeweiligen Inhaber.
12.1 Servicehinweise
Dieses Produkt ist qualitätsgeprü und mit der gesetzlichen
Gewährleistungszeit von 24 Monaten ab Kaufdatum versehen.
Bie bewahren Sie den Rechnungsbeleg als Kaufnachweis auf. Bei
Gewährleistungsansprüchen wenden Sie sich bie an den Händler des
Produktes.
Hinweis!
Für Fragen und Informationen oder wenn es mit diesem Gerät zu einem
Problem kommt, ist unsere Technische Hotline:
Mo. - Fr. 8:00 - 18:00 unter Tel.:
03925/9220 1800 erreichbar.
Reparaturauräge können auch direkt online unter
www.technisat.de/reparatur, beauragt werden.

27
DE
EN
FR
IT
NL
PL
Für eine eventuell erforderliche Einsendung des Gerätes verwenden Sie bie
ausschließlich folgende Anschri:
TechniSat Digital GmbH
Service-Center
Nordstr. 4a
39418 Staßfurt
13 Notizen

28

Instruction Manual
TECHNIPOLAR 1
Mobile air conditioner for cooling and heating, with fan and
dehumidifier function.

30
1 Contents
1 Contents .....................................................................................................................30
2 Preface ........................................................................................................................31
3 Safety instructions .................................................................................................. 32
3.1 Signs and symbols used ........................................................................................................32
3.2 Intended use ...............................................................................................................................33
3.3 Safe use of air conditioners .................................................................................................33
3.4 Disposal instructions ................................................................................................................35
4 Illustrations ...............................................................................................................36
5 Installation instructions ......................................................................................... 37
5.1 Exhaust air discharge .............................................................................................................. 37
5.2 Installing the window kit .......................................................................................................38
5.3 Site of installation .....................................................................................................................39
6 Operation .................................................................................................................. 40
6.1 Control panel .............................................................................................................................. 40
6.2 Switch On/O .............................................................................................................................40
6.3 Cooling mode .............................................................................................................................41
6.4 Heat mode ................................................................................................................................... 41
6.5 Dehumidifier mode ................................................................................................................. 42
6.6 Fan mode......................................................................................................................................43
6.7 Automatic mode .......................................................................................................................43
7 Timer mode ...............................................................................................................43
7.1 Programming the timer .........................................................................................................43
8 Using the remote control ..................................................................................... 44
8.1 Inserting the baeries ........................................................................................................... 44
8.2 Overview ........................................................................................................................................45
8.3 Activating special functions with the remote control ............................................. 46
8.3.1 Ventilation outlet .................................................................................................................... 46
8.3.2 Changing the temperature unit ........................................................................................ 46
8.3.3 Night mode ................................................................................................................................. 46
9 Servicing and maintenance..................................................................................47
9.1 Draining the condensation water ......................................................................................47
9.2 Cleaning ........................................................................................................................................ 48
9.3 ACTIVITIES AT THE START / END OF THE SEASON .................................................... 48
10 Troubleshooting ......................................................................................................49
11 Technical data .......................................................................................................... 51
12 Legal notices ............................................................................................................52
12.1 Service instructions ..................................................................................................................52
13 Notes ........................................................................................................................... 53

31
DE
EN
FR
IT
NL
PL
2 Preface
Dear Customer,
Thank you for choosing this air conditioner from TechniSat.
This instruction manual is intended to help you get to know the extensive functions
that your new unit oers and to make the best use of them. It will help you to
use the product as intended and safely. It is intended for anyone who is installing,
operating, cleaning or disposing of the unit.
Store the instruction manual in a safe place for later use.
A current version of the instruction manual can be found in the download area of
your product on the TechniSat website at www.technisat.de.
We hope you enjoy using your
TechniSat product!
Your
TechniSat Team

32
3 Safety instructions
3.1 Signs and symbols used
In this instruction manual:
Indicates a safety instruction which can lead to serious injuries or death if not
observed. Note the following signal words:
DANGER - Serious / fatal injury
WARNING - Serious injury, possibly fatal
CAUTION - Injury
This identifies information that must always be observed to prevent defects,
data loss/misuse and undesired operation. It also describes other functions
of your unit.
Beware of electrical voltage. Follow all safety instructions to avoid electric
shock. Do not open the unit under any circumstances.
On the unit:
Danger from hazardous substances. Follow all safety instructions.
Carelessness in proximity to flammable substances can lead to fire.
Observe all information and safety instructions in the instruction manual.
Indoor use - devices with this symbol are only suitable for indoor use.
Protection class II - Electrical devices in protection class II are electrical
devices with continuous double and/or reinforced insulation and having no
connection options for a protective conductor. The casing of an electrical
device of protection class II, which is enclosed in an insulating material, can
form part or all of the additional or reinforced insulation.
Your device bears the CE symbol and complies with all requisite EU
standards.
Electronic devices do not belong in the household waste and must be
disposed of properly in accordance with Directive 2002/96/EC of the
European Parliament and of the Council dated January 27, 2003 concerning
waste electrical and electronic equipment. Please return this unit to the
designated public collection point for disposal at the end of its service life.

33
DE
EN
FR
IT
NL
PL
3.2 Intended use
The TechniSat TECHNIPOLAR 1 air conditioner is for cooling or heating living spaces
measuring between 13 m² and 35 m².
3.3 Safe use of air conditioners
Please take note of the following information to minimise safety risks, to prevent
damage to the unit and to make a contribution to environmental protection.
Please read all the safety information carefully and keep it for future reference.
Always heed all the warnings and instructions in this instruction manual and on the
rear of the unit.
WARNING!
Flammable substances. The unit is filled with R290 propane gas. It is
essential to observe the manufacturer's guidelines for repair or service work.
Servicing may only be carried out by trained specialist personnel.
WARNING!
Never open the unit!
Touching live parts poses a danger to life!
Observe all of the following instructions for the intended use of the unit and
to prevent damage to the unit and injury to persons.
> The unit is not intended to be used by people (including children) with
limited physical, sensoryormentalcapacities or a lackof experienceand/
or knowledge,unless they are supervised by a person responsible for their
safety, or if they have been instructed by them as to how to use the unit.
> Children must be supervised to ensure that they do not play with the unit.
> Do not use this unit for functions other than those described in this
instruction manual.
> If the power cord is worn or damaged, it must only be replaced by a qualified
service technician using genuine spare parts.
> The plug must be firmly and completely inserted into the socket. There is a
risk of electric shock or fire.
> Do not connect other devices to the same outlet, there is a risk of electric
shock.
> Neither the air conditioner nor the power cord must be disassembled or
modified, otherwise there is a risk of electric shock or fire. All other work on
the unit must be carried out by a qualified technician.

34
> Do not place the power cord or air conditioner near a heater, radiator, or
other heat source. There is a risk of electric shock or fire.
> The unit is equipped with a cable with a grounded conductor, which is
connected to an earthing pin or tab. The plug must be plugged into a
properly installed and grounded electrical outlet. Under no circumstances
should the earthing pin or tab be cut o or removed from the plug.
> The unit must be used or stored in such a way that it is protected from
moisture, such as condensed water, splashed water, and the like.
> Transport your air conditioner in a vertical position and place it on a stable,
flat surface while in use. If the unit is transported lying on its side, it should
stand upright for 6 hours and only then be connected to the power supply.
> Switch o the unit or the remote control using the switch on the control
panel. Do not start or stop operation by plugging in or unplugging the power
cord. There is a risk of causing electric shock.
> Do not press the buons on the control panel with wet or damp hands.
> Do not use hazardous chemicals to clean the unit and keep them away from
the unit. To avoid damaging the surface, only clean the air conditioner with
a so cloth. Do not use wax, thinners or strong cleaning agents. Do not use
the unit in the presence of flammable substances or vapours such as alcohol,
insecticides, petrol, and the like.
> If the air conditioner makes unusual noises or emits smoke or an unusual
smell, pull the plug out of the socket immediately.
> Do not clean the unit with water. Water can enter the unit and damage the
insulation, creating the risk of electric shock. If water has entered the unit,
immediately pull the power plug out and contact customer service.
> The unit should be lied and installed by at least two people.
> Make sure that all accessories are removed from the packaging before use.
> When removing and installing the filter, do not touch the metal parts of the
air conditioner to avoid cuts. There is a risk of personal injury.
> Do not block the air inlet or outlet vents on the air conditioner. A reduced air
flow leads to poor performance and can damage the unit.

35
DE
EN
FR
IT
NL
PL
> Always grip the plug when plugging in or unplugging the air conditioner.
Never pull the plug out of the socket by pulling on the cable. Otherwise there
is a risk of electric shock and damage.
> Place the air conditioner on a stable, level surface that can support a load of
up to 50 kg. Installation on a non-solid or uneven surface can lead to damage
and personal injury.
> For the most ecient operation, close all doors and windows in the room.
Make sure that the exhaust hose is routed outside to ensure ecient
operation.
IMPORTANT - EARTHING METHOD
This product is factory-fied with a power cord that has a three-pin grounded plug.
It must only be connected to an electrical outlet that is equipped in accordance with
the National Electrical Code and applicable local codes and regulations for earthing.
If the circuit does not have a grounded outlet, it is the responsibility and obligation
of the customer to replace the existing outlet in accordance with the National
Electrical Code and applicable local codes and regulations. The third earthing
contact must never be cut o or removed. Never use the cable, plug or unit if any of
them are damaged. Only use the unit with an extension cable if it has been checked
and tested by a qualified electrician. If the earthed plug is incorrectly connected,
there is a risk of fire, electric shock and / or injury to persons in connection with the
unit. Contact a qualified service technician if you have any doubts as to whether the
unit is properly earthed.
ELECTRICAL CONNECTIONS
Before plugging the unit into the wall socket, check the following:
> The mains voltage corresponds to the value specified on the type plate on
the back of the unit.
> The socket and circuit are suitable for the unit.
> The mains socket matches the plug. If this is not the case, have the plug
replaced.
> The mains socket is adequately earthed. Failure to observe these important
safety instructions releases the manufacturer from any liability.
3.4 Disposal instructions
Important information for the proper disposal of the product in accordance with EC
Directive 2012119/EC.
At the end of its service life, the product must not be disposed of as municipal
waste. It must be taken to a special municipal collection point or to a retailer who
oers this service.

36
The separate disposal of household appliances avoids possible negative eects on
the environment and the health of persons resulting from improper disposal. It also
enables components to be reused, resulting in significant energy and resource
savings. As a reminder of the need to dispose of household appliances separately
the product is marked with a crossed out wheelie bin.
4 Illustrations
1 Air vent
2 Control panel
3 Handles (both sides)
4 Wheels
5 Power cord
6 Filter inlet
7 Exhaust air connection
8 Air inlet
9 Lower condensate
drain
10 Upper condensate
drain

37
DE
EN
FR
IT
NL
PL
5 Installation instructions
5.1 Exhaust air discharge
In cooling or heating mode, the unit must be installed near a window or opening so
that the warm or cold exhaust air can be discharged outside.
Place the unit on a level floor and ensure that there is a minimum distance of 30 cm
around the unit and that it is close to an earthed socket.
1. Extend the hose to the desired length by unravelling it (Fig. 1)
2. Screw it onto the hose inlet (Fig. 2).
3. Screw the hose outlet onto the other end
of the hose (Fig. 3).
4. Mount the hose inlet onto the exhaust air
connection (7) (Fig. 4).
5. Aach the hose outlet to the window kit
(see “5.2 Fenster-Kit installieren“).
Aach
Lock

38
5.2 Installing the window kit
The window kit is designed to seal tilt windows. To install proceed as follows:
Glue the Velcro tape to the
window frame.
Glue the Velcro tape to the
frame of the window.
Shorten the Velcro tape at
the corners.
Make sure that the corners
are flush.
Aach the window seal. Make sure that both halves
are aligned with each other.
Open the zipper at the side. Insert the exhaust hose into the
opening and close the zipper.

39
DE
EN
FR
IT
NL
PL
5.3 Site of installation
> The unit should be set up on a solid surface to minimise noise and vibration.
To ensure a stable and secure state, place the unit on a smooth, level floor
that is solid enough to support the weight of the unit.
> The unit is equipped with wheels to make installation easier. However, it
should only be wheeled on smooth, flat surfaces. Be careful when wheeling
it on carpets. Be careful and protect the floors when you roll the unit over
wooden floors. Do not try to roll the unit over objects.
> The unit must be installed within the reach of a properly dimensioned
earthed wall outlet.
> Never place any obstacles around the air inlet or outlet vents on the unit.
> Leave a distance of at least 45 cm from the wall to achieve ecient air
conditioning.
> The hose can be extended, but should be kept as short as possible. Also
make sure that the hose has no kinks and does not sag.

40
6 Operation
The control panel is located on the top of the unit.
However, you need to use the remote control in order to utilise the full potential of
the unit.
6.1 Control panel
1 2 3 4 5 6
7 8 9 10 11 12 13 14 15 16
1 Switching operating modes
2 Timer
3 Temperature selection (warmer)
4 Temperature selection (cooler)
5 Fan level
6 On/O switch
7 Heating function on
8 Cooling function on
9 Dehumidifier on
10 Fan on
11 Timer on
12 Display
13 Fan level high
14 Fan level medium
15 Fan level low
16 Automatic temperature regulator on
6.2 Switch On/O
Insert the plug into the wall outlet. "- -" appears on the display.
Press the POWER buon (6) once to switch on the unit.
Press the POWER buon again to switch the unit o.
Never turn o the air conditioner by pulling out the power plug. Always
switch the air conditioner o by pressing the POWER buon and waiting a
few minutes before pulling the plug. This allows the unit to perform a check
cycle and shutdown properly.

41
DE
EN
FR
IT
NL
PL
Do not switch the air conditioner back on immediately aer switching it o -
wait a few minutes.
6.3 Cooling mode
The unit is ideal for hot, humid weather when it comes to cooling and dehumidifying
the room at the same time.
> Press the MODE buon (1) several times until "Cool" (8) lights up.
> Select the target temperature (18 ° C to 32 ° C) by pressing the Temperature
selection warmer / cooler (3, 4) buon until the corresponding value is
shown on the display.
Aer switching on the unit and activating the cooling function, it may take a
moment for the compressor to start and the unit to start to cool.
> Press the FAN buon (5) several times to select the desired fan speed,
whereby High, Medium, Low and Auto (automatic control) can be selected.
Depending on the fan speed selected, the noise level of the air conditioning
unit while in operation will also change. If you prefer the unit to operate more
quietly, select Low.
If you turn on the cooling mode immediately aer the heating mode has
been active, it can take up to 5 minutes before the unit starts to cool.
The most suitable temperature for the room during the summer is between
24 °C and 27 °C. However, it is recommended not to set a temperature that is
far below the temperature outside.
Both drain caps (9, 10) should be closed in this mode to allow ecient
cooling.
6.4 Heat mode
If you want to heat up a room, most probably in the cooler months, select heat
mode.
> Press the MODE buon (1) several times until "Heat" (7) lights up.
> Select the target temperature (13 °C to 27 °C) by pressing the Temperature
selection warmer / cooler (3, 4) buon until the corresponding value is
shown on the display.
> Press the FAN buon (5) several times to select the desired fan speed,
whereby High, Medium, Low and Auto (automatic control) can be selected.
Depending on the fan speed selected, the noise level of the air conditioning
unit while in operation will also change. If you prefer the unit to operate more
quietly, select Low.
If you turn on the heating mode immediately aer the cooling mode has
been active, it can take up to 5 minutes before the unit starts to heat.
Water is extracted from the air and collected in the tank. When the tank is
full, the unit switches o and the display shows Ft (full tank).

42
The lower drain cap (9) must then be removed and the tank emptied. Let all
of the water drain into a collection vessel. When all the water has drained out
of the unit, put the cap back on. Aer emptying the tank, the unit will start up
again.
When operating the unit in very cold rooms, the unit is automatically
defrosted, which temporarily interrupts normal operation. Lt appears on the
display. During this process, it is normal for the sound coming from the unit
to change.
> In this mode, you may have to wait a few minutes before the unit begins to
emit hot air.
> In this mode, the fan may continue to work briefly, even though the set
temperature has already been reached.
6.5 Dehumidifier mode
The unit is ideal for reducing the room humidity (in spring and autumn, damp
rooms, rainy periods, etc.).
Note that in dehumidifier mode the moisture in the air is reduced. The
condensed water is discharged to the outside via the upper drain (10). Direct
the water into a suitable container and empty it regularly, depending on the
size of the container.
> Remove the upper drain cap (1.).
> Connect the supplied hose or a suitable hose to the connection (2) and direct
it into a suitable container.
Cap
Connect
the hose
1. 2.
> Press the MODE buon (1) repeatedly until Dry (9) lights up and, at the same
time, the symbol for the automatic fan Auto (16) lights up.
In this mode, the fan speed is selected automatically by the unit and cannot
be set manually.
Be careful not to kink the condensate hose.

43
DE
EN
FR
IT
NL
PL
6.6 Fan mode
If you use the unit in this mode, the exhaust hose does not need to be connected.
> Press the MODE buon (1) several times until Fan (10) lights up. Press the
FAN buon (5) several times to select the desired fan speed, where High,
Medium, or Low can be selected.
Automatic control is not available in this mode.
6.7 Automatic mode
In automatic mode, the unit independently decides which mode to use based on
the current room temperature:
- Up to 20°C room temperature = heat mode
- Between 20°C and 23°C = fan mode
- Above 23°C room temperature = cool mode
> Press the MODE buon (1) several times until all mode LEDs are switched o
and a rotating bar appears on the display.
> Press the FAN buon (5) several times to select the desired fan speed, where
High, Medium, or Low can be selected.
7 Timer mode
The timer can be used to automate switching the unit on or o.
Ecient use of the timer mode saves electricity, since the unit is only in operation at
the set times.
7.1 Programming the timer
Delayed switching on
> First select the mode and the desired seings (fan speed, temperature) while
the unit is in operation. Then switch o the unit.
> When the unit is switched o, press the TIMER buon (2). The timer LED (11)
and the number of hours flash on the display.
> Press the TIMER buon again several times within 5 seconds to set the hours
by which the unit should be switched on aer a delay.
The timer can be set in 1 hour intervals from 1 hour to 24 hours.

44
> Approximately 5 seconds aer the time is selected, the seing is saved,
the timer LED lights up and the display indicates that the unit is in standby
mode (--).
> Aer the set time has elapsed, the unit will start up in the last set operating
mode.
To delete the seing, press the timer buon again. The timer display will turn
o.
Delayed turning o
> When the unit is switched on, press the TIMER buon (2). The timer LED (11)
and the number of hours flash on the display.
> Press the TIMER buon again several times within 5 seconds to set the hours
by which the unit should be switched o aer a delay.
The timer can be set in 1 hour intervals from 1 hour to 24 hours.
> Approximately 5 seconds aer the time selection, the seing is saved and the
timer LED lights up.
> Aer the set time has elapsed, the unit switches to standby mode.
To delete the seing, press the timer buon again. The timer display will turn
o.
8 Using the remote control
8.1 Inserting the baeries
> Open the cover on the baery compartment at the rear of the remote control
by pressing gently at the point indicated and sliding open the cover.
> Insert the baeries (LR03, AAA, 1.5 V), ensuring that the terminals are the
right way round (indicator visible in baery compartment).
> Close the baery compartment again.
Important information for the disposal of baeries:
Baeries may contain poisonous substances that harm the environment.
Therefore, it is imperative to dispose of baeries according to the legal
provisions in force. Never dispose of baeries with normal domestic waste.
Used baeries can be disposed of at your specialist retailer or at special
disposal sites free of charge.
Ensure that the baeries are kept out of the reach of children. Children could
put the baeries into their mouths and swallow them. This could lead to
serious injuries. Seek medical advice immediately if this occurs! Therefore
ensure that the baeries are out of reach of young children.

45
DE
EN
FR
IT
NL
PL
Only operate the unit using the baeries approved for this unit.
Normal baeries must not be charged. Baeries must not be reactivated
using other means, disassembled, heated or disposed of in an open fire
(explosion hazard!).
Clean the baery contacts and the unit contacts before inserting. There is an
explosion hazard if a baery is inserted incorrectly!
8.2 Overview
Turn On/O
Temperature
higher
Temperature
lower
Timer mode
Selecting
temperature unit
Fan mode
Operating mode
Air outlet
Night mode
> Basic operation using the remote control is as described in chapter “6
Bedienung“. Press the correspondingly labelled buon, analogous to the top
of the unit.

46
> Point the remote control at the top of the air conditioner. Observe the
maximum distance of 7 metres.
8.3 Activating special functions with the remote control
8.3.1 Ventilation outlet
The upper ventilation outlet opens and closes slightly in a constant rhythm. If you
want to lock the ventilation outlet in one position, press the Air outlet buon on the
remote control.
Press the buon again to automatically adjust the panning.
8.3.2 Changing the temperature unit
Press the Temperature unit buon to switch the temperature unit shown on the
display between degrees Celsius and Fahrenheit.
8.3.3 Night mode
In night mode, the display and the LED on the top of the unit are dimmed.
> Select heat, cool or automatic mode.
> Press the Night mode buon on your remote control.
The displays are now dimmed and the fan runs at the lowest speed.
In cool mode, the temperature seing is gradually increased to 1 °C above
the original target temperature for each of the first 2 hours. The unit then
maintains the same temperature for 6 hours and then switches to standby
mode.
In heat mode, the temperature seing is gradually lowered to 1 °C below
the original target temperature for each of the first 3 hours. The unit then
maintains the same temperature for 5 hours and then switches to standby
mode.

47
DE
EN
FR
IT
NL
PL
9 Servicing and maintenance
9.1 Draining the condensation water
Over time, condensation will collect in the air conditioning unit's tank. If the tank is
full, the unit stops and Ft (= full tank) appears on the display.
Draining the condensation water manually:
> Remove the plug of the air conditioning unit from the wall socket.
> Place a suitable container under the lower condensate drain (9, page 8).
> Remove the drain cap and let all the water drain into the collection vessel.
> When the water has drained, put the cap back on the condensate drain.
> You can then put the air conditioner back into operation.
Automatically drain the condensed water continuously:
In dehumidifier mode, the condensed water must be continuously drained to the
outside. The upper condensate drain (10, page 8) is provided for this purpose.
> Remove the plug of the air conditioning unit from the wall socket.
> Place a suitable container under the upper condensate drain (10, page 8).
> Remove the drain cap and aach a suitable hose to the drain connection.
> The hose should now be directed straight down into the collection vessel. Be
careful not to kink the hose.
> Put the air conditioner back into operation and activate the dehumidifier
mode.
In cool mode, the upper condensate drain must be closed to ensure ecient
operation.

48
9.2 Cleaning
Switch o the unit before cleaning or performing maintenance by pressing
the POWER buon on the control panel or remote control. Wait a few
minutes and then pull the plug out of the wall outlet.
CLEANING THE UNIT
> Clean the unit with a slightly damp cloth and then dry it completely with a
dry cloth.
Never clean the air conditioner with water. Never use petrol, alcohol or
solvents to clean the unit. Never spray insecticides or the like onto the unit.
CLEANING THE FILTER
To ensure that your air conditioning system
works eciently, you should clean the filter
every week of operation.
> The filter can be removed as shown in the
figure on the right.
> Remove dust accumulation on the filter
with a vacuum cleaner.
> If the filter is very dirty, immerse it in warm
water and rinse several times. The water
should be lukewarm.
> Aer washing, let the filter dry completely
and then put it back in place.
Never use a filter that is still wet. Doing so
can damage the unit.
WARNING!
When the filter housing is open, do not
touch the cooling fins inside the unit. These
are sharp and can cause cuts.
9.3 ACTIVITIES AT THE START / END OF THE SEASON
Start of the season:
> Check the power cord and plug for damage. Check the basic installation of
the unit and the location according to these instructions.

49
DE
EN
FR
IT
NL
PL
End of the season:
If the air conditioner is not going to be used for an extended period:
> Empty the condensation water container completely and leave the lower
drain cap open until the residual water has drained away. As soon as the
tank is completely empty and no more water drains out, replace the rubber
stopper.
> Remove and clean the filter, let it dry completely, and then reinsert it.
> Remove the baeries from the remote control.
> Store the air conditioner in a cool, dry place, away from direct sunlight,
extreme temperatures and excessive dust.
10 Troubleshooting
Problem Cause Solution
The air conditioner does
not start / does not
switch on.
No power. Check the electrical
supply.
Power cord not plugged
in.
Plug the power cord into
a wall outlet.
Protection circuit
activated.
Wait 30 minutes and
then try again. If the
error persists, contact our
service department.
The air conditioner only
runs for a short time.
The exhaust hose is
kinked or incorrectly
connected.
Follow the steps in the
operating instructions for
connecting the exhaust
hose
The air outlet / exhaust
hose is blocked.
Check the air outlet /
exhaust hose for possible
dirt contamination.
The air conditioner works
but does not cool.
Windows / curtains /
drapes are open.
Protect the room from
sunlight and close all
windows.
Other devices in the room
are causing heat (e.g.
television, stoves, hair
dryer).
Switch o all additional
devices in the room.
The exhaust hose was
not installed or was not
directed outside.
Install the exhaust hose
correctly.
The cooling capacity
is not suitable for the
room in which the air
conditioner is being
operated.
Pay aention to the
technical data of the air
conditioner.

50
The unit emits an
unpleasant odour while in
operation.
Air filter is blocked or
dirty.
Remove the air filter
and clean it as per the
instructions.
Aer a restart, it takes 3
minutes for the unit to
start working again.
The protective circuit of
the compressor prevents
an immediate start
aer the unit has been
switched o and on
again.
Wait 3 minutes. The unit
will then work as usual
again.
The following error
messages appear on the
display:
Lt
PF
Ft
The self-diagnosis
function has detected an
error.
Lt - temperature in the
room is too low. The de-
frost function starts.
PF - sensor error. Notify
our service department
Ft - condensed water
tank is full. Empty the
tank as described in these
instructions.

51
DE
EN
FR
IT
NL
PL
11 Technical data
Cooling performance 11000 BTU/h / 3.2 kW
Heating output 10000 BTU/h / 2.9 kW
Modes Cooling, heating, fan, dehumidifier, timer
Temperature range: 18 - 27 °C
Room size 25 - 35 m²
Dehumidification output 36 litres per 24hour
Air circulation 250 - 300 m³/h
Noise emission 53 - 65 dB
Coolant R290 (260g)
GWP coolant 3
Power consumption - cooling 1.23 kW/h
ERR 2.62 (refrigeration coecient)
Energy eciency class - cooling A
Power consumption - heating 1.04 kW/h
COP 2.8 (heat output coecient)
Energy eciency class - heating A+
Power consumption standby mode 0,5 W
Power consumption in „Temperature
controller o“ operating mode
-
Intake pressure 1.2 MPa
Outlet pressure 2.3 MPa
Exhaust hose length 1.5 m (max.)
Exhaust hose diameter 13 cm
CO₂ equivalent 0.0008 t
Compressor LRA 23.5 A
Protection class IPX0
Display Type: 7-segment, 2-digit
Dimensions (WxHxD) 445 x 720 x 375 mm
Weight 31,00 kg
Power supply Mains adapter: internal
Rated power: 1,640 W
Frequency: 50 Hz
Nominal voltage: AC 220 - 240 V

52
Scope of delivery Mobile air conditioner unit. Instruction
manual, remote control,
Exhaust hose and condensate hose,
window seal
12 Legal notices
TechniSat accepts no liability for product damage as a result of external
influences, wear or improper handling, unauthorised repairs, modifications or
accidents.
Changes and printingerrors reserved. Version 11/23.
Copying and reproduction are subject to the publisher's consent. The relevant
current version of the manual can be obtained in PDF format from the
download area of the TechniSat homepage at www.technisat.de.
TechniSat and TECHNIPOLAR 1 are registered trademarks of:
TechniSat Digital GmbH
TechniPark
Julius-Saxler-Strasse 3
D-54550 Daun/Eifel, Germany
www.technisat.de
The names of the companies, institutions or brands referred to are trademarks or
registered trademarks of the respective owners.
12.1 Service instructions
This product is quality-tested and provided with the legally-specified warranty
period of 24 months from the date of purchase. Please keep your receipt as
proof of purchase. In the event of warranty claims please contact the product
dealer.
Note!
Should you experience a problem with this unit, or for queries and
information, our Technical Hotline is available:
Mon. - Fri. 8:00 am - 6:00 pm on:
+49 (0) 3925 9220 1800.
Repair orders can also be placed directly online at
www.technisat.de/reparatur.

53
DE
EN
FR
IT
NL
PL
If the unit needs to be returned, please use the following address only:
TechniSat Digital GmbH
Service-Center
Nordstr. 4a
39418 Stassfurt, Germany
13 Notes

54

Mode d'emploi
TECHNIPOLAR 1
Système de climatisation mobile pour rafraîchir et chauer avec ventilateur
et fonction de déshumidification.

56
1 Sommaire
1 Sommaire ..................................................................................................................56
2 Avant-propos ............................................................................................................ 57
3 Consignes de sécurité ............................................................................................58
3.1 Caractères et symboles utilisés ..........................................................................................58
3.2 Utilisation conforme.................................................................................................................59
3.3 Utilisation sécurisée des climatiseurs ..............................................................................59
3.4 Consignes pour la mise au rebut........................................................................................61
4 Illustrations ...............................................................................................................62
5 Instructions d'installation .....................................................................................63
5.1 Évacuation de l'air .....................................................................................................................63
5.2 Installation du kit fenêtre ..................................................................................................... 64
5.3 Lieu d'installation ......................................................................................................................65
6 Commande ................................................................................................................66
6.1 Unité de commande ............................................................................................................... 66
6.2 Mise en marche et arrêt ....................................................................................................... 66
6.3 Mode Rafraîchissement .........................................................................................................67
6.4 Mode Chauage ........................................................................................................................67
6.5 Mode Déshumidification ........................................................................................................68
6.6 Mode ventilateur .......................................................................................................................69
6.7 Mode automatique ...................................................................................................................69
7 Mode Minuterie ........................................................................................................ 69
7.1 Programmation de la minuterie ........................................................................................69
8 Commande avec la télécommande ...................................................................70
8.1 Insertion des piles.....................................................................................................................70
8.2 Vue d'ensemble ..........................................................................................................................71
8.3 Fonctions spéciales avec la télécommande ................................................................. 72
8.3.1 Sortie d'air ................................................................................................................................... 72
8.3.2 Permutation de l'unité de température .........................................................................72
8.3.3 Mode Nuit .....................................................................................................................................72
9 Service et maintenance ......................................................................................... 73
9.1 Évacuation de l'eau de condensation .............................................................................73
9.2 Neoyage de l'appareil ..........................................................................................................74
9.3 TÂCHES POUR DÉMARRER/FINIR LA SAISON ..............................................................74
10 Recherche d'erreurs ............................................................................................... 75
11 Données techniques ............................................................................................... 77
12 Mentions légales ......................................................................................................78
12.1 Consignes d'entretien .............................................................................................................78
13 Notes ...........................................................................................................................79

57
DE
EN
FR
IT
NL
PL
2 Avant-propos
Chers clients,
Merci d'avoir fait le choix d'un appareil de climatisation TechniSat.
Le présent mode d’emploi vous aidera à découvrir et à utiliser de manière optimale
les nombreuses fonctionnalités de votre nouvel appareil. Il vous aide à l'utiliser de
manière sûre et conforme à sa destination. Il s’adresse à toutes les personnes qui
installent, utilisent, neoient ou meent l’appareil au rebut.
Conservez soigneusement le mode d'emploi pour une utilisation ultérieure.
Vous trouverez une version actuelle du mode d'emploi dans l'espace de
téléchargement de votre produit sur le site Internet TechniSat www.technisat.de.
Nous vous souhaitons une bonne utilisation de votre
produit TechniSat !
Votre
équipe TechniSat

58
3 Consignes de sécurité
3.1 Caractères et symboles utilisés
Dans ce mode d'emploi :
Désigne une consigne de sécurité qui peut conduire à de graves blessures ou
la mort en cas de non-respect. Veuillez respecter les avertissements suivants :
DANGER - Graves blessures avec risque mortel
AVERTISSEMENT - Graves blessures, éventuellement avec risque mortel
ATTENTION - Blessures
Désigne une consigne à respecter impérativement afin d’éviter toute
perturbation de l’appareil, toute perte/mauvaise utilisation des données ou
tout fonctionnement indésirable. Il décrit en outre d'autres fonctionnalités de
votre appareil.
Avertissement face à un risque de tension électrique. Respectez toutes les
consignes de sécurité pour éviter une décharge électrique. N'ouvrez jamais
l'appareil.
Sur l'appareil :
avertissement indiquant la présence de substances inflammables. Respectez
toutes les consignes de sécurité. Des inaentions à proximité de substances
inflammables peuvent provoquer des feux.
Respectez toutes les indications et consignes de sécurité du mode d'emploi.
Utilisation dans des espaces intérieurs - les appareils avec ce symbole
conviennent uniquement à une utilisation dans des espaces intérieurs.
Classe de protection II - les appareils électriques de la classe de protection II
sont des appareils électriques qui possèdent une isolation continue double et/ou
renforcée sans possibilité de raccorder un conducteur de protection. Le boîtier
d'un appareil électrique de la classe de protection II entouré de matériau isolant
peut former une isolation supplémentaire ou renforcée, partielle ou intégrale.
Votre appareil porte la marque CE et répond à toutes les normes
européennes requises.
Les appareils électroniques ne doivent pas être jetés avec les ordures
ménagères mais doivent être mis au rebut de manière appropriée -
conformément à la directive 2002/96/UE du Parlement et Conseil européens
du 27 janvier 2003 sur les appareils électriques et électroniques usagés. Une
fois son utilisation terminée, veuillez déposer cet appareil dans un des points
de collecte publics prévus à cet eet pour sa mise au rebut.

59
DE
EN
FR
IT
NL
PL
3.2 Utilisation conforme
Le climatiseur TECHNIPOLAR 1 de TechniSat est prévu pour rafraîchir ou chauer les
pièces intérieures de 13 m² min. à 35 m² max.
3.3 Utilisation sécurisée des climatiseurs
Veuillez respecter les indications ci-dessous afin de réduire tout risque en matière
de sécurité, d’éviter toute détérioration de l’appareil et de contribuer à la protection
de l’environnement.
Lisez aentivement l'ensemble des consignes de sécurité et conservez-les pour
toute question ultérieure. Respectez toujours l'ensemble des avertissements et
consignes de ce mode d'emploi ainsi que ceux au dos de l’appareil.
AVERTISSEMENT !
Substances inflammables. L'appareil est rempli de propane R290. Respectez
impérativement les directives du fabricant pour les réparations ou l'entretien.
Le service doit être uniquement eectué par du personnel spécialisé qualifié.
AVERTISSEMENT !
N’ouvrez jamais l’appareil!
Tout contact avec des pièces sous tension peut entraîner la mort!
Veuillez respecter toutes les consignes suivantes pour une utilisation
conforme de l'appareil et éviter toute perturbation de l'appareil et tout
dommage corporel.
> L'appareil n'est pas destiné à être utilisé par des personnes (y compris
les enfants) dont les capacités physiques, sensorielles ou mentales sont
limitées ou manquant d'expérience et/ou de connaissances, sauf si elles sont
surveillées par une personne responsable de leur sécurité ou si elles reçoivent
de sa part les instructions nécessaires à l'utilisation de l'appareil.
> Les enfants doivent être surveillés afin de s’assurer qu’ils ne jouent pas avec
l’appareil.
> N'utilisez pas cet appareil pour d'autres fonctions que celles décrites dans ce
mode d'emploi.
> Si le câble d'alimentation est usé ou endommagé, il doit être uniquement
remplacé par un technicien de service qualifié en utilisant des pièces de
rechange d'origine.
> La fiche doit être solidement et entièrement insérée dans la prise. Il existe un
risque de décharge électrique ou de feu.
> Ne branchez pas d'autres appareils à la même prise, il existe un risque de
décharge électrique.
> Ni le climatiseur ni le câble d'alimentation ne doivent être démontés ou
modifiés, car il existe sinon un risque de décharge électrique ou de feu. Tous
les autres travaux sur l'appareil doivent être réalisés par un technicien qualifié.

60
> Ne placez ni le câble d'alimentation ni le climatiseur à proximité d'un
chauage, d'un corps chaud ou d'une autre source de chaleur. Il existe un
risque de décharge électrique ou de feu.
> L'appareil est équipé d'un câble relié à la terre via une broche de terre ou une
pae de mise à la terre. La fiche doit être insérée dans une prise installée de
manière appropriée et reliée à la terre. La broche de terre ou la pae de mise
à la terre ne doivent en aucun cas être coupées ou retirées de cee fiche.
> L'appareil doit être utilisé ou stocké de manière à le protéger de l'humidité, p.
ex. de l'eau de condensation, des projections d'eau, etc.
> Transportez votre climatiseur en position verticale et posez-le sur une surface
stable et plane pendant l'utilisation. Si l'appareil est transporté sur le côté,
celui-ci doit être posé à la verticale pendant 6 heures avant d'être raccordé à
l'alimentation électrique.
> Éteignez l'appareil via l'interrupteur sur le panneau de commande ou la
télécommande. Ne démarrez ou n'arrêtez pas le fonctionnement en insérant
ou retirant le câble d'alimentation. Il existe un risque d'électrocution.
> N'appuyez pas sur les touches du panneau de contrôle avec les doigts
humides ou mouillés.
> N'utilisez aucun produit chimique dangereux pour neoyer l'appareil et
tenez-les éloignés de l'appareil. Pour éviter d'endommager la surface,
utilisez uniquement un chion doux pour neoyer le climatiseur. N'utilisez
ni cire, ni diluant, ni neoyant puissant. N'utilisez pas l'appareil en présence
de substances inflammables ou de vapeurs de type alcool, insecticides,
essence, etc.
> Si le climatiseur fait des bruits inhabituels, dégage de la fumée ou émet une
odeur inhabituelle, retirez immédiatement la fiche de la prise.
> Ne pas neoyer l'appareil à l'eau. L'eau risque de pénétrer dans l'appareil
et d'endommager l'isolation ce qui peut provoquer un risque de décharge
électrique. Lorsque de l'eau a pénétré dans l'appareil, retirez immédiatement
la fiche et contactez le service après-vente.
> L'appareil doit être soulevé et installé par au moins deux personnes.
> Assurez-vous de sortir tous les accessoires de l'emballage avant utilisation.
> Lors du démontage et de l'installation du filtre, ne touchez pas aux pièces
métalliques du climatiseur pour éviter de vous blesser en vous coupant. Il
existe un risque de dommage corporel.
> N'obstruez pas l'entrée ou la sortie d'air du climatiseur. Un débit d'air réduit
altère la performance et peut endommager l'appareil.

61
DE
EN
FR
IT
NL
PL
> Saisissez toujours l'appareil au niveau de la fiche lorsque vous branchez ou
débranchez le climatiseur. Ne retirez jamais la fiche de la prise en tirant sur le
câble. Dans le cas contraire, il existe un risque de décharge électrique et de
dommages.
> Posez le climatiseur sur une surface plane et stable qui peut supporter
jusqu'à 50 kg. L'installation sur une surface non plane et non solide peut
conduire à des dommages corporels et matériels.
> Pour un fonctionnement le plus ecace possible, fermez toutes les portes et
fenêtres de la pièce. Veillez à ce que le tuyau d'évacuation d'air conduise à
l'extérieur pour garantir un fonctionnement ecace.
IMPORTANT - MÉTHODE DE MISE À LA TERRE
Ce produit est équipé en usine d'un câble d'alimentation qui dispose d'une fiche
tripolaire reliée à la terre. Il peut être branché uniquement à une prise reliée à
la terre conformément au National Electrical Code et aux réglementations et
ordonnances locales applicables. Si le circuit électrique ne dispose pas de prise
reliée à la terre, le client a la responsabilité et l'obligation de remplacer la prise
présente conformément au National Electrical Code et aux réglementations et
ordonnances locales en vigueur. Le troisième contact de mise à la terre ne peut en
aucun cas être coupé ou retiré. N'utilisez jamais le câble, la fiche ou l'appareil s'ils
présentent des dommages. Utilisez votre appareil avec une rallonge uniquement
lorsque cee dernière a été vérifiée et testée par une entreprise électrique
spécialisée. En cas de raccordement non conforme de la fiche reliée à la terre,
il existe un risque d'incendie, de décharge électrique et/ou de blessure pour les
personnes lié à l'appareil. Adressez-vous à un technicien de service qualifié si vous
avez des doutes sur le fait que l'appareil est ou non correctement relié à la terre.
RACCORDEMENTS ÉLECTRIQUES
Avant de brancher l'appareil à la prise électrique, vérifiez les points suivants :
> La tension de secteur correspond à la valeur indiquée sur la fiche signalétique
à l'arrière de l'appareil.
> La prise et le circuit électrique sont adaptés à l'appareil.
> La prise de courant est adaptée à la fiche. Si ce n'est pas le cas, faites
changer la fiche.
> La mise à la terre de la prise est susante. Le non-respect de ces consignes
de sécurité importantes délie le fabricant de toute responsabilité.
3.4 Consignes pour la mise au rebut
Consignes importantes pour une mise au rebut en bonne et due forme du produit
conformément à la directive UE 2012119/UE.
Une fois son temps d'utilisation terminé, l'appareil ne doit pas être éliminé en tant
que déchet urbain. Il doit être rapporté dans un point de collecte communal spécial
ou chez un revendeur qui propose cee prestation.

62
Le tri séparé des appareils domestiques permet d'éviter les possibles conséquences
négatives sur l'environnement et la santé d'une mise au rebut non conforme. En
outre, cela permet de réemployer certains composants, pouvant ainsi permere de
significatives économies d'énergie et de ressources. Pour rappeler la nécessité d'une
mise au rebut séparée des appareils domestiques, une poubelle à roulees barrée
est représentée sur le produit.
4 Illustrations
1 Ouverture pour la ventilation
2 Panneau de commande
3 Poignées encastrées (des deux
côtés)
4 Roulees
5 Câble d'alimentation
6 Unité de filtration entrée d'air
7 Raccord d'air
8 Entrée d'air
9 Vidange inférieure
Eau de condensation
10 Vidange supérieure
Eau de condensation

63
DE
EN
FR
IT
NL
PL
5 Instructions d'installation
5.1 Évacuation de l'air
En mode Chauage ou Rafraîchissement, l'appareil doit être installé à proximité
d'une fenêtre ou d'une ouverture pour que l'air chaud ou froid puisse être conduit à
l'extérieur.
Posez l'appareil sur un sol plat et veillez à maintenir une distance minimale de 30
cm autour de l'appareil et à ce que l'appareil se trouve à proximité d'une prise de
courant reliée à la terre.
1. Allongez le tuyau en tirant dessus jusqu'à
la longueur souhaitée (ill. 1)
2. Vissez-le à l'entrée du tuyau (ill. 2).
3. Vissez la sortie du tuyau à l'autre
extrémité du tuyau (ill. 3).
4. Montez l'entrée du tuyau au raccord d'air
(7) (ill. 4).
5. Fixez la sortie du tuyau au kit fenêtre (voir
“ 5.2 Fenster-Kit installieren “).
Raccorder
Verrouiller

64
5.2 Installation du kit fenêtre
Le kit fenêtre est prévu pour étanchéifier les fenêtres à souet. Pour l'installation,
veuillez procéder comme suit :
Collez la bande auto-
agrippante sur le cadre de la
fenêtre.
Collez la bande auto-
agrippante sur le cadre de la
fenêtre.
Raccourcissez la bande auto-
agrippante aux coins.
Veillez à ce que les coins
soient aeurants.
Fixez le calfeutrage de
fenêtre.
Veillez à ce que les deux
moitiés soient dirigées l'une
vers l'autre.
Ouvrez la fermeture zippée
sur le côté.
Insérez le tuyau d'évacuation dans
l'ouverture créée et fermez la
fermeture zippée.

65
DE
EN
FR
IT
NL
PL
5.3 Lieu d'installation
> L'appareil doit être installé sur une surface stable pour réduire au minimum
les bruits et vibrations. Pour garantir une bonne stabilité, posez l'appareil sur
un sol lisse et plat susamment solide pour porter l'appareil.
> L'appareil est équipé de roulees pour faciliter son installation. Toutefois, il
doit être déplacé uniquement sur des surfaces planes et lisses. Soyez prudent
lorsque vous le faites rouler sur des tapis. Soyez prudent et protégez les
sols lorsque vous faites rouler l'appareil sur du parquet/plancher. N'essayez
jamais de faire rouler l'appareil sur des objets.
> L'appareil doit être installé à portée d'une prise de courant reliée à la terre,
dimensionnée de manière conforme.
> Ne placez jamais d'obstacle autour de l'entrée ou sortie d'air de l'appareil.
> Laissez au moins 45 cm de distance avec le mur pour permere une
climatisation ecace.
> Le tuyau peut être allongé mais doit être gardé aussi court que possible.
Veillez à ne pas plier ni arquer le tuyau.

66
6 Commande
Le panneau de commande se trouve sur le dessus de l'appareil.
Pour exploiter pleinement le potentiel de l'appareil, vous devez cependant utiliser la
télécommande.
6.1 Unité de commande
1 2 3 4 5 6
7 8 9 10 11 12 13 14 15 16
1 Permutation du mode de fonctionnement
2 Minuterie (timer)
3 Choix de la température (plus chaud)
4 Choix de la température (plus froid)
5 Niveau de souerie
6 Interrupteur Marche/Arrêt
7 Fonction de chauage active
8 Fonction de rafraîchissement active
9 Déshumidification de l'air active
10 Mode ventilateur actif
11 Minuterie active
12 Écran
13 Niveau de souerie - élevé
14 Niveau de souerie - moyen
15 Niveau de souerie - faible
16 Commande automatique de la climatisation activée
6.2 Mise en marche et arrêt
Insérez la fiche secteur dans la prise secteur. " - - " s'ache à l'écran.
Appuyez une fois sur la touche POWER (6) pour mere en marche l'appareil.
Appuyez à nouveau sur la touche POWER pour éteindre l'appareil.
N'éteignez jamais le climatiseur en tirant sur la fiche secteur. Éteignez
toujours le climatiseur en appuyant sur la touche POWER et aendez
quelques minutes avant de retirer la fiche. Cela permet à l'appareil d'eectuer
un cycle de contrôle et de s'arrêter de manière conforme.

67
DE
EN
FR
IT
NL
PL
Ne rallumez pas le climatiseur immédiatement après l'avoir éteint, mais
aendez quelques minutes.
6.3 Mode Rafraîchissement
Idéal pour les temps chauds et humides lorsqu'il faut à la fois rafraîchir la pièce
et la déshumidifier.
> Appuyez sur la touche MODE (1) plusieurs fois jusqu'à ce que " Cool " (8)
s'allume.
> Choisissez la température de consigne (18 °C à 32 °C) en appuyant sur la
touche Choix de la température plus chaud/plus froid (3, 4) jusqu'à ce que
la valeur correspondante s'ache à l'écran.
Après la mise en marche et l'activation de la fonction de rafraîchissement,
le compresseur peut mere un certain temps à démarrer et l'appareil à
rafraîchir la pièce.
> Choisissez en appuyant plusieurs fois sur la touche FAN (5) la vitesse de
ventilation souhaitée, les réglages High (élevé), Medium (moyen), Low
(faible) et Auto (réglage automatique) pouvant être sélectionnés. Selon
la vitesse de ventilation choisie, le bruit de fonctionnement du climatiseur
change aussi. Si vous désirez que le climatiseur fasse le moins de bruit
possible en fonctionnement, sélectionnez Low.
Si vous activez le mode rafraîchissement directement après activation du
mode Chauage, cela peut prendre 5 minutes avant que l'appareil commence
à rafraîchir la pièce.
La température qui convient le mieux à la pièce pendant l'été est comprise
entre 24 °C et 27 °C. Il est cependant recommandé de ne pas paramétrer
une température trop éloignée de la température extérieure.
Avec ce mode, les deux capuchons de vidange (9, 10) doivent être fermés
pour permere un rafraîchissement ecace.
6.4 Mode Chauage
Si vous souhaitez, de préférence pendant l'hiver chauer une pièce, sélectionnez le
mode Chauage.
> Appuyez sur la touche MODE (1) plusieurs fois jusqu'à ce que " Heat " (7) s'allume.
> Choisissez la température de consigne (13 °C à 27 °C) en appuyant sur la
touche Choix de la température plus chaud/plus froid (3, 4) jusqu'à ce que
la valeur correspondante s'ache à l'écran.
> Choisissez en appuyant plusieurs fois sur la touche FAN (5) la vitesse de
ventilation souhaitée, les réglages High (élevé), Medium (moyen), Low
(faible) et Auto (réglage automatique) pouvant être sélectionnés. Selon
la vitesse de ventilation choisie, le bruit de fonctionnement du climatiseur
change aussi. Si vous désirez que le climatiseur fasse le moins de bruit
possible en fonctionnement, sélectionnez Low.
Si vous activez le mode Chauage directement après activation du mode
Rafraîchissement, cela peut prendre 5 minutes avant que l'appareil
commence à chauer la pièce.
L'air se vide de son humidité qui est capturée dans le réservoir. Lorsque le
réservoir est plein, l'appareil s'éteint et Ft (réservoir plein) s'ache à l'écran.

68
Le capuchon de vidange inférieur (9) doit être retiré et le réservoir vidé.
Laissez toute l'eau s'écouler dans un bac de récupération. Une fois l'eau
entièrement vidangée, remeez le capuchon. Une fois le réservoir vidé,
l'appareil redémarre.
En cas d'utilisation dans des pièces très froides, l'appareil est dégivré
automatiquement, le fonctionnement normal étant brièvement interrompu.
Lt s'ache à l'écran. Au cours de ce processus, il est normal que les bruits de
l'appareil changent.
> Avec ce mode, vous devez dans certaines circonstances aendre quelques
minutes avant que l'appareil ne commence à diuser de l'air chaud.
> Avec ce mode, le ventilateur peut fonctionner brièvement bien que la
température réglée soit déjà aeinte.
6.5 Mode Déshumidification
Idéal pour réduire l'humidité de l'air dans la pièce (printemps et automne, pièces
humides, périodes de pluie, etc.)
Veuillez noter qu'en mode Déshumidification, l'air est déshumidifié. L'eau de
condensation est conduite à l'extérieur via la vidange supérieure (10). Dirigez
l'eau dans un récipient adapté et videz-le régulièrement en fonction de sa
taille.
> Retirez le capuchon de vidange supérieur (1.).
> Raccordez le tuyau fourni ou un tuyau adapté au raccord (2.) et dirigez-le
dans un récipient adapté.
Capuchon
Branchement du
tuyau
1. 2.
> Appuyez sur la touche MODE (1) jusqu'à ce que Dry (9) s'allume ainsi que le
symbole de la ventilation automatique Auto (16).
Avec ce mode, la vitesse de ventilation est sélectionnée automatiquement
par l'appareil et ne peut pas être réglée manuellement.
Veillez à ne pas plier le tuyau d'eau de condensation.

69
DE
EN
FR
IT
NL
PL
6.6 Mode ventilateur
Si vous utilisez l'appareil avec ce mode, le tuyau d'évacuation ne doit pas être
branché.
> Appuyez sur la touche MODE (1) plusieurs fois jusqu'à ce que Fan (10)
s'allume. Choisissez en appuyant plusieurs fois sur la touche FAN (5) la vitesse
de ventilation souhaitée, les réglages High (élevé), Medium (moyen) ou Low
(faible) pouvant être sélectionnés.
La régulation automatique n'est pas disponible avec ce mode.
6.7 Mode automatique
En mode automatique, l'appareil choisit lui-même son mode en se basant sur la
température ambiante actuelle :
- Température ambiante : jusqu'à 20 °C = mode chauage
- Entre 20 °C et 23 °C = mode ventilateur
- Température ambiante : plus de 23 °C = mode rafraîchissement
> Appuyez plusieurs fois sur la touche MODE (1) jusqu'à ce que toutes les LED
de mode soient éteintes et qu'une barre tournante s'ache à l'écran.
> Choisissez en appuyant plusieurs fois sur la touche FAN (5) la vitesse de
ventilation souhaitée, les réglages High (élevé), Medium (moyen) ou Low
(faible) pouvant être sélectionnés.
7 Mode Minuterie
Grâce à la minuterie, l'appareil se met en marche et s'éteint automatiquement.
Une utilisation ecace du mode Minuterie permet des économies d'électricité,
l'appareil ne fonctionnant qu'aux heures fixes indiquées.
7.1 Programmation de la minuterie
Mise en marche diérée
> Pendant le fonctionnement, sélectionnez le mode et les réglages souhaités
(vitesse de ventilation, température). Puis éteignez l'appareil.
> Appuyez sur la touche TIMER (2) lorsque l'appareil est éteint. Les LED de
la minuterie (Timer) (11) se meent alors à clignoter ainsi qu'un chire
indiquant les heures.
> Dans les 5 secondes, appuyez à nouveau plusieurs fois sur la touche TIMER,
pour paramétrer la durée après laquelle l'appareil doit être mis en marche en
diéré.
Avec des intervalles d'une heure, la mise en marche peut être diérée d'une
heure à 24 heures plus tard.

70
> Le réglage est enregistré 5 secondes environ après le choix de la durée, la
LED de la minuterie s'allume et l'écran ache que l'appareil se trouve en
mode veille (--).
> Une fois le temps réglé écoulé, l'appareil démarre avec le dernier mode de
fonctionnement paramétré.
Pour supprimer le réglage, appuyez une nouvelle fois sur la touche Timer.
L'achage de la minuterie s'éteint.
Arrêt diéré
> En marche, appuyez sur la touche TIMER (2). Les LED de la minuterie (Timer)
(11) se meent alors à clignoter ainsi qu'un chire indiquant les heures.
> Dans les 5 secondes, appuyez à nouveau plusieurs fois sur la touche TIMER,
pour paramétrer la durée après laquelle l'appareil doit être arrêté en diéré.
Avec des intervalles d'une heure, la mise en marche peut être diérée d'une
heure à 24 heures plus tard.
> Le réglage est enregistré 5 secondes environ après le choix de la durée, la
LED de la minuterie s'allume.
> Une fois le temps réglé écoulé, l'appareil se met en veille.
Pour supprimer le réglage, appuyez une nouvelle fois sur la touche Timer.
L'achage de la minuterie s'éteint.
8 Commande avec la télécommande
8.1 Insertion des piles
> Ouvrez le couvercle du compartiment à piles au dos de la télécommande en
appuyant légèrement à l'endroit indiqué et ouvrez le couvercle.
> Insérez les piles (LR03, AAA, 1,5 V) en respectant la polarité (indiquée au
niveau du compartiment à piles).
> Refermez le compartiment à piles.
Consigne importante relative à la mise au rebut des piles :
les piles peuvent contenir des substances toxiques pour l'environnement.
Vous devez donc les mere au rebut conformément aux dispositions légales
en vigueur. Ne jetez jamais les piles avec les autres déchets ménagers. Vous
pouvez mere les piles gratuitement au rebut auprès de votre revendeur ou
aux points de collecte spéciaux.
Veillez à ce que les piles ne tombent pas entre les mains des enfants. Les
enfants peuvent les mere dans la bouche et les avaler, ce qui peut entraîner
de graves problèmes de santé. Dans ce cas, contactez immédiatement un
médecin! Conservez de ce fait les piles hors de portée des enfants en bas âge.

71
DE
EN
FR
IT
NL
PL
Utilisez l’appareil uniquement avec les piles homologuées pour cet appareil.
Les piles normales ne doivent pas être rechargées. Les piles ne doivent pas
être réactivées avec d’autres moyens, ni être démontées, chauées ou jetées
au feu (risque d’explosion !).
Neoyez les contacts des piles et les contacts de l’appareil avant la mise en
place. Il y a un risque d’explosion si les piles ne sont pas mises correctement
en place!
8.2 Vue d'ensemble
Mise en marche/
Arrêt
Augmenter
la température
Baisser
la température
Mode Minuterie
Permutation unité
de température
Mode ventilateur
Mode opérationnel
Sortie d'air
Mode Nuit
> L'utilisation de base avec la télécommande s'eectue comme décrit au
chapitre “ 6 Bedienung “. Appuyez sur la touche correspondante, analogue
au-dessus de l'appareil.

72
> Orientez la télécommande vers la partie supérieure du climatiseur. Respectez
une distance maximale de 7 mètres.
8.3 Fonctions spéciales avec la télécommande
8.3.1 Sortie d'air
La sortie d'air s'ouvre et se ferme légèrement à un rythme régulier. Si vous souhaitez
stopper la sortie d'air dans une position, appuyez sur la touche Sortie d'air de la
télécommande.
Appuyez une nouvelle fois sur la touche pour réguler automatiquement le
basculement.
8.3.2 Permutation de l'unité de température
Appuyez sur la touche Permutation unité de température pour basculer l'unité de
température achée à l'écran entre grad/celsius et Fahrenheit.
8.3.3 Mode Nuit
En mode Nuit, la lumière de l'écran et de la LED sur le dessus de l'appareil est
tamisée.
> Sélectionnez le mode Chauage, Rafraîchissement ou Automatique.
> Appuyez sur la touche Mode nuit de la télécommande.
Les achages sont alors tamisés et le ventilateur fonctionne à vitesse
minimale.
En mode Rafraîchissement, le réglage de la température pour chacune des
deux premières heures est augmenté progressivement à 1 °C au-dessus de
la température de consigne d'origine. L'appareil maintient ensuite la même
température pendant 6 heures puis bascule en mode veille.
En mode Chauage, le réglage de la température pour chacune des trois
premières heures est baissé progressivement à 1 °C en dessous de la
température de consigne d'origine. L'appareil maintient ensuite la même
température pendant 5 heures puis bascule en mode veille.

73
DE
EN
FR
IT
NL
PL
9 Service et maintenance
9.1 Évacuation de l'eau de condensation
Avec le temps, de l'eau de condensation s'accumule dans le réservoir du climatiseur.
Si le réservoir est plein, l'appareil s'arrête et Ft s'ache à l'écran (Full Tank = réservoir
plein).
Vider manuellement l'eau de condensation :
> Débranchez la fiche secteur du climatiseur.
> Posez un récipient adapté sous la vidange inférieure de l'eau de
condensation (9, page 8).
> Retirez le capuchon de la vidange et laissez l'eau s'évacuer entièrement dans
le bac de récupération.
> Une fois l'eau vidée, enfoncez à nouveau le capuchon sur la vidange de l'eau
de condensation.
> Remeez le climatiseur en marche.
Évacuation continue automatique de l'eau de condensation :
En mode Déshumidification, l'eau de condensation doit être conduite vers l'extérieur
de manière continue. La vidange supérieure de l'eau de condensation (10, page 8)
est prévue à cet eet.
> Débranchez la fiche secteur du climatiseur.
> Posez un récipient adapté sous la vidange supérieure de l'eau de
condensation (10, page 8).
> Retirez le capuchon de la vidange et montez un tuyau adapté au raccord de
vidange.
> Le tuyau doit maintenant conduire directement vers le bas dans le bac de
récupération. Veillez à ne pas plier le tuyau.
> Remeez le climatiseur en fonctionnement et activez le mode de
déshumidification.
En mode Rafraîchissement, la vidange supérieure de l'eau de condensation
doit être branchée pour garantir un fonctionnement ecace.

74
9.2 Neoyage de l'appareil
Éteignez l'appareil avant le neoyage ou l'entretien en appuyant sur la touche
POWER du panneau de commande ou de la télécommande. Aendez
quelques minutes puis retirez la fiche secteur de la prise.
NETTOYAGE DE L'APPAREIL
> Neoyez l'appareil avec un chion légèrement humide puis séchez-le
entièrement avec un chion sec.
Ne neoyez jamais l'appareil avec de l'eau. N'utilisez jamais d'essence, d'alcool
ou de solvant pour neoyer l'appareil. Ne vaporisez jamais de liquides
insecticides ou de liquides similaires.
NETTOYAGE DU FILTRE
Pour permere un fonctionnement
ecace de votre système de climatisation,
le filtre doit être neoyé une fois par
semaine d'utilisation.
> Le filtre peut être démonté comme
montré dans l'illustration à droite.
> Retirez les accumulations de poussière sur
le filtre avec un aspirateur.
> En cas de fort encrassement, plongez-le
dans l'eau chaude et rincez-le plusieurs
fois. L'eau doit être tiède.
> Laissez le filtre sécher entièrement après
le lavage et remeez-le.
N'utilisez jamais un filtre encore humide.
Cela peut provoquer des dommages.
ATTENTION !
Lorsque le boîtier du filtre est ouvert, ne
saisissez jamais les ailees de refroidissement dans l'appareil. Celles-ci ont
des angles vifs et peuvent provoquer des coupures.
9.3 TÂCHES POUR DÉMARRER/FINIR LA SAISON
Démarrage de la saison :
> Vérifiez si le câble de connexion et la fiche sont endommagés. Vérifiez
l'installation de base de l'appareil et le lieu d'installation conformément à ce
mode d'emploi.

75
DE
EN
FR
IT
NL
PL
Fin de la saison :
Si vous n'utilisez pas le climatiseur pendant une longue période :
> Videz entièrement le bac de récupération de l'eau de condensation et laissez
le capuchon de vidange inférieur ouvert jusqu'à évacuation complète de l'eau
résiduelle. Dès que le réservoir est entièrement vidé et qu'il n'y a plus d'eau,
replacez-le bouchon en caoutchouc.
> Retirez et neoyez le filtre, laissez-le sécher entièrement puis replacez-le.
> Retirez les piles de la télécommande.
> Entreposez le climatiseur dans un endroit frais et sec, éloigné des rayons
directs du soleil, des températures extrêmes et de l'excès de poussière.
10 Recherche d'erreurs
Problème Cause Solution
Le climatiseur ne démarre
pas / ne s'enclenche pas.
Pas d'alimentation
électrique.
Vérifiez l'alimentation
électrique.
Le câble d'alimentation
n'est pas branché.
Branchez le câble
d'alimentation à une
prise.
Circuit de protection actif. Aendez 30 minutes et
réessayez. Si l'erreur se
reproduit, contactez le
service après-vente.
Le climatiseur ne
fonctionne que peu de
temps.
Le tuyau d'évacuation est
plié ou mal branché.
Respectez les instructions
du mode d'emploi visant
à poser/brancher le tuyau
d'évacuation
La sortie d'air / le tuyau
d'évacuation est bouché.
Vérifiez si la sortie d'air /
le tuyau d'évacuation est
sale.

76
Le climatiseur fonctionne
mais ne rafraîchit pas.
Les fenêtres / voilages /
rideaux sont ouverts.
Protégez la pièce des
rayons du soleil et fermez
toutes les fenêtres.
D'autres appareils dans
la pièce sont sources
de chaleur (p. ex. le
téléviseur, four, sèche-
cheveux).
Éteignez tous les
appareils supplémentaires
dans la pièce.
Le tuyau d'évacuation
n'a pas été installé ou
ne conduit pas vers
l'extérieur.
Installez correctement le
tuyau d'évacuation.
La capacité de
refroidissement ne
convient pas pour la
pièce dans laquelle le
climatiseur a été installé.
Veuillez tenir compte des
données techniques du
climatiseur.
De désagréables odeurs
se répandent pendant le
fonctionnement.
Le filtre à air est obstrué
ou sale.
Retirez le filtre à air,
neoyez-le conformément
aux instructions.
Après un redémarrage,
l'appareil met 3 minutes à
refonctionner.
Le circuit de protection
du compresseur empêche
un démarrage immédiat
après l'arrêt et la mise en
marche de l'appareil.
Aendez 3 minutes.
L'appareil fonctionne
ensuite normalement.
Les messages d'erreurs
suivants s'achent à
l'écran :
Lt
PF
Ft
L'auto-diagnostic a
détecté une erreur.
Lt - La température de
la pièce est trop basse.
La fonction De-Frost
démarre.
PF - Erreur de capteur.
Contactez le service
après-vente.
Ft - Le réservoir d'eau
de condensation est
plein. Videz le réservoir
comme décrit dans ces
instructions.

77
DE
EN
FR
IT
NL
PL
11 Données techniques
Capacité de refroidissement 11000 BTU/h / 3.2 kW
Capacité de chaue 10000 BTU/h / 2.9 kW
Modes Rafraîchir, chauer, ventiler,
déshumidifier, minuterie
Plage de température : 18 - 27 °C
Taille de la pièce 25 - 35 m²
Capacité de déshumidification 36 litres par 24heure
Circulation d'air 250 - 300 m³/h
Volume 53 - 65 dB
Élément de refroidissement R290 (260 g)
Élément de refroidissement PCG 3
Consommation électrique :
refroidissement
1,23 kW/h
ERR 2,62 (niveau de puissance de
refroidissement)
Classe énergétique : refroidissement A
Consommation électrique en mode
veille
0,5 W
Puissance absorbée en mode
„régulateur de température désactivé
-
Consommation électrique : chauage 1,04 kW/h
COP 2,8 (niveau de puissance de chaue)
Classe énergétique : chauage A+
Pression d'aspiration 1,2 MPa
Pression de sortie 2,3 MPa
Longueur du tuyau d'évacuation 1,5 m (max.)
Diamètre du tuyau d'évacuation 13 cm
Équivalent CO₂ 0.0008 t
Compresseur LRA 23,5 A
Indice de protection IPX0
Écran Type : 7 segments, à 2 positions
Dimensions (l x h x p) 445 x 720 x 375 mm
Poids 31 kg
Alimentation électrique Bloc d'alimentation : interne
Puissance nominale : 1640 W
Fréquence : 50 Hz
Tension nominale : AC 220 - 240 V

78
Contenu de la livraison Climatiseur mobile. Mode d'emploi,
télécommande,
Tuyau de condensation et d'évacuation,
calfeutrage pour fenêtre
12 Mentions légales
La société TechniSat ne peut être tenue pour responsable des dommages
causés au produit dans le cas d’influences extérieures, d’une usure, d’une
utilisation inappropriée, d’une réparation non autorisée, de modifications ou
d’accidents.
Sous réserve de modifications et d’erreurs typographiques. Dernière mise à
jour 11/23.
Toutes copies et reproductions sont soumises à l’autorisation de l’éditeur.
Vous pouvez télécharger une version actuelle du manuel au format PDF dans
l'espace de téléchargement du site Internet TechniSat sur www.technisat.de.
TechniSat et TECHNIPOLAR 1 sont des marques déposées de la société :
TechniSat Digital GmbH
TechniPark
Julius-Saxler-Strasse 3
D-54550 Daun/Eifel, Allemagne
www.technisat.de
Les noms de sociétés, institutions ou marques citées sont des marques ou des
marques déposées de leurs propriétaires respectifs.
12.1 Consignes d'entretien
La qualité de ce produit est contrôlée et garantie pendant la période de
garantie légale de 24mois à compter de la date d’achat. Veuillez conserver
la facture comme preuve d'achat. Veuillez vous adresser au revendeur du
produit pour toute demande relevant de la garantie.
Remarque!
Notre assistance technique téléphonique est joignable pour toute question et
complément d'informations, ou en cas de problème avec l’appareil:
Du lundi au vendredi de 8 h à 18 h au numéro suivant :
+ 49 (0) 392 592 201 800.
Les demandes de réparation peuvent également être faites directement en
ligne sur
www.technisat.de/reparatur.
En cas d'éventuel retour de l'appareil, merci d'adresser votre colis uniquement à

79
DE
EN
FR
IT
NL
PL
l'adresse suivante :
TechniSat Digital GmbH
Service-Center
Nordstr. 4a
39418 Stassfurt, Allemagne
13 Notes

80

Istruzioni per l'uso
TECHNIPOLAR 1
Impianto di climatizzazione mobile per il rareddamento e il riscaldamento,
con ventilatore e funzione di deumidificazione.

82
1 Indice
1 Indice ..........................................................................................................................82
2 Premessa ...................................................................................................................83
3 Avvertenze di sicurezza ........................................................................................84
3.1 Simboli utilizzati ........................................................................................................................ 84
3.2 Uso conforme alle disposizioni ........................................................................................... 85
3.3 Uso sicuro dei climatizzatori ................................................................................................85
3.4 Note per lo smaltimento .......................................................................................................87
4 Immagini ....................................................................................................................88
5 Istruzioni per l'installazione .................................................................................89
5.1 Scarico dell'aria ..........................................................................................................................89
5.2 Installare il kit per finestra ...................................................................................................90
5.3 Luogo di posizionamento ..................................................................................................... 91
6 Utilizzo ........................................................................................................................ 92
6.1 Unità di comando .................................................................................................................... 92
6.2 Accensione e spegnimento ................................................................................................. 92
6.3 Modalità di rareddamento ................................................................................................. 93
6.4 Modalità di riscaldamento ....................................................................................................93
6.5 Modalità di deumidificazione ............................................................................................. 94
6.6 Modalità ventilatore .................................................................................................................95
6.7 Modalità automatica ................................................................................................................95
7 Modalità timer ..........................................................................................................95
7.1 Programmare il timer ..............................................................................................................95
8 Uso del telecomando .............................................................................................96
8.1 Inserire le baerie .................................................................................................................... 96
8.2 Panoramica .................................................................................................................................. 97
8.3 Funzioni speciali con telecomando ..................................................................................98
8.3.1 Uscita di ventilazione .............................................................................................................98
8.3.2 Cambio dell'unità di temperatura .....................................................................................98
8.3.3 Modalità nourna .....................................................................................................................98
9 Assistenza e manutenzione .................................................................................99
9.1 Scarico dell'acqua di condensa ......................................................................................... 99
9.2 Pulire l'apparecchio ...............................................................................................................100
9.3 ATTIVITÀ PER L'AVVIO/FINE DELLA STAGIONE .......................................................... 100
10 Ricerca degli errori ............................................................................................... 101
11 Dati tecnici ..............................................................................................................103
12 Avvertenze giuridiche ..........................................................................................104
12.1 Note per l'assistenza .............................................................................................................104
13 Appunti ....................................................................................................................105

83
DE
EN
FR
IT
NL
PL
2 Premessa
Gentili clienti,
grazie per aver optato per un climatizzatore TechniSat.
Le presenti istruzioni per l'uso consentono di conoscere e sfruare al meglio le
numerose funzioni del suo nuovo apparecchio. Esse la supporteranno all'uso
conforme e sicuro. Sono rivolte a tui coloro che installano, utilizzano, puliscono o
smaltiscono l'apparecchio.
Conservi le istruzioni per l'uso accuratamente per un uso successivo.
Una versione auale delle istruzioni per l'uso è presente nella sezione download del
prodoo sul sito web TechniSat www.technisat.de.
Vi auguriamo buon divertimento con
Il prodoo TechniSat!
Il Team di
TechniSat

84
3 Avvertenze di sicurezza
3.1 Simboli utilizzati
Nelle presenti istruzioni per l'uso:
Indica un'avvertenza di sicurezza, la cui inosservanza può causare gravi lesioni
o la morte. Rispeare le seguenti parole di avvertenza:
PERICOLO - Gravi lesioni con conseguenze mortali
AVVERTENZA - Gravi lesioni con possibili conseguenze mortali
ATTENZIONE - Lesioni
Indica una nota importante a cui bisogna tassativamente aenersi per evitare
difei dell'apparecchio, perdite o usi illeciti di dati o un funzionamento
indesiderato. Inoltre descrive ulteriori funzioni dell'apparecchio.
Avvertenza da tensione elerica. Rispeare tue le avvertenze di sicurezza
per evitare una scossa elerica. Non aprire mai l'apparecchio.
Sull'apparecchio:
Avvertenza da sostanze infiammabili. Rispeare tue le avvertenze di
sicurezza. L'inosservanza nei pressi di sostanze infiammabili può causare
incendi.
Rispeare le avvertenze e le avvertenze di sicurezza nelle istruzioni per l'uso.
Uso in ambienti interni - Gli apparecchi con questo simbolo sono idonei solo
per l'uso in ambienti interni.
Classe di protezione II - Gli apparecchi elerici della classe di protezione II
sono apparecchi elerici che possiedono un isolamento dopio e/o rinforzato
continuo e non hanno possibilità di collegamento con un conduore di
protezione. L'alloggiamento di un apparecchio elerico racchiuso in materiale
isolante della classe di protezione II può formare in parte o totalmente
l'isolamento aggiuntivo o raorzato.
L'apparecchio è provvisto del marchio CE e pertanto è conforme a tue le
norme UE applicabili.
Gli apparecchi eleronici non vanno smaltiti tra i rifiuti domestici, bensì
devono essere smaltiti come da Direiva 2002/96/CE del Parlamento e del
Consiglio Europeo del 27 gennaio 2003 sugli apparecchi elerici ed eleronici
obsoleti. Al termine del suo utilizzo, consegnare l'apparecchio presso un
centro raccolta comunale per lo smaltimento.

85
DE
EN
FR
IT
NL
PL
3.2 Uso conforme alle disposizioni
Il climatizzatore TechniSat TECHNIPOLAR 1 è concepito per il rareddamento o il
riscaldamento di ambienti interni da min. 13 m² a max. 35 m².
3.3 Uso sicuro dei climatizzatori
Al fine di minimizzare i rischi per la sicurezza, evitare danni all'apparecchio e
contribuire alla protezione dell'ambiente, seguire le indicazioni riportate di seguito.
Leggere aentamente tue le indicazioni di sicurezza e conservarle per eventuali
consultazioni successive. Seguire sempre tue le note e le avvertenze riportate nelle
presenti istruzioni per l’uso e sul retro dell’apparecchio.
AVVERTENZA!
Sostanze infiammabili. L'apparecchio contiene gas propano R290. Osservare
obbligatoriamente le norme del produore in materia di riparazione o lavori
di assistenza. L'assistenza può essere eseguita solo da personale specializzato
formato.
AVVERTENZA!
Non aprire mai l'apparecchio!
Il contao con parti soo tensione può causare lesioni mortali!
Rispeare tue le seguenti avvertenze sull'uso conforme dell'apparecchio e al
fine di prevenire i difei dell'apparecchio e i danni personali.
> L'apparecchio non è pensato per essere utilizzato da persone (compresi i
bambini) con capacità fisiche, sensoriali o intelleuali limitate o assenza di
esperienza e/o conoscenze, tranne nei casi in cui queste sono controllate da
una persona responsabile della loro sicurezza o hanno ricevuto istruzioni su
come utilizzare l’apparecchio.
> I bambini devono essere sorvegliati per assicurarsi che non giochino con
l'apparecchio.
> Non utilizzare questo apparecchio per funzioni diverse da quelle descrie
nelle presenti istruzioni per l'uso.
> Se il cavo di alimentazione è usurato o danneggiato, questo può essere
sostituito solo da un tecnico dell'assistenza qualificato con un ricambio
originale.
> La spina deve essere inserita nella presa in modo saldo e completo. Vi è un
pericolo di scossa elerica o incendio.
> Non collegare altri apparecchi alla stessa presa, pericolo di scossa elerica.
> Non smontare né modificare il climatizzatore o il cavo di alimentazione,
poiché altrimenti vi è un pericolo di scossa elerica o d'incendio. Tui gli altri
lavori all'apparecchio devono essere eseguiti da un tecnico qualificato.

86
> Non collocare il cavo di alimentazione né il climatizzatore nei pressi di un
riscaldamento, un termosifone o un'altra fonte di calore. Vi è un pericolo di
scossa elerica o incendio.
> L'apparecchio è dotato di un conduore di messa a terra, collegato con
una spina o un passante di terra. La spina deve essere inserita in una presa
installata e messa a terra regolarmente. In nessuna circostanza si deve
tagliare o rimuovere la spina di messa a terra o il passante di messa a terra.
> L'apparecchio deve essere utilizzato o conservato in modo che sia proteo
dall'umidità, come ad es. acqua di condensa, schizzi d'acqua, ecc.
> Trasportare il climatizzatore in posizione verticale e collocarlo su una
superficie stabile, piana durante l'uso. Se l'apparecchio viene trasportato
riposto su un lato, deve essere lasciato in posizione verticale per 6 ore prima
di poter essere collegato all'alimentazione elerica.
> Spegnere l'apparecchio o il telecomando mediante l'interruore sul pannello
di comando. Non avviare o interrompere il funzionamento inserendo o
tirando il cavo di alimentazione. Pericolo di scossa elerica.
> Non premere i tasti sul pannello di comando con dita bagnate o umide.
> Non utilizzare sostanze chimiche pericolose per pulire l'apparecchio e tenerle
lontane dall'apparecchio. Per evitare danni superficiali, per la pulizia del
climatizzatore utilizzare solo un panno morbido. Non utilizzare cere, diluenti o
detergenti forti. Non utilizzare l'apparecchio in presenza di sostanze o vapori
infiammabili, come alcool, inseicidi, benzina, ecc.
> Se il climatizzatore produce rumori o un fumo insolito oppure emana odori
insoliti, tirare immediatamente la spina dalla presa.
> Non pulire l'apparecchio con acqua. L'acqua può penetrare nell'apparecchio
e danneggiare l'isolamento, generando un pericolo di scossa elerica. Se
l'acqua è penetrata nell'apparecchio, tirare immediatamente la spina e
contaare l'assistenza clienti.
> L'apparecchio deve essere sollevato e installato da almeno due persone.
> Assicurarsi che tui gli accessori siano rimossi dalla confezione prima dell'uso.
> Non toccare le parti metalliche del climatizzatore durante la rimozione e
l'installazione del filtro, al fine di evitare le lesioni da taglio. Pericolo di danni
personali.
> Non ostruire l'ingresso o l'uscita d'aria del climatizzatore. Una portata d'aria
ridoa causa prestazioni ridoe e può danneggiare l'apparecchio.

87
DE
EN
FR
IT
NL
PL
> Aerrare sempre la spina quando si collega o scollega il climatizzatore. Non
estrarre mai la spina dalla presa, tirando dal cavo. Altrimenti vi è un pericolo
di scossa elerica con possibili danneggiamenti.
> Collocare il climatizzatore su una superficie stabile, piana, con una capacità
di almeno 50 kg. Il posizionamento su una superficie non solida o non piana
può causare danni materiali e personali.
> Per un esercizio più eciente possibile chiudere tue le porte e finestre della
stanza. Verificare che il tubo di sfiato sia rivolto verso l'esterno per garantire
un funzionamento eciente.
IMPORTANTE - METODO DI MESSA A TERRA
Questo prodoo è dotato di fabbrica di cavo di alimentazione con una spina
tripolare con messa a terra. Può essere collegato solo ad una spina dotata di
messa a terra secondo il National Electrical Code e le normative locali applicabili.
Se il circuito elerico non dispone di prese con messa a terra, è responsabilità e
obbligo del cliente sostituire la presa presente secondo il National Electrical Code e
le normative locali applicabili. Il terzo contao di messa a terra non deve in nessun
caso essere tagliato o rimosso. Non utilizzare mai il cavo, la spina o l'apparecchio, se
questi presentano danni. Utilizzare l'apparecchio con un cavo prolunga, solo
se questo è stato testato e certificato da un elericista qualificato. In caso
di collegamento non conforme della spina di messa a terra vi è un pericolo di
incendio, scossa elerica e/o lesioni personali in relazione all'apparecchio. Rivolgersi
ad un tecnico dell'assistenza qualificato, in caso di dubbi relativi alla messa a terra
regolare dell'apparecchio.
COLLEGAMENTI ELETTRICI
Prima di inserire l'apparecchio nella presa di alimentazione, verificare quanto segue:
> La tensione di rete è conforme al valore riportato sulla targhea sulla parte
posteriore dell'apparecchio.
> La presa e il circuito elerico sono indicati per l'apparecchio.
> La presa di alimentazione è adaa alla spina. In caso contrario, far sostituire
la spina.
> La presa di alimentazione presenta messa a terra. L'inosservanza di queste
importanti avvertenze di sicurezza dispensa il produore da qualsiasi
responsabilità.
3.4 Note per lo smaltimento
Avvertenze importanti per lo smaltimento conforme del prodoo secondo la
Direiva CE 2012/119/CE.
Al termine del ciclo di vita d'uso, il prodoo non può essere smaltito come rifiuto
solido urbano. Esso deve essere portato presso un centro di raccolta comunale o un
rivenditore che ore questo servizio.

88
Mediante lo smaltimento dierenziato degli elerodomestici è possibile evitare
eei negativi per l'ambiente e per la salute mediante uno smaltimento conforme.
Inoltre mediante il recupero di componenti è possibile risparmiare significative
quantità di energia e risorse. Come promemoria della necessità di dierenziare gli
elerodomestici, il prodoo è contrassegnato con i simboli di bidoni dell'immondizia
barrati sulle ruote.
4 Immagini
1 Apertura ventola
2 Pannello di comando
3 Maniglie (entrambi i lati)
4 Ruote
5 Cavo di alimentazione
6 Unità filtro ingresso aria
7 Aacco aria di scarico
8 Ingresso aria
9 Acqua di condensa inferiore
Scarico
10 Acqua di condensa superiore
Scarico

89
DE
EN
FR
IT
NL
PL
5 Istruzioni per l'installazione
5.1 Scarico dell'aria
In modalità di rareddamento e riscaldamento l'apparecchio deve essere collocato
nei pressi di una finestra o apertura, anché l'aria di scarico calda o fredda possa
essere condoa all'esterno.
Collocare l'apparecchio su una superficie piana e verificare che l'apparecchio abbia
una distanza minima di 30 cm dagli oggei circostanti e che nelle vicinanze ci sia
una presa con contao di protezione.
1. Prolungare il tubo alla lunghezza
desiderata, estraendolo (Fig. 1)
2. Avvitarlo all'ingresso del tubo (Fig. 2).
3. Avvitare l'uscita del tubo all'altra estremità
del tubo (Fig. 3).
4. Montare l'ingresso del tubo all'aacco
dell'aria di scarico (7) (Fig. 4).
5. Fissare l'uscita del tubo al kit per finestra
(vedere “ 5.2 Fenster-Kit installieren “).
Applicare
Chiudere

90
5.2 Installare il kit per finestra
Il kit per finestra è pensato per isolare finestre a ribalta. Per l'installazione procedere
come segue:
Incollare la fascia di velcro al
telaio della finestra.
Incollare la fascia di velcro al
telaio della finestra.
Accorciare la fascia di velcro
agli angoli.
Verificare che gli angoli
poggino aderendo l'uno
all'altro.
Fissare la guarnizione per
finestra.
Verificare che entrambe
le metà siano allineate a
vicenda.
Aprire la chiusura lampo sul
lato.
Inserire il tubo di scarico dell'aria
nell'apertura creata e chiudere la
chiusura lampo.

91
DE
EN
FR
IT
NL
PL
5.3 Luogo di posizionamento
> L'apparecchio deve essere collocato su una superficie solida per minimizzare
rumori e vibrazioni. Al fine di garantire un posizionamento sicuro, collocare
l'apparecchio su un pavimento liscio, piano, sucientemente solido per
l'apparecchio.
> L'apparecchio è dotato di ruote per facilitare il posizionamento. Tuavia
deve essere spostato solo su superfici lisce, piane. Prestare aenzione agli
spostamenti su moquee. Prestare aenzione e proteggere il pavimento
quando si sposta l'apparecchio su pavimenti in legno. Non provare a far
passare l'apparecchio su oggei.
> L'apparecchio deve essere collocato ad una correa distanza dalla presa del
contao di messa a terra.
> Non collocare mai ostacoli intorno all'ingresso o all'uscita dell'aria
dell'apparecchio.
> Osservare una distanza di almeno 45 cm dalla parete per oenere una
climatizzazione eciente.
> Il tubo può essere prolungato, ma deve essere tenuto il più corto possibile.
Verificare anche che il tubo non abbia piegature o curve.

92
6 Utilizzo
Il pannello di comando si trova sul lato superiore dell'apparecchio.
Tuavia per sfruare l'apparecchio al massimo del suo potenziale, utilizzare il
telecomando.
6.1 Unità di comando
1 2 3 4 5 6
7 8 9 10 11 12 13 14 15 16
1 Commutazione modalità d'esercizio
2 Timer
3 Selezione temperatura (più calda)
4 Selezione temperatura (più fredda)
5 Livello ventola
6 Interruore di accensione/spegnimento
7 Funzione di riscaldamento aiva
8 Funzione di rareddamento aiva
9 Deumidificazione aria aiva
10 Modalità ventilatore aiva
11 Timer aivo
12 Display
13 Livello ventola alto
14 Livello ventola medio
15 Livello ventola basso
16 Comando climatizzazione automatico aivo
6.2 Accensione e spegnimento
Inserire la spina nella presa. Sul display compare "--".
Premere una volta il tasto POWER (6), per accendere l'apparecchio.
Premere nuovamente il tasto POWER per spegnere l'apparecchio.
Non spegnere mai il climatizzatore, tirando la spina. Spegnere il climatizzatore
sempre premendo il tasto POWER e aendere alcuni minuti prima di tirare
la spina. In questo modo l'apparecchio può eseguire un ciclo di controllo e
spegnersi correamente.

93
DE
EN
FR
IT
NL
PL
Non riaccendere il climatizzatore subito dopo lo spegnimento, bensì
aendere alcuni minuti.
6.3 Modalità di rareddamento
Ideale per il meteo caldo e umido, quando è necessario rareddare la stanza e
allo stesso tempo deumidificare.
> Premere il tasto MODE (1) più volte, finché "Cool" (8) non si accende.
> Selezionare la temperatura nominale (da 18 °C a 32 °C) premendo il tasto
Selezione temperatura più calda/fredda (3, 4) finché sul display non
compare il valore corrispondente.
Dopo l'accensione e l'aivazione della funzione di rareddamento, può volerci
un aimo prima che il compressore si avvii e l'apparecchio rareddi.
> Premendo più volte il tasto FAN (5) selezionare la velocità della ventola
desiderata, tra cui High (alta), Medium (media), Low (bassa) e Auto
(regolazione automatica). A seconda della velocità della ventola selezionata
cambia anche la rumorosità di funzionamento del climatizzatore. Se si
preferisce un funzionamento più silenzioso, selezionare Low.
Aivare la modalità di rareddamento direamente dopo la modalità
riscaldamento può richiedere fino a 5 minuti prima che l'apparecchio inizi a
rareddare.
La temperatura più indicata per la stanza durante l'estate è compresa tra 24
°C e 27 °C. Tuavia si consiglia di non impostare una temperatura inferiore
alla temperatura esterna.
I due tappi di scarico (9, 10) devono essere chiusi in questa modalità al fine
di consentire un rareddamento eciente.
6.4 Modalità di riscaldamento
Se si desidera riscaldare una stanza, preferibilmente nele stagioni più fredde,
selezionare la modalità di riscaldamento.
> Premere il tasto MODE (1) più volte, finché "Heat" (7) non si accende.
> Selezionare la temperatura nominale (da 13 °C a 27 °C), premendo il tasto
Selezione temperatura più calda/fredda (3, 4) finché sul display non
compare il valore corrispondente.
> Premendo più volte il tasto FAN (5) selezionare la velocità della ventola
desiderata, tra cui High (alta), Medium (media), Low (bassa) e Auto
(regolazione automatica). A seconda della velocità della ventola selezionata
cambia anche la rumorosità di funzionamento del climatizzatore. Se si
preferisce un funzionamento più silenzioso, selezionare Low.
Aivare la modalità di riscaldamento direamente dopo la modalità
rareddamento può richiedere fino a 5 minuti prima che l'apparecchio inizi a
rareddare.
Dall'aria viene estraa acqua, la quale viene accumulata nel serbatoio.
Quando il serbatoio è pieno, spegnere l'apparecchio e sul display compare Ft
(serbatoio pieno).

94
Il tappo di scarico inferiore (9) deve essere rimosso per svuotare il serbatoio.
Lasciar scorrere tua l'acqua in un recipiente di raccolta. Una volta scaricata
tua l'acqua, riapplicare il tappo. Dopo lo svuotamento del serbatoio,
l'apparecchio si riavvia.
In caso di funzionamento in stanze molto fredde, l'apparecchio si sbrina
automaticamente, interrompendo per breve tempo il funzionamento
normale. Sul display compare Lt. Durante questo processo è normale che
l'apparecchio produca rumori insoliti.
> In questa modalità è necessario aendere alcuni minuti prima che
l'apparecchio possa iniziare a rilasciare aria calda.
> In questa modalità è possibile che il ventilatore si azioni per breve tempo,
sebbene la temperatura impostata sia già stata raggiunta.
6.5 Modalità di deumidificazione
Ideale per la riduzione dell'umidità dell'aria nella stanza (primavera e autunno,
stanze umide, periodi di piogge, ecc.).
In modalità di deumidificazione l'aria viene deumidificata. L'acqua di
condensa viene condoa all'esterno tramite lo scarico superiore (10).
Scaricare l'acqua in un contenitore adeguato e svuotarlo regolarmente a
seconda delle dimensioni.
> Rimuovere il tappo di scarico superiore (1.).
> Collegare il tubo fornito o uno adeguato all'aacco (2.) e farlo terminare in un
contenitore adeguato.
Tappo
Collegare il tubo
1. 2.
> Premere il tasto MODE (1) finché Dry (9) non si illumina e
contemporaneamente non si illumina il simbolo della ventola automatica
Auto (16).
In questa modalità la velocità della ventola viene selezionata
automaticamente dall'apparecchio e non può essere impostata
manualmente.
Prestare aenzione a non piegare il tubo dell'acqua di condensa.

95
DE
EN
FR
IT
NL
PL
6.6 Modalità ventilatore
Se si utilizza l'apparecchio in questa modalità, il tubo di scarico dell'aria non deve
essere collegato.
> Premere il tasto MODE (1) più volte, finché Fan (10) non si accende.
Premendo più volte il tasto FAN (5) selezionare la velocità della ventola
desiderata High (alta), Medium (media) o Low (bassa).
La regolazione automatica non è disponibile in questa modalità.
6.7 Modalità automatica
In modalità automatica l'apparecchio decide autonomamente sulla base dell'auale
temperatura della stanza, in quale modalità operare:
- Fino a 20 °C di temperatura della stanza = modalità di riscaldamento
- Tra 20 °C e 23 °C = modalità ventilatore
- Oltre 23 °C di temperatura della stanza = modalità di rareddamento
> Premere il tasto MODE (1) più volte, finché tui i LED di modalità non si
spengono e sul display compare una barra rotante.
> Premendo più volte il tasto FAN (5) selezionare la velocità della ventola
desiderata High (alta), Medium (media) o Low (bassa).
7 Modalità timer
Con il timer è possibile automatizzare l'accensione o lo spegnimento dell'apparecchio.
Mediante l'uso eciente della modalità timer è possibile risparmiare corrente, poiché
l'apparecchio è funzione solo per il tempo impostato.
7.1 Programmare il timer
Accensione ritardata
> Prima selezionare la modalità in funzione e le impostazioni desiderata
(velocità di ventilatore, temperatura). Spegnere poi l'apparecchio.
> In stato spento premere il tasto TIMER (2). Successivamente lampeggiano i
LED timer (11) e la cifra delle ore sul display.
> Premere nuovamente il tasto TIMER più volte entro 5 secondi per impostare
le ore di cui si desidera ritardare l'accensione dell'apparecchio.
Il timer può essere impostato in intervalli di 1 ora da 1 a 24 ore.

96
> Circa 5 secondi dopo la selezione delle ore viene memorizzata l'impostazione,
i LED del timer si illuminano e il display indica che l'apparecchio si trova in
modalità di standby (--).
> Dopo il termine del tempo impostato, l'apparecchio si avvia nella modalità
d'esercizio impostata per ultima.
Per cancellare l'impostazione, premere nuovamente il tasto timer.
L'indicazione del timer si spegne.
Spegnimento ritardato
> In stato acceso premere il tasto TIMER (2). Successivamente lampeggiano i
LED timer (11) e la cifra delle ore sul display.
> Premere nuovamente il tasto TIMER più volte entro 5 secondi per impostare
le ore di cui si desidera ritardare lo spegnimento dell'apparecchio.
Il timer può essere impostato in intervalli di 1 ora da 1 a 24 ore.
> Circa 5 secondi dopo la selezione delle ore viene memorizzata l'impostazione,
i LED del timer si accendono.
> Dopo il termine del tempo impostato, l'apparecchio passa in modalità di
standby.
Per cancellare l'impostazione, premere nuovamente il tasto timer.
L'indicazione del timer si spegne.
8 Uso del telecomando
8.1 Inserire le baerie
> Aprire il coperchio del vano baeria sul retro del telecomando, premendo sul
punto segnato e facendo scorrere il coperchio.
> Inserire le baerie (LR03, AAA, 1,5 V) prestando aenzione alla correa
polarità (contrassegno visibile nel vano baerie).
> Richiudere il vano baerie.
Avvertenza importante per lo smaltimento delle baerie:
le baerie possono contenere sostanze tossiche dannose per l'ambiente.
Smaltire le baerie rispeando obbligatoriamente le disposizioni legali
vigenti. Non geare mai le baerie tra i rifiuti domestici. Le baerie usate
possono essere consegnate gratuitamente al proprio rivenditore o presso i
centri di smaltimento speciali.
Controllare che le baerie non siano maneggiate da bambini. I bambini
potrebbero portarle alla bocca e ingerirle, ciò può causare gravi danni
alla loro salute. In questo caso contaare immediatamente un medico!
Conservare pertanto le baerie fuori dalla portata dei bambini.

97
DE
EN
FR
IT
NL
PL
L’apparecchio può essere messo in funzione solo con le baerie conformi a
questo apparecchio.
Non è consentito caricare le baerie normali. Le baerie non devono essere
riaivate con altri mezzi, smontate, riscaldate o geate in fiamme aperte
(pericolo di esplosione!).
Pulire i contai delle baerie e dell’apparecchio prima dell’inserimento. In
caso di inserimento errato delle baerie vi è pericolo di esplosione!
8.2 Panoramica
Accensione/
Spegnimento
Aumentare la
temperatura
Aumentare la
temperatura
Modalità timer
Cambio unità di
temperatura
Modalità
ventilatore
Modalità operativa
Uscita dell'aria
Modalità nourna
> L'uso del telecomando avviene come descrio nel capitolo “ 6 Bedienung “.
Premere il tasto con la corrispondente dicitura, analogamente al lato superiore
dell'apparecchio.

98
> Rivolgere il telecomando verso il lato superiore del climatizzatore. Osservare
una distanza massima di 7 metri.
8.3 Funzioni speciali con telecomando
8.3.1 Uscita di ventilazione
L'uscita superiore di ventilazione si apre e si chiude con ritmo costante. Se si
desidera bloccare l'uscita di ventilazione in una posizione, premere il tasto Uscita
dell'aria sul telecomando.
Premere nuovamente il tasto per regolare automaticamente l'oscillazione.
8.3.2 Cambio dell'unità di temperatura
Premere il tasto Cambio dell'unità di temperatura per cambiare l'unità di
temperatura, che compare sul display, tra gradi Celsius e Fahrenheit.
8.3.3 Modalità nourna
In modalità nourna il display e i LED sul lato superiore dell'apparecchio vengono
dimmerati.
> Selezionare la modalità di riscaldamento, rareddamento o automatica.
> Premere il tasto Modalità nourna sul telecomando.
Le spie vengono ora dimmerate e la ventola gira alla velocità più bassa.
In modalità di rareddamento l'impostazione della temperatura per ciascuna
delle prime 2 ore viene aumentata gradualmente a 1 °C sopra la temperatura
nominale originaria. Quindi l'apparecchio mantiene la stessa temperatura per
6 ore e successivamente va in standby.
In modalità di riscaldamento l'impostazione di temperatura per ciascuna delle
prime 3 ore viene ridoa gradualmente a 1 °C soo la temperatura nominale
originaria. Quindi l'apparecchio mantiene la stessa temperatura per 5 ore e
successivamente va in standby.

99
DE
EN
FR
IT
NL
PL
9 Assistenza e manutenzione
9.1 Scarico dell'acqua di condensa
Con il tempo il serbatoio del climatizzatore si riempie di acqua di condensa. Quando
il serbatoio è pieno, l'apparecchio si arresta e sul display compare Ft (Full-Tank =
serbatoio pieno).
Scaricare manualmente l'acqua di condensa:
> Tirare la spina di alimentazione del climatizzatore.
> Collocare un contenitore adeguato soo lo scarico inferiore dell'acqua di
condensa (9, pagina 8).
> Rimuovere il tappo dello scarico e lasciar scorrere l'acqua completamente nel
contenitore di raccolta.
> Una volta fuoriuscita tua l'acqua, riapplicare il tappo sullo scarico dell'acqua
di condensa.
> Rimeere in funzione il climatizzatore.
Scaricare in modo continuo e automatico l'acqua di condensa:
In modalità di deumidicazione l'acqua di condensa deve essere scaricata
continuamente all'esterno. A tal fine è pensato lo scarico dell'acqua di condensa
superiore (10, pagina 8).
> Tirare la spina di alimentazione del climatizzatore.
> Collocare un contenitore adeguato soo lo scarico superiore dell'acqua di
condensa (10, pagina 8).
> Rimuovere il tappo dello scarico e montare un tubo adeguato alla bocca di
scarico.
> Il tubo deve essere rivolto verso il basso nel contenitore di raccolta. Prestare
aenzione a non piegare il tubo.
> Rimeere in funzione il climatizzatore e aivare la modalità di
deumidificazione.
In modalità di rareddamento lo scarico dell'acqua di condensa superiore
deve essere chiuso per poter garantire un funzionamento eciente.

100
9.2 Pulire l'apparecchio
Spegnere l'apparecchio prima della pulizia o della manutenzione, premendo il
tasto POWER sul pannello di comando o sul telecomando. Aendere qualche
minuto, quindi tirare la spina dalla presa.
PULIZIA DELL'APPARECCHIO
> Pulire l'apparecchio con un panno leggermente umido e asciugare
completamente con un panno asciuo.
Non lavare mai il climatizzatore con acqua. Non utilizzare mai benzina, alcool
o solventi per pulire l'apparecchio. Non spruzzare mai inseicidi liquidi o
simili.
PULIZIA DEL FILTRO
Anché il climatizzatore funzioni in modo
eciente, pulire il filtro ogni seimana di
funzionamento.
> Il filtro può essere smontato come
ragurato nell'immagine a destra.
> Rimuovere gli accumuli di polvere sul filtro
con un aspirapolvere.
> In caso di sporco eccessivo immergere
in acqua calda e sciacquare più volte.
L'acqua deve essere tiepida.
> Dopo il lavaggio far asciugare il filtro
completamente e installarlo nuovamente.
Non utilizzare mai un filtro ancora umido.
Questo può causare danneggiamenti.
ATTENZIONE!
In caso di alloggiamento del filtro aperto,
non aerrare le alee di rareddamento
nell'apparecchio. Queste sono alate e possono causare lesioni da taglio.
9.3 ATTIVITÀ PER L'AVVIO/FINE DELLA STAGIONE
Avvio della stagione:
> Verificare la presenza di danni al cavo di alimentazione e alla spina. Verificare
l'installazione dell'apparecchio e l'ubicazione secondo le presenti istruzioni.

101
DE
EN
FR
IT
NL
PL
Fine della stagione:
Quando il climatizzatore non deve essere utilizzato per un periodo di tempo
prolungato:
> Svuotare completamente il serbatoio di raccolta dell'acqua di condensa
e lasciare aperto il tappo di scarico inferiore finché l'acqua residua non è
defluita. Non appena il serbatoio è completamente vuoto e non fuoriesce più
acqua, applicare il tappo di gomma.
> Rimuovere e pulire il filtro, lasciarlo asciugare completamente e reinserirlo.
> Rimuovere le baerie dal telecomando.
> Conservare il climatizzatore in un luogo fresco, asciuo, lontano
dall'irradiamento solare direo, da temperature estreme e polvere in eccesso.
10 Ricerca degli errori
Problema Causa Soluzione
Il climatizzatore non si
avvia / non si spegne.
Nessuna alimentazione
elerica.
Verificare l'alimentazione
di corrente.
Cavo di alimentazione
non collegato.
Inserire il cavo di
alimentazione in una
presa.
Circuito di protezione
aivo.
Aendere 30 minuti e
riprovare. Se si verifica
un errore, contaare
l'assistenza.
Il climatizzatore si avvia
solo per poco tempo.
Il tubo di scarico è
piegato o collegato in
modo errato.
Rispeare le avvertenze
nelle istruzioni per l'uso al
fine di smontare/collegare
il tubo di scarico dell'aria.
L'uscita dell'aria / il tubo
di scarico dell'aria è
intesato.
Verificare la possibile
presenza di impurità
all'uscita dell'aria / tubo di
scarico dell'aria.

102
Il climatizzatore funziona,
ma non raredda.
Finestra / tende / tendine
sono aperte.
Proteggere la stanza
dall'irradiazione solare e
chiudere tue le finestre.
Altri apparecchi nella
stanza causano calore
(ad es. televisore, forno,
asciugacapelli).
Spegnere tui gli altri
apparecchi nella stanza.
Il tubo di scarico dell'aria
non è stato installato o
non è rivolto all'esterno.
Installare correamente il
tubo dell'aria di scarico.
La potenza di
rareddamento non è
indicata per la stanza, in
cui è messo in funzione il
climatizzatore.
Rispeare i dati tecnici
del climatizzatore.
Durante l'esercizio si
verificano odori spiacevoli.
Il filtro dell'aria è intasato
o sporco.
Rimuovere il filtro dell'aria,
pulirlo secondo le
istruzioni.
Dopo un riavvio,
occorrono 3 minuti
prima che l'apparecchio
riprende il funzionamento.
Il circuito di protezione del
compressore impedisce
un avvio immediato
dopo lo spegnimento
e la riaccensione
dell'apparecchio.
Aendere 3 minuti.
L'apparecchio funziona
poi normalmente.
Sul display compaiono
i seguenti messaggi di
errore:
Lt
PF
Ft
L'autodiagnosi ha rilevato
un errore.
Lt - La temperatura nella
stanza è troppo bassa. La
funzione De-Frost si avvia.
PF - errore del sensore.
Contaare l'assistenza
Ft - Il serbatoio dell'acqua
di condensa è pieno.
Svuotare il serbatoio
come descrio nelle
presenti istruzioni.

103
DE
EN
FR
IT
NL
PL
11 Dati tecnici
Potenza di rareddamento 11000 BTU/h / 3,2 kW
Potenza di riscaldamento 10000 BTU/h / 2,9 kW
Modalità Rareddamento, riscaldamento,
ventilatore, deumidificatore, timer
Intervallo di temperatura: 18 - 27 °C
Dimensioni stanza 25 - 35 m²
Potenza di deumidificazione 36 litri per 24ora
Ricircolo d'aria 250 - 300 m³/h
Volume 53 - 65 dB
Refrigerante R290 (260g)
Refrigerante GWP 3
Potenza assorbita rareddamento 1,23 kW/h
ERR 2,62 (rapporto di ecienza energetica)
Classe energetica rareddamento A
Potenza assorbita riscaldamento 1,04 kW/h
COP 2,8 (coeciente di prestazione)
Classe energetica riscaldamento A+
Consumo di energia in modalità standby 0,5 W
Consumo di energia in modalità
operativa „Termoregolatore spento“.
-
Pressione di aspirazione 1,2 MPa
Pressione di uscita 2,3 MPa
Lunghezza tubo di sfiato 1,5 m (max.)
Diametro tubo di sfiato 13 cm
CO₂ equivalente 0,0008 t
Compressore LRA 23,5 A
Classe di protezione IPX0
Display Tipo: 7 segmenti, 2 cifre
Dimensioni (LxAxP) 445 x 720 x 375 mm
Peso 31,00 kg
Alimentazione di corrente Alimentatore: interno
Potenza nominale: 1640 W
Frequenza: 50 Hz
Tensione nominale: da AC 220 - 240 V

104
Entità della fornitura Climatizzatore mobile. Istruzioni per
l'uso, telecomando,
tubo dell'aria di scarico e dell'acqua di
condensa, guarnizione per finestra
12 Avvertenze giuridiche
TechniSat non è responsabile dei danni del prodoo causati da azioni
esterne, usura o da un utilizzo inappropriato, una riparazione non autorizzata,
modifiche o incidenti.
Con riserva di modifiche ed errori di stampa. Ultimo aggiornamento 11/23.
La copia e la riproduzione sono consentite solo con il permesso dell'editore.
La versione aggiornata delle istruzioni è disponibile in formato PDF nell'
area di download del sito Internet TechniSat www.technisat.de.
TechniSat e TECHNIPOLAR 1 sono marchi registrati di:
TechniSat Digital GmbH
TechniPark
Julius-Saxler-Straße 3
D-54550 Daun/Eifel
www.technisat.de
I nomi delle aziende, delle istituzioni o delle marche menzionate sono marchi di
fabbrica o marchi registrati appartenenti ai rispeivi proprietari.
12.1 Note per l'assistenza
Questo prodoo è stato sooposto a un controllo di qualità e ha un periodo
di garanzia di 24 mesi a decorrere dalla data di acquisto. Conservare lo
scontrino come prova di acquisto. Per avvalersi dei dirii di garanzia rivolgersi
al rivenditore del prodoo.
Avviso!
Per domande e informazioni o in caso di problemi con l'apparecchio è
disponibile la nostra linea tecnica direa:
lun. - ven. ore 8.00 - 18.00 al tel.:
03925/9220 1800.
Gli ordini di riparazione possono essere inviati anche online, direamente al
sito www.technisat.de/reparatur.

105
DE
EN
FR
IT
NL
PL
Qualora fosse necessario spedire l'apparecchio, utilizzare esclusivamente il seguente
indirizzo:
TechniSat Digital GmbH
Service-Center
Nordstr. 4a
39418 Staßfurt
13 Appunti

106

Handleiding
TECHNIPOLAR 1
Mobiel airconditioningsysteem voor koeling en verwarming, met ventilator
en ontvochtigingsfunctie.

108
1 Inhoudsopgave
1 Inhoudsopgave ......................................................................................................108
2 Voorwoord ..............................................................................................................109
3 Veiligheidsinstructies ........................................................................................... 110
3.1 Gebruikte tekens en symbolen ......................................................................................... 110
3.2 Beoogd gebruik ........................................................................................................................ 111
3.3 Veilig gebruik van airconditioners .................................................................................... 111
3.4 Informatie over de verwijdering ...................................................................................... 112
4 Aeeldingen .......................................................................................................... 114
5 Installatie-instructies ............................................................................................115
5.1 Luchtafvoer .................................................................................................................................115
5.2 Raamkit installeren ................................................................................................................. 116
5.3 plaats van installatie ...............................................................................................................117
6 Bediening ................................................................................................................ 118
6.1 Bedieningspaneel ....................................................................................................................118
6.2 Aan- en uitzeen .....................................................................................................................118
6.3 Koelmodus ................................................................................................................................. 119
6.4 Verwarmingsmodus ............................................................................................................... 119
6.5 Ontvochtigingsmodus .......................................................................................................... 120
6.6 Ventilatormodus ...................................................................................................................... 121
6.7 Automatische modus ............................................................................................................ 121
7 Timermodus ............................................................................................................ 121
7.1 Timer programmeren ............................................................................................................ 121
8 Omgang met de afstandbediening ..................................................................122
8.1 Baerijen plaatsen ................................................................................................................ 122
8.2 Overzicht .....................................................................................................................................123
8.3 Speciale functies met de afstandsbediening ........................................................... 124
8.3.1 Ventilatie-uitgang ................................................................................................................. 124
8.3.2 Meeteenheid voor de temperatuur omzeen.......................................................... 124
8.3.3 Nachtmodus ............................................................................................................................. 124
9 Service en onderhoud .........................................................................................125
9.1 Condenswater afvoeren .......................................................................................................125
9.2 Apparaat reinigen .................................................................................................................. 126
9.3 ACTIVITEITEN BIJ BEGIN/EINDE VAN HET SEIZOEN ............................................... 126
10 Problemen oplossen ............................................................................................127
11 Technische gegevens ...........................................................................................129
12 Weelijke bepalingen .......................................................................................... 130
12.1 Service-instructies ...................................................................................................................130
13 Opmerkingen ...........................................................................................................131

109
DE
EN
FR
IT
NL
PL
2 Voorwoord
Geachte klant,
Bedankt dat u voor een airco-unit van TechniSat hebt gekozen.
Deze handleiding is bedoeld om u te helpen de uitgebreide functies van uw nieuwe
apparaat te leren kennen en gebruiken. Deze helpt u bij het doelmatige en veilige
gebruik ervan. Ze is bedoeld voor iedereen die het apparaat installeert, bedient,
reinigt of als afval verwijdert.
Bewaar de handleiding op een veilige plaats voor later gebruik.
De meest recente versie van de handleiding vindt u in het downloadgedeelte van
uw product op de TechniSat-website www.technisat.de.
Wij wensen u veel plezier met uw
TechniSat-apparaat!
Uw
TechniSat team

110
3 Veiligheidsinstructies
3.1 Gebruikte tekens en symbolen
In deze handleiding:
Markeert een veiligheidsinstructie, die kan leiden tot ernstig letsel of de dood
als deze niet wordt opgevolgd. Let op de volgende signaalwoorden:
GEVAAR - Ernstige verwondingen met de dood tot gevolg
WAARSCHUWING - Zware verwondingen, mogelijk met de dood tot gevolg
LET OP - Kans op verwondingen
Let op - duidt een belangrijke aanwijzing aan die strikt moet worden
opgevolgd om defecten, gegevensverlies/-misbruik of een onbedoelde
werking van het apparaat te voorkomen. Het beschrij ook verdere functies
van uw apparaat.
Waarschuwing voor elektrische spanning. Volg alle veiligheidsinstructies om
elektrische schokken te voorkomen. Maak het apparaat nooit open.
Op het apparaat:
Waarschuwing voor brandgevaarlijke stoen. Volg alle veiligheidsinstructies
op. Onzorgvuldigheid in de nabijheid van brandbare materialen kan brand
veroorzaken.
Neem alle aanwijzingen en veiligheidsinstructies in de bedieningshandleiding
in acht.
Gebruik binnenshuis - units met dit symbool zijn uitsluitend bestemd voor
gebruik binnenshuis.
Beschermingsklasse II - Elektrische apparaten van beschermingsklasse II zijn
elektrische apparaten met doorlopende dubbele en/of versterkte isolatie
en zonder aansluitmogelijkheden voor een aardingskabel. De behuizing van
een elektrisch apparaat van beschermingsklasse II dat in isolatiemateriaal is
ingesloten, kan voor extra of verstevigde isolatie zorgen.
Uw toestel draagt het CE-keurmerk en voldoet aan alle vereiste EU-normen.
Elektronische apparaten horen niet thuis bij het huishoudelijk afval, maar
moeten op de juiste manier worden verwijderd in overeenstemming met
Richtlijn 2002/96/EG van het Europees Parlement en de Raad van 27 januari
2003, betreende afgedankte elektrische en elektronische apparatuur.
Gelieve dit toestel aan het einde van de levenscyclus in te leveren voor
verwijdering op de voorziene openbare inzamelpunten.

111
DE
EN
FR
IT
NL
PL
3.2 Beoogd gebruik
De TechniSat-airconditioning TECHNIPOLAR 1 is ontworpen voor het koelen of
verwarmen van binnenruimtes van minimaal 13 m² tot max. 35 m².
3.3 Veilig gebruik van airconditioners
Neem de volgende instructies in acht om veiligheidsrisico's tot een minimum
te beperken, schade aan het apparaat te voorkomen en bij te dragen aan de
bescherming van het milieu.
Lees alle veiligheidsvoorschrien zorgvuldig door en bewaar deze voor latere
vragen. Volg altijd alle waarschuwingen en aanwijzingen in deze gebruiksaanwijzing
en op de achterzijde van het apparaat op.
OPGELET!
Brandgevaarlijke stoen. Het apparaat is gevuld met propaangas R290.
Neem bij reparaties of serviceonderhoud altijd de richtlijnen van de fabrikant
in acht. Het onderhoud mag alleen worden uitgevoerd door gekwalificeerd
vakpersoneel.
OPGELET!
Maak het apparaat nooit open.
Het aanraken van onder spanning staande onderdelen is levensgevaarlijk.
Neem steeds de volgende instructies in acht voor doelmatig gebruik van
het apparaat en om defecten aan het apparaat en persoonlijk letsel te
voorkomen.
> Dit apparaat is niet bedoeld voor gebruik door personen (inclusief kinderen)
met beperkte fysieke, zintuiglijke of mentale capaciteiten of met gebrek
aan ervaring en/of kennis, tenzij deze onder toezicht staan van iemand die
verantwoordelijk is voor hun veiligheid, dan wel door deze persoon over het
gebruik van het apparaat zijn geïnstrueerd.
> Kinderen moeten onder toezicht staan om ervoor te zorgen dat ze niet met
het apparaat spelen.
> Gebruik dit toestel niet voor andere functies dan die in deze handleiding
worden beschreven.
> Als het netsnoer versleten of beschadigd is, mag het alleen worden
vervangen door een gekwalificeerde servicetechnicus die uitsluitend gebruik
maakt van originele reserveonderdelen.
> De stekker moet stevig vast en helemaal in het stopcontact worden gestoken.
Er is een risico op elektrische schokken of brand.
> Sluit geen andere apparaten aan op hetzelfde stopcontact. Er bestaat een
risico op elektrische schokken.
> Demonteer of breng geen wijzigingen in de airconditioner of het netsnoer
aan, want er bestaat een risico op elektrische schokken of brand. Alle andere
werkzaamheden aan het apparaat moeten door een gekwalificeerd technicus
worden uitgevoerd.

112
> Plaats het netsnoer of de airconditioner niet in de buurt van een verwarming,
radiator of een andere warmtebron. Er is een risico op elektrische schokken
of brand.
> Het apparaat is uitgerust met een kabel inclusief geaarde geleider, die is
verbonden met een aardpen of een aardkabel. De stekker moet in een
correct geïnstalleerd en geaard stopcontact worden gestoken. In geen geval
mag de aardpen of aardkabel van deze stekker worden onderbroken of
verwijderd.
> Het apparaat moet zo worden gebruikt of opgeslagen, dat het beschermd is
tegen vocht (bijv. condensatie, spatwater, etc.).
> Transporteer uw airconditioner altijd in verticale positie en plaats hem op een
stabiele, vlakke ondergrond tijdens het gebruik. Als het apparaat op zijn kant
wordt getransporteerd, moet het daarna 6 uur rechtop staan, alvorens het
wordt aangesloten op de stroomvoorziening.
> Schakel het toestel of de afstandsbediening uit met de schakelaar op het
bedieningspaneel. Start of stop de werking niet door de stekker in het
stopcontact te steken of de stekker uit het stopcontact te halen. Er bestaat
gevaar voor elektrische schokken.
> Druk niet met nae of vochtige vingers op de toetsen van het
bedieningspaneel.
> Gebruik geen gevaarlijke chemicaliën om het apparaat te reinigen en houd
ze uit de buurt van het apparaat. Gebruik om schade aan het oppervlak te
voorkomen uitsluitend een zachte doek om de airconditioner te reinigen.
Gebruik geen was, verdunner of een sterk reinigingsmiddel. Gebruik het
apparaat niet in de aanwezigheid van ontvlambare stoen of dampen zoals
alcohol, insecticiden, benzine, etc.
> Als de airconditioner een abnormaal geluid maakt of rook of een abnormale
geur afgee, haal dan onmiddellijk de stekker van het apparaat uit het
stopcontact.
> Reinig het apparaat niet met water. Water kan het apparaat binnendringen
en de isolatie beschadigen, waardoor het risico op elektrische schokken
ontstaat. Als er water in het apparaat is gekomen, trek dan onmiddellijk de
stekker uit het stopcontact en neem contact op met de klantenservice.
> Het apparaat moet door ten minste twee personen worden opgetild en
geïnstalleerd.
> Zorg ervoor dat alle accessoires voor gebruik uit de verpakking worden
verwijderd.
> Raak om snijwonden te voorkomen bij het verwijderen en installeren van het
filter de metalen onderdelen van de airconditioner niet aan. Er bestaat gevaar
voor persoonlijk letsel.
> Blokkeer de luchtinlaat of -uitlaat van de airconditioner niet. Een verminderde
luchtstroom leidt tot slechte prestaties en kan het toestel beschadigen.

113
DE
EN
FR
IT
NL
PL
> Pak altijd de stekker vast als u de airconditioner aansluit of loskoppelt.
Trek nooit de stekker uit het stopcontact door aan de kabel te trekken.
Anders bestaat er gevaar voor elektrische schokken en kan schade worden
veroorzaakt.
> Plaats de airconditioner op een stabiele, vlakke ondergrond die tot 50 kg kan
dragen. Installatie op een onstabiele of ongelijke ondergrond kan leiden tot
schade aan eigendommen en persoonlijk letsel.
> Sluit alle deuren en ramen naar de ruimte voor de meest eciënte werking.
Zorg ervoor dat de uitlaatslang naar buiten wordt geleid om een eciënte
werking te garanderen.
BELANGRIJK - METHODE VAN AARDING
Dit product is in de fabriek uitgerust met een netsnoer met een driepins geaarde
stekker. Het mag alleen worden aangesloten op een stopcontact dat is voorzien
van een aarding in overeenstemming met de National Electrical Code en de
van toepassing zijnde lokale regels en voorschrien. Als het circuit geen geaard
stopcontact hee, is het de verantwoordelijkheid en de verplichting van de klant
om het bestaande stopcontact te vervangen in overeenstemming met de National
Electrical Code en de toepasselijke lokale voorschrien en verordeningen. Het
derde aardecontact mag nooit worden doorgesneden of verwijderd. Gebruik nooit
de kabel, de stekker of het apparaat als deze beschadigd is. Gebruik uw apparaat
alleen met een verlengsnoer, wanneer het is geïnspecteerd en getest door een
gekwalificeerde elektricien. Onjuiste aansluiting van de geaarde stekker kan leiden
tot brand, elektrische schokken en/of letsel aan personen in verband met de
apparatuur. Raadpleeg een gekwalificeerde servicetechnicus, indien u twijfelt of het
apparaat goed geaard is.
ELEKTRISCHE AANSLUITINGEN
Controleer het volgende alvorens de stekker van het apparaat in het stopcontact te
steken:
> De netspanning komt overeen met de waarde die op het typeplaatje aan de
achterzijde van het apparaat is aangegeven.
> Contactdoos en circuit zijn geschikt voor het apparaat.
> Het stopcontact komt overeen met de stekker. Als dit niet het geval is, laat
dan de stekker vervangen.
> Het stopcontact is voldoende geaard. Het niet in acht nemen van
deze belangrijke veiligheidsinstructies ontslaat de fabrikant van elke
aansprakelijkheid.
3.4 Informatie over de verwijdering
Belangrijke instructies voor de correcte verwijdering van het product volgens de EG-
richtlijn 2012119/EG.
Aan het einde van de gebruiksduur mag het product niet als gemeentelijk afval
verwijderd worden Het moet naar een speciaal gemeentelijk inzamelpunt gaan of
naar een retailer, die deze service aanbiedt.

114
De gescheiden verwijdering van huishoudelijke apparaten zal de mogelijke negatieve
gevolgen voor het milieu en de gezondheid, als gevolg van onjuiste verwijdering
verminderen. Bovendien wordt het hergebruik van componenten vergemakkelijkt,
zodat aanzienlijke besparingen op het gebied van energie en hulpbronnen
gerealiseerd kunnen worden. Ter herinnering aan de noodzaak om huishoudelijke
apparaten gescheiden te verwijderen, is het product met een doorgestreepte
vuilnisbak op wielen gemarkeerd.
4 Aeeldingen
1 Ventilatoropening
2 Bedieningspaneel
3 Verzonken handgrepen (aan
beide zijden)
4 Rollen
5 Netsnoer
6 Filterunit luchtinlaat
7 Afvoerluchtaansluiting
8 Luchtinlaat
9 Onderste condenswater
afvoer
10 Bovenste condenswater
afvoer

115
DE
EN
FR
IT
NL
PL
5 Installatie-instructies
5.1 Luchtafvoer
In de koel- of verwarmingsmodus moet het apparaat in de buurt van een raam of
een opening worden geplaatst, zodat de warme of koude afvoerlucht naar buiten
kan worden geleid.
Plaats het apparaat op een vlakke ondergrond en zorg ervoor dat er een minimale
afstand van 30 cm rond het apparaat is en dat het zich in de buurt van een geaard
stopcontact bevindt.
1. Verleng de slang tot de gewenste lengte
door deze uit elkaar te trekken (A. 1).
2. Schroef deze op de slanginvoer (A. 2).
3. Schroef de slanguitlaat op het andere
uiteinde van de slang aan (A. 3).
4. Monteer de slanginvoer op de
luchtaansluiting (7) (A. 4).
5. Bevestig de slanguitlaat aan de raamkit
(zie „Raamkit installeren“).
Bevestigen
Vergrendeling

116
5.2 Raamkit installeren
De raamkit is bedoeld voor het afdichten van kiepramen. Ga voor de installatie als
volgt te werk:
Plak het klienband op het
vensterkozijn.
Plak het klienband op het
kozijn van het venster.
Verkort de klienband op de
hoeken.
Zorg ervoor dat de hoeken
gelijk liggen aan elkaar.
Bevestig de raamafdichting. Zorg ervoor dat beide helen
recht op elkaar zijn uitgelijnd.
Open de rits aan de zijkant. Steek de uitlaatslang in de
ontstane opening en sluit de rits.

117
DE
EN
FR
IT
NL
PL
5.3 plaats van installatie
> Het apparaat moet op een vaste ondergrond worden geplaatst om lawaai en
trillingen tot een minimum te beperken. Plaats het apparaat op een gladde,
vlakke vloer die stevig genoeg is om het apparaat te ondersteunen.
> Het apparaat is uitgerust met wielen om de installatie te vergemakkelijken.
Er mag echter alleen worden gerold op gladde, vlakke oppervlakken. Wees
voorzichtig bij het oprollen van het tapijt. Wees voorzichtig en bescherm de
vloer wanneer u over houten vloeren rolt. Probeer het apparaat niet over
objecten te rollen.
> Het apparaat moet binnen het bereik van een geschikte aardcontactdoos
worden opgesteld.
> Plaats nooit obstakels rond de luchtinlaat of -uitlaat van het apparaat.
> Laat minstens 45 cm afstand tot de muur om een eciënte airconditioning
te bereiken.
> De slang kan worden verlengd, maar moet zo kort mogelijk worden
gehouden. Zorg er ook voor dat de slang geen knikken hee en niet
doorhangt.

118
6 Bediening
Het bedieningspaneel bevindt zich aan de bovenzijde van het apparaat.
Om het volledige potentieel van het apparaat te gebruiken, moet u echter de
afstandsbediening gebruiken.
6.1 Bedieningspaneel
1 2 3 4 5 6
7 8 9 10 11 12 13 14 15 16
1 Omschakeling van de bedrijfsmodus
2 Tijdbediening (timer)
3 Temperatuurkeuze (warmer)
4 Temperatuurkeuze (kouder)
5 Ventilatorniveau
6 Aan-/uitschakelaar
7 Verwarmingsfunctie actief
8 Koelfunctie actief
9 Luchtontvochtiging actief
10 Ventilatormodus actief
11 Tijdbediening actief
12 Display
13 Hoog ventilatorniveau
14 Ventilatorniveau medium
15 Laag ventilatorniveau
16 Automatische klimaatregeling actief
6.2 Aan- en uitzeen
Steek de stekker in het stopcontact. Op het display staat " - - ".
Druk eenmaal op de POWER-toets (6), om de stroom in te schakelen.
Druk nogmaals op de POWER-toets, om de stroom uit te schakelen.
Schakel de airconditioner nooit uit door de stekker eruit te trekken. Schakel
de airconditioner altijd uit door eerst op de POWER-toets te drukken en
wacht enkele minuten voordat u de stekker uit het stopcontact haalt.
Hierdoor kan het apparaat een besturingscyclus uitvoeren en op de juiste
manier worden uitgeschakeld.

119
DE
EN
FR
IT
NL
PL
Schakel de airconditioner niet onmiddellijk na het uitschakelen weer in, maar
wacht enkele minuten.
6.3 Koelmodus
Ideaal voor warm, vochtig weer wanneer het nodig is om de kamer af te koelen en
tegelijkertijd te ontvochtigen.
> Druk herhaaldelijk op de toets MODE (1) tot „Cool“ (8) oplicht.
> Selecteer de gewenste temperatuur (18 °C tot 32 °C) door herhaaldelijk op
de toets Temperatuurselectie warmer/koeler (3, 4) te drukken, totdat de
overeenkomstige waarde op het display wordt weergegeven.
Na het inschakelen en activeren van de koelfunctie kan het even duren
voordat de compressor start en het apparaat aoelt.
> Druk meerdere malen op de toets FAN (5) voor de gewenste
ventilatorsnelheid, waarbij High (hoog), Medium (middel), Low (laag) en
Auto (automatische regeling) kunnen worden geselecteerd. Aankelijk van
de gekozen ventilatorsnelheid verandert ook het geluid van de airconditioner.
Als u de voorkeur gee aan de stilst mogelijke werking, selecteer dan Low.
Als u de koelmodus direct na het inschakelen van de verwarmingsmodus
activeert, kan het tot 5 minuten duren voordat het apparaat begint te koelen.
De meest geschikte temperatuur voor de ruimte in de zomer ligt tussen 24 °C
en 27 °C. Het wordt echter aanbevolen om niet een temperatuur in te stellen
die ver onder de buitentemperatuur ligt.
Beide aappunten (9, 10) moeten in deze modus worden gesloten om een
eciënte koeling mogelijk te maken.
6.4 Verwarmingsmodus
Als u een kamer wilt verwarmen, bij voorkeur in het koudere seizoen, kiest u de
verwarmingsmodus.
> Druk herhaaldelijk op de toets MODE (1) tot „Heat“ (7) oplicht.
> Selecteer de gewenste temperatuur (13 °C tot 27 °C) door herhaaldelijk op
de toets Temperatuurselectie warmer/koeler (3, 4) te drukken, totdat de
overeenkomstige waarde op het display wordt weergegeven.
> Druk meerdere malen op de toets FAN (5) voor de gewenste
ventilatorsnelheid, waarbij High (hoog), Medium (middel), Low (laag) en
Auto (automatische regeling) kunnen worden geselecteerd. Aankelijk van
de gekozen ventilatorsnelheid verandert ook het geluid van de airconditioner.
Als u de voorkeur gee aan de stilst mogelijke werking, selecteer dan Low.
Als u de verwarmingsmodus direct na het inschakelen van de koelmodus
activeert, kan het tot 5 minuten duren voordat het apparaat begint te
verwarmen.
Water wordt uit de lucht gehaald en opgevangen in de tank. Als de tank vol
is, schakelt het apparaat uit en verschijnt op het display Ft (volle tank).

120
De onderste aapdop (9) moet worden verwijderd en de tank moet worden
geleegd. Laat al het water in een opvangbak lopen. Als al het water is
afgevoerd, moet de dop weer erop worden gedraaid. Na het legen van de
tank start het apparaat weer.
Bij gebruik in zeer koude ruimtes zal het apparaat automatisch ontdooien,
waardoor de normale werking voor korte tijd wordt onderbroken. Op het
display verschijnt Lt. Tijdens deze procedure is het normaal dat het geluid
van het apparaat verandert.
> In deze modus moet u wellicht enkele minuten wachten voordat het
apparaat warme lucht gaat uitstoten.
> De ventilator kan kortstondig in deze modus werken, ook al is de ingestelde
temperatuur al bereikt.
6.5 Ontvochtigingsmodus
Ideaal voor het verminderen van de luchtvochtigheid binnenshuis (lente en herfst,
vochtige ruimtes, regenperiodes, etc.).
Merk op dat in de ontvochtigingsmodus de lucht wordt ontvochtigd. Het
condenswater wordt via de bovenste afvoer (10) naar buiten geleid. Voer het
water in een geschikte bak en maak deze regelmatig leeg, aankelijk van de
grooe.
> Verwijder de bovenste aapdop (1.).
> Sluit de meegeleverde slang of een geschikte slang aan op de aansluiting (2.)
en leid deze in een geschikte bak.
Dop
Slang
aansluiten
1. 2.
> Druk herhaaldelijk op de toets MODE (1) tot Dry (9) oplicht en tegelijkertijd
het symbool voor de automatische ventilator Auto (16) oplicht.
In deze modus wordt de ventilatorsnelheid automatisch geselecteerd door
het toestel en kan deze niet handmatig worden ingesteld.
Zorg ervoor dat u de condenswaterslang niet knikt.

121
DE
EN
FR
IT
NL
PL
6.6 Ventilatormodus
Als u het apparaat in deze modus gebruikt, hoe de uitlaatslang niet te worden
aangesloten.
> Druk herhaaldelijk op de toets MODE (1) tot Fan (10) oplicht. Druk meerdere
malen op de toets FAN (5) voor de gewenste ventilatorsnelheid, waarbij High
(hoog), Medium (middel) of Low (laag) kunnen worden geselecteerd.
Automatische regeling is in deze modus niet beschikbaar.
6.7 Automatische modus
In de automatische modus bepaalt het apparaat zelfstandig in welke modus het
werkt op basis van de huidige kamertemperatuur:
- Tot 20 °C kamertemperatuur = Verwarmingsmodus
- Tussen 20 °C en 23 °C = Ventilatormodus
- Boven 23 °C kamertemperatuur = Koelmodus
> Druk meerdere malen op de toets MODE (1) totdat alle modus-led's uit zijn
en er een draaiende balk op het display verschijnt.
> Druk meerdere malen op de toets FAN (5) voor de gewenste
ventilatorsnelheid, waarbij High (hoog), Medium (middel) of Low (laag)
kunnen worden geselecteerd.
7 Timermodus
De timer kan worden gebruikt om het in- of uitschakelen van het apparaat te
automatiseren.
Door eciënt gebruik te maken van de timerbediening kan er energie worden
bespaard, omdat het apparaat alleen op de ingestelde vaste tijden in bedrijf is.
7.1 Timer programmeren
Vertraagde inschakeling
> Selecteer eerst de modus en de gewenste instellingen (ventilatorsnelheid,
temperatuur) tijdens het gebruik. Schakel dan het apparaat uit.
> Met de stroom uitgeschakeld, druk op de toets TIMER (2). De Timer-led (11)
en het aantal uren knipperen op het display.
> Druk binnen 5 seconden opnieuw op de TIMER-toets om de uren in te
stellen, waarmee het apparaat moet worden vertraagd bij het inschakelen.
De timer kan worden ingesteld in intervallen van 1 uur tot 24 uur.

122
> Ongeveer 5 seconden nadat de tijd is ingesteld, wordt de instelling
opgeslagen, gaat de timer-led branden en gee het display aan dat het
apparaat in de stand-by-modus (--) staat.
> Na afloop van de ingestelde tijd start het apparaat in de laatst ingestelde
bedrijfsmodus.
Om de instelling te wissen, drukt u nogmaals op de toets Timer. De
timerweergave gaat uit.
Vertraagde uitschakeling
> Met de stroom ingeschakeld, druk op de toets TIMER (2). De Timer-led (11)
en het aantal uren knipperen op het display.
> Druk binnen 5 seconden opnieuw op de TIMER-toets om de uren in te
stellen, waarmee het apparaat moet worden vertraagd bij het inschakelen.
De timer kan worden ingesteld in intervallen van 1 uur tot 24 uur.
> Ca. 5 seconden nadat de tijd is geselecteerd, wordt de instelling opgeslagen
en gaat de timer-led branden.
> Na het verstrijken van de ingestelde tijd schakelt het apparaat over naar de
stand-bymodus.
Om de instelling te wissen, drukt u nogmaals op de toets Timer. De
timerweergave gaat uit.
8 Omgang met de afstandbediening
8.1 Baerijen plaatsen
> Open het deksel van het baerijvak aan de achterzijde van de
afstandsbediening door zacht op de aangegeven plek te drukken en het
deksel open te schuiven.
> Plaats de meegeleverde baerijen (LR03, AAA, 1,5 V) met de + en - polen in
de juiste stand (aangegeven in het baerijvak).
> Sluit het baerijvak opnieuw.
Belangrijke aanwijzing voor afvalverwijdering van baerijen:
baerijen kunnen giige stoen bevaen die schadelijk zijn voor het milieu.
Zorg daarom dat u de baerijen weggooit in overeenstemming met de
toepasselijke wetgeving. Doe de baerijen nooit bij het normale huisafval. U
kunt gebruikte baerijen gratis inleveren bij uw speciaalzaak of bij speciale
afvalinzamelingsstations.
Let erop dat baerijen buiten handbereik van kinderen blijven. Kinderen
kunnen baerijen in hun mond nemen en inslikken. Dit kan tot ernstige
gezondheidsproblemen leiden. Raadpleeg in dit geval onmiddellijk een
arts! Houd daarom baerijen en afstandsbediening buiten bereik van kleine
kinderen.

123
DE
EN
FR
IT
NL
PL
Gebruik het apparaat alleen met baerijen die voor dit apparaat zijn
goedgekeurd.
Normale baerijen mogen niet worden opgeladen. Baerijen mogen niet op
andere manieren worden gereactiveerd, niet uit elkaar worden genomen,
worden verwarmd of in open vuur worden gegooid (explosiegevaar!).
Maak de baerijcontacten en apparaatcontacten schoon voordat u ze plaatst.
Bij verkeerd geplaatste baerijen bestaat explosiegevaar!
8.2 Overzicht
Aan- en uitzeen
Temperatuur
verhogen
Temperatuur
verlangen
Timermodus
Meeteenheid
temperatuur
omzeen
Ventilatormodus
Bedrijfsmodus
Luchtuitlaat
Nachtmodus
> De basisbediening met de afstandsbediening is zoals beschreven in het
„Bediening“ hoofdstuk. Druk op de toets die overeenkomstig is gelabeld,
analoog aan de bovenkant van het apparaat.

124
> Richt de afstandsbediening op de bovenkant van de airconditioner. Neem de
maximale afstand van 7 meter in acht.
8.3 Speciale functies met de afstandsbediening
8.3.1 Ventilatie-uitgang
De bovenste ventilatie-uitgang opent en sluit in een constant ritme. Als u de
luchtuitlaat in één positie wilt vergrendelen, druk dan op de toets Luchtuitlaat op
de afstandsbediening.
Druk nogmaals op de knop om het zwenken automatisch te regelen.
8.3.2 Meeteenheid voor de temperatuur omzeen
Druk op de toets Meeteenheid temperatuur omzeen om de meeteenheid voor
de temperatuur die op het display wordt gebruikt, te wisselen tussen graden/Celsius
en Fahrenheit.
8.3.3 Nachtmodus
In de nachtmodus worden het display en de led aan de bovenkant van het apparaat
gedimd.
> Selecteer de verwarmings-, koel- of automatische modus.
> Druk op de toets Nachtmodus van de afstandsbediening.
De displays zijn nu gedimd en de ventilator draait op de laagste snelheid.
In de koelmodus wordt de temperatuur geleidelijk verhoogd tot 1 °C boven
de oorspronkelijke nominale temperatuur, voor elk van de eerste 2 uur.
Daarna houdt het apparaat 6 uur lang dezelfde temperatuur aan en schakelt
dan over naar de stand-bymodus.
In de verwarmingsmodus wordt de temperatuur geleidelijk verlaagd tot 1 °C
onder de oorspronkelijke nominale temperatuur, voor elk van de eerste 3 uur.
Daarna houdt het apparaat 5 uur lang dezelfde temperatuur aan en schakelt
dan over naar de stand-bymodus.

125
DE
EN
FR
IT
NL
PL
9 Service en onderhoud
9.1 Condenswater afvoeren
Na verloop van tijd verzamelt het condenswater zich in de tank van de
airconditioner. Als de tank vol is, stopt het apparaat en toont het display Ft (Full-
tank = volle tank).
Condenswater handmatig afvoeren:
> Trek de stekker van de airconditioner uit het stopcontact.
> Plaats een geschikte bak onder de onderste condensafvoer (9, pagina 8).
> Verwijder de dop van de afvoer en laat het water volledig in de opvangbak
lopen.
> Als het water is weggelopen, plaats dan de dop op de condensafvoer.
> Zet de airconditioner weer in werking.
Condenswater wordt automatisch en continu afgevoerd:
In de ontvochtigingsmodus moet het condenswater continu naar buiten worden
afgevoerd. De bovenste condenswaterafvoer (10, pagina 8) is hiervoor voorzien.
> Trek de stekker van de airconditioner uit het stopcontact.
> Plaats een geschikte bak onder de bovenste condensafvoer (10, pagina 8).
> Verwijder de dop van de afvoer en breng een geschikte slang aan op de
afvoeraansluiting.
> De slang moet nu recht naar beneden in de opvangbak worden geleid. Zorg
ervoor dat de condenswaterslang niet knikt.
> Zet de airconditioner weer in werking en activeer de ontvochtigingsmodus.
In de koelmodus moet de bovenste condensafvoer gesloten zijn om een
eciënte werking te garanderen.

126
9.2 Apparaat reinigen
Schakel de stroom uit door op de POWER-toets op het bedieningspaneel
of de afstandsbediening te drukken, alvorens het apparaat te reinigen of
onderhoud uit te voeren. Wacht enkele minuten en haal dan de stekker uit
het stopcontact.
APPARAAT SCHOONMAKEN
> Maak het apparaat met een licht vochtige doek schoon en droog het
vervolgens volledig af met een droge doek.
Maak de airconditioner nooit met water schoon. Gebruik nooit benzine,
alcohol of oplosmiddelen om het apparaat schoon te maken. Spuit er nooit
insecticiden of iets dergelijks op.
FILTER SCHOONMAKEN
Om uw airconditioner eciënt te laten
werken, moet u het filter elke week dat hij
gebruikt wordt, schoonmaken.
> Het filter kan worden verwijderd zoals
aangegeven in de aeelding hiernaast.
> Verwijder stofophopingen op het filter
met een stofzuiger.
> Als het erg vuil is, dompel het dan onder
in warm water en spoel het meerdere
malen af. Het water moet lauw zijn.
> Laat het filter na het wassen volledig
drogen en plaats het terug.
Gebruik nooit een filter dat nog nat is. Dit
kan leiden tot schade.
LET OP!
Raak de koelribben in het apparaat
niet aan als het filterhuis open is. Deze
hebben scherpe kanten en kunnen leiden
tot snijverwondingen.
9.3 ACTIVITEITEN BIJ BEGIN/EINDE VAN HET SEIZOEN
Begin van het seizoen:
> Controleer de voedingskabel en de stekker op beschadigingen. Controleer de
basisinstallatie van het apparaat en de locatie volgens deze instructies.

127
DE
EN
FR
IT
NL
PL
Einde van het seizoen:
Wanneer de airconditioner gedurende een lange periode niet wordt gebruikt:
> Maak de opvangbak voor condenswater volledig leeg en laat de onderste
aapdop open tot het resterende water is afgevoerd. Zodra de tank
volledig leeg is en er geen water meer lekt, moet de rubberen stop worden
vervangen.
> Verwijder en reinig het filter, laat het volledig drogen en vervang het dan.
> Haal de baerijen uit de afstandsbediening.
> Bewaar de airconditioner op een koele, droge plaats, uit de buurt van direct
zonlicht, extreme temperaturen en overmatig stof.
10 Problemen oplossen
Probleem Oorzaak Oplossing
De airconditioner start
niet/schakelt niet in.
Geen stroom. Controleer de
stroomvoorziening.
Stroomkabel niet
aangesloten.
Steek de stekker van
het netsnoer in een
stopcontact.
Beveiligingscircuit actief. Wacht 30 minuten en
probeer het opnieuw. Als
de storing blij optreden,
neem dan contact op met
de klantenservice.
De airconditioner loopt
maar korte tijd.
De uitlaatslang is geknikt
of verkeerd aangesloten.
Neem de aanwijzingen in
de gebruikershandleiding
voor het plaatsen/
aankoppelen van de
afvoerslang in acht.
De luchtuitlaat/
afvoerslang is
geblokkeerd.
Controleer de luchtuitlaat/
afvoerslang op mogelijke
vervuiling.

128
De airconditioner werkt,
maar koelt niet af.
Ramen/vitrages/gordijnen
zijn open.
Sluit de kamer af tegen
de zon en sluit alle ramen.
Andere apparaten in
de kamer veroorzaken
warmte (bijv. televisie,
ovens, haardrogers).
Schakel alle extra
apparaten in de kamer
uit.
De afvoerslang is niet
geïnstalleerd of is niet
naar buiten geleid.
Installeer de afvoerslang
op de juiste manier.
De koelcapaciteit is niet
geschikt voor de ruimte
waar de airconditioner
wordt gebruikt.
Neem de technische
gegevens van de
airconditioner in acht.
Tijdens het gebruik
ontstaan onaangename
geuren.
Luchtfilter is verstopt of
vuil.
Verwijder het luchtfilter,
reinig het volgens de
instructies.
Na een herstart duurt
het 3 minuten tot het
apparaat weer werkt.
Het beveiligingscircuit van
de compressor voorkomt
een onmiddellijke start
na het uit- en weer
inschakelen van het
apparaat.
Wacht drie minuten. Het
apparaat werkt dan weer
normaal.
De volgende
foutmeldingen
verschijnen op het
display:
Lt
PF
Ft
De zelfdiagnose hee een
fout ontdekt.
Lt - Temperatuur in
de kamer te laag. De
ontdooifunctie start.
PF - Sensorfout.
Informeer de service-
afdeling
Ft - Condenswatertank
is vol. Maak de tank leeg
zoals beschreven in deze
handleiding.

129
DE
EN
FR
IT
NL
PL
11 Technische gegevens
Koelvermogen 11000 BTU/h / 3.2 kW
Warmteopbrengst 10000 BTU/h / 2.9 kW
Modi Koeling, verwarming, ventilator,
ontvochtiging, timer
Temperatuurbereik: 18 - 27 °C
Kameromvang 25 - 35 m²
Ontvochtigingsvermogen 36 liter per 24uur
Luchtcirculatie 250 - 300 m³/h
Volume 53 - 65 dB
Koelvloeistof R290 (260g)
GWP-koelvloeistof 3
Stroomverbruik koeling 1,23 kW/h
ERR 2,62 (vermogenscoëciënt)
Energieklasse koeling A
Stroomverbruik verwarming 1,04 kW/h
COP 2,8 (warmteafgiecoëciënt)
Energieklasse verwarming A+
Stroomverbruik stand-by 0,5 W
Stroomverbruik in bedrijfsmodus
„Temperatuurregelaar uit“.
-
Aanzuigdruk 1,2 MPa
Afvoerdruk 2,3 MPa
Lengte afvoerslang 1,5 m (max.)
Diameter afvoerslang 13 cm
CO₂-equivalent 0,0008 t
Compressor LRA 23,5 A
Beschermingsklasse IPX0
Display Type: 7-segment, 2-cijferig
Afmetingen (b x h x d) 445 x 720 x 375 mm
Gewicht 31,00 kg
Voeding Voeding: intern
Nominaal vermogen: 1640 W
Frequentie: 50 Hz
Nominale spanning: AC 220 - 240 V

130
Leveringspakket Mobiele airconditioner. Handleiding,
afstandsbediening,
afvoerlucht- en condenswaterslang,
raamafdichting
12 Weelijke bepalingen
TechniSat is niet aansprakelijk voor productschade als gevolg van externe
invloeden, slijtage of onjuiste behandeling, ongeoorloofde reparatie,
veranderingen of ongelukken.
Wijzigingen en drukfouten voorbehouden. Laatst gewijzigd 11/23.
Kopiëren en vermenigvuldigen alleen met toestemming van de uitgever. De
huidige versie van de handleiding is beschikbaar in PDF-formaat in het
downloadgedeelte op de homepage van TechniSat op www.technisat.de.
TechniSat en TECHNIPOLAR 1 zijn geregistreerde handelsmerken van:
TechniSat Digital GmbH
TechniPark
Julius-Saxler-Straße 3
D-54550 Daun/Eifel
www.technisat.de
Namen van de genoemde bedrijven, instellingen of merken zijn handelsmerken of
gedeponeerde handelsmerken van hun respectievelijke eigenaren.
12.1 Service-instructies
Dit product is getest op kwaliteit en hee een weelijke garantieperiode
van 24 maanden vanaf de datum van aankoop. Bewaar de factuur als
aankoopbewijs. Neem voor garantieclaims contact op met de dealer van het
product.
Opmerking
Voor vragen en informatie of als er een probleem is met dit apparaat, kunt u
terecht bij onze technische hotline:
Ma. - vr. 8:00 - 18:00 via tel.:
03925/9220 1800 bereikbaar.
U kunt reparaties ook direct op www.technisat.de/reparatur aanvragen.

131
DE
EN
FR
IT
NL
PL
Gebruik in geval van retourzending van het apparaat alleen het volgende adres:
TechniSat Digital GmbH
Service-center
Nordstr. 4a
39418 Staßfurt
13 Opmerkingen

132

Instrukcja obsługi
TECHNIPOLAR 1
Mobilny klimatyzator do chłodzenia i ogrzewania wyposażony w wentylator i
funkcję osuszania.

134
1 Spis treści
1 Spis treści ................................................................................................................134
2 Wstęp ....................................................................................................................... 135
3 Wskazówki dotyczące bezpieczeństwa .........................................................136
3.1 Zastosowane znaki i symbole ...........................................................................................136
3.2 Zastosowanie zgodne z przeznaczeniem ....................................................................137
3.3 Bezpieczna obsługa klimatyzatorów .............................................................................137
3.4 Wskazówki dotyczące utylizacji ........................................................................................ 139
4 Ilustracje ..................................................................................................................140
5 Wskazówki dotyczące instalacji ....................................................................... 141
5.1 Wylot powietrza wylotowego ...........................................................................................141
5.2 Zainstaluj zestaw okienny .................................................................................................. 142
5.3 Miejsce ustawienia ..................................................................................................................143
6 Obsługa ....................................................................................................................144
6.1 Panel sterowania .................................................................................................................... 144
6.2 Włączanie i wyłączanie .......................................................................................................144
6.3 Tryb chłodzenia ........................................................................................................................145
6.4 Tryb ogrzewania ......................................................................................................................145
6.5 Tryb osuszania ......................................................................................................................... 146
6.6 Tryb wentylacji ..........................................................................................................................147
6.7 Tryb automatyczny .................................................................................................................147
7 Tryb timera ..............................................................................................................147
7.1 Programowanie timera ........................................................................................................147
8 Obsługa pilota zdalnego sterowania ...............................................................148
8.1 Wkładanie baterii ................................................................................................................... 148
8.2 Informacje ogólne.................................................................................................................. 149
8.3 Funkcje specjalne kontrolowane za pomocą pilota zdalnego sterowania .. 150
8.3.1 Wylot wentylacyjny .............................................................................................................. 150
8.3.2 Przełączanie jednostki temperatury .............................................................................. 150
8.3.3 Tryb nocny ................................................................................................................................. 150
9 Serwis i konserwacja ............................................................................................151
9.1 Spuszczanie kondensatu wody .........................................................................................151
9.2 Czyszczenie urządzenia ........................................................................................................ 152
9.3 CZYNNOŚCI NA POCZĄTKU/KOŃCU SEZONU .............................................................152
10 Rozwiązywanie problemów ............................................................................... 153
11 Dane techniczne ....................................................................................................155
12 Informacje prawne ...............................................................................................156
12.1 Wskazówki serwisowe ..........................................................................................................156
13 Notatki ......................................................................................................................157

135
DE
EN
FR
IT
NL
PL
2 Wstęp
Szanowny Kliencie,
Dziękujemy za wybór klimatyzatora firmy TechniSat.
Poniższa instrukcja obsługi pomaga w zapoznaniu się z wieloma funkcjami
nowego urządzenia i umożliwia ich optymalne wykorzystanie. Jest to pomocne
w bezpiecznym i zgodnym z przeznaczeniem użytkowaniu urządzenia. Instrukcja
obsługi jest skierowana do każdej osoby ustawiającej, obsługującej, czyszczącej lub
utylizującej urządzenie.
Przechowuj instrukcję w celu jej wykorzystania w przyszłości.
Aktualną wersję instrukcji obsługi możesz uzyskać w obszarze pobierania danego
produktu na stronie internetowej TechniSat www.technisat.de.
Życzymy przyjemnego korzystania z
produktu TechniSat!
Twój
Zespół TechniSat

136
3 Wskazówki dotyczące bezpieczeństwa
3.1 Zastosowane znaki i symbole
W niniejszej instrukcji obsługi:
Oznacza wskazówkę bezpieczeństwa, której nieprzestrzeganie może
prowadzić do poważnych obrażeń ciała lub śmierci. Uwzględnij następujące
słowa ostrzegawcze:
NIEBEZPIECZEŃSTWO - Ciężkie obrażenia ciała ze skutkiem śmiertelnym
OSTRZEŻENIE - Ciężkie obrażenie ciała z możliwym skutkiem śmiertelnym
UWAGA - Obrażenia ciała
Oznacza ważną wskazówkę, której przestrzeganie jest niezbędne w celu
uniknięcia uszkodzenia urządzenia, utraty / niewłaściwego wykorzystania
danych lub niezamierzonego uruchomienia. Dodatkowo opisuje on inne
funkcje urządzenia.
Ostrzeżenie przed napięciem elektrycznym. Zastosuj się do treści wskazówek
dotyczących bezpieczeństwa w celu uniknięcia porażenia prądem
elektrycznym. W żadnym wypadku nie otwieraj urządzenia.
Na urządzeniu:
Ostrzeżenie przed substancjami łatwopalnymi. Przestrzegaj wszystkich
instrukcji bezpieczeństwa. Nieostrożność w pobliżu materiałów łatwopalnych
może spowodować pożary.
Przestrzegaj wszystkich instrukcji i wskazówek dotyczących bezpieczeństwa
zawartych w niniejszej instrukcji obsługi.
Do użytku wewnątrz pomieszczeń — urządzenia oznaczone tym symbolem są
przeznaczone wyłącznie do użytku wewnątrz pomieszczeń.
Klasa ochronności II — Urządzenia elektryczne o II klasie ochronności to
urządzenia elektryczne o ciągłej podwójnej i/lub wzmocnionej izolacji, bez
możliwości podłączenia przewodu ochronnego. Urządzenie elektryczne o
klasie ochronności II, wyposażone w obudowę z materiału izolacyjnego, może
częściowo lub całkowicie tworzyć dodatkową lub wzmocnioną izolację.
Urządzenie jest opatrzone znakiem CE i spełnia wszystkie niezbędne normy UE.
Urządzenia elektroniczne nie należą do kategorii odpadów z gospodarstwa
domowego, ale muszą być utylizowane we właściwy sposób, zgodny z
dyrektywą 2002/96/WE Parlamentu Europejskiego i Rady Europejskiej
z dnia 27 stycznia 2003 r. w sprawie zużytego sprzętu elektrycznego i
elektronicznego. Prosimy o zwrot urządzenia po zakończeniu użytkowania w
celu przeprowadzenia utylizacji w przewidzianych do tego celu publicznych
punktach zbiórki.

137
DE
EN
FR
IT
NL
PL
3.2 Zastosowanie zgodne z przeznaczeniem
Klimatyzator TechniSat TECHNIPOLAR 1 służy do chłodzenia oraz ogrzewania
pomieszczeń mieszkalnych o powierzchni od co najmniej 13 m² do maksymalnie 35 m².
3.3 Bezpieczna obsługa klimatyzatorów
Przestrzegaj zamieszczonych poniżej wskazówek w celu uniknięcia wszelkich
niebezpieczeństw, uszkodzeń urządzenia oraz zagrożeń dla środowiska naturalnego.
Dokładnie przeczytaj wszystkie wskazówki dotyczące bezpieczeństwa i zachowaj
je na wypadek ew. późniejszych pytań. Zawsze stosuj się do wszystkich ostrzeżeń
i wskazówek zawartych w poniższej instrukcji obsługi oraz zamieszczonych z tyłu
urządzenia.
OSTRZEŻENIE!
Substancje łatwopalne. Urządzenie jest wypełnione gazem propanowym
R290. Zawsze przestrzegaj zaleceń producenta dotyczących prac
naprawczych lub serwisowych. Obsługa taka może być wykonywana
wyłącznie przez przeszkolonych specjalistów.
OSTRZEŻENIE!
W żadnym wypadku nie otwieraj urządzenia!
Dotknięcie elementów pozostających pod napięciem grozi śmiercią!
Przestrzegaj wszystkich zamieszczonych poniżej instrukcji dotyczących
użytkowania urządzenia zgodnie z jego przeznaczeniem w celu uniknięcia
uszkodzeń urządzenia i wystąpienia obrażeń ciała.
> Urządzenie nie jest przystosowane do obsługi przez osoby (włącznie z
dziećmi) o obniżonej sprawności psychomotorycznej lub nieposiadające
odpowiedniego doświadczenia oraz/lub wiedzy. Nie dotyczy to przypadków,
kiedy osoby takie znajdują się pod nadzorem osoby odpowiedzialnej za
ich bezpieczeństwo lub otrzymują wskazówki dotyczące wykorzystania
urządzenia.
> Konieczne jest dopełnienie obowiązku nadzoru nad dziećmi w celu
wykluczenia możliwości ich manipulowania przy urządzeniu.
> Nie używaj tego urządzenia do żadnych innych celów, niż te opisane w
niniejszej instrukcji.
> W przypadku uszkodzenia przewodu zasilającego zleć jego wymianę
wykwalifikowanemu technikowi serwisowemu i z zastosowaniem oryginalnych
części zamiennych.
> Wtyczka musi być mocno i całkowicie włożona do gniazda. Uwzględnij ryzyko
porażenia prądem elektrycznym lub pożaru.
> Nie podłączaj innych urządzeń do tego samego gniazdka elektrycznego,
ponieważ może to spowodować ryzyko porażenia elektrycznego.
> Nie demontuj ani nie modyfikuj klimatyzatora lub jego przewodu zasilającego,
ponieważ stwarza to niebezpieczeństwo porażenia prądem elektrycznym lub
spowodowania pożaru. Wszystkie inne prace dotyczące urządzenia muszą
być wykonywane przez wykwalifikowanego technika.

138
> Nie umieszczaj przewodu zasilającego ani klimatyzatora w pobliżu grzejnika,
kaloryfera lub innego źródła ciepła. Uwzględnij ryzyko porażenia prądem
elektrycznym lub pożaru.
> Urządzenie wyposażone jest w przewód z żyłą uziemiającą podłączoną
do bolca lub końcówki uziemiającej. Wtyczka musi być podłączona do
prawidłowo zainstalowanego i uziemionego gniazdka. Pod żadnym pozorem
nie przecinaj ani nie wyjmuj bolca lub styku uziemiającego z tej wtyczki.
> Urządzenie musi być używane i przechowywane w sposób zapewniający
ochronę przed wilgocią, powstałą np. w wyniku kondensacji, spryskania
wodą itp.
> Klimatyzator należy transportować w pozycji pionowej i ustawiać go
na stabilnej, równej powierzchni użytkowania. Jeżeli urządzenie jest
transportowane w pozycji leżącej na boku, przed podłączeniem do zasilania
ustaw je w pozycji pionowej na co najmniej 6 godzin.
> Wyłączaj urządzenie lub pilota zdalnego sterowania za pomocą przełącznika
na panelu sterowania. Nie rozpoczynaj ani nie kończ pracy poprzez
podłączanie lub odłączanie kabla zasilającego. Stwarza to niebezpieczeństwo
porażeniem prądem elektrycznym.
> Nie naciskaj przycisków na panelu sterowania mokrymi lub wilgotnymi
palcami.
> Nie stosuj do czyszczenia urządzenia niebezpiecznych środków chemicznych
i trzymaj je z dala od urządzenia. Aby zapobiec uszkodzeniu powierzchni, do
czyszczenia klimatyzatora używaj wyłącznie miękkiej ściereczki. Nie używaj
wosków, rozcieńczalników ani silnych środków czyszczących. Nie używaj
urządzenia w obecności substancji palnych lub oparów, takich jak alkohol,
środki owadobójcze, benzyna itp.
> Jeśli klimatyzator wydaje nietypowe dźwięki lub wydziela dym albo nietypowy
zapach, natychmiast odłącz go od gniazda zasilania.
> Nie czyść urządzenia wodą. Woda może przedostać się do wnętrza
urządzenia i uszkodzić izolację, stwarzając ryzyko porażenia prądem
elektrycznym. W przypadku przedostania się wody do wnętrza urządzenia
natychmiast odłącz wtyczkę zasilającą urządzenia i skontaktuj się z serwisem.
> Urządzenie powinno być podnoszone i instalowane przez co najmniej dwie
osoby.
> Przed użyciem upewnij się, że wszystkie akcesoria zostały wyjęte z
opakowania.
> Podczas demontażu i montażu filtra nie dotykaj metalowych części
klimatyzatora, aby uniknąć ran ciętych. Czynności takie stwarzają ryzyko
odniesienia obrażeń ciała.
> Nie zasłaniaj wlotu ani wylotu powietrza z klimatyzatora. Zmniejszenie
przepływu powietrza spowoduje obniżenie wydajności i może spowodować
uszkodzenie urządzenia.

139
DE
EN
FR
IT
NL
PL
> Podczas podłączania i odłączania klimatyzatora zawsze chwytaj za wtyczkę.
Nigdy nie wyciągaj wtyczki z gniazdka, pociągając za kabel. W przeciwnym
razie istnieje ryzyko porażenia prądem i uszkodzenia elementów urządzenia.
> Ustaw klimatyzator na stabilnej, równej powierzchni o nośności sięgającej
50 kg. Montaż na niestabilnej lub nierównej powierzchni może prowadzić do
uszkodzeń i obrażeń ciała.
> Zamknij wszystkie drzwi i okna pomieszczenia, aby zapewnić jak najwyższą
skuteczność pracy urządzenia. Upewnij się, że wąż odprowadzający
skropliny jest odprowadzony na zewnątrz w celu zapewnienia jak najwyższej
skuteczności pracy urządzenia.
WAŻNE — TYP UZIEMIENIA
Produkt ten jest fabrycznie wyposażony w kabel zasilający z trójstykową
wtyczką z uziemieniem. Można ją podłączyć wyłącznie do gniazda elektrycznego
wyposażonego w uziemienie odpowiadające wymaganiom krajowych przepisów
dotyczących instalacji elektrycznych oraz zgodne z obowiązującymi, lokalnymi
przepisami i regulacjami. Jeżeli instalacja zasilania nie jest wyposażona w uziemione
gniazdo, obowiązkiem użytkownika jest dokonanie wymiany tego gniazda i
montaż gniazda zgodnego z obowiązującymi krajowymi i lokalnymi przepisami i
rozporządzeniami. Trzeciego przewodu uziemienia w żadnym wypadku nie należy
przecinać lub demontować. Nigdy nie używaj kabla, wtyczki lub urządzenia, jeśli
elementy te są uszkodzone. Zastosowanie przedłużacza do zasilania urządzenia
jest możliwe tylko wtedy, gdy został on sprawdzony i przetestowany przez
wykwalifikowanego elektryka. W przypadku nieprawidłowego podłączenia wtyczki z
uziemieniem może dojść do pożaru, porażenia prądem elektrycznym i/lub obrażeń
ciała osób. W razie jakichkolwiek wątpliwości dotyczących prawidłowego uziemienia
urządzenia skonsultuj się z wykwalifikowanym serwisantem.
PRZYŁĄCZE ELEKTRYCZNE
Przed podłączeniem urządzenia do gniazda zasilania, sprawdź następujące punkty:
> Napięcie zasilania jest zgodne z danymi zamieszczonymi na tabliczce
znamionowej umieszczonej z tyłu urządzenia.
> Gniazdo zasilania i obwód zasilania są przystosowane do urządzenia.
> Gniazdo sieciowe jest tego samego typu, co wtyczka. W przeciwnym
przypadku zleć wymianę wtyczki.
> Gniazdo sieciowe jest odpowiednio uziemione. Nieprzestrzeganie tych
ważnych wskazówek dotyczących bezpieczeństwa zwalnia producenta od
wszelkiej odpowiedzialności.
3.4 Wskazówki dotyczące utylizacji
Ważne wskazówki dotyczące prawidłowej utylizacji produktu zgodnie z dyrektywą
2012119/WE.
Po zakończeniu okresu użytkowania produkt nie może być utylizowany jako odpady
komunalne. Konieczne jest jego przekazanie do specjalnego komunalnego punktu
zbiórki lub do dealera oferującego tę usługę.

140
Oddzielna utylizacja sprzętu gospodarstwa domowego ogranicza ewentualny
negatywny wpływ na środowisko naturalne i zdrowie ludzi, występujące w
przypadku niewłaściwej utylizacji odpadów. Ponadto prawidłowa utylizacja ułatwia
ponowne wykorzystanie elementów składowych i uzyskanie znacznych oszczędności
energii i zasobów. W celu zwrócenia uwagi na konieczność oddzielenia produktu od
urządzeń gospodarstwa domowego w celu utylizacji, produkt ten został oznaczony
za pomocą okrągłego, przekreślonego kosza na śmieci.
4 Ilustracje
1 Otwór wentylatora
2 Panel sterowania
3 Uchwyty do przenoszenia
(po obu stronach)
4 Rolki
5 Kabel zasilania
elektrycznego
6 Jednostka filtrująca wlotu
powietrza
7 Przyłącze powietrza
wylotowego
8 Wlot powietrza
9 Dolny
odpływ kondensatu wody
10 Górny
odpływ kondensatu wody

141
DE
EN
FR
IT
NL
PL
5 Wskazówki dotyczące instalacji
5.1 Wylot powietrza wylotowego
W trybie chłodzenia lub ogrzewania urządzenie musi być umieszczone w pobliżu
okna lub otworu, w celu zapewnienia odprowadzania ciepłego lub zimnego
powietrza wylotowego na zewnątrz.
Umieść urządzenie na równej podłodze i upewnij się, że w odległości 30 cm wokół
urządzenia nie znajdują się żadne przedmioty oraz że urządzenie znajduje się w
pobliżu gniazda zasilania elektrycznego.
1. Wydłuż wąż na odpowiednią długość,
rozciągając go (ilustr. 1).
2. Przykręć wąż do otworu wlotowego (ilustr.
2).
3. Nakręć wylot węża na drugi koniec węża
(ilustr. 3).
4. Zamontuj wlot węża do wlotu węża na
przyłączu powietrza wylotowego (7)
(ilustr. 4).
5. Podłącz wylot węża do zestawu
okiennego (patrz „5.2 Fenster-Kit
installieren“).
Nakładanie
Blokowanie

142
5.2 Zainstaluj zestaw okienny
Zestaw okienny przeznaczony jest do uszczelniania okien uchylnych. Podczas
instalacji wykonaj następujące czynności:
Przyklej taśmę rzepową do
ramy okiennej.
Przyklej taśmę rzepową do
ramy okna.
Skróć taśmę rzepową w
narożnikach.
Upewnij się, że narożniki
są ustawione w jednej
płaszczyźnie względem siebie.
Zamocuj uszczelkę okienną. Upewnij się, że obie połówki
są ustawione prosto
względem siebie.
Otwórz zamek błyskawiczny
z boku.
Włóż wąż wylotowy do
wykonanego otworu i zamknij
zamek błyskawiczny.

143
DE
EN
FR
IT
NL
PL
5.3 Miejsce ustawienia
> Urządzenie powinno być ustawione na twardym podłożu, aby zminimalizować
emisję hałasu i wibracji. Aby zapewnić stabilne ustawienie, ustaw urządzenie
na gładkim, równym podłożu o wystarczającej nośności.
> Urządzenie wyposażone jest w kółka ułatwiające ustawienie. Przesuwanie na
kółkach może odbywać się wyłącznie na gładkich i płaskich powierzchniach.
Zachowaj ostrożność, przesuwając urządzenie po dywanie. Zachowaj
ostrożność w trakcie przesuwania urządzenia na kółkach po drewnianej
podłodze i zapewnij ochronę takiej podłogi. Nie próbuj wjeżdżać kółkami
urządzenia na żadne obiekty.
> Urządzenie musi być ustawione w pobliżu gniazda o odpowiednich
parametrach.
> Nigdy nie umieszczaj żadnych przeszkód wokół wlotu lub wylotu powietrza z
urządzenia.
> Aby uzyskać wysoką skuteczność klimatyzacji, zapewnij odległość od ściany
wynoszącą co najmniej 45 cm.
> Wąż może być wydłużony, ale powinien być możliwie jak najkrótszy. Upewnij
się również, że wąż nie ma żadnych zagięć i nie zwisa luźno.

144
6 Obsługa
Panel sterowania znajduje się w górnej części maszyny.
Pełne wykorzystanie potencjału urządzenia wymaga zastosowania pilota zdalnego
sterowania.
6.1 Panel sterowania
1 2 3 4 5 6
7 8 9 10 11 12 13 14 15 16
1 Przełączanie trybu pracy
2 Sterowanie czasem pracy (timer)
3 Ustawienie temperatury (wyższej)
4 Ustawienie temperatury (niższej)
5 Stopień pracy dmuchawy
6 Włącznik
7 Funkcja ogrzewania aktywna
8 Funkcja chłodzenia aktywna
9 Osuszanie powietrza aktywne
10 Tryb wentylacji aktywny
11 Sterowanie czasowe aktywne
12 Wyświetlacz
13 Wysoki stopień pracy dmuchawy
14 Średni stopień pracy dmuchawy
15 Niski stopień pracy dmuchawy
16 Klimatyzacja automatyczna aktywna
6.2 Włączanie i wyłączanie
Włóż wtyczkę zasilania do gniazda sieciowego. Na wyświetlaczu pojawi się
wskazanie „- -”.
Jeden raz naciśnij przycisk zasilania POWER (6) w celu włączenia urządzenia.
Ponownie naciśnij przycisk zasilania POWER w celu wyłączenia urządzenia.
Nigdy nie wyłączaj klimatyzatora przez wyciągnięcie wtyczki z gniazda
zasilania. Zawsze wyłączaj klimatyzator, najpierw naciskając przycisk zasilania
POWER i odczekaj kilka minut przed odłączeniem wtyczki zasilania od
gniazda. Umożliwi to wykonanie cyklu kontrolnego przez urządzenie i jego
prawidłowe wyłączenie.

145
DE
EN
FR
IT
NL
PL
Nie włączaj ponownie klimatyzatora bezpośrednio po jego wyłączeniu, ale
odczekaj kilka minut.
6.3 Tryb chłodzenia
Idealny na gorącą, wilgotną pogodę i zawsze wtedy, gdy konieczne jest schłodzenie
pomieszczenia i jego jednoczesne osuszanie.
> Kilkakrotnie naciśnij przycisk MODE (1), aż pojawi się symbol „Cool” (8).
> Wybierz temperaturę zadaną (od 18°C do 32°C), wielokrotnie naciskając
przycisk wyboru temperatury wyższej/niższej (3, 4), aż na wyświetlaczu
pojawi się odpowiednia wartość.
Po włączeniu i uruchomieniu funkcji chłodzenia odczekaj chwilę konieczną na
uruchomienie się sprężarki i rozpoczęcie chłodzenia przez urządzenie.
> Wybierz żądaną prędkość obrotową wentylatora, naciskając kilkakrotnie
przycisk wentylatora FAN(5). System umożliwia ustawienie stopnia High
(wysokiego), Medium (średniego), Low (niskiego) i Auto (automatycznego).
W zależności od wybranej prędkości obrotowej wentylatora zmienia się
również hałas wytwarzany w trakcie pracy klimatyzatora. Najniższy poziom
hałasu osiągany jest po ustawieniu stopnia Low (niskiego).
Włączenie trybu chłodzenia bezpośrednio po trybie ogrzewania może oznaczać
konieczność odrzekania do 5 minut, zanim urządzenie rozpocznie chłodzenie.
Najbardziej odpowiednia temperatura w pomieszczeniu w okresie letnim
wynosi od 24 do 27°C. Nie zaleca się jednak ustawiania temperatury znacznie
niższej od temperatury zewnętrznej.
W tym trybie oba korki spustowe (9, 10) powinny być zamknięte w celu
umożliwienia efektywnego chłodzenia.
6.4 Tryb ogrzewania
W celu ogrzania pomieszczenia w trakcie chłodniejszych pór roku wybierz tryb
ogrzewania.
> Kilkakrotnie naciśnij przycisk MODE (1), aż pojawi się symbol „Heat” (7).
> Wybierz zadaną temperaturę (od 13°C do 27°C), wielokrotnie naciskając
przycisk wyboru temperatury wyższej/niższej (3, 4), aż na wyświetlaczu
pojawi się odpowiednia wartość.
> Wybierz żądaną prędkość obrotową wentylatora, naciskając kilkakrotnie
przycisk wentylatora FAN(5). System umożliwia ustawienie stopnia High
(wysokiego), Medium (średniego), Low (niskiego) i Auto (automatycznego).
W zależności od wybranej prędkości obrotowej wentylatora zmienia się
również hałas wytwarzany w trakcie pracy klimatyzatora. Najniższy poziom
hałasu osiągany jest po ustawieniu stopnia Low (niskiego).
Włączenie trybu ogrzewania bezpośrednio po działaniu trybu chłodzenia,
może oznaczać konieczność odrzekania do 5 minut, zanim urządzenie
rozpocznie ogrzewanie.
Woda jest pobierana z powietrza i gromadzona w zbiorniku. Gdy zbiornik jest
pełny, urządzenie wyłącza się, a na wyświetlaczu pojawia się wskazanie Ft
(zbiornik pełny).

146
Konieczne jest zdjęcie dolnego korka spustowego (9) i opróżnienie zbiornika.
Pozwól na spłynięcie całej, nagromadzonej wody do pojemnika zbiorczego.
Gdy cała woda zostanie spuszczona, należy ponownie zamontować korek. Po
opróżnieniu zbiornika urządzenie uruchamia się ponownie.
W przypadku pracy w bardzo zimnych pomieszczeniach urządzenie
automatycznie rozmraża się, przerywając na krótko normalną pracę. Na
wyświetlaczu pojawi się symbol Lt. Podczas tej operacji nietypowe odgłosy
pracy urządzenia są normalnym zjawiskiem.
> W tym trybie konieczne może być odczekanie kilku minut, aż urządzenie
znowu zacznie wytwarzać ciepłe powietrze.
> W tym trybie wentylator może także pracować jeszcze przez krótki czas po
tym, jak ustawiona temperatura zostanie już osiągnięta.
6.5 Tryb osuszania
Idealny tryb pracy do zmniejszenia wilgotności powietrza w pomieszczeniach
(wiosna i jesień, wilgotne pomieszczenia, okresy deszczowe itp.).
Pamiętaj, że w trybie osuszania zachodzi obniżanie wilgotności powietrza.
Kondensat wody odprowadzany jest na zewnątrz przez górny odpływ (10).
Odprowadzaj wodę do odpowiedniego pojemnika i, w zależności od jego
wielkości, opróżniaj go regularnie.
> Zdejmij górną pokrywę spustową (1.).
> Podłącz do przyłącza (2.) należący do urządzenia wąż lub inny odpowiedni
wąż i skieruj go do odpowiedniego pojemnika.
Zaślepka
Podłączanie
węża
1. 2.
> Kilkakrotnie naciśnij przycisk trybu pracy MODE (1), aż do włączenia się symbolu
osuszania Dry (9) i symbolu automatycznej pracy wentylatora Auto (16).
W tym trybie prędkość obrotowa wentylatora jest automatycznie
kontrolowana przez urządzenie i nie może być ustawiana ręcznie.
Zachowaj ostrożność, aby nie doprowadzić do zagięcia węża spustowego
wody kondensacyjnej.

147
DE
EN
FR
IT
NL
PL
6.6 Tryb wentylacji
W przypadku korzystania z urządzenia w tym trybie nie ma potrzeby podłączania
węża powietrza wylotowego.
> Kilkakrotnie naciśnij przycisk trybu MODE (1), aż do włączenia się symbolu
wentylatora Fan (10). Wybierz żądaną prędkość obrotową wentylatora,
kilkakrotnie naciskając przycisk wentylatora FAN (5) w celu wybrania stopnia
High (wysoki), Medium (średni) lub Low (niski).
W tym trybie pracy sterowanie automatyczne nie jest dostępne.
6.7 Tryb automatyczny
W trybie automatycznym urządzenie samoczynnie wybiera odpowiedni tryb pracy
na podstawie aktualnej temperatury w pomieszczeniu:
- Temperatura pomieszczenia do 20°C = tryb ogrzewania
- Między 20°C a 23°C = tryb wentylacji
- Temperatura pokojowa powyżej 23°C = tryb chłodzenia
> Kilkakrotnie naciśnij przycisk trybu MODE (1), aż wszystkie diody LED trybu
pracy wyłączą się, a na wyświetlaczu pojawi się obracający się pasek.
> Wybierz żądaną prędkość obrotową wentylatora, kilkakrotnie naciskając
przycisk wentylatora FAN (5) w celu wybrania stopnia High (wysoki), Medium
(średni) lub Low (niski).
7 Tryb timera
Timer może służyć do automatycznego włączania i wyłączania urządzenia.
Efektywne wykorzystanie funkcji timera umożliwia zmniejszenie zużycia energii,
ponieważ urządzenie pracuje tylko w ustalonych, stałych godzinach.
7.1 Programowanie timera
Opóźnienie włączenia
> Najpierw wybierz tryb i żądane ustawienia pracy (prędkość obrotowa
wentylatora, temperatura). Następnie wyłącz urządzenie.
> Przy wyłączonym zasilaniu naciśnij przycisk TIMER (2). Dioda LED timera (11) i
liczba godzin na wyświetlaczu zaczną migać.
> W ciągu 5 sekund ponownie, kilkakrotnie naciśnij przycisk TIMER w celu
ustawienia liczby godzin opóźnienia włączenia urządzenia.
Zegar sterujący timer może zostać ustawiony w 1-godzinnych odstępach od 1
godziny do 24 godzin.

148
> Około 5 sekund po ustawieniu czasu ustawienie jest zapisywane, dioda LED
timera świeci się, a wyświetlacz wskazuje, że urządzenie znajduje się w trybie
czuwania (--).
> Po upływie ustawionego czasu urządzenie uruchamia się w ostatnio
wykorzystywanym trybie pracy.
Aby usunąć dane ustawienie, ponownie naciśnij przycisk timera. Symbol
timera zgaśnie.
Opóźnienie wyłączenia
> Przy włączonym zasilaniu naciśnij przycisk TIMER (2). Dioda LED timera (11) i
liczba godzin na wyświetlaczu zaczną migać.
> W ciągu 5 sekund ponownie, kilkakrotnie naciśnij przycisk TIMER w celu
ustawienia liczby godzin opóźnienia wyłączenia urządzenia.
Zegar sterujący timer może zostać ustawiony w 1-godzinnych odstępach od 1
godziny do 24 godzin.
> Około 5 sekund po wybraniu czasu, ustawienie jest zapisywane i włącza się
dioda LED timera.
> Po upływie ustawionego czasu, urządzenie uruchamia się w trybie czuwania.
Aby usunąć dane ustawienie, ponownie naciśnij przycisk timera. Symbol
timera zgaśnie.
8 Obsługa pilota zdalnego sterowania
8.1 Wkładanie baterii
> Otwórz znajdującą się z tyłu pilota pokrywkę komory baterii, naciskając lekko
zaznaczony obszar i przesuwając pokrywkę do góry.
> Włóż baterie (LR03, AAA, 1,5 V), zwracając uwagę na prawidłową
biegunowość (oznaczenie widoczne w komorze baterii).
> Zamknij komorę baterii.
Ważna wskazówka dotycząca utylizacji baterii/akumulatorów:
baterie/akumulatory mogą zawierać substancje toksyczne, szkodliwe
dla środowiska naturalnego. Z tego względu utylizuj baterie zgodnie z
obowiązującymi przepisami prawnymi. Nigdy nie wyrzucaj baterii do odpadów
gospodarstwa domowego. Zużyte baterie/akumulatory mogą zostać
przekazane do utylizacji sprzedawcy lub do specjalnego punktu utylizacji.
Zachowaj ostrożność, aby baterie nie dostały się w ręce dzieci. Dzieci są w
stanie połknąć baterię. Może to spowodować poważne szkody na zdrowiu.
W przypadku połknięcia baterii natychmiast skontaktuj się z lekarzem! Ze
względów bezpieczeństwa baterie przechowuj tak, aby nigdy nie były one
dostępne dla dzieci.

149
DE
EN
FR
IT
NL
PL
Urządzenie może być eksploatowane wyłącznie z zastosowaniem baterii
odpowiedniego typu.
Nie wolno ładować zwykłych baterii. Baterii nie można też reaktywować
na inne sposoby, demontować, ogrzewać ani wrzucać do otwartego ognia
(niebezpieczeństwo wybuchu!).
Przed włożeniem baterii oczyść styki urządzenia. Nieprawidłowe włożenie
baterii może spowodować ich wybuch!
8.2 Informacje ogólne
Włączanie/
wyłączanie
Temperatura:
- zwiększanie
Temperatura:
- zmniejszanie
Tryb timera
Przełączanie
jednostki
temperatury
Tryb wentylacji
Tryb pracy
Wylot powietrza
Tryb nocny
> Podstawowa obsługa za pomocą pilota została opisana w rozdziale „6
Bedienung“ . Naciśnij odpowiedni przycisk, oznaczony analogicznie jak w
górnej części urządzenia.

150
> Skieruj pilota w stronę górnej części klimatyzatora. Nie przekraczaj
maksymalnej odległości, wynoszącej 7 metrów.
8.3 Funkcje specjalne kontrolowane za pomocą pilota zdalnego sterowania
8.3.1 Wylot wentylacyjny
Górny wylot wentylacyjny otwiera się i zamyka w stałym rytmie. Zablokowanie
kierunku wylotu powietrza następuje po naciśnięciu przycisku na pilocie zdalnego
sterowania.
Ponownie naciśnij przycisk w celu powrotu do automatycznej kontroli kierunku
wylotu powietrza.
8.3.2 Przełączanie jednostki temperatury
Naciśnij przycisk przełączanie jednostki temperatury, aby przełączać pomiędzy
widocznymi na wyświetlaczu jednostkami Celsjusza i Fahrenheita.
8.3.3 Tryb nocny
W trybie nocnym wyświetlacz i dioda LED w górnej części urządzenia są
przyciemniane.
> Wybierz tryb ogrzewania, chłodzenia lub automatyczny.
> Naciśnij przycisk trybu nocnego na pilocie zdalnego sterowania.
Jasność symboli zostanie zmniejszona, a wentylator będzie pracował z
najniższą prędkością obrotową.
W trybie chłodzenia, przez pierwsze dwie godziny, ustawienie temperatury
jest stopniowo zmniejszane do 1°C powyżej pierwotnej temperatury
docelowej. Następnie urządzenie utrzyma tę samą temperaturę przez 6
godzin, a następnie przełączy się w tryb czuwania.
W trybie ogrzewania, przez pierwsze 3 godziny, ustawienie temperatury
jest stopniowo zwiększane do 1°C poniżej pierwotnej temperatury zadanej.
Następnie urządzenie utrzyma tę samą temperaturę przez 5 godzin i
przełączy się w tryb czuwania.

151
DE
EN
FR
IT
NL
PL
9 Serwis i konserwacja
9.1 Spuszczanie kondensatu wody
W miarę upływu czasu kondensat wody gromadzi się w zbiorniku klimatyzatora. Gdy
zbiornik jest pełny, urządzenie wyłącza się, a na wyświetlaczu pojawia się napis Ft
(Full-Tank = zbiornik pełny).
Ręczne spuszczanie kondensatu wody:
> Odłącz wtyczkę zasilania klimatyzatora.
> Umieść odpowiedni pojemnik pod dolnym spustem kondensatu (9, strona 8 ).
> Zdejmij korek odpływu i spuść całą wodę do pojemnika zbiorczego.
> Jeśli woda spłynęła, ponownie zamontuj korek na spuście kondensatu.
> Ponownie uruchom klimatyzator.
Automatyczne i ciągłe odprowadzanie kondensatu wody:
W trybie osuszania kondensat wody musi być stale odprowadzany na zewnątrz. W
tym celu wykorzystać należy górny odpływ kondensatu wody (10, strona 8).
> Odłącz wtyczkę zasilania klimatyzatora.
> Umieść odpowiedni pojemnik pod górnym spustem kondensatu (10, strona 8 ).
> Zdejmij korek spustu i zamontuj odpowiedni wąż na króćcu spustowym.
> Wąż powinien być skierowany prosto do pojemnika zbiorczego. Zachowaj
ostrożność, aby nie dopuścić do skręcenia węża.
> Ponownie uruchom klimatyzator i włącz tryb osuszania.
W trybie chłodzenia górny spust kondensatu musi być zamknięty, aby
zapewnić wysoką wydajność pracy.

152
9.2 Czyszczenie urządzenia
Przed przystąpieniem do czyszczenia lub serwisowania należy wyłączyć
zasilanie, naciskając przycisk zasilania POWER na panelu sterowania lub
pilocie zdalnego sterowania. Odczekaj kilka minut, a następnie wyciągnij
wtyczkę z gniazda zasilania.
CZYSZCZENIE URZĄDZENIA
> Urządzenie należy wyczyścić lekko wilgotnym kawałkiem tkaniny, a następnie
całkowicie wysuszyć suchą ściereczką.
Nigdy nie należy czyścić klimatyzatora wodą. Do czyszczenia urządzenia nigdy
nie używaj benzyny, alkoholu ani rozpuszczalników. Nigdy nie rozpylaj na
urządzenie środków owadobójczych lub podobnych.
CZYSZCZENIE FILTRA
W celu zapewnienia wydajności pracy
klimatyzatora jego filtr należy czyścić co
tydzień.
> Filtr można wyjąć w sposób
przedstawiony na umieszczonej po prawej
stronie ilustracji.
> Nagromadzony na filtrach pył usuń
odkurzaczem.
> W przypadku silnego zabrudzenia zanurz
filtr w ciepłej wodzie i spłucz go kilka razy.
Woda powinna być letnia.
> Po umyciu filtra pozostaw go do
całkowitego wyschnięcia i ponownie
zamontuj go w urządzeniu.
Nigdy nie używaj filtra, który jest jeszcze
mokry. Może to spowodować uszkodzenia.
UWAGA!
Nie dotykaj żeber chłodzących w urządzeniu, gdy obudowa filtra jest otwarta.
Ich ostre krawędzie mogą spowodować skaleczenia.
9.3 CZYNNOŚCI NA POCZĄTKU/KOŃCU SEZONU
Początek sezonu:
> Sprawdź, czy przewód zasilający i wtyczka zasilania nie są uszkodzone.
Sprawdź zgodność instalacji urządzenia i jego ustawienia z niniejszą
instrukcją.

153
DE
EN
FR
IT
NL
PL
Koniec sezonu:
Wyłączenie klimatyzatora z eksploatacji na dłuższy okres czasu:
> Całkowicie opróżnij zbiornik na kondensat wody, pozostawiając dolną zaślepkę
spustową otwartą, aż do momentu spuszczenia całej wody. Zamontuj gumową
zaślepkę, gdy woda całkowicie wypłynie a zbiornik będzie pusty.
> Wyjmij i wyczyść filtr, odczekaj do jego całkowitego wyschnięcia, a następnie
ponownie go zamontuj.
> Wyjmij baterie z pilota zdalnego sterowania.
> Klimatyzator przechowuj w chłodnym, suchym miejscu, z dala od działania
bezpośredniego światła słonecznego, skrajnych temperatur i nadmiernego
zapylenia.
10 Rozwiązywanie problemów
Problem Przyczyna Rozwiązanie
Klimatyzator nie
uruchamia się / nie
włącza się.
Brak zasilania
elektrycznego.
Sprawdź zasilanie
elektryczne.
Kabel zasilania nie jest
podłączony.
Podłącz przewód zasilania
do gniazda.
Obwód ochronny aktywny. Odczekaj 30 minut
i wykonaj kolejną
próbę. Jeśli błąd nadal
występuje, skontaktuj się
z serwisem.
Klimatyzator działa tylko
przez krótki czas.
Wąż powietrza
wylotowego jest zagięty
lub nieprawidłowo
podłączony.
Zastosuj się do zawartych
w instrukcji obsługi
wskazówek dotyczących
układania/podłączania
węża powietrza
wylotowego
Wylot powietrza / wąż
powietrza wylotowego
jest zablokowany.
Sprawdź, czy wylot
powietrza / wąż
powietrza wylotowego nie
jest zanieczyszczony.

154
Klimatyzator pracuje, ale
efekt chłodzenia nie jest
odczuwalny.
Okna / kurtyny / zasłony
są otwarte.
Zabezpiecz
pomieszczenie przed
światłem słonecznym i
zamknij wszystkie okna.
Inne urządzenia w
pomieszczeniu powodują
nagrzewanie się (np.
telewizor, piekarnik,
suszarka do włosów).
Wyłącz wszystkie
dodatkowe urządzenia w
pomieszczeniu.
Wąż powietrza
wylotowego nie został
zamontowany lub nie
został wyprowadzony na
zewnątrz.
Prawidłowo zamontuj wąż
wylotowy.
Wydajność chłodzenia
nie jest wystarczająca
dla pomieszczenia, w
którym klimatyzator jest
eksploatowany.
Uwzględnij dane
techniczne klimatyzatora.
Podczas pracy pojawiają
się nieprzyjemne zapachy.
Filtr powietrza
jest zatkany lub
zanieczyszczony.
Wyjmij filtr powietrza,
wyczyść go zgodnie z
instrukcją.
Po ponownym
uruchomieniu rozpoczęcie
pracy przez urządzenie
trwa 3 minuty.
Obwód zabezpieczający
sprężarkę uniemożliwia
natychmiastowe
uruchomienie po
wyłączeniu i ponownym
włączeniu urządzenia.
Odczekaj trzy minuty.
Urządzenie będzie
działało normalnie.
Na wyświetlaczu
pojawiają się następujące
komunikaty o błędach:
Lt
PF
Ft
Funkcja autodiagnozy
wykryła błąd.
Lt — temperatura w
pomieszczeniu jest zbyt
niska. Uruchamiana jest
funkcja odmrażania.
PF — Błąd czujnika.
Skontaktuj się z serwisem
Ft — Zbiornik kondensatu
wody jest pełny. Opróżnij
zbiornik w sposób
opisany w niniejszej
instrukcji.

155
DE
EN
FR
IT
NL
PL
11 Dane techniczne
Moc chłodnicza 11000 BTU/h / 3,2 kW
Moc grzewcza 10000 BTU/h / 2,9 kW
Tryby pracy Chłodzenie, ogrzewanie, wentylacja,
osuszanie, timer
Zakres temperatury 18–27 °C
Wielkość pomieszczenia 25–35 m²
Wydajność osuszania 36 litry na 24godzinę
Przepływ powietrza 250–300 m³/h
Głośność 53 / 65
Środek chłodniczy R290 (260 g)
Środek chłodniczy GWP 3
Pobór mocy przy chłodzeniu 1,23 kW/h
ERR 2,62 (współczynnik wydajności
chłodniczej)
Klasa energetyczna dla chłodzenia A
Pobór mocy przy ogrzewaniu 1,04 kW/h
COP 2,8 (współczynnik wydajności cieplnej)
Klasa energetyczna dla ogrzewania A+
Zużycie energii w trybie gotowości 0,5 W
Zużycie energii w trybie pracy
„Regulator temperatury wyłączony“
-
Ciśnienie zasysania 1,2 MPa
Ciśnienie wydmuchu 2,3 MPa
Długość kanału powietrza wylotowego 1,5 m (maks.)
Średnica kanału powietrza wylotowego 13 cm
Ekwiwalent CO₂ 0,0008 t
Sprężarka LRA 23,5 A
Klasa ochrony IPX0
Wyświetlacz Typ: 7 segmentów, 2 miejsca
Wymiary zewnętrzne (szer. x wys. x gł.) 445 x 720 x 375 mm
Masa 31,00 kg
Zasilanie elektryczne Zasilacz sieciowy: wewnętrzny
1640 W
Częstotliwość 50 Hz
Napięcie nominalne: AC 220 - 240 V.

156
Zakres dostawy Mobilny klimatyzator Instrukcja obsługi,
pilot zdalnego sterowania,
wąż wylotu powietrza i kondensatu
wody, uszczelka okienna
Informacje prawne
Firma TechniSat nie ponosi odpowiedzialności za uszkodzenia urządzenia
związane z działaniem czynników zewnętrznych, zużyciem lub niewłaściwym
zastosowaniem, nieprawidłową naprawą, modyfikacją lub wypadkiem.
Zmiany w druku zastrzeżone. Wydanie z 11/23
Kopiowanie i powielanie możliwe tylko za zgodą wydawcy. Aktualna wersja
instrukcji może zostać pobrana w formacie PDF z
obszaru pobierania witryny internetowej firmy TechniSat www.technisat.de.
TechniSat oraz Transita 1 to zastrzeżone znaki towarowe firmy
TechniSat Digital GmbH
TechniPark
Julius-Saxler-Straße 3
D-54550 Daun/Eifel
www.technisat.de
Nazwy wymienionych firm, instytucji oraz marek są znakami towarowymi lub
zastrzeżonymi znakami firmowymi należącymi do odpowiednich podmiotów.
11.1 Wskazówki serwisowe
Ten produkt został poddany kontroli jakości i jest objęty 24-miesięczną
gwarancją począwszy od daty zakupu. Zachowaj rachunek będący dowodem
zakupu. W przypadku roszczenia gwarancyjnego skontaktuj się z dealerem
produktu.
Wskazówka!
W przypadku pytań lub wystąpienia problemów z urządzeniem prosimy o
kontakt z linią serwisową dostępną od poniedziałku do piątku w godzinach
od 8:00 do 18:00 pod numerem telefonu:
03925/9220 1800.
Zlecenia naprawy można również zamówić bezpośrednio online na stronie
www.technisat.de/reparatur.
W uzasadnionych przypadkach prosimy o przesłanie urządzenia na adres:
TechniSat Digital GmbH
Service-Center
Nordstr. 4a
39418 Staßfurt

157
DE
EN
FR
IT
NL
PL
12 Notatki

158

159
DE
EN
FR
IT
NL
PL

M000/3956
-
 1
1
-
 2
2
-
 3
3
-
 4
4
-
 5
5
-
 6
6
-
 7
7
-
 8
8
-
 9
9
-
 10
10
-
 11
11
-
 12
12
-
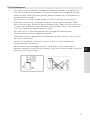 13
13
-
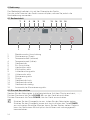 14
14
-
 15
15
-
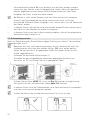 16
16
-
 17
17
-
 18
18
-
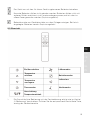 19
19
-
 20
20
-
 21
21
-
 22
22
-
 23
23
-
 24
24
-
 25
25
-
 26
26
-
 27
27
-
 28
28
-
 29
29
-
 30
30
-
 31
31
-
 32
32
-
 33
33
-
 34
34
-
 35
35
-
 36
36
-
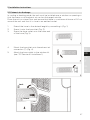 37
37
-
 38
38
-
 39
39
-
 40
40
-
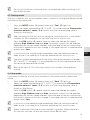 41
41
-
 42
42
-
 43
43
-
 44
44
-
 45
45
-
 46
46
-
 47
47
-
 48
48
-
 49
49
-
 50
50
-
 51
51
-
 52
52
-
 53
53
-
 54
54
-
 55
55
-
 56
56
-
 57
57
-
 58
58
-
 59
59
-
 60
60
-
 61
61
-
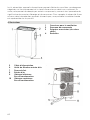 62
62
-
 63
63
-
 64
64
-
 65
65
-
 66
66
-
 67
67
-
 68
68
-
 69
69
-
 70
70
-
 71
71
-
 72
72
-
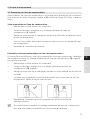 73
73
-
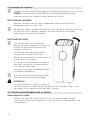 74
74
-
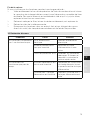 75
75
-
 76
76
-
 77
77
-
 78
78
-
 79
79
-
 80
80
-
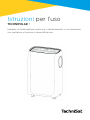 81
81
-
 82
82
-
 83
83
-
 84
84
-
 85
85
-
 86
86
-
 87
87
-
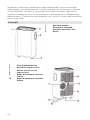 88
88
-
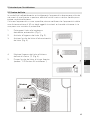 89
89
-
 90
90
-
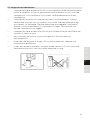 91
91
-
 92
92
-
 93
93
-
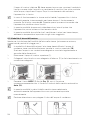 94
94
-
 95
95
-
 96
96
-
 97
97
-
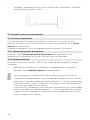 98
98
-
 99
99
-
 100
100
-
 101
101
-
 102
102
-
 103
103
-
 104
104
-
 105
105
-
 106
106
-
 107
107
-
 108
108
-
 109
109
-
 110
110
-
 111
111
-
 112
112
-
 113
113
-
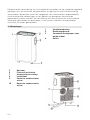 114
114
-
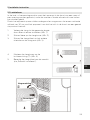 115
115
-
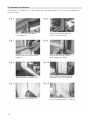 116
116
-
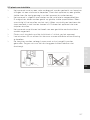 117
117
-
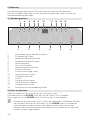 118
118
-
 119
119
-
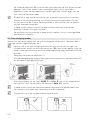 120
120
-
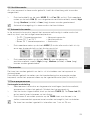 121
121
-
 122
122
-
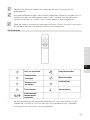 123
123
-
 124
124
-
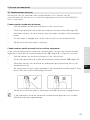 125
125
-
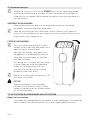 126
126
-
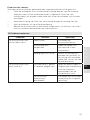 127
127
-
 128
128
-
 129
129
-
 130
130
-
 131
131
-
 132
132
-
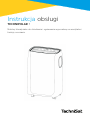 133
133
-
 134
134
-
 135
135
-
 136
136
-
 137
137
-
 138
138
-
 139
139
-
 140
140
-
 141
141
-
 142
142
-
 143
143
-
 144
144
-
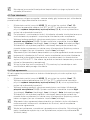 145
145
-
 146
146
-
 147
147
-
 148
148
-
 149
149
-
 150
150
-
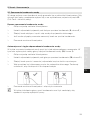 151
151
-
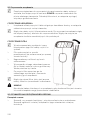 152
152
-
 153
153
-
 154
154
-
 155
155
-
 156
156
-
 157
157
-
 158
158
-
 159
159
-
 160
160


in andere talen
- English: TechniSat TECHNIPOLAR 1 User manual
- italiano: TechniSat TECHNIPOLAR 1 Manuale utente
- français: TechniSat TECHNIPOLAR 1 Manuel utilisateur
- Deutsch: TechniSat TECHNIPOLAR 1 Benutzerhandbuch
- polski: TechniSat TECHNIPOLAR 1 Instrukcja obsługi