
KA203O/98/a6/09.10
52016601
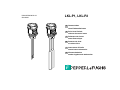
LKL-P1, LKL-P2
dGrenzschalter
ohne Elektronikeinsatz
ePoint Level Switch
without electronic insert
fDétecteur de niveau
sans électronique
es Detector de nivel
sin electrónica
iInterruttore di livello
senza inserto elettronico
nl Niveauschakelaar
zonder ingebouwde elektronika

df
2
Inhalt
Sicherheitshinweise 4
Geräteidentifikation 6
Einbau 8
Seile kürzen 10
Stäbe kürzen 12
Anschluss 15
Leitungsüberwachung 17
Wartung 18
Technische Daten 19
Zubehör 22
Fehlersuche 23
Ergänzende
Dokumentation 29
"Achtung!
= verboten; führt zu
fehlerhaftem Betrieb
oder Zerstörung.
Contents
Notes on Safety 4
Device Identification 6
Installation 8
Shorten ropes 10
Shorten rods 12
Connections 15
Line monitoring 17
Maintenance 18
Technical Data 19
Accessories 22
Trouble-shooting 24
Supplementary
Documentation 29
"Caution!
= forbidden; leads to
incorrect operation or
destruction.
Sommaire
Conseils de sécurité 4
Dénomination 6
Montage 8
Raccourcir les câbles 10
Raccourcir les tiges 12
Raccordement 15
Surveillance de ligne 17
Entretien 18
Caractéristiques techniques 19
Accessoires 22
Recherche de défauts 25
Documentation
complémentaire 29
"Attention!
= interdit; peut provoquer
des dysfonctionnements
ou la destruction.

es inl
3
Indice
Notas sobre seguridad 5
Identificación del equipo 6
Montaje 8
Acortar el cable 10
Acortar la varilla 12
Conexiones 15
Control de conexión 17
Mantenimiento 18
Datos técnicos 19
Accesorios 22
Identificación de fallos 26
Documentación
suplementaria 29
"Atención!
= Prohibido; peligro
de mal funcionamiento
o de destrucción.
Indice
Note sulla sicurezza 5
Identificazione dello
strumento 6
Montaggio 8
Accorciamento funi
10
Accorciamento aste 12
Collegamenti 15
Controllo della linea
17
Manutenzione 18
Dati tecnici 19
Accessori 22
Individuazione e
eliminazione delle anomalie 27
Documentazione
supplementare 29
"Attenzione!
= Vietato; pericolo
di malfunzionamento
o di distruzione.
Inhoud
Veiligheidsinstructies 5
Instrument-identificatie 6
Inbouw 8
Kabel inkorten 10
Staaf inkorten 12
Aansluiting 15
Kabelbewaking 17
Onderhoud 18
Technische gegevens 19
Toebehoren 22
Fout zoeken 28
Aanvullende documentatie 29
"Opgelet!
= verboden; leidt tot
foutieve werking
of storing.

d
f
4
Sicherheitshinweise
Der LKL-P1, LKL-P2 darf nur als
Grenzschalter für leitfähige
Flüssigkeiten verwendet werden.
Bei unsachgemäßem Einsatz
können Gefahren von ihm
ausgehen.
Das Gerät darf
nur von
qualifiziertem und
autorisiertem Fachpersonal
unter strenger Beachtung dieser
Betriebsanleitung,
der einschlägigen Normen,
der gesetzlichen Vorschriften und
der Zertifikate
(je nach Anwendung) eingebaut,
angeschlossen,
in Betrieb genommen und
gewartet werden.
In der Gebäudeinstallation ist ein
Netzschalter für das Gerät leicht
erreichbar in dessen Nähe zu
installieren.
Er ist als Trennvorrichtung für das
Ge r ä t z u ke n n z e i c h n e n .
Notes on Safety
The LKL-P1, LKL-P2 is designed
for point level detection in liquids.
If used incorrectly it is
possible that application-related
dangers may arise.
The device may be installed,
connected, commissioned,
operated and maintained
by
qualified and authorised
personnel only
, under strict
observance of these operating
instructions, any relevant
standards,
legal requirements, and, where
appropriate, the certificate.
Install an easily accessible power
switch in the proximity
of the device.
Mark the power switch as a
disconnector for the device.
Conseils de sécurité
Le LKL-P1, LKL-P2 doit être
exclusivement utilisé comme
détecteur de niveau pour liquides.
Il peut être source de danger en
cas d’utilisation non conforme aux
prescriptions.
L’appareil ne doit être
installé, raccordé, mis en service
et entretenu
que par un
personnel qualifié et autorisé
,
qui tiendra compte des indications
contenues dans la présente mise
en service, des normes en vigueur
et des certificats disponibles
(selon l’application).
Installer un commutateur réseau à
proximité immédiate de l’appareil,
en veillant à ce qu’il soit facilement
accessible.
Marquer ce commutateur comme
prise de coupure de l’appareil.

es
i
nl
5
Notas sobre seguridad
El detector de nivel LKL-P1,
LKL-P2 ha sido diseñado para la
detección de límite en fluidos.
Su empleo inapropiado puede
resultar peligroso. El equipo
deberá ser montado, conectado,
instalado y mantenido
única y
exclusivamente por personal
cualificado y autorizado
,
bajo rigurosa observación de las
presentes instrucciones de
servicio, de las normativas y
legislaciones vigentes,
así como de los certificados
(dependiendo de la aplicación).
Instalar un interruptor de fácil
acceso en las proximidades del
equipo.
Identificar el interruptor como
desconectador del equipo.
Note sulla sicurezza
Il LKL-P1, LKL-P2 è
particolarmente studiato per
l'impiego come soglia di livello in
liquidi.
Un'installazione non corretta può
determinare pericolo.
Lo strumento può essere montato
solamente da personale
qualificato ed autorizzato
. La
messa in esercizio e la
manutenzione devono rispettare
le indicazioni di collegamento,
le norme e i certificati di
seguito riportati.
Installare un interuttore per
l'alimentazione in prossimità
del dispositivo.
Marcare l'interuttore come
disconnessione del dispositivo.
Veiligheidsinstructies
Gebruik de LKL-P1, LKL-P2 alleen
als niveauschakelaar voor
vloeistoffen.
Indien niet correct gebruikt
kunnen gevaarlijke situaties
ontstaan.
Het instrument
alleen door
gekwalificeerd en
geautoriseerd personeel
laten
inbouwen, aansluiten,
in bedrijf nemen en onderhouden.
Neem de instructies in deze
Inbedrijfstellingsvoorschriften,
de desbetreffende normen, de
wettelijke voorschriften en
eventuele certificaten in acht.
Installeer een makkelijk
bereikbare voedingschakelaar in
de nabijheid van het instrument.
Kenmerk de voedingschakelaar
specifiek voor het instrument.

d
f
es
i
nl
6
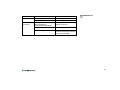
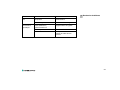
Geräteidentifikation
Device Identification
Dénomination
Identificación del equipo
Identificazione dello
strumento
Instrument-identificatie
LKL–P – – –
LKL-P1
A... mm, 100 mm ... 4000 mm
B... in, 3.9 in ... 157.5 in
C1000 mm
D2000 mm
LKL-P2
A... mm, 250 mm ... 15000 mm
B... in, 10 in ... 590.6 in
G5 G1½, ISO 228, PPS
N5 1½ NPT, ANSI, PPS
1Stäbe/Rods/Tiges/Varilla/Aste/Staven
2Seile/Ropes/Câbles/Cable/Funi/Kabels
L
L

7
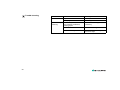
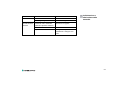
LKL–P – – –
NA *1
WH WHG *3
EB ¬ II 2G EEx ia/ib IIC T6
EC ¬ II 3G EEx nA/C (L) IIC T6
N*1
Y*2
NA *1
P1 IP66, M20 x 1.5
P2 IP66, ½ NPT
P3 IP66, G½
Stäbe/Rods/Tiges/Varilla/Aste/Staven
22, 316L
33, 316L
55, 316L
Seile/Ropes/Câbles/Cable/Funi/Kabels
22, 316Ti
33, 316Ti
55, 316Ti
1Stäbe/Rods/Tiges/Varilla/Aste/Staven
2Seile/Ropes/Câbles/Cable/Funi/Kabels
*1 ohne/without/sans/sin/senza/zonder
*2 andere/others/autres/otros/altri/andere
*3 Leckage Überwachung/Leakage detection/Détection de fuite/Detección de fugas/Rilevamento perdita/Lek detectie
1 2 3

d
f
es
i
nl
8
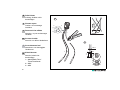
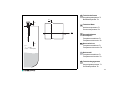
Einbau
Für Seil-/Stabsonden
Installation
For rope/rod probes
Montaje
Para sonda de cable/varilla
Montaggio
Per sonde ad asta/fune
Inbouw
Voor kabel-/staafelektroden
Montage
pour sondes à câbles/tiges
* *
Nur bei 2-Stabsonden
möglich
Only possible with
2-rod probes
Seulement possible
pour sondes à 2 tiges
Posible únicamente
con 2 sondas de varilla
Possibile solo
con 2 sonda ad asta
Alleen bij 2-staafelektroden
mogelijk
*
*
*

f
es
i
nl
d
9
Falscher Einbau
Incorrect Mounting
Montage incorrect
Montaje incorrecto
Montaggio errato
Foutieve inbouw

d
f
es
i
nl
10
Seile kürzen
Achtung: Isolation nicht
beschädigen
Shorten ropes
Caution: do not damage
insulation
Acortar el cable
Atención: no dañe el aislamiento
Accorciamento funi
Attenzione: non danneggiare
l'isolamento
Kabel inkorten
Attentie: isolatie niet
beschadigen
Raccourcir les câbles
Attention : ne pas endommager
l'isolation
1 = Masse/Earth/Terre/
Tierra/Terra/Aarde
2 = MAX
3 = MIN
A
11
ø1
B
4
3
2
5
1
1
2
3
Ø2.5

f
es
i
nl
d
11
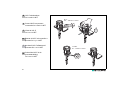
Gewi c h t mo nt i e r e n
Mount weight
Montar contrapeso
Rimontaggio peso
Gewicht monteren
Monter le poids
100 mm = 3.94 in
LOCTITE
A
B
100
3
14
M4 6
11
Ø2.6
Ø1.5
Ø10

d
f
es
i
nl
12
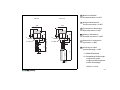
Stäbe kürzen
Achtung: Isolation anderer Stäbe
nicht beschädigen
Shorten rods
Caution: do not damage
insulation of other rods
Acortar la varilla
Atención: no dañe el aislamiento
de otras varillas
Accorciamento asta
Attenzione: non danneggiare
l'isolamento delle altre aste
Staven inkorten
Attentie: isolatie van andere
staven niet beschadigen
Raccourcir les tiges
Attention : ne pas endommager
l'isolation d'autres tiges
1 = Masse/Earth/Terre/
Tierra/Terra/Aarde
2 = MAX
3 = MIN
A
ø4
28
ø5
B
1
2
3
4
3
2
5
1

f
es
i
d
nl
13
A) Abstandhalter anbringen.
B) Nicht benötigte Führungen
können entfernt werden.
A) Provide spacer.
B) Guides not required can be
removed.
A) Añadir espaciador.
B) Las guías innecesarias
pueden eliminarse.
A) Distanziali.
B) Rimuovere le guide non
necessarie.
A) Afstandhouder monteren.
B) Niet gebruikte doorvoering
verwijderen.
A) Mettre en place le distanceur.
B) Les guides non utilisés
peuvent être supprimés.
B
A
250
mm 500
mm 500
mm 500
mm 500
mm
5.
4.
3.
2.
1.

d
f
es
i
nl
14
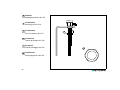
LKL-P einschrauben
G1
½
und 1½ NPT
Screw LKL-P into process
connection G1½ and 1½ NPT
Roscar el LKL-P a la conexión a
proceso G1½ y 1½ NPT
Avvitare il LKL-P all’attacco di
processo G1½ e 1½ NPT
Schroef de LKL-P in de
procesaansluiting
G1½ en 1½ NPT
Visser le LKL-P
G1
½
et 1½ NPT
40 … 80 Nm 10 bar≅
P
T
F
E
T
E
F
L
O
N
80 … 100 Nm 10 bar≅
55
G1½
1½ NPT

f
es
i
nl
d
15
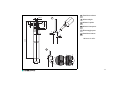
Anschluss
Connections
Conexiones
Collegamenti elettrici
Aansluiting
Raccordement
max. 2.5 mm²
(max. AWG 14)
Nationale Normen und Vorschriften beachten!
Note national regulations!
Respecter les normes et règles locales en vigueur!
Nationale voorschriften in acht nemen!
Considere reglamentaciones nacionales!
Osservare le norme nazionali!
Leitungsüberwachung
Line monitoring
Control de conexión
Kabelbewaking
Surveillance de ligne
Controllo della linea
ø5 … 9 mm
(ø0.2 … 0.35 in)
G1½ oder/or/ou/o/o/of
1½ NPT
1
3
4
52

d
f
es
i
nl
16
4
3
3
2
25
41
1
5
5 MIN
3 MIN
4 MAX
2 MAX
Δ
s
III
III
Anschluss
Connections
Conexiones
Collegamenti elettrici
Aansluiting
Raccordement

f
es
i
d
nl
17
Leitungsüberwachung
Erforderlich mit WHG-Zertifikat!
Line monitoring
Required with WHG certificate!
Control de conexión
Requerido con certificado WHG!
Controllo della linea
Obbligatorio con certificato
WHG!
Kabelbewaking
Vereist WHG certificaat!
Surveillance de ligne
Obligatoire avec certificat WHG!
Alarm
(ON)
Bei Auswertegeräten die diese Funktion nicht unterstützen,
ist die Leitungsüberwachung zu entfernen.
Remove line monitoring on switching units which do not support this function.
Supprimer la surveillance de ligne sur les détecteurs
qui ne supportent pas cette fonction.
Elimine el control de conexión en las unidades que no soporten esta función.
Rimuovere controllo della linea dall'unità di commutazione che non supporta
questa funzione.
Bij schakelversterkers die deze functie niet ondersteunen
de kabelbewaking verwijderen.
*
1
3
5
4
2
*
III

nl
i
es
f
d
18
Wartung
Isolation der Sonden prüfen
Ansatz entfernen
Maintenance
Check probe insulation
Remove build-up
Mantenimiento
Compruebe el aislamiento de la
sonda
Elimine las adherencias
Manutenzione
Verificare l'isolamento
rimuovere i depositi
Onderhoud
Isolatie controleren,
aangroei verwijderen
Entretien
Vérifier l'isolation des sondes
Supprimer les dépôts

f
es
i
d
nl
19
Technische Daten
Umgebungstemperatur T1
Betriebstemperatur T2
Technical Data
Ambient temperature T1
Process temperature T2
Datos técnicos
Temperatura ambiente T1
Temperatura de servicio T2
Dati tecnici
Temperatura ambiente T1
Temperatura di servizio T2
Technische gegevens
Omgevingstemperatuur T1
Procestemperatuur T2
Caractéristiques
techniques
Température ambiante T1
Température de service T2
=
-1 … +10 bar
p
(-14.5 … +142.9 psi)
e
T
1
°C
T
1
T
2
°C
T
2
70
-40
-40 100

d
f
es
i
nl
20
Bauform und Maße
Prozessanschluss G1½
Design and dimensions
Process connection G1½
Diseño y dimensiones
Conexión a proceso G1½
Dimensioni e connessione
al processo G1½
Uitvoering en maten
procesaansluiting G1½
Construction et dimensions
Raccord process G1½
*1 = SW55/AF55/Clé55
*2 = Sondenlänge/Probe length/
Longueur de sonde/
Longitud sonda/Lunghezza
sonda/ sensorlengte
100 mm = 3.94 in
LKL-P2
LKL-P1
ø5
ø4
24
ø2.5
ø10
100
22
37
G1½
22
37
G1½
*1*1
64
max. 63
ø66
64
max. 63
ø66
*2
250 mm … 15000 mm
*2
100 mm … 4000 mm

d
f
es
i
nl
21
Bauform und Maße
Prozessanschluss 1½ NPT
Design and dimensions
Process connection 1½ NPT
Diseño y dimensiones
Conexión a proceso 1½ NPT
Dimensioni e connessione
al processo 1½ NPT
Uitvoering en maten
procesaansluiting 1½ NPT
Construction et dimensions
Raccord process 1½ NPT
*1 = SW55/AF55/Clé55
*2 = Sondenlänge/Probe length/
Longueur de sonde/
Longitud sonda/Lunghezza
sonda/ sensorlengte
100 mm = 3.94 in
*1*1
ø2.5
23.5
23.5
38.5
38.5
ø10
100
*2
250 mm … 15000 mm
1½ NPT1½ NPT
LKL-P2
LKL-P1
ø5
ø4
24
*2
100 mm … 4000 mm
86
max. 63
ø66
86
max. 63
ø66

d
f
es
i
nl
22
Zubehör
Befestigungsmutter LKL-Z10
Accessories
Mounting nut LKL-Z10
Accesorios
Tuerca de montaje LKL-Z10
Accessori
Dadi di montaggio LKL-Z10
Toebehoren
Bevestigingsmoer LKL-Z10
Accessoires
Ecrou de fixation LKL-Z10
A
A

23
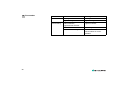
Fehlfunktion Ursache Maßnahme
Schaltet nicht Versorgungsspannung fehlt Versorgung prüfen
Signalleitung defekt Signalleitung prüfen
Fehlschaltung,
sporadisch
Dichter schwerer Schaum,
wilde Turbulenzen,
aufgeschäumte Flüssigkeit
Gerät gegebenenfalls in einem
Bypass montieren
Extreme Funkstörung Verbindungskabel abschirmen
Wasser im Gehäuse Deckel und
Kabeldurchführungen säubern
und fest zuschrauben
Fehlersuche
d

24
Fault Reason Remedy
Does not switch No power Check power
Faulty signal line Check signal line
Sporadic faulty
switching
Thick heavy foam,
very turbulent conditions,
foaming liquid
Mount device in a bypass if
necessary
Extreme radio interference Screen connecting cable
Water in housing Clean cover and cable gland
and screw tight
Trouble-shooting

25
Défaut Cause Mesure
Ne commute
pas
Tension d’alimentation
manquante
Vérifier la tension
d’alimentation
Câble de signal défectueux Vérifier le câble de signal
Mauvaise
commutation,
sporadique
Mousse dense et lourde,
fortes turbulences,
liquide émulsionné
Monter le cas échéant
l'appareil dans un bypass
Parasites puissants Blinder le câble de liaison
Eau dans le boîtier Nettoyer le couvercle et les
entrées de câble et bien
revisser
Recherche de défauts
f

26
Fallo Causa Solución
No conmuta No hay alimentación Comprobar alimentación
Señal defectuosa Comprobar cable de señal
Fallos de
conmutación
esporádicos
Espuma muy densa,
turbulencias,
líquidos espumosos
Si es necesario, montar el
equipo en un bypass
RFI extremo Utilizar cable apantallado
Agua en el cabezal Limpiar la tapa del cabezal
y el prensaestopa y roscar
firmemente
Identificación de fallos
es

27
Guasto Motivo Rimedio
Non commuta Mancanza alimentazione Controllare l’alimentazione
Linea segnale guasta Controllare segnale linea
Commutazione
sporadicamente
difettosa
Schiuma pesante e torbida
condizioni molto turbolente,
liquido che produce schiuma
Se necessario montare lo
strumento in bypass
RFI forte Usare cavo schermato
Acqua nella custodia Asciugare il coperchio e il
pressacavo e stringere con
cura
Individuazione e
eliminazione delle
anomalie
d
i

28
Fout Oorzaak Maatregel
Schakelt niet Voeding ontbreekt Voeding kontroleren
Signaalleiding defect Signaalleiding kontroleren
Sporadische
foutschakeling
Dik zwaar schuim,
wilde turbulentie,
opgeschuimde vloeistof
Instrument mogelijk in een
bypass monteren
Extreme RFI invloed Verbindingskabel afschermen
Water in de behuizing Deksel en wartels
schoonmaken en correct
afdichten
Fout zoeken
nl

29
Supplementary
Documentation
Documentation
complémentaire
Documentación
adicional
Documentazione
supplementare
Aanvullende
documentatie
Technische Information/Technical information/Information technique/
Información técnica/Informazioni tecniche/Technische informatie
TI375O
Sicherheitshinweise/Notes on Safety/Conseils de sécurité/
Notas sobre seguridad/Note sulla sicurezza/Veiligheidsinstructies
SI226O ¬ II 3G EEx nA/C (L) IIC T6
SI230O
¬
II 2G EEx ia/ib IIC T6
www.pepperl-fuchs.com
Ergänzende
Dokumentation
dd
d
f
es
i
nl

30

31

Subject to modifications
Copyright PEPPERL+FUCHS • Printed in Germany
www.pepperl-fuchs.com
Worldwide Headquarters
Pepperl+Fuchs GmbH
68307 Mannheim · Germany
Tel. +49 621 776-0
E-mail: [email protected]
USA Headquarters
Pepperl+Fuchs Inc.
Twinsburg, Ohio 44087 · USA
Tel. +1 330 4253555
E-mail: [email protected]
Asia Pacific Headquarters
Pepperl+Fuchs Pte Ltd.
Company Registration No. 199003130E
Singapore 139942
Tel. +65 67799091
E-mail: [email protected]
52016601
KA203O/98/a6/09.10
FM7.1
DOCT-0500B 125877
09/2010
-
 1
1
-
 2
2
-
 3
3
-
 4
4
-
 5
5
-
 6
6
-
 7
7
-
 8
8
-
 9
9
-
 10
10
-
 11
11
-
 12
12
-
 13
13
-
 14
14
-
 15
15
-
 16
16
-
 17
17
-
 18
18
-
 19
19
-
 20
20
-
 21
21
-
 22
22
-
 23
23
-
 24
24
-
 25
25
-
 26
26
-
 27
27
-
 28
28
-
 29
29
-
 30
30
-
 31
31
-
 32
32


Pepperl+Fuchs LKL-P1 Handleiding
- Type
- Handleiding
- Deze handleiding is ook geschikt voor
in andere talen
- italiano: Pepperl+Fuchs LKL-P1 Istruzioni per l'uso
- français: Pepperl+Fuchs LKL-P1 Mode d'emploi
- español: Pepperl+Fuchs LKL-P1 Instrucciones de operación
- Deutsch: Pepperl+Fuchs LKL-P1 Bedienungsanleitung


