Electrolux EKK601305X Handleiding
- Categorie
- Keuken-
- Type
- Handleiding

EKK 601305
Handleiding
User manual
BE
Gas-En Elektrisch Fornuis
Mixed-Fuel Cooker

2 electrolux
Oderstaande symbolen vindt u in de tekst en hebben de voldende betekenis:
Aanwijzingen m.b.t. de veiligheid
Aanwijzingen m.b.t. het gebruik
Adviezen en tips
Informatie m.b.t. het milieu
)
Over deze gebruiksanwijzing
Dit Toestel voldoet aan de EEG-richtlijn:
• 2006/95 (lage spanning);
• 2004/108 (elektromagnetische vereinigbaarheid);
• 90/396 (met betrekking tot apparatuur op gas);
en de daarop volgende wijzigingen.
Waarschuwingen en adviezen .......................................................................................... 3
Bedienigspaneel............................................................................................................... 6
De kookplaat....................................................................................................................7
Elektrische oven ............................................................................................................... 9
Tips voor het gebruik van de gasbranders ...................................................................... 11
Enkele tips bij het gebruik van de oven ........................................................................... 11
Adviestabel voor bakken en braden ............................................................................... 14
Onderhoud .................................................................................................................... 16
Wan te doen indien ........................................................................................................ 18
Technische gegevens ..................................................................................................... 19
Instructies voor de installateur ........................................................................................ 20
Elektrische aaansluiting .................................................................................................. 24
Service en onderdelen.................................................................................................... 25
Garantie/serviceafdeling ................................................................................................. 25
Europese garantie .......................................................................................................... 27
Inhoud
Electrolux. Thinking of you.
Ga voor meer van onze ideeën naar www.electrolux.com
FABRIKANT :
ELECTROLUX POLAND SP. Z.O.O.
ul. Kazimierza Odnowiciela 28
58-100 Swidnica (Polen)

electrolux 3
Installatie
z De installatie moet gedaan worden door
bevoegde en gekwalificeerde
installateurs, volgens de normen van
kracht.
z Elke eventuele modificatie aan de
electrische huisopstelling die nodig
mocht zijn om de apparatuur te kunnen
installeren, mag enkel gedaan worden
door bevoegd personeel.
z Het is gevaarlijk om de kenmerken van
deze apparatuur te veranderen of te
willen veranderen.
z In geval van twijfel, vraag raad aan de
installateur.
z Vermijd de installatie van het gasfornuis
in de nabijheid van ontvlambare
materialen (bvb. gordijnen, grof linnen
ecc. ...).
z Het apparaat moet op de vloer worden
geplaatst; hetmag niet op een voetstuk
worden gezet.
Veiligheid van kinderen
z Deze apparatuur is ontworpen om
gebruikt te worden door volwassenen.
Opgelet dat de kinderen zich niet
naderen met de bedoeling om er te
spelen.
z Let op de kinderen geheel gedurende
het gebruik dat ze de oppervlakken niet
aanraken en dat ze niet dicht bij de
apparatuur staan tijdens het gebruik of
tijdens het afkoelen.
z Dit apparaat mag niet gebruikt worden
door kinderen of andere personen wiens
lichamelijke, motorische of geestelijke
gesteldheid of gebrek aan ervaring en
kennis die daardoor het apparaat niet
kunnen gebruiken zonder supervisie of
instructies van een verantwoordelijk
persoon om zeker te zijn van dat het
apparaat veilig kan worden gebruikt.
Tijdens het gebruik
z Onstabiele of vervormde kookpannen
mogen niet op de gaspitten of op de
platen gezet worden om ongelukken van
omslaan of overlopen te voorkomen.
z Bewaak aandachtig het koken met olien
en vetten.
z De apparatuur blijft lang warm na het
afzetten.
z Indien de apparatuur uitgerust is met
een deksel, is diens functie om het
fornuis te beschermen tegen het stof
wanneer het gesloten is, en om de
vetspatten op te vangen wanneer het
open is.
z Gebruik het niet voor andere
doeleinden.
z Maak het deksel steeds schoon
vooraleer het te sluiten of weg te nemen
en laat de gaspitten en/of de platen
afkoelen vooraleer het deksel te sluiten.
z Tijdens het gebruik wordt het toestel
heet. Wees voorzichtig om aanraking
van de verwarmingselementen binnenin
de oven te voorkomen.
z Op het moment van het openen van
de ovendeur, gedurende de
bereidingsfase of aan het einde
hiervan, oppassen met de hete lucht
die uit de oven komt.
z Controleer steeds dat de
bedieningstoetsen in de positie «
z»
Deze waarschuwingen zijn opgesteld voor uw veiligheid en de veiligheid van
derden. Wij verzoeken u deze aandachtig te lezen vooraleer het apparaat te
installeren en te gebruiken.
Waarschuwingen en adviezen
NEDERLANDS

4 electrolux
of «0» staan, wanneer de apparatuur
niet in functie is.
z Plaats steeds de druippan wanneer U de
gril gebruikt of wanneer U het vlees op
het grilrooster legt.
z Giet een beetje water in de druippan om
het aanbranden van de vetten te
voorkomen, en zo slechte geuren te
vermijden.
z Gebruik steeds keukenhandschoenen
om de gerechten uit de oven te nemen.
z De accessoires worden, vooraleer ze
voor de eerste keer te gebruiken,
schoongemaakt.
z Opgepast wanneer U schoonmaakpro-
ducten gebruikt in spray: richt nooit de
spray op de weerstand en de thermo-
statische bol.
z Indien, gedurende het inzetten of
uitnemen van gerechten uit de oven, er
aanzienlijke hoeveelheden olie, saus,
ecc. achteraan in de oven moesten
vallen, maak dan eerst schoon vooraleer
het koken te beginnen om
onaangename rook en ook mogelijk
branden van deze stoffen te voorkomen.
z Dit toestel is niet aangesloten op een
afvoerkanaal voor verbrandingsgassen.
Het moet geplaatst en aangesloten
worden in overeenstemming met de gel-
dendevoorschriften. Bijzondere
aandacht moet worden gegeven aan die
punten diebetrekking hebben op de
ventilatie.
z Door het gebruik van een kooktoestel op
gas wordt et warmte en vochtigheid
geproduceerd in het lokaal waar het
toestel is opgesteld. Waak erover dat de
keuken goed verlucht wordt waarbij u de
natuurlijke verluchting openlaat of een
mechanische voorziening aanbrengt
(mechanische dampkap).
z Een langduring en intensief gebruik van
het toestel kan een bijkomende
verluchting vereisen, bijv. door het
openen van een raam, of een efficiëntere
verluchting , bijv. door het vermogen
van de mechanische ventilatie te
verhogen, als deze aanwezing is.
z Om hygienische- en veiligheidsredenen
moet deze apparatuur altijd proper
gehouden worden.
z Dit apparaat mag niet worden
schoongemaakt met stoom of met een
stoomreiniger.
z Vormingen van vetten of andere spijzen
kunnen branden veroorzaken.
z Dit product is gemaakt voor het koken
van eetwaren en mag niet gebruikt
worden voor andere doeleinden.
z Voed de apparatuur met het type gas
dat vermeld staat op het kleefetiket,
geplaatst nabij de tube van de
aansluiting van het gas.
z De ovenwanden niet bekleden met
alluminiumfolie, vooral niet de achterste
wand.
z De apparatuur is zwaar, verzet haar met
voorzichtigheid.
z Gebruik nooit ruwe schuurmiddelen of
een scherpe metalen krabber om het
glas van de ovendeur schoon te maken
omdat deze krassen in het oppervlak en
daarmee barsten in het glas kunnen
veroorzaken.
z Voor het onderhoud of de schoonmaak
eerst de apparatuur uitschakelen en
laten afkoelen.
z Om de ontsteking te vergemakkelijken,
steek eerst de gaspit aan vooraleer de
kookpan op het rooster te zetten. Na de
gaspitten aangestoken te hebben,
controleer of de vlam regelmatig is.
z Verlaag steeds de vlam of ontdoof ze,
vooraleer de kookpannen weg te
nemen.
z Verzeker U ervan of de roosters van het
fornuis juist geplaatst worden.
z Enkel vuurvaste borden mogen in de
schuif onder de oven geplaatst worden.
Er geen ontvlambare stoffen inzetten.

electrolux 5
Het is heel belangrijk dat dit
instructieboekje, voor eender welke
toekomstige raadpleging, samen met de
apparatuur bewaard wordt. Indien de
apparatuur verkocht moest worden, of
overgedragen aan een andere persoon,
verzeker U ervan, dat het boekje samen
geleverd wordt, zodat de nieuwe
gebruiker op de hoogte kan gesteld
worden van het functioneren van het
apparaat en van de relatieve
waarschuwingen.
Deze instructies gelden enkel voor de
landen waarvan het identificatiesymbool
is aangebracht op het titelblad van het
instructieboekje en het apparaat zelf.
Service
z Voor eventuele tussenkomst richt U zich
tot een geautoriseerde Technisch
Hulpdienst om originele wisselstukken te
bekomen.
Informatie m.b.t. het milieu
z Houd bij het weggooien van de
verpakking rekening met de veiligheid en
het milieu.
z Als u een oud apparaat afdankt, maak
het dan onbruikbaar door het
aansluitsnoer af te snijden.
Het symbool
op het product
of op de verpakking wijst erop dat dit
product niet als huishoudafval mag worden
behandeld. Het moet echter naar een plaats
worden gebracht waar elektrische en
elektronische apparatuur wordt gerecycled.
Als u ervoor zorgt dat dit product op de
correcte manier wordt verwijderd, voorkomt
u mogelijk voor mens en milieu negatieve
gevolgen die zich zouden kunnen voordoen
in geval van verkeerde afvalbehandeling.
Voor meer details in verband met het
recyclen van dit product, neemt u het best
contact op met de gemeentelijke instanties,
het bedrijf of de dienst belast met de
verwijdering van huishoudafval of de winkel
waar u het product hebt gekocht.

6 electrolux
Onderdelen
Rooster
1. Bedieningsknop de brander/ zone
linksachter (Normaalbrander)
2. Bedieningsknop de brander/ zone
linksvoor (Sterkbrander)
3. Bedieningsknop de brander/ zone
rechtsvoor (Kleinbrander)
4. Bedieningsknop de brander/ zone
rechtsachter (Normaalbrander)
Ovenruimte
Verlichtingslampje
Vangschaal
Bedienigspaneel
Grill-element
Cirkulatieventilator
5. Oven-funktieschakelaar
6. Bedieningsknop oventhermostaat
7. Klok einde bereidingstijd
8. Thermostaat kontrolelampje
65432 871

electrolux 7
Bedieningsknoppen van het kookvlak
Op het bedieningspaneel bevinden zich
drukknoppen om de gasbranders van het
kookvlak te bedienen.
De regelknoppen voor de gasbranders
kunnen in tegenwijzerzin worden gedraaid
tot een symbool dat een kleine vlam voorstelt
en omgekeerd ook in wijzerzin.
z er komt geen gas wrij
er komt een maximale hoe
veelheid gas vrij
er komt een minimale hoeveel
heid gas vrij
Aansteken van de branders op het
kookvlak
z Door de knop van de te gebruiken
brandergeheel in te drukken en op de
hoogste stand te draaien (
), zal de
betreffendebrander aangaan.
z Maar houdt vervolgens de knop nog 5
seconden geheel ingedrukt. Dat is nodig
omde vlambeveiliging in te schakelen. De
vlam beveiliging voorkomt, dat het gas
blijftdoorstromen, als de vlam uitwaait of
uitgaat door een storing in het gasnet.
Zetvervolgens de knop in de gewenste
stand.
z Wanneer de brander ontvlamd is, stelt u
de vlammen af naar wens.
z Indien na verschillende pogingen de
brander niet ontvlamt, kijkt u best even
na of de vlamverdeler en de kop van de
brander goed op hun plaats zitten.
z Om de gastoevoer te stoppen draait u de
knop in wijzerzin op de stand “
z “.
Het ontstekingsmechanisme
mag niet langer dan 15 seconden
ingedrukt worden. Als de brander
niet aan is na 15 seconden, wacht
dan minstens 1 minuut voordat u
het nogmaals probeert.
De kookplaat
A - Branderdeksel
B - Vlamverdeler
C - Vonkontsteking
D - Vlambeveiliging

8 electrolux
Type brander Min. Max.
afmeting afmeting
Sterk 180 mm. 260 mm.
Normaal 120 mm. 220 mm.
Klein 80 mm. 160 mm.
Als de brander per ongeluk dooft,
zet dan de knop op UIT "
z" en
wacht minstens 1 minuut voordat
u het nogmaals probeert.
Wanneer u bij het koken vetten of
olie gebruikt moet u steeds goed
toekijken, want deze vetstoffen
kunnen bij opwarming vuur
vatten.
Luciferontsteking
Steek de lucifer aan. Druk de knop
van de betreffendebrander in en draai
hem linksom. Steek de brander
direktan.
Tabel van de minimale en maximale
diametersvan de pannen.
Over Kookpotten en pannen
Denk er steeds aan dat een brede, grote
pan een grote warmteoppervlakte heeft en de
ingrediënten dus sneller koken dan een in een
smallere, kleinere pan.
Gebruik dus steeds pannen die aange-
past zijn aan wat u klaarmaakt. Let in het
bijzonder goed op dat de pannen niet te klein
zijn voor vloeistoffen die makkelijk kunnen
overkoken of dan weer niet te groot zijn voor
ingrediënten die snel klaar moeten zijn. Op
een bodem die niet met vet of braadjus
bedekt blijft kunnen de ingrediënten makkelijk
aanbranden. Voor taarten en gebak gebruikt
u best vormen in staal die niet opengaan. Een
vorm die opengaat laat vruchtenjus en suiker
door die wanneer ze op de bodem van de
oven vallen, karameliseren en moeilijk te
verwijderen zijn. Vermijd ood pannen met
plastic handgrepen in de oven te zetten; ze
zouden immers de hitte niet kunnen
weerstaan. Om het maximale rendement uit
de branders te halen en dus ook gas te be-
sparen, raden we u aan pannen te gebruiken
waarvan de diameter gelijk is of groter dan de
gebruikte brander.
We raden u ook aan de pannen waarin u
iets kookt af te dekken en wanneer het aan
de kook komt, de vlam te verminderen zodat
alles rustig verder kookt.

electrolux 9
Bakwijzeknop
en thermostaatregel-
knop
Deze beide knoppen laten u toe de
bakwijze (keuze van het verwarmings-
element) en de temperatuur te kiezen
afhankelijk van de eisen van het recept.
Het ovenlampje blijft branden ongeacht
de stand van de knop.
Betekenis van de symbolen
Boven- en onderwarmte - De warmte
komt van zowel de bovenste als de
onderste verwarmingselementen, zodat
er in de gehele ovenruimte een
gelijkmatige temperatuur heerst.
Hetelucht - Bij deze instelling kunt u
braden of tegelijkertijd braden en bakken
op verschillende niveaus, zonder
smaakoverdracht.
Kleine grill - Kan gebruikt worden om
kleine hoeveelheden te grillen.
Grote grill - Het gehele grillelement
wordt ingeschakeld.
Pizzafunctie - Het onderste
verwarmingselement en de kleine grill
zijn ingeschakeld en de ventilator zorgt
ervoor dat er lucht circuleert om het
beleg van de pizza of de vulling van
pasteien gaar te maken.
Onderste verwarmingselement - De warmte
komt alleen van de bodem van de oven.
Om elke oververhitting tijdens het
gebruik van de oven of de grill te
vermijden, laat u steeds het
deksel van het fornuis openstaan.
Verklikkerlichtje oventhermostaat
Dit lichtje gaat uit wanneer de oven de
ingestelde temperatuur bereikt en zal telkens
opnieuw gaan branden wanneer de
thermostaat in werking treedt om de
temperatuur zelf te regelen.
Elektrische oven

10 electrolux
)
Klok einde bereidingstijd
Hiermee kunt u de oven automatisch
laten uitschakelen als de ingestelde tijd
verlopen is. Als de bereidingstijd is afgelopen
klinkt er een geluidssignaal. De
bereidingsduur kan op maximaal 120
minuten worden ingesteld.
Zet het gerecht in de oven en draai de
functieknop en de thermostaatknop op de
gewenste instellingen. Draai de knop van de
timer naar de maximale stand (“120”), draai
hem daarna terug tot de gewenste
bereidingstijd. Als de bereidingstijd is
afgelopen klinkt er een geluidssignaal en wordt
de oven automatisch uitgeschakeld.
Draai de timerknop op
om de oven
op handmatige bediening te zetten.
De beveiligingsthermostaat
Voor de veiligheid van de gebruiker is de
oven voorzien van een beveiligings-
thermostaat. Bij een eventueel optredend
defect van de hoofdthermostaat met als
gevolg oververhitting schakelt deze
beveiligingsthermostaat de oven uit. Als dit
onverhoopt een keer gebeurt, probeer dan
onder geen voorwaarde de oven zelf te
repareren, maar waarschuw direct onze
service-afdeling.
Het gebruik van de oven voor de eerste keer
Voordat u de oven gebruikt, zorg ervoor
dat de einde tijd-toets in positie staat.
Na het plaatsen van de oven ga dan als
volgt te werk:
1) zet de Bakwijzeknop op
;
2) zet de thermostaatknop op “max”;
3) laat de oven (leeg) 45 minuten lang
werken;
4) zet een raam open voor frisse lucht.
Tijdens de eerste paar minuten zal er
rook met een onaangename geur onstaan,
dit wordt veroorzaakt door het isolatie-
materiaal en vettige restanten op het
materiaal, erop gekomen tijdens de
produktie.
Het is raadzaam de hierboven beschreven
procedure te herhalen, door de
bereidingsfuncties “Grote grill“
en
“Pizzafunctie“
te kiezen gedurende onge-
veer 5-10 minuten.
Was de ovenaccessoires goed af alvo-
rens de oven voor het eerst te
gebruiken.
Afdekplaat voor de kookplaat
Als de kookplaat voorzien is van een
afdekplaat, mag u deze alleen gebruiken als
bescherming tegen stof op de kookplaat, of
als hij open staat, als opvang van vetspatten
ter bescherming van de keukenwand.
Gebruik deze plaat nergens ander voor.
Droog het deksel goed of voordat u de
plaat open zet.
Maak het deksel goed schoon voordat u
deze dicht doet, vergeet niet de branders
eerst te laten afkoelen.
WAARSCHUWING: Het glazen
deksel kan bij oververhitting in vele
stukjes springen Zorg
er altijd voor, dat de
branders afgekoeld
zijn voordat u de
deksel sluit.

electrolux 11
Gebruik de oven met de deur
gesloten.
Let goed op bij het openen van de
naar beneden openslaande
ovendeur. Laat deze niet
openvallen - ondersteun de deur
met de handgreep totdat deze
helemaal open is.
De oven heeft vier bakplaatstanden.
De bakplaatstanden worden geteld
vanaf de bodem van de oven, zoals
de figuur laat zien.
Het is belangrijk dat de bakplaat goed
geplaatst wordt.
Plaats geen kookwaren direct op
de bodem van de oven.
Om elke oververhitting tijdens het
gebruik van de oven of de grill te
vermijden, laat u steeds het
deksel van het fornuis openstaan.
Enkele tips bij het gebruik van de oven
4
3
2
1
Tips voor het gebruik van de gasbranders
Begin het koken steeds met een
volledige vlam door de regelknop op te
zetten. Stel nadien de vlammen in naar
wens. De vlam is aan de buitenzijde veel
warmer dan binnenin (de kern). Daarom
moeten de punten van de vlammen de
bodem van de pan aanraken. De vlammen
die buiten de oppervlakte van de pan komen
zijn een verspilling van gas en energie. In
tegenstelling tot elektrische kookvlakken is
het onnodig dat de pannen een vlakke
bodem hebben. Pannen met een dunne
wand zullen de warmte dan weer sneller
doorgeven naar de inhoud dan pannen met
een dikkere wand. En omdat warmte niet
gelijkmatig over de bodem wordt verspreid
kunnen de ingrediënten lokaal oververhit
geraken.
Indien u pannen met een dunne bodem
gebruikt, is het nodig de inhoud vaak (om) te
roeren. Een dikkere bodem vermindert het
risico op lokaal aanbranden omdat op de
bodem een voldoende thermische
compensatie ontstaat.
We raden u aan pannen te gebruiken
met een gepaste grootte. Brede en lage
pannen zijn geschikter dan smalle en hoge
pannen want ze zorgen voor een snelle
opwarming.
Men versnelt het koken niet door kleine
pannetjes op een grotere brander te zetten.
Men verspilt er enkel gas door. U gebruikt de
branders op de juiste manier wanneer u
kleine pannen op de kleine brander zet en
grote op de grote brander. Met een gesloten,
afgedekte pan vermijdt u ook de verspilling
van warmte.
Opgelet: de kans bestaat, dat bij
onzorgvuldig gebruik van de ovendeur
vingers beklemd raken.

12 electrolux
Om de evolutie von het bakken van de
taart te controleren, steekt u een tanden-
stoker in het deeg. Indien hij er droog uitkomt
is de taart voldoende gebakken.
Wacht om dit te doen tot minstens 3/4
van de voorziene, voorgeschreven baktijd is
verstreken.
Houd er over het algemeen ook rekening
mee dat:
een gerecht dat aan de buitenkant
voldoende gebakken is maar onvoldoende
binnenin, een langere baktijd noding had
maar wel aan een lagere temperatuur.
En omgekeerd zal een droog gerecht
een kortere baktijd nodig hebben maar wel
aan een hogere temperatuur.
Het braden en bakken van vlees
Vlees dat u in de oven wil braden moet
minstens 1 kg wegen. Zo vermijdt u dat het
te droog wordt. Indien u gebraad wenst met
een prachtig kleurtje, gebruik dan weinig
vetstoffen. Indien u mager vlees braadt,
gebruik dan wat olie en wat boter. Boter of
olie zijn overbodig indien het vlees bovenop
een stukje zwoerd of vet heeft. Indien het
gebraad dat stukje vet op de zijkant heeft,
legt u beter die kant naar boven zodat wan-
neer het vet smelt het nodige vet over het
lagere deel zal verspreiden.
Rood vlees neemt u beter 1 uur vóór het
braden uit de koelkast, zo niet zal het
bruuske temperatuurverschil het vlees taaier
maken. Gebraad, zeker rood vlees, moet niet
gezouten worden bij de aanvang van het
braden omdat het zout het vocht en het
bloed uit het vlees zou halen en het vlees dus
zal verhinderen een smakelijk braadkleurtje
te krijgen.
We raden u aan het gebraad te zouten
buiten de oven, even na verloop van de helft
van da baktijd.
Leg gebraad steeds in een schotel met
een lage rand. Een schotel met een hoge
rand legt een scherm rond het vlees en
verhindert de goede verspreiding en
Condensatie en stoom
Deze oven is voorzien van een exclusief
bereidingssysteem dat een natuurlijke
luchtcirculatie genereert met voortdurend
hergebruik van de bereidingsstoom. Dit
maakt het mogelijk om etenswaren te
bereiden in een omgeving met een constante
vochtigheidsgraad, terwijl de levensmiddelen
van binnen zacht en van buiten krokant
blijven. Bovendien worden de
bereidingstijden en het energieverbruik tot
een minimum beperkt. Gedurende de
bereiding kan er stoom ontstaan, die bij het
openen van de deur naar buiten komt.
Dit verschijnsel is helemaal natuurlijk.
Op het moment van het openen
van de ovendeur, gedurende de
bereidingsfase of aan het einde
hiervan, oppassen met de hete
lucht die uit de oven komt.
Zodra voedsel wordt verwarmd
onstaat er stoom die in contact komt
met het glas van de ovendeur en
vervolgens waterdruppels op het glas
vormt. Dit is normaal en wordt niet
door een fout in de oven veroorzaakt.
Om condensatie te verminderen, de
lege oven altijd 10 minuten
voorverwarmen. We adviseren deze
druppels na ieder gebruik te
verwijderen.
Tips bij het gebruik van de traditionele
oven
Het bakken van taarten
De oven minstens 10 minuten vóór her
gebruik voorverwarmen, behalve indien het
gerecht het anders vereist.
Open de ovendeur niet wanneer u
gerechten klaarmaakt die moeten rijzen (by,
gistdeeg, soufflés…) De aanvoer van
koudere lucht zou het gistingsproces
stoppen.

electrolux 13
verdeling van de warmte.
Vlees kan gebakken worden in ovenvaste
schotels of rechtstreeks op het rooster
waaronder u de vetvanger plaatst. De
ingrediënten van het braadvocht voegt u
enkel onmiddellijk aan de schotel wanneer
de baktijd kort is, zo niet wacht u tot het
laatste half uur van de baktijd.
Rood, bloedend vlees begint u te bakken
met een constante hitte om vorvolgens de
temperatuur te verminderen om het
binnenste van het vlees te braden. De
temperatuur van het braden van wit vlees
kan gematigd blijven van het begin tot het
einde.
Het verloop van het braden kan u nagaan
door met een vork op het vlees te drukken.
Indien het vlees niet meteen meegeeft is het
licht doorbakken (à point).
Op het einde van het braden raden we u
aan een kwartier te wachten vooraleer het te
versnijden. Zo verliest het niet teveel vocht.
U kan de dienborden warm houden in de
oven. U moet die wel op de minimale
temperatuur houden.
Het bakken van vis
Vis van kleine omvang bakt u van het
begin tot het einde aan een hoge tempera-
tuur. Bij middelgrote vis begint u met een
hoge temperatuur om zo langzaam de
temperatuur te verminderen. Grote vis bakt
u van het begin tot het einde aan een
gematigde temperatuur.
U kan het verloop van het bakken
controleren door voorzichtig met een mes of
een vork een stukje van de buik op te heffen;
het vlees moet gelijkmatig wit en
ondoorschijnend zijn. Dit geldt uiteraard niet
voor zalm, forel en gelijkaardige soorten.
Volg in elk geval steeds de aanwijzingen
van de recepten.
Bakken met de grill
Met de grill kan u vooral rood vlees
stukken (maar niet te groot) vlees van
verschillende grootte bakken; gevogelte
snijdt u best in twee en drukt u plat en verder
zijn ook vis, bepaalde groenten (by,
courgettes, aubergines, tomaat, enz.), en
vlees-, vis- of zeevruchtenbrochetten
geschikt voor de grill.
Vlees en vis voor de grill oliet u vooraf in
en legt u op het rooster; zout het vlees op het
einde van het braden; vis daarentegen zout
u best aan de binnenkant vóór het bakken;
het rooster plaatst u naar wens zo dicht
mogelijk of zo ver mogelijk van het
grillelement om het bakken te doseren zodat
het oppervlak niet verbrandt en het binnenste
gedeelte niet rauw blijft.
Giet telkens 1 of 2 glazen water op de
vetvanger om rookvorming te vermijden door
het druppen van jus en vet op de warme
plaat.
U kan de grill ook gebruiken om te
gratineren, brood te toasten of knapperig te
maken en bepaalde vruchten zoals bananen,
halve pompelmoezen, stukken ananas,
appels, enz. te grillen. Dit fruit mag u echter
niet te dicht bij het grillelement plaatsen.
De baktijd
De baktijden varieren uitraard naargelang
de ingrediënten, hun homogeniteit en hun
omvang. We raden u aan de eerste baksels
goed te observeren en de resultaten ervan te
noteren. Op basis van deze gegevens kunt
u deze of andere gerechten (opnieux) klaar-
marken.
We geven in de volgende tabel enkele
richtinggevende baktijden en temperaturen
voor de oven en de grill.
Um eigen ervaring zal u vervolgens
toelaten ev. variaties op de aangegeven
waarden aan te brengen.
Veel succes en veel kookgenot!

14 electrolux
De aangegeven bereidingstijden houden geen rekening met de voorverhitting.
De lege oven altijd 10 minuten voorverwarmen.
Adviestabel voor bakken en braden
ZOETE NAGERECHTEN
Met opgeklopt deeg 2 170 2 (1en3)* 160 45 ~ 60 In bakvorm
Kruimeldeeg, taartbodem 2 170 2 (1en3)* 160 20 ~ 30 In bakvorm
Ricottataart 1 160 2 150 60 ~ 80 In bakvorm
Appeltaart 1 180 2 (1en3)* 170 40 ~ 60 In bakvorm
Strudel 2 175 2 150 60 ~ 80
Vruchtenvlaai 2 175 2 (1en3)* 160 30 ~ 40
Fruit cake 1 175 1 160 45 ~ 60 In bakblik
Biscuit 1 175 2 (1en3)* 160 30 ~ 40 In bakvorm
Panettone 1 170 1 160 40 ~ 60 In bakvorm
Casinogebak 1 170 1 160 50 ~ 60 In bakblik
Kleine gebakjes
(met opgeklopt deeg) 2 175 2 (1en3)* 160 25 ~ 35 op bakplaat
Koekjes (kruimeldeeg) 2 160 2 (1en3)* 150 20 ~ 30 op bakplaat
Schuimpjes 2 100 2 (1en3)* 100 90 ~ 120 op bakplaat
Focaccia 2 190 2 (1en3)* 180 12 ~ 20 op bakplaat
Soesjes, roomsoezen 2 200 2 (1en3)* 190 15 ~ 25 op bakplaat
BROOD en PIZZA
1000 Wit brood 1 190 2 180 40 ~ 60 1 of 2 stokbroden
500 Roggebrood 1 190 1 180 30 ~ 45 In bakblik
500 Broodjes 2 200 2 (1en3)* 175 20 ~ 35 6 of 8 broodjes
250 Pizza 1 210 2 (1en3)* 190 15 ~ 30 op lekbak
OVENSCHOTELS
Met droge pasta 2 200 2 (1en3)* 175 40 ~ 50 In bakvorm
Met groenten 2 200 2 (1en3)* 175 45 ~ 60 In bakvorm
Quiches 1 200 2 (1en3)* 180 35 ~ 45 In bakvorm
Lasagna 2 180 2 160 45 ~ 60 In bakvorm
Cannelloni 2 200 2 175 40 ~ 55 In bakvorm
VLEES
1000 Braadstuk van rundvlees 2 190 2 175 50 ~ 70 Gebakken op rooster
1200 Braadstuk van varkensvlees 2 180 2 175 100 ~ 130 Gebakken op rooster
1000 Braadstuk van kalfsvlees 2 190 2 175 90 ~ 120 Gebakken op rooster
1500 Rosbief (saignant) 2 210 2 200 50 ~ 60 Gebakken op rooster
“ “ (matig gebakken) 2 210 2 200 60 ~ 70 Gebakken op rooster
“ “ (goed gebakken) 2 210 2 200 70 ~ 80 Gebakken op rooster
2000 Schouderham 2 180 2 170 120 ~150 Met zwoerd
1200 Lamsvlees 2 190 2 175 110 ~ 130 Bil
1000 Kip 2 190 2 175 60 ~ 80 Heel
4000 Kalkoen 2 180 2 160 210 ~ 240 Heel
1500 Eend 2 175 2 160 120 ~ 150 Heel
3000 Gans 2 175 2 160 150 ~ 200 Heel
1200 Konijn 2 190 2 175 60 ~ 80 In stukken
1200 Varkenspoot 2 180 2 160 100 ~ 120 2 poten
1500 Haas 2 190 2 175 150 ~ 200 In stukken
800 Fazant 2 190 2 175 90 ~ 120 Heel
- Gehaktbrood 2 180 2 160 40 ~ 60 In bakblik
VIS
1200 Forel - Zeebrasem 2 190 2 (1en3)* 175 30 ~ 40 3-4 hele vissen
1500 Tonijn - Zalm 2 190 2 (1en3)* 175 25 ~ 35 4-6 moten in vorm
OPMERKINGEN
Bereidin-
gsduur
minuten
temp. °C
Niveau
4
3
2
1
Niveau
Traditionele
bereiding
Hetelucht
bereiding
Gewicht in (gr.)
GERECHT
temp. °C
4
3
2
1
(*) Bij een geventileerde bereiding op meer niveaus, is het aangewezen de niveaus
aangegeven tussen haakjes te respecteren.
Traditionele en hetelucht bereiding

electrolux 15
Bereiding op grill
-
Rundshaas 4 800 3 max 12 ~ 15 12 ~ 14
Biefstukken 4 600 3 max 10 ~ 12 6 ~ 8
Worst 8 — 3 max 12 ~ 15 10 ~ 12
Varkenskarbonade 4 600 3 max 12 ~ 16 12 ~ 14
Have kip 2 1000 3 max 30 ~ 35 25 ~ 30
Spiesjes 4 — 3 max 10 ~ 15 10 ~ 12
Kippenborst 4 400 3 max 12 ~ 15 12 ~ 14
Hamburger 6 600 3 max 10 ~ 15 8 ~ 10
Vis, filet (tong) 4 400 3 max 12 ~ 14 10 ~ 12
Gevulde tosti 4-6 — 3 max 5 ~ 7 —
Wit tostibrood 4-6 — 3 max 2 ~ 4 2 ~ 3
Bovenkant
°C
Temperatuur
Nummer
stukken
Gewicht
in gr
Hoeveelheid
Bereidingsduur
(minuten)
GERECHT
Niveau
4
3
2
1
De aangegeven bereidingstijden houden geen rekening met de voorverhitting.
De lege oven altijd 10 minuten voorverwarmen.
Onderkant
Pizzafunctie
De aangegeven temperaturen zijn richtlijnen. Misschien moeten de temperaturen
aangepast worden aan persoonlijke wensen.
temp.°C
Bereidingstijd in
minuten
Pizzafunctie
4
3
2
1
GERECHT OPMERKINGEN
Pizza , groot 1 200 15~25 op bakplaat
Pizza , klein 1 200 10~20
op bakplaat of op rooster
Broodjes 1 200 15~25 op bakplaat

16 electrolux
Schoonmaak van de ovendeur
Om de ovendeur volledig te kunnen
schoonmaken, is het aan te raden de deur
te demonteren.
U gaat als volgt te werk:
1. open volledig de deur;
2. de twee hefboompjes van de ara van de
scharnier 180° draaien (Fig. 1, 2);
3. de deur bijna dicht doen tot een hoek van
Onderhoud
Voor het reinigen de
ovenuitschakelen en laten
afkoelen.
Dit apparaat mag niet worden
schoongemaakt met stoom of met
een stoomreiniger.
De oven moet altijd schoon
worden gehouden. Een opeen-
hoping van vet of andere voedsel-
resten kan brand ten gevolge
hebben, in het bijzonder in de
grillpan.
Onderhoud van het fornuis
De druppels saus, sap, fruitsap, ecc.
moeten zo vlug mogelijk verwijderd worden
met een vochtig doek. Zo niet, zouden ze op
de lange duur het blinken van het email doen
verdwijnen.
Om lichte strepen te doen verdwijnen in
het email, gebruikt U een gewoon licht
schuurmiddel in poedervorm.
Gebruik geen staalwol of messen om
incrustatie te verwijderen.
Voor de dagelijkse schoonmaak gebruikt
U water met reinigingsmiddel of n van de
talrijke producten in de handel.
Was de geemailleerde roosters met
water en reinigingsmiddel; U kan ze ook in
afwasmachine plaatsen.
Verwijder het bovenste gedeelte van de
gaspit en de gasontstekers en was ze heel
nauwkeurig met warm water en
reinigingsmiddel. Droog ze goed vooraleer
ze terug te plaatsen.
Verzeker U ervan dat ze bovendien juist
op hun plaats staan.
De gaspit kan gepoetst worden met
staalwol of een licht schuurmiddel in
poedervorm.
De ovendeur wast U enkel met warm
water en vermijdt U het gebruik van ruwe
doeken of schuurmiddelen.
Onderhoud van de oven
Na gebruik maakt U de oven heel
nauwkeurig schoon en dit wanneer hij nog
een beetje warm is.
Inderdaad, op dat moment kan U
gemakkelijk de vet- of andere resten en het
fruitsap verwijderen.
Gebruik warm water met reinigingsmid-
del, ofwel een van de sprays die in de handel
verkrijgbaar zijn. Volg hiervoor de
aanwijzingen van de producent. Richt de
spray niet op de delen in glansstaal, U zou
ze kunnen beschadigen.
De accessoires van de oven maakt U
met warm water en reinigingsmiddel schoon.
Eventuele incrustaties verwijdert U met
en licht schuurmiddel in poedervorm.
Bedek nooit de ovenwanden of de
ovenbodem met aluminiumfolie
om de grasspatten op te vangen.
U zou een opeenstapeling van
warmte voortbrengen dat het
resultaat van het bereiden nega-
tief beinvloedt en U zou het email
kunnen beschadigen.
Verscheidene controles
Controleer geregeld de status van
behoud van de flexibele tube van de gas-
verbinding en laat hem vervangen door
bevoegd personeel wanneer hij nauwelijks
een afwijking vertoond.
We raden een jaarlijkse vervanging aan.

electrolux 17
1
2
3
))
))
)
ongeveer 30°, optillen en uit de voorkant
halen (Fig. 3).
De deur terug installerendoor de hierbo-
ven beschreven handelingen te volgen in
tegenovergestelde volgorde.
Maak de ovendeur NIET schoon
terwijl de glasplaten warm zijn.
Als deze voorzorgsmaatregel niet
wordt nageleefd, dan kan de
glasplaat versplinteren.
Als de glasplaat van de deur
gebarsten is of diepe krassen
heeft, dan wordt het glas minder
sterk en moet het worden
vervangen om te voorkomen dat
het verbrijzelt. Neem contact op
met onze service-afdeling die u
graag advies zal geven.
Modellen van roestvrij staal of aluminium
Wij raden aan de ovendeur uitsluitend te
reinigen met behulp van een natte spons en
deze daarna met een zachte doek te drogen.
Gebruik nooit staalwol, zuren of schuur-
middelen, deze kunnen het oppervlak van de
oven beschadigen.
Dezelfde aanwijzigen gelden voor het
schoonmaken van het bedieningspaneel van
de oven.
Vervangen van binnenverlichting
Als de ovenlamp moet worden vervangen,
dan moet deze voldoen aan de volgende
eisen:
- Vermogen: 15 W / 25 W,
- Voltage: 230 V (50 Hz),
- Hittebestendig tot 300°C,
- Soort verbinding: E14.
Deze lampen zijn verkrijgbaar bij
Klantenservice.
Om de kapotte lamp te vervangen:
1. Zorg ervoor dat de oven is afgesloten van
het lichtnet.
2. Draai de glazen beschermkap tegen de
klok in los.
3. Verwijder de kapotte lamp en vervang deze
door een nieuwe.
4. Doe de glazen beschermkap terug op zijn
plaats.
5. Sluit de oven weer aan op het lichtnet.

18 electrolux
Wan te doen indien
zz
zz
z De gasaanvoer lijkt
abnormaal:
zz
zz
z Er is een gaslucht
waarneembaar
zz
zz
z De oven warmt niet
op
zz
zz
z Te lange kooktijden
zz
zz
z Er komt rook uit de
oven
zz
zz
z Het ovenlicht werk
niet
Vergewis u ervan of:
- de gaten van de vlamverdeler van de brander(s) niet
verstopt zitten;
- wanneer de gas uit een fles komt, de gasfles niet leeg
is;
- de drukregelaar werkt;
- de kraan van de gasfles volledig open staat.
Vergewis u ervan of:
- de voedingsbuis goed gedlaatst werd en in goede staat
verkeert; denk eraan dat die minstens éénmaal per jaar
moet vervangen worden.
Zoek nooit naar een gaslek met een brandende lu-
cifer. gebruik schuim of zeepwater.
Vergewis u ervan of de ovenknop wel degelijk aan staat.
Bent u vergeten om terug te schakelen naar de
handmatige modus, na het gebruik van de optie Klok
einde bereidingstijd?
Controleer of de gekozen temperatuur overeenstemt met
de voeding/het gerecht dat u klaarmaakt.
We raden u aan de oven te reinigen telkens u hem
gebruikt hebt.
Tijdens het braden van vlees vormen zich vetspatten;
wanneer deze niet verwijderd worden, zullen ze rook en
geuren veroorzaken tijdens volgende bakbeurten. Zie
daarover het stuk over het schoonmaken van de oven.
Wellicht is het lampje zelf stuk. Hoe u het moet vervan-
gen, kijkt u na in de paragraaf daarover.
Indien na deze controles het fornuis nog steeds niet werkt,
wendt u zich best tot het dichtstbijgelegen
Servicecentrum en houd alle gegevens over het toestel bij
de hand: model en identificatienummer.
Indien het toestel niet naar behoren werkt, kijkt u, voordat u de Servicedienst belt, best
de volgende punten na:

electrolux 19
Oven
Bovenelement 800 W
Onderelement 1,000 W
Onder- en boven-element 1,800 W
Kleine grill 1,650 W
Grote grill 2,450 W
Hetelucht 1,825 W
Pizzafunctie 2,675 W
Ovenverlichting 25 W
Cirkulatieventilator 25 W
Aansluitwaarde oven 2,700 W
Lichtnetspanning (50 Hz) 230 V
Kookplat
Brander/ zone linksachter (Normaalbrander) 2,000 W
Brander/ zone linksvoor (Sterkbrander) 3,000 W (Aardgas) - 2,800 W (
Flessengas)
Brander/ zone rechtsachter (Normaalbrander) 2,000 W
Brander/ zone rechtsvoor (Kleinbrander) 1,000 W
Aansluitwaarde kookplaat 8,000 W
Afmetingen van de apparaten
Hoogte 850 mm
Breedte: 600 mm
Diepte 600 mm
Inhoud 56 l
Apparaat klasse 1 en klasse 2 sub-klasse 1
CATEGORIE: II2E+3+
In de fabriek getest apparaat om met het volgend soort gas te werken: G20/G25 20/25
mbar
Technische gegevens

20 electrolux
twee meubelstukken waarvan de hoogte die van
de kookplat niet overschrijdt (EN 60 335-2-6).
Nivellering
Het fornuis is uitgerust met stelvoetjes die
zich zowel voor als achteraan de sokkel
bevinden.
Het is mogelijk om de hoogte van het
apparaat te stellen met de stelvoetjes zodat
de pannen met hun inhoud waterpas staan.
Gasaansluiting
De gasaansluiting moet worden uitge-
voerd in overeenstemming met de nationaal
geldende normen. Het toestel werd vóór het
de fabriek verliet, getest en afgesteld voor
het soort gas dat aangeduid staat op het
identificatieplaatje achteraan op het fornuis,
naast de aansluiting. Vergewis u ervan dat
het gebruikte en voorhanden zijnde gas
overeenstemt met het soort gas op het
plaatie.
Instructies voor de installateur
De volgende instructies relatief aan de
installatie en het regelen moeten uitgevoerd
worden door gekwalificeerd personeel. Het
apparaat moet correct en conform met de
normen en de wetten van kracht, worden
geinstalleerd.
Om het even welke tussenkomst
moet worden gedaan bij een
uitgeschakeld apparaat.
De constructiefirma wijst elke
verantwoordelijkheid af voor
eventuele schade voortkomend
uit een installatie die niet conform
is aan de geldende normen.
Plaats van installatie
Voor een goed functioneren van het
apparaat, is het noodzakelijk dat er in de
kamer de nodige lucht voor de gas-
verbranding kan toestromen op een natuur-
lijke wijze. (De installateur moet de nationale
normen van kracht volgen.) De toevoer van
lucht moet rechtstreeks vanuit openingen
komen die niet van binnen, noch van buiten,
verstopt mogen worden. De hierna volgende
instructies zijn bestemd voor de erkende
installateur. De installatie en onderhoud van
het toestel moeten worden uitgevoetd door
een bevoegde installateur overeenkomstig
de geltende voorschriften en de regels van
de kunst, met name: NBND 51003. Voor de
toestellen aangesloten op het lichtnet: NBN
normen. Wij kunnen geen verantwoordelijk-
heid aanvaarden voor ongevallen of
incidenten veroorzaakt door een defecte of
onbestaande aarding.
Uitlaat van de verbrandingsstoffen
De gasfornuizen moeten de
verbrandingsstoffen uitlaten, conform aan de
nationale normen van kracht.
Plaatsing
Dit is een type X toetsel.
Het werd ontworpen om te plaatsen tussen
NEEN
ELEKTRISCHE
KABEL
SOEPELE
RUBBEREN
SLANG
JA
SOEPELE
RUBBEREN
SLANG
ELEKTRISCHE
KABEL

electrolux 21
Aaansluiting met een vaste buis of een
metalen en soepele slang
Om veiliger te zijn raden we aan de
aansluiting uit te voeren met vaste buizen (bv.
in koper) of met soepele buizen in inoxstaal
zodat het toestel niet beschadigd raakt. De
aansluiting aan de gasmond voor deze
toestellen is Gc 1/2.
Aaansluiting met soepele, niet- metalen
buis
Wanneer u voor de aansluiting een
soepele niet-metalen buis of slang gebruikt,
moet u bij de controel van de staat van de
slang vooral op de volgende punten letten:
- de slang vertoont geen plooien,
versmallingen, brandsporen; zowel aan
de beide uiteinden als over de volledige
lengte;
- het materiaal is niet hard geworden en is
dus nog steeds even soepel en
buigzaam;
- de verbindings- en sluitingsringen (als er
zijn) zijn niet geroest;
- de geldigheidsdatum (als er een is) niet
verstreken is.
De slang moet als volgt geplaatst
worden:
- mag niet onder spanning of gedraaid zijn;
- mag niet in aanraking komen met
scherpe voorwerpen of met scherpe
randen;
- het moet makkelijk zijn om de staat van
de slang te controleren.
Indien zich toch één van bovenvermelde
dingen voordoet (of meerdere tegelijk) moet
u da slang niet laten herstellen maar volledig
vervangen.
BELANGRIJK: Wanneer de instal-
latie voltooid is, gaat u de goede
vastheid van de verbindingen na
met schuim of zeepwater maar
NOOIT met een vlammetje.

22 electrolux
Bypass vijs
Aanpassing voor verschillende gassorten
Om het fornuis aan een verschillend soort
gas aan te passen dan dat waarvoor het
vooraf geregeld is, de opeenvolgende
handelingen verrichten.
Gasverbinding
Flessengas: de rubber-houder “C” gebrui-
ken
Aardgas: de verbinding “A” gebruiken
Steeds de pakking “B” invoegen . Daarna
overgaan tot de verbinding volgens de
gegeven instruktie’s.
(Zie de overeenkostige paragraaf).
Vervanging en regeling van de sproeiers
van de kookplaat
1. Vervanging van de sproeiers:
– De roosters wegnemen.
– De deksels en de kronen van de bran-
ders afnemen.
– Met een sleutel van 7 de sproeiers los-
schroeven en wegnemen en deze ver-
vangen door diegenen die geschikt zijn
voor het te gebruiken gas (zie tabel "Al-
gemene eigenschappen").
De onderdelen weer monteren door de
beschreven handelen knop de tegenoverge-
stelde manier te verrichten.
Deze branders hebben geen primaire
luchtregeling nodig.
Vervang het indentificatieplaatje door het
plaatje dat oveneenstemtmet het nieuwe
gastype. Dit identificatieplaatje vindtu in de
verpakking van het inspuitstuk meegeleverd-
met het toestel.
2. Minimum regeling branders van de
kookplaat
Om het minimum te regelen, een vlam
aansteken, de knop op de minimim positie
brengen, de knop wegnemen en dan:
- in geval van transformatie van aardgas
noor Flessengas, het by-pass schroofje
van de kranen goed vastschroeven;
- in geval van transformatie van Flessen-
gas noor aardgas, het by-pass
schroofje ongeveer 1/4 draai los-
schroeven, totdat men een kleine regel-
matige vlam verkrijgt.
De onderdelen weer monteren door de
beschreven handelen knop de tegenoverge-
stelde manier te verrichten.
Aan het einde controleren dat de brander
niet uit gaat door de knop snel van de
maximum naar de minimum positie te
draaien.
C
B
A
B

electrolux 23
ALGEMENE EIGENSCHAPPEN
kW kW
1 0,33
2 0,45
Aardgas:
3 0,75
Flessengas:2,8
BRANDER
Kleinbrander
Normaalbrander
Sterkbrander
Maximale
calorisch
debiet
Minimale
calorisch
debiet
Aardgas Flessengas
Richtpunt
1/100
70
96
119
0,095
0,190
0,286
0,111
0,221
0,332
G20
20
mbar
G25
25
mbar
m
3
/h
Richtpunt
1/100
50
71
86
72,5
145
203
71,5
143
200
G30
G31
g/h
Brander Ø By-pass
in 1/100
of mm.
Kleinbrander 28
Normaalbrander 32
Sterkbrander 42
DIAMETERS VAN BY-PASS

24 electrolux
Het toestel is geschikt voor een
aansluiting op een spanning van 230 V
monofase.
De elektrische aansluiting moet gebeuren
volgens de geldende normen en schikkingen
voorzien in de wetgeving.
Ga vóór het aansluiten na of:
- de hoofdzekering en de installatie van het
huis de lading van het toestel aankunnen
(zie het identificatieplaatje achteraan)
- de voedingsinstallatie uitgerust is met
een doeltreffende aarding volgens de
geldende normen en schikkingen
voorzien in de wetgeving.
- het stopcontact en de bipolaire schake-
laar makkelijk bereikbaar zijn wanneer
het fornuis is uitgerust en verbindt het
met een gepaste stekker.
De oven wordt met aansluitkabel; men
moet deze dusvoorzien van een standaard
stekker en aanpassen,geschikt voor de
totale elektrische lading, aangewezenop het
identificatieplaatje.
Het toestel moet rechtstreeks op het net
wenst verbonden zijn, moet u tussen het
toestel en het net een bipolaire schakelaar
zetten met min. 3 mm opening tussen de
contacten, aangepast aan de lading en
voldoend aan de geldende normen.
De geel/groene aarding mag niet
onderbroken worden door de schakelaar.
De fasedraad - kastanjekleur (komend
van de klem “L” van het fornuisbord) moet
altijd verbonden zijn met de fase van het
voedingsnet. De voedingskabel moet altijd
zo geplaatst worden dat hij over de hele
lengte nooit een temperatuur kan bereiken
die 50°C hoger is dan de kamertemperatuur.
Indien u de voedingskabel vervangt,
gebruik dan draad van het type H05RR-F /
H05V2V2-F (T90) / H05VV-F met een sectie
aangepast aan de lading. U moet er
bovendien voor zorgen dat de kleine geel/
groene aarding ongeveer 2 cm langer is dan
de fase en neutrale draden.
Na de aansluiting gaat u de opwarming
na door de elementen ongeveer 3 minuten
aan te zetten.
De fabrikant wijst alle verantwoordelijd-
heid af indien de preventienormen niet
werden gerespecteerd.
Elektrische aaansluiting
Neutraal
Aarde (geel-groen)
Fase

electrolux 25
Garantie/serviceafdeling
Service en onderdelen
Als de storing na deze verificatie blijft,
wendt u zich dan tot de ELECTROLUX SER-
VICE. Geef daarbij op om welke storing het
gaat, het modelnummer (Mod. No.) en het
productnummer (Ser.
No.) die u op het type-
plaatje vindt.
België
WAARBORGVOORWAARDEN
Onze toestellen worden met de grootst mogelijke zorgvuldigheid geproduceerd.
Desondanks kan het voorkomen dat er een defect optreedt. Onze klantendienst zal dit op
verzoek herstellen, zowel binnen als buiten de waarborgtermijn. De levensduur van het toestel
wordt daardoor niet negatief beïnvloed.
Onderstaande waarborgvoorwaarden zijn gestoeld op de EU Richtlijn 99/44/EG
en het Burgerlijk Wetboek. De daaruit voortvloeiende rechten blijven onverlet.
Ook de waarborgverplichtingen van de verkoper naar de eindgebruiker blijven
onaangetast.
Voor dit toestel verlenen wij waarborg volgens onderstaande voorwaarden:
1. Wij verhelpen kosteloos met inachtneming van de voorwaarden 2 tot en met 15
gebreken aan het toestel die zich openbaren binnen 24 maanden vanaf de datum van
levering aan de eindgebruiker. Deze waarborgvoorwaarden zijn niet van toepassing in
geval van professioneel of daarmee gelijk te stellen gebruik.
2. De waarborgprestatie houdt in dat het toestel kosteloos wordt teruggebracht in de
toestand die het had voor het defect optrad. Gebrekkige onderdelen worden hersteld
of vervangen. Kosteloos vervangen onderdelen worden ons eigendom.
3. Het gebrek moet terstond gemeld worden, om mogelijke verdere schade te voorkomen.
4. Voor een beroep op waarborg dient het aankoopbewijs met aankoop- en/of
leveringsdatum te worden overlegd.
5. De waarborg heeft geen betrekking op schade aan kwetsbare onderdelen, zoals
(vitrokeramisch) glas, kunststof, rubber, die ontstaan is door onzorgvuldig gebruik
6. De waarborg heeft geen betrekking op kleine afwijkingen van de gestelde kwaliteit die
voor de waarde en deugdelijkheid van het toestel onbeduidend zijn.
7. De waarborg geldt evenmin voor schade veroorzaakt door:
- chemische en elektrochemische inwerking van water,
- abnormale milieuomstandigheden in het algemeen
- voor het toestel oneigenlijke bedrijfsomstandigheden

26 electrolux
- contact met agressieve stoffen.
8. De waarborg heeft geen betrekking op gebreken door transportschade die buiten onze
verantwoordelijkheid is ontstaan, niet vakkundige installatie of montage, verkeerd ge-
bruik, gebrekkig onderhoud, of het niet in acht nemen van de gebruiks- of
montageaanwijzingen.
9. Het recht op waarborg vervalt wanneer het defect werd veroorzaakt door herstelling of
ingrepen door derden die niet bevoegd of niet deskundig zijn, of wanneer het toestel
voorzien werd van toebehoren of onderdelen die niet origineel zijn en daardoor een
defect veroorzaken.
10.Toestellen die gemakkelijk kunnen worden vervoerd dienen te worden overhandigd of
gezonden naar onze klantendienst. Herstelling ter plaatse kan slechts worden gevraagd
voor grote of ingebouwde toestellen.
11. Indien het toestel zodanig is ingebouwd, ondergebouwd, opgehangen of geplaatst dat
de benodigde tijd voor het in- en uitbouwen samen meer dan 30 minuten bedraagt,
dan worden de hierdoor ontstane extra kosten aan de gebruiker in rekening gebracht.
Schade die ontstaat door abnormale in- of uitbouw komt ten laste van de gebruiker.
12. Indien binnen de waarborgperiode de herstelling van hetzelfde gebrek meermaals
mislukt of de herstellingkosten disproportioneel zijn wordt in overleg met de gebruiker
een gelijkwaardige vervanging geleverd. In geval van vervanging behouden we ons het
recht voor om een vergoeding te rekenen naar rato van de verstreken gebruiksperiode.
13. Herstelling onder waarborg heeft geen verlenging van de waarborgtermijn noch
aanvang van een nieuwe waarborgtermijn tot gevolg.
14. Op herstellingen geven wij een waarborg van 12 maanden, uitsluitend op hetzelfde
gebrek.
15. Verdere of andere rechten, in het bijzonder vergoeding van schade ontstaan buiten het
toestel, zijn uitgesloten voor zover een aansprakelijkheid niet wettelijk is vastgelegd. In
geval van aansprakelijkheid zal een vergoeding de aankoopwaarde van het toestel niet
overtreffen.
Deze waarborgvoorwaarden gelden voor in België gekochte en/of in gebruik zijnde
toestellen. Indien een toestel naar het buitenland wordt gebracht dient de gebruiker na te
gaan of het toestel voldoet aan de technische voorwaarden ( o.a. spanning, frequentie,
installatievoorschriften, gassoort, klimaatomstandigheden) in het betreffende land. Voor in
het buitenland aangeschafte toestellen dient de gebruiker zich zelf te vergewissen van de
bepalingen in België. Noodzakelijke of gewenste aanpassingen vallen niet onder de waar-
borg, en kunnen niet altijd worden aangebracht.
Ook na afloop van de waarborgtermijn staat onze klantendienst u ter beschikking.
Adres Klantendienst:
België
Tel: Fax:
Electrolux Home Products Belgium Consumer services 02/363.04.44 02/363.04.00
ELECTROLUX SERVICE 02/363.04.60
Bergensesteenweg 719
1502 Lembeek
E-mail: [email protected]

electrolux 27
Dit apparaat wordt door Electrolux in elk van de achter in deze handleiding genoemde
landen gedurende de in het bij het apparaat behorende garantiebewijs genoemdeb periode
of anderszins bij de wet gegarandeerd. Als u van een van deze landen verhuist naar een
ander van de hieronder genoemde landen, verhuist de garantie op het apparaat met u mee.
De volgende beperkingen zijn hierop van toepassing:
• De garantie op het apparaat begint op de datum van eerste aankoop van het apparaat.
Deze datum dient te worden aangetoond door overlegging van een geldig, door de
verkoper van het apparaat afgegeven ankoopbewijs.
• De garantie op het apparaat geldt voor dezelfde periode en in dezelfde mate voor
arbeidsloon en onderdelen als van toepassing in uw nieuwe land van vestiging op dit
specifieke model of deze specifieke serie apparaten.
• De garantie op het apparaat is persoonlijk, geldt dus voor de oorspronkelijke koper van
het apparaat en kan niet worden overgedragen op een andere gebruiker.
• Het apparaat wordt geïnstalleerd en gebruikt in overeenstemming met de door Electrolux
afgegeven instructies en wordt alleen in huis gebruikt, dat wil zeggen, het apparaat wordt
niet gebruikt voor commerciële doeleinden.
• Het apparaat wordt geïnstalleerd in overeenstemming met alle relevante voorschriften
die in uw nieuwe land van vestiging van kracht zijn.
De voorwaarden van deze Europese garantie tasten geen van de aan u bij de wet
verleende rechten aan.
Europese garantie
Luxemburg
ELECTROLUX HOME PRODUCTS Consumer services 00 35242431-1 0035242 431-360
Rue de Bitbourg. 7
L-1273 Luxembourg-Hamm
E-mail: [email protected]

28 electrolux

electrolux 29
The following symbols will be found in the text to guide you throughout the instructions:
Safety instructions
Step by step instructions for an operation
Hints and tips
Environmental information
)
Guide to use the instructions
This appliance complies with the following E.E.C. Directives:
•
2006/95 (Low Voltage Directive);
•
2004/108 (Electromagnetical Compatibility Directive);
• 90/396 (Gas Appliance Directive);
and subsequent modifications.
Important safety information ........................................................................................... 30
Control panel ................................................................................................................. 32
Using the hob ................................................................................................................ 33
Electric oven .................................................................................................................. 35
Suggestions for using the hob ........................................................................................ 37
Suggestions for using the oven ...................................................................................... 37
Cooking tables ............................................................................................................... 40
Cleaning and maintenance ............................................................................................. 42
Something not working .................................................................................................. 44
Technical data ................................................................................................................ 45
Instructions for the installer ............................................................................................. 46
Electrical connection ...................................................................................................... 51
Original spare parts ....................................................................................................... 52
Declaration of guarantee terms ..................................................................................... 52
European guarantee ...................................................................................................... 54
Contents
MANUFACTURER:
ELECTROLUX POLAND SP. Z.O.O.
ul. Kazimierza Odnowiciela 28
58-100 Swidnica (Poland)
Electrolux. Thinking of you.
Share more of our thinking at www.electrolux.com

30 electrolux
Installation
z The work of installation must be carried
out by competent and qualified installers
according to the regulations in force.
• Any modifications to the domestic
electrical mains which may be necessary
for the installation of the appliance should
be carried out only by competent
personnel.
• This appliance is not connected to a
combustion products evacuation device.
It must be installed and connected in
accordance with current installation
regulations. Particular attention shall be
given to the relevant requirements
regarding ventilation.
• The use of a gas cooking appliance
results in the production of heat and
moisture in the room in which it is
installed. Ensure that the kitchen is well
venti- lated: keep natural ventilation holes
open or install a mechanical ventilation
device (mechanical extractor hood).
• Prolonged intensive use of the appliance
may call for additional ventilation, for
example opening of a win- dow, or more
effective ventilation, for example increas-
ing the level of mechanical ventilation
where present.
• Avoid installation of the cooker near
inflammable material (e.g. curtains, tea
towels, etc.).
• Supply the appliance with the type of gas
stamped on the relevant adhesive label
situated in the immediate vicinity of the
gas connection tube.
• The appliance has to be placed on the
floor and it cannot be placed on a base.
People Safety
z This appliance has been designed for use
by adults. Take care, therefore, that
children do not attempt to play with it.
• The appliance remains hot for a long time
after being switched off. Supervise
children at all times, paying attention that
they do not touch surfaces or remain in
the vicinity of the appliance when in use
or when not completely cooled.
• This appliance is not intended for use by
children or other persons whose physical,
sensory or mental capabilities or lack of
experience and knowledge prevents them
from using the appliance safely without
supervision or instruction by a responsible
person to ensure that they can use the
appliance safely.
During Operation
z This product is intended for the cooking
of food and must not be used for other
purposes.
• It is dangerous to modify, or attempt to
modify, the characteristics of this
appliance.
• The appliance becomes very hot with
use, and retain their heat for a long period
after use. Care should be taken to avoid
touching heating elements inside the
oven.
• Always stand back from the oven when
opening the oven door during cooking or
at the end of it to allow any build up of
steam or heat to release.
• Unstable or deformed pans should not
be placed on the burners or plates in
order to avoid accidents caused by
upsetting or boiling over.
These warnings have been given for the safety of you and others. We therefore ask
you to carefully read the procedures of installing and using this cooker.
Important safety information
ENGLISH

electrolux 31
• Particular care should be taken when
cooking with oil or fat.
• If the appliance is fitted with a cover, its
function is to protect the surface from
dust when closed and to ac- cumulate
splashes of grease when open. Do not
use for other purposes.
• Always clean the cover before closing.
• Leave the burners and/or plates to cool
before closing.
• All the covers, in plate glass or enamel,
are removable to facilitate cleaning.
• Always ensure that the knobs are in
the «0» or «
» (Stop) position when
the appliance is not in use.
z Always insert the dripping pan when
using the grill or when cooking meat on
the grid. Pour a little water into the
dripping pan to avoid grease burning and
creating unpleasant smells.
• Always use oven gloves to remove dishes
from the oven.
• The accessories should be washed
before using for the first time.
• Take care when using cleaning products
in spray form: never direct the spray onto
the resistance or the thermostat bulb.
• If, when placing food in the oven, or when
removing it, a large quantity of oil, juice,
etc. spills onto the bottom of the oven, re-
clean before starting to cook to avoid
unpleasant smoke and also the possibility
of these substances catching fire.
• For reasons of hygiene and safety this
appliance must always be kept clean. A
build up of grease or other food can
cause fires.
• This appliance cannot be cleaned with
steam or with a steam cleaning machine.
• Do not use harsh abrasive cleaners or
sharp metal scraper to clean the oven door
glass since they can scratch the surface,
which may result in shattering of the glass.
• Do not cover the sides of the oven with
aluminium foil, in particular the lower part
of the opening.
• The appliance is heavy, move it carefully.
• Before maintenance and cleaning
disconnect the appliance and allow to cool.
• To facilitate ignition, light the burners
before placing pans on the grid. After
having lit the burners check that the
flame is regular.
• Always lower the flame or turn it off
before removing the pan.
• Ensure that the oven grids are inserted
correctly.
• Only heat-resistant plates may be placed
in the drawer situated under the oven.
Do not put combustible materials
there.
Service
z In case of repairs, do not attempt to
correct yourself. Repairs carried out by
unqualified persons can cau- se
damage. Contact an authorized
Technical Assistance Centre and insist
an original spareparts.
Environmental Information
z After installation, please dispose of the
packaging with due regard to safety and
the environment.
• When disposing of an old appliance,
make it unusable, by cutting off the cable.
The symbol on the product or
on
its packaging indicates that this product
may not be treated as household waste.
Instead it shall be handed over to the
applicable collection point for the recycling
of electrical and electronic equipment. By
ensuring this product is disposed of
correctly, you will help prevent potential ne-
gative consequences for the environment
and human health, which could otherwise
be caused by inappropriate waste handling
of this product. For more detailed
information about recycling of this product,
please con- tact your local city office, your
household waste disposal service or the
shop where you purchased the product.

32 electrolux
It is very important that this instruction
book
should be kept safely for future
consultation. If
the appliance should be
sold or given to
another person, please
ensure that the booklet
goes together
with it, so that the new owner
can know
of the functions of the machine and
also
be aware of the warnings
These instructions are only for the
countries stated by the symbol printed
on the front cover of this instruction
book.
1. Back left burner control knob (semi-
rapid)
2. Front left burner control knob (rapid)
3. Front right burner control knob (auxiliary)
4. Back right burner control knob (semi-
rapid)
Control panel
5. Oven function control knob
6. Oven thermostat control knob
7. End of cooking programmer
8. Oven thermostat pilot light
Oven Shelf
The Oven Cavity
Oven light
Dripping Pan
Grill element
Oven fan
Accessories
65
432
87
1

electrolux 33
Control knobs
The knobs for using the gas hob of the
cooker are found on the control panel. The
regulation knobs could be turned in anti-
clockwise direction until the small flame
symbol, and vice-versa for the larger symbol.
z No gas supply
Maximum gas supply
Minimum gas supply
Ignition of gas burners
The appliance is equipped with
progressive taps which allow a better
flame regulation.
z To ignite a burner, before positioning the
saucepan, push the corresponding knob
in completely and turn in an
anticlockwise direction to the maximum
position (
).
z Once a flame has appeared, hold the
control knob pressed in for around 5
seconds so as to activate the Oven
Safety Device (Thermocouple).
z Upon ignition regulate the flame as
required.
z If after a few attempts the burner does
not ignite, check that the crown and its
cap are correctly positioned.
z To interrupt the supply of gas, turn the
knob in a clockwise direction to the off
position “
z“.
Do not keep the control knob
pressed for more than 15
seconds.
If the burner does not light even
after 15 seconds, release the
control knob, turn it the "off"
position and wait for at least one
minute before trying to light the
burner again.
If the burner accidentally goes
out, turn the control knob to the
Using the hob
A - Burner cap
B - Burner crown
C - Ignition candle
D - Thermocouple
))
))
)

34 electrolux
"off" position and wait for at least
1 minute before trying to light the
burner again.
During cooking, when using fats
or oils, take particular care as they
can, when over-heated, self-
ignite.
In the absence of electricity, ignition
can occur without the electrical
device; in this case approach the
burner with a flame, push the relevant
knob down and turn it anti-clockwise
until it reaches the "maximum"
position.
To ensure maximum burner efficiency,
you should only use pots and pans with a flat
bottom fitting the size of the burner used (see
table).
Recommended pottery
Remember that a wide-bottomed pan
allows a faster cooking than a narrow one.
Always use pots which properly fit what you
have to cook.
Particularly make sure that the pans are
not too small for liquids, since these could
easily overflow. Moreover, the pans should
not be too large for a faster cooking. In fact,
grease and juices may spread on the bottom
and burn easily.
It is better to use non-openable moulds
for baking cakes. In fact, an openable mould
lets juices and sugar leak through, falling on
the bottom of the oven and consequently
burning on the bottom of the baking tray,
making cleaning difficult.
Avoid putting plastic-handled pans in the
oven as they are not heat-proof.
You should use oans with the right
diameter to fit the burner, in order to make
the most out of it, thus reducing gas
consumption.
It is also advisable to cover any boiling
casserole and, as soon as the liquid starts
boiling, lower the flame enough to keep the
boiling point.
Burner minimum maximum
diameter diameter
Large (rapid) 180 mm. 260 mm.
Medium
(semi-rapid) 120 mm. 220 mm.
Small
(Auxiliary) 80 mm. 160 mm.

electrolux 35
Switch to choose type of cooking and
thermostat regulation
These two switches allow you to select the
type of cooking (choice of heating element) as
well as temperature, according to the require-
ments of the recipe.
Explanation of symbols
Conventional cooking - The heat comes
from both the top and bottom element,
ensuring even heating inside the oven.
Fan cooking - This allows you to roast or
roast and bake simoultaneously using any
shelf, without flavour transference.
Inner grill - It can be used for grilling small
quantities.
Full grill - The full grill element will be on.
Pizza Oven - The bottom element
provides direct heat to the base of
pizzas, quiches or pies, while the fan
ensures air is circulated to cook the pizza
toppings or pie fillings.
Bottom heating element - The heat comes
from the bottom of the oven only.
When cooking in the oven or grill,
always leave the appliance lid open, in
order to avoid overheating.
Oven thermostat control light
The oven thermostat control light will come
on when the thermostat control knob is turned.
The light will remain on until the correct tempe-
rature is reached. It will then cycle on and off to
show the temperature is being maintained.
End of cooking programmer
This device allows you to make the oven
switch off automatically once the preset time
is over. An acousitic signal will be heard
when the cooking is completed. The cooking
duration can be set up to 120 minutes
Electric oven

36 electrolux
maximum. Place food in the oven and turn
the oven function control knob and the
thermostat control knob on the required
settings. Turn the timer knob to maximum
time position ("120"), then turn it back to set
the required cooking time. When the cooking
time is over, an acoustic alarm will sound
and the oven will switch off automatically.
Turn the timer knob on
to set the oven
on manual operation.
Safety thermostat
In order to avoid excessive overheating
due to incorrect use of the appliance or else
to a faulty component, the oven is equipped
with a safety thermostat which cuts off the
power supply if necessary. Operation is re-
stored automatically when the oven tempera-
ture decreases to normal values. Therefore, if
the thermostat cuts in because you have not
been using the appliance correctly, the oven
can be used again simply by waiting for the
appliance to cool down. If, instead, the ther-
mostat cuts in because of a faulty component,
you should call the Service Department.
When using the oven for the first time
When using the oven for the first time:
1) set the oven knob to
and the
thermostat knob to MAX;
2) allow the oven to run empty for
approximately 45 minutes;
3) open a window for ventilation.
During this time, an unpleasant odour
may be emitted. This is absolutely normal,
and is caused by residues of manufacturing.
Once this operation is carried out, let the
oven cool down, then clean the oven cavity
with a soft cloth soaked in warm soapy
water. This procedure should be repeated
with the full grill cooking function
and
pizza oven cooking function for
approximately 5-10 minutes. Before cooking
for the first time, carefully wash the oven
accessories.
))
))
)
The hob lid
The lid is meant to avoid dust to settle on
the hob, when it is closed, and to collect
splashes of oil or fat, when it is open. Do not
use it for any other purpose.
Always wipe off any splash of liquid before
opening the lid.
Always clean the lid from cooking residues
before opening it or taking it off.
WARNING! The
crystal lid can splinter
when overheated.
Always ensure all the
burners are off before
closing it.

electrolux 37
Always cook with the oven door
closed.
Stand clear when opening the
drop down oven door. Do not
allow it to fall open - support the
door using the door handle, until it
is fully open.
The oven has four shelf levels.
The shelf positions are counted from
the bottom of the oven as shown in
the diagram.
It is important that the shelf is correctly
positioned.
Do not place cookware directly on
the oven base.
When cooking with the oven or
grill, the cover must be kept open
to avoid overheating.
To open the oven door, always catch
the handle in its central part.
4
3
2
1
Suggestions for using the hob
Start your cooking with a big flame by
turning the knob to the symbol
. Then
adjust the flame as necessary.
The outside of the flame is much hotter
than its inside (nucleus).
Accordingly, the top of the flame should
lick the bottom of the pan. Excessive flames
mean a waste of gas.
In contrast with electric grids, gas
burners do not require flat-bottomed pans:
the flames lick the bottom and spread the
heat all over the surface.
No special pans are required for gas
burners. However, thinwalled pans transmit
the heat to the food more quickly than thick-
walled ones.
Since heat doesn't spread evenly on the
pan's bottom, the food may only be partially
heated. Consequently it is advisable to stir
the food many times.
A thick pan bottom prevents partial
overheating as it allows sufficient thermic
compensation.
Avoid very small pans. Wide and shallow
pans are more suitable than narrow and
deep ones as they allow a faster heating.
Cooking is not quickened by placing narrow
pans on wide burners. The result is just a
waste of gas. For a proper usage, place
small pans on small burners and large pans
on large burners.
Remember to cover pans to reduce gas
consumption.
Suggestions for using the oven

38 electrolux
Condensation and Steam
The oven is supplied with an exclusive
system which produces a natural circulation
of air and the constant recycling of steam.
This system makes it possible to cook in
a steamy environment and keep the
dishes soft inside and crusty outside.
Moreover, the cooking time and energy
consumption are reduced to a minimum.
During cooking steam may be produced
which can be released when opening the
oven door. This is absolutely normal.
However, always stand back from
the oven when opening the oven
door during cooking or at the
end of it to allow any build up of
steam or heat to release.
When food is heated, it produces
steam in the same way as a boiling
kettle does. When steam comes in
contact of the oven door glass, it will
condense and produce water
droplets.
To reduce condensation, ensure the
oven is well heated before placing
food in the oven cavity. A short oven
pre-heating (about 10 minutes) will
then be necessary before any
cooking. We recommend you to
wipe away condensation after each
use of the appliance.
Using the oven
For the cooking of cakes
Pre-heat the oven, unless indicated
differently, for at least 10 minutes before use.
Do not open the oven door when cooking
dishes which must raise (e.g. raised pastries
and soufflés); the jet of cold air would block
the raising process. To check if cakes are
cooked, insert a toothpick into the mixture;
if it comes out clean the cake is ready. Wait
until at least 3/4 of the cooking time has
passed before doing this check.
As a general rule remember that:
a dish which is well-cooked on the
outside but not sufficiently cooked inside
would have required a lower temperature
and longer cooking time. On the contrary, a
“dry” texture would have required a shorter
time and higher cooking temperature.
For the cooking of meat
Meat to be cooked in the oven should
weigh at least 1 kilo to avoid its becoming
too dry. If you want roasts with a good
colour, use very little oil. If the piece is lean,
use oil or butter or a little of both. Butter or
oil are on the other hand unnecessary if the
piece has a strip of fat. If the piece has a strip
of fat on one side only, put it in the oven with
this side upwards; when melting the fat will
grease the lower side sufficiently.
Red meat should be removed from the
fridge one hour before cooking otherwise the
sudden change of tempe- rature could
cause it to become tough. A roast,
especially if of red meat, must not be salted
at the beginning of cooking as salt causes
juices and blood to seep out of the meat,
thus preventing the formation of a well-
browned crust.
It is advisable to salt the outside of the
meat after just over half the cooking time.
Place the roast in the oven in a dish
having a low rim; a deep dish shields heat.
Meat can be placed on an ovenproof
dish or directly on the grill, under which the
dripping pan will be inserted to collect juice.
Ingredients for gravy should only be put in the
dish immediately if cooking time is brief,
otherwise they should be added during the
last half hour.
Begin cooking rare meat at a high
temperature, reducing the temperature to
finish cooking the inside.
The cooking temperature for white meat
can be moderate throughout.
The degree of cooking can be checked
by pressing the meat with a fork; if it does

electrolux 39
Cooking times
Cooking times can vary according to the
type of food, its consistency and its volume.
It is advisable to watch when cooking for the
first time and check results since when
preparing the same dishes, in the same
conditions, similar results are obtained.
The “COOKING TABLES” relating to
cooking in the oven and by grill is provided
as a guide. Experience will show possible
variations to the values set out in the table.
Nevertheless carefully follow the in-
dications given in the receipe you in-
tend to follow.
Attention: do not place any utensils
such as dripping pan, cake tins, casseroles,
pyrex dishes, aluminium foil or other on the
base of the oven when the oven is in use. A
stagnation of heat would result which would
compromise the results of cooking and
could damage the oven enamel.
not give the meat is cooked. At the end of
cooking it is advisable to wait at least 15
minutes before cutting the meat in order that
the juices are not lost.
Before serving plates can be kept warm
in the oven at minimum temperature.
For the cooking of fish
Cook small fish from start to finish at a
high temperatu- re. Cook medium-sized fish
initially at a high tempera- ture and then
gradually lower the temperature.
Cook large fish at a moderate tempera-
ture from start to finish.
Check that baked fish is cooked by
gently lifting one side of the gut; the meat
must be white and opaque throughout,
except in the case of salmon, trout or similar.
Grilling
The following types of meat are suitable
for grilling. Mostly meat or offal cut in slices
or pieces of various sizes, but not usually
very thick, poultry cut in half and flattened,
fish, some vegetables (e.g. courgettes,
aubergines, tomatoes, etc.), skewers of meat
or fish and seafood.
Meat and fish to be grilled should be
lightly brushed with oil and always placed on
the grill; meat should be salted upon
completion of cooking; whereas fish should
be salted on the inside before cooking. The
grill should be positioned in the guides
nearest or furthest from the grill element
according to the thickness of the meat, in
order to avoid burning the surface and
cooking the inside insufficiently.
The formation of smoke caused by drops
of juice and fat can be avoided by pouring 1
or 2 glasses of water into the dripping pan.
The grill can also be used to brown, toast
bread and grill certain types of fruit, such as
bananas, halved grapefruit, slices of
pineapple, apples, etc. Fruit should not be
placed too near the source of heat.

40 electrolux
Cooking times do not include pre-heating time. A short oven pre-heating
(about 10 minutes) is necessary before any cooking.
Cooking tables
Traditional cooking and fan cooking
CAKES
Whisked recipes 2 170 2 160 45 ~ 60 In cake mould
Shortbread dough 2 170 2 (1 and 3)* 160 20 ~ 30 In cake mould
Butter-milk cheese cake 1 160 2 150 60 ~ 80 In cake mould
Apple cake 1 180 2 (1 and 3)* 170 40 ~ 60 In cake mould
Strudel 2 175 2 150 60 ~ 80
Jam-tart 2 175 2 (1 and 3)* 160 30 ~ 40
Fruit cake 1 175 1 160 45 ~ 60 In bread pan
Sponge cake 1 175 2 (1 and 3)* 160 30 ~ 40 In cake mould
Christmas cake 1 170 1 160 40 ~ 60 In cake mould
Plum cake 1 170 1 160 50 ~ 60 In bread pan
PASTRIES
Small cakes 2 175 2 (1 and 3)* 160 25 ~ 35 In baking tray
Biscuits 2 160 2 (1 and 3)* 150 20 ~ 30 In baking tray
Meringues 2 100 2 (1 and 3)* 100 90 ~ 120 In baking tray
Buns 2 190 2 (1 and 3)* 180 12 ~ 20 In baking tray
Pastry: Choux 2 200 2 (1 and 3)* 190 15 ~ 25 In baking tray
BREAD AND PIZZA
1000 White bread 1 190 2 180 40 ~ 60 1-2 pieces
500 Rye bread 1 190 1 180 30 ~ 45 In bread pan
500 Bread rolls 2 200 2 (1 and 3)* 175 20 ~ 35 6-8 rolls
250 Pizza 1 200 2 (1 and 3)* 190 15 ~ 30 On baking tray
FLANS
Pasta flan 2 200 2 (1 and 3)* 175 40 ~ 50 in mould
Vegetable flan 2 200 2 (1 and 3)* 175 45 ~ 60 in mould
Quiches 1 200 2 (1 and 3)* 180 35 ~ 45 in mould
Lasagne 2 180 2 160 45 ~ 60 in mould
Cannelloni 2 200 2 175 40 ~ 55 in mould
MEAT
1000 Beef 2 190 2 175 50 ~ 70 On grid
1200 Pork 2 180 2 175 100 ~ 130 On grid
1000 Veal 2 190 2 175 90 ~ 120 On grid
1500 English roast beef
1500 underdone 2 210 2 200 50 ~ 60 On grid
1500 done 2 210 2 200 60 ~ 70 On grid
1500 well done 2 210 2 200 70 ~ 80 On grid
2000 Shoulder of pork 2 180 2 170 120 ~ 150 With rind
1200 Shin of pork 2 180 2 160 100 ~ 120 2 pieces
1200 Lamb 2 190 2 175 110 ~ 130 Leg
1000 Chicken 2 190 2 175 60 ~ 80 Whole
NOTES
Cooking
time
minutes
temp. °C
Level
4
3
2
1
Level
Traditional
cooking
Fan
cooking
Weight (gr.)
TYPE OF DISH
temp. °C
4
3
2
1

electrolux 41
(*) If you need to cook more than one dish at the same time, we recommend you to place
them on the levels quoted between brackets.
Grilling -
Cooking times do not include pre-heating time.
A short oven pre-heating (about 10 minutes) is necessary before any cooking.
4000 Turkey 2 180 2 160 210 ~ 240 Whole
1500 Duck 2 175 2 160 120 ~ 150 Whole
3000 Goose 2 175 2 160 150 ~ 200 Whole
1200 Rabbit 2 190 2 175 60 ~ 80 Cut in pieces
1500 Hare 2 190 2 175 150 ~ 200 Cut in pieces
800 Pheasant 2 190 2 175 90 ~ 120 Whole
FISH
1200 Trout/Sea bream 2 190 2 (1 and 3)* 175 30 ~ 40 3-4 fishes
1500 Tuna fish/Salmon 2 190 2 (1 and 3)* 175 25 ~ 35 4-6 fillets
Fillet steaks 4 800 3 max 12 ~ 15 12 ~ 14
Beef-steaks 4 600 3 max 10 ~ 12 6 ~ 8
Sausages 8 — 3 max 12 ~ 15 10 ~ 12
Pork chops 4 600 3 max 12 ~ 16 12 ~ 14
Chicken (cut in two) 2 1000 3 max 30 ~ 35 25 ~ 30
Kebabs 4 — 3 max 10 ~ 15 10 ~ 12
Chicken (breast) 4 400 3 max 12 ~ 15 12 ~ 14
Hamburger 6 600 3 max 10 ~ 15 8 ~ 10
Fish (fillets) 4 400 3 max 12 ~ 14 10 ~ 12
Sandwiches 4-6 — 3 max 5 ~ 7 —
Toast 4-6 — 3 max 2 ~ 4 2 ~ 3
Upper
side
°C
Temp.
Pieces Weight
Quantity
Cooking time
(minutes)
TYPE OF DISH
4
3
2
1
Lower
side
Level
The oven temperatures are intended as a guide only. It may be necessary to increase
or decrease the temperatures to suit individual preferences and requirements.
Pizza
700 Pizza, large 1 200 15 ~ 25 in baking tray
500 Pizza, small 1 200 10 ~ 20 in mould on the shelf
500 Flat cake 1 200 15 ~ 25 in baking tray
44
44
4
33
33
3
22
22
2
11
11
1
NOTES
Cooking
time
minutes
Temperature
°C
Level
Weight
(gr.)
TYPE OF DISH

42 electrolux
Cleaning and maintenance
Before cleaning always allow the
oven to cool down before
switching off at the electricity
supply.
This appliance cannot be cleaned
with steam or with a steam
cleaning machine.
The oven should be kept clean at
all times. A build-up of fats or other
foodstuffs could result in a fire,
especially in the grill pan.
Cleaning the cooker
Drops of sauce, fruit juice etc., should be
removed as soon as possible with a soft cloth
soaked in warm detergent water. Do not use
steel wool or knives to take off layers of crust.
Remove stubborn marks with a well wetted
soap impregnated pad, but care must be taken
not to scratch the enamel. Wash the enamelled
grids with water and detergent; these can also
be washed a dishwasher.
Take off the burner covers and the grids
and wash them carefully with warm water and
detergent. Dry them well before putting them
back in position.
Moreover, make sure that these are
properly re-placed. The burner can be rubbed
with steel wool or a slightly abrasive cloth. Clean
the oven door and crystal cover, in models
equipped with these items, only with warm
water, and avoid the use of rough cloths or
abrasive substances; in cookers with an
automatic ignition the sparkling bulb should be
cleaned periodically and accurately to avoid dif-
ficulties in lighting; furthermore check that the
burner holes are not obstructed.
Cleaning the oven
Clean carefully the oven cavity after use
when it is still warm. In fact, at this moment it
is easy to take off deposits of fat or other
substances such as fruit juice, sugar particles
or fat. You can use warm detergent water or
one of the appropriate spray oven cleaners.
Do not direct the spray at the mat steel parts
as this could damage them and always follow
the manufacturer's instructions. Clean the
oven accessories with warm water and
detergent.Remove possible incrustations with
a slightly abrasive powder.
Never line any part of the oven
with aluminium foil. It would
result in an accumulation of heat
which might damage the cooking
results and also damage the
enamel.
Controls - Sundries
Periodically check the condition of the
flexible pipe of gas connection and make it
replaced by skilled technicians as soon as it
shows abnormalities.
Annual replacement is recommended.

electrolux 43
2
3
))
))
)
1
Cleaning the oven door
For a more complete cleaning of the oven
door, it is advisable to disassemble it in the
following way:
1. open the door fully;
2. turn the two caps situated on the arm of the
hinge to 180° (diagram 1 and 2);
3. partially close the door to an angle of 30°
(diagram 3);
4. lift the door and extract from the front
(diagram 3). Re-mount the door by reversing
the operation described above.
DO NOT clean the oven door while
the glass panels are warm. If this
precaution is not observed the glass
panel may shatter.
If the door glass panel becomes
chipped or has deep scratches, the
glass will be weakened and must be
replaced to prevent the possibility of
the panel shattering. Contact your
local Repair agent who will be
pleased to advise further.
Models in stainless steel or aluminium:
We recommend to clean the oven door using
only a wet sponge and dry it up after cleaning with
a soft cloth. Never use steel wool, acids or
abrasive products as they can damage the oven
surface. Clean the oven control panel following
the same precautions.
Replacing the Oven Light
If the oven bulb needs replacing, it must
comply with the following specifications:
- Power: 15 W / 25 W,
- Voltage: 230 V (50 Hz),
- Temperature Rating of 300 °C,
- Thread type: E14.
These bulbs are available from your local
Service Force Centre.
To replace the faulty bulb:
1. Ensure the oven is disconnected from the
electrical supply.
2. Turn the glass cover anticlockwise.
3. Remove the faulty bulb and replace with the
new one.
4. Refit the glass cover.
5. Reconnect to the electrical supply.

44 electrolux
Something not working
zz
zz
z The flow of gas seems
abnormal.
zz
zz
z Gas smell in the room.
zz
zz
z The oven does not heat.
zz
zz
z Cooking time is too long.
zz
zz
z The cooker produces smoke.
zz
zz
z The oven lamp doesn't work.
Make sure that:
- the flame spreader holes are not obstructed;
- the pressure regulator is working;
- the bottle valve is completely open.
Make sure that:
- the gas supply tube is well positioned and in
good condition; remember to replace it at
least once a year.
Never look for an escape of gas with a
match; use instead soapy water.
- Make sure that the oven knobs are in the
correct worrking positions.
- Have you forgotten to switch back to manual
mode after using the end of cooking
programmer?
- Check that the temperature is correct for the
type of food to be cooked.
- We advise you to clean the oven after use.
Splashes of fat can occur during the cooking
of meat and, if the oven isn't cleaned
properly, these produce smoke and bad
smell. (see paragraph concerning cleaning).
- The lamp has burnt out. To replace it follow
the instructions given in the relative
paragraph.
If the appliance does not work properly check the following points before asking for
service:
If, after following all the above checks the appliance still does not work, call your nearest
Service Centre givin them all the necessary information, such as model and serial number of
the appliance.

electrolux 45
Oven
Top element 800 W
Bottom element 1,000 W
Top + Bottom element 1,800 W
Inner grill 1,650 W
Full grill 2,450 W
Fan cooking 1,825 W
Pizza 2,675 W
Oven fan 25 W
Oven lamp 25 W
Max. power rating (Oven) 2,700 W
Voltage tension (50 Hz) 230 V
Hob
Rear left burner (semi-rapid) 2,000 W
Front left burner (rapid) 3,000 W (G20) - 2,800 W (G30/G31)
Rear right burner (semi-rapid) 2,000 W
Front right burner (auxiliary) 1,000 W
Max. power rating (Hob) 8,000 W
Dimensions of the appliance
Height 850 mm
Width 600 mm
Depth 600 mm
Capacity 56 l
Appliance Class 1 and Class 2 Sub-Class 1
Category: II2E+3+
Appliance set for use with gas type: G20/G25 20/25 mbar
Technical data

46 electrolux
Instructions for the installer
The following instructions are meant for
a qualified installer, in order that the
operations of installation, regulation, and
service are executed according to the
existing regulations.
Whenever changes are mode involving
the disconnection of the machine it is
necessary to proceed with maximum
caution.
THE MANUFACTURING COMPA-
NY DECLINES ANY RESPONSA-
BILITY FOR POSSIBLE DAMAGES
RESULTING FROM AN INSTALLA-
TION WHICH DOESN'T COMPLY
WITH THE RULES IN FORCE
Installation environnement
Warning - This unit can be installed and
can work only in constantly ventilated rooms,
according to rules in force.
In order to make the gas unit work
properly, it is necessary that air sufficient to
gas combustion can naturally flow in the
room. (The installer must follow the rules in
force).
The air flow into the room must come
directly through openings of external walls.
These openings (or opening) should be
realized in such a way not to be occluded
both from inside and outside.
Installation and maintenance must be
carried out by a qualified technician, in
compliance with rules in force, particularly
NBND 51003.
The electric coonection must be carried
out in compliance with rule NBN.
Our responsability will not be involved in
case of accidents caused by a defective or
non existent earth connection.

electrolux 47
Combustion products
discharge
Gas cooking units must discharge
combustion products through hoods di-
rectly connected to flues or outside.
Positioning
This appliance belongs to the class "X".
It has been designed to be placed close to
furniture units not exceeding the height of
the working level (EN 60 335-2-6)
Levelling
The appliance is provided with adjustable
small feet placed in the back corners of the
base.
By adjusting the small feet it is possible to en-
sure a uniform distribution of the liquids con-
tained in pans or pots.
Gas connection
Gas connection must be carried out
according to the rules in force. The manu-
facturing company release the unit, once
tested, adjusted for the kind of gas stated
on the rating plate located on the back of
the range, next to connection pipe. Be sure
that you are going to connect the unit to the
same kind of gas written on the plate.
Connection using a rigid pipe or a
flexible metal pipe
To ensure higher safety, it is recom-
mended to carry out the connection to the
gas system using rigid pipes (ex. copper) or
using flexible stainless steel pipes, to avoid
any stress to the unit. Gas feeding pipe fit-
ting is Gc 1/2.
For this type of installation, connection
to the gas supply should be carried out
using only and exclusively flexible metallic
tubes in conformity with rules in force.
NO
ELECTRIC
WIRE
FLEXIBLE
RUBBER GAS
PIPELINE
YES
FLEXIBLE RUBBER
GAS PIPELINE
ELECTRIC
WIRE

48 electrolux
Connection using flexible non metal
pipes
When the connection can be easily
inspected in its full extent, there is the
chance to use a flexible pipe according to
the rules in force. The flexible pipe must be
tightly fixed using clamps according to the
rules in force. The flexible pipe should be
made ready for use in such a way that:
- nowhere it can reach overtemperature,
other than room temperature, higher
than 30°C; if the flexible pipe, to reach
the cock, must run behind the range, it
must be installed as shown in the dia-
gram;
- it is no longer than 1500 mm;
- it shows no throttles;
- it is not subject to traction or torsion;
- it doesn't get in touch with cutting edges
or corners;
- it can be easily inspected in order to
check its condition.
The control of preservation of the flexible
pipe consists in checking that:
- it doesn't show cracks, cuts, marks of
burnings both on the end parts and on
its full extent;
- the material is not hardened, but shows
its normal elasticity;
- the fastening clamps are not rusted;
- expiry term is not due.
If one or more abnormalities are seen,
do not repair the pipe, but replace it.
IMPORTANT: Once installation is
complete, check the perfect seal
of every pipe fitting, using a soapy
solution, never a flame.
Adaptation to different kinds of gas
To adapt the appliance to a different kind
of gas from the one the appliance has been
set for, follow the instructions below in their
order.

electrolux 49
Gas connection
LPG: use the rubber pipe holder «C».
Natural gas: use the pipe fitting «A».
Always insert the gasket «B». Then
proceed with the gas connection, as indi-
cated in the relevant paragraphs.
Hob burners nozzles replacement
– Remove the pan supports.
- Extract the caps and the wall baffles of
the burners.
- Using a socket spanner 7 unscrew and
remove the nozzles replacing them with
the ones required for the kind of gas in
use (see table "Burners characteristics").
Reassemble the parts following the same
procedure backwards.
Replace the rating label (placed near the
gas supply pipe) with the relevant one for the
new type of gas supply. You can find this
label in the package of theinjectors supplied
with the appliance.
These burners do not need any
primary air regulation.
Hob burners - Adjustment of minimum
level
To adjust the minimum level:
1) turn the knob to the position of
minimum flame;
2) remove the knob;
3a) in case of conversion from natural gas
to LPG, tightly screw the by-pass screw
of the cocks;
3b) when converting from LPG to natural
gas unscrew about one-fourth turn by-
pass screw, until a regular small flame
is reached.
Reassemble the parts following the same
procedure backwards.
Check that, turning quickly the knob from
the maximum position to the minimum one,
the flame does not go out.
By-pass screw
C
B
A
B

50 electrolux
BURNERS CHARACTERISTICS
kW kW
1 0,33
2 0,45
Natural gas:
3 0,75
LPG : 2,8
BURNER
Auxiliary
Semi-rapid
Rapid
Normal
power
Reduced
power
Natural Gas LPG
Mark
1/100
70
96
119
0,095
0,190
0,286
0,111
0,221
0,332
G20
20
mbar
G25
25
mbar
m
3
/h
Mark
1/100
50
71
86
72,5
145
203
71,5
143
200
G30
G31
g/h
Burner Ø By-pass in
1/100 of mm.
Auxiliary 28
Semi-rapid 32
Rapid 42
BY-PASS DIAMETERS

electrolux 51
The unit is preset to work with a voltage
of single phase 230 V.
Before making the connection make sure
that:
- the energy power available in the user's
house is sufficient for the normal supply
of this appliance (see rating plate).
— the unit is correctly connected to earth
through a suitable plug and according to
the installation country Laws.
— the socket or the omnipolar switch used
for the connection must be easilv
reached with the installed appliance.
The appliance is supplied with electric
cable, therefore you will have to fit it with a
standard plug, suitable for the total electric
load shown on the rating plate. The plug isto
be inserted into a suitable wall socket.
If you wish to directly connect to the
mains, you have to interpose an omnipolar
switch with a minimum opening between
contacts of 3 mm, between the unit and the
mains, complying with the existing
regulations. The brown live wire (originating
from the clamp of the cooker junction box)
must always be connected to the phase of
the mains supply. In any case, the supply
cord must be positioned in such a way as it
doesn't reach in any point a temperature
higher by 50°C than the room tem- perature.
Should the supply cord need to be
replaced, use only the following cable types:
H05RR-F / H05VV-F / H05V2V2-F (T90).
It is necessary that the yellow/green earth
wire is about 2cm longer than the live and
neutral ones.
After the connection, test the heating
elements for about 3 minutes to ensure that
they are working correctly.
The manufacturer refuses any respon-
sability in cases where normal safety
measures are not observed.
Electrical connection
FO 0073
Neutral
wire
Ground (yellow - green)
Phase

52 electrolux
Declaration of guarantee terms
Original spare parts
If after the checks listed in the previous
chapter, the appliance still does not work
correctly, contact your locals Service Centre,
specifying the type of malfunctioning, the
appliance model (Mod.), the product number
(Prod. No.) and the serial number (Ser. No.)
marked on the identification plate.
This plate is placed on the front external
edge of the oven cavity.
Original spareparts, certified by the product
manufacturer and carrying
this symbol are only available
at our Service Centre and au-
thorized spareparts shops.
Our appliances are produced with the greatest of care. However, a defect may still occur.
Our consumer services department will repair this upon request, either during or after the
guarantee period. The service life of the appliance will not, however, be reduced as a result.
This declaration of guarantee terms is based on European Union Directive 99/44/EC and
the provisions of the Civil Code. The statutory rights that the consumer has under this legislation
are not affected by this declaration of guarantee terms.
This declaration does not affect the vendor’s statutory warranty to the end user. The
appliance is guaranteed within the context of and in adherence with the following terms:
1. In accordance with provisions laid down in paragraphs 2 to 15, we will remedy free of
charge any defect that occurs within 24 months from the date the appliance is delivered
to the first end user.
These guarantee terms do not apply in the event of use for professional or equivalent
purposes.
2. Performing the guarantee means that the appliance is returned to the condition it was
in before the defect occurred. Defective parts are replaced or repaired. Parts replaced
free of charge become our property.
3. So as to avoid more severe damage, the defect must be brought to our attention
immediately.
4. Applying the guarantee is subject to the consumer providing proof of purchase showing
the purchase and/or delivery date.
5. The guarantee will not apply if damage caused to delicate parts, such as glass (vitreous
ceramic), synthetic materials and rubber, is the result of inappropriate use.
6. The guarantee cannot be called on for minor faults that do not affect the value or the
overall reliability of the appliance.
7. The statutory warranty does not apply when defects are caused by:
− a chemical or electrochemical reaction caused by water,
− abnormal environmental conditions in general,
− unsuitable operating conditions,

electrolux 53
− contact with harsh substances.
8. The guarantee does not apply to defects due to transport which have occurred outside
of our responsibility. Nor will the guarantee cover those caused by inadequate installation
or assembly, lack of maintenance or failure to respect the assembly instructions or di-
rections for use.
9. Defects that result from repairs or measures carried out by people who are not qualified
or expert or defects that result from the addition of non-original accessories or spare
parts are not covered by the guarantee.
10. Appliances that are easy to transport may be delivered or sent to the consumer services
department. Home repairs are only anticipated for bulky appliances or built-in
appliances.
11. If the appliances are built-in, built-under, fixed or suspended in such a way that removing
and replacing them in the place where they are fitted takes more than half an hour, the
costs that result therefrom will be charged for. Connected damage caused by these
removal and replacement operations will be the responsibility of the user.
12. If, during the guarantee period, repairing the same defect repeatedly is not conclusive,
or if the repair costs are considered disproportionate, in agreement with the consumer,
the defective appliance may be replaced with another appliance of the same value.
In this event, we reserve the right to ask for a financial contribution calculated according
to the length of time it has been used.
13. A repair under guarantee does not mean that the normal guarantee period will be
extended nor that a new guarantee period begins.
14. We give a twelve month guarantee for repairs, limited to the same defect.
15. Except in the event where liability is legally imposed, this declaration of guarantee terms
excludes any compensation for damage outside the appliance for which the consumer
wishes to assert his rights. In the event of legally admitted liability, compensation will
not exceed the purchase price paid for the appliance.
These guarantee terms are only valid for appliances purchased and used in Belgium.
For exported appliances, the user must first make sure that they satisfy the technical
conditions (e.g.: voltage, frequency, installation instructions, etc.) for the country concerned
and that they can withstand the local climatic and environmental conditions. For appliances
purchased abroad, the user must first ensure that they meet the qualifications required in
Belgium. Non-essential or requested adjustments are not covered by the guarantee and are
not possible in all cases.
Our consumer services department is always at your disposal, even after the guarantee
period has expired.
Address for our consumer services department:
BELGIUM
Tel: Fax:
Electrolux Home Products Belgium Consumer services 02/363.04.44 02/363.04.00
ELECTROLUX SERVICE 02/363.04.60
Bergensesteenweg 719
1502 Lembeek
E-mail: [email protected]

54 electrolux
This appliance is guaranteed by Electrolux in each of the countries listed at the back of
this user manual, for the period specified in the appliance guarantee or otherwise by law. If
you move from one of these countries to another of the countries listed below the appliance
guarantee will move with you subject to the following qualifications:
• The appliance guarantee starts from the date you first purchased the appliance which
will be evidenced by production of a valid purchase document issued by the seller of the
appliance.
• The appliance guarantee is for the same period and to the same extent for labour and
parts as exists in your new country of residence for this particular model or range of
appliances.
• The appliance guarantee is personal to the original purchaser of the appliance and cannot
be transferred to another user.
• The appliance is installed and used in accordance with instructions issued by Electrolux
and is only used within the home, i.e. is not used for commercial purposes.
• The appliance is installed in accordance with all relevant regulations in force within your
new country of residence.
The provisions of this European Guarantee do not affect any of the rights granted to you by
law.
European guarantee
GRAND-DUCHÉ DE LUXEMBOURG
ELECTROLUX HOME PRODUCTS Consumer services 00 35242431-1 0035242 431-360
Rue de Bitbourg. 7
L-1273 Luxembourg-Hamm
E-mail: [email protected]

electrolux 55

397133702-A-062009
www.electrolux.be
-
 1
1
-
 2
2
-
 3
3
-
 4
4
-
 5
5
-
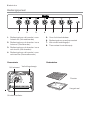 6
6
-
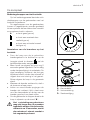 7
7
-
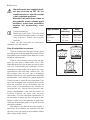 8
8
-
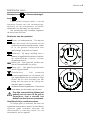 9
9
-
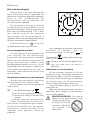 10
10
-
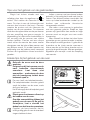 11
11
-
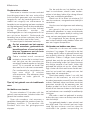 12
12
-
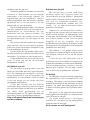 13
13
-
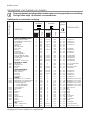 14
14
-
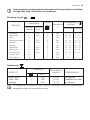 15
15
-
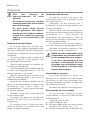 16
16
-
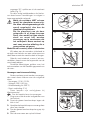 17
17
-
 18
18
-
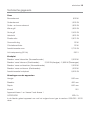 19
19
-
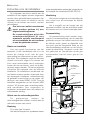 20
20
-
 21
21
-
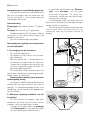 22
22
-
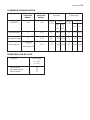 23
23
-
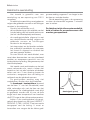 24
24
-
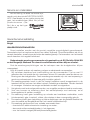 25
25
-
 26
26
-
 27
27
-
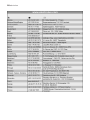 28
28
-
 29
29
-
 30
30
-
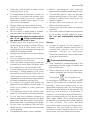 31
31
-
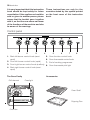 32
32
-
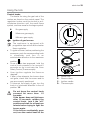 33
33
-
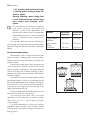 34
34
-
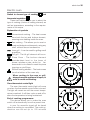 35
35
-
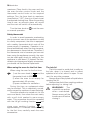 36
36
-
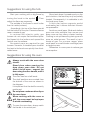 37
37
-
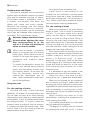 38
38
-
 39
39
-
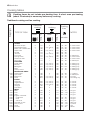 40
40
-
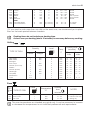 41
41
-
 42
42
-
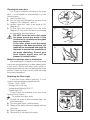 43
43
-
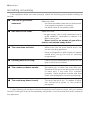 44
44
-
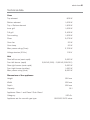 45
45
-
 46
46
-
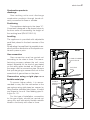 47
47
-
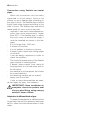 48
48
-
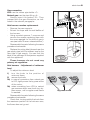 49
49
-
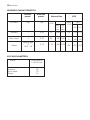 50
50
-
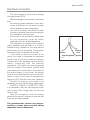 51
51
-
 52
52
-
 53
53
-
 54
54
-
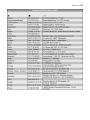 55
55
-
 56
56


Electrolux EKK601305X Handleiding
- Categorie
- Keuken-
- Type
- Handleiding
in andere talen
- English: Electrolux EKK601305X User manual