
1
Installation and User
Guide
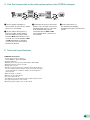
There are two versions of the Tybox 5101 transmier.
To nd out the transmier version, press the “mode” buon for several seconds until the 1st
conguration menu appears: CF00 or CF01.
First
version
Second
version
> 5s > 5s
321 4
mode
mode mode
> 5s > 5s
321 4
mode
mode mode
> 5s > 5s
321 4
mode
mode mode
Access the instructions
Access the instructions
> 5s > 5s
321 4
mode
mode mode
Tybox 5101
www.deltadore.com
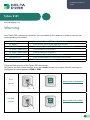
Warning
Your Tybox 5101 is paired to a receiver. You must identify this receiver in order to consult the
corresponding instructions:
RF 6050+ Consult the Tybox 5300 web instructions
RF 6000+ Consult the Tybox 2300 web instructions
RF 6700 FP Consult the Tybox 5701/5702 FP web instructions
RF 6000 (Tybox 5100) Consult these instructions
RF 6050 (Tybox 5200) Consult these instructions
RF 6200 Consult the Tybox 5150 web manual
Delta 8000 RF Consult the Delta 8101 Pack web instructions
Other receivers Consult these instructions

1
Tybox 5101
09/23
1. Notice web détaillée / Gedetailleerde gebruiksaanwijzing online / Detaillierte Web-Anleitung / Istruzioni web dettagliate /
Detailed instructions / Manual de instalación detallado en la página web / Szczegółowa instrukcja on-line
FR Notice web détaillée : scannez le QR Code.
- Con guration,
- Association,
- Fonctions avancées,
- Aide...
NL Gedetailleerde handleiding online: scan de QR-code.
- Con guratie,
- Koppeling,
- Geavanceerde functies,
- Hulp...
DE Detaillierte Web-Anleitung: Scannen Sie den QR-Code.
- Kon guration,
- Zuordnung,
- Erweiterte Funktionen,
- Hilfe ...
IT Istruzioni web de agliate: scansiona il codice QR.
- Con gurazione,
- Associazione,
- Funzioni avanzate,
- Aiuto...
EN For detailed instructions: scan the QR code.
- Setup,
- Pairing,
- Advanced features,
- Help...
ES Manual de instalación detallado en la página web:
escanee el código QR.
- Con guración,
- Asociación,
- Funciones avanzadas,
- Ayuda...
PL Szczegółowa instrukcja on-line: zeskanuj kod QR.
-Kon guracja,
- Podłączenie,
-Funkcje zaawansowane,
- Pomoc...
www.deltadore.com
Tybox 5101
2 x 1,5V LR03 - AAA Alkaline
868,7 MHz -> 869.2 MHz (EN 300 220) - 300 m max.
Maximum wireless power < 10 mW - Category 2 receiver
°C -10°C / +40°C
80 x 84 x 21 mm
IP 20
mode
FR Guide de démarrage rapide
NL Snelstartgids
DE Schnellstartanleitung
IT Guida rapida
EN Quick start guide
ES Guía de inicio rápido
PL Instrukcja szybkiego
uruchamiania
mode
1.1 Tybox 5101 utilisé avec le récepteur RF 6700 FP / Tybox 5101 gebruikt met de RF 6700 FP-ontvanger / Tybox 5101 in Verbindung mit dem RF 6700
FP-Empfänger / Tybox 5101 utilizzato con il ricevitore RF 6700 FP / Tybox 5101 used with the RF 6700 FP receiver / Tybox 5101 usado con el receptor
RF 6700 FP / Tybox 5101 używany z odbiornikiem RF 6700 FP
1.2 Tybox 5101 utilisé avec le récepteur RF 6050 + / Tybox 5101 gebruikt met de RF 6050 + ontvanger / Tybox 5101 in Verbindung mit dem Empfänger
RF 6050+ / Tybox 5101 utilizzato con il ricevitore RF 6050 + / Tybox 5101 used with the RF 67050 + receiver/ Tybox 5101 usado con el receptor RF
6050 + / Tybox 5101 używany z odbiornikiem RF 6050 +
FR Voir notice du pack Tybox 5300 ou scannez le QR code.
NL Bekijk de handleiding van de Tybox 5300-verpakking of
scan de QR-code.
DE Bedienungsanleitung für Tybox 5300 ansehen oder den
QR-Code scannen.
IT Consultare le istruzioni del pack Tybox 5300 o
scansionare il QR code.
EN Consult the Tybox 5300 pack user guide or scan the QR
code.
ES Consulte el manual de instalación del Pack Tybox 5300 o
escanee el código QR. .
PL Zobacz instrukcje zestawu Tybox 5300 lub zeskanuj kod
QR.
FR Voir notice du pack Tybox 5701 FP ou scannez le QR code.
NL Bekijk de handleiding van de Tybox 5701 FP-verpakking
of scan de QR-code.
DE Bedienungsanleitung für Tybox 5701 FP ansehen oder den
QR-Code scannen.
IT Consultare le istruzioni del pack Tybox 5701 FP o
scansionare il QR code.
EN Consult the Tybox 5701 FP pack user guide or scan the
QR code.
ES Consulte el manual de instalación del Pack Tybox 5701 FP
o escanee el código QR.
PL Zobacz instrukcje zestawu Tybox 5701 FP lub zeskanuj
kod QR.
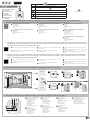
2. Installation / Installatie / Installation / Installazione / Installation / Instalación / Instalacja
2 x 1,5V - AAA LR03
2 x 1,5V - AAA LR03
~1,50 m
> 10 cm
OFF
ON
230V~
50 Hz
5A - 230V~
LN
Click
Click
Click
Click
~1,50 m
> 20 cm
Fixation murale
Wandmontage
Wandhalterung
Fissaggio a parete
Wall mounting
Fijación en la pared
Mocowanie naścienne
Fixation sur support
Bevestiging op
een ondersteuning
Befestigung auf einer
Halterung
Fissaggio su supporto
Mounting on a base
Fijación sobre el soporte
Mocowanie na podstawie
2 x 1,5V - AAA LR03
2 x 1,5V - AAA LR03
~1,50 m
> 10 cm
OFF
ON
230V~
50 Hz
5A - 230V~
LN
Click
Click
Click
Click
~1,50 m
> 20 cm
2 x 1,5V - AAA LR03
2 x 1,5V - AAA LR03
~1,50 m
> 10 cm
OFF
ON
230V~
50 Hz
5A - 230V~
LN
Click
Click
Click
Click
~1,50 m
> 20 cm
2 x 1,5V - AAA LR03
2 x 1,5V - AAA LR03
~1,50 m
> 10 cm
OFF
ON
230V~
50 Hz
5A - 230V~
LN
Click
Click
Click
Click
~1,50 m
> 20 cm
2 x 1,5V - AAA LR03
2 x 1,5V - AAA LR03
~1,50 m
> 10 cm
OFF
ON
230V~
50 Hz
5A - 230V~
LN
Click
Click
Click
Click
~1,50 m
> 20 cm
2 x 1,5V - AAA LR03
2 x 1,5V - AAA LR03
~1,50 m
> 10 cm
OFF
ON
230V~
50 Hz
5A - 230V~
LN
Click
Click
Click
Click
~1,50 m
> 20 cm
2 x 1,5V - AAA LR03
2 x 1,5V - AAA LR03
~1,50 m
> 10 cm
OFF
ON
230V~
50 Hz
5A - 230V~
LN
Click
Click
Click
Click
~1,50 m
> 20 cm
2 x 1,5V - AAA LR03
2 x 1,5V - AAA LR03
~1,50 m
> 10 cm
OFF
ON
230V~
50 Hz
5A - 230V~
LN
Click
Click
Click
Click
~1,50 m
> 20 cm
A Achage de la température
Weergave van de temperatuur
Temperaturanzeige
Visualizzazione della
temperatura
Temperature display
Visualización de la
temperatura
Wyświetlanie temperatury
B Choix du mode
Keuze van de modus
Auswahl der Betriebsart
Scelta della modalità
Select the mode
Elección del modo
Wybór trybu
C Touches de réglage
Insteltoetsen
Einstelltasten
Tasti d’impostazione
Adjustment buons
Teclas de ajuste
Przyciski regulacji
D Demande en cours
Aanvraag gaande
Heiz- bzw. Kühlbefehl läu
Caldaia aiva
Current request
solicitud en curso
Wybrana funkcja jest
uruchomiona
E Mode Chauage
Verwarmingsmodus
Heizbetrieb
Modalità Riscaldamento
Heat mode
Modo Calefacción
Tryb ogrzewanie
F Mode Climatisation
Aircomodus
Betriebsart Klimaanlage
Modalità Climatizzazione
Cool mode
Modo Climatización
Tryb Klimatyzacja
G
mode
A
D E F G
C
B
Signal d’usure des piles
Controlelampje van de baerijen
Baeriezustandsanzeige
Spia di usura delle pile
Baery level symbol
Testigo de pilas usadas
Symbol wyczerpania baterii
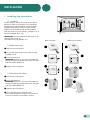
3. Description / Omschrijving / Produktbeschreibung / Descrizione / Description / Descripción / Opis

2
FR ❶ Appuyez sur une touche pour réveiller
l’achage.
Le mode en cours s’ache :
On = thermostat en marche, OFF = Arrêt.
Pour passer d’un mode à l’autre, appuyez sur
mode.
❷ A partir du mode On, patientez quelques
secondes pour acher la température de
consigne et la modier par + ou -.
Validation après 2 secondes sans appui.
NL ❶ Druk op een toets om de weergave te
activeren.
De modus in uitvoering verschijnt:
On = thermostaat in werking, OFF = uit.
Druk op modus om naar een andere modus
over te gaan.
❷ Vanuit de modus On moet u enkele
seconden wachten tot de ingestelde
temperatuur verschijnt, om die met + of - te
wijzigen.
Validering na 2 seconden zonder druk op een
toets.
DE ❶ Drücken Sie auf eine beliebige Taste, um
die Anzeige einzuschalten.
Die Betriebsart wird angezeigt:
On = Thermostat ein, OFF = Aus.
Um von einer Betriebsart in die andere zu
wechseln, drücken Sie auf Betriebsart.
❷ Warten Sie in der Betriebsart On einige
Sekunden bis zur Anzeige der Solltemperatur
und ändern Sie diese mit + oder -.
Speicherung nach 2 Sekunden ohne
Tastendruck.
IT ❶ Premere un tasto per riaivare la
visualizzazione.
Viene visualizzata la modalità corrente:
On = termostato in funzione, OFF = Spento.
Per passare da una modalità all’altra,
premere su mode.
❷
Partendo dalla modalità On, aendere
qualche secondo per visualizzare la
temperatura di setpoint e modicarla con + o -.
Conferma dopo 2 secondi senza premere
alcun tasto.
EN ❶ Press any buon to activate the display.
The current mode is displayed:
On = Thermostat running, OFF = Stop.
To switch from one mode to another, press
mode.
❷From On mode, wait a few seconds
to display the set-point temperature and
change it using + or -.
Validation aer 2 seconds if no buons are
pressed.
ES ❶ Pulse una tecla para activar la
visualización.
Aparece el modo actual:
On = termostato en marcha, OFF = Paro.
Para pasar de un modo a otro, pulse modo.
❷ Desde el modo On, espere unos segundos
para ver la temperatura de consigna y
modicarla con + o -.
Validación una vez transcurridos 2 segundos
sin pulsar.
PL ❶ Naciśnij któryś przycisk, aby uruchomić
wyświetlacz.
Wyświetli się bieżący tryb:
On = termostat jest włączony, OFF =
wyłączony.
Aby zmienić tryb, naciśnij tryb.
❷ Jeżeli bieżący tryb to On, poczekaj kilka
chwil, aż wyświetli się wybrana wcześniej
temperatura, którą można zmienić,
naciskając plus lub minus.
Zapis nastąpi po 2 sekundach bez używania
przycisków.
FR ❶ Appuyez sur une touche pour réveiller
l’achage.
Pour passer de Chauage ( ) à Climatisation
( ), appuyez 2 fois sur mode.
Le mode en cours s’ache :
On = thermostat en marche, OFF = Arrêt.
Pour passer d’un mode à l’autre, appuyez sur
mode.
❷ A partir du mode «On», patientez quelques
secondes pour acher la température de
consigne et la modier par + ou -.
Validation après 2 secondes sans appui.
NL ❶ Druk op een toets om de
weergave te activeren.
Om van verwarming ( ) naar
airconditioning ( ) over te gaan,
drukt u 2 keer op modus.
De modus in uitvoering verschijnt:
On = thermostaat in werking, OFF
= uit.
Druk op modus om naar een andere
modus te gaan.
❷ Vanuit de modus «On» moet u
enkele seconden wachten tot de
ingestelde temperatuur verschijnt,
om die met + of - te wijzigen.
Validering na 2 seconden zonder
druk op een toets.
DE ❶ Drücken Sie auf eine beliebige Taste, um die
Anzeige einzuschalten.
Um von der Heizung () zur Klimaanlage ( )
zu wechseln, drücken Sie zweimal Betriebsart.
Die aktuelle Betriebsart wird angezeigt:
On = Thermostat Ein, OFF = Aus.
Drücken Sie auf Betriebsart, um von einer
Betriebsart in die andere zu wechseln.
❷Warten Sie in der Betriebsart „On“ einige
Sekunden bis zur Anzeige der Solltemperatur
und ändern Sie diese mit + oder -.
Speicherung nach 2 Sekunden ohne
Tastendruck.
IT ❶ Premere un tasto per riaivare la
visualizzazione.
Per passare da riscaldamento ( ) a
climatizzazione ( ) premere 2 volte su mode.
Viene visualizzata la modalità corrente:
On = termostato in funzione, OFF = Spento.
Per passare da una modalità all’altra, premere
su mode.
❷ A partire dalla modalità «On», aendere
qualche secondo per visualizzare la
temperatura di setpoint e modicarla con + o -.
Conferma dopo 2 secondi senza premere alcun
tasto.
EN ❶ Press any buon to activate the display.
To switch from Heating ( ) to Cooling ( ),
press mode twice.
The current mode is displayed:
On = Thermostat running, OFF = Stop.
To switch from one mode to another, press
mode.
❷ From On mode, wait a few seconds to
display the set-point temperature and change
it using + or -.
Validation aer 2 seconds if no buons are
pressed.
ES ❶ Pulse una tecla para activar la
visualización.
Para pasar de Calefacción ( ) a Aire
acondicionado ( ), pulse 2 veces en modo.
Aparece el modo actual:
On = termostato en marcha, OFF = Paro.
Para pasar de un modo a otro, pulse modo.
❷ Desde del modo On, espere unos segundos
para ver la temperatura de consigna y
modicarla con + o -.
Validación una vez transcurridos 2 segundos
sin pulsar.
PL ❶ Naciśnij któryś przycisk, aby uruchomić
wyświetlacz.
Aby zamienić Ogrzewanie ( ) na
Klimatyzację ( ), naciśnij dwa razy na tryb.
Wyświetli się bieżący tryb :
On = termostat jest włączony, OFF =
wyłączony.
Aby zmienić tryb na inny, naciśnij tryb.
❷ Jeżeli bieżący tryb to On, odczekaj kilka
chwil, aż wyświetli się wcześniej ustawiona
temperatura, którą możesz zmienić za pomocą
plusa lub minusa.
Zapis nastąpi po 2 sekundach bez używania
przycisków.
modemode
21
modemode
21
mode
x2
modemode
2
modemode
21
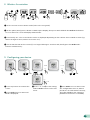
4. Association radio / Radioverbinding / Funkkopplung / Associazione radio / Wireless Association / Asociación vía radio / Połączenie
radiowe
4.1 Chauage - Verwarming - Heizung - Riscaldamento -
Heating - Calefacción - Ogrzewanie
4.2 Climatisation - Airconditioning - Klimaanlage - Climatizzazione -
Cooling - Aire acondicionado - Klimatyzacja
4.3 Chauage - Climatisation / Verwarming - Airconditioning / Heizung – Klimaanlage / Riscaldamento - Climatizzazione /
Heating - Cooling / Calefacción - Climatización / Ogrzewanie - Klimatyzacja
Réglages accessibles selon le récepteur associé / Beschikbare instellingen afhankelijk van de bijbehorende ontvanger / Je nach verknüpem Empfänger zugängliche Einstellungen/ Impostazioni
disponibili a seconda del ricevitore associato / Seings available depending on the associated receiver / Ajustes disponibles en función del receptor asociado / Ustawienia dostępne zgodnie z
powiązanym odbiornikiem
5. Réglage des consignes / Instelling van de gewenste kamertemperaturen / Einstellung der Sollwerte / Regolazione dei valori di set-point /
Set point settings / Ajuste de las consignas / Ustawianie wartości zadanych
>3s
OFF
mode mode
1
234
>3s
... ... ...
mode
FR ❶ Meez le récepteur en aente
d’association : voir sa notice.
❷Sur le Tybox, appuyez brièvement sur
une touche pour réveiller l’achage, puis
appuyez simultanément 3 secondes sur les
touches mode et +. L’écran ache rF00.
Relâchez.
❸Appuyez brièvement sur +. L’écran
clignote jusqu’à acher rF suivi du nombre
de récepteurs associés (ex : rF01 pour un seul
récepteur, rF02 pour 2 récepteurs, etc...).
❹Vériez que le voyant du(des) récepteur(s)
ne clignote plus. Pour sortir du mode, appuyez
simultanément et brièvement sur les touches
mode et +.
NL ❶ Zet de ontvanger op status ‘wachten
op verbinding’: bekijk de handleiding.
❷Druk kort op een toets op de Tybox om
de weergave opnieuw te activeren, en druk
daarna de toetsenmodus en + gelijktijdig 3
seconden in. Op het scherm verschijnt rF00.
Laat de knop los.
❸ Druk kort op +. Het scherm knippert
tot rF verschijnt, gevolgd door het aantal
gekoppelde ontvangers (bijv.: rF01 voor één
enkele ontvanger, rF02 voor 2 ontvangers,
enz.).
❹Controleer of het lampje van de
ontvanger(s) niet meer knippert. Om de
modus te verlaten, drukt u de toetsen modus
en + kort gelijktijdig in.
DE ❶ Bringen Sie den Empfänger in die
Wartestellung für die Verknüpfung (siehe
entsprechende Bedienungsanleitung).
❷Drücken Sie auf der Tybox kurz auf eine
Taste, um die Anzeige zu wecken, drücken Sie
dann gleichzeitig 3 Sekunden lang auf die
Tasten Betriebsart und +. Auf dem Display
erscheint: rF00. Lassen Sie die Taste(n) los.
❸Drücken Sie kurz auf +. Das Display
blinkt, bis rF angezeigt wird, gefolgt von der
Anzahl der zugeordneten Empfänger (z.B.:
rF01 für einen einzelnen Empfänger, rF02 für 2
Empfänger usw.).
❹Kontrollieren Sie, ob die Kontrollleuchte
des/der Empfänger(s) nicht mehr blinkt.
Um den Modus zu verlassen, drücken Sie
gleichzeitig und kurz die Tasten Mode und +.
IT ❶ Disporre il ricevitore in aesa di
associazione: consultare le relative istruzioni.
❷Sul Tybox, premere brevemente un tasto
per riaivare il display, quindi premere
contemporaneamente i tasti mode e + per 3
secondi. Lo schermo indica rF00. Rilasciare.
❸Premere brevemente il tasto +. Lo
schermo lampeggia no a visualizzare rF
seguito dal numero di ricevitori associati (ad
esempio, rF01 per un singolo ricevitore, rF02
per 2 ricevitori, ecc.)
❹Vericare che la spia del/dei ricevitore/i
non lampeggi più. Per uscire dalla modalità,
premere simultaneamente e brevemente i
tasti mode e +.
EN ❶ Set the receiver to association mode:
(refer to the user guide).
❷On the Tybox, briey press a buon to
wake up the display, then press and hold both
the mode and + buons for 3 seconds.
The screen will display rF00. Release.
❸Press briey on +. The screen ashes until
rF is displayed depending on the number of
associated receivers (eg. rF01 for a single
receiver, rF02 for 2 receivers etc.).
❹Check that the LED of the receiver(s) is no
longer ashing. To exit the mode, briey press
the mode and + buons simultaneously.
ES ❶ Ponga el receptor en espera de
asociación : ver el manual de instalación.
❷En el Tybox 5300, pulse brevemente en
una tecla para activar la pantalla y luego,
pulse simultáneamente durante 3 segundos
las teclas «mode» y +. Aparecerá rF00 en la
pantalla. Suelte.
❸Pulse brevemente + La pantalla
parpadea hasta que se muestra rF seguido
del número de receptores asociados (por
ejemplo : rF01 para un solo receptor, rF02 para
2 receptores, etc.).
❹Compruebe que el indicador de los
receptores ya no parpadea. Para salir del
modo, pulse simultánea y brevemente las
teclas «mode» y +.
PL ❶ Ustaw odbiornik w pozycji oczekiwania na
przypisanie: patrz instrukcja odbiornika.
❷ Na termostacie naciśnij krótko dowolny
przycisk, aby uaktywnić wyświetlacz, a
następnie naciskaj jednocześnie przez 3
sekundy przyciski mode i +. Na ekranie
wyświetlane jest rF00. Puść przycisk.
❸Naciśnij krótko +. Wyświetlacz miga
do momentu, gdy pojawi się rF, a następnie
liczba połączonych odbiorników (np. rF01
dla pojedynczego odbiornika, rF02 dla 2
odbiorników itd.)
❹Sprawdź, czy dioda na odbiorniku
(odbiornikach) już nie miga.
Aby wyjść z trybu, naciśnij jednocześnie i
krótko klawisze mode i +.

2
Installation and User
Guide
Tybox 5101
www.deltadore.com
Contents
Installation
1. Installing the transmier ............................................................................................ 3
1.1 Location .............................................................................................................................3
1.2 Wall mounting..................................................................................................................3
1.3 Mounting on a base ......................................................................................................3
2. Wireless Association .................................................................................................... 4
3. Conguring your device ............................................................................................. 4
Menu CF00 Backlit display ..................................................................................................5
Menu CF01 - Correcting the temperature measured ...................................................5
Menu CF02 Locking the buons .......................................................................................5
Menu CF03 RT2012 Solar optimisation ............................................................................5
4. Link the thermostat to the solar optimisation of an RT2012 manager .............. 6
5. Technical specications ............................................................................................ 6
1. Description .................................................................................................................... 7
2. Set point seings ........................................................................................................ 7
2.1 Heating/Cooling ............................................................................................................. 7
2.2 Heating ..............................................................................................................................7
2.3 Air conditioning ...............................................................................................................7
3. Open window detection .............................................................................................. 8
4. Troubleshooting ............................................................................................................ 8
4.1 Changing baeries ........................................................................................................8
4.2 Frequently Asked Questions (FAQ).............................................................................8
Use

3
~1,50 m
> 20 cm
mode
mode
mode
mode
mode
mode
2 x 1,5V - AAA LR03
2 x 1,5V - AAA LR03
Click
Click
Click
Click
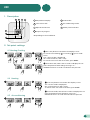
1. Installing the transmitter
1.1 Location
The thermostat can be mounted on the wall or
placed on a piece of furniture in a room whose
temperature is representative of the location’s
average temperature, with a recommended
height of 1.5 m, and it should also be nowhere
near any heat sources (reworks, sunlight, etc.) or
air ows (window, door, etc.).
IMPORTANT: Do not install the thermostat on an
external wall or with an
unheated room (e.g. garage, etc.)
1.2 Wall mounting
❶Remove the front panel.
❷Secure the thermostat to the surface using
suitable screws.
❸Insert the baeries
WARNING: make sure you insert the baeries
facing the right way and that they are the right
type (no lithium baeries).
❹Replace the front panel.
1.3 Mounting on a base
❶Remove the front panel.
❷Insert the baeries
WARNING: make sure you insert the baeries
facing the right way and that they are the right
type (no lithium baeries).
❸Replace the front panel.
❹Insert the base into the back of the
thermostat and place the device in the desire
location (on a at, non-metallic surface).
INSTALLATION
Wall mounting Mounting on a base

4
2. Wireless Association
❶ Set the receiver to association mode: (refer to the user guide).
❷ On the Tybox, briey press a buon to wake up the display, then press and hold both the mode and + buons
for 3 seconds. The screen will display rF00. Release.
❸ Press briey on +. The screen ashes until rF is displayed depending on the number of associated receivers (eg.
rF01 for a single receiver, rF02 for 2 receivers etc.).
❹ Check that the LED of the receiver(s) is no longer ashing. To exit the mode, briey press the mode and +
buons simultaneously.
3. Configuring your device
>3s
OFF
mode mode
1
234
>3s
... ... ...
mode
> 5s
> 5s
321 4
mode
mode mode
❶ Press any buon to activate the
screen.
❷ Press mode for 10 seconds until
CF00 is displayed.
❸ Press + or - to adjust the seing,
and on mode to move to the next
menu.
❹ Press mode for 5 seconds to exit
the conguration menu or, aer a
period of 2 seconds without activity,
the Tybox validates the change of
parameter and returns to standby.

5
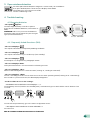
3. Configuring your device
Menu CF00 Backlit display
Default value: activated
Deactivated
Activated (automatic switch-o)
Menu CF01 - Correcting the temperature measured
This menu is used to correct any dierence you have noticed between the
displayed temperature and the measured temperature.
Example: If the temperature displayed by the device is 19°C and the meas-
ured temperature is 20°C, input +1°C then conrm using OK.
Adjusts from -5°C to 5°C,
in increments of 0.1°C.
Menu CF02 Locking the buons
This menu allows you to prohibit any changes (seings, set point, mode).
No locking
Locking active
Menu CF03 RT2012 Solar optimisation
Please leave the seing at 00 unless the Tybox is being used on its own
(without a receiver) in solar optimisation mode with an RT2012 manager (see
§4).
In order to change this seing, the unit
must have been running for at least 2
hours beforehand.
Default seing: 0°C
If locked, the screen will display “----”.
To temporarily unlock, simultaneously press
and hold the + and - buons for 5 seconds.
+ 5°C
- 5°C
>5s
mode
mode
mode
Depending on the receiver to which the Tybox
is connected, other CF menus may appear:
refer to the pack instructions.

6
4. Link the thermostat to the solar optimisation of an RT2012 manager
>3s
mode
>3s
1
2 3 4
mode
❶ Set the power manager to
«Association a room sensor» mode
(refer to its user guide).
❷ On the Tybox, briey press a
buon to wake up the display,
then simultaneously press and
hold the Mode and + buons for 3
seconds. The screen displays rF00
or rF01 depending on whether
or not a receiver is associated.
Release the buon.
❸ Simultaneously press the + and -
buons for 3 seconds. The screen
will display rF-- For 1 to 2 seconds
then automatically returns
automatically to rF00 or rF01.
The manager then conrms the
association.
❹ To exit and return to
the temperature display,
Simultaneously press (short press)
+ and -.
5. Technical specifications
TYBOX 5101 transmitter
• Power supply using 2 baeries:
2x1.5V Alkaline - Type LR03-AAA
• Class III insulation
• X3D transmission frequency: 868.7 MHz to 869.2 MHz
• Maximum wireless power < 10 mW
• Category II receiver
• Wireless range of 300 metres outside, varies depending on
the associated equipment (the range can vary depending
on the installation conditions and the electromagnetic
environment).
• Wall-mounted or on base
• Dimensions: 80 x 84 x 21 mm
• Protection Class: IP 20
• Installation in an environment with normal pollution levels
• Storage temperature: -10°C /+70°C
• Operating temperature from -10°C / +40°C

7
1. Description
2. Set point settings
2.1 Heating/Cooling
❶ Press any buon to activate the display screen.
To switch from Heating ( ) to Cooling ( ), press mode
twice.
The current mode is displayed:
On = Thermostat on, OFF = Stop.
To switch from one mode to another, press mode.
❷ From On mode, wait a few seconds to display the set-
point temperature and change it using + or -.
Validation aer 2 seconds if no buons are pressed.
2.2 Heating
2.3 Air conditioning
mode
x2
modemode
2
modemode
21
modemode
21
❶ Press any buon to activate the display screen.
The current mode is displayed:
On = Thermostat on, OFF = Stop.
To switch from one mode to another, press mode.
❷ From On mode, wait a few seconds to display the set-
point temperature and change it using + or -.
Validation aer 2 seconds if no buons are pressed.
modemode
21
USE
mode
A
D E F G
C
B
A Temperature display
B Select the mode
C Adjustment buons
D Request in progress
Ë Heat mode*
F Air conditioning mode*
G Baery level indicator
*Depending on the installation

8
3. Open window detection
You have paired a window/door magnetic contact with your installation.
If an open window/door is detected, the display shows OPEn.
The heating is in frost protection mode.
The air conditioning is o.
4. Troubleshooting
4.1 Changing baeries
• The symbol appears.
You have approximately 1 month to replace
them (two 1.5 V alkaline baeries, either LR03 or
AAA).
WARNING: make sure you insert the baeries
facing the right way and that they are the right
type (no lithium baeries).
4.2 Frequently Asked Questions (FAQ)
• The screen displays:
Your Tybox transmier is temporarily awaiting feedback.
• The screen displays:
Your Tybox transmier has just “woken up” (exit standby).
• The screen displays:
mode
>5s
See Chapter 3 “Conguration”, paragraph “CF02”.
• The screen displays “dF 0”.
Your Tybox transmier is not associated to a heating receiver.
• The screen displays “dF 9”.
Wireless fault during wireless communication (turning on, sending a command).
• The screen displays “dF22”.
You are controlling several receivers that are not in the same operating mode (heating or air conditioning).
Press mode to synchronise them, the dF22 display disappears.
• You do not have access to the seings:
•The buons are locked. The screen displays “----”.
To temporarily unlock (until the next standby time), simultaneously press and hold the + and - buons for 5
seconds.
To unlock them permanently, go to the CF02 conguration menu.
•Your Tybox is associated to a receiver and CF03 = 1
Set CF03 to 0.
END OF TYBOX 5101 WEB INSTRUCTIONS 2nd VERSION.
2 x 1,5V - AAA LR03
mode
>5s

1
Tybox 5101
09/23
1. Notice web détaillée / Gedetailleerde gebruiksaanwijzing online / Detaillierte Web-Anleitung / Istruzioni web dettagliate /
Detailed instructions / Manual de instalación detallado en la página web / Szczegółowa instrukcja on-line
FR Notice web détaillée : scannez le QR Code.
- Con guration,
- Association,
- Fonctions avancées,
- Aide...
NL Gedetailleerde handleiding online: scan de QR-code.
- Con guratie,
- Koppeling,
- Geavanceerde functies,
- Hulp...
DE Detaillierte Web-Anleitung: Scannen Sie den QR-Code.
- Kon guration,
- Zuordnung,
- Erweiterte Funktionen,
- Hilfe ...
IT Istruzioni web de agliate: scansiona il codice QR.
- Con gurazione,
- Associazione,
- Funzioni avanzate,
- Aiuto...
EN For detailed instructions: scan the QR code.
- Setup,
- Pairing,
- Advanced features,
- Help...
ES Manual de instalación detallado en la página web:
escanee el código QR.
- Con guración,
- Asociación,
- Funciones avanzadas,
- Ayuda...
PL Szczegółowa instrukcja on-line: zeskanuj kod QR.
-Kon guracja,
- Podłączenie,
-Funkcje zaawansowane,
- Pomoc...
www.deltadore.com
Tybox 5101
2 x 1,5V LR03 - AAA Alkaline
868,7 MHz -> 869.2 MHz (EN 300 220) - 300 m max.
Maximum wireless power < 10 mW - Category 2 receiver
°C -10°C / +40°C
80 x 84 x 21 mm
IP 20
mode
FR Guide de démarrage rapide
NL Snelstartgids
DE Schnellstartanleitung
IT Guida rapida
EN Quick start guide
ES Guía de inicio rápido
PL Instrukcja szybkiego
uruchamiania
mode
1.1 Tybox 5101 utilisé avec le récepteur RF 6700 FP / Tybox 5101 gebruikt met de RF 6700 FP-ontvanger / Tybox 5101 in Verbindung mit dem RF 6700
FP-Empfänger / Tybox 5101 utilizzato con il ricevitore RF 6700 FP / Tybox 5101 used with the RF 6700 FP receiver / Tybox 5101 usado con el receptor
RF 6700 FP / Tybox 5101 używany z odbiornikiem RF 6700 FP
1.2 Tybox 5101 utilisé avec le récepteur RF 6050 + / Tybox 5101 gebruikt met de RF 6050 + ontvanger / Tybox 5101 in Verbindung mit dem Empfänger
RF 6050+ / Tybox 5101 utilizzato con il ricevitore RF 6050 + / Tybox 5101 used with the RF 67050 + receiver/ Tybox 5101 usado con el receptor RF
6050 + / Tybox 5101 używany z odbiornikiem RF 6050 +
FR Voir notice du pack Tybox 5300 ou scannez le QR code.
NL Bekijk de handleiding van de Tybox 5300-verpakking of
scan de QR-code.
DE Bedienungsanleitung für Tybox 5300 ansehen oder den
QR-Code scannen.
IT Consultare le istruzioni del pack Tybox 5300 o
scansionare il QR code.
EN Consult the Tybox 5300 pack user guide or scan the QR
code.
ES Consulte el manual de instalación del Pack Tybox 5300 o
escanee el código QR. .
PL Zobacz instrukcje zestawu Tybox 5300 lub zeskanuj kod
QR.
FR Voir notice du pack Tybox 5701 FP ou scannez le QR code.
NL Bekijk de handleiding van de Tybox 5701 FP-verpakking
of scan de QR-code.
DE Bedienungsanleitung für Tybox 5701 FP ansehen oder den
QR-Code scannen.
IT Consultare le istruzioni del pack Tybox 5701 FP o
scansionare il QR code.
EN Consult the Tybox 5701 FP pack user guide or scan the
QR code.
ES Consulte el manual de instalación del Pack Tybox 5701 FP
o escanee el código QR.
PL Zobacz instrukcje zestawu Tybox 5701 FP lub zeskanuj
kod QR.
2. Installation / Installatie / Installation / Installazione / Installation / Instalación / Instalacja
2 x 1,5V - AAA LR03
2 x 1,5V - AAA LR03
~1,50 m
> 10 cm
OFF
ON
230V~
50 Hz
5A - 230V~
LN
Click
Click
Click
Click
~1,50 m
> 20 cm
Fixation murale
Wandmontage
Wandhalterung
Fissaggio a parete
Wall mounting
Fijación en la pared
Mocowanie naścienne
Fixation sur support
Bevestiging op
een ondersteuning
Befestigung auf einer
Halterung
Fissaggio su supporto
Mounting on a base
Fijación sobre el soporte
Mocowanie na podstawie
2 x 1,5V - AAA LR03
2 x 1,5V - AAA LR03
~1,50 m
> 10 cm
OFF
ON
230V~
50 Hz
5A - 230V~
LN
Click
Click
Click
Click
~1,50 m
> 20 cm
2 x 1,5V - AAA LR03
2 x 1,5V - AAA LR03
~1,50 m
> 10 cm
OFF
ON
230V~
50 Hz
5A - 230V~
LN
Click
Click
Click
Click
~1,50 m
> 20 cm
2 x 1,5V - AAA LR03
2 x 1,5V - AAA LR03
~1,50 m
> 10 cm
OFF
ON
230V~
50 Hz
5A - 230V~
LN
Click
Click
Click
Click
~1,50 m
> 20 cm
2 x 1,5V - AAA LR03
2 x 1,5V - AAA LR03
~1,50 m
> 10 cm
OFF
ON
230V~
50 Hz
5A - 230V~
LN
Click
Click
Click
Click
~1,50 m
> 20 cm
2 x 1,5V - AAA LR03
2 x 1,5V - AAA LR03
~1,50 m
> 10 cm
OFF
ON
230V~
50 Hz
5A - 230V~
LN
Click
Click
Click
Click
~1,50 m
> 20 cm
2 x 1,5V - AAA LR03
2 x 1,5V - AAA LR03
~1,50 m
> 10 cm
OFF
ON
230V~
50 Hz
5A - 230V~
LN
Click
Click
Click
Click
~1,50 m
> 20 cm
2 x 1,5V - AAA LR03
2 x 1,5V - AAA LR03
~1,50 m
> 10 cm
OFF
ON
230V~
50 Hz
5A - 230V~
LN
Click
Click
Click
Click
~1,50 m
> 20 cm
A Achage de la température
Weergave van de temperatuur
Temperaturanzeige
Visualizzazione della
temperatura
Temperature display
Visualización de la
temperatura
Wyświetlanie temperatury
B Choix du mode
Keuze van de modus
Auswahl der Betriebsart
Scelta della modalità
Select the mode
Elección del modo
Wybór trybu
C Touches de réglage
Insteltoetsen
Einstelltasten
Tasti d’impostazione
Adjustment buons
Teclas de ajuste
Przyciski regulacji
D Demande en cours
Aanvraag gaande
Heiz- bzw. Kühlbefehl läu
Caldaia aiva
Current request
solicitud en curso
Wybrana funkcja jest
uruchomiona
E Mode Chauage
Verwarmingsmodus
Heizbetrieb
Modalità Riscaldamento
Heat mode
Modo Calefacción
Tryb ogrzewanie
F Mode Climatisation
Aircomodus
Betriebsart Klimaanlage
Modalità Climatizzazione
Cool mode
Modo Climatización
Tryb Klimatyzacja
G
mode
A
D E F G
C
B
Signal d’usure des piles
Controlelampje van de baerijen
Baeriezustandsanzeige
Spia di usura delle pile
Baery level symbol
Testigo de pilas usadas
Symbol wyczerpania baterii
3. Description / Omschrijving / Produktbeschreibung / Descrizione / Description / Descripción / Opis

2
FR ❶ Appuyez sur une touche pour réveiller
l’achage.
Le mode en cours s’ache :
On = thermostat en marche, OFF = Arrêt.
Pour passer d’un mode à l’autre, appuyez sur
mode.
❷ A partir du mode On, patientez quelques
secondes pour acher la température de
consigne et la modier par + ou -.
Validation après 2 secondes sans appui.
NL ❶ Druk op een toets om de weergave te
activeren.
De modus in uitvoering verschijnt:
On = thermostaat in werking, OFF = uit.
Druk op modus om naar een andere modus
over te gaan.
❷ Vanuit de modus On moet u enkele
seconden wachten tot de ingestelde
temperatuur verschijnt, om die met + of - te
wijzigen.
Validering na 2 seconden zonder druk op een
toets.
DE ❶ Drücken Sie auf eine beliebige Taste, um
die Anzeige einzuschalten.
Die Betriebsart wird angezeigt:
On = Thermostat ein, OFF = Aus.
Um von einer Betriebsart in die andere zu
wechseln, drücken Sie auf Betriebsart.
❷ Warten Sie in der Betriebsart On einige
Sekunden bis zur Anzeige der Solltemperatur
und ändern Sie diese mit + oder -.
Speicherung nach 2 Sekunden ohne
Tastendruck.
IT ❶ Premere un tasto per riaivare la
visualizzazione.
Viene visualizzata la modalità corrente:
On = termostato in funzione, OFF = Spento.
Per passare da una modalità all’altra,
premere su mode.
❷
Partendo dalla modalità On, aendere
qualche secondo per visualizzare la
temperatura di setpoint e modicarla con + o -.
Conferma dopo 2 secondi senza premere
alcun tasto.
EN ❶ Press any buon to activate the display.
The current mode is displayed:
On = Thermostat running, OFF = Stop.
To switch from one mode to another, press
mode.
❷ From On mode, wait a few seconds
to display the set-point temperature and
change it using + or -.
Validation aer 2 seconds if no buons are
pressed.
ES ❶ Pulse una tecla para activar la
visualización.
Aparece el modo actual:
On = termostato en marcha, OFF = Paro.
Para pasar de un modo a otro, pulse modo.
❷ Desde el modo On, espere unos segundos
para ver la temperatura de consigna y
modicarla con + o -.
Validación una vez transcurridos 2 segundos
sin pulsar.
PL ❶ Naciśnij któryś przycisk, aby uruchomić
wyświetlacz.
Wyświetli się bieżący tryb:
On = termostat jest włączony, OFF =
wyłączony.
Aby zmienić tryb, naciśnij tryb.
❷ Jeżeli bieżący tryb to On, poczekaj kilka
chwil, aż wyświetli się wybrana wcześniej
temperatura, którą można zmienić,
naciskając plus lub minus.
Zapis nastąpi po 2 sekundach bez używania
przycisków.
FR ❶ Appuyez sur une touche pour réveiller
l’achage.
Pour passer de Chauage ( ) à Climatisation
( ), appuyez 2 fois sur mode.
Le mode en cours s’ache :
On = thermostat en marche, OFF = Arrêt.
Pour passer d’un mode à l’autre, appuyez sur
mode.
❷ A partir du mode «On», patientez quelques
secondes pour acher la température de
consigne et la modier par + ou -.
Validation après 2 secondes sans appui.
NL ❶ Druk op een toets om de
weergave te activeren.
Om van verwarming ( ) naar
airconditioning ( ) over te gaan,
drukt u 2 keer op modus.
De modus in uitvoering verschijnt:
On = thermostaat in werking, OFF
= uit.
Druk op modus om naar een andere
modus te gaan.
❷ Vanuit de modus «On» moet u
enkele seconden wachten tot de
ingestelde temperatuur verschijnt,
om die met + of - te wijzigen.
Validering na 2 seconden zonder
druk op een toets.
DE ❶ Drücken Sie auf eine beliebige Taste, um die
Anzeige einzuschalten.
Um von der Heizung () zur Klimaanlage ( )
zu wechseln, drücken Sie zweimal Betriebsart.
Die aktuelle Betriebsart wird angezeigt:
On = Thermostat Ein, OFF = Aus.
Drücken Sie auf Betriebsart, um von einer
Betriebsart in die andere zu wechseln.
❷Warten Sie in der Betriebsart „On“ einige
Sekunden bis zur Anzeige der Solltemperatur
und ändern Sie diese mit + oder -.
Speicherung nach 2 Sekunden ohne
Tastendruck.
IT ❶ Premere un tasto per riaivare la
visualizzazione.
Per passare da riscaldamento ( ) a
climatizzazione ( ) premere 2 volte su mode.
Viene visualizzata la modalità corrente:
On = termostato in funzione, OFF = Spento.
Per passare da una modalità all’altra, premere
su mode.
❷ A partire dalla modalità «On», aendere
qualche secondo per visualizzare la
temperatura di setpoint e modicarla con + o -.
Conferma dopo 2 secondi senza premere alcun
tasto.
EN ❶ Press any buon to activate the display.
To switch from Heating ( ) to Cooling ( ),
press mode twice.
The current mode is displayed:
On = Thermostat running, OFF = Stop.
To switch from one mode to another, press
mode.
❷ From On mode, wait a few seconds to
display the set-point temperature and change
it using + or -.
Validation aer 2 seconds if no buons are
pressed.
ES ❶ Pulse una tecla para activar la
visualización.
Para pasar de Calefacción ( ) a Aire
acondicionado ( ), pulse 2 veces en modo.
Aparece el modo actual:
On = termostato en marcha, OFF = Paro.
Para pasar de un modo a otro, pulse modo.
❷ Desde del modo On, espere unos segundos
para ver la temperatura de consigna y
modicarla con + o -.
Validación una vez transcurridos 2 segundos
sin pulsar.
PL ❶ Naciśnij któryś przycisk, aby uruchomić
wyświetlacz.
Aby zamienić Ogrzewanie ( ) na
Klimatyzację ( ), naciśnij dwa razy na tryb.
Wyświetli się bieżący tryb :
On = termostat jest włączony, OFF =
wyłączony.
Aby zmienić tryb na inny, naciśnij tryb.
❷ Jeżeli bieżący tryb to On, odczekaj kilka
chwil, aż wyświetli się wcześniej ustawiona
temperatura, którą możesz zmienić za pomocą
plusa lub minusa.
Zapis nastąpi po 2 sekundach bez używania
przycisków.
modemode
21
modemode
21
mode
x2
modemode
2
modemode
21
4. Association radio / Radioverbinding / Funkkopplung / Associazione radio / Wireless Association / Asociación vía radio / Połączenie
radiowe
4.1 Chauage - Verwarming - Heizung - Riscaldamento -
Heating - Calefacción - Ogrzewanie
4.2 Climatisation - Airconditioning - Klimaanlage - Climatizzazione -
Cooling - Aire acondicionado - Klimatyzacja
4.3 Chauage - Climatisation / Verwarming - Airconditioning / Heizung – Klimaanlage / Riscaldamento - Climatizzazione /
Heating - Cooling / Calefacción - Climatización / Ogrzewanie - Klimatyzacja
Réglages accessibles selon le récepteur associé / Beschikbare instellingen afhankelijk van de bijbehorende ontvanger / Je nach verknüpem Empfänger zugängliche Einstellungen/ Impostazioni
disponibili a seconda del ricevitore associato / Seings available depending on the associated receiver / Ajustes disponibles en función del receptor asociado / Ustawienia dostępne zgodnie z
powiązanym odbiornikiem
5. Réglage des consignes / Instelling van de gewenste kamertemperaturen / Einstellung der Sollwerte / Regolazione dei valori di set-point /
Set point settings / Ajuste de las consignas / Ustawianie wartości zadanych
>3s
OFF
mode mode
1
234
>3s
... ... ...
mode
FR ❶ Meez le récepteur en aente
d’association : voir sa notice.
❷ Sur le Tybox, appuyez brièvement sur
une touche pour réveiller l’achage, puis
appuyez simultanément 3 secondes sur les
touches mode et +. L’écran ache rF00.
Relâchez.
❸ Appuyez brièvement sur +. L’écran
clignote jusqu’à acher rF suivi du nombre
de récepteurs associés (ex : rF01 pour un seul
récepteur, rF02 pour 2 récepteurs, etc...).
❹ Vériez que le voyant du(des) récepteur(s)
ne clignote plus. Pour sortir du mode, appuyez
simultanément et brièvement sur les touches
mode et +.
NL ❶ Zet de ontvanger op status ‘wachten
op verbinding’: bekijk de handleiding.
❷Druk kort op een toets op de Tybox om
de weergave opnieuw te activeren, en druk
daarna de toetsenmodus en + gelijktijdig 3
seconden in. Op het scherm verschijnt rF00.
Laat de knop los.
❸ Druk kort op +. Het scherm knippert
tot rF verschijnt, gevolgd door het aantal
gekoppelde ontvangers (bijv.: rF01 voor één
enkele ontvanger, rF02 voor 2 ontvangers,
enz.).
❹ Controleer of het lampje van de
ontvanger(s) niet meer knippert. Om de
modus te verlaten, drukt u de toetsen modus
en + kort gelijktijdig in.
DE ❶ Bringen Sie den Empfänger in die
Wartestellung für die Verknüpfung (siehe
entsprechende Bedienungsanleitung).
❷ Drücken Sie auf der Tybox kurz auf eine
Taste, um die Anzeige zu wecken, drücken Sie
dann gleichzeitig 3 Sekunden lang auf die
Tasten Betriebsart und +. Auf dem Display
erscheint: rF00. Lassen Sie die Taste(n) los.
❸ Drücken Sie kurz auf +. Das Display
blinkt, bis rF angezeigt wird, gefolgt von der
Anzahl der zugeordneten Empfänger (z.B.:
rF01 für einen einzelnen Empfänger, rF02 für 2
Empfänger usw.).
❹ Kontrollieren Sie, ob die Kontrollleuchte
des/der Empfänger(s) nicht mehr blinkt.
Um den Modus zu verlassen, drücken Sie
gleichzeitig und kurz die Tasten Mode und +.
IT ❶ Disporre il ricevitore in aesa di
associazione: consultare le relative istruzioni.
❷ Sul Tybox, premere brevemente un tasto
per riaivare il display, quindi premere
contemporaneamente i tasti mode e + per 3
secondi. Lo schermo indica rF00. Rilasciare.
❸ Premere brevemente il tasto +. Lo
schermo lampeggia no a visualizzare rF
seguito dal numero di ricevitori associati (ad
esempio, rF01 per un singolo ricevitore, rF02
per 2 ricevitori, ecc.)
❹ Vericare che la spia del/dei ricevitore/i
non lampeggi più. Per uscire dalla modalità,
premere simultaneamente e brevemente i
tasti mode e +.
EN ❶ Set the receiver to association mode:
(refer to the user guide).
❷ On the Tybox, briey press a buon to
wake up the display, then press and hold both
the mode and + buons for 3 seconds.
The screen will display rF00. Release.
❸ Press briey on +. The screen ashes until
rF is displayed depending on the number of
associated receivers (eg. rF01 for a single
receiver, rF02 for 2 receivers etc.).
❹ Check that the LED of the receiver(s) is no
longer ashing. To exit the mode, briey press
the mode and + buons simultaneously.
ES ❶ Ponga el receptor en espera de
asociación : ver el manual de instalación.
❷ En el Tybox 5300, pulse brevemente en
una tecla para activar la pantalla y luego,
pulse simultáneamente durante 3 segundos
las teclas «mode» y +. Aparecerá rF00 en la
pantalla. Suelte.
❸ Pulse brevemente + La pantalla
parpadea hasta que se muestra rF seguido
del número de receptores asociados (por
ejemplo : rF01 para un solo receptor, rF02 para
2 receptores, etc.).
❹ Compruebe que el indicador de los
receptores ya no parpadea. Para salir del
modo, pulse simultánea y brevemente las
teclas «mode» y +.
PL ❶ Ustaw odbiornik w pozycji oczekiwania na
przypisanie: patrz instrukcja odbiornika.
❷ Na termostacie naciśnij krótko dowolny
przycisk, aby uaktywnić wyświetlacz, a
następnie naciskaj jednocześnie przez 3
sekundy przyciski mode i +. Na ekranie
wyświetlane jest rF00. Puść przycisk.
❸ Naciśnij krótko +. Wyświetlacz miga
do momentu, gdy pojawi się rF, a następnie
liczba połączonych odbiorników (np. rF01
dla pojedynczego odbiornika, rF02 dla 2
odbiorników itd.)
❹ Sprawdź, czy dioda na odbiorniku
(odbiornikach) już nie miga.
Aby wyjść z trybu, naciśnij jednocześnie i
krótko klawisze mode i +.

mode
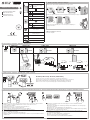
Fixation / Mounting / Montage / Fissaggio
Raccordement / Connection / Anschluss / Collegamento
Mise en service / Activation / Inbetriebnahme / Messa in funzione
Associer le thermostat au récepteur / Associate the thermostat with the receiver / Zuordnen des Raumthermostats mit dem Empfänger / Associare il termostato al ricevitore
1
2
3
4
2 x 1,5V - AAA LR03
Click
Click
1 2 4
3
1 2 3
Fixation murale / Wall mounting / Wandhalterung / Fissaggio a parete
Fixation sur support / Mounted on a base / Befestigung auf einer Halterung / Fissaggio su supporto
Fixation du récepteur / Mounting the receiver / Befestigen des Empfängers /
Fissaggio del ricevitore
RF 6000 (TYBOX 5100) - RF 6050 (TYBOX 5200) :
A la mise sous tension, le voyant de droite clignote : choix du mode (appuis brefs) /
When the device is switched on, the right indicator light flashes: Mode selection (press and release) /
Nach dem Einschalten blinkt die rechte Kontrollleuchte: Modusauswahl (kurzer Tastendruck) /
Alla messa sotto tensione, la spia di destra lampeggia: Scelta della modalità (pressioni brevi)
34
1
>3s
2
>3s EXIT
... ... ...
OFF
mode mode
FR Ê Appuyez 3 secondes sur la touche du récepteur jusqu’à ce que le voyant gauche clignote. Relâchez.
Ë Sur le TYBOX 5101, appuyez simultanément 3 secondes sur les touches mode et +.
L’écran affiche rF00. Relâchez.
Ì Appuyez brièvement sur +. L’écran clignote jusqu’à afficher rF01.
Í Vérifiez que le voyant du récepteur ne clignote plus.
Pour sortir du mode, appuyez simultanément sur les touches mode et +.
EN Ê Press and hold the receiver button for 3 seconds until the LED flashes. Release.
Ë Press and hold the mode and + buttons on the TYBOX 5101 simultaneously for 3 seconds.
The screen will display rF00. Release.
Ì Press + briefly. The screen will flash, then display rF01.
Í Make sure that the receiver LED has stopped flashing. To exit the mode, press the mode and + buttons
simultaneously.
DE Ê Drücken Sie 3 Sekunden lang die Taste des Empfängers, bis dessen Kontrollleuchte blinkt.
Lassen Sie die Taste los.
Ë Drücken Sie am TYBOX 5101 3 Sekunden gleichzeitig die Tasten mode und +. rF00 wird angezeigt.
Lassen Sie die Tasten los.
Ì Drücken Sie auf +. Das Display blinkt, bis rF01 angezeigt wird.
Í Stellen Sie sicher, dass die Kontrollleuchte des Empfängers nicht mehr blinkt. Drücken Sie gleichzeitig
die Tasten mode und +, um den Modus zu verlassen.
IT Ê Premete per 3 secondi il tasto del ricevitore fino a quando la sua spia lampeggia. Rilasciate.
Ë Sul TYBOX 5101, premete simultaneamente per 3 secondi i tasti mode e +.
Lo schermo indica rF00. Rilasciate.
Ì Premete +. Lo schermo lampeggia fino a visualizzare rF01.
Í Verificate che la spia del ricevitore non lampeggi più.
Per uscire dalla modalità, premete simultaneamente i tasti mode e +.
Ê Noir / Black / Schwarz / Nero
Ë Gris / Grey / Grau / Grigio
Ì Bleu / Blue / Blau / Blu
Í Marron / Brown / Braun / Marrone
Lg : 1m
TYBOX 5101 TYBOX 5100 TYBOX 5200 TYBOX 5150
mode
mode + RF 6000 mode + RF 6050 mode + RF 6200
NL
5A
Max.
230V~
50 Hz
5A - 230V~
LN
1 2 3 4 5
LN
230V~
50 Hz
5A - 230V~
6 7 8 1 2 3 4 5
LN
230V~
50 Hz
5A - 230V~
6 7 8
Th
Th HeatTh Cool
Change-over
230V~
50 Hz
OFF
Ê Ë
ON
... ...
HEAT
HEA
T/COOL
COOL
.. .. ..... .. ..
... ... ...
230V~
50 Hz
TYBOX 5100 (TYBOX 5101 + RF 6000)
• Boiler Plus compliant
FR Thermostat d’ambiance Radio
EN Radio room thermostat
DE Funk-Raumthermostat
IT Termostato di zona radio
TYBOX 5101 / 5100 / 5200 / 5150
RF 6000 / RF 6050 / RF 6200
230 V~, 50 Hz - 1,8 VA
(RF 6000 / RF 6050)
230 V~, 50 Hz - 2,6 VA
(RF 6200)
54 x 140 x 25 mm
IP IP 40
5 A max., 230V~
TYBOX 5101
2 x 1,5V - AAA LR03
80 x 84 x 21 mm
IP IP 20
868,7 Õ 869,2 MHz
100 Õ 300 m
Maximum radio power < 10 mW,
receiver category: 2
8 max.
-10°C / +40°C
Important product information (Ë Í)
www.deltadore.com
D
e
l
t
a
D
o
r
e
·
S
m
a
r
t
i
s
t
h
e
n
e
w
p
o
w
e
r
·
D
e
l
t
a
D
o
r
e
·
S
m
a
r
t
i
s
t
h
e
n
e
w
p
o
w
e
r
·
D
e
l
t
a
D
o
r
e
·
S
m
a
r
t
i
s
t
h
e
n
e
w
p
o
w
e
r
·
Boiler Plus
Compliant
05/22

Associer un autre émetteur / Associate another transmitter / Zuordnen eines weite-
ren Empfängers / Associare un altro emettitore
Configuration / Configuration / Konfiguration / Configurazione
Utilisation / Use / Verwendung / Utilizzo
Déverrouiller les touches / Unlock the buttons / Freischalten der Tasten / Sbloccare i
tasti
Effacer les associations / Remove the associations / Zuordnungen löschen /
Cancellare le associazioni
Aide / Troubleshooting / Hilfe / Aiuto
Changer les piles / Replace the batteries / Batterien ersetzen / Sostituire le pile
Associer le thermostat pour l’optimisation solaire / Associate the thermostat for solar
optimisation / Zuordnen des Raumthermostats für die Solaroptimierung / Associare il
termostato per l‘ottimizzazione solare
5
7
8
9
11
12
10
6
>3s
... ... ...
OFF
230V~
50 Hz
ON
OFF
1 2 3
OK
Ex : TYBOX 2020 WT, TYDOM 4000,
apps TYDOM...
+ 5°C
- 5°C
>10s
mode
mode
mode
mode
mode
mode
1 2 3
mode
>10s
>20s
3s 7s 10s
.. .. ..... .. ..
... ... ...
... ... ...
RESET OK
RESET OK
>3s
>3s
mode
2 x 1,5V - AAA LR03
>3s
mode
>3s
1
2 3
4
CF01 : Correction de la température mesurée /
Correcting the measured temperature /
Korrektur der gemessenen Temperatur /
Correzione della temperatura misurata /
CF02 : Verrouillage des touches / Locking the
buttons / Tastensperrung / Blocco dei tasti
CF03 :
00 : Fonction thermostat / Thermostat function
/ Thermostat-Funktion /Funzione termostato
01 : Fonction sonde de température seule
(optimisation solaire, capteur)/ Temperature
sensor function only (solar optimisation,
sensor)/ Funktion „Nur Temperaturfühler“
(Solar-Optimierungfunktion, Sensor)/ Funzione
solo sonda di temperatura (ottimizzazione
solare, sensore)
00 01
TYBOX 5101 X
TYBOX 5100 X
TYBOX 5200 X
TYBOX 5150 X
FR Ê Mettez l’installation sous tension.
Appuyez 3 secondes sur la touche du récepteur
jusqu’à ce que son voyant clignote. Relâchez.
Ë Sur l’émetteur, envoyez l’ordre d’association
(voir sa notice).
Ì Vérifiez que le voyant du récepteur ne clignote
plus. Les produits sont associés.
EN Ê Switch on the installation.
Press and hold the receiver button for 3 seconds
until the LED flashes. Release.
Ë Send the association command to the
transmitter (see user guide).
Î Make sure that the receiver LED has stopped
flashing. The products are now associated.
DE Ê Schalten Sie die Anlage ein.
Drücken Sie 3 Sekunden lang die Taste des
Empfängers, bis dessen Kontrollleuchte blinkt.
Lassen Sie die Taste los.
Ë Senden Sie am Empfänger den Zuordnungs-
befehl (siehe Anleitung).
Ì Stellen Sie sicher, dass die Kontrollleuchte
des Empfängers nicht mehr blinkt. Die Produkte
wurden zugeordnet.
IT Ê Mettete sotto tensione l’installazione. Premete
per 3 secondi il tasto del ricevitore fino a quando
la sua spia lampeggia. Rilasciate.
Ë Sull’emettitore, inviate l’ordine di associazione
(vedere le relative istruzioni).
Ì Verificate che la spia del ricevitore non
lampeggi più. I prodotti sono associati.
FR Ê Mettez le gestionnaire d’énergie en mode
«Association d’un capteur de type sonde
d’ambiance» (voir sa notice).
Ë Sur le TYBOX 5101, appuyez simultanément
3 secondes sur les touches mode et + jusqu’à
afficher rF01 (rF00 si TYBOX 5101 utilisé seul)
Ì Appuyez simultanément 3 secondes sur les
touches + et -.
L’écran affiche rF--.
Í Sortie automatique du mode.
EN Ê Set the energy manager to “Associate a room
sensor” mode (see user guide).
Ë Press and hold the mode and + buttons on
the TYBOX 5101 simultaneously for 3 seconds
until it displays rF01 (rF00 if TYBOX 5101 is
used alone)
Ì Press and hold the + and - buttons simultane-
ously for 3 seconds.
The screen will display rF--.
Í The mode is automatically exited.
DE Ê Bringen Sie die Energiemanagementsystem
in den Modus „Zuordnen eines Fühlers vom Typ
Raumtemperaturfühler“ (siehe Anleitung).
Ë Drücken Sie am TYBOX 5101 3 Sekunden
gleichzeitig die Tasten mode und +, bis rF01
angezeigt wird (rF00 falls TYBOX 5101 einzeln
verwendet wird).
Ì Drücken Sie 3 Sekunden lang gleichzeitig die
Tasten + und -.
Auf dem Display erscheint rF--.
Í Automatisches Verlassen des Modus.
IT Ê Mettete il gestore di energia in modalità
“Associazione di un sensore di tipo sonda
ambiente” (vedere le relative istruzioni).
Ë Sul TYBOX 5101, premete simultaneamente
per 3 secondi i tasti mode e + fino a visualizzare
rF01 (rF00 se TYBOX 5101 utilizzato da solo).
Ì Premete simultaneamente per 3 secondi i
tasti + e -.
Lo schermo indica rF--.
Í Uscita automatica dalla modalità.
FR Ê Appuyez sur une touche pour réveiller
l’affichage. Le mode en cours s’affiche :
ON = autorisation de marche, = Arrêt.
Pour le modifier, appuyez sur mode.
Ë A partir du mode ON, appuyez sur + ou - pour
afficher la température de consigne et la
modifier.
Ì Appuyez sur mode ou attendez 5 secondes-
pour sortir.
Lors du passage du mode au mode ON, la
consigne revient à sa valeur par défaut : 20°C.
Indique que le système est en
Hors-gel (10°C, non modifiable).
Exemple : fenêtre ouverte
EN Ê Press any button to activate the display
screen. The current mode will be displayed:
ON = start authorisation, = shutdown. To
change the mode, press mode.
Ë From the ON mode, press the ‘+’ or ‘-’ buttons
to display the temperature setting and change it.
Ì Press on mode or wait 5 seconds to exit.
When switching over from the mode to the
ON mode, the setting’s default value is restored:
20°C.
Indicates that the system is in Frost
Protection mode (10°C non
modifiable).
Example: open window
DE Ê Drücken Sie eine beliebige Taste, um das
Display einzuschalten. Der aktuelle Modus wird
angezeigt: ON = Ein, = Aus. Drücken Sie auf
„mode“, um diesen zu ändern.
Ë Drücken Sie im Modus ON auf + oder -, um
die Solltemperatur anzuzeigen und zu ändern.
Ì Drücken Sie auf Modus oder warten Sie
5 Sekunden, um diesen zu verlassen.
Beim Wechseln in den Modus ON, wird der
Sollwert auf den Standardwert zurückgesetzt:
20 °C.
Zeigt an, dass das System im
Frostschutzbetrieb ist (10 °C, nicht
änderbar). Beispiel: Fenster offen
IT Ê Premete un tasto per riattivare la visualizza-
zione. La modalità in corso viene visualizzata:
ON = autorizzazione di funzionamento, =
Arresto. Per modificarla, premete su mode.
Ë A partire dalla modalità ON, premete + o - per
visualizzare la temperatura di riferimento e
modificarla.
Ì Premete mode oppure attendete 5 secondi
per uscire. Al passaggio dalla modalità alla
modalità ON, il valore di riferimento ritorna al
valore predefinito: 20 °C.
Indica che il sistema è in modalità
Antigelo (10 °C, non modificabile).
Esempio: finestra aperta
Sur le récepteur / On the receiver / Am Empfänger / Sul ricevitore
Sur le thermostat / On the thermostat / Am Raumthermostat / Sul termostato
Indique qu’une dérogation de la
température de consigne est en cours sur
l’émetteur associé (ex : TYBOX 2020 WT).
Indicates a temperature setting override
on the associated transmitter (e.g.:
TYBOX 2020 WT).
Zeigt an, dass die Solltemperaturregelung
aktuell vom zugeordneten Sender(z. B.:
TYBOX 2020 WT) unterbrochen wird.
Indica che una deroga della temperatura
di riferimento è in corso sull’emettitore
associato
(es.: TYBOX 2020 WT).
Indique ponctuellement qu’il y a eu un
conflit de transmission radio et que la
commande n’est pas passée.
Recommencez l’opération.
Temporarily indicates that there has
been a wireless transmission conflict
and that the command was not sent.
Repeat the operation.
Zeigt an, dass die Funkübertragung
zeitweise nicht möglich ist und der
Befehl nicht gesendet werden konnte.
Wiederholen Sie den Vorgang.
Indica puntualmente che si è verificato
un conflitto di trasmissione radio e che
il comando non è passato.
Ricominciate l’operazione.
Indique qu’aucun produit n’est associé.
Reportez-vous au § Association.
Indicates that no product is associated.
Refer to § Association.
Gibt an, dass kein Produktzugeordnet wurde.
Siehe Abschnitt Zuordnung.
Indica che nessun prodotto è associato.
Consultate il § Associazione.
-
 1
1
-
 2
2
-
 3
3
-
 4
4
-
 5
5
-
 6
6
-
 7
7
-
 8
8
-
 9
9
-
 10
10
-
 11
11
-
 12
12
-
 13
13
-
 14
14


in andere talen
- English: DELTA DORE TYBOX 5101 BK Installation guide
- italiano: DELTA DORE TYBOX 5101 BK Guida d'installazione
- français: DELTA DORE TYBOX 5101 BK Guide d'installation
- español: DELTA DORE TYBOX 5101 BK Guía de instalación
- Deutsch: DELTA DORE TYBOX 5101 BK Installationsanleitung
- polski: DELTA DORE TYBOX 5101 BK Instrukcja instalacji
Gerelateerde papieren
-
DELTA DORE Tybox 5701FP Gebruikershandleiding
-
DELTA DORE RF 6050+ Installatie gids
-
-
-
-
-
DELTA DORE TTRTC TYXAL+ Installatie gids
-
-
-
