
PRODUCT OF
DO263A
Handleiding Mobiele airco
Mode d’emploi Climatiseur mobile
Gebrauchsanleitung Mobile Klimaanlage
Instruction booklet Mobile air conditioning
Návod k použití Mobilní klimatizace

Lees aandachtig alle instructies - bewaar deze handleiding voor latere raadpleging.
Lisez attentivement les instructions - gardez le mode d’emploi pour utilisation ultérieur.
Lesen Sie genau die Anweisungen - bewahren Sie die Gebrauchsanleitung für spätere
heranziehung.
Read all instructions carefully - save this instruction manual for future reference.
Před použitím si důkladně přečtěte tento manuál - manuál si uschovejte i pro případ
budoucího nahlédnutí.
NL Nederlands 3
FR Français 19
DE Deutsch 35
EN English 51
CZ Čeština 66

3
DO263A
www.domo-elektro.be
NL
GARANTIE
Geachte klant,
Al onze producten ondergaan steeds een strenge kwaliteitscontrole,
alvorens ze aan je worden aangeboden. Mocht je desondanks toch nog
problemen hebben met jouw toestel, dan betreuren wij dit ten zeerste.
In dat geval verzoeken wij je contact op te nemen met onze klantendienst.
Onze medewerkers zullen je met plezier verder helpen.
+32 14 21 71 91 [email protected]
Maandag – Donderdag : 8.30u – 12.00u en van 13.00u – 17.00u
Vrijdag : 8.30u – 12.00u en van 13.00u – 16.30u
Dit apparaat heeft een garantietermijn van 2 jaar vanaf de datum van aankoop. Gedurende
de garantieperiode zal de distributeur volledige verantwoording op zich nemen voor
gebreken die aanwijsbaar berusten op materiaal- of constructiefouten. Wanneer dergelijke
gebreken voorkomen, zal het apparaat, indien nodig, vervangen of gerepareerd worden. De
garantieperiode van 2 jaar zal op dit moment niet terug beginnen, maar loopt verder tot 2
jaar na de aankoop van het toestel. De garantie wordt verleend op basis van het kassaticket.
Indien je apparaat defect is binnen de garantietermijn van 2 jaar, dan mag je het toestel
samen met het originele kassaticket binnenbrengen in de winkel waar je het toestel hebt
aangekocht.
De garantie op accessoires en onderdelen die onderhevig zijn aan slijtage, bedraagt 6
maanden.
De garantie en verantwoordelijkheid/aansprakelijkheid van de leverancier en fabrikant
vervallen automatisch in de volgende gevallen:
· Bij het niet naleven van de instructies in deze handleiding.
· Bij verkeerde aansluiting, vb. te hoge elektrische spanning.
· Bij verkeerd, hardhandig of abnormaal gebruik.
· Bij onvoldoende of verkeerd onderhoud.
· Bij herstelling of wijziging van het toestel door de consument of niet gemachtigde derden.
· Bij gebruik van onderdelen of accessoires welke niet worden aanbevolen of geleverd door
de leverancier / fabrikant.

4
DO263A
NL
VEILIGHEIDSVOORSCHRIFTEN
Wanneer je elektrische toestellen gebruikt, moeten volgende veiligheidsinstructies in acht
genomen worden:
· Lees deze instructies zorgvuldig door. Bewaar deze handleiding om later te raadplegen.
· Verwijder voor het eerste gebruik alle verpakkingsmaterialen en eventuele promotionele
stickers. Zorg ervoor dat kinderen niet met de verpakkingsmaterialen spelen.
· Dit toestel is geschikt om te gebruiken in de huishoudelijke omgeving en in gelijkaardige
omgevingen zoals:
· Keukenhoek voor personeel van winkels, kantoren en andere gelijkaardige
professionele omgevingen
· Boerderijen
· Hotel- en motelkamers en andere omgevingen met een residentieel karakter
· Gastenkamers, of gelijkaardige
· Dit toestel mag gebruikt worden door kinderen vanaf 16 jaar en personen met een fysieke
of sensoriële beperking of mensen met een beperkte mentale capaciteit of gebrek aan
ervaring of kennis, op voorwaarde dat deze personen toezicht krijgen of instructies hebben
gekregen over het gebruik van het toestel op een veilige manier en dat ze ook de gevaren
kennen bij het gebruik van het toestel. Kinderen mogen niet met het toestel spelen. Het
onderhoud en de reiniging van het toestel mogen niet door kinderen gebeuren tenzij ze
ouder zijn dan 16 jaar en onder toezicht staan.
· Houd het toestel en de voedingskabel buiten het bereik van kinderen jonger dan 16 jaar.
· Opgelet: het toestel mag niet gebruikt worden met een externe timer.
· Kijk voor gebruik na of het voltage vermeld op het toestel overeenkomt met het voltage
van het elektriciteitsnet bij je thuis.
· De voedingskabel moet steeds aangesloten worden op een stopcontact dat geïnstalleerd
en geaard is volgens de lokale standaarden en normen.
· Laat het snoer niet op een heet oppervlak of over de rand van een tafel of aanrecht
hangen.
· Gebruik het toestel nooit wanneer het snoer of de stekker beschadigd is, na een slechte
werking van het toestel of wanneer het toestel beschadigd is. Breng het toestel dan naar
het dichtsbijzijnde gekwaliceerde service center voor nazicht en reparatie.
· Streng toezicht is noodzakelijk wanneer het toestel door of in de buurt van kinderen
gebruikt wordt.
· Het gebruik van accessoires die niet aanbevolen of verkocht worden door de fabrikant, kan
brand, elektrische schokken of verwondingen veroorzaken.
· Trek de stekker uit het stopcontact wanneer het toestel niet in gebruik is, vooraleer
onderdelen te monteren of demonteren en vooraleer het toestel te reinigen. Zet eerst alle
knoppen in de ‘uit’-stand en trek de stekker bij de stekker zelf uit het stopcontact. Trek
nooit aan het snoer om de stekker uit het stopcontact te trekken.
· Laat een werkend toestel niet zonder toezicht achter.

5
DO263A
www.domo-elektro.be
NL
· Zet dit toestel nooit op of in de buurt van een gasvuur of elektrisch vuur of op een plaats
waar het in contact zou kunnen komen met een warm toestel.
· Gebruik het toestel niet buiten.
· Gebruik het toestel enkel voor het doel waarvoor het bestemd is.
· Gebruik het toestel altijd op een stevig, droog, een oppervlak.
· Gebruik het toestel alleen voor huishoudelijk gebruik. De fabrikant is niet verantwoordelijk
voor ongelukken die een gevolg zijn van verkeerd gebruik van het toestel, of het niet
naleven van de regels zoals ze vermeld zijn in deze handleiding.
· Alle herstellingen, buiten het gewone onderhoud van het toestel, moeten uitgevoerd
worden door de fabrikant of zijn dienst na verkoop.
· Dompel het toestel, het elektrisch snoer of de stekker nooit onder in water of een andere
vloeistof.
· Zorg ervoor dat kinderen het elektrisch snoer of het toestel niet kunnen aanraken.
· Hou het snoer uit de buurt van scherpe randen en hete onderdelen of andere
warmtebronnen.
· Plaats het toestel nooit in de buurt van een gastoestel, vuur of een lichtontvlambare
vloeistof.
· Sla nooit op het toestel of schud niet met het toestel, om schade te voorkomen.
· Dek de luchtinlaat en -uitlaat nooit af, om oververhitting te voorkomen.
· Besprenkel het toestel nooit met water of plaats het toestel nooit in de buurt van water,
om elektrocutie te voorkomen.
· Deel de stroomtoevoer naar de airco nooit met een ander toestel.
· Steek de stekker nooit in het stopcontact of verwijder de stekker nooit uit het stopcontact
met natte handen.
· Steek nooit vreemde voorwerpen in de openingen van het toestel.
· Gebruik nooit een verlengsnoer.
· Laat kinderen nooit in de buurt van het toestel spelen.
· Wanneer je het toestel uitzet en kort daarna terug aanzet, zal de compressor minstens 3
minuten nodig hebben om terug op te starten.
· Plaats het toestel minstens op 1 meter afstand van tv of radio, om storingen te voorkomen.
· Plaats het toestel niet in rechtstreeks zonlicht, om verkleuring van het toestel te
voorkomen.
· Laat het toestel nooit meer dan 35° hellen wanneer je het verplaatst. Verplaats de airco
altijd rechtopstaand. Verplaats het toestel nooit ondersteboven.
· Verwijder steeds het water uit het toestel voor je het opbergt, zo verleng je de levensduur
van het toestel.
· Gebruik geen chemische middelen om het toestel te reinigen, dit zal het toestel
beschadigen.
· Zorg er steeds voor dat je de stroom uitschakelt voor je het luchtinlaatrooster weghaalt of
plaatst.

6
DO263A
NL
· Zorg ervoor dat de airco steeds beschermd is tegen vocht, zoals condensatie, spatwater,
etc. Zorg ervoor dat de airco zo staat dat hij niet in water of een andere vloeistof kan
vallen. Wanneer hij toch in water of een vloeistof moest vallen, verwijder dan onmiddellijk
de stekker uit het stopcontact.
· Gebruik de airco niet in een vochtige ruimte zoals een badkamer of wasplaats.
· Neem steeds contact op met een gekwaliceerde persoon om het toestel te laten
herstellen.
· Zorg ervoor dat de vrije ruimte rondom het toestel minstens 30 cm bedraagt.
· Bedien de toetsen van het toestel alleen met je vingers en met geen enkel ander voorwerp.
· Verwijder geen vaste delen van de airco. Gebruik het toestel niet wanneer het niet naar
behoren functioneert, wanneer het toestel gevallen of beschadigd is.
· Gebruik nooit de stekker om het toestel aan of uit te zetten. Gebruik steeds de knoppen op
het bedieningspaneel.
· Gebruik het toestel niet in de buurt van licht ontvlambare stoen, zoals alcohol,
insecticide, petroleum, …
· Herstellingen, detectie van lekken en werkzaamheden aan de installatie dienen te
gebeuren door bevoegde personen voorzien van de relevante certicaten.
· De installatie moet worden uitgevoerd volgens de installatie-instructies. Een onjuiste
installatie kan waterlekkage, elektrische schokken of brand veroorzaken.
· Raak het apparaat niet aan met natte of vochtige handen of op blote voeten.
· Als de airconditioner tijdens gebruik wordt omgestoten, schakel het apparaat dan uit en
trek de stekker onmiddellijk uit het stopcontact. Inspecteer het toestel om er zeker van
te zijn dat er geen schade is. Als je vermoedt dat het apparaat beschadigd is, neem dan
contact op met een technicus of klantenservice.
· Schakel het toestel uit bij onweer en trek de stekker uit het stopcontact om schade aan het
toestel door blikseminslag te voorkomen.
· Als de drainagefunctie niet in gebruik is, bevestig beide rubberen pluggen in de
drainageopeningen. Bewaar de rubberen pluggen zorgvuldig wanneer je deze niet gebruikt
om te voorkomen dat kinderen stikken.
· Laat het snoer niet onder vloerbedekking lopen. Bedek het snoer niet met vloerkleden,
lopers of soortgelijke bedekkingen. Leg het snoer niet onder meubels of apparaten. Leg
het snoer uit de buurt van een doorgang en waar niemand over kan struikelen.
· Schakel het toestel uit en trek de stekker uit het stopcontact als er vreemde geluiden,
geuren of rook uit het toestel komen.
· Lees grondig alle waarschuwingen.
· Gebruik bij het ontdooien en reinigen van het apparaat geen andere gereedschappen dan
de gereedschappen aanbevolen door het productiebedrijf.
· Het apparaat moet worden geplaatst in een ruimte zonder permanente
ontstekingsbronnen (bijvoorbeeld: open vlammen, gasapparaten of elektrische apparaten
in werking).

7
DO263A
www.domo-elektro.be
NL
· Het mag niet worden doorprikt of verbrand.
· Koelgassen kunnen geurloos zijn.
· Het apparaat moet worden geïnstalleerd, gebruikt en bewaard in een ruimte die groter is
dan 8 m
2
.
· Dit apparaat bevat een aantal grammen R290 koelgas (zie het typeplaatje achteraan op
het systeem).
· R290 is een koelgas dat voldoet aan de Europese milieurichtlijnen. Geen enkel onderdeel
van het koelcircuit mag worden doorprikt.
· Als het apparaat geïnstalleerd, gebruikt of bewaard wordt in een niet-geventileerde
ruimte, moet deze ruimte ontworpen zijn om de opbouw van koelmiddellekken te
voorkomen, omdat deze lekken leiden tot een risico op brand of explosies door de
ontsteking van het koelmiddel, die wordt veroorzaakt door elektrische verwarming,
elektrische kachels of andere ontstekingsbronnen.
· Het apparaat moet zodanig worden bewaard dat mechanische defecten worden
voorkomen.
· Personen die het koelcircuit gebruiken of er werkzaamheden aan uitvoeren, moeten
beschikken over de juiste certicaten, verstrekt door een geaccrediteerde organisatie,
die een garantie biedt van bevoegdheid in de behandeling van koelmiddelen, in
overeenstemming met een specieke beoordeling erkend door verenigingen in de sector.
· Reparaties moeten worden uitgevoerd op basis van de aanbevelingen van het
productiebedrijf. Onderhoud en reparaties waarvoor de assistentie van ander
gekwaliceerd personeel nodig is, moeten worden uitgevoerd onder toezicht van een
persoon die is aangeduid voor het gebruik van ontvlambare koelmiddelen.
Voorzichtig: gevaar voor brand / ontvlambare materialen.
Dit apparaat gebruikt een ontvlambaar koelmiddel. Als het koelmiddel lekt en
is blootgesteld aan een externe ontstekingsbron, is er gevaar voor brand.
BEWAAR DEZE INSTRUCTIES
ENERGIETIPS
· Gebruik het toestel alleen in ruimtes welke niet groter zijn dan de aanbevolen grootte.
· Plaat het toestel zo, dat luchtstroom niet belemmerd wordt door meubelen of andere
voorwerpen.
· Hou gordijnen gesloten tijdens het warmste uur van de dag.
· Zorg ervoor dat de lters altijd zuiver zijn.
· Houd ramen en deuren steeds gesloten om de koude lucht binnen te houden en de warme
lucht buiten.

8
DO263A
NL
ONDERDELEN
1. Controlepaneel
2. Luchtuitlaat
3. Luchtlter
4. Luchtinlaat
5. Luchtuitlaat
6. Drainage
7. Drainageslang
8. Afstandsbediening
9. Muurbevestiging afstandsbediening
10. Luchtuitlaatslang
10 a. Koppelstuk luchtuitlaatslang
11. Muurbevestiging
11 a. Muuradapter
11 b. Koppelstuk muurbevestiging
12. Raambevestiging
12 a. Raamadapter
12 b. Koppelstuk raambevestiging
12 c. Dichtingen
12 d. Adapterstop
12 e. L-ijzer met schroeven
1
2
3
4
5
6
8
11b
11
7
12b 12c
12
12e

9
DO263A
www.domo-elektro.be
NL
INSTALLATIE
· Plaats de airco op een solide en stabiele ondergrond, om de
geluidshinder en vibratie tot een minimum te beperken. Zorg er
ook voor dat de ondergrond sterk genoeg is om het gewicht van
het toestel te dragen.
· Om het toestel makkelijk te kunnen verplaatsen, is het voorzien
van wieltjes. Zorg ervoor dat je het toestel alleen rolt over een
gladde en vlakke ondergrond. Wees voorzichtig wanneer je het
toestel al rollend verplaatst over een tapijt. Rol het toestel nooit
over een object.
· Plaats het toestel in de buurt van een geaard stopcontact.
· Plaats geen voorwerpen binnen een straal van 30 cm rondom
het toestel.
· De luchtuitlaatslang moet geplaatst worden tijdens de instelling COOL of AUTO. Tijdens
de instelling FAN en DRY heb je de luchtuitlaatslang niet nodig.
· Zorg er ook voor dat zich rondom de luchtuitlaat buiten, in een straal van 50 cm, geen
obstakels bevinden.
· Zorg ervoor dat de luchtuitlaatslang niet te fel gebogen is bij het gebruik.
max 120 cm
min 30 cm
· Plaats het koppelstuk van de luchtuitlaatslang op het uiteinde van de slang.
· Plaats de luchtuitlaatslang op de luchtuitlaat aan de achterzijde van het toestel.
max 120 cm
min 30 cm
· Plaats het koppelstuk van de raambevestiging op het andere uiteinde van de
luchtuitlaatslang.
· Plaats de raamadapter in je venster. Dit kan voor zowel horizontale als verticale
schuiframen. Blokkeer de raamadapter op de gewenste lengte.
· Bevestig de slang met koppelstuk op de raamadapter.
· Maak gebruik van de raamdichtingen om eventuele openingen in het venster af te sluiten
· Blokkeer de raamadapter op de gewenste lengte met behulp van de meegeleverde
raamadapter stop.
· Indien gewenst kan je het raam vastzetten met het L-ijzer en 2 schroeven.
max 120 cm
min 30 cm

10
DO263A
NL
max 120 cm
min 30 cm
max 120 cm
min 30 cm
· Plaats het koppelstuk van de luchtuitlaatslang op het uiteinde van de slang.
· Plaats de luchtuitlaatslang op de luchtuitlaat aan de achterzijde van het toestel.
max 120 cm
min 30 cm
· Maak een opening in de muur ter grootte van de muuradapter.
· Plaats de muuradapter in de opening. Bevestig de muuradapter met de meegeleverde
schroeven.
· Plaats het koppelstuk van de muurbevestiging op het andere uiteinde van de
luchtuitlaatslang.
· Bevestig de slang met koppelstuk op de muuradapter.
max 120 cm
min 30 cm

11
DO263A
www.domo-elektro.be
NL
De horizontale lamellen aan de voorzijde van de airco kan je manueel open en dicht klappen
om zo de luchtuitlaat beter te kunnen richten.
CONTROLEPANEEL
12
4
3
1. ON-OFF - toets
Om het toestel in en uit te schakelen.
2. “+” en “-” - toetsen
Om de temperatuurinstelling aan te passen. De temperatuur kan ingesteld worden tussen
17°C en 30°C (COOL mode). Als je beide toetsen tegelijkertijd ingedrukt houdt gedurende 3
sec, kan je wisselen tussen “°C” en “°F”.
3. MODE - toets
Met deze toets selecteer je de gewenste gebruiksinstelling. Telkens je op de toets drukt,
zal de gebruiksinstelling wijzigen: COOL, FAN en DRY. Het desbetreende lichtje op
het controlepaneel zal oplichten. Als je de FAN-instelling kiest, blaast de ventilatie op
automatische stand. Je kan de ventilatiesnelheid enkel aanpassen met de afstandsbediening.
4. LED display
Toont de ingestelde temperatuur. Wanneer het toestel in de DRY of FAN instelling staat,
zal op het display de kamertemperatuur weergegeven
worden.
Zorg bij het gebruik van de afstandsbediening dat je
deze steeds richt naar het toestel. Als je dit niet doet,
kan je na het wijzigen van een bepaalde instelling de
afstandsbediening nog even richten naar het toestel en op
de ON-OFF toets drukken.
Als het toestel een signaal ontvangt van de
afstandsbediening hoor je een piep. De afstandsbediening
moet in een straal van 8 meter rond het toestel gebruikt
worden.
1
2
3
4
5
6
7
8

12
DO263A
NL
1. ON-OFF - toets
Om het toestel in en uit te schakelen.
2. MODE - toets
Met deze toets selecteer je de gewenste gebruiksinstelling. Telkens je op de toets drukt, zal
de gebruiksinstelling wijzigen: AUTO, COOL, DRY en FAN. Het desbetreende lichtje op het
controlepaneel zal oplichten.
3. FAN - toets
Met deze toets kan je de ventilatiesnelheid instellen. Er zijn drie instellingen : LOW
55
66
MODE display
Displays the current
mode, including:
AUTO
COOL
DRY
HEAT
FAN
Transmission Indicator
Lights up when remote sends
signal to unit
ON/OFF display
Appears when the unit is turned on,
and disappears when it is turned off
TIMER ON display
Displays when TIMER
ON is set
TIMER OFF display
Displays when TIMER
OFF is set
SLEEP display
Battery display
SILENT display
ECO display
Displays when
SLEEP function
is activated
FOLLOW ME
display
Indicates that
the FOLLOW ME
function is on
FAN SPEED display
Displays selected FAN SPEED:
HIGH, MED,
or LOW
This display is blank when
set to AUTO speed.
Temperature/Timer display
Displays the set temperature by default, or timer setting
when using TIMER ON/OFF functions
o O O
Temperature range: 17-30 C(62 F-86 F)
Timer setting range: 0-24 hours
This display is blank when operating in FAN mode.
1. Press the MODE button to select
COOL mode.
2. Set your desired temperature using
the Temp or Temp button.
3. Press the FAN button to select the
fan speed: AUTO, LOW, MED,or
HIGH.
4. Press the ON/OFF button to start the
unit.
In AUTO mode, the unit will automatically
select the COOL, FAN, HEAT or DRY mode
based on the set temperature.
1. Press the MODE button to select Auto mode.
2. Set your desired temperature using the
Temp or Temp button.
3. Press the ON/OFF button to start the unit.
,
NOTE: FAN SPEED can t be set in Auto mode.
SETTING TEMPERATURE
AUTO operation
The operating temperature range for units is
O O O
17-30 C(62 F-86 F). You can increase or
O O
decrease the set tmeperature in 1 C(1 F)
increments.
COOL operation
1
3
2
1
3
2
4
Not available for this unit
Not available for
this unit
Not available for
this unit
Low battery
detection
Remote LED Screen Indicators
How To Use The Basic Functions
ON/OFF
ON/OFF
TEMP
TEMP
SHORT
CUT
SHORT
CUT
TIMER
ON
TIMER
ON
TIMER
OFF
TIMER
OFF
MODE
MODE
FAN
FAN
SLEEP
SLEEP
LED
LED
FOLLOW
ION
SWING
ME
FOLLOW
ION
SWING
ME
, HIGH
55
66
MODE display
Displays the current
mode, including:
AUTO
COOL
DRY
HEAT
FAN
Transmission Indicator
Lights up when remote sends
signal to unit
ON/OFF display
Appears when the unit is turned on,
and disappears when it is turned off
TIMER ON display
Displays when TIMER
ON is set
TIMER OFF display
Displays when TIMER
OFF is set
SLEEP display
Battery display
SILENT display
ECO display
Displays when
SLEEP function
is activated
FOLLOW ME
display
Indicates that
the FOLLOW ME
function is on
FAN SPEED display
Displays selected FAN SPEED:
HIGH, MED,
or LOW
This display is blank when
set to AUTO speed.
Temperature/Timer display
Displays the set temperature by default, or timer setting
when using TIMER ON/OFF functions
o O O
Temperature range: 17-30 C(62 F-86 F)
Timer setting range: 0-24 hours
This display is blank when operating in FAN mode.
1. Press the MODE button to select
COOL mode.
2. Set your desired temperature using
the Temp or Temp button.
3. Press the FAN button to select the
fan speed: AUTO, LOW, MED,or
HIGH.
4. Press the ON/OFF button to start the
unit.
In AUTO mode, the unit will automatically
select the COOL, FAN, HEAT or DRY mode
based on the set temperature.
1. Press the MODE button to select Auto mode.
2. Set your desired temperature using the
Temp or Temp button.
3. Press the ON/OFF button to start the unit.
,
NOTE: FAN SPEED can t be set in Auto mode.
SETTING TEMPERATURE
AUTO operation
The operating temperature range for units is
O O O
17-30 C(62 F-86 F). You can increase or
O O
decrease the set tmeperature in 1 C(1 F)
increments.
COOL operation
1
3
2
1
3
2
4
Not available for this unit
Not available for
this unit
Not available for
this unit
Low battery
detection
Remote LED Screen Indicators
How To Use The Basic Functions
ON/OFF
ON/OFF
TEMP
TEMP
SHORT
CUT
SHORT
CUT
TIMER
ON
TIMER
ON
TIMER
OFF
TIMER
OFF
MODE
MODE
FAN
FAN
SLEEP
SLEEP
LED
LED
FOLLOW
ION
SWING
ME
FOLLOW
ION
SWING
ME
en AUTO.
4. SLEEP - toets
Gebruik je om de “sleep” functie in te stellen.
Wanneer je deze instelling selecteert, zal de ingestelde temperatuur binnen 30 min. met 1°C
stijgen. Na nog 30 min. zal de temperatuur opnieuw met 1°C stijgen. Deze temperatuur zal
aangehouden worden voor de komende 7 uur. Na deze tijd gaat de temperatuur terug naar de
origineel ingestelde temperatuur en wordt de SLEEP-instelling beëindigd.
NOTA : deze instelling kan niet geselecteerd worden bij FAN- en DRY-instelling.
5. TEMP - toets
Om de temperatuurinstelling aan te passen. De temperatuur kan ingesteld worden tussen
17°C en 30°C. Als je de volledige TEMP-toets ingedrukt houdt gedurende 3 sec, kan je wisselen
tussen “°C” en “°F”.
6. SHORT CUT - toets
Met deze toets kan je een voorkeursinstelling vastleggen en inschakelen. (p. 13)
7. TIMER ON - toets
Met deze toets kan je de tijd instellen wanneer het toestel moet inschakelen. (p. 12)
8. TIMER OFF - toets
Met deze toets kan je de tijd instellen wanneer het toestel moet uitschakelen. (p. 13)
9. LED - toets
Deze toets schakelt het LED display van het controlepaneel uit. Deze kan je gebruiken als het
display teveel licht geeft als je wil slapen. Als je een tweede keer op de knop drukt, schakelt
het display terug in.

13
DO263A
www.domo-elektro.be
NL
55
66
MODE display
Displays the current
mode, including:
AUTO
COOL
DRY
HEAT
FAN
Transmission Indicator
Lights up when remote sends
signal to unit
ON/OFF display
Appears when the unit is turned on,
and disappears when it is turned off
TIMER ON display
Displays when TIMER
ON is set
TIMER OFF display
Displays when TIMER
OFF is set
SLEEP display
Battery display
SILENT display
ECO display
Displays when
SLEEP function
is activated
FOLLOW ME
display
Indicates that
the FOLLOW ME
function is on
FAN SPEED display
Displays selected FAN SPEED:
HIGH, MED,
or LOW
This display is blank when
set to AUTO speed.
Temperature/Timer display
Displays the set temperature by default, or timer setting
when using TIMER ON/OFF functions
o O O
Temperature range: 17-30 C(62 F-86 F)
Timer setting range: 0-24 hours
This display is blank when operating in FAN mode.
1. Press the MODE button to select
COOL mode.
2. Set your desired temperature using
the Temp or Temp button.
3. Press the FAN button to select the
fan speed: AUTO, LOW, MED,or
HIGH.
4. Press the ON/OFF button to start the
unit.
In AUTO mode, the unit will automatically
select the COOL, FAN, HEAT or DRY mode
based on the set temperature.
1. Press the MODE button to select Auto mode.
2. Set your desired temperature using the
Temp or Temp button.
3. Press the ON/OFF button to start the unit.
,
NOTE: FAN SPEED can t be set in Auto mode.
SETTING TEMPERATURE
AUTO operation
The operating temperature range for units is
O O O
17-30 C(62 F-86 F). You can increase or
O O
decrease the set tmeperature in 1 C(1 F)
increments.
COOL operation
1
3
2
1
3
2
4
Not available for this unit
Not available for
this unit
Not available for
this unit
Low battery
detection
Remote LED Screen Indicators
How To Use The Basic Functions
ON/OF F
ON/OF F
TEMP
TEMP
SHORT
CUT
SHORT
CUT
TIMER
ON
TIMER
ON
TIMER
OFF
TIMER
OFF
MODE
MODE
FAN
FAN
SLEEP
SLEEP
LED
LED
FOLLO W
ION
SWING
ME
FOLLO W
ION
SWING
ME
In de instelling AUTO kiest het toestel automatisch de gepaste instelling in functie van de
gekozen temperatuur. Deze instelling kan je enkel kiezen met de afstandsbediening.
1. Kies met de MODE - toets op de afstandsbediening voor AUTO.
2. Stel de gewenste temperatuur in met de TEMP - toets. Het toestel gaat in functie
hiervan de instelling bepalen.
In AUTO-modus kan je de snelheid van de ventilatie (FAN) niet aanpassen.
55
66
MODE display
Displays the current
mode, including:
AUTO
COOL
DRY
HEAT
FAN
Transmission Indicator
Lights up when remote sends
signal to unit
ON/OFF display
Appears when the unit is turned on,
and disappears when it is turned off
TIMER ON display
Displays when TIMER
ON is set
TIMER OFF display
Displays when TIMER
OFF is set
SLEEP display
Battery display
SILENT display
ECO display
Displays when
SLEEP function
is activated
FOLLOW ME
display
Indicates that
the FOLLOW ME
function is on
FAN SPEED display
Displays selected FAN SPEED:
HIGH, MED,
or LOW
This display is blank when
set to AUTO speed.
Temperature/Timer display
Displays the set temperature by default, or timer setting
when using TIMER ON/OFF functions
o O O
Temperature range: 17-30 C(62 F-86 F)
Timer setting range: 0-24 hours
This display is blank when operating in FAN mode.
1. Press the MODE button to select
COOL mode.
2. Set your desired temperature using
the Temp or Temp button.
3. Press the FAN button to select the
fan speed: AUTO, LOW, MED,or
HIGH.
4. Press the ON/OFF button to start the
unit.
In AUTO mode, the unit will automatically
select the COOL, FAN, HEAT or DRY mode
based on the set temperature.
1. Press the MODE button to select Auto mode.
2. Set your desired temperature using the
Temp or Temp button.
3. Press the ON/OFF button to start the unit.
,
NOTE: FAN SPEED can t be set in Auto mode.
SETTING TEMPERATURE
AUTO operation
The operating temperature range for units is
O O O
17-30 C(62 F-86 F). You can increase or
O O
decrease the set tmeperature in 1 C(1 F)
increments.
COOL operation
1
3
2
1
3
2
4
Not available for this unit
Not available for
this unit
Not available for
this unit
Low battery
detection
Remote LED Screen Indicators
How To Use The Basic Functions
ON/OF F
ON/OF F
TEMP
TEMP
SHORT
CUT
SHORT
CUT
TIMER
ON
TIMER
ON
TIMER
OFF
TIMER
OFF
MODE
MODE
FAN
FAN
SLEEP
SLEEP
LED
LED
FOLLO W
ION
SWING
ME
FOLLO W
ION
SWING
ME
Met de COOL-functie kan je de ruimte aoelen tot een bepaalde temperatuur.
1. Druk op de MODE - toets tot het COOL-indicatielampje brandt.
2. Gebruik de “+” en “-” toetsen op het controlepaneel of de TEMP - toets op de
afstandsbediening, om de gewenste kamertemperatuur in te stellen.
3. Gebruik de FAN - toets op de afstandsbediening om de gewenste ventilatiesnelheid
in te stellen. Er zijn drie instellingen : LOW
55
66
MODE display
Displays the current
mode, including:
AUTO
COOL
DRY
HEAT
FAN
Transmission Indicator
Lights up when remote sends
signal to unit
ON/OFF display
Appears when the unit is turned on,
and disappears when it is turned off
TIMER ON display
Displays when TIMER
ON is set
TIMER OFF display
Displays when TIMER
OFF is set
SLEEP display
Battery display
SILENT display
ECO display
Displays when
SLEEP function
is activated
FOLLOW ME
display
Indicates that
the FOLLOW ME
function is on
FAN SPEED display
Displays selected FAN SPEED:
HIGH, MED,
or LOW
This display is blank when
set to AUTO speed.
Temperature/Timer display
Displays the set temperature by default, or timer setting
when using TIMER ON/OFF functions
o O O
Temperature range: 17-30 C(62 F-86 F)
Timer setting range: 0-24 hours
This display is blank when operating in FAN mode.
1. Press the MODE button to select
COOL mode.
2. Set your desired temperature using
the Temp or Temp button.
3. Press the FAN button to select the
fan speed: AUTO, LOW, MED,or
HIGH.
4. Press the ON/OFF button to start the
unit.
In AUTO mode, the unit will automatically
select the COOL, FAN, HEAT or DRY mode
based on the set temperature.
1. Press the MODE button to select Auto mode.
2. Set your desired temperature using the
Temp or Temp button.
3. Press the ON/OFF button to start the unit.
,
NOTE: FAN SPEED can t be set in Auto mode.
SETTING TEMPERATURE
AUTO operation
The operating temperature range for units is
O O O
17-30 C(62 F-86 F). You can increase or
O O
decrease the set tmeperature in 1 C(1 F)
increments.
COOL operation
1
3
2
1
3
2
4
Not available for this unit
Not available for
this unit
Not available for
this unit
Low battery
detection
Remote LED Screen Indicators
How To Use The Basic Functions
ON/OFF
ON/OFF
TEMP
TEMP
SHORT
CUT
SHORT
CUT
TIMER
ON
TIMER
ON
TIMER
OFF
TIMER
OFF
MODE
MODE
FAN
FAN
SLEEP
SLEEP
LED
LED
FOLLOW
ION
SWING
ME
FOLLOW
ION
SWING
ME
, HIGH
55
66
MODE display
Displays the current
mode, including:
AUTO
COOL
DRY
HEAT
FAN
Transmission Indicator
Lights up when remote sends
signal to unit
ON/OFF display
Appears when the unit is turned on,
and disappears when it is turned off
TIMER ON display
Displays when TIMER
ON is set
TIMER OFF display
Displays when TIMER
OFF is set
SLEEP display
Battery display
SILENT display
ECO display
Displays when
SLEEP function
is activated
FOLLOW ME
display
Indicates that
the FOLLOW ME
function is on
FAN SPEED display
Displays selected FAN SPEED:
HIGH, MED,
or LOW
This display is blank when
set to AUTO speed.
Temperature/Timer display
Displays the set temperature by default, or timer setting
when using TIMER ON/OFF functions
o O O
Temperature range: 17-30 C(62 F-86 F)
Timer setting range: 0-24 hours
This display is blank when operating in FAN mode.
1. Press the MODE button to select
COOL mode.
2. Set your desired temperature using
the Temp or Temp button.
3. Press the FAN button to select the
fan speed: AUTO, LOW, MED,or
HIGH.
4. Press the ON/OFF button to start the
unit.
In AUTO mode, the unit will automatically
select the COOL, FAN, HEAT or DRY mode
based on the set temperature.
1. Press the MODE button to select Auto mode.
2. Set your desired temperature using the
Temp or Temp button.
3. Press the ON/OFF button to start the unit.
,
NOTE: FAN SPEED can t be set in Auto mode.
SETTING TEMPERATURE
AUTO operation
The operating temperature range for units is
O O O
17-30 C(62 F-86 F). You can increase or
O O
decrease the set tmeperature in 1 C(1 F)
increments.
COOL operation
1
3
2
1
3
2
4
Not available for this unit
Not available for
this unit
Not available for
this unit
Low battery
detection
Remote LED Screen Indicators
How To Use The Basic Functions
ON/OFF
ON/OFF
TEMP
TEMP
SHORT
CUT
SHORT
CUT
TIMER
ON
TIMER
ON
TIMER
OFF
TIMER
OFF
MODE
MODE
FAN
FAN
SLEEP
SLEEP
LED
LED
FOLLOW
ION
SWING
ME
FOLLOW
ION
SWING
ME
en AUTO.
55
66
MODE display
Displays the current
mode, including:
AUTO
COOL
DRY
HEAT
FAN
Transmission Indicator
Lights up when remote sends
signal to unit
ON/OFF display
Appears when the unit is turned on,
and disappears when it is turned off
TIMER ON display
Displays when TIMER
ON is set
TIMER OFF display
Displays when TIMER
OFF is set
SLEEP display
Battery display
SILENT display
ECO display
Displays when
SLEEP function
is activated
FOLLOW ME
display
Indicates that
the FOLLOW ME
function is on
FAN SPEED display
Displays selected FAN SPEED:
HIGH, MED,
or LOW
This display is blank when
set to AUTO speed.
Temperature/Timer display
Displays the set temperature by default, or timer setting
when using TIMER ON/OFF functions
o O O
Temperature range: 17-30 C(62 F-86 F)
Timer setting range: 0-24 hours
This display is blank when operating in FAN mode.
1. Press the MODE button to select
COOL mode.
2. Set your desired temperature using
the Temp or Temp button.
3. Press the FAN button to select the
fan speed: AUTO, LOW, MED,or
HIGH.
4. Press the ON/OFF button to start the
unit.
In AUTO mode, the unit will automatically
select the COOL, FAN, HEAT or DRY mode
based on the set temperature.
1. Press the MODE button to select Auto mode.
2. Set your desired temperature using the
Temp or Temp button.
3. Press the ON/OFF button to start the unit.
,
NOTE: FAN SPEED can t be set in Auto mode.
SETTING TEMPERATURE
AUTO operation
The operating temperature range for units is
O O O
17-30 C(62 F-86 F). You can increase or
O O
decrease the set tmeperature in 1 C(1 F)
increments.
COOL operation
1
3
2
1
3
2
4
Not available for this unit
Not available for
this unit
Not available for
this unit
Low battery
detection
Remote LED Screen Indicators
How To Use The Basic Functions
ON/OF F
ON/OF F
TEMP
TEMP
SHORT
CUT
SHORT
CUT
TIMER
ON
TIMER
ON
TIMER
OFF
TIMER
OFF
MODE
MODE
FAN
FAN
SLEEP
SLEEP
LED
LED
FOLLO W
ION
SWING
ME
FOLLO W
ION
SWING
ME
Met deze functie kan je de ruimte ontvochtigen. Houd ramen en deuren gesloten bij deze
functie.
1. Druk op de MODE - toets tot het DRY - indicatielampje brandt.
2. Bij deze instelling kan je de ventilatiesnelheid niet instellen.
55
66
MODE display
Displays the current
mode, including:
AUTO
COOL
DRY
HEAT
FAN
Transmission Indicator
Lights up when remote sends
signal to unit
ON/OFF display
Appears when the unit is turned on,
and disappears when it is turned off
TIMER ON display
Displays when TIMER
ON is set
TIMER OFF display
Displays when TIMER
OFF is set
SLEEP display
Battery display
SILENT display
ECO display
Displays when
SLEEP function
is activated
FOLLOW ME
display
Indicates that
the FOLLOW ME
function is on
FAN SPEED display
Displays selected FAN SPEED:
HIGH, MED,
or LOW
This display is blank when
set to AUTO speed.
Temperature/Timer display
Displays the set temperature by default, or timer setting
when using TIMER ON/OFF functions
o O O
Temperature range: 17-30 C(62 F-86 F)
Timer setting range: 0-24 hours
This display is blank when operating in FAN mode.
1. Press the MODE button to select
COOL mode.
2. Set your desired temperature using
the Temp or Temp button.
3. Press the FAN button to select the
fan speed: AUTO, LOW, MED,or
HIGH.
4. Press the ON/OFF button to start the
unit.
In AUTO mode, the unit will automatically
select the COOL, FAN, HEAT or DRY mode
based on the set temperature.
1. Press the MODE button to select Auto mode.
2. Set your desired temperature using the
Temp or Temp button.
3. Press the ON/OFF button to start the unit.
,
NOTE: FAN SPEED can t be set in Auto mode.
SETTING TEMPERATURE
AUTO operation
The operating temperature range for units is
O O O
17-30 C(62 F-86 F). You can increase or
O O
decrease the set tmeperature in 1 C(1 F)
increments.
COOL operation
1
3
2
1
3
2
4
Not available for this unit
Not available for
this unit
Not available for
this unit
Low battery
detection
Remote LED Screen Indicators
How To Use The Basic Functions
ON/OF F
ON/OF F
TEMP
TEMP
SHORT
CUT
SHORT
CUT
TIMER
ON
TIMER
ON
TIMER
OFF
TIMER
OFF
MODE
MODE
FAN
FAN
SLEEP
SLEEP
LED
LED
FOLLO W
ION
SWING
ME
FOLLO W
ION
SWING
ME
1. Druk op de MODE - toets tot het FAN-indicatielampje brandt.
2. Druk op de FAN-toets van de afstandsbediening om de ventilatiesnelheid in te
stellen. Er zijn drie instellingen : LOW
55
66
MODE display
Displays the current
mode, including:
AUTO
COOL
DRY
HEAT
FAN
Transmission Indicator
Lights up when remote sends
signal to unit
ON/OFF display
Appears when the unit is turned on,
and disappears when it is turned off
TIMER ON display
Displays when TIMER
ON is set
TIMER OFF display
Displays when TIMER
OFF is set
SLEEP display
Battery display
SILENT display
ECO display
Displays when
SLEEP function
is activated
FOLLOW ME
display
Indicates that
the FOLLOW ME
function is on
FAN SPEED display
Displays selected FAN SPEED:
HIGH, MED,
or LOW
This display is blank when
set to AUTO speed.
Temperature/Timer display
Displays the set temperature by default, or timer setting
when using TIMER ON/OFF functions
o O O
Temperature range: 17-30 C(62 F-86 F)
Timer setting range: 0-24 hours
This display is blank when operating in FAN mode.
1. Press the MODE button to select
COOL mode.
2. Set your desired temperature using
the Temp or Temp button.
3. Press the FAN button to select the
fan speed: AUTO, LOW, MED,or
HIGH.
4. Press the ON/OFF button to start the
unit.
In AUTO mode, the unit will automatically
select the COOL, FAN, HEAT or DRY mode
based on the set temperature.
1. Press the MODE button to select Auto mode.
2. Set your desired temperature using the
Temp or Temp button.
3. Press the ON/OFF button to start the unit.
,
NOTE: FAN SPEED can t be set in Auto mode.
SETTING TEMPERATURE
AUTO operation
The operating temperature range for units is
O O O
17-30 C(62 F-86 F). You can increase or
O O
decrease the set tmeperature in 1 C(1 F)
increments.
COOL operation
1
3
2
1
3
2
4
Not available for this unit
Not available for
this unit
Not available for
this unit
Low battery
detection
Remote LED Screen Indicators
How To Use The Basic Functions
ON/OFF
ON/OFF
TEMP
TEMP
SHORT
CUT
SHORT
CUT
TIMER
ON
TIMER
ON
TIMER
OFF
TIMER
OFF
MODE
MODE
FAN
FAN
SLEEP
SLEEP
LED
LED
FOLLOW
ION
SWING
ME
FOLLOW
ION
SWING
ME
, HIGH
55
66
MODE display
Displays the current
mode, including:
AUTO
COOL
DRY
HEAT
FAN
Transmission Indicator
Lights up when remote sends
signal to unit
ON/OFF display
Appears when the unit is turned on,
and disappears when it is turned off
TIMER ON display
Displays when TIMER
ON is set
TIMER OFF display
Displays when TIMER
OFF is set
SLEEP display
Battery display
SILENT display
ECO display
Displays when
SLEEP function
is activated
FOLLOW ME
display
Indicates that
the FOLLOW ME
function is on
FAN SPEED display
Displays selected FAN SPEED:
HIGH, MED,
or LOW
This display is blank when
set to AUTO speed.
Temperature/Timer display
Displays the set temperature by default, or timer setting
when using TIMER ON/OFF functions
o O O
Temperature range: 17-30 C(62 F-86 F)
Timer setting range: 0-24 hours
This display is blank when operating in FAN mode.
1. Press the MODE button to select
COOL mode.
2. Set your desired temperature using
the Temp or Temp button.
3. Press the FAN button to select the
fan speed: AUTO, LOW, MED,or
HIGH.
4. Press the ON/OFF button to start the
unit.
In AUTO mode, the unit will automatically
select the COOL, FAN, HEAT or DRY mode
based on the set temperature.
1. Press the MODE button to select Auto mode.
2. Set your desired temperature using the
Temp or Temp button.
3. Press the ON/OFF button to start the unit.
,
NOTE: FAN SPEED can t be set in Auto mode.
SETTING TEMPERATURE
AUTO operation
The operating temperature range for units is
O O O
17-30 C(62 F-86 F). You can increase or
O O
decrease the set tmeperature in 1 C(1 F)
increments.
COOL operation
1
3
2
1
3
2
4
Not available for this unit
Not available for
this unit
Not available for
this unit
Low battery
detection
Remote LED Screen Indicators
How To Use The Basic Functions
ON/OFF
ON/OFF
TEMP
TEMP
SHORT
CUT
SHORT
CUT
TIMER
ON
TIMER
ON
TIMER
OFF
TIMER
OFF
MODE
MODE
FAN
FAN
SLEEP
SLEEP
LED
LED
FOLLOW
ION
SWING
ME
FOLLOW
ION
SWING
ME
en AUTO.
3. De temperatuur kan niet worden ingesteld.
Met deze functie kan je het toestel uitgesteld laten starten, tot maximum 24 uur.
1. Druk op de TIMER ON - toets op de afstandsbediening.
2. Op het display van de afstandsbediening kan je nu aezen over hoeveel tijd de airco
zal beginnen werken.
3. Druk meerdere keren op de TIMER ON - toets om de tijd te verhogen. Of houd de
toets ingedrukt.
4. Eens de gewenste tijd is ingesteld, zal je op het display van de afstandsbediening
“Timer on” zien staan. Op het display van het controlepaneel zijn er 2 verlichte
bolletjes te zien.

14
DO263A
NL
5. Als je de timer wil uitschakelen, druk dan meerdere keren op de TIMER ON - toets, tot
de teller op “0” komt te staan. Of houd de toets ingedrukt.
Met deze functie kan je het toestel automatisch laten uitschakelen na verloop van tijd.
1. Druk op de TIMER OFF - toets op de afstandsbediening.
2. Op het display van de afstandsbediening kan je nu aezen over hoeveel tijd de airco
zal uitschakelen.
3. Druk meerdere keren op de TIMER OFF - toets om de tijd te verhogen. Of houd de
toets ingedrukt.
4. Eens de gewenste tijd is ingesteld, zal je op het display van de afstandsbediening
“Timer o” zien staan.
5. Als je de timer wil uitschakelen, druk dan meerdere keren op de TIMER OFF - toets,
tot de teller op “0” komt te staan.
Je kan beide functies ook gelijktijdig inschakelen. Hierdoor bepaal je wanneer het toestel
inschakelt, maar ook wanneer het toestel uitschakelt.
Let op: deze tijd is telkens vanaf het uur dat je de instelling programmeert. Bijvoorbeeld: het
is nu 13:00. Je wil het toestel laten werken van 16:30 tot 18:00. Stel de functie TIMER ON in op
3,5 h en de TIMER OFF op 5,0 h.
Wanneer je deze instelling selecteert, zal de ingestelde temperatuur binnen 30 min. met 1°C
stijgen. Na nog 30 min. zal de temperatuur opnieuw met 1°C stijgen. Deze temperatuur zal
aangehouden worden voor de komende 7 uur. Na deze tijd gaat de temperatuur terug naar de
origineel ingestelde temperatuur en wordt de SLEEP-instelling beëindigd.
NOTA : deze instelling kan niet geselecteerd worden bij FAN en DRY-instelling.
Met deze toets kan je een voorkeursinstelling vastleggen en inschakelen.
Als je een bepaalde instelling vaker gebruikt, kan je deze vastleggen door de SHORTCUT -
toets gedurende 3 seconden ingedrukt te houden. Het toestel onthoudt dan de instellingen
die op het moment van indrukken ingeschakeld zijn. Deze instellingen kunnen zijn: de
gebruiksinstelling (MODE), ingestelde temperatuur, ventilatiesnelheid (FAN) en eventueel
ook de SLEEP-instelling.
Op het moment dat je op de SHORTCUT-toets drukt, zal het toestel werken op de eerder
vastgelegde instellingen.

15
DO263A
www.domo-elektro.be
NL
DRAINAGE
Tijdens het ontvochtigen, kan je een permanente drainage gebruiken.
1. Verwijder de drainage afsluiting en het rubber dopje in het midden, achteraan het
toestel.
2. Bevestig de drainageslang aan de drainage opening.
3. Zorg ervoor dat het water op een veilige en permanente manier kan wegvloeien.
1
2
Wanneer je geen gebruik maakt van de permanente drainage, zal het water opgevangen
worden in de drainagebak, onderaan het toestel.
· Wanneer deze vol is, zal je enkele biepsignalen horen en
op de display verschijnt de code “P1”. De ontvochtiging of
airconditioning zal stoppen. De ventilator blijft wel werken,
dit is normaal.
· Verplaats het toestel voorzichtig naar een plaats waar je het
water makkelijk kan laten weglopen.
· Verwijder de afsluiting van de drainage opening onderaan het
toestel (A). Het water zal nu weglopen.
· Nadat het water volledig verwijderd is, plaats je de afsluiting
terug op de drainage opening.
· Je kan nu het toestel terug opstarten. Let er op dat de code
“P1” op de display verdwijnt. Indien de code niet onmiddellijk
verdwijnt, kan je enkele malen proberen om het toestel uit en
terug in te schakelen. Wanneer de code zich blijft herhalen,
moet je contact opnemen met de servicedienst.
· NOTA: installeer altijd eerst de drainage afsluiting, voordat je
het toestel terug aanzet.
· Verwijder steeds de stekker uit het stopcontact alvorens het toestel te reinigen.
· Gebruik geen chemische of schurende producten om het toestel te reinigen.
A

16
DO263A
NL
· Was het toestel nooit met water of een andere vloeistof, dit kan elektrocutie tot gevolg
hebben.
· Wanneer het elektrisch snoer beschadigd is, moet het vervangen of hersteld worden door
de dienst na verkoop van de fabrikant of een gekwaliceerd persoon.
· Reinig de luchtlter minstens om de 2 weken. Om te
voorkomen dat de ventilator slecht gaat werken door stof
in de lter.
· Reinig de lter in lauw water met een mild detergent.
Spoel de lter grondig en laat deze aan de lucht drogen.
· Als de lter volledig droog is, kan je deze terug in het
toestel plaatsen.
Gebruik een vochtige zachte doek en een beetje mild detergent om de buitenkant van het
toestel te reinigen. Maak het toestel achteraf grondig droog met een zachte, droge doek.
Voor je het toestel opbergt voor een langere tijd, kan je best eerst het volgende doen, om
schade aan het toestel te voorkomen :
· Verwijder al het water uit het toestel met behulp van de drainage.
· Zet het toestel daarna aan op de FAN-instelling. Laat het toestel gedurende een halve dag
in een verwarmde ruimte werken. Zo kan het toestel volledig drogen aan de binnenkant en
voorkom je schimmelvorming.
· Zet het toestel uit, verwijder de stekker uit het stopcontact en verwijder de batterijen uit
de afstandsbediening.
· Maak de lter schoon en plaats deze terug in het toestel.
· Berg het toestel op in een droge, donkere ruimte.
Het toestel werkt niet wanneer je op de ON/OFF - toets drukt.
· Op het display staat P1 : verwijder het water uit het toestel.
· De kamertemperatuur is lager dan de ingestelde temperatuur. Pas de temperatuur op het
toestel aan.
De ruimte koelt niet voldoende af.
· De ramen en deuren zijn niet gesloten. Zorg ervoor dat alle ramen en deuren gesloten zijn.
· Er zijn warmte producerende toestellen in de ruimte. Verwijder indien mogelijk de
warmtebronnen.

17
DO263A
www.domo-elektro.be
NL
· De luchtuitlaatslang is niet aangesloten of geblokkeerd. Sluit de slang aan en zorg ervoor
dat ze naar behoren kan functioneren.
· De ingestelde temperatuur is te hoog. Pas de ingestelde temperatuur aan.
· De luchtlter is vuil. Reinig de luchtlter.
Het toestel maakt te veel lawaai of zorgt voor trillingen.
· De vloer is niet recht of vlak genoeg. Plaats het toestel op een rechte vlakke ondergrond.
· De luchtlter is vuil. Reinig de luchtlter.
Het toestel maakt een gorgelend geluid.
· Het geluid komt van de koelvloeistof in het toestel. Dit is normaal.
Volgende error codes kunnen verschijnen op het display van het toestel :
E1: de sensor van de kamertemperatuur werkt niet. Zet het toestel uit en verwijder de stekker
uit het stopcontact. Wacht 10 sec. en steek de stekker terug in het stopcontact. Zet het toestel
opnieuw aan. Wanneer de error code opnieuw verschijnt, moet je contact opnemen met de
hersteldienst.
E2: de sensor van de luchtverdamper werkt niet. Zet het toestel uit en verwijder de stekker uit
het stopcontact. Wacht 10 sec. en steek de stekker terug in het stopcontact. Zet het toestel
opnieuw aan. Wanneer de error code opnieuw verschijnt, moet je contact opnemen met de
hersteldienst.
E4: het display werkt niet naar behoren. Zet het toestel uit en verwijder de stekker uit het
stopcontact. Wacht 10 sec. en steek de stekker terug in het stopcontact. Zet het toestel
opnieuw aan. Wanneer de error code opnieuw verschijnt, moet je contact opnemen met de
hersteldienst.
P1: het waterreservoir is vol. Verwijder het water volgens het hoofdstuk “drainage” van deze
handleiding.

18
DO263A
NL
EN
Dit symbool op het product of op de verpakking wijst erop dat
dit product niet als huishoudafval mag worden behandeld.
Het moet naar een plaats worden gebracht waar elektrische
en elektronische apparatuur wordt gerecycleerd. Als je ervoor
zorgt dat dit product op de correcte manier wordt verwijderd,
voorkom je mogelijk voor mens en milieu negatieve gevolgen
die zich zouden kunnen voordoen in geval van verkeerde
afvalbehandeling. Voor meer details in verband met het
recycleren van dit product, neem je best contact op met de
gemeentelijke instanties, het bedrijf of de dienst belast met
de verwijdering van huishoudafval of de winkel waar je het
product hebt gekocht.
Het verpakkingsmateriaal is recycleerbaar. Behandel de
verpakking milieubewust.

19
DO263A
www.domo-elektro.be
FR
GARANTIE
Cher client,
Tous nos produits sont soumis à des contrôles qualité stricts avant
d’être proposés à la vente. Si vous deviez toutefois rencontrer
un problème avec votre appareil, nous le déplorons vivement.
Dans ce cas, nous vous invitons à prendre contact avec notre service clientèle.
Nos collaboratrices se feront un plaisir de vous aider !
+32 14 21 71 91 [email protected]
Du lundi au jeudi : 8 h 30 – 12 h et 13 h – 17 h
Vendredi : 8 h 30 – 12 h et 13 h – 16 h 30
Cet appareil est garanti 2 ans à compter de la date d’achat. Durant la période de garantie, le
distributeur assumera l’entière responsabilité en cas de défauts de fonctionnement (matériel)
ou de fabrication. Si un tel problème survient, l’appareil sera remplacé ou réparé. La période
de garantie de 2 ans ne reprend pas à zéro, mais se poursuit (jusqu’à 2 ans à compter de la
date d’achat de l’appareil). La garantie est accordée sur la base du ticket de caisse.
Pour les accessoires et les éléments d’usure, une garantie de 6 mois s’applique.
La garantie et la responsabilité du fournisseur et du fabricant n’ont plus eet dans les cas
suivants :
· Les instructions du manuel n’ont pas été suivies.
· Mauvais raccordement, par ex. tension électrique trop forte.
· Utilisation contraire, brutale ou anormale.
· Entretien insusant ou non conforme.
· Réparation ou modication de l’appareil par le consommateur ou un tiers non autorisé.
· Utilisation d’éléments ou d’accessoires qui ne sont pas recommandés ou fournis par le
fournisseur/fabricant.

20
DO263A
FR
Les consignes de sécurité suivantes doivent être respectées lors de l’utilisation de tout
appareil électrique:
· Lisez ces consignes très attentivement. Conservez ce mode d’emploi an de pouvoir le
consulter ultérieurement.
· Avant la première utilisation, enlevez tous les éléments d’emballage et les éventuels
autocollants promotionnels. Veillez à ce que les enfants ne jouent pas avec les matériaux
d’emballage.
· Cet appareil est conçu pour être utilisé dans un environnement domestique ou dans des
environnements comparables, tels que :
· Coin-cuisine du personnel dans les commerces, les bureaux et autres environnements
professionnels comparables
· Fermes
· Chambres d’hôtel ou de motel et autres environnements à caractère résidentiel
· Chambres d’hôtes ou comparables
· Cet appareil peut être utilisé par des enfants âgés de 16 ans ou plus et par des personnes
présentant un handicap physique ou sensoriel, une capacité mentale limitée ou un manque
d’expérience ou de connaissances, à condition que ces personnes soient sous surveillance
ou qu’elles aient reçu des instructions sur la manière d’utiliser l’appareil en toute sécurité et
qu’elles connaissent les dangers liés à son utilisation. Les enfants ne peuvent pas jouer avec
cet appareil. L’entretien et le nettoyage de l’appareil ne peuvent pas être eectués par des
enfants, sauf s’ils sont âgés de plus de 16 ans et sous la surveillance d’un adulte.
· Gardez l’appareil et le cordon électrique hors de portée des enfants.
· Attention: l’appareil ne peut pas être utilisé avec une minuterie externe.
· Vériez avant usage si la tension indiquée sur l’appareil correspond à la tension du réseau
électrique de votre domicile.
· Le cordon d’alimentation doit toujours être branché dans une prise de courant placée et
mise à la terre conformément aux normes et standards locaux.
· Ne laissez pas le cordon pendre sur une surface chaude ou sur le rebord d’une table.
· N’utilisez jamais l’appareil lorsque le cordon ou la che sont endommagés, après un
mauvais fonctionnement de l’appareil ou lorsque l’appareil est endommagé. Amenez alors
l’appareil au centre de services le plus proche pour contrôle et réparation.
· Soyez très attentif lorsque l’appareil est utilisé par des enfants ou à proximité d’enfants.
· L’utilisation d’accessoires non préconisés par le fabricant peut provoquer un incendie, une
électrocution ou des blessures.
· Retirez la che de la prise lorsque l’appareil n’est pas utilisé, avant d’installer ou d’enlever
des pièces et avant de nettoyer l’appareil. Mettez tous les boutons en position « arrêt » et
retirez la che de la prise. Ne tirez jamais sur le câble pour retirer la che de la prise.
· Ne laissez jamais un appareil en service sans surveillance.

21
DO263A
www.domo-elektro.be
FR
· Ne placez jamais cet appareil sur ou à proximité d’un feu au gaz ou d’un feu électrique où il
pourrait entrer en contact avec un appareil chaud.
· N’utilisez pas l’appareil à l’extérieur.
· Utilisez l’appareil uniquement dans le but auquel il est destiné.
· Utilisez toujours l’appareil sur une surface solide, sèche et plane.
· Cet appareil ne convient qu’à un usage domestique. Le fabricant décline toute
responsabilité pour des accidents qui découleraient d’un mauvais usage de l’appareil ou du
non-respect des instructions fournies dans ce manuel.
· Toutes les réparations, en dehors de l’entretien ordinaire de l’appareil, doivent être
réalisées par le fabricant ou son service après-vente.
· N’immergez jamais le cordon électrique, la che ou l’appareil lui-même dans l’eau ou tout
autre milieu liquide.
· Veillez à ce que les enfants ne puissent pas toucher à l’appareil ou au cordon électrique.
· Tenez le cordon éloigné de rebords tranchants et de pièces brûlantes ou d’autres sources
de chaleur.
· Avant la première utilisation, enlevez tous les éléments d’emballage et les éventuels
autocollants promotionnels.
· Ne placez jamais l’appareil à proximité d’un appareil au gaz, d’un feu ou d’un liquide
facilement inammable.
· Pour éviter tout dommage, ne frappez et ne secouez jamais l’appareil.
· Pour éviter toute surchaue, ne recouvrez jamais l’arrivée d’air et la sortie d’air.
· Pour éviter toute électrocution, n’aspergez jamais l’appareil avec de l’eau et ne le placez
jamais à proximité d’un point d’eau.
· Ne partagez jamais l’alimentation électrique du climatiseur avec un autre appareil.
· Ne branchez/débranchez jamais la che de l’appareil sur une prise de courant si vous avez
les mains mouillées.
· N’insérez jamais des corps étrangers dans les ouvertures de l’appareil.
· N’utilisez jamais un cordon prolongateur.
· Ne laissez jamais des enfants jouer à proximité de l’appareil.
· Si vous éteignez l’appareil et que vous le rallumez juste après, la compresseur aura besoin
d’un délai de 3 minutes au moins pour redémarrer.
· Placez l’appareil à au moins 1 mètre de distance d’un téléviseur ou d’une radio pour éviter
des interférences.
· Pour éviter toute décoloration, n’exposez pas l’appareil à la lumière directe du soleil.
· N’inclinez jamais l’appareil à plus de 35° lorsque vous le déplacez. Déplacez toujours le
climatiseur à la verticale. Ne déplacez jamais l’appareil à l’envers.
· Eliminez toujours l’eau contenue dans l’appareil avant de le ranger, vous prolongerez ainsi
sa durée de vie.
· N’utilisez pas de produits chimiques pour nettoyer l’appareil, ils risqueraient fort de
l’abîmer.

22
DO263A
FR
· Veillez toujours à éteindre l’appareil avant d’enlever ou de replacer la grille d’arrivée d’air.
· Veillez toujours à protéger le climatiseur contre l’humidité, la condensation, les projections
d’eau, etc.
· Veillez à installer le climatiseur de telle manière qu’il ne puisse pas tomber dans l’eau ou
un autre liquide. S’il arrivait malgré tout que l’appareil tombe dans l’eau ou un liquide,
débranchez immédiatement la che électrique.
· N’utilisez pas le climatiseur dans un local humide comme une salle de bain ou une
buanderie.
· Eteignez totalement l’appareil lorsque vous ne l’utilisez pas.
· Faites toujours appel à un technicien qualié pour faire réparer l’appareil si besoin.
· Veillez à laisser un espace libre d’au moins 30 cm tout autour de l’appareil.
· Si le climatiseur a été renversé, débranchez immédiatement la che électrique.
· Ne touchez pas l’appareil lorsque vous avez les mains humides ou lorsque vous marchez
pieds nus.
· N’actionnez les touches de l’appareil qu’avec les doigts, jamais avec un autre objet.
· Ne retirez aucune partie xe du climatiseur. N’utilisez pas l’appareil s’il ne fonctionne pas
correctement, s’il est tombé ou s’il est endommagé.
· N’utilisez jamais la che pour allumer ou éteindre l’appareil. Utilisez toujours les boutons
du panneau de commande.
· Ne recouvrez jamais la grille d’arrivée d’air ou de sortie d’air de l’appareil.
· N’utilisez pas l’appareil à proximité de substances facilement inammables telles que
alcool, insecticide, essence,...
· Les réparations, la détection de fuites et toutes les autres interventions à l’installation
doivent être faites par des personnes qualiées, prévues des certicates rélévantes.
· L’installation doit être eectuée conformément aux instructions. Une installation
incorrecte peut provoquer une fuite d’eau, un choc électrique ou un incendie.
· Ne touchez pas l’appareil si vous avez les mains humides ou mouillées ni si vous êtes pieds
nus.
· Si le climatiseur est renversé alors qu’il fonctionne, coupez l’alimentation électrique et
débranchez-le immédiatement. Inspectez l’appareil pour vous assurer qu’il n’est pas
endommagé. Si vous pensez que c’est le cas, prenez contact avec un technicien ou le
service à la clientèle.
· Le courant doit être coupé en cas d’orage pour éviter que la foudre n’endommage
l’appareil.
· Si la fonction de drainage n’est pas utilisée, xez les deux bouchons en caoutchouc dans les
trous de drainage. Rangez soigneusement le exible de vidange lorsqu’il n’est pas utilisé
pour éviter que les enfants ne s’étranglent.
· Ne faites pas passer le l sous le revêtement de sol. Ne le couvrez pas avec des tapis ou
d’autres revêtements. Ne le faites pas passer sous des meubles ou appareils. Éloignez le l
du passage pour éviter tout trébuchement.
· Débranchez l’appareil s’il émet des bruits, odeurs ou fumées étranges.

23
DO263A
www.domo-elektro.be
FR
· Lisez attentivement tous les avertissements.
· Lors du dégivrage et du nettoyage de l’appareil, n’utilisez pas d’outils autres que ceux
conseillés par le fabricant.
· L’appareil doit être installé dans un espace sans sources continues d’inammation, par
exemple,des ammes nues, des appareils électriques ou fonctionnant au gaz en continu.
· Ne pas percer, ne pas brûler.
· Les frigorigènes peuvent être sans odeur.
· L’appareil doit être installé, utilisé et stocké dans une pièce dont la supercie est supérieure
à 8 m
2
.
· Cet appareil contient une certaine quantité de frigorigène R290 (reportez-vous à l’étiquette
signalétique à l’arrière de l’appareil).
· R290 est un frigorigène conforme aux directives européennes en matière d’environnement.
Ne percez jamais le circuit de réfrigération.
· Si l’appareil est installé, utilisé ou stocké dans une zone non-ventilée, la pièce doit être
conçue de sorte à éviter toute accumulation de frigorigène, suite à des fuites, pouvant
entraîner un incendie ou une explosion à cause de l’inammation du frigorigène causé par
des chauages, fours électriques ou autres sources d’inammation.
· L’appareil doit être stocké de sorte à éviter toute défaillance mécanique.
· Toute personne travaillant ou intervenant sur un circuit de uide frigorigène doit
être titulaire d’un certicat valide délivré par un organisme accrédité qui autorise sa
compétence à la manipulation des frigorigènes conformément à une évaluation spécique
reconnue par des associations de l’industrie.
· Les réparations doivent être eectuées sur la base des recommandations du fabricant. Les
travaux d ‘entretien et de réparation nécessitant l’assistance d’autres personnes qualiées
doivent être eectués sous la supervision de la personne qualiée pour l’utilisation de
uides frigorigènes inammables.
Attention : risque d’incendie / matériaux inammables
Cet appareil contient un agent réfrigérant inammable. Cet agent réfrigérant
risque donc de s’enammer en cas d’exposition à une source d’ignition.
CONSERVEZ CES INSTRUCTIONS
· N’utilisez l’appareil que dans des espaces qui ne dépassent pas la supercie recommandée.
· Placez l’appareil de manière à ce que le ux d’air ne soit pas gêné par des meubles ou
d’autres objets.
· Gardez les rideaux fermés pendant l’heure la plus chaude de la journée.
· Veillez à ce que les ltres soient toujours propres.
· Gardez les portes et les fenêtres fermées pour garder l’air froid à l’intérieur et l’air chaud à
l’extérieur.

24
DO263A
FR
PARTIES
1. Panneau de
commande
2. Évacuation d’air
3. Filtre d’arrivée
d’air
4. Arrivée d’air
5. Évacuation d’air
6. Vidange
7. Flexible de vidange
8. Télécommande
9. Fixation murale télécommande
10. Tuyau d’évacuation d’air
10 a. Connecteur tuyau d’évacuation d’air
11. Kit de xation murale
11 a. Adaptateur mural
11 b. Connecteur kit de xation murale
12. Kit de xation à la fenêtre
12 a. Adaptateur de fenêtre
12 b. Connecteur kit de xation à la fenêtre
12 c. Étanchéité de la fenêtre
12 d. Bouchon adaptateur
12 e. Cornière avec vis
1
2
3
4
5
6
8
11b
11
7
12b 12c
12
12e

25
DO263A
www.domo-elektro.be
FR
max 120 cm
min 30 cm
INSTALLATION
· Placez la climatisation sur une surface stable et solide, an de
limiter à un minimum les nuisances sonores et les vibrations.
Veillez à ce que la surface soit susamment solide pour
supporter le poids de l’appareil.
· L’appareil est muni de roulettes, pour pouvoir le déplacer
facilement. Veillez à ce que la surface soit lisse et plate si vous
déplacez seul l’appareil. Soyez prudent lorsque vous déplacez
l’appareil sur un tapis. Ne faites jamais rouler l’appareil sur un
objet.
· Placez l’appareil à proximité d’une prise reliée à la masse.
· Ne placez pas d’objets dans un rayon de 30 cm autour de
l’appareil.
· Le tuyau d’évacuation d’air doit être placé pendant le réglage « froid » ou « auto ».
Vous n’avez pas besoin du tuyau d’évacuation d’air lorsque vous vous trouvez en mode
« ventilateur » et « sec ».
· Veillez à ce qu’il n’y ait pas d’obstacles autour de l’évacuation d’air, dans un rayon de 50 cm.
· Veillez à ce que le tuyau d’évacuation d’air ne soit pas trop plié lors de l’utilisation.
max 120 cm
min 30 cm
· Placez l’embout du tuyau d’évacuation d’air à l’extrémité du tuyau.
· Placez le tuyau d’évacuation d’air sur la sortie d’air prévue à l’arrière de l’appareil.
max 120 cm
min 30 cm
· Placez l’embout du kit de fenêtre à l’autre extrémité du tuyau d’évacuation d’air.
· Placez le kit de fenêtre sur votre fenêtre. Celui-ci peut être posé tant verticalement
qu’horizontalement. Bloquez le kit de fenêtre à la longueur souhaitée.
· Fixez le tuyau au kit de fenêtre à l’aide de l’embout prévu à cet eet.
· Utilisez les joints de la fenêtre pour fermer les éventuelles ouvertures dans la fenêtre.
· Bloquez l’adaptateur de châssis à la longueur désirée à l’aide du bouchon adaptateur de
châssis fourni.
· Si vous le souhaitez, vous pouvez xer le châssis au moyen de la cornière et de 2 vis.

26
DO263A
FR
max 120 cm
min 30 cm
max 120 cm
min 30 cm
· Placez l’embout du tuyau d’évacuation d’air à l’extrémité du tuyau.
· Placez le tuyau d’évacuation d’air sur la sortie d’air prévue à l’arrière de l’appareil.
max 120 cm
min 30 cm
· Faites dans le mur une ouverture de la taille de l’adaptateur mural.
· Placez l’adaptateur mural dans l’ouverture. Fixer l’adaptateur mural à l’aide des vis fournies.
· Placez l’embout de l’adaptateur mural à l’autre extrémité du tuyau d’évacuation d’air.
· Fixez le tuyau à l’adaptateur mural à l’aide de l’embout prévu à cet eet.
max 120 cm
min 30 cm

27
DO263A
www.domo-elektro.be
FR
1
2
3
4
5
6
7
8
Vous pouvez orienter le ux d’air manuellement en relevant ou en abaissant les lamelles de la
grille située à l’avant de l’appareil.
12
4
3
1. Touche MARCHE-ARRÊT
Pour allumer et éteindre l’appareil.
2. Touches «+» et «-»
Utilisez ces touches pour modier le paramètre de température. Vous pouvez choisir une
température comprise entre 17 °C et 30 °C. (COOL mode) Maintenez les deux èches
enfoncées simultanément pendant 3 secondes pour permuter entre « C° » et « F° ».
3. Touche MODE
Cette touche vous permet de sélectionner le paramètre utilisateur souhaité. Chaque pression
sur la touche modie le paramètre d’utilisation : FROID, SEC et VENTILATEUR. Le témoin
correspondant s’allume sur le panneau de commande. Si vous choisissez le mode FAN, le
climatiseur souera selon un réglage automatique. Vous ne pourrez modier la vitesse de
ventilation qu’à l’aide de la télécommande.
4. Écran LED
Ache le paramètre déni de température. Lorsque l’appareil se trouve en mode SEC ou
VENTILATEUR, l’écran ache la température ambiante.
Veillez à toujours diriger la télécommande vers l’appareil.
Si vous ne le faites pas, vous pouvez toujours diriger la
télécommande vers l’appareil et appuyer sur le bouton
ON/OFF après avoir modié un réglage.
Lorsque l’appareil reçoit un signal émis par la
télécommande, il émet un signal sonore. La
télécommande fonctionne dans un rayon de 8 mètres
autour de l’appareil.

28
DO263A
FR
1. Touche MARCHE-ARRÊT
Pour allumer et éteindre l’appareil.
2. Touche MODE
Cette touche vous permet de sélectionner le paramètre utilisateur souhaité. Chaque pression
sur la touche modie le paramètre d’utilisation : FROID, SEC et VENTILATEUR. Le témoin
correspondant s’allume sur le panneau de commande.
3. Touche VENTILATEUR
Cette touche vous permet de régler la vitesse de la ventilation. Trois paramètres sont
possibles : FAIBLE
55
66
MODE display
Displays the current
mode, including:
AUTO
COOL
DRY
HEAT
FAN
Transmission Indicator
Lights up when remote sends
signal to unit
ON/OFF display
Appears when the unit is turned on,
and disappears when it is turned off
TIMER ON display
Displays when TIMER
ON is set
TIMER OFF display
Displays when TIMER
OFF is set
SLEEP display
Battery display
SILENT display
ECO display
Displays when
SLEEP function
is activated
FOLLOW ME
display
Indicates that
the FOLLOW ME
function is on
FAN SPEED display
Displays selected FAN SPEED:
HIGH, MED,
or LOW
This display is blank when
set to AUTO speed.
Temperature/Timer display
Displays the set temperature by default, or timer setting
when using TIMER ON/OFF functions
o O O
Temperature range: 17-30 C(62 F-86 F)
Timer setting range: 0-24 hours
This display is blank when operating in FAN mode.
1. Press the MODE button to select
COOL mode.
2. Set your desired temperature using
the Temp or Temp button.
3. Press the FAN button to select the
fan speed: AUTO, LOW, MED,or
HIGH.
4. Press the ON/OFF button to start the
unit.
In AUTO mode, the unit will automatically
select the COOL, FAN, HEAT or DRY mode
based on the set temperature.
1. Press the MODE button to select Auto mode.
2. Set your desired temperature using the
Temp or Temp button.
3. Press the ON/OFF button to start the unit.
,
NOTE: FAN SPEED can t be set in Auto mode.
SETTING TEMPERATURE
AUTO operation
The operating temperature range for units is
O O O
17-30 C(62 F-86 F). You can increase or
O O
decrease the set tmeperature in 1 C(1 F)
increments.
COOL operation
1
3
2
1
3
2
4
Not available for this unit
Not available for
this unit
Not available for
this unit
Low battery
detection
Remote LED Screen Indicators
How To Use The Basic Functions
ON/OFF
ON/OFF
TEMP
TEMP
SHORT
CUT
SHORT
CUT
TIMER
ON
TIMER
ON
TIMER
OFF
TIMER
OFF
MODE
MODE
FAN
FAN
SLEEP
SLEEP
LED
LED
FOLLOW
ION
SWING
ME
FOLLOW
ION
SWING
ME
, ÉLEVÉ
55
66
MODE display
Displays the current
mode, including:
AUTO
COOL
DRY
HEAT
FAN
Transmission Indicator
Lights up when remote sends
signal to unit
ON/OFF display
Appears when the unit is turned on,
and disappears when it is turned off
TIMER ON display
Displays when TIMER
ON is set
TIMER OFF display
Displays when TIMER
OFF is set
SLEEP display
Battery display
SILENT display
ECO display
Displays when
SLEEP function
is activated
FOLLOW ME
display
Indicates that
the FOLLOW ME
function is on
FAN SPEED display
Displays selected FAN SPEED:
HIGH, MED,
or LOW
This display is blank when
set to AUTO speed.
Temperature/Timer display
Displays the set temperature by default, or timer setting
when using TIMER ON/OFF functions
o O O
Temperature range: 17-30 C(62 F-86 F)
Timer setting range: 0-24 hours
This display is blank when operating in FAN mode.
1. Press the MODE button to select
COOL mode.
2. Set your desired temperature using
the Temp or Temp button.
3. Press the FAN button to select the
fan speed: AUTO, LOW, MED,or
HIGH.
4. Press the ON/OFF button to start the
unit.
In AUTO mode, the unit will automatically
select the COOL, FAN, HEAT or DRY mode
based on the set temperature.
1. Press the MODE button to select Auto mode.
2. Set your desired temperature using the
Temp or Temp button.
3. Press the ON/OFF button to start the unit.
,
NOTE: FAN SPEED can t be set in Auto mode.
SETTING TEMPERATURE
AUTO operation
The operating temperature range for units is
O O O
17-30 C(62 F-86 F). You can increase or
O O
decrease the set tmeperature in 1 C(1 F)
increments.
COOL operation
1
3
2
1
3
2
4
Not available for this unit
Not available for
this unit
Not available for
this unit
Low battery
detection
Remote LED Screen Indicators
How To Use The Basic Functions
ON/OFF
ON/OFF
TEMP
TEMP
SHORT
CUT
SHORT
CUT
TIMER
ON
TIMER
ON
TIMER
OFF
TIMER
OFF
MODE
MODE
FAN
FAN
SLEEP
SLEEP
LED
LED
FOLLOW
ION
SWING
ME
FOLLOW
ION
SWING
ME
et AUTO.
4. Touche VEILLE
Utilisez cette touche pour paramétrer la fonction « veille ».
Lorsque vous sélectionnez ce paramètre, la température augmente de 1°C dans les 30
minutes. Après encore 30 minutes, la température augmente à nouveau de 1°C. Cette
température est conservée pour les 7 heures suivantes. Ensuite, la température revient à la
température réglée d’origine et le mode « veille » est terminé.
NOTE : ce paramètre ne peut pas être sélectionné pour les modes « ventilateur » et « sec ».
5. Touche TEMP
Utilisez ces touches pour modier le paramètre de température. Vous pouvez choisir
une température comprise entre 17 °C et 30 °C. Maintenez les deux èches enfoncées
simultanément pendant 3 secondes pour permuter entre « C° » et « F° ».
6. Touche SHORTCUT
Cette touche vous permet d’enregistrer et d’utiliser un réglage spécique. (p. 28)
7. Touche TIMER ON
Cette touche permet de régler la durée pendant laquelle l’appareil doit être allumé. (p. 27)
8. Touche TIMER OFF
Cette touche permet de régler la durée pendant laquelle l’appareil doit être éteint. (p. 28)
9. Touche LED
Ce bouton vous permet d’éteindre l’écran LED du panneau de commande. Vous pouvez par
exemple l’utiliser si vous souhaitez dormir et que la lumière émise par l’écran vous dérange.
Appuyez à nouveau sur ce bouton pour rallumer l’écran.

29
DO263A
www.domo-elektro.be
FR
55
66
MODE display
Displays the current
mode, including:
AUTO
COOL
DRY
HEAT
FAN
Transmission Indicator
Lights up when remote sends
signal to unit
ON/OFF display
Appears when the unit is turned on,
and disappears when it is turned off
TIMER ON display
Displays when TIMER
ON is set
TIMER OFF display
Displays when TIMER
OFF is set
SLEEP display
Battery display
SILENT display
ECO display
Displays when
SLEEP function
is activated
FOLLOW ME
display
Indicates that
the FOLLOW ME
function is on
FAN SPEED display
Displays selected FAN SPEED:
HIGH, MED,
or LOW
This display is blank when
set to AUTO speed.
Temperature/Timer display
Displays the set temperature by default, or timer setting
when using TIMER ON/OFF functions
o O O
Temperature range: 17-30 C(62 F-86 F)
Timer setting range: 0-24 hours
This display is blank when operating in FAN mode.
1. Press the MODE button to select
COOL mode.
2. Set your desired temperature using
the Temp or Temp button.
3. Press the FAN button to select the
fan speed: AUTO, LOW, MED,or
HIGH.
4. Press the ON/OFF button to start the
unit.
In AUTO mode, the unit will automatically
select the COOL, FAN, HEAT or DRY mode
based on the set temperature.
1. Press the MODE button to select Auto mode.
2. Set your desired temperature using the
Temp or Temp button.
3. Press the ON/OFF button to start the unit.
,
NOTE: FAN SPEED can t be set in Auto mode.
SETTING TEMPERATURE
AUTO operation
The operating temperature range for units is
O O O
17-30 C(62 F-86 F). You can increase or
O O
decrease the set tmeperature in 1 C(1 F)
increments.
COOL operation
1
3
2
1
3
2
4
Not available for this unit
Not available for
this unit
Not available for
this unit
Low battery
detection
Remote LED Screen Indicators
How To Use The Basic Functions
ON/OF F
ON/OF F
TEMP
TEMP
SHORT
CUT
SHORT
CUT
TIMER
ON
TIMER
ON
TIMER
OFF
TIMER
OFF
MODE
MODE
FAN
FAN
SLEEP
SLEEP
LED
LED
FOLLO W
ION
SWING
ME
FOLLO W
ION
SWING
ME
Lorsque vous réglez le climatiseur en mode « AUTO », l’appareil choisit le réglage adéquat
en fonction de la température dénie. Ce mode ne peut être activé qu’à l’aide de la
télécommande.
1. Utilisez le bouton « MODE » pour choisir le mode « AUTO ».
2. Réglez la température souhaitée à l’aide du bouton « TEMP ». L’appareil se réglera en
fonction de celle-ci.
Vous ne pouvez pas régler la vitesse de ventilation (« FAN ») lorsque le mode « AUTO »
est activé.
55
66
MODE display
Displays the current
mode, including:
AUTO
COOL
DRY
HEAT
FAN
Transmission Indicator
Lights up when remote sends
signal to unit
ON/OFF display
Appears when the unit is turned on,
and disappears when it is turned off
TIMER ON display
Displays when TIMER
ON is set
TIMER OFF display
Displays when TIMER
OFF is set
SLEEP display
Battery display
SILENT display
ECO display
Displays when
SLEEP function
is activated
FOLLOW ME
display
Indicates that
the FOLLOW ME
function is on
FAN SPEED display
Displays selected FAN SPEED:
HIGH, MED,
or LOW
This display is blank when
set to AUTO speed.
Temperature/Timer display
Displays the set temperature by default, or timer setting
when using TIMER ON/OFF functions
o O O
Temperature range: 17-30 C(62 F-86 F)
Timer setting range: 0-24 hours
This display is blank when operating in FAN mode.
1. Press the MODE button to select
COOL mode.
2. Set your desired temperature using
the Temp or Temp button.
3. Press the FAN button to select the
fan speed: AUTO, LOW, MED,or
HIGH.
4. Press the ON/OFF button to start the
unit.
In AUTO mode, the unit will automatically
select the COOL, FAN, HEAT or DRY mode
based on the set temperature.
1. Press the MODE button to select Auto mode.
2. Set your desired temperature using the
Temp or Temp button.
3. Press the ON/OFF button to start the unit.
,
NOTE: FAN SPEED can t be set in Auto mode.
SETTING TEMPERATURE
AUTO operation
The operating temperature range for units is
O O O
17-30 C(62 F-86 F). You can increase or
O O
decrease the set tmeperature in 1 C(1 F)
increments.
COOL operation
1
3
2
1
3
2
4
Not available for this unit
Not available for
this unit
Not available for
this unit
Low battery
detection
Remote LED Screen Indicators
How To Use The Basic Functions
ON/OF F
ON/OF F
TEMP
TEMP
SHORT
CUT
SHORT
CUT
TIMER
ON
TIMER
ON
TIMER
OFF
TIMER
OFF
MODE
MODE
FAN
FAN
SLEEP
SLEEP
LED
LED
FOLLO W
ION
SWING
ME
FOLLO W
ION
SWING
ME
Le mode « COOL » vous permet de refroidir la pièce pour obtenir la température dénie.
1. Appuyez sur le bouton « MODE » jusqu’à ce que le témoin « COOL » s’allume.
2. Utilisez les boutons « + » et « - » du panneau de commande ou le bouton « TEMP » de la
télécommande pour dénir la température souhaitée.
3. Utilisez la touche « FAN » de la télécommande pour dénir la vitesse de ventilation
souhaitée. Trois paramètres sont disponibles : LOW
55
66
MODE display
Displays the current
mode, including:
AUTO
COOL
DRY
HEAT
FAN
Transmission Indicator
Lights up when remote sends
signal to unit
ON/OFF display
Appears when the unit is turned on,
and disappears when it is turned off
TIMER ON display
Displays when TIMER
ON is set
TIMER OFF display
Displays when TIMER
OFF is set
SLEEP display
Battery display
SILENT display
ECO display
Displays when
SLEEP function
is activated
FOLLOW ME
display
Indicates that
the FOLLOW ME
function is on
FAN SPEED display
Displays selected FAN SPEED:
HIGH, MED,
or LOW
This display is blank when
set to AUTO speed.
Temperature/Timer display
Displays the set temperature by default, or timer setting
when using TIMER ON/OFF functions
o O O
Temperature range: 17-30 C(62 F-86 F)
Timer setting range: 0-24 hours
This display is blank when operating in FAN mode.
1. Press the MODE button to select
COOL mode.
2. Set your desired temperature using
the Temp or Temp button.
3. Press the FAN button to select the
fan speed: AUTO, LOW, MED,or
HIGH.
4. Press the ON/OFF button to start the
unit.
In AUTO mode, the unit will automatically
select the COOL, FAN, HEAT or DRY mode
based on the set temperature.
1. Press the MODE button to select Auto mode.
2. Set your desired temperature using the
Temp or Temp button.
3. Press the ON/OFF button to start the unit.
,
NOTE: FAN SPEED can t be set in Auto mode.
SETTING TEMPERATURE
AUTO operation
The operating temperature range for units is
O O O
17-30 C(62 F-86 F). You can increase or
O O
decrease the set tmeperature in 1 C(1 F)
increments.
COOL operation
1
3
2
1
3
2
4
Not available for this unit
Not available for
this unit
Not available for
this unit
Low battery
detection
Remote LED Screen Indicators
How To Use The Basic Functions
ON/OFF
ON/OFF
TEMP
TEMP
SHORT
CUT
SHORT
CUT
TIMER
ON
TIMER
ON
TIMER
OFF
TIMER
OFF
MODE
MODE
FAN
FAN
SLEEP
SLEEP
LED
LED
FOLLOW
ION
SWING
ME
FOLLOW
ION
SWING
ME
, HIGH
55
66
MODE display
Displays the current
mode, including:
AUTO
COOL
DRY
HEAT
FAN
Transmission Indicator
Lights up when remote sends
signal to unit
ON/OFF display
Appears when the unit is turned on,
and disappears when it is turned off
TIMER ON display
Displays when TIMER
ON is set
TIMER OFF display
Displays when TIMER
OFF is set
SLEEP display
Battery display
SILENT display
ECO display
Displays when
SLEEP function
is activated
FOLLOW ME
display
Indicates that
the FOLLOW ME
function is on
FAN SPEED display
Displays selected FAN SPEED:
HIGH, MED,
or LOW
This display is blank when
set to AUTO speed.
Temperature/Timer display
Displays the set temperature by default, or timer setting
when using TIMER ON/OFF functions
o O O
Temperature range: 17-30 C(62 F-86 F)
Timer setting range: 0-24 hours
This display is blank when operating in FAN mode.
1. Press the MODE button to select
COOL mode.
2. Set your desired temperature using
the Temp or Temp button.
3. Press the FAN button to select the
fan speed: AUTO, LOW, MED,or
HIGH.
4. Press the ON/OFF button to start the
unit.
In AUTO mode, the unit will automatically
select the COOL, FAN, HEAT or DRY mode
based on the set temperature.
1. Press the MODE button to select Auto mode.
2. Set your desired temperature using the
Temp or Temp button.
3. Press the ON/OFF button to start the unit.
,
NOTE: FAN SPEED can t be set in Auto mode.
SETTING TEMPERATURE
AUTO operation
The operating temperature range for units is
O O O
17-30 C(62 F-86 F). You can increase or
O O
decrease the set tmeperature in 1 C(1 F)
increments.
COOL operation
1
3
2
1
3
2
4
Not available for this unit
Not available for
this unit
Not available for
this unit
Low battery
detection
Remote LED Screen Indicators
How To Use The Basic Functions
ON/OFF
ON/OFF
TEMP
TEMP
SHORT
CUT
SHORT
CUT
TIMER
ON
TIMER
ON
TIMER
OFF
TIMER
OFF
MODE
MODE
FAN
FAN
SLEEP
SLEEP
LED
LED
FOLLOW
ION
SWING
ME
FOLLOW
ION
SWING
ME
et AUTO.
55
66
MODE display
Displays the current
mode, including:
AUTO
COOL
DRY
HEAT
FAN
Transmission Indicator
Lights up when remote sends
signal to unit
ON/OFF display
Appears when the unit is turned on,
and disappears when it is turned off
TIMER ON display
Displays when TIMER
ON is set
TIMER OFF display
Displays when TIMER
OFF is set
SLEEP display
Battery display
SILENT display
ECO display
Displays when
SLEEP function
is activated
FOLLOW ME
display
Indicates that
the FOLLOW ME
function is on
FAN SPEED display
Displays selected FAN SPEED:
HIGH, MED,
or LOW
This display is blank when
set to AUTO speed.
Temperature/Timer display
Displays the set temperature by default, or timer setting
when using TIMER ON/OFF functions
o O O
Temperature range: 17-30 C(62 F-86 F)
Timer setting range: 0-24 hours
This display is blank when operating in FAN mode.
1. Press the MODE button to select
COOL mode.
2. Set your desired temperature using
the Temp or Temp button.
3. Press the FAN button to select the
fan speed: AUTO, LOW, MED,or
HIGH.
4. Press the ON/OFF button to start the
unit.
In AUTO mode, the unit will automatically
select the COOL, FAN, HEAT or DRY mode
based on the set temperature.
1. Press the MODE button to select Auto mode.
2. Set your desired temperature using the
Temp or Temp button.
3. Press the ON/OFF button to start the unit.
,
NOTE: FAN SPEED can t be set in Auto mode.
SETTING TEMPERATURE
AUTO operation
The operating temperature range for units is
O O O
17-30 C(62 F-86 F). You can increase or
O O
decrease the set tmeperature in 1 C(1 F)
increments.
COOL operation
1
3
2
1
3
2
4
Not available for this unit
Not available for
this unit
Not available for
this unit
Low battery
detection
Remote LED Screen Indicators
How To Use The Basic Functions
ON/OF F
ON/OF F
TEMP
TEMP
SHORT
CUT
SHORT
CUT
TIMER
ON
TIMER
ON
TIMER
OFF
TIMER
OFF
MODE
MODE
FAN
FAN
SLEEP
SLEEP
LED
LED
FOLLO W
ION
SWING
ME
FOLLO W
ION
SWING
ME
Ce mode vous permet de déshumidier la pièce. Fermez les fenêtres et les portes lorsque vous
utilisez ce mode.
1. Appuyez sur le bouton « MODE » jusqu’à ce que le témoin « DRY » s’allume.
2. Ce mode ne permet pas de régler la vitesse de ventilation.
55
66
MODE display
Displays the current
mode, including:
AUTO
COOL
DRY
HEAT
FAN
Transmission Indicator
Lights up when remote sends
signal to unit
ON/OFF display
Appears when the unit is turned on,
and disappears when it is turned off
TIMER ON display
Displays when TIMER
ON is set
TIMER OFF display
Displays when TIMER
OFF is set
SLEEP display
Battery display
SILENT display
ECO display
Displays when
SLEEP function
is activated
FOLLOW ME
display
Indicates that
the FOLLOW ME
function is on
FAN SPEED display
Displays selected FAN SPEED:
HIGH, MED,
or LOW
This display is blank when
set to AUTO speed.
Temperature/Timer display
Displays the set temperature by default, or timer setting
when using TIMER ON/OFF functions
o O O
Temperature range: 17-30 C(62 F-86 F)
Timer setting range: 0-24 hours
This display is blank when operating in FAN mode.
1. Press the MODE button to select
COOL mode.
2. Set your desired temperature using
the Temp or Temp button.
3. Press the FAN button to select the
fan speed: AUTO, LOW, MED,or
HIGH.
4. Press the ON/OFF button to start the
unit.
In AUTO mode, the unit will automatically
select the COOL, FAN, HEAT or DRY mode
based on the set temperature.
1. Press the MODE button to select Auto mode.
2. Set your desired temperature using the
Temp or Temp button.
3. Press the ON/OFF button to start the unit.
,
NOTE: FAN SPEED can t be set in Auto mode.
SETTING TEMPERATURE
AUTO operation
The operating temperature range for units is
O O O
17-30 C(62 F-86 F). You can increase or
O O
decrease the set tmeperature in 1 C(1 F)
increments.
COOL operation
1
3
2
1
3
2
4
Not available for this unit
Not available for
this unit
Not available for
this unit
Low battery
detection
Remote LED Screen Indicators
How To Use The Basic Functions
ON/OF F
ON/OF F
TEMP
TEMP
SHORT
CUT
SHORT
CUT
TIMER
ON
TIMER
ON
TIMER
OFF
TIMER
OFF
MODE
MODE
FAN
FAN
SLEEP
SLEEP
LED
LED
FOLLO W
ION
SWING
ME
FOLLO W
ION
SWING
ME
1. Appuyez sur le bouton « MODE » jusqu’à ce que le témoin « FAN » s’allume.
2. Appuyez sur la touche « FAN » de la télécommande pour régler la vitesse de ventilation.
Trois paramètres sont disponibles : LOW
55
66
MODE display
Displays the current
mode, including:
AUTO
COOL
DRY
HEAT
FAN
Transmission Indicator
Lights up when remote sends
signal to unit
ON/OFF display
Appears when the unit is turned on,
and disappears when it is turned off
TIMER ON display
Displays when TIMER
ON is set
TIMER OFF display
Displays when TIMER
OFF is set
SLEEP display
Battery display
SILENT display
ECO display
Displays when
SLEEP function
is activated
FOLLOW ME
display
Indicates that
the FOLLOW ME
function is on
FAN SPEED display
Displays selected FAN SPEED:
HIGH, MED,
or LOW
This display is blank when
set to AUTO speed.
Temperature/Timer display
Displays the set temperature by default, or timer setting
when using TIMER ON/OFF functions
o O O
Temperature range: 17-30 C(62 F-86 F)
Timer setting range: 0-24 hours
This display is blank when operating in FAN mode.
1. Press the MODE button to select
COOL mode.
2. Set your desired temperature using
the Temp or Temp button.
3. Press the FAN button to select the
fan speed: AUTO, LOW, MED,or
HIGH.
4. Press the ON/OFF button to start the
unit.
In AUTO mode, the unit will automatically
select the COOL, FAN, HEAT or DRY mode
based on the set temperature.
1. Press the MODE button to select Auto mode.
2. Set your desired temperature using the
Temp or Temp button.
3. Press the ON/OFF button to start the unit.
,
NOTE: FAN SPEED can t be set in Auto mode.
SETTING TEMPERATURE
AUTO operation
The operating temperature range for units is
O O O
17-30 C(62 F-86 F). You can increase or
O O
decrease the set tmeperature in 1 C(1 F)
increments.
COOL operation
1
3
2
1
3
2
4
Not available for this unit
Not available for
this unit
Not available for
this unit
Low battery
detection
Remote LED Screen Indicators
How To Use The Basic Functions
ON/OFF
ON/OFF
TEMP
TEMP
SHORT
CUT
SHORT
CUT
TIMER
ON
TIMER
ON
TIMER
OFF
TIMER
OFF
MODE
MODE
FAN
FAN
SLEEP
SLEEP
LED
LED
FOLLOW
ION
SWING
ME
FOLLOW
ION
SWING
ME
, HIGH
55
66
MODE display
Displays the current
mode, including:
AUTO
COOL
DRY
HEAT
FAN
Transmission Indicator
Lights up when remote sends
signal to unit
ON/OFF display
Appears when the unit is turned on,
and disappears when it is turned off
TIMER ON display
Displays when TIMER
ON is set
TIMER OFF display
Displays when TIMER
OFF is set
SLEEP display
Battery display
SILENT display
ECO display
Displays when
SLEEP function
is activated
FOLLOW ME
display
Indicates that
the FOLLOW ME
function is on
FAN SPEED display
Displays selected FAN SPEED:
HIGH, MED,
or LOW
This display is blank when
set to AUTO speed.
Temperature/Timer display
Displays the set temperature by default, or timer setting
when using TIMER ON/OFF functions
o O O
Temperature range: 17-30 C(62 F-86 F)
Timer setting range: 0-24 hours
This display is blank when operating in FAN mode.
1. Press the MODE button to select
COOL mode.
2. Set your desired temperature using
the Temp or Temp button.
3. Press the FAN button to select the
fan speed: AUTO, LOW, MED,or
HIGH.
4. Press the ON/OFF button to start the
unit.
In AUTO mode, the unit will automatically
select the COOL, FAN, HEAT or DRY mode
based on the set temperature.
1. Press the MODE button to select Auto mode.
2. Set your desired temperature using the
Temp or Temp button.
3. Press the ON/OFF button to start the unit.
,
NOTE: FAN SPEED can t be set in Auto mode.
SETTING TEMPERATURE
AUTO operation
The operating temperature range for units is
O O O
17-30 C(62 F-86 F). You can increase or
O O
decrease the set tmeperature in 1 C(1 F)
increments.
COOL operation
1
3
2
1
3
2
4
Not available for this unit
Not available for
this unit
Not available for
this unit
Low battery
detection
Remote LED Screen Indicators
How To Use The Basic Functions
ON/OFF
ON/OFF
TEMP
TEMP
SHORT
CUT
SHORT
CUT
TIMER
ON
TIMER
ON
TIMER
OFF
TIMER
OFF
MODE
MODE
FAN
FAN
SLEEP
SLEEP
LED
LED
FOLLOW
ION
SWING
ME
FOLLOW
ION
SWING
ME
et AUTO.
3. La température ne peut pas être réglée.
Cette fonction vous permet de retarder le démarrage du climatiseur de maximum 24 heures.
1. Appuyez sur la touche « TIMER ON » de la télécommande.
2. L’écran de la télécommande ache dans combien de temps le climatiseur commencera à
fonctionner.
3. Appuyez à plusieurs reprises sur le bouton « TIMER ON » pour faire augmenter cette
durée. Vous pouvez également maintenir le bouton appuyé.
4. Une fois que vous avez réglé la durée souhaitée, l’écran de la télécommande ache «

30
DO263A
FR
TIMER ON ». Deux petits indicateurs ronds seront en outre allumés sur le panneau de
commande.
5. Si vous souhaitez désactiver la minuterie, appuyez à plusieurs reprises sur le bouton «
TIMER ON » jusqu’à ce que la durée achée soit « 0 ». Vous pouvez également maintenir
le bouton appuyé.
Grâce à cette fonction, l’appareil s’éteint automatiquement après un laps de temps prédéni.
1. Appuyez sur la touche « TIMER OFF » de la télécommande.
2. L’écran de la télécommande ache dans combien de temps le climatiseur s’éteindra.
3. Appuyez à plusieurs reprises sur le bouton « TIMER OFF » pour faire augmenter cette
durée. Vous pouvez également maintenir le bouton appuyé.
4. Une fois que vous avez réglé la durée souhaitée, l’écran de la télécommande ache «
TIMER OFF ».
5. Si vous souhaitez désactiver la minuterie, appuyez à plusieurs reprises sur le bouton «
TIMER OFF » jusqu’à ce que la durée achée soit « 0 ».
Vous pouvez activer ces deux fonctions en même temps. Vous déterminerez ainsi quand le
climatiseur s’allumera et quand il s’éteindra.
Attention : l’heure l’allumage et d’arrêt de l’appareil dépend de l’heure à laquelle vous
programmez la minuterie. Exemple : il est actuellement 13 h. Vous voulez que l’appareil
fonctionne de 16 h 30 à 18 00. Vous devez dans ce cas régler la fonction « TIMER ON » sur 3,5
h, et la fonction « TIMER OFF » sur 5 h.
Lorsque vous sélectionnez ce paramètre, la température augmente de 1°C dans les 30
minutes. Après encore 30 minutes, la température augmente à nouveau de 1°C. Cette
température est conservée pour les 7 heures suivantes. Ensuite, la température revient à la
température réglée d’origine et le mode « veille » est terminé.
NOTE : ce paramètre ne peut pas être sélectionné pour les modes « ventilateur » et « sec ».
Cette touche vous permet d’enregistrer et d’utiliser un réglage spécique.
Si vous paramétrez souvent l’appareil de la même manière, vous pouvez enregistrer ce
réglage en maintenant le bouton « SHORTCUT » enfoncé pendant 3 secondes. L’appareil
retient alors les paramètres actifs au moment où vous maintenez la touche enfoncée. Ces
paramètres peuvent être : le mode d’utilisation (« MODE »), la température dénie, la vitesse
de ventilation (« FAN »), et éventuellement le réglage du mode veille (« SLEEP »).
Par la suite, l’appareil reviendra à ces paramètres dès que vous enfoncerez la touche «
SHORTCUT ».

31
DO263A
www.domo-elektro.be
FR
A
Vous pouvez utiliser une vidange permanente pendant la déshumidication.
1. Enlevez le bouchon de vidange et le capuchon en caoutchouc, au milieu à l’arrière de
votre appareil.
2. Fixez le tuyau de vidange sur l’ouverture de vidange.
3. Veillez à ce que l’eau puisse s’écouler de manière sûre et continue.
1
2
Si vous n’utilisez pas la vidange continue, l’eau sera récupérée dans le bac de vidange, au bas
de l’appareil.
· Lorsque ce bac est plein, l’appareil émet quelques tonalités et le code P1 apparaît à
l’écran. La déshumidication ou la climatisation s’arrête. Le
ventilateur continue à fonctionner, c’est normal.
· Déplacez l’appareil prudemment vers un endroit où vous
pouvez laisser l’eau s’évacuer facilement.
· Enlevez le bouchon de la vidange au bas de votre appareil. (A)
L’eau s’évacue alors.
· Lorsque l’eau est totalement évacuée, replacez le bouchon
sur l’ouverture de vidange.
· Vous pouvez ensuite redémarrer l’appareil. Veillez à ce que
le code « P1 » disparaisse de l’écran. Si le code ne disparaît
pas immédiatement, vous pouvez essayer plusieurs fois
d’éteindre et de rallumer l’appareil. Si le code se répète,
veuillez prendre contact avec le service à la clientèle.
· NOTE : installez toujours d’abord le bouchon de vidange
avant d’allumer à nouveau l’appareil.
NETTOYAGE
· Enlevez toujours la che de la prise de courant avant de nettoyer l’appareil.
· N’utilisez pas de produits chimiques ou abrasifs pour nettoyer l’appareil.

32
DO263A
FR
· Ne lavez jamais l’appareil à l’eau ou avec d’autres liquides car cela pourrait provoquer une
électrocution.
· Lorsque le cordon électrique est endommagé, il doit être remplacé ou réparé par le service
après-vente du fabricant ou par une personne qualiée.
· Nettoyez le ltre à air au moins toutes les deux semaines. Pour éviter tout
dysfonctionnement du ventilateur en raison de poussière dans le ltre.
· Nettoyez le ltre dans l’eau tiède avec un détergent doux.
Rincez soigneusement le ltre et laissez-le sécher à l’air.
· Lorsque le ltre est sec, vous pouvez le replacer dans
l’appareil.
Utilisez un chion doux humide avec un peu de détergent
doux pour nettoyer l’extérieur de l’appareil. Séchez ensuite
l’appareil entièrement avec un chion sec et doux.
Avant de stocker l’appareil pour une plus longue durée, procédez comme suit pour éviter tout
dommage à l’appareil :
· Enlevez toute l’eau de l’appareil à l’aide du tuyau de vidange.
· Mettez ensuite l’appareil en mode « ventilateur », laissez l’appareil allumé une demi-
journée dans une salle chauée. L’appareil peut de cette manière entièrement sécher à
l’intérieur. Vous évitez de la sorte la formation de champignons.
· Éteignez l’appareil, enlevez la che de la prise et enlevez les piles de la télécommande.
· Nettoyez les ltres et replacez-les dans l’appareil.
· Rangez l’appareil dans un endroit sec et sombre.
L’appareil ne fonctionne pas lorsque vous appuyez sur la touche marche/arrêt.
· L’écran indique P1 : enlevez l’eau de l’appareil.
· La température de la pièce est inférieure à la température réglée sur l’appareil. Adaptez la
température sur votre appareil.
La pièce ne refroidit pas susamment.
· Les portes et les fenêtres ne sont pas fermées. Veillez à ce que toutes les portes et les
fenêtres soient fermées.
· Il y a dans la pièce des appareils qui génèrent de la chaleur. Enlevez autant que possible les
sources de chaleur.

33
DO263A
www.domo-elektro.be
FR
· Le tuyau d’évacuation d’air n’est pas raccordé ou est bloqué. Raccordez le tuyau et veillez à
ce qu’il fonctionne correctement.
· La température réglée est trop élevée. Adaptez la température réglée.
L’appareil fait trop de bruit ou génère des vibrations.
· Le sol n’est pas susamment droit ou plane. Placez l’appareil sur une surface plane, si
possible.
· Le ltre à air est sale. Nettoyez le ltre à air.
Votre appareil fait un bruit d’écoulement d’eau.
· Le bruit provient du liquide de refroidissement de votre appareil. C’est normal.
· Le ltre à air est sale. Nettoyez le ltre à air.
Les codes “erreur” suivants peuvent apparaître sur l’écran de l’appareil :
E1: le capteur relevant la température ambiante ne fonctionne pas. Éteignez l’appareil et
débranchez la prise. Attendez 10 sec. et remettez la che dans la prise. Remettez l’appareil
sous tension. Si le code d’erreur réapparaît, merci de contacter le service de réparation.
E2: le capteur de l’évaporateur d’air ne fonctionne pas. Éteignez l’appareil et débranchez la
prise. Attendez 10 sec. et remettez la che dans la prise. Remettez l’appareil sous tension. Si le
code d’erreur réapparaît, merci de contacter le service de réparation.
E4: l’écran ne fonctionne pas correctement. Éteignez l’appareil et débranchez la prise.
Attendez 10 sec. et remettez la che dans la prise. Remettez l’appareil sous tension. Si le code
d’erreur réapparaît, merci de contacter le service de réparation.
P1: le réservoir d’eau est plein. Retirez l’eau conformément à la section «drainage» du manuel.

34
DO263A
FR
Ce symbole sur le produit ou son emballage indique que ce
produit ne peut être traité comme déchet ménager. Il doit
plutôt être remis au point de ramassage concerné, se chargeant
du recyclage du matériel électrique et électronique. En vous
assurant que ce produit est éliminé correctement, vous favorisez
la prévention des conséquences négatives pour l’environnement
et la santé humaine qui, sinon, seraient le résulat d’un
traitement inapproprié des déchets de ce produit. Pour obtenir
plus de détails sur le recyclage de ce produit, veuillez prendre
contact avec le bureau municipal de votre région, votre service
d’éliminiation des déchets ménagers ou le magasin où vous avez
acheté le produit.
L’emballage est recyclable. Traitez l’emballage écologiquement.

35
DO263A
www.domo-elektro.be
DE
GARANTIE
Sehr geehrter Kunde,
Sämtliche unserer Produkte unterliegen einer strengen Qualitätskontrolle,
bevor Sie Ihnen angeboten werden. Sollten dennoch
Probleme mit Ihrem Gerät auftreten, bedauern wir dies zutiefst.
Wir möchten Sie in diesem Fall bitten, unseren Kundenservice zu kontaktieren.
Unsere Mitarbeiter helfen Ihnen gern weiter!
+32 14 21 71 91 [email protected]
Montag – Donnerstag: 8:30 Uhr – 12:00 Uhr und von 13:00 Uhr – 17:00 Uhr
Freitag: 8:30 Uhr – 12:00 Uhr und von 13:00 Uhr – 16:30 Uhr
Dieses Gerät hat eine Garantiefrist von 2 Jahren ab dem Kaufdatum. Während der Garantiezeit
übernimmt der Hersteller die vollständige Verantwortung für Mängel, die nachweislich auf
Material- oder Konstruktionsfehler zurückzuführen sind. Wenn derartige Mängel auftreten,
wird das Gerät wenn nötig ausgetauscht oder repariert. Die Garantiezeit von 2 Jahren beginnt
in diesem Moment nicht erneut, sondern sie läuft bis 2 Jahre nach dem Kaufdatum weiter. Die
Garantie wird auf der Grundlage des Kassenbons gewährt.
Die Garantie auf Accessoires und Verschleißteile beträgt 6 Monate.
Die Garantie und die Verantwortung/Haftung des Lieferanten und Herstellers entfallen
automatisch in den folgenden Fällen:
· Bei Nichtbeachtung der Anweisungen in dieser Bedienungsanleitung.
· Bei falschem Anschluss, z.B. bei einer zu hohen Stromspannung.
· Bei falscher, grober oder abnormaler Verwendung.
· Bei unzureichender oder falscher Wartung.
· Bei vom Verbraucher oder von nicht ermächtigten Dritten vorgenommenen Reparaturen
oder Änderungen am Gerät.
· Bei der Verwendung von Ersatzteilen oder Accessoires, die nicht vom Lieferanten /
Hersteller empfohlen oder geliefert werden.

36
DO263A
DE
Wenn Sie elektrische Geräte verwenden, müssen folgende Sicherheitshinweise beachtet
werden:
· Lesen Sie diese Hinweise sorgfältig durch. Bewahren Sie diese Bedienungsanleitung zum
späteren Nachschlagen auf.
· Entfernen Sie vor dem ersten Gebrauch alle Verpackungsmaterialien und möglichen
Werbeauleber. Sorgen Sie dafür, dass Kinder nicht mit den Verpackungsmaterialien
spielen.
· Dieses Gerät eignet sich für den Einsatz im Haushalt und in ähnlichen Umfeldern, zum
Beispiel in folgenden Bereichen:
· Küchenbereich für Mitarbeiter von Geschäften, Büros und anderen ähnlichen
beruichen Umfeldern.
· Bauernhöfe
· Hotel- und Motelzimmer und andere Bereiche mit wohnungsähnlichem Charakter
· Gästezimmer oder Ähnliches
· Diese Gerät darf von Kindern ab 16 Jahren und Menschen mit körperlichen oder
sensorischen Behinderungen oder Menschen mit eingeschränkten geistigen Fähigkeiten
oder mangelnder Erfahrung bzw. Sachkenntnis unter der Bedingung verwendet werden,
dass diese Personen beaufsichtigt werden oder sie eine Anleitung zur sicheren Verwendung
des Geräts erhalten haben und sich der Gefahren bei der Verwendung des Geräts bewusst
sind. Kinder dürfen nicht mit dem Gerät spielen. Die Wartung und Reinigung des Geräts
darf nicht durch Kinder ausgeführt werden, außer diese sind älter als 16 Jahre und werden
von einem Erwachsenen beaufsichtigt.
· Achtung: das Gerät darf nicht mit einer externen Zeitschaltuhr.
· Vor der Benutzung prüfen, ob die Spannung, die auf dem Gerät angegeben ist, mit der
Spannung Ihres Stromnetzes übereinstimmt.
· Das Netzkabel muss stets an eine Steckdose angeschlossen werden, die gemäß den
örtlichen Standards und Normen isoliert und geerdet wurde.
· Lassen Sie das Netzkabel nicht über den Tisch oder die Anrichte hängen, oder in Kontakt
mit heißen Oberächen kommen.
· Benutzen Sie das Gerät niemals, wenn die Kabelschnur oder der Stecker beschädigt
ist, nach beeinträchtigtem Funktionieren des Gerätes, oder wenn das Gerät beschädigt
ist. Bringen Sie in solchen Fällen das Gerät zur nächsten qualizierten Servicestelle zur
Überprüfung und/oder Reparatur.
· Beim Einsatz des Gerätes in Anwesenheit von Kindern ist strenge Aufsicht geboten.
· Die Verwendung von Zubehör, das nicht vom Hersteller empfohlen oder verkauft wird,
besteht die Gefahr von Brand, elektrischen Schlages oder von Verletzungen.
· Ziehen Sie den Stecker aus der Steckdose, wenn das Gerät nicht im Einsatz ist, Einzelteile
montiert oder demontiert werden, oder das Gerät gereinigt wird. Ziehen Sie den Stecker
direkt am Stecker selber und nicht an der Kabelschnur aus der Steckdose.
· Lassen Sie das im Betrieb bendliche Gerät nicht unbeaufsichtigt.

37
DO263A
www.domo-elektro.be
DE
· Stellen Sie das Gerät nicht in der Nähe oder auf einer Gasamme, einer elektrischen Platte
oder an einer Stelle ab, auf der es in Kontakt mit einem Elektroofen oder einem anderen
heißen Geräten kommen kann.
· Benutzen Sie das Gerät nicht im Freien.
· Benutzen Sie das Gerät ausschließlich für den Zweck, für den es gedacht ist.
· Stellen Sie das Gerät immer auf eine stabile, ache und trockene Oberäche.
· Das Gerät ist nur auf den privaten Gebrauch ausgelegt. Der Hersteller ist nicht
verantwortlich für Unfälle, die als Folge von unsachgemäßem Gebrauch des Geräts oder
Nichtbefolgen der in dieser Anleitung aufgeführten Regeln entstehen.
· Sämtliche Reparaturen, abgesehen von der gewöhnlichen Pege, sind durch den Hersteller
oder dessen Kundendienst zu übernehmen.
· Das Gerät, das Kabel oder den Stecker niemals in Wasser oder in andere Flüssigkeiten
tauchen.
· Sorgen Sie dafür, dass Kinder das Netzkabel oder das Gerät nicht berühren können.
· Netzkabel vor scharfen Kanten, heißen Gegen-ständen oder anderen Wärmequellen
schützen.
· Beim ersten Gebrauch Verpackungsmaterial und mögliche Werbeauleber komplett
entfernen.
· Stellen Sie das Gerät nicht in die Nähe von Gasbrennern, Feuerstellen oder leicht
entammbaren Stoen, wie z.B. Alkohol, Chemikalien, Insektenvernichtungsmitteln, etc.
· Vermeiden Sie gegen das Gerät zu stoßen oder daran zu wackeln. So können Sie Schäden
am Gerät vermeiden.
· Sorgen Sie dafür, dass die Luft-Zu- und -abfuhr nicht abgedeckt sind. Das Gerät könnte
sonst überhitzen.
· Vermeiden Sie, dass das Gerät Wasserspritzer abbekommt und stellen Sie es nicht in die
Nähe von Wasserquellen. So vermeiden Sie, dass es zu Kurzschlüssen kommt.
· Schließen Sie auf der gleichen Stromzufuhr, an der die Klimaanlage angeschlossen ist, kein
weiteres Gerät an.
· Bedienen Sie den Stecker nicht mit nassen Händen.
· Stecken Sie keine fremden Gegenstände in die Önungen des Gerätes.
· Benutzen Sie keine Verlängerungsschnur.
· Lassen Sie das Gerät nicht unbeaufsichtigt, wenn Kinder in der Nähe sind.
· Wenn Sie das Gerät innerhalb von kurzer Zeit an- und ausschalten dauert es etwa 3 min. bis
der Kompressor wieder einsatzbereit ist.
· Stellen Sie das Gerät zur Vermeidung von Störungen nicht in einen Umkreis von 1m zu
Fernseher oder Radio.
· Um Verfärbungen am Gehäuse zu vermeiden stellen Sie das Gerät nicht in direktes
Sonnenlicht.
· Kippen Sie das Gerät nicht mehr als 35° wenn Sie es transportieren und transportieren Sie
es niemals mit der Unterseite nach oben. Transportieren Sie das Gerät immer aufrecht.
· Stellen Sie das Gerät auf einen achen Untergrund.

38
DO263A
DE
· Zur Verlängerung der Lebensdauer des Gerätes entfernen Sie stets das Wasser aus dem
Gerät, sofern Sie es für längere Zeit wegstellen und nicht benutzen.
· Benutzen Sie zur Reinigung des Gerätes keine chemischen Mittel, da diese das Gerät
beschädigen könnten.
· Achten Sie darauf, dass das Gerät nicht an den Strom angeschlossen ist, wenn Sie den
Lüftungsrost einsetzen oder entnehmen.
· Achten Sie darauf, dass die Klimaanlage nicht in Kontakt mit Feuchtigkeit kommt (z.B.
Kondenswasser, Spritzwasser etc.). Sollte das Gerät zufälligerweise in Wasser oder andere
Flüssigkeiten gefallen sein, ziehen Sie unmittelbar den Stecker aus der Steckdose.
· Benutzen Sie das Gerät nicht in feuchten Räumen, wie z.B. Badezimmern oder
Waschküchen.
· Wenn das Gerät nicht funktioniert nehmen Sie bitte Kontakt mit einem qualizierten
Fachhändler auf.
· Sorgen Sie dafür, dass rund um das Gerät mindestens 30 cm Freiraum ist.
· Falls die Klimaanlage umgefallen ist muss sofort der Stecker aus der Steckdose gezogen
werden.
· Berühren Sie das Gerät nicht, wenn Sie nasse Hände oder nackte Füße haben.
· Entfernen Sie keine festmontierten Teile des Gerätes und benutzen Sie das Gerät nicht,
wenn es nicht vernünftig funktioniert, gefallen oder beschädigt ist.
· Benutzen Sie nicht den Stecker zum An- und Abschalten. Verwenden Sie immer die Tasten
auf dem Bedienfeld.
· Reparaturen, Detektion von Leckagen sowie Arbeiten an der Anlage müssen von
qualizierten Personen die über die geeigneten Zertikate verfügen, ausgeführt werden.
· Die Installation muss gemäß der Installationsanleitung durchgeführt werden. Eine
unsachgemäße Installation kann zu Wasseraustritt, Stromschlag oder Brand führen.
· Berühren Sie das Gerät nicht mit nassen oder feuchten Händen oder auf bloßen Füßen.
· Wenn die Klimaanlage während des Betriebs umgestoßen wird, schalten Sie das Gerät aus
und ziehen Sie sofort den Netzstecker. Inspizieren Sie das Gerät, um sicherzustellen, dass
es nicht beschädigt ist. Wenn Sie vermuten, dass das Gerät beschädigt ist, wenden Sie sich
an einen Techniker oder den Kundendienst.
· Während eines Gewitters muss der Strom abgeschaltet werden, um Schäden am Gerät
durch Blitzschlag zu vermeiden.
· Wenn die Abussfunktion nicht verwendet wird, bringen Sie beide Gummistopfen in den
Abusslöchern an. Bewahren Sie den Ablaufschlauch bei Nichtgebrauch sorgfältig auf, um
Kinder vor dem Ersticken zu schützen.
· Verlegen Sie das Kabel nicht unter Teppichböden. Bedecken Sie das Kabel nicht mit
Teppichen, Läufern oder ähnlichen Belägen. Verlegen Sie das Kabel nicht unter Möbeln
oder Geräten. Verlegen Sie das Kabel außerhalb eines Durchgangs und so, dass niemand
darüber stolpern kann.
· Trennen Sie das Gerät von der Stromversorgung, wenn ungewöhnliche Geräusche,
Gerüche oder Rauch aus dem Gerät austreten.

39
DO263A
www.domo-elektro.be
DE
· Bitte lesen Sie alle Warnhinweise aufmerksam durch.
· Verwenden Sie beim Abtauen oder bei der Reinigung des Geräts keine anderen als vom
Hersteller empfohlenen Werkzeuge.
· Das Gerät muss in einem Raum auewahrt werden, in dem keine permanent betriebenen
Zündquellen vorhanden sind (zum Beispiel: oene Flammen, ein eingeschaltetes Gasgerät
oder laufende Elektroheizung).
· Nicht durchstechen oder verbrennen.
· Kältemittel können geruchlos sein.
· Das Gerät muss in einem Raum aufgebaut, verwendet und gelagert werden, der größer als
8 m
2
ist.
· Das Gerät enthält eine gewisse Menge (siehe Typenschild auf der Geräterückseite) des
Kältemittels R290.
· Das Kältemittel R290 entspricht den europäischen Umweltrichtlinien. Beschädigen Sie
nicht den Kältekreislauf.
· Wird das Gerät in einem unbelüfteten Raum aufgestellt, betrieben oder gelagert, muss
der Raum so gestaltet sein, dass sich das Kältemittel bei einer Leackage nicht sammeln
und eine Explosions- und Brandgefahr darstellen kann, aufgrund der Entzündung des
Kältemittels durch Elektroheizungen, Öfen oder anderen Zündquellen.
· Das Gerät ist so zu lagern, dass mechanische Schäden ausgeschlossen werden.
· Alle Personen, die an einem Kältemittelkreislauf arbeiten oder in ihn eingreifen, müssen im
Besitz eines gültigen Zertikats von einer anerkannten Prüfstelle sein, die ihnen bestätigt,
dass sie sicher im Umgang mit Kältemitteln gemäß der anerkannten Spezikationen sind.
· Reparaturen sind entsprechend der Empfehlungen des Hersteller durchzuführen.
Wartungs- und Reparaturarbeiten, bei denen weitere Fachkräfte assistieren müssen,
sind unter der Aufsicht der Person, die in der Verwendung von brennbaren Kältemitteln
geschult ist, durchzuführen.
Vorsicht: Brandgefahr / brennbare Materialien
Dieses Gerät verwendet ein brennbares Kühlmittel. Wenn das Kühlmittel
austritt und einer externen Zündquelle ausgesetzt ist, besteht Brandgefahr.
BEWAHREN SIE DIESE ANWEISUNGEN AUF
ENERGIETIPPS
· Benutzen Sie das Gerät nicht in Räumen, die größer sind als für das Gerät empfohlen.
· Stellen Sie das Gerät so auf, dass der Luftstrom nicht durch Möbel oder andere
Gegenstände behindert wird.
· Halten Sie Gardinen während der wärmsten Tageszeit geschlossen.
· Achten Sie darauf, dass die Filter immer sauber sind.
· Halten Sie Fenster und Türen geschlossen, um die gekühlte Luft drinnen und die warme
Luft draußen zu halten.

40
DO263A
DE
TEILE
1. Bedienpanel
2. Luftauslass
3. Luftlter
4. Lufteinlass
5. Luftauslass
6. Drainage
7. Drainageschlauch
8. Fernbedienung
9. Fernbedienung Wandbefestigung
10. Luftauslassschlauch
10 a. Kopplung Luftauslassschlauch
11. Wandbefestigungssatz
11 a. Wandadapter
11 b.Kopplung
12. Fensterbefestigungssatz
12 a. Fensteradapter
12 b. Kopplung Fensterbefestigungssatz
12 c. Fensterdichtung
12 d. Adapterstecker
12 e. L-Eisen mit Schrauben
1
2
3
4
5
6
8
11b
11
7
12b 12c
12
12e

41
DO263A
www.domo-elektro.be
DE
max 120 cm
min 30 cm
· Stellen Sie die Klimaanlage auf einen soliden, stabilen Untergrund, um Lärmbelästigung
und Vibrationen zu reduzieren.
· Achten Sie darauf, dass der Untergrund stark genug ist, um dass
Gewicht des Gerätes zu tragen.
· Um das Gerät einfach transportieren zu können hat es Rollen.
Rollen Sie das Gerät ausschließlich über glatte, ache Böden
und nicht über Gegenstände. Beim Rollen über Teppiche sollte
man besonders vorsichtig sein.
· Stellen Sie das Gerät in die Nähe einer geerdeten Steckdose.
· Achten Sie darauf, dass sich rund um das Gerät 30 cm Freiraum
benden.
· Der Luftablassschlauch muss während der COOL- oder
AUTO-Funktion angeschlossen werden. Im FAN- oder DRY-Modus haben Sie den
Luftablassschlauch nicht nötig.
· Achten Sie darauf, dass sich im Umkreis von 50 cm von der Luftabfuhr keine Hindernisse
benden.
· Achten Sie darauf, dass der Luftablassschlauch bei der Montage nicht zu stark gebogen
wird
max 120 cm
min 30 cm
· Bringen Sie die Koppelung des Luftauslassschlauchs am Schlauchende an.
· Bringen Sie den Luftauslassschlauch an der Rückseite des Geräts an.
max 120 cm
min 30 cm
· Bringen Sie die Koppelung der Fensterbefestigung am anderen Ende des
Luftauslassschlauches an.
· Bringen Sie den Fensteradapter im Fenster an. Dies ist sowohl für horizontale wie auch
vertikale Schieberahmen möglich. Blockieren Sie den Fensteradapter auf der gewünschten
Länge.
· Befestigen Sie den Schlauch mit Koppelung auf dem Fensteradapter.
· Verwenden Sie die Fensterdichtungen, um eventuelle Önungen im Fenster zu
verschließen.

42
DO263A
DE
· Setzen Sie die gewünschte Länge des Fensteradapters mit dem mitgelieferten
Fensteradapterstopper fest.
· Auf Wunsch können Sie das Fenster mit dem L-Eisen und 2 Schrauben befestigen.
max 120 cm
min 30 cm
max 120 cm
min 30 cm
· Bringen Sie die Koppelung des Luftauslassschlauchs am Schlauchende an.
· Bringen Sie den Luftauslassschlauch an der Rückseite des Geräts an.
max 120 cm
min 30 cm
· Bringen Sie eine Önung in der Mauer in der Größe des Maueradapters an.
· Bringen Sie den Maueradapter in der Önung an. Befestigen Sie die Wandhalterung mit
den im Lieferumfang enthaltenen Schrauben.
· Bringen Sie die Koppelung der Mauerbefestigung am anderen Ende des
Luftauslassschlauches an.
· Befestigen Sie den Schlauch mit Koppelung auf dem Maueradapter.
max 120 cm
min 30 cm

43
DO263A
www.domo-elektro.be
DE
1
2
3
4
5
6
7
8
Die horizontalen Lamellen an der Vorderseite der Klimaanlage können Sie manuell önen und
schließen, um so den Luftauslass besser ausrichten zu können.
12
4
3
1. ON-OFF-Taste
Mit dieser Taste können Sie das Gerät an- oder ausschalten.
2. “+” und “-”-Tasten
Diese Tasten müssen Sie benutzen, wenn Sie die Temperatureinstellung ändern wollen. Die
Temperatur kann auf einen Wert zwischen 17 °C und 30 °C eingestellt werden. Wenn Sie beide
Pfeil-Tasten gleichzeitig 3 sek. Gedrückt halten können Sie zwischen °C und °F wählen.
3. MODE-Taste
Mit dieser Taste können Sie die gewünschte Gebrauchseinstellung wählen. Bei jedem
Druck auf diese Taste wird die Gebrauchseinstellung verändern: COOL, DRY und FAN.
Das entsprechende Kontrolllämpchen auf dem Panel wird aueuchten. Wenn Sie die
FAN-Einstellung wählen, bläst die Lüftung im automatischen Stand. Sie können die
Lüftungsgeschwindigkeit nur mit der Fernbedienung anpassen.
4. LED-Display
Das LED-Display gibt die eingestellte Temperatureinstellung wieder. Wenn das Gerät im
DRY- oder FAN-Modus steht, wird auf dem Display die
Zimmertemperatur wiedergegeben.
Achten Sie bei Verwendung der Fernbedienung immer
darauf, sie in Richtung des Geräts zu richten. Wenn Sie dies
unterlassen, können Sie nach dem Ändern einer bestimmten
Einstellung die Fernbedienung noch auf das Gerät richten
und auf die EIN-AUS-Taste drücken.
Wenn das Gerät ein Signal der Fernbedienung empfängt,
hören Sie einen Piepston. Die Fernbedienung muss in einem
Radius von 8 Metern um das Gerät verwendet werden.

44
DO263A
DE
1. ON-OFF-Taste
Mit dieser Taste können Sie das Gerät an- oder ausschalten.
2. MODE-Taste
Mit dieser Taste können Sie die gewünschte Gebrauchseinstellung wählen. Bei jedem
Druck auf diese Taste wird die Gebrauchseinstellung verändern: COOL, DRY und FAN. Das
entsprechende Kontrolllämpchen auf dem Panel wird aueuchten.
3. FAN-Taste
Mit dieser Taste können Sie die Geschwindigkeit des Ventilators einstellen. Sie können
zwischen drei Geschwindigkeiten wählen: LOW
55
66
MODE display
Displays the current
mode, including:
AUTO
COOL
DRY
HEAT
FAN
Transmission Indicator
Lights up when remote sends
signal to unit
ON/OFF display
Appears when the unit is turned on,
and disappears when it is turned off
TIMER ON display
Displays when TIMER
ON is set
TIMER OFF display
Displays when TIMER
OFF is set
SLEEP display
Battery display
SILENT display
ECO display
Displays when
SLEEP function
is activated
FOLLOW ME
display
Indicates that
the FOLLOW ME
function is on
FAN SPEED display
Displays selected FAN SPEED:
HIGH, MED,
or LOW
This display is blank when
set to AUTO speed.
Temperature/Timer display
Displays the set temperature by default, or timer setting
when using TIMER ON/OFF functions
o O O
Temperature range: 17-30 C(62 F-86 F)
Timer setting range: 0-24 hours
This display is blank when operating in FAN mode.
1. Press the MODE button to select
COOL mode.
2. Set your desired temperature using
the Temp or Temp button.
3. Press the FAN button to select the
fan speed: AUTO, LOW, MED,or
HIGH.
4. Press the ON/OFF button to start the
unit.
In AUTO mode, the unit will automatically
select the COOL, FAN, HEAT or DRY mode
based on the set temperature.
1. Press the MODE button to select Auto mode.
2. Set your desired temperature using the
Temp or Temp button.
3. Press the ON/OFF button to start the unit.
,
NOTE: FAN SPEED can t be set in Auto mode.
SETTING TEMPERATURE
AUTO operation
The operating temperature range for units is
O O O
17-30 C(62 F-86 F). You can increase or
O O
decrease the set tmeperature in 1 C(1 F)
increments.
COOL operation
1
3
2
1
3
2
4
Not available for this unit
Not available for
this unit
Not available for
this unit
Low battery
detection
Remote LED Screen Indicators
How To Use The Basic Functions
ON/OFF
ON/OFF
TEMP
TEMP
SHORT
CUT
SHORT
CUT
TIMER
ON
TIMER
ON
TIMER
OFF
TIMER
OFF
MODE
MODE
FAN
FAN
SLEEP
SLEEP
LED
LED
FOLLOW
ION
SWING
ME
FOLLOW
ION
SWING
ME
, HIGH
55
66
MODE display
Displays the current
mode, including:
AUTO
COOL
DRY
HEAT
FAN
Transmission Indicator
Lights up when remote sends
signal to unit
ON/OFF display
Appears when the unit is turned on,
and disappears when it is turned off
TIMER ON display
Displays when TIMER
ON is set
TIMER OFF display
Displays when TIMER
OFF is set
SLEEP display
Battery display
SILENT display
ECO display
Displays when
SLEEP function
is activated
FOLLOW ME
display
Indicates that
the FOLLOW ME
function is on
FAN SPEED display
Displays selected FAN SPEED:
HIGH, MED,
or LOW
This display is blank when
set to AUTO speed.
Temperature/Timer display
Displays the set temperature by default, or timer setting
when using TIMER ON/OFF functions
o O O
Temperature range: 17-30 C(62 F-86 F)
Timer setting range: 0-24 hours
This display is blank when operating in FAN mode.
1. Press the MODE button to select
COOL mode.
2. Set your desired temperature using
the Temp or Temp button.
3. Press the FAN button to select the
fan speed: AUTO, LOW, MED,or
HIGH.
4. Press the ON/OFF button to start the
unit.
In AUTO mode, the unit will automatically
select the COOL, FAN, HEAT or DRY mode
based on the set temperature.
1. Press the MODE button to select Auto mode.
2. Set your desired temperature using the
Temp or Temp button.
3. Press the ON/OFF button to start the unit.
,
NOTE: FAN SPEED can t be set in Auto mode.
SETTING TEMPERATURE
AUTO operation
The operating temperature range for units is
O O O
17-30 C(62 F-86 F). You can increase or
O O
decrease the set tmeperature in 1 C(1 F)
increments.
COOL operation
1
3
2
1
3
2
4
Not available for this unit
Not available for
this unit
Not available for
this unit
Low battery
detection
Remote LED Screen Indicators
How To Use The Basic Functions
ON/OFF
ON/OFF
TEMP
TEMP
SHORT
CUT
SHORT
CUT
TIMER
ON
TIMER
ON
TIMER
OFF
TIMER
OFF
MODE
MODE
FAN
FAN
SLEEP
SLEEP
LED
LED
FOLLOW
ION
SWING
ME
FOLLOW
ION
SWING
ME
und AUTO.
4. SLEEP-Taste
Mit dieser Taste können Sie das Gerät in Schlafmodus setzen.
Wenn Sie diese Funktion wählen wird die eingestellte Temperatur innerhalb von 30 min. um
1 °C steigen. Nach weiteren 30 min. wird die Temperatur nochmals um 1 °C steigen. Die dann
erreichte Temperatur wird anschließend für die nächsten 7 Std. konstant gehalten. Danach
sinkt die Temperatur auf ihre ursprüngliche Einstellung und ist der „SLEEP“-Modus beendet.
HINWEIS: Diese Funktion kann nicht bei „DRY“- oder „FAN“-Funktion gewählt werden.
5. TEMP-Taste
Diese Tasten müssen Sie benutzen, wenn Sie die Temperatureinstellung ändern wollen. Die
Temperatur kann auf einen Wert zwischen 17 °C und 30 °C eingestellt werden. Wenn Sie beide
Pfeil-Tasten gleichzeitig 3 sek. Gedrückt halten können Sie zwischen °C und °F wählen.
6. SHORT CUT-Taste
Mit dieser Taste können Sie eine bevorzugte Einstellungen festlegen und einschalten.
7. TIMER ON-Taste
Mit dieser Taste können Sie die Zeit einstellen, wann das Gerät sich anstellen soll.
8. TIMER OFF-Taste
Mit dieser Taste können Sie die Zeit einstellen, wann das Gerät sich ausstellen soll.
9. LED-Taste
Mit dieser Taste wird das LED-Display des Bedienfelds ausgeschaltet. Sie können sie
verwenden, wenn das Display zu viel Licht abgibt, wenn Sie schlafen möchten. Wenn Sie ein
zweites Mal auf die Taste drücken, schaltet sich das Display wieder ein.

45
DO263A
www.domo-elektro.be
DE
55
66
MODE display
Displays the current
mode, including:
AUTO
COOL
DRY
HEAT
FAN
Transmission Indicator
Lights up when remote sends
signal to unit
ON/OFF display
Appears when the unit is turned on,
and disappears when it is turned off
TIMER ON display
Displays when TIMER
ON is set
TIMER OFF display
Displays when TIMER
OFF is set
SLEEP display
Battery display
SILENT display
ECO display
Displays when
SLEEP function
is activated
FOLLOW ME
display
Indicates that
the FOLLOW ME
function is on
FAN SPEED display
Displays selected FAN SPEED:
HIGH, MED,
or LOW
This display is blank when
set to AUTO speed.
Temperature/Timer display
Displays the set temperature by default, or timer setting
when using TIMER ON/OFF functions
o O O
Temperature range: 17-30 C(62 F-86 F)
Timer setting range: 0-24 hours
This display is blank when operating in FAN mode.
1. Press the MODE button to select
COOL mode.
2. Set your desired temperature using
the Temp or Temp button.
3. Press the FAN button to select the
fan speed: AUTO, LOW, MED,or
HIGH.
4. Press the ON/OFF button to start the
unit.
In AUTO mode, the unit will automatically
select the COOL, FAN, HEAT or DRY mode
based on the set temperature.
1. Press the MODE button to select Auto mode.
2. Set your desired temperature using the
Temp or Temp button.
3. Press the ON/OFF button to start the unit.
,
NOTE: FAN SPEED can t be set in Auto mode.
SETTING TEMPERATURE
AUTO operation
The operating temperature range for units is
O O O
17-30 C(62 F-86 F). You can increase or
O O
decrease the set tmeperature in 1 C(1 F)
increments.
COOL operation
1
3
2
1
3
2
4
Not available for this unit
Not available for
this unit
Not available for
this unit
Low battery
detection
Remote LED Screen Indicators
How To Use The Basic Functions
ON/OF F
ON/OF F
TEMP
TEMP
SHORT
CUT
SHORT
CUT
TIMER
ON
TIMER
ON
TIMER
OFF
TIMER
OFF
MODE
MODE
FAN
FAN
SLEEP
SLEEP
LED
LED
FOLLO W
ION
SWING
ME
FOLLO W
ION
SWING
ME
In der Einstellung AUTO wählt das Gerät automatisch die passende Einstellung abhängig von
der gewählten Temperatur. Diese Einstellung können Sie lediglich mit der Fernbedienung
wählen.
1. Wählen Sie mit der MODUS-Taste auf der Fernbedienung AUTO aus.
2. Regeln Sie die Temperatur mit der TEMP-Taste. Das Gerät bestimmt die Einstellung
abhängig hiervon.
Im AUTO-Modus können Sie die Geschwindigkeit der Lüftung (FAN) nicht einstellen.
55
66
MODE display
Displays the current
mode, including:
AUTO
COOL
DRY
HEAT
FAN
Transmission Indicator
Lights up when remote sends
signal to unit
ON/OFF display
Appears when the unit is turned on,
and disappears when it is turned off
TIMER ON display
Displays when TIMER
ON is set
TIMER OFF display
Displays when TIMER
OFF is set
SLEEP display
Battery display
SILENT display
ECO display
Displays when
SLEEP function
is activated
FOLLOW ME
display
Indicates that
the FOLLOW ME
function is on
FAN SPEED display
Displays selected FAN SPEED:
HIGH, MED,
or LOW
This display is blank when
set to AUTO speed.
Temperature/Timer display
Displays the set temperature by default, or timer setting
when using TIMER ON/OFF functions
o O O
Temperature range: 17-30 C(62 F-86 F)
Timer setting range: 0-24 hours
This display is blank when operating in FAN mode.
1. Press the MODE button to select
COOL mode.
2. Set your desired temperature using
the Temp or Temp button.
3. Press the FAN button to select the
fan speed: AUTO, LOW, MED,or
HIGH.
4. Press the ON/OFF button to start the
unit.
In AUTO mode, the unit will automatically
select the COOL, FAN, HEAT or DRY mode
based on the set temperature.
1. Press the MODE button to select Auto mode.
2. Set your desired temperature using the
Temp or Temp button.
3. Press the ON/OFF button to start the unit.
,
NOTE: FAN SPEED can t be set in Auto mode.
SETTING TEMPERATURE
AUTO operation
The operating temperature range for units is
O O O
17-30 C(62 F-86 F). You can increase or
O O
decrease the set tmeperature in 1 C(1 F)
increments.
COOL operation
1
3
2
1
3
2
4
Not available for this unit
Not available for
this unit
Not available for
this unit
Low battery
detection
Remote LED Screen Indicators
How To Use The Basic Functions
ON/OF F
ON/OF F
TEMP
TEMP
SHORT
CUT
SHORT
CUT
TIMER
ON
TIMER
ON
TIMER
OFF
TIMER
OFF
MODE
MODE
FAN
FAN
SLEEP
SLEEP
LED
LED
FOLLO W
ION
SWING
ME
FOLLO W
ION
SWING
ME
Mit der Kühlfunktion können Sie den Raum auf eine bestimmte Temperatur abkühlen.
1. Drücken Sie auf die MODUS-Taste, bis die COOL-Anzeigeleuchte brennt.
2. Verwenden Sie die „+”- und „-”-Tasten auf dem Bedienfeld oder die TEMP-Taste auf der
Fernbedienung, um die gewünschte Zimmertemperatur einzustellen.
3. Verwenden Sie die FAN-Taste auf der Fernbedienung, um die gewünschte
Lüftungsgeschwindigkeit einzustellen. Es gibt drei Einstellungen. LOW
55
66
MODE display
Displays the current
mode, including:
AUTO
COOL
DRY
HEAT
FAN
Transmission Indicator
Lights up when remote sends
signal to unit
ON/OFF display
Appears when the unit is turned on,
and disappears when it is turned off
TIMER ON display
Displays when TIMER
ON is set
TIMER OFF display
Displays when TIMER
OFF is set
SLEEP display
Battery display
SILENT display
ECO display
Displays when
SLEEP function
is activated
FOLLOW ME
display
Indicates that
the FOLLOW ME
function is on
FAN SPEED display
Displays selected FAN SPEED:
HIGH, MED,
or LOW
This display is blank when
set to AUTO speed.
Temperature/Timer display
Displays the set temperature by default, or timer setting
when using TIMER ON/OFF functions
o O O
Temperature range: 17-30 C(62 F-86 F)
Timer setting range: 0-24 hours
This display is blank when operating in FAN mode.
1. Press the MODE button to select
COOL mode.
2. Set your desired temperature using
the Temp or Temp button.
3. Press the FAN button to select the
fan speed: AUTO, LOW, MED,or
HIGH.
4. Press the ON/OFF button to start the
unit.
In AUTO mode, the unit will automatically
select the COOL, FAN, HEAT or DRY mode
based on the set temperature.
1. Press the MODE button to select Auto mode.
2. Set your desired temperature using the
Temp or Temp button.
3. Press the ON/OFF button to start the unit.
,
NOTE: FAN SPEED can t be set in Auto mode.
SETTING TEMPERATURE
AUTO operation
The operating temperature range for units is
O O O
17-30 C(62 F-86 F). You can increase or
O O
decrease the set tmeperature in 1 C(1 F)
increments.
COOL operation
1
3
2
1
3
2
4
Not available for this unit
Not available for
this unit
Not available for
this unit
Low battery
detection
Remote LED Screen Indicators
How To Use The Basic Functions
ON/OFF
ON/OFF
TEMP
TEMP
SHORT
CUT
SHORT
CUT
TIMER
ON
TIMER
ON
TIMER
OFF
TIMER
OFF
MODE
MODE
FAN
FAN
SLEEP
SLEEP
LED
LED
FOLLOW
ION
SWING
ME
FOLLOW
ION
SWING
ME
, HIGH
55
66
MODE display
Displays the current
mode, including:
AUTO
COOL
DRY
HEAT
FAN
Transmission Indicator
Lights up when remote sends
signal to unit
ON/OFF display
Appears when the unit is turned on,
and disappears when it is turned off
TIMER ON display
Displays when TIMER
ON is set
TIMER OFF display
Displays when TIMER
OFF is set
SLEEP display
Battery display
SILENT display
ECO display
Displays when
SLEEP function
is activated
FOLLOW ME
display
Indicates that
the FOLLOW ME
function is on
FAN SPEED display
Displays selected FAN SPEED:
HIGH, MED,
or LOW
This display is blank when
set to AUTO speed.
Temperature/Timer display
Displays the set temperature by default, or timer setting
when using TIMER ON/OFF functions
o O O
Temperature range: 17-30 C(62 F-86 F)
Timer setting range: 0-24 hours
This display is blank when operating in FAN mode.
1. Press the MODE button to select
COOL mode.
2. Set your desired temperature using
the Temp or Temp button.
3. Press the FAN button to select the
fan speed: AUTO, LOW, MED,or
HIGH.
4. Press the ON/OFF button to start the
unit.
In AUTO mode, the unit will automatically
select the COOL, FAN, HEAT or DRY mode
based on the set temperature.
1. Press the MODE button to select Auto mode.
2. Set your desired temperature using the
Temp or Temp button.
3. Press the ON/OFF button to start the unit.
,
NOTE: FAN SPEED can t be set in Auto mode.
SETTING TEMPERATURE
AUTO operation
The operating temperature range for units is
O O O
17-30 C(62 F-86 F). You can increase or
O O
decrease the set tmeperature in 1 C(1 F)
increments.
COOL operation
1
3
2
1
3
2
4
Not available for this unit
Not available for
this unit
Not available for
this unit
Low battery
detection
Remote LED Screen Indicators
How To Use The Basic Functions
ON/OFF
ON/OFF
TEMP
TEMP
SHORT
CUT
SHORT
CUT
TIMER
ON
TIMER
ON
TIMER
OFF
TIMER
OFF
MODE
MODE
FAN
FAN
SLEEP
SLEEP
LED
LED
FOLLOW
ION
SWING
ME
FOLLOW
ION
SWING
ME
und AUTO.
55
66
MODE display
Displays the current
mode, including:
AUTO
COOL
DRY
HEAT
FAN
Transmission Indicator
Lights up when remote sends
signal to unit
ON/OFF display
Appears when the unit is turned on,
and disappears when it is turned off
TIMER ON display
Displays when TIMER
ON is set
TIMER OFF display
Displays when TIMER
OFF is set
SLEEP display
Battery display
SILENT display
ECO display
Displays when
SLEEP function
is activated
FOLLOW ME
display
Indicates that
the FOLLOW ME
function is on
FAN SPEED display
Displays selected FAN SPEED:
HIGH, MED,
or LOW
This display is blank when
set to AUTO speed.
Temperature/Timer display
Displays the set temperature by default, or timer setting
when using TIMER ON/OFF functions
o O O
Temperature range: 17-30 C(62 F-86 F)
Timer setting range: 0-24 hours
This display is blank when operating in FAN mode.
1. Press the MODE button to select
COOL mode.
2. Set your desired temperature using
the Temp or Temp button.
3. Press the FAN button to select the
fan speed: AUTO, LOW, MED,or
HIGH.
4. Press the ON/OFF button to start the
unit.
In AUTO mode, the unit will automatically
select the COOL, FAN, HEAT or DRY mode
based on the set temperature.
1. Press the MODE button to select Auto mode.
2. Set your desired temperature using the
Temp or Temp button.
3. Press the ON/OFF button to start the unit.
,
NOTE: FAN SPEED can t be set in Auto mode.
SETTING TEMPERATURE
AUTO operation
The operating temperature range for units is
O O O
17-30 C(62 F-86 F). You can increase or
O O
decrease the set tmeperature in 1 C(1 F)
increments.
COOL operation
1
3
2
1
3
2
4
Not available for this unit
Not available for
this unit
Not available for
this unit
Low battery
detection
Remote LED Screen Indicators
How To Use The Basic Functions
ON/OF F
ON/OF F
TEMP
TEMP
SHORT
CUT
SHORT
CUT
TIMER
ON
TIMER
ON
TIMER
OFF
TIMER
OFF
MODE
MODE
FAN
FAN
SLEEP
SLEEP
LED
LED
FOLLO W
ION
SWING
ME
FOLLO W
ION
SWING
ME
Mit dieser Funktion können Sie den Raum entfeuchten. Halten Sie bei Betrieb dieser Funktion
Fenster und Türen geschlossen.
1. Drücken Sie auf die MODUS-Taste, bis die DRY-Anzeigeleuchte brennt.
2. Verwenden Sie die „+”- und „-”-Tasten auf dem Bedienfeld oder die TEMP-Taste auf der
Fernbedienung, um die gewünschte Zimmertemperatur einzustellen.
3. Bei dieser Einstellung können Sie die Lüftungsgeschwindigkeit nicht einstellen.
55
66
MODE display
Displays the current
mode, including:
AUTO
COOL
DRY
HEAT
FAN
Transmission Indicator
Lights up when remote sends
signal to unit
ON/OFF display
Appears when the unit is turned on,
and disappears when it is turned off
TIMER ON display
Displays when TIMER
ON is set
TIMER OFF display
Displays when TIMER
OFF is set
SLEEP display
Battery display
SILENT display
ECO display
Displays when
SLEEP function
is activated
FOLLOW ME
display
Indicates that
the FOLLOW ME
function is on
FAN SPEED display
Displays selected FAN SPEED:
HIGH, MED,
or LOW
This display is blank when
set to AUTO speed.
Temperature/Timer display
Displays the set temperature by default, or timer setting
when using TIMER ON/OFF functions
o O O
Temperature range: 17-30 C(62 F-86 F)
Timer setting range: 0-24 hours
This display is blank when operating in FAN mode.
1. Press the MODE button to select
COOL mode.
2. Set your desired temperature using
the Temp or Temp button.
3. Press the FAN button to select the
fan speed: AUTO, LOW, MED,or
HIGH.
4. Press the ON/OFF button to start the
unit.
In AUTO mode, the unit will automatically
select the COOL, FAN, HEAT or DRY mode
based on the set temperature.
1. Press the MODE button to select Auto mode.
2. Set your desired temperature using the
Temp or Temp button.
3. Press the ON/OFF button to start the unit.
,
NOTE: FAN SPEED can t be set in Auto mode.
SETTING TEMPERATURE
AUTO operation
The operating temperature range for units is
O O O
17-30 C(62 F-86 F). You can increase or
O O
decrease the set tmeperature in 1 C(1 F)
increments.
COOL operation
1
3
2
1
3
2
4
Not available for this unit
Not available for
this unit
Not available for
this unit
Low battery
detection
Remote LED Screen Indicators
How To Use The Basic Functions
ON/OF F
ON/OF F
TEMP
TEMP
SHORT
CUT
SHORT
CUT
TIMER
ON
TIMER
ON
TIMER
OFF
TIMER
OFF
MODE
MODE
FAN
FAN
SLEEP
SLEEP
LED
LED
FOLLO W
ION
SWING
ME
FOLLO W
ION
SWING
ME
1. Drücken Sie auf die MODUS-Taste, bis die FAN-Anzeigeleuchte brennt.
2. Verwenden Sie die FAN-Taste auf der Fernbedienung, um die gewünschte
Lüftungsgeschwindigkeit einzustellen. Es gibt drei Einstellungen. LOW
55
66
MODE display
Displays the current
mode, including:
AUTO
COOL
DRY
HEAT
FAN
Transmission Indicator
Lights up when remote sends
signal to unit
ON/OFF display
Appears when the unit is turned on,
and disappears when it is turned off
TIMER ON display
Displays when TIMER
ON is set
TIMER OFF display
Displays when TIMER
OFF is set
SLEEP display
Battery display
SILENT display
ECO display
Displays when
SLEEP function
is activated
FOLLOW ME
display
Indicates that
the FOLLOW ME
function is on
FAN SPEED display
Displays selected FAN SPEED:
HIGH, MED,
or LOW
This display is blank when
set to AUTO speed.
Temperature/Timer display
Displays the set temperature by default, or timer setting
when using TIMER ON/OFF functions
o O O
Temperature range: 17-30 C(62 F-86 F)
Timer setting range: 0-24 hours
This display is blank when operating in FAN mode.
1. Press the MODE button to select
COOL mode.
2. Set your desired temperature using
the Temp or Temp button.
3. Press the FAN button to select the
fan speed: AUTO, LOW, MED,or
HIGH.
4. Press the ON/OFF button to start the
unit.
In AUTO mode, the unit will automatically
select the COOL, FAN, HEAT or DRY mode
based on the set temperature.
1. Press the MODE button to select Auto mode.
2. Set your desired temperature using the
Temp or Temp button.
3. Press the ON/OFF button to start the unit.
,
NOTE: FAN SPEED can t be set in Auto mode.
SETTING TEMPERATURE
AUTO operation
The operating temperature range for units is
O O O
17-30 C(62 F-86 F). You can increase or
O O
decrease the set tmeperature in 1 C(1 F)
increments.
COOL operation
1
3
2
1
3
2
4
Not available for this unit
Not available for
this unit
Not available for
this unit
Low battery
detection
Remote LED Screen Indicators
How To Use The Basic Functions
ON/OFF
ON/OFF
TEMP
TEMP
SHORT
CUT
SHORT
CUT
TIMER
ON
TIMER
ON
TIMER
OFF
TIMER
OFF
MODE
MODE
FAN
FAN
SLEEP
SLEEP
LED
LED
FOLLOW
ION
SWING
ME
FOLLOW
ION
SWING
ME
, HIGH
55
66
MODE display
Displays the current
mode, including:
AUTO
COOL
DRY
HEAT
FAN
Transmission Indicator
Lights up when remote sends
signal to unit
ON/OFF display
Appears when the unit is turned on,
and disappears when it is turned off
TIMER ON display
Displays when TIMER
ON is set
TIMER OFF display
Displays when TIMER
OFF is set
SLEEP display
Battery display
SILENT display
ECO display
Displays when
SLEEP function
is activated
FOLLOW ME
display
Indicates that
the FOLLOW ME
function is on
FAN SPEED display
Displays selected FAN SPEED:
HIGH, MED,
or LOW
This display is blank when
set to AUTO speed.
Temperature/Timer display
Displays the set temperature by default, or timer setting
when using TIMER ON/OFF functions
o O O
Temperature range: 17-30 C(62 F-86 F)
Timer setting range: 0-24 hours
This display is blank when operating in FAN mode.
1. Press the MODE button to select
COOL mode.
2. Set your desired temperature using
the Temp or Temp button.
3. Press the FAN button to select the
fan speed: AUTO, LOW, MED,or
HIGH.
4. Press the ON/OFF button to start the
unit.
In AUTO mode, the unit will automatically
select the COOL, FAN, HEAT or DRY mode
based on the set temperature.
1. Press the MODE button to select Auto mode.
2. Set your desired temperature using the
Temp or Temp button.
3. Press the ON/OFF button to start the unit.
,
NOTE: FAN SPEED can t be set in Auto mode.
SETTING TEMPERATURE
AUTO operation
The operating temperature range for units is
O O O
17-30 C(62 F-86 F). You can increase or
O O
decrease the set tmeperature in 1 C(1 F)
increments.
COOL operation
1
3
2
1
3
2
4
Not available for this unit
Not available for
this unit
Not available for
this unit
Low battery
detection
Remote LED Screen Indicators
How To Use The Basic Functions
ON/OFF
ON/OFF
TEMP
TEMP
SHORT
CUT
SHORT
CUT
TIMER
ON
TIMER
ON
TIMER
OFF
TIMER
OFF
MODE
MODE
FAN
FAN
SLEEP
SLEEP
LED
LED
FOLLOW
ION
SWING
ME
FOLLOW
ION
SWING
ME
und AUTO.
3. Die Temperatur kann nicht eingestellt werden.
Mit dieser Funktion können Sie das Gerät zeitverzögert starten, bis zu maximal 24 Stunden.
1. Drücken Sie auf der Fernbedienung auf die Taste „TIMER ON“.
2. Auf dem Display der Fernbedienung können Sie jetzt ablesen, zu welchem Zeitpunkt die
Klimaanlage den Betrieb aufnimmt.

46
DO263A
DE
3. Drücken Sie mehrmals auf die Taste TIMER ON, um den Wert der Zeit zu erhöhen. Oder
halten Sie die Taste eingedrückt.
4. Erst wenn die gewünschte Zeit eingestellt ist, wird auf dem Display der Fernbedienung
„Timer on“ stehen. Auf dem Display des Bedienfelds sind 2 erleuchtete Kugeln zu sehen.
5. Wenn Sie den Timer ausschalten möchten, drücken Sie mehrmals auf die Taste TIMER
ON, bis der Zähler auf „0“ steht. Oder halten Sie die Taste eingedrückt.
Mit dieser Funktion können Sie das Gerät nach Ablauf der Zeit automatisch ausschalten
lassen.
1. Drücken Sie auf der Fernbedienung auf die Taste „TIMER OFF“.
2. Auf dem Display der Fernbedienung können Sie jetzt ablesen, zu welchem Zeitpunkt die
Klimaanlage abgeschaltet wird.
3. Drücken Sie mehrmals auf die Taste TIMER OFF, um den Wert der Zeit zu erhöhen. Oder
halten Sie die Taste eingedrückt.
4. Erst wenn die gewünschte Zeit eingestellt ist, wird auf dem Display der Fernbedienung
„Timer o“ stehen. Auf dem Display des Bedienfelds sind 2 erleuchtete Kugeln zu sehen.
5. Wenn Sie den Timer ausschalten möchten, drücken Sie mehrmals auf die Taste TIMER
OFF, bis der Zähler auf „0“ steht.
Sie können auch beide Funktionen gleichzeitig einschalten. Damit bestimmen Sie, wann das
Gerät eingeschaltet wird, aber auch, wann das Gerät ausgeschaltet wird.
Wichtig: Diese Zeit gilt ab dem Zeitpunkt, an dem Sie die Einstellung programmieren.
Beispiel: Es ist jetzt 13:00. Sie möchten das Gerät von 16:30 bis 19:00 betrieben. Stellen Sie
die Funktion TIMER ON auf 3,5 Stunden ein und TIMER OFF auf 5,0 Stunden.
Wenn Sie diese Funktion wählen wird die eingestellte Temperatur innerhalb von 30 min. um
1 °C steigen. Nach weiteren 30 min. wird die Temperatur nochmals um 1 °C steigen. Die dann
erreichte Temperatur wird anschließend für die nächsten 7 Std. konstant gehalten. Danach
sinkt die Temperatur auf ihre ursprüngliche Einstellung und ist der „SLEEP“-Modus beendet.
HINWEIS: Diese Funktion kann nicht bei „DRY“- oder „FAN“-Funktion gewählt werden.
Mit dieser Taste können Sie eine bevorzugte Einstellungen festlegen und einschalten.
Wenn Sie eine bestimmte Einstellung häuger verwenden, können Sie sie einstellen, indem
Sie die SHORTCUT-Taste 3 Sekunden lang eingedrückt halten. Das Gerät speichert dann
die Einstellungen, die zum Zeitpunkt des Drückens eingeschaltet sind. Diese Einstellungen
können sein: die Gebrauchseinstellung (MODE), die eingestellte Temperatur, die

47
DO263A
www.domo-elektro.be
DE
A
Lüftungsgeschwindigkeit (FAN) und eventuell auch noch die SLEEP-Einstellung.
Zu dem Zeitpunkt, an dem Sie die SHORTCUT-Taste betätigen, arbeitet das Gerät in
Übereinstimmung mit den zuvor festgelegten Einstellungen.
Während des Entfeuchtungsvorgangs können Sie am Besten eine permanente Drainage
benutzen.
1. Entfernen Sie den Drainage-Verschluss und die Gummikappe auf der Rückseite des
Gerätes.
2. Befestigen Sie den Drainageschlauch an der Drainage-Önung.
3. Achten Sie darauf, dass das Wasser sicher und dauerhaft abießen kann.
1
2
Wenn Sie nicht von einer permanenten Drainage Gebrauch machen, läuft das Wasser in den
Auangbehälter unten am Gerät.
· Wenn der Behälter voll ist wird der Hinweis „P1“ auf dem Display erscheinen. Der
Entfeuchtungsprozess/Kühlungsprozess wird stoppen, aber
der Ventilator wird sich weiterhin drehen.
· Bringen Sie das Gerät an einen Ort, wo Sie das Wasser einfach
ablassen können.
· Entfernen Sie den Verschluss von der Drainage-Önung unten
am Gerät. Das Wasser wird nun ablaufen.
· Nachdem das Wasser vollständig abgelaufen ist, drehen Sie
bitte wieder den Verschluss auf die Drainage-Önung. (A)
· Nun können Sie das Gerät wieder anschalten. Achten Sie
darauf, dass die Meldung „P1“ nicht mehr auf dem Display
steht.
· Falls die Meldung nicht verschwunden ist, können Sie das
Gerät einige Male an- und ausschalten. Sollte die Meldung
dann noch stets auf dem Display erscheinen, wenden Sie sich
bitte an den Fachhändler.

48
DO263A
DE
· HINWEIS: Verschließen Sie immer erst wieder die Drainage-Önung, bevor Sie das Gerät
wieder einschalten.
· Ziehen Sie immer erst den Stecker aus der Steckdose, bevor Sie das Gerät reinigen.
· Benutzen Sie keine chemischen oder scheuernden Reinigungsmittel.
· Spülen Sie das Gerät niemals mit Wasser ab, da dies zu Kurzschlüssen und Unfällen führen
kann.
· Falls das Kabel des Gerätes beschädigt ist, muss dieses durch den Hersteller oder einen
qualizierten Fachhandel repariert werden.
· Um zu gewährleisten, dass der Ventilator problemlos
funktioniert und sich nicht zu viel Staub im Filter bendet,
reinigen Sie den Luftlter mindestens alle zwei Wochen.
· Waschen Sie den Filter in lauwarmem Wasser mit etwas
mildem Spülmittel vorsichtig aus. Spülen Sie den Filter
danach mit sauberem Wasser ab und lassen Sie den Filter
an der Luft trockenen.
· Erst wenn der Filter völlig trocken ist können Sie dieser
wieder ins Gerät einsetzen.
Das Gehäuse kann mit einem weichen, feuchten Tuch mit etwas mildem Spülmittel
abgewaschen werden. Trocknen Sie das Gehäuse nach dem Abwaschen gründlich mit einem
weichen, trockenen Tuch ab.
Bevor Sie das Gerät für eine längere Zeit verstauen, empfehlen wir Ihnen folgende
Wartungsschritte:
· Entfernen Sie sämtliches Wasser mit Hilfe des Drainageschlauchs aus dem Gerät.
· Stellen bei dem Gerät anschließend die „FAN“-Funktion ein und lassen es einen halben Tag
in einem erwärmten Raum stehen. Auf diese Art und Weise kann das Gerät auch von Innen
vollständig trockenen und wird sich kein Schimmel bilden.
· Schalten Sie das Gerät danach ab und ziehen Sie den Stecker aus der Steckdose. Entfernen
Sie anschließend die Batterien aus der Fernbedienung.
· Reinigen Sie die Filter und setzen Sie diese wieder ins Gerät ein.
· Verstauen Sie das Gerät in einem trockenen, dunklen Raum.

49
DO263A
www.domo-elektro.be
DE
Das Gerät springt nicht an, wenn man auf den ON/OFF-Taste drückt
· Auf dem Display steht „P1“. Entfernen Sie das Wasser aus dem Gerät.
· Die Zimmertemperatur ist niedriger als die Temperatur, die Sie eingestellt haben. Ändern
Sie entsprechend die Temperatureinstellung am Gerät.
Das Zimmer kühlt nicht entsprechend ab
· Fenster und Türen sind nicht geschlossen. Sorgen Sie dafür, dass Fenster und Türen
geschlossen werden.
· Es benden sich wärmeerzeugende Geräte im Raum. Entfernen Sie, wenn möglich, die
Wärmequellen.
· Der Luftablassschlauch ist nicht angeschlossen oder blockiert. Schließen Sie den Schlauch
an und sorgen Sie dafür, dass er nicht zu sark gekrümmt ist.
· Die eingestellte Temperatur ist zu hoch. Passen Sie die Temperatureingabe entsprechend
an.
· Der Luftlter ist verschmutzt. Reinigen Sie den Luftlter.
Das Gerät macht zu viel Lärm und sorgt für Vibrationen
· Der Boden, auf dem das Gerät steht, ist nicht ach genug. Stellen Sie das Gerät an einen
anderen Platz, wo der Boden ach und eben ist.
· Der Luftlter ist verschmutzt. Reinigen Sie den Luftlter.
Das Gerät macht gurgelnde Geräusche
· Die Geräusche kommen vom Kühlmittel im Gerät und sind völlig normal.
Folgende Error-Meldungen können bei Störungen auf dem Display erscheinen:
E1: Der Sensor für die Zimmertemperatur funktioniert nicht. Schalten Sie das Gerät ab und
ziehen Sie den Stecker aus der Steckdose. Warten Sie ca. 10 sek. und stecken Sie den Stecker
erneut in die Steckdose. Schalten Sie das Gerät wieder ein. Sollte die gleiche Error-Meldung
auf dem Display erscheinen nehmen Sie bitte Kontakt mit dem Reparaturservice auf.
E2: Der Sensor vom Luftverdampfer funktioniert nicht. Schalten Sie das Gerät ab und ziehen
Sie den Stecker aus der Steckdose. Warten Sie ca. 10 sek. und stecken Sie den Stecker erneut
in die Steckdose. Schalten Sie das Gerät wieder ein. Sollte die gleiche Error-Meldung auf dem
Display erscheinen nehmen Sie bitte Kontakt mit dem Reparaturservice auf.
E4: Das Display funktioniert nicht vernünftig. Schalten Sie das Gerät ab und ziehen Sie den
Stecker aus der Steckdose. Warten Sie ca. 10 sek. und stecken Sie den Stecker erneut in
die Steckdose. Schalten Sie das Gerät wieder ein. Sollte die gleiche Error-Meldung auf dem
Display erscheinen nehmen Sie bitte Kontakt mit dem Reparaturservice auf.

50
DO263A
DE
P1: Das Wasserreservoir ist voll. Schließen Sie den Drainageschlauch unten am Gerät an und
lassen Sie das Wasser ablaufen. Sollte die gleiche Error-Meldung auf dem Display erscheinen
nehmen Sie bitte Kontakt mit dem Reparaturservice auf.
ENTSORGEN
Dieses Symbol auf dem Produkt oder seiner Verpackung
weist darauf hin, dass dieses Produkt nicht als normaler
Haushaltsabfall zu behandeln ist, sondern an einem
Sammelpunkt für das Recyling von elektrischen und
elektronischen Geräten abgegeben werden muss. Durch Ihren
Beitrag zum korrekten Entsorgen dieses Produkts schützen
Sie die Umwelt und die Gesundheit Ihrer Mitmenschen.
Umwelt und Gesundheit werden durch falsches Entsorgen
gefährdet. Weitere Informationen über das Recycling dieses
Produkts erhalten Sie von Ihren Rathaus, Ihrer Müllabfuhr
oder dem Geschäft, in dem Sie das Produkt gekauft haben.
Das Verpackungsmaterial ist wiederverwertbar. Entsorgen
Sie die Verpackung umweltgerecht und führen Sie sie der
Wertstosammlung zu.

51
DO263A
www.domo-elektro.be
EN
Dear client ,
All of our products are always submitted to a strict quality control before they are sold to you.
Should you nevertheless experience problems with your device, we sincerely regret this.
In that case, we kindly request you to contact our customer service.
Our sta will gladly assist you.
+32 14 21 71 91 [email protected]
Monday – Thursday: 8.30 – 12.00 and 13.00 – 17.00
Friday: 8.30 – 12.00 and 13.00 – 16.30
This appliance has a two year warranty period. During this period the manufacturer is
responsible for any failures that are the direct result of construction failure. When these
failures occur the appliance will be repaired or replaced if necessary. The warranty will not be
valid when the damage to the appliance is caused by wrong use, not following the instructions
or repairs executed by a third party. The guarantee is issued with the original till receipt. All
parts, which are subject to wear, are excluded from the warranty.
If your device breaks down within the 2-year warranty period, you can return the device
together with your receipt to the shop where you purchased it.
The guarantee on accessories and components that are liable to wear-and-tear is only 6
months.
The guarantee and responsibility of the supplier and manufacturer lapse automatically in the
following cases:
· If the instructions in this manual have not been followed.
· In case of incorrect connection, e.g., electrical voltage that is too high.
· In case of incorrect, rough or abnormal use.
· In case of insucient or incorrect maintenance.
· In case of repairs or alterations to the device by the consumer or non-authorised third
parties.
· If the customer used parts or accessories that are not recommended or provided by the
supplier / manufacturer.

52
DO263A
EN
When using electrical appliances, basic safety precautions should always be taken, including
the following:
· Read all instructions carefully. Keep this manual for future reference.
· Make sure all packaging materials and promotional stickers have been removed before
using the appliance for the rst time. Make sure children cannot play with the packaging
materials.
· This appliance is intended to be used in household and similar applications such as:
· sta kitchen areas in shops, oces and other working environments;
· farm houses;
· by clients in hotels, motels and other residential type environments;
· bed and breakfast type environments.
· Children should be supervised to ensure that they do not play with the appliance.
· This appliance can be used by children aged from 16 years and above and persons with
reduced physical, sensory or mental capabilities or lack of experience and knowledge if
they have been given supervision or instruction concerning use of the appliance in a safe
way and understand the hazards involved. Children shall not play with the appliance.
Cleaning and user maintenance shall not be made by children unless they are older than 16
and supervised.
· Keep the appliance and its cord out of reach of children younger than 16 years.
· Attention: This appliance cannot be used with an external timer.
· Before use, check if the voltage stated on the appliance corresponds with the voltage of
the power net at your home.
· The plug must be plugged into an appropriate outlet that is installed and grounded in
accordance with all local standards and requirements.
· Do not let the cord hang on a hot surface or on the edge of a table or counter top.
· Never use the appliance when the cord or plug is damaged, after malfunction or when the
appliance itself is damaged. In that case, take the appliance to the nearest qualied service
center for check-up and repair.
· Close supervision is necessary when the appliance is used near or by children.
· The use of accessories that are not recommended or sold by the manufacturer can cause
re, electrical shock or injuries.
· Unplug the appliance when it is not in use, before assembling or disassembling any parts
and before cleaning the appliance. Put all buttons and knobs into the ‘o’ position and
unplug the appliance by grasping the plug. Never unplug by pulling the cord.
· Do not leave a working appliance unattended.
· Never place this appliance near a gas stove or electrical stove or in a place where it may
come into contact with a warm appliance.
· Do not use the appliance outdoors.

53
DO263A
www.domo-elektro.be
EN
· Only use the appliance for its intended use.
· Always use the appliance on a steady, dry and level surface.
· Only use the appliance for domestic use. The manufacturer cannot be held responsible for
accidents that result from improper use of the appliance or not following the instructions
described in this manual.
· All repairs should be carried out by the manufacturer or its aftersales service.
· Never immerse the appliance, the cord or the plug in water or any other liquid.
· Make sure that children do not touch the cord or appliance.
· Keep the cord away from sharp edges and hot parts or other heat sources.
· Before use, remove all packaging materials and any promotional stickers.
· Never place the unit near a stove, re or highly inammable liquids.
· Never hit or shake the unit, to prevent damage.
· Never cover the air inlet or air outlet, to prevent overheating the unit.
· Never splash water on the unit, or place the unit near water, to prevent electrocution.
· Never place another appliance on the same electrical circuit as the air conditioning.
· Never handle the plug with wet hands.
· Never put any foreign objects in the openings of the air conditioning.
· Never use an extension cord.
· Never let children play near the unit.
· When you turn o the unit and want to turn it on immediately afterwards, the compressor
will need 3 min.to start up again.
· Always place the unit at least 1m away from TV or radio, to prevent disturbance.
· Never place the unit in direct sun light, to prevent discoloration of the air conditioning.
· Make sure the angle of the unit is never more than 35°, when you move the air
conditioning. Never place the unit upside down.
· Always remove the water from the water tank, when storing the air conditioning. This will
keep your air conditioning in optimal condition for a long time.
· Never use any chemicals to clean the unit, this will cause damage.
· Always make sure to disconnect the unit from the electrical supply before attaching or
removing the air inlet grill.
· Make sure the air conditioning is always protected against condensation, splashing water,
etc. Make sure the air conditioning can’t come in contact or be pulled into water or any
other liquid. If for some reason the air conditioning will fall in to water or any other liquid,
immediately remove the plug form the socket.
· Never use the air conditioning in a damp room such as a bathroom or a laundry room.
· Always contact a qualied person for repairing the unit.
· Make sure that the free space around the unit is at least 30 cm.
· Never touch the unit with wet hands or bare feed.
· Do not press the buttons on the control panel with anything other than your ngers.

54
DO263A
EN
· Never remove xed parts from the air conditioning. Never use the unit when it is not
working properly, or when the unit has fallen or has been damaged.
· Never use the plug to turn the unit on or o. Always use the buttons on the control panel.
· Reparations, checking for leaks or other services need to happen by a qualied technician
with the right certicates.
· Installation must be performed according to the installation instructions. Improper
installation can cause water leakage, electrical shock, or re.
· Do not touch the unit with wet or damp hands or when barefoot.
· If the air conditioner is knocked over during use, turn o the unit and unplug it from
the main power supply immediately. Inspect the unit to ensure there is no damage. If
you suspect the unit has been damaged, contact a technician or customer service for
assistance.
· In a thunderstorm, the power must be cut o to avoid damage to the machine due to
lightning.
· When the water drainage function is not in use, keep the upper and the lower drain plug
rmly to the unit. When the drain plug is not in use, keep it carefully to prevent children
from choking.
· Do not run cord under carpeting. Do not cover cord with throw rugs, runners, or similar
coverings. Do not route cord under furniture or appliances. Arrange cord away from trac
area and where it will not be tripped over.
· Disconnect the power if strange sounds, smell, or smoke comes from it.
· Do not press the buttons on the control panel with anything other than your ngers.
· Thoroughly read all of the warnings.
· When defrosting and cleaning the appliance, do not use any tools other than those
recommended by the manufacturing company.
· The appliance must be placed in an area without any continuous sources of ignition (for
example: open ames, gas or electrical appliances in operation).
· Do not puncture and do not burn.
· Refrigerant gases can be odourless.
· The appliance must be installed, used and stored in an area that is greater than 8 m
2
.
· This appliance contains a certain number of grams (see rating label back of unit) of R290
refrigerant gas.
· R290 is a refrigerant gas that complies with the European directives on the environment.
Do not puncture any part of the refrigerant circuit.
· If the appliance is installed, operated or stored in a nonventilated area, the room must
be designed to prevent the accumulation of refrigerant leaks resulting in a risk of re or
explosion due to ignition of the refrigerant caused by electric heaters, stoves, or other
sources of ignition.

55
DO263A
www.domo-elektro.be
EN
· The appliance must be stored in such a way as to prevent mechanical failure.
· Individuals who operate or work on the refrigerant circuit must have the appropriate
certication issued by an accredited organisation that ensures competence in handling
refrigerants according to a specic evaluation recognized by associations in the industry.
· Repairs must be performed based on the recommendations from the manufacturing
company. Maintenance and repairs that require the assistance of other qualied personnel
must be performed under the supervision of an individual specied in the use of ammable
refrigerants.
Caution: risk of re / ammable materials
This appliance uses a ammable refrigerant. If the refrigerant is leaked and
exposed to an external ignition source, there is a risk of re.
· Never use the unit it rooms that are bigger than the recommended room size.
· Make sure that the airow of the unit is not blocked by furniture or other objects.
· Keep curtains closed during the warmest hours of the day.
· Make sure the lters of the air conditioning are always clean.
· Always keep doors and windows closed to keep the cool air inside and the warm air
outside.
SAVE THESE INSTRUCTIONS

56
DO263A
EN
PARTS
1. Control panel
2. Air outlet
3. Air lter
4. Air inlet
5. Air outlet
6. Drain
7. Drain hose
8. Remote control
9. Remote control wall mount
10. Air outlet hose
10 a. Air outlet hose connection
11. Wall installation kit
11 a. Wall adaptor
11 b. Wall installation kit connection
12. Window installation kit
12 a. Window adaptor
12 b. Window installation kit connection
12 c. Window seal
12 d. Adapter plug
12 e. L-iron with screws
1
2
3
4
5
6
8
11b
11
7
12b 12c
12
12e

57
DO263A
www.domo-elektro.be
EN
INSTALLATION
· Place the air conditioning on a solid and stable oor, this way you will prevent excessive
noise and vibrations. Make sure that the oor is strong enough
to support the weight of the appliance.
· The appliance has small wheels for easy moving. Make sure only
to move the air conditioning over a at and level surface. Be
careful when moving the air conditioning over carpet. Never roll
the unit over an object.
· Place the unit near an earthed socket.
· Never place any object within 30 cm round the air conditioning.
· The air outlet hose must be used in the “cool” or “auto” mode.
During the “fan” or “dry” mode, you don’t need to attach the air
outlet hose.
· Make sure there is a free surrounding of at least 50 cm around the outlet.
· Make sure the air outlet hose isn’t bend during use.
max 120 cm
min 30 cm
· Place the coupling of the air outlet hose on the end of the hose.
· Place the air outlet hose on the air outlet at the back of the appliance.
max 120 cm
min 30 cm
· Place the coupling of the window attachment on the other end of the air outlet hose.
· Place the window adaptor in your window. This is possible for horizontal and vertical sliding
windows. Block the window adapter at the desired length.
· Attach the hose with the coupling to the window adapter.
· Make use of the window seals to close o any possible openings in the window.
· Block the window adapter at the desired length using the supplied window adapter plug.
· If desired, you can x the window with the L-iron and 2 screws.
max 120 cm
min 30 cm
max 120 cm
min 30 cm
max 120 cm
min 30 cm

58
DO263A
EN
· Place the coupling of the air outlet hose on the end of the hose.
· Place the air outlet hose on the air outlet at the back of the appliance.
max 120 cm
min 30 cm
· Make an opening in the wall the size of the wall adapter.
· Place the wall adapter in the opening. Attach the wall adapter using the screws supplied.
· Place the coupling of the wall attachment on the other end of the air outlet hose.
· Attach the hose with coupling to the wall adapter.
max 120 cm
min 30 cm
The horizontal strip on the front of the air conditioning can be opened and shut manually in
order to aim the air outlet better.
12
4
3
1. ON/OFF touch
To turn the unit o or on.
2. ”+” and “-” touch
Use these touches to select the temperature. The temperature can be set between 17°C and
30°C. When pressing both buttons at the same time you can switch between “°C” or “°F”.

59
DO263A
www.domo-elektro.be
EN
3. MODE- touch
With this touch you can select the desired function. Every time when pressing this touch the
function will change : COOL – DRY – FAN. The related indication light will turn on on the
control panel. If you choose the FAN setting, the ventilation blows on the automatic position.
You can only adapt the ventilation speed with the remote control.
4. LED display
Will show het temperature selections. When the “dry or “fan” mode is selected, the display
will show the room temperature.
When using the remote control make sure that you always aim it towards the apparatus. If
you don’t do this, you can briey aim the remote control towards the apparatus and press the
ON-OFF button.
When the apparatus receives a signal of the remote control you hear a beep. The remote
control must be used within an eight-metre radius around
the apparatus.
1. ON/OFF touch
To turn the unit o or on.
2. MODE- touch
With this touch you can select the desired function. Every
time when pressing this touch the function will change :
COOL – DRY – FAN. The related indication light will turn
on on the control panel.
3. FAN touch
With this touch you can select the fan speed : LOW
55
66
MODE display
Displays the current
mode, including:
AUTO
COOL
DRY
HEAT
FAN
Transmission Indicator
Lights up when remote sends
signal to unit
ON/OFF display
Appears when the unit is turned on,
and disappears when it is turned off
TIMER ON display
Displays when TIMER
ON is set
TIMER OFF display
Displays when TIMER
OFF is set
SLEEP display
Battery display
SILENT display
ECO display
Displays when
SLEEP function
is activated
FOLLOW ME
display
Indicates that
the FOLLOW ME
function is on
FAN SPEED display
Displays selected FAN SPEED:
HIGH, MED,
or LOW
This display is blank when
set to AUTO speed.
Temperature/Timer display
Displays the set temperature by default, or timer setting
when using TIMER ON/OFF functions
o O O
Temperature range: 17-30 C(62 F-86 F)
Timer setting range: 0-24 hours
This display is blank when operating in FAN mode.
1. Press the MODE button to select
COOL mode.
2. Set your desired temperature using
the Temp or Temp button.
3. Press the FAN button to select the
fan speed: AUTO, LOW, MED,or
HIGH.
4. Press the ON/OFF button to start the
unit.
In AUTO mode, the unit will automatically
select the COOL, FAN, HEAT or DRY mode
based on the set temperature.
1. Press the MODE button to select Auto mode.
2. Set your desired temperature using the
Temp or Temp button.
3. Press the ON/OFF button to start the unit.
,
NOTE: FAN SPEED can t be set in Auto mode.
SETTING TEMPERATURE
AUTO operation
The operating temperature range for units is
O O O
17-30 C(62 F-86 F). You can increase or
O O
decrease the set tmeperature in 1 C(1 F)
increments.
COOL operation
1
3
2
1
3
2
4
Not available for this unit
Not available for
this unit
Not available for
this unit
Low battery
detection
Remote LED Screen Indicators
How To Use The Basic Functions
ON/OFF
ON/OFF
TEMP
TEMP
SHORT
CUT
SHORT
CUT
TIMER
ON
TIMER
ON
TIMER
OFF
TIMER
OFF
MODE
MODE
FAN
FAN
SLEEP
SLEEP
LED
LED
FOLLOW
ION
SWING
ME
FOLLOW
ION
SWING
ME
– HIGH
55
66
MODE display
Displays the current
mode, including:
AUTO
COOL
DRY
HEAT
FAN
Transmission Indicator
Lights up when remote sends
signal to unit
ON/OFF display
Appears when the unit is turned on,
and disappears when it is turned off
TIMER ON display
Displays when TIMER
ON is set
TIMER OFF display
Displays when TIMER
OFF is set
SLEEP display
Battery display
SILENT display
ECO display
Displays when
SLEEP function
is activated
FOLLOW ME
display
Indicates that
the FOLLOW ME
function is on
FAN SPEED display
Displays selected FAN SPEED:
HIGH, MED,
or LOW
This display is blank when
set to AUTO speed.
Temperature/Timer display
Displays the set temperature by default, or timer setting
when using TIMER ON/OFF functions
o O O
Temperature range: 17-30 C(62 F-86 F)
Timer setting range: 0-24 hours
This display is blank when operating in FAN mode.
1. Press the MODE button to select
COOL mode.
2. Set your desired temperature using
the Temp or Temp button.
3. Press the FAN button to select the
fan speed: AUTO, LOW, MED,or
HIGH.
4. Press the ON/OFF button to start the
unit.
In AUTO mode, the unit will automatically
select the COOL, FAN, HEAT or DRY mode
based on the set temperature.
1. Press the MODE button to select Auto mode.
2. Set your desired temperature using the
Temp or Temp button.
3. Press the ON/OFF button to start the unit.
,
NOTE: FAN SPEED can t be set in Auto mode.
SETTING TEMPERATURE
AUTO operation
The operating temperature range for units is
O O O
17-30 C(62 F-86 F). You can increase or
O O
decrease the set tmeperature in 1 C(1 F)
increments.
COOL operation
1
3
2
1
3
2
4
Not available for this unit
Not available for
this unit
Not available for
this unit
Low battery
detection
Remote LED Screen Indicators
How To Use The Basic Functions
ON/OFF
ON/OFF
TEMP
TEMP
SHORT
CUT
SHORT
CUT
TIMER
ON
TIMER
ON
TIMER
OFF
TIMER
OFF
MODE
MODE
FAN
FAN
SLEEP
SLEEP
LED
LED
FOLLOW
ION
SWING
ME
FOLLOW
ION
SWING
ME
– AUTO.
4. SLEEP touch
You can use this touch for activating the “sleep”mode.
When pressing the “sleep” touch, the selected temperature will be elevated with 1 °C after 30
min. After another 30 min the temperature will increase with another 1°C. The air conditioning
will maintain this temperature for 7 hours. After this time, the air conditioning will go back to
the original set temperature and the “sleep” function will end.
NOTE : this function cannot be selected with the “fan” or “dry” function.
5. TEMP touch
Use these touches to select the temperature. The temperature can be set between 17°C and
30°C. When pressing both buttons at the same time you can switch between “°C” or “°F”.
1
2
3
4
5
6
7
8

60
DO263A
EN
6. SHORT CUT touch
With this button you can x and switch on a preferential setting.
7. TIMER ON touch
With this function you can select when the unit must turn on.
8. TIMER OFF touch
With this function you can select when the unit must turn o.
9. LED touch
This button turns o the control panel’s LED display. This can be used if the display gives too
much light when you want to sleep. If you press the button a second time, the display will
switch on again.
55
66
MODE display
Displays the current
mode, including:
AUTO
COOL
DRY
HEAT
FAN
Transmission Indicator
Lights up when remote sends
signal to unit
ON/OFF display
Appears when the unit is turned on,
and disappears when it is turned off
TIMER ON display
Displays when TIMER
ON is set
TIMER OFF display
Displays when TIMER
OFF is set
SLEEP display
Battery display
SILENT display
ECO display
Displays when
SLEEP function
is activated
FOLLOW ME
display
Indicates that
the FOLLOW ME
function is on
FAN SPEED display
Displays selected FAN SPEED:
HIGH, MED,
or LOW
This display is blank when
set to AUTO speed.
Temperature/Timer display
Displays the set temperature by default, or timer setting
when using TIMER ON/OFF functions
o O O
Temperature range: 17-30 C(62 F-86 F)
Timer setting range: 0-24 hours
This display is blank when operating in FAN mode.
1. Press the MODE button to select
COOL mode.
2. Set your desired temperature using
the Temp or Temp button.
3. Press the FAN button to select the
fan speed: AUTO, LOW, MED,or
HIGH.
4. Press the ON/OFF button to start the
unit.
In AUTO mode, the unit will automatically
select the COOL, FAN, HEAT or DRY mode
based on the set temperature.
1. Press the MODE button to select Auto mode.
2. Set your desired temperature using the
Temp or Temp button.
3. Press the ON/OFF button to start the unit.
,
NOTE: FAN SPEED can t be set in Auto mode.
SETTING TEMPERATURE
AUTO operation
The operating temperature range for units is
O O O
17-30 C(62 F-86 F). You can increase or
O O
decrease the set tmeperature in 1 C(1 F)
increments.
COOL operation
1
3
2
1
3
2
4
Not available for this unit
Not available for
this unit
Not available for
this unit
Low battery
detection
Remote LED Screen Indicators
How To Use The Basic Functions
ON/OF F
ON/OF F
TEMP
TEMP
SHORT
CUT
SHORT
CUT
TIMER
ON
TIMER
ON
TIMER
OFF
TIMER
OFF
MODE
MODE
FAN
FAN
SLEEP
SLEEP
LED
LED
FOLLO W
ION
SWING
ME
FOLLO W
ION
SWING
ME
In the AUTO function, the apparatus automatically chooses the right setting depending on the
chosen temperature. This setting can also be chosen with the remote control.
1. Choose AUTO with the MODE button on the remote control.
2. Set the desired temperature with the TEMP button. The apparatus will determine the
setting accordingly.
You cannot adapt the speed of the ventilation (FAN) in AUTO modus.
55
66
MODE display
Displays the current
mode, including:
AUTO
COOL
DRY
HEAT
FAN
Transmission Indicator
Lights up when remote sends
signal to unit
ON/OFF display
Appears when the unit is turned on,
and disappears when it is turned off
TIMER ON display
Displays when TIMER
ON is set
TIMER OFF display
Displays when TIMER
OFF is set
SLEEP display
Battery display
SILENT display
ECO display
Displays when
SLEEP function
is activated
FOLLOW ME
display
Indicates that
the FOLLOW ME
function is on
FAN SPEED display
Displays selected FAN SPEED:
HIGH, MED,
or LOW
This display is blank when
set to AUTO speed.
Temperature/Timer display
Displays the set temperature by default, or timer setting
when using TIMER ON/OFF functions
o O O
Temperature range: 17-30 C(62 F-86 F)
Timer setting range: 0-24 hours
This display is blank when operating in FAN mode.
1. Press the MODE button to select
COOL mode.
2. Set your desired temperature using
the Temp or Temp button.
3. Press the FAN button to select the
fan speed: AUTO, LOW, MED,or
HIGH.
4. Press the ON/OFF button to start the
unit.
In AUTO mode, the unit will automatically
select the COOL, FAN, HEAT or DRY mode
based on the set temperature.
1. Press the MODE button to select Auto mode.
2. Set your desired temperature using the
Temp or Temp button.
3. Press the ON/OFF button to start the unit.
,
NOTE: FAN SPEED can t be set in Auto mode.
SETTING TEMPERATURE
AUTO operation
The operating temperature range for units is
O O O
17-30 C(62 F-86 F). You can increase or
O O
decrease the set tmeperature in 1 C(1 F)
increments.
COOL operation
1
3
2
1
3
2
4
Not available for this unit
Not available for
this unit
Not available for
this unit
Low battery
detection
Remote LED Screen Indicators
How To Use The Basic Functions
ON/OF F
ON/OF F
TEMP
TEMP
SHORT
CUT
SHORT
CUT
TIMER
ON
TIMER
ON
TIMER
OFF
TIMER
OFF
MODE
MODE
FAN
FAN
SLEEP
SLEEP
LED
LED
FOLLO W
ION
SWING
ME
FOLLO W
ION
SWING
ME
With the COOL function you can cool the room up to a certain temperature.
1. Press the MODE button until the COOL indicator lamp is on.
2. Use the “+” and “-” buttons on the control panel or the TEMP button on the remote
control to set the desired room temperature.
3. Use the FAN button on the remote control to set the desired ventilation speed. There are
three settings: LOW
55
66
MODE display
Displays the current
mode, including:
AUTO
COOL
DRY
HEAT
FAN
Transmission Indicator
Lights up when remote sends
signal to unit
ON/OFF display
Appears when the unit is turned on,
and disappears when it is turned off
TIMER ON display
Displays when TIMER
ON is set
TIMER OFF display
Displays when TIMER
OFF is set
SLEEP display
Battery display
SILENT display
ECO display
Displays when
SLEEP function
is activated
FOLLOW ME
display
Indicates that
the FOLLOW ME
function is on
FAN SPEED display
Displays selected FAN SPEED:
HIGH, MED,
or LOW
This display is blank when
set to AUTO speed.
Temperature/Timer display
Displays the set temperature by default, or timer setting
when using TIMER ON/OFF functions
o O O
Temperature range: 17-30 C(62 F-86 F)
Timer setting range: 0-24 hours
This display is blank when operating in FAN mode.
1. Press the MODE button to select
COOL mode.
2. Set your desired temperature using
the Temp or Temp button.
3. Press the FAN button to select the
fan speed: AUTO, LOW, MED,or
HIGH.
4. Press the ON/OFF button to start the
unit.
In AUTO mode, the unit will automatically
select the COOL, FAN, HEAT or DRY mode
based on the set temperature.
1. Press the MODE button to select Auto mode.
2. Set your desired temperature using the
Temp or Temp button.
3. Press the ON/OFF button to start the unit.
,
NOTE: FAN SPEED can t be set in Auto mode.
SETTING TEMPERATURE
AUTO operation
The operating temperature range for units is
O O O
17-30 C(62 F-86 F). You can increase or
O O
decrease the set tmeperature in 1 C(1 F)
increments.
COOL operation
1
3
2
1
3
2
4
Not available for this unit
Not available for
this unit
Not available for
this unit
Low battery
detection
Remote LED Screen Indicators
How To Use The Basic Functions
ON/OFF
ON/OFF
TEMP
TEMP
SHORT
CUT
SHORT
CUT
TIMER
ON
TIMER
ON
TIMER
OFF
TIMER
OFF
MODE
MODE
FAN
FAN
SLEEP
SLEEP
LED
LED
FOLLOW
ION
SWING
ME
FOLLOW
ION
SWING
ME
, HIGH
55
66
MODE display
Displays the current
mode, including:
AUTO
COOL
DRY
HEAT
FAN
Transmission Indicator
Lights up when remote sends
signal to unit
ON/OFF display
Appears when the unit is turned on,
and disappears when it is turned off
TIMER ON display
Displays when TIMER
ON is set
TIMER OFF display
Displays when TIMER
OFF is set
SLEEP display
Battery display
SILENT display
ECO display
Displays when
SLEEP function
is activated
FOLLOW ME
display
Indicates that
the FOLLOW ME
function is on
FAN SPEED display
Displays selected FAN SPEED:
HIGH, MED,
or LOW
This display is blank when
set to AUTO speed.
Temperature/Timer display
Displays the set temperature by default, or timer setting
when using TIMER ON/OFF functions
o O O
Temperature range: 17-30 C(62 F-86 F)
Timer setting range: 0-24 hours
This display is blank when operating in FAN mode.
1. Press the MODE button to select
COOL mode.
2. Set your desired temperature using
the Temp or Temp button.
3. Press the FAN button to select the
fan speed: AUTO, LOW, MED,or
HIGH.
4. Press the ON/OFF button to start the
unit.
In AUTO mode, the unit will automatically
select the COOL, FAN, HEAT or DRY mode
based on the set temperature.
1. Press the MODE button to select Auto mode.
2. Set your desired temperature using the
Temp or Temp button.
3. Press the ON/OFF button to start the unit.
,
NOTE: FAN SPEED can t be set in Auto mode.
SETTING TEMPERATURE
AUTO operation
The operating temperature range for units is
O O O
17-30 C(62 F-86 F). You can increase or
O O
decrease the set tmeperature in 1 C(1 F)
increments.
COOL operation
1
3
2
1
3
2
4
Not available for this unit
Not available for
this unit
Not available for
this unit
Low battery
detection
Remote LED Screen Indicators
How To Use The Basic Functions
ON/OFF
ON/OFF
TEMP
TEMP
SHORT
CUT
SHORT
CUT
TIMER
ON
TIMER
ON
TIMER
OFF
TIMER
OFF
MODE
MODE
FAN
FAN
SLEEP
SLEEP
LED
LED
FOLLOW
ION
SWING
ME
FOLLOW
ION
SWING
ME
and AUTO.
55
66
MODE display
Displays the current
mode, including:
AUTO
COOL
DRY
HEAT
FAN
Transmission Indicator
Lights up when remote sends
signal to unit
ON/OFF display
Appears when the unit is turned on,
and disappears when it is turned off
TIMER ON display
Displays when TIMER
ON is set
TIMER OFF display
Displays when TIMER
OFF is set
SLEEP display
Battery display
SILENT display
ECO display
Displays when
SLEEP function
is activated
FOLLOW ME
display
Indicates that
the FOLLOW ME
function is on
FAN SPEED display
Displays selected FAN SPEED:
HIGH, MED,
or LOW
This display is blank when
set to AUTO speed.
Temperature/Timer display
Displays the set temperature by default, or timer setting
when using TIMER ON/OFF functions
o O O
Temperature range: 17-30 C(62 F-86 F)
Timer setting range: 0-24 hours
This display is blank when operating in FAN mode.
1. Press the MODE button to select
COOL mode.
2. Set your desired temperature using
the Temp or Temp button.
3. Press the FAN button to select the
fan speed: AUTO, LOW, MED,or
HIGH.
4. Press the ON/OFF button to start the
unit.
In AUTO mode, the unit will automatically
select the COOL, FAN, HEAT or DRY mode
based on the set temperature.
1. Press the MODE button to select Auto mode.
2. Set your desired temperature using the
Temp or Temp button.
3. Press the ON/OFF button to start the unit.
,
NOTE: FAN SPEED can t be set in Auto mode.
SETTING TEMPERATURE
AUTO operation
The operating temperature range for units is
O O O
17-30 C(62 F-86 F). You can increase or
O O
decrease the set tmeperature in 1 C(1 F)
increments.
COOL operation
1
3
2
1
3
2
4
Not available for this unit
Not available for
this unit
Not available for
this unit
Low battery
detection
Remote LED Screen Indicators
How To Use The Basic Functions
ON/OF F
ON/OF F
TEMP
TEMP
SHORT
CUT
SHORT
CUT
TIMER
ON
TIMER
ON
TIMER
OFF
TIMER
OFF
MODE
MODE
FAN
FAN
SLEEP
SLEEP
LED
LED
FOLLO W
ION
SWING
ME
FOLLO W
ION
SWING
ME
With this function you can dehumidify the room. Keep windows and doors closed for this
function.
1. Press the MODE button until the DRY indicator lamp is on.
2. Use the “+” and “-” buttons on the control panel or the TEMP button on the remote
control to set the desired room temperature.
3. You cannot set the ventilation speed in this setting.

61
DO263A
www.domo-elektro.be
EN
FAN
55
66
MODE display
Displays the current
mode, including:
AUTO
COOL
DRY
HEAT
FAN
Transmission Indicator
Lights up when remote sends
signal to unit
ON/OFF display
Appears when the unit is turned on,
and disappears when it is turned off
TIMER ON display
Displays when TIMER
ON is set
TIMER OFF display
Displays when TIMER
OFF is set
SLEEP display
Battery display
SILENT display
ECO display
Displays when
SLEEP function
is activated
FOLLOW ME
display
Indicates that
the FOLLOW ME
function is on
FAN SPEED display
Displays selected FAN SPEED:
HIGH, MED,
or LOW
This display is blank when
set to AUTO speed.
Temperature/Timer display
Displays the set temperature by default, or timer setting
when using TIMER ON/OFF functions
o O O
Temperature range: 17-30 C(62 F-86 F)
Timer setting range: 0-24 hours
This display is blank when operating in FAN mode.
1. Press the MODE button to select
COOL mode.
2. Set your desired temperature using
the Temp or Temp button.
3. Press the FAN button to select the
fan speed: AUTO, LOW, MED,or
HIGH.
4. Press the ON/OFF button to start the
unit.
In AUTO mode, the unit will automatically
select the COOL, FAN, HEAT or DRY mode
based on the set temperature.
1. Press the MODE button to select Auto mode.
2. Set your desired temperature using the
Temp or Temp button.
3. Press the ON/OFF button to start the unit.
,
NOTE: FAN SPEED can t be set in Auto mode.
SETTING TEMPERATURE
AUTO operation
The operating temperature range for units is
O O O
17-30 C(62 F-86 F). You can increase or
O O
decrease the set tmeperature in 1 C(1 F)
increments.
COOL operation
1
3
2
1
3
2
4
Not available for this unit
Not available for
this unit
Not available for
this unit
Low battery
detection
Remote LED Screen Indicators
How To Use The Basic Functions
ON/OF F
ON/OF F
TEMP
TEMP
SHORT
CUT
SHORT
CUT
TIMER
ON
TIMER
ON
TIMER
OFF
TIMER
OFF
MODE
MODE
FAN
FAN
SLEEP
SLEEP
LED
LED
FOLLO W
ION
SWING
ME
FOLLO W
ION
SWING
ME
1. Press the MODE button until the FAN indicator lamp is on.
2. Press the FAN button of the remote control to set the ventilation speed. There are three
settings: LOW
55
66
MODE display
Displays the current
mode, including:
AUTO
COOL
DRY
HEAT
FAN
Transmission Indicator
Lights up when remote sends
signal to unit
ON/OFF display
Appears when the unit is turned on,
and disappears when it is turned off
TIMER ON display
Displays when TIMER
ON is set
TIMER OFF display
Displays when TIMER
OFF is set
SLEEP display
Battery display
SILENT display
ECO display
Displays when
SLEEP function
is activated
FOLLOW ME
display
Indicates that
the FOLLOW ME
function is on
FAN SPEED display
Displays selected FAN SPEED:
HIGH, MED,
or LOW
This display is blank when
set to AUTO speed.
Temperature/Timer display
Displays the set temperature by default, or timer setting
when using TIMER ON/OFF functions
o O O
Temperature range: 17-30 C(62 F-86 F)
Timer setting range: 0-24 hours
This display is blank when operating in FAN mode.
1. Press the MODE button to select
COOL mode.
2. Set your desired temperature using
the Temp or Temp button.
3. Press the FAN button to select the
fan speed: AUTO, LOW, MED,or
HIGH.
4. Press the ON/OFF button to start the
unit.
In AUTO mode, the unit will automatically
select the COOL, FAN, HEAT or DRY mode
based on the set temperature.
1. Press the MODE button to select Auto mode.
2. Set your desired temperature using the
Temp or Temp button.
3. Press the ON/OFF button to start the unit.
,
NOTE: FAN SPEED can t be set in Auto mode.
SETTING TEMPERATURE
AUTO operation
The operating temperature range for units is
O O O
17-30 C(62 F-86 F). You can increase or
O O
decrease the set tmeperature in 1 C(1 F)
increments.
COOL operation
1
3
2
1
3
2
4
Not available for this unit
Not available for
this unit
Not available for
this unit
Low battery
detection
Remote LED Screen Indicators
How To Use The Basic Functions
ON/OFF
ON/OFF
TEMP
TEMP
SHORT
CUT
SHORT
CUT
TIMER
ON
TIMER
ON
TIMER
OFF
TIMER
OFF
MODE
MODE
FAN
FAN
SLEEP
SLEEP
LED
LED
FOLLOW
ION
SWING
ME
FOLLOW
ION
SWING
ME
, HIGH
55
66
MODE display
Displays the current
mode, including:
AUTO
COOL
DRY
HEAT
FAN
Transmission Indicator
Lights up when remote sends
signal to unit
ON/OFF display
Appears when the unit is turned on,
and disappears when it is turned off
TIMER ON display
Displays when TIMER
ON is set
TIMER OFF display
Displays when TIMER
OFF is set
SLEEP display
Battery display
SILENT display
ECO display
Displays when
SLEEP function
is activated
FOLLOW ME
display
Indicates that
the FOLLOW ME
function is on
FAN SPEED display
Displays selected FAN SPEED:
HIGH, MED,
or LOW
This display is blank when
set to AUTO speed.
Temperature/Timer display
Displays the set temperature by default, or timer setting
when using TIMER ON/OFF functions
o O O
Temperature range: 17-30 C(62 F-86 F)
Timer setting range: 0-24 hours
This display is blank when operating in FAN mode.
1. Press the MODE button to select
COOL mode.
2. Set your desired temperature using
the Temp or Temp button.
3. Press the FAN button to select the
fan speed: AUTO, LOW, MED,or
HIGH.
4. Press the ON/OFF button to start the
unit.
In AUTO mode, the unit will automatically
select the COOL, FAN, HEAT or DRY mode
based on the set temperature.
1. Press the MODE button to select Auto mode.
2. Set your desired temperature using the
Temp or Temp button.
3. Press the ON/OFF button to start the unit.
,
NOTE: FAN SPEED can t be set in Auto mode.
SETTING TEMPERATURE
AUTO operation
The operating temperature range for units is
O O O
17-30 C(62 F-86 F). You can increase or
O O
decrease the set tmeperature in 1 C(1 F)
increments.
COOL operation
1
3
2
1
3
2
4
Not available for this unit
Not available for
this unit
Not available for
this unit
Low battery
detection
Remote LED Screen Indicators
How To Use The Basic Functions
ON/OFF
ON/OFF
TEMP
TEMP
SHORT
CUT
SHORT
CUT
TIMER
ON
TIMER
ON
TIMER
OFF
TIMER
OFF
MODE
MODE
FAN
FAN
SLEEP
SLEEP
LED
LED
FOLLOW
ION
SWING
ME
FOLLOW
ION
SWING
ME
and AUTO.
3. The temperature cannot be adjusted.
With this function you can delay the start of the apparatus, up to maximum 24 hours.
1. Press the TIMER ON button on the remote control.
2. You can now read on the display of the remote control when the air conditioning will go
on.
3. Press the TIMER ON button several times to increase the time. Or keep the button
pressed.
4. Once the desired time is set, you will see “Timer on” on the display of the remote control.
Two lights will light up on the control panel’s display.
5. If you want to switch o the timer, press the TIMER ON button several times until the
counter goes to “0”. Or keep the button pressed.
With this function you can switch o the apparatus automatically after some time.
1. Press the TIMER OFF button on the remote control.
2. You can now read on the display of the remote control when the air conditioning will go
o.
3. Press the TIMER OFF button several times to increase the time. Or keep the button
pressed.
4. Once the desired time is set, you will see “Timer o” on the display of the remote control.
Two lights will light up on the control panel’s display.
5. If you want to switch o the timer, press the TIMER OFF button several times until the
counter goes to “0”.
You can also switch on both functions simultaneously. This determines when you switch on
the apparatus, but also when the apparatus switches o.
Please note: this time is always from the hour when you programme the setting. For example:
it is now 1 pm. You want the apparatus to work from 4:30 to 6 pm. Set the TIMER ON on 3.5 h
and TIMER OFF on 5.0 h.

62
DO263A
EN
When pressing the “sleep” touch, the selected temperature will be elevated with 1 °C after 30
min. After another 30 min the temperature will increase with another 1°C. The air conditioning
will maintain this temperature for 7 hours. After this time, the air conditioning will go back to
the original set temperature and the “sleep” function will end.
NOTE : this function cannot be selected with the “fan” or “dry” function.
With this button you can set and switch on a preferential setting.
If you use a certain setting more often, you can set this by pressing the SHORTCUT button
for three seconds. The apparatus then remembers the settings that are switched on at the
moment of pressing. These settings can include: the user setting (MODE), set temperature,
ventilation speed (FAN) and possibly also the SLEEP setting.
The moment you press the SHORTCUT button, the apparatus will work at the previously
determined settings.
DRAINING
During the “dry” mode you can use a permanent drainage.
1. Remove the drain plug and the rubber top.
2. Attach the drain hose on the drain.
3. Make sure the water is drained in a save and permanent way.
1
2
When you don’t use the permanent drain, the non recycled condensation water, will be stored
in the water tank.
· When the water tank is full a few beep signals will be heard and on the display the code
P1 will appear. The “cool” or “dry” mode will end automatically. The fan will continue to
operate, this is normal.
· Move the unit over to a place where you can easily drain the water.

63
DO263A
www.domo-elektro.be
EN
· Remove the drain plug at the bottom of your unit (A) and drain the water.
· After fully draining the water tank, place the drain plug back on the drain opening.
· Restart the unit, make sure the error code P1 is no longer
displayed. When the code doesn’t disappear, try turning o
and on the unit a few times. When the error code continues,
please contact the after sales service.
· NOTE : always make sure to install the drain plug, before
turning the unit back on.
CLEANING
· Always remove the plug from the socket before cleaning the
unit.
· Never use any chemical or abrasive products to clean the
unit.
· Never clean the unit with water or any other liquid, this can
cause electrocution.
· When the power cord is damaged it must be repaired or
replaced by the after sales surface of the manufacturer or by a qualied person.
· Clean the air lter at least ever 2 weeks. To make sure the air conditioning can operate in
optimal conditions.
· Clean the air lter in lukewarm water with a bit of detergent. Rinse the lter thoroughly
and let it dry.
· Make sure the lter is completely dry before placing it back in to the air conditioning.
Use a damp, soft cloth and a bit of mild detergent, to clean
the outside of the unit. Make sure the unit is thoroughly dried
afterwards.
Before storing the unit for a longer period of time, please
follow the next steps :
· Drain all the water from the appliance.
· Afterwards turn on the unit in the “fan” mode for half a
day. Make sure the unit is placed in a heated room. This will dry the unit completely and
prevent the forming of mold.
· Turn o the unit, remove the plug from the socket and remove the batteries from the
remote control.
A

64
DO263A
EN
· Clean the lters and place them back in the unit.
· Store the unit in a dry, dark place.
The appliance isn’t working when pressing the on/o touch.
· The error code P1 is displayed , drain the water from the air conditioning.
· The room temperature is lower than the selected temperature. Adjust the selected
temperature.
The room is not cool enough.
· The windows and doors aren’t closed. Make sure all windows and doors are closed.
· There are heat sources in the room. Remove all heat sources if possible.
· The air outlet hose is not connected or blocked. Attach the hose and check if there is no
blockage.
· The selected temperature is to high. Adjust the selected temperature.
· The air lter is dirty. Clean the air lter.
The appliance is making to much noise or is causing vibrations.
· The oor is not level or at. Place the appliance on the at and level surface if possible.
· The air lter is dirty. Clean the air lter.
Your appliance makes a gurgling sound
· The sound is produced by the refrigerant in your appliance, this is normal.
Following error codes can be displayed on your air conditioning :
E1 : the sensor for the room temperature is not working. Turn o the unit and remove the plug
from the socket. Wait for 10 sec and plug the unit back in. Turn on the unit. When the error
codes repeats, you need to contact the after sales service.
E2 : The sensor of the dehumidier doesn’t work. Turn o the unit and remove the plug from
the socket. Wait for 10 sec and plug the unit back in. Turn on the unit. When the error codes
repeats, you need to contact the after sales service.
E4 : The display is not functioning properly. Remove the plug from the socket. Wait for 10
seconds. Plug the unit back in. When the error codes repeats, you need to contact the after
sales service.
P1 : The water tank is full. Connect the drain hose to the bottom drain and remove the water.
When the error codes repeats, you need to contact the after sales service.

65
DO263A
www.domo-elektro.be
EN
This symbol on the product or on its packaging indicates
that this product may not be treated as household waste.
Instead it must be brought to the applicable collection point
for recycling of electrical and electronic equipment. By
ensuring this product is disposed of correctly, you will help
prevent potential negative consequences for the environment
and human health, which could otherwise be caused by
inappropriate waste handling of this product. For more
detailed information about recycling of this product, please
contact your local city oce, your household waste disposal
service or the shop where you purchased the product.
The packaging is recyclable. Please treat the packaging
ecologically.

66
DO263A
CZ
Práva a povinnosti prodávajícího a kupujícího ohledně práv z vadného plnění se řídí
příslušnými obecně závaznými předpisy dle občanského zákoníku.
1. Trvání záruky: 2 roky
2. Záruka se nevztahuje
a) na mechanické poškození
b) nesprávné používání v rozporu s návodem k použití
3. Záruka zaniká:
- při použití spotřebiče jinak než v je uvedeno v manuálu (nesprávným postupem)
- při provádění opravy nebo změny na spotřebiči osobou jinou než pověřenou naším
servisem
Prodávající odpovídá kupujícímu, že zboží při převzetí nemá vady. Zejména prodávající
odpovídá kupujícímu, že v době, kdy kupující zboží převzal:
· má zboží takové vlastnosti, které výrobce v tomto návodu popisuje,
· se zboží hodí k účelu, ke kterému výrobce uvádí,
· zboží odpovídá jakostí nebo provedením smluvenému vzorku nebo předloze, byla-li jakost
nebo provedení určeno podle smluveného vzorku nebo předlohy,
· zboží vyhovuje požadavkům právních předpisů.
Projeví-li se vada v průběhu šesti měsíců od převzetí, má se za to, že zboží bylo vadné již při
převzetí.
Pokud není u výrobku uvedeno jinak, činí záruční doba 24 měsíců. Záruční doba počíná běžet
od převzetí věci kupujícím.
Práva z vadného plnění uplatňuje kupující u prodávajícího na adrese jeho provozovny, v níž
je přijetí reklamace možné s ohledem na sortiment prodávaného zboží, případně i v sídle
nebo místě podnikání. Za okamžik uplatnění reklamace se považuje okamžik, kdy prodávající
obdržel od kupujícího reklamované zboží.
Reklamaci lze také uplatnit v servisním středisku na adrese
Pro rychlé a bezproblémové vyřízení reklamace doporučujeme přiložit k reklamaci doklad o koupi
a průvodní dopis s popisem závady a zpáteční adresou s telefonickým kontaktem.

67
DO263A
www.domo-elektro.be
CZ
· Pečlivě si přečtěte tyto informace a manuál nechte i pro pozdější nahlédnutí.
· Ujistěte se, že před použitím odlepíte a odstraníte veškeré reklamní a ochranné fólie.
· Děti si s ochrannými ani reklamními polepy nesmí hrát.
· Přístroj je určen pro používání v domácnostech a podobných prostředích, tak jako je:
· kuchyňky v obchodech, kancelářích atd.
· chaty, chalupy
· hotely, penziony a jiné dočasné ubytování
· Dohlédněte, aby si děti nehrály s přístrojem.
· Tento spotřebič mohou používat děti ve věku 16 let a starší a osoby se sníženými fyzickými,
smyslovými nebo mentálními schopnostmi, nebo nedostatkem zkušeností a znalostí
pokud jsou pod neustálým dozorem nebo byly poučeny o používání spotřebiče bezpečným
způsobem a rozumí případným nebezpečím. Děti si s přístrojem nesmějí hrát. Čištění a
údržbu prováděnou uživatelem nesmějí provádět děti bez dozoru.
· Čistění a běžnou údržbu smí provádět pouze osoby starší 16 let a při tom být pod
dohledem.
· Přístroj a jeho el. kabel skladujte mimo dosah dětí.
· Upozornění: Přístroj se nesmí používat s externími časovači.
· Před použitím důkladně zkontrolujte, zda napětí a frekvence el. sítě ve vaší domácnosti
odpovídají požadavkům uvedeným na přístroji.
· Zástrčku (přívodní kabel) zapojujte vždy jen do zásuvky, která je bez vad a nainstalována,
uzemněna v souladu se všemi místními normami.
· Nikdy neumisťujte přístroj v blízkosti trouby, ohně, nebo vysoce hořlavých tekutin.
· Nikdy do přístroje nebouchejte a netřeste s ním, mohli byste jej poškodit.
· Nikdy nezakrývejte sání vzduchu, ani výfuk, mohli byste způsobit přehřátí přístroje.
· Dávejte pozor, abyste přístroj nepocákali vodou a neumisťujte jej v blízkosti zdrojů vody,
aby nemohlo dojít ke zkratu.
· Poškozený napájecí kabel musí být vyměněn výrobcem, nebo v odborném servisu, či
kvalikovanou osobou.
· Nikdy nezapojujte jiný elektrický přístroj do stejného okruhu, jako klimatizaci.
· Nikdy neberte zástrčku do mokrých rukou.
· Nikdy nestrkejte do otvorů přístroje cizí objekty.
· Nepoužívejte přístroj s prodlužovací šňůrou.
· Nedovolte dětem, aby si hráli s přístrojem, nebo blízko něj.
· Po vypnutí přístroje počkejte alespoň 3 minuty, než jej zapnete znovu. Kompresor
potřebuje nějaký čas, aby nedošlo k jeho poškození.
· Přístroj umisťujte alespoň 1m od televize, nebo rádia, abyste zamezili rušení.

68
DO263A
CZ
· Abyste zachovali barvu přístroje, nestavte jej na přímé sluneční světlo.
· Nikdy při manipulaci s přístroje nenaklánějte přístroj o více než 35o. Nikdy přístroj
nepokládejte, nebo neotáčejte dnem vzhůru.
· Přístroj vždy umístěte na rovný a stabilní povrch.
· Než přístroj uschováte, nezapomeňte z něj vylít zkondenzovanou vodu. Zajistíte tak Vaší
klimatizaci dobrou funkčnost po delší dobu.
· Na čištění přístroje nikdy nepoužívejte chemikálie.
· Přístroj vždy vypněte a odpojte od elektrické sítě, než budete nasazovat nebo sundávat
mřížku nasávání.
· Vždy se ujistěte, že nemůžete dojít k vniknutí vody do přístroje vlivem kondenzace vody,
nebo stříkající vodou apod.
· Dbejte na to, aby přístroj nemohl přijít do styku s vodou, nebo jinou tekutinou. Pokud k
tomu dojde, okamžitě přístroj odpojte od elektrické sítě.
· Nikdy nepoužívejte přístroj ve vlhkých místnostech, jako je například koupelna, ložnice,
nebo prádelna.
· Pokud přístroj nepoužíváte, vypněte jej.
· Opravy přístroje smí provádět pouze autorizovaný servis, nebo kvalikovaná osoba.
· Kolem přístroj musíte zachovat volný prostor 30 cm.
· Nikdy se přístroje nedotýkejte mokrýma rukama.
· Dotýkejte se prsty pouze ovládacího panelu.
· Nesnažte se z přístroje odstraňovat jeho pevné části.
· Nikdy nepoužívejte přístroj pokud nepracuje správně, pokud Vám spadl, nebo je jinak
poškozený.
· Přístroj nevypínejte vytažením ze zásuvky. Vždy používejte tlačítka na ovládacím panelu.
· Používejte přístroj pouze k účelům, ke kterým je určený.
· Všetky opravy, úpravy, kontrola tesnosti a prípadných porúch musia byť vykonávané len
odborným certikovaným servisom.
· Spotřebič obsahuje uorované skleníkové plyny zahrnuté v Kjotském protokolu.
· Instalace a zapojení musí být provedeno odborně a dle pokynů v návodu. Nesprávná
instalace může způsobit únik vody, úraz elektrickým proudem nebo požár.
· Nesahejte na přístroj, pokud jste naboso, nesahejte na něj ani s mokrýma/vlhkýma rukama.
· Pokud dojde během používání k převrácení klimatizační jednotky, tak ji ihned vypněte
a okamžitě odpojte od napájení (el. sítě). Následně zvedněte a vizuálně důkladně
zkontrolujte, zda není poškozená. Pokud máte podezření, že byl přístroj poškozen, tak
zavolejte do odborného servisu a nechejte překontrolovat jeho stav.
· Pokud je (nebo hrozí) v lokalitě bouřka, tak přístroj vypojte z el. sítě. Jinak hrozí poškození
přístroje a případně i požár.
· Pokud nepoužíváte trvalý odvod kondenzátu, tak mějte oba (horní i spodní) vypouštěcí
vývody dostatečně uzavřené, aby nehrozilo riziko zadušení. Pokud vypouštěcí vývody
nepoužíváte, pečlivě je udržujte uzavřené, aby se zabránilo zadušení dětí nebo zvířat.

69
DO263A
www.domo-elektro.be
CZ
· Přívodní kabel nikdy neveďte pod kobercem ani ho nijak nezakrývejte. Nepokládejte
kabel pod nábytek ani pod přístroj samotný. Přívodní kabel by měl být veden tak, aby o něj
nemohl nikdo zakopnout a přitom nebyl překrytý ani zatížený žádným předmětem.
· Pokud se z přístroje začnou ozývat divné zvuky, bude cítit kouř nebo se začne linout dým,
tak ho ihned vypněte a vypojte z el. sítě.
· Proces odmrazování nebo čištění neurychlujte použitím prostředků, které k tomu nejsou
určeny výrobcem.
· Spotřebič musí být skladován v místnosti, ve které nejsou nepřetržité zdroje zážehu/
vznícení (např. otevřený oheň, spuštěný plynový spotřebič nebo spuštěný elektrický
ohřívač).
· Nepropichujte ani nezapalujte.
· Berte na vědomí, že chladivo nemusí mít žádný zápach.
· Zařízení DO263A by mělo být nainstalováno, provozováno a skladováno v místnosti, jejíž
podlahová plocha přesahuje 8 m
2
.
· Musí být dodrženy veškeré vnitrostátní předpisy o plynu.
· Okolí ventilačních otvorů udržujte bez překážek.
· Spotřebič musí být skladován tak, aby se zabránilo jeho mechanickému poškození.
· Spotřebič musí být skladován v dobře větraném prostoru, jehož rozměry odpovídají
minimálním uvedeným rozmě-rům, které jsou nutné pro správný provoz spotřebiče.
· Jakákoli osoba, která zasahuje do okruhu chladiva, musí mít aktuální a platné osvědčení
udělené hodnotícím orgá-nem, který je akreditovaný v rámci odpovídajícího průmyslu
a který může ručit za jejich schopnost bezpečně zpraco-vávat chladiva v souladu s
uznávaným hodnotícím požadavkem.
· Servis může být prováděn pouze v souladu s doporučením výrobce. Údržba a opravy, které
vyžadují zapojení jiného odborného personálu, se musí provádět pod dohledem osoby,
která je způsobilá k zacházení s hořlavými chladivy.
Pozor: Nebezpečí vzniku požáru / hořlavé materiály
Tento spotřebič používá hořlavé chladivo. Pokud by chladivo prosakovalo či
unikalo ven, kde by mohlo hrozit riziko zapálení, tak hrozí nebezpečí požáru.
· Nikdy nepoužívejte přístroj v místnostech, které jsou větší, než je doporučená velikost.
· Dbejte na to, aby žádné otvory přístroje nebyly ucpané, nebo blokované nábytkem apod.
· Během nejteplejších dnů zatáhněte i žaluzie, nebo záclony na oknech, aby se vzduch
v místnosti zbytečně znovu neohříval.
· Kontrolujte ltry, aby byly vždy čisté.
· Mějte vždy zavřené dveře a okna, abyste udržely studený vzduch v místnosti a teplý Vám
z venku neproudil dovnitř.

70
DO263A
CZ
TENTO MANUÁL SI USCHOVEJTE I PRO POZDĚJŠÍ NAHLÉDNUTÍ.
1. Ovládací panel
2. Výstup vzduchu
3. Vzduchový ltr
4. Vstup
vzduchu
5. Výstup vzduchu
6. Odtok
7. Hadice odtoku
8. Dálkový ovladač
9. Nástěnný držák dálkového ovládání
10. Výfuková hadice
10 a. Napojení výfukové hadice
11. Sada pro montáž na zeď
11 a. Adaptér na zeď
11 b. Sada pro přichycení
12. Sada pro montáž do okna
12 a. Okenní adaptér
12 b. Sada pro upevnění
12 c. Okenní utěsnění
12 d. Zásuvka
12 e. Železné „L“ vzpěry
1
2
3
4
5
6
8
11b
11
7
12b 12c
12
12e

71
DO263A
www.domo-elektro.be
CZ
· Umístěte přístroj na stabilní a rovnou plochu. Tak předejdete
obtěžujícím zvukům a vibracím. Ujistěte se, že podlaha pod
přístrojem je dostatečně pevná, aby přístroj unesla.
· Přístroj má malá kolečka pro snazší manipulaci. Přesouvejte
přístroj pouze po rovné a hladké ploše. Dbejte zvýšené
opatrnosti při posunování přístrojem po koberci. Nikdy se
nesnažte přístrojem přejíždět předměty na zemi.
· Umístěte přístroj co nejblíže uzemněné zásuvce.
· Kolem klimatizace ponechte do všech směrů volný prostor
minimálně 30 cm.
· Hadici pro odvod teplého vzduchu musíte používat vždy, když nastavíte funkci „cool“,
nebo „auto“. Během používání funkcí „fan“ a „dry“, hadice není potřeba.
· Zajistěte dostatek prostoru okolo výstupu vzduchu - alespoň 50 cm.
· Zjistěte, aby se hadice během používání nijak neohýbala.
max 120 cm
min 30 cm
· Nejdříve na výfukovou hadici nasaďte spojku k okenní koncovce.
· Potom celou hadici nasaďte na otvor výfuku v zadní části přístroje.
max 120 cm
min 30 cm
· Na druhý konec hadice napevno připojte okenní koncovku.
· Do okna umístěte okenní adaptér. Ten je možné umístit v horizontální I vertikální rovině.
Adaptér zajistěte ve Vámi požadované délce.
· Do zajištěného adaptéru v okně nacvakněte okenní koncovku (která je přichycena na
hadici).
· Pokud je potřeba, tak můžete okolí ještě utěsnit.
· Okenní adaptér si zaxujte na požadovanou délku.
· Pokud je potřeba, tak si můžete okno zaxovat pomocí železných „L vzpěr“ a šroubky.
max 120 cm
min 30 cm
max 120 cm
min 30 cm
max 120 cm
min 30 cm

72
DO263A
CZ
· Nejdříve na výfukovou hadici nasaďte spojku k okenní koncovce.
· Potom celou hadici nasaďte na otvor výfuku v zadní části přístroje.
max 120 cm
min 30 cm
· Na druhý konec hadice napevno připojte koncovku do zdi .
· Ve zdi připravte otvor s odpovídajícím rozměrem vůči koncovce
· Koncovku připevněte do otvoru ve zdi a zajistěte.
max 120 cm
min 30 cm
Horizontálně položený díl v přední části klimatizace můžete v případě potřeby ručně vysunout
/ zasunout. Tento díl zlepšuje výstup vzduchu .
12
4
3
1. Hlavní spínač ON/OFF
Tímto tlačítkem přístroj zapnete/vypnete
2. Tlačítka ”+” a “-”
Tlačítka slouží k nastavování teploty. Požadovaná teplota může být nastavena v rozmezí od

73
DO263A
www.domo-elektro.be
CZ
17°C do 30°C. Na přístroji si můžete volit mezi nastavení stupňů “°C “a “°F”. Změnu jednotek
provedete stiskem obou tlačítek na ráz.
3. Tlačítko FUNKCE
Tlačítkem si můžete volit jednu z funkcí přístroje. Každým stiskem tlačítka se přepne funkce:
KLIMATIZACE – ODVLHČOVÁNÍ – VENTILACE. Vybraná funkce bude na ovládacím panelu
podsvícená. Pokud si zvolíte funkcí ventilace, tak se přístroj přepne do automatického režimu.
Vy můžete volit jen rychlost ventilace.
4. LED displej
Displej ukazuje nastavenou teplotu. Pokud máte vybranou funkci “ventilace”, tak na displeji
bude zobrazena aktuální pokojová teplota.
Při používání ovladače musíte vždy mířit přímo proti
přístroji. Pokud ovladač nereaguje, tak ho zaměřte přímo
na přístroj a zkuste opět stisknout ON/OFF.
Jakmile se přístroj zapne (vypínač reaguje), tak se ozve
zvukový signál. Dálkový ovladač pracuje v dosahu 8 m od
přístroje.
1. Hlavní spínač ON/OFF
Tímto tlačítkem přístroj zapnete/vypnete
2. Tlačítko FUNKCE
Tlačítkem si můžete volit jednu z funkcí přístroje. Každým stiskem tlačítka se přepne funkce:
KLIMATIZACE – ODVLHČOVÁNÍ – VENTILACE. Vybraná funkce bude na ovládacím panelu
podsvícená.
3. Tlačítko FAN (ventilace)
Tímto tlačítkem si volíte rychlost ventilátoru: LOW
55
66
MODE display
Displays the current
mode, including:
AUTO
COOL
DRY
HEAT
FAN
Transmission Indicator
Lights up when remote sends
signal to unit
ON/OFF display
Appears when the unit is turned on,
and disappears when it is turned off
TIMER ON display
Displays when TIMER
ON is set
TIMER OFF display
Displays when TIMER
OFF is set
SLEEP display
Battery display
SILENT display
ECO display
Displays when
SLEEP function
is activated
FOLLOW ME
display
Indicates that
the FOLLOW ME
function is on
FAN SPEED display
Displays selected FAN SPEED:
HIGH, MED,
or LOW
This display is blank when
set to AUTO speed.
Temperature/Timer display
Displays the set temperature by default, or timer setting
when using TIMER ON/OFF functions
o O O
Temperature range: 17-30 C(62 F-86 F)
Timer setting range: 0-24 hours
This display is blank when operating in FAN mode.
1. Press the MODE button to select
COOL mode.
2. Set your desired temperature using
the Temp or Temp button.
3. Press the FAN button to select the
fan speed: AUTO, LOW, MED,or
HIGH.
4. Press the ON/OFF button to start the
unit.
In AUTO mode, the unit will automatically
select the COOL, FAN, HEAT or DRY mode
based on the set temperature.
1. Press the MODE button to select Auto mode.
2. Set your desired temperature using the
Temp or Temp button.
3. Press the ON/OFF button to start the unit.
,
NOTE: FAN SPEED can t be set in Auto mode.
SETTING TEMPERATURE
AUTO operation
The operating temperature range for units is
O O O
17-30 C(62 F-86 F). You can increase or
O O
decrease the set tmeperature in 1 C(1 F)
increments.
COOL operation
1
3
2
1
3
2
4
Not available for this unit
Not available for
this unit
Not available for
this unit
Low battery
detection
Remote LED Screen Indicators
How To Use The Basic Functions
ON/OFF
ON/OFF
TEMP
TEMP
SHORT
CUT
SHORT
CUT
TIMER
ON
TIMER
ON
TIMER
OFF
TIMER
OFF
MODE
MODE
FAN
FAN
SLEEP
SLEEP
LED
LED
FOLLOW
ION
SWING
ME
FOLLOW
ION
SWING
ME
– HIGH
55
66
MODE display
Displays the current
mode, including:
AUTO
COOL
DRY
HEAT
FAN
Transmission Indicator
Lights up when remote sends
signal to unit
ON/OFF display
Appears when the unit is turned on,
and disappears when it is turned off
TIMER ON display
Displays when TIMER
ON is set
TIMER OFF display
Displays when TIMER
OFF is set
SLEEP display
Battery display
SILENT display
ECO display
Displays when
SLEEP function
is activated
FOLLOW ME
display
Indicates that
the FOLLOW ME
function is on
FAN SPEED display
Displays selected FAN SPEED:
HIGH, MED,
or LOW
This display is blank when
set to AUTO speed.
Temperature/Timer display
Displays the set temperature by default, or timer setting
when using TIMER ON/OFF functions
o O O
Temperature range: 17-30 C(62 F-86 F)
Timer setting range: 0-24 hours
This display is blank when operating in FAN mode.
1. Press the MODE button to select
COOL mode.
2. Set your desired temperature using
the Temp or Temp button.
3. Press the FAN button to select the
fan speed: AUTO, LOW, MED,or
HIGH.
4. Press the ON/OFF button to start the
unit.
In AUTO mode, the unit will automatically
select the COOL, FAN, HEAT or DRY mode
based on the set temperature.
1. Press the MODE button to select Auto mode.
2. Set your desired temperature using the
Temp or Temp button.
3. Press the ON/OFF button to start the unit.
,
NOTE: FAN SPEED can t be set in Auto mode.
SETTING TEMPERATURE
AUTO operation
The operating temperature range for units is
O O O
17-30 C(62 F-86 F). You can increase or
O O
decrease the set tmeperature in 1 C(1 F)
increments.
COOL operation
1
3
2
1
3
2
4
Not available for this unit
Not available for
this unit
Not available for
this unit
Low battery
detection
Remote LED Screen Indicators
How To Use The Basic Functions
ON/OFF
ON/OFF
TEMP
TEMP
SHORT
CUT
SHORT
CUT
TIMER
ON
TIMER
ON
TIMER
OFF
TIMER
OFF
MODE
MODE
FAN
FAN
SLEEP
SLEEP
LED
LED
FOLLOW
ION
SWING
ME
FOLLOW
ION
SWING
ME
– AUTO.
4. Tlačítko SLEEP (spánek)
Tlačítkem aktivujete režim na spánek – sleep
V režimu “sleep” je zvolená teplota postupně navyšována o 1°C za 30 min. Za dalších 30
minut se teplota zvýší o další 1oC. Klimatizace bude tuto teplotu udržovat dalších 7 hodin.
Po uplynutí tohoto času se klimatizace přepne zpět do původního nastavení teploty a funkce
„sleep“ se ukončí.
POZNÁMKA: tuto funkci nemůžete nastavit zároveň s „fan“, nebo „dry“ funkcí.
1
2
3
4
5
6
7
8

74
DO263A
CZ
5. Tlačítko TEMP (teplota)
Na přístroji si můžete nastavit požadovanou teplotu v rozmezí 17-30 °C. Jakmile stisknete obě
tlačítka zároveň, tak se přehodí jednotky teploty “°C” a “°F”.
6. Tlačítko RYCHLÉ VOLBY (SHORTCUT)
K tomuto tlačítku si můžete nastavit předvolenou funkci a následně jí jedním stiskem zapínat/
vypínat.
7. Tlačítko zapnutí časovače (TIMER ON)
Tímto tlačítkem zapínáte časovač.
8. Tlačítko vypnutí časovače (TIMER OFF )
Tímto tlačítkem časovač vypínáte.
9. Tlačítko pro sepnutí LED osvícení
Tímto tlačítkem vypnete LED podsvícení. To uvítáte pokud chcete spát a osvětlení displeje Vás
ruší. Jakmile stisknete tlačítko znovu, tak se displej opět rozsvítí.
55
66
MODE display
Displays the current
mode, including:
AUTO
COOL
DRY
HEAT
FAN
Transmission Indicator
Lights up when remote sends
signal to unit
ON/OFF display
Appears when the unit is turned on,
and disappears when it is turned off
TIMER ON display
Displays when TIMER
ON is set
TIMER OFF display
Displays when TIMER
OFF is set
SLEEP display
Battery display
SILENT display
ECO display
Displays when
SLEEP function
is activated
FOLLOW ME
display
Indicates that
the FOLLOW ME
function is on
FAN SPEED display
Displays selected FAN SPEED:
HIGH, MED,
or LOW
This display is blank when
set to AUTO speed.
Temperature/Timer display
Displays the set temperature by default, or timer setting
when using TIMER ON/OFF functions
o O O
Temperature range: 17-30 C(62 F-86 F)
Timer setting range: 0-24 hours
This display is blank when operating in FAN mode.
1. Press the MODE button to select
COOL mode.
2. Set your desired temperature using
the Temp or Temp button.
3. Press the FAN button to select the
fan speed: AUTO, LOW, MED,or
HIGH.
4. Press the ON/OFF button to start the
unit.
In AUTO mode, the unit will automatically
select the COOL, FAN, HEAT or DRY mode
based on the set temperature.
1. Press the MODE button to select Auto mode.
2. Set your desired temperature using the
Temp or Temp button.
3. Press the ON/OFF button to start the unit.
,
NOTE: FAN SPEED can t be set in Auto mode.
SETTING TEMPERATURE
AUTO operation
The operating temperature range for units is
O O O
17-30 C(62 F-86 F). You can increase or
O O
decrease the set tmeperature in 1 C(1 F)
increments.
COOL operation
1
3
2
1
3
2
4
Not available for this unit
Not available for
this unit
Not available for
this unit
Low battery
detection
Remote LED Screen Indicators
How To Use The Basic Functions
ON/OF F
ON/OF F
TEMP
TEMP
SHORT
CUT
SHORT
CUT
TIMER
ON
TIMER
ON
TIMER
OFF
TIMER
OFF
MODE
MODE
FAN
FAN
SLEEP
SLEEP
LED
LED
FOLLO W
ION
SWING
ME
FOLLO W
ION
SWING
ME
V režimu AUTO si sám přístroj upravuje výkon a sepnutí klimatizace, tak aby se požadovaná
teplota okolí měnila co nejméně. Tato funkce může být zapnuta I přes dálkové ovládání.
1. Na ovladači si navolte režim AUTO pomocí tlačítka MODE.
2. Nastavte si požadovanou teplotu a přístroj si už sám zvolí stupeň potřebné klimatizace.
Během automatického režimu vy nemůžete regulovat rychlost ventilátoru.
55
66
MODE display
Displays the current
mode, including:
AUTO
COOL
DRY
HEAT
FAN
Transmission Indicator
Lights up when remote sends
signal to unit
ON/OFF display
Appears when the unit is turned on,
and disappears when it is turned off
TIMER ON display
Displays when TIMER
ON is set
TIMER OFF display
Displays when TIMER
OFF is set
SLEEP display
Battery display
SILENT display
ECO display
Displays when
SLEEP function
is activated
FOLLOW ME
display
Indicates that
the FOLLOW ME
function is on
FAN SPEED display
Displays selected FAN SPEED:
HIGH, MED,
or LOW
This display is blank when
set to AUTO speed.
Temperature/Timer display
Displays the set temperature by default, or timer setting
when using TIMER ON/OFF functions
o O O
Temperature range: 17-30 C(62 F-86 F)
Timer setting range: 0-24 hours
This display is blank when operating in FAN mode.
1. Press the MODE button to select
COOL mode.
2. Set your desired temperature using
the Temp or Temp button.
3. Press the FAN button to select the
fan speed: AUTO, LOW, MED,or
HIGH.
4. Press the ON/OFF button to start the
unit.
In AUTO mode, the unit will automatically
select the COOL, FAN, HEAT or DRY mode
based on the set temperature.
1. Press the MODE button to select Auto mode.
2. Set your desired temperature using the
Temp or Temp button.
3. Press the ON/OFF button to start the unit.
,
NOTE: FAN SPEED can t be set in Auto mode.
SETTING TEMPERATURE
AUTO operation
The operating temperature range for units is
O O O
17-30 C(62 F-86 F). You can increase or
O O
decrease the set tmeperature in 1 C(1 F)
increments.
COOL operation
1
3
2
1
3
2
4
Not available for this unit
Not available for
this unit
Not available for
this unit
Low battery
detection
Remote LED Screen Indicators
How To Use The Basic Functions
ON/OF F
ON/OF F
TEMP
TEMP
SHORT
CUT
SHORT
CUT
TIMER
ON
TIMER
ON
TIMER
OFF
TIMER
OFF
MODE
MODE
FAN
FAN
SLEEP
SLEEP
LED
LED
FOLLO W
ION
SWING
ME
FOLLO W
ION
SWING
ME
Funkce “COOL” je klimatizace a snižuje teplotu v místnosti.
1. Navolte si tuto funkci COOL tlačítkem MODE, jakmile bude zvolena, tak bude na
ovládacím panelu svítit.
2. Pomocí šipek na panelu nebo na ovladači si nastavte požadovanou teplotu v místnosti.
3. Tlačítkem „fan“ nebo na ovladači si nastavte požadovanou rychlost ventilátoru. Jsou zde
3 rychlosti.
55
66
MODE display
Displays the current
mode, including:
AUTO
COOL
DRY
HEAT
FAN
Transmission Indicator
Lights up when remote sends
signal to unit
ON/OFF display
Appears when the unit is turned on,
and disappears when it is turned off
TIMER ON display
Displays when TIMER
ON is set
TIMER OFF display
Displays when TIMER
OFF is set
SLEEP display
Battery display
SILENT display
ECO display
Displays when
SLEEP function
is activated
FOLLOW ME
display
Indicates that
the FOLLOW ME
function is on
FAN SPEED display
Displays selected FAN SPEED:
HIGH, MED,
or LOW
This display is blank when
set to AUTO speed.
Temperature/Timer display
Displays the set temperature by default, or timer setting
when using TIMER ON/OFF functions
o O O
Temperature range: 17-30 C(62 F-86 F)
Timer setting range: 0-24 hours
This display is blank when operating in FAN mode.
1. Press the MODE button to select
COOL mode.
2. Set your desired temperature using
the Temp or Temp button.
3. Press the FAN button to select the
fan speed: AUTO, LOW, MED,or
HIGH.
4. Press the ON/OFF button to start the
unit.
In AUTO mode, the unit will automatically
select the COOL, FAN, HEAT or DRY mode
based on the set temperature.
1. Press the MODE button to select Auto mode.
2. Set your desired temperature using the
Temp or Temp button.
3. Press the ON/OFF button to start the unit.
,
NOTE: FAN SPEED can t be set in Auto mode.
SETTING TEMPERATURE
AUTO operation
The operating temperature range for units is
O O O
17-30 C(62 F-86 F). You can increase or
O O
decrease the set tmeperature in 1 C(1 F)
increments.
COOL operation
1
3
2
1
3
2
4
Not available for this unit
Not available for
this unit
Not available for
this unit
Low battery
detection
Remote LED Screen Indicators
How To Use The Basic Functions
ON/OF F
ON/OF F
TEMP
TEMP
SHORT
CUT
SHORT
CUT
TIMER
ON
TIMER
ON
TIMER
OFF
TIMER
OFF
MODE
MODE
FAN
FAN
SLEEP
SLEEP
LED
LED
FOLLO W
ION
SWING
ME
FOLLO W
ION
SWING
ME
Funkce DRY je funkce odvlhčování a vy si tak můžete regulovat vlhkost v místnosti. Při
používání zavřete dveře i okna, aby odvlhčení místnosti bylo co nejlepší.
1. Stiskem tlačítka „MODE“ nastavte funkci „DRY“ – rozsvítí se příslušná kontrolka na
panelu.

75
DO263A
www.domo-elektro.be
CZ
2. Pomocí šipek na panelu nebo na ovladači si nastavte požadovanou hodnotu.
3. Pro tuto funkci nelze nastavovat rychlost ventilátoru.
55
66
MODE display
Displays the current
mode, including:
AUTO
COOL
DRY
HEAT
FAN
Transmission Indicator
Lights up when remote sends
signal to unit
ON/OFF display
Appears when the unit is turned on,
and disappears when it is turned off
TIMER ON display
Displays when TIMER
ON is set
TIMER OFF display
Displays when TIMER
OFF is set
SLEEP display
Battery display
SILENT display
ECO display
Displays when
SLEEP function
is activated
FOLLOW ME
display
Indicates that
the FOLLOW ME
function is on
FAN SPEED display
Displays selected FAN SPEED:
HIGH, MED,
or LOW
This display is blank when
set to AUTO speed.
Temperature/Timer display
Displays the set temperature by default, or timer setting
when using TIMER ON/OFF functions
o O O
Temperature range: 17-30 C(62 F-86 F)
Timer setting range: 0-24 hours
This display is blank when operating in FAN mode.
1. Press the MODE button to select
COOL mode.
2. Set your desired temperature using
the Temp or Temp button.
3. Press the FAN button to select the
fan speed: AUTO, LOW, MED,or
HIGH.
4. Press the ON/OFF button to start the
unit.
In AUTO mode, the unit will automatically
select the COOL, FAN, HEAT or DRY mode
based on the set temperature.
1. Press the MODE button to select Auto mode.
2. Set your desired temperature using the
Temp or Temp button.
3. Press the ON/OFF button to start the unit.
,
NOTE: FAN SPEED can t be set in Auto mode.
SETTING TEMPERATURE
AUTO operation
The operating temperature range for units is
O O O
17-30 C(62 F-86 F). You can increase or
O O
decrease the set tmeperature in 1 C(1 F)
increments.
COOL operation
1
3
2
1
3
2
4
Not available for this unit
Not available for
this unit
Not available for
this unit
Low battery
detection
Remote LED Screen Indicators
How To Use The Basic Functions
ON/OF F
ON/OF F
TEMP
TEMP
SHORT
CUT
SHORT
CUT
TIMER
ON
TIMER
ON
TIMER
OFF
TIMER
OFF
MODE
MODE
FAN
FAN
SLEEP
SLEEP
LED
LED
FOLLO W
ION
SWING
ME
FOLLO W
ION
SWING
ME
1. Stiskem tlačítka „MODE“ nastavte funkci „FAN“ – rozsvítí se příslušná kontrolka na
panelu.
2. Tlačítkem „fan“ nebo na ovladači si nastavte požadovanou rychlost ventilátoru. Jsou zde
3 rychlosti (LOW
55
66
MODE display
Displays the current
mode, including:
AUTO
COOL
DRY
HEAT
FAN
Transmission Indicator
Lights up when remote sends
signal to unit
ON/OFF display
Appears when the unit is turned on,
and disappears when it is turned off
TIMER ON display
Displays when TIMER
ON is set
TIMER OFF display
Displays when TIMER
OFF is set
SLEEP display
Battery display
SILENT display
ECO display
Displays when
SLEEP function
is activated
FOLLOW ME
display
Indicates that
the FOLLOW ME
function is on
FAN SPEED display
Displays selected FAN SPEED:
HIGH, MED,
or LOW
This display is blank when
set to AUTO speed.
Temperature/Timer display
Displays the set temperature by default, or timer setting
when using TIMER ON/OFF functions
o O O
Temperature range: 17-30 C(62 F-86 F)
Timer setting range: 0-24 hours
This display is blank when operating in FAN mode.
1. Press the MODE button to select
COOL mode.
2. Set your desired temperature using
the Temp or Temp button.
3. Press the FAN button to select the
fan speed: AUTO, LOW, MED,or
HIGH.
4. Press the ON/OFF button to start the
unit.
In AUTO mode, the unit will automatically
select the COOL, FAN, HEAT or DRY mode
based on the set temperature.
1. Press the MODE button to select Auto mode.
2. Set your desired temperature using the
Temp or Temp button.
3. Press the ON/OFF button to start the unit.
,
NOTE: FAN SPEED can t be set in Auto mode.
SETTING TEMPERATURE
AUTO operation
The operating temperature range for units is
O O O
17-30 C(62 F-86 F). You can increase or
O O
decrease the set tmeperature in 1 C(1 F)
increments.
COOL operation
1
3
2
1
3
2
4
Not available for this unit
Not available for
this unit
Not available for
this unit
Low battery
detection
Remote LED Screen Indicators
How To Use The Basic Functions
ON/OFF
ON/OFF
TEMP
TEMP
SHORT
CUT
SHORT
CUT
TIMER
ON
TIMER
ON
TIMER
OFF
TIMER
OFF
MODE
MODE
FAN
FAN
SLEEP
SLEEP
LED
LED
FOLLOW
ION
SWING
ME
FOLLOW
ION
SWING
ME
, HIGH
55
66
MODE display
Displays the current
mode, including:
AUTO
COOL
DRY
HEAT
FAN
Transmission Indicator
Lights up when remote sends
signal to unit
ON/OFF display
Appears when the unit is turned on,
and disappears when it is turned off
TIMER ON display
Displays when TIMER
ON is set
TIMER OFF display
Displays when TIMER
OFF is set
SLEEP display
Battery display
SILENT display
ECO display
Displays when
SLEEP function
is activated
FOLLOW ME
display
Indicates that
the FOLLOW ME
function is on
FAN SPEED display
Displays selected FAN SPEED:
HIGH, MED,
or LOW
This display is blank when
set to AUTO speed.
Temperature/Timer display
Displays the set temperature by default, or timer setting
when using TIMER ON/OFF functions
o O O
Temperature range: 17-30 C(62 F-86 F)
Timer setting range: 0-24 hours
This display is blank when operating in FAN mode.
1. Press the MODE button to select
COOL mode.
2. Set your desired temperature using
the Temp or Temp button.
3. Press the FAN button to select the
fan speed: AUTO, LOW, MED,or
HIGH.
4. Press the ON/OFF button to start the
unit.
In AUTO mode, the unit will automatically
select the COOL, FAN, HEAT or DRY mode
based on the set temperature.
1. Press the MODE button to select Auto mode.
2. Set your desired temperature using the
Temp or Temp button.
3. Press the ON/OFF button to start the unit.
,
NOTE: FAN SPEED can t be set in Auto mode.
SETTING TEMPERATURE
AUTO operation
The operating temperature range for units is
O O O
17-30 C(62 F-86 F). You can increase or
O O
decrease the set tmeperature in 1 C(1 F)
increments.
COOL operation
1
3
2
1
3
2
4
Not available for this unit
Not available for
this unit
Not available for
this unit
Low battery
detection
Remote LED Screen Indicators
How To Use The Basic Functions
ON/OFF
ON/OFF
TEMP
TEMP
SHORT
CUT
SHORT
CUT
TIMER
ON
TIMER
ON
TIMER
OFF
TIMER
OFF
MODE
MODE
FAN
FAN
SLEEP
SLEEP
LED
LED
FOLLOW
ION
SWING
ME
FOLLOW
ION
SWING
ME
, AUTO)
3. Pro tuto funkci nelze nastavovat teplotu místnosti.
Tímto tlačítkem zapnete časovač, který odloží start klimatizace a přístroj sepne.
1. Časovač zapnete stiskem tlačítka TIMER ON na ovladači.
2. Na displeji ovladače se zobrazí čas za jak dlouho by se přístroj sepnul.
3. Každé stisknutí (nebo podržení) tlačítka zvýší nastavený čas. Čas udává za jak dlouho se
přístroj spustí.
4. Po nastavení času, začne přístroj čas odpočítávat a displeji svítí “TIMER ON”. Na
ovládacím panelu budou svítit 2 světelné kontrolky.
5. Pokud časovač chcete vypnout, tak tímto tlačítkem přenastavte čas až do “0”. Tlačítko
můžete mačkat nebo podržet.
Tímto tlačítkem nastavíte časovač, pro automatické vypnutí klimatizace po určité době..
1. Stiskněte tlačítko TIMER OFF na ovladači.
2. Na displeji ovladače se zobrazí čas za jak dlouho by se přístroj vypnul.
3. Každé stisknutí (nebo podržení) tlačítka zvýší nastavený čas. Čas udává za jak dlouho se
přístroj vypne.
4. Po nastavení času, začne přístroj čas odpočítávat a displeji svítí “TIMER OFF”. Na
ovládacím panelu budou svítit 2 světelné kontrolky.
5. Pokud časovač vypnutí chcete zrušit, tak tímto tlačítkem přenastavte čas až do “0”.
Tlačítko můžete mačkat nebo podržet.
Výše zmíněné funkce časovače můžete samozřejmě nastavit i současně. Nastavení pak bude
automaticky udávat, kdy se přístroj sepne ale i kdy se následně vypne.
POZNÁMKA: Čas nastavení vždy vyhází z aktuálního času a dopočítává jej. Příklad. Je-li nyní
13 hodin a my chceme klimatizaci sepnout v 16:30 a v 18 hodin opět vypnout. Tak musíte na
časovači zapnutí (TIMER ON) nastavit 3,5 hodiny a na časovači vypnutí (TIMER OFF) 5,0 hodin.

76
DO263A
CZ
Po aktivaci funkce „sleep“ se po 30 minutách zvýší teplota o 1oC. Za dalších 30 minut se
teplota zvýší o další 1oC. Klimatizace bude tuto teplotu udržovat dalších 7 hodin. Po uplynutí
tohoto času se klimatizace přepne zpět do původního nastavení teploty a funkce „sleep“ se
ukončí.
POZNÁMKA: tuto funkci nemůžete nastavit zároveň s ventilací („fan“), ani funkcí
odvlhčování („dry“).
K tomuto tlačítku si můžete nastavit předvolenou funkci a následně jí jedním stiskem zapínat/
vypínat.
Pokud nějaké nastavení přístroje používáte častěji, tak si jej můžete uložit do paměti. Uložíte
podržením tlačítka na 3 vteřiny. Přístroj si uloží nastavení, které je zvoleno právě v momentě
ukládání. Pod volbu nastavení je možné si uložit: funkci (MODE), požadovanou teplotu,
rychlost ventilace a případně I nastavení časovače,
Kdykoli potom stiskněte tlačítko (SHORTCUT), tak přístroj začne pracovat na uložené a
zapamatované nastavení.
1. Během funkce “odvlhčování“ můžete použít trvalé odvodnění. Odstraňte zátku vyústění
trvalého odtoku.
2. Připojte vypouštěcí hadici na místo pro stálý odtok kondenzátu a druhý konec odveďte
do odpadu v místnosti.
3. Ujistěte se, že voda je bezpečně odváděna a nic jí nestojí v cestě.
1
2
Pokud nepoužíváte trvalý odtok, nerecyklovaná kondenzovaná voda bude uchovávána v
nádržce na vodu.
· Po naplnění nádržky na vodu se ozve několik zvukových signálů a na displeji se zobrazí kód
P1. Funkce “chlazení“ a “odvlhčování“ se automaticky ukončí. Ventilátor nadále poběží, což
je normální.

77
DO263A
www.domo-elektro.be
CZ
· Přesuňte přístroj na místo, kde můžete snadno vodu vypustit/
vylít.
· Vyjměte vypouštěcí zátku na spodní části přístroje (A) a vypusťte
vodu.
· Po úplném vypuštění nádržky na vodu umístěte vypouštěcí
zátku zpět na otvor pro odtok.
· Restartujte přístroj a ujistěte se, že chybový kód P1 na displeji
již není zobrazen. Pokud kód nezmizí, zkuste přístroj několikrát
vypnout a zapnout. Pokud je i nadále kód zobrazený, prosím
kontaktujte poprodejní servis.
· POZNÁMKA: Před opětovným spuštěním přístroje se vždy
ujistěte, že jste nádržku opět uzavřeli.
· Před čištěním přístroje vždy vytáhněte zástrčku ze zásuvky.
· Nikdy na čistění přístroje nepoužívejte žádná chemické nebo
drsné prostředky.
· Nikdy přístroj nečistěte vodou nebo jinými kapalinami, to by mohlo způsobit poškození
elektrickým proudem.
· Pokud je poškozený přívodní kabel, musí být opraven
nebo nahrazen poprodejním servisem nebo kvalikovanou
osobou.
· Čistěte vzduchový ltr alespoň každé dva týdny. Ujistěte se,
že klimatizace může pracovat v optimálních podmínkách.
· Čistěte vzduchový ltr ve vlažné vodě s trochou mycího
prostředku. Filtr důkladně vypláchněte a nechte uschnout.
· Před umístěním ltru zpět do klimatizace se ujistěte, že je
kompletně suchý.
Pro vyčištění vnější části přístroje používejte vlhký měkký hadřík s trochou jemného čistícího
prostředku. Ujistěte se, že je přístroj důkladně vysušen.
Před skladováním přístroje na delší dobu, prosím postupujte podle následujících kroků:
· Vypusťte veškerou vodu ze spotřebiče.
· Potom na půl dne zapněte přístroj ve funkci “foukání“. Ujistěte se, že je přístroj umístěn ve
vyhřívaném prostoru. To přístroj kompletně vysuší a předejte utváření plísní.
A

78
DO263A
CZ
· Přístroj vypněte, vytáhněte zástrčku ze zásuvky a odejměte baterie z dálkového ovládání.
· Vyčistěte ltry a umístěte je zpět do přístroje.
· Uchovávejte přístroj na suchém a tmavém místě.
Přístroj nefunguje, když mačkáte tlačítko on/o.
· Pokud je zobrazen chybový kód P1, vypusťte vodu z klimatizace.
· Pokud je teplota v místnosti nižší, než zvolená teplota, upravte zvolenou teplotu.
Místnost není dostatečně chladná.
· Okna a dveře nejsou zavřeny. Ujistěte se, že všechny okna a dveře jsou zavřeny.
· V místnosti může být nějaký zdroj tepla. Pokud je to možné, odstraňte všechny zdroje
tepla.
· Vzduchová hadice není připojena nebo je blokována. Přípojte hadici a zkontrolujte, zda
není blokována.
· Zvolená teplota je vysoká. Upravte zvolenou teplotu.
· Vzduchový ltr je znečištěný. Vyčistěte vzduchový ltr.
Přístroj vydává moc hluku nebo vibruje.
· Podlaha není hladká nebo rovná. Pokud je to možné, umístěte přístroj na hladký a rovný
povrch.
· Vzduchový ltr je znečištěný. Vyčistěte vzduchový ltr.
Přístroj vydává bublavý zvuk
· Tento zvuk vytváří chladící náplň, který je v přístroji. Tento občasný zvuk je v pořádku.
Na vaší klimatizaci se mohou zobrazit následující chybové kódy:
E1: Nefunguje senzor pro snímání teploty v místnosti.
Vypněte přístroj a odejměte zástrčku ze zásuvky.
Počkejte 10 sekund a zapojte přístroj zpět. Zapněte přístroj. Pokud chybový kód přetrvává,
kontaktujte servis.
E2: Senzor vlhkosti nefunguje.
Vypněte přístroj a odejměte zástrčku ze zásuvky. Počkejte 10 sekund a zapojte přístroj zpět.
Zapněte přístroj. Pokud chybový kód přetrvává, kontaktujte servis.
E4: Displej nefunguje správně.
Vypněte přístroj a odejměte zástrčku ze zásuvky. Počkejte 10 sekund a zapojte přístroj zpět.
Zapněte přístroj. Pokud chybový kód přetrvává, kontaktujte servis.

79
DO263A
www.domo-elektro.be
CZ
P1: Nádržka na vodu je plná.
Připojte vypouštěcí hadici na dolní místo pro odtok kondenzátu. Když chybový kód přetrvává,
kontaktujte servis.
Symbol na přístroji či na jeho obalu znamená, že s tímto
výrobkem není možno nakládat jako s běžným domovním
odpadem, nýbrž musí být odevzdán na místech určených
ke sběru a likvidaci elektrických a elektronických zařízení.
Dodržením tohoto doporučení chráníte životní prostředí a
zdraví spoluobčanů. Více informací o možnostech likvidace
nebezpečného odpadu obdržíte na obecních nebo městských
úřadech, sběrných dvorech nebo v prodejně, kde jste přístroj
zakoupili.
Obalové materiály jsou recyklovatelné, nakládejte s nimi
podle předpisů pro životní prostředí.

80
DO263A
4.10A
900W
R290/0.15kg
5.80A
1100W
220-240V~ 50Hz, 1Ph
EXCESSIVE OPERATING
PRESSURE
POWER SOURCE
CURRENT
INPUT
STANDARD
RATING
CONDITIONS
DISCHARGE
1.0MPa
2.6MPa
SUCTION
COOLING
HEATING
CURRENT
INPUT
IPX0
MOISTURE RESISTANCE CLASS
REFRIGERANT
ELECTRICAL HEATER INPUT
RATED CURRENT
RATED INPUT
WARNING
Appliance sh ould be ins talled,
operate d and sto red in a roo m
2
with a oor a rea lar ger tha n 8 m .

81
DO263A
www.domo-elektro.be

82
DO263A

83
DO263A
www.domo-elektro.be

LINEA 2000 BV - Dompel 9 - 2200 Herentals - Belgium - Tel: +32 14 21 71 91 - Fax: +32 14 21 54 63
BESTEL
de originele
Domo-accessoires
en -onderdelen
online via:
of scan hier:
COMMANDEZ
d’authentiques
accessoires et
pièces Domo en
ligne sur:
ou scannez ici:
BESTELLEN SIE
die Domo
Original-Zubehör
und -Ersatzteile
online über:
oder hier scannen:
ORDER
the original
Domo
accessories and
parts online at:
or scan here:
webshop.domo-elektro.be
Webshop
Documenttranscriptie
DO263A Handleiding Mobiele airco Mode d’emploi Climatiseur mobile Gebrauchsanleitung Mobile Klimaanlage Instruction booklet Mobile air conditioning Návod k použití Mobilní klimatizace PRODUCT OF Lees aandachtig alle instructies - bewaar deze handleiding voor latere raadpleging. Lisez attentivement les instructions - gardez le mode d’emploi pour utilisation ultérieur. Lesen Sie genau die Anweisungen - bewahren Sie die Gebrauchsanleitung für spätere heranziehung. Read all instructions carefully - save this instruction manual for future reference. Před použitím si důkladně přečtěte tento manuál - manuál si uschovejte i pro případ budoucího nahlédnutí. NL Nederlands 3 FR Français 19 DE Deutsch 35 EN English 51 CZ Čeština 66 NL GARANTIE Geachte klant, Al onze producten ondergaan steeds een strenge kwaliteitscontrole, alvorens ze aan je worden aangeboden. Mocht je desondanks toch nog problemen hebben met jouw toestel, dan betreuren wij dit ten zeerste. In dat geval verzoeken wij je contact op te nemen met onze klantendienst. Onze medewerkers zullen je met plezier verder helpen. +32 14 21 71 91 [email protected] Maandag – Donderdag : 8.30u – 12.00u en van 13.00u – 17.00u Vrijdag : 8.30u – 12.00u en van 13.00u – 16.30u Dit apparaat heeft een garantietermijn van 2 jaar vanaf de datum van aankoop. Gedurende de garantieperiode zal de distributeur volledige verantwoording op zich nemen voor gebreken die aanwijsbaar berusten op materiaal- of constructiefouten. Wanneer dergelijke gebreken voorkomen, zal het apparaat, indien nodig, vervangen of gerepareerd worden. De garantieperiode van 2 jaar zal op dit moment niet terug beginnen, maar loopt verder tot 2 jaar na de aankoop van het toestel. De garantie wordt verleend op basis van het kassaticket. Indien je apparaat defect is binnen de garantietermijn van 2 jaar, dan mag je het toestel samen met het originele kassaticket binnenbrengen in de winkel waar je het toestel hebt aangekocht. De garantie op accessoires en onderdelen die onderhevig zijn aan slijtage, bedraagt 6 maanden. De garantie en verantwoordelijkheid/aansprakelijkheid van de leverancier en fabrikant vervallen automatisch in de volgende gevallen: · Bij het niet naleven van de instructies in deze handleiding. · Bij verkeerde aansluiting, vb. te hoge elektrische spanning. · Bij verkeerd, hardhandig of abnormaal gebruik. · Bij onvoldoende of verkeerd onderhoud. · Bij herstelling of wijziging van het toestel door de consument of niet gemachtigde derden. · Bij gebruik van onderdelen of accessoires welke niet worden aanbevolen of geleverd door de leverancier / fabrikant. www.domo-elektro.be DO263A 3 NL VEILIGHEIDSVOORSCHRIFTEN Wanneer je elektrische toestellen gebruikt, moeten volgende veiligheidsinstructies in acht genomen worden: · Lees deze instructies zorgvuldig door. Bewaar deze handleiding om later te raadplegen. · Verwijder voor het eerste gebruik alle verpakkingsmaterialen en eventuele promotionele stickers. Zorg ervoor dat kinderen niet met de verpakkingsmaterialen spelen. · Dit toestel is geschikt om te gebruiken in de huishoudelijke omgeving en in gelijkaardige omgevingen zoals: · Keukenhoek voor personeel van winkels, kantoren en andere gelijkaardige professionele omgevingen · Boerderijen · Hotel- en motelkamers en andere omgevingen met een residentieel karakter · Gastenkamers, of gelijkaardige · Dit toestel mag gebruikt worden door kinderen vanaf 16 jaar en personen met een fysieke of sensoriële beperking of mensen met een beperkte mentale capaciteit of gebrek aan ervaring of kennis, op voorwaarde dat deze personen toezicht krijgen of instructies hebben gekregen over het gebruik van het toestel op een veilige manier en dat ze ook de gevaren kennen bij het gebruik van het toestel. Kinderen mogen niet met het toestel spelen. Het onderhoud en de reiniging van het toestel mogen niet door kinderen gebeuren tenzij ze ouder zijn dan 16 jaar en onder toezicht staan. · Houd het toestel en de voedingskabel buiten het bereik van kinderen jonger dan 16 jaar. · Opgelet: het toestel mag niet gebruikt worden met een externe timer. · Kijk voor gebruik na of het voltage vermeld op het toestel overeenkomt met het voltage van het elektriciteitsnet bij je thuis. · De voedingskabel moet steeds aangesloten worden op een stopcontact dat geïnstalleerd en geaard is volgens de lokale standaarden en normen. · Laat het snoer niet op een heet oppervlak of over de rand van een tafel of aanrecht hangen. · Gebruik het toestel nooit wanneer het snoer of de stekker beschadigd is, na een slechte werking van het toestel of wanneer het toestel beschadigd is. Breng het toestel dan naar het dichtsbijzijnde gekwalificeerde service center voor nazicht en reparatie. · Streng toezicht is noodzakelijk wanneer het toestel door of in de buurt van kinderen gebruikt wordt. · Het gebruik van accessoires die niet aanbevolen of verkocht worden door de fabrikant, kan brand, elektrische schokken of verwondingen veroorzaken. · Trek de stekker uit het stopcontact wanneer het toestel niet in gebruik is, vooraleer onderdelen te monteren of demonteren en vooraleer het toestel te reinigen. Zet eerst alle knoppen in de ‘uit’-stand en trek de stekker bij de stekker zelf uit het stopcontact. Trek nooit aan het snoer om de stekker uit het stopcontact te trekken. · Laat een werkend toestel niet zonder toezicht achter. 4 DO263A NL · Zet dit toestel nooit op of in de buurt van een gasvuur of elektrisch vuur of op een plaats waar het in contact zou kunnen komen met een warm toestel. · Gebruik het toestel niet buiten. · Gebruik het toestel enkel voor het doel waarvoor het bestemd is. · Gebruik het toestel altijd op een stevig, droog, effen oppervlak. · Gebruik het toestel alleen voor huishoudelijk gebruik. De fabrikant is niet verantwoordelijk voor ongelukken die een gevolg zijn van verkeerd gebruik van het toestel, of het niet naleven van de regels zoals ze vermeld zijn in deze handleiding. · Alle herstellingen, buiten het gewone onderhoud van het toestel, moeten uitgevoerd worden door de fabrikant of zijn dienst na verkoop. · Dompel het toestel, het elektrisch snoer of de stekker nooit onder in water of een andere vloeistof. · Zorg ervoor dat kinderen het elektrisch snoer of het toestel niet kunnen aanraken. · Hou het snoer uit de buurt van scherpe randen en hete onderdelen of andere warmtebronnen. · Plaats het toestel nooit in de buurt van een gastoestel, vuur of een lichtontvlambare vloeistof. · Sla nooit op het toestel of schud niet met het toestel, om schade te voorkomen. · Dek de luchtinlaat en -uitlaat nooit af, om oververhitting te voorkomen. · Besprenkel het toestel nooit met water of plaats het toestel nooit in de buurt van water, om elektrocutie te voorkomen. · Deel de stroomtoevoer naar de airco nooit met een ander toestel. · Steek de stekker nooit in het stopcontact of verwijder de stekker nooit uit het stopcontact met natte handen. · Steek nooit vreemde voorwerpen in de openingen van het toestel. · Gebruik nooit een verlengsnoer. · Laat kinderen nooit in de buurt van het toestel spelen. · Wanneer je het toestel uitzet en kort daarna terug aanzet, zal de compressor minstens 3 minuten nodig hebben om terug op te starten. · Plaats het toestel minstens op 1 meter afstand van tv of radio, om storingen te voorkomen. · Plaats het toestel niet in rechtstreeks zonlicht, om verkleuring van het toestel te voorkomen. · Laat het toestel nooit meer dan 35° hellen wanneer je het verplaatst. Verplaats de airco altijd rechtopstaand. Verplaats het toestel nooit ondersteboven. · Verwijder steeds het water uit het toestel voor je het opbergt, zo verleng je de levensduur van het toestel. · Gebruik geen chemische middelen om het toestel te reinigen, dit zal het toestel beschadigen. · Zorg er steeds voor dat je de stroom uitschakelt voor je het luchtinlaatrooster weghaalt of plaatst. www.domo-elektro.be DO263A 5 NL · Zorg ervoor dat de airco steeds beschermd is tegen vocht, zoals condensatie, spatwater, etc. Zorg ervoor dat de airco zo staat dat hij niet in water of een andere vloeistof kan vallen. Wanneer hij toch in water of een vloeistof moest vallen, verwijder dan onmiddellijk de stekker uit het stopcontact. · Gebruik de airco niet in een vochtige ruimte zoals een badkamer of wasplaats. · Neem steeds contact op met een gekwalificeerde persoon om het toestel te laten herstellen. · Zorg ervoor dat de vrije ruimte rondom het toestel minstens 30 cm bedraagt. · Bedien de toetsen van het toestel alleen met je vingers en met geen enkel ander voorwerp. · Verwijder geen vaste delen van de airco. Gebruik het toestel niet wanneer het niet naar behoren functioneert, wanneer het toestel gevallen of beschadigd is. · Gebruik nooit de stekker om het toestel aan of uit te zetten. Gebruik steeds de knoppen op het bedieningspaneel. · Gebruik het toestel niet in de buurt van licht ontvlambare stoffen, zoals alcohol, insecticide, petroleum, … · Herstellingen, detectie van lekken en werkzaamheden aan de installatie dienen te gebeuren door bevoegde personen voorzien van de relevante certificaten. · De installatie moet worden uitgevoerd volgens de installatie-instructies. Een onjuiste installatie kan waterlekkage, elektrische schokken of brand veroorzaken. · Raak het apparaat niet aan met natte of vochtige handen of op blote voeten. · Als de airconditioner tijdens gebruik wordt omgestoten, schakel het apparaat dan uit en trek de stekker onmiddellijk uit het stopcontact. Inspecteer het toestel om er zeker van te zijn dat er geen schade is. Als je vermoedt dat het apparaat beschadigd is, neem dan contact op met een technicus of klantenservice. · Schakel het toestel uit bij onweer en trek de stekker uit het stopcontact om schade aan het toestel door blikseminslag te voorkomen. · Als de drainagefunctie niet in gebruik is, bevestig beide rubberen pluggen in de drainageopeningen. Bewaar de rubberen pluggen zorgvuldig wanneer je deze niet gebruikt om te voorkomen dat kinderen stikken. · Laat het snoer niet onder vloerbedekking lopen. Bedek het snoer niet met vloerkleden, lopers of soortgelijke bedekkingen. Leg het snoer niet onder meubels of apparaten. Leg het snoer uit de buurt van een doorgang en waar niemand over kan struikelen. · Schakel het toestel uit en trek de stekker uit het stopcontact als er vreemde geluiden, geuren of rook uit het toestel komen. Specifieke informatie over apparaten met R290 koelgas · Lees grondig alle waarschuwingen. · Gebruik bij het ontdooien en reinigen van het apparaat geen andere gereedschappen dan de gereedschappen aanbevolen door het productiebedrijf. 6 · Het apparaat moet worden geplaatst in een ruimte zonder permanente ontstekingsbronnen (bijvoorbeeld: open vlammen, gasapparaten of elektrische apparaten in werking). DO263A NL · Het mag niet worden doorprikt of verbrand. · Koelgassen kunnen geurloos zijn. · Het apparaat moet worden geïnstalleerd, gebruikt en bewaard in een ruimte die groter is dan 8 m2. · Dit apparaat bevat een aantal grammen R290 koelgas (zie het typeplaatje achteraan op het systeem). · R290 is een koelgas dat voldoet aan de Europese milieurichtlijnen. Geen enkel onderdeel van het koelcircuit mag worden doorprikt. · Als het apparaat geïnstalleerd, gebruikt of bewaard wordt in een niet-geventileerde ruimte, moet deze ruimte ontworpen zijn om de opbouw van koelmiddellekken te voorkomen, omdat deze lekken leiden tot een risico op brand of explosies door de ontsteking van het koelmiddel, die wordt veroorzaakt door elektrische verwarming, elektrische kachels of andere ontstekingsbronnen. · Het apparaat moet zodanig worden bewaard dat mechanische defecten worden voorkomen. · Personen die het koelcircuit gebruiken of er werkzaamheden aan uitvoeren, moeten beschikken over de juiste certificaten, verstrekt door een geaccrediteerde organisatie, die een garantie biedt van bevoegdheid in de behandeling van koelmiddelen, in overeenstemming met een specifieke beoordeling erkend door verenigingen in de sector. · Reparaties moeten worden uitgevoerd op basis van de aanbevelingen van het productiebedrijf. Onderhoud en reparaties waarvoor de assistentie van ander gekwalificeerd personeel nodig is, moeten worden uitgevoerd onder toezicht van een persoon die is aangeduid voor het gebruik van ontvlambare koelmiddelen. Voorzichtig: gevaar voor brand / ontvlambare materialen. Dit apparaat gebruikt een ontvlambaar koelmiddel. Als het koelmiddel lekt en is blootgesteld aan een externe ontstekingsbron, is er gevaar voor brand. BEWAAR DEZE INSTRUCTIES ENERGIETIPS · Gebruik het toestel alleen in ruimtes welke niet groter zijn dan de aanbevolen grootte. · Plaat het toestel zo, dat luchtstroom niet belemmerd wordt door meubelen of andere voorwerpen. · Hou gordijnen gesloten tijdens het warmste uur van de dag. · Zorg ervoor dat de filters altijd zuiver zijn. · Houd ramen en deuren steeds gesloten om de koude lucht binnen te houden en de warme lucht buiten. www.domo-elektro.be DO263A 7 NL ONDERDELEN Voorzijde 1. Controlepaneel 2. Luchtuitlaat 1 3 2 Achterzijde 3. Luchtfilter 4. Luchtinlaat 5. Luchtuitlaat 6. Drainage 5 4 6 Onderdelen 7. Drainageslang 8. Afstandsbediening 9. Muurbevestiging afstandsbediening 10. Luchtuitlaatslang 10 a. Koppelstuk luchtuitlaatslang 11. Muurbevestiging 11 a. Muuradapter 7 11 b. Koppelstuk muurbevestiging 12. Raambevestiging 12 a. Raamadapter 9 12 b. Koppelstuk raambevestiging 12 c. Dichtingen 8 12 d. Adapterstop 12 e. L-ijzer met schroeven 10 10a 11 11b 11a 12 12a 8 DO263A 12b 12c 12d 12e NL INSTALLATIE · Plaats de airco op een solide en stabiele ondergrond, om de geluidshinder en vibratie tot een minimum te beperken. Zorg er ook voor dat de ondergrond sterk genoeg is om het gewicht van het toestel te dragen. · Om het toestel makkelijk te kunnen verplaatsen, is het voorzien van wieltjes. Zorg ervoor dat je het toestel alleen rolt over een max je 120 cm gladde en vlakke ondergrond. Wees voorzichtig wanneer het toestel al rollend verplaatst over een tapijt. Rol het toestel nooit min 30 cm over een object. · Plaats het toestel in de buurt van een geaard stopcontact. · Plaats geen voorwerpen binnen een straal van 30 cm rondom het toestel. · De luchtuitlaatslang moet geplaatst worden tijdens de instelling COOL of AUTO. Tijdens de instelling FAN en DRY heb je de luchtuitlaatslang niet nodig. · Zorg er ook voor dat zich rondom de luchtuitlaat buiten, in een straal van 50 cm, geen obstakels bevinden. · Zorg ervoor dat de luchtuitlaatslang niet te fel gebogen is bij het gebruik. INSTALLATIE VAN DE RAAMBEVESTIGING · Plaats het koppelstuk van de luchtuitlaatslang op het uiteinde van de slang. · Plaats de luchtuitlaatslang op de luchtuitlaat aan de achterzijde van het toestel. · Plaats het koppelstuk van de raambevestiging op het andere uiteinde van de luchtuitlaatslang. · Plaats de raamadapter in je venster. Dit kan voor zowel horizontale als verticale schuiframen. Blokkeer de raamadapter op de gewenste lengte. · Bevestig de slang met koppelstuk op de raamadapter. · Maak gebruik van de raamdichtingen om eventuele openingen in het venster af te sluiten · Blokkeer de raamadapter op de gewenste lengte met behulp van de meegeleverde raamadapter stop. · Indien gewenst kan je het raam vastzetten met het L-ijzer en 2 schroeven. www.domo-elektro.be DO263A 9 NL INSTALLATIE MUURBEVESTIGING · Plaats het koppelstuk van de luchtuitlaatslang op het uiteinde van de slang. · Plaats de luchtuitlaatslang op de luchtuitlaat aan de achterzijde van het toestel. · Maak een opening in de muur ter grootte van de muuradapter. · Plaats de muuradapter in de opening. Bevestig de muuradapter met de meegeleverde schroeven. · Plaats het koppelstuk van de muurbevestiging op het andere uiteinde van de luchtuitlaatslang. · Bevestig de slang met koppelstuk op de muuradapter. max 120 cm min 30 cm 10 DO263A NL GEBRUIK De horizontale lamellen aan de voorzijde van de airco kan je manueel open en dicht klappen om zo de luchtuitlaat beter te kunnen richten. CONTROLEPANEEL 4 3 1. 2 1 ON-OFF - toets Om het toestel in en uit te schakelen. 2. “+” en “-” - toetsen Om de temperatuurinstelling aan te passen. De temperatuur kan ingesteld worden tussen 17°C en 30°C (COOL mode). Als je beide toetsen tegelijkertijd ingedrukt houdt gedurende 3 sec, kan je wisselen tussen “°C” en “°F”. 3. MODE - toets Met deze toets selecteer je de gewenste gebruiksinstelling. Telkens je op de toets drukt, zal de gebruiksinstelling wijzigen: COOL, FAN en DRY. Het desbetreffende lichtje op het controlepaneel zal oplichten. Als je de FAN-instelling kiest, blaast de ventilatie op automatische stand. Je kan de ventilatiesnelheid enkel aanpassen met de afstandsbediening. 4. LED display Toont de ingestelde temperatuur. Wanneer het toestel in de DRY of FAN instelling staat, zal op het display de kamertemperatuur weergegeven worden. AFSTANDSBEDIENING Zorg bij het gebruik van de afstandsbediening dat je deze steeds richt naar het toestel. Als je dit niet doet, kan je na het wijzigen van een bepaalde instelling de afstandsbediening nog even richten naar het toestel en op de ON-OFF toets drukken. Als het toestel een signaal ontvangt van de afstandsbediening hoor je een piep. De afstandsbediening moet in een straal van 8 meter rond het toestel gebruikt worden. www.domo-elektro.be 1 2 3 4 6 7 8 5 9 DO263A 11 NL SLEEP dis Displays w SLEEP fun is activated 1. ON-OFF - toets FOLLOW M display Indicates th 2. MODE - toets the FOLLO Met deze toets selecteer je de gewenste gebruiksinstelling. Telkens je op de toets drukt, zal function is de gebruiksinstelling wijzigen: AUTO, COOL, DRY en FAN. Het desbetreffende lichtje op het Not availab controlepaneel zal oplichten. FAN SPEED thisdisplay unit Displays selected FAN SILENT display 3. FAN - toets HIGH, FAN SPEED display Not available for this unit or Displays SPEED: , LOW HIGH Met deze selected toets kan FAN je de ventilatiesnelheid instellen. Er zijn drie instellingen : LOW HIGH, MED, en AUTO. This display is blank w or LOW set to AUTO speed. Temperature/Timer display This display is blank when 4. SLEEP - toets Displays the set temperature by default, or timer settin set to AUTO speed. Gebruik je om de “sleep” functie in te stellen.when using TIMER ON/OFF functions Om het toestel in en uit te schakelen. Temperature range:binnen 17-3030C(62 F) Wanneer je deze instelling selecteert, zal de ingestelde temperatuur min. F-86 met 1°C stijgen. Na nog 30 min. zal de temperatuur opnieuw metsetting 1°C stijgen. Deze temperatuur zal Timer range: 0-24 hours aangehouden worden voor de komende 7 uur. Na deze tijd gaat de temperatuur terug naar de display is blank when operating in FAN mode. origineel ingestelde temperatuur en wordt deThis SLEEP-instelling beëindigd. o O O NOTA : deze instelling kan niet geselecteerd worden bij FAN- en DRY-instelling. 5 5. TEMP - toets Om de temperatuurinstelling aan te passen. De temperatuur kan ingesteld worden tussen 17°C en 30°C. Als je de volledige TEMP-toets ingedrukt houdt gedurende 3 sec, kan je wisselen tussen “°C” en “°F”. 6. SHORT CUT - toets Met deze toets kan je een voorkeursinstelling vastleggen en inschakelen. (p. 13) 7. TIMER ON - toets Met deze toets kan je de tijd instellen wanneer het toestel moet inschakelen. (p. 12) 8. TIMER OFF - toets Met deze toets kan je de tijd instellen wanneer het toestel moet uitschakelen. (p. 13) 9. LED - toets Deze toets schakelt het LED display van het controlepaneel uit. Deze kan je gebruiken als het display teveel licht geeft als je wil slapen. Als je een tweede keer op de knop drukt, schakelt het display terug in. 12 DO263A 1 up when remote se signal to unitLights signal to unit ON/OFF display MODE display ON/OFF Appears when the unitdisplay is turne display Battery display FUNCTIESON/OFF INSTELLEN Low battery Displays theMODE currentdisplay MODE display Appears the and disappears whenwhen it is turn Appears when the unit is turned on, detection Displays the current and disappears when it is turned off Displays the current mode, including: and disappears w AUTO mode, including: TIMER OFF display SLEEP display TIMER ON display mode, including: AUTO TIMER ON displ AUTO 2 InLED de instelling AUTODisplays kiest when het TIMER toestel Displays automatisch de gepaste Displays when instelling in functie van de when TIMER COOL Remote Screen Indicators How The Basic Func OFF is set ON is set TIME when T 3 To UseDisplays SLEEP function AUTO DRY gekozen temperatuur. Deze instelling kan je enkel COOL kiezen met de afstandsbediening. ON is set Disp is activated HEAT 1 COOL DRY FAN 1. ON i Kies met de MODE - toets op de afstandsbediening voor AUTO. FOLLOW ME ECO display DRY HEAT Transmission Indicator display Not available for COOL operation Lights up when remote sends 2. Stel de gewenste temperatuur in met de TEMP - toets. toestel gaat in functie Indicates that Het this unit HEAT FAN signal to unit the FOLLOW ME Remote LED Screen Indicators How To Use The Basic 1. Press the MODE button toFunct select hiervan de instelling bepalen. FAN functiondisplay is on Battery ON/OFF display COOL mode. Low battery (FAN) niet aanpassen. In AUTO-modus kan je de snelheid van de ventilatie MODE display Appears when the unit is turned on, 2. Set your desired temperature us TIMER ON MODE TEMP ECO display Not available for this unit Transmission Indicator Lights up when remote sends signal to unit TIMER OFF FAN ION FOLLOW ME SWING SLEEP ON/OFF LED NL HEAT FAN SHORT CUT TIMER ON MODE TEMP TIMER OFF FAN ION SLEEP SWING FOLLOW ME LED Not available for detection Displays the current and disappears when it is turned off the Temp or Temp button this unit mode, including: 3. Press the FAN button to select th Transmission Indicator SLEEP display TIMER OFF display TIMER ON display SILENT display fan speed: AUTO, LOW, MED,or AUTO Lights up when remote sends FAN SPEED display 2 Displays when Displays COOL Displays when TIMER for Not available this unitwhen TIMER HIGH. ON/OFF COOL signal to unit Displays selected FAN SPEED: SHORT SLEEP function OFF is set ON is set 3 4. Press the CUT ON/OFF button to star DRY HIGH, MED, is activated ON/OFF display kan je de ruimte afkoelen tot een bepaalde temperatuur. unit. Met de COOL-functie TIMER MODE or HEAT LOW 1 ON MODE display Appears when the unit is turned on, FAN Temperature/Timer display TEMP FOLLOW ME This display is blank when ECO display Displays the current and disappears when it is turned off TIMER 1. Druk op de MODE toets tot het COOL-indicatielampje brandt. FAN Displays the set temperature by default, ordisplay timer setting OFF set to including: AUTO speed. mode, available for COOL operation when using TIMER ON/OFF functions Not Indicates that ION TIMER OFF display ON “-” display this unit AUTO o O 2. Gebruik deTIMER “+” en toetsen op het controlepaneel MEde TEMP - toets op de 2 17-30 C(62 F-86OF)the FOLLOWof Displays when TIMER Displays Temperature when TIMERrange: 1. Press the MODEFOLLOW button to select COOL SLEEP SWING LED function is on ON/OFF OFF is set ON is set 3 COOL mode. ME SHORT CUT Battery display afstandsbediening, derange: gewenste kamertemperatuur in te stellen. Timerom setting 0-24 hours DRY Low battery yourMODEdesired temperature usi HEAT TIMER Not available for This display is blank when operating in FAN mode. 1 2. Set ON detection the Temp or Temp button 3. Gebruik de FAN - toets op de afstandsbediening FAN TEMP thisdisplay unit om de gewenste ventilatiesnelheid ECO SIL FAN SPEED display Not a FAN SPEED display Displays selected FAN SPEED: Displays selected HIGH, MED,FAN SPEED: 3. Press the FAN button to select th HIGH, MED, orSLEEP LOW ,display HIGH en AUTO. in te stellen. Er zijnSILENT drie5 instellingen : LOW display Not available for fan speed: AUTO, LOW, MED,or FAN SPEED display Displays this unit when or Not available for this unit Temperat HIGH. LOW Displays selected FAN SPEED: This display SLEEP function is blank when 4. Press the ON/OFF button to start HIGH, MED, Displays t is activated Battery display unit. or LOW This display is blank when set AUTO speed. Lowto battery DRY Temperature/Timer display when usin FOLLOW ME This display is blank when detection Displays the set temperature by default, or timer setting set to AUTO speed. display set to AUTO Metspeed. deze functie kan jewhen deusing ruimte ontvochtigen. bij deze COOL operation TIMER ON/OFF functions Houd ramen en deuren gesloten Tempe Indicates that SLEEP display Temperature range: 17-30 C(62 F-86 Displays F) FOLLOW the functie. whenME 1. Press the MODE button toTimer select s function is on SLEEP function Timer setting range: 0-24 hours mode. is activated 1. Druk op de MODE - toets tot het DRY - indicatielampje brandt. 2. COOL Set your desired temperature using This display is blank when operating in FAN mode. Not available for displ the Temp or TempThis button. FOLLOW MEinstellen. this unit 2. Bij deze instelling kan je de ventilatiesnelheid niet 3. Press the FAN button to select the TIMER OFF FAN ION SLEEP o O SWING FOLLOW ME LED O display Indicates that the FOLLOW ME function is on SILENT5display Not available for this unit COOL operation fan speed: AUTO, LOW, MED,or HIGH. 1. button to to select 4. Press Press the the MODE ON/OFF button start th COOL unit. mode. SILENT FAN SPEED display 2. Set your desired temperature using Temperature/Timer display Not available for This display is blank availa the Temp or TempNotbutton. 1. when Druk op de MODE - toets tot hetbyFAN-indicatielampje brandt. Displays the set temperature default, or this timer setting FAN SPEED display unit Displays selected FAN SPEED: set to AUTO speed. 3. Press the FAN button to select the when using TIMER ON/OFF functions SILENT van display speed: AUTO, LOW, MED,or Displays selected FAN SPEED: HIGH, MED,fan 2. Druk op de FAN-toets de17-30 afstandsbediening om de ventilatiesnelheid in te o O O FAN SPEED display Temperature range: C(62 F-86 F) Not available for this unit HIGH. Displays selected FAN SPEED: HIGH, MED, button to start th or , LOW HIGH en AUTO. stellen. Er zijn Timer drie setting instellingen LOW range: 0-24: hours 4. Press the ON/OFF HIGH, MED, unit. Temperature/ LOW or LOW This display is blank when operating in FAN mode. or FAN SPEED display Displays selected FAN SPEED: HIGH, MED, FAN or LOW This display is blank when De temperatuur kan niet worden Temperature/Timer display ingesteld. Displays the set temperature by default, or timer setting This display is blank when set to AUTO speed. 5 when using TIMER ON/OFF functions set to AUTO speed. Temperature range: 17-30 C(62 F-86 F) Timer on 3. This display is blank when set to AUTO speed. o O O Timer setting range: 0-24 hours Displays theTe s Di when using TI wh Temperatur Met deze functie kanThis je display het toestel uitgesteld laten starten, tot maximum 24 uur. is blank when operating in FAN mode. 1. 2. Timer settin Druk op de TIMER ON - toets op de afstandsbediening. This display is 5 Op het display van de afstandsbediening kan je nu aflezen over hoeveel tijd de airco Th zal beginnen werken. 3. Druk meerdere keren op de TIMER ON - toets om de tijd te verhogen. Of houd de toets ingedrukt. 4. Eens de gewenste tijd is ingesteld, zal je op het display van de afstandsbediening “Timer on” zien staan. Op het display van het controlepaneel zijn er 2 verlichte bolletjes te zien. www.domo-elektro.be DO263A 5 13 NL 5. Als je de timer wil uitschakelen, druk dan meerdere keren op de TIMER ON - toets, tot de teller op “0” komt te staan. Of houd de toets ingedrukt. Timer off Met deze functie kan je het toestel automatisch laten uitschakelen na verloop van tijd. 1. Druk op de TIMER OFF - toets op de afstandsbediening. 2. Op het display van de afstandsbediening kan je nu aflezen over hoeveel tijd de airco zal uitschakelen. 3. Druk meerdere keren op de TIMER OFF - toets om de tijd te verhogen. Of houd de toets ingedrukt. 4. Eens de gewenste tijd is ingesteld, zal je op het display van de afstandsbediening “Timer off” zien staan. 5. Als je de timer wil uitschakelen, druk dan meerdere keren op de TIMER OFF - toets, tot de teller op “0” komt te staan. Timer on + Timer off Je kan beide functies ook gelijktijdig inschakelen. Hierdoor bepaal je wanneer het toestel inschakelt, maar ook wanneer het toestel uitschakelt. Let op: deze tijd is telkens vanaf het uur dat je de instelling programmeert. Bijvoorbeeld: het is nu 13:00. Je wil het toestel laten werken van 16:30 tot 18:00. Stel de functie TIMER ON in op 3,5 h en de TIMER OFF op 5,0 h. Sleep Wanneer je deze instelling selecteert, zal de ingestelde temperatuur binnen 30 min. met 1°C stijgen. Na nog 30 min. zal de temperatuur opnieuw met 1°C stijgen. Deze temperatuur zal aangehouden worden voor de komende 7 uur. Na deze tijd gaat de temperatuur terug naar de origineel ingestelde temperatuur en wordt de SLEEP-instelling beëindigd. NOTA : deze instelling kan niet geselecteerd worden bij FAN en DRY-instelling. Shortcut Met deze toets kan je een voorkeursinstelling vastleggen en inschakelen. Als je een bepaalde instelling vaker gebruikt, kan je deze vastleggen door de SHORTCUT toets gedurende 3 seconden ingedrukt te houden. Het toestel onthoudt dan de instellingen die op het moment van indrukken ingeschakeld zijn. Deze instellingen kunnen zijn: de gebruiksinstelling (MODE), ingestelde temperatuur, ventilatiesnelheid (FAN) en eventueel ook de SLEEP-instelling. Op het moment dat je op de SHORTCUT-toets drukt, zal het toestel werken op de eerder vastgelegde instellingen. 14 DO263A NL REINIGING EN ONDERHOUD DRAINAGE Permanente drainage Tijdens het ontvochtigen, kan je een permanente drainage gebruiken. 1. Verwijder de drainage afsluiting en het rubber dopje in het midden, achteraan het toestel. 2. Bevestig de drainageslang aan de drainage opening. 3. Zorg ervoor dat het water op een veilige en permanente manier kan wegvloeien. 2 1 Drainage bij P1 code Wanneer je geen gebruik maakt van de permanente drainage, zal het water opgevangen worden in de drainagebak, onderaan het toestel. · Wanneer deze vol is, zal je enkele biepsignalen horen en op de display verschijnt de code “P1”. De ontvochtiging of airconditioning zal stoppen. De ventilator blijft wel werken, dit is normaal. · Verplaats het toestel voorzichtig naar een plaats waar je het water makkelijk kan laten weglopen. · Verwijder de afsluiting van de drainage opening onderaan het toestel (A). Het water zal nu weglopen. · Nadat het water volledig verwijderd is, plaats je de afsluiting terug op de drainage opening. · Je kan nu het toestel terug opstarten. Let er op dat de code “P1” op de display verdwijnt. Indien de code niet onmiddellijk verdwijnt, kan je enkele malen proberen om het toestel uit en terug in te schakelen. Wanneer de code zich blijft herhalen, moet je contact opnemen met de servicedienst. A · NOTA: installeer altijd eerst de drainage afsluiting, voordat je het toestel terug aanzet. REINIGING · Verwijder steeds de stekker uit het stopcontact alvorens het toestel te reinigen. · Gebruik geen chemische of schurende producten om het toestel te reinigen. www.domo-elektro.be DO263A 15 NL · Was het toestel nooit met water of een andere vloeistof, dit kan elektrocutie tot gevolg hebben. · Wanneer het elektrisch snoer beschadigd is, moet het vervangen of hersteld worden door de dienst na verkoop van de fabrikant of een gekwalificeerd persoon. Luchtfilter · Reinig de luchtfilter minstens om de 2 weken. Om te voorkomen dat de ventilator slecht gaat werken door stof in de filter. · Reinig de filter in lauw water met een mild detergent. Spoel de filter grondig en laat deze aan de lucht drogen. · Als de filter volledig droog is, kan je deze terug in het toestel plaatsen. Behuizing Gebruik een vochtige zachte doek en een beetje mild detergent om de buitenkant van het toestel te reinigen. Maak het toestel achteraf grondig droog met een zachte, droge doek. Opbergen Voor je het toestel opbergt voor een langere tijd, kan je best eerst het volgende doen, om schade aan het toestel te voorkomen : · Verwijder al het water uit het toestel met behulp van de drainage. · Zet het toestel daarna aan op de FAN-instelling. Laat het toestel gedurende een halve dag in een verwarmde ruimte werken. Zo kan het toestel volledig drogen aan de binnenkant en voorkom je schimmelvorming. · Zet het toestel uit, verwijder de stekker uit het stopcontact en verwijder de batterijen uit de afstandsbediening. · Maak de filter schoon en plaats deze terug in het toestel. · Berg het toestel op in een droge, donkere ruimte. PROBLEMEN EN HUN OPLOSSING Het toestel werkt niet wanneer je op de ON/OFF - toets drukt. · Op het display staat P1 : verwijder het water uit het toestel. · De kamertemperatuur is lager dan de ingestelde temperatuur. Pas de temperatuur op het toestel aan. De ruimte koelt niet voldoende af. · De ramen en deuren zijn niet gesloten. Zorg ervoor dat alle ramen en deuren gesloten zijn. 16 · Er zijn warmte producerende toestellen in de ruimte. Verwijder indien mogelijk de warmtebronnen. DO263A NL · De luchtuitlaatslang is niet aangesloten of geblokkeerd. Sluit de slang aan en zorg ervoor dat ze naar behoren kan functioneren. · De ingestelde temperatuur is te hoog. Pas de ingestelde temperatuur aan. · De luchtfilter is vuil. Reinig de luchtfilter. Het toestel maakt te veel lawaai of zorgt voor trillingen. · De vloer is niet recht of vlak genoeg. Plaats het toestel op een rechte vlakke ondergrond. · De luchtfilter is vuil. Reinig de luchtfilter. Het toestel maakt een gorgelend geluid. · Het geluid komt van de koelvloeistof in het toestel. Dit is normaal. ERROR CODES Volgende error codes kunnen verschijnen op het display van het toestel : E1: de sensor van de kamertemperatuur werkt niet. Zet het toestel uit en verwijder de stekker uit het stopcontact. Wacht 10 sec. en steek de stekker terug in het stopcontact. Zet het toestel opnieuw aan. Wanneer de error code opnieuw verschijnt, moet je contact opnemen met de hersteldienst. E2: de sensor van de luchtverdamper werkt niet. Zet het toestel uit en verwijder de stekker uit het stopcontact. Wacht 10 sec. en steek de stekker terug in het stopcontact. Zet het toestel opnieuw aan. Wanneer de error code opnieuw verschijnt, moet je contact opnemen met de hersteldienst. E4: het display werkt niet naar behoren. Zet het toestel uit en verwijder de stekker uit het stopcontact. Wacht 10 sec. en steek de stekker terug in het stopcontact. Zet het toestel opnieuw aan. Wanneer de error code opnieuw verschijnt, moet je contact opnemen met de hersteldienst. P1: het waterreservoir is vol. Verwijder het water volgens het hoofdstuk “drainage” van deze handleiding. www.domo-elektro.be DO263A 17 NL MILIEURICHTLIJNEN Dit symbool op het product of op de verpakking wijst erop dat dit product niet als huishoudafval mag worden behandeld. Het moet naar een plaats worden gebracht waar elektrische en elektronische apparatuur wordt gerecycleerd. Als je ervoor zorgt dat dit product op de correcte manier wordt verwijderd, voorkom je mogelijk voor mens en milieu negatieve gevolgen die zich zouden kunnen voordoen in geval van verkeerde afvalbehandeling. Voor meer details in verband met het recycleren van dit product, neem je best contact op met de gemeentelijke instanties, het bedrijf of de dienst belast met de verwijdering van huishoudafval of de winkel waar je het product hebt gekocht. Het verpakkingsmateriaal is recycleerbaar. Behandel de verpakking milieubewust. 18 DO263A GARANTIE Cher client, Tous nos produits sont soumis à des contrôles qualité stricts avant FR d’être proposés à la vente. Si vous deviez toutefois rencontrer un problème avec votre appareil, nous le déplorons vivement. Dans ce cas, nous vous invitons à prendre contact avec notre service clientèle. Nos collaboratrices se feront un plaisir de vous aider ! +32 14 21 71 91 [email protected] Du lundi au jeudi : 8 h 30 – 12 h et 13 h – 17 h Vendredi : 8 h 30 – 12 h et 13 h – 16 h 30 Cet appareil est garanti 2 ans à compter de la date d’achat. Durant la période de garantie, le distributeur assumera l’entière responsabilité en cas de défauts de fonctionnement (matériel) ou de fabrication. Si un tel problème survient, l’appareil sera remplacé ou réparé. La période de garantie de 2 ans ne reprend pas à zéro, mais se poursuit (jusqu’à 2 ans à compter de la date d’achat de l’appareil). La garantie est accordée sur la base du ticket de caisse. Pour les accessoires et les éléments d’usure, une garantie de 6 mois s’applique. La garantie et la responsabilité du fournisseur et du fabricant n’ont plus effet dans les cas suivants : · Les instructions du manuel n’ont pas été suivies. · Mauvais raccordement, par ex. tension électrique trop forte. · Utilisation contraire, brutale ou anormale. · Entretien insuffisant ou non conforme. · Réparation ou modification de l’appareil par le consommateur ou un tiers non autorisé. · Utilisation d’éléments ou d’accessoires qui ne sont pas recommandés ou fournis par le fournisseur/fabricant. www.domo-elektro.be DO263A 19 CONSIGNES DE SÉCURITÉ Les consignes de sécurité suivantes doivent être respectées lors de l’utilisation de tout appareil électrique: FR · Lisez ces consignes très attentivement. Conservez ce mode d’emploi afin de pouvoir le consulter ultérieurement. · Avant la première utilisation, enlevez tous les éléments d’emballage et les éventuels autocollants promotionnels. Veillez à ce que les enfants ne jouent pas avec les matériaux d’emballage. · Cet appareil est conçu pour être utilisé dans un environnement domestique ou dans des environnements comparables, tels que : · Coin-cuisine du personnel dans les commerces, les bureaux et autres environnements professionnels comparables · Fermes · Chambres d’hôtel ou de motel et autres environnements à caractère résidentiel · Chambres d’hôtes ou comparables · Cet appareil peut être utilisé par des enfants âgés de 16 ans ou plus et par des personnes présentant un handicap physique ou sensoriel, une capacité mentale limitée ou un manque d’expérience ou de connaissances, à condition que ces personnes soient sous surveillance ou qu’elles aient reçu des instructions sur la manière d’utiliser l’appareil en toute sécurité et qu’elles connaissent les dangers liés à son utilisation. Les enfants ne peuvent pas jouer avec cet appareil. L’entretien et le nettoyage de l’appareil ne peuvent pas être effectués par des enfants, sauf s’ils sont âgés de plus de 16 ans et sous la surveillance d’un adulte. · Gardez l’appareil et le cordon électrique hors de portée des enfants. · Attention: l’appareil ne peut pas être utilisé avec une minuterie externe. · Vérifiez avant usage si la tension indiquée sur l’appareil correspond à la tension du réseau électrique de votre domicile. · Le cordon d’alimentation doit toujours être branché dans une prise de courant placée et mise à la terre conformément aux normes et standards locaux. · Ne laissez pas le cordon pendre sur une surface chaude ou sur le rebord d’une table. · N’utilisez jamais l’appareil lorsque le cordon ou la fiche sont endommagés, après un mauvais fonctionnement de l’appareil ou lorsque l’appareil est endommagé. Amenez alors l’appareil au centre de services le plus proche pour contrôle et réparation. · Soyez très attentif lorsque l’appareil est utilisé par des enfants ou à proximité d’enfants. · L’utilisation d’accessoires non préconisés par le fabricant peut provoquer un incendie, une électrocution ou des blessures. · Retirez la fiche de la prise lorsque l’appareil n’est pas utilisé, avant d’installer ou d’enlever des pièces et avant de nettoyer l’appareil. Mettez tous les boutons en position « arrêt » et retirez la fiche de la prise. Ne tirez jamais sur le câble pour retirer la fiche de la prise. · Ne laissez jamais un appareil en service sans surveillance. 20 DO263A · Ne placez jamais cet appareil sur ou à proximité d’un feu au gaz ou d’un feu électrique où il pourrait entrer en contact avec un appareil chaud. · N’utilisez pas l’appareil à l’extérieur. · Utilisez l’appareil uniquement dans le but auquel il est destiné. · Cet appareil ne convient qu’à un usage domestique. Le fabricant décline toute responsabilité pour des accidents qui découleraient d’un mauvais usage de l’appareil ou du non-respect des instructions fournies dans ce manuel. FR · Utilisez toujours l’appareil sur une surface solide, sèche et plane. · Toutes les réparations, en dehors de l’entretien ordinaire de l’appareil, doivent être réalisées par le fabricant ou son service après-vente. · N’immergez jamais le cordon électrique, la fiche ou l’appareil lui-même dans l’eau ou tout autre milieu liquide. · Veillez à ce que les enfants ne puissent pas toucher à l’appareil ou au cordon électrique. · Tenez le cordon éloigné de rebords tranchants et de pièces brûlantes ou d’autres sources de chaleur. · Avant la première utilisation, enlevez tous les éléments d’emballage et les éventuels autocollants promotionnels. · Ne placez jamais l’appareil à proximité d’un appareil au gaz, d’un feu ou d’un liquide facilement inflammable. · Pour éviter tout dommage, ne frappez et ne secouez jamais l’appareil. · Pour éviter toute surchauffe, ne recouvrez jamais l’arrivée d’air et la sortie d’air. · Pour éviter toute électrocution, n’aspergez jamais l’appareil avec de l’eau et ne le placez jamais à proximité d’un point d’eau. · Ne partagez jamais l’alimentation électrique du climatiseur avec un autre appareil. · Ne branchez/débranchez jamais la fiche de l’appareil sur une prise de courant si vous avez les mains mouillées. · N’insérez jamais des corps étrangers dans les ouvertures de l’appareil. · N’utilisez jamais un cordon prolongateur. · Ne laissez jamais des enfants jouer à proximité de l’appareil. · Si vous éteignez l’appareil et que vous le rallumez juste après, la compresseur aura besoin d’un délai de 3 minutes au moins pour redémarrer. · Placez l’appareil à au moins 1 mètre de distance d’un téléviseur ou d’une radio pour éviter des interférences. · Pour éviter toute décoloration, n’exposez pas l’appareil à la lumière directe du soleil. · N’inclinez jamais l’appareil à plus de 35° lorsque vous le déplacez. Déplacez toujours le climatiseur à la verticale. Ne déplacez jamais l’appareil à l’envers. · Eliminez toujours l’eau contenue dans l’appareil avant de le ranger, vous prolongerez ainsi sa durée de vie. · N’utilisez pas de produits chimiques pour nettoyer l’appareil, ils risqueraient fort de l’abîmer. www.domo-elektro.be DO263A 21 · Veillez toujours à éteindre l’appareil avant d’enlever ou de replacer la grille d’arrivée d’air. FR · Veillez toujours à protéger le climatiseur contre l’humidité, la condensation, les projections d’eau, etc. · Veillez à installer le climatiseur de telle manière qu’il ne puisse pas tomber dans l’eau ou un autre liquide. S’il arrivait malgré tout que l’appareil tombe dans l’eau ou un liquide, débranchez immédiatement la fiche électrique. · N’utilisez pas le climatiseur dans un local humide comme une salle de bain ou une buanderie. · Eteignez totalement l’appareil lorsque vous ne l’utilisez pas. · Faites toujours appel à un technicien qualifié pour faire réparer l’appareil si besoin. · Veillez à laisser un espace libre d’au moins 30 cm tout autour de l’appareil. · Si le climatiseur a été renversé, débranchez immédiatement la fiche électrique. · Ne touchez pas l’appareil lorsque vous avez les mains humides ou lorsque vous marchez pieds nus. · N’actionnez les touches de l’appareil qu’avec les doigts, jamais avec un autre objet. · Ne retirez aucune partie fixe du climatiseur. N’utilisez pas l’appareil s’il ne fonctionne pas correctement, s’il est tombé ou s’il est endommagé. · N’utilisez jamais la fiche pour allumer ou éteindre l’appareil. Utilisez toujours les boutons du panneau de commande. · Ne recouvrez jamais la grille d’arrivée d’air ou de sortie d’air de l’appareil. · N’utilisez pas l’appareil à proximité de substances facilement inflammables telles que alcool, insecticide, essence,... · Les réparations, la détection de fuites et toutes les autres interventions à l’installation doivent être faites par des personnes qualifiées, prévues des certificates rélévantes. · L’installation doit être effectuée conformément aux instructions. Une installation incorrecte peut provoquer une fuite d’eau, un choc électrique ou un incendie. · Ne touchez pas l’appareil si vous avez les mains humides ou mouillées ni si vous êtes pieds nus. · Si le climatiseur est renversé alors qu’il fonctionne, coupez l’alimentation électrique et débranchez-le immédiatement. Inspectez l’appareil pour vous assurer qu’il n’est pas endommagé. Si vous pensez que c’est le cas, prenez contact avec un technicien ou le service à la clientèle. · Le courant doit être coupé en cas d’orage pour éviter que la foudre n’endommage l’appareil. · Si la fonction de drainage n’est pas utilisée, fixez les deux bouchons en caoutchouc dans les trous de drainage. Rangez soigneusement le flexible de vidange lorsqu’il n’est pas utilisé pour éviter que les enfants ne s’étranglent. · Ne faites pas passer le fil sous le revêtement de sol. Ne le couvrez pas avec des tapis ou d’autres revêtements. Ne le faites pas passer sous des meubles ou appareils. Éloignez le fil du passage pour éviter tout trébuchement. 22 · Débranchez l’appareil s’il émet des bruits, odeurs ou fumées étranges. DO263A Informations spécifiques concernant les appareils contenant du fluide frigorigène R290 · Lisez attentivement tous les avertissements. · L’appareil doit être installé dans un espace sans sources continues d’inflammation, par exemple,des flammes nues, des appareils électriques ou fonctionnant au gaz en continu. · Ne pas percer, ne pas brûler. FR · Lors du dégivrage et du nettoyage de l’appareil, n’utilisez pas d’outils autres que ceux conseillés par le fabricant. · Les frigorigènes peuvent être sans odeur. · L’appareil doit être installé, utilisé et stocké dans une pièce dont la superficie est supérieure à 8 m2. · Cet appareil contient une certaine quantité de frigorigène R290 (reportez-vous à l’étiquette signalétique à l’arrière de l’appareil). · R290 est un frigorigène conforme aux directives européennes en matière d’environnement. Ne percez jamais le circuit de réfrigération. · Si l’appareil est installé, utilisé ou stocké dans une zone non-ventilée, la pièce doit être conçue de sorte à éviter toute accumulation de frigorigène, suite à des fuites, pouvant entraîner un incendie ou une explosion à cause de l’inflammation du frigorigène causé par des chauffages, fours électriques ou autres sources d’inflammation. · L’appareil doit être stocké de sorte à éviter toute défaillance mécanique. · Toute personne travaillant ou intervenant sur un circuit de fluide frigorigène doit être titulaire d’un certificat valide délivré par un organisme accrédité qui autorise sa compétence à la manipulation des frigorigènes conformément à une évaluation spécifique reconnue par des associations de l’industrie. · Les réparations doivent être effectuées sur la base des recommandations du fabricant. Les travaux d ‘entretien et de réparation nécessitant l’assistance d’autres personnes qualifiées doivent être effectués sous la supervision de la personne qualifiée pour l’utilisation de fluides frigorigènes inflammables. Attention : risque d’incendie / matériaux inflammables Cet appareil contient un agent réfrigérant inflammable. Cet agent réfrigérant risque donc de s’enflammer en cas d’exposition à une source d’ignition. CONSERVEZ CES INSTRUCTIONS CONSEILS ÉNERGÉTIQUES · N’utilisez l’appareil que dans des espaces qui ne dépassent pas la superficie recommandée. · Placez l’appareil de manière à ce que le flux d’air ne soit pas gêné par des meubles ou d’autres objets. · Gardez les rideaux fermés pendant l’heure la plus chaude de la journée. · Veillez à ce que les filtres soient toujours propres. · Gardez les portes et les fenêtres fermées pour garder l’air froid à l’intérieur et l’air chaud à l’extérieur. www.domo-elektro.be DO263A 23 PARTIES FR Face avant 1. Panneau de commande 2. Évacuation d’air 1 3 2 Face arrière 3. Filtre d’arrivée d’air 4. Arrivée d’air 5. Évacuation d’air 6. Vidange 5 4 6 Parties 7. Flexible de vidange 8. Télécommande 9. Fixation murale télécommande 10. Tuyau d’évacuation d’air 10 a. Connecteur tuyau d’évacuation d’air 7 11. Kit de fixation murale 11 a. Adaptateur mural 11 b. Connecteur kit de fixation murale 9 12. Kit de fixation à la fenêtre 12 a. Adaptateur de fenêtre 12 b. Connecteur kit de fixation à la fenêtre 8 12 c. Étanchéité de la fenêtre 12 d. Bouchon adaptateur 12 e. Cornière avec vis 10 10a 11 11b 11a 12 12a 24 DO263A 12b 12c 12d 12e INSTALLATION · Placez la climatisation sur une surface stable et solide, afin de limiter à un minimum les nuisances sonores et les vibrations. Veillez à ce que la surface soit suffisamment solide pour supporter le poids de l’appareil. FR · L’appareil est muni de roulettes, pour pouvoir le déplacer facilement. Veillez à ce que la surface soit lisse et plate si vous déplacez seul l’appareil. Soyez prudent lorsque vous déplacez max 120 cm l’appareil sur un tapis. Ne faites jamais rouler l’appareil sur un min 30 cm objet. · Placez l’appareil à proximité d’une prise reliée à la masse. · Ne placez pas d’objets dans un rayon de 30 cm autour de l’appareil. · Le tuyau d’évacuation d’air doit être placé pendant le réglage « froid » ou « auto ». Vous n’avez pas besoin du tuyau d’évacuation d’air lorsque vous vous trouvez en mode « ventilateur » et « sec ». · Veillez à ce qu’il n’y ait pas d’obstacles autour de l’évacuation d’air, dans un rayon de 50 cm. · Veillez à ce que le tuyau d’évacuation d’air ne soit pas trop plié lors de l’utilisation. INSTALLATION KIT DE FIXATION À LA FENÊTRE · Placez l’embout du tuyau d’évacuation d’air à l’extrémité du tuyau. · Placez le tuyau d’évacuation d’air sur la sortie d’air prévue à l’arrière de l’appareil. · Placez l’embout du kit de fenêtre à l’autre extrémité du tuyau d’évacuation d’air. · Placez le kit de fenêtre sur votre fenêtre. Celui-ci peut être posé tant verticalement qu’horizontalement. Bloquez le kit de fenêtre à la longueur souhaitée. · Fixez le tuyau au kit de fenêtre à l’aide de l’embout prévu à cet effet. · Utilisez les joints de la fenêtre pour fermer les éventuelles ouvertures dans la fenêtre. · Bloquez l’adaptateur de châssis à la longueur désirée à l’aide du bouchon adaptateur de châssis fourni. · Si vous le souhaitez, vous pouvez fixer le châssis au moyen de la cornière et de 2 vis. www.domo-elektro.be DO263A 25 FR min 30 cm INSTALLATION KIT DE FIXATION MURALE · Placez l’embout du tuyau d’évacuation d’air à l’extrémité du tuyau. · Placez le tuyau d’évacuation d’air sur la sortie d’air prévue à l’arrière de l’appareil. · Faites dans le mur une ouverture de la taille de l’adaptateur mural. · Placez l’adaptateur mural dans l’ouverture. Fixer l’adaptateur mural à l’aide des vis fournies. · Placez l’embout de l’adaptateur mural à l’autre extrémité du tuyau d’évacuation d’air. · Fixez le tuyau à l’adaptateur mural à l’aide de l’embout prévu à cet effet. max 120 cm min 30 cm 26 DO263A UTILISATION Vous pouvez orienter le flux d’air manuellement en relevant ou en abaissant les lamelles de la grille située à l’avant de l’appareil. FR PANNEAU DE COMMANDE 4 3 1. 2 1 Touche MARCHE-ARRÊT Pour allumer et éteindre l’appareil. 2. Touches «+» et «-» Utilisez ces touches pour modifier le paramètre de température. Vous pouvez choisir une température comprise entre 17 °C et 30 °C. (COOL mode) Maintenez les deux flèches enfoncées simultanément pendant 3 secondes pour permuter entre « C° » et « F° ». 3. Touche MODE Cette touche vous permet de sélectionner le paramètre utilisateur souhaité. Chaque pression sur la touche modifie le paramètre d’utilisation : FROID, SEC et VENTILATEUR. Le témoin correspondant s’allume sur le panneau de commande. Si vous choisissez le mode FAN, le climatiseur soufflera selon un réglage automatique. Vous ne pourrez modifier la vitesse de ventilation qu’à l’aide de la télécommande. 4. Écran LED Affiche le paramètre défini de température. Lorsque l’appareil se trouve en mode SEC ou VENTILATEUR, l’écran affiche la température ambiante. TÉLÉCOMMANDE Veillez à toujours diriger la télécommande vers l’appareil. Si vous ne le faites pas, vous pouvez toujours diriger la télécommande vers l’appareil et appuyer sur le bouton ON/OFF après avoir modifié un réglage. Lorsque l’appareil reçoit un signal émis par la télécommande, il émet un signal sonore. La télécommande fonctionne dans un rayon de 8 mètres autour de l’appareil. www.domo-elektro.be 1 2 3 4 6 7 8 5 9 DO263A 27 1. Touche MARCHE-ARRÊT Pour allumer et éteindre l’appareil. FR 2. Touche MODE Cette touche vous permet de sélectionner le paramètre utilisateur souhaité. Chaque pression sur la touche modifie le paramètre d’utilisation : FROID, SEC et VENTILATEUR. Le témoin correspondant s’allume sur le panneau de commande. SILENT display SILENT Not available for this unitdisplay Not available for this Displays selected SPEED: MED, Cette touche vous permet deHIGH, régler la vitesse de laFAN ventilation. Trois paramètres sont HIGH, MED, or LOW , ÉLEVÉ et AUTO. possibles : FAIBLE Temperature/Timer display This display isorblank LOW when Temperature/Timer displ Displays the set temperature by default This display is blank when set to AUTO speed. 4. Touche VEILLE Displays the setfunctions temperatu when using TIMER ON/OFF set to AUTO speed. o O when using TIMER ON/OF Utilisez cette touche pour paramétrer la fonction « veille ». Temperature range: 17-30 C(62 F-86 3. FAN SPEED display Touche VENTILATEUR FAN FAN SPEED display Displays selected SPEED: range: 17 Lorsque vous sélectionnez ce paramètre, la température augmente de 1°C dansTemperature les 30 0-24 hours Timer setting range: minutes. Après encore 30 minutes, la température augmente à nouveau de 1°C.Timer Cette setting range: 0This display is blank when température est conservée pour les 7 heures suivantes. Ensuite, la température revient à la operating in This display is blank when température réglée d’origine et le mode « veille » est terminé. NOTE : ce paramètre ne peut pas être sélectionné pour les modes « ventilateur 5 » et « sec ». 5 5. Touche TEMP Utilisez ces touches pour modifier le paramètre de température. Vous pouvez choisir une température comprise entre 17 °C et 30 °C. Maintenez les deux flèches enfoncées simultanément pendant 3 secondes pour permuter entre « C° » et « F° ». 6. Touche SHORTCUT Cette touche vous permet d’enregistrer et d’utiliser un réglage spécifique. (p. 28) 7. Touche TIMER ON Cette touche permet de régler la durée pendant laquelle l’appareil doit être allumé. (p. 27) 8. Touche TIMER OFF Cette touche permet de régler la durée pendant laquelle l’appareil doit être éteint. (p. 28) 9. Touche LED Ce bouton vous permet d’éteindre l’écran LED du panneau de commande. Vous pouvez par exemple l’utiliser si vous souhaitez dormir et que la lumière émise par l’écran vous dérange. Appuyez à nouveau sur ce bouton pour rallumer l’écran. 28 DO263A 1 Transmission Indicator How To Use The ECO display Indicator Lights up when remote sends Not available for Transmission this unit to unitLights up when remote sen signal Transmission Indicator Battery display signal to unit UTILISATION DES ETsends FONCTION Lights MODES up when remote Low batteryON/OFF display signal to unit detection MODE display MODE « AUTO » ON/OFF Appears when the unitdisplay is turne ON/OFF display SLEEP display MODE display Displays the current MODE display Appears when the and disappears when it is turne Appears when the unit is turned on, Lorsque vous réglez le and climatiseur en mode « AUTO », l’appareilDisplays choisit le réglage adéquat when Displays the current disappears when it is turned off Displays thel’aide current mode, including: SLEEP function and disappears wh mode, including: en fonction de la température définie. Ce mode ne peut être activé qu’à de la is activated TIMER OFF display TIMER ON display AUTO TIMER ON displa AUTO mode, including: télécommande. Displays when TIMER Displays when TIMER COOL Remote LED Screen Indicators How The B FOLLOW ME OFF is set ON is set TIME Displays when TIM 3 To Use AUTO COOL DRY display ON is set 1. Utilisez COOL operation HEATle bouton « MODE » pour choisir le mode « AUTO ». Displa Indicates that 1 COOL DRY FAN the FOLLOW ME ON is ECO 1. Press the MODE b 2. Réglez la température souhaitée à l’aide du bouton ». display L’appareil se réglera en DRY function is on HEAT « TEMP Transmission Indicator Not available for COOL mode. up when remote sends fonction deLights celle-ci. this unit 2. Set your desired te HEAT FAN Not available for signal to unit or Te Remote Screen Indicators How the Use The B Vous neLED pouvez pas régler la vitesse de ventilation (« FANBattery ») lorsque le mode « AUTO »ToTemp this unit FAN display 3. Press the FAN butt ON/OFF display Low battery SILENT display fan speed: AUTO, est activé. MODE display Appears when the unit is turned on, FAN SPEED display HEAT MODE FAN LED Screen Indicators Remote TEMP FAN ION FO SWING SLEEP MODE FR ON/OFF TEMP FAN ION SLEEP SWING FOL M detection available HIGH. Displays currentFAN and disappears when itNot is turned off for this unit Displaysthe selected SPEED: 4. Press the ON/OFF mode, including: HIGH, MED, Transmission Indicator SLEEP display unit. TIMER OFF display TIMER ON display or AUTO LOW Lights up when remote sends Displays Temperature/Timer display when TIMERDisplays when MODE « display COOL » when Displays when TIMER unit ThisCOOL issignal blank to ON/OFF SLEEP function OFF is set ON isDisplays set 3 the set temperature by default, or timer setting set DRY to AUTO speed. is activated when using TIMER ON/OFFpour functions ON/OFF display de Le mode « COOL » vous permet refroidir la pièce obtenir la température définie. HEAT MODE 1 MODE display Appears when the unitTemperature is turned on,range: 17-30oC(62OF-86OF) FAN TEMP FOLLOW ME ECO display » s’allume. Displays the current and disappears when it » is jusqu’à turned off ce que le témoin 1. Appuyez sur le bouton « MODE « COOL FAN display Timer setting range: 0-24 hours mode, including: Not available for COOL operation Indicates that ION OFF display display this mode. unit le bouton « TEMP » de la AUTO les boutons « + » TIMER is blankTIMER when in FAN 2. Utilisez et «This -ON » display du panneau deoperating commande theou FOLLOW ME Displays when TIMER Displays when TIMER 1. Press the MODEFOLLOW bu COOL SLEEP SWING function is on ON/OFF ME OFF is set ON is set 3 télécommande pour définir la température souhaitée. Battery display COOL mode. DRY Low battery 5 2. Set your desired tem HEAT MODE Not available for 1 the Temp detection or Tem 3. Utilisez vitesse de ventilation FAN la touche « FAN » de la télécommande pour définir TEMP thisla unit ECO display FAN SPEED display N FAN SPEED display Displays selected FAN SPEED: Displays selected HIGH, MED,FAN SPEED: 3. Press the FAN butto HIGH, MED, or LOW , HIGH et AUTO. fan speed: souhaitée. Trois paramètres sont disponibles SLEEP display SILENT display : LOW Not available for AUTO, L FAN SPEED display Displays when this unit or Not available for this unit Temp HIGH. LOW Displays selected FAN SPEED: This display is blank when SLEEP function 4. Press the ON/OFF b HIGH, MED, Displ is activated Battery display or LOW This display is blank unit. when set to AUTO speed. Low battery MODE « DRY » Temperature/Timer display when FOLLOW ME This display is blank when detectionset to AUTO speed. Displays the set temperature by default, or timer setting display set to AUTO Ce mode vousspeed. permet de déshumidifier laTIMER pièce. Fermez les fenêtres et les portes lorsque vous COOL operation Te when using ON/OFF functions Indicates that SLEEP display Temperature range: 17-30 C(62 F-86 Displays F) the FOLLOW utilisez ce mode. whenME 1. Press the MODE butt Ti functionfunction is on SLEEP Timer setting range: 0-24 hours COOL mode. is activated 1. Appuyez sur le bouton « MODE » jusqu’à ce que le témoin « DRY » s’allume. 2. Set your desired temp This display is blank when operating in FAN Notmode. available for This the Temp or Tem FOLLOW this unit ME 2. Ce mode ne permet pas de régler la vitesse de ventilation. 3. Press the FAN button FAN ION SLEEP o 2. O display Indicates that the FOLLOW ME function is on SILENT5display Not available for this unit COOL operation fan speed: AUTO, LO HIGH. 1. butto 4. Press Press the the MODE ON/OFF bu COOL unit. mode. SILENT FAN SPEED display 2. Set your desired temp Temperature/Timer display Not available for This display is blank Not availa the Temp or Temp Appuyez sur when le bouton « MODE jusqu’à ce quebyselected le témoin «unit FANSPEED: »display s’allume. Displays»the setDisplays temperature default, or this timer setting FAN SPEED FAN set to AUTO speed. 3. Press the FAN button when using TIMER ON/OFF functions SILENT display fan speed: AUTO, LO Displays selected FAN SPEED: HIGH, Appuyez sur la touche « FANTemperature » de la télécommande pour régler la MED, vitesse de ventilation. o O O FAN SPEED display range: 17-30 Not available for this unitC(62 F-86 F) HIGH. Displays selected FAN SPEED: HIGH, MED, or LOW , HIGH et AUTO. Trois paramètres sont disponibles : LOW Timer setting range: 0-24 hours 4. Press the ON/OFF bu HIGH, MED, unit. Temperature/T LOW or LOW This display is blank when operatingor in FAN mode. FAN SPEED display Displays selected FAN SPEED: HIGH, MED, MODE «LOW FAN » or 1. O This display is blank when La température ne peut pas être réglée. Temperature/Timer display Displays the set set temperature by default, or timer setting is blank when This display to AUTO speed. 5 when using TIMER ON/OFF functions set to AUTO speed. Temperature range: 17-30 C(62 F-86 F) Fonction « Timer on » 3. FOLLOW ME SWING This display is blank when set to AUTO speed. o O O Timer setting range: 0-24 hours Displays theTem se Dis when using TIM wh Temperature Cette fonction vous permet de retarder démarrage du inclimatiseur de maximum 24 heures. This display le is blank when operating FAN mode. Timer settin 1. 2. Appuyez sur la touche « TIMER ON » de la télécommande. This display is 5 L’écran de la télécommande affiche dans combien de temps le climatiseur commencera à Th fonctionner. 3. Appuyez à plusieurs reprises sur le bouton « TIMER ON » pour faire augmenter cette durée. Vous pouvez également maintenir le bouton appuyé. 4. Une fois que vous avez réglé la durée souhaitée, l’écran de la télécommande affiche « www.domo-elektro.be DO263A 5 29 TIMER ON ». Deux petits indicateurs ronds seront en outre allumés sur le panneau de commande. FR 5. Si vous souhaitez désactiver la minuterie, appuyez à plusieurs reprises sur le bouton « TIMER ON » jusqu’à ce que la durée affichée soit « 0 ». Vous pouvez également maintenir le bouton appuyé. FONCTION « TIMER OFF » Grâce à cette fonction, l’appareil s’éteint automatiquement après un laps de temps prédéfini. 1. Appuyez sur la touche « TIMER OFF » de la télécommande. 2. L’écran de la télécommande affiche dans combien de temps le climatiseur s’éteindra. 3. Appuyez à plusieurs reprises sur le bouton « TIMER OFF » pour faire augmenter cette durée. Vous pouvez également maintenir le bouton appuyé. 4. Une fois que vous avez réglé la durée souhaitée, l’écran de la télécommande affiche « TIMER OFF ». 5. Si vous souhaitez désactiver la minuterie, appuyez à plusieurs reprises sur le bouton « TIMER OFF » jusqu’à ce que la durée affichée soit « 0 ». Fonction « Timer on » + fonction « Timer off » Vous pouvez activer ces deux fonctions en même temps. Vous déterminerez ainsi quand le climatiseur s’allumera et quand il s’éteindra. Attention : l’heure l’allumage et d’arrêt de l’appareil dépend de l’heure à laquelle vous programmez la minuterie. Exemple : il est actuellement 13 h. Vous voulez que l’appareil fonctionne de 16 h 30 à 18 00. Vous devez dans ce cas régler la fonction « TIMER ON » sur 3,5 h, et la fonction « TIMER OFF » sur 5 h. Fonction SLEEP Lorsque vous sélectionnez ce paramètre, la température augmente de 1°C dans les 30 minutes. Après encore 30 minutes, la température augmente à nouveau de 1°C. Cette température est conservée pour les 7 heures suivantes. Ensuite, la température revient à la température réglée d’origine et le mode « veille » est terminé. NOTE : ce paramètre ne peut pas être sélectionné pour les modes « ventilateur » et « sec ». Fonction « SHORTCUT » Cette touche vous permet d’enregistrer et d’utiliser un réglage spécifique. Si vous paramétrez souvent l’appareil de la même manière, vous pouvez enregistrer ce réglage en maintenant le bouton « SHORTCUT » enfoncé pendant 3 secondes. L’appareil retient alors les paramètres actifs au moment où vous maintenez la touche enfoncée. Ces paramètres peuvent être : le mode d’utilisation (« MODE »), la température définie, la vitesse de ventilation (« FAN »), et éventuellement le réglage du mode veille (« SLEEP »). 30 Par la suite, l’appareil reviendra à ces paramètres dès que vous enfoncerez la touche « SHORTCUT ». DO263A NETTOYAGE ET ENTRETIEN ÉVACUATION D’EAU Vidange permanente 1. Enlevez le bouchon de vidange et le capuchon en caoutchouc, au milieu à l’arrière de votre appareil. 2. Fixez le tuyau de vidange sur l’ouverture de vidange. 3. Veillez à ce que l’eau puisse s’écouler de manière sûre et continue. FR Vous pouvez utiliser une vidange permanente pendant la déshumidification. 2 1 Vidange code P1 Si vous n’utilisez pas la vidange continue, l’eau sera récupérée dans le bac de vidange, au bas de l’appareil. · Lorsque ce bac est plein, l’appareil émet quelques tonalités et le code P1 apparaît à l’écran. La déshumidification ou la climatisation s’arrête. Le ventilateur continue à fonctionner, c’est normal. · Déplacez l’appareil prudemment vers un endroit où vous pouvez laisser l’eau s’évacuer facilement. · Enlevez le bouchon de la vidange au bas de votre appareil. (A) L’eau s’évacue alors. · Lorsque l’eau est totalement évacuée, replacez le bouchon sur l’ouverture de vidange. · Vous pouvez ensuite redémarrer l’appareil. Veillez à ce que le code « P1 » disparaisse de l’écran. Si le code ne disparaît pas immédiatement, vous pouvez essayer plusieurs fois d’éteindre et de rallumer l’appareil. Si le code se répète, veuillez prendre contact avec le service à la clientèle. A · NOTE : installez toujours d’abord le bouchon de vidange avant d’allumer à nouveau l’appareil. NETTOYAGE · Enlevez toujours la fiche de la prise de courant avant de nettoyer l’appareil. · N’utilisez pas de produits chimiques ou abrasifs pour nettoyer l’appareil. www.domo-elektro.be DO263A 31 · Ne lavez jamais l’appareil à l’eau ou avec d’autres liquides car cela pourrait provoquer une électrocution. FR · Lorsque le cordon électrique est endommagé, il doit être remplacé ou réparé par le service après-vente du fabricant ou par une personne qualifiée. Filtre à air · Nettoyez le filtre à air au moins toutes les deux semaines. Pour éviter tout dysfonctionnement du ventilateur en raison de poussière dans le filtre. · Nettoyez le filtre dans l’eau tiède avec un détergent doux. Rincez soigneusement le filtre et laissez-le sécher à l’air. · Lorsque le filtre est sec, vous pouvez le replacer dans l’appareil. Boîtier Utilisez un chiffon doux humide avec un peu de détergent doux pour nettoyer l’extérieur de l’appareil. Séchez ensuite l’appareil entièrement avec un chiffon sec et doux. Stockage Avant de stocker l’appareil pour une plus longue durée, procédez comme suit pour éviter tout dommage à l’appareil : · Enlevez toute l’eau de l’appareil à l’aide du tuyau de vidange. · Mettez ensuite l’appareil en mode « ventilateur », laissez l’appareil allumé une demijournée dans une salle chauffée. L’appareil peut de cette manière entièrement sécher à l’intérieur. Vous évitez de la sorte la formation de champignons. · Éteignez l’appareil, enlevez la fiche de la prise et enlevez les piles de la télécommande. · Nettoyez les filtres et replacez-les dans l’appareil. · Rangez l’appareil dans un endroit sec et sombre. PROBLÈMES POSSIBLES ET LEUR SOLUTION L’appareil ne fonctionne pas lorsque vous appuyez sur la touche marche/arrêt. · L’écran indique P1 : enlevez l’eau de l’appareil. · La température de la pièce est inférieure à la température réglée sur l’appareil. Adaptez la température sur votre appareil. La pièce ne refroidit pas suffisamment. · Les portes et les fenêtres ne sont pas fermées. Veillez à ce que toutes les portes et les fenêtres soient fermées. 32 · Il y a dans la pièce des appareils qui génèrent de la chaleur. Enlevez autant que possible les sources de chaleur. DO263A · Le tuyau d’évacuation d’air n’est pas raccordé ou est bloqué. Raccordez le tuyau et veillez à ce qu’il fonctionne correctement. · La température réglée est trop élevée. Adaptez la température réglée. · Le sol n’est pas suffisamment droit ou plane. Placez l’appareil sur une surface plane, si possible. FR L’appareil fait trop de bruit ou génère des vibrations. · Le filtre à air est sale. Nettoyez le filtre à air. Votre appareil fait un bruit d’écoulement d’eau. · Le bruit provient du liquide de refroidissement de votre appareil. C’est normal. · Le filtre à air est sale. Nettoyez le filtre à air. CODES “ERREUR “ Les codes “erreur” suivants peuvent apparaître sur l’écran de l’appareil : E1: le capteur relevant la température ambiante ne fonctionne pas. Éteignez l’appareil et débranchez la prise. Attendez 10 sec. et remettez la fiche dans la prise. Remettez l’appareil sous tension. Si le code d’erreur réapparaît, merci de contacter le service de réparation. E2: le capteur de l’évaporateur d’air ne fonctionne pas. Éteignez l’appareil et débranchez la prise. Attendez 10 sec. et remettez la fiche dans la prise. Remettez l’appareil sous tension. Si le code d’erreur réapparaît, merci de contacter le service de réparation. E4: l’écran ne fonctionne pas correctement. Éteignez l’appareil et débranchez la prise. Attendez 10 sec. et remettez la fiche dans la prise. Remettez l’appareil sous tension. Si le code d’erreur réapparaît, merci de contacter le service de réparation. P1: le réservoir d’eau est plein. Retirez l’eau conformément à la section «drainage» du manuel. www.domo-elektro.be DO263A 33 MISE AU REBUT FR Ce symbole sur le produit ou son emballage indique que ce produit ne peut être traité comme déchet ménager. Il doit plutôt être remis au point de ramassage concerné, se chargeant du recyclage du matériel électrique et électronique. En vous assurant que ce produit est éliminé correctement, vous favorisez la prévention des conséquences négatives pour l’environnement et la santé humaine qui, sinon, seraient le résulat d’un traitement inapproprié des déchets de ce produit. Pour obtenir plus de détails sur le recyclage de ce produit, veuillez prendre contact avec le bureau municipal de votre région, votre service d’éliminiation des déchets ménagers ou le magasin où vous avez acheté le produit. L’emballage est recyclable. Traitez l’emballage écologiquement. 34 DO263A GARANTIE Sehr geehrter Kunde, Sämtliche unserer Produkte unterliegen einer strengen Qualitätskontrolle, bevor Sie Ihnen angeboten werden. Sollten dennoch Probleme mit Ihrem Gerät auftreten, bedauern wir dies zutiefst. Wir möchten Sie in diesem Fall bitten, unseren Kundenservice zu kontaktieren. Unsere Mitarbeiter helfen Ihnen gern weiter! [email protected] DE +32 14 21 71 91 Montag – Donnerstag: 8:30 Uhr – 12:00 Uhr und von 13:00 Uhr – 17:00 Uhr Freitag: 8:30 Uhr – 12:00 Uhr und von 13:00 Uhr – 16:30 Uhr Dieses Gerät hat eine Garantiefrist von 2 Jahren ab dem Kaufdatum. Während der Garantiezeit übernimmt der Hersteller die vollständige Verantwortung für Mängel, die nachweislich auf Material- oder Konstruktionsfehler zurückzuführen sind. Wenn derartige Mängel auftreten, wird das Gerät wenn nötig ausgetauscht oder repariert. Die Garantiezeit von 2 Jahren beginnt in diesem Moment nicht erneut, sondern sie läuft bis 2 Jahre nach dem Kaufdatum weiter. Die Garantie wird auf der Grundlage des Kassenbons gewährt. Die Garantie auf Accessoires und Verschleißteile beträgt 6 Monate. Die Garantie und die Verantwortung/Haftung des Lieferanten und Herstellers entfallen automatisch in den folgenden Fällen: · Bei Nichtbeachtung der Anweisungen in dieser Bedienungsanleitung. · Bei falschem Anschluss, z.B. bei einer zu hohen Stromspannung. · Bei falscher, grober oder abnormaler Verwendung. · Bei unzureichender oder falscher Wartung. · Bei vom Verbraucher oder von nicht ermächtigten Dritten vorgenommenen Reparaturen oder Änderungen am Gerät. · Bei der Verwendung von Ersatzteilen oder Accessoires, die nicht vom Lieferanten / Hersteller empfohlen oder geliefert werden. www.domo-elektro.be DO263A 35 SICHERHEITSVORKEHRUNGEN Wenn Sie elektrische Geräte verwenden, müssen folgende Sicherheitshinweise beachtet werden: · Lesen Sie diese Hinweise sorgfältig durch. Bewahren Sie diese Bedienungsanleitung zum späteren Nachschlagen auf. · Entfernen Sie vor dem ersten Gebrauch alle Verpackungsmaterialien und möglichen Werbeaufkleber. Sorgen Sie dafür, dass Kinder nicht mit den Verpackungsmaterialien spielen. DE · Dieses Gerät eignet sich für den Einsatz im Haushalt und in ähnlichen Umfeldern, zum Beispiel in folgenden Bereichen: · Küchenbereich für Mitarbeiter von Geschäften, Büros und anderen ähnlichen beruflichen Umfeldern. · Bauernhöfe · Hotel- und Motelzimmer und andere Bereiche mit wohnungsähnlichem Charakter · Gästezimmer oder Ähnliches · Diese Gerät darf von Kindern ab 16 Jahren und Menschen mit körperlichen oder sensorischen Behinderungen oder Menschen mit eingeschränkten geistigen Fähigkeiten oder mangelnder Erfahrung bzw. Sachkenntnis unter der Bedingung verwendet werden, dass diese Personen beaufsichtigt werden oder sie eine Anleitung zur sicheren Verwendung des Geräts erhalten haben und sich der Gefahren bei der Verwendung des Geräts bewusst sind. Kinder dürfen nicht mit dem Gerät spielen. Die Wartung und Reinigung des Geräts darf nicht durch Kinder ausgeführt werden, außer diese sind älter als 16 Jahre und werden von einem Erwachsenen beaufsichtigt. · Achtung: das Gerät darf nicht mit einer externen Zeitschaltuhr. · Vor der Benutzung prüfen, ob die Spannung, die auf dem Gerät angegeben ist, mit der Spannung Ihres Stromnetzes übereinstimmt. · Das Netzkabel muss stets an eine Steckdose angeschlossen werden, die gemäß den örtlichen Standards und Normen isoliert und geerdet wurde. · Lassen Sie das Netzkabel nicht über den Tisch oder die Anrichte hängen, oder in Kontakt mit heißen Oberflächen kommen. · Benutzen Sie das Gerät niemals, wenn die Kabelschnur oder der Stecker beschädigt ist, nach beeinträchtigtem Funktionieren des Gerätes, oder wenn das Gerät beschädigt ist. Bringen Sie in solchen Fällen das Gerät zur nächsten qualifizierten Servicestelle zur Überprüfung und/oder Reparatur. · Beim Einsatz des Gerätes in Anwesenheit von Kindern ist strenge Aufsicht geboten. · Die Verwendung von Zubehör, das nicht vom Hersteller empfohlen oder verkauft wird, besteht die Gefahr von Brand, elektrischen Schlages oder von Verletzungen. · Ziehen Sie den Stecker aus der Steckdose, wenn das Gerät nicht im Einsatz ist, Einzelteile montiert oder demontiert werden, oder das Gerät gereinigt wird. Ziehen Sie den Stecker direkt am Stecker selber und nicht an der Kabelschnur aus der Steckdose. · Lassen Sie das im Betrieb befindliche Gerät nicht unbeaufsichtigt. 36 DO263A · Stellen Sie das Gerät nicht in der Nähe oder auf einer Gasflamme, einer elektrischen Platte oder an einer Stelle ab, auf der es in Kontakt mit einem Elektroofen oder einem anderen heißen Geräten kommen kann. · Benutzen Sie das Gerät nicht im Freien. · Benutzen Sie das Gerät ausschließlich für den Zweck, für den es gedacht ist. · Stellen Sie das Gerät immer auf eine stabile, flache und trockene Oberfläche. · Das Gerät ist nur auf den privaten Gebrauch ausgelegt. Der Hersteller ist nicht verantwortlich für Unfälle, die als Folge von unsachgemäßem Gebrauch des Geräts oder Nichtbefolgen der in dieser Anleitung aufgeführten Regeln entstehen. · Das Gerät, das Kabel oder den Stecker niemals in Wasser oder in andere Flüssigkeiten tauchen. DE · Sämtliche Reparaturen, abgesehen von der gewöhnlichen Pflege, sind durch den Hersteller oder dessen Kundendienst zu übernehmen. · Sorgen Sie dafür, dass Kinder das Netzkabel oder das Gerät nicht berühren können. · Netzkabel vor scharfen Kanten, heißen Gegen-ständen oder anderen Wärmequellen schützen. · Beim ersten Gebrauch Verpackungsmaterial und mögliche Werbeaufkleber komplett entfernen. · Stellen Sie das Gerät nicht in die Nähe von Gasbrennern, Feuerstellen oder leicht entflammbaren Stoffen, wie z.B. Alkohol, Chemikalien, Insektenvernichtungsmitteln, etc. · Vermeiden Sie gegen das Gerät zu stoßen oder daran zu wackeln. So können Sie Schäden am Gerät vermeiden. · Sorgen Sie dafür, dass die Luft-Zu- und -abfuhr nicht abgedeckt sind. Das Gerät könnte sonst überhitzen. · Vermeiden Sie, dass das Gerät Wasserspritzer abbekommt und stellen Sie es nicht in die Nähe von Wasserquellen. So vermeiden Sie, dass es zu Kurzschlüssen kommt. · Schließen Sie auf der gleichen Stromzufuhr, an der die Klimaanlage angeschlossen ist, kein weiteres Gerät an. · Bedienen Sie den Stecker nicht mit nassen Händen. · Stecken Sie keine fremden Gegenstände in die Öffnungen des Gerätes. · Benutzen Sie keine Verlängerungsschnur. · Lassen Sie das Gerät nicht unbeaufsichtigt, wenn Kinder in der Nähe sind. · Wenn Sie das Gerät innerhalb von kurzer Zeit an- und ausschalten dauert es etwa 3 min. bis der Kompressor wieder einsatzbereit ist. · Stellen Sie das Gerät zur Vermeidung von Störungen nicht in einen Umkreis von 1m zu Fernseher oder Radio. · Um Verfärbungen am Gehäuse zu vermeiden stellen Sie das Gerät nicht in direktes Sonnenlicht. · Kippen Sie das Gerät nicht mehr als 35° wenn Sie es transportieren und transportieren Sie es niemals mit der Unterseite nach oben. Transportieren Sie das Gerät immer aufrecht. · Stellen Sie das Gerät auf einen flachen Untergrund. www.domo-elektro.be DO263A 37 · Zur Verlängerung der Lebensdauer des Gerätes entfernen Sie stets das Wasser aus dem Gerät, sofern Sie es für längere Zeit wegstellen und nicht benutzen. · Benutzen Sie zur Reinigung des Gerätes keine chemischen Mittel, da diese das Gerät beschädigen könnten. · Achten Sie darauf, dass das Gerät nicht an den Strom angeschlossen ist, wenn Sie den Lüftungsrost einsetzen oder entnehmen. · Achten Sie darauf, dass die Klimaanlage nicht in Kontakt mit Feuchtigkeit kommt (z.B. Kondenswasser, Spritzwasser etc.). Sollte das Gerät zufälligerweise in Wasser oder andere Flüssigkeiten gefallen sein, ziehen Sie unmittelbar den Stecker aus der Steckdose. DE · Benutzen Sie das Gerät nicht in feuchten Räumen, wie z.B. Badezimmern oder Waschküchen. · Wenn das Gerät nicht funktioniert nehmen Sie bitte Kontakt mit einem qualifizierten Fachhändler auf. · Sorgen Sie dafür, dass rund um das Gerät mindestens 30 cm Freiraum ist. · Falls die Klimaanlage umgefallen ist muss sofort der Stecker aus der Steckdose gezogen werden. · Berühren Sie das Gerät nicht, wenn Sie nasse Hände oder nackte Füße haben. · Entfernen Sie keine festmontierten Teile des Gerätes und benutzen Sie das Gerät nicht, wenn es nicht vernünftig funktioniert, gefallen oder beschädigt ist. · Benutzen Sie nicht den Stecker zum An- und Abschalten. Verwenden Sie immer die Tasten auf dem Bedienfeld. · Reparaturen, Detektion von Leckagen sowie Arbeiten an der Anlage müssen von qualifizierten Personen die über die geeigneten Zertifikate verfügen, ausgeführt werden. · Die Installation muss gemäß der Installationsanleitung durchgeführt werden. Eine unsachgemäße Installation kann zu Wasseraustritt, Stromschlag oder Brand führen. · Berühren Sie das Gerät nicht mit nassen oder feuchten Händen oder auf bloßen Füßen. · Wenn die Klimaanlage während des Betriebs umgestoßen wird, schalten Sie das Gerät aus und ziehen Sie sofort den Netzstecker. Inspizieren Sie das Gerät, um sicherzustellen, dass es nicht beschädigt ist. Wenn Sie vermuten, dass das Gerät beschädigt ist, wenden Sie sich an einen Techniker oder den Kundendienst. · Während eines Gewitters muss der Strom abgeschaltet werden, um Schäden am Gerät durch Blitzschlag zu vermeiden. · Wenn die Abflussfunktion nicht verwendet wird, bringen Sie beide Gummistopfen in den Abflusslöchern an. Bewahren Sie den Ablaufschlauch bei Nichtgebrauch sorgfältig auf, um Kinder vor dem Ersticken zu schützen. · Verlegen Sie das Kabel nicht unter Teppichböden. Bedecken Sie das Kabel nicht mit Teppichen, Läufern oder ähnlichen Belägen. Verlegen Sie das Kabel nicht unter Möbeln oder Geräten. Verlegen Sie das Kabel außerhalb eines Durchgangs und so, dass niemand darüber stolpern kann. · Trennen Sie das Gerät von der Stromversorgung, wenn ungewöhnliche Geräusche, Gerüche oder Rauch aus dem Gerät austreten. 38 DO263A Detaillierte Informationen bezüglich der Geräte mit dem Kältemittel R290 · Bitte lesen Sie alle Warnhinweise aufmerksam durch. · Verwenden Sie beim Abtauen oder bei der Reinigung des Geräts keine anderen als vom Hersteller empfohlenen Werkzeuge. · Das Gerät muss in einem Raum aufbewahrt werden, in dem keine permanent betriebenen Zündquellen vorhanden sind (zum Beispiel: offene Flammen, ein eingeschaltetes Gasgerät oder laufende Elektroheizung). · Nicht durchstechen oder verbrennen. · Kältemittel können geruchlos sein. · Das Gerät enthält eine gewisse Menge (siehe Typenschild auf der Geräterückseite) des Kältemittels R290. DE · Das Gerät muss in einem Raum aufgebaut, verwendet und gelagert werden, der größer als 8 m2 ist. · Das Kältemittel R290 entspricht den europäischen Umweltrichtlinien. Beschädigen Sie nicht den Kältekreislauf. · Wird das Gerät in einem unbelüfteten Raum aufgestellt, betrieben oder gelagert, muss der Raum so gestaltet sein, dass sich das Kältemittel bei einer Leackage nicht sammeln und eine Explosions- und Brandgefahr darstellen kann, aufgrund der Entzündung des Kältemittels durch Elektroheizungen, Öfen oder anderen Zündquellen. · Das Gerät ist so zu lagern, dass mechanische Schäden ausgeschlossen werden. · Alle Personen, die an einem Kältemittelkreislauf arbeiten oder in ihn eingreifen, müssen im Besitz eines gültigen Zertifikats von einer anerkannten Prüfstelle sein, die ihnen bestätigt, dass sie sicher im Umgang mit Kältemitteln gemäß der anerkannten Spezifikationen sind. · Reparaturen sind entsprechend der Empfehlungen des Hersteller durchzuführen. Wartungs- und Reparaturarbeiten, bei denen weitere Fachkräfte assistieren müssen, sind unter der Aufsicht der Person, die in der Verwendung von brennbaren Kältemitteln geschult ist, durchzuführen. Vorsicht: Brandgefahr / brennbare Materialien Dieses Gerät verwendet ein brennbares Kühlmittel. Wenn das Kühlmittel austritt und einer externen Zündquelle ausgesetzt ist, besteht Brandgefahr. BEWAHREN SIE DIESE ANWEISUNGEN AUF ENERGIETIPPS · Benutzen Sie das Gerät nicht in Räumen, die größer sind als für das Gerät empfohlen. · Stellen Sie das Gerät so auf, dass der Luftstrom nicht durch Möbel oder andere Gegenstände behindert wird. · Halten Sie Gardinen während der wärmsten Tageszeit geschlossen. · Achten Sie darauf, dass die Filter immer sauber sind. · Halten Sie Fenster und Türen geschlossen, um die gekühlte Luft drinnen und die warme Luft draußen zu halten. www.domo-elektro.be DO263A 39 TEILE Vorderseite 1. Bedienpanel 2. Luftauslass 3 2 Rückseite DE 1 3. Luftfilter 4. Lufteinlass 5. Luftauslass 6. Drainage 5 4 6 Teile 7. Drainageschlauch 8. Fernbedienung 9. Fernbedienung Wandbefestigung 10. Luftauslassschlauch 10 a. Kopplung Luftauslassschlauch 11. Wandbefestigungssatz 11 a. Wandadapter 7 11 b.Kopplung 12. Fensterbefestigungssatz 12 a. Fensteradapter 9 12 b. Kopplung Fensterbefestigungssatz 12 c. Fensterdichtung 8 12 d. Adapterstecker 12 e. L-Eisen mit Schrauben 10 10a 11 11b 11a 12 12a 40 DO263A 12b 12c 12d 12e MONTAGE · Stellen Sie die Klimaanlage auf einen soliden, stabilen Untergrund, um Lärmbelästigung und Vibrationen zu reduzieren. · Achten Sie darauf, dass der Untergrund stark genug ist, um dass Gewicht des Gerätes zu tragen. · Um das Gerät einfach transportieren zu können hat es Rollen. Rollen Sie das Gerät ausschließlich über glatte, flache Böden und nicht über Gegenstände. Beim Rollen über Teppiche sollte max 120 cm man besonders vorsichtig sein. · Stellen Sie das Gerät in die Nähe einer geerdeten Steckdose. min 30 cm DE · Achten Sie darauf, dass sich rund um das Gerät 30 cm Freiraum befinden. · Der Luftablassschlauch muss während der COOL- oder AUTO-Funktion angeschlossen werden. Im FAN- oder DRY-Modus haben Sie den Luftablassschlauch nicht nötig. · Achten Sie darauf, dass sich im Umkreis von 50 cm von der Luftabfuhr keine Hindernisse befinden. · Achten Sie darauf, dass der Luftablassschlauch bei der Montage nicht zu stark gebogen wird MONTAGE DER FENSTER-LUFTABFUHR · Bringen Sie die Koppelung des Luftauslassschlauchs am Schlauchende an. · Bringen Sie den Luftauslassschlauch an der Rückseite des Geräts an. · Bringen Sie die Koppelung der Fensterbefestigung am anderen Ende des Luftauslassschlauches an. · Bringen Sie den Fensteradapter im Fenster an. Dies ist sowohl für horizontale wie auch vertikale Schieberahmen möglich. Blockieren Sie den Fensteradapter auf der gewünschten Länge. · Befestigen Sie den Schlauch mit Koppelung auf dem Fensteradapter. · Verwenden Sie die Fensterdichtungen, um eventuelle Öffnungen im Fenster zu verschließen. www.domo-elektro.be DO263A 41 max 120 cm min 30 cm · Setzen Sie die gewünschte Länge des Fensteradapters mit dem mitgelieferten Fensteradapterstopper fest. · Auf Wunsch können Sie das Fenster mit dem L-Eisen und 2 Schrauben befestigen. MONTAGE DER WAND-LUFTABFUHR DE · Bringen Sie die Koppelung des Luftauslassschlauchs am Schlauchende an. · Bringen Sie den Luftauslassschlauch an der Rückseite des Geräts an. · Bringen Sie eine Öffnung in der Mauer in der Größe des Maueradapters an. · Bringen Sie den Maueradapter in der Öffnung an. Befestigen Sie die Wandhalterung mit den im Lieferumfang enthaltenen Schrauben. · Bringen Sie die Koppelung der Mauerbefestigung am anderen Ende des Luftauslassschlauches an. · Befestigen Sie den Schlauch mit Koppelung auf dem Maueradapter. max 120 cm min 30 cm 42 DO263A GEBRAUCH Die horizontalen Lamellen an der Vorderseite der Klimaanlage können Sie manuell öffnen und schließen, um so den Luftauslass besser ausrichten zu können. BEDIENPANEL 4 1. 2 1 DE 3 ON-OFF-Taste Mit dieser Taste können Sie das Gerät an- oder ausschalten. 2. “+” und “-”-Tasten Diese Tasten müssen Sie benutzen, wenn Sie die Temperatureinstellung ändern wollen. Die Temperatur kann auf einen Wert zwischen 17 °C und 30 °C eingestellt werden. Wenn Sie beide Pfeil-Tasten gleichzeitig 3 sek. Gedrückt halten können Sie zwischen °C und °F wählen. 3. MODE-Taste Mit dieser Taste können Sie die gewünschte Gebrauchseinstellung wählen. Bei jedem Druck auf diese Taste wird die Gebrauchseinstellung verändern: COOL, DRY und FAN. Das entsprechende Kontrolllämpchen auf dem Panel wird aufleuchten. Wenn Sie die FAN-Einstellung wählen, bläst die Lüftung im automatischen Stand. Sie können die Lüftungsgeschwindigkeit nur mit der Fernbedienung anpassen. 4. LED-Display Das LED-Display gibt die eingestellte Temperatureinstellung wieder. Wenn das Gerät im DRY- oder FAN-Modus steht, wird auf dem Display die Zimmertemperatur wiedergegeben. FERNBEDIENUNG Achten Sie bei Verwendung der Fernbedienung immer darauf, sie in Richtung des Geräts zu richten. Wenn Sie dies unterlassen, können Sie nach dem Ändern einer bestimmten 1 2 Einstellung die Fernbedienung noch auf das Gerät richten und auf die EIN-AUS-Taste drücken. 3 Wenn das Gerät ein Signal der Fernbedienung empfängt, 4 hören Sie einen Piepston. Die Fernbedienung muss in einem Radius von 8 Metern um das Gerät verwendet werden. www.domo-elektro.be 6 7 8 5 9 DO263A 43 1. ON-OFF-Taste Mit dieser Taste können Sie das Gerät an- oder ausschalten. 2. MODE-Taste Mit dieser Taste können Sie die gewünschte Gebrauchseinstellung wählen. Bei jedem Druck auf diese Taste wird die Gebrauchseinstellung verändern: COOL, DRY und FAN. Das entsprechende Kontrolllämpchen auf dem Panel wird aufleuchten. SILEN FAN SPEED display Not ava FAN SPEED display Displays selected FAN SPEED: Displays selected FAN SPEED: HIGH, MED, Mit dieser Taste können Sie die Geschwindigkeit des Ventilators einstellen. Sie können HIGH, MED, or , LOW HIGH und AUTO. zwischen drei Geschwindigkeiten wählen: LOW Temperature or LOW This display is blank when Displays theT display is blank when set to AUTOThis speed. 4. SLEEP-Taste D when using T set to AUTO speed. w Mit dieser Taste können Sie das Gerät in Schlafmodus setzen. Temperatu DE 3. FAN-Taste Wenn Sie diese Funktion wählen wird die eingestellte Temperatur innerhalb von 30 min. um Timer sett 1 °C steigen. Nach weiteren 30 min. wird die Temperatur nochmals um 1 °C steigen. Die dann erreichte Temperatur wird anschließend für die nächsten 7 Std. konstant gehalten. DanachThis display T sinkt die Temperatur auf ihre ursprüngliche Einstellung und ist der „SLEEP“-Modus beendet. HINWEIS: Diese Funktion kann nicht bei „DRY“- oder „FAN“-Funktion gewählt werden. 5. TEMP-Taste Diese Tasten müssen Sie benutzen, wenn Sie die Temperatureinstellung ändern wollen. Die Temperatur kann auf einen Wert zwischen 17 °C und 30 °C eingestellt werden. Wenn Sie beide Pfeil-Tasten gleichzeitig 3 sek. Gedrückt halten können Sie zwischen °C und °F wählen. 6. SHORT CUT-Taste Mit dieser Taste können Sie eine bevorzugte Einstellungen festlegen und einschalten. 7. TIMER ON-Taste Mit dieser Taste können Sie die Zeit einstellen, wann das Gerät sich anstellen soll. 8. TIMER OFF-Taste Mit dieser Taste können Sie die Zeit einstellen, wann das Gerät sich ausstellen soll. 9. LED-Taste Mit dieser Taste wird das LED-Display des Bedienfelds ausgeschaltet. Sie können sie verwenden, wenn das Display zu viel Licht abgibt, wenn Sie schlafen möchten. Wenn Sie ein zweites Mal auf die Taste drücken, schaltet sich das Display wieder ein. 44 DO263A 5 1 Remote LED Screen Indicators ECO display HEAT FAN Not available for this unit Transmission Indicator Lights up when remote sends signal to unit EINSTELLUNG DER FUNKTIONEN Battery display Low battery detection Transmission Indicator Lights up when remote sends signal to unit ECO d Not av this un Transmiss Lights up w Batter signalLow to un b TIMER ON MODE TEMP TIMER OFF FAN ION SLEEP SWING FOLLOW ME LED ON/OFF display MODEAUTO display Appears when the unit is turned on, Displays the current and disappears when it is turned off SLEEP display mode,In including: der Einstellung AUTO wählt das Gerät automatisch die passende Einstellung abhängig von Displays when TIMER OFF display SLEEP function TIMER ON display AUTO 2 der gewählten Temperatur. Diese Einstellung können Sie lediglich mit der Fernbedienung Displays when TIMER Displays when TIMER COOL is activated ON/OFF SHORT OFF is set ON is set 3 CUT DRY wählen. Remote LED Screen Indicators How Func FOLLOW ME HEAT TIMER 1 To UseMODEThe Basic ON display FAN TEMP 1. Wählen Sie mit der MODUS-Taste auf der Fernbedienung AUTO aus. COOL operation ECO display Indicates that TIMER FAN OFF Not the available FOLLOW for ME Press theIONMODE button to select 2. Transmission Regeln SieIndicator die Temperatur mit der TEMP-Taste.this Das bestimmt die 1. Einstellung unitGerät function is on COOL mode. FOLLOW Lights up whenhiervon. remote sends SWING LED abhängig ME 2. Set your SLEEP desired temperature us Battery display Not available for signal to unit the Temp or Temp button Low battery Im AUTO-Modus können Sie die Geschwindigkeit Lüftung (FAN) nicht einstellen. this der unit 3. Press the FAN button to select th detection ON/OFF display SILENTon, display fan speed: AUTO, LOW, MED,or MODE displaydisplay Appears when the unit is turned FAN SPEED available HIGH. SLEEP display Displays currentFANand disappears when it Not is turned off for this unit Displaysthe selected SPEED: 4. Press the ON/OFF buttonFunct to star Remote LED Indicators How To Use The Basic Displays when mode, including: HIGH,Screen MED, COOL unit. SLEEP function TIMER OFF display TIMER ON display or AUTO LOW 2 Temperature/Timer display when TIMER is activated Displays when TIMER Mitisder Kühlfunktion Sie denDisplays Raum eine bestimmte Temperatur3abkühlen. ThisCOOL display blank when ON/OFF SHORT OFF is setbyauf ON können isDisplays set CUT the set temperature default, or timer setting DRY set to AUTO speed. FOLLOW ME Indicator when using TIMER ON/OFF functions HEAT TIMER MODE 1. Transmission Drücken Sie auf die MODUS-Taste, bis die COOL-Anzeigeleuchte brennt. 1 ON Lights up when remote sends Temperature range: 17-30oC(62OF-86OF)display FAN COOL operation TEMP Indicates that ECO display signal to unit TIMER FAN 2. Verwenden Sie die „+”„-”-Tasten auf dem Bedienfeld auf der OFF Timerund setting range: 0-24 hours the FOLLOW Not available forME oder die TEMP-Taste 1. Press the MODE button to select function ON/OFF display This display is blank when operating in FAN ION this unit is on einzustellen. mode. um die gewünschte Zimmertemperatur COOL mode. MODE display Fernbedienung, Appears when the unit is turned on, FOLLOW SWING LED 2. Set yourSLEEP desired temperature usi ME Displays the current Not available for and disappears when it is turned off Battery display the Temp or Temp button 3. Verwenden Sie die FAN-Taste mode, including: thisbattery unit um die gewünschte Low 5 auf der Fernbedienung, 3. Press the FAN button to select th TIMER OFFEs display TIMER ON display AUTO HIGH AUTO, LOW, MED,or Lüftungsgeschwindigkeit einzustellen. gibtdetection drei Einstellungen. LOW fan, speed: SILENT display 2 FANCOOL SPEED display Displays when TIMER Displays when TIMER ON/OFF SHORT Not available for this unit HIGH. OFF is set ON is set 3 Displays CUT SLEEP display DRY selected FAN SPEED: und AUTO. 4. Press the ON/OFF button to start MED, Displays when HEAT HIGH, TIMER 1 unit. MODE ON or FAN LOW SLEEP function TEMP Temperature/Timer display ECO display is activated TIMER FAN This display is blank when OFF Displays the set temperature by default, or timer setting Not available for DRY set to AUTO speed. when using TIMER ON/OFF functions this ION FOLLOW unit ME o O O display FOLLOW Temperature range: 17-30 C(62 F-86 F) SWING SLEEP LED Mit dieser Funktion können Sie den Raum entfeuchten. Halten Sie bei Betrieb dieser Funktion COOL operation ME Battery display Indicates that Timer setting range: 0-24 hours o O O Low battery the FOLLOW ME Fenster und Türen geschlossen. 1. Press the MODE button to select detection function is on This display is blank when operating in FAN mode. ON/OFF display Appears when the unit is turned on, and disappears when it is turned off TIMER ON display Displays when TIMER ON is set the FO functio ECO d DE MODE display Displays the current mode, including: AUTO COOL DRY HEAT FAN detect ON MODE display App Displays the currentSLEEP and Displa mode, including: SLEEP AUTO is activ COOL TIMER OFF display DRY FOLLO Displays when TIMER displa OFFHEAT is set FAN Indicat Not av Not av this un FAN SPEED display this un Displays selected FAN SPEE Batter SILENT display HIGH, LowME b Not available foror this unit LOW detect FAN SPEED display Displays selected FAN SPEED: HIGH, MED, or LOW This display is blank when set to AUTO speed. SLEEP Temperature/Timer display Displa This display is blank when Displays the set temperature by default, or timer s SLEEP set to AUTO speed. when using TIMER ON/OFF functions is activ Temperature range: 17-30 C(62 F-86 F) COOL mode. FOLLO 1. Drücken Sie auf die MODUS-Taste, bis die DRY-Anzeigeleuchte brennt. Timer setting range: hours 2.0-24 Set your desired temperature using SLEEP display Not available for the Temp or Temp button. displa 5 Displays when this unit 2. Verwenden Sie die „+”- und „-”-Tasten auf dem Bedienfeld die TEMP-Taste auf der 3. Press the FAN button to select the SLEEP function This display oder is blank when operating inLOW, FAN mode Indicat SILENT display fan speed: AUTO, MED,or is activated FAN SPEED display Fernbedienung, umNotdie gewünschte Zimmertemperatur einzustellen. available for this unit HIGH. the FO Displays selected FAN SPEED: 4. Press the ON/OFF button to start th FOLLOW ME HIGH, Bei dieser MED, Einstellung können Sie die Lüftungsgeschwindigkeit 3. nicht einstellen. functio unit. display or LOW This display is blank when set to AUTO speed. Indicates that Temperature/Timer display FOLLOW Displays the set temperature by default, or the timer setting ME function is on when using TIMER ON/OFF functions 5 COOL operation 1. Press the MODE button to Not selectav COOL mode. FAN display 2. SetSPEED your desired temperature thisusing un the Temp or Temp button. 1. Drücken Sie brennt. Displays selected FAN SPEE 3. Press the FAN button to select the SILENT display fan speed: AUTO, LOW, MED,or HIGH, ME FAN SPEED 2.display Verwenden Siedisplay die FAN-Taste auf der Fernbedienung, um die gewünschte FAN SPEED available for this unit HIGH. Not available fororthis unit Displays selectedDisplays FAN SPEED: selectedNot LOW FAN SPEED: , HIGH Lüftungsgeschwindigkeit einzustellen. Es gibt drei Einstellungen. LOW 4. Press the ON/OFF button to start th 5 HIGH, MED, unit. HIGH, MED, or LOW und AUTO. This display is blank when Temperature/Timer display This display is blank when or LOW Displays the set temperature by default, or timer setting set to AUTO speed. 3.speed. Die Temperatur kann nicht eingestellt werden. set to AUTO when using TIMER ON/OFF functions Temperature/Timer display This display is blank when Temperature range: 17-30 C(62 F-86 F) Displays the set temperature by default, or timer s set to AUTO speed. Timer setting range: 0-24 hours when using TIMER ON/OFF functions Timer on This display is blank when operating in FAN mode. o Temperature range: 17-30 C(62OF-86OF) Mit dieser Funktion können Sie das Gerät zeitverzögert starten, bis zu maximal 24 Stunden. FAN Temperature range: 17-30oC(62OF-86OF) Not available for auf die MODUS-Taste, Timer setting range: 0-24 bis hoursdie FAN-Anzeigeleuchte this unit This display is blank when operating in FAN mode. SILENT display o O O 5 1. Drücken Sie auf der Fernbedienung auf die TasteTimer „TIMERsetting ON“. range: 0-24 hours 2. Auf dem Display der Fernbedienung können Sie jetzt ablesen, zu welchem Zeitpunkt die This display is blank when operating in FAN mode Klimaanlage den Betrieb aufnimmt. www.domo-elektro.be 5 DO263A 45 3. Drücken Sie mehrmals auf die Taste TIMER ON, um den Wert der Zeit zu erhöhen. Oder halten Sie die Taste eingedrückt. 4. Erst wenn die gewünschte Zeit eingestellt ist, wird auf dem Display der Fernbedienung „Timer on“ stehen. Auf dem Display des Bedienfelds sind 2 erleuchtete Kugeln zu sehen. 5. Wenn Sie den Timer ausschalten möchten, drücken Sie mehrmals auf die Taste TIMER ON, bis der Zähler auf „0“ steht. Oder halten Sie die Taste eingedrückt. Timer off DE Mit dieser Funktion können Sie das Gerät nach Ablauf der Zeit automatisch ausschalten lassen. 1. Drücken Sie auf der Fernbedienung auf die Taste „TIMER OFF“. 2. Auf dem Display der Fernbedienung können Sie jetzt ablesen, zu welchem Zeitpunkt die Klimaanlage abgeschaltet wird. 3. Drücken Sie mehrmals auf die Taste TIMER OFF, um den Wert der Zeit zu erhöhen. Oder halten Sie die Taste eingedrückt. 4. Erst wenn die gewünschte Zeit eingestellt ist, wird auf dem Display der Fernbedienung „Timer off“ stehen. Auf dem Display des Bedienfelds sind 2 erleuchtete Kugeln zu sehen. 5. Wenn Sie den Timer ausschalten möchten, drücken Sie mehrmals auf die Taste TIMER OFF, bis der Zähler auf „0“ steht. Timer on + Timer off Sie können auch beide Funktionen gleichzeitig einschalten. Damit bestimmen Sie, wann das Gerät eingeschaltet wird, aber auch, wann das Gerät ausgeschaltet wird. Wichtig: Diese Zeit gilt ab dem Zeitpunkt, an dem Sie die Einstellung programmieren. Beispiel: Es ist jetzt 13:00. Sie möchten das Gerät von 16:30 bis 19:00 betrieben. Stellen Sie die Funktion TIMER ON auf 3,5 Stunden ein und TIMER OFF auf 5,0 Stunden. Sleep Wenn Sie diese Funktion wählen wird die eingestellte Temperatur innerhalb von 30 min. um 1 °C steigen. Nach weiteren 30 min. wird die Temperatur nochmals um 1 °C steigen. Die dann erreichte Temperatur wird anschließend für die nächsten 7 Std. konstant gehalten. Danach sinkt die Temperatur auf ihre ursprüngliche Einstellung und ist der „SLEEP“-Modus beendet. HINWEIS: Diese Funktion kann nicht bei „DRY“- oder „FAN“-Funktion gewählt werden. Shortcut Mit dieser Taste können Sie eine bevorzugte Einstellungen festlegen und einschalten. Wenn Sie eine bestimmte Einstellung häufiger verwenden, können Sie sie einstellen, indem Sie die SHORTCUT-Taste 3 Sekunden lang eingedrückt halten. Das Gerät speichert dann die Einstellungen, die zum Zeitpunkt des Drückens eingeschaltet sind. Diese Einstellungen können sein: die Gebrauchseinstellung (MODE), die eingestellte Temperatur, die 46 DO263A Lüftungsgeschwindigkeit (FAN) und eventuell auch noch die SLEEP-Einstellung. Zu dem Zeitpunkt, an dem Sie die SHORTCUT-Taste betätigen, arbeitet das Gerät in Übereinstimmung mit den zuvor festgelegten Einstellungen. REINIGUNG UND WARTUNG WASSERABFUHR Permanente Drainage 1. Entfernen Sie den Drainage-Verschluss und die Gummikappe auf der Rückseite des Gerätes. 2. Befestigen Sie den Drainageschlauch an der Drainage-Öffnung. 3. Achten Sie darauf, dass das Wasser sicher und dauerhaft abfließen kann. DE Während des Entfeuchtungsvorgangs können Sie am Besten eine permanente Drainage benutzen. 2 1 Drainage Hinweis „P1“ Wenn Sie nicht von einer permanenten Drainage Gebrauch machen, läuft das Wasser in den Auffangbehälter unten am Gerät. · Wenn der Behälter voll ist wird der Hinweis „P1“ auf dem Display erscheinen. Der Entfeuchtungsprozess/Kühlungsprozess wird stoppen, aber der Ventilator wird sich weiterhin drehen. · Bringen Sie das Gerät an einen Ort, wo Sie das Wasser einfach ablassen können. · Entfernen Sie den Verschluss von der Drainage-Öffnung unten am Gerät. Das Wasser wird nun ablaufen. · Nachdem das Wasser vollständig abgelaufen ist, drehen Sie bitte wieder den Verschluss auf die Drainage-Öffnung. (A) · Nun können Sie das Gerät wieder anschalten. Achten Sie darauf, dass die Meldung „P1“ nicht mehr auf dem Display steht. · Falls die Meldung nicht verschwunden ist, können Sie das Gerät einige Male an- und ausschalten. Sollte die Meldung dann noch stets auf dem Display erscheinen, wenden Sie sich bitte an den Fachhändler. www.domo-elektro.be A DO263A 47 · HINWEIS: Verschließen Sie immer erst wieder die Drainage-Öffnung, bevor Sie das Gerät wieder einschalten. REINIGUNG · Ziehen Sie immer erst den Stecker aus der Steckdose, bevor Sie das Gerät reinigen. · Benutzen Sie keine chemischen oder scheuernden Reinigungsmittel. · Spülen Sie das Gerät niemals mit Wasser ab, da dies zu Kurzschlüssen und Unfällen führen kann. DE · Falls das Kabel des Gerätes beschädigt ist, muss dieses durch den Hersteller oder einen qualifizierten Fachhandel repariert werden. Luftfilter · Um zu gewährleisten, dass der Ventilator problemlos funktioniert und sich nicht zu viel Staub im Filter befindet, reinigen Sie den Luftfilter mindestens alle zwei Wochen. · Waschen Sie den Filter in lauwarmem Wasser mit etwas mildem Spülmittel vorsichtig aus. Spülen Sie den Filter danach mit sauberem Wasser ab und lassen Sie den Filter an der Luft trockenen. · Erst wenn der Filter völlig trocken ist können Sie dieser wieder ins Gerät einsetzen. Gehäuse Das Gehäuse kann mit einem weichen, feuchten Tuch mit etwas mildem Spülmittel abgewaschen werden. Trocknen Sie das Gehäuse nach dem Abwaschen gründlich mit einem weichen, trockenen Tuch ab. Verstauen Bevor Sie das Gerät für eine längere Zeit verstauen, empfehlen wir Ihnen folgende Wartungsschritte: · Entfernen Sie sämtliches Wasser mit Hilfe des Drainageschlauchs aus dem Gerät. · Stellen bei dem Gerät anschließend die „FAN“-Funktion ein und lassen es einen halben Tag in einem erwärmten Raum stehen. Auf diese Art und Weise kann das Gerät auch von Innen vollständig trockenen und wird sich kein Schimmel bilden. · Schalten Sie das Gerät danach ab und ziehen Sie den Stecker aus der Steckdose. Entfernen Sie anschließend die Batterien aus der Fernbedienung. · Reinigen Sie die Filter und setzen Sie diese wieder ins Gerät ein. · Verstauen Sie das Gerät in einem trockenen, dunklen Raum. 48 DO263A MÖGLICHE PROBLEME UND PROBLEMLÖSUNGEN Das Gerät springt nicht an, wenn man auf den ON/OFF-Taste drückt · Auf dem Display steht „P1“. Entfernen Sie das Wasser aus dem Gerät. · Die Zimmertemperatur ist niedriger als die Temperatur, die Sie eingestellt haben. Ändern Sie entsprechend die Temperatureinstellung am Gerät. Das Zimmer kühlt nicht entsprechend ab · Es befinden sich wärmeerzeugende Geräte im Raum. Entfernen Sie, wenn möglich, die Wärmequellen. · Der Luftablassschlauch ist nicht angeschlossen oder blockiert. Schließen Sie den Schlauch an und sorgen Sie dafür, dass er nicht zu sark gekrümmt ist. DE · Fenster und Türen sind nicht geschlossen. Sorgen Sie dafür, dass Fenster und Türen geschlossen werden. · Die eingestellte Temperatur ist zu hoch. Passen Sie die Temperatureingabe entsprechend an. · Der Luftfilter ist verschmutzt. Reinigen Sie den Luftfilter. Das Gerät macht zu viel Lärm und sorgt für Vibrationen · Der Boden, auf dem das Gerät steht, ist nicht flach genug. Stellen Sie das Gerät an einen anderen Platz, wo der Boden flach und eben ist. · Der Luftfilter ist verschmutzt. Reinigen Sie den Luftfilter. Das Gerät macht gurgelnde Geräusche · Die Geräusche kommen vom Kühlmittel im Gerät und sind völlig normal. ERROR-MELDUNGEN Folgende Error-Meldungen können bei Störungen auf dem Display erscheinen: E1: Der Sensor für die Zimmertemperatur funktioniert nicht. Schalten Sie das Gerät ab und ziehen Sie den Stecker aus der Steckdose. Warten Sie ca. 10 sek. und stecken Sie den Stecker erneut in die Steckdose. Schalten Sie das Gerät wieder ein. Sollte die gleiche Error-Meldung auf dem Display erscheinen nehmen Sie bitte Kontakt mit dem Reparaturservice auf. E2: Der Sensor vom Luftverdampfer funktioniert nicht. Schalten Sie das Gerät ab und ziehen Sie den Stecker aus der Steckdose. Warten Sie ca. 10 sek. und stecken Sie den Stecker erneut in die Steckdose. Schalten Sie das Gerät wieder ein. Sollte die gleiche Error-Meldung auf dem Display erscheinen nehmen Sie bitte Kontakt mit dem Reparaturservice auf. E4: Das Display funktioniert nicht vernünftig. Schalten Sie das Gerät ab und ziehen Sie den Stecker aus der Steckdose. Warten Sie ca. 10 sek. und stecken Sie den Stecker erneut in die Steckdose. Schalten Sie das Gerät wieder ein. Sollte die gleiche Error-Meldung auf dem Display erscheinen nehmen Sie bitte Kontakt mit dem Reparaturservice auf. www.domo-elektro.be DO263A 49 P1: Das Wasserreservoir ist voll. Schließen Sie den Drainageschlauch unten am Gerät an und lassen Sie das Wasser ablaufen. Sollte die gleiche Error-Meldung auf dem Display erscheinen nehmen Sie bitte Kontakt mit dem Reparaturservice auf. ENTSORGEN DE Dieses Symbol auf dem Produkt oder seiner Verpackung weist darauf hin, dass dieses Produkt nicht als normaler Haushaltsabfall zu behandeln ist, sondern an einem Sammelpunkt für das Recyling von elektrischen und elektronischen Geräten abgegeben werden muss. Durch Ihren Beitrag zum korrekten Entsorgen dieses Produkts schützen Sie die Umwelt und die Gesundheit Ihrer Mitmenschen. Umwelt und Gesundheit werden durch falsches Entsorgen gefährdet. Weitere Informationen über das Recycling dieses Produkts erhalten Sie von Ihren Rathaus, Ihrer Müllabfuhr oder dem Geschäft, in dem Sie das Produkt gekauft haben. Das Verpackungsmaterial ist wiederverwertbar. Entsorgen Sie die Verpackung umweltgerecht und führen Sie sie der Wertstoffsammlung zu. 50 DO263A WARRANTY Dear client , All of our products are always submitted to a strict quality control before they are sold to you. Should you nevertheless experience problems with your device, we sincerely regret this. In that case, we kindly request you to contact our customer service. Our staff will gladly assist you. +32 14 21 71 91 [email protected] Monday – Thursday: 8.30 – 12.00 and 13.00 – 17.00 This appliance has a two year warranty period. During this period the manufacturer is responsible for any failures that are the direct result of construction failure. When these failures occur the appliance will be repaired or replaced if necessary. The warranty will not be valid when the damage to the appliance is caused by wrong use, not following the instructions or repairs executed by a third party. The guarantee is issued with the original till receipt. All parts, which are subject to wear, are excluded from the warranty. EN Friday: 8.30 – 12.00 and 13.00 – 16.30 If your device breaks down within the 2-year warranty period, you can return the device together with your receipt to the shop where you purchased it. The guarantee on accessories and components that are liable to wear-and-tear is only 6 months. The guarantee and responsibility of the supplier and manufacturer lapse automatically in the following cases: · If the instructions in this manual have not been followed. · In case of incorrect connection, e.g., electrical voltage that is too high. · In case of incorrect, rough or abnormal use. · In case of insufficient or incorrect maintenance. · In case of repairs or alterations to the device by the consumer or non-authorised third parties. · If the customer used parts or accessories that are not recommended or provided by the supplier / manufacturer. www.domo-elektro.be DO263A 51 SAFETY INSTRUCTIONS When using electrical appliances, basic safety precautions should always be taken, including the following: · Read all instructions carefully. Keep this manual for future reference. · Make sure all packaging materials and promotional stickers have been removed before using the appliance for the first time. Make sure children cannot play with the packaging materials. · This appliance is intended to be used in household and similar applications such as: · staff kitchen areas in shops, offices and other working environments; · farm houses; · by clients in hotels, motels and other residential type environments; · bed and breakfast type environments. EN · Children should be supervised to ensure that they do not play with the appliance. · This appliance can be used by children aged from 16 years and above and persons with reduced physical, sensory or mental capabilities or lack of experience and knowledge if they have been given supervision or instruction concerning use of the appliance in a safe way and understand the hazards involved. Children shall not play with the appliance. Cleaning and user maintenance shall not be made by children unless they are older than 16 and supervised. · Keep the appliance and its cord out of reach of children younger than 16 years. · Attention: This appliance cannot be used with an external timer. · Before use, check if the voltage stated on the appliance corresponds with the voltage of the power net at your home. · The plug must be plugged into an appropriate outlet that is installed and grounded in accordance with all local standards and requirements. · Do not let the cord hang on a hot surface or on the edge of a table or counter top. · Never use the appliance when the cord or plug is damaged, after malfunction or when the appliance itself is damaged. In that case, take the appliance to the nearest qualified service center for check-up and repair. · Close supervision is necessary when the appliance is used near or by children. · The use of accessories that are not recommended or sold by the manufacturer can cause fire, electrical shock or injuries. · Unplug the appliance when it is not in use, before assembling or disassembling any parts and before cleaning the appliance. Put all buttons and knobs into the ‘off’ position and unplug the appliance by grasping the plug. Never unplug by pulling the cord. · Do not leave a working appliance unattended. · Never place this appliance near a gas stove or electrical stove or in a place where it may come into contact with a warm appliance. · Do not use the appliance outdoors. 52 DO263A · Only use the appliance for its intended use. · Always use the appliance on a steady, dry and level surface. · Only use the appliance for domestic use. The manufacturer cannot be held responsible for accidents that result from improper use of the appliance or not following the instructions described in this manual. · All repairs should be carried out by the manufacturer or its aftersales service. · Never immerse the appliance, the cord or the plug in water or any other liquid. · Make sure that children do not touch the cord or appliance. · Keep the cord away from sharp edges and hot parts or other heat sources. · Before use, remove all packaging materials and any promotional stickers. · Never place the unit near a stove, fire or highly inflammable liquids. · Never hit or shake the unit, to prevent damage. · Never cover the air inlet or air outlet, to prevent overheating the unit. · Never splash water on the unit, or place the unit near water, to prevent electrocution. · Never place another appliance on the same electrical circuit as the air conditioning. · Never handle the plug with wet hands. EN · Never put any foreign objects in the openings of the air conditioning. · Never use an extension cord. · Never let children play near the unit. · When you turn off the unit and want to turn it on immediately afterwards, the compressor will need 3 min.to start up again. · Always place the unit at least 1m away from TV or radio, to prevent disturbance. · Never place the unit in direct sun light, to prevent discoloration of the air conditioning. · Make sure the angle of the unit is never more than 35°, when you move the air conditioning. Never place the unit upside down. · Always remove the water from the water tank, when storing the air conditioning. This will keep your air conditioning in optimal condition for a long time. · Never use any chemicals to clean the unit, this will cause damage. · Always make sure to disconnect the unit from the electrical supply before attaching or removing the air inlet grill. · Make sure the air conditioning is always protected against condensation, splashing water, etc. Make sure the air conditioning can’t come in contact or be pulled into water or any other liquid. If for some reason the air conditioning will fall in to water or any other liquid, immediately remove the plug form the socket. · Never use the air conditioning in a damp room such as a bathroom or a laundry room. · Always contact a qualified person for repairing the unit. · Make sure that the free space around the unit is at least 30 cm. · Never touch the unit with wet hands or bare feed. · Do not press the buttons on the control panel with anything other than your fingers. www.domo-elektro.be DO263A 53 · Never remove fixed parts from the air conditioning. Never use the unit when it is not working properly, or when the unit has fallen or has been damaged. · Never use the plug to turn the unit on or off. Always use the buttons on the control panel. · Reparations, checking for leaks or other services need to happen by a qualified technician with the right certificates. · Installation must be performed according to the installation instructions. Improper installation can cause water leakage, electrical shock, or fire. · Do not touch the unit with wet or damp hands or when barefoot. · If the air conditioner is knocked over during use, turn off the unit and unplug it from the main power supply immediately. Inspect the unit to ensure there is no damage. If you suspect the unit has been damaged, contact a technician or customer service for assistance. · In a thunderstorm, the power must be cut off to avoid damage to the machine due to lightning. EN · When the water drainage function is not in use, keep the upper and the lower drain plug firmly to the unit. When the drain plug is not in use, keep it carefully to prevent children from choking. · Do not run cord under carpeting. Do not cover cord with throw rugs, runners, or similar coverings. Do not route cord under furniture or appliances. Arrange cord away from traffic area and where it will not be tripped over. · Disconnect the power if strange sounds, smell, or smoke comes from it. · Do not press the buttons on the control panel with anything other than your fingers. Specific information regarding appliances with R290 refrigerant gas. · Thoroughly read all of the warnings. · When defrosting and cleaning the appliance, do not use any tools other than those recommended by the manufacturing company. · The appliance must be placed in an area without any continuous sources of ignition (for example: open flames, gas or electrical appliances in operation). · Do not puncture and do not burn. · Refrigerant gases can be odourless. · The appliance must be installed, used and stored in an area that is greater than 8 m2. · This appliance contains a certain number of grams (see rating label back of unit) of R290 refrigerant gas. · R290 is a refrigerant gas that complies with the European directives on the environment. Do not puncture any part of the refrigerant circuit. · If the appliance is installed, operated or stored in a nonventilated area, the room must be designed to prevent the accumulation of refrigerant leaks resulting in a risk of fire or explosion due to ignition of the refrigerant caused by electric heaters, stoves, or other sources of ignition. 54 DO263A · The appliance must be stored in such a way as to prevent mechanical failure. · Individuals who operate or work on the refrigerant circuit must have the appropriate certification issued by an accredited organisation that ensures competence in handling refrigerants according to a specific evaluation recognized by associations in the industry. · Repairs must be performed based on the recommendations from the manufacturing company. Maintenance and repairs that require the assistance of other qualified personnel must be performed under the supervision of an individual specified in the use of flammable refrigerants. Caution: risk of fire / flammable materials This appliance uses a flammable refrigerant. If the refrigerant is leaked and exposed to an external ignition source, there is a risk of fire. ENERGY TIPS · Never use the unit it rooms that are bigger than the recommended room size. · Make sure that the airflow of the unit is not blocked by furniture or other objects. EN · Keep curtains closed during the warmest hours of the day. · Make sure the filters of the air conditioning are always clean. · Always keep doors and windows closed to keep the cool air inside and the warm air outside. SAVE THESE INSTRUCTIONS www.domo-elektro.be DO263A 55 PARTS Front 1. Control panel 2. Air outlet 1 3 2 Back 3. Air filter 4. Air inlet 5. Air outlet 6. Drain 5 4 6 EN Parts 7. Drain hose 8. Remote control 9. Remote control wall mount 10. Air outlet hose 10 a. Air outlet hose connection 11. Wall installation kit 11 a. Wall adaptor 7 11 b. Wall installation kit connection 12. Window installation kit 12 a. Window adaptor 9 12 b. Window installation kit connection 12 c. Window seal 8 12 d. Adapter plug 12 e. L-iron with screws 10 10a 11 11b 11a 12 12a 56 DO263A 12b 12c 12d 12e INSTALLATION · Place the air conditioning on a solid and stable floor, this way you will prevent excessive noise and vibrations. Make sure that the floor is strong enough to support the weight of the appliance. · The appliance has small wheels for easy moving. Make sure max 120only cm to move the air conditioning over a flat and level surface. Be 30 cm careful when moving the air conditioning over carpet.min Never roll the unit over an object. · Place the unit near an earthed socket. · Never place any object within 30 cm round the air conditioning. · The air outlet hose must be used in the “cool” or “auto” mode. During the “fan” or “dry” mode, you don’t need to attach the air outlet hose. · Make sure there is a free surrounding of at least 50 cm around the outlet. EN · Make sure the air outlet hose isn’t bend during use. INSTALLATION OF THE WINDOW KIT · Place the coupling of the air outlet hose on the end of the hose. · Place the air outlet hose on the air outlet at the back of the appliance. · Place the coupling of the window attachment on the other end of the air outlet hose. max 120 cmsliding · Place the window adaptor in your window. This is possible for horizontal and vertical min 30 cm windows. Block the window adapter at the desired length. · Attach the hose with the coupling to the window adapter. · Make use of the window seals to close off any possible openings in the window. · Block the window adapter at the desired length using the supplied window adapter plug. · If desired, you can fix the window with the L-iron and 2 screws. www.domo-elektro.be DO263A 57 INSTALLATION WALL KIT · Place the coupling of the air outlet hose on the end of the hose. · Place the air outlet hose on the air outlet at the back of the appliance. · Make an opening in the wall the size of the wall adapter. · Place the wall adapter in the opening. Attach the wall adapter using the screws supplied. · Place the coupling of the wall attachment on the other end of the air outlet hose. EN · Attach the hose with coupling to the wall adapter. max 120 cm min 30 cm USE The horizontal strip on the front of the air conditioning can be opened and shut manually in order to aim the air outlet better. CONTROL PANEL 4 3 1. 2 1 ON/OFF touch To turn the unit off or on. 2. 58 ”+” and “-” touch Use these touches to select the temperature. The temperature can be set between 17°C and 30°C. When pressing both buttons at the same time you can switch between “°C” or “°F”. DO263A Transmission Indica Lights up when remote sends signal to unitLights up when remo signal to unit ON/OFF display 3. MODE- touch MODE display ON/OFF when the unitdis is With this touch you can select the desired function. Every time when pressingAppears this touch the Displays the MODE current display Appears whe and disappears when it is function will change : COOL – DRY – FAN. The related indication light will turn on on the Displays the current mode, including: and disappe control panel. If you choose the FAN setting, the ventilation blows on the automatic position. mode, including: TIMER ON d AUTO You can only adapt the ventilation speed with the remote control. Displays wh AUTO COOL ON is set COOL DRY 4. LED display DRY HEAT Will show het temperature selections. When the “dry orFAN “fan” mode isHEAT selected, the display FAN will show the room temperature. REMOTE CONTROL When using the remote control make sure that you always aim it towards the apparatus. If you don’t do this, you can briefly aim the remote control towards the apparatus and press the ON-OFF button. 1. EN When the apparatus receives a signal of the remote control you hear a beep. The remote control must be used within an eight-metre radius around the apparatus. ON/OFF touch To turn the unit off or on. 2. MODE- touch 1 2 3 6 7 8 With this touch you can select the desired function. Every time when pressing this touch the function will change : 5 COOL – DRY – FAN. The related indication light will turn 9 4 on on the control panel. SIL FAN SPEED display Not a FAN SPEED display Displays selected FAN SPEED: 3. FAN touch Displays selected HIGH, MED,FAN SPEED: MED, or –LOW HIGH –HIGH, AUTO. With this touch you can select the fan speed : LOW Temperat or LOW This display is blank when Displays t display is blank when set to AUTO This speed. 4. SLEEP touch when usin set to AUTO speed. You can use this touch for activating the “sleep”mode. Tempe When pressing the “sleep” touch, the selected temperature will be elevated with 1 °C after 30 Timer min. After another 30 min the temperature will increase with another 1°C. The air conditioning will maintain this temperature for 7 hours. After this time, the air conditioning will go back to This displ the original set temperature and the “sleep” function will end. NOTE : this function cannot be selected with the “fan” or “dry” function. 5. TEMP touch Use these touches to select the temperature. The temperature can be set between 17°C and 30°C. When pressing both buttons at the same time you can switch between “°C” or “°F”. www.domo-elektro.be DO263A 59 Transmission Indicator Transmission Indicator Lights up when remote sends 6. SHORT CUT touch signal to unitLights up when remote sends With this button you can fix and switch on a preferentialsignal setting. to unit ON/OFF display MODE display ON/OFF Appears when the unitdisplay is turned on, 7. TIMER ON touch Displays theMODE display current Appears when the unit and disappears when it is turned offis turned on, Remote LED Screen Indicators How To Use The Basic Fun the current With this function you canmode, select including: whenDisplays the unit must turn on. and disappears when it is turned off TIMER OF TIMER ON display AUTO mode, including: Transmission Indicator Displays w TIMER ON display Displays when TIMER AUTO COOL 8. TIMER OFF Lights up whentouch remote sends is se ON is set Displays whenOFF TIMER COOL signal to unit DRY ON is set With this function you can select when the unit must turn off. ON/OFF display DRY HEAT MODE display Appears when the unit is turned on, HEAT FAN Displays the current and disappears when it is turned off mode, including: FAN 9. LED touch TIMER OFF display TIMER ON display AUTO Remote Displays when TIMER COOLLED Screen Indicators Displays when TIMER 2 How To Use The Basic Fun ON/OFF SHORT is set ON iscontrol set This button turns off the panel’sOFF LED display. This can be used if the display gives too 3 DRY HEAT much light when you want to sleep. If you press the button a second time, the1display will FAN ECO display switchTransmission on again. Indicator CUT TIMER ON MODE TEMP TIMER OFF FAN Not available for this unit Lights up when remote sends signal to unit ION SLEEP SWING FOLLOW LED EN ME ON/OFF display Battery display SET FUNCTIONS Low battery MODE display Appears when the unit is turned on, detection Displays the current and disappears when it is turned off mode,AUTO including: TIMER OFF display SLEEP display TIMER ON display AUTO 2 InLED the AUTO function, the apparatus chooses the right setting depending on the Displays when Displays when TIMER Displays when TIMER automatically COOL Remote Screen Indicators How The Basic Func ON/OFF SHORT OFF is set ON is set 3 To Use CUT function DRY chosen temperature. This setting can also be chosenSLEEP with the remote control. is activated HEAT TIMER MODE 1 ON FAN TEMP 1. Choose AUTO with the MODE button on the remote control. FOLLOW ME ECO display TIMER FAN Transmission Indicator OFF display Not available for COOL operation up when remote sends 2. Lights Set the desired temperature with the TEMP button. Indicates thatapparatus will determineIONthe this unitThe signal to unit the FOLLOW ME FOLLOW SWING LED to select 1. Press theSLEEP MODE button setting accordingly. ME functiondisplay is on Battery ON/OFF display COOL mode. Low battery adapt theisspeed of the ventilation (FAN) in AUTO modus. 2. Set your desired temperature us MODE display You cannot Appears when the unit turned on, Not available for detection Displays the current and disappears when it is turned off the Temp or Temp button this unit mode, including: 3. Press the FAN button to select th SLEEP display TIMER OFF display TIMER ON display SILENT display fan speed: AUTO, LOW, MED,or AUTO FAN SPEED display 2 Displays when Displays COOL Displays when TIMER for Not available this unitwhen TIMER HIGH. ON/OFF COOL Displays selected FAN SPEED: SHORT SLEEP function OFF is set ON is set 3 4. Press the CUT ON/OFF button to star DRY HIGH, MED, With the COOL function you can cool the room up tois activated a certain temperature.1 unit. MODE TIMER or HEAT LOW ON FAN Temperature/Timer display TEMP FOLLOW ME This display when ECO display TIMER 1. is blank Press the MODE button until the COOL lamp FAN Displays the set temperature by indicator default, ordisplay timer settingis on. OFF set to AUTO speed. available for COOL operation when using TIMER ON/OFF functions Not Indicates that ION this unit o O O 2. Use the “+” and “-” buttons on the17-30 control panel the TEMP button on the remote FOLLOW ME Temperature range: C(62 F-86 F)theor 1. Press the MODEFOLLOW button to select SLEEP SWING LED function is on ME Battery display control to set the desired room temperature. Timer setting range: 0-24 hours COOL mode. Low battery 2. Set your desired temperature usi Not available for This display is blank when operating in FAN mode. the Temp or Temp button 3. Use the FAN button on the remote control to detection set this the unit desired ventilation speed. There are SILENT display FAN SPEED display SILENT displ Not available for this unit FAN SPEED display Displays selected FAN SPEED: Not available fo Displays selected HIGH, MED,FAN SPEED: 3. Press the FAN button to select th HIGH, MED, or SILENT , LOW HIGH and AUTO. three settings: LOW SLEEP display fan speed: AUTO, LOW, MED,or 5 display FAN SPEED display Not available foror this unit LOW Displays when Temperature/Timer display HIGH. Displays selected FAN SPEED: This display is blank when SLEEP function 4. Press the ON/OFF button to start HIGH, MED, Temperature/Timer Displays the set temperature by d is activated unit. or LOW display is blank when set to AUTOThis speed. DRY Temperature/Timer display DisplaysON/OFF the set temp when using TIMER func FOLLOW ME This display is blank when set to byAUTO speed. Displays the set temperature default, or timer setting displaywindows and doors closed when set to AUTO speed. using TIMER O With this function you when can using dehumidify the room. Keep for this COOL operation TIMER ON/OFF functions Temperature range: 17-30oC(6 Indicates that Temperature range: 17-30 C(62 F-86 the F) FOLLOW ME function. Temperature rang 1. Press the MODE button to select Timer setting range: 0-24 hour function is on Timer setting range: 0-24 hours COOL mode. 1. Press the MODE button until the DRY indicator lamp is on. Timer setting 2. Set your desired temperaturerang using This display is blank when operating in FAN Not mode. available for This display is blank when button. operat the Temp or Temp this unit 2. Use the “+” and “-” buttons on the control panel or the TEMP button on the remote 3. Press the FAN button to select the This display is blank SILENT5display fan speed: AUTO, LOW, MED,or FAN SPEED display control to set the desired room temperature. Not available for this unit HIGH. o Displays selected FAN SPEED: HIGH, You cannot MED, 3. LOW or This display is blank when set to AUTO speed. 60 DO263A O O set the ventilation speed in this setting. Temperature/Timer display Displays the set temperature by default, or timer setting when using TIMER ON/OFF functions Temperature range: 17-30oC(62OF-86OF) Timer setting range: 0-24 hours 5 4. Press the ON/OFF button to start th unit. 5 Displays when SLEEP function is activated FOLLOW ME display Indicates that the FOLLOW ME function is on COOL operation 1. Press the MODE button to select FAN COOL mode. SILENT display FAN SPEED display 2. Set your desired temperature using Not available for SILENT display Not available for this unit the Temp or Temp button. 1. Press the MODE button until the FAN indicator lamp is on. FAN SPEED display this unit Displays selected FAN SPEED: 3. PressNot the FAN button to select the available for this SILENT display speed: AUTO, LOW, MED,or Displays SPEED: HIGH, MED, 2.display Press the FAN button of the remoteselected control toFAN set the ventilation speed.fan There are three FAN SPEED Not available for this unit HIGH. Displays selected FAN SPEED: HIGH, MED, or , LOW HIGH and AUTO. settings: LOW 4. Press the ON/OFF button to start th HIGH, MED, unit. Temperature/Timer display or LOW or LOW ThisTemperature/Timer display is adjusted. blank The temperature cannot be displaywhen the set temperature by default, or timer when setting This display is blank set Displays to AUTO speed. when using TIMER ON/OFF functions set to AUTO speed. Temperature range: 17-30 C(62 F-86 F) Timer on 3. This display is blank when set to AUTO speed. o O O Timer setting range: 0-24 hours displ Displays theTemperature/Timer set temperature by defaul DisplaysON/OFF the set temperatu when using TIMER functions o O when using17-30 TIMER ON/OF Temperature range: C(62 F-8 Temperature With this function you delay the start of the apparatus, up to maximum 24 hours. Thiscan display is blank when operating in FAN mode. Timer setting range: 0-24 range: hours 172. Timer setting range: 0-2 This display is blank when operating in You can now read on the display of the remote control when the air conditioning will is goblank when This display on. Press the TIMER ON button on the remote control. 5 5 3. Press the TIMER ON button several times to increase the time. Or keep the button pressed. 4. Once the desired time is set, you will see “Timer on” on the display of the remote control. Two lights will light up on the control panel’s display. 5. If you want to switch off the timer, press the TIMER ON button several times until the counter goes to “0”. Or keep the button pressed. 5 EN 1. Timer off With this function you can switch off the apparatus automatically after some time. 1. Press the TIMER OFF button on the remote control. 2. You can now read on the display of the remote control when the air conditioning will go off. 3. Press the TIMER OFF button several times to increase the time. Or keep the button pressed. 4. Once the desired time is set, you will see “Timer off” on the display of the remote control. Two lights will light up on the control panel’s display. 5. If you want to switch off the timer, press the TIMER OFF button several times until the counter goes to “0”. Timer on + Timer off You can also switch on both functions simultaneously. This determines when you switch on the apparatus, but also when the apparatus switches off. Please note: this time is always from the hour when you programme the setting. For example: it is now 1 pm. You want the apparatus to work from 4:30 to 6 pm. Set the TIMER ON on 3.5 h and TIMER OFF on 5.0 h. www.domo-elektro.be DO263A 61 Sleep When pressing the “sleep” touch, the selected temperature will be elevated with 1 °C after 30 min. After another 30 min the temperature will increase with another 1°C. The air conditioning will maintain this temperature for 7 hours. After this time, the air conditioning will go back to the original set temperature and the “sleep” function will end. NOTE : this function cannot be selected with the “fan” or “dry” function. Shortcut With this button you can set and switch on a preferential setting. If you use a certain setting more often, you can set this by pressing the SHORTCUT button for three seconds. The apparatus then remembers the settings that are switched on at the moment of pressing. These settings can include: the user setting (MODE), set temperature, ventilation speed (FAN) and possibly also the SLEEP setting. The moment you press the SHORTCUT button, the apparatus will work at the previously determined settings. EN CLEANING AND MAINTENANCE DRAINING Permanent drain During the “dry” mode you can use a permanent drainage. 1. Remove the drain plug and the rubber top. 2. Attach the drain hose on the drain. 3. Make sure the water is drained in a save and permanent way. 2 1 Drain code P1 When you don’t use the permanent drain, the non recycled condensation water, will be stored in the water tank. · When the water tank is full a few beep signals will be heard and on the display the code P1 will appear. The “cool” or “dry” mode will end automatically. The fan will continue to operate, this is normal. · Move the unit over to a place where you can easily drain the water. 62 DO263A · Remove the drain plug at the bottom of your unit (A) and drain the water. · After fully draining the water tank, place the drain plug back on the drain opening. · Restart the unit, make sure the error code P1 is no longer displayed. When the code doesn’t disappear, try turning off and on the unit a few times. When the error code continues, please contact the after sales service. · NOTE : always make sure to install the drain plug, before turning the unit back on. CLEANING · Always remove the plug from the socket before cleaning the unit. · Never use any chemical or abrasive products to clean the unit. A · Never clean the unit with water or any other liquid, this can cause electrocution. EN · When the power cord is damaged it must be repaired or replaced by the after sales surface of the manufacturer or by a qualified person. Air filter · Clean the air filter at least ever 2 weeks. To make sure the air conditioning can operate in optimal conditions. · Clean the air filter in lukewarm water with a bit of detergent. Rinse the filter thoroughly and let it dry. · Make sure the filter is completely dry before placing it back in to the air conditioning. Air conditioning body Use a damp, soft cloth and a bit of mild detergent, to clean the outside of the unit. Make sure the unit is thoroughly dried afterwards. Storing Before storing the unit for a longer period of time, please follow the next steps : · Drain all the water from the appliance. · Afterwards turn on the unit in the “fan” mode for half a day. Make sure the unit is placed in a heated room. This will dry the unit completely and prevent the forming of mold. · Turn off the unit, remove the plug from the socket and remove the batteries from the remote control. www.domo-elektro.be DO263A 63 · Clean the filters and place them back in the unit. · Store the unit in a dry, dark place. POSSIBLE PROBLEMS AND THEIR SOLUTIONS The appliance isn’t working when pressing the on/off touch. · The error code P1 is displayed , drain the water from the air conditioning. · The room temperature is lower than the selected temperature. Adjust the selected temperature. The room is not cool enough. · The windows and doors aren’t closed. Make sure all windows and doors are closed. · There are heat sources in the room. Remove all heat sources if possible. · The air outlet hose is not connected or blocked. Attach the hose and check if there is no blockage. · The selected temperature is to high. Adjust the selected temperature. EN · The air filter is dirty. Clean the air filter. The appliance is making to much noise or is causing vibrations. · The floor is not level or flat. Place the appliance on the flat and level surface if possible. · The air filter is dirty. Clean the air filter. Your appliance makes a gurgling sound · The sound is produced by the refrigerant in your appliance, this is normal. ERROR CODES Following error codes can be displayed on your air conditioning : E1 : the sensor for the room temperature is not working. Turn off the unit and remove the plug from the socket. Wait for 10 sec and plug the unit back in. Turn on the unit. When the error codes repeats, you need to contact the after sales service. E2 : The sensor of the dehumidifier doesn’t work. Turn off the unit and remove the plug from the socket. Wait for 10 sec and plug the unit back in. Turn on the unit. When the error codes repeats, you need to contact the after sales service. E4 : The display is not functioning properly. Remove the plug from the socket. Wait for 10 seconds. Plug the unit back in. When the error codes repeats, you need to contact the after sales service. P1 : The water tank is full. Connect the drain hose to the bottom drain and remove the water. When the error codes repeats, you need to contact the after sales service. 64 DO263A ENVIRONMENTAL GUIDELINES The packaging is recyclable. Please treat the packaging ecologically. www.domo-elektro.be DO263A EN This symbol on the product or on its packaging indicates that this product may not be treated as household waste. Instead it must be brought to the applicable collection point for recycling of electrical and electronic equipment. By ensuring this product is disposed of correctly, you will help prevent potential negative consequences for the environment and human health, which could otherwise be caused by inappropriate waste handling of this product. For more detailed information about recycling of this product, please contact your local city office, your household waste disposal service or the shop where you purchased the product. 65 ZÁRUKA Práva a povinnosti prodávajícího a kupujícího ohledně práv z vadného plnění se řídí příslušnými obecně závaznými předpisy dle občanského zákoníku. 1. Trvání záruky: 2 roky 2. Záruka se nevztahuje a) na mechanické poškození b) nesprávné používání v rozporu s návodem k použití 3. Záruka zaniká: - při použití spotřebiče jinak než v je uvedeno v manuálu (nesprávným postupem) - při provádění opravy nebo změny na spotřebiči osobou jinou než pověřenou naším servisem Prodávající odpovídá kupujícímu, že zboží při převzetí nemá vady. Zejména prodávající odpovídá kupujícímu, že v době, kdy kupující zboží převzal: · má zboží takové vlastnosti, které výrobce v tomto návodu popisuje, · se zboží hodí k účelu, ke kterému výrobce uvádí, · zboží odpovídá jakostí nebo provedením smluvenému vzorku nebo předloze, byla-li jakost nebo provedení určeno podle smluveného vzorku nebo předlohy, · zboží vyhovuje požadavkům právních předpisů. Projeví-li se vada v průběhu šesti měsíců od převzetí, má se za to, že zboží bylo vadné již při převzetí. CZ Pokud není u výrobku uvedeno jinak, činí záruční doba 24 měsíců. Záruční doba počíná běžet od převzetí věci kupujícím. Práva z vadného plnění uplatňuje kupující u prodávajícího na adrese jeho provozovny, v níž je přijetí reklamace možné s ohledem na sortiment prodávaného zboží, případně i v sídle nebo místě podnikání. Za okamžik uplatnění reklamace se považuje okamžik, kdy prodávající obdržel od kupujícího reklamované zboží. Reklamaci lze také uplatnit v servisním středisku na adrese DOMO-elektro s.r.o., Na Kobyle 783, 345 06 Kdyně, Česká republika, tel. (+420) 379 422 550, [email protected] Pro rychlé a bezproblémové vyřízení reklamace doporučujeme přiložit k reklamaci doklad o koupi a průvodní dopis s popisem závady a zpáteční adresou s telefonickým kontaktem. 66 DO263A BEZPEČNOSTNÍ POKYNY Při používání jakkéhokoli el. spotřebiče dbejte zvýšené opatrnosti a dodržujte určitá bezpečnostní pravidla: · Pečlivě si přečtěte tyto informace a manuál nechte i pro pozdější nahlédnutí. · Ujistěte se, že před použitím odlepíte a odstraníte veškeré reklamní a ochranné fólie. · Děti si s ochrannými ani reklamními polepy nesmí hrát. · Přístroj je určen pro používání v domácnostech a podobných prostředích, tak jako je: · kuchyňky v obchodech, kancelářích atd. · chaty, chalupy · hotely, penziony a jiné dočasné ubytování · Dohlédněte, aby si děti nehrály s přístrojem. · Tento spotřebič mohou používat děti ve věku 16 let a starší a osoby se sníženými fyzickými, smyslovými nebo mentálními schopnostmi, nebo nedostatkem zkušeností a znalostí pokud jsou pod neustálým dozorem nebo byly poučeny o používání spotřebiče bezpečným způsobem a rozumí případným nebezpečím. Děti si s přístrojem nesmějí hrát. Čištění a údržbu prováděnou uživatelem nesmějí provádět děti bez dozoru. · Čistění a běžnou údržbu smí provádět pouze osoby starší 16 let a při tom být pod dohledem. · Přístroj a jeho el. kabel skladujte mimo dosah dětí. · Upozornění: Přístroj se nesmí používat s externími časovači. · Před použitím důkladně zkontrolujte, zda napětí a frekvence el. sítě ve vaší domácnosti odpovídají požadavkům uvedeným na přístroji. · Zástrčku (přívodní kabel) zapojujte vždy jen do zásuvky, která je bez vad a nainstalována, uzemněna v souladu se všemi místními normami. · Nikdy neumisťujte přístroj v blízkosti trouby, ohně, nebo vysoce hořlavých tekutin. · Nikdy do přístroje nebouchejte a netřeste s ním, mohli byste jej poškodit. · Dávejte pozor, abyste přístroj nepocákali vodou a neumisťujte jej v blízkosti zdrojů vody, aby nemohlo dojít ke zkratu. CZ · Nikdy nezakrývejte sání vzduchu, ani výfuk, mohli byste způsobit přehřátí přístroje. · Poškozený napájecí kabel musí být vyměněn výrobcem, nebo v odborném servisu, či kvalifikovanou osobou. · Nikdy nezapojujte jiný elektrický přístroj do stejného okruhu, jako klimatizaci. · Nikdy neberte zástrčku do mokrých rukou. · Nikdy nestrkejte do otvorů přístroje cizí objekty. · Nepoužívejte přístroj s prodlužovací šňůrou. · Nedovolte dětem, aby si hráli s přístrojem, nebo blízko něj. · Po vypnutí přístroje počkejte alespoň 3 minuty, než jej zapnete znovu. Kompresor potřebuje nějaký čas, aby nedošlo k jeho poškození. · Přístroj umisťujte alespoň 1m od televize, nebo rádia, abyste zamezili rušení. www.domo-elektro.be DO263A 67 · Abyste zachovali barvu přístroje, nestavte jej na přímé sluneční světlo. · Nikdy při manipulaci s přístroje nenaklánějte přístroj o více než 35o. Nikdy přístroj nepokládejte, nebo neotáčejte dnem vzhůru. · Přístroj vždy umístěte na rovný a stabilní povrch. · Než přístroj uschováte, nezapomeňte z něj vylít zkondenzovanou vodu. Zajistíte tak Vaší klimatizaci dobrou funkčnost po delší dobu. · Na čištění přístroje nikdy nepoužívejte chemikálie. · Přístroj vždy vypněte a odpojte od elektrické sítě, než budete nasazovat nebo sundávat mřížku nasávání. · Vždy se ujistěte, že nemůžete dojít k vniknutí vody do přístroje vlivem kondenzace vody, nebo stříkající vodou apod. · Dbejte na to, aby přístroj nemohl přijít do styku s vodou, nebo jinou tekutinou. Pokud k tomu dojde, okamžitě přístroj odpojte od elektrické sítě. · Nikdy nepoužívejte přístroj ve vlhkých místnostech, jako je například koupelna, ložnice, nebo prádelna. · Pokud přístroj nepoužíváte, vypněte jej. · Opravy přístroje smí provádět pouze autorizovaný servis, nebo kvalifikovaná osoba. · Kolem přístroj musíte zachovat volný prostor 30 cm. · Nikdy se přístroje nedotýkejte mokrýma rukama. · Dotýkejte se prsty pouze ovládacího panelu. · Nesnažte se z přístroje odstraňovat jeho pevné části. · Nikdy nepoužívejte přístroj pokud nepracuje správně, pokud Vám spadl, nebo je jinak poškozený. · Přístroj nevypínejte vytažením ze zásuvky. Vždy používejte tlačítka na ovládacím panelu. · Používejte přístroj pouze k účelům, ke kterým je určený. · Všetky opravy, úpravy, kontrola tesnosti a prípadných porúch musia byť vykonávané len odborným certifikovaným servisom. CZ · Spotřebič obsahuje fluorované skleníkové plyny zahrnuté v Kjotském protokolu. · Instalace a zapojení musí být provedeno odborně a dle pokynů v návodu. Nesprávná instalace může způsobit únik vody, úraz elektrickým proudem nebo požár. · Nesahejte na přístroj, pokud jste naboso, nesahejte na něj ani s mokrýma/vlhkýma rukama. · Pokud dojde během používání k převrácení klimatizační jednotky, tak ji ihned vypněte a okamžitě odpojte od napájení (el. sítě). Následně zvedněte a vizuálně důkladně zkontrolujte, zda není poškozená. Pokud máte podezření, že byl přístroj poškozen, tak zavolejte do odborného servisu a nechejte překontrolovat jeho stav. · Pokud je (nebo hrozí) v lokalitě bouřka, tak přístroj vypojte z el. sítě. Jinak hrozí poškození přístroje a případně i požár. · Pokud nepoužíváte trvalý odvod kondenzátu, tak mějte oba (horní i spodní) vypouštěcí vývody dostatečně uzavřené, aby nehrozilo riziko zadušení. Pokud vypouštěcí vývody nepoužíváte, pečlivě je udržujte uzavřené, aby se zabránilo zadušení dětí nebo zvířat. 68 DO263A · Přívodní kabel nikdy neveďte pod kobercem ani ho nijak nezakrývejte. Nepokládejte kabel pod nábytek ani pod přístroj samotný. Přívodní kabel by měl být veden tak, aby o něj nemohl nikdo zakopnout a přitom nebyl překrytý ani zatížený žádným předmětem. · Pokud se z přístroje začnou ozývat divné zvuky, bude cítit kouř nebo se začne linout dým, tak ho ihned vypněte a vypojte z el. sítě. Varování (lze použít pouze s chladivem R290 · Proces odmrazování nebo čištění neurychlujte použitím prostředků, které k tomu nejsou určeny výrobcem. · Spotřebič musí být skladován v místnosti, ve které nejsou nepřetržité zdroje zážehu/ vznícení (např. otevřený oheň, spuštěný plynový spotřebič nebo spuštěný elektrický ohřívač). · Nepropichujte ani nezapalujte. · Berte na vědomí, že chladivo nemusí mít žádný zápach. · Zařízení DO263A by mělo být nainstalováno, provozováno a skladováno v místnosti, jejíž podlahová plocha přesahuje 8 m2. · Musí být dodrženy veškeré vnitrostátní předpisy o plynu. · Okolí ventilačních otvorů udržujte bez překážek. · Spotřebič musí být skladován tak, aby se zabránilo jeho mechanickému poškození. · Spotřebič musí být skladován v dobře větraném prostoru, jehož rozměry odpovídají minimálním uvedeným rozmě-rům, které jsou nutné pro správný provoz spotřebiče. · Jakákoli osoba, která zasahuje do okruhu chladiva, musí mít aktuální a platné osvědčení udělené hodnotícím orgá-nem, který je akreditovaný v rámci odpovídajícího průmyslu a který může ručit za jejich schopnost bezpečně zpraco-vávat chladiva v souladu s uznávaným hodnotícím požadavkem. · Servis může být prováděn pouze v souladu s doporučením výrobce. Údržba a opravy, které vyžadují zapojení jiného odborného personálu, se musí provádět pod dohledem osoby, která je způsobilá k zacházení s hořlavými chladivy. Tento spotřebič používá hořlavé chladivo. Pokud by chladivo prosakovalo či unikalo ven, kde by mohlo hrozit riziko zapálení, tak hrozí nebezpečí požáru. CZ Pozor: Nebezpečí vzniku požáru / hořlavé materiály TIPY NA NIŽŠÍ SPOTŘEBU ENERGIE · Nikdy nepoužívejte přístroj v místnostech, které jsou větší, než je doporučená velikost. · Dbejte na to, aby žádné otvory přístroje nebyly ucpané, nebo blokované nábytkem apod. · Během nejteplejších dnů zatáhněte i žaluzie, nebo záclony na oknech, aby se vzduch v místnosti zbytečně znovu neohříval. · Kontrolujte filtry, aby byly vždy čisté. · Mějte vždy zavřené dveře a okna, abyste udržely studený vzduch v místnosti a teplý Vám z venku neproudil dovnitř. www.domo-elektro.be DO263A 69 TENTO MANUÁL SI USCHOVEJTE I PRO POZDĚJŠÍ NAHLÉDNUTÍ. ČÁSTI Přední část 1. Ovládací panel 2. Výstup vzduchu Zadní část 1 3 2 3. Vzduchový filtr 4. Vstup vzduchu 5. Výstup vzduchu 6. Odtok 5 4 6 Části 7. Hadice odtoku 8. Dálkový ovladač 9. Nástěnný držák dálkového ovládání 10. Výfuková hadice 10 a. Napojení výfukové hadice 11. Sada pro montáž na zeď 7 11 a. Adaptér na zeď 11 b. Sada pro přichycení 12. Sada pro montáž do okna 12 a. Okenní adaptér 9 12 b. Sada pro upevnění CZ 12 c. Okenní utěsnění 8 12 d. Zásuvka 12 e. Železné „L“ vzpěry 10 10a 11 11b 11a 12 12a 70 DO263A 12b 12c 12d 12e ZAPOJENÍ A INSTALACE · Umístěte přístroj na stabilní a rovnou plochu. Tak předejdete obtěžujícím zvukům a vibracím. Ujistěte se, že podlaha pod přístrojem je dostatečně pevná, aby přístroj unesla. max 120 cm · Přístroj má malá kolečka pro snazší manipulaci. Přesouvejte přístroj pouze po rovné a hladké ploše. Dbejte zvýšené minse30 cm opatrnosti při posunování přístrojem po koberci. Nikdy nesnažte přístrojem přejíždět předměty na zemi. · Umístěte přístroj co nejblíže uzemněné zásuvce. · Kolem klimatizace ponechte do všech směrů volný prostor minimálně 30 cm. · Hadici pro odvod teplého vzduchu musíte používat vždy, když nastavíte funkci „cool“, nebo „auto“. Během používání funkcí „fan“ a „dry“, hadice není potřeba. · Zajistěte dostatek prostoru okolo výstupu vzduchu - alespoň 50 cm. · Zjistěte, aby se hadice během používání nijak neohýbala. INSTALACE OKENNÍHO ADAPTÉRU · Nejdříve na výfukovou hadici nasaďte spojku k okenní koncovce. · Potom celou hadici nasaďte na otvor výfuku v zadní části přístroje. · Do okna umístěte okenní adaptér. Ten je možné umístit v horizontální I vertikální rovině. max 120 cm Adaptér zajistěte ve Vámi požadované délce. CZ · Na druhý konec hadice napevno připojte okenní koncovku. min 30 cm · Do zajištěného adaptéru v okně nacvakněte okenní koncovku (která je přichycena na hadici). · Pokud je potřeba, tak můžete okolí ještě utěsnit. · Okenní adaptér si zafixujte na požadovanou délku. · Pokud je potřeba, tak si můžete okno zafixovat pomocí železných „L vzpěr“ a šroubky. www.domo-elektro.be DO263A 71 INSTALACE NA ZEĎ · Nejdříve na výfukovou hadici nasaďte spojku k okenní koncovce. · Potom celou hadici nasaďte na otvor výfuku v zadní části přístroje. · Na druhý konec hadice napevno připojte koncovku do zdi . · Ve zdi připravte otvor s odpovídajícím rozměrem vůči koncovce · Koncovku připevněte do otvoru ve zdi a zajistěte. max 120 cm min 30 cm POUŽITÍ Horizontálně položený díl v přední části klimatizace můžete v případě potřeby ručně vysunout / zasunout. Tento díl zlepšuje výstup vzduchu . CZ OVLÁDACÍ PANEL 4 3 1. 2 1 Hlavní spínač ON/OFF Tímto tlačítkem přístroj zapnete/vypnete 2. 72 Tlačítka ”+” a “-” Tlačítka slouží k nastavování teploty. Požadovaná teplota může být nastavena v rozmezí od DO263A Transmission Indicator Transmission Indica when remote sends 17°C do 30°C. Na přístroji si můžete volit mezi nastavení stupňů “°C Lights “a “°F”.up Změnu jednotek signal to unitLights up when remo provedete stiskem obou tlačítek na ráz. signal to unit ON/OFF display MODE display ON/OFF Appears when the unitdisp is 3. Tlačítko FUNKCE Displays the MODE current display Appears whe and disappears when it is Tlačítkem si můžete volit jednu z funkcí přístroje. Každým stiskem tlačítka se přepne funkce: Displays the current mode, including: and disappea KLIMATIZACE – ODVLHČOVÁNÍ – VENTILACE. Vybraná funkce bude na ovládacím panelu mode, including: TIMER ON d AUTO podsvícená. Pokud si zvolíte funkcí ventilace, tak se přístroj přepne do automatického režimu. Displays whe AUTO COOL Vy můžete volit jen rychlost ventilace. ON is set COOL DRY DRY HEAT 4. LED displej HEAT FAN FAN tak na displeji Displej ukazuje nastavenou teplotu. Pokud máte vybranou funkci “ventilace”, bude zobrazena aktuální pokojová teplota. DÁLKOVÉ OVLÁDÁNÍ Při používání ovladače musíte vždy mířit přímo proti přístroji. Pokud ovladač nereaguje, tak ho zaměřte přímo na přístroj a zkuste opět stisknout ON/OFF. Jakmile se přístroj zapne (vypínač reaguje), tak se ozve zvukový signál. Dálkový ovladač pracuje v dosahu 8 m od přístroje. 1 2 3 1. 4 Hlavní spínač ON/OFF 6 7 8 5 9 Tímto tlačítkem přístroj zapnete/vypnete 2. Tlačítko FUNKCE CZ Tlačítkem si můžete volit jednu z funkcí přístroje. Každým stiskem tlačítka se přepne funkce: KLIMATIZACE – ODVLHČOVÁNÍ – VENTILACE. Vybraná funkce bude na ovládacím panelu podsvícená. SIL FAN SPEED display Not a FAN SPEED display Displays selected FAN SPEED: 3. Tlačítko FAN (ventilace) Displays selected FAN SPEED: HIGH, MED, MED, or –LOW HIGH –HIGH, AUTO. Tímto tlačítkem si volíte rychlost ventilátoru: LOW Temperat or LOW This display is blank when Displays t display is blank when set to AUTO This speed. 4. Tlačítko SLEEP (spánek) when usin set to AUTO speed. Tlačítkem aktivujete režim na spánek – sleep Tempe V režimu “sleep” je zvolená teplota postupně navyšována o 1°C za 30 min. Za dalších 30 Timer s minut se teplota zvýší o další 1oC. Klimatizace bude tuto teplotu udržovat dalších 7 hodin. Po uplynutí tohoto času se klimatizace přepne zpět do původního nastavení teploty a funkce This displa „sleep“ se ukončí. POZNÁMKA: tuto funkci nemůžete nastavit zároveň s „fan“, nebo „dry“ funkcí. www.domo-elektro.be DO263A 73 5. Tlačítko TEMP (teplota) Na přístroji si můžete nastavit požadovanou teplotu v rozmezí 17-30 °C. Jakmile stisknete obě tlačítka zároveň, tak se přehodí jednotky teploty “°C” a “°F”. 6. Tlačítko RYCHLÉ VOLBY (SHORTCUT) K tomuto tlačítku si můžete nastavit předvolenou funkci a následně jí jedním stiskem zapínat/ vypínat. Remote LED Screen Indicators 7. How To Use The Basic Fun Tlačítko zapnutí časovače (TIMER ON) Tímto tlačítkem zapínáte časovač. 8. Transmission Indicator Lights up when remote sends signal to unit Tlačítko vypnutí časovače (TIMER OFF ) CZ ON/OFF display MODE displaytlačítkem Appears when the vypínáte. unit is turned on, Tímto časovač Displays the current and disappears when it is turned off mode, including: Remote LED Screen Indicators How To Use The TIMER OFF display TIMER ON display AUTO 2 Displays when TIMER Displays when TIMER COOL 9. Tlačítko pro sepnutí osvícení OFF is set ON/OFF SHORT ON is LED set 3 CUT DRY HEAT Tímto tlačítkem vypnete LED podsvícení. To uvítáte pokud chcete spát a osvětlení displeje Vás TIMER MODE Transmission Indicator 1 ON FAN TEMP Lights up when remote sends ECO display ruší. Jakmile stisknete tlačítko znovu, tak se displej opět rozsvítí. TIMER FAN signal to unit OFF Not available for ION this unit ON/OFF display FOLLOW MODE display Appears when the unit is turned on, SLEEP SWING LED ME Battery display Displays the current and disappears when it is turned off NASTAVENÍ FUNKCÍ Low battery mode, including: detection TIMER OFF display TIMER ON display AUTO AUTO Displays when TIMER Displays when TIMER COOL LED Screen Indicators Remote How To Use The ON/OFF OFFSLEEP is set display ON is set 3 DRY V režimu AUTO si sám přístroj upravuje výkon a sepnutí klimatizace, tak aby se požadovaná Displays when HEAT MODE 1 SLEEP function teplota okolí zapnuta I přes dálkové ovládání. FAN měnila co nejméně. Tato funkce může být TEMP is activated ECO display FAN Transmission Indicator Not available for 1. Na ovladači siLights navolte režim MODE. FOLLOW ME up when remoteAUTO sends pomocí tlačítka ION this unit display signal to unit COOL operation F SLEEP SWING 2. Nastavte si požadovanou teplotu a přístroj si užIndicates sám zvolí that stupeň potřebné klimatizace. Battery display ON/OFF display the FOLLOW ME Low battery 1. Press the MODE button to select Během automatického režimu vy nemůžete regulovat rychlost ventilátoru. MODE display Appears when the unit is turned on, function is on detection COOL mode. Displays the current and disappears when it is turned off 2. Set your desired temperature us mode, including: Not available forSLEEP display the Temp or Temp button TIMER OFF display TIMER ON display AUTO this unit Displays when 3. Press the FAN button to select th Displays when TIMER COOL – chlazení Displays when TIMER COOL ON/OFF SLEEP function OFF is set is set SILENTON display fan speed: AUTO, LOW, MED,or 3 FAN SPEED display DRY is activated Not available for thisteplotu unit HIGH. “COOL” a snižuje v místnosti. DisplaysFunkce selected FAN SPEED:je klimatizace HEAT HIGH, MED, FAN LOW 1. Navolte si tuto FOLLOW ME MODE 1 4. Press the ON/OFF button to star unit. na ECO display tak bude funkci COOL tlačítkem MODE, jakmile bude zvolena, display Not available for Temperature/Timer display Indicates that This display is blank when ovládacím panelu svítit. this unit Displays the set temperature by default, or timer setting the FOLLOW ME set to AUTO speed. or when using TIMER ON/OFF functions TEMP FAN COOL operation ION 1. Press the MODE b SLEEP SWING function is on O Battery display 2. Pomocí šipek na panelu neborange: na ovladači nastavte požadovanou teplotu v místnosti. COOL mode. Temperature 17-30oC(62Osi F-86 F) Low battery 2. Set your desired te Not available for Timer range:si 0-24 hours detection the Temp or Te 3. Tlačítkem „fan“ nebo na setting ovladači nastavte požadovanouthis rychlost ventilátoru. Jsou zde unit 3. Press the FAN butt This display is blank when operating in FAN mode. 3FAN rychlosti. SLEEP display SILENT display fan speed: AUTO, SPEED display Displays when Not available for this unit HIGH. Displays selected FAN SPEED: SLEEP function 5 4. Press the ON/OFF HIGH, MED, is activated unit. or LOW DRY-odvlhčování Temperature/Timer display FOLLOW ME This display is blank when Displays the set temperature by default, or timer setting setDRY to AUTO Funkce jespeed. funkce odvlhčováníwhen a vyusing si tak můžete regulovat display vlhkost v místnosti. Při COOL operation TIMER ON/OFF functions Indicates that O O 17-30oC(62 F-86co F) the FOLLOW ME používání zavřete dveře i okna, aby Temperature odvlhčenírange: místnosti bylo nejlepší. 1. Press the MODE b function is on Timer setting range: 0-24 hours 1. 74 mode. Stiskem tlačítka „MODE“ nastavte funkci „DRY“ – rozsvítí se příslušná kontrolka na2. COOL Set your desired te This display is blank when operating in FANNot mode. available for the Temp or Te panelu. this unit FAN SPEED display DO263A Displays selected FAN SPEED: HIGH, MED, or LOW 5 display SILENT Not available for this unit 3. Press the FAN but fan speed: AUTO, HIGH. 4. Press the ON/OFF unit. Low battery detection SLEEP display Displays when SLEEP function is activated požadovanou hodnotu. 2. Pomocí šipek na panelu nebo na ovladači si nastavte 3. Pro tuto funkci nelze nastavovat rychlost ventilátoru. FOLLOW ME display Indicates that the FOLLOW ME function is on COOL operation 1. Press the MODE but FAN – ventilace COOL mode. 2. Set your desired tem Not available for SILENT display the Temp or Tem 1. Stiskem tlačítka „MODE“ nastavte funkci „FAN“ – rozsvítí se příslušná kontrolka na this unit FAN SPEED display 3. Press the FAN butto SILENT display Not available for this unit panelu. fan speed: AUTO, LO FAN SILENT SPEED display FANdisplay SPEED: FAN SPEED displayDisplays selected Not available for this unit HIGH. Not available for this selected FAN SPEED: Displays selected FAN SPEED: HIGH, MED, 2. Displays Tlačítkem „fan“ nebo na ovladači si nastavte požadovanou rychlost ventilátoru. Jsou zde the ON/OFF b 4. Press HIGH, MED, unit. HIGH, MED, or LOW or LOW , HIGH , AUTO) Temperature/Timer display Temperature/Timer display or LOW Displays the set temperature by default, or timer setting This display is blank when nastavovat teplotu místnosti. when using TIMER ON/OFF functions disp Displays theTemperature/Timer set temperature by defa display is blank when set to AUTOThis speed. Temperature range: 17-30 C(62 F-86 F) the set tempera when using Displays TIMER ON/OFF function setTimer to AUTO speed. setting range: 0-24 hours o O when using TIMER ON/O Timer on – automatické zapnutí This display is blank when operating in FAN mode. Temperature range: 17-30 C(62 F Temperature Tímto tlačítkem zapnete časovač, který odloží start klimatizace a přístroj Timersepne. setting range: 0-24range: hours 17 3 rychlosti (LOW 3. This display is blank when Pro tutospeed. funkci nelze set to AUTO o 1. 2. O O 5 Timer setting range: 0 This display is blank when operating Na displeji ovladače se zobrazí čas za jak dlouho by se přístroj sepnul. This display is blank whe Časovač zapnete stiskem tlačítka TIMER ON na ovladači. 3. Každé stisknutí (nebo podržení) tlačítka zvýší nastavený čas. Čas udává za jak dlouho se 5 přístroj spustí. 4. Po nastavení času, začne přístroj čas odpočítávat a displeji svítí “TIMER ON”. Na ovládacím panelu budou svítit 2 světelné kontrolky. 5. Pokud časovač chcete vypnout, tak tímto tlačítkem přenastavte čas až do “0”. Tlačítko můžete mačkat nebo podržet. 5 Timer off – automatické vypnutí Tímto tlačítkem nastavíte časovač, pro automatické vypnutí klimatizace po určité době.. Stiskněte tlačítko TIMER OFF na ovladači. 2. Na displeji ovladače se zobrazí čas za jak dlouho by se přístroj vypnul. 3. Každé stisknutí (nebo podržení) tlačítka zvýší nastavený čas. Čas udává za jak dlouho se přístroj vypne. 4. Po nastavení času, začne přístroj čas odpočítávat a displeji svítí “TIMER OFF”. Na ovládacím panelu budou svítit 2 světelné kontrolky. 5. Pokud časovač vypnutí chcete zrušit, tak tímto tlačítkem přenastavte čas až do “0”. Tlačítko můžete mačkat nebo podržet. CZ 1. Automatické vypnutí/zapnutí (Timer on + Timer off) Výše zmíněné funkce časovače můžete samozřejmě nastavit i současně. Nastavení pak bude automaticky udávat, kdy se přístroj sepne ale i kdy se následně vypne. POZNÁMKA: Čas nastavení vždy vyhází z aktuálního času a dopočítává jej. Příklad. Je-li nyní 13 hodin a my chceme klimatizaci sepnout v 16:30 a v 18 hodin opět vypnout. Tak musíte na časovači zapnutí (TIMER ON) nastavit 3,5 hodiny a na časovači vypnutí (TIMER OFF) 5,0 hodin. www.domo-elektro.be DO263A 75 Sleep Po aktivaci funkce „sleep“ se po 30 minutách zvýší teplota o 1oC. Za dalších 30 minut se teplota zvýší o další 1oC. Klimatizace bude tuto teplotu udržovat dalších 7 hodin. Po uplynutí tohoto času se klimatizace přepne zpět do původního nastavení teploty a funkce „sleep“ se ukončí. POZNÁMKA: tuto funkci nemůžete nastavit zároveň s ventilací („fan“), ani funkcí odvlhčování („dry“). RYCHLÁ VOLBA (Shortcut) K tomuto tlačítku si můžete nastavit předvolenou funkci a následně jí jedním stiskem zapínat/ vypínat. Pokud nějaké nastavení přístroje používáte častěji, tak si jej můžete uložit do paměti. Uložíte podržením tlačítka na 3 vteřiny. Přístroj si uloží nastavení, které je zvoleno právě v momentě ukládání. Pod volbu nastavení je možné si uložit: funkci (MODE), požadovanou teplotu, rychlost ventilace a případně I nastavení časovače, Kdykoli potom stiskněte tlačítko (SHORTCUT), tak přístroj začne pracovat na uložené a zapamatované nastavení. ČIŠTĚNÍ A ÚDRŽBA ODVODNĚNÍ Trvalý odtok 1. Během funkce “odvlhčování“ můžete použít trvalé odvodnění. Odstraňte zátku vyústění trvalého odtoku. 2. Připojte vypouštěcí hadici na místo pro stálý odtok kondenzátu a druhý konec odveďte do odpadu v místnosti. 3. Ujistěte se, že voda je bezpečně odváděna a nic jí nestojí v cestě. 2 CZ 1 Odtok: kód P1 Pokud nepoužíváte trvalý odtok, nerecyklovaná kondenzovaná voda bude uchovávána v nádržce na vodu. · Po naplnění nádržky na vodu se ozve několik zvukových signálů a na displeji se zobrazí kód P1. Funkce “chlazení“ a “odvlhčování“ se automaticky ukončí. Ventilátor nadále poběží, což je normální. 76 DO263A · Přesuňte přístroj na místo, kde můžete snadno vodu vypustit/ vylít. · Vyjměte vypouštěcí zátku na spodní části přístroje (A) a vypusťte vodu. · Po úplném vypuštění nádržky na vodu umístěte vypouštěcí zátku zpět na otvor pro odtok. · Restartujte přístroj a ujistěte se, že chybový kód P1 na displeji již není zobrazen. Pokud kód nezmizí, zkuste přístroj několikrát vypnout a zapnout. Pokud je i nadále kód zobrazený, prosím kontaktujte poprodejní servis. · POZNÁMKA: Před opětovným spuštěním přístroje se vždy ujistěte, že jste nádržku opět uzavřeli. A ČIŠTĚNÍ · Před čištěním přístroje vždy vytáhněte zástrčku ze zásuvky. · Nikdy na čistění přístroje nepoužívejte žádná chemické nebo drsné prostředky. · Nikdy přístroj nečistěte vodou nebo jinými kapalinami, to by mohlo způsobit poškození elektrickým proudem. · Pokud je poškozený přívodní kabel, musí být opraven nebo nahrazen poprodejním servisem nebo kvalifikovanou osobou. Vzduchový filtr · Čistěte vzduchový filtr alespoň každé dva týdny. Ujistěte se, že klimatizace může pracovat v optimálních podmínkách. · Čistěte vzduchový filtr ve vlažné vodě s trochou mycího prostředku. Filtr důkladně vypláchněte a nechte uschnout. CZ · Před umístěním filtru zpět do klimatizace se ujistěte, že je kompletně suchý. Tělo klimatizace Pro vyčištění vnější části přístroje používejte vlhký měkký hadřík s trochou jemného čistícího prostředku. Ujistěte se, že je přístroj důkladně vysušen. Skladování Před skladováním přístroje na delší dobu, prosím postupujte podle následujících kroků: · Vypusťte veškerou vodu ze spotřebiče. · Potom na půl dne zapněte přístroj ve funkci “foukání“. Ujistěte se, že je přístroj umístěn ve vyhřívaném prostoru. To přístroj kompletně vysuší a předejte utváření plísní. www.domo-elektro.be DO263A 77 · Přístroj vypněte, vytáhněte zástrčku ze zásuvky a odejměte baterie z dálkového ovládání. · Vyčistěte filtry a umístěte je zpět do přístroje. · Uchovávejte přístroj na suchém a tmavém místě. MOŽNÉ PROBLÉMY A JEJICH ŘEŠENÍ Přístroj nefunguje, když mačkáte tlačítko on/off. · Pokud je zobrazen chybový kód P1, vypusťte vodu z klimatizace. · Pokud je teplota v místnosti nižší, než zvolená teplota, upravte zvolenou teplotu. Místnost není dostatečně chladná. · Okna a dveře nejsou zavřeny. Ujistěte se, že všechny okna a dveře jsou zavřeny. · V místnosti může být nějaký zdroj tepla. Pokud je to možné, odstraňte všechny zdroje tepla. · Vzduchová hadice není připojena nebo je blokována. Přípojte hadici a zkontrolujte, zda není blokována. · Zvolená teplota je vysoká. Upravte zvolenou teplotu. · Vzduchový filtr je znečištěný. Vyčistěte vzduchový filtr. Přístroj vydává moc hluku nebo vibruje. · Podlaha není hladká nebo rovná. Pokud je to možné, umístěte přístroj na hladký a rovný povrch. · Vzduchový filtr je znečištěný. Vyčistěte vzduchový filtr. Přístroj vydává bublavý zvuk · Tento zvuk vytváří chladící náplň, který je v přístroji. Tento občasný zvuk je v pořádku. CZ CHYBOVÉ KÓDY Na vaší klimatizaci se mohou zobrazit následující chybové kódy: E1: Nefunguje senzor pro snímání teploty v místnosti. Vypněte přístroj a odejměte zástrčku ze zásuvky. Počkejte 10 sekund a zapojte přístroj zpět. Zapněte přístroj. Pokud chybový kód přetrvává, kontaktujte servis. E2: Senzor vlhkosti nefunguje. Vypněte přístroj a odejměte zástrčku ze zásuvky. Počkejte 10 sekund a zapojte přístroj zpět. Zapněte přístroj. Pokud chybový kód přetrvává, kontaktujte servis. E4: Displej nefunguje správně. Vypněte přístroj a odejměte zástrčku ze zásuvky. Počkejte 10 sekund a zapojte přístroj zpět. Zapněte přístroj. Pokud chybový kód přetrvává, kontaktujte servis. 78 DO263A P1: Nádržka na vodu je plná. Připojte vypouštěcí hadici na dolní místo pro odtok kondenzátu. Když chybový kód přetrvává, kontaktujte servis. OHLED NA ŽÍVOTNÍ PROSTŘEDÍ Symbol na přístroji či na jeho obalu znamená, že s tímto výrobkem není možno nakládat jako s běžným domovním odpadem, nýbrž musí být odevzdán na místech určených ke sběru a likvidaci elektrických a elektronických zařízení. Dodržením tohoto doporučení chráníte životní prostředí a zdraví spoluobčanů. Více informací o možnostech likvidace nebezpečného odpadu obdržíte na obecních nebo městských úřadech, sběrných dvorech nebo v prodejně, kde jste přístroj zakoupili. CZ Obalové materiály jsou recyklovatelné, nakládejte s nimi podle předpisů pro životní prostředí. www.domo-elektro.be DO263A 79 EXCESSIVE OPERATING PRESSURE POWER SOURCE DISCHARGE 2.6MPa 1.0MPa SUCTION 220-240V~ 50Hz, 1Ph REFRIGERANT R290/0.15kg CURRENT STANDARD COOLING INPUT RATING CONDITIONS HEATING CURRENT INPUT RATED CURRENT 5.80A RATED INPUT 1100W ELECTRICAL HEATER INPUT MOISTURE RESISTANCE CLASS WARNING 4.10A 900W IPX0 Appliance sh ould be ins talled, operate d and sto red in a roo m with a floor a rea lar ger tha n 8 m 2 . 80 DO263A www.domo-elektro.be DO263A 81 82 DO263A www.domo-elektro.be DO263A 83 Webshop BESTEL de originele Domo-accessoires en -onderdelen online via: COMMANDEZ d’authentiques accessoires et pièces Domo en ligne sur: BESTELLEN SIE die Domo Original-Zubehör und -Ersatzteile online über: ORDER the original Domo accessories and parts online at: webshop.domo-elektro.be of scan hier: ou scannez ici: oder hier scannen: or scan here: LINEA 2000 BV - Dompel 9 - 2200 Herentals - Belgium - Tel: +32 14 21 71 91 - Fax: +32 14 21 54 63-
 1
1
-
 2
2
-
 3
3
-
 4
4
-
 5
5
-
 6
6
-
 7
7
-
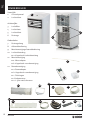 8
8
-
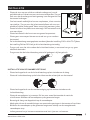 9
9
-
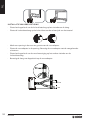 10
10
-
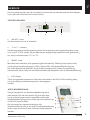 11
11
-
 12
12
-
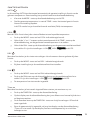 13
13
-
 14
14
-
 15
15
-
 16
16
-
 17
17
-
 18
18
-
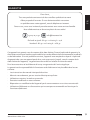 19
19
-
 20
20
-
 21
21
-
 22
22
-
 23
23
-
 24
24
-
 25
25
-
 26
26
-
 27
27
-
 28
28
-
 29
29
-
 30
30
-
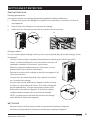 31
31
-
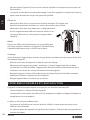 32
32
-
 33
33
-
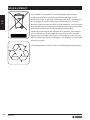 34
34
-
 35
35
-
 36
36
-
 37
37
-
 38
38
-
 39
39
-
 40
40
-
 41
41
-
 42
42
-
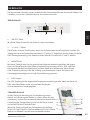 43
43
-
 44
44
-
 45
45
-
 46
46
-
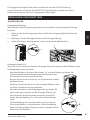 47
47
-
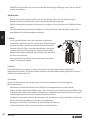 48
48
-
 49
49
-
 50
50
-
 51
51
-
 52
52
-
 53
53
-
 54
54
-
 55
55
-
 56
56
-
 57
57
-
 58
58
-
 59
59
-
 60
60
-
 61
61
-
 62
62
-
 63
63
-
 64
64
-
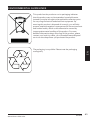 65
65
-
 66
66
-
 67
67
-
 68
68
-
 69
69
-
 70
70
-
 71
71
-
 72
72
-
 73
73
-
 74
74
-
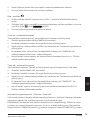 75
75
-
 76
76
-
 77
77
-
 78
78
-
 79
79
-
 80
80
-
 81
81
-
 82
82
-
 83
83
-
 84
84


in andere talen
- English: Domo DO263A Owner's manual
- français: Domo DO263A Le manuel du propriétaire
- Deutsch: Domo DO263A Bedienungsanleitung
- čeština: Domo DO263A Návod k obsluze
Gerelateerde papieren
-
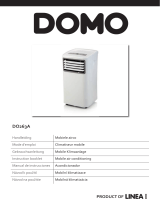 Linea 2000 Domo DO263A de handleiding
-
Domo DO324A de handleiding
-
Domo DO266A de handleiding
-
-
Domo Säulenventilator de handleiding
-
Domo DO362A de handleiding
-
Domo DO360A de handleiding
-
-
-
Domo DO361A de handleiding
