
4-450-239-01(1)
LCD
/Handheld Grip
with LCD Screen/Boîtier
portatif avec écran LCD
/Operating Guide/Mode
d’emploi/Guía de operaciones/Manual
de instruções/Bedienungsanleitung/
Bedieningshandleiding
AKA-LU1
© 2012 Sony Corporation Printed in China
http://www.sony.net
English
By connecting this device to the HDR-AS10/AS15 (sold
separately, hereinafter referred to as ‘camera’), you can record
images while monitoring, or play back recorded images on the
LCD screen.
For details on camera operation, refer to the instruction manual
of the camera.
Parts and controls (See
-1/2.)
LCD screen*
1
PREV button*
2
PLAY button
NEXT button*
2
Hook for wrist strap
HOLD switch*
3
REC START/STOP button/
ENTER (Menu execute) button
REC/access lamp
Cover
Expansion connector
*
1
Can be rotated to the degree shown by the arrows. When
recording in mirror mode, a mirror-image of the subject
appears on the LCD screen; however, the image will be
recorded normally.
*
2
Does not switch on the camera.
*
3
Used to prevent accidental operation. Slide in the direction of
to lock. Slide in the opposite direction to release.
Getting Started
Switching on/off
To switch on, press the NEXT or PREV button on the camera.
To switch off, select [PwOFF], then press the ENTER button
on the camera.
Attaching (See
)
Switch off the camera, then confirm that the
HOLD switch
on the camera is released.
Open the cover of this device.
Open the connector cover of the camera, then insert the
expansion connector of this device (a) into the expansion
connector of the camera (b).
Close the cover of this device.
Detaching
Switch off the camera and open the cover of this device.
Lift the camera straight up to detach.
Notes
Be sure to switch off the camera when attaching/detaching it.
Release the HOLD switch on the camera when detaching it.
If you lift the camera at a tilt when detaching it, the expansion
connector may be damaged.
Recording
Switch on the camera.
Set the camera to [MOVIE] or [INTVL] mode.
Open the LCD screen of this device.
Press the REC START/STOP button.
To stop recording, press the REC START/STOP button again.
Viewing
Switch on the camera.
Open the LCD screen of this device.
Press the PLAY button of this device.
A movie or still image is played back according to the setting
of the camera. To pause movie playback or start a slideshow,
press the PLAY button.
To cancel playback mode, press the REC START/STOP
button.
Notes
In the playback mode, the Auto Power Off function of the
camera may not work. Be sure to switch off the camera after
playback.
Only images are displayed on the LCD screen of this device.
Information such as operation status should be confirmed on
the display panel of the camera.
Images are displayed on the LCD screen only when the
camera is set to the following modes.
[MOVIE]
[INTVL]
Playback mode
The LCD screen is manufactured using extremely high-
precision technology, so over 99.99% of the pixels are
effectively operational. However, there may be some tiny
black points and/or bright points (white, red, blue, or green in
color) that appear constantly on the LCD screen. These points
are a normal result of the manufacturing process, and do not
affect recording in any way.
Specifications
Dimensions (approx.): 42.0 mm × 64.5 mm × 102.5 mm
(1 11/16 in. × 2 5/8 in. × 4 1/8 in.)
(W/H/D, excluding protrsions)
Mass (approx.): 135 g (4.8 oz)
LCD screen
Picture: 6.7 cm (2.7 type, aspect ratio 16:9)
Total number of pixels: 230 400 (960 × 240)
Included items:
Handheld Grip with LCD Screen (1), Set of printed
documentation
Design and specifications are subject to change without
notice.
HDR-AS15(
)
-1/2
*
1
PREV( ) *
2
PLAY( )
NEXT( ) *
2
HOLD *
3
REC START/STOP /
ENTER( )
REC/
*
1
*
2
*
3
/
NEXT PREV
[PwOFF]
ENTER
(
)
HOLD
(a) (b)
HOLD
[MOVIE] [INTVL]
REC START/STOP
REC START/STOP
PLAY
PLAY
REC START/STOP
[MOVIE]
[INTVL]
99.99
42.0 mm 64.5 mm 102.5 mm
135 g
6.7 cm 2.7 16 9
230 400
960 240
LCD 1
Français
En raccordant cet appareil au HDR-AS10/AS15 (vendu
séparément, ci-après nommé « caméscope »), vous pouvez
enregistrer des images tout en les visionnant ou effectuer la
lecture des images enregistrées sur l’écran LCD.
Pour plus de détails sur le fonctionnement du caméscope,
reportez-vous au mode d’emploi du caméscope.
Pièces et réglages (Voir
-1/2.)
Écran LCD*
1
Touche PREV*
2
Touche PLAY
Touche NEXT*
2
Crochet pour dragonne
Commutateur HOLD*
3
Touche REC START/STOP/
Touche ENTER (Exécuter menu)
Témoin REC/d’accès
Couvercle
Connecteur d’extension
*
1
Peut pivoter selon l’angle indiqué par les flèches. Lors de
l’enregistrement en mode miroir, une image en miroir du
sujet s’affiche sur l’écran LCD, mais l’image enregistrée est
normale.
*
2
Ne permet pas d’allumer le caméscope.
*
3
Utilisé pour prévenir les utilisations accidentelles. Réglez-le
dans le sens de la flèche pour activer le verrouillage.
Réglez-le dans le sens inverse pour désactiver le verrouillage.
Comment démarrer
Mise en marche/arrêt
Pour allumer l’appareil, appuyez sur la touche NEXT ou PREV
du caméscope.
Pour éteindre l’appareil, sélectionnez [PwOFF], puis appuyez
sur la touche ENTER du caméscope.
Fixation (Voir
)
Éteignez le caméscope, puis confirmez que le commutateur
HOLD sur le caméscope est relâché.
Ouvrez le couvercle de cet appareil.
Ouvrez le couvercle de connecteur du caméscope, puis
insérez le connecteur d’extension de cet appareil (a) dans le
connecteur d’extension du caméscope (b).
Fermez le couvercle de cet appareil.
Retrait
Éteignez le caméscope, puis ouvrez le couvercle de cet
appareil.
Soulevez le caméscope directement vers le haut pour le
retirer.
Remarques
Assurez-vous d’éteindre le caméscope lors de la fixation/du
retrait.
Relâchez le commutateur HOLD sur le caméscope lors du
retrait.
Si vous soulevez le caméscope en l’inclinant lors du retrait,
vous risquez d’endommager le connecteur d’extension.
Enregistrement
Allumez le caméscope.
Réglez le caméscope sur le mode [MOVIE] ou [INTVL].
Ouvrez l’écran LCD de cet appareil.
Appuyez sur la touche REC START/STOP.
Pour arrêter l’enregistrement, appuyez de nouveau sur la
touche REC START/STOP.
Visionnement
Allumez le caméscope.
Ouvrez l’écran LCD de cet appareil.
Appuyez sur la touche PLAY de cet appareil.
La lecture d’un film ou d’une image fixe démarre, selon le
réglage du caméscope. Pour mettre en pause la lecture d’un
film ou démarrer un diaporama, appuyez sur la touche PLAY.
Pour annuler le mode de lecture, appuyez sur la touche REC
START/STOP.
Remarques
En mode de lecture, la fonction Désactivation automatique
du caméscope pourrait ne pas fonctionner. Assurez-vous
d’éteindre le caméscope après la lecture.
L’écran LCD de cet appareil affiche uniquement des images.
Les informations telles que l’état de fonctionnement doivent
être confirmées sur le panneau d’affichage du caméscope.
Les images s’affichent sur l’écran LCD uniquement lorsque le
caméscope est réglé sur les modes suivants.
[MOVIE]
[INTVL]
Mode de lecture
L’écran LCD est le produit d’une technologie de très haute
précision et plus de 99,99 % des pixels sont opérationnels.
Cependant, de minuscules points noirs et/ou lumineux
(blancs, rouges, bleus ou verts) peuvent apparaître en
permanence sur l’écran LCD. Ces points sont normaux et
résultent du processus de fabrication; ils n’affectent en aucun
cas la qualité de l’enregistrement.
Caractéristiques techniques
Dimensions (approx.) 42,0 mm × 64,5 mm × 102,5 mm
(1 11/16 po × 2 5/8 po × 4 1/8 po)
(L/H/P, excluant les parties saillantes)
Poids (approx.) : 135 g (4,8 oz)
Écran LCD
Image : 6,7 cm (type 2,7, format d’image 16:9)
Nombre total de pixels : 230 400 (960 × 240)
Éléments inclus :
Boîtier portatif avec écran LCD (1), Ensemble de
documentation imprimée
La conception et les caractéristiques techniques sont sujettes à
modifications sans préavis.
Español
Al conectar este dispositivo a HDR-AS10/AS15 (se vende por
separado, en adelante, referida como “cámara”), puede grabar
imágenes mientras supervisa o puede reproducir imágenes
grabadas en la pantalla LCD.
Para obtener información detallada acerca del funcionamiento
de la cámara, consulte el manual de instrucciones
correspondiente.
Partes y controles (consulte
-1/2.)
Pantalla LCD*
1
Botón PREV*
2
Botón PLAY
Botón NEXT*
2
Gancho para correa de mano
Interruptor HOLD*
3
Botón REC START/STOP/
botón ENTER (ejecución del menú)
Lámpara de acceso/REC
Cubierta
Conector de expansión
*
1
Se puede rotar hasta la graduación indicada por las flechas.
Cuando se graba en modo espejo, aparece una imagen
espejada del sujeto en la pantalla LCD, pero la imagen se
graba normalmente.
*
2
No enciende la cámara.
*
3
Se usa para evitar el funcionamiento accidental. Para
bloquearlo, deslícelo hacia . Para desbloquearlo, deslícelo en
la dirección opuesta.
Inicio
Encendido y apagado
Para encenderla, presione los botones NEXT o PREV de la
cámara.
Para apagarla, seleccione [PwOFF] y luego presione el botón
ENTER de la cámara.
Conexión (consulte
)
Apague la cámara. Luego, asegúrese de que el interruptor
HOLD de la cámara esté desbloqueado.
Abra la cubierta del dispositivo.
Abra la cubierta del conector de la cámara e inserte el
conector de expansión del dispositivo (a) en el conector de
expansión de la cámara (b).
Cierre la cubierta del dispositivo.
Desconexión
Apague la cámara y abra la cubierta del dispositivo.
Levante la cámara de manera erguida para desconectarla.
Notas
Asegúrese de apagar la cámara al conectarla o desconectarla.
Desbloquee el interruptor HOLD de la cámara al
desconectarla.
Si levanta la cámara y la inclina en el momento de
desconectarla, el conector de expansión puede dañarse.
Grabación
Encienda la cámara.
Configure la cámara en el modo [MOVIE] o [INTVL].
Abra la pantalla LCD del dispositivo.
Presione el botón REC START/STOP.
Para detener la grabación, vuelva a presionar el botón REC
START/STOP.
Visualización
Encienda la cámara.
Abra la pantalla LCD del dispositivo.
Presione el botón PLAY del dispositivo.
Según la configuración de la cámara, se reproduce una
película o una imagen fija. Para detener la reproducción de la
película o iniciar una presentación de diapositivas, presione
el botón PLAY.
Para cancelar el modo de reproducción, presione el botón
REC START/STOP.
Notas
Es posible que la función de Apagado automático de la
cámara no funcione en el modo de reproducción. Asegúrese
de apagar la cámara después de la reproducción.
En la pantalla LCD del dispositivo, solo se muestran
imágenes. Se debe confirmar información, como el estado de
la operación, en el panel de visualización de la cámara.
Las imágenes se muestran en la pantalla LCD solo cuando la
cámara está configurada en los siguientes modos.
[MOVIE]
[INTVL]
Modo de reproducción
La pantalla LCD ha sido fabricada con tecnología de la más
alta precisión, de modo que más del 99,99 % de los píxeles
son operativos de manera efectiva. Sin embargo, es posible
que se observen pequeños puntos negros y/o brillantes (de
color blanco, rojo, azul o verde) que aparecen constantemente
en la pantalla LCD. Es normal que estos puntos resulten del
proceso de fabricación y no afectan la grabación de ninguna
manera.
Especificaciones
Dimensiones (aprox.): 42,0 mm × 64,5 mm × 102,5 mm
(an./al./prof., sin incluir partes salientes)
Peso (aprox.): 135 g
Pantalla LCD
Imagen: 6,7 cm (tipo 2,7; relación de aspecto 16:9)
Cantidad total de píxeles: 230 400 (960 × 240)
Requerimientos de alimentación: cc de 9,0 V
Consumo de alimentación: 0,2 W
Elementos incluidos:
Videomonitor con pantalla de cristal liquido para
videocámara (1), documentación impresa
El diseño y las especificaciones están sujetos a cambios sin
previo aviso.
Português
Ao ligar este dispositivo à HDR-AS10/AS15 (vendida
separadamente, daqui em diante designada como a “câmara”),
pode gravar imagens enquanto monitoriza ou reproduzir
imagens gravadas no ecrã LCD.
Para obter detalhes acerca do funcionamento da câmara,
consulte o manual de instruções da câmara.
Peças e controlos (Consulte
-1/2.)
Ecrã LCD*
1
Botão PREV*
2
Botão PLAY
Botão NEXT*
2
Gancho para correia de pulso
Interruptor HOLD*
3
Botão REC START/STOP/
Botão ENTER (Menu executar)
REC/indicador luminoso de acesso
Tampa
Conector de expansão
*
1
Pode ser rodado para o grau indicado pelas setas. Quando
gravar no modo de espelho, aparece uma imagem reflectida
do motivo no ecrã LCD; no entanto, a imagem será gravada
normalmente.
*
2
Não liga a câmara.
*
3
Utilizado para evitar o funcionamento acidental. Faça deslizar
na direcção de para bloquear. Faça deslizar na direcção
oposta para desbloquear.
Preparativos
Ligar/desligar
Para ligar, carregue no botão NEXT ou PREV na câmara.
Para desligar, seleccione [PwOFF] e, em seguida, carregue no
botão ENTER na câmara.
Colocação (Consulte
)
Desligue a câmara e, em seguida, confirme que o interruptor
HOLD na câmara está desengatado.
Abra a tampa deste dispositivo.
Abra a tampa do conector da câmara e, em seguida,
introduza o conector de expansão deste dispositivo (a) no
conector de expansão da câmara (b).
Feche a tampa deste dispositivo.
Remoção
Desligue a câmara e abra a tampa deste dispositivo.
Levante a câmara e vire-a para cima para remover.
Notas
Certifique-se de que desliga a câmara quando a
colocar/remover.
Desengate o interruptor HOLD na câmara quando a
remover.
Se levantar a câmara com uma inclinação quando a remover,
o conector de expansão poderá ficar danificado.
Gravar
Ligue a câmara.
Defina a câmara para o modo [MOVIE] ou [INTVL].
Abra o ecrã LCD deste dispositivo.
Carregue no botão REC START/STOP.
Para parar de gravar, carregue novamente no botão REC
START/STOP.
Visualização
Ligue a câmara.
Abra o ecrã LCD deste dispositivo.
Carregue no botão PLAY deste dispositivo.
Um filme ou uma imagem fixa é reproduzida de acordo com
a definição da câmara. Para interromper a reprodução do
filme ou iniciar uma apresentação de diapositivos, carregue
no botão PLAY.
Para cancelar o modo de reprodução, carregue no botão REC
START/STOP.
Notas
No modo de reprodução, a função Desligar automático da
câmara poderá não funcionar. Certifique-se de que desliga a
câmara após a reprodução.
São apresentadas apenas imagens no ecrã LCD deste
dispositivo. As informações como o estado do funcionamento
devem ser confirmadas no painel do visor da câmara.
As imagens são apresentadas no ecrã LCD apenas quando a
câmara está definida para os modos seguintes.
[MOVIE]
[INTVL]
Modo de reprodução
O ecrã LCD foi fabricado com tecnologia de precisão
extremamente elevada, pelo que mais de 99,99% dos píxeis
estão efectivamente operacionais. No entanto, podem existir,
de forma contínua, pequenos pontos pretos e/ou brilhantes
(brancos, vermelhos, azuis ou verdes) no ecrã LCD. Estes
pontos são um resultado normal do processo de fabrico e não
afectam, de forma alguma, a gravação.
Especificações
Dimensões (aprox.): 42,0 mm × 64,5 mm × 102,5 mm (L/A/P,
excluindo partes salientes)
Peso (aprox.): 135 g
Ecrã LCD
Imagem: 6,7 cm (tipo 2,7, formato 16:9)
Número total de píxeis: 230 400 (960 × 240)
Itens incluídos:
Unidade portátil com ecrã LCD (1), Documentos impressos
O design e as especificações estão sujeitos a alterações sem
aviso prévio.
1
2
Deutsch
Wenn Sie dieses Gerät an die HDR-AS10/AS15 (gesondert
erhältlich, im Folgenden als „Kamera“ bezeichnet) anschließen,
können Sie Bilder während der Aufnahme anzeigen oder
Aufnahmen auf dem LCD-Display anzeigen.
Einzelheiten zum Bedienen der Kamera finden Sie in der
Bedienungsanleitung zur Kamera.
Teile und Bedienelemente (siehe
-1/2)
LCD-Display*
1
Taste PREV*
2
Taste PLAY
Taste NEXT*
2
Öse für Handgelenksriemen
Schalter HOLD*
3
Taste REC START/STOP/
Taste ENTER (Menüfunktion ausführen)
Aufnahme-/Zugriffsanzeige REC
Abdeckung
Erweiterungsanschluss
*
1
Kann wie mit den Pfeilen angegeben gedreht werden.
Beim Aufnehmen im Spiegelmodus erscheint das Motiv als
Spiegelbild auf dem LCD-Display, aufgenommen wird es
jedoch normal.
*
2
Dient nicht zum Einschalten der Kamera.
*
3
Dient zum Sperren der Bedienelemente. Schieben Sie den
Schalter zum Sperren in die mit angegebene Richtung.
Schieben Sie ihn zum Entsperren in die entgegengesetzte
Richtung.
Vorbereitungen
Ein-/Ausschalten
Drücken Sie zum Einschalten die Taste NEXT oder PREV auf
der Kamera.
Wählen Sie zum Ausschalten [PwOFF] und drücken Sie dann
die Taste ENTER an der Kamera.
Einsetzen der Kamera (siehe
)
Schalten Sie die Kamera aus und vergewissern Sie sich, dass
der Schalter HOLD an der Kamera deaktiviert ist.
Öffnen Sie die Abdeckung dieses Geräts.
Öffnen Sie die Anschlussabdeckung der Kamera und setzen
Sie den Erweiterungsanschluss dieses Geräts (a) in den
Erweiterungsanschluss an der Kamera (b) ein.
Schließen Sie die Abdeckung dieses Geräts.
Herausnehmen der Kamera
Schalten Sie die Kamera aus und öffnen Sie die Abdeckung
dieses Geräts.
Heben Sie die Kamera gerade nach oben heraus.
Hinweise
Achten Sie darauf, dass die Kamera beim Einsetzen/
Herausnehmen ausgeschaltet ist.
Deaktivieren Sie zum Herausnehmen den Schalter HOLD
an der Kamera.
Wenn Sie die Kamera beim Herausnehmen schräg halten,
kann der Erweiterungsanschluss beschädigt werden.
Aufnahme
Schalten Sie die Kamera ein.
Stellen Sie an der Kamera den Modus [MOVIE] oder
[INTVL] ein.
Klappen Sie das LCD-Display an diesem Gerät auf.
Drücken Sie die Taste REC START/STOP.
Zum Stoppen der Aufnahme drücken Sie die Taste REC
START/STOP erneut.
Wiedergabe
Schalten Sie die Kamera ein.
Klappen Sie das LCD-Display an diesem Gerät auf.
Drücken Sie die Taste PLAY an diesem Gerät.
Je nach Kameraeinstellung wird ein Film oder ein Standbild
wiedergegeben. Zum Anhalten der Filmwiedergabe bzw.
Starten einer Diaschau drücken Sie die Taste PLAY.
Drücken Sie zum Beenden des Wiedergabemodus die Taste
REC START/STOP.
Hinweise
Im Wiedergabemodus funktioniert die Ausschaltautomatik
der Kamera möglicherweise nicht. Achten Sie darauf, die
Kamera nach der Wiedergabe auszuschalten.
Nur Aufnahmen werden auf dem LCD-Display dieses Geräts
angezeigt. Informationen wie den Betriebsstatus finden Sie
auf dem Display der Kamera.
Auf dem LCD-Display werden Aufnahmen nur angezeigt,
wenn die Kamera in einen der folgenden Modi geschaltet ist.
[MOVIE]
[INTVL]
Wiedergabemodus
Das LCD-Display wird unter Einsatz von
Hochpräzisionstechnologie hergestellt, so dass der Anteil der
effektiven Bildpunkte bei über 99,99 % liegt. Dennoch können
kleine schwarze Punkte und/oder helle Lichtpunkte (weiß,
rot, blau oder grün) permanent auf dem LCD-Display zu
sehen sein. Diese Punkte gehen auf das Herstellungsverfahren
zurück und haben keinen Einfluss auf die Aufnahmequalität.
Technische Daten
Abmessungen: ca. 42,0 mm × 64,5 mm × 102,5 mm (B/H/T,
ohne vorstehende Teile)
Gewicht: ca. 135 g
LCD-Display
Bild: 6,7 cm (Typ 2,7, Bildformat 16:9)
Gesamtzahl der Pixel: 230 400 (960 × 240)
Mitgelieferte Teile:
Handgehäuse mit LCD-Display (1), Gedruckte Anleitungen
Änderungen, die dem technischen Fortschritt dienen, bleiben
vorbehalten.
Nederlands
Door dit apparaat aan te sluiten op de HDR-AS10/AS15
(los verkrijgbaar, hierna 'camera' genoemd), kunt u beelden
opnemen tijdens het monitoren of opgenomen beelden afspelen
op het LCD-scherm.
Meer informatie over de bediening van de camera vindt u in de
gebruiksaanwijzing ervan.
Onderdelen en bedieningselementen
(zie
-1/2.)
LCD-scherm*
1
PREV-toets*
2
PLAY-toets
NEXT-toets*
2
Haak voor polsriem
HOLD-schakelaar*
3
REC START/STOP-toets/
ENTER (menu uitvoeren)-toets
REC-/toegangslampje
Klep
Uitbreidingsaansluiting
*
1
Kan gedraaid worden in een hoek van het aantal graden dat
aangegeven wordt door de pijlen. Bij het opnemen in de
spiegelstand verschijnt er een spiegelbeeld van het onderwerp
op het LCD-scherm. Het beeld wordt echter normaal
opgenomen.
*
2
Hiermee kunt u de camera niet inschakelen.
*
3
Om ongewenste bediening te voorkomen. Schuif de
schakelaar naar om het apparaat te vergrendelen. Schuif
de schakelaar in de omgekeerde richting om het apparaat te
ontgrendelen.
Aan de slag
In-/uitschakelen
Om het apparaat in te schakelen, drukt u op de NEXT- of
PREV-toets op de camera.
Om het apparaat uit te schakelen, selecteert u [PwOFF] en
drukt u vervolgens op de ENTER-toets op de camera.
Bevestigen (zie
)
Schakel de camera uit en controleer of de
HOLD-
schakelaar op de camera ontgrendeld is.
Open de klep van dit apparaat.
Open het klepje voor de aansluitingen van de camera en
verbind vervolgens de uitbreidingsaansluiting van dit
apparaat (a) met de uitbreidingsaansluiting van de camera
(b).
Sluit de klep van dit apparaat.
Losmaken
Schakel de camera uit en open de klep van dit apparaat.
Hef de camera loodrecht op om deze los te maken.
Opmerkingen
Zorg ervoor dat de camera uitgeschakeld is wanneer u deze
bevestigt/losmaakt.
Ontgrendel de HOLD-schakelaar op de camera wanneer u
deze losmaakt.
Als u de camera schuin opheft bij het losmaken, raakt de
uitbreidingsaansluiting mogelijk beschadigd.
Opnemen
Schakel de camera in.
Activeer de stand [MOVIE] of [INTVL] op de camera.
Open het LCD-scherm van dit apparaat.
Druk op de REC START/STOP-toets.
Om de opname te stoppen, drukt u nogmaals op de REC
START/STOP-toets.
Weergeven
Schakel de camera in.
Open het LCD-scherm van dit apparaat.
Druk op de PLAY-toets van dit apparaat.
Afhankelijk van de instelling van de camera wordt er een
film of stilstaand beeld weergegeven. Om de weergave van
een film te pauzeren of een diavoorstelling te starten, drukt u
op de PLAY-toets.
Om de weergavestand te annuleren, drukt u op de REC
START/STOP-toets.
Opmerkingen
De automatische uitschakelfunctie van de camera werkt
mogelijk niet in de weergavestand. Vergeet de camera na het
weergeven niet uit te schakelen.
Er kunnen alleen afbeeldingen weergegeven worden op
het LCD-scherm van dit apparaat. Informatie zoals de
bedieningsstatus moet u op het scherm van de camera
controleren.
Er kunnen alleen afbeeldingen weergegeven worden op
het LCD-scherm wanneer een van de volgende standen
geactiveerd is op de camera:
[MOVIE]
[INTVL]
Weergavestand
Het LCD-scherm is vervaardigd met precisietechnologie,
waardoor minstens 99,99% van de pixels effectief operationeel
is. Soms kunnen er echter zwarte en/of heldere stipjes (wit,
rood, blauw of groen) verschijnen op het LCD-scherm. Deze
stipjes zijn een normaal gevolg van het productieproces en
hebben geen enkele invloed op de opnames.
Specificaties
Afmetingen (ong.): 42,0 mm × 64,5 mm × 102,5 mm (B/H/D,
exclusief uitstekende delen)
Gewicht (ong.): 135 g
LCD-scherm
Beeld: 6,7 cm (type 2,7, beeldverhouding 16:9)
Totaal aantal pixels: 230 400 (960 × 240)
Bijgeleverde items:
Draagbare houder met LCD-scherm (1), gedrukte
documentatie
Ontwerp en specificaties kunnen zonder kennisgeving
gewijzigd worden.

1 1
USB
USB
English
Owner’s Record
The model and serial numbers are located on the
bottom. Record the serial number in the space provided
below. Refer to these numbers whenever you call your
Sony dealer regarding this product.
Model No. AKA-LU1
Serial No.
WARNING
To reduce fire or shock hazard, do not expose the
unit to rain or moisture.
For the Customers in U.S.A.
CAUTION
You are cautioned that any changes or modifications
not expressly approved in this manual could void your
authority to operate this equipment.
Note:
This equipment has been tested and found to comply
with the limits for a Class B digital device, pursuant to
Part 15 of the FCC Rules.
These limits are designed to provide reasonable
protection against harmful interference in a residential
installation. This equipment generates, uses, and can
radiate radio frequency energy and, if not installed
and used in accordance with the instructions, may
cause harmful interference to radio communications.
However, there is no guarantee that interference will
not occur in a particular installation. If this equipment
does cause harmful interference to radio or television
reception, which can be determined by turning the
equipment off and on, the user is encouraged to try to
correct the interference by one or more of the following
measures:
Reorient or relocate the receiving antenna.
Increase the separation between the equipment and receiver.
Connect the equipment into an outlet on a circuit different
from that to which the receiver is connected.
Consult the dealer or an experienced radio/TV technician
for help.
FOR CUSTOMERS IN EUROPE
Notice for the customers in the countries applying EU
Directives
The manufacturer of this product is Sony Corporation,
1-7-1 Konan Minato-ku Tokyo, 108-0075 Japan. The
Authorized Representative for EMC and product safety
is Sony Deutschland GmbH, Hedelfinger Strasse 61,
70327 Stuttgart, Germany. For any service or guarantee
matters please refer to the addresses given in separate
service or guarantee documents.
Attention
The electromagnetic fields at the specific frequencies
may influence the picture and sound of this unit.
Disposal of Old Electrical & Electronic Equipment
(Applicable in the European Union and other European
countries with separate collection systems)
This symbol on the product or on its
packaging indicates that this product shall
not be treated as household waste. Instead
it shall be handed over to the applicable
collection point for the recycling of
electrical and electronic equipment. By
ensuring this product is disposed of
correctly, you will help prevent potential negative
consequences for the environment and human health,
which could otherwise be caused by inappropriate waste
handling of this product. The recycling of materials will
help to conserve natural resources. For more detailed
information about recycling of this product, please
contact your local Civic Office, your household waste
disposal service or the shop where you purchased the
product.
Estimated duration of recording and
playback for each battery pack
Estimated recording time
(Units: minutes)
Battery pack Continuous
recording time
Typical
recording time
Image quality HQ VGA HQ VGA
NP-BX1 125 160 75 95
NP-BG1/FG1 95 120 55 70
Estimated playing time
(Units: minutes)
Battery pack Playing time
Image quality HQ VGA
NP-BX1 170 175
NP-BG1/FG1 125 130
When using the HDR-AS10/AS15 (sold separately).
Approximate time available when you use a fully charged
battery pack.
Times measured when using the camera at 25°C (77°F). It is
recommended that you use the camera in an environment of
10°C to 30°C (50°F to 86°F).
Recording/playback duration may decrease as a result of
conditions under which the camera is used (such as in low
temperatures).
Français
Aide-mémoire
Les numéros de modèle et de série se situent sous
l’appareil. Prendre en note le numéro de série dans
l’espace prévu ci-dessous. Se reporter à ces numéros lors
des communications avec le détaillant Sony au sujet de
ce produit.
Modèle no AKA-LU1
No de série ____________________________
AVERTISSEMENT
Afin de réduire les risques d’incendie ou de
décharge électrique,n’exposez pas cet appareil à
la pluie ou à l’humidité.
À l’intention des clients aux É.-U.
AVERTISSEMENT
Par la présente, vous êtes avisé du fait que tout
changement ou toute modification ne faisant pas l’objet
d’une autorisation expresse dans le présent manuel
pourrait annuler votre droit d’utiliser l’appareil.
Note:
L’appareil a été testé et est conforme aux exigences d’un
appareil numérique de Classe B, conformément à la
Partie 15 de la réglementation de la FCC.
Ces critères sont conçus pour fournir une protection
raisonnable contre les interférences nuisibles dans un
environnement résidentiel. L’appareil génère, utilise
et peut émettre des fréquences radio; s’il n’est pas
installé et utilisé conformément aux instructions,
il pourrait provoquer des interférences nuisibles
aux communications radio. Cependant, il n’est pas
possible de garantir que des interférences ne seront pas
provoquées dans certaines conditions particulières. Si
l’appareil devait provoquer des interférences nuisibles
à la réception radio ou à la télévision, ce qui peut être
démontré en allumant et éteignant l’appareil, il est
recommandé à l’utilisateur d’essayer de corriger cette
situation par l’une ou l’autre des mesures suivantes :
Réorienter ou déplacer l’antenne réceptrice.
Augmenter la distance entre l’appareil et le récepteur.
Brancher l’appareil dans une prise ou sur un circuit différent
de celui sur lequel le récepteur est branché.
Consulter le détaillant ou un technicien expérimenté en
radio/téléviseurs.
Note pour les clients européens
Avis aux consommateurs des pays appliquant les
Directives UE
Le fabricant de ce produit est Sony Corporation,
1-7-1 Konan Minato-ku Tokyo, 108-0075 Japon.
Le représentant agréé pour la compatibilité
électromagnétique et la sécurité du produit est Sony
Deutschland GmbH, Hedelfinger Strasse 61, 70327
Stuttgart, Allemagne. Pour toute question relative à la
garantie ou aux réparations, reportez-vous à l’adresse
que vous trouverez dans les documents ci-joints, relatifs
à la garantie et aux réparations.
Attention
Le champ électromagnétique à des fréquences particulières peut
avoir une incidence sur l’image et le son de cet appareil.
Traitement des appareils électriques et électroniques en
fin de vie (Applicable dans les pays de l’Union Européenne
et aux autres pays européens disposant de systèmes de
collecte sélective)
Ce symbole, apposé sur le produit ou sur
son emballage, indique que ce produit ne
doit pas être traité avec les déchets
ménagers. Il doit être remis à un point de
collecte approprié pour le recyclage des
équipements électriques et électroniques.
En vous assurant que ce produit sont mis
au rebut de façon appropriée, vous participez activement
à la prévention des conséquences négatives que leur
mauvais traitement pourrait provoquer sur
l’environnement et sur la santé humaine. Le recyclage
des matériaux contribue par ailleurs à la préservation
des ressources naturelles. Pour toute information
complémentaire au sujet du recyclage de ce produit,
vous pouvez contacter votre municipalité, votre
déchetterie locale ou le point de vente où vous avez
acheté le produit.
Durée estimée d’enregistrement et de
lecture pour chaque batterie
Durée d’enregistrement estimée
(Unités : minutes)
Batterie Durée
d’enregistrement
continu
Durée
d’enregistrement
typique
Qualité de l’image HQ VGA HQ VGA
NP-BX1 125 160 75 95
NP-BG1/FG1 95 120 55 70
Durée de lecture estimée
(Unités : minutes)
Batterie Durée de lecture
Qualité de l’image HQ VGA
NP-BX1 170 175
NP-BG1/FG1 125 130
Lors de l’utilisation du HDR-AS10/AS15 (vendu séparément).
Durée approximative lorsque vous utilisez une batterie
entièrement chargée.
Durées mesurées lors de l’utilisation du caméscope à 25 °C
(77 °F). Il est recommandé d’utiliser le caméscope dans un
environnement dont la température est comprise entre 10 °C
et 30 °C (50 °F et 86 °F).
La durée d’enregistrement/de lecture peut être réduite
en raison des conditions d’utilisation du caméscope (par
exemple, à des températures basses).
Español
Nombre del producto: Videomonitor con pantalla de cristal
liquido para videocámara
Modelo: AKA-LU1
POR FAVOR LEA DETALLADAMENTE ESTE MANUAL
DE INSTRUCCIONES ANTES DE CONECTAR Y OPERAR
ESTE EQUIPO.
RECUERDE QUE UN MAL USO DE SU APARATO
PODRÍA ANULAR LA GARANTÍA.
AVISO
Para reducir el riesgo de incendio o descarga
eléctrica, no exponga la unidad a la lluvia ni a la
humedad.
Atención para los clientes en Europa
Aviso para los clientes de países en los que se aplican las
directivas de la UE
El fabricante de este producto es Sony Corporation,
1-7-1 Konan Minato-ku Tokyo, 108-0075, Japón. El
representante autorizado en lo referente al cumplimiento
de la directiva EMC y a la seguridad de los productos es
Sony Deutschland GmbH, Hedelfinger Strasse 61, 70327
Stuttgart, Alemania. Para resolver cualquier asunto
relacionado con el soporte técnico o la garantía, consulte
las direcciones que se indican en los documentos de
soporte técnico y garantía suministrados por separado.
Atención
Los campos electromagnéticos a frecuencias específicas podrán
influir en la imagen y el sonido de esta unidad.
Tratamiento de los equipos eléctricos y electrónicos al
final de su vida útil (aplicable en la Unión Europea y en
países europeos con sistemas de tratamiento selectivo de
residuos)
Este símbolo en el equipo o en su embalaje
indica que el presente producto no puede
ser tratado como residuos doméstico
normal. Debe entregarse en el
correspondiente punto de recogida de
equipos eléctricos y electrónicos. Al
asegurarse de que este producto se desecha
correctamente, usted ayuda a prevenir las consecuencias
potencialmente negativas para el medio ambiente y la
salud humana que podrían derivarse de la incorrecta
manipulación en el momento de deshacerse de este
producto. El reciclaje de materiales ayuda a conservar
los recursos naturales. Para recibir información
detallada sobre el reciclaje de este producto, póngase en
contacto con el ayuntamiento, el punto de recogida más
cercano o el establecimiento donde ha adquirido el
producto.
Duración estimada de grabación y
reproducción para cada paquete de
baterías
Tiempo estimado de grabación
(Unidades: minuto)
Paquete de baterías Tiempo
continuo de
grabación
Tiempo habitual
de grabación
Calidad de imagen HQ VGA HQ VGA
NP-BX1 125 160 75 95
NP-BG1/FG1 95 120 55 70
Tiempo estimado de reproducción
(Unidades: minuto)
Paquete de baterías Tiempo de
reproducción
Calidad de imagen HQ VGA
NP-BX1 170 175
NP-BG1/FG1 125 130
Al usar HDR-AS10/AS15 (se vende por separado).
Tiempo aproximado disponible al usar un paquete de baterías
completamente cargadas.
Tiempos medidos usando la cámara a 25 °C
Se recomienda usar la cámara en un ambiente de 10 °C a 30 °C
La duración de la grabación o la reproducción puede
disminuir como consecuencia de las condiciones en las que se
usa la cámara (como bajas temperaturas).
Português
AVISO
Para reduzir o risco de incêndio ou choque
eléctrico, não exponha a unidade à chuva ou à
humidade.
Aviso para os clientes na Europa
Nota para os clientes nos países que apliquem as
Directivas da UE
O fabricante deste produto é a Sony Corporation,
1-7-1 Konan Minato-ku Tokyo, 108-0075 Japan. O
Representante Autorizado para EMC e segurança de
produto é a Sony Deutschland GmbH, Hedelfinger
Strasse 61, 70327, Stuttgart, Germany. Para questões
acerca de serviço e acerca da garantia, consulte as
moradas fornecidas em separado, nos documentos de
serviço e garantia.
Atenção
Os campos magnéticos em frequências específicas podem
influenciar a imagem e o som desta unidade.
Tratamento de Equipamentos Eléctricos e Electrónicos
no final da sua vida útil (Aplicável na União Europeia e
em países Europeus com sistemas de recolha selectiva de
resíduos)
Este símbolo, colocado no produto ou na
sua embalagem, indica que este não deve
ser tratado como resíduo urbano
indiferenciado. Deve sim ser colocado
num ponto de recolha destinado a resíduos
de equipamentos eléctricos e electrónicos.
Assegurandose que este produto é
correctamente depositado, irá prevenir potenciais
consequências negativas para o ambiente bem como
para a saúde, que de outra forma poderiam ocorrer pelo
mau manuseamento destes produtos. A reciclagem dos
materiais contribuirá para a conservação dos recursos
naturais. Para obter informação mais detalhada sobre a
reciclagem deste produto, por favor contacte o
município onde reside, os serviços de recolha de
resíduos da sua área ou a loja onde adquiriu o produto.
Duração estimada de gravação e
reprodução para cada bateria
Tempo de gravação estimado
(Unidades: minutos)
Bateria Tempo de
gravação
contínua
Tempo de
gravação normal
Qualidade de
imagem
HQ VGA HQ VGA
NP-BX1 125 160 75 95
NP-BG1/FG1 95 120 55 70
Tempo de reprodução estimado
(Unidades: minutos)
Bateria Tempo de
reprodução
Qualidade de
imagem
HQ VGA
NP-BX1 170 175
NP-BG1/FG1 125 130
Ao utilizar a HDR-AS10/AS15 (vendida separadamente).
Tempo aproximado disponível quando utiliza uma bateria
totalmente carregada.
Tempos medidos quando utilizar a câmara a 25 °C.
Recomenda-se que utilize a câmara num ambiente de 10 °C
a 30 °C.
A duração de gravação/reprodução pode diminuir como
resultado das condições sob as quais a câmara é utilizada
(como em baixas temperaturas).
Deutsch
WARNUNG
Um Feuergefahr und die Gefahr eines elektrischen
Schlags zu verringern, setzen Sie das Gerät weder
Regen noch Feuchtigkeit aus.
Für Kunden in Europa
Hinweis für Kunden in Ländern, in denen EU-Richtlinien
gelten
Der Hersteller dieses Produkts ist Sony Corporation,
1-7-1 Konan Minato-ku Tokyo, 108-0075, Japan.
Autorisierter Vertreter für EMV und Produktsicherheit
ist die Sony Deutschland GmbH, Hedelfinger Strasse
61, 70327 Stuttgart, Deutschland. Für Fragen im
Zusammenhang mit Kundendienst oder Garantie
wenden Sie sich bitte an die in den separaten
Kundendienst- oder Garantieunterlagen genannten
Adressen.
Achtung
Die elektromagnetischen Felder bei den speziellen Frequenzen
können Bild und Ton dieses Gerätes beeinflussen.
Entsorgung von gebrauchten elektrischen und
elektronischen Geräten (anzuwenden in den Ländern der
Europäischen Union und anderen europäischen Ländern
mit einem separaten Sammelsystem für diese Geräte)
Das Symbol auf dem Produkt oder seiner
Verpackung weist darauf hin, dass dieses
Produkt nicht als normaler Haushaltsabfall
zu behandeln ist, sondern an einer
Annahmestelle für das Recycling von
elektrischen und elektronischen Geräten
abgegeben werden muss. Durch Ihren
Beitrag zum korrekten Entsorgen dieses Produkts
schützen Sie die Umwelt und die Gesundheit Ihrer
Mitmenschen. Umwelt und Gesundheit werden durch
falsches Entsorgen gefährdet. Materialrecycling hilft, den
Verbrauch von Rohstoffen zu verringern. Weitere
Informationen zum Recycling dieses Produkts erhalten
Sie bei Ihrer Gemeindeverwaltung, den kommunalen
Entsorgungsbetrieben oder dem Geschäft, in dem Sie
das Produkt gekauft haben.
Voraussichtliche Aufnahme- und
Wiedergabedauer bei den einzelnen Akkus
Voraussichtliche Aufnahmedauer
(Einheit: Minuten)
Akku Dauer bei
kontinuierlicher
Aufnahme
Dauer bei
normaler
Aufnahme
Bildqualität HQ VGA HQ VGA
NP-BX1 125 160 75 95
NP-BG1/FG1 95 120 55 70
Voraussichtliche Wiedergabedauer
(Einheit: Minuten)
Akku Wiedergabedauer
Bildqualität HQ VGA
NP-BX1 170 175
NP-BG1/FG1 125 130
Bei Verwendung der HDR-AS10/AS15 (gesondert erhältlich).
Ungefähre Dauer bei Verwendung eines vollständig geladenen
Akkus.
Die Angaben gelten bei einer Verwendung der Kamera
bei 25 °C. Für die Verwendung der Kamera wird eine
Umgebungstemperatur zwischen 10 °C und 30 °C empfohlen.
Die Aufnahme-/Wiedergabedauer kann je nach den
Nutzungsbedingungen der Kamera kürzer sein (z. B. bei
niedrigen Temperaturen).
Nederlands
WAARSCHUWING
Om het gevaar van brand of elektrische schokken
te verkleinen, mag het apparaat niet worden
blootgesteld aan regen of vocht.
Voor klanten in Europa
Kennisgeving voor klanten in de landen waar
EU-richtlijnen van toepassing zijn
De fabrikant van dit product is Sony Corporation,
1-7-1 Konan Minato-ku Tokyo, 108-0075 Japan.
De geautoriseerde vertegenwoordiger voor EMC
en productveiligheid is Sony Deutschland GmbH,
Hedelfinger Strasse 61, 70327 Stuttgart, Duitsland.
Voor kwesties met betrekking tot service of garantie
kunt u het adres in de afzonderlijke service- en
garantiedocumenten gebruiken.
Let op
De elektromagnetische velden bij de specifieke frequenties
kunnen het beeld en het geluid van dit apparaat beïnvloeden.
Verwijdering van oude elektrische en elektronische
apparaten (van toepassing in de Europese Unie en andere
Europese landen met gescheiden inzamelingssystemen)
Dit symbool op het product of op de
verpakking wijst erop dat dit product niet
als huishoudelijk afval mag worden
behandeld. Het moet echter naar een
inzamelingspunt worden gebracht waar
elektrische en elektronische apparatuur
wordt gerecycled. Als u ervoor zorgt dat
dit product op de correcte manier wordt verwerkt, helpt
u mogelijke negatieve gevolgen voor mens en milieu die
zouden kunnen veroorzaakt worden in geval van
verkeerde afvalbehandeling te voorkomen. Het
recycleren van materialen draagt bij tot het behoud van
natuurlijke bronnen. Voor meer details in verband met
het recyclen van dit product, kan u contact opnemen
met de gemeentelijke instanties, de organisatie belast
met de verwijdering van huishoudelijk afval of de winkel
waar u het product hebt gekocht.
Verwachte opname- en afspeelduur voor
elke accu
Verwachte opnameduur
(eenheid: minuten)
Accu Doorlopende
opnameduur
Gemiddelde
opnameduur
Beeldkwaliteit HQ VGA HQ VGA
NP-BX1 125 160 75 95
NP-BG1/FG1 95 120 55 70
Verwachte speelduur
(eenheid: minuten)
Accu Afspeelduur
Beeldkwaliteit HQ VGA
NP-BX1 170 175
NP-BG1/FG1 125 130
Bij gebruik van de HDR-AS10/AS15 (los verkrijgbaar).
Verwachte beschikbare tijd wanneer u een volledig opgeladen
accu gebruikt.
Tijden gemeten bij gebruik van de camera bij 25 °C. Wij raden
u aan de camera te gebruiken bij een temperatuur tussen
10 °C en 30 °C.
De opname-/afspeelduur kan afnemen als gevolg van de
omstandigheden waaronder de camera wordt gebruikt (bv. bij
een lage omgevingstemperatuur).
1
AKA-LU1
8
http://www.sony.jp/support/actioncam/
..........................
0120-333-020
PHS IP
.......
0466-31-2511
FAX
.............................................
0120-333-389
9:00 18:00
9:00 17:00
405 +
108-0075 1-7-1
( )
HQ VGA HQ VGA
NP-BX1 125 160 75 95
NP-BG1/FG1 95 120 55 70
( )
HQ VGA
NP-BX1 170 175
NP-BG1/FG1 125 130
HDR-AS15( )
25 10 30
Documenttranscriptie
English 日 本語 4-450-239-01(1) お買い上げいただきありがとうございます。 グリップスタイルLCD ユニット/Handheld Grip with LCD Screen/Boîtier portatif avec écran LCD 取扱説明書/Operating Guide/Mode d’emploi/Guía de operaciones/Manual de instruções/Bedienungsanleitung/ Bedieningshandleiding 本機では、 HDR-AS15(別売、以下、ビデオカメラとす る)を接続して、 液晶モニターで画像を確認しながら 撮影したり、再生したりでき ます。 ビデオカメラの操作方法については、 ビデオカメラの 取扱説明書をご覧ください。 各部の名称(-1/2参照) 液晶モニター *1 PREV(前へ)ボタン*2 PLAY(再生)ボタン NEXT(次へ)ボタン*2 リストストラップ取付け部 HOLDスイッチ* 3 REC START/STOPボタン/ ENTER(メニュー決定)ボタン REC/アクセスランプ カバー AKA-LU1 © 2012 Sony Corporation Printed in China 拡張端子 *1 矢印の角度に回すことができます。対面撮影時に、液 晶モニターには左右反転して映りますが、実際には正し く録画されます。 *2 ビデオカメラの電源を入れることはできません。 *3 携帯時にボタンなどが誤って押されることを防ぎます。 ホールドするには方向にスライドさせ、解除するには 元の位置に戻します。 準備 電源の入/切 電源を入れるには、ビデオカメラのNEXTまたはPREVボ タンを押します。 電源を切るには、ビデオカメラの[PwOFF]を選び、 ENTERボタンを押します。 取り付け(参照) ビデオカメラの電源を切り、 ビデオカメラの HOLDスイッチが解除されていることを確認す る。 本機のカバーを開ける。 ビデオカメラの端子カバーを開けた状態で、 本機 の拡張端子(a)にビデオカメラの拡張端子(b)を差 し込んで取り付ける。 本機のカバーを閉める。 取り外し ビデオカメラの電源を切り、 本機のカバーを開け る。 ビデオカメラを真上に引き上げて取り外す。 ご注意 http://www.sony.net 1 取り付け、取り外しのときは、ビデオカメラの電源を必 ず切ってください。 取り付けるときは、ビデオカメラのHOLDスイッチを 解除してください。 取り外すときにビデオカメラを傾けて引き上げると、拡 張端子が破損する恐れがあります。 撮る ビデオカメラの電源を入れる。 ビデオカメラを[MOVIE]または[INTVL]モードに する。 本機の液晶モニターを開く。 REC START/STOPボタンを押す。 撮影を止めるには、 もう一度REC START/STOPボ タンを押します。 見る 2 ビデオカメラの電源を入れる。 本機の液晶モニターを開く。 本機のPLAYボタンを押す。 ビデオカメラの設定次第で、 動画または静止画が 再生されます。動画の一時停止や静止画のスライ ドショーを行うには、 PLAYボタンを押します。 再生モードを終了するには、 REC START/STOPボ タンを押す。 ご注意 再生モードでは、ビデオカメラの自動電源オフ機能が無 効になる場合があります。再生後は、ビデオカメラの電 源を必ず切ってください。 本機の液晶モニターには、画像のみ表示されます。動作 状況などはビデオカメラの表示パネルでご確認くださ い。 本機の液晶モニターに画像が表示されるのは、ビデオカ メラのモードが以下に設定されているときのみです。 [MOVIE] [INTVL] 再生モード 液晶モニターは有効画素99.99%以上の非常に精密度の 高い技術で作られていますが、黒い点が現れたり、白や 赤、青、緑の点が消えなかったりすることがあります。 これは故障ではありません。これらの点は記録されま せん。 主な仕様 外形寸法:約42.0 mm × 64.5 mm × 102.5 mm (幅×高さ×奥行き、 突起部を除く) 質量:約135 g 液晶モニター: 画面サイズ:6.7 cm(2.7型、アスペクト比16:9) 総ドット数:230 400ドット 横960 × 縦240 付属品: グリップスタイルLCDユニット(1)、印刷物一式 本機の仕様および外観は、改良のため予告なく変更する ことがありますがご了承ください。 Français By connecting this device to the HDR-AS10/AS15 (sold separately, hereinafter referred to as ‘camera’), you can record images while monitoring, or play back recorded images on the LCD screen. For details on camera operation, refer to the instruction manual of the camera. Parts and controls (See -1/2.) Español En raccordant cet appareil au HDR-AS10/AS15 (vendu séparément, ci-après nommé « caméscope »), vous pouvez enregistrer des images tout en les visionnant ou effectuer la lecture des images enregistrées sur l’écran LCD. Pour plus de détails sur le fonctionnement du caméscope, reportez-vous au mode d’emploi du caméscope. Pièces et réglages (Voir -1/2.) LCD screen* Écran LCD* PREV button*2 Touche PREV*2 1 1 PLAY button Touche PLAY NEXT button*2 Touche NEXT*2 Hook for wrist strap Crochet pour dragonne HOLD switch*3 REC START/STOP button/ ENTER (Menu execute) button REC/access lamp Cover Expansion connector *1 Can be rotated to the degree shown by the arrows. When recording in mirror mode, a mirror-image of the subject appears on the LCD screen; however, the image will be recorded normally. 2 * Does not switch on the camera. 3 * Used to prevent accidental operation. Slide in the direction of to lock. Slide in the opposite direction to release. Getting Started Switching on/off To switch on, press the NEXT or PREV button on the camera. To switch off, select [PwOFF], then press the ENTER button on the camera. Attaching (See ) Switch off the camera, then confirm that the HOLD switch on the camera is released. Open the cover of this device. Open the connector cover of the camera, then insert the expansion connector of this device (a) into the expansion connector of the camera (b). Close the cover of this device. Detaching Switch off the camera and open the cover of this device. Lift the camera straight up to detach. Notes Be sure to switch off the camera when attaching/detaching it. Release the HOLD switch on the camera when detaching it. If you lift the camera at a tilt when detaching it, the expansion connector may be damaged. Recording Switch on the camera. Set the camera to [MOVIE] or [INTVL] mode. Open the LCD screen of this device. Press the REC START/STOP button. To stop recording, press the REC START/STOP button again. Viewing Switch on the camera. Open the LCD screen of this device. Press the PLAY button of this device. A movie or still image is played back according to the setting of the camera. To pause movie playback or start a slideshow, press the PLAY button. To cancel playback mode, press the REC START/STOP button. Notes In the playback mode, the Auto Power Off function of the camera may not work. Be sure to switch off the camera after playback. Only images are displayed on the LCD screen of this device. Information such as operation status should be confirmed on the display panel of the camera. Images are displayed on the LCD screen only when the camera is set to the following modes. [MOVIE] [INTVL] Playback mode The LCD screen is manufactured using extremely highprecision technology, so over 99.99% of the pixels are effectively operational. However, there may be some tiny black points and/or bright points (white, red, blue, or green in color) that appear constantly on the LCD screen. These points are a normal result of the manufacturing process, and do not affect recording in any way. Specifications Dimensions (approx.): 42.0 mm × 64.5 mm × 102.5 mm (1 11/16 in. × 2 5/8 in. × 4 1/8 in.) (W/H/D, excluding protrsions) Mass (approx.): 135 g (4.8 oz) LCD screen Picture: 6.7 cm (2.7 type, aspect ratio 16:9) Total number of pixels: 230 400 (960 × 240) Included items: Handheld Grip with LCD Screen (1), Set of printed documentation Design and specifications are subject to change without notice. Commutateur HOLD*3 Touche REC START/STOP/ Touche ENTER (Exécuter menu) Témoin REC/d’accès Couvercle Connecteur d’extension * Peut pivoter selon l’angle indiqué par les flèches. Lors de 1 l’enregistrement en mode miroir, une image en miroir du sujet s’affiche sur l’écran LCD, mais l’image enregistrée est normale. *2 Ne permet pas d’allumer le caméscope. *3 Utilisé pour prévenir les utilisations accidentelles. Réglez-le dans le sens de la flèche pour activer le verrouillage. Réglez-le dans le sens inverse pour désactiver le verrouillage. Comment démarrer Mise en marche/arrêt Pour allumer l’appareil, appuyez sur la touche NEXT ou PREV du caméscope. Pour éteindre l’appareil, sélectionnez [PwOFF], puis appuyez sur la touche ENTER du caméscope. Fixation (Voir ) Éteignez le caméscope, puis confirmez que le commutateur HOLD sur le caméscope est relâché. Ouvrez le couvercle de cet appareil. Ouvrez le couvercle de connecteur du caméscope, puis insérez le connecteur d’extension de cet appareil (a) dans le connecteur d’extension du caméscope (b). Fermez le couvercle de cet appareil. Retrait Éteignez le caméscope, puis ouvrez le couvercle de cet appareil. Soulevez le caméscope directement vers le haut pour le retirer. Remarques Assurez-vous d’éteindre le caméscope lors de la fixation/du retrait. Relâchez le commutateur HOLD sur le caméscope lors du retrait. Si vous soulevez le caméscope en l’inclinant lors du retrait, vous risquez d’endommager le connecteur d’extension. Enregistrement Allumez le caméscope. Réglez le caméscope sur le mode [MOVIE] ou [INTVL]. Ouvrez l’écran LCD de cet appareil. Appuyez sur la touche REC START/STOP. Pour arrêter l’enregistrement, appuyez de nouveau sur la touche REC START/STOP. Visionnement Allumez le caméscope. Ouvrez l’écran LCD de cet appareil. Appuyez sur la touche PLAY de cet appareil. La lecture d’un film ou d’une image fixe démarre, selon le réglage du caméscope. Pour mettre en pause la lecture d’un film ou démarrer un diaporama, appuyez sur la touche PLAY. Pour annuler le mode de lecture, appuyez sur la touche REC START/STOP. Remarques En mode de lecture, la fonction Désactivation automatique du caméscope pourrait ne pas fonctionner. Assurez-vous d’éteindre le caméscope après la lecture. L’écran LCD de cet appareil affiche uniquement des images. Les informations telles que l’état de fonctionnement doivent être confirmées sur le panneau d’affichage du caméscope. Les images s’affichent sur l’écran LCD uniquement lorsque le caméscope est réglé sur les modes suivants. [MOVIE] [INTVL] Mode de lecture L’écran LCD est le produit d’une technologie de très haute précision et plus de 99,99 % des pixels sont opérationnels. Cependant, de minuscules points noirs et/ou lumineux (blancs, rouges, bleus ou verts) peuvent apparaître en permanence sur l’écran LCD. Ces points sont normaux et résultent du processus de fabrication; ils n’affectent en aucun cas la qualité de l’enregistrement. Caractéristiques techniques Dimensions (approx.) 42,0 mm × 64,5 mm × 102,5 mm (1 11/16 po × 2 5/8 po × 4 1/8 po) (L/H/P, excluant les parties saillantes) Poids (approx.) : 135 g (4,8 oz) Écran LCD Image : 6,7 cm (type 2,7, format d’image 16:9) Nombre total de pixels : 230 400 (960 × 240) Éléments inclus : Boîtier portatif avec écran LCD (1), Ensemble de documentation imprimée La conception et les caractéristiques techniques sont sujettes à modifications sans préavis. Al conectar este dispositivo a HDR-AS10/AS15 (se vende por separado, en adelante, referida como “cámara”), puede grabar imágenes mientras supervisa o puede reproducir imágenes grabadas en la pantalla LCD. Para obtener información detallada acerca del funcionamiento de la cámara, consulte el manual de instrucciones correspondiente. Partes y controles (consulte -1/2.) Pantalla LCD*1 Botón PREV*2 Botón PLAY Botón NEXT*2 Gancho para correa de mano Interruptor HOLD*3 Botón REC START/STOP/ botón ENTER (ejecución del menú) Lámpara de acceso/REC Cubierta Conector de expansión *1 Se puede rotar hasta la graduación indicada por las flechas. Cuando se graba en modo espejo, aparece una imagen espejada del sujeto en la pantalla LCD, pero la imagen se graba normalmente. *2 No enciende la cámara. *3 Se usa para evitar el funcionamiento accidental. Para bloquearlo, deslícelo hacia . Para desbloquearlo, deslícelo en la dirección opuesta. Inicio Encendido y apagado Para encenderla, presione los botones NEXT o PREV de la cámara. Para apagarla, seleccione [PwOFF] y luego presione el botón ENTER de la cámara. Conexión (consulte ) Apague la cámara. Luego, asegúrese de que el interruptor HOLD de la cámara esté desbloqueado. Abra la cubierta del dispositivo. Abra la cubierta del conector de la cámara e inserte el conector de expansión del dispositivo (a) en el conector de expansión de la cámara (b). Cierre la cubierta del dispositivo. Desconexión Apague la cámara y abra la cubierta del dispositivo. Levante la cámara de manera erguida para desconectarla. Notas Asegúrese de apagar la cámara al conectarla o desconectarla. Desbloquee el interruptor HOLD de la cámara al desconectarla. Si levanta la cámara y la inclina en el momento de desconectarla, el conector de expansión puede dañarse. Grabación Encienda la cámara. Configure la cámara en el modo [MOVIE] o [INTVL]. Abra la pantalla LCD del dispositivo. Presione el botón REC START/STOP. Para detener la grabación, vuelva a presionar el botón REC START/STOP. Visualización Encienda la cámara. Abra la pantalla LCD del dispositivo. Presione el botón PLAY del dispositivo. Según la configuración de la cámara, se reproduce una película o una imagen fija. Para detener la reproducción de la película o iniciar una presentación de diapositivas, presione el botón PLAY. Para cancelar el modo de reproducción, presione el botón REC START/STOP. Notas Es posible que la función de Apagado automático de la cámara no funcione en el modo de reproducción. Asegúrese de apagar la cámara después de la reproducción. En la pantalla LCD del dispositivo, solo se muestran imágenes. Se debe confirmar información, como el estado de la operación, en el panel de visualización de la cámara. Las imágenes se muestran en la pantalla LCD solo cuando la cámara está configurada en los siguientes modos. [MOVIE] [INTVL] Modo de reproducción La pantalla LCD ha sido fabricada con tecnología de la más alta precisión, de modo que más del 99,99 % de los píxeles son operativos de manera efectiva. Sin embargo, es posible que se observen pequeños puntos negros y/o brillantes (de color blanco, rojo, azul o verde) que aparecen constantemente en la pantalla LCD. Es normal que estos puntos resulten del proceso de fabricación y no afectan la grabación de ninguna manera. Especificaciones Dimensiones (aprox.): 42,0 mm × 64,5 mm × 102,5 mm (an./al./prof., sin incluir partes salientes) Peso (aprox.): 135 g Pantalla LCD Imagen: 6,7 cm (tipo 2,7; relación de aspecto 16:9) Cantidad total de píxeles: 230 400 (960 × 240) Requerimientos de alimentación: cc de 9,0 V Consumo de alimentación: 0,2 W Elementos incluidos: Videomonitor con pantalla de cristal liquido para videocámara (1), documentación impresa El diseño y las especificaciones están sujetos a cambios sin previo aviso. Deutsch Português Ao ligar este dispositivo à HDR-AS10/AS15 (vendida separadamente, daqui em diante designada como a “câmara”), pode gravar imagens enquanto monitoriza ou reproduzir imagens gravadas no ecrã LCD. Para obter detalhes acerca do funcionamento da câmara, consulte o manual de instruções da câmara. Peças e controlos (Consulte -1/2.) Nederlands Wenn Sie dieses Gerät an die HDR-AS10/AS15 (gesondert erhältlich, im Folgenden als „Kamera“ bezeichnet) anschließen, können Sie Bilder während der Aufnahme anzeigen oder Aufnahmen auf dem LCD-Display anzeigen. Einzelheiten zum Bedienen der Kamera finden Sie in der Bedienungsanleitung zur Kamera. Teile und Bedienelemente (siehe -1/2) Door dit apparaat aan te sluiten op de HDR-AS10/AS15 (los verkrijgbaar, hierna 'camera' genoemd), kunt u beelden opnemen tijdens het monitoren of opgenomen beelden afspelen op het LCD-scherm. Meer informatie over de bediening van de camera vindt u in de gebruiksaanwijzing ervan. Onderdelen en bedieningselementen (zie -1/2.) Ecrã LCD* LCD-Display* Botão PREV*2 Taste PREV*2 LCD-scherm*1 Botão PLAY Taste PLAY PREV-toets*2 Botão NEXT*2 Taste NEXT*2 PLAY-toets Gancho para correia de pulso Öse für Handgelenksriemen NEXT-toets*2 Interruptor HOLD*3 Schalter HOLD*3 Haak voor polsriem Botão REC START/STOP/ Taste REC START/STOP/ HOLD-schakelaar*3 Taste ENTER (Menüfunktion ausführen) Aufnahme-/Zugriffsanzeige REC Abdeckung Erweiterungsanschluss REC START/STOP-toets/ 1 Botão ENTER (Menu executar) REC/indicador luminoso de acesso Tampa Conector de expansão * Pode ser rodado para o grau indicado pelas setas. Quando 1 gravar no modo de espelho, aparece uma imagem reflectida do motivo no ecrã LCD; no entanto, a imagem será gravada normalmente. *2 Não liga a câmara. *3 Utilizado para evitar o funcionamento acidental. Faça deslizar na direcção de para bloquear. Faça deslizar na direcção oposta para desbloquear. Preparativos Ligar/desligar Para ligar, carregue no botão NEXT ou PREV na câmara. Para desligar, seleccione [PwOFF] e, em seguida, carregue no botão ENTER na câmara. Colocação (Consulte ) Desligue a câmara e, em seguida, confirme que o interruptor HOLD na câmara está desengatado. Abra a tampa deste dispositivo. Abra a tampa do conector da câmara e, em seguida, introduza o conector de expansão deste dispositivo (a) no conector de expansão da câmara (b). Feche a tampa deste dispositivo. Remoção Desligue a câmara e abra a tampa deste dispositivo. Levante a câmara e vire-a para cima para remover. Notas Certifique-se de que desliga a câmara quando a colocar/remover. Desengate o interruptor HOLD na câmara quando a remover. Se levantar a câmara com uma inclinação quando a remover, o conector de expansão poderá ficar danificado. Gravar Ligue a câmara. Defina a câmara para o modo [MOVIE] ou [INTVL]. Abra o ecrã LCD deste dispositivo. Carregue no botão REC START/STOP. Para parar de gravar, carregue novamente no botão REC START/STOP. Visualização Ligue a câmara. Abra o ecrã LCD deste dispositivo. Carregue no botão PLAY deste dispositivo. Um filme ou uma imagem fixa é reproduzida de acordo com a definição da câmara. Para interromper a reprodução do filme ou iniciar uma apresentação de diapositivos, carregue no botão PLAY. Para cancelar o modo de reprodução, carregue no botão REC START/STOP. Notas No modo de reprodução, a função Desligar automático da câmara poderá não funcionar. Certifique-se de que desliga a câmara após a reprodução. São apresentadas apenas imagens no ecrã LCD deste dispositivo. As informações como o estado do funcionamento devem ser confirmadas no painel do visor da câmara. As imagens são apresentadas no ecrã LCD apenas quando a câmara está definida para os modos seguintes. [MOVIE] [INTVL] Modo de reprodução O ecrã LCD foi fabricado com tecnologia de precisão extremamente elevada, pelo que mais de 99,99% dos píxeis estão efectivamente operacionais. No entanto, podem existir, de forma contínua, pequenos pontos pretos e/ou brilhantes (brancos, vermelhos, azuis ou verdes) no ecrã LCD. Estes pontos são um resultado normal do processo de fabrico e não afectam, de forma alguma, a gravação. Especificações Dimensões (aprox.): 42,0 mm × 64,5 mm × 102,5 mm (L/A/P, excluindo partes salientes) Peso (aprox.): 135 g Ecrã LCD Imagem: 6,7 cm (tipo 2,7, formato 16:9) Número total de píxeis: 230 400 (960 × 240) Itens incluídos: Unidade portátil com ecrã LCD (1), Documentos impressos O design e as especificações estão sujeitos a alterações sem aviso prévio. 1 *1 Kann wie mit den Pfeilen angegeben gedreht werden. Beim Aufnehmen im Spiegelmodus erscheint das Motiv als Spiegelbild auf dem LCD-Display, aufgenommen wird es jedoch normal. 2 * Dient nicht zum Einschalten der Kamera. 3 * Dient zum Sperren der Bedienelemente. Schieben Sie den Schalter zum Sperren in die mit angegebene Richtung. Schieben Sie ihn zum Entsperren in die entgegengesetzte Richtung. Vorbereitungen Ein-/Ausschalten Drücken Sie zum Einschalten die Taste NEXT oder PREV auf der Kamera. Wählen Sie zum Ausschalten [PwOFF] und drücken Sie dann die Taste ENTER an der Kamera. Einsetzen der Kamera (siehe ) Schalten Sie die Kamera aus und vergewissern Sie sich, dass der Schalter HOLD an der Kamera deaktiviert ist. Öffnen Sie die Abdeckung dieses Geräts. Öffnen Sie die Anschlussabdeckung der Kamera und setzen Sie den Erweiterungsanschluss dieses Geräts (a) in den Erweiterungsanschluss an der Kamera (b) ein. Schließen Sie die Abdeckung dieses Geräts. Herausnehmen der Kamera Schalten Sie die Kamera aus und öffnen Sie die Abdeckung dieses Geräts. Heben Sie die Kamera gerade nach oben heraus. Hinweise Achten Sie darauf, dass die Kamera beim Einsetzen/ Herausnehmen ausgeschaltet ist. Deaktivieren Sie zum Herausnehmen den Schalter HOLD an der Kamera. Wenn Sie die Kamera beim Herausnehmen schräg halten, kann der Erweiterungsanschluss beschädigt werden. Aufnahme Schalten Sie die Kamera ein. Stellen Sie an der Kamera den Modus [MOVIE] oder [INTVL] ein. Klappen Sie das LCD-Display an diesem Gerät auf. Drücken Sie die Taste REC START/STOP. Zum Stoppen der Aufnahme drücken Sie die Taste REC START/STOP erneut. Wiedergabe Schalten Sie die Kamera ein. Klappen Sie das LCD-Display an diesem Gerät auf. Drücken Sie die Taste PLAY an diesem Gerät. Je nach Kameraeinstellung wird ein Film oder ein Standbild wiedergegeben. Zum Anhalten der Filmwiedergabe bzw. Starten einer Diaschau drücken Sie die Taste PLAY. Drücken Sie zum Beenden des Wiedergabemodus die Taste REC START/STOP. Hinweise Im Wiedergabemodus funktioniert die Ausschaltautomatik der Kamera möglicherweise nicht. Achten Sie darauf, die Kamera nach der Wiedergabe auszuschalten. Nur Aufnahmen werden auf dem LCD-Display dieses Geräts angezeigt. Informationen wie den Betriebsstatus finden Sie auf dem Display der Kamera. Auf dem LCD-Display werden Aufnahmen nur angezeigt, wenn die Kamera in einen der folgenden Modi geschaltet ist. [MOVIE] [INTVL] Wiedergabemodus Das LCD-Display wird unter Einsatz von Hochpräzisionstechnologie hergestellt, so dass der Anteil der effektiven Bildpunkte bei über 99,99 % liegt. Dennoch können kleine schwarze Punkte und/oder helle Lichtpunkte (weiß, rot, blau oder grün) permanent auf dem LCD-Display zu sehen sein. Diese Punkte gehen auf das Herstellungsverfahren zurück und haben keinen Einfluss auf die Aufnahmequalität. Technische Daten Abmessungen: ca. 42,0 mm × 64,5 mm × 102,5 mm (B/H/T, ohne vorstehende Teile) Gewicht: ca. 135 g LCD-Display Bild: 6,7 cm (Typ 2,7, Bildformat 16:9) Gesamtzahl der Pixel: 230 400 (960 × 240) Mitgelieferte Teile: Handgehäuse mit LCD-Display (1), Gedruckte Anleitungen Änderungen, die dem technischen Fortschritt dienen, bleiben vorbehalten. ENTER (menu uitvoeren)-toets REC-/toegangslampje Klep Uitbreidingsaansluiting *1 Kan gedraaid worden in een hoek van het aantal graden dat aangegeven wordt door de pijlen. Bij het opnemen in de spiegelstand verschijnt er een spiegelbeeld van het onderwerp op het LCD-scherm. Het beeld wordt echter normaal opgenomen. 2 * Hiermee kunt u de camera niet inschakelen. 3 * Om ongewenste bediening te voorkomen. Schuif de schakelaar naar om het apparaat te vergrendelen. Schuif de schakelaar in de omgekeerde richting om het apparaat te ontgrendelen. Aan de slag In-/uitschakelen Om het apparaat in te schakelen, drukt u op de NEXT- of PREV-toets op de camera. Om het apparaat uit te schakelen, selecteert u [PwOFF] en drukt u vervolgens op de ENTER-toets op de camera. Bevestigen (zie ) Schakel de camera uit en controleer of de HOLDschakelaar op de camera ontgrendeld is. Open de klep van dit apparaat. Open het klepje voor de aansluitingen van de camera en verbind vervolgens de uitbreidingsaansluiting van dit apparaat (a) met de uitbreidingsaansluiting van de camera (b). Sluit de klep van dit apparaat. Losmaken Schakel de camera uit en open de klep van dit apparaat. Hef de camera loodrecht op om deze los te maken. Opmerkingen Zorg ervoor dat de camera uitgeschakeld is wanneer u deze bevestigt/losmaakt. Ontgrendel de HOLD-schakelaar op de camera wanneer u deze losmaakt. Als u de camera schuin opheft bij het losmaken, raakt de uitbreidingsaansluiting mogelijk beschadigd. Opnemen Schakel de camera in. Activeer de stand [MOVIE] of [INTVL] op de camera. Open het LCD-scherm van dit apparaat. Druk op de REC START/STOP-toets. Om de opname te stoppen, drukt u nogmaals op de REC START/STOP-toets. Weergeven Schakel de camera in. Open het LCD-scherm van dit apparaat. Druk op de PLAY-toets van dit apparaat. Afhankelijk van de instelling van de camera wordt er een film of stilstaand beeld weergegeven. Om de weergave van een film te pauzeren of een diavoorstelling te starten, drukt u op de PLAY-toets. Om de weergavestand te annuleren, drukt u op de REC START/STOP-toets. Opmerkingen De automatische uitschakelfunctie van de camera werkt mogelijk niet in de weergavestand. Vergeet de camera na het weergeven niet uit te schakelen. Er kunnen alleen afbeeldingen weergegeven worden op het LCD-scherm van dit apparaat. Informatie zoals de bedieningsstatus moet u op het scherm van de camera controleren. Er kunnen alleen afbeeldingen weergegeven worden op het LCD-scherm wanneer een van de volgende standen geactiveerd is op de camera: [MOVIE] [INTVL] Weergavestand Het LCD-scherm is vervaardigd met precisietechnologie, waardoor minstens 99,99% van de pixels effectief operationeel is. Soms kunnen er echter zwarte en/of heldere stipjes (wit, rood, blauw of groen) verschijnen op het LCD-scherm. Deze stipjes zijn een normaal gevolg van het productieproces en hebben geen enkele invloed op de opnames. Specificaties Afmetingen (ong.): 42,0 mm × 64,5 mm × 102,5 mm (B/H/D, exclusief uitstekende delen) Gewicht (ong.): 135 g LCD-scherm Beeld: 6,7 cm (type 2,7, beeldverhouding 16:9) Totaal aantal pixels: 230 400 (960 × 240) Bijgeleverde items: Draagbare houder met LCD-scherm (1), gedrukte documentatie Ontwerp en specificaties kunnen zonder kennisgeving gewijzigd worden. 日本語 安全のために 誤った使いかたをしたときに生じる感電や傷害など 人への危害、 また火災などの財産への損害を未然に防 止するため、 次のことを必ずお守りください。 「安全のために」の注意事項を守る 定期的に点検する 1年に1度は、端子にほこりがたまっていないか、故障 したまま使用していないか、などを点検してください。 故障したら使わない カメラの動作がおかしくなったり、破損していること に気がついたら、すぐに相談窓口へご相談ください。 万一、異常が起きたら 変な音・ においがしたら 煙が出たら ぐらついた台の上や傾いた所に置いたり、不 安定な状態で三脚を設置すると、製品が落ち たり倒れたりして、けがの原因となることが あります。 使用中は機器を布で覆ったりしない 熱がこもってケースが変形したり、火災、感電 の原因となることがあります。 液晶モニターはガラス製のため、強い衝撃を 与えると割れて、けがの原因となることがあ ります。 保証書について 電源を切る 電池を外す 相談窓口に連絡する この製品には保証書が添付されていますので、お買い上 げの際お買い上げ店でお受け取りください。 所定事項の記入および記載内容をお確かめのうえ、大切 に保存してください。 本製品は、国内仕様です。外国で万一、故障、不具合が生 じた場合の現地でのアフターサービスおよびその費用 については、ご容赦ください。 保証期間は、お買い上げ日より1 年間です。 アフターサービス 警告表示の意味 調子が悪いときは この取扱説明書や製品では、次のような表示をしてい ます。 この説明書をもう一度ご覧になってお調べください。 この表示のある事項を守らないと、極めて危険な状況 が起こり、その結果大けがや死亡にいたる危害が発生 します。 それでも具合が悪いときは 相談窓口またはお買い上げ店にご相談ください。ご相談にな るときは、次のことをお知らせください。 この表示のある事項を守らないと、思わぬ危険な状況 が起こり、その結果大けがや死亡にいたる危害が発生 することがあります。 型名:AKA-LU1 ご相談内容:できるだけ詳しく お買い上げ年月日: 保証期間中の修理は させていただきます。 当社では本機の補修用性能部品(製品の機能を維持するために 必要な部品)を、 製造打ち切り後8年間保有しています。 ただし、故障の状況その他の事情により、 修理に代えて製品交 換をする場合がありますのでご了承ください。 よくあるお問い合わせ、解決方法などはホームページをご活用 ください。 http://www.sony.jp/support/actioncam/ 使い方相談窓口 フリーダイヤル .......................... 0120-333-020 携帯・PHS・一部のIP電話....... 0466-31-2511 FAX ............................................. 0120-333-389 受付時間 月∼金:9:00 ∼ 18:00 土・日・祝日:9:00 ∼ 17:00 分解や改造をしない 火災や感電の原因となります。内部点検や修 理は相談窓口にご依頼ください。 内部に水や異物(金属類や燃えやすい物 など) を入れない 火災、感電の原因となります。万一、 水や異物 が入ったときは、 すぐに電源を切り、 電池を取 り出してください。USB接続している場合は、 USBケーブルを抜いて、相談窓口にご相談く ださい。 運転中に使用しない 自動車、オートバイなどの運転をしながら、本 機の操作や液晶モニターを見ることは絶対お やめください。交通事故の原因となります。 撮影時は周囲の状況に注意をはらう 周囲の状況を把握しないまま、撮影を行わな いでください。事故やけがなどの原因となり ます。 機器本体や付属品、 メモリーカードは乳 幼児の手の届く場所に置かない 電池などの付属品などを飲み込む恐れがあり ます。乳幼児の手の届かない場所に置き、お 子様がさわらぬようご注意ください。万一飲 み込んだ場合は、 直ちに医師に相談してくだ さい。 長時間、 同じ持ち方で使用しない 使用中に本機が熱いと感じなくても皮膚の同 じ場所が長時間触れたままの状態でいると、 赤くなったり水ぶくれができたりなど低温や けどの原因となる場合があります。 Note: This equipment has been tested and found to comply with the limits for a Class B digital device, pursuant to Part 15 of the FCC Rules. These limits are designed to provide reasonable protection against harmful interference in a residential installation. This equipment generates, uses, and can radiate radio frequency energy and, if not installed and used in accordance with the instructions, may cause harmful interference to radio communications. However, there is no guarantee that interference will not occur in a particular installation. If this equipment does cause harmful interference to radio or television reception, which can be determined by turning the equipment off and on, the user is encouraged to try to correct the interference by one or more of the following measures: Reorient or relocate the receiving antenna. Increase the separation between the equipment and receiver. Connect the equipment into an outlet on a circuit different from that to which the receiver is connected. Consult the dealer or an experienced radio/TV technician for help. 上記番号へ接続後、最初のガイダンスが流れている間に 「405」+ 「#」 を押してください。直接、担当窓口へおつなぎします。 ソニー株式会社 〒108-0075 東京都港区港南1-7-1 バッテリーごとの撮影・再生可能時間 およその撮影可能時間 (単位:分) バッテリー 連続撮影時 実撮影時 画質 HQ 125 95 HQ 75 55 NP-BX1 NP-BG1/FG1 VGA 160 120 VGA 95 70 およその再生可能時間 (単位:分) バッテリー 再生可能時間 画質 HQ VGA NP-BX1 170 175 NP-BG1/FG1 125 130 HDR-AS15(別売)の場合です。 満充電からのおよその時間です。 25℃で使用したときの時間です。10℃∼ 30℃でのご使 用をおすすめします。 低温の場所での使用など、使用状態によって撮影・再生 可能時間は短くなります。 Notice for the customers in the countries applying EU Directives The manufacturer of this product is Sony Corporation, 1-7-1 Konan Minato-ku Tokyo, 108-0075 Japan. The Authorized Representative for EMC and product safety is Sony Deutschland GmbH, Hedelfinger Strasse 61, 70327 Stuttgart, Germany. For any service or guarantee matters please refer to the addresses given in separate service or guarantee documents. Attention The electromagnetic fields at the specific frequencies may influence the picture and sound of this unit. Disposal of Old Electrical & Electronic Equipment (Applicable in the European Union and other European countries with separate collection systems) This symbol on the product or on its packaging indicates that this product shall not be treated as household waste. Instead it shall be handed over to the applicable collection point for the recycling of electrical and electronic equipment. By ensuring this product is disposed of correctly, you will help prevent potential negative consequences for the environment and human health, which could otherwise be caused by inappropriate waste handling of this product. The recycling of materials will help to conserve natural resources. For more detailed information about recycling of this product, please contact your local Civic Office, your household waste disposal service or the shop where you purchased the product. Estimated duration of recording and playback for each battery pack Estimated recording time Battery pack Image quality NP-BX1 NP-BG1/FG1 Battery pack Image quality NP-BX1 (Units: minutes) Playing time HQ VGA 170 175 NP-BG1/FG1 125 水滴のかかる場所など湿気の多い場所や ほこり、 油煙、 湯気の多い場所では使わな い 火災や感電の原因になることがあります。 ぬれた手で使用しない 感電の原因になることがあります。 (Units: minutes) Typical recording time HQ VGA 75 95 55 70 Estimated playing time 下記の注意事項を守らないと、けがや財産に損害を与 えることがあります。 Continuous recording time HQ VGA 125 160 95 120 Par la présente, vous êtes avisé du fait que tout changement ou toute modification ne faisant pas l’objet d’une autorisation expresse dans le présent manuel pourrait annuler votre droit d’utiliser l’appareil. Note: L’appareil a été testé et est conforme aux exigences d’un appareil numérique de Classe B, conformément à la Partie 15 de la réglementation de la FCC. Ces critères sont conçus pour fournir une protection raisonnable contre les interférences nuisibles dans un environnement résidentiel. L’appareil génère, utilise et peut émettre des fréquences radio; s’il n’est pas installé et utilisé conformément aux instructions, il pourrait provoquer des interférences nuisibles aux communications radio. Cependant, il n’est pas possible de garantir que des interférences ne seront pas provoquées dans certaines conditions particulières. Si l’appareil devait provoquer des interférences nuisibles à la réception radio ou à la télévision, ce qui peut être démontré en allumant et éteignant l’appareil, il est recommandé à l’utilisateur d’essayer de corriger cette situation par l’une ou l’autre des mesures suivantes : Réorienter ou déplacer l’antenne réceptrice. Augmenter la distance entre l’appareil et le récepteur. Brancher l’appareil dans une prise ou sur un circuit différent de celui sur lequel le récepteur est branché. Consulter le détaillant ou un technicien expérimenté en radio/téléviseurs. 130 When using the HDR-AS10/AS15 (sold separately). Approximate time available when you use a fully charged battery pack. Times measured when using the camera at 25°C (77°F). It is recommended that you use the camera in an environment of 10°C to 30°C (50°F to 86°F). Recording/playback duration may decrease as a result of conditions under which the camera is used (such as in low temperatures). Note pour les clients européens Avis aux consommateurs des pays appliquant les Directives UE Le fabricant de ce produit est Sony Corporation, 1-7-1 Konan Minato-ku Tokyo, 108-0075 Japon. Le représentant agréé pour la compatibilité électromagnétique et la sécurité du produit est Sony Deutschland GmbH, Hedelfinger Strasse 61, 70327 Stuttgart, Allemagne. Pour toute question relative à la garantie ou aux réparations, reportez-vous à l’adresse que vous trouverez dans les documents ci-joints, relatifs à la garantie et aux réparations. Le champ électromagnétique à des fréquences particulières peut avoir une incidence sur l’image et le son de cet appareil. Traitement des appareils électriques et électroniques en fin de vie (Applicable dans les pays de l’Union Européenne et aux autres pays européens disposant de systèmes de collecte sélective) Ce symbole, apposé sur le produit ou sur son emballage, indique que ce produit ne doit pas être traité avec les déchets ménagers. Il doit être remis à un point de collecte approprié pour le recyclage des équipements électriques et électroniques. En vous assurant que ce produit sont mis au rebut de façon appropriée, vous participez activement à la prévention des conséquences négatives que leur mauvais traitement pourrait provoquer sur l’environnement et sur la santé humaine. Le recyclage des matériaux contribue par ailleurs à la préservation des ressources naturelles. Pour toute information complémentaire au sujet du recyclage de ce produit, vous pouvez contacter votre municipalité, votre déchetterie locale ou le point de vente où vous avez acheté le produit. Durée estimée d’enregistrement et de lecture pour chaque batterie Durée d’enregistrement estimée (Unités : minutes) Qualité de l’image NP-BX1 NP-BG1/FG1 Durée d’enregistrement continu HQ VGA 125 160 95 120 Durée d’enregistrement typique HQ VGA 75 95 55 70 Durée de lecture estimée Batterie Qualité de l’image NP-BX1 NP-BG1/FG1 Para reducir el riesgo de incendio o descarga eléctrica, no exponga la unidad a la lluvia ni a la humedad. Aviso para los clientes de países en los que se aplican las directivas de la UE El fabricante de este producto es Sony Corporation, 1-7-1 Konan Minato-ku Tokyo, 108-0075, Japón. El representante autorizado en lo referente al cumplimiento de la directiva EMC y a la seguridad de los productos es Sony Deutschland GmbH, Hedelfinger Strasse 61, 70327 Stuttgart, Alemania. Para resolver cualquier asunto relacionado con el soporte técnico o la garantía, consulte las direcciones que se indican en los documentos de soporte técnico y garantía suministrados por separado. Atención Los campos electromagnéticos a frecuencias específicas podrán influir en la imagen y el sonido de esta unidad. Tratamiento de los equipos eléctricos y electrónicos al final de su vida útil (aplicable en la Unión Europea y en países europeos con sistemas de tratamiento selectivo de residuos) Este símbolo en el equipo o en su embalaje indica que el presente producto no puede ser tratado como residuos doméstico normal. Debe entregarse en el correspondiente punto de recogida de equipos eléctricos y electrónicos. Al asegurarse de que este producto se desecha correctamente, usted ayuda a prevenir las consecuencias potencialmente negativas para el medio ambiente y la salud humana que podrían derivarse de la incorrecta manipulación en el momento de deshacerse de este producto. El reciclaje de materiales ayuda a conservar los recursos naturales. Para recibir información detallada sobre el reciclaje de este producto, póngase en contacto con el ayuntamiento, el punto de recogida más cercano o el establecimiento donde ha adquirido el producto. Duración estimada de grabación y reproducción para cada paquete de baterías (Unités : minutes) Durée de lecture HQ VGA 170 175 125 130 Lors de l’utilisation du HDR-AS10/AS15 (vendu séparément). Durée approximative lorsque vous utilisez une batterie entièrement chargée. Durées mesurées lors de l’utilisation du caméscope à 25 °C (77 °F). Il est recommandé d’utiliser le caméscope dans un environnement dont la température est comprise entre 10 °C et 30 °C (50 °F et 86 °F). La durée d’enregistrement/de lecture peut être réduite en raison des conditions d’utilisation du caméscope (par exemple, à des températures basses). Calidad de imagen NP-BX1 NP-BG1/FG1 Tiempo continuo de grabación HQ VGA 125 160 95 120 (Unidades: minuto) Tiempo habitual de grabación HQ 75 55 VGA 95 70 Tiempo estimado de reproducción (Unidades: minuto) Paquete de baterías Tiempo de reproducción Calidad de imagen HQ VGA NP-BX1 170 175 NP-BG1/FG1 125 130 Al usar HDR-AS10/AS15 (se vende por separado). Tiempo aproximado disponible al usar un paquete de baterías completamente cargadas. Tiempos medidos usando la cámara a 25 °C Se recomienda usar la cámara en un ambiente de 10 °C a 30 °C La duración de la grabación o la reproducción puede disminuir como consecuencia de las condiciones en las que se usa la cámara (como bajas temperaturas). WAARSCHUWING WARNUNG AVISO Para reduzir o risco de incêndio ou choque eléctrico, não exponha a unidade à chuva ou à humidade. Um Feuergefahr und die Gefahr eines elektrischen Schlags zu verringern, setzen Sie das Gerät weder Regen noch Feuchtigkeit aus. Om het gevaar van brand of elektrische schokken te verkleinen, mag het apparaat niet worden blootgesteld aan regen of vocht. Voor klanten in Europa Für Kunden in Europa Aviso para os clientes na Europa Nota para os clientes nos países que apliquem as Directivas da UE Hinweis für Kunden in Ländern, in denen EU-Richtlinien gelten Kennisgeving voor klanten in de landen waar EU‑richtlijnen van toepassing zijn O fabricante deste produto é a Sony Corporation, 1-7-1 Konan Minato-ku Tokyo, 108-0075 Japan. O Representante Autorizado para EMC e segurança de produto é a Sony Deutschland GmbH, Hedelfinger Strasse 61, 70327, Stuttgart, Germany. Para questões acerca de serviço e acerca da garantia, consulte as moradas fornecidas em separado, nos documentos de serviço e garantia. Der Hersteller dieses Produkts ist Sony Corporation, 1-7-1 Konan Minato-ku Tokyo, 108-0075, Japan. Autorisierter Vertreter für EMV und Produktsicherheit ist die Sony Deutschland GmbH, Hedelfinger Strasse 61, 70327 Stuttgart, Deutschland. Für Fragen im Zusammenhang mit Kundendienst oder Garantie wenden Sie sich bitte an die in den separaten Kundendienst- oder Garantieunterlagen genannten Adressen. De fabrikant van dit product is Sony Corporation, 1-7-1 Konan Minato-ku Tokyo, 108-0075 Japan. De geautoriseerde vertegenwoordiger voor EMC en productveiligheid is Sony Deutschland GmbH, Hedelfinger Strasse 61, 70327 Stuttgart, Duitsland. Voor kwesties met betrekking tot service of garantie kunt u het adres in de afzonderlijke service- en garantiedocumenten gebruiken. Achtung De elektromagnetische velden bij de specifieke frequenties kunnen het beeld en het geluid van dit apparaat beïnvloeden. Atenção Os campos magnéticos em frequências específicas podem influenciar a imagem e o som desta unidade. Tratamento de Equipamentos Eléctricos e Electrónicos no final da sua vida útil (Aplicável na União Europeia e em países Europeus com sistemas de recolha selectiva de resíduos) Este símbolo, colocado no produto ou na sua embalagem, indica que este não deve ser tratado como resíduo urbano indiferenciado. Deve sim ser colocado num ponto de recolha destinado a resíduos de equipamentos eléctricos e electrónicos. Assegurandose que este produto é correctamente depositado, irá prevenir potenciais consequências negativas para o ambiente bem como para a saúde, que de outra forma poderiam ocorrer pelo mau manuseamento destes produtos. A reciclagem dos materiais contribuirá para a conservação dos recursos naturais. Para obter informação mais detalhada sobre a reciclagem deste produto, por favor contacte o município onde reside, os serviços de recolha de resíduos da sua área ou a loja onde adquiriu o produto. Duração estimada de gravação e reprodução para cada bateria Tempo de gravação estimado Bateria Qualidade de imagem NP-BX1 NP-BG1/FG1 Tempo de gravação contínua HQ VGA 125 95 (Unidades: minutos) Tempo de gravação normal 160 120 Bateria Qualidade de imagem NP-BX1 HQ VGA 75 55 95 70 NP-BG1/FG1 (Unidades: minutos) Tempo de reprodução HQ VGA 170 125 Die elektromagnetischen Felder bei den speziellen Frequenzen können Bild und Ton dieses Gerätes beeinflussen. Entsorgung von gebrauchten elektrischen und elektronischen Geräten (anzuwenden in den Ländern der Europäischen Union und anderen europäischen Ländern mit einem separaten Sammelsystem für diese Geräte) Das Symbol auf dem Produkt oder seiner Verpackung weist darauf hin, dass dieses Produkt nicht als normaler Haushaltsabfall zu behandeln ist, sondern an einer Annahmestelle für das Recycling von elektrischen und elektronischen Geräten abgegeben werden muss. Durch Ihren Beitrag zum korrekten Entsorgen dieses Produkts schützen Sie die Umwelt und die Gesundheit Ihrer Mitmenschen. Umwelt und Gesundheit werden durch falsches Entsorgen gefährdet. Materialrecycling hilft, den Verbrauch von Rohstoffen zu verringern. Weitere Informationen zum Recycling dieses Produkts erhalten Sie bei Ihrer Gemeindeverwaltung, den kommunalen Entsorgungsbetrieben oder dem Geschäft, in dem Sie das Produkt gekauft haben. Voraussichtliche Aufnahme- und Wiedergabedauer bei den einzelnen Akkus Tempo de reprodução estimado Tiempo estimado de grabación Paquete de baterías Attention Batterie POR FAVOR LEA DETALLADAMENTE ESTE MANUAL DE INSTRUCCIONES ANTES DE CONECTAR Y OPERAR ESTE EQUIPO. RECUERDE QUE UN MAL USO DE SU APARATO PODRÍA ANULAR LA GARANTÍA. Atención para los clientes en Europa AVERTISSEMENT FOR CUSTOMERS IN EUROPE 部品の保有期間について 下記の注意事項を守らないと、火災、 大けがや死亡にいた る危害が発生することがあります。 You are cautioned that any changes or modifications not expressly approved in this manual could void your authority to operate this equipment. 修理によって機能が維持できる場合は、ご要望により有料修理 Afin de réduire les risques d’incendie ou de décharge électrique, n’exposez pas cet appareil à la pluie ou à l’humidité. À l’intention des clients aux É.-U. CAUTION くは保証書をご覧ください。 注意を促す記号 「安全のために」の文中の「電池」とは、バッテリーパッ クも含みます。 For the Customers in U.S.A. Nombre del producto: Videomonitor con pantalla de cristal liquido para videocámara Modelo: AKA-LU1 Nederlands Deutsch Português AVISO AVERTISSEMENT To reduce fire or shock hazard, do not expose the unit to rain or moisture. 保証書の記載内容に基づいて修理させていただきます。詳し 保証期間経過後の修理は 電池について Les numéros de modèle et de série se situent sous l’appareil. Prendre en note le numéro de série dans l’espace prévu ci-dessous. Se reporter à ces numéros lors des communications avec le détaillant Sony au sujet de ce produit. Modèle no AKA-LU1 No de série ____________________________ この表示のある事項を守らないと、思わぬ危険な状況 が起こり、けがや財産に損害を与えることがあります。 行為を禁止する記号 Aide-mémoire The model and serial numbers are located on the bottom. Record the serial number in the space provided below. Refer to these numbers whenever you call your Sony dealer regarding this product. WARNING 保証書とアフターサービス Español Owner’s Record Model No. AKA-LU1 Serial No. 液晶モニターに衝撃を与えない Français English 不安定な場所に置かない 175 130 Ao utilizar a HDR-AS10/AS15 (vendida separadamente). Tempo aproximado disponível quando utiliza uma bateria totalmente carregada. Tempos medidos quando utilizar a câmara a 25 °C. Recomenda-se que utilize a câmara num ambiente de 10 °C a 30 °C. A duração de gravação/reprodução pode diminuir como resultado das condições sob as quais a câmara é utilizada (como em baixas temperaturas). Voraussichtliche Aufnahmedauer Akku Bildqualität NP-BX1 NP-BG1/FG1 (Einheit: Minuten) Dauer bei Dauer bei kontinuierlicher normaler Aufnahme Aufnahme HQ VGA HQ VGA 125 160 75 95 95 120 55 70 Voraussichtliche Wiedergabedauer Akku Bildqualität NP-BX1 (Einheit: Minuten) Wiedergabedauer HQ VGA 170 175 NP-BG1/FG1 125 130 Bei Verwendung der HDR-AS10/AS15 (gesondert erhältlich). Ungefähre Dauer bei Verwendung eines vollständig geladenen Akkus. Die Angaben gelten bei einer Verwendung der Kamera bei 25 °C. Für die Verwendung der Kamera wird eine Umgebungstemperatur zwischen 10 °C und 30 °C empfohlen. Die Aufnahme-/Wiedergabedauer kann je nach den Nutzungsbedingungen der Kamera kürzer sein (z. B. bei niedrigen Temperaturen). Let op Verwijdering van oude elektrische en elektronische apparaten (van toepassing in de Europese Unie en andere Europese landen met gescheiden inzamelingssystemen) Dit symbool op het product of op de verpakking wijst erop dat dit product niet als huishoudelijk afval mag worden behandeld. Het moet echter naar een inzamelingspunt worden gebracht waar elektrische en elektronische apparatuur wordt gerecycled. Als u ervoor zorgt dat dit product op de correcte manier wordt verwerkt, helpt u mogelijke negatieve gevolgen voor mens en milieu die zouden kunnen veroorzaakt worden in geval van verkeerde afvalbehandeling te voorkomen. Het recycleren van materialen draagt bij tot het behoud van natuurlijke bronnen. Voor meer details in verband met het recyclen van dit product, kan u contact opnemen met de gemeentelijke instanties, de organisatie belast met de verwijdering van huishoudelijk afval of de winkel waar u het product hebt gekocht. Verwachte opname- en afspeelduur voor elke accu Verwachte opnameduur Accu Beeldkwaliteit NP-BX1 NP-BG1/FG1 Doorlopende opnameduur HQ VGA 125 160 95 120 (eenheid: minuten) Gemiddelde opnameduur HQ VGA 75 95 55 70 Verwachte speelduur Accu Beeldkwaliteit NP-BX1 NP-BG1/FG1 (eenheid: minuten) Afspeelduur HQ VGA 170 175 125 130 Bij gebruik van de HDR-AS10/AS15 (los verkrijgbaar). Verwachte beschikbare tijd wanneer u een volledig opgeladen accu gebruikt. Tijden gemeten bij gebruik van de camera bij 25 °C. Wij raden u aan de camera te gebruiken bij een temperatuur tussen 10 °C en 30 °C. De opname-/afspeelduur kan afnemen als gevolg van de omstandigheden waaronder de camera wordt gebruikt (bv. bij een lage omgevingstemperatuur).-
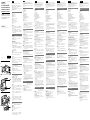 1
1
-
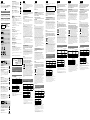 2
2


in andere talen
- English: Sony AKA-LU1 User manual
- français: Sony AKA-LU1 Manuel utilisateur
- español: Sony AKA-LU1 Manual de usuario
- Deutsch: Sony AKA-LU1 Benutzerhandbuch
- português: Sony AKA-LU1 Manual do usuário
- 日本語: Sony AKA-LU1 ユーザーマニュアル