
BWO 155 · BWO 155 12V
BWO 155 Z · BWO 155 ERT
DEUTSCHE VORTEX GMBH & CO. KG
Kästnerstraße 6 | 71642 Ludwigsburg, Germany
Fon: +49(0)71 41.2552-0 | info@deutsche-vortex.com
WWW.DEUTSCHE-VORTEX.COM
Original operating
instructions
Manual de instrucciones
original
Oorspronkelijke
gebruiksaanwijzing

2
Contents • Índice • Inhoud
Safety • Seguridad • Veiligheid, productomschrijving 3
Product description and declaration of conformity • Descripción del producto y Conformidad CE •
Conformiteitverklaring
6
Technical specications • Datos técnicos • Technische gegevens 8
Installation • Instalación • Installatie 9
Electrical connection • Conexión eléctrica • Elektrische aansluiting 14
Venting • Purgado • Ontluchten 18
Electronic regulating thermostat ERT • Termostato electrónico ERT • Elektronisch regelthermostaat ERT 19
Timer • Programador horario • Tijdschakelklok 22
Speed adjustment • Regulación de la velocidad • Toerentalinstelling 28
Servicing • Mantenimiento • Onderhoud 30
Replacement • Sustitución • Vervanging 33
Disposal • Reciclaje • Recyclage 35
Faults and remedies • Incidencias y soluciones • Storingen en remedies 37

3
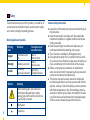
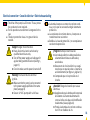
Safety
These instructions are part of the product, are valid for all
series named and describe how to use the product safely
and correctly during all operating phases.
Warning
label
Risk level Consequences of
non-observance
Danger!
immediate acute
risk
fatal or
serious injury
Warning! potential acute risk
fatal or
serious injury
Careful!
potentially
hazardous situation
light injury,
damage to device
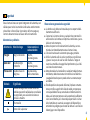
Warning labels and symbols
Symbol
Meaning
Safety warning sign: Take note of all
information indicated by the safety
warning sign and follow the instructions
to avoid injury or death.
Information
Instruction
General safety instructions
Installation of the pump may only be performed by quali-
ed personnel.
Keep the operating instructions and other applicable
documents complete, in a legible condition and perma-
nently accessible.
Read the operating instructions and make sure you
understand them before working on the pump.
This circulator is suitable for drinking water only.
Only operate the pump if it is in perfect technical condi-
tion; only use it as intended, staying aware of safety and
risks, and adhering to the instructions in this manual.
Before carrying out any installation or maintenance
work, disconnect motor from power supply and ensure it
cannot be reconnected unintentionally.
This device may only be used, cleaned or maintained
by children aged 8 years and over; persons with limited
physical , sensory or mental faculties; as well as persons
with limited experience or lack of knowledge; under su-
pervision or after they have been instructed for the safe
use of the device and understand the resulting dangers.
Children are not allowed to play with the device.

4
Seguridad
Estas instrucciones son parte integrante de la bomba, son
válidas para todos los modelos indicados anteriormente
y describen cómo utilizar el producto de forma segura y
correcta durante todas las fases de funcionamiento.
Advertencia Nivel de riesgo Consecuencias si
se desatienden
¡Peligro! peligro inminente muerte,
lesiones graves
¡Atención! posible peligro
inminente
muerte,
lesiones graves
¡Precaución! posible situación
peligrosa
lesiones leves,
daños materiales
Advertencias y símbolos
Símbolo
Signicado
Señales de seguridad: acatar todas las
medidas que estén señalizadas con señales
de seguridad, para así evitar lesiones o
incluso la muerte.
Información
Instrucción a ejecutar
Observaciones generales de seguridad
La bomba solo debe ser instalada por un experto debi-
damente cualicado.
Conserve las instrucciones y cualquier documentación
adicional de las bombas en óptimas condiciones y acce-
sible en todo momento.
Antes de poner en funcionamiento la bomba, se reco-
mienda leer detenidamente estas instrucciones.
Circulador adecuado solamente para agua potable.
Utilice la bomba sólo si está en perfectas condiciones
y para el uso para el cual ha sido diseñada. Tenga en
cuenta las medidas de seguridad pertinentes y las indi-
caciones de este manual.
Antes de realizar la instalación o cualquier trabajo de man-
tenimiento, debe desconectar el motor de la red eléctrica
y asegurándose de que no pueda volver a conectarse por
accidente.
Este dispositivo solo puede utilizarse, limpiarse o mante-
nerse por niños a partir de 8 años de edad, por personas
con capacidades físicas, sensoriales o intelectuales limi-
tadas, así como por personas sin la experiencia suciente
o sin conocimientos, si lo hacen bajo supervisión o si han
sido instruidos en cuanto al uso seguro del dispositivo y
entienden los peligros que de este se derivan. Los niños no
deben jugar con el dispositivo.

5
Veiligheid
Deze gebruiksaanwijzing maakt onderdeel uit van de
pomp, geldt voor alle genoemde series en beschrijft het
veilige en deskundige gebruik in alle bedrijfsfasen.
Waarschuwing Gevarenniveau Gevolgen bij
overtreding
Gevaar! direct dreigend
gevaar
dood, ernstig
lichamelijk letsel
Waarschuwing! mogelijk dreigend
gevaar
dood, ernstig
lichamelijk letsel
Let op! mogelijk
gevaarlijke situatie
licht lichamelijk
letsel, materiële
schade
Waarschuwingen en symbolen
Symbool Betekenis
Veiligheidsteken: alle maatregelen die
zijn gekenmerkt met het veiligheidste-
ken in acht nemen om lichamelijk letsel
en materiële schade te voorkomen.
Informatie
Gebruiksaanwijzing
Algemene veiligheidsvoorschriften
Installatie van de pomp uitsluitend door gekwaliceerd
geschoold personeel laten uitvoeren.
Gebruiksaanwijzing en aanvullend geldende documenten
compleet en leesbaar houden en op ieder moment toegan-
kelijk bewaren.
Vóór werkzaamheden aan de pomp, gebruiksaanwijzing
lezen en begrijpen.
Deze circulatiepomp is uitsluitend geschikt voor drinkwa-
ter.
Pomp uitsluitend bedienen in technisch perfecte toestand,
volgens de bestemming, veiligheids- en gevaarbewust en
met inachtneming van deze gebruiksaanwijzing.
Vóór alle montage- en onderhoudswerkzaamheden de
motor vrij van spanning schakelen en beveiligen tegen
hernieuwde inschakeling.
Dit apparaat mag alleen onder toezicht door kinderen van 8
jaar en ouder, personen met beperkte lichamelijke, zintuig-
lijke of verstandelijke vermogens, of door personen met
een gebrek aan ervaring of kennis worden gereinigd of on-
derhouden als ze zijn geïnstrueerd met betrekking tot het
veilig gebruik van het apparaat en de resulterende gevaren
begrijpen. Laat kinderen niet met het apparaat spelen.

6
Product description
Declaration of conformity
Descripción del producto
Conformidad CE
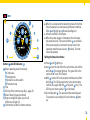
The pump BWO 155 BlueOne is a domestic hot water pump
with a highly-efcient electronically commutated DC motor
as drive source. It is built according to the original VORTEX
spherical motor principle and contains a permanent magnetic
rotor. The speed of the pump BWO 155 is innitely variable.
Scope of delivery
Gaskets and selected union set for pumps with V-type
pump housing
Insulating cover for pump housing
Operating instructions
This product meets the applicable European directives and
the complementary national requirements and standards.
Conformity has been proven. The declaration of conformity can
be retrieved under www.deutsche- vortex.com or directly
from Deutsche Vortex GmbH & Co. KG.
La bomba BWO 155 BlueOne es una bomba doméstica de
recirculación para agua caliente sanitaria que está equi-
pada con un motor síncrono con conmutación electrónica
de alta eciencia. Está construida según el principio del
motor esférico original de VORTEX que dispone de un rotor
esférico de imán permanente. La velocidad de la bomba
BWO 155 puede regularse de forma variable.
Alcance del suministro
Juntas y racores de conexión para bombas del tipo V.
Carcasa de aislamiento para el cuerpo de la bomba.
Manual de instrucciones.
Este producto cumple con las directivas europeas, así
como con los requisitos y normas nacionales complemen-
tarias. La conformidad ha sido comprobada. La Declara-
ción de Conformidad de este producto puede obtenerse
en www.deutsche-vortex.com o solicitarse directamente a
Deutsche Vortex GmbH & Co. KG.

7
Productomschrijving
EC - Conformiteit
De pomp BWO 155 BlueOne is een pomp voor gebruikswater
(circulatiepomp voor drinkwater) met een zeer efciënte
elektronisch gecommuteerde gelijkstroommotor als aan-
drijfbron. Zij is gebouwd volgens het originele kogelmotor-
principe van VORTEX en bevat een permanent magnetische
kogelrotor. Het toerental van pomp BWO 155 is variabel
afstelbaar.
Leveringsprogramma
Platte pakkingen en gekozen schroefbevestigingsset bij
pompen met V-pomphuis
Isoleerschaal voor pomphuis
Gebruiksaanwijzing
Dit product voldoet aan de geldende Europese normen
alsmede aan de aanvullende nationale eisen en normen.
De conformiteit werd aangetoond. De conformiteitsverklaring
van het product kan via de site www.deutsche-vortex.com of
direct bij Deutsche Vortex GmbH & Co. KG worden opge-
vraagd.

8
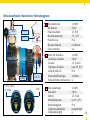
~ 43 dB(A)
t
2
≤ 40 °C
t
1
≤ 95 °C
P
max
= 10 bar
12 V=
1~115 – 230 V /
50 – 60 Hz
TF 95
(t
1
≤ 95 °C)
Max. delivery head 1,3 mWS
Max. ow rate 950 l/h
Power consumption 2,5 – 9 W
Max. uid temperature 2 °C – 95 °C
Protection class IP 44
Max. water hardness no limitation
Dry run protection yes
Altura máx. de bombeo 1,3 mWS
Caudal máx. de bombeo 950 l/h
Consumo 2,5 – 9 vatios
Temperatura del líquido hasta 2 °C – 95 °C
Grado de protección IP 44
Dureza admisible del agua sin límites
Protección frente a marcha en seco sí
Max. opvoerhoogte 1,3 mWS
Max. debiet 950 l/h
Verbruik 2,5 – 9 watt
Mediumtemperatuur tot 2 °C – 95 °C
Beschermingsgraad IP 44
Toegelaten waterhardheid niet gelimiteerd
Droogloopbeveiliging ja
Technical specications • Datos técnicos • Technische gegevens

99
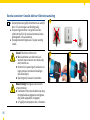
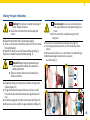
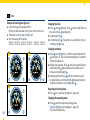
Careful! Damage to device caused by water
intrusion.
► After mounting, ensure that the cable entry or
the cable is pointing downwards (see g.).
¡Precaución! Se pueden producir daños si
entra agua en la bomba.
► Asegúrese que tras el montaje, el prensa esto-
pa queda colocado hacia abajo (ver guras).
Let op! Materiële schade door inkomend
water.
► Zorg ervoor, dat na de montage de kabelinvoer
resp. de kabel naar beneden wijst
(zie afbeeldingen).
Installation • Instalación • Installatie

10
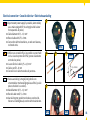
≥ 50 cm
KV 150
RV 153
(1)
(2)
≥ 50 cm
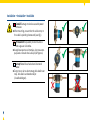
A shut-off valve and a non-return valve are already
built into V-pumps (1).
► With R 1/2" pumps (2), build in an additional non-
return valve RV 153 and a ball shut-off valve KV 150.
Las bombas V (1) llevan integradas una válvula de
cierre y una válvula retención.
► En las bombas R 1/2" (2), debe instalar adicionalmen-
te una válvula de retención RV 153 y una válvula de
bola de cierre KV 150.
Bij V-pompen (1) zijn een afsluit- en terugslagventiel
ingebouwd.
► Bij R 1/2"-pompen (2) extra terugslagventiel RV 153
en kogelkraan KV 150 inbouwen.
Installation • Instalación • Installatie

11
3
1
2
+ +
VORTEX EF 150
= 20 Nm
4 5
Installation • Instalación • Installatie
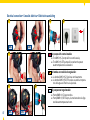
Careful! Damage to bearings caused by
dry-running.
► Flush pipework thoroughly with water and
bleed (see gs. 1–12).
¡Precaución! Los cojinetes pueden dañar-
se si la bomba funciona en vacío.
► Limpie exhaustivamente la red de tuberías
con agua y a continuación púrguela (ver
guras 1–12).
Let op! Opslagschade door droogloop.
► Leidingsysteem grondig met water door-
spoelen en ontluchten (zie afbeeldingen
1–12).

12
6 7
98
= 20 Nm
10 11 12
13
Installation • Instalación • Installatie

13
Installation • Instalación • Installatie
Careful! Damage to bearings caused by
dry-running.
► Flood the pump before connecting electric-
ity: Open all stop valves slowly (see g. 13,
page 12).
¡Precaución! Los cojinetes pueden dañarse
si la bomba funciona en vacío.
► Llene la bomba antes de conectarla a la red:
abra lentamente todas las válvulas de cierre
(ver gura 13, página 12).
Let op! Opslagschade door droogloop.
► Vóór elektrische aansluiting laten vollopen:
Alle afsluitventielen langzaam openen (zie
afbeelding 13, page 12).

14
The drive of the pump is a DC motor. Thus a protec-
tive conductor is not required.
For AC operation a transformer is integrated in the
cap.
Thanks to protection class 2 no ground wire is
needed.
Danger! Danger of electrocution.
► Have all electrical work carried out by
qualied electricians only.
► Turn off the power supply and safeguard it
against being switched back on (see g. 1,
page 15).
► Check to make sure the power is turned off.
Warning! Fire hazard due to electrical
ignition.
► Make sure that the pump is only connected
to the power supply specied on the name
plate (see page 8).
► Secure 12 V DC pumps with a 2 A fuse.
La bomba incorpora un motor de corriente conti-
nua, por lo que no se necesita ningún sistema de
protección.
Las versiones de corriente alterna, incorporan un
transformador en su interior.
Debido a la clase de protección 2, no se requiere un
conductor de protección.
¡Peligro! Muerte por electrocución.
► Los trabajos eléctricos deben realizarlos
solamente electricistas cualicados y
autorizados.
► Desconecte el circuito eléctrico y asegú-
rese de que no pueda volver a conectarse
accidentalmente (ver gura 1, página 15).
► Compruebe que no hay tensión en el
circuito.
¡Atención! Riesgo de incendio por causas
eléctricas.
► Asegúrese de que la bomba esté conectada
únicamente a la fuente de alimentación
como se indica en la placa de identicación
de la bomba ( véase página 8).
► Proteja las bombas de corriente continua
de 12 V con fusibles de 2 A.
Electrical connection • Conexión eléctrica • Elektrische aansluiting

15
32
Tx10
1
De pomp bevat een gelijkstroommotor als aandrijf-
bron. Er is daarom geen aardleiding nodig.
De spanningsomvormer voor gebruik van wis-
selstroom (trafo) is bij de wisselstroomvarianten
geïntegreerd in de aansluitdop.
Vanwege beschermingsklasse 2 is geen aarding
vereist.
Gevaar! Dood door elektrocutie.
► Werkzaamheden aan elektronica uit-
sluitend laten uitvoeren door deskundig
elektrotechnicus.
► Stroomcircuit spanningsvrij schakelen en
tegen opnieuw inschakelen beveiligen
(zie afbeelding 1).
► Spanningsvrije toestand vaststellen.
Waarschuwing! Brandgevaar door elektri-
sche ontsteking.
► Controleren of de pomp uitsluitend op de op
het typeplaatje aangegeven spanningsvoe-
ding wordt aangesloten (zie page 8).
► 12 V gelijkstroompompen met 2 A zekeren.
Electrical connection • Conexión eléctrica • Elektrische aansluiting

16
5a
5b
+
–
230 V~
12 V=
8,5 - 10 mm
5c
6
230 V~ 12 V=
230 V~ 12 V=
4
Electrical connection • Conexión eléctrica • Elektrische aansluiting
► A permanent power supply is possible, alternatively
use a mains plug with IP 44 rating (provide isolator
that separates all poles).
► Cable diameter 0.75 – 1.5 mm²
► Round cable with Ø 5 – 8 mm
► Connection with twisted wires, no wire end sleeves,
no tinned ends.
► Utilizar una conexión ja si es posible o un enchufe
con la clase de protección IP44 (prever aislamiento
en todos los polos).
► La sección del cable 0,75 a 1,5 mm²
► Cable con Ø 5 – 8 mm
► Conexión con cable trenzado sin punteras.
► Vaste aansluiting is mogelijk of gebruik een
stroomstekker met beveiligingsklasse IP44 (op alle
polen scheiden is voorzien).
► Kabeldiameter 0,75 – 1,5 mm²
► Ronde kabel met Ø 5 – 8 mm
► Aansluiting met gevlochten draden, zonder eind-
hulzen van leidingdraad, zonder vertinde uiteinden.

17
11 12
7
230 V~
12 V=
230 V~
12 V=
8
10
230 V~
12 V=
9
Electrical connection • Conexión eléctrica • Elektrische aansluiting
For pumps with control module:
The BWO 155 Z pump will run continuously.
The BWO 155 ERT pump will run when the preset
water temperature is exceeded.
En bombas con módulo de regulación:
La bomba BWO 155 Z funciona continuamente.
La bomba BWO 155 ERT funciona cuando la tempera-
tura del agua es inferior a la ajustada.
Bij pompen met regelmodule:
Pomp BWO 155 Z loopt continu.
Pomp BWO 155 ERT loopt, als men beneden de afge-
stelde watertemperatuur komt.

18
5x
3 4
1 2
5
Waarschuwing! Gevaar voor verbranding door
hete oppervlakken bij de pompbehuizing en de
motor.
► Direct contact met pompbehuizing en motor
vermijden.
► Luchtvrije circulatieleiding waarborgen (zie page 11).
Tot de pomp geluidloos werkt, voor het ontluchten afwis-
selend:
► Pomp meerdere keren in- en uitschakelen (zie afbeelding 2).
► Warmwatertappunt meerdere keren openen
(zie afbeelding 3).
Warning! Hot surface on pump housing and
motor. Danger of burns!
► Avoid direct contact with pump housing and
motor.
► Ensure that the return line is air-free (see page 11).
Then act as follows to bleed the pump until it runs noise-
free (alternately):
► Switch the pump on and off several times (see g. 2).
► Open a hot water tap several times (see g. 3).
¡Atención! Existe riesgo de quemaduras por
tocar la supercie caliente del cuerpo de la
bomba y del motor.
► Evitar el contacto directo con el cuerpo de la
bomba y el motor.
► Asegúrese de que el cuerpo de la bomba no tenga aire
(véase página 11).
Purgue la bomba hasta que funcione sin hacer ruido.
Para ello realice alternativamente las siguientes accio-
nes:
► Encienda y apague la bomba varias veces (ver gura 2).
► Abra varias veces el grifo de agua caliente (ver gura 3).
Venting • Purgado • Ontluchten

19
1
4
3
5
2
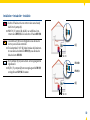
1
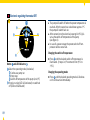
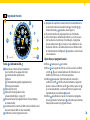
The pump will switch off when the preset temperature is
reached. After the water has cooled down approx. 7°C
the pump will switch back on.
After connection to the electrical power grid 45°C (e) is
set as the switch-off temperature of the pump
(see gure 1).
In case of a power outage the preset switch-off tem-
perature will be conserved.
Changing the switch-off temperature:
► Press
1
until the desired switch-off temperature is
illuminated. (9 steps in 5° increments from 35°C to
75°C).
Changing the operating mode:
► Press
1
until the desired operating mode is illuminat-
ed. It will be active immediately.
Button
and LED indicators :
1
Select the operating mode (clockwise):
2
Continuous pump run
3
Pump stop
4
Switch-off temperature of the pump (e=45°C)
5
Pump is running (LED is illuminated) or switched
off (LED not illuminated)
Electronic regulating thermostat ERT

20
1
4
3
5
2
1
La bomba se desconecta al alcanzar la temperatura
ajustada. Una vez que la temperatura del agua descien-
de 7 °C, la bomba vuelve a encenderse.
Tras la conexión a la red eléctrica, la temperatura de
desconexión de la bomba (e) se ajusta en 45 °C (véase
gura 1).
Si se produce un fallo en la alimentación, la temperatu-
ra de desconexión ajustada se mantiene.
Modicar la temperatura de desconexión:
► Pulse
1
hasta que se encienda la temperatura de
desconexión deseada. (9 niveles en pasos de 5 °, en un
rango de 35 °C a 75 °C).
Modicar el modo de funcionamiento:
► Pulse
1
hasta que se encienda el modo de funciona-
miento deseado. Éste se activa de inmediato.
Termostato electrónico ERT
Tecla e indicadores LED :
1
Seleccionar el modo de funcionamiento (en el sentido de
las agujas del reloj):
2
Modo de funcionamiento continuo
3
Parada permanente
4
Temperatura de desconexión para la desconexión
de la bomba (e = 45 °C)
5
La bomba está en marcha (el LED está encendido)
o está desconectada (el LED no está encendido)

21
1
4
3
5
2
1
De pomp wordt uitgeschakeld bij de afgestelde tempe-
ratuur. Na afkoeling van het water met ca. 7 °C wordt de
pomp weer ingeschakeld.
Na aansluiting op het elektrische stroomnet is 45 °C (e)
als uitschakeltemperatuur van de pomp ingesteld (zie
afbeelding 1).
Bij stroomuitval blijft de ingestelde uitschakeltempera-
tuur behouden.
Uitschakeltemperatuur wijzigen:
►
1
indrukken, totdat de gewenste uitschakeltempera-
tuur brandt. (9 fasen met stappen van 5° in een bereik
van 35 °C t/m 75 °C).
Bedrijfstoestand wijzigen:
►
1
indrukken, totdat de gewenste bedrijfstoestand
brandt. Hij is direct actief.
Toets
en LED-indicaties :
1
Bedrijfstoestand kiezen (met de wijzers van de klok mee):
2
Continu lopen
3
Continu stop
4
Uitschakeltemperatuur voor stoppen van de
pomp (e=45 °C)
5
Pomp loopt (LED brandt) of is uitgeschakeld
(LED brandt niet)
Elektronisch regelthermostaat ERT

22
5
7
3
2
6
4
9
8
10
1
1
4
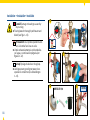
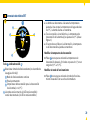
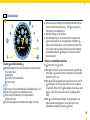
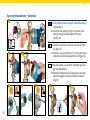
Buttons and LED indicators :
1
Select operating state (clockwise):
2
Continuous
3
Setting mode
4
Operation via time switch
5
Permanent stop
6
Time
7
LED ring of the runtimes (see g. 2, page 23)
8
Select times (time and runtimes)
9
Pump running (LED lights up) or is off
(LED does not light up)
10
Conrm time/conrm or delete runtimes
When it is connected to the electricity mains for the rst
time, the pump runs continuously (delivered condition –
LEDs
3
and
9
light up,
6
ashes (see gure 1).
Shortest runtime is 30 minutes.
When the power supply is interrupted, the time stops
(no power reserve). The saved runtimes
7
are retained.
If the power supply is restored, the pump runs in the
operating state that was last set,
6
ashes. The time
has to be updated.
Setting the time and runtimes:
► Press
1
until
3
lights up.
► Use
8
to set the red LED to the current time and conrm
with OK
10
.
9
no longer lights up. The green LED in the
section 0.00 h to 0.30 h ashes.
► With
8
, set the LED to the required runtime and conrm
with OK
10
. The LED jumps directly to the next runtime.
Conrm once again with OK
10
or skip with
8
(etc.). The
LED ring runs more quickly if
8
is held down.
► End setting with
1
. The saved runtimes are displayed.
The pump runs according to the set runtimes,
4
lights
up.
Timer

23
4
10
1
3
8
3
10 8
1
6
3
2
4
6
9
7
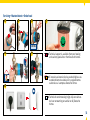
Changing the time:
► Press
1
until
3
lights up. Press
8
until the red LED is on
the current time
6
(see gure 3).
► Conrm with OK
10
.
► End setting with
1
. The pump runs according to the set
runtimes,
4
lights up.
Changing runtimes:
► Press
1
until
3
lights up. Conrm current time with OK
10
(see gure 3). The saved runtimes light up. A runtime
ashes (see gure 4).
► Adding new runtimes: Press
8
until new runtime ashes,
conrm with OK
10
. Repeat process for additional run-
times or end setting with
1
.
► Deleting runtimes: Press
8
until the runtime you want
to delete ashes, conrm with OK
10
. Repeat process for
additional runtimes or end setting with
1
.
Resetting all setting values:
► Press
1
for 5 seconds (see gure 1, page 22).
Changing the operating state:
► Press
1
until the required operating state
(
2
,
4
or
5
) lights up (see gure 1, page 22).
It is active immediately.
Example of a setting (see gure 2):
Current time
6
: for example 9:30 h
(LED in the time window from 9:30 a.m. till 10:00 a.m.)
The pump is not running, LED
9
is off.
Set runtimes
7
of the pump:
06:00 a.m. – 07:30 a.m. 15:30 a.m. – 18:30 a.m. 21:00 a.m. – 21.30 a.m.
11:00 a.m. – 13:30 a.m. 20:00 a.m. – 20:30 a.m. 22:00 a.m. – 22:30 a.m.
Timer

24
5
7
3
2
6
4
9
8
10
1
1
4
Teclas e indicadores LED :
1
Seleccionar el modo de funcionamiento
(en el sentido de las agujas del reloj):
2
Funcionamiento permanente
3
Ajuste
4
Funcionamiento según el programa horario
5
Parada permanente
6
Esfera LED del reloj
7
Esfera LED del programa horario
(véase también gura 2, pág. 25)
8
Para seleccionar el programa horario (hora y tiempos
de conmutación)
9
La bomba está en marcha (el LED está encendido) o está
desconectada (el LED no está encendido)
10
Conrmar o borrar programa horario
Después de la primera conexión eléctrica la bomba funcio-
na en modo continuo (estado de entrega: los LED
3
y
9
están iluminados,
6
parpadea, véase gura 1).
El periodo mínimo de programación es de 30 minutos.
Si se interrumpe la alimentación eléctrica, el reloj se para
(no hay reserva de potencia). Sin embargo, el programa
horario almacenado
7
se conserva. Si se restablece la ali-
mentación eléctrica, la bomba funciona en el último modo
de funcionamiento congurado,
6
parpadea. La hora ha de
ser actualizada.
Ajusta hora y el programa horario:
► Pulse
1
hasta que el
3
se ilumine.
► Pulse
8
para ajustar el LED rojo a la hora actual y conrme
con OK
10
.
9
ya no estará iluminado. El LED verde en el
ámbito de 0.00 horas a 0.30 horas parpadea.
► Utilice
8
para ajustar el primer tiempo de conexión y
conrme con OK
10
. El LED salta directamente al siguiente
ajuste. Vuelva a conrmar con OK
10
u omita el paso con
8
(y así sucesivamente). La esfera LED del reloj avanza más
rápidamente si se mantiene
8
pulsado.
► Utilice
1
para nalizar el ajuste. Se muestra el programa
horario guardado. Se ilumina el
4
, indicando que la bomba
trabajará de acuerdo al programa horario.
Programador horario

25
4
10
1
3
8
3
10 8
1
6
3
2
4
6
9
7
Programador horario
Ejemplo de un ajuste (véase gura 2):
Hora actual
6
: 9.50 horas
(LED en la ventana de tiempo de 9.30 a 10.00 horas)
La bomba está parada; el LED
9
está apagado.
Tiempos de funcionamiento
7
de la bomba:
06.00 horas – 07.30 horas 15.30 horas – 18.30 horas 21.00 horas – 21.30 horas
11.00 horas – 13.30 horas 20.00 horas – 20.30 horas 22.00 horas – 22.30 horas
Modicar la hora:
► Pulse
1
hasta que el
3
se ilumine. Pulse
8
hasta que el
LED rojo esté en la hora actual
6
(véase gura 3).
► Conrmar con OK
10
.
► Utilice
1
para nalizar el ajuste. Se ilumina el
4
, indicando
que la bomba trabajará de acuerdo al programa horario.
Modicar el programa horario:
► Pulse
1
hasta que el
3
se ilumine. Conrmar la hora actual
con OK
10
(véase gura 3). El programa horario almacenado
se ilumina. Un tiempo de funcionamiento se ilumina (véase
gura 4).
► Añadir nuevos tiempos de funcionamiento: pulse
8
hasta que
el nuevo tiempo de funcionamiento parpadee y conrme con
OK
10
. Repetir el procedimiento para otros tiempos de funcio-
namiento o terminar la conguración con
1
.
► Borrar tiempos de funcionamiento: pulse
8
hasta que parpa-
dee el tiempo de funcionamiento que se va a borrar y conrme
con OK
10
. Repetir el procedimiento para otros tiempos de
funcionamiento o terminar la conguración con
1
.
Puesta a cero de todos los valores de ajuste:
► Pulse
1
durante 5 segundos (véase gura 1, pág. 24).
Modicar modo de funcionamiento:
► Pulse
1
hasta que se ilumine el modo de funcionamiento
deseado (
2
,
4
o
5
) (véase gura 1, pág. 24). Se activa
inmediatamente.

26
5
7
3
2
6
4
9
8
10
1
1
4
Tijdschakelklok
Toetsen en LED-indicaties :
1
Bedrijfstoestand kiezen (met de wijzers van de klok mee):
2
Continu lopen
3
Afstelling
4
Bedrijf via tijdschakelklok
5
Continu stop
6
Tijd
7
LED-krans van de reactietijden (zie ook afbeelding 2, p. 27)
8
Tijden (tijd op klok en reactietijden) kiezen
9
Pomp loopt (LED brandt) of is uitgeschakeld
(LED brandt niet)
10
Tijden bevestigen/reactietijden bevestigen of wissen
Na de eerste aansluiting op het elektriciteitsnet loopt de
pomp continu (leveringsstatus – LED
3
en
9
branden,
6
knippert (zie afbeelding 1).
Kleinste tijdstap is 30 minuten.
Bij onderbreking van de stroomtoevoer stopt de klok
(geen werkingsreserve). De opgeslagen looptijden
7
blijven echter behouden. Is de stroomtoevoer weer her-
steld, dan loopt de pomp opnieuw in de laatst ingestel-
de bedrijfstoestand.
6
knippert. De tijd moet worden
geactualiseerd.
Tijdstip en schakeltijden afstellen:
►
1
indrukken, tot
3
brandt.
► Met
8
de rode LED op de actuele tijd zetten, met OK
10
bevestigen.
9
brandt niet meer. De groene LED knippert
bij 0:00 bis 0:30 uur.
► Met
8
de LED op de gewenste looptijd zetten en met OK
10
bevestigen. De LED springt direct naar de volgende
schakeltijd. Weer met OK
10
bevestigen of overslaan met
8
(enz.). De LED-krans loopt sneller, als
8
ingedrukt
blijft.
► Met
1
de afstelling beëindigen. De opgeslagen loop-
tijden worden weergegeven. De pomp loopt via het
afgestelde schakelprogramma,
4
brandt.

27
4
10
1
3
8
3
10 8
1
6
3
2
4
6
9
7
Tijdschakelklok
Voorbeeld van een afstelling (zie afbeelding 2):
Actuele tijd
6
: bijvoorbeeld 9.50 uur
(LED in het tijdvenster 9.30 uur t/m 10.00 uur)
De pomp loopt niet, LED
9
is uit.
Ingestelde looptijden
7
van de pomp:
06.00 uur – 07.30 uur 15.30 uur – 18.30 uur 21.00 uur – 21.30 uur
11.00 uur – 13.30 uur 20.00 uur – 20.30 uur 22.00 uur – 22.30 uur
Tijd veranderen:
►
1
indrukken, totdat
3
brandt.
8
indrukken, totdat de
rode LED de actuele tijd
6
weergeeft (zie afbeelding 3).
► Met OK
10
bevestigen.
► Met
1
de afstelling beëindigen. De pomp loopt via het
afgestelde schakelprogramma,
4
brandt.
Reactietijden veranderen:
►
1
indrukken, totdat
3
brandt. Actuele looptijd met OK
10
bevestigen (zie afbeelding 3). De opgeslagen looptijden
lichten op. Een looptijd knippert (zie afbeelding 4).
► Nieuwe looptijden toevoegen:
8
indrukken tot de nieuwe
looptijd knippert, bevestigen met OK
10
. Deze werkwijze
herhalen voor de andere looptijden of de afstelling beëin-
digen met
1
.
► Looptijden wissen:
8
indrukken tot de te wissen looptijd
knippert, bevestigen met OK
10
. Deze werkwijze herhalen
voor de andere looptijden of de afstelling beëindigen met
1
.
Reset van alle ingestelde waarden:
► 5 seconden op
1
drukken (zie afbeelding 1, page 26).
Bedrijfstoestand wijzigen:
►
1
indrukken, totdat de gewenste bedrijfstoestand
(
2
,
4
of
5
) brandt (zie afbeelding 1, page 26).
Hij is direct actief.

28
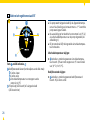
0 100 200 300 400 500 600 700
0,2
0,4
0,6
0,8
1,0
1,2
1,4
2
4
6
8
10
12
14
800 900
Q [l / h]
H [mWS]
n = 2000 - 3000 1/minBWO 155 V
0 100 200 300 400 500 600 700
0,2
0,4
0,6
0,8
1,0
1,2
1,4
2
4
6
8
10
12
14
800 900
n = 2000 - 3000 1/minBWO 155 R
[kPa]
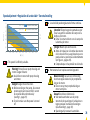
Speed adjustment • Regulación de la velocidad • Toerentalinstelling
The speed is innitely variable.
Warning! Hot surface on pump housing and
motor. Danger of burns!
► Avoid direct contact with pump housing
and motor.
Danger! Danger of electrocution.
► Before working on the pump, disconnect
power supply and ensure that it cannot
be reconnected unintentionally
(see g. 1, page 29).
► Check to make sure the power is turned
off.
La velocidad puede regularse de forma continua.
¡Atención! Existe riesgo de quemaduras por
tocar la supercie caliente del cuerpo de la
bomba y del motor.
► Evitar el contacto directo con el cuerpo de
la bomba y el motor.
¡Peligro! Muerte por electrocución.
► Antes de trabajar en la bomba desconecte
el circuito eléctrico y asegúrese de que no
pueda volver a conectarse accidentalmente
(ver gura 1, página 29).
► Compruebe que no hay tensión en el circuito.
Het toerental kan traploos worden ingesteld.
Waarschuwing! Gevaar voor verbranding
door hete oppervlakken bij de pompbehui-
zing en de motor.
► Direct contact met pompbehuizing en
motor vermijden.
Gevaar! Dood door elektrocutie.
► Vóór werkzaamheden aan de pomp
stroomcircuit spanningsvrij schakelen en
tegen opnieuw inschakelen beveiligen
(zie afbeelding 1, page 29).
► Spanningsvrije toestand vaststellen.

29
7
5
61
3
4
2
230 V~ 12 V=
Speed adjustment • Regulación de la velocidad • Toerentalinstelling

30
2
1
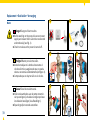
Servicing • Mantenimiento • Onderhoud
Danger! Danger of electrocution.
► Before working on the pump, disconnect power
supply and ensure that it cannot be reconnected
unintentionally (see g. 2).
► Check to make sure the power is turned off.
¡Peligro! Muerte por electrocución.
► Antes de trabajar en la bomba desconecte el
circuito eléctrico y asegúrese de que no pueda
volver a conectarse accidentalmente (ver gura 2).
► Compruebe que no hay tensión en el circuito.
Gevaar! Dood door elektrocutie.
► Vóór werkzaamheden aan de pomp stroomcir-
cuit spanningsvrij schakelen en tegen opnieuw
inschakelen beveiligen (zie afbeelding 2).
► Spanningsvrije toestand vaststellen.

31
9 106
4
7 8
3
5
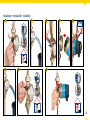
Servicing • Mantenimiento • Onderhoud
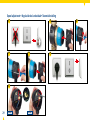
► Every time the motor is opened, replace the sealing
ring (see g. 9).
► Insert the new sealing ring into the groove in the
pump housing and press slightly into place
(see g. 10).
► Cambie la junta tórica cada vez que abra el motor
(ver gura 9).
► Inserte la nueva junta tórica en la ranura del cuerpo
de bomba y presiónela ligeramente (ver gura 10).
► Na ieder openen van de motor dichtingsring vervan-
gen (zie afbeelding 9).
► Nieuwe dichtingsring in de uitsparing van de pomp-
behuizing leggen en zachtjes drukken (zie afbeel-
ding 10).

32
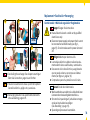
Servicing • Mantenimiento • Onderhoud
5x
16
1711
13
14
12
15
= 20 Nm
► Technical support is available from your heating
and sanitary specialist or from Deutsche Vortex.
► Si necesita asistencia técnica puede dirigirse a su
establecimiento de calefacción y equipamientos
sanitarios o a la empresa Deutsche Vortex.
► Technische ondersteuning krijgt u bij een vakhan-
del voor verwarming en sanitair en bij Deutsche
Vortex.

33
5 6 7
1 2
3 4
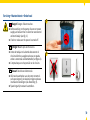
Motor
Replacement • Sustitución • Vervanging
Danger! Danger of electrocution.
► Before working on the pump, disconnect power
supply and ensure that it cannot be reconnected
unintentionally (see g. 1).
► Check to make sure the power is turned off.
¡Peligro! Muerte por electrocución.
► Antes de trabajar en la bomba desconecte el
circuito eléctrico y asegúrese de que no pueda
volver a conectarse accidentalmente (ver gura 1).
► Compruebe que no hay tensión en el circuito.
Gevaar! Dood door elektrocutie.
► Vóór werkzaamheden aan de pomp stroomcir-
cuit spanningsvrij schakelen en tegen opnieuw
inschakelen beveiligen (zie afbeelding 1).
► Spanningsvrije toestand vaststellen.

34
8
10
11
9
12
= 20 Nm
Danger! Danger of electrocution.
► Have all electrical work carried out by qualied
electricians only.
► Disconnect power supply and ensure that it cannot
be reconnected unintentionally (see g. 1,
page 35). Check to make sure the power is turned
off.
¡Peligro! Muerte por electrocución.
► Los trabajos eléctricos deben realizarlos sola-
mente electricistas cualicados y autorizados.
► Desconecte el circuito eléctrico y asegúrese de
que no pueda volver a conectarse accidental-
mente (ver gura 1, página 35).
► Compruebe que no hay tensión en el circuito.
Gevaar! Dood door elektrocutie.
► Werkzaamheden aan elektronica uitsluitend laten
uitvoeren door deskundig elektrotechnicus.
► Stroomcircuit spanningsvrij schakelen en tegen
opnieuw inschakelen beveiligen
(zie afbeelding 1, page 35).
► Spanningsvrije toestand vaststellen.
Replacement • Sustitución • Vervanging
► Concluding the exchange: See chapters starting at
Electrical Connection, page 14 and further.
► Finalizar la sustitución: véase a partir del capítulo
Conexión eléctrica, página 14 y sucesivas.
► Vervanging afsluiten: zie vanaf hoofdstuk Elektri-
sche aansluiting, page 14 ff.
Control module • Módulo de regulación • Regelmodule

35
21
► Concluding the exchange: See chapters starting at
Electrical Connection, page 14 and further.
► Finalizar la sustitución: véase a partir del capítulo
Conexión eléctrica, página 14 y sucesivas.
► Vervanging afsluiten: zie vanaf hoofdstuk Elektri-
sche aansluiting, page 14 ff.
Replacement • Sustitución • Vervanging
Disposal
Product disposal
The symbol of the crossed out wheeled
bin on the product or on the packaging
means that this product has to be
disposed of separately from household
waste at a collection point for the
recycling of electrical and electronic
equipment. By ensuring this product is
disposed of properly, you will help
prevent potential negative effects for
the environment and human health, which could be caused
by inappropriate waste handling of EEE. For more detailed
information about the recycling of this product, please
contact your local Civic Ofce, your household waste disposal
service or the shop where you purchased the product.

36
Reciclaje Recyclage
Cómo deshacerse del producto
Este símbolo en el equipo o en su em-
balaje indica que el presente producto
no puede ser tratado como residuos
doméstico normal. Debe entregarse en
el cor respondiente punto de recogida
de equipos eléctricos y electrónicos.
Al asegurarse de que este producto se
desecha correctamente, usted ayuda
a prevenir las consecuencias potencial-
mente negativas para el medio ambiente
y la salud humana que podrían derivarse de la incorrecta
manipulación en el momento de deshacerse de este produc-
to. Para recibir información detallada sobre el reciclaje de
este producto, póngase en contacto con el ayuntamiento, el
punto de recogida más cercano o el establecimiento donde
ha adquirido el producto.
Verwijdering van het product
Dit symbool op het product of op de
verpakking wijst erop dat dit product
niet als huishoudelijk afval mag worden
behandeld. Het moet echter naar een
inzamelingspunt worden gebracht
waar elektrische en elektronische
apparatuur wordt gerecycled. Als u
ervoor zorgt dat dit product op de
correcte manier wordt verwerkt, helpt
u mogelijke negatieve gevolgen voor
mens en milieu die zouden kunnen veroorzaakt worden
in geval van verkeerde afvalbehandeling te voorkomen.
Het recycleren van materialen draagt bij tot het behoud
van natuurlijke bronnen. Voor meer details in verband met
het recyclen van dit product, kan u contact opnemen met
de gemeentelijke instanties, de organisatie belast met de
verwijdering van huishoudelijk afval of de winkel waar u
het product hebt gekocht.

37
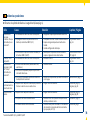
Faults and remedies
► Observe the chapter “Safety” (see p. 3).
Fault Cause Remedy Chapter/page
Pump not run-
ning.
"Pump" LED does
not light up*.
Power supply is interrupted. ► Ensure correct power supply.
Time switch function does not start the
pump. (BWO 155 Z)
► Check "Operating state" LED.
► Wait for next pump start.
► Change time setting.
Timer, p. 22
Temperature function does not start the
pump (BWO 155 ERT).
► Change shutdown temperature or wait for
next pump start.
Electronic regulating
thermostat ERT, p. 19
"Time" LED
ashes*.
Power supply was interrupted. ► Update time. Timer, p. 22
Pump is not
running: LED
"Pumpe" (pump)
is illuminated.*
Motor is defective (electrical/electronics). ► Replace motor.
Rotor is blocked because the rotor bearing is
defective.
Rotor is blocked by debris. ► Clean wetted parts. Maintenance, p. 31
Pump stops the
rotor continuously.
Air in the pump housing, dry run protection
is active.
► Bleed the circulation line. Installation, p. 9 and
Venting, p. 18
Pump makes
noise.
Air in the pump housing. ► Bleed the circulation line. Installation, p. 9 and
Venting, p. 18
Rotor bearing defective. ► Replace the rotor. If the bearing pin is
damaged exchange the motor.
Replacement, p. 33
Non-return valve is loose. ► Exchange the V-type pump housing or non-
return valve installed behind the pump
(e.g. RV 153).
Installation, p. 9
*only Pumps BWO 155 Z and/or BWO 155 ERT

38
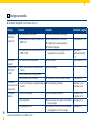
Incidencias y soluciones
► Observe el capítulo dedicado a la seguridad (véase pág. 4).
Fallo Causa Solución Capitulo / Página
La bomba no
funciona.
El LED de
"Pumpe"
(la bomba)
no se
enciende*.
La alimentación eléctrica se ha interrumpido. ► Asegúrese de que hay alimentación eléctrica.
El programa horario no pone en marcha la
bomba (en la bomba: BWO 155 Z).
► Compruebe el LED de "estado de funcionamiento".
► Espere a la siguiente puesta en marcha de la
bomba.
► Cambie conguración de tiempo.
Programador horario,
pág. 24
El termostato no pone en marcha la bomba (en
la bomba: BWO 155 ERT).
► Modique la temperatura de desconexión o
espere al siguiente inicio de la bomba.
Termostato electrónico
ERT, pág. 20
El LED de "hora"
parpadea*.
La alimentación eléctrica se ha interrumpido. ► Actualice la hora. Programador horario,
pág. 24
La bomba no
funciona: El LED
de "Pumpe"
(la bomba) se
enciende*.
El motor está defectuoso (sistema eléctrico/
electrónico).
► Cambie el motor.
El rotor está bloqueado porque el soporte del
rotor está defectuoso.
El rotor está bloqueado debido a la existencia
de depósitos de suciedad.
► Limpie los componentes que están en contacto
con el agua.
Mantenimiento, pág. 31
La bomba detiene
continuamente la
marcha del rotor.
Hay aire en el cuerpo de la bomba; la protección
frente a la marcha en seco está activa.
► Purgue la red de tuberías. Instalación, pág. 9 y
Purgado, pág. 18
La bomba hace
ruidos.
Hay aire en el cuerpo de la bomba. ► Purgue la red de tuberías. Instalación, pág. 9 y
Purgado, pág. 18
El soporte del rotor está defectuoso. ► Cambie el rotor. Si el pasador de soporte está
dañado, cambie el motor.
Sustitución, pág. 33
La válvula de retención está suelta. ► Cambie el cuerpo de la bomba en V o la válvula
de retención incorporada detrás de la bomba
(por ejemplo, RV 153).
Instalación, pág. 9
*solo bombas BWO 155 Z y/o BWO 155 ERT

39
Storingen en remedies
► Hoofdstuk Veiligheid in acht nemen (zie p. 5).
Storing Oorzaak Remedie Hoofdstuk / pagina
Pomp loopt niet.
LED "Pumpe"
brandt niet.*
Stroomtoevoer is onderbroken ► Correcte stroomtoevoer waarborgen.
Tijdschakelfunctie schakelt de pomp niet in.
(BWO 155 Z)
► LED "Bedrijfstoestand" controleren.
► Volgende start van pomp afwachten.
► Tijdinstelling wijzigen.
Tijdschakelklok, S. 26
Temperatuurfunctie schakelt de pomp niet in
(BWO 155 ERT).
► Uitschakeltemperatuur wijzigen of wachten
op volgende start van de pomp.
Elektronisch
regelthermostaat ERT,
S. 21
LED "Uhrzeit"
knippert*.
Stroomtoevoer was onderbroken. ► Werk de tijd bij. Tijdschakelklok, S. 26
Pomp loopt niet:
LED “Pumpe”
brandt.*
Motor defect (elektrische installatie/elek-
tronica).
► Motor vervangen.
Rotor blokkeert, want rotorlager defect.
Rotor blokkeert door afzettingen. ► Onderdelen in contact met water reinigen. Onderhoud, S. 31
Pomp zet het
lopen van de rotor
constant stop.
Lucht in het pomphuis, droogloopbeveiliging
is actief.
► Circulatieleiding ontluchten. Installatie, S. 9 en
Ontluchten, S. 18
Pomp maakt
geluiden.
Lucht in het pomphuis. ► Circulatieleiding ontluchten. Installatie, S. 9 en
Ontluchten, S. 18
Rotorlager defect. ► Rotor vervangen. Als lagerpen beschadigd is,
motor vervangen.
Vervanging, S. 33
Terugslagklep zit los. ► V-pomphuis of achter de pomp ingebouwde
terugslagklep (bv. RV 153) vervangen.
Installatie, S. 9
*uitsluitend pomp BWO 155 Z en/of BWO 155 ERT

BWO 155 · BWO 155 12V
BWO 155 Z · BWO 155 ERT
Original operating instructions
Manual de instrucciones original
Oorspronkelijke gebruiksaanwijzing
DEUTSCHE VORTEX GMBH & CO. KG
Kästnerstraße 6 | 71642 Ludwigsburg, Germany | Fon: +49(0)71 41.2552-0
Fax: +49(0)71 41.2552-70 | info@deutsche-vortex.com
WWW.DEUTSCHE-VORTEX.COM
199-130-261_en-es-nl · 08/19
-
 1
1
-
 2
2
-
 3
3
-
 4
4
-
 5
5
-
 6
6
-
 7
7
-
 8
8
-
 9
9
-
 10
10
-
 11
11
-
 12
12
-
 13
13
-
 14
14
-
 15
15
-
 16
16
-
 17
17
-
 18
18
-
 19
19
-
 20
20
-
 21
21
-
 22
22
-
 23
23
-
 24
24
-
 25
25
-
 26
26
-
 27
27
-
 28
28
-
 29
29
-
 30
30
-
 31
31
-
 32
32
-
 33
33
-
 34
34
-
 35
35
-
 36
36
-
 37
37
-
 38
38
-
 39
39
-
 40
40


Vortex BLUEONE BWO 155 ERT Handleiding
- Type
- Handleiding
- Deze handleiding is ook geschikt voor
in andere talen
Gerelateerde papieren
Andere documenten
-
Bosch MC 400 Installation Instructions For Skilled Labour
-
SFA SANIFOS 500 Series Installation Instructions Manual
-
DAB D.CONNECT Handleiding
-
-
-
-
Davey SilensorPRO SP400BT Installation And Operating Instructions Manual
-
 Pentair, Inc. INTELLIFLO VS-3050 Handleiding
