protech FOCUS180 Building Instructions
- Categorie
- Speelgoed met afstandsbediening
- Type
- Building Instructions

BUILDING INSTRUCTIONS
Bouwhandleiding
Plan de montage
Bauplan
Please follow the enclosed safety precautions for electric powered aircrafts
Gelieve de bijgesloten veiligheidsvoorschriften voor electro-vliegtuigen te lezen
Observer les conseils de sécurité sur les pages de précautions joint
Beiliegende Sicherheitshinweise für Elektroflugmodelle beachten.
version:30-08-2002 - T0319

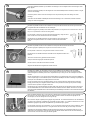
Schroef de plastiek kwiklinks op de metalen stuurstangen om te vermijden dat de stuurstangen uit de
romp glijden.
Visser les chapes en plastique sur les tringles de commande métalliques afin d’éviter que celles-ci ne glis-
sent hors du fuselage.
Screw the plastic clevises onto the metal push rods to prevent the push rods sliding out of the
fuselage.
Schrauben Sie die Plastik Gabelköpfe auf die Gewindestange, um zu verhindern, daß die Gewinde-
stange aus dem Rumpf gleiten.
Monteer de plastiek roerhoorn door middel van de koperen M2 schroeven en moeren.
Monter le guignol en plastique au moyen des vis et écrous M2 en cuivre.
Fix the plastic control horn, using the 2mm brass screws and nuts.
Montieren Sie den Plastik Ruderhorn mit Hilfe der M2-Kupferschrauben und -
Muttern.
Monteer de V-vlakken op de houder en let op voor de uitlijning van de vlakken met de metalen
bevestigingspennen. Breng eventueel na de montage lijm aan zodat de V-staart onverandert blijft.
Steek vervolgens de metalen pennen door de plastiek romp en borg ze aan de onderzijde met 2x M2
moeren.
Monter l’empennage en V sur l’appui de montage.Aligner svp l’empennage sur les broches metalliques.
Coller l’empennage en V. Ensuite faire passer les broches métalliques à travers le fuselage en plastique et
les bloquer du côté inférieur en employant deux écrous M2.
Fix the V-tail stabs onto the V-tail holder taking care of correctly align the stabs with the metal rods.
Finally glue the stab parts together with the holder. Then push the rods through the plastic fuselage
and lock them in position using two 2mm nuts.
Montieren Sie die V-Höhenruderteile auf dem Halter. Gib obacht auf eine korrekte Position der Flachen
mit den Metallstiften. Man kann eventuell die Flachen verkleben mit dem Halter. Stecken Sie anschlie-
ßend die beiden Metallstifte durch den Plastikrumpf und befestigen Sie diese an der Unterseite mit zwei
M2-Muttern.
Sluit de plastiek kwiklinks aan op de roerhoorns. Neemt men het uiterste gaatje aan de buitenzijde van
de roerhoorn, dan zal de uitslag van het roer kleiner worden. Neemt men het eerste gaatje aan de
binnenzijde, dan zal de uitslag van het roer groter zijn.
Raccorder les chapes en plastique aux guignols du gouvernail. Si on utilise le dernier trou du côté extérieur
du guignol de gouvernail, l’amplitude du gouvernail sera plus petite. Si on utilise le dernier trou du côté
intérieur du guignol de gouvernail, l’amplitude du gouvernail sera plus grande.
Fix the plastic clevises to the controlhorns. If you use the hole at the outer end of the controlhorn, then
the movement of the flap will be less. Using the hole at the inner end will give more flap movement.
Verbinden Sie die Plastik Gabelköpfe mit den Ruderhörner. Nimmt man die äußerste Öffnung an der
Außenseite vom Ruderhörner, wird der Ausschlag des Ruders kleiner. Nimmt man die erste Öffnung an
der Innenseite, wird der Ausschlag des Ruders größer.
1
Monteer de plastiek roerhoorn door middel van de koperen M2 schroeven en moeren op het rechtse
hoogteroervlak met de hefboom aan de onderzijde.
Attacher le guignol en plastique sur la dérive de profondeur, au moyen des vis et écrous M2 en cuivre, de
façon à ce que le levier se trouve du cöté gauche.
Fix the plastic control horn onto the right hand elevator flap, using the 2mm
brass screws and nuts, with the lever on the underside.
Montieren Sie den Plastik Ruderhorn mit dem Hebel an der Unterseite mit
Hilfe der M2-Kupferschrauben und -muttern auf die rechte Höhenruder-
fläche.
2
3
4
5
Toont hoe de roerhoorns geplaatst moeten worden.
Indique comment les guignols doivent être placés.
Shows how the controlhorns should be mounted
Zeigt wie die Ruderhörner angebracht werden müssen.

Eerst moet het neutraalpunt van de servo’s bepaalt worden, dit doe je door de servo’s op de ontvanger
aan te sluiten en de trimmingen en stuursticks van de radiobesturing in de neutraalstand te plaatsen.
Als de servo’s in neutraalstand staan moet ook het kielvlak en het hoogteroer recht staan.
Plaats de servo’s zoals afgebeeld op de foto in de servoplaat door middel van 4 schroeven (deze
schroeven worden bij de radiobesturingsset of servo’s bijgeleverd. Vergeet niet de rubberhulsen voor
de servo’s te plaatsen). Het plaatsen van de servo’s in de servoplaat gaat eenvoudiger als de
servoplaat losgeschroefd wordt. Maak de vorm van de servohevels zoals afgebeeld op de foto. Het is
belangrijk dat de servohevels vrij kunnen bewegen zonder deromp te raken. Let op de neutraalstand.
Il faut tout d’abord déterminer le point neutre des servos, ce que l’on fait en raccordant ceux-ci au récepteur
et en plaçant les trimmes de réglage et les sticks de la télécommande en position neutre. Si les servos se
trouvent en position neutre, la dérive et le gouvernail de profondeur doivent également être droits.
Placer les servos dans la platine de servo comme indiqué sur la photo, au moyen de 4 vis (ces vis sont
fournies avec le set de commande radio ou les servos. Ne pas oublier de placer les enveloppes en caout-
chouc sur les servos). Le placement des servos dans la platine de servo sera plus aisé si celle-ci est
dévissée. Donner aux leviers des servos la forme telle qu’indiquée sur la photo. Il est important que les tiges
des servos puissent bouger librement sans toucher le fuselage.
The first job is to determine the neutral position of the servomotors. This is done by connecting the
servomotors to the receiver and ensuring that the settings of the trims and joysticks on the remote
control unit are in the neutral position. When the servos are in the neutral position, then the tail fin and
elevator flaps must be straight.
Mount the servomotors onto the servoplate, as shown in the photograph, using 4 screws (these should
be supplied with the remote control unit or servomotors). Don’t forget to mount the rubber covers for
the servomotors. Mounting the servo’s on the servoplate is easier if the servoplate fixing screws are
loosened first. Cut the servohorns into shape as shown in the photo. The servohorns must be able to
move freely without touching the fuselage. Check the neutral position.
Erst muß der neutrale Punkt des Servos bestimmt werden. Das tun Sie, indem Sie die Servos an den
Empfänger anschließen und die Trimmvorrichtungen und Steuersticks der Fernsteuerung in die
Neutralposition stellen. Wenn sich die Servos in der Neutralposition befinden, müssen auch die
Kielfläche und das Höhenruder aufrecht stehen.
Bringen Sie die Servos, wie auf dem Foto abgebildet, mit Hilfe von vier Schrauben an der Servoplatte
an. (Diese Schrauben werden mit Fernsteuersatz oder den Servos mitgeliefert. Vergessen Sie nicht, die
Gummihülsen vor den Servos anzubringen). Das Anbringen der Servos an der Servoplatte geht
einfacher, wenn die Servoplatte losgeschraubt wird. Schneiden Sie die Servohebel in den richtigen
form, wie es auf dem Foto abgebildet ist. Es ist wichtig, daß die Servohebel sich frei bewegen können,
ohne den Rumpf zu berühren. Achten Sie auf die Neutralposition.
Plaats schuimrubber rond de ontvanger ter bescherming.
Placer de la mousse autour du récepteur afin de le protéger.
Wrap foam rubber round the receiver to protect it.
Bringen Sie rundum den Empfänger Schaumgummi zum Schutz an.
Bij gebruik van Micro-servo’s kunt U de verkleiningsplaat gebruiken die geplaatst wordt op de opening
van de standaard servo’s.
Si vous utilisez des Micro-servos, vous pouvez utiliser la plaque de réduction, à placer sur l’ouverture des
servos standard.
If you are using micro-servo’s, you can mount them on the smaller servoplate which can be fitted on
the opening in the standard servoplate.
Bei Verwendung von Mikro-Servos können Sie die Verkleinerungsplatte verwenden, die auf der Öffnung
der Standardservos angebracht wird.
6
7

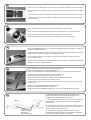
Plaats de aandrijfbatterij boven op de servoplaat zoals afgebeeld. Blokkeer de batterij door middel van
piepschuim of klittenband (velcro).
Placer la batterie de propulsion au-dessus de la plaque à servo comme indiqué sur l’illustration. Bloquer la
batterie au moyen de mousse de fixation ou d’auto-agrippant (Velcro).
Place the battery on top of the servoplate as shown in the photo and fix it in position using foam
rubber or Velcro fastener.
Bringen Sie die Antriebsbatterie wie abgebildet oben auf der Servoplatte an. Blockieren Sie die Batterie
mit Hilfe von Schaumstoff oder Klettenband.
Plaats de aluminium vleugelpennen in de middelste vleugelsectie.
Plaats de vleugeltippen tegen de middelste vleugelsectie.
Breng doorzichtige kleefband op beide vleugelhelften aan om van de vleugel één geheel te maken.
Insérer les clés d’ ailes en aluminium dans la section centrale de l’aile.
Insérer les extrémités de l’aile contre la section centrale de l’aile.
Mettre du ruban adhésif transparent sur les deux moitiés de l’aile pour les assembler.
Insert the aluminium wing pins into the central wing section.
Place the outer wing tips onto the middle section and fix them carefully with sticky tape to make one
complete wing.
Bringen Sie die Aluminiumflügelstifte im mittleren Flügel an.
Bringen Sie die Flügelspitzen am mittleren Flügel an.
Bringen Sie auf beiden Flügelhälften Klebeband an, um aus dem Flügel eine Einheit zu machen.
Het zwaartepunt van de zwever bevindt zich op 65 mm van de
voorkant van de vleugel. Probeer door het verschuiven van de
aandrijfbatterij het ideale zwaartepunt te bekomen.
Le centre de gravité du planeur se trouve à 65 mm de l’avant de l’aile.
Tenter d’obtenir le centre de gravité idéal en déplaçant la batterie
d’entraînement.
The centre of gravity of the glider is located 65mm behind the front of
the wing. Move the battery back or forward to try to ensure that the
centre of gravity is at this optimum point
Der Schwerpunkt des Flugzeugs befindet sich 65 mm von der
Vorderseite des Flügels. Versuchen Sie, den idealen Schwerpunkt zu
finden, indem Sie die Antriebsbatterie verschieben
Sluit de servo’s en snelheidsregelaar aan op de ontvanger en plaats de ontvanger onder de servoplaat.
Raccorder les servos et le variateur de vitesse au récepteur, et placer le récepteur en dessous de la platine
de servo.
Connect the servos and speed controller to the receiver and mount the receiver under the servo- plate.
Schließen Sie die Servos und Fahrtregler an den Empfänger an und bringen Sie den Empfänger unter
der Servoplatte an.
Plaats de electronische snelheidsregelaar onder de servoplaat, voor de ontvanger.
Placer le variateur de vitesse électronique en dessous de la platine des servos, devant le récepteur.
Mount the electronic speedcontroller under the servoplate in front of the receiver.
Bringen Sie den elektronischen Fahrtregler vor dem Empfänger unter der Servoplatte an.
8
9
10
11
12
65 mm
Antenne bevestiging
Fixation d’ antenne
Aerial fixation
Antenne Befestigung

Belangrijke Veiligheidsinstructies
Lees de instructies betreffende montage en werking van je model vooraleer u het de eerste maal in gebruik neemt. U alleen bent verantwoordelijk voor de veilige werking
van uw radiobestuurd model. Kinderen zijn enkel toegestaan om deze modellen te bouwen en te vliegen onder het toeziend oog van een volwassene, die zich bewust is van
de gevaren die dit met zich meebrengt.
Gebruik enkel passende gepolariseerde verbindingsstukken. Alle kabels, verbindingsstukken en de batterij ,indien deze zelf samengesteld is, moeten geïsoleerd worden om
kortsluiting te voorkomen. Poog nooit verschillende types van pluggen en contacten te kombineren (vb.tin-en goudcontacten), daar zulke combinaties onbetrouwbaar zijn.
NC-batterijen zijn geschikt om enorme hoeveelheden energie vast te houden en vrij te geven. Zodoende vertegenwoordigt een batterij een constant risico op explosie en
brandgevaar.
Wij hebben geen controle over de manier waarop u het RC-vliegtuig bouwt en gebruikt. Daarom zijn wij verplicht om alle aansprakelijkheid voor ongevallen van de hand te
wijzen. Het enige dat in onze mogelijkheden ligt is u te waarschuwen voor de risico’s.
Als u hulp nodig heeft, roep dan de bijstand van een ervaren modelbouwer of een modelbouwclub in, of schrijf u in bij een modelvliegclub. Modelshops en de
gespecialiseerde pers zijn eveneens een geschikte bron van informatie. De beste les is echter zich aan te sluiten bij een club en te vliegen op de goedgekeurde
vliegplaatsen.
Rubber elastieken verslijten met het gebruiken en worden broos. Vervang ze tijdig, zodoende stelt u de veiligheid en de betrouwbaarheid van uw model veilig. Span alle
rubber elastieken op vooraleer u ze gebruikt om te controleren of ze nog sterk genoeg zijn.
Motoren mogen enkel buiten in openlucht lopen ! De sterke zuigkracht van de propeller en de luchtverplaatsing die deze veroorzaakt, kan in kleine ruimten makkelijk een
ongeval tot gevolg hebben (vb. schilderijen die naar beneden vallen, een gordijn dat in de propeller gezogen wordt). Het model moet steeds stevig worden vastgehouden
door een helper.
Houdt de rotatiebaan van een propeller vrij, sta er nooit voor of in de lijn van de propeller. Er kan steeds een deel loskomen en met hoge snelheid wegvliegen, zodat het
uzelf of iemand anders in de omgeving kan verwonden. Raak de ronddraaiende propeller nooit met enig voorwerp aan. Vermijdt steeds dat welk voorwerp ook het draaien
van de propeller verhindert.
Pas op met losse kleding zoals sjaals, losse shirts, … Losse kleding kan makkelijk in de propeller gezogen worden.
Als u de motor start terwijl deze op losse of zanderige grond staat, zal de propeller het zand opzuigen en rondslingeren zodat het in je ogen kan komen. Draag dus steeds
een veiligheidsbril op zo’n momenten.
Controleer, elke keer als u een model wil gebruiken, zorgvuldig of het model en alles wat erbij hoort (vb. propeller, aandrijving, RC-onderdelen, …) in goede staat en
onbeschadigd is. Als u een fout bemerkt, vlieg dan niet met het model tot u de fout hebt opgelost.
Verzeker uzelf ervan dat de frequentie vrij is vooraleer u de zender aanzet. Radiostoringen veroorzaakt door vreemde bronnen kunnen op elk moment en zonder
waarschuwing voorkomen. Als dit gebeurt is je model oncontroleerbaar en volledig onvoorspelbaar. Laat uw radiobesturing nooit onbewaakt achter, andere mensen zouden
kunnen proberen het te gebruiken.
Controleer of er niets in de baan van de propeller is vooraleer u de electromotor aanzet. Probeer nooit de draaiende propeller te stoppen. Electromotoren verbonden met
een propeller mogen enkel lopen als deze veilig geïnstalleerd is.
Als u uw model veilig wil vliegen en u wil problemen vermijden, dan is het essentieel dat u zich bewust bent van zijn positite en hoogte tijdens iedere vlucht. Laat het dus
niet te ver weg vliegen ! Als u een controleprobleem of storingen ontdekt gedurende een vlucht, landt dan onmiddellijk om een mogelijk ongeval te voorkomen. Bemerk dat
de zenderstick voor de motorfunctie in de off-stand moet staan vooraleer u het systeem aanzet. Om te voorkomen dat de electromotor onverwacht start, zet eerst de
zender aan, later pas de ontvanger. Gebruik de omgekeerde volgorde bij het afzetten : eerst de ontvanger, dan de zender. Controleer of de roeren in de juiste richting
bewegen als u de sticks gebruikt.
Heb begrip voor het doel van deze opmerkingen. Wij willen u enkel opmerkzaam maken voor de vele gevaren en risico’s die zich kunnen voordoen als u kennis en ervaring
mist, nonchalant of onverantwoordelijk te werk gaat.
Als u redelijk zorg draagt, is modelvliegen een zeer creatieve, leerrijke, plezierige en ontspannende vrijetijdsbesteding.
Important Safety Notes
Be sure to read right through the instructions covering assembly and operation of your model before you attempt to operate it for the first time. You alone are responsible for
the safe operation of your radio-controlled model. Young people should only be permitted to build and fly these models under the instruction and supervision of an adult
who is aware of the hazards involved in this activity.
Use only matching polarised connectors. All cables, connectors and the battery if home-assembled must be insulated to prevent short circuits. Never attempt to combine
different types of plug and socket - e.g. tin-plated and gold-plated types - as such combinations are bound to be unreliable.
NC batteries are capable of holding and releasing enormous amounts of energy, and as such represent a constant hazard of explosion and fire.
We have no control over the way you build and operate your RC model aircraft, and for this reason we are obliged to deny all liability for accidents. All we can do is point out
the hazards and make sure you are aware of them.
If you need help, please enlist the aid of an experienced modeller, a model club or enrol at a model flying training school, Model shops and the specialist model press are
also good sources of information. The best course is always to join a club and fly at the approved model flying site.
Rubber bands deteriorate with age and become brittle. Replace them from time to time to maintain the safety and reliability of your model. Stretch all rubber bands before
use to check that they are still strong enough for their purpose.
Motors should only be run in the open air! The powerful suction of the propeller and the volume of air which it accelerates can easily lead to accidents in enclosed spaces
(e.g. pictures falling down, curtains sucked into the propeller). The model must be held securely by an assistant at all times.
Keep well clear of the rotational plane of propellers - don't stand in line with it or in front of it. You never know when some part may come loose and fly off at high speed,
hitting you or anybody else in the vicinity. Never touch the revolving propeller with any object.
There must be no chance of any object getting in the way of the propeller and preventing it rotating.
Take care with loose clothing such as scarves, loose shirts etc. Flapping cloth can easily be sucked into the area of the propeller and then get tangled in it.
If you start your motor when the model is standing on loose or sandy ground, the propeller will suck up sand and dust and hurl it around. and it could easily get in your eyes.
Wear protective goggles at such times.
Every time you intend to operate your model check carefully that it and everything attached to it (e.g. propeller, gearbox,RC components etc.) are in good condition and
undamaged. If you find a fault do not fly the model until you have corrected it.
Satisfy yourself that your frequency is vacant before you switch on. Radio interference caused by unknown sources can occur at any time without warning. If this should
happen, your model will be uncontrollable and completely unpredictable. Never leave your radio control system unguarded, as other people might pick it up and try to use it.
Check that nothing is in the way of the propeller before you switch on the electric motor. Never attempt to stop the spinning propeller.Electric motors with a propeller
attached should only be run when installed securely.
lf you are to fly your model safely and avoid problems it is essential that you are aware of its position and attitude throughout each flight - so don't let it fly too far away! lf
you detect a control problem or interference during a flight,immediately land the model to prevent a potential accident Note that the transmitter throttle stick must be set to
the OFF (motor stopped) position before you switch on the power system. To avoid the electric motor starting unexpectedly, switch on the transmitter first. then the
receiving system. Use the reverse sequence when switching off: receiver first, then the transmitter. Check that the control surfaces move in the correct "sense" when you
operate the sticks.
Please don't misunderstand the purpose of these notes. We only want to make you aware of the many dangers and hazards which can arise if you lack knowledge and
experience, or work carelessly or irresponsibly. If you take reasonable care model flying is a highly creative, instructive, enjoyable and relaxing pastime.
Pagina wordt geladen...
Pagina wordt geladen...
Pagina wordt geladen...
Documenttranscriptie
BUILDING INSTRUCTIONS Bouwhandleiding Plan de montage Bauplan Please follow the enclosed safety precautions for electric powered aircrafts Gelieve de bijgesloten veiligheidsvoorschriften voor electro-vliegtuigen te lezen Observer les conseils de sécurité sur les pages de précautions joint Beiliegende Sicherheitshinweise für Elektroflugmodelle beachten. version:30-08-2002 - T0319 1 Schroef de plastiek kwiklinks op de metalen stuurstangen om te vermijden dat de stuurstangen uit de romp glijden. Visser les chapes en plastique sur les tringles de commande métalliques afin d’éviter que celles-ci ne glissent hors du fuselage. Screw the plastic clevises onto the metal push rods to prevent the push rods sliding out of the fuselage. Schrauben Sie die Plastik Gabelköpfe auf die Gewindestange, um zu verhindern, daß die Gewindestange aus dem Rumpf gleiten. 2 Monteer de plastiek roerhoorn door middel van de koperen M2 schroeven en moeren op het rechtse hoogteroervlak met de hefboom aan de onderzijde. Attacher le guignol en plastique sur la dérive de profondeur, au moyen des vis et écrous M2 en cuivre, de façon à ce que le levier se trouve du cöté gauche. Fix the plastic control horn onto the right hand elevator flap, using the 2mm brass screws and nuts, with the lever on the underside. Montieren Sie den Plastik Ruderhorn mit dem Hebel an der Unterseite mit Hilfe der M2-Kupferschrauben und -muttern auf die rechte Höhenruderfläche. 3 Monteer de plastiek roerhoorn door middel van de koperen M2 schroeven en moeren. Monter le guignol en plastique au moyen des vis et écrous M2 en cuivre. Fix the plastic control horn, using the 2mm brass screws and nuts. Montieren Sie den Plastik Ruderhorn mit Hilfe der M2-Kupferschrauben und Muttern. Toont hoe de roerhoorns geplaatst moeten worden. Indique comment les guignols doivent être placés. Shows how the controlhorns should be mounted Zeigt wie die Ruderhörner angebracht werden müssen. 4 Monteer de V-vlakken op de houder en let op voor de uitlijning van de vlakken met de metalen bevestigingspennen. Breng eventueel na de montage lijm aan zodat de V-staart onverandert blijft. Steek vervolgens de metalen pennen door de plastiek romp en borg ze aan de onderzijde met 2x M2 moeren. Monter l’empennage en V sur l’appui de montage.Aligner svp l’empennage sur les broches metalliques. Coller l’empennage en V. Ensuite faire passer les broches métalliques à travers le fuselage en plastique et les bloquer du côté inférieur en employant deux écrous M2. Fix the V-tail stabs onto the V-tail holder taking care of correctly align the stabs with the metal rods. Finally glue the stab parts together with the holder. Then push the rods through the plastic fuselage and lock them in position using two 2mm nuts. Montieren Sie die V-Höhenruderteile auf dem Halter. Gib obacht auf eine korrekte Position der Flachen mit den Metallstiften. Man kann eventuell die Flachen verkleben mit dem Halter. Stecken Sie anschließend die beiden Metallstifte durch den Plastikrumpf und befestigen Sie diese an der Unterseite mit zwei M2-Muttern. 5 Sluit de plastiek kwiklinks aan op de roerhoorns. Neemt men het uiterste gaatje aan de buitenzijde van de roerhoorn, dan zal de uitslag van het roer kleiner worden. Neemt men het eerste gaatje aan de binnenzijde, dan zal de uitslag van het roer groter zijn. Raccorder les chapes en plastique aux guignols du gouvernail. Si on utilise le dernier trou du côté extérieur du guignol de gouvernail, l’amplitude du gouvernail sera plus petite. Si on utilise le dernier trou du côté intérieur du guignol de gouvernail, l’amplitude du gouvernail sera plus grande. Fix the plastic clevises to the controlhorns. If you use the hole at the outer end of the controlhorn, then the movement of the flap will be less. Using the hole at the inner end will give more flap movement. Verbinden Sie die Plastik Gabelköpfe mit den Ruderhörner. Nimmt man die äußerste Öffnung an der Außenseite vom Ruderhörner, wird der Ausschlag des Ruders kleiner. Nimmt man die erste Öffnung an der Innenseite, wird der Ausschlag des Ruders größer. 6 Eerst moet het neutraalpunt van de servo’s bepaalt worden, dit doe je door de servo’s op de ontvanger aan te sluiten en de trimmingen en stuursticks van de radiobesturing in de neutraalstand te plaatsen. Als de servo’s in neutraalstand staan moet ook het kielvlak en het hoogteroer recht staan. Plaats de servo’s zoals afgebeeld op de foto in de servoplaat door middel van 4 schroeven (deze schroeven worden bij de radiobesturingsset of servo’s bijgeleverd. Vergeet niet de rubberhulsen voor de servo’s te plaatsen). Het plaatsen van de servo’s in de servoplaat gaat eenvoudiger als de servoplaat losgeschroefd wordt. Maak de vorm van de servohevels zoals afgebeeld op de foto. Het is belangrijk dat de servohevels vrij kunnen bewegen zonder deromp te raken. Let op de neutraalstand. Il faut tout d’abord déterminer le point neutre des servos, ce que l’on fait en raccordant ceux-ci au récepteur et en plaçant les trimmes de réglage et les sticks de la télécommande en position neutre. Si les servos se trouvent en position neutre, la dérive et le gouvernail de profondeur doivent également être droits. Placer les servos dans la platine de servo comme indiqué sur la photo, au moyen de 4 vis (ces vis sont fournies avec le set de commande radio ou les servos. Ne pas oublier de placer les enveloppes en caoutchouc sur les servos). Le placement des servos dans la platine de servo sera plus aisé si celle-ci est dévissée. Donner aux leviers des servos la forme telle qu’indiquée sur la photo. Il est important que les tiges des servos puissent bouger librement sans toucher le fuselage. The first job is to determine the neutral position of the servomotors. This is done by connecting the servomotors to the receiver and ensuring that the settings of the trims and joysticks on the remote control unit are in the neutral position. When the servos are in the neutral position, then the tail fin and elevator flaps must be straight. Mount the servomotors onto the servoplate, as shown in the photograph, using 4 screws (these should be supplied with the remote control unit or servomotors). Don’t forget to mount the rubber covers for the servomotors. Mounting the servo’s on the servoplate is easier if the servoplate fixing screws are loosened first. Cut the servohorns into shape as shown in the photo. The servohorns must be able to move freely without touching the fuselage. Check the neutral position. Erst muß der neutrale Punkt des Servos bestimmt werden. Das tun Sie, indem Sie die Servos an den Empfänger anschließen und die Trimmvorrichtungen und Steuersticks der Fernsteuerung in die Neutralposition stellen. Wenn sich die Servos in der Neutralposition befinden, müssen auch die Kielfläche und das Höhenruder aufrecht stehen. Bringen Sie die Servos, wie auf dem Foto abgebildet, mit Hilfe von vier Schrauben an der Servoplatte an. (Diese Schrauben werden mit Fernsteuersatz oder den Servos mitgeliefert. Vergessen Sie nicht, die Gummihülsen vor den Servos anzubringen). Das Anbringen der Servos an der Servoplatte geht einfacher, wenn die Servoplatte losgeschraubt wird. Schneiden Sie die Servohebel in den richtigen form, wie es auf dem Foto abgebildet ist. Es ist wichtig, daß die Servohebel sich frei bewegen können, ohne den Rumpf zu berühren. Achten Sie auf die Neutralposition. Bij gebruik van Micro-servo’s kunt U de verkleiningsplaat gebruiken die geplaatst wordt op de opening van de standaard servo’s. Si vous utilisez des Micro-servos, vous pouvez utiliser la plaque de réduction, à placer sur l’ouverture des servos standard. If you are using micro-servo’s, you can mount them on the smaller servoplate which can be fitted on the opening in the standard servoplate. Bei Verwendung von Mikro-Servos können Sie die Verkleinerungsplatte verwenden, die auf der Öffnung der Standardservos angebracht wird. 7 Plaats schuimrubber rond de ontvanger ter bescherming. Placer de la mousse autour du récepteur afin de le protéger. Wrap foam rubber round the receiver to protect it. Bringen Sie rundum den Empfänger Schaumgummi zum Schutz an. 8 Sluit de servo’s en snelheidsregelaar aan op de ontvanger en plaats de ontvanger onder de servoplaat. Raccorder les servos et le variateur de vitesse au récepteur, et placer le récepteur en dessous de la platine de servo. Connect the servos and speed controller to the receiver and mount the receiver under the servo- plate. Schließen Sie die Servos und Fahrtregler an den Empfänger an und bringen Sie den Empfänger unter der Servoplatte an. 9 Plaats de electronische snelheidsregelaar onder de servoplaat, voor de ontvanger. Placer le variateur de vitesse électronique en dessous de la platine des servos, devant le récepteur. Mount the electronic speedcontroller under the servoplate in front of the receiver. Bringen Sie den elektronischen Fahrtregler vor dem Empfänger unter der Servoplatte an. 10 Plaats de aandrijfbatterij boven op de servoplaat zoals afgebeeld. Blokkeer de batterij door middel van piepschuim of klittenband (velcro). Placer la batterie de propulsion au-dessus de la plaque à servo comme indiqué sur l’illustration. Bloquer la batterie au moyen de mousse de fixation ou d’auto-agrippant (Velcro). Place the battery on top of the servoplate as shown in the photo and fix it in position using foam rubber or Velcro fastener. Bringen Sie die Antriebsbatterie wie abgebildet oben auf der Servoplatte an. Blockieren Sie die Batterie mit Hilfe von Schaumstoff oder Klettenband. 11 Plaats de aluminium vleugelpennen in de middelste vleugelsectie. Plaats de vleugeltippen tegen de middelste vleugelsectie. Breng doorzichtige kleefband op beide vleugelhelften aan om van de vleugel één geheel te maken. Insérer les clés d’ ailes en aluminium dans la section centrale de l’aile. Insérer les extrémités de l’aile contre la section centrale de l’aile. Mettre du ruban adhésif transparent sur les deux moitiés de l’aile pour les assembler. Insert the aluminium wing pins into the central wing section. Place the outer wing tips onto the middle section and fix them carefully with sticky tape to make one complete wing. Bringen Sie die Aluminiumflügelstifte im mittleren Flügel an. Bringen Sie die Flügelspitzen am mittleren Flügel an. Bringen Sie auf beiden Flügelhälften Klebeband an, um aus dem Flügel eine Einheit zu machen. Het zwaartepunt van de zwever bevindt zich op 65 mm van de voorkant van de vleugel. Probeer door het verschuiven van de aandrijfbatterij het ideale zwaartepunt te bekomen. 12 Le centre de gravité du planeur se trouve à 65 mm de l’avant de l’aile. Tenter d’obtenir le centre de gravité idéal en déplaçant la batterie d’entraînement. 65 mm The centre of gravity of the glider is located 65mm behind the front of the wing. Move the battery back or forward to try to ensure that the centre of gravity is at this optimum point Antenne bevestiging Fixation d’ antenne Aerial fixation Antenne Befestigung Der Schwerpunkt des Flugzeugs befindet sich 65 mm von der Vorderseite des Flügels. Versuchen Sie, den idealen Schwerpunkt zu finden, indem Sie die Antriebsbatterie verschieben Belangrijke Veiligheidsinstructies Lees de instructies betreffende montage en werking van je model vooraleer u het de eerste maal in gebruik neemt. U alleen bent verantwoordelijk voor de veilige werking van uw radiobestuurd model. Kinderen zijn enkel toegestaan om deze modellen te bouwen en te vliegen onder het toeziend oog van een volwassene, die zich bewust is van de gevaren die dit met zich meebrengt. Gebruik enkel passende gepolariseerde verbindingsstukken. Alle kabels, verbindingsstukken en de batterij ,indien deze zelf samengesteld is, moeten geïsoleerd worden om kortsluiting te voorkomen. Poog nooit verschillende types van pluggen en contacten te kombineren (vb.tin-en goudcontacten), daar zulke combinaties onbetrouwbaar zijn. NC-batterijen zijn geschikt om enorme hoeveelheden energie vast te houden en vrij te geven. Zodoende vertegenwoordigt een batterij een constant risico op explosie en brandgevaar. Wij hebben geen controle over de manier waarop u het RC-vliegtuig bouwt en gebruikt. Daarom zijn wij verplicht om alle aansprakelijkheid voor ongevallen van de hand te wijzen. Het enige dat in onze mogelijkheden ligt is u te waarschuwen voor de risico’s. Als u hulp nodig heeft, roep dan de bijstand van een ervaren modelbouwer of een modelbouwclub in, of schrijf u in bij een modelvliegclub. Modelshops en de gespecialiseerde pers zijn eveneens een geschikte bron van informatie. De beste les is echter zich aan te sluiten bij een club en te vliegen op de goedgekeurde vliegplaatsen. Rubber elastieken verslijten met het gebruiken en worden broos. Vervang ze tijdig, zodoende stelt u de veiligheid en de betrouwbaarheid van uw model veilig. Span alle rubber elastieken op vooraleer u ze gebruikt om te controleren of ze nog sterk genoeg zijn. Motoren mogen enkel buiten in openlucht lopen ! De sterke zuigkracht van de propeller en de luchtverplaatsing die deze veroorzaakt, kan in kleine ruimten makkelijk een ongeval tot gevolg hebben (vb. schilderijen die naar beneden vallen, een gordijn dat in de propeller gezogen wordt). Het model moet steeds stevig worden vastgehouden door een helper. Houdt de rotatiebaan van een propeller vrij, sta er nooit voor of in de lijn van de propeller. Er kan steeds een deel loskomen en met hoge snelheid wegvliegen, zodat het uzelf of iemand anders in de omgeving kan verwonden. Raak de ronddraaiende propeller nooit met enig voorwerp aan. Vermijdt steeds dat welk voorwerp ook het draaien van de propeller verhindert. Pas op met losse kleding zoals sjaals, losse shirts, … Losse kleding kan makkelijk in de propeller gezogen worden. Als u de motor start terwijl deze op losse of zanderige grond staat, zal de propeller het zand opzuigen en rondslingeren zodat het in je ogen kan komen. Draag dus steeds een veiligheidsbril op zo’n momenten. Controleer, elke keer als u een model wil gebruiken, zorgvuldig of het model en alles wat erbij hoort (vb. propeller, aandrijving, RC-onderdelen, …) in goede staat en onbeschadigd is. Als u een fout bemerkt, vlieg dan niet met het model tot u de fout hebt opgelost. Verzeker uzelf ervan dat de frequentie vrij is vooraleer u de zender aanzet. Radiostoringen veroorzaakt door vreemde bronnen kunnen op elk moment en zonder waarschuwing voorkomen. Als dit gebeurt is je model oncontroleerbaar en volledig onvoorspelbaar. Laat uw radiobesturing nooit onbewaakt achter, andere mensen zouden kunnen proberen het te gebruiken. Controleer of er niets in de baan van de propeller is vooraleer u de electromotor aanzet. Probeer nooit de draaiende propeller te stoppen. Electromotoren verbonden met een propeller mogen enkel lopen als deze veilig geïnstalleerd is. Als u uw model veilig wil vliegen en u wil problemen vermijden, dan is het essentieel dat u zich bewust bent van zijn positite en hoogte tijdens iedere vlucht. Laat het dus niet te ver weg vliegen ! Als u een controleprobleem of storingen ontdekt gedurende een vlucht, landt dan onmiddellijk om een mogelijk ongeval te voorkomen. Bemerk dat de zenderstick voor de motorfunctie in de off-stand moet staan vooraleer u het systeem aanzet. Om te voorkomen dat de electromotor onverwacht start, zet eerst de zender aan, later pas de ontvanger. Gebruik de omgekeerde volgorde bij het afzetten : eerst de ontvanger, dan de zender. Controleer of de roeren in de juiste richting bewegen als u de sticks gebruikt. Heb begrip voor het doel van deze opmerkingen. Wij willen u enkel opmerkzaam maken voor de vele gevaren en risico’s die zich kunnen voordoen als u kennis en ervaring mist, nonchalant of onverantwoordelijk te werk gaat. Als u redelijk zorg draagt, is modelvliegen een zeer creatieve, leerrijke, plezierige en ontspannende vrijetijdsbesteding. Important Safety Notes Be sure to read right through the instructions covering assembly and operation of your model before you attempt to operate it for the first time. You alone are responsible for the safe operation of your radio-controlled model. Young people should only be permitted to build and fly these models under the instruction and supervision of an adult who is aware of the hazards involved in this activity. Use only matching polarised connectors. All cables, connectors and the battery if home-assembled must be insulated to prevent short circuits. Never attempt to combine different types of plug and socket - e.g. tin-plated and gold-plated types - as such combinations are bound to be unreliable. NC batteries are capable of holding and releasing enormous amounts of energy, and as such represent a constant hazard of explosion and fire. We have no control over the way you build and operate your RC model aircraft, and for this reason we are obliged to deny all liability for accidents. All we can do is point out the hazards and make sure you are aware of them. If you need help, please enlist the aid of an experienced modeller, a model club or enrol at a model flying training school, Model shops and the specialist model press are also good sources of information. The best course is always to join a club and fly at the approved model flying site. Rubber bands deteriorate with age and become brittle. Replace them from time to time to maintain the safety and reliability of your model. Stretch all rubber bands before use to check that they are still strong enough for their purpose. Motors should only be run in the open air! The powerful suction of the propeller and the volume of air which it accelerates can easily lead to accidents in enclosed spaces (e.g. pictures falling down, curtains sucked into the propeller). The model must be held securely by an assistant at all times. Keep well clear of the rotational plane of propellers - don't stand in line with it or in front of it. You never know when some part may come loose and fly off at high speed, hitting you or anybody else in the vicinity. Never touch the revolving propeller with any object. There must be no chance of any object getting in the way of the propeller and preventing it rotating. Take care with loose clothing such as scarves, loose shirts etc. Flapping cloth can easily be sucked into the area of the propeller and then get tangled in it. If you start your motor when the model is standing on loose or sandy ground, the propeller will suck up sand and dust and hurl it around. and it could easily get in your eyes. Wear protective goggles at such times. Every time you intend to operate your model check carefully that it and everything attached to it (e.g. propeller, gearbox,RC components etc.) are in good condition and undamaged. If you find a fault do not fly the model until you have corrected it. Satisfy yourself that your frequency is vacant before you switch on. Radio interference caused by unknown sources can occur at any time without warning. If this should happen, your model will be uncontrollable and completely unpredictable. Never leave your radio control system unguarded, as other people might pick it up and try to use it. Check that nothing is in the way of the propeller before you switch on the electric motor. Never attempt to stop the spinning propeller.Electric motors with a propeller attached should only be run when installed securely. lf you are to fly your model safely and avoid problems it is essential that you are aware of its position and attitude throughout each flight - so don't let it fly too far away! lf you detect a control problem or interference during a flight,immediately land the model to prevent a potential accident Note that the transmitter throttle stick must be set to the OFF (motor stopped) position before you switch on the power system. To avoid the electric motor starting unexpectedly, switch on the transmitter first. then the receiving system. Use the reverse sequence when switching off: receiver first, then the transmitter. Check that the control surfaces move in the correct "sense" when you operate the sticks. Please don't misunderstand the purpose of these notes. We only want to make you aware of the many dangers and hazards which can arise if you lack knowledge and experience, or work carelessly or irresponsibly. If you take reasonable care model flying is a highly creative, instructive, enjoyable and relaxing pastime.-
 1
1
-
 2
2
-
 3
3
-
 4
4
-
 5
5
-
 6
6
-
 7
7
-
 8
8


protech FOCUS180 Building Instructions
- Categorie
- Speelgoed met afstandsbediening
- Type
- Building Instructions
in andere talen
- English: protech FOCUS180
- français: protech FOCUS180
- Deutsch: protech FOCUS180
Gerelateerde papieren
-
protech ALPHA180 Building Instructions
-
-
-
-
-
-
-
-
-