
Model
Language
Page
)H*W(eziSlairetaM
Designer
Designer
Confirm
Color(cover/body)
Part No
Date
etaD.oN
Chage Record
Change content
ECO No.
1
2
3
4
5
6
7
8
9
Weight 80g
201..26
V+20%279+20%27
English'XWFK)UHQFK*HUPDQ
MFL6708605 Description
1/1
190×260(mm)
/L;XHMXQ
Owners Manual

OWNER’S MANUAL
HOM-BOT
VHOMBOT*
VHOMBOT**
Before using, please carefully read the Safety Precautions pages to allow for
safe operation of the product. After reading the operation manual, please keep
it in an easily accessible location.
www.lg.com
DEUTSCH
DUTCHENGLISH
FRANÇAIS
DEUTSCH
DUTCHENGLISH
FRANÇAIS

FEATURES
Images of the floor are obtained from the sensors of the lower camera, and
through this, the location of HOM-BOT will be confirmed,therefore, elaborate
cleaning can be accomplished for every part of the room.
As the height of the HOM-BOT is low (90mm), even the underside of a framed
bed or furniture can be cleaned.
The HOM-BOT also has voice confirmation and instruction that can be easily
understood by the user.
The HOM-BOT can clean all parts of the area by cleaning in zigzag mode and
then in spatial expansion mode.
As the noise levels are at a quiet 60dB, cleaning can be performed at night.
*Less than 60dB
Camera sensor
Please, check
the dust bin

CONTENTS
Safety Precautions
Included with Product
Parts Descriptions
Button Functions
Display Status Information
Before You Start
Overview
1
BEFORE USING
2
HOW TO USE
3
CARE AND MAINTENANCE
26~28
29
How to Install the Home Station
How to Turn the Power Supply On and Off.
How to Start and Stop Cleaning
How to Charge the Battery
Cleaning Modes
Auxiliary Cleaning Modes
Timer Cleaning
Cleaning the Dust Bin
Cleaning the Dust Bin Filter
Cleaning the Brush
Cleaning the Sensor/Charging Terminal
Cleaning the Side Brush
4
ADDITIONAL INFORMATION
5
REFERENCE
1~4
5
6~7
8~9
10
11
12
13
14
15
16~17
18
19
20
21
22
23
24
25
Troubleshooting
Before You Call for Service
Product Specifications
30
ENGLISH

SAFETY PRECAUTIONS
The purpose of the safety precautions described below is for the user to use the product safely and correctly
to prevent any unexpected risk or damage.
Basic safety precautions
After reading this manual, please keep it in an easily accessible location.
This is the safety alert symbol. This symbol alerts you to potential hazards that can result in prop-
erty damage and/or serious bodily harm or death.
Indicates a hazardous situation which, if not avoided, could result in death or serious injury.
Indicates a hazardous situation which, if not avoided, could result in minor or moderate injury.
WARNING
WARNING
CAUTION
This appliance is not intended for use by persons
(including children) with reduced physical, sensory or
mental capabilities, or lack of experience and knowl-
edge, unless they have been given supervision or
instruction concerning use of the appliance by a person
responsible for their safety.
Children should be supervised to ensure that they do
not play with the appliance.
If the supply cord is damaged, it must be replaced by
LG Electronics Service Agent in order to avoid a hazard.
This appliance can be used by children aged from 8
years and above and persons with reduced physical,
sensory or mental capabilities or lack of experience and
knowledge if they have been given supervision or
instruction concerning use of the appliance in a safe
way and understand the hazards involved. Children shall
not play with the appliance. Cleaning and user mainte-
nance shall not be made by children without supervi-
sion.
1.
2.
3.
4.
1

For your safety, do not remove the battery
from the HOM-BOT. If you need to replace the
battery or the HOM-BOT, take it to the nearest
authorized LG Electronics service center or
dealer for assistance.
Make sure the power cord of the home sta-
tion is not crushed under a heavy object or
damaged by contact with sharp objects.
Never use the HOM-BOT with a bat-
tery and/or home station from any
other product than the HOM-BOT.
Failure to follow this warning can cause fire or
product failure. If the power cord is broken,
replace it at an LG Electronics customer care
center.
Do not use the HOM-BOT when
candles or fragile objects are placed
on the floor.
Doing so can cause fire or product failure.
Failure to follow this warning can cause fire
or product failure.
Doing so can cause fire or product failure.
Do not place the home station and
the HOM-BOT near a heating device.
Always use a dedicated outlet.
Doing so can cause product deformation,
fire, or product failure.
If multiple appliances are connected to an
outlet simultaneously, they can generate
enough heat to cause a fire.
Do not force the power plug to bend.
Do not use the power plug when it
has been damaged or loosened.
When pulling out the power plug, always
pull it out by grabbing the plug, not the
cord. When pulling out the power plug, do
not to touch the prongs with your fingers.
Doing so can cause fire or product failure.
Doing so can cause an electric
shock.
SAFETY PRECAUTIONS
2
Do not touch the power plug with
wet hands.
Do not use the HOM-BOT while a
child or object is on it. Do not use the
HOM-BOT while an object is hanging
from it.
Doing so can cause electric shock.
Doing so can cause injury or product dam-
age.
ENGLISH

SAFETY PRECAUTIONS
Do not operate the HOM-BOT in a room
where a child is sleeping.
Doing so can cause injury or product dam-
age.
Do not insert any part of the body, such as
a hand or foot, below the brush or wheels
of the HOM-BOT while in use.
Doing so can cause injury or product damage.
Do not spray or suck in inflammable
materials, surfactants, or drinking wa-
ter in the vicinity of the HOM-BOT.
Doing so can cause fire or product failure.
*
Inflammable materials: gasoline, thinner, etc.
*
Surfactant: detergent, articles for bath, etc.
Turn the power supply off immediately if
any abnormal sound, odor, or smoke is
generated from the HOM-BOT.
Failure to do so can cause fire or product
failure.
Do not operate the HOM-BOT on nar -
row and high furniture such as a ward-
robe, refrigerator, desk, table, etc.
Doing so can cause injury or product failure.
Do not let children play with the
HOM-BOT.
Doing so can cause injury or product dam-
age.
Do not expose the HOM-BOT to
cold temperatures (less than 23°F
or -5°C) for a long period of time.
Use the HOM-BOT indoors only.
Doing so can cause product failure.
Using it outdoors can cause prod-
uct failure.
The dust collected in the dust bin
can trigger allergies and may contain
harmful insects.
Frequently empty the dust bin and
maintain its cleanliness.
Do not drop the HOM-BOT or sub -
ject it to strong impacts.
Doing so can cause injury or product failure.
WARNING
CAUTION
Cleaning will not proceed smoothly
on carpets with tassels or carpets
thicker than 10 mm.
The HOM-BOT may bump into fur -
niture such as chair legs, table legs,
thin and long furniture, etc. while
operating.
It may be more convenient to
arrange them before using the
product.
For a quicker and cleaner performance,
place the chairs on top of the table.
3

SAFETY PRECAUTIONS
In rare cases, the HOM-BOT brush
can damage the carpet. If this hap-
pens, immediately stop the cleaning
operation.
When a carpet has long tassels, the
tassels can be damaged.
Do not allow the HOM-BOT to suc -
tion up liquids, blades, thumb tacks,
kindling, etc.
These items can cause product
failure.
Do not let the main frame and charg-
ing terminal of the home station come
into contact with metallic objects.
Doing so can cause product failure.
Do not put sharp objects into the
opening of the HOM-BOT super -
sonic sensor.
Doing so can cause product failure.
Do not put water, detergent, etc.
into the HOM-BOT.
Doing so can cause product failure. Do not
put any water or detergent on the HOM-BOT.
If liquids get inside of the HOM-BOT, turn off
the power supply and contact an LG Electron-
ics sales agent or customer care center.
Do not use the HOM-BOT when the
dust bin is completely filled up.
Doing so can cause product failure.
If the floor is wet or has wet spots,
wipe them up before using the
HOM-BOT.
Failure to do so can cause product
failure.
Check the following items before use:
Remove fragile or unnecessary objects from the room to be cleaned. For example, remove
expensive ceramics and valuables from the floor.
ot use this product in the room where a child is sleeping alone. The child can be hurt.
Confirm whether the battery has sufficient power, and if it is low, recharge it.
Empty the dust bin after if fills up.
Close the doors of any room that you do not want the HOM-BOT to enter.
During cleaning, the HOM-BOT may enter another room and continue cleaning.
Remove any moisture from the floor before cleaning.
Remove any cables or long strings from the floor.
Remove cables, strips, towels, socks, etc. from the floor so they will not get caught by the brush.
Cleaning will not proceed smoothly on carpets with tassels or carpets thicker than 8 mm
(0.315 in). It may be more convenient to arrange them before using the product.
Tip
CAUTION
Please note, this product is not intended for use in any workshop, commercial office, garage or outdoor
environment. It is for normal Domestic internal home use only.
4
To save energy, turn off the switch
when it is not using, and turn to the
cleaning and loading.
ENGLISH

HOM-BOT

PARTS DESCRIPTION
Figures can be different from actual objects.
Top view
Dust bin cover button
Dust bin cover
Ultrasonic sensor
Ventilation port
Cliff detection sensor
Charging terminal
Brush
Side brush
Wheel
Lower camera sensor
Battery
Power switch
Status indication lamp
Detecting sensor of home station &
receiving sensor of remote controller
Front view
Rear view
Bottom view
6
ENGLISH

PART DESCRIPTION – HOME STATION / DUST BIN
ᶀ Figures can be different from actual objects.
Home station
Dust bin
Power lamp
Charging terminal
Reset button
Sponge
filter
HEPA filter
Dust bin handle
Dust bin cover
Suction port cover
Dust bin cover opening
button
Power cord fixing groove
7

BUTTON FUNCTIONS
START/STOP
Pres START/ST HOM-BOT /o s r /s e
Pres START/ST on HOM-BOT
s r e
START/ST ress e HOM-BOT
s e
Pres START/ST on ro w se
o HOM-BOT.
HOM-BOT S B
ressed se
8
ENGLISH

BUTTON FUNCTIONS – REMOTE CONTROL
ţ The HOM-BOT power supply cannot be turned on with the remote control.
ţ To turn on the power supply, use START/STOP button on the top of HOM-BOT.
ţIn order to do spot cleaning, timer cleaning, zigzag cleaning, and spatial expansion cleaning, you
must first stop the operation of the HOM-BOT.
ţ*GUIFNBJO frame is turned off, the remote control will not be activated.
ţ The preset feature may be set only when the HOM-BOT returns to the charging stand.
ţIf the main switch on the underside of the HOM-BOT is in the off position, the Status display will
flash and sound when the unit is manually placed onto the home station, to indicate that the
main switch is off.
Tip
Start Charging
Directional button
Stop
Spot
Timer
Zigzag cleaning and then
spatial expansion
The HOM-BOT will start cleaning The HOM-BOT will move to the
home station for charging.
The HOM-BOT will move as desired
by the user: to front, rear, left, and
right sides for cleaning.
If the HOM-BOT is in operation it will
be stopped. If it has been set for
timer cleaning, the reservation will be
canceled.
Cleaning will concentrate within a
space of about 1 m (3.28 ft).
The timer can be set from 1-12
hours in the future.
The HOM-BOT will clean while ma-
neuvering in a zigzag pattern and
then expand the cleaning area.
9

DISPLAY STATUS INFORMATION
T canc se es ST o c START/ST
HOM-BOT.
Tip
Battery and reserved time indi-
cation
Timer icon
Battery icon
w f e -
a e evel own.
w f e
ese va own.
ca es e
se .
es a e e
e
s a c e
cle
10
ENGLISH

BEFORE YOU START
Check these items before cleaning
Loading the remote control battery
1. Open the battery cover by lifting the rear hook of the remote control.
2. Insert two AAA batteries, checking for +, - nodes while loading.
3. Close the battery cover completely so that the batteries will not fall out.
ţ%POot use this device in a room where a child is left alone. The child could be injured.
ţRemove fragile or unnecessary objects from the room to be cleaned.
Especially, remove expensive ceramics and valuables from the floor.
ţRemove any moisture that might be on the floor.
ţRemove cables, strips, towels, socks, etc. from the floor so they will not get caught by the brush.
ţConfirm whether battery charge is sufficient, and if it is low, recharge it.
ţEmpty the dust bin if it is full.
ţClose the doors of any room that you do not want the HOM-BOT to enter. %uring cleaning, the HOM-BOT
may enter another room and continue cleaning.
ţWhen the mop is attached, HOM-BOT will not be able to go over thresholds of 5mm or higher.
If you are not planning to use the mop for cleaning, remote the mop before using HOM-BOT.
Precautions while using the remote control
ţ0OMZQress one button at a time.
ţ%POot drop or subject it to forceful impact.
ţ%POot store it near devices that give off heat, fire or hot air.
ţCertain fluorescent lamps, such as 3 wavelength fluorescent lamps, can interfere with the activation of the
remote control. Therefore, use it as far away as possible from such lamps.
ţIf the remote control is far from the HOM-BOT when activated, it may fail to operate properly. Use the device
within 3 m (9.84 ft) of the HOM-BOT if possible.
11

OVERVIEW
1
Install the home station. (page 13)
Insert the power cord plug into an outlet and locate the
station against a wall. If power is not supplied to the
home station, the HOM-BOT will not charge.
2
Turn on the power supply of the HOM-BOT. (page 14)
Turn on the power switch located on the bottom of the
Roboking and press the upper START/STOP button to
turn on the power supply.
* If the power supply is not turned on, refer to page 14.
3
Start cleaning. (page 15)
Press the START/STOP button once again while the
HOM-BOT is turned on. You will hear the sound of clean-
ing and cleaning will begin.
4
Automatic charge. (page 16-17)
The HOM-BOT will self-diagnose and automatically return
to the home station to recharge before the complete dis-
charge of the battery. It takes approximately three hours
to charge the battery.
5
Use auxiliary functions. (page 18-21)
With the remote control, the auxiliary functions can be
used. Auxiliary functions include manual cleaning, spot
cleaning, the timer function, and ultra microfiber mop
cleaning.
1.5m
1.5m
2m
12
ENGLISH

1. Position the home station against a wall, to prevent sliding dur-
ing docking, on hard level flooring.
nihtiwdnaedistfeldnathgirehtot.m5.1nihtiwstcejboevomeR
2m. to the front.
2. Plug the power cord into an outlet.
Wrap the power cord around the fixed hanger on the back side
of the home station or along the wall surface so that the travel
path of the HOM-BOT will not be obstructed.
3. Turn on the power switch.
How to Install the Home Station
Always keep the home station plugged in. If the home station is not plugged in, the HOM-BOT
will not return to the station to charge automatically.
Do not operate the HOM-BOT if it has a damaged cord or plug, if it is not working properly, or
if it has been damaged or dropped. To avoid hazard, the cord must be replaced by LG Elec-
tronics, Inc. or a qualified service person.
HOW TO INSTALL THE HOME STATION
Tip
Fixing groove of power cord
1.5m
1.5m
2m
13

HOW TO TURN THE POWER SUPPLY ON AND OFF.
To turn the power supply on, turn the HOM-BOT upside down on
a smooth/soft surface and check whether the main power sup-
ply switch is turned on.
If the main power supply switch is turned off, turn on the
switch.
When turning on the power switch, do not press the button
located at the upper section of the HOM-BOT. Operation of the
button can be delayed.
Turn off the power switch if the HOM-BOT will not be used for
a long period of time, in order to protect the battery.
The power switch cover is used for protecting the switch
from the dust. Always keep the cover attached on.
When HOM-BOT is not turned on, press the ‘START/
STOP’ button for more than 1 second. The power supply
will be turned on with the melody sound.
If the power supply is turned on and nothing is done for
ten minutes, the power supply will automatically turn off
to reduce battery consumption.
Press the START/STOP button for two seconds while the
HOM-BOT is turned on. A melody will sound when the
power is turned off. The power will be turned off with the
melody sound.
Turning on the main power supply
Turning on the power supply
Turning off the power supply
The power can be turned off due to the static electricity during
the operation.
- If the power is turned off, turn off the main power switch and
then turn it back on.
ower cannot be turned on, do the following.
- Turn on the power switch and wait for more than 3 seconds.
- Press the ‘START/STOP’ button when the power switch is
turned on.
- If the power is not turned on or if there is no display but only
the “Ting” sound, put the HOM-BOTon the home station.
- If there is no change even when HOM-BOT is attached to the
home station, press the reset switch located on the rear side
of the home station while the HOM-BOT is attached on the
home station.
Tip
14
ENGLISH

After the HOM-BOT is turned on, press the START/STOP button to
begin cleaning. A melody will sound and cleaning will begin.
Press the START/STOP button during the cleaning cycle to stop cleaning.
When the ‘START/STOP’ button is pressed while the power supply
of the HOM-BOT is turned off, the power will be turned on. Press the
‘START/STOP’ button one more time to clean.
After the HOM-BOT is turned on, press the START button on the re-
mote control. A melody will sound and cleaning will begin.
Press the STOP button during the cleaning cycle to stop cleaning.
The HOM-BOT power supply cannot be turned on by using the re-
mote control if the power of the HOM-BOT is off. When the power is
off, press the ‘START/STOP’ button on the upper side of HOM-BOT
to turn the power on.
When the START button on the main unit or remote control is pressed, HOM-BOT will start cleaning in
‘Spatial expansion’ mode.
During cleaning, collisions can happen when the sensor cannot detect objects because of their shape.
When this happens, the internal impact detecting sensor will avoid the obstacles by using a backward mo-
tion.
If the HOM-BOT is set to start cleaning at a location away from the home station, put the device on a flat floor
in order to prevent a malfunction of the obstacle detecting sensor. In addition, start cleaning from a location
where there are not any obstacles such as curtains or walls within 30 cm (11.8 in) of the HOM-BOT.
Using the buttons on the HOM-BOT
Using the remote control
For best results:
Briefly scan the area to be cleaned for big and small objects that will cause difficulty if vacu-
umed up.
If cleaning is started when the HOM-BOT is at the home station, the device can rapidly be re-
turned to the home station as the current home position has been accurately read.
HOW TO START AND STOP CLEANING
Tip
15

HOW TO CHARGE THE BATTERY
The HOM-BOT returns to the home station at the end of a cleaning cycle
or when its battery is running low.
If the HOM-BOT is unable to dock to the home station on its first at -
tempt, it will try again until it docks successfully.
When HOM-BOT completed all areas that it can clean, it will return
to the home station even when the battery level is not low.
Automatic charging
If using the HOM-BOT for the first time or when charging the battery during cleaning, you can manually
charge the battery.
Method 1. Attach the HOM-BOT to the home station by matching
up the two arrows on the HOM-BOT and the home sta-
tion. A melody will sound and charging will begin.
When the HOM-BOT is attached to the home station, if a
“TING” sound is generated repeatedly, please check the
power switch and turn it on.
Method 2. When the HOMING button of the remote control or the
HOM-BOT is pressed, charging will start by automatically
generating a searching sound and returning the HOM-BOT
to the home station.
If the HOM-BOT stays within 10 cm (3.9 in) of the front of the charging terminal while the power supply is
turned on, it will automatically be returned to the home station and charging will begin.
Manual charging
Take the following precautions when using the home station:
If foreign material is caught in the charging terminal, charging may not proceed smoothly.
Wipe the terminal from time to time with a dry cloth after the power plug is disconnected.
To prevent electric shock, do not touch the charging terminal with any metallic objects.
To avoid fire or electric shock, never disassemble or modify the home station.
Do not to place the home station or power plug near to a heating appliance.
Tip
16
ENGLISH

Check 1. If the battery is not charging even when the HOM-BOT is at
tached to the home station, check the following items.
- Turn the power switch on the bottom of the HOM-BOT off
once and then on again.
- Unplug and plug in the power plug on the home station.
- Wipe the terminal on the home station with a dry cloth.
Check 2. If the battery is still not charging after the previous check, try
the following.
- Attach the HOM-BOT to the home station.
-
Press the reset button at the rear of the home station for
three seconds.
If the Battery is Not Charging
The remaining battery charge can be confirmed from the charge indication light, which will indicate charge
as follows:
During charging, the charge remaining indication light will flicker.
When charging is completed at the home station, only the battery icon will illuminate to save power.
The battery icon will flicker when battery charging is required.
Remaining Battery Charge Indicator
Fully charging
(under charging)
High middle Low
Charging is required
Flickering
If the “TING” sound is repeated when the main unit is at-
tached on the home station, check the main power switch.
HOW TO CHARGE THE BATTERY
17

CLEANING MODES
When the START button on the main unit or the remote
control is pressed, HOM-BOT operates in the spatial ex-
pansion cleaning mode.
HOM-BOT first runs the zigzag cleaning mode and then switch-
es to spatial expansion mode by dividing the space by partial
squares to clean inside the house thoroughly.
1. Press the ZIGZAG+Cell by Cell button on the remote con-
trol. Zigzag cleaning and then spatial expansion’
2. Roboking cleans total of 6m area in zigzag cleaning mode
by cleaning up to 3m on the left side until it hits the wall.
3. After cleaning in the left direction, HOM-BOT returns to the
starting point and cleans in the right direction until it hits
the wall to clean total area of 6m to complete the zigzag
cleaning mode.
4. And then HOM-BOT switches to the spatial expansion clean -
ing mode, which is the automatic cleaning mode.
Spatial expansion cleaning
Zigzag cleaning and then spatial expansion button
The cleaning mode can only be changed with the remote control.
Tip
The 1st stage:
A maximum area of 3 mx3m(9.84ftx
9.84 ft) will be cleaned. (The actual size
of the area will change in accordance
with the shape of the house’s interior.)
The 2nd stage:
The inside of the area will be cleaned in
a zigzag path.
When the 1st and 2nd stages are completed, the device
will move to the next cleaning area and repeat the stages
until the entire inside of the house has been cleaned.
18
ENGLISH

This method of cleaning involves manually moving the HOM-BOT by pressing the directional (arrow) buttons
on the remote control.
The interior space will be cleaned by the HOM-BOT as it is being moved to the front, rear, or rotated to the left
and right side according to the input of the directional buttons.
Manual cleaning
Use this cleaning method when concentrated cleaning of a small interior space is required.
After moving the HOM-BOT to the location to be cleaned, press the SPOT button on the remote control.
The spot cleaning icon will illuminate on the HOM-BOT, and concentrated cleaning will be performed for a
space within a radius of 1 m (3.28 ft).
During charging, the spot cleaning button on the remote control will not activate.
Spot Cleaning
AUXILIARY CLEANING MODES
19

TIMER CLEANING
1. By pressing the TIMER button on the re-
mote control or the HOM-BOT, a clean-
ing time can be scheduled.
2. Adjust the time by pressing the ‘TIMER’
button multiple times. Each time you
press the button, it changes from 2 hours
to 6 hours to 12 hours.
3. After setting up the start time, press the START/
STOP button on the HOM-BOT or wait about five
seconds. Time setting will complete and a melody
will sound.
- When the time set up is complete, the time set-
ting icon, in the shape of a clock, will illuminate
and a voice message will sound.
HOM-BOT can be scheduled to start cleaning after a certain period of time.
The time can be set among 2 hours, 6 hours and 12 hours.
2 hours
12 hours6 hours
When the set up time elapses, cleaning will start automatically.
Use the timer setting when the HOM-BOT is attached to the home station.
To cancel the timer setting during the set up time, press the STOP button on the remote con-
trol or the START/STOP button on the HOM-BOT.
When HOM-BOT is detached from the home station, the timer setting will automatically be
canceled.
Tip
20
ENGLISH

CLEANING THE DUST BIN
1. Open the dust bin cover by pressing the PUSH button
on the HOM-BOT.
2. Grab the handle of the dust bin and pull it upward.
3.
Separate the HEPA filter and the inside sponge filter by
removing the HEPA filter
To clean the dust bin filter, refer to page 23.
4. Lift the cover upward while pressing the separation
button on the dust bin.
5. Empty the dust bin and clean it with a cleaning brush
or under running water.
6. After cleaning with water, completely dry the dust bin
in a well-ventilated area out of the direct sunlight.
7. When you have completed cleaning the dust bin, close
the cover and replace the sponge filter and HEPA filter.
8. Put the dust bin into the HOM-BOT and close the dust
bin cover.
If the dust bin is full, suction power can be weakened. Clean the dust bin before and after each cleaning ses-
sion. Clean the dust bin using the following sequence:
After cleaning, always mount the dust bin filters (HEPA filter, sponge filter) to the dust bin. If
they are not mounted, dust may enter the HOM-BOT interior and cause product failure.
Always close the dust bin cover. If attempt to operate the HOM-BOT while the cover is open, you
will hear a voice message stating “Please check the dust bin.”
Tip
21

The dust bin filters are comprised of the HEPA filter and the sponge filter.
Clean the HEPA filter and the sponge filter according to the following sequence:
1. Separate the HEPA filter and the inside
sponge filter by removing the HEPA
filter.
3. After washing the HEPA filter and the
sponge filter with water, place them out
of direct sunlight and allow them to dry
completely.
4. Mount the cleaned HEPA filter and sponge
filter into the dust bin according to the
sequence shown to the right. When assem-
bling the filter, the filter handle should face
upward.
2. Carefully clean any fine dust off the HEPA
filter and the sponge filter with a vacuum
cleaner or water.
In order to maintain the performance of the HOM-BOT, the HEPA filter should be cleaned with
a cleaning brush or
vacuum cleaner at least once a week, and should be washed under running
water at least once a month.
CLEANING THE DUST BIN FILTER
Tip
22
ENGLISH

CLEANING THE BRUSH
Lay a smooth cloth on the floor.
Turn the HOM-BOT over and
put the HOM-BOT on the cloth.
Turn off the power switch before
cleaning.
Grab the brush and remove by
pulling it up.
Insert the fixing hook on the op-
posite side of the brush (marked
with a rounded rectangle) by
matching it to the separation
groove of the brush.
Separate the cover by press-
ing the fixing hook and pulling
upward.
Clean the brush with a
vacuum cleaner by hand, or
an old unused firm bristle
toothbrush.
Insert the fixing guide in front
of the brush by matching it to
the fixing groove located on
the main frame.
Wearing gloves turn the brush
until the separation groove of
the brush appears.
Insert the fixing hook on the
side of the brush (marked with
the square) by matching it to
the fixing groove of the brush.
Close the cover by pressing
it down until you hear a click
from the fixing hook.
Be careful that the side
brush is not caught by the
cover.
The brush, located on the bottom of the HOM-BOT, helps with the suction of foreign objects. Perform the fol-
lowing steps to clean the brush:
Separation
groove of
brush
23

Receiving sensor of
remote controller
ot clean the HOM-BOT by directly spraying it with water, thinner, benzene, etc.
Call the service center if the sensor or charging terminal is damaged. Sensor and terminal
damage can cause the product to malfunction.
There are sensors on the HOM-BOT that can detect obstacles, stairways and the
home station for charging the battery. In order to maintain the performance of
the HOM-BOT, regularly clean the sensors and charging terminal as follows:
1. Lay a smooth cloth on the floor, overturn the HOM-BOT and put it on the
cloth.
2. Turn off the power switch on the bottom of the HOM-BOT. Injury can be
caused by the activation of the HOM-BOT during cleaning.
3. Use a smooth cloth or cleaning brush to wipe the dust off each sensor and
the charging terminal as described below.
CLEANING THE SENSOR/CHARGING TERMINAL
Charging terminal
Obstacle detection sensor
Cliff detection sensor
Charging terminal
Lens
Tip
24
ENGLISH

CLEANING THE SIDE BRUSH
Foreign objects/materials such as hair can easily adhere to the side
brush. Remove such materials at least once a week.
If excessive amounts of foreign materials are stuck to the brush, there is
the risk of breakage.
If the floor is rough or walls are frequently cleaned, the side brush may bend or become damaged. In this
case, use the following method to straighten the side brush.
1. The following procedure is helpful in restoring de-
formed brushes.
2. Turn off the power supply by pressing the
START/STOP button on the HOM-BOT for two
seconds.
3. Place the HOM-BOT at the end of a table to make
cleaning the side brush easier. Make sure that the
HOM-BOT is not in danger of falling.
4. Soak the side brush in warm water.
5. Press the side brush for about ten seconds so that it
is completely submerged in the water.
6. Slowly wipe the side brush by sliding it through your
hand.
7. Rotate the side brush and repeat steps 4-6 for each
section of the brush.
8. Use the side brush only after it has completely dried.
25

TROUBLESHOOTING
When the voice, “Please check the wheels”, is announced.
If the unit becomes stuck or suspended and the wheels do not allow the unit to move, the voice,
“Please check the wheels”, will be announced.
wheel trapped in the front door, balcony, stairway, etc?
foreign material wound around the wheel?
Move the HOM-BOT on to the flat floor.
Lay smooth cloth on the floor, overturn the HOM-BOT, and put it on the cloth.
Remove foreign material by confirming the wheel.
26
ENGLISH

TROUBLESHOOTING
When the voice, “Battery is low”, is announced.
When the voice, “Please check the dust bin”, is announced
When an abnormality is detected with the dust bin, the voice, “Please check the dust bin”, is announced.
When remaining amount of battery is almost nil, the voice, “Battery is low”, is generated.
st bin fitted correctly?
ate battery charging of HOM-BOT by moving it to the home station.
When attaching the HOM-BOT to the home station by matching both arrows
of HOM-BOT and home station, charging will be started and the sound of
charging start melody will be heard.
Open the dust bin cover, and if check if the dust bin is actually fitted. the unit will not operate without
the dust bin.
st bin cover opened, close the cover before operating the unit.
27

TROUBLESHOOTING
When the voice, “Please check the brush”, is announced.
When the HOM-BOT detects that the brush is not functioning properly, you will hear the message
“Please check the brush.”
Lay a smooth cloth on the floor, overturn the HOM-BOT, and place it on the cloth.
ŖThe side brush is stuck.
Remove any foreign materials such as cables, thread or hair caught in the side brush or the brush.
Confirm the correct assembly of the brush by checking the separation groove of the brush.
ŖThe brush is making a loud, abnormal sound.
Remove the brush from the HOM-BOT and remove any foreign material from the brush.
Proper assembly assures that the rota-
tion of the brush becomes smooth.
For a more detailed description of this process, refer to the instructions on page 24.
Separation
groove of brush
Separation
groove of brush
28
ENGLISH

Check the following before calling for service.
BEFORE YOU CALL FOR SERVICE
Problem Solutions (Reference page)
This is not a failure. HOM-BOT has its own power saving function. If it is
not used for ten minutes after the power supply is turned on, the power
will automatically turn off.
Check that the power switch is turned on. (Page 14)
Confirm that the battery has been charged. (page 17)
Carefully wipe the sensor with a smooth cloth. (page 24)
Turn on the power switch off and on.
Check whether there is foreign material blocking the suction port.
(page 23
Empty the dust bin. (page 21)
Clean the dust bin filter. (page 22)
Confirm that the dust bin has been mounted properly.
Confirm that the dust bin filter has been mounted properly. (page 22)
Check whether foreign material is caught in the brush. (page 23)
Replace the remote control batteries. (page 11)
Confirm that the control is within the coverage area of the main frame,
which is less than 3 m or 9.84 ft. (page 11)
Clean the brush. (page 23)
Remove objects around the home station. (page 13)
Confirm that the power supply is connected to the home station. (page 13)
Wipe the charging terminal with a dry cloth.
The HOM-BOT will not activate.
Movements or travel path are
abnormal.
Suction power becomes weak.
Noise becomes louder.
The HOM-BOT cannot be activat-
ed with the remote control.
The brush does not rotate.
The HOM-BOT will not charge.
The power supply automatically
turns off.
The power supply cannot be
turned on.
23
29

Item/model
External dimension
Weight
Power consumption
Battery (fully charging)
Traveling velocity
Use time
(1 time charging)
Charging time
Main functions
LG HOM-BOT VHOMBOT*/VHOMBOT**
360 mm X 90 mm
3.2 kg
15 W
DC 16.8 V
350 mm/sec
Approx. 90 minutes
Based on general floor surface
3 hours
Obstacle detection function
Falling prevention function
Timer cleaning function
Error indication function
Automatic, manual charging function
Dry mop function (wiping) (option)
Corner cleaning function
Voice output function
Map building function
Spot cleaning function
Spatial expansion cleaning function
Item/model
Charging battery
Nominal voltage
Battery
Lithium polymer
14.8 V / 1900mAh
Item/model
External dimension
Rating
Output voltage/current
Power consumption
Home station VR594
204 mm x 158 mm x 125 mm
17.1 V / 1.1 A
23 W
PRODUCT SPECIFICATIONS
30
ENGLISH

Disposal of waste batteries/accumulators
1. When this crossed-out wheeled bin symbol is attached to batteries/accumulators of Your product it means they
BSFDPWFSFECZ&VSPQFBO%JSFDUJWF$&
2. This symbol may be combined with chemical symbols for mercury(Hg), cadmium(Cd) or lead(Pb) if the battery
$POUBJOTNPSFUIBUPGNFSDVSZPGDBENJVNPSPGMFBE
3. All batteries/accumulators should be disposed separately from the municipal waste stream via designated
collection facilities appointed by the government or the local authorities.
4. The correct disposal of Your old batteries/accumulators will help to prevent potential negative consequences for
the environment, animal and human health.
'PSNPSFEFUBJMFEJOGPSNBUJPOBCPVUEJTQPTBMPG:PVSPMECBUUFSJFTBDDVNVMBUPSTQMFBTFDPOUBDU:PVSDJUZPGżDF
waste disposal service or the shop where You purchased the product.
Disposal of your old appliance
1. When this crossed-out wheeled bin symbol is attached to a product it means the product is covered by the
&VSPQFBO%JSFDUJWF&$
2. All electrical and electronic products should be disposed of separately from the municipal waste stream via
designated collection facilities appointed by the government or the local authorities.
3. The correct disposal of your old appliance will help prevent potential negative consequences for the environment
and human health.
4. For more detailed information about disposal of your old appliance, please contact your city office, waste
disposal service or the shop where you purchased the product.

ENGLISH


HANDLEIDING VOOR DE EIGENAAR
Voor het gebruik, lees de pagina's met de veiligheidsvoorschriften aandachtig
door voor een veilige werking van het product. Nadat u de gebruiksaanwijzing
heeft gelezen, bewaart u deze op een gemakkelijk toegankelijke locatie.
VHOMBOT*
VHOMBOT**
DUTCH

Afbeeldingen van de vloer zijn verkregen via de sensors van de lagere
camera, en de locatie van de HOM-BOT wordt ook gedetecteerd en
bevestigd. Daardoor kan elke hoek van de kamer worden schoongemaakt.
Omdat de hoogte van de HOM-BOT laag is (90mm) kan zelfs de onderzijde
van een bed of meubel worden schoongemaakt.
Omdat het lawaainiveau alleen 60dB is, kunt u het gebruiken zelfs in de nacht.
* Minder dan 60dB
De HOM-BOT kan alle componenten van het gebied schoonmaken m.b.v.
verschillende schoonmaakmodi.
De HOM-BOT heeft ook stembevestiging en -instructies, wat het gebruik
daarvan vergemakkelijkt.
FUNCTIES

INHOUD
VOOR HET GEBRUIK
1~4
5
6~7
8~9
10
11
12
WIJZE VAN GEBRUIK
13
14
15
16~17
18
19
20
HANTERINGSMETHODE NA GEBRUIK
21
22
23
24
25
Veiligheidsmaatregelen
Meegeleverd met product
Beschrijving van de onderdelen
Functies van de knoppen
Informatie over de display-status
Voordat u begint
Overzicht
26~28
29
De stofcontainer reinigen
Het filter van de opvangbak reinigen
De borstel reinigen
De sensor/contactpunten reinigen
De zijborstel reinigen
4
AANVULLENDE INFORMATIE
5
VERWIJZING
Hoe het oplaadstation te installeren
Hoe de stroomvoorziening naar de robotstofzuiger
aan en uit te zetten
Hoe te starten en te stoppen met reinigen
Hoe de batterij op te laden
Reinigingsmodi
Extra reinigingsmodi
Timer schoonmaken
Problemen oplossen
Voordat u belt voor service
Productspecificaties
30
DUTCH

VEILIGHEIDSMAATREGELEN
Het doel van de hieronder beschreven veiligheidsvoorschriften is dat de gebruiker het product veilig en
correct gebruikt om eventuele onverwachte risico op verwondingen of schade te voorkomen.
Elementaire voorzorgsmaatregelen
Nadat u de handleiding heeft gelezen, bewaart u deze op een gemakkelijk toegankelijke locatie.
Dit is het symbool voor een veiligheidswaarschuwing. Dit symbool waarschuwt u voor mogelijke gevaren
die schade aan eigendommen kan toebrengen en/of tot ernstig lichamelijk letsel of de dood kan leiden.
Geeft een gevaarlijke situatie aan die, indien niet vermeden, de dood of ernstig
letsel ten gevolge kan hebben.
Geeft een gevaarlijke situatie aan die, indien niet vermeden, licht tot letsel letsel ten
gevolge kan hebben.
WAARSCHUWING
WAARSCHUWING
LET OP
1.
Dit apparaat is niet bedoeld voor gebruik door personen (inclusief
kinderen) met beperkte lichamelijke, zintuiglijke of geestelijke
vermogens, of gebrek aan ervaring en kennis, tenzij ze onder toezicht
staan of worden geïnstrueerd over het gebruik van het apparaat door
een persoon die verantwoordelijk is voor hun veiligheid.
2.
Kinderen moeten onder toezicht staan om ervoor te zorgen dat ze
niet met het apparaat spelen.
3.
Indien het netsnoer beschadigd is, moet om gevaar te voorkomen
deze worden vervangen door een service-vertegenwoordiger van
LG Electronics
4.
Dit apparaat kan worden gebruikt door kinderen van 8 jaar en
ouder en personen met verminderde lichamelijke, zintuiglijke
of verstandelijke vermogens of gebrek aan ervaring en kennis
als ze onder toezicht staan of instructies hebben gekregen over
hoe het apparaat op een veilige manier te gebruiken en de
risico's hiervan begrijpen. Kinderen mogen niet met het apparaat
spelen. Reiniging en onderhoud mogen niet zonder toezicht door
kinderen worden uitgevoerd.

VEILIGHEIDSMAATREGELEN
Verwijder de batterij niet uit de HOM-BOT
voor uw eigen veiligheid Als u de batterij of
de HOM-BOT moet vervangen, brengt u
deze naar het dichtstbijzijnde geautoriseerde
servicecentrum van LG Electronics of
wederverkoper voor hulp.
Als u deze waarschuwing niet opvolgt,
kan dit brand of defecten in het
apparaat veroorzaken.
Gebruik de HOM-BOT nooit
met een batterij en/of laadstation
van een ander product dan deze
HOM-BOT.
Dit kan brand of veroorzaken of
kunnen er defecten in het apparaat
optreden.
Zorg ervoor dat het netsnoer van het
oplaadstation niet wordt verpletterd onder
een zwaar voorwerp of worden beschadigd
door aanraking met scherpe voorwerpen.
Als u deze waarschuwing niet opvolgt, kan dit elektrische
schokken, brand of defecten in het apparaat veroorzaken.
Steek de stekker niet in de wandcontactdoos als het
netsnoer beschadigd is. Breng het product naar een
erkend service-reparateur van LG Electronics.
Plaats het oplaadstation en de
HOM-BOT niet in de buurt van
een verwarmingsapparaat.
Hierdoor kan het apparaat vervormen,
brand veroorzaken of kunnen er
defecten in het apparaat optreden.
Raak de stekker niet aan met natte
handen.
Dit kan leiden tot elektrische
schokken.
Forceer de stekker niet dat deze
doorbuigt. Gebruik de stekker niet
wanneer deze is beschadigd of
losgeraakt.
Dit kan brand of veroorzaken of kunnen
er defecten in het apparaat optreden.
Gebruik de HOM-BOT niet
Gebruik altijd een veilig stopcontact.
wanneer er kaarsen of breekbare
voorwerpen op de vloer staan.
Dit kan brand of veroorzaken of
kunnen er defecten in het apparaat
optreden.
Als er meerdere apparaten gelijktijdig zijn
verbonden met een wandcontactdoos
kunnen ze voldoende warmte genereren
om brand te veroorzaken.
Hierdoor kan letsel of schade aan
het apparaat worden toegebracht.
Bij het uittrekken van de stekker van het
oplaadstation trekt u de stekker altijd uit
door aan de stekker, en niet aan het snoer,
te trekken. Als u de stekker eruit trekt, mag
u de pinnen niet met uw vingers aanraken.
Dit kan een elektrische schok veroorzaken.
Gebruik de HOM-BOT niet wanneer
er een kind of voorwerp daarop
staat. Gebruik de HOM-BOT ook
niet als er een voorwerp daarop
hangt.
DUTCH

VEILIGHEIDSMAATREGELEN
WAARSCHUWING
Spuit of gebruik geen of ontvlambare
materialen, oppervlakte-actieve stoffen,
of drinkwater in de nabijheid van de
HOM-BOT.
Dit kan brand of veroorzaken of kunnen
er defecten in het apparaat optreden.
*
Brandbare materialen: benzine, thinner, enz.
*
Oppervlakte-actieve stoffen: wasmiddelen,
badproducten, enz.
Steek tijdens het gebruik geen
lichaamsdelen, zoals een hand of
voet, onder de borstel of wielen van
de HOM-BOT.
Hierdoor kan letsel of schade aan
het apparaat worden toegebracht.
Laat de HOM-BOT niet op smalle
en hoge meubelen werken zoals een
kledingkast, koelkast, bureau, tafel, enz.
Dit kan persoonlijk letsel veroorzaken,
kunnen er defecten optreden of schade
aan het apparaat worden toegebracht
die niet onder de garantie vallen.
Als u dit niet doet, kan dit brand
veroorzaken of kunnen er defecten
in het apparaat optreden.
Laat de HOM-BOT niet in een
kamer werken waar een kind ligt te
slapen.
Hierdoor kan letsel of schade aan
het apparaat worden toegebracht.
Hierdoor kan letsel of schade aan
het apparaat worden toegebracht.
Zet het apparaat onmiddellijk uit als er
een vreemd geluid, geur of rook uit de
HOM-BOT naar buiten komt.
Anders kunt u brand of productschade
veroorzaken.
De HOM-BOT is geen speelgoed voor
kinderen.
LET OP
Leeg de opvangbak veelvuldig en
houd deze schoon.
Het in de opvangbak verzamelde
stof kan leiden tot allergieën en kan
schadelijke insecten bevatten.
Gebruik de HOM-BOT alleen
binnenshuis.
Als dit apparaat buitenshuis
wordt gebruikt, kunnen er zowel
defecten in het apparaat optreden
als onherstelbare schade aan het
apparaat worden toegebracht.
Laat de HOM-BOT niet vallen
en stel het niet bloot aan sterke
schokken.
Dit kan persoonlijk letsel
veroorzaken, of kunnen er defecten
optreden die niet onder de garantie
vallen.
Stel de HOM-BOT niet bloot aan
koude temperaturen (lager dan -5
°C) voor een lange periode van tijd.
Als u dit toch doet, kunnen er
defecten in het apparaat optreden.
Tapijten met kwastjes of diegene
dikker dan 10mm worden niet
gemakkelijk schoongemaakt.
Besteedt u daaraan aandacht voordat
u het product gebruikt.
In zeldzame gevallen kan de borstel
van de HOM-BOT het tapijt
beschadigen. Als dit gebeurt, stop
dan onmiddellijk met stofzuigen.
Als een tapijt lange franje heeft, kan
deze franje worden beschadigd.
Zorg ervoor dat de HOM-BOT
geen vloeistoffen, messen, punaises,
aanmaakhoutjes, enz. kan opzuigen.
Hierdoor kunnen er defecten in het
apparaat optreden.

reinigingsmiddelen,
DUTCH

INBEGREPEN BIJ HET APPARAAT
DockingstationAfstandsbediening
Cijfers kunnen afwijken van de werkelijke objecten.
Beknopte handleiding
Gebruiksaanwijzing
CReinigingsborstel
Droge cel voor afstandsbediening

Zicht van de top
BESCHRIJVING ONDERDELEN
Knop voor de klep van de opvangbak
Stofcontainerklep
Lamp statusindicatie
Detecteersensor van het homestation
en ontvangstsensor van de
afstandsbediening.
Ultrasone sensoren
Vooraanzicht
Achteraanzicht
Onderaanzicht
Ventilatiepoort
Hoogtedetectiesensor
Contactpunten
Borstel
Zijborstel
Wiel
Batterij
Lagere camerasensor
Aan-/uitschakelaar
Cijfers kunnen afwijken van de werkelijke objecten.
DUTCH

DEEL BESCHRIJVING - DOCKINGSTATION/STOFCONTAINER
Dockingstation
Powerlamp
Contactpunten
Bevestigingspunt netsnoer
Knop Terugstellen
Stofcontainer
Handgreep opvangbak
Stofcontainerklep
Flapje zuigopening
Openingsknop klep
van de opvangbak
Filterklep
HEPA-filter
Cijfers kunnen afwijken van de werkelijke objecten.

FUNCTIES VAN DE KNOPPEN
Druk op de knop STARTEN/STOPPEN om de HOM-BOT aan/uit te zetten of
starten/stoppen.
Druk op de knop STARTEN/STOPPEN wanneer de HOM-BOT aangezet is, en het
schoonmaakproces wordt automatisch gestart.
Indien de knop STARTEN/STOPPEN op wordt gedrukt tijdens automatisch schoonmaken,
zal de HOM-BOT stoppen met het schoonmaken.
Druk op de knop STARTEN/STOPPEN en houd hem voor ongeveer 2 seconden
ingedrukt om de HOM-BOT uit te zetten.
Daarna gaat de HOM-BOT naar de Stand-by-stand.
Indien deze knop op wordt gedrukt tijdens de timermodus, zullen de instellingen van de
timer worden geannuleerd.
DUTCH

KNOPFUNCTIES - AFSTANDSBEDIENING
Starten
De HOM-BOT zal starten met
het schoonmaken.
Opladen
De HOM-BOT zal naar het
homestation gaan voor het
opladen.
Timer
De instelling van de timer is 1 à
12 uren.
Stoppen
Indien de HOM-BOT in
gebruik wordt zal het dan
stoppen. Indien er een timer
ingesteld is zal het ook
geannuleerd worden.
Richtingsknop
De HOM-BOT zal bewegen volgens
de instructies van de gebruiker:
naar de voorkant, achterkant, links
of rechts voor het schoonmaken.
Punten
De oppervlakte van 1m (3,28 voet)
wordt schoongemaakt.
Zigzag schoonmaken en dan
ruimtevergroting
De HOM-BOT zal schoonmaken
tijdens zijn zigzag langs de meubel.
Het schoon te maken gebied wordt
daardoor ook vergroot.
De HOM-BOT kan niet worden aangezet m.b.v. de afstandsbediening.
Om de HOM-BOT aan te zetten, druk op de knop STARTEN/STOPPEN boven het
apparaat.
U dient eerst de HOM-BOT te stoppen voordat u puntschoonmaak,
timerschoonmaak, zigzagschoonmaak of ruimtevergroting gebruikt.
Indien het hoofdvenster uitgezet is, kan de afstandsbediening niet worden
gebruikt.
De vooraf ingestelde kenmerken kunnen worden gebruikt wanneer de HOM-BOT
terug naar de oplaadstand gaat.
Indien de hoofdschakelaar onder de HOM-BOT in de stand UIT is, zal de Status-
indicator flikkeren en een geluid geven wanneer het apparaat op het homestation
is geplaatst om te laten zien dat de hoofdschakelaar in de stand UIT blijft.
Wenk

INFORMATIE OVER DE DISPLAY-STATUS
Indicatie van batterijduur
Plaatje van timer
Plaatje van accu
Voor het schoonmaken wordt het
accuniveau weergegeven.
Voor het schoonmaken bij timer wordt de
reservatietijd weergegeven.
Wanneer de accu moet opgeladen
worden of het apparaat terug naar het
homestation moet worden gebracht na
het gebruik flikkert het plaatje.
Dit toont dat er een timer ingesteld is.
Om de instelling van timer te annuleren, druk op de knop STOPPEN op de afstandsbediening
of de knop STARTEN/STOPPEN op de HOM-BOT.
Wenk
DUTCH

VOORDAT U BEGINT
ţ(FCSVJLEJUBQQBSBBUOJFUJOFFOLBNFSwBBSFFOLJOEBMMFFOHFMBUFOwoSEU)FULJOELBOHFwPOESBLFO
ţVFSXJKEFSCSFFLCBSFoGovFSCPEJHFvooSwFSQFOVJUEFLBNFSEJFNPFUwoSEFOHFsUoG[VJHE
VFSXJKEFSNFUOBNFEVVSLFSBNJFLFOLosUCBBSIFEFOWBOEFWMPFS.
ţVFSXJKEFSFvFOUVFFMvPDIUEBUFSPQEFWMPFSLBO[JKO
ţVFSXJKEFSLBCFMTsUSJQTIBOEEPFLFONBUKFTFO[WBOEFWMPFSzPEBUzFOJFUEPPSEFCPSsUFMwoSEFO
PQHFQBLU.
ţCPOUSPMFFSoGEFCBUUFSJKvPMEPFOEFJTPQHFMBEFOFOBMTIFUMBBHJTMBBEUVEFzFBMTOPHPQ.
ţ.BBLEFTUPGGFOUBOLMFFHJOEJFOIFUWPMJT
Controleer de volgende punten vóór het stofzuigen
ţ4MVJUEFEFVSFOWBOFMLFLBNFSwBBSWBOVOJFUXJMUEBUEF)0.#05EFzFJOHBBU.5JKEFOTIFU
sUoG[VJHFOLBOEF)0.#05FFOBOEFSFLBNFSJOHBBOFOvFSEFSsUoG[VJHFO
ţ"MTEFEwFJMJTCFvFsUJHEzBMEF)0.#05OJFUJOsUBBU[JKOPNovFSESFNQFMTWBONNoGIPHFS
IFFOUFHBBO"MTVOJFUWBOQMBOPNEFEwFJMUFHFCSVJLFOvPPSIFUsUoG[VJHFOIBBMUVEFEwFJMVJUEF
IPVEFSvooSEBUVEF)0.#05HFCSVJLU.
0QFOIFUCBUUFSJKLMFQKFEPPSIFUBDIUFSsUFQVOUWBOEFBfsUBOETCFEJFOJOHFSVJUUFIBMFO
2PMBBUTUwFFAAACBUUFSJKFOIJFSCJKcPOUSoMFFSUVoGEFcoOUBDUQVOUFOzJKOBBOHFTMoUFOUJKEFOTIFUMBEFO.
3%PFIFUCBUUFSJKLMFQKFIFMFNBBMEJDIUzPEBUEFCBUUFSJKFOFSOJFUVJUWBMMFO
De batterij van de afstandsbediening opladen
ţ%SVLTMFDIUTPQ¨¨OLOPQQFSLFFS.
ţ/JFUMBUFOWBMMFOoGCMPoUsUFMMFOBBOLSBDIUJHFsDIPLLFO
ţ#FwBBSIFUBQQBSBBUOJFUCJKBQQBSBUFOEJFwBSNUFWVVSoGIFUFMVDIUBfHFvFO
ţ
ţ
#FQBBMEFŽVPSFscFOUJFMBNQFOzPBMTfFMMFsUSBMJOHTMBNQFOLVOOFOJOUFSfFSFSFONFUIFUJOsDIBLFMFOWBOEF
BfsUBOETCFEJFOJOH)PVEIFUBQQBSBBUEBBSPNzovFSNPHFMJKLVJUEFCVVSUWBOEFSHFMJKLFMBNQFO
"MTCJKIFUJOsDIBLFMFOEFBfsUBOETCFEJFOJOHUFvFSWBOEF)0.#05vFSXJKEFSEJTLBOIFUOJFUOBBS
CFIPSFOfVODUJPOFSFO(FCSVJLIFUBQQBSBBUzPNPHFMJKLPQFFOBfsUBOEWBONJOEFSEBONWBOEF
)0.#05
Voorzorgsmaatregelen tijdens het gebruik van de afstandsbediening

OVERZICHT
Het oplaadstation installeren.
Steek de stekker van het netsnoer aan op een
stopcontact en zoek een goede plek voor het
station tegen een muur. Als er geen stroom aan het
oplaadstation wordt geleverd, wordt de HOM-BOT niet
opgeladen.
De stroom aanzetten van de HOM-BOT.
Zet de schakelaar aan op de bodem van de Roboking
en druk op de knop STARTEN/STOPPEN om het
apparaat aan te zetten.
Begin met stofzuigen.
Druk nogmaals op de knop START/STOP terwijl de
HOM-BOT aanstaat. U hoort het geluid van de
stofzuiger en het reinigen begint.
Automatisch opladen.
Gebrulk de reinigingsstand en extra functies.
De HOM-BOT zal zelf een diagnose stellen en
automatisch terugkeren naar het oplaadstation op te
laden voordat de batterij helemaal leeg is. Het duurt
ongeveer drie uur om de batterij op te laden.
De extrafuncties kunnen worden gebruikt m.b.v. de
afstandsbediening. Deze bevat o.a. handmatig
schoonmaken, punt schoonmaken, timerfunctie, en
de ultramicrofiber zwabberen.
(Pagina13)
(Pagina14)
(Pagina15)
(Pagina16~17)
(Pagina18~21)
DUTCH

HOE HET OPLAADSTATION TE INSTALLEREN
1. Plaats op harde vloeren het oplaadstation tegen een muur om
schuiven te voorkomen tijdens het opladen.
Verwijder voorwerpen binnen 1,5 m van de rechter-en linkerkant en
binnen 2 m van de voorkant.
Hoe het oplaadstation te installeren
2. Sluit het netsnoer aan op een stopcontact.
Wikkel het netsnoer om de bevestigingshaak aan de achterkant
van het oplaadstation of langs het muuroppervlak zodat de
bewegingsbaan van de HOM-BOT niet wordt belemmerd.
Bevestigingshaak van het
netsnoer
3.
Bevestig het oplaadstation aan de muur, zodat het niet kan bewegen.
Zet de stroomschakelaar aan.
ţ
ţ
Houd het oplaadstation altijd aangesloten met de stroom Als het oplaadstation niet is
aangesloten, zal de HOM-BOT niet terugkeren naar het station om automatisch op
te laden.
Gebruik de HOM-BOT niet als het snoer of de stekker van het oplaadstation
beschadigd is, als het niet goed werkt, of als het beschadigd of gevallen is. Om
gevaar te voorkomen, moet het snoer worden vervangen door LG Electronics, Inc
of door een erkend onderhoudsmonteur.
Wenk

HOE DE STROOMVOORZIENING VAN DE ROBOTSTOFZUIGER AAN EN UIT TE ZETTEN
De hoofdschakelaar aanzetten
Het apparaat aanzetten
Het apparaat uitzetten
Wanneer u het apparaat aanzet, druk niet op de knop op de
bovenkant van de HOM-BOT. Gebruik het later.
Zet de hoofdschakelaar in de stand UIT als het apparaat lang niet
wordt gebruikt om de accu te beschermen.
De bedekking van de hoofdschakelaar wordt gebruikt om de
schakelaar stofvrij te houden. Zorg dat de bedekking altijd daar zich
bevindt.
Om het apparaat aan te zetten, plaats de HOM-BOT omgekeerd op
een gladde/zachte oppervlak en controleer of de hoofdschakelaar
in de stand AAN is.
Indien hij in de stand UIT is, zet hem aan.
Wanneer de HOM-BOT niet aangezet is, druk op de knop
STARTEN/STOPPEN voor meer dan 1 seconde. Het apparaat wordt
zo aangezet met een geluid.
Druk op de knop STARTEN/STOPPEN voor twee seconden
wanneer de HOM-BOT aangezet is. Een geluid wordt afgespeeld
wanneer het apparaat wordt uitgezet. Daarna wordt het apparaat
uiteindelijk uitgezet.
Indien het apparaat aangezet is maar niets wordt in 10 minuten
gedaan, dan wordt het apparaat weer uitgezet om batterij te
sparen.
Het apparaat kan worden uitgezet vanwege de statische
elektriciteit tijdens het gebruik.
- Indien het apparaat uitgezet is, zet de hoofdschakelaar uit
en daarna weer aan.
Indien het apparaat niet uitgezet kan worden, volg dan deze
stappen:
-Zet de hoofdschakelaar aan en wacht voor 3 seconden.
-Druk op de knop STARTEN/STOPPEN wanneer de hoofd
schakelaar aangezet is.
-Indien het apparaat niet wordt aangezet of indien er geen
weergave bestaat op het scherm maar alleen een geluid
'ting', plaats de HOM-BOT op het homestation.
-Indien er geen reactie is zelfs als de HOM-BOT al op het
homestation staat, druk op de knop Terugstellen op de
achterkant van het homestation wanneer de HOM-BOT
daarmee verbonden is.
Wenk
DUTCH

HOE HET REINIGEN TE STARTEN EN TE STOPPEN
Nadat de HOM-BOT is aangezet, drukt u op de knop START/
STOP om te beginnen met stofzuigen. Er wordt een melodie
afgespeeld en het stofzuigen begint. Druk tijdens de stofzuigencyclus
op de knop START/STOP om te stoppen met stofzuigen.
Als de knop 'START/STOP' wordt ingedrukt terwijl de
stroomvoorziening van de HOM-BOT uitstaat, wordt de stroom
aangezet. Druk nog een keer op de knop 'START/STOP' om te
beginnen met stofzuigen.
Met behulp van de knoppen op de HOM-BOT
Nadat de HOM-BOT is aangezet, drukt u op de knop 'START'
op de afstandsbediening. Er wordt een melodie afgespeeld en het
stofzuigen begint.
Druk op de knop STOP tijdens de stofzuigencyclus om te stoppen
met stofzuigen.
De afstandsbediening gebruiken
De HOM-BOT kan niet worden aangezet m.b.v. de afstandsbedien-
ing indien HOM-BOT uitgezet is. In dit geval, druk op de knop
STARTEN/STOPPEN op de bovenkant van de HOM-BOT om het
apparaat aan te zetten.
Tijdens het stofzuigen kunnen er botsingen plaatsvinden wanneer de sensor geen objecten kan
detecteren vanwege hun vorm (dunne stoel- en tafelpoten, meubelhoekjes). Wanneer dit gebeurt, zal de
interne effecten detecteren sensor reageren door een achterwaartse beweging te maken.
Als de HOM-BOT is ingesteld om op een locatie op afstand van het oplaadstation te starten met
stofzuigen, zet u de HOM-BOT op een vlakke vloer om een storing van de obstakeldetectiesensor te
voorkomen. Daarnaast begint u te stofzuigen vanaf een locatie waar er geen obstakels zoals gordijnen of
muren binnen 30 cm (11.8 inch) van de HOM-BOT zijn.
Voor de beste resultaten:
ţ Controleer het gebied dat moet worden gestofzuigd even op grote en kleine voorwerpen
die problemen kunnen veroorzaken voor de HOM-BOT.
ţ Als het stofzuigen wordt gestart wanneer de HOM-BOT tegen het oplaadstation
staat, kan het apparaat snel worden geretourneerd naar het oplaadstation omdat de
huidige uitgangspositie nauwkeurig is gelezen.
ţ Als de dweilhouder is geïnstalleerd, gaat de eenheid niet over drempels van 5 mm of
hoger om een 2e verontreiniging van de verontreinigde dweil te voorkomen
Wenk
Wanneer de knop STARTEN op de hoofdeenheid of de afstandsbediening wordt ingedrukt, werkt de
HOM-BOT in de stand ruimtevergroting.

HOE DE BATTERIJ OP TE LADEN
Automatisch opladen
De HOM-BOT keert terug naar het oplaadstation aan het einde
van een reinigingscyclus of wanneer de batterij bijna leeg is.
Als HOM-BOT niet in staat is om tijdens de eerste poging
zich aan het oplaadstation te koppelen, wordt opnieuw geprobeerd
totdat deze koppeling met succes plaatsvindt.
Als HOM-BOT alle gebieden die het kan stofzuigen heeft voltooid,
keert het terug naar het oplaadstation zelfs wanneer het batterijniveau
niet bijna leeg is.
Met de handbediening opladen
Als de HOM-BOT voor het eerst wordt gebruikt of wanneer tijdens het stofzuigen de batterij wordt
opgeladen, kunt u handmatig de batterij opladen.
Wanneer de HOM-BOT verbonden is met het homestation
en u een geluid van ‘Ting’ voortdurend hoort, controleer
dan de hoofdschakelaar en zet hem aan.
Methode 1.
Verbind de HOM-BOT met het homestation door de twee
pijlen van de HOM-BOT op het homestation aan te
passen. Een geluid wordt afgespeeld en het opladen zal
beginnen.
Methode 2. Wanneer de knop 'HOME' van de afstandsbediening
of van de HOM-BOT wordt ingedrukt, vindt deze
opgeladen doordat het een zoeksignaal automatisch
wordt gegenerereerd en de HOM-BOT naar het
oplaadstation wordt geretourneerd.
Neem de volgende voorzorgsmaatregelen bij het gebruik van het oplaadstation:
ţ
ţ
ţ
ţ
Als er vreemd materiaal in de contactpunten terecht komt, kan het opladen niet goed verlopen.
Veeg de contactpunten van tijd tot tijd met een droge doek af na de stekker uit het stopcontact
te hebben gehaald.
Wenk
Om elektroshock te voorkomen, raakt de oplaadterminal niet aan met enige metallische
voorwerpen.
Om brand of elektroshock te voorkomen, demonteer of wijzig het homestation nooit.
Plaats het homestation of de stekker nooit dichtbij een hittebron.
Als de HOM-BOT zich binnen 10 cm (3.9 inch) van de voorkant van de contactpunten
bevindt terwijl de stroomvoorziening aanstaat, keert deze autornatisch terug naar het oplaad-
station en het opladen begint.
DUTCH

DE BATTERIJ OPLADEN
Indicator resterende batterij
Indien de accu niet opgeladen kan worden
Het niveau van de resterende batterij ziet u van de indicator, en de procedure is als volgt:
Tijdens het opladen zal deze indicator flikkeren.
Wanneer het opladen bij het homestation is voltooid, zal alleen het plaatje van de batterij illumineren om
energie te sparen.
Het plaatje van batterij zal flikkeren wanneer de accu opgeladen moet worden.
Vol opladen
(Wordt opgeladen)
Hoog Midden Laag Opladen vereist
Flikkerend
Indien de accu niet opgeladen kan worden zelfs alf de
HOM-BOT al verbonden is met het homestation, controleer de
volgende items:
- Zet de schakelaar op de bodem van de HOM-BOT uit en
daarna weer aan.
- Trek de stekker uit van het stopcontact en daarna weer in.
- Veeg de terminal op het homestation met een droog doekje.
Indien de accu nog niet opgeladen kan worden na de vorige
controle, probeer eens:
- Verbind de HOM-BOT met het homestation.
- Houd de knop Terugstellen aan de achterkant 3 seconden
ingedrukt.
Controleer 1:
Controleer 2:
Ndien het geluid van 'ting' voortdurend wordt gehoord wanneer de
hoofdeenheid op het homestation is aangesloten, controleer de
hoofdschakelaar.

REINIGINGSMODI
Ruimtevergroting schoonmaken
Zigzag schoonmaken en daarna ruimtevergroting
Indien de knop STARTEN op de hoofdeenheid of de
afstandsbediening gedrukt wordt, werkt de HOM-BOT in
de ruimtevergrotingmodus.
Een maximale oppervlakte van 3mX3m
(9,84 voet x 9,84 voet) wordt schoonge-
maakt. (De echte grootte van de opperv-
lakte verandert volgens de vorm van de
kamer.)
De eerste fase:
De oppervlakte wordt schoongemaakt in
een zigzag pad.
Na de eerste en tweede fasen gaat het apparaat naar de
volgende schoon te maken oppervlakte totdat het hele
huis schoongemaakt wordt.
De tweede fase:
De HOM-BOT werkt eerst in de zigzag schoonmaakmodus
en daarna in de ruimtevergrotingmodus. Zo wordt het hele
huis grondig schoongemaakt.
Druk op ZIGZAG+Cell op de afstandsbediening. Zigzag
schoonmaken en daarna ruimtevergrotingmodus.
De Roboking maakt in totaal 6 vierkante meter schoon in
de zigzagmodus door 3 meter op elke kant totdat zij de
muur aanraakt.
Na het schoonmaken in de linkerkant gaat de HOM-BOT
terug naar het startpunt en maakt daarna de rechterkant
schoon totdat zij de muur aanraakt, voor een totale opperv-
lakte van 6 meter.
Daarna werkt de HOM-BOT in de ruimtevergrotingmodus,
wat volautomatisch is.
1.
2.
3.
4.
De schoonmaakmodus kan alleen worden gewijzigd door de afstandsbediening.
Wenk
DUTCH

EXTRA REINIGINGSMODI
Handmatig schoonmaken
Punt schoonmaken
U kunt handmatig schoonmaken door de richting- (pijl) knop te drukken op de afstandsbediening.
De kamer wordt schoongemaakt door de HOM-BOT omdat het naar alle richtingen kan gaan indien u
op de corresponderende knop op de afstandsbediening drukt.
Gebruik deze schoonmaakmodus wanneer alleen een klein deel van de kamer schoongemaakt moet
worden.
Nadat de HOM-BOT naar de schoon te maken locatie is geplaatst, druk op de knop SPOT op de afstands-
bediening.
Het plaatje van punt schoonmaken zal illumineren op de HOM-BOT, en de kamer wordt schoongemaakt
binnen en radius van 1 m (3,28 voet).
Tijdens het opladen kan de knop punt schoonmaken op de afstandsbediening niet worden gedrukt.

TIMER SCHOONMAKEN
De HOM-BOT kan starten met het schoonmaken na een periode van tijd. De instellingen bevatten 2 uren, 6
uren en 12 uren.
Druk op de knop TIMER op de afstands-
bediening of de HOM-BOT kunt u een
tijd instellen.
Kies de tijd door de knop TIMER voort-
durend te drukken. Elke keer u daarop
drukt, verandert het van 2 uren naar 6
uren en daarna naar 12 uren.
Nadat u de starttijd hebt ingesteld, druk
op de knop STARTEN/STOPPEN op de
HOM-BOT of wacht ongeveer 5 secon-
den. Nadat de instelling effectief is wordt
een geluid afgespeeld.
-Wanneer de tijdinstelling voltooid is, zal
het plaatje van timer, een klokje, illumi-
neren alsmede een stembericht.
2 uren 6 uren 12 uren
Wanneer het de tijd wordt, wordt schoonmaken automatisch gestart.
Gebruik de timerinstelling wanneer de HOM-BOT met het homestation verbonden is.
Om de tijdinstelling te annuleren tijdens het instellen, druk op de knop STOPPEN op de
afstandsbediening of de knop STARTEN/STOPPEN op de HOM-BOT.
Wanneer de HOM-BOT niet op het homestation aangesloten is worden de timerinstellingen
geannuleerd.
Wenk
DUTCH

DE STOFCONTAINER REINIGEN
Als de opvangbak vol is, kan de zuigkracht afnemen. Reinig de opvangbak voor en na elke reinigingssessie.
Reinig de opvangbak met de volgende sequentie:
1. Open de opvangbakklep met behulp van de
drukknop op de HOM-BOT
2. Pak de hendel van de opvangbak en trek deze
omhoog.
Scheid de HEPA-filter en de interne sponsfilter door de
HEPA-filter te verwijderen.
Om de stoffentankfilter schoon te maken, ga naar.
Wanneer u de stoffentank hebt schoongemaakt, sluit de
bedekking en plaats de sponsfilter en de HEPA-filter
naar hun oorspronkelijke plaatsen.
4. Til de klep op terwijl u op de scheidingaknop op
de opvangbak drukt.
5. Leeg de opvangbak en reinig deze met een
borstel of onder stromend water.
6. Na de opvangbak met water te hebben gereinigd,
droogt u deze in een goed geventileerde ruimte
uit het directe zonlicht.
Zet de opvangbak in de HOM-BOT en sluit
de klep
van de opvangbak.
Na het schoonmaken, sluit de stoffentankfilters (HEPA-filter, sponsfilter) altijd aan op de
stoffentank. Indien zij niet gemonteerd zijn, kunnen stoffen binnen de HOM-BOT gaan en
storing veroorzaken.
Sluit altijd de bedekking van de stoffentank. Indien u de HOM-BOT probeert te gebruiken
wanneer de bedekking open is, hoort u een geluid ‘Controleert u de stoffentank.’
Wenk

HET FILTER VAN DE OPVANGBAK REINIGEN
De stoffentankfilters zijn de HEPA-filter en de sponsfilter.
Maak de HEPA-filter en de sponsfilter schoon volgens deze regels:
Scheid de HEPA-filter en de interne
sponsfilter door de HEPA-filter te
verwijderen.
Verwijder de stoffen van de HEPA-filter
en de sponsfilter met een stofzuiger of
water.
Na het wassen van de HEPA-filter en de
sponsfilter met water, plaats hen niet
onder direct zonlicht en laat hen helemaal
drogen.
Monteer de schoongemaakte HEPA-filter
en de sponsfilter in de stoffentank
volgens de orde in de rechterkant.
Wanneer u de filter monteert, moet het
handvat van de filter naar beneden
richten.
Om de prestatie van de HOM-BOT te handhaven moet de HEPA-filter schoongemaakt met
een borstel of stofzuiger minstens eens per week en gewassen minstens eens per maand.
Wenk
DUTCH

DE BORSTEL REINIGEN
De borstel op de bodem van de HOM-BOT, helpt met het zuigen van vreemde voorwerpen. Volg deze stappen
om de borstel schoon te maken:
Plaats een glad doekje op de
vloer. Keer de HOM-BOT om
en plaats hem op het doekje.
Zet de hoofdschakelaar uit
voor het schoonmaken.
Pak de borstel aan en trek
hem opwaarts.
Steek de vaststelhoek in op
de andere zijde van de borstel
(ook in de afbeelding) m.b.v.
het scheidingscharnier van de
borstel.
Steek de vaststelgids voor de
borstel in door het met het
vaststelscharnier te passen op
de hoofdeenheid.
Sluit de bedekking door haar
naar beneden te duwen totdat
u een geluid hoort van de
vaststelhoek.
Maak de borstel schoon met
de stofzuiger, of met de
handen, of met een onge-
bruikte tandenborstel.
Steek de vaststelhoek in op de
zijkant van de borstel (in de
afbeelding) m.b.v. het vaststel-
scharnier van de borstel.
Scheid de bedekking door de
vaststelhoek te drukken en
opwaarts te trekken.
Met handschoenen duwt u de
borstel totdat het scheidingss-
charnier verschijnt.
Scheidingsscharnier van de
borstel
Zorg ervoor dat de zijborstel
de bedekking niet belemmert.

DE SENSOR/OPLAADTERMINAL SCHOONMAKEN
Er bestaan sensors op de HOM-BOT die obstakels, trappen en het homesta-
tion voor het opladen van accu kunnen detecteren. Om de prestatie van de
HOM-BOT te handhaven, maak de sensoren en oplaadterminal regelmatig
schoon als volgt:
Plaats een glad doekje op de vloer, keer de HOM-BOT om en plaats hem
op het doekje.
Zet de hoofdschakelaar op de bodem van de HOM-BOT. Letsel kan
worden veroorzaakt door de aanzet van de HOM-BOT tijdens het schoon-
maken.
Gebruik een glad doekje of borstel om de stoffen op de sensoren en de
oplaadterminal te vegen zoals hierna beschreven.
1.
2.
3.
Ontvangstsensor van
de afstandsbediening
Obstakeldetectiesensoren
Klifdetectiesensor
Oplaadterminal
Oplaadterminal
Lens
U moet geen water, verdunner of benzine direct op de HOM-BOT besproeien om hem
schoon te maken.
Bel het servicecentrum indien de sensoren of oplaadterminal beschadigd is. Schade aan
de sensor of oplaadterminal kan tot malfunctie leiden.
Wenk
DUTCH

DE ZIJBORSTEL REINIGEN
Vreemde voorwerpen/materialen zoals haren kunnen zich
gemakkelijk hechten aan de zijborstel. Verwijder dergelijke materialen
ten minste één keer per week.
Als grote hoeveelheden vreemde voorwerpen vast aan de borstel
zitten, bestaat het risico dat de borstels beschadigd kunnen raken.
Als de vloer ruw is of muren vaak worden gereinigd, kan de zijborstel verbogen of beschadigd raken. In dit
geval gebruikt u de volgende methode om de zijborstel recht te buigen.
1. De volgende procedure is nuttig om verbogen
borstels te herstellen.
Zet het apparaat uit door de knop
STARTEN/STOPPEN 2 seconden ingedrukt te
houden.
3. Zet de HOM-BOT op het uiteinde van een tafel
om het reinigen van de zijborstel makkelijker
te laten verlopen. Zorg dat de HOM-BOT niet
om kan vallen.
4. Week de zijborstel in warm water.
5. Druk tien seconden lang op de zijborstel, zodat
deze volledig wordt ondergedompeld in het water.
6. Veeg de zijborstel langzaam af door het met uw
hand te omvatten terwijl u het uitknijpt.
7. Draai de zijborstel rond en herhaal de stappen
4-6 voor elke sectie van de borstel.
8. Gebruik de zijborstel pas als het volledig is
opgedroogd.

PROBLEMEN OPLOSSEN
Wanneer de stem ‘Controleert u de wielen’ wordt gehoord:
Indien het apparaat niet meer kan bewegen vanwege de wielen, dan hoort u de stem
‘Controleert u de wielen’.
wiel vast in de voordeur, balkon, trap, enz?
et het wiel omwikkeld met draden of haren?
Leg een zachte doek op de vloer, draai de HOM-BOT om en leg deze op de doek. Verwijder
vreemde voorwerpen na het wiel te hebben bekeken.
HOM-BOT
DUTCH

PROBLEMEN OPLOSSEN
Wanneer de stem ‘Controleert u de stoffentank’ wordt gehoord:
Indien er een storing bestaat met de stoffentank, dan hoort u de stem ‘Controleert u de stoffentank’.
Is de stoffentank goed gemonteerd?
Open de bedekking van de stoffentank en controleer of het goed vastgesteld is.
De stofzuiger werkt niet zonder de stoffentank.
Ndien de bedekking van de stoffentank wordt geopend, doe de bedekking dicht voordat u het
apparaat gebruikt.
Wanneer de stem ‘Batterij is bijna op’ wordt gehoord:
Indien het niveau van de batterij zeer laag is, dan hoort u de stem ‘Batterij is bijna op’.
Plaats de HOM-BOT op het homestation voor het opladen.
Nadat u de HOM-BOT op het homestation aansluit m.b.v. de pijpen, wordt het
opladen gestart en het oplaadgeluid afgespeeld.

PROBLEMEN OPLOSSEN
Wanneer de stem ‘Controleert u de borstel’ wordt gehoord:
Indien de borstel van de HOM-BOT niet goed werkt, hoort u de stem 'Controleert u de borstel'.
Plaats een glad doekje op de vloer, keer de HOM-BOT om, en plaats hem op het doekje.
De zijborstel is geblokkeerd.
Verwijder vreemde materialen zoals kabels, draden of haar de (zij)borstel blokkeert.
Bevestig de juiste montering van de borstel door de scheiding daarvan te controleren.
De borstel maakt een luid en abnormaal geluid.
Neem de borstel af van de HOM-BOT en verwijder vreemde materialen van de borstel.
Scheiding van
de borstel
Scheiding van
de borstel
Juiste montering zorgt dat de rotatie
van de borstel glad is.
Voor een meer gedetailleerde beschrijving van het proces, verwijs naar de instructies op pagina 24.
DUTCH

VOORDAT U BELT VOOR ONDERSTEUNING
Controleer alvorens de storing van de HOM-BOT door te geven.
Probleem Oplossingen (verwijzingspagina)
De HOM-BOT wordt niet
geactiveerd.
Controleer dat de stroomschakelaar is aangezet. (Pagina 14)
Controleer dat de batterij is opgeladen. (Pagina 17)
Bewegingen zijn abnormaal
of de bewegingsbaan is
abnormaal.
Veeg de sensor zorgvuldig met een zachte doek af. (Pagina 24)
Zet de stroomschakelaar uit en aan.
Controleer dat geen vreemde voorwerpen de zuigopening blokkeren.
(Pagina 23)
Leeg de opvangbak. (Pagina 21)
De zuigkracht wordt zwakker.
Er is meer lawaai. Controleer dat de opvangbak naar behoren is gemonteerd.
Controleer dat de opvangbakfilter naar behoren is gemonteerd.
(Pagina 22)
Controleer dat vreemde voorwerpen in de borstel zijn geraakt. (Pagina 23)
De HOM-BOT kan niet
worden geactiveerd met de
afstandsbediening.
Vervang de batterijen van de afstandsbediening. (Pagina 11)
Controleer of de bediening binnen het dekkingsgebied van het
motorlichaam werkt, dat minder dan 3 m. bedraagt. (Pagina 11)
De borstel draait niet. Reinig de borstel. (Pagina 23)
Controleer dat de borstel op de juiste wijze is gemonteerd. (Pagina 23)
De HOM-BOT wordt niet
opgeladen.
Controleer dat de hoofdstroomschakelaar is aangezet.
Verwijder objecten rondom het oplaadstation. (Pagina 13)
Controleer dat de stroomvoorziening is aangesloten op het
oplaadstation. (Pagina 13)
Veeg de contactpunten met een droge doek af.
De stroomvoorziening wordt
automatisch uitgeschakeld.
Dit is geen storing. De HOM-BOT beschikt over een eigen
energiebesparingsfunctie.
Als na het aanzetten er geen tien minuten lang geen stroom wordt
gebruikt, wordt de stroom automatisch weer uitgezet.
De stroomvoorziening kan niet
worden aangezet.
Controleer dat de stroomschakelaar is aangezet. (Pagina 14)
22

APPARAATSPECIFICATIES
Artikel/Model
Externe afmetingen
Gewicht
Stroomverbruik
Batterij (volledig opladen)
Bewegingssnelheid
Verbruikstijd
Oplaadtijd
Hoofdfuncties
Functie obstakeldetectie
Functie valpreventie
Functie schoonmaken volgens timer
Functie foutindicatie
Functie automatisch en handmatig opladen
Functie zwabber drogen (vegen) (optioneel)
Functie hoek schoonmaken
Functie stemberichtgeving
Functie kaartoprichting
Functie punt schoonmaken
Functie ruimtevergroting schoonmaken
Ca. 90 minuten
(op basis van algemene houten vloer)
Artikel/Model
Externe afmetingen
Classificatie
Uitvoerspanning/-stroom
Stroomverbruik
Dockingstation VR594
Artikel/Model Batterij
Oplaadbare accu lithium polymeer
DUTCH

Verwijdering van oude batterijen/accu's
1. Indien dit doorkruiste verrijdbare afvalbaksymbool is bevestigs aan batterijen/accu 's van uw apparaat staat,
CFUFLFOUEBU[FWBMMFOPOEFSEF&VSPQFTF3JDIUMJKO&$
2. Dit symbool kan worden gecombineerd met chemische symbolen voor kwik (Hg), cadmium (Cd) of lood (Pb) als
EFCBUUFSJKNFFSEBOLXJLDBENJVNPGMPPECFWBU
3. Alle batterijen/accu 's moeten gescheiden worden afgevoerd met het huishoudelijk afval naar speciale, door de
overheid of plaatselijke autoriteiten aangewezen inzamelingspunten.
4. Door de correcte verwijdering van uw oude batterijen/accu 's helpt u mogelijk schadelijke gevolgen voor het
milieu, mens en dier te voorkomen.
7PPSNFFSJOGPSNBUJFPWFSIFUBGWPFSFOWBOVXPVEFCBUUFSJKFOBDDVTLVOUVDPOUBDUPQOFNFONFUVX
gemeente, afvalverwerkingsbedrijf of de winkel waar u het apparaat heeft gekocht.
Verwijdering van uw oude apparaat
1. Indien dit doorkruiste verrijdbare afvalbaksymbool zich bevindt op een apparaat betekent dat het apparaat valt
POEFSEF&VSPQFTF3JDIUMJKO&$
2. Alle elektrische en elektronische apparaten moeten gescheiden worden afgevoerd met het huishoudelijk afval
naar speciale, door de overheid of plaatselijke autoriteiten aangewezen inzamelingspunten.
3. De correcte verwijdering van uw oude apparaat helpt negatieve gevolgen voor het milieu en de menselijke
gezondheid te voorkomen.
4. Voor meer informatie over het afvoeren van uw oude apparaat, kun u contact opnemen met uw gemeente,
afvalverwerkingsbedrijf of de winkel waar u het apparaat heeft gekocht.

DUTCH


VHOMBOT*
VHOMBOT**
FRANÇAIS


26 28
29
30
FRANÇAIS


FRANÇAIS


FRANÇAIS


FRANÇAIS


FRANÇAIS


FRANÇAIS


FRANÇAIS


FRANÇAIS


FRANÇAIS


FRANÇAIS


FRANÇAIS


FRANÇAIS


FRANÇAIS


FRANÇAIS


FRANÇAIS


VR594
FRANÇAIS

Mise au rebut des piles ou batteries usagées
1. Le pictogramme d'une poubelle barrée sur les piles ou batteries accompagnant votre produit indique qu'elles
TPOUDPOGPSNFTMB%JSFDUJWFFVSPQ¨FOOF&$
2. Ce symbole peut étre associé aux symboles chimiques du mercure (Hg), du cadmium (Cd) ou du plomb (Pb) si
MBCBUUFSJFDPOUJFOUQMVTEFEFNFSDVSFEFDBENJVNPVEFQMPNC
3. Toutes les piles et batteries doivent être collectées séparément et transportées par les services de voirie
municipaux vers des installations spécifiques de collecte des déchets, indentifiées en conséquence par le
gouvernement ou par les autorités locales.
4. Le traitement correct de vos piles ou batteries usagées contribue protéger l'environnement et la santé des
personnes et des animaux.
5. Pour plus d'informations sur le traitement de vos piles ou batteries usagées, merci de bien vouloir vous adresser
votre mairie, au service de la voirie ou au magasin où vous avez acheté le produit.
Mise au rebut des produits
-FQJDUPHSBNNFEŜVOFQPVCFMMFCBSS¨FTVSMFQSPEVJUJOEJRVFRVFMFQSPEVJUFTUDPOGPSNFMB%JSFDUJWF
FVSPQ¨FOOF&$
2. Tous les déchets électriques et électroniques doivent être collectés séparément et transportés par les services
de voirie municipaux vers des installations spécifiques de collecte des déchets, identifiées en conséquence par
le gouvernement ou par les autorités locales.
-FUSBJUFNFOUDPSSFDUEFWPUSFWJFJMBQQBSFJMDPOUSJCVFQSPU¨HFSMŜFOWJSPOOFNFOUFUMBTBOU¨EFTQFSTPOOFT
1PVSQMVTEŜJOGPSNBUJPOTTVSMFUSBJUFNFOUEFWPUSFBQQBSFJMFOżOEFWJFNFSDJEFCJFOWPVMPJSWPVTBESFTTFS
votre mairie, au service de la voirie ou au magasin où vous avez acheté le produit.

aspirateur
FRANÇAIS


VHOMBOT*
VHOMBOT**
DEUTSCH


DEUTSCH


DEUTSCH


DEUTSCH


DEUTSCH


DEUTSCH


DEUTSCH


DEUTSCH


DEUTSCH


DEUTSCH


DEUTSCH


DEUTSCH


DEUTSCH


DEUTSCH


DEUTSCH


DEUTSCH


DEUTSCH

Entsorgung von gebrauchten Batterien/Akkus
1. Wenn dieses durchgestrichene Mülltonnensymbol auf Batterien / Akkus Ihres Produkts angebracht ist, unterliegt
TJFEFSFVSPQ£JTDIFO3JDIUMJOJF&$
2. Dieses Symbol kann mit chemischen Symbolen für Quecksilber (Hg), Cadmium (Cd) oder Blei (Pb) kombiniert
XFSEFOXFOOEJF#BUUFSJFNFISBMT2VFDLTJMCFS,BENJVNPEFS#MFJFOUI£MU
3. Alle Batterien / Akkus sollten getrennt vom üblichen Hausmüll über entsprechende Sammelstellen gemäß den
Richtlinien Ihrer Gemeinde entsorgt werden.
4. Die ordnungsgemäße Entsorgung Ihrer Batterien/ Akkus verhindert mögliche negative Folgen für Umwelt und
Gesundheit.
8FJUFSF*OGPSNBUJPOFO»CFSEJF&OUTPSHVOH*ISFSBMUFO#BUUFSJFO"LLVTFSIBMUFO4JFCFJ*ISFS(FNFJOEFWFSXBMUVOH
Ihrem Müllentsorgungsunternehmen oder über den Laden, wo Sie Ihr Gerät erworben haben.
Entsorgung Ihres Altgeräts
1. Wenn dieses Symbol mit einem durchgestrichenen Mülleimer mit Rädern auf einem Produkt angebracht ist,
CFEFVUFUEJFTEBTTEBT1SPEVLUEFS&VSPQ£JTDIFO3JDIUMJOJF&$FOUTQSJDIU
2. Alle Elektrogeräte sollten getrennt vom üblichen Hausmüll über entsprechende Sammelstellen gemäß den
Richtlinien Ihrer Gemeinde entsorgt werden.
3. Die ordnungsgemäße Entsorgung Ihres Altgeräts verhindert mögliche negative Folgen für Umwelt und
Gesundheit.
4. Weitere Informationen über die Entsorgung Ihres Altgeräts erhalten Sie bei Ihrer Gemeindeverwaltung, Ihrem
Müllentsorgungsunternehmen oder in dem Geschäft, wo Sie Ihr Gerät erworben haben.

DEUTSCH

-(&MFDUSPOJDT*OD&63FQSFTFOUBUJWF,SJKHTNBO%."NTUFMWFFO5IF/FUIFSMBOET
-
 1
1
-
 2
2
-
 3
3
-
 4
4
-
 5
5
-
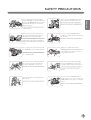 6
6
-
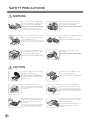 7
7
-
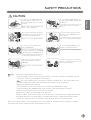 8
8
-
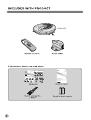 9
9
-
 10
10
-
 11
11
-
 12
12
-
 13
13
-
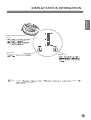 14
14
-
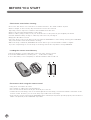 15
15
-
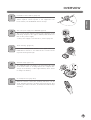 16
16
-
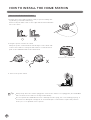 17
17
-
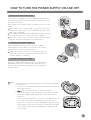 18
18
-
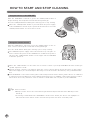 19
19
-
 20
20
-
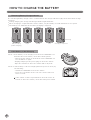 21
21
-
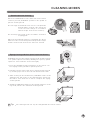 22
22
-
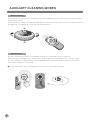 23
23
-
 24
24
-
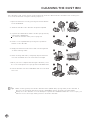 25
25
-
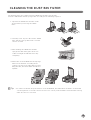 26
26
-
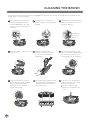 27
27
-
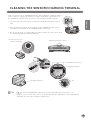 28
28
-
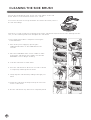 29
29
-
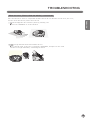 30
30
-
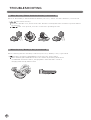 31
31
-
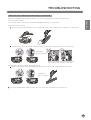 32
32
-
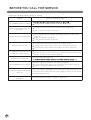 33
33
-
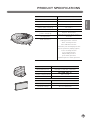 34
34
-
 35
35
-
 36
36
-
 37
37
-
 38
38
-
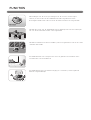 39
39
-
 40
40
-
 41
41
-
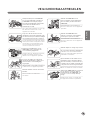 42
42
-
 43
43
-
 44
44
-
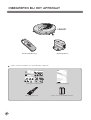 45
45
-
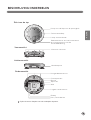 46
46
-
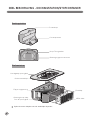 47
47
-
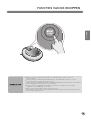 48
48
-
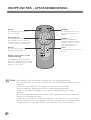 49
49
-
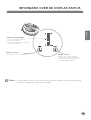 50
50
-
 51
51
-
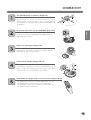 52
52
-
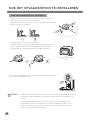 53
53
-
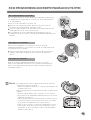 54
54
-
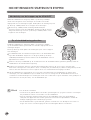 55
55
-
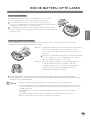 56
56
-
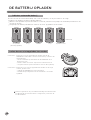 57
57
-
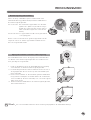 58
58
-
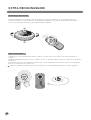 59
59
-
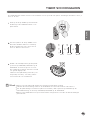 60
60
-
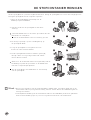 61
61
-
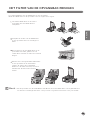 62
62
-
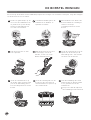 63
63
-
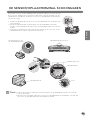 64
64
-
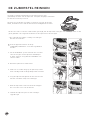 65
65
-
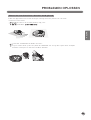 66
66
-
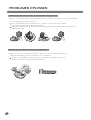 67
67
-
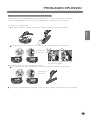 68
68
-
 69
69
-
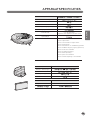 70
70
-
 71
71
-
 72
72
-
 73
73
-
 74
74
-
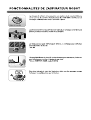 75
75
-
 76
76
-
 77
77
-
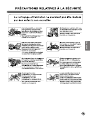 78
78
-
 79
79
-
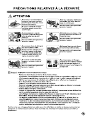 80
80
-
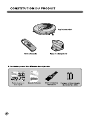 81
81
-
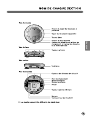 82
82
-
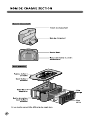 83
83
-
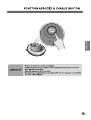 84
84
-
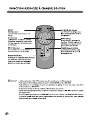 85
85
-
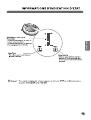 86
86
-
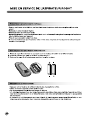 87
87
-
 88
88
-
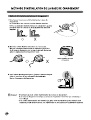 89
89
-
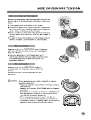 90
90
-
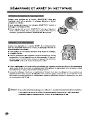 91
91
-
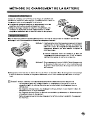 92
92
-
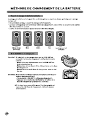 93
93
-
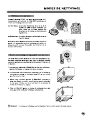 94
94
-
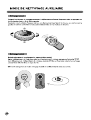 95
95
-
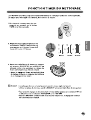 96
96
-
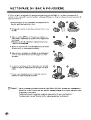 97
97
-
 98
98
-
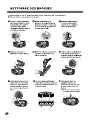 99
99
-
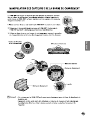 100
100
-
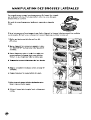 101
101
-
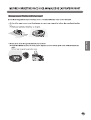 102
102
-
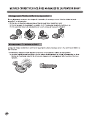 103
103
-
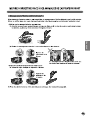 104
104
-
 105
105
-
 106
106
-
 107
107
-
 108
108
-
 109
109
-
 110
110
-
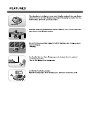 111
111
-
 112
112
-
 113
113
-
 114
114
-
 115
115
-
 116
116
-
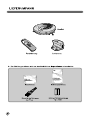 117
117
-
 118
118
-
 119
119
-
 120
120
-
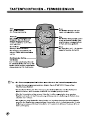 121
121
-
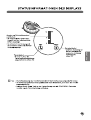 122
122
-
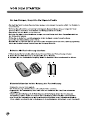 123
123
-
 124
124
-
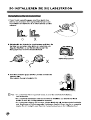 125
125
-
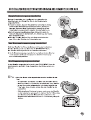 126
126
-
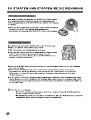 127
127
-
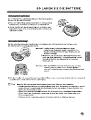 128
128
-
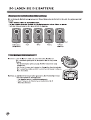 129
129
-
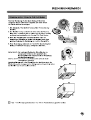 130
130
-
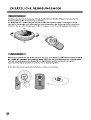 131
131
-
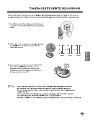 132
132
-
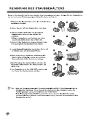 133
133
-
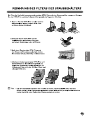 134
134
-
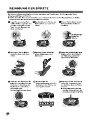 135
135
-
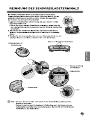 136
136
-
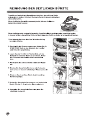 137
137
-
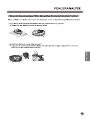 138
138
-
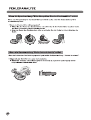 139
139
-
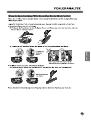 140
140
-
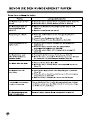 141
141
-
 142
142
-
 143
143
-
 144
144
-
 145
145


