Celexon Mobile Expert 366 x 274 cm ramowy ekran projekcyjny de handleiding
- Type
- de handleiding

Bedienungsanleitung
celexon Faltrahmenleinwand Mobil
Expert Front- / Rückprojektion
Vielen Dank für den Kauf dieses Produkts.
Für eine optimale Leistung und Sicherheit lesen Sie diese Anweisungen bitte sorgfältig
durch, bevor Sie dieses Produkt anschließen oder betreiben. Bitte bewahren Sie diese
Anleitung für eine spätere Verwendung auf.
Version: 32422_071

1
Diese Bedienungsanleitung dient dazu, Sie mit der Funktionsweise dieses Produktes
vertraut zu machen. Bewahren Sie diese Anleitung daher gut auf, damit Sie jederzeit
darauf zugreifen können.
• Bitte beachten Sie vor der Montage das beiliegende Datenblatt mit weiteren Sicher-
heits- und Verwendungshinweisen.
• Beginnen Sie nicht mit der Montage, bevor Sie die komplette Bedienungsanleitung
gelesen und diese verstanden haben.
• Führen Sie die Installation mit einer weiteren Person durch um eine sichere Montage
zu gewährleisten.
• Entnehmen die das Produkt der Verpackung und entfernen alle Verpackungsmate-
rialien. Achten Sie darauf, dass sich kein Verpackungsmaterial am oder im Produkt
bendet. Sollten Sie Verpackungsbeschädigungen feststellen, prüfen Sie zusätzlich
ob Beschädigungen am Produkt zu nden sind. Sollten Sie äußerliche Beschädi-
gungen an dem Gerät oder unerwartete unübliche Funktionsweisen feststellen, darf
das Produkt nicht weiter genutzt werden. Kontaktieren Sie umgehend den Händler,
bei dem Sie das Produkt gekauft haben oder celexon direkt (Web: www.celexon.de,
Mail: info@celexon.de) für weitere Informationen.
• Das Produkt darf nur in trockener und windfreier Umgebung eingesetzt werden. Es
ist nur zum temporären Einsatz im Freien unter geeigneten Sicherheitsmaßnahmen
gegen ein Umfallen geeignet. (optional erhältl. „celexon Abspann-Set“ ist einzuset-
zen bei Aufbau im Freien!)
• Die Nutzung des Gerätes und Zubehörteilen ist Kindern unter 16 Jahren verboten.
• Sorgen Sie dafür, dass keine Kinder mit den Geräten spielen oder sich ohne Aufsicht
in der Nähe aufhalten.
• Ein Umbauen oder Verändern des Produktes beeinträchtigt die Produktsicherheit
und ist nicht zulässig.
• Achtung Verletzungsgefahr! Öffnen Sie das Produkt niemals eigenmächtig. Führen
Sie Reparaturen nie selbst aus!
• Dieses Produkt darf nur im original Herstellerzustand und mit ggf. original Zubehör
verwendet werden.
• Verwenden Sie das Produkt nicht in der Nähe von Gas- oder wasserfürhrenden Ge-
rätschaften und nicht in staubiger Umgebung.
• Behandeln Sie das Produkt sorgfältig. Es kann durch Stöße, Schläge oder Fall aus
bereits geringer Höhe beschädigt werden.
• Halten Sie das Produkt fern von Feuchtigkeit und Hitze.
WARNHINWEISE

2
• Tauchen Sie das Produkt niemals in Wasser oder andere Flüssigkeiten.
• Verwenden Sie das Produkt nur in seiner bestimmungsgemäßen Art und Weise. Eine
anderweitige Verwendung kann zu Beschädigungen am Produkt oder in dessen Um-
gebung führen.
• Ziehen Sie die Schrauben fest, aber überdrehen diese nicht. Ein zu feste Anziehen
kann Schäden verursachen und den sicheren Halt der Leinwand beeinträchtigen.
• Bei Nichtbeachtung obiger Anweisungen kann es zu Personenschäden und
Beschädigungen des Produktes oder Geräten die daran angeschlossen
sind kommen. Auch kann bei fehlerhafter Installation oder Verwendung die
Garantie erlöschen.
• Wenn Sie beim Verwenden des Produktes unsicher sind, kontaktieren Sie
Fachpersonal, Ihren Händler oder celexon direkt (Web: www.celexon.de,
Mail: info@celexon.de).
• Technische Änderungen und Irrtümer vorbehalten.
Der Hersteller übernimmt keine Verantwortung für Sachschäden oder Personenschäden,
wenn die Leinwand außerhalb der empfohlenen Spezikationen verwendet wird, oder
bei unsachgemäßer Installation. Verwenden Sie diese Leinwand nicht in der Nähe von
Heizungen oder Klimaanlagen. Nutzen Sie das Produkt nur begrenzt in direkter Sonne,
das PVC Material kann sich dabei verformen und die Planlage beeinussen. Ist das Tuch
nach Einsatz in der Sonne sehr warm, warten Sie bis es auf Raumtemperatur (ca. 18-24°)
abgekühlt und stets komplett trocken ist, bevor sie es falten und einpacken.
Wir empfehlen Ihnen, das Tuch in kalter Jahreszeit einige Stunden im warmen Zimmer
zu lagern, damit das Material weicher wird um es besser passend und schadlos auf den
Rahmen aufziehen zu können.
Bitte vermeiden Sie jegliche Flecken auf der Tuchoberäche. Diese könnten sich mög-
licherweise nicht mehr entfernen lassen.
• Beachten Sie die Front-und Rückseite des Tuches bei der Anbringung.
• Bitte kontrollieren Sie ALLE Teile vor dem Zusammenbau auf Schäden.
• Die Leinwand darf NUR auf weichem, gepolstertem Untergrund zusammengebaut
werden. Die Rahmenbeschichtung kann andernfalls verkratzen.
• Für eine dauerhafte Planlage beachten Sie folgende Hinweise:
1. Berühren Sie das Projektionstuch nicht mit den Händen.
2. Falten Sie das Projektionstuch nicht in kaltem (unter 10°C) oder sehr warmen
Zustand (über 30°C).
3. Bemalen oder beschriften Sie nicht das Projektionstuch.

3
Die Angaben in diesem Dokument können ohne vorherige Ankündigung durch
den Hersteller geändert werden. Änderungen werden jeweils in den folgenden
Versionen dieses Handbuchs ergänzt. Der Hersteller übernimmt keine Garantie
oder Gewährleistung auf die Richtigkeit der Angaben in diesem Dokument.
PFLEGEHINWEIS
Reinigen Sie die Leinwand NIEMALS mit Alkohol oder anderen Reinigungs-
mitteln, die Lösungsmittel enthalten. Benutzen Sie nur ein weiches und saube-
res Tuch. Mit einer milden Seifenlauge kann gegebenenfalls Schmutz von der
Oberäche entfernt werden. Vermeiden Sie unbedingt den Kontakt mit spitzen
oder scharfen Gegenständen. Diese könnten das Projektionstuch nachhaltig
beschädigen. Weitere Hinweise entnehmen Sie den beiliegenden Leinwand-
hinweisen.
HAFTUNGSAUSSCHLUSS
LIEFERUMFANG
(A) Rahmen (B) Projektionstuch
(Front oder Rück)
(C) QC Pass
(D) Tuchtasche (E) Schrauben (F) Anleitung
(G) Standbeine, links & rechts
(je nach Größe inkl. zus. Stützstrebe)

4
INSTALLATIONSHINWEIS
Bitte prüfen Sie vor der Installation, ob alle oben aufgeführten Teile enthalten
sind! Sollten Teile fehlen, kontaktieren Sie den Händler und warten mit der In-
stallation bis alles vollständig ist. Es wird empfohlen, die Leinwand mit einer
zweiten Person zu montieren.
Die Leinwand kann in 10 Minuten und ohne Werkzeug montiert werden. Bei
Nichtgebrauch wird die Leinwand im mitgelieferten Schutzkoffer gelagert.
MONTAGE
MONTAGEVARIANTEN
Eine korrekte Nutzung der Leinwand ermöglicht die besten Ergebnisse.
Für Frontprojektion montieren und
betrachten Sie die Leinwand wie in
Abb. 1.
Für Rückprojektion montieren und
betrachten Sie die Leinwand wie in
Abb. 2.
Abb.1
Abb. 2

5
SCHRITT 1
Nehmen Sie den Rahmen aus der Transportbox und legen Sie ihn auf eine
ebene Fläche. Klappen Sie zuerst die langen Teile aus (Abb. 3, 4).
Abb. 3 Abb. 4
SCHRITT 2
Falten Sie den Rahmen soweit auseinander, bis die Beschläge an den Gelenken
hörbar ineinander „klicken“. Wiederholen Sie den Vorgang nun auch mit den
kürzeren Teilen (Abb. 5, 6).
Abb. 5 Abb. 6
SCHRITT 3
Stellen Sie sicher, dass alle vier Ecken des Rahmens im 90° Winkel auseinander
geklappt sind und dass die Stabilisierungselemente in den Ecken gerade und
nicht gebogen sind (Abb. 7, 8).
Abb. 7 Abb. 8

6
SCHRITT 4
Nehmen Sie das Leinwandtuch aus der Tasche und legen Sie es in eine Ecke
des Rahmens. Entfalten Sie das Tuch gemäß der Zeichnung (Abb. 9, 10).
Abb. 9. Abb. 10
SCHRITT 5
Wenn Sie das Tuch komplett entfaltet haben, befestigen Sie es mit den Druck-
knöpfen am Rahmen. Befestigen Sie die Druckknöpfe wie beschrieben in
Abb. 11-14. In kalter Umgebung wirkt das Tuch ggf. zu klein. Lagern Sie es ca.
24 Std. vorher in einem warmen Raum, damit das Material mit der ursprüngli-
chen Größe und weicher, passend aufgezogen werden kann.
Abb. 11. Abb. 12
Abb. 13. Abb. 14

7
Abb. 15
(Dieser Schritt entfällt, wenn sich
T-Standbeine ohne Stützstrebe im Lie-
ferumfang benden).
Haben Sie die Standbeine korrekt aus-
geklappt, nutzen Sie die Handschrau-
ben und sichern die Stützstrebe an den
Beinen an einer geeigneten Position.
Die Stützstreben können in passender
Länge eingestellt werden. Wenn der
Rahmen höher an den Standbeinen be-
festigt ist, sollten die Stützstreben ent-
sprechend weiter oben befestigt werden
(Abb. 16-18).
Info:
Stützstreben an den Füßen werden nur
bei folgenden Größen benötigt und
mitgeliefert:
- 305 x 229cm (4:3)
- 366 x 274cm (4:3)
- 406 x 305cm (4:3)
- 406 x 228cm (16:9)
- 406 x 254cm (16:10)
SCHRITT 6
Nehmen Sie die gefalteten Standbeine
aus der Box und öffnen Sie diese wie
in Abb. 15. Es gibt 2 Arten von Stand-
beinen, je nach Größe des Rahmens
bendet sich ein Typ im Lieferumfang:
„T-Standbeine“ für kleinere Versionen
und „T-Standbeine mit Stützstrebe“ für
größere Versionen der Leinwand.
SCHRITT 7
Abb. 16
Abb. 17
Abb. 18

8
SCHRITT 8
Legen Sie den Rahmen auf den Boden und positionieren Sie die Standbeine
auf den Seiten des Rahmens. Nutzen Sie die Handschrauben, um den Rahmen
an den Standbeinen zu befestigen. Befestigen Sie alle Schrauben erst ein we-
nig, bevor Sie sie festziehen (Abb. 19, 20).
SCHRITT 9
Wenn der Rahmen wieder aufgestellt ist, klappen Sie die nach vorne zeigen-
den Füße der Beine aus.
Die Montage ist nun beendet und die Leinwand steht stabil auf einem ebenen
Untergrund (Abb. 21, 22).
SCHRITT 10
Nach Nutzung der Leinwand demontieren Sie die Leinwand und bewahren Sie
sie in der mitgelieferten Box auf. Um die Leinwand zu demontieren führen Sie
die Montageschritte in umgekehrter Reihenfolge aus.
Abb. 19. Abb. 20
Abb. 21 Abb. 22
Abb. 23
Das Tuch falten Sie bitte stets mit Vor-
sicht und lagern es stets nur oben lie-
gend in der Box. An den Faltstellen
zuvor entnommenes Polstermaterial
einlegen, um Knicke minimal zu halten.

9
ALLGEMEINE HINWEISE
Falten in der Projektionsäche verschwinden in der Regel nach kurzer Zeit von
selbst. Nach dem Auspacken oder langer Lagerung sind diese bei diesem Pro-
dukttyp teils nicht zu vermeiden. Ein Aufstellen in sonniger Umgebung (Wär-
me) unterstützt und beschleunigt diesen Vorgang. Sofern möglich, bauen Sie
die Leinwand 1-2 Stunden vor eigentlicher Verwendung auf, eventuelle Knicke
verschwinden in warmer Umgebung bzw. gehen deutlich zurück. Während der
Betrachtung aus üblicher Entfernung von einigen Metern, stören diese Knicke
nicht die Projektion bzw. sind dann nicht sichtbar.
Dieser Produkttyp eignet sich nur begrenzt zur Verwendung mit Kurzdistanz
oder vor allem Ultra-Kurzdistanz-Projektoren. Technologie-typisch benötigen
diese Art Projektoren eine extrem plane Oberäche um keine Geometrie-
Verzerrung im Bild zu verursachen.
Lagern Sie die Leinwand in einer trockenen und kühlen Umgebung. Sollte die
Leinwand während der Verwendung nass geworden sein, lassen Sie sie voll-
ständig trocknen, bevor Sie sie demontieren und einlagern.
celexon Europe GmbH | Gutenbergstraße 2 | 48282 Emsdetten | DE

Operating instructions
celexon Folding Frame Screen
Mobile Expert
Front / Rear projection
Thank you for purchasing this product.
For optimum performance and safety, please read these instructions carefully before
connecting or operating this product. Please retain these instructions for future referen-
ce.
Version: 32422_071

1
These operating instructions arew intended to familiarise you with the opera-
tion of this product. Keep this manual in a safe place so that you can refer to
it at any time.
• Before installation, please refer to the data sheet for further safety and
use instructions.
• Do not begin installation until you have read and understood the com-
plete operating instructions.
• Carry out the installation with another person to ensure safe installa-
tion.
• Remove the product from its packaging and remove all packaging ma-
terials.
• Make sure that there is no packaging material on or in the product. If
you notice any damage to the packaging, also check for damage to
the product. If you notice any external damage to the unit or unexpec-
ted unusual functioning, do not continue to use the product. Imme-
diately contact the dealer from whom you purchased the product or
celexon directly (Web: www.celexon.co.uk, Mail: info@celexon.co.uk)
for further information.
• The product may only be used in a dry and wind-free environment.
It is only suitable for temporary outdoor use with appropriate safety
measures to prevent it from falling over. (optionally available „celexon
guy line set“ for use when setting up outdoors).
• Children under the age of 16 are not permitted to use the unit or its
accessories.
• Ensure that no children play with the equipment or are in the vicinity
without supervision.
• Conversion or modication of the product impairs product safety and
is not permitted.
• Caution: Risk of injury! Never open the product without authorisation.
Never carry out repairs yourself!
• This product may only be used in its original manufacturer‘s condition
and with any original accessories.
• Do not use the product in the vicinity of gas or water-conveying equip-
ment or in a dusty environment.
• Handle the product with care. It may be damaged by knocks, blows or
WARNINGS

2
falling from even a small height.
• Keep the product away from moisture and heat.
• Never immerse the product in water or other liquids.
• Only use the product in its intended manner. Any other use may result
in damage to the product or its surroundings.
• Tighten the screws but do not over tighten them. Overtightening can
cause damage and may affect the secure t of the screen.
• Failure to follow the above instructions may result in personal injury
and damage to the product or equipment connected to it. Incorrect
installation or use may also invalidate the warranty.
• If you are unsure about the use of the product, please contact your
specialist personnel, your dealer or celexon directly (Web: www.ce-
lexon.co.uk, Mail: info@celexon.co.uk)
• Technical changes and errors excepted.
The manufacturer accepts no responsibility for damage to property or
personal injury if the screen is used outside the recommended specica-
tions, or in the event of improper installation. Do not use this screen near
heaters or air conditioners. Use the product in direct sunlight only to a
limited extent, the PVC material may deform and affect atness. If the
screen is very warm after use in the sun, wait until it has cooled down to
room temperature (approx. 18-24°) and is always completely dry before
folding and packing it.
We recommend that you keep the fabric in a warm room for a few hours in
cold conditions to soften the material making it easier to t.
Please avoid any stains on the surface of the cloth. These may not be able
to be removed.
• Note the front and back of the fabric when attaching.
• Please check ALL parts for damage before assembling.
• The screen must ONLY be assembled on a soft, cushioned surface. The
frame coating may otherwise be scratched.
• For permanent atness, please observe the following instructions
1. Do not touch the projection screen surface with your hands.
2. Do not fold the projection screen surface when it is cold (below 10°C)
or very warm (above 30°C).
3. Do not paint or write on the projection screen surface.

3
The information in this document is subject to change without notice by the
manufacturer.
Changes will be added to subsequent versions of this manual. The manufac-
turer does not guarantee or warranty for the correctness of the information in
this document.
CARE INSTRUCTIONS
NEVER clean the screen with alcohol or other cleaning agents containing sol-
vents. Use only a soft and clean cloth. If necessary, use a mild soap solution to
remove dirt from the surface.
Avoid contact with sharp or pointed objects. These could permanently dama-
ge the projection
screen fabric. For further instructions, please refer to the screen instructions.
DISCLAIMER
IN THE BOX
(A) Frame (B) Projection screen
fabric (front or rear)
(C) QC Pass
(D) Cloth bag (E) Screws (F) Instructions
(G) Support legs, left & right
(depending on size incl. additional support strut)

4
INSTALLATION NOTE
Before installation, please check that all the parts listed above are included. If
parts are missing, contact the dealer and wait for installation until everything
is complete.
It is recommended to install the screen with a second person.
The screen can be installed in 10 minutes without tools. When not in use, the
screen should be stored in the protective case supplied.
ASSSEMBLY
MOUNTING OPTIONS
Correct use of the screen will give the best results.
For front projection, mount and
and view the screen as shown in Fig. 1.
For rear projection, mount and view
the screen as shown in Fig. 2
Fig. 1
Fig. 2

5
STEP 1
Remove the frame from the transport box and place it on a at surface. Unfold
the long sides rst (g. 3, 4).
Fig. 3. Fig. 4.
STEP 2
Unfold the frame until the ttings on the joints audibly „click“ into place. Now
repeat the process with the shorter sides (Fig. 5, 6).
Fig. 5. Fig. 6.
STEP 3
Make sure that all four corners of the frame are folded apart at 90° and that the
stabilisers in the corners are straight and not bent (gs. 7, 8).
Fig. 7. Fig. 8.

6
STEP 4
Take the screen fabric out of the bag and place it in a corner of the frame. Un-
fold the fabric according to the drawing (Fig. 9, 10).
Fig. 9. Fig. 10
STEP 5
When you have completely unfolded the fabric, fasten it to the frame with the
press-studs.
Fasten the press studs as described in gs. 11-14.
In a cold environment the fabric may appear too small. Store it approx 24
hours beforehand in a warm room, so that the material is softer and can be
tted more easily.
Fig. 11. Fig. 12.
Fig. 13. Fig. 14.

7
Fig. 15.
(This step is not necessary if T-legs wi-
thout a support strut are included in
the box).
Once you have unfolded the support
legs correctly, use the hand levers to
secure the support strut to the legs in
a suitable position. The support struts
can be adjusted in length.
If the frame is xed higher up on the
the legs, the support struts should be
fastened
correspondingly higher up (Fig. 16-18).
Info:
Support struts on the feet are only re-
quired for the following sizes:
- 305 x 229cm (4:3)
- 366 x 274cm (4:3)
- 406 x 305cm (4:3)
- 406 x 228cm (16:9)
- 406 x 254cm (16:10)
STEP 6
Take the folded support legs out of the
box and open it as shown in Fig. 15.
There are 2 types of legs, depending
on the size of the frame. One type is
included in the delivery:
„T-legs“ for smaller versions and „T-legs
with support strut“ for larger versions
of the screen.
STEP 7
Fig. 16.
Fig. 17.
Fig. 18.

8
STEP 8
Place the frame on the oor and position the legs on the sides of the frame.
Use the hand screws to secure the frame to the legs. Tighten all screws a little
before tightening them fully (Fig. 19, 20).
STEP 9
When the legs are attached, fold out the feet of the legs. Assembly is now
complete and the screen is stable on a at surface (Fig. 21, 22).
STEP 10
After using the screen, dismantle the screen and store it in the box provided.
To disassemble the screen, follow the assembly steps in reverse order.
Fig. 19. Fig. 20.
Fig. 21. Fig. 22.
Fig 23.
Always fold the fabric at the previously
folded points and always store it lying
on top in the box. Use the previous-
ly removed padding material to keep
creases to a minimum.

9
GENERAL NOTES
Wrinkles in the projection surface usually disappear by themselves after a
short time. After long storage, these are sometimes unavoidable with this type
of product. Placing the screen in a sunny environment (heat) supports and
accelerates this process. If possible, set up the screen 1-2 hours before you
actually use it. During viewing from the usual distance of a few metres, these
creases do not interfere with the projection or are not visible.
This type of product is only suitable to a limited extent for use with short-di-
stance or especially ultra-short distance projectors. Typically this technology
requires an extremely at surface in order to avoid geometric distortion in the
image.
Store the screen in a dry and cool environment. If the screen becomes wet du-
ring use, allow it to dry completely before dismantling and storing.
celexon Europe GmbH | Gutenbergstraße 2 | 48282 Emsdetten | DE

Manuel d’utilisation
Écran sur cadre pliable celexon
Mobil Expert
Projection par l’avant / arrière
Nous vous remercions d’avoir acheté cet article.
Pour des performances et une sécurité optimales, veuillez lire attentivement ces
instructions avant d’installer ou d‘utiliser ce produit. Veuillez conserver ce manuel pour
une utilisation ultérieure.
Version: 32422_071

1
Ce mode d’emploi a pour but de vous familiariser avec le fonctionnement de ce produit.
Conservez donc soigneusement ce manuel an de pouvoir le consulter à tout moment.
• Avant de procéder au montage, veuillez consulter la che technique jointe cont-
enant d’autres consignes de sécurité et d’utilisation.
• Ne commencez pas le montage avant d’avoir lu et compris l’intégralité du mode
d’emploi.
• Effectuez l’installation avec une autre personne an de garantir un montage sûr.
• Retirez le produit de son emballage et enlevez tous les matériaux d’emballage.
Veillez à ce qu’aucun matériau d’emballage ne se trouve sur ou dans le produit.
Si vous constatez des dommages sur l’emballage, vériez également si le produit
est endommagé. Si vous constatez des dommages extérieurs sur le produit ou un
fonctionnement inattendu ou inhabituel, l’écran ne doit plus être utilisé. Contactez
immédiatement le revendeur chez qui vous avez acheté le produit ou directement
le fabricant celexon (Web : www.celexon.fr, Mail : info@celexon.fr) pour plus d’infor-
mations.
• Le produit ne doit être utilisé que dans un environnement sec et à l’abri du vent. Il
est uniquement destiné à une utilisation extérieure temporaire avec des mesures
de sécurité appropriées pour éviter qu‘il ne tombe. (disponible en option, le “kit de
xation au sol“ doit être utilisé en cas de montage à l‘extérieur !)
• L’utilisation de l’appareil et de ses accessoires est interdite aux enfants de moins de
16 ans.
• Veillez à ce que les enfants ne jouent pas avec le produit et ne se trouvent pas à
proximité sans surveillance.
• Toute transformation ou modication du produit est interdite et porte atteinte à la
sécurité du produit !
• Attention au risque de blessure ! Ne démontez jamais le produit de votre propre
chef. N’effectuez jamais de réparations vous-même !
• Ce produit ne doit être utilisé que dans son état d’origine, non modié et non en-
dommagé.
• N’utilisez pas le produit à proximité d’appareils à gaz ou à eau ou dans un
environnement poussiéreux.
• Manipulez le produit avec soin. Il peut être endommagé par des chocs, des coups ou
des chutes, même de faible hauteur.
• Gardez le produit à l’abri de l’humidité et de la chaleur.
AVERTISSEMENTS

2
• Ne plongez jamais le produit dans l’eau ou dans d’autres liquides.
• N’utilisez le produit que de la manière pour laquelle il a été conçu. Toute autre utili-
sation peut entraîner des blessures corporelles, des dommages au produit ou à son
environnement.
• Lorsque vous serrez les vis, ne les serrez pas trop fort. Un serrage excessif (par ex-
emple à l’aide d’une visseuse électrique) peut entraîner des dommages et compro-
mettre la bonne tenue de l’écran.
• Le non-respect des instructions ci-dessus peut entraîner des dommages corporels
et endommager le produit ou les appareils qui y sont raccordés. La garantie peut
également être annulée en cas d’installation ou d’utilisation incorrecte.
• Si vous avez des doutes sur l’utilisation du produit, contactez le personnel spécialisé,
votre revendeur ou le fabricant celexon directement (Web : www.celexon.fr, mail :
info@celexon.fr).
• Sous réserve de modications techniques et d’erreurs.
Le fabricant décline toute responsabilité en cas de dommages matériels ou corporels
si l’écran est utilisé en dehors des spécications recommandées ou s’il n’est pas installé
correctement. N‘utilisez pas cet écran à proximité d’un chauffage ou d’un climatiseur.
N’utilisez le produit que de manière limitée en plein soleil, le matériau PVC peut s’y dé-
former et inuencer la planéité. Si la toile est très chaude après une utilisation au soleil,
attendez qu’elle redescende à température ambiante (env. 18-24°) et qu’elle soit toujours
complètement sèche avant de la plier et de l’emballer.
Nous vous recommandons de laisser la toile dans une pièce chaude pendant quelques
heures par temps froid, an d’assouplir le matériau et de mieux pouvoir l’ajuster et la
xer sans dommage sur le cadre.
Veuillez éviter de faire des tâches sur la surface de la toile. Celles-ci pourraient ne plus
pouvoir être enlevées. Remontez toujours la toile après chaque utilisation.
• Notez l’avant et l’arrière de la toile lors de la mise en place.
• Veuillez vérier TOUTES les pièces avant l’assemblage pour vous assurer qu’el-
les ne sont pas endommagées ou rayées.
• La toile doit être assemblée UNIQUEMENT sur une surface souple et rem-
bourrée. Dans le cas contraire, le revêtement du cadre peut se rayer.
• Pour une planéité durable, veuillez respecter les consignes suivantes:
1. Ne touchez pas la surface de la toile de projection avec les mains nues
(utilisez des gants en tissu idéalement).
2. Ne pliez pas la toile de projection.
3. Ne peignez ou n’écrivez pas sur la toile de projection.

3
Les informations contenues dans ce document peuvent être modiées sans
préavis par le fabricant. Les modications seront toujours ajoutées dans les
versions suivantes de ce manuel. Le fabricant ne fournit aucune garantie quant
à l’exactitude des informations contenues dans ce document.
CONSEIL D’ENTRETIEN
Ne nettoyez JAMAIS la toile avec de l’alcool ou d’autres produits de nettoyage
contenant des solvants. Utilisez uniquement un chiffon doux et propre. Une
eau savonneuse douce permet, le cas échéant, d’éliminer la saleté de la sur-
face. Évitez absolument tout contact avec des objets pointus ou tranchants.
Ceux-ci pourraient endommager durablement la toile de projection. Pour de
plus amples informations, veuillez consulter les instructions relatives à l’écran.
AVIS DE NON-RESPONSABILITÉ
CONTENU DE LA LIVRAISON
(A) Cadre (B) Toile de
projection (avant ou
arrière)
(C) Passeport
QC
(D) Sac pour la toile (E) Vis (F) Instructions
(G) Pieds de support, gauche et droit (selon la
taille, barre de support supplémentaire incluse)

4
CONSEIL D’INSTALLATION
Avant l’installation, veuillez vérier si toutes les pièces mentionnées ci-dessus
sont incluses! En cas de pièces manquantes, contactez le revendeur et atten-
dez que tout soit complet avant de procéder à l’installation. Il est recommandé
de monter l’écran avec une deuxième personne.
L’écran peut être monté en 10 minutes et sans outils. Lorsqu’il n‘est pas utilisé,
l’écran doit être rangé dans le coffre fourni.
MONTAGE
VARIANTES DE MONTAGE
Une utilisation correcte de l’écran permet d’obtenir les meilleurs résultats.
Pour une projection par l’avant, mon-
tez et visualisez l’écran comme indiqué
sur la g. 1.
Pour une projection par l’arrière, mon-
tez et visualisez l’écran comme indiqué
sur la g. 2.
Fig. 1
Fig. 2

5
ÉTAPE 1
Retirez le cadre du coffre de transport et posez-le sur une surface plane. Dé-
pliez d’abord lesparties longues (g. 3, 4).
Fig. 3 Fig. 4
ÉTAPE 2
Dépliez le cadre jusqu’à ce que vous entendiez les armatures s’emboîter les
unes dans lesautres au niveau des articulations. Répétez maintenant l’opérati-
on avec les parties plus courtes (g. 5, 6).
Fig. 5 Fig. 6
ÉTAPE 3
Assurez-vous que les quatre coins du cadre soient écartés de 90° et que les
éléments de stabilisation dans les coins soient droits et non courbés (g. 7, 8).
Fig. 7 Fig. 8

6
ÉTAPE 4
Sortez la toile de son sac et placez-la dans un coin du cadre. Dépliez la toile
comme indiqué sur le dessin (g. 9, 10).
Fig. 9. Fig. 10
ÉTAPE 5
Une fois la toile entièrement dépliée, xez-la au cadre à l’aide des bou-
tons-pression. Fixez les boutons-pression comme décrit sur les g. 11-14. Dans
un environnement froid, la toile peut paraître trop petite. Stockez-la environ
24 heures à l‘avance dans un endroit chaud, an que le matériau puisse être
déployé de manière adaptée avec sa taille initiale et toute sa souplesse.
Fig. 11. Fig. 12
Fig. 13. Fig. 14

7
Fig. 15
(Ignorez cette étape si des pieds de
support en T sans barre de support
sont fournis). Une fois les pieds de sup-
port correctement déployés, utilisez les
vis à main et xez la barre de support
aux pieds dans une position approp-
riée. Les barres de support peuvent
être réglées à la bonne longueur. Si le
cadre est xé plus haut sur les pieds,
les barres de support doivent aussi être
xées plus haut (g. 16-18).
Info:
Des barres de support aux pieds ne
sont nécessaires et fournies que pour
les dimensions suivantes :
- 305 x 229 cm (4:3)
- 366 x 274 cm (4:3)
- 406 x 305 cm (4:3)
- 406 x 228 cm (16:9)
- 406 x 254 cm (16:10)
ÉTAPE 6
Retirez les pieds pliés du coffre et ou-
vrez-les comme indiqué sur la g. 15. Il
existe 2 types de pieds de support dans
la livraison. Selon la taille du cadre, vous
trouverez le type “pieds de support
en T“ pour les versions plus petites et
“pieds de support en T avec barre de
support“ pour les versions plus grandes
de l’écran.
ÉTAPE 7
Fig. 16
Fig. 17
Fig. 18

8
ÉTAPE 8
Posez le cadre sur le sol et positionnez les pieds de chaque côté du cadre. Uti-
lisez les vis à main pour xer le cadre aux pieds. Fixez légèrement toutes les vis
avant de les serrer (g. 19, 20).
ÉTAPE 9
Une fois le cadre redressé, dépliez les pieds vers l’avant. Le montage est
maintenant terminé et la toile est stable sur une surface plane (g. 21, 22).
ÉTAPE 10
Après avoir utilisé l’écran, démontez-le et rangez-le dans le coffre fourni. Pour
démonter l’écran, suivez les étapes de montage dans l‘ordre inverse.
Fig. 19. Fig. 20
Fig. 21 Fig. 22
Fig. 23
Pliez toujours la toile avec précaution
et rangez-la toujours en haut du coffre.
Aux points de pliage, insérez le maté-
riel de rembourrage préalablement re-
tiré an de minimiser les plis.

9
REMARQUES GÉNÉRALES
Les plis de la surface de projection disparaissent généralement d’eux-mêmes
après peu de temps. Après le déballage ou un long stockage, ils sont parfois in-
évitables chez ce type de produit. Dans la mesure du possible, installez l’écran
1 à 2 heures avant son utilisation. Les éventuels plis disparaissent ou diminuent
nettement dans un environnement ensoleillé / chaud. À une distance normale
de quelques mètres, ces plis ne gênent pas la projection ou ne sont pas visib-
les.
Ce type de produit ne convient que de manière limitée à une utilisation
avec des vidéoprojecteurs à courte focale ou, surtout, à ultra-courte focale.
Typiquement, ces vidéoprojecteurs nécessitent une surface extrêmement pla-
ne pour ne pas provoquer de distorsion géométrique de l’image.
Stockez la toile dans un environnement sec et frais. Si la toile est mouillée
pendant l’utilisation, laissez-la sécher complètement avant de la démonter et
de la stocker.
celexon Europe GmbH | Gutenbergstraße 2 | 48282 Emsdetten | DE

Manual de instrucciones
Pantalla de marco plegable
celexon Mobil Expert Proyección
frontal / trasera
Gracias por adquirir este producto.
Para un rendimiento y seguridad óptimos, lea atentamente estas instrucciones antes de
instalar o utilizar este producto. Conserve este manual para futuras consultas.
Versión: 32422_071

1
El propósito de este manual es familiarizarle con el funcionamiento de este producto.
Conserve este manual en un lugar seguro para futuras consultas.
• Consulte la hoja de datos adjunta con más instrucciones de seguridad y funciona-
miento antes de iniciar el montaje.
• No comience la instalación hasta que haya leído y comprendido todo el manual.
• Realice la instalación con otra persona para garantizar un montaje seguro.
• Saque el producto de su embalaje y retire todo el material de embalaje. Asegúrese
de que no haya ningún material de embalaje sobre o dentro del producto. Si observa
algún daño en el embalaje, compruebe también si el producto está dañado. Si ob-
serva algún daño externo en el producto o un funcionamiento inesperado o inusual,
no debe seguir utilizando el monitor. Póngase en contacto inmediatamente con el
distribuidor al que compró el producto o directamente con el fabricante celexon
(Web: www.celexon.es, Mail: info@celexon.es) para obtener más información.
• El producto sólo debe utilizarse en un entorno seco y sin viento. Sólo está destina-
do a un uso temporal en exteriores con las medidas de seguridad adecuadas para
evitar que se caiga (para el montaje en exteriores debe utilizarse el „kit de jación
al suelo“ opcional).
• Los niños menores de 16 años no pueden utilizar el aparato ni sus accesorios.
• Asegúrese de que los niños no jueguen con el producto ni permanezcan cerca de
él sin supervisión.
• Cualquier alteración o modicación del producto está prohibida y pone en peligro
su seguridad.
• Tenga cuidado con el riesgo de lesiones. No desmonte nunca el producto por su
cuenta. No realice nunca reparaciones por su cuenta.
• Este producto sólo debe utilizarse en su estado original, sin modicaciones ni daños.
• No utilice el producto cerca de aparatos de gas o agua ni en entornos polvorientos.
• Manipule el producto con cuidado. Puede dañarse por golpes o caídas, incluso des-
de poca altura.
• Mantenga el producto alejado de la humedad y el calor.
• No sumerja nunca el producto en agua u otros líquidos.
• Utilice el producto únicamente para el n para el que ha sido diseñado. Cualquier
otro uso puede causar lesiones personales, daños al producto o a su entorno.
• No apriete demasiado los tornillos. Un apriete excesivo (por ejemplo, con un destor-
nillador eléctrico) puede causar daños y comprometer el ajuste correcto de la pan-
ADVERTENCIAS

2
talla.
• El incumplimiento de las instrucciones anteriores puede provocar lesiones persona-
les y daños en el producto o en los equipos conectados a él. La garantía también
puede quedar anulada en caso de instalación o uso incorrectos.
• Si tiene alguna duda sobre el uso del producto, póngase en contacto con su per-
sonal especializado, su distribuidor o directamente con el fabricante celexon (Web:
www.celexon.es, mail: info@celexon.es).
• Sujeto a cambios y errores técnicos.
El fabricante declina toda responsabilidad por daños materiales o personales si la pantal-
la se utiliza fuera de las especicaciones recomendadas o si no se instala correctamente.
No utilice esta pantalla cerca de un calefactor o aire acondicionado. Utilice el producto
sólo de forma limitada bajo la luz solar directa, ya que el material de PVC puede defor-
marse y afectar a la planitud. Si la tela está muy caliente después de usarla al sol, espere
a que haya bajado a temperatura ambiente (aprox. 18-24°) y esté completamente seca
antes de plegarla y empaquetarla.
Le recomendamos que deje la tela en una habitación caliente durante unas horas cuando
haga frío, para que el material se ablande y pueda ajustarse y jarse al bastidor sin sufrir
daños.
Evite manchar la supercie de la tela. Es posible que no se puedan quitar. Vuelva a
montar siempre la tela después de cada uso.
• Tenga en cuenta el anverso y el reverso de la tela al montarla.
• Compruebe TODAS las piezas antes del montaje para asegurarse de que no estén
dañadas ni arañadas.
• La tela SÓLO debe montarse sobre una supercie blanda y acolchada. De lo contra-
rio, el revestimiento del marco podría rayarse.
• Para conseguir una planicidad duradera, tenga en cuenta las siguientes directrices:
1. No toque la supercie de la pantalla de proyección con las manos descubiertas
(lo ideal es utilizar guantes de tela).
2. No doble la pantalla de proyección.
3. No pinte ni escriba en la pantalla de proyección.

3
La información contenida en este documento está sujeta a cambios sin previo
aviso por parte del fabricante. Los cambios se incorporarán siempre en las ver-
siones posteriores de este manual. El fabricante no garantiza la exactitud de la
información contenida en este documento.
INSTRUCCIONES DE CUIDADO
NUNCA limpie el tejido con alcohol u otros productos de limpieza que con-
tengan disolventes. Utilice únicamente un paño suave y limpio. Puede utili-
zarse agua jabonosa suave para eliminar la suciedad de la supercie. Evite
el contacto con objetos alados o puntiagudos. Éstos pueden causar daños
permanentes en la pantalla de proyección. Para más información, consulte las
instrucciones de la pantalla.
AVISO LEGAL
CONTENIDO DE LA ENTREGA
(A) Marco (B) Pantalla de proy-
ección (FRONTAL O
RETRO)
(C) Manual de
control de calidad
(D) Bolsa para la pantalla (E) Tornillos (F) Instrucciones
(G) Patas de soporte, izquierda y
derecha (dependiendo del tamaño,
barra de soporte adicional incluida)

4
CONSEJOS DE INSTALACIÓN
Antes de proceder a la instalación, compruebe si se incluyen todas las piezas
mencionadas. Si falta alguna pieza, póngase en contacto con el distribuidor y
espere a que todo esté completo antes de proceder a la instalación. Se reco-
mienda montar la mampara con una segunda persona.
La mampara puede montarse en 10 minutos sin herramientas. Cuando no se
utilice, la mampara debe guardarse en la caja suministrada.
MONTAJE
VARIANTES DE MONTAJE
Los mejores resultados se obtienen utilizando la pantalla correctamente.
Para proyección frontal, monte y visua-
lice la pantalla como se muestra en la
g. 1.
Para proyección trasera, monte y vea la
pantalla como se muestra en la g. 2.
Fig. 1
Fig. 2

5
PASO 1
Saque el bastidor de la caja de transporte y colóquelo sobre una supercie
plana. Despliegue primero las partes largas (Fig. 3, 4).
Fig. 3 Fig. 4
PASO 2
Despliegue el armazón hasta que oiga que los armazones encajan entre sí en
las juntas. Ahora repita el proceso con las partes más cortas (g. 5, 6).
Fig. 5 Fig. 6
PASO 3
Asegúrese de que las cuatro esquinas del marco estén separadas 90° y que los
elementos estabilizadores de las esquinas estén rectos y no doblados (g. 7, 8).
Fig. 7 Fig. 8

6
PASO 4
Saque la tela de su bolsa y colóquela en una esquina del bastidor. Despliegue
la tela como se muestra en el dibujo (g. 9, 10).
Fig. 9 Fig. 10
PASO 5
Una vez que la tela esté completamente desplegada, fíjela al bastidor con los
broches. Fije los broches como se describe en la g. 11-14. En un ambiente frío,
la tela puede parecer demasiado pequeña. Guárdela unas 24 horas antes en un
lugar cálido, para que el material pueda desplegarse con su tamaño y exibi-
lidad originales.
Fig. 11 Fig. 12
Fig. 13 Fig. 14

7
Fig. 15
(Ignore este paso si se suministran pa-
tas de apoyo en forma de T sin barra
de apoyo). Una vez desplegadas cor-
rectamente las patas de apoyo, utilice
los tornillos manuales y je la barra
de apoyo a las patas en una posición
adecuada. Las barras de apoyo pueden
ajustarse a la longitud correcta. Si el
bastidor se ja más alto en las patas,
las barras de apoyo también deben -
jarse más altas (g. 16-18).
Info:
Las barras de apoyo en las patas sólo
son necesarias y se suministran para las
siguientes dimensiones:
- 305 x 229 cm (4:3)
- 366 x 274 cm (4:3)
- 406 x 305 cm (4:3)
- 406 x 228 cm (16:9)
- 406 x 254 cm (16:10)
PASO 6
Saque las patas plegadas de la caja
y ábralas como se muestra en la Fig.
15. Se suministran 2 tipos de patas de
apoyo. Dependiendo del tamaño del
marco, encontrará el tipo „patas de so-
porte en forma de T“ para las versiones
más pequeñas y „patas de soporte en
forma de T con barra de soporte“ para
las versiones más grandes de la pantal-
la.
PASO 7
Fig. 16
Fig. 17
Fig. 18

8
PASO 8
Coloque el marco en el suelo y coloque las patas a ambos lados del marco.
Utilice los tornillos manuales para jar el marco a las patas. Apriete ligeramente
todos los tornillos antes de apretarlos (g. 19, 20).
PASO 9
Una vez que el bastidor esté en posición vertical, despliegue las patas hacia
delante. El montaje se ha completado y la lona está estable sobre una super-
cie plana (g. 21, 22).
PASO 10
Después de utilizar la pantalla, desmóntela y guárdela en la caja suministrada.
Para desmontar la pantalla, siga los pasos de montaje en orden inverso.
Fig. 19 Fig. 20
Fig. 21 Fig. 22
Fig. 23
Pliegue siempre la mampara con cui-
dado y guárdela encima de la caja. En
los puntos de plegado, introduzca el
material de acolchado retirado previa-
mente para minimizar las arrugas.

9
NOTAS GENERALES
Las arrugas en la supercie de proyección suelen desaparecer por sí solas al
cabo de poco tiempo. Después de desembalar o almacenar durante mucho
tiempo, a veces son inevitables con este tipo de producto. Si es posible, instale
la pantalla 1 ó 2 horas antes de utilizarla. Las posibles arrugas desaparecerán o
disminuirán considerablemente en un entorno soleado o cálido. A una distan-
cia normal de unos pocos metros, estas arrugas no intereren con la proyec-
ción o no son visibles.
Este tipo de producto sólo es adecuado en cierta medida para su uso con
proyectores de corta distancia o, especialmente, de ultracorta distancia. Nor-
malmente, estos proyectores requieren una supercie extremadamente plana
para no provocar distorsiones geométricas de la imagen.
Guarde la pantalla en un lugar fresco y seco. Si la pantalla se moja durante su
uso, deje que se seque completamente antes de desmontarla y guardarla.
celexon Europe GmbH | Gutenbergstraße 2 | 48282 Emsdetten | DE

Manuale d´uso
celexon Schermo da proiezione
pieghevole Mobil Expert
Proiezione frontale / retro
Gentile Cliente, celexon la ringrazia per l´acquisto di questo prodotto.
Prima di utilizzare lo schermo leggere attentamente le istruzioni e conservare il manuale
dopo la consultazione.
Version: 32422_071

1
Questo manuale d´istruzioni ha lo scopo di familiarizzare con il funzionamento di questo
prodotto. Si consiglia di conservare questo manuale in un luogo sicuro in modo da po-
terlo consultare in qualsiasi momento.
• Leggere attentamente questo manuale prima di procedere all‘installazione e con-
servarlo per eventuali consultazioni future.
• Per un utilizzo corretto e sicuro, si consideri che il presente schermo è concepito
esclusivamente per un utilizzo interno.
• Tenere lo schermo fuori dalla portata dei bambini di età inferiore ai 16 anni. Non las-
ciare bambini nei pressi dello schermo senza supervisione di un adulto. Non giocare
in prossimità dello schermo.
• L´installazione dello schermo deve essere effettuata con l´aiuto di una seconda
persona.
• Per una maggiore praticità e sicurezza, installare lo schermo con l‘aiuto di un‘altra
persona.
• Per non compromettere il funzionamento dello schermo stringere saldamente le
viti durante l‘installazione ma senza forzare (evitare l‘uso di cacciaviti elettrici a
batteria).
• Ricordiamo che occorre vericare la tenuta e la stabilità dei carichi sospesi almeno
due volte l´anno.
• Si prega di utilizzare lo schermo in modo idoneo, un uso improprio può causare
danni a persone o cose.
• Effettuare l‘installazione su superci regolari ed, in caso di pareti, portanti in mura-
tura o cemento.
• ATTENZIONE: Tenere le mani e/o le dita lontani dallo schermo durante la sua
apertura/chiusura.
• Qualora si riscontrassero danni esterni all´imballo, si prega di vericare che non
ci siano danni al prodotto. In caso di danni al prodotto o malfunzionamento del-
lo stesso, non utilizzare lo schermo. Contattare immediatamente il venditore dello
schermo o celexon Europe GmbH all´indirizzo [email protected]
AVVERTENZE

2
• Tenere lontano lo schermo da fonti di calore ed umidità.
• Non immergere il prodotto in acqua o in altri liquidi.
• La mancata osservazione delle indicazioni sopracitate può causare danni a persone,
allo schermo o ai dispositivi ad esso collegati. La garanzia non copre danni dovuti
ad un‘installazione o ad un uso non idonei.
• In caso di dubbi sull‘utilizzo del prodotto, rivolgersi direttamente o celexon (info@
celexon.it) o a installatori specializzati.
• Le informazioni presenti all´interno di questo manuale possono subire modiche
senza alcun preavviso. Versioni successive del presente manuale possono dunque
contenere correzioni/aggiunte.
• Il produttore non si assume alcuna responsabilità per danni a persone o cose in caso
di utilizzo scorretto dello schermo o errata installazione.
• Non utilizzare lo schermo in prossimità di fonti di calore o climatizzatori. Non espor-
re lo schermo alla luce solare diretta o davanti ad una nestra per evitare danni
permanenti alla supercie di proiezione.
• Si consiglia di attendere circa 2 ore dal momento della consegna prima di installare
lo schermo per consentire l’acclimatamento della tela, soprattutto in caso di tras-
porto da un ambiente freddo ad uno più caldo.
• Evitare di sporcare la tela da proiezione: la rimozione di eventuali macchie potrebbe
risultare impossibile.
• Evitare di macchiare la supercie dell tela.Potrebbe rivelarsi impossibile asportare
macchie
• Durante l´installazione fare attenzione al lato frontale e retro della tela
• Controllare che TUTTE le parti non presentino danni o graf prima del mon-
taggio!
• Lo schermo deve essere montato SOLO su una supercie morbida e imbottita.
• Diversamente, il rivestimento della cornice potrebbe grafarsi.
• Per ottenere una supercie piana durevole, osservare le seguenti istruzioni:
1. Non toccare la supercie dello schermo di proiezione con le mani.
2. Non piegare la tela dello schermo di proiezione in caso di basse tempera-
ture (meno di 10°C) oppure alte temperature (oltre i 30°C).
3. Non dipingere o scrivere sulla supercie dello schermo di proiezione.

3
Le informazioni contenute in questo documento sono soggette a modiche
senza preavviso da parte del produttore. Le modiche saranno apportate nelle
versioni successive di questo manuale. Il produttore non garantisce o assicura
la garanzia della correttezza delle informazioni contenute in questo documen-
to.
INDICAZIONI SULLA CURA DEL PRODOTTO
Pulire la supercie dello schermo da asciutta solo con un panno morbido. Non
utilizzare MAI alcool o altri detergenti contenenti solventi. La rimozione del-
le impurità dalla supercie di proiezione può essere effettuata tramite acqua
saponata neutra. Evitare il contatto con oggetti appuntiti o aflati che potreb-
bero provocare danni irreversibili alla supercie di proiezione.
ESCLUSIONE DI RESPONSABILITÀ
CONTENUTO DELLA FORNITURA
(A) cornice pieghevole (B) tela da proiezione
(frontale o retro)
(C) QC pass
(D) Custiodia telo (E) Viti (F) Manuale
utente
(G) Piedi, lato destro e sinistro (in base alle dimensioni, la fornitura
include anche una barra di sicurezza)

4
MODALITÀ DI INSTALLAZIONE
Prima di installare lo schermo, vericare la presenza nella fornitura di tutti i
pezzi sotto riportati e controllare che ogni componente sia privo di graf o
difetti! In caso di mancanza di alcuni pezzi, prima di procedere con l‘installazi-
one, contattare il venditore.
Si consiglia di montare lo schermo con l´aiuto di un´altra persona.
Lo schermo può essere montato in 10 minuti e senza l´utilizzo di ulteriori att-
rezzi. In caso di non utilizzo, custodire lo schermo nell´apposita valigia in do-
tazione.
MONTAGGIO
TIPOLOGIE DI MONTAGGIO POSSIBILI
In base all´utilizzo in proiezione frontale o retro, posizionarsi come da
immagini:
Per la proiezione frontale, montare lo
schermo e posizionarsi come indicato
nella gura 1.
Per la retro proiezione, montare lo
schermo e posizionarsi come indicato
nella gura 2.
Fig. 1
Fig. 2

5
STEP 1
Togliere il telaio dalla confezione e posizionarlo su una supercie piana. Aprire
il telaio. (g. 3+4)
Fig. 3 Fig. 4
STEP 2
Spiegare completamente il telaio no a sentire “click”. (g. 5+6). Ripetere
l´operazione anche con i componenti più corti.
Fig. 5 Fig. 6
STEP 3
Assicurarsi che i 4 angoli della cornice siano a 90° e che la barra angolare di
supporto sia dritta e non piegata. (g. 7-10).
Fig. 7 Fig. 8

6
STEP 4
Togliere il telo dalla custodia e posizionarlo al centro della cornice montata.
Aprirlo come illustrato. (Fig. 9+10).
Fig. 9. Fig. 10
STEP 5
Una volta srotolato completamente il telo, ssarlo al telaio con i bottoni a pres-
sione. Fissare i bottoni a pressione come descritto nelle g. 11-14. In un ambi-
ente freddo il telo può apparire troppo piccolo; riporlo quindi in un ambiente
caldo per circa 24 ore, in modo che il materiale possa ammorbidirsi ed essere
allungato no alle dimensioni originali.
Fig. 11. Fig. 12
Fig. 13. Fig. 14

7
Fig. 15
Posizionare le gambe in verticale, ssa-
re la gamba di supporto a quella ver-
ticale, stringendo manualmente le viti
in dotazione. Regolare l´altezza delle
gambe in base alle necessità. (Fig. 16-
18).
Le barre di sostegno possono essere
regolate (g.17) in base all´altezza del
telaio.
Se il telaio è ssato più in alto rispetto
alle barre di sostegno, queste ultime
devono essere ssate più in alto dello
stesso.
Informazione:
Le barre di sostegno vengono fornite
per gli schermi delle seguenti dimen-
sioni:
- 305 x 229cm (4:3)
- 366 x 274cm (4:3)
- 406 x 305cm (4:3)
- 406 x 228cm (16:9)
- 406 x 254cm (16:10)
STEP 6
Togliere le gambe dello schermo dalla
confezione e dispiegarle no a sentire
un “click”, come illustrato nella gura
15. Esistono 2 tipi di gambe, a seconda
delle dimensioni del telaio. „Gambe a T
per le versioni più piccole e „gambe a
T con barra di sostegno“ per i modelli
più grandi.
STEP 7
Fig. 16
Fig. 17
Fig. 18

8
STEP 8
Posizionare la cornice e le gambe sul pavimento. Fissare le gambe alla cornice
avvitando manualmente le viti in dotazione. Con l´aiuto di un´altra persona,
posizionare lo schermo montato in verticale. (Fig.19-20)
STEP 9
Una volta posizionato lo schermo in verticale, piegare la base di ciascuna gam-
ba no a farla poggiare sul pavimento in modo che lo schermo possa reggersi
autonomamente,in maniera stabile e sicura. (Fig. 21, 22)
STEP 10
Dopo aver utilizzato lo schermo, smontarlo e riporlo nell‘apposita valigia. Per
smontare lo schermo, eseguire le operazioni di montaggio in ordine inverso.
Fig. 19. Fig. 20
Fig. 21 Fig. 22
Fig. 23
Si prega di piegare sempre la tela con
cura e di riporla nella parte superiore
della valigia. Nei punti di piegatura po-
sizionare materiale di imbottitura al
ne di ridurre al minimo le pieghe.

9
ISTRUZIONI GENERALI
Eventuali pieghe sulla supercie di proiezione normalmente scompaiono dopo
poco tempo. Dopo il disimballaggio o un lungo stoccaggio, problemi di ques-
ta natura sono inevitabili. La collocazione dello schermo in un ambiente so-
leggiato (caldo) favorisce e accelera questo processo. Se possibile, installare
lo schermo 1-2 ore prima dell‘uso effettivo, eventuali pieghe spariranno con il
calore.
Si tenga in considerazione che eventuali pieghe, da una distanza di visione di
qualche metro non saranno visibili e non incideranno sulla qualità della proie-
zione.
Questa tipologia di schermo non è compatibile con proiettori a focale ultra
corta. I proiettori a focale ultra corta infatti hanno bisogno di una supercie
perfettamente planare, per evitare distorsioni geometriche nell‘immagine.
Conservare lo schermo in un ambiente asciutto e fresco.
Qualora lo schermo dovesse bagnarsi durante l‘uso, lasciarlo asciugare com-
pletamente prima di smontarlo e riporlo.
celexon Europe GmbH | Gutenbergstraße 2 | 48282 Emsdetten | DE

Instrukcja obsługi
Składany ekran ramowy celexon
Mobil Expert do przedniej/tylnej
projekcji
Dziękujemy za zakup tego produktu.
Aby zapewnić optymalne działanie i bezpieczeństwo, przed podłączeniem lub obsługą
tego produktu należy uważnie przeczytać niniejsze instrukcje. Prosimy o zachowanie
niniejszej instrukcji do wykorzystania w przyszłości.
Wersja: 32422_071

1
Niniejsza instrukcja obsługi ma na celu zapoznanie użytkownika z działaniem
produktu. Niniejszą instrukcję przechowywać w bezpiecznym miejscu, aby mieć do niej
dostęp w dowolnym momencie.
• Przed podjęciem montażu należy zapoznać się z załączoną kartą danych zawierają-
cą dalsze wskazówki dotyczące bezpieczeństwa i użytkowania.
• Przed podjęciem montażu należy przeczytać ze zrozumieniem całą instrukcję ob-
sługi.
• Instalację należy wykonywać z drugą osobą, aby zapewnić bezpieczny montaż.
• Rozpakować produkt i usunąć wszystkie materiały opakowaniowe. Upewnić się,
czy w produkcie lub na nim nie ma materiałów opakowaniowych. W przypad-
ku stwierdzenia uszkodzeń opakowania należy również sprawdzić, czy produkt
nie jest uszkodzony. Jeśli widoczne są zewnętrzne uszkodzenia urządzenia albo
w przypadku stwierdzenia niespodziewanego lub nietypowego sposobu działa-
nia, nie wolno dalej używać produktu. Należy bezzwłocznie skontaktować się ze
sprzedawcą, u którego nabyto produkt lub bezpośrednio z rmą celexon (Internet:
www.celexon.pl, e-mail: info@celexon.pl), aby uzyskać więcej informacji.
• Produkt może być używany wyłącznie w suchym i bezwietrznym otoczeniu. Nada-
je się tylko do tymczasowego użytku na zewnątrz przy zachowaniu odpowiednich
środków bezpieczeństwa przed upadkiem. (opcjonalnie dostępny „zestaw rozłącza-
jący celexon” służy do ustawiania na zewnątrz!)
• Korzystanie z urządzenia i akcesoriów jest zabronione dla dzieci poniżej 16 roku ży-
cia.
• Upewnić się, czy dzieci nie bawią się urządzeniami ani nie przebywają w pobliżu
bez nadzoru.
• Jakiekolwiek przeróbki lub modykacje produktu mają wpływ na bezpieczeństwo
produktu i są niedozwolone.
• Uwaga, ryzyko obrażeń ciała! Nigdy nie otwierać produktu samodzielnie. Nigdy
nie przeprowadzać napraw samodzielnie!
• Produkt może być używany tylko w oryginalnym stanie producenta i ewentualnie z
oryginalnymi akcesoriami.
• Nie używać produktu w pobliżu urządzeń przewodzących gaz lub wodę lub w za-
pylonym otoczeniu.
• Z produktem obchodzić się ostrożnie. Może zostać uszkodzony przez wstrząsy, ude-
rzenia lub upadek nawet z niewielkiej wysokości.
• Produkt należy chronić przed wilgocią i wysoką temperaturą.
WSKAZÓWKI OSTRZEGAWCZE

2
• Nigdy nie zanurzać produktu w wodzie lub innych płynach.
• Używać produktu wyłącznie zgodnie z jego przeznaczeniem. Każde inne użycie
może prowadzić do uszkodzenia produktu lub jego otoczenia.
• Dokręcić śruby, ale ich nie przekręcić. Zbyt mocne dokręcenie może spowodować
uszkodzenie i wpłynąć negatywnie na bezpieczne zamocowanie ekranu projekcyj-
nego.
• Niezastosowanie się do powyższych instrukcji może spowodować obrażenia
ciała oraz uszkodzenie produktu lub podłączonych do niego urządzeń. Niewła-
ściwa instalacja lub użytkowanie może również doprowadzić do wygaśnięcia
gwarancji.
• Jeśli nie ma pewności w odniesieniu do korzystania z produk-
tu, skontaktować się z wykwalikowanym personelem, sprzedaw-
cą lub bezpośrednio z rmą celexon (Internet: www.celexon.pl,
e-mail: info@celexon.pl).
• Zastrzega się możliwość zmian technicznych i błędów.
Producent nie ponosi odpowiedzialności za szkody materialne lub obrażenia ciała, jeśli
ekran projekcyjny będzie używany niezgodnie z zalecanymi specykacjami lub jeśli jest
nieprawidłowo zainstalowany. Nie używać ekranu projekcyjnego w pobliżu grzejników
lub klimatyzatorów. Używać produktu w bezpośrednim świetle słonecznym wyłącznie
w ograniczonym stopniu, materiał PCW może się odkształcić i wpłynąć na płaską pozy-
cję. Jeśli tkanina jest bardzo ciepła po używaniu na słońcu, przed złożeniem i zapako-
waniem należy odczekać, aż ostygnie do temperatury pokojowej (ok. 18-24°) i zawsze
będzie całkowicie sucha.
Zalecamy przechowywanie tkaniny w ciepłym pomieszczeniu przez kilka godzin w zim-
nych porach roku, aby materiał stał się bardziej miękki i można go było lepiej oraz bez
uszkodzeń naciągnąć na ramę.
Unikać wszelkich plam na powierzchni tkaniny. Ich usunięcie może być niemożliwe.
• Podczas mocowania zwracać uwagę na przednią i tylną stronę tkaniny.
• Przed montażem sprawdzić WSZYSTKIE części pod kątem uszkodzeń.
• Ekran projekcyjny należy montować WYŁĄCZNIE na miękkiej, wyściełanej po-
wierzchni. W przeciwnym razie powłoka ramy może ulec zarysowaniu.
• Aby uzyskać trwałą płaską pozycję, zwrócić uwagę na następujące wskazówki:
1. Nie dotykać tkaniny projekcyjnej rękoma.
2. Nie składać tkaniny projekcyjnej, gdy jest zimna (poniżej 10°C) lub bardzo go-
rąca (powyżej 30°C).
3. Nie malować ani nie pisać na powierzchni projekcyjnej.

3
Informacje zawarte w tym dokumencie mogą ulec zmianie bez uprzedniego
powiadomienia ze strony producenta. Zmiany będą dodawane do kolejnych
wersji niniejszej instrukcji. Producent nie udziela gwarancji ani rękojmi odno-
śnie poprawności informacji zawartych w tym dokumencie.
WSKAZÓWKA DOTYCZĄCA PIELĘGNACJI
NIGDY nie czyścić ekranu projekcyjnego alkoholem lub innymi środkami
czyszczącymi zawierającymi rozpuszczalniki. Używać tylko miękkiej i czy-
stej szmatki. W razie potrzeby brud można usunąć z powierzchni łagodnym
roztworem mydła. Należy bezwzględnie unikać kontaktu ze spiczastymi lub
ostrymi przedmiotami. Mogą one trwale uszkodzić tkaninę projekcyjną. Dal-
sze wskazówki można znaleźć w załączonych wskazówkach dotyczących ekra-
nu projekcyjnego.
WYŁĄCZENIE ODPOWIEDZIALNOŚCI
ZAKRES DOSTAWY
(A) Rama (B) Tkanina projekcyjna
(przednia lub tylna)
(C) QC Pass
(D) Torba na tkaninę (E) Śruby (F) Instrukcja
(G) Nóżki, po lewej i po prawej
(w zależności od wielkości łącznie ze wspornikiem podpierającym)

4
WSKAZÓWKA DOTYCZĄCA INSTALACJI
Przed instalacją sprawdzić, czy wszystkie wymienione powyżej części są do-
łączone do zestawu! Jeśli brakuje jakichkolwiek części, skontaktować się ze
sprzedawcą i wstrzymać instalację do momentu uzyskania wszystkich części.
Zaleca się montaż ekranu z drugą osobą.
Można zmontować ekran projekcyjny w 10 minut i bez użycia narzędzi. Nieuży-
wany ekran projekcyjny należy przechowywać w dołączonej walizce ochronnej.
MONTAŻ
WARIANTY MONTAŻU
Właściwe użycie tkaniny pozwala uzyskać najlepsze rezultaty.
W przypadku projekcji przed-
niej zamontować ekran i
oglądać go jak na rys. 1.
W przypadku projek-
cji tylnej zamontować ekran i
oglądać go jak na rys. 2.
Rys. 1
Rys. 2

5
KROK 1
Wyjąć ramę z pudła transportowego i umieścić ją na
płaskiej powierzchni. Najpierw rozłożyć długie części (rys. 3, 4).
Rys. 3 Rys. 4
KROK 2
Rozłożyć ramę, aż będzie słyszalne „kliknięcie” okuć na przegubach. Następnie
powtórzyć proces z krótszymi częściami (rys. 5, 6).
Rys. 5 Rys. 6
KROK 3
Upewnić się, że wszystkie cztery narożniki ramy są rozłożone pod kątem 90°
oraz że elementy stabilizujące w narożach są proste i nie wygięte (rys. 7, 8).
Rys. 7 Rys. 8

6
KROK 4
Wyjąć tkaninę z torby i umieścić ją w jednym z narożników ramy. Rozłożyć
tkaninę zgodnie z rysunkiem (rys. 9, 10).
Rys. 10
Rys. 9
KROK 5
Po całkowitym rozłożeniu tkaniny przymocować ją do ramy
za pomocą zatrzasków. Zapiąć zatrzaski zgodnie z opisem na
rys. 11-14. W zimnym otoczeniu tkanina może wydawać się za mała. Przecho-
wywać ją ok. 24 godziny wcześniej w ciepłym pomieszczeniu, dzięki czemu
materiał będzie mógł być rozciągnięty do oryginalnego rozmiaru i bardziej
miękki w dopasowaniu.
Rys. 11 Rys. 12
Rys. 13 Rys. 14

7
Rys. 15
(Ten krok nie jest konieczny, je-
śli w zakresie dostawy znajdują się
nóżki T bez wspornika podpierające-
go).
Po prawidłowym rozłożeniu nó-
żek użyć śrub ręcznych i zamo-
cować wspornik podpierający na
nóżkach w odpowiedniej pozycji.
Wsporniki podpierające można dopa-
sować do odpowiedniej długości. Je-
żeli rama jest zamocowana wyżej na
nóżkach, wsporniki podpierające na-
leży zamocować odpowiednio wyżej
(Rys. 16-18).
Informacja:
Wsporniki podpierające na nóżkach są
wymagane i dołączone tylko do nastę-
pujących rozmiarów:
- 305 x 229 cm (4:3)
- 366 x 274 cm (4:3)
- 406 x 305 cm (4:3)
- 406 x 228 cm (16:9)
- 406 x 254 cm (16:10)
KROK 6
Wyjąć złożone nóżki z pudełka i otwo-
rzyć je, jak pokazano na rys. 15. Dostęp-
ne są 2 rodzaje nóżek. W zależności
od wielkości ramy w zakres dostawy
wchodzi jeden typ: „Nóżki T” dla mniej-
szych wersji i „nóżki T ze wspornikiem
podpierającym” dla większych wersji
ekranu projekcyjnego.
KROK 7
Rys. 16
Rys. 17
Rys. 18

8
KROK 8
Położyć ramę na ziemi i ustawić nóżki po bokach ramy. Użyć śrub ręcznych,
aby przymocować ramę do nóżek. Dokręcić lekko wszystkie śruby przed ich
dokręceniem (rys. 19, 20).
KROK 9
Gdy rama jest z powrotem uniesiona, rozłożyć skierowane do przodu stopy
nóżek.
Montaż jest zakończony, a ekran projekcyjny stoi stabilnie na równej po-
wierzchni (rys. 21, 22).
KROK 10
Po użyciu ekranu projekcyjnego zdemontować ekran i schować go w dostar-
czonym pudełku. Aby zdemontować ekran projekcyjny, wykonać czynności
montażowe w odwrotnej kolejności.
Rys. 19. Rys. 20
Rys. 21 Rys. 22
Rys. 23
Proszę zawsze ostrożnie składać tkani-
nę i zawsze przechowywać ją w pudeł-
ku leżącą na wierzchu. Włożyć wcze-
śniej usunięty materiał wyściełający w
fałdy, aby zminimalizować zagniece-
nia.

9
WSKAZÓWKI OGÓLNE
Zagniecenia na powierzchni projekcyjnej zwykle znikają samoistnie po krót-
kim czasie. Po rozpakowaniu lub długim przechowywaniu są one czasami nie-
uniknione w przypadku tego typu produktów. Ustawienie w słonecznym oto-
czeniu (ciepło) wspomaga i przyspiesza ten proces. Jeśli to możliwe, ustawić
ekran na 1-2 godziny przed faktycznym użyciem, wszelkie zagniecenia znikną
lub znacznie się zmniejszą w ciepłym otoczeniu. Podczas obserwacji z typowej
odległości kilku metrów, zagięcia nie przeszkadzają w projekcji i nie są wtedy
widoczne.
Ten rodzaj produktu ma ograniczoną przydatność do użytku z projek-
torami krótkiego zasięgu, a zwłaszcza projektorami bardzo krótkiego
zasięgu. Jest to typowe dla tej technologii; tego typu projektor wyma-
ga wyjątkowo płaskiej powierzchni, aby nie powstawały zniekształcenia
geometrii obrazu.
Ekran projekcyjny przechowywać w suchym i chłodnym miejscu. Jeśli ekran
projekcyjny zamoczy się podczas użytkowania, przed demontażem i przecho-
wywaniem należy pozostawić go do całkowitego wyschnięcia.
celexon Europe GmbH | Gutenbergstraße 2 | 48282 Emsdetten | DE

Handleiding
celexon spanframescherm Mobil
Expert voor- /achterprojectie
Hartelijk dank voor uw aankoop van dit product.
Voor optimale prestaties en veiligheid moet u deze aanwijzingen zorgvuldig doorlezen
voordat u dit product aansluit of gebruikt. Bewaar deze handleiding voor later gebruik.
Versie: 32422_071

1
Deze handleiding is bedoeld om u vertrouwd te maken met de werking
van dit product. Bewaar deze handleiding daarom goed, zodat u deze altijd kunt raad-
plegen.
• Neem voor de montage het bijgevoegde gegevensblad met verdere veiligheids- en
gebruiksaanwijzingen in acht.
• Begin niet met de montage voordat u de volledige handleiding hebt doorgelezen
en begrepen.
• Voer de installatie met een tweede persoon uit om een veilige montage te waar-
borgen.
• Haal het product uit de verpakking en verwijder alle verpakkingsmaterialen. Let
erop dat zich geen verpakkingsmateriaal aan of in het product bevindt. Mocht u
beschadigingen aan de verpakking constateren, moet u ook controleren of het pro-
duct beschadigd is. Mocht u beschadigingen aan de buitenkant van het apparaat of
onverwachte of ongebruikelijke werking constateren, mag het product niet verder
worden gebruikt. Neem voor meer informatie onmiddellijk contact op met de dealer
waarbij u het product hebt gekocht of rechtstreeks met celexon (internet: www.
celexon.nl, e-mail: info@celexon.nl).
• Het product mag alleen in een droge en windstille omgeving worden gebruikt. Het
is alleen geschikt voor tijdelijk gebruik in de buitenlucht met geschikte veiligheids-
maatregelen tegen omvallen. (de optioneel verkrijgbare 'celexon spanset' moet bij
opbouw in de buitenlucht worden gebruikt!)
• Het gebruik van het apparaat en accessoires is verboden voor kinderen jonger dan
16 jaar.
• Zorg ervoor dat kinderen niet met het apparaat spelen of zich zonder toezicht in de
buurt van het apparaat bevinden.
• Ombouwen of veranderen van het product beïnvloedt de productveiligheid en is
niet toegestaan.
• Let op, letselgevaar! Open het product nooit eigenmachtig. Voer nooit zelf repa-
raties uit!
• Dit product mag alleen in oorspronkelijke toestand en met evt. originele accessoires
worden gebruikt.
• Gebruik het product niet in de buurt van gas- of watervoerende apparaten en niet
in stofge omgeving.
• Behandel het product zorgvuldig. Het apparaat kan door stoten, schokken of vallen
(al vanaf geringe hoogte) beschadigd raken.
WAARSCHUWINGEN

2
• Houd het product uit de buurt van vocht en hitte.
• Dompel het product nooit in water of andere vloeistoffen.
• Gebruik het product alleen waarvoor het bedoeld is. Afwijkend gebruik kan leiden
tot beschadigingen van het product of in de omgeving van het product.
• Draai de schroeven vast, maar draai ze niet te strak aan. Te strak aandraaien kan
schade veroorzaken en de veilige houvast van het scherm beïnvloeden.
• Bij niet-inachtneming van bovenstaande aanwijzingen kun-
nen letsel en beschadigingen van het product of daaraan aange-
sloten apparaten ontstaan. Bij foutieve installatie of gebruik kan de
garantie ook komen te vervallen.
• Als u twijfelt bij het gebruik van het product, neem dan contact op met vak-
personeel, uw dealer of rechtstreeks met celexon (internet: www.celexon.nl,
e-mail: info@celexon.nl).
• Technische wijzigingen en fouten zijn voorbehouden.
De fabrikant is niet aansprakelijk voor materiële schade of letsel als het scherm buiten
de aanbevolen specicaties wordt gebruikt of bij ondeskundige installatie. Gebruik dit
scherm niet in de buurt van verwarmingen of airco's. Gebruik het product alleen in be-
perkte mate in direct zonlicht, het materiaal van pvc kan daarbij vervormen en de vlakke
toestand beïnvloeden. Als het doek na gebruik in de zon erg warm is, moet u wachten
tot het is afgekoeld tot kamertemperatuur (ca. 18-24°) en altijd volledig droog is, voordat
u het opvouwt en inpakt.
Wij adviseren u om het doek tijdens koude seizoenen enkele uren in een warme kamer te
bewaren, zodat het materiaal zachter wordt om het beter passend en zonder beschadi-
ging op het frame te kunnen spannen.
Vermijd vlekken op het doekoppervlak. Deze kunnen mogelijk niet meer verwijderd
worden.
• Let bij aanbrengen op de voor- en achterkant van het doek.
• Controleer ALLE onderdelen voor de assemblage op schade.
• Het scherm mag ALLEEN op zachte, gevoerde ondergrond worden geassembleerd.
Er kunnen anders krassen op de framecoating ontstaan.
• Voor een permanente vlakke toestand neemt u de volgende aanwijzingen in acht:
1. Raak het projectiedoek niet met uw handen aan.
2. Vouw het projectiedoek niet in koude (onder 10°C) of zeer warme toestand
(boven 30°C).
3. Beschilder of beschrijf het projectiedoek niet.

3
De informatie in dit document kan zonder voorafgaande kennisgeving door de
fabrikant worden gewijzigd. Wijzigingen worden telkens in de volgende versies
van dit handboek aangevuld. De fabrikant geeft geen garantie op de juistheid
van de informatie in dit document.
VERZORGINGSAANWIJZING
Reinig het scherm NOOIT met alcohol of andere reinigingsmiddelen die op-
losmiddel bevatten. Gebruik alleen een zachte en schone doek. Met een mild
zeepsopje kan eventueel vuil van het oppervlak worden verwijderd. Vermijd
beslist het contact met puntige of scherpe voorwerpen. Deze kunnen het pro-
jectiedoek blijvend beschadigen. Meer aanwijzingen staan in de bijgevoegde
aanwijzingen voor het scherm.
UITSLUITING VAN AANSPRAKELIJKHEID
LEVERINGSOMVANG
(A) Frame (B) Projectiedoek (voor-
kant of achterkant)
(C) QC Pass
(D) Doektas (E) Schroeven (F) Handleiding
(G) Poten, links en rechts
(afhankelijk van grootte incl.
aanv. steunbalk)

4
INSTALLATIE-AANWIJZING
Controleer voor de installatie of alle boven vermelde onderdelen aanwezig zijn!
Mochten er onderdelen ontbreken, neem dan contact op met de dealer en
wacht met de installatie tot alles volledig is. Aanbevolen wordt om het scherm
samen met een andere persoon te monteren.
Het scherm kan binnen 10 minuten en zonder gereedschap worden gemon-
teerd. Als het scherm niet wordt gebruikt, wordt het in de meegeleverde be-
schermkoffer opgeborgen.
MONTAGE
MONTAGEVARIANTEN
Correct gebruik van het scherm zorgt voor de beste resultaten.
Voor frontprojectie monteert en
bekijkt u het scherm zoals in afb. 1.
Voor achterprojectie monteert en
bekijkt u het scherm zoals in afb. 2.
Afb. 1
Afb. 2

5
STAP 1
Neem het frame uit de transportkoffer en plaats het op een
effen oppervlak. Klap eerst de lange onderdelen uit (afb. 3, 4).
Afb. 3 Afb. 4
STAP 2
Vouw het frame zover uit elkaar tot het beslag bij de scharnieren hoorbaar in
elkaar klikt. Herhaal de procedure nu ook met de kortere onderdelen (afb. 5, 6).
Afb. 5 Afb. 6
STAP 3
Zorg ervoor dat alle vier hoeken van het frame in een hoek van 90° uit elkaar
zijn geklapt en dat de stabilisatie-elementen in de hoeken recht en niet gebo-
gen zijn (afb. 7, 8).
Afb. 7 Afb. 8

6
STAP 4
Haal het schermdoek uit de tas en plaats het in een hoek van het frame. Vouw
het doek in overeenstemming met de tekening uit (afb. 9, 10).
Afb. 9 Afb. 10
STAP 5
Als u het doek volledig hebt uitgevouwen, bevestigt u het met de druk-
knoppen op het frame. Bevestig de drukknoppen zoals beschreven in
afb. 11-14. In een koude omgeving is het doek mogelijk te klein. Bewaar het ca.
24 uur van te voren in een warme ruimte, zodat het materiaal in de oorspron-
kelijke grootte en op een zachtere, passende manier kan worden gespannen.
Afb. 11. Afb. 12
Afb. 13 Afb. 14

7
Afb. 15
(Deze stap komt te vervallen als
T-standpoten zonder steunbalk zijn
meegeleverd).
Als u de standpoten correct hebt uit-
geklapt, gebruikt u de handschroe-
ven en borgt u de steunbalk op een
geschikte positie aan de poten. De
steunbalken kunnen in passende leng-
te worden ingesteld. Als het frame
hoger op de standpoten is bevestigd,
moeten de steunbalken overeenkom-
stig verder boven worden bevestigd
(afb. 16-18).
Info:
Steunbalken op de voeten zijn alleen bij
de volgende groottes nodig en meege-
leverd:
- 305 x 229 cm (4:3)
- 366 x 274 cm (4:3)
- 406 x 305 cm (4:3)
- 406 x 228 cm (16:9)
- 406 x 254 cm (16:10)
STAP 6
Neem de gevouwen standpoten uit de
koffer en open deze zoals in afb. 15. Er
zijn 2 soorten standpoten, afhankelijk
van de grootte van het frame bevindt
zich een type in de leveringsomvang:
'T-standpoten' voor kleinere versies en
'T-standpoten met steunbalk' voor gro-
tere versies van het scherm.
STAP 7
Afb. 16
Afb. 17
Afb. 18

8
STAP 8
Plaats het frame op de vloer en positioneer de standpoten aan de zijkanten
van het frame. Gebruik de handschroeven om het frame aan de standpoten te
bevestigen. Bevestig alle schroeven eerst een beetje voordat u ze vastdraait
(afb. 19, 20).
STAP 9
Als het frame weer is opgesteld, klapt u de voeten van de poten die naar
voren wijzen uit.
De montage is nu beëindigd en het scherm staat stabiel op een effen onder-
grond (afb. 21, 22).
STAP 10
Na gebruik van het scherm demonteert u het scherm en bewaart u het in de
meegeleverde koffer. Om het scherm te demonteren voert u de montagestap-
pen in omgekeerde volgorde uit.
Afb. 19 Afb. 20
Afb. 21 Afb. 22
Afb. 23
Het doek moet u altijd voorzichtig op-
vouwen en alleen bovenliggend in de
koffer bewaren. Op de vouwpunten
voorheen verwijderd voeringmateriaal
plaatsen om knikken minimaal te hou-
den.

9
ALGEMENE AANWIJZINGEN
Vouwen in het projectieoppervlak verdwijnen normaliter na korte tijd vanzelf.
Na het uitpakken of langer opbergen zijn deze bij dit type product deels niet te
vermijden. Opstelling in zonnige omgeving (warmte) ondersteunt en versnelt
dit proces. Indien mogelijk moet u het scherm 1-2 uur voor eigenlijk gebruik
opbouwen, eventuele knikken verdwijnen in warme omgeving of worden aan-
zienlijk verminderd. Tijdens het kijken vanaf normale afstand van enkele meters
zijn deze knikken niet storend resp. niet zichtbaar bij de projectie.
Dit type product is maar beperkt geschikt voor gebruik met korteafstands- of
vooral ultra-korteafstandsprojectoren. Voor dit soort projectoren is een extreem
vlak oppervlak nodig om geen geometrievervorming in het beeld te veroorzaken
.
Bewaar het scherm in een droge en koele omgeving. Mocht het scherm tijdens
het gebruik nat zijn geworden, laat het dan volledig drogen voordat u het de-
monteert en opbergt.
celexon Europe GmbH | Gutenbergstraße 2 | 48282 Emsdetten | DE

Bruksanvisning
celexon Hopfällbar projektorduk
Mobile Expert front- eller bak-
projektion
Tack för att du har valt denna produkt!
Läs igenom denna bruksanvisning noga innan du ansluter eller använder produkten för
att garantera säkerheten och uppnå bästa möjliga prestanda. Spara denna bruksanvis-
ning för framtida bruk.
Version: 32422_071

1
Syftet med denna bruksanvisning är att förklara hur produkten fungerar. Spara därför
bruksanvisningen på ett säkert ställe så att du kan läsa i den senare om det behövs.
• Läs det medföljande databladet med er säkerhets- och användningsanvisningar
innan du börjar med monteringen.
• Börja inte med monteringen förrän du har läst och förstått hela bruksanvisningen.
• Utför installationen tillsammans med en medhjälpare för att garantera säkerheten
under monteringen.
• Ta ut produkten ur förpackningen och avlägsna allt förpackningsmaterial. Kontroll-
era att det inte nns något förpackningsmaterial på eller i produkten. Om du ser att
förpackningen är skadad bör du kontrollera om produkten är skadad också. Om du
hittar utvändiga skador på produkten eller om den inte fungerar som den ska eller
om den beter sig onormalt så får produkten inte användas längre. Kontakta ome-
delbart återförsäljaren som du köpte produkten av eller vänd dig direkt till celexon
(webbplats: www.celexon.se, e-post: info@celexon.se) för mer information.
• Produkten får endast användas i torra och vindfria miljöer. Produkten får endast
användas utomhus tillfälligt och med lämpliga säkerhetsåtgärder som förhindrar att
den faller omkull. (En förankringssats från celexon som nns som extra tillbehör
måste användas vid uppställning utomhus!)
• Barn under 16 år får inte använda apparaten eller tillbehören.
• Se till så att inga barn leker med produkterna eller vistas i närheten av dessa utan
uppsikt.
• Det är inte tillåtet att bygga om eller förändra produkten, eftersom det påverkar
produktsäkerheten negativt.
• Varning för skaderisk! Öppna aldrig produkten på egen hand. Utför aldrig några
reparationer själv!
• Denna produkt får endast användas i sitt originaltillverkningsskick och med origi-
naltillbehör.
• Använd aldrig produkten i närheten av gas- eller vattenburen utrustning eller i dam-
miga miljöer.
• Handskas försiktigt med produkten. Den kan skadas av stötar, slag eller fall från låga
höjder.
• Håll produkten borta från fukt och hög värme.
• Doppa aldrig produkten i vatten eller några andra vätskor.
• Använd produkten endast på det sätt som den är avsedd för. Om den används på
VARNINGAR

2
något annat sätt kan detta leda till skador på produkten eller dess omgivning.
• Dra åt skruvarna ordentligt, men dra inte åt dem för hårt. Om skruvarna dras åt för
hårt kan det leda till skador och göra så att duken inte sitter fast ordentligt.
• Om anvisningarna ovan inte följs kan detta leda till personskador el-
ler skador på produkten eller på utrustning som är ansluten till den.
Felaktig installation eller felaktig användning kan även leda till att
garantin upphör att gälla.
• Om du är osäker på hur produkten ska användas ber vi dig kontakta en ex-
pert, din återförsäljare eller celexon direkt (webbplats: www.celexon.se,
e-post: info@celexon.se).
• Med reservation för tekniska ändringar och fel.
Tillverkaren ansvarar inte för sakskador eller personskador som uppstår om projektordu-
ken inte används enligt de rekommenderade specikationerna, eller om installationen är
felaktigt utförd. Denna projektorduk får inte användas i närheten av värmeelement eller
luftkonditioneringar. Produkten får endast användas i direkt solljus i begränsad omfatt-
ning, eftersom PVC-materialet kan deformeras och påverka ytjämnheten. Om duken är
mycket varm efter att ha använts i solen så väntar du tills den har svalnat till rumstem-
peratur (ca 18–24°) och alltid tills den är helt torr innan du viker ihop och packar ner den.
Under den kalla årstiden rekommenderar vi att du först låter duken ligga i några timmar
i ett varmt rum, så att materialet mjuknar och passar bättre på ramen och kan monteras
utan att skadas.
Undvik alla typer av äckar på dukens yta. Det kan hända att de inte går att få bort.
• Se till så att dukens framsida hamnar framåt när duken monteras.
• Kontrollera ALLA delar före monteringen för att se om de är skadade.
• Duken får ENBART monteras på ett mjukt och vadderat underlag. Annars kan ra-
mens ytbeläggning repas.
• För att bevara ytjämnheten måste du följa de följande anvisningarna:
1. Rör aldrig vid projektorduken med händerna.
2. Vik inte projektorduken när den är kall (under 10 °C) eller mycket varm (över
30 °C).
3. Skriv eller måla aldrig på projektorduken.

3
Informationen i detta dokument kan ändras av tillverkaren utan förvarning.
Ändringar införs i de efterföljande versionerna av denna bruksanvisning. Till-
verkaren garanterar inte att uppgifterna i detta dokument är korrekta.
SKÖTSELRÅD
Rengör ALDRIG projektorduken med alkohol eller andra rengöringsmedel som
innehåller lösningsmedel. Använd bara en mjuk och ren trasa. Om det behövs
kan du ta bort smuts från ytan med en mild tvållösning. Undvik kontakt med
spetsiga eller vassa föremål. De kan skada projektorduken permanent. Fler an-
visningar hittar du i de medföljande projektorduksinstruktionerna.
ANSVARSFRISKRIVNING
LEVERANSOMFATTNING
(A) Ram (B) Projektorduk (front-
eller bakprojektion)
(C) QC Pass
(D) Dukpåse (E) Skruvar (F) Instruktioner
(G) Ben, vänster och höger
(plus en stötta beroende på storlek)

4
INSTALLATIONSANVISNING
Kontrollera att alla delar som listas ovan nns med innan du börjar med instal-
lationen. Om det fattas några delar kontaktar du återförsäljaren och väntar
med installationen tills du har alla delar. Vi rekommenderar att man är två när
man monterar projektorduken.
Projektorduken kan monteras på 10 minuter utan verktyg. När projektorduken
inte används förvaras den i den medföljande förvaringsväskan.
MONTERING
MONTERINGSVARIANTER
För att få bästa möjliga resultat måste projektorduken användas på rätt sätt.
Vid frontprojektion monterar och tittar
man på projektorduken som på bild 1.
Vid bakprojektion monterar och tittar
man på projektorduken som på bild 2.
Bild 1
Bild 2

5
STEG 1
Ta ut ramen ur förvaringsväskan och lägg den på ett plant underlag. Fäll ut de
långa delarna först (bild 3 och 4).
Bild 3 Bild 4
STEG 2
Fäll upp ramen så långt att det hörs att beslagen på lederna klickar fast i varan-
dra. Gör sedan likadant med de kortare delarna (bild 5 och 6).
Bild 5 Bild 6
STEG 3
Kontrollera att ramens alla fyra hörn är utfällda i 90° vinkel och att de stabilise-
rande delarna i hörnen är raka och inte böjda (bild 7 och 8).
Bild 7 Bild 8

6
STEG 4
Ta ut projektorduken ur påsen och lägg den i ett av hörnen på ramen. Vik upp
duken som på bilden (bild 9 och 10).
Bild 9 Bild 10
STEG 5
När du har vikt upp duken helt fäster du den på ramen med tryckknap-
parna. Fäst tryckknapparna som på bilderna 11–14. I kalla omgivning-
ar kan det verka som att duken är för liten. Förvara därför duken i ca
24 timmar i ett varmt rum före användningen, så att materialet behåller sin
ursprungliga storlek och mjukhet och duken passar när den monteras.
Bild 11 Bild 12
Bild 13 Bild 14

7
Bild 15
(Detta steg är inte relevant om din pro-
jektorduk har T-ben utan stötta).
När du har fällt ut benen korrekt fäs-
ter du stöttan på benen i en lämp-
lig position med hjälp av handskru-
varna. Stöttorna kan ställas in på
längden så att de passar. Om ramen
sätts fast högre upp på benen så
bör även stöttorna fästas högre upp
(bild 16–18).
Info:
Stöttor till fötterna behövs och levere-
ras bara till de följande storlekarna:
- 305 x 229 cm (4:3)
- 366 x 274 cm (4:3)
- 406 x 305 cm (4:3)
- 406 x 228 cm (16:9)
- 406 x 254 cm (16:10)
STEG 6
Ta ut de hopvikta benen ur väskan och
fäll upp dem som på bild 15. Det nns
två olika typer av ben och vilken typ
som följer med i leveransen beror på
hur stor ramen är: ”T-ben” för mindre
versioner och ”T-ben med stötta” för
större versioner av projektorduken.
STEG 7
Bild 16
Bild 17
Bild 18

8
STEG 8
Lägg ramen på golvet och placera benen på sidorna av ramen. Fäst stödbenen
på ramen med hjälp av handskruvarna. Skruva i alla skruvarna lite löst först,
innan du drar åt dem (bild 19 och 20).
STEG 9
När ramen har ställts upp fäller du ner de framåtpekande fötterna på benen.
Monteringen är nu klar och projektorduken står stabilt på ett jämnt underlag
(bild 21 och 22).
STEG 10
När du har använt projektorduken demonterar du den och förvarar den i den
medföljande väskan. För att demontera projektorduken följer du monterings-
stegen fast i omvänd ordning.
Bild 19 Bild 20
Bild 21 Bild 22
Bild 23
Vik alltid ihop duken mycket försiktigt
och förvara den alltid längst upp i väs-
kan. Lägg tillbaka stoppningsmaterial-
et på de ställen där duken viks för att
hålla vecken så små som möjligt.

9
ALLMÄN INFORMATION
Veck i projektionsytan försvinner i regel av sig själva inom kort. Efter att den
har packats upp eller efter en längre tids förvaring går det tyvärr inte alltid att
undvika veck för denna typ av produkt. Om duken ställs upp i en solig (varm)
miljö underlättas och påskyndas denna process. Om det går är det bra att stäl-
la upp projektorduken 1–2 timmar innan den ska användas, eftersom eventuella
veck försvinner helt eller blir betydligt mindre i varma omgivningar. När man
tittar på duken på ett normalt avstånd på några meter så syns vecken inte och
de stör inte heller projektionen.
Denna typ av produkt kan endast användas i begränsad omfattning med pro-
jektorer med kort eller ultrakort projektionsavstånd (short throw eller ultra
short throw). För tekniken i den typen av projektor behövs en extremt jämn
projektionsyta så att inte geometriska förvrängningar uppstår i bilden.
Förvara projektorduken på ett torrt och svalt ställe. Om duken skulle bli blöt
under användningen måste du vänta tills den har torkat helt innan du demon-
terar och packar ner den.
celexon Europe GmbH | Gutenbergstraße 2 | 48282 Emsdetten | DE
-
 1
1
-
 2
2
-
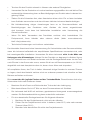 3
3
-
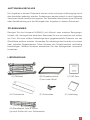 4
4
-
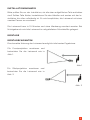 5
5
-
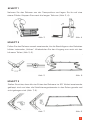 6
6
-
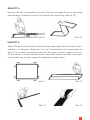 7
7
-
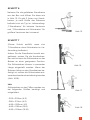 8
8
-
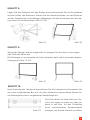 9
9
-
 10
10
-
 11
11
-
 12
12
-
 13
13
-
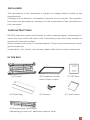 14
14
-
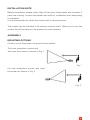 15
15
-
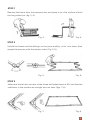 16
16
-
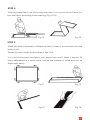 17
17
-
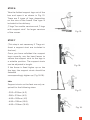 18
18
-
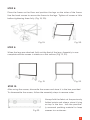 19
19
-
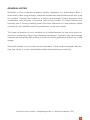 20
20
-
 21
21
-
 22
22
-
 23
23
-
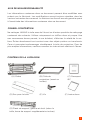 24
24
-
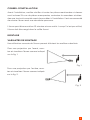 25
25
-
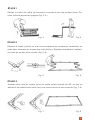 26
26
-
 27
27
-
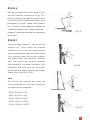 28
28
-
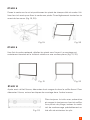 29
29
-
 30
30
-
 31
31
-
 32
32
-
 33
33
-
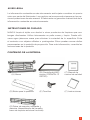 34
34
-
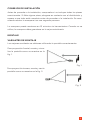 35
35
-
 36
36
-
 37
37
-
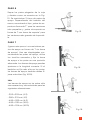 38
38
-
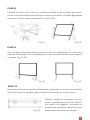 39
39
-
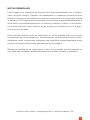 40
40
-
 41
41
-
 42
42
-
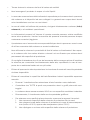 43
43
-
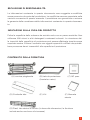 44
44
-
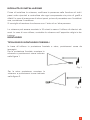 45
45
-
 46
46
-
 47
47
-
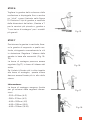 48
48
-
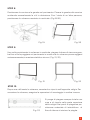 49
49
-
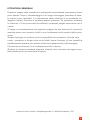 50
50
-
 51
51
-
 52
52
-
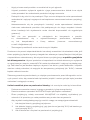 53
53
-
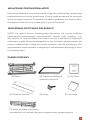 54
54
-
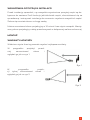 55
55
-
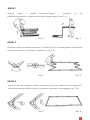 56
56
-
 57
57
-
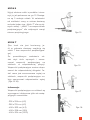 58
58
-
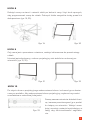 59
59
-
 60
60
-
 61
61
-
 62
62
-
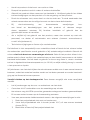 63
63
-
 64
64
-
 65
65
-
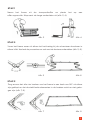 66
66
-
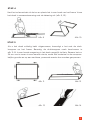 67
67
-
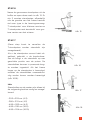 68
68
-
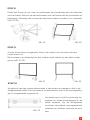 69
69
-
 70
70
-
 71
71
-
 72
72
-
 73
73
-
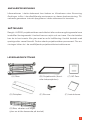 74
74
-
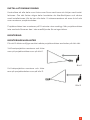 75
75
-
 76
76
-
 77
77
-
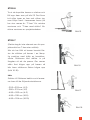 78
78
-
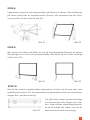 79
79
-
 80
80


Celexon Mobile Expert 366 x 274 cm ramowy ekran projekcyjny de handleiding
- Type
- de handleiding
in andere talen
- italiano: Celexon Mobile Expert 366 x 274 cm ramowy ekran projekcyjny Manuale del proprietario
- français: Celexon Mobile Expert 366 x 274 cm ramowy ekran projekcyjny Le manuel du propriétaire
- español: Celexon Mobile Expert 366 x 274 cm ramowy ekran projekcyjny El manual del propietario
- Deutsch: Celexon Mobile Expert 366 x 274 cm ramowy ekran projekcyjny Bedienungsanleitung
- svenska: Celexon Mobile Expert 366 x 274 cm ramowy ekran projekcyjny Bruksanvisning
- polski: Celexon Mobile Expert 366 x 274 cm ramowy ekran projekcyjny Instrukcja obsługi
Gerelateerde papieren
-
Celexon Tischleinwand Mobil Professional 81 x 61cm de handleiding
-
-
-
-
-
-
-
-
-