
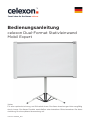
Bedienungsanleitung
celexon Dual-Format Stativleinwand
Mobil Expert
Vielen Dank für den Kauf dieses Produkts.
Für eine optimale Leistung und Sicherheit lesen Sie diese Anweisungen bitte sorgfältig
durch, bevor Sie dieses Produkt anschließen oder betreiben. Bitte bewahren Sie diese
Anleitung für eine spätere Verwendung auf.
Version: 32422_071

1
Diese Bedienungsanleitung dient dazu, Sie mit der Funktionsweise dieses Produktes
vertraut zu machen. Bewahren Sie diese Anleitung daher gut auf, damit Sie jederzeit
darauf zugreifen können.
• Bitte beachten Sie vor der Montage bzw. Nutzung das beiliegende Datenblatt mit
weiteren Sicherheits- und Verwendungshinweisen.
• Beginnen Sie nicht mit der Montage, bevor Sie die komplette Bedienungsanleitung
gelesen und diese verstanden haben.
• Führen Sie die Installation mit einer weiteren Person durch um eine sichere Montage
zu gewährleisten.
• Entnehmen die das Produkt der Verpackung und entfernen alle Verpackungsmateri-
alien. Achten Sie darauf, dass sich kein Verpackungsmaterial am oder im Produkt be-
ndet. Sollten Sie Verpackungsbeschädigungen feststellen, prüfen Sie zusätzlich ob
Beschädigungen am Produkt zu nden sind. Sollten Sie äußerliche Beschädigungen
an dem Gerät oder unerwartete oder unübliche Funktionsweisen feststellen, darf
das Produkt nicht weiter genutzt werden. Kontaktieren Sie umgehend den Händler,
bei dem Sie das Produkt gekauft haben oder celexon direkt (Web: www.celexon.de,
Mail: info@celexon.de) für weitere Informationen.
• Dieses Produkt ist grundsätzlich zur Nutzung und Lagerung in Innenräumen vorge-
sehen. Eine zeitweise Nutzung im Freien ist möglich und darf nur beaufsichtigt, bei
max. Windstärke 1 und im Trockenen erfolgen.
• Die Nutzung des Gerätes und Zubehörteilen ist Kindern unter 16 Jahren verboten.
• Sorgen Sie dafür, dass keine Kinder mit den Geräten spielen oder sich ohne Aufsicht
in der Nähe aufhalten.
• Ein Umbauen oder Verändern des Produktes beeinträchtigt die Produktsicherheit.
• Achtung Verletzungsgefahr! Öffnen Sie das Produkt niemals eigenmächtig. Führen
Sie Reparaturen nie selbst aus!
• Verwenden Sie das Produkt nicht in der Nähe von austretendem Gas, Wasser oder
in staubiger Umgebung.
• Behandeln Sie das Produkt sorgfältig. Es kann durch Stöße, Schläge oder Fall aus
bereits geringer Höhe beschädigt werden.
• Halten Sie das Produkt fern von Feuchtigkeit und Hitze.
• Tauchen Sie das Produkt niemals in Wasser oder andere Flüssigkeiten.
• Verwenden Sie das Produkt nur in seiner bestimmungsgemäßen Art und Weise. Eine
anderweitige Verwendung kann zu Beschädigungen am Produkt oder in dessen Um-
gebung führen.
WARNHINWEISE

2
HAFTUNGSAUSSCHLUSS
PFLEGEHINWEIS
Die Angaben in diesem Dokument können ohne vorherige Ankündigung durch
den Hersteller geändert werden. Änderungen werden jeweils in den folgenden
Versionen dieses Handbuchs ergänzt. Der Hersteller übernimmt keine Garantie
oder Gewährleistung auf die Richtigkeit der Angaben in diesem Dokument.
• Achtung Verletzungsgefahr! Das Gerät schließt bündig und fest im eingefahrenen
Zustand – halten Sie Finger, Hände oder andere Kleinteile von der Öffnung fern.
• Bei Nichtbeachtung obiger Anweisungen kann es zu Personenschäden und
Beschädigungen des Produktes oder Geräten die daran angeschlossen
sind kommen. Auch kann bei fehlerhafter Installation oder Verwendung die
Garantie erlöschen.
• Wenn Sie beim Verwenden des Produktes unsicher sind, kontaktieren Sie
Fachpersonal, Ihren Händler oder celexon direkt (Web: www.celexon.de,
Mail: info@celexon.de).
• Technische Änderungen und Irrtümer vorbehalten.
Der Hersteller übernimmt keine Verantwortung für Sachschäden oder Personenschäden,
wenn die Leinwand außerhalb der empfohlenen Spezikationen verwendet wird, oder
bei unsachgemäßer Installation. Verwenden Sie diese Leinwand nicht in der Nähe von
Heizungen oder Klimaanlagen. Nutzen Sie das Produkt möglichst nicht in direktem Son-
nenlicht oder vor einem Fenster. Aufgrund des temperaturempndlichen Tuchmaterials
kann es zu einer Verformung des Projektionstuchs kommen (Planlage).
Wir empfehlen Ihnen, nach der Lieferung ca. 2 Stunden mit der Montage zu warten. So
kann sich die Leinwand akklimatisieren; besonders wenn die Leinwand von kalter in eine
warme Umgebung gebracht wird.
Bitte vermeiden Sie jegliche Flecken auf der Tuchoberäche. Diese könnten sich mög-
licherweise nicht mehr entfernen lassen.
Reinigen Sie die Leinwand NIEMALS mit Alkohol oder anderen Reinigungs-
mitteln, die Lösungsmittel enthalten. Benutzen Sie nur ein weiches und saube-
res Tuch. Mit einer milden Seifenlauge kann gegebenenfalls Schmutz von der
Oberäche entfernt werden. Vermeiden Sie unbedingt den Kontakt mit spitzen
oder scharfen Gegenständen. Diese könnten das Projektionstuch nachhaltig

3
beschädigen. Weitere Hinweise entnehmen Sie den beiliegenden Leinwand-
hinweisen.
1. Positionieren oder lagern Sie die Leinwand nicht in Bereichen, in welchen
direktes Sonnenlicht auf die Leinwand strahlt.
2. Halten Sie das Leinwandtuch frei von Schmutz oder Partikeln, um die Tu-
choberäche nicht zu beschädigen und das Projektionsergebnis nicht zu
verschlechtern. Wenn die Leinwand verschmutzt ist, reinigen Sie diese mit
einem weichen Tuch und handwarmer, milder Seifenlauge.Danach wischen
Sie nochmals mit klarem Wasser nach, damit keine Seifenreste verbleiben.
Das Tuch darf nicht durchtränkt sondern nur leicht feucht abgewischt wer-
den und muss vor dem Einfahren komplett trocken sein.
3. Bitte verwenden Sie keine Benzine, Verdünner oder vergleichbare Lösun-
gen um das Tuch zu reinigen.
4. Bei diesem Modell wird ein PET-Projektionstuch verwendet. Dieses darf
nicht geknickt werden, da sich die Knicke nicht mehr entfernen lassen.
Ebenso ist es empndlicher gegen Hitze und sollte daher nicht in direkter
Sonne oder Nahe Öfen stehen bzw. gelagert werden.
LIEFERUMFANG
1x Stativleinwand
INSTALLATIONSHINWEIS
Installieren Sie die Leinwand an einer für alle Betrachter komplett sichtbaren
Position. Die optimale Aufstellhöhe entspricht der Position der Betrachter mit-
tig zur Leinwand bei ausgefahrenem Tuch: Augenhöhe = unteres Drittel der
Bildäche. Die Leinwand nicht in Laufwegen und nicht an zügigen Orten auf-
stellen, um ein Umfallen und ggf. Verletzungen von Personen zu vermeiden.
1. Berühren Sie nicht das Tuch während Sie die Leinwand ein- oder ausfahren.
2. Stellen Sie die Leinwand nicht auf instabilen oder unebenen Flächen auf,
die Leinwand könnte fallen oder umkippen. Seien Sie achtsam, dass sich

4
keine Kinder mit der Leinwand im Raum allein aufhalten.
3. Wenn die Leinwand nicht in Gebrauch ist, empfehlen wir Ihnen die Lein-
wand waagerecht zu lagern, um sie vor Umstürzen zu sichern.
4. Hängen Sie keine Gegenstände an die Leinwand.
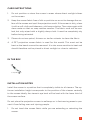
AUFSTELLEN DER LEINWAND
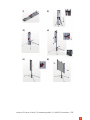
ZUSAMMENBAU DER LEINWAND
Legen Sie die Leinwand auf den Boden und stellen die Stativfüße leicht auf
(Abb.1).
Stellen Sie die Leinwand auf die leicht geöffneten Füße, drücken die Fixiertaste
und stellen die Stativfüße komplett auseinander für einen sicheren Stand (Abb.
2 und 3).
Halten Sie das Gehäuse am oberen Griff und ziehen Sie den Federstift zurück,
um das Gehäuse auf die gewünschte Höhe hochziehen zu können. Treten Sie
dabei mit dem Fuß leicht auf die Ausbuchtung unten am Stativ, damit die
Leinwand beim Hochsetzen des Gehäuses sicher stehen bleibt. Wenn die ge-
wünschte Höhe erreicht ist, muss der Federstift wieder in eines der Löcher
arretieren, bevor Sie den oberen Griff loslassen und das Gehäuse entlasten
(Abb. 4).
Drücken Sie seitlich im Gehäuse den eingelassenen Taster um das Gehäuse
seitwärts zu öffnen (Abb. 5).
Ziehen Sie das Gehäuse vorsichtig zur Seite auseinander, das jeweilige Bild-For-
mat ist durch leichte Arretierung haptisch dabei zu vernehmen.
Führen Sie die oben genannten Schritte in umgekehrter Reihenfolge aus und
achten darauf beim Zusammenbauen sich nicht die Finger zu klemmen.

5
1| 2|
3| 4|
5| 6|
celexon Europe GmbH | Gutenbergstraße 2 | 48282 Emsdetten | DE

Operating instructions
celexon Dual-Format Tripod Screen
Mobile Expert
Thank you for purchasing this product.
For optimum performance and safety, please read these instructions carefully
before connecting or operating this product. Please retain these instructions for future
reference.
Version: 32422_071

1
The purpose of these operating instructions is to familiarise you with the operation of
this product. Therefore, keep these instructions in a safe place so that you can refer to
them at any time.
• Before installation or use, please refer to the enclosed data sheet with additional-
further safety and usage instructions.
• Do not start installation until you have read and understood the complete operating
instructions.
• Carry out the installation with another person to ensure safe installation.
• Remove the product from its packaging and remove all packaging materials. Make
sure that there is no packaging material on or in the product. If you notice any
damage to the packaging, also check whether there is any damage to the pro-
duct. If you notice any external damage to the unit or any unexpected or unusual
functioning, do not continue to use the product. Contact the dealer from whom
you purchased the product or celexon directly (Web: www.celexon.co.uk,
Mail: info@celexon.co.uk) for further information.
• This product is intended for indoor use and storage. Occasional outdoor use is pos-
sible and may only be carried out under supervision, in a max. wind force 1 and in
dry conditions.
• The use of the screen and accessories is prohibited for children under 16
years of age.
• Ensure that children do not play with the appliance or stay in the vicinity without
supervision.
• Conversion or modication of the product impairs product safety.
• Caution: Risk of injury! Never open the product without authorisation. Never carry
out repairs yourself!
• Do not use the product in the vicinity of escaping gas, water or in a dusty
environment.
• Handle the product with care. It can be damaged by knocks, blows or falling from a
from even a small height. Keep the product away from moisture and heat.
• Never immerse the product in water or other liquids.
• Only use the product in its intended manner. Any other use may result in damage to
the product or its surroundings.
WARNINGS

2
DISCLAIMER
CARE INSTRUCTIONS
The information in this document is subject to change without notice by the
manufacturer. Changes will be added to subsequent versions of this manual.
The manufacturer does not guarantee or warranty for the correctness of the
information in this document.
• Caution: Risk of injury! The unit closes ush and rmly when retracted. Keep ngers,
hands or other small parts away from the opening.
• Failure to follow the above instructions may result in personal injury and damage to
the product or equipment, or devices connected to it. Incorrect installation or use
may also invalidate the warranty.
• If you are unsure about the use of the product, please contact your speci-
alist personnel, your dealer or celexon directly (Web: www.celexon.co.uk,
Mail: info@celexon.co.uk).
• Technical changes and errors expected.
The manufacturer accepts no responsibility for damage to property or personal injury
if the screen is used outside the recommended specications, or in the event of impro-
per installation. Do not use this screen in the vicinity of heaters or air conditioners. If
possible, do not use the product in direct sunlight or in front of a window. Due to the
temperature-sensitive material of the screen the projection screen fabric may become
deformed (atness). We recommend that you wait approx. 2 hours after delivery before
installing the projection screen fabric. This way the projection screen can acclimatise,
especially if it is moved from a cold to a warm environment.
Please avoid any stains on the surface of the screen. These may not be able to be re-
moved.
NEVER clean the screen with alcohol or other cleaning agents containing sol-
vents. Use only a soft and clean cloth. If necessary, use a mild soap solution
to remove dirt from the surface. Avoid contact with sharp or pointed objects.
These could permanently damage the projection screen fabric. For further in-
formation, please refer to the enclosed projection screen instructions.

3
1. Do not position or store the screen in areas where direct sunlight shines
on the screen.
2. Keep the screen fabric free of dirt or particles so as not to damage the sur-
face of the screen and spoil the projection result. If the screen is dirty, clean
it with a soft cloth and lukewarm, mild soap solution. Then wipe again with
clean water so that no soap residue remains. The fabric must not be soa-
ked, but only wiped with a slightly damp cloth. It must be completely dry
before being retracted.
3. Please do not use petrol, thinners or similar solvents to clean the fabric.
4. A PET projection screen fabric is used for this model. This must not be
bent as the bends cannot be removed. It is also more sensitive to heat and
should therefore not be placed in direct sunlight or close to radiators.
IN THE BOX
1 x Tripod screen
INSTALLATION NOTES
Install the screen in a position that is completely visible to all viewers. The op-
timum installation height corresponds to the position of the viewers centrally
to the screen.Ideally the viewer‘s eye level will be level with the lower third of
the screen surface.
Do not place the projection screen in walkways or in fast-moving areas to pre-
vent it from falling over and injuring people.
1. Do not touch the screen fabric while you are extending or retracting the
screen.
CARE INSTRUCTIONS

4
2. Do not place the screen on unstable or uneven surfaces, the screen could
fall or tip over. Be careful children are not left alone in the room with the
screen.
3. When the screen is not in use, place it vertically on the stand and lean it
against a wall, for example, to prevent it from falling over.
4. Do not hang any objects on the screen.
SETTING UP THE SCREEN
PACKING AWAY THE SCREEN
Place the screen on the oor and seperate the tripod feet lightly (Fig.1).
Place the projection screen on the slightly opened feet, press the xation but-
ton and set the tripod feet completely apart for a secure stand (gs. 2 and 3).
Hold the casing by the top handle and pull back the spring pin to raise the ca-
sing to the desired height. Step lightly on the protrusion at the bottom of the
stand so that the screen remains securely in place when the housing is raised.
When the desired height has been reached, the spring pin must be released
before releasing the top handle and taking the weight of the casing (Fig. 4).
Press the recessed button on the side of the housing to open the housing si-
deways (Fig. 5).
Carefully pull the housing apart to the side, the respective image sizes can be
felt as it is slightly locks in place.
Carry out the above steps in reverse order and be careful not to get anything
stuck when closing the casing.

5
1| 2|
3| 4|
5| 6|
celexon Europe GmbH | Gutenbergstraße 2 | 48282 Emsdetten | DE

Manuel d’utilisation
Écran de projection sur pied celexon
Mobil Expert double format
Nous vous remercions d’avoir acheté cet article.
Pour des performances et une sécurité optimales, veuillez lire attentivement ces
instructions avant d’installer ou d’utiliser ce produit. Veuillez conserver ce manuel pour
une utilisation ultérieure.
Version: 32422_071

1
Ce mode d’emploi a pour but de vous familiariser avec le fonctionnement de ce produit.
Conservez donc soigneusement ce manuel an de pouvoir le consulter à tout moment.
• Avant de procéder au montage, veuillez consulter la che technique jointe
contenant d’autres consignes de sécurité et d’utilisation.
• Ne commencez pas le montage avant d’avoir lu et compris l’intégralité du mode
d’emploi.
• Effectuez l’installation avec une autre personne an de garantir un montage sûr.
• Retirez le produit de son emballage et enlevez tous les matériaux d’emballage.
Veillez à ce qu’aucun matériau d’emballage ne se trouve sur ou dans le produit.
Si vous constatez des dommages sur l’emballage, vériez également si le produit
est endommagé. Si vous constatez des dommages extérieurs sur le produit ou un
fonctionnement inattendu ou inhabituel, l’écran ne doit plus être utilisé. Contactez
immédiatement le revendeur chez qui vous avez acheté le produit ou directement
le fabricant celexon (Web : www.celexon.fr, Mail : info@celexon.fr) pour plus d’infor-
mations.
• Ce produit est destiné à être utilisé et stocké à l’intérieur.
• L’utilisation de l’appareil et de ses accessoires est interdite aux enfants de moins de
16 ans.
• Veillez à ce que les enfants ne jouent pas avec le produit et ne se trouvent pas à
proximité sans surveillance.
• Toute transformation ou modication du produit est interdite et porte atteinte à la
sécurité du produit !
• Attention au risque de blessure ! Ne démontez jamais le produit de votre propre
chef. N’effectuez jamais de réparations vous-même !
• Ce produit ne doit être utilisé que dans son état d’origine, non modié et non en-
dommagé.
• N’utilisez pas le produit à proximité d’appareils à gaz ou à eau ou dans un environ-
nement poussiéreux.
• Manipulez le produit avec soin. Il peut être endommagé par des chocs, des coups ou
des chutes, même de faible hauteur.
• Gardez le produit à l’abri de l’humidité et de la chaleur.
• Ne plongez jamais le produit dans l’eau ou dans d’autres liquides.
• N’utilisez le produit que de la manière pour laquelle il a été conçu. Toute autre utili-
sation peut entraîner des blessures corporelles, des dommages au produit ou à son
AVERTISSEMENTS

2
AVIS DE NON-RESPONSABILITÉ
CONSEIL D‘ENTRETIEN
Les informations contenues dans ce document peuvent être modiées sans
préavis par le fabricant. Les modications seront toujours ajoutées dans les
versions suivantes de ce manuel. Toute erreur est exclue.
environnement.
• Attention au risque de blessure ! L’appareil se ferme à eur et fermement en po-
sition rétractée - tenez vos doigts, vos mains ou d’autres petits objets à l’écart de
l’ouverture.
• Le non-respect des instructions ci-dessus peut entraîner des dommages corporels
et endommager le produit ou les appareils qui y sont raccordés. La garantie peut
également être annulée en cas d’installation ou d’utilisation incorrecte.
• Si vous avez des doutes sur l’utilisation du produit, contactez le personnel spécialisé,
votre revendeur ou le fabricant celexon directement (Web : www.celexon.fr, mail :
info@celexon.fr).
• Sous réserve de modications techniques et d’erreurs.
Le fabricant décline toute responsabilité en cas de dommages matériels ou corporels
si l’écran est utilisé en dehors des spécications recommandées ou s’il n’est pas installé
correctement. N’utilisez pas cet écran à proximité d’un chauffage ou d’un climatiseur.
N’installez pas non plus le produit à la lumière directe du soleil ou devant une fenêtre.
En raison de la surface en PVC sensible à la température, la toile de projection peut être
endommagée de manière durable.
Nous vous recommandons d’attendre environ 2 heures après la livraison avant de pro-
céder au montage. Cela permet à la toile de s’acclimater ; en particulier lorsque la toile
est déplacée d’un environnement froid vers un environnement chaud (ou inversement).
Veuillez éviter de faire des tâches sur la surface de la toile. Celles-ci pourraient ne plus
pouvoir être enlevées. Remontez toujours la toile après chaque utilisation.
Ne nettoyez JAMAIS la toile avec de l’alcool ou d’autres produits de nettoyage
contenant des solvants. Utilisez uniquement un chiffon doux et propre. Une
solution savonneuse douce (max. 5%) peut éventuellement éliminer la saleté
de la surface. Évitez absolument tout contact avec des objets pointus ou tran-
chants. Ceux-ci pourraient endommager durablement la toile de projection.

3
Pour de plus amples informations, veuillez consulter les instructions relatives
à l’écran.
1. N’installez pas ou ne stockez pas l’écran dans des endroits à la lumière
directe du soleil.
2. Maintenez la toile loin de la saleté ou de particules an de ne pas endom-
mager sa surface et de ne pas détériorer le résultat de la projection. Si
l’écran est sale, nettoyez-le à l’aide d’un chiffon doux et d’une solution
savonneuse douce et tiède, puis essuyez à nouveau à l’eau claire an d’éli-
miner tout résidu de savon. Le chiffon ne doit pas être trempé, mais seu-
lement légèrement humide et l’écran doit être complètement sec avant
d’être refermé.
3. N’utilisez pas d’essence, de diluants ou de solutions comparables pour net-
toyer la toile.
4. Ce modèle utilise une toile de projection en PET. Celle-ci ne doit pas être
pliée, car les plis ne peuvent plus être éliminés par la suite.
5. Elle est également plus sensible à la chaleur et ne doit donc pas être pla-
cée ou stockée en plein soleil ou près d’un four.
CONTENU DE LA LIVRAISON
1x Écran de projection
sur pied
CONSEIL D’INSTALLATION
Installez l’écran dans une position entièrement visible pour tous les
spectateurs ! La hauteur d’installation optimale est atteinte lorsque les spec-
tateurs se trouvent au centre de l’écran (toile déployée) et que la hauteur de
leurs yeux = tiers inférieur de la surface de l’image.
1. Ne touchez pas la surface de la toile avec les mains lorsque vous montez
ou démontez l’écran an d’éviter de salir la surface de projection.
2. Ne placez pas l’écran sur des surfaces instables ou irrégulières, l’écran
pourrait tomber ou se renverser. Veillez à ce qu’aucun enfant ne reste seul
dans la pièce avec l’écran.

4
3. Lorsque l’écran n’est pas utilisé, placez-le à la verticale sur son pied et ap-
puyez-le contre un mur, par exemple, pour éviter qu’il ne tombe.
4. N’accrochez aucun objet sur la toile ou l’écran.
INSTALLATION DE L’ÉCRAN
DÉSINSTALLATION DE L’ÉCRAN
Posez l’écran sur le sol et relevez légèrement les pieds du trépied (Fig. 1).
Placez l’écran sur les pieds légèrement ouverts, appuyez sur le bouton de xa-
tion et écartez complètement les pieds du trépied pour une bonne stabilité
(g.2 et 3).
Tenez le carter par la poignée supérieure et tirez la goupille à ressort vers
l’arrière pour pouvoir remonter le carter à la hauteur souhaitée. Pour ce faire,
appuyez légèrement le pied sur le renement en bas du trépied an que l’écran
reste bien en place lorsque vous relevez le carter. Lorsque la hauteur souhaitée
est atteinte, la goupille à ressort doit se bloquer dans l’un des trous avant que
vous ne relâchiez la poignée supérieure et que vous ne libériez le carter (g. 4).
Appuyez sur le bouton encastré sur le côté du carter pour ouvrir l’écran laté-
ralement (g. 5).
Tirez prudemment le carter sur le côté, le format d’image correspondant est
perceptible au toucher grâce à un léger blocage.
Suivez les étapes ci-dessus dans l’ordre inverse, en veillant à ne pas vous coin-
cer les doigts lors du remontage.

5
1| 2|
3| 4|
5| 6|
celexon Europe GmbH | Gutenbergstraße 2 | 48282 Emsdetten | DE

Manual de usuario
celexon pantalla de trípode móvil de
doble formato Expert
Gracias por comprar este producto.
Para un rendimiento y seguridad óptima, lea atentamente estas instrucciones antes de
conectar o utilizar este producto. Conserve estas instrucciones para futuras consultas.
Version: 32422_071

1
Este manual de instrucciones está destinado a familiarizarle con el funcionamiento de
este producto. Por lo tanto, guarde estas instrucciones en un lugar seguro para poder
acceder a ellas en cualquier momento.
• Antes del montaje, consulte la hoja de datos adjunta con más instrucciones de se-
guridad y uso.
• No inicie la instalación hasta que haya leído y comprendido todo el manual de ins-
trucciones.
• Realice la instalación con otra persona para garantizar una instalación segura.
• Saque el producto de su embalaje y retire todos los materiales de embalaje.
Asegúrese de que no haya material de embalaje sobre o dentro del producto. Si
observa algún daño en el embalaje, compruebe también si hay algún daño en el
producto. Si observa algún daño externo en la unidad o un funcionamiento inespe-
rado o inusual, no siga utilizando el producto. Póngase inmediatamente en contacto
con el distribuidor al que compró el producto o directamente con celexon (Web:
www.celexon.es, Correo: info@celexon.es) para obtener más información.
• Este producto está pensado básicamente para su uso y almacenamiento en interio-
res. El uso temporal al aire libre es posible y sólo puede tener lugar bajo supervisión,
con una fuerza del viento de 1 como máximo y en condiciones de sequedad.
• El uso del aparato y sus accesorios está prohibido a los menores de 16 años.
• Asegúrese de que ningún niño juegue con el equipo o esté en las proximidades sin
supervisión.
• La modicación o alteración del producto comprometerá la seguridad del mismo.
• Precaución: ¡Riesgo de lesiones! No abra nunca el producto sin autorización. Nunca
realice las reparaciones usted mismo.
• No utilice el producto cerca de equipos que emitan gases, líquidos, o lugares pol-
vorientos.
• Manipule el producto con cuidado. Puede dañarse a causa de los golpes, o de las
caídas, incluso desde una pequeña altura.
• Mantenga el producto alejado de la humedad y el calor.
• Nunca sumerja el producto en agua u otros líquidos.
• Utilice el producto sólo de la manera prevista. Cualquier otro uso puede causar
daños al producto o a su entorno.
ADVERTENCIAS

2
EXONERACIÓN DE RESPONSABILIDAD
INSTRUCCIONES DE CUIDADO
La información de este documento puede ser modicada por el fabricante
sin previo aviso. Los cambios se añadirán a las versiones posteriores de este
manual. El fabricante no garantiza la exactitud de la información contenida en
este documento.
• Precaución: ¡Riesgo de lesiones! La unidad se cierra al ras y con rmeza
cuando se retrae. Mantenga los dedos, las manos u otras partes pequeñas
alejadas de la abertura.
• Si no se siguen las instrucciones anteriores, pueden producirse lesiones
personales y daños en el producto o en los equipos conectados a él.
Además, una instalación o uso incorrecto puede invalidar la garantía.
• Si tiene dudas sobre el uso del producto, póngase en contacto con per-
sonal cualicado, con su distribuidor o directamente con celexon (web:
www.celexon.es, Correo: info@celexon.es).
• Nos reservamos el derecho sobre posibles cambios y/o errores técnicos.
El fabricante no acepta ninguna responsabilidad por daños materiales o personales si la
pantalla se utiliza fuera de las especicaciones recomendadas, o si se instala incorrecta-
mente. No utilice esta pantalla cerca de calefactores o aires acondicionados. Tampoco
instale el producto a la luz directa del sol o frente a una ventana. Debido a la supercie
de PVC sensible a la temperatura, pueden producirse daños permanentes en la supercie
de la pantalla de proyección. Le recomendamos que espere unas 2 horas después de
la entrega antes de instalar la pantalla de proyección. Esto permitirá que la pantalla se
aclimate, especialmente cuando se traslade de un entorno frío a uno cálido (o viceversa).
Por favor, evite cualquier mancha en la supercie de la tela. Es posible que no se puedan
eliminar.
NUNCA limpie la tela con alcohol u otros productos de limpieza que cont-
engan disolventes. Utilice sólo un producto suave y limpio, un paño seco y,
si es necesario, limpie ligeramente el polvo de la supercie de la tela sólo en
dirección horizontal. Para eliminar la suciedad, utilice únicamente agua limpia
y, como mucho, tibia y ejercer poca presión. Evite el contacto con objetos

3
alados o puntiagudos. Estos podrían dañar permanentemente la proyección.
Para más información, consulte las instrucciones de la pantalla adjunta.
1. No coloque ni guarde la pantalla en lugares donde le dé la luz del sol di-
rectamente.
2. Mantenga la tela de la pantalla libre de suciedad o partículas para no dañar
la supercie de la tela y deteriorar el resultado de la proyección. Si la pan-
talla está sucia, límpiela con un paño suave y agua jabonosa tibia, y luego
vuelve a limpiarla con agua limpia para que no queden restos de jabón. La
tela no debe estar empapada, sino sólo limpiada con un paño ligeramente
húmedo, y debe estar completamente seca antes de retraerse.
3. No utilice gasolina, diluyentes o soluciones similares para limpiar la tela.
4. Este modelo utiliza un tejido de pantalla de proyección de PET. No debe
doblar, ya que las dobleces podrían no poder eliminarse. También es más
sensible al calor, por lo que no debe almacenarse a la luz directa del sol ni
cerca de espacios con alta incidencia del sol o en la proximidad de hornos.
VOLUMEN DE LA ENTREGA
1x Pantalla de trípode
NOTA DE INSTALACIÓN
Instale la pantalla en una posición completamente visible para todos los
espectadores. La altura óptima de instalación corresponde a la posición de los
espectadores en el centro de la pantalla cuando la tela está extendida: nivel de
los ojos = tercio inferior de la supercie de la pantalla. No instale la pantalla en
zonas de paso o en lugares de movimiento rápido para evitar que se caiga y
pueda herir a las personas.
1. No toque la tela al retraer o extender la pantalla.

4
CONFIGURACIÓN DE LA PANTALLA
Coloque la pantalla en el suelo y abra ligeramente las patas del trípode (Ima-
gen 1).
Coloque la pantalla sobre las patas ligeramente abiertas, pulse el botón de
jación y separe completamente las patas del trípode para obtener un soporte
seguro (Imagen 2 y 3).
Sujete la pantalla por el asa superior y tire hacia atrás del pasador de resorte
para elevar la pantalla a la altura deseada. Al hacerlo, sujete ligeramente el
saliente de la parte inferior, para que la pantalla quede bien sujeta y estable.
Una vez alcanzada la altura deseada, el pasador de resorte debe volver a blo-
quearse en uno de los oricios antes de soltar el asa superior y quitar el peso
del mueble (Imagen 4).
Pulse el botón de la carcasa en el lateral de la carcasa para abrirla lateralmente
(Imagen 5).
Separe con cuidado la carcasa hacia un lado; el formato de imagen se puede
ajustar, en él lo notarán mediante un ligero bloqueo.
2. No coloque la pantalla en supercies inestables o irregulares, la pantalla
puede caerse o volcarse. Procure que ningún niño se quede solo en la habita-
ción con la pantalla.
3. Cuando la pantalla no esté en uso, colóquela verticalmente en el soporte y
apóyela contra una pared, por ejemplo, para evitar que se caiga.
4. No cuelgue ningún objeto en la pantalla.
MONTAJE DE LA PANTALLA
Realice los pasos anteriores en orden inverso y tenga cuidado de no equi-
vocarse al volver a montarla.

5
1| 2|
3| 4|
5| 6|
celexon Europe GmbH | Gutenbergstraße 2 | 48282 Emsdetten | DE

Manuale di istruzioni
celexon schermo da proiezione a
treppiede Mobil Expert doppio
formato
Gentile Cliente, celexon la ringrazia per l´acquisto di questo prodotto.
Prima di utilizzare lo schermo leggere attentamente le istruzioni e conservare il manuale
dopo la consultazione.
Version: 32422_071

1
Questo manuale d´istruzioni ha lo scopo di familiarizzare con il funzionamento di questo
prodotto. Si consiglia di conservare questo manuale in un luogo sicuro in modo da po-
terlo consultare in qualsiasi momento.
• Leggere attentamente questo manuale prima di procedere all‘installazione e conser-
varlo per eventuali consultazioni future.
• Per un utilizzo corretto e sicuro, si consideri che il presente schermo è concepito
esclusivamente per un utilizzo interno.
• Tenere lo schermo fuori dalla portata dei bambini di età inferiore ai 16 anni. Non las-
ciare bambini nei pressi dello schermo senza supervisione di un adulto. Non giocare
in prossimità dello schermo.
• L´installazione dello schermo deve essere effettuata con l´aiuto di una seconda per-
sona.
• Per una maggiore praticità e sicurezza, installare lo schermo con l‘aiuto di un‘altra
persona.
• Per non compromettere il funzionamento dello schermo stringere saldamente le viti
durante l‘installazione ma senza forzare (evitare l‘uso di cacciaviti elettrici a batte-
ria).
• Ricordiamo che occorre vericare la tenuta e la stabilità dei carichi sospesi almeno
due volte l´anno.
• Si prega di utilizzare lo schermo in modo idoneo, un uso improprio può causare
danni a persone o cose.
• Effettuare l‘installazione su superci regolari ed, in caso di pareti, portanti in mura-
tura o cemento.
• ATTENZIONE: Tenere le mani e/o le dita lontani dallo schermo durante la sua
apertura/chiusura.
• Qualora si riscontrassero danni esterni all´imballo, si prega di vericare che non ci si-
ano danni al prodotto. In caso di danni al prodotto o malfunzionamento dello stesso,
non utilizzare lo schermo. Contattare immediatamente il venditore dello schermo o
celexon Europe GmbH all´indirizzo [email protected]
• Tenere lontano lo schermo da fonti di calore ed umidità.
• Non immergere il prodotto in acqua o in altri liquidi.
• La mancata osservazione delle indicazioni sopracitate può causare danni a persone,
allo schermo o ai dispositivi ad esso collegati. La garanzia non copre danni dovuti
ad un‘installazione o ad un uso non idonei.
• In caso di dubbi sull‘utilizzo del prodotto, rivolgersi direttamente o celexon Europe
AVVERTENZE

2
ESCLUSIONE DI RESPONSABILITÀ
INDICAZIONI SULLA CURA DEL PRODOTTO
Le informazioni contenute in questo documento sono soggette a modiche
senza preavviso da parte del produttore. Le modiche saranno apportate nelle
versioni successive di questo manuale. Il produttore non garantisce o assicura
la garanzia della correttezza delle informazioni contenute in questo documen-
to.
GmbH ([email protected]) o a installatori specializzati.
• Le informazioni presenti all´interno di questo manuale possono subire modiche
senza alcun preavviso. Versioni successive del presente manuale possono dunque
contenere correzioni/aggiunte.
Il produttore non si assume alcuna responsabilità per danni a persone o cose in caso di
utilizzo scorretto dello schermo o errata installazione.
Non utilizzare lo schermo in prossimità di fonti di calore o climatizzatori. Non esporre
lo schermo alla luce solare diretta o davanti ad una nestra per evitare danni perma-
nenti alla supercie di proiezione.
Si consiglia di attendere circa 2 ore dal momento della consegna prima di installare lo
schermo per consentire l’acclimatamento della tela, soprattutto in caso di trasporto da
un ambiente freddo ad uno più caldo.
Evitare di sporcare la tela da proiezione: la rimozione di eventuali macchie potrebbe
risultare impossibile.
Pulire la supercie dello schermo da asciutta solo con un panno morbido. Non
utilizzare MAI alcool o altri detergenti contenenti solventi. La rimozione del-
le impurità dalla supercie di proiezione può essere effettuata tramite acqua
saponata neutra. Evitare il contatto con oggetti appuntiti o aflati che pot-
rebbero provocare danni irreversibili alla supercie di proiezione. Per ulteriori
indicazioni, consultare le istruzioni allegate.

3
1. Non posizionare o riporre lo schermo in aree in cui la luce diretta del sole
possa colpire la supercie.
2. Mantenere la tela pulita da sporco o particelle al ne di non danneggiare
la supercie e deteriorare il risultato d‘uso. Se la supercie è sporca, pulirla
con un panno morbido e acqua tiepida (max. 30°C). Il panno non deve es-
sere imbevuto, ma solo leggermente umido, e deve essere completamente
asciutto prima di essere introdotto.
3. Non utilizzare benzina, diluente o soluzioni simili per pulire il telo.
4. Questo modello utilizza un telo per schermi di proiezione in PET. Questo
non deve essere piegato, poiché le pieghe non possono essere rimosse. È
inoltre più sensibile al calore e quindi non deve essere conservato alla luce
diretta del sole o vicino a fonti di calore
CONTENUTO DELLA FORNITURA
1x schermo a treppiede
CONSIGLI PER IL MONTAGGIO
Installare lo schermo in una posizione completamente visibile a tutti gli spetta-
tori! L‘altezza di installazione ottimale corrisponde alla posizione degli spetta-
tori al centro dello schermo con il telo esteso: livello degli occhi = terzo inferi-
ore della supercie dello schermo. Non installare lo schermo in luoghi esposti
a correnti d‘aria per evitare che cada e ferisca le persone.
1. Non toccare la tela mentre la si sposta all‘interno o all‘esterno.
2. Non collocare lo schermo su supercie irregolari o in luoghi esposti a cor-
renti d‘aria per evitare che cada e ferisca le persone. Lo schermo potrebbe

4
cadere o ribaltarsi. Fate attenzione che nessun bambino venga lasciato
solo con lo schermo, senza sorveglianza.
3. Quando lo schermo non viene utilizzato, riporlo il più possibile in posizione
orizzontale
4. Non appendere nulla allo schermo.
SMONTAGGIO DELLO SCHERMO
ASSEMBLAGGIO DELLO SCHERMO
Posizionare lo schermo sul pavimento poggiando gradatamente i piedini del
treppiede (Fig. 1).
Collocare lo schermo di proiezione sui piedini leggermente aperti, premere il
pulsante di ssaggio e distanziare completamente i piedi del treppiede per
ottenere un supporto sicuro (g. 2 e 3).
Afferrare la maniglia del cassonetto e tirare indietro il perno a molla, per poter
sollevare il cassonetto all‘altezza desiderata. Regolare i piedi in modo che lo
schermo sia stabile. Una volta raggiunta l‘altezza desiderata, il perno a molla
deve bloccarsi in uno dei fori prima di rilasciare la maniglia superiore. (Fig. 4).
Premere il pulsante sul lato del cassonetto per aprirlo lateralmente (Fig. 5).
Estrarre il cassonetto lateralmente no a raggiungere il formato desiderato.
Per lo smontaggio dello schermo, eseguire le operazioni sopra descritte in or-
dine inverso, facendo attenzione a non schiacciarsi le dita.
Eseguire le operazioni sopra descritte in ordine inverso, facendo attenzione a
non schiacciarsi le dita durante la chiusura dello schermo.

5
1| 2|
3| 4|
5| 6|
celexon Europe GmbH | Gutenbergstraße 2 | 48282 Emsdetten | DE

Instrukcja obsługi
Dwuformatowy ekran projekcyjny na
statywie celexon Mobil Expert
Dziękujemy za zakup tego produktu.
Aby zapewnić optymalne działanie i bezpieczeństwo, przed podłączeniem lub obsługą
tego produktu należy uważnie przeczytać niniejsze instrukcje. Prosimy o zachowanie
niniejszej instrukcji do wykorzystania w przyszłości.
Wersja: 32422_071

1
Niniejsza instrukcja obsługi ma na celu zapoznanie użytkownika z działaniem
produktu. Niniejszą instrukcję przechowywać w bezpiecznym miejscu, aby mieć do niej
dostęp w dowolnym momencie.
• Przed podjęciem montażu lub użyciem należy zapoznać się z załączoną kartą da-
nych z dalszymi wskazówkami dotyczącymi bezpieczeństwa i użytkowania.
• Przed podjęciem montażu należy przeczytać ze zrozumieniem całą instrukcję ob-
sługi.
• Instalację należy wykonywać z drugą osobą, aby zapewnić bezpieczny montaż.
• Rozpakować produkt i usunąć wszystkie materiały opakowaniowe. Upewnić się,
czy w produkcie lub na nim nie ma materiałów opakowaniowych. W przypadku
stwierdzenia uszkodzeń opakowania należy również sprawdzić, czy produkt nie
jest uszkodzony. Jeśli widoczne są zewnętrzne uszkodzenia urządzenia lub w przy-
padku stwierdzenia niespodziewanego lub nietypowego sposobu działania nie
wolno dalej używać produktu. Należy bezzwłocznie skontaktować się ze sprze-
dawcą, u którego nabyto produkt lub bezpośrednio z rmą celexon (Internet:
www.celexon.pl, e-mail: info@celexon.pl), aby uzyskać więcej informacji.
• Ten produkt jest zasadniczo przeznaczony do użytku i przechowywania w pomiesz-
czeniach. Tymczasowe użytkowanie na zewnątrz jest możliwe i może odbywać się
wyłącznie pod nadzorem, przy maks. sile wiatru na poziomie 1 i w suchych warun-
kach.
• Korzystanie z urządzenia i akcesoriów jest zabronione dla dzieci poniżej 16 roku ży-
cia.
• Upewnić się, czy dzieci nie bawią się urządzeniami ani nie przebywają w pobliżu
bez nadzoru.
• Przebudowa lub modykowanie produktu ma negatywny wpływ na jego bezpie-
czeństwo.
• Uwaga, ryzyko obrażeń ciała! Nigdy nie otwierać produktu samodzielnie. Nigdy
nie przeprowadzać napraw samodzielnie!
• Nie używać produktu w pobliżu wycieku gazu, wody lub w zapylonym otoczeniu.
• Z produktem obchodzić się ostrożnie. Może zostać uszkodzony przez wstrząsy, ude-
rzenia lub upadek nawet z niewielkiej wysokości.
• Produkt należy chronić przed wilgocią i wysoką temperaturą.
• Nigdy nie zanurzać produktu w wodzie lub innych płynach.
• Używać produktu wyłącznie zgodnie z jego przeznaczeniem. Każde inne użycie
może prowadzić do uszkodzenia produktu lub jego otoczenia.
WSKAZÓWKI OSTRZEGAWCZE

2
WYŁĄCZENIE ODPOWIEDZIALNOŚCI
WSKAZÓWKA DOTYCZĄCA PIELĘGNACJI
Informacje zawarte w tym dokumencie mogą ulec zmianie bez uprzedniego
powiadomienia ze strony producenta. Zmiany będą dodawane do kolejnych
wersji niniejszej instrukcji. Producent nie udziela gwarancji ani rękojmi odno-
śnie poprawności informacji zawartych w tym dokumencie.
• Uwaga, ryzyko obrażeń ciała! Urządzenie zamyka się równo i szczelnie po schowa-
niu – trzymać palce, dłonie lub inne małe części z dala od otworu.
• Niezastosowanie się do powyższych instrukcji może spowodować obrażenia
ciała oraz uszkodzenie produktu lub podłączonych do niego urządzeń. Niewła-
ściwa instalacja lub użytkowanie może również doprowadzić do wygaśnięcia
gwarancji.
• Jeśli nie ma pewności w odniesieniu do korzystania z produk-
tu, skontaktować się z wykwalikowanym personelem, sprzedaw-
cą lub bezpośrednio z rmą celexon (Internet: www.celexon.pl,
e-mail: info@celexon.pl).
• Zastrzega się możliwość zmian technicznych i błędów.
Producent nie ponosi odpowiedzialności za szkody materialne lub obrażenia ciała, jeśli
ekran projekcyjny będzie używany niezgodnie z zalecanymi specykacjami lub jeśli jest
nieprawidłowo zainstalowany. Nie używać ekranu projekcyjnego w pobliżu grzejników
lub klimatyzatorów. Unikać używania produktu w bezpośrednim świetle słonecznym
lub przed oknem. Ze względu na wrażliwy na temperaturę materiał tkaniny projekcyj-
nej, może ona ulec deformacji (płaskość).
Zalecamy odczekanie ok. 2 godzin po dostawie przed rozpoczęciem montażu. Pozwala
to na aklimatyzację ekranu projekcyjnego; zwłaszcza gdy płótno jest przenoszone z zim-
nego do ciepłego otoczenia.
Unikać wszelkich plam na powierzchni tkaniny. Ich usunięcie może być niemożliwe.
NIGDY nie czyścić ekranu projekcyjnego alkoholem lub innymi środkami
czyszczącymi zawierającymi rozpuszczalniki. Używać tylko miękkiej i czy-
stej szmatki. W razie potrzeby brud można usunąć z powierzchni łagodnym
roztworem mydła. Należy bezwzględnie unikać kontaktu ze spiczastymi lub
ostrymi przedmiotami. Mogą one trwale uszkodzić tkaninę projekcyjną. Dal-

3
sze wskazówki można znaleźć w załączonych wskazówkach dotyczących ekra-
nu projekcyjnego.
1. Nie umieszczać ani nie przechowywać ekranu projekcyjnego w miejscach,
w których na powierzchnię pada bezpośrednie światło słoneczne.
2. Chronić tkaninę ekranu projekcyjnego przed brudem lub cząstkami, aby
nie uszkodzić jej powierzchni i nie pogorszyć wyniku projektowania. Je-
śli ekran projekcyjny jest zabrudzony, wyczyścić go miękką szmatką i let-
nią wodą z łagodnym mydłem. Następnie przetrzeć go ponownie czystą
wodą, aby nie pozostały resztki mydła. Tkaniny nie wolno moczyć, a je-
dynie przecierać lekko wilgotną ściereczką i przed zwinięciem musi ona
całkowicie wyschnąć.
3. Nie używać benzyny, rozcieńczalnika ani podobnych środków do czyszcze-
nia tkaniny.
4. W tym modelu zastosowano tkaninę ekranu projekcyjnego PET. Nie moż-
na go zginać, ponieważ załamań nie da się już usunąć. Jest również bar-
dziej wrażliwy na wysokie temperatury i dlatego nie należy go umieszczać
ani przechowywać w miejscu wystawionym na bezpośrednie działanie
promieni słonecznych ani w pobliżu piekarnika.
ZAKRES DOSTAWY
1x ekran projekcyjny na statywie
WSKAZÓWKA DOTYCZĄCA INSTALACJI
Zainstalować ekran projekcyjny w miejscu, które jest w pełni widoczne dla
wszystkich widzów. Optymalna wysokość instalacji odpowiada pozycji widza
na środku ekranu projekcyjnego z rozciągniętą tkaniną: Wysokość oczu = dol-
na jedna trzecia obszaru obrazu. Nie ustawiać ekranu projekcyjnego na dro-
gach przejściowych ani w miejscach o dużym natężeniu ruchu, aby zapobiec
przewróceniu się ludzi i ewentualnym obrażeniom.
1. Nie dotykać tkaniny podczas wsuwania lub wysuwania ekranu projekcyj-
nego.

4
2. Nie umieszczać ekranu projekcyjnego na niestabilnej lub nierównej po-
wierzchni, ponieważ może on spaść lub przewrócić się. Uważać, aby dzieci
nie przebywały same w pokoju z ekranem projekcyjnym.
3. Gdy ekran nie jest używany, zalecamy przechowywanie go w pozycji po-
ziomej, aby zapobiec jego przewróceniu.
4. Nie zawieszać niczego na ekranie projekcyjnym.
POSADOWIENIE EKRANU PROJEKCYJNEGO
SKŁADANIE EKRANU PROJEKCYJNEGO
Położyć ekran projekcyjny na podłodze i lekko unieść nóżki statywu (rys.1).
Umieścić ekran projekcyjny na lekko rozchylonych nóżkach, nacisnąć przycisk
blokady i całkowicie rozłożyć nóżki statywu, aby zapewnić bezpieczną podsta-
wę (rys. 2 i 3).
Przytrzymać obudowę za górny uchwyt i pociągnąć za sworzeń sprężynowy,
aby móc podnieść obudowę na żądaną wysokość. Stanąć lekko stopą na wy-
brzuszeniu w dolnej części statywu, aby ekran projekcyjny pozostał stabilny
po podniesieniu obudowy. Po osiągnięciu żądanej wysokości sworzeń spręży-
nowy musi ponownie zatrzasnąć się w jednym z otworów przed zwolnieniem
górnego uchwytu i odciążeniem obudowy (rys. 4).
Nacisnąć przycisk z boku obudowy, aby otworzyć obudowę na bok (rys. 5).
Ostrożnie odciągnąć obudowę na bok, odpowiedni format obrazu będzie od-
bierany haptycznie przez lekkie zatrzaśnięcie.
Wykonać powyższe czynności w odwrotnej kolejności, uważając, aby nie przy-
ciąć sobie palców podczas ponownego montażu.

5
1| 2|
3| 4|
5| 6|
celexon Europe GmbH | Gutenbergstraße 2 | 48282 Emsdetten | DE

Handleiding
celexon Dual-Format statiefscherm
Mobil Expert
Hartelijk dank voor uw aankoop van dit product.
Voor optimale prestaties en veiligheid moet u deze aanwijzingen zorgvuldig doorlezen
voordat u dit product aansluit of gebruikt. Bewaar deze handleiding voor later gebruik.
Versie: 32422_071

1
Deze handleiding is bedoeld om u vertrouwd te maken met de werking
van dit product. Bewaar deze handleiding daarom goed, zodat u deze altijd kunt raad-
plegen.
• Neem voor de montage resp. het gebruik het bijgevoegde gegevensblad met verde-
re veiligheids- en gebruiksaanwijzingen in acht.
• Begin niet met de montage voordat u de volledige handleiding hebt doorgelezen
en begrepen.
• Voer de installatie met een tweede persoon uit om een veilige montage te waar-
borgen.
• Haal het product uit de verpakking en verwijder alle verpakkingsmaterialen. Let
erop dat zich geen verpakkingsmateriaal aan of in het product bevindt. Mocht u be-
schadigingen aan de verpakking constateren, moet u ook controleren of het product
beschadigd is. Mocht u beschadigingen aan de buitenkant van het apparaat of een
onverwachte of ongebruikelijke werking constateren, mag het product niet verder
worden gebruikt. Neem voor meer informatie onmiddellijk contact op met de dealer
waarbij u het product hebt gekocht of rechtstreeks met celexon (internet: www.
celexon.nl, e-mail: info@celexon.nl).
• Dit product is in principe voor gebruik en opslag in binnenruimten bedoeld. Tijdelijk
gebruik in de buitenlucht is mogelijk en mag alleen onder toezicht, bij max. wind-
kracht 1 en bij droog weer plaatsvinden.
• Het gebruik van het apparaat en accessoires is verboden voor kinderen jonger dan
16 jaar.
• Zorg ervoor dat kinderen niet met het apparaat spelen of zich zonder toezicht in de
buurt van het apparaat bevinden.
• Ombouwen of veranderen van het product beïnvloedt de productveiligheid.
• Let op, letselgevaar! Open het product nooit eigenmachtig. Voer nooit zelf repa-
raties uit!
• Gebruik het product niet in de buurt van uittredend gas, water of in een stofge
omgeving.
• Behandel het product zorgvuldig. Het apparaat kan door stoten, schokken of vallen
(al vanaf geringe hoogte) beschadigd raken.
• Houd het product uit de buurt van vocht en hitte.
• Dompel het product nooit in water of andere vloeistoffen.
• Gebruik het product alleen waarvoor het bedoeld is. Afwijkend gebruik kan leiden
tot beschadigingen van het product of in de omgeving van het product.
WAARSCHUWINGEN

2
UITSLUITING VAN AANSPRAKELIJKHEID
VERZORGINGSAANWIJZING
De informatie in dit document kan zonder voorafgaande kennisgeving door de
fabrikant worden gewijzigd. Wijzigingen worden telkens in de volgende versies
van dit handboek aangevuld. De fabrikant geeft geen garantie op de juistheid
van de informatie in dit document.
• Let op, letselgevaar! Het apparaat sluit vlak en stevig in ingeschoven toestand -
houd vingers, handen of andere kleine voorwerpen uit de buurt van de opening.
• Bij niet-inachtneming van bovenstaande aanwijzingen kun-
nen letsel en beschadigingen van het product of daaraan aange-
sloten apparaten ontstaan. Bij foutieve installatie of gebruik kan de
garantie ook komen te vervallen.
• Als u twijfelt bij het gebruik van het product, neem dan contact op met vak-
personeel, uw dealer of rechtstreeks met celexon (internet: www.celexon.nl,
e-mail: info@celexon.nl).
• Technische wijzigingen en fouten zijn voorbehouden.
De fabrikant is niet aansprakelijk voor materiële schade of letsel als het scherm buiten
de aanbevolen specicaties wordt gebruikt of bij ondeskundige installatie. Gebruik dit
scherm niet in de buurt van verwarmingen of airco's. Gebruik het product indien moge-
lijk niet in direct zonlicht of voor een raam. Vanwege het temperatuurgevoelige doekma-
teriaal kan het projectiedoek vervormen (vlakke toestand).
Wij adviseren om na levering ca. 2 uur met de montage te wachten. Zo kan het scherm
acclimatiseren; vooral als het scherm van koude in een warme omgeving wordt gebracht.
Vermijd vlekken op het doekoppervlak. Deze kunnen mogelijk niet meer verwijderd
worden.
Reinig het scherm NOOIT met alcohol of andere reinigingsmiddelen die op-
losmiddel bevatten. Gebruik alleen een zachte en schone doek. Met een mild
zeepsopje kan eventueel vuil van het oppervlak worden verwijderd. Vermijd
beslist het contact met puntige of scherpe voorwerpen. Deze kunnen het pro-
jectiedoek blijvend beschadigen. Meer aanwijzingen staan in de bijgevoegde
aanwijzingen voor het scherm.

3
1. Positioneer of bewaar het scherm niet in omgevingen waar direct zonlicht
op het scherm komt.
2. Houd het schermdoek vrij van vuil of deeltjes om het doekoppervlak
niet te beschadigen en het projectresultaat niet te verslechteren. Als het
scherm verontreinigd is, reinigt u het met een zachte doek en handwarm,
mild zeepsop. Veeg daarna nogmaals met helder water na zodat er geen
zeepresten achterblijven. Het doek mag niet doordrenkt zijn, maar mag
alleen licht vochtig worden afgeveegd en moet voor het inschuiven hele-
maal droog zijn.
3. Gebruik geen benzine, verdunner of vergelijkbare oplossingen om het
doek te reinigen.
4. Bij dit model wordt een PET-projectiedoek gebruikt. Dit mag niet worden
geknikt, omdat de knikken niet meer verwijderd kunnen worden. Ook is het
doek gevoeliger voor hitte en mag daarom niet in direct zonlicht of in de
buurt van een oven staan resp. worden opgeborgen.
LEVERINGSOMVANG
1x statiefscherm
INSTALLATIE-AANWIJZING
Installeer het scherm op een positie die voor alle kijkers volledig zichtbaar is.
De optimale opstelhoogte komt overeen met de positie van de kijkers ten op-
zichte van het midden van het scherm bij uitgeschoven doek: Ooghoogte =
onderste derde deel van het beeldoppervlak. Het scherm niet in looppaden en
niet op winderige plekken opstellen om omvallen en evt. letsel van personen
te vermijden.
1. Tijdens het in- of uitschuiven van het scherm mag het doek niet worden
aangeraakt.

4
2. Stel het scherm niet op instabiele of oneffen oppervlakken op; het scherm
zou kunnen vallen of omkantelen. Let op dat zich geen kinderen alleen met
het scherm in een ruimte bevinden.
3. Als het scherm niet wordt gebruikt, adviseren wij om het scherm horizon-
taal op te bergen, om het te beveiligen tegen omvallen.
4. Hang geen voorwerpen aan het scherm.
SCHERM OPSTELLEN
SCHERM ASSEMBLEREN
Plaats het scherm op de vloer en zet de statiefvoeten er licht op (afb.1).
Zet het scherm op de licht geopende voeten, druk de xeertoets in en zet de
statiefvoeten volledig uit elkaar voor een goede stand (afb. 2 en 3).
Houd de behuizing aan de bovenste handgreep vast en trek de veerpen terug
om de behuizing op de gewenste hoogte omhoog te kunnen trekken. Stap
daarbij met uw voet licht op de uitronding onder op het statief, zodat het
scherm bij het omhoogzetten van de behuizing veilig blijft staan. Als de ge-
wenste hoogte is bereikt, moet de veerpen weer in een van de gaten worden
vergrendeld voordat u de bovenste handgreep loslaat en de behuizing ontlast
(afb. 4).
Druk de geïntegreerde toets aan de zijkant van de behuizing in om de behui-
zing zijwaarts te openen (afb. 5)
Trek de behuizing voorzichtig naar de zijkant uit elkaar; het betreffende beeld-
formaat is daarbij door lichte vergrendeling haptisch waar te nemen.
Voer de bovengenoemde stappen in omgekeerde volgorde uit en let bij het
assembleren erop dat uw vingers niet klem komen te zitten.

5
1| 2|
3| 4|
5| 6|
celexon Europe GmbH | Gutenbergstraße 2 | 48282 Emsdetten | DE

Bruksanvisning
celexon Dual Format Stativduk Mobile
Expert
Tack för att du har valt denna produkt!
Läs igenom denna bruksanvisning noga innan du ansluter eller använder produkten för
att garantera säkerheten och uppnå bästa möjliga prestanda. Spara denna bruksanvis-
ning för framtida bruk.
Version: 32422_071

1
Syftet med denna bruksanvisning är att förklara hur produkten fungerar. Spara därför
bruksanvisningen på ett säkert ställe så att du kan läsa i den senare om det behövs.
• Läs det medföljande databladet med er säkerhets- och användningsanvisningar
innan du börjar med monteringen eller användningen.
• Börja inte med monteringen förrän du har läst och förstått hela bruksanvisningen.
• Utför installationen tillsammans med en medhjälpare för att garantera säkerheten
under monteringen.
• Ta ut produkten ur förpackningen och avlägsna allt förpackningsmaterial. Kontroll-
era att det inte nns något förpackningsmaterial på eller i produkten. Om du ser att
förpackningen är skadad bör du kontrollera om produkten är skadad också. Om du
hittar utvändiga skador på produkten eller om den inte fungerar som den ska eller
om den beter sig onormalt så får produkten inte användas längre. Kontakta ome-
delbart återförsäljaren som du köpte produkten av eller vänd dig direkt till celexon
(webbplats: www.celexon.se, e-post: info@celexon.se) för mer information.
• Denna produkt ska huvudsakligen användas och förvaras inomhus. Produkten kan
användas utomhus tidvis om den hålls under uppsikt och om vindstyrkan är 1 eller
lägre och om det är torrt på användningsplatsen.
• Barn under 16 år får inte använda apparaten eller tillbehören.
• Se till så att inga barn leker med produkterna eller vistas i närheten av dessa utan
uppsikt.
• Om produkten byggs om eller förändras påverkas produktens säkerhet negativt.
• Varning för skaderisk! Öppna aldrig produkten på egen hand. Utför aldrig några
reparationer själv!
• Använd aldrig produkten i närheten av utträngande gas eller vatten eller i dammiga
miljöer.
• Handskas försiktigt med produkten. Den kan skadas av stötar, slag eller fall från låga
höjder.
• Håll produkten borta från fukt och hög värme.
• Doppa aldrig produkten i vatten eller några andra vätskor.
• Använd produkten endast på det sätt som den är avsedd för. Om den används på
något annat sätt kan detta leda till skador på produkten eller dess omgivning.
• Varning för skaderisk! Apparaten stängs och sluter hårt och tätt när den fälls ner –
håll därför ngrar, händer och smådelar borta från öppningen.
• Om anvisningarna ovan inte följs kan detta leda till personskador el-
VARNINGAR

2
ANSVARSFRISKRIVNING
SKÖTSELRÅD
Informationen i detta dokument kan ändras av tillverkaren utan förvarning.
Ändringar införs i de efterföljande versionerna av denna bruksanvisning. Till-
verkaren garanterar inte att uppgifterna i detta dokument är korrekta.
ler skador på produkten eller på utrustning som är ansluten till den.
Felaktig installation eller felaktig användning kan även leda till att
garantin upphör att gälla.
• Om du är osäker på hur produkten ska användas ber vi dig kontakta en ex-
pert, din återförsäljare eller celexon direkt (webbplats: www.celexon.se,
e-post: info@celexon.se).
• Med reservation för tekniska ändringar och fel.
Tillverkaren ansvarar inte för sakskador eller personskador som uppstår om projektor-
duken inte används enligt de rekommenderade specikationerna, eller om installationen
är felaktigt utförd. Denna projektorduk får inte användas i närheten av värmeelement
eller luftkonditioneringar. Använd helst inte produkten i direkt solljus eller framför ett
fönster. Det temperaturkänsliga dukmaterialet kan göra att projektionsduken deforme-
ras (ytjämnheten).
Vi rekommenderar att du väntar i ca 2 timmar med monteringen efter leveransen. På så
vis hinner projektorduken anpassa sig till rumsklimatet; särskilt om projektorduken yt-
tas från en kall till en varm omgivning.
Undvik alla typer av äckar på dukens yta. Det kan hända att de inte går att få bort.
Rengör ALDRIG projektorduken med alkohol eller andra rengöringsmedel som
innehåller lösningsmedel. Använd bara en mjuk och ren trasa. Om det behövs
kan du ta bort smuts från ytan med en mild tvållösning. Undvik kontakt med
spetsiga eller vassa föremål. De kan skada projektorduken permanent. Fler an-
visningar hittar du i de medföljande projektorduksinstruktionerna.

3
INSTALLATIONSANVISNING
1. Placera eller förvara inte projektorduken på platser där duken träffas av
direkt solljus.
2. Håll projektorduken fri från smuts och partiklar, så att dukens yta inte ska-
das och så att projektionsresultatet inte försämras när den används. Om
projektorduken är smutsig rengör du den med en mjuk trasa och ljummet,
milt tvålvatten. Sedan torkar du efter med enbart rent vatten, så att alla
tvålrester försvinner. Duken får inte bli blöt utan bara lite lätt fuktig när den
torkas av och innan den fälls ner igen måste den vara helt torr.
3. Använd aldrig någon form av bensin, förtunningsmedel eller liknande lös-
ningsmedel för att rengöra duken.
4. På den här modellen används en PET-projektionsduk. Denna duk får inte
vikas eller veckas, eftersom vecken inte går att få bort. Den är också mer
känslig för värme och den bör därför inte stå uppställd eller förvaras i di-
rekt solljus eller i närheten av ugnar/kaminer.
LEVERANSOMFATTNING
1 st. stativduk
Installera projektorduken på ett ställe där alla som ska titta på den kan se hela
duken. Den perfekta uppställningshöjden mäts från en tittare som sitter mitt
framför den utfällda projektorduken: deras ögonhöjd = vid bildytans nedre
tredjedel. Ställ aldrig upp projektorduken på gångvägar eller dragiga platser,
för att förhindra att den välter och eventuellt skadar någon.
1. Rör aldrig vid duken medan din projektorduk fälls in eller ut.
2. Ställ aldrig projektorduken på ostadiga eller ojämna underlag, eftersom
den kan välta då. Barn får inte lämnas ensamma med projektorduken i
rummet.

4
3. När projektorduken inte används rekommenderar vi att du förvarar den i
vågrät position, så att den inte kan välta.
4. Häng aldrig några föremål på projektorduken.
SÅ HÄR STÄLLER DU UPP PROJEKTORDUKEN
SÅ HÄR TAR DU NER PROJEKTORDUKEN
Lägg projektorduken på golvet och fäll ut stativets fötter en aning (bild 1).
Ställ projektorduken på de en aning utfällda fötterna, tryck in låsknappen och
fäll ut stativets fötter helt så att stativet står stadigt (bild 2 och 3).
Ta tag i det övre handtaget på kassetten och dra ut det fjäderbelastade stiftet,
så att du kan dra upp kassetten till den höjd du vill ha den på. Sätt samtidigt
foten lite lätt på utbuktningen längst ner på stativet, så att projektorduken står
stadigt medan du drar upp kassetten. När kassetten är på rätt höjd måste det
fjäderbelastade stiftet hakas fast i ett av hålen igen, innan du släpper det övre
handtaget och låter kassetten hänga (bild 4).
Tryck på knappen som sitter i sidan på kassetten så att du kan öppna kassetten
åt sidorna (bild 5).
Dra försiktigt ut kassetten åt sidorna; när du drar ut kassetten kan du känna de
olika bildformaten med ngrarna genom att kassetten hakas fast lätt i forma-
tens läge.
Utför stegen ovan i omvänd ordning och akta dig så att du inte klämmer ng-
rarna när du fäller ihop projektorduken.

5
1| 2|
3| 4|
5| 6|
celexon Europe GmbH | Gutenbergstraße 2 | 48282 Emsdetten | DE
-
 1
1
-
 2
2
-
 3
3
-
 4
4
-
 5
5
-
 6
6
-
 7
7
-
 8
8
-
 9
9
-
 10
10
-
 11
11
-
 12
12
-
 13
13
-
 14
14
-
 15
15
-
 16
16
-
 17
17
-
 18
18
-
 19
19
-
 20
20
-
 21
21
-
 22
22
-
 23
23
-
 24
24
-
 25
25
-
 26
26
-
 27
27
-
 28
28
-
 29
29
-
 30
30
-
 31
31
-
 32
32
-
 33
33
-
 34
34
-
 35
35
-
 36
36
-
 37
37
-
 38
38
-
 39
39
-
 40
40
-
 41
41
-
 42
42
-
 43
43
-
 44
44
-
 45
45
-
 46
46
-
 47
47
-
 48
48


Celexon Mobile Expert 172 x 108 cm dwuformatowy ekran na statywie 4:3/16:10 de handleiding
- Type
- de handleiding
in andere talen
- italiano: Celexon Mobile Expert 172 x 108 cm dwuformatowy ekran na statywie 4:3/16:10 Manuale del proprietario
- français: Celexon Mobile Expert 172 x 108 cm dwuformatowy ekran na statywie 4:3/16:10 Le manuel du propriétaire
- español: Celexon Mobile Expert 172 x 108 cm dwuformatowy ekran na statywie 4:3/16:10 El manual del propietario
- Deutsch: Celexon Mobile Expert 172 x 108 cm dwuformatowy ekran na statywie 4:3/16:10 Bedienungsanleitung
- svenska: Celexon Mobile Expert 172 x 108 cm dwuformatowy ekran na statywie 4:3/16:10 Bruksanvisning
- polski: Celexon Mobile Expert 172 x 108 cm dwuformatowy ekran na statywie 4:3/16:10 Instrukcja obsługi
Gerelateerde papieren
-
Celexon Ultra-Leightweight 194 x 121 cm ekran na trójnogu 16:10 de handleiding
-
-
-
-
-
-
-
-
-