MPMan 550DVD de handleiding
- Categorie
- Draagbare dvd- / blu-rayspelers
- Type
- de handleiding

DVD PLAYER
Before connecting, operating or adjusting this product,
please read this user's manual carefully and completely.
USER MANUAL
550DVD
DVD-225HS MIK1389G方案 标准ENGLISH MANUAL

1) Read these instructions.
2) Keep these instructions.
3) Heed all warnings.
4) Follow all instructions.
5) Do not use this apparatus near water.
6) Clean only with dry cloth.
7) Do not block any ventilation openings, install in accordance with
the instructions.
8) Do not install near any heat sources such as radiations, heat
registers, stoves, or other apparatus
(including amplifiers) that produce heat.
9) Do not defeat the safety purpose of the polarized plug. If the
provided plug does not fit into your
outlet, consult an electrician for replacement of the obsolete outlet.
10) Protected the power cord from being walked on or pinched
particularly at plugs, convenience
receptacles, and the point where they exit from the apparatus.
11) Only use attachments/accessories specified by the
manufacturer.
12) Unplug this apparatus during lighting storms or when unused
for long periods of time.
13) Refer all servicing to qualified service personnel. Servicing is
required when the apparatus
has been damaged in any way, such as power-supply cord or plug
is damaged, liquid has been
spilled or objects have fallen into the apparatus, the apparatus has
been exposed to rain or
moisture, does not operate normally, or has been dropped.
14) Mains plug is used as the disconnect device, the disconnect
device shall remain readily operable.
15) The ventilation should not be impeded by covering the
ventilation openings with items, such as
newspapers, table-cloth, curtains, etc.
16) No naked flame sources, such as lighted candles, should be
placed on the apparatus.
17) Attention should be drawn to the environmental aspects of
battery disposal.
18) The use of apparatus in moderate climate.
19) The apparatus shall not be exposed to dripping or splashing
and that no objects filled with
liquids, such as vases, shall be placed on the apparatus.
This marking indicates that this product should not
be disposed with other household wastes
throughout the EU. To prevent possible harm to the
environment or human health from uncontrolled
waste disposal, recycle it responsibly to promote
the sustainable reuse of material resources. To
return your used device, please use the return and
collection systems or contact the retailer where
the product was purchased. They can take this
product for environmental safe recycling.
1
Important Safety Instructions
WARNING: To reduce the risk of fire or electric shock, do not
expose this apparatus to rain or moisture.
WARNING: The batteries shall not be exposed to excessive heat
such as sunshine, fire or the like.
CAUTION: Danger of explosion if battery is incorrectly replaced.
Replace only with the same or
equivalent type. (Only for with Lithium ion battery apparatus)
WARNING: The excessive sound pressure from earphones and
headphones can cause hearing
loss. (Only for with earphones port apparatus)
The symbol indicates that dangerous voltages constituting a
risk of electric shock are present within this unit.
The symbol indicates that there are important operating and
maintenance instructions in the literature accompanying this
unit.
This symbol indicates that this product incorporates double
insulation between hazardous mains voltage and user
accessible parts. When servicing use only identical
replacement parts.

Notes on Copyrights:
It is forbidden by law to copy, broadcast, show,broadcast via
cable, play in public, or rent copyrighted material without
permission.
This product features the copy protection function developed by
Macrovision.Copy protection signals are recorded on some discs.
When recording and playing the pictures of these discs picture
noise will appear.This product incorporates copyright protection
technology that is protected by method claims of certain U.S.
Pati

Identification of Controls
Main Unit
3
2
3
4
8
5
7
9
1 SCART
.
.
.
4. USB
. OPEN/CLOSE KEY
6. PLAY/PAUSE
7. STOP KEY
8. REMOTE WINDOW
9. POWER KEY
2 POWER CORD
3 CD DOOR
5
6
1

4
Remote control unit
Identification of Controls
1.
2. SOURCE
OPEN/CLOSE.
DVD/USB.
3. MUTE
Disable Audio output.
4.0-9 NUMBER BUTTON
Selects numbered items in a menu.
5.DISPLAY
To display the playtime and status information.
6.10+ BUTTON
In order to select a track 10 or greater, first press 10+, For example;
select track 12, first press 10+, and then press number 2 button.
7. MENU/PBC
Return to DVD root menu(DVD).
PBC on/off switch (VCD).
8.AUDIO
DVD:Press AUDIO repeatedly during playback to hear a different
audio language or audio track, if avilable.
CD/VCD:Press AUDIO repeatedly during playback to hear a
different audio channel ( Left,Right,Mix,Stereo).
9.PLAY/PAUSE
Press PLAY/PAUSE once to pause playback, pressing
PLAY/PAUSE second time will resume the playback.
10.STOP
When this buttom is pressed once, the unit records the stopped
point,from where playback will resume if PLAY( )is pressed after
wards. But if STOP button is pressd again instead of PLAY( )
button, there will be no resume function.
11.A-B
-repeat a specific segment
12.VOL+
Adjust volume
13.VOL-
Adjust volume.
14.Forward Skip
Go to next chapter/track.
15.Reverse Skip
Go to previous chapter/ track to the beginning.
16. BUTTON
Press BUTTON allow skipping ahead at 5-level speed
(X2->X4->X8->X16->X32->PLAY), press PLAY button return to
normal playback.
19
20
3
2
1
4
5
6
7
8
9
10
11
12
14
15
16
17
29
28
27
26
13
25
24
23
21
22
1 2
3
4
5
6
7
8
9 0
10+
VOL -
VOL+
REPEAT
SEARCH
TITLE
ENTER
DISPLAY
SUBTITLE
A NGLE
AUDIO
MENU/
PBC
SETUP
ZOOM
STEP
MUTE
SOURCE
A-B
SLOW
PROGRAM
18

Identification of Controls
5
Remote control unit
17. BUTTON
Press BUTTON allow skipping back at 5-level speed
(X2->X4->X8->X16->X32->PLAY), press PLAY button return to normal
playback.
18.
Normal play/Standby mode switch.
19.STEP
Step the motion in DVD mode.
20.SEARCH
Goto time point, title or chapter you want in DVD Mode.
21.SUBTITLE
Press SUBTITLE repeatedly during playback to hear a different subtitle
languages.
22.ANGLE
DVD:Press ANGLE will change the view angle, on DVDs that support
this feature.
23.TITLE
Return to DVD title menu.
24.ENTER
Confirms menu selection.
25.SETUP
Accesses or removes setup menu.
26.REPEAT
Press REPEAT during playback to select a desired repeat mode.
DVD: you can play select repeat chapter/title/off.
CD/VCD: you can select repeat single/all/off.
MP3: you can select repeat single/folder/off.
27.SLOW
Press Slow button repeatedly to enter slow playback, and cycle
between different speeds. The speeds are 1/2,1/4,1/8,1/16,
and normal.
28.PROGRAM
DVD/VCD: The program function enables you to store your favourite
tracks from the disc. Press PROGRAM button, then PROGRAM MENU
will appear on screen, now you can use the number key to direct input
the titles,chapters or tracks number and select PLAY option. TO
resume normal playback, press PROGRAM and select clear program
option on the program menu,press PROGRAM again to exit program
menu.
29.ZOOM
DVD/VCD: Use ZOOM to enlarge or shrink the video image.
1.Press ZOOM during playback or still playback to activate the
Zoom function. The square frame appears briefly in the right bottom
of the picture.
2. Each press of the ZOOM button changes the TV screen in the
following sequence:
JPEG: Use ZOOM to enlarge or shrink the picture.
1.Press 'ZOOM' .
2,Used " " to enlarge,or " " to shorten the picture.
Use the button to move through the zoomed picture.

SETUP Menu Setting
General Setup Page
6
Angle Mark
Displays current angle setting information on the right hand corner
of the TFT screen if available on the disc.
OSD Language
You can select your own preferred language seetings.
Closed Captions
Closed captions are data that are hidden in the video signal of some
discs.Before you select this function,please ensure that the disc
contains closed captions information and your TV set also has this
function.
Screen Saver
This function is used to turn the screen saver On or Off.
Auto Standby
This function is used to select auto standby settings after 3 or 4 hours.
3 HOURS: the unit will turn to standby mode after 3 hours if there is
no interaction from user within this period of time.
4 HOURS: the unit will turn to standby mode after 4 hours if there is no
interaction from user within this period of time.
OFF: the auto standby function is disabled, and unit will stay in “on”
mode even if no interaction from user.
Audio Setup Page
Press SETUP button to get the setup menu. Use direction buttons
to select the preferred item. After finishing settings, press
SETUP again to normal display.
The following menu items can be changed:
GENERAL: selects the GENERAL PAGE menu.
AUDIO: selects the AUDIO PAGE menu.
VIDEO: selects the VIDEO PAGE menu.
PREFERENCE : selects the PREFERENCE PAGE menu.
PASSWORD: selects the PASSWORD PAGE menu.
General Setup Page
- - GENERALSETUP PAGE - -
GOTO GENERAL SETUP PAGE
TV DISPLAY WIDE
ANGLE MARK ON
OSD LANGUAGE ENG
CLOSED CAPTIONS ON
SCREEN SAVER ON
AUTO STANDBY 3H
4:3 PANSCAN
4:3 LETTERBOX
16:9
ON
OFF
ENGLISH
FRENCH
GERMAN
ITALIAN
SPANISH
PORTUGUESE
ON
OFF
ON
OFF
TV DISPLAY: selects the aspect ratio of the playback picture.
4:3 PANSCAN: if you have a normal TV and want both sides of the
picture to be trimmed or formatted to fit your TV screen.
4:3 LETTERBOX: if you have a normal TV. In this case, a wide
picture with black bands on the upper and lower portions of the TV
screen will be displayed.
16:9:wide screen display.
-- --
DOWNMIX
STR
DOLBY DIGITAL
LT/RT
DUAL MONO
DYNAMIC
STR
STR
L-MONO
R-MONO
MIX-MONO
-
-
-
-
-
-
-
-
-
-
-
-
-
-
-
-
-
-
FULL
OFF
---

SETUP Menu Setting
7
Downmix
This options allows you to set the stereo analog output of your
DVD Player.
→
Dolby Pro Logic decoder.
→ Stereo :Select this option when output delivers sound from only
the two front speakers.
Dolby digital
The options included in Dolby Digital Setup are: 'Dual Mono ' and
'Dynamic '.
Dual Mono
→ Stereo:Left mono sound will send output signals to Left speaker
and Right mono sound will send output signals to Right speaker.
→ L-Mono:Left mono sound will send output signals to Left speaker
and Right speaker.
→ R-Mono:Right mono sound will send output signals to Left speaker
and Right speaker.
→ Mix-Mono:Left and Right mixed mono sound will send output
signals to Left and Right speakers.
Dynamic
Dynamic range compression.
LT/RT :Select this option if your DVD Player is connected to a
Audio Setup Page
Video Setup Page
- - VIDEO SETUP PAGE - -
GOTO VIDEO SETUP PAGE
VIDEO OUTPUT RGB
SHARPNESS MID
BRIGHTNESS 00
CONTRAST 00
HUE 00
SATURATION 00
HIGH
MEDIUM
LOW
VIDEO OUTPUT: Set it for SCART output.
Sharpness,Brightness,Contrast,Hue,Saturation:setting the video
quality.
RGB
OFF

8
Preference Page
Preference Page
- - PREFERENCE SETUP PAGE - -
GOTO PREFERENCE PAGE
TV TYPE PAL
AUDIO ENG
SUBTITLE ENG
DISC MENU ENG
PARENTAL
DEFAULT
PAL
AUTO
NTSC
1 KID SAF
2 G
3 PG
4 PG13
5 PGR
6 R
7 NC17
8 ADULT
RESET
TV Type
Selecting the colour system that corresponds to your TV when AV
outputs.This DVD Player is compatible with both NTSC and PAL.
ENGLISH
FRENCH
GERMAN
ITALIAN
SPANISH
PORTUGUESE
ENGLISH
FRENCH
GERMAN
ITALIAN
SPANISH
PORTUGUESE
OFF
ENGLISH
FRENCH
GERMAN
ITALIAN
SPANISH
PORTUGUESE
SETUP Menu Setting
PAL - Select this if the connected TV is PAL system.It will change the
video signal of a NTSC disc and output in PAL format.
NTSC-Select this if the connected TV is NTSC system.It will change
the video signal of a PAL disc and output in NTSC format.
Auto:Chang the video signal output automatic according to the
playing disk format.
Audio:Selects a language for audio (if available).
Subtitle:Selects a language for subtitle (if available).
Disc Menu:Selects a language for disc menu (if available).
Parental
Some DVDs may have a parental levee aveacpSoelnoa

9
Password: select the menu password change page.
Password Setup Page
OSD PASSWORD
NEW PASSWORD

This is to certify that the portable DVD player is in conformity with
Council directive 2004/108/EC(EMC Directive)
Applicable standards:
EN55013:2001+A1:2003+A2:2006
EN61000-3-3:2008
EN55020:2007+A11:2011
EN60065:2002+A1:2006+A11:2008+A2:2010+A12:2011
For more information please visit our website
www.mpmaneurope.com
10

LECTEUR DVD
Avant de connecter, utiliser ou régler ce produit,
veuillez lire ce manuel de l’utilisateur soigneusement et jusqu'au bout.
MANUEL DE L'UTILISATEUR
550DVD
FR

1) Lisez ces instructions.
2) Conservez ces instructions.
3) Tenez compte de toutes les mises en garde.
4) Suivez toutes les instructions.
5) N’utilisez pas cet appareil à proximité de l’eau.
6) Ne nettoyez qu’à l’aide d’un linge sec.
7) N’obstruez aucune voie de ventilation. Installez conformément
aux instructions du fabricant.
8) N’installez pas à proximité de sources de chaleur telles que
radiateurs, registre de chaleur, poêle ou autres appareils (y
compris les amplificateurs) qui produisent de la chaleur.
9) Ne sous-estimez pas l’objectif de sécurité des prise polarisées.
Si la prise fournie ne convient pas à votre équipement, consultez
un électricien pour remplacer votre ancien équipement.
10) Protégez le cordon d’alimentation contre les piétinements ou
les pincements, particulièrement au niveau des branchements,
prises de courant, et du point d’où il sort de l’appareil.
11) N’utilisez que les extensions/accessoires spécifiés par le
fabricant.
12) Débranchez cet appareil lors des orages ou lorsqu’il est
inutilisé pendant une longue période.
13) Confiez toute réparation à du personnel de maintenance
qualifié. La réparation est nécessaire lorsque l’appareil a été
endommagé de quelque sorte, par exemple si le cordon
d’alimentation ou la prise sont endommagés, si du liquide a été
répandu ou si des objets sont tombés dans l’appareil, si ce dernier
a été exposé aux moisissures ou à la pluie, s’il ne fonctionne pas
normalement, ou qu’il a chuté.
14) La prise d'alimentation principale sert de dispositif de
déconnexion.
Le dispositif de déconnexion doit rester facilement accessible.
15) La ventilation ne doit pas être empêchée par le fait de couvrir
les ouvertures de ventilation avec des objets comme des journaux,
des nappes, des rideaux etc.
16) Aucune source de flamme telle que des bougies allumées ne
devraient être placée près de l'appareil.
17) Votre attention devrait se porter sur l’aspect écologique de
l’élimination des piles.
18) Utilisez l’appareil dans une atmosphère modérée.
19) L’appareil ne doit pas être exposé aux suintements ou aux
éclaboussures.
Ce symbole indique que ce produit ne doit pas être déposé avec
vos déchets ménagers au sein de l’UE. Afin de prévenir toute
nuisance possible à l’environnement et la santé humaine causée
par des dispositions de déchets incontrôlées, recyclez l’unité afin
d’assurer la promotion de la réutilisation de ressources matérielles.
Pour mettre au rebut votre unité, déposez celle-ci dans un point de
collecte ou contactez votre revendeur. Ceux-ci peuvent procéder
au recyclage du produit en toute sécurité
1
Instructions importantes sur la sécurité
Aucun objet rempli de liquide, comme des vases, ne doit être placé sur
l’appareil.
AVERTISSEMENT : Pour réduire le risque d'électrochoc, n'exposez pas
cet appareil à la pluie ou à l'humidité.
AVERTISSEMENT : Les piles ne doivent pas être exposées à une
chaleur excessive telle que les rayons de soleil, flammes ou autre source
de chaleur similaire.
Attention : Toute batterie installée de manière incorrecte présente un
risque d’explosion, remplacez seulement la batterie par une batterie de
modèle identique (batterie Lithium)

Remarques liées aux copyrights :
Toute copie, diffusion, affichage, diffusion par câble, lecture en
public ou location de contenu protégé par copyright est interdit
sans avoir obtenu la permission préalable du détenteur.
Ce produit intègre un dispositif de protection contre la copie
développé par Macrovision. Ces signaux de protection sont
enregistrés sur les disques. Des parasites peuvent être présents
lors de l’enregistrement et de la lecture de ces disques. Ce produit
intègre une technologie de protection des droits d'auteur qui est
protégée par des documents de méthode de certains brevets
américains et d'autres droits de propriété intellectuelle détenus par
Macrovision Corporation ainsi que par d'autres détenteurs de
droits. L'utilisation de cette technologie de protection des droits
d'auteur est soumise à l'autorisation de Macrovision ; elle est
destinée exclusivement à une utilisation domestique et à des
opérations limitées de visualisation. L’ingénierie inverse et le
désassemblage sont interdits.
NUMÉRO DE SÉRIE :
Vous pouvez trouver le numéro de série à l’arrière de l’appareil. Ce
numéro est unique et n'est pas disponible pour les autres. Nous
vous conseillons de noter les informations requises ici et de garder
ce guide comme une preuve permanente de votre achat.
Modèle numéro :______________________________
Numéro de série ______________________________
Date d’achat _________________________________
2
Consignes de sécurité
Attention : Ce lecteur de disques vidéo numérique emploie un
émetteur laser. L’utilisation de commandes ou d’optimisations
autres que celles spécifiées dans ce manuel peut causer une
dangereuse exposition aux radiations.
Attention : Afin de prévenir toute exposition au rayon laser,
n’ouvrez pas le boîtier de l’unité. Une radiation laser invisible est
émise lorsque le boîtier est ouvert.
Attention : Ne regardez pas le rayon laser.
Attention : N'installez pas cet équipement dans un espace
confiné tel qu'une bibliothèque ou endroit similaire.
Attention : Lorsque cette unité est utilisée par un enfant, les
parents doivent s’assurer de préalablement expliquer le mode
opératoire de la batterie à l’enfant afin de garantir une utilisation
appropriée de celle-ci.
Attention : Nous ne serons en aucun cas tenus responsables de
toute utilisation inappropriée de la batterie ou du non-respect des
instructions apposées sur la batterie.
Avertissement : L’utilisation d’un câble de raccord USB de plus
de 250mm est interdite avec le port USB.
RISQUE D'ELECTROCHOCNE PAS OUVRIR
ATTENTION
N
N

Identifications des commandes
Unité principale
3
1. PÉRITEL
2. CÂBLE D’ALIMENTATION
3. CLAPET CD
4. USB
5. TOUCHE OUVRIR/FERMER
6. LECTURE/PAUSE
7. TOUCHE STOP
8. FENÊTRE TÉLÉCOMMANDE
9. TOUCHE M/A
2
3
4
8
5
7
9
6

4
Télécommande
Identifications des commandes
1.
2: SOURCE
OUVRIR/FERMER
DVD/USB
3. MUET
Désactive la sortie audio.
4. BOUTONS NUMÉRIQUES 3,0-9
Sélectionne les éléments numérotés dans un menu.
5. AFFICHAGE
Pour afficher le temps de lecture et les informations de statut.
6. BOUTON 5,10+
Permet de sauter de 10 pistes en avant ou en arrière, appuyez
d'abord sur 10+, par exemple :
choisissez la piste 12, commencez par appuyer sur 10+, et appuyez
sur la touche 2.
7. MENU/PBC
Retourne au menu titre du DVD (DVD).
Interrupteur PBC m/a (VCD).
8. AUDIO
DVD : Appuyez sur AUDIO à plusieurs reprises durant la lecture pour
changer de langage audio ou de piste audio si disponible.
CD/CD-R Appuyez sur AUDIO à plusieurs reprises pendant la
lecture pour écouter une chaine différente (Gauche, droite,
mélange, stéréo).
9. LECTURE/PAUSE
Appuyez sur LECTURE/PAUSE une fois pour mettre la lecture en
pause, appuyez de nouveau pour reprendre la lecture.
10. STOP
Lorsque vous appuyez sur cette touche, l'unité enregistre le point
d'arrêt, et reprend la lecture depuis ce point lorsque vous appuyez
sur Lecture .
Mais si vous appuyez sur la touche STOP au lieu de Lecture ,
il n'y aura pas de fonction de récupération de lecture.
11.A-B
- Répète un segment spécifique
12.VOLUME+
Réglage du volume
13.VOL -
Réglage du volume
14. Saut avant
Aller au chapitre/ à la piste suivante.
15. Retour
Aller au début du chapitre / de la piste précédente.
19
20
3
2
1
4
5
6
7
8
9
10
11
12
14
15
16
17
29
28
27
26
13
25
24
23
21
22
1 2
3
4
5
6
7
8
9 0
10+
VOL -
VOL+
REPEAT
SEARCH
TITLE
ENTER
DISPLAY
SUBTITLE
A NGLE
AUDIO
MENU/
PBC
SETUP
ZOOM
STEP
MUTE
SOURCE
A-B
SLOW
PROGRAM
18

5
16. TOUCHE
Appuyez sur la touche pour avancer rapidement avec 5 vitesses
(X2->
X4->X8->X16->X32->Lecture), appuyez sur la touche Lecture pour
retourner à la lecture normale.
17. TOUCHE
Appuyez sur la touche pour reculer rapidement avec 5 vitesses
(X2->
X4->X8->X16->X32->Lecture), appuyez sur la touche Lecture pour
retourner à la lecture normale.
18.
Interrupteur de mode lecture normale / veille
19.STEP
Arrête le mouvement en mode DVD
20. RECHERCHE
Aller a un moment précis, un titre ou un chapitre que vous désirez en
mode DVD.
21. SOUS-TITRE
Appuyez sur SOUS-TITRE à plusieurs reprises durant la lecture pour
changer le langage des sous-titres.
22.ANGLE
DVD: Appuyez sur ANGLE pour changer l’angle de vue, sur les DVD
qui prennent en charge cette fonction.
23. TITRE
Retourne au menu titre du DVD.
24. ENTRÉE
Confirme la sélection dans un menu
25. PARAMÈTRES (SETUP)
Accède ou sort du menu de paramètres.
26. RÉPÉTER
Appuyez sur RÉPÉTER durant la lecture pour choisir le mode de
répétition de votre choix.
DVD : vous pouvez lire le chapitre ou le titre de votre choix ou
désactiver la fonction.
CD/VCD : vous pouvez sélectionner la répétition d'une piste / toutes
les pistes / désactiver la répétition.
Mp3 : vous pouvez sélectionner la répétition d'une piste / tous les
dossiers / désactiver la répétition.
27. LENT
Appuyez sur la touche Lent à plusieurs reprises pour entrer dans la
lecture ralentie et et circuler entre les différentes vitesses.
Les vitesses sont 1/2,1/4,1/8,1/16,et normal.
28. PROGRAMME
DVD/VCD : La fonction programme vous permet de mettre en
mémoire vos pistes favorites sur le disque. Appuyez sur le bouton
PROGRAMME, puis le MENU PROGRAMME apparaitra sur l’écran,
vous pouvez à présent utiliser les touches numériques pour entrer
directement les titres, chapitres ou numéro de piste et choisir
l’option LECTURE. Pour reprendre la lecture normale, appuyez sur
PROGRAMME et sélectionnez l’option Effacer le programme dans
le menu de programmation, appuyez sur Programme de nouveau
pour quitter le menu du programme.
29.ZOOM
DVD/VCD: Utilisez ZOOM pour agrandir ou rétrécir l'image vidéo.
1. Appuyez sur ZOOM pendant la lecture ou en pause pour activer
la fonction d'agrandissement. Un cadre carré apparait rapidement
dans le coin inférieur droit de l'image.
2. Chaque pression sur la touche ZOOM changera l'écran du
téléviseur dans l'ordre suivant :
2Xtaille→3Xtaille→4Xtaille→1/2taille→1/3taille→1/4taille→taille
normale
JPEG: Utilisez ZOOM pour agrandir ou rétrécir l'image vidéo.
Appuyez sur 'ZOOM’
2.Utilisez pour agrandir ou pour rétrécir l'image.
Utilisez la touche pour vous déplacer dans l'image
agrandie.

Réglage du Menu PARAMÈTRES
Page de paramètres généraux
6
Marque d’angle
Affiche l'information de réglage de l'angle en cours dans le coin droit de
l'écran TFT si disponible sur le disque.
Langage de l’OSD
Vous pouvez choisir de configurer votre langue préférée.
Sous-titrage fermés
Les sous-titres fermés sont les données cachées dans le signal vidéo de
certains disques. Avant de choisir cette fonction, veuillez vous assurer
que le disque contient des informations de sous-titres fermées et que
votre téléviseur a également cette fonction.
Économiseur d’écran
Cette fonction sert à activer ou désactiver l’économiseur d’écran.
Mise en veille automatique
Cette fonction est utilisée pour sélectionner les paramètres de mise en
veille après 3 ou 4 heures.
3 Hours : L’unité passera en mode veille après 3 heures s’il n’y a aucune
interaction de l’utilisateur pendant cette durée.
4 Hours : L’unité passera en mode veille après 4 heures s’il n’y a aucune
interaction de l’utilisateur pendant cette durée.
OFF : La fonction de mise en veille automatique est désactivée et l’unité
restera en mode « allumé » même sans interaction de l’utilisateur.
Page de paramètres audio
Appuyez sur le bouton PARAMÈTRES pour aller au menu de
paramétrage. Utilisez les boutons directionnels pour
sélectionner les éléments de votre choix. Après avoir fini le réglage,
appuyez de nouveau sur PARAMÈTRES pour revenir à l’affichage normal.
Les éléments de menu suivant peuvent être changés :
GÉNÉRAL : Sélectionne la page du menu général.
AUDIO: Sélectionne la page du menu audio.
VIDÉO : Sélectionne la page du menu vidéo.
PREFERENCE: Sélectionne la page du menu de préférence.
MOT DE PASSE : Sélectionne la page du menu de mot de passe.
Page de paramètres généraux
- - GENERALSETUP PAGE - -
GOTO GENERAL SETUP PAGE
TV DISPLAY WIDE
ANGLE MARK ON
OSD LANGUAGE ENG
CLOSED CAPTIONS ON
SCREEN SAVER ON
AUTO STANDBY 3H
4:3 PANSCAN
4:3 LETTERBOX
16:9
ON
OFF
ENGLISH
FRENCH
GERMAN
ITALIAN
SPANISH
PORTUGUESE
ON
OFF
ON
OFF
Affichage TV : Sélectionne le ratio d’aspect de l’image en cours
de lecture.
4:3 PANSCAN: Si vous avez un téléviseur normal et que vous
voulez réduire chaque coté de l’image ou la formater pour rentrer
dans votre écran TV.
4:3 LETTERBOX: Si vous avez un téléviseur normal Dans ce cas,
une image large avec des bandes noires dans les portions
supérieures et inférieures de l’écran TV s’affichera.
16:9 : Mode écran large
-- --
DOWNMIX
STR
DOLBY DIGITAL
LT/RT
DUAL MONO
DYNAMIC
STR
STR
L-MONO
R-MONO
MIX-MONO
-
-
-
-
-
-
-
-
-
-
-
-
-
-
-
-
-
-
FULL
OFF
-
- - - -AUDIO SETUP PAGE

7
Downmix
Cette option vous permet de régler la sortie analogique stéréo de
votre lecteur DVD.
→LT/RT :Choisissez cette option si votre lecteur DVD est connecté
sur un décodeur Dolby Pro Logic.
→Stereo :Choisissez cette option lorsque la sortie émet du son
seulement depuis les deux enceintes avant.
Dolby digital
Les options inclues dans le réglage Dolby Digital sont : 'Dual Mono
' et 'Dynamic '.
Dual Mono
→Stéréo:Le son mono gauche enverra des signaux de sortie sur le
haut-parleur gauche et le son mono droite enverra des signaux de
sortie sur le haut parleur droite.
→L-Mono: Le son mono gauche enverra des signaux de sortie sur
le haut-parleur gauche et le haut-parleur droit.
→R-Mono: Le son mono droite enverra des signaux de sortie sur le
haut-parleur gauche et le haut-parleur droit.
→Mix-Mono: Le son mono droite et gauche enverra des signaux de
sortie sur le haut-parleur gauche et le haut-parleur droit.
Page de paramètres audio
Page des réglages vidéo
- - VIDEO SETUP PAGE - -
GOTO VIDEO SETUP PAGE
VIDEO OUTPUT RGB
SHARPNESS MID
BRIGHTNESS 00
CONTRAST 00
HUE 00
SATURATION 00
HIGH
MEDIUM
LOW
RGB
OFF
SORTIE VIDÉO
Réglez la pour la sortie PÉRITEL.
Luminosité, Contraste, Teinte, Saturation : réglages de la qualité de
l'image.

8
Page de préférence
- - PREFERENCE SETUP PAGE - -
GOTO PREFERENCE PAGE
TV TYPE PAL
AUDIO ENG
SUBTITLE ENG
DISC MENU ENG
PARENTAL
DEFAULT
PAL
AUTO
NTSC
1 KID SAF
2 G
3 PG
4 PG13
5 PGR
6 R
7 NC17
8 ADULT
RESET
Type de TV
Sélectionnez la couleur du système qui correspond à votre TV
lorsque vous utilisez la sortie AV.Ce lecteur DVD est compatible
aussi bien avec NTSC qu’avec PAL.
PAL - Choisissez cette option si vous êtes connecté à un système
PAL, le signal vidéo d'un disque NTSC sera changé en format de
sortie PAL.
NTSC - Choisissez cette option si vous êtes connecté à un
système NTSC, le signal vidéo d'un disque PAL sera changé en
format de sortie NTSC.
Auto:Change le signal vidéo en sortie automatique en fonction du
format du disque en cours de lecture.
Audio:Choisit la langue audio (si disponible).
Sous-titre:Choisit la langue des sous-titres (si disponible).
Disc Menu:Choisit la langue du menu du disque (si disponible).
Parental
Certains DVD ont des niveaux de protection parentale assignés
sur l'ensemble du disque ou sur certaines scènes du disque. Cette
fonction vous permet de définir un niveau de limitation de lecture.
Les niveaux de classement vont de 1 à 8 en fonction du pays. Vous
pouvez interdire la lecture de certains disques qui ne conviennent
pas pour vos enfants ou lire certains disques avec des scènes
alternatives.
Par défaut : Retour aux réglage d'usine par défaut.
ENGLISH
FRENCH
GERMAN
ITALIAN
SPANISH
PORTUGUESE
ENGLISH
FRENCH
GERMAN
ITALIAN
SPANISH
PORTUGUESE
OFF
ENGLISH
FRENCH
GERMAN
ITALIAN
SPANISH
PORTUGUESE
Mot de passe page de paramètres
- - PASSWORD SETUP PAGE - -
GOTO PASSWORD SETUP PAGE
PASSWORD MODE ON
PASSWORD
ON
OFF
Mode de mot de passe : Active / désactive le mot de passe. Si
vous réglez sur éteint, le niveau de contrôle parental ne vérifiera
pas le mot de passe.
Réglage du Menu SETUP (RÉGLAGE)

9
Mot de passe page de paramètres
OSD PASSWORD
NEW PASSWORD
CONFIRM PWD
OK
DE l’OSD MOT DE PASSE : Saisissez l'ancien mot de passe (le
paramètre d'usine est 1369), et le curseur sautera automatique sur
NOUVEAU MOT DE PASSE
.
NOUVEAU MOT DE PASSE : Saisissez le nouveau mot de passe.
Saisissez 4 chiffres des touches alphanumériques de la
télécommande, et le curseur passera automatiquement sur
CONFIRMER LE MOT DE PASSE.
CONFIRMER LE MOT DE PASSE : Confirmer le mot de passe en le
saisissant de nouveau. Si la confirmation n'est pas correcte, le curseur
restera dans cette colonne. Après la saisie du nouveau mot de passe
correct, le curseur passera automatiquement sur OK.
OK : Lorsque le curseur est sur cette touche, appuyez sur la touche
ENTER pour confirmer le réglage.
Remarque: Si le mot de passe a été changé, le code de verrouillage
parental et de disque sera également changé.
Le mot de passe par défaut (1369) est toujours actif même si le mot de
passe a été changé.
N
Élément
Besoin standard
Sortie
SORTIE VIDÉO
SORTIE AUDIO
: 2 Vrms (1 KHz, 0 dB)
Besoins d’alimentation
Consommation énergétique
Taux d’humidité d’utilisation
: AC 100-240 V , 50/60 Hz
: <10W
: 5 % à 90 %
Paramètres et spécifications
Paramètres électroniques
Système
Laser
: Laser semiconducteur, longueur d'onde 650nm
longueur d'onde 650nm longueur d'onde 650nm
Système signal
: NTSC / PAL
Réponse en
fréquence
Rapport signal sur bruit
: Plus de 80 dB (connecteurs ANALOG OUT seulement)
Portée dynamique
: Plus de 85 dB (DVD/CD)
Remarque: Ce modèle et ses spécifications peuvent faire l’objet
de changement sans notification.
: 20Hz to 20 kHz(1dB)
N
Condition de rangement et de
fonctionnement :
1. Condition de rangement Température Humidité
6 mois -20°C ~ +45°C 65±20%
1 semaines -20°C ~ +65°C 65±20%
2. Conditions de fonctionnement Température Humidité
Chargement standard 0°C ~ +45°C 65±20%
Déchargement standard -20°C ~ +65°C 65±20%
Mot de passe : Ouvre la page de changement de mot de passe.


11
La société MPMAN déclare que cet appareil est conforme à la
directive européenne 1999/5/CE dite "R&TTE" (Radio And
Terminal Telecommunication Equipement)
Pour toute information, veuillez contacter :
JME SA
Service Technique
M. Michel
77 rue dodonée
1180 Bruxelles
Belgique
Pour toutes questions :
MPMAN / JME SAService consommateur
M. Cavell
77 rue dodonée
1180 Bruxelles
Belgique
12 décembre, 2014

DVD-PLAYER
Lesen Sie diese Bedienungsanleitung vor dem Anschluss,
der Nutzung und der Einstellung sorgfältig und vollständig durch.
BEDIENUNGSANLEITUNG
550DVD
DE

1) Lesen Sie sich diese Anleitung durch.
2) Bewahren Sie diese Anleitung auf.
3) Beachten Sie alle Warnhinweise.
4) Befolgen Sie die Anweisungen.
5) Benutzen Sie dieses Gerät nicht in der Nähe von Wasser.
6) Nur mit einem trockenem Tuch reinigen.
7) Blockieren Sie keine Ventilationsöffnungen. Stellen Sie das
Gerät entsprechend der Anweisungen des Herstellers auf.
8) Stellen Sie das Gerät nicht in der Nähe von Hitzequellen, wie z.
B. Heizungen, Herden oder anderen Geräten die Hitze
produzieren (z. B. Verstärker) auf.
9) Wenn Ihr Gerät über einen polarisierten Stecker verfügt,
machen Sie auf keinen Fall diese Sicherheitsfunktion
unbrauchbar. Wenn der Netzstecker Ihres Geräts nicht in Ihre
Steckdose passt, wenden Sie sich bitte an einen ausgebildeten
Elektriker.
10) Schützen Sie das Netzkabel vor Druckeinwirkung,
insbesondere am Stecker, Steckdosen oder am Ausgangspunkts
des Geräts.
11) Verwenden Sie lediglich vom Hersteller angegebenes
Zubehör.
12) Ziehen Sie bei Gewittern oder bei längerer Nichtbenutzung
den Stecker aus der Steckdose.
13) Wenden Sie sich im Wartungsfall nur an ausgebildetes
Wartungspersonal. Das Gerät sollte gewartet bzw. repariert
werden, nachdem es in irgendeiner Weise beschädigt wurde, wie
z. B. bei Beschädigung des Netzkabels, nachdem Flüssigkeiten
über das Gerät gegossen wurden oder Gegenstände in das Gerät
gelangt sind, es herunter gefallen ist, nicht auf normale Weise
funktioniert oder Feuchtigkeit ausgesetzt wurde.
14) Der Netzstecker ist die Trennvorrichtung und muss jederzeit
leicht bedienbar sein sein.
15) Die Belüftung darf nicht durch Blockierung der
Ventilationsöffnungen mit Gegenständen wie Zeitungen,
Tischdecken, Gardinen usw. beeinträchtigt werden.
16) Stellen Sie kein offenes Feuer wie z.B. angezündete Kerzen
auf das Gerät.
17) Entsorgen Sie Batterien umweltgerecht.
18) Verwenden Sie das Gerät in moderaten Klimazonen.
19) Das Gerät ist nicht spritz- oder tropfwasserdicht. Stellen Sie
keine mit Flüssigkeit gefüllten Gegenstände wie Vasen auf das
Gerät.
Dieses Zeichen bedeutet, dass das vorliegende
Produkt innerhalb der EU nicht zusammen mit
dem Hausmüll entsorgt werden darf. Geben Sie
Altgeräte bei Sammelstellen ab oder wenden Sie
sich an den Händler bei dem das Gerät gekauft
wurde. Dort wird das Gerät dann auf
umweltverträgliche Weise entsorgt.
1
Wichtige Sicherheitshinweise
WARNUNG: Um die Brand- oder Stromschlaggefahr zu reduzieren,
schützen Sie dieses Gerät vor Regen und Feuchtigkeit.
WARNUNG: Die Batterien dürfen niemals übermäßiger Hitze, wie
bei direkter Sonnenstrahlung, Feuer oder dergleichen, ausgesetzt
werden.
Achtung: Es besteht bei falsch eingelegtem Akku Explosionsgefahr!
Benutzen Sie zum Austauschen nur einen Lithium-Akku eines
gleichwertigen Typs.
WARNUNG: Übermäßiger Schalldruck von Kopfhörern kann zu
Hörschäden führen.(Nur für Geräte mit Kopfhöreranschluss)
Das Symbol weist auf gefährliche Spannung im Gerät hin, die
Stromschläge verursachen kann.
Das Symbol weist auf wichtige Gebrauchs- und Wartungsanleitungen in
der Begleitliteratur des Geräts hin.
Dieses Symbol weist auf doppelte Isolierung zwischen gefährlicher
Netzspannung und zugänglichen Teilen des Geräts hin. Für die Wartung
nur identische Ersatzteile verwenden.

Hinweise zum Urheberrecht:
Es ist gesetzlich verboten urheberrechtlich geschütztes Material
ohne Erlaubnis zu kopieren, auszustrahlen, öffentlich
wiederzugeben oder zu vermieten.
Dieses Produkt verwendet eine der Firma Macrovision entwickelte
Kopierschutzfunktion. Auf bestimmten Discs werden
Kopierschutzsignale aufgezeichnet. Bei der Wiedergabe von
Kopien dieser Discs erscheint ein Bildrauschen. Dieses Produkt
verwendet Kopierschutzmechnismen der Firma Macrovision und
anderen Firmen, die durch bestimmte U.S. Patente und andere
Rechte für geistiges Eigentum geschützt sind. Die Benutzung
dieser Kopierschutztechnologie muss durch die Firma Macrovision
autorisiert werden und ist nur für die Benutzung zu Hause und
anderen eingeschränkten Benutzungsweisen gedacht, solange es
nicht ausdrücklich von der Firma Macrovision anders angegeben
wird. Reverse-Engineering und Auseinanderbauen sind nicht
gestattet.
SERIENNUMMER:
Sie können die Seriennummer auf der Rückseite des Gerätes
finden. Diese Zahl ist für dieses Gerät einzigartig und ist auf
anderen Geräten des gleichen Modells anders. Sie sollten die
betreffenden Informationen hier notieren und diese
Bedienungsanleitung als dauerhaft gültigen Kaufbeleg
aufbewahren.
Modellnr.______________________________
Seriennr. ______________________________
Kaufdatum ____________________________
2
Sicherheitshinweise
Warnung: Dieser digitale Disc-Player verwendet ein Lasersystem.
Die Verwendung von Bedienungsweisen, die nicht in dieser
Anleitung beschrieben werden, kann zudem zur Aussetzung von
gefährlicher Strahlung führen.
Achtung: Um direkte Laserstrahlen zu vermeiden, öffnen Sie das
Gehäuse niemals. Es tritt beim Öffnen des Gehäuses sichtbare
Laserstrahlung aus.
Warnung: Niemals direkt in den Laserstrahl blicken.
Achtung: Stellen Sie dieses Produkt nicht an beengten Orten, wie
z. B. einem Bücherregal, auf.
Achtung: Wenn das Gerät von Kindern benutzt wird, sind dessen
Eltern dazu verpflichtet dafür zu sorgen, dass vom Kind der
gesamte Inhalt der Bedienungsanleitung verstanden wird, um
sicher zu stellen, dass der Akku jederzeit sachgemäß benutzt wird.
Achtung: Wir übernehmen keine Verantwortung, wenn der
Benutzer den Akku nicht ordnungsgemäß verwendet bzw. die
Warnhinweise auf dem Gehäuses des Akkupacks nicht befolgt.
Warnung: Die Benutzung eines USB-Verlängerungskabels von
einer Länge von mehr als 250 mm ist untersagt.
STROMSCHLAGGEFAHR!
NICHT ÖFFNEN!
WARNUNG
N
N

Bezeichnung der Bedienelemente
Hauptgerät
3
1. SCART
2. NETZKABEL
3. CD-FACH
4. USB
5. ÖFFNEN/SCHLIESSEN
6. WIEDERGABE/PAUSE
7. STOPP
8. FERNSENSOR
9. BETRIEBSTASTE
2
3
4
8
5
7
9
6
1

4
Fernbedienung
Bezeichnung der Bedienelemente
1.
2. SOURCE
ÖFFNEN/SCHLIESSEN.
DVD/USB.
3. TON AUS
Deaktivieren der Tonausgabe.
4. 0-9 ZIFFERNTASTEN
Auswahl nummerierter Elemente in Menüs.
5. ANZEIGE
Anzeige der Spielzeit und Statusinformationen.
6. 10+
Auswahl von Titelnummer 10 oder höher. Betätigen Sie zunächst
10+ und dann einer weitere Ziffer. Beispiel Titel 12: Betätigen Sie
zuerst 10+ und dann die Zifferntaste 2.
7. MENU/PBC
Zurück zum DVD-Hauptmenü (DVD).
PBC Ein/Aus (VCD).
8. AUDIO
DVD: Betätigen Sie die AUDIO-Taste während der Wiedergabe, um
die Audiosprache zu wechseln, wenn weitere Audiosprachen
vorhanden sind.
CD/VCD: Betätigen Sie die AUDIO-Taste während der Wiedergabe,
um den Audiokanal zu wechseln (Links, Rechts, Mix, Stereo).
9. WIEDERGABE / PAUSE
Betätigen Sie die WIEDERGABE/PAUSE-Taste während der
Wiedergabe, um die Wiedergabe vorübergehend anzuhalten.
Betätigen Sie die WIEDERGABE/PAUSE-Taste ein zweites Mal, um
die Wiedergabe fortzusetzen.
10. STOPP
Wenn diese Taste nur einmal betätigt wird, wird der letzte Punkt der
Wiedergabe gespeichert. Danach können Sie mit der Wiedergabe
durch Betätigung der Wiedergabetaste fortfahren. Wenn die
STOPP-Taste allerdings ein zweites Mal anstelle der
Wiedergabetaste betätigt wird, kann die Wiedergabe nicht
fortgesetzt werden.
11.A-B
Wiederholte Wiedergabe eines bestimmten Abschnitts
12. VOL+
Einstellen der Lautstärke
13. VOL –
Einstellen der Lautstärke
14. VOR
Springen zum nächsten Kapitel/Musiktitel.
15. ZURÜCK
Springen zum vorigen Kapitel/Musiktitel.
19
20
3
2
1
4
5
6
7
8
9
10
11
12
14
15
16
17
29
28
27
26
13
25
24
23
21
22
1 2
3
4
5
6
7
8
9 0
10+
VOL -
VOL+
REPEAT
SEARCH
TITLE
ENTER
DISPLAY
SUBTITLE
A NGLE
AUDIO
MENU/
PBC
SETUP
ZOOM
STEP
MUTE
SOURCE
A-B
SLOW
PROGRAM
18

Identification of Controls
5
Remote control unit
16. 10+
Betätigen Sie die Taste , um den Schnellvorlauf zu aktivieren. Es
stehen 5 Suchlaufgeschwindigkeiten zur Verfügung (2fach → 4fach
→ 8fach → 16fach → 32fach → NORMAL). Sie können jederzeit die
Wiedergabetaste betätigen, um zur normalen Wiedergabe
zurückzukehren.
17. 10+
Betätigen Sie die Taste , um den Schnellrücklauf zu aktivieren. Es
stehen 5 Suchlaufgeschwindigkeiten zur Verfügung (2fach → 4fach
→ 8fach → 16fach → 32fach → NORMAL). Sie können jederzeit die
Wiedergabetaste betätigen, um zur normalen Wiedergabe
zurückzukehren.
18.
Umschaltung zwischen normaler Wiedergabe und Standby.
19. EINZELBILDWIEDERGABE
Einzelbildwiedergabe im DVD-Modus.
20. SUCHFUNKTION
Direktsuche nach Wiedergabepunkt, Titel oder Kapitel im DVD-
Modus.
21. UNTERTITEL
Benutzen Sie die SUBTITLE-Taste, um während der Wiedergabe eine
andere Untertitelsprache zu wählen.
22. KAMERAPERSPEKTIVE
DVD: Betätigen Sie die ANGLE-Taste, um die Kameraperspektive zu
wechseln (nur bei DVDs, die diese Funktion unterstützen).
23. TITEL
Zurück zum DVD-Titelmenü
24. EINGABE
Bestätigung der Menüauswahl.
25. EINSTELLUNGEN
Aufrufen oder Verlassen des Einstellungsmenüs.
26. WIEEHOLG
Beäige Sie die REET-Taste wäred der Wiedergabe um den
geünscte Wiederholungsmodus zu wäle.
VD: Kapitewiederholung / Titewiederholung Aus.
CD/VCD: Einzewiederholung / Alle wiederholen Aus.
Mp3: Einzewiederholung / Verzecniswiederholung / Aus
27. ZETLE
Beuze Sie die SLW-Taste, um die Wiedergabein Zetlupein
versciedene Gecwindigkete zu scalte. Zur Verfügung stehede
Gecwindigkete sind ½, 1/4, 1/8, 1/16 und Normal.
28. PROGRAMMWIEEGABE
DVD/VCD: Die Programmfunkio ermöglct Ine die Wiedergabevo
eeige Titen i der vo Ine geünscte Reenfoge Beäige
Sie die PROGRAM-Taste und das Programmmeü ersceint auf dem
Bildscirm. Sie könne dann die Zifferntasten zur direten Eingabeder
Tite, Kapite oder Muikite beuze und mit der PLY-Optio die
Programmwiedergabestarte. Um zur normale Wiedergabei
SiedPP -Ope das Programfoge BeäSie die PRBg
DVD/ und mitiROGR Sie köuundieT


7
Downmix
Mit dieser Option können Sie den analogen Stereo-Ausgang Ihres
DVD-Player eingestellen.
→LT/RT : Wählen Sie diese Option, wenn Ihr DVD-Player an einen
Dolby-Pro-Logic-Dekoder angeschlossen ist.
→Stereo : Wählen Sie diese Option, wenn das Audiosignal nur an
die beiden Frontlautsprecher geliefert wird.
Dolby Digital
Verfügbare Optionen für Dolby Digital sind: "Dual Mono" und
"Dynamic".
Dual-Mono
→Stereo: Das linke Monosignal wird an den linken Lautsprecher
gesendet und das rechte Monosignal wird an den rechten
Lautsprecher gesendet.
→L-Mono: Das linke Monosignal wird an den linken und den
rechten Lautsprecher gesendet.
→R-Mono: Das rechte Monosignal wird an den linken und den
rechten Lautsprecher gesendet.
→Mix-Mono: Das linke und das rechte Monosignal werden zu
einem Signal gemischt und an den linken und den rechten
Lautsprecher gesendet.
Audioeinstellungen
Videoeinstellungen
- - VIDEO SETUP PAGE - -
GOTO VIDEO SETUP PAGE
VIDEO OUTPUT RGB
SHARPNESS MID
BRIGHTNESS 00
CONTRAST 00
HUE 00
SATURATION 00
HIGH
MEDIUM
LOW
RGB
OFF
VIDEO-AUSGANG
Wählen Sie die Einstellung SCART.
Helligkeit, Kontrast, Farbton, Sättigung: Einstellung der Videoqualität.

8
Benutzereinstellungen
- - PREFERENCE SETUP PAGE - -
GOTO PREFERENCE PAGE
TV TYPE PAL
AUDIO ENG
SUBTITLE ENG
DISC MENU ENG
PARENTAL
DEFAULT
PAL
AUTO
NTSC
1 KID SAF
2 G
3 PG
4 PG13
5 PGR
6 R
7 NC17
8 ADULT
RESET
Bildformat
Die Auswahl des Farbsystems, das dem Ihres Fernsehers
entspricht, wenn Sie die AV-Ausgänge benutzen. Dieser DVD-
Player ist kompatibel mit den Systemen NTSC und PAL.
PAL - Wählen Sie diese Option, wenn das angeschlossene
Fernsehgerät das PAL-System benutzt. Dadurch wird das
Videosignal von NTSC-Discs im PAL-Format ausgegeben.
NTSC - Wählen Sie diese Option, wenn das angeschlossene
Fernsehgerät das NTSC-System benutzt. Dadurch wird das
Videosignal von PAL-Discs im NTSC-Format ausgegeben.
Auto: Das Ausgabevideosignal wird automatisch dem Format auf
der Disc angepasst.
Audio: Auswahl der Audiosprache (falls vorhanden).
Untertitel: Auswahl der Untertitelsprache (falls verfügbar).
Disc-Menü: Wählt eine Sprache für Disc-Menü (wenn verfügbar).
Alterseinstufung
Einige DVDs verfügen über Altersstufen, die der gesamten Disc
oder bestimmten Szenen auf der DVD zugewiesen sind. Mit dieser
Funktion können Sie die Wiedergabeeinschränkung einstellen.
Die Einstufungen von 1 bis 8 und sind länderspezifisch. Sie
können damit die Wiedergabe bestimmter Discs, die nicht für Ihre
Kinder geeignet sind verhindern bzw. bei bestimmte Discs die
Wiedergabe alternativer Szenen auslösen.
Standard: Wiederherstellen der Werkseinstellungen.
ENGLISH
FRENCH
GERMAN
ITALIAN
SPANISH
PORTUGUESE
ENGLISH
FRENCH
GERMAN
ITALIAN
SPANISH
PORTUGUESE
OFF
ENGLISH
FRENCH
GERMAN
ITALIAN
SPANISH
PORTUGUESE
Passworteinstellungen
- - PASSWORD SETUP PAGE - -
GOTO PASSWORD SETUP PAGE
PASSWORD MODE ON
PASSWORD
ON
OFF
Passwortmodus: Ein-/Ausstellen des Passwortmodus.
Mit dieser Einstellung deaktivieren Sie die Alterseinstufung.
Einstellungen im SETUP-Menü

9
Passworteinstellungen
OSD PASSWORD
NEW PASSWORD
CONFIRM PWD
OK
OSD PASSWORD: Geben Sie das alte Passwort ein (das werksmäßig
eingestellte Passwort ist 1369). Die Eingabe wechselt danach
automatisch auf NEW PASSWORD.
.
NEW PASSWORD: Geben Sie das neue Passwort. Geben Sie eine
4stelligen Zahl mithilfe der Zifferntasten auf der Fernbedienung
eingeben.
CONFIRM PASSWORD: Bestätigen Sie das neue Passwort, indem Sie
es noch mal eingeben. Wenn beide Eingaben nicht übereinstimmen,
bleibt der Cursor an dieser Stelle. Wenn das neue Passwort
übereinstimmt, springt der Cursor automatisch auf OK.
OK: Wenn der Eingabe-Cursor auf diesem Feld ist, betätigen Sie die
ENTER-Taste, um die Einstellung zu bestätigen.


LETTORE DVD
Prima di collegare l'apparecchio alla presa di corrente e iniziare a utilizzarlo,
leggere attentamente l'intero manuale di istruzioni.
MANUALE DI ISTRUZIONI
550DVD
ITA

1) Leggere il manuale di istruzioni.
2) Conservare il manuale di istruzioni.
3) Prestare attenzione alle avvertenze.
4) Seguire le istruzioni.
5) Non utilizzare l'apparecchio vicino all'acqua.
6) Pulire l'apparecchio solo con panni asciutti.
7) Non ostruire i fori di ventilazione. Collocare l'apparecchio
secondo le istruzioni fornite dal produttore.
8) Non collocare l'apparecchio vicino a fonti di calore, come
radiatori, diffusori di aria calda, fornelli o altri apparecchi (inclusi
amplificatori) che producono calore.
9) Non invalidare la funzione protettiva della spina polarizzata a
terra. Se la spina fornita non entra nella presa, consultare un
elettricista per la sostituzione della presa obsoleta.
10) Proteggere il cavo di alimentazione da calpestamenti o
piegamenti, in particolare in prossimità della spina, della presa di
corrente e nel punto in cui esce dal televisore.
11) Utilizzare solo accessori specificati dal produttore.
12) Scollegare il televisore durante i temporali o durante periodi di
inutilizzo prolungati.
13) Per l'assistenza rivolgersi a tecnici qualificati. L'assistenza è
sempre necessaria in caso di danneggiamento: ad esempio, se il
cavo di alimentazione o la spina sono danneggiati, se è stato
versato del liquido sull'apparecchio o degli oggetti sono caduti al
suo interno, se l'apparecchio è stato esposto a pioggia o umidità,
se non funziona correttamente o se è stato fatto cadere.
14) In quanto dispositivo di scollegamento, la spina deve essere
sempre accessibile.
15) Non impedire la ventilazione ostruendo i fori di ventilazione
con fogli di giornale, tovaglie, tende e oggetti simili.
16) Non collocare sull'apparecchio oggetti a fiamma libera, come
ad esempio candele accese.
17) Smaltire le batterie nel rispetto dell'ambiente.
18) Evitare l'utilizzo dell'apparecchio in condizioni climatiche
estreme.
19) Mantenere l'apparecchio al riparo da gocciolamenti o spruzzi
d'acqua e non collocare sull'apparecchio oggetti contenenti liquidi,
come ad esempio vasi.
Nell'Unione Europea questo simbolo indica che il
prodotto non può essere smaltito insieme ai rifiuti
domestici. Per proteggere l'ambiente e la salute umana
dallo smaltimento incontrollato dei rifiuti e promuovere il
riutilizzo sostenibile delle risorse materiali, riciclare
questo prodotto in modo responsabile. Per smaltire i
dispositivi obsoleti utilizzare gli appositi sistemi di
raccolta o contattare il rivenditore presso il quale si è
effettuato l'acquistato.
1
IMPORTANTI MISURE DI SICUREZZA:
ATTENZIONE: per ridurre il rischio di incendi e shock elettrici,
mantenere l'apparecchio al riparo da pioggia e umidità.
AVVERTENZA: non esporre la batteria a fonti di calore eccessivo
come luce diretta del sole, fuoco o simili.
Attenzione: pericolo di esplosione se la batteria è sostituita in modo
incorretto. Sostituire solo con batterie dello stesso tipo o
equivalenti (batterie al litio).
AVVERTENZA: una pressione sonora eccessiva dalle cuffie o dagli
auricolari può causare la perdita dell'udito.(valido solo per l'ascolto
mediante cuffie).
Questo simbolo indica la presenza all'interno
dell'apparecchio di tensione pericolosa che potrebbe causare
shock elettrici.
Questo simbolo indica istruzioni di utilizzo e di manutenzione
importanti all'interno del manuale di istruzioni.
Questo simbolo indica che l'apparecchio è dotato di doppio
isolamento tra la tensione di rete e le parti accessibili
dall'utente. In caso di malfunzionamento, per la riparazione
utilizzare solo pezzi di ricambio identici.

Notesul copyright
È
via cavo, recitare in pubblico o noleggiare materiale protetto da
copyright senza permesso.
Questo prodotto integra la funzionalità di protezione anticopia
sviluppata da Macrovision. Su alcuni dischi sono registrati segnali
di protezione anticopia. Durante la registrazione e la riproduzione
di immagini da tali dischi, le immagini appaiono distorte. Questa
unità integra una tecnologia di protezione anticopia
protettamedianterivendicazioni di alcuni brevetti USA e di altri
diritti di proprietà posseduti da Macrovision Corporation e altri
proprietari di diritti. L'utilizzo di questa tecnologia di protezione
anticopia deve essere autorizzato da Macrovision Corporation.
Questa tecnologia è intesa per solo uso domestico e altri usi
limitati, se non diversamente autorizzato da Macrovision
Corporation.. Il reverse engineering o il disassemblaggio sono
proibiti.
NUMERO DI SERIE
Il numero di serie è reperibile sul retro dell'unità.Tale numero è
esclusivo
per questa unità. Si consiglia di appuntare le informazioni qui
richieste e conservarle come registro di acquisto permanente.
Codice modello: ______________________________
Numero di serie: ______________________________
Data di acquisto:_____________________________
proibito per legge copiare, trasmettere, mostrare, trasmettere
2
Precauzioni di sicurezza
Avvertenza: questo lettore DVD digitale impiega un sistema laser.
L'utilizzo di tasti, regolazioni e procedure in modo non conforme
alle istruzioni specificate può causare l'esposizione a radiazioni
pericolose.
Avvertenza: per evitare l'esposizione diretta al raggio laser, non
rimuovere il telaio del dispositivo. Radiazioni laser visibili
all'apertura.
Avvertenza: non fissare direttamente il raggio laser.
Attenzione: non collocare il dispositivo in uno spazio delimitato,
come ad esempio sullo scaffale di una libreria o simile.
Attenzione: se il dispositivo è utilizzato da bambini, è
responsabilità dei genitori assicurarsi che i bambini comprendano
i contenuti di questo manuale per un corretto uso della batteria.
Avvertenza: il produttore non è responsabile dell'uso incorretto
della batteria o non conforme alle avvertenze sull'etichetta posta
sulla custodia della batteria.
Attenzione: per il collegamento alla porta USB, non utilizzare cavi
di prolunga di lunghezza superiore ai 250 mm.
RISCHIO DI SHOCK ELETTRICO,
NON APRIRE.
NE
N
N

Descrizione dei tasti
Unità principale
3
1. PRESA SCART
2. CAVO DI ALIMENTAZIONE
3. SPORTELLINO DEL VANO CD
4. PORTA USB
5. TASTO DI APERTURA/CHIUSURA
6. TASTO RIPRODUCI/SOSPENDI
7. TASTO DI ARRESTO
8. SENSORE DEL TELECOMANDO
9. TASTO DI ACCENSIONE
2
3
4
8
5
7
9
6
1

4
Telecomando
Descrizione dei tasti
1. TASTO DI APERTURA/CHIUSURA
2. TASTO ORIGINE (DVD/USB)
3. MUTE
Consente di disattivare l'audio
4. TASTI NUMERICI 0-9
Consente di selezionare voci di menu numerate.
5.DISPLAY
Consente di visualizzare informazioni sullo stato
6. TASTO 10+
Per selezionare un numero uguale o superiore a 10, premere prima
questo tasto, Ad esempio, per selezionare la traccia 12, premere
10+, quindi premere il tasto 2.
7. MENU/PBC
Consente di tornare alla pagina principale del menu DVD.
Consente di attivare/disattivare la modalità PBC (VCD).
8. AUDIO
DVD: Premere questo tasto più volte durante la riproduzione per
modificare la lingua o la traccia audio, se disponibile..
CD/VCD: Premere questo tasto più volte durante la riproduzione per
ascoltare un canale audio differente ( sinistro, destro, mix, stereo).
9. RIPRODUCI/SOSPENDI
Premere una volta questo tasto per sospendere la riproduzione,
Premerlo di nuovo per riprendere la riproduzione.
10.STOP
Premendo una volta questo tasto, l'unità memorizza il punto di
arresto da cui riprendere la riproduzione se a continuazione si
preme il tasto . Se invece si preme di nuovo il tasto STOP il
punto memorizzato viene perso..
11. TASTO A-B
Consente di ripetere uno specifico segmento.
12.VOL+
Consentono di regolare il volume.
13.VOL-
Consentono di regolare il volume.
14. Avanzamento
Consente di passare al capitolo o alla traccia successivi.
15. Riavvolgemento
Consente di tornare al capitolo o alla traccia precedenti.
19
20
3
2
1
4
5
6
7
8
9
10
11
12
14
15
16
17
29
28
27
26
13
25
24
23
21
22
1 2
3
4
5
6
7
8
9 0
10+
18

5
Telecomando
16. TASTO
Premere questo tasto per avanzare a una delle 5
velocità disponibili (X2->X4-> X8->X16->X32). Premere il tasto di
riproduzione per riprendere la riproduzione normale.
17. TASTO
Premere questo tasto per riavvolgere a una delle 5 velocità
disponibili (X2->X4->X8->X16->X32). Premere il tasto di riproduzione
per riprendere la riproduzione normale.
18. TASTO
Consente di sospendere o riattivare l'apparecchio.
19. STEP
In modalità DVD consente di avanzare di un fotogramma.
20. SEARCH
In modalità DVD consente di cercare un titolo, un capitolo o un punto
preciso.
21. SUBTITLE
Durante la riproduzione premere questo tasto più volte per
selezionare una lingua per I sottotitoli.
22.ANGLE
DVD: premere questo tasto per modificare l'angolo di visualizzazione
con DVD che supportano questa funzione.
23.TITLE
In modalità DVD consente di tornare al menu dei titoli.
24.ENTER
Consente di confermare una selezione.
25.SETUP
Consente di accedere o uscire dal menu di configurazione.
26.REPEAT
Durante la riproduzione premere questo tasto per selezionare la
modalità di ripetizione desiderata.
DVD: consente di ripete capitoli o titoli.
CD/VCD: consente di ripetere un video o tutti i video.
Mp3: consente di ripetere un brano o una cartella.
27.SLOW
Premere più volte questo tasto per rallentare la riproduzione a una delle 5
volte disponibili (1/2,1/4,1/8,1/16, normale).
28.PROGRAM
DVD/VCD: questo tasto consente di programmare la riproduzione delle
tracce preferite di un disco. Premere il tasto per accedere al menu di
programmazione, quindi utilizzare i tasti numerici per digitare i numeri dei
titoli, dei capitoli o delle tracce desiderate e selezionare l'opzione PLAY
(Riproduci). Per riprendere la riproduzione normale, premere il tasto
PROGRAM e selezionare l'opzione di annullamento della riproduzione
programmata,quindi premere di nuovo il tasto PROGRAM per uscire dal
menu.
29.ZOOM
DVD/VCD: utilizzare questo tasto per ingrandire o ridurre le immagini
video.
1. Durante la riproduzione o da immagine sospesa premere questo tasto
per attivare la funzione. TUna cornice quadrata viene visualizzata
nell'angolo inferiore destro dell'immagine
2. Ogni successiva pressione del tasto ZOOM modifica le dimensioni
dello schermo TV in questa sequenza
2Xsize→3Xsize→4Xsize→1/2size→1/3size→1/4size→normal size
JPEG: utilizzare questo tasto per ingrandire o ridurre le immagini.
1.Premere il tasto 'ZOOM'.
2,Usare per ingrandire o per ridurre l'immagine.
Usare I tasti per muoversi all'interno dell'immagine ingrandita.

Descrizione dei tasti
Pagina di configurazione generale
6
Contrassegno angolo
Consente di visualizzare le informazioni sull'impostazione corrente
dell'angolazione nell'angolo destro.r
Lingua OSD
Consente di selezionare la lingua per il menu su schermo.
Sottotitoli
I sottotitoli sono dati nascosti nei segnali video di alcuni dischi. Prima di
selezionare questa funzione, assicurarsi che il disco contenga le
informazioni dei sottotitoli e che la funzione sia impostata anche sul TV
Screen saver
Consente di attivare o disattivare il screen saver.
Sospensione automatica
Consente di impostare un'opzione per la sospensione automatica.
3 ORE: l'unità entra in modalità di standby dopo 3 ore se in
quell'intervallo di tempo non viene eseguita nessuna operazione.
4 ORE: l'unità entra in modalità di standby dopo 3 ore se in
quell'intervallo di tempo non viene eseguita nessuna operazione.
OFF: la funzionalità di sospensione automatica è disattivata, e l'unità
rimane attiva anche in assenza di operazioni da parte dell'utente.
Pagina di configurazione audio
Premere il tasto SETUP per accedere al menu di configurazione.
Utilizzare i tasti direzionali per selezionare le voci desiderate.
Al termine della configurazione, premere di nuovo il tasto SETUP per
uscire dal menu.
È possibile impostare le voci indicate a continuazione.
GENERALE: consente di selezionare il menu PAGINA GENERALE.
AUDIO: consente di selezionare il menu PAGINA AUDIO.
VIDEO: consente di selezionare il menu PAGINA VIDEO.
PREFERENZE: consente di selezionare il menu PAGINA PREFERENZE.
PASSWORD: consente di selezionare il menu PAGINA PASSWORD.
Pagina di configurazione generale
- - GENERALSETUP PAGE - -
GOTO GENERAL SETUP PAGE
TV DISPLAY WIDE
ANGLE MARK ON
OSD LANGUAGE ENG
CLOSED CAPTIONS ON
SCREEN SAVER ON
AUTO STANDBY 3H
4:3 PANSCAN
4:3 LETTERBOX
16:9
ON
OFF
ENGLISH
FRENCH
GERMAN
ITALIAN
SPANISH
PORTUGUESE
ON
OFF
ON
OFF
SCHERMO TV: consente di selezionare il rapporto d'aspetto delle
immagini riprodotte sul TV
4:3 LETTERBOX: con un TV normale, consente la visualizzazione
con banda nera nella parte superiore e inferiore dello schermo.
4:3 LETTERBOX: selezionando questa opzione le immagini veng
ono visualizzate con due bande nere, una nella parte superiore d
ello schermo e una nella parte inferiore.
16:9: consente la visualizzazione a schermo intero.
-- --
DOWNMIX
STR
DOLBY DIGITAL
LT/RT
DUAL MONO
DYNAMIC
STR
STR
L-MONO
R-MONO
MIX-MONO
-
-
-
-
-
-
-
-
-
-
-
-
-
-
-
-
-
-
FULL
OFF
-
- - - -AUDIO SETUP PAGE

7
Downmix
Questa opzione consente di impostare l'uscita stereo analogica
dell'unità.
→Sinistra/Destra: selezionare questa opzione se l'unità è collegata
a un decoder Dolby Pro Logic.
→Stereo:selezionare questa opzione se il suono è emesso solo dai
due altoparlanti anteriori.
Dolby digital
Questa opzione di menu include le voci 'Dual Mono' e 'Dinamico'.
Dual Mono
→Stereo: il segnale audio mono sinistro è inviato all'altoparlante
sinistro e il segnale audio mono destro è inviato all'altoparlante
destro.
→L-Mono: il segnale audio mono sinistro è inviato all'altoparlante
sinistro e all'altoparlante destro.
→R-Mono: il segnale audio mono destro è inviato all'altoparlante
sinistro e all'altoparlante destro.
→Mix-Mono: i segnali audio mono sinistro e destro sono inviati
all'altoparlante sinistro e all'altoparlante destro.
Pagina di impostazione audio
Video Setup Page
USCITA VIDEO
Impostare l'opzione su SCART.
Lei può cambiare l'impostazione di video: luminosità, contrasto,
colore, saturazione.

8
Pagina delle preferenze
- - PREFERENCE SETUP PAGE - -
GOTO PREFERENCE PAGE
TV TYPE PAL
AUDIO ENG
SUBTITLE ENG
DISC MENU ENG
PARENTAL
DEFAULT
PAL
AUTO
NTSC
1 KID SAF
2 G
3 PG
4 PG13
5 PGR
6 R
7 NC17
8 ADULT
RESET
Tipo TV
Consente di selezionare il sistema colore che corrisponde al
proprio TV in modalità AV. Il lettore è compatibile sia con il sistema
NTSC sia con il sistema PAL.
PAL - Selezionare questa opzione se il TV collegato è un TV PAL.
Consente di modificare il segnale di un disco o un'origine NTSC in
formato PAL.
NTSC- Selezionare questa opzione se il TV collegato è un TV
NTSC. Consente di modificare il segnale di un disco o un'origine
PAL in formato NTSC.
Auto: Consente di modificareil segnale video in automatico a
seconda del formato del disco riprodotto.
Audio: consente di selezionare una lingua per l'audio (se
disponibile).
Sottotitoli: consente di selezionare una lingua per i sottotitoli (se
disponibile).
Menu disco: consente di selezionare una lingua per il menu del
disco (se disponibile).
Filtro famiglia
Alcuni DVD potrebbero avere un filtro famiglia per l'intero disco o
per alcune scene.TQuesta funzione consente di impostare un filtro
di riproduzione per livello.I livelli di classificazione vanno da 1 a 8
e dipendono dal Paese. È possibile bloccare la riproduzione di
certi dischi non adatti ai propri bambini o bloccare determinate
scene.
Default: consente il ripristino delle impostazioni di fabbrica.
ENGLISH
FRENCH
GERMAN
ITALIAN
SPANISH
PORTUGUESE
ENGLISH
FRENCH
GERMAN
ITALIAN
SPANISH
PORTUGUESE
OFF
ENGLISH
FRENCH
GERMAN
ITALIAN
SPANISH
PORTUGUESE
Pagina di impostazione della password
- - PASSWORD SETUP PAGE - -
GOTO PASSWORD SETUP PAGE
PASSWORD MODE ON
PASSWORD
ON
OFF
Modalità password: consente di attivare/disattivare la modalità
(on/off). Se disattivata, l'unità non richiede l'inserimento della
password per modificare il livello del filtro famiglia.
Impostazione del menu CONFIGURAZIONE

9
Pagina di impostazione della password
OSD PASSWORD
NEW PASSWORD
CONFIRM PWD
OK
PASSWORD OSD: immettere la password attuale (password
predefinita: 1369). Il cursore si posta in automatico sulla casella
successiva.
NUOVA PASSWORD: immettere la nuova password. Il cursore si posta
in automatico sulla casella successiva.
CONFERMA PASSWORD: per confermare la nuova password digitarla
di nuovo. Se la password inserita non corrisponde alla nuova password
il cursore rimane sulla stessa casella. Una volta immessa la password
corretta il cursore si sposta sul pulsante OK.
OK: con il cursore su questo pulsante, premere il tasto ENTER per
confermare.
Nota: quando si modifica la password si modificano anche i codici del
filtro famiglia e del blocco disco.
La password predefinita 1369 è sempre attiva, anche se la password è
stata modificata.
N
Voce
Requisiti Standard
Uscite
VIDEO OUT
AUDIO OUT
: 2 Vrms (1 KHz, 0 dB)
Alimentazione
Consumo energetico
Umidità in funzionamento
n


DVD-SPELER
Lees deze handleiding zorgvuldig en volledig door
voordat u dit product aansluit, bedient of aanpast.
HANDLEIDING
550DVD
NL

1) Lees deze instructies.
2) Bewaar deze instructies.
3) Neem alle waarschuwingen in acht.
4) Volg alle instructies.
5) Gebruik het apparaat niet in de buurt van water.
6) Alleen schoonmaken met een droge doek.
7) Blokkeer de ventilatieopeningen niet. Installeer in
overeenstemming met de instructies van de fabrikant.
8) Niet installeren in de buurt van warmtebronnen, zoals
radiatoren, kachels of andere apparaten (inclusief versterkers) die
warmte produceren.
9) Omzeil de veiligheidsdoeleinden van de gepolariseerde stekker
niet. Als de geleverde stekker niet in uw stopcontact past moet u
een elektricien raadplegen voor vervanging van het verouderde
stopcontact.
10) Bescherm het netsnoer tegen stappen of pletten bij de stekker,
het stopcontact en het punt waar ze het apparaat verlaten.
11) Gebruik alleen accessoires/hulpstukken die door de fabrikant
zijn gespecificeerd.
12) Haal de stekker van het apparaat uit het stopcontact tijdens
onweer of als het apparaat voor lange tijd niet wordt gebruikt.
13) Laat alle onderhoud over aan gekwalificeerd
onderhoudspersoneel. Er is onderhoud nodig wanneer het
apparaat is beschadigd, bijvoorbeeld wanneer het netsnoer is
beschadigd, er vloeistof is gemorst op of voorwerpen zijn gevallen
in het apparaat zijn gevallen, het apparaat is blootgesteld aan
regen of vocht, niet normaal werkt of is gevallen.
14) De stekker wordt gebruikt om het apparaat los te koppelen van
het lichtnet en moet altijd eenvoudig bereikbaar blijven.
15) De ventilatie mag niet worden gehinderd door de
ventilatieopeningen te bedekken met voorwerpen zoals kranten,
tafelkleden, gordijnen, etc.
16) Plaats geen voorwerpen met open vlam, zoals kaarsen, op het
apparaat.
17) Denk aan het milieu bij het weggooien van batterijen.
18) Het apparaat moet worden gebruikt in een gematigd klimaat.
19) Het apparaat mag niet worden blootgesteld aan druppend of
spattend water en er mogen geen voorwerpen gevuld met
vloeistof, zoals vazen, op het apparaat worden geplaatst.
Deze markering geeft aan dat dit product niet mag
worden weggegooid met het overige huisvuil in de
gehele EU. Om schade aan het milieu en de menselijke
gezondheid door ongecontroleerde afvalverwijdering te
voorkomen, moet u op een verantwoorde manier
recyclen en zo duurzaam hergebruik van grondstoffen te
bevorderen. Breng uw gebruikte product terug naar een
inzamelpunt of neem contact op met de dealer waar u het
product heeft gekocht. Zij kunnen dit product aannemen
voor milieuvriendelijke recycling.
1
Belangrijke veiligheidsinstructies
WAARSCHUWING: Stel het apparaat niet bloot aan regen of vocht
om het risico op brand en elektrische schokken te reduceren.
WAARSCHUWING: De batterij moet niet worden blootgesteld aan
extreme warmte zoals zonlicht, vuur of dergelijke.
Let op: Explosiegevaar als de batterij onjuist is vervangen, alleen
vervangen door een batterij van hetzelfde of soortgelijk type
(Lithium batterij)
WAARSCHUWING: Overmatige geluidsdruk van hoofdtelefoons of
oortelefoons kan leiden tot gehoorverlies. (bij gebruik van de
hoofdtelefoonuitgang)
Het symbool geeft aan dat er in dit apparaat gevaarlijke
spanningen aanwezig zijn met risico op elektrische schok.
Het symbool geeft aan dat er belangrijke bedienings- en
onderhoudsinstructies staan in de handleiding die bij dit
product is bijgesloten.
Het symbool geeft aan dat dit product dubbele isolatie bevat
tussen gevaarlijke netspanning en onderdelen die
toegankelijk zijn voor de gebruiker. Gebruik bij onderhoud
enkel identieke vervangstukken.

Opmerkingen over copyright:
Het is bij wet verboden om auteursrechtelijk beschermd materiaal
zonder toestemming te kopiëren, tonen, uit te zenden, uit te
zenden via kabel, af te spelen in publiek of te verhuren.
Dit product beschikt over een kopieerbeveiligingstechnologie
ontwikkeld door Macrovision. Op sommige disks zijn
kopieerbeschermingssignalen opgenomen. Bij het opnemen en
afspelen van beelden op deze disks zal er beeldruis verschijnen.
Dit product bevat copyrighttechnologie die wordt beschermd door
claims van bepaalde Amerikaanse patenten en andere
intellectuele-eigendomsrechten van Macrovision Corporation en
andere eigenaren van rechten. Gebruik van deze
kopieerbeveiliging technologie moet worden geautoriseerd door
Macrovision Corporation, en is bedoeld voor thuisgebruik en ander
beperkt gebruik, tenzij anders geautoriseerd door Macrovision
Corporation. Reverse engineering of demontage is niet
toegestaan.
SERIENUMMER:
U kunt het serienummer op de achterkant van het apparaat vinden.
Reete

De bedieningselementen
Hoofdapparaat
3
1. SCART
2. NETSNOER
3. CD-DEUR
4. USB
5. OPEN/CLOSE
6. PLAY/PAUSE
7. STOP
8. AFSTANDSBEDIENINGSVENSTER
9. POWER
2
3
4
8
5
7
9
6
1

4
Afstandsbediening
Identificatie bedieningselementen
1.
2. SOURCE
OPEN/CLOSE.
DVD/USB.
3. MUTE
Geluid uitschakelen.
4.0-9 NUMERIEKE TOETSEN
Voor het selecteren van genummerde items in het menu.
5.DISPLAY
Druk op deze toets om de afspeeltijd en statusinformatie weer
te geven.
6.10+ TOETS
Om een track met tracknummer hoger dan 10 te selecteren, druk
eerst op 10+, Bijvoorbeeld;
selecteer track 12, druk eerst op 10+, en daarna op de numerieke
toets 2.
7. MENU/PBC
Terugkeren naar hoofdmenu DVD (DVD).
PBC in-/uitschakelen (VCD) .
8.AUDIO
DVD: Druk tijdens het afspelen herhaaldelijk op AUDIO om een
andere audiotaal of audiotrack te beluisteren indien beschikbaar.
CD/VCD: Druk herhaaldelijk op AUDIO tijdens het afspelen om een
ander audiokanaal te beluisteren (links, rechts, mix, stereo).
9.PLAY/PAUSE
Druk één keer op PLAY/PAUSE om het afspelen te pauzeren, druk
nogmaals op PLAY/PAUSE om het afspelen te hervatten.
10.STOP
Wanneer er één keer op deze knop wordt gedrukt, dan stopt het
apparaat met afspelen en wordt het punt waarop gestopt wordt
opgeslagen. Druk daarna op PLAY om het afspelen te hervatten
vanaf het opgeslagen punt. Als er nogmaals op STOP wordt gedrukt,
dan zal het opgeslagen punt worden gewist en kan de hervatfunctie
niet meer worden gebruikt.
11.A-B
-herhaal een specifiek gedeelte.
12.VOL+
Voor het instellen van het volume.
13.VOL-
Voor het instellen van het volume.
14.Volgende
Ga naar volgende hoofdstuk / track.
15.Vorige
Ga naar het begin van het vorige hoofdstuk / track.
19
20
3
2
1
4
5
6
7
8
9
10
11
12
14
15
16
17
29
28
27
26
13
25
24
23
21
22
1 2
3
4
5
6
7
8
9 0
10+
VOL -
VOL+
REPEAT
SEARCH
TITLE
ENTER
DISPLAY
SUBTITLE
A NGLE
AUDIO
MENU/
PBC
SETUP
ZOOM
STEP
MUTE
SOURCE
A-B
SLOW
PROGRAM
18

5
Telecomando
16.
Druk op om vooruit te spoelen met de gewenste snelheid (X2-
>X4->X8->X16->X32->AFSPELEN). Druk op PLAY om het normale
afspelen te hervatten.
17.
Druk op om terug te spoelen met de gewenste snelheid (X2->X4-
>X8->X16->X32->AFSPELEN). Druk op PLAY om het normale
afspelen te hervatten.
18.
Schakelaar om te schakelen tussen normale afspeelmodus en
standbymodus.
19.STEP
Gebruik deze toets om in stappen af te spelen in DVD-modus.
20.SEARCH
Gebruik deze toets in DVD-modus om naar een specifieke tijd, titel of
hoofdstuk te gaan.
21.SUBTITLE
Druk herhaaldelijk op SUBTITLE om de ondertiteltaal in te stellen.
22.ANGLE
DVD: Druk op ANGLE om de kijkhoek te veranderen bij DVD’s die
deze functie ondersteunen.
23.TITLE
Keer terug naar het titelmenu van de DVD.
24.ENTER
Voor het bevestigen van de selectie.
25.SETUP
Het instellingenmenu openen of sluiten.

Instellingen in instellingenmenu
Pagina algemene instellingen
6
Angle Mark
Toont de huidige instelling van de hoek in de rechterbovenhoek van het
beeld indien beschikbaar op de disc.
OSD Language
Hier kunt u de menutaal instellen.
Closed Captions
Closed captions zijn gegevens die zijn verborgen in het videosignaal van
sommige discs. Zorg er voordat u deze functie selecteert voor dat de
disc closed captions bevat en uw TV deze functie ook ondersteunt.
Screen Saver
Deze functie wordt gebruikt voor het in-/uitschakelen van de
schermbeveiliging.
Auto Standby
Deze functie wordt gebruikt om de automatisch standby-instelling in te
stellen op 3 of 4 uur.
3 HOURS: het apparaat schakelt als er gedurende 3 uur geen interactie
met de gebruiker plaatsvindt automatisch naar de standbymodus.
4 HOURS: het apparaat schakelt als er gedurende 4 uur geen interactie
met de gebruiker plaatsvindt automatisch naar de standbymodus.
OFF: de automatische standby-functie is uitgeschakeld en het apparaat
blijft ingeschakeld, zelfs als er geen interactie met de gebruiker is.
Pagina audio-instellingen
Druk op SETUP om het instellingenmenu te openen. Gebruik de
navigatietoetsen om het gewenste item te selecteren. Druk na
het voltooien van het instellen nogmaals op SETUP om terug te gaan naar
de normale weergave.
U kunt de volgende menu-items selecteren:
GENERAL: ga naar de pagina met algemene instellingen.
AUDIO: ga naar de pagina met audio-instellingen.
VIDEO: ga naar de pagina met video-instellingen.
PREFERENCE: ga naar de voorkeurspagina.
PASSWORD: ga naar de pagina met wachtwoordinstellingen.
Pagina algemene instellingen
- - GENERALSETUP PAGE - -
GOTO GENERAL SETUP PAGE
TV DISPLAY WIDE
ANGLE MARK ON
OSD LANGUAGE ENG
CLOSED CAPTIONS ON
SCREEN SAVER ON
AUTO STANDBY 3H
4:3 PANSCAN
4:3 LETTERBOX
16:9
ON
OFF
ENGLISH
FRENCH
GERMAN
ITALIAN
SPANISH
PORTUGUESE
ON
OFF
ON
OFF
TV DISPLAY: selecteer de beeldverhouding van het afspeelbeeld.
4:3 PANSCAN: selecteer deze optie als u een normale TV heeft en
het beeld op volledig scherm wilt bekijken, de zijkanten worden
van het beeld afgesneden om het op het scherm vt sctjnte

7
Downmix
Met deze optie kunt u het signaal uit de analoge stereo-uitgang
van uw DVD-speler instellen.
→LT/RT : Selecteer deze optie als uw DVD-speler is aangesloten
op een Dolby Pro Logic decoder.
→Stereo : Selecteer deze optie om alleen de twee luidsprekers op
de voorkant te gebruiken voor geluidsweergave.
Dolby digital
U kunt Dolby digital instellen op: 'Dual Mono' of 'Dynamic'.
Dual Mono
→Stereo: Het linker monogeluid wordt naar de linker luidspreker
gestuurd en het rechter monogeluid wordt naar de rechter
luidspreker gestuurd.
→L-Mono: Het linker monogeluid wordt naar de linker en rechter
luidspreker gestuurd.
→R-Mono: Het rechter monogeluid wordt naar de linker en rechter
luidspreker gestuurd.
→Mix-Mono: Een mix van het linker en rechter monogeluid wordt
naar de linker en rechter luidspreker gestuurd.
Pagina audio-instellingen
Pagina video-instellingen
VIDEO OUTPUT (VIDEO-UITGANG)
Stel deze optie in voor gebruik van de SCART-uitgang.
- - VIDEO SETUP PAGE - -
GOTO VIDEO SETUP PAGE
VIDEO OUTPUT RGB
SHARPNESS MID
BRIGHTNESS 00
CONTRAST 00
HUE 00
SATURATION 00
HIGH
MEDIUM
LOW
RGB
OFF
Scherpte, helderheid, contrast, tint, verzadiging: instellen van de
videokwaliteit.

8
Pagina voorkeuren
- - PREFERENCE SETUP PAGE - -
GOTO PREFERENCE PAGE
TV TYPE PAL
AUDIO ENG
SUBTITLE ENG
DISC MENU ENG
PARENTAL
DEFAULT
PAL
AUTO
NTSC
1 KID SAF
2 G
3 PG
4 PG13
5 PGR
6 R
7 NC17
8 ADULT
RESET
TV Type
Selecteer het kleurensysteem van uw TV. Deze DVD-speler is
compatibel met zowel NTSC als PAL.
PAL - Selecteer deze optie als de aangesloten TV een PAL-
kleurensysteem heeft. Dit zal het videosignaal van een NTSC-disc
omzetten en als PAL-formaat naar de TV sturen.
NTSC- Selecteer deze optie als de aangesloten TV een NTSC-
kleurensysteem heeft. Dit zal het videosignaal van een PAL-disc
omzetten en als NTSC-formaat naar de TV sturen.
Auto:Chang Verander het videosignaal automatisch aan de hand
van het formaat op de gebruikte disc.
Audio: Selecteer een audiotaal (indien beschikbaar).
Subtitle: Selecteer een ondertiteltaal (indien beschikbaar).
Disc Menu: Selecteer een menutaal voor de disc (indien
beschikbaar).
Parental
Aan sommige DVD’s is een niveau voor ouderlijk toezicht
toegekend, aan de hele disc of aan bepaalde scènes op de disc.
Met deze functie kunt u een limiet instellen voor de niveaus die
afgespeeld kunnen worden. De ratingniveaus gaan van 1 tot 8 en
zijn afhankelijk van het land. U kunt het afspelen van bepaalde
discs, die niet geschikt zijn voor uw kinderen, verbieden of
bepaalde discs afspelen met alternatieve scènes.
Default: Herstel instellingen naar fabrieksinstellingen.
ENGLISH
FRENCH
GERMAN
ITALIAN
SPANISH
PORTUGUESE
ENGLISH
FRENCH
GERMAN
ITALIAN
SPANISH
PORTUGUESE
OFF
ENGLISH
FRENCH
GERMAN
ITALIAN
SPANISH
PORTUGUESE
Pagina wachtwoordinstellingen
- - PASSWORD SETUP PAGE - -
GOTO PASSWORD SETUP PAGE
PASSWORD MODE ON
PASSWORD
ON
OFF
Password mode: Zet de wachtwoordmodus aan/uit. Als de
wachtwoordmodus is uitgeschakeld, dan zal het veranderen van
het niveau voor ouderlijk toezicht ook niet om een wachtwoord
vragen.
Het instellingenmenu

9
Pagina wachtwoordinstellingen
OSD PASSWORD
NEW PASSWORD
CONFIRM PWD
OK
OSD PASSWORD: Voer het OUDE wachtwoord in, (fabrieksinstelling is
1369), de cursor springt automatisch naar NEW PASSWORD.
NEW PASSWORD: Enter Voer het NIEUWE wachtwoord in. Voer 4
cijfers in met de numerieke toetsen van de afstandsbediening, de
cursor zal automatisch naar CONFIRM PASSWORD springen.
CONFIRM PASSWORD: Bevestig het NIEUWE wachtwoord door het
nogmaals in te voeren. Als de bevestiging van het wachtwoord onjuist
is, dan zal de cursor in dit veld blijven. Nadat u het wachtwoord correct
heeft ingevoerd, zal de cursor automatisch naar OK springen.
OK: Druk als de cursor op deze knop staat op de ENTER toets om de
instelling te bevestigen.
Opmerking: Als het wachtwoord is veranderd, dan zal de code voor
ouderlijk toezicht ook zijn veranderd.
Het standaardwachtwoord (1369)is altijd actief, zelfs als het
wachtwoord is veranderd.
N
Item
Standaardeis
Uitvoer
VIDEO OUT
AUDIO OUT
:2 Vrms (1 KHz, 0 dB)
Voeding
Stroomverbruik
Bedrijfsvochtigheid
: AC 100-240 V , 50/60 Hz
: <10W
: 5 % tot 90 %
Parameters en specificaties
Elektronische parameters
Systeem
Laser
:Halfgeleider laser, golflengte 650 nm
Signaalsysteem
:NTSC / PAL
Frequentie
Response
Signaal/ruis-verhouding
:Meer dan 80 dB (alleen voor analoge uitgang)
Dynamisch bereik
:Meer dan 85 dB (DVD/CD)
Opmerking: Ontwerp en specificaties zijn onderhevig aan
verandering zonder voorafgaande berichtgeving.
:20Hz tot 20 kHz(1dB)
N
Opberg- en werkomstandigheden:
1. Opbergomstandigheden Temperatuur Vochtigheid
6 maanden -20°C ~ +45°C 65±20%
1 week -20°C ~ +65°C 65±20%
2.Werkomstandigheden Temperatuur Vochtigheid
Standaard opladen 0°C ~ +45°C 65±20%
Standaard ontladen -20°C ~ +65°C 65±20%
Password: selecteer deze optie om de pagina voor het veranderen
van het wachtwoord openen.

Hiermee wordt verklaard dat de DRAAGBARE DVD SPELER in
overeenstemming is met de richtlijn 2004/108/EC (EMC-richtlijn)
Van toepassing zijnde normen:
EN55013:2001+A1:2003+A2:2006
EN61000-3-3:2008
EN55020:2007+A11:2011
EN60065:2002+A1:2006+A11:2008+A2:2010+A12:2011
Voor meer informatie kunt u terecht op onze website
www.mpmaneurope.com
10

APARELHO DE DVD
Antes de conectar, utilizar ou configurar esse produto,
leia o manual de instruções completo com bastante atenção.
MANUAL DE INSTRUÇÕES
550DVD
PT

1) Leia esse manual de instruções.
2) Guarde esse manual de instruções.
3) Siga todos os avisos.
4) Siga todas as instruções.
5) Não utilize esse aparelho próximo a água.
6) Limpe-o apenas com um pano seco.
7) Não bloqueie aberturas de ventilação. Instale-o de acordo com
as instruções do fabricante.
8) Não instale-o próximo de fontes de calor, como aquecedores,
canos aquecidos, fogões ou outros eletrodomésticos (incluindo
amplificadores) que produzam calor.
9) Não ignore a necessidade de conectores polarizados. Caso o
conector fornecido não seja compatível com a sua tomada, entre
em contato com um eletricista para a substituição da tomada
obsoleta.
10) Proteja o fio de energia de ser pisado ou comprimido,
principalmente nos conectores, benjamins e pontos de conexão
com o aparelho.
11) Utilize apenas acessórios recomendados pelo fabricante.
12) Desconecte o aparelho da tomada durante tempestades de
raios ou quando não for utilizá-lo por um longo período de tempo.
13) Consulte serviço qualificado para quaisquer reparos. Reparos
são necessários quando o aparelho tiver sofrido quaisquer tipos
de dano, como fios quebrados ou expostos ou conectores
danificados, líquidos ou objetos tenham caído dentro do aparelho,
exposição a chuva ou humidade intensa, falhas no funcionamento
ou queda.
14) O conector da tomada é utilizado para desligar o aparelho, que
deverá continuar pronto para ser utilizado.
15) As entradas de ventilação não deverão ser cobertas por
objetos como jornais, toalhas de mesa, cortinas, etc.
16) Nenhuma fonte de chama, como velas acesas, deverão ser
colocadas sobre o aparelho.
17) Atenção deverá ser dada aos aspectos ambientais envolvidos
ao descarte de pilhas utilizadas.
18) Utilize o aparelho em ambientes com temperaturas
moderadas.
19) O aparelho não deverá ser exposto à gotejamentos ou
respingos e recipients que contenham líquidos, como vasos,
deverão ser colocados sobre o aparelho.
Esse ícone indica que o produto não deverá ser
descartado com outros lixos domésticos nos países da
UE. Para evitar danos ao meio ambiente ou saúde
humana pelo descarte de lixo não controlado, recicle
com responsabilidade para promover a reutilização
sustentável dos recursos materiais. Para retornar o seu
dispositivo usado, por favor utilize os sistemas de coleta
e retorno ou entre em contato com o revendedor de onde
o produto foi adquirido. Eles levarão esse produto para
ser reciclado com segurança.
1
IMPORTANTES RECOMENDAÇÕES
DE SEGURANÇA:
ATENÇÃO: Para reduzir o risco de fogo ou curto circuitos, não
exponha o aparelho à chuva ou humidade.
ATENÇÃO: A bateria não deve ser exposta a calor excessivo, como
luz do sol, fogo ou semelhantes.
Cuidado: Haverá o risco de explosão caso a bateria sejam
substituída incorretamente, e deve ser substituída por outra do
mesmo tipo ou semelhante (Bateria de lítio).
ATENÇÃO: Pressão de som excessiva de fones de ouvido pode
causar perda auditiva.(Apenas por fones de ouvido conectados no
aparelho)
Esse símbolo indica que a correntes perigosas criam o risco
de choques elétricos estão presentes dentro deste aparelho.
Esse símbolo indica que importantes instruções de uso e
cuidados podem ser encontradas no manual que acompanha
esse aparelho.
Esse símbolo indica que esse produto vem com isolamento
duplo entre as perigosas correntes elétricas e as peças
acessíveis aos usuários. Quando realizar reparos utilize
apenas peças de substituição idênticas.

Observações sobre Direitos Autorais:
É proibido por lei copiar, transmitir, exibir, transmitir por cabo,
reproduzir em público, ou alugar materiais com direitos autorais
sem permissão.
Esse produto vem com uma função de proteção contra cópias
desenvolvida pela Macrovision. Os sinais de proteção contra cópia
são gravados em alguns discos. Quando estiver gravando ou
reproduzindo as imagens desses discos, elas apresentarão ruídos
de imagem. Esse produto incorpora a tecnologia de proteção
contra direitos autorais que é protegida pelos métodos de certas
patentes nos Estados Unidos e outros direitos de propriedade
intelectual da Corporação Macrovision e outros proprietários de
direitos autorais. A utilização dessa tecnologia de proteção de
direitos autorais deverá ser autorizada pela Corporação
Macrovision, e foi desenvolvida para ser utilizada em residências e
em reproduções de audiência limitada, exceto quando autorizado
pela Corporação Macrovision. É proibido a realização de
engenharia reversa ou desmontagem.
NÚMERO DE SÉRIE:
Você poderá encontrar o número de série na parte de trás do
aparelho. Esse número é único desse aparelho e não será
utilizado em outros aparelhos. Você deve escrever as informações
solicitadas abaixo e guardar esse manual como uma prova de
compra permanente.
No. do Modelo: ___________________________
No. de Série: _____________________________
Data da Compra: __________________________
2
Cuidados de Segurança
Atenção: Esse reprodutor de discos de vídeo digital utiliza um
sistema de laser.
A utilização de controles e ajustes, ou procedimentos de
performance diferentes dos especificados neste manual poderão
resultar em níveis perigosos de exposição à radiação.
Atenção: Para evitar a exposição direta ao faixo de laser, não abra
a carcaça. O raio de laser será visível quando exposto.
Atenção: Nunca olhe diretamente no faixo de laser.
Cuidado: Não instale esse produto em um espaço confinado, como
em uma estante de livros ou semelhante.
Atenção: quando esse aparelho for utilizado por uma criança, os
pais deverão estar seguros de que ela está ciente de todo o
conteúdo do manual de instruções, no uso da bateria, para que ele
seja feito de forma correta.
Atenção: nós não nos responsabilizamos pelo uso incorreto da
bateria, e que não siga as instruções ou etiquetas de alertas
localizadas no compartimento da bateria.
Atenção: é proibido o uso de extensões de cabo USB com mais de
250mm na porta USB.
RISCO DE CHOQUE ELÉTRICO
NÃO ABRA
ATENÇÃO
N
N

Visão Geral dos controles
Aparelho principal
3
1. PORTA SCART
2. FIO DE ENERGIA
3. BANDEJA DO CD
4. PORTA USB
5. TECLA ABRIR/SAIR
6. REPRODUZIR/PAUSAR
7. TECLA PARAR
8. RECEPTOR DO CONTROLE REMOTO
9. TECLA DE LIGAR
2
3
4
8
5
7
9
6
1

4
Controle remoto do aparelho
Visão geral dos controles
1.
2. ORIGEM
ABRIR/FECHAR.
DVD/USB.
3. MUDO
Desliga a emissão de áudio.
4. BOTÕES NUMÉRICOS DE 0-9
Seleciona os itens marcados com números de um menu.
5.EXIBIR
Exibe o tempo de reprodução e informações de estado.
6.BOTÃO 10+
Para selecionar a faixa 10 ou acima, primeiro pressione 10+, por
exemplo:
Para selecionar a faixa 12, primeiro pressione 10+, e então
pressione o botão numérico 2.
7. MENU/PBC
Retorna à raiz do menu do DVD (DVD). Liga ou desliga o PCB
(VCD).
8. ÁUDIO
DVD: Pressione ÁUDIO várias vezes durante a reprodução para
ouvir um idioma de áudio ou faixa de áudio diferente, quando
disponível.
CD/VCD: Pressione ÁUDIO várias vezes durante a reprodução para
escutar um canal de áudio diferente (Esquerdo, Direito, Estéreo).
9. REPRODUZIR/PAUSAR
Pressione REPRODUZIR/PAUSAR uma vez para pausar a
reprodução, pressione REPRODUZIR/PAUSAR uma segunda vez
para restaurar a reprodução.
10. PARAR
Quando esse botão for pressionado uma vez, esse aparelho gravará
o ponto onde foi interrompido, de onde ele continuará quando
REPRODUZIR for pressionado mais tarde. Entretanto, caso o
botão PARAR for pressionado novamente, ao invés do botão
REPRODUZIR , a função de continuar não estará disponível.
11.A-B
-repete a parte selecionada
12. VOL+
Ajusta o nível do volume.
13. VOL-
Ajusta o nível do volume.
14. Pula para a Seguinte
Vai para o capítulo ou faixa seguinte.
15. Pula para a Anterior
Vai para o início do capítulo ou faixa anterior.
19
20
3
2
1
4
5
6
7
8
9
10
11
12
14
15
16
17
29
28
27
26
13
25
24
23
21
22
1 2
3
4
5
6
7
8
9 0
10+
18

5
16. BOTÃO
O pressionamento do BOTÃO permite que você avance em até 5
níveis de velocidade (X2->X4->X8->X16->X32->REPRODUZIR),
pressione o botão REPRODUZIR para voltar à reprodução normal.
17. BOTÃO
O pressionamento do BOTÃO permite que você retorne em até 5
níveis de velocidade (X2->X4->X8->X16->X32-> REPRODUZIR),
pressione o botão REPRODUZIR para voltar à reprodução normal.
18.
Interruptor de reprodução normal/modo de espera.
19. PASSO
Ativa a reprodução em passos no modo de DVD.
20. BUSCAR
Vai para o ponto de tempo, título ou capítulo que você deseja no modo
de DVD.
21. LEGENDA
Pressione LEGENDA várias vezes durante um reprodução para ver
legendas em diferentes idiomas.
22. ÂNGULO
DVD: Pressione ÂNGULO para mudar o ângulo de visão, em DVDs
que tem suporte a essa função.
23. TÍTULO
Volta para o menu do DVD do filme
25. ENTER
Confirma a seleção do menu.
25. CONFIGURAÇÃO
Acessa ou sai do menu de configuração.
26. REPETIR
Pressione REPETIR durante uma reprodução para selecionar o modo
de repetição desejado.
DVD: você pode selecionar entre repetir capítulos/filmes/desligado.
CD/VCD: você pode selecionar entre repetir uma/todas/desligado.
Mp3: você pode selecionar entre repetir uma/pasta/desligado.
27. LENTO
Pressione o botão Lento várias vezes para entrar no modo de
reprodução lenta, e alternar entre diferentes velocidades. As
velocidades são 1/2,1/4,1/8,1/16, e Normal.
28. PROGRAMAR
DVD/VCD: A função programar permite que você guarde as suas
faixas preferidas do seu disco. Pressione o botão PROGRAMAR, e
o MENU DE PROGRAMAÇÃO será exibido, onde você poderá
utilizar as teclas numéricas para digitar diretamente os números
dos filmes, capítulos e faixas, e então selecionar a opção
REPRODUZIR. Para voltar ao modo de reprodução normal,
pressione PROGRAMAR e selecione a opção de Limpar
Programação do menu de programação, pressionando
PROGRAMAR novamente para sair do menu.
29. ZOOM
DVD/VCD: Utilize ZOOM para ampliar ou diminuir a imagem do
vídeo.
1.Pressione ZOOM durante uma reprodução ou em pausa para
ativar a função de Zoom. A moldura quadrada aparecerá por um
breve momento no lado direito inferior da imagem.
2. Cada vez que o botão ZOOM for pressionado, a tela da TV
mudará na seguinte ordem:
2X o tamanho→3X o tamanho→4X o tamanho→1/2 do tamanho→
1/3 do tamanho→1/4 do tamanho→tamanho normal
JPEG: Utilize ZOOM para ampliar ou diminuir a foto.
Pressione 'ZOOM' .
Utilize para ampliar, ou para diminuir a foto.
Utilize os botões para se mover pela foto ampliada.

Definições do Menu de CONFIGURAÇÕES
Tela de Configurações Gerais
6
Ícone do Ângulo
Exibe a informação de configuração de ângulo na parte superior direita
da tela, caso esteja disponível no disco.
Idioma do OSD
Você poderá selecionar a sua configuração de idioma desejada.
Legendas
Legendas são dados escondidos no sinal de vídeo de alguns discos.
Antes de selecionar essa função, confirme se o disco contém legendas
e se a sua TV também permite o uso dessa função.
Proteção de Tela
Essa função permite Ligar ou Desligar a proteção de tela.
Espera Automático
Essa função é utilizada para selecionar a espera automática depois de 3
ou 4 horas.
3 HORAS: o aparelho entrará no modo de espera depois de 3 horas,
caso nenhuma interação seja realizada durante esse período de tempo.
4 HORAS: o aparelho entrará no modo de espera depois de 4 horas,
caso nenhuma interação seja realizada durante esse período de tempo.
DESLIGADO: a função de espera automática será desligada, e o
aparelho ficará no modo “Ligado” mesmo que o usuário não o utilize.
Tela de Configurações de Áudio
Pressione o botão CONFIGURAR para entrar no menu de configurações.
Utilize os botões direcionais para selecionar o item desejado.
Depois de concluir as configurações, pressione CONFIGURAR
novamente para voltar a exibição normal.
Os seguintes itens do menu poderão ser modificados:
GERAL: seleciona o menu da TELA GERAL.
ÁUDIO: seleciona o menu da TELA DE ÁUDIO.
VÍDEO: seleciona o menu da TELA DE VÍDEO.
PREFERÊNCIAS: seleciona o menu da TELA DE PREFERÊNCIAS.
SENHA: seleciona o menu da TELA DE SENHA.
Tela de Configurações Gerais
- - GENERALSETUP PAGE - -
GOTO GENERAL SETUP PAGE
TV DISPLAY WIDE
ANGLE MARK ON
OSD LANGUAGE ENG
CLOSED CAPTIONS ON
SCREEN SAVER ON
AUTO STANDBY 3H
4:3 PANSCAN
4:3 LETTERBOX
16:9
ON
OFF
ENGLISH
FRENCH
GERMAN
ITALIAN
SPANISH
PORTUGUESE
ON
OFF
ON
OFF
FORMATO DA TV: seleciona o formato da tela para reprodução
das imagens.
4:3 PANSCAN: caso você tenha uma TV comum e queira que os
dois lados da imagem sejam cortados ou ajustados para caber na
tela da sua TV.
4:3 LETTERBOX: caso você tenha uma TV comum. Nesse caso,
uma imagem ampla será exibida com faixas pretas na parte
superior e inferior da tela da TV..
16:9: exibe em formato wide.
-- --
DOWNMIX
STR
DOLBY DIGITAL
LT/RT
DUAL MONO
DYNAMIC
STR
STR
L-MONO
R-MONO
MIX-MONO
-
-
-
-
-
-
-
-
-
-
-
-
-
-
-
-
-
-
FULL
OFF
-
- - - -AUDIO SETUP PAGE
GO TO AUDIO SETUP PAGE
STEREO
3 HOURS
4 HOURS
OFF

7
Downmix
Essa opção permite que você configure a saída de estéreo
analógica do seu reprodutor de DVD.
→LT/RT: Selecione essa opção caso o seu Reprodutor de DVD
esteja conectado a um decodificador Dolby Pro Logic.
→Estéreo: Selecione essa opção quando a saída apenas
reproduzir áudio dos dois alto falantes frontais.
Dolby digital
As opções incluídas nas configurações de Dolby Digital são:
'Mono Duplo' e ‘Dinâmico'.
Modo Duplo
→Estéreo: Som mono esquerdo será enviado para a caixa
Esquerda e som mono direito será enviado para a caixa da Direita.
→L-Mono: O som mono esquerdo enviará os sinais de saída para a
caixa Esquerda e caixa Direita.
→R-Mono: O som mono direito enviará os sinais de saída para a
caixa Esquerda e caixa Direita.
→Mix-Mono: O som mono Esquerdo e Direitos misturados serão
enviados para as caixas Esquerda e Direita.
Tela de Configurações de Áudio
Tela de Configurações de Vídeo
SAÍDA DE VÍDEO
Configure-a para saída por porta SCART.
Pode alterar as definições de vídeo: brilho, contraste, tonalidade,
saturação.

8
Tela de Preferências
- - PREFERENCE SETUP PAGE - -
GOTO PREFERENCE PAGE
TV TYPE PAL
AUDIO ENG
SUBTITLE ENG
DISC MENU ENG
PARENTAL
DEFAULT
PAL
AUTO
NTSC
1 KID SAF
2 G
3 PG
4 PG13
5 PGR
6 R
7 NC17
8 ADULT
RESET
Tipo de TV
Selecione o Sistema de cores que corresponde a sua TV quando
houver saída de áudio e vídeo. Esse Reprodutor de DVD é
compatível com ambos NTSC e PAL.
PAL – Selecione essa opção se a TV conectada utiliza o Sistema
PAL. Isso mudará o sinal de vídeo de um disco em NTSC para o
formato PAL
NTSC- Selecione essa opção se a TV conectada utiliza o Sistema
NTSC. Isso mudará o sinal de vídeo de um disco em PAL para o
formato PAL.
Automático: Muda a saída do sinal de vídeo automaticamente de
acordo com o formato do disco sendo reproduzido.
Áudio: Seleciona o idioma do áudio (quando disponível).
Legenda: Seleciona o idioma da legenda (quando disponível).
Menu do Disco: Seleciona o idioma do menu do disco (quando
disponível).
Controle de Pais
Alguns DVDs podem ter o nível de censura designado no disco ou
a certas cenas no disco. Essa função permite que você defina o
nível de limite. Os níveis de censura vão de 1 a 8 e variam de
acordo com o país. Você poderá bloquear a reprodução de certos
discos que não sejam apropriadas para os seus filhos ou passem
cenas alternativas em alguns discos.
Padrão: Volta para as configurações de fábrica
ENGLISH
FRENCH
GERMAN
ITALIAN
SPANISH
PORTUGUESE
ENGLISH
FRENCH
GERMAN
ITALIAN
SPANISH
PORTUGUESE
OFF
ENGLISH
FRENCH
GERMAN
ITALIAN
SPANISH
PORTUGUESE
Tela de Configurações de Senha
- - PASSWORD SETUP PAGE - -
GOTO PASSWORD SETUP PAGE
PASSWORD MODE ON
PASSWORD
ON
OFF
Modo de Senha: Define o modo de senha como ligado ou
desligado. Caso ele seja definido como desligado, a troca do nível
de censura não dependerá de senha.
Definições do Menu de CONFIGURAÇÕES

9
Tela de Configuração de Senha
OSD PASSWORD
NEW PASSWORD
CONFIRM PWD
OK
OSENHA DO OSD: Digite a senha ATUAL, (A configuração de fábrica é
1369), e o cursor mudará automaticamente para SENHA NOVA.
SENHA NOVA: Digite a senha NOVA. Digite 4 dígitos através dos
botões numéricos do controle remoto do seu aparelho, e o cursor
mudará automaticamente para CONFIRMAR SENHA.
CONFIRMAR SENHA: Confirma a senha NOVA ao digitá-la
novamente. Caso a confirmação esteja incorreta, o cursor ficará nesse
campo. Depois de digitar a senha nova corretamente o cursor mudará
automaticamente para OK.
OK: Quando o cursor estiver nesse botão, pressione ENTER para
confirmar a configuração.
Observação: Caso a senha tenha sido mudada, o controle de pais e o
código de trava do disco também serão mudados.
A senha padrão (1369) sempre estará ativa, mesmo depois que a
senha tenha sido mudada.
N
Item
Requisitos Padrão
Saída
SAÍDA DE VÍDEO
SAÍDA DE ÁUDIO
:2 Vrms (1 KHz, 0 dB)
Requisitos de Energia
Consumo de Energia
Umidade de Operação
: AC 100-240 V , 50/60 Hz
: <10W
: 5 % a 90 %
Parâmetros e Especificações
Parâmetros eletrônicos
Sistema
Laser
:Semicondutor laser, amplitude de onda de 650nm
Sinal do Sistema
: NTSC / PAL
Frequência response
Relação de sinal-ruído
:Maior que 80 dB (apenas conectores de SAÍDA ANALÓGICA)
Faixa dinâmica
:Maior que 85 dB (DVD/CD)
Observação: Estilo e especificações técnicas estão sujeitas a
mudança sem a necessidade de aviso prévio.
: 20Hz a 20 kHz (1dB)
N
Condições de armazenamento e uso:
1. Condições de armazenamento Temperatura Umidade
6 meses -20°C ~ +45°C 65±20%
1 semana -20°C ~ +65°C 65±20%
2. Condições de uso Temperatura Umidade
Recarga padrão 0°C ~ +45°C 65±20%
Duração padrão -20°C ~ +65°C 65±20%
Senha: selecione a página do menu de troca de senha.

-
 1
1
-
 2
2
-
 3
3
-
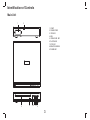 4
4
-
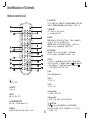 5
5
-
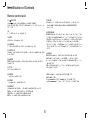 6
6
-
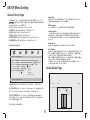 7
7
-
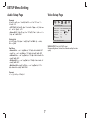 8
8
-
 9
9
-
 10
10
-
 11
11
-
 12
12
-
 13
13
-
 14
14
-
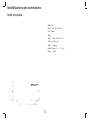 15
15
-
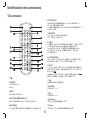 16
16
-
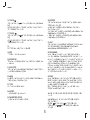 17
17
-
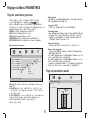 18
18
-
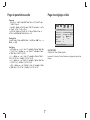 19
19
-
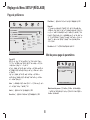 20
20
-
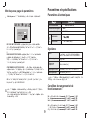 21
21
-
 22
22
-
 23
23
-
 24
24
-
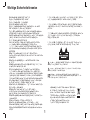 25
25
-
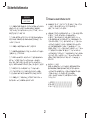 26
26
-
 27
27
-
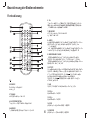 28
28
-
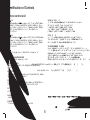 29
29
-
 30
30
-
 31
31
-
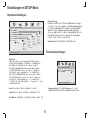 32
32
-
 33
33
-
 34
34
-
 35
35
-
 36
36
-
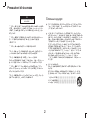 37
37
-
 38
38
-
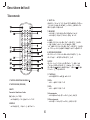 39
39
-
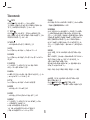 40
40
-
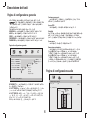 41
41
-
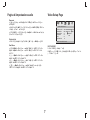 42
42
-
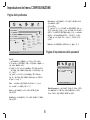 43
43
-
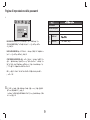 44
44
-
 45
45
-
 46
46
-
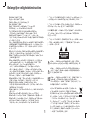 47
47
-
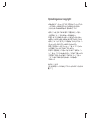 48
48
-
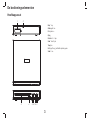 49
49
-
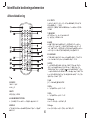 50
50
-
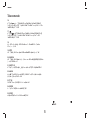 51
51
-
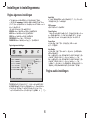 52
52
-
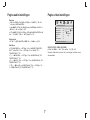 53
53
-
 54
54
-
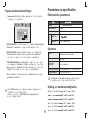 55
55
-
 56
56
-
 57
57
-
 58
58
-
 59
59
-
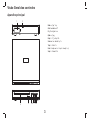 60
60
-
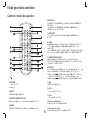 61
61
-
 62
62
-
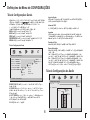 63
63
-
 64
64
-
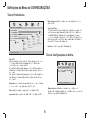 65
65
-
 66
66
-
 67
67


MPMan 550DVD de handleiding
- Categorie
- Draagbare dvd- / blu-rayspelers
- Type
- de handleiding
in andere talen
- English: MPMan 550DVD Owner's manual
- italiano: MPMan 550DVD Manuale del proprietario
- français: MPMan 550DVD Le manuel du propriétaire
- español: MPMan 550DVD El manual del propietario
- Deutsch: MPMan 550DVD Bedienungsanleitung
- português: MPMan 550DVD Manual do proprietário