
MINI300BT
INSTRUCTION MANUAL
Mini Stereo System
*Versions of GB/FR/DE/IT/NL/PT

1
TABLE OF CONTENTS
WARNING.....................................................................................................................................
ACCESSORIES.............................................................................................................................
SPECIFICATION..........................................................................................................................
PANEL CONTROLS....................................................................................................................
SYSTEM CONNECTION...........................................................................................................
BASIC OPERATION...................................................................................................................
CD OPERATION.........................................................................................................................
AUX IN OPERATION................................................................................................................
REMOTE CONTROL..................................................................................................................
USB OPERATION......................................................................................................................
BLUETOOTH OPERATION.....................................................................................................
RADIO OPERATION................................................................................................................
TROUBLE SHOOTING............................................................................................................
2
3
4
5
6
7
8
10
11
11
12
13
14

WARNING
1. The apparatus shall not be exposed to dripping or splashing.
No objects filled with liquids, such as vases, shall be placed on the apparatus.
2. Minimum distance around the apparatus for sufficient ventilation is 5cm.
The ventilation should not be impeded by covering the ventilation openings
with items, such as newspapers, table-cloths, curtains, etc.
3. No naked flame sources, such as lighted candles, should be placed on the
apparatus.
4. The apparatus shall be used in moderate climates only.
5. The plug shall remain readily operable.
6. Danger of explosion if battery is incorrectly replaced. Replace only with the
same or equivalent type.
7. Different types of batteries or new and used batteries are not to be mixed.
8. Batteries are to be inserted with the correct polarity.
9. Exhausted batteries are to be removed from the product.
10. Batteries shall be disposed of in a safe way. Only dispose of batteries in
specific collection containers (contact your retailer for more information)
in order to protect the environment.
11. Batteries shall not be exposed to excessive heat such as sunshine, fire or
the like.
12. If the supply cord is damaged, it must be replaced by the manufacturer,
its service agent or similarly qualified persons in order to avoid a hazard.
13. Batteries should be set up with the correct polarity.
14. The supplier is clear from his responsibility for all kinds of incidents caused
by the non-respect of battery polarity; the appliance will not be covered by
the warranty if damaged.
2
This product complies with the European Commission on the Eco-design Directive
and its implementing Regulations- Energy related products. 15 minutes (approx.)
later without any input ( expect in FM mode), the system will automatically enter
standby mode. Follow up the instruction manual to assume the function operation.
ERP II note (Energy Related Products note)


SPECIFICATION
Power supply
Max. power consumption
Standby power
USB charging output
Connection
Disc type
FM frequency
Remote control distance
Bluetooth effective distance
Operating conditions
AC 220-240V, 50Hz
60W
<0.5W
5V 500mA
USB, Aux input
CD, CD-R, MP3
87.5-108.0MHz
7 meters
10 meters
Temperature 5°C-35°C
Install on a flat horizontal surface
4

FM ANTENNA
POWER SWITCH
L/R SPEAKERS
POWER SUPPLY
L/R AUDIO OUTPUT
PANEL CONTROLS

STANDBY
USB
FM
BLUETOOTH
EJECT
AUX
REPEAT
PROGRAM
NUMBER BUTTONS
MUTE
VOLUME+/-
ENTER
NEXT
FAST FORWARD
STOP
PLAY/PAUSE
MONO/STEREO
TUNE-
TUNE+
SEARCH
PREVIOUS
FAST REWIND
PANEL.LED LIGHT
CHANNEL+
CHANNEL-
CD BT FM
AUX
USB
1
2
3
4
5
6
7
8
9 0
REPEAT
REP.AB
CD RIP.
PROGRAM
P.LED
ENTER
CH+
CH-
VOL-
SEARCH SAVE MO/ST
DSP
BASS+
TREBLE+
BASS-
TREBLE-
RANDOM
TU-
TU+
VOL+
CD
CD RIPPING
REPEAT A-B
DSP
RANDOM
TREBLE+/-
BASS+/-
TIME/FREQUENCY
SAVE
T/F
REMOTE CONTROL
1. Turn on the unit, insert the batteries into the remote control, and direct the
remote control at the remote sensor on the front panel.
2. The distance of remote control should not exceed 7 meters, or it will not work.
3. Interference from other electronic devices that generate high frequency signals
can strongly influence the way that the remote control functions.
6

Amplifier
FM Antenna
Left Speaker
Right Speaker
→
→
→
→

Preparation
1. Before the unit is turned on, please check if all the connections are right and
safely made. Insert the plug in the corresponding power socket.
2. Press the POWER ON/OFF button on the rear panel of this unit.
3. Move the disc cover out by pressing the EJECT button on remote control or
on the front panel. Put the disc on the disc holder and press button again.
4. The player will start loading the disc and playing the disc automatically.
Standby mode
Press the STANDBY button on remote control or on front panel to switch on
the unit or switch to standby mode.
Mode selection
1. Press the CD, BT, FM, AUX, or USB button on remote control to enter the mode.
2. Repeatedly press the FUNCTION button on the front panel to select the mode.
P.LED
Press P.LED button on the remote control to turn off or on the panel LED light.
Volume setting
Press the VOLUME+/- buttons on the remote control or rotate the Volume Knob
on the front panel to turn the volume up or down.
Mute button
Press the MUTE button to mute the sound. Press this button again or press the
VOL+/- buttons to resume the volume level.
Play/Pause
Press the PLAY/PAUSE button to pause the playback, press again to resume.
Stop
While playing music, press the STOP button on remote control to stop playing,
press PLAY/PAUSE button to start from the beginning.
BASIC OPERATION
8

Fast Forward and Rewind
Press the 8 or 7button to fast forward or fast rewind by speed X2 (press once),
or speed X4 (press twice), press the third time to resume the normal speed.
Previous and next
Press the or button to go to the previous or next track/song.
Number buttons
NUMBER buttons are for selecting tracks or preset radio stations.
Repeat
Press the REPEAT button once on remote control to repeat the current track( );
press twice to repeat all the tracks ( ). Press the third time to cancel.
Repeat A-B
Press the REP. AB button on the remote control to set the section for repeating.
1. Press the REP.AB button once at the beginning of the section (A).
2. Press the REP.AB button the second time at the end of the section (B).
3. It will automatically repeat the section A-B. Press the third time to exit.
Random
Press RANDOM button on remote control to play the tracks in a random order.
Press again to cancel and resume the normal playback order.
DSP
Press the DSP button to select the different sound fields: Jazz, Rock, Classic, Pop,
Live, Dance and off.
Tone setting
Press TONE button on the front panel to select bass or treble, then rotate Volume
Knob from low to high to adjust the effect of bass or treble. Or press BASS+/- or
TREBLE+/- buttons on the remote control to adjust directly.
Enter
Press the ENTER button to enable the selected options.
ALL
9

SPECIAL OPERATION FOR CD
Program
The unit can play selected tracks from a disc in the programmed order.
1. Press STOP button to stop playing, then press PROGRAM, it displays PR 0100.
2. Input the number of first track you want to play.
E.g. input 04, the fourth track will be played as the first song.
3. Repeat step 2 for each of the tracks you want to program.
4. When you have finished programming, press ENTER to start playing tracks in
the programmed order.
5. To cancel programmed playing, press the STOP button twice.
CD Ripping
CD Ripping is to store tracks from a disc to a USB device.
1. Press CD RIP. button to enter CD Ripping mode. It shows <CD RIP>.
2. Press the or to select the ripping speed <NORMAL> or <HIGH>.
When you have selected the speed, the unit enters the ready ripping status.
3. Press NUMBER buttons to select the tracks you want to rip, it shows <RIP_ _ Y>.
When you have selected the first track, it will skip to next ripping interface:
< RIP _ _ Y>.
4. To cancel the track you have selected or delete a selected track, enter the track
number again. When it shows <RIP _ _N>, the selected track is cancelled.
5. To select all tracks, press T/F button. To cancel all tracks, press T/F button again.
6. When you have finished tracks selection, press ENTER button to start ripping.
The selected tracks are stored in a new folder of USB device.
7. While the unit is ripping, the screen displays the ripping track numbers at the
second number 5. If you selected the normal ripping speed, the unit will play
the music.
8. When ripping is complete, it displays <CD RIP>, and the tracks stop playing.
9. To stop ripping at any time, press STOP button twice. Press PLAY/PAUSE button
to start playback from the beginning.
Example,
To rip the 5th and 13th tracks into the USB stick, first press STOP button to stop
playback, then press CD RIP button. Press 0, 5, it displays <RIP 05Y>. Press 1, 3,
it displays <RIP 13Y>. Finally press ENTER to start ripping the selected tracks.
10

You can enjoy music via other audio devices or a USB stick. Pay attention to the
AUX IN OPERATION AND USB OPERATION
RCA cable

Bluetooth pairing steps
1. Press the BT button on remote control or press FUNCTION button on the front
panel to enter the Bluetooth mode. The indicator flashes blue quickly.
2. Turn on the Bluetooth function on your device (e.g. smart phone).
3. Place the phone/BT device in Bluetooth search mode. The phone/BT device will
search for this unit.
4. Select MINI300BT from the list of found devices on the phone/music device.
5. Some devices may ask you to select OK/YES/PAIR to enable the connection.
6. (For some devices) If prompted, enter 0000 (four Zero) for passkey.
7. When successfully paired with your device, the indicator will steadily lit.
Playback operation
1. The Bluetooth playback is controlled by your device and the buttons on the
remote control. Please refer to BASIC OPERATION for more detail.
2. To disconnect and pair with another device
a. Turn off the Bluetooth function on your device to disconnect the device.
The unit will enter the Bluetooth pairing status automatically.
b. In this paired status, follow the steps 2-5 of BLUETOOTH PAIRING to connect
to another device.
3. When playing music via a phone, and there comes a call, music will stop playing
automatically. When the call ends, it depends on the settings of the phone
whether the playback will resume or not.
NOTE:
1. Some devices such as an iPhone, may connect immediately after pairing, some
may take longer time to connect.
2. The unit can only pair and play tracks from one device at a time.
3. To connect to a different paired device, you have to turn off the Bluetooth
function on your device, or unpaired from the currently paired device, and then
manually connect to another device.
4. The Bluetooth search range is 10 meters in the open air.
BLUETOOTH OPERATION
12

RADIO OPERATION
Basic information for FM operation
1. Make sure the aerial on the back of the unit is fully extended and adjusted
before attempt to tune to an FM station (a vertical position is recommended).
This will ensure the unit to get the best reception.
2. Extending the aerial also ensures the best possible sound quality.
3. The range of FM frequency is from 87.5MHz to 108.0MHz.
4. Press FM button on remote control or FUNCTION button to enter FM mode.
5. Press MO/ST button to turn STEREO ON or OFF if there is strong stereo signal.
Selecting stations
1. Press NUMBER buttons to select stations.
E.g. press 1, then 5 to select 15th station.
2. Press CH+/- buttons to turn to skip to the previous or next station.
3. Press T/F button on remote control to choose frequency.
E.g. first press T/F button, then press 9, 9, 7, 0 to select the frequency 99.7MHz.
Station searching/tuning
1. Automatic searching
Press the SEARCH button, the unit starts to search stations from low to high
frequency automatically. The searched stations are saved automatically. Press
again to stop.
2. Manual tuning:
a. Press TU+/- button briefly to adjust the frequency in increment of 0.05MHz.
b. Press and hold TU+/- buttons to tune the next or previous frequency wieceptio,n ocrgalgible frequenc

TROUBLE SHOOTING
For your convenience, we have listed some methods to solve common problems
you may encounter when you use the system. If the problem occurs repeatedly,
contact the nearest maintenance center.
Possible cause
Power supply does
not work
Power plug is not fully
inserted into the power socket
Fully insert the power plug
into the power socket
Remote control
does not work
The batteries have been
used up
Replace them with new ones
The remote control is not
aimed at the remote control
sensor
Please aim the remote control
correctly; in line with the
remote sensor
Play is unavailable
No disc inserted
Insert a disc
Disc incorrectly inserted
Reinsert the disc with the
picture upward
Disc is not compatible with
this device
No sound from
speakers
Audio wire is not connected
correctly
Connect the audio wire
correctly
Incorrectly connected to
computer
Connect the computer correctly
by referring to the illustration
Discontinuous sound
Disc is not clean
Disc scratched
Replace with a clean disc or
use a soft cloth to clean the
disc
Replace with a new one
Only use discs that are
compatible with this device
Problem
14
Solution

This is to certify that MINI300BT is in conformity with:
Council directive 2004/108/EC(EMC direction):
Applicable standards:
EN 55013: 2001 +A1 :2003 +A2 : 2006
EN 55020: 2007 + A11 : 2011
EN 61000-3-2: 2006 +A1: 2009 +A2: 2009
EN 61000-3-3: 2008
Made in PRC
For more information please visit our website
www.mpmaneurope.com

Mini système stéréo
MINI300BT
MANUEL D’INSTRUCTION

TABLE DES MATIÈRES
AVERTISSEMENT....................................................................................... 2
ACCESSOIRES...... ... ... ................. ................. .... .................. .................. ... .. 3
CARACTÉRISTIQUES.............................................................................. 4
PANNEAU DE COMMANDE.................................................................... 5
TÉLÉCOMMANDE..................................................................................... 6
CONNEXION DU SYSTÈME................................................................... 7
FONCTIONNEMENT BASIQUE.............................................................. 8
FONCTIONNEMENT CD........................................................................... 10
FONCTION ENTRÉE AUXILIAIRE......................................................... 12
FONCTIONNEMENT USB..................... ... .................. .................. ... .......... 12
FONCTIONNEMENT BLUETOOTH......................................................... 13
UTILISATION DE LA RADIO................................................................... 14
RÉSOLUTION DES PROBLÈMES........................................................... 16
1

AVERTISSEMENT
1. L’appareil ne doit pas être exposé aux suintements ou aux éclaboussures.
Aucun objet rempli de liquide, comme des vases, ne doit être placé sur l’unité.
2. Une distance minimum de 5 cm autour de l’appareil doit être préservée pour
une ventilation suffisante.
La ventilation ne doit pas être empêchée du fait qu e les ouvertures de
ventilation soient couvertes avec des accessoires tels que journaux, serviettes
de table, rideaux, etc.
3. Aucune source de flamme telle que des bougies allumées ne devraient être
placée près de l'appareil.
4. L'appareil ne doit être utilisé que dans un climat modéré.
5. La prise doit rester facilement accessible.
6. Danger d’ex plosion si les piles ne sont pas correctement remplacées.
Remplacez seulement avec les mêmes ou un type équivalent.
7. Ne pas utiliser d es piles de type différent ou ne p as mélanger les piles
neuves et anciennes.
8. Les piles doivent être installées en respectant les polarités.
9. Les piles usag ées doivent être enlevées du jouet.
10. Les piles doivent être éliminées de manière sure. Ne jetez les piles que dans
des récipients de collecte spécifiques (contactez votre vendeur pour plus
d'informations) afin de protéger l'environnement.
11. Les batteries ne doivent pas être exposées à des chaleurs excessives telles que
la lumière du soleil, le feu ou autres.
12. Si le câble d’alimentation est endommagé, il doit être remplacé par le fabricant
ou son prestataire de service, ou un technicien qualifié, afin d’ éviter tout risque
inutile.
13. Les piles doivent être installées en respectant les polarités.
14. Le fournisseur n'assumera aucune responsabilité pour tous les incidents
provoqués par le non-respect des polarités de la batterie, l'appareil ne sera pas
couvert par la garantie s'il est endommagé.
Remarque ERP II (remarque concernant l'énergie)
Produits liés à l'électricité - Ce p roduit est conforme à la directiv e de conception
écologique de la Commission Européenne et ses réglementations de mise en oeuvre.
Après (environ) 15 minutes sans entrée (sauf en mode FM), le système passera
automatiquement en mode veille. Suiv ez les instructio ns du manuel pour relancer le
fonctionnement.
2

INSTRUCTIONS DE SECURITÉ
Veuillez lire et comprendre tous les avertissements présentés ci-dessous, ainsi que
ceux marqués sur l'unité Cette unité a été conçue et fabriquée pour garantir la
sécurité des personnes.
N'utilisez pas d'autre sources
d'alimentation que celles spécifiées
dans le manuel d'utilisateur ou su r
le système.
Évitez de placer à la lumière directe
du soleil ou près d'une source de
chaleur.
Ne pliez pas ou ne tirez pas sur le
câble d'alimentation excessivement,
et n'appliquez pas de pressi o n en
vous tenant dessus.
Tenez l'unité et la prise éloignées
de l'eau.
N'ouvrez jamais le couvercle et
évitez de faire tomber quoi que ce
soit dans l'unité, comme des pièces,
des broches et des aiguilles par
exemple.
Débranchez l'unité du secteur
lorsque vous ne l'utilisez pas
pendant longtemps.
ACCESSOIRES
Partie 1 :
Câble audio
Partie 2 :
Antenne FM
Partie 3 :
Télécommande
Partie 4 :
Manuel de l’utilisateur
3

CARACTÉRISTIQUES
4
Ali
mentation
Consommation énergétique
maxi male
Connexion de sortie de
chargement USB alimentation
standard
T
ype de disques
Fréquence FM Distance
télécommande, Distance
effecti ve Bluetooth Conditi ons
de fonctionnement
AC 220-240V, 50Hz
60W.
<0,5W
5V 500mA USB, Entrée Aux CD,
CD-R, MP3
87,5-108,0MHz
7 mètres
10 mètres
Température 5°C-35°C
Installation sur une surface
horizontale plate

PANNEAU DE COMMANDE
Panneau frontal
ECRAN D’AFFICHAGE
INDICATEUR
LUMINEUX VEILLE
FONCTION
LECTURE/PAUSE
RECHERCHE
RETOUR RAPIDE ET
PRECEDENT
INDICATEUR
LUMINEUX DEL
CAPTEUR
INFRAROUGE
EJECT
MOLETTE DE
VOLUME
STOP
TONALITÉ
DSP
AVANCE RAPIDE
SUIVANT
FENTES ENTRÉE
AUXILIAIRE G/D
TELEPHONE
TIROIR DE DISQUE
PORT USB
Panneau arrière
SOR TIE AUDIO G/D
ANTENNE FM
INTERRUPTEUR
D’ALIMENTATION
ALIMENTATION
ELECTRIQUE HAUT-
PARLEUR G/D
5

TÉLÉCOMMANDE
1. Allumez l'unité, insérez les batteries d ans la télécommande et dirigez la
télécommande vers le capteur sur le panneau frontal.
2. La distance de la télécommande ne doit pas dépasser 7 mètres, ou elle ne
fonctionne ra p as.
3. Les interférences d'autres appareils électro ni q ues qui gén è rent des si g naux
haute fréquence peuvent influencer fortement la manière dont fonctionne la
télécommande.
6
ST
ANDB
Y
BL
UE
T
OO
TH
CD
USB
EJECT
AU X
FM
NUMBER BUT TONS
REPEAT A-B
TIME/FREQUENCY
CD RIPPING
REPEAT
MONO/STEREO
SEARCH
PANEL.LED LIGHT
RANDOM
SA
VE
TUNE-
CHANNEL
-
DSP
PLA
Y/P
A
USE
FA S T
FOR
W
ARD
FA S T
RE
WIND
ST
OP
PROGRAM
CHANNEL+
TUNE+
ENTER
MUTE
NEXT
PREVIOUS
CD BT FM
AUX
USB
1
2
3
4
5
6
7
8
9 0
REPEAT
REP.AB
CD RIP.
PROGRAM
P.LED
ENTER
CH+
CH-
VOL-
SEARCH SAVE MO/ST
DSP
BASS+
TREBLE+
BASS-
TREBLE-
RANDOM
TU-
TU+
VOL+
T/F
VOLUME+/
-
TREBLE+/-
BASS+/-

CONNEXION DU SYSTÈME
Av antd'alimenter la machine, vérifiez et efectuez les connexions comme ci-dessous:
1. S'il y a plusieurs connexions entre le lecteur et l'amplificateur, veuillez en choisir
une et débrancher les autres afin de ne pas influencer la qualité du son.
2. N'
allumez, n'éteignez pas ou n'appuyez pas fréquemment sur l'interrupteur
d'alimentation, un intervalle de 5 secondes doit être respecté entre chaque pression
sur l'interrupteur.
7

FONCTIONNEMENT BASIQUE
Préparation
1. Avant d’ allumer l’unité, veuillez vérifier si toutes les connex ions sont correctes
et sures. Insérez la prise dans la fente d'alimentation correspondante.
2. Appuyez sur la touche ALIMENTATION M/A sur la panneau arrière de cette unité.
3.
Enlevez le couvercle du CD en appuyant sur la touche EJECT sur le panneau
frontal ou sur la télécommande. Mettez le disque sur le porte-disque et appuyez sur
la touche de nouvea u.
4. Le lecteur commencera à charger le disque et à le lire automatiquement.
Mode veille.
Ap
puyez sur la touche VEILLE sur la télécommande ou sur le panneau frontal pour
entrer / sortir du mode veille.
Sélection du mode
1. Appuyez sur la touche CD, BT, FM, AUX ou USB sur la télécommande pour
entrer dans le mode.
2. Vous pouvez aussi appuyer sur la touche FUNCTION à plusieurs reprises sur
le panneau frontal pour cho isir le mode correspondan t.
P.LED
Appuyez sur la touche P.LED sur la télécommande pour éteindre ou allumer la DEL
lumineuse du pannea u.
Réglage du volume
Appuyez sur les touches VOLUME+/- sur la télécommande ou tournez la molette de
volume sur le panneau frontal pour augmenter ou diminuer le volume.
Touche Muet
Appuyez sur la to u che Muet pour couper la sor tie de son. Appu yez à nouveau sur la
touche ou appuyez sur les touche VOL+/- pour remettre le son.
8
Lecture/Pa
use
Appuyez sur la touche LECTURE/PAUSE pour mettre la lecture en pause,
appuyez de nouveau pour reprendre la lecture.
Sto p
En mode de lecture, appuyez sur la touche STOP sur la télécommande pour
arrêter la lecture, appuyez sur la touche LECTURE/PAUSE pour reprendre la

lecture depuis le début.
Avance rapide / retour rapide
Appuyez sur la touche pour avancer ou reculer rapidement en vitesse 2X
(appuyer une fois), ou en vitesse 4X (appuyer deux fois), ap pu yez une troisième
fois pour r eprendre la v itesse normale.
Précé
dent et Suivant
Appuyez s
ur la touche ou pour passer à la piste/chanson suivante ou précédente.
Pavé numériqu e
Les touches NUMERO servent à sélectionner les pistes ou les stations de radio
préselectionnées.
Répéter
A
ppuyez sur la tou che REPETER une fois sur la télécommande pour répéter la piste
en cours (
) ; Appuyez deux fois pour répéter toutes les pistes (ALL ). Appuyez une
troisième fois pour annuler.
Répéter A-B
Appuyez sur la touche REP.AB sur la télécommande pour régler la fonction de
répéter. 1. Appuyez sur la touche REP AB une fois au début de la section (A).
2. Appuyez sur la touche REP AB une fois à la fin de la section (B). 3. La section
A.B sera automatiquement répé tée, ap puyez une troisième fois pour qu itter.
Aléatoire
Appuyez sur la touche RANDOM sur la télécommande pour lire les pistes dans un
ordre aléatoire. Appuyez de nouveau pour annuler et reprendre l'ordre de lecture
normal.
DSP
Appuyez sur la touche DSP pour choisir les différents champs sonores: Jazz, Rock,
Classic, Pop, Live, Dance et off.
Réglage des tonalités
Appuyez sur la touche TONE sur le panneau frontal pour choisir les basses ou les
aiguës, puis tournez la MOLETTE DE VOLUME du bas vers le haut pour régler
l'effet de graves ou d'aiguë. Appuyez sur les touches BASS+/-, TREBLE +/- sur la
télécommande pour régler directement.
Entrée
Appuyez sur la touche ENTER pour activer les éléments sélectionnés.
9

10
OPÉRA
TION SPÉCIALE POUR CD
Programme
L'unité peut lire les pistes sélectionnée dans un disque dans l'ordre programmé.
1. Appuyez sur la touche STOP pour arrêter la lecture, puis appuyez sur la
touche PROGRAM, PR 0100 s'affiche.
2. Saisissez le numéro de la première piste que vous souhaitez jouer.
Ex : saisissez 04, la quatrième piste sera lue en premier.
3. Répétez l'étape 2 pour chacune des pistes que vous souhaitez programmer.
4. Lorsque vous avez fini la prog r ammation, appuyez sur ENTRER pour
commencer la lecture des pi st es da ns l' or dre programm é.
5. Pour arrêter la lecture programmée, appuyez sur le bouton STOP deux fois.
Extraire un CD
L'extraction de CD permet de sauvegarder les pistes d'un CD sur une clé USB.
1. Appuyez sur la touche CD.RIP pour passer en mode d'extraction CD.
<CD RIP> s'affiche.
2.
Appuyez sur ou pour choisir la vitesse d'extraction <NORMAL>
ou <HIGH>.
Lorsque vous choisi la vitesse de copie, l'unité entrera en statut prêt pour
l'extraction.
3. Appuyez sur les touches NUMÉRIQUES pour choisir les pistes que vous
souhaitez copier, l'écran affiche <RIP_ _ Y>.
Lorsque vous choisi la première piste, elle passe automatiquement à l'interface
d'extraction de la piste suivante: < RIP _ _ Y>
4. Pour annuler la piste que vous avez choisi ou effacer une piste sélectionné,
saisissez le numéro de la piste de nouveau. Lorsque <RIP _ _N> s'affiche, la
piste sélectionnée est annulée.
5. Pour choisir toutes les pistes, appuyez sur la touche T/F. Pour annuler toutes
les pistes, appuyez sur la touche T/F de nouveau.
6. Lorsque vous avez terminé de choisir les pistes, appuyez sur la touch e ENTER
pour commencer l'extraction. Les pistes sélectionnées sont sauvegardées dans
un nouveau dossier d'un appareil USB.
7. Pendant que l'un ité est en cours d'extraction, l'écran affiche la piste en cours
d'extraction à la seconde numéro 5. Si la copie est effectuée à la vitesse normale,
l'unité jouera la musique.
8. Lorsque l'extraction est terminée, l'écran affiche <CD RIP>, et la piste s'arrête
de jouer.

11
9. Pour arrêter l'extraction, appuyez deux fois sur la touche STOP à tout moment.
Appuyez sur la touche LECTURE/PAUSE pour commencer la lecture depuis le
début.
Exemple,
Pour extraire les pistes 5 et 13 dans la clé USB, commencez par appuyer sur la touche
STOP pour arrêter la lectu re, puis appuyez sur la touche CD RIP. Appuyez sur 0, 5,
<RIP 05Y> s'affiche. Appuyez sur 1, 3, <RIP 13Y> s'affiche. Finalement, appuyez sur
ENTER pour commencer l' ext racti on des pistes sélectionnées.

FONCTIONNEMENT ENTREE AUX ET FONCTIONNEMENT USB
Vous pouvez apprécier votre musique via des appareils audio ou une clé USB.
Pay attention to the
Observez bien l'image ci-dessous, chaque co nnexion doit ê tre
sure et stable.
C
asque
ECOUTEURS
Câble RCA
PC/téléphone/lecteur audio
Clé USB
Fonction entrée auxiliaire
1. Appuyez sur la touche AUX sur la télécommande ou sur la touche FUNCTION sur
le panneau frontal pour passer en mode ENTRÉE AUXILIAIRE
2. Connectez le PC/téléphone/lecteur audio (un appareil) avec l'unité via un câble
audio.
3. Une fois connecté sur une fente d'entrée aux iliaire, la commande de lectur e
fonctionne sur l'appareil externe, vous pouvez régler le volume avec la commande
du volume sur l'unité.
Fonctionnement USB
1. Insérez une clé USB dans le panneau frontal de l’unité.
2. Appuyez sur la touche USB sur la télécommande ou sur la touche FUNCTION sur
le panneau frontal pour passer en mode USB.
3. Le lecteur détectera automatiquement l'appareil et commencera à jouer lorsque les
fichiers auront été détectés.
4. Consultez la section FONCTIONNEMENT BASIQUE pour plus de détails sur le
fonctionnement.
5. Le port USB permet également de charger un appareil USB connecté.
12

FONCTIONNEMENT BLUETOOTH
Étapes de couplage Bluetooth
1. Appuyez sur la touche BT sur la télécommande ou sur la touche FUNCTION sur
le panneau frontal pour passer en mode Bluetooth. L’indicateur clignotera
rapidement en bleu.
2. Activez la fon ction Bluetooth d e votre appareil (ex : smartphon e).
3. Placez le téléphone/l'appareil BT en mode de recherche Bluetooth. Le téléphone /
l'appareil BT recherchera cette unité.
4. Choisissez MINI300BT dans la liste des appareils sélectionnés sur le téléphon e /
l'appareil audio.
5. Certains appareil vous demanderont de choisir OK/OUI/COUPLER pour activer
la connexion.(Pour certain s appareil) si on vous le demande, saisissez 0000
(quatre zéro) comme mot de passe.
6. Lorsque vous avez correctemen t co uplé votre appareil, l'in dicateur lumineux
s'allume en continu.
Fonctionnement de la lectur e
1. La lecture Bluetooth est contrôlée par votre appareil et les touches de la
télécommande. Consultez la section FONCTIONNEMENT BASIQUE pou r
plus de détails.
2. Pour déconnecter et coupler un autre appareil
a. Éteignez la fonction Bluetooth de votre appareil pour déconnecter.
L'unité passera automatiquement en mode de couplage Bluetooth.
b. Dans le mode de couplage, suivez les étapes 2-5 de la section COUPLAGE
BLUETOOTH pour conn ecter à un au tre appar e il.
3. Lors de la lecture de musique sur un téléphone, et que vous recevez un appel, la
musique cessera automatiquement de jouer. Lorsque l'appel est terminé, cela
dépend du réglage de votre téléphone, si la piste en cours reprendra sa lecture
ou non.
REMARQUE:
1. Certains appareils, comme les iPhone, se connectent immédiatement après le
couplage, certains peuvent prendre plus longtemps pour se connecter.
2. L'unité ne peut être connectée et jouer des contenus que depuis un seul appareil
à la fois.
3. Pour connecter à un autre appareil couplé, vous devez éteindre le Bluetooth ou
découpler de l'appareil actuellement connecté et connecter manuellement l'autre
appareil.
4. La portée de recherche Bluetooth est de 10 mètres en plein air.
13

UTILISATION DE LA RADIO
Information basique pour le fonctionnement FM
1. Assurez-vous que l'antenne derrière la radio est complètement tendue et réglée
avant d'essayer de régler u ne station FM (une position v erticale est recommandée).
Cela garantira une meilleure réception de l'unité.
2. Étendre l'antenne garantit également un e meilleu re qualité sonore.
3. L’éventail de fréquence FM s’étend de 87.5MHz à 108.0MHz.
4. Appuyez sur la touche FM sur la télécommande ou sur la touche FUNCTION sur
le panneau frontal pour passer en mode FM.
5. Appuyez sur la touche MO/ST pour mettre STEREO sur ON ou OFF, si le signal
stéréo est fort.
Choisir des stations.
1. Appuyez sur les touches numériques pour choisir les stations. Ex : appuyer sur 1
puis 5 pour choisir la 15e station.
2. Appu yez sur les touches CH+/- pour passer à la station suiv an te ou précédente.
3. Appuyez sur la touche T/F sur la télécommande pour choisir la fréquence.
Ex. : commencez par appuyer sur la touche T/F, puis appuyez sur 9,9,7,0 pour
choisir la fréquence de 99,7MHz.
Recherche / réglage de stations
1. Rech erche automatiq ue
Appuyez sur la touche RECHERCHE, ce système commence à rechercher les
bandes des fréquences basses vers les fréquences hautes automatiquement. Les
stations recherchées sont sauvegardées automatiquement. Appuyez de nouveau
pour arrêter la recherche.
2. Réglage manuel :
a. Appuyez brièvement sur la touche TU+/- pour régler la fréquence par
incrément de 0,05MHz.
b. Tenez les touches TU+/- appuyés pour régler la fréquence suivante ou
précédente avec une réception suffisante, une fois qu'une fréquence
disponible est détectée, le réglage s'arrêtera.
Sauvegarder des stations
(vous pouvez sauvegarder j usqu'à 60 stations) .
1. Pour sauvegarder la fréquence en cours dans l'espace de préselection en cours.
Ex: Si vous écoutez 88.9MHz sur la 5e station, appuyez sur la touche SAVE
pour enregistrer 88.9MHz sur la 5e station.
14

2. Pour sauvegarder une station en préselection :
Ex: Si vous souhaitez enregistrer 99.70MHz dans la 15e station, commencez par
appuyez sur CH+/- ou sur les touches numériques 1, 5 pour choisir la 15e
station; appuyez sur la touche T/F et saisissez les numéros 9,9,7,0, puis
appuyez sur la touche SAVE pour sauvegarder.
15

RÉSOLUTION DES PROBLÈMES
Pour plus de commodité, nous avons listé les méthodes pour résoudre les problèmes
communs que vous rencon trerez lorsque vous utilisez le système. Si le problème
persiste, contactez votre centre de réparation le plus proche.
Problème
L’alimentation
électrique ne
fonctionne pas
La télécommande ne
fonctionne pas
Cause possible

Nous certifions par la présente que le MINI300BT est conforme à :
Directive du conseil 20 04 /1 08/EC (directive CEM):
Normes applicables :
EN 55013: 2001 +A1 :2003 +A2 : 2006
EN 55020: 2007 + A11 : 2011
EN 61000-3-2: 2006 +A1: 2009 +A2: 2009
EN 61000-3-3: 2008
Fabriqué en RPC
Pour de plus amples informations, veuillez consulter notre site Internet
www.mpmaneurope.com
17

Mini-Stereoanlage
MINI300B
T
BEDIENUNGSANLEITUNG

INHALT
WAR NUNGE N... ....... ........ ........ ......... ........ ........ ........ ....... ........ ........ ........ ......... ........ ...... ...... .......
2
ZUBEHÖR......... ......... ........ ........ ......... ........ ...... ........ ......... ........ ........ ........ ....... ........ ....................
3
TECHNI SC H E DATE N. .. ........ ...... .. ... .. ...... .. .. .. ...... .. .. .. ....... .. .. .. ...... .. .. .. ....... .. .. .. ........ ...... .. .. .. .....
4
T A S T E N A U F D E M B ED I E NF E L D.... ........ ........ ...... ........ ......... ........ ........ ......... ...... ........ ........ .........
5
FERNBEDIENUNG....................................................................................................................
6
SYSTE MANSC HLÜS SE....... ........ ......... ........ ...... ........ ......... ........ ........ ......... ...... ........ ........ ........
7
GRUNDLE GENDER BETRIEB ....... ........ ........ ........ ......... ...... ........ ........ ......... ........ ........ ....... ...
8
CD-BETRIEB
.......... ........ ........ ......... ...... ........ ........ ......... ........ ........ ...... ......... ........ ........ .........
11
AUX-BETR IEB. ......... ........ ........ ......... ...... ........ ........ ......... ........ ........ ........ ....... ........ ........ ... .......
13
USB-BETRIEB............................................................................................................................
13
BLUETOOTH-BETRIEB...........................................................................................................
15
RADIOBETRIEB.......................................................................................................................
16
STÖRBE HEBUN G..... ........ ........ ........ ........ ........ ........ ....... ........ ........ ........ ......... ........ ...... ........ ...
18
1

WARNUNGEN
1. Gerät vor Spritz- und Tropfwasser schützen
.
Stellen Sie keine mit Flüssigkeit gefüllten Gegenstände wie Vasen auf das Gerät
.
2. Halten Sie um das Gerät herum einen Mindestabstand von 5 cm für eine
ausreichende Belüftung ein.
Die Belüftungsöffnungen d ürfen ni cht mit Gegenständen wi e Zeitungen,
Tis c h de c k e n , Ga r d i ne n u s w. b e d e c kt wer de n , um di e Ventilation nicht zu
beein trächtig en
.
3. Stellen Sie kein offenes Feuer wie angezündete Kerzen auf das Gerät
.
4. Gerät nu r in moderaten Klimazonen ve r wenden
.
5. Der Stecker muss immer betriebsbereit sein
.
6. Es besteht Explosionsgefahr, falls die Batterie falsch eingelegt wird. Batterie
nur durch die B at t eri e des glei chen o der gleichwertigen Typs ersetzen.
7. Verwenden Sie nicht unterschiedliche Batterien oder neue und alte Batterien
gemeinsa m
.
8. Batterien müssen gemäß der richtigen Polarität eingeleg t werden
.
9. Entfernen Sie verbrauchte Batterien aus dem Gerät.
10. Entsorgen Sie Batterien auf sichere Art und Weise. Geben Sie Batterien nur an
speziellen Sammelstellen ab (wenden Sie sich für nähere In fo rmationen an
Ihren Einzelhändler), um die Umwelt zu schützen.
11. Schützen Sie Batterien vor extremer Hitze wie Sonneneinstrahlung, Feuer
oder ähnlichem
.
12. Ein beschädigtes Netzkabel muss vom Hersteller, von dessen
Kundendienst oder einer ähnlich qualifizierten Person ersetzt werden, um
Gefahrensituationen zu vermeiden
.
13. Installieren Sie Batterien gemäß der richtigen Po larität
.
14. Der Lieferant haftet nicht für Unfälle aufgrund der Nichteinhaltung der
Batteriepol ari t ät ; Schäde n des Geräts fallen nicht unt er die Garantie.
Hinweis zu ERP II (Energieprodukte)
Dieses Produkt entspricht der Ökodesig n-Richtlinie der Europäischen Kommission
und deren Anf orde ru ngen für Energieprodu k t e. Falls (ungefähr) 15 Mi nuten lang
keine Eingabe erfolgt (im FM-Modus), aktiviert das Gerät automatisch den Standby-
Modus. Informieren Sie sich im weiteren Verlauf der Bedienungsanleitung, wie Sie
in solch einem Fall den normalen Betrieb wieder aufn ehmen.
2

SICHERHEITSHINWEISE
Lesen und verinnerli c hen Si e a l l e nachfo lgenden Warnung en sowie die
Warnhinweise auf dem Gerät. Dieses G erät wurde un ter Berücksichtigung
Ihrer persönlichen Sicherh e it en twickelt und hergestellt
.
Gerät nur an eine Stromversorgung
anschließen, die den Angaben in der
Bedienungsanleitung und auf dem
Gerät entspricht.
Gerät vor direkter Sonneneinstrahlung
schützen und von Wärmequellen
fernhalten
.
Das Kabel nicht knicken, daran
ziehen oder darauf treten.
Gerät und Netzstecker vor Wasser
schützen.
Abdeckung nicht öffnen. Keine
Gegenstände wie Münzen,
Haarklemmen oder Nadeln in das
Gerät eindringen lassen
.
Trennen Sie das Gerät während
längerer Zeiten des Nichtgebrauchs
vom Netzstrom
.
ZUBEHÖR
Audiokabel
FM-Antenne
Fernbedienung
Bedienungsanle itung
3
USER MANUAL

TECHNISCHE DATEN
Stro
mversorgung
Max. Stromverbrauch
Standby-Verbrauch
USB-
Ladeausgang
4
Anschlüsse
Disc-Typ
FM-Frequenz
Reichweite Fernbedienung
Bluetooth-Reichweite
Betriebsbedingungen
AC
220-240V
,
50Hz
60W
<0,5W
5V 500mA
U SB , A u x- Eingang
CD, CD-R,
MP3
87,5-108,0MHz
7 Meter
10 Mete r
T
emperatur
5°
C-35
°
C
, Auf flacher,
horizontaler Oberfläche installieren

TASTEN AUF DEM BEDIENFELD
Vorderseite
DISPLAY
ANZEIGELA MPE
ST
ANDB
Y
WIEDERGAB
E
/P
A
USE
FUNK TION
SUCHE
ZURÜCKSPULEN
ZURÜCK
LED-ANZEIGE
FERNSENSO R
AUSWERFEN
LAUTSTÄRKE
STOPP
TON
DSP
VORSPULEN
WEITER
KOPFHÖRER BUCHSE
R/L
AUX-EINGÄNGE
DISC-LAUFWERK
USB-PORT
5

FERNBEDIENUNG
1. Schalt en Sie das Gerät ei n. Legen Sie die Batterien in die Fernbedi enung ein
und richten Sie die Fernbedienung auf den Fernsensor an der Vorderseite des
Geräts
.
2. Die Reichweite der Fernbedienung beträgt 7 Meter. Außerhalb dieser funktioniert
das Gerät nicht
.
3. Störungen von anderen Geräten, die Hochfrequenzsignale erzeugen, können die
Funktionsweise der Fernbedienung beeinträchtigen
.
6
ST
ANDB
Y
BL
UE
T
OO
TH
CD
USB
AUSWERFEN
AU X
FM
ZIFFERNTASTEN
WIEDERHOLEN A-B
ZEIT/FREQUENZ
CD-RIPPING
WIEDERHOLEN
MONO/STEREO
SUCHE
LED-ANZEIGE
RANDOM
SPEICHERN
TUNING-
SENDER-
DSP
WIEDERGAB
E
/P
A
USE
VORSPULEN
ZURÜCKSPULE
STOPP
PROGRAM
MIEREN
SENDER+
TUNING+
ENTER
STUMM
WEITER
ZURÜCK
TIEFTON+/ -
LAUTSTÄRKE+/-
HOCHTON+/-
CD BT FM
AUX
USB
1
2
3
4
5
6
7
8
9 0
REPEAT
REP.AB
CD RIP.
PROGRAM
P.LED
ENTER
CH+
CH-
VOL-
SEARCH SAVE MO/ST
DSP
BASS+
TREBLE+
BASS-
TREBLE-
RANDOM
TU-
TU+
VOL+
T/F

SYSTEMANSCHLÜSSE
Überprüfen Sie vor dem Einschalten des Geräts nachfolgende Anschlüsse
:
1. Falls es zwischen dem Gerät und Verstärker mehrere Anschlüsse gibt, wählen Sie
einen aus und trenn en Sie die and eren, um die Soundqualität nicht zu
beein trächtig en
.
7
2.
Schalten Sie das Gerät nicht kontinuierlich mit der Betriebstaste ein oder au s.
Warten Sie zwischen dem Ein- und Ausschalten immer mindestens 5 Sekun de n
.
FM-
Ant
enne
Rechter
Lautsprecher
Linker
Lautsprecher
→
→
Verstärker

GRUNDLEGENDER BETRIEB
Vorbereitung
1. Überprüfen Sie vor dem Einschalten des Geräts, dass alle Anschlüsse richtig
und sicher vorgenommen wurden. Schließen Sie den Netzstecker an eine
geeignete Steckdose an.
2. Drücken Sie die Taste
BETRIEB EIN/AUS
an der Rückseite des Geräts.
3.
Öffnen S i e das Dis c-Laufwerk dur ch Drück en der Ta s te
AUSWERFEN
auf
der Fernbedienung oder auf der Vorderseite des Geräts. Legen Sie eine Disc in
die Halterung und drücken Sie die Taste erneut.
4. Das Gerät lädt die Disc und startet die Wiedergabe automatisch
.
Standby-Modus
Drücken Sie d
ie Taste
STANDBY
auf der Fernbedienung oder an der
Vorderseite des Geräts, um das Gerät einzuschalten oder den Standby-Mo dus
zu aktivieren
.
Modus auswählen
1. Drücken Sie die Tast en
CD
,
BT
,
FM
,
AUX
oder USB auf der Fernbedien ung, um
den jeweiligen Modus einzusch alten
.
2. Drücken Sie wiederholt die Taste
FUNCTION
an der Vorderseite des Geräts, um
den gewünschten Modus auszuwählen
.
P.LED
Drücken Sie die Taste
P.LED
auf der Fernbedienung, um die LED-Anzeige am Gerät
ein- oder auszuschalten.
Lautstärke einstellen
Drücken Sie die Tasten
LAUTSTÄRKE +/-
auf der Fernbedienu n g oder drehen Sie den
Lautstärkeregler auf der Vorderseite des Geräts, um die Lautstärke zu erhöhen oder
zu reduzieren.
Ton stumm stellen
Drücken Sie die
STUMM
-Taste auf der Fernbedienung, um den Ton auszuschalten.
Drücken Sie die Taste erneut oder die Taste
VOL+/-
, um die ursprüngliche
Lautstärke wieder einzustellen
.
8

9
Wiedergabe/Pause
Drücken Sie die Taste
WIEDERGABE/PAUSE
, um die Wiedergabe zu
unterbrechen. Drücken Sie die Taste erneut, um die Wiedergabe fortzusetzen
.
Stopp
Drücken Sie während der Wiedergabe die Taste
STOPP
auf der Fernbedienung,
um die Wiedergabe zu beenden. Drücken Sie die Taste
WIEDERGABE/PAUSE
, um
die Wiedergabe vo n vor n zu beginnen
.
Vor
- und Zurückspulen
Drücken Sie die Tasten
,
um die Wiedergabe mit 2-facher (einmal drücken)
oder 4-facher (zweimal drücken
) Geschwindigkeit zurück- oder vorzuspulen.
Drücken Sie die Tasten ein drittes Mal, um die normale Wiedergabe fortzusetzen
.
Zurück und Weiter
D
rücken Sie oder , um zum vorherigen oder nächsten Titel/Song z u s p r i n g e n
.
Zifferntasten
Verwenden Sie die
ZIFFERN
-Tasten für die Auswa hl vo n Ti t el n oder ges pei cherten
Radiosendern
.
Wiedergabe wiederholen
Drücken Sie einmal die Taste
REPEAT
auf der Fernbedienung, um den aktuellen Titel
zu wiederholen (
).
Drücken Sie die Taste ein zweites Mal, um alle Titel zu wiederholen (ALL ).
Drü
cken Sie die Taste ein drittes Mal, um die Funktion zu beenden.
Abschnitt A-B wiederholen
Drücken Sie die Taste
REP. AB
auf der Fernbedienung, um den zu wiederholenden
Abschnitt einzustellen.
1. Drücken Sie
REP.AB
einmal am Anfang des Abschnitts (A).
2. Drücken Sie
REP.AB
ein zweites Mal am Ende des Abschnitts (B).
3. Das Gerät wiederh olt den Abschnitt A-B automatisch. Drü cken Sie die Taste ein
drittes Mal zum Beenden der Funktio n.
Willkürliche Wiedergabe
Drücken Sie die Taste
RANDOM
auf der Fernbedienung, um alle Titel in
willkürlicher Reihenfolge abzusp ielen. Drücken Sie die Taste erneut, u m d i e
normale Wiedergabe fortzusetzen
.

DSP
Drücken Sie die Taste DSP, um unterschiedliche Klangmodi einzuschalten: Jazz,
Rock, Klassik,
P
op
,
Liv
e
,
Dance oder Aus
.
Toneinstellungen
Drücken Sie die Taste
TONE
an der Vordersei t e des Geräts, um Tiefton oder Hochto n
auszuwählen , und drehen Sie dann de n Lautstärkeregler von der niedrigen bis zur
hohen Einstellung, um den Tiefton oder Hochton entsprechend einzustellen. Oder
drücken Sie die Tasten BASS+/- oder
TREBLE+/-
auf der Fernbedienung, um di e
Einstellungen direkt vorzunehmen
.
Eingabe bestätigen
Drücken Sie die Taste
ENTER
, um ausgewählte Optionen zu bestätig en
.
10

CD-BETRIEB
Programmierte Wiedergabe
Dieses Gerät kann ausgewählte Titel der CD in programmierter Reihenfolge
abspielen
.
1. Drücken Sie die Taste
STOPP
, um die Wiedergabe zu beenden und drücken
Sie dann
PROGRAM
. Im Display erschei nt
PR
0100
.
2. Geben Sie die Numm er des ersten gewünschten Titel s ein
.
Geben Sie z.B.
04 ein, wird der vierte Titel als erster Titel der Sequenz gespeichert
.
3. Wiederholen Sie Sch r itt 2, um weitere gewünschte Titel zu programmieren.
4. Drücken Si e nach der Pr ogrammierung di e Taste
ENTER
, um die Titel in der
programmierten Reihenfolge abzuspielen
.
5. Um die programmierte Wiedergabe zu beenden, drücken Sie zweimal die Taste
STOPP
.
CD- Ripping
CD-Ripping ermöglicht Ihnen, Titel einer Disc auf einem USB-Gerät zu speichern.
1. Drücken Sie die Taste CD
RI
P
.
, um den CD-
R
ipping-Modus zu aktivieren.
Im Display erscheint
<CD
RIP>
.
2
. Drücken Sie od er
zur Auswahl der Ripping-Geschwindig keit
<NORMAL>
oder
<HOCH>
.
Nach Auswahl der Ripping-Geschwind igkeit ist das Gerät bereit
für das Ripping
.
3. W ählen Sie mit den
ZIFFERN
-Tasten den gewünschten Titel aus; im Display
erscheint
<RIP_
_
Y>
.
Nach Auswahl des ersten Titels erscheint eine neue
Anzeige
:
<
RIP
_ _
Y>
.
4. Um den ausgewählten Titel abzubrechen oder zu löschen, geben Sie die
Titelnummer erneut ein. Erscheint die Anzeige
<RIP
_
_N>
,
wurde der
ausgewählte Titel gelö scht
.
5.
Um all e Titel auszuwählen , d rücken S ie die Taste
T/F. Drücken Sie T/F
erneut, um alle Titel zu löschen.
6. Drücken Si e nach der A usw ahl de r ge wünschten Titel die Tast e
ENTER
, um
den Ripping-Vo rg ang zu starten. Die ausg ewählten Titel werden in ein e m
neuen Ordner auf dem USB-Gerät gespeichert
.
7.Während des Ripping-Vorgangs erscheint im Display nach der zweiten
11
Num
mer 5 die übert ragenen Tit elnummern. Bei normaler Ripping-

12
Geschwindigkeit spielt das Gerät die Musik ab
.
8. Nach dem Ripping-Vorgang erscheint im Display die Anzeige <CD
RIP>
und
die Titelwiedergabe wird beendet
.
9. Sie können den Ripping-Vorgang jederzeit beenden, indem Sie die Taste
STOP
zweimal drücken. Drücken Sie
WIEDERGABE/PAUSE
, um die Wieder gabe von
vorn zu starten
.
Beispiel:
Um den 5. und 13. Titel auf einem USB-Stick zu speichern, drücken Sie zunächst
STOPP
, um die Wiedergabe zu beenden. Drücken Sie dan n di e T a s te CD
RIP
.
Drücken Sie 0
,
5
und im Display erscheint
<RIP
05 Y >. Drücken Sie 1
,
3
und im
Display erscheint <RIP 13Y>. Drücken Sie zum Abschluss ENTER, um die
ausgewählten Titel zu überspielen .

AUX-BETRIEB UND USB-BETRIEB
Sie können Musik von anderen Audiogeräten oder einem USB-Stick abspielen.
Beachten Sie nachfolgende Abbildung für eine sichere und ordnungsgemäße
Verbindung.
Kopfhörer
RCA-Kabel
PC/Handy/Audiogerät
USB-S
tick
Aux-Betrieb
1. Drücken Sie die Taste
AUX
auf der Fernbedienung oder
FUNCTION
an der
Vorderseite, um den AUX-IN-Modus einzuschalten
.
2. Schließen Sie ein(en) PC/Handy/Audiogerät (ein Gerät) mit einem Audiokabel
an das Gerät an
.
3. Nach dem Anschluss an den Aux-Eingang erfolgt die Wiedergabesteuerung
über das externe Gerät. Sie können jedoch die Lautstärke an diesem Produkt
einstellen
.
USB -Betrieb
1. Schließen Sie einen USB-Stick an den USB-Port an der Vorderseite des
Geräts an.
2. Drücken Sie die Taste USB auf der Fernbedienung oder
FUNCTION
an der
Vorderseite, um den USB-Modus einzuschalten
.
3. Das Gerät erkennt das USB-Gerät automatisch und spielt die gefundenen
Dateien ab
.
4. Beziehen Sie sich auf den Abschnitt
GRUNDLEGENDER BETRIEB
für mehr
Informat i onen über die einzelnen Funkti o nen.
5.
Das angeschlossene USB-Gerät wird über den USB-Port aufgeladen
.
13

14
HINWEIS:
1. Je nach Datenm enge un d Ü bert ra g un gsgeschwindigkeit kann das Auslesen
der Inhalte auf dem USB-Gerät länger oder kürzer dauern. In einigen Fällen
kann dies bis zu 60 Sekunden in Anspruch nehmen. Das ist keine Fehlfunktion.
2. Es ist möglich, dass auc h s ol che Dat ei e n, deren Format unterstüt zt wi r d, je
nach Kompatibilität nicht angezeigt oder abgespielt werden können
.
3. Dieses System un terstützt Dateifor mate in MP3 - Fo r ma t m it er w ei t er t e r
Dateiendung „.mp3“
.

BLUETOOTH-BETRIEB
Bluetooth-Kopplung
1. Drücken Sie die Taste
BT
auf der Fern bedienung oder
FUNCTION
an der
Vorderseite des Geräts, um den Bluetooth-Modus zu aktivieren. Die Anzeige
blinkt schnell bl au
.
2. Aktivieren Sie an Ihrem externen Gerät (z.B. Smartphone) die Bluetooth-Funktion.
3. Aktivieren Sie am Handy/B T-Gerät den Bluetoot h-S uchmodus. Das Handy / B T-
Gerät sucht nach Ihrer Stereoanlage.
4.
Wählen Sie in der Liste der gefundenen Geräte
MINI300BT
aus
.
5. Bei einigen Geräten müssen Sie ggf. die Optionen
OK/JA/KOPPELN
auswählen,
um
die Verbindun g herzustellen.
6. (Bei einigen Geräten:) Falls Sie dazu aufgefordert werden, geben Sie 0000
(vier Nullen) als Passwort ein.
7. Nach der erfolgreichen Kopplung leuchtet die Anzeige an Ihrem Gerät stetig.
Wiedergabefunktionen
1. Steuern Sie die Bluetooth-Wiedergabe über Ihr Gerät und mit den Tasten auf
der
Fernbedienung
. Siehe
GRUNDLEGENDER BETRIEB
für mehr Informationen.
2. Verbindung trennen und anderes Gerät koppeln
a. Deaktivieren Sie an Ihrem Gerät die Bluetooth-Funktion, um das Gerät zu
trennen. Das Gerät aktiviert dann den
Bluetooth-Koppl ungsmodus
automatisch.
b
.
Wiederholen Sie in diesem Kopp lungsmodus die Schritte 2-5 der
BLUETOOTH-
KOPPLUNG
, um ein anderes Gerät zu verbinden
.
3. Falls Sie während der Musikwiedergabe eines Handys einen Anruf erhalten, wird
die Wiedergabe automatisch unterbrochen. Nach dem Anruf ist es von den
Einstellungen Ihres Hand ys abhängig, ob die Musikwiederg ab e fortgesetzt wird
oder nicht.
HINWEIS:
1. Einige Geräte wie iPhones stellen nach der Kopplung umgehend eine Verbindung
her, bei anderen Geräten kann dies jedoch länger dauern.
2. Dieses Gerät kann immer nur ein Gerät koppeln und dessen Musikdateien abspielen
.
3.
Um ein anderes Gerät zu verbinden, müssen Sie an Ihrem Gerät zunächst
die Bluetooth-Funktion deaktivieren oder dieses vom aktuell gekoppelten
Gerät trennen und dann manuell ein neues Gerät verbin de n
.
4. Die Bluetooth-Reichweite beträgt 10 Meter im freien Gelände
.
15

RADIOBETRIEB
Grundlegende Informationen zum FM-Betrieb
1. Vergewissern Sie sich, dass die Antenne an der Rückseite des Geräts
vollständig ausg ezogen ist, bevor Sie einen FM-Radiosender einstellen
(vertikale Position empfohlen). So gewährleisten Sie einen optimalen
Empfang.
2. Eine vollständig ausgezogene Antenne sorgt außerdem für eine bestmögliche
Soundqualität
.
3. Der FM-Frequenzbereich liegt zwischen 87,5 MHz
und
108,0 MHz.
4. Drücken Sie die Taste
FM
auf der Fern bedienung oder
FUNCTION
, um den
FM-Modus einzuschalten
.
5. Drücken Sie
MO/ST
, um
STEREO
EIN oder
AUS
auszuwählen,
falls ein starkes
Stereosignal vor handen ist
.
Sender einstellen
1. Wählen Sie Sender mit den
ZIFFERN
-Tasten aus. Drücken Sie z.B. 1 gefolgt
von 5, um den 15. Sender auszuw äh len.
2. Drücken Sie die Tast en CH+/-, um den vorheri gen oder nächsten Sender
einzustellen.
3. Drücken Sie die Taste T/F auf der Fernbedienung, um die Frequenz
einzustellen
.
Drücken Sie z.B. zunächst die Taste
T/F und anschließend 9, 9, 7, 0
,
um die Frequenz
99,7 MHz einzustellen .
Sender suchen/tunen
1. Automatisch Suche
Drücken Sie die Taste
SEARCH
. Das Gerät sucht automatisch von der
niedrigsten bis zur höc hsten Frequenz. Gefunde ne Sen de r wer de n aut omatisch
gespeichert. Drücken Sie die Taste erneut zum Beenden der Suche
.
2. Manuelle Suche:
a. Drücken Sie kurz die Tasten
TU+/-
, um die Frequenz in Schritten von 0,05MH z
einzustellen.
b
.
Halten Sie die Tasten TU+/- gedrückt , um die nächste oder vorhe ri ge
Frequenz mit ausreichendem Signal zu suchen. Sobald eine verfügbare
Frequenz gefunden wurde, beendet das Gerät die Suche
.
16

Sender speichern
(Es können b is zu 60 Sender gespeichert werden
.)
1. Die aktuelle Frequenz auf dem aktuellen Speicherplatz speichern:
Beispiel: Speicherplatz 5 ist eingestellt und Sie h ören den Sender mit einer
Frequenz von 88 ,9 MHz an. Drücken Sie die Taste
SAVE
auf der Fernbedienung,
um die Frequenz 88,9 MHz auf Speicherplatz 5 zu speichern.
2. Sender als Favorit speichern:
Beispiel: Sie möchten die Frequenz 99,70 MHz auf Speicherplatz 15 speichern.
Drücken Sie zunächst die Taste
CH+/-
oder die Ziffernta sten 1 u nd 5, um
den 15. Speicher platz a us zuwählen. Drü cke n Sie dann
T/F
, um das
Eingabeinter fa ce zu öff nen. Geben Sie die Nummern 9, 9, 7, 0 ein. Drücken
Sie zum Abschluss
SAVE
, um den Sender zu speichern.
17

STÖRBEHEBUNG
Nachfolgend finden Sie eine Liste mit Vorschlägen, um gängige Probleme, die an Ihrem
Gerät auftreten können, zu beheben. Sollte ein Problem jedoch öfter auftreten, w e nd e n S i e
sich bitte an ein Kundendienst zentrum in Ihrer Nähe
.
P
r
oblem
Keine
Stromversorgung.
Fernbedienung
funktioniert
nicht.
Mögliche Ursache
Netzstecker nicht r ichtig an der
Steckdose angeschl ossen.
Batterien verbraucht.
Fernbedienung ist nicht auf
den Fernsensor gerichtet.
Behebung
Schließen Sie den Netzstecker
richtig an die Steckdose an.
Batterien durch neue ersetzen.
Richten Sie die Fernbedienung
richtig auf den Fernsensor am
Gerät.
Keine Wiedergabe.
Ke in e D i sc ei n g el eg t . Legen Sie eine D isc ein.
Disc nicht richtig eingelegt.
Legen Sie die Disc erneut
mit der bedruckten Seite
nach oben ein.
Kein Ton aus
den
Lautsprechern.
Disc nicht mit dem Gerät
kompatibel.
Audiokabel nich t richtig
verbunden.
Computer fa lsch ve rbunden.
Verwenden Sie nur mit
diesem Gerät kompatible
Discs.
Schließen Sie d as Audio kabel richt ig
an.
Computer gem äß Abbi ldung
anschließen.
Ton unterbrochen.
Disc nicht
sauber.
Disc zerkratzt.
Legen Sie eine neue Disc
ein oder reinigen Sie die
Disc mit einem trockenen
Lappen.
Legen Sie eine neue
Disc ein.
18

Hiermit wird bescheinigt, dass MINI300BT konform ist mit:
Richtlinie des Rates 2004/108/EC (EMV-Vorschrift)
Geltenden Stan dar ds:
EN 55013: 2001 +A1 : 2003 +A2: 2006
EN 55020: 2007 + A11: 2011
EN 61000-3-2: 2006 +A1: 2009 +A2: 2009
EN 61000-3-3 : 2008
Made in China
Für weitere Informationen b esuchen Sie b itte unsere Website un ter:
www .mp man eu rop e.co m
19

M ini
S
t
er
eo
S
y
stem
MINI300B
T
MANUALE D'USO

INDICE
AVVERTENZA. . . . . . . . . . . . . . . . . . . . . . . . . . . . . . . . . . . . . . . . . . . . . . . . . . . . . . . . . . . . . . . . . . . . . . . . . . . . . . . . . . . . . . . . . . . . . . . . . . . . . . . . . . . . . . . . . . . . . . .. ... .. ..
2
ACCE SSORI ....... ......... ........ ........ ......... ...... ........ ........ ......... ........ ........ ......... ...... ........ ....... ... .. ......
3
SPECI FICHE... ......... ...... ........ ........ ......... ........ ........ ...... ......... ........ ........ ......... ........ ........ .. ......... ..
4
CONTROLLI.. ........ ........ ........ ........ ......... ...... ........ ........ ......... ........ ........ ....... ........ ........ ..... ..... .....
5
TELECOMANDO.......................................................................................................................
6
COLLEG AMEN TI...... ........ ........ ........ ........ ........ ........ ....... ........ ........ ......... ........ ........ ...... ....... .....
7
OPERAZ IONI DI BASE ........ ...... ......... ........ ........ ........ ......... ...... ........ ......... ........ ........ ........ ........
8
CD..... ........ ........ ...... ........ ........ ........ ......... ........ ...... ........ ......... ........ ........ ......... ........ . ....................
10
AUX IN ........ ...... ........ ........ ........ ......... ........ ........ ...... ......... ........ ........ ........ ......... ...... ...... ........ ......
USB
......... ........ ......... ........ .
...........................................................................................................
BLUETOOTH....
......... ........ ........ .........
.......................................................................................
RADIO
.......... ......... ........ ........ ....
.................................................................................................
15
RISOLU ZIO NE DEI PR OB L EMI. ... ........ ...... .. .. .. ...... ... .. .. ...... .. .. .. ...... .. .. ... ...... .. .. .. ...... .. .. .. .........
17
1
12
12
14

AVVERTENZA
1. Non esporre l'apparecchio a schizzi o liquidi, e non disporre oggetti contentente
liquidi, come vasi, sull'apparecchio.
2. Per garantire una ventilazione su ff iciente non d isporre oggetti a meno di 5 cm
dall'apparecchio.
Non ostruire le aperture d i ventilazio ne con oggetti come giornali, tov aglie,
tende, ecc.
3. Non disporre sull'apparecchio oggetti pericolosi come candele accese
.
4. Usare l'apparecchio solo in situazioni climatiche moderate
.
5.
Assicurarsi che la spina sia facilme nte accessibile
.
6. Rischio esplosioni! Sostituire le batterie solo con batterie nuove dello stesso
tipo e voltaggio.
7. Evitare conbinazioni di batterie diverse (vecchie e nuove).
8. In serire le batterie correttamente secondo la polarità indicata.
9. Rimuovere dall'apparecchio le batterie scariche.
10. Lo smaltimento delle batterie potreb b e essere soggetto a normative per il
rispetto ambientale. Disporre le battterie in un luogo sicuro e in con ten itori
appositi (per magg ior i info rmazioni contattare il proprio rivenditore).
11. Non esporre le batterie a fonti di calore eccessive, luce diretta del sole,
fiamme vive o simili.
12. In caso di danneggiamento so stituire immediatamente il cavo di
alimentazione. Il cavo di alimentazione deve essere sostituito solo da
personale qualificato
.
13. Installare correttamente le batterie secondo la po larità ind icata
.
14.
Il fornitore non è asso lutamente respons abile pe-7(ae que-7(l(sins)-7(i)1(io)-4(n)1(io)-4dentv)-4(e )]TJ-0.0083 Tc 0 Tw 00763 -1.198 TD[causbat)-5(i)1( )-5(na )-5uInu solleo trine se n rispetd iltaiain n1( d)-5(i)1c(ata)-7e
sullvsphzio 51c(ns)-7o( 51iao)-5( 51po)-4(r)2ondo tinconiue-7(rà garue-7(ontat)-5(e i( caso)-4( ri )]TJ-0.0033 Tc 0 Tw 3 -1.198 TD[(dan)-4(n)1eog)-4((iaee-7(onio)-4e.)]TJ/DeviceGray cs 0 scn 0 Tc 10.02 0 0 10.02 0 0 Tm 4.170961 6.67-1 TD[( )]TJEMC /P <</MCID211>> BDC 900712 -1294 TD[( )]TJ/CS0 cs 0.212 0.204 0.208 scn /TT1 1 Tf -0.0217 Tc -0.0517 Tw EMC /P <</MCID226>> BDC 0.006 -1.096 TD[(ns)6f(o)4rcm)8(atm)10vi)4(, sul)4(l)10( asi)4curme2(zm)8z'a

SICUREZZA
Leggere con attenzione e comprendere le avvertenze elencate di seguito
,
comprese quelle indicate sull'unità. Questa unità è stata progettata e realizzata
secondo specifiche norme per la sicurezza.
Utilizzare solo fonti di
alimentazione come specificato
dal Manuale d'uso o sull'unità .
Non esporre l'unità alla luce
diretta del sole o vicino a fonti di
calore
.
Evitare di calpestare, stringere,
piegare o tirare eccessivamente
il cavo dell'alimentazione.
Tenere l'unità ed il cavo
d'alimentazione lontano
dall'acqua
.
Non aprire l'unità ed evitare la
caduta accidentale all'interno
dell'unità di p iccoli og getti
metallici (per esempio monete,
forcine o aghi).
Scollegare l'unità dur ante lunghi
periodi di inutilizzo.
ACCESSORI
3
Cavo audio
Antenna F M
Telecomando
Manuale d'uso
USER MANUAL

SPECIFICHE
Alimentazione
Consumo energetico massimo
Consumo energetico
in standby
Caricamento tramite
USB
C
ollegamenti
4
Dischi supportati
G a m m a F M
Distanza max telecomando
Portata Bluetooth
Condizioni d'utilizzo
AC
220-240V
,
50Hz
60W
<0.5W
5V 500mA
USB, Aux
CD, CD-R,
MP3
87.5-108.0MHz
7 m
10 m
T
emperatur a t r a
5°
C - 35
°
C
Installare su una superficie piatta

CONTROLLI
Pannello frontale
SCHERMO
INDICATORE
ST
ANDB
Y
PLA
Y/P
A
USE
FUNCTION
SEARCH
FAST REWIND
PREVIOUS
INDICATORE LED
SENSORE TELECOMANDO
ESPELLI/APRI VANO CF
VOLUME
STOP
TONE
DSP
FAST FORWARD
CUFFIE
AUX IN R/L
CASSETTO CD
PORTA USB
5
Pannello posteriore
AUDIO L/R
ANTENNA FM
INTERRUTORE
ALTOPAR LAN TE L/R
ALIMENTAZIONE

TELECOMANDO
1.
Accendere l'apparecchio, inserire le batterie nel teleco mando e
puntare
verso il sensore sul pannello frontale
.
2.
Per un corretto funziona mento del telecoman do non superare la distanza
massima di 7 metri
.
3.
Dispositivi elettronici ad alta frequenza potrebbero avere conseguenze
sul corretto funzionamento del telecomando
.
STANDBY
BLUETOOTH
CD
USB
ESPELLI/APRI VANO CD
AUX
FM
TASTI NU MER ICI
REPEAT A-B
TIME/FREQUENCY
CD RIPPING
REPEAT
MONO/STERE O
SEARCH
PANEL.LED LIGHT
RANDOM
SAVE
TUNE-
CHANNEL
-
DSP
PLA
Y/P
A
USE
FA S T
FOR
W
ARD
FA S T
RE
WIND
STOP
PROGRAM
CHANNEL+
TUNE+
ENTER
MUTE
NEXT
PREVIOUS
BASS+/-
VOLUME+/
-
TREBLE+/-
6
CD BT FM
AUX
USB
1
2
3
4
5
6
7
8
9 0
REPEAT
REP.AB
CD RIP.
PROGRAM
P.LED
ENTER
CH+
CH-
VOL-
SEARCH SAVE MO/ST
DSP
BASS+
TREBLE+
BASS-
TREBLE-
RANDOM
TU-
TU+
VOL+
T/F

COLLEGAMENTI PRELIMINARI
Prima di utilizzare l'apparecchio si prega di controllare ed ese guire i collegamenti
riportati di segui to:
1. In caso di collegamenti multipli tra lettore ed amplificatore, p er ottenere
prestazioni audio o ttimali selezionare un collegamento e scollegare g li altri.
2. Evitare di accendere e spegnere l'apparecchio ripetutamente. Attendere 5

OPERAZIONI DI BASE
P
r
epar
az
ione
1. Prima di accendere l'unità accertarsi di aver eseguito tutti i collegamenti
correttamente. Inserire il cavo di alimentazione nella presa corretta.
2. Premere ON/OFF nel pannello po steriore dell'unità.
3. Prem
ere
ESPELLI
sul telecomando o sul pannello frontale per aprire il vano
di a ll o gg ia men to de l d is co . Inserire il disco sul vano e premere nuovamente
.
4. La lettura del disco si avvierà automaticamente.
Modalità Standby
Prem
ere
STANDBY
sul telecomando o sul pannello frontale per accendere
l'unità o metterla in modalità standby
.
Modalità di selezione della sorgente audio
1. Premere
CD
,
BT
,
FM
,
AUX
,
o USB sul telecomando per selezionare la sorgente.
2. Premere ripetutamente
FUNCTION
sul pannello front ale per
selezionare la
sorgente.
Display LED
Premere
P.LED
sul telecomando per accendere o spegnere il display al LED.
Regolazione Volume
Premere
VOLUME+/-
sul telecomando o la manopola del Volume su l pannello
frontale per regolare il volume.
Tasto Mute (Muto)
Premere
MUTE
per interrompere l'audio. Premere nuovamente o premere uno dei tasti
VOL+/-
per ripristinare l'audio.
8
Pla
y/Pause
P r e m e r e
PLAY/PAUSE
per mettere la riproduzione in pausa. Premere nuovamente
per riprendere la riproduzione
.
Stop
Durante la riproduzione premere
STOP
sul telecomando per arrestare la
riproduzione
,
premere
PLAY/PAUSE
per riprendere la riproduzione dall'inizio.

F
ast
Forward
and Rewind
Premere per avvolgere o riavvolgere rapidamente. Ad ogni pressione la
velocità aumenterà( X2, X4)
,
premere tre volte per riprodurre a velocità normale.
P
r
e
vious
and next
P
remere o per riprodurre la traccia precedente o successiva
.
Tasti numerici
I Tasti Numerici permettono di selezionare direttamente le tracce o le stazioni radio
preimpostate
.
Repeat (Ripeti)
Premere
REPEAT
una volta per ripetere la riproduzione della traccia corrente (
);
pr
emere due volte per ripetere tutte le tracce
(
ALL
)
. Premere tre volte per annullare.
Repeat A-B
Premere
RE
P
.
AB sul telecomando per impostare la sezione da ripetere
.
1. Premere
REP.AB
una volta per impostare il punto di inizio della sezione
(
A
).
2. Premere
REP.AB
una volta per impostare il punto di fine della sezione
(
B
).
3. La sezione impostata
A-B
verrà riprodotta automaticamente. Premere nuovamente
per annullare la funzione.
R
andom (Riproduzione casuale)
Premere
RANDOM
sul telecomando per riprodurre le tracce in ordine casuale.
Premere nuovamente per annullar e e riprendere la riproduzione normale.
DSP (Effetto sonoro predefinito)
Premere DSP per selezionare una regolazione sonora differente: Jazz,
Rock, Classic,
P
op
,
Liv
e
,
Dance. Premere nuovamente per annullare
.
Impostazione Toni
Premere
TONE

FUNZIONI SPECIALI DEL CD
P
r
ogr
am (Programmazione)
E' possibile programma re la ripro duzione di b rani secondo l'o rdine preferit o.
1. Premere
STOP
per interrompere la riproduzione, quindi premere
PROGRAM
,
sul display apparirà PR
0100
.
2.
Digitare il numero del brano da riprodurre per primo
.
Es.
digitare 04 se si desidera che il brano numero 4 venga riprodotto per primo
.
3. Ripetere i l p u n t o 2 per ogni brano che si desidera includere nella
programmazione.
4. Premere
ENTER
per terminare la programmazione ed avviare la
riproduzione.
5. Per annullare la programmazione premere due volte il tasto
STOP
.
CD
R
ipping (estrazione di file dal CD)
Il CD
R
ipping consente il trasferimento di tracce dal disco CD ad un dispositivo
USB.
1. Premere CD
RI
P
.
per attivare la modalità CD
R
ipping
.
<CD
RIP>
apparirà sul
display
.
2. P
remere o
per selezionare una velocità di estrazione
<NORMAL>
(Normale)
o
<HIGH> (Rapida)
.
Dopo aver selezionato la velocità l'apparecchio entrerà nella fase di estrazione
.
3. Premere i Tasti
NUMERICI
per selezionare la traccia da estrarre
,
sul display
apparirà
<RIP_
_
Y>
.
Dopo aver selezionato la prima traccia, l'apparecchio passerà alla fase
successiva di estrazione:
<
RIP
_ _
Y>
.
4. Per annullare o cancellare la traccia selezionata digitare un nuovo numero.
Quando la traccia sarà cancellata
<RIP
_
_N>
apparirà sul display.
5. Premere T/F per selezionare tutte le tracce. Premere nuovamente per annullare
la selezione.
6. Dopo aver selezionato tutte le tracce premere
ENTER
per iniziare l'estrazione
dei file. Le tracce selezionate verranno trasferite nel dispositivo
USB
.
7. Durante il trasferimento dei file sullo schermo apparirano il numero della
traccia seguita dal numero 5. Per consentire la riproduzione delle tracce
10

11
durante il trasferimento, estrarre i file a velocità normale
.
8. Quando il trasferimento è completato sul display apparirà <CD
RIP>
,
e la
riproduzione si interromperà
.
9. Per interrompere il trasferimento premere
STOP
due volte
.
Pr emere
PLAY/PAUSE
per avviare la riproduzione dall'inizio.
Esempio:
Per estrarre la traccia 5 e 13, premere
STOP
per interro mpere la r iproduzione
,
44.633 TD[(44.28 22 0 0P8D[( )]TJ38 Tf -0.00 scn.85(n)-d5(n)rem)11(4re )]TJ/TT1 1 Tf 0.00542Tc 0 Tw 8.85438 TD[(<CCD)

OPERAZIONI CON AUX IN E USB
E' possibile riprodurre musica attraverso altri dispo sitivi audio o
USB
.
Per eseguire i
collegamenti correttamente procedere come mostrato nella figura riportata qui sotto:
Cuffie
Cavo RCA
PC/cellulare/lettore Mp3
Chiavetta
USB
Aux in
1. Premere
AUX
sul telecomando o
FUNCTION
sul pannello frontale per attiv are
la modalità
AUX I N
.
2.
C
ollegare il
PC/palmare/letto re mp3 (un solo dispo sitivo alla volta)
all'apparecchio attraverso un cavo audio (Cavo RCA).
3. Quando un dispositivo esterno è collegato in modalità Aux In i co mandi
vengono eseguiti tramite il dispositivo esterno, fatta eccezione per il volume,
che può essere regolato anche tramite l'apparecchio.
USB
1.
I
nserire la chiavetta
USB
nella porta
USB
posta sul pannello frontale
dell'apparecchio
.
2. Per attivare la modalità USB premer e USB sul telecomando o
FUNCTION
sul
pannello frontale.
3.
Il lettore rileverà a utomaticamente il d ispositivo connesso e d avvierà la
riproduzione .
4. Per ulteriori dettagli fare riferimento alle
OPERAZIONI DI BASE
.
5.
E' possibile rica ricare i dispositi vi
USB
tra m i te la porta
USB
.
12

il tempo di lettura potrebbe essere pari o superiore ai 60 secondi.
2.
Alcuni file anche se di un formato su pportato potr ebbero essere non
riprodotti, no n apparire s ul display o non compatibi li.
3.
Questo lettore è i n grado di ri produrre solo file
MP3 con l'estensione
“
.mp3
”
.
13
NOTA:
1. La velocità di caricamento dei file potrebbe variare in base al numero dei file
in lettura o alla velocità di trasferimento del dispo sitivo connesso. In alcu ni casi

BLUETOOTH
Associazione Bluetooth (Pairing)
1. Premere
BT
sul telecomando o premere
FUNCTION
sul pannello frontale
per attivare la modalità Bluetooth
.
L'indicatore lumin oso blu lampegge rà
rapidamente.
2.
Accendere la funzione
Bluetoot sul proprio dispositivo
(e
s
.
palmare) .
3. Avviare la ricerca d i altri dispo sitiv i dal proprio cellulare
/dispositivo B
T
per
trovare il segnale dell'appa recc hio .
4.
S
elezionare
MINI300BT
dall'elenco d ei dispositivi trovati.
5. Alcuni dispositivi potrebbero chiedere conferma
OK/YES/PAIR
prima di
avviare l'associazione.
6. Per alcuni dispositivi, s e n ecessario, digitare il codice 0000
.
7. Quando il dispositivo e l'apparecchio saranno associati l'indicatore luminoso
smetterà di lampeggiare.
Riproduzione
1.
La riproduzione tramite
Bluetooth può essere regolata tramite il dispositivo
connesso o con il teleco mando. Per ulteriori dettagli fare riferimento alle
OPERAZIONI DI BASE
.
2.
Per dissociare il dispositivo ed associare un nuovo dispositivo:
a.
Spegnere il
Bluetooth sul dispositivo e discon nettere l'unità.
L'unità
cercherà automaticamente un nuovo dis posi tiv o da associa re.
b
.
Per collegare un altro dispositivo s
eguire le istruzioni ai punti 2-5 del
paragrafo ASSOCIAZIONE
BLUETOOTH
3. Durante la riproduzio ne t ramite telefono cel l ula re, i n caso di chi a mata la
riproduzione si interro mperà automaticamente. Al ter mine della chiamata l a
riproduzione riprenderà a seconda delle impostazioni del t ele fono.
NOTA:
1. Alcuni dispositivi, come l'
iPhone
,
potrebbero connettersi rapidamente, altri
potrebbero rich i e dere più tempo.
2. E' possibile riprodurre file da un solo disp ositiv o alla volta.
3.
Per collegare un altro dispositivo, disattivare il
Bluetooth sul dispositivo
connesso o dissociare l'unità e connettere manualmente ad un altro dispositivo.
4.
La distanza massima di ricerca del
Bluetooth è di 10 metri.
14

RADIO
Informazioni di base per la funzione
FM
1. Prima di procedere alla regolazione delle stazioni radio in FM assicurarsi che
l'antenna dell'unità sia estesa e posizionata correttamente.
Per una migliore ricezione si raccomanda una posizione verticale.
2. Il prolung amento dell'antenn a garantisce una migliore qualità del suono .
3. La gamma di frequenza FM è tra gli 87.5MHz e
d i
108.0MHz.
4. Premere
FM
sul telecomando o
FUNCTION
per attivare la modalità FM
.
5. Premere
MO/ST
per accendere o spegnere la modalità
STEREO
in caso il
segnale radio sia sufficientemente forte.
Selezione delle stazioni
1. Premere i TASTI
NUMERICI
per selezionare le stazioni.
Es.
prem ere 1, poi 5 p e r s e lez ion a r e la st azi one numer o 1 5.
2. Premere CH+/- per selezionare la stazione precedente o successiva.
3. Premere T/F sul telecomando per selezionare la frequenza.
Es.
premere T/F , quindi premere 9, 9, 7, 0
per selezionare la frequenza
99.7MHz.
Ricerca e sintonizzazione delle stazioni
1. Ricerca automatica:
Premere
SEARCH
, per avviare la ricerca ed il salvataggio automatico delle
stazioni. Premere nuovamente per interrompere
.
2. Ricerca manuale:
a. Pr emere TU+/- br evemente per regolare la fr equenza di 0.05MHz.
b
.
Premere e tenere premuto TU+/- per sintonizzare la frequenza successiva.
Quando una frequenza sufficientemente forte viene rilevata la sintonizzazione si
interrompe
.
Salavataggio delle
Stazioni
(Sino a 60 stazioni disponibili
.)
1. Per salvare ed impostare una freq ue nza :
Es.
Se stai ascoltando la frequenza 88.9MHz sulla stazione 5, premere
SAVE
sul tele coma ndo per salvare automaticamente la frequenza prescelta nella
stazione 5.
15

2. Per salvare ed impostare una s taz ion e:
Es.
Pe r s a lva r e l a fr e q u e n za 99.70M Hz sulla s tazione 15, prem ere CH+/-
o
premere
1 e 5 p er s e lez ion are l a s t azi o n e 15; quindi premere T/F per avviare
la selezione di frequenza, digitare 9, 9, 7, 0 e premere
SAVE
per salvare la
stazione.
16

RISOLUZIONE DEI PROBLEMI
In caso di eventuali problemi dur ante l'uso, si prega di consulta re l'elenco riportato di
seguito. Sono stati elencati alcuni dei problemi comuni e le ev entuali soluzioni. Se il
problem a dovesse persiste re contatt are il centro assistenza più vici no.
P
r
oblema
L'alimentazione non
funziona
Il telecomando
non funziona
Possibile causa
Il cavo di alimentazione non è
collegato corret tamente
Le batterie sono scariche
Il telecomando non è puntato
verso il sensore
sull'apparecchio
Soluzione
Collegare c orret tam ente il cavo
di alimentazione
Sostituire le batterie
Assicurarsi di punt are il
telecomando verso il sensore
sull'apparecchio
Riproduzione non
disponibile
Nessun disco inserito
I
nserire un disco
Disco non inserito correttam ente
Inserire il disco con la
figura in alto
Non c'è suono
dagli
altoparlanti
Il disco non è compatibile
con il dispositivo
Il cavo di connessione
audio non è collega to
correttamente
Non è collegato
correttamente
al
computer
Utilizzare solo dischi compatibili
C
ollegare il
cavo di
connessione audio
correttamente
Collegare correttamente l'unità
al
computer c o m e d a
figura
Suono discontinuo
Il disco non è pulito
Il disco è graffiato
Sostituire il disco con uno pulito
o pulire il disco
Sostituire con un disco
nuovo
17

Questo marchio MINI300B T certifica la conform ità con:
Direttiva Comunitaria 2004/108/EC (EMC direction):
Standard appli cabi li :
EN 55013: 2001 +A1 :2003 +A2 : 2006
EN 55020: 2007 + A11 : 2011
EN 61000-3-2: 2006 +A1: 2009 +A2: 2009
EN 61000-3-3: 2008
Costruito nella RPC
Per ulteriori informazioni, siere pregati di far visita al nostro sito:
www.mpmaneurope.com
18


M ini
S
t
er
eo
s
y
steem
MINI300B
T
HANDLEIDING

INHOUDSOPGAVE
WAARSCHUWING EN.. ...... ........ ......... ........ ........ ........ ....... ........ ........ ........ ......... ........ ........ ....... ....
2
ACCE SSOIRES ...... ........ ........ ........ ......... ........ ...... ........ ......... ........ ........ ......... ........ ...... ....... ...... .. .
3
SPECI FICATIE S........ ........ ........ ......... ........ ...... ........ ......... ........ ........ ........ ....... ........ ........ ...... ... .. .
4
BEDIENINGSELEMENTEN PANEEL.......... ...... .. .. .. ...... .. ... .. ...... .. .. .. ........ ....... .. .. .. ...... .. .. .. ...... .. ... .. ...
5
AFSTANDSBEDIENING.............................................................................................................
6
AANSL UITING EN… …....... ........ ........ ........ ........ ...... ......... ........ ........ ......... ........ ...... ........ .........
7
BASISB EDIENI NG.... ........ ........ ........ ...... ........ ........ ......... ........ ........ ...... ......... ........ ........ ....... .... .
8
GEBRUIK CD.... ........ ...... ........ ........ ......... ........ ........ ....... ........ ........ ........ ......... ........ ........ .. ......... ..
11
G E B R U I K A UX I N..... ........ ........ ........ ........ ...... ........ ......... ........ ........ ........ ....... ........ ........ ...... ..... ..
13
GEBRUIK USB.............................................................................................................................
13
GEBRUIK BLUETOOTH............................................................................................................
15
GEBRUIK RADIO.......................................................................................................................
16
PROBLE ME N OPL O SSEN.. .. ...... .. ... .. ........ ...... .. .. .. ....... .. .. .. ...... .. .. .. ...... .. ... .. ...... .. .. .. ...... .. .. .. ......
18
1

WAARSCHUWINGEN
1. Het apparaat mag ni et word en bl o otgest e ld aan dr up pend of spattend wate r.
Er mogen geen voor werpen gevuld m et vl oei st of op het app a raat worden
geplaatst.
2. Houd een minimumafstand van 5cm vrij rond het apparaat vo or vol d oen d e
ventilatie.
De ventilatie mag niet word en gehinderd door de ventilatieop eningen te
bedekken met voorwe rpen zo al s krant en, t af e l kle den, go rdijnen, etc.
3. Plaats geen voorwe rpen m e t open vl am, zoals kaarsen, op het apparaat .
4. Gebruik het apparaat al l een in gematigde klimaten.
5. De stekker m oet alt i jd eenvoudi g bereikbaar blijven.
6. Explosiegevaar wan neer de bat t eri j onj ui st wo rdt ver van g e n. Ver van g de
batterij alleen door een bat t eri j van hetzelfde of een equivalent t y pe.
7. Meng geen verschillend e soorten batterijen of nieuwe en oude batterijen.
8. Batterijen moet en i n de jui s t e ri cht i ng (polariteit) worden gepl aat st .
9. Lege batterijen moeten worden verwijderd ui t het product.
10. Batterijen moeten op een veilige manier worden weggegooid. Gooi alleen
weg in speciale inzamelbakken (neem cont act op met uw winkelie r vo or
meer informat ie) om het milieu te beschermen.
11. Batterijen mogen niet worden blootgest eld aan extreme warmte , zoal s
zonlicht, vuur of dergelijke.
12. Als het netsnoer is beschadigd, dan m oet het wo rden vervangen door d e
fabrikant, een vertegenw oo rd i ger van de fabrikant of een soort geli jk
gekwalificeerd persoon om gevaar te voorkomen.
13. Batteri jen moeten in de juiste richting (polari t eit ) worden geplaatst.
14. De leverancier is niet verantwoordelijk voor alle incidenten die zijn veroorzaakt
doordat er geen rekeni ng wordt gehouden met de polariteit van de bat t e rijen;
het apparaat is niet gedekt doo r garantie indien het beschadigd raakt door d a t
batterijen onjui s t wor den gepl aat st (en er geen reke ni ng wordt gehouden m et
de polariteit).
Opmerking ERP II (opmerking energiegerelateerde producten)
Dit product voldo et aan de richtlijn Eco-Design van de Europese Commissie en
de richtlijnen voo r energiegerelateerde producten . Hey systeem zal, wanneer er
geen invoer is voor ( on geveer ) 1 5 m i nut en (b ehal ve i n de F M -modus), automatisch
naar de standbym odus schakelen. Volg de handl ei di ng om gebruik van het sy st eem
te hervatten.
2

VEILIGHEIDSINSTRUCTIES
Lees en begrijp alle waarschuwingen die hieronder zijn afgedrukt, alsmede de
waarschuwingen die zijn afgedr ukt op het produ ct. Dit product is ontworpen en
gefabriceerd om de persoonlijke veiligheid te garanderen
.
Gebruik alleen de voedi ng di e is
gespecificeerd in de handleiding
of op het systeem
Plaats het apparaat niet in direct
zonlicht of in de buurt van een
warmtebron
Buig of trek niet overmatig aan
het netsnoer en oefen geen druk
uit op het netsnoer doo r ero p te
staan.
Houd het apparaat en het netsnoer
uit de buurt va n wat e r.
Open de behui zing ni et en
voorkom dat er voorwerp en als
muntjes, haars pelden of naalden
in het apparaat vallen
.
Haal de stekker uit het stopcontact
wanneer het systeem voor lange
tijd niet wordt geb r ui kt
.
3
ACCESSOIRES
BT
DSP
A
udiokabel
FM-antenne
Afstands-
bediening
Handleiding
USER MANUAL
PROGRAM
DSP
BT
T/F

4
SPECIFICATES
Voeding
AC 220-24 0V, 50Hz
Max. Stroomverbruik 60W
Stroomverbruik in standby 5V 500mA
USB-oplaadui t gan g USB,Aux-i n gang
Ondersteunde discs CD, CD-R, MP3
FM-frequentie 87.5-108.0MHz
Afstandsbediening 7 meter
Effectief bereik afstandsbediening 10 meter
Bedrijfsomstandigh eden
Temperatuur 5°C-35°C
Installeren op een vl ak
horizontaal oppervlak

BEDIENINGSELEMENTEN PANEEL
Voorpaneel
DISPLAY
INDICATOR
ST
AND
BY
PLA
Y/P
A
USE
FUNC TION
SEARCH
FA S T
RE
WIND
PREVIOUS
LED-VERLICHTING
PANEEL
AFSTANDSBEDIE
NINGS-SENSOR
EJECT
VOLUMEKNOP
STOP
TONE
DSP
FAST FORWA RD
NEXT
PHONES-AANS LUITI NG
R/L
AUX INGANG
DISC-LADE
USB-POOR
5
Achterpaneel
L/R AUDIO-UITGANG
FM -ANTENNE
AAN/UIT-KNOP
L/R LUIDSPREKERS
VOEDING

AFSTANDSBEDIENING
1.
Schakel het apparaat in , installeer d e batterijen in d e afstandsbediening
en richt de afstandsb ediening op de afstandsbedieningssensor op he t
voorpaneel
.
2. De afstand tussen de a fstandsbediening en de sensor mag nie t groter zijn
dan 7 meter, a nders zal de afstan dsbediening nie t werken.
3. Interferentie van andere elektron ische appara ten die hoogfrequent e
signalen genereren kan de manier waarop de afstandsbediening werkt
sterk beïnvloe den.
6
ST
ANDB
Y
BL
UE
T
OO
TH
CD
USB
EJECT
AU X
FM
NUMBER BUT TONS
REPEAT A-B
TIME/FREQUENCY
CD RIPPING
REPEAT
MONO/STEREO
SEARCH
PANEL.LED LIGHT
RANDOM
SA
VE
CHANNEL-
DSP
PLA
Y/P
A
USE
FA S T
FOR
W
ARD
FA S T
RE
WIND
ST
OP
PROGRAM
CHANNEL+
TUNE+
ENTER
MUTE
NEXT
PREVIOUS
BASS+/-
VOLUME+/-
TREBLE+/-
CD BT FM
AUX
USB
1
2
3
4
5
6
7
8
9 0
REPEAT
REP.AB
CD RIP.
PROGRAM
P.LED
ENTER
CH+
CH-
VOL-
SEARCH SAVE MO/ST
DSP
BASS+
TREBLE+
BASS-
TREBLE-
RANDOM
TU-
TU+
VOL+
T/F
TUNE-

SYSTEEM AANSLUITEN
Voordat u het apparaat inschakelt, moet u eerst het systeem aansluiten zoals
hieronder is aangegeven:
1. Als er meerdere verbindingen worden gemaakt tussen de speler en de versterker,
selecteer dan één aansluiting en haal de stekkers van de ande re aan sluitingen uit
het apparaat zodat de geluidskwaliteit niet negatief wordt beïnvloed.
7
2.
Schakel het apparaat niet te snel aan en uit, het interval tussen het in- en
uitschakelen van het apparaat moet minimaal 5 seconden zijn.
FM-antenne

BASISBEDIENING
Voorbereiding
1. Controleer, v oordat u het ap paraat inschakelt, of alle aansluiting en juist en
stevig zijn gemaakt en steek daarna de stekker in het stopcontact.
2. Druk op de
AAN/UIT-KNOP
op het achterpaneel van het apparaat .
3.
Open de disc-l ade d oo r op EJECT op de afstandsbedien ing of het voorpaneel
te drukken. Plaats de disc in de lade en druk nogmaals op .
4. De speler start met het laden van de disc en het afspelen wordt na het laden van
de disc automatisch gestart.
Standbymodus
Druk op
STANDBY
op de afstandsbediening of het voorpaneel om het
systeem in te schakelen of het systeem standby te zetten
.
Modus selecteren
1. Druk o p
CD
,
BT
,
FM
,
AUX
,
of USB op de afstandsbediening om de bijbehorende
modus te openen
.
2. Druk herhaaldeli jk op
FUNCTION
op het voorpaneel om de modus te selecteren.
P.LED
Druk op
P.LED
op de afstandsbediening om de LED-verlichting van het paneel aan
of uit te zetten.
Volume instellen
Druk op
VOLUME+/-
op de afstandsbediening of draai aan de
Volumeknop
op het
voorpaneel om het volume te verhoge n of verlagen.
Geluid uitschakelen (Mute)
Druk op
MUTE
om het geluid uit te schakelen. Druk nogmaals op deze knop of druk
op VOL+/- om het geluid weer in te schakelen.
8
Play/Pause
Druk op
PLAY/PAUSE
om het afspelen te pauzeren, druk nogmaal s op de kn o p
om het afspelen te hervatten.

Stop
Druk tijdens he t afspel en op
STOP
op de afstandsbediening om het afspelen
te stoppen. D r u k o p
PLAY/PAUSE
om het afspelen te starten vanaf het begin
.
Vooruitspoelen en terugspoelen
Druk op om vooruit of terug te spoelen met X2 (druk één keer) of X4
(druk twee keer) de normale snelheid. Druk een derde keer om het afspelen met
normale snelheid te hervatten.
Vorige en volgende
Druk op of om naar de vorige of volgende track te gaan
.
Numerieke toetsen
De
NUMERIEKE TOETSEN
zijn bedoeld voor het selecteren van tracks of
voorkeurszenders.
Herhalen
Druk één keer op REPEAT op de afstandsbediening om de huidige track te
herhalen (
); druk twee keer om alle tracks (ALL ) te herhalen.
Druk een derde keer om het herhalen te beëindigen.
Herhalen A-B
Druk op REP. AB op de afstandsbediening om een specifiek gedeelte van een
track te herhalen.
1. Druk de eerste keer op REP.AB aan het begin van het gedeelte dat u wilt
herhalen (A).
2. Druk de tweede keer op REP.AB aan het einde van h et gedeelte dat u wilt
herhalen (B).
3. Het gedeelte A-B wordt nu automatisch herhaald door het systeem.
Druk een derde keer om het herhalen te annuleren.
In willekeurige volgorde afspelen
Druk op
RANDOM
op de afstandsbediening om de tracks in willekeurige
volgorde af te spelen. Druk nogmaals op de toets om te annuleren en het afspelen
in normale volgorde te hervatten.
DSP
Druk op DSP om een van de verschillende genres te kiezen:
Jazz, Rock, Classic, Pop, Live, Dance of off.
9

Toon instellen
Druk op
TONE
op het voorpaneel om bass of treble te selecteren en draai daarna aan
de Volumeknop om het bass- of treble-effect in te stellen (van laag n a ar hoog). U
kunt ook op BASS+/- of
TREBLE+/-
op de afstandsbediening drukken om deze
effecten rechtstreeks in te stellen.
Enter
Druk op
ENTER
om de geselecteerde opties in te schakelen
.
10

SPECIALE BEDIENING VOOR CD
Programma
Het systeem kan geselecteerde tracks op een disc in een geprogrammeerde
volgorde afspelen.
1. Druk op
STOP
om het afspelen te stoppen en druk d aarna op
PROGRAM
,
het display toon t PR
0100
.
2. Voer het nummer in van de eerste track die u wilt afspelen.
Bijv. Voer 04 in, de vierde track zal als eerst worden afgespeeld.
3. Herhaal stap 2 voor alle tracks die u wilt programmeren.
4. Als u het program ma volledig heeft in gev oer d, druk dan op ENTER om
het afspelen van tracks in de geprogrammeerde volgorde te starten.
5. Druk om het afspelen van het programma te annuleren twee keer op STOP.
CD rippen
Het rippen van CD’s is het opslaan van de tracks op een USB-apparaat.
1. Druk op CD RIP. om de modus voor het rippen van CD’s te openen.
Het display toont <CD RIP>.
2
. Druk op of
om de ripsnelheid te selecteren,
<NORMAL>
of
<HIGH>
.
Als u de snelhei d heeft gesel ect eerd, dan zal het apparaat klaar zijn om te
beginnen m et ri ppen
.
3. Druk op de
NUMERIEKE TOETSEN
om de tracks die u wilt rippen te
selecteren, het display toont
<RIP_
_
Y>
.
Als u de eerste track heeft geselecteerd, dan gaat het sy st eem naar de volgende
stap: <
RIP
_ _
Y>
.
4. Voer het tracknummer nogmaals in om het rippen van de geselecteerde track te
annuleren of een geselecteerde track te verwijderen. Als het display <RIP _ _N>
toont, dan wordt het rippen van de geselecteerde track geannuleerd of wordt de
opgeslagen track verwijderd.
5. Druk om alle tracks te selecteren op T/F. Druk om het selecteren van alle tracks
ongedaan te maken nogmaal s op T/F.
6. Als u klaar bent met het selecteren van tracks, druk dan op ENTER om te
starten met het rippen. De geselecteerde tracks worden opgeslagen in een
11
ni
euwe map op het USB-apparaat.

12
7. Het display toont tijdens het rippen het nummer van de t rack die wordt geript
bij het tweede nummer 5. Als u bij het selecteren van de ripsnelheid voor
de normale snelheid heeft gekozen, dan zal he t apparaat de muziek tijdens
het rippen afspelen.
8. Als het rippen is voltooid, dan toont het displ ay <CD RIP>, en het afspelen van
de tracks wordt gestopt.
9. Druk om op enig moment te stoppen met rippen twee keer op STOP. Druk op
PLAY/PAUSE om het afs pel en te sta rte n vana f h et b egi n.
Voorbeeld,
Als u de 5e en 13e track wilt rippen op een USB-stick, druk dan eerst op STOP
om het afspelen te stoppen. Druk daarna op CD RIP. Druk op 0, 5, het display toont
<RIP 05Y>. Druk op 1, 3, het display toont <RIP 13Y>. Druk tot slot op ENTER
om het rippen van de geselectee rde t racks te star ten.

GEBRUIK VAN AUX-INGANG EN USB
U kunt ook van muziek genieten via andere audioapparaten of een USB-stick.
Kijk naar de afbeelding hieronder, de apparaten moeten juist en stevig worden
aangesloten
Hoofdtelefoon
RCA-kabel
PC/telefoon/muziek-speler
USB-stick
Gebruik aux-ingang
1. Druk op AUX op de afstandsbediening of FUNCTION op het voorpaneel om
naar de aux-modus te schakelen.
2. Sluit de PC/telefoon/muziekspeler (één apparaat) aan met een audiokabel.
3. Zodra het apparaat is aangesloten op de aux-ingang, kan het afspelen worden
bediend op het extern apparaat.
U kunt het volume aanpassen met de volumeregel ing op dit audiosysteem .
Gebruik USB
1. Steek de USB-stick in de USB-poort op het voorpaneel van het audiosysteem .
2. Druk op USB op de afstandsbediening of FUNCTION op het voorpaneel om
naar de USB-modus te schakelen.
3. De speler zal het USB-apparaat automatisch detecteren en het afspelen starten
nadat de bestanden op het USB-apparaat zijn gevonden.
4. Raadpleeg BASISBEDIENING voor meer informatie.
5. De USB-poort kan ook worden gebruikt om USB-apparaten op te laden.
13

OPMERKING:
1. Het lezen van de gegevens op het USB-apparaat kan, afhankelijk van de
hoeveelheid gegevens en de snelheid van het USB-apparaat, wat langer duren.
In bepaalde gevallen kan het lezen tot 60 seconden duren. Dit is geen defect.
2. Het is mogelijk dat bepaalde best anden, zelfs wanneer het formaat wordt
ondersteund, niet weergegeven of afgespeeld kunnen worden door co mpatibiliteit.
3. Dit systeem ondersteunt het MP3-bestands formaat, dit form aat is voorzien van de
extensie “.mp3”.
14

GEBRUIK BLUETOOTH
Stappen voor het koppelen met Bluetooth
1. Druk op BT op de afstandsbediening of druk op FUNCTION op het voorpaneel
om naar de Bluetooth-modus te schakelen. De indicat or knippert snel blauw.
2. Schakel de Bluetooth-functie in op het extern apparaat (bijv. Smartphone).
3. Plaats de telefoon/het BT-apparaat in de Bluetooth-zoekmodus. De telefoon/het
BT-apparaat zoekt n aar het audiosystee m.
4. Selecteer MINI300BT uit de lijst met gevonden Bluetooth-apparaten op de
telefoon/het muziekapparaat.
5. Het is mogelijk dat sommige apparaten u vragen om OK/YES/PAIR te selecteren
om verbinding te maken. Als er wordt gevraagd om een wachtwoord in te voeren,
voer dan 0000 (vier nullen) in.
6. Als er succesvol is gekoppeld, dan zal de indicator continu branden.
Het afspelen bedienen
1.
Het afspelen in de Bluetooth-modus kan worden bediend op het audiosysteem
en met de knoppen op de afstandsbediening. Raadpleeg BASISBEDIENING
voor meer details.
2. U kunt de verbinding met een ander apparaat verbreken door
a. De Bluetooth-functie op uw apparaat uit te schakelen.
Het audiosysteem schakelt automatisch terug naar de Bluetooth-koppelm odus.
b. U kunt in de koppelmodus de stappen 2-5 van Stappen voor het koppelen met
Bluetooth volgen om te koppelen met een ander apparaat.
3. Als er tijdens het afspelen van muziek via een telefoon een oproep op de telefoon
binnenkomt, dan zal het systeem automatisch stoppen met het afspelen van muziek.
Als de oproep wordt beëindigd, dan is het afhankelijk van de instellingen op de
telefoon of het afspelen wordt hervat of niet.
OPMERKING:
1. Sommige apparaten, zoals een iPhone, kunnen automatisch verbinding maken na
het koppelen. Op sommige apparaten kan het echter ook wat langer duren.
2. Het apparaat kan alleen met één apparaat tegelijkertijd koppelen en tracks van dit
apparaat afspelen. (Het Bluetooth/bereik is 10 meter zonder obst akels.)
3. Om verbinding te m aken met een ander ap paraat, moet u de Bluet ooth/verbinding
op uw apparaat uitschakelen, of de koppeling tussen de apparaten verbreken en
daarna handmatig verbinding maken met het andere apparaat.
15

GEBRUIK RADIO
Basisinformatie voor gebruik FM
1. Zorg ervoor dat de antenne op de achterkant van h et systeem volledig is
uitgestrekt en goed is gericht, voordat u probeert af te stemmen op een FM-
zender (er wordt aanbevolen de antenne verticaal te plaatsen, dit zorgt voor
optimale ontvangst).
2. Het uitstrekken van de antenne zorgt ook voor de best mogelijke geluidskwaliteit.
3. Het FM-bereik is van 87.5MHz tot108.0MHz.
4. Druk op FM op de afstandsbediening of FUNCTION om naar de FM-modus
te schakelen.
5. Druk op MO/ST om STEREO AAN of UIT te zetten, afhankelijk van d e sterkte
van het ontvangen signaal.
Afstemmen op zenders
1. Druk op de NUMERIEKE TOETSEN om zenders te selecteren.
Druk bv. Op 1 en daarna op 5 om de 15e zender te selecteren.
2. Druk op CH+/- om naar de vorige of volge nde zender te gaan.
3. Druk op T/F op de afstandsbediening om de frequentie te selecteren.
Bijv. Druk eerst op T/F en daarna op 9, 9, 7, 0 om af te stemmen op de
frequentie 99.7MHz.
Zoeken/afstemmen op zender
1. Automatisch zoeken
Druk op SEARCH, het apparaat zoekt automatisch v an lage naar hoge
frequentie naar zenders. De gevonden zenders worden automatisch opgeslagen.
Druk nogmaals op de toets om het zoeken te beëindigen.
2. Handmatig afstemmen:
a. Druk kort op op TU+/- om de f req ue nti e te veranderen met stappen van
0.05MHz.
b. Houd TU+/- ingedrukt om op de volgende of vorige frequentie met een
voldoende sterk signaal af te stemmen.
Zodra er een beschikbare fr equentie is gevonden zal het afstemmen stoppen.
16

Zenders opslaan
(er kunnen tot 60 zenders worden opgeslagen.)
1. De huidige frequentie opslaan op de huidige voorkeurszender:
Als u bijvoorbeeld luistert naar 88.9MHz op de 5e zender, druk dan op SAVE
op de afstandsbediening om de frequentie 88.9MHz rechtstreeks op te slaan op
de 5e voorkeurszender.
2. Een zender opslaan als voorkeurszender:
Als u bijvoorbeeld de frequentie 99.70MHz wilt opslaan onder voorkeurszender
15, druk dan eerst op CH+/- of druk op de Numerieke toetsen 1 en daarna 5 om de
15e voorkeurszender te selecteren; druk op T/F om de frequentie in te voeren, voer
de frequentie in 9, 9, 7, 0; druk tot slot op SAVE om de zender op te slaan.
17

PROBLEMEN OPLOSSEN
Hieronder hebben we een aantal methoden uiteengezet om veel voorkomende
problemen met het syst eem op t e lossen. Als een probleem zich herhaaldelijk
voordoet, neem dan contact op met het dichtstbijzijnde servicecen trum.
P
r
obleem
Voeding werkt
niet
Afstandsbedieni
ng werkt niet
Mogelijke oorzaak
Stekker is niet volledi g in
het stopcontact gedrukt
De batterijen zijn
leeg
De afstandsbediening wordt
niet op de
afstandsbedieningsssensor
gericht
Oplossing
Steek de stekker volledig
in het stopcontact
Vervang de batterijen
Richt de afstandsbediening op
de sensor
Afspelen werkt
niet
Geen disc geplaatst Plaats een disc
Disc onjuist geplaatst
Plaats de disc opnieuw
met de afdruk naar
boven
Geen geluid
uit
luidspreker s
Disc is niet compati bel
met dit apparaat
Audiokabel is niet juist
aangesloten
Het apparaat is niet
juist aangesloten op
de computer
Gebruik alleen discs die
compatib el zijn met dit
apparaat
Sluit de audiokabel
correct aan
Sluit de computer juis t aan
volgens de afbeelding
Onderbrekingen in
geluidsweergav e
Disc is niet schoon
Disc is bekrast
Gebruik een schone disc
of gebruik een zacht
doekje om de disc schoon
te maken
Gebruik een nieuwe disc
18

Dit is om te certificeren dat MINI300BT in overeenstemming is met:
Richtlijn van de Raad 2004/108/EC(EMC richtlijn):
Toepasselijke normen:
EN 55013: 2001 +A1 :2003 +A2 : 2006
EN 55020: 2007 + A11 : 2011
EN 61000-3-2: 2006 +A1: 2009 +A2: 2009
EN 61000-3-3: 2008
Gemaakt in de Vo lksrepubliek China
Voor meer informatie bezoek onze website
www.mpmaneurope.com
19

Mini Sistema de Som
MINI300B
T
MANUAL DE INSTRUÇÕES

ÍNDICE
AV JSOS.... ........ ......... ...... ........ ........ ......... ........ ........ ...... ......... ........ ........ ......... ........ ..... ..............
2
ACESSÓRIOS..... ......... ........ ........ ......... ........ ...... ........ ......... ........ ........ ......... ...... ........ ........ .......
3
ESPECI FICAÇÕ ES...... ........ ........ ......... ...... ........ ........ ......... ........ ........ ....... ........ ........ ........ ......
4
P A I N E L D E C ON T R OL ES ... ........ ....... ......... ........ ........ ....... ........ ........ ........ ......... ........ ...... ........ ... .
5
CONTROLE REMOTO............................................................................................................
6
CONEX ÕE S DO SI STE MA. .. .. .. ........ ...... .. .. .. ...... .. .. .. ....... .. .. .. ...... .. .. .. ...... ... .. .. ...... .. .. .. ........ .....
7
OPERAÇ ÕES B ÁSICA S....... ........ ......... ........ ........ ....... ........ ........ ........ ......... ........ ...... ........ .....
8
UTILIZANDO
O CD..... .. ...... .. .. .. ........ ...... .. .. .. ...... .. .. .. ....... .. .. .. ...... .. .. .. ...... ... .. .. ...... .. .. .. ........ .....
11
U T I L I Z A N D O A E N T R A D A AUX.... ........ ........ ........ ......... ...... ........ ........ ......... ........ ........ ....... .
13
UTILIZANDO
O CONECTOR USB.........................................................................................
13
UTILIZANDO
O BLUETOOTH...............................................................................................
15
UTILIZANDO
O RÁDIO..........................................................................................................
17
RESOL UÇ Ã O DE PR OB LEMA S .. ....... .. .. .. ...... .. .. .. ....... .. .. .. ...... .. .. .. ...... .. ... .. ........ ...... .. .. .. ....... .
19
1

AVISOS
1.O aparelho não deve ser exposto a gotejamentos ou respingos
.
Objetos que contenham líquidos, como vasos, não devem ser colocados
próximos ao aparelho.
2 . O espaço mínimo para ventilação ao redor do aparelho deve ser de 5cm.
As aberturas de ventilação não devem ser bloquear por objetos como, jornais,
toalhas de mesa, cortinas, etc.
3 . Nenhuma fonte de chama, como velas acesas, devem ser colocadas sobre o aparelho.
4. O aparelho deverá ser utilizado apenas em climas moderad os.
5 . A tomada deverá estar em condições de uso.
6 . Haverá perigo de explosão caso a bater ia tenha sido substituída de for ma incorreta. Substitu a-a
apenas por baterias equivalentes ou do mesmo tipo.
7 . Não misture diferentes tipos de bateria e baterias novas e usadas
.
8 . As baterias deverão ser instaladas com as polaridades na posição correta.
9 . Baterias completamente usadas deverão ser removidas do aparelho.
1 0 . Baterias usadas deverão ser descartadas de forma segura. Apenas descarte baterias em pontos
de coleta especificados (entre em contato com o seu revendedor para mais informações) para
proteger o meio ambiente.
1 1 . Baterias não devem ser expostas a calor excessivo como exposição direta ao sol, fogo,
etc
.
1 2 . Caso o cabo de energia fornecido esteja danificado, ele deverá ser imediatamente
substituído p elo fabricante, técnico especial izado ou outro agente qu alificado para evitar a
possibilidade de acidentes.
1 3 . Baterias deverão ser instaladas com as polaridades na posição corretas
.
1 4 . O revendedor não se responsabiliza por incidentes causados pela instalação incorreta das
polariades das baterias, onde o aparleho não será coberto pela garantia em caso de dano.
Observação ERP II
(observação de Produtos Relacionados com Energia)
Esse produto está em conformidade com a Comissão Européia na Diretivas de
Projetos Ecológicos e suas Regulamentações Aplicadas a Produtos
Relacionados com Energia. 15 minutos (aproximadamente) sem ser utilizado
(exceto no modo de rádio), colocará o sistema automaticamente no modo de
espera
.
Consulte o manual de instruções para restaurar as funções de uso.
2

INSTRUÇÕES DE SEGURANÇA
Leia com atenção e compreenda todos os avis os descrit os a baixo, bem como
aqueles marcados no aparelho. Esse aparelho foi criado e fab ri cado para gar a nt i r
a sua segurança.
3
Utilize fon
tes de energia
especificadas no manual do
usuário ou no aparelho.
Evite colocar o aparelho em
contato direto com o sol ou
próximo a fontes de calor.
Não flexione ou pu xe o ca b o de
energia em excesso, ou coloque
objetos pesados sobre ele.
Mantenha o aparelho e a
tomada longe de líquidos
.
Nunca desmonte a caixa e evite
deixar objetos caí rem dentro do
aparelho, como moedas, grampos
ou agulhas.
Desligue o aparelh o da tomada
quando não fo r utilizá-lo por um
longo período de tempo.
ACESSÓRIOS
Cabo de
Áudio
Antena de
Rádio
C
ontr
ole Remoto
Manual de Instruções
USER MANUAL


PAINEL DE CONTROLES
Painel frontal
TELA
INDICADOR LUMINOSO
ESPERA
REPRODUZIR/PAUSAR
BUSCA
RETORNO ACELERADO
ANTERIOR
LUZ DE FUNDO DA TELA
SENSOR DO
CONTROLE REMOTO
EJETAR
AJUSTADOR DO
VOLUME
PARAR
TOM
DSP
AVANÇO
ACELERADO
SEGUINTE
DE OUVIDO
CONECTOR DE ENTRADA
AUXILIAR R/L
BANDEJA DE DISCO
PORTA USB
Painel traseiro
SAÍDA DE ÁUDIO L/R
ANTENA DE RÁDIO
INTERRUPTOR DE
ENERGIA
CAIXA DE SOM L/R
FONTE DE ENERGIA

CONTROLE REMOTO
1. Ligue o aparelho, insira as pilhas no controle remoto, e aponte o controle
remoto para o sensor do controle localizado no painel frontal.
2. A distância de uso do controle remoto não deverá ser maior do que 7 metros, ou ele
não funcionará.
3. Interferências de outros dispositivos eletrônicos, que gerem sinais de alta
frequência, poderão ter grande influência no uso das funções do controle remoto.
MODO DE ESPERA
BLUETOOTH
CD
USB
EJETAR
AUXILIAR
BOTÕES NUMÉRICOS
REPETIR A-B
HORA/FREQUÊNCIA
CÓPIA DE CD
REPETIR
MONO/ESTÉREO
BUSCAR
LUZ DE FUNDO DA
TELA
ALEATÓRIO
SALVAR
SINTONIA-
ESTAÇÃO-
DSP
REPRODUZIR/PAUSAR
AVANÇO RÁPIDO
RETORNO RÁDPIDO
PARAR
PROGRAMAR
ESTAÇÃO+
SINTONIA+
MUDO
SEGUINTE
ANTERIOR
GRAVES+/-
VOLUME+/-
AGUDOS+/-
6
CD BT FM
AUX
USB
1
2
3
4
5
6
7
8
9 0
REPEAT
REP.AB
CD RIP.
PROGRAM
P.LED
ENTER
CH+
CH-
VOL-
SEARCH SAVE MO/ST
DSP
BASS+
TREBLE+
BASS-
TREBLE-
RANDOM
TU-
TU+
VOL+
T/F
RÁDIO
ENTER

CONEXÕES DO SISTEMA
Antes de ligar o seu aparelho, verifque e faça as conexões de acordo com a descrição
abaixo:
1 . Caso existam várias conexões entre o aparelho e o amplificador, selecione apenas uma delas e
desconecte outras, para que a qualidade do som não seja afetada.
2
. Não ligue e desligue o aparelho em intervalos muito curtos. É necessário esperar 5 segundos
quando o aparelho for ligado ou desligado.
7

OPERAÇÃO BÁSICA
Preparação
1. Antes de ligar o aparelho, verifique se todas as conexões foram feitas
corretamente e com segurança. Insira o conector de energia na tomada.
2. Pressione o interruptor de energia LIGAR/DESLIGAR localizado no painel
traseiro desse aparelho.
3. Ejete a bandeja do disco através do botão EJETAR no controle remoto ou __
no painel frontal . Insira um disco na bandeja e pressione o bot ão _ __
novamente.
4. O aparelho começará a ler o conteúdo do disco e iniciará sua reprodução
automaticamente.
Modo de Espera
P
ressione o botão ESPERA no controle remoto ou no painel fron tal p ara
ligar o aparelho ou ent rar no modo de espera
.
Modo de seleção
1. Pressione o botão
CD
,
BT
,
FM
,
AUX
,
ou USB no controle remoto para acessar
o modo correspondente
.
2 . Pressione várias vezes o botão
FUNÇÃO
no painel frontal para selecionar o modo.
Iluminação
Pressione o botão
ILUMINAÇÃO
no controle remoto p a ra desligar ou lig ar o luz do
painel.
Ajustando o Volume
Pressione o botão
VOLUME+/-
no controle remoto ou gire o Ajustador de Volume
no painel frontal para aumentar ou diminuir o volume.
Botão Mudo
Pressione o botão
MUDO
desligar o som
.
Pressione esse botão novamente ou
pressione os botões de
VOL+/-
para restaurar o nível do volume.
8
Repr
oduzir/Pausar
Pressione o botão
REPRODUZIR/PAUSAR
para pausar a reprodução, pressione
novamente para continuar
.

Parar
Dura
nte a reprodução de uma música, pressione o b otã o PARAR no controle
remoto para interromper uma reprodução, pr essi one o bot ão
REPRODUZIR/
PAUSAR
para começar do início.
Avanço e Retorno Acelerado
P
ressione o ______ para realizar o avanço acelarado ou retorno acelerado na
velocidade x2 (pressio ne uma vez), ou velocidade x4 (p ress i one d uas veze s),
pressione uma terceira vez para restaurar a velocidade normal.
Anterior e seguinte
P
ressione o botão ___ ou ___ para pular para a faixa/música anterior ou seguinte
.
Botões numéricos
Botões numéricos são u tilizados para selecionar faixas e estações de rádio
memorizadas.
Repetir
Pressione o botão REPETIR uma vez no controle remoto para repetir a faixa
atual (
);
pressione repetir duas vezes para repetir todas as faixas (
TODAS
).
Pressione uma terceira vez para cancelar.
Repetir A-B
Pressione o botão
RE
P
.
AB no controle remoto para definir um intervalo a ser
repetido. Pressione o botão
REP.AB
uma vez para definir o início do intervalo a
ser repetido (A)
.
Pressione o botão
REP.AB
uma segunda vez para definir o final
do intervalo a ser repetido
(
B
).
O in t er va l o A-B será auto maticamente repe tido.
Pressione uma terceira vez para sair.
Aleatório
Pressione o botão
ALEATÓRIO
no controle remoto para reproduzir as faixas
em ordem aleatória. Pressione novamente para cancelar e voltar a ordem de
reprodução normal.
DSP
Pressione o botão DSP para selecionar entre os diferentes estilos de som: Jazz,
Rock, Clássica,
P
op
,
Ao vivo
,
Danc e e
Desligado.
9

Configuração de timbre
Pressione o botão
TIMBRE
no painel frontal para selecionar entre graves ou
agudos, e então gire o Ajustador do Volume de baixo para alto para ajustar
o efeito do Grave ou Agudo. Ou então, pressione os botões GRAVE+/- ou
AGUDO+/-
no controle remoto para ajustá-los diret a mente.
Enter
Pressione o botão ENTER
para habilitar a opção selecionada.
10

OPERAÇÕES ESPECIAIS PARA O CD
P
r
ogr
amar
O aparelho poderá reproduzir as faixas selecionadas de um disco na ordem
programada.
1. Pressione o botão
PARAR
para parar a reproducão, e então pressione
PROGRAMAR
,
e PR 0100 será exibido na tela.
2. Digite o número da primeira faixa que você deseja reproduzir.
Ex: digite 04, e a quarta faixa será a pri meira música a ser reproduzida.
3. Repita o passo 2 para cada faixa que você deseja programar.
4. Quando você terminar de programar a reprodução, pressione ENTER para
iniciar a reprodução das faixas na ordem programada.
5. Para cancelar a reprodução programada, pressione o botão PARAR duas vezes.
Copiando um CD
Ao copiar um CD você irá guardar as faixas de um disco no seu dispositivo USB.
1. Pressione o botão CÓPIAR CD para entrar no m odo de C ópi a de CD
.
<CD
RIP>
será exibido n a tela
.
2.
Pressione o botão ___ ou ___ para selecionar a velocidade de cópia como
<NORMAL>
ou
<ALTA>
.
Quando você selecionar a velocidade, o aparelho entrará no estado pronto
para cópia.
3. Pressione os botões
NUMÉRICOS
para selecionar as faixas que você deseja
cop i ar, e
<
COPIAR_ _ Y
>
será exibido na tela.
Quando você selecionar a primeira faixa, ela pulará para a tela de cópi a
seguinte
:
<
COPIAR
_ _
Y>
.
4. Para cancelar a faixa que você selecionou ou apa gar a faixa se lecionada,
entre o número da fa ixa novamente. Quando <
COPIAR
_ _
N
> for exibido,
a faixa selec ionada será can celada.
5. Para selecionar todas as faixa s, pressione o botão
T/F
. Para cancelar
todas as faixas, presione o botão
T/F
novamente.
6. Quando você termina r de selecionar as faixas, pressione o botão
ENTER
para iniciar a cópia. As faixas selecionad as serão armazenadas
em uma nova pasta no seu dispositivo USB.
11

12
7. Enquanto o aparelho estiver copiando , a tela ex ibirá o número da faixa
que
estiver sendo copiada no segund o número 5. Caso você tenha
selecionado a velocidade de cópia normal, o aparelho reproduzirá a faixa.
8. Quando a repro duçã o fo r c oncluída, <CD COPIADO> será exibido na tela,
e a reprodução das faixas será interrompida.
9. Para interromper a cópia a qualquer momento, pressione o botão PARAR
duas vezes. Pressione o botão REPRODUZIR/PAUSAR para começar a
reprodução do início.
Exemplo:
Para copiar a 5a. e a 13a. faixa para o dispositivo USB, pressione primeiro o
botão PARAR para interromper a reprodução, e então pressione o botão
COPIAR CD.
Pressione 0, 5 e <COPIAR 05Y> será ex ibido.
Pressione 1, 3 e <COPIAR 13Y> será ex ibido.
Finalmente pressione ENTER para iniciar a cópia das faixas selecionadas.

U
TILIZANDO A ENTRADA AUX E USB
Você poderá curtir a su a música de outros dispositivos de áud io ou de um dispositivo
USB. Analise a figura aba ixo, e cada conexão dever á ser firme e segura.
Fone de
ouvido
Cabo RCA
PC/Telefone/tocador de música
Dispositivo USB
Utilizando a Entrada Auxiliar
1. Pressione o botão AUX no controle remoto ou o botão FUNÇÃO no painel
frontal para entrar no modo ENTRADA AUX.
2. Conecte o PC/Telefone/Tocador de músi ca (apenas um dispositivo) no aparelho
através de um cabo de áudio.
3. Uma vez conectado pelos co nectores de entrada aux iliar, o controle de
reprodução será realizado através do outro dispositivo; você poderá ajustar
o volume no aparelho.
Utilizando a porta USB
1. Insira o dispositivo USB na porta USB localizada na parte frontal do painel
do aparelho.
2. Pressione o botão USB no cont role remoto ou o botão FUNÇÃO no painel
frontal para entrar no modo USB.
3. O aparelho detectará automaticamente o dispositivo e começará a reproduzir
quando os arquivos forem encontrados.
4. Consulte OPERAÇÕES BÁSICAS para mais detalhes de uso.
5. A porta USB também irá recarregar o dispositivo USB conectado.
13

OBSERVAÇÃO:
1. Dependendo da quantidade de dados e d a velocidade da mídia, o aparelho poderá
demorar mais para ler o conteúdo do dispositivo USB. Em alguns casos o tempo
de leitura poderá ser de até 60 segundos. Esse comportamento não representa u m
defeito.
2. Mesmo que alguns arquivos sejam de um formato suportado, eles poderão
não ser reproduzidos ou exibidos dependendo de sua compatibilidade.
3. O formato de arquivo que esse sistema é capaz de reproduzir é o formato MP3
com a extensão ". mp3".
14

UTILIZANDO O BLUETOOTH
Passos para emparelhamento de Bluetooth
1. Pressio ne o botão
BT
no controle remoto ou pressione o botão FUNÇÃO
no painel frontal para entrar no modo Bluetooth
.
O indicador piscará
em azul rapidamente.
2. Ative a função de blueto oth no seu dispos i t i vo (ex: Smartphone).
3. Coloque o telefone/dispositivo de BT no modo de busca de bluetooth.
O telefone/dispositivo BT buscará o aparelho.
4.
S
elec
ione
MINI300BT
da lista de dispositivos encon trad os no telefone/
dispositivo de música
.
5. Alguns dispositivos poderão solicitar que você selecione OK/EMPARELHAR
para habilitar essa conexão.
6. (Para alguns dispositivo s) Caso solicitado, entre 0000 (quatro zeros) como
senha.
7. Quando o emparelhamento com o seu dispositivo for bem sucedido,
o indicador luminoso ficará constantemente aceso.
Operação da reprodução
1. A reprodução de Bluetooth é controlada pelo seu dispositivo e os botões no
controle remoto. Consulte OPERAÇÕES BÁSICAS para mais detalhes.
2.
Para desconectar ou emparelha r com outro dispositiv o:
a. Desligue a função de Blu etooth no seu dispositivo para desconecta r
esse dispositivo.
O aparelho en trará no estad o de emparelh amento automatica mente.
b. No estado de emparelhamento, siga o s passos 2 a 5 descritos em
EMPARELHAMENTO BLUETOOTH
para conect ar outro
dispositivo.
3. Quando você estiver rep roduzindo músicas atravé s de seu telefone ,
e receber uma chamada , a reprodução da música será automaticamente
interrompida. Quand o a chamada terminar, dependendo da configuração
do seu telefone, a música poderá ou não voltar a ser reproduzida.
OBSERVAÇÃO:
1. Alguns dispositivos como iPhone, poderão se conect ar auto matica mente
depois de ter sido emparelhado. Outros poderão demorar mais te mpo
para se conectar.
15

2. O aparelho poderá apen as se emparelha r e reproduzir faixas d e um
dispositivo de cada vez.
3. Par a se conectar a um dispositivo diferente, você precisará desligar a
função de Blueto oth do seu dispositi vo, ou desemparelhar do disposit ivo
com o qual você está atualmente empare lhado, e então se cone ctar
manualmente a outro dispositivo.
4. A distância de busc a do Bluetooth é de 10 metros em á reas abertas.
16

UTILIZANDO O RÁDIO
Informações básicas para utilizar o rádio
1. Certifique-se de que a antena na parte de trá s do aparelho esteja completament e
esticada e posicionada antes de tentar sintonizar uma estação de Rádio
(recomendamos utilizar a posição vertical). Isso garantirá a melhor recepção para
o aparelho.
2. Extender a antena também garantirá a melhor qualidade de som possível.
3. A faixa de frequência de rádio será entre 87,5 MHz e 108,0MHz .
4. Pressio ne o botão
FM
no controle remoto ou botão
FUNÇÃO
para entrar no
modo de rádio
.
5. Pressione o botão
MO/ST
para LIGAR ou DESLIGAR o ESTÉREO,
caso obtenha um sinal estéreo potente.
Selecionando estações
1. Pressione os botões NUMÉRICOS para selecionar as estações.
Ex: pressione 1, e então 5 para selecionar a 15
a
estação.
2. Pressione os botões CH+/- para pular para a estação anterior ou seguinte.
3. Pressione o botão T/F no controle remoto para escolher a frequência.
Ex: primeiro pressione o botão T/F, e então pressione 9, 9, 7, 0 para selecionar
a frequência 99,7MHz.
Buscando/Sintonizando estações
1. Busca automática
Pressione o botão BUSCAR, o aparelho começará a procurar por estações
automaticamen te da frequênci a mais baixa p ara a mais alta. As estações
encontradas são auto maticamente armazenada s. Pressione novamen te para parar.
2. Sintonia manual:
a. Pressione o botão TU+/- para ajustar a frequência em incrementos de 0,05MHz.
b. Mantenha o botão TU+/- pressionado para sintonizar a frequência seguinte ou
anterior que tenha m recepção o suficiente, e assim que uma es tação for
encontrada, a sintoniza ção será interro mpida.
Armazenando Estações
(Até 60 estações poderão ser armazenadas)
1. Para salvar a estação atua l na posição de me mória atual:
Ex: Caso você esteja escutando a frequên cia 88,9MHz na 5a. estação, pressione
17

o botão ARMAZENAR diretamente no controle remoto e a frequência
88,9MHz será armazenada no lugar da 5a. estação.
2. Para salv ar a estação em uma posição de me mória:
Ex: Caso você deseje ar mazenar a fr equência 99,70MHz na 15a. posição de
memória, pressione primeiro os botões CH+/- ou pressione o botão
numérico 1, 5 para selecionar a 15a. estação; pressione o botão
T/F
para entrar na tela da frequência, entre o número 9, 9, 7, 0 ; por último
pressione o botão ARMAZENAR para armazenar a es tação.
18

RESOLUÇÃO DE PROBLEMAS
Para a sua com odidade, nós c riamos um a lista de como sol ucionar os problema s mais
comuns que você poderá enco ntrar quando estiver utilizando o sistema de som. C a s o o
problema ocorra mais de uma vez, entre em contato com a assistência técnica mais
próxima.
P
r
oblema
A fonte não está
funcionando
O controle re moto
não funciona
Possível causa
O conector da tomada não
está totalmente inserida na
tomada.
As pilhas estão vazias.
O controle remoto não está
apontado para o sensor do
controle remoto no aparelho.
Solução
Termine de conectar a
conector na tomada.
Substitua as pilhas por pilhas
novas.
Aponte o controle remoto
corretamente, alinhado-o com o
sensor do controle remoto.
Não é possível
reproduzir
Nenhum disco inserido Insira um disco
O disco foi inserido incorretamente Insira o disco com a imagem
voltada para cima.
Sem som das caixas
de som
O disco nãoé compatível com
esse aparelho
O cabo de áudio não está
conectado corretamente.
Conexão com o computador foi
feita de forma incorreta
Utilize apenas discos que sejam
compatíveis com esse aparelho.
Conecte o cabo de áudio
corretamente.
Faça a conexão com o computaor
corrtamente de acordo com a
ilustração
Reprodução de som
sendo interrompida
O disco não está limpo
O disco está arranhado
Substitua o disco por um limpo
ou utilize um pano macio para
limpar o disco
Substitua o disco por
um disco novo
19

Isto é para certificar que MINI300BT está em conformidade com:
Directiva de concelho 2004/108/EC (direcção EMC):
Padrões aplicáveis:
EN 55013: 2001 +A1 :2003 +A2 : 2006
EN 55020: 2007 + A11 : 2011
EN 61000-3-2: 2006 +A1: 2009 +A2: 2009
EN 61000-3-3: 2008
Fabricado na RPC
Para mais informações, visite o nosso website:
www.mpmaneurope.com
20

-
 1
1
-
 2
2
-
 3
3
-
 4
4
-
 5
5
-
 6
6
-
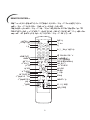 7
7
-
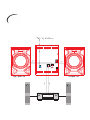 8
8
-
 9
9
-
 10
10
-
 11
11
-
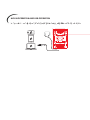 12
12
-
 13
13
-
 14
14
-
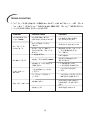 15
15
-
 16
16
-
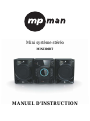 17
17
-
 18
18
-
 19
19
-
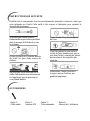 20
20
-
 21
21
-
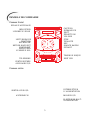 22
22
-
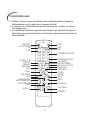 23
23
-
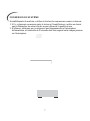 24
24
-
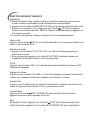 25
25
-
 26
26
-
 27
27
-
 28
28
-
 29
29
-
 30
30
-
 31
31
-
 32
32
-
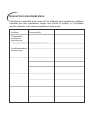 33
33
-
 34
34
-
 35
35
-
 36
36
-
 37
37
-
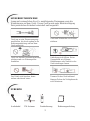 38
38
-
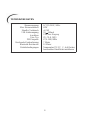 39
39
-
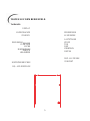 40
40
-
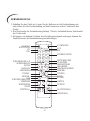 41
41
-
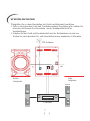 42
42
-
 43
43
-
 44
44
-
 45
45
-
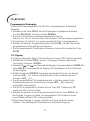 46
46
-
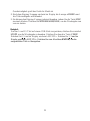 47
47
-
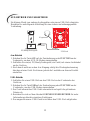 48
48
-
 49
49
-
 50
50
-
 51
51
-
 52
52
-
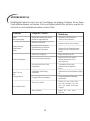 53
53
-
 54
54
-
 55
55
-
 56
56
-
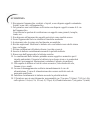 57
57
-
 58
58
-
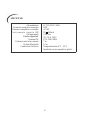 59
59
-
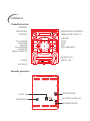 60
60
-
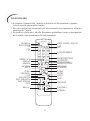 61
61
-
 62
62
-
 63
63
-
 64
64
-
 65
65
-
 66
66
-
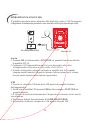 67
67
-
 68
68
-
 69
69
-
 70
70
-
 71
71
-
 72
72
-
 73
73
-
 74
74
-
 75
75
-
 76
76
-
 77
77
-
 78
78
-
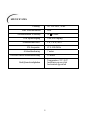 79
79
-
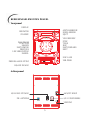 80
80
-
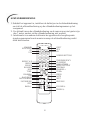 81
81
-
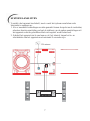 82
82
-
 83
83
-
 84
84
-
 85
85
-
 86
86
-
 87
87
-
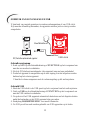 88
88
-
 89
89
-
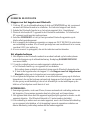 90
90
-
 91
91
-
 92
92
-
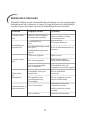 93
93
-
 94
94
-
 95
95
-
 96
96
-
 97
97
-
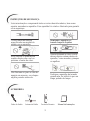 98
98
-
 99
99
-
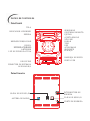 100
100
-
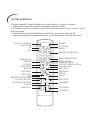 101
101
-
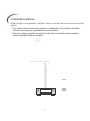 102
102
-
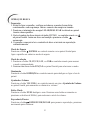 103
103
-
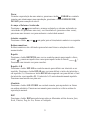 104
104
-
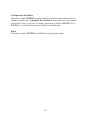 105
105
-
 106
106
-
 107
107
-
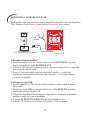 108
108
-
 109
109
-
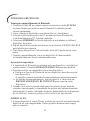 110
110
-
 111
111
-
 112
112
-
 113
113
-
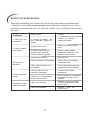 114
114
-
 115
115
-
 116
116


in andere talen
- italiano: MPMan MINI300BT Manuale del proprietario
- français: MPMan MINI300BT Le manuel du propriétaire
- Deutsch: MPMan MINI300BT Bedienungsanleitung
- português: MPMan MINI300BT Manual do proprietário
Gerelateerde papieren
Andere documenten
-
Sharp XL-B512(BK) de handleiding
-
Sharp XL-B512 Handleiding
-
Roadstar HIF-6970BT Handleiding
-
Samsung HT-J7750W Handleiding
-
-
-
Samsung BD-ES7000 Handleiding
-
Samsung BD-ES6000 Handleiding
-
Samsung BD-E6100 Handleiding
-
TRONIOS FENTON SBS20 Karaoke de handleiding