
Height-adjustable table
Work table, Conference table, Cable management, Screens
Instructions for Use
Series
G8AAP7
2019-05

21
Safety Instruction (Keep this operation manual)
Sicherheitsanweisungen (Bewahren Sie diese Bedienungsanleitung auf)
Consignes de sécurité (conserver ce mode d'emploi)
Instrucciones de seguridad (guarde este manual de uso)
Istruzioni per la sicurezza (consultare questo manuale d'uso)
Veiligheidsinstructies (Bewaar deze bedieningshandleiding)
Warning
GB
User must follow these instructions to prevent death or severe
injuries.
Warnung
D
Benutzer müssen diese Anweisungen befolgen, um Todesfälle oder
schwerwiegende Verletzungen zu vermeiden.
Avertissement
F
L'utilisateur doit suivre ces instructions pour éviter tout risque de
décès ou de blessures.
Advertencia
E
El usuario debe seguir estas instrucciones para evitar el
fallecimiento o lesiones graves.
Avvertenza
I
L’utente è tenuto a rispettare le seguenti istruzioni per evitare gravi
infortuni o decessi.
Waarschuwing
NL
De gebruiker moet deze instructies opvolgen zodat de dood of
ernstig letsel worden voorkomen.
Caution
GB
User must follow these instructions to prevent from accidents and
injuries, or damages to their property.
Achtung
D
Benutzer müssen diese Anweisungen befolgen, um Unfälle und
Verletzungen bzw. Sachschäden zu vermeiden.
Attention
F
L'utilisateur doit suivre ces instructions pour éviter tout risque
d'accident et de blessure, ou de dégât matériel.
Precaución
E
El usuario debe seguir estas instrucciones para evitar accidentes y
lesiones, así como posibles daños a su propiedad.
Attenzione
I
L’utente è tenuto a rispettare le seguenti istruzioni per evitare
incidenti e infortuni o danni alle cose.
Waarschuwing
NL
De gebruiker moet deze instructies opvolgen zodat ongelukken en
letsel of beschadigingen van eigendommen worden voorkomen.
Warning - Warnung - Avertissement - Advertencia - Avvertenza - Waarschuwing
GB
User must follow these instructions to prevent fire and electric shock.
· If any malfunctions occur, unplug the product immediately and contact an official okamura
dealer. If any malfunctions occur, do not use the product. Failure to do so may cause a fire
and electric shock.
* The term "malfunction" indicates the following:
the product emits smoke, unusual noise, odor, or if liquid is spilled into the product, etc.
· Do not connect the product to an outlet other than that of the rated voltage.
· Do not assemble or disassemble the product with the main power on.
· Do not use a multi-plug adaptor.
· Do not adjust the tabletop height consecutively for more than one
minute. If the tabletop height is adjusted consecutively for one
minute, do not operate for at least 10 minutes. Failure to do so
may cause a malfunction.
· Do not use a power cord other than that is provided.
· Do not damage the power cord. Do not use a damaged power
cord.
· Do not dismantle the height adjustable unit, controller, or control
panel.
· Keep the power plug and wall outlet free of dust.
· Do not bend or pull the power cord forcefully.
· Do not use the product outside or near water. Do not plug or
unplug the product with wet hands.
Rated voltage: 100 V - 230 V
Power consumption:
· Work table
Free standing type: 300 W
L-shaped type: 450 W
Bench type (per seat): 300 W
· Conference table: 300 W
Rated frequency: 50 Hz/60 Hz
* US ONLY
Rated voltage: 120 V
Rated frequency: 60 Hz
· Unplug the product when it will not be used for a long time.
D
Benutzer müssen diese Anweisungen befolgen, um einen Brand oder Stromschlag zu vermeiden.
· Wenn es zu Fehlfunktionen kommt, trennen Sie das Produkt sofort vom Netzstrom und
wenden Sie sich einen offiziellen Okamura-Händler. Verwenden Sie das Produkt nicht, wenn
es zu Fehlfunktionen kommt. Andernfalls kann es zu einem Brand oder Stromschlag kommen.
* Der Begriff „Fehlfunktion“ bezieht sich auf folgende Situationen:
Aus dem Produkt dringt Rauch, es kommt zu ungewöhnlichen Geräuschen, Gerüchen oder
es ist Flüssigkeit in das Produkt gelangt usw.
· Schließen Sie das Produkt nur an eine Netzsteckdose mit der Nennspannung an.
· Bauen Sie das Produkt nicht zusammen oder auseinander, während der Hauptschalter
eingeschaltet ist.
· Verwenden Sie keine Mehrfach-Steckeradapter.
· Passen Sie die Höhe der Tischplatte nicht fortlaufend länger als eine Minute an. Wenn
die Höhe der Tischplatte fortlaufend länger als eine Minute verstellt wird, unterlassen Sie
für mindestens 10 Minuten jegliche Bedienung. Andernfalls kann es zu einer Fehlfunktion
kommen.
· Verwenden Sie ausschließlich das mitgelieferte Netzkabel.
· Beschädigen Sie das Netzkabel nicht. Verwenden Sie kein beschädigtes Netzkabel.
· Bauen Sie die Einheit zur Höhenverstellung, den Controller und das Bedienfeld nicht
auseinander.
· Sorgen Sie dafür, dass der Netzstecker und die Netzsteckdose
staubfrei sind.
· Verbiegen Sie das Netzkabel nicht und ziehen Sie nicht mit
Gewalt daran.
· Verwenden Sie das Produkt nicht im Freien oder in der Nähe
von Wasser. Schließen Sie den Stecker des Produktes nicht mit
feuchten Händen an und trennen
Sie ihn nicht mit feuchten Händen.
Nennspannung: 100 V - 230 V
Leistungsaufnahme:
· Schreibtisch
Freistehender Typ: 300 W
L-förmiger Typ: 450 W
Banktyp (pro Sitz): 300 W
· Tisch: 300 W
Nennfrequenz: 50 Hz/60 Hz
· Trennen Sie das Produkt vom Netzstrom, wenn es längere Zeit
nicht verwendet wird.

43
Warning - Warnung - Avertissement - Advertencia - Avvertenza - Waarschuwing
F
L'utilisateur doit suivre ces instructions pour éviter tout risque d'incendie et
d'électrocution.
· En cas de dysfonctionnement, débranchez le produit immédiatement et contactez un
revendeur Okamura agréé. En cas de dysfonctionnement, n'utilisez pas le produit. Le non-
respect de ces consignes peut provoquer un risque d'incendie et d'électrocution.
* Le terme « dysfonctionnement » désigne les phénomènes suivants :
de la fumée, un bruit ou une odeur inhabituelle se dégageant du produit, ou du liquide ayant
été déversé sur le produit, etc.
· Ne branchez pas le produit au secteur si la tension n'est pas adaptée.
· Ne montez et ne démontez pas le produit lorsqu'il est branché au secteur.
· N'utilisez pas de rallonge électrique.
· Le processus de réglage de la hauteur du dessus de la tablette ne doit pas dépasser une
minute. Si le processus de réglage de la hauteur de la table dépasse une minute, attendez au
moins 10 minutes avant d'utiliser le produit. Le non-respect de ces consignes peut provoquer
un risque de dysfonctionnement.
· N'utilisez pas un cordon d'alimentation différent du câble fourni.
· N'abîmez pas le cordon d'alimentation. N'utilisez pas un cordon d'alimentation endommagé.
· Ne démontez pas le dispositif, les commandes ou le panneau
de contrôle de réglage de la hauteur.
· Assurez-vous que la fiche et la prise électriques sont
exemptes de poussière.
· Ne pliez pas et ne tirez pas sur le cordon d'alimentation.
· N'utilisez pas le produit à l'extérieur ou à proximité de l'eau.
Ne branchez et ne débranchez pas le produit avec les mains
mouillées.
Tension nominale : 100 V - 230 V
Consommation électrique :
· Bureau
Modèle classique : 300 W
Modèle en forme de L : 450 W
Modèle type établi (par siège) :
300 W
· Table : 300 W
Fréquence nominale : 50 Hz/60 Hz
· Débranchez le produit s'il n'est pas destiné à être utilisé sur
une longue période.
E
El usuario debe seguir estas instrucciones para evitar incendios y descargas eléctricas.
· Si se produce algún fallo en el funcionamiento, desconecte el producto inmediatamente y
póngase en contacto con el distribuidor oficial de Okamura. Si se produce algún fallo en
el funcionamiento, no utilice el producto. De lo contrario puede ocasionarse un incendio o
descarga eléctrica.
* El término “fallo en el funcionamiento” indica lo siguiente:
el producto desprende humo, un ruido extraño, mal olor, se ha derramado líquido en el
producto, etc.
· No conecte el producto a una toma de corriente distinta a la de la tensión nominal.
· No monte ni desmonte el producto con la corriente principal conectada.
· No utilice un adaptador con múltiples enchufes.
· No regule la altura del tablero de la mesa de forma continuada durante más de un minuto.
Si se regula el tablero de la mesa de forma ininterrumpida durante más de un minuto, no
lo utilice durante al menos 10 minutos. De lo contrario puede ocasionarse un fallo en el
funcionamiento.
· No utilice un cable de alimentación distinto del que se proporciona.
· No dañe el cable de alimentación. No utilice un cable de alimentación que esté dañado.
· No desmonte la unidad de altura regulable, el controlador ni el
panel de control.
· Mantenga el cable de alimentación y el enchufe de la pared
libres de polvo.
· No doble el cable de alimentación ni tire de él con fuerza.
· No utilice el producto en exteriores ni cerca del agua. No
enchufe ni desenchufe el producto con las manos mojadas.
Tensión nominal: 100 V - 230 V
Consumo de energía:
· Escritorio
Independiente: 300 W
En L: 450 W
Tipo banco (por asiento): 300 W
· Mesa: 300 W
Frecuencia nominal: 50 Hz/60 Hz
· Desenchufe el producto cuando no se vaya a utilizar durante
un largo periodo de tiempo.
Warning - Warnung - Avertissement - Advertencia - Avvertenza - Waarschuwing
I
L’utente è tenuto a rispettare le seguenti istruzioni per evitare incendi e scosse elettriche.
· Qualora si verificassero anomalie di funzionamento, scollegare immediatamente il prodotto
dalle prese elettriche e contattare un rivenditore ufficiale Okamura. Qualora si verificassero
anomalie di funzionamento, non utilizzare il prodotto. La mancata osservanza di questa
istruzione potrebbe causare incendi o scosse elettriche.
* Con il termine “anomalie di funzionamento” si intende quanto segue:
emissione di fumo, rumori o odori inconsueti da parte del prodotto, versamento di liquido sul
prodotto, ecc.
· Non collegare il prodotto a una presa elettrica con tensione nominale non conforme alle
specifiche.
· Non montare o smontare il prodotto con l’alimentazione principale attiva.
· Non utilizzare un adattatore multiplo.
· Non azionare il meccanismo di regolazione dell’altezza del piano del tavolo per più di un
minuto consecutivamente. Se il meccanismo di regolazione dell’altezza del piano del tavolo è
stato azionato per un minuto, attendere almeno 10 minuti prima di azionarlo nuovamente. La
mancata osservanza di questa istruzione potrebbe causare anomalie di funzionamento.
· Non utilizzare un cavo di alimentazione diverso da quello fornito in dotazione.
·
Non danneggiare il cavo di alimentazione. Non utilizzare un cavo
di alimentazione danneggiato.
· Non smontare l’unità regolabile in altezza, il dispositivo di
comando o il pannello di controllo.
· Evitare che la polvere si accumuli sulla spina di alimentazione
e la presa a muro.
· Non piegare o tirare con forza il cavo di alimentazione.
· Non utilizzare il prodotto in ambienti esterni o vicino all’acqua.
Non collegare o scollegare la spina del prodotto con le mani
umide.
Tensione nominale: 100 V - 230 V
Potenza assorbita:
· Scrivania
Tipo autonomo: 300 W
Tipo a L: 450 W
Tipo a banco (per seduta): 300 W
· Tavolo: 300 W
Frequenza nominale: 60 Hz
· Se il prodotto non verrà utilizzato per periodi prolungati,
scollegarlo dall’alimentazione elettrica.
NL
De gebruiker moet deze instructies opvolgen zodat brand en elektrische schokken
worden voorkomen.
· Indien er storing optreedt, haalt u de stekker van het product onmiddellijk uit het stopcontact
en neemt u contact op met een officiële Okamura-dealer. Gebruik het product niet indien er
storing optreedt. Als u dit nalaat, kan dit leiden tot brand of elektrische schokken.
* De term "storing" wijst op het volgende:
er komt rook uit het product, het verspreidt vreemde geluiden, het geeft een geur af, of als
er vloeistof in het product is gemorst, enz.
· Sluit het product niet aan op een stopcontact met een andere spanning dan de nominale
spanning.
· Monteer of demonteer niet het product terwijl de hoofdvoeding is ingeschakeld.
· Gebruik geen multistekkeradapter.
· Verstel continu de hoogte van het tafelblad niet langer dan een minuut. Als de hoogte van het
tafelblad continu versteld wordt gedurende een minuut, mag u het niet bedienen gedurende
minstens 10 minuten. Als u dit nalaat, kan dit leiden tot een storing.
· Gebruik geen netsnoer behalve die die meegeleverd is.
· Beschadig niet het netsnoer. Gebruik geen beschadigd netsnoer.
· Haal de in hoogte verstelbare eenheid, de controller of het
bedieningspaneel niet uit elkaar.
· Houd de stekker en het stopcontact vrij van stof.
· Knik niet en trek niet met kracht aan het netsnoer.
· Gebruik het product niet buiten of in de nabijheid van water.
Steek de stekker niet met natte handen in het stopcontact en
verwijder hem ook niet met natte handen.
Nominale spanning: 100 V - 230 V
Energieverbruik:
· Bureau
Type zit/sta: 300 W
Type L-vorm: 450 W
Type bank (per zitting): 300 W
· Tafelv: 300 W
Nominale frequentie: 50 Hz/60 Hz
· Koppel het product los wanneer het gedurende een lange
periode niet zal worden gebruikt.

65
Warning - Warnung - Avertissement - Advertencia - Avvertenza - Waarschuwing
GB
Do not move the product when its cords and cables are connected. Failure to do so may
cause the product to tip over or disconnected.
D
Stellen Sie das Produkt nicht um, während die Kabel angeschlossen sind. Andernfalls
kann das Produkt umkippen oder die Kabel können getrennt werden.
F
Ne déplacez pas le produit lorsque le cordon d'alimentation et les câbles sont branchés.
Le non-respect de ces consignes peut provoquer un risque de chute ou de déconnexion.
E
No traslade el producto cuando los cables estén conectados. De lo contrario puede
ocasionarse la caída o desconexión del producto.
I
Non spostare il prodotto con i cavi collegati. In caso contrario, il prodotto potrebbe
ribaltarsi o venire scollegato dall’alimentazione elettrica.
NL
Verplaats het product niet terwijl de snoeren en kabels zijn aangesloten. Als u dit nalaat,
kan het product kantelen of worden losgekoppeld.
GB
User must follow the following instruction to prevent injuries.
D
Die Benutzer müssen die folgenden Anweisungen befolgen, um Verletzungen zu
verhindern.
F
L'utilisateur doit suivre les instructions ci-dessous pour éviter tout risque de blessures.
E
El usuario debe seguir las siguientes instrucciones para evitar lesiones.
I
L’utente è tenuto a rispettare le seguenti istruzioni per evitare infortuni.
NL
De gebruiker moet de volgende instructie volgen om letsel te vermijden.
GB
· Make sure that nothing is under or around the product that will obstruct
movement when adjusting the tabletop height.
D
· Stellen Sie sicher, dass sich nichts unter oder im Bereich des Produktes
befindet, das eine Bewegung verhindert, wenn Sie die Höhe der
Tischplatte anpassen.
F
· Veillez à ce qu'aucun élément susceptible de gêner vos mouvements
lors du réglage de la hauteur du dessus de la tablette ne soit placé sous
le produit ou à proximité de ce dernier.
E
· Asegúrese de que no hay nada debajo o alrededor del producto que obstaculice el
movimiento al regular la altura del tablero de la mesa.
I
· Assicurarsi che sotto il prodotto o nell’area circostante non siano presenti oggetti che
potrebbero ostruirne il movimento durante la regolazione dell’altezza del piano del tavolo.
NL
· Zorg ervoor dat er zich niks onder of rondom het product bevindt dat de beweging zou
belemmeren tijdens het verstellen van de hoogte van het tafelblad.
GB
· Make sure to keep your body, hands, and feet away from moving parts when
adjusting the tabletop height.
D
· Stellen Sie sicher, dass Sie Körper, Hände und Füße von sich bewegenden
Teilen fernhalten, wenn Sie die Höhe der Tischplatte anpassen.
F
· Restez à distance et éloignez les mains et les pieds des pièces en
mouvement lors du réglage de la hauteur du dessus de la tablette.
E
· Asegúrese de mantener su cuerpo, manos y pies apartados de las piezas móviles cuando se
disponga a regular el tablero de la mesa.
I
· Si raccomanda di mantenere il corpo, le mani e i piedi lontano dalle parti in movimento
durante la regolazione dell’altezza del piano del tavolo.
NL
· Zorg ervoor dat uw lichaam, handen en voeten weg van de bewegende onderdelen blijven
tijdens het verstellen van de hoogte van het tafelblad.
Warning - Warnung - Avertissement - Advertencia - Avvertenza - Waarschuwing
GB
· Make sure to keep other people away from the product when adjusting the
tabletop height.
D
· Stellen Sie sicher, dass sich andere Personen von vom Produkt fernhalten,
wenn Sie die Höhe der Tischplatte anpassen.
F
· Veillez à tenir les personnes présentes à distance lors du réglage de la hauteur du dessus de
la tablette.
E
· Asegúrese de mantener a otras personas apartadas de las piezas móviles cuando se
disponga a regular el tablero de la mesa.
I
· Assicurarsi che i presenti si mantengano lontano dal prodotto durante la regolazione
dell’altezza del piano del tavolo.
NL
· Zorg ervoor dat andere personen weg blijven van het product tijdens het verstellen van de
hoogte van het tafelblad.
GB
· Do not touch moving parts such as the legs when adjusting the tabletop
height.
D
· Berühren Sie keine sich bewegenden Teile, wie die Beine, wenn Sie die
Höhe der Tischplatte anpassen.
F
· Ne touchez pas les pièces en mouvement, telles que les pieds lors du
réglage de la hauteur du dessus de la tablette.
E
· No toque las piezas móviles como las patas, cuando se disponga a regular el tablero de la
mesa.
I
· Durante la regolazione dell’altezza del piano del tavolo non toccare le parti in movimento
come le gambe.
NL
· Raak de bewegende onderdelen zoals de poten niet aan tijdens het verstellen van de hoogte
van het tafelblad.
GB
· Make sure that the product does not hit objects above it, such as
shelves when lifting the tabletop. Remove things posted on the wall
before lifting the tabletop. Failure to do so may cause damage.
D
· Stellen Sie sicher, dass das Produkt nicht gegen Gegenstände darüber
stößt, wie zum Beispiel ein Regel, wenn Sie die Tischplatte anheben.
Entfernen Sie an der Wand befestigte Gegenstände, bevor Sie die
Tischplatte anheben. Andernfalls kann es zu Schäden kommen.
F
· En relevant le dessus de la tablette, veillez à ce qu'il ne heurte pas d'élément situé au-dessus
de lui. Retirez tout élément du mur avant de relever le dessus de la tablette. Le non-respect
de ces consignes peut provoquer un risque de dommage.
E
· Asegúrese de que el producto no tropieza con ningún objeto que tenga por encima, como
estantes, cuando se disponga a elevar el tablero de la mesa. Retire cualquier objeto colocado
en la pared antes de elevar el tablero de la mesa. De lo contrario pueden ocasionarse daños.
I
· Durante il sollevamento del piano, assicurarsi che il prodotto non urti eventuali oggetti posti al
di sopra di esso, quali ad esempio scaffali. Prima di sollevare il piano del tavolo, rimuovere gli
oggetti appesi alla parete. In caso contrario, si potrebbero verificare danni.
NL
· Zorg ervoor dat het product niet tegen voorwerpen bovenop stoot, zoals schappen, tijdens
het naar omhoog halen van het tafelblad. Verwijder voorwerpen die aan de muur hangen
voordat u het tafelblad naar omhoog haalt. Als u dit nalaat, kan dit leiden tot schade.

87
Warning - Warnung - Avertissement - Advertencia - Avvertenza - Waarschuwing
GB
· Do not place your fingers or hands on the pedestal when placing the pedestal under the table
tabletop. Your fingers or hands may get caught.
D
· Legen Sie Ihre Finger oder Hände nicht auf das Untergestell, wenn Sie das Untergestell unter
der Tischplatte platzieren. Andernfalls könnten Sie sich die Finger oder Hände einklemmen.
F
· Ne placez pas les doigts ou les mains sur le support lorsque ce dernier est placé sous le
dessus de la tablette. Vous risquez de vous coincer les doigts ou les mains.
E
· No coloque los dedos ni las manos sobre el pedestal cuando se disponga a colocarlo bajo el
tablero del escritorio. Puede pillarse los dedos o las manos.
I
· Non collocare le dita o le mani sul piedistallo durante il posizionamento del piedistallo sotto il
piano della scrivania. Rischio di schiacciamento delle dita.
NL
· Plaats geen vingers of handen op het voetstuk wanneer u het voetstuk onder het tafelblad
van het bureau plaatst. Uw vingers of uw handen kunnen klem raken.
GB
· Make sure that nothing is under or around the product when lowering the
tabletop. Failure to do so may cause damage or malfunction.
D
· Stellen Sie sicher, dass sich nichts unter oder im Bereich des Produktes
befindet, wenn Sie die Tischplatte senken. Andernfalls kann es zu Schäden
oder einer Fehlfunktion kommen.
F
· Veillez à ce qu'aucun élément ne soit placé sous le produit ou à proximité
de ce dernier lors de l'abaissement du dessus de la tablette. Le non-
respect de ces consignes peut provoquer un risque de dommage ou de dysfonctionnement.
E
· Asegúrese de que no hay nada debajo o alrededor del producto cuando se disponga a bajar
el tablero de la mesa. De lo contrario pueden ocasionarse daños o fallos en el funcionamiento.
I
· Assicurarsi che non siano presenti oggetti sotto il prodotto o nell’area circostante durante
l’abbassamento del piano del tavolo. La mancata osservanza di questa istruzione potrebbe
causare danni o anomalie di funzionamento.
NL
· Zorg ervoor dat er zich niks onder of rondom het product bevindt tijdens het lager maken van
het tafelblad. Als u dit nalaat, kan dit leiden tot schade of storing.
GB
· If the tabletop hits a chair or pedestal when lowering the
tabletop, immediately stop lowering it and lift the tabletop
back up. It may cause you to fall or damage to the product.
GB
Immediately lift the tabletop back.
D
Heben Sie die Tischplatte sofort
wieder an.
F
Relevez le dessus de la tablette
immédiatement.
E
Eleve inmediatamente la parte
posterior del tablero de la mesa.
I
Risollevare immediatamente il
piano.
NL
Haal het tafelblad onmiddellijk
terug omhoog.
D
· Wenn die Tischplatte beim Absenken einen Stuhl oder das
Untergestell berührt, stoppen Sie das Absenken sofort und
heben Sie die Tischplatte wieder an. Andernfalls können Sie
fallen oder es kann zu Schäden am Produkt kommen.
F
· Si le dessus de la tablette heurte une chaise ou le
support lorsqu'il est abaissé, interrompez le processus
immédiatement et relever le dessus de la tablette.
Cette action peut provoquer la chute de l'utilisateur ou
endommager le produit.
E
· Si al bajar el tablero de la mesa, este tropieza con una silla o base,
detenga el descenso inmediatamente y eleve la parte posterior del
mismo. Esto podría provocarle una caída o daños en el producto.
I
· Qualora il piano del tavolo dovesse urtare una sedia o un piedistallo
durante l’abbassamento, interrompere immediatamente la discesa e riportare in alto il piano.
In tal caso, l’utente potrebbe cadere o si potrebbe danneggiare il prodotto.
NL
· Als het tafelblad tegen een stoel of een voetstuk stoot tijdens het lager maken van het
tafelblad, stop onmiddellijk met het verlagen ervan en haal het tafelblad terug omhoog. U zou
kunnen vallen of het product beschadigen.
Warning - Warnung - Avertissement - Advertencia - Avvertenza - Waarschuwing
GB
· Cables such as power cords must have enough length to be used
when the tabletop is lifted to its maximum height. Make sure the
cables can move without obstructed in when adjusting the tabletop
height. Failure to do so may cause the product to tip over or
disconnected.
D
· Die Kabel, wie die Netzkabel, sind ausreichend lang, um sie
auch dann zu verwenden, wenn die Tischplatte auf die maximale
Höhe angehoben wurde. Stellen Sie sicher, dass sich die Kabel
blockierungsfrei bewegen können, wenn die Höhe der Tischplatte
angepasst wird. Andernfalls kann das Produkt umkippen oder
getrennt werden.
F
· La longueur des câbles, tels que les cordons d'alimentation, doit être assez suffisante lorsque
le dessus de la tablette est relevé au niveau maximum. Veillez à ce que les câbles puissent
être déplacés librement lors du réglage de la hauteur du dessus de la tablette. Le non-respect
de ces consignes peut provoquer un risque de chute ou de déconnexion.
E
· Los cables de alimentación y demás cables, deben contar con la longitud suficiente como
para poder elevar el tablero de la mesa a su altura máxima. Asegúrese de que se pueden
mover los cables sin problema cuando se disponga a regular la altura del tablero de la mesa.
De lo contrario puede ocasionarse la caída o desconexión del producto.
I
· I cavi, per esempio i cavi di alimentazione devono essere di lunghezza sufficiente per poter
essere utilizzati con il piano del tavolo sollevato alla massima altezza. Assicurarsi che i cavi
possano muoversi liberamente durante la regolazione dell’altezza del piano del tavolo. In caso
contrario, il prodotto potrebbe ribaltarsi o venire scollegato dall’alimentazione elettrica.
NL
· Kabels zoals netsnoeren moeten lang genoeg zijn zodat die kunnen worden gebruikt wanneer
het tafelblad naar zijn maximale hoogte omhoog wordt gehaald. Zorg ervoor dat de kabels
zich zonder belemmering kunnen verplaatsen tijdens het verstellen van de hoogte van het
tafelblad. Als u dit nalaat, kan het product kantelen of worden losgekoppeld.
[Tabletop adjustment range - Einstellbereich der Tischplatte - Valeurs de réglage de la hauteur
du dessus de la tablette - Margen de regulación del tablero -
Intervallo di regolazione del piano del tavolo - Verstelbereik van het tafelblad]
GB
Work table tabletop height
D Höhe Tischplatte Schreibtisch
F Hauteur du dessus de la tablette du bureau
E Altura del tablero del escritorio
I Altezza del piano della scrivania
NL
Tafelbladhoogte van bureau
GB
Conference table tabletop height
D Höhe Tischplatte Tisch
F Hauteur du dessus de la tablette
E Altura del tablero de la mesa
I Altezza del piano del tavolo
NL
Tafelbladhoogte van tafel
H25 1/2-49 3/16 inch [H650-1250mm] H27 1/2-49 3/16 inch [H700-1250mm]
GB
* US ONLY
To reduce the risk of electric shock, this furnishing has a polarized plug (one blade is wider than the other).
This plug will fit in a polarized outlet only one way. If the plug does not fit fully in the outlet, reverse the plug. If
it still does not fit, contact a qualified electrician to install the proper outlet. Do not change the plug in any way.

109
Caution - Achtung - Attention - Precaución - Attenzione - Waarschuwing
GB
Do not use the product other than for office use.
D
Verwenden Sie das Produkt ausschließlich in einer Büroumgebung.
F
Utilisez uniquement ce produit dans un bureau.
E
No utilice este producto para otro fin que no sea su uso en oficinas.
I
Non utilizzare il prodotto per finalità diverse dalle attività di ufficio.
NL
Gebruik het product niet voor andere doeleinden dan kantoorgebruik.
GB
Be careful of the following items since they may cause injury or damage the product.
D
Achten Sie auf die folgenden Punkte, da sie Verletzungen oder Schäden am Produkt
verursachen können.
F
Attention aux éléments suivants qui sont susceptibles de provoquer des blessures ou
des dégâts matériels.
E
Tenga precaución con los siguientes puntos ya que podrían causar daños en el
producto.
I
Prestare attenzione ai seguenti elementi, in quanto potrebbero causare infortuni o danni
al prodotto.
NL
Wees voorzichtig met de volgende items aangezien ze tot letsel of schade aan het
product kunnen leiden.
GB
· Do not use as a stepstool. Failure may cause you to fall and result in injury.
D
· Verwenden Sie das Produkt nicht als Trittleiter. Andernfalls könnten Sie herunterfallen und
Verletzungen erleiden.
F
· N'utilisez pas le produit en tant que marchepied. Le non-respect de ces consignes peut
provoquer un risque de chute et de blessure.
E
· No utilice el producto como taburete. De lo contrario podría caerse y lesionarse.
I
· Non salire sopra il prodotto con i piedi. In caso contrario, si potrebbe cadere riportando
lesioni.
NL
· Gebruik het niet als een keukentrapje. Als u dit nalaat, kan het tot gevolg hebben dat u valt en
letsel veroorzaken.
GB
· Do not sit or put heavy items on the corners of the table top.
D
· Setzen Sie sich nicht auf die Ecke der Tischplatte und stellen Sie dort keine
schweren Gegenstände ab.
F
· Ne vous asseyez pas sur les coins de la table et n'y posez pas d'éléments
lourds.
E
· No se siente ni coloque objetos pesados en las esquinas de la superficie de la mesa.
I
· Non sedersi o appoggiare oggetti pesanti sugli spigoli del piano del tavolo.
NL
· Ga niet op de hoeken van het tafelblad zitten of plaats er geen zware voorwerpen op.
GB
· If found unstable due to loosening of bolts or screws, retighten them.
D
· Wenn der Tisch instabil ist, da sich Stifte oder Schrauben gelockert haben, ziehen Sie diese
wieder fest.
F
· S'il est instable à cause de boulons ou de vis desserrés, resserrez-les.
E
· Si el producto pierde estabilidad a causa del aflojamiento de los tornillos o las tuercas, vuelva
a apretarlos.
I
· Se si riscontra instabilità a causa dell'allentamento di bulloni o viti, serrarli.
NL
· Als het product onstabiel is doordat er bouten of schroeven loszitten, moet u deze
aandraaien.
Caution - Achtung - Attention - Precaución - Attenzione - Waarschuwing
GB
· Do not hang on or lean on to the product.
D
· Hängen Sie sich nicht an das Produkt und lehnen Sie sich nicht dagegen.
F
· Ne vous pendez pas au produit et ne vous appuyez pas contre lui.
E
· No se agarre al producto ni se apoye en él.
I
· Non appendersi o appoggiarsi al prodotto.
NL
· Steun niet tegen het product of leun er niet tegen.
GB
When adjusting levelers, hold the product with two or more people so that you do not
get your hands or fingers caught.
· Do not lift the table when items are on the table.
· Do not store fragile items, chemical or medical items, or live animals, in the product.
D
Wenn Sie die Ausgleichstücke anpassen, halten Sie das Produkt mit zwei oder mehr
Personen fest, damit Sie sich nicht die Hände oder Finger einklemmen.
· Heben Sie den Tisch nicht an, wenn sich Gegenstände darauf befinden.
· Lagern Sie keine zerbrechlichen Gegenstände, chemische oder medizinische Gegenstände
oder lebende Tiere in dem Produkt.
F
Lors du réglage des vérins, tenez le produit à l'aide d'une ou de plusieurs personnes
pour éviter de vous coincer les doigts.
· Ne levez pas la table lorsque des éléments y sont posés.
· Ne rangez pas d'objets fragiles, de produits chimiques, de médicaments, ou d'animaux
vivants dans le produit.
E
A la hora de regular los niveladores, sujete el producto con la ayuda de dos o más
personas para que no pillarse las manos o los dedos.
· No eleve la mesa cuando haya objetos sobre ella.
· No guarde elementos frágiles, material químico ni médico, así como animales vivos, en el
producto.
I
Durante la regolazione dei piedini livellanti farsi aiutare da due o più persone per
sorreggere il prodotto, onde evitare di schiacciarsi le mani o le dita.
· Prima di alzare il tavolo, rimuovere tutti gli oggetti posti sopra di esso.
· Non collocare oggetti fragili, sostanze chimiche, dispositivi medici o animali vivi sul prodotto o
nei relativi vani.
NL
Houd tijdens het verstellen van de stelvoetjes het product vast met twee of meer
personen zodat uw handen of vingers niet klem raken.
· Haal de tafel niet omhoog wanneer er voorwerpen op de tafel liggen.
· Bewaar geen fragiele voorwerpen, chemische of medische producten, of levende dieren in
het product.

1211
Caution - Achtung - Attention - Precaución - Attenzione - Waarschuwing
GB
Do not place anything over the maximum loading capacity on the product.
D
Stellen Sie nichts auf das Produkt, das die maximale Ladekapazität übersteigt.
F
Ne placez pas d'éléments dont le poids est supérieur à la charge maximale
recommandée.
E
No coloque nada sobre el producto que supere la capacidad máxima de carga.
I
Non collocare sul prodotto oggetti di peso superiore alla capacità di carico massima
specificata.
NL
Plaats niks op het product dat het maximale draagvermogen overschrijdt.
GB
Work table free standing type 102 kg (225 lbs)/L-shaped type 155 kg (342 lbs)/Bench type (per seat)
102 kg (225 lbs)/Conference table type 68 kg (150 lbs) Uniformly distributed weight
* Speed of moving up and down may change depending on the loading weight.
D Schreibtisch Freistehender Typ 102 kg (225 lbs)/L-förmiger Typ 155 kg (342 lbs)/Banktyp (pro Sitz)
102 kg (225 lbs)/Tisch 68 kg (150 lbs) Gleichmäßig verteiltes Gewicht
* Die Geschwindigkeit bei der Bewegung nach oben und nach unten kann sich abhängig vom
Belastungsgewicht ändern.
F Bureau modèle classique 102 kg (225 lb)/modèle en forme de L 155 kg (342 lbs)/modèle type établi (par siège)
102 kg (225 lbs)/Type table 68 kg (150 lb) Poids réparti uniformément
* La vitesse de déplacement vers le haut et le bas peut varier selon le poids de la charge.
E Escritorio Independiente 102 kg (225 lbs)/en L 155 kg (342 lbs)/tipo banco (por asiento)
102 kg (225 lbs)/Tipo mesa 68 kg (150 lbs) Carga uniformemente repartida
* La velocidad del desplazamiento ascendente y descendente puede variar en función del peso cargado.
I Scrivania tipo autonomo 102 kg (225 lbs)/tipo a L 155 kg (342 lbs)/tipo a banco (per seduta) 102 kg (225 lbs)/
Tipo tavolo 68 kg (150lbs) Peso distribuito in modo uniforme
* La velocità di sollevamento e abbassamento potrebbe cambiare a seconda del peso caricato sul piano.
NL
Bureauype type zit/sta 102 kg (225 lbs)/type L-vorm 155 kg (342 lbs)/type bank (per zitting) 102 kg (225 lbs)/
Type tafel 68 kg (150 lbs) Gelijkmatig verdeeld gewicht
* De snelheid van het omhoog en omlaag bewegen kan verschillen afhankelijk van de belasting.
GB
* What is “Uniformly distributed weight”?
It means to load on a work surface, etc. evenly. Uneven loading on the product may cause balance loss
and thus drop or fall.
D
* Was bedeutet „gleichmäßig verteiltes Gewicht“?
Das bedeutet, dass sich das Gewicht gleichmäßig auf eine Arbeitsfläche usw. verteilt. Bei einer
ungleichmäßigen Verteilung auf dem Produkt kann es aus dem Gleichgewicht kommen und daher
umkippen oder umfallen.
F
* Que signifie l'expression « poids réparti uniformément ? »
Cette expression signifie que la charge doit être placée de manière régulière sur la surface de travail, etc.
Une charge placée irrégulièrement sur le produit peut causer un déséquilibre et entraîner une chute.
E
* ¿Qué significa «carga uniformemente repartida»?
Esto significa que la carga se reparte en la mesa de trabajo de forma uniforme. La carga desigual sobre el
producto puede causar una pérdida de equilibrio y por consiguiente, su descenso o caída.
I
* Cosa si intende per “peso distribuito in modo uniforme”?
Significa che l’oggetto in questione deve caricare il piano di lavoro in maniera uniforme. Se il carico è
distribuito in maniera disomogenea, l’oggetto appoggiato potrebbe cadere.
NL
* Wat is "gelijkmatig verdeeld gewicht"?
Dit betekent een werkoppervlak, enz. evenredig belasten. Een ongelijkmatige belasting van het product
kan tot evenwichtsverlies leiden en het product zou dus kunnen neer- of omvallen.
GB
User must follow these following instructions when moving the product.
D
Die Benutzer müssen die folgenden Anweisungen beachten, wenn sie das Produkt umstellen.
F
L'utilisateur doit suivre les instructions ci-dessous lors du déplacement du produit.
E
El usuario debe seguir estas instrucciones a la hora de desplazar el producto.
I
Per spostare il prodotto, attenersi alle seguenti istruzioni.
NL
De gebruikers moeten de volgende instructies naleven tijdens het verplaatsen van het product.
Caution - Achtung - Attention - Precaución - Attenzione - Waarschuwing
GB
· Do not move the product with objects placed on it.
D
· Stellen Sie das Produkt nicht um, während sich Gegenstände auf dem Produkt befinden.
F
· Ne déplacez pas le produit si des éléments y sont posés.
E
· No desplace el producto con objetos encima.
I
· Prima di spostare il prodotto, rimuovere tutti gli oggetti collocati sopra di esso.
NL
· Verplaats het product niet met voorwerpen erbovenop.
GB
· Confirm a safe position and carry the product by two or more people.
D
· Überprüfen Sie die sichere Position und tragen Sie das Produkt mit zwei
oder mehr Personen.
F
· Adoptez une position stable et portez le produit à l'aide d'une ou de
plusieurs personnes.
E
· Mantenga una posición segura y transporte el producto con la ayuda de
dos o más personas.
I
· Il prodotto deve essere spostato da due o più persone, dopo aver verificato che l’operazione
possa essere eseguita in sicurezza.
NL
· Bevestig dat u in een veilige positie bent en draag het product met minstens twee personen.
GB
· Connection fitting must be removed.
D
· Das Verbindungsstück muss entfernt werden.
F
· Retirez les branchements.
E
· Debe retirarse el accesorio de conexión.
I
· L’accessorio di collegamento deve essere rimosso.
NL
· Het aansluitstuk moet verwijderd zijn.
GB
Do not modify the product after purchase.
This leads to malfunction or accident.
D
Verändern Sie das Produkt nach dem Kauf nicht.
Andernfalls kann es zu einer Fehlfunktion oder einem Unfall kommen.
F
Ne modifiez pas le produit après son achat.
Cela peut provoquer un dysfonctionnement ou un accident.
E
No modifique el producto después de la compra.
Podría provocar errores o accidentes.
I
Non apportare modifiche al prodotto in seguito all’acquisto.
Questo potrebbe causare malfunzionamenti o incidenti.
NL
Modificeer niet het product na aankoop.
Dit kan leiden tot defecten of ongevallen.
GB
· Modifying by yourself causes the product to malfunction or accident. Okamura will have no
responsibility for any damages caused by modifying.
D
· Wenn Sie das Produkt selbst verändern, kommt es zu einer Fehlfunktion oder einem
Unfall. Okamura übernimmt keine Haftung für Schäden, die durch eine derartige Änderung
verursacht wurden.
F
· Toute modification du produit effectuée par vos soins peut provoquer un dysfonctionnement
ou un accident. Okamura ne saurait être tenu responsable des dommages occasionnés suite
à une modification du produit.

1413
Caution - Achtung - Attention - Precaución - Attenzione - Waarschuwing
E
· Si lo modifica usted mismo puede provocar un accidente o un fallo en el funcionamiento del
producto. Okamura no se hace responsable de ningún daño ocasionado por la modificación.
I
· Qualora l’utente dovesse apportare modifiche al prodotto, si potrebbero verificare anomalie di
funzionamento o incidenti. Okamura declina ogni responsabilità in caso di danni provocati da
eventuali modifiche al prodotto.
NL
· Het product zelf modificeren veroorzaakt storingen of ongevallen. Okamura aanvaardt geen
aansprakelijkheid voor schade die veroorzaakt is door modificeren.
GB
· Please contact an official okamura dealer in advance when needed.
D
· Wenden Sie sich bei Bedarf im Vorfeld an einen offiziellen Okamura-Händler.
F
· Veuillez contacter un revendeur Okamura agréé au préalable, le cas échéant.
E
· Cuando sea necesario, póngase en contacto de antemano con el distribuidor oficial de
Okamura.
I
· Se necessario, contattare preventivamente un rivenditore ufficiale Okamura.
NL
· Neem indien nodig op voorhand contact op met een officiële Okamura-dealer.
Installation - Montage - Installation - Instalación - Installazione - Montage
GB
Please follow instructions below. Failure to do so may cause serious damage to the
product. Okamura will have no responsibility for any dameges caused by modifying.
D
Befolgen Sie die unten aufgeführten Anweisungen. Andernfalls kann es zu schweren
Schäden an dem Produkt kommen. Okamura übernimmt keine Haftung für Schäden, die
durch eine derartige Änderung verursacht wurden.
F
Veuillez suivre les instructions ci-dessous. Le non-respect de ces consignes peut
provoquer un risque de dommage important. Okamura ne saurait être tenu responsable
des dommages occasionnés suite à une modification du produit.
E
Siga las instrucciones que aparecen a continuación. De lo contrario pueden ocasionarse
daños graves en el producto. Okamura no se hace responsable de ningún daño
ocasionado por la modificación.
I
Attenersi alle istruzioni riportate di seguito. La mancata osservanza di queste istruzioni
potrebbe causare gravi danni al prodotto. Okamura declina ogni responsabilità in caso di
danni provocati da eventuali modifiche al prodotto.
NL
Volg de instructies onderaan op. Als u dit nalaat, kan het product ernstige schade
oplopen. Okamura aanvaardt geen aansprakelijkheid voor schade die veroorzaakt is
door modificeren.
GB
Indoor use only.
· Do not use outdoors or near water. Failure to do so may cause warping, mold, electric shock,
or electric leakage.
D
Nur für den Gebrauch in Innenräumen.
· Verwenden Sie das Produkt nicht im Freien oder in der Nähe von Wasser. Andernfalls kann es
zum Verbiegen, zu Schimmelbildung, einem Stromschlag oder einem Kriechstrom kommen.
F
Usage intérieur seulement.
· N'utilisez pas le produit à l'extérieur ou à proximité de l'eau. Le non-respect de ces consignes
peut provoquer un risque de déformation, d'électrocution, d'étincelles ou favoriser la
formation de moisissure.
Installation - Montage - Installation - Instalación - Installazione - Montage
E
Utilice el producto solo en interiores.
· No utilice el producto en exteriores ni cerca del agua. De lo contrario pueden producirse
deformaciones, formarse moho, descargas o fugas eléctricas.
I
Solo per uso interno.
· Non utilizzare il prodotto all’aperto o vicino all’acqua. In caso contrario, il prodotto potrebbe
deformarsi, si potrebbero formare muffe o verificare folgorazioni o dispersioni di corrente.
NL
Alleen binnenshuis gebruiken.
· Gebruik het niet buiten of in de nabijheid van water. Als u dit nalaat, kan dit tot vervormingen,
schimmel, elektrische schokken of elektrische lekken leiden.
GB
Avoid direct sunlight.
· When placing alongside windows, use curtain or blind to avoid from direct sunlight.
D
Vermeiden Sie direkte Sonneneinstrahlung.
· Wenn Sie den Tisch in Fensternähe aufstellen, schützen Sie ihn mit Jalousien oder Vorhängen
gegen direkte Sonneneinstrahlung.
F
Évitez la lumière directe du soleil.
· Si vous placez le fauteuil près d'une fenêtre, utilisez un rideau ou un store pour éviter la
lumière directe du soleil.
E
Evite la exposición a la luz directa del sol.
· Si coloca el producto junto a una ventana, utilice una cortina o persiana para evitar que quede
expuesto a la luz directa del sol.
I
Evitare la luce diretta del sole.
· Se il prodotto viene collocato in prossimità delle finestre, utilizzare tende o veneziane per
evitare la luce diretta del sole.
NL
Vermijd direct zonlicht.
· Wanneer u deze tafel bij het raam plaatst, houd dan direct zonlicht tegen met behulp van
gordijnen of zonwering.
GB
Avoid high temperature, high humidity, or extraordinary aridity.
D
Vermeiden Sie hohe Temperaturen, hohe Luftfeuchtigkeit oder außergewöhnliche
Trockenheit.
F
Évitez les températures élevées, la forte humidité ou la sécheresse extrême.
E
Evite las temperaturas y la humedad elevadas, así como los lugares extremadamente
secos.
I
Evitare condizioni di temperatura, umidità o aridità elevate.
NL
Vermijd hoge temperaturen, hoge luchtvochtigheid of uitzonderlijke droogte.
GB
Do not place product under heater or air-conditioner exhausting high temperature air.
D
Stellen Sie das Produkt nicht unter ein Heizgerät oder in die Nähe einer Klimaanlage, die
stark erwärmte Luft abgibt.
F
Ne placez pas le produit sous un appareil de chauffage ou un climatiseur évacuant de
l'air chaud.
E
No coloque el producto debajo de fuentes de calor o equipos de aire acondicionado que
expulsen aire a temperaturas elevadas.
I
Non posizionare il prodotto in prossimità di caloriferi o dell'aria di scarico ad alta
temperatura di un condizionatore d'aria.
NL
Plaats het product niet onder apparatuur voor verwarming of airconditioning waar zeer
warme lucht uitkomt.

1615
Installation - Montage - Installation - Instalación - Installazione - Montage
GB
Do not place on an uneven floor.
· Make sure to place the product on an even floor when using. Failure may cause the product
to deform or to be damaged.
· Adjust using the levelers so the product is horizontal to the floor.
· Leave enough space between the product and other objects such as walls or other tables.
Your fingers or hands may be caught in the moving parts.
·
The left/right spacer must be attached. Your fingers or hands may be caught in the moving parts.
D
Stellen Sie ihn nicht auf unebene Böden.
· Stellen Sie sicher, dass Sie das Produkt bei Verwendung auf einer ebenen Bodenfläche
aufstellen. Andernfalls kann sich das Produkt verformen oder beschädigt werden.
· Nehmen Sie eine Anpassung mit den Ausgleichstücken vor, damit das Produkt horizontal zum
Fußboden ist.
· Lassen Sie ausreichend Platz zwischen dem Produkt und anderen Gegenständen, wie
Wänden oder anderen Tischen.
· Ihre Finger oder Hände können in die sich bewegenden Teile geraten. Der linke/rechte
Abstandshalter muss angebracht sein.
F
Ne placez pas le fauteuil sur une surface inégale.
· Veillez à placer le produit sur une surface plane. Le non-respect de ces consignes peut
provoquer un risque de déformation ou de dommage.
· Ajustez à l'aide des vérins pour que le produit soit parallèle au sol.
· Prévoyez suffisamment d'espace entre le produit et les éléments alentour, tels que les murs
ou les autres bureaux.
· Vous pouvez vous coincer les doigts et les mains dans les pièces en mouvement. L'entretoise
gauche / droite doit être fixée.
E
No coloque el producto en superficies irregulares.
· Asegúrese de colocar el producto sobre un suelo uniforme cuando se esté utilizando. De lo
contrario el producto puede deformarse o resultar dañado.
·
Regule el producto, utilizando los niveladores para que quede horizontal con respecto al suelo.
· Deje espacio suficiente entre el producto y otros elementos como las paredes u otros
escritorios.
· Puede pillarse los dedos o las manos en las piezas móviles. Deben colocarse los separadores
de la parte izquierda y derecha.
I
Non utilizzare su un pavimento non in piano.
· Si raccomanda di posizionare il prodotto su un pavimento in piano durante l’uso. In caso
contrario, il prodotto potrebbe deformarsi o subire danni.
· Regolare mediante i piedini livellanti in modo che il prodotto risulti orizzontale rispetto al
pavimento.
·
Lasciare spazio sufficiente tra il prodotto ed eventuali altri elementi, quali pareti o altre scrivanie.
· In caso contrario, le parti in movimento potrebbero provocare lo schiacciamento delle mani o
delle dita. Il distanziale sinistro/destro deve essere installato.
NL
Niet op een ongelijke vloer plaatsen.
· Zorg ervoor dat het product op een vlakke vloer geplaatst is tijdens het gebruik. Als u dit
nalaat, kan dit leiden tot een vervorming of een beschadiging van het product.
· Gebruik de stelvoetjes om te verstellen zodat het product horizontaal is ten opzichte van de
vloer.
· Laat genoeg ruimte tussen het product en andere voorwerpen zoals muren of andere
bureaus.
· Uw vingers of uw handen kunnen klem raken in de bewegende onderdelen. Bevestig de
tussenring links/rechts.
Appropriate Ventilation Measures - Angemessene Belüftungsmaßnahmen -
Mesures d'aération appropriées - Medidas apropiadas de ventilación -
Misure per un’adeguata ventilazione - Passende ventilatiemaatregelen
GB
Chemical substances may be released by the product when it is first purchased.
Sufficiently ventilate the room after installing the product.
D
Nach dem ersten Kauf können chemische Substanzen aus dem Produkt freigesetzt
werden. Lüften Sie den Raum ausreichend, wenn Sie das Produkt aufstellen.
F
Des produits chimiques peuvent se dégager du produit lors de son achat. Aérez la pièce
de manière appropriée après avoir installé le produit.
E
Es posible que al principio después de la compra, el producto libere sustancias
químicas. Ventile suficientemente la habitación una vez que haya instalado el producto.
I
Il prodotto potrebbe rilasciare sostanze chimiche subito dopo l’acquisto. In seguito
all’installazione, aerare adeguatamente l’ambiente.
NL
Het product kan bij aankoop chemische stoffen vrijlaten. Verlucht de kamer voldoende
na de installatie van het product.
GB
Do not completely close windows when using the product in rooms with conspicuously
high temperatures/humidity (the benchmarks for these are temperatures in excess of
28°C (82.4°F) and relative humidity in excess of 50%).
D
Schließen Sie die Fenster nicht vollständig, wenn Sie das Produkt in Räumen mit
auffallend hohen Temperaturen/hoher Luftfeuchtigkeit verwenden (die Bezugswerte sind
hier Temperaturen über 28 °C (82,4 °F) und eine relative Luftfeuchtigkeit über 50 %).
F
Ne fermez pas les fenêtres complètement lorsque le produit est utilisé dans des pièces
dont la température ou le taux d'humidité sont trop élevés (supérieurs à 28 °C (82,4 °F) et
50 % respectivement).
E
No cierre las ventanas completamente cuando utilice el producto en habitaciones con
altos niveles de humedad y temperatura (esto alude a temperaturas que superen los
28º C (82,4º F) y a una humedad relativa mayor al 50 %).
I
Se il prodotto viene utilizzato in locali con temperature/livelli di umidità molto alti
(temperature superiori a 28 °C (82,4 °F) e umidità relativa superiore al 50%), non chiudere
completamente le finestre.
NL
Sluit de ramen niet volledig bij gebruik van het product in kamers met opvallend hoge
temperaturen/vochtigheid (de referentiewaarden hiervoor zijn temperaturen die 28 °C
(82,4 °F) overschrijden en een relatieve vochtigheid die 50% overschrijdt).

1817
Part names – Teilebezeichnungen – Nom des pièces – Nombres de las piezas –
Nomi delle parti – Namen van onderdelen
Work table (Free standing type) - Schreibtisch (Freistehender Typ) - Bureau (Modèle classique) -
Escritorio (Independiente) - Scrivania (Tipo autonomo) - Bureau (Type zit/sta)
a
b
c
d
d
e
f
g
h
k
li
ja
GB
Side panel (optional)
D
Seitenteil (optional)
F
Panneau latéral (en
option)
E
Panel lateral (opcional)
I
Pannello laterale
(opzionale)
NL
Zijpaneel (optioneel)
b
GB
Cable tray
D
Kabelfach
F
Passe-câbles
E
Bandeja de
cables
I
Portacavi
NL
Kabelgoot
c
GB
Tabletop
D
Tischplatte
F
Dessus de la tablette
E
Superficie de la mesilla
I
Piano della ribaltina
NL
Tafelblad
d
GB
Cable guard
(optional)
D
Kabelführung
(optional)
F
Guide-câbles
(en option)
E
Portacables
(opcional)
I
Canalina per
cavi (opzionale)
NL
Cableveyor
(optioneel)
e
GB
Height adjustable
unit
D
Einheit zur
Höhenverstellung
F
Dispositif de réglage
de la hauteur
E
Unidad de altura
regulable
I
Unità regolabile in
altezza
NL
In hoogte verstelbare
eenheid
f
GB
Leveler
D
Ausgleichstück
F
Vérin
E
Nivelador
I
Piedino
livellante
NL
Stelvoetje
g
GB
Control panel
D
Bedienfeld
F
Panneau de
contrôle
E
Panel de control
I
Pannello di
controllo
NL
Bedieningspaneel
h
GB
Back panel
(optional)
D
Rückseitenteil
(optional)
F
Panneau arrière (en
option)
E
Panel posterior
(opcional)
I
Pannello posteriore
(opzionale)
NL
Achterpaneel
(optioneel)
i
GB
Function beam
(optional)
D
Funktionsträger
(optional)
F
Barre
transversale (en
option)
E
Barra funcional
(opcional)
I
Traversa
operativa
(opzionale)
NL
Functiebalk
(optioneel)
j
GB
Corner connection
fitting (optional)
D
Eckverbindungsstück
(optional)
F
Connecteur d'angle
(en option)
E
Accesorio de
conexión para
esquinas (opcional)
I
Accessorio di
collegamento
angolare (opzionale)
NL
Hoekaansluitstuk
(optioneel)
k
GB
Cable hook
(optional)
D
Kabelhaken
(optional)
F
Crochet pour
câble (en
option)
E
Enganche
para cables
(opcional)
I
Gancio per cavi
(opzionale)
NL
Kabelhaak
(optioneel)
l
GB
Protection tube (optional)
D
Schutzrohr (optional)
F
Tube de protection (en option)
E
Tubo de protección (opcional)
I
Tubo di protezione (opzionale)
NL
Beschermhuls (optioneel)
Part names – Teilebezeichnungen – Nom des pièces – Nombres de las piezas –
Nomi delle parti – Namen van onderdelen
Work table (L-shaped type) - Schreibtisch (L-förmiger Typ) - Bureau (Modèle en forme de L) -
Escritorio (En L) - Scrivania (Tipo a L) - Bureau (Type L-vorm)
a
b
c
d
a
GB
Control panel
D
Bedienfeld
F
Panneau de
contrôle
E
Panel de control
I
Pannello di
controllo
NL
Bedieningspaneel
b
GB
Leveler
D
Ausgleichstück
F
Vérin
E
Nivelador
I
Piedino livellante
NL
Stelvoetje
c
GB
Height adjustable
unit
D
Einheit zur
Höhenverstellung
F
Dispositif de
réglage de la
hauteur
E
Unidad de altura
regulable
I
Unità regolabile in
altezza
NL
In hoogte
verstelbare
eenheid
d
GB
Tabletop
D
Tischplatte
F
Dessus de la tablette
E
Superficie de la mesilla
I
Piano della ribaltina
NL
Tafelblad

2019
Part names – Teilebezeichnungen – Nom des pièces – Nombres de las piezas –
Nomi delle parti – Namen van onderdelen
Work table (Bench type) - Schreibtisch (Banktyp) - Bureau (Modèle type établi) - Escritorio (Tipo
banco) - Scrivania (Tipo a banco) - Bureau (Type bank)
e
d
ab
c
f
g
a
GB
Height adjustable unit
D
Einheit zur
Höhenverstellung
F
Dispositif de réglage de
la hauteur
E
Unidad de altura
regulable
I
Unità regolabile in
altezza
NL
In hoogte verstelbare
eenheid
b
GB
Wiring duct
D
Kabelkanal
F
Chemin de câbles
E
Conducto para cables
I
Canalina per cablaggio
NL
Bedradingskanaal
c
GB
Cableveyor
D
Kabelführung
F
Guide-câbles
E
Portacables
I
Canalina per cavi
NL
Cableveyor
d
GB
Control panel
D
Bedienfeld
F
Panneau de contrôle
E
Panel de control
I
Pannello di controllo
NL
Bedieningspaneel
e
GB
Leveler
D
Ausgleichstück
F
Vérin
E
Nivelador
I
Piedino livellante
NL
Stelvoetje
f
GB
Tabletop
D
Tischplatte
F
Dessus de la tablette
E
Superficie de la mesilla
I
Piano della ribaltina
NL
Tafelblad
g
GB
Fixing panel
D
Befestigungsteil
F
Partition
E
Panel de fijación
I
Pannello di fissaggio
NL
Bevestigingspaneel
Part names – Teilebezeichnungen – Nom des pièces – Nombres de las piezas –
Nomi delle parti – Namen van onderdelen
Conference table - Tisch - Table - Mesa - Tavolo - Tafel
a
b
c
d
e
f
g
a
GB
Height adjustable
unit
D
Einheit zur
Höhenverstellung
F
Dispositif de réglage
de la hauteur
E
Unidad de altura
regulable
I
Unità regolabile in
altezza
NL
In hoogte verstelbare
eenheid
b
GB
Leveler
D
Ausgleichstück
F
Vérin
E
Nivelador
I
Piedino livellante
NL
Stelvoetje
c
GB
Cable guard
(optional)
D
Kabelschutz
(optional)
F
Colonne protège-
câbles (en option)
E
Protector de
cables (opcional)
I
Protezione per
cavi (opzionale)
NL
Kabelbeschermer
(optioneel)
d
GB
Control panel
D
Bedienfeld
F
Panneau de
contrôle
E
Panel de control
I
Pannello di
controllo
NL
Bedieningspaneel
e
GB
Cable cover
D
Kabelabdeckung
F
Capot du cache-
câbles
E
Cubierta para
cables
I
Copertura cavi
NL
Kabelafdekking
f
GB
Cable tray
D
Kabelfach
F
Passe-câbles
E
Bandeja de cables
I
Portacavi
NL
Kabelgoot
g
GB
Table
D
Tisch
F
Table
E
Mesa
I
Tavolo
NL
Tafel

2221
Operation guide (1) - Bedienungsanleitung (1) - Mode d'emploi (1) - Guía de
operación (1) - Guida al funzionamento (1) - Bedieningshandleiding (1)
¢ Leveler - Ausgleichstück - Vérin - Nivelador - Piedino livellante - Stelvoetje
GB
The table height can be adjusted with the levelers attached on the bottom of the table base in
the range shown in the illustration. Place the product horizontally using these levelers.
∗When adjusting the levelers, hold the product with two or more people so that you do not
get your hands or fingers caught. Follow the instructions on the below.
D
Die Tischhöhe kann mit den Ausgleichstücken, die sich an der Unterseite der Tischbasis
befinden, in dem in der Abbildung dargestellten Bereich angepasst werden. Platzieren Sie das
Produkt mit Hilfe dieser Ausgleichstücke horizontal.
∗Wenn Sie die Ausgleichstücke anpassen, halten Sie das Produkt mit zwei oder mehr
Personen fest, damit Sie sich nicht die Hände oder Finger einklemmen. Befolgen Sie die
Anweisungen unten.
F
La hauteur de la table peut être réglée à l'aide des vérins fixés aux pieds de la table selon la
fourchette indiquée sur l'illustration. Placez le produit à l'horizontale à l'aide des vérins.
∗Lors du réglage des vérins, tenez le produit à l'aide d'une ou de plusieurs personnes pour
éviter de vous coincer les doigts. Suivez les instructions ci-dessous.
E
La altura de la mesa se puede regular con los niveladores que aparecen en la parte inferior
de la base de la mesa como se muestra en la ilustración. Coloque el producto en posición
horizontal utilizando estos niveladores.
∗Al regular los niveladores, sujete el producto con la ayuda de dos o más personas para que
no pillarse las manos o los dedos. Sigas las instrucciones que aparecen a continuación.
I
I piedini livellanti fissati alla parte inferiore della base del tavolo permettono di regolare l’altezza
del tavolo nell’intervallo di regolazione indicato nell’illustrazione. Installare il prodotto in
orizzontale utilizzando i piedini livellanti.
∗Durante la regolazione dei piedini livellanti farsi aiutare da due o più persone per sorreggere
il prodotto, onde evitare di schiacciarsi le mani o le dita. Attenersi alle istruzioni riportate di
seguito.
NL
U kunt de hoogte van de tafel verstellen met behulp van de stelvoetjes die aan de onderkant
van de tafelbasis bevestigd zijn, binnen het bereik dat getoond is in de illustratie. Plaats het
product horizontaal met behulp van deze stelvoetjes.
∗Houd tijdens het verstellen van de stelvoetjes het product vast met twee of meer personen
zodat uw handen of vingers niet klem raken. Volg de instructies onderaan.
0-15mm/0-1/2inch
GB
Up
D
Nach oben
F
Vers le haut
E
Hacia arriba
I
Alzare
NL
Omhoog
GB
Adjust the level by rotating the levelers.
D
Richten Sie das Produkt eben aus, indem Sie die
Ausgleichstücke drehen.
F
Réglez le niveau en vissant les vérins.
E
Para regular el nivel, gire los niveladores.
I
Per regolare il livello, ruotare i piedini livellanti.
NL
Verstel de hoogte door aan de stelvoetjes te draaien.
GB
Down
D
Nach unten
F
Vers le bas
E
Hacia abajo
I
Abbassare
NL
Omlaag
Operation guide (1) - Bedienungsanleitung (1) - Mode d'emploi (1) - Guía de
operación (1) - Guida al funzionamento (1) - Bedieningshandleiding (1)
¢ Wiring route - Kabelführung - Gestion des câbles - Ruta del cableado - Instradamento
dei cavi - Bekabeling
GB
The power cable or LAN cable connected from the floor must be protected with the cable guard.
Stow the extra cord lengths in the cable tray.
∗When wiring the cables, lift the tabletop to the top level so that the cables do not get
disconnected when adjusting the tabletop height.
D
Netz- oder LAN-Kabel, die über den Boden zum Tisch verlaufen, müssen mit dem Kabelschutz
geschützt werden. Verstauen Sie die überschüssige Kabellänge im Kabelfach.
∗Wenn Sie die Kabel verlegen, heben Sie die Tischplatte auf die höchste Höhe an, sodass die
Kabel nicht getrennt werden, wenn Sie die Höhe der Tischplatte anpassen.
F
Le cordon d'alimentation ou le câble LAN branché au sol doit être protégé à l'aide d'un protège-
câbles. Passez complètement les câbles dans le passe-câbles.
∗Lors du câblage, relevez le dessus de la tablette à la hauteur maximum de façon à éviter de
débrancher les câbles lors du réglage de la hauteur du dessus de la tablette.
E
El cable de alimentación o el cable LAN conectados desde el suelo, deben protegerse con el
protector para cables. Guarde el cable restante en la bandeja para cables.
∗Al realizar el cableado, eleve el tablero al nivel más alto, de forma que los cables no se
desconecten al regular la altura del mismo.
I
Il cavo di alimentazione o cavo LAN proveniente dal pavimento deve essere protetto con l’apposita
protezione. Organizzare i cavi inserendo le sezioni di lunghezza eccessiva all’interno del portacavi.
∗Durante l'esecuzione dei cablaggi portare il piano del tavolo all’altezza massima, onde evitare
che i cavi vengano scollegati durante la regolazione in altezza del piano del tavolo.
NL
De voedingskabel of de LAN-kabel die vanaf de vloer aangesloten zijn, moeten beschermd zijn
door de kabelbeschermer. Berg de extra snoerlengtes op in de kabelgoot.
∗Tijdens het aansluiten van de kabels, haalt u het tafelblad omhoog tot de bovenste hoogte zodat
de kabels niet worden losgekoppeld bij het verstellen van de hoogte van het tafelblad.

2423
Operation guide (1) - Bedienungsanleitung (1) - Mode d'emploi (1) - Guía de
operación (1) - Guida al funzionamento (1) - Bedieningshandleiding (1)
Work table - Schreibtisch - Bureau - Escritorio - Scrivania - Bureau
a
b
c
GB
When a power strip was used
D
Wenn eine Mehrfachsteckdose verwendet
wird
F
Avec rallonge électrique
E
Cuando se utiliza una regleta
I
Se si utilizza una ciabatta
NL
Wanneer u een stekkerdoos gebruikt
GB
When a power strip was not used
D
Wenn keine Mehrfachsteckdose verwendet
wird
F
Sans rallonge électrique
E
Cuando no se utiliza una regleta
I
Se non si utilizza una ciabatta
NL
Wanneer u geen stekkerdoos gebruikt
GB
A power strip with magnet can be attached to the underside of the tabletop or the frame.
Mount a power strip without magnet on the cable tray.
D
Eine Mehrfachsteckdose mit Magnet kann an der Unterseite der Tischplatte oder am Rahmen
befestigt werden.
Platzieren Sie eine Mehrfachsteckdose ohne Magnet im Kabelfach.
F
Une rallonge électrique aimantée peut être fixée sous le dessus de la tablette ou au cadre.
Fixez une rallonge non aimantée sur le passe-câbles.
E
Se puede fijar una regleta con imán a la parte inferior del tablero de la mesa o de la estructura.
Coloque una regleta sin imán en la bandeja de cables.
I
È possibile attaccare una ciabatta magnetica al lato inferiore del piano del tavolo o al telaio.
Se la ciabatta in uso non è magnetica, montarla sul portacavi.
NL
U kunt een stekkerdoos met magneet aan de onderkant van het tafelblad of het kader bevestigen.
Bevestig een stekkerdoos zonder magneet op de kabelgoot.
b
a
GB
Power strip cord
D
Mehrfachsteckdosen-Kabel
F
Cordon d'alimentation de la
rallonge électrique
E
Cable de la regleta
I
Cavo della ciabatta
NL
Stekkerdoossnoer
b
GB
Power cord
D
Netzkabel
F
Cordon d'alimentation
E
Cable de alimentación
I
Cavo di alimentazione
NL
Netsnoer
c
GB
Power strip
D
Mehrfachsteckdose
F
Rallonge électrique
E
Regleta
I
Ciabatta
NL
Stekkerdoos
Operation guide (1) - Bedienungsanleitung (1) - Mode d'emploi (1) - Guía de
operación (1) - Guida al funzionamento (1) - Bedieningshandleiding (1)
Free standing type/L-shaped type - Freistehender
Typ/L-förmiger Typ - Modèle classique / Modèle en
forme de L - Independiente/En L- Tipo autonomo/
Tipo a L - Type zit/sta/Type L-vorm
Bench type - Banktyp - Modèle type établi - Tipo
banco - Tipo a banco - Type bank
d
e
c
fe
c
d
fg
d
GB
Power cable/LAN cable
D
Netzkabel/LAN-Kabel
F
Cordon d'alimentation /
Câble LAN
E
Cable de alimentación/
cable LAN
I
Cavo di alimentazione/
cavo LAN
NL
Voedingskabel/LAN-
kabel
e
GB
Cable tray
D
Kabelfach
F
Passe-câbles
E
Bandeja de cables
I
Portacavi
NL
Kabelgoot
f
GB
Controller
D
Steuergerät
F
Commande
E
Controlador
I
Dispositivo di comando
NL
Controller
g
GB
Wiring duct
D
Kabelkanal
F
Chemin de câbles
E
Conducto para cables
I
Canalina per cablaggio
NL
Bedradingskanaal

2625
Operation guide (1) - Bedienungsanleitung (1) - Mode d'emploi (1) - Guía de
operación (1) - Guida al funzionamento (1) - Bedieningshandleiding (1)
Conference table - Tisch - Table - Mesa - Tavolo - Tafel
d
e
c
b
a
a
GB
Cable cover
D
Kabelabdeckung
F
Capot du cache-câbles
E
Cubierta para cables
I
Copertura cavi
NL
Kabelafdekking
b
GB
Controller
D
Steuergerät
F
Commande
E
Controlador
I
Dispositivo di
comando
NL
Controller
c
GB
Power strip
D
Mehrfachsteckdose
F
Rallonge électrique
E
Regleta
I
Ciabatta
NL
Stekkerdoos
d
GB
Cable guard
D
Kabelschutz
F
Colonne protège-câbles
E
Protector de cables
I
Protezione per cavi
NL
Kabelbeschermer
e
GB
Power cable/LAN cable
D
Netzkabel/LAN-Kabel
F
Cordon d'alimentation / Câble LAN
E
Cable de alimentación/cable LAN
I
Cavo di alimentazione/cavo LAN
NL
Voedingskabel/LAN-kabel
¢ How to use cable cover - So verwenden Sie die Kabelabdeckung - Utilisation des cache-câbles -
Cómo utilizar la cubierta para cables - Come utilizzare la copertura cavi - De kabelafdekking
gebruiken
[Conference table - Tisch - Table - Mesa - Tavolo - Tafel]
GB
Cable cover can be opened from the opposite side of the cable cover receiver. Lift the front
side of the cable cover. Use the cables and power strip with the cover open. For cable
maintenance, remove the cable cover.
D
Die Kabelabdeckung kann über die Seite, die der Kabelabdeckungsaufnahme gegenüber liegt,
geöffnet werden. Heben Sie die Vorderseite der Kabelabdeckung an. Verwenden Sie Kabel
und eine Mehrfachsteckdose bei geöffneter Abdeckung. Entfernen Sie die Kabelabdeckung zu
Wartungszwecken.
F
Le cache-câbles s'ouvre à partir du côté opposé au support du cache-câbles. Soulevez la
partie avant du cache-câbles. Utilisez les câbles et la rallonge électrique avec le cache-câbles
ouvert. Retirez le cache-câbles lors des opérations de gestion des câbles.
Operation guide (1) - Bedienungsanleitung (1) - Mode d'emploi (1) - Guía de
operación (1) - Guida al funzionamento (1) - Bedieningshandleiding (1)
E
La cubierta para cables se puede abrir desde el lado opuesto donde se sitúa el receptor de la
misma. Levante la parte frontal de la cubierta para cables. Utilice los cables y la regleta con la
cubierta abierta. Para realizar labores de mantenimiento en los cables, extraiga la cubierta para
cables.
I
La copertura cavi si apre dal lato opposto del relativo supporto di installazione. Sollevare la
parte anteriore della copertura cavi. Per utilizzare i cavi e la ciabatta, tenere la copertura aperta.
Per eseguire la manutenzione dei cavi, rimuovere la copertura cavi.
NL
De kabelafdekking kan worden geopend vanaf de tegenoverliggende kant van het
bevestigingsstuk van de kabelafdekking. Haal de voorkant van de kabelafdekking omhoog.
Gebruik de kabels en de stekkerdoos met de afdekking open. Verwijder de kabelafdekking voor
de onderhoud van de kabels.
GB
Cable cover
D
Kabelabdeckung
F
Capot du cache-câbles
E
Cubierta para cables
I
Copertura cavi
NL
Kabelafdekking
GB
Cable cover receiver
D
Kabelabdeckungsaufnahme
F
Support du cache-câbles
E
Receptor de la cubierta para
cables
I
Supporto di installazione della
copertura cavi
NL
Bevestigingsstuk van de
kabelafdekking
GB
[Removing the cable cover]
Lift the front side of the cable cover at an angle of 45 degrees and
pull it out.
D
[Entfernen der Kabelabdeckung]
Heben Sie die Vorderseite der Kabelabdeckung in einem Winkel von
45 Grad an und ziehen Sie sie heraus.
F
[Démontage du cache-câbles]
Soulevez la partie avant du cache-câbles selon un angle de 45 degrés
et retirez-le.
E
[Extracción de la cubierta para cables.]
Levante la parte delantera de la cubierta para cables hasta
alcanzar un ángulo de 45 grados y a continuación tire de ella.
I
[Rimozione della copertura cavi]
Alzare la parte anteriore della copertura cavi portandola a un
angolo di 45°, quindi estrarla.
NL
[Verwijdering van de kabelafdekking]
Haal de voorkant van de kabelafdekking omhoog tot het in een hoek van 45 graden zit en trek
ze naar buiten.
GB
Notch
D
Kerbe
F
Encoche
E
Muesca
I
Scanalatura
NL
Inkeping
GB
[Attaching the cable cover]
Attach the notches on the cable cover to the cable cover
receiver and close the cover by rotating it.
D
[Anbringen der Kabelabdeckung]
Setzen Sie die Kerben in der Kabelabdeckung auf die
Kabelabdeckungsaufnahme und schließen Sie die Abdeckung,
indem Sie sie drehen.
F
[Montage du cache-câbles]
Fixez le cache-câbles au support du cache-câbles à l'aide des
encoches, puis fermez le cache-câbles en le tournant.

2827
Operation guide (1) - Bedienungsanleitung (1) - Mode d'emploi (1) - Guía de
operación (1) - Guida al funzionamento (1) - Bedieningshandleiding (1)
E
[Fijación de la cubierta para cables]
Fije las muescas de la cubierta para cables en el receptor de la cubierta para cables y cierre la
cubierta girándola.
I
[Installazione della copertura cavi]
Inserire le scanalature della copertura cavi sul relativo supporto di installazione e chiudere la
copertura ruotandola.
NL
[Bevestiging van de kabelafdekking]
Bevestig de inkepingen van de kabelafdekking op het bevestigingsstuk van de kabelafdekking
en sluit de afdekking door er aan te draaien.
¢ Left/right spacer and connection fitting - Linker/rechter Abstandshalter und
Verbindungsstück - Entretoise de gauche / droite et connecteur - Separadores izquierdo
y derecho y accesorio de conexión - Distanziale sinistro/destro e accessorio di
collegamento - Tussenring links/rechts en aansluitstuk
GB
The left/right spacer or connection fitting must be attached when setting tables facing each
other or side by side. The left/right spacer and connection fitting keep a certain amount of
space between tables and the wall to avoid your fingers or cables being caught.
There are left/right spacers (standard) and connection fittings (optional).
D
Der linke/rechte Abstandshalter bzw. das Verbindungsstück müssen angebracht sein, wenn Sie
Schreibtische gegenüber oder nebeneinander aufstellen. Der linke/rechte Abstandshalter bzw. das
Verbindungsstück sorgen für einen bestimmten Abstand zwischen den Schreibtischen und der
Wand, um zu verhindern, dass Sie sich die Finger einklemmen oder dass sich Kabel verfangen.
Es gibt linke/rechte Abstandshalter (Standard) und Verbindungsstücke (optional).
F
L'entretoise de gauche / droite ou le connecteur doivent se fixer aux bureaux lorsque
ces derniers sont placés face-à-face ou côte-à-côte. L'entretoise de gauche / droite et le
connecteur permettent de laisser un espace entre les bureaux et le mur pour éviter de se
coincer les doigts ou les câbles.
Des entretoises de gauche / droite sont fournies ainsi que des connecteurs (en option).
E
Los separadores izquierdo y derecho y el accesorio de conexión deben colocarse al montarse
los escritorios uno frente al otro o en paralelo. Los separadores izquierdo y derecho y el
accesorio de conexión guardan un espacio determinado entre los escritorios y la pared para
evitar que se pillen los dedos o se aplasten los cables.
Hay separadores izquierdo y derecho (estándares) y accesorios de conexión (opcional).
I
Per collocare installare le scrivanie una di fronte all’altra o installarle in posizione affiancata, è
necessario utilizzare il distanziale sinistro/destro o l’accessorio di collegamento. Il distanziale
sinistro/destro e l’accessorio di collegamento servono a distanziare le scrivanie tra di loro ed
alla parete, onde evitare di schiacciarsi le dita o di comprimere i cavi.
Sono disponibili distanziali destri/sinistri (di serie) e accessori di collegamento (opzionali).
NL
De tussenring links/rechts of het aansluitstuk moeten worden bevestigd bij plaatsing van
bureaus tegenover elkaar of naast elkaar. De tussenring links/rechts en het aansluitstuk houden
een bepaalde hoeveelheid ruimte tussen de bureaus en de muur om te voorkomen dat uw
vingers of kabels klem raken.
Er zijn tussenringen links/rechts (standaard) en aansluitstukken (optioneel).
Operation guide (1) - Bedienungsanleitung (1) - Mode d'emploi (1) - Guía de
operación (1) - Guida al funzionamento (1) - Bedieningshandleiding (1)
GB
Tabletop spacer
D
Tischplatten-Abstandshalter
F
Entretoise du dessus de la
tablette
E
Separadores del tablero de
la mesa
I
Distanziale per piano del
tavolo
NL
Tussenring voor tafelblad
GB
Wall
D
Wand
F
Mur
E
Pared
I
Parete
NL
Muur
b
a
a
GB
Left/right spacer (standard)
∗Always use when setting tables side by side or
along a wall.
D
Linker/rechter Abstandshalter (Standard)
∗Verwenden Sie diese immer, wenn Sie
Schreibtische nebeneinander oder entlang einer
Wand aufstellen.
F
Entretoise de gauche / droite (fournies)
∗Utilisez-les lorsque vous placez les bureaux
côte-à-côte ou contre un mur.
E
Separadores izquierdo y derecho (estándares)
∗Utilícelos siempre que se disponga a montar
los escritorios uno al lado del otro o frente a la
pared.
I
Distanziale sinistro/destro (di serie)
∗Utilizzare sempre qualora le scrivanie vengano
posizionate affiancate o lungo una parete.
NL
Tussenring links/rechts (standaard)
∗Steeds gebruiken bij plaatsing van bureaus
naast elkaar of langs een muur.
b
GB
Opposite table connector (optional)
∗Always use when setting tables facing each
other.
D
Verbindungsstück (optional)
∗Verwenden Sie diese immer, wenn Sie die
Schreibtische einander gegenüber aufstellen.
F
Connecteur (en option)
∗Utilisez-les lorsque vous placez les bureaux
face-à-face.
E
Accesorio de conexión (opcional)
∗Utilícelo siempre que se disponga a montar los
escritorios uno frente al otro.
I
Accessorio di collegamento (opzionale)
∗Utilizzare sempre qualora le scrivanie vengano
posizionate l’una di fronte all’altra.
NL
Aansluitstuk (optioneel)
∗Steeds gebruiken bij plaatsing van bureaus
tegenover elkaar.

3029
Operation guide (1) - Bedienungsanleitung (1) - Mode d'emploi (1) - Guía de
operación (1) - Guida al funzionamento (1) - Bedieningshandleiding (1)
Left/right spacer (standard) - Linker/rechter Abstandshalter (Standard) -
Entretoise de gauche / droite (fournies) - Separadores izquierdo y derecho (estándares) -
Distanziale sinistro/destro (di serie) - Tussenring links/rechts (standaard)
GB
Rotate the spacer to get it out.
D
Drehen Sie den Abstandshalter,
um ihn herauszudrehen.
F
Tournez l'entretoise pour la retirer.
E
Gire el separador para sacarlo.
I
Per estrarre il distanziale, ruotarlo.
NL
Draai aan de tussenring om hem
weg te halen.
When stored -
Bei der Lagerung -
En position rangée -
Cuando está guardado -
Posizione di
immagazzinamento -
In bewaring
When using -
Bei der Verwendung -
En fonctionnement -
Cuando está en uso -
Posizione di utilizzo -
In gebruik
Opposite table connector (optional) - Verbindungsstück (optional) - Connecteur (en option) -
Accesorio de conexión (opcional) - Accessorio di collegamento (opzionale) - Aansluitstuk (optioneel)
GB
Opposite table connector (optional)
D
Verbindungsstück (optional)
F
Connecteur (en option)
E
Accesorio de conexión (opcional)
I
Accessorio di collegamento (opzionale)
NL
Aansluitstuk (optioneel)
Caution - Achtung - Attention - Precaución - Attenzione - Waarschuwing
GB
Always remove the opposite table connector when moving the table.
D
Entfernen Sie immer das Verbindungsstück, wenn Sie den Tisch verschieben.
F
Retirez le connecteur lorsque vous déplacez le bureau.
E
Retire siempre el accesorio de conexión cuando vaya a trasladar el escritorio.
I
Rimuovere sempre l’accessorio di collegamento per spostare la scrivania.
NL
Verwijder steeds de tussenring bij verplaatsing van het bureau.
Adjusting the tabletop height – Anpassen der Höhe der Tischplatte –
Réglage de la hauteur du dessus de la tablette – Regulación de la altura del
tablero de la mesa – Regolazione dell’altezza del piano del tavolo –
Verstelling van de hoogte van het tafelblad
GB
You can adjust the tabletop height with the control panel. You can also use memory function to adjust the tabletop at
a saved height. You can save up to three height preferences.
D
Sie können die Höhe der Tischplatte über das Bedienfeld verstellen. Sie können auch die Speicherfunktion nutzen,
um die Tischplatte auf eine gespeicherte Höhe einzustellen. Sie können bis zu drei Höheneinstellungen speichern.
F
Réglez la hauteur du dessus de la tablette à l'aide du panneau de contrôle. Utilisez la mémoire pour régler le dessus
de la tablette à la hauteur préalablement enregistrée. Sauvegardez trois hauteurs différentes.
E
Puede regular la altura del tablero de la mesa con el panel de control. También puede utilizar la función de memoria
para regular el tablero de la mesa a una altura guardada. Puede guardar hasta tres tipos de alturas preferentes.
I
Per regolare l’altezza del piano del tavolo si utilizza il pannello di controllo. È inoltre disponibile una funzione di
memoria che permette di portare il piano del tavolo a un’altezza precedentemente salvata. È possibile salvare fino a
tre altezze preferite.
NL
U kunt de hoogte van het tafelblad verstellen met behulp van het bedieningspaneel. U kunt ook de geheugenfunctie
gebruiken om het tafelblad op een opgeslagen hoogte te verstellen. U kunt tot drie hoogtevoorkeuren opslaan.
Warning - Warnung - Avertissement - Advertencia - Avvertenza - Waarschuwing
GB
Do not adjust the tabletop height consecutively for more than one minute.
If the tabletop height is adjusted consecutively for one minute, do not operate for at least
10 minutes. Failure to do so may cause a malfunction.
D
Passen Sie die Höhe der Tischplatte nicht fortlaufend länger als eine Minute an.
Wenn die Höhe der Tischplatte fortlaufend länger als eine Minute verstellt wird,
unterlassen Sie für mindestens 10 Minuten jegliche Bedienung. Andernfalls kann es zu
einer Fehlfunktion kommen.
F
Le processus de réglage de la hauteur du dessus de la tablette ne doit pas dépasser une
minute.
Si le processus de réglage de la hauteur de la table dépasse une minute, attendez au
moins 10 minutes avant d'utiliser le produit. Le non-respect de ces consignes peut
provoquer un risque de dysfonctionnement.
E
No regule la altura del tablero de la mesa de forma continuada durante más de un minuto.
Si se regula el tablero de la mesa de forma ininterrumpida durante más de un minuto, no
lo utilice durante al menos 10 minutos. De lo contrario puede ocasionarse un fallo en el
funcionamiento.
I
Non azionare il meccanismo di regolazione dell’altezza del piano del tavolo per più di un
minuto consecutivamente.
Se il meccanismo di regolazione dell’altezza del piano del tavolo è stato azionato per
un minuto, attendere almeno 10 minuti prima di azionarlo nuovamente. La mancata
osservanza di questa istruzione potrebbe causare anomalie di funzionamento.
NL
Verstel continu de hoogte van het tafelblad niet langer dan een minuut.
Als de hoogte van het tafelblad continu versteld wordt gedurende een minuut, mag u
het niet bedienen gedurende minstens 10 minuten. Als u dit nalaat, kan dit leiden tot een
storing.

3231
Adjusting the tabletop height – Anpassen der Höhe der Tischplatte –
Réglage de la hauteur du dessus de la tablette – Regulación de la altura del
tablero de la mesa – Regolazione dell’altezza del piano del tavolo –
Verstelling van de hoogte van het tafelblad
¢ Control panel names - Bedienfeld-Bezeichnungen - Fonctions du panneau de contrôle -
Nombres del panel de control - Nomenclatura del pannello di controllo - Bedieningspaneelnamen
Control panel with indicator -
Bedienfeld mit Anzeige -
Panneau de contrôle avec
indicateur - Panel de control
con indicador - Pannello di
controllo con indicatore -
Bedieningspaneel met
indicator
a
c d e
b
Control panel without indicator -
Bedienfeld ohne Anzeige -
Panneau de contrôle sans
indicateur - Panel de control sin
indicador - Pannello di controllo
senza indicatore -
Bedieningspaneel zonder
indicator
c d
a
GB
Memory (1-3)
D
Speicher (1-3)
F
Mémoire (1-3)
E
Memoria (1-3)
I
Memoria (1-3)
NL
Geheugen (1-3)
b
GB
Indicator
D
Anzeige
F
Indicateur
E
Indicador
I
Indicatore
NL
Indicator
c
GB
Higher button
D
Höher-Taste
F
Flèche vers le haut
E
Botón Elevar
I
Pulsante di sollevamento
NL
Knop hoger
d
GB
Lower button
D
Niedriger-Taste
F
Flèche vers le bas
E
Botón Bajar
I
Pulsante di abbassamento
NL
Knop lager
e
GB
Save setting button
D
Taste zum Speichern der Einstellung
F
Touche Enregistrement
E
Botón Guardar configuración
I
Pulsante di salvataggio dell’impostazione
NL
Knop instelling opslaan
f
GB
Higher
D
Höher
F
Vers le haut
E
Elevar
I
Disollevamento
NL
Hoger
g
GB
Lower
D
Niedriger
F
Vers le bas
E
Bajar
I
Di abbassamento
NL
Lager
¢ Operation guide - Bedienungsanleitung - Mode d'emploi -
Guía de operación - Guida al funzionamento - Bedieningshandleiding
Higher/Lower button - Höher/Niedriger taste - Flèche vers le haut / vers le bas - Elevar/Bajar
botón - Sollevamento/abbassamento pulsante - Hoger/lager -knop ( )
GB
Press and hold the Higher ( )/Lower ( ) button to adjust the tabletop height.
D
Halten Sie die Taste Höher ( )/Niedriger ( ) gedrückt, um die Höhe der Tischplatte einzustellen.
F
Appuyez sur la flèche vers le haut ( ) / vers le bas ( ) sans la relâcher pour régler la hauteur du
dessus de la tablette.
E
Presione y mantenga pulsado el botón Elevar ( )/ o Bajar ( ) para regular la altura del tablero de
la mesa.
I
Per regolare l’altezza del piano del tavolo, mantenere premuto il pulsante di sollevamento ( )/
abbassamento ( ).
NL
Houd de hoger ( )/lager ( )-knop ingedrukt om de hoogte van het tafelblad te verstellen.
Adjusting the tabletop height – Anpassen der Höhe der Tischplatte –
Réglage de la hauteur du dessus de la tablette – Regulación de la altura del
tablero de la mesa – Regolazione dell’altezza del piano del tavolo –
Verstelling van de hoogte van het tafelblad
Stopping the tabletop manually/automatically - Manuelles/automatisches Stoppen der
Tischplatte - Arrêt manuel / automatique du dessus de la tablette - Suspensión del modo
manual o automático del tablero de la mesa - Arresto manuale/automatico del piano del
tavolo - Het tafelblad handmatig/automatisch stoppen
GB
· Release the Higher ( )/Lower ( ) button when the tabletop reaches the height you want.
· When the tabletop reaches the maximum/minimum height, it stops moving automatically.
· When the Safety Reverse Function is activated, it stops moving and reverses automatically even
if the button is being pressed.
D
· Lassen Sie die Taste Höher ( )/Niedriger ( ) los, wenn die Tischplatte die gewünschte Höhe
erreicht hat.
· Wenn die Tischplatte die maximale/minimale Höhe erreicht hat, stoppt sie automatisch.
· Wenn die Sicherheitsumkehrfunktion aktiviert wurde, stoppt die Bewegung und wird automatisch
umgekehrt, auch wenn die Taste gedrückt wird.
F
· Relâchez la flèche vers le haut ( ) / vers le bas ( ) lorsque le dessus de la tablette atteint la
hauteur souhaitée.
· Lorsque le dessus de la tablette atteint la hauteur maximum / minimum, il s'arrête
automatiquement.
· Lorsque la fonction de sécurité de mouvement inverse est activée, il s'arrête et repart
automatiquement en sens inverse même si vous appuyez sur la touche.
E
· Suelte el botón Elevar ( )/ o Bajar ( ) cuando el tablero de la mesa haya alcanzado la altura
deseada.
· Una vez que el tablero de la mesa alcanza la altura máxima o mínima, este deja de moverse de
forma automática.
· Cuando la función de retroceso de seguridad está activada, deja de moverse y retrocede
automáticamente aunque siga presionando el botón.
I
· Quando il piano del tavolo avrà raggiunto l’altezza desiderata, rilasciare il pulsante di sollevamento
()/abbassamento ( ).
· Al raggiungimento dell’altezza massima/minima, il piano del tavolo si arresta automaticamente.
· Se è stata attivata la funzione di inversione di sicurezza, il piano del tavolo si arresta e inverte
automaticamente la direzione di movimento, anche se si mantiene premuto il pulsante.
NL
· Laat de hoger ( )/lager ( )-knop los wanneer het tafelblad de gewenste hoogte heeft bereikt.
· Wanneer het tafelblad de maximale/minimale hoogte heeft bereikt, stopt het automatisch.
· Wanneer de functie voor veiligheidsomkeer wordt geactiveerd, stopt het en keert het automatisch
terug zelfs als de knop ingedrukt is.

3433
Adjusting the tabletop height – Anpassen der Höhe der Tischplatte –
Réglage de la hauteur du dessus de la tablette – Regulación de la altura del
tablero de la mesa – Regolazione dell’altezza del piano del tavolo –
Verstelling van de hoogte van het tafelblad
Adjusting the tabletop height to the saved position - Anpassen der Tischplattenhöhe auf
eine gespeicherte Position - Réglage du dessus de la tablette à la hauteur sauvegardée -
Regulación de la altura del tablero de la mesa a la posición guardada - Impostazione nel
piano del tavolo all’altezza memorizzata - Verstelling van de hoogte van het tafelblad naar de
opgeslagen stand
GB
Pressing and holding the Memory button moves the tabletop to the height you saved.
D
Wenn Sie die Speicher-Taste gedrückt halten, wird die Tischplatte in die gespeicherte Höhe
gefahren.
F
Appuyez sur la touche Mémoire sans la relâcher pour régler le dessus de la tablette à la hauteur
préalablement sauvegardée.
E
Al mantener pulsado el botón Memoria, el tablero de la mesa alcanza la altura que ha guardado.
I
Tenendo premuto il pulsante Memoria, è possibile portare il piano del tavolo a un’altezza
memorizzata in precedenza.
NL
Houd de geheugenknop ingedrukt om het tafelblad naar de hoogte te verplaatsen die u heeft
opgeslagen.
Indicator - Anzeige - Indicateur - Indicador - Indicatore - Indicator
GB
Displays the tabletop height.
D
Zeigt die Höhe der Tischplatte an.
F
Affiche la hauteur du dessus de la tablette.
E
Muestra la altura del tablero de la mesa.
I
Visualizza l’altezza del piano del tavolo.
NL
Geeft de hoogte van het tafelblad weer.
Adjusting the tabletop height – Anpassen der Höhe der Tischplatte –
Réglage de la hauteur du dessus de la tablette – Regulación de la altura del
tablero de la mesa – Regolazione dell’altezza del piano del tavolo –
Verstelling van de hoogte van het tafelblad
How to save your setting - So speichern Sie Ihre Einstellung - Sauvegarde de vos réglages -
Cómo guardar su configuración - Salvataggio dell’impostazione - Uw instelling opslaan
GB
a Adjust the tabletop height of your preference with the Higher ( )/Lower ( ) button.
b Press the Save setting ( ) button. "S" blinks for two seconds.
c While it blinks, press either Memory button (1 ( ), 2 ( ), or 3 ( )). The memory button
number is displayed and the positon is saved.
D
a Passen Sie die Höhe der Tischplatte nach Ihren Wünschen mit der Taste Höher ( )/Niedriger
() an.
b Drücken Sie die Taste zum Speichern der Einstellung ( ). „S“ blinkt zwei Sekunden lang.
c Drücken Sie in dieser Zeit eine der Speicher-Tasten (1 ( ), 2 ( ) oder 3 ( )). Die Nummer der
Speichertaste wird angezeigt und die Position wird gespeichert.
F
a Réglez le dessus de la tablette à la hauteur souhaitée à l'aide de la flèche vers le haut ( ) / vers
le bas ( ).
b Appuyez sur la touche Enregistrement ( ). La lettre « S » clignote pendant deux secondes.
c Pendant ce temps, appuyez sur la touche Mémoire (1 ( ), 2 ( ), ou 3 ( )). Le numéro de la
touche Mémoire s'affiche et la position est sauvegardée.
E
a Regule la altura del tablero de la mesa según sus preferencias con el botón Elevar ( )/ o Bajar
().
b Presione el botón Guardar configuración ( ). “S” parpadea durante dos segundos.
c Mientras parpadea, presione cualquiera de los botones de Memoria, (1( ), 2 ( ) o 3 ( )). Se
muestra el número del botón de memoria y se guarda la posición.
I
a Portare il piano del tavolo all’altezza desiderata premendo il pulsante di sollevamento ( )/
abbassamento ( ).
b Premere il pulsante di salvataggio dell’impostazione ( ). “S” lampeggia per due secondi.
c Mentre lampeggia, premere il pulsante Memoria (1 ( ), 2 ( ) o 3 ( )). Viene visualizzato il
numero di memorizzazione e la posizione viene salvata.
NL
a Verstel de hoogte van het tafelblad volgens uw voorkeur met de hoger ( )/lager ( )-knop.
b Druk op de knop om de instelling op te slaan ( ). "S" knippert gedurende twee seconden.
c Terwijl het knippert, drukt u op een van de geheugenknoppen (1 ( ), 2 ( ) of 3 ( )). De
geheugenknopnummer wordt weergegeven en de stand wordt bewaard.
How to initialize the setting - So initialisieren Sie die Einstellung - Initialisation des réglages -
Cómo iniciar la configuración - Inizializzazione dell’impostazione - De instelling initialiseren
GB
· Follow the procedure below after unplugging or re-plugging the product.
a When the height adjustable unit is at the minimum height, press and hold the Lower ( ) button
for more than 10 seconds.
b The height adjustable unit moves down for 10mm/0.3in and the initial settings are complete.
D
· Befolgen Sie die Schritte unten, nachdem Sie das Produkt getrennt oder wieder angeschlossen
haben.
a Wenn sich der höhenverstellbare Tisch auf der Mindesthöhe befindet, halten Sie die Niedriger-
Taste ( ) länger als 10 Sekunden gedrückt.
b Die Einheit zur Höhenverstellung bewegt sich 10 mm/0,3 Zoll nach unten und die
Grundeinstellung ist abgeschlossen.

3635
Adjusting the tabletop height – Anpassen der Höhe der Tischplatte –
Réglage de la hauteur du dessus de la tablette – Regulación de la altura del
tablero de la mesa – Regolazione dell’altezza del piano del tavolo –
Verstelling van de hoogte van het tafelblad
F
· Suivez les étapes ci-dessous après avoir débranché ou rebranché le produit.
a Lorsque le dispositif de réglage est à la hauteur minimum, appuyez sur la flèche vers le bas ( )
sans la relâcher pendant plus de 10 secondes.
b Le dispositif de réglage de la hauteur descend sur 10 mm (0,3") pour effectuer les réglages
d'origine.
E
· Siga el procedimiento que aparece a continuación una vez que se haya desconectado y vuelto
a conectar el producto.
a Cuando la unidad de altura ajustable esté a la altura mínima, presione y mantenga pulsado el
botón Bajar ( ) durante más de 10 segundos.
b La unidad de altura regulable desciende a 10 mm o 0,3 pulgadas y se completan los ajustes
iniciales.
I
· Dopo aver scollegato o ricollegato il prodotto all’alimentazione elettrica, attenersi alla seguente
procedura.
a Quando l’unità regolabile in altezza si trova all’altezza minima, premere e mantenere premuto il
pulsante di abbassamento ( ) per almeno 10 secondi.
b L’unità regolabile in altezza scende di 10 mm (0,3 pollici), dopodiché le impostazioni iniziali sono
concluse.
NL
· Volg de procedure onderaan nadat u het netsnoer van het product uit het stopcontact heeft
getrokken en het opnieuw heeft ingestoken.
a Wanneer de in hoogte verstelbare eenheid de minimale hoogte heeft bereikt, houdt u de lager
()-knop meer dan 10 seconden omlaag ingedrukt.
b De in hoogte verstelbare eenheid daalt 10 mm/0,3 in, en de initiële instellingen zijn voltooid.
How to initialize the tabletop height - So initialisieren Sie die Höhe der Tischplatte - Initialisation
de la hauteur du dessus de la tablette - Cómo iniciar la altura del tablero de la mesa -
Inizializzazione dell’altezza del piano del tavolo - De hoogte van het tafelblad initialiseren
GB
* Follow the procedure below when the actual tabletop height and the height displayed in the
indicator differ.
a Move the tabletop to the maximum height (1250mm/49inch) to perform the indicator settings.
b Press the Higher ( )/Lower ( ) button simultaneously for approximately 5 seconds so that the
table height currently set is displayed after “- - -” lights.
c Press the Higher ( )/Lower ( ) button to set the height displayed in the indicator to
1250mm/49inch.
d When approximately 5 seconds pass after releasing all buttons, the displayed number flashes,
completing the setting.
D
* Befolgen Sie die Schritte unten, wenn die tatsächliche Höhe der Tischplatte und die in der
Anzeige angezeigte Höhe voneinander abweichen.
a Heben Sie die Tischplatte auf die maximale Höhe an (1.250 mm/49 Zoll), um die
Anzeigeeinstellungen durchzuführen.
b Drücken Sie gleichzeitig die Taste Höher ( )/Niedriger ( ) ungefähr 5 Sekunden lang, sodass
die derzeit eingestellte Tischhöhe angezeigt wird, nachdem „- - -“ leuchtet.
c Drücken Sie die Taste Höher ( )/Niedriger ( ), um die in der Anzeige angezeigte Höhe auf
125 (mm)/49 (Zoll) einzustellen.
d Ungefähr 5 Sekunden nach dem Loslassen der Tasten blinkt die angezeigte Zahl und die
Einstellung ist abgeschlossen.
Adjusting the tabletop height – Anpassen der Höhe der Tischplatte –
Réglage de la hauteur du dessus de la tablette – Regulación de la altura del
tablero de la mesa – Regolazione dell’altezza del piano del tavolo –
Verstelling van de hoogte van het tafelblad
F
* Suivez les étapes ci-dessous lorsque la hauteur du dessus de la tablette ne correspond pas à
la valeur indiquée.
a Placez le dessus de la tablette à la hauteur maximum (1250 mm / 49") pour procéder au
réglage de l'indicateur.
b Appuyez sur la flèche vers le haut ( ) / le bas ( ) simultanément pendant environ 5 secondes
pour afficher la hauteur après l'indication « - - - ».
c Appuyez sur la flèche vers le haut ( ) / le bas ( ) pour régler la hauteur selon la valeur
indiquée à 125 mm (49").
d Environ 5 secondes après avoir relâché toutes les touches, la valeur s'affiche en clignotant pour
terminer le réglage.
E
* Siga el procedimiento que aparece a continuación cuando la altura actual del tablero de la
mesa y la altura que se muestra en el indicador son diferentes.
a Mueve el tablero de la mesa a la altura máxima (1250 mm o 49 pulgadas) para realizar la
configuración de los indicadores.
b Presione el botón Elevar ( )/ o Bajar ( ) de forma simultánea durante aproximadamente 5
segundos de manera que la altura del escritorio que actualmente está fijada, se muestra tras
las luces “- - -”.
c Presione el botón Elevar ( )/ o Bajar ( ) para establecer la altura que se muestra en el
indicador de 125 mm o 49 pulgadas.
d Una vez transcurridos aproximadamente 5 segundos después de dejar de pulsar todos los
botones, se muestra el número y se completa la configuración.
I
* In caso di discrepanza tra l’altezza effettiva del piano del tavolo e l’altezza visualizzata
dall’indicatore, attenersi alla seguente procedura.
a Portare il piano del tavolo all’altezza massima (1250 mm/49 pollici) per eseguire le impostazioni
dell’indicatore.
b Premere contemporaneamente i pulsanti di sollevamento ( )/abbassamento ( ) per circa 5
secondi, in modo che l’indicazione dell’altezza della scrivania impostata, visualizzata dopo “- -
-”, si illumini.
c Premere il pulsante di sollevamento ( )/abbassamento ( ) per impostare l’altezza visualizzata
dall’indicatore a 125 mm (49 pollici).
d Dopo 5 secondi da quando si saranno rilasciati tutti i pulsanti, il numero visualizzato
lampeggerà, per indicare che l’impostazione è stata completata.
NL
* Volg de procedure onderaan als de eigenlijke hoogte van het tafelblad en de weergegeven
hoogte op de indicator verschillen.
a Verplaats het tafelblad naar de maximale hoogte (1.250 mm/49 in) om de instellingen van de
indicator uit te voeren.
b Druk tegelijk op de hoger ( )/lager ( )-knop gedurende ongeveer 5 seconden zodat de
hoogte van het bureau dat momenteel is ingesteld wordt weergegeven nadat "- - -" brandt.
c Druk op de hoger ( )/lager ( )-knop om de hoogte die wordt weergegeven op de indicator op
125 (mm)/49 (in.) in te stellen.
d Ongeveer 5 seconden na het loslaten van alle knoppen, knippert het weergegeven nummer, en
de instelling is voltooid.

3837
Adjusting the tabletop height – Anpassen der Höhe der Tischplatte –
Réglage de la hauteur du dessus de la tablette – Regulación de la altura del
tablero de la mesa – Regolazione dell’altezza del piano del tavolo –
Verstelling van de hoogte van het tafelblad
¢ Control panel names - Bedienfeld-Bezeichnungen - Fonctions du panneau de contrôle -
Nombres del panel de control - Nomenclatura del pannello di controllo - Bedieningspaneelnamen
Control panel with indicator
(Lever type) - Bedienfeld mit
Anzeige (Hebeltyp) - Panneau
de contrôle avec indicateur
(de type levier) - Panel
de control con indicador
(Tipo palanca) - Pannello di
controllo con indicatore (Tipo
a leva) - Bedieningspaneel
met indicator (Type hefboom)
a
cd
b
Control panel without indicator
(Lever type) - Bedienfeld ohne
Anzeige (Hebeltyp) - Panneau
de contrôle sans indicateur
(de type levier) - Panel de
control sin indicador (Tipo
palanca) - Pannello di controllo
senza indicatore (Tipo a leva)
- Bedieningspaneel zonder
indicator (Type hefboom)
c
a
GB
Memory (1-3)
D
Speicher (1-3)
F
Mémoire (1-3)
E
Memoria (1-3)
I
Memoria (1-3)
NL
Geheugen (1-3)
b
GB
Indicator
D
Anzeige
F
Indicateur
E
Indicador
I
Indicatore
NL
Indicator
c
GB
Up/Down lever
D
Anheben-/Absenken-Hebel
F
Levier Monter/Descendre
E
Palanca de subida/bajada
I
Leva di sollevamento/
abbassamento
NL
Omhoog/omlaag-hendel
d
GB
Save setting button
D
Taste zum Speichern der
Einstellung
F
Touche Enregistrement
E
Botón Guardar configuración
I
Pulsante di salvataggio
dell’impostazione
NL
Knop instelling opslaan
¢ Operation guide - Bedienungsanleitung - Mode d'emploi -
Guía de operación - Guida al funzionamento - Bedieningshandleiding
Up/Down lever - Anheben-/Absenken-Hebel - Levier Monter/Descendre - Palanca de subida/
bajada - Leva di sollevamento/abbassamento - Omhoog/omlaag-hendel
GB
Push the lever upward to raise the tabletop, or push the lever downward to lower the tabletop.
D
Drücken Sie den Hebel nach oben, um die Tischplatte anzuheben, und drücken Sie den Hebel
nach unten, um die Tischplatte abzusenken.
F
Relevez ou abaissez le levier pour faire monter ou descendre le dessus de la tablette.
E
Mueva la palanca hacia arriba para subir el tablero de la mesa o hacia abajo para bajarlo.
I
Spingere la leva verso l’alto per sollevare il piano del tavolo oppure spingere la leva verso il basso
per abbassare il piano del tavolo.
NL
Druk de hendel omhoog om het tafelblad te doen stijgen, of druk de hendel omlaag om het
tafelblad te doen dalen.
Stopping the tabletop manually/automatically - Manuelles/automatisches Stoppen der
Tischplatte - Arrêt manuel / automatique du dessus de la tablette - Suspensión del modo
manual o automático del tablero de la mesa - Arresto manuale/automatico del piano del
tavolo - Het tafelblad handmatig/automatisch stoppen
GB
· Release the Up/Down lever when the tabletop reaches the height you want.
· When the tabletop reaches the maximum/minimum height, it stops moving automatically.
· When the Safety Reverse Function is activated, it stops moving and reverses automatically, even
if the lever is being operated.
D
· Lassen Sie den Anheben-/Absenken-Hebel los, wenn die Tischplatte die gewünschte Höhe
erreicht hat.
· Wenn die Tischplatte die maximale/minimale Höhe erreicht hat, stoppt sie automatisch.
· Wenn die Sicherheitsumkehrfunktion aktiviert wurde, stoppt die Bewegung und wird automatisch
umgekehrt, auch wenn der Hebel gedrückt wird.
Adjusting the tabletop height – Anpassen der Höhe der Tischplatte –
Réglage de la hauteur du dessus de la tablette – Regulación de la altura del
tablero de la mesa – Regolazione dell’altezza del piano del tavolo –
Verstelling van de hoogte van het tafelblad
F
· Relâchez le levier Monter/Descendre dès que le dessus de la tablette est à la hauteur voulue.
· Lorsque le dessus de la tablette atteint la hauteur maximum / minimum, il s'arrête
automatiquement.
· Lorsque la fonction de sécurité de mouvement inverse est activée, le dessus de la tablette s’arrête
et repart automatiquement en sens inverse, même si vous actionnez le levier.
E
· Suelte la palanca de subida/bajada cuando el tablero de la mesa llegue a la altura deseada.
· Una vez que el tablero de la mesa alcanza la altura máxima o mínima, este deja de moverse de
forma automática.
· Cuando la función de retroceso de seguridad está activada, deja de moverse y retrocede
automáticamente aunque siga moviendo la palanca.
I
· Rilasciare la leva di sollevamento/abbassamento quando il piano del tavolo raggiunge l’altezza
desiderata.
· Al raggiungimento dell’altezza massima/minima, il piano del tavolo si arresta automaticamente.
· Quando la funzione di inversione di sicurezza è attivata, il piano si arresta e inverte
automaticamente la direzione di movimento, anche se si agisce sulla leva.
NL
· Laat de omhoog/omlaag-hendel los wanneer het tafelblad de gewenste hoogte heeft bereikt.
· Wanneer het tafelblad de maximale/minimale hoogte heeft bereikt, stopt het automatisch.
· Wanneer de functie voor veiligheidsomkeer wordt geactiveerd, stopt het en keert het automatisch
terug zelfs als de hendel bediend is.
Adjusting the tabletop height to the saved position - Anpassen der Tischplattenhöhe auf
eine gespeicherte Position - Réglage du dessus de la tablette à la hauteur sauvegardée -
Regulación de la altura del tablero de la mesa a la posición guardada - Impostazione nel
piano del tavolo all’altezza memorizzata - Verstelling van de hoogte van het tafelblad naar de
opgeslagen stand
GB
Pressing and holding the Memory button moves the tabletop to the height you saved.
D
Wenn Sie die Speicher-Taste gedrückt halten, wird die Tischplatte in die gespeicherte Höhe
gefahren.
F
Appuyez sur la touche Mémoire sans la relâcher pour régler le dessus de la tablette à la hauteur
préalablement sauvegardée.
E
Al mantener pulsado el botón Memoria, el tablero de la mesa alcanza la altura que ha guardado.
I
Tenendo premuto il pulsante Memoria, è possibile portare il piano del tavolo a un’altezza
memorizzata in precedenza.
NL
Houd de geheugenknop ingedrukt om het tafelblad naar de hoogte te verplaatsen die u heeft
opgeslagen.
Indicator - Anzeige - Indicateur - Indicador - Indicatore - Indicator
GB
Displays the tabletop height.
D
Zeigt die Höhe der Tischplatte an.
F
Affiche la hauteur du dessus de la tablette.
E
Muestra la altura del tablero de la mesa.
I
Visualizza l’altezza del piano del tavolo.
NL
Geeft de hoogte van het tafelblad weer.

4039
Adjusting the tabletop height – Anpassen der Höhe der Tischplatte –
Réglage de la hauteur du dessus de la tablette – Regulación de la altura del
tablero de la mesa – Regolazione dell’altezza del piano del tavolo –
Verstelling van de hoogte van het tafelblad
How to save your setting - So speichern Sie Ihre Einstellung - Sauvegarde de vos réglages -
Cómo guardar su configuración - Salvataggio dell’impostazione - Uw instelling opslaan
GB
a Adjust the tabletop height to your preference with the Up/Down lever.
b Press the Save setting (S) button. "S" blinks for two seconds.
c While it blinks, press either Memory button (1 ( ), 2 ( ), or 3 ( )). The memory button
number is displayed and the positon is saved.
D
a Passen Sie die Höhe der Tischplatte mit dem Anheben-/Absenken-Hebel nach Ihren Wünschen
an.
b Drücken Sie die Taste zum Speichern der Einstellung (S). „S“ blinkt zwei Sekunden lang.
c Drücken Sie in dieser Zeit eine der Speicher-Tasten (1 ( ), 2 ( ) oder 3 ( )). Die Nummer der
Speichertaste wird angezeigt und die Position wird gespeichert.
F
a Réglez le dessus de la tablette à la hauteur souhaitée à l’aide du levier Monter/Descendre.
b Appuyez sur la touche Enregistrement (S). La lettre « S » clignote pendant deux secondes.
c Pendant ce temps, appuyez sur la touche Mémoire (1 ( ), 2 ( ), ou 3 ( )). Le numéro de la
touche Mémoire s'affiche et la position est sauvegardée.
E
a Ajuste la altura del tablero de la mesa según sus preferencias con la palanca de subida/bajada.
b Presione el botón Guardar configuración (S). “S” parpadea durante dos segundos.
c Mientras parpadea, presione cualquiera de los botones de Memoria, (1( ), 2 ( ) o 3 ( )). Se
muestra el número del botón de memoria y se guarda la posición.
I
a Regolare l’altezza del piano del tavolo in base alle proprie preferenze con la leva di
sollevamento/abbassamento.
b Premere il pulsante di salvataggio dell’impostazione (S). “S” lampeggia per due secondi.
c Mentre lampeggia, premere il pulsante Memoria (1 ( ), 2 ( ) o 3 ( )). Viene visualizzato il
numero di memorizzazione e la posizione viene salvata.
NL
a Verstel de hoogte van het tafelblad volgens uw voorkeur met de omhoog/omlaag-hendel.
b Druk op de knop om de instelling op te slaan (S). "S" knippert gedurende twee seconden.
c Terwijl het knippert, drukt u op een van de geheugenknoppen (1 ( ), 2 ( ) of 3 ( )). De
geheugenknopnummer wordt weergegeven en de stand wordt bewaard.
How to initialize the setting - So initialisieren Sie die Einstellung - Initialisation des réglages -
Cómo iniciar la configuración - Inizializzazione dell’impostazione - De instelling initialiseren
GB
· Follow the procedure below after unplugging or re-plugging the product.
a When the height adjustable unit is at the minimum height, push and hold the Up/Down lever
downward for more than 10 seconds.
b The height adjustable unit moves down for 10mm/0.3in and the initial settings are complete.
D
· Befolgen Sie die Schritte unten, nachdem Sie das Produkt getrennt oder wieder angeschlossen
haben.
a Wenn sich der höhenverstellbare Tisch auf der Mindesthöhe befindet, drücken Sie den
Anheben-/Absenken-Hebel länger als 10 Sekunden nach unten.
b Die Einheit zur Höhenverstellung bewegt sich 10 mm/0,3 Zoll nach unten und die
Grundeinstellung ist abgeschlossen.
Adjusting the tabletop height – Anpassen der Höhe der Tischplatte –
Réglage de la hauteur du dessus de la tablette – Regulación de la altura del
tablero de la mesa – Regolazione dell’altezza del piano del tavolo –
Verstelling van de hoogte van het tafelblad
F
· Suivez les étapes ci-dessous après avoir débranché ou rebranché le produit.
a Lorsque le dispositif de réglage est à la hauteur minimum, abaissez le levier Monter/Descendre
et maintenez-le dans cette position pendant plus de 10 secondes.
b Le dispositif de réglage de la hauteur descend sur 10 mm (0,3") pour effectuer les réglages
d'origine.
E
· Siga el procedimiento que aparece a continuación una vez que se haya desconectado y vuelto
a conectar el producto.
a Cuando la unidad de altura ajustable esté a la altura mínima, mantenga bajada la palanca de
subida/bajada durante más de 10 segundos.
b La unidad de altura regulable desciende a 10 mm o 0,3 pulgadas y se completan los ajustes
iniciales.
I
· Dopo aver scollegato o ricollegato il prodotto all’alimentazione elettrica, attenersi alla seguente
procedura.
a Quando l’unità regolabile in altezza si trova all’altezza minima, mantenere la leva di
sollevamento/abbassamento spinta verso il basso per almeno 10 secondi.
b L’unità regolabile in altezza scende di 10 mm (0,3 pollici), dopodiché le impostazioni iniziali sono
concluse.
NL
· Volg de procedure onderaan nadat u het netsnoer van het product uit het stopcontact heeft
getrokken en het opnieuw heeft ingestoken.
a Wanneer de in hoogte verstelbare eenheid de minimale hoogte heeft bereikt, houdt u de
omhoog/omlaag-hendel gedurende meer dan 10 seconden omlaag ingedrukt.
b De in hoogte verstelbare eenheid daalt 10 mm/0,3 in, en de initiële instellingen zijn voltooid.
How to initialize the tabletop height - So initialisieren Sie die Höhe der Tischplatte - Initialisation
de la hauteur du dessus de la tablette - Cómo iniciar la altura del tablero de la mesa -
Inizializzazione dell’altezza del piano del tavolo - De hoogte van het tafelblad initialiseren
GB
* Follow the procedure below when the actual tabletop height and the height displayed in the
indicator differ.
a Move the tabletop to the maximum height (1250mm/49inch) to perform the indicator settings.
b Press the Memory button for more than 10 seconds so that the table height currently set is
displayed after “- - -” lights.
c Push the Up/Down lever upward or downward to set the height displayed in the indicator to
1250mm/49inch.
d When approximately 5 seconds pass after releasing all buttons, the displayed number flashes,
completing the setting.
D
* Befolgen Sie die Schritte unten, wenn die tatsächliche Höhe der Tischplatte und die in der
Anzeige angezeigte Höhe voneinander abweichen.
a Heben Sie die Tischplatte auf die maximale Höhe an (1.250 mm/49 Zoll), um die
Anzeigeeinstellungen durchzuführen.
b Drücken Sie die Speicher-Taste länger als 10 Sekunden, damit die derzeit eingestellte Höhe
angezeigt wird, nachdem „- - -“ leuchtet.
c Drücken Sie den Anheben-/Absenken-Hebel nach oben oder unten, um die in der Anzeige
angezeigte Höhe auf 1.250 mm/49 Zoll einzustellen.
d Ungefähr 5 Sekunden nach dem Loslassen der Tasten blinkt die angezeigte Zahl und die
Einstellung ist abgeschlossen.

4241
Adjusting the tabletop height – Anpassen der Höhe der Tischplatte –
Réglage de la hauteur du dessus de la tablette – Regulación de la altura del
tablero de la mesa – Regolazione dell’altezza del piano del tavolo –
Verstelling van de hoogte van het tafelblad
F
* Suivez les étapes ci-dessous lorsque la hauteur du dessus de la tablette ne correspond pas à
la valeur indiquée.
a Placez le dessus de la tablette à la hauteur maximum (1250 mm / 49") pour procéder au
réglage de l'indicateur.
b Appuyez sur la touche Mémoire pendant plus de 10 secondes pour afficher la hauteur après
l’indication « - - - ».
c Relevez ou abaissez le levier Monter/Descendre pour régler la hauteur selon la valeur indiquée à
1 250 mm (49 pouces).
d Environ 5 secondes après avoir relâché toutes les touches, la valeur s'affiche en clignotant pour
terminer le réglage.
E
* Siga el procedimiento que aparece a continuación cuando la altura actual del tablero de la
mesa y la altura que se muestra en el indicador son diferentes.
a Mueve el tablero de la mesa a la altura máxima (1250 mm o 49 pulgadas) para realizar la
configuración de los indicadores.
b Pulse el botón Memoria durante más de 10 segundos para que aparezca la altura de la mesa
ajustada actualmente después de que se ilumine “- - -”.
c Mueva la palanca de subida/bajada hacia arriba o abajo para establecer la altura que se
muestra en el indicador a 1250 mm o 49 pulgadas.
d Una vez transcurridos aproximadamente 5 segundos después de dejar de pulsar todos los
botones, se muestra el número y se completa la configuración.
I
* In caso di discrepanza tra l’altezza effettiva del piano del tavolo e l’altezza visualizzata
dall’indicatore, attenersi alla seguente procedura.
a Portare il piano del tavolo all’altezza massima (1250 mm/49 pollici) per eseguire le impostazioni
dell’indicatore.
b Premere il pulsante Memoria per almeno 10 secondi per visualizzare, dopo la comparsa di
“- - -”, l’altezza del tavolo attualmente impostata.
c Spingere la leva di sollevamento/abbassamento verso l’alto o verso il basso per impostare
l’altezza visualizzata dall’indicatore a 1250 mm (49 pollici).
d Dopo 5 secondi da quando si saranno rilasciati tutti i pulsanti, il numero visualizzato
lampeggerà, per indicare che l’impostazione è stata completata.
NL
* Volg de procedure onderaan als de eigenlijke hoogte van het tafelblad en de weergegeven
hoogte op de indicator verschillen.
a Verplaats het tafelblad naar de maximale hoogte (1.250 mm/49 in) om de instellingen van de
indicator uit te voeren.
b Houd de geheugenknop gedurende meer dan 10 seconden ingedrukt zodat de hoogte van het
bureau dat momenteel is ingesteld wordt weergegeven nadat "- - -" brandt.
c Druk de omhoog/omlaag-hendel omhoog of omlaag om de hoogte die wordt weergegeven op
de indicator op 1.250 (mm)/49 (in.) in te stellen.
d Ongeveer 5 seconden na het loslaten van alle knoppen, knippert het weergegeven nummer, en
de instelling is voltooid.
Adjusting the tabletop height – Anpassen der Höhe der Tischplatte –
Réglage de la hauteur du dessus de la tablette – Regulación de la altura del
tablero de la mesa – Regolazione dell’altezza del piano del tavolo –
Verstelling van de hoogte van het tafelblad
¢ The list of error code - Liste der Fehlercodes - Liste des codes d'erreurs -
La lista de códigos de error - Elenco dei codici di errore - Lijst met foutcodes
Error code - Fehlercode -
Codes d'erreurs - Código de error -
Codice di errore - Foutcode
Problem - Problem - Problème -
Problema - Problema - Probleem
E01
GB
Initial setting is needed. Memory setting position is unknown.
D
Die Grundeinstellung ist erforderlich.
Speichereinstellungsposition ist unbekannt.
F
Procéder aux réglages d'origine. La position sauvegardée
est inconnue.
E
Se necesita una configuración inicial. Se desconoce la
posición configurada en la memoria.
I
È necessario eseguire l’impostazione iniziale. I dati di
posizione salvati in memoria sono danneggiati.
NL
De initiële instelling moet worden ingesteld. De
geheugeninstellingsstand is onbekend.
E02
GB
Overloaded upward
D
Überlastung nach oben
F
Surcharge vers le haut
E
Sobrecarga hacia arriba
I
Carico eccessivo verso l’alto
NL
Overbelasting omhoog
E03
GB
Overloaded downward
D
Überlastung nach unten
F
Surcharge vers le bas
E
Sobrecarga hacia abajo
I
Carico eccessivo verso il basso
NL
Overbelasting omlaag
E16
GB
Incorrect button is pressed.
D
Es wurde die falsche Taste betätigt.
F
La touche incorrecte est activée.
E
Se ha presionado el botón incorrecto.
I
È stato premuto un pulsante errato.
NL
De verkeerde knop is ingedrukt.
¢ Safety Reverse Function - Sicherheitsumkehrfunktion - Fonction de sécurité de mouvement
inverse - Función de retroceso de seguridad - Funzione di inversione di sicurezza - Functie voor
veiligheidsomkeer
GB
This product has a Safety Reverse Function to prevent things such as your fingers or cables from
being caught during height adjustment. When the tabletop touches some object and pressure is
applied to it, the Safety Reverse Function is activated and the tabletop reverses automatically for
about 3cm/1in. When the Safety Reverse Function is activated, check that the tabletop doesn't
touch other objects.
D
Dieses Produkt umfasst eine Sicherheitsumkehrfunktion, um zum Beispiel zu verhindern,
dass Sie sich bei der Höheneinstellung die Finger einklemmen oder sich Kabel verfangen.
Wenn die Tischplatte einen Gegenstand berührt und Druck auf sie ausgeübt wird, wird die
Sicherheitsumkehrfunktion aktiviert und die Tischplatte fährt um ungefähr 3 cm/1 Zoll zurück.
Wenn die Sicherheitsumkehrfunktion aktiviert wurde, überprüfen Sie, dass die Tischplatte keine
anderen Gegenstände berührt.

4443
Operation guide (2) - Bedienungsanleitung (2) - Mode d'emploi (2) - Guía de
operación (2) - Guida al funzionamento (2) - Bedieningshandleiding (2)
F
Ce produit est doté d'une fonction de sécurité de mouvement inverse permettant d'éviter le
coincement des doigts ou des câbles au cours du réglage de la hauteur. Lorsque le dessus
de la tablette heurte un élément et qu'une pression est exercée, la fonction de sécurité de
mouvement inverse est activée et le dessus de la tablette repart automatiquement en sens
inverse sur 3 cm (1"). Lorsque la fonction de sécurité de mouvement inverse est activée, vérifiez
que le dessus de la tablette ne heurte pas d'autres éléments.
E
Este producto cuenta con una función de retroceso de seguridad para evitar que se pillen los
dedos o se aplasten los cables durante el proceso de regulación de la altura. Cuando el tablero
de la mesa tropieza con un objeto y ejerce presión sobre el mismo, la función de retroceso
de seguridad se activa y este retrocede automáticamente unos 3 cm o 1 pulgada. Cuando
la función de retroceso de seguridad esté activada, compruebe que el tablero de la mesa no
tropiece con otros objetos.
I
Il prodotto è dotato di una funzione di inversione di sicurezza, che serve a impedire lo
schiacciamento delle dita o dei cavi durante la regolazione dell’altezza. Quando il piano del
tavolo urta un oggetto e viene rilevata una pressione, viene attivata la funzione di inversione di
sicurezza e il tavolo si muove automaticamente di circa 3 cm (1 pollice) in direzione opposta.
Quando viene attivata la funzione di inversione di sicurezza, assicurarsi che il piano del tavolo
non urti altri oggetti.
NL
Dit product beschikt over een functie voor veiligheidsomkeer om te voorkomen dat bijvoorbeeld
uw vingers of kabels klem raken tijdens de verstelling van de hoogte. Wanneer het tafelblad
een voorwerp aanraakt en er wordt druk op uitgeoefend, dan wordt de functie voor
veiligheidsomkeer geactiveerd en gaat het tafelblad automatisch ongeveer 3 cm/1 in terug.
Wanneer de functie voor veiligheidsomkeer wordt geactiveerd, dan moet u controleren of het
tafelblad geen andere voorwerpen aanraakt.
Condition where the Safety Reverse Function is activated - Bedingungen, unter denen
die Sicherheitsumkehrfunktion aktiviert wird - Les cas où la fonction de sécurité de
mouvement inverse est activée - Condiciones en las que se activa la función de retroceso
de seguridad - Condizioni che determinano l’attivazione della funzione di inversione di
sicurezza - Toestand waarbij de functie voor veiligheidsomkeer wordt geactiveerd
GB
· The pedestal under the table hits the back panel.
D
· Das Untergestell unter dem Tisch berührt das Rückseitenteil.
F
· Le support situé sous le bureau heurte le panneau arrière.
E
· El pedestal que se sitúa debajo del escritorio tropieza con el panel
posterior.
I
· Urto tra il piedistallo posto sotto la scrivania e il pannello posteriore.
NL
· Het voetstuk onder het bureau stoot tegen het achterpaneel.
Operation guide (2) - Bedienungsanleitung (2) - Mode d'emploi (2) - Guía de
operación (2) - Guida al funzionamento (2) - Bedieningshandleiding (2)
GB
· Objects around the table such as trays hit the tabletop.
D
· Gegenstände um den Tisch herum, wie zum Beispiel
Schubladencontainer, stoßen gegen die Tischplatte.
F
· Des éléments situés à proximité de la table, tels que
des plateaux, heurtent le dessus de la tablette.
E
· Hay objetos alrededor del escritorio que tropiezan con
el tablero de la mesa.
I
· Urto tra oggetti posti attorno alla scrivania (come vassoi
portadocumenti, ecc.) e il piano del tavolo.
NL
· Voorwerpen rondom het bureau zoals bakken stoten
tegen het tafelblad.
GB
· The chair under the table hits the tabletop.
D
· Der Stuhl unter dem Tisch berührt die Tischplatte.
F
· La chaise située sous le bureau heurte le dessus de la tablette.
E
· La silla que está colocada bajo el escritorio tropieza con el tablero de
la mesa.
I
· Urto tra la sedia sotto la scrivania e il piano del tavolo.
NL
· De stoel onder het bureau stoot tegen het tafelblad.
Warning - Warnung - Avertissement - Advertencia - Avvertenza - Waarschuwing
GB
· The safety Reverse Function is to prevent the product and other objects from being
damaged, however, it does not guarantee safety in every circumstance.
· Make sure that nothing is under or around the product when adjusting the tabletop
height.
* When the tabletop hits a soft object such as a bag or cushion or a tip of an object and
bends it, the Safety Reverse Function may not activate. In that case, stop adjusting the
height immediately.
D
· Die Sicherheitsumkehrfunktion soll verhindern, dass das Produkt und andere
Gegenstände beschädigt werden. Sie garantiert aber keine Sicherheit unter allen
Umständen.
· Stellen Sie sicher, dass sich nichts unter oder im Bereich des Produktes befindet,
wenn Sie die Tischplatte verstellen.
* Wenn die Tischplatte gegen einen weichen Gegenstand stößt, wie eine Tasche oder
ein Kissen, oder gegen die Spitze eines Gegenstandes und diese verbiegt, wird die
Sicherheitsumkehrfunktion möglicherweise nicht aktiviert. Stoppen Sie in diesem Fall die
Höheneinstellung sofort.
F
· La fonction de sécurité de mouvement inverse permet d'éviter que le produit et les
autres éléments ne soient endommagés, mais ne garantit pas la sécurité dans tous
les cas.
· Veillez à ce qu'aucun élément ne soit placé sous le produit ou à proximité de ce
dernier lors de l'abaissement du dessus de la tablette.
* Lorsque le dessus de la tablette heurte un élément mou, tel qu'un sac ou un coussin, ou
l'extrémité d'un objet et le plie, la fonction de sécurité de mouvement inverse peut ne pas
s'activer. Dans ce cas, cessez immédiatement de procéder au réglage de la hauteur du
dessus de la tablette.

4645
Operation guide (2) - Bedienungsanleitung (2) - Mode d'emploi (2) - Guía de
operación (2) - Guida al funzionamento (2) - Bedieningshandleiding (2)
Warning - Warnung - Avertissement - Advertencia - Avvertenza - Waarschuwing
E
· La función de retroceso de seguridad está pensada para evitar daños en el
producto y otros objetos, sin embargo no se garantiza la seguridad en todas las
circunstancias.
· Asegúrese de que no haya nada debajo o alrededor del producto cuando se
disponga a regular la altura del tablero de la mesa.
* Cuando el tablero de la mesa tropieza con un objeto blando, como una bolsa o un
cojín, o toca la punta de un objeto y la dobla, es posible que la función de retroceso de
seguridad no se active. En ese caso, deje de regular la altura inmediatamente.
I
· La funzione di inversione di sicurezza serve a evitare danni al prodotto e ad altri
oggetti, tuttavia non può garantire la sicurezza in qualsiasi situazione.
· Assicurarsi che non siano presenti oggetti sotto il prodotto o nell’area circostante
durante la regolazione dell’altezza del piano del tavolo.
* Se il piano del tavolo urta un oggetto morbido come una borsa o un cuscino o la punta
di un oggetto e lo piega/deforma, la funzione di inversione di sicurezza potrebbe non
attivarsi. In tal caso, interrompere immediatamente la regolazione dell’altezza.
NL
· De functie voor veiligheidsomkeer dient ervoor het product en andere voorwerpen
tegen schade te beschermen, maar de veiligheid kan echter niet in alle
omstandigheden worden gegarandeerd.
· Zorg ervoor dat er niks aanwezig is onder of rondom het product tijdens de
verstelling van de hoogte van het tafelblad.
* Wanneer het tafelblad tegen een zacht voorwerp stoot zoals een tas of een kussen,
of tegen de tip van een voorwerp en het wordt geplooid, dan wordt de functie voor
veiligheidsomkeer mogelijk niet geactiveerd. In zo'n geval moet u onmiddellijk stoppen
met de verstelling van de hoogte.
GB
· When a soft object such as a bag or cushion hits the tabletop
D
· Wenn ein weicher Gegenstand, wie eine Tasche oder ein
Kissen, die Tischplatte trifft
F
· Lorsque le dessus de la tablette heurte un élément mou, tel
qu'un sac ou un coussin
E
· Cuando un objeto blando, como una bolsa o un cojín, tropieza
con el tablero de la mesa
I
· Se il piano del tavolo tocca un oggetto morbido, come una
borsa o un cuscino
NL
· Wanneer het tafelblad tegen een zacht voorwerp stoot zoals een tas of een kussen
GB
· When a tip of an object hits the tabletop and is bent
D
· Wenn die Spitze eines Gegenstandes die Tischplatte berührt
und verbogen wird
F
· Lorsque le dessus de la tablette heurte l'extrémité d'un objet et
le plie
E
· Cuando la punta de un objeto tropieza con el tablero de la
mesa y se dobla
I
· Se il piano del tavolo tocca la punta di un oggetto piegandolo
NL
· Wanneer het tafelblad tegen de tip van een voorwerp stoot en het wordt geplooid
Operation guide (2) - Bedienungsanleitung (2) - Mode d'emploi (2) - Guía de
operación (2) - Guida al funzionamento (2) - Bedieningshandleiding (2)
Warning - Warnung - Avertissement - Advertencia - Avvertenza - Waarschuwing
If an object is caught in between - Wenn ein Gegenstand eingeklemmt wird -
Si un élément est coincé - Si un objeto queda obstruido -
In caso di schiacciamento di un oggetto - Als er een voorwerp tussenin vast zit
GB
· Lift the table and remove the object.
· If you cannot lift the table, press the buttons several times and
reverse the tabletop.
D
· Heben Sie den Tisch an und entfernen Sie den Gegenstand.
· Wenn Sie den Tisch nicht anheben können, drücken Sie die
Tasten mehrere Male und fahren Sie die Tischplatte in die andere
Richtung.
F
· Relevez le dessus de la tablette et retirez l'élément.
· Si le dessus de la tablette ne peut pas être relevé, appuyez sur les touches à plusieurs
reprises et inversez le sens du mouvement.
E
· Levante el escritorio y retire el objeto.
· Si no puede levantar el escritorio, pulse los botones varias veces para revertir el tablero de
la mesa.
I
· Alzare la scrivania e rimuovere l’oggetto.
· Se non è possibile alzare la scrivania, premere più volte i pulsanti per riportare il piano del
tavolo all’altezza di partenza.
NL
· Hef het bureau op en verwijder het voorwerp.
· Als u het bureau niet kunt opheffen, drukt u meerdere malen op de knoppen en laat u het
tafelblad terug gaan.
Instructions to Extend the Life of Product – Anweisungen zur Verlängerung der
Nutzungsdauer des Produktes – Instructions pour allonger la durée de vie du
produit – Instrucciones para alargar la vida útil del producto – Istruzioni per
prolungare la vita utile del prodotto – Instructies om de levensduur van uw product
te verlengen
GB
Please follow instructions below. Failure may cause serious damage to the product.
Okamura will have no responsibility for any damages caused by modyfying.
D
Folgen Sie bitte den nachfolgenden Anweisungen. Eine Zuwiderhandlung kann
schwerwiegende Beschädigungen des Produkts zur Folge haben.
Okamura übernimmt keine Haftung für Schäden, die durch Änderungen verursacht wurden.
F
Veuillez suivre les instructions ci-dessous. Le non-respect des instructions peut causer
des dommages importants au produit.
Okamura ne saurait être tenu responsable des dommages occasionnés suite à une
modification du produit.
E
Por favor, siga las siguientes instrucciones. Si no lo hace, el producto podría sufrir daños
importantes.
Okamura no se hace responsable de ningún daño ocasionado por una modificación.

4847
Instructions to Extend the Life of Product – Anweisungen zur Verlängerung der
Nutzungsdauer des Produktes – Instructions pour allonger la durée de vie du
produit – Instrucciones para alargar la vida útil del producto – Istruzioni per
prolungare la vita utile del prodotto – Instructies om de levensduur van uw product
te verlengen
I
Attenersi alle istruzioni riportate di seguito. Diversamente, si potrebbero provocare gravi
danni al prodotto.
Okamura declina ogni responsabilità in caso di danni provocati da eventuali modifiche
apportate al prodotto.
NL
Wij verzoeken u onderstaande instructies op te volgen. Als u dat niet doet, kan dat tot
ernstige beschadiging van het product leiden.
Okamura aanvaardt geen aansprakelijkheid voor schade die veroorzaakt is door
modificeren.
Operating precautions and maintenance - Vorsichtsmaßnahmen bei der Bedienung und
Wartung - Précautions d'utilisation et maintenance - Precauciones de funcionamiento
y mantenimiento - Precauzioni per l’uso e manutenzione del prodotto -
Gebruiksvoorzorgsmaatregelen en onderhoud
GB
· Indoor use only.
· No outdoor or waterfront use.
· Avoid direct sunlight or heat from a heating appliance. Failure to do so may discolor or distort the
product.
· This instruction manual is very important, so store it in an easily accessible location.
· When bolts and screws become loose and the table wobbles, tighten the bolts and screws.
This is the secret to make the product last longer. Make sure to tighten the bolts and screws
beforehand.
· Frequent maintenance of the product is the key to long-lasting use. After warranty expiration,
please use our fee-based service.
D
· Nur für den Gebrauch in Innenräumen.
· Verwenden Sie das Produkt nicht im Freien oder am Wasser.
· Vermeiden Sie direkte Sonneneinstrahlung und Wärme von einem Heizgerät. Andernfalls kann es
zu Verfärbungen kommen oder das Produkt kann sich verformen.
· Diese Bedienungsanleitung ist sehr wichtig. Bewahren Sie sie an einem leicht zugängigen Ort auf.
· Wenn sich Stifte oder Schrauben lösen und der Tisch wackelt, ziehen Sie die Stifte und
Schrauben fest. Das ist das Geheimnis, um die Nutzungsdauer des Produktes zu verlängern.
· Stellen Sie sicher, dass Sie die Stifte und Schrauben vorher festziehen. Eine häufige Wartung des
Produktes ist für die langfristige Verwendung wichtig. Nutzen Sie nach Ablauf der Garantie bitte
unseren gebührenpflichtigen Service.
F
· Usage intérieur seulement.
· N'utilisez pas le produit à l'extérieur ou à proximité de l'eau.
· Évitez d'exposer le produit à la lumière du soleil directe ou à la chaleur provenant d'un dispositif
de chauffage. Le non-respect de ces consignes peut provoquer un risque de décoloration ou de
dommage.
· Ce manuel d'utilisation est très important, veuillez le ranger dans un endroit facile d'accès.
· Resserrez les boulons et les vis lorsqu'ils se desserrent et lorsque le bureau est bancal. Ces
astuces permettront d'allonger la durée de vie de votre produit.
· Assurez-vous de serrer les boulons et les vis au préalable. L'entretien régulier du produit permet
d'allonger sa durée de vie. Après expiration de la garantie, veuillez utiliser nos services payants.
Instructions to Extend the Life of Product – Anweisungen zur Verlängerung der
Nutzungsdauer des Produktes – Instructions pour allonger la durée de vie du
produit – Instrucciones para alargar la vida útil del producto – Istruzioni per
prolungare la vita utile del prodotto – Instructies om de levensduur van uw product
te verlengen
E
· Utilice el producto solo en interiores.
· No haga uso del producto en exteriores ni en zonas costeras.
· Evite la luz solar directa o el calor procedente de un aparato de calefacción. De lo contrario el
producto podría decolorarse o deformarse.
· Este manual de instrucciones es muy importante, así que guárdelo en un lugar fácilmente
accesible.
· Cuando los pernos y los tornillos se aflojen y el escritorio se tambalee, apriételos. Este es el
secreto para conseguir que el producto dure más tiempo.
· Asegúrese de apretar los pernos y tornillos con antelación. El mantenimiento frecuente del
producto es la clave para un uso de larga duración. Una vez que la garantía haya caducado,
utilice nuestro servicio con cargos.
I
· Solo per uso interno.
· Non utilizzare il prodotto all’aperto o vicino al mare.
· Evitare la luce solare diretta e tenere lontano da apparecchi di riscaldamento. In caso contrario, il
prodotto potrebbe scolorirsi o deformarsi.
· Il presente manuale di istruzioni è molto importante, pertanto si raccomanda di conservarlo in un
luogo facilmente accessibile.
· Se i bulloni e le viti si allentano e la scrivania si muove, stringerli. Ciò è fondamentale per
prolungare la vita utile del prodotto.
· Si raccomanda di serrare preventivamente le viti e i bulloni. Una manutenzione frequente è
fondamentale per garantire una lunga durata del prodotto. Alla scadenza della garanzia, si
consiglia di usufruire del nostro servizio di assistenza a pagamento.
NL
· Alleen binnenshuis gebruiken.
· Geen gebruik buiten of aan water.
· Vermijd direct zonlicht of warmte van een verwarmingsapparaat. Als u dit nalaat, kan het
verkleuring of vervorming van het product tot gevolg hebben.
· Deze instructiehandleiding is zeer belangrijk. Bewaar ze op een plaats waar die gemakkelijk terug
te vinden is.
· Als bouten of schroeven los worden en het bureau wiebelt, draait u de bouten en schroeven vast.
Dit is het geheim om het product langer te doen meegaan.
· Zorg ervoor dat u de bouten en schroeven op voorhand vastdraait. Een frequente onderhoud
van het product is de sleutel tot een langdurig gebruik. Gebruik onze dienst tegen betaling na het
verlopen van de garantie.

5049
Instructions to Extend the Life of Product – Anweisungen zur Verlängerung der
Nutzungsdauer des Produktes – Instructions pour allonger la durée de vie du
produit – Instrucciones para alargar la vida útil del producto – Istruzioni per
prolungare la vita utile del prodotto – Instructies om de levensduur van uw product
te verlengen
Maintenance - Zur Pflege und Wartung - Entretien -
Mantenimiento - Manutenzione - Onderhoud
GB
For daily care
· Always use the dry and soft cloth for daily care.
* Covering material
· For cloth upholstery, tap the surface first, and brush or vacuum it.
· Do not lubricate the Height adjustable unit.
D
Tägliche Pflege
· Verwenden Sie für die tägliche Pflege immer ein trockenes, weiches Tuch.
* Abdeckungsmaterial
· Klopfen Sie bei Stoffpolstern zuerst die Oberfläche ab und bürsten oder saugen Sie sie ab.
· Ölen Sie die Einheit zur Höheneinstellung nicht ein.
F
Pour un entretien quotidien
· Utilisez un chiffon sec et doux pour un entretien quotidien.
* Pour les revêtements en tissu
· Pour les éléments en tissu, époussetez tout d'abord la surface, puis brossez ou aspirez.
· Ne lubrifiez pas le dispositif de réglage de la hauteur.
E
Para el cuidado diario
· Utilice siempre un paño suave y seco para el cuidado diario.
* Material de recubrimiento
· Para una tapicería de tela, primero sacuda la superficie un poco y cepíllela o aspírela.
· No lubrique la unidad de altura regulable.
I
Manutenzione giornaliera
· Per la pulizia quotidiana utilizzare sempre un panno morbido e asciutto.
* Materiali di copertura
· Per la pulizia dei rivestimenti in tessuto, tamponare preventivamente la superficie, quindi
spazzolare o aspirare.
· Non lubrificare l’unità regolabile in altezza.
NL
Voor dagelijkse verzorging
· Gebruik steeds een zachte, droge doek voor de dagelijkse verzorging.
* Bekledingsmateriaal
· Voor stoffen bekleding, klopt u eerst zachtjes op het oppervlak, en maakt u vervolgens met een
borstel of stofzuiger schoon.
· Smeer de in hoogte verstelbare eenheid niet.
GB
For exceptionally dirty case
· Dip a soft cloth into mild solution of neutral detergent (1 - 3%) and wring it out to wipe away the
dirt. Then, wipe off the detergent thoroughly with a soft dry cloth.
D
Wenn Teile besonders stark verschmutzt sind
· Tauchen Sie ein weiches Tuch in eine milde Lösung mit neutralem Reinigungsmittel (1-3 %),
wringen Sie es aus und wischen Sie den Schmutz ab. Wischen Sie das Reinigungsmittel dann
sorgfältig mit einem weichen, trockenen Tuch ab.
Instructions to Extend the Life of Product – Anweisungen zur Verlängerung der
Nutzungsdauer des Produktes – Instructions pour allonger la durée de vie du
produit – Instrucciones para alargar la vida útil del producto – Istruzioni per
prolungare la vita utile del prodotto – Instructies om de levensduur van uw product
te verlengen
F
En cas de salissure exceptionnelle
· Trempez un chiffon doux dans une solution savonneuse (1 à 3 %), puis essorez et nettoyez les
salissures. Ensuite, retirez la totalité du savon à l'aide d'un chiffon doux et sec.
E
Para casos de extrema suciedad
· Sumerja un paño suave en una solución ligera con detergente neutro (de 1 a 3 %) y escúrralo
para limpiar la suciedad. A continuación, elimine completamente el detergente con un paño
suave y seco.
I
Sporco ostinato
· Immergere un panno morbido in una soluzione con acqua e detergente neutro (1 - 3%), quindi
strizzarlo e strofinare per eliminare la sporcizia. Quindi passare un panno morbido e asciutto per
eliminare accuratamente le tracce di detergente.
NL
In geval van buitengewoon vuil
· Maak een zachte doek vochtig met een milde oplossing van neutrale detergent (1 - 3%) en wring
hem uit om het vuil weg te vegen. Veeg vervolgens het detergent goed weg met een zachte
droge doek.
GB
Notes on maintenance
· When using commercially available cleaner, try it out on an invisible part to check for discoloration
before use.
D
Hinweise zur Wartung
· Wenn Sie im Handel erhältlichen Reiniger verwenden, testen Sie ihn an einer nicht sichtbaren
Stelle auf Verfärbungen, bevor Sie ihn verwenden.
F
Remarques sur l'entretien
· Lors de l'utilisation d'un nettoyant industriel, faites un essai sur une partie invisible du produit
pour vérifier l'absence de décoloration.
E
Indicaciones para el mantenimiento
· Si va a utilizar un limpiador disponible en el mercado, aplíquelo en una parte invisible para
comprobar su eficacia antes de su uso, si produce decoloración.
I
Note sulla manutenzione
· Se si utilizza un detergente reperibile in commercio, provarlo preventivamente su una zona non
visibile per assicurarsi che non provochi scolorimenti.
NL
Opmerkingen over onderhoud
· Bij gebruik van een in de handel verkrijgbaar reinigingsmiddel, probeert u het eerst uit op een
gedeelte waar het niet zal opvallen om te controleren of er geen verkleuring wordt veroorzaakt.

5251
GB
Materials and Surface Finish
Part Materials Surface Finish
Work table
(Free standing type)
Tabletop
Surface Laminate
Edge ABS resin
Core Metal (steel) Bake coating
Cable cap ABS resin >ABS<
Cable tray Main body ABS resin >ABS<
Cable guard Main body Polypropylene >PP<
Duct/stay Metal (steel) Bake coating
Protection tube Main body Polyethylene terephthalate
resin
Cable hook Main body Thermoplastic elastomer
Work table
(L-shaped type)
Wood tabletop
Surface Laminate
Edge ABS resin
Core material Mediumdensity fiberboard
Rear surface Laminate
Cable cap ABS resin >ABS<
Upper frame Main body Metal (steel) Bake coating
End cap ABS resin >ABS<
Upper arm Main body Metal (steel) Bake coating
Cable tray Main body ABS resin >ABS<
Height adjustable unit Main body exterior Metal (steel) Bake coating
Lower arm
Main body Metal (steel) Bake coating
End cap ABS resin >ABS<
Leveler Polypropylene >PP<
Left/right spacer Polypropylene >PP<
Lower cap Main body Metal (aluminium) Bake coating
Leveler Polypropylene >PP<
Bluetooth unit Main body exterior Polycarbonate
Work table
(Bench type)
Tabletop
Surface Laminate
Edge ABS resin
Core material Metal (steel) Bake coating
Cable cap ABS resin >ABS<
Upper frame Main body Metal (steel) Bake coating
End cap ABS resin >ABS<
Cable tray Main body ABS resin >ABS<
Height adjustable unit Main body exterior Metal (steel) Bake coating
Lower arm
Main body Metal (steel) Bake coating
End cap ABS resin >ABS<
Leveler Polypropylene >PP<
Left/right spacer Polypropylene >PP<
Bluetooth unit Main body exterior Polycarbonate
Wiring duct Main body Metal (steel) Bake coating
Prop Main body Metal (steel) Bake coating
Cableveyor Fixing attachment Metal (steel) Bake coating
Main body Polypropylene >PP<
End cover Main body Metal (steel) Bake coating
Fixing panel
Cloth Polyester 100% (including
regenerated fiber for 51%)
Core material Falcataria plywood
Prop Metal (steel) Bake coating
Part Materials Surface Finish
Work table
(Bench type)
Cable cover receiver Main body Metal (steel) Bake coating
Cable cover Main body Metal (steel) Bake coating
Conference table
Tabletop
Surface Laminate
Edge Polyurethane
Core Particle board/Medium-
density fiberboard
Cable cover Main body Metal (aluminum) Bake coating
Soft part ABS resin + TPE
Cable tray Main body Metal (steel) Bake coating
Cable guard Main body Polypropylene >PP<
Common for Work
table/Conference
table
Upper frame Main body Metal (steel) Bake coating
End cover ABS resin >ABS<
Height adjustable unit Main body Metal (steel) Bake coating
Lower arm
Main body Metal (steel) Bake coating
Leveler Polypropylene >PP<
Left/right spacer Polypropylene >PP<
Panel
Main body Cloth Polyester 100% (including
regenerated fiber for 51%)
Core material Falcataria plywood
Attachment hook Main body Metal (steel) Bake coating
Corner connection
fitting Main body Metal (steel) Bake coating
Opposite table
connector Main body ABS resin >ABS<
Floor fixing metal
fittings Main body Metal (steel) Bake coating
Function beam Beam Main body Metal (aluminum) Anodized
aluminum
finishing
Stay Main body Metal (steel) Bake coating
∗> XX < indicates the materials of the parts. This information is useful for recycling.
∗Please understand that product specifications might change without prior notification due to improvements made
to the product.

5453
D Materialien und Oberflächenbehandlung
Teil Materialien
Oberflächenbehandlung
Schreibtisch
(Freistehender Typ)
Tischplatte
Oberfläche Laminat
Kante ABS
Kern Metall (Stahl) Eingebrannte
Beschichtung
Kabelkappe ABS >ABS<
Kabelfach Hauptteil ABS >ABS<
Kabelführung
Hauptteil Polypropylen >PP<
Kabelkappe Metall (Stahl) Eingebrannte
Beschichtung
Schutzröhre Hauptteil PET
Kabelaufhängung Hauptteil TPE
Schreibtisch
(L-förmiger Typ)
Holztischplatte
Oberfläche Laminat
Kante ABS
Kernmaterial Faserplatte mit mittlerer
Dichte
Oberfläche der
Rückseite Laminat
Kabelkappe ABS >ABS<
Oberer Rahmen Hauptteil Metall (Stahl) Eingebrannte
Beschichtung
Endkappe ABS >ABS<
Oberer Arm Hauptteil Metall (Stahl) Eingebrannte
Beschichtung
Kabelfach Hauptteil ABS >ABS<
Einheit zur
Höhenverstellung Außenteil Hauptteil Metall (Stahl) Eingebrannte
Beschichtung
Unterer Arm
Hauptteil Metall (Stahl) Eingebrannte
Beschichtung
Endkappe ABS >ABS<
Ausgleichstück Polypropylen >PP<
Linker/rechter
Abstandshalter Polypropylen >PP<
Untere Kappe Hauptteil Metall (Aluminium) Eingebrannte
Beschichtung
Ausgleichstück Polypropylen >PP<
Bluetooth-Einheit Außenteil Hauptteil Polycarbonat
Schreibtisch
(Banktyp)
Tischplatte
Oberfläche Laminat
Kante ABS
Kernmaterial Metall (Stahl) Eingebrannte
Beschichtung
Kabelkappe ABS >ABS<
Oberer Rahmen Hauptteil Metall (Stahl) Eingebrannte
Beschichtung
Endkappe ABS >ABS<
Kabelfach Hauptteil ABS >ABS<
Einheit zur
Höhenverstellung Außenteil Hauptteil Metall (Stahl) Eingebrannte
Beschichtung
Unterer Arm
Hauptteil Metall (Stahl) Eingebrannte
Beschichtung
Endkappe ABS >ABS<
Ausgleichstück Polypropylen >PP<
Linker/rechter
Abstandshalter Polypropylen >PP<
Bluetooth-Einheit Außenteil Hauptteil Polycarbonat
Kabelkanal Hauptteil Metall (Stahl) Eingebrannte
Beschichtung
Teil Materialien
Oberflächenbehandlung
Schreibtisch
(Banktyp)
Stütze Hauptteil Metall (Stahl) Eingebrannte
Beschichtung
Kabelführung
Befestigungszubehör
Metall (Stahl) Eingebrannte
Beschichtung
Hauptteil Polypropylen >PP<
Endabdeckung Hauptteil Metall (Stahl) Eingebrannte
Beschichtung
Befestigungsteil
Stoff
Polyester 100 %
(einschließlich
regenerierter Fasern für
51 %)
Kernmaterial Falcataria-Spanplatte
Stütze Metall (Stahl) Eingebrannte
Beschichtung
Kabelabdeckungsaufnahme
Hauptteil Metall (Stahl) Eingebrannte
Beschichtung
Kabelabdeckung Hauptteil Metall (Stahl) Eingebrannte
Beschichtung
Tisch
Tischplatte
Oberfläche Laminat
Kante Polyurethan
Kern Spanplatte/Faserplatte mit
mittlerer Dichte
Kabelabdeckung Hauptteil Metall (Aluminium) Eingebrannte
Beschichtung
Weiche Teile ABS + TPE
Kabelfach Hauptteil Metall (Stahl) Eingebrannte
Beschichtung
Kabelschutz Hauptteil Polypropylen >PP<
Allgemein für
Schreibtisch/Tisch
Oberer Rahmen Hauptteil Metall (Stahl) Eingebrannte
Beschichtung
Endabdeckung ABS >ABS<
Einheit zur
Höhenverstellung Hauptteil Metall (Stahl) Eingebrannte
Beschichtung
Unterer Arm
Hauptteil Metall (Stahl) Eingebrannte
Beschichtung
Ausgleichstück Polypropylen >PP<
Linker/rechter
Abstandshalter Polypropylen >PP<
Täfelung
Hauptteil Stoff
Polyester 100 %
(einschließlich
regenerierter Fasern für
51 %)
Kernmaterial Falcataria-Spanplatte
Befestigungshaken Hauptteil Metall (Stahl) Eingebrannte
Beschichtung
Eckverbindungsstück Hauptteil Metall (Stahl) Eingebrannte
Beschichtung
Verbindungsstück Hauptteil ABS >ABS<
Bodenbefestigungs-
Metallstücke
Hauptteil Metall (Stahl) Eingebrannte
Beschichtung
Funktionsträger
Träger Hauptteil Metall (Aluminium)
Eloxierte
Aluminiumveredelung
Steg Hauptteil Metall (Stahl) Eingebrannte
Beschichtung
∗> XX < verweist auf das Material der Teile. Diese Informationen sind nützlich für das Recycling.
∗Beachten Sie bitte, dass sich die Produktspezifikationen ohne vorherige Ankündigung aufgrund von
Verbesserungen an dem Produkt ändern können.

5655
F Matériaux et revêtements
Pièce Matériaux Revêtement
Bureau
(Modèle classique)
Dessus de la tablette
Surface Stratifié
Bordure Résine ABS
Centre Métal (acier) Polymérisation
Dessus du cache-
câbles Résine ABS >ABS<
Passe-câbles Partie principale Résine ABS >ABS<
Guide-câbles Partie principale Polypropylène >PP<
Gaine Métal (acier) Polymérisation
Tube de protection Partie principale Résine de polytéréphtalate
d'éthylène
Crochet pour câble Partie principale Élastomère
thermoplastique
Bureau
(Modèle en forme
de L)
Dessus de tablette
en bois
Surface Stratifié
Bordure Résine ABS
Matériau principal Panneau de fibres de
densité moyenne
Surface arrière Stratifié
Dessus du
cachecâbles Résine ABS >ABS<
Cadre supérieur
Partie principale Métal (acier) Polymérisation
Dessus du cache-
câbles Résine ABS >ABS<
Bras Partie principale Métal (acier) Polymérisation
Passe-câbles Partie principale Résine ABS >ABS<
Dispositif de réglage
de la hauteur Extérieur de la
partie principale Métal (acier) Polymérisation
Pied
Partie principale Métal (acier) Polymérisation
Dessus du cache-
câbles Résine ABS >ABS<
Vérin Polypropylène >PP<
Entretoise de
gauche / droite Polypropylène >PP<
Cache-câble inférieur Partie principale Métal (aluminium) Polymérisation
Vérin Polypropylène >PP<
Module Bluetooth Extérieur de la
partie principale Polycarbonate
Bureau
(Modèle type établi)
Dessus de la tablette
Surface Stratifié
Bordure Résine ABS
Matériau principal Métal (acier) Polymérisation
Dessus du
cachecâbles Résine ABS >ABS<
Cadre supérieur
Partie principale Métal (acier) Polymérisation
Dessus du cache-
câbles Résine ABS >ABS<
Passe-câbles Partie principale Résine ABS >ABS<
Dispositif de réglage
de la hauteur Extérieur de la
partie principale Métal (acier) Polymérisation
Pied
Partie principale Métal (acier) Polymérisation
Dessus du cache-
câbles Résine ABS >ABS<
Vérin Polypropylène >PP<
Entretoise de
gauche / droite Polypropylène >PP<
Pièce Matériaux Revêtement
Bureau
(Modèle type établi)
Module Bluetooth Extérieur de la
partie principale Polycarbonate
Chemin de câbles Partie principale Métal (acier) Polymérisation
Pied central Partie principale Métal (acier) Polymérisation
Guide-câbles Élément de fixation Métal (acier) Polymérisation
Partie principale Polypropylène >PP<
Embout Partie principale Métal (acier) Polymérisation
Partition
Tissu 100 % polyester (dont 51
% de fibres reconstituées)
Matériau principal Contreplaqué de
Falcataria
Pied central Métal (acier) Polymérisation
Support du cache-
câbles Partie principale Métal (acier) Polymérisation
Capot du cachecâbles Partie principale Métal (acier) Polymérisation
Table
Dessus de la tablette
Surface Stratifié
Bordure Polyuréthane
Centre Panneau de
particules / panneau de
fibres de densité moyenne
Capot du cache-
câbles
Partie principale Métal (aluminium) Polymérisation
Partie souple Résine ABS + TPE
Passe-câbles Partie principale Métal (acier) Polymérisation
Colonne protège-
câbles Partie principale Polypropylène >PP<
Pièces
communes aux
bureaux / tables
Cadre supérieur Partie principale Métal (acier) Polymérisation
Embout Résine ABS >ABS<
Dispositif de réglage
de la hauteur Partie principale Métal (acier) Polymérisation
Pied
Partie principale Métal (acier) Polymérisation
Vérin Polypropylène >PP<
Entretoise de
gauche / droite Polypropylène >PP<
Panneau
Partie principale
Tissu 100 % polyester
(dont 51 % de fibres
reconstituées)
Matériau principal Contreplaqué de
Falcataria
Crochet de fixation Partie principale Métal (acier) Polymérisation
Connecteur d'angle Partie principale Métal (acier) Polymérisation
Connecteur Partie principale Résine ABS >ABS<
Éléments de
fixation au sol en
métal Partie principale Métal (acier) Polymérisation
Barre transversale Barre transversale Partie principale Métal (aluminium) Finition en
aluminium
anodisé
Support Partie principale Métal (acier) Polymérisation
∗> XX < indique les matériaux des différentes pièces. Cette information est utile pour le recyclage.
∗Veuillez comprendre que les spécifications des produits peuvent changer sans notification préalable en raison des
améliorations apportées au produit.

5857
E Materiales y acabado de la superficie
Pieza Materiales Acabado de la
superficie
Escritorio
(Independiente)
Superficie de la
mesilla
Superficie Lámina
Borde Resina ABS
Interior Metal (acero) Recubrimiento
cocido
Tapa para cables Resina ABS >ABS<
Bandeja de cables Carcasa principal Resina ABS >ABS<
Portacables
Carcasa principal Polipropileno >PP<
Soporte de conducto Metal (acero) Recubrimiento
cocido
Tubo de protección Carcasa principal Resina de tereftalato de
polietileno
Enganche para cables Carcasa principal Elastómero termoplástico
Escritorio
(En L)
Tablero de la mesa de
madera
Superficie Lámina
Borde Resina ABS
Material del núcleo Conglomerado de
densidad media
Superficie posterior Lámina
Tapa para cables Resina ABS >ABS<
Estructura superior Carcasa principal Metal (acero) Recubrimiento
cocido
Tapón de extremo Resina ABS >ABS<
Brazo superior de
suspensión Carcasa principal Metal (acero) Recubrimiento
cocido
Bandeja de cables Carcasa principal Resina ABS >ABS<
Unidad de altura
regulable Exterior del cuerpo
principal Metal (acero) Recubrimiento
cocido
Brazo de suspensión
Carcasa principal Metal (acero) Recubrimiento
cocido
Tapón de extremo Resina ABS >ABS<
Nivelador Polipropileno >PP<
Separadores
izquierdo y derecho Polipropileno >PP<
Tapón inferior Carcasa principal Metal (aluminio) Recubrimiento
cocido
Nivelador Polipropileno >PP<
Unidad Bluetooth Exterior del cuerpo
principal Policarbonato
Escritorio
(Tipo banco)
Superficie de la
mesilla
Superficie Lámina
Borde Resina ABS
Material del núcleo Metal (acero) Recubrimiento
cocido
Tapa para cables Resina ABS >ABS<
Estructura superior Carcasa principal Metal (acero) Recubrimiento
cocido
Tapón de extremo Resina ABS >ABS<
Bandeja de cables Carcasa principal Resina ABS >ABS<
Unidad de altura
regulable Exterior del cuerpo
principal Metal (acero) Recubrimiento
cocido
Brazo de suspensión
Carcasa principal Metal (acero) Recubrimiento
cocido
Tapón de extremo Resina ABS >ABS<
Nivelador Polipropileno >PP<
Separadores
izquierdo y derecho Polipropileno >PP<
Unidad Bluetooth Exterior del cuerpo
principal Policarbonato
Pieza Materiales Acabado de la
superficie
Escritorio
(Tipo banco)
Conducto para cables Carcasa principal Metal (acero) Recubrimiento
cocido
Columna Carcasa principal Metal (acero) Recubrimiento
cocido
Portacables Accesorio de fijación Metal (acero) Recubrimiento
cocido
Carcasa principal Polipropileno >PP<
Cubierta externa Carcasa principal Metal (acero) Recubrimiento
cocido
Panel de fijación
Tela
100 % poliéster (incluyendo
el 51 % de fibras regenerada)
Material del núcleo Contrachapado Falcataria
Columna Metal (acero) Recubrimiento
cocido
Receptor de la
cubierta para cables Carcasa principal Metal (acero) Recubrimiento
cocido
Cubierta para cables Carcasa principal Metal (acero) Recubrimiento
cocido
Mesa
Superficie de la
mesilla
Superficie Lámina
Borde Poliuretano
Interior Tablero de partículas/
conglomerado de
densidad media
Cubierta para cables Carcasa principal Metal (aluminio) Recubrimiento
cocido
Parte suave Resinas ABS y TPE
Bandeja de cables Carcasa principal Metal (acero) Recubrimiento
cocido
Protector de cables Carcasa principal Polipropileno >PP<
Frecuente en
escritorios y
mesas
Estructura superior Carcasa principal Metal (acero) Recubrimiento
cocido
Cubierta externa Resina ABS >ABS<
Unidad de altura
regulable Carcasa principal Metal (acero) Recubrimiento
cocido
Brazo de suspensión
Carcasa principal Metal (acero) Recubrimiento
cocido
Nivelador Polipropileno >PP<
Separadores
izquierdo y derecho Polipropileno >PP<
Panel
Carcasa principal Tela
100 % poliéster (incluyendo
el 51 % de fibras regenerada)
Material del núcleo Contrachapado Falcataria
Enganche de sujeción Carcasa principal Metal (acero) Recubrimiento
cocido
Accesorio de conexión
para esquinas Carcasa principal Metal (acero) Recubrimiento
cocido
Accesorio de
conexión Carcasa principal Resina ABS >ABS<
Accesorios de
metal de fijación
al suelo Carcasa principal Metal (acero) Recubrimiento
cocido
Barra funcional
Barra Carcasa principal Metal (aluminio) Acabado
de aluminio
anodizado
Soporte Carcasa principal Metal (acero) Recubrimiento
cocido
∗> XX < indica los materiales de las piezas. Esta información resulta útil para el reciclaje.
∗Comprenda que las especificaciones del producto pueden cambiar sin previo aviso debido a mejoras
incorporadas.

6059
I Materiali e finiture
Parte Materiali Finitura
superficiale
Scrivania
(Tipo autonomo)
Piano della ribaltina
Superficie Laminato
Bordo Resina ABS
Interno Metallo (acciaio) Rivestimento a
caldo
Copertura cavi Resina ABS >ABS<
Portacavi Corpo principale Resina ABS >ABS<
Canalina per cavi
Corpo principale Polipropilene >PP<
Parti flessibili Metallo (acciaio) Rivestimento a
caldo
Tubo di protezione Corpo principale Resina polietilentereftalato
Gancio per cavi Corpo principale Elastomero termoplastico
Scrivania
(Tipo a L)
Piano del tavolo in
legno
Superficie Laminato
Bordo Resina ABS
Materiale interno MDF
Superficie
posteriore Laminato
Copertura cavi Resina ABS >ABS<
Telaio superiore Corpo principale Metallo (acciaio) Rivestimento a
caldo
Tappo terminale Resina ABS >ABS<
Braccio superiore Corpo principale Metallo (acciaio) Rivestimento a
caldo
Portacavi Corpo principale Resina ABS >ABS<
Unità regolabile in
altezza Parte esterna del
corpo principale Metallo (acciaio) Rivestimento a
caldo
Braccio inferiore
Corpo principale Metallo (acciaio) Rivestimento a
caldo
Tappo terminale Resina ABS >ABS<
Piedino livellante Polipropilene >PP<
Distanziale sinistro/
destro Polipropilene >PP<
Tappo inferiore Corpo principale Metallo (alluminio) Rivestimento a
caldo
Piedino livellante Polipropilene >PP<
Unità Bluetooth Parte esterna del
corpo principale Policarbonato
Scrivania
(Tipo a banco)
Piano della ribaltina
Superficie Laminato
Bordo Resina ABS
Materiale interno Metallo (acciaio) Rivestimento a
caldo
Copertura cavi Resina ABS >ABS<
Telaio superiore Corpo principale Metallo (acciaio) Rivestimento a
caldo
Tappo terminale Resina ABS >ABS<
Portacavi Corpo principale Resina ABS >ABS<
Unità regolabile in
altezza Parte esterna del
corpo principale Metallo (acciaio) Rivestimento a
caldo
Braccio inferiore
Corpo principale Metallo (acciaio) Rivestimento a
caldo
Tappo terminale Resina ABS >ABS<
Piedino livellante Polipropilene >PP<
Distanziale sinistro/
destro Polipropilene >PP<
Parte Materiali Finitura
superficiale
Scrivania
(Tipo a banco)
Unità Bluetooth Parte esterna del
corpo principale Policarbonato
Canalina per cablaggio Corpo principale Metallo (acciaio) Rivestimento a
caldo
Supporto Corpo principale Metallo (acciaio) Rivestimento a
caldo
Canalina per cavi
Collegamento di
fissaggio Metallo (acciaio) Rivestimento a
caldo
Corpo principale Polipropilene >PP<
Copertura terminale Corpo principale Metallo (acciaio) Rivestimento a
caldo
Pannello di fissaggio
Tessuto Poliestere 100% (di cui
51% di fibre rigenerate)
Materiale interno Compensato di legno di
falcataria
Supporto Metallo (acciaio) Rivestimento a
caldo
Supporto installazione
copertura cavi Corpo principale Metallo (acciaio) Rivestimento a
caldo
Copertura cavi Corpo principale Metallo (acciaio) Rivestimento a
caldo
Tavolo
Piano della ribaltina
Superficie Laminato
Bordo Poliuretano
Interno Truciolato/MDF
Copertura cavi Corpo principale Metallo (alluminio) Rivestimento a
caldo
Parti flessibili Resina ABS + TPE
Portacavi Corpo principale Metallo (acciaio) Rivestimento a
caldo
Protezione per cavi Corpo principale Polipropilene >PP<
Elementi comuni
scrivania/tavolo
Telaio superiore
Corpo principale Metallo (acciaio) Rivestimento a
caldo
Copertura
terminale Resina ABS >ABS<
Unità regolabile in
altezza Corpo principale Metallo (acciaio) Rivestimento a
caldo
Braccio inferiore
Corpo principale Metallo (acciaio) Rivestimento a
caldo
Piedino livellante Polipropilene >PP<
Distanziale sinistro/
destro Polipropilene >PP<
Pannello
Corpo principale
Tessuto Poliestere 100% (di cui
51% di fibre rigenerate)
Materiale interno Compensato di legno di
falcataria
Gancio di
collegamento Corpo principale Metallo (acciaio) Rivestimento a
caldo
Accessorio di
collegamento angolare Corpo principale Metallo (acciaio) Rivestimento a
caldo
Accessorio di
collegamento Corpo principale Resina ABS >ABS<
Accessori metallici
per fissaggio a
pavimento Corpo principale Metallo (acciaio) Rivestimento a
caldo
Traversa operativa
Traversa Corpo principale Metallo (alluminio) Finitura in
alluminio
anodizzato
Supporto Corpo principale Metallo (acciaio) Rivestimento a
caldo
∗> XX < indica i materiali delle parti. Queste informazioni sono utili per il riciclaggio.
∗Le specifiche del prodotto sono soggette a modifiche senza preavviso a scopo di migliorare il prodotto.

6261
NL
Materialen en oppervlaktekwaliteit
Onderdeel Materialen
Oppervlaktekwaliteit
Bureau
(Type zit/sta)
Tafelblad
Oppervlakte Laminaat
Rand ABS-hars
Geheel Metaal (staal) Ingebrande coating
Kabelkap ABS-hars >ABS<
Kabelgoot Hoofddeel ABS-hars >ABS<
Cableveyor Hoofddeel Polypropyleen >PP<
Kokersteun Metaal (staal) Ingebrande coating
Beschermhuls Hoofddeel Polyethyleentereftalaat-hars
Kabelhaak Hoofddeel Thermoplastisch
elastomeer
Bureau
(Type L-vorm)
Houten tafelblad
Oppervlakte Laminaat
Rand ABS-hars
Basismateriaal Vezelplaat met gemiddelde
dichtheid
Achterkant Laminaat
Kabelkap ABS-hars >ABS<
Bovenkader Hoofddeel Metaal (staal) Ingebrande coating
Afsluitkap ABS-hars >ABS<
Bovenarm Hoofddeel Metaal (staal) Ingebrande coating
Kabelgoot Hoofddeel ABS-hars >ABS<
In hoogte
verstelbare eenheid Buitenkant
hoofdgedeelte Metaal (staal) Ingebrande coating
Onderarm
Hoofddeel Metaal (staal) Ingebrande coating
Afsluitkap ABS-hars >ABS<
Stelvoetje Polypropyleen >PP<
Tussenring
links/rechts Polypropyleen >PP<
Onderkap Hoofddeel Metaal (aluminium) Ingebrande coating
Stelvoetje Polypropyleen >PP<
Bluetooth-eenheid Buitenkant
hoofdgedeelte Polycarbonaat
Bureau
(Type bank)
Tafelblad
Oppervlakte Laminaat
Rand ABS-hars
Basismateriaal Metaal (staal) Ingebrande coating
Kabelkap ABS-hars >ABS<
Bovenkader Hoofddeel Metaal (staal) Ingebrande coating
Afsluitkap ABS-hars >ABS<
Kabelgoot Hoofddeel ABS-hars >ABS<
In hoogte
verstelbare eenheid Buitenkant
hoofdgedeelte Metaal (staal) Ingebrande coating
Onderarm
Hoofddeel Metaal (staal) Ingebrande coating
Afsluitkap ABS-hars >ABS<
Stelvoetje Polypropyleen >PP<
Tussenring
links/rechts Polypropyleen >PP<
Bluetooth-eenheid Buitenkant
hoofdgedeelte Polycarbonaat
Bedradingskanaal Hoofddeel Metaal (staal) Ingebrande coating
Poot Hoofddeel Metaal (staal) Ingebrande coating
Cableveyor
Bevestigingsverbinding
Metaal (staal) Ingebrande coating
Hoofddeel Polypropyleen >PP<
Onderdeel Materialen
Oppervlaktekwaliteit
Bureau
(Type bank)
Afsluitdeksel Hoofddeel Metaal (staal) Ingebrande coating
Bevestigingspaneel
Stof Polyester 100% (inclusief
51% aan geregenereerde
vezel)
Basismateriaal Falcataria-multiplex
Poot Metaal (staal) Ingebrande coating
Bevestigingsstuk
van de
kabelafdekking Hoofddeel Metaal (staal) Ingebrande coating
Kabelafdekking Hoofddeel Metaal (staal) Ingebrande coating
Tafel
Tafelblad
Oppervlakte Laminaat
Rand Polyurethaan
Geheel Spaanplaat/vezelplaat met
gemiddelde dichtheid
Kabelafdekking Hoofddeel Metaal (aluminium) Ingebrande coating
Zacht onderdeel ABS-hars + TPE
Kabelgoot Hoofddeel Metaal (staal) Ingebrande coating
Kabelbeschermer Hoofddeel Polypropyleen >PP<
Gemeenschappelijk
aan bureau/tafel
Bovenkader Hoofddeel Metaal (staal) Ingebrande coating
Afsluitdeksel ABS-hars >ABS<
In hoogte
verstelbare eenheid Hoofddeel Metaal (staal) Ingebrande coating
Onderarm
Hoofddeel Metaal (staal) Ingebrande coating
Stelvoetje Polypropyleen >PP<
Tussenring
links/rechts Polypropyleen >PP<
Paneel
Hoofddeel Stof Polyester 100% (inclusief
51% aan geregenereerde
vezel)
Basismateriaal Falcataria-multiplex
Bevestigingshaak Hoofddeel Metaal (staal) Ingebrande coating
Hoekaansluitstuk Hoofddeel Metaal (staal) Ingebrande coating
Aansluitstuk Hoofddeel ABS-hars >ABS<
Metalen
beugels voor
vloerbevestiging Hoofddeel Metaal (staal) Ingebrande coating
Functiebalk Balk Hoofddeel Metaal (aluminium) Afwerking in
geanodiseerd
aluminium
Steun Hoofddeel Metaal (staal) Ingebrande coating
∗> XX < wijst op het materiaal van de onderdelen. Deze informatie is nuttig voor recycling.
∗Houd er rekening mee dat de productspecificaties zonder voorafgaande kennisgeving kunnen wijzigen wegens
verbeteringen die aan het product zijn aangebracht.
-
 1
1
-
 2
2
-
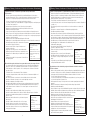 3
3
-
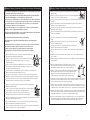 4
4
-
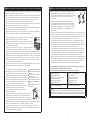 5
5
-
 6
6
-
 7
7
-
 8
8
-
 9
9
-
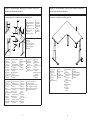 10
10
-
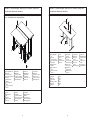 11
11
-
 12
12
-
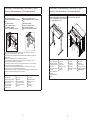 13
13
-
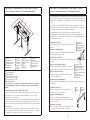 14
14
-
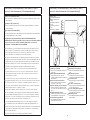 15
15
-
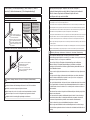 16
16
-
 17
17
-
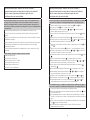 18
18
-
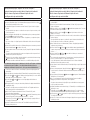 19
19
-
 20
20
-
 21
21
-
 22
22
-
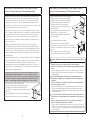 23
23
-
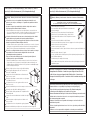 24
24
-
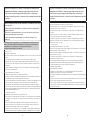 25
25
-
 26
26
-
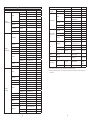 27
27
-
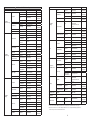 28
28
-
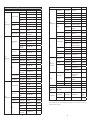 29
29
-
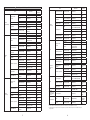 30
30
-
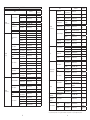 31
31
-
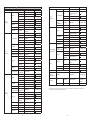 32
32


Okamura SW Handleiding
- Type
- Handleiding
- Deze handleiding is ook geschikt voor
in andere talen
- italiano: Okamura SW Istruzioni per l'uso
- français: Okamura SW Mode d'emploi
- español: Okamura SW Instrucciones de operación
- Deutsch: Okamura SW Bedienungsanleitung
Gerelateerde papieren


Andere documenten
-
Hama Universal Smartphone or Tablet Holder de handleiding
-
Scheppach basato 3 Handleiding
-
-
Kettler 3699-855 de handleiding
-
CORNILLEAU COMPETITION 610 de handleiding
-
-
Xavax avec tiroir 61 x 60 cm de handleiding
-
Goobay 58530 Monitor Mount Handleiding
-
-
IKEA GALANT AA-452151-3 Instructions Manual