
Dampftapetenablöser / Steam Wallpaper Stripper /
Décolleuse à papier peint PDTA 5 A1
Dampftapetenablöser
Originalbetriebsanleitung
Décolleuse à papier peint
Traduction des instructions d‘origine
Stoom-behangverwijderaar
Vertaling van de originele gebruiksaanwijzing
Parní odstraňovač tapet
Překlad originálního provozního návodu
Steam Wallpaper Stripper
Translation of the original instructions
Urządzenie parowe do
usuwania tapet
Tłumaczenie oryginalnej instrukcji obsługi
Parný odstraňovač tapiet
Preklad originálneho návodu na obsluhu
IAN 332976_1907
Dampftapetenablöser / Steam Wallpaper Stripper /

Klappen Sie vor dem Lesen die Seite mit den Abbildungen aus und machen Sie sich anschließend mit
allen Funktionen des Gerätes vertraut.
Before reading, unfold the page containing the illustrations and familiarise yourself with all functions of
the device.
Avant de lire le mode d‘emploi, ouvrez la page contenant les illustrations et familiarisez-vous ensuite avec
toutes les fonctions de l‘appareil.
Vouw vóór het lezen de pagina met de afbeeldingen open en maak u vertrouwd met alle functies van het
apparaat.
Przed przeczytaniem proszę rozłożyć stronę z ilustracjami, a następnie proszę zapoznać się z
wszystkimi funkcjami urządzenia.
Před čtením si otevřete stranu s obrázky a potom se seznamte se všemi funkcemi přístroje.
Pred čítaním si odklopte stranu s obrázkami a potom sa oboznámte so všetkými funkciami prístroja.
DE / AT / CH Originalbetriebsanleitung Seite XX
GB / IE Translation of the original instructions Page XX
FR / BE Traduction des instructions d‘origine Page XX
NL / BE Vertaling van de originele gebruiksaanwijzing Pagina XX
PL Tłumaczenie oryginalnej instrukcji obsługi Strona XX
CZ Překlad originálního provozního návodu Strana XX
SK Preklad originálneho návodu na obsluhu Strana XX
4
24
47
14
37
58
68

1
2
10
14
14
11
1211
13
13
3
4
5
6
6
7
11
12
14
4
8
8
12
11
7
9
2
15

4
DE AT CH
Inhalt
Einleitung .....................................4
Bestimmungsgemäße
Verwendung ................................ 4
Allgemeine Beschreibung .............4
Lieferumfang ..................................... 5
Übersicht ......................................... 5
Funktionsbeschreibung ....................... 5
Technische Daten ..........................5
Sicherheitshinweise ......................5
Bildzeichen auf dem Gerät: ................ 5
Symbole in der Anleitung ................... 6
Sicherheitshinweise ........................... 6
Sicherheitshinweise bei Verwendung
des Dampftapetenablösers ................. 7
Sicherheitsvorrichtungen .................... 7
Inbetriebnahme ...........................8
Halteklammern montierten .................. 8
Schlauch und Dampfplatte anschließen 8
Montage und Wechsel der großen
Dampfplatte ..................................... 8
Wasser ein- oder nachfüllen ............... 8
Bedienung ...................................8
Ein- und Ausschalten .......................... 9
Tapeten ablösen .............................. 10
Reinigung und Wartung .............10
Reinigung....................................... 10
Entkalken ....................................... 10
Lagerung ...................................11
Entsorgung/ Umweltschutz .........11
Ersatzteile/Zubehör ...................11
Garantie ....................................12
Reparatur-Service ......................13
Service-Center ............................13
Importeur .................................. 13
Einleitung
Herzlichen Glückwunsch zum Kauf Ihres
neuen Gerätes. Sie haben sich damit für
ein hochwertiges Gerät entschieden. Die-
ses Gerät wurde während der Produktion
auf Qualität geprüft und einer Endkontrolle
unterzogen. Die Funktionsfähigkeit Ihres
Gerätes ist somit sichergestellt.
Die Betriebsanleitung ist Bestandteil
dieses Gerätes. Sie enthält wichtige
Hinweise für Sicherheit, Gebrauch und Ent-
sorgung. Machen Sie sich vor der Benut-
zung des Gerätes mit allen Bedien- und Si-
cherheitshinweisen vertraut. Benutzen Sie
das Gerät nur wie beschrieben und für die
angegebenen Einsatzbereiche.
Bewahren Sie die Betriebsanleitung gut auf
und händigen Sie alle Unterlagen bei Wei-
tergabe des Gerätes an Dritte mit aus.
Bestimmungsgemäße
Verwendung
Das Gerät ist zum Lösen von Tapeten vor-
gesehen. Jede andere Verwendung, die in
dieser Anleitung nicht ausdrücklich zuge-
lassen wird, kann zu Schäden am Gerät
führen und eine ernsthafte Gefahr für den
Benutzer darstellen.
Der Hersteller haftet nicht für Schäden, die
durch bestimmungswidrigen Gebrauch
oder falsche Bedienung verursacht wurden.
Dieses Gerät ist nicht zur gewerblichen
Nutzung geeignet. Bei gewerblichem Ein-
satz erlischt die Garantie.
Allgemeine
Beschreibung
Die Abbildung der wichtigs-
ten Funktionsteile fi nden Sie
auf den Ausklappseiten.
Original-EG-
Konformitätserklärung ...............78
Explosionszeichnung .................. 85

5
DE AT CH
Lieferumfang
Packen Sie das Gerät aus und kontrollieren
Sie, ob es vollständig ist:
- Netzkabel mit Stecker
- Boilerbehälter
- Dampfschlauch
- Kleine Dampfplatte
- Große Dampfplatte
- Halteklammern
- Schaber
- Betriebsanleitung
Übersicht
1 Netzkabel
2 Halteklammer
3 Tragegriff Boilerbehälter
4 Schlauchanschluss Boilerbehälter
5 Überdruckventil
6 Boilerdeckel
7 Boilerbehälter
8 Wasserstandsanzeige
9 Schaber
10 Handgriff kleine Dampfplatte
11 Kleine Dampfplatte
12 Führungsschiene kleine
Dampfplatte
13 Große Dampfplatte
14 Dampfschlauch
15 Schraube für Halteklammer
Funktionsbeschreibung
Der Dampftapetenablöser mit einer Dampf-
zeit von 80 Minuten besitzt eine kleine und
eine große Dampfplatte und einen 4 Meter
langen Dampfschlauch.
Die Funktion der Bedienteile entnehmen Sie
bitte der nachfolgenden Beschreibung.
Technische Daten
Dampftapetenablöser ....PDTA 5 A1
Leistung P ..................................2300 W
Spannung U .............. 230-240V~, 50 Hz
Dampfzeit ................................... 80 min
Behältervolumen ................................ 5 l
Dampfschlauchlänge .........................4 m
Dampfkraft .............................. 60 g/min
Größe (große Dampfplatte) .... 20 x 28 cm
Größe (kleine Dampfplatte) ...... 18 x 8 cm
Netzkabel ........................................3 m
Schutzklasse .................................... IPX4
Gewicht (ohne Zubehör) ................ 935 g
Gewicht (nur Zubehör) ................... 815 g
Sicherheitshinweise
Beim Gebrauch des Geräts sind die
Sicherheitshinweise zu beachten.
Bildzeichen auf dem Gerät:
Lesen Sie die Betriebsanlei-
tung aufmerksam durch.
Elektrogeräte gehören nicht
in den Hausmüll.
Achtung!
Heiße Oberfl äche.
100°C
Das Arbeiten mit heißem
Dampf kann zu schweren
Verbrühungen führen!
Achtung!
Achtung! Es besteht Ver-
brennungsgefahr.

6
DE AT CH
Dampf nicht auf den eige-
nen Körper oder auf ande-
re Personen und nicht auf
Tiere richten!
Gerät sicher und standfest
auf dem ebenen Fußboden
aufstellen.
Nicht als Tritt benutzen
WARNHINWEIS –
Verbrühungsgefahr
Symbole in der Anleitung
Gefahrenzeichen mit
Angaben zur Verhütung
von Personen- oder
Sachschäden
Gefahrenzeichen mit
Angaben zur Verhütung
von Personenschäden
durch einen elektrischen
Schlag
Gebotszeichen mit Angaben
zur Verhütung von Schäden
Hinweiszeichen mit Informati-
onen zum besseren Umgang
mit dem Gerät
Verbrühungsgefahr !
Keine Arbeiten direkt über
dem Kopf durchführen.
Schutzhandschuhe tragen!
Dampf kann aus dem Gerät
entweichen.
Sicherheitshinweise
a) Dieses Gerät kann von Kindern
ab 8 Jahren und darüber sowie
von Personen mit verringerten
physischen, sensorischen oder
mentalen Fähigkeiten oder Man-
gel an Erfahrung und Wissen
benutzt werden, wenn sie be-
aufsichtigt oder bezüglich des
sicheren Gebrauchs des Gerätes
unterwiesen wurden und die
daraus resultierenden Gefahren
verstehen. Kinder dürfen nicht
mit dem Gerät spielen. Reinigung
und Benutzer-Wartung dürfen
nicht von Kindern ohne Beauf-
sichtigung durchgeführt werden.
b) Stellen Sie sicher, dass das Gerät
nicht direkt auf elektrische Geräte
und Einrichtungen, die elektrische
Bauteile enthalten, z. B. den
Innenraum von Öfen, gerichtet
wird
c) Nach dem Gebrauch und vor
Benutzerwartung muss das Gerät
durch Ziehen des Netzsteckers
vom Netz getrennt werden.
d) Lassen Sie das Gerät nicht un-
beaufsichtigt, wenn es mit dem
Netz verbunden ist.
e) Die Einfüllöffnung, darf während
des Gebrauchs nicht geöffnet
werden. Beachten Sie die Anwei-
sungen für das sichere Nachfül-
len des Wasserbehälters.
f) Verwenden Sie das Gerät nicht,
wenn es heruntergefallen ist,
offensichtliche Beschädigungen
aufweist oder undicht ist.
g) Halten Sie Kinder während der
Benutzung und des Abkühlens
von dem Gerät fern.

7
DE AT CH
k) Gerät nur am Handgriff tragen.
Nicht am Kabel oder Schlauch
ziehen.
l) Schlauch nicht überdehnen und
nicht knicken.
m) Gerät sicher und standfest auf
dem ebenen Fußboden aufstel-
len. Gerät nicht umstoßen.
n) Verbrühungsgefahr! Sollte das
Gerät umfallen, gelangt heißes
Wasser in den Schlauch und
kann am Schlauchende austre-
ten. Gerät sofort ausschalten,
Netzstecker ziehen, abkühlen
lassen und erst dann Schlauch
entleeren.
o) Dampfplatte nur am Griff anfas-
sen.
Sicherheitsvorrichtungen
• Der Boilerdeckel (6) verfügt über ein
Überdruckventil (5). Dadurch kann
Dampf und etwas heißes Wasser
ausgeschieden werden, wenn im
Boilerbehälter (7) ein Überdruck ent-
steht. Dies kann auftreten, wenn der
Dampfschlauch (14) verstopft oder der
Boilerbehälter (7) überfüllt ist. Ziehen
Sie in einem solchen Fall den Netzste-
cker (1) aus der Steckdose, und lassen
Sie das Gerät abkühlen, bevor Sie es
überprüfen. Dieses Überdruckventil (5)
darf unter keinen Umständen blockiert
werden.
Bei normaler Verwendung werden
über das Überdruckventil (5) kleine
Mengen an Dampf und Wasser
ausgeschieden.
• Der Boilerdeckel (6) verfügt über ein
Vakuumlöseventil, über das Luft in das
Gerät gelangen kann, wenn ein Vaku-
Sicherheitshinweise bei
Verwendung des Dampfta-
petenablösers
a) Oberfl ächen können sich wäh-
rend der Verwendung erhitzen.
Der Boilerdeckel kann während
des Betriebs und beim Abkühlen
heiß sein.
b) Gerät nie ohne Wasserfüllung
einschalten!
c) Gerät nie in Flüssigkeiten eintau-
chen.
d) Gerät nur mit Leitungswasser fül-
len. Niemals brennbare, giftige,
ätzende oder andere Flüssigkei-
ten beimischen.
e) Maximale Füllmenge (5 l) nicht
überschreiten.
f) Vor dem Tapetenlösen Schalter
und Steckdosen an den Wän-
den wasser- und dampfdicht
abdecken.
g) Boiler- und Schraubverschlüsse
vor Inbetriebnahme fest ver-
schließen (siehe Inbetriebnah-
me).“
h) Verbrühungsgefahr! Boilerde-
ckel und Schraubverschlüsse
während des Betriebs niemals
öffnen. Vor dem Öffnen des
Boilerdeckels und der Schraub-
verschlüsse: Netzstecker ziehen
und das Gerät sowie restliches
Wasser abkühlen lassen. Dann
erst den Boilerdeckel oder die
Schraubverschlüsse öffnen (sie-
he Wasser ein- oder nachfüllen).
i) Wenn der Dampfschlauch ver-
stopft ist und dadurch ein Über-
druck entsteht, ziehen Sie den
Netzstecker aus der Steckdose.
j) Beim Arbeiten stets für einen
sicheren Stand sorgen.

8
DE AT CH
um entsteht.
• Der Dampfschlauch (14) ist doppelwan-
dig, um die Oberfl ächentemperatur zu
senken.
• Das Gerät ist mit einem automatischen
Überhitzungsschutz (Thermoauslöser)
versehen, der ausgelöst wird, wenn
das Gerät unbefüllt erhitzt wird. Befül-
len Sie das Gerät mit (vorzugsweise
heißem) Wasser. Nach einigen Minu-
ten erzeugt das Gerät wieder Dampf.
• Achten Sie darauf, das Gerät nicht zu
kippen. Andernfalls wird der automati-
sche Überhitzungsschutz (Thermoauslö-
ser) möglicherweise ausgelöst.
Inbetriebnahme
Halteklammern montierten
Setzen Sie die beiden Halteklammern(2)
auf das Gerät und verschrauben Sie diese
mit den Schrauben (15). Siehe Detail
.
Schlauch und Dampfplatte
anschließen
1. Schrauben Sie ein Ende des
Dampfschlauchs (14) auf den
Schlauchanschluss (4) am Boiler-
behälter (7).
2. Schrauben Sie das andere Ende
des Dampfschlauchs (14) auf den
Schlauchanschluss der kleinen
Dampfplatte (11).
Achten Sie darauf, dass der
Dampfschlauch ordnungsge-
mäß angeschlossen wurde.
Schraubverschlüsse während des
Betriebs niemals öffnen.
Montage und Wechsel
der großen Dampfplatte
1. Zur Montage und Wechsel des Zube-
hörs den Netzstecker (1) ziehen. War-
ten, bis kein Dampf mehr austritt und
das Gerät abgekühlt ist.
2. Um die große Dampfplatte (13) zu
verwenden, schieben Sie diese in
die Führungsschiene (12) der kleinen
Dampfplatte (11).
3. Zur Demontage der großen Dampfplat-
te (13) wird diese aus der Führungs-
schiene (12) der kleinen Dampfplatte
(11) gezogen.
Wasser ein- oder
nachfüllen
1. Vergewissern Sie sich, dass der Netz-
stecker (1) ausgesteckt und das Gerät
abgekühlt ist.
2. Schrauben Sie den Boilerdeckel (6) ab
und entfernen Sie diesen.
3. Befüllen Sie den Boilerbehälter (7) mit
sauberem Leitungswasser. Befüllen Sie
den Boilerbehälter (7) nur bis zur MAX-
Markierung der Wasserstandsanzeige
(8) (höchsten 5 Liter)
4. Schrauben Sie den Boilerdeckel (6) ein.
Achten Sie darauf, dass dieser ord-
nungsgemäß eingeschraubt ist.
Bei längeren Arbeitszeiten:
Die Minimum-Markierung der Was-
serstandsanzeige (8) beachten und
rechtzeitig Wasser nachfüllen.
Bedienung
Achtung! Oberfl ächen
können sich während der
Verwendung erhitzen. Der
Boilerdeckel kann während

9
DE AT CH
des Betriebs und beim Ab-
kühlen heiß sein.
Verbrühungsgefahr!
Keine Arbeiten direkt über dem
Kopf durchführen. Schutzhand-
schuhe tragen!
Dampf kann aus dem Gerät ent-
weichen.
Dampf nicht auf den eigenen
Körper oder auf andere Personen
und nicht auf Tiere richten!
• Prüfen Sie vor Arbeitsbeginn den Zu-
stand des Verputzes, da Dampf mit
hohen Temperaturen lockeren, porösen
oder schlecht gebundenen Putz lösen
kann. Der Putz kann sich auch in Be-
reichen leichter ablösen, die Sprünge
oder Löcher aufweisen.
Auch sollte die Dampfplatte nicht über
einen längeren Zeitraum über einer
Stelle gehalten werden. Sie können lo-
ckeren Putz erkennen, indem Sie einige
Stellen der Wand mit den Knöcheln ab-
klopfen. Wenn dabei ein hohler Klang
entsteht, wird empfohlen, nur unter
größter Vorsicht fortzufahren.
• Testen Sie den Tapetenablöser in jedem
Fall zunächst in einem kleinen Bereich
von etwa 100 cm², bevor Sie mit der
eigentlichen Arbeit beginnen.
• Wenn Sie feststellen, dass sich der
Verputz löst oder ein Knacken zu hören
ist, stellen Sie die Arbeit ein. Der Tape-
tenablöser kann gefahrlos für Rigips-/
Gipskartonfl ächen eingesetzt werden.
• Aufgrund der von diesem Produkt er-
zeugten Hitze können bestimmte Ober-
fl ächen, z. B. Teppiche, Polstermöbel,
Tischplatten oder Schränke Schäden
davontragen. Damit die jeweiligen
Oberfl ächen nicht durch die Hitze des
Boilerbehälters (7) beschädigt werden,
sollte dieser stets auf ein Holzbrett oder
einen ähnlichen Gegenstand gestellt
werden. Staubdecken oder Zeitungen
eignen sich nicht für diesen Zweck.
• Boilerbehälter (7) nur am Tragegriff (3)
anfassen.
• Mehrmals gestrichene oder wasserfeste
Tapeten lassen sich nur schwer entfer-
nen. Solche Tapeten mit einer Stachel-
walze perforieren, damit der Dampf
auf die Kleisterschicht einwirken kann.
• Bei Vinylschaumtapeten gegebenenfalls
zunächst die obere Vinylschicht abzie-
hen, dann erst mit dem Tapetenlöser
arbeiten.
• Tragen Sie beim Entfernen von Decken-
tapeten stets Schutzkleidung. Achten
Sie auf das sich an der Dampfplatte
sammelnde Kondenswasser, da heißes
Wasser abtropfen kann. Leeren Sie
die Dampfplatte regelmäßig, und ver-
wenden Sie sie nicht direkt über Ihrem
Kopf.
• Die Dampfplatte (11/13) stets in einem
geeigneten Behälter platzieren, wenn
diese (auch nur kurz) unbeaufsichtigt
bleibt. Bei der Verwendung darf die
Dampfplatte nicht in Richtung des Be-
nutzers weisen.
Ein- und Ausschalten
1 Zum Einschalten stecken Sie den Netz-
stecker (1) in die Steckdose.
2 Abhängig von der Temperatur des
eingefüllten Wassers benötigt das Ge-
rät bis zu 15 Minuten, um Dampf zu
erzeugen. Während der Aufheizphase
kann etwas heißes Wasser aus der
Dampfplatte auslaufen. Die Dampfplat-
te auf einem Eimer ablegen, um auslau-
fendes Wasser aufzufangen.

10
DE AT CH
Gerät im eingeschalteten Zustand
niemals unbeaufsichtigt lassen.
3 Zum Ausschalten des Geräts ziehen Sie
den Netzstecker (1) aus der Steckdose.
Tapeten ablösen
• Die kleine Dampfplatte (11) nur am
Handgriff (10) anfassen.
• Am besten von der Zimmerdecke zum
Fußboden arbeiten.
• Zum Tapetenlösen in Ecken oder Ni-
schen die kleine Dampfplatte (11) ver-
wenden (siehe Montage und Wechsel
der großen Dampfplatte).
• Zum Tapetenlösen auf großen Flächen
die große Dampfplatte (13) verwenden
(siehe Montage und Wechsel der gro-
ßen Dampfplatte).
• Dampfplatte (11/13) auf die Tapete
aufsetzen. Je nach Art von Tapete und
Untergrund nach ca. 10 Sekunden die
Dampfplatte abnehmen und die Tapete
von oben nach unten abziehen oder
mit dem Schaber (9) abschaben.
• Während des Abschabens die Dampf-
platte (11/13) wiederholt auf die Tape-
te aufsetzen.
Reinigung und Wartung
Lassen Sie Instandsetzungsarbeiten
und Wartungsarbeiten, die nicht
in dieser Anleitung beschrieben
sind, von unserem Service-Center
durchführen. Verwenden Sie nur
Originalteile.
Ziehen Sie den Netzstecker (1) aus
der Steckdose und lassen Sie das
Gerät vor allen Arbeiten abkühlen.
Führen Sie folgende Reinigungs- und War-
tungsarbeiten regelmäßig durch. Dadurch
ist eine lange und zuverlässige Nutzung
gewährleistet.
Reinigung
Das Gerät darf weder mit
Wasser abgespritzt werden,
noch in Wasser gelegt wer-
den. Es besteht die Gefahr
eines Stromschlages.
• Spülen Sie den Boiler gelegentlich
solange mit Leitungswasser aus, bis
dieses klar ist.
Verwenden Sie keine Reinigungs- bzw.
Lösungsmittel. Sie könnten das Gerät
damit irreparabel beschädigen.
Entkalken
Niemals brennbare, giftige, ätzen-
de oder andere Flüssigkeiten beimi-
schen!
Das Gerät bei Bedarf entkalken, je
nach Wasserhärte und Häufi gkeit
des Gebrauchs. Handelsübliche
Entkalkungsmittel, bevorzugt Zitro-
nensäure, verwenden. Die Dosie-
rungs- und Anwendungshinweise
des Entkalkungsmittel-Herstellers
beachten!
Defekte wegen mangelnder Entkal-
kung sind von der Garantie ausge-
schlossen.
1 Vergewissern Sie sich, dass der Netz-
stecker (1) ausgesteckt und das Gerät
abgekühlt ist.
2. Eine handelsübliche Entkalkungslösung
(2,5 Liter) einfüllen.
3. Den Dampfschlauch (14) abnehmen

11
DE AT CH
und den Netzstecker (1) einstecken.
4. Entkalkungslösung ca. 5 Minuten ko-
chen lassen.
5. Den Netzstecker (1) aus der Steckdose
ziehen und die Lösung noch ca. 10Mi-
nuten einwirken lassen.
6. Das Gerät und die restliche Lösung
abkühlen lassen. Das Gerät ausleeren,
mit klarem Wasser nachspülen und aus-
trocknen lassen.
Lagerung
• Lassen Sie das Gerät mindestens zehn
Minuten abkühlen.
• Leeren Sie das Gerät.
• Wickeln Sie den Dampfschlauch (14)
um die Halteklammern (2) am Boilerbe-
hälter (7).
• Bewahren Sie das Gerät in aufrechter
Position an einem trockenen und staub-
geschützten Ort auf, außerhalb der
Reichweite von Kindern.
Entsorgung/
Umweltschutz
Elektrische Geräte gehören nicht in
den Hausmüll.
• Geben Sie das Gerät an einer Verwer-
tungsstelle ab. Die verwendeten Kunst-
stoff- und Metallteile können sortenrein
getrennt werden und so einer Wieder-
verwertung zugeführt werden. Fragen
Sie hierzu unser Service-Center.
• Die Entsorgung Ihrer defekten, einge-
sendeten Geräte führen wir kostenlos
durch.
Ersatzteile/Zubehör
Ersatzteile und Zubehör erhalten Sie unter
www.grizzly-service.eu
Sollten Sie Probleme mit dem Bestellvorgang haben, verwenden Sie bitte das Kontaktfor-
mular. Bei weiteren Fragen wenden Sie sich an das „Service-Center“ (siehe Seite 13).
Pos. Betriebsanleitung Bezeichnung Bestell-Nr.
2 – 8, 15 Boilerbehälter komplett 91105685
14 Dampfschlauch 91105686
10 – 13 Dampfplatte komplett 91105687

12
DE AT CH
Garantie
Sehr geehrte Kundin, sehr geehrter Kunde,
Sie erhalten auf dieses Gerät 3 Jahre Ga-
rantie ab Kaufdatum.
Im Falle von Mängeln dieses Produkts
stehen Ihnen gegen den Verkäufer des
Produkts gesetzliche Rechte zu. Diese
gesetzlichen Rechte werden durch unsere
im Folgenden dargestellte Garantie nicht
eingeschränkt.
Garantiebedingungen
Die Garantiefrist beginnt mit dem Kauf-
datum. Bitte bewahren Sie den Original-
Kassenbon gut auf. Diese Unterlage wird
als Nachweis für den Kauf benötigt.
Tritt innerhalb von drei Jahren ab dem
Kaufdatum dieses Produkts ein Material-
oder Fabrikationsfehler auf, wird das Pro-
dukt von uns – nach unserer Wahl – für Sie
kostenlos repariert oder ersetzt. Diese Ga-
rantieleistung setzt voraus, dass innerhalb
der Drei-Jahres-Frist das defekte Gerät und
der Kaufbeleg (Kassenbon) vorgelegt und
schriftlich kurz beschrieben wird, worin der
Mangel besteht und wann er aufgetreten
ist.
Wenn der Defekt von unserer Garantie ge-
deckt ist, erhalten Sie das reparierte oder
ein neues Produkt zurück. Mit Reparatur
oder Austausch des Produkts beginnt kein
neuer Garantiezeitraum.
Garantiezeit und gesetzliche
Mängelansprüche
Die Garantiezeit wird durch die Gewähr-
leistung nicht verlängert. Dies gilt auch
für ersetzte und reparierte Teile. Eventuell
schon beim Kauf vorhandene Schäden und
Mängel müssen sofort nach dem Auspa-
cken gemeldet werden. Nach Ablauf der
Garantiezeit anfallende Reparaturen sind
kostenpflichtig.
Garantieumfang
Das Gerät wurde nach strengen Qualitäts-
richtlinien sorgfältig produziert und vor
Anlieferung gewissenhaft geprüft.
Die Garantieleistung gilt für Material- oder
Fabrikationsfehler. Diese Garantie erstreckt
sich nicht auf Produktteile, die normaler
Abnutzung ausgesetzt sind und daher als
Verschleißteile angesehen werden können
oder für Beschädigungen an zerbrechli-
chen Teilen
.
Diese Garantie verfällt, wenn das Produkt
beschädigt, nicht sachgemäß benutzt oder
nicht gewartet wurde. Für eine sachge-
mäße Benutzung des Produkts sind alle in
der Betriebsanleitung aufgeführten Anwei-
sungen genau einzuhalten. Verwendungs-
zwecke und Handlungen, von denen in
der Betriebsanleitung abgeraten oder vor
denen gewarnt wird, sind unbedingt zu
vermeiden.
Das Produkt ist lediglich für den privaten
und nicht für den gewerblichen Gebrauch
bestimmt. Bei missbräuchlicher und unsach-
gemäßer Behandlung, Gewaltanwendung
und bei Eingriffen, die nicht von unserer
autorisierten Service-Niederlassung vorge-
nommen wurden, erlischt die Garantie.
Abwicklung im Garantiefall
Um eine schnelle Bearbeitung Ihres Anlie-
gens zu gewährleisten, folgen Sie bitte den
folgenden Hinweisen:
• Bitte halten Sie für alle Anfragen den
Kassenbon und die Identifi kationsnum-
mer (IAN332976_1907) als Nach-
weis für den Kauf bereit.
• Die Artikelnummer entnehmen Sie bitte
dem Typenschild.
• Sollten Funktionsfehler oder sonstige
Mängel auftreten kontaktieren Sie
zunächst die nachfolgend benannte
Serviceabteilung telefonisch oder per

13
DE AT CH
E-Mail. Sie erhalten dann weitere In-
formationen über die Abwicklung Ihrer
Reklamation.
• Ein als defekt erfasstes Produkt können
Sie, nach Rücksprache mit unserem
Kundenservice, unter Beifügung des
Kaufbelegs (Kassenbons) und der
Angabe, worin der Mangel besteht
und wann er aufgetreten ist, für Sie
portofrei an die Ihnen mitgeteilte
Service-Anschrift übersenden. Um An-
nahmeprobleme und Zusatzkosten zu
vermeiden, benutzen Sie unbedingt nur
die Adresse, die Ihnen mitgeteilt wird.
Stellen Sie sicher, dass der Versand
nicht unfrei, per Sperrgut, Express oder
sonstiger Sonderfracht erfolgt. Senden
Sie das Gerät bitte inkl. aller beim Kauf
mitgelieferten Zubehörteile ein und
sorgen Sie für eine ausreichend sichere
Transportverpackung.
Reparatur-Service
Sie können Reparaturen, die nicht der Ga-
rantie unterliegen, gegen Berechnung von
unserer Service-Niederlassung durchführen
lassen. Sie erstellt Ihnen gerne einen Kos-
tenvoranschlag.
Wir können nur Geräte bearbeiten, die
ausreichend verpackt und frankiert einge-
sandt wurden.
Achtung: Bitte senden Sie Ihr Gerät gerei-
nigt und mit Hinweis auf den Defekt an
unsere Service-Niederlassung.
Nicht angenommen werden unfrei - per
Sperrgut, Express oder mit sonstiger Son-
derfracht - eingeschickte Geräte.
Die Entsorgung Ihrer defekten, eingesende-
ten Geräte führen wir kostenlos durch.
Service-Center
DE
Service Deutschland
Tel.: 0800 54 35 111
E-Mail: [email protected]
IAN 332976_1907
AT
Service Österreich
Tel.: 0820 201 222
(0,15 EUR/Min.)
E-Mail: [email protected]
IAN 332976_1907
CH
Service Schweiz
Tel.: 0842 665566
(0,08 CHF/Min.,
Mobilfunk max. 0,40 CHF/Min.)
E-Mail: [email protected]
IAN 332976_1907
Importeur
Bitte beachten Sie, dass die folgende
Anschrift keine Serviceanschrift ist. Kon-
taktieren Sie zunächst das oben genannte
Service-Center.
Grizzly Tools GmbH & Co. KG
Stockstädter Straße 20
D-63762 Großostheim
GERMANY
www.grizzly-service.eu

14
GB IE
Content
Introduction ...............................14
Proper use .................................14
General description ....................14
Scope of delivery ............................ 15
Overview ....................................... 15
Description of functions .................... 15
Technical data ........................... 15
Safety information ..................... 15
Symbols on the device: ................... 15
Symbols used in the instruction
manual: ......................................... 16
Safety information ........................... 16
Safety information for using the
steam wallpaper remover ................. 17
Safety devices ................................ 17
Initial start-up ............................ 18
Mount the retaining clips .................. 18
Connecting the hose and steam plate 18
Mounting and replacing the large
steam plate .................................... 18
Filling or topping up with water ........ 18
Switching on and off ....................... 19
Removing wallpaper ........................ 19
Cleaning and Servicing...............20
Cleaning ........................................ 20
Descaling ....................................... 20
Storage ......................................21
Disposal / Environmental protec-
tion ............................................21
Replacement parts/Accessories ..21
Guarantee .................................22
Repair Service ............................23
Service-Center ............................23
Importer .................................... 23
Introduction
Congratulations on the purchase of your
new device. With it, you have chosen a
high quality product. During production,
this equipment has been checked for qual-
ity and subjected to a fi nal inspection. The
functionality of your equipment is therefore
guaranteed.
The operating instructions constitute
part of this product. They contain
important information on safety, use
and disposal.
Before using the product, familiarise your-
self with all of the operating and safety
instructions. Use the product only as de-
scribed and for the applications specifi ed.
Keep this manual safely and in the event
that the product is passed on, hand over
all documents to the third party.
Proper use
The device is intended for removing
wallpaper. Any other use not expressly
approved in the present instruction manual
can damage the device and thus present a
substantial risk for the user.
The manufacturer is not liable for damage
caused by improper use or incorrect opera-
tion. This device is not suitable for commer-
cial use. The warranty is void in the case
of commercial use.
General description
An illustration of the most
important functional compo-
nents can be found on the
fold-out pages.
Translation of the original EC
declaration of conformity ...........79
Exploded Drawing .....................85

15
IEGB
Scope of delivery
Unpack the device and check for comple-
teness:
- Mains cable with plug
- Boiler tank
- Steam hose
- Small steam plate
- Large steam plate
- Retaining clips
- Scraper
- Instruction manual
Overview
1 Mains cable
2 Retaining clip
3 Boiler tank carrying handle
4 Boiler tank hose connection
5 Pressure relief valve
6 Boiler cap
7 Boiler tank
8 Water level indicator
9 Scraper
10 Small steam plate handle
11 Small steam plate
12 Small steam plate guide rail
13 Large steam plate
14 Steam hose
15 Screw for retaining clip
Description of functions
The steam wallpaper remover has a steam
time of 80 minutes, a small and large
steam plate and a 4 metre long steam
hose.
Please refer to the descriptions below for
information on how the operating elements
work.
Technical data
Steam wallpaper remover
......................................PDTA 5 A1
Power P ....................................2300 W
Voltage U .................. 230-240V~, 50 Hz
Steam time .................................. 80 min
Tank volume ...................................... 5 l
Steam hose length .............................4 m
Steam power ........................... 60 g/min
Size (large steam plate) ......... 20 x 28 cm
Size (small steam plate) ...........
18 x 8 cm
Mains cable .....................................3 m
Protection class ................................IPX4
Weight (excluding accessories) ....... 935 g
Weight (accessories only) ............... 815 g
Safety information
Follow all safety instructions when
using the device.
Symbols on the device:
Read the instruction manual
carefully.
Electrical devices must not
be disposed of with domestic
waste.
Attention!
Hot surface.
100°C
Working with hot steam
can lead to severe scal-
ding!
Attention!
Attention! There is a risk of
burns.

16
GB IE
Never direct steam towards
yourself or towards other
people or animals!
Place the device securely
and fi rmly on an even fl oor.
Do not use as a step
WARNING! –
Risk of scalding
Symbols used in the instruc-
tion manual:
Hazard symbol with
information on the pre-
vention of personal in-
jury or property dama-
ge
Hazard symbol with
information on the pre-
vention of personal in-
jury caused by electric
shock
Hazard symbol with informa-
tion on damage prevention
Advisory symbol with infor-
mation on how to best use
the device
Risk of scalding!
Do not work directly over
your head. Wear protective
gloves!
Steam may escape from the
device.
Safety information
a) This appliance can be used by
children aged from 8 years and
above and persons with reduced
physical, sensory or mental ca-
pabilities or lack of experience
and knowledge if they have been
given supervision or instruction
concerning use of the appliance
in a safe way and understand
the hazards involved. Children
shall not play with the appliance.
Cleaning and user maintenance
shall not be made by children
without supervision.
b) Make sure that the device is not
directly aimed at electrical de-
vices and equipment that contain
electrical components, e.g. the
inside of an oven
c) Remove the mains plug from the
socket to disconnect the device
from the mains supply before use
or before any user maintenance
work.
d) Do not leave the device unatten-
ded while it is connected to the
mains supply.
e) The in-feed aperture must not be
opened during use. Follow the
instructions for safely topping up
the water tank.
f) Do not use the device if it has
been dropped, shows obvious
signs of damage or is leaking.
g) Keep children away from the
device during use and while it is
cooling down.

17
IEGB
l) Do not overstretch or kink the
hose.
m) Place the device securely and
fi rmly on an even fl oor. Do not
knock the device over.
n) Risk of scalding! If the device
falls over, hot water can get into
the hose and escape out of the
end of the hose. Switch off the
device immediately, remove the
mains plug, allow the device to
cool down and only then empty
the hose.
o) Grasp the steam plate by the
handle only.
Safety devices
• The boiler cap (6) has a pressure relief
valve (5). This means that steam and
hot water may escape if there is too
much pressure in the boiler tank (7).
This can occur if the steam hose (14) is
blocked or the boiler tank (7) is over-
fi lled. In this case, remove the mains
plug (1) from the socket and allow the
device to cool down before checking it.
This pressure relief valve (5) must under
no circumstances become blocked.
In normal use, small amounts of
steam and water escape via the
pressure relief valve (5).
• The boiler cap (6) has a vacuum re-
lease valve that allows air to enter the
device when a vacuum is created.
• The steam hose (14) is dual-lined in
order to lower its surface temperature.
• The device is equipped with automatic
overheating protection (thermal over-
load relay), which triggers when the
device is heated without fi lling. Fill the
device with (preferably hot) water. After
Safety information for
using the steam wallpaper
remover
a) Surfaces may heat up during
use. The boiler cap may be hot
during operation and when coo-
ling down.
b) Never switch on the device wit-
hout fi lling with water!
c) Never immerse the device in
liquids.
d) Only fi ll the device with tap
water. Never add fl ammable,
toxic, caustic or other liquids.
e) Do not exceed the maximum
fi lling quantity (5 l).
f) Before removing the wallpaper,
cover switches and sockets on
the walls to make them water-
proof and steamproof.
g) Close the boiler cap and screw
caps tightly before operating
the device (see “Initial start-up”).
h) Risk of scalding! Never open
the boiler cap or screw caps du-
ring operation. Before opening
the boiler cap and screw caps:
Remove the mains plug from
the socket and allow the device
and any remaining water to
cool down. Only then is it safe
to open the boiler cap or the
screw caps (see “Filling or top-
ping up with water”).
i) If the steam hose becomes blo-
cked and causes overpressure,
remove the mains plug from the
socket.
j) Always ensure you are working
in a sturdy environment.
k) Carry the device by its handle
only. Do not pull on the cable or
hose.

18
GB IE
a few minutes, the device will generate
steam again.
• Be careful not to tip the device, as this
may trigger the automatic overheating
protection (thermal overload relay).
Initial start-up
Mount the retaining clips
Place the two retaining clips (2) on the
device and screw them in with the screws
(15). See detail
.
Connecting the hose and
steam plate
1. Screw one end of the steam hose
(14) onto the hose connection (4)
on the boiler tank (7).
2. Screw the other end of the steam
hose (14) onto the hose connec-
tion of the small steam plate (11).
Make sure that the steam
hose is connected properly.
Never open the screw caps during
operation.
Mounting and replacing
the large steam plate
1. Remove the mains plug (1) from the so-
cket before mounting and changing the
accessories. Wait until steam no longer
escapes and the device has cooled
down.
2. To use the large steam plate (13), slide
it into the guide rail (12) of the small
steam plate (11).
3. To remove the large steam plate (13),
pull it out of the guide rail (12) of the
small steam plate (11).
Filling or topping up
with water
1. Make sure that the mains plug (1) is re-
moved from the socket and the device
has cooled down.
2. Unscrew the boiler cap (6) and remove
it.
3. Fill the boiler tank (7) with clean tap
water. Fill the boiler tank (7) only up to
the MAX mark on the water level indi-
cator (8) (maximum 5 litres)
4. Screw on the boiler cap (6). Ensure that
it is screwed in properly.
When working for long peri-
ods: Observe the minimum mark
on the water level indicator (8) and
top up with water in good time.
Operation
Attention! Surfaces may
heat up during use. The boi-
ler cap may be hot during
operation and when coo-
ling down.
Risk of scalding!
Do not work directly over your
head. Wear protective gloves!
Steam may escape from the de-
vice.
Never direct steam towards your-
self or towards other people or
animals!
• Check the condition of the plaster be-
fore starting work, as steam generated
at high temperatures can inadvertently
remove loose, porous or poorly bound
plaster. The plaster may also come
away more easily in areas that have

19
IEGB
cracks or holes.
Also, do not hold the steam plate in
one place for a long period of time.
You can determine where there is
loose plaster by tapping parts of the
wall with your knuckles. If it produces
a hollow sound, please proceed with
extreme caution.
• Always test the wallpaper remover in
a small area of about 100 cm² before
actually starting work.
• If you fi nd that the plaster is coming
loose or you hear a crack, stop wor-
king. The wallpaper remover can be
used safely for plasterboard surfaces.
• The heat generated by this product
may cause damage to certain surfaces,
e.g. carpets, upholstered furniture,
table tops or cupboards. In order for
these surfaces not to be damaged by
the heat of the boiler tank (7), always
place the tank on a wooden board or a
similar object. Dust covers or newspa-
pers are not suitable for this purpose.
• Hold the boiler tank (7) by the handle
(3) only.
• Wallpapers that have had several
coats of paint or that are waterproof
are diffi cult to remove. Perforate this
type of wallpaper with a spiked roller
so that the steam can work on the pas-
te layer.
• In the case of foam backed vinyl wall-
paper, remove the top vinyl layer, if
necessary, before working with the
wallpaper remover.
• Always wear protective clothing when
removing wallpaper from the ceiling.
Pay attention to the condensation coll-
ecting on the steam plate, as hot water
may drip off. Empty the steam plate
regularly and do not use it directly over
your head.
• Always place the steam plate (11/13)
in a suitable container when left un-
attended (even if only briefl y). Never
point the steam plate towards yourself
when using it.
Switching on and off
1 To switch on, insert the mains plug (1)
into the socket.
2 Depending on the temperature of the
fi lled water, the device may take up to
15 minutes to generate steam. During
the heating phase, some hot water may
escape from the steam plate. Place the
steam plate on a bucket to catch any
escaping water.
Never leave the device unattended
while it is switched on.
3 To switch off the device, remove the
mains plug (1) from the socket.
Removing wallpaper
• Grasp the small steam plate (11) by the
handle (10) only.
• It is best to work from the ceiling to the
fl oor.
• Use the small steam plate (11) to re-
move wallpaper in corners or niches
(see “Mounting and changing the large
steam plate”).
• Use the large steam plate (13) to re-
move wallpaper on large areas (see
“Mounting and changing the large
steam plate”).
• Place the steam plate (11/13) on the
wallpaper. Depending on the type of
wallpaper and surface, remove the
steam plate after approx. 10 seconds
and remove the wallpaper from top
to bottom or scrape off with the
scraper (9).

20
GB IE
• Place the steam plate (11/13) on the
wallpaper repeatedly while scraping.
Cleaning and Servicing
You should have any repair and
maintenance work that is not de-
scribed in these instructions carried
out by our Service Centre. Only use
original parts.
Remove the mains plug (1) from the
socket and allow the device to cool
down before starting any work.
Perform the following cleaning and mainte-
nance work regularly. This will guarantee
long and reliable use.
Cleaning
The device must not be
sprayed with water or placed
in water. Otherwise there is
a risk of electric shock.
• Rinse the boiler occasionally with tap
water until it is clear.
Do not use any cleaning agents or
solvents. This could damage the device
irreparably.
Descaling
Never add fl ammable, toxic,
caustic or other liquids!
Descale the appliance if necessary,
depending on the water hardness
and frequency of use. Use commer-
cially available descaling agents,
preferably citric acid. Follow the
dosage and application instructions
of the descaling agent manufactu-
rer!
Defects due to a lack of descaling
are excluded from the warranty.
1 Make sure that the mains plug (1) is
removed from the socket and that the
device has cooled down.
2. Pour in a commercially available des-
caling solution (2.5 litres).
3. Remove the steam hose (14) and insert
the mains plug (1).
4. Boil the descaling solution for approx.
5 minutes.
5. Remove the mains plug (1) from the
socket and allow the solution to take
effect for another 10 minutes.
6. Allow the device and the rest of the so-
lution to cool down. Empty the device,
rinse it with clear water and allow it to
dry.

21
IEGB
Storage
• Allow the device to cool down for at
least 10 minutes.
• Empty the device.
• Wind the steam hose (14) around the
retaining clips (2) on the boiler tank
(7).
• Store the device in an upright position
in a dry and dustproof location and out
of reach of children.
Disposal /
Environmental
protection
Electrical devices do not belong in
domestic waste.
• Take the device to a recycling plant.
The plastic and metal parts used on
your device can be properly sorted
according to materials and grades and
effi ciently recycled. Please contact our
service centre for more information.
• We will dispose of any defective de-
vices that you send to us free of char-
ge.
Replacement parts/Accessories
Spare parts and accessories can be obtained at
www.grizzly-service.eu
If you have issues ordering, please use the contact form.
If you have any other questions, contact the ”Service-Center” (see page 23).
Position Manual Description Order no.
2 – 8, 15 Boiler tank complete 91105685
14 Steam hose 91105686
10 – 13 Steam plate complete 91105687

22
GB IE
Guarantee
Dear Customer,
This equipment is provided with a 3-year
guarantee from the date of purchase.
In case of defects, you have statutory rights
against the seller of the product. These
statutory rights are not restricted by our
guarantee presented below.
Terms of Guarantee
The term of the guarantee begins on the
date of purchase. Please retain the original
receipt. This document is required as proof
of purchase.
If a material or manufacturing defect
occurs within three years of the date of
purchase of this product, we will repair or
replace – at our choice – the product for
you free of charge. This guarantee requires
the defective equipment and proof of pur-
chase to be presented within the three-year
period with a brief written description of
what constitutes the defect and when it oc-
curred.
If the defect is covered by our guarantee,
you will receive either the repaired product
or a new product. No new guarantee pe-
riod begins on repair or replacement of the
product.
Guarantee Period and Statutory
Claims for Defects
The guarantee period is not extended by
the guarantee service. This also applies for
replaced or repaired parts. Any damages
and defects already present at the time of
purchase must be reported immediately af-
ter unpacking. Repairs arising after expiry
of the guarantee period are chargeable.
Guarantee Cover
The equipment has been carefully pro-
duced in accordance with strict quality
guidelines and conscientiously checked
prior to delivery.
The guarantee applies for all material and
manufacturing defects. This guarantee
does not extend to cover product parts that
are subject to normal wear and may there-
fore be considered as wearing parts (e.g.
brushes) or to cover damage to breakable
parts (e.g. switches).
This guarantee shall be invalid if the prod-
uct has been damaged, used incorrectly or
not maintained. Precise adherence to all of
the instructions specifi ed in the operating
manual is required for proper use of the
product. Intended uses and actions against
which the operating manual advises or
warns must be categorically avoided.
The product is designed only for private
and not commercial use. The guarantee
will be invalidated in case of misuse or
improper handling, use of force, or inter-
ventions not undertaken by our authorised
service branch.
Processing in Case of Guarantee
To ensure quick handling of you issue,
please follow the following directions:
• Please have the receipt and identifi ca-
tion number (IAN332976_1907)
ready as proof of purchase for all en-
quiries.
• Please fi nd the item number on the rat-
ing plate.
• Should functional errors or other de-
fects occur, please initially contact the
service department specifi ed below by
telephone or by e-mail. You will then
receive further information on the pro-
cessing of your complaint.

23
IEGB
• After consultation with our customer
service, a product recorded as defec-
tive can be sent postage paid to the
service address communicated to you,
with the proof of purchase (receipt)
and specifi cation of what constitutes
the defect and when it occurred. In or-
der to avoid acceptance problems and
additional costs, please be sure to use
only the address communicated to you.
Ensure that the consignment is not sent
carriage forward or by bulky goods,
express or other special freight. Please
send the equipment inc. all accessories
supplied at the time of purchase and
ensure adequate, safe transport pack-
aging.
Repair Service
For a charge, repairs not covered by the
guarantee can be carried out by our ser-
vice branch, which will be happy to issue
a cost estimate for you.
We can handle only equipment that has
been sent with adequate packaging and
postage.
Attention: Please send your equipment to
our service branch in clean condition and
with an indication of the defect.
Equipment sent carriage forward or by
bulky goods, express or other special
freight will not be accepted.
We will dispose of your defective devices
free of charge when you send them to us.
Service-Center
GB
Service Great Britain
Tel.: 0800 404 7657
E-Mail: [email protected]
IAN 332976_1907
IE
Service Ireland
Tel.: 1890 930 034
(0,08 EUR/Min., (peak))
(0,06 EUR/Min., (off peak))
E-Mail: [email protected]
IAN 332976_1907
Importer
Please note that the following address is
not a service address. Please initially con-
tact the service centre specifi ed above.
Grizzly Tools GmbH & Co. KG
Stockstädter Straße 20
DE-63762 Großostheim
GERMANY
www.grizzly-service.eu

24
FR BE
Sommaire
Introduction ...............................24
Utilisation conforme ................... 24
Description générale ..................24
Matériel livré .................................. 25
Aperçu .......................................... 25
Description fonctionnelle .................. 25
Caractéristiques techniques ........25
Consignes de sécurité ................. 25
Pictogrammes sur l‘appareil: ............ 25
Symboles dans la notice: ................. 26
Sicherheitshinweise ......................... 26
Consignes de sécurité pour l‘utilisation
de la décolleuse à papier peint ......... 27
Dispositifs de sécurité ...................... 27
Mise en service ..........................28
Monter les clips de fi xation ............... 28
Raccorder le fl exible et la plaque à
vapeur ........................................... 28
Montage et échange de la grande
plaque à vapeur ............................. 28
Verser ou faire l‘appoint en eau ........ 28
Utilisation ..................................29
Mise en marche et arrêt ................... 30
Décoller des papiers peints .............. 30
Nettoyage et maintenance .........30
Nettoyage ...................................... 30
Détartrer ........................................ 31
Stockage ...............................31
Élimination / Protection de
l‘environnement .........................31
Pièces de rechange/Accessoires ..32
Garantie - France .......................33
Garantie - Belgique ....................35
Service Réparations ...................36
Service-Center ............................36
Importateur ............................... 36
Introduction
Toutes nos félicitations pour l’achat de
votre nouvel appareil. Vous avez ainsi
choisi un produit de qualité supérieure.
La qualité de l’appareil a été vérifi ée pen-
dant la production et il a été soumis à un
contrôle fi nal. Le fonctionnement de votre
appareil est donc ainsi garanti.
La notice d’utilisation fait partie de
ce produit. Elle contient des instruc-
tions importantes pour la sécurité,
l’utilisation et l’élimination des
déchets. Avant d’utiliser ce produit,
lisez attentivement les consignes
d’emploi et de sécurité. N’utilisez le
produit que tel que décrit et unique-
ment pour les domaines d’emploi
indiqués.
Conservez cette notice et remettez-
la avec tous les documents si vous
cédez le produit à un tiers.
Utilisation conforme
L‘appareil est conçu pour décoller des pa-
piers peints. Toute autre utilisation qui n‘est
pas expressément préconisée dans ces
instructions peut entraîner des dommages
à l‘appareil et constituer un sérieux danger
pour l‘utilisateur.
Le fabricant ne peut être tenu pour respon-
sable des dommages causés par une utili-
sation inappropriée ou par une manipulati-
on incorrecte. Cet appareil n‘est pas conçu
pour une utilisation commerciale. Une utili-
sation commerciale annule la garantie.
Description générale
Vous trouverez la représen-
tation des fonctions les plus
importantes sur les volets
rabattables.
Traduction de la déclaration de
conformité CE originale ..............80
Vue éclatée ................................85

25
BEFR
Matériel livré
Déballez l‘appareil et contrôlez s‘il est au
complet:
- Câble d‘alimentation avec fi che
- Réservoir chauffant
- Flexible à vapeur
- Petite plaque à vapeur
- Grande plaque à vapeur
- Clips de fi xation
- Racloir
- Mode d‘emploi
Aperçu
1 Câble d‘alimentation
2 Clip de fi xation
3 Poignée de transport du réser-
voir chauffant
4 Raccord de fl exible du réservoir
chauffant
5 Soupape de surpression
6 Couvercle du réservoir chauffant
7 Réservoir chauffant
8 Indicateur de niveau d‘eau
9 Racloir
10 Poignée de la petite plaque à
vapeur
11 Petite plaque à vapeur
12 Rail de guidage de la petite
plaque à vapeur
13 Grande plaque à vapeur
14 Flexible à vapeur
15 Vis pour clip de fi xation
Description fonctionnelle
La décolleuse à papier peint avec une
durée de vapeur de 80 minutes est dotée
d‘une grande et d‘une petite plaque à
vapeur et d‘un fl exible à vapeur d‘une
longueur de 4 mètres.
Pour savoir quelles fonctions remplissent
les éléments de commande, veuillez vous
reporter à la description suivante.
Caractéristiques
techniques
Décolleuse à papier peint
......................................PDTA 5 A1
Puissance P ...............................2300 W
Tension U .................. 230-240V~, 50 Hz
Durée de vapeur .......................... 80 min
Volume du réservoir ............................ 5 l
Longueur du fl exible à vapeur ............. 4 m
Débit de vapeur ....................... 60 g/min
Dimension
(grande plaque à vapeur) ...... 20 x 28 cm
Dimension
(petite plaque à vapeur) ........... 18 x 8 cm
Câble d‘alimentation .........................3 m
Classe de protection ......................... IPX4
Poids (sans accessoires) ................. 935 g
Poids (uniquement accessoires) ....... 815 g
Consignes de sécurité
Pendant l‘utilisation de l‘appareil, il
faut respecter les consignes de sécu-
rité.
Pictogrammes sur
l‘appareil:
Veuillez lire attentivement la
notice d‘utilisation.
Les appareils électriques ne
doivent pas être jetés avec
les déchets ménagers.
Attention!
Surface chaude.

26
FR BE
100°C
Le travail avec de la vapeur
chaude peut provoquer de
graves brûlures!
Attention!
Attention! Il y a un risque
de brûlures.
Ne pas diriger la vapeur
sur son corps ni sur d‘autres
personnes ou des ani-
maux!
Poser l‘appareil de mani-
ère sûre et stable sur le sol
plan.
Ne pas utiliser comme mar-
chepied
AVERTISSEMENT –
Risque de brûlures
Symboles dans la notice:
Pictogramme de danger
avec informations de
prévention des dom-
mages aux personnes
ou des dégâts matériels
Pictogrammes de dan-
ger avec informations
de prévention des dom-
mages aux personnes
par décharge électrique
Pictogramme d‘obligation
avec informations de préven-
tion des dommages
Pictogramme d‘indication
avec des informations por-
tant sur la meilleure manipula-
tion de l‘appareil
Consignes de sécurité
Ne pas travailler directement
au-dessus de la tête. Porter
des gants de protection!
De la vapeur peut
s‘échapper de l‘appareil.
Consignes de sécurité
a) Cet appareil peut être utilisé
par des enfants à partir de 8
ans et plus et par des personnes
ayant des capacités physiques,
sensorielles ou mentales réduites
ou un manque d‘expérience et
de connaissances à condition
qu‘elles aient reçu une supervisi-
on ou des instructions concernant
I’utilisation de I‘appareil en
toute sécurité et qu‘elles com-
prennent les dangers encourus.
Les enfants ne doivent pas jouer
avec l’appareil. Le nettoyage et
I’entretien par I‘usager ne doivent
pas être effectués par des enfants
sans surveillance.
b) Assurez-vous de ne pas diriger
l‘appareil directement sur des ap-
pareils et des équipements élec-
triques contenant des composants
électriques, par ex. l‘intérieur
d‘un four
c) Après l‘utilisation et avant
l‘entretien par l‘utilisateur,
l‘appareil doit être débranché
du réseau en tirant sur la fi che
secteur.
d) Ne laissez pas l‘appareil sans
surveillance lorsqu‘il est branché
au secteur.
e) L‘orifi ce de remplissage ne

27
BEFR
chauffant ni les bouchons à vis-
ser pendant le fonctionnement.
Avant d‘ouvrir le couvercle du
réservoir chauffant et les bou-
chons à visser: débrancher la
fi che secteur et laisser refroidir
l‘appareil ainsi que l‘eau res-
tante. Ouvrir alors seulement le
couvercle du réservoir chauffant
ou les bouchons à visser (voir
„Verser ou faire l‘appoint en
eau“).
i) Si le fl exible à vapeur est ob-
strué et que cela génère une
surpression, débranchez la fi che
secteur de la prise de courant.
j) Pendant le travail, veiller à tou-
jours garder l‘équilibre.
k) Porter l‘appareil uniquement par
la poignée. Ne pas tirer sur le
câble ou le fl exible.
l) Ne pas tendre excessivement le
fl exible et ne pas le plier.
m) Poser l‘appareil de manière sûre
et stable sur le sol plan. Ne pas
renverser l‘appareil.
n) Risque de brûlures! Si
l‘appareil se renverse, de l‘eau
chaude peut parvenir dans le
fl exible et sortir par l‘extrémité
du fl exible. Éteindre immédiate-
ment l‘appareil, débrancher la
fi che secteur, laisser refroidir et
après seulement, vider le fl exib-
le.
o) Saisir la plaque à vapeur uni-
quement par la poignée.
Dispositifs de sécurité
• Le couvercle du réservoir chauffant (6)
est équipé d‘une soupape de surpres-
sion (5). Ce qui permet d‘évacuer de
la vapeur et un peu d‘eau chaude si le
doit pas être ouvert pendant
l‘utilisation. Respectez les inst-
ructions pour un remplissage sûr
du réservoir à eau.
f) N‘utilisez pas l‘appareil s‘il est
tombé, s‘il présente des détéri-
orations manifestes ou s‘il n‘est
pas étanche.
g) Pendant l‘utilisation et le refro-
idissement, tenez les enfants
éloignés de l‘appareil.
Consignes de sécurité
pour l‘utilisation de la dé-
colleuse à papier peint
a) Pendant l‘utilisation, les surfaces
peuvent chauffer. Pendant le
fonctionnement et le refroidisse-
ment, le couvercle du réservoir
chauffant peut être chaud.
b) Ne jamais mettre l‘appareil
en marche sans l‘avoir rempli
d‘eau!
c) Ne jamais plonger l‘appareil
dans des liquides.
d) Remplir l‘appareil uniquement
avec de l‘eau du robinet. Ne
jamais ajouter de liquides in-
fl ammables, toxiques, irritants
ou autres.
e) Ne pas dépasser la quantité de
remplissage maximale (5l).
f) Avant de décoller le papier
peint, recouvrir les interrupteurs
et prises de courant sur les murs
pour les protéger de l‘eau et de
la vapeur.
g) Fermer solidement les bouchons
du réservoir chauffant et à
visser avant la mise en service
(voir „Mise en service“).
h) Risque de brûlures! Ne jamais
ouvrir le couvercle du réservoir

28
FR BE
réservoir chauffant (7) est en surpressi-
on. Cela peut arriver si le fl exible à va-
peur (14) est bouché ou si le réservoir
chauffant (7) est trop rempli. Dans ce
cas, débranchez la fi che secteur (1) de
la prise de courant, et laissez l‘appareil
refroidir avant de le vérifi er. Cette
soupape de surpression (5) ne doit en
aucun cas être bloquée.
Dans le cas d‘une utilisation norma-
le, de petites quantités de vapeur et
d‘eau sont évacuées par la soupa-
pe de surpression (5).
• Le couvercle du réservoir chauffant (6)
dispose d‘une vanne de déclenchement
au vide par laquelle de l‘air peut entrer
dans l‘appareil en cas d‘apparition de
vide.
• Le fl exible à vapeur (14) est doté d‘une
double paroi permettant d‘abaisser la
température de la surface.
• L‘appareil est équipé d‘une protection
anti-surchauffe automatique (coupe-
circuit thermique) qui se déclenche
lorsque l‘appareil est chauffé à vide.
Remplissez l‘appareil avec de l‘eau (de
préférence chaude). Au bout de quel-
ques minutes, l‘appareil génère de la
vapeur.
• Veillez à ne pas renverser l‘appareil.
Dans le cas contraire, la protection an-
ti-surchauffe automatique (coupe-circuit
thermique) risque de se déclencher.
Mise en service
Monter les clips de fi xation
Placez les deux clips de fi xation (2) sur
l‘appareil et vissez-les avec les vis (15).
Voir détails
.
Raccorder le fl exible et la
plaque à vapeur
1. Vissez une extrémité du fl exible à
vapeur (14) sur le raccord de fl e-
xible (4) sur le réservoir chauffant
(7).
2. Vissez l‘autre extrémité du fl exible
à vapeur (14) sur le raccord de
fl exible de la petite plaque à va-
peur (11).
Assurez-vous que le fl exible
à vapeur a été correctement
raccordé. Ne jamais ouvrir les
bouchons à visser pendant le foncti-
onnement.
Montage et échange de
la grande plaque à va-
peur
1. Pour monter et échanger les acces-
soires, débrancher la fi che secteur (1).
Attendre que plus aucune vapeur ne
sorte et que l‘appareil ait refroidi.
2. Pour utiliser la grande plaque à vapeur
(13), glissez-la dans le rail de guidage
(12) de la petite plaque à vapeur (11).
3. Pour démonter la grande plaque à
vapeur (13), tirez-la hors du rail de gui-
dage (12) de la petite plaque à vapeur
(11).
Verser ou faire l‘appoint
en eau
1. Assurez-vous que la fi che secteur (1) est
débranchée et que l‘appareil a refroidi.
2. Dévissez le couvercle du réservoir
chauffant (6) et retirez-le.
3. Remplissez le réservoir chauffant
(7) avec de l‘eau du robinet propre.
Remplissez le réservoir chauffant (7)

29
BEFR
uniquement jusqu‘au repère MAX de
l‘indicateur de niveau d‘eau (8) (maxi-
mum 5 litres)
4. Vissez le couvercle du réservoir chauf-
fant (6). Veillez à ce qu‘il soit correcte-
ment vissé.
En cas de temps de travail
prolongés: Observer le repère
Minimum de l‘indicateur de niveau
d‘eau (8) et faire l‘appoint en eau
en temps utile.
Utilisation
Attention! Pendant
l‘utilisation, les surfaces
peuvent chauffer. Pendant
le fonctionnement et le ref-
roidissement, le couvercle
du réservoir chauffant peut
être chaud.
Risque de brûlures!
Ne pas travailler directement au-
dessus de la tête. Porter des gants
de protection!
De la vapeur peut s‘échapper de
l‘appareil.
Ne pas diriger la vapeur sur son
corps ni sur d‘autres personnes
ou des animaux!
• Avant de commencer à travailler, véri-
fi ez l‘état de l‘enduit, car la vapeur à
des températures élevées peut dissoud-
re un enduit poreux ou mal lié. L‘enduit
peut également se détacher plus faci-
lement dans des zones présentant des
crevasses ou des trous.
De même, la plaque à vapeur ne de-
vrait pas être maintenue de manière
prolongée à un même endroit. Vous
pouvez reconnaître un enduit instable
en tapotant avec les phalanges à cer-
tains endroits du mur. Si cela sonne
creux, il est recommandé de poursuivre
avec une extrême prudence.
• Dans tous les cas, testez d‘abord la
décolleuse à papier peint sur une petite
zone de 100cm² environ avant de
réellement commencer à travailler.
• Si vous constatez que l‘enduit se dis-
sout ou si vous entendez un craque-
ment, cessez immédiatement le travail.
La décolleuse à papier peint peut être
utilisée sans risque pour les cloisons
sèches/en placoplâtre.
• En raison de la chaleur générée par
ce produit, certaines surfaces, par ex.
tapis, tissus d‘ameublement, dessus de
table ou meubles, peuvent subir des
dégâts. Afi n de ne pas endommager
la surface respective avec la chaleur
du réservoir chauffant (7), il devrait
toujours être posé sur une planche en
bois ou un objet similaire. Une bâche
de protection ou des journaux ne sont
pas adaptés.
• Saisir le réservoir chauffant (7) unique-
ment par la poignée de transport (3).
• Les papiers peints recouverts plusieurs
fois ou résistants à l‘eau sont diffi ciles à
retirer. Perforer ces papiers peints avec
un rouleau à dents afi n que la vapeur
puisse agir sur les couches de colle.
• Pour les papiers peints en mousse de
vinyle, retirer d‘abord le cas échéant
la couche supérieure en vinyle, puis
travailler alors seulement avec la décol-
leuse à papier peint.
• Pour retirer du papier peint collé au
plafond, portez toujours des vêtements
de protection. Faites attention à l‘eau
de condensation qui s‘accumule sur la
plaque à vapeur, car de l‘eau chaude
peut goutter. Videz régulièrement la

30
FR BE
plaque à vapeur, et ne l‘utilisez jamais
directement au-dessus de votre tête.
• Toujours placer la plaque à vapeur
(11/13) dans un récipient adapté,
lorsqu‘elle est laissée (même briè-
vement) sans surveillance. Pendant
l‘utilisation, la plaque à vapeur ne doit
pas être orientée vers l‘utilisateur.
Mise en marche et arrêt
1 Pour la mise en marche, branchez la
fi che secteur (1) dans la prise de cou-
rant.
2 En fonction de la température de l‘eau
de remplissage, l‘appareil génère
de la vapeur au bout de 15 minutes
maximum. Pendant la phase de ré-
chauffement, un peu d‘eau chaude
peut s‘échapper de la plaque à vapeur.
Poser la plaque à vapeur sur un seau
pour récupérer l‘eau qui s‘échappe.
Ne jamais laisser l‘appareil sans
surveillance lorsqu‘il est allumé.
3 Pour arrêter l‘appareil, débranchez en-
suite la fi che secteur (1) de la prise de
courant.
Décoller des papiers
peints
• Saisir la petite plaque à vapeur (11)
uniquement par la poignée (10).
• Travailler idéalement du plafond de la
pièce vers le sol.
• Pour décoller du papier peint dans des
coins ou des niches, utiliser la petite
plaque à vapeur (11) (voir „Montage
et échange de la grande plaque à va-
peur“).
• Pour décoller du papier peint sur de
grandes surfaces, utiliser la grande
plaque à vapeur (13) (voir „Montage
et échange de la grande plaque à va-
peur“).
• Poser la plaque à vapeur (11/13) sur
le papier peint. En fonction du type de
papier peint et du support, retirer la
plaque à vapeur au bout de 10 secon-
des environ et tirer le papier du haut
vers le bas ou racler avec le racloir (9).
• Pendant le raclage, poser plusieurs fois
la plaque à vapeur (11/13) sur le pa-
pier peint.
Nettoyage et
maintenance
Faites effectuer les travaux de
réparation et de maintenance qui
ne sont pas mentionnés dans cette
notice par notre Centre de service
après-vente. Utilisez exclusivement
des pièces d‘origine.
Débranchez la fi che secteur (1)
de la prise de courant et laissez
l‘appareil refroidir avant de réaliser
tous travaux.
Effectuez régulièrement les travaux de net-
toyage et de maintenance suivants. Cela
garantit une durée d‘utilisation longue et
fi able.
Nettoyage
L‘appareil ne doit être ni net-
toyé au jet d‘eau ni plongé
dans l‘eau. Il existe un risque
d‘électrocution.
• Rincez de temps en temps le réservoir
chauffant à l‘eau du robinet jusqu‘à ce
que celle-ci soit claire.

31
BEFR
N‘utilisez aucun produit de nettoyage
ou de détergent. Vous pourriez endom-
mager l‘appareil de manière irréversib-
le.
Détartrer
Ne jamais ajouter de liquides in-
fl ammables, toxiques, irritants ou
autres!
Le cas échéant, détartrer l‘appareil
en fonction de la dureté de l’eau
et de la fréquence d‘emploi. Utili-
ser des détartrants du commerce,
de préférence de l‘acide citrique.
Respecter les consignes de dosage
et d‘emploi du fabricant du détart-
rant!
Les défauts résultant de l‘absence
de détartrage sont exclus de la
garantie.
1 Assurez-vous que la fi che secteur (1) est
débranchée et que l‘appareil a refroidi.
2. Verser une solution détartrante du com-
merce (2,5 litres).
3. Retirer le fl exible à vapeur (14) et bran-
cher la fi che secteur (1).
4. Faire bouillir la solution détartrante
pendant env. 5 minutes.
5. Retirer la fi che secteur (1) de la prise
de courant et laisser agir la solution
pendant encore 10 minutes environ.
6. Laisser refroidir l‘appareil et la solution
restante. Vider l‘appareil, rincer à l‘eau
claire et laisser sécher.
Stockage
• Laissez l‘appareil refroidir pendant au
moins dix minutes.
• Videz l‘appareil.
• Enroulez le fl exible à vapeur (14)
autour des clips de fi xation (2) sur le
réservoir chauffant (7).
• Conservez l‘appareil en position ver-
ticale dans un endroit sec et protégé
de la poussière et hors de portée des
enfants.
Élimination / Protection
de l‘environnement
Les appareils électriques ne doivent
pas être jetés avec les déchets mé-
nagers.
Portez le carton à un point de
recyclage.
Le produit est recyclable, est soumis
à une responsabilité élargie du fa-
bricant et est collecté dans le cadre
du tri sélectif.
• Restituez l‘appareil dans un point de
collecte des déchets à recycler. Il est
possible de trier les pièces en plastique
et métalliques par matières et de les
introduire ainsi dans un circuit de recy-
clage. Pour cela, veuillez vous adresser
à notre centre de SAV.
• Nous effectuons gratuitement la mise
au rebut de votre appareil défectueux
retourné.

32
FR BE
Pièces de rechange/Accessoires
Vous obtiendrez des pièces de rechange et des accessoires à
l’adresse www.grizzly-service.eu
Si vous avez des problèmes lors du passage de la commande, merci d’utiliser
le formulaire de contact. Pour toute autre question, adressez-vous au
”Service-Center” (voir page 36).
Position Notice d‘utilisation Désignation Article n°
2 – 8, 15 Réservoir chauffant complète 91105685
14 Flexible à vapeur 91105686
10 – 13 Plaque vapeur complète 91105687

33
BEFR
Garantie - France
Chère cliente, cher client,
Ce produit bénéfi cie d’une garantie de
3ans, valable à compter de la date
d’achat.
En cas de manques constatés sur ce pro-
duit, vous disposez des droits légaux contre
le vendeur du produit. Ces droits légaux ne
sont pas limités par notre garantie présen-
tée par la suite.
Article L217-4 du Code de la consommation
Le vendeur livre un bien conforme au
contrat et répond des défauts de conformité
existant lors de la délivrance.
Il répond également des défauts de
conformité résultant de l‘emballage, des
instructions de montage ou de l‘installation
lorsque celle-ci a été mise à sa charge par
le contrat ou a été réalisée sous sa respon-
sabilité.
Article L217-5 du Code de la consommation
Le bien est conforme au contrat :
1° S´il est propre à l‘usage habituellement
attendu d‘un bien semblable et, le cas
échéant :
- s‘il correspond à la description donnée
par le vendeur et posséder les qualités
que celui-ci a présentées à l‘acheteur
sous forme d‘échantillon ou de modèle ;
- s‘il présente les qualités qu‘un acheteur
peut légitimement attendre eu égard
aux déclarations publiques faites par le
vendeur, par le producteur ou par son
représentant, notamment dans la publi-
cité ou l‘étiquetage ;
2° Ou s‘il présente les caractéristiques dé-
fi nies d‘un commun accord par les parties
ou être propre à tout usage spécial recher-
ché par l‘acheteur, porté à la connaissance
du vendeur et que ce dernier a accepté.
Article L217-16 du Code de la
consommation
Lorsque l‘acheteur demande au vendeur,
pendant le cours de la garantie commer-
ciale qui lui a été consentie lors de l‘acquisi-
tion ou de la réparation d‘un bien meuble,
une remise en état couverte par la garantie,
toute période d‘immobilisation d‘au moins
sept jours vient s‘ajouter à la durée de la
garantie qui restait à courir. Cette période
court à compter de la demande d‘interven-
tion de l‘acheteur ou de la mise à disposi-
tion pour réparation du bien en cause, si
cette mise à disposition est postérieure à la
demande d‘intervention.
Indépendamment de la garantie commer-
ciale souscrite, le vendeur reste tenu des
défauts de conformité du bien et des vices
rédhibitoires dans les conditions prévues
aux articles L217-4 à L217-13 du Code de
la consommation et aux articles 1641 à
1648 et 2232 du Code Civil.
Article L217-12 du Code de la
consommation
L‘action résultant du défaut de conformité se
prescrit par deux ans à compter de la déli-
vrance du bien.
Conditions de garantie
Le délai de garantie débute avec la date
d’achat. Veuillez conserver soigneusement
le ticket de caisse original. En effet, ce do-
cument vous sera réclamé comme preuve
d’achat.
Si un défaut de matériel ou un défaut de fa-
brication se présente au cours des trois ans
suivant la date d’achat de ce produit, nous
réparons gratuitement ou remplaçons ce
produit - selon notre choix. Cette garantie
suppose que l’appareil défectueux et le jus-
tifi catif d’achat (ticket de caisse) nous soient
présentés durant cette période de trois ans

34
FR BE
et que la nature du manque et la manière
dont celui-ci est apparu soient explicités par
écrit dans un bref courrier.
Si le défaut est couvert par notre garantie,
le produit vous sera retourné, réparé ou
remplacé par un neuf. Aucune nouvelle pé-
riode de garantie ne débute à la date de la
réparation ou de l’échange du produit.
Durée de garantie et demande légale en
dommages-intérêts
La durée de garantie n’est pas prolongée
par la garantie. Ce point s’applique aussi
aux pièces remplacées et réparées. Les
dommages et les manques éventuellement
constatés dès l’achat doivent immédiate-
ment être signalés après le déballage. A
l’expiration du délai de garantie les répa-
rations occasionnelles sont à la charge de
l’acheteur.
Volume de la garantie
L’appareil a été fabriqué avec soin, selon
de sévères directives de qualité et il a été
entièrement contrôlé avant la livraison.
La garantie s’applique aux défauts de maté-
riel ou aux défauts de fabrication.
Cette garantie ne s’applique pas aux
consommables. Les pièces d’usure sont rem-
placées pendant les deux premières années
à compter de la date d’achat.
Cette garantie prend fi n si le produit endom-
magé n’a pas été utilisé ou entretenu d’une
façon conforme. Pour une utilisation ap-
propriée du produit, il faut impérativement
respecter toutes les instructions citées dans
le manuel de l’opérateur. Les actions et les
domaines d’utilisation déconseillés dans la
notice d’utilisation ou vis-à-vis desquels une
mise en garde est émise, doivent absolu-
ment être évités.
Le produit est conçu uniquement pour un
usage privé et non pour un usage industriel.
En cas d’emploi impropre et incorrect, de
recours à la force et d’interventions entre-
prises et non autorisées par notre succur-
sale, la garantie prend fi n.
Les pièces détachées indispensables à l’uti-
lisation du produit sont disponibles pendant
la durée de la garantie du produit.
Article 1641 du Code civil
Le vendeur est tenu de la garantie à raison
des défauts cachés de la chose vendue qui
la rendent impropre à l‘usage auquel on
la destine, ou qui diminuent tellement cet
usage que l‘acheteur ne l‘aurait pas ac-
quise, ou n‘en aurait donné qu‘un moindre
prix, s‘il les avait connus.
Article 1648 1er alinéa du Code civil
L‘action résultant des vices rédhibitoires doit
être intentée par l‘acquéreur dans un délai
de deux ans à compter de la découverte du
vice.
Marche à suivre dans le cas de garantie
Pour garantir un traitement rapide de votre
demande, veuillez suivre les instructions
suivantes :
• Tenez vous prêt à présenter, sur de-
mande, le ticket de caisse et le numéro
d’identifi cation (IAN 332976_1907)
comme preuve d’achat.
• Vous trouverez le numéro d’article sur la
plaque signalétique.
• Si des pannes de fonctionnement ou
d’autres manques apparaissent, prenez
d’abord contact, par téléphone ou par
e-Mail, avec le service après-vente
dont les coordonnées sont indiquées
ci-dessous. Vous recevrez alors des
renseignements supplémentaires sur le
déroulement de votre réclamation.
• En cas de produit défectueux vous pou-
vez, après contact avec notre service
clients, envoyer le produit, franco de

35
BEFR
port à l’adresse de service après-vente
indiquée, accompagné du justifi catif
d’achat (ticket de caisse) et en indiquant
quelle est la nature du défaut et quand
celui-ci s’est produit. Pour éviter des pro-
blèmes d’acceptation et des frais sup-
plémentaires, utilisez absolument seu-
lement l’adresse qui vous est donnée.
Assurez-vous que l’expédition ne se fait
pas en port dû, comme marchandises
encombrantes, envoi express ou autre
taxe spéciale. Veuillez renvoyer l’appa-
reil, y compris tous les accessoires livrés
lors de l’achat et prenez toute mesure
pour avoir un emballage de transport
suffi samment sûr.
Garantie - Belgique
Chère cliente, cher client,
Ce produit bénéfi cie d’une garantie de 3
ans, valable à compter de la date d’achat.
En cas de manques constatés sur ce
produit, vous disposez des droits légaux
contre le vendeur du produit. Ces droits lé-
gaux ne sont pas limités par notre garantie
présentée par la suite.
Conditions de garantie
Le délai de garantie débute avec la date
d’achat. Veuillez conserver soigneusement
le ticket de caisse original. En effet, ce do-
cument vous sera réclamé comme preuve
d’achat.
Si un défaut de matériel ou un défaut de
fabrication se présente au cours des trois
ans suivant la date d’achat de ce produit,
nous réparons gratuitement ou remplaçons
ce produit - selon notre choix. Cette garan-
tie suppose que l’appareil défectueux et le
justifi catif d’achat (ticket de caisse) nous
soient présentés durant cette période de
trois ans et que la nature du manque et la
manière dont celui-ci est apparu soient ex-
plicités par écrit dans un bref courrier.
Si le défaut est couvert par notre garantie,
le produit vous sera retourné, réparé ou
remplacé par un neuf. Aucune nouvelle pé-
riode de garantie ne débute à la date de
la réparation ou de l’échange du produit.
Durée de garantie et demande lé-
gale en dommages-intérêts
La durée de garantie n’est pas prolongée
par la garantie. Ce point s’applique aussi
aux pièces remplacées et réparées. Les
dommages et les manques éventuellement
constatés dès l’achat doivent immédiate-
ment être signalés après le déballage. A
l’expiration du délai de garantie les répa-
rations occasionnelles sont à la charge de
l’acheteur.
Volume de la garantie
L’appareil a été fabriqué avec soin, selon
de sévères directives de qualité et il a été
entièrement contrôlé avant la livraison.
La garantie s’applique aux défauts de
matériel ou aux défauts de fabrication.
Cette garantie ne s’étend pas aux parties
du produit qui sont exposées à une usure
normale et peuvent être donc considérées
comme des pièces d’usure (par exemple la
lame) ou pour des dommages affectant les
parties fragiles (par exemple les commuta-
teurs).
Cette garantie prend fi n si le produit en-
dommagé n’a pas été utilisé ou entretenu
d’une façon conforme. Pour une utilisation
appropriée du produit, il faut impérative-
ment respecter toutes les instructions citées
dans le manuel de l’opérateur. Les actions
et les domaines d’utilisation déconseillés
dans la notice d’utilisation ou vis-à-vis des-
quels une mise en garde est émise, doivent
absolument être évités.

36
FR BE
Marche à suivre dans le cas de
garantie
Pour garantir un traitement rapide de votre
demande, veuillez suivre les instructions
suivantes :
• Tenez vous prêt à présenter, sur de-
mande, le ticket de caisse et le numéro
d’identifi cation (IAN 332976_1907)
comme preuve d’achat.
• Vous trouverez le numéro d’article sur
la plaque signalétique.
• Si des pannes de fonctionnement ou
d’autres manques apparaissent, pre-
nez d’abord contact, par téléphone ou
par e-Mail, avec le service après-vente
dont les coordonnées sont indiquées
ci-dessous. Vous recevrez alors des
renseignements supplémentaires sur le
déroulement de votre réclamation.
• En cas de produit défectueux vous pou-
vez, après contact avec notre service
clients, envoyer le produit, franco de
port à l’adresse de service après-vente
indiquée, accompagné du justifi catif
d’achat (ticket de caisse) et en indi-
quant quelle est la nature du défaut et
quand celui-ci s’est produit. Pour éviter
des problèmes d’acceptation et des
frais supplémentaires, utilisez absolu-
ment seulement l’adresse qui vous est
donnée. Assurez-vous que l’expédition
ne se fait pas en port dû, comme
marchandises encombrantes, envoi
express ou autre taxe spéciale. Veuil-
lez renvoyer l’appareil, y compris tous
les accessoires livrés lors de l’achat et
prenez toute mesure pour avoir un em-
ballage de transport suffi samment sûr.
Service Réparations
Vous pouvez, contre paiement, faire exécu-
ter par notre service, des réparations qui ne
font pas partie de la garantie. Nous vous
enverrons volontiers un devis estimatif.
Nous ne pouvons traiter que des appareils
qui ont été correctement emballés et qui
ont envoyés suffi samment affranchis.
Attention: veuillez renvoyer à notre agence
de service votre appareil nettoyé et avec
une note indiquant le défaut constaté.
Les appareils envoyés en port dû - comme
marchandises encombrantes, en envoi
express ou avec toute autre taxe spéciale
ne seront pas acceptés. Nous exécutons
gratuitement la mise aux déchets de vos
appareils défectueux renvoyés.
Service-Center
FR
Service France
Tel.: 0800 919270
E-Mail: [email protected]
IAN 332976_1907
BE
Service Belgique
Tel.: 070 270 171
(0,15 EUR/Min.)
E-Mail: [email protected]
IAN 332976_1907
Importateur
Veuillez noter que l’adresse suivante n’est
pas une adresse de service après-vente.
Contactez d’abord le service après-vente
cité plus haut.
Grizzly Tools GmbH & Co. KG
Stockstädter Straße 20
DE-63762 Großostheim
Allemagne
www.grizzly-service.eu

37
BENL
Inhoud
Inleiding ....................................37
Reglementair gebruik ................37
Algemene beschrijving ............... 37
Inhoud van de levering .................... 38
Overzicht ....................................... 38
Functiebeschrijving .......................... 38
Technische gegevens ..................38
Veiligheidsaanwijzingen ............ 38
Pictogrammen op het apparaat: ........ 38
Pictogrammen in de
gebruiksaanwijzing: ........................ 39
Veiligheidsaanwijzingen .................. 39
Veiligheidsaanwijzingen bij gebruik
van de behangafstomer ................... 40
Veiligheidsvoorzieningen ................. 40
Inbedrijfstelling ..........................41
Houdklemmen monteren................... 41
Slang en stoomplaat
aansluiten ...................................... 41
Montage en vervanging van de
grote stoomplaat ............................. 41
Water toevoegen of bijvullen ............ 41
Bediening ..................................41
In- en uitschakelen ........................... 42
Behang strippen .............................. 42
Reiniging en onderhoud ............. 43
Reiniging ....................................... 43
Ontkalken ...................................... 43
Opslag ..................................44
Afvalverwijdering/
milieubescherming ..................... 44
Reserveonderdelen/Accessoires .44
Garantie ....................................45
Reparatieservice ........................46
Service-Center ............................46
Importeur .................................. 46
Inleiding
Hartelijk gefeliciteerd met de aankoop van
uw nieuw apparaat. Daarmee hebt u voor
een hoogwaardig apparaat gekozen.
Dit apparaat werd tijdens de productie op
kwaliteit gecontroleerd en aan een eind-
controle onderworpen. De functionaliteit
van uw apparaat is bijgevolg verzekerd.
De gebruiksaanwijzing vormt een
bestanddeel van dit apparaat. Ze
omvat belangrijke aanwijzingen
voor veiligheid, gebruik en afval-
verwijdering. Maak u vóór het
gebruik van het apparaat met alle
bedienings- en veiligheidsinstructies
vertrouwd. Gebruik het apparaat
uitsluitend zoals beschreven en
voor de aangegeven toepassings-
gebieden. Bewaar de handleiding
goed en overhandig alle docu-
menten bij het doorgeven van het
apparaat mee aan derden.
Reglementair gebruik
Het apparaat is voorzien voor het strippen
van behang. Elk ander gebruik dat in deze
handleiding niet expliciet wordt toege-
staan, kan leiden tot schade aan het ap-
paraat en ernstig risico voor de gebruiker.
De fabrikant is niet aansprakelijk voor
schade die voortvloeit uit oneigenlijk
gebruik of uit een foute bediening. Dit
apparaat is niet bedoeld voor commercieel
gebruik. Bij commercieel gebruik vervalt
de garantie.
Algemene beschrijving
De illustratie van de belan-
grijkste functionele onder-
delen is te vinden op de
uitklapbare pagina‘s.
Vertaling van de originele
CE-conformiteitsverklaring .........81
Explosietekening ........................85

38
NL BE
Inhoud van de levering
Pak het apparaat uit en controleer of het
volledig is:
- Netsnoer met stekker
- Keteltank
- Stoomslang
- Kleine stoomplaat
- Grote stoomplaat
- Houdklemmen
- Schraper
- Gebruiksaanwijzing
Overzicht
1 Netsnoer
2 Houdklem
3 Draaggreep keteltank
4 Slangaansluiting keteltank
5 Overdrukventiel
6 Keteldeksel
7 Keteltank
8 Waterpeilindicator
9 Schraper
10 Handgreep kleine stoomplaat
11 Kleine stoomplaat
12 Geleiderail kleine stoomplaat
13 Grote stoomplaat
14 Stoomslang
15 Schroef voor houdklem
Functiebeschrijving
De stoombehangstripper met een stoomtijd
van 80 minuten heeft een kleine en een
grote stoomplaat en een stoomslang van
4 meter.
De functie van de bedieningsonderdelen is
hieronder beschreven.
Technische gegevens
Behangafstomer ............PDTA 5 A1
Vermogen P ...............................2300 W
Spanning U ............... 230-240V~, 50 Hz
Stoomtijd .................................... 80 min
Tankvolume ....................................... 5 l
Stoomslanglengte ..............................4 m
Stoomkracht ............................ 60 g/min
Afmetingen (grote stoomplaat).
20 x 28 cm
Afmetingen (kleine stoomplaat) .18 x 8 cm
Netsnoer ..........................................3 m
Veiligheidsklasse .............................. IPX4
Gewicht (zonder toebehoren) ......... 935 g
Gewicht (enkel toebehoren) ............ 815 g
Veiligheidsaanwijzingen
Bij het gebruik van het apparaat
moeten de veiligheidsinstructies in
acht worden genomen.
Pictogrammen op het ap-
paraat:
Lees zorgvuldig de gebruik-
saanwijzing door.
Elektrische apparaten horen
niet bij het huisvuil.
Let op!
Heet oppervlak.
100°C
Het werken met hete stoom
kan tot ernstige brandwon-
den!
Let op!
Let op! Er bestaat een risico
op brandwonden.

39
BENL
Richt stoom niet op uw ei-
gen lichaam of op andere
mensen en niet op dieren!
Plaats het apparaat veilig
en stevig op de vlakke vlo-
er.
Niet als opstap gebruiken
WAARSCHUWING –
Verbrandingsgevaar
Pictogrammen in de gebruik-
saanwijzing:
Waarschuwingsbord
met informatie voor het
voorkomen van letsels
of schade
Gevaarsteken met in-
formatie voor het voor-
komen van letsels door
elektrische schok
Waarschuwingsbord met in-
formatie voor het voorkomen
van schade
Waarschuwingsbord met in-
formatie voor betere omgang
met het apparaat
Verbrandingsgevaar!
Werk niet direct boven het
hoofd. Draag veiligheids-
handschoenen!
Er kan stoom uit het ap-
paraat ontsnappen.
Veiligheidsaanwijzingen
a) Dit apparaat kan door kinderen
vanaf 8 jaar en ouder en tevens
door personen met verminderde
fysieke, zintuiglijke of mentale
capaciteiten of met een gebrek
aan ervaring en kennis gebruikt
worden wanneer ze onder to-
ezicht staan of met het oog op
het gebruik van het apparaat
geïnstrueerd werden en zich van
de daaruit resulterende gevaren
bewust zijn. Kinderen mogen niet
met het apparaat spelen. Reini-
ging en gebruikersonderhoud
mogen niet door kinderen zonder
toezicht doorgevoerd worden.
b) Zorg ervoor dat het apparaat
niet rechtstreeks is gericht op
elektrische apparaten en appara-
tuur die elektrische componenten
bevatten, bijv. de binnenkant van
ovens
c) Na gebruik en vóór gebruiker-
sonderhoud moet het apparaat
worden losgekoppeld van het
lichtnet door de stekker uit het
stopcontact te trekken.
d) Laat het apparaat niet onbeheerd
achter wanneer het op het licht-
net is aangesloten.
e) De vulopening mag tijdens ge-
bruik niet worden geopend. Volg
de instructies om het waterreser-
voir veilig te vullen.
f) Gebruik het apparaat niet als
het is gevallen, duidelijke schade
vertoont of lekt.
g) Houd kinderen tijdens gebruik en
koeling uit de buurt van het ap-
paraat.

40
NL BE
l) Rek de slang niet uit of knik hem
niet.
m) Plaats het apparaat veilig en
stevig op de vlakke vloer. Stoot
het apparaat niet omver.
n) Verbrandingsgevaar! Als het
apparaat omvalt, komt er heet
water in de slang en kan dit
aan het uiteinde van de slang
ontsnappen. Schakel het ap-
paraat onmiddellijk uit, trek de
stekker uit het stopcontact, laat
het afkoelen en leeg dan pas de
slang.
o) Pak de stoomplaat alleen aan
het handvat vast.
Veiligheidsvoorzieningen
• Het keteldeksel (6) beschikt over een
overdrukventiel (5). Daardoor kunnen
stoom en wat heet water kunnen wor-
den uitgescheiden als er overdruk is in
de keteltank (7). Dit kan gebeuren als
de stoomslang (14) verstopt is of de ke-
teltank (7) te vol is. Trek in dat geval de
stekker (1) uit het stopcontact en laat
het apparaat afkoelen voordat u het
controleert. Dit overdrukventiel (5) mag
in geen geval worden geblokkeerd.
Bij normaal gebruik worden via het
overdrukventiel (5) kleine hoeveel-
heden stoom en water uitgeschei-
den.
• Het keteldeksel (6) heeft een va-
cuümafl aatklep waarmee lucht het
apparaat kan binnendringen wanneer
een vacuüm wordt gecreëerd.
• De stoomslang (14) is dubbelwandig
om de oppervlaktetemperatuur te verla-
gen.
• Het apparaat is uitgerust met een
Veiligheidsaanwijzingen
bij gebruik van de behan-
gafstomer
a) Oppervlakken kunnen tijdens
gebruik warm worden. Het ke-
teldeksel kan tijdens bedrijf en
tijdens het afkoelen heet zijn.
b) Schakel het apparaat nooit in
zonder dat het gevuld is met
water!
c) Dompel het apparaat nooit in
vloeistoffen.
d) Vul het apparaat alleen met lei-
dingwater. Voeg nooit ontvlam-
bare, giftige, bijtende of andere
vloeistoffen toe.
e) Maximaal vulpeil (5 l) niet over-
schrijden.
f) Dek schakelaar en stopcontac-
ten aan de wanden af, vóór u
het behang afstoomt.
g) Sluit de ketel- en schroefdoppen
stevig af voor het opstarten (zie
Inbedrijfstelling).
h) Verbrandingsgevaar! Open
tijdens gebruik nooit het ketel-
deksel en de schroefdoppen.
Voordat u het keteldeksel en de
schroefdoppen opent: Trek de
stekker uit het stopcontact en
laat het apparaat en het reste-
rende water afkoelen. Open
vervolgens alleen het keteldek-
sel of de schroefdoppen (zie
Vullen of bijvullen van water).
i) Als de stoomslang verstopt is en
hierdoor overdruk ontstaat, trekt
u de stekker uit het stopcontact.
j) Zorg altijd voor een veilige
stand tijdens het werken.
k) Draag het apparaat altijd enkel
aan de handgreep. Trek niet
aan de kabel of aan de slang.

41
BENL
automatische beveiliging tegen over-
verhitting (thermische ontgrendeling),
die wordt geactiveerd wanneer het ap-
paraat ongevuld wordt verwarmd. Vul
het apparaat met water (liefst heet). Na
enige minuten produceert het apparaat
weer stoom.
• Pas op dat u het apparaat niet doet
kantelen. Anders kan de automatische
beveiliging tegen oververhitting (ther-
mische ontgrendeling) worden geacti-
veerd.
Inbedrijfstelling
Houdklemmen monteren
Plaats beide houdklemmen (2) op het
apparaat en schroef deze vast met de
schroeven (15). Zie detail
.
Slang en stoomplaat
aansluiten
1. Schroef een uiteinde van de
stoomslang (14) op de slangaans-
luiting (4) op de keteltank (7).
2. Schroef een uiteinde van de
stoomslang (14) op de slangaans-
luiting van de kleine stoomplaat
(11).
Let erop dat de stoomslang
correct is aangesloten. Open
tijdens gebruik nooit de schroefver-
grendeling.
Montage en vervanging
van de grote stoomplaat
1. Voor de montage en de vervanging
van toebehoren het netsnoer (1) uitt-
rekken. Wacht tot er geen stoom meer
ontsnapt en het apparaat is afgekoeld.
2. Om de grote stoomplaat (13) te gebru-
iken, schuift u deze in de geleiderail
(12) van de kleine stoomplaat (11).
3. Om de grote stoomplaat (13) te verwi-
jderen, trekt u deze uit de geleiderail
(12) van de kleine stoomplaat (11).
Water toevoegen of
bijvullen
1. Zorg ervoor dat de stekker (1) is losge-
koppeld en dat het apparaat is afgeko-
eld.
2. Schroef het tankdeksel (6) af en verwij-
der deze.
3. Vul de keteltank (7) met zuiver leiding-
water. Vul de keteltank (7) tot maximaal
het MAX-merkteken op de waterniveau-
indicator (8) (maximaal 5 liter)
4. Schroef het tankdeksel (6) op. Let erop
dat deze juist opgeschroefd is.
Voor langere werktijden: Let
op de minimummarkering op de
waterpeilindicator (8) en vul tijdig
water bij.
Bediening
Let op! Oppervlakken kun-
nen tijdens het gebruik heet
worden. Het keteldeksel
kan tijdens bedrijf en tij-
dens het afkoelen heet zijn.
Verbrandingsgevaar!
Werk niet direct boven het hoofd.
Draag veiligheidshandschoenen!
Er kan stoom uit het apparaat
ontsnappen.
Richt stoom niet op uw eigen
lichaam of op andere mensen en
niet op dieren!

42
NL BE
• Controleer de staat van de bepleiste-
ring voordat u begint met werken, om-
dat stoom bij hoge temperaturen losse,
poreuze of slecht gebonden bepleis-
tering kan losmaken. De bepleistering
kan ook gemakkelijker afschilferen in
gebieden met scheuren of gaten.
Ook mag de stoomplaat niet gedu-
rende een lange periode op één
plaats worden gehouden. U kunt losse
bepleistering detecteren door met uw
knokkels op sommige delen van de
muur te tikken. Als dit een hol geluid
produceert, is het raadzaam om uiterst
voorzichtig te werk te gaan.
• Test de behangstripper in elk geval
eerst op een klein oppervlak van onge-
veer 100 cm² voordat u met het eigen-
lijke werk begint.
• Als u merkt dat de bepleistering los-
raakt of als u een knakgeluid hoort,
stop dan met werken. De behangstrip-
per kan veilig worden gebruikt voor
gipsplaten/gipskartonplaten.
• Vanwege de warmte die door dit
product wordt gegenereerd, kunnen
bepaalde oppervlakken, b.v. tapijten,
gestoffeerde meubels, tafelbladen of
kasten schade oplopen. Om te voorko-
men dat de respectieve oppervlakken
door de hitte van de keteltank (7)
worden beschadigd, moet deze altijd
op een houten plank of een soortgelijk
voorwerp worden geplaatst. Stofhoe-
zen of kranten zijn niet geschikt voor
dit doel.
• Houd de keteltank (7) enkel vast bij de
draaggreep (3).
• Meermaals gecoat of waterbestendig
behang zijn moeilijk te verwijderen.
Perforeer dergelijk behang met een
puntige rol zodat de stoom op de
pastalaag kan werken.
• In het geval van vinylschuimbehang,
verwijder indien nodig eerst de bovens-
te vinyllaag en werk pas dan met de
behangstripper.
• Draag bij het verwijderen van plafond-
behang steeds beschermende kledij.
Houd rekening met condenswater dat
zich op de stoomplaat verzamelt, om-
dat heet water kan afdruipen. Leeg de
stoomplaat regelmatig en gebruik deze
niet direct boven uw hoofd.
• Plaats de stoomplaat (11/13) altijd in
een geschikte houder als deze onbe-
heerd blijft (zelfs kort). Tijdens gebruik
mag de stoomplaat niet naar de gebru-
iker wijzen.
In- en uitschakelen
1 Vóór het inschakelen steekt u de stekker
(1) in het stopcontact.
2 Afhankelijk van de temperatuur van het
toegevoegde water heeft het apparaat
tot maximaal 15 minuten nodig om
stoom te produceren. Tijdens de ver-
warmingsfase kan er wat heet water uit
de stoomplaat stromen. Leg de stoom-
plaat op een emmer om uitlopend wa-
ter op te vangen.
Laat het apparaat nooit onbeheerd
achter wanneer het is ingeschakeld.
3 Voor het uitschakelen van het apparaat
trekt u de stekker (1) uit het stopcontact.
Behang strippen
• De kleine stoomplaat (11) enkel bij de
handgreep (10) vastnemen.
• Het is het beste om vanaf het plafond
tot aan de vloer te werken.
• Gebruik de kleine stoomplaat (11) om
behang in hoeken of nissen te strippen
(zie Montage en vervanging van de

43
BENL
grote stoomplaat).
• Gebruik de grote stoomplaat (13) om
behang te strippen op grote oppervlak-
ken (zie Montage en vervanging van
de grote stoomplaat).
• Stoomplaat (11/13) op het behang
plaatsen. Afhankelijk van het type be-
hang en het oppervlak, verwijdert u de
stoomplaat na ongeveer 10 seconden
en trekt u het behang van boven naar
beneden af of schraapt u het af met de
schraper (9).
• Tijdens het afschrapen de stoomplaat
(11/13) herhaaldelijk op het behang
plaatsen.
Reiniging en onderhoud
Laat reparatiewerkzaamheden en
onderhoud, die niet zijn beschreven
in deze handleiding, uitvoeren door
een gespecialiseerd service-center.
Gebruik uitsluitend originele onder-
delen.
Trek de stekker (1) uit het stopcon-
tact en laat het apparaat vóór alle
werkzaamheden afkoelen.
Voer de onderstaande reinigings- en on-
derhoudswerkzaamheden regelmatig uit.
Daardoor is een lange levensduur en een
betrouwbare werking gegarandeerd.
Reiniging
Het apparaat mag niet met
water worden afgespoeld of
in water worden gedompeld.
Er bestaat anders een risico
op een elektrische schok.
• Spoel de ketel af en toe met kraanwa-
ter totdat deze schoon is.
Gebruik geen reinigings- of oplosmid-
delen. U kunt het apparaat op die ma-
nier zodanig beschadigen dat het niet
meer kan worden gerepareerd.
Ontkalken
Voeg nooit ontvlambare, giftige,
bijtende of andere vloeistoffen toe!
Ontkalk het apparaat indien nodig,
afhankelijk van de waterhardheid
en de gebruiksfrequentie. Gebruik
in de handel verkrijgbare ontkal-
kingsmiddelen, bij voorkeur citro-
enzuur. Volg de doserings- en toe-
passingsinstructies van de fabrikant
van het ontkalkingsmiddel!
Defecten door een gebrek aan
ontkalking vallen niet onder de
garantie.
1. Zorg ervoor dat de stekker (1) is losge-
koppeld en dat het apparaat is afgeko-
eld.
2. Voeg een in de handel verkrijgbare
ontkalkingsoplossing (2,5 liter) toe.
3. Verwijder de stoomslang (14) en steek
de stekker (1) in het stopcontact.
4. Laat de ontkalkingsoplossing ongeveer
5 minuten koken.
5. Trek de stekker (1) uit het stopcontact
en laat de oplossing nog ca. 10 minu-
ten inwerken.
6. Laat het apparaat en de resterende
oplossing afkoelen. Leeg het apparaat,
spoel het met schoon water en laat het
drogen.

44
NL BE
Opslag
• Laat het apparaat minstens tien minuten
afkoelen.
• Leeg het apparaat.
• Wikkel de stoomslang (14) rond de
houdklemmen (2) aan de keteltank (7).
• Bewaar het apparaat rechtop op een
droge en tegen stof beschermde plaats,
buiten het bereik van kinderen.
Afvalverwijdering/
milieubescherming
Elektrische apparaten horen niet
thuis bij het huisvuil.
• Lever het apparaat in bij een recycle-
punt. De gebruikte kunststoffen en me-
talen delen kunnen naar soort worden
gescheiden voor recycling. Vraag ons
service-center om advies.
• We voeren gratis uw defecte, ingezon-
den apparaten af.
Reserveonderdelen/Accessoires
Reserveonderdelen en accessoires verkrij gt u op
www.grizzly-service.eu
Ondervindt u problemen bij het orderproces, gebruik dan het contactformulier.
Bij andere vragen neemt u contact op met het “Service-Center” (zie pag. 46).
Pos. Gebruiksaanwijzing Benaming Artikelnummer
2 – 8, 15 Keteltank compleet 91105685
14 Stoomslang 91105686
10 – 13 stoomplaat compleet 91105687

45
BENL
Garantie
Geachte cliënte, geachte klant,
U krij gt op dit apparaat 3 jaar garantie, te
rekenen vanaf de datum van aankoop.
Ingeval van gebreken aan dit apparaat
heeft u tegenover de verkoper van het ap-
paraat wettelij ke rechten. Deze wettelij ke
rechten worden door onze hierna beschre-
ven garantie niet beperkt.
Garantievoorwaarden
De garantietermij n begint met de datum
van aankoop. Gelieve de originele kassa-
bon goed te bewaren. Dit document wordt
als bewij s van de aankoop benodigd.
Indien er zich binnen drie jaar, te rekenen
vanaf de datum van aankoop van dit
apparaat, een materiaal- of fabricagefout
voordoet, wordt het apparaat door ons
– naar onze keuze – voor u gratis gerepa-
reerd of vervangen. Deze garantievergoe-
ding stelt voorop dat binnen de termij n van
drie jaar het defecte apparaat en het be-
wij s van aankoop (kassabon) voorgelegd
en dat schriftelij k kort beschreven wordt,
waarin het gebrek bestaat en wanneer het
zich voorgedaan heeft.
Als het defect door onze garantie gedekt
is, krij gt u het gerepareerde of een nieuw
apparaat terug. Met herstelling of uitwis-
seling van het apparaat begint er geen
nieuwe garantieperiode.
Garantieperiode en wettelij ke
kwaliteitsgarantie
De garantieperiode wordt door de garan-
tievergoeding niet verlengd. Dit geldt ook
voor vervangen en gerepareerde onderde-
len. Eventueel al bij de aankoop bestaan-
de beschadigingen en gebreken moeten
onmiddellij k na het uitpakken gemeld
worden. Na het verstrij ken van de garan-
tieperiode tot stand komende reparaties
worden tegen verplichte betaling van de
kosten uitgevoerd.
Omvang van de garantie
Het apparaat werd volgens strikte kwali-
teitsrichtlij nen zorgvuldig geproduceerd en
vóór afl evering nauwgezet getest.
De garantievergoeding geldt voor materi-
aal- of fabricagefouten. Deze garantie is
niet van toepassing op apparaatonderdelen,
die aan een normale slij tage blootgesteld
zij n en daarom als aan slij tage onderhevige
onderdelen beschouwd kunnen worden (b.v.
borstels) of op beschadigingen aan breekba-
re onderdelen (b.v. schakelaars).
Deze garantie valt weg wanneer het ap-
paraat beschadigd, niet oordeelkundig
gebruikt of niet onderhouden werd. Voor
een vakkundig gebruik van het apparaat
dienen alle in de gebruiksaanwij zing ver-
melde aanwij zingen nauwgezet in acht ge-
nomen te worden. Gebruiksdoeleinden en
handelingen, die in de gebruiksaanwij zing
afgeraden worden of waarvoor gewaar-
schuwd wordt, dienen onvoorwaardelij k
vermeden te worden.
Het apparaat is uitsluitend voor het privé-
en niet voor het commerciële gebruik be-
stemd. Bij een verkeerde of onoordeelkun-
dige behandeling, toepassing van geweld
en bij ingrepen, die niet door het door ons
geautoriseerde servicefi liaal doorgevoerd
werden, valt de garantie weg.
Afhandeling ingeval van garantie
Gelieve aan de volgende aanwij zingen
gevolg te geven om een snelle behande-
ling van uw verzoek te garanderen:
• Gelieve voor alle aanvragen de kas-
sabon en het identifi catienummer

46
NL BE
(IAN332976_1907) als bewij s van de
aankoop klaar te houden.
• Gelieve het artikelnummer uit het type-
plaatje.
• Indien er zich functiefouten of andere
gebreken voordien, contacteert u in
eerste instantie de hierna vernoemde ser-
viceafdeling telefonisch of per e-mail. U
krij gt dan bij komende informatie over de
afhandeling van uw klacht.
• Een als defect geregistreerd apparaat
kunt u, na overleg met onze klantenser-
vice, mits toevoeging van het bewij s van
aankoop (kassabon) en de vermelding,
waarin het gebrek bestaat en wanneer
het zich voorgedaan heeft, voor u franco
naar het u medegedeelde serviceadres
zenden. Om problemen bij de accepta-
tie en extra kosten te vermij den, maakt
u onvoorwaardelij k uitsluitend gebruik
van het adres, dat u medegedeeld
wordt. Zorg ervoor dat de verzending
niet ongefrankeerd, als volumegoed,
per expresse of via een andere speciale
verzendingswij ze plaatsvindt. Gelieve
het apparaat met inbegrip van alle bij
de aankoop bij geleverde accessoires in
te zenden en voor een voldoende veilige
transportverpakking te zorgen.
Reparatieservice
U kunt reparaties, die niet onder de ga-
rantie vallen, tegen berekening door ons
servicefi liaal laten doorvoeren. Zij maakt
graag voor u een kostenraming op.
Wij kunnen uitsluitend apparaten behande-
len, die voldoende verpakt en gefrankeerd
ingezonden werden.
Opgelet: Gelieve uw apparaat gereinigd
en met een aanwij zing op het defect naar
ons servicefi liaal te zenden.
Ongefrankeerd – als volumegoed, per
expresse of via een andere speciale ver-
zendingswij ze – ingezonden apparaten
worden niet geaccepteerd.
De afvalverwerking van uw defecte inge-
zonden apparaten voeren wij gratis door.
Service-Center
NL
Service Nederland
Tel.: 0900 0400223
(0,10 EUR/Min.)
E-Mail: [email protected]
IAN 332976_1907
BE
Service België
Tel.: 070 270 171
(0,15 EUR/Min.)
E-Mail: [email protected]
IAN 332976_1907
Importeur
Gelieve in acht te nemen dat het volgende
adres geen serviceadres is. Contacteer in
eerste instantie het hoger vermelde service-
center.
Grizzly Tools GmbH & Co. KG
Stockstädter Straße 20
63762 Großostheim
Duitsland
www.grizzly-service.eu

47
PL
Spis tresci
Wstęp ........................................ 47
Użytkowanie zgodne z
przeznaczeniem ......................... 47
Opis ogólny ............................... 48
Zakres dostawy .............................. 48
Zestawienie elementów urządzenia ... 48
Opis funkcji .................................... 48
Wskazówki bezpieczeństwa ......48
Symbole grafi czne na urządzeniu: .... 48
Symbole zastosowane w
instrukcji: ....................................... 49
Wskazówki bezpieczeństwa ............ 49
Wskazówki bezpieczeństwa dotyczące
użytkowania parowego zdzieraka
do tapet ......................................... 50
Zabezpieczenia .............................. 51
Uruchamianie urządzenia ..........51
Zamontować zaciski mocujące ......... 51
Podłączanie przewodu wężowego i
płyty parowej ................................. 51
Montaż i wymiana dużej płyty
parowej ......................................... 51
Napełnianie lub uzupełnianie wody .. 52
Obsługa.....................................52
Włączanie i wyłączanie .................. 53
Zdzieranie tapet ............................. 53
Czyszczenie i konserwacja ......... 54
Czyszczenie ................................... 54
Odkamienianie ............................... 54
Przechowywanie .......................55
Utylizacja / ochrona środowiska55
Części zamienne / Akcesoria ...... 55
Gwarancja .................................56
Serwis naprawczy .....................57
Service-Center ............................57
Importer .................................... 57
Wstęp
Gratulujemy zakupu nowego urządzenia.
Zdecydowali się Państwo na zakup
wartościowego produktu. Niniejsze
urządzenie sprawdzono w trakcie produk-
cji pod kątem jakości, a także dokonano
jego kontroli ostatecznej. W ten sposób
zapewniona jest jego sprawność.
Instrukcja obsługi jest częścią
składową produktu. Zawiera ona
ważne wskazówki dotyczące
bezpieczeństwa, eksploatacji i utylizacji.
Przed rozpoczęciem użytkowania produktu
należy się zapoznać ze wszystkimi wskazów-
kami dotyczącymi obsługi i bezpieczeństwa.
Produkt należy użytkować tylko zgodnie z
opisem i podanym przeznaczeniem.
Instrukcję należy przechowywać staran-
nie, a w przypadku przekazania produktu
osobom trzecim należy dostarczyć nabyw-
cy kompletną dokumentację.
Użytkowanie zgodne z
przeznaczeniem
Urządzenie jest przeznaczone do zrywa-
nia tapet. Każdy inny rodzaj zastosowa-
nia, który nie został wyraźnie dopuszczo-
ny w niniejszej instrukcji, może prowadzić
do uszkodzenia urządzenia i stanowić
źródło poważnych niebezpieczeństw dla
użytkownika.
Producent nie odpowiada za szkody
spowodowane użyciem urządzenia w
sposób niezgodny z przeznaczeniem lub
jego nieprawidłową obsługą. Niniejsze
urządzenie nie nadaje się do użytku pro-
fesjonalnego. Użytkowanie urządzenia
do celów komercyjnych powoduje utratę
gwarancji.
Tłumaczenie oryginalnej
deklaracji zgodności WE ............. 82
Rysunek samorozwijający ..........85

48
PL
Opis ogólny
Rysunek z najważniejszymi
elementami funkcjona-
lnymi znajduje się na
rozkładanych stronach.
Zakres dostawy
Rozpakuj urządzenie i sprawdź, czy jest
kompletne:
- Kabel zasilający z wtyczką
- Bojler
- Wężowy przewód parowy
- Mała płyta parowa
- Duża płyta parowa
- Zaciski mocujące
- Skrobak
- instrukcja obsługi
Zestawienie elementów
urządzenia
1 Kabel zasilający
2 Zaciski mocujące
3 Uchwyt do przenoszenia bojlera
4 Przyłącze przewodu wężowego
do bojlera
5 Zawór nadciśnieniowy
6 Pokrywa zbiornika
7 Bojler
8 Wskaźnik poziomu wody
9 Skrobak
10 Uchwyt małej płyty parowej
11 Mała płyta parowa
12 Prowadnica szynowa małej płyty
parowej
13 Duża płyta parowa
14 Wężowy przewód parowy
15 Śruba do zacisków mocujących
Opis funkcji
Urządzenie parowe do zdzierania ta-
pet z czasem parowania 80 minut jest
wyposażone w małą i dużą płytę parową
oraz w wężowy przewód parowy o
długości 4 metrów.
Funkcje elementów obsługowych podano
w poniższych opisach.
Dane techniczne
Urządzenie parowe do zdzierania
tapet ..............................PDTA 5 A1
Moc P .......................................2300 W
Napięcie U ............... 230-240V~, 50 Hz
Czas parowania .......................... 80 min
Pojemność zbiornika........................... 5 l
Długość węża parowego ...................4 m
Intensywność parowania ........... 60 g/min
Rozmiar (duża płyta parowa) .20 x 28 cm
Rozmiar (mała płyta parowa) ...18 x 8 cm
Kabel zasilający ...............................3 m
Klasa ochrony..................................IPX4
Waga (bez akcesoriów)................. 935 g
Waga (z akcesoriami) ................... 815 g
Wskazówki
bezpieczeństwa
Podczas pracy z urządzeniem
należy przestrzegać wskazówek
bezpieczeństwa.
Symbole grafi czne na
urządzeniu:
Uważnie przeczytać
instrukcję obsługi.
Urządzeń elektrycznych nie
należy wyrzucać razem z
odpadami komunalnymi.

49
PL
Uwaga!
Gorąca powierzchnia.
100°C
Praca z gorącą parą może
być przyczyną poważnych
oparzeń!
Uwaga!
Uwaga!
Niebezpieczeństwo popar-
zenia.
Nie kierować strumienia
pary na własne ciało oraz
na inne osoby i zwierzęta!
Urządzenie należy ustawić
stabilnie na płaskim
podłożu.
Nie wchodzić na
urządzenie
OSTRZEŻENIE –
Ryzyko poparzenia
Symbole zastosowane w
instrukcji:
Symbol zagrożenia z in-
formacjami o zapobie-
ganiu obrażeniom ciała
lub szkodom material-
nym
Symbol zagrożenia
z informacjami
dotyczącymi zapobie-
gania obrażeniom ciała
w wyniku porażenia
prądem elektrycznym
Znak nakazu z informacjami
dotyczącymi zapobiegania
szkodom
Znak informacyjny z informac-
jami ułatwiającymi obsługę
urządzenia
Ryzyko poparzenia !
Nie wykonywać prac
bezpośrednio nad głową.
Nosić rękawice ochronne!
Z urządzenia może się
wydostawać para wodna.
Wskazówki
bezpieczeństwa
a) Urządzenie to mogą obsługiwać
dzieci od 8 roku życia, a
także osoby o zmniejszonych
zdolnościach fi zycznych,
zmysłowych czy umysłowych,
czy też osoby dysponujące nie-
dostatecznym doświadczeniem
oraz wiedzą, pod warunkiem,
że praca odbywa się pod nad-
zorem albo po instruktażu w
zakresie bezpiecznej eksploata-
cji urządzenia i ze zrozumie-
niem istniejących zagrożeń.
Dzieciom nie wolno bawić się
urządzeniem. Dzieciom nie
wolno bez nadzoru wykonywać
czyszczenia i konserwacji.
b) Należy pamiętać, aby
nie kierować urządzenia
bezpośrednio na inne
urządzenia wyposażone w
instalacje elektryczne, np. na
wewnętrzne części piecyków
c) Po zakończeniu użytkowania
i przed rozpoczęciem zabie-
gów konserwacyjnych należy

50
PL
g) Przed uruchomieniem
urządzenia dobrze zamknąć
bojler i zakręcić inne
zamknięcia (patrz rozdział
„Uruchamianie urządzenia”).“
h) Ryzyko poparzenia! Nie
otwierać pokrywy bojlera i
nie odkręcać innych zamknięć
podczas pracy urządzenia.
Przed otwarciem pokrywy bo-
jlera i odkręceniem zamknięć:
Wyciągnąć wtyczkę z gniazdka
i odczekać do wystudzenia
urządzenia i pozostałej w nim
wody. Dopiero potem otworzyć
pokrywę bojlera lub zakręcane
zamknięcia (patrz rozdział
„Napełnianie lub uzupełnianie
wody”).
i) W przypadku, gdy wężowy
przewód parowy jest zatka-
ny, w wyniku czego powstaje
nadciśnienie, należy wyciągnąć
wtyczkę z gniazda sieciowego.
j) Podczas prac cały czas
pamiętać o stabilnej postawie.
k) Urządzenie należy przenosić
jedynie przy użyciu uchwytu.
Nie ciągnąć za kabel lub za
przewód wężowy.
l) Nie rozciągać i nie zaginać
przewodu wężowego.
m) Urządzenie należy ustawić sta-
bilnie na płaskim podłożu. Nie
uderzać w urządzenie.
n) Ryzyko poparzenia! W przy-
padku, gdy urządzenie się
wywróci, gorąca woda dostaje
się do przewodu wężowego
i może wyciec z jego końca.
Urządzenie należy natychmiast
wyłączyć, wyciągnąć wtyczkę z
gniazdka, wystudzić urządzeni
i dopiero wtedy opróżnić wąż.
odłączyć urządzeni od sieci
zasilającej, wyciągając wtyczkę
z gniazda.
d) Nie pozostawiać urządzenia
bez nadzoru, jeśli jest ono
podłączone do sieci.
e) Podczas użytkowania
urządzenia nie wolno otwierać
wlewu. Należy postępować
zgodnie z instrukcjami bezpie-
cznego napełniania zbiornika z
wodą.
f) Urządzenia nie należy używać
po upadku lub gdy wykazuje
ono widoczne uszkodzenia lub
gdy jest nieszczelne.
g) Podczas użytkowania i wystud-
zania urządzenia w pobliżu nie
mogą przebywać dzieci.
Wskazówki
bezpieczeństwa dotyczące
użytkowania parowego
zdzieraka do tapet
a) Podczas użytkowania może
dochodzić do nagrzewania się
powierzchni. Pokrywa bojlera
może być podczas pracy i
wystudzania gorąca.
b) Nigdy nie włączać urządzenia,
które nie jest napełnione wodą!
c) Nigdy nie zanurzać urządzenia
w płynach.
d) Urządzenie należy napełniać
jedynie wodą z sieci. Nie
dodawać palnych, toksycznych,
żrących lub innych płynów.
e) Nie przekraczać maksymalnej
ilości napełniania (5 l).
f) Przed rozpoczęciem zd-
zierania tapet należy zakryć
przełączniki i gniazdka ścienne
w wodo- i paroszczelny sposób.

51
PL
o) Płytę parową dotykać jedynie
za uchwyt.
Zabezpieczenia
• Na pokrywie bojlera (6) znajduje
się zawór nadciśnieniowy (5). Dzięki
niemu można upuścić parę i niewielką
ilość gorącej wody, gdy w bojlerze
(7) będzie panowało nadciśnienie.
Do takiej sytuacji może dochodzić,
gdy wężowy przewód parowy (14)
będzie niedrożny lub gdy w bojl-
erze (7) będzie zbyt dużo wody.
W takiej sytuacji należy wciągnąć
wtyczkę (1) z gniazda sieciowego i
odczekać do wystudzenia urządzenia
przed rozpoczęciem jego kontroli.
Zawór nadciśnieniowy (5) może
w określonych okolicznościach się
zablokować.
W normalnym trybie użytkowania
(5) przez zawór nadciśnieniowy
wydostają się niewielki ilości pary i
wody.
• Pokrywa bojlera (6) jest wyposażona
w zawór usuwający próżnię, za
pomocą którego do urządzenia może
się przedostawać powietrze, gdy pow-
stanie w nim próżnia.
• Wężowy przewód parowy (14) jest
dwuścienny, dzięki czemu temperatura
jego powierzchni jest niższa.
• Urządzenie jest wyposażone w au-
tomatyczne zabezpieczenia przed
przegrzaniem (wyzwalacz termicz-
ny), które sygnalizuje podgrzewanie
nienapełnionego wodą urządzenia.
Urządzenie należy napełnić (naj-
lepiej gorącą) wodą. Po kilku mi-
nutach urządzenie będzie ponownie
generować parę.
• Należy uważać, by nie przechylać
urządzenia. W przeciwnym razie
może zadziałać zabezpieczenie przed
przegrzaniem (wyzwalacz termostatu).
Uruchamianie
urządzenia
Zamontować zaciski
mocujące
Założyć obydwa zaciski mocujące (2) na
urządzeniu i przykręcić je śrubami (15).
Patrz szczegóły
.
Podłączanie przewodu
wężowego i płyty parowej
1. Wkręcić jeden koniec wężowego
przewodu parowego (14) na
przyłącze przewodu wężowego
(4) na bojlerze (7).
2. Drugi koniec wężowego prze-
wodu parowego (14) wkręcić na
przyłącze przewodu wężowego
małej płyty parowej (11).
Należy pamiętać o
prawidłowym podłączeniu
wężowego przewodu pa-
rowego. Nigdy nie otwierać
zakręcanych zamknięć podczas
pracy urządzenia.
Montaż i wymiana dużej
płyty parowej
1. Przed montażem i wymianą akce-
soriów należy wyciągnąć wtyczkę
(1) z gniazdka. Odczekać do mo-
mentu, w którym para przestanie się
wydostawać z urządzenia oraz do
wystudzenia urządzenia.

52
PL
2. Aby użyć dużą płytę parową (13),
należy ją wsunąć w prowadnicę
szynową (12) małej płyty parowej
(11).
3. Aby zdemontować dużą płytę parową
(13), należy ją wysunąć z prowadnicy
szynowej (12) małej płyty parowej
(11).
Napełnianie lub
uzupełnianie wody
1. Należy się upewnić, że wtyczka (1)
została wyciągnięta z gniazdka, a
urządzenie jest wystudzone.
2. Odkręcić pokrywę bojlera (6) i zdjąć
ją.
3. Napełnić bojler (7) czystą wodą z
sieci wodociągowej. Bojler (7) należy
napełniać jedynie do znacznika mak-
symalnego poziomu wskaźnika pozio-
mu wody (8) (maksymalnie 5 litrów)
4. Wkręcić pokrywę bojlera (6). Należy
zwracać uwagę na prawidłowe
zakręcenie pokrywy.
W przypadku dłuższego cza-
su pracy: Należy uwzględniać
wskaźnik poziomu minimalnego
(8) i w odpowiednim momencie
dolewać wody.
Obsługa
Uwaga! Podczas
użytkowania może
dochodzić do nagrzewania
się powierzchni. Pokrywa
bojlera może być pod-
czas pracy i wystudzania
gorąca.
Ryzyko poparzenia!
Nie wyk onywać prac
bezpośrednio nad głową. Nosić
rękawic e ochr onne!
Z urządzenia może się
wydostawać para wodna.
Nie kierować strumienia pary na
własne ciało oraz na inne osoby
i zwierzęta!
• Przed rozpoczęciem prac należy
skontrolować stan tynku, ponieważ
gorąca para może rozpuszczać luźny,
porowaty lub słabo związany tynk.
Tynk może odchodzić łatwiej od ściany
w strefach uskoków i dziur.
Płyty parowej nie należy przez dłuższy
czas przytrzymywać w jednym miej-
scu. Obecność luźnego tynku można
rozpoznać, opukując kilka miejsc
ściany piąstką. Jeśli podczas tych
zabiegów da się usłyszeć głuchy
dźwięk, należy dalej postępować z za-
chowaniem najwyższej ostrożności.
• Przed rozpoczęciem właściwych prac
należy zawsze wykonać test zdzier-
acza taper na niewielkim fragmencie
tapety o powierzchni ok. 100 cm².
• W przypadku stwierdzenia, że do-
chodzi do odpadania tynku lub jeśli
dają się słyszeć jego rozłupywanie,
należy wstrzymać prace. Zdzier-
acz do tapet można bezpiecznie
wykorzystywać do prac na po-
wierzchniach z płyt gipsowych/gip-
sowo-kartonowych.
• Ciepło generowane przez niniejsze
urządzenie może się przyczyniać do
powstawania szkód na określonych
powierzchniach, np. na dywanach, ta-
picerowanych meblach, blatach stołów
lub na szafach. Aby nie uszkodzić
powierzchni w kontakcie z ciepłem
generowanym przez bojler (7) należy
urządzenie zawsze ustawiać na drew-

53
PL
nianej desce lub innym podobnym
przedmiocie. Nie należy do tego celu
stosować osłon przeciwpyłowych lub
gazet.
• Bojler (7) należy chwytać jedynie za
uchwyt (3).
• Tapety z kilkoma warstwami farby lub
tapety wodoodporne można usuwać
ze ścian, choć jest to trudniejsze niż
w przypadku innych tapet. Tego typu
tapety należy podziurawić przy użyciu
wałka z kolcami, tak by para mogła
oddziaływać na warstwę kleju.
• W przypadku tapet z pianką winylową
należy w razie potrzeby w pierwszej
kolejności zedrzeć warstwę winylu, po
czym dopiero wtedy przeprowadzić
prace z użyciem urządzenia do zd-
zierania tapet.
• W ramach usuwania tapet z sufi -
tu należy zawsze nosić odzież
ochronną. Należy zwracać uwagę na
osadzający się na płycie parowej kon-
densat. Gorąca woda może bowiem
kapać z płyty. Płyty parowe należy
regularnie opróżniać i nie stosować ich
bezpośrednio nad głową.
• Płytę parową (11/13) należy
umieszczać w odpowiednim pojemni-
ku, gdy pozostawiamy ją bez nadzoru
(nawet na krótki czas). W trakcie
korzystania z płyty parowej nigdy
nie należy jej zwracać w kierunku
użytkownika.
Włączanie i wyłączanie
1 W celu włączenia urządzenia należy
włożyć wtyczkę (1) do gniazdka.
2 W zależności od temperatury wody,
którą wypełnione jest urządzenie,
należy odczekać do 15 minut, aż
urządzenie będzie w stanie generować
parę. Podczas fazy nagrzewania z
płyty parowej może wyciekać niewie-
lka ilość gorącej wody. Płytę parową
należy odkładać na wiadrze, tak by
mogła do niego spływać woda.
Nigdy nie pozostawiać
włączonego urządzenia bez nad-
zoru.
3 W celu wyłączenia urządzenia należy
wyciągnąć wtyczkę sieciową (1) z
gniazdka.
Zdzieranie tapet
• Małą płytę parową (11) należy
chwytać jedynie za uchwyt (10).
• Prace najlepiej jest prowadzić od sufi tu
pokoju w kierunku podłogi.
• Do zdzierania tapet w narożnikach
lub we wnękach należy stosować małą
płytę parową (11) (patrz rozdział
„Montaż i wymiana małej płyty paro-
wej”).
• Do zdzierania tapet na dużych po-
wierzchniach należy stosować dużą
płytę parową (13) (patrz rozdział
„Montaż i wymiana dużej płyty paro-
wej”).
• Przyłożyć płytę parową (11/13) do ta-
pety. W zależności od rodzaju tapety i
podłoża odsunąć po ok. 10 sekundach
płytę parową i ściągnąć tapetę ruchem
od góry do dołu lub zdrapać za
pomocą skrobaka (9).
• Podczas zdrapywania kilka razy
przykładać płytę parową (11/13) na
tapetę.

54
PL
Czyszczenie i
konserwacja
Wykonanie prac naprawczych i
konserwacyjnych, które nie zostały
opisane w tej instrukcji, powierzać
naszym specjalistom z działu ser-
wisowego. Stosować tylko oryginal-
ne części.
Wyciągnąć wtyczkę (1) z gniaz-
da sieciowego i odczekać do
wystudzenia urządzenia przed
rozpoczęciem wszelkich prac.
Regularnie wykonywać opisane poniżej
zabiegi czyszczenia i konserwacji. Za-
pewni to długie i niezawodne użytkowanie
urządzenia.
Czyszczenie
Nie wolno chlapać wodą
na urządzenie, ani wkładać
urządzenia do wody. Istnieje
niebezpieczeństwo porażenia
prądem elektrycznym.
• Bojler należy od czasu do cza-
su przepłukiwać wodą z sieci
wodociągowej, do momentu, w którym
będzie ona czysta.
Nie stosować żadnych środków
myjących ani rozpuszczalników.
Mogłoby to spowodować nieodwracal-
ne uszkodzenie urządzenia.
Odkamienianie
Nigdy nie dodawać palnych,
toksycznych, żrących lub innych
płynów!
W razie potrzeby należy
odkamienić urządzenie, w
zależności od twardości wody i
częstotliwości użytkowania. Należy
stosować dostępne w ogólnym
handlu środki odkamieniające,
najlepiej kwas cytrynowy. W za-
kresie dozowania i zastosowania
należy postępować zgodnie z
zaleceniami producenta środków
odkamieniających!
Uszkodzenia wynikające z
nieprzeprowadzania zabiegów
odkamieniających nie podlegają
gwarancji.
1 Należy się upewnić, że wtyczka (1)
została wyciągnięta z gniazdka, a
urządzenie jest wystudzone.
2. Wlać roztwór środka do odkamieni-
ania dostępnego w ogólnym handlu
(2,5 l).
3. Zdjąć wężowy przewód parowy (14) i
wetknąć wtyczkę (1) do gniazdka.
4. Roztwór odkamieniający gotować
przez ok. 5 minut.
5. Wyciągnąć wtyczkę sieciową (1)
z gniazdka i odczekać jeszcze ok.
10minut, aby roztwór mógł odpowied-
nio zadziałać.
6. Wystudzić urządzenie i pozostałą
ilość roztworu. Opróżnić urządzenie,
przepłukać czystą wodą i pozostawić
do wyschnięcia.

55
PL
Przechowywanie
• Urządzeni należy wystudzić przez co
najmniej dziesięć minut.
• Opróżnić urządzenie.
• Owinąć wężowy przewód parowy
(14) wokół zacisków mocujących (2)na
bojlerze (7).
• Urządzenie przechowywać w pozy-
cji pionowej w suchym i chronionym
przed kurzem miejscu, poza zasięgiem
dzieci.
Utylizacja / ochrona
środowiska
Urządzeń elektrycznych nie należy
wyrzucać razem ze śmieciami do-
mowymi.
• Oddaj urządzenie do punktu recyklin-
gu. Zastosowane elementy z tworzywa
sztucznego i metali można posortować
według rodzajów odpadów i w ten
sposób przekazać do punktu recyklin-
gu. Odpowiednie informacje można
uzyskać w naszym dziale serwisowym.
• Przesłane do nas urządzenia poddamy
bezpłatnie utylizacji.
Części zamienne / Akcesoria
Części zamienne i akcesoria można zakupić na
www.grizzly-service.eu
W przypadku problemów z zamawianiem należy skorzystać z
formularza kontaktowego. W razie kolejnych pytań należy zwracać się
do „Service-Center” (patrz strona 57)
.
Pos. Instrukcja obsługi Oznaczenie Nr. katalogowe
2 – 8, 15 Bojler kompletny 91105685
14 Wężowy przewód parowy 91105686
10 – 13 płyta parowa kompletny 91105687

56
PL
Gwarancja
Szanowna Klientko, Szanowny Kliencie,
na zakupione urządzenie otrzymują Pań-
stwo 3 lata gwarancji od daty zakupu.
W przypadku wad tego produktu przysłu-
gują Państwu ustawowe prawa w stosunku
do sprzedawcy produktu. Prawa te nie są
ograniczone przez naszą przedstawioną
niżej gwarancję.
Warunki gwarancji
Okres gwarancji rozpoczyna się z datą
zakupu. Prosimy zachować oryginalny pa-
ragon. Będzie on potrzebny jako dowód
zakupu.
Jeśli w okresie trzech lat od daty zakupu
tego produktu wystąpi wada materiałowa
lub fabryczna, produkt zostanie – wedle
naszego wyboru – bezpłatnie naprawiony
lub wymieniony. Gwarancja zakłada, że w
okresie trzech lat uszkodzone urządzenie
zostanie przesłane wraz z dowodem za-
kupu (paragonem) z krótkim opisem, gdzie
wystąpiła wada i kiedy się pojawiła.
Jeśli defekt jest objęty naszą gwarancją,
otrzymają Państwo z powrotem naprawio-
ny lub nowy produkt. (Wraz z naprawą
lub wymianą produktu okres gwarancji nie
biegnie na nowo.)
Okres gwarancji i ustawowe rosz-
czenia z tytułu wad
Okres gwarancji nie wydłuża się z po-
wodu świadczenia gwarancyjnego. Obo-
wiązuje to również dla wymienionych lub
naprawionych części. Ewentualne uszko-
dzenia i wady istniejące już w momencie
zakupu należy zgłosić bezzwłocznie po
rozpakowaniu. Naprawy przypadające
po upływie okresu gwarancji są odpłatne.
Zakres gwarancji
Urządzenie wyprodukowano z zacho-
waniem staranności zgodnie z surowymi
normami jakościowymi i dokładnie spraw-
dzono przed wysyłką.
Gwarancja obowiązuje dla wad mate-
riałowych lub fabrycznych. Gwarancja
nie rozciąga się na części produktu, które
podlegają normalnemu zużyciu i można je
uznać za części zużywalne (np. szczotki),
oraz na uszkodzenia części delikatnych
(np. przełączniki).
Gwarancja przepada, jeśli produkt został
uszkodzony, nie był zgodnie z przezna-
czeniem użytkowany i konserwowany.
Użytkowanie zgodnie z przeznaczeniem
wiąże się z przestrzeganiem wszystkich
wskazówek zawartych w instrukcji obsługi.
Należy bezwzględnie unikać zastosowań
i działań, których odradza się lub przed
którymi ostrzega się w instrukcji obsługi.
Produkt jest przeznaczony do użytku
prywatnego, a nie komercyjnego. W przy-
padku niewłaściwego i nieodpowiedniego
obchodzenia się z urządzeniem, stosowa-
nia „na siłę” i zabiegów, które nie zostały
przeprowadzone przez nasz autoryzowa-
ny oddział, gwarancja wygasa.
Realizacja w przypadkach objętych
gwarancją
Aby zagwarantować szybkie przetworze-
nie Państwa sprawy, prosimy o przestrze-
ganie poniższych wskazówek:
• W przypadku wszelkich zapytań
prosimy o przygotowanie paragonu i
numeru identyfi kacyjnu jako dowodu
zakupu (IAN332976_1907).
• Numer artykułu znajduje się na tablicz-
ce znamionowej.
• W przypadku wystąpienia usterek lub
innych wad prosimy o skontaktowanie
się z wymienionym niżej działem ser-

57
PL
wisowym telefonicznie lub mailowo.
Uzyskają Państwo wówczas szczegó-
łowe informacje na temat realizacji
reklamacji.
• Uszkodzony produkt mogą Państwo
wysłać po skontaktowaniu się z
naszym działem obsługi klienta, za-
łączając dowód zakupu (paragon) i
określając, na czym polega wada i
kiedy wystąpiła, bezpłatnie na podany
adres serwisu. Aby uniknąć proble-
mów z odbiorem i dodatkowych kosz-
tów, prosimy o wysłanie przesyłki na
adres, który Państwu podano. Należy
się upewnić, żeby wysyłka nie nastąpi-
ła odpłatnie, jako ponadwymiarowa,
ekspresowo lub na innych specjalnych
warunkach. Prosimy o przesłanie
urządzenia wraz ze wszystkimi czę-
ściami wyposażenia otrzymanymi przy
zakupie i zadbanie o wystarczająco
bezpieczne opakowanie.
Serwis naprawczy
Naprawy, które nie są objęte gwarancją,
można zlecić odpłatnie w naszym oddzia-
le serwisowym. Serwis sporządzi Państwu
kosztorys naprawy.
Podejmujemy się wyłącznie naprawy urzą-
dzeń, które zostały prawidłowo zapako-
wane i ofrankowane.
Uwaga: Prosimy o przesłanie czystego
urządzenia ze wskazaniem usterki.
Urządzenia przesłane dla nas odpłatnie,
jako przesyłka ponadwymiarowa, ekspre-
sowa lub na innych warunkach specjal-
nych, nie zostaną odebrane.
Utylizację przesłanych do nas uszkodzo-
nych urządzeń przeprowadzamy bezpłat-
nie.
Service-Center
PL
Serwis Polska
Tel.: 22 397 4996
E-Mail: [email protected]
IAN 332976_1907
Importer
Prosimy mieć na uwadze, że poniższy
adres nie jest adresem serwisu. Prosimy
o kontakt z wymienionym wyżej centrum
serwisowym.
Grizzly Tools GmbH & Co. KG
Stockstädter Straße 20
DE-63762 Großostheim
NIEMCY
www.grizzly-service.eu

58
CZ
Turinys
Úvod..........................................58
Použití dle určení ........................58
Obecný popis .............................58
Rozsah dodávky ............................. 59
Přehled .......................................... 59
Popis funkce ................................... 59
Technické údaje ..........................59
Bezpečnostní pokyny .................59
Piktogram na přístroji: ...................... 59
Symboly v návodu: .......................... 60
Bezpečnostní pokyny ....................... 60
Bezpečnostní pokyny při používání
parního odstraňovače tapet .............. 60
Bezpečnostní zařízení ...................... 61
Uvedení do provozu ...................61
Montáž přídržných spon .................. 61
Připojení hadice a parní desky ......... 62
Montáž a výměna velké parní desky . 62
Nalití a dolití vody .......................... 62
Obsluha .....................................62
Zapnutí avypnutí ............................ 63
Odstranění tapet ............................. 63
Čištění aúdržba .........................63
Čištění ........................................... 64
Odvápnění ..................................... 64
Skladování ...........................64
Likvidace/ochrana životního
prostředí ....................................65
Náhradní díly / Příslušenství ......65
Záruka ......................................66
Opravna .................................... 67
Service-Center ............................67
Dovozce ..................................... 67
Úvod
Blahopřejeme vám ke koupi vašeho nové-
ho přístroje. Rozhodli jste se pro vysoce
kvalitní v ýrobek.
Kvalita tohoto přístroje byla kontrolována
během v ýroby a byla provedena také
závěrečná kontrola. Tím je zaručena
funkčnost přístroje.
Návod k obsluze je součástí tohoto
výrobku. Obsahuje důležité pokyny
týkající se bezpečnosti, používání a
likvidace. Před použitím výrobku se
seznamte se všemi pokyny k obsluze
a bezpečnosti. Výrobek používejte
jen k popsaným účelům a v rámci
uvedených oblastí použití.
Návod dobře uschovejte a při
předávání výrobku třetímu předejte
i všechny podklady.
Použití dle určení
Přístroj je určen k odstraňování tapet.
Jakékoliv jiné použití, které není v tomto
návodu výslovně povoleno, může vést
k poškození přístroje a pro uživatele
představovat vážné nebezpečí.
Výrobce neručí za škody způsobené
nesprávným použitím nebo nesprávnou
obsluhou. Tento přístroj není vhodný pro
komerční využití. Při řemeslném použití
záruka zaniká.
Obecný popis
Zobrazení nejdůležitějších
funkčních dílů naleznete na
výklopných stránkách.
Originalios EB atitikties
deklaracijos vertimas ................. 83
Rozvinuté náčrtky ......................85

59
CZ
Rozsah dodávky
Vybalte přístroj a zkontrolujte, zda je kom-
pletní:
- síťový kabel se zástrčkou
- nádobka bojleru
- parní hadice
- malá parní deska
- velká parní deska
- přídržné spony
- škrabka
- návod k obsluze
Přehled
1 síťový kabel
2 přídržná spona
3 rukojeť pro přenášení nádobky
bojleru
4 přípojka hadice nádobky bojleru
5 přetlakový ventil
6 víko bojleru
7 nádobka bojleru
8 ukazatel hladiny vody
9 škrabka
10 rukojeť malé parní desky
11 malá parní deska
12 malá vodicí lišta Parní deska
13 velká parní deska
14 parní hadice
15 šroub přídržné spony
Popis funkce
Parní odstraňovač tapet s dobou páry 80
minut má malou a velkou parní desku a 4
metry dlouhou parní hadici.
Funkci ovládacích prvků naleznete vnásle-
dujícím popisu.
Technické údaje
Parní odstraňovač tapet .PDTA 5 A1
Výkon P ....................................2300 W
Napětí U ................... 230-240V~, 50 Hz
Doba páry .................................. 80 min
Objem nádobky ................................. 5 l
Délka parní hadice ............................4 m
Parní síla ................................. 60 g/min
Velikost (velká parní deska) .... 20 x 28 cm
Velikost (malá parní deska) ....... 18 x 8 cm
Síťový kabel .....................................3 m
Třída ochrany ..................................IPX4
Hmotnost (bez příslušenství) ............ 935 g
Hmotnost (pouze příslušenství) ........ 815 g
Bezpečnostní pokyny
Při používaní přístroje je třeba
dodržovat bezpečnostní pokyny.
Piktogram na přístroji:
Pozorně si přečtěte návod
kobsluze.
Elektrická zařízení nepatří do
domácího odpadu.
Pozor!
Horký povrch.
100°C
Práce s horkou párou může
vést k těžkému opaření!
Pozor!
Pozor! Hrozí nebezpečí
popálení.
Nesměrujte páru na své
vlastní tělo ani na jiné lidi
ani na zvířata!

60
CZ
Postavte přístroj bezpečně
a pevně na rovnou podla-
hu.
Nepoužívejte jako stupátko
VÝSTRAŽNÉ
UPOZORNĚNÍ –
Nebezpečí opaření
Symboly v návodu:
Označení nebezpečí
s informacemi o
zabránění zranění osob
nebo hmotných škod
Označení nebezpečí
s informacemi o
zabránění zranění osob
v důsledku zasažení
elektrickým proudem
Označení nebezpečí s infor-
macemi o zabránění škod
Informační značka s infor-
macemi pro lepší zacházení
s přístrojem
Nebezpečí opaření !
Nepracujte přímo nad
hlavou. Noste ochranné
rukavice! Z přístroje může
unikat pára.
Bezpečnostní pokyny
a) Tento přístroj mohou používat
děti od 8 roků jakož i osoby se
sníženými fyzickými, senzorický-
mi anebo mentálními scho-
pnostmi, anebo s nedostatkem
zkušeností a vědomostí, pokud
jsou pod dozorem anebo byli
poučené o bezpečném používaní
přístroje a rozumějí rizikům,
které z toho vyplývají. Děti si s
přístrojem nesmí hrát. Děti nesmí
vykonávat čistění a údržbu bez
dozoru.
b) Ujistěte se, zda přístroj není
přímo nasměrován na elektrická
zařízení a zařízení, která ob-
sahují elektrické součásti, např.
vnitřek pecí
c) Po použití a před údržbou
uživatele se zařízení musí odpojit
od sítě vytažením síťové zástrčky.
d) Nenechávejte přístroj bez do-
zoru, pokud je zapojeno do sítě.
e) Plnicí otvor se nesmí během
používání otevírat. Postupujte
podle pokynů pro bezpečné
doplnění nádrže na vodu.
f) Nepoužívejte přístroj, pokud
spadl, má zjevná poškození
nebo je netěsný.
g) Během používání a ochlazení
uuchovávejte přístroj mimo dosah
dětí.
Bezpečnostní pokyny
při používání parního
odstraňovače tapet
a) Povrchy se mohou během použití
zahřát. Víko bojleru může být
během provozu a při ochlazo-
vání horké.
b) Nikdy nezapínejte přístroj bez
vody!
c) Nikdy neponořujte přístroj do te-
kutin.
d) Do přístroje nalijte pouze vodu
z vodovodu. Nikdy nepřidávejte
hořlavé, jedovaté, žíravé nebo
jiné kapaliny.

61
CZ
Bezpečnostní zařízení
• Víko bojleru (6) má přetlakový ventil
(5). To znamená, že pára a trochu
horké vody mohou uniknout, pokud je
v nádobce bojleru (7) přetlak. K tomu
může dojít, pokud je parní hadice (14)
ucpaná nebo je-li nádobka bojleru
(7) přeplněna. V takovém případě
vytáhněte síťovou zástrčku (1) ze zá-
suvky a před kontrolou nechte přístroj
vychladnout. Tento přetlakový ventil (5)
nesmí být za žádných okolností bloko-
ván.
Při normálním použití malé
množství páry a vody unikne přes
přetlakový ventil (5).
• Víko bojleru (6) má vakuový uvolňovací
ventil, který umožňuje vstup vzduchu
do přístroje, když se vytvoří vakuum.
• Ke snížení povrchové teploty je parní
hadice (14) je dvojitá.
• Přístroj je vybaven automatickou
ochranou proti přehřátí (tepelný
spouštěč), která se spustí, pokud je
přístroj zahříván nenaplněný. Nalijte
do přístroje (nejlépe horkou) vodu. Po
několika minutách přístroj opět vytváří
páru.
• Dbejte na to, aby se přístroj
nepřevrátil. Jinak se může aktivovat
automatická ochrana proti přehřátí (te-
pelný spouštěč).
Uvedení do provozu
Montáž přídržných spon
Nasaďte obě přídržné spony (2) na přístroj
a sešroubujte tyto přiloženýmišrouby (15).
Viz detail
.
e) Nesmí se překročit maximální
množství naplnění (5 l).
f) Před odstraněním tapety zakryjte
spínače a zásuvky na stěnách
tak, aby byly vodotěsné a odol-
né proti páře.
g) Před uvedením do provozu
pevně utáhněte uzávěry bojleru
a šroubové uzávěry (viz Uvedení
do provozu).“
h) Nebezpečí opaření! Během
provozu nikdy neotevírejte víko
bojleru a šroubové uzávěry.
Před otevřením víka bojleru a
odšroubováním šroubových
uzávěrů: Vytáhněte síťovou
zástrčku a nechte přístroj a zbý-
vající vodu vychladnout. Až poté
otevřete pouze víko bojleru nebo
odšroubujte šroubové uzávěry
(viz Nalití nebo dolití vody).
i) Pokud je parní hadice ucpaná a
vytvoří se tím přetlak, vytáhněte
síťovou zástrčku ze zásuvky.
j) Při práci vždy udržujte bezpečné
postavení.
k) Přístroj noste pouze za rukojeť.
Netahejte za kabel ani za hadi-
ci.
l) Hadici nenatahujte ani ji neohý-
bejte.
m) Postavte přístroj bezpečně a
pevně na rovnou podlahu.
Přístroj nepřevracejte.
n) Nebezpečí opaření! Pokud
přístroj spadne, horká voda se
dostane do hadice a může vyté-
kaz z konce hadice. Okamžitě
vypněte přístroj, vytáhněte
síťovou zástrčku, nechte jej
vychladnout a teprve poté
vyprázdněte hadici.
o) Parní desku uchopte pouze za
rukojeť.

62
CZ
Připojení hadice a parní
desky
1. Našroubujte jeden konec parní
hadice (14) na přípojku hadice
(4) na nádobce bojleru (7).
2. Našroubujte druhý konec parní
hadice (14) na přípojku hadice
(4) malé parní desky (11).
Dbejte na to, aby parní hadi-
ce byla správně připojena.
ěhem provozu nikdy neotevírejte
šroubové uzávěry.
Montáž a výměna velké
parní desky
1. Při montáži a výměně příslušenství
vytáhněte síťovou zástrčku (1).
Vyčkejte, až pára přestane unikat a
přístroj se ochladil.
2. Pro použití velké parní desky (13) tuto
zasuňte do vodicí lišty (12) malé parní
desky (11).
3. K demontáži velké parní desky (13) se
tato vytáhne z vodicí lišty (12) malé
parní desky (11).
Nalití a dolití vody
1. Ujistěte se, zda je síťová zástrčka (1)
vytažená a zda přístroj vychladl.
2. Odšroubujte víko bojleru (6) a sejměte
jej.
3. Nalijte do nádobky bojleru (7) čistou
vodu z vodovodu. Naplňte nádob-
ku bojleru (7) pouze až po značku
MAX na ukazateli hladiny vody (8)
(maximálně 5 litrů)
4. Našroubujte víko bojleru (6). Dbejte na
to, aby toto bylo řádně našroubované.
V případě delších pracovních
dobách: Sledujte značku minima
na ukazateli hladiny vody (8) a
včas dolijte vodu.
Obsluha
Pozor! Povrchy se mohou
během použití zahřát. Víko
bojleru může být během
provozu a při ochlazování
horké.
Nebezpečí opaření!
Nepracujte přímo nad hlavou.
Noste ochranné rukavice! Z
přístroje může unikat pára.
Nesměrujte páru na své vlast-
ní tělo ani na jiné lidi ani na
zvířata!
• Před zahájením práce zkontrolujte
stav omítky, protože pára při vysokých
teplotách může uvolnit volnou, porézní
nebo špatně vázanou omítku. Omítka
se také snáze odlupuje v oblastech,
kde jsou praskliny nebo díry.
Parní deska by se také neměla držet
na jednom místě po delší dobu. Volnou
omítku můžete rozpoznat klepnutím na
některá místa zdi pomocí kloubů. Zaz-
ní-li přitom dutý zvuk, doporučujeme
postupovat s maximální opatrností.
• V každém případě vyzkoušejte
odstraňovač tapet nejprve na malé
ploše asi 100 cm² před zahájením
skutečné práce.
• Pokud zjistíte, že se omítka uvolňuje
nebo uslyšíte-li praskání, přestaňte pra-
covat. Odstraňovač tapet lze bezpečně
použít pro sádrokartonové povrchy.
• V důsledku tepla generovaného tímto
produktem, se určité povrchy, např.

63
CZ
koberce, čalouněný nábytek, stolové
desky nebo skříňky mohou poškodit.
Aby nedošlo k poškození příslušných
povrchů teplem nádobky bojleru (7),
měla by se vždy postavit na dřevěnou
desku nebo na podobný předmět. Pro
tento účel nejsou vhodné prachové
deky nebo noviny.
• Nádobku bojleru (7) uchopte pouze za
rukojeť pro přenášení (3).
• Vícekrát natřené nebo vodotěsné tapety
lze jen obtížně odstranit. Perforujte
takovou tapetu ostnatým válečkem, aby
pára mohla působit na vrstvu lepidla.
• V případě tapet z vinylové pěny
dle potřeby nejprve odstraňte horní
vinylovou vrstvu, až pak pracujte s
odstraňovačem tapet.
• Při odstraňování stropních tapet noste
vždy ochranný oděv. Dbejte na to,
aby se na parní desce shromažďovala
kondenzovaná voda, protože horká
voda může odkapávat. Parní desku
pravidelně vyprazdňujte a nepoužívejte
ji přímo nad Vaší hlavou.
• Parní desky (11/13) vždy dejte do
vhodné nádoby, pokud tyto zůstanou
bez dozoru (i krátce). Při použití nes-
mí parní deska ukazovat směrem k
uživateli.
Zapnutí avypnutí
1 K zapnutí zasuňte síťovou zástrčku (1)
do zásuvky.
2 V závislosti na teplotě nalité vody
potřebuje přístroj až 15 minut, než se
vytvoří pára. Během zahřívací fáze
může z parní desky vytékat horká
voda. Odložte parní desku na kbelík,
abyste zachytili veškerou vytékající
vodu.
Nikdy nenechávejte přístroj bez
dozoru v zapnutém stavu.
3 K vypnutí přístroje vytáhněte ze zásuv-
ky síťovou zástrčku (1).
Odstranění tapet
• Malou parní desku (11) uchopte pouze
za rukojeť (10).
• Pracujte nejlépe od stropu pokoje až k
podlaze.
• Použijte malou parní desku (11) k
odstranění tapety v rozích nebo výklen-
cích (viz Montáž a výměna velké parní
desky).
• Použijte velkou parní desku (13) k
odstranění tapety na velkých plochách
(viz Montáž a výměna velké parní
desky).
• Položte parní desky (11/13) na tapetu.
V závislosti na typu tapety a povrchu
odstraňte parní desku po cca 10 se-
kundách a stáhněte tapetu shora dolů
nebo ji oškrábejte škrabkou (9).
• Při stírání položte parní desky (11/13)
opakovaně na tapetu.
Čištění aúdržba
Opravné a údržbářské práce, které
nejsou popsány vtomto návodu
kobsluze, přenechejte našemu
servisnímu centru. Používejte pouze
originální díly.
Před zahájením jakékoliv práce
vytáhněte síťovou zástrčku (1) ze
zásuvky a nechte přístroj vychladn-
out.
Pravidelně provádějte níže uvedené čisticí
aúdržbářské práce. Tím zajistíte dlouhou
životnost aspolehlivé užívání.

64
CZ
Čištění
Přístroj se nesmí postříkat
vodou ani se do ní nesmí
položit. Hrozí nebezpečí úra-
zu elektrickým proudem.
• Příležitostně vypláchněte bojler vodou z
vodovodu, dokud voda nebude čirá.
Nepoužívejte čisticí prostředky
ani rozpouštědla. Ty by mohly
neopravitelně přístroj poškodit.
Odvápnění
Nikdy nepřidávejte hořlavé, jedo-
vaté, žíravé nebo jiné kapaliny!
V případě potřeby přístroj
odvápněte, a to v závislosti na
tvrdosti vody a četnosti používání.
Použijte v obchodě běžně dostup-
né odvápňovací prostředky,
přednostně kyselinu citronovou.
Dodržujte pokyny pro dávkování
a použití výrobce odvápňovacího
prostředku!
Vady, způsobené nedostatkem
odstraňování vodního kamene, jsou
ze záruky vyloučeny.
1. Ujistěte se, zda je síťová zástrčka (1)
vytažená a zda přístroj vychladl.
2. Nalijte běžně dostupný odvápňovací
roztok (2,5 litru).
3. Sejměte parní hadici (14) a zastrčte
síťovou zástrčku (1) do zásuvky.
4. Nechte odvápňovací roztok vařit cca 5
minut.
5. Vytáhněte síťovou zástrčku (1) ze
zásuvky a roztok nechte působit ještě
dalších cca 10 minut.
6. Nechte přístroj a zbytek roztoku
vychladnout. Vyprázdněte přístroj,
vypláchněte ho čistou vodou a nechte
jej vyschnout.
Skladování
• Nechte přístroj minimálně deset minut
vychladnout.
• Přístroj vyprázdněte.
• Parní hadici (14) naviňte kolem
přídržných spon (2) na nádobce bojle-
ru (7).
• Skladujte přístroj ve svislé poloze na
suchém místě chráněném před prachem
a mimo dosah dětí.

65
CZ
Likvidace/ochrana
životního prostředí
Elektrická zařízení nepatří do
domácího odpadu.
• Přístroj odevzdejte na sběrném
recyklačním místě. Použité plastové a
kovové části lze oddělit a vytřídit pro
recyklaci. V případě dotazů se obraťte
na servisní centrum.
• Likvidaci Vašich vadných zaslaných
přístrojů provádíme bezplatně.
Náhradní díly / Příslušenství
Náhradní díly a příslušenství obdržíte na stránkách
www.grizzly-service.eu
Pokud máte problémy při objednávání, použijte prosím kontaktní formulář.
V případě jakýchkoliv dalších dotazů se obraťte na
servisní středisko / „Service-Center“ (viz strana 67).
Pol. Návod k obsluze Označení Č. artiklu.
2 – 8, 15 nádobka bojleru kompletní 91105685
14 parní hadice 91105686
10 – 13 parní deska kompletní 91105687

66
CZ
Záruka
Vážení zákazníci,
Na tento přístroj poskytujeme 3letou záru-
ku od data zakoupení.
V případě závady tohoto výrobku vám
vůči prodejci výrobku přináleží zákonná
práva. Tato zákonná práva nejsou omeze-
na naší následovně uvedenou zárukou.
Záruční podmínky
Záruční doba začíná běžet ode dne náku-
pu. Uschovejte si, prosím, originál účtenky
pro pozdější použití. Tento dokument bu-
dete potřebovat jako doklad o koupi.
Zjistíte-li během tří let od data koupě u
tohoto výrobku materiálovou nebo výrobní
vadu, bude výrobek námi, podle našeho
výběru, bezplatně opraven nebo nahra-
zen. Tato záruční oprava předpokládá, že
během 3leté lhůty předložíte poškozený
přístroj s dokladem o koupi (pokladní stvr-
zenka) a písemně krátce popíšete, v čem
spočívá závada a kdy k ní došlo.
Bude-li závada kryta naší zárukou, zís-
káte zpět opravený nebo nový výrobek.
Opravou nebo výměnou výrobku nezačíná
záruční doba běžet od začátku.
Záruční doba a zákonné nároky
na odstranění vady
Záruční doba se neprodlužuje poskytnutím
záruky. Toto platí i pro nahrazené a opra-
vené díly. Již při koupi zjištěné závady a
nedostatky musíte nahlásit okamžitě po
vybalení výrobku. Po uplynutí záruční
doby musíte uhradit náklady za provedené
opravy.
Rozsah záruky
Přístroj byl precizně vyroben podle přís-
ných jakostních směrnic a před dodáním
byl svědomitě zkontrolován.
Záruční oprava se vztahuje na materiálové
nebo výrobní vady. Tato záruka se netýká
dílů výrobku, které jsou vystaveny normál-
nímu opotřebení, a lze je považovat za
spotřební materiál (např. kartáče), nebo
poškození křehkých dílů (např. spínače).
Tato záruka neplatí, je-li výrobek poškozen
z důvodu neodborného používání, nebo
pokud u něj nebyla prováděna údržba.
Pro odborné používání výrobku musí být
přesně dodržovány všechny pokyny uve-
dené v návodu k obsluze. Bezpodmínečně
je třeba zabránit používání a manipula-
cím s výrobkem, které nejsou v návodu k
obsluze doporučeny, nebo je před nimi
varováno.
Výrobek je určen jen pro soukromé účely
a ne pro komerční využití. Záruka zaniká
v případě zneužívání a neodborné ma-
nipulace, používání nadměrné síly a při
zásazích, které nebyly provedeny naším
autorizovaným servisem.
Postup v případě uplatňování zá-
ruky
Pro zajištění rychlého zpracování vaší
žádosti, prosím, postupujte podle následu-
jících pokynů:
• Na důkaz, že jste výrobek zakoupili,
mějte pro jakékoli případné dotazy
připravenou pokladní stvrzenku a
identifi kační číslo (IAN 332976_1907).
• Číslo výrobku je uvedeno na typovém
štítku.
• Pokud by došlo k funkční poruše nebo
jiným závadám, nejdříve telefonicky
nebo e-mailem kontaktujte níže uvede-
né servisní oddělení. Pak získáte další
informace o vyřízení vaší reklamace.
• Výrobek označený jako vadný můžete
po domluvě s naším zákaznickým
servisem, s připojením dokladu o kou-
pi (pokladní stvrzenky) a po uvedení, v
čem závada spočívá a kdy k ní došlo,

67
CZ
přeposlat bez platby poštovného na
vám sdělenou adresu příslušného ser-
visu. Aby bylo zabráněno problémům
s přijetím a dodatečnými náklady,
bezpodmínečně použijte jen tu adresu,
která vám bude sdělena. Zajistěte, aby
zásilka nebyla odeslána nevyplaceně
jako nadměrné zboží, expres nebo
jiný, zvláštní druh zásilky. Přístroj za-
šlete včetně všech částí příslušenství
dodaných při zakoupení a zajistěte
dostatečně bezpečný přepravní obal.
Opravna
Opravy, které nespadají do záruky, mů-
žete nechat udělat v našem servisu oproti
zúčtování. Rádi vám připravíme předběžný
odhad nákladů.
Můžeme zpracovávat jen ty přístroje, které
byly dostatečně zabalené a odeslány vy-
placeně.
Pozor: Prosím, přístroj zašlete našemu au-
torizovanému servisu vyčištěný a s upozor-
něním na závadu.
Nepřijmeme přístroje zaslané nevyplaceně
jako nadměrné zboží, expres nebo jiný,
zvláštní druh zásilky.
Likvidaci vašich poškozených zaslaných
přístrojů provedeme bezplatně.
Service-Center
CZ
Servis Česko
Tel.: 800143873
E-Mail: grizzly@lidl.cz
IAN 332976_1907
Dovozce
Prosím, respektujte, že následující adresa
není adresou servisu. Nejdříve kontaktujte
shora uvedené servisní středisko.
Grizzly Tools GmbH & Co. KG
Stockstädter Straße 20
DE-63762 Großostheim
NĚMECKO
www.grizzly-service.eu

68
SK
Obsah
Úvod..........................................68
Používanie na určený účel .......... 68
Všeobecný opis ..........................68
Rozsah dodávky ............................. 69
Prehľad .......................................... 69
Opis funkcie ................................... 69
Bezpečnostné pokyny ................69
Piktogramy na prístroji: .................... 69
Symboly v návode: .......................... 70
Bezpečnostné pokyny ...................... 70
Bezpečnostné pokyny pri používaní
parného odstraňovača tapiet ............ 70
Bezpečnostné zariadenia ................. 71
Uvedenie do prevádzky .............72
Montáž prídržných svoriek ............... 72
Pripojenie hadice a parnej platne ..... 72
Montáž a výmena veľkej parnej
platne ............................................ 72
Naplnenie alebo doplnenie vody ...... 72
Obsluha .....................................72
Zapnutie a vypnutie ......................... 73
Uvoľňovanie tapiet .......................... 73
Čiščenje in vzdrževanje ..............74
Čistenie ......................................... 74
Odstraňovanie vodného kameňa ...... 74
Skladovanie ...............................75
Likvidácia/ochrana životného
prostredia ..................................75
Náhradné diely / Príslušenstvo .75
Záruka ......................................76
Servisná oprava ........................77
Service-Center ............................77
Dovozca .....................................77
Úvod
Gratulujeme Vám k zakúpeniu Vášho
nového prístroja. Tým ste sa rozhodli pre
kvalitný produkt.
Tento prístroj bol počas výroby testovaný
na kvalitu a podrobený výstupnej kontrole.
Tým je zabezpečená funkčnosť vášho prí-
stroja.
Návod na obsluhu je súčasťou tohto
produktu. Obsahuje dôležité upo-
zornenia ohľadom bezpečnosti,
obsluhy a likvidácie. Pred
používaním produktu sa oboznámte
so všetkými pokynmi pre obsluhu
a bezpečnosť. Používajte produkt
len predpísaným spôsobom a len v
uvedených oblastiach použitia.
Návod na obsluhu uschovajte a
v prípade odovzdania produktu
tretím osobám odovzdajte aj všetky
podklady.
Používanie na určený
účel
Prístroj je určený na uvoľňovanie tapiet.
Každé iné používanie, ktoré nie je v tomto
návode výslovne povolené, môže viesť k
poškodeniu prístroja a predstavovať vážne
nebezpečenstvo pre používateľa.
Výrobca neručí za škody, ktoré vzniknú
iným používaním než podľa určenia alebo
nesprávnou obsluhou. Tento prístroj nie
je vhodný na komerčné používanie. Pri
komerčnom používaní záruka zaniká.
Všeobecný opis
Obrázok najdôležitejších
funkčných dielov nájdete na
výklopných stranách.
Preklad originálneho prehlá-
senia o zhode CE .......................84
Výkres náhradných dielov .........85

69
SK
Rozsah dodávky
Vybaľte prístroj a skontrolujte, či je kom-
pletný:
– Sieťový kábel so zástrčkou
– Nádrž bojlera
– Parná hadica
– Malá parná platňa
– Veľká parná platňa
– Prídržné svorky
– Škrabka
– Návod na obsluhu
Prehľad
1 Sieťový kábel
2 Prídržná svorka
3 Držiak nádrže bojlera
4 Hadicová prípojka nádrže bojle-
ra
5 Pretlakový ventil
6 Veko bojlera
7 Nádrž bojlera
8 Ukazovateľ stavu vody
9 Škrabka
10 Držadlo malej parnej platne
11 Malá parná platňa
12 Vodiaca koľajnička malá
Parná platňa
13 Veľká parná platňa
14 Parná hadica
15 Skrutka pre prídržnú svorku
Opis funkcie
Parný odstraňovač tapiet s časom parenia
80 minút má jednu malú a jednu veľkú
parnú platňu a jednu 4 metre dlhú parnú
hadicu.
Funkciu ovládacích jednotiek nájdete v
nasledujúcom opise.
Technické údaje
Parný odstraňovač tapiet
......................................PDTA 5 A1
Výkon P ....................................2300 W
Napätie U ................. 230-240V~, 50 Hz
Čas parenia ................................80 min
Objem nádrže ................................... 5 l
Dĺžka parnej hadice ..........................4 m
Parná sila ................................ 60 g/min
Veľkosť (veľká parná platňa) ... 20 x 28 cm
Veľkosť (malá parná platňa) ..... 18
x 8 cm
Sieťový kábel ....................................3 m
Trieda ochrany .................................IPX4
Hmotnosť (bez príslušenstva) ........... 935 g
Hmotnosť (iba príslušenstvo) ........... 815 g
Bezpečnostné pokyny
Pri používaní prístroja je nutné
dodržiavať bezpečnostné pokyny.
Piktogramy na prístroji:
Pozorne si prečítajte návod
na obsluhu.
Elektrické prístroje nepatria
do domového odpadu.
Pozor!
Horúci povrch.
100°C
Práca s horúcou parou
môže viesť k ťažkým obare-
niam!
Pozor!
Pozor! Je nebezpečenstvo
popálenia.

70
SK
Paru nesmerujte na vlastné
telo alebo na iné osoby ani
na zvieratá!
Prístroj postavte bezpečne
a stabilne na rovnej podla-
he.
Prístroj nepoužívajte ako
stúpadlo
VÝSTRAŽNÉ UPO-
ZORNENIE –
Nebezpečenstvo oba-
renia
Symboly v návode:
Značky nebezpečenstva
s údajmi na zabránenie
poškodeniam zdravia
osôb alebo vecným
škodám
Značky nebezpečenstva
s údajmi na zabráne-
nie poškodení zdravia
osôb v dôsledku zásahu
elektrickým prúdom
Zákazová značka s údajmi k
zabráneniu škodám
Upozorňovacia značka s
informáciami pre lepšiu ma-
nipuláciu s prístrojom
Nebezpečenstvo oba-
renia!
Nevykonávajte žiadne
práce priamo nad hlavou.
Noste ochranné rukavice!
Para môže uniknúť z príst-
roja.
Bezpečnostné pokyny
a) Tento prístroj môžu používať
deti od 8 rokov ako aj osoby
so zníženými fyzickými, sen-
zorickými alebo mentálnymi
schopnosťami, alebo s nedo-
statkom skúseností a vedomostí,
ak sú pod dozorom alebo boli
poučené o bezpečnom používaní
prístroja a rozumejú rizikám,
ktoré z toho vyplývajú. Deti sa s
prístrojom nesmú hrať. Deti nes-
mú vykonávať čistenie a údržbu
bez dozoru.
b) Uistite sa, že prístroj nesmeruje
priamo na elektrické prístroje a
zariadenia, ktoré obsahujú elek-
trické konštrukčné diely, napr. vo
vnútornom priestore pecí
c) Po použití a pred používateľskou
údržbou sa musí prístroj vy-
tiahnutím sieťovej zástrčky
odpojiť od siete.
d) Prístroj nenechajte bez dozoru,
keď je zapojený do siete.
e) Plniaci otvor sa nesmie počas
používania otvárať. Dodržiavajte
pokyny pre bezpečné doplnenie
nádrže na vodu.
f) Prístroj nepoužívajte, keď spadol,
vykazuje viditeľné poškodenia
alebo je netesný.
g) Počas používania a chladenia
držte deti mimo dosahu prístroja.
Bezpečnostné pokyny
pri používaní parného
odstraňovača tapiet
a) Povrchy sa môžu počas
používania zohriať. Veko bojlera
môže byť počas prevádzky a
chladenia horúce.

71
SK
sa horúca voda do hadice a
môže vystupovať na konci hadi-
ce. Prístroj ihneď vypnite, vytiah-
nite sieťovú zástrčku, nechajte
ho vychladnúť a až potom
odstráňte hadicu.
o) Parnú platňu chytajte iba za
držadlo.
Bezpečnostné zariadenia
• Veko bojlera (6) má jeden pretlakový
ventil (5). Tým sa môže vylúčiť para
a trochu horúcej vody, keď v nádrži
bojlera (7) existuje pretlak. To sa môže
vyskytnúť, keď parná hadica (14) je
upchaná alebo nádrž bojlera (7) je
preplnená. V takomto prípade vytiah-
nite sieťovú zástrčku (1) zo zásuvky a
nechajte prístroj vychladnúť, skôr ako
ho skontrolujete. Tento pretlakový ventil
(5) sa nesmie za žiadnych okolností
blokovať.
Pri normálnom používaní sa cez
pretlakový ventil (5) vylučujú malé
množstvá pary a vody.
• Veko bojlera (6) disponuje ventilom
uvoľňovania vákua, cez ktorý sa môže
do prístroja dostať vzduch, keď vznikne
vákuum.
• Parná hadica (14) je dvojstenná, aby
bolo možné znížiť teplotu povrchu.
• Prístroj je vybavený automatickou
ochranou proti prehrievaniu (tepelný
istič), ktorý sa aktivuje vtedy, keď sa
prístroj zohrieva nenaplnený. Prístroj
naplňte (prednostne horúcou) vodou.
Po niekoľkých minútach prístroj generu-
je znova paru.
• Dávajte pozor na to, aby sa prístroj
nepreklápal. V opačnom prípade sa
podľa možnosti aktivuje automatická
b) Prístroj nezapínajte bez naplne-
nia vodou!
c) Prístroj nikdy neponárajte do
kvapalín.
d) Prístroj plňte iba potrubnou
vodou. Nikdy neprimiešavajte
horľavé, leptavé alebo iné kva-
paliny.
e) Neprekračujte maximálne
plniace množstvo (5 l).
f) Pred odstraňovaním tapiet
zakryte spínače a zásuvky na
stenách vodotesne a parotesne.
g) Uzávery bojlera a skrutkovacie
uzávery pred uvedením do pre-
vádzky uzatvorte (pozri Uvede-
nie do prevádzky).“
h) Nebezpečenstvo obarenia!
Veko bojlera a skrutkovacie
uzávery počas prevádzky
nikdy neotvárajte. Pred otvor-
ením veka bojlera a skrutko-
vacích uzáverov: Vytiahnite
sieťovú zástrčku a prístroj,
ako aj zvyšnú vodu nechajte
vychladnúť. Až potom otvorte
veko bojlera alebo skrutkovacie
uzávery (pozri Naplnenie alebo
doplnenie vody).
i) Keď je parná hadica upchaná
a tým vzniká pretlak, vytiahnite
sieťovú zástrčku zo zásuvky.
j) Pri práci sa vždy starajte o
bezpečné postavenie.
k) Prístroj noste iba za držadlo.
Nikdy neťahajte za kábel alebo
hadicu.
l) Hadicu nepreťahujte a nezalo-
mujte.
m) Prístroj postavte bezpečne a sta-
bilne na rovnej podlahe. Prístroj
neprevracajte.
n) Nebezpečenstvo obarenia! Ak
by mal prístroj spadnúť, dostane

72
SK
ochrana proti prehrievaniu (tepelný
istič).
Uvedenie do prevádzky
Montáž prídržných svoriek
Nasaďte obidve prídržné svorky (2) na
prístroj a zoskrutkujte ho pevne so skrutka-
mi (15). Pozri detail
.
Pripojenie hadice a parnej
platne
1. Naskrutkujte koniec parnej hadice
(14) na prípojku hadice (4) na
nádrži bojlera (7).
2. Naskrutkujte druhý koniec parnej
hadice (14) na prípojku hadice
malej parnej platne (11).
Dávajte pozor na to, aby
parná hadica bola riadne
pripojená. Skrutkovacie uzávery
počas prevádzky nikdy neotváraj-
te.
Montáž a výmena veľkej
parnej platne
1. Na montáž a výmenu príslušenstva vy-
tiahnite sieťovú zástrčku (1). Počkajte,
kým nebude viac vystupovať žiadna
para a prístroj bude vychladnutý.
2. Na použitie veľkej parnej platne (13)
zasuňte túto do vodiacej koľajničky
(12) malej parnej platne (11).
3. Na demontáž veľkej parnej platne (13)
sa táto vytiahne z vodiacej koľajničky
(12) malej parnej platne (11).
Naplnenie alebo
doplnenie vody
1. Uistite sa, že je sieťová zástrčka (1)
odpojená a že je prístroj vychladnutý.
2. Odskrutkujte veko bojlera (6) a
odstráňte ho.
3. Naplňte veko bojlera (7) čistou potrub-
nou vodou. Naplňte veko bojlera (7)
až po značku MAX ukazovateľa stavu
vody (8) (maximálne 5 litrov)
4. Naskrutkujte veko bojlera (6). Dávajte
pozor na to, aby bolo riadne naskrut-
kované.
Pri dlhších časoch prestáv-
ky: Zohľadnite značku minima
ukazovateľa stavu vody (8) a
doplňte včas vodu.
Obsluha
Pozor! Povrchy sa môžu
počas používania zohrievať.
Veko bojlera môže byť
počas prevádzky a chlade-
nia horúce.
Nebezpečenstvo obarenia!
Nevykonávajte žiadne práce pri-
amo nad hlavou. Noste ochranné
rukavice!
Para môže uniknúť z prístroja.
Paru nesmerujte na vlastné telo
alebo na iné osoby ani na zviera-
tá!
• Pred začiatkom práce skontrolujte stav
omietky, pretože para môže s vysokým
teplotami uvoľniť uvoľnenú, poréznu
alebo zle viazanú omietku. Omietka sa
dá ľahšie uvoľniť aj v oblastiach, ktoré
majú odskoky alebo otvory.

73
SK
Tiež by sa parná platňa nemala dlhší
čas držať na jednom mieste. Uvoľnenú
omietku môžete rozpoznať tak, že na
niektoré miesta na stene poklepete hán-
kami prstov. Keď pritom vznikne dutý
zvuk, odporúča sa pokračovať iba s
väčšou opatrnosťou.
• V každom prípade najprv otestuj-
te uvoľňovač tapiet v malej oblasti
približne 100 cm², skôr ako začnete s
vlastnou prácou.
• Keď zistíte, že sa omietka uvoľňuje ale-
bo je počuť praskanie, prácu zastavte.
Uvoľňovač tapiet sa môže bezpečne
používať na sadrokartónové plochy
Rigips.
• Z dôvodu tepla generovaného týmto
produktom sa môžu určité povrchy,
napr. koberce, čalúnený nábytok, stolo-
vé dosky alebo skrine poškodiť. Aby sa
príslušné povrchy nepoškodili teplom
nádrže bojlera (7), mala by sa na
tieto položiť drevená doska alebo iný
podobný predmet. Obaly na ochranu
proti prachu alebo noviny sa na tento
účel nehodia.
• Nádrž bojlera (7) chytajte iba za
držiak (3).
• Viackrát natierané alebo vodotes-
né tapety sa dajú odstraňovať iba
veľmi ťažko. Takéto tapety perforujte
ježkovým valcom, aby para mohla
pôsobiť na vrstvu lepidla.
• Pri tapetách z vinylovej peny prípadne
najprv stiahnite hornú vinylovú vrstvu,
až potom pracujte s uvoľňovačom ta-
piet.
• Pri odstraňovaní krycích tapiet noste
vždy ochranný odev. Dávajte pozor
na kondenzovanú vodu, zbierajúcu
sa na parnej platni, pretože môže
odkvapkávať horúca voda. Parnú
platňu vyprázdňujte pravidelne a
nepoužívajte ju priamo nad vašou hla-
vou.
• Parnú platňu (11/13) umiestnite vždy
vo vhodnej nádobe, keď ju (aj nak-
rátko) nechávate bez dozoru. Parná
platňa pri používaní nesmie ukazovať
so smeru používateľa.
Zapnutie a vypnutie
1 Na zapnutie zastrčte sieťovú zástrčku
(1) do zásuvky.
2 V závislosti od teploty naplnenej vody
prístroj potrebuje až 15 minút na vyt-
vorenie pary. Počas fázy zohrievania
môže z parnej platne vytekať trochu
horúcej vody. Parnú platňu odložte
na vedre, aby bolo možné zachytiť
vytečenú vodu.
Prístroj v zapnutom stave nikdy nen-
echávajte bez dozoru.
3 Na vypnutie prístroja vytiahnite sieťovú
zástrčku (1) zo zásuvky.
Uvoľňovanie tapiet
• Malú parnú platňu (11) chytajte iba za
držadlo (10).
• Najlepšie bude, ak budete pracovať od
stropu izby k podlahe.
• Na uvoľňovanie tapiet v rohoch alebo
nikách použite malú parnú platňu (11)
(pozri Montáž a výmena veľkej parnej
platne).
• Na uvoľňovanie tapiet na veľkých
plochách použite veľkú parnú platňu
(13) (pozri Montáž a výmena veľkej
parnej platne).
• Parnú platňu (11/13) nasaďte na ta-
petu. Podľa druhu tapety a podkladu
po približne 10 sekundách odoberte
parnú platňu a stiahnite tapetu zhora
nadol alebo ju zoškrabte so škrabkou
(9).

74
SK
• Počas oškrabávania parnú platňu
(11/13) nasaďte opakovane na tape-
tu.
Čiščenje in vzdrževanje
Údržbárske a opravárenské práce,
ktoré nie sú uvedené v tomto
návode na prevádzku, nechajte
vykonať nášmu servisnému centru.
Používajte len originálne náhradné
diely.
Vytiahnite sieťovú zástrčku (1) zo
zásuvky a nechajte prístroj pred
všetkými prácami vychladnúť.
Pravidelne vykonávajte čistiace a
údržbárske práce. Tým sa zabezpečí dlhá
a spoľahlivá životnosť.
Čistenie
Prístroj sa nesmie striekať s
vodou ani vkladať do vody.
Existuje nebezpečenstvo zá-
sahu elektrickým prúdom.
• Bojler vyplachujte príležitostne vodou z
vodovodu, až bude táto priezračná.
Nepoužívajte žiadne čistiace pros-
triedky ani rozpúšťadlá. Tým môžete
náradie poškodiť tak, že nie je možné
ho už opraviť.
Odstraňovanie vodného
kameňa
Nikdy neprimiešavajte horľavé, lep-
tavé alebo iné kvapaliny!
Z prístroja v prípade potreby
odstráňte vodný kameň, podľa
tvrdosti vody a častosti používania.
Používajte bežný prostriedok na
odstraňovanie vodného kameňa,
prednostne kyselinu citrónovú.
Dodržiavajte pokyny pre dávko-
vanie a používanie výrobcu pros-
triedku na odstraňovanie vodného
kameňa!
Chyby v dôsledku nedostatočného
odstraňovania vodného kameňa sú
zo záruky vylúčené.
1. Uistite sa, že je sieťová zástrčka (1)
odpojená a že je prístroj vychladnutý.
2. Naplňte bežný prostriedok na
odstraňovanie vodného kameňa (2,5
litra).
3. Odoberte parnú hadicu (14) zastrčte
sieťovú zástrčku (1).
4. Roztok na odstraňovanie vodného
kmeňa nechajte cca 5 minút variť.
5. Sieťovú zástrčku (1) vytiahnite zo zá-
suvky a roztok nechajte pôsobiť ešte
cca 10minút.
6. Prístroj a zvyšný roztok nechajte
vychladnúť. Prístroj vyprázdnite,
opláchnite čistou vodou a nechajte
vysušiť.

75
SK
Skladovanie
• Prístroj nechajte ochladzovať minimálne
desať minút.
• Vyprázdnite prístroj.
• Oviňte parnú hadicu (14) okolo
prídržných svoriek (2) na nádrži bojle-
ra (7).
• Prístroj uschovajte v rovnej polohe na
suchšom mieste, chránenom pred pra-
chom a mimo dosahu detí.
Likvidácia/ochrana
životného prostredia
Elektrické prístroje nepatria do do-
mového odpadu.
• Náradie a odovzdajte na zbernom
mieste pre ďalšie zhodnotenie. Použité
plastové a kovové časti sa môžu
vytriediť a tak odniesť na ekologické
zhodnotenie. Informujte sa o tom v
našom Service-Centre.
• Likvidáciu vašich zaslaných chybných
prístrojov vykonáme bezplatne.
Náhradné diely / Príslušenstvo
Náhradné diely a príslušenstvo nájdete na strane www.grizzly-
service.eu
Ak by sa mali vyskytnúť problémy s procesom objednávky, použite, prosím, kontaktný
formulár. Pri ďalších otázkach sa obráťte na „Service-Center“ (pozri stranu 77).
Pol. Označenie Č. Artiklu
2 – 8, 15 Nádrž bojlera komplett 91105685
14 Parná hadica 91105686
10 – 13 parná platňa komplett 91105687

76
SK
Záruka
Vážená zákazníčka, vážený zákazník,
Pre tento prístroj platí záruka 3 roky od dá-
tumu zakúpenia.
Ak je prístroj poškodený, podľa zákona
máte právo ho reklamovať u výrobcu pro-
duktu. Tieto práva vyplývajúce zo zákona
nie sú našou následne opísanou zárukou
obmedzené.
Záručné podmienky
Záručná lehota začína dňom zakúpenia.
Pokladničný doklad ako originál prosím sta-
rostlivo uschovajte. Je potrebný ako dôkaz
o zakúpení.
Ak sa počas troch rokov od dátumu zakú-
penia tohto produktu vyskytne materiálna
alebo výrobná chyba, produkt - podľa náš-
ho rozhodnutia - bezplatne opravíme alebo
nahradíme. Predpokladom záruky je, že v
priebehu trojročnej lehoty bude predložený
poškodený prístroj a pokladničný doklad a
stručne opísaná chyba a kedy sa vyskytla.
Ak sa v rámci našej záruky chyba pokryje,
obdržíte späť opravený alebo nový prístroj.
S opravou alebo výmenou produktu sa ne-
začína nová záručná doba.
Záručná doba a nárok na odstráne-
nie vady
Záručná doba sa poskytnutím záruky
nepredlžuje. To platí aj pre nahradené a
opravené diely. Prípadné škody a nedostat-
ky vzniknuté už pri zakúpení sa musia ih-
neď po vybalení ohlásiť. Opravy vykonané
po uplynutí záručnej doby sú spoplatnené.
Rozsah záruky
Prístroj bol vyrobený podľa prísnych smer-
níc kvality a pred dodaním bol svedomite
kontrolovaný.
Záruka sa týka materiálových alebo výrob-
ných chýb. Táto záruka sa nevzťahuje na
diely produktu, ktoré sú vystavené normál-
nemu opotrebeniu a preto sa môžu pova-
žovať za opotrebované diely (napr. Kefy)
alebo na poškodenia na krehkých dieloch
(napr. vypínač).
Táto záruka zaniká, ak bol produkt po-
užívaný poškodený, neodborne alebo
nebola vykonávaná údržba. Pre odborné
používanie produktu je nutné presne do-
držiavať všetky návody uvedené v návode
na obsluhu. Bezpodmienečne sa vyhnite
používaniu, ktoré sa v návode na obsluhu
neodporúča alebo pred ktorým ste boli
vystríhaní.
Produkt je určený len pre súkromné použitie
a nie v oblasti podnikania. Záruka zaniká
pri nesprávnom a neodbornom používaní,
pri násilnom používaní a pri zásahoch,
ktoré neboli vykonané v našej servisnej
pobočke.
Postup v prípade reklamácie
Pre zabezpečenie rýchleho spracovania
vašej žiadosti postupujte prosím podľa na-
sledujúcich pokynov:
• Pri všetkých požiadavkách predložte
pokladničný doklad a číslo identifi kač-
né (IAN 332976_1907) ako dôkaz o
zakúpení.
• Číslo artiklu nájdete na typovom štítku.
• Ak sa vyskytnú chyby funkcie alebo
iné nedostatky, kontaktujte najskôr
následne uvedené servisné oddelenie
telefonicky alebo emailom. Následne
obdržíte ďalšie informácie o priebehu
vašej reklamácie.
• Produkt evidovaný ako poškodený
môžete po dohode s našim zákazníc-
kym servisom, s priloženým dokladom
o zakúpení (pokladničný doklad) a s
údajmi, v čom chyba spočíva a kedy
vznikla, zaslať bez poštovného na adre-

77
SK
su servisu, ktorá vám bude oznámená.
Pre zabránenie dodatočných nákladov
a problémov pri prevzatí použite len
tú adresu, ktorá vám bude oznámená.
Nezasielajte prístroj ako nadmerný
tovar na náklady príjemcu, expresne
alebo s iným špeciálnym nákladom.
Prístroj zašlite so všetkými časťami
príslušenstva dodanými pri zakúpení a
zabezpečte dostatočne bezpečné pre-
pravné balenie.
Servisná oprava
Opravy, ktoré nepodliehajú záruke, mô-
žeme nechať vykonať v našej servisnej
pobočke za úhradu. Radi vám poskytneme
predbežnú kalkuláciu nákladov.
Môžeme spracovať len prístroje, ktoré boli
doručené dostatočne zabalené a so zapla-
teným poštovným.
Pozor: Prístroj zašlite do našej servisnej po-
bočky vyčistený a s informáciami o chybe.
Neprevezmeme prístroje zaslané ako nad-
merný tovar na náklady príjemcu, expres-
ne alebo s iným špeciálnym nákladom.
Likvidáciu vašich poškodených zaslaných
prístrojov vykonáme bezplatne.
Service-Center
SK
Servis Slovensko
Tel.: 0850 232001
E-Mail: [email protected]
IAN 332976_1907
Dovozca
Nasledujúca adresa nie je adresa servisu.
Najskôr kontaktujte hore uvedené servisné
centrum.
Grizzly Tools GmbH & Co. KG
Stockstädter Straße 20
DE-63762 Großostheim
NEMECKO
www.grizzly-service.eu

78
DE
AT
CH
Original-
EG-Konformitätserklärung
Hiermit bestätigen wir, dass der
Dampftapetenablöser
PDTA 5 A1
Seriennummer
202002000001 - 202002045660
folgenden einschlägigen EU-Richtlinien in ihrer jeweils gültigen Fassung entspricht:
2014/35/EU • 2014/30/EU • 2011/65/EU*
Um die Übereinstimmung zu gewährleisten, wurden folgende harmonisierte Normen
sowie nationale Normen und Bestimmungen angewendet:
EN 60335-1:2012+A11:2014+A13:2017
EN 60335-2-54:2008+A11:2012+A1:2015
EN 55014-1:2017 • EN 55014-2:2015 • EN 61000-3-2:2014
EN 61000-3-3:2013 • EN 62321-1:2013
Die alleinige Verantwortung für die Ausstellung dieser Konformitätserklärung (20)**
trägt der Hersteller:
Grizzly Tools GmbH & Co. KG
Stockstädter Straße 20
63762 Großostheim
GERMANY
29.02.2020
* Der oben beschriebene Gegenstand der Erklärung erfüllt die Vorschriften der Richtlinie
2011/65/EU des Europäischen Parlaments und des Rates vom 8. Juni 2011 zur Beschrän-
kung der Verwendung bestimmter gefährlicher Stoffe in Elektro- und Elektronikgeräten.
** Die beiden letzten Ziffern des Jahres, in dem die CE-Kennzeichnung angebracht wurde
Christian Frank
Dokumentationsbevollmächtigter

79
GB
IE
Translation of the original
EC declaration of conformity
We hereby declare that the
Steam wallpaper remover
PDTA 5 A1
Serial Number
202002000001 - 202002045660
conforms with the following applicable relevant version of the EU guidelines:
2014/35/EU • 2014/30/EU • 2011/65/EU*
In order to guarantee consistency, the following harmonised standards as well as
national standards and stipulations have been applied:
This declaration of conformity (20)** is issued under the sole responsibility of the
manufacturer:
Christian Frank
Documentation Representative
Grizzly Tools GmbH & Co. KG
Stockstädter Straße 20
63762 Großostheim, Germany
29.02.2020
* The object of the declaration described above satisfi es the provisions of Directive 2011/65/EU
of the European Parliament and the Council of 8 June 2011 on limiting the use of certain harmful
substances in electrical and electronic appliances.
** The last two digits of the year in which the CE marking was affi xed.
EN 60335-1:2012+A11:2014+A13:2017
EN 60335-2-54:2008+A11:2012+A1:2015
EN 55014-1:2017 • EN 55014-2:2015 • EN 61000-3-2:2014
EN 61000-3-3:2013 • EN 62321-1:2013

80
FR BE
Traduction de la déclaration
de conformité CE originale
Nous certifi ons par la présente que le
Décolleuse à papier peint
série PDTA 5 A1
Numéro de série
202002000001 - 202002045660
est conforme aux directives UE actuellement en vigueur :
2014/35/EU • 2014/30/EU • 2011/65/EU*
En vue de garantir la conformité les normes harmonisées ainsi que les normes et déci-
sions nationales suivantes ont été appliquées :
Le fabricant assume seul la responsabilité d‘établir la présente déclaration de
conformité (20)** :
Christian Frank
(Chargé de documentation)
Grizzly Tools GmbH & Co. KG
Stockstädter Straße 20
63762 Großostheim, Germany
29.02.2020
* L‘objet de la déclaration décrit ci-dessus est conforme aux dispositions de la directive
2011/65/EU du Parlement Européen et du Conseil du 8 juin 2011 sur la limitation de l‘utilisation
de certaines substances dangereuses dans les équipements électriques et électroniques.
** Les deux derniers chiffres de l‘année dans laquelle le marquage CE a été fi xé.
EN 60335-1:2012+A11:2014+A13:2017
EN 60335-2-54:2008+A11:2012+A1:2015
EN 55014-1:2017 • EN 55014-2:2015 • EN 61000-3-2:2014
EN 61000-3-3:2013 • EN 62321-1:2013

81
NL BE
Vertaling van de originele
CE-conformiteitsverklaring
Hiermede bevestigen wij dat de
Behangafstomer
bouwserie PDTA 5 A1
Serienummer
202002000001 - 202002045660
is overeenkomstig met de hierna volgende, van toepassing zijnde EU-richtlijnen:
2014/35/EU • 2014/30/EU • 2011/65/EU*
Om de overeenstemming te waarborgen, werden de hierna volgende, in overeenstem-
ming gebrachte normen en nationale normen en bepalingen toegepast:
De exclusieve verantwoordelijkheid voor de uitgifte van deze conformiteitsverklaring
(20)** wordt gedragen door de fabrikant:
Christian Frank
Documentatiegelastigde
Grizzly Tools GmbH & Co. KG
Stockstädter Straße 20
63762 Großostheim, Germany
29.02.2020
* Het hierboven beschreven voorwerp van de verklaring voldoet aan de voorschriften van de
richtlijn 2011/65/EU van het Europese Parlement en van de Raad van 8 juni 2011 inzake beper-
king van het gebruik van bepaalde gevaarlijke stoffen in elektrische en elektronische apparaten.
** De beide laatste cijfers van het jaar waarin de CE-markering werd aangebracht.
EN 60335-1:2012+A11:2014+A13:2017
EN 60335-2-54:2008+A11:2012+A1:2015
EN 55014-1:2017 • EN 55014-2:2015 • EN 61000-3-2:2014
EN 61000-3-3:2013 • EN 62321-1:2013

82
PL
Tłumaczenie oryginalnej
deklaracji zgodności WE
Niniejszym oświadczamy, że:
Urządzenie parowe do zdzierania tapet
typoszereg, PDTA 5 A1
Numer seryjny
202002000001 - 202002045660
spełnia wymogi odpowiednich Dyrektyw UE w ich aktualnie obowiązującym
brzmieniu:
2014/35/EU • 2014/30/EU • 2011/65/EU*
W celu zapewnienia zgodności z powyższymi dyrektywami zastosowano następujące
normy harmonizujące oraz normy i przepisy krajowe:
Wyłączną odpowiedzialność za wystawienie tej deklaracji zgodności (20)** ponosi
producent:
Christian Frank
Osoba upoważniona do sporządzania doku-
mentacji technicznej
Grizzly Tools GmbH & Co. KG
Stockstädter Straße 20
63762 Großostheim, Germany
29.02.2020
* Wyżej opisany przedmiot deklaracji spełnia wymogi dyrektywy 2011/65/UE Parlamentu
Europejskiego i Rady z dnia 8 czerwca 2011r. w sprawie ograniczenia stosowania niektórych
niebezpiecznych substancji w sprzęcie elektrycznym i elektronicznym.
** Dwie ostatnie cyfry roku nadania znaku CE.
EN 60335-1:2012+A11:2014+A13:2017
EN 60335-2-54:2008+A11:2012+A1:2015
EN 55014-1:2017 • EN 55014-2:2015 • EN 61000-3-2:2014
EN 61000-3-3:2013 • EN 62321-1:2013

83
CZ
Překlad originálního
prohlášení o shodě CE
Potvrzujeme tímto, že tento
Parní odstraňovač tapet
konstrukční řady PDTA 5 A1
Pořadové číslo
202002000001 - 202002045660
odpovídá následujícím příslušným směrnicím EÚ v jejich právě platném znění:
2014/35/EU • 2014/30/EU • 2011/65/EU*
Aby byl zaručen souhlas, byly použity následující harmonizované normy, národní nor-
my a ustanovení:
Výhradní odpovědnost za vystavení tohoto prohlášení o shodě (20)** nese výrobce:
Christian Frank
Osoba zplnomocněná k sestavení dokumentace
Grizzly Tools GmbH & Co. KG
Stockstädter Straße 20
63762 Großostheim, Germany
29.02.2020
* Výše popsaný předmět prohlášení splňuje předpisy směrnice 2011/65/EU Evropského par-
lamentu a Rady z 8. června 2011 o omezení používání některých nebezpečných látek v elek-
trických a elektronických zařízeních.
** Obě poslední číslice roku, kdy bylo uvedeno označení CE.
EN 60335-1:2012+A11:2014+A13:2017
EN 60335-2-54:2008+A11:2012+A1:2015
EN 55014-1:2017 • EN 55014-2:2015 • EN 61000-3-2:2014
EN 61000-3-3:2013 • EN 62321-1:2013

84
SK
Preklad originálneho
prehlásenia o zhode CE
Potvrdzujeme týmto, že tento
Parný odstraňovač tapiet
konštrukčnej série PDTA 5 A1
Poradové číslo
202002000001 - 202002045660
zodpovedá nasledujúcim príslušným smerniciam EÚ v ich práve platnom znení:
2014/35/EU • 2014/30/EU • 2011/65/EU*
Aby bola zaručená zhoda, boli použité nasledovné harmonizované normy ako i
národné normy a predpisy:
Jediný zodpovedný za vystavenie tohto vyhlásenia o zhode (20)** je výrobca:
Christian Frank
Osoba splnomocnená na zostavenie
dokumentácie
Grizzly Tools GmbH & Co. KG
Stockstädter Straße 20
63762 Großostheim, Germany
29.02.2020
* Vyššie popísaný predmet vyhlásenia spĺňa predpisy smernice 2011/65/EU Európskeho parla-
mentu a Rady z 8. júna 2011 pre obmedzenie používania určitých nebezpečných látok v elek-
trických a elektronických prístrojoch.
** Obe posledné číslice roka, v ktorom bolo pripojené označenie CE.
EN 60335-1:2012+A11:2014+A13:2017
EN 60335-2-54:2008+A11:2012+A1:2015
EN 55014-1:2017 • EN 55014-2:2015 • EN 61000-3-2:2014
EN 61000-3-3:2013 • EN 62321-1:2013

85
Explosionszeichnung ∙ Exploded Drawing
Vue éclatée ∙ Explosietekening
Rysunek samorozwijający ∙ Rozvinuté náčrtky
Výkres náhradných dielov
PDTA 5 A1
informativ, informative, informatif, informatief, pouczający, informační, informatívny
20200225_rev02_ts

1
2
14
2
13
9
11 10


GRIZZLY TOOLS GMBH & CO. KG
Stockstädter Straße 20
DE-63762 Großostheim
GERMANY
Stand der Informationen · Last Information
Update · Version des informations ·
Stand van de informatie · Stan informacji ·
Stav informací · Stav informácií: 02/2020
Ident.-No.: 60002206022020-8
IAN 332976_1907
Documenttranscriptie
Dampftapetenablöser / Steam Wallpaper Stripper / Décolleuse à papier peint PDTA 5 A1 Dampftapetenablöser Steam Wallpaper Stripper Originalbetriebsanleitung Translation of the original instructions Décolleuse à papier peint Stoom-behangverwijderaar Traduction des instructions d‘origine Vertaling van de originele gebruiksaanwijzing Urządzenie parowe do usuwania tapet Parní odstraňovač tapet Překlad originálního provozního návodu Tłumaczenie oryginalnej instrukcji obsługi Parný odstraňovač tapiet Preklad originálneho návodu na obsluhu IAN 332976_1907 Klappen Sie vor dem Lesen die Seite mit den Abbildungen aus und machen Sie sich anschließend mit allen Funktionen des Gerätes vertraut. Before reading, unfold the page containing the illustrations and familiarise yourself with all functions of the device. Avant de lire le mode d‘emploi, ouvrez la page contenant les illustrations et familiarisez-vous ensuite avec toutes les fonctions de l‘appareil. Vouw vóór het lezen de pagina met de afbeeldingen open en maak u vertrouwd met alle functies van het apparaat. Przed przeczytaniem proszę rozłożyć stronę z ilustracjami, a następnie proszę zapoznać się z wszystkimi funkcjami urządzenia. Před čtením si otevřete stranu s obrázky a potom se seznamte se všemi funkcemi přístroje. Pred čítaním si odklopte stranu s obrázkami a potom sa oboznámte so všetkými funkciami prístroja. DE / AT / CH GB / IE FR / BE NL / BE PL CZ SK Originalbetriebsanleitung Translation of the original instructions Traduction des instructions d‘origine Vertaling van de originele gebruiksaanwijzing Tłumaczenie oryginalnej instrukcji obsługi Překlad originálního provozního návodu Preklad originálneho návodu na obsluhu Seite Page Page Pagina Strona Strana Strana XX4 XX 14 XX 24 XX 37 XX 47 XX 58 XX 68 4 3 2 5 15 2 6 1 7 8 10 9 11 12 13 14 14 4 14 11 6 11 12 11 7 12 13 8 DE AT CH Inhalt Einleitung Einleitung ..................................... 4 Bestimmungsgemäße Verwendung ................................ 4 Allgemeine Beschreibung ............. 4 Lieferumfang..................................... 5 Übersicht ......................................... 5 Funktionsbeschreibung ....................... 5 Technische Daten .......................... 5 Sicherheitshinweise ...................... 5 Bildzeichen auf dem Gerät: ................ 5 Symbole in der Anleitung ................... 6 Sicherheitshinweise ........................... 6 Sicherheitshinweise bei Verwendung des Dampftapetenablösers ................. 7 Sicherheitsvorrichtungen .................... 7 Inbetriebnahme ........................... 8 Halteklammern montierten .................. 8 Schlauch und Dampfplatte anschließen 8 Montage und Wechsel der großen Dampfplatte ..................................... 8 Wasser ein- oder nachfüllen ............... 8 Bedienung ................................... 8 Ein- und Ausschalten .......................... 9 Tapeten ablösen .............................. 10 Reinigung und Wartung ............. 10 Reinigung....................................... 10 Entkalken ....................................... 10 Lagerung ................................... 11 Entsorgung/ Umweltschutz......... 11 Ersatzteile/Zubehör ................... 11 Garantie .................................... 12 Reparatur-Service ...................... 13 Service-Center ............................ 13 Importeur .................................. 13 Original-EGKonformitätserklärung ............... 78 Explosionszeichnung .................. 85 Herzlichen Glückwunsch zum Kauf Ihres neuen Gerätes. Sie haben sich damit für ein hochwertiges Gerät entschieden. Dieses Gerät wurde während der Produktion auf Qualität geprüft und einer Endkontrolle unterzogen. Die Funktionsfähigkeit Ihres Gerätes ist somit sichergestellt. Die Betriebsanleitung ist Bestandteil dieses Gerätes. Sie enthält wichtige Hinweise für Sicherheit, Gebrauch und Entsorgung. Machen Sie sich vor der Benutzung des Gerätes mit allen Bedien- und Sicherheitshinweisen vertraut. Benutzen Sie das Gerät nur wie beschrieben und für die angegebenen Einsatzbereiche. Bewahren Sie die Betriebsanleitung gut auf und händigen Sie alle Unterlagen bei Weitergabe des Gerätes an Dritte mit aus. Bestimmungsgemäße Verwendung Das Gerät ist zum Lösen von Tapeten vorgesehen. Jede andere Verwendung, die in dieser Anleitung nicht ausdrücklich zugelassen wird, kann zu Schäden am Gerät führen und eine ernsthafte Gefahr für den Benutzer darstellen. Der Hersteller haftet nicht für Schäden, die durch bestimmungswidrigen Gebrauch oder falsche Bedienung verursacht wurden. Dieses Gerät ist nicht zur gewerblichen Nutzung geeignet. Bei gewerblichem Einsatz erlischt die Garantie. Allgemeine Beschreibung Die Abbildung der wichtigsten Funktionsteile finden Sie auf den Ausklappseiten. 4 DE AT CH Lieferumfang Technische Daten Packen Sie das Gerät aus und kontrollieren Sie, ob es vollständig ist: - Netzkabel mit Stecker - Boilerbehälter - Dampfschlauch - Kleine Dampfplatte - Große Dampfplatte - Halteklammern - Schaber - Betriebsanleitung Dampftapetenablöser .... PDTA 5 A1 Leistung P ..................................2300 W Spannung U .............. 230-240V~, 50 Hz Dampfzeit ................................... 80 min Behältervolumen ................................ 5 l Dampfschlauchlänge .........................4 m Dampfkraft .............................. 60 g/min Größe (große Dampfplatte) .... 20 x 28 cm Größe (kleine Dampfplatte) ...... 18 x 8 cm Netzkabel ........................................3 m Schutzklasse .................................... IPX4 Gewicht (ohne Zubehör) ................ 935 g Gewicht (nur Zubehör) ................... 815 g Übersicht 1 2 3 4 5 6 7 8 9 10 11 12 Netzkabel Halteklammer Tragegriff Boilerbehälter Schlauchanschluss Boilerbehälter Überdruckventil Boilerdeckel Boilerbehälter Wasserstandsanzeige Schaber Handgriff kleine Dampfplatte Kleine Dampfplatte Führungsschiene kleine Dampfplatte 13 Große Dampfplatte 14 Dampfschlauch 15 Schraube für Halteklammer Funktionsbeschreibung Der Dampftapetenablöser mit einer Dampfzeit von 80 Minuten besitzt eine kleine und eine große Dampfplatte und einen 4 Meter langen Dampfschlauch. Die Funktion der Bedienteile entnehmen Sie bitte der nachfolgenden Beschreibung. Sicherheitshinweise Beim Gebrauch des Geräts sind die Sicherheitshinweise zu beachten. Bildzeichen auf dem Gerät: Lesen Sie die Betriebsanleitung aufmerksam durch. Elektrogeräte gehören nicht in den Hausmüll. Achtung! Heiße Oberfläche. 100°C Das Arbeiten mit heißem Dampf kann zu schweren Verbrühungen führen! Achtung! Achtung! Es besteht Verbrennungsgefahr. 5 DE AT CH Dampf nicht auf den eigenen Körper oder auf andere Personen und nicht auf Tiere richten! Gerät sicher und standfest auf dem ebenen Fußboden aufstellen. Nicht als Tritt benutzen WARNHINWEIS – Verbrühungsgefahr Symbole in der Anleitung Gefahrenzeichen mit Angaben zur Verhütung von Personen- oder Sachschäden Gefahrenzeichen mit Angaben zur Verhütung von Personenschäden durch einen elektrischen Schlag Gebotszeichen mit Angaben zur Verhütung von Schäden Hinweiszeichen mit Informationen zum besseren Umgang mit dem Gerät Verbrühungsgefahr ! Keine Arbeiten direkt über dem Kopf durchführen. Schutzhandschuhe tragen! Dampf kann aus dem Gerät entweichen. 6 Sicherheitshinweise a) Dieses Gerät kann von Kindern ab 8 Jahren und darüber sowie von Personen mit verringerten physischen, sensorischen oder mentalen Fähigkeiten oder Mangel an Erfahrung und Wissen benutzt werden, wenn sie beaufsichtigt oder bezüglich des sicheren Gebrauchs des Gerätes unterwiesen wurden und die daraus resultierenden Gefahren verstehen. Kinder dürfen nicht mit dem Gerät spielen. Reinigung und Benutzer-Wartung dürfen nicht von Kindern ohne Beaufsichtigung durchgeführt werden. b) Stellen Sie sicher, dass das Gerät nicht direkt auf elektrische Geräte und Einrichtungen, die elektrische Bauteile enthalten, z. B. den Innenraum von Öfen, gerichtet wird c) Nach dem Gebrauch und vor Benutzerwartung muss das Gerät durch Ziehen des Netzsteckers vom Netz getrennt werden. d) Lassen Sie das Gerät nicht unbeaufsichtigt, wenn es mit dem Netz verbunden ist. e) Die Einfüllöffnung, darf während des Gebrauchs nicht geöffnet werden. Beachten Sie die Anweisungen für das sichere Nachfüllen des Wasserbehälters. f) Verwenden Sie das Gerät nicht, wenn es heruntergefallen ist, offensichtliche Beschädigungen aufweist oder undicht ist. g) Halten Sie Kinder während der Benutzung und des Abkühlens von dem Gerät fern. DE Sicherheitshinweise bei Verwendung des Dampftapetenablösers a) Oberflächen können sich während der Verwendung erhitzen. Der Boilerdeckel kann während des Betriebs und beim Abkühlen heiß sein. b) Gerät nie ohne Wasserfüllung einschalten! c) Gerät nie in Flüssigkeiten eintauchen. d) Gerät nur mit Leitungswasser füllen. Niemals brennbare, giftige, ätzende oder andere Flüssigkeiten beimischen. e) Maximale Füllmenge (5 l) nicht überschreiten. f) Vor dem Tapetenlösen Schalter und Steckdosen an den Wänden wasser- und dampfdicht abdecken. g) Boiler- und Schraubverschlüsse vor Inbetriebnahme fest verschließen (siehe Inbetriebnahme).“ h) Verbrühungsgefahr! Boilerdeckel und Schraubverschlüsse während des Betriebs niemals öffnen. Vor dem Öffnen des Boilerdeckels und der Schraubverschlüsse: Netzstecker ziehen und das Gerät sowie restliches Wasser abkühlen lassen. Dann erst den Boilerdeckel oder die Schraubverschlüsse öffnen (siehe Wasser ein- oder nachfüllen). i) Wenn der Dampfschlauch verstopft ist und dadurch ein Überdruck entsteht, ziehen Sie den Netzstecker aus der Steckdose. j) Beim Arbeiten stets für einen sicheren Stand sorgen. AT CH k) Gerät nur am Handgriff tragen. Nicht am Kabel oder Schlauch ziehen. l) Schlauch nicht überdehnen und nicht knicken. m) Gerät sicher und standfest auf dem ebenen Fußboden aufstellen. Gerät nicht umstoßen. n) Verbrühungsgefahr! Sollte das Gerät umfallen, gelangt heißes Wasser in den Schlauch und kann am Schlauchende austreten. Gerät sofort ausschalten, Netzstecker ziehen, abkühlen lassen und erst dann Schlauch entleeren. o) Dampfplatte nur am Griff anfassen. Sicherheitsvorrichtungen • Der Boilerdeckel (6) verfügt über ein Überdruckventil (5). Dadurch kann Dampf und etwas heißes Wasser ausgeschieden werden, wenn im Boilerbehälter (7) ein Überdruck entsteht. Dies kann auftreten, wenn der Dampfschlauch (14) verstopft oder der Boilerbehälter (7) überfüllt ist. Ziehen Sie in einem solchen Fall den Netzstecker (1) aus der Steckdose, und lassen Sie das Gerät abkühlen, bevor Sie es überprüfen. Dieses Überdruckventil (5) darf unter keinen Umständen blockiert werden. Bei normaler Verwendung werden über das Überdruckventil (5) kleine Mengen an Dampf und Wasser ausgeschieden. • Der Boilerdeckel (6) verfügt über ein Vakuumlöseventil, über das Luft in das Gerät gelangen kann, wenn ein Vaku- 7 DE AT CH um entsteht. • Der Dampfschlauch (14) ist doppelwandig, um die Oberflächentemperatur zu senken. • Das Gerät ist mit einem automatischen Überhitzungsschutz (Thermoauslöser) versehen, der ausgelöst wird, wenn das Gerät unbefüllt erhitzt wird. Befüllen Sie das Gerät mit (vorzugsweise heißem) Wasser. Nach einigen Minuten erzeugt das Gerät wieder Dampf. • Achten Sie darauf, das Gerät nicht zu kippen. Andernfalls wird der automatische Überhitzungsschutz (Thermoauslöser) möglicherweise ausgelöst. Inbetriebnahme Montage und Wechsel der großen Dampfplatte 1. Zur Montage und Wechsel des Zubehörs den Netzstecker (1) ziehen. Warten, bis kein Dampf mehr austritt und das Gerät abgekühlt ist. 2. Um die große Dampfplatte (13) zu verwenden, schieben Sie diese in die Führungsschiene (12) der kleinen Dampfplatte (11). 3. Zur Demontage der großen Dampfplatte (13) wird diese aus der Führungsschiene (12) der kleinen Dampfplatte (11) gezogen. Wasser ein- oder nachfüllen Halteklammern montierten Setzen Sie die beiden Halteklammern (2) auf das Gerät und verschrauben Sie diese mit den Schrauben (15). Siehe Detail . Schlauch und Dampfplatte anschließen 1. Schrauben Sie ein Ende des Dampfschlauchs (14) auf den Schlauchanschluss (4) am Boilerbehälter (7). 2. Schrauben Sie das andere Ende des Dampfschlauchs (14) auf den Schlauchanschluss der kleinen Dampfplatte (11). Achten Sie darauf, dass der Dampfschlauch ordnungsgemäß angeschlossen wurde. Schraubverschlüsse während des Betriebs niemals öffnen. 8 1. Vergewissern Sie sich, dass der Netzstecker (1) ausgesteckt und das Gerät abgekühlt ist. 2. Schrauben Sie den Boilerdeckel (6) ab und entfernen Sie diesen. 3. Befüllen Sie den Boilerbehälter (7) mit sauberem Leitungswasser. Befüllen Sie den Boilerbehälter (7) nur bis zur MAXMarkierung der Wasserstandsanzeige (8) (höchsten 5 Liter) 4. Schrauben Sie den Boilerdeckel (6) ein. Achten Sie darauf, dass dieser ordnungsgemäß eingeschraubt ist. Bei längeren Arbeitszeiten: Die Minimum-Markierung der Wasserstandsanzeige (8) beachten und rechtzeitig Wasser nachfüllen. Bedienung Achtung! Oberflächen können sich während der Verwendung erhitzen. Der Boilerdeckel kann während DE des Betriebs und beim Abkühlen heiß sein. Verbrühungsgefahr! Keine Arbeiten direkt über dem Kopf durchführen. Schutzhandschuhe tragen! Dampf kann aus dem Gerät entweichen. Dampf nicht auf den eigenen Körper oder auf andere Personen und nicht auf Tiere richten! • Prüfen Sie vor Arbeitsbeginn den Zustand des Verputzes, da Dampf mit hohen Temperaturen lockeren, porösen oder schlecht gebundenen Putz lösen kann. Der Putz kann sich auch in Bereichen leichter ablösen, die Sprünge oder Löcher aufweisen. Auch sollte die Dampfplatte nicht über einen längeren Zeitraum über einer Stelle gehalten werden. Sie können lockeren Putz erkennen, indem Sie einige Stellen der Wand mit den Knöcheln abklopfen. Wenn dabei ein hohler Klang entsteht, wird empfohlen, nur unter größter Vorsicht fortzufahren. • Testen Sie den Tapetenablöser in jedem Fall zunächst in einem kleinen Bereich von etwa 100 cm², bevor Sie mit der eigentlichen Arbeit beginnen. • Wenn Sie feststellen, dass sich der Verputz löst oder ein Knacken zu hören ist, stellen Sie die Arbeit ein. Der Tapetenablöser kann gefahrlos für Rigips-/ Gipskartonflächen eingesetzt werden. • Aufgrund der von diesem Produkt erzeugten Hitze können bestimmte Oberflächen, z. B. Teppiche, Polstermöbel, Tischplatten oder Schränke Schäden davontragen. Damit die jeweiligen Oberflächen nicht durch die Hitze des • • • • • AT CH Boilerbehälters (7) beschädigt werden, sollte dieser stets auf ein Holzbrett oder einen ähnlichen Gegenstand gestellt werden. Staubdecken oder Zeitungen eignen sich nicht für diesen Zweck. Boilerbehälter (7) nur am Tragegriff (3) anfassen. Mehrmals gestrichene oder wasserfeste Tapeten lassen sich nur schwer entfernen. Solche Tapeten mit einer Stachelwalze perforieren, damit der Dampf auf die Kleisterschicht einwirken kann. Bei Vinylschaumtapeten gegebenenfalls zunächst die obere Vinylschicht abziehen, dann erst mit dem Tapetenlöser arbeiten. Tragen Sie beim Entfernen von Deckentapeten stets Schutzkleidung. Achten Sie auf das sich an der Dampfplatte sammelnde Kondenswasser, da heißes Wasser abtropfen kann. Leeren Sie die Dampfplatte regelmäßig, und verwenden Sie sie nicht direkt über Ihrem Kopf. Die Dampfplatte (11/13) stets in einem geeigneten Behälter platzieren, wenn diese (auch nur kurz) unbeaufsichtigt bleibt. Bei der Verwendung darf die Dampfplatte nicht in Richtung des Benutzers weisen. Ein- und Ausschalten 1 Zum Einschalten stecken Sie den Netzstecker (1) in die Steckdose. 2 Abhängig von der Temperatur des eingefüllten Wassers benötigt das Gerät bis zu 15 Minuten, um Dampf zu erzeugen. Während der Aufheizphase kann etwas heißes Wasser aus der Dampfplatte auslaufen. Die Dampfplatte auf einem Eimer ablegen, um auslaufendes Wasser aufzufangen. 9 DE AT CH Gerät im eingeschalteten Zustand niemals unbeaufsichtigt lassen. 3 Zum Ausschalten des Geräts ziehen Sie den Netzstecker (1) aus der Steckdose. Führen Sie folgende Reinigungs- und Wartungsarbeiten regelmäßig durch. Dadurch ist eine lange und zuverlässige Nutzung gewährleistet. Reinigung Tapeten ablösen • Die kleine Dampfplatte (11) nur am Handgriff (10) anfassen. • Am besten von der Zimmerdecke zum Fußboden arbeiten. • Zum Tapetenlösen in Ecken oder Nischen die kleine Dampfplatte (11) verwenden (siehe Montage und Wechsel der großen Dampfplatte). • Zum Tapetenlösen auf großen Flächen die große Dampfplatte (13) verwenden (siehe Montage und Wechsel der großen Dampfplatte). • Dampfplatte (11/13) auf die Tapete aufsetzen. Je nach Art von Tapete und Untergrund nach ca. 10 Sekunden die Dampfplatte abnehmen und die Tapete von oben nach unten abziehen oder mit dem Schaber (9) abschaben. • Während des Abschabens die Dampfplatte (11/13) wiederholt auf die Tapete aufsetzen. Reinigung und Wartung Lassen Sie Instandsetzungsarbeiten und Wartungsarbeiten, die nicht in dieser Anleitung beschrieben sind, von unserem Service-Center durchführen. Verwenden Sie nur Originalteile. Ziehen Sie den Netzstecker (1) aus der Steckdose und lassen Sie das Gerät vor allen Arbeiten abkühlen. 10 Das Gerät darf weder mit Wasser abgespritzt werden, noch in Wasser gelegt werden. Es besteht die Gefahr eines Stromschlages. • Spülen Sie den Boiler gelegentlich solange mit Leitungswasser aus, bis dieses klar ist. Verwenden Sie keine Reinigungs- bzw. Lösungsmittel. Sie könnten das Gerät damit irreparabel beschädigen. Entkalken Niemals brennbare, giftige, ätzende oder andere Flüssigkeiten beimischen! Das Gerät bei Bedarf entkalken, je nach Wasserhärte und Häufigkeit des Gebrauchs. Handelsübliche Entkalkungsmittel, bevorzugt Zitronensäure, verwenden. Die Dosierungs- und Anwendungshinweise des Entkalkungsmittel-Herstellers beachten! Defekte wegen mangelnder Entkalkung sind von der Garantie ausgeschlossen. 1 Vergewissern Sie sich, dass der Netzstecker (1) ausgesteckt und das Gerät abgekühlt ist. 2. Eine handelsübliche Entkalkungslösung (2,5 Liter) einfüllen. 3. Den Dampfschlauch (14) abnehmen DE und den Netzstecker (1) einstecken. 4. Entkalkungslösung ca. 5 Minuten kochen lassen. 5. Den Netzstecker (1) aus der Steckdose ziehen und die Lösung noch ca. 10 Minuten einwirken lassen. 6. Das Gerät und die restliche Lösung abkühlen lassen. Das Gerät ausleeren, mit klarem Wasser nachspülen und austrocknen lassen. Lagerung • Lassen Sie das Gerät mindestens zehn Minuten abkühlen. • Leeren Sie das Gerät. • Wickeln Sie den Dampfschlauch (14) um die Halteklammern (2) am Boilerbehälter (7). • Bewahren Sie das Gerät in aufrechter Position an einem trockenen und staubgeschützten Ort auf, außerhalb der Reichweite von Kindern. AT CH Entsorgung/ Umweltschutz Elektrische Geräte gehören nicht in den Hausmüll. • Geben Sie das Gerät an einer Verwertungsstelle ab. Die verwendeten Kunststoff- und Metallteile können sortenrein getrennt werden und so einer Wiederverwertung zugeführt werden. Fragen Sie hierzu unser Service-Center. • Die Entsorgung Ihrer defekten, eingesendeten Geräte führen wir kostenlos durch. Ersatzteile/Zubehör Ersatzteile und Zubehör erhalten Sie unter www.grizzly-service.eu Sollten Sie Probleme mit dem Bestellvorgang haben, verwenden Sie bitte das Kontaktformular. Bei weiteren Fragen wenden Sie sich an das „Service-Center“ (siehe Seite 13). Pos. Betriebsanleitung Bezeichnung Bestell-Nr. 2 – 8, 15 Boilerbehälter komplett 91105685 14 Dampfschlauch 91105686 10 – 13 Dampfplatte komplett 91105687 11 DE AT CH Garantie Sehr geehrte Kundin, sehr geehrter Kunde, Sie erhalten auf dieses Gerät 3 Jahre Garantie ab Kaufdatum. Im Falle von Mängeln dieses Produkts stehen Ihnen gegen den Verkäufer des Produkts gesetzliche Rechte zu. Diese gesetzlichen Rechte werden durch unsere im Folgenden dargestellte Garantie nicht eingeschränkt. Garantiebedingungen Die Garantiefrist beginnt mit dem Kaufdatum. Bitte bewahren Sie den OriginalKassenbon gut auf. Diese Unterlage wird als Nachweis für den Kauf benötigt. Tritt innerhalb von drei Jahren ab dem Kaufdatum dieses Produkts ein Materialoder Fabrikationsfehler auf, wird das Produkt von uns – nach unserer Wahl – für Sie kostenlos repariert oder ersetzt. Diese Garantieleistung setzt voraus, dass innerhalb der Drei-Jahres-Frist das defekte Gerät und der Kaufbeleg (Kassenbon) vorgelegt und schriftlich kurz beschrieben wird, worin der Mangel besteht und wann er aufgetreten ist. Wenn der Defekt von unserer Garantie gedeckt ist, erhalten Sie das reparierte oder ein neues Produkt zurück. Mit Reparatur oder Austausch des Produkts beginnt kein neuer Garantiezeitraum. Garantiezeit und gesetzliche Mängelansprüche Die Garantiezeit wird durch die Gewährleistung nicht verlängert. Dies gilt auch für ersetzte und reparierte Teile. Eventuell schon beim Kauf vorhandene Schäden und Mängel müssen sofort nach dem Auspacken gemeldet werden. Nach Ablauf der Garantiezeit anfallende Reparaturen sind kostenpflichtig. 12 Garantieumfang Das Gerät wurde nach strengen Qualitätsrichtlinien sorgfältig produziert und vor Anlieferung gewissenhaft geprüft. Die Garantieleistung gilt für Material- oder Fabrikationsfehler. Diese Garantie erstreckt sich nicht auf Produktteile, die normaler Abnutzung ausgesetzt sind und daher als Verschleißteile angesehen werden können oder für Beschädigungen an zerbrechlichen Teilen. Diese Garantie verfällt, wenn das Produkt beschädigt, nicht sachgemäß benutzt oder nicht gewartet wurde. Für eine sachgemäße Benutzung des Produkts sind alle in der Betriebsanleitung aufgeführten Anweisungen genau einzuhalten. Verwendungszwecke und Handlungen, von denen in der Betriebsanleitung abgeraten oder vor denen gewarnt wird, sind unbedingt zu vermeiden. Das Produkt ist lediglich für den privaten und nicht für den gewerblichen Gebrauch bestimmt. Bei missbräuchlicher und unsachgemäßer Behandlung, Gewaltanwendung und bei Eingriffen, die nicht von unserer autorisierten Service-Niederlassung vorgenommen wurden, erlischt die Garantie. Abwicklung im Garantiefall Um eine schnelle Bearbeitung Ihres Anliegens zu gewährleisten, folgen Sie bitte den folgenden Hinweisen: • Bitte halten Sie für alle Anfragen den Kassenbon und die Identifikationsnummer (IAN 332976_1907) als Nachweis für den Kauf bereit. • Die Artikelnummer entnehmen Sie bitte dem Typenschild. • Sollten Funktionsfehler oder sonstige Mängel auftreten kontaktieren Sie zunächst die nachfolgend benannte Serviceabteilung telefonisch oder per DE E-Mail. Sie erhalten dann weitere Informationen über die Abwicklung Ihrer Reklamation. • Ein als defekt erfasstes Produkt können Sie, nach Rücksprache mit unserem Kundenservice, unter Beifügung des Kaufbelegs (Kassenbons) und der Angabe, worin der Mangel besteht und wann er aufgetreten ist, für Sie portofrei an die Ihnen mitgeteilte Service-Anschrift übersenden. Um Annahmeprobleme und Zusatzkosten zu vermeiden, benutzen Sie unbedingt nur die Adresse, die Ihnen mitgeteilt wird. Stellen Sie sicher, dass der Versand nicht unfrei, per Sperrgut, Express oder sonstiger Sonderfracht erfolgt. Senden Sie das Gerät bitte inkl. aller beim Kauf mitgelieferten Zubehörteile ein und sorgen Sie für eine ausreichend sichere Transportverpackung. Reparatur-Service Sie können Reparaturen, die nicht der Garantie unterliegen, gegen Berechnung von unserer Service-Niederlassung durchführen lassen. Sie erstellt Ihnen gerne einen Kostenvoranschlag. Wir können nur Geräte bearbeiten, die ausreichend verpackt und frankiert eingesandt wurden. Achtung: Bitte senden Sie Ihr Gerät gereinigt und mit Hinweis auf den Defekt an unsere Service-Niederlassung. Nicht angenommen werden unfrei - per Sperrgut, Express oder mit sonstiger Sonderfracht - eingeschickte Geräte. Die Entsorgung Ihrer defekten, eingesendeten Geräte führen wir kostenlos durch. AT CH Service-Center DE Service Deutschland Tel.: 0800 54 35 111 E-Mail: [email protected] IAN 332976_1907 AT Service Österreich Tel.: 0820 201 222 (0,15 EUR/Min.) E-Mail: [email protected] IAN 332976_1907 CH Service Schweiz Tel.: 0842 665566 (0,08 CHF/Min., Mobilfunk max. 0,40 CHF/Min.) E-Mail: [email protected] IAN 332976_1907 Importeur Bitte beachten Sie, dass die folgende Anschrift keine Serviceanschrift ist. Kontaktieren Sie zunächst das oben genannte Service-Center. Grizzly Tools GmbH & Co. KG Stockstädter Straße 20 D-63762 Großostheim GERMANY www.grizzly-service.eu 13 GB IE Content Introduction Introduction ............................... 14 Proper use ................................. 14 General description .................... 14 Scope of delivery ............................ 15 Overview ....................................... 15 Description of functions .................... 15 Technical data ........................... 15 Safety information ..................... 15 Symbols on the device: ................... 15 Symbols used in the instruction manual: ......................................... 16 Safety information ........................... 16 Safety information for using the steam wallpaper remover ................. 17 Safety devices ................................ 17 Initial start-up ............................ 18 Mount the retaining clips .................. 18 Connecting the hose and steam plate 18 Mounting and replacing the large steam plate .................................... 18 Filling or topping up with water ........ 18 Switching on and off ....................... 19 Removing wallpaper........................ 19 Cleaning and Servicing............... 20 Cleaning ........................................ 20 Descaling ....................................... 20 Storage ...................................... 21 Disposal / Environmental protection ............................................ 21 Replacement parts/Accessories .. 21 Guarantee ................................. 22 Repair Service ............................ 23 Service-Center ............................ 23 Importer .................................... 23 Translation of the original EC declaration of conformity ...........79 Exploded Drawing .....................85 Congratulations on the purchase of your new device. With it, you have chosen a high quality product. During production, this equipment has been checked for quality and subjected to a final inspection. The functionality of your equipment is therefore guaranteed. 14 The operating instructions constitute part of this product. They contain important information on safety, use and disposal. Before using the product, familiarise yourself with all of the operating and safety instructions. Use the product only as described and for the applications specified. Keep this manual safely and in the event that the product is passed on, hand over all documents to the third party. Proper use The device is intended for removing wallpaper. Any other use not expressly approved in the present instruction manual can damage the device and thus present a substantial risk for the user. The manufacturer is not liable for damage caused by improper use or incorrect operation. This device is not suitable for commercial use. The warranty is void in the case of commercial use. General description An illustration of the most important functional components can be found on the fold-out pages. GB IE Scope of delivery Technical data Unpack the device and check for completeness: - Mains cable with plug - Boiler tank - Steam hose - Small steam plate - Large steam plate - Retaining clips - Scraper - Instruction manual Steam wallpaper remover ...................................... PDTA 5 A1 Power P ....................................2300 W Voltage U .................. 230-240V~, 50 Hz Steam time .................................. 80 min Tank volume ...................................... 5 l Steam hose length .............................4 m Steam power ........................... 60 g/min Size (large steam plate) ......... 20 x 28 cm Size (small steam plate) ........... 18 x 8 cm Mains cable .....................................3 m Protection class ................................ IPX4 Weight (excluding accessories) ....... 935 g Weight (accessories only)............... 815 g Overview 1 2 3 4 5 6 7 8 9 10 11 12 13 14 15 Mains cable Retaining clip Boiler tank carrying handle Boiler tank hose connection Pressure relief valve Boiler cap Boiler tank Water level indicator Scraper Small steam plate handle Small steam plate Small steam plate guide rail Large steam plate Steam hose Screw for retaining clip Safety information Follow all safety instructions when using the device. Symbols on the device: Read the instruction manual carefully. Electrical devices must not be disposed of with domestic waste. Attention! Hot surface. Description of functions The steam wallpaper remover has a steam time of 80 minutes, a small and large steam plate and a 4 metre long steam hose. Please refer to the descriptions below for information on how the operating elements work. 100°C Working with hot steam can lead to severe scalding! Attention! Attention! There is a risk of burns. 15 GB IE Never direct steam towards yourself or towards other people or animals! Place the device securely and firmly on an even floor. Do not use as a step WARNING! – Risk of scalding Symbols used in the instruction manual: Hazard symbol with information on the prevention of personal injury or property damage Hazard symbol with information on the prevention of personal injury caused by electric shock Hazard symbol with information on damage prevention Advisory symbol with information on how to best use the device Risk of scalding! Do not work directly over your head. Wear protective gloves! Steam may escape from the device. 16 Safety information a) This appliance can be used by children aged from 8 years and above and persons with reduced physical, sensory or mental capabilities or lack of experience and knowledge if they have been given supervision or instruction concerning use of the appliance in a safe way and understand the hazards involved. Children shall not play with the appliance. Cleaning and user maintenance shall not be made by children without supervision. b) Make sure that the device is not directly aimed at electrical devices and equipment that contain electrical components, e.g. the inside of an oven c) Remove the mains plug from the socket to disconnect the device from the mains supply before use or before any user maintenance work. d) Do not leave the device unattended while it is connected to the mains supply. e) The in-feed aperture must not be opened during use. Follow the instructions for safely topping up the water tank. f) Do not use the device if it has been dropped, shows obvious signs of damage or is leaking. g) Keep children away from the device during use and while it is cooling down. GB Safety information for using the steam wallpaper remover a) Surfaces may heat up during use. The boiler cap may be hot during operation and when cooling down. b) Never switch on the device without filling with water! c) Never immerse the device in liquids. d) Only fill the device with tap water. Never add flammable, toxic, caustic or other liquids. e) Do not exceed the maximum filling quantity (5 l). f) Before removing the wallpaper, cover switches and sockets on the walls to make them waterproof and steamproof. g) Close the boiler cap and screw caps tightly before operating the device (see “Initial start-up”). h) Risk of scalding! Never open the boiler cap or screw caps during operation. Before opening the boiler cap and screw caps: Remove the mains plug from the socket and allow the device and any remaining water to cool down. Only then is it safe to open the boiler cap or the screw caps (see “Filling or topping up with water”). i) If the steam hose becomes blocked and causes overpressure, remove the mains plug from the socket. j) Always ensure you are working in a sturdy environment. k) Carry the device by its handle only. Do not pull on the cable or hose. IE l) Do not overstretch or kink the hose. m) Place the device securely and firmly on an even floor. Do not knock the device over. n) Risk of scalding! If the device falls over, hot water can get into the hose and escape out of the end of the hose. Switch off the device immediately, remove the mains plug, allow the device to cool down and only then empty the hose. o) Grasp the steam plate by the handle only. Safety devices • The boiler cap (6) has a pressure relief valve (5). This means that steam and hot water may escape if there is too much pressure in the boiler tank (7). This can occur if the steam hose (14) is blocked or the boiler tank (7) is overfilled. In this case, remove the mains plug (1) from the socket and allow the device to cool down before checking it. This pressure relief valve (5) must under no circumstances become blocked. In normal use, small amounts of steam and water escape via the pressure relief valve (5). • The boiler cap (6) has a vacuum release valve that allows air to enter the device when a vacuum is created. • The steam hose (14) is dual-lined in order to lower its surface temperature. • The device is equipped with automatic overheating protection (thermal overload relay), which triggers when the device is heated without filling. Fill the device with (preferably hot) water. After 17 GB IE a few minutes, the device will generate steam again. • Be careful not to tip the device, as this may trigger the automatic overheating protection (thermal overload relay). Initial start-up Mount the retaining clips Place the two retaining clips (2) on the device and screw them in with the screws (15). See detail . Connecting the hose and steam plate 1. Screw one end of the steam hose (14) onto the hose connection (4) on the boiler tank (7). 2. Screw the other end of the steam hose (14) onto the hose connection of the small steam plate (11). Make sure that the steam hose is connected properly. Never open the screw caps during operation. Mounting and replacing the large steam plate 1. Remove the mains plug (1) from the socket before mounting and changing the accessories. Wait until steam no longer escapes and the device has cooled down. 2. To use the large steam plate (13), slide it into the guide rail (12) of the small steam plate (11). 3. To remove the large steam plate (13), pull it out of the guide rail (12) of the small steam plate (11). 18 Filling or topping up with water 1. Make sure that the mains plug (1) is removed from the socket and the device has cooled down. 2. Unscrew the boiler cap (6) and remove it. 3. Fill the boiler tank (7) with clean tap water. Fill the boiler tank (7) only up to the MAX mark on the water level indicator (8) (maximum 5 litres) 4. Screw on the boiler cap (6). Ensure that it is screwed in properly. When working for long periods: Observe the minimum mark on the water level indicator (8) and top up with water in good time. Operation Attention! Surfaces may heat up during use. The boiler cap may be hot during operation and when cooling down. Risk of scalding! Do not work directly over your head. Wear protective gloves! Steam may escape from the device. Never direct steam towards yourself or towards other people or animals! • Check the condition of the plaster before starting work, as steam generated at high temperatures can inadvertently remove loose, porous or poorly bound plaster. The plaster may also come away more easily in areas that have GB • • • • • • • • cracks or holes. Also, do not hold the steam plate in one place for a long period of time. You can determine where there is loose plaster by tapping parts of the wall with your knuckles. If it produces a hollow sound, please proceed with extreme caution. Always test the wallpaper remover in a small area of about 100 cm² before actually starting work. If you find that the plaster is coming loose or you hear a crack, stop working. The wallpaper remover can be used safely for plasterboard surfaces. The heat generated by this product may cause damage to certain surfaces, e.g. carpets, upholstered furniture, table tops or cupboards. In order for these surfaces not to be damaged by the heat of the boiler tank (7), always place the tank on a wooden board or a similar object. Dust covers or newspapers are not suitable for this purpose. Hold the boiler tank (7) by the handle (3) only. Wallpapers that have had several coats of paint or that are waterproof are difficult to remove. Perforate this type of wallpaper with a spiked roller so that the steam can work on the paste layer. In the case of foam backed vinyl wallpaper, remove the top vinyl layer, if necessary, before working with the wallpaper remover. Always wear protective clothing when removing wallpaper from the ceiling. Pay attention to the condensation collecting on the steam plate, as hot water may drip off. Empty the steam plate regularly and do not use it directly over your head. Always place the steam plate (11/13) IE in a suitable container when left unattended (even if only briefly). Never point the steam plate towards yourself when using it. Switching on and off 1 To switch on, insert the mains plug (1) into the socket. 2 Depending on the temperature of the filled water, the device may take up to 15 minutes to generate steam. During the heating phase, some hot water may escape from the steam plate. Place the steam plate on a bucket to catch any escaping water. Never leave the device unattended while it is switched on. 3 To switch off the device, remove the mains plug (1) from the socket. Removing wallpaper • Grasp the small steam plate (11) by the handle (10) only. • It is best to work from the ceiling to the floor. • Use the small steam plate (11) to remove wallpaper in corners or niches (see “Mounting and changing the large steam plate”). • Use the large steam plate (13) to remove wallpaper on large areas (see “Mounting and changing the large steam plate”). • Place the steam plate (11/13) on the wallpaper. Depending on the type of wallpaper and surface, remove the steam plate after approx. 10 seconds and remove the wallpaper from top to bottom or scrape off with the scraper (9). 19 GB IE • Place the steam plate (11/13) on the wallpaper repeatedly while scraping. Cleaning and Servicing You should have any repair and maintenance work that is not described in these instructions carried out by our Service Centre. Only use original parts. Remove the mains plug (1) from the socket and allow the device to cool down before starting any work. Perform the following cleaning and maintenance work regularly. This will guarantee long and reliable use. Cleaning The device must not be sprayed with water or placed in water. Otherwise there is a risk of electric shock. • Rinse the boiler occasionally with tap water until it is clear. Do not use any cleaning agents or solvents. This could damage the device irreparably. Descaling Never add flammable, toxic, caustic or other liquids! Descale the appliance if necessary, depending on the water hardness and frequency of use. Use commercially available descaling agents, preferably citric acid. Follow the dosage and application instructions 20 of the descaling agent manufacturer! Defects due to a lack of descaling are excluded from the warranty. 1 Make sure that the mains plug (1) is removed from the socket and that the device has cooled down. 2. Pour in a commercially available descaling solution (2.5 litres). 3. Remove the steam hose (14) and insert the mains plug (1). 4. Boil the descaling solution for approx. 5 minutes. 5. Remove the mains plug (1) from the socket and allow the solution to take effect for another 10 minutes. 6. Allow the device and the rest of the solution to cool down. Empty the device, rinse it with clear water and allow it to dry. GB Storage • Allow the device to cool down for at least 10 minutes. • Empty the device. • Wind the steam hose (14) around the retaining clips (2) on the boiler tank (7). • Store the device in an upright position in a dry and dustproof location and out of reach of children. IE Disposal / Environmental protection Electrical devices do not belong in domestic waste. • Take the device to a recycling plant. The plastic and metal parts used on your device can be properly sorted according to materials and grades and efficiently recycled. Please contact our service centre for more information. • We will dispose of any defective devices that you send to us free of charge. Replacement parts/Accessories Spare parts and accessories can be obtained at www.grizzly-service.eu If you have issues ordering, please use the contact form. If you have any other questions, contact the ”Service-Center” (see page 23). Position Manual Description Order no. 2 – 8, 15 Boiler tank complete 91105685 14 Steam hose 91105686 10 – 13 Steam plate complete 91105687 21 GB IE Guarantee Dear Customer, This equipment is provided with a 3-year guarantee from the date of purchase. In case of defects, you have statutory rights against the seller of the product. These statutory rights are not restricted by our guarantee presented below. Terms of Guarantee The term of the guarantee begins on the date of purchase. Please retain the original receipt. This document is required as proof of purchase. If a material or manufacturing defect occurs within three years of the date of purchase of this product, we will repair or replace – at our choice – the product for you free of charge. This guarantee requires the defective equipment and proof of purchase to be presented within the three-year period with a brief written description of what constitutes the defect and when it occurred. If the defect is covered by our guarantee, you will receive either the repaired product or a new product. No new guarantee period begins on repair or replacement of the product. Guarantee Period and Statutory Claims for Defects The guarantee period is not extended by the guarantee service. This also applies for replaced or repaired parts. Any damages and defects already present at the time of purchase must be reported immediately after unpacking. Repairs arising after expiry of the guarantee period are chargeable. 22 Guarantee Cover The equipment has been carefully produced in accordance with strict quality guidelines and conscientiously checked prior to delivery. The guarantee applies for all material and manufacturing defects. This guarantee does not extend to cover product parts that are subject to normal wear and may therefore be considered as wearing parts (e.g. brushes) or to cover damage to breakable parts (e.g. switches). This guarantee shall be invalid if the product has been damaged, used incorrectly or not maintained. Precise adherence to all of the instructions specified in the operating manual is required for proper use of the product. Intended uses and actions against which the operating manual advises or warns must be categorically avoided. The product is designed only for private and not commercial use. The guarantee will be invalidated in case of misuse or improper handling, use of force, or interventions not undertaken by our authorised service branch. Processing in Case of Guarantee To ensure quick handling of you issue, please follow the following directions: • Please have the receipt and identification number (IAN 332976_1907) ready as proof of purchase for all enquiries. • Please find the item number on the rating plate. • Should functional errors or other defects occur, please initially contact the service department specified below by telephone or by e-mail. You will then receive further information on the processing of your complaint. GB • After consultation with our customer service, a product recorded as defective can be sent postage paid to the service address communicated to you, with the proof of purchase (receipt) and specification of what constitutes the defect and when it occurred. In order to avoid acceptance problems and additional costs, please be sure to use only the address communicated to you. Ensure that the consignment is not sent carriage forward or by bulky goods, express or other special freight. Please send the equipment inc. all accessories supplied at the time of purchase and ensure adequate, safe transport packaging. Repair Service For a charge, repairs not covered by the guarantee can be carried out by our service branch, which will be happy to issue a cost estimate for you. We can handle only equipment that has been sent with adequate packaging and postage. Attention: Please send your equipment to our service branch in clean condition and with an indication of the defect. Equipment sent carriage forward or by bulky goods, express or other special freight will not be accepted. We will dispose of your defective devices free of charge when you send them to us. IE Service-Center GB IE Service Great Britain Tel.: 0800 404 7657 E-Mail: [email protected] IAN 332976_1907 Service Ireland Tel.: 1890 930 034 (0,08 EUR/Min., (peak)) (0,06 EUR/Min., (off peak)) E-Mail: [email protected] IAN 332976_1907 Importer Please note that the following address is not a service address. Please initially contact the service centre specified above. Grizzly Tools GmbH & Co. KG Stockstädter Straße 20 DE-63762 Großostheim GERMANY www.grizzly-service.eu 23 FR BE Sommaire Introduction Introduction ............................... 24 Utilisation conforme ................... 24 Description générale .................. 24 Matériel livré .................................. 25 Aperçu .......................................... 25 Description fonctionnelle .................. 25 Caractéristiques techniques ........ 25 Consignes de sécurité ................. 25 Pictogrammes sur l‘appareil : ............ 25 Symboles dans la notice :................. 26 Sicherheitshinweise ......................... 26 Consignes de sécurité pour l‘utilisation de la décolleuse à papier peint......... 27 Dispositifs de sécurité ...................... 27 Mise en service .......................... 28 Monter les clips de fixation............... 28 Raccorder le flexible et la plaque à vapeur ........................................... 28 Montage et échange de la grande plaque à vapeur ............................. 28 Verser ou faire l‘appoint en eau ........ 28 Utilisation .................................. 29 Mise en marche et arrêt ................... 30 Décoller des papiers peints .............. 30 Nettoyage et maintenance ......... 30 Nettoyage...................................... 30 Détartrer ........................................ 31 Toutes nos félicitations pour l’achat de votre nouvel appareil. Vous avez ainsi choisi un produit de qualité supérieure. La qualité de l’appareil a été vérifiée pendant la production et il a été soumis à un contrôle final. Le fonctionnement de votre appareil est donc ainsi garanti. Stockage ...............................31 Élimination / Protection de l‘environnement ......................... 31 Pièces de rechange/Accessoires.. 32 Garantie - France ....................... 33 Garantie - Belgique .................... 35 Service Réparations ................... 36 Service-Center ............................ 36 Importateur ............................... 36 Traduction de la déclaration de conformité CE originale ..............80 Vue éclatée ................................85 La notice d’utilisation fait partie de ce produit. Elle contient des instructions importantes pour la sécurité, l’utilisation et l’élimination des déchets. Avant d’utiliser ce produit, lisez attentivement les consignes d’emploi et de sécurité. N’utilisez le produit que tel que décrit et uniquement pour les domaines d’emploi indiqués. Conservez cette notice et remettezla avec tous les documents si vous cédez le produit à un tiers. Utilisation conforme L‘appareil est conçu pour décoller des papiers peints. Toute autre utilisation qui n‘est pas expressément préconisée dans ces instructions peut entraîner des dommages à l‘appareil et constituer un sérieux danger pour l‘utilisateur. Le fabricant ne peut être tenu pour responsable des dommages causés par une utilisation inappropriée ou par une manipulation incorrecte. Cet appareil n‘est pas conçu pour une utilisation commerciale. Une utilisation commerciale annule la garantie. Description générale Vous trouverez la représentation des fonctions les plus importantes sur les volets rabattables. 24 FR Matériel livré Déballez l‘appareil et contrôlez s‘il est au complet : - Câble d‘alimentation avec fiche - Réservoir chauffant - Flexible à vapeur - Petite plaque à vapeur - Grande plaque à vapeur - Clips de fixation - Racloir - Mode d‘emploi Aperçu 1 Câble d‘alimentation 2 Clip de fixation 3 Poignée de transport du réservoir chauffant 4 Raccord de flexible du réservoir chauffant 5 Soupape de surpression 6 Couvercle du réservoir chauffant 7 Réservoir chauffant 8 Indicateur de niveau d‘eau 9 Racloir 10 Poignée de la petite plaque à vapeur 11 Petite plaque à vapeur 12 Rail de guidage de la petite plaque à vapeur 13 Grande plaque à vapeur 14 Flexible à vapeur 15 Vis pour clip de fixation Description fonctionnelle La décolleuse à papier peint avec une durée de vapeur de 80 minutes est dotée d‘une grande et d‘une petite plaque à vapeur et d‘un flexible à vapeur d‘une longueur de 4 mètres. BE Pour savoir quelles fonctions remplissent les éléments de commande, veuillez vous reporter à la description suivante. Caractéristiques techniques Décolleuse à papier peint ...................................... PDTA 5 A1 Puissance P ...............................2300 W Tension U .................. 230-240V~, 50 Hz Durée de vapeur .......................... 80 min Volume du réservoir ............................ 5 l Longueur du flexible à vapeur .............4 m Débit de vapeur ....................... 60 g/min Dimension (grande plaque à vapeur) ...... 20 x 28 cm Dimension (petite plaque à vapeur) ........... 18 x 8 cm Câble d‘alimentation .........................3 m Classe de protection ......................... IPX4 Poids (sans accessoires) ................. 935 g Poids (uniquement accessoires) ....... 815 g Consignes de sécurité Pendant l‘utilisation de l‘appareil, il faut respecter les consignes de sécurité. Pictogrammes sur l‘appareil : Veuillez lire attentivement la notice d‘utilisation. Les appareils électriques ne doivent pas être jetés avec les déchets ménagers. Attention ! Surface chaude. 25 FR 100°C BE Le travail avec de la vapeur chaude peut provoquer de graves brûlures ! Attention ! Attention ! Il y a un risque de brûlures. Ne pas diriger la vapeur sur son corps ni sur d‘autres personnes ou des animaux ! Poser l‘appareil de manière sûre et stable sur le sol plan. Ne pas utiliser comme marchepied AVERTISSEMENT – Risque de brûlures Symboles dans la notice : Pictogramme de danger avec informations de prévention des dommages aux personnes ou des dégâts matériels Pictogrammes de danger avec informations de prévention des dommages aux personnes par décharge électrique Pictogramme d‘obligation avec informations de prévention des dommages Pictogramme d‘indication avec des informations por26 tant sur la meilleure manipulation de l‘appareil Consignes de sécurité Ne pas travailler directement au-dessus de la tête. Porter des gants de protection ! De la vapeur peut s‘échapper de l‘appareil. Consignes de sécurité a) Cet appareil peut être utilisé par des enfants à partir de 8 ans et plus et par des personnes ayant des capacités physiques, sensorielles ou mentales réduites ou un manque d‘expérience et de connaissances à condition qu‘elles aient reçu une supervision ou des instructions concernant I’utilisation de I‘appareil en toute sécurité et qu‘elles comprennent les dangers encourus. Les enfants ne doivent pas jouer avec l’appareil. Le nettoyage et I’entretien par I‘usager ne doivent pas être effectués par des enfants sans surveillance. b) Assurez-vous de ne pas diriger l‘appareil directement sur des appareils et des équipements électriques contenant des composants électriques, par ex. l‘intérieur d‘un four c) Après l‘utilisation et avant l‘entretien par l‘utilisateur, l‘appareil doit être débranché du réseau en tirant sur la fiche secteur. d) Ne laissez pas l‘appareil sans surveillance lorsqu‘il est branché au secteur. e) L‘orifice de remplissage ne FR doit pas être ouvert pendant l‘utilisation. Respectez les instructions pour un remplissage sûr du réservoir à eau. f) N‘utilisez pas l‘appareil s‘il est tombé, s‘il présente des détériorations manifestes ou s‘il n‘est pas étanche. g) Pendant l‘utilisation et le refroidissement, tenez les enfants éloignés de l‘appareil. Consignes de sécurité pour l‘utilisation de la décolleuse à papier peint a) Pendant l‘utilisation, les surfaces peuvent chauffer. Pendant le fonctionnement et le refroidissement, le couvercle du réservoir chauffant peut être chaud. b) Ne jamais mettre l‘appareil en marche sans l‘avoir rempli d‘eau ! c) Ne jamais plonger l‘appareil dans des liquides. d) Remplir l‘appareil uniquement avec de l‘eau du robinet. Ne jamais ajouter de liquides inflammables, toxiques, irritants ou autres. e) Ne pas dépasser la quantité de remplissage maximale (5 l). f) Avant de décoller le papier peint, recouvrir les interrupteurs et prises de courant sur les murs pour les protéger de l‘eau et de la vapeur. g) Fermer solidement les bouchons du réservoir chauffant et à visser avant la mise en service (voir „Mise en service“). h) Risque de brûlures ! Ne jamais ouvrir le couvercle du réservoir BE chauffant ni les bouchons à visser pendant le fonctionnement. Avant d‘ouvrir le couvercle du réservoir chauffant et les bouchons à visser : débrancher la fiche secteur et laisser refroidir l‘appareil ainsi que l‘eau restante. Ouvrir alors seulement le couvercle du réservoir chauffant ou les bouchons à visser (voir „Verser ou faire l‘appoint en eau“). i) Si le flexible à vapeur est obstrué et que cela génère une surpression, débranchez la fiche secteur de la prise de courant. j) Pendant le travail, veiller à toujours garder l‘équilibre. k) Porter l‘appareil uniquement par la poignée. Ne pas tirer sur le câble ou le flexible. l) Ne pas tendre excessivement le flexible et ne pas le plier. m) Poser l‘appareil de manière sûre et stable sur le sol plan. Ne pas renverser l‘appareil. n) Risque de brûlures ! Si l‘appareil se renverse, de l‘eau chaude peut parvenir dans le flexible et sortir par l‘extrémité du flexible. Éteindre immédiatement l‘appareil, débrancher la fiche secteur, laisser refroidir et après seulement, vider le flexible. o) Saisir la plaque à vapeur uniquement par la poignée. Dispositifs de sécurité • Le couvercle du réservoir chauffant (6) est équipé d‘une soupape de surpression (5). Ce qui permet d‘évacuer de la vapeur et un peu d‘eau chaude si le 27 FR BE réservoir chauffant (7) est en surpression. Cela peut arriver si le flexible à vapeur (14) est bouché ou si le réservoir chauffant (7) est trop rempli. Dans ce cas, débranchez la fiche secteur (1) de la prise de courant, et laissez l‘appareil refroidir avant de le vérifier. Cette soupape de surpression (5) ne doit en aucun cas être bloquée. Dans le cas d‘une utilisation normale, de petites quantités de vapeur et d‘eau sont évacuées par la soupape de surpression (5). • Le couvercle du réservoir chauffant (6) dispose d‘une vanne de déclenchement au vide par laquelle de l‘air peut entrer dans l‘appareil en cas d‘apparition de vide. • Le flexible à vapeur (14) est doté d‘une double paroi permettant d‘abaisser la température de la surface. • L‘appareil est équipé d‘une protection anti-surchauffe automatique (coupecircuit thermique) qui se déclenche lorsque l‘appareil est chauffé à vide. Remplissez l‘appareil avec de l‘eau (de préférence chaude). Au bout de quelques minutes, l‘appareil génère de la vapeur. • Veillez à ne pas renverser l‘appareil. Dans le cas contraire, la protection anti-surchauffe automatique (coupe-circuit thermique) risque de se déclencher. Mise en service Monter les clips de fixation Placez les deux clips de fixation (2) sur l‘appareil et vissez-les avec les vis (15). Voir détails . 28 Raccorder le flexible et la plaque à vapeur 1. Vissez une extrémité du flexible à vapeur (14) sur le raccord de flexible (4) sur le réservoir chauffant (7). 2. Vissez l‘autre extrémité du flexible à vapeur (14) sur le raccord de flexible de la petite plaque à vapeur (11). Assurez-vous que le flexible à vapeur a été correctement raccordé. Ne jamais ouvrir les bouchons à visser pendant le fonctionnement. Montage et échange de la grande plaque à vapeur 1. Pour monter et échanger les accessoires, débrancher la fiche secteur (1). Attendre que plus aucune vapeur ne sorte et que l‘appareil ait refroidi. 2. Pour utiliser la grande plaque à vapeur (13), glissez-la dans le rail de guidage (12) de la petite plaque à vapeur (11). 3. Pour démonter la grande plaque à vapeur (13), tirez-la hors du rail de guidage (12) de la petite plaque à vapeur (11). Verser ou faire l‘appoint en eau 1. Assurez-vous que la fiche secteur (1) est débranchée et que l‘appareil a refroidi. 2. Dévissez le couvercle du réservoir chauffant (6) et retirez-le. 3. Remplissez le réservoir chauffant (7) avec de l‘eau du robinet propre. Remplissez le réservoir chauffant (7) FR uniquement jusqu‘au repère MAX de l‘indicateur de niveau d‘eau (8) (maximum 5 litres) 4. Vissez le couvercle du réservoir chauffant (6). Veillez à ce qu‘il soit correctement vissé. En cas de temps de travail prolongés : Observer le repère Minimum de l‘indicateur de niveau d‘eau (8) et faire l‘appoint en eau en temps utile. • • Utilisation Attention ! Pendant l‘utilisation, les surfaces peuvent chauffer. Pendant le fonctionnement et le refroidissement, le couvercle du réservoir chauffant peut être chaud. Risque de brûlures ! Ne pas travailler directement audessus de la tête. Porter des gants de protection ! De la vapeur peut s‘échapper de l‘appareil. • • • Ne pas diriger la vapeur sur son corps ni sur d‘autres personnes ou des animaux ! • • Avant de commencer à travailler, vérifiez l‘état de l‘enduit, car la vapeur à des températures élevées peut dissoudre un enduit poreux ou mal lié. L‘enduit peut également se détacher plus facilement dans des zones présentant des crevasses ou des trous. De même, la plaque à vapeur ne devrait pas être maintenue de manière prolongée à un même endroit. Vous • BE pouvez reconnaître un enduit instable en tapotant avec les phalanges à certains endroits du mur. Si cela sonne creux, il est recommandé de poursuivre avec une extrême prudence. Dans tous les cas, testez d‘abord la décolleuse à papier peint sur une petite zone de 100 cm² environ avant de réellement commencer à travailler. Si vous constatez que l‘enduit se dissout ou si vous entendez un craquement, cessez immédiatement le travail. La décolleuse à papier peint peut être utilisée sans risque pour les cloisons sèches/en placoplâtre. En raison de la chaleur générée par ce produit, certaines surfaces, par ex. tapis, tissus d‘ameublement, dessus de table ou meubles, peuvent subir des dégâts. Afin de ne pas endommager la surface respective avec la chaleur du réservoir chauffant (7), il devrait toujours être posé sur une planche en bois ou un objet similaire. Une bâche de protection ou des journaux ne sont pas adaptés. Saisir le réservoir chauffant (7) uniquement par la poignée de transport (3). Les papiers peints recouverts plusieurs fois ou résistants à l‘eau sont difficiles à retirer. Perforer ces papiers peints avec un rouleau à dents afin que la vapeur puisse agir sur les couches de colle. Pour les papiers peints en mousse de vinyle, retirer d‘abord le cas échéant la couche supérieure en vinyle, puis travailler alors seulement avec la décolleuse à papier peint. Pour retirer du papier peint collé au plafond, portez toujours des vêtements de protection. Faites attention à l‘eau de condensation qui s‘accumule sur la plaque à vapeur, car de l‘eau chaude peut goutter. Videz régulièrement la 29 FR BE plaque à vapeur, et ne l‘utilisez jamais directement au-dessus de votre tête. • Toujours placer la plaque à vapeur (11/13) dans un récipient adapté, lorsqu‘elle est laissée (même brièvement) sans surveillance. Pendant l‘utilisation, la plaque à vapeur ne doit pas être orientée vers l‘utilisateur. Mise en marche et arrêt 1 Pour la mise en marche, branchez la fiche secteur (1) dans la prise de courant. 2 En fonction de la température de l‘eau de remplissage, l‘appareil génère de la vapeur au bout de 15 minutes maximum. Pendant la phase de réchauffement, un peu d‘eau chaude peut s‘échapper de la plaque à vapeur. Poser la plaque à vapeur sur un seau pour récupérer l‘eau qui s‘échappe. Ne jamais laisser l‘appareil sans surveillance lorsqu‘il est allumé. 3 Pour arrêter l‘appareil, débranchez ensuite la fiche secteur (1) de la prise de courant. Décoller des papiers peints • Saisir la petite plaque à vapeur (11) uniquement par la poignée (10). • Travailler idéalement du plafond de la pièce vers le sol. • Pour décoller du papier peint dans des coins ou des niches, utiliser la petite plaque à vapeur (11) (voir „Montage et échange de la grande plaque à vapeur“). • Pour décoller du papier peint sur de grandes surfaces, utiliser la grande 30 plaque à vapeur (13) (voir „Montage et échange de la grande plaque à vapeur“). • Poser la plaque à vapeur (11/13) sur le papier peint. En fonction du type de papier peint et du support, retirer la plaque à vapeur au bout de 10 secondes environ et tirer le papier du haut vers le bas ou racler avec le racloir (9). • Pendant le raclage, poser plusieurs fois la plaque à vapeur (11/13) sur le papier peint. Nettoyage et maintenance Faites effectuer les travaux de réparation et de maintenance qui ne sont pas mentionnés dans cette notice par notre Centre de service après-vente. Utilisez exclusivement des pièces d‘origine. Débranchez la fiche secteur (1) de la prise de courant et laissez l‘appareil refroidir avant de réaliser tous travaux. Effectuez régulièrement les travaux de nettoyage et de maintenance suivants. Cela garantit une durée d‘utilisation longue et fiable. Nettoyage L‘appareil ne doit être ni nettoyé au jet d‘eau ni plongé dans l‘eau. Il existe un risque d‘électrocution. • Rincez de temps en temps le réservoir chauffant à l‘eau du robinet jusqu‘à ce que celle-ci soit claire. FR N‘utilisez aucun produit de nettoyage ou de détergent. Vous pourriez endommager l‘appareil de manière irréversible. Détartrer Ne jamais ajouter de liquides inflammables, toxiques, irritants ou autres ! Le cas échéant, détartrer l‘appareil en fonction de la dureté de l’eau et de la fréquence d‘emploi. Utiliser des détartrants du commerce, de préférence de l‘acide citrique. Respecter les consignes de dosage et d‘emploi du fabricant du détartrant ! Les défauts résultant de l‘absence de détartrage sont exclus de la garantie. 1 Assurez-vous que la fiche secteur (1) est débranchée et que l‘appareil a refroidi. 2. Verser une solution détartrante du commerce (2,5 litres). 3. Retirer le flexible à vapeur (14) et brancher la fiche secteur (1). 4. Faire bouillir la solution détartrante pendant env. 5 minutes. 5. Retirer la fiche secteur (1) de la prise de courant et laisser agir la solution pendant encore 10 minutes environ. 6. Laisser refroidir l‘appareil et la solution restante. Vider l‘appareil, rincer à l‘eau claire et laisser sécher. BE • Enroulez le flexible à vapeur (14) autour des clips de fixation (2) sur le réservoir chauffant (7). • Conservez l‘appareil en position verticale dans un endroit sec et protégé de la poussière et hors de portée des enfants. Élimination / Protection de l‘environnement Les appareils électriques ne doivent pas être jetés avec les déchets ménagers. Portez le carton à un point de recyclage. Le produit est recyclable, est soumis à une responsabilité élargie du fabricant et est collecté dans le cadre du tri sélectif. • Restituez l‘appareil dans un point de collecte des déchets à recycler. Il est possible de trier les pièces en plastique et métalliques par matières et de les introduire ainsi dans un circuit de recyclage. Pour cela, veuillez vous adresser à notre centre de SAV. • Nous effectuons gratuitement la mise au rebut de votre appareil défectueux retourné. Stockage • Laissez l‘appareil refroidir pendant au moins dix minutes. • Videz l‘appareil. 31 FR BE Pièces de rechange/Accessoires Vous obtiendrez des pièces de rechange et des accessoires à l’adresse www.grizzly-service.eu Si vous avez des problèmes lors du passage de la commande, merci d’utiliser le formulaire de contact. Pour toute autre question, adressez-vous au ”Service-Center” (voir page 36). Position Notice d‘utilisation 32 Désignation Article n° 2 – 8, 15 Réservoir chauffant complète 91105685 14 Flexible à vapeur 91105686 10 – 13 Plaque vapeur complète 91105687 FR Garantie - France Chère cliente, cher client, Ce produit bénéficie d’une garantie de 3 ans, valable à compter de la date d’achat. En cas de manques constatés sur ce produit, vous disposez des droits légaux contre le vendeur du produit. Ces droits légaux ne sont pas limités par notre garantie présentée par la suite. Article L217-4 du Code de la consommation Le vendeur livre un bien conforme au contrat et répond des défauts de conformité existant lors de la délivrance. Il répond également des défauts de conformité résultant de l‘emballage, des instructions de montage ou de l‘installation lorsque celle-ci a été mise à sa charge par le contrat ou a été réalisée sous sa responsabilité. Article L217-5 du Code de la consommation Le bien est conforme au contrat : 1° S´il est propre à l‘usage habituellement attendu d‘un bien semblable et, le cas échéant : s‘il correspond à la description donnée par le vendeur et posséder les qualités que celui-ci a présentées à l‘acheteur sous forme d‘échantillon ou de modèle ; s‘il présente les qualités qu‘un acheteur peut légitimement attendre eu égard aux déclarations publiques faites par le vendeur, par le producteur ou par son représentant, notamment dans la publicité ou l‘étiquetage ; 2° Ou s‘il présente les caractéristiques définies d‘un commun accord par les parties ou être propre à tout usage spécial recherché par l‘acheteur, porté à la connaissance du vendeur et que ce dernier a accepté. BE Article L217-16 du Code de la consommation Lorsque l‘acheteur demande au vendeur, pendant le cours de la garantie commerciale qui lui a été consentie lors de l‘acquisition ou de la réparation d‘un bien meuble, une remise en état couverte par la garantie, toute période d‘immobilisation d‘au moins sept jours vient s‘ajouter à la durée de la garantie qui restait à courir. Cette période court à compter de la demande d‘intervention de l‘acheteur ou de la mise à disposition pour réparation du bien en cause, si cette mise à disposition est postérieure à la demande d‘intervention. Indépendamment de la garantie commerciale souscrite, le vendeur reste tenu des défauts de conformité du bien et des vices rédhibitoires dans les conditions prévues aux articles L217-4 à L217-13 du Code de la consommation et aux articles 1641 à 1648 et 2232 du Code Civil. Article L217-12 du Code de la consommation L‘action résultant du défaut de conformité se prescrit par deux ans à compter de la délivrance du bien. Conditions de garantie Le délai de garantie débute avec la date d’achat. Veuillez conserver soigneusement le ticket de caisse original. En effet, ce document vous sera réclamé comme preuve d’achat. Si un défaut de matériel ou un défaut de fabrication se présente au cours des trois ans suivant la date d’achat de ce produit, nous réparons gratuitement ou remplaçons ce produit - selon notre choix. Cette garantie suppose que l’appareil défectueux et le justificatif d’achat (ticket de caisse) nous soient présentés durant cette période de trois ans 33 FR BE et que la nature du manque et la manière dont celui-ci est apparu soient explicités par écrit dans un bref courrier. Si le défaut est couvert par notre garantie, le produit vous sera retourné, réparé ou remplacé par un neuf. Aucune nouvelle période de garantie ne débute à la date de la réparation ou de l’échange du produit. Durée de garantie et demande légale en dommages-intérêts La durée de garantie n’est pas prolongée par la garantie. Ce point s’applique aussi aux pièces remplacées et réparées. Les dommages et les manques éventuellement constatés dès l’achat doivent immédiatement être signalés après le déballage. A l’expiration du délai de garantie les réparations occasionnelles sont à la charge de l’acheteur. Volume de la garantie L’appareil a été fabriqué avec soin, selon de sévères directives de qualité et il a été entièrement contrôlé avant la livraison. La garantie s’applique aux défauts de matériel ou aux défauts de fabrication. Cette garantie ne s’applique pas aux consommables. Les pièces d’usure sont remplacées pendant les deux premières années à compter de la date d’achat. Cette garantie prend fin si le produit endommagé n’a pas été utilisé ou entretenu d’une façon conforme. Pour une utilisation appropriée du produit, il faut impérativement respecter toutes les instructions citées dans le manuel de l’opérateur. Les actions et les domaines d’utilisation déconseillés dans la notice d’utilisation ou vis-à-vis desquels une mise en garde est émise, doivent absolument être évités. Le produit est conçu uniquement pour un usage privé et non pour un usage industriel. En cas d’emploi impropre et incorrect, de 34 recours à la force et d’interventions entreprises et non autorisées par notre succursale, la garantie prend fin. Les pièces détachées indispensables à l’utilisation du produit sont disponibles pendant la durée de la garantie du produit. Article 1641 du Code civil Le vendeur est tenu de la garantie à raison des défauts cachés de la chose vendue qui la rendent impropre à l‘usage auquel on la destine, ou qui diminuent tellement cet usage que l‘acheteur ne l‘aurait pas acquise, ou n‘en aurait donné qu‘un moindre prix, s‘il les avait connus. Article 1648 1er alinéa du Code civil L‘action résultant des vices rédhibitoires doit être intentée par l‘acquéreur dans un délai de deux ans à compter de la découverte du vice. Marche à suivre dans le cas de garantie Pour garantir un traitement rapide de votre demande, veuillez suivre les instructions suivantes : • Tenez vous prêt à présenter, sur demande, le ticket de caisse et le numéro d’identification (IAN 332976_1907) comme preuve d’achat. • Vous trouverez le numéro d’article sur la plaque signalétique. • Si des pannes de fonctionnement ou d’autres manques apparaissent, prenez d’abord contact, par téléphone ou par e-Mail, avec le service après-vente dont les coordonnées sont indiquées ci-dessous. Vous recevrez alors des renseignements supplémentaires sur le déroulement de votre réclamation. • En cas de produit défectueux vous pouvez, après contact avec notre service clients, envoyer le produit, franco de FR port à l’adresse de service après-vente indiquée, accompagné du justificatif d’achat (ticket de caisse) et en indiquant quelle est la nature du défaut et quand celui-ci s’est produit. Pour éviter des problèmes d’acceptation et des frais supplémentaires, utilisez absolument seulement l’adresse qui vous est donnée. Assurez-vous que l’expédition ne se fait pas en port dû, comme marchandises encombrantes, envoi express ou autre taxe spéciale. Veuillez renvoyer l’appareil, y compris tous les accessoires livrés lors de l’achat et prenez toute mesure pour avoir un emballage de transport suffisamment sûr. Garantie - Belgique Chère cliente, cher client, Ce produit bénéficie d’une garantie de 3 ans, valable à compter de la date d’achat. En cas de manques constatés sur ce produit, vous disposez des droits légaux contre le vendeur du produit. Ces droits légaux ne sont pas limités par notre garantie présentée par la suite. Conditions de garantie Le délai de garantie débute avec la date d’achat. Veuillez conserver soigneusement le ticket de caisse original. En effet, ce document vous sera réclamé comme preuve d’achat. Si un défaut de matériel ou un défaut de fabrication se présente au cours des trois ans suivant la date d’achat de ce produit, nous réparons gratuitement ou remplaçons ce produit - selon notre choix. Cette garantie suppose que l’appareil défectueux et le justificatif d’achat (ticket de caisse) nous soient présentés durant cette période de trois ans et que la nature du manque et la manière dont celui-ci est apparu soient ex- BE plicités par écrit dans un bref courrier. Si le défaut est couvert par notre garantie, le produit vous sera retourné, réparé ou remplacé par un neuf. Aucune nouvelle période de garantie ne débute à la date de la réparation ou de l’échange du produit. Durée de garantie et demande légale en dommages-intérêts La durée de garantie n’est pas prolongée par la garantie. Ce point s’applique aussi aux pièces remplacées et réparées. Les dommages et les manques éventuellement constatés dès l’achat doivent immédiatement être signalés après le déballage. A l’expiration du délai de garantie les réparations occasionnelles sont à la charge de l’acheteur. Volume de la garantie L’appareil a été fabriqué avec soin, selon de sévères directives de qualité et il a été entièrement contrôlé avant la livraison. La garantie s’applique aux défauts de matériel ou aux défauts de fabrication. Cette garantie ne s’étend pas aux parties du produit qui sont exposées à une usure normale et peuvent être donc considérées comme des pièces d’usure (par exemple la lame) ou pour des dommages affectant les parties fragiles (par exemple les commutateurs). Cette garantie prend fin si le produit endommagé n’a pas été utilisé ou entretenu d’une façon conforme. Pour une utilisation appropriée du produit, il faut impérativement respecter toutes les instructions citées dans le manuel de l’opérateur. Les actions et les domaines d’utilisation déconseillés dans la notice d’utilisation ou vis-à-vis desquels une mise en garde est émise, doivent absolument être évités. 35 FR BE Marche à suivre dans le cas de garantie Pour garantir un traitement rapide de votre demande, veuillez suivre les instructions suivantes : • Tenez vous prêt à présenter, sur demande, le ticket de caisse et le numéro d’identification (IAN 332976_1907) comme preuve d’achat. • Vous trouverez le numéro d’article sur la plaque signalétique. • Si des pannes de fonctionnement ou d’autres manques apparaissent, prenez d’abord contact, par téléphone ou par e-Mail, avec le service après-vente dont les coordonnées sont indiquées ci-dessous. Vous recevrez alors des renseignements supplémentaires sur le déroulement de votre réclamation. • En cas de produit défectueux vous pouvez, après contact avec notre service clients, envoyer le produit, franco de port à l’adresse de service après-vente indiquée, accompagné du justificatif d’achat (ticket de caisse) et en indiquant quelle est la nature du défaut et quand celui-ci s’est produit. Pour éviter des problèmes d’acceptation et des frais supplémentaires, utilisez absolument seulement l’adresse qui vous est donnée. Assurez-vous que l’expédition ne se fait pas en port dû, comme marchandises encombrantes, envoi express ou autre taxe spéciale. Veuillez renvoyer l’appareil, y compris tous les accessoires livrés lors de l’achat et prenez toute mesure pour avoir un emballage de transport suffisamment sûr. Service Réparations Vous pouvez, contre paiement, faire exécuter par notre service, des réparations qui ne font pas partie de la garantie. Nous vous enverrons volontiers un devis estimatif. Nous ne pouvons traiter que des appareils qui ont été correctement emballés et qui ont envoyés suffisamment affranchis. Attention: veuillez renvoyer à notre agence de service votre appareil nettoyé et avec une note indiquant le défaut constaté. Les appareils envoyés en port dû - comme marchandises encombrantes, en envoi express ou avec toute autre taxe spéciale ne seront pas acceptés. Nous exécutons gratuitement la mise aux déchets de vos appareils défectueux renvoyés. Service-Center FR Service France Tel.: 0800 919270 E-Mail: [email protected] IAN 332976_1907 BE Service Belgique Tel.: 070 270 171 (0,15 EUR/Min.) E-Mail: [email protected] IAN 332976_1907 Importateur Veuillez noter que l’adresse suivante n’est pas une adresse de service après-vente. Contactez d’abord le service après-vente cité plus haut. Grizzly Tools GmbH & Co. KG Stockstädter Straße 20 DE-63762 Großostheim Allemagne www.grizzly-service.eu 36 NL BE Inhoud Inleiding Inleiding .................................... 37 Reglementair gebruik ................ 37 Algemene beschrijving ............... 37 Inhoud van de levering .................... 38 Overzicht ....................................... 38 Functiebeschrijving .......................... 38 Technische gegevens .................. 38 Veiligheidsaanwijzingen ............ 38 Pictogrammen op het apparaat: ........ 38 Pictogrammen in de gebruiksaanwijzing: ........................ 39 Veiligheidsaanwijzingen .................. 39 Veiligheidsaanwijzingen bij gebruik van de behangafstomer ................... 40 Veiligheidsvoorzieningen ................. 40 Inbedrijfstelling .......................... 41 Houdklemmen monteren................... 41 Slang en stoomplaat aansluiten ...................................... 41 Montage en vervanging van de grote stoomplaat ............................. 41 Water toevoegen of bijvullen ............ 41 Bediening .................................. 41 In- en uitschakelen ........................... 42 Behang strippen.............................. 42 Reiniging en onderhoud ............. 43 Reiniging ....................................... 43 Ontkalken ...................................... 43 Hartelijk gefeliciteerd met de aankoop van uw nieuw apparaat. Daarmee hebt u voor een hoogwaardig apparaat gekozen. Dit apparaat werd tijdens de productie op kwaliteit gecontroleerd en aan een eindcontrole onderworpen. De functionaliteit van uw apparaat is bijgevolg verzekerd. Opslag ..................................44 Afvalverwijdering/ milieubescherming ..................... 44 Reserveonderdelen/Accessoires . 44 Garantie .................................... 45 Reparatieservice ........................ 46 Service-Center ............................ 46 Importeur .................................. 46 Vertaling van de originele CE-conformiteitsverklaring .........81 Explosietekening ........................85 De gebruiksaanwijzing vormt een bestanddeel van dit apparaat. Ze omvat belangrijke aanwijzingen voor veiligheid, gebruik en afvalverwijdering. Maak u vóór het gebruik van het apparaat met alle bedienings- en veiligheidsinstructies vertrouwd. Gebruik het apparaat uitsluitend zoals beschreven en voor de aangegeven toepassingsgebieden. Bewaar de handleiding goed en overhandig alle documenten bij het doorgeven van het apparaat mee aan derden. Reglementair gebruik Het apparaat is voorzien voor het strippen van behang. Elk ander gebruik dat in deze handleiding niet expliciet wordt toegestaan, kan leiden tot schade aan het apparaat en ernstig risico voor de gebruiker. De fabrikant is niet aansprakelijk voor schade die voortvloeit uit oneigenlijk gebruik of uit een foute bediening. Dit apparaat is niet bedoeld voor commercieel gebruik. Bij commercieel gebruik vervalt de garantie. Algemene beschrijving De illustratie van de belangrijkste functionele onderdelen is te vinden op de uitklapbare pagina‘s. 37 NL BE Inhoud van de levering Technische gegevens Pak het apparaat uit en controleer of het volledig is: - Netsnoer met stekker - Keteltank - Stoomslang - Kleine stoomplaat - Grote stoomplaat - Houdklemmen - Schraper - Gebruiksaanwijzing Behangafstomer ............ PDTA 5 A1 Vermogen P ...............................2300 W Spanning U ............... 230-240V~, 50 Hz Stoomtijd .................................... 80 min Tankvolume ....................................... 5 l Stoomslanglengte ..............................4 m Stoomkracht ............................ 60 g/min Afmetingen (grote stoomplaat).20 x 28 cm Afmetingen (kleine stoomplaat) .18 x 8 cm Netsnoer ..........................................3 m Veiligheidsklasse .............................. IPX4 Gewicht (zonder toebehoren) ......... 935 g Gewicht (enkel toebehoren) ............ 815 g Overzicht 1 2 3 4 5 6 7 8 9 10 11 12 13 14 15 Netsnoer Houdklem Draaggreep keteltank Slangaansluiting keteltank Overdrukventiel Keteldeksel Keteltank Waterpeilindicator Schraper Handgreep kleine stoomplaat Kleine stoomplaat Geleiderail kleine stoomplaat Grote stoomplaat Stoomslang Schroef voor houdklem Veiligheidsaanwijzingen Bij het gebruik van het apparaat moeten de veiligheidsinstructies in acht worden genomen. Pictogrammen op het apparaat: Lees zorgvuldig de gebruiksaanwijzing door. Elektrische apparaten horen niet bij het huisvuil. Functiebeschrijving De stoombehangstripper met een stoomtijd van 80 minuten heeft een kleine en een grote stoomplaat en een stoomslang van 4 meter. De functie van de bedieningsonderdelen is hieronder beschreven. Let op! Heet oppervlak. 100°C Het werken met hete stoom kan tot ernstige brandwonden! Let op! Let op! Er bestaat een risico op brandwonden. 38 NL Richt stoom niet op uw eigen lichaam of op andere mensen en niet op dieren! Plaats het apparaat veilig en stevig op de vlakke vloer. Niet als opstap gebruiken WAARSCHUWING – Verbrandingsgevaar Pictogrammen in de gebruiksaanwijzing: Waarschuwingsbord met informatie voor het voorkomen van letsels of schade Gevaarsteken met informatie voor het voorkomen van letsels door elektrische schok Waarschuwingsbord met informatie voor het voorkomen van schade Waarschuwingsbord met informatie voor betere omgang met het apparaat Verbrandingsgevaar! Werk niet direct boven het hoofd. Draag veiligheidshandschoenen! Er kan stoom uit het apparaat ontsnappen. BE Veiligheidsaanwijzingen a) Dit apparaat kan door kinderen vanaf 8 jaar en ouder en tevens door personen met verminderde fysieke, zintuiglijke of mentale capaciteiten of met een gebrek aan ervaring en kennis gebruikt worden wanneer ze onder toezicht staan of met het oog op het gebruik van het apparaat geïnstrueerd werden en zich van de daaruit resulterende gevaren bewust zijn. Kinderen mogen niet met het apparaat spelen. Reiniging en gebruikersonderhoud mogen niet door kinderen zonder toezicht doorgevoerd worden. b) Zorg ervoor dat het apparaat niet rechtstreeks is gericht op elektrische apparaten en apparatuur die elektrische componenten bevatten, bijv. de binnenkant van ovens c) Na gebruik en vóór gebruikersonderhoud moet het apparaat worden losgekoppeld van het lichtnet door de stekker uit het stopcontact te trekken. d) Laat het apparaat niet onbeheerd achter wanneer het op het lichtnet is aangesloten. e) De vulopening mag tijdens gebruik niet worden geopend. Volg de instructies om het waterreservoir veilig te vullen. f) Gebruik het apparaat niet als het is gevallen, duidelijke schade vertoont of lekt. g) Houd kinderen tijdens gebruik en koeling uit de buurt van het apparaat. 39 NL BE Veiligheidsaanwijzingen bij gebruik van de behangafstomer a) Oppervlakken kunnen tijdens gebruik warm worden. Het keteldeksel kan tijdens bedrijf en tijdens het afkoelen heet zijn. b) Schakel het apparaat nooit in zonder dat het gevuld is met water! c) Dompel het apparaat nooit in vloeistoffen. d) Vul het apparaat alleen met leidingwater. Voeg nooit ontvlambare, giftige, bijtende of andere vloeistoffen toe. e) Maximaal vulpeil (5 l) niet overschrijden. f) Dek schakelaar en stopcontacten aan de wanden af, vóór u het behang afstoomt. g) Sluit de ketel- en schroefdoppen stevig af voor het opstarten (zie Inbedrijfstelling). h) Verbrandingsgevaar! Open tijdens gebruik nooit het keteldeksel en de schroefdoppen. Voordat u het keteldeksel en de schroefdoppen opent: Trek de stekker uit het stopcontact en laat het apparaat en het resterende water afkoelen. Open vervolgens alleen het keteldeksel of de schroefdoppen (zie Vullen of bijvullen van water). i) Als de stoomslang verstopt is en hierdoor overdruk ontstaat, trekt u de stekker uit het stopcontact. j) Zorg altijd voor een veilige stand tijdens het werken. k) Draag het apparaat altijd enkel aan de handgreep. Trek niet aan de kabel of aan de slang. 40 l) Rek de slang niet uit of knik hem niet. m) Plaats het apparaat veilig en stevig op de vlakke vloer. Stoot het apparaat niet omver. n) Verbrandingsgevaar! Als het apparaat omvalt, komt er heet water in de slang en kan dit aan het uiteinde van de slang ontsnappen. Schakel het apparaat onmiddellijk uit, trek de stekker uit het stopcontact, laat het afkoelen en leeg dan pas de slang. o) Pak de stoomplaat alleen aan het handvat vast. Veiligheidsvoorzieningen • Het keteldeksel (6) beschikt over een overdrukventiel (5). Daardoor kunnen stoom en wat heet water kunnen worden uitgescheiden als er overdruk is in de keteltank (7). Dit kan gebeuren als de stoomslang (14) verstopt is of de keteltank (7) te vol is. Trek in dat geval de stekker (1) uit het stopcontact en laat het apparaat afkoelen voordat u het controleert. Dit overdrukventiel (5) mag in geen geval worden geblokkeerd. Bij normaal gebruik worden via het overdrukventiel (5) kleine hoeveelheden stoom en water uitgescheiden. • Het keteldeksel (6) heeft een vacuümaflaatklep waarmee lucht het apparaat kan binnendringen wanneer een vacuüm wordt gecreëerd. • De stoomslang (14) is dubbelwandig om de oppervlaktetemperatuur te verlagen. • Het apparaat is uitgerust met een NL automatische beveiliging tegen oververhitting (thermische ontgrendeling), die wordt geactiveerd wanneer het apparaat ongevuld wordt verwarmd. Vul het apparaat met water (liefst heet). Na enige minuten produceert het apparaat weer stoom. • Pas op dat u het apparaat niet doet kantelen. Anders kan de automatische beveiliging tegen oververhitting (thermische ontgrendeling) worden geactiveerd. Inbedrijfstelling Houdklemmen monteren Plaats beide houdklemmen (2) op het apparaat en schroef deze vast met de schroeven (15). Zie detail . Slang en stoomplaat aansluiten 1. Schroef een uiteinde van de stoomslang (14) op de slangaansluiting (4) op de keteltank (7). 2. Schroef een uiteinde van de stoomslang (14) op de slangaansluiting van de kleine stoomplaat (11). Let erop dat de stoomslang correct is aangesloten. Open tijdens gebruik nooit de schroefvergrendeling. Montage en vervanging van de grote stoomplaat 1. Voor de montage en de vervanging van toebehoren het netsnoer (1) uittrekken. Wacht tot er geen stoom meer ontsnapt en het apparaat is afgekoeld. BE 2. Om de grote stoomplaat (13) te gebruiken, schuift u deze in de geleiderail (12) van de kleine stoomplaat (11). 3. Om de grote stoomplaat (13) te verwijderen, trekt u deze uit de geleiderail (12) van de kleine stoomplaat (11). Water toevoegen of bijvullen 1. Zorg ervoor dat de stekker (1) is losgekoppeld en dat het apparaat is afgekoeld. 2. Schroef het tankdeksel (6) af en verwijder deze. 3. Vul de keteltank (7) met zuiver leidingwater. Vul de keteltank (7) tot maximaal het MAX-merkteken op de waterniveauindicator (8) (maximaal 5 liter) 4. Schroef het tankdeksel (6) op. Let erop dat deze juist opgeschroefd is. Voor langere werktijden: Let op de minimummarkering op de waterpeilindicator (8) en vul tijdig water bij. Bediening Let op! Oppervlakken kunnen tijdens het gebruik heet worden. Het keteldeksel kan tijdens bedrijf en tijdens het afkoelen heet zijn. Verbrandingsgevaar! Werk niet direct boven het hoofd. Draag veiligheidshandschoenen! Er kan stoom uit het apparaat ontsnappen. Richt stoom niet op uw eigen lichaam of op andere mensen en niet op dieren! 41 NL BE • Controleer de staat van de bepleistering voordat u begint met werken, omdat stoom bij hoge temperaturen losse, poreuze of slecht gebonden bepleistering kan losmaken. De bepleistering kan ook gemakkelijker afschilferen in gebieden met scheuren of gaten. Ook mag de stoomplaat niet gedurende een lange periode op één plaats worden gehouden. U kunt losse bepleistering detecteren door met uw knokkels op sommige delen van de muur te tikken. Als dit een hol geluid produceert, is het raadzaam om uiterst voorzichtig te werk te gaan. • Test de behangstripper in elk geval eerst op een klein oppervlak van ongeveer 100 cm² voordat u met het eigenlijke werk begint. • Als u merkt dat de bepleistering losraakt of als u een knakgeluid hoort, stop dan met werken. De behangstripper kan veilig worden gebruikt voor gipsplaten/gipskartonplaten. • Vanwege de warmte die door dit product wordt gegenereerd, kunnen bepaalde oppervlakken, b.v. tapijten, gestoffeerde meubels, tafelbladen of kasten schade oplopen. Om te voorkomen dat de respectieve oppervlakken door de hitte van de keteltank (7) worden beschadigd, moet deze altijd op een houten plank of een soortgelijk voorwerp worden geplaatst. Stofhoezen of kranten zijn niet geschikt voor dit doel. • Houd de keteltank (7) enkel vast bij de draaggreep (3). • Meermaals gecoat of waterbestendig behang zijn moeilijk te verwijderen. Perforeer dergelijk behang met een puntige rol zodat de stoom op de pastalaag kan werken. • In het geval van vinylschuimbehang, 42 verwijder indien nodig eerst de bovenste vinyllaag en werk pas dan met de behangstripper. • Draag bij het verwijderen van plafondbehang steeds beschermende kledij. Houd rekening met condenswater dat zich op de stoomplaat verzamelt, omdat heet water kan afdruipen. Leeg de stoomplaat regelmatig en gebruik deze niet direct boven uw hoofd. • Plaats de stoomplaat (11/13) altijd in een geschikte houder als deze onbeheerd blijft (zelfs kort). Tijdens gebruik mag de stoomplaat niet naar de gebruiker wijzen. In- en uitschakelen 1 Vóór het inschakelen steekt u de stekker (1) in het stopcontact. 2 Afhankelijk van de temperatuur van het toegevoegde water heeft het apparaat tot maximaal 15 minuten nodig om stoom te produceren. Tijdens de verwarmingsfase kan er wat heet water uit de stoomplaat stromen. Leg de stoomplaat op een emmer om uitlopend water op te vangen. Laat het apparaat nooit onbeheerd achter wanneer het is ingeschakeld. 3 Voor het uitschakelen van het apparaat trekt u de stekker (1) uit het stopcontact. Behang strippen • De kleine stoomplaat (11) enkel bij de handgreep (10) vastnemen. • Het is het beste om vanaf het plafond tot aan de vloer te werken. • Gebruik de kleine stoomplaat (11) om behang in hoeken of nissen te strippen (zie Montage en vervanging van de NL grote stoomplaat). • Gebruik de grote stoomplaat (13) om behang te strippen op grote oppervlakken (zie Montage en vervanging van de grote stoomplaat). • Stoomplaat (11/13) op het behang plaatsen. Afhankelijk van het type behang en het oppervlak, verwijdert u de stoomplaat na ongeveer 10 seconden en trekt u het behang van boven naar beneden af of schraapt u het af met de schraper (9). • Tijdens het afschrapen de stoomplaat (11/13) herhaaldelijk op het behang plaatsen. Reiniging en onderhoud Laat reparatiewerkzaamheden en onderhoud, die niet zijn beschreven in deze handleiding, uitvoeren door een gespecialiseerd service-center. Gebruik uitsluitend originele onderdelen. Trek de stekker (1) uit het stopcontact en laat het apparaat vóór alle werkzaamheden afkoelen. Voer de onderstaande reinigings- en onderhoudswerkzaamheden regelmatig uit. Daardoor is een lange levensduur en een betrouwbare werking gegarandeerd. Reiniging Het apparaat mag niet met water worden afgespoeld of in water worden gedompeld. Er bestaat anders een risico op een elektrische schok. BE Gebruik geen reinigings- of oplosmiddelen. U kunt het apparaat op die manier zodanig beschadigen dat het niet meer kan worden gerepareerd. Ontkalken Voeg nooit ontvlambare, giftige, bijtende of andere vloeistoffen toe! Ontkalk het apparaat indien nodig, afhankelijk van de waterhardheid en de gebruiksfrequentie. Gebruik in de handel verkrijgbare ontkalkingsmiddelen, bij voorkeur citroenzuur. Volg de doserings- en toepassingsinstructies van de fabrikant van het ontkalkingsmiddel! Defecten door een gebrek aan ontkalking vallen niet onder de garantie. 1. Zorg ervoor dat de stekker (1) is losgekoppeld en dat het apparaat is afgekoeld. 2. Voeg een in de handel verkrijgbare ontkalkingsoplossing (2,5 liter) toe. 3. Verwijder de stoomslang (14) en steek de stekker (1) in het stopcontact. 4. Laat de ontkalkingsoplossing ongeveer 5 minuten koken. 5. Trek de stekker (1) uit het stopcontact en laat de oplossing nog ca. 10 minuten inwerken. 6. Laat het apparaat en de resterende oplossing afkoelen. Leeg het apparaat, spoel het met schoon water en laat het drogen. • Spoel de ketel af en toe met kraanwater totdat deze schoon is. 43 NL BE Opslag • Laat het apparaat minstens tien minuten afkoelen. • Leeg het apparaat. • Wikkel de stoomslang (14) rond de houdklemmen (2) aan de keteltank (7). • Bewaar het apparaat rechtop op een droge en tegen stof beschermde plaats, buiten het bereik van kinderen. Afvalverwijdering/ milieubescherming Elektrische apparaten horen niet thuis bij het huisvuil. • Lever het apparaat in bij een recyclepunt. De gebruikte kunststoffen en metalen delen kunnen naar soort worden gescheiden voor recycling. Vraag ons service-center om advies. • We voeren gratis uw defecte, ingezonden apparaten af. Reserveonderdelen/Accessoires Reserveonderdelen en accessoires verkrijgt u op www.grizzly-service.eu Ondervindt u problemen bij het orderproces, gebruik dan het contactformulier. Bij andere vragen neemt u contact op met het “Service-Center” (zie pag. 46). Pos. Gebruiksaanwijzing 44 Benaming Artikelnummer 2 – 8, 15 Keteltank compleet 91105685 14 Stoomslang 91105686 10 – 13 stoomplaat compleet 91105687 NL Garantie Geachte cliënte, geachte klant, U krijgt op dit apparaat 3 jaar garantie, te rekenen vanaf de datum van aankoop. Ingeval van gebreken aan dit apparaat heeft u tegenover de verkoper van het apparaat wettelijke rechten. Deze wettelijke rechten worden door onze hierna beschreven garantie niet beperkt. Garantievoorwaarden De garantietermijn begint met de datum van aankoop. Gelieve de originele kassabon goed te bewaren. Dit document wordt als bewijs van de aankoop benodigd. Indien er zich binnen drie jaar, te rekenen vanaf de datum van aankoop van dit apparaat, een materiaal- of fabricagefout voordoet, wordt het apparaat door ons – naar onze keuze – voor u gratis gerepareerd of vervangen. Deze garantievergoeding stelt voorop dat binnen de termijn van drie jaar het defecte apparaat en het bewijs van aankoop (kassabon) voorgelegd en dat schriftelijk kort beschreven wordt, waarin het gebrek bestaat en wanneer het zich voorgedaan heeft. Als het defect door onze garantie gedekt is, krijgt u het gerepareerde of een nieuw apparaat terug. Met herstelling of uitwisseling van het apparaat begint er geen nieuwe garantieperiode. Garantieperiode en wettelijke kwaliteitsgarantie De garantieperiode wordt door de garantievergoeding niet verlengd. Dit geldt ook voor vervangen en gerepareerde onderdelen. Eventueel al bij de aankoop bestaande beschadigingen en gebreken moeten onmiddellijk na het uitpakken gemeld worden. Na het verstrijken van de garan- BE tieperiode tot stand komende reparaties worden tegen verplichte betaling van de kosten uitgevoerd. Omvang van de garantie Het apparaat werd volgens strikte kwaliteitsrichtlijnen zorgvuldig geproduceerd en vóór aflevering nauwgezet getest. De garantievergoeding geldt voor materiaal- of fabricagefouten. Deze garantie is niet van toepassing op apparaatonderdelen, die aan een normale slijtage blootgesteld zijn en daarom als aan slijtage onderhevige onderdelen beschouwd kunnen worden (b.v. borstels) of op beschadigingen aan breekbare onderdelen (b.v. schakelaars). Deze garantie valt weg wanneer het apparaat beschadigd, niet oordeelkundig gebruikt of niet onderhouden werd. Voor een vakkundig gebruik van het apparaat dienen alle in de gebruiksaanwijzing vermelde aanwijzingen nauwgezet in acht genomen te worden. Gebruiksdoeleinden en handelingen, die in de gebruiksaanwijzing afgeraden worden of waarvoor gewaarschuwd wordt, dienen onvoorwaardelijk vermeden te worden. Het apparaat is uitsluitend voor het privéen niet voor het commerciële gebruik bestemd. Bij een verkeerde of onoordeelkundige behandeling, toepassing van geweld en bij ingrepen, die niet door het door ons geautoriseerde servicefiliaal doorgevoerd werden, valt de garantie weg. Afhandeling ingeval van garantie Gelieve aan de volgende aanwijzingen gevolg te geven om een snelle behandeling van uw verzoek te garanderen: • Gelieve voor alle aanvragen de kassabon en het identificatienummer 45 NL BE (IAN 332976_1907) als bewijs van de aankoop klaar te houden. • Gelieve het artikelnummer uit het typeplaatje. • Indien er zich functiefouten of andere gebreken voordien, contacteert u in eerste instantie de hierna vernoemde serviceafdeling telefonisch of per e-mail. U krijgt dan bijkomende informatie over de afhandeling van uw klacht. • Een als defect geregistreerd apparaat kunt u, na overleg met onze klantenservice, mits toevoeging van het bewijs van aankoop (kassabon) en de vermelding, waarin het gebrek bestaat en wanneer het zich voorgedaan heeft, voor u franco naar het u medegedeelde serviceadres zenden. Om problemen bij de acceptatie en extra kosten te vermijden, maakt u onvoorwaardelijk uitsluitend gebruik van het adres, dat u medegedeeld wordt. Zorg ervoor dat de verzending niet ongefrankeerd, als volumegoed, per expresse of via een andere speciale verzendingswijze plaatsvindt. Gelieve het apparaat met inbegrip van alle bij de aankoop bijgeleverde accessoires in te zenden en voor een voldoende veilige transportverpakking te zorgen. Reparatieservice U kunt reparaties, die niet onder de garantie vallen, tegen berekening door ons servicefiliaal laten doorvoeren. Zij maakt graag voor u een kostenraming op. Wij kunnen uitsluitend apparaten behandelen, die voldoende verpakt en gefrankeerd ingezonden werden. Opgelet: Gelieve uw apparaat gereinigd en met een aanwijzing op het defect naar ons servicefiliaal te zenden. Ongefrankeerd – als volumegoed, per 46 expresse of via een andere speciale verzendingswijze – ingezonden apparaten worden niet geaccepteerd. De afvalverwerking van uw defecte ingezonden apparaten voeren wij gratis door. Service-Center Service Nederland NL Tel.: 0900 0400223 (0,10 EUR/Min.) E-Mail: [email protected] IAN 332976_1907 Service België BE Tel.: 070 270 171 (0,15 EUR/Min.) E-Mail: [email protected] IAN 332976_1907 Importeur Gelieve in acht te nemen dat het volgende adres geen serviceadres is. Contacteer in eerste instantie het hoger vermelde servicecenter. Grizzly Tools GmbH & Co. KG Stockstädter Straße 20 63762 Großostheim Duitsland www.grizzly-service.eu PL Spis tresci Wstęp Wstęp ........................................ 47 Użytkowanie zgodne z przeznaczeniem ......................... 47 Opis ogólny ............................... 48 Zakres dostawy .............................. 48 Zestawienie elementów urządzenia ... 48 Opis funkcji.................................... 48 Wskazówki bezpieczeństwa ...... 48 Symbole graficzne na urządzeniu: .... 48 Symbole zastosowane w instrukcji: ....................................... 49 Wskazówki bezpieczeństwa ............ 49 Wskazówki bezpieczeństwa dotyczące użytkowania parowego zdzieraka do tapet ......................................... 50 Zabezpieczenia .............................. 51 Uruchamianie urządzenia .......... 51 Zamontować zaciski mocujące ......... 51 Podłączanie przewodu wężowego i płyty parowej ................................. 51 Montaż i wymiana dużej płyty parowej ......................................... 51 Napełnianie lub uzupełnianie wody .. 52 Obsługa..................................... 52 Włączanie i wyłączanie .................. 53 Zdzieranie tapet ............................. 53 Czyszczenie i konserwacja ......... 54 Czyszczenie ................................... 54 Odkamienianie ............................... 54 Przechowywanie ....................... 55 Utylizacja / ochrona środowiska 55 Części zamienne / Akcesoria ...... 55 Gwarancja ................................. 56 Serwis naprawczy ..................... 57 Service-Center ............................ 57 Importer .................................... 57 Tłumaczenie oryginalnej deklaracji zgodności WE ............. 82 Rysunek samorozwijający..........85 Gratulujemy zakupu nowego urządzenia. Zdecydowali się Państwo na zakup wartościowego produktu. Niniejsze urządzenie sprawdzono w trakcie produkcji pod kątem jakości, a także dokonano jego kontroli ostatecznej. W ten sposób zapewniona jest jego sprawność. Instrukcja obsługi jest częścią składową produktu. Zawiera ona ważne wskazówki dotyczące bezpieczeństwa, eksploatacji i utylizacji. Przed rozpoczęciem użytkowania produktu należy się zapoznać ze wszystkimi wskazówkami dotyczącymi obsługi i bezpieczeństwa. Produkt należy użytkować tylko zgodnie z opisem i podanym przeznaczeniem. Instrukcję należy przechowywać starannie, a w przypadku przekazania produktu osobom trzecim należy dostarczyć nabywcy kompletną dokumentację. Użytkowanie zgodne z przeznaczeniem Urządzenie jest przeznaczone do zrywania tapet. Każdy inny rodzaj zastosowania, który nie został wyraźnie dopuszczony w niniejszej instrukcji, może prowadzić do uszkodzenia urządzenia i stanowić źródło poważnych niebezpieczeństw dla użytkownika. Producent nie odpowiada za szkody spowodowane użyciem urządzenia w sposób niezgodny z przeznaczeniem lub jego nieprawidłową obsługą. Niniejsze urządzenie nie nadaje się do użytku profesjonalnego. Użytkowanie urządzenia do celów komercyjnych powoduje utratę gwarancji. 47 PL Opis ogólny Rysunek z najważniejszymi elementami funkcjonalnymi znajduje się na rozkładanych stronach. Zakres dostawy Rozpakuj urządzenie i sprawdź, czy jest kompletne: - Kabel zasilający z wtyczką - Bojler - Wężowy przewód parowy - Mała płyta parowa - Duża płyta parowa - Zaciski mocujące - Skrobak - instrukcja obsługi Zestawienie elementów urządzenia 1 2 3 4 5 6 7 8 9 10 11 12 13 14 15 Kabel zasilający Zaciski mocujące Uchwyt do przenoszenia bojlera Przyłącze przewodu wężowego do bojlera Zawór nadciśnieniowy Pokrywa zbiornika Bojler Wskaźnik poziomu wody Skrobak Uchwyt małej płyty parowej Mała płyta parowa Prowadnica szynowa małej płyty parowej Duża płyta parowa Wężowy przewód parowy Śruba do zacisków mocujących Opis funkcji Urządzenie parowe do zdzierania tapet z czasem parowania 80 minut jest wyposażone w małą i dużą płytę parową oraz w wężowy przewód parowy o długości 4 metrów. Funkcje elementów obsługowych podano w poniższych opisach. Dane techniczne Urządzenie parowe do zdzierania tapet .............................. PDTA 5 A1 Moc P.......................................2300 W Napięcie U ............... 230-240V~, 50 Hz Czas parowania .......................... 80 min Pojemność zbiornika........................... 5 l Długość węża parowego ...................4 m Intensywność parowania ........... 60 g/min Rozmiar (duża płyta parowa) .20 x 28 cm Rozmiar (mała płyta parowa) ... 18 x 8 cm Kabel zasilający ...............................3 m Klasa ochrony.................................. IPX4 Waga (bez akcesoriów)................. 935 g Waga (z akcesoriami) ................... 815 g Wskazówki bezpieczeństwa Podczas pracy z urządzeniem należy przestrzegać wskazówek bezpieczeństwa. Symbole graficzne na urządzeniu: Uważnie przeczytać instrukcję obsługi. Urządzeń elektrycznych nie należy wyrzucać razem z odpadami komunalnymi. 48 PL Uwaga! Gorąca powierzchnia. 100°C Praca z gorącą parą może być przyczyną poważnych oparzeń! Uwaga! Uwaga! Niebezpieczeństwo poparzenia. Nie kierować strumienia pary na własne ciało oraz na inne osoby i zwierzęta! Urządzenie należy ustawić stabilnie na płaskim podłożu. Nie wchodzić na urządzenie OSTRZEŻENIE – Ryzyko poparzenia Symbole zastosowane w instrukcji: Symbol zagrożenia z informacjami o zapobieganiu obrażeniom ciała lub szkodom materialnym Symbol zagrożenia z informacjami dotyczącymi zapobiegania obrażeniom ciała w wyniku porażenia prądem elektrycznym Znak nakazu z informacjami dotyczącymi zapobiegania szkodom Znak informacyjny z informacjami ułatwiającymi obsługę urządzenia Ryzyko poparzenia ! Nie wykonywać prac bezpośrednio nad głową. Nosić rękawice ochronne! Z urządzenia może się wydostawać para wodna. Wskazówki bezpieczeństwa a) Urządzenie to mogą obsługiwać dzieci od 8 roku życia, a także osoby o zmniejszonych zdolnościach fizycznych, zmysłowych czy umysłowych, czy też osoby dysponujące niedostatecznym doświadczeniem oraz wiedzą, pod warunkiem, że praca odbywa się pod nadzorem albo po instruktażu w zakresie bezpiecznej eksploatacji urządzenia i ze zrozumieniem istniejących zagrożeń. Dzieciom nie wolno bawić się urządzeniem. Dzieciom nie wolno bez nadzoru wykonywać czyszczenia i konserwacji. b) Należy pamiętać, aby nie kierować urządzenia bezpośrednio na inne urządzenia wyposażone w instalacje elektryczne, np. na wewnętrzne części piecyków c) Po zakończeniu użytkowania i przed rozpoczęciem zabiegów konserwacyjnych należy 49 PL d) e) f) g) odłączyć urządzeni od sieci zasilającej, wyciągając wtyczkę z gniazda. Nie pozostawiać urządzenia bez nadzoru, jeśli jest ono podłączone do sieci. Podczas użytkowania urządzenia nie wolno otwierać wlewu. Należy postępować zgodnie z instrukcjami bezpiecznego napełniania zbiornika z wodą. Urządzenia nie należy używać po upadku lub gdy wykazuje ono widoczne uszkodzenia lub gdy jest nieszczelne. Podczas użytkowania i wystudzania urządzenia w pobliżu nie mogą przebywać dzieci. Wskazówki bezpieczeństwa dotyczące użytkowania parowego zdzieraka do tapet a) Podczas użytkowania może dochodzić do nagrzewania się powierzchni. Pokrywa bojlera może być podczas pracy i wystudzania gorąca. b) Nigdy nie włączać urządzenia, które nie jest napełnione wodą! c) Nigdy nie zanurzać urządzenia w płynach. d) Urządzenie należy napełniać jedynie wodą z sieci. Nie dodawać palnych, toksycznych, żrących lub innych płynów. e) Nie przekraczać maksymalnej ilości napełniania (5 l). f) Przed rozpoczęciem zdzierania tapet należy zakryć przełączniki i gniazdka ścienne w wodo- i paroszczelny sposób. 50 g) Przed uruchomieniem urządzenia dobrze zamknąć bojler i zakręcić inne zamknięcia (patrz rozdział „Uruchamianie urządzenia”).“ h) Ryzyko poparzenia! Nie otwierać pokrywy bojlera i nie odkręcać innych zamknięć podczas pracy urządzenia. Przed otwarciem pokrywy bojlera i odkręceniem zamknięć: Wyciągnąć wtyczkę z gniazdka i odczekać do wystudzenia urządzenia i pozostałej w nim wody. Dopiero potem otworzyć pokrywę bojlera lub zakręcane zamknięcia (patrz rozdział „Napełnianie lub uzupełnianie wody”). i) W przypadku, gdy wężowy przewód parowy jest zatkany, w wyniku czego powstaje nadciśnienie, należy wyciągnąć wtyczkę z gniazda sieciowego. j) Podczas prac cały czas pamiętać o stabilnej postawie. k) Urządzenie należy przenosić jedynie przy użyciu uchwytu. Nie ciągnąć za kabel lub za przewód wężowy. l) Nie rozciągać i nie zaginać przewodu wężowego. m) Urządzenie należy ustawić stabilnie na płaskim podłożu. Nie uderzać w urządzenie. n) Ryzyko poparzenia! W przypadku, gdy urządzenie się wywróci, gorąca woda dostaje się do przewodu wężowego i może wyciec z jego końca. Urządzenie należy natychmiast wyłączyć, wyciągnąć wtyczkę z gniazdka, wystudzić urządzeni i dopiero wtedy opróżnić wąż. PL o) Płytę parową dotykać jedynie za uchwyt. Zabezpieczenia • Na pokrywie bojlera (6) znajduje się zawór nadciśnieniowy (5). Dzięki niemu można upuścić parę i niewielką ilość gorącej wody, gdy w bojlerze (7) będzie panowało nadciśnienie. Do takiej sytuacji może dochodzić, gdy wężowy przewód parowy (14) będzie niedrożny lub gdy w bojlerze (7) będzie zbyt dużo wody. W takiej sytuacji należy wciągnąć wtyczkę (1) z gniazda sieciowego i odczekać do wystudzenia urządzenia przed rozpoczęciem jego kontroli. Zawór nadciśnieniowy (5) może w określonych okolicznościach się zablokować. W normalnym trybie użytkowania (5) przez zawór nadciśnieniowy wydostają się niewielki ilości pary i wody. • Pokrywa bojlera (6) jest wyposażona w zawór usuwający próżnię, za pomocą którego do urządzenia może się przedostawać powietrze, gdy powstanie w nim próżnia. • Wężowy przewód parowy (14) jest dwuścienny, dzięki czemu temperatura jego powierzchni jest niższa. • Urządzenie jest wyposażone w automatyczne zabezpieczenia przed przegrzaniem (wyzwalacz termiczny), które sygnalizuje podgrzewanie nienapełnionego wodą urządzenia. Urządzenie należy napełnić (najlepiej gorącą) wodą. Po kilku minutach urządzenie będzie ponownie generować parę. • Należy uważać, by nie przechylać urządzenia. W przeciwnym razie może zadziałać zabezpieczenie przed przegrzaniem (wyzwalacz termostatu). Uruchamianie urządzenia Zamontować zaciski mocujące Założyć obydwa zaciski mocujące (2) na urządzeniu i przykręcić je śrubami (15). Patrz szczegóły . Podłączanie przewodu wężowego i płyty parowej 1. Wkręcić jeden koniec wężowego przewodu parowego (14) na przyłącze przewodu wężowego (4) na bojlerze (7). 2. Drugi koniec wężowego przewodu parowego (14) wkręcić na przyłącze przewodu wężowego małej płyty parowej (11). Należy pamiętać o prawidłowym podłączeniu wężowego przewodu parowego. Nigdy nie otwierać zakręcanych zamknięć podczas pracy urządzenia. Montaż i wymiana dużej płyty parowej 1. Przed montażem i wymianą akcesoriów należy wyciągnąć wtyczkę (1) z gniazdka. Odczekać do momentu, w którym para przestanie się wydostawać z urządzenia oraz do wystudzenia urządzenia. 51 PL 2. Aby użyć dużą płytę parową (13), należy ją wsunąć w prowadnicę szynową (12) małej płyty parowej (11). 3. Aby zdemontować dużą płytę parową (13), należy ją wysunąć z prowadnicy szynowej (12) małej płyty parowej (11). Napełnianie lub uzupełnianie wody 1. Należy się upewnić, że wtyczka (1) została wyciągnięta z gniazdka, a urządzenie jest wystudzone. 2. Odkręcić pokrywę bojlera (6) i zdjąć ją. 3. Napełnić bojler (7) czystą wodą z sieci wodociągowej. Bojler (7) należy napełniać jedynie do znacznika maksymalnego poziomu wskaźnika poziomu wody (8) (maksymalnie 5 litrów) 4. Wkręcić pokrywę bojlera (6). Należy zwracać uwagę na prawidłowe zakręcenie pokrywy. W przypadku dłuższego czasu pracy: Należy uwzględniać wskaźnik poziomu minimalnego (8) i w odpowiednim momencie dolewać wody. Obsługa Uwaga! Podczas użytkowania może dochodzić do nagrzewania się powierzchni. Pokrywa bojlera może być podczas pracy i wystudzania gorąca. Ryzyko poparzenia! Nie wykonywać prac 52 bezpośrednio nad głową. Nosić rękawice ochronne! Z urządzenia może się wydostawać para wodna. Nie kierować strumienia pary na własne ciało oraz na inne osoby i zwierzęta! • Przed rozpoczęciem prac należy skontrolować stan tynku, ponieważ gorąca para może rozpuszczać luźny, porowaty lub słabo związany tynk. Tynk może odchodzić łatwiej od ściany w strefach uskoków i dziur. Płyty parowej nie należy przez dłuższy czas przytrzymywać w jednym miejscu. Obecność luźnego tynku można rozpoznać, opukując kilka miejsc ściany piąstką. Jeśli podczas tych zabiegów da się usłyszeć głuchy dźwięk, należy dalej postępować z zachowaniem najwyższej ostrożności. • Przed rozpoczęciem właściwych prac należy zawsze wykonać test zdzieracza taper na niewielkim fragmencie tapety o powierzchni ok. 100 cm². • W przypadku stwierdzenia, że dochodzi do odpadania tynku lub jeśli dają się słyszeć jego rozłupywanie, należy wstrzymać prace. Zdzieracz do tapet można bezpiecznie wykorzystywać do prac na powierzchniach z płyt gipsowych/gipsowo-kartonowych. • Ciepło generowane przez niniejsze urządzenie może się przyczyniać do powstawania szkód na określonych powierzchniach, np. na dywanach, tapicerowanych meblach, blatach stołów lub na szafach. Aby nie uszkodzić powierzchni w kontakcie z ciepłem generowanym przez bojler (7) należy urządzenie zawsze ustawiać na drew- PL • • • • • nianej desce lub innym podobnym przedmiocie. Nie należy do tego celu stosować osłon przeciwpyłowych lub gazet. Bojler (7) należy chwytać jedynie za uchwyt (3). Tapety z kilkoma warstwami farby lub tapety wodoodporne można usuwać ze ścian, choć jest to trudniejsze niż w przypadku innych tapet. Tego typu tapety należy podziurawić przy użyciu wałka z kolcami, tak by para mogła oddziaływać na warstwę kleju. W przypadku tapet z pianką winylową należy w razie potrzeby w pierwszej kolejności zedrzeć warstwę winylu, po czym dopiero wtedy przeprowadzić prace z użyciem urządzenia do zdzierania tapet. W ramach usuwania tapet z sufitu należy zawsze nosić odzież ochronną. Należy zwracać uwagę na osadzający się na płycie parowej kondensat. Gorąca woda może bowiem kapać z płyty. Płyty parowe należy regularnie opróżniać i nie stosować ich bezpośrednio nad głową. Płytę parową (11/13) należy umieszczać w odpowiednim pojemniku, gdy pozostawiamy ją bez nadzoru (nawet na krótki czas). W trakcie korzystania z płyty parowej nigdy nie należy jej zwracać w kierunku użytkownika. Włączanie i wyłączanie 1 W celu włączenia urządzenia należy włożyć wtyczkę (1) do gniazdka. 2 W zależności od temperatury wody, którą wypełnione jest urządzenie, należy odczekać do 15 minut, aż urządzenie będzie w stanie generować parę. Podczas fazy nagrzewania z płyty parowej może wyciekać niewielka ilość gorącej wody. Płytę parową należy odkładać na wiadrze, tak by mogła do niego spływać woda. Nigdy nie pozostawiać włączonego urządzenia bez nadzoru. 3 W celu wyłączenia urządzenia należy wyciągnąć wtyczkę sieciową (1) z gniazdka. Zdzieranie tapet • Małą płytę parową (11) należy chwytać jedynie za uchwyt (10). • Prace najlepiej jest prowadzić od sufitu pokoju w kierunku podłogi. • Do zdzierania tapet w narożnikach lub we wnękach należy stosować małą płytę parową (11) (patrz rozdział „Montaż i wymiana małej płyty parowej”). • Do zdzierania tapet na dużych powierzchniach należy stosować dużą płytę parową (13) (patrz rozdział „Montaż i wymiana dużej płyty parowej”). • Przyłożyć płytę parową (11/13) do tapety. W zależności od rodzaju tapety i podłoża odsunąć po ok. 10 sekundach płytę parową i ściągnąć tapetę ruchem od góry do dołu lub zdrapać za pomocą skrobaka (9). • Podczas zdrapywania kilka razy przykładać płytę parową (11/13) na tapetę. 53 PL Czyszczenie i konserwacja Wykonanie prac naprawczych i konserwacyjnych, które nie zostały opisane w tej instrukcji, powierzać naszym specjalistom z działu serwisowego. Stosować tylko oryginalne części. Wyciągnąć wtyczkę (1) z gniazda sieciowego i odczekać do wystudzenia urządzenia przed rozpoczęciem wszelkich prac. Regularnie wykonywać opisane poniżej zabiegi czyszczenia i konserwacji. Zapewni to długie i niezawodne użytkowanie urządzenia. Czyszczenie Nie wolno chlapać wodą na urządzenie, ani wkładać urządzenia do wody. Istnieje niebezpieczeństwo porażenia prądem elektrycznym. • Bojler należy od czasu do czasu przepłukiwać wodą z sieci wodociągowej, do momentu, w którym będzie ona czysta. Nie stosować żadnych środków myjących ani rozpuszczalników. Mogłoby to spowodować nieodwracalne uszkodzenie urządzenia. 54 Odkamienianie Nigdy nie dodawać palnych, toksycznych, żrących lub innych płynów! W razie potrzeby należy odkamienić urządzenie, w zależności od twardości wody i częstotliwości użytkowania. Należy stosować dostępne w ogólnym handlu środki odkamieniające, najlepiej kwas cytrynowy. W zakresie dozowania i zastosowania należy postępować zgodnie z zaleceniami producenta środków odkamieniających! Uszkodzenia wynikające z nieprzeprowadzania zabiegów odkamieniających nie podlegają gwarancji. 1 Należy się upewnić, że wtyczka (1) została wyciągnięta z gniazdka, a urządzenie jest wystudzone. 2. Wlać roztwór środka do odkamieniania dostępnego w ogólnym handlu (2,5 l). 3. Zdjąć wężowy przewód parowy (14) i wetknąć wtyczkę (1) do gniazdka. 4. Roztwór odkamieniający gotować przez ok. 5 minut. 5. Wyciągnąć wtyczkę sieciową (1) z gniazdka i odczekać jeszcze ok. 10 minut, aby roztwór mógł odpowiednio zadziałać. 6. Wystudzić urządzenie i pozostałą ilość roztworu. Opróżnić urządzenie, przepłukać czystą wodą i pozostawić do wyschnięcia. PL Przechowywanie • Urządzeni należy wystudzić przez co najmniej dziesięć minut. • Opróżnić urządzenie. • Owinąć wężowy przewód parowy (14) wokół zacisków mocujących (2)na bojlerze (7). • Urządzenie przechowywać w pozycji pionowej w suchym i chronionym przed kurzem miejscu, poza zasięgiem dzieci. Utylizacja / ochrona środowiska Urządzeń elektrycznych nie należy wyrzucać razem ze śmieciami domowymi. • Oddaj urządzenie do punktu recyklingu. Zastosowane elementy z tworzywa sztucznego i metali można posortować według rodzajów odpadów i w ten sposób przekazać do punktu recyklingu. Odpowiednie informacje można uzyskać w naszym dziale serwisowym. • Przesłane do nas urządzenia poddamy bezpłatnie utylizacji. Części zamienne / Akcesoria Części zamienne i akcesoria można zakupić na www.grizzly-service.eu W przypadku problemów z zamawianiem należy skorzystać z formularza kontaktowego. W razie kolejnych pytań należy zwracać się do „Service-Center” (patrz strona 57). Pos. Instrukcja obsługi Oznaczenie Nr. katalogowe 2 – 8, 15 Bojler kompletny 91105685 14 Wężowy przewód parowy 91105686 10 – 13 płyta parowa kompletny 91105687 55 PL Gwarancja Szanowna Klientko, Szanowny Kliencie, na zakupione urządzenie otrzymują Państwo 3 lata gwarancji od daty zakupu. W przypadku wad tego produktu przysługują Państwu ustawowe prawa w stosunku do sprzedawcy produktu. Prawa te nie są ograniczone przez naszą przedstawioną niżej gwarancję. Warunki gwarancji Okres gwarancji rozpoczyna się z datą zakupu. Prosimy zachować oryginalny paragon. Będzie on potrzebny jako dowód zakupu. Jeśli w okresie trzech lat od daty zakupu tego produktu wystąpi wada materiałowa lub fabryczna, produkt zostanie – wedle naszego wyboru – bezpłatnie naprawiony lub wymieniony. Gwarancja zakłada, że w okresie trzech lat uszkodzone urządzenie zostanie przesłane wraz z dowodem zakupu (paragonem) z krótkim opisem, gdzie wystąpiła wada i kiedy się pojawiła. Jeśli defekt jest objęty naszą gwarancją, otrzymają Państwo z powrotem naprawiony lub nowy produkt. (Wraz z naprawą lub wymianą produktu okres gwarancji nie biegnie na nowo.) Okres gwarancji i ustawowe roszczenia z tytułu wad Okres gwarancji nie wydłuża się z powodu świadczenia gwarancyjnego. Obowiązuje to również dla wymienionych lub naprawionych części. Ewentualne uszkodzenia i wady istniejące już w momencie zakupu należy zgłosić bezzwłocznie po rozpakowaniu. Naprawy przypadające po upływie okresu gwarancji są odpłatne. 56 Zakres gwarancji Urządzenie wyprodukowano z zachowaniem staranności zgodnie z surowymi normami jakościowymi i dokładnie sprawdzono przed wysyłką. Gwarancja obowiązuje dla wad materiałowych lub fabrycznych. Gwarancja nie rozciąga się na części produktu, które podlegają normalnemu zużyciu i można je uznać za części zużywalne (np. szczotki), oraz na uszkodzenia części delikatnych (np. przełączniki). Gwarancja przepada, jeśli produkt został uszkodzony, nie był zgodnie z przeznaczeniem użytkowany i konserwowany. Użytkowanie zgodnie z przeznaczeniem wiąże się z przestrzeganiem wszystkich wskazówek zawartych w instrukcji obsługi. Należy bezwzględnie unikać zastosowań i działań, których odradza się lub przed którymi ostrzega się w instrukcji obsługi. Produkt jest przeznaczony do użytku prywatnego, a nie komercyjnego. W przypadku niewłaściwego i nieodpowiedniego obchodzenia się z urządzeniem, stosowania „na siłę” i zabiegów, które nie zostały przeprowadzone przez nasz autoryzowany oddział, gwarancja wygasa. Realizacja w przypadkach objętych gwarancją Aby zagwarantować szybkie przetworzenie Państwa sprawy, prosimy o przestrzeganie poniższych wskazówek: • W przypadku wszelkich zapytań prosimy o przygotowanie paragonu i numeru identyfikacyjnu jako dowodu zakupu (IAN 332976_1907). • Numer artykułu znajduje się na tabliczce znamionowej. • W przypadku wystąpienia usterek lub innych wad prosimy o skontaktowanie się z wymienionym niżej działem ser- PL • wisowym telefonicznie lub mailowo. Uzyskają Państwo wówczas szczegółowe informacje na temat realizacji reklamacji. Uszkodzony produkt mogą Państwo wysłać po skontaktowaniu się z naszym działem obsługi klienta, załączając dowód zakupu (paragon) i określając, na czym polega wada i kiedy wystąpiła, bezpłatnie na podany adres serwisu. Aby uniknąć problemów z odbiorem i dodatkowych kosztów, prosimy o wysłanie przesyłki na adres, który Państwu podano. Należy się upewnić, żeby wysyłka nie nastąpiła odpłatnie, jako ponadwymiarowa, ekspresowo lub na innych specjalnych warunkach. Prosimy o przesłanie urządzenia wraz ze wszystkimi częściami wyposażenia otrzymanymi przy zakupie i zadbanie o wystarczająco bezpieczne opakowanie. Service-Center Serwis Polska PL Tel.: 22 397 4996 E-Mail: [email protected] IAN 332976_1907 Importer Prosimy mieć na uwadze, że poniższy adres nie jest adresem serwisu. Prosimy o kontakt z wymienionym wyżej centrum serwisowym. Grizzly Tools GmbH & Co. KG Stockstädter Straße 20 DE-63762 Großostheim NIEMCY www.grizzly-service.eu Serwis naprawczy Naprawy, które nie są objęte gwarancją, można zlecić odpłatnie w naszym oddziale serwisowym. Serwis sporządzi Państwu kosztorys naprawy. Podejmujemy się wyłącznie naprawy urządzeń, które zostały prawidłowo zapakowane i ofrankowane. Uwaga: Prosimy o przesłanie czystego urządzenia ze wskazaniem usterki. Urządzenia przesłane dla nas odpłatnie, jako przesyłka ponadwymiarowa, ekspresowa lub na innych warunkach specjalnych, nie zostaną odebrane. Utylizację przesłanych do nas uszkodzonych urządzeń przeprowadzamy bezpłatnie. 57 CZ Turinys Úvod Úvod.......................................... 58 Použití dle určení........................ 58 Obecný popis ............................. 58 Rozsah dodávky ............................. 59 Přehled .......................................... 59 Popis funkce ................................... 59 Technické údaje.......................... 59 Bezpečnostní pokyny ................. 59 Piktogram na přístroji:...................... 59 Symboly v návodu:.......................... 60 Bezpečnostní pokyny ....................... 60 Bezpečnostní pokyny při používání parního odstraňovače tapet .............. 60 Bezpečnostní zařízení...................... 61 Uvedení do provozu ................... 61 Montáž přídržných spon .................. 61 Připojení hadice a parní desky ......... 62 Montáž a výměna velké parní desky . 62 Nalití a dolití vody .......................... 62 Obsluha ..................................... 62 Zapnutí a vypnutí ............................ 63 Odstranění tapet ............................. 63 Čištění a údržba ......................... 63 Čištění ........................................... 64 Odvápnění..................................... 64 Blahopřejeme vám ke koupi vašeho nového přístroje. Rozhodli jste se pro vysoce kvalitní výrobek. Kvalita tohoto přístroje byla kontrolována během výroby a byla provedena také závěrečná kontrola. Tím je zaručena funkčnost přístroje. Skladování ...........................64 Likvidace/ochrana životního prostředí .................................... 65 Náhradní díly / Příslušenství ...... 65 Záruka ...................................... 66 Opravna .................................... 67 Service-Center ............................ 67 Dovozce ..................................... 67 Originalios EB atitikties deklaracijos vertimas ................. 83 Rozvinuté náčrtky ......................85 58 Návod k obsluze je součástí tohoto výrobku. Obsahuje důležité pokyny týkající se bezpečnosti, používání a likvidace. Před použitím výrobku se seznamte se všemi pokyny k obsluze a bezpečnosti. Výrobek používejte jen k popsaným účelům a v rámci uvedených oblastí použití. Návod dobře uschovejte a při předávání výrobku třetímu předejte i všechny podklady. Použití dle určení Přístroj je určen k odstraňování tapet. Jakékoliv jiné použití, které není v tomto návodu výslovně povoleno, může vést k poškození přístroje a pro uživatele představovat vážné nebezpečí. Výrobce neručí za škody způsobené nesprávným použitím nebo nesprávnou obsluhou. Tento přístroj není vhodný pro komerční využití. Při řemeslném použití záruka zaniká. Obecný popis Zobrazení nejdůležitějších funkčních dílů naleznete na výklopných stránkách. CZ Rozsah dodávky Technické údaje Vybalte přístroj a zkontrolujte, zda je kompletní: Parní odstraňovač tapet . PDTA 5 A1 Výkon P ....................................2300 W Napětí U................... 230-240V~, 50 Hz Doba páry .................................. 80 min Objem nádobky................................. 5 l Délka parní hadice............................4 m Parní síla ................................. 60 g/min Velikost (velká parní deska) .... 20 x 28 cm Velikost (malá parní deska)....... 18 x 8 cm Síťový kabel .....................................3 m Třída ochrany .................................. IPX4 Hmotnost (bez příslušenství) ............ 935 g Hmotnost (pouze příslušenství) ........ 815 g - síťový kabel se zástrčkou nádobka bojleru parní hadice malá parní deska velká parní deska přídržné spony škrabka návod k obsluze Přehled 1 síťový kabel 2 přídržná spona 3 rukojeť pro přenášení nádobky bojleru 4 přípojka hadice nádobky bojleru 5 přetlakový ventil 6 víko bojleru 7 nádobka bojleru 8 ukazatel hladiny vody 9 škrabka 10 rukojeť malé parní desky 11 malá parní deska 12 malá vodicí lišta Parní deska 13 velká parní deska 14 parní hadice 15 šroub přídržné spony Popis funkce Parní odstraňovač tapet s dobou páry 80 minut má malou a velkou parní desku a 4 metry dlouhou parní hadici. Funkci ovládacích prvků naleznete v následujícím popisu. Bezpečnostní pokyny Při používaní přístroje je třeba dodržovat bezpečnostní pokyny. Piktogram na přístroji: Pozorně si přečtěte návod k obsluze. Elektrická zařízení nepatří do domácího odpadu. Pozor! Horký povrch. 100°C Práce s horkou párou může vést k těžkému opaření! Pozor! Pozor! Hrozí nebezpečí popálení. Nesměrujte páru na své vlastní tělo ani na jiné lidi ani na zvířata! 59 CZ Postavte přístroj bezpečně a pevně na rovnou podlahu. Nepoužívejte jako stupátko VÝSTRAŽNÉ UPOZORNĚNÍ – Nebezpečí opaření b) Symboly v návodu: Označení nebezpečí s informacemi o zabránění zranění osob nebo hmotných škod c) Označení nebezpečí s informacemi o zabránění zranění osob v důsledku zasažení elektrickým proudem e) Označení nebezpečí s informacemi o zabránění škod Informační značka s informacemi pro lepší zacházení s přístrojem Nebezpečí opaření ! Nepracujte přímo nad hlavou. Noste ochranné rukavice! Z přístroje může unikat pára. Bezpečnostní pokyny a) Tento přístroj mohou používat děti od 8 roků jakož i osoby se sníženými fyzickými, senzorickými anebo mentálními schopnostmi, anebo s nedostatkem zkušeností a vědomostí, pokud 60 d) f) g) jsou pod dozorem anebo byli poučené o bezpečném používaní přístroje a rozumějí rizikům, které z toho vyplývají. Děti si s přístrojem nesmí hrát. Děti nesmí vykonávat čistění a údržbu bez dozoru. Ujistěte se, zda přístroj není přímo nasměrován na elektrická zařízení a zařízení, která obsahují elektrické součásti, např. vnitřek pecí Po použití a před údržbou uživatele se zařízení musí odpojit od sítě vytažením síťové zástrčky. Nenechávejte přístroj bez dozoru, pokud je zapojeno do sítě. Plnicí otvor se nesmí během používání otevírat. Postupujte podle pokynů pro bezpečné doplnění nádrže na vodu. Nepoužívejte přístroj, pokud spadl, má zjevná poškození nebo je netěsný. Během používání a ochlazení uuchovávejte přístroj mimo dosah dětí. Bezpečnostní pokyny při používání parního odstraňovače tapet a) Povrchy se mohou během použití zahřát. Víko bojleru může být během provozu a při ochlazování horké. b) Nikdy nezapínejte přístroj bez vody! c) Nikdy neponořujte přístroj do tekutin. d) Do přístroje nalijte pouze vodu z vodovodu. Nikdy nepřidávejte hořlavé, jedovaté, žíravé nebo jiné kapaliny. CZ e) Nesmí se překročit maximální množství naplnění (5 l). f) Před odstraněním tapety zakryjte spínače a zásuvky na stěnách tak, aby byly vodotěsné a odolné proti páře. g) Před uvedením do provozu pevně utáhněte uzávěry bojleru a šroubové uzávěry (viz Uvedení do provozu).“ h) Nebezpečí opaření! Během provozu nikdy neotevírejte víko bojleru a šroubové uzávěry. Před otevřením víka bojleru a odšroubováním šroubových uzávěrů: Vytáhněte síťovou zástrčku a nechte přístroj a zbývající vodu vychladnout. Až poté otevřete pouze víko bojleru nebo odšroubujte šroubové uzávěry (viz Nalití nebo dolití vody). i) Pokud je parní hadice ucpaná a vytvoří se tím přetlak, vytáhněte síťovou zástrčku ze zásuvky. j) Při práci vždy udržujte bezpečné postavení. k) Přístroj noste pouze za rukojeť. Netahejte za kabel ani za hadici. l) Hadici nenatahujte ani ji neohýbejte. m) Postavte přístroj bezpečně a pevně na rovnou podlahu. Přístroj nepřevracejte. n) Nebezpečí opaření! Pokud přístroj spadne, horká voda se dostane do hadice a může vytékaz z konce hadice. Okamžitě vypněte přístroj, vytáhněte síťovou zástrčku, nechte jej vychladnout a teprve poté vyprázdněte hadici. o) Parní desku uchopte pouze za rukojeť. Bezpečnostní zařízení • Víko bojleru (6) má přetlakový ventil (5). To znamená, že pára a trochu horké vody mohou uniknout, pokud je v nádobce bojleru (7) přetlak. K tomu může dojít, pokud je parní hadice (14) ucpaná nebo je-li nádobka bojleru (7) přeplněna. V takovém případě vytáhněte síťovou zástrčku (1) ze zásuvky a před kontrolou nechte přístroj vychladnout. Tento přetlakový ventil (5) nesmí být za žádných okolností blokován. Při normálním použití malé množství páry a vody unikne přes přetlakový ventil (5). • Víko bojleru (6) má vakuový uvolňovací ventil, který umožňuje vstup vzduchu do přístroje, když se vytvoří vakuum. • Ke snížení povrchové teploty je parní hadice (14) je dvojitá. • Přístroj je vybaven automatickou ochranou proti přehřátí (tepelný spouštěč), která se spustí, pokud je přístroj zahříván nenaplněný. Nalijte do přístroje (nejlépe horkou) vodu. Po několika minutách přístroj opět vytváří páru. • Dbejte na to, aby se přístroj nepřevrátil. Jinak se může aktivovat automatická ochrana proti přehřátí (tepelný spouštěč). Uvedení do provozu Montáž přídržných spon Nasaďte obě přídržné spony (2) na přístroj a sešroubujte tyto přiloženými šrouby (15). Viz detail . 61 CZ Připojení hadice a parní desky 1. Našroubujte jeden konec parní hadice (14) na přípojku hadice (4) na nádobce bojleru (7). 2. Našroubujte druhý konec parní hadice (14) na přípojku hadice (4) malé parní desky (11). Dbejte na to, aby parní hadice byla správně připojena. ěhem provozu nikdy neotevírejte šroubové uzávěry. Montáž a výměna velké parní desky 1. Při montáži a výměně příslušenství vytáhněte síťovou zástrčku (1). Vyčkejte, až pára přestane unikat a přístroj se ochladil. 2. Pro použití velké parní desky (13) tuto zasuňte do vodicí lišty (12) malé parní desky (11). 3. K demontáži velké parní desky (13) se tato vytáhne z vodicí lišty (12) malé parní desky (11). Nalití a dolití vody 1. Ujistěte se, zda je síťová zástrčka (1) vytažená a zda přístroj vychladl. 2. Odšroubujte víko bojleru (6) a sejměte jej. 3. Nalijte do nádobky bojleru (7) čistou vodu z vodovodu. Naplňte nádobku bojleru (7) pouze až po značku MAX na ukazateli hladiny vody (8) (maximálně 5 litrů) 4. Našroubujte víko bojleru (6). Dbejte na to, aby toto bylo řádně našroubované. 62 V případě delších pracovních dobách: Sledujte značku minima na ukazateli hladiny vody (8) a včas dolijte vodu. Obsluha Pozor! Povrchy se mohou během použití zahřát. Víko bojleru může být během provozu a při ochlazování horké. Nebezpečí opaření! Nepracujte přímo nad hlavou. Noste ochranné rukavice! Z přístroje může unikat pára. Nesměrujte páru na své vlastní tělo ani na jiné lidi ani na zvířata! • Před zahájením práce zkontrolujte stav omítky, protože pára při vysokých teplotách může uvolnit volnou, porézní nebo špatně vázanou omítku. Omítka se také snáze odlupuje v oblastech, kde jsou praskliny nebo díry. Parní deska by se také neměla držet na jednom místě po delší dobu. Volnou omítku můžete rozpoznat klepnutím na některá místa zdi pomocí kloubů. Zazní-li přitom dutý zvuk, doporučujeme postupovat s maximální opatrností. • V každém případě vyzkoušejte odstraňovač tapet nejprve na malé ploše asi 100 cm² před zahájením skutečné práce. • Pokud zjistíte, že se omítka uvolňuje nebo uslyšíte-li praskání, přestaňte pracovat. Odstraňovač tapet lze bezpečně použít pro sádrokartonové povrchy. • V důsledku tepla generovaného tímto produktem, se určité povrchy, např. CZ • • • • • koberce, čalouněný nábytek, stolové desky nebo skříňky mohou poškodit. Aby nedošlo k poškození příslušných povrchů teplem nádobky bojleru (7), měla by se vždy postavit na dřevěnou desku nebo na podobný předmět. Pro tento účel nejsou vhodné prachové deky nebo noviny. Nádobku bojleru (7) uchopte pouze za rukojeť pro přenášení (3). Vícekrát natřené nebo vodotěsné tapety lze jen obtížně odstranit. Perforujte takovou tapetu ostnatým válečkem, aby pára mohla působit na vrstvu lepidla. V případě tapet z vinylové pěny dle potřeby nejprve odstraňte horní vinylovou vrstvu, až pak pracujte s odstraňovačem tapet. Při odstraňování stropních tapet noste vždy ochranný oděv. Dbejte na to, aby se na parní desce shromažďovala kondenzovaná voda, protože horká voda může odkapávat. Parní desku pravidelně vyprazdňujte a nepoužívejte ji přímo nad Vaší hlavou. Parní desky (11/13) vždy dejte do vhodné nádoby, pokud tyto zůstanou bez dozoru (i krátce). Při použití nesmí parní deska ukazovat směrem k uživateli. Zapnutí a vypnutí 1 K zapnutí zasuňte síťovou zástrčku (1) do zásuvky. 2 V závislosti na teplotě nalité vody potřebuje přístroj až 15 minut, než se vytvoří pára. Během zahřívací fáze může z parní desky vytékat horká voda. Odložte parní desku na kbelík, abyste zachytili veškerou vytékající vodu. 3 K vypnutí přístroje vytáhněte ze zásuvky síťovou zástrčku (1). Odstranění tapet • Malou parní desku (11) uchopte pouze za rukojeť (10). • Pracujte nejlépe od stropu pokoje až k podlaze. • Použijte malou parní desku (11) k odstranění tapety v rozích nebo výklencích (viz Montáž a výměna velké parní desky). • Použijte velkou parní desku (13) k odstranění tapety na velkých plochách (viz Montáž a výměna velké parní desky). • Položte parní desky (11/13) na tapetu. V závislosti na typu tapety a povrchu odstraňte parní desku po cca 10 sekundách a stáhněte tapetu shora dolů nebo ji oškrábejte škrabkou (9). • Při stírání položte parní desky (11/13) opakovaně na tapetu. Čištění a údržba Opravné a údržbářské práce, které nejsou popsány v tomto návodu k obsluze, přenechejte našemu servisnímu centru. Používejte pouze originální díly. Před zahájením jakékoliv práce vytáhněte síťovou zástrčku (1) ze zásuvky a nechte přístroj vychladnout. Pravidelně provádějte níže uvedené čisticí a údržbářské práce. Tím zajistíte dlouhou životnost a spolehlivé užívání. Nikdy nenechávejte přístroj bez dozoru v zapnutém stavu. 63 CZ Čištění Přístroj se nesmí postříkat vodou ani se do ní nesmí položit. Hrozí nebezpečí úrazu elektrickým proudem. • Příležitostně vypláchněte bojler vodou z vodovodu, dokud voda nebude čirá. Nepoužívejte čisticí prostředky ani rozpouštědla. Ty by mohly neopravitelně přístroj poškodit. Odvápnění Nikdy nepřidávejte hořlavé, jedovaté, žíravé nebo jiné kapaliny! V případě potřeby přístroj odvápněte, a to v závislosti na tvrdosti vody a četnosti používání. Použijte v obchodě běžně dostupné odvápňovací prostředky, přednostně kyselinu citronovou. Dodržujte pokyny pro dávkování a použití výrobce odvápňovacího prostředku! Vady, způsobené nedostatkem odstraňování vodního kamene, jsou ze záruky vyloučeny. 1. Ujistěte se, zda je síťová zástrčka (1) vytažená a zda přístroj vychladl. 2. Nalijte běžně dostupný odvápňovací roztok (2,5 litru). 3. Sejměte parní hadici (14) a zastrčte síťovou zástrčku (1) do zásuvky. 4. Nechte odvápňovací roztok vařit cca 5 minut. 5. Vytáhněte síťovou zástrčku (1) ze zásuvky a roztok nechte působit ještě dalších cca 10 minut. 64 6. Nechte přístroj a zbytek roztoku vychladnout. Vyprázdněte přístroj, vypláchněte ho čistou vodou a nechte jej vyschnout. Skladování • Nechte přístroj minimálně deset minut vychladnout. • Přístroj vyprázdněte. • Parní hadici (14) naviňte kolem přídržných spon (2) na nádobce bojleru (7). • Skladujte přístroj ve svislé poloze na suchém místě chráněném před prachem a mimo dosah dětí. CZ Likvidace/ochrana životního prostředí Elektrická zařízení nepatří do domácího odpadu. • Přístroj odevzdejte na sběrném recyklačním místě. Použité plastové a kovové části lze oddělit a vytřídit pro recyklaci. V případě dotazů se obraťte na servisní centrum. • Likvidaci Vašich vadných zaslaných přístrojů provádíme bezplatně. Náhradní díly / Příslušenství Náhradní díly a příslušenství obdržíte na stránkách www.grizzly-service.eu Pokud máte problémy při objednávání, použijte prosím kontaktní formulář. V případě jakýchkoliv dalších dotazů se obraťte na servisní středisko / „Service-Center“ (viz strana 67). Označení Č. artiklu. 2 – 8, 15 nádobka bojleru kompletní 91105685 14 parní hadice 91105686 10 – 13 parní deska kompletní 91105687 Pol. Návod k obsluze 65 CZ Záruka Vážení zákazníci, Na tento přístroj poskytujeme 3letou záruku od data zakoupení. V případě závady tohoto výrobku vám vůči prodejci výrobku přináleží zákonná práva. Tato zákonná práva nejsou omezena naší následovně uvedenou zárukou. Záruční podmínky Záruční doba začíná běžet ode dne nákupu. Uschovejte si, prosím, originál účtenky pro pozdější použití. Tento dokument budete potřebovat jako doklad o koupi. Zjistíte-li během tří let od data koupě u tohoto výrobku materiálovou nebo výrobní vadu, bude výrobek námi, podle našeho výběru, bezplatně opraven nebo nahrazen. Tato záruční oprava předpokládá, že během 3leté lhůty předložíte poškozený přístroj s dokladem o koupi (pokladní stvrzenka) a písemně krátce popíšete, v čem spočívá závada a kdy k ní došlo. Bude-li závada kryta naší zárukou, získáte zpět opravený nebo nový výrobek. Opravou nebo výměnou výrobku nezačíná záruční doba běžet od začátku. Záruční doba a zákonné nároky na odstranění vady Záruční doba se neprodlužuje poskytnutím záruky. Toto platí i pro nahrazené a opravené díly. Již při koupi zjištěné závady a nedostatky musíte nahlásit okamžitě po vybalení výrobku. Po uplynutí záruční doby musíte uhradit náklady za provedené opravy. Rozsah záruky Přístroj byl precizně vyroben podle přísných jakostních směrnic a před dodáním byl svědomitě zkontrolován. 66 Záruční oprava se vztahuje na materiálové nebo výrobní vady. Tato záruka se netýká dílů výrobku, které jsou vystaveny normálnímu opotřebení, a lze je považovat za spotřební materiál (např. kartáče), nebo poškození křehkých dílů (např. spínače). Tato záruka neplatí, je-li výrobek poškozen z důvodu neodborného používání, nebo pokud u něj nebyla prováděna údržba. Pro odborné používání výrobku musí být přesně dodržovány všechny pokyny uvedené v návodu k obsluze. Bezpodmínečně je třeba zabránit používání a manipulacím s výrobkem, které nejsou v návodu k obsluze doporučeny, nebo je před nimi varováno. Výrobek je určen jen pro soukromé účely a ne pro komerční využití. Záruka zaniká v případě zneužívání a neodborné manipulace, používání nadměrné síly a při zásazích, které nebyly provedeny naším autorizovaným servisem. Postup v případě uplatňování záruky Pro zajištění rychlého zpracování vaší žádosti, prosím, postupujte podle následujících pokynů: • Na důkaz, že jste výrobek zakoupili, mějte pro jakékoli případné dotazy připravenou pokladní stvrzenku a identifikační číslo (IAN 332976_1907). • Číslo výrobku je uvedeno na typovém štítku. • Pokud by došlo k funkční poruše nebo jiným závadám, nejdříve telefonicky nebo e-mailem kontaktujte níže uvedené servisní oddělení. Pak získáte další informace o vyřízení vaší reklamace. • Výrobek označený jako vadný můžete po domluvě s naším zákaznickým servisem, s připojením dokladu o koupi (pokladní stvrzenky) a po uvedení, v čem závada spočívá a kdy k ní došlo, CZ přeposlat bez platby poštovného na vám sdělenou adresu příslušného servisu. Aby bylo zabráněno problémům s přijetím a dodatečnými náklady, bezpodmínečně použijte jen tu adresu, která vám bude sdělena. Zajistěte, aby zásilka nebyla odeslána nevyplaceně jako nadměrné zboží, expres nebo jiný, zvláštní druh zásilky. Přístroj zašlete včetně všech částí příslušenství dodaných při zakoupení a zajistěte dostatečně bezpečný přepravní obal. Opravna Opravy, které nespadají do záruky, můžete nechat udělat v našem servisu oproti zúčtování. Rádi vám připravíme předběžný odhad nákladů. Můžeme zpracovávat jen ty přístroje, které byly dostatečně zabalené a odeslány vyplaceně. Pozor: Prosím, přístroj zašlete našemu autorizovanému servisu vyčištěný a s upozorněním na závadu. Nepřijmeme přístroje zaslané nevyplaceně jako nadměrné zboží, expres nebo jiný, zvláštní druh zásilky. Likvidaci vašich poškozených zaslaných přístrojů provedeme bezplatně. Service-Center Servis Česko CZ Tel.: 800143873 E-Mail: [email protected] IAN 332976_1907 Dovozce Prosím, respektujte, že následující adresa není adresou servisu. Nejdříve kontaktujte shora uvedené servisní středisko. Grizzly Tools GmbH & Co. KG Stockstädter Straße 20 DE-63762 Großostheim NĚMECKO www.grizzly-service.eu 67 SK Obsah Úvod Úvod.......................................... 68 Používanie na určený účel .......... 68 Všeobecný opis .......................... 68 Rozsah dodávky ............................. 69 Prehľad .......................................... 69 Opis funkcie ................................... 69 Bezpečnostné pokyny ................ 69 Piktogramy na prístroji: .................... 69 Symboly v návode:.......................... 70 Bezpečnostné pokyny ...................... 70 Bezpečnostné pokyny pri používaní parného odstraňovača tapiet ............ 70 Bezpečnostné zariadenia ................. 71 Uvedenie do prevádzky ............. 72 Montáž prídržných svoriek ............... 72 Pripojenie hadice a parnej platne ..... 72 Montáž a výmena veľ kej parnej platne ............................................ 72 Naplnenie alebo doplnenie vody ...... 72 Obsluha ..................................... 72 Zapnutie a vypnutie......................... 73 Uvoľňovanie tapiet .......................... 73 Čiščenje in vzdrževanje .............. 74 Čistenie ......................................... 74 Odstraňovanie vodného kameňa ...... 74 Skladovanie............................... 75 Likvidácia/ochrana životného prostredia .................................. 75 Náhradné diely / Príslušenstvo . 75 Záruka ...................................... 76 Servisná oprava ........................ 77 Service-Center ............................ 77 Dovozca ..................................... 77 Preklad originálneho prehlásenia o zhode CE ....................... 84 Výkres náhradných dielov .........85 Gratulujeme Vám k zakúpeniu Vášho nového prístroja. Tým ste sa rozhodli pre kvalitný produkt. Tento prístroj bol počas výroby testovaný na kvalitu a podrobený výstupnej kontrole. Tým je zabezpečená funkčnosť vášho prístroja. Návod na obsluhu je súčasťou tohto produktu. Obsahuje dôležité upozornenia ohľadom bezpečnosti, obsluhy a likvidácie. Pred používaním produktu sa oboznámte so všetkými pokynmi pre obsluhu a bezpečnosť. Používajte produkt len predpísaným spôsobom a len v uvedených oblastiach použitia. Návod na obsluhu uschovajte a v prípade odovzdania produktu tretím osobám odovzdajte aj všetky podklady. Používanie na určený účel Prístroj je určený na uvoľňovanie tapiet. Každé iné používanie, ktoré nie je v tomto návode výslovne povolené, môže viesť k poškodeniu prístroja a predstavovať vážne nebezpečenstvo pre používateľa. Výrobca neručí za škody, ktoré vzniknú iným používaním než podľa určenia alebo nesprávnou obsluhou. Tento prístroj nie je vhodný na komerčné používanie. Pri komerčnom používaní záruka zaniká. Všeobecný opis Obrázok najdôležitejších funkčných dielov nájdete na výklopných stranách. 68 SK Rozsah dodávky Technické údaje Vybaľte prístroj a skontrolujte, či je kompletný: – Sieťový kábel so zástrčkou – Nádrž bojlera – Parná hadica – Malá parná platňa – Veľ ká parná platňa – Prídržné svorky – Škrabka – Návod na obsluhu Parný odstraňovač tapiet ...................................... PDTA 5 A1 Výkon P ....................................2300 W Napätie U ................. 230-240V~, 50 Hz Čas parenia ................................ 80 min Objem nádrže ................................... 5 l Dĺžka parnej hadice ..........................4 m Parná sila ................................ 60 g/min Veľ kosť (veľ ká parná platňa) ... 20 x 28 cm Veľ kosť (malá parná platňa) ..... 18 x 8 cm Sieťový kábel ....................................3 m Trieda ochrany................................. IPX4 Hmotnosť (bez príslušenstva) ........... 935 g Hmotnosť (iba príslušenstvo) ........... 815 g Prehľad 1 2 3 4 5 6 7 8 9 10 11 12 13 14 15 Sieťový kábel Prídržná svorka Držiak nádrže bojlera Hadicová prípojka nádrže bojlera Pretlakový ventil Veko bojlera Nádrž bojlera Ukazovateľ stavu vody Škrabka Držadlo malej parnej platne Malá parná platňa Vodiaca koľajnička malá Parná platňa Veľ ká parná platňa Parná hadica Skrutka pre prídržnú svorku Opis funkcie Parný odstraňovač tapiet s časom parenia 80 minút má jednu malú a jednu veľ kú parnú platňu a jednu 4 metre dlhú parnú hadicu. Funkciu ovládacích jednotiek nájdete v nasledujúcom opise. Bezpečnostné pokyny Pri používaní prístroja je nutné dodržiavať bezpečnostné pokyny. Piktogramy na prístroji: Pozorne si prečítajte návod na obsluhu. Elektrické prístroje nepatria do domového odpadu. Pozor! Horúci povrch. 100°C Práca s horúcou parou môže viesť k ťažkým obareniam! Pozor! Pozor! Je nebezpečenstvo popálenia. 69 SK Paru nesmerujte na vlastné telo alebo na iné osoby ani na zvieratá! Prístroj postavte bezpečne a stabilne na rovnej podlahe. Prístroj nepoužívajte ako stúpadlo VÝSTRAŽNÉ UPOZORNENIE – Nebezpečenstvo obarenia Symboly v návode: Značky nebezpečenstva s údajmi na zabránenie poškodeniam zdravia osôb alebo vecným škodám Značky nebezpečenstva s údajmi na zabránenie poškodení zdravia osôb v dôsledku zásahu elektrickým prúdom Zákazová značka s údajmi k zabráneniu škodám Upozorňovacia značka s informáciami pre lepšiu manipuláciu s prístrojom Nebezpečenstvo obarenia! Nevykonávajte žiadne práce priamo nad hlavou. Noste ochranné rukavice! Para môže uniknúť z prístroja. 70 Bezpečnostné pokyny a) Tento prístroj môžu používať deti od 8 rokov ako aj osoby so zníženými fyzickými, senzorickými alebo mentálnymi schopnosťami, alebo s nedostatkom skúseností a vedomostí, ak sú pod dozorom alebo boli poučené o bezpečnom používaní prístroja a rozumejú rizikám, ktoré z toho vyplývajú. Deti sa s prístrojom nesmú hrať. Deti nesmú vykonávať čistenie a údržbu bez dozoru. b) Uistite sa, že prístroj nesmeruje priamo na elektrické prístroje a zariadenia, ktoré obsahujú elektrické konštrukčné diely, napr. vo vnútornom priestore pecí c) Po použití a pred používateľskou údržbou sa musí prístroj vytiahnutím sieťovej zástrčky odpojiť od siete. d) Prístroj nenechajte bez dozoru, keď je zapojený do siete. e) Plniaci otvor sa nesmie počas používania otvárať. Dodržiavajte pokyny pre bezpečné doplnenie nádrže na vodu. f) Prístroj nepoužívajte, keď spadol, vykazuje viditeľné poškodenia alebo je netesný. g) Počas používania a chladenia držte deti mimo dosahu prístroja. Bezpečnostné pokyny pri používaní parného odstraňovača tapiet a) Povrchy sa môžu počas používania zohriať. Veko bojlera môže byť počas prevádzky a chladenia horúce. SK b) Prístroj nezapínajte bez naplnenia vodou! c) Prístroj nikdy neponárajte do kvapalín. d) Prístroj plňte iba potrubnou vodou. Nikdy neprimiešavajte horľavé, leptavé alebo iné kvapaliny. e) Neprekračujte maximálne plniace množstvo (5 l). f) Pred odstraňovaním tapiet zakryte spínače a zásuvky na stenách vodotesne a parotesne. g) Uzávery bojlera a skrutkovacie uzávery pred uvedením do prevádzky uzatvorte (pozri Uvedenie do prevádzky).“ h) Nebezpečenstvo obarenia! Veko bojlera a skrutkovacie uzávery počas prevádzky nikdy neotvárajte. Pred otvorením veka bojlera a skrutkovacích uzáverov: Vytiahnite sieťovú zástrčku a prístroj, ako aj zvyšnú vodu nechajte vychladnúť. Až potom otvorte veko bojlera alebo skrutkovacie uzávery (pozri Naplnenie alebo doplnenie vody). i) Keď je parná hadica upchaná a tým vzniká pretlak, vytiahnite sieťovú zástrčku zo zásuvky. j) Pri práci sa vždy starajte o bezpečné postavenie. k) Prístroj noste iba za držadlo. Nikdy neťahajte za kábel alebo hadicu. l) Hadicu nepreťahujte a nezalomujte. m) Prístroj postavte bezpečne a stabilne na rovnej podlahe. Prístroj neprevracajte. n) Nebezpečenstvo obarenia! Ak by mal prístroj spadnúť, dostane sa horúca voda do hadice a môže vystupovať na konci hadice. Prístroj ihneď vypnite, vytiahnite sieťovú zástrčku, nechajte ho vychladnúť a až potom odstráňte hadicu. o) Parnú platňu chytajte iba za držadlo. Bezpečnostné zariadenia • Veko bojlera (6) má jeden pretlakový ventil (5). Tým sa môže vylúčiť para a trochu horúcej vody, keď v nádrži bojlera (7) existuje pretlak. To sa môže vyskytnúť, keď parná hadica (14) je upchaná alebo nádrž bojlera (7) je preplnená. V takomto prípade vytiahnite sieťovú zástrčku (1) zo zásuvky a nechajte prístroj vychladnúť, skôr ako ho skontrolujete. Tento pretlakový ventil (5) sa nesmie za žiadnych okolností blokovať. Pri normálnom používaní sa cez pretlakový ventil (5) vylučujú malé množstvá pary a vody. • Veko bojlera (6) disponuje ventilom uvoľňovania vákua, cez ktorý sa môže do prístroja dostať vzduch, keď vznikne vákuum. • Parná hadica (14) je dvojstenná, aby bolo možné znížiť teplotu povrchu. • Prístroj je vybavený automatickou ochranou proti prehrievaniu (tepelný istič), ktorý sa aktivuje vtedy, keď sa prístroj zohrieva nenaplnený. Prístroj naplňte (prednostne horúcou) vodou. Po niekoľ kých minútach prístroj generuje znova paru. • Dávajte pozor na to, aby sa prístroj nepreklápal. V opačnom prípade sa podľa možnosti aktivuje automatická 71 SK ochrana proti prehrievaniu (tepelný istič). Uvedenie do prevádzky Montáž prídržných svoriek Nasaďte obidve prídržné svorky (2) na prístroj a zoskrutkujte ho pevne so skrutkami (15). Pozri detail . Pripojenie hadice a parnej platne 1. Naskrutkujte koniec parnej hadice (14) na prípojku hadice (4) na nádrži bojlera (7). 2. Naskrutkujte druhý koniec parnej hadice (14) na prípojku hadice malej parnej platne (11). Dávajte pozor na to, aby parná hadica bola riadne pripojená. Skrutkovacie uzávery počas prevádzky nikdy neotvárajte. Montáž a výmena veľ kej parnej platne 1. Na montáž a výmenu príslušenstva vytiahnite sieťovú zástrčku (1). Počkajte, kým nebude viac vystupovať žiadna para a prístroj bude vychladnutý. 2. Na použitie veľ kej parnej platne (13) zasuňte túto do vodiacej koľajničky (12) malej parnej platne (11). 3. Na demontáž veľ kej parnej platne (13) sa táto vytiahne z vodiacej koľajničky (12) malej parnej platne (11). 72 Naplnenie alebo doplnenie vody 1. Uistite sa, že je sieťová zástrčka (1) odpojená a že je prístroj vychladnutý. 2. Odskrutkujte veko bojlera (6) a odstráňte ho. 3. Naplňte veko bojlera (7) čistou potrubnou vodou. Naplňte veko bojlera (7) až po značku MAX ukazovateľa stavu vody (8) (maximálne 5 litrov) 4. Naskrutkujte veko bojlera (6). Dávajte pozor na to, aby bolo riadne naskrutkované. Pri dlhších časoch prestávky: Zohľadnite značku minima ukazovateľa stavu vody (8) a doplňte včas vodu. Obsluha Pozor! Povrchy sa môžu počas používania zohrievať. Veko bojlera môže byť počas prevádzky a chladenia horúce. Nebezpečenstvo obarenia! Nevykonávajte žiadne práce priamo nad hlavou. Noste ochranné rukavice! Para môže uniknúť z prístroja. Paru nesmerujte na vlastné telo alebo na iné osoby ani na zvieratá! • Pred začiatkom práce skontrolujte stav omietky, pretože para môže s vysokým teplotami uvoľniť uvoľnenú, poréznu alebo zle viazanú omietku. Omietka sa dá ľahšie uvoľniť aj v oblastiach, ktoré majú odskoky alebo otvory. SK • • • • • • • Tiež by sa parná platňa nemala dlhší čas držať na jednom mieste. Uvoľnenú omietku môžete rozpoznať tak, že na niektoré miesta na stene poklepete hánkami prstov. Keď pritom vznikne dutý zvuk, odporúča sa pokračovať iba s väčšou opatrnosťou. V každom prípade najprv otestujte uvoľňovač tapiet v malej oblasti približne 100 cm², skôr ako začnete s vlastnou prácou. Keď zistíte, že sa omietka uvoľňuje alebo je počuť praskanie, prácu zastavte. Uvoľňovač tapiet sa môže bezpečne používať na sadrokartónové plochy Rigips. Z dôvodu tepla generovaného týmto produktom sa môžu určité povrchy, napr. koberce, čalúnený nábytok, stolové dosky alebo skrine poškodiť. Aby sa príslušné povrchy nepoškodili teplom nádrže bojlera (7), mala by sa na tieto položiť drevená doska alebo iný podobný predmet. Obaly na ochranu proti prachu alebo noviny sa na tento účel nehodia. Nádrž bojlera (7) chytajte iba za držiak (3). Viackrát natierané alebo vodotesné tapety sa dajú odstraňovať iba veľmi ťažko. Takéto tapety perforujte ježkovým valcom, aby para mohla pôsobiť na vrstvu lepidla. Pri tapetách z vinylovej peny prípadne najprv stiahnite hornú vinylovú vrstvu, až potom pracujte s uvoľňovačom tapiet. Pri odstraňovaní krycích tapiet noste vždy ochranný odev. Dávajte pozor na kondenzovanú vodu, zbierajúcu sa na parnej platni, pretože môže odkvapkávať horúca voda. Parnú platňu vyprázdňujte pravidelne a nepoužívajte ju priamo nad vašou hlavou. • Parnú platňu (11/13) umiestnite vždy vo vhodnej nádobe, keď ju (aj nakrátko) nechávate bez dozoru. Parná platňa pri používaní nesmie ukazovať so smeru používateľa. Zapnutie a vypnutie 1 Na zapnutie zastrčte sieťovú zástrčku (1) do zásuvky. 2 V závislosti od teploty naplnenej vody prístroj potrebuje až 15 minút na vytvorenie pary. Počas fázy zohrievania môže z parnej platne vytekať trochu horúcej vody. Parnú platňu odložte na vedre, aby bolo možné zachytiť vytečenú vodu. Prístroj v zapnutom stave nikdy nenechávajte bez dozoru. 3 Na vypnutie prístroja vytiahnite sieťovú zástrčku (1) zo zásuvky. Uvoľňovanie tapiet • Malú parnú platňu (11) chytajte iba za držadlo (10). • Najlepšie bude, ak budete pracovať od stropu izby k podlahe. • Na uvoľňovanie tapiet v rohoch alebo nikách použite malú parnú platňu (11) (pozri Montáž a výmena veľ kej parnej platne). • Na uvoľňovanie tapiet na veľ kých plochách použite veľ kú parnú platňu (13) (pozri Montáž a výmena veľ kej parnej platne). • Parnú platňu (11/13) nasaďte na tapetu. Podľa druhu tapety a podkladu po približne 10 sekundách odoberte parnú platňu a stiahnite tapetu zhora nadol alebo ju zoškrabte so škrabkou (9). 73 SK • Počas oškrabávania parnú platňu (11/13) nasaďte opakovane na tapetu. Čiščenje in vzdrževanje Údržbárske a opravárenské práce, ktoré nie sú uvedené v tomto návode na prevádzku, nechajte vykonať nášmu servisnému centru. Používajte len originálne náhradné diely. Vytiahnite sieťovú zástrčku (1) zo zásuvky a nechajte prístroj pred všetkými prácami vychladnúť. Pravidelne vykonávajte čistiace a údržbárske práce. Tým sa zabezpečí dlhá a spoľahlivá životnosť. Čistenie Prístroj sa nesmie striekať s vodou ani vkladať do vody. Existuje nebezpečenstvo zásahu elektrickým prúdom. • Bojler vyplachujte príležitostne vodou z vodovodu, až bude táto priezračná. Nepoužívajte žiadne čistiace prostriedky ani rozpúšťadlá. Tým môžete náradie poškodiť tak, že nie je možné ho už opraviť. 74 Odstraňovanie vodného kameňa Nikdy neprimiešavajte horľavé, leptavé alebo iné kvapaliny! Z prístroja v prípade potreby odstráňte vodný kameň, podľa tvrdosti vody a častosti používania. Používajte bežný prostriedok na odstraňovanie vodného kameňa, prednostne kyselinu citrónovú. Dodržiavajte pokyny pre dávkovanie a používanie výrobcu prostriedku na odstraňovanie vodného kameňa! Chyby v dôsledku nedostatočného odstraňovania vodného kameňa sú zo záruky vylúčené. 1. Uistite sa, že je sieťová zástrčka (1) odpojená a že je prístroj vychladnutý. 2. Naplňte bežný prostriedok na odstraňovanie vodného kameňa (2,5 litra). 3. Odoberte parnú hadicu (14) zastrčte sieťovú zástrčku (1). 4. Roztok na odstraňovanie vodného kmeňa nechajte cca 5 minút variť. 5. Sieťovú zástrčku (1) vytiahnite zo zásuvky a roztok nechajte pôsobiť ešte cca 10 minút. 6. Prístroj a zvyšný roztok nechajte vychladnúť. Prístroj vyprázdnite, opláchnite čistou vodou a nechajte vysušiť. SK Skladovanie • Prístroj nechajte ochladzovať minimálne desať minút. • Vyprázdnite prístroj. • Oviňte parnú hadicu (14) okolo prídržných svoriek (2) na nádrži bojlera (7). • Prístroj uschovajte v rovnej polohe na suchšom mieste, chránenom pred prachom a mimo dosahu detí. Likvidácia/ochrana životného prostredia Elektrické prístroje nepatria do domového odpadu. • Náradie a odovzdajte na zbernom mieste pre ďalšie zhodnotenie. Použité plastové a kovové časti sa môžu vytriediť a tak odniesť na ekologické zhodnotenie. Informujte sa o tom v našom Service-Centre. • Likvidáciu vašich zaslaných chybných prístrojov vykonáme bezplatne. Náhradné diely / Príslušenstvo Náhradné diely a príslušenstvo nájdete na strane www.grizzlyservice.eu Ak by sa mali vyskytnúť problémy s procesom objednávky, použite, prosím, kontaktný formulár. Pri ďalších otázkach sa obráťte na „Service-Center“ (pozri stranu 77). Pol. Označenie Č. Artiklu 2 – 8, 15 Nádrž bojlera komplett 14 Parná hadica 91105686 10 – 13 parná platňa komplett 91105687 91105685 75 SK Záruka Vážená zákazníčka, vážený zákazník, Pre tento prístroj platí záruka 3 roky od dátumu zakúpenia. Ak je prístroj poškodený, podľa zákona máte právo ho reklamovať u výrobcu produktu. Tieto práva vyplývajúce zo zákona nie sú našou následne opísanou zárukou obmedzené. Záručné podmienky Záručná lehota začína dňom zakúpenia. Pokladničný doklad ako originál prosím starostlivo uschovajte. Je potrebný ako dôkaz o zakúpení. Ak sa počas troch rokov od dátumu zakúpenia tohto produktu vyskytne materiálna alebo výrobná chyba, produkt - podľa nášho rozhodnutia - bezplatne opravíme alebo nahradíme. Predpokladom záruky je, že v priebehu trojročnej lehoty bude predložený poškodený prístroj a pokladničný doklad a stručne opísaná chyba a kedy sa vyskytla. Ak sa v rámci našej záruky chyba pokryje, obdržíte späť opravený alebo nový prístroj. S opravou alebo výmenou produktu sa nezačína nová záručná doba. Záručná doba a nárok na odstránenie vady Záručná doba sa poskytnutím záruky nepredlžuje. To platí aj pre nahradené a opravené diely. Prípadné škody a nedostatky vzniknuté už pri zakúpení sa musia ihneď po vybalení ohlásiť. Opravy vykonané po uplynutí záručnej doby sú spoplatnené. Rozsah záruky Prístroj bol vyrobený podľa prísnych smerníc kvality a pred dodaním bol svedomite kontrolovaný. 76 Záruka sa týka materiálových alebo výrobných chýb. Táto záruka sa nevzťahuje na diely produktu, ktoré sú vystavené normálnemu opotrebeniu a preto sa môžu považovať za opotrebované diely (napr. Kefy) alebo na poškodenia na krehkých dieloch (napr. vypínač). Táto záruka zaniká, ak bol produkt používaný poškodený, neodborne alebo nebola vykonávaná údržba. Pre odborné používanie produktu je nutné presne dodržiavať všetky návody uvedené v návode na obsluhu. Bezpodmienečne sa vyhnite používaniu, ktoré sa v návode na obsluhu neodporúča alebo pred ktorým ste boli vystríhaní. Produkt je určený len pre súkromné použitie a nie v oblasti podnikania. Záruka zaniká pri nesprávnom a neodbornom používaní, pri násilnom používaní a pri zásahoch, ktoré neboli vykonané v našej servisnej pobočke. Postup v prípade reklamácie Pre zabezpečenie rýchleho spracovania vašej žiadosti postupujte prosím podľa nasledujúcich pokynov: • Pri všetkých požiadavkách predložte pokladničný doklad a číslo identifikačné (IAN 332976_1907) ako dôkaz o zakúpení. • Číslo artiklu nájdete na typovom štítku. • Ak sa vyskytnú chyby funkcie alebo iné nedostatky, kontaktujte najskôr následne uvedené servisné oddelenie telefonicky alebo emailom. Následne obdržíte ďalšie informácie o priebehu vašej reklamácie. • Produkt evidovaný ako poškodený môžete po dohode s našim zákazníckym servisom, s priloženým dokladom o zakúpení (pokladničný doklad) a s údajmi, v čom chyba spočíva a kedy vznikla, zaslať bez poštovného na adre- SK su servisu, ktorá vám bude oznámená. Pre zabránenie dodatočných nákladov a problémov pri prevzatí použite len tú adresu, ktorá vám bude oznámená. Nezasielajte prístroj ako nadmerný tovar na náklady príjemcu, expresne alebo s iným špeciálnym nákladom. Prístroj zašlite so všetkými časťami príslušenstva dodanými pri zakúpení a zabezpečte dostatočne bezpečné prepravné balenie. Servisná oprava Opravy, ktoré nepodliehajú záruke, môžeme nechať vykonať v našej servisnej pobočke za úhradu. Radi vám poskytneme predbežnú kalkuláciu nákladov. Môžeme spracovať len prístroje, ktoré boli doručené dostatočne zabalené a so zaplateným poštovným. Pozor: Prístroj zašlite do našej servisnej pobočky vyčistený a s informáciami o chybe. Neprevezmeme prístroje zaslané ako nadmerný tovar na náklady príjemcu, expresne alebo s iným špeciálnym nákladom. Likvidáciu vašich poškodených zaslaných prístrojov vykonáme bezplatne. Service-Center Servis Slovensko SK Tel.: 0850 232001 E-Mail: [email protected] IAN 332976_1907 Dovozca Nasledujúca adresa nie je adresa servisu. Najskôr kontaktujte hore uvedené servisné centrum. Grizzly Tools GmbH & Co. KG Stockstädter Straße 20 DE-63762 Großostheim NEMECKO www.grizzly-service.eu 77 DE OriginalEG-Konformitätserklärung AT CH Hiermit bestätigen wir, dass der Dampftapetenablöser PDTA 5 A1 Seriennummer 202002000001 - 202002045660 folgenden einschlägigen EU-Richtlinien in ihrer jeweils gültigen Fassung entspricht: 2014/35/EU • 2014/30/EU • 2011/65/EU* Um die Übereinstimmung zu gewährleisten, wurden folgende harmonisierte Normen sowie nationale Normen und Bestimmungen angewendet: EN 60335-1:2012+A11:2014+A13:2017 EN 60335-2-54:2008+A11:2012+A1:2015 EN 55014-1:2017 • EN 55014-2:2015 • EN 61000-3-2:2014 EN 61000-3-3:2013 • EN 62321-1:2013 Die alleinige Verantwortung für die Ausstellung dieser Konformitätserklärung (20)** trägt der Hersteller: Grizzly Tools GmbH & Co. KG Stockstädter Straße 20 63762 Großostheim GERMANY 29.02.2020 Christian Frank Dokumentationsbevollmächtigter * Der oben beschriebene Gegenstand der Erklärung erfüllt die Vorschriften der Richtlinie 2011/65/EU des Europäischen Parlaments und des Rates vom 8. Juni 2011 zur Beschränkung der Verwendung bestimmter gefährlicher Stoffe in Elektro- und Elektronikgeräten. ** Die beiden letzten Ziffern des Jahres, in dem die CE-Kennzeichnung angebracht wurde 78 GB Translation of the original EC declaration of conformity IE We hereby declare that the Steam wallpaper remover PDTA 5 A1 Serial Number 202002000001 - 202002045660 conforms with the following applicable relevant version of the EU guidelines: 2014/35/EU • 2014/30/EU • 2011/65/EU* In order to guarantee consistency, the following harmonised standards as well as national standards and stipulations have been applied: EN 60335-1:2012+A11:2014+A13:2017 EN 60335-2-54:2008+A11:2012+A1:2015 EN 55014-1:2017 • EN 55014-2:2015 • EN 61000-3-2:2014 EN 61000-3-3:2013 • EN 62321-1:2013 This declaration of conformity (20)** is issued under the sole responsibility of the manufacturer: Grizzly Tools GmbH & Co. KG Stockstädter Straße 20 63762 Großostheim, Germany 29.02.2020 Christian Frank Documentation Representative * The object of the declaration described above satisfies the provisions of Directive 2011/65/EU of the European Parliament and the Council of 8 June 2011 on limiting the use of certain harmful substances in electrical and electronic appliances. ** The last two digits of the year in which the CE marking was affixed. 79 FR Traduction de la déclaration de conformité CE originale BE Nous certifions par la présente que le Décolleuse à papier peint série PDTA 5 A1 Numéro de série 202002000001 - 202002045660 est conforme aux directives UE actuellement en vigueur : 2014/35/EU • 2014/30/EU • 2011/65/EU* En vue de garantir la conformité les normes harmonisées ainsi que les normes et décisions nationales suivantes ont été appliquées : EN 60335-1:2012+A11:2014+A13:2017 EN 60335-2-54:2008+A11:2012+A1:2015 EN 55014-1:2017 • EN 55014-2:2015 • EN 61000-3-2:2014 EN 61000-3-3:2013 • EN 62321-1:2013 Le fabricant assume seul la responsabilité d‘établir la présente déclaration de conformité (20)** : Grizzly Tools GmbH & Co. KG Stockstädter Straße 20 63762 Großostheim, Germany 29.02.2020 Christian Frank (Chargé de documentation) * L‘objet de la déclaration décrit ci-dessus est conforme aux dispositions de la directive 2011/65/EU du Parlement Européen et du Conseil du 8 juin 2011 sur la limitation de l‘utilisation de certaines substances dangereuses dans les équipements électriques et électroniques. ** Les deux derniers chiffres de l‘année dans laquelle le marquage CE a été fixé. 80 NL Vertaling van de originele CE-conformiteitsverklaring BE Hiermede bevestigen wij dat de Behangafstomer bouwserie PDTA 5 A1 Serienummer 202002000001 - 202002045660 is overeenkomstig met de hierna volgende, van toepassing zijnde EU-richtlijnen: 2014/35/EU • 2014/30/EU • 2011/65/EU* Om de overeenstemming te waarborgen, werden de hierna volgende, in overeenstemming gebrachte normen en nationale normen en bepalingen toegepast: EN 60335-1:2012+A11:2014+A13:2017 EN 60335-2-54:2008+A11:2012+A1:2015 EN 55014-1:2017 • EN 55014-2:2015 • EN 61000-3-2:2014 EN 61000-3-3:2013 • EN 62321-1:2013 De exclusieve verantwoordelijkheid voor de uitgifte van deze conformiteitsverklaring (20)** wordt gedragen door de fabrikant: Grizzly Tools GmbH & Co. KG Stockstädter Straße 20 63762 Großostheim, Germany 29.02.2020 Christian Frank Documentatiegelastigde * Het hierboven beschreven voorwerp van de verklaring voldoet aan de voorschriften van de richtlijn 2011/65/EU van het Europese Parlement en van de Raad van 8 juni 2011 inzake beperking van het gebruik van bepaalde gevaarlijke stoffen in elektrische en elektronische apparaten. ** De beide laatste cijfers van het jaar waarin de CE-markering werd aangebracht. 81 Tłumaczenie oryginalnej deklaracji zgodności WE PL Niniejszym oświadczamy, że: Urządzenie parowe do zdzierania tapet typoszereg, PDTA 5 A1 Numer seryjny 202002000001 - 202002045660 spełnia wymogi odpowiednich Dyrektyw UE w ich aktualnie obowiązującym brzmieniu: 2014/35/EU • 2014/30/EU • 2011/65/EU* W celu zapewnienia zgodności z powyższymi dyrektywami zastosowano następujące normy harmonizujące oraz normy i przepisy krajowe: EN 60335-1:2012+A11:2014+A13:2017 EN 60335-2-54:2008+A11:2012+A1:2015 EN 55014-1:2017 • EN 55014-2:2015 • EN 61000-3-2:2014 EN 61000-3-3:2013 • EN 62321-1:2013 Wyłączną odpowiedzialność za wystawienie tej deklaracji zgodności (20)** ponosi producent: Grizzly Tools GmbH & Co. KG Stockstädter Straße 20 63762 Großostheim, Germany 29.02.2020 Christian Frank Osoba upoważniona do sporządzania dokumentacji technicznej * Wyżej opisany przedmiot deklaracji spełnia wymogi dyrektywy 2011/65/UE Parlamentu Europejskiego i Rady z dnia 8 czerwca 2011r. w sprawie ograniczenia stosowania niektórych niebezpiecznych substancji w sprzęcie elektrycznym i elektronicznym. ** Dwie ostatnie cyfry roku nadania znaku CE. 82 Překlad originálního prohlášení o shodě CE CZ Potvrzujeme tímto, že tento Parní odstraňovač tapet konstrukční řady PDTA 5 A1 Pořadové číslo 202002000001 - 202002045660 odpovídá následujícím příslušným směrnicím EÚ v jejich právě platném znění: 2014/35/EU • 2014/30/EU • 2011/65/EU* Aby byl zaručen souhlas, byly použity následující harmonizované normy, národní normy a ustanovení: EN 60335-1:2012+A11:2014+A13:2017 EN 60335-2-54:2008+A11:2012+A1:2015 EN 55014-1:2017 • EN 55014-2:2015 • EN 61000-3-2:2014 EN 61000-3-3:2013 • EN 62321-1:2013 Výhradní odpovědnost za vystavení tohoto prohlášení o shodě (20)** nese výrobce: Grizzly Tools GmbH & Co. KG Stockstädter Straße 20 63762 Großostheim, Germany 29.02.2020 Christian Frank Osoba zplnomocněná k sestavení dokumentace * Výše popsaný předmět prohlášení splňuje předpisy směrnice 2011/65/EU Evropského parlamentu a Rady z 8. června 2011 o omezení používání některých nebezpečných látek v elektrických a elektronických zařízeních. ** Obě poslední číslice roku, kdy bylo uvedeno označení CE. 83 Preklad originálneho prehlásenia o zhode CE SK Potvrdzujeme týmto, že tento Parný odstraňovač tapiet konštrukčnej série PDTA 5 A1 Poradové číslo 202002000001 - 202002045660 zodpovedá nasledujúcim príslušným smerniciam EÚ v ich práve platnom znení: 2014/35/EU • 2014/30/EU • 2011/65/EU* Aby bola zaručená zhoda, boli použité nasledovné harmonizované normy ako i národné normy a predpisy: EN 60335-1:2012+A11:2014+A13:2017 EN 60335-2-54:2008+A11:2012+A1:2015 EN 55014-1:2017 • EN 55014-2:2015 • EN 61000-3-2:2014 EN 61000-3-3:2013 • EN 62321-1:2013 Jediný zodpovedný za vystavenie tohto vyhlásenia o zhode (20)** je výrobca: Grizzly Tools GmbH & Co. KG Stockstädter Straße 20 63762 Großostheim, Germany 29.02.2020 Christian Frank Osoba splnomocnená na zostavenie dokumentácie * Vyššie popísaný predmet vyhlásenia spĺňa predpisy smernice 2011/65/EU Európskeho parlamentu a Rady z 8. júna 2011 pre obmedzenie používania určitých nebezpečných látok v elektrických a elektronických prístrojoch. ** Obe posledné číslice roka, v ktorom bolo pripojené označenie CE. 84 Explosionszeichnung ∙ Exploded Drawing Vue éclatée ∙ Explosietekening Rysunek samorozwijający ∙ Rozvinuté náčrtky Výkres náhradných dielov PDTA 5 A1 informativ, informative, informatif, informatief, pouczający, informační, informatívny 20200225_rev02_ts 85 13 11 10 9 2 1 2 14 GRIZZLY TOOLS GMBH & CO. KG Stockstädter Straße 20 DE-63762 Großostheim GERMANY Stand der Informationen · Last Information Update · Version des informations · Stand van de informatie · Stan informacji · Stav informací · Stav informácií: 02/2020 Ident.-No.: 60002206022020-8 IAN 332976_1907-
 1
1
-
 2
2
-
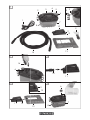 3
3
-
 4
4
-
 5
5
-
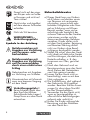 6
6
-
 7
7
-
 8
8
-
 9
9
-
 10
10
-
 11
11
-
 12
12
-
 13
13
-
 14
14
-
 15
15
-
 16
16
-
 17
17
-
 18
18
-
 19
19
-
 20
20
-
 21
21
-
 22
22
-
 23
23
-
 24
24
-
 25
25
-
 26
26
-
 27
27
-
 28
28
-
 29
29
-
 30
30
-
 31
31
-
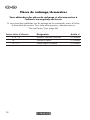 32
32
-
 33
33
-
 34
34
-
 35
35
-
 36
36
-
 37
37
-
 38
38
-
 39
39
-
 40
40
-
 41
41
-
 42
42
-
 43
43
-
 44
44
-
 45
45
-
 46
46
-
 47
47
-
 48
48
-
 49
49
-
 50
50
-
 51
51
-
 52
52
-
 53
53
-
 54
54
-
 55
55
-
 56
56
-
 57
57
-
 58
58
-
 59
59
-
 60
60
-
 61
61
-
 62
62
-
 63
63
-
 64
64
-
 65
65
-
 66
66
-
 67
67
-
 68
68
-
 69
69
-
 70
70
-
 71
71
-
 72
72
-
 73
73
-
 74
74
-
 75
75
-
 76
76
-
 77
77
-
 78
78
-
 79
79
-
 80
80
-
 81
81
-
 82
82
-
 83
83
-
 84
84
-
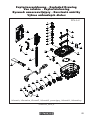 85
85
-
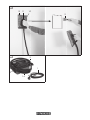 86
86
-
 87
87
-
 88
88


Parkside 332976_1907 Translation Of The Original Instructions
- Type
- Translation Of The Original Instructions
- Deze handleiding is ook geschikt voor
in andere talen
- English: Parkside 332976_1907
- français: Parkside 332976_1907
- Deutsch: Parkside 332976_1907
- slovenčina: Parkside 332976_1907
- čeština: Parkside 332976_1907
- polski: Parkside 332976_1907
Andere documenten
-
WAGNER DTS 5800 Operating Instructions Manual
-
BLACK+DECKER KX3300T Handleiding
-
BLACK+DECKER KX3300 Handleiding
-
Earlex SS76 de handleiding
-
WAGNER W 14 Safety Instructions
-
Vonroc WS503AC Handleiding
-
-
-
Powerplus POWX340 de handleiding
-
Domo DO7057S de handleiding