
Model: BT-CTB001
Item-No.: 7064170
www.bataviapower.com
Twinbrush
Doppelbürste
Double brosse
Dubbele borstel
Spazzola doppia
Cepillo doble
Escova dupla
Szczotka podwójna
Operating instructions
Bedienungsanleitung (Original)
Mode d'emploi
Gebruiksaanwijzing
Istruzioni di Funzionamento
Manual de usuario
Instruções de funcionamento
Instrukcja
PACK 18 V

A
BC
13
12
9
11
10
7
6
8
5
4
3
1
2
19
18
17
16
15
14
22
20
21

D
11
12
H
F G
I
E
4
3
12
14
16
15
23
19
2
2
17
5
11
18
12

Overview
1 Retaining clip
2 Grip sleeve
3 Locking screw
4 Extra handle
5 Power supply unit
6 Locking clip
7 Battery cover
8 ON/OFF switch
9 Stopcock
10 Velcro tape
11 Hose adapter
12 Attachment clip
13 Hose
14 Inner part of the brush
15 Outer part of the brush
16 Spindle lock button
17 Motor unit
18 Locking lever
19 Extension pole (optional accessory)
20 Socket
21 Tug strap
22 Plug
Übersicht
1 Halteclip
2 Griffhülse
3 Feststellschraube
4 Zusatzhandgriff
5 Stromversorgungseinheit
6 Spannverschluss
7 Akkuabdeckung
8 Ein-/Ausschalter
9 Absperrhahn
10 Klettband
11 Schlauchadapter
12 Befestigungsclip
13 Wasserschlauch
14 Bürsteninnenteil
15 Bürstenaußenteil
16 Wellenblockierknopf
17 Motoreinheit
18 Feststellhebel
19 Verlängerung (optionales Zubehör)
20 Buchse
21 Zuglasche
22 Stecker
Vue d’ensemble
1 Clip de maintien
2 Manchon-poignée
3 Vis de blocage
4 Poignée auxiliaire
5 Bloc d’alimentation électrique
6 Clip de verrouillage
7 Couvercle de la batterie
8 Interrupteur marche/arrêt
9 Robinet d’arrêt
10 Bande autoagrippante
11 Adaptateur de tuyau
12 Clip de xation
13 Tuyau d’eau
14 Brosse intérieure
15 Brosse extérieure
16 Bouton de blocage de l’axe
17 Moteur
18 Levier de blocage
19 Rallonge (accessoire en option)
20 Douille
21 Tirette
22 Fiche
Overzicht
1 Borgclip
2 Grijphuls
3 Vergrendelschroef
4 Extra handgreep
5 Voedingseenheid
6 Sluiting
7 Accu-afdekking
8 Aan-/uitschakelaar
9 Afsluitkraan
10 Klittenband
11 Slangadapter
12 Bevestigingsclip
13 Waterslang
14 Binnendeel borstel
15 Buitendeel borstel
16 Asvergrendelingsknop
17 Motoreenheid
18 Vergrendelingshendel
19 Verlengstuk (optioneel toebehoren)
20 Aansluiting
21 Treklipje
22 Stekker
2

Panoramica
1 Clip di ssaggio
2 Boccola di presa
3 Vite di regolazione
4 Impugnatura supplementare
5 Unità alimentazione
6 Chiusura di serraggio
7 Coperchio batteria
8 Interruttore on/off
9 Rubinetto d’isolamento
10 Nastro in velcro
11 Adattatore per tubo
12 Clip di bloccaggio
13 Tubo dell’acqua
14 Parte interna della spazzola
15 Parte esterna della spazzola
16 Tasto di bloccaggio albero
17 Unità motore
18 Leva di regolazione
19 Prolunga (accessorio opzionale)
20 Presa
21 Linguetta
22 Spina
Vista general
1 Clip de sujeción
2 Casquillo del mango
3 Tornillo de jación
4 Asidero adicional
5 Unidad de alimentación eléctrica
6 Gancho sujetador
7 Cubierta de la batería
8 Botón conexión/desconexión
9 Llave de cierre
10 Velcro
11 Adaptador de manguera
12 Clip de jación
13 Manguera de agua
14 Pieza interior del cepillo
15 Pieza exterior del cepillo
16 Botón de bloqueo del eje
17 Unidad del motor
18 Palanca de bloqueo
19 Prolongación (accesorio opcional)
20 Conector
21 Tirador
22 Enchufe
Vista geral
1 Mola de retenção
2 Manga do punho
3 Parafuso de bloqueio
4 Punho lateral
5 Fonte de alimentação
6 Fecho de mola
7 Tampa da bateria
8 Interruptor ligar/desligar
9 Válvula de fecho
10 Fita tipo velcro
11 Adaptador de mangueira
12 Mola de xação
13 Mangueira de água
14 Parte interior da escova
15 Parte exterior da escova
16 Botão de bloqueio do eixo
17 Unidade do motor
18 Alavanca de bloqueio
19 Extensão (acessório opcional)
20 Conector fêmea
21 Patilha de puxar
22 Conector macho
Przegląd
1 Klips mocujący
2 Tuleja uchwytu
3 Śruba blokująca
4 Dodatkowy uchwyt
5 Jednostka zasilająca
6 Zatrzask
7 Pokrywa akumulatora
8 Włącznik/wyłącznik
9 Zawór odcinający
10 Taśma na rzepy
11 Adapter węża
12 Klips mocujący
13 Wąż do wody
14 Część wewnętrzna szczotki
15 Część zewnętrzna szczotki
16 Przycisk blokujący wał
17 Jednostka silnika
18 Dźwignia blokująca
19 Przedłużka (opcjonalny element wyposa
żenia)
20 Gniazdo
21 Języczek
22 Wtyczka
3

Table of content
1Explanation of the symbols....................... 6
2Additional safety instructions................... 6
3Contents of packing................................... 6
4Before the rst use...................................... 6
5Intended use................................................ 7
6Use................................................................. 7
7Maintenance, cleaning and storing.......... 8
8Technical data............................................. 8
9Accessories - optionally available............ 9
10 Disposal........................................................ 9
11 Declaration of conformity.......................... 9
Inhaltsverzeichnis
1Erläuterung der Symbole........................... 10
2Zusätzliche Sicherheitshinweise.............. 10
3Verpackungsinhalt...................................... 10
4Vor der ersten Benutzung.......................... 10
5Bestimmungsgemäßer Gebrauch........... 11
6Bedienung..................................................... 11
7Wartung, Reinigung und Lagerung.......... 12
8Technische Daten....................................... 13
9Zubehör - optional erhältlich..................... 13
10 Entsorgung................................................... 13
11 Konformitätserklärung............................... 14
Table des matières
1Explication des symboles.......................... 15
2Consignes de sécurité supplémentaires 15
3Contenu de l’emballage............................. 15
4Avant la première utilisation..................... 16
5Utilisation conforme................................... 16
6Utilisation...................................................... 16
7Entretien, nettoyage et stockage.............. 17
8Caractéristiques techniques..................... 18
9Accessoires – disponibles en option...... 18
10 Élimination.................................................... 18
11 Déclaration de conformité......................... 19
Inhoudsopgave
1Verklaring van de symbolen...................... 20
2Extra veiligheidsinstructies....................... 20
3Verpakkingseenheid................................... 20
4Voor het eerste gebruik.............................. 20
5Beoogd gebruik............................................ 21
6Bediening...................................................... 21
7Onderhoud, reiniging en opslag................ 22
8Technische gegevens................................ 23
9Toebehoren - optioneel verkrijgbaar........ 23
10 Afvoeren........................................................ 23
11 Conformiteitsverklaring............................. 24
4

Sommario
1Spiegazione dei simboli............................. 25
2Avvertenze di sicurezza addizionali........ 25
3Contenuto dell’imballaggio........................ 25
4Prima del primo utilizzo............................. 26
5Uso previsto................................................. 26
6Utilizzo........................................................... 26
7Manutenzione, pulizia e
immagazzinamento.................................... 27
8Dati tecnici.................................................... 28
9Accessorio - disponibile opzionalmente. 28
10 Smaltimento................................................. 28
11 Dichiarazione di conformità...................... 29
Índice
1Explicación de los símbolos...................... 30
2Indicaciones de seguridad adicionales... 30
3Contenido del embalaje............................. 30
4Antes del primer uso.................................. 30
5Uso conforme al n previsto..................... 31
6Manejo.......................................................... 31
7Mantenimiento, limpieza y
almacenamiento......................................... 32
8Datos técnicos............................................. 33
9Accesorios - disponibles
opcionalmente............................................. 33
10 Eliminación................................................... 33
11 Declaración de conformidad.................... 34
Índice
1Explicação dos símbolos........................... 35
2Instruções de segurança adicionais....... 35
3Conteúdo da embalagem.......................... 35
4Antes da primeira utilização..................... 36
5Utilização adequada................................... 36
6Operação...................................................... 36
7Manutenção, limpeza e
armazenamento.......................................... 37
8Dados técnicos............................................ 38
9Acessório - opcionalmente disponível.... 38
10 Eliminação.................................................... 38
11 Declaração de Conformidade................... 39
Spis treści
1Objaśnienie symboli................................... 40
2Dodatkowe informacje dotyczące
bezpieczeństwa........................................... 40
3Zawartość opakowania............................. 40
4Przed pierwszym użyciem........................ 41
5Użytkowanie zgodne z przeznaczeniem 41
6Obsługa......................................................... 41
7Konserwacja, czyszczenie i
przechowywanie......................................... 42
8Dane techniczne.......................................... 43
9Elementy wyposażenia – dostępne jako
opcja.............................................................. 43
10 Utylizacja....................................................... 43
11 Deklaracja zgodności................................. 44
5

Dear customer
Please familiarize yourself with the proper
usage of the device by reading and following
each chapter of this manual, in the order
presented. Keep these operating instructions
for further reference.
Please read the enclosed "General safety
instructions for power tools" and all addi
tional safety instructions in this operating
instructions!
This manual contains important information on
operating and handling the device. Keep these
operating instructions for further reference.
Please pass it on along with the unit if it is
handed over to a third party.
The Maxxpack batteries and chargers are avail
able online and in participating stores.
1. Explanation of the symbols
The following symbols are used in the user
manual or on the product:
Warning! To reduce the risk of injury,
the user must read the instruction
manual.
Denotes risk of personal injury, loss of
life or damage to the tool in case of
non-observance of the instructions in
this manual.
Wear safety glasses.
CE stands for "Conformité Europé
enne", which means "In accordance
with EU Regulations". With the CE
marking, the manufacturer conrms
that this Electric tool complies with
the applicable European directives.
Do not dispose of electric power tools
with domestic refuse.
2. Additional safety instructions
a. The device must be used as intended.
Observe local conditions and watch out for
other people in your vicinity when working
with the device.
b. Before using the device, check for
damages and do not use a damaged
device. Should the device become
damaged do not use it and have it repaired
by a professional or contact our customer
support department. Do not disassemble
the device or try repairing it yourself.
c. WARNING: The appliance must not be
operated by children or persons who have
not been instructed accordingly.
d. Persons with limited physical, sensorial or
mental abilities are not allowed to use the
device, unless they are supervised and
briefed for their safety by a qualied
person. Keep the device out of reach of
children.
e. Children must not clean or service the
device unsupervised.
f. Supervise children to prevent them from
playing with the appliance.
g. Hold the device rmly and safely when
turning it on.
h. The appliance must not be operated in
explosive atmospheres.
i. Always wear eye protection.
j. This device is suitable for indoor and
outdoor use, but do not use in rain.
k. Check to make sure the brush accessory
is installed correctly prior to use.
l. Do not force the brush into tight spaces
during use.
m. Do not touch rotating parts when device is
in use.
3. Contents of packing
1× Twin brush - Dual Power Scrubber (motor
unit and power supply unit)
1× extra handle including attachment materials
1× medium brush (outer part and inner part)
1 x user manual
4. Before the rst use
Remove the machine and all accessories from
the package. Keep the packaging materials out
of the reach of small children. There is a
danger of suffocation!
Check all parts for damage in transit and do
not use a damaged device.
English
6

4.1. Assembly
a. Place the motor unit (17) and the power
supply unit (5) with the tube ends facing
each other.
b. Slightly pull the socket (20) using the tug
strap (21) and the plug (22) out of the
tube ends. (see Fig. B)
c. Connect the socket and the plug with the
arrows pointing towards each other and
screw together tightly.
d. Connect the two tube ends (arrows
pointing towards each other) and screw
them together with the grip sleeve (2).
e. Plug the hose (13) into the connection on
the motor unit. (see Fig. C)
f. Guide the hose through the retaining
clip (1) and the mount on the motor unit.
Make sure that the hose on the motor unit
is long enough so that the adjustable
brush head can move without restriction.
g. Connect the hose adapter (11) to the
hose.
h. Slide the hose adapter onto the guide track
of the attachment clip (12). (see Fig. D)
5. Intended use
This product is intended for cleaning surfaces
indoors and outdoors in the domestic sector.
The product can be operated dry or with water.
It is not intended for permanent commercial
use.
The intended use also includes an operation
following the operating instructions.
Any use beyond these parameters (different
media, applying force) or any changes (recon
struction, no original accessory) can lead to
serious risks and is regarded as use that is
contrary to the intended purpose.
Only use accessories recommended by
supplier.
6. Use
6.1. Inserting/changing the battery
The battery cover protects the battery from
moisture and debris.
a. Only use the device with water when the
battery cover is properly closed.
b. Make sure the battery cover's seal and
rubber edge is clean and dry.
a. Undo the locking clip (6) and open the
battery cover (7).
b. Insert or take out the battery (see Fig. E).
c. Always check the seal before closing the
battery cover!
Remove dirt and foreign objects in the
area of the seal and check whether the
seal is present and undamaged.
d. Close the battery cover and lock it with the
locking clip.
6.2. Attaching/changing the brush
a. Block the shaft with the shaft lock
button (16) and screw on the outer part of
the brush (15) in the clockwise direction
(see Fig. F).
b. Insert the inner part of the brush (14) and
lock it in place in the counter-clockwise
direction.
c. To undo the inner part of the brush, unlock
it in the clockwise direction and take it off.
d. Block the shaft with the shaft lock button
and unscrew the outer part of the brush in
the counter-clockwise direction.
6.3. Adjusting the tilt angle of the brush
When using the device on the ground / oor,
the head should not be locked. The head can
then move along with the surface to be
cleaned.
Only lock the head when using the device
above shoulder height.
a. Lift the locking lever (18) all the way (see
Fig. G).
b. Adjust the tilt angle to your individual
needs and x it in place by pushing down
the locking lever.
Do not push the locking lever through with
great force. If the locking lever does not
close properly, adjust the inclination of the
brush slightly.
6.4. Adjusting the extra handle
a. Undo the locking screw (3). (see Fig. H)
English
7

b. Adjust the position of the attachment
clip (12) and the tilt of the extra handle (4)
to your needs and tighten the locking
screw again.
6.5. Working with the device
a. For wet use, close the stopcock and
connect the hose adapter to your water
supply. Adjust the water quantity with the
stopcock (see Fig. A).
b. Press the ON/OFF switch (8) to turn the
device on.
It is not necessary to hold the ON/OFF
switch during use.
Only exert minimal pressure (gentle feed
motion) on the device when working.
Gently and evenly push the device
forwards.
c. Press the ON/OFF switch again to turn the
device off.
6.6. Mounting the extension pole (optional
accessory)
The extension pole is an optional accessory
and not delivered with the device. Do not use
more than one extension pole with the device.
a. Pull the hose adapter (11) off the guide rail
of the attachment clip (12). (see Fig. I)
b. Unscrew the grip sleeve (2) and pull the
two tube ends apart.
c. Unscrew the tting and pull the plug (22)
and the socket (20) apart.
d. Place the motor unit (17) and the exten
sion pole (19) with the tube ends facing
each other.
e. Slightly pull the socket (20) using the tug
strap (21) and the plug (22) out of the
tube ends. (see Fig. B)
f. Connect the socket and the plug with the
arrows pointing towards each other and
screw together tightly.
g. Connect the two tube ends (arrows
pointing towards each other) and screw
them together with the sleeve (2).
h. Place the power supply unit (5) and the
extension pole (19) with the tube ends
facing each other.
i. Slightly pull the socket (20) using the tug
strap (21) and the plug (22) out of the
tube ends.
j. Connect the socket and the plug with the
arrows pointing towards each other and
screw together tightly.
k. Connect the two tube ends (arrows
pointing towards each other) and screw
them together with the sleeve (2).
l. Slide the hose adapter onto the guide track
of the sleeve (23).
7. Maintenance, cleaning and storing
Keep the device and its accessories in good
and clean condition to ensure easy and safe
working.
Remove the battery pack from the tool before
carrying out any adjustment, servicing or main
tenance.
If the bristles of the brush are
deformed by transport or incor
rect storage, immerse the brush
in hot (90 degrees Celsius) water
for 30 seconds. The bristles of
the brush then return to the
correct shape.
8. Technical data
Battery type: 18 V,
4000 mAh, Li-
Ion
No load speed
(ø100/180 mm):
200/400 min-1
Sound pressure level LpA: 66 dB(A)
Uncertainty KpA: 3 dB(A)
Sound power level LWA: 77 dB(A)
Uncertainty KWA: 3 dB(A)
Hand/arm vibration ah,b: 3.91 m/s2
Uncertainty K: 1.5 m/s2
8.1. Vibration level
The declared vibration total value and the
declared noise emission values have been
measured in accordance with a standard test
method (EN 62841) and may be used for
comparing one tool with another. The declared
vibration total value may also be used in a
preliminary assessment of exposure.
English
8

Warning!
The vibration and noise emission during actual
use of the power tool can differ from the
declared total value depending on the ways in
which the tool is used, in particular, what kind
of work piece is machined.
It is necessary to identify safety measured to
protect the operator that are based on an esti
mation of exposure in the actual conditions of
use (taking account of all parts of the operating
cycle such as the times when the tool is
switched off and when it is running idle in addi
tion to the trigger time).
Try to minimize the impact of vibration and
noise. Exemplary measures to reduce vibration
exposure include wearing gloves while using
the tool, limiting working time, and using acces
sories in good condition.
9. Accessories - optionally available
Item Item no:
Brush hard (red) 7064253
Thick strong hair for tough spots
Perfect for (ceramic) indoor and outdoor
tiles, outdoor wooden furniture, wooden
decks, walls, garage doors, and many
more
Brush medium (blue) 7064252
Medium hairs for all round cleaning
Perfect for boats, (ceramic) indoor and
outdoor tiles, outdoor wooden furniture,
wooden deck, walls, oors, and many
more
Brush soft (black) 7064251
Soft hairs for delicate surfaces
Perfect for boats, caravan/camper, tiles,
metal surfaces, mobile homes, and many
more
Extension pole 7064279
Extension of the reach by approx. 85 cm.
10. Disposal
Do not dispose of electric power tools
with domestic refuse.
The electric power tool is shipped in
packaging to reduce transport damage. This
packaging is a raw material and as such can
either be reused or can be fed back into the raw
material cycle. The electric power tool and its
accessories are made from various materials
such as metals and plastics. Take defective
components to a special refuse collection
point. Ask about these at your specialist shop
or local council.
10.1. Batteries
Think of the environment when disposing of
batteries. Contact your local authorities to nd
out where your nearest disposal area is. Do not
dispose of batteries with domestic refuse. Do
not dispose of by burning, risk of explosion.
11. Declaration of conformity
We, the Batavia B.V., Weth. Wassebaliestraat
6d, NL-7951 SN Staphorst, declare by our
own responsibility that the product Twinbrush,
Item-No 7064170, Model Nr. BT-CTB001 is
according to the basic requirements, which are
dened in the European Directives Electromag
netic Compatibility 2014/30/EU (EMC),
2006/42/EC (Machinery), RoHS: 2011/65/EU
and their amendments. For the evaluation of
conformity, the following harmonized stand
ards were consulted:
EN62841-1:2015+A15;
EN IEC 62841-2-3:2021;
ISO12100:2010;
AfPS GS 2019:01;
EN IEC 55014-1:2021;
EN IEC 55014-2:2021
Staphorst, 1 April 2022
Meino Seinen, QA Representative
Batavia B.V., Weth. Wassebaliestraat 6d, 7951
SN Staphorst, Netherlands
The product and the user manual may be
subject to changes. Technical data may be
changed without prior notice.
English
9

Sehr geehrte Damen und Herren
Bitte machen Sie sich in der Reihenfolge der
Kapitel mit dem Gerät vertraut und bewahren
Sie diese Bedienungsanleitung für spätere
Zwecke gut auf.
Lesen Sie bitte die beigefügten "Allgemeine
Sicherheitshinweise für Elektrowerkzeuge"
und alle weiteren Sicherheitshinweise in
dieser Betriebsanleitung!
Diese Bedienungsanleitung enthält wichtige
Hinweise zur Inbetriebnahme und Handha
bung. Legen Sie die Anleitung dem Produkt bei,
wenn Sie es an Dritte weitergeben.
Die Maxxpack Akkus und Ladegeräte sind
online und in teilnehmenden Geschäften
verfügbar.
1. Erläuterung der Symbole
Folgende Symbole werden im Benutzerhand
buch oder auf dem Produkt verwendet:
WARNUNG - Zur Verringerung des
Verletzungsrisikos Bedienungsanlei
tung lesen.
Allgemeines Warnzeichen – Seien Sie
aufmerksam und beachten Sie allge
meine Gefahren.
Tragen Sie eine Schutzbrille.
CE steht für "Conformité Européenne",
dies bedeutet "Übereinstimmung mit
EU Richtlinien". Mit der CE Kennzeich
nung bestätigt der Hersteller, dass
dieses Elektrowerkzeug den geltenden
europäischen Richtlinien entspricht.
Nicht in den Hausmüll entsorgen!
2. Zusätzliche Sicherheitshinweise
a. Das Gerät muss bestimmungsgemäß
verwendet werden. Achten Sie bei Arbeiten
mit dem Gerät auf die örtlichen Gegeben
heiten und auf andere Personen in Ihrer
Nähe.
b. Überprüfen Sie das Gerät vor der Verwen
dung auf Schäden und verwenden Sie ein
beschädigtes Gerät nicht. Sollte das Gerät
beschädigt sein, verwenden Sie es nicht
und lassen Sie es von einem Fachmann
reparieren oder wenden Sie sich an
unseren Kundendienst. Nehmen Sie das
Gerät nicht auseinander und versuchen Sie
nicht, es selbst zu reparieren.
c. Das Gerät darf nicht von Kindern oder
Personen bedient werden, die nicht
entsprechend unterwiesen wurden.
d. Dieses Gerät kann von Personen mit
eingeschränkten körperlichen, sensori
schen oder geistigen Fähigkeiten oder
mangelnder Erfahrung und Kenntnis
verwendet werden, wenn sie beaufsichtigt
oder unterwiesen werden, das Gerät auf
sichere Weise zu benutzen und die damit
verbundenen Gefahren zu verstehen.
Kinder dürfen nicht mit dem Gerät spielen.
e. Reinigung und Wartung dürfen nicht von
Kindern ohne Aufsicht durchgeführt
werden.
f. Beaufsichtigen Sie Kinder, damit sie nicht
mit dem Gerät spielen.
g. Halten Sie das Gerät beim Einschalten gut
und sicher fest.
h. Das Gerät darf nicht in explosionsgefähr
deten Bereichen betrieben werden.
i. Tragen Sie immer einen Augenschutz.
j. Dieses Gerät ist für den Innen- und
Außenbereich geeignet, darf aber nicht im
Regen verwendet werden.
k. Vergewissern Sie sich vor dem Gebrauch,
dass das Bürstenzubehör richtig installiert
ist.
l. Drücken Sie die Bürste während des
Gebrauchs nicht in enge Räume.
m. Berühren Sie keine rotierenden Teile, wenn
das Gerät in Gebrauch ist.
3. Verpackungsinhalt
1× Twin brush - Akku Bürste (Motoreinheit und
Stromversorgungseinheit)
1× Zusatzhandgriff inkl. Befestigungsmaterial
1× Bürste mittel (Bürstenaußen- und -innenteil)
1× Bedienungsanleitung
4. Vor der ersten Benutzung
Nehmen Sie das Gerät und alle Zubehörteile
aus der Verpackung. Bewahren Sie das
Deutsch
10

Verpackungsmaterial außerhalb der Reichweite
von Kindern auf. Es besteht Erstickungsgefahr!
Überprüfen Sie alle Teile auf Transportschäden
und verwenden Sie ein beschädigtes Gerät
nicht.
4.1. Montage
a. Die Motoreinheit (17) und die Stromversor
gungseinheit (5) mit den Rohrenden
zueinander legen.
b. Die Buchse (20) mit Hilfe der Zugla
sche (21) und den Stecker (22) aus den
Rohrenden leicht hervorziehen. (siehe
Abb. B)
c. Die Buchse und den Stecker mit
zueinander zeigenden Pfeilen zusammen
stecken und verschrauben.
d. Die beiden Rohrenden mit zueinander
zeigenden Pfeilen zusammenstecken und
mittels der Griffhülse (2) verschrauben.
e. Den Wasserschlauch (13) in den
Anschluss an der Motoreinheit stecken.
(siehe Abb. C)
f. Den Wasserschlauch durch den Halte
clip (1) und die Halterung an der Motorein
heit führen.
Achten Sie auf eine ausreichende Länge
des Wasserschlauchs an der Motoreinheit,
damit sich der verstellbare Bürstenkopf
uneingeschränkt bewegen kann.
g. Den Schlauchadapter (11) mit dem
Wasserschlauch verbinden.
h. Den Schlauchadapter auf die Führungs
schiene des Befestigungsclips (12)
aufschieben. (siehe Abb. D)
5. Bestimmungsgemäßer Gebrauch
Das Produkt ist bestimmt zum Reinigen von
Oberächen in Innenräumen und im Freien im
privaten Bereich. Das Produkt kann trocken
oder mit Wasser eingesetzt werden. Es ist nicht
für den gewerblichen Dauereinsatz vorge
sehen.
Zur bestimmungsgemäßen Verwendung
gehört auch das Einhalten der Anleitung.
Jede darüber hinausgehende Verwendung
(andere Medien, Gewaltanwendung) oder
eigenmächtige Veränderung (Umbau, kein Orig
inal-Zubehör) können Gefahren auslösen und
gelten als nicht bestimmungsgemäß.
Verwenden Sie nur vom Lieferanten empfoh
lenes Zubehör.
6. Bedienung
6.1. Akku einsetzen/wechseln
Die Akkuabdeckung schützt den Akku vor
Feuchtigkeit und Verschmutzungen.
a. Verwenden Sie das Gerät nur mit Wasser,
wenn die Akkuabdeckung richtig
geschlossen ist.
b. Achten Sie darauf, dass die Dichtung und
der Gummirand der Akkuabdeckung
sauber und trocken sind.
a. Den Spannverschluss (6) lösen und
Akkuabdeckung (7) öffnen.
b. Den Akku einsetzen oder entnehmen
(siehe Abb. E).
c. Vor dem Schließen der Akkuabdeckung
immer die Dichtung prüfen!
Entfernen Sie Schmutz und Fremdkörper
im Bereich der Dichtung und prüfen Sie, ob
die Dichtung vorhanden und unbeschädigt
ist.
d. Die Akkuabdeckung schließen und mit
dem Spannverschluss verriegeln.
6.2. Bürste montieren/wechseln
a. Die Welle mit dem Wellenblockier
knopf (16) blockieren und das
Bürstenaußenteil (15) im Uhrzeigersinn
verschrauben (siehe Abb. F).
b. Das Bürsteninnenteil (14) einsetzen und
gegen den Uhrzeigersinn verriegeln.
c. Zum Lösen das Bürsteninnenteil im
Uhrzeigersinn entriegeln und abnehmen.
d. Die Welle mit dem Wellenblockierknopf
blockieren und das Bürstenaußenteil
gegen den Uhrzeigersinn abschrauben.
6.3. Neigungswinkel der Bürste einstellen
Bei Verwendung des Geräts auf dem Boden
sollte der Kopf nicht xiert werden. Der Kopf
kann sich dann mit der zu reinigenden Fläche
mitbewegen.
Deutsch
11

Fixieren Sie den Kopf nur, wenn Sie das Gerät
über Schulterhöhe verwenden.
a. Den Feststellhebel (18) vollständig
aufklappen (siehe Abb. G).
b. Die Neigung der Bürste auf die individu
ellen Anforderungen einstellen und durch
Zuklappen des Feststellhebels xieren.
Drücken Sie den Feststellhebel nicht mit
großer Kraft zu. Wenn der Feststellhebel
nicht richtig schließt, passen Sie die
Neigung der Bürste leicht an.
6.4. Zusatzhandgriff einstellen
a. Lösen Sie die Feststellschraube (3). (siehe
Abb. H)
b. Stellen Sie die Position des Befestigung
sclips (12) und die Neigung des Zusatz
handgriffs (4) auf Ihre Bedürfnisse ein und
ziehen Sie die Feststellschraube wieder an.
6.5. Arbeiten mit dem Gerät
a. Für die Nassanwendung schließen Sie den
Absperrhahn und verbinden Sie den
Schlauchadapter mit Ihrer Wasserversor
gung. Regulieren Sie die Wassermenge mit
dem Absperrhahn. (siehe Abb. A)
b. Um das Gerät einzuschalten, drücken Sie
den Ein-/Ausschalter (8).
Es ist nicht notwendig, den Ein-/
Ausschalter während der Arbeit festzu
halten.
Üben Sie nur minimalen Druck (leichte
Vorschubbewegung) auf das Gerät aus,
wenn Sie arbeiten. Schieben Sie das Gerät
sanft und gleichmäßig vorwärts.
c. Zum Ausschalten drücken Sie den Ein-/
Ausschalter erneut.
6.6. Verlängerung montieren (optionales
Zubehör)
Die Verlängerung ist ein optionales Zubehör
und wird nicht mit dem Gerät geliefert.
Verwenden Sie nicht mehr als eine Verlän
gerung mit dem Gerät.
a. Den Schlauchadapter (11) von der
Führungsschiene des Befestigung
sclips (12) ziehen. (siehe Abb. I)
b. Die Griffhülse (2) abschrauben und die
beiden Rohrenden auseinander ziehen.
c. Die Verschraubung lösen und den
Stecker (22) und die Buchse (20)
auseinander ziehen.
d. Die Motoreinheit (17) und die Verlän
gerung (19) mit den Rohrenden
zueinander legen.
e. Die Buchse (20) mit Hilfe der Zugla
sche (21) und den Stecker (22) aus den
Rohrenden leicht hervorziehen. (siehe
Abb. B)
f. Die Buchse und den Stecker mit
zueinander zeigenden Pfeilen zusammen
stecken und verschrauben.
g. Die beiden Rohrenden mit zueinander
zeigenden Pfeilen zusammenstecken und
mittels der Griffhülse (2) verschrauben.
h. Die Stromversorgungseinheit (5) und die
Verlängerung (19) mit den Rohrenden
zueinander legen.
i. Die Buchse (20) mit Hilfe der Zugla
sche (21) und den Stecker (22) aus den
Rohrenden leicht hervorziehen.
j. Die Buchse und den Stecker mit
zueinander zeigenden Pfeilen zusammen
stecken und verschrauben.
k. Die beiden Rohrenden mit zueinander
zeigenden Pfeilen zusammenstecken und
mittels der Griffhülse (2) verschrauben.
l. Den Schlauchadapter (11) auf die
Führungsschiene der Hülse (23)
aufschieben.
7. Wartung, Reinigung und Lagerung
Halten Sie das Gerät und das Zubehör in gutem
und sauberem Zustand, um gut und sicher zu
arbeiten.
Vor allen Arbeiten am Gerät den Akku
entfernen.
Wenn die Borsten der Bürste
durch den Transport oder falsche
Lagerung verformt sind, tauchen
Sie die Bürste 30 Sekunden lang
in heißes Wasser (90 °C). Die
Borsten nehmen dann wieder ihre
ursprüngliche Form an.
Deutsch
12

8. Technische Daten
Akku Typ: 18 V,
4000 mAh, Li-
Ion
Leerlaufdrehzahl
(ø100/180 mm):
200/400 min-1
Schalldruckpegel LpA: 66 dB(A)
Unsicherheit KpA: 3 dB(A)
Schallleistungspegel LWA: 77 dB(A)
Unsicherheit KWA: 3 dB(A)
Hand-Arm-Vibration ah,b: 3,91 m/s2
Unsicherheit K: 1,5 m/s2
8.1. Vibrationsstufe
Der angegebene Schwingungsgesamtwert und
die angegebenen Geräuschemissionswerte
sind nach einem genormten Prüfverfahren
(EN 62841) gemessen worden und können
zum Vergleich eines Elektrowerkzeugs mit
einem anderen verwendet werden. Sie können
auch zu einer vorläugen Einschätzung der
Belastung verwendet werden.
Warnung!
Die Schwingungs- und Geräuschemissionen
können während der tatsächlichen Benutzung
des Elektrowerkzeugs von den Angabewerten
abweichen, abhängig von der Art und Weise, in
der das Elektrowerkzeug verwendet wird,
insbesondere, welche Art von Werkstück bear
beitet wird.
Es ist notwendig, Sicherheitsmaßnahmen zum
Schutz des Bedieners festzulegen, die auf einer
Abschätzung der Schwingungsbelastung
während der tatsächlichen Benutzungsbedin
gungen beruhen (hierbei sind alle Anteile des
Betriebszyklus zu berücksichtigen, beispiels
weise Zeiten, in denen das Elektrowerkzeug
abgeschaltet ist, und solche, in denen es zwar
eingeschaltet ist, aber ohne Belastung läuft).
Versuchen Sie, die Belastung durch Vibrationen
und Geräusche so gering wie möglich zu
halten. Beispielhafte Maßnahmen zur Verrin
gerung der Vibrationsbelastung sind das
Tragen von Handschuhen beim Gebrauch des
Werkzeugs, die Begrenzung der Arbeitszeit und
das Einsatz von Zubehören in gutem Zustand.
9. Zubehör - optional erhältlich
Artikel Artikel-Nr.
Bürste hart (rot) 7064253
Dickes, starkes Haar für schwierige
Stellen
Perfekt für (Keramik-)Fliesen im Innen-
und Außenbereich, Holzmöbel im
Außenbereich, Holzdecks, Wände, Gara
gentore und vieles mehr
Bürste mittel (blau) 7064252
Mittelstarke Haare für die allgemeine
Reinigung
Perfekt für Boote, (Keramik-)Fliesen im
Innen- und Außenbereich, Holzmöbel im
Außenbereich, Holzdecks, Wände, Böden
und vieles mehr
Bürste weich (schwarz) 7064251
Weiche Haare für empndliche Oberä
chen
Perfekt für Boote, Wohnwagen/Wohnmo
bile, Fliesen, Metalloberächen, Wohn
mobile und vieles mehr
Verlängerung 7064279
Verlängerung der Reichweite um ca.
85 cm.
10. Entsorgung
Werter Kunde, bitte helfen Sie mit, Abfall
zu vermeiden. Sollten Sie sich einmal von
diesem Artikel trennen wollen, so
bedenken Sie bitte, dass viele seiner Kompo
nenten aus wertvollen Rohstoffen bestehen
und wiederverwertet werden können.
Entsorgen Sie es daher nicht in die Mülltonne,
sondern führen Sie es bitte Ihrer Sammelstelle
für Wertstoffe zu.
10.1. Batterien
Denken Sie bei der Entsorgung von Batterien an
den Umweltschutz. Wenden Sie sich zwecks
einer umweltfreundlichen Entsorgung an die
lokalen Behörden.
Deutsch
13

11. Konformitätserklärung
Wir, die Batavia B.V., Weth. Wassebaliestraat
6d, NL-7951 SN Staphorst, erklären in allei
niger Verantwortung, dass das Produkt
Doppelbürste, Artikel Nr. 7064170, Modell
Nr. BT-CTB001 den wesentlichen Schutzan
forderungen genügt, die in den Europäischen
Richtlinien 2014/30/EU Elektromagnetische
Verträglichkeit (EMV), 2006/42/EG Maschinen,
RoHS: 2011/65/EU und deren Änderungen
festgelegt sind. Für die Konformitätsbewertung
wurden folgende harmonisierte Normen heran
gezogen:
EN62841-1:2015+A15;
EN IEC 62841-2-3:2021;
ISO12100:2010;
AfPS GS 2019:01;
EN IEC 55014-1:2021;
EN IEC 55014-2:2021
Staphorst, den 1. April 2022
Meino Seinen, Qualitätsbeauftragter
Batavia B.V., Weth. Wassebaliestraat 6d, 7951
SN Staphorst, Niederlande
Das Produkt und das Benutzerhandbuch
können geändert werden. Die technischen
Daten können ohne Vorankündigung geändert
werden.
Deutsch
14

Chère cliente, cher client
Veuillez vous familiariser avec l’appareil en
lisant cette notice d’utilisation dans l’ordre des
chapitres et conservez soigneusement la
notice pour toute référence ultérieure.
Lisez les « Consignes de sécurité générales
pour outils électriques » ci-jointes et toutes
les autres consignes de sécurité gurant
dans ce manuel d’instructions !
Cette notice d’utilisation contient des informa
tions importantes concernant la mise en
service et la manipulation du produit. Joignez
cette notice au produit si vous le donnez à un
tiers.
Les batteries et chargeurs Maxxpack sont
disponibles en ligne et dans les magasins
participants.
1. Explication des symboles
Les symboles suivants apparaissent dans le
manuel d’utilisation ou sur le produit :
AVERTISSEMENT ! Lisez la notice
d’utilisation an de réduire le risque de
blessure.
Symbole d’avertissement général :
soyez attentif et prenez en compte les
dangers d’ordre général.
Portez des lunettes de protection.
CE est l’abréviation de « Conformité
européenne », c’est-à-dire « Confor
mité aux directives de l’UE ». Avec le
marquage CE, le fabricant atteste que
cet outil électrique est conforme à la
règlementation européenne en
vigueur.
Ne pas jeter avec les déchets
ménagers !
2. Consignes de sécurité supplémen
taires
a. L’appareil doit être utilisé conformément à
sa destination. Lorsque vous travaillez
avec l’appareil, faites attention à votre
environnement et aux autres personnes se
trouvant à proximité.
b. Vériez que l’appareil n’est pas endom
magé avant de l’utiliser et n’utilisez pas un
appareil endommagé. Si l’appareil est
endommagé, ne l’utilisez pas et faites-le
réparer par un spécialiste ou adressez-
vous à notre service clientèle. Ne
démontez pas l’appareil et n’essayez pas
de le réparer vous-même.
c. L’appareil ne doit pas être utilisé par des
enfants ou par des personnes n’ayant pas
été formées à son utilisation.
d. Cet appareil peut être utilisé par des
personnes dont les capacités physiques,
sensorielles ou mentales sont réduites, ou
qui manquent d’expérience et de connaiss
ances, à condition qu’elles soient supervi
sées ou qu’elles aient reçu des instruc
tions sur la manière d’utiliser l’appareil en
toute sécurité et de comprendre les
risques qu’il présente. Les enfants ne
doivent pas jouer avec l’appareil.
e. La maintenance et le nettoyage ne doivent
pas être réalisés par des enfants sans
surveillance.
f. Surveillez les enfants an qu’ils ne jouent
pas avec l’appareil.
g. Tenez correctement et fermement l’ap
pareil lorsque vous le mettez en marche.
h. N’utilisez pas l’appareil dans des zones à
risque d’explosion.
i. Portez toujours une protection oculaire.
j. Cet appareil est adapté à l’intérieur comme
à l’extérieur, mais ne doit pas être utilisé
sous la pluie.
k. Assurez-vous que l’accessoire de bros
sage est correctement installé avant de
l’utiliser.
l. Ne poussez pas la brosse dans des
espaces étroits pendant son utilisation.
m. Ne touchez pas les pièces en rotation
lorsque l’appareil est en cours d’utilisation.
3. Contenu de l’emballage
1× double brosse – brosse à batterie (moteur
et bloc d’alimentation électrique)
1× poignée auxiliaire avec matériel de xation
1× brosse classique (brosse extérieure et
brosse intérieure)
Français
15

1× notice d’utilisation
4. Avant la première utilisation
Sortez l’appareil et tous ses accessoires de
l’emballage. Rangez l’emballage hors de portée
des enfants. Il existe un risque d’étouffement.
Vériez qu’aucune pièce n’a été endommagée
durant le transport et n’utilisez pas un appareil
endommagé.
4.1. Montage
a. Placez les extrémités des tubes du
moteur (17) et du bloc d’alimentation (5)
l’une contre l’autre.
b. Retirez légèrement la douille (20) de l’ex
trémité des tubes à l’aide de la tirette (21)
et de la che (22) (voir g. B).
c. Assemblez et vissez la douille et la che
en orientant les èches l’une vers l’autre.
d. Assemblez les deux extrémités des tubes
en orientant les èches l’une vers l’autre et
vissez-les au moyen du manchon-
poignée (2).
e. Introduisez le tuyau d’eau (13) dans le
raccordement sur le moteur (voir g. C).
f. Faites passer le tuyau d’eau par le clip de
maintien (1) et le support du moteur.
Veillez à ce que la longueur du tuyau d’eau
sur le moteur soit susante pour que la
tête de brosse réglable puisse se déplacer
sans restriction.
g. Raccordez l’adaptateur de tuyau (11) au
tuyau d’eau.
h. Glissez l’adaptateur de tuyau sur le rail de
guidage du clip de xation (12) (voir
g. D).
5. Utilisation conforme
Le produit est destiné au nettoyage des
surfaces à l’intérieur et à l’extérieur dans la
sphère domestique. Le produit peut être utilisé
à sec ou avec de l’eau. Il n’est pas prévu pour
une utilisation professionnelle continue.
Le respect de la notice fait également partie
d’une utilisation conforme.
Toute autre utilisation (autres liquides, force
excessive) ou modication arbitraire (transfor
mation, utilisation d’accessoires n’étant pas
d’origine) peut entraîner des risques et est
considérée comme non conforme à l’usage
prévu.
N’utilisez que les accessoires recommandés
par le fournisseur.
6. Utilisation
6.1. Insertion/remplacement de la batterie
Le couvercle de la batterie protège la batterie
de l’humidité et des salissures.
a. N’utilisez l’appareil avec de l’eau que
lorsque le couvercle de la batterie est
correctement fermé.
b. Veillez à ce que le joint d’étanchéité et le
bord en caoutchouc du couvercle de la
batterie soient propres et secs.
a. Desserrez le clip de verrouillage (6) et
ouvrez le couvercle de la batterie (7).
b. Insérez ou retirez la batterie (voir g. E).
c. Vériez toujours le joint d’étanchéité
avant de fermer le couvercle de la batt
erie !
Retirez la saleté et les corps étrangers de
la zone du joint d’étanchéité et vériez que
le joint est bien en place et non endom
magé.
d. Fermez le couvercle de la batterie et
bloquez-le à l’aide du clip de verrouillage.
6.2. Montage/remplacement des brosses
a. Bloquez l’axe avec le bouton de blocage de
l’axe (16) et vissez la brosse extéri
eure (15) dans le sens des aiguilles d’une
montre (voir g. F).
b. Insérez la brosse intérieure (14) et
verrouillez-la en tournant dans le sens
inverse des aiguilles d’une montre.
c. Pour desserrer, déverrouillez la brosse
intérieure en tournant dans le sens des
aiguilles d’une montre et retirez-la.
d. Bloquez l’axe à l’aide du bouton de blocage
de l’axe et dévissez la brosse extérieure
dans le sens inverse des aiguilles d’une
montre.
Français
16

6.3. Réglage de l’angle d’inclinaison de la
brosse
En cas d’utilisation de l’appareil sur le sol, la
tête ne doit pas être xée. La tête peut alors
suivre la surface à nettoyer.
Ne xez la tête que si vous utilisez l’appareil au-
dessus de la hauteur des épaules.
a. Ouvrez complètement le levier de blocage
(18) (voir g. G).
b. Réglez l’inclinaison de la brosse en fonc
tion de vos besoins et xez-la en fermant
le levier de blocage.
Ne forcez pas lorsque vous serrez le levier
de blocage. Si le levier de blocage ne se
ferme pas correctement, ajustez légère
ment l’inclinaison de la brosse.
6.4. Réglage de la poignée auxiliaire
a. Desserrez la vis de blocage (3) (voir
g. H).
b. Réglez la position du clip de xation (12)
et l’inclinaison de la poignée auxiliaire (4)
en fonction de vos besoins, puis resserrez
la vis de blocage.
6.5. Utilisation de l’appareil
a. Pour une utilisation avec de l’eau, fermez
le robinet d’arrêt et raccordez l’adaptateur
de tuyau à votre alimentation en eau.
Réglez le débit d’eau à l’aide du robinet
d’arrêt (voir g. A).
b. Pour mettre l’appareil en marche, appuyez
sur l’interrupteur marche/arrêt (8).
Il n’est pas nécessaire de tenir fermement
l’interrupteur marche/arrêt pendant l’utili
sation de l’appareil.
N’exercez qu’une pression minimale
(légère poussée vers l’avant) sur l’appareil
lorsque vous travaillez. Poussez l’appareil
doucement et régulièrement vers l’avant.
c. Pour éteindre l’appareil, appuyez à
nouveau sur l’interrupteur marche/arrêt.
6.6. Montage de la rallonge (accessoire en
option)
La rallonge est un accessoire disponible en
option et n’est pas fournie avec l’appareil. N’uti
lisez pas plus d’une rallonge avec l’appareil.
a. Retirez l’adaptateur de tuyau (11) du rail
de guidage du clip de xation (12) (voir
g. I).
b. Dévissez le manchon-poignée (2) et
éloignez les deux extrémités des tubes.
c. Desserrez le raccord à vis et éloignez la
che (22) de la douille (20).
d. Placez les extrémités des tubes du
moteur (17) et de la rallonge (19) l’une
contre l’autre.
e. Retirez légèrement la douille (20) de l’ex
trémité des tubes à l’aide de la tirette (21)
et de la che (22) (voir g. B).
f. Assemblez et vissez la douille et la che
en orientant les èches l’une vers l’autre.
g. Assemblez les deux extrémités des tubes
en orientant les èches l’une vers l’autre et
vissez-les au moyen du manchon-
poignée (2).
h. Placez les extrémités des tubes du bloc
d’alimentation électrique (5) et de la
rallonge (19) l’une contre l’autre.
i. Retirez légèrement la douille (20) de l’ex
trémité des tubes à l’aide de la tirette (21)
et de la che (22).
j. Assemblez et vissez la douille et la che
en orientant les èches l’une vers l’autre.
k. Assemblez les deux extrémités des tubes
en orientant les èches l’une vers l’autre et
vissez-les au moyen du manchon-
poignée (2).
l. Faites glisser l’adaptateur de tuyau (11)
sur le rail de guidage du manchon (23).
7. Entretien, nettoyage et stockage
Veillez à la propreté de l’appareil et de ses
accessoires an de pouvoir travailler correcte
ment et en toute sécurité.
Retirez la batterie avant toute intervention sur
l’appareil.
Si les poils de la brosse sont
déformés à cause du transport
ou d’un mauvais stockage,
plongez la brosse dans de l’eau
chaude (90 °C) pendant
30 secondes. Les poils repre
nnent alors leur forme initiale.
Français
17

8. Caractéristiques techniques
Type de batterie : 18 V
4 000 mAh, li-
ion
Vitesse de rotation à vide
(ø 100/180 mm) :
200/400 min-1
Niveau de pression sonore LpA :66 dB(A)
Incertitude KpA : 3 dB(A)
Niveau de puissance sonore
LWA :
77 dB(A)
Incertitude KWA : 3 dB(A)
Vibration transmise au
système main-bras ah,b :
3,91 m/s2
Incertitude K : 1,5 m/s2
8.1. Niveau de vibration
La valeur totale des vibrations et les valeurs
d’émission sonore indiquées ont été mesurées
en appliquant une méthode d’essai normée
(EN 62841). Elles peuvent être utilisées pour
comparer des outils électriques entre eux. Elles
peuvent également être utilisées pour une esti
mation provisoire de la sollicitation.
Avertissement !
Les émissions de vibrations et de bruit peuvent
différer des valeurs indiquées pendant l’utilisa
tion effective de l’outil électrique en fonction du
type d’utilisation de l’outil électrique, en particu
lier en fonction du type de pièce utilisée.
En vue de protéger l’utilisateur, il est nécessaire
de xer des mesures de sécurité basées sur
une estimation de la sollicitation vibratoire
dans les conditions d’utilisation réelles (pour
cela, il faut tenir compte de toutes les phases
du cycle de fonctionnement, par exemple des
temps d’arrêt de l’outil électrique, ainsi que des
temps où l’outil est en marche sans être solli
cité).
Essayez de réduire au minimum les sollicita
tions vibratoires et sonores. Le port de gants
lors de l’utilisation de l’outil, la limitation du
temps de travail et l’utilisation d’accessoires en
bon état sont des exemples de mesures visant
à réduire la sollicitation vibratoire.
9. Accessoires – disponibles en
option
Article Référence
Brosse rigide (rouge) 7064253
Poils épais et durs pour les endroits di
ciles
Idéale pour les carreaux (en céramique)
d’intérieur et d’extérieur, les meubles
d’extérieur en bois, les terrasses en bois,
les murs, les portes de garage et bien
plus encore
Brosse classique (bleue) 7064252
Poils moyennement durs pour le
nettoyage général
Idéale pour les bateaux, les carreaux (en
céramique) d’intérieur et d’extérieur, les
meubles d’extérieur en bois, les terrasses
en bois, les murs, les sols et bien plus
encore
Brosse douce (noire) 7064251
Poils souples pour les surfaces délicates
Idéale pour les bateaux, les caravanes et
camping-cars, le carrelage, les surfaces
métalliques, les mobile homes et bien
plus encore
Rallonge 7064279
Extension de la portée d’environ 85 cm.
10. Élimination
Cher client, aidez-nous à contribuer à la
réduction des déchets. Si vous deviez
vous séparer de cet article, n’oubliez pas
que nombre de ses composants sont consti
tués de matériaux précieux et peuvent être
recyclés. Ne le jetez donc pas avec les ordures
ménagères, mais apportez-le dans un point de
collecte pour matériaux recyclables.
10.1. Piles
Pensez à la protection de l’environnement
lorsque vous vous débarrassez des piles.
Renseignez-vous auprès des autorités locales
pour une élimination respectueuse de l’envir
onnement.
Français
18

11. Déclaration de conformité
Nous, Batavia B.V., Weth. Wassebaliestraat
6d, NL-7951 SN Staphorst, déclarons sous
notre seule responsabilité que le produit
Double brosse, référence 7064170, modèle
BT-CTB001 est conforme aux exigences
essentielles de protection dénies dans les
directives européennes 2014/30/UE Compati
bilité électromagnétique (CEM), 2006/42/CE
Machines, RoHS : 2011/65/UE et leurs
amendements. Les normes harmonisées
suivantes ont été utilisées pour l’évaluation de
la conformité :
EN62841-1:2015+A15 ;
EN IEC 62841-2-3:2021 ;
ISO12100:2010 ;
AfPS GS 2019:01 ;
EN IEC 55014-1:2021 ;
EN IEC 55014-2:2021
Staphorst, le 1er avril 2022
Meino Seinen, responsable qualité
Batavia B.V., Weth. Wassebaliestraat 6d, 7951
SN Staphorst, Pays-Bas
Le produit et le manuel d’utilisation peuvent
faire l’objet de modications. Les caractéris
tiques techniques peuvent être modiées sans
préavis.
Français
19

Geachte dames en heren
Maak uzelf vertrouwd met het apparaat in de
volgorde van de hoofdstukken en bewaar deze
gebruikershandleiding voor toekomstig gebruik.
Lees de bijgevoegde "Algemene veiligheid
sinstructies voor elektrisch gereedschap" en
alle andere veiligheidsinstructies in deze
gebruikershandleiding!
Deze gebruikershandleiding bevat belangrijke
instructies over de ingebruikname en omgang.
Voeg de handleiding bij het product als u deze
aan derden doorgeeft.
De Maxxpack accu's en opladers zijn online en
in deelnemende winkels verkrijgbaar.
1. Verklaring van de symbolen
De volgende symbolen worden in het gebruiker
shandboek of op het product gebruikt:
WAARSCHUWING: Lees de gebruiker
shandleiding om het risico op letsel te
verminderen.
Algemeen waarschuwingsteken -
Wees opmerkzaam en let op de alge
mene gevaren.
Draag een veiligheidsbril.
CE staat voor "Conformité Europé
enne", dit betekent "Naleving van EU-
richtlijnen". Met de CE-markering
bevestigt de fabrikant dat dit elek
trisch gereedschap voldoet aan de
geldende Europese richtlijnen.
Niet in het huisvuil werpen!
2. Extra veiligheidsinstructies
a. Het apparaat moet volgens het beoogde
gebruik worden gebruikt. Let bij het werken
met het apparaat op de plaatselijke
omstandigheden en op andere mensen in
uw omgeving.
b. Controleer het apparaat voor gebruik op
schade en gebruik geen beschadigd appa
raat. Als het apparaat beschadigd is,
gebruik het dan niet en laat het repareren
door een professional of neem contact op
met onze klantenservice. Haal het appa
raat niet uit elkaar en probeer niet om het
zelf te repareren.
c. Het apparaat mag niet door kinderen of
personen worden gebruikt, die niet naar
behoren instructies hebben gekregen.
d. Dit apparaat kan worden gebruikt door
personen met verminderde fysieke, zintui
glijke of mentale vermogens of met een
gebrek aan ervaring en kennis als ze onder
toezicht staan of instructies hebben
gekregen om het apparaat op een veilige
manier te gebruiken en de bijbehorende
risico's begrijpen. Kinderen mogen niet
met het apparaat spelen.
e. Reiniging en onderhoud mogen niet door
kinderen zonder toezicht worden uitge
voerd.
f. Let op dat er geen kinderen met het appa
raat spelen.
g. Houd het apparaat bij het inschakelen
goed en veilig vast.
h. Het apparaat mag niet in explosiegevaar
lijke omgevingen worden gebruikt.
i. Draag altijd oogbescherming.
j. Dit apparaat is geschikt voor binnen- en
buitengebruik, maar mag echter niet in de
regen worden gebruikt.
k. Controleer voor het gebruik of het borstel
toebehoren juist gemonteerd is.
l. Duw de borstel tijdens gebruik niet in
krappe ruimtes.
m. Raak geen draaiende onderdelen aan,
wanneer het apparaat in gebruik is.
3. Verpakkingseenheid
1× twin brush - accuborstel (motoreenheid en
voedingseenheid)
1× extra handgreep incl. bevestigingsmateriaal
1× borstel medium (borstel buitenste en
binnenste deel)
1× gebruikershandleiding
4. Voor het eerste gebruik
Haal het apparaat en alle toebehoren uit de
verpakking. Bewaar het verpakkingsmateriaal
buiten bereik van kinderen. Er bestaat verstik
kingsgevaar!
Nederlands
20

Controleer alle delen op transportschade en
gebruik geen beschadigd apparaat.
4.1. Montage
a. De motoreenheid (17) en de voedingseen
heid (5) met de buisuiteinden tegen elkaar
leggen.
b. De aansluiting (20) met behulp van het
treklipje (21) en de stekker (22) iets uit de
buisuiteinden trekken. (zie afb. B)
c. De aansluiting en de stekker met de pijlen
naar elkaar wijzend samenplaatsen en aan
elkaar schroeven.
d. Plaats de twee buisuiteinden met de pijlen
naar elkaar gericht en schroef ze aan
elkaar met behulp van de grijphuls (2).
e. De waterslang (13) in de aansluiting op de
motoreenheid steken. (zie afb. C)
f. De waterslang door de borgclip (1) en de
beugel van de motoreenheid leiden.
Let erop dat de waterslang op de motor
eenheid lang genoeg is om de verstelbare
borstelkop vrij te laten bewegen.
g. De slangadapter (11) met de waterslang
verbinden.
h. De slangadapter op de geleiderail van de
bevestigingsclip (12) schuiven. (zie afb. D)
5. Beoogd gebruik
Het product is bedoeld voor het reinigen van
oppervlakken in binnenruimtes en buiten voor
particulier gebruik. Het product kan droog of
met water worden gebruikt. Het is niet bedoeld
voor continu commercieel gebruik.
Tot het beoogde gebruik behoort ook het
naleven van de instructies.
Elk ander gebruik (andere media, gebruik van
geweld) of ongeoorloofde wijziging (ombouw,
geen originele toebehoren) kan gevaar ople
veren en wordt als oneigenlijk beschouwd.
Gebruik alleen het toebehoren dat door de
fabrikant is aanbevolen.
6. Bediening
6.1. Accu plaatsen/vervangen
De accu-afdekking beschermt de accu tegen
vochtigheid en vuil.
a. Gebruik het apparaat alleen met water,
wanneer de accu-afdekking juist gesloten
is.
b. Let erop dat de afdichting van het batterij
deksel en de rubberen rand schoon en
droog zijn.
a. De sluiting (6) losmaken en de accu-afdek
king (7) openen.
b. De accu gebruiken of verwijderen (zie afb.
E).
c. Voor het sluiten van de accu-afdekking
altijd de afdichting controleren!
Verwijder vuil en vreemd materiaal in het
gedeelte van de afdichting en controleer of
de afdichting aanwezig en onbeschadigd
is.
d. Sluit de accu-afdekking en vergrendel deze
met de sluiting.
6.2. Borstel monteren/vervangen
a. De as met de asvergrendelingsknop (16)
blokkeren en het buitenste deel van de
borstel (15) met de wijzers van de klok
mee vastschroeven (zie afb. F).
b. Het binnendeel van de borstel (14)
plaatsen en tegen de wijzers van de klok in
vergrendelen.
c. Om los te maken, ontgrendelt u het
binnenste deel van de borstel met de
wijzers van de klok mee en verwijdert u
het.
d. De as met de asvergrendelingsknop blok
keren en het buitenste deel van de borstel
met de wijzers van de klok mee losschro
even.
6.3. Hoek van de borstel instellen
Bij gebruik van het apparaat op de vloer mag
de kop niet worden vastgezet. De kop kan dan
meebewegen met het te reinigen oppervlak.
Zet de kop alleen vast, wanneer u het apparaat
boven schouderhoogte gebruikt.
Nederlands
21

a. De vergrendelingshendel (18) volledig
openen (zie afb. G).
b. Pas de helling van de borstel aan uw indi
viduele wensen aan en zet deze vast door
de vergrendelingshendel te sluiten.
Druk niet met overmatige kracht op de
vergrendelingshendel. Als de vergrende
lingshendel niet juist sluit, moet u de
helling van de borstel iets aanpassen.
6.4. Extra handgreep instellen
a. Maak de vergrendelschroef los (3). (zie
afb. H)
b. Stel de positie van de bevestigingsclip (12)
en de helling van de extra handgreep (4) in
volgens uw behoeften en trek de vergren
delschroef weer aan.
6.5. Werken met het apparaat
a. Sluit bij nat gebruik de afsluitkraan en sluit
de slangadapter aan op uw waterleiding.
Regel de hoeveelheid water met de
afsluitkraan. (zie afb. A)
b. Druk op de aan-/uitschakelaar (8) om het
apparaat in te schakelen.
Het is niet nodig de aan-/uitschakelaar
tijdens het werk vast te houden.
Oefen tijdens het werken minimale druk uit
(lichte voorwaartse beweging) op het
apparaat. Schuif het apparaat soepel en
gelijkmatig naar voren.
c. Druk opnieuw de aan-/uitschakelaar in om
uit te schakelen.
6.6. Verlengstuk monteren (optioneel toebe
horen)
Het verlengstuk is een optionele accessoire en
wordt niet bij het apparaat geleverd. Gebruik
niet meer dan een verlengstuk met het appa
raat.
a. De slangadapter (11) van de geleiderail
van de bevestigingsclip (12) trekken. (zie
afb. I)
b. De grijphuls (2) afschroeven en de beide
buisuiteinden uit elkaar trekken.
c. De schroefverbinding losdraaien en de
stekker (22) en de aansluiting (20) uit
elkaar trekken.
d. De motoreenheid (17) en het verleng
stuk (19) met de buisuiteinden tegen
elkaar leggen.
e. De aansluiting (20) met behulp van het
treklipje (21) en de stekker (22) iets uit de
buisuiteinden trekken. (zie afb. B)
f. De aansluiting en de stekker met de pijlen
naar elkaar wijzend samenplaatsen en aan
elkaar schroeven.
g. Plaats de twee buisuiteinden met de pijlen
naar elkaar gericht en schroef ze aan
elkaar met behulp van de grijphuls (2).
h. De voedingseenheid (5) en het verleng
stuk (19) met de buisuiteinden tegen
elkaar leggen.
i. De aansluiting (20) met behulp van het
treklipje (21) en de stekker (22) iets uit de
buisuiteinden trekken.
j. De aansluiting en de stekker met de pijlen
naar elkaar wijzend samenplaatsen en aan
elkaar schroeven.
k. Plaats de twee buisuiteinden met de pijlen
naar elkaar gericht en schroef ze aan
elkaar met behulp van de grijphuls (2).
l. De slangadapter (11) op de geleiderail van
de huls (23) schuiven.
7. Onderhoud, reiniging en opslag
Houd het apparaat en toebehoren in een goede
en schone toestand om goed en veilig te
werken.
Verwijder de accu-afdekking voor alle werk
zaamheden aan het apparaat.
Als de haren van de borstel
vervormd zijn door transport of
onjuiste opslag, laat de borstel
dan 30 seconden lang in heet
water (90 °C) weken. De borstel
haren keren dan terug naar hun
oorspronkelijke vorm.
Nederlands
22

8. Technische gegevens
Type accu: 18 V,
4000 mAh, Li-
ion
Onbelast toerental
(ø100/180 mm):
200/400 min-1
Geluidsdrukniveau LpA: 66 dB(A)
Onnauwkeurigheid KpA: 3 dB(A)
Geluidsvermogensniveau LWA: 77 dB(A)
Onnauwkeurigheid KWA: 3 dB(A)
Hand-arm-vibratie ah,b: 3,91 m/s2
Onnauwkeurigheid K: 1,5 m/s2
8.1. Trillingsniveau
De aangegeven totale trillingswaarde en de
aangegeven geluidsemissiewaarden zijn
volgens een genormeerd controleprocedé
(EN 62841) gemeten en kunnen ter vergelijking
van een elektrisch gereedschap met een ander
elektrisch gereedschap gebruikt worden. Deze
kunnen ook voor een voorlopige inschatting
van de belasting gebruikt worden.
Waarschuwing!
De trillings- en geluidsemissies kunnen tijdens
het daadwerkelijke gebruik van het elektrisch
gereedschap van de aangegeven waarden
afwijken. Dit is afhankelijk van de manier
waarop het elektrisch gereedschap gebruikt
wordt, in het bijzonder welke soort werkstuk
bewerkt wordt.
Het is noodzakelijk om veiligheidsmaatregelen
ter bescherming van de bediener te bepalen.
Deze moeten gebaseerd zijn op een inschatting
van de trillingsbelasting tijdens de daadwerke
lijke gebruiksomstandigheden (hierbij moet
rekening gehouden worden met alle aandelen
van de bedrijfscyclus, bijvoorbeeld tijden,
waarin het elektrisch gereedschap uitgescha
keld is, en tijden waarin het weliswaar inge
schakeld is maar zonder belasting draait).
Probeer de belasting door trillingen en geluiden
zo laag mogelijk te houden. Voorbeelden van
maatregelen om de trillingsbelasting te vermin
deren zijn het dragen van handschoenen bij het
gebruik van het gereedschap, de begrenzing
van de werktijd en het gebruik van toebehoren
in goede toestand.
9. Toebehoren - optioneel verkrijg
baar
Artikel Artikel-nr.
Harde borstel (rood) 7064253
Dik, sterk haar voor moeilijke zones
Perfect voor (keramische) tegels binnen
en buiten, houten buitenmeubels, houten
dekken, muren, garagedeuren en nog
veel meer
Medium borstel (blauw) 7064252
Middelsterke haren voor de algemene
reiniging
Perfect voor boten, (keramische) tegels
binnen en buiten, houten buitenmeubels,
houten dekken, muren, vloeren en nog
veel meer
Zachte borstel (zwart) 7064251
Zacht haar voor delicate oppervlakken
Perfect voor boten, woonwagens/cara
vans, tegels, metalen oppervlakken,
mobiele woningen en nog veel meer
Verlengstuk 7064279
Verlengstuk van het bereik met ongeveer
85 cm.
10. Afvoeren
Beste klant, help alstublieft om verspilling
te voorkomen. Als u ooit afstand wilt
doen van dit artikel, houd er dan rekening
mee dat veel van de componenten uit waarde
volle grondstoffen bestaan en kunnen worden
gerecycled. Gooi het daarom niet in de vuil
nisbak, maar breng het naar uw inzamelpunt
voor recyclebaar materiaal.
10.1. Batterijen
Denk aan het milieu bij het weggooien van
batterijen. Neem contact op met de plaatselijke
autoriteiten voor milieuvriendelijke verwijdering.
Nederlands
23

11. Conformiteitsverklaring
Wij, Batavia B.V., Weth. Wassebaliestraat 6d,
NL-7951 SN Staphorst verklaart hier in eigen
verantwoording, dat het product Dubbele
borstel, Artikel nr. 7064170, model nr. BT-
CTB001 voldoet aan de wezenlijke veiligheid
seisen, die in de Europese richtlijnen
2014/30/EU Elektromagnetische compatibili
teit (EMC), 2006/42/EG Machinerichtlijn, RoHS:
2011/65/EU en hun wijzigingen vastgelegd zijn.
Voor de beoordeling van de conformiteit zijn de
volgende geharmoniseerde normen gebruikt:
EN62841-1:2015+A15;
EN IEC 62841-2-3:2021;
ISO12100:2010;
AfPS GS 2019:01;
EN IEC 55014-1:2021;
EN IEC 55014-2:2021
Staphorst, 1 april 2022
Meino Seinen, kwaliteitsfunctionaris
Batavia B.V., Weth. Wassebaliestraat 6d, 7951
SN Staphorst, Nederland
Het product en het gebruikershandboek
kunnen worden gewijzigd. De technische speci
caties kunnen zonder voorafgaande kennis
geving worden gewijzigd.
Nederlands
24

Gentile signore e gentili signori
Familiarizzare con la sequenza del capitolo del
dispositivo e conservare queste istruzioni per
l’uso in modo da poterle consultare in futuro.
Leggere attentamente le “Avvertenze di
sicurezza generali per gli elettroutensili”
allegate e tutte le altre avvertenze di sicur
ezza contenute in questo manuale d’uso!
Le istruzioni per l’uso contengono avvisi impor
tanti per la messa in funzione e la maneggevo
lezza. Allegare il manuale al prodotto quando
questo viene ceduto a terzi.
La batteria Maxxpack e il caricabatteria sono
disponibili online e nei negozi autorizzati.
1. Spiegazione dei simboli
I seguenti simboli vengo utilizzati nel manuale
d’uso o sono stampigliati sul prodotto:
AVVERTIMENTO - Per ridurre al
minimo il rischio di lesioni leggere le
istruzioni per l’uso.
Avvertenze generali - Siate sempre
vigili e fate attenzione ai pericoli
generali.
Indossare gli occhiali di protezione.
CE signica "Conformité Européenne”
cioè "conformità con le direttive UE". Il
marchio CE conferma che il fabbri
cante ha realizzato questo utensile
elettrico in conformità con le direttive
europee.
Non smaltire con i riuti domestici!
2. Avvertenze di sicurezza addizionali
a. Il dispositivo deve essere utilizzato in
conformità con la sua destinazione d’uso.
Durante l’utilizzo del dispositivo, rispettare
le norme locali e fare attenzione alle
persone che si trovano nelle immediate
vicinanze.
b. Prima dell’uso controllare il dispositivo in
modo da vericare la presenza di danni.
Non utilizzare un dispositivo danneggiato.
Se il dispositivo fosse danneggiato, non
utilizzarlo, farlo riparare a un tecnico quali
cato o rivolgersi al nostro servizio di
assistenza clienti. Non smontare il disposi
tivo né cercare di ripararlo da soli.
c. Il dispositivo non può essere utilizzato da
bambini o da persone non specicata
mente addestrate.
d. Questo dispositivo può essere utilizzato da
persone con ridotte capacità siche,
sensoriali o mentali o prive di esperienza e
conoscenza se sono supervisionate o
istruite a utilizzare il dispositivo in modo
sicuro e a comprendere i pericoli coinvolti.
Non permettere ai bambini di giocare con
il dispositivo.
e. La pulizia e la manutenzione non possono
essere eseguiti dai bambini senza la
supervisione di un adulto.
f. Vi invitiamo a tenere sotto controllo i
bambini in modo che non possano giocare
con il dispositivo.
g. Durante l’accensione tenere saldamente in
mano il dispositivo.
h. Il dispositivo non può essere utilizzato in
ambienti esposti al pericolo di esplosione.
i. Indossare sempre gli occhiali protettivi.
j. Questo dispositivo è adatto per uso
interno ed esterno, ma non deve essere
utilizzato sotto la pioggia.
k. Prima dell’uso vericare che l’accessorio
spazzola sia stato installato corretta
mente.
l. Durante il funzionamento non spingere la
spazzola in ambienti stretti.
m. Quando il dispositivo è un funzione, non
toccare le parti rotanti.
3. Contenuto dell’imballaggio
1× Twin brush - Spazzola a batteria (unità
motore e unità alimentazione)
1x Impugnatura supplementare con materiale
di ssaggio
1x Spazzola media (parte interna ed esterna
della spazzola)
1x Istruzioni per l’uso
Italiano
25

4. Prima del primo utilizzo
Estrarre il dispositivo e tutti gli accessori
dall’imballaggio. Conservare il materiale da
imballaggio lontano dalla portata dei bambini.
Pericolo di soffocamento!
Vetricare che tutte le parti non abbiano subito
alcun danno durante il trasporto e non utiliz
zare un dispositivo danneggiato.
4.1. Montaggio
a. Collegare l’unità motore (17) e l’unità
alimentazione (5) alle estremità del tubo.
b. Tirare leggermente la presa (20) con la
linguetta (21) e la spina (22) dall’estremità
dei tubi. (vedi g. B)
c. Collegare e avvitare la presa e la spina in
base alle frecce stampigliate.
d. Inserire tra di loro entrambe le estremità
del tubo, in base alle frecce stampigliate, e
avvitare con la boccola di presa (2).
e. Inserire il tubo dell’acqua (13) nell’attacco
dell’unità motore. (vedi g. C)
f. Guidare il tubo dell’acqua attraverso la clip
di ssaggio (1) e il supporto no all’unità
motore.
Assicurarsi che la lunghezza del tubo
dell’acqua sia suciente no all’unità
motore in modo che la testa della spaz
zola possa muoversi liberamente.
g. Collegare l’adattatore per tubo (11) al tubo
dell’acqua.
h. Spingere l’adattatore per tubo lungo il
binario guida della clip di ssaggio (12).
(vedi g. D)
5. Uso previsto
Il prodotto è stato concepito per pulire superci
in ambienti interni o esterni privati. Il prodotto
può essere utilizzato a secco o con acqua.
Esso non è stato concepito per l’utilizzo a ciclo
continuo.
L’utilizzo conforme alla destinazione d’uso
prevede anche il rispetto delle istruzioni.
Tutti gli impieghi diversi (altri liquidi, forzature)
o le modiche arbitrarie (alterazione, nessun
accessorio originale) possono causare situa
zioni di pericolo e valgono come utilizzo non
conforme alla destinazione d’uso.
Utilizzare solo gli accessori consigliati dal forni
tore.
6. Utilizzo
6.1. Inserimento/cambio della batteria
Il coperchio batteria protegge la batteria
dall’umidità e dallo sporco.
a. Utilizzare il dispositivo solo in acqua
quando il coperchio batteria è stato chiuso
correttamente.
b. Assicurarsi che la guarnizione e il bordo di
gomma del coperchio batteria siano puliti
e asciutti.
a. Allentare la chiusura di serraggio (6) per
aprire il coperchio batteria (7).
b. Inserire o rimuovere la batteria (vedi g.
E).
c. Prima di chiudere il coperchio batteria
controllare sempre la guarnizione!
Rimuovere lo sporco e i corpi estranei dal
perimetro della guarnizione e vericare se
questa sia presente e intatta.
d. Chiudere il coperchio batteria con la chiu
sura di serraggio.
6.2. Montaggio/sostituzione della spazzola
a. Bloccare l’albero con il tasto di bloccaggio
albero (16) e svitare la parte esterna della
spazzola (15) ruotandola in senso orario
(vedi g. F).
b. Inserire la parte interna della spazzola (14)
e bloccarla ruotandola in senso antiorario.
c. Per allentare e rimuovere la parte interna
della spazzola, ruotarla in senso orario.
d. Bloccare l’albero con il tasto di bloccaggio
albero e svitare la parte esterna della spaz
zola ruotandola in senso antiorario.
6.3. Regolazione dell’angolo di inclinazione
della spazzola
In caso di utilizzo del dispositivo sul pavimento,
la testa non deve essere bloccata. La testa può
così adattarsi alla supercie da pulire.
Bloccare la testa solo se il dispositivo deve
essere utilizzato oltre l’altezza spalle.
Italiano
26

a. Aprire completamente la leva di regola
zione (18) (vedi g. G).
b. Regolare l’angolo di inclinazione della
spazzola in base alle proprie esigenze
speciche e ssare con la leva di regola
zione.
Spingere la leva di regolazione senza appli
care alcuna forza eccessiva. Se la leva di
regolazione non si chiude correttamente,
adattare di conseguenza l’inclinazione
della spazzola.
6.4. Regolazione della impugnatura supple
mentare
a. Allentare la vite di regolazione (3). (vedi
g. H)
b. Regolare la posizione della clip di
ssaggio (12) e l’inclinazione dell’impug
natura supplementare (4) in base alle
proprie esigenze. Inne, serrare la vite di
regolazione.
6.5. Lavorare con il dispositivo
a. Per l’utilizzo bagnato, chiudere il rubinetto
d’isolamento e collegare l’adattatore per
tubo con l’alimentazione dell’acqua. Rego
lare la quantità d’acqua con il rubinetto
d’isolamento. (vedi g. A)
b. Per accendere il dispositivo, premere l’in
terruttore on/off (8).
Durante il lavoro, è necessario tenere
premuto l’interruttore on/off.
Applicare solo una pressione minima
(piccolo movimento di spostamento) sul
dispositivo durante il lavoro. Spingere in
avanti il dispositivo in modo leggero e
uniforme.
c. Premere nuovamente l’interruttore on/off
per spegnere il dispositivo.
6.6. Montaggio della prolunga (accessorio
opzionale)
La prolunga è un accessorio opzionale e non è
in dotazione al dispositivo. Non utilizzare mail il
dispositivo con più di una prolunga.
a. Estrarre l’adattatore per tubo (11) dal
binario guida della clip di ssaggio (12).
(vedi g. I)
b. Svitare la boccola di presa (2) e sperare
entrambe le estremità del tubo.
c. Allentare il raccordo a vite e separare la
spina (22) dalla presa (20).
d. Collegare l’unità motore (17) e la
prolunga (19) alle estremità del tubo.
e. Tirare leggermente la presa (20) con la
linguetta (21) e la spina (22) dall’estremità
dei tubi. (vedi g. B)
f. Collegare e avvitare la presa e la spina in
base alle frecce stampigliate.
g. Inserire tra di loro entrambe le estremità
del tubo, in base alle frecce stampigliate, e
avvitare con la boccola di presa (2).
h. Collegare l’unità alimentazione (5) e la
prolunga (19) alle estremità del tubo.
i. Tirare leggermente la presa (20) con la
linguetta (21) e la spina (22) dall’estremità
dei tubi.
j. Collegare e avvitare la presa e la spina in
base alle frecce stampigliate.
k. Inserire tra di loro entrambe le estremità
del tubo, in base alle frecce stampigliate, e
avvitare con la boccola di presa (2).
l. Spingere l’adattatore per tubo (11) lungo il
binario guida della boccola (23).
7. Manutenzione, pulizia e immagaz
zinamento
Mantenere il dispositivo e gli accessori in
buono stato e puliti in modo da poter lavorare
in sicurezza.
Prima di intervenire sul dispositivo, estrarre
sempre la batteria.
Se le setole della spazzola si
deformano a causa del trasporto
o dell’immagazzinamento errato,
immergere la spazzola per
30 secondo in acqua bollente
(90 °C). Le setole riacquisteranno
la loro forma originaria.
Italiano
27

8. Dati tecnici
Tipo di batteria: 18 V,
4000 mAh, Li-
Ion
Velocità a folle (ø
100/180 mm):
200/400 min-1
Livello di pressione sonora LpA: 66 dB(A)
Incertezza KpA: 3 dB(A)
Livello di potenza sonora LWA: 77 dB(A)
Incertezza KWA: 3 dB(A)
Vibrazione mano-braccio ah,b: 3,91 m/s2
Incertezza K: 1,5 m/s2
8.1. Livello di vibrazione
Il valore di vibrazione totale dichiarato e i valori
di emissione sonora dichiarati sono stati
misurati secondo una procedura di prova
standardizzata (EN 62841) e possono essere
utilizzati per confrontare tra di loro i diversi elet
troutensili. Inoltre, possono essere utilizzati
anche per una valutazione preliminare del
carico.
Avvertimento!
Le vibrazioni e le emissioni di rumore durante
l’uso effettivo dell’elettroutensile possono
differire dai valori indicati a seconda del modo
in cui viene utilizzato l’elettroutensile e, in parti
colare, a seconda del tipo di pezzo da lavorare.
È necessario stabilire misure di sicurezza per
proteggere l’operatore sulla base di una stima
del carico vibrazionale in condizioni reali di
utilizzo (tenendo conto di tutte le parti del ciclo
operativo, come i periodi in cui l’utensile elet
trico è spento e i periodi in cui è acceso ma
senza carico).
Cercare di mantenere al minimo l’esposizione
alle vibrazioni e al rumore. Gli esempi di misure
per ridurre le vibrazioni includono l’uso di
guanti durante l’uso dell’utensile, la limitazione
del tempo di lavoro e l’uso di accessori in
buone condizioni.
9. Accessorio - disponibile opzional
mente
Articolo Cod. articolo
Spazzola dura (rossa) 7064253
Setola spessa e rigida per i punti dicili
Perfetta per piastrelle (ceramica) per
interni ed esterni, mobili in legno da giar
dino, coperte di legno, pareti, porte per
garage e altro ancora
Spazzola media (blu) 7064252
Setole di medio spessore per la pulizia
generale
Perfetta per imbarcazioni, piastrelle
(ceramica) per interni ed esterni, mobili in
legno da giardino, coperte di legno,
pareti, pavimenti e altro ancora
Spazzola morbida (nera) 7064251
Setole morbide per superci sensibili
Perfetta imbarcazioni, roulotte/camper,
piastrelle, superci di metallo, camper e
altro ancora
Prolunga 7064279
Prolunga della portata no a ca. 85 cm.
10. Smaltimento
Invitiamo i clienti Werter di aiutarci a
ridurre i riuti. Se foste costretti a elimi
nare l’articolo, vi ricordiamo che questo i
componenti sono stati realizzati con materia
prime pregiate che possono essere riciclate.
Non smaltire con i normali riuti bensì vi invi
tiamo a conferire i componenti presso una piat
taforma ecologica.
10.1. Batterie
Per lo smaltimento delle batterie pensare
all’ambiente. Per lo smaltimento eco-compati
bile rivolgersi alle autorità locali.
Italiano
28

11. Dichiarazione di conformità
La sottoscritta Batavia B.V. Weth. Wasseba
liestraat 6d, NL-7951 SM Staphorst, Paesi
Bassi, dichiara sotto la propria esclusiva
responsabilità che il prodotto Spazzola doppia,
cod. articolo 7064170, n. modello BT-
CTB001 soddisfa i requisiti essenziali di prote
zione stabiliti dalle direttive europee
2014/30/UE Compatibilità elettromagnetica
(EMC), 2006/42/CE Macchine, 2011/65/UE e
relativi emendamenti. Per la valutazione della
conformità sono state utilizzate le seguenti
norme armonizzate:
EN62841-1:2015+A15;
EN IEC 62841-2-3:2021;
ISO12100:2010;
AfPS GS 2019:01;
EN IEC 55014-1:2021;
EN IEC 55014-2:2021
Staphorst, 1 aprile 2022
Meino Seinen, Responsabile qualità
Batavia B.V., Weth. Wassebaliestraat 6d, 7951
SN Staphorst, Paesi Bassi
Il prodotto e il manuale d’uso sono soggetti a
modiche. I dati tecnici possono essere modi
cati senza preavviso.
Italiano
29

Estimados señores y señoras:
Familiarícese con el dispositivo a lo largo de
los capítulos y guarde bien el manual de
instrucciones para su consulta futura.
¡Lea las "Indicaciones generales de seguridad
para herramientas eléctricas" adjuntas y las
indicaciones de seguridad restantes de este
manual de instrucciones!
Este manual de instrucciones incluye indica
ciones importantes para la puesta en marcha y
el manejo. Adjunte el manual si entrega el
producto a terceros.
Las baterías y los cargadores Maxxpack están
disponibles online y en tiendas participantes.
1. Explicación de los símbolos
En el manual de usuario o el producto se
emplean los símbolos siguientes:
ADVERTENCIA - Lea el manual de
instrucciones para reducir el riesgo de
lesiones.
Signo de advertencia general – Perma
nezca atento y tenga cuidado con los
peligros generales.
Utilice gafas protectoras.
CE signica "Conformité Européenne",
esto quiere decir "Conformidad con
Directivas UE". Mediante el marcado
CE el fabricante conrma que la herra
mienta eléctrica cumple las directivas
europeas vigentes.
¡No eliminar en la basura doméstica!
2. Indicaciones de seguridad adicio
nales
a. El dispositivo debe emplearse conforme a
lo previsto. Durante el trabajo con el dispo
sitivo tenga en cuenta las circunstancias
locales y tenga cuidado con las personas
cerca de usted.
b. Compruebe si el dispositivo presenta
daños antes de usarlo y no emplee un
dispositivo defectuoso. Si el dispositivo
estuviera dañado, no lo use y encargue su
reparación a un especialista o póngase en
contacto con nuestro servicio de atención
al cliente. No desarme el dispositivo y no
intente repararlo por su cuenta.
c. El dispositivo no debe ser manejado por
niños o personas que no hayan recibido
una instrucción adecuada.
d. Este dispositivo puede ser empleado por
personas con sus capacidades físicas,
sensoriales o intelectuales mermadas o
carentes de conocimientos y experiencia,
si están bajo supervisión o son instruidas
sobre cómo emplear el dispositivo de
forma segura y entender los peligros rela
cionados con el mismo. Los niños no
deben jugar con el dispositivo.
e. Está prohibido que los niños realicen
tareas de limpieza y mantenimiento sin
vigilancia.
f. Mantenga a los niños vigilados para que
no jueguen con el dispositivo.
g. Sujete el dispositivo bien y rmemente al
encenderlo.
h. El dispositivo no debe emplearse en zonas
explosivas.
i. Utilice siempre protección ocular.
j. Este dispositivo es apto para su uso en
interiores y exteriores, pero no debe
emplearse bajo la lluvia.
k. Asegúrese de que el accesorio del cepillo
se haya instalado correctamente antes de
usarlo.
l. No presione el cepillo en espacios estre
chos durante el uso.
m. No toque ninguna pieza en rotación, mien
tras el dispositivo se esté empleando.
3. Contenido del embalaje
1× Twin brush - cepillo con batería (unidad del
motor y unidad de alimentación eléctrica)
1× asidero adicional incl. material de jación
1× cepillo mediano (pieza interior y exterior del
cepillo)
1× manual de instrucciones
4. Antes del primer uso
Extraiga el dispositivo y todos los accesorios
del embalaje. Guarde el material de embalaje
Español
30

fuera del alcance de los niños. ¡Existe peligro
de asxia!
Compruebe que ninguna pieza presenta daños
derivados del transporte y no emplee un dispo
sitivo defectuoso.
4.1. Montaje
a. Coloque la unidad del motor (17) y la
unidad de alimentación eléctrica (5) con
los extremos del tubo uno frente al otro.
b. Extraiga ligeramente el conector (20) con
ayuda del tirador (21) y el enchufe (22) de
los extremos del tubo. (véase g. B)
c. Una el conector y el enchufe con las
echas apuntando una a la otra y atorníl
lelos.
d. Inserte los dos extremos del tubo con las
echas apuntando la una a la otra y ator
níllelos empleando el casquillo del
mango (2).
e. Inserte la manguera de agua (13) en la
conexión de la unidad del motor. (véase
g. C)
f. Guíe la manguera de agua por el clip de
sujeción (1) y el soporte de la unidad del
motor.
Tenga cuidado de que la manguera de
agua de la unidad del motor posea una
longitud suciente para que el cabezal
ajustable del cepillo pueda moverse libre
mente.
g. Conecte el adaptador de manguera (11)
con la manguera de agua.
h. Deslice el adaptador de manguera por el
carril de guía del clip de jación (12).
(véase g. D)
5. Uso conforme al n previsto
El producto ha sido diseñado para limpiar
supercies en interiores y exteriores en
entornos privados. El producto puede
emplearse en seco o con agua. No ha sido
diseñado para su uso comercial continuado.
El uso conforme al n previsto incluye también
el cumplimiento del manual.
Cualquier uso que lo exceda (otros medios,
aplicación de violencia) o la modicación por
cuenta propia (remodelación, uso de acce
sorios no originales) puede dar lugar a peligros
y se considera no conforme a lo previsto.
Emplee únicamente accesorios recomendados
por el proveedor.
6. Manejo
6.1. Colocación/cambio de la batería
La cubierta de la batería la protege de la
humedad y la suciedad.
a. Emplee el dispositivo con agua única
mente con la cubierta de la batería bien
cerrada.
b. Tenga cuidado de que la junta y el borde
de goma de la cubierta de la batería estén
limpios y secos.
a. Suelte el gancho sujetador (6) y abra la
cubierta de la batería (7).
b. Introduzca o retire la batería (véase g. E).
c. ¡Compruebe la junta siempre antes de
cerrar la cubierta de la batería!
Elimine la suciedad y los cuerpos extraños
del área de la junta y compruebe que esta
esté colocada y no presente desperfectos.
d. Cierre la cubierta de la batería y bloquéela
con el gancho sujetador.
6.2. Montaje/cambio del cepillo
a. Bloquee el eje con el botón de bloqueo del
eje (16) y atornille la pieza exterior del
cepillo (15) en sentido horario (véase g.
F).
b. Colque la pieza interior del cepillo (14) y
bloquéela en sentido antihorario.
c. Para soltarla desbloquee y retire la pieza
interior del cepillo en sentido horario.
d. Bloquee el eje con el botón de bloqueo del
eje y desenrosque la pieza exterior del
cepillo en sentido antihorario.
6.3. Ajuste del ángulo de inclinación del
cepillo
El cabezal no debe jarse si el dispositivo se va
a emplear sobre el suelo. Así el cabezal podrá
desplazarse junto con la supercie a limpiar.
Fije el cabezal únicamente si el dispositivo se
emplea por encima de la altura de los
hombros.
Español
31

a. Despliegue la palanca de bloqueo (18)
completamente (véase g. G).
b. Ajuste la inclinación del cepillo conforme a
las necesidades individuales y fíjela
plegando la palanca de bloqueo.
No ejerza una fuerza excesiva al cerrar la
palanca de bloqueo. Si la palanca de
bloqueo no se cierra correctamente, ajuste
la inclinación del cepillo ligeramente.
6.4. Ajuste del asidero adicional
a. Aoje el tornillo de jación (3). (véase g.
H)
b. Ajuste la posición del clip de jación (12) y
la inclinación del asidero adicional (4)
según sus necesidades y vuelva a apretar
el tornillo de jación.
6.5. Trabajar con el dispositivo
a. Para el uso en húmedo cierre la llave de
cierre y conecte el adaptador de
manguera con su suministro de agua.
Ajuste la cantidad de agua con la llave de
cierre. (véase g. A)
b. Para encender el dispositivo, presione el
botón conexión/desconexión (8).
No es necesario mantener pulsado el
botón conexión/desconexión durante el
trabajo.
Ejerza siempre solo una presión mínima
(ligero movimiento de avance) sobre el
dispositivo, mientras trabaja. Desplace el
dispositivo hacia delante de forma suave y
uniforme.
c. Para apagarlo presione el botón conexión/
desconexión de nuevo.
6.6. Montaje de la prolongación (accesorio
opcional)
La prolongación es un accesorio opcional y no
se entrega con el dispositivo. No emplee más
de una prolongación con el dispositivo.
a. Extraiga el adaptador de manguera (11)
del carril de guía del clip de jación (12).
(véase g. I)
b. Desenrosque el casquillo del mango (2) y
separe los dos extremos del tubo.
c. Aoje el atornillamiento y separe el
enchufe (22) y el conector (20).
d. Coloque la unidad del motor (17) y la
prolongación (19) con los extremos del
tubo uno frente al otro.
e. Extraiga ligeramente el conector (20) con
ayuda del tirador (21) y el enchufe (22) de
los extremos del tubo. (véase g. B)
f. Una el conector y el enchufe con las
echas apuntando una a la otra y atorníl
lelos.
g. Inserte los dos extremos del tubo con las
echas apuntando la una a la otra y ator
níllelos empleando el casquillo del
mango (2).
h. Coloque la unidad de alimentación eléc
trica (5) y la prolongación (19) con los
extremos del tubo uno frente al otro.
i. Extraiga ligeramente el conector (20) con
ayuda del tirador (21) y el enchufe (22) de
los extremos del tubo.
j. Una el conector y el enchufe con las
echas apuntando una a la otra y atorníl
lelos.
k. Inserte los dos extremos del tubo con las
echas apuntando la una a la otra y ator
níllelos empleando el casquillo del
mango (2).
l. Deslice el adaptador de manguera (11)
por el carril de guía del casquillo (23).
7. Mantenimiento, limpieza y almace
namiento
Mantenga el dispositivo y los accesorios
limpios y en buen estado para poder trabajar
bien y con seguridad.
Retirar la batería del dispositivo antes de real
izar cualquier trabajo.
Sumerja el cepillo durante
30 segundos en agua caliente
(90 °C) si sus cerdas se han
deformado debido al transporte o
un almacenamiento erróneo. Las
cerdas recobrarán su forma orig
inal.
Español
32

8. Datos técnicos
Tipo de batería: 18 V,
4000 mAh,
iones de litio
Número de revoluciones al
ralentí (ø100/180 mm):
200/400 rpm
Nivel de presión sonora LpA: 66 dB(A)
Incertidumbre KpA: 3 dB(A)
Nivel de potencia acústica LWA: 77 dB(A)
Incertidumbre KWA: 3 dB(A)
Vibración brazo-mano ah,b: 3,91 m/s2
Incertidumbre K: 1,5 m/s2
8.1. Nivel de vibración
El valor de oscilación total y los valores de
emisión acústica indicados han sido medidos
de conformidad con un método de prueba
normalizado (EN 62841) y pueden emplearse
para comparar una herramienta eléctrica con
otra. También se pueden emplear para realizar
una estimación provisional de la carga.
¡Advertencia!
Las emisiones de vibraciones y sonoras
pueden diferir de los valores indicados durante
el uso real de la herramienta eléctrica, depend
iendo de la forma en la que se emplee la herra
mienta eléctrica, y, especialmente, del tipo de
pieza de trabajo procesado.
Es necesario determinar medidas de seguridad
para proteger al usuario que estén basadas en
una evaluación de la carga por oscilación
durante las condiciones de uso reales (aquí
deben tenerse en cuenta todas las partes del
ciclo de funcionamiento, como, por ejemplo,
los tiempos, en los que la herramienta eléctrica
está desconectada y aquellos en los que está
conectada, pero funciona sin carga).
Intente reducir al mínimo posible la carga deri
vada de las vibraciones y los ruidos. Las
medidas para reducir la carga por vibraciones
incluyen, por ejemplo, el empleo de guantes
durante el uso de la herramienta, la limitación
del tiempo de trabajo y el uso de accesorios en
buen estado.
9. Accesorios - disponibles opcional
mente
Artículo Art. n.º
Cepillo duro (rojo) 7064253
Pelo grueso y fuerte para zonas difíciles
Ideal para azulejos y baldosas (de
cerámica) en interiores y exteriores,
muebles de madera de exterior, techos
de madera, paredes, puertas de garajes y
mucho más
Cepillo medio (azul) 7064252
Pelos de grosor medio para la limpieza
general
Ideal para botes, azulejos y baldosas (de
cerámica) en interiores y exteriores,
muebles de madera de exterior, techos
de madera, paredes, suelos y mucho
más
Cepillo blando (negro) 7064251
Pelos suaves para supercies delicadas
Ideal para botes, caravanas, baldosas,
azulejos, supercies de metal y mucho
más
Prolongación 7064279
Prolongación del alcance de aprox.
85 cm.
10. Eliminación
Estimado cliente, ayúdenos a prevenir los
residuos. Si alguna vez deseara desha
cerse de este artículo, le rogamos que
tenga en cuenta que muchos de sus compo
nentes están fabricados de materias primas
valiosas que pueden reutilizarse. No lo elimine
por ello en el contenedor de basura, entréguelo
en un punto de recogida para materiales recic
lables.
10.1. Pilas
Piense en la protección del medio ambiente al
eliminar las pilas. Póngase en contacto con las
autoridades locales para recabar información
sobre una eliminación respetuosa con el medio
ambiente.
Español
33

11. Declaración de conformidad
Nosotros, Batavia B.V., Weth. Wassebalies
traat 6d, NL-7951 SN Staphorst, declaramos
bajo responsabilidad exclusiva que el producto
Cepillo doble, artículo n.º 7064170, modelo
n.º BT-CTB001 cumple los requisitos esen
ciales de seguridad, determinados en las Direc
tivas europeas 2014/30/UE de compatibilidad
electromagnética (CEM), 2006/42/CE
máquinas, RoHS: 2011/65/UE y sus modica
ciones. Para la valoración de la conformidad
han servido de referencia las normas armoni
zadas siguientes:
EN62841-1:2015+A15;
EN IEC 62841-2-3:2021;
ISO12100:2010;
AfPS GS 2019:01;
EN IEC 55014-1:2021;
EN IEC 55014-2:2021
Staphorst, a 1 de abril de 2022
Meino Seinen, responsable de calidad de
Batavia B.V., Weth. Wassebaliestraat 6d, 7951
SN Staphorst, Países Bajos
El producto y el manual de usuario pueden
someterse a cambios. Los datos técnicos
pueden modicarse sin previo aviso.
Español
34

Estimado cliente
Familiarize-se com o aparelho pela ordem dos
capítulos e guarde este manual de operação
num local para futura consulta.
Leia as "Instruções de segurança gerais para
ferramentas elétricas" fornecidas e todas as
outras instruções de segurança neste manual
de instruções!
Este manual de operação contém informações
importantes sobre a colocação em funciona
mento e o manuseamento. Se entregar o
produto a terceiros, entregue também o
manual.
As baterias e os carregadores Maxxpack estão
disponíveis online e nas lojas aderentes.
1. Explicação dos símbolos
Os seguintes símbolos são usados no manual
de utilização ou no produto:
ADVERTÊNCIA - Para reduzir o risco
de ferimentos, leia o manual de oper
ação.
Sinal de advertência geral – Esteja
alerta e atento aos perigos gerais.
Use óculos de proteção.
CE signica "Conformité Européenne",
ou seja, "conformidade com as dire
tivas da UE". Com a marcação CE, o
fabricante conrma que esta ferra
menta elétrica está em conformidade
com as diretivas europeias aplicáveis.
Não deite o aparelho no lixo domés
tico!
2. Instruções de segurança adicionais
a. O aparelho tem de ser utilizado como
previsto. Ao trabalhar com o aparelho,
preste atenção às condições locais e a
outras pessoas nas proximidades.
b. Antes de utilizar o aparelho, verique se
este apresenta danos e não o utilize caso
esteja danicado. Se o aparelho estiver
danicado, não o utilize e mande repará-lo
por um prossional ou contacte o nosso
serviço de assistência ao cliente. Não
desmonte o aparelho nem tente repará-lo
sozinho.
c. O aparelho não pode ser operado por
crianças ou pessoas que não tenham sido
devidamente instruídas.
d. Este aparelho pode ser utilizado por
pessoas com capacidades físicas, sensor
iais ou mentais limitadas ou com falta de
experiência e conhecimentos, se forem
vigiadas ou tiverem sido instruídas rela
tivas ao uso do aparelho de uma forma
segura e compreenderem os riscos envol
vidos. As crianças não devem brincar com
o aparelho.
e. Não é permitido às crianças realizar a
limpeza e a manutenção sem supervisão.
f. Vigie as crianças para que não brinquem
com o aparelho.
g. Segure o aparelho com rmeza e segur
ança ao ligá-lo.
h. O aparelho não pode ser operado em
áreas potencialmente explosivas.
i. Use sempre proteção ocular.
j. Este aparelho é adequado para uso em
interiores e exteriores, mas não pode ser
utilizado à chuva.
k. Certique-se de que o acessório da
escova está corretamente instalado antes
de utilizar o aparelho.
l. Não pressione a escova contra espaços
apertados durante a utilização.
m. Não toque em nenhumas peças rotativas
quando o aparelho estiver a ser utilizado.
3. Conteúdo da embalagem
1× Twin brush - Escova com bateria (unidade
do motor e fonte de alimentação)
1× punho lateral, incl. material de xação
1× escova média (parte exterior e interior da
escova)
1× manual de operação
Português
35

4. Antes da primeira utilização
Retire o aparelho e todos os acessórios da
embalagem. Guarde o material de embalagem
fora do alcance das crianças. Existe risco de
asxia!
Verique todas as peças quanto a danos de
transporte e não utilize o aparelho, se apre
sentar danos.
4.1. Montagem
a. Coloque a unidade do motor (17) e a fonte
de alimentação (5) com as extremidades
do tubo voltadas uma para a outra.
b. Puxe ligeiramente o conector fêmea (20),
com a ajuda da patilha de puxar (21), e o
conector macho (22) para fora das
extremidades do tubo (ver g. B).
c. Encaixe o conector macho no conector
fêmea com as setas apontadas uma para
a outra e enrosque-os.
d. Encaixe as duas extremidades do tubo
com as setas apontadas uma para a outra
e enrosque com a manga do punho (2).
e. Encaixe a mangueira de água (13) na
ligação na unidade do motor (ver g. C).
f. Passe a mangueira de água através da
mola de retenção (1) e do suporte na
unidade do motor.
Certique-se de que a mangueira de água
na unidade do motor é sucientemente
longa para que a cabeça da escova ajus
tável se possa mover sem restrições.
g. Ligue o adaptador de mangueira (11) à
mangueira de água.
h. Introduza o adaptador de mangueira na
barra guia da mola de xação (12) (ver
g. D).
5. Utilização adequada
O produto destina-se à limpeza de superfícies
interiores e exteriores em áreas privadas. O
produto pode ser usado a seco ou com água.
Não se destina a utilização contínua a nível
comercial.
O cumprimento das instruções também faz
parte da utilização prevista.
Qualquer utilização para além desta (outros
líquidos, uso de força) ou modicação não
autorizada (transformação, uso de acessórios
não originais) pode causar perigos e é consid
erada utilização inadequada.
Utilize apenas acessório recomendado pelo
fornecedor.
6. Operação
6.1. Introduzir/substituir a bateria
A tampa da bateria protege a bateria da
humidade e da sujidade.
a. Utilize o aparelho apenas com água,
quando a tampa da bateria está devida
mente fechada.
b. Certique-se de que a vedação e a junta
de borracha da tampa da bateria estão
limpas e secas.
a. Soltar o fecho de mola (6) e abrir a tampa
da bateria (7).
b. Introduzir ou remover a bateria (ver g. E).
c. Verique sempre a vedação antes de
fechar a tampa da bateria!
Remova a sujidade e os corpos estranhos
na área da vedação e verique se a
vedação está presente e sem danos.
d. Feche a tampa da bateria e tranque-a com
o fecho de mola.
6.2. Montar/trocar a escova
a. Bloqueie o eixo com o botão de bloqueio
do eixo (16) e enrosque a parte exterior da
escova (15) no sentido dos ponteiros do
relógio (ver g. F).
b. Encaixe a parte interior da escova (14) e
bloqueie-a no sentido contrário ao dos
ponteiros do relógio.
c. Para soltar a parte interior da escova,
desbloqueie e rode no sentido dos
ponteiros do relógio.
d. Bloqueie o eixo com o botão de bloqueio
do eixo e desenrosque a parte exterior da
escova no sentido contrário ao dos
ponteiros do relógio.
Português
36

6.3. Ajuste o ângulo de inclinação da escova
Ao usar o aparelho no chão, a cabeça não deve
car xa. A cabeça pode então mover-se junta
mente com a superfície a ser limpa.
Fixe a cabeça apenas quando usar o aparelho
acima da altura dos ombros.
a. Abra a alavanca de bloqueio (18) comple
tamente (ver g. G).
b. Ajuste a inclinação da escova de acordo
com as necessidades individuais e xe-a,
fechando a alavanca de bloqueio.
Não aperte a alavanca de bloqueio com
muita força. Se a alavanca de bloqueio
não fechar corretamente, ajuste ligeira
mente a inclinação da escova.
6.4. Ajustar o punho lateral
a. Solte o parafuso de bloqueio (3) (ver g.
H)
b. Ajuste a posição da mola de xação (12) e
a inclinação do punho lateral (4) às suas
necessidades e aperte novamente o
parafuso de bloqueio.
6.5. Realização de trabalhos com o aparelho
a. Para uso com água, feche a válvula de
fecho e ligue o adaptador de mangueira à
rede de água doméstica. Regule o uxo de
água com a válvula de fecho (ver g. A)
b. Pressione o interruptor ligar/desligar (8)
para ligar o aparelho.
Não é necessário segurar o interruptor
ligar/desligar enquanto trabalha.
Aplique uma pressão mínima (movimento
de avanço ligeiro) no aparelho quando
estiver a trabalhar. Empurre o aparelho
para a frente de forma suave e uniforme.
c. Volte a pressionar o interruptor ligar/
desligar para desligar o aparelho.
6.6. Montar a extensão (acessório opcional)
A extensão é um acessório opcional e não é
fornecida com o aparelho. Não utilize mais do
que uma extensão com o aparelho.
a. Puxe o adaptador de mangueira (11) da
barra guia da mola de xação (12) (ver
g. I).
b. Desaperte a manga do punho (2) e puxe
as duas extremidades do tubo para fora.
c. Solte a união roscada e separa o conector
macho (22) do conector fêmea (20).
d. Coloque a unidade do motor (17) e a
extensão (19) com as extremidades do
tubo voltadas uma para a outra.
e. Puxe ligeiramente o conector fêmea (20),
com a ajuda da patilha de puxar (21), e o
conector macho (22) para fora das
extremidades do tubo (ver g. B).
f. Encaixe o conector macho no conector
fêmea com as setas apontadas uma para
a outra e enrosque-os.
g. Encaixe as duas extremidades do tubo
com as setas apontadas uma para a outra
e enrosque com a manga do punho (2).
h. Coloque a fonte de alimentação (5) e a
extensão (19) com as extremidades do
tubo voltadas uma para a outra.
i. Puxe ligeiramente o conector fêmea (20),
com a ajuda da patilha de puxar (21), e o
conector macho (22) para fora das
extremidades do tubo.
j. Encaixe o conector macho no conector
fêmea com as setas apontadas uma para
a outra e enrosque-os.
k. Encaixe as duas extremidades do tubo
com as setas apontadas uma para a outra
e enrosque com a manga do punho (2).
l. Introduza o adaptador de mangueira (11)
na barra guia da manga (23).
7. Manutenção, limpeza e armazena
mento
Mantenha o aparelho e os acessórios limpos e
em boas condições para trabalhar bem e em
segurança.
Remova a bateria do aparelho antes de todos
os trabalhos.
Se as cerdas da escova esti
verem deformadas devido ao
transporte ou ao armazena
mento incorreto, submerja a
escova em água quente (90 °C)
durante 30 segundos. As cerdas
recuperarão a sua forma original.
Português
37

8. Dados técnicos
Tipo de bateria: 18 V,
4000 mAh,
iões de lítio
Velocidade de rotação lenta
(ø100/180 mm):
200/400 min-1
Nível de pressão sonora LpA: 66 dB(A)
Incerteza KpA: 3 dB(A)
Nível de potência sonora LWA: 77 dB(A)
Incerteza KWA: 3 dB(A)
Vibrações transmitidas ao
sistema mão-braço ah,b:
3,91 m/s2
Incerteza K: 1,5 m/s2
8.1. Nível de vibração
O valor total de vibrações indicado e os valores
de emissão de ruído indicados foram medidos
de acordo com um método de teste normali
zado (EN 62841) e podem ser utilizados para
realizar a comparação entre ferramentas elétr
icas. Estes podem também ser utilizados para
a realização de uma avaliação preliminar da
exposição.
Advertência!
As emissões de vibração e ruído durante a
utilização efetiva da ferramenta elétrica podem
divergir dos valores indicativos, dependendo da
forma como a ferramenta elétrica é utilizada,
em particular do tipo de peça de trabalho que
se encontra em processamento.
É necessário denir medidas de segurança
para a proteção do utilizador, baseadas numa
avaliação da carga vibratória durante as
efetivas condições de utilização (aqui devem
ser consideradas todas as fases do ciclo de
funcionamento, por exemplo, tempos durante
os quais a ferramenta elétrica está desligada e
aqueles durante os quais está ligada mas a
funcionar sem carga).
Tente minimizar a exposição às vibrações e ao
ruído ao mínimo. As medidas para reduzir a
exposição às vibraçãões incluem, por exemplo,
o uso de luvas durante a utilização da ferra
menta, a limitação do tempo de trabalho e a
utilização de acessórios em boas condições.
9. Acessório - opcionalmente dispo
nível
Artigo N.º do artigo
Escova dura (vermelha) 7064253
Cerdas espessas e resistentes para
áreas difíceis
Perfeita para ladrilhos (cerâmica) no inte
rior e no exterior, móveis de madeira no
exterior, decks de madeira, paredes,
portões de garagem, etc.
Escova média (azul) 7064252
Cerdas de média resistência para
limpeza geral
Perfeita para barcos, ladrilhos (cerâmica)
no interior e no exterior, móveis de
madeira no exterior, decks de madeira,
paredes, pavimentos, etc.
Escova macia (preta) 7064251
Cerdas macias para superfícies deli
cadas
Perfeita para barcos, caravanas/autocar
avanas, ladrilhos, superfícies metálicas,
etc.
Extensão 7064279
Extensão do alcance em aprox. 85 cm.
10. Eliminação
Caro cliente, ajude a evitar resíduos. Se
alguma vez se quiser desfazer deste
artigo, tenha em mente que muitos dos
seus componentes são fabricados a partir de
matérias-primas valiosas e podem ser reci
clados. Por isso, não o deite no lixo, entre
gando-o antes no ponto de recolha de mate
riais.
10.1. Baterias
Pense na proteção do ambiente quando elim
inar as baterias. Contacte as autoridades
locias para uma eliminação ecológica.
Português
38

11. Declaração de Conformidade
Nós, Batavia B.V., Weth. Wassebaliestraat 6d,
7951 SN Staphorst, declaramos, sob a nossa
inteira responsabilidade, que o produto Escova
dupla, n.º de artigo 7064170, n.º de modelo
BT-CTB001, cumpre os requisitos essenciais
de proteção estabelecidos nas Diretivas
2014/30/UE (Compatibilidade Eletromagnética,
CEM), 2006/42/CE (Máquinas), 2011/65/UE
(RoHS) e as respetivas alterações. Foram apli
cadas as seguintes normas harmonizadas
para a avaliação de conformidade:
EN62841-1:2015+A15;
EN IEC 62841-2-3:2021;
ISO12100:2010;
AfPS GS 2019:01;
EN IEC 55014-1:2021;
EN IEC 55014-2:2021
Staphorst, 1 de abril de 2022
Meino Seinen, gestor de qualidade
Batavia B.V., Weth. Wassebaliestraat 6d, 7951
SN Staphorst, Países Baixos
O produto e o manual de utilização podem
sofrer alterações. Os dados técnicos estão
sujeitos a alterações sem aviso prévio.
Português
39

Szanowni Państwo
Zapoznaj się z urządzeniem zgodnie z kolejno
ścią rozdziałów i zachowaj niniejszą instrukcję
obsługi do późniejszego użycia.
Przeczytaj dołączone „Ogólne informacje
dotyczące bezpieczeństwa – elektronar
zędzia” oraz wszystkie inne informacje
dotyczące bezpieczeństwa zawarte w
niniejszej instrukcji obsługi!
Niniejsza instrukcja obsługi zawiera ważne
wskazówki dotyczące uruchomienia i obsługi.
Przekazując produkt osobom trzecim, dołącz
również niniejszą instrukcję obsługi.
Akumulatory i ładowarki Maxxpack są
dostępne w internecie oraz w sklepach biorą
cych udział w programie.
1. Objaśnienie symboli
W podręczniku użytkownika lub na produkcie
stosowane są następujące symbole:
OSTRZEŻENIE – Aby zmniejszyć
ryzyko obrażeń, należy przeczytać
instrukcję obsługi.
Ogólny znak ostrzegawczy –
Zachowaj czujność i świadomość
ogólnych zagrożeń.
Noś okulary ochronne.
CE to skrót od „Conformité Europé
enne”, co oznacza „Zgodność z dyrek
tywami UE”. Znak CE oznacza, że
producent potwierdza zgodność tego
elektronarzędzia z obowiązującymi
dyrektywami europejskimi.
Nie wyrzucać do odpadów domowych!
2. Dodatkowe informacje dotyczące
bezpieczeństwa
a. Urządzenie musi być używane zgodnie z
przeznaczeniem. Podczas pracy urządze
niem zwracaj uwagę na warunki lokalne i
inne osoby znajdujące się w pobliżu.
b. Przed użyciem sprawdź, czy urządzenie
nie jest uszkodzone. Nie używaj uszkodzo
nego urządzenia. Jeśli urządzenie jest
uszkodzone, nie używaj go i zleć jego
naprawę specjaliście lub skontaktuj się z
naszym serwisem. Nie demontuj urząd
zenia i nie próbuj go naprawiać samod
zielnie.
c. Urządzenia nie wolno obsługiwać dzie
ciom ani osobom, które nie zostały odpo
wiednio poinstruowane.
d. Urządzenia mogą używać osoby o ogra
niczonych zdolnościach zycznych,
sensorycznych lub umysłowych, a także
osoby nieposiadające doświadczenia i
wiedzy, jeżeli użytkowanie odbywa się pod
nadzorem lub zostały one poinstruowane
w zakresie bezpiecznego użytkowania
urządzenia i rozumieją związane z tym
zagrożenia. Dzieciom nie wolno bawić się
urządzeniem.
e. Dzieciom nie wolno przeprowadzać
czyszczenia i konserwacji bez nadzoru.
f. Dopilnuj, aby dzieci nie bawiły się urządze
niem.
g. Podczas włączania trzymaj urządzenie
mocno i pewnie.
h. Urządzenia nie wolno stosować w miejs
cach, w których istnieje zagrożenie wybu
chem.
i. Zawsze stosuj ochronę oczu.
j. Urządzenie jest przeznaczone do użytku
wewnątrz i na zewnątrz pomieszczeń, ale
nie wolno go używać w czasie deszczu.
k. Przed użyciem upewnij się, że elementy
wyposażenia szczotki są prawidłowo
zamontowane.
l. Podczas użytkowania nie należy wciskać
szczotki w wąskie szczeliny.
m. Podczas pracy urządzenia nie dotykaj
wirujących części.
3. Zawartość opakowania
1× Twin brush – szczotka akumulatorowa
(jednostka silnika i jednostka zasilająca)
1× dodatkowy uchwyt wraz z materiałami
mocującymi
1× szczotka średnia (zewnętrzna i wewnętrzna
część szczotki)
1× instrukcja obsługi
Polski
40

4. Przed pierwszym użyciem
Wyjmij urządzenie i wszystkie elementy wypo
sażenia z opakowania. Przechowuj materiał
opakowaniowy poza zasięgiem dzieci. Niebez
pieczeństwo uduszenia!
Sprawdź wszystkie części pod kątem
uszkodzeń transportowych i nie używaj
uszkodzonego urządzenia.
4.1. Montaż
a. Ułóż jednostkę silnika (17) i jednostkę
zasilającą (5) końcówkami rurek do siebie.
b. Trzymając za wypustkę (21) lekko
wyciągnij gniazdo (20) oraz wtyczkę (22) z
końcówek rurek. (patrz rys. B)
c. Połącz gniazdo i wtyczkę, tak aby strzałki
były skierowane do siebie, i skręć je.
d. Połącz obie końcówki rurek, tak aby
strzałki były skierowane do siebie i skręć je
za pomocą tulei uchwytu (2).
e. Włóż wąż do wody (13) do przyłącza na
jednostce silnika. (patrz rys. C)
f. Przełóż wąż przez klips mocujący (1) i
uchwyt na jednostce silnika.
Upewnij się, że wąż do wody ma odpo
wiednią długość przy jednostce silnika, tak
aby regulowana głowica szczotki mogła
się swobodnie poruszać.
g. Połącz adapter węża (11) z wężem do
wody.
h. Nasuń adapter węża na szynę prowad
zącą klipsa mocującego (12). (patrz rys.
D)
5. Użytkowanie zgodne z przeznacze
niem
Produkt jest przeznaczony do czyszczenia
powierzchni we wnętrzach i na zewnątrz
budynków na terenach prywatnych. Produkt
można stosować na sucho lub z użyciem
wody. Nie jest on przeznaczony stałego użytku
komercyjnego.
Zastosowanie zgodne z przeznaczeniem obej
muje również przestrzeganie niniejszej
instrukcji.
Każde zastosowanie wykraczające poza ten
zakres (inne media, użycie siły) lub samowolna
modykacja (przebudowa, brak oryginalnych
elementów wyposażenia) może spowodować
zagrożenie i jest uważane za niewłaściwe
użycie.
Używaj wyłącznie elementów wyposażenia
zalecanych przez dostawcę.
6. Obsługa
6.1. Wkładanie / wymiana akumulatora
Pokrywa akumulatora chroni akumulator przed
wilgocią i brudem.
a. Używaj urządzenia z wodą, tylko jeśli
pokrywa akumulatora jest prawidłowo
zamknięta.
b. Upewnij się, że uszczelka i gumowe
obrzeże pokrywy akumulatora są czyste i
suche.
a. Poluzuj zatrzask (6) i otwórz pokrywę
akumulatora (7).
b. Włóż lub wyjmij akumulator (patrz rys. E).
c. Przed zamknięciem pokrywy akumula
tora zawsze sprawdzaj uszczelkę!
Usuń zanieczyszczenia i ciała obce w
obszarze uszczelnienia oraz sprawdź, czy
uszczelka jest na miejscu i czy nie jest
nieuszkodzona.
d. Zamknij pokrywę akumulatora i zablokuj ją
za pomocą zatrzasku.
6.2. Montaż / wymiana szczotki
a. Zablokuj wał za pomocą przycisku bloku
jącego wał (16) i przykręć zewnętrzną
część szczotki (15) zgodnie z ruchem
wskazówek zegara (patrz rys. F).
b. Włóż wewnętrzną część szczotki (14) i
zablokuj ją w kierunku przeciwnym do
ruchu wskazówek zegara.
c. Aby zdemontować, odblokuj wewnętrzną
część szczotki w kierunku zgodnym z
ruchem wskazówek zegara i wyjmij ją.
d. Zablokuj wał za pomocą przycisku bloku
jącego wał i odkręć zewnętrzną część
szczotki w kierunku przeciwnym do ruchu
wskazówek zegara.
Polski
41

6.3. Regulacja kąta nachylenia szczotki
W przypadku stosowania urządzenia na
podłodze głowica nie powinna być zabloko
wana. Głowica może się wtedy poruszać odpo
wiednio do czyszczonej powierzchni.
Zablokuj głowicę tylko wówczas, jeśli używasz
urządzenia na wysokości powyżej ramion.
a. Odchyl całkowicie dźwignię blokującą (18)
(patrz rys. G).
b. Dopasuj nachylenie szczotki do indywi
dualnych potrzeb i zablokuj ją, zamykając
dźwignię blokującą.
Nie naciskaj dźwigni blokującej z dużą siłą.
Jeżeli dźwignia blokująca nie zamyka się
prawidłowo, lekko zmień nachylenie
szczotki.
6.4. Regulacja dodatkowego uchwytu
a. Poluzuj śrubę blokującą (3). (patrz rys. H)
b. Dostosuj położenie klipsa mocują
cego (12) i nachylenie dodatkowego
uchwytu (4) do własnych potrzeb i
ponownie dokręć śrubę blokującą.
6.5. Praca z urządzeniem
a. W przypadku pracy na mokro zamknij
zawór odcinający i podłącz adapter węża
do źródła wody. Reguluj ilość wody za
pomocą zaworu odcinającego. (patrz rys.
A)
b. Aby włączyć urządzenie, naciśnij włącznik/
wyłącznik (8).
Podczas pracy nie trzeba trzymać włącz
nika/wyłącznika.
Podczas pracy wywieraj tylko minimalny
nacisk na urządzenie (lekki ruch posu
wisty). Przesuwaj urządzenie delikatnie i
równomiernie do przodu.
c. Aby wyłączyć urządzenie, ponownie
naciśnij włącznik/wyłącznik.
6.6. Montaż przedłużki (opcjonalny element
wyposażenia)
Przedłużka stanowi opcjonalny element wypo
sażenia i nie jest dostarczana wraz z urządze
niem. Nie stosuj w urządzeniu więcej niż jednej
przedłużki.
a. Zsuń adapter węża (11) z szyny prowad
zącej klipsa mocującego (12). (patrz rys.
I)
b. Odkręć tuleję uchwytu (2) i rozłącz
końcówki rurek.
c. Odkręć połączenie śrubowe i rozłącz
wtyczkę (22) i gniazdo (20).
d. Ułóż jednostkę silnika (17) i przed
łużkę (19) końcówkami rurek do siebie.
e. Trzymając za wypustkę (21) lekko
wyciągnij gniazdo (20) oraz wtyczkę (22) z
końcówek rurek. (patrz rys. B)
f. Połącz gniazdo i wtyczkę, tak aby strzałki
były skierowane do siebie, i skręć je.
g. Połącz obie końcówki rurek, tak aby
strzałki były skierowane do siebie i skręć je
za pomocą tulei uchwytu (2).
h. Ułóż jednostkę zasilającą (5) i przed
łużkę (19) końcówkami rurek do siebie.
i. Trzymając za wypustkę (21) lekko
wyciągnij gniazdo (20) oraz wtyczkę (22) z
końcówek rurek.
j. Połącz gniazdo i wtyczkę, tak aby strzałki
były skierowane do siebie, i skręć je.
k. Połącz obie końcówki rurek, tak aby
strzałki były skierowane do siebie i skręć je
za pomocą tulei uchwytu (2).
l. Nasuń adapter węża (11) na szynę
prowadzącą tulei (23).
7. Konserwacja, czyszczenie i prze
chowywanie
Utrzymuj urządzenie i elementy wyposażenia w
dobrym stanie technicznym i czystości, aby
zapewnić jego prawidłowe i bezpieczne dzia
łanie.
Przed przystąpieniem do jakichkolwiek prac
przy urządzeniu należy wyjąć z niego akumu
lator.
Jeżeli włosie szczotki uległo
deformacji w wyniku transportu
lub nieprawidłowego przechowy
wania, zanurz szczotkę na
30 sekund w gorącej wodzie
(90 °C). Włosie powróci do
swojego pierwotnego kształtu.
Polski
42

8. Dane techniczne
Typ akumulatora: 18 V,
4000 mAh, Li-
Ion
Prędkość obrotowa biegu jało
wego (ø100/180 mm):
200/400 min-1
Poziom ciśnienia akustycz
nego LpA:
66 dB(A)
Niepewność KpA: 3 dB(A)
Poziom mocy akustycznej LWA: 77 dB(A)
Niepewność KWA: 3 dB(A)
Wibracja ręki i ramienia ah,b: 3,91 m/s2
Niepewność K: 1,5 m/s2
8.1. Poziom wibracji
Podaną całkowitą wartość drgań oraz wartości
emisji hałasu zmierzono zgodnie ze znormali
zowaną procedurą (EN 62841) i można ich
używać do porównywania różnych elektronar
zędzi. Można ich również używać do wstępnej
oceny obciążenia.
Ostrzeżenie!
Podczas rzeczywistego użytkowania elektro
narzędzia emisje drgań i hałasu mogą
odbiegać od podanych wartości w zależności
od sposobu użytkowania elektronarzędzia, a
szczególnie od rodzaju obrabianego detalu.
Konieczne jest określenie środków ochrony
operatora polegających na ocenie obciążenia
drganiami w rzeczywistych warunkach pracy
(należy przy tym uwzględnić wszystkie etapy
cyklu pracy, na przykład czasy, w których elek
tronarzędzie jest wyłączone, a także te, w
których jest ono wprawdzie włączone, ale
pracuje bez obciążenia).
W miarę możliwości zminimalizuj obciążenie
wibracjami i hałasem. Przykładowym
sposobem na zmniejszenie obciążenia wibrac
jami może być noszenie rękawic podczas
używania narzędzia, ograniczenie czasu pracy
oraz stosowanie elementów wyposażenia w
dobrym stanie.
9. Elementy wyposażenia – dostępne
jako opcja
Artykuł Nr artykułu
Szczotka twarda (czer
wona)
7064253
Grube, mocne włosie do trudnych miejsc
Idealna do płytek (ceramicznych)
wewnątrz i na zewnątrz budynków, mebli
drewnianych na terenie zewnętrznym,
drewnianych tarasów, ścian, bram gara
żowych itp.
Szczotka średniej twar
dości (niebieska)
7064252
Włosie średniej grubości do czyszczenia
ogólnego
Idealna do czyszczenia łodzi, płytek
(ceramicznych) wewnątrz i na zewnątrz
budynków, mebli drewnianych na tere
nach zewnętrznych, drewnianych
tarasów, ścian, podłóg itp.
Szczotka miękka (czarna) 7064251
Miękkie włosie do delikatnych
powierzchni
Idealna do czyszczenia łodzi, przyczep
kempingowych i kamperów, płytek,
powierzchni metalowych, domów mobil
nych itp.
Przedłużka 7064279
Zwiększenie zasięgu o ok. 85 cm.
10. Utylizacja
Szanowny Kliencie, pomóż zapobiegać
powstawaniu odpadów. Jeśli kiedykol
wiek będziesz chciał się rozstać z tym
produktem, pamiętaj, że wiele z jego
elementów jest wykonanych z cennych
surowców i może zostać wykorzystanych
ponownie. Nie wyrzucaj go więc do pojemnika
na śmieci, lecz oddaj do punktu zbiórki
surowców wtórnych.
10.1. Baterie
W przypadku utylizacji baterii pamiętaj o
ochronie środowiska. Aby uzyskać informacje
na temat przyjaznej dla środowiska utylizacji,
zwróć się do lokalnych władz.
Polski
43

11. Deklaracja zgodności
My, Batavia B.V., Weth. Wassebaliestraat 6d,
NL-7951 SN Staphorst, oświadczamy na
naszą wyłączną odpowiedzialność, że produkt
Szczotka podwójna, nr artykułu 7064170, nr
modelu BT-CTB001 spełnia najważniejsze
wymagania dotyczące ochrony określone w
dyrektywach europejskich: 2014/30/UE w
sprawie kompatybilności elektromagnetycznej
(EMC), 2006/42/WE w sprawie maszyn, RoHS:
2011/65/UE i ich zmianach. Do oceny zgod
ności zastosowano następujące normy zhar
monizowane:
EN62841-1:2015+A15;
EN IEC 62841-2-3:2021;
ISO12100:2010;
AfPS GS 2019:01;
EN IEC 55014-1:2021;
EN IEC 55014-2:2021
Staphorst, 1 kwietnia 2022 roku
Meino Seinen, pełnomocnik ds. jakości
Batavia B.V., Weth. Wassebaliestraat 6d, 7951
SN Staphorst, Holandia
Produkt i instrukcja obsługi mogą ulec zmianie.
Dane techniczne mogą ulec zmianie bez
wcześniejszego powiadomienia.
Polski
44

45

30+30+
TOOLS
TOOLS
30+30+
TOOLS
TOOLS
ONE BATTERY
FOR 30+ TOOLS
Cordless collection
PACK 18 V

www.bataviapower.com
2 YEAR WARRANTY
This product has got a 2 year warranty
Dear Client, if for any reason this product is not working, please ensure you contact our
Client Service Centre. Ensure you have your original receipt of purchase. This warranty
covers all defects in workmanship or materials in this Batavia product for a two year period
from the date of purchase. The warranty does not cover any malfunction, or defect resulting
from misuse, neglect, alteration, or repair.
Dieses Produkt hat 2 Jahre Garantie
Sehr geehrter Kunde, unsere Produkte unterliegen einer strengen Qualitätskontrolle. Sollte dieses
Gerät nicht einwandfrei sein, so wenden Sie sich bitte immer zuerst an unseren Kunden-Service.
Bitte bewahren Sie unbedingt den Kaufbeleg auf. Die Garantieleistung gilt nur für Material-oder
Fabrikationsfehler. Ausgeschlossen sind Mängel die durch häugen Gebrauch, missbräuchlicher
und unsachgemäßer Behandlung oder Gewalteinwirkung verursacht worden sind.
Ce produit a 2 ans de garantie
Cher client, Si pour une raison quelconque, ce produit ne fonctionne pas, veuillez contacter
notre Centre de service après-vente. Conservez le bon d’achat original. Cette garantie couvre
tous les défauts de matériau et de main d’œuvre constatés sur ce produit Batavia pendant
une période de deux ans à compter de la date d’achat. Les défauts de fonctionnement et
autres résultant d’abus ou de mauvais emploi, de négligence, de modifications ou
réparations non autorisées sont exclus de la garantie.
Dit product heeft 2 jaar garantie
Geachte klant, onze producten ondergaan een streng kwaliteitscontrole proces.
Wanneer dit product niet correct functioneert, wend u zich alstublieft altijd eerst
tot onze klantenservice. Bewaar altijd uw aankoopbewijs. De garantieservice is
alleen van toepassing op materiaal- of productiefouten. Uitgesloten zijn
gebreken veroorzaakt door intensief gebruik, misbruik en incorrecte
behandeling of extern geweld.
Europe / Europa / L’Europe / أوروبا
Customer Service / Kunden-Service / Service clientèle /
Klantenservice / Servizio clienti / Servicio de atención al cliente /
Serviço ao cliente / Obsługa klienta / خدمة العملاء
service@batavia.eu
Monday till Friday / Lundi jusqu’à Vendredi / Maandag t/m vrijdag/
Dal lunedì al venerdì / De lunes a viernes / Segunda a sexta-
feira / Od poniedziałku do piątku / من الاثنين إلى الجمعة
08.00 — 17.00
(DE) 0800 664 7740
(EUR) 00800 664 774 00
BATAVIA B.V. | Weth. Wassebaliestraat 6d | 7951SN Staphorst | Netherlands
WARRANTY
2 YEARS

www.bataviapower.com
BATAVIA B.V. | Weth. Wassebaliestraat 6d | 7951SN Staphorst | Netherlands
7064170/1
2 YEAR WARRANTY
Questo prodotto è garantito per 2 anni
Gentile Cliente, se per una qualche ragione il prodotto non funziona, La invitiamo a mettersi
in contatto con il nostro Centro Assistenza Clienti. Si accerti di avere la ricevuta originale
dell’acquisto. La garanzia copre tutti i difetti di fabbricazione o di materiale in questo prodotto
Batavia per un periodo di 2 anni dalla data di acquisto. La garanzia non copre malfunzionamenti
o difetti derivanti da uso inappropriato, improprio, da modiche o riparazioni.
Este producto tiene dos años de garantía
Estimado cliente: si por cualquier razón este producto no funciona, póngase en contacto con
nuestro Centro de Atención al Cliente. Asegúrese de tener a mano la factura de compra original.
Esta garantía cubre todos los defectos de mano de obra o materiales de este producto de Batavia
por un período de dos años a partir de la fecha de compra. La garantía no cubre ningún mal
funcionamiento o defectos resultantes del mal uso, negligencia, alteración o reparación.
Este produto tem uma garantia de 2 anos
Estimado Cliente, se, por qualquer motivo, este produto não estiver a funcionar devidamente,
contacte o nosso Centro de Apoio ao Cliente. Certique-se de que possui a prova de compra
original. Esta garantia cobre todos os defeitos de fabrico ou materiais do produto Batavia
durante um período de dois anos, a contar da data de compra. A garantia não cobre
quaisquer avarias ou defeitos resultantes de um uso indevido, negligência, modicações
ou reparações.
Produkt posiada 2-letnią gwarancję.
Szanowny Kliencie! Jeśli z jakiegokolwiek powodu niniejszy produkt nie działa, prosimy
skontaktować się z naszym Centrum obsługi serwisowej. Upewnij się, że posiadasz
oryginalny dowód zakupu. Niniejsza gwarancja obejmuje wszystkie wady
produkcyjne i materiałowe w produktach Batavia przez okres dwóch lat od daty
zakupu. Gwarancja nie obejmuje żadnych usterek lub uszkodzeń wynikających z
nieprawidłowego użycia, zaniedbania, modykacji lub naprawy.
Europe / Europa / L’Europe / أوروبا
Customer Service / Kunden-Service / Service clientèle /
Klantenservice / Servizio clienti / Servicio de atención al cliente /
Serviço ao cliente / Obsługa klienta / خدمة العملاء
service@batavia.eu
Monday till Friday / Lundi jusqu’à Vendredi / Maandag t/m vrijdag/
Dal lunedì al venerdì / De lunes a viernes / Segunda a sexta-
feira / Od poniedziałku do piątku / من الاثنين إلى الجمعة
08.00 — 17.00
(DE) 0800 664 7740
(EUR) 00800 664 774 00
WARRANTY
2 YEARS
-
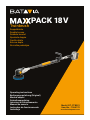 1
1
-
 2
2
-
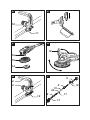 3
3
-
 4
4
-
 5
5
-
 6
6
-
 7
7
-
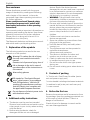 8
8
-
 9
9
-
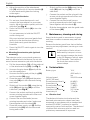 10
10
-
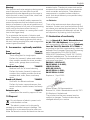 11
11
-
 12
12
-
 13
13
-
 14
14
-
 15
15
-
 16
16
-
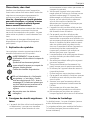 17
17
-
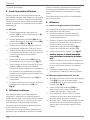 18
18
-
 19
19
-
 20
20
-
 21
21
-
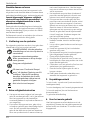 22
22
-
 23
23
-
 24
24
-
 25
25
-
 26
26
-
 27
27
-
 28
28
-
 29
29
-
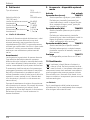 30
30
-
 31
31
-
 32
32
-
 33
33
-
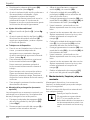 34
34
-
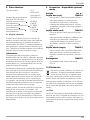 35
35
-
 36
36
-
 37
37
-
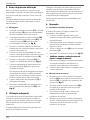 38
38
-
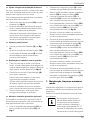 39
39
-
 40
40
-
 41
41
-
 42
42
-
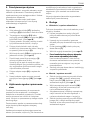 43
43
-
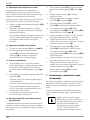 44
44
-
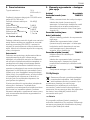 45
45
-
 46
46
-
 47
47
-
 48
48
-
 49
49
-
 50
50


in andere talen
- italiano: Batavia BT-CTB001 Manuale utente
- français: Batavia BT-CTB001 Manuel utilisateur
- español: Batavia BT-CTB001 Manual de usuario
- Deutsch: Batavia BT-CTB001 Benutzerhandbuch
- português: Batavia BT-CTB001 Manual do usuário
- polski: Batavia BT-CTB001 Instrukcja obsługi
Gerelateerde papieren
-
Batavia Cordless Paint Sprayer Handleiding
-
-
-
-
-
-
-