Philips HR7830/53 Handleiding
- Categorie
- Voedsel verwerkers
- Type
- Handleiding

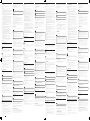
1
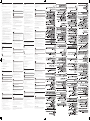
(MAX)
5 x 1 sec 500 g
5 x 1 sec 500 g
30 sec 50 g
60 sec 250 g
45 sec 250 g2
30 sec 200 g2
2-3 min 500 g
360 ml
350 ml
4 pcs
1
1
1
2
P/2
P
1
30 sec 300 g1
60-180 sec
60-180 sec
1
30 sec 200 g
30 sec 500 g
400 g
30 sec 500 g
1
30 sec2 pcs
1
1
30 sec 200 g1
1 min1 L
1 min1 L
1 min1 L
3 min
600 ml
P
P x 9
6 x
30 sec 40 g
30 sec 70 g
30 sec 40 g
30 sec 50 g
2
2
2
2
2
2
2
2
30 sec 500 g1
5 sec 100 gP
30 sec 500 g1
2
43
5
76
9
8
10
11
9
12
P
0
1
2
P
0
1
2
Register your product and get support at
HR7830
www.philips.com/welcome
Specifications are subject to change without notice
© 2012 Koninklijke Philips Electronics N.V.
All rights reserved.
HR7830_UM_V1.0
3140 035 31991
English
1 Important
Read this user manual carefully before you use the appliance, and save the user manual for
future reference.
Danger
• Do not immerse the motor unit in water nor rinse it under the tap.
Warning
•
Neveruseyourngersoranobject(forexample,aspatula)topushingredientsinto
thefeedingtubewhiletheapplianceisrunning.Onlyusethepusher.
• Beforeyouconnecttheappliancetothepower,makesurethatthevoltageindicated
onthebottomoftheappliancecorrespondstothelocalpowervoltage.
• Never connect this appliance to a timer switch, to avoid a hazardous situation.
• Ifthepowercord,theplug,orotherpartsaredamaged,donotusetheappliance.
• Ifthepowercordisdamaged,youmusthaveitreplacedbyPhilips,aservicecenter
authorizedbyPhilips,orsimilarlyqualiedpersonstoavoidahazard.
• Thisapplianceisnotintendedforusebypersons(includingchildren)withreduced
physical,sensoryormentalcapabilities,orlackofexperienceandknowledge,unless
theyhavebeengivensupervisionorinstructionconcerninguseoftheappliancebya
person responsible for their safety.
• For their safety, do not allow children to play with the appliance.
• Never let the appliance run unattended.
• Iffoodstickstothewalloftheblenderjarorbowl,switchofftheapplianceandunplug
it. Then use a spatula to remove the food from the wall.
• Be careful when you handle or clean the discs, the blade unit of the food processor, and
the blade unit of the blender and the mini chopper. The blade units and the inserts are
very sharp.
• Donottouchtheblades,especiallywhentheapplianceispluggedin.Thebladesare
very sharp.
• Ifthebladesgetstuck,unplugtheappliancebeforeyouremovetheingredientsthat
block the blades.
Caution
•
Neverswitchofftheappliancebyturningtheblenderjar,thebowl,ortheirlids.Always
switchofftheappliancebyturningthespeedselectorto0.
• Unplugtheapplianceimmediatelyafteruse.
• Alwaysunplugtheappliancebeforeyoureachintotheblenderjarwithyourngersor
anobject(forexample,aspatula).
• Waituntilthemovingpartsstoprunningbeforeyouremovethelidofthebowlorjar.
• Donotexceedthemaximumlevelindicationonthejarorthebowl.
• Thoroughlycleanthepartsthatcomeintocontactwithfoodbeforeyouusethe
applianceforthersttime.
• Beforeyouremove,cleanorchangetheaccessories,switchoffandunplugthe
appliance.
• NeveruseanyaccessoriesorpartsfromothermanufacturersorthatPhilipsdoesnot
specicallyrecommend.Ifyouusesuchaccessoriesorparts,yourguaranteebecomes
invalid.
• This appliance is intended for household use only.
• Donotexceedthequantitiesandprocessingtimeindicatedintheusermanual.
• Lethotingredientscooldown(<80ºC)beforeprocessingthem.
• Alwayslettheappliancecooldowntoroomtemperatureaftereachbatchthatyou
process.
• Certainingredientsmaycausediscolorationsonthesurfaceoftheparts.Thisdoesnot
haveanegativeeffectontheparts.Thediscolorationsusuallydisappearaftersometime.
Note
•
Noiselevel=83dB[A]
Electromagnetic elds (EMF)
ThisPhilipsappliancecomplieswithallstandardsregardingelectromagneticelds(EMF).If
handledproperlyandaccordingtotheinstructionsinthisusermanual,theapplianceissafe
tousebasedonscienticevidenceavailabletoday.
Recycling
Yourproductisdesignedandmanufacturedwithhighqualitymaterialsandcomponents,
which can be recycled and reused.
When you see the crossed-out wheel bin symbol attached to a product, it means the
productiscoveredbytheEuropeanDirective2002/96/EC:
Neverdisposeofyourproductwithotherhouseholdwaste.Pleaseinformyourselfabout
the local rules on the separate collection of electrical and electronic products. The correct
disposalofyouroldproducthelpspreventpotentiallynegativeconsequencesonthe
environment and human health.
2 Introduction
CongratulationsonyourpurchaseandwelcometoPhilips!Tofullybenetfromthesupport
thatPhilipsoffers,registeryourproductatwww.philips.com/welcome.
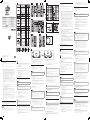
Thisapplianceisequippedwithabuilt-insafetylock.Youcanonlyswitchontheappliance
afteryoucorrectlyassemblethefollowingpartsonthemotorunit:
• the food processor bowl and its lid, or
• theblenderjaranditslid,or
• the mini chopper.
If these parts are assembled correctly, the built-in safety lock is unlocked.
Forrecipes,gotowww.philips.com/kitchen
3 Food processor
Blade unit
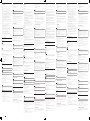
Beforeyoustart,makesurethatyouassembleaccordingtoFig.2.
Youcanusethebladeunittochop,mix,blend,orpureeingredients.
Caution
• Donotusethebladeunittochophardingredients,likecoffeebeans,turmeric,nutmeg,and
icecubes,asthismaycausethebladetogetblunt.
Note
• Donotlettheapplianceruntoolongwhenyouchop(hard)cheeseorchocolate.Otherwise
theseingredientsbecometoohot,starttomelt,andturnlumpy.
• Precutlargepiecesoffoodintopiecesofapprox.3x3x3cm.
1 Turnthebowlclockwisetoxitonthemotorunit,andthenputtheshaftinthebowl.
» Whenthebowlisxedcorrectly,youhearaclick.
2 Take the blade unit out of the protective cover.
3 Putthebladeunitontheshaft.
4 Puttheingredientsinthebowl.
5 Putthelidonthebowl,andthenturnthelidclockwisetoxit.
» Whenthelidisassembledcorrectly,youhearaclickandthelidisxedtothe
bowl handle.
6 Putthepusherintothefeedingtube.
7 Connectthepowerplugtothepowersupply.
8 Select the speed that matches the color of the accessory - speed 1.
9 Afteruse,turnthespeedselectorto0,andthenunplugtheappliance.
Tip
• When you chop onions, turn the speed selector to P a few times to prevent the onions from
becomingtoonelychopped.
• How to remove food that sticks to the blade or to the inside of the bowl? 1. Switch off the
appliance,andthenunplugit.2.Removethelidfromthebowl.3.Removetheingredients
from the blade or from the side of the bowl with a spatula.
Kneading accessory
Beforeyoustart,makesurethatyouassembleaccordingtoFig.3.
Youcanusethekneadingaccessorytokneadyeastdoughforbreadandpizzas.Youneedto
adjusttheamountofliquidtoformthedoughaccordingtothehumidityandtemperature
condition.
1 Turnthebowlclockwisetoxitonthemotorunit,andthenputtheshaftinthebowl.
» Whenthebowlisxedcorrectly,youhearaclick.
2 Putthekneadingaccessoryontheshaft.
3 Puttheingredientsinthebowl.
4 Putthelidonthebowl,andthenturnthelidclockwisetoxit.
» Whenthelidisassembledcorrectly,youhearaclickandthelidisxedtothe
bowl handle.
5 Connectthepowerplugtothepowersupply.
6 Select the speed that matches the color of the accessory - speed 1.
• Dependingontherecipe,pourliquidingredientintothefeedingtubewhilethe
device is turned on.
7 Afteruse,turnthespeedselectorto0,andthenunplugtheappliance.
Discs
Beforeyoustart,makesurethatyoupickyourdesireddiscfromfollowingandassemble
accordingtoFig.4andFig.5:
• Emulsifyingdisc
• Reversibleslicing/shreddingdisc(ne)
• Reversibleslicing/shreddingdisc(coarse)
• French fry disc
• Granulatingdisc
Caution
• Becarefulwhenyouhandletheslicingbladeofdisc.Ithasaverysharpcuttingedge.
• Neverusethedisctoprocesshardingredients,likeicecubes.
• Donotexerttoomuchpressureonthepusherwhenyoupressingredientsintothefeed
tube.
1 Turnthebowlclockwisetoxitonthemotorunit,andthenputtheshaftinthebowl.
» Whenthebowlisxedcorrectly,youhearaclick.
2 Putthediscontheshaft.
3 Putthelidonthebowl,andthenturnthelidclockwisetoxit.
» Whenthelidisassembledcorrectly,youhearaclickandthelidisxedtothe
bowl handle.
4 Puttheingredientsintothefeedingtubewiththepusher.Fillthefeedingtubeevenlyfor
thebestresults.Whenyouhavetoprocessalargeamountofingredients,processsmall
batches and empty the bowl between batches.
5 Connectthepowerplugtothepowersupply.
6 Checkthepreparationtime,themaximumamountandthespeedsettingrequiredfor
theingredientsinTable1.Selectthespeedthatmatchesthecoloroftheaccessory.
7 Afteruse,turnthespeedselectorto0,andthenunplugtheappliance.
4 Mini chopper
Beforeyoustart,makesureyouassembleaccordingtoFig.6.
Caution
• Donotusetheminichoppertochophardingredients,likenutmeg,Chineserocksugar,or
ice cubes.
• Never use the mini chopper for more than 30 seconds without interruption.
• Assemblethesealingringontothebladeunitbeforeyouattachthebladeunittothemini
chopper,toavoidleakage.
• Alwaysprocesscloves,staranise,andaniseedtogether.Ifprocessedseparately,these
ingredientsmayattacktheplasticmaterialsoftheappliance.
• The mini chopper beaker may become discolored when you use the mill to process
ingredients,likecloves,anise,andcinnamon.
• Donotusetheminichoppertoprocessliquidslikefruitjuice.
• Lethotingredientscooldown(<80ºC)beforeprocessingthem.
1 Puttheingredientsintheminichopperbeakerwithinthemaximumindication.
2 Turnthebladeunitanticlockwiseontheminichopperbeakeruntilitisxedproperly.
3 Turn the mini chopper clockwise onto the motor unit until you hear a click.
4 Connectthepowerplugtothepowersupply.
5 Select the speed that matches the color of the accessory - speed 2. Let it run for about
10-30secondsuntiltheingredientsareneenough.
6 Afteruse,turnthespeedselectorto0,andthenunplugtheappliance.
7 Turn the mini chopper anticlockwise to take it off from the motor unit.
8 Turn the blade unit clockwise to take it off from the mini chopper beaker.
Tip
• You can use the mini chopper to chop coffee beans, peppercorns, nuts, herbs etc. Use speed
2andprocessfor30sec.Donotexceedthemaximumlevelindicatedontheminichopper.
• Forbestresultswhenprocessingbeef,pleaseuserefrigeratedbeefcubes(2x2x2cm).Use
maxof100gbeefcubesatspeedPfor5sec.
5 Blender
Beforeyoustart,makesureyouassembleaccordingtoFig.7.
Theblenderisintendedfor:
• Blendinguids,likedairyproducts,sauces,fruitjuices,soups,mixeddrinks,andshakes,
• Mixingsoftingredients,likepancakebatter,
• Pureeingcookedingredients,likebabyfood.
Note
• Donotexerttoomuchpressureonthehandleoftheblenderjar.
• Neveropenthelidtoputyourhandoranyobjectinthejarwhiletheblenderisrunning.
• Alwaysassemblethesealingringontothebladeunitbeforeyouattachthebladeunittothe
blenderjar.
• Toaddliquidingredientsduringprocessing,pourthemintotheblenderjarthroughthe
feedinghole.
• Precutsolidingredientsintosmallpiecesbeforeyouprocessthem.
• Ifyouwanttopreparealargequantity,processsmallbatchesofingredientsinsteadofalarge
quantityatonce.
• Usecookedingredientswhenyoublendasoup.
• Toavoidspillage:Whenyouprocessaliquidthatishotortendstofoam(forexample,milk),
donotputmorethan1literofliquidintheblenderjar.
• Ifyouarenotsatisedwiththeresult,switchofftheapplianceandstirtheingredientswitha
spatula.Removesomeofthecontentstoprocessasmallerquantityoraddsomeliquid.
1 Turnthebladeunitontheblenderjar.
2 Placetheblenderjaronthemotorunitandturnitclockwisetoxit.
» Whenthejarisxedcorrectly,youhearaclick.
3 Puttheingredientsintheblenderjarwithinthemaximumlevelindication.
4 Placethelidontheblenderjar,andthenturnitclockwisetoxit.
5 Connectthepowerplugtothepowersupply.
6 Select the speed that matches the color of the accessory - speed 2.
7 Afteruse,turnthespeedselectorto0,andunplugtheappliance.
Tip
• Howtoremovetheingredientsthatsticktothesideoftheblenderjar?1.Switchoff
theappliance,andthenunplugit.2.Openthelid,andthenuseaspatulatoremovethe
ingredientsfromthesideofthejar.3.Keepthespatulaatleast2cmfromtheblade.
6 Cleaning and storage
Caution
• Beforeyoucleantheappliance,unplugit.
• Makesurethatthecuttingedgesoftheblades,discs,andtheinsertsdonotcomeinto
contactwithhardobjects.Thismaycausethebladetogetblunt.
• Thecuttingedgesaresharp.Becarefulwhenyouclean.
1 Cleanthemotorunitwithamoistcloth.
2 Cleantheotherpartsinhotwater(<60ºC)withsomewashing-upliquidorina
dishwasher.
3 Store the product in a dry place.
Quick cleaning
Youcanfollowthefollowingstepstocleanthefoodprocessorbowlandblenderjareasier.
Note
• Make sure that the blade is assembled in the bowl if you clean the food processor bowl.
1 Pourlukewarmwater(notmorethan0.5liters)andsomewashing-upliquidintothe
foodprocessorbowlorblenderjar.
2 Placethelidonthefoodprocessorbowlorblenderjar,andthenturnitclockwiseto
xit.
3 Turn the speed selector to Puntilthebowlorjarisclean.
4 Lettheappliancerunfor30secondsoruntilthefoodprocessorbowlorblenderjar
is clean.
5 Detachtheblenderjarorfoodprocessorbowlandrinseitwithcleanwater.
7 Guarantee and service
If you have a problem, need service, or need information, see www.philips.com/support or
contactthePhilipsConsumerCareCenterinyourcountry.Thephonenumberisinthe
worldwideguaranteeleaet.IfthereisnoConsumerCareCenterinyourcountry,gotoyour
localPhilipsdealer.
1/4
EN User manual
NL Gebruiksaanwijzing
FR Mode d’emploi
DE Benutzerhandbuch
ES Manual del usuario
IT Manuale utente
PL Instrukcja obsługi
SV Användarhandbok
NO Brukerhåndbok
DA Brugervejledning
FI Käyttöopas
AR
FA
EL
Εγχειρίδιο χρήσης
TR Kullanım kılavuzu
PT Manual do utilizador
KK Қолданушының нұсқасы
UK Посібник користувача
CS Příručka pro uživatele
RU Руководство пользователя
RO Manual de utilizare
SL Uporabniški priročnik
SK Príručka užívateľa
ET Kasutusjuhend
LV Lietotāja rokasgrāmata
LT Vartotojo vadovas
HR Korisnički priručnik
HU Felhasználói kézikönyv
BG Ръководство за потребителя
Nederlands
1 Belangrijk
Leesdezegebruiksaanwijzingzorgvuldigdoorvoordatuhetapparaatgaatgebruiken.Bewaar
degebruiksaanwijzingomdezeindiennodigtekunnenraadplegen.
Gevaar
• Dompel de motorunit niet in water en spoel deze ook niet af.
Let op
•
Gebruiknooituwvingersofeenvoorwerp(bijvoorbeeldeenspatel)omingrediënten
doordevultrechterteduwenterwijlhetapparaatwerkt.Gebruikalleendestamper.
• Controleervoordatuhetapparaataansluitopnetspanningofhetvoltagedataan
deonderkantvanhetapparaatwordtaangegevenovereenkomtmetdeplaatselijke
netspanning.
•
Sluitditapparaatnooitaanopeentijdschakelaaromgevaarlijkesituatiestevermijden.
• Gebruik het apparaat niet indien het netsnoer, de stekker of andere onderdelen
beschadigdzijn.
• Indienhetnetsnoerbeschadigdis,moethetwordenvervangendoorPhilips,eendoor
Philipsgeautoriseerdservicecentrumofpersonenmetvergelijkbarekwalicatiesom
gevaartevoorkomen.
• Ditapparaatisnietbedoeldvoorgebruikdoorpersonen(waaronderkinderen)
metverminderdelichamelijke,zintuiglijkeofgeestelijkevermogens,ofdiegebrekaan
ervaringofkennishebben,tenzijiemanddieverantwoordelijkisvoorhunveiligheid
toezichtophenhoudtofhenheeftuitgelegdhoehetapparaatdientteworden
gebruikt.
•
Laatkinderennietmethetapparaatspelenvoorhuneigenveiligheid.
• Laat het apparaat nooit zonder toezicht werken.
•
Schakelhetapparaatuitenhaaldestekkeruithetstopcontactalseringrediëntenaan
dewandvandeblenderkanofkomblijvenkleven.Verwijderdeingrediëntenvervolgens
van de wand met een spatel.
•
Weesvoorzichtigwanneerudeschijven,demesunitvandekeukenmachine,de
mesunit van de blender en de minihakmolen beetpakt of schoonmaakt. De mesunits en
deinzetschijvenzijnzeerscherp.
• Raakdemessennietaan,vooralnietwanneerdestekkervanhetapparaatnoginhet
stopcontactzit.Demessenzijnzeerscherp.
• Alsdemessenvastlopen,haaldaneerstdestekkeruithetstopcontactvoordatude
ingrediëntendiedemessenblokkerenverwijdert.
Let op
• Schakel het apparaat nooit uit door de blenderkan, de kom of de deksels te draaien.
Schakelhetapparaataltijduitdoordesnelheidskeuzeknopnaardestand0 te draaien.
•
Haalnagebruikaltijddirectdestekkeruithetstopcontact.
• Haalaltijddestekkeruithetstopcontactvoordatuuwvingersofeenvoorwerp
(bijvoorbeeldeenspatel)indeblenderkansteekt.
• Wachttotdebewegendedelenstilstaanvoordatuhetdekselvandekomofkan
verwijdert.
•
Overschrijdhetaangegevenmaximumniveauopdekanofdekomniet.
• Maakdeonderdelendieincontactkomenmetvoedselgoedschoonvoordatuhet
apparaatvoordeeerstekeergebruikt.
• Schakel,voorudeaccessoiresverwijdert,schoonmaaktofverwisselt,hetapparaatuit
en haal de stekker uit het stopcontact.
•
Gebruiknooitaccessoiresofonderdelenvananderefabrikantenofdienietspeciek
zijnaanbevolendoorPhilips.Alsudergelijkeaccessoiresofonderdelengebruikt,vervalt
degarantie.
• Ditapparaatisuitsluitendbedoeldvoorhuishoudelijkgebruik.
• Overschrijddehoeveelhedenenbewerkingstijdindegebruiksaanwijzingniet.
• Laatheteingrediëntenafkoelen(<80°C)voordatudezegaatverwerken.
• Laat het apparaat afkoelen tot kamertemperatuur na iedere portie die u hebt verwerkt.
•
Bepaaldeingrediëntenkunnenverkleuringenopdeonderdelenveroorzaken.Ditheeft
geennegatiefeffectopdeonderdelen.Deverkleuringenverdwijnennaeentijdje
meestal vanzelf.
Opmerking
•
Geluidsniveau=83dB[A]
Elektromagnetische velden (EMV)
DitPhilips-apparaatvoldoetaanallerichtlijnenmetbetrekkingtotelektromagnetische
velden(EMV).Mitshetapparaatopdejuistewijzeenvolgensdeinstructiesindeze
gebruiksaanwijzingwordtgebruikt,ishetveiligtegebruikenvolgenshetnubeschikbare
wetenschappelijkebewijs.
Recycling
Uwproductisvervaardigdvankwalitatiefhoogwaardigematerialenenonderdelendie
gerecycledenopnieuwgebruiktkunnenworden.
Wanneer een product is voorzien van een symbool van een afvalcontainer met een kruis
erdoorheen,valthetproductonderdeEuropeserichtlijn2002/96/EG:
Gooihetproductnooitwegmetanderhuishoudelijkafval.Informeeruoverdelokale
regelsinzakegescheidenafvalophalingvanelektrischeenelektronischetoestellen.Eengoede
afvalverwerkingvanuwoudeproductdraagtbijtothetvoorkomenvanmogelijkeschade
voorhetmilieuendevolksgezondheid.
2 Inleiding
GefeliciteerdmetuwaankoopenwelkombijPhilips!Registreeruwproductopwww.
philips.com/welcomeomoptimaalgebruiktekunnenmakenvandedoorPhilipsgeboden
ondersteuning.
Ditapparaatisvoorzienvaneeningebouwdebeveiliging.Ukunthetapparaatalleen
inschakelennadatudevolgendeonderdelenopdejuistemanieropdemotorunithebt
bevestigd:
• de keukenmachinekom en het deksel of
• de blenderkan en het deksel of
• de minihakmolen.
Alsdezeonderdelenopdejuistemanierzijnbevestigd,wordtdeingebouwdebeveiliging
ontgrendeld.
Ga voor recepten naar www.philips.com/kitchen
3 Keukenmachine
Mesunit
Controleervoorubegintofuallesinelkaarzetvolgensg.2.
Ukuntdemesunitgebruikenomingrediëntentehakken,mixen,mengenofpureren.
Let op
• Gebruikdemesunitnietomhardeingrediëntenzoalskofebonen,kurkuma,nootmuskaatof
ijsblokjestehakken.Hierdoorkanhetmesbotworden.
Opmerking
• Laathetapparaatniettelangwerkenwanneeru(harde)kaasofchocoladehakt.Deze
ingrediëntenwordenandersteheet,waardoorzegaansmeltenenklonteren.
• Snijdgrotestukkenvoedselvantevoreninstukjesvancirca3x3x3cm.
1 Draaidekomrechtsomomdezeopdemotorunittebevestigenenplaatsdandeas
in de kom.
» Alsdekomcorrectisgeplaatst,hoortueenklik.
2 Haal de mesunit uit de beschermhoes.
3 Plaatsdemesunitopdeas.
4 Doedeingrediëntenindekom.
5 Plaatshetdekselopdekomendraaihetdekselrechtsomomhetvasttezetten.
» Wanneerhetdekselcorrectisgeplaatst,hoortueenklik.Hetdekselisdanaan
hethandvatvandekombevestigd.
6 Plaatsdestamperindevultrechter.
7 Steek de stekker in het stopcontact.
8 Kiesdesnelheiddiebijdekleurvanhetaccessoirepast-snelheid1.
9 Draainagebruikdesnelheidskeuzeknopnaar0enhaalvervolgensdestekkervanhet
apparaat uit het stopcontact.
Tip
• Alsuuienhakt,draaidandesnelheidskeuzeknopeenpaarkeernaarP om te voorkomen dat
deuientejnwordengehakt.
• Hoeverwijderikdeingrediëntendieaanhetmesofaandebinnenkantvandekomblijven
kleven?1.Schakelhetapparaatuitenhaaldestekkeruithetstopcontact.2.Neemhetdeksel
vandekom.3.Verwijderdeingrediëntenmeteenspatelvanhetmesenvandezijkantvan
de kom.
Kneedaccessoire
Controleervoorubegintofuallesinelkaarzetvolgensg.3.
Ukunthetkneedaccessoiregebruikenomgistdeegvoorbroodenpizza'stekneden.Umoet
dehoeveelheidvloeistofaanpassenomhetdeegtevormenaandehandvandevochtigheid
en temperatuur.
1 Draaidekomrechtsomomdezeopdemotorunittebevestigenenplaatsdandeas
in de kom.
» Alsdekomcorrectisgeplaatst,hoortueenklik.
2 Plaatshetkneedaccessoireopdeas.
3 Doedeingrediëntenindekom.
4 Plaatshetdekselopdekomendraaihetdekselrechtsomomhetvasttezetten.
» Wanneerhetdekselcorrectisgeplaatst,hoortueenklik.Hetdekselisdanaan
hethandvatvandekombevestigd.
5 Steek de stekker in het stopcontact.
6 Kiesdesnelheiddiebijdekleurvanhetaccessoirepast-snelheid1.
•
Gietvloeibareingrediëntenindevultrechterterwijlhetapparaatisingeschakeld.
Ditisafhankelijkvanhetrecept.
7 Draainagebruikdesnelheidskeuzeknopnaar0enhaalvervolgensdestekkervanhet
apparaat uit het stopcontact.
Discs
Kiesvoorubegintdegewensteschijfenbevestigdievolgensg.4en5:
• Mengschijf
• Omgekeerdsnijden/raspschijf(jn)
• Omgekeerdsnijden/raspschijf(grof)
• Schijfvoorfrites
• Granuleerschijf
Let op
• Weesvoorzichtigalsuhetmesvandeschijfgebruikt.Hetheefteenzeerscherpesnijkant.
• Gebruikdeschijfnooitomhardeingrediëntenzoalsijsblokjesteverwerken.
• Oefennietteveeldrukuitopdestamperwanneerudeingrediëntenindevultrechterduwt.
1 Draaidekomrechtsomomdezeopdemotorunittebevestigenenplaatsdandeas
in de kom.
» Alsdekomcorrectisgeplaatst,hoortueenklik.
2 Plaatsdeschijfopdeas.
3 Plaatshetdekselopdekomendraaihetdekselrechtsomomhetvasttezetten.
» Wanneerhetdekselcorrectisgeplaatst,hoortueenklik.Hetdekselisdanaan
hethandvatvandekombevestigd.
4 Doedeingrediëntenmetdestamperindevultrechter.Plaatsdeingrediënten
gelijkmatigindevultrechtervoorhetbesteresultaat.Wanneerueengrotehoeveelheid
ingrediëntenwiltverwerken,verwerkdankleineportiesenmaakdekomtussentijds
regelmatigleeg.
5 Steek de stekker in het stopcontact.
6 ControleerinTabel1devereistebereidingstijd,maximalehoeveelheidensnelheidvoor
deingrediënten.Kiesdesnelheiddiebijdekleurvanhetaccessoirepast.
7 Draainagebruikdesnelheidskeuzeknopnaar0enhaalvervolgensdestekkervanhet
apparaat uit het stopcontact.
4 Minihakmolen
Zorgervoordatuvoorubegintallesinelkaarzetvolgensg.6.
Let op
• Gebruikdeminihakmolennietomhardeingrediëntenzoalsnootmuskaat,Chineserotssuiker
enijsblokjestehakken.
• Laatdeminihakmolennooitlangerdan30secondenonafgebrokenwerken.
• Bevestigdeafdichtringopdemesunitvoordatudemesunitaandeminihakmolenbevestigt
om lekken te voorkomen.
• Verwerkkruidnagels,steranijsenanijszaadaltijdsamen.Alsdezeingrediëntenongemengd
worden verwerkt, kunnen ze de kunststof onderdelen van het apparaat aantasten.
• Debekervandeminihakmolenkanverkleurenindiendemaalmolenwordtgebruiktom
ingrediëntenzoalskruidnagels,anijsenkaneelteverwerken.
• Gebruik de minihakmolen niet om vloeistoffen zoals vruchtensap te verwerken.
• Laatheteingrediëntenafkoelen(<80°C)voordatudezegaatverwerken.
1 Doedeingrediëntenindebekervandeminihakmolenenoverschrijddaarbijde
maximumindicatieopdekomniet.
2 Draaidemesunitlinksomopdebekervandeminihakmolentotdatdezegoedvastzit.
3 Draai de minihakmolen rechtsom op de motorunit totdat u een klik hoort.
4 Steek de stekker in het stopcontact.
5 Kiesdesnelheiddiebijdekleurvanhetaccessoirepast-snelheid2. Laat het apparaat
ongeveer10-30secondenwerkentotdatdeingrediëntenjngenoegzijn.
6 Draainagebruikdesnelheidskeuzeknopnaar0enhaalvervolgensdestekkervanhet
apparaat uit het stopcontact.
7 Draaideminihakmolenlinksomomdezevandemotorunitteverwijderen.
8 Draai de mesunit rechtsom om deze van de beker van de minihakmolen te
verwijderen.
Tip
• Ukuntdeminihakmolengebruikenomkofebonen,peperkorrels,noten,kruidenenz.
tehakken.Gebruiksnelheid2enlaathetapparaat30sec.werken.Overschrijdhet
maximumniveauaangegevenopdeminihakmolenniet.
• Voorhetbesteresultaatbijhetverwerkenvanrundvleesgebruiktugekoelde
rundvleesblokjes(2x2x2cm).Gebruikmax.100grundvleesblokjesvoor5sec.opsnelheidP.
5 Blender
Zorgervoordatuvoorubegintallesinelkaarzetvolgensg.7.
Deblenderisbedoeldvoor:
• hetmengenvanvloeistoffenzoalszuivelproducten,sauzen,vruchtensappen,soepen,
drankjesenmilkshakes;
• hetmengenvanzachteingrediëntenzoalspannenkoekbeslag;
• hetpurerenvangekookteingrediëntenzoalsbabyvoeding.
Opmerking
• Oefennietteveeldrukuitophethandvatvandeblenderkan.
• Steeknooituwhandofeenvoorwerpindekanterwijldeblenderwerkt.
• Bevestigdeafdichtringaltijdopdemesunitvoordatudemesunitaandeblenderkanbevestigt.
• Alsutijdensdebewerkingvloeibareingrediëntenwilttoevoegen,gietdezedaninde
blenderkanviadevulopening.
• Snijdvasteingrediënteninkleinestukjesvoordatuzeverwerkt.
• Wanneerueengrotehoeveelheidvoedselwiltbereiden,doedannietalleingrediëntenin
één keer in de kom, maar verwerk steeds kleine hoeveelheden.
• Gebruikgareingrediëntenwanneerusoepindeblenderverwerkt.
• Voorkommorsen:alsueenvloeistofverwerktdieheetisofsnelgaatschuimen(bijvoorbeeld
melk),doedannietmeerdan1litervloeistofindeblenderkan.
• Alsuniettevredenbentmethetresultaat,schakeldanhetapparaatuitenroerde
ingrediëntenmeteenspatel.Gieteendeelvandeingrediëntenuitdekanomeenkleinere
hoeveelheidteverwerkenofvoegwatvloeistoftoe.
1 Draai de mesunit op de blenderkan.
2 Plaatsdeblenderkanopdemotorunitendraaidekanrechtsomomdezevastte
zetten.
» Alsdekancorrectisgeplaatst,hoortueenklik.
3 Doedeingrediëntenindeblenderkanenoverschrijddaarbijdemaximumindicatieniet.
4 Plaatshetdekselopdeblenderkanendraaihetdekselrechtsomomhetvasttezetten.
5 Steek de stekker in het stopcontact.
6 Kiesdesnelheiddiebijdekleurvanhetaccessoirepast-snelheid2.
7 Draainagebruikdesnelheidskeuzeknopnaar0 en haal de stekker van het apparaat uit
het stopcontact.
Tip
• Hoeverwijderikingrediëntendieaandezijkantvandeblenderkankleven?1.Schakelhet
apparaatuitenhaaldestekkeruithetstopcontact.2.Openhetdekselengebruikeenspatel
omdeingrediëntenvandezijkantvandekanteverwijderen.3.Houddespateloptenminste
2cmvanhetmes.
6 Schoonmaken en opbergen
Let op
• Haal de stekker uit het stopcontact voordat u het apparaat schoonmaakt.
• Voorkomdatdesnijkantenvandemessen,schijveneninzetschijvenincontactkomenmet
harde voorwerpen. Hierdoor kan het mes bot worden.
• Desnijkantenzijnscherp.Weesvoorzichtigbijhetschoonmaken.
1 Maakdemotorunitschoonmeteenvochtigedoek.
2 Maakdeandereonderdelenschooninwarmwater(<60ºC)meteenbeetje
afwasmiddel of in de vaatwasmachine.
3 Berghetproductopeendrogeplaatsop.
Snel schoonmaken
Omdekeukenmachinekomenblenderkangemakkelijkerschoontemakengaatualsvolgt
te werk.
Opmerking
• Controleerofhetmesindekomisbevestigdalsudekeukenmachinekomschoonmaakt.
1 Gietlauwwarmwater(nietmeerdan0,5liter)enwatafwasmiddelindekomvande
keukenmachine of in de blenderkan.
2 Plaatshetdekselopdekomvandekeukenmachineofdeblenderkanendraaihet
deksel rechtsom om het vast te zetten.
3 Zet de snelheidskeuzeknop op P totdat de kom of kan schoon is.
4 Laat het apparaat 30 seconden werken of totdat de kom van de keukenmachine of de
blenderkan schoon is.
5 Maak de kom van de keukenmachine of de blenderkan los en spoel deze met schoon
water uit.
7 Garantie en service
Alsueenprobleemhebtofvraaghebtofservicenodighebt,gaatunaarwww.philips.com/
supportofneemtucontactopmethetPhilipsConsumerCareCenterinuwland.Het
telefoonnummervindtuinhet'worldwideguarantee'-vouwblad.AlsergeenConsumerCare
Centreinuwlandis,gadannaaruwPhilips-dealer.
Pagina wordt geladen...
Pagina wordt geladen...
Pagina wordt geladen...
Pagina wordt geladen...
Pagina wordt geladen...
Pagina wordt geladen...
Pagina wordt geladen...
Documenttranscriptie
Register your product and get support at 2 1 www.philips.com/welcome 3 4 Nederlands 8 0 P 1 HR7830 2 (MAX) 9 5 x 1 sec 500 g P 5 x 1 sec 500 g P/2 30 sec 50 g 2 60 sec 250 g 1 45 sec 250 g 2 30 sec 200 g 2 2-3 min EN User manual NL Gebruiksaanwijzing FR Mode d’emploi DE Benutzerhandbuch ES Manual del usuario IT Manuale utente PL Instrukcja obsługi SV Användarhandbok NO Brukerhåndbok DA Brugervejledning FI Käyttöopas Εγχειρίδιο χρήσης Kullanım kılavuzu Lees deze gebruiksaanwijzing zorgvuldig door voordat u het apparaat gaat gebruiken. Bewaar de gebruiksaanwijzing om deze indien nodig te kunnen raadplegen. Discs Kies voor u begint de gewenste schijf en bevestig die volgens fig. 4 en 5: Dompel de motorunit niet in water en spoel deze ook niet af. Let op • • 1 • • 60-180 sec 350 ml 1 • 60-180 sec 4 pcs 1 30 sec 500 g 1 30 sec 200 g 1 30 sec 2 pcs 1 30 sec 500 g 1 30 sec 300 g 1 • 5 9 10 • • • • • 30 sec 500 g 1 30 sec 200 g 1 30 sec 500 g 1 30 sec 40 g 2 • • 30 sec 70 g 2 • • • • Gebruik nooit uw vingers of een voorwerp (bijvoorbeeld een spatel) om ingrediënten door de vultrechter te duwen terwijl het apparaat werkt. Gebruik alleen de stamper. Controleer voordat u het apparaat aansluit op netspanning of het voltage dat aan de onderkant van het apparaat wordt aangegeven overeenkomt met de plaatselijke netspanning. Sluit dit apparaat nooit aan op een tijdschakelaar om gevaarlijke situaties te vermijden. Gebruik het apparaat niet indien het netsnoer, de stekker of andere onderdelen beschadigd zijn. Indien het netsnoer beschadigd is, moet het worden vervangen door Philips, een door Philips geautoriseerd servicecentrum of personen met vergelijkbare kwalificaties om gevaar te voorkomen. Dit apparaat is niet bedoeld voor gebruik door personen (waaronder kinderen) met verminderde lichamelijke, zintuiglijke of geestelijke vermogens, of die gebrek aan ervaring of kennis hebben, tenzij iemand die verantwoordelijk is voor hun veiligheid toezicht op hen houdt of hen heeft uitgelegd hoe het apparaat dient te worden gebruikt. Laat kinderen niet met het apparaat spelen voor hun eigen veiligheid. Laat het apparaat nooit zonder toezicht werken. Schakel het apparaat uit en haal de stekker uit het stopcontact als er ingrediënten aan de wand van de blenderkan of kom blijven kleven. Verwijder de ingrediënten vervolgens van de wand met een spatel. Wees voorzichtig wanneer u de schijven, de mesunit van de keukenmachine, de mesunit van de blender en de minihakmolen beetpakt of schoonmaakt. De mesunits en de inzetschijven zijn zeer scherp. Raak de messen niet aan, vooral niet wanneer de stekker van het apparaat nog in het stopcontact zit. De messen zijn zeer scherp. Als de messen vastlopen, haal dan eerst de stekker uit het stopcontact voordat u de ingrediënten die de messen blokkeren verwijdert. • 6 7 Schakel het apparaat nooit uit door de blenderkan, de kom of de deksels te draaien. Schakel het apparaat altijd uit door de snelheidskeuzeknop naar de stand 0 te draaien. Haal na gebruik altijd direct de stekker uit het stopcontact. Haal altijd de stekker uit het stopcontact voordat u uw vingers of een voorwerp (bijvoorbeeld een spatel) in de blenderkan steekt. Wacht tot de bewegende delen stilstaan voordat u het deksel van de kom of kan verwijdert. Overschrijd het aangegeven maximumniveau op de kan of de kom niet. Maak de onderdelen die in contact komen met voedsel goed schoon voordat u het apparaat voor de eerste keer gebruikt. Schakel, voor u de accessoires verwijdert, schoonmaakt of verwisselt, het apparaat uit en haal de stekker uit het stopcontact. Gebruik nooit accessoires of onderdelen van andere fabrikanten of die niet specifiek zijn aanbevolen door Philips. Als u dergelijke accessoires of onderdelen gebruikt, vervalt de garantie. Dit apparaat is uitsluitend bedoeld voor huishoudelijk gebruik. Overschrijd de hoeveelheden en bewerkingstijd in de gebruiksaanwijzing niet. Laat hete ingrediënten afkoelen (< 80°C) voordat u deze gaat verwerken. Laat het apparaat afkoelen tot kamertemperatuur na iedere portie die u hebt verwerkt. Bepaalde ingrediënten kunnen verkleuringen op de onderdelen veroorzaken. Dit heeft geen negatief effect op de onderdelen. De verkleuringen verdwijnen na een tijdje meestal vanzelf. 30 sec 40 g 2 30 sec 50 g 2 5 sec 100 g P 1 min 1 L 2 1 min 1 L 2 1 min 1 L 2 Px9 6x P Opmerking 2 Elektromagnetische velden (EMV) 11 • 0 • 1 2 • 400 g 3 min • • • • • 600 ml Geluidsniveau = 83 dB [A] Dit Philips-apparaat voldoet aan alle richtlijnen met betrekking tot elektromagnetische velden (EMV). Mits het apparaat op de juiste wijze en volgens de instructies in deze gebruiksaanwijzing wordt gebruikt, is het veilig te gebruiken volgens het nu beschikbare wetenschappelijke bewijs. Wanneer een product is voorzien van een symbool van een afvalcontainer met een kruis erdoorheen, valt het product onder de Europese richtlijn 2002/96/EG: 3140 035 31991 5 6 1 Important Read this user manual carefully before you use the appliance, and save the user manual for future reference. Danger Do not immerse the motor unit in water nor rinse it under the tap. Warning Never use your fingers or an object (for example, a spatula) to push ingredients into the feeding tube while the appliance is running. Only use the pusher. Before you connect the appliance to the power, make sure that the voltage indicated on the bottom of the appliance corresponds to the local power voltage. Never connect this appliance to a timer switch, to avoid a hazardous situation. If the power cord, the plug, or other parts are damaged, do not use the appliance. If the power cord is damaged, you must have it replaced by Philips, a service center authorized by Philips, or similarly qualified persons to avoid a hazard. This appliance is not intended for use by persons (including children) with reduced physical, sensory or mental capabilities, or lack of experience and knowledge, unless they have been given supervision or instruction concerning use of the appliance by a person responsible for their safety. For their safety, do not allow children to play with the appliance. Never let the appliance run unattended. If food sticks to the wall of the blender jar or bowl, switch off the appliance and unplug it. Then use a spatula to remove the food from the wall. Be careful when you handle or clean the discs, the blade unit of the food processor, and the blade unit of the blender and the mini chopper. The blade units and the inserts are very sharp. Do not touch the blades, especially when the appliance is plugged in. The blades are very sharp. If the blades get stuck, unplug the appliance before you remove the ingredients that block the blades. • • • • • • • • • • Never dispose of your product with other household waste. Please inform yourself about the local rules on the separate collection of electrical and electronic products. The correct disposal of your old product helps prevent potentially negative consequences on the environment and human health. 2 Introduction Congratulations on your purchase and welcome to Philips! To fully benefit from the support that Philips offers, register your product at www.philips.com/welcome. This appliance is equipped with a built-in safety lock. You can only switch on the appliance after you correctly assemble the following parts on the motor unit: • the food processor bowl and its lid, or • the blender jar and its lid, or • the mini chopper. If these parts are assembled correctly, the built-in safety lock is unlocked. For recipes, go to www.philips.com/kitchen • • • • • • • • • • • • This Philips appliance complies with all standards regarding electromagnetic fields (EMF). If handled properly and according to the instructions in this user manual, the appliance is safe to use based on scientific evidence available today. Recycling When you see the crossed-out wheel bin symbol attached to a product, it means the product is covered by the European Directive 2002/96/EC: 1/4 • • • • • Emulsifying disc Reversible slicing / shredding disc (fine) Reversible slicing / shredding disc (coarse) French fry disc Granulating disc Caution •• Be careful when you handle the slicing blade of disc. It has a very sharp cutting edge. •• Never use the disc to process hard ingredients, like ice cubes. •• Do not exert too much pressure on the pusher when you press ingredients into the feed tube. Put the disc on the shaft. 4 Put the ingredients into the feeding tube with the pusher. Fill the feeding tube evenly for the best results. When you have to process a large amount of ingredients, process small batches and empty the bowl between batches. Before you start, make sure that you assemble according to Fig. 2. You can use the blade unit to chop, mix, blend, or puree ingredients. Caution •• Do not use the blade unit to chop hard ingredients, like coffee beans, turmeric, nutmeg, and ice cubes, as this may cause the blade to get blunt. Note •• Do not let the appliance run too long when you chop (hard) cheese or chocolate. Otherwise these ingredients become too hot, start to melt, and turn lumpy. •• Precut large pieces of food into pieces of approx. 3 x 3 x 3 cm. 1 Turn the bowl clockwise to fix it on the motor unit, and then put the shaft in the bowl. »» When the bowl is fixed correctly, you hear a click. 2 3 4 5 Take the blade unit out of the protective cover. 6 7 8 9 Put the blade unit on the shaft. Put the ingredients in the bowl. Put the lid on the bowl, and then turn the lid clockwise to fix it. »» When the lid is assembled correctly, you hear a click and the lid is fixed to the bowl handle. Put the pusher into the feeding tube. Connect the power plug to the power supply. Select the speed that matches the color of the accessory - speed 1. After use, turn the speed selector to 0, and then unplug the appliance. Tip •• When you chop onions, turn the speed selector to P a few times to prevent the onions from becoming too finely chopped. •• How to remove food that sticks to the blade or to the inside of the bowl? 1. Switch off the appliance, and then unplug it. 2. Remove the lid from the bowl. 3. Remove the ingredients from the blade or from the side of the bowl with a spatula. Kneading accessory You can use the kneading accessory to knead yeast dough for bread and pizzas. You need to adjust the amount of liquid to form the dough according to the humidity and temperature condition. 1 2 3 4 Turn the bowl clockwise to fix it on the motor unit, and then put the shaft in the bowl. »» When the bowl is fixed correctly, you hear a click. Put the kneading accessory on the shaft. Put the ingredients in the bowl. Put the lid on the bowl, and then turn the lid clockwise to fix it. »» When the lid is assembled correctly, you hear a click and the lid is fixed to the bowl handle. 5 Blender Before you start, make sure you assemble according to Fig. 7. The blender is intended for: • • • Before you start, make sure that you pick your desired disc from following and assemble according to Fig. 4 and Fig. 5: 2 3 Before you start, make sure that you assemble according to Fig. 3. Your product is designed and manufactured with high quality materials and components, which can be recycled and reused. Discs Blade unit Noise level = 83 dB [A] Electromagnetic fields (EMF) After use, turn the speed selector to 0, and then unplug the appliance. Turn the bowl clockwise to fix it on the motor unit, and then put the shaft in the bowl. »» When the bowl is fixed correctly, you hear a click. Note • Select the speed that matches the color of the accessory - speed 1. • Depending on the recipe, pour liquid ingredient into the feeding tube while the device is turned on. 1 Caution Never switch off the appliance by turning the blender jar, the bowl, or their lids. Always switch off the appliance by turning the speed selector to 0. Unplug the appliance immediately after use. Always unplug the appliance before you reach into the blender jar with your fingers or an object (for example, a spatula). Wait until the moving parts stop running before you remove the lid of the bowl or jar. Do not exceed the maximum level indication on the jar or the bowl. Thoroughly clean the parts that come into contact with food before you use the appliance for the first time. Before you remove, clean or change the accessories, switch off and unplug the appliance. Never use any accessories or parts from other manufacturers or that Philips does not specifically recommend. If you use such accessories or parts, your guarantee becomes invalid. This appliance is intended for household use only. Do not exceed the quantities and processing time indicated in the user manual. Let hot ingredients cool down (< 80ºC) before processing them. Always let the appliance cool down to room temperature after each batch that you process. Certain ingredients may cause discolorations on the surface of the parts. This does not have a negative effect on the parts. The discolorations usually disappear after some time. 7 Connect the power plug to the power supply. 3 Food processor • Draai de kom rechtsom om deze op de motorunit te bevestigen en plaats dan de as in de kom. »» Als de kom correct is geplaatst, hoort u een klik. 2 3 Plaats de schijf op de as. 4 Doe de ingrediënten met de stamper in de vultrechter. Plaats de ingrediënten gelijkmatig in de vultrechter voor het beste resultaat. Wanneer u een grote hoeveelheid ingrediënten wilt verwerken, verwerk dan kleine porties en maak de kom tussentijds regelmatig leeg. 5 6 7 Plaats het deksel op de kom en draai het deksel rechtsom om het vast te zetten. »» Wanneer het deksel correct is geplaatst, hoort u een klik. Het deksel is dan aan het handvat van de kom bevestigd. Steek de stekker in het stopcontact. Controleer in Tabel 1 de vereiste bereidingstijd, maximale hoeveelheid en snelheid voor de ingrediënten. Kies de snelheid die bij de kleur van het accessoire past. Draai na gebruik de snelheidskeuzeknop naar 0 en haal vervolgens de stekker van het apparaat uit het stopcontact. Zorg ervoor dat u voor u begint alles in elkaar zet volgens fig. 6. Let op •• Gebruik de minihakmolen niet om harde ingrediënten zoals nootmuskaat, Chinese rotssuiker en ijsblokjes te hakken. •• Laat de minihakmolen nooit langer dan 30 seconden onafgebroken werken. •• Bevestig de afdichtring op de mesunit voordat u de mesunit aan de minihakmolen bevestigt om lekken te voorkomen. •• Verwerk kruidnagels, steranijs en anijszaad altijd samen. Als deze ingrediënten ongemengd worden verwerkt, kunnen ze de kunststof onderdelen van het apparaat aantasten. •• De beker van de minihakmolen kan verkleuren indien de maalmolen wordt gebruikt om ingrediënten zoals kruidnagels, anijs en kaneel te verwerken. •• Gebruik de minihakmolen niet om vloeistoffen zoals vruchtensap te verwerken. •• Laat hete ingrediënten afkoelen (< 80°C) voordat u deze gaat verwerken. 1 2 3 4 5 6 7 8 Doe de ingrediënten in de beker van de minihakmolen en overschrijd daarbij de maximumindicatie op de kom niet. Draai de mesunit linksom op de beker van de minihakmolen totdat deze goed vast zit. Draai de minihakmolen rechtsom op de motorunit totdat u een klik hoort. Steek de stekker in het stopcontact. Kies de snelheid die bij de kleur van het accessoire past - snelheid 2. Laat het apparaat ongeveer 10-30 seconden werken totdat de ingrediënten fijn genoeg zijn. Draai na gebruik de snelheidskeuzeknop naar 0 en haal vervolgens de stekker van het apparaat uit het stopcontact. Draai de minihakmolen linksom om deze van de motorunit te verwijderen. Draai de mesunit rechtsom om deze van de beker van de minihakmolen te verwijderen. •• U kunt de minihakmolen gebruiken om koffiebonen, peperkorrels, noten, kruiden enz. te hakken. Gebruik snelheid 2 en laat het apparaat 30 sec. werken. Overschrijd het maximumniveau aangegeven op de minihakmolen niet. •• Voor het beste resultaat bij het verwerken van rundvlees gebruikt u gekoelde rundvleesblokjes (2x2x2 cm). Gebruik max. 100 g rundvleesblokjes voor 5 sec. op snelheid P. Zorg ervoor dat u voor u begint alles in elkaar zet volgens fig. 7. Gooi het product nooit weg met ander huishoudelijk afval. Informeer u over de lokale regels inzake gescheiden afvalophaling van elektrische en elektronische toestellen. Een goede afvalverwerking van uw oude product draagt bij tot het voorkomen van mogelijke schade voor het milieu en de volksgezondheid. English • 1 5 Blender Specifications are subject to change without notice © 2012 Koninklijke Philips Electronics N.V. All rights reserved. • •• Wees voorzichtig als u het mes van de schijf gebruikt. Het heeft een zeer scherpe snijkant. •• Gebruik de schijf nooit om harde ingrediënten zoals ijsblokjes te verwerken. •• Oefen niet te veel druk uit op de stamper wanneer u de ingrediënten in de vultrechter duwt. Tip Uw product is vervaardigd van kwalitatief hoogwaardige materialen en onderdelen die gerecycled en opnieuw gebruikt kunnen worden. • Mengschijf Omgekeerd snijden/raspschijf (fijn) Omgekeerd snijden/raspschijf (grof) Schijf voor frites Granuleerschijf Let op Recycling 12 HR7830_UM_V1.0 • • • • • Draai na gebruik de snelheidskeuzeknop naar 0 en haal vervolgens de stekker van het apparaat uit het stopcontact. 4 Minihakmolen Let op P EL TR AR FA PT Manual do utilizador KK Қолданушының нұсқасы UK Посібник користувача CS Příručka pro uživatele RU Руководство пользователя RO Manual de utilizare SL Uporabniški priročnik SK Príručka užívateľa ET Kasutusjuhend LV Lietotāja rokasgrāmata LT Vartotojo vadovas HR Korisnički priručnik HU Felhasználói kézikönyv BG Ръководство за потребителя 7 • 360 ml Kies de snelheid die bij de kleur van het accessoire past - snelheid 1. • Giet vloeibare ingrediënten in de vultrechter terwijl het apparaat is ingeschakeld. Dit is afhankelijk van het recept. 1 Belangrijk Gevaar 500 g 6 Put the lid on the bowl, and then turn the lid clockwise to fix it. »» When the lid is assembled correctly, you hear a click and the lid is fixed to the bowl handle. 5 6 Connect the power plug to the power supply. 7 After use, turn the speed selector to 0, and then unplug the appliance. Check the preparation time, the maximum amount and the speed setting required for the ingredients in Table 1. Select the speed that matches the color of the accessory. 4 Mini chopper Blending fluids, like dairy products, sauces, fruit juices, soups, mixed drinks, and shakes, Mixing soft ingredients, like pancake batter, Pureeing cooked ingredients, like baby food. Note •• Do not exert too much pressure on the handle of the blender jar. •• Never open the lid to put your hand or any object in the jar while the blender is running. •• Always assemble the sealing ring onto the blade unit before you attach the blade unit to the blender jar. •• To add liquid ingredients during processing, pour them into the blender jar through the feeding hole. •• Precut solid ingredients into small pieces before you process them. •• If you want to prepare a large quantity, process small batches of ingredients instead of a large quantity at once. •• Use cooked ingredients when you blend a soup. •• To avoid spillage: When you process a liquid that is hot or tends to foam (for example, milk), do not put more than 1 liter of liquid in the blender jar. •• If you are not satisfied with the result, switch off the appliance and stir the ingredients with a spatula. Remove some of the contents to process a smaller quantity or add some liquid. 1 2 Turn the blade unit on the blender jar. 3 4 5 6 7 Put the ingredients in the blender jar within the maximum level indication. Place the blender jar on the motor unit and turn it clockwise to fix it. »» When the jar is fixed correctly, you hear a click. •• Do not use the mini chopper to chop hard ingredients, like nutmeg, Chinese rock sugar, or ice cubes. •• Never use the mini chopper for more than 30 seconds without interruption. •• Assemble the sealing ring onto the blade unit before you attach the blade unit to the mini chopper, to avoid leakage. •• Always process cloves, star anise, and aniseed together. If processed separately, these ingredients may attack the plastic materials of the appliance. •• The mini chopper beaker may become discolored when you use the mill to process ingredients, like cloves, anise, and cinnamon. •• Do not use the mini chopper to process liquids like fruit juice. •• Let hot ingredients cool down (< 80ºC) before processing them. 1 2 3 4 5 Put the ingredients in the mini chopper beaker within the maximum indication. 6 7 8 After use, turn the speed selector to 0, and then unplug the appliance. Select the speed that matches the color of the accessory - speed 2. After use, turn the speed selector to 0, and unplug the appliance. Tip •• How to remove the ingredients that stick to the side of the blender jar? 1. Switch off the appliance, and then unplug it. 2. Open the lid, and then use a spatula to remove the ingredients from the side of the jar. 3. Keep the spatula at least 2 cm from the blade. 6 Cleaning and storage •• Before you clean the appliance, unplug it. •• Make sure that the cutting edges of the blades, discs, and the inserts do not come into contact with hard objects. This may cause the blade to get blunt. •• The cutting edges are sharp. Be careful when you clean. 1 2 Clean the motor unit with a moist cloth. Als deze onderdelen op de juiste manier zijn bevestigd, wordt de ingebouwde beveiliging ontgrendeld. Ga voor recepten naar www.philips.com/kitchen 3 Keukenmachine Mesunit Controleer voor u begint of u alles in elkaar zet volgens fig. 2. U kunt de mesunit gebruiken om ingrediënten te hakken, mixen, mengen of pureren. Let op •• Gebruik de mesunit niet om harde ingrediënten zoals koffiebonen, kurkuma, nootmuskaat of ijsblokjes te hakken. Hierdoor kan het mes bot worden. 3 Store the product in a dry place. You can follow the following steps to clean the food processor bowl and blender jar easier. Connect the power plug to the power supply. Select the speed that matches the color of the accessory - speed 2. Let it run for about 10-30 seconds until the ingredients are fine enough. • • •• Laat het apparaat niet te lang werken wanneer u (harde) kaas of chocolade hakt. Deze ingrediënten worden anders te heet, waardoor ze gaan smelten en klonteren. •• Snijd grote stukken voedsel van tevoren in stukjes van circa 3 x 3 x 3 cm. 1 Draai de kom rechtsom om deze op de motorunit te bevestigen en plaats dan de as in de kom. »» Als de kom correct is geplaatst, hoort u een klik. 2 3 4 5 Haal de mesunit uit de beschermhoes. •• •• •• •• •• •• •• •• •• 6 7 8 9 Plaats de stamper in de vultrechter. Plaats het deksel op de kom en draai het deksel rechtsom om het vast te zetten. »» Wanneer het deksel correct is geplaatst, hoort u een klik. Het deksel is dan aan het handvat van de kom bevestigd. Steek de stekker in het stopcontact. Kies de snelheid die bij de kleur van het accessoire past - snelheid 1. Draai na gebruik de snelheidskeuzeknop naar 0 en haal vervolgens de stekker van het apparaat uit het stopcontact. Tip •• Als u uien hakt, draai dan de snelheidskeuzeknop een paar keer naar P om te voorkomen dat de uien te fijn worden gehakt. •• Hoe verwijder ik de ingrediënten die aan het mes of aan de binnenkant van de kom blijven kleven? 1. Schakel het apparaat uit en haal de stekker uit het stopcontact. 2. Neem het deksel van de kom. 3. Verwijder de ingrediënten met een spatel van het mes en van de zijkant van de kom. Note •• Make sure that the blade is assembled in the bowl if you clean the food processor bowl. Turn the mini chopper anticlockwise to take it off from the motor unit. 1 Pour lukewarm water (not more than 0.5 liters) and some washing-up liquid into the food processor bowl or blender jar. 2 Place the lid on the food processor bowl or blender jar, and then turn it clockwise to fix it. 3 4 Turn the speed selector to P until the bowl or jar is clean. 5 Detach the blender jar or food processor bowl and rinse it with clean water. Let the appliance run for 30 seconds or until the food processor bowl or blender jar is clean. 7 Guarantee and service If you have a problem, need service, or need information, see www.philips.com/support or contact the Philips Consumer Care Center in your country. The phone number is in the worldwide guarantee leaflet. If there is no Consumer Care Center in your country, go to your local Philips dealer. Kneedaccessoire Draai de mesunit op de blenderkan. 3 4 5 6 7 Doe de ingrediënten in de blenderkan en overschrijd daarbij de maximumindicatie niet. 5 Steek de stekker in het stopcontact. Doe de ingrediënten in de kom. Plaats het deksel op de kom en draai het deksel rechtsom om het vast te zetten. »» Wanneer het deksel correct is geplaatst, hoort u een klik. Het deksel is dan aan het handvat van de kom bevestigd. Kies de snelheid die bij de kleur van het accessoire past - snelheid 2. Draai na gebruik de snelheidskeuzeknop naar 0 en haal de stekker van het apparaat uit het stopcontact. Let op •• Haal de stekker uit het stopcontact voordat u het apparaat schoonmaakt. •• Voorkom dat de snijkanten van de messen, schijven en inzetschijven in contact komen met harde voorwerpen. Hierdoor kan het mes bot worden. •• De snijkanten zijn scherp. Wees voorzichtig bij het schoonmaken. 1 2 Maak de motorunit schoon met een vochtige doek. 3 Berg het product op een droge plaats op. Maak de andere onderdelen schoon in warm water (< 60ºC) met een beetje afwasmiddel of in de vaatwasmachine. Snel schoonmaken Om de keukenmachinekom en blenderkan gemakkelijker schoon te maken gaat u als volgt te werk. Opmerking •• Controleer of het mes in de kom is bevestigd als u de keukenmachinekom schoonmaakt. 1 3 4 Plaats het kneedaccessoire op de as. Steek de stekker in het stopcontact. 6 Schoonmaken en opbergen 2 2 3 4 Plaats het deksel op de blenderkan en draai het deksel rechtsom om het vast te zetten. Tip U kunt het kneedaccessoire gebruiken om gistdeeg voor brood en pizza's te kneden. U moet de hoeveelheid vloeistof aanpassen om het deeg te vormen aan de hand van de vochtigheid en temperatuur. Draai de kom rechtsom om deze op de motorunit te bevestigen en plaats dan de as in de kom. »» Als de kom correct is geplaatst, hoort u een klik. Plaats de blenderkan op de motorunit en draai de kan rechtsom om deze vast te zetten. »» Als de kan correct is geplaatst, hoort u een klik. •• Hoe verwijder ik ingrediënten die aan de zijkant van de blenderkan kleven? 1. Schakel het apparaat uit en haal de stekker uit het stopcontact. 2. Open het deksel en gebruik een spatel om de ingrediënten van de zijkant van de kan te verwijderen. 3. Houd de spatel op ten minste 2 cm van het mes. Controleer voor u begint of u alles in elkaar zet volgens fig. 3. 1 Oefen niet te veel druk uit op het handvat van de blenderkan. Steek nooit uw hand of een voorwerp in de kan terwijl de blender werkt. Bevestig de afdichtring altijd op de mesunit voordat u de mesunit aan de blenderkan bevestigt. Als u tijdens de bewerking vloeibare ingrediënten wilt toevoegen, giet deze dan in de blenderkan via de vulopening. Snijd vaste ingrediënten in kleine stukjes voordat u ze verwerkt. Wanneer u een grote hoeveelheid voedsel wilt bereiden, doe dan niet alle ingrediënten in één keer in de kom, maar verwerk steeds kleine hoeveelheden. Gebruik gare ingrediënten wanneer u soep in de blender verwerkt. Voorkom morsen: als u een vloeistof verwerkt die heet is of snel gaat schuimen (bijvoorbeeld melk), doe dan niet meer dan 1 liter vloeistof in de blenderkan. Als u niet tevreden bent met het resultaat, schakel dan het apparaat uit en roer de ingrediënten met een spatel. Giet een deel van de ingrediënten uit de kan om een kleinere hoeveelheid te verwerken of voeg wat vloeistof toe. 1 2 Plaats de mesunit op de as. Doe de ingrediënten in de kom. het mengen van vloeistoffen zoals zuivelproducten, sauzen, vruchtensappen, soepen, drankjes en milkshakes; het mengen van zachte ingrediënten zoals pannenkoekbeslag; het pureren van gekookte ingrediënten zoals babyvoeding. Opmerking Opmerking Clean the other parts in hot water (< 60ºC) with some washing-up liquid or in a dishwasher. Turn the mini chopper clockwise onto the motor unit until you hear a click. •• You can use the mini chopper to chop coffee beans, peppercorns, nuts, herbs etc. Use speed 2 and process for 30 sec. Do not exceed the maximum level indicated on the mini chopper. •• For best results when processing beef, please use refrigerated beef cubes (2x2x2 cm). Use max of 100g beef cubes at speed P for 5 sec. Dit apparaat is voorzien van een ingebouwde beveiliging. U kunt het apparaat alleen inschakelen nadat u de volgende onderdelen op de juiste manier op de motorunit hebt bevestigd: • de keukenmachinekom en het deksel of • de blenderkan en het deksel of • de minihakmolen. Caution Quick cleaning Tip Connect the power plug to the power supply. Turn the blade unit anticlockwise on the mini chopper beaker until it is fixed properly. Turn the blade unit clockwise to take it off from the mini chopper beaker. Gefeliciteerd met uw aankoop en welkom bij Philips! Registreer uw product op www. philips.com/welcome om optimaal gebruik te kunnen maken van de door Philips geboden ondersteuning. • Place the lid on the blender jar, and then turn it clockwise to fix it. Before you start, make sure you assemble according to Fig. 6. Caution 2 Inleiding De blender is bedoeld voor: 5 Giet lauwwarm water (niet meer dan 0,5 liter) en wat afwasmiddel in de kom van de keukenmachine of in de blenderkan. Plaats het deksel op de kom van de keukenmachine of de blenderkan en draai het deksel rechtsom om het vast te zetten. Zet de snelheidskeuzeknop op P totdat de kom of kan schoon is. Laat het apparaat 30 seconden werken of totdat de kom van de keukenmachine of de blenderkan schoon is. Maak de kom van de keukenmachine of de blenderkan los en spoel deze met schoon water uit. 7 Garantie en service Als u een probleem hebt of vraag hebt of service nodig hebt, gaat u naar www.philips.com/ support of neemt u contact op met het Philips Consumer Care Center in uw land. Het telefoonnummer vindt u in het 'worldwide guarantee'-vouwblad. Als er geen Consumer Care Centre in uw land is, ga dan naar uw Philips-dealer.-
 1
1
-
 2
2
-
 3
3
-
 4
4
-
 5
5
-
 6
6
-
 7
7
-
 8
8


Philips HR7830/53 Handleiding
- Categorie
- Voedsel verwerkers
- Type
- Handleiding
in andere talen
- English: Philips HR7830/53 User manual
- italiano: Philips HR7830/53 Manuale utente
- русский: Philips HR7830/53 Руководство пользователя
- français: Philips HR7830/53 Manuel utilisateur
- español: Philips HR7830/53 Manual de usuario
- Deutsch: Philips HR7830/53 Benutzerhandbuch
- português: Philips HR7830/53 Manual do usuário
- slovenčina: Philips HR7830/53 Používateľská príručka
- dansk: Philips HR7830/53 Brugermanual
- suomi: Philips HR7830/53 Ohjekirja
- čeština: Philips HR7830/53 Uživatelský manuál
- svenska: Philips HR7830/53 Användarmanual
- eesti: Philips HR7830/53 Kasutusjuhend
- Türkçe: Philips HR7830/53 Kullanım kılavuzu
- polski: Philips HR7830/53 Instrukcja obsługi
- română: Philips HR7830/53 Manual de utilizare