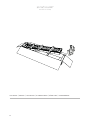
SunShower SS_202980_202983_202995 Installatie gids
- Type
- Installatie gids

Installatiehandleiding | Installation guide | Installationsanleitung | Guida all’installazione | Guide d’installation | Instrukcja montażu
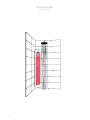
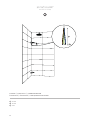
opbouw hoek | build-on corner
ENNL DE IT FR PL
Online
manual
Installation
video

2
GENERAL
INSTRUCTIONS
ALLGEMEIN
ANWEISUNGEN
ALGEMENE
INSTRUCTIES
NL EN DE
Lees deze instructies zorgvuldig
door voordat u met de installatie
begint. Installatie dient enkel
uitgevoerd te worden door
geschoold en erkend
vakpersoneel. De elektrische
aansluiting van Sunshower-
componenten mag alleen door
een erkend elektricien worden
uitgevoerd. Sunshower is niet
aansprakelijk voor schade
veroorzaakt door onjuiste
installatie.
De elektrische aansluiting van
Sunshower-componenten mag
alleen door een erkend
elektricien worden uitgevoerd.
De montage en elektrische
aansluiting van de Sunshower
moet worden uitgevoerd in
overeenstemming met de gel-
dende internationale en
nationale normen en richtlijnen
(bijvoorbeeld voor Nederland:
nen 1010 – 701).
Be sure to read this instruction
carefully before installation.
Installation can only be carried
out by qualified installers. The
electrical connection of
Sunshower components can only
be carried out by qualified
electricians. Sunshower is not
liable for damage caused by
incorrect installation.
The electrical connection of
Sunshower components may
only be carried out by a qualified
electrician. The installation
and electrical connection of the
Sunshower installation must be
carried out in accordance with
the applicable
international and national
standards and guidelines.
Lesen Sie diese Anleitung vor
dem Einbau sorgfältig durch.
Die Installation darf nur von
qualifizierten Fachkräften
durchgeführt werden. Der
elektrische Anschluss von
Komponenten von Sunshower
darf nur von qualifizierten
Elektrofachkräften ausgeführt
werden. Sunshower haftet nicht
für Schäden, die durch
unsachgemäße Installation
verursacht werden.
Der elektrische Anschluss von
Komponenten der Sunshower
darf nur von einer qualifizierten
Elektrofachkraft durchgeführt
werden. Die Montage und der
elektrische Anschluss der
Sunshower müssen in
Übereinstimmung mit den
geltenden internationalen und
nationalen Normen und
Richtlinien, wie z.B. DIN VDE
0100 durchgeführt werden. Die
Sunshower muss über einen
separaten, bauseitig
vorzusehenden
Fehlerstrom-Schutzschalter
RCD)abgesichert werden (siehe
Elektroanschluss).
!!!!!!
!!!!!!

INSTALLATIEHANDLEIDING LARGE, MEDIUM, SMALL I SUNSHOWER ONE - PLUS I P6135 REV D 3
GÉNÉRAL
INSTRUCTIONS
OGÓLNE
INSTRUKCJE
GENERALE
ISTRUZIONI
IT FR PL
Leggere attentamente queste
istruzioni prima di procedere
con l’installazione.
L’installazione può essere fatta
solo da un professionista
qualificato. El connessioni
elettroniche del Sunshower
devono essere fatta un
elettricista qualificato.
Sunshower non e’ responsabile
dei danni causati da un
installazione non errata.
Le connessioni elettriche dei
componenti Sunshower devono
essere fatta da un professionista
qualificato. L’installazione e la
connessione del sunshower
devone essere fatta in acordo
con le regolamentazioni e le
linee guida internazionali e
nazionali. Il Sunshower deve
essere protetta da impianto di
messa a terra (vedi connessioni
elettriche).
Lisez attentivement cette
instruction avant de procéder
à l’installation. L’installation
ne peut être effectuée que par
des installateurs qualifiés. Le
raccordement électrique des
composants de douche solaire
ne peut être effectué que par
des électriciens qualifiés.
Sunshower n’est pas
responsable des dommages
causés par une installation
incorrecte.
Le raccordement électrique
des éléments de Sunshower ne
doit être effectué que par un
électricien qualifié. L’installation
et le raccordement électrique
de l’installation de Sunshower
doivent être effectués
conformément aux normes
et directives internationales
et nationales applicables. La
Sunshower doit être protégée
par un disjoncteur différentiel
séparé (rcd) (voir raccordement
électrique).
Przed rozpoczęciem montażu należy
uważnie przeczytać niniejsze
instrukcje. Instalacja może być
wykonywana wyłącznie przez
przeszkolony i autoryzowany,
wykwalifikowany personel.
Podłączenie elektryczne elementów
systemu Sunshower powinien
wykonać wyłącznie
wykwalifikowany elektryk. Firma
Sunshower nie ponosi odpowied-
zialności za szkody spowodowane
niewłaściwą instalacją.
Podłączenie elektryczne elementów
systemu Sunshower powinien
wykonać wyłącznie
wykwalifikowany elektryk.
Montaż i podłączenie elektryczne a
Sunshower należy wykonać zgodnie
z obowiązującymi normami i
wytycznymi międzynarodowymi i
krajowymi.
!!!!!!
!!!!!!

4
Nederland, Amsterdam, 1 januari 2023
M. Wegdam, Technisch Directeur
DECLARATION OF
CONFORMITY
KONFORMITÄTSBE-
SCHEINIGUNG
CONFORMITEITS-
VERKLARING
NL EN DE
Sunshower B.V.
Hoogoorddreef 63-65
1101 BB Amsterdam,
Nederland verklaart hierbij op eigen
verantwoordelijkheid, dat deze
Sunshower ROUND is gefabriceerd
volgens de voorschriften in de volgende
richtlijnen:
• Laagspanningsrichtlijn 2014/35/EU
• Richtlijn 2014/30/EU voor
elektromagnetische compatibiliteit van
het Europees Parlement
Normen gebruikt om de conformiteit te
ondersteunen:
• EN60335-1:2012 + A11:2014 + AC2014 +
A13:2017 + A1:2019
+ A2:2019 + A14:2019
• EN60335-2-27:2014 + A1:2020 + A2:2020
• EN61000-6-3:2007 + A1:2011 + AC:2012
• EN61000-6-1:2007
• EN61000-6-1:2019
• EN61000-3-3:2013
• EN61000-3-2:2014
Dit Sunshower product is IPX5 gekeurd
en speciaal ontwikkeld voor gebruik en
installatie in de douche (zone 1).
Ondertekend voor en namens:
Sunshower B.V.
Hoogoorddreef 63-65
1101 BB Amsterdam, the Netherlands
hereby declares under our sole
responsibility, that the Sunshower
ROUND is in accordance with the
conditions of the following directives:
• Low-Voltage Directive 2014/35/EU
• Directive 2014/30/EU for
Electromagnetic compatibility of the
European Parliament
And are in conformity with the following
standards:
• EN60335-1:2012 + A11:2014 + AC2014 +
A13:2017 + A1:2019
+ A2:2019 + A14:2019
• EN60335-2-27:2014 + A1:2020 + A2:2020
• EN61000-6-3:2007 + A1:2011 + AC:2012
• EN61000-6-1:2007
• EN61000-6-1:2019
• EN61000-3-3:2013
• EN61000-3-2:2014
This Sunshower product is IPX5
approved and specially designed for use
and installation in the shower (zone 1).
Signed for and on behalf of:
Sunshower B.V.
Hoogoorddreef 63-65
1101 BB Amsterdam, Niederlande
erklärt hiermit eigenverantwortlich, dass
das Produkt Sunshower ROUND herge-
stellt ist gemäß den Bestimmungen der
Richtlinien:
• Richtlinie 2014/30/EU der
Europäischen Gemeinschaft
• Niederspannungsrichtlinie 2014/35/EU
der Europäischen Gemeinschaft
Und gemäß den folgenden Standards:
• EN60335-1:2012 + A11:2014 + AC2014 +
A13:2017 + A1:2019
+ A2:2019 + A14:2019
• EN60335-2-27:2014 + A1:2020 + A2:2020
• EN61000-6-3:2007 + A1:2011 + AC:2012
• EN61000-6-1:2007
• EN61000-6-1:2019
• EN61000-3-3:2013
• EN61000-3-2:2014
Dieses Sunshower-Produkt ist IPX5-zer-
tifiziert und wurde speziell für die
Verwendung und Installation in der
Dusche (Zone 1) entwickelt.
Unterzeichnet für und im Namen von:

INSTALLATIEHANDLEIDING LARGE, MEDIUM, SMALL I SUNSHOWER ONE - PLUS I P6135 REV D 5
CONFORMITÉ
DÉCLARATION
ZGODNOŚĆ
DEKLARACJA
DICHIARAZIONE DI
CONFORMITÀ
IT FR PL
Sunshower B.V.
Hoogoorddreef 63-65
1101 BB Amsterdam, I Paesi Bassi
dichiara, sotto la propria responsabilità,
che il prodotto Sunshower ROUND stato
fabbricato secondo i requisiti delle
seguenti direttive:
• Direttiva LVD 2014/35/EU
• Direttiva 2014/30/EU per
compatibilità Elettromagnetica della
Comunità Europea
E in conformità con le seguenti norme:
• EN60335-1:2012 + A11:2014 + AC2014 +
A13:2017 + A1:2019
+ A2:2019 + A14:2019
• EN60335-2-27:2014 + A1:2020 + A2:2020
• EN61000-6-3:2007 + A1:2011 + AC:2012
• EN61000-6-1:2007
• EN61000-6-1:2019
• EN61000-3-3:2013
• EN61000-3-2:2014
Questo prodotto Sunshower è certificato
IPX5 e sviluppato appositamente per
l’uso e l’installazione nella doccia (zona 1).
Firmato in nome e per conto di:
Sunshower B.V.
Hoogoorddreef 63-65
1101 BB Amsterdam, Les Pays-Bas
déclarons que le produit Sunshower
ROUND est conforme aux dispositions
des Directives suivantes:
• Directive 89/336/CEE de la Communau-
té européenne
• Directive sur les basses tensions
2006/95/CE de la Communauté
européenne
Et des normes suivantes:
• EN60335-1:2012 + A11:2014 + AC2014 +
A13:2017 + A1:2019
+ A2:2019 + A14:2019
• EN60335-2-27:2014 + A1:2020 + A2:2020
• EN61000-6-3:2007 + A1:2011 + AC:2012
• EN61000-6-1:2007
• EN61000-6-1:2019
• EN61000-3-3:2013
• EN61000-3-2:2014
Ce produit Sunshower est certifié IPX5
et spécialement développé pour une
utilisation et une installation dans la
douche (zone 1).
Signé pour et au nom de:
Sunshower B.V.
Hoogoorddreef 63-65
1101 BB Amsterdam, Holandia
niniejszym oświadcza na własną
odpowiedzialność, że niniejszy ROUND
Sunshower został wyprodukowany
zgodnie z wymogami następujących
dyrektyw:
• Dyrektywa niskonapięciowa 2014/35/EU
• Dyrektywa Parlamentu Europejskiego
w sprawie kompatybilności
elektromagnetycznej 2014/30/UE
Normy stosowane do wspierania
zgodności:
• EN60335-1:2012 + A11:2014 + AC2014 +
A13:2017 + A1:2019
+ A2:2019 + A14:2019
• EN60335-2-27:2014 + A1:2020 + A2:2020
• EN61000-6-3:2007 + A1:2011 + AC:2012
• EN61000-6-1:2007
• EN61000-6-1:2019
• EN61000-3-3:2013
• EN61000-3-2:2014
Ten produkt Sunshower jest
sklasyfikowany jako IPX5 i specjalnie
zaprojektowany do użytku i instalacji pod
prysznicem (strefa 1).
Podpisano w imieniu i na rzecz:

6

INSTALLATIEHANDLEIDING LARGE, MEDIUM, SMALL I SUNSHOWER ONE - PLUS I P6135 REV D 7
Contents | Inhoud
Items p. 8
Preparation
• Dimensions p. 10
• Electrics p. 18
Installation p. 24
Finishing p. 44
CONTENTSINHOUD
NL
IT
EN
FR
DE
PL
Benodigdheden p. 8
Voorbereiding
• Bemating p. 10
• Elektra p. 18
Installatie p. 24
Afronden p. 44
Fournitures p. 8
Préparation
• Dimensions p. 10
• Électricité p. 18
Installation p. 24
Finalisation p. 44
Benötigte Materialien p. 8
Vorbereitung
• Installationsort p. 10
• Stromversorgung p. 18
Installation p. 24
Fertigstellen p. 44
Materiały eksploatacyjne p. 8
Procedura wstępna
• Pasowanie p. 10
• Sprzęt elektryczny p. 18
Instalacja p. 24
Zakończenie p. 44
CONTENU
INHALT
SPIS TREŚCICONTENUTO
Attrezzatura p. 8
Preparazione
• Dimensionamento p. 10
• Impianto elettrico p. 18
Installazione p. 24
Conclusione p. 44

Clean
8
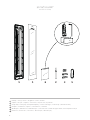
Behuizing | Housing | Gehäuse | Alloggiamento | Boîtier | Obudowa
Glasplaat | Glass pane | Glasplatte | Lastra di vetro | Plaque en verre | Płyta szklana
Montage zakje | Mounting bag | Montagematerialpackung | Sacchetto di montaggio | Sac de montage | Woreczek montażowy
Montagekit | Installationskit | Sigillante | Joint d’étanchéité | Uszczelniacz
Wandbeugelset | Wall bracket set | Wandhalterungsset | Set di staffe a muro | Esemble de supports muraux | Zestaw wsporników ściennych
Elektra snoer | Electrical wire | Cavo elettrico | Câble électrique | Kabel elektryczny

INSTALLATIEHANDLEIDING LARGE, MEDIUM, SMALL I SUNSHOWER ONE - PLUS I P6135 REV D 9
In de doos
1x Behuizing
1x Glasplaat
1x Montage zakje
1x Glas slot
2x Ontvet doekjes
1x Montagekit
1x Inbus sleutel 5 mm
Opbouw set
1x Hoek beugel boven (RVS)
1x Hoek beugel onder (RVS)
8x Montageschroef (RVS)
8x Montageplug
1x Elektrakabel
Niet meegeleverd
1x Rolmaat
1x Schroevendraaier ( + )
1x Waterpas
1x Boormachine
1x Ø8 mm spiraalboor
Let op:
De glasplaat en opbouw set zijn
apart verpakt.
NL
IT
EN
FR
DE
PL
In the box
1x Housing
1x Glass pane
1x Assembly bag
1x Glass lock
2x Degreasing cloth
1x Caulk
1x Hex key 5 mm
Mounting set
1x Top corner bracket (SST)
1x Bottom corner bracket (SST)
8x Mounting screw (SST)
8x Mounting plug
1x Electrical cable
Not included
1x Tape measure
1x Screwdriver ( + )
1x Spirit level
1x Drill
1x Ø8 mm spiral drill
Note:
The glass pane and mounting set
are packaged separately.
SUPPLIES
In der Verpackung
1x Gehäuse
1x Glasplatte
1x Montagematerialpackung
1x Glasverriegelung
2x Entfettungstuch
1x Installationskit
1x Inbusschlüssel 5 mm
Aufputz- Set
1x Eckhalterung oben (Edelstahl)
1x Eckhalterung unten (Edelstahl)
8x Montageschraube (Edelstahl)
8x Montagedübel
1x Stromkabel
Nicht im Lieferumfang enthalten
1x Bandmaß
1x Schraubenzieher ( + )
1x Wasserwaage
1x Bohrmaschine
1x Ø8 mm Spiralbohrer
Achtung:
Die Glasplatte und das Aufputz-set sind
separat verpackt.
Nella scatola
1x Alloggiamento
1x Lastra di vetro
1x Sacchetto di montaggio
1x Serratura vetro
2x Panno per sgrassare
1x Sigillante
1x Chiave a brugola da 4 mm
Set di assemblaggio
1x Staffa d’angolo superiore
1x Staffa d’angolo inferiore
8x Vite di montaggio
8x Spina di montaggio
1x Cavo elettrico
Non incluso
1x Metro a nastro
1x Cacciavite ( + )
1x Livellamento
1x Trapano
1x Trapano a spirale da Ø8 mm
FOURNITURES
BENÖTIGTE MATERIALIEN
MATERIAŁY EKSPLOATACYJNEATTREZZATURA
Dans la boîte
1x Boîtier
1x Plaque en verre
1x Sac de montage
1x Verrou de vitre
2x Chiffon de dégraissage
1x Joint d’étanchéité
1x Clé Allen de 4 mm
Ensemble de montage
1x Étrier d’angle supérieur (INOX)
1x Étrier d’angle inférieur (INOX)
8x Vis de montage (INOX)
8x Fiche de montage
1x Câble électrique
Non fournis
1x Mètre-ruban
1x Tournevis ( + )
1x Niveau à bulle
1x Perceuse
1x Foret de Ø8 mm
W pudełku
1x Obudowa
1x Płyta szklana
1x Woreczek montażowy
1x Zamek szklany
2x Ściereczka do odtłuszczania
1x Uszczelniacz
1x Klucz imbusowy 4 mm
Zestaw montażowy
1x Górny wspornik narożny (stal nierdzewna)
1x Dolny wspornik narożny (stal nierdzewna)
8x Montażowa śruba mocująca
8x Śruba kołek rozporowy
1x Kabel elektryczny
Nie wchodzi w skład zestawu
1x Miara taśmowa
1x Śrubokręt ( + )
1x Poziomica
1x Wiertarka elektryczna
1x Wiertło spiralne Ø8 mm
BENODIGDHEDEN

10
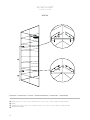
900 mm
≥310 mm
≤280 mm
≥200 mm
1000 mm
300 mm
300 - 500 mm
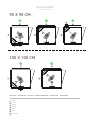
90 X 90 CM
100 X 100 CM
BEMATING | DIMENSIONS | MAẞEN | DIMENSIONAMENTO | DIMENSIONS | KOJARZENIE

INSTALLATIEHANDLEIDING LARGE, MEDIUM, SMALL I SUNSHOWER ONE - PLUS I P6135 REV D 11
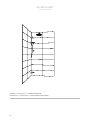
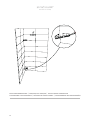
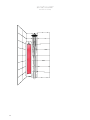
In deze afbeelding staan de
relevante maten voor het
installeren van de Sunshower
met betrekking tot de grootte
van de doucheruimte.
Houd rekening met een
maximale breedte van 28 cm
van de thermostaat (maat C)
wanneer deze in het midden
van de muur geplaatst wordt
in een doucheruimte van 90 x
90 cm.
Houd rekening met een
gebruikersafstand van 30-50
cm (maat G).
NL
IT
EN
FR
DE
PL
This illustration shows the
relevant dimensions for installing
the Sunshower in relation to the
size of the shower enclosure.
Take a maximum width of 28 cm
of the thermostat (size C) when
placed in the middle of the wall
in a 90 x 90 cm shower enclosure
into account.
Take a user distance of 30-50 cm
(size G) into account.
Diese Abbildung zeigt die relevanten
Maße für die Installation der
Sunshower in Abhängigkeit von der
Größe des Duschraums.
Berücksichtigen Sie eine maximale
Breite des Thermostats von 28 cm
(Größe C), wenn er in der Mitte der
Wand in einem 90 x 90 cm großen
Duschraum angebracht wird.
Berücksichtigen Sie einen
Benutzerabstand von 0-50 cm
(Größe G).
Questa illustrazione mostra le
dimensioni rilevanti per
l’installazione del Sunshower
in relazione alle dimensioni del
locale doccia.
Tenere conto di una larghezza
massima di 28 cm del termostato
(taglia C) se posizionato al centro
della parete in un locale doccia di
90 x 90 cm.
Tenere conto di una distanza tra
gli utenti di 30-50 cm (misura G).
Cette illustration montre les
dimensions pertinentes pour
l’installation de la Sunshower en
fonction de la taille de la salle
d’eau.
Tenir compte d’une largeur
maximale de 28 cm du thermostat
(taille C) lorsqu’il est placé au
milieu du mur dans une salle de
douche de 90 x 90 cm.
Tenir compte d’une distance
d’utilisation de 30-50 cm (taille G).
Ilustracja przedstawia odpowiednie
wymiary do instalacji Sunshower w
odniesieniu do wielkości
pomieszczenia prysznicowego.
Uwzględnić maksymalną szerokość
28 cm termostatu (rozmiar C) przy
umieszczeniu na środku ściany w
pomieszczeniu
prysznicowym o wymiarach 90 x 90
cm.
Uwzględnić odległość użytkownika
30-50 cm (rozmiar G).
INSTRUCTIONS
INSTRUCTIONS
ANLEITUNGEN
INSTRUKCJE
INSTRUCTIES
ISTRUZIONI

12
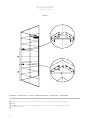
50 mm (hart op hart | center to center | Empfohlene Größe | centro a centro | entraxe | odległość od środka do środka)
65 mm
1650 mm (hart op hart | center to center | Empfohlene Größe | centro a centro | entraxe | odległość od środka do środka)
≥185 mm
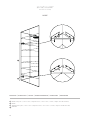
LARGE
BEMATING | DIMENSIONS | MAẞEN | DIMENSIONAMENTO | DIMENSIONS | KOJARZENIE

INSTALLATIEHANDLEIDING LARGE, MEDIUM, SMALL I SUNSHOWER ONE - PLUS I P6135 REV D 13
Sunshower Large
Voor gebruikers met een lengte
tot en met 190 cm adviseert
Sunshower de aangegeven maten.
Voor lengtes daarboven wordt het
volgende geadviseerd voor
maat D;
Maat D = lichaamslengte - 171,5 cm
Let op:
Houdt minimaal 11 cm vrije ruimte
onder de Sunshower vrij bij
bijvoorbeeld opbouwen boven een
zitvlak.
Monteer de beugels en ga verder op
pagina 18 voor de volgende stappen
van de installatie.
Sunshower Large
Sunshower raccomanda le misure
indicate per utilizzatori alti fino a
190 cm.
Per altezze superiori, si
raccomanda la seguente misura D;
Misura D = altezza corpo - 171,5 cm
Attenzione:
Lasciare almeno 11 cm di spazio
libero sotto il spazio libero sotto il
Sunshower quando, ad esempio, lo
si monta sopra un sedile.
Monta le staffe e vai avanti a pagina
18 per conoscere i prossimi
passaggi dell’installazione.
Sunshower Large
For users with a height up to 190 cm,
Sunshower recommends the sizes
indicated.
For users who are taller, the
following is recommended for
dimension D;
Dimension D = body height - 171,5 cm
Caution:
Keep at least 11 cm of free space
under the Sunshower when, for
example, installing it above a seat.
Mount the brackets and continue on
page 18 with the next steps of the
installation.
Sunshower Large
Sunshower recommande d’utiliser
les dimensions indiquées pour des
utilisateurs mesurant jusqu’à 190 cm.
Pour des tailles supérieures, il est
conseillé ce qui suit pour la
dimension D;
Dimension D = longueur du corps -
171,5 cm
Attention:
Gardez un espace libre d’au moins
11 cm sous la Sunshower lorsque
vous l’installez, par exemple,
au-dessus d’un siège.
Montez les étriers et passez aux
étapes suivantes d’installation à
partir de la page 18.
Sunshower Large
Für Benutzer mit einer
Körpergröße von bis zu 190 cm
empfiehlt Sunshower die
angegebenen Abmessungen.
Für größere Körpergrößen wird
Folgendes empfohlen für
Größe D;
Größe D = Körpergröße - 171,5 cm
Achtung:
Halten Sie einen Freiraum von
mindestens 11 cm unter dem
Sunshower ein, wenn Sie ihn z. B.
über einem Sitz montieren.
Montieren Sie die Halterungen und
fahren Sie auf Seite 18 fort für die
nachfolgenden Installationsschritte.
Sunshower Large
Dla użytkowników o wzroście do 190
cm, firma Sunshower zaleca wskaza-
ne rozmiary.
W przypadku wzrostu powyżej tej
wartości dla rozmiaru D
zalecane są następujące
rozmiary;
Rozmiar D = Długość ciała - 171,5 cm
Uwaga:
Zachowaj co najmniej 11 cm wolnej
przestrzeni pod Sunshowerem, gdy
np. instalujesz go nad siedzeniem.
Zamontuj wsporniki i przejdź na
stronę 18, aby zapoznać się z kolejny-
mi etapami montażu.
NL
IT
EN
FR
DE
PL
INSTRUCTIONS
INSTRUCTIONS
ANLEITUNGEN
INSTRUKCJE
INSTRUCTIES
ISTRUZIONI

14
50 mm (hart op hart | center to center | Empfohlene Größe | centro a centro | entraxe | odległość od środka do środka)
65 mm
1200 mm (hart op hart | center to center | Empfohlene Größe | centro a centro | entraxe | odległość od środka do środka)
460 mm (min. 185 mm)
MEDIUM
BEMATING | DIMENSIONS | MAẞEN | DIMENSIONAMENTO | DIMENSIONS | KOJARZENIE

INSTALLATIEHANDLEIDING LARGE, MEDIUM, SMALL I SUNSHOWER ONE - PLUS I P6135 REV D 15
Sunshower Medium
Voor gebruikers met een lengte
tot en met 190 cm adviseert
Sunshower de aangegeven maten.
Voor lengtes daarboven wordt het
volgende geadviseerd voor
maat D;
Maat D = lichaamslengte - 144 cm
Let op:
Houdt minimaal 11 cm vrije ruimte
onder de Sunshower vrij bij
bijvoorbeeld opbouwen boven een
zitvlak.
Monteer de beugels en ga verder
op pagina 18 voor de volgende
stappen van de installatie.
NL
IT
EN
FR
DE
PL
INSTRUCTIONS
INSTRUCTIONS
ANLEITUNGEN
INSTRUKCJE
INSTRUCTIES
ISTRUZIONI
Sunshower Medium
Sunshower raccomanda le misure
indicate per utilizzatori alti fino a
190 cm.
Per altezze superiori, si
raccomanda la seguente misura D;
Misura D = altezza corpo - 144 cm
Attenzione:
Lasciare almeno 11 cm di spazio
libero sotto il spazio libero sotto il
Sunshower quando, ad esempio, lo
si monta sopra un sedile.
Monta le staffe e vai avanti a
pagina 18 per conoscere i
prossimi passaggi
dell’installazione.
Sunshower Medium
For users with a height up to 190
cm, Sunshower recommends the
sizes indicated.
For users who are taller, the
following is recommended for
size D;
Dimension D = body height - 144 cm
Caution:
Keep at least 11 cm of free space
under the Sunshower when, for
example, installing it above a seat.
Mount the brackets and continue on
page 18 with the next steps of the
installation.
Sunshower Medium
Sunshower recommande d’utiliser
les dimensions indiquées pour des
utilisateurs mesurant jusqu’à 190
cm.
Pour des tailles supérieures, il est
conseillé ce qui suit pour la
dimension D;
Dimension D = longueur du corps -
144 cm
Attention:
Gardez un espace libre d’au moins
11 cm sous la Sunshower lorsque
vous l’installez, par exemple,
au-dessus d’un siège.
Montez les étriers et passez aux
étapes suivantes d’installation à
partir de la page 18.
Sunshower Medium
Für Benutzer mit einer
Körpergröße von bis zu 190 cm
empfiehlt Sunshower die
angegebenen Abmessungen.
Für größere Körpergrößen wird
Folgendes empfohlen für
Größe D;
Größe D = Körpergröße - 144 cm
Achtung:
Halten Sie einen Freiraum von
mindestens 11 cm unter dem
Sunshower ein, wenn Sie ihn z. B.
über einem Sitz montieren.
Montieren Sie die Halterungen und
fahren Sie auf Seite 18 fort für die
nachfolgenden Installationsschritte.
Sunshower Medium
Dla użytkowników o wzroście do 190
cm, firma Sunshower zaleca
wskazane rozmiary.
W przypadku wzrostu powyżej tej
wartości dla rozmiaru D
zalecane są następujące
rozmiary;
Rozmiar D = Długość ciała - 144 cm
Uwaga:
Zachowaj co najmniej 11 cm wolnej
przestrzeni pod Sunshowerem, gdy
np. instalujesz go nad siedzeniem.
Zamontuj wsporniki i przejdź na
stronę 18, aby zapoznać się z
kolejnymi etapami montażu.

16
50 mm (hart op hart | center to center | Empfohlene Größe | centro a centro | entraxe | odległość od środka do środka)
65 mm
750 mm (hart op hart | center to center | Empfohlene Größe | centro a centro | entraxe | odległość od środka do środka)
795 mm (min. 185 mm)
SMALL
BEMATING | DIMENSIONS | MAẞEN | DIMENSIONAMENTO | DIMENSIONS | KOJARZENIE

INSTALLATIEHANDLEIDING LARGE, MEDIUM, SMALL I SUNSHOWER ONE - PLUS I P6135 REV D 17
Sunshower Small
Voor gebruikers met een lengte
tot en met 190 cm adviseert
Sunshower de aangegeven maten.
Voor lengtes daarboven wordt het
volgende geadviseerd voor
maat D;
Maat D = lichaamslengte - 110,5 cm
Let op:
Houdt minimaal 11 cm vrije ruimte
onder de Sunshower vrij bij
bijvoorbeeld opbouwen boven een
zitvlak.
Monteer de beugels en ga verder op
pagina 18 voor de volgende stappen
van de installatie.
NL
IT
EN
FR
DE
PL
INSTRUCTIONS
INSTRUCTIONS
ANLEITUNGEN
INSTRUKCJE
INSTRUCTIES
ISTRUZIONI
Sunshower Small
Sunshower raccomanda le misure
indicate per utilizzatori alti fino a
190 cm.
Per altezze superiori, si
raccomanda la seguente misura D;
Misura D = altezza corpo - 110,5 cm
Attenzione:
Lasciare almeno 11 cm di spazio
libero sotto il spazio libero sotto il
Sunshower quando, ad esempio, lo
si monta sopra un sedile.
Monta le staffe e vai avanti a pagina
18 per conoscere i prossimi
passaggi dell’installazione.
Sunshower Small
For users with a height up to 190 cm,
Sunshower recommends the sizes
indicated.
For users who are taller, the
following is recommended for size D;
Dimension D = longueur du corps -
110,5 cm
Caution:
Keep at least 11 cm of free space
under the Sunshower when, for
example, installing it above a seat.
Mount the brackets and continue on
page 18 with the next steps of the
installation.
Sunshower Small
Sunshower recommande d’utiliser
les dimensions indiquées pour des
utilisateurs mesurant jusqu’à 190
cm.
Pour des tailles supérieures, il est
conseillé ce qui suit pour la
dimension D;
Dimension D = longueur du corps -
110,5 cm
Attention:
Gardez un espace libre d’au moins
11 cm sous la Sunshower lorsque
vous l’installez, par exemple,
au-dessus d’un siège.
Montez les étriers et passez aux
étapes suivantes d’installation à
partir de la page 18.
Sunshower Small
Für Benutzer mit einer
Körpergröße von bis zu 190 cm
empfiehlt Sunshower die
angegebenen Abmessungen.
Für größere Körpergrößen wird
Folgendes empfohlen für
Größe D;
Größe D = Körpergröße - 110,5 cm
Achtung:
Halten Sie einen Freiraum von
mindestens 11 cm unter dem
Sunshower ein, wenn Sie ihn z. B.
über einem Sitz montieren.
Montieren Sie die Halterungen und
fahren Sie auf Seite 18 fort für die
nachfolgenden Installationsschritte.
Sunshower Small
Dla użytkowników o wzroście do 190
cm, firma Sunshower zaleca
wskazane rozmiary.
W przypadku wzrostu powyżej tej
wartości dla rozmiaru D
zalecane są następujące
rozmiary;
Rozmiar D = Długość ciała - 110,5 cm
Uwaga:
Zachowaj co najmniej 11 cm wolnej
przestrzeni pod Sunshowerem, gdy
np. instalujesz go nad siedzeniem.
Zamontuj wsporniki i przejdź na
stronę 18, aby zapoznać się z
kolejnymi etapami montażu.

18
ELEKTRA | ELECTRICITY | STROMVERSORGUNG
ÉLECTRICITÉ | ÉLECTRICITÉ | PODŁĄCZENIE ELEKTRYCZNE

INSTALLATIEHANDLEIDING LARGE, MEDIUM, SMALL I SUNSHOWER ONE - PLUS I P6135 REV D 19
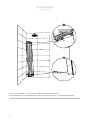
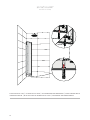
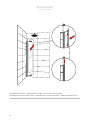
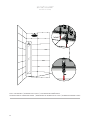
In deze handleiding zijn twee
mogelijkheden voor het
aansluiten van de Sunshower
weergegeven:
De kabel doorvoeren
vanuit de wand waarop de
Sunshower geïnstalleerd
is.
De kabel via een kabelgoot
langs de bovenzijde naar
de Sunshower leiden.
Gebruik in alle gevallen een
kabel van minimaal 3x 1,5mm².
De Sunshower wordt geleverd
met een kabel van 4 meter.
De Sunshower moet worden
aangesloten op een eigen
groep voorzien van een
aardlekschakelaar, met 230V~
50Hz en een 16A zekering.
INSTRUCTIONS
INSTRUCTIONS
ANLEITUNGEN
INSTRUKCJE
INSTRUCTIES
ISTRUZIONI
NL
IT
EN
FR
DE
PL
In questo manuale vengono
riportati due modi per collegare
la Sunshower:
Fai passare il cavo
attraverso il muro dove è
installata la Sunshower.
Conduci il cavo alla
Sunshower tramite una
canalina lungo la parte
superiore.
In tutti i casi, usa un cavo di
almeno 3x 1,5mm². La
Sunshower viene fornita con un
cavo di 4 metri.
La Sunshower deve essere
collegata al proprio gruppo
dotato di dispositivo
differenziale, con 230V~50Hz e
un fusibile da 16A.
Two options for connecting the
Sunshower are shown in this
manual:
Feeding the cable through
from the wall where the
Sunshower is installed.
Route the cable to the
Sunshower via a cable
tray from the top.
Provide a YMVK-cable of at least
3x 1,5mm².
The Sunshower comes with a
4 metre cable.
The Sunshower must be
connected to its own group with
a residual-current circuit breaker
(RCCB), with 230V~50Hz and a
16A fuse.
Ce manuel présente deux
manières différentes de raccorder
la Sunshower.
En faisant passer le câble
par la paroi dans laquelle
est installée la Sunshower.
En faisant passer le câble
par une goulotte le long
de la partie supérieure de la
Sunshower.
Utilisez dans tous les cas un câble
d’au moins 3x 1,5 mm².
La Sunshower est livrée avec un
câble de 4 mètres.
La Sunshower doit être reliée à
un groupe séparé comportant un
disjoncteur différentiel, avec une
tension 230V~50Hz et un fusible
de 16A.
In dieser Anleitung werden zwei
Anschlussmöglichkeiten für den
Sunshower beschrieben:
Führen Sie das Kabel
durch die Wand, an der
der Sunshower installiert ist.
Führen Sie das Kabel über
einen Kabelkanal entlang
der Oberseite zum Sunshower.
Verwenden Sie in jedem Fall ein
NYM-J Kabel von mindestens
3 x 1,5 mm². Im Lieferumfang von
Sunshower ist ein 4 Meter langes
Kabel inbegriffen.
Der Sunshower muss an eine eigene
Gruppe mit einem
FI-Schutzschalter, 230V~50Hz und
einer 16A-Sicherung angeschlossen
werden.
W niniejszej instrukcji
przedstawiono dwa sposoby
podłączenia the Sunshower:
Poprowadź kabel przez
ścianę, na której zainstalo
wany jest Sunshower.
Poprowadź kabel do
Sunshower przez kanał
kablowy wzdłuż górnej
części.
We wszystkich przypadkach należy
używać kabla o przekroju co
najmniej 3x 1,5 mm². Sunshower jest
dostarczany z 4-metrowym kablem.
The Sunshower należy podłączyć
do własnej grupy z wyłącznikiem
różnicowoprądowym, zasilanej
napięciem 230V~50Hz i wyposażonej
w bezpiecznik 16A.

20
>240 mm
>800 mm
109 mm
9 mm
ELEKTRA | ELECTRICITY | STROMVERSORGUNG
ÉLECTRICITÉ | ÉLECTRICITÉ | PODŁĄCZENIE ELEKTRYCZNE

INSTALLATIEHANDLEIDING LARGE, MEDIUM, SMALL I SUNSHOWER ONE - PLUS I P6135 REV D 21
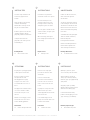
Voer de YMVK-kabel op de
juiste hoogte door de muur en
dicht het gat in de wand af met
siliconenkit.
De aangegeven snoerlengte
en hoogte is geschikt voor alle
Sunshower modellen.
Ga verder op pagina 22 voor
de volgende stappen van de
installatie.
Alle elektrische werkzaamheden
moeten worden uitgevoerd door
een erkend elektricien in
overeenstemming met de
geldende richtlijnen (Hd 60364-
7-701 e.D.) en de nationale
voorschriften (bv. voor
Nederland nen 1010 - 701). Er
moet een aparte
stroomaansluiting met
aardlekschakelaar worden
voorzien.
Fai passare il cavo YMVK attra-
verso il muro all’altezza corretta
e sigilla il foro nel muro con del
sigillante siliconico.
La lunghezza del cavo e l’altezza
indicate sono adatte a tutti i
modelli di Sunshower.
Prosegui a pagina 22 per
conoscere i prossimi passaggi
dell’installazione.
Tutte le operazioni elettriche
devono essere eseguite da un
elettricista qualificato ai sensi
delle direttive applicabili (Hd
60364-7-701 ecc.) e dei
regolamenti nazionali.
È necessario provvedere a una
connessione elettrica separata.
Feed the YMVK-cable through
the wall at the correct height
and seal the hole in the wall with
sealant.
The indicated cord length and
height is suitable for all
Sunshower models.
Continue on page 22 for the next
steps of the installation.
All electrical work must be
carried out by a certified
electrician in accordance with
the applicable guidelines (Hd
60364-7-701 e.D.) and national
regulations. A separate power
connection must be provided.
Faites passer le câble YMVK à
travers le mur à la bonne
hauteur et comblez le trou dans
la paroi à l’aide de joint silicone.
La longueur du câble et la
hauteur indiquées conviennent à
tous les modèles de Sunshower.
Passez ensuite à la page 22
pour les étapes suivantes de
l’installation.
Tous les travaux électriques
doivent être réalisés par un
électricien agréé conformément
aux directives en vigueur (Hd
60364-7-701 e.D.) et aux
prescriptions nationales.
L’alimentation électrique doit
être séparée.
Führen Sie das NYM-J Kabel auf
der richtigen Höhe durch die
Wand und dichten Sie das Loch
in der Wand mit
Silikondichtmasse ab.
Die angegebene Kabellänge
und -höhe sind für alle
Sunshower-Modelle geeignet.
Fahren Sie auf Seite 22 fort für
die nachfolgenden
Installationsschritte.
Alle elektrischen Arbeiten
müssen von einer ausgebildeten
Elektrofachkraft in Überein-
stimmung mit den geltenden
Richtlinien (Hd 60364-7-701 e.D.)
und den nationalen Vorschriften
ausgeführt werden. Es muss
ein separater Stromanschluss
angelegt werden.
Przeprowadź kabel YMVK przez
ścianę na odpowiedniej
wysokości i uszczelnij otwór w
ścianie za pomocą szczeliwa
silikonowego.
Podana długość kabla i wysokość
są odpowiednie dla wszystkich
modeli marki Sunshower.
Na stronie 22 znajdują się kolejne
etapy montażu.
Wszystkie prace elektryczne
muszą być wykonywane przez
wykwalifikowanego elektryka
zgodnie z obowiązującymi
dyrektywami (Hd 60364-7-701
itd.) i przepisami krajowymi.
Należy zapewnić oddzielne
przyłącze zasilania.
INSTRUCTIONS
INSTRUCTIONS
ANLEITUNGEN
INSTRUKCJE
INSTRUCTIES
ISTRUZIONI
NL
IT
EN
FR
DE
PL

22
220 mm
109 mm
9 mm
ELEKTRA | ELECTRICITY | STROMVERSORGUNG
ÉLECTRICITÉ | ÉLECTRICITÉ | PODŁĄCZENIE ELEKTRYCZNE

INSTALLATIEHANDLEIDING LARGE, MEDIUM, SMALL I SUNSHOWER ONE - PLUS I P6135 REV D 23
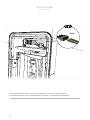
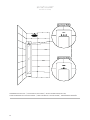
Laat de kabel circa 20 cm onder
de bovenste wandbeugel
uitkomen.
Sluit na het installeren van de
behuizing de kabelgoot zo dicht
mogelijk aan op de behuizing
voor een mooie afwerking.
Ga verder op pagina 22 voor
de volgende stappen van de
installatie.
Benodigdheden:
1x Elektrakabel
Alle elektrische werkzaamheden
moeten worden uitgevoerd door
een erkend elektricien in
overeenstemming met de
geldende richtlijnen (Hd 60364-
7-701 e.D.) en de nationale
voorschriften (bv. voor
Nederland nen 1010 - 701).
Er moet een aparte
stroomaansluiting met
aardlekschakelaar worden
voorzien.
Lascia che il cavo passi a circa 20 cm
sotto la staffa a parete superiore.
Dopo l’installazione dell’alloggiamento,
collega la canalina il più vicino possi-
bile all’alloggiamento per una finitura
accurata.
Prosegui a pagina 22 per conoscere i
prossimi passaggi dell’installazione.
Attrezzatura
1x Cavo elettrico
Tutte le operazioni elettriche devono
essere eseguite da un elettricista
qualificato ai sensi delle direttive ap-
plicabili (Hd 60364-7-701 ecc.) e dei
regolamenti nazionali.
È necessario provvedere a una
connessione elettrica separata.
Allow the cable to extend
approximately 20 cm below the
top wall bracket.
After installing the housing,
mount the cable tray as close
to the housing as possible, this
gives the best result.
Continue on page 22 for the next
steps of the installation.
Required tools
1x Electrical cable
All electrical work must be
carried out by a certified
electrician in accordance with
the applicable guidelines (Hd
60364-7-701 e.D.) and national
regulations. A separate power
connection must be provided.
Faites dépasser le câble d’environ
20 cm en dessous de l’étrier mural
supérieur.
Lorsque le boîtier est installé,
raccordez la goulotte aussi près que
possible du boîtier pour soigner la
finition.
Passez ensuite à la page 22 pour les
étapes suivantes de l’installation.
Fournitures
1x Câble électrique
Tous les travaux électriques
doivent être réalisés par un
électricien agréé conformément aux
directives en vigueur (Hd 60364-
7-701 e.D.) et aux prescriptions
nationales. L’alimentation électrique
doit être séparée.
Lassen Sie das Kabel etwa 20 cm
unter der oberen Wandhalterung
herausragen.
Führen Sie den Kabelkanal nach
Montage des Gehäuses so nah wie
möglich am Gehäuse entlang, um
einen ordentlichen Abschluss
zu erzielen.
Fahren Sie auf Seite 22 fort für
die nachfolgenden Installationsschritte.
Benötigte Materialien
1x Stromkabel
Alle elektrischen Arbeiten müssen von
einer ausgebildeten
Elektrofachkraft in Übereinstimmung mit
den geltenden Richtlinien (Hd 60364-7-
701 e.D.) und den nationalen Vorschriften
ausgeführt werden. Es muss ein
separater Stromanschluss angelegt
werden.
Przewód powinien wystawać
około 20 cm poniżej górnego
uchwytu ściennego.
Po zainstalowaniu obudowy
połącz kanał kablowy z obudową
tak blisko, jak to możliwe, aby
uzyskać estetyczne wykończenie.
Na stronie 22 znajdują się kolejne
etapy montażu.
Materiały eksploatacyjne
1x Kabel elektryczny
Wszystkie prace elektryczne
muszą być wykonywane przez
wykwalifikowanego elektryka
zgodnie z obowiązującymi
dyrektywami (Hd 60364-7-701
itd.) i przepisami krajowymi.
Należy zapewnić oddzielne
przyłącze zasilania.
INSTRUCTIONS
INSTRUCTIONS
ANLEITUNGEN
INSTRUKCJE
INSTRUCTIES
ISTRUZIONI
NL
IT
EN
FR
DE
PL

24
BEHUIZING VOORBEREIDEN | PREPARING THE HOUSING | ECKHALTERUNG VORBEREITEN
PREPARAZIONE STAFFA D’ANGOLO | PRÉPARATION ÉTRIER D’ANGLE | PRZYGOTOWANIE WSPORNIK NAROŻNY

INSTALLATIEHANDLEIDING LARGE, MEDIUM, SMALL I SUNSHOWER ONE - PLUS I P6135 REV D 25
Breng kit aan op de voorzijde van
de onderste wandbeugel zoals
afgebeeld.
Let op:
Zorg voor een schone en
vetvrije ondergrond voordat de
kit wordt aangebracht. Gebruik
hiervoor het meegeleverde
ontvet doekje.
Benodigdheden:
1x Ontvet doekje
1x Montagekit
Applica il sigillante alla parte
anteriore della staffa a parete
inferiore come illustrato.
Attenzione:
Assicurati che la superficie
sia pulita e sgrassata prima di
applicare il sigillante. A tal fine,
utilizza il panno sgrassante in
dotazione.
Attrezzatura
1x Panno per sgrassare
1x Sigillante di montaggio
Apply sealant to the front of the
bottom wall bracket according to
the drawing.
Caution:
Ensure the surface is clean and
free of grease before applying
the sealant. Use the included
degreasing cloth for this
purpose.
Required tools
1x Degreasing cloth
1x Caulk
Appliquez du joint d’étanchéité
sur l’étrier mural inférieur com-
me indiqué dans l’illustration.
Attention:
Veillez à ce que la surface soit
propre et sans graisse avant
d’appliquer le joint. Utilisez pour
cela le chiffon dégraissant fourni.
Fournitures
1x Chiffon de dégraissage
1x Joint d’étanchéité
Tragen Sie Dichtungsmasse
auf die Vorderseite der unteren
Wandhalterung auf, wie
abgebildet.
Achtung:
Achten Sie darauf, dass die
Oberfläche sauber und fettfrei
ist, bevor Sie die
Installationskit auftragen.
Verwenden Sie dazu das
mitgelieferte Entfettungstuch.
Benötigte Materialien
1x Entfettungstuch
1x Installationskit
Nałóż masę uszczelniającą na
przednią część dolnego
wspornika ściennego, jak
pokazano na rysunku.
Uwaga:
Przed nałożeniem masy
uszczelniającej należy upewnić
się, że powierzchnia jest czysta i
odtłuszczona. Do tego celu należy
użyć załączonej ściereczki do
odtłuszczania.
Materiały eksploatacyjne
1x Ściereczka do odtłuszczania
1x Uszczelniacz
INSTRUCTIONS
INSTRUCTIONS
ANLEITUNGEN
INSTRUKCJE
INSTRUCTIES
ISTRUZIONI
NL
IT
EN
FR
DE
PL

26
UITPAKKEN | UNPACK | AUSPACKEN | DISIMBALLAGGIO | DÉBALLAGE | ROZPAKOWANIE

INSTALLATIEHANDLEIDING LARGE, MEDIUM, SMALL I SUNSHOWER ONE - PLUS I P6135 REV D 27
Verwijder de onderste
buffer van de verpakking en
plaats deze op de grond waar
de Sunshower geïnstalleerd zal
worden.
Benodigdheden
1x Behuizing
1x Verpakking buffer
Rimuovi il buffer inferiore
dall’imballaggio e posizionalo nel
luogo in cui verrà installata la
Sunshower.
Attrezzatura
1x Alloggiamento
1x Imballaggio del buffer
Remove the bottom buffer from
the package and place it on the
ground where the Sunshower
will be installed.
Required tools
1x Housing
1x Packaging buffer
Enlevez la protection située dans
la partie basse de l’emballage et
placez-la sur le sol à l’endroit où
la Sunshower va être installée.
Fournitures
1x Boîtier
1x Protection d’emballage
Nehmen Sie den unteren Puffer
aus der Verpackung und setzen
Sie ihn auf den Boden, wo der
Sunshower installiert werden
soll.
Benötigte Materialien
1x Gehäuse
1x Verpackung Puffer
Wyjmij dolny bufor z
opakowania i umieść go na
podłodze, w miejscu, w którym
zostanie zainstalowany
Sunshower.
Materiały eksploatacyjne
1x Opakowanie buforu
1x Obudowa
INSTRUCTIONS
INSTRUCTIONS
ANLEITUNGEN
INSTRUKCJE
INSTRUCTIES
ISTRUZIONI
NL
IT
EN
FR
DE
PL

28
ELEKTRISCHE AANSLUITING | ELECTRICAL CONNECTION | ELEKTRISCHER ANSCHLUSS
COLLEGAMENTO ELETTRICO | RACCORDEMENT ÉLECTRIQUE | PODŁĄCZENIE ELEKTRYCZNE

INSTALLATIEHANDLEIDING LARGE, MEDIUM, SMALL I SUNSHOWER ONE - PLUS I P6135 REV D 29
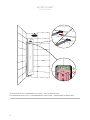
Plaats de behuizing stabiel in de
hoek.
Voer de voorbereidde YMVK-
kabel door de behuizing zoals
afgebeeld en draai de wartel
stevig aan.
Let op:
Zorg dat de buitenhuls van
de kabel compleet door de
behuizing steekt voor een juiste
montage.
Posiziona l’alloggiamento nel-
l’angolo.
Fai passare il cavo YMVK
preparato attraverso l’alloggia-
mento come mostrato e stringi
saldamente il pressacavo.
Attenzione:
Assicurati che il rivestimento
esterno del cavo passi lungo
tutto l’alloggiamento per un
montaggio corretto.
Place the housing in the corner
stably.
Feed the prepared YMVK-cable
through the housing as shown
and tighten the cable gland
firmly.
Caution:
Make sure the outer sleeve of
the cable extends completely
through the housing for proper
mounting.
Placez le boîtier de manière
stable dans le coin.
Passez le câble YMVK préparé à
travers le boîtier comme indiqué
dans l’illustration et serrez le
presse-étoupe fermement.
Attention:
Assurez-vous que la gaine
extérieure du câble traverse
complètement le boîtier pour que
l’installation soit correcte.
Setzen Sie das Gehäuse stabil in
die Eckhalterung.
Führen Sie das vorbereitete
NYM-J Kabel wie abgebildet
durch das Gehäuse und ziehen
Sie den Anschlagwirbel fest an.
Achtung:
Vergewissern Sie sich, dass
der Außenmantel des Kabels
vollständig durch das Gehäuse
geführt ist, um eine
ordnungsgemäße Installation zu
gewährleisten.
Umieścić obudowę bezpiecznie w
narożniku.
Przeprowadź przygotowany
kabel YMVK przez obudowę w
sposób pokazany na rysunku i
mocno dokręć dławik kablowy.
Uwaga:
Aby zapewnić prawidłowy
montaż, należy upewnić się, że
zewnętrzna tuleja kabla
całkowicie wystaje przez
obudowę.
INSTRUCTIONS
INSTRUCTIONS
ANLEITUNGEN
INSTRUKCJE
INSTRUCTIES
ISTRUZIONI
NL
IT
EN
FR
DE
PL

30
*click*
ELEKTRISCHE AANSLUITING | ELECTRICAL CONNECTION | ELEKTRISCHER ANSCHLUSS
COLLEGAMENTO ELETTRICO | RACCORDEMENT ÉLECTRIQUE | PODŁĄCZENIE ELEKTRYCZNE

INSTALLATIEHANDLEIDING LARGE, MEDIUM, SMALL I SUNSHOWER ONE - PLUS I P6135 REV D 31
INSTRUCTIONS
INSTRUCTIONS
ANLEITUNGEN
INSTRUKCJE
INSTRUCTIES
ISTRUZIONI
NL
IT
EN
FR
DE
PL
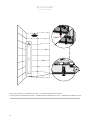
Disconnetti il connettore pre-
montato e collega i cavi come
mostrato.
Spingi i cavi nel connettore
finché non si sente un *click*.
Ricollega il connettore
all’alloggiamento.
Disconnect the pre-mounted
connector and connect the
cables as shown.
There will be an audible *click*
when the cables are pushed far
enough into the connector.
Connect the connector back to
the housing.
Retirez le connecteur pré-mon-
té et reliez les câbles comme
indiqué.
Poussez les fils dans le connec-
teur jusqu’à entendre un *clic*.
Remettez le connecteur en place
dans le boîtier.
Lösen Sie den vormontierten
Steckverbinder und schließen
Sie die Kabel wie abgebildet an.
Schieben Sie die Kabel in den
Steckverbinder, bis ein *Klick*
zu hören ist.
Verbinden Sie den
Steckverbinder wieder mit dem
Gehäuse.
Odłącz zamontowane wcześniej
złącze i podłącz kable zgodnie z
ilustracją.
Wsuń kable do złącza, aż będzie
słychać *kliknięcie*.
Podłącz ponownie złącze do
obudowy.
Haal de voor gemonteerde
connector los en verbind de
kabels zoals afgebeeld.
Duw de kabels in de connector
tot er een *klik* te horen is.
Verbind de connector terug met
de behuizing.

32
PLAATSEN BEHUIZING | PLACING THE HOUSING | GEHÄUSE PLATZIERUNG
POSIZIONAMENTO DELL’ALLOGGIAMENTO | MISE EN PLACE DU BOITIER | UMIESZCZENIE OBUDOWY

INSTALLATIEHANDLEIDING LARGE, MEDIUM, SMALL I SUNSHOWER ONE - PLUS I P6135 REV D 33
INSTRUCTIONS
INSTRUCTIONS
ANLEITUNGEN
INSTRUKCJE
INSTRUCTIES
ISTRUZIONI
NL
IT
EN
FR
DE
PL
Hang de behuizing aan de
bovenste wandbeugel
zoals afgebeeld. Houd de
behuizing hierbij schuin
naar voren zodat deze nog
niet met de kit in contact
komt.
Druk de behuizing tegen
de onderste wandbeugel
via een scharnierende
beweging.
Let op:
Zorg dat de behuizing waterpas
hangt en zorg voor een schone
en vetvrije ondergrond. Gebruik
hiervoor het meegeleverde
ontvet doekje.
Benodigdheden
1x Ontvet doekje
1x Waterpas
Hang the housing on the
top wall bracket as shown.
When doing so, tilt the
enclosure forward so that
it is not yet touching the
kit.
Press the housing against
the lower wall bracket
using a hinged movement.
Caution:
Make sure the housing is level
and ensure the surface is clean
and free of grease. Use the
included degreasing cloth for
this purpose.
Required tools
1x Degreasing cloth
1x Spirit level
Hängen Sie das Gehäuse
wie abgebildet in die obere
Wandhalterung ein. Halten
Sie das Gehäuse dabei
schräg nach vorne ge-
kippt, sodass es noch nicht
mit der Dichtungsmasse in
Berührung kommt.
Drücken Sie das Gehäuse
mit einer Kippbewegung
gegen die untere Wand
halterung.
Achtung:
Vergewissern Sie sich, dass das
Gehäuse eben ist und dass die
Oberfläche sauber und fettfrei
ist. Verwenden Sie dazu das
mitgelieferte Entfettungstuch.
Benötigte Materialien
1x Entfettungstuch
1x Wasserwaage
Appendi l’alloggiamento
sulla staffa a parete supe-
riore come mostrato. Tieni
l’alloggiamento inclinato in
modo che non entri subito
in contatto con il sigillante.
Premi l’alloggiamento
contro la staffa a parete
inferiore con un movimen
to a cerniera.
Attenzione:
Assicuratevi che l’alloggiamento
penda a livello sulla staffa e che
la superficie sia pulita e priva di
grasso. A tal fine, utilizza il panno
sgrassante in dotazione.
Attrezzatura
1x Panno per sgrassare
1x Livellamento
Suspendez le boîtier à
l’étrier mural supérieur
comme indiqué dans
l’illustration. Maintenez le
boîtier vers l’avant à un
angle tel qu’il n’entre pas
encore en contact avec le
produit d’étanchéité.
Appuyez le boîtier contre
l’étrier mural inférieur par
un mouvement pivotant.
Attention:
Assurez-vous que le boîtier est
de niveau et que la surface est
propre et exempte de graisse.
Utilisez pour cela le chiffon
dégraissant fourni.
Fournitures
1x Chiffon de dégraissage
1x Niveau à bulle
Zawieś obudowę na górnym
wsporniku ściennym, jak
pokazano na rysunku.
Przytrzymaj obudowę pod
kątem, tak aby nie stykała się
jeszcze z masą uszczelniającą.
Dociśnij obudowę do
dolnego wspornika ścien
nego, wykonując ruch
obrotowy.
Uwaga:
Upewnij się, że obudowa jest
wypoziomowana, a jej powierzchnia
jest czysta i wolna od tłuszczu. Do
tego celu należy użyć
załączonej ściereczki do
odtłuszczania.
Materiały eksploatacyjne
1x Ściereczka do odtłuszczania
1x Poziomica

34
*click*
PLAATSEN GLAS SLOT | PLACING GLASS LOCK | GLASVERRIEGELUNG ANBRINGEN | INSTALLAZIONE DELLA
SERRATURA VETRO | MISE EN PLACE DU VERROU DE LA VITRE | UMIESZENIE SZKLANEGO ZAMKA

INSTALLATIEHANDLEIDING LARGE, MEDIUM, SMALL I SUNSHOWER ONE - PLUS I P6135 REV D 35
INSTRUCTIONS
INSTRUCTIONS
ANLEITUNGEN
INSTRUKCJE
INSTRUCTIES
ISTRUZIONI
NL
IT
EN
FR
DE
PL
Plaats het glas slot met de hand
in de behuizing zoals afgebeeld.
Er zal een *klik* te horen zijn
wanneer deze ver genoeg in de
behuizing is geplaatst.
Benodigdheden
1x Glas slot
Inserisci la sigillatura del
vetro nell’alloggiamento come
mostrato.
Si sentirà un *clic* quando sarà
inserita abbastanza a fondo
nell’alloggiamento.
Attrezzatura
1x Serratura vetro
Insert the glass lock into the
housing by hand as shown.
There will be an audible *click*
when it is inserted far enough
into the housing.
Required tools
1x Glass lock
Mettez en place le verrou de
la vitre comme indiqué dans
l’illustration.
Vous entendrez un *clic* lorsqu’il
aura été inséré suffisamment
loin dans le boîtier.
Fournitures
1x Verrou de vitre
Setzen Sie die Glasverriegelung
wie abgebildet in das Gehäuse
ein.
Sie werden ein *Klick* hören
wenn sie weit genug in das
Gehäuse eingeführt wurde.
Benötigte Materialien
1x Glasverriegelung
Umieść szklany zamek w obu-
dowie w sposób pokazany na
rysunku.
Po włożeniu go do obudowy
usłyszysz *kliknięcie*.
Materiały eksploatacyjne
1x Zamek szklany

36
AANSLUITEN DISPLAY | MOUNTING GLASS CABLE | DISPLAY ANSCHLIEẞEN
COLLEGAMENTO DEL DISPLAY | RACCORDEMENT DE L’AFFICHAGE | PODŁĄCZENIE WYŚWIETLACZA

INSTALLATIEHANDLEIDING LARGE, MEDIUM, SMALL I SUNSHOWER ONE - PLUS I P6135 REV D 37
INSTRUCTIONS
INSTRUCTIONS
ANLEITUNGEN
INSTRUKCJE
INSTRUCTIES
ISTRUZIONI
NL
IT
EN
FR
DE
PL
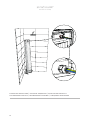
Sluit de display-kabel van de
behuizing aan op de connector
van de glasplaat. De connector is
te vinden op de achterzijde van
de glasplaat ter hoogte van de
display.
Let op:
Zorg dat de kabel in de
bovenzijde van de behuizing
valt tijdens het monteren van de
glasplaat.
Benodigdheden
1x Glasplaat
Collega il cavo del display
dell’alloggiamento al connettore
della lastra di vetro. Il connettore
si trova sul retro della lastra di
vetro all’altezza del display.
Attenzione:
Assicurati che il cavo rientri
nella parte superiore
dell’alloggiamento al momento
di montare la piastra di vetro.
Attrezzatura
1x Lastra di vetro
Connect the housing display
cable to the glass pane
connector. The connector is
located on the back of the glass
pane at the level of the display.
Caution:
Make sure the cable sits in the
top of the housing while
mounting the glass pane.
Required tools
1x Glass pane
Raccordez le câble de l’afficheur
du boîtier au connecteur de la
plaque en verre. Le connecteur se
trouve à l’arrière de la plaque en
verre à la hauteur de l’afficheur.
Attention:
Veillez à ce que le câble tombe
dans la partie supérieure du
boîtier pendant le montage de la
plaque en verre.
Fournitures
1x Plaque en verre
Schließen Sie das Displaykabel
des Gehäuses an den
Steckverbinder der Glasplatte
an. Der Steckverbinder befindet
sich auf der Rückseite der Glas-
platte auf der Höhe des Displays.
Achtung:
Achten Sie bei der Montage der
Glasplatte darauf, dass das Kabel
oben in das Gehäuse hineinfällt.
Benötigte Materialien
1x Glasplatte
Podłącz kabel wyświetlacza z
obudowy do złącza na szklanej
płycie. Złącze znajduje się z tyłu
szklanej płyty, na wysokości
wyświetlacza.
Uwaga:
Podczas montażu płytki szklanej
płyty należy upewnić się, że
kabel wpada do górnej części
obudowy.
Materiały eksploatacyjne
1x Płyta szklana

38
MONTEREN GLASPLAAT | MOUNTING GLASS PANE | GLASPLATTE INSTALLIEREN
MONTAGGIO DELLA PIASTRA DI VETRO | MONTAGE DE LA PLAQUE EN VERRE | MONTAŻ SZKLANEJ PŁYTY

INSTALLATIEHANDLEIDING LARGE, MEDIUM, SMALL I SUNSHOWER ONE - PLUS I P6135 REV D 39
INSTRUCTIONS
INSTRUCTIONS
ANLEITUNGEN
INSTRUKCJE
INSTRUCTIES
ISTRUZIONI
NL
IT
EN
FR
DE
PL
Plaats de glasplaat met
een 35 graden hoek naar
beneden in de behuizing
zoals afgebeeld.
Duw de glasplaat
vervolgens recht naar
beneden tot deze niet
meer verder kan.
Let op:
Zorg dat deze stap zorgvuldig
wordt uitgevoerd, een correcte
plaatsing is nodig voor de
waterdichtheid van de
Sunshower.
Benodigdheden
1x Glasplaat
Place the glass pane
with a 35 degree angle
downwards into the
housing as shown.
Then push the glass pane
straight down until it
cannot be moved any
further.
Caution:
Make sure this step is done with
precision. Proper placement is
necessary for the Sunshower to
be watertight.
Required tools
1x Glass pane
Setzen Sie die Glasplatte
wie abgebildet in einem
Winkel von 35 Grad in das
Gehäuse ein.
Drücken Sie dann die
Glasplatte gerade nach
unten, bis sie sich nicht
weiter bewegen lässt.
Achtung:
Führen Sie diesen Schritt
sorgfältig aus, da die korrekte
Positionierung erforderlich ist,
um die Wasserdichtigkeit von
Sunshower zu gewährleisten.
Benötigte Materialien
1x Glasplatte
Posiziona la lastra di vetro
nell’alloggiamento con un
angolo di 35 gradi verso il
basso come mostrato.
Poi spingi la lastra di vetro
verso il basso finché non
può essere spostata ulteri
ormente.
Attenzione:
Assicurati di eseguire questo
passaggio con attenzione, poiché
un posizionamento corretto è
necessario per garantire la
tenuta stagna della Sunshower.
Attrezzatura
1x Lastra di vetro
Placez la plaque en verre
avec un angle de 35
degrés vers le bas dans
le boîtier, comme indiqué
dans l’illustration.
Poussez ensuite la plaque
en verre droite vers le
bas jusqu’à ce qu’elle ne
puisse pas aller plus loin.
Attention:
Effectuez cette étape avec soin,
un bon placement est nécessaire
pour assurer l’étanchéité de la
Sunshower.
Fournitures
1x Plaque en verre
Umieść szklaną płytę w
obudowie pod kątem 35
stopni w dół, jak pokazano
na rysunku.
Następnie popchnij płytkę
szklaną prosto w dół, do
momentu aż nie będzie
można jej dalej przesuwać.
Uwaga:
Upewnij się, że ta czynność
została wykonana starannie,
ponieważ prawidłowe
umieszczenie jest niezbędne do
zapewnienia wodoszczelności
Sunshower.
Materiały eksploatacyjne
1x Płyta szklana

40
*click*
GLAS SLOT SLUITEN | CLOSING GLASS LOCK | GLASVERRIEGELUNG SCHLIEẞEN
CHIUSURA DELLA SERRATURA VETRO | FERMETURE DU VERROU DE LA VITRE | ZAMKCIĘCIE BLOKADY SZYBY

INSTALLATIEHANDLEIDING LARGE, MEDIUM, SMALL I SUNSHOWER ONE - PLUS I P6135 REV D 41
INSTRUCTIONS
INSTRUCTIONS
ANLEITUNGEN
INSTRUKCJE
INSTRUCTIES
ISTRUZIONI
NL
IT
EN
FR
DE
PL
Duw het glas slot met de hand
omhoog totdat deze niet meer
zichtbaar is.
Er zal een *klik* te horen zijn
wanneer deze ver genoeg in de
behuizing is geduwd.
De glasplaat is nu vergrendeld
met de Sunshower.
Let op:
Laat de kit 24 uur drogen
alvorens gebruik te maken van
de douche.
Spingi la serratura del vetro
verso l’alto con la mano fino a
quando non è più visibile.
Si sentirà un *clic* quando sarà
inserita abbastanza a fondo
nell’alloggiamento.
La lastra di vetro è ora fissata
alla Sunshower.
Attenzione:
Lascia asciugare il sigillante
per 24 ore prima di utilizzare la
doccia.
Push the glass lock up by hand
untill it is no longer visible.
There will be an audible *click*
when it is pushed far enough into
the housing.
The glass pane is now locked
with the Sunshower.
Caution:
Allow the sealant to dry for 24
hours before using the shower.
Poussez le verrou de la vitre
vers le haut avec la main jusqu’à
ce que celui-ci ne soit plus
visible.
Vous entendrez un *clic*
lorsqu’il aura été placé
suffisamment loin dans le boîtier.
La plaque en verre est main-
tenant verrouillée avec la
Sunshower.
Attention:
Laissez sécher le joint pendant
24 heures avant d’utiliser la
douche.
Drücken Sie die
Glasverriegelung mit der Hand
nach oben, bis sie nicht mehr zu
sehen ist.
Ein *Klick* ist zu hören, wenn
sie weit genug in das Gehäuse
geschoben wurde.
Die Glasplatte ist nun mit dem
Sunshower verriegelt.
Achtung:
Lassen Sie die Dichtungsmasse
24 Stunden lang trocknen vor
Gebrauch der Dusche.
Przesuń ręcznie blokadę szyby
do góry, aż przestanie być
widoczna.
Po wciśnięciu jej dostatecznie
głęboko w obudowę usłyszysz
*kliknięcie*.
Szklana płyta jest teraz
zablokowana w the Sunshower.
Uwaga:
Pozostaw masę uszczelniającą
do wyschnięcia na 24 godziny
przed rozpoczęciem korzystania
z prysznica.

42
*click*
GLAS SLOT OPENEN | OPENING GLASS LOCK | GLASVERRIEGELUNG ÖFFNEN
APERTURA DELLA SERRATURA VETRO | OUVERTURE DU VERROU DE LA VITRE | OTWARCIE BLOKADY SZYBY

INSTALLATIEHANDLEIDING LARGE, MEDIUM, SMALL I SUNSHOWER ONE - PLUS I P6135 REV D 43
INSTRUCTIONS
INSTRUCTIONS
ANLEITUNGEN
INSTRUKCJE
INSTRUCTIES
ISTRUZIONI
NL
IT
EN
FR
DE
PL
Voer deze stap uit wanneer de
Sunshower geopend moet
worden.
Plaats de inbus in de opening
onderaan de behuizing.
Duw de inbus omhoog en trek
het glas slot naar beneden.
Zodra het glas slot met de tekst
“OPEN” zichtbaar is kan de
glasplaat gedemonteerd worden.
Til bij het demonteren de
glasplaat recht omhoog en van
de behuizing af.
Benodigdheden
1x Inbus sleutel 4 mm
Esegui questo passaggio quando
si deve aprire la Sunshower.
Inserisci l’esagono incassato
nell’apertura sul fondo
dell’alloggiamento. Spingi
l’esagono verso l’alto e tira
la serratura del vetro verso il
basso.
Non appena la serratura di vetro
con il testo “OPEN” è visibile,
la lastra di vetro può essere
rimossa.
Durante lo smontaggio, solleva
la lastra di vetro verso l’alto e
lontano dall’alloggiamento.
Attrezzatura
1x Chiave a brugola da 4 mm
Perform this step when the
Sunshower needs to be opened.
Insert the hex key into the
opening at the bottom of the
housing. Push the hex key up
and pull the glass lock down.
Once the glass lock with the text
“OPEN” is visible, the glass pane
can be removed.
When removing, lift the glass
pane straight up and away from
the housing
Required tools
1x Hex key 4 mm
Effectuez cette étape pour
procéder à l’ouverture de la
Sunshower.
Placez la clé Allen dans
l’ouverture en bas du boîtier.
Poussez la clé vers le haut et
tirez le verrou de la vitre vers
le bas.
La plaque en verre pourra être
démontée dès que le texte
“OPEN” apparaîtra au niveau du
verrou de la vitre.
Lors du démontage, tirez la
plaque en verre bien droite vers
le haut hors du boîtier.
Fournitures
1x Clé Allen de 4 mm
Führen Sie diesen Schritt aus,
wenn Sunshower geöffnet
werden muss.
Stecken Sie den Inbusschlüssel
in die Öffnung an der Unterseite
des Gehäuses. Drücken Sie den
Inbusschlüssel nach oben und
ziehen Sie die Glasverriegelung
nach unten.
Sobald die Glasverriegelung mit
dem Text “OPEN“ sichtbar ist,
kann die Glasplatte
herausgenommen werden.
Heben Sie die Glasplatte beim
Herausnehmen gerade nach
oben und weg vom Gehäuse.
Benötigte Materialien
1x Sechskantschlüsse 4 mm
Wykonaj tę czynność, jeżeli
chcesz otworzyć the Sunshower.
Umieść imbus w otworze w
dolnej części obudowy. Wciśnij
imbus do góry i pociągnij blokadę
szyby w dół.
Gdy tylko pojawi się szklany
zamek z napisem “OPEN”, można
zdemontować szklaną płytę.
Podczas demontażu należy
podnieść szklaną płytę prosto do
góry i odsunąć ją od obudowy.
Materiały eksploatacyjne
1x Klucz imbusowy 4 mm

44
AFRONDEN INSTALLATIE | FINISHING INSTALLATION | INSTALLATION FERTIGSTELLEN
COMPLETAMENTO DELL’INSTALLAZIONE | FINALISATION DE L’INSTALLATION | ZAKOŃCZENIE MONTAŻU

INSTALLATIEHANDLEIDING LARGE, MEDIUM, SMALL I SUNSHOWER ONE - PLUS I P6135 REV D 45
INSTRUCTIONS
INSTRUCTIONS
ANLEITUNGEN
INSTRUKCJE
INSTRUCTIES
ISTRUZIONI
NL
IT
EN
FR
DE
PL
Schakel de groep of
aardlekschakelaar in.
De aan/uitknop op de
Sunshower zal knipperen (raak tijdens
het knipperen de aan/uitknop niet aan,
de Sunshower is aan het kalibreren).
Indien de aan/uitknop niet
knippert, controleer dan of de
connector goed is gemonteerd.
Wanneer de aan/uitknop stopt met
knipperen is de Sunshower klaar voor
gebruik.
Sunshower ONE en PLUS:
Controleer of de IR lampen
werken: druk eenmaal op de linker
toets, de infrarood lampen gaan
branden. Druk eenmaal op de middelste
toets en de
Sunshower zal gaan nakoelen.
Sunshower PLUS:
Controleer of de UV lampen
werken: zet een UV bril op en
druk eenmaal op de rechter toets. De
UV lampen starten op. Druk eenmaal op
de middelste toets en de Sunshower zal
gaan nakoelen.
De Sunshower is gereed voor
gebruik!
Accendi il gruppo o l’interruttore
differenziale.
Il pulsante on/off sulla Sunshower
lampeggerà (non toccare il pulsante on/
off mentre lampeggia, la Sunshower si
sta calibrando).
Se il pulsante on/off non lampeggia,
controlla che il connettore sia montato
correttamente.
Quando il pulsante on/off smette di
lampeggiare, la Sunshower è pronta
per l’uso.
Sunshower ONE e PLUS:
Controlla che le lampade IR funzionino:
premi una volta il pulsante sinistro, le
lampade IR si accenderanno. Premi il
pulsante centrale una volta e la
Sunshower inizierà a raffreddarsi.
Sunshower PLUS:
Controlla che le lampade UV funzionino:
indossa gli occhiali UV e premi una
volta il pulsante destro. Le lampade UV
si avviano. Premi il pulsante centrale
una volta e la Sunshower inizierà a
raffreddarsi.
La Sunshower è pronta per l’uso!
Switch on the electrical group or
residual-current circuit breaker.
The power button on the Sunshower
will flash (do not touch the power button
while flashing, the Sunshower is now
calibrating).
If the power button does not flash, check
if the connector is properly mounted.
When the on/off button stops flashing,
the Sunshower is ready for use.
Sunshower ONE and PLUS:
Check if the infrared lamps are working:
press the left button once, the IR lights
will light up. Press the middle button
once and the Sunshower will start to
cool down.
Sunshower PLUS:
Check if the UV lamps are working:
put on UV goggles and press the right
button once. The UV lamps start up.
Press the middle button once and the
Sunshower will start to cool down.
The Sunshower is ready for use!
Mettez le groupe ou le disjoncteur
différentiel sous tension.
Le bouton marche/arrêt de la
Sunshower va clignoter (ne touchez
pas le bouton marche/arrêt pendant
qu’il clignote, l’échantillonnage de la
Sunshower est en cours).
Si le bouton marche/arrêt ne clignote
pas, vérifiez si le connecteur est
correctement monté.
Lorsque le bouton marche/arrêt arrête
de clignoter, la Sunshower est prête à
être utilisée.
Sunshower ONE et PLUS:
Vérifiez si les lampes IR fonctionnent:
appuyez une fois sur le bouton de
gauche, les lampes infrarouge
s’allument. Appuyez une fois sur le
bouton du milieu et la Sunshower
passera en mode refroidissement.
Sunshower PLUS:
Vérifiez si les lampes UV fonctionnent:
mettez des lunettes UV et appuyez une
fois sur le bouton de droite. Les lampes
UV s’allument. Appuyez une fois sur
le bouton du milieu et la Sunshower
passera en mode refroidissement.
La Sunshower est prête à être utilisée.
Schalten Sie den Gruppen- oder
FI-Schutzschalter ein.
Der Ein-/Aus-Schalter des Sunshowers
blinkt (Ein-/Aus-Schalter während des
Blinkens nicht berühren, der Sunshower
wird kalibriert).
Wenn der Ein-/Aus-Schalter nicht blinkt,
überprüfen Sie, ob der Steckverbinder
richtig angeschlossen ist.
Wenn der Ein/Aus-Schalter aufgehört
hat zu blinken, ist der Sunshower
einsatzbereit.
Sunshower ONE und PLUS:
Prüfen Sie, ob die IR-Lampen funktio-
nieren: Drücken Sie dazu einmal auf die
linke Taste und die IR-Lampen beginnen
zu leuchten. Drücken Sie einmal auf
die mittlere Taste und der Sunshower
beginnt mit Nachkühlen.
Sunshower PLUS:
Prüfen Sie, ob die UV-Lampen funktio-
nieren: Setzen Sie die UV-Brille auf und
drücken Sie einmal die rechte Taste. Die
UV-Lampen starten. Drücken Sie einmal
auf die mittlere Taste und der
Sunshower beginnt mit Nachkühlen.
Der Sunshower ist einsatzbereit!
Włącz grupę lub przełącznik
różnicowoprądowy.
Przycisk włączania/wyłączania na
Sunshower będzie migać (nie dotykaj
przycisku włączania/wyłączania, gdy
miga, ponieważ Sunshower jest w
procesie kalibracji).
Jeżeli przycisk włączania/wyłączania
nie miga, sprawdź, czy złącze jest
prawidłowo zainstalowane.
Gdy przycisk włączania/wyłączania
przestanie migać, Sunshower jest
gotowy do użycia.
Sunshower ONE et PLUS:
Sprawdź, czy działają lampy podc-
zerwieni: naciśnij raz lewy przycisk,
a lampy podczerwieni powinny się
zaświecić. Naciśnij jeden raz środkowy
przycisk, a Sunshower powinien zacząć
się schładzać.
Sunshower PLUS:
Sprawdź, czy lampy UV działają: załóż
okulary UV i naciśnij jeden raz prawy
przycisk. Lampy UV zostają
uruchomione. Naciśnij jeden
razśrodkowy przycisk, a Sunshower
powinien zacząć się schładzać.
Sunshower jest gotowy do użytku!

46

INSTALLATIEHANDLEIDING LARGE, MEDIUM, SMALL I SUNSHOWER ONE - PLUS I P6135 REV D 47
INSTRUCTIONS
INSTRUCTIONS
ANLEITUNGEN
INSTRUKCJE
INSTRUCTIES
ISTRUZIONI
NL
IT
EN
FR
DE
PL
U bevindt zich aan het eind van
de instructies.
Sei giunto alla fine delle
istruzioni.
You are at the end of the
instructions.
Vous êtes à la fin des
instructions.
Sie sind nun am Ende der
Installationsanleitung angelangt.
Jesteś na końcu instrukcji.

Sunshower®
Hoogoorddreef 63-65, 1101 BB Amsterdam, Nederland
T 0031 (0)20 462 14 60, info@sunshower.nl, www.sunshower.nl
-
 1
1
-
 2
2
-
 3
3
-
 4
4
-
 5
5
-
 6
6
-
 7
7
-
 8
8
-
 9
9
-
 10
10
-
 11
11
-
 12
12
-
 13
13
-
 14
14
-
 15
15
-
 16
16
-
 17
17
-
 18
18
-
 19
19
-
 20
20
-
 21
21
-
 22
22
-
 23
23
-
 24
24
-
 25
25
-
 26
26
-
 27
27
-
 28
28
-
 29
29
-
 30
30
-
 31
31
-
 32
32
-
 33
33
-
 34
34
-
 35
35
-
 36
36
-
 37
37
-
 38
38
-
 39
39
-
 40
40
-
 41
41
-
 42
42
-
 43
43
-
 44
44
-
 45
45
-
 46
46
-
 47
47
-
 48
48


SunShower SS_202980_202983_202995 Installatie gids
- Type
- Installatie gids
in andere talen
Gerelateerde papieren

Andere documenten
-
 Micro Explorer S Handleiding
-
MasterChef 670810 Handleiding
-
Güde GP 1100.1 Handleiding
-
MasterChef AMZ919101880 Handleiding
-
MasterChef 670817 Handleiding
-
 Micro Mobility Micro Merlin frein tambour Handleiding
-
MasterChef AMZ919101839 Handleiding
-
Parkside PAS 3.6 A1 Operation and Safety Notes
-
Far Tools 112031 Original Manual Translation

