
P/No. : .'-
MH6589DR
MH6589DRS
MH6589DRB
www.lg.com
OWNER'S MANUAL
MICROWAVE OVEN
PLEASE READ THIS OWNER’S MANUAL THOROUGHLY BEFORE OPERATING.
ENGLISH
FRANÇAIS
NEDERLANDS


You cannot operate your oven with the door open due to the safety interlocks
built into the door mechanism. These safety interlocks automatically switch off
any cooking activity when the door is opened; which in the case of a
microwave oven could result in harmful exposure to microwave energy.
It is important not to tamper with the safety interlocks.
Do not place any object between the oven front face and the door or allow
food or cleaner residue to accumulate on sealing surfaces.
Do not operate your oven if it is damaged. It is particularly important that the
oven door closes properly and that there is no damage to the: (1) door(bent),
(2) hinges and latches (broken or loosened), (3) door seals and sealing
surfaces.
Your oven should not be adjusted or repaired by anyone except qualified
service personnel.
Warning
Precautions to avoid possible exposure to excessive microwave energy.
Precautions
When heating liquids, e.g. soups, sauces and beverages in your microwave
oven, delayed eruptive boiling can occur without evidence of bubbling. This
could result in a sudden boil over of the hot liquid. To prevent this possibility
the following steps should be taken:
1 Avoid using straight sided containers with narrow necks.
2 Do not overheat.
3 Stir the liquid before placing the container in the oven and again halfway
through the heating time.
4 After heating, allow to stand in the oven for a short time, stir or shake
them(especially the contents of feeding bottles and baby food jars) again
carefully and check the temperature of them before consumption to avoid
burns (especially, contents of feeding bottles and baby food jars).
Be careful when handling the container.
Warning
Always allow food to stand after being cooked by
microwaves and check the temperature of them
before consumption. Especially contents of feeding
bottles and baby food jars.
Please ensure cooking times are correctly set as
over cooking may result in the FOOD catching fire
and subsequent damage to your oven.
3

How the Microwave Oven Works
Microwaves are a form of energy similar to radio and television waves and
ordinary daylight. Normally, microwaves spread outwards as they travel
through the atmosphere and disappear without effect. Microwave ovens,
however, have a magnetron which is designed to make use of the energy in
microwaves. Electricity, supplied to the magnetron tube, is used to created
microwave energy.
These microwaves enter the cooking area through openings inside the oven.
A turntable or tray is located at the bottom of the oven. Microwaves cannot
pass through metal walls of the oven, but they can penetrate such materials
as glass, porcelain and paper, the materials out of which microwave-safe
cooking dishes are constructed.
Microwaves do not heat cookware, though cooking vessels will eventually get
hot from the heat generated by the food.
A very safe appliance
Contents
Your microwave oven is one of the safest of all home
appliances. When the door is opened, the oven
automatically stops producing microwaves. Microwave
energy is converted completely to heat when it enters
food, leaving no “left over” energy to harm you when
you eat your food.
Precautions
Contents
Unpacking & Installing
Setting the Clock
Child Clock
Micro Power Cooking
Micro Power Level
Two Stage Cooking
Quick Start
Grill Cooking
Combinaion Cooking
Auto Cook
Auto Defrost
Quick Defrost
Crispy Reheat
Defrost & Grill
Taste Saver
Heating or Reheating Guide
Fresh Vegetable Guide
Grill Cooking Guide
Important safety instructions
Microwave - safe Utensils
Food characteristics & Microwave cooking
Questions & Answers
Plug Wiring Information/Technical Specifications
5~ 6
7
8
9
10
11
12
13
14
15 ~ 16
17 ~ 18
19 ~ 20
21 ~ 22
23 ~ 24
25
26
27
28
29 ~ 30
31
32 ~ 33
34
35
4
4
3

Place the oven in the level location of your choice with
more than 85cm height but make sure there is at least
30cm of space on the top and 10cm at the rear for proper
ventilation. The front of the oven should be at least 8cm from the
edge of the surface to prevent tipping.
An exhaust outlet is located on top or side of the oven. Blocking
the outlet can damage the oven.
Unpack your oven and place it on a flat level
surface.
By following the basic steps on these two pages you will be able to quickly check that your oven is operating
correctly. Please pay particular attention to the guidance on where to install your oven. When unpacking your
oven make sure you remove all accessories and packing. Check to make sure that your oven has not been
damaged during delivery.
THIS OVEN SHOULD NOT BE USED FOR COMMERCIAL CATERING
PURPOSES
3
2
1
5
3
2
1
5
3
2
1
5
Unpacking &
Installing
GLASS TRAY
ROTATING RING
HIGH RACK
LOW RACK
5

The DISPLAY will count down from 30 seconds
When it reaches 0, BEEP sounds. Open the
oven door and test the temperature of the water. If your
oven is operating the water should be warm. Be careful
when removing the container it may be hot.
YOUR OVEN IS NOW INSTALLED
Fill a microwave safe container with
300 ml (1/2 pint) of water. Place on
the GLASS TRAY and close the oven door. If you
have any doubts about what type of container to
use please refer to page
31
.
Press the START
button once
to set
30 seconds
of cooking
time.
Open your oven door by pulling the DOOR HANDLE.
Place the ROLLER REST inside the oven and place the
GLASS TRAY on top.
Plug your oven into a standard household socket.
Make sure your oven is the only appliance
connected to the socket. If your oven does not operate
properly, unplug it from the electrical socket and then plug it
back in.
MINU TOS
30
Seconds
6

When your oven is plugged in for the
first time or when power resumes after a
power cut, a ‘24H’ will be shown in the
display; you can reset the clock.
If the clock (or display) shows any
strange looking symbols, unplug your
oven from the electrical socket and plug
it back in and reset the clock.
Make sure that you have correctly installed your oven asdescribed earlier
in this book.
(If you want to use different option,Press
.
If you want to change different option after setting clock,
you have to unplug and plug it back in.)
Plug in your oven for the first time.
"24H" appears on the display.
You can set either 12 hour clock or 24 hour clock.
In the following example I will show you how to set the time for 14:35 when using the 24 clock.
Make sure that you have removed all packaging from your oven.
Setting the
Clock
Turn DIAL until display shows “14: ”.
Press for hour confirmation.
Turn DIAL until display shows “14:35”.
Press .
The clock starts counting.
taste saver
START
START
7

Child
Lock
Press and hold STOP/CLEAR until “L” appears on the display and
BEEP sounds.
The CHILD LOCK is now set.
The time will disappear on the display if you have set the clock.
“L” remains on the display to let you know that CHILD LOCK is set.
To cancel CHILD LOCK press and hold STOP/CLEAR until “L” disappears.
You will hear BEEP when it’s released.
Your oven has a safety feature that
prevents accidental running of the oven.
Once the child lock is set, you will be
unable to use any functions and no
cooking can take place.
However your child can still open the
oven door.
Press STOP/CLEAR.
8

Micro Power
Cooking
Make sure that you have correctly installed your oven as described
earlier in this book.
Press STOP/CLEAR.
Press START.
In the following example I will show you how to cook some food on 80% power for 5 minutes and 30 seconds.
Your oven has five microwave Power
settings.
POWER
HIGH
MAX
M
EDIUM
HIGH
MEDIUM
DEFROST
MEDIUM LOW
L
OW
%
100%
80%
60%
40%
20%
Power Output
850W
680W
510W
340W
170W
68
68
Press MICRO twice to select 680 power.
“680” appears on the display.
Turn DIAL until display shows “5:30”.
9

Micro Power
Level
Your microwave oven is equipped with 5 power levels to give you maximum flexibility and control over cooking.
The table below shows the examples of food and their recommended cooking power levels for use with this
microwave oven.
POWER LEVEL
POWER LEVEL
(%)
HIGH * Boil Water
* Brown minced beef
* Cook poultry pieces, fish, vegetables
* Cook tender cuts of meat
MEDIUM HIGH * All reheating
* Roast meat and poultry
* Cook mushrooms and shellfish
* Cook foods containing cheese and eggs
MEDIUM * Bake cakes and scones
* Prepare eggs
* Cook custard
* Prepare rice, soup
DEFROST/ * All thawing
MEDIUM LOW * Melt butter and chocolate
* Cook less tender cuts of meat
LOW * Soften butter & cheese
* Soften ice cream
* Raise yeast dough
USE
POWER OUTPUT
100%
80%
60%
40%
20%
850W
680W
510W
340W
170W
10

Two stage
Cooking
Press STOP/CLEAR.
Set the power and the cooking time for stage1.
Press MICRO once to select HIGH power.
Set the power and the cooking time for stage2.
Press MICRO four times to select power.
Press START.
During two stage cooking the oven door
can be opened and food checked. Close
the oven door and press START and the
cooking stage will continue.
At the end of stage1, BEEP sounds and
stage 2 commences.
Should you wish to clear the programme
press STOP/CLEAR twice.
In the following example I will show you how to cook some food in two stages. The first stages will cook your
food for 11 minutes on HIGH; the second will cook for 35 minutes on
340
.
340
Turn DIAL until display shows “11:00”.
Turn DIAL until display shows “35:00”.
11

Quick
Start
In the following example I will show you how to set 2 minutes of cooking on high power.
Press STOP/CLEAR .
Press START four times to select 2 minutes on HIGH power.
Your oven will start before you have finished the fourth press.
During QUICK START cooking, you can extend the cooking time by repeatedly
pressing the START button.
The QUICK START feature allows you to
set 30 seconds intervals of HIGH power
cooking with a touch of the START
button.
12

Grill
Cooking
Press STOP/CLEAR.
This feature will allow you to brown and
crisp food quickly.
In the following example I will show you how to use the grill to cook some food for 12 minutes and 30 seconds.
Press START.
Press GRILL.
Set the cooking time.
Turn DIAL until display shows “12:30”.
13

Press STOP/CLEAR .
Your oven has a combination cooking
feature which allows you to cook food
with heater and microwave at the same
time or alternately. This generally means
it takes less time to cook your food.
The sheath heater grills the surface of
the food while microwave heats inside.
Moreover, preheating your oven is not
necessary.
Combination Cooking Mode
CATEGORY MICRO POWER (%) HEATER POWER (%)
Co-1 20 80
Co-2 40 60
Co-3 60 40
Press START.
Be careful when removing your food because the container will be hot!
In the following example I will show you how to programme your oven with combi mode Co-3 for a cooking time
of 25 minutes.
Combination
Cooking
Set the cooking time.
Press Combi three times.
“Co-3” appears on the display.
Turn DIAL until display shows “25:00”.
14

AUTO COOK allows you to cook most of
your favorite food easily by selecting the
food type and entering the weight of the
food.
In the following example I will show you how to cook 0.6 kg of fresh vegetable.
Press STOP/CLEAR .
Press AUTO COOK twice to select Fresh vegetable.
Auto
Cook
Press
Category
Jacket potato
Fresh vegetable
Frozen vegetable
AUTO COOK
time
times
times
times
Rice
time
times
Press START.
Turn DIAL until display shows “0.6”.
15

FOOD CATEGORY FOOD TEMP. UTENSILS
WEIGHT LIMIT
INSTRUCTIONS
Room
Room
Frozen
On Glass tray
Microwave-
safe bowl
Microwave-
safe bowl
Choose medium sized potatoes 170-200g .
Wash and dry potatoes. Pierce the potatoes several times with fork. Place
the potatoes on the glass try. Adjust weight and press start. After cooking,
Place vegetables in a microwave-safe bowl. Add water.
Cover with wrap. After cooking, stir and allow to stand for 2 minutes.
Add amount of water according to the quantity.
** 0.2kg - 0.4kg : 2 Tablespoon
** 0.5kg - 0.8kg : 4 Tablespoon
Place vegetables in a microwave-safe bowl. Add water.
Cover with wrap. After cooking, stir and allow to stand for 2 minutes.
Add amount of water according to the quantity.
** 0.2kg - 0.4kg : 2 Tablespoon
** 0.5kg - 0.8kg : 4 Tablespoon
0.2 kg ~ 1.0 kg
0.2 kg ~ 0.8 kg
0.2 kg ~ 0.8 kg
remove the potatoes from the oven. Let stand covered with foil for 5 min-
utes.
1. Jacket patato
2. Fresh vegetable
3. Frozen
vegetable
4. Rice
Room
Microwave-
safe bowl
0.1 kg ~ 0.3 kg
Wash rice. Darin water.
Plase rice & boiling water in a deep and large bowl.
** Rice -- After cooking, stand covered for 5 minutes or until water is
absorbed.
Weight
Boiling water
100g
200ml
200g
400ml
300g
600ml Yes/Vent corner
Cover
16

Auto
Defrost
The temperature and density of food varies, I would recommend that the food is checked before cooking
commences. Pay particular attention to large joints of meat and chicken, some foods should not be
completely thawed before cooking. The BREAD programme is suitable for defrosting small items such as
rolls or a small loaf. These will require a standing time to allow the centre to thaw. In the following
example I will show you how to defrost 1.4 Kg of frozen poultry.
Your oven has four microwave defrost
settings:- MEAT, POULTRY, FISH and
BREAD; each defrost category has
different power settings. Repeated
presses of the AUTO DEFROST button
will select a different setting.
Category
MEAT
POULTRY
FISH
BREAD
Press
DEFROST
time
times
times
times
Enter the weight of the frozen food that you are about to defrost.
Press START.
During defrosting your oven will “BEEP”, at which point open the oven door, turn food over and separate to
ensure even thawing. Remove any portions that have thawed or shield them to help slow down thawing. After
checking close the oven door and press START to resume defrosting.
Your oven will not stop defrosting (even when the beep sounded) unless the door is opened.
Press AUTO DEFROST twice to select the POULTRY defrosting
programme.
Press STOP/CLEAR.
Weight the food that you are about to defrost. Be certain to remove any
metallic ties or wraps; then place the food in your oven and close the
oven door.
Turn DIAL until display shows “1.4”.
17

AUTO WEIGHT DEFROST GUIDE
* Food to be defrosted should be in a suitable microwave proof container and place uncovered on the glass turntable.
* If necessary, shield small areas of meat or poultry with flat pieces of aluminum foil. This will prevent thin areas becoming warm during defrosting. Ensure the
foil does not touch the oven walls.
* Separate items like minced meat, chops, sausages and bacon as soon as possible.
When BEEP, at this piont remove the food fromthe microwave oven,turn the food over and return to the microwave oven. Press start to continue. At the end of
the program, remove the food from the microwave oven, cover with foil and allow to stand until completely thawed.
To thaw completely, for example joints of meat and whole chickens should STAND for a minimum of 1 hour before cooking.
Category Weight Limit Utensil Food
0.1 ~ 4.0 kg
Microwave ware
(Flat plate)
Meat
Minced beef, Fillet steak, Cubes for stew, Sirloin steak, Pot roast, Rump roast, Beef burger
Pork chops, Lamp chops, Rolled roast, Sausage, Cutlets(.2cm)
Turn food over at beep.
After defrosting, let stand for 5-15 minutes.
Poultry
Whole chicken, Legs, Breasts, Turkey breasts(under 2.0kg)
Turn food over at beep.
After defrosting, let stand for 20-30 minutes.
Fish
Fillets, Steaks, Whole fish, Sea foods
Turn food over at beep.
After defrosting, let stand for 10-20 minutes.
Meat
Poultry
Fish
0.1 ~ 0.5 kg
Paper towel
or flat plate
Sliced bread, Buns, Baguette, etc.
Bread
Separate slices and place between paper towel or flat plate.
Turn food over at beep.
After defrosting, let stand for 1-2 minutes.
18

Quick
Defrost
Use this function to thaw only 0.5kg of Minced meat very quickly.
This will require a standing time to allow the center to thaw. In the following example will show you how to defrost
0.5kg of frozen minced meat.
Your oven has a microwave quick
defrost setting (MEAT).
Press STOP/CLEAR.
Weight the food that you are about to defrost. Be certain to remove
any metallic ties or wraps; then place the food in your oven and close
the oven door.
Press QUICK DEFROST.
The oven will start automatically.
During defrosting your oven will “BEEP”, at which point open the oven door, turn food over and separate to
ensure even thawing. Remove any portions that have thawed or shield them to help slow down thawing. After
checking close the oven door and press START to resume defrosting.
Your oven will not stop defrosting (even when the beep sounded) unless the door is opened.
19

UTENSIL INSTRUCTIONS
Minced meat
Microwave ware
Use this function to defrost quickly for minced meat.
Remove the meat completely from it's wrapping. Place the mince onto a microwave-safe plate. When BEEP, at this point remove the mince from the microwave
oven, turn the mince over and return to the microwave oven . Press start to continue. At the end of the program remove the mince from the microwave oven ,
cover with foil and allow to stand 5-15 minutes or until completely thawed.
Minced meat
AUTO W EIGHT DEFROST GUIDE
CATEGORY WEIGHT
0.5kg
(Flat plate)
After defrosting, let stand for 5-15 minutes
Turn food over at beep
20

Crispy
Reheat
Press STOP/CLEAR.
In the following example I will show you how to cook 0.3kg of "Roasted Meat ".
Press Crispy Reheat once.
Crispy reheat allows you to cook your
favorite food easily by selecting the food
type and entering the weight of food by
turn the wheel dial.
Roasted Meat
Lasagna
Bread
Pie
Category
time
times
times
times
Press
Crispy reheat
Press START.
Turn DIAL until display shows "0.3kg".
21

FOOD
TEMP.
Quantity Category
InstructionsUtensil
Roasted Meat 0.2-0.6kg
Refrigerated
Lasagna 0.2-0.6kg
Bread 0.1-0.3kg Frozen
Pie Refrigerated0.2-0.4kg
Slice each of roasted meat under 2.5cm
thickness. Place food
Place frozen
baguette or croissant
milk or water.
And do same as above.
Place leftover pie
Refrigerated
And do same as above.
rack.
on the high
on the high rack. Brush baguettes with
Place leftover lasagna
on
the high rack.
And do same as
above.
And do same as
above.
on
the high rack.
High Rack
22

Defrost & Grill
Press STOP/CLEAR.
In the following example I will show you how to cook 0.3kg of "Salmon Fillet".
Press Defrost & Grill once.
Salmon Fillet
Shrimp
Hamburger Patties
Sausage
Category
time
times
times
times
Press
Defrost & Grill
Press START.
Turn DIAL until display shows "0.3kg".
Defrost & Grill allows you to cook most
of your favorite food easily by selecting
the food type and entering the weight of
food by turn the wheel dial.
23

Utensil Instructions
FOOD
TEMP.
Quantity Category
1.Clean and de-vein shrimps. Place on the high rack.
Shrimp 0.1-0.4kg Frozen
2.When beep, turn food over.
Place hamburger Patties on the high rack.
Choose the menu and weight, press start.
After cooking, remove from the oven and stand.
Hamburger
1-4 piece Frozen
Patties
Choose salm
thickness each. Frozen it. Place food
Salmon fillet 0.2-0.6kg Frozen
on fillet of 200g weight and 2.5cm
and stand.
After cooking, remove from the oven
press start.
Choose the menu and weight,
on the high rack.
0.2-0.6kg
1.Remove all packages and slit on the surface.
Place on the high rack.
2.When beep, turn food over.
Sausage
Frozen
24
High Rack

Taste saver
In the following example I will show you how to use the taste saver function to warm food at
high level in 90 min.
Put some food into the micro-wave oven,press
“taste saver
” two times,
“
HO-H”appears on the display.
Press “start”.
1.Set the required AUTO COOK programme.
Press“start”. And after the AUTO COOK programme,it will
automatically run Taste saver function when five minutes
later after AUTO COOK is over.
want to warm your food when
the AUTO COOK programme,you can get the
warming food by pressing the key.
When the food without Auto function need
warming you can set warming at any point
by pressing the key.
Taste saver function has only one time
level-90 minutes. But the function will
stop when you open the door.
Taste saver manually
Taste saver after AUTO COOK
2.When the AUTO COOK is over, you can also press “taste saver ”,
and
*TIME display
When Taste saver is running,it will display
|
-----
|
-----
|
|
And then you press “taste saver
”
again,left time of
Taste saver will appear on the display.
LEVEL
Low level
High level
Press
Taste saver
time
times
Display
|
|
|
|
——
|
|
|
|
——
——
——
|
|
|
|
——
|
|
|
|
——
|
|
|
|
——
——
——
|
|
——
“HO-H”appears on the display.
Press “start”.
using
If you
25

Item
Cook time
Special Instructions
(at HIGH)
To heat or reheat successfully in the microwave, it is important to follow several guidelines. Measure the amount of
food in order to determine the time needed to reheat. Arrange the food in a circular pattern for best results. Room
temperature food will heat faster than refrigerated food. Canned foods should be taken out of the can and placed in a
microwavable container. The food will be heated more evenly if covered with a microwavable lid or vented plastic
wrap. Remove cover carefully to prevent steam burns. Use the following chart as a guide for reheating cooked food.
Heating or Reheating
Guide
Sliced meat
3 slices
(0.5cm thick)
Chicken pieces
1 breast
1 leg and thigh
Fish fillet
(170-230g)
Lasagne
1 serving(300g)
Casserole
1 cup
4 cups
Casserole
cream or cheese
1 cup
4 cups
Sloppy Joe or
Barbecued beef
1 sandwich
(
1
/ 2
cup meat filling)
without bun
1~2 minutes
2~3 minutes
3~3
1
/ 2
minutes
1~2 minutes
4~6 minutes
1
1
/ 2
~3 minutes
4
1
/ 2
~7minutes
1~2
1
/ 2
minutes
3
1
/ 2
~6 minutes
1~2
1
/ 2
minutes
Place sliced meat on microwavable plate.
Cover with plastic wrap and vent.
¥ N ote: G ravy or sauce helps to keep meat juicy.
Place chicken pieces on microwavable plate.
Cover with plastic wrap and vent.
Place fish on microwavable plate.
Cover with plastic wrap and vent.
Place lasagne on microwavable plate.
Cover with plastic wrap and vent.
CO O K covered in microwavable casserole dish.
Stir once halfway through cooking.
CO O K covered in microwavable casserole dish.
Stir once halfway through cooking.
Reheat filling and bun separately.
CO O K covered in microwavable casserole dish.
Stir once. Heat bun as directed in chart below.
Item
Cook time
Special Instructions
(at HIGH)
Mashed potatoes
1 cup
4 cups
Baked beans
1 cup
Ravioli or pasta in sauce
1 cup
4 cups
Rice
1 cup
4 cups
Sandwich roll or bun
1 roll
Vegetables
1 cup
4 cups
Soup
1 serving (8 oz.)
2
1
/2~3
1
/2 minutes
6~9 minutes
1
1
/2~3 minutes
2
1
/2~4 minutes
7
1
/2~11minutes
1~1
1
/2 minutes
3
1
/2~5 minutes
15~30 seconds
1
1
/2~2
1
/2 minutes
3
1
/2~5
1
/2 minutes
1
1
/2~2 minutes
COOK covered in microwavable casserole dish.
Stir once halfway through cooking.
COOK covered in microwavable casserole dish.
Stir once halfway through cooking.
COOK covered in microwavable casserole dish.
Stir once halfway through cooking.
COOK covered in microwavable casserole dish.
Stir once halfway through cooking.
Wrap in paper towel and place on glass tray.
COOK covered in microwavable casserole dish.
Stir once halfway through cooking.
COOK covered in microwavable casserole dish.
Stir once halfway through cooking.
26

Fresh Vegetable
Guide
Vegetable Amount
Cook time
Instructions
Standing
(at HIGH)
Time
Corn, Fresh
Mushrooms,
Fresh, Sliced
Parsnips, Fresh,
Sliced
Peas, Green,
Fresh
Sweet Potatoes
Whole Baking
(170~230g each)
White potatoes,
Whole Baking
(170~230g each)
Spinach, Fresh,
Leaf
Courgette, Fresh,
Sliced
Courgette, Fresh,
Whole
Husk. Add 2 tbsp water in 1.5 litre
baking dish. Cover.
Place mushrooms in 1.5 litre covered
casserole dish. Stir halfway through
cooking.
Add
1
/2
cup water in 1.5 litre covered
casserole dish. Stir halfway through
cooking.
Add
1
/2
cup water in 1.5 litre covered
casserole dish. Stir halfway through
cooking.
Pierce potatoes several times with fork.
Place on 2 paper towels.
Turn over halfway through cooking.
Pierce potatoes several times with fork.
Place on 2 paper towels.
Turn over halfway through cooking.
Add
1
/2
cup water in 2 litre covered
casserole dish.
Add
1
/2
cup water in 1.5 litre covered
casserole dish. Stir halfway through
cooking.
Pierce. Place on 2 paper towels.
Turn courgette over and rearrange
halfway through cooking.
2~3 minutes
2~3 minutes
2~3 minutes
2~3 minutes
2~3 minutes
2~3 minutes
2~3 minutes
2~3 minutes
2~3 minutes
4 ~ 8
1
1
/2 ~ 2
1
/2
4 ~ 7
6 ~ 9
4 ~ 9
6~ 12
5
1
/2 ~ 7
1
/2
9
1
/2
~ 14
4
1
/2 ~ 7
1
/2
4
1
/2
~ 7
1
/2
6 ~ 9
2 ears
230g
450g
4 cups
2 medium
4 medium
2 potatoes
4 potatoes
450g
450g
450g
Vegetable Amount
Cook time
Instructions
Standing
(at HIGH)
Time
Artichokes
(230g each)
Asparagus,
Fresh, Spears
Green Beans
Beats, Fresh
Broccoli, Fresh,
Spears
Cabbage, Fresh,
Chopped
Carrots, Fresh,
Sliced
Cauliflower,
Fresh, Whole
Fresh, Flowerettes
Celery, Fresh,
Sliced
Trim. Add 2 tsp water and 2 tsp juice.
Cover.
Add 1 cup water. Cover.
Add
1
/2 cup water in 1.5 litre casserole
dish. Stir halfway through cooking.
Add
1
/2
cup water in 1.5 litre covered
casserole dish. Rearrange halfway
through cooking.
Place broccoli in baking dish.
Add
1
/2
cup water.
Add
1
/2
cup water in 1.5 litre covered
casserole dish. Stir halfway through
cooking.
Add
1
/4
cup water in 1.5 litre covered
casserole dish. Stir halfway through
cooking.
Trim. Add
1
/4
cup water in 1.5 litre
covered casserole dish. Stir halfway
through cooking.
Slice. Add
1
/2
cup water in 1.5 litre
covered casserole dish. Stir halfway
through cooking.
2~3 minutes
2~3 minutes
2~3 minutes
2~3 minutes
2~3 minutes
2~3 minutes
2~3 minutes
2~3 minutes
2~3 minutes
4
1
/2
~ 7
10 ~ 12
2
1
/2
~ 6
7 ~ 11
11 ~ 16
5 ~ 8
5
1
/2~
7
1
/2
2 ~ 3
5 ~ 7
11 ~ 16
2 medium
4 medium
450g
450g
450g
450g
450g
200g
450g
2 cups
4 cups
27

Directions for grilling meat on grill
• Trim excess fat from meat. Cut fat, making sure you do not cut into the lean.
(This will stop the fat curling.)
• Arrange on the rack. Brush with melted butter or oil.
• Halfway through, turn the meat over.
Directions for grilling fish and seafood
Place fish and seafood on the rack. Whole fish should be scored diagonally on both sides
before grilling. Brush fish and seafood with melted butter, margarine or oil before and
during cooking. This helps stop the fish drying out. Grill for times recommended in the chart.
Whole fish and fish steaks should be carefully turned over halfway through grilling time. If
desired thick fillets can also be turned halfway.
Item Weight
Approx. cooking time
Hints
( in minutes)
Grill Cooking
Guide
Lamb chops
(2.5cm (1”) thick)
Sausages
(2.5cm (1”) thick)
Fish fillets
1 cm (
1
/2”) thick
1.5cm (
1
/2”) thick
230g x 2
230g
230g
230g
25-32
13-16
17-21
20-24
Baste with oil or melted
butter. Thin items should
be placed on the grill rack.
Thick items can be placed
on to a drip tray. Turn
food over after half the
cooking time.
Turn frequently.
Brush with melted butter
and turn over halfway
through cooking.
Item Weight
Approx. cooking time
Hints
( in minutes)
Fish steaks
2.5 cm (1”) thick
Whole fish
Scallops
Prawns uncooked
230g
225-350g each
450g
450g
450g
24-28
16-20
24-28
16-20
16-20
Brush with melted butter
and turn over halfway
through cooking.
Allow extra time for thick
and oily fish.
Baste well during cooking.
28

12 Before cooking, pierce the skin of potatoes, apples or any such fruit or
vegetable.
13 Do not cook eggs in their shell. Pressure will build up inside the egg which
will burst.
14 Do not attempt deep fat frying in your oven.
15 Remove the plastic wrapping from food before cooking or defrosting. Note
though that in some cases food should be covered with plastic film, for
heating or cooking.
16 If the oven door or door seals are damaged, the oven must not be
operated until it has been repaired by a qualified service technician.
17 If smoke is observed, switch off or disconnect the oven from the power
supply and keep the oven door closed in order to stifle any flames.
18 When food is heated or cooked in disposable containers of plastic, paper
or other combustible materials, check the oven frequently due to the
possibility of the food container is deteriorating.
19 Only allow children to use the oven without supervision when adequate
instructions have been given so that the child is able to use the oven in a
safe way and understands the hazards of improper use.
20 Liquids or other foods must not be heated in sealed containers since they
are liable to explode.
21 Do not operate the oven, if the door seals and adjacent parts of the
microwave oven are faulty, until the oven has been repaired by a qualified
service technician.
22 Check the utensils are suitable for use in microwave ovens before use.
23 Do not touch the oven door, outer cabinet, rear cabinet, oven cavity,
accessories and dishes during grill mode, convection mode and auto cook
operations, unless wearing thick oven gloves, as they will become hot.
Before clearing make sure they are not hot.
1 Do not attempt to tamper with, or make any adjustments or repairs to the
door, control panel, safety interlock switches or any other part of the oven.
It is hazardous for anyone to carry out any service or repair operation
which involves the removal of any cover which gives protection against
exposure to microwave energy. Repairs should only be undertaken by a
qualified service technician.
2 Do not operate the oven when empty. It is best to leave a glass of water in
the oven when not in use. The water will safely absorb all microwave
energy, if the oven is accidentally started.
3 Do not use the oven for the purpose of dehumidification. It can be the cause
of serious damage of safety. (ex. Operating the microwave oven with the
wet newspapers, clothes, toys, pet or portable electric devices, etc.)
4 Do not cook food wrapped in paper towels, unless your cook book contains
instructions, for the food you are cooking.
5 Do not use newspaper in place of paper towels for cooking.
6 Do not use wooden containers. They may heat-up and char. Do not use
ceramic containers which have metallic (e.g. gold or silver) inlays. Always
remove metal twist ties. Metal objects in the oven may arc, which can cause
serious damage.
7 Do not operate the oven with a kitchen towel, a napkin or any other
obstruction between the door and the front edges of the oven, which may
cause microwave energy leakage.
8 Do not use recycled paper products since they may contain impurities which
may cause sparks and/or fires when used in cooking.
9 Do not rinse the turntable by placing it in water just after cooking. This may
cause breakage or damage.
10 Small amounts of food require shorter cooking or heating time. If normal
times are allowed they may overheat and burn.
11 Be certain to place the oven so the front of the door is 8 cm or more
behind the edge of the surface on which it is placed, to avoid accidental
tipping of the appliance.
Important safety instructions
Read carefully and keep for future reference
WARNING
Please ensure cooking times are correctly
set as over cooking may result in FIRE and
subsequent DAMAGE to the OVEN.
29

Important safety instructions
Read carefully and keep for future reference
30
24 Only use utensils that are suitable for use in microwave ovens.
38 Do not use harsh abrasive cleaners or sharp metal scrapers to clean the
oven door glass since they can scratch the surface, which may result in
25 When heating food in plastic or paper containers, keep an eye on the
oven due to the possibility of ignition.
shattering of the glass.
26 If smoke is observed, switch off or unplug the appliance and keep the
39 This appliance is not intended for use by persons (including children) with
door closed in order to stifle any flames.
reduced physical, sensory or mental capabilities, or lack of experience and
knowledge, unless they have been given supervision or instruction concerning
27 Microwave heating of beverages can result in delayed eruptive boiling,
therefore care must be taken when handing the container.
use of the appliance by a person responsible for their safety.
28 The contents of feeding bottles and baby food jars shall be stirred or shaken
WARNING: If the door or door seals are damaged, the oven must not
and the temperature checked before consumption, in order to avoid burns.
be operated until it has been repaired by a competent
person.
29 Eggs in their shell and whole hard-boiled eggs should not be heated in
WARNING: It is hazardous for anyone other than a competent person
microwave ovens since they may explode, even after microwave heating
has ended.
to carry out any service or repair operation that involves
the removal of a cover which gives protection against
30 Details for cleaning door seals, cavities and adjacent parts.
exposure to microwave energy.
31 The oven should be cleaned regularly and any food deposits removed.
WARNING: Liquids and other foods must not be heated in sealed
containers since they are liable to explode.
32 Failure to maintain the oven in a clean condition could lead to
deterioration of the surface that could adversely affect the life of the
WARNING: Only allow children to use the oven without supervision
appliance and possibly result in a hazardous situation.
when adequate instructions have been given so that the
child is able to use the oven in a safe way and understands
33 Only use the temperature probe recommended for this oven (for
the hazards of improper use.
appliances having a facility to use a temperature-sensing probe).
WARNING: Accessible parts may become hot during use. Young
34 If heating elements are provided, during use the appliance becomes hot.
children should be kept away.
WARNING:
Care should be taken to avoid touching heating elements inside the oven.
When the appliance is operated in the combination mode,
children should only use the oven under adult supervision
35 The appliance is not intended for use by young children or infirm
due
to the temperatures generated.
persons without supervision.
WARNING:
Should be monitored to ensure that children do not play
36 The microwave oven must be operated with the decorative door open.
with the device.
37 This connection may be achieved by having the plug accessible or by
WARNING:
The devices are not intended to be operated by an
incorporation a switch in the fixed wiring in accordance with the wiring
external timer or by a separate control.
rules.

Microwave-safe
Utensils
Never use metal or metal trimmed utensils in your
microwave oven
Microwaves cannot penetrate metal. They will bounce off any metal object in the
oven and cause arcing, an alarming phenomenon that resembles lightning.
Most heat resistant non metallic cooking utensils are safe for use in your microwave
oven. However, some may contain materials that render them unsuitable as
microwave cookware. If you have any doubts about a particular utensil, there’s a
simple way to find out if it can be used in your microwave oven.
Place the utensil in question next to a glass bowl filled with water in the microwave
oven. Microwave at power HIGH for 1 minute. If the water heats up but the utensil
remains cool to the touch, the utensil is microwave~safe. However, if the water does
not change temperature but the utensil becomes warm, microwaves are being
absorbed by the utensil and it is not safe for use in the microwave oven. You
probably have many items on hand in your kitchen right now that can be used as
cooking equipment in your microwave oven. Just read through the following
checklist.
Dinner plates
Many kinds of dinner-ware are microwave-safe. If in doubt consult the
manufacturer’s literature or perform the microwave test.
Glassware
Glassware that is heat-resistant is microwave-safe. This would include all brands of
oven tempered glass cookware. However, do not use delicate glassware, such as
tumblers or wine glasses, as these might shatter as the food warms.
Plastic storage containers
These can be used to hold foods that are to be quickly reheated. However, they
should not be used to hold foods that will need considerable time in the oven as hot
foods will eventually warp or melt plastic containers.
Paper
Paper plates and containers are convenient and safe to use in your microwave oven,
provided that the cooking time is short and foods to be cooked are low in fat and
moisture. Paper towels are also very useful for wrapping foods and for lining baking
trays in which greasy foods such as bacon are cooked. In general, avoid coloured
paper products as the colour may run. Some recycled paper products may contain
impurities which could cause arcing or fires when used in the microwave oven.
Plastic cooking bags
Provided they are made specially for cooking, cooking bags are microwave safe.
However, be sure to make a slit in the bag so that steam can escape. Never use
ordinary plastic bags for cooking in your microwave oven, as they will melt and
rupture.
Plastic microwave cookware
A variety of shapes and sizes of microwave cookware are available. For the most
part, you can probably use items you already have on hand rather than investing in
new kitchen equipment.
Pottery, stoneware and ceramic
Containers made of these materials are usually fine for use in your microwave oven,
but they should be tested to be sure.
CAUTION
Some items with high lead or iron content are not suitable for cooking
utensils.
Utensils should be checked to ensure that they are suitable for use in
microwave ovens.
31

Keeping an eye on things
The recipes in the book have been formulated with great care, but your success in
preparing them depends on how much attention you pay to the food as it cooks.
Always watch your food while it cooks. Your microwave oven is equipped with a
light that turns on automatically when the oven is in operation so that you can see
inside and check the progress of your food. Directions given in recipes to elevate,
stir, and the like should be thought of as the minimum steps recommended. If the
food seems to be cooking unevenly, simply make the necessary adjustments you think
appropriate to correct the problem.
Factors affecting microwave cooking times
Many factors affect cooking times. The temperature of ingredients used in a recipe
makes a big difference in cooking times. For example, a cake made with ice-cold
butter, milk, and eggs will take considerably longer to bake than one made with
ingredients that are at room temperature. All of the recipes in this book give a range
of cooking times. In general, you will find that the food remains under-cooked at the
lower end of the time range, and you may sometimes want to cook your food beyond
the maximum time given, according to personal preference. The governing
philosophy of this book is that it is best for a recipe to be conservative in giving
cooking times. While overcooked food is ruined for good. Some of the recipes,
particularly those for bread, cake, and custards, recommend that food be removed
from the oven when they are slightly undercooked. This is not a mistake. When
allowed to stand, usually covered, these foods will continue to cook outside of the
oven as the heat trapped within the outer portions of the food gradually travels
inward. If the food is left in the oven until it is cooked all the way through, the outer
portions will become overcooked or even burnt. You will become increasingly skilful
in estimating both cooking and standing times for various foods.
Density of food
Light, porous food such as cakes and breads cook more quickly than heavy, dense
foods such as roasts and casseroles. You must take care when microwaving porous
food that the outer edges do not become dry and brittle.
Height of food
The upper portion of tall food, particularly roasts, will cook more quickly than the
lower portion. Therefore, it is wise to turn tall food during cooking, sometimes several
times.
Moisture content of food
Since the heat generated from microwaves tends to evaporate moisture, relatively dry food
such as roasts and some vegetables should either be sprinkled with water prior to cooking
or covered to retain moisture.
Bone and fat content of food
Bones conduct heat and fat cooks more quickly than meat. Care must be taken when
cooking bony or fatty cuts of meat that they do not cook unevenly and do not become
overcooked.
Quantity of food
The number of microwaves in your oven remains constant regardless of how much food is
being cooked. Therefore, the more food you place in the oven, the longer the cooking time.
Remember to decrease cooking times by at least one third when halving a recipe.
Shape of food
Microwaves penetrate only about 2.cm into food, the interior portion of thick foods are
cooked as the heat generated on the outside travels inward. Only the outer edge of food in
cooked by microwave energy; the rest is cooked by conduction. The worst possible shape
for a food that is to be microwaved is a thick square. The corners will burn long before the
centre is even warm . Round thin foods and ring shaped foods cook successfully in the
microwave.
Covering
A cover traps heat and steam which causes food to cook more quickly. Use a lid or
microwave cling film with a corner folded back to prevent splitting.
Browning
Meats and poultry that are cooked fifteen minutes or longer will brown lightly in their own
fat. Foods that are cooked for a shorter period of time may be brushed with a browning
sauce such as worcestershire sauce, soy sauce or barbecue sauce to achieve an appetizing
colour. Since relatively small amounts of browning sauces are added to food the original
flavour of the recipe is not altered.
Covering with greaseproof paper
Greaseproofing effectively prevents spattering and helps food retain some heat. But
because it makes a looser cover than a lid or clingfilm, it allows the food to dry out slightly.
Arranging and spacing
Individual foods such as baked potatoes, small cakes and hors d’oeuvres will heat more
evenly if placed in the oven an equal distance apart, preferably in a circular pattern. Never
stack foods on top of one another.
Food characteristics &
Microwave cooking
32

Food characteristics &
Microwave cooking
Stirring
Stirring is one of the most important of all microwaving techniques. In conventional cooking,
food is stirred for the purpose of blending. Microwaved food, however, is stirred in order to
spread and redistribute heat. Always stir from the outside towards the centre as the outside
of the food heats first.
Turning over
Large, tall foods such as roasts and whole chickens should be turned so that the top and
bottom will cook evenly. It is also a good idea to turn cut up chicken and chops.
Placing thicker portions facing outwards
Since microwaves are attracted to the outside portion of food, it makes sense to place
thicker portions of meat, poultry and fish to the outer edge of the baking dish. This way,
thicker portions will receive the most microwave energy and the food will cook evenly.
Shielding
Strips of aluminium foil (which block microwaves) can be placed over the corners or edges
of square and rectangular foods to prevent those portions from overcooking. Never use too
much foil and make sure the foil is secured to the dish or it may cause ‘arcing’ in the oven.
Elevating
Thick or dense foods can be elevated so that microwaves can be absorbed by the underside
and centre of the foods.
Piercing
Foods enclosed in a shell, skin or membrane are likely to burst in the oven unless they are
pierced prior to cooking. Such foods include yolks and whites of eggs, clams and oysters
and whole vegetables and fruits.
Testing if cooked
Food cooks so quickly in a microwave oven, it is necessary to test it frequently. Some foods
are left in the microwave until completely cooked, but most foods, including meats and
poultry, are removed from the oven while still slightly undercooked and allowed to finish
cooking during standing time. The internal temperature of foods will rise between 5
0
F (3
0
C)
and 15
0
F (8
0
C) during standing time.
Standing time
Foods are often allowed to stand for 3 to 10 minutes after being removed from the
microwave oven. Usually the foods are covered during standing time to retain heat unless
they are supposed to be dry in texture (some cakes and biscuits, for example). Standing
allows foods to finish cooking and also helps flavour blend and develop.
To Clean Your Oven
1 Keep the inside of the oven clean
Food spatters or spilled liquids stick to oven walls and between seal and door
surface. It is best to wipe up spillovers with a damp cloth right away. Crumbs and
spillovers will absorb microwave energy and lengthen cooking times. Use a damp
cloth to wipe out crumbs that fall between the door and the frame. It is important to
keep this area clean to assure a tight seal. Remove greasy spatters with a soapy cloth
then rinse and dry. Do not use harsh detergent or abrasive cleaners. The glass tray
can be washed by hand or in the dishwasher.
2 Keep the outside of the oven clean
Clean the outside of your oven with soap and water then with clean water and dry
with a soft cloth or paper towel. To prevent damage to the operating parts inside the
oven, the water should not be allowed to seep into the ventilation openings. To clean
control panel, open the door to prevent oven from accidentally starting, and wipe a
damp cloth followed immediately by a dry cloth. Press STOP/CLEAR after cleaning.
3 If steam accumulates inside or around the outside of the oven door, wipe the panels
with a soft cloth. This may occur when the microwave oven is operated under high
humidity conditions and in no way indicates a malfunction of the unit.
4 The door and door seals should be kept clean. Use only warm, soapy water, rinse
then dry thoroughly.
DO NOT USE ABRASIVE MATERIALS, SUCH AS CLEANING POWDERS OR
STEEL AND PLASTIC PADS.
Metal parts will be easier to maintain if wiped frequently with a damp cloth.
5 Do not use any steam cleaner.
33

Questions &
Answers
Q What’s wrong when the oven light will not glow?
A There may be several reasons why the oven light will not glow.
Light bulb has blown
Door is not closed
Q Does microwave energy pass through the viewing screen in the door?
A No. The holes, or ports, are made to allow light to pass; they do not let
microwave energy through.
Q Why does the beep tone sound when a pad on the Control Panel is
touched?
A The beep tone sounds to assure that the setting is being properly entered.
Q Will the microwave oven be damaged if it operates empty?
A Yes Never run it empty or without the glass tray.
Q Why do eggs sometimes pop?
A When baking, frying, or poaching eggs, the yolk may pop due to steam
build up inside the yolk membrane. To prevent this, simply pierce the yolk
before cooking. Never microwave eggs in the shell.
Q Why is standing time recommended after microwave cooking is over?
A After microwave cooking is finished, food keeps on cooking during
standing time. This standing time finishes cooking evenly throughout the
food. The amount of standing time depends on the density of the food.
Q Is it possible to pop corn in a microwave oven?
A Yes, if using one of the two methods described
below
1 Popcorn-popping utensils designed specifically for microwave cooking.
2 Prepackaged commercial microwave popcorn that contains specific
times and power outputs needed for an acceptable final product.
FOLLOW EXACT DIRECTIONS GIVEN BY EACH MANUFACTURER FOR
THEIR POPCORN PRODUCT. DO NOT LEAVE THE OVEN UNATTENDED
WHILE THE CORN IS BEING POPPED. IF CORN FAILS TO POP AFTER
THE SUGGESTED TIMES, DISCONTINUE COOKING. OVERCOOKING
COULD RESULT IN THE CORN CATCHING FIRE.
CAUTION
NEVER USE A BROWN PAPER BAG FOR POPPING CORN. NEVER
ATTEMPT TO POP LEFTOVER KERNELS.
Q Why doesn’t my oven always cook as fast as the cooking guide says?
A Check your cooking guide again to make sure you’ve followed directions
correctly, and to see what might cause variations in cooking time.
Cooking guide times and heat settings are suggestions, chosen to help
prevent overcooking, the most common problem in getting used to a
microwave oven. Variations in the size, shape, weight and dimensions of
the food require longer cooking time. Use your own judgement along with
the cooking guide suggestions to test food condition, lust as you would do
with a conventional cooker.
34

Plug wiring information/
Technical Specifications
The wires in this mains lead are colored in accordance with the
following codes
BLUE ~ Neutral
BROWN ~ Live
GREEN & YELLOW ~ Earth
As the colours of the wires in the mains lead of this appliance may
not correspond with the coloured markings identifying the terminals
in your plug proceed as follows:
The wire which is colored BLUE must be connected to the terminal
which is marked with the letter N or Colored BLACK.
The wire which is colored BROWN must be connected to the
terminal which is marked with the letter L or colored RED.
The wire which is colored GREEN & YELLOW or GREEN must be
connected to the terminal which is marked with the letter E or .
If the supply cord is damaged, it must be replaced by the
manufacturer or its service agent or a similarly qualified person in
order to avoid a hazard;
Warning
Technical Specification
This appliance must be earthed
MH6589DR/MH6589DRS/MH6589DRB
Power Input
Output
Microwave Frequency
Outside Dimension
230 V AC /50Hz
850 W (IEC60705 rating standard)
2,450 MHz
507 mm(W) X 283mm(H) X 435mm(D)
1,250 Watts
Power Consumption
Microwave
Grill
Combination
1,000 Watts
2,200 Watts
<English>
Disposal of your old appliance
1. When this crossed-out wheeled bin symbol is attached to a product it
means the product is covered by the European Directive 2002/96/EC.
2. All electrical and electronic products should be disposed of separately from
the municipal waste stream via designated collection facilities appointed by
the government or the local authorities.
3. The correct disposal of your old appliance will help prevent potential
negative consequences for the environment and human health.
4. For more detailed information about disposal of your old appliance, please
contact your city office, waste disposal service or the shop where you
purchased the product.
35


www.lg.com
MAGNETRON OVEN
GEBRUIKERSHANDLEIDING
LEES DEZE GEBRUIKERSHANDLEIDING AANDACHTIG
VÓÓR GEBRUIK.
MH6589DR
MH6589DRS
MH6589DRB
NEDERLANDS

U kunt uw oven niet bedienen met de deur open vanwege de
veiligheidsvergrendelingen die in het deurmechanisme zijn ingebouwd. Deze
veiligheidsvergrendelingen schakelen automatisch elke kookactiviteit uit
wanneer de deur wordt geopend; zo niet zou u kunnen worden blootgesteld
aan schadelijke microgolfenergie van de magnetronoven.
Het is belangrijk dat niet met de veiligheidsvergrendelingen wordt geknoeid.
Plaats geen voorwerp tussen het voorvlak van de oven en de deur en
voorkom dat etensresten of reinigingsmiddel aan de afdichtingsoppervlakken
vastkoeken.
Gebruik uw oven niet als hij beschadigd is. Het is bijzonder belangrijk dat
de ovendeur goed sluit en dat de volgende onderdelen niet beschadigd zijn:
(1) deur (gebogen), (2) scharnieren en vergrendelingen (stuk of los), (3)
deurafdichtingen en afdichtingsoppervlakken.
Uw oven mag uitsluitend worden afgesteld of gerepareerd door
gekwalificeerd onderhoudspersoneel.
Waarschuwing
Voorzorgsmaatregelen om mogelijke blootstelling aan
microgolfenergie te vermijden.
Voorzorgsmaatregelen
Wanneer u vloeibare eetwaren, bijvoorbeeld soep, saus en dranken,
opwarmt in uw magnetronoven, kunnen deze met vertraging fel beginnen te
koken, zonder dat men ze ziet borrelen. Daardoor kan de hete vloeistof
plots overkoken. Neem de volgende maatregelen
om dit te voorkomen:
1 Vermijd het gebruik van houders met rechte zijkanten en een smalle hals.
2 Vermijd te lang opwarmen.
3 Roer in de vloeistof voordat u de houder in de oven plaatst en halverwege
tijdens het verwarmen.
4 Laat de hete vloeistof na het verwarmen nog even in de oven staan.
Vervolgens nogmaals goed roeren of schudden (dit geldt vooral voor
papflessen en potjes babyvoeding) en de temperatuur controleren vóór
consumptie, om brandwonden te vermijden (dit geldt vooral voor
papflessen en potjes babyvoeding). Wees voorzichtig wanneer u de
houder vastneemt.
Waarschuwing
Laat etenswaren die in de magnetronoven zijn
gekookt even staan en controleer de temperatuur
vóór consumptie. Vooral de inhoud van papflessen
en potjes babyvoeding kan nog erg warm zijn.
Zorg ervoor dat u de kooktijden correct instelt. Als
voedsel te lang wordt gekookt, kan het immers
vuur vatten, met schade aan uw oven tot gevolg.
36

Hoe werkt een magnetronoven?
Microgolven zijn een vorm van energie die vergelijkbaar is met radio- en
televisiegolven en gewoon daglicht. Normaliter verspreiden microgolven zich
naar de buitenkant in de atmosfeer en verdwijnen ze zonder effect.
Magnetronovens
beschikken echter over een magnetron, die ontworpen is om deze
microgolfenergie te benutten. Om microgolven op te wekken, wordt stroom
toegevoerd naar de magnetronbuis.
Deze microgolven komen in de kookruimte terecht via openingen aan de
binnenkant van de oven. Op de bodem van de oven bevindt zich een
draaiplateau. Microgolven dringen niet door de metalen wanden van de
oven, maar wel door glas, porselein en papier, de materialen waaruit
magnetronbestendige schotels zijn gemaakt.
De microgolven warmen het kookgerei niet op. Dit zal uiteindelijk wel warm
worden door de hitte die het voedsel opwekt.
Een uiterst veilig toestel
Inhoudsopgave
Uw magnetronoven is één van de veiligste huishoudtoestellen.
Wanneer de deur wordt geopend, stopt de oven automatisch
met het produceren van microgolven. De microgolfenergie
wordt volledig omgezet in warmte wanneer hij in het voedsel
doordringt, waardoor er geen schadelijke "overtollige"
energie in het voedsel achterblijft.
Voorzorgsmaatregelen
36
37
38 ~ 39
40
41
42
43
44
45
46
47
48 ~ 49
50 ~ 51
52 ~ 53
54 ~ 55
56 ~ 57
58
59
60
61
62 ~ 63
64
65 ~ 66
67
68
Inhoudsopgave
Uitpakken en installeren
Kinderslot
Koken met magnetronvermogen
Magnetronvermogensniveau
Koken in twee fasen
Automatisch koken
Automatisch ontdooien
Snel ontdooien
Richtlijnen voor verwarmen of opwarmen
Richtlijnen voor verse groenten
Richtlijnen voor grillen
Veiligheidsvoorschriften
Magnetronbestendig kookgerei
Eigenschappen van voedsel en koken in de magnetron
Vragen en antwoorden
Informatie over de stekker/Technische gegevens
Snelle start
Grillen
Combi-kookstand
De Klok instellen
Taste Saver
37
Crisp Verwarmen
Ontdooien en Grillen

Plaats de oven op een vlak oppervlak naar keuze dat
minstens 85 cm hoog is. Laat een vrije ruimte van 30 cm
aan de bovenkant en 10 cm aan de achterkant met het oog op
een goede ventilatie. De voorkant van de oven moet zich op
minstens 8 cm van de rand van het oppervlak bevinden, om te
voorkomen dat de oven per ongeluk omkantelt.
De oven is bovenaan of aan de zijkant voorzien van een
afvoeropening. Het blokkeren van deze afvoeropening kan de
oven beschadigen. oppervlak.
Uitpakken en
installeren
Pak uw oven uit en plaats hem op een effen.
DEZE OVEN IS NIET BEDOELD VOOR COMMERCIËLE
MAALTIJDBEREIDING
Volg de eenvoudige stappen op deze twee bladzijden om snel te testen of uw oven goed werkt.
Besteedbijzondere aandacht aan de richtlijnen in verband met de installatie van uw oven. Zorg er tijdens
het uitpakkenvan uw oven voor dat u alle accessoires en verpakkingsmateriaal verwijdert. Ga na of uw
oven niet beschadigd istijdens de levering.
TR
ROTATING RING
HIGH RACK
LOW RACK
38
GLAZEN SCHAAL
DRAAIENDE RING
LAAG REK
HOOG REK

Open de ovendeur door aan het DEURHANDVAT te
trekken. Plaats de DRAAIENDE RING in de oven en
plaats er het GLAZEN DRAAIPLATEAU op.
SECONDEN
Steek de stekker van uw oven in een gewoon
stopcontact. Sluit uw oven als enige toestel op dat
stopcontact aan. Als uw oven niet goed werkt, trekt u de
stekker uit het stopcontact en steekt u hem weer in.
Het DISPLAY begint af te tellen vanaf 30
seconden. Wanneer het aftellen ten einde is,
hoort u een pieptoon. Open de ovendeur en meet de
temperatuur van het water. Als uw oven goed werkt, moet
het water warm zijn. Wees voorzichtig, want de houder
kan warm zijn.
Vul een magnetronbestendige houder
met 300 ml water. Plaats de houder
op het GLAZEN DRAAIPLATEAU en sluit de
ovendeur. Raadpleeg bladzijde als u niet
zeker weet welk soort houder u moet gebruiken.
Druk op de
STOP-toets en
druk vervolgens
een keer op de
START-toets om
om 30 seconden
kooktijd in te stellen.
39
64

Indien uw oven voor de eerste keer
ingestoken is of indien de stroom na
een stroomonderbreking hervat wordt,
zal “24H” getoond worden op het
scherm; u kunt de klok resetten.
Indien de klok (of het scherm)
vreemde symbolen toont, trekt u de
stekker uit uw oven en steekt u deze
weer in om de klok te resetten.
Zorg dat u uw oven correct geïnstalleerd heeft, zoals eerder
in dit boek beschreven.
Steek uw oven voor de eerste keer in.
"24H" “wordt op het scherm getoond.
(Indien u een andere optie wilt gebruiken,
drukt u op taste saver.
Indien u na het instellen van de klok een andere optie wilt wijzigen,
moet u opnieuw de stekker uit trekken
en weer insteken.)
Draai aan de SCHIJF totdat het scherm het volgende toont “14: ”.
Druk voor de uurbevestiging op taste saver (of START).
Draai aan de SCHIJF totdat het scherm het volgende toont “14:35”.
Druk op taste saver (of START).
De klok start met tellen.
U kunt de 12 uur klok of de 24 uur klok instellen.
In het volgende voorbeeld wordt uitgelegd hoe u de tijd instelt voor 14:35 bij gebruik van de 24 uur klok.
Zorg dat u alle verpakkingsmaterialen uit de oven verwijderd heeft.
De klok
instellen
40

Kinderslot
Houd STOP/CLEAR ingedrukt tot "L" in het display verschijnt en u een
pieptoon hoort.
Het kinderslot (CHILD LOCK) is nu ingesteld.
Als u de klok hebt ingesteld, verdwijnt de tijdsaanduiding in het display.
"L" blijft in het display staan om aan te geven dat het kinderslot (CHILD
LOCK) is ingesteld.
Om het kinderslot te annuleren, drukt u op STOP/CLEAR tot "L" verdwijnt.
U hoort een pieptoon wanneer u de toets loslaat.
Uw oven beschikt over een
veiligheidsfunctie die ongewilde
bediening van de oven voorkomt.
Wanneer het kinderslot is ingesteld,
kunt u geen functies meer gebruiken en
is koken niet mogelijk.
Uw kind kan echter nog steeds de
ovendeur openen.
Druk op STOP/CLEAR.
41

Koken met
magnetronvermogen
Zorg ervoor dat uw oven juist geïnstalleerd is zoals eerder in deze
handleiding beschreven.
Druk op STOP/CLEAR.
Draai aan de DRAAIKNOP tot "5:30" in het display verschijnt.
Druk op START.
In het volgende voorbeeld toon ik hoe u voedsel kookt met 80% van het vermogen gedurende
5 minuten en 30 seconden.
Uw oven heeft vijf
magnetronvermogensinstellingen. Het
hoogste vermogen wordt automatisch
gekozen, maar u kunt een ander vermogen
kiezen door herhaaldelijk op de MICRO-
toets te drukken.
STAND
HOOG MAX.
MIDDELHOOG
GEMIDDELD
ONTDOOIEN,
MIDDELLAAG
LAAG
Druk op
MICRO
Vermogen
%
100%
80%
60%
40%
20%
maal
maal
maal
maal
maal
850W
680W
510W
340W
170W
Druk tweemaal op KOKEN MET om het vermogen 80% te kiezen.
42

Magnetronvermo-
gensniveau
Uw magnetronoven beschikt over 5 vermogensniveaus die een optimale flexibiliteit en controle over het
kookproces garanderen. De onderstaande tabel toont verschillende soorten voedsel en het bijbehorende
aanbevolen vermogensniveau van de magnetron.
VERMOGENSNIVEAU
VERMOGENSNIVEAU
(%)
HOOG
MIDDELHOOG
GEMIDDELD
ONTDOOIEN/
MIDDELLAAG
LAAG
* Water koken
* Gehakt laten bruinen
* Stukken gevogelte, vis, groenten koken
* Malse stukken vlees koken
* Alle soorten voedsel opwarmen
* Vlees en gevogelte braden
* Champignons en schaaldieren koken
* Voedsel koken dat kaas en eieren bevat
* Cake en gebak bakken
* Eieren bereiden
* Vla koken
* Rijst, soep bereiden
* Alle soorten voedsel ontdooien
* Boter en chocolade smelten
* Minder malse stukken vlees koken
* Boter & kaas zacht maken
* Ijsroom zacht maken
* Deeg laten rijzen
GEBRUIK
VERMOGEN
100%
80%
60%
40%
20%
850W
680W
510W
340W
170W
43

Koken in twee
fasen
Druk op STOP/CLEAR.
Stel het vermogen en de kooktijd in voor fase 1.
Druk eenmaal op MICRO om het hoge vermogen (HIGH) te kiezen.
Draai aan de DRAAIKNOP tot "11:00" in het display verschijnt.
Stel het vermogen en de kooktijd in voor fase 2.
Druk viermaal op MICRO om het vermogen
340
te kiezen.
Draai aan de DRAAIKNOP tot "35:00" in het display verschijnt.
Druk op START.
Tijdens het koken in twee fasen kunt u de
ovendeur openen en het voedsel
controleren. Sluit de ovendeur en druk
op START om de kookfase voort te
zetten.
Na afloop van fase 1 weerklinkt er een
pieptoon, waarna fase 2 start.
Om het programma te annuleren, drukt
u tweemaal op STOP/CLEAR.
In het volgende voorbeeld toon ik hoe u voedsel in twee fasen kookt. In de eerste fase wordt uw voedsel gekookt
gedurende 11 minuten met hoog vermogen (HIGH); in de tweede fase wordt het voedsel gedurende 35 minuten
gekookt met 40% vermogen.
44

Snelle
start
In het volgende voorbeeld toon ik hoe u de oven instelt op 2 minuten koken met hoog vermogen.
Druk op STOP/CLEAR.
Druk viermaal op START om 2 minuten met hoog vermogen (HIGH) te
kiezen.
Uw oven begint te werken voordat u de vierde maal hebt gedrukt.
Tijdens het koken met QUICK START (snelle start) kunt u de kooktijd verlengen
door meermaals
op de START-toets te drukken.
De functie QUICK START (snelle start)
stelt u in staat de oven in stappen van 30
seconden in te stellen op koken met hoog
vermogen (HIGH) met een druk op de
START-toets.
45

Druk op STOP/CLEAR.
Met de grill kunt u voedsel snel bruin en
knapperig laten worden.
Druk op GRILL.
Draai aan de DRAAIKNOP tot "12:30" in het display verschijnt.
Druk op START.
Grillen
In het volgende voorbeeld toon ik u hoe u voedsel kookt met de grill gedurende 12 minuten en 30 seconden.
46

Combi-
kookstand
In het volgende voorbeeld toon ik hoe u de oven programmeert in de combi-stand co-3 voor een kooktijd van 25
minuten.
Druk driemaal op COMBI.
Druk op STOP/CLEAR.
Uw oven beschikt over een combi-
kookstand waarmee u voedsel tegelijk of
afwisselend met het verwarmingselement
en met de magnetron kunt koken.
Gewoonlijk duurt het minder lang om uw
voedsel te koken in deze stand.
Het ringvormige verwarmingselement
grillt de buitenkant van het voedsel
terwijl de magnetron de binnenkant
verwarmt. Bovendien hoeft u uw oven
niet voor te verwarmen.
Combi-kookstand
CATEGORIE VERMOGEN MAGN (%) VERMOGEN VERWARMINGSEL (%)
Co-1 20 80
Co-2 40 60
Co-3 60 40
Druk op START.
Wees voorzichtig wanneer u het voedsel uit de oven haalt, want de
houder zal heet zijn!
Draai aan de DRAAIKNOP tot "25:00" in het display verschijnt.
tot het display “Co- 3” weergeeft.
47

Automatisch
koken
Met AUTO COOK kunt u vrijwel al uw
lievelingsvoedsel makkelijk koken door
gewoon het soort voedsel te kiezen en
het gewicht in te voeren.
In het volgende voorbeeld toon ik hoe u 0,6 kg verse groenten
Druk op STOP/CLEAR .
Druk tweemaal op AUTO COOK om verse groenten te kiezen.
Draai aan de DRAAIKNOP tot het display "0.6" aangeeft.
Categorie
Aardappel in de schil
Verse groenten
Diepvriesgroenten
Druk op
AUTO COOK
keer
keer
keer
keer
Rijst
Druk op START.
48

SOORT VOEDSEL
VOEDSEL-TEMP
BENODIGDHEDEN
GE-WICHTSLIMIET
RICHTLIJNEN
Kamertemperatuur
Kamertemperatuur
Diepgevroren
Op glazen schaal
Magnetronbe
stendige kom
Magnetronbe
stendige kom
Kies middelgrote aardappelen uit: 170 tot 200 g.
.
Was en droog de aardappelen. Prik met een vork verschillende malen in de
aardappelen. Plaats de aardappelen op de glazen schaal. Stel het gewicht in
en druk op start. Na het koken verwijdert u de aardappelen uit de oven. Laat
de aardappelen na het koken nog 5 minuten staan met een folie erover.
0,2 kg ~ 1,0 kg
0,2 kg ~ 0,8 kg
0,2 kg ~ 0,8 kg
1. Aardappel in de schil
2. Verse groenten
3. Diepvriesgroenten
4. Rijst
Magnetronbe
stendige kom
Kamertemperatuur
0,1 kg ~ 0,3 kg
Was de rijst. Giet het water af.
Doe de rijst in een diepe en grote kom, samen met kokend water.
** Rijst -- Na het koken 5 minuten afgedekt laten staan of
wachten tot het water is opgeslorpt.
Plaats de groenten in een magnetronbestendige kom.
Voeg water toe.
Dek met folie af. Na het koken roert u nogmaals door de
groenten en laat u ze 2 minuten staan.
Voeg een hoeveelheid water bij in verhouding tot de
hoeveelheid groenten.
** 0,2kg -0,4kg: 2 eetlepels
** 0,5 kg - 0,8 kg: 4 eetlepels
Plaats de groenten in een magnetronbestendige kom.
Voeg water toe.
Dek met folie af. Na het koken roert u nogmaals door de
groenten en laat u ze 2 minuten staan.
Voeg een hoeveelheid water bij in verhouding tot de
hoeveelheid groenten.
** 0,2kg -0,4kg: 2 eetlepels
** 0,5 kg - 0,8 kg: 4 eetlepels
Gewicht 100g 200g 300g Deksel
Kokend water 200ml 400ml 600ml Ja/Verlucht hoek
49

Automatisch
ontdooien
De temperatuur en de dichtheid van voedsel variëren. Ik raad u dan ook aan het voedsel te controleren voordat u het
kookt. Dit geldt vooral voor grote stukken vlees en kip. Sommige soorten voedsel moeten niet volledig worden ontdooid
vóór het koken. Het broodprogramma (BREAD) is geschikt om kleine dingen zoals broodjes of een klein brood te
ontdooien. Deze moet men enige tijd laten staan om het midden te laten ontdooien. In het volgende voorbeeld toon ik
hoe u een stuk gevogelte van 1,4 kg ontdooit.
Uw oven heeft vier
magnetronontdooistanden:- MEAT
(vlees), POULTRY (gevogelte), FISH (vis)
en BREAD (brood); De
vermogensinstelling is per categorie
verschillend. Druk meermaals op de toets
AUTO DEFROST om een andere
instelling te kiezen.
Categorie
VLEES
VIS
BROOD
Druk op
DEFROST
GEVOGELTE
maal
maal
maal
maal
Voer het gewicht in van het diepgevroren voedsel dat u gaat ontdooien.
Draai aan de DRAAIKNOP tot het display "1.4" aangeeft.
Druk op START.
Tijdens het ontdooien zal uw oven een pieptoon laten horen. Open dan de ovendeur, keer het voedsel om en
verdeel het voedsel in stukken zodat het gelijkmatig kan ontdooien. Verwijder delen die reeds ontdooid zijn of
dek ze af om het ontdooien te vertragen. Sluit vervolgens de ovendeur en druk op START om het ontdooien te
hervatten. Uw oven stopt niet met ontdooien (ook niet na de pieptoon) voordat de deur wordt geopend.
Druk tweemaal op AUTO DEFROST om het ontdooiprogramma POULTRY
(gevogelte) te kiezen.
Druk op STOP/CLEAR.
Weeg het voedsel dat u gaat ontdooien. Verwijder alle metalen
verpakkingsdelen; plaats dan het voedsel in uw oven en sluit de deur.
50

RICHTLIJNEN VOOR HET ONTDOOIEN MET AUTOMATISCHE GEWICHTSINSTELLING
*
Plaats de te ontdooien levensmiddelen in een magnetronbestendige recipiënt en plaats ze onafgedekt op de glazen draaitafel.
* Scherm indien nodig kleine stukken vlees of gevogelte af met vlakke gedeelten aluminiumfolie. aluminiumfolie niet met de wanden van
de oven in aanraking komt.
* Scheid eetwaren zoals gehakt, karbonades, worsten en spek zo vlug mogelijk. Zo voorkomt u dat dunne gedeelten tijdens het
ontdooien warm worden. Zorg ervoor dat de
Wanneer u een piepsignaal hoort, moet u het gerecht uit de magnetron nemen, het
omdraaien en opnieuw in
de magnetron plaatsen. Druk op de toets START om verder te gaan. Neem aan het einde van het programma
het gerecht uit de magnetronoven, dek het met folie af en laat het staan of totdat het volledig ontdooid is.
Om volledig te laten ontdooien, moet u bijvoorbeeld grote stukken vlees en hele kippen nog minstens 1 uur LATEN STAAN alvorens ze
te bereiden.
Categorie
Gewichtslimiet
Kookgerei Voedsel
0,1 ~ 4,0 kg
Magnetronbestendig
vaatwerk (plat bord)
Vlees
Gevogelte
Vis
Vlees
Gevogelte
Vis
0,1 ~ 0,5 kg
Keukenpapier of plat
bord
Brood
Gemalen rundvlees, Tournedos, Stoofvleesblokjes, Lendenbiefstuk, Stoofschotel,
Gebraden bout, Hamburger, Varkenskarbonades, Lamskarbonades, Rollades, Worst,
Koteletten (.2cm)
Bij het piepsignaal het vlees omdraaien.
Laat het vlees na het ontdooien nog 5 tot 15 minuten staan.
Hele kip, Kippenpoten, Kippenborsten, Kalkoenborsten (minder dan 2,0 kg)
Bij het piepsignaal het vlees omdraaien.
Laat het vlees na het ontdooien nog 20 tot 30 minuten staan.
Filets, Vissteak, Hele vis, Schaal- en schelpdieren
Bij het piepsignaal het vlees omdraaien.
Laat de vis na het ontdooien nog 10 tot 20 minuten staan.
Gesneden brood, broodjes, stokbrood enz.
Doe de sneden van elkaar en leg ze tussen keukenpapier of plat bord.
Bij het piepsignaal het brood omdraaien.
Laat het brood na het ontdooien nog 1 tot 2 minuten staan.
51

De magnetron is voorzien van een
programma voor snel ontdooien (
).
Druk op STOP/CLEAR.
Weeg het voedsel dat u wilt ontdooien. Verwijder eerst alle metalen
koordjes en/of verpakkingen. Plaats het voedsel vervolgens in de
oven en sluit de deur.
Druk op QUICK DEFROST om het ontdooiprogramma
te kiezen.
De oven start automatisch.
Tijdens het ontdooien hoort u een pieptoon. Als u deze hoort, opent u de ovendeur, draait u het voedsel om en
verspreidt u het verder over de schaal, zodat het voedsel gelijkmatig ontdooit. Verwijder stukken die al zijn
ontdooid of bedek deze om het ontdooien te vertragen. Na het controleren, sluit u de ovendeur en drukt u op
START om het ontdooien te hervatten.
Snel ontdooien
Gebruik deze functie om 0,5 kg gehakt zeer snel te ontdooien. Het voedsel moet daarna nog enige tijd blijven
staan, zodat ook het middenstuk ontdooit. In onderstaand voorbeeld ziet u hoe u 0,5 kg bevroren gehakt ontdooit.
De oven stopt pas met ontdooien wanneer de ovendeur wordt geopend. Wanneer u een pieptoon hoort,
stopt de oven niet met ontdooien.
Gehakt
Gehakt
52

Voedsel Gewicht Kookgerei Instructies
INSTRUCTIES VOOR SNEL ONTDOOIEN
0.5kg
Magnetronbestendig
(plat bord)
Gehakt
Draai het voedsel om als u de pieptoon hoort.
Laat het voedsel na het ontdooien 5 tot 15 minuten staan.
Gebruik deze functie om snel gehakt te ontdooien.
Haal alle verpakking van het vlees. Plaats het gehakt op een magnetronbestendig bord. Wanneer u een pieptoon hoort, haalt u het gehakt uit de oven, draait
u het om en plaatst u het weer in de oven. Druk op Start
om door te gaan. Als het programma klaar is, haalt u het gehakt uit de oven, bedekt u het met folie en
laat u het vervolgens 5 tot 15 minuten staan of zolang nodig is om volledig te ontdooien.
Gehakt
53

Crispy
Verwarmen
Met Krokant verwarmen kunt u uw
favoriete gerechten gemakkelijk
bereiden door het type gerecht te
kiezen en het gewicht van het
voedsel met behulp van de
draaischijf in te voeren.
In het volgende voorbeeld laat ik u zien hoe u 0,3 kg Braadvlees
Druk op STOP/ CLEAR.
Druk éénmaal op Crispy Reheat.
Draai de DRAAISCHIJF tot het venster "0,3 kg" aangeeft.
Druk op START.
Categorie
Druk op
Crispy Reheat
Braadvlees
Lasagna
Brood
Pastei
tijd
maal
maal
maal
54

Aanwijzingen
Braadvlees
Lasagna
Brood
Pastei
0,2 ~ 0,6 kg
0,2 ~ 0,6 kg
0,1 ~ 0,3 kg
0,2 ~ 0,4 kg
Uit de koelkast
Uit de koelkast
Diepvries
Uit de koelkast
Snijd het braadvlees in lapjes van iets minder dan 2,5 cm dikte.
Plaats het voedsel
Bereid het gerecht verder als hierboven.
Plaats de overgebleven lasagna
Bereid het gerecht verder als hierboven.
Plaats de diepvriesbaguette of -croissant
Bestrijk de baguettes met melk of water.
Bereid het gerecht verder als hierboven.
Plaats de overgebleven pastei / taart
Bereid het gerecht verder als hierboven.
Categorie
VOEDSELTEMPERATUUR
Keukengerei
Hoeveelheid
55
Hoog rek
Hoog rek
Hoog rek
Hoog rek
op het hoog rek.
op het hoog rek.
op het hoog rek.
op het hoog rek.

Ontdooien en
Grillen
Met behulp van Ontdooien en grillen
kunt u de meeste van uw favoriete
gerechten gemakkelijk bereiden door
het type voedsel te selecteren en het
gewicht van het voedsel met de
draaischijf in te voeren.
In het volgende voorbeeld laat ik u zien hoe u 0,3 kg "Zalmfilet" bereidt.
Druk op STOP/ CLEAR.
Druk eenmaal op Defrost & Grill.
Draai de DRAAISCHIJF tot het venster "0,3 kg" aangeeft.
Druk op START.
Categorie
Druk op
Defrost & Grill
Zalmfilet
Garnalen
Hamburgerhapjes
Worstjes
tijd
maal
maal
maal
56

Aanwijzingen
Zalmfilet
Garnalen
Hamburgerhapjes
Worstjes
0,2 ~ 0,6 kg
0,1 ~ 0,4 kg
1 – 4 stuks
0,2 ~ 0,6 kg
Diepvries
Diepvries
Diepvries
epvries
Kies zalmfilets van plm. 2,5 cm dik een gewicht van 200 g per stuk.
Diepvries Plaats het voedsel
Kies het menu en het gewicht en druk op start.
Neem het gerecht na de bereiding uit de oven.
1. Reinig en ontader de garnalen. Leg ze
2. Als u een piep hoort, keert u het gerecht.
Plaats de hamburgerhapjes
Kies het menu en het gewicht en druk op start.
Neem het gerecht na de bereiding uit de oven.
1. Verwijder de verpakking en kerf de buitenkant in.
Leg ze
2. Als u een piep hoort, keert u het gerecht.
Categorie
VOEDSELTEMPERATUUR
Keukengerei
Hoeveelheid
57
Hoog rek
Hoog rek
Hoog rek
Hoog rek
Di
op het hoog rek.
op het hoog rek.
op het hoog rek.
op het hoog rek.

Het volgende betreft een voorbeeld over het gebruik van de warm houd functie om voesel op warm niveau in
90 minuten op te warmen.
*TIJD weergave
Indien warm houden in werking is, zal
getoond worden, druk opnieuw om de
resterende warm houd tijd op het scherm te tonen.
“taste saver"
Plaats het voedsel in de magnetron, druk twee
keer op “ (warm houden) ,taste saver ”
“ ” wordt HO-H
op het scherm getoond.
Druk op “ ”.start
1. Stel het vereiste AUTO COOK programma in.
Druk op “start”. Na het AUTO COOK programma,
zal de warm houden functie automatisch nog vijf
minuten na het afsluiten van AUTO COOK blijven werken.
2. Zodra AUTO COOK afgesloten is, kunt u ook op "taste saver"
.
houden
Warm houden na AUTO COOK
Indien u voedsel wilt warm houden bij het
gebruik van het programma AUTO COOK,
kunt u het voedsel warm houden door op
de knop te drukken.
Indien het voedsel zonder de Auto functie
warm gehouden moet worden, kunt u het
warm houden op ieder gewenst moment
activeren door op de knop te drukken.
De functie warm houden heeft maar één
niveau van 90 minuten. Maar de functie
stopt zodra u de deur opent.
NIVEAU Scherm
Druk op "taste saver"
Laag niveau
Hoog niveau
tijd
tijden
HO-L
HO-H
op het scherm getoond.
Druk op "start".
” wordt “HO-H
58
Taste saver
Taste saver

Voedsel
Kooktijd
Speciale richtlijnen
(HIGH)
Om voedsel met succes te verwarmen of op te warmen in de magnetron, is het belangrijk dat u bepaalde richtlijnen
volgt. Meet de hoeveelheid voedsel af om te bepalen hoeveel tijd er nodig is om het op te warmen. Plaats het voedsel in
cirkelvorm voor optimale resultaten. Het opwarmen van voedsel op kamertemperatuur duurt minder lang dan het
opwarmen van gekoeld voedsel. Verwijder ingeblikt voedsel uit het blik en doe het in een magnetronbestendige schaal.
Het voedsel zal sneller opwarmen als u het afdekt met een magnetronbestendig deksel of plasticfolie met luchtgaten.
Verwijder de afdekking voorzichtig om verbranding door stoom te voorkomen. Gebruik de onderstaande tabel als
richtlijn voor het opwarmen van gekookt voedsel.
Richtlijnen voor
verwarmen of opwarmen
Lapjes vlees
3 lapjes
(0,5 cm dik)
Stukken kip
1 borst
1 poot en bil
Visfilet
(170-230 gr)
Lasagne
1 portie (300 gr)
Stoofschotel
1 kop
4 koppen
Stoofschotel
met room of kaas
1 kop
4 koppen
Broodje gehakt of
geroosterd
rundvlees
1 sandwich (1/2
kop vleesvulling)
zonder broodje
1tot 2 minuten
2tot 3 minuten
3tot3
1
/2 minuten
1tot2 minuten
4tot6 minuten
1
1
/2tot3 minuten
4
1
/2tot7minuten
1tot2
1
/2 minuten
3
1
/2tot6 minuten
1tot2
1
/2 minuten
Leg de lapjes vlees op een magnetronbestendig bord.
Dek af met plastic folie en doorprik de folie.
• Opmerking: jus of saus helpt om het vlees sappig te houden.
Leg de stukken kip op een magnetronbestendig bord.
Dek af met plastic folie en doorprik de folie.
Leg de vis op een magnetronbestendig bord.
Dek af met plastic folie en doorprik de folie.
Leg de lasagne op een magnetronbestendig bord.
Dek af met plastic folie en doorprik de folie.
KOOK in een afgedekte magnetronbestendige schotel.
Eenmaal omroeren halverwege het koken.
KOOK in een afgedekte magnetronbestendige schotel.
Eenmaal omroeren halverwege het koken.
Warm de vulling en het broodje afzonderlijk op.
KOOK in een afgedekte magnetronbestendige schotel.
Eenmaal omroeren. Warm het broodje op volgens de
richtlijnen in de hiernavolgende tabel.
Voedsel
Kooktijd
Speciale richtlijnen
(HIGH)
Aardappelpuree
1 kop
4 koppen
Gebakken bonen
1 kop
Ravioli of pasta in saus
1 kop
4 koppen
Rijst
1 kop
4 koppen
Sandwich of broodje
1 broodje
Groenten
1 kop
4 koppen
Soep
1 portie (1/4 l)
2
1
/2tot3
1
/2
minuten
6tot9 minuten
1
1
/2tot3 minuten
2
1
/2tot4 minuten
7
1
/2tot11minuten
1tot1
1
/2 minuten
3
1
/2tot5 minuten
15tot30 seconden
1
1
/2tot2
1
/2
minuten
3
1
/2tot5
1
/2
minuten
1
1
/2tot2 minuten
KOOK in een afgedekte magnetronbestendige schotel.
Eenmaal omroeren halverwege het koken.
KOOK in een afgedekte magnetronbestendige schotel.
Eenmaal omroeren halverwege het koken.
KOOK in een afgedekte magnetronbestendige schotel.
Eenmaal omroeren halverwege het koken.
KOOK in een afgedekte magnetronbestendige schotel.
Eenmaal omroeren halverwege het koken.
In keukenpapier wikkelen en op het glazen
draaiplateau plaatsen.
KOOK in een afgedekte magnetronbestendige schotel.
Eenmaal omroeren halverwege het koken.
KOOK in een afgedekte magnetronbestendige schotel.
Eenmaal omroeren halverwege het koken.
59

Richtlijnen voor
verse groenten
Groente
Hoeveelheid
Kooktijd
Richtlijnen Standtijd
(HIGH)
Maïs, vers
Champignons,
vers, schijfjes
Pastinaak, vers,
gesneden
Groene erwten,
vers
Zoete aardappelen,
hele (170 tot 230
gr per stuk)
Witte aardappelen,
hele (170 tot 230
gr per stuk)
Spinazie, vers,
bladspinazie
Courgette, vers,
gesneden
Courgette, vers,
heel
Schillen. 2 eetlepels water toevoegen in
een schotel van 1,5 liter. Afdekken.
Champignons in schotel van 1,5 liter
doen en afdekken. Halverwege tijdens
het koken omroeren.
1/2 kop water toevoegen in een schotel
van 1,5 liter en afdekken. Halverwege
tijdens het koken omroeren.
1/2 kop water toevoegen in een schotel
van 1,5 liter en afdekken. Halverwege
tijdens het koken omroeren.
Enkele malen in de aardappelen prikken
met een vork. Op 2 stukken
keukenpapier plaatsen. Halverwege
tijdens het koken omkeren.
Enkele malen in de aardappelen prikken
met een vork. Op 2 stukken
keukenpapier plaatsen. Halverwege
tijdens het koken omkeren.
1/2 kop water toevoegen in een schotel
van 2 liter en afdekken.
1/2 kop water toevoegen in een schotel
van 1,5 liter en afdekken. Halverwege
tijdens het koken omroeren.
Doorprikken. Op 2 stukken
keukenpapier plaatsen. Halverwege het
koken de courgette omkeren en
herschikken.
2tot3 minuten
2tot3 minuten
2tot3 minuten
2tot3 minuten
2tot3 minuten
2tot3 minuten
2tot3 minuten
2tot3 minuten
2tot3 minuten
4 tot 8
1
1
/2 tot 2
1
/2
4 tot 7
6 tot 9
4 tot 9
6 tot 12
5
1
/2 tot 7
1
/2
9
1
/2
tot 14
4
1
/2 tot 7
1
/2
4
1
/2 tot 7
1
/2
6 tot 9
2 kolven
230 gr
450 gr
4 koppen
2 middelgrote
4 middelgrote
2aardappelen
4aardappelen
450 gr
450 gr
450 gr
Groente
Hoeveelheid
Kooktijd
Richtlijnen Standtijd
(HIGH)
Artisjokken
(230 gr per stuk)
Asperges,
vers, stengels
Groene bonen
Bieten, vers
Broccoli, vers,
stengels
Kool, vers,
gesneden
Wortelen, vers,
gesneden
Bloemkool,
vers, heel
Vers,
bloemkoolroosjes,
selder, vers,
gesneden
Schoonmaken. 2 eetlepels water en 2
eetlepels sap toevoegen. Afdekken.
1 kop water toevoegen. Afdekken.
1/2 kop water toevoegen in schotel van 1,5
liter. Halverwege tijdens het koken omroeren.
1/2 kop water toevoegen in een schotel
van 1,5 liter en afdekken. Herschikken
halverwege het koken.
Doe de broccoli in een ovenschotel.
1/2 kop water toevoegen.
1/2 kop water toevoegen in een schotel
van 1,5 liter en afdekken. Halverwege
tijdens het koken omroeren.
1/4 kop water toevoegen in een schotel
van 1,5 liter en afdekken. Halverwege
tijdens het koken omroeren.
Schoonmaken. 1/4 kop water toevoegen in
een schotel van 1,5 liter en afdekken.
Halverwege tijdens het koken omroeren.
In stukken snijden. 1/2 kop water
toevoegen in een schotel van 1,5 liter en
afdekken. Halverwege tijdens het koken
omroeren.
2tot3 minuten
2tot3 minuten
2tot3 minuten
2tot3 minuten
2tot3 minuten
2tot3 minuten
2tot3 minuten
2tot3 minuten
2tot3 minuten
4
1
/2
tot 7
10 tot 12
2
1
/2
tot 6
7 tot 11
11 tot 16
5 tot 8
5
1
/2tot
7
1
/2
2 tot 3
5 tot 7
11 tot 16
2 middelgrote
4 middelgrote
450 gr
450 gr
450 gr
450 gr
450 gr
200 gr
450 gr
2 koppen
4 koppen
60

Richtlijnen voor het grillen van vlees
• Snijd het overtollige vet van het vlees. Let bij het afsnijden van het vet op dat u niet in het
malse deel snijdt. (Dit voorkomt dat het vet omkrult.)
• Plaats het vlees op het rek. Bestrijk het vlees met gesmolten boter of olie.
• Keer halverwege tijdens het grillen het vlees om.
Richtlijnen voor het grillen van vis en schaaldieren
Plaats vis en schaaldieren op het rek. Een hele vis moet vóór het grillen aan beide zijden
diagonaal worden ingesneden. Bestrijk vis en schaaldieren met gesmolten boter, margarine
of olie vóór en tijdens het koken. Dit voorkomt dat de vis uitdroogt. Grill het voedsel
gedurende de in de tabel vermelde aanbevolen tijdsduur. Hele vis en vissteaks moeten
halverwege tijdens het grillen voorzichtig worden omgekeerd. Dikke visfilets kunnen indien
gewenst ook halverwege worden omgekeerd.
Voedsel Gewicht
Kooktijd bij benadering
Tips
( in minuten)
Richtlijnen voor
Hamburgers
Biefstuk
(2,5 cm (1") dik)
Licht gebakken
Medium
Goed doorbakken
Varkenslapjes
(2,5 cm (1") dik)
Lamskoteletten
(2,5 cm (1") dik)
Worsten
(2,5 cm (1") dik)
50 gr x 2
100 gr x 2
230 gr x 2
230 gr x 2
230 gr x 2
230 gr x 2
230 gr x 2
230 gr
13-16
19-23
18-20
22-24
26-28
27-32
25-32
13-16
Bedruip het vlees met olie
of gesmolten boter. Plaats
dunne stukken vlees op het
grillrek. Dikkere stukken
kunnen in een schaal
worden geplaatst. Keer
het voedsel halverwege
tijdens het koken om.
Regelmatig omkeren.
Regelmatig omkeren.
grillen
Voedsel Gewicht
Kooktijd bij benadering
Tips
( in minuten)
Visfilets
1 cm ( 1 /2") dik
1,5 cm ( 1 /2") dik
Vissteaks
2,5 cm (1") dik
Hele vis
Sint-
Jacobsschelpen
Ongekookte
garnalen
230 gr
230 gr
230 gr
225-350 gr per
stuk
450 gr
450 gr
450 gr
17-21
20-24
24-28
16-20
24-28
16-20
16-20
Bestrijk het voedsel met
gesmolten boter en keer
het halverwege tijdens het
koken om.
Dikke en vette vis heeft
extra tijd nodig.
Goed bedruipen tijdens
het koken.
61

Veiligheidsvoorschriften
WAARSCHUWING
Zorg ervoor dat u de kooktijden correct instelt.
Te lang koken kan immers BRAND en bijgevolg SCHADE
aan de OVEN veroorzaken.
11. Plaats de oven zodanig dat de voorkant van de deur zich op minimaal 8
cm van de rand van het oppervlak bevindt waarop de oven staat, om te
voorkomen dat hij per ongeluk omkantelt.
12. Doorprik aardappelen, appelen of ander dergelijk fruit of groenten vóór
u ze kookt.
13. Kook eieren niet in hun schaal. Er zal dan druk in het ei ontstaan,
waardoor het zal barsten.
14. Probeer niet te frituren in uw oven.
15. Verwijder de plastic verpakking van etenswaren vóór u ze kookt of
ontdooit. Soms moeten etenswaren echter worden afgedekt met plastic
folie vóór u ze opwarmt of kookt.
16. Als de ovendeur of de deurafdichtingen beschadigd zijn, mag de oven
niet meer worden gebruikt voordat hij is gerepareerd door een
gekwalificeerde onderhoudstechnicus.
17. Als u rook opmerkt, moet u de oven uitschakelen of de stekker uit het
stopcontact trekken en de ovendeur dicht houden om de vlammen te
smoren.
18. Wanneer etenswaren worden opgewarmd of gekookt in plastic
wegwerpschaaltjes, papier of ander brandbaar materiaal, moet u de
oven regelmatig controleren in verband met brandgevaar.
19. Kinderen mogen de oven alleen gebruiken onder toezicht en nadat ze
duidelijke instructies hebben gekregen, zodat ze de oven veilig kunnen
bedienen en zich bewust zijn van de gevaren van verkeerd gebruik.
20. Vloeistoffen of andere etenswaren mogen niet worden opgewarmd in
gesloten houders, want dit houdt ontploffingsgevaar in.
1. Knoei niet met de deur, het bedieningspaneel, de veiligheidsschakelaars
of enig ander onderdeel van de oven en voer er evenmin aanpassingen of
reparaties aan uit. Het uitvoeren van onderhoud of reparaties waarvoor
beschermingen tegen microgolfenergie moeten worden verwijderd, is
gevaarlijk. Reparaties mogen uitsluitend worden uitgevoerd door een
gekwalificeerd onderhoudstechnicus.
2. Bedien de oven niet terwijl hij leeg is. U laat het best een glas water in de
oven staan wanneer u hem niet gebruikt. Het water zal alle
microgolfenergie veilig absorberen als de oven per ongeluk wordt gestart.
3. Droog geen kleren in de magnetronoven. Als deze te lang worden
verwarmd, kunnen ze verkolen of verbranden.
4. Kook geen voedsel dat in keukenpapier is gewikkeld, tenzij dit volgens de
instructies in uw kookboek zo hoort.
5. Gebruik geen krantenpapier in plaats van keukenpapier om te koken.
6. Gebruik geen houten houders. Deze kunnen warm worden en
verbranden. Gebruik geen keramische houders met metalen inlegwerk
(bv. goud of zilver). Verwijder altijd metalen verpakkingsdelen. Metalen
voorwerpen kunnen vonken en aldus ernstige schade veroorzaken.
7. Bedien de oven niet met een stuk keukenpapier, een servet of enig ander
obstakel tussen de deur en de voorste randen van de oven. Dit kan
lekkage van microgolfenergie veroorzaken.
8. Gebruik geen gerecycleerd papier. Dit kan immers onzuiverheden
bevatten die vonken en/of brand kunnen veroorzaken tijdens het koken.
9. Spoel het draaiplateau niet af in water onmiddellijk na het koken. Dit kan
breuk of beschadiging veroorzaken.
10. Hoe kleiner de etenswaren, des te korter de kook- of verwarmingstijd.
Als men de normale kooktijden aanhoudt, kan dit oververhitting en
brand veroorzaken.
21. Gebruik uitsluitend gereedschappen die voor het magnetron zijn
bedoeld.
62

Veiligheidsvoorschriften
WAARSCHUWING
Zorg ervoor dat u de kooktijden correct instelt.
Te lang koken kan immers BRAND en bijgevolg SCHADE
aan de OVEN veroorzaken.
63
22. Wanner u eten in plastiek-of papierbakjes voorverwarmt, houd de oven
35. Dit apparaat is niet bedoeld om gebruikt te worden door personen
in de gaten om brand te voorkomen.
(inclusief kinderen) met verminderde fysieke, gevoelsmatige of
23. Indien u rook opmerkt, schakel het apparaat uit of trek de stekker uit het
mentale mogelijkheden, of gebrek aan ervaring en kennis, tenzij
stopcontact en houd de deur dicht om eventuele vlammen te doven.
er is toezicht is of instructies betreffende het gebruik van het apparaat
24. Het verwarmen van drank in de magnetron kan een vertraagde maar
zijn verstrekt door een persoon die verantwoordelijk is voor hun veiligheid.
plotselinge kookreactie veroorzaken, waardoor u het bakje voorzichtig
WAARSCHUWING: Indien de deur of de deurafsluiting is beschadigd, zal
dient te verwijderen.
de oven niet werken tot een bevoegde technicus het
25. Om verbranding te voorkomen, dient u, vóór consumptie, de inhoud van
probleem heeft verholpen.
voedingsflesjes en potjes babyvoeding te roeren en te schudden en de
WAARSCHUWING: Het is gevaarlijk voor niet bevoegde personen het
temperatuur af te laten nemen.
apparaat te openen of het deksel te verwijderen om
26. Verwarm nooit eieren in hun dop of hele gekookte eieren in de magnetron, want
het toestel te repareren, want het deksel beschermt
tegen de magnetron uitstraling.
ze kunnen ontploffen, zelfs nadat de verwarmingstijd van de magnetron is beëindigd.
WAARSCHUWING: Verwarm nooit vloeistof en etenswaren in afgedekte
27. Details over het schoonmaken van deurafsluitingen, hoekjes en aanliggende delen.
bakjes, want ze kunnen ontploffen.
28. De oven moet regelmatig worden schoongemaakt en alle voedselrestjes
WAARSCHUWING: Laat kinderen alleen de oven zonder toezicht gebruiken
worden verwijderd.
nadat u duidelijke instructies heeft gegeven zodat het
29. Indien u de oven niet schoon houd, kan het oppervlakte van het
kind de oven op een veilige manier kan gebruiken en
apparaat verslechteren, waardoor het toestel minder lang mee gaat en
de gevaren van een onjuist gebruik begrijpt.
een gevaarlijke situatie kan veroorzaken.
30. Gebruik uitsluitend de voor deze oven aanbevolen temperatuurpijl (voor
WAARSCHUWING: De te bereiken onderdelen kunnen heet worden
tijdens gebruik. Houd jonge kinderen uit de buurt.
apparaten die uitgerust zijn met een temperatuursensor mogelijkheid).
31. Indien u de meegeleverde verwarmingselementen gebruikt, zal het
WAARSCHUWING: Als dit apparaat in de gecombineerde stand wordt
apparaat heet worden. Zorg ervoor dat u de verwarmingselementen
gebruikt, mogen kinderen de oven wegens de
binnen de oven niet aanraakt.
temperatuur die wordt opgewekt alleen onze toezicht
32. Het toestel mag niet zonder toezicht worden gebruikt door jonge
van een volwassene gebruiken.
kinderen of door geestelijke gehandicapte mensen.
WAARSCHUWING:
Sta niet toe dat kinderen op, met of in de machine
33. Deze verbinding kan bereikt worden door de stekker op een te
spelen. Nauw toezicht is nodig indien het apparaat
bereiken plek te plaatsen, of door het gebruik van een knop in de
door of in de buurt van kinderen word gebruikt.
bedrading, volgens de bedradingsrichtlijnen.
WAARSCHUWING:
De apparaten zijn niet bedoeld om aangestuurd te
34. Gebruik geen agressieve schoonmaakproducten, of scherpe metalen
worden door een externe tijdsklok of door een ander
schrapers omde ovendeur te reinigen, aangezien deze krassen kummen
niet LG gerelateerd bediening.
veroorzaken, waardoortht glas kan breken.

Magnetronbestendig
kookgerei
Gebruik nooit metalen of met metaal afgewerkt kookgerei in uw
magnetronoven
Microgolven dringen immers niet door metaal. Metalen voorwerpen in de oven
zullen de microgolven weerkaatsen, waardoor een vonkoverslag ontstaat, een
verschijnsel dat vergelijkbaar is met bliksem. De meeste hittebestendige niet-metalen
houders zijn geschikt voor gebruik in uw magnetronoven. Sommige houders kunnen
echter materiaal bevatten waardoor ze ongeschikt zijn voor de magnetron. Als u
twijfelt of een bepaalde houder geschikt is voor de magnetron, dan kunt u hierover
op een eenvoudige manier zekerheid krijgen. Plaats de houder in kwestie naast een
glazen schaal gevuld met water in de magnetronoven. Laat de magnetron
gedurende 1 minuut met hoog vermogen (HIGH) werken. Als het water warm wordt,
maar de houder koud aanvoelt, dan is hij geschikt voor de magnetron. Als het water
echter niet van temperatuur verandert, maar de houder warm wordt, worden de
microgolven opgeslorpt door de houder en is hij niet geschikt voor gebruik in de
magnetronoven. Wellicht hebt u reeds heel wat kookgerei in uw keuken dat geschikt
is voor gebruik in uw magnetronoven. Overloop gewoon even de volgende
controlelijst.
Servies
Vele soorten serviezen zijn magnetronbestendig. Lees in geval van twijfel de
documentatie van de fabrikant of doe de magnetrontest.
Glaswerk
Hittebestendig glaswerk is geschikt voor de magnetron. Dit omvat alle merken van in
de oven gehard glaswerk. Gebruik echter geen fragiele glazen, zoals tuimelglazen
of wijnglazen. Deze kunnen immers barsten wanneer het voedsel warm wordt.
Plastic opbergdozen
Deze kunnen worden gebruikt voor voedsel dat snel moet worden opgewarmd.
Gebruik ze echter niet voor voedsel dat een aanzienlijke tijd in de oven moet staan.
Door de warmte van het voedsel kunnen de plastic dozen immers vervormen of
smelten.
Papier
Papieren borden en houders zijn handig en kunnen veilig in uw magnetronoven
worden gebruikt, op voorwaarde dat de kooktijd kort is en dat het te koken voedsel
vet- en vochtarm is. Keukenpapier is ook erg handig om etenswaren in te wikkelen
en voor het bedekken van bakschotels waarin vette etenswaren, bijvoorbeeld spek,
worden gekookt. U vermijdt het best gekleurd papier, aangezien de kleur kan
uitlopen. Gerecycleerd papier kan onzuiverheden bevatten die vonken en/of brand
kunnen veroorzaken bij gebruik in de magnetronoven.
Plastic kookzakjes
Kookzakjes zijn magnetronbestendig mits ze speciaal voor het koken bestemd zijn.
Maak echter een insnijding in het zakje zodat de stoom kan ontsnappen. Gebruik
geen gewone plastic zakjes in uw magnetronoven, want deze zullen smelten en
barsten.
Plastic magnetron-kookgerei
Magnetron-kookgerei bestaat in verschillende vormen en formaten.
Doorgaans kunt u het keukengerei gebruiken dat u al heeft, zodat u geen
nieuwe dingen hoeft te kopen.
Aardewerk, steengoed en keramiek
Houders die uit deze materialen zijn gemaakt zijn gewoonlijk geschikt voor gebruik
in uw magnetronoven. Niettemin voert u best een test uit.
OPGELET
Sommige houders met hoog lood- of ijzergehalte zijn niet geschikt voor
de magnetron. Controleer de houders om zeker te zijn dat ze geschikt
zijn voor gebruik in een magnetronoven.
64

Houd het voedsel in het oog
De recepten in het boek zijn met veel zorg opgesteld. Het welslagen ervan hangt echter af
van de mate waarin u het voedsel tijdens het koken in het oog houdt. Houd uw voedsel
steeds in het oog tijdens het koken. Uw magnetronoven is uitgerust met een lamp die
automatisch gaat branden wanneer de oven in werking is. Zo kunt u in de oven kijken en
het kookproces volgen. De aanwijzingen in recepten betreffende het hoger plaatsen van
voedsel, roeren en dergelijke, moeten worden beschouwd als minimale aanbevelingen. Als
het voedsel ongelijkmatig lijkt te koken, voert u gewoon de aanpassingen uit die u nodig
acht om het probleem op te lossen.
Factoren die de kooktijd in de magnetron beïnvloeden
Er zijn vele factoren die de kooktijd beïnvloeden. De temperatuur van de bij het recept
gebruikte ingrediënten maakt een groot verschil uit voor de kooktijd. Wanneer bijvoorbeeld
ijskoude boter, melk en eieren zijn gebruikt om een cake te maken, zal het langer duren om
hem te bakken dan wanneer de ingrediënten op kamertemperatuur zijn. Alle recepten in dit
boek vermelden steeds een minimale en een maximale kooktijd. Over het algemeen zal u
merken dat het voedsel te licht gekookt is na de minimale kooktijd, en soms zult u het
voedsel langer willen koken dan de maximumtijd, naar gelang van uw persoonlijke
voorkeur. De vuistregel die in dit boek wordt gevolgd, is dat men het best conservatief is in
het geven van kooktijden. Voedsel dat te lang heeft gekookt, is immers onherroepelijk
verkwist. In sommige recepten, vooral die voor brood, cake en vla, wordt aangeraden het
voedsel uit de oven te halen wanneer het nog niet helemaal doorgekookt is. Dit is geen
vergissing. Dit soort voedsel blijft immers, meestal afgedekt, nog doorkoken buiten de oven
doordat de warmte aan de buitenkant zich geleidelijk naar binnen toe verspreidt. Als het
voedsel in de oven blijft staan tot het helemaal is doorgekookt, zal de buitenkant te hard
gekookt zijn of kan het voedsel zelfs aanbranden. Na verloop van tijd zult u erg bedreven
worden in het schatten van zowel de kooktijd als de standtijd van verschillende soorten
voedsel.
Dichtheid van voedsel
Het duurt minder lang om licht en poreus voedsel zoals cake en brood te koken dan zwaar
en compact voedsel als gebraad en stoofschotels. Let bij het koken van poreus voedsel in de
magnetronoven op dat de buitenste randen niet droog en breekbaar worden.
Hoogte van het voedsel
Het bovenste deel van hoog voedsel, bijvoorbeeld gebraad, zal sneller koken dan het
onderste deel. Daarom is het aangewezen hoog voedsel enkele malen om te keren tijdens
het koken.
Vochtgehalte van voedsel
Vocht heeft de neiging te verdampen onder invloed van de warmte van de microgolven.
Daarom moet relatief droog voedsel, zoals gebraad en sommige groenten, vóór het koken
worden besprenkeld met water of worden afgedekt om het vocht vast te houden.
Benen en vet
Benen geleiden de warmte en vet kookt sneller dan vlees. Let tijdens het koken van vlees met
een been of vet op dat het vlees niet ongelijkmatig of te lang wordt gekookt.
Hoeveelheid voedsel
Het aantal microgolven in uw oven blijft constant, ongeacht de hoeveelheid voedsel die u
kookt. Dus, hoe meer voedsel in de oven, hoe langer de kooktijd. Denk eraan de kooktijd
minstens met één derde te verminderen wanneer u maar de helft van een recept klaarmaakt.
Vorm van het voedsel
Microgolven dringen slechts ongeveer 2 cm door in het voedsel. De binnenkant van dik
voedsel wordt gekookt naarmate de warmte aan de buitenkant zich naar binnen toe
verspreidt. Alleen de buitenkant van het voedsel wordt gekookt door microgolfenergie. de
rest wordt gekookt door geleiding. De slechtst mogelijke vorm van voedsel voor de
magnetron is dik en rechthoekig. De hoeken zullen aanbranden lang voor het midden zelfs
maar warm is. Voedsel met een dunne ronde vorm of ringvorm kan wel met succes worden
klaargemaakt in de magnetron.
Afdekken
Door het voedsel af te dekken, worden de warmte en de stoom vastgehouden, waardoor het
voedsel sneller kookt. Gebruik een deksel of speciale magnetronfolie en plooi een hoekje om,
om te voorkomen dat de folie scheurt.
Bruinen
Vlees en gevogelte dat vijftien minuten of langer wordt gekookt, zal lichtjes bruinen in zijn
eigen vet. Voedsel dat gedurende een kortere tijd wordt gekookt, kan worden bestreken met
een bruineersaus, zoals worcestersaus, sojasaus of barbecuesaus, om het een smakelijke
kleur te geven. Aangezien een relatief kleine hoeveelheid bruineersaus aan het voedsel
wordt toegevoegd, zal de oorspronkelijke smaak van het recept niet veranderen.
Afdekken met vetbestending papier
Door voedsel af te dekken met vetbestendig papier voorkomt u spatten en houdt het voedsel
de warmte vast. Het dekt het voedsel echter niet zo goed af als een deksel of speciale folie,
waardoor het voedsel lichtjes uitdroogt.
Schikken en ruimte laten
Losse etenswaren zoals gebakken aardappelen, cakejes en hapjes worden gelijkmatiger
opgewarmd als u ze op gelijke afstand van elkaar en bij voorkeur in cirkelvorm in de oven
plaatst. Plaats nooit etenswaren boven op elkaar.
Eigenschappen van voedsel en
koken in de magnetron
65

Eigenschappen van voedsel en
koken in de magnetron
Roeren
Roeren is één van de belangrijkste technieken tijdens het koken in de magnetron. Bij
gewoon koken, roert u om het voedsel te mengen. Bij het koken in de magnetron dient het
roeren echter om de warmte te verspreiden en te herverdelen. Roer steeds van de buitenkant
naar het midden, aangezien de buitenkant van het voedsel het eerst warm wordt.
Omkeren
Groot, hoog voedsel, bijvoorbeeld gebraad of een hele kip, moet worden omgekeerd zodat
de boven- en de onderkant gelijkmatig kunnen koken. Het verdient ook aanbeveling stukken
kip of vleeslapjes om te keren.
Dikkere stukken aan de buitenkant plaatsen
Aangezien microgolven worden aangetrokken door de buitenkant van het voedsel, is het
aangewezen dikkere stukken vlees, gevogelte en vis aan de buitenste rand van de
bakschotel te plaatsen. Op die manier vangen de dikkere stukken het meeste
microgolfenergie op en kan het voedsel gelijkmatig koken.
Afschermen
U kunt strookjes aluminiumfolie (die de microgolven tegenhouden) aanbrengen aan de
hoeken of randen van rechthoekig voedsel om te voorkomen dat deze te hard worden
gekookt. Gebruik nooit te veel folie en zorg ervoor dat de folie vastzit aan de schotel, om
'vonkoverslag' in de oven te voorkomen.
Hoger plaatsen
Dik of compact voedsel kan hoger worden geplaatst, zodat de microgolven kunnen worden
geabsorbeerd door de onderkant en het midden van het voedsel.
Doorprikken
Etenswaren die in een schaal, schil of vlies zitten barsten makkelijk open in de oven als u ze
niet vooraf doorprikt. Voorbeelden hiervan zijn eierdooiers en eiwit, mosselen en oesters en
hele stukken groenten en fruit.
Controleren of het voedsel gaar is
Voedsel wordt zo snel gaar in een magnetronoven dat u het regelmatig moet controleren.
Bepaalde etenswaren blijven in de magnetron tot ze volledig gaar zijn, maar de meeste
etenswaren, bijvoorbeeld vlees en gevogelte, worden uit de oven gehaald terwijl ze nog niet
helemaal gaar zijn en koken verder gedurende de 'standtijd'. De inwendige temperatuur
van het voedsel zal tijdens de standtijd stijgen met 5˚F (3˚C) tot 15˚F (8˚C).
Standtijd
Vaak moeten etenswaren nadat u ze uit de oven hebt gehaald nog 3 tot 10 minuten blijven
staan. Gewoonlijk wordt het voedsel gedurende deze standtijd afgedekt om de warmte te
bewaren, tenzij het voedsel moet drogen (cakes en koekjes, bijvoorbeeld). Door het voedsel
nog even te laten staan, wordt het gelijkmatig gekookt en krijgt het zijn volle smaak.
Uw oven reinigen
1. Houd de binnenkant van de oven schoon
Spatten van etenswaren of gemorste vloeistof koeken vast aan de ovenwanden
en tussen de afdichting en het deuroppervlak. U veegt gemorst voedsel het best
onmiddellijk weg met een vochtige doek. Kruimels en spatten slorpen
microgolfenergie op en verlengen de kooktijd. Veeg kruimels die tussen de
deur en het frame vallen weg met een vochtige doek. Het is belangrijk dat u dit
deel schoon houdt met het oog op een goede afdichting van de oven.
Verwijder vetspatten met een in zeepwater gedrenkte doek. Daarna afspoelen
en laten drogen. Gebruik geen agressieve schoonmaakmiddelen of
schuurmiddelen. Het glazen draaiplateau mag worden afgewassen met de
hand of in de vaatwasmachine.
2. Houd de buitenkant van de oven schoon
Reinig de buitenkant van uw oven met zeepwater. Spoel de oven af met zuiver
water en droog hem af met een zachte doek of keukenpapier. Om schade aan
de werkende delen binnen in de oven te voorkomen, moet u vermijden dat het
water door de ventilatieopeningen naar binnen sijpelt. Om het
bedieningspaneel te reinigen, opent u de deur om te voorkomen dat de oven
per ongeluk start en veegt u het paneel eerst met een vochtige en meteen
daarna met een droge doek schoon. Druk na het reinigen op de STOP/CLEAR-
toets.
3. Als de ovendeur aan de binnenkant of aan de buitenkant beslaat, veegt u de
deurpanelen schoon met een zachte doek. Dit kan gebeuren wanneer de
magnetronoven wordt gebruikt bij hoge vochtigheid en duidt geenszins op een
defect.
4. Houd de deur en de deurafdichtingen schoon. Gebruik alleen warm water met
zeep. Vervolgens goed afspoelen en afdrogen. GEBRUIK GEEN
SCHUURMIDDELEN, ZOALS REINIGINGSPOEDER OF STALEN EN PLASTIC
SCHUURSPONSJES. Metalen delen zijn makkelijker te onderhouden als u ze
regelmatig schoonveegt met een vochtige doek.
66

Vragen en
antwoorden
V Wat is er mis wanneer de ovenlamp niet gaat branden?
A Als de ovenlamp niet brandt, kan dit verschillende oorzaken hebben.
De lamp is doorgebrand
De deur is niet gesloten
V Dringt de microgolfenergie door het kijkvenster in de deur?
A Nee. De openingen, of doorgangen, zijn bedoeld om licht door te laten;
zij laten echter geen microgolven door.
V Waarom weerklinkt er een pieptoon wanneer men een toets op het
bedieningspaneel aanraakt?
A De pieptoon bevestigt dat de instelling juist is ingevoerd.
V Wordt de magnetronoven beschadigd als men hem leeg gebruikt?
A Ja. Laat de oven nooit leeg of zonder het glazen draaiplateau werken.
V Waarom spatten eieren soms open?
A Wanneer u eieren bakt, kookt of pocheert, kan de dooier openspatten als
gevolg van de stoom die in het dooiervlies wordt opgebouwd. Om dit te
voorkomen, doorprikt u de dooier gewoon vóór het koken. Kook nooit
eieren in hun schaal in de magnetronoven.
V Waarom is het aan te bevelen dat men voedsel na het koken in de
magnetron nog even laat staan?
A Wanneer u voedsel nadat het in de magnetron is gekookt nog even laat
staan, blijft het doorkoken. Deze standtijd zorgt ervoor dat het voedsel
gelijkmatig wordt gekookt. De duur van de standtijd varieert naar gelang
van de dichtheid van het voedsel.
V Kan men popcorn maken in een magnetronoven?
A Ja, op één van de twee hierna beschreven manieren
1 Door gebruik te maken van kookgerei dat speciaal bedoeld is voor het
maken van popcorn in de magnetron.
2 Door in de winkel verkrijgbare voorverpakte magnetron-popcorn te
gebruiken, waarop de juiste kooktijden en vermogens zijn vermeld voor
een goed resultaat.
VOLG NAUWGEZET DE RICHTLIJNEN VAN DE FABRIKANT VAN HET
POPCORNPRODUCT. BLIJF BIJ DE OVEN TIJDENS HET POFFEN VAN
MAÏS. STOP MET KOKEN ALS DE MAÏS NIET POFT BINNEN DE
VOORGESCHREVEN TIJD. DOOR TE LANG TE KOKEN, KUNNEN DE
MAÏSKORRELS VUUR VATTEN.
OPGELET
GEBRUIK NOOIT EEN BRUINE PAPIEREN ZAK VOOR HET POFFEN VAN
MAÏS. PROBEER NOOIT OVERSCHOTJES MAÏSKORRELS TE POFFEN.
V Waarom kookt mijn oven soms minder snel dan vermeld in het
kookboek?
A Lees nogmaals de aanwijzingen in uw kookboek om te zien of u ze
nauwkeurig hebt gevolgd en om na te gaan wat het verschil in kooktijd
kan veroorzaken. De tijden en warmte-instellingen die in kookboeken
staan vermeld, zijn richtlijnen die te lang koken voorkomen. Dit is
namelijk het voornaamste probleem bij het leren koken met de
magnetron. Door verschillen in grootte, vorm, gewicht en afmetingen van
het voedsel kan een langere kooktijd vereist zijn. Tracht aan de hand van
de richtlijnen in het kookboek de toestand van het voedsel zelf te
beoordelen, net als bij gewoon koken.
67

Informatie over de stekker/
Technische gegevens
De draden in de voedingskabel zijn gekleurd overeenkomstig de
volgende kleurcodes
BLAUW ~ Nulleider
BRUIN ~ Stroomdraad
GROEN EN GEEL ~ Aarding
Wanneer de kleuren van de draden van de voedingskabel niet
overeenstemmen met de kleuren van de aansluitingen in uw stekker,
gaat u als volgt te werk:
Sluit de BLAUWE draad aan op de met N gemerkte of ZWART
gekleurde aansluiting.
Sluit de BRUINE draad aan op de met L gemerkte of ROOD
gekleurde aansluiting.
Sluit de GROEN EN GELE of GROENE draad aan op de met E of
gemerkte aansluiting.
Als de voedingskabel beschadigd is, moet hij worden vervangen
door de fabrikant of zijn vertegenwoordiger of een ander bevoegd
persoon, om gevaar te vermijden;
Waarschuwing
Technische gegevens
Dit apparaat moet worden geaard
Ingangsspanning
Vermogen
Microgolffrequentie
Buitenafmetingen
Magnetron
Grill
Combinatie
230 V AC /50Hz
850 W (IEC60705-norm)
2,450 MHz
507mm(B) X 283mm(H) X 435mm(D)
1,250 Watt
1,000 Watt
2,200 Watt
Stroomv-
erbruik
<Dutch>
Uw oude toestel wegdoen
1. Als het symbool met de doorgekruiste verrijdbare afvalbak op een product
staat, betekent dit dat het product valt onder de Europese Richtlijn
2002/96/EC.
2. Elektrische en elektronische producten mogen niet worden meegegeven
met het huishoudelijk afval, maar moeten worden ingeleverd bij speciale
inzamelingspunten die door de lokale of landelijke overheid zijn
aangewezen.
3. De correcte verwijdering van uw oude toestel helpt negatieve gevolgen
voor het milieu en de menselijke gezondheid voorkomen.
4. Wilt u meer informatie over de verwijdering van uw oude toestel? Neem
dan contact op met uw gemeente, de afvalophaaldienst of de winkel waar
u het product hebt gekocht.
68
MH6589DR/MH6589DRS/MH6589DRB

MH6589DR
MH6589DRS
MH6589DRB
www.lg.com
MANUEL DE L’UTILISATEUR
FOUR À MICRO-ONDES
LISEZ ATTENTIVEMENT LE PRESENT MANUEL DE L’UTILISATEUR
AVANT D’UTILISER L’APPAREIL.
FRANÇAIS


Please ensure cooking times are correctly set as
over cooking may result in the FOOD catching fire
and subsequent damage to your oven.
Précautions destinées à éviter toute surexposition aux micro-ondes.
Précautions
Le four ne peut fonctionner porte ouverte grâce à son système de verrouillage
de sécurité intégré dans le mécanisme de la porte. Ces mécanismes de
sécurité arrêtent automatiquement toute cuisson lors de l’ouverture de la porte
; ce qui dans le cas de micro-ondes pourrait engendrer une exposition nocive
à l’énergie micro-ondes.
Il est important de ne pas endommager le système de verrouillage.
Ne placer aucun objet entre l’avant du four et la porte et ne laisser aucun
résidu d’aliment ou de produit nettoyant s’accumuler sur les surfaces assurant
l’étanchéité.
Ne pas utiliser un four endommagé. La bonne fermeture de la porte est
particulièrement importante. La porte, l’encadrement, les charnières et les
loquets (cassés ou mal ajustés), les joints de la porte et les surfaces
d’étanchéité ne doivent pas être endommagés.
Ne confier cet appareil pour réglage ou réparation qu’à un technicien
qualifié du service après-vente.
Attention
Lors du réchauffage de liquides, soupes, sauces et boissons dans votre four
à micro-ondes, une ébullition éruptive tardive peut se produire sans
apparition de bulles. Cette condition peut entraîner un bouillonnenment
soudain sur le liquide chaud. Pour éviter ce risque, suivre les étapes
ci-dessous:
1. Éviter d’utiliser des récipients à bard droit avec col étroit.
2. Ne pas surchauffer.
3. Agiter le liquide avant de placer le récipient dans le four, agiter à nouveau
à mi-cuisson.
4. Après le réchauffage, laisser reposer dans le four quelques minutes, agiter
ou secouer de nouveau les liquides (en particulier, le contenu des
biberons et des récipients d’aliments pour nourrissons) et vérifier leur
température avant consommation afin d’éviter les brûlures (biberons et
récipients d’aliments pour nourrissons, notamment). Faire attention en
anipulant le reecipient.
Attention
Laisser reposer un instant l’aliment
réchauffé au micro-onde et tester
la température avant consommation.
Notamment les biberons et petits pots.
Vérifier les temps de cuisson.
Une cuisson excessive peut enflammer
un aliment et endommager le four.
69

Mode de fonctionnement du four à micro-ondes
Les micro-ondes sont une forme d’énergie semblable aux ondes radio ou télé
et à la lumière du jour. En général les micro-ondes se propagent vers
l’extérieur alors qu’elles se déplacent dans l’atmosphère et disparaissent sans
effet. Les fours à micro-ondes cependant, disposent d’un magnétron conçu
pour utiliser l’énergie des micro-ondes. L’électricité, qui alimente le
magnétron, permet de créer l’énergie micro-ondes.
Ces micro-ondes pénètrent la surface de cuisson par des ouvertures
pratiquées dans le four. Un plateau tournant est situé sur la sole du four. Les
micro-ondes ne peuvent traverser les parois métalliques du four, mais elles
peuvent pénétrer dans des matériaux tels que le verre, la porcelaine, le
papier, des matériaux dont sont constitués les ustensiles pour micro-ondes.
Les micro-ondes ne chauffent pas les récipients utilisés pour la cuisson même
si ceux-ci peuvent chauffer du fait de la chaleur générée par la nourriture.
Un appareil très sûr
Sommaire
69
70
7 1~ 72
73
74
75
76
77
78
79
80
81 ~ 82
83 ~ 84
85 ~ 86
87 ~ 88
89 ~ 90
91
92
93
94
95 ~ 96
98 ~ 99
100
101
97
Précautions
Sommaire
Réglage
Puissance de cuisson
Niveau de puissance
Démarrage rapide
Cuisson gril
Cuisson combinée
Cuisson automatique
Décongélation
Guide de cuisson et de réchauffage
Caractéristiques des aliments et
cuisson micro-ondes
Questions et réponses
Guide de légumes frais
Ustensiles
pour micro-ondes
Déballage de l'appareil et installation
Sécurité enfant
automatique
Consignes importantes de sécurité
Votre four à micro-ondes est l’un des appareils
électroménagers les plus sûrs. Lorsque la porte est ouverte,
le four cesse immédiatement de produire des micro-ondes.
L’énergie micro-ondes est totalement convertie en chaleur
lorsqu’elle pénètre la nourriture, ne dégageant aucune
énergie résiduelle nocive pour la personne qui cuisine.
Gril guide
Cuisson en deux etapes
Avertissements et Spécifications techniques
rapide
Décongélation
Taste Saver
de
l’horloge
70
Gratin Réchauf fer
Décongélation & Grill

3
2
1
5
3
2
1
5
3
2
1
5
Placer le four à l’emplacement de votre choix, à une
hauteur supérieure à 85 cm, en s’assurant qu’il existe
un espace d’au moins 30 cm en haut et 10 cm à l’arrière,
pour assurer une ventilation correcte. L’avant du four doit se
trouver à au moins 8 cm du bord de la surface pour éviter de
basculer.
Déballage de l’appareil et
Installation
Déballez le four et posez-le sur une surface
plane.
En suivant les étapes de base décrites sur ces deux pages, vous serezrapidement en
mesure de vérifier le bon fonctionnement de votre four. Veuillez faire particulièrement
attention aux instructions portant surl’emplacement de votre four. Lorsque vous sortez le
four de son emballage, veillez à bien retirer tous les accessoires et emballages. Vérifiez
que le fourn’a pas été endommagé pendant la livraison.
CE FOUR NE DOIT PAS ÊTRE UTILISE A DES FINS DE
RESTAURATION COMMERCIALE
Une sortie d’évacuation est placée sur la partie supérieure ou
latérale du four. Ne pas l’obstruer pour éviter d’endommager
l’appareil.
71
Bague rotative
Grille basse
Grille haute
Plateau en verre

Ouvrir la porte de votre four en tirant sur la poignée
de porte. Placer la BAGUE POTATIVE à l’intérieur du
four et le PLATEAU EN VERRE dessus.
Branchez le four dans une prise standard.
Vérifiez que le four est le seul appareil
bronché à cette prise.
Si votre four ne fonctionne pas correctement,
débranchez et rebranchez-le.
30
L’AFFICHEUR comptera à rebours à partir de
30 secondes. Lorsqu’il indiquera 0, il sonnera
trois fois. Ouvrez la porte du four et testez la température
de l’eau. Si votre four fonctionne bien, l’eau devrait être
chaude. Faites attention en sortant le récipient du four, il
peut être chaud.
VOTRE FOUR EST PRÊT
Remplissez un récipient pour micro-
ondes avec 300 ml d’eau. Placez-le
sur le PLATEAU EN VERRE et fermez la porte du
four. Si vous avez des doutes sur le récipient à
utiliser, veuillez vous reporter à la page
Appuyez sur le
bouton DÉPART
une fois pour
régler le temps
de cuisson sur
30 secondes.
72
97

Réglage de
l’horloge
Lorsque votre four est branché pour
la première fois, ou lorsque le courant
revient après une panne, « 24H »
s’affiche : vous devez alors régler à
nouveau l’horloge.
Si l’horloge (ou l'affichage) montre
des symboles étranges, débranchez
votre four de la prise électrique,
rebranchez-le et réglez à nouveau
l’horloge.
Vérifiez que vous avez correctement installé votre four conformément
aux instructions de ce manuel.
Branchez votre four pour la première fois.
L’écran affiche « 24H ».
(Si vous souhaitez utiliser une option différente,
appuyez sur
taste saver (Maintien au
chaud / Horloge.
Si vous souhaitez changer d’option après avoir réglé l’horloge,
vous devez débrancher l’appareil puis le
rebrancher.)
Tournez DIAL jusqu’à ce que « 14: » s’affiche.
Appuyez sur taste saver (ou START)
pour confirmer l’heure.
Tournez DIAL jusqu’à ce que « 14:35 » s’affiche.
Appuyez sur taste saver (ou START).
L’horloge se met en marche.
Vous pouvez régler l’horloge au format 12 ou 24 heures.
L’exemple suivant vous explique comment régler l’heure à 14h35 avec l’horloge au format 24 heures.
Vérifiez que vous avez retiré tous les matériaux d’emballage du four.
73

Sécurité
Enfant
Appuyez et maintenez enfoncée la touche STOP/CANCEL
(ARRET/ANNULATION). jusqu’à ce que “L” apparaisse sur l’afficheur et
qu’un signal sonore retentisse.
La SÉCURITÉ ENFANT est enclenchée.
L’heure disparaîtra de l’afficheur si vous avez réglé l’horloge.
Le “L” restera affiché pour vous rappeler que la SÉCURITÉ ENFANT est
enclenchée.
Pour annuler la SÉCURITÉ ENFANT, appuyez et maintenez enfoncée la
touche STOP/CANCEL (ARRET/ANNULATION). jusqu’à ce que le “L”
disparaisse, vous entendrez SIGNAL SONORE quand elle sero désactivée.
Votre four dispose d’une sécurité qui
évite tout fonctionnement accidentel du
four. Une fois la sécurité enfant
enclenchée, vous ne pourrez utiliser
aucune fonction et vous ne pourrez pas
cuire d’aliments.
Votre enfant peut toutefois encore ouvrir
la porte!
Appuyez sur STOP/CANCEL (ARRET/ANNULATION).
74

Assurez-vous que vous avez installé le four correctement, conformément
aux instructions données dans les pages précédentes.
Appuyez sur STOP/CANCEL (ARRET/ANNULATION).
Choisir "5:30" en tournant le bouton de sélection.
Votre four à micro-ondes possède cinq
niveaux de puissance de cuisson
différents. La puissance la plus élevée est
sélectionnée par défaut et le bouton de
sélection sert à choisir une puissance
différente.
PUISSANCE
ELEVEE
MOYENNE
A ELEVEE
MOYENNE
DECONGELATION( )/
MOYENNE FAIBLE
FAIBLE
100%
80%
60%
40%
20%
Appuyez sur START (DÉPART).
850 W
680 W
510 W
340 W
170 W
Puissance
de cuisson
Dans l'exemple qui suit, je vous montre comment cuire des aliments à une puissance de 680(80%) pendant
5 minutes 30 secondes.
PUISSANCE
680
Appuyez sur
“ ” apparaisse dans la fenêtre d’affichage.
75

Niveau de
puissance
Votre four à micro-ondes possède 5 niveaux de puissance pour vous permettre un maximum de flexibilité et un
contrôle optimal de la cuisson. Le tableau ci-dessous vous indique le niveau de puissance recommandé pour
différents types d'opérations possibles avec ce four à micro-ondes.
PUISSANCE
ELEVEE 100% * Faire bouillir de l'eau
* Faire dorer du boeuf haché
* Cuire de la volaille, du poisson ou des légumes
* Cuire des morceaux de viande tendre
MOYENNE A ELEVEE
80% * Réchauffer toutes sortes d'aliments
* Faire rôtir de la viande et de la volaille
* Faire cuire des champignons et des fruits de mer
* Faire cuire des aliments contenant du fromage et des oeufs
MOYENNE 60% * Préparer des cakes et des brioches
* Préparer des oeufs
* Préparer un flan
* Préparer du riz, de la soupe
DECONGELATION ( ) /
40% * Toute décongélation
MOYENNE FAIBLE * Faire fondre du beurre et du chocolat
* Cuire des morceaux de viande moins tendre
FAIBLE 20% * Ramollir du beurre et du fromage
* Ramollir de la glace
* Faire lever de la pâte à la levure
POURCENTAGE
USAGE
76

Cuisson
en Deux Etapes
Dans l’exemple suivant, je vais vous montrer comment cuire des aliments en deux étapes. La première étape cuira
votre aliment pendant 11 minutes en réglage PUISSANCE MAXI, la seconde, pendant 35 minutes à
340W (40%)
340
la puissance.
Appuyer sur STOP/CLEAR.
RégIer la puissance et le temps de cuisson pour I’étape 1.
Appuyer une fois sur MICRO pour sélectionner Ia puissance MAXI.
Tourner le bouton ROTATIF jusqu’à ce que l‘affichage indique “11:00”
RégIer la puissance et le temps de cuisson pour I’étape 2.
Appuyer quatre fois sur MICRO pour sélectionner une puissance
Tourner le bouton ROTATIF jusqu’à ce que l‘affichage indique “35:00”
Pendant la cuisson en deux étapes, la
porte du four peut être ouverte pour
surveiller les aliments. Refermer la porte
et appuyer sur START pour que l’é tape
de cuisson continue.
A la fin de l‘é tape 1, BIP retentit et
l‘é tape 2 commence.
Si vous désirez annuler le programme,
appuyer deux fois sur STOP/CLEAR.
Appuyer sur START.
77

Démarrage
rapide
Dans cet exemple, je vous montre comment sélectionner 2 minutes de cuisson à puissance maximale.
Appuyez sur STOP/CANCEL (ARRET/ANNULATION).
Appuyez quatre fois sur START (DÉPART) pour sélectionner 2 minutes à
puissance maximale (HIGH).
Votre four se mettra en route avant la quatrième pression.
La fonction DEMARRAGE RAPIDE vous
permet d'introduire des intervalles de 30
secondes de cuisson à puissance
maximale (HIGH) en utilisant la touche
DÉPART.
Pendant la cuisson DÉPART INSTANTANÉ, vous pouvez augmenter la durée de cuisson jusqu’à
10 minutes en appuyant de façon répétée sur le bouton START (DÉPART).
78

Cuisson
gril
Dans l'exemple qui suit, je vous montre comment utiliser le gril pour cuire des aliments pendant 12 minutes 30
secondes.
Appuyez sur STOP/CANCEL (ARRET/ANNULATION).
Choisir "12:30" en tournant le bouton de sélection.
Cette fonction vous permet de dorer et
gratiner les aliments rapidement.
En mode gril, le plateau métallique se
place entre le plateau en verre et la
grille.
La grille (grille plus haute) doit être
utilisée pour la cuisson avec gril.
Appuyez sur START (DÉPART).
Appuyez sur GRIL
79

Co-1
Co-2
Co-3
20%
40%
60%
Cuisson
combinée
Dans l’exemple suivant, je vais vous expliquer comment programmer votre four avec une
puissance micro-ondes de 20% et le mode combi pour une durée de
cuisson de 25 minutes.
Votre four possède une fonction de
cuisson combinée qui vous permet
de cuire les aliments avec la
résistance
et les micro-ondes en même temps. Ceci
permet
généralement de cuire vos
aliments plus rapidement.
Vous pouvez choisir entre 3 niveaux de
puissance micro- ondes (20 %, 40 % et
60 %) dans le mode combi.
Catégorie
Puissance
micro-ondes (%)
Appuy
ez sur STOP/CLEAR.
sélectionner le mode combi Co-1.
Tournez le bouton jusqu’à ce
que “ 25 :00 ” apparaisse
Appuyez sur START.
Soyez
vigilant en sortant vos aliments
car le récipient sera très chaud !
Appuyez sur COMBINEE pour
80

Cuisson
automatique
Dans l'exemple suivant, je vous explique comment cuire 0,6 kg de pommes de terre en chemise.
Appuyez sur STOP/CANCEL (ARRET/ANNULATION).
Appuyez sur AUTO COOK (CUISSON AUTOMATIQUE)
“Ac-1” apparaisse dans la fenêtre d’affichage.
La fonction CUISSON AUTOMATIQUE
vous permet de cuire facilement la
plupart vos aliments préférés en
sélectionnant le type d'aliment et en
entrant son poids.
Choisir "0.6" en tournant le bouton de sélection.
Appuyez sur
fois
fois
fois
fois
Catégorie
Légumes frais
Légumes surgelés
Riz
en chemise
Pomme de terre
Appuyez sur START (DÉPART).
81

Fonction Catégorie Limite de poids Ustensile Instructions
Auto Cook
(Cuisson
automatique)
0,2 ~ 1,0kg Plateau
métallique
Pomme de terre
en chemise
Temp. de
la pièce
Choisissez des pommes de terre de taille moyenne (170-200g). Lavez et essuyez les pommes
de terre. Faites plusieurs trous dans les pommes de terre avec une fourchette. Posez-les sur le
plateau métallique. Introduisez le poids et appuyez sur START. Après la cuisson, sortez les
pommes de terre du four. Couvrez-les d'une feuille de papier d'aluminium et laissez-les
reposer pendant 5 minutes.
ATTENTION: Le grille et les parois du four sont BRULANTS. Utilisez des gants appropriés.
0,2 ~ 0,8kg Plat creux
adapté à la
cuisson au
micro-ondes
Légumes
frais
Temp. de
la pièce
Mettez les légumes dans un plat adapté à la cuisson au micro-ondes.
Ajoutez de l'eau. Couvrez. Après la cuisson, remuez et laissez reposer.
Ajoutez de l'eau en fonction de la quantité.
** 0,2 kg à 0,4 kg: 2 cuillères à soupe
** 0,5 kg à 0,8 kg: 4 cuillères à soupe
0,2 ~ 0,8kg Plat creux
adapté à la
cuisson au
micro-ondes
Légumes
surgelés
Surgelé Mettez les légumes dans un plat adapté à la cuisson au micro-ondes. Ajoutez de
l'eau. Couvrez. Après la cuisson, remuez et laissez reposer.
Ajoutez de l'eau en fonction de la quantité.
** 0,2 kg à 0,4 kg: 2 cuillères à soupe
** 0,5 kg à 0,8 kg: 4 cuillères à soupe
0,1 ~ 0,3kg Plat creux
adapté à la
cuisson au
micro-ondes
Riz Temp. de
la pièce
Lavez le riz et laissez-le tremper pendant 30 minutes.
Mettez le riz, l'eau bouilante et
1
/
4
à 1 cuillère à thé de sel dans un plat creux suffisamment grand.
** Riz - Après cuisson, laissez couvert pendant 5 minutes ou jusqu'à ce que l'eau soit absorbée.
Poids
Riz
100g
200ml
200g
400ml
300g
600ml
Couvrir
O ui
Température
de l'aliment
82

Appuyez sur STOP/CANCEL (ARRET/ANNULATION).
Pesez les aliments que vous allez décongeler. Retirez tout ruban ou
emballage métallique, puis mettez les aliments dans le
four et refermez la porte.
Introduisez le poids des aliments surgelés que vous allez décongeler.
Choisir "1.4" en tournant le bouton de sélection.
Appuyez deux fois sur la touche AUTO DEFROST (DECONGELATION
AUTOMATIQUE) pour sélectionner le programme de décongélation de
volaille (POULTRY).
La fenêtre d'affichage indique “dEF2”.
Appuyez sur START (DÉPART).
Votre four à micro-ondes dispose de trois
modes de décongélation: VIANDE, VOLAILLE,
POISSON et PAIN. Plusieurs puissances sont
possibles pour chaque mode de
décongélation. Appuyez plusieurs fois sur la
touche DECONGELATION AUTOMATIQUE
pour sélectionner une puissance différente.
Catégorie
MEAT (VIANDE)
POULTRY (VOLAILLE)
FISH (POISSON)
BREAD (PAIN)
Appuyez sur
Pendant la décongélation, le four émettra un "bip". Ouvrez le four, retournez la pièce et étalez les
morceaux pour que la décongélation se fasse de manière uniforme. Sortez les parties qui ont
décongelé ou protégez-les pour ralentir leur décongélation. Une fois la vérification terminée, refermez
la porte du four et appuyez sur la touche START pour poursuivre la décongélation. Le processus de
décongélation continue (même lorsque le "bip" rentit) tant que vous n'ouvrez pas la porte.
Décongélation
automatique
fois
fois
fois
fois
La température et la densité des aliments varie. Dès lors, je vous recommande de vérifier les aliments avant de
commencer la cuisson. Faites particulièrement attention aux gros morceaux de viande ou de volaille. Certains
aliments ne doivent pas être totalement décongelés avant la cuisson. Par exemple, le poisson cuit si vite qu'il est
parfois préférable de commencer la cuisson quand le poisson n'est pas encore entièrement dégelé. Le programme
POULTRY convient pour décongeler des pièces de petite taille comme une petits pains ou une petite tranche.
Ces pièces nécessitent un certain temps de repos pour que le centre soit bien décongelé. L'exemple suivant vous
indique comment décongeler 1,4 kg de volaille surgelée.
83

Catégorie
Limite de poids
Ustensile Aliments
GUIDE DE DECONGELATION
0,1 ~ 4,0 kg
Accessoires pour
micro-ondes
(assiette plate)
Viande
Boeuf haché, filet de boeuf, cubes pour ragoût, bifteck, rôti braisé, culotte de boeuf, hamburger
Côtelettes de porc, côtelettes d'agneau, rouleau de viande, saucisse, côtelettes (2cm)
Retournez les aliments lorsque le "bip" retentit.
Après la décongélation, laissez reposer de 5 à 15 minutes.
Volaille
Poulet entier, cuisses, poitrines, poitrines de dinde (mmoins de 2 kg)
Retournez les aliments lorsque le "bip" retentit.
Après la décongélation, laissez reposer de 20 à 30 minutes.
Poisson
Filets, steaks, poisson entier, fruits de mer
Retournez les aliments lorsque le "bip" retentit.
Après la décongélation, laissez reposer de 10 à 20 minutes.
* La nourriture à décongeler doit se trouver dans un récipient adapté au micro-ondes et être placée, sans couvercle, sur le plateau tournant en verre.
* Au besoin, protégez les morceaux plus petits de viande ou de volaille avec des feuilles de papier aluminium. De cette manière, ces pièces ne se réchaufferont
pas pendant la décongélation. Veillez à ce que la feuille en aluminium ne touche pas les parois du four.
* Etalez les aliments tels que viande hachée, côtelettes, saucisses et tranches de lard dès que leur état de décongélation le permet. Lorsque le "bip" retentit,
retournez les aliments. Sortez les pièces décongelées. Laissez décongeler les pièces restantes. Après la décongélation, laissez reposer les aliments pour que la
décongélation soit complète.
* Par exemple, les rôtis de viande et les poulets entiers doivent REPOSER pendant 1 heure minimum avant leur cuisson.
Viande
Volaille
Poisson
0,1 ~ 0,5 kg
Serviette en papier
ou assiette plate
Pain en tranches, petits pains, baguette, etc.
Pain
84

Décongélation
rapide
Appuyez sur STOP/CLEAR.
Pesez les aliments que vous allez décongeler. Veillez à ce que tout ruban
ou emballage métallique soit retiré, puis mettez les
aliments dans le four et refermez la porte.
Pendant la décongélation, le four émettra un "bip". Ouvrez le four, retournez la pièce et étalez les morceaux
pour que la décongélation se fasse de manière uniforme. Sortez les parties qui ont décongelé ou protégez-les
pour ralentir leur décongélation. Une fois la vérification terminée, refermez la porte du four et appuyez sur la
touche START pour poursuivre la décongélation.Le processus de décongélation continue (même lorsque le
"bip" rentit) tant que vous n'ouvrez pas la porte.
Appuyez sur la touche QUICK DEFROST pour sélectionner le programme
de décongélation de viande (MEAT).
Votre four à micro-ondes dispose d'une
fonction de décongélation rapide
(MEAT / VIANDE).
Utilisez cette fonction pour décongeler rapidement jusqu'à 0,5 kg de viande hachée uniquement.
Laissez reposer la viande un certain temps pour que le centre soit bien décongelé. L'exemple ci-dessous vous
indique comment décongeler 0,5 kg de viande hachée surgelée.
120
85

Catégorie Poids Ustensile Instructions
GUIDE DE DECONGELATION RAPIDE
0,5kg
Accessoires pour
micro-ondes
(assiette plate)
Viande hachée
Retournez les aliments lorsque le "bip" retentit.
Après la décongélation, laissez reposer de 5 à 15 minutes.
Utilisez cette fonction pour décongeler rapidement de la viande hachée.
Débarrassez complètement la viande de son emballage. Mettez la viande hachée dans un plat pour micro-ondes. Lorsque le "bip" retentit, sortez la viande du
four, retournez-la et remettez-la dans le four. Appuyez sur SATRT pour poursuivre la décongélation. A la fin du programme, sortez la viande hachée du four,
couvrez-la de papier d'aluminium et laissez-la reposer de 5 à 15 minutes ou jusqu'à ce qu'elle soit complètement décongelée.
Viande hachée
86

Gratin
Réchauffer
La fonction réchauffage croustillant
vous permet de réchauffer facilement
vos aliments en sélectionnant
simplement le type d'aliment et en
entrant le poids des aliments à l'aide
de la mollette.
Dans l'exemple suivant, je vais vous montrer comment réchauffer 300 gr de "Viande rôtie".
Appuyez sur STOP/CLEAR.
Appuyez une fois sur Crispy Reheat.
Tournez la mollette jusqu'à ce que l'affichage indique "0.3kg".
Appuyez sur START.
Catégorie
Appuyez sur
Crispy Reheat
Viande rôtie
Lasagnes
Pain
Tourte
heure
fois
fois
fois
87

Instructions
Viande rôtie
Lasagnes
Pain
Tourte
0,2 ~ 0,6 kg
0,2 ~ 0,6 kg
0,1 ~ 0,3 kg
0,2 ~ 0,4 kg
Réfrigéré
Réfrigéré
Congelé
Réfrigéré
Découpez la viande rôtie en tranches de moins de 2,5 cm d'épaisseur.
Placez les aliments du
grille haute
.
Et faites comme indiqué ci-dessus.
Placez les restes de lasagnes du
grille haute
Et faites comme indiqué ci-dessus.
Placez la baguette ou le croissant congelé du
grille haute
Passez un pinceau imprégné de lait ou d'eau sur les baguettes.
Et faites comme indiqué ci-dessus.
Placez les restes de tourte du
grille haute
Et faites comme indiqué ci-dessus.
Catégorie
Température des
aliments
Ustensile
Quantité
88
Grille haute
Grille haute
Grille haute
Grille haute
.
.
.

Décongélation &
Grill
La fonction Décongélation & Grill
vous permet de cuire facilement la
plupart des aliments en sélectionnant
simplement le type d'aliment et en
entrant le poids des aliments à l'aide
de la mollette.
Dans l'exemple suivant, je vais vous montrer comment cuire 300 gr de "Filet de saumon".
Appuyez sur STOP/CLEAR.
Appuyez une fois sur Defrost & Grill.
Tournez la mollette jusqu'à ce que l'affichage indique "0.3kg".
Appuyez sur START.
Catégorie
Appuyez sur
Defrost & Grill
Filet de saumon
Crevettes
Rondelles de hamburger
Saucisse
heure
fois
fois
fois
89

Instructions
Filet de saumon
Crevettes
Rondelles de
hamburger
Saucisse
0,2 ~ 0,6 kg
0,1 ~ 0,4 kg
1 ~ 4
morceaux/pièces
0,2 ~ 0,6 kg
Congelé
Congelé
Congelé
Congelé
Achetez des filets de saumon de 200g chacun et de 2,5cm d'épaisseur.
Congelez-les. Placez les aliments
Choisissez le type et le poids, puis appuyez sur Start.
Après la cuisson, retirez du four et laissez reposer.
1. Nettoyez les crevettes. Placez-les
2. Lorsque vous entendez un bip sonore, retournez les aliments.
Placez les rondelles de hamburger
Choisissez le type et le poids, puis appuyez sur Start.
Après la cuisson, retirez du four et laissez reposer.
1. Retirez l'emballage et fendez la surface.
Placez-les
2. Lorsque vous entendez un bip sonore, retournez les aliments.
Catégorie
Température des
aliments
Ustensile
Quantité
90
Grille haute
Grille haute
Grille haute
Grille haute
du
grille haute
.
du
grille haute
.
du
grille haute
.
du
grille haute
.

L’exemple suivant vous explique comment utiliser la fonction de maintien au chaud pour réchauffer des aliments
à une puissance élevée en 90 minutes.
Placez des aliments dans le four à micro-ondes, appuyez deux
fois sur «taste saver »
« HO-H » s’affiche à l’écran.
Appuyez sur « Start » (Démarrer).
Lorsque la fonction de maintien au chaud est en marche,
s’affiche vous pouvez
appuyer à nouveau sur « taste saver »
pour afficher le temps restant.
1. Réglez le programme AUTO COOK (Cuisson automatique) requis.
Appuyez sur « Start » (Démarrer).
Une fois le programme AUTO COOK terminé, la fonction
de taste saver se met
automatiquement en marche
au bout de cinq minutes.
2. Lorsque le programme AUTO COOK est terminé, vous pouvez
également appuyer sur
« taste saver »
manuel
Maintien au chaud après AUTO COOK
*Affichage du TEMPS
Si vous voulez réchauffer des aliments lors
de l'utilisation du programme AUTO COOK
(Cuisson automatique), il suffit d’appuyer sur
la touche.
Lorsque des aliments cuits sans la fonction
automatique ont besoin d’être réchauffés,
vous pouvez débuter le réchauffage à tout
moment en appuyant sur la touche.
La fonction de maintien au chaud ne
propose qu’un seul intervalle de temps :
90 minutes. Toutefois, elle s’arrête à
l’ouverture de la porte.
NIVEAU Affichage
Appuyez sur
taste saver
Niveau faible
Niveau élevé
fois
fois
HO-L
HO-H
« HO-H » s’affiche à l’écran.
Appuyez sur « Start » (Démarrer)
.
.
91
Taste saver
Taste saver

Aliments
Temps de cuisson
Instructions spéciales
(sur ELEVEE)
Pour chauffer ou réchauffer correctement aux micro-ondes, il est important de se conformer à quelques règles de base. Pesez les aliments
de façon à déterminer le temps de réchauffage requis. Disposez les aliments en arrondi de manière à obtenir les meilleurs résultats. Les
aliments à température ambiante se réchaufferont plus rapidement que les aliments réfrigérés. Les aliments en conserve doivent être
retirés de leur conteneur et placés dans un récipient prévu pour les fours à micro-ondes. Les aliments seront réchauffés plus uniformément
si vous recouvrez le récipient d’un couvercle ou de film spécial pour fours à micro-ondes. Retirez précautionneusement le couvercle ou le
film afin d’éviter de vous brûler avec la vapeur. Reportez-vous au tableau suivant comme guide de réchauffage des aliments cuits.
Guide de cuisson
et de réchauffage
Viande hachée
3 tranches (0,5 cm
d’épaisseur)
Poulet
1 poitrine
1 pilon et haut de cuisse
Filet de poisson
(170-230g)
Lasagne
1 portion (300 g)
Plat mijoté
1 tasse
4 tasses
Plat mijoté
Crème ou fromage
1 tasse
4 tasses
Hamburger ou bœuf
grillé
1 sandwich (1/2
portion de viande en
garniture) sans le pain
1~2 minutes
2~3 minutes
3~3
1
/2 minutes
1~2 minutes
4~6 minutes
1
1
/2~3 minutes
4
1
/2~7minutes
1~2
1
/2 minutes
3
1
/2~6 minutes
1~2
1
/2 minutes
Placez la viande hachée sur une assiette résistant aux
micro-ondes. Recouvrez de film plastique percé d’un trou.
• Remarque : Une sauce contribue à garder la viande juteuse.
Placez les morceaux de poulet sur une assiette résistant
aux micro-ondes.
Recouvrez de film plastique percé d’un trou.
Placez le poisson sur une assiette résistant aux micro-
ondes. Recouvrez de film plastique percé d’un trou.
Placez la lasagne sur une assiette résistant aux micro-
ondes. Recouvrez de film plastique percé d’un trou.
Cuisez à couvert dans un plat de cuisson résistant aux
micro-ondes. Mélangez une fois à mi-cuisson.
Cuisez à couvert dans un plat de cuisson résistant aux
micro-ondes. Mélangez une fois à mi-cuisson.
Réchauffez la garniture et le pain séparément.
Cuisez à couvert dans un plat de cuisson résistant aux
micro-ondes. Mélangez une fois. Réchauffez le pain
suivant les instruction du tableau ci-dessous.
Aliments
Temps de cuisson
Instructions spéciales
(sur ELEVEE)
Purée de pommes de terre
350g
Haricots blancs cuisinés
1 tasse
Raviolis ou pâtes en sauce
1 tasse
4 tasses
Riz
1 tasse
4 tasses
Sandwich ou petit pain
1 petit pain
Légumes
1 tasse
4 tasses
Soupe
1 portion (250 g)
5 ~ 5
1
/2
minutes
(Moyen / fort)
1
1
/2~3 minutes
2
1
/2~4 minutes
7
1
/2~11minutes
1~1
1
/2 minutes
3
1
/2~5 minutes
15~30 seconds
1
1
/2~2
1
/2 minutes
3
1
/2~5
1
/2 minutes
1
1
/2~2 minutes
Cuisez à couvert dans un plat de cuisson résistant
aux micro-ondes.
Mélangez une fois à mi-cuisson.
Cuisez à couvert dans un plat de cuisson résistant
aux micro-ondes.
Mélangez une fois à mi-cuisson.
Cuisez à couvert dans un plat de cuisson résistant
aux micro-ondes.
Mélangez une fois à mi-cuisson.
Cuisez à couvert dans un plat de cuisson résistant
aux micro-ondes.
Mélangez une fois à mi-cuisson.
Emballez-les de papier absorbant avant de les
placer sur le plateau en verre.
Cuisez à couvert dans un plat de cuisson résistant
aux micro-ondes.
Mélangez une fois à mi-cuisson.
Cuisez à couvert dans un plat de cuisson résistant
aux micro-ondes.
Mélangez une fois à mi-cuisson.
92

Guide de
légumes frais
Légumes
Quantité
Temps de cuisson
Instructions
Temps
(sur ELEVEE)
de repos
Maïs, Frais
Champignons,
Frais, Emincés
Panais, Frais,
Tranchés
Petits pois,
Frais
Patates douces
Cuisson en entier
(170~230 g chacune)
Pommes de terre,
Cuisson en entier
(170~230 g
chacune)
Epinards, Frais,
Branches
Courgettes,
Fraîches,
Tranchées
Courgettes,
Fraîches,
Entières
Egrenez. Ajoutez 2 c.à s. d’eau dans un
plat de cuisson de 1,5 litres. Couvrez.
Placez les champignons dans un plat à
mijoter couvert de 1,5 litres. Mélangez à
mi-cuisson.
Ajoutez
1
/2 tasse d’eau dans un plat à
mijoter couvert de 1,5 litres. Mélangez à
mi-cuisson.
Ajoutez
1
/2 tasse d’eau dans un plat à
mijoter couvert de 1,5 litres. Mélangez à
mi-cuisson.
Piquez plusieurs fois les patates avec une
fourchette. Placez-les sur 2 feuilles de papier
absorbant. Retournez-les à mi-cuisson.
Piquez plusieurs fois les pommes de terre avec
une fourchette. Placez-les sur 2 feuilles de
papier absorbant. Retournez-les à mi-cuisson.
Ajoutez
1
/2 tasse d’eau dans un plat à
mijoter couvert de 2 litres.
Ajoutez
1
/2 tasse d’eau dans un plat à
mijoter couvert de 1,5 litres. Mélangez à
mi-cuisson.
Percez. Placez sur 2 feuilles de papier
absorbant. Retournez et réarrangez à
mi-cuisson.
2~3 minutes
2~3 minutes
2~3 minutes
2~3 minutes
2~3 minutes
2~3 minutes
2~3 minutes
2~3 minutes
2~3 minutes
4 ~ 8
1
1
/2 ~ 2
1
/2
4 ~ 7
6 ~ 9
4 ~ 9
6~ 12
5
1
/2 ~ 7
1
/2
9
1
/2
~ 14
4
1
/2 ~ 7
1
/2
4
1
/2 ~ 7
1
/2
6 ~ 9
2 épis
230g
450g
4 tasses
2 moyens
4 moyens
2 patates
4 patates
450g
450g
450g
Légumes
Quantité
Temps de cuisson
Instructions
Temps
(sur ELEVEE)
de repos
Artichauts
(230 g pièce)
Asperges,
Fraîches, Pointes
Haricots verts
Fèves, Fraîches
Brocolis, Frais,
Bouquets
Chou, Frais,
Emincé
Carottes,
Fraîches,
En rondelles
Chou-fleur,
Frais, Entier
« Flowerettes »,
Fraîches
Céleri, Frais,
Tranché
Nettoyez. Ajoutez 2 c.à s. d’eau et 2 c.à
s. de jus de citron. Couvrez.
Ajoutez 1 tasse d’eau. Couvrez.
Ajoutez
1
/2 tasse d’eau dans un plat à
mijoter de 1,5 litres. Mélangez à mi-cuisson.
Ajoutez
1
/2 tasse d’eau dans un plat à
mijoter couvert de 1,5 litres. Réarrangez
à mi-cuisson.
Placez le brocoli dans un plat de cuisson.
Ajoutez
1
/2 tasse d’eau.
Ajoutez
1
/2 tasse d’eau dans un plat à
mijoter couvert de 1,5 litres. Mélangez à
mi-cuisson.
Ajoutez
1
/4 tasse d’eau dans un plat à
mijoter couvert de 1,5 litres. Mélangez à
mi-cuisson.
Nettoyez. Ajoutez
1
/4 tasse d’eau dans
un plat à mijoter couvert de 1,5 litres.
Mélangez à mi-cuisson.
Tranchez. Ajoutez
1
/2 tasse d’eau dans
un plat à mijoter couvert de 1,5 litres.
Mélangez à mi-cuisson.
2~3 minutes
2~3 minutes
2~3 minutes
2~3 minutes
2~3 minutes
2~3 minutes
2~3 minutes
2~3 minutes
2~3 minutes
4
1
/2
~ 7
10 ~ 12
2
1
/2
~ 6
7 ~ 11
11 ~ 16
5 ~ 8
5
1
/2~
7
1
/2
2 ~ 3
5 ~ 7
11 ~ 16
2 moyens
4 moyens
450g
450g
450g
450g
450g
200g
450g
2 tasses
4 tasses
93

1) Instructions pour griller la viande.
Otez l'excédent de gras autour de la viande pour éviter qu'elle ne se rétracte.
Placez sur la grille badigeonnée d'un corps gras.
A mi-cuisson, retournez la viande
2) Instructions pour griller le poisson ou les crustacés
Placez le poisson ou les crustacés sur la clayette. Le poisson entier doit être vidé et coupé sur
les flancs. Badigeonnez le poisson ou les crustacés avec un corps gras avant la cuisson.
Renouvelez l'opération en cours de cuisson pour éviter que le poisson ne ne se dessèche.
Respectez les temps de cuisson indiqués dans le tableau. Retournez le poisson entier ou en
filet à mi-cuisson.
Cote d'agneau
(2,5cm d'épaisseur)
Saucisses
(2,5cm d'épaisseur)
230g x 2
230g
25-32
13-16
.
Steak de poisson
(2,5cm d'épaisseur)
Poisson entier
Escalope
Crevettes fraîches
230g
225-350 g
450g
450g
450g
24-28
16-20
24-28
16-20
16-20
Prévoir plus de temps
pour les poissons
gras et épais.
Arroser pendant la
cuisson.
Catégorie Poids Temps de cuisson Instructions
d'aliments (en minutes)
Gril
Guide
Badigeonner d'un corps
gras.
Placez les petites pièces
de préférence sur la
clayette. Les grosses
pièces peuvent être
placés dans un plat.
Tournez à mi-cuisson.
Tournez fréquemment.
Poisson, filet
1cm d'épaisseur
1,5cm d'épaisseur
230g
230g
17-21
20-24
Badigeonnez d'un corps
gras et tournez
à mi-cuisson.
Badigeonnez d'un corps
gras et tournez
à mi-cuisson.
94

1. Ne pas tenter d’altérer, ou de réparer la porte, le panneau de commande, les
interrupteurs de verrouillage de sécurité ou une autre partie quelconque du
four. Il est en effet dangereux d’intervenir sur l’appareil en deposant des
couvercles protégeant contre l’exposition à l’énergie micro-ondes. Les
réparations ne doivent être entreprises que par un technicien qualifié.
2. Ne pas faire fonctionner le four vide. Il est préférable de laisser un verre d’eau
dans le four inutilisé. L’eau absorbera les micro-ondes en toute sécurité en cas
de démarrage accidentel du four.
3. Ne pas utiliser le four comme deshumidificateur, cela pourrait endommager les
composants électriques et provoquer des dysfonctionnements. (ex: ne mettre ni
journaux mouillés, vêtements, jouets, animaux ni composants électriques dans
le four à micro-ondes en marche)
4. Ne pas cuire d’aliments enveloppés dans de l’essuie-tout à moins que cela ne
soit indiqué dans votre livre de recettes pour l’aliment que vous cuisinez.
5. Ne pas utiliser de papier journal au lieu d’essuie-tout pour la cuisson.
6. Ne pas utiliser de récipients en bois. Ils peuvent chauffer et carboniser.
Ne pas utiliser de récipient métallique avec des incrustations métalliques (or ou
argent par exemple). Enlever toutes les fermetures métalliques. Des objets en
métal peuvent créer un arc dans le four et engendrer des dégâts importants.
7. Ne pas faire fonctionner le four lorsqu’un torchon, une serviette ou tout autre
objet vient faire obstruction entre la porte et le devant du four, ce qui pourrait
engendrer des fuites d’énergie micro-ondes.
8. Ne pas utiliser de produits fabriqués à partir de papier recyclé : ils peuvent
contenir des impuretés et engendrer des étincelles et / ou s’enflammer quand
ils sont utilisés pour la cuisson.
9. Ne pas rincer le plateau tournant juste après la cuisson. Cela peut
l’endommager ou le casser.
10. De petites quantités d’aliments peuvent requérir des temps de cuisson ou de
chauffage plus courts. S’ils sont placés dans le four pour une durée normale,
ils peuvent surchauffer et brûler.
11. Veiller à bien placer le four de sorte que le devant de la porte se situe à au
moins 8 cm derrière le bord de la surface sur laquelle il est posé, afin d’éviter
le renversement accidentel de l’appareil.
12. Avant la cuisson, percer la peau des pommes de terre, des pommes ou de
tout autre fruit ou légume semblable.
14. Ne pas utiliser le four pour frire.
15. Enlever les emballages plastiques des aliments avant de cuire ou de
décongeler. Noter cependant que dans certains cas l’aliment doit être couvert
par un film plastique pour le réchauffage et la cuisson.
16. Si la porte du four est endommagée, ne pas utiliser le four jusqu’à ce qu’il ait
été réparé par un technicien spécialisé du service après-vente.
17. En cas de fumée, ne pas ouvrir la porte du four, éteindre ou débrancher le
four de la prise de courant.
18. Lorsque la nourriture est réchauffée ou cuite dans des récipients jetables en
plastique, papier ou autres matériaux combustibles, surveiller de près le four
pour noter toute détérioration du récipient.
20. Les liquides ou d’autres aliments ne doivent pas être réchauffés dans des
récipients hermétiques, en raison du risque d’explosion.
21. Ne pas utiliser le four si les joints de la porte et les surfaces d'étanchéité sont
endommagés. Avant toute utilisation faire viser le four par un technicien
qualifié.
22. Utiliser des ustensiles compatibles au four à micro-ondes.
23. Lorsque le four fonctionne en mode gril, chaleur tournante ou en programmes
de cuisson automatiques, ne pas toucher la porte du four, l'encadrement, la
cavité ni les plats de cuisson à moins de porter des gants spéciaux. Assurez-
vous que les plats ne soient pas trop chaud avant de les sortir du four.
Consignes importantes de sécurité
Lisez ces consignes avec grande attention et
conservez-les pour pouvoir vous y référer
ATTENTION
Vérifiez que les temps de cuisson sont correctement
réglés ; toute surcuisson peut mettre le FEU et
ENDOMMAGER alors le FOUR.
13. Il n’est pas recommandé de chauffer les œufs dans leur coquille et les
œufs durs entiers dans un four micro-ondes car ils risquent d’exploser,
même après la fin de cuisson.
19. N’autorisez les enfants à utiliser le four sans surveillance que si des
instructions appropriées leur ont été données,permettant à l’enfant d’utiliser
le four de façon sûre et de comprendre les dangers d’une utilisation incorrecte.
95

Consignes importantes de sécurité
Lisez ces consignes avec grande attention et
conservez-les pour pouvoir vous y référer
96
Qu’il convient de surveiller les enfants pour s’assurer qu’ils
ne jouent pas avec l’appareil.
Que les appareils ne sont pas destinés àêtre mis en
fonctionnement au moyen d’une minuterie extérieure ou par
un système de commande séparée.

Ustensiles pour
Micro-ondes
Ne jamais utiliser d’objets métalliques ou bordés de
métal dans votre four à micro-ondes.
Les micro-ondes ne peuvent traverser le métal. Elles vont rebondir sur l’objet métallique
dans le four et peuvent créer un arc électrique, phénomène alarmant qui ressemble à
un éclair. La plupart des ustensiles de cuisson non métalliques résistant à la chaleur
peuvent être utilisés dans un micro-ondes. Cependant, certains ustensiles peuvent
contenir des matériaux qui les rendent impropres à une utilisation dans un micro-
ondes. En cas de doutes sur un ustensile particulier, il existe un moyen simple de
savoir s’il peut aller au micro-ondes. Placez l’ustensile en question près d’un bol d’eau
dans le micro-ondes. Faites chauffer pendant 1 minute à pleine puissance. Si l’eau
chauffe alors que l’ustensile reste froid au toucher, l’ustensile peut passer au micro-
ondes. En revanche, si la température de l’eau ne change pas mais que l’ustensile
chauffe, alors il ne peut être utiliser dans le micro-ondes. Vous disposez certainement
dans votre cuisine de nombreux récipients qui peuvent passer au micro-ondes. En voici
une liste.
Assiettes
La plupart des assiettes vont au micro-ondes. En cas de doute se reporter aux
documents du fabricants ou effectuer le test décrit plus haut.
Verres
Le verre qui résiste à la chaleur peut passer au micro-ondes. Cela est valable pour
toutes les marques d’ustensiles de cuisine en verre trempé pour four. Néanmoins, ne
pas utiliser de verre fragile, tel que les verres à vin, qui pourraient se briser pendant le
réchauffage.
Récipients en plastique
Ils peuvent être utilisés pour contenir des aliments à ne pas réchauffés rapidement.
Toutefois, il ne faut pas les utiliser pour contenir des aliments qui devront rester très
longtemps dans le four dans la mesure où l’aliment chaud finira par déformer ou faire
fondre le récipient en plastique.
Papier
Les assiettes et les récipients en papier conviennent et peuvent être utilisés dans votre
four à micro-ondes, dans la mesure où le temps de cuisson est court et que les aliments
contiennent peu de graisses et d’eau. Les serviettes en papier sont également très utiles
pour envelopper les aliments et pour garnir les plateaux de cuisson dans lesquels les
aliments gras comme le bacon sont cuits. Éviter en général les produits en papier de
couleur, laquelle peut déteindre. Certains produits en papier recyclé peuvent contenir
des impuretés qui pourraient engendrer des arcs ou s’enflammer en cas d’utilisation
dans un micro-ondes.
Sacs de cuisson en plastique
Remuer les aliments est l’une des techniques les plus importantes de l’utilisation en
micro-ondes. Dans la cuisson traditionnelle, on remue les aliments pour bien les
mélanger. Les aliments cuits au micro-ondes sont, eux, remués afin de répartir et de
redistribuer la chaleur. Ne jamais oublier de remuer de l’extérieur vers le centre
puisque l’extérieur chauffe d’abord.
Vaisselle plastique pour micro-ondes
Il existe toute sorte de formes et de tailles de vaisselle pour micro-ondes. Pour la
plupart, vous pouvez utiliser dans votre micro-ondes les ustensiles dont vous disposez
déjà plutôt que d’investir dans un nouvel équipement de cuisine.
Poterie, plats en pierre, céramique
Les récipients fabriqués dans ces matériaux conviennent généralement pour une
utilisation en micro-ondes, mais il est préférable d’effectuer un test au préalable.
ATTENTION
Certains ustensiles ayant une forte teneur en plomb ou en fer ne conviennent pas
comme ustensiles de cuisson.
Les ustensiles doivent être vérifiés pour assurer leur emploi approprié dans les fours
à micro-ondes.
97

Ne quittez pas le four des yeux
Les recettes de ce livre ont été écrites soigneusement, mais votre réussite dépend de
l’attention que vous portez aux aliments pendant leur cuisson. Gardez toujours un oeil
sur vos aliments pendant qu’ils cuisent. Votre four à micro-ondes est équipé d’une
lampe qui s’allume automatiquement pendant le fonctionnement du four, ainsi vous
pouvez voir ce qu’il y a dedans et vérifier l’évolution de la cuisson. Les instructions
données dans les recettes (soulever, remuer ...) sont les étapes minimum
recommandées. Si la nourriture ne paraît pas cuire de façon homogène, faites les
réglages que vous pensez nécessaires pour résoudre ce problème.
Les facteurs affectant le temps de cuisson
De nombreux facteurs affectent les temps de cuisson. Par exemple, un gâteau composé
de beurre, de lait et d’oeufs glacés sera bien plus long à cuire qu’un gâteau composé
d’ingrédients à température ambiante. Toutes les recettes de ce livre indiquent une
fourchette de temps de cuisson. En général, vous vous apercevrez que l’aliment n’est
pas assez cuit pour un temps de cuisson du bas de la fourchette et qu’il faut poursuivre
la cuisson au delà du temps maximum donné, selon vos goûts personnels. Le principe
qui guide ce livre est qu’il vaut mieux suivre le temps de cuisson donné de la recette.
Parce qu’un plat trop cuit est vraiment fichu. Certaines recettes, en particulier pour le
pain, les gâteaux et les crèmes, recommandent de retirer l’aliment du four alors qu’il
n’est pas encore tout à fait cuit. Ce n’est pas une erreur. Lorsque l’on les laisse reposer,
en général couverts, ces aliments continuent à cuire en dehors du four alors que la
chaleur enfermée dans les parties externes de l’aliment se propage progressivement
vers l’intérieur. Si les aliments restent dans le four pendant toute la durée, les parties
externes cuisent trop, voire elles brûlent. Votre compétence pour estimer la cuisson et
les temps de repos pour les divers aliments évoluera avec l’expérience.
Densité des aliments
Des aliments légers, poreux, tels que les gâteaux et le pain cuisent plus rapidement
que les aliments denses et lourds comme les rôtis et les ragoûts. Faites attention lorsque
vous cuisez des aliments poreux, les bords externes peuvent sécher et devenir friables.
Hauteur des aliments
Les portions supérieures d’aliments hauts, en particulier des rôtis, cuiront plus
rapidement que la portion inférieure. Il est donc sage de retourner les aliments hauts
pendant la cuisson, parfois plusieurs fois.
Teneur hydrique des aliments
Puisque la chaleur générée dans les micro-ondes a tendance à évaporer l’humidité, des
aliments relativement secs tels que les rôtis et certains légumes doivent être aspergés d’eau
avant la cuisson ou recouverts pour conserver leur humidité.
Quantité d’os et teneur en graisses des aliments
Les os conduisent la chaleur et la graisse cuit plus rapidement que la viande. Il faut faire
attention lors de la cuisson de morceaux de viande osseux ou gras, afin qu’ils cuisent de
façon homogène et ne soient pas trop cuits.
Quantité d’aliments
Le nombre de micro-ondes de votre four demeure stable indépendamment de la quantité
de nourriture cuite. En conséquence, plus il y a d’aliments dans le four, plus le temps de
cuisson est long. Ne pas oublier de réduire le temps de cuisson d’un tiers au moins lorsque
vous divisez par deux les recettes.
Forme des aliments
Les micro-ondes pénètrent environ 2,5 cm des aliments, la portion interne des aliments
épais est cuite alors que la chaleur générée sur l’extérieur progresse vers l’intérieur. Seule
la partie externe de l’aliment est cuite par l’énergie micro-ondes ; le reste est cuit par
convection. La forme la moins adaptée d’un aliment à cuire au micro-ondes est un carré
épais. Les angles brûleront bien avant que le centre ne soit à peine chaud. Les aliments
ronds et fins ou en forme d’anneau conviennent parfaitement à la cuisson au micro-ondes.
Couvercle
Un couvercle enferme la chaleur et la vapeur et permet de cuire l’aliment plus rapidement.
Utiliser un couvercle ou un film pour micro-ondes avec un coin retourné pour éviter les
projections.
Brunissage
Les viandes et volailles cuites un quart d’heure ou plus bruniront légèrement dans leur
propre graisse. Les aliments cuits moins longtemps peuvent être badigeonnés d’une sauce
telle que la sauce Worcestershire, la sauce soja ou barbecue afin d’obtenir une couleur
appétissante. Vu que les quantités de sauces ajoutées aux aliments sont minimes, la saveur
originale du plat n’est pas modifiée.
Couverture avec un papier sulfurisé
Le papier sulfurisé empêche les projections et permet aux aliments de conserver un peu de
chaleur. Mais vu qu’il s’agit d’un couvercle qui tient moins que le couvercle ou le film
plastique, la nourriture peut sécher légèrement.
Disposition et espacement
Les aliments individuels tels que les pommes de terre cuites, les petits gâteaux et les hors
d’oeuvre chaufferont de façon plus homogène s’ils sont placés dans le four à distance
égale, de préférence en cercle. Ne jamais empiler les aliments les uns sur les autres.
Caractéristiques des aliments et
Cuisson micro-ondes
98

Caractéristiques des aliments et
Cuisson micro-ondes
Penser à remuer les aliments
Remuer les aliments est l’une des techniques les plus importantes de l’utilisation en micro-
ondes. Dans la cuisson traditionnelle, on remue les aliments pour bien les mélanger.
Les aliments cuits au micro-ondes sont, eux, remués afin de répartir et de redistribuer la
chaleur. Ne jamais oublier de remuer de l’extérieur vers le centre puisque l’extérieur chauffe
d’abord.
Retourner les aliments
Il faut retourner les aliments gros et hauts tels que les rôtis et les poulets entiers afin qu’ils
cuisent de façon homogène le haut et le bas. Cela vaut également pour les morceaux de
poulet et les côtelettes.
Placer les parties plus épaisses vers l’extérieur
Étant donné que les micro-ondes sont attirées par la partie externe des aliments, il est
préférable de placer les portions plus épaisses de viande, de volaille et de poisson sur le bord
externe du plat. Ainsi les portions plus épaisses recevront la plupart des micro-ondes et
l’aliment cuira de façon homogène.
Protection
Des bandes d’aluminium (bloquant les micro-ondes) peuvent être placées sur les angles ou
bords des aliments carrés et rectangulaires pour éviter de trop cuire ces portions. N’utilisez
jamais trop d’aluminium et vérifiez que le papier est bien attaché au plat afin de ne pas
générer d’arc électrique dans le four.
Surélévation
Les aliments épais ou denses peuvent être surélevés afin que les micro-ondes soient absorbées
par le dessous et le centre de l’aliment.
Perçage
Les aliments enfermés dans une coquille, une peau ou une membrane vont éclater dans le
four à moins de les percer avant de les cuire. Il en va ainsi du blanc et du jaune díoeuf, des
clams et des huîtres et des légumes et fruits entiers.
Test de cuisson
La nourriture cuit si rapidement dans un four à micro-ondes qu’il est nécessaire de la tester
souvent. Certains aliments restent dans le micro-ondes jusqu’à cuisson totale, mais la plupart
des aliments, comme la viande et la volaille, doivent être retirés du four juste avant d’être
cuits et il faut les laisser reposer un moment ce qui leur permet de terminer leur cuisson. La
température interne des aliments augmentera de 3˚C à 8˚C pendant la période de repos.
Temps de repos
On laisse souvent les aliments reposer entre 3 et 10 minutes après les avoir sortis du four à
micro-ondes. On couvre les aliments en général afin de conserver la chaleur sauf si leur
texture doit être sèche (certains gâteaux et biscuits par exemple). Le repos permet aux
aliments de finir de cuire et permet à la saveur de bien se répartir et de se développer.
Pour Nettoyer Votre Four
1. L’intérieur du four doit rester propre
Des projections de nourriture et des résidus de liquides collent aux murs du four et
aux surfaces entre le joint et la porte. Il est préférable d’essuyer immédiatement les
débordements avec un chiffon humide. Les miettes et les débordements vont absorber
les micro-ondes et rallonger les temps de cuisson. Prenez un chiffon humide pour
enlever les miettes qui tombent entre la porte et l’encadrement. Il est important de
garder cette surface propre pour garantir l’étanchéité parfaite. Enlevez les projections
grasses avec un chiffon savonneux, rincez et séchez. N’utilisez pas de détergent
agressif ou de nettoyant abrasif. Le plateau en verre peut être lavé dans l’évier ou
dans le lave-vaisselle.
2. L’extérieur du four doit rester propre
Nettoyez l’extérieur du four avec de l’eau et du savon puis à l’eau et séchez avec un
chiffon doux ou un essuie-tout. Pour éviter díendommager les pièces actives à
l’intérieur du four, l’eau ne doit pas pénétrer dans les ouvertures de ventilation. Pour
nettoyer le bandeau de commande, ouvrez la porte afin d’éviter tout démarrage
accidentel et essuyez avec un chiffon humide immédiatement suivi d’un chiffon sec.
Appuyez sur ARRÉT après le nettoyage.
3. Si de la vapeur s’accumule à l’intérieur ou autour de l’extérieur de la porte du four,
essuyez les panneaux avec un chiffon doux. Cela peut arriver lorsque le micro-ondes
fonctionne dans des conditions d’humidité élevée et n’indique en aucun cas un
mauvais fonctionnement de l’appareil.
4. La porte et les joints d’étanchéité de la porte du four doivent être propres. N’utiliser
que de l’eau chaude et savonneuse, puis séchez complètement. NE PAS UTILISER DE
MATÉRIAUX ABRASIFS TELS QUE LES POUDRES OU TAMPONS MÉTALLIQUES OU
PLASTIQUES. Les pièces métalliques sont plus faciles à entretenir lorsqu’elles sont
essuyées souvent avec un chiffon humide.
99

Questions et
Réponses
Q. Que se passe-t-il lorsque la lampe du four ne s’allume pas?
R. Il peut y avoir plusieurs raisons à cela :
L’ampoule a grillé.
La porte n’est pas fermée.
Q. L’énergie micro-ondes traverse-t-elle la vitre du four dans la porte?
R. Non. Les trous, ou hublots, permettent de laisser passer la lumière ; mais
pas l’énergie micro-ondes.
Q. Pourquoi entend-on un signal sonore lorsque l’on touche un bouton sur
le bandeau de commande?
R. Le signal sonore permet de vérifier que le réglage est correctement entré.
Q. Le micro-ondes sera-t-il endommagé s’il fonctionne à vide?
R. Oui. Ne jamais faire marcher le micro-ondes vide ou sans le plateau en
verre.
Q. Pourquoi les oeufs éclatent-ils parfois?
R. Lorsque l’on cuit, frit ou poche des oeufs, le jaune peut éclater en raison de
la vapeur qui se développe sous la membrane du jaune. Afin d’éviter cela,
il suffit de percer le jaune avant de le cuire. Ne mettez jamais au micro-
ondes les oeufs dans leur coquille.
Q. Pourquoi recommande-t-on un temps de repos à la fin de la cuisson?
R. Une fois la cuisson terminée, l’aliment continue à cuire pendant le temps
de repos. Ce temps de repos permet de terminer la cuisson de façon
homogène dans tout l’aliment. La durée du temps de repos dépend de la
densité de l’aliment.
Q. Est-il possible de faire du pop-corn dans un four à micro-ondes?
R. Oui, si l’on utilise l’une des deux méthodes suivantes :
1. Des ustensiles pour pop-corn spécialement conçus pour la cuisson au
micro-ondes.
2. Du pop-corn pré-conditionné commercialisé qui recommande des
durées et des niveaux de puissance spécifiques pour que le produit final
soit acceptable.
SUIVRE LES INSTRUCTIONS EXACTES DE CHAQUE FABRICANT POUR
LEUR LEUR POP-CORN. NE PAS LAISSER LE FOUR SANS SURVEILLANCE
PENDANT L’ECLATEMENT DU MANÏS. SI LE MAÏS N’ECLATE PAS A LA
FIN DE LA DUREE RECOMMANDEE, NE PAS POURSUIVRE LA CUISSON.
UNE SURCUISSON PEUT ENFLAMMER LE MAÏS.
ATTENTION
NE JAMAIS UTILISER DE SAC EN PAPIER MARRON POUR FAIRE
ECLATER LE MAÏS. NE JAMAIS ESSAYER DE FAIRE ECLATER LES GRAINS
QUI SONT RESTES ENTIERS.
Q. Pourquoi mon four ne cuit-il pas aussi vite que les temps indiqués dans
le guide de cuisson?
R. Consultez à nouveau votre guide de cuisson pour vérifier que vous avez
bien suivi les instructions, et pour trouver ce qui peut engendrer des
variations dans les temps de cuissons. Les temps indiqués dans le guide de
cuisson et les niveaux de puissance ne sont que des suggestions, choisies
pour éviter de cuire trop un aliment, problème le plus fréquent avant de
s’habituer au micro-ondes. Les changements de taille, de forme, de poids
et de dimensions des aliments peuvent requérir des temps de cuisson
supérieurs. Faites appel à votre jugement ainsi qu’aux suggestions du
guide de cuisson pour voir où en est la cuisson de l’aliment, tout comme
vous le feriez avec une cuisinière traditionnelle.
100

Avertissements et
Spécifications Techniques
Les fils de connexion au secteur respectent le code suivant:
BLUE : Neutre
MARRON : Phase
VERT OU JAUNE : Terre
Cet appareil est fourni avec un câble de réseau de performances
spécifiques, qui, s’il est endommagé, doit être remplacé par un
câble de réseau de même type ; un tel câble de réseau peut
s’obtenir auprés de l’importateur et doit être installé par une
personne compétente ( ).
Si le câble d’alimentation est endommagé, il doit être remplacé par
le fabricant, son service après vente ou une personne de
qualification similaire afin d’éviter un danger.
CET APPAREIL DOIT ÊTRE RELIE A LA TERRE
Alimentation
Sortie
Fréquence micro-ondes
Dimension extérieure
Puissance consommée
Micro-ondes
230 V AC / 50Hz
850 W (valeur standard IEC60705)
2 450 MHz
507 mm(L) X 283 mm(H) X 435 mm(P)
1 250 Watt
1 000 Watt
Combinaison
2 2
00 W att
Les œufs dans leur coquille et les œufs durs ne doivent pas être cuits ou réchauffés dans un four
à micro onde , car ils risquent d’exploser et d’endommager irrémédiablement votre appareil .
Après la cuisson ou le réchauffage , laisser reposer quelques instants , les aliments dans le four
, pour que la température de toutes les parties de l’aliment soit homogène.
Remuer ou agiter le contenu ( en particulier le biberons et les pots d’aliments pour bébé ) et
surtout , vérifier la température avec soin avant consommation afin d’éviter les brûlures .
Ce four micro-ondes est livre avec un cordon reseau special, qui, s’il est
endommage, doit etre remplace par un cordon de meme type. Ce cordon ne
peut etre delivre que par le fabriquant et installe par une personne competente.
<French>
Élimination de votre ancien appareil
1. Ce symbole, représentant une poubelle sur roulettes barrée d'une croix,
signifie que le produit est couvert par la directive européenne 2002/96/EC.
2. Les éléments électriques et électroniques doivent être jetés séparément,
dans les vide-ordures prévus à cet effet par votre municipalité.
3. Une élimination conforme aux instructions aidera à réduire les
conséquences négatives et risques éventuels pour l'environnement et la
santé humaine.
4. Pour plus d'information concernant l'élimination de votre ancien appareil,
veuillez contacter votre mairie, le service des ordures ménagères ou
encore la magasin où vous avez acheté ce produit.
Attention
Spécifications Techniques
NOTE IMPORTANTE
A la différence des autres appareils de cuisson, votre four à micro-ondes ne chauffe pas le
récipient mais uniquement son contenu. Un réel danger de brûlure de la gorge et du palais
existe, si vous ne contrôlez pas la température des aliments avant de les absorber. Nous vous
recommandons plus particulièrement de vérifier la température du lait (ou autre liquide),
contenu dans un récipient (biberon par exemple) à donner aux nourrissons et enfants.
Ne jamais faire chauffer de liquide dans un récipient fermé.
(risque d’éclatement du récipient, avant, pendant ou oprès l’ouverture de la parte) Le
remplacement du cable d’alimentation et/ou toute intervention nécessitant l’ouverture de
l’appareil ne doit s’effectuer que par du personnel technique qualifié.
101
MH6589DR/MH6589DRS/MH6589DRB

-
 1
1
-
 2
2
-
 3
3
-
 4
4
-
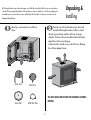 5
5
-
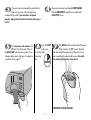 6
6
-
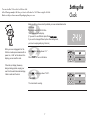 7
7
-
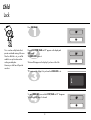 8
8
-
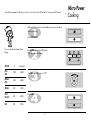 9
9
-
 10
10
-
 11
11
-
 12
12
-
 13
13
-
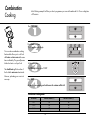 14
14
-
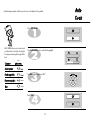 15
15
-
 16
16
-
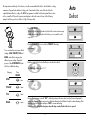 17
17
-
 18
18
-
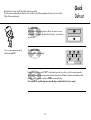 19
19
-
 20
20
-
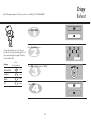 21
21
-
 22
22
-
 23
23
-
 24
24
-
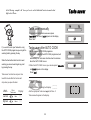 25
25
-
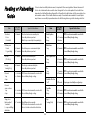 26
26
-
 27
27
-
 28
28
-
 29
29
-
 30
30
-
 31
31
-
 32
32
-
 33
33
-
 34
34
-
 35
35
-
 36
36
-
 37
37
-
 38
38
-
 39
39
-
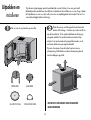 40
40
-
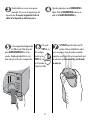 41
41
-
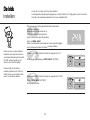 42
42
-
 43
43
-
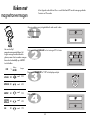 44
44
-
 45
45
-
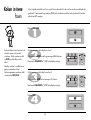 46
46
-
 47
47
-
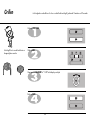 48
48
-
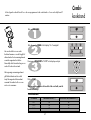 49
49
-
 50
50
-
 51
51
-
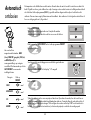 52
52
-
 53
53
-
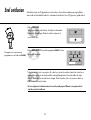 54
54
-
 55
55
-
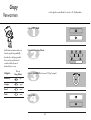 56
56
-
 57
57
-
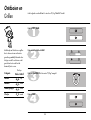 58
58
-
 59
59
-
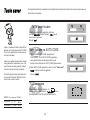 60
60
-
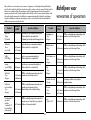 61
61
-
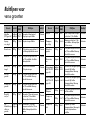 62
62
-
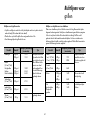 63
63
-
 64
64
-
 65
65
-
 66
66
-
 67
67
-
 68
68
-
 69
69
-
 70
70
-
 71
71
-
 72
72
-
 73
73
-
 74
74
-
 75
75
-
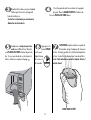 76
76
-
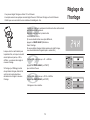 77
77
-
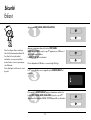 78
78
-
 79
79
-
 80
80
-
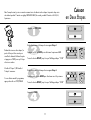 81
81
-
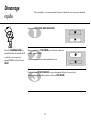 82
82
-
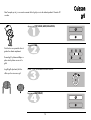 83
83
-
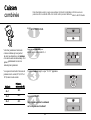 84
84
-
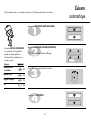 85
85
-
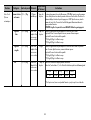 86
86
-
 87
87
-
 88
88
-
 89
89
-
 90
90
-
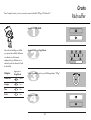 91
91
-
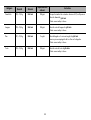 92
92
-
 93
93
-
 94
94
-
 95
95
-
 96
96
-
 97
97
-
 98
98
-
 99
99
-
 100
100
-
 101
101
-
 102
102
-
 103
103
-
 104
104
-
 105
105
-
 106
106


LG MH6589 de handleiding
- Categorie
- Magnetrons
- Type
- de handleiding
in andere talen
- English: LG MH6589 Owner's manual
- français: LG MH6589 Le manuel du propriétaire
Gerelateerde artikelen
Andere documenten
-
Panasonic NN-E221 MM de handleiding
-
Panasonic NN-J19KS de handleiding
-
Panasonic NNSD279SEPG de handleiding
-
-
Panasonic NNE486MM de handleiding
-
Whirlpool MWD 344 IX Gebruikershandleiding
-
Tefal TA1005 - Tajine de handleiding
-
-
-
Valberg MWO 23 E K 343C de handleiding