
73502-V1-24/10/2017
FR EN DE ES RU NL IT
p. 01-08
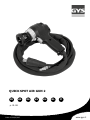
QUICK SPOT AIR GUN 2
www.gys.fr

2
QUICK SPOT AIR GUN 2
n° FR EN DE ES RU NL IT
1
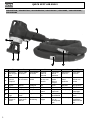
Connecteur
câble de puis-
sance
Power cable
connector
Schweißkabe-
lanschluß
Conector
cable de
potencia
Коннектор
кабеля
можности
Aansluiting
netsnoer
Cavo della
corrente
2
Connecteur
tuyau air
comprimé
Compressed
air connector
Druckluftan-
schluß
Conector tubo
de aire com-
primido
Коннектор
трубки
сжатого
воздуха
Aansluiting
kabel
perslucht
Connessione
all’aria com-
pressa
3 Poignée Handle Handgriff Asa Ручка Handvat Impugnatura
4 Gâchette Trigger Abzug Gatillo Курок Trekker Grilletto
5
Patin d’appui Bearing pad Fußplatte Patín de
sosten
Опорный
подпятник
Steunplaatje Piastra
d’appoggio
6
Electrode de
tirage
Pulling elec-
trode
Zugelektrode Electrodo de
tiro
Электрод для
вытягивания
Elektrode Elettrodo per
tirare
7
Molette de
réglage de
course
Stroke adjust-
ment thum-
bwheel
Rändelrad-
Einstellung
Rueda de
reglaje
Колесико
для de
регилировки
хода
Afstelwieltje Manopola di
regolazione
della forza del
tiro
DESCRIPTION / DESCRIPTION / BESCHREIBUNG / DESCRIPCION / ОПИСАНИЕ / OMSCHRIJVING /
DESCRIZIONE
1
4
56
7
2
3

3
QUICK SPOT AIR GUN 2
FR - Longueur du faisceau de câbles
EN - Cables set length
DE - Kabellänge
ES – Longitud del haz de cables
RU - Длина пучка кабелей
NL - Kabellengte
IT - Lunghezza cavo
2,5 m
FR - Pression air comprimé
EN - Air input pressure
DE – Eingangsluftdruck
ES – Presión de aire comprimido
RU – Давление сжатого вождуха
NL - Druk perslucht
IT - Pressione dell’aria in ingresso
6 bar < P < 8 bar
FR – Dimensions (hors câble)
EN – Dimensions (except cables)
DE – Maße (ohne Kabel)
ES – Dimensiones (cables excluidos)
RU – Размеры (вне кабеля)
NL - Afmetingen (zonder de kabels)
IT - Dimensioni (esclusi i cavi)
165 L x 80 l x 200 H mm
FR - Poids (hors câbles)
EN - Weight (excepting cables)
DE - Gewicht (ohne Kabel)
ES – Peso (cables excluidos)
RU – Вес (вне кабеля)
NL - Gewicht (zonder de kabels)
IT - Peso (esclusi i cavi)
920 g
CARACTÉRISTIQUES / CARACTERISTICS / TECHNISCHE DATEN / CARACTÉRISTICAS /
ХАРАКТЕРИСТИКИ / EIGENSCHAPPEN / CARATTERISTICHE TECNICHE

4
QUICK SPOT AIR GUN 2
BRANCHEMENTS / CONNECTIONS / ANSCHLUSS / CONEXIONES / ПОДКЛЮЧЕНИЕ / AANSLUITINGEN
/CONNESSIONI
Branchement électrique / Electrical connections /Schweißstromanschluß / Conexión eléctrica /
Elektrische aansluitingen / Электр. подключение / Connessione alla corrente elettrica
FR - Brancher le connecteur du câble de puissance sur le générateur.
EN - Connect the power cable connector on the generator.
DE - Schweißkabelanschluß am Gerät anschließen.
ES - Conectar el conector del cable de potencia con el generador.
RU - Подсоедините кабель мощности к генератору.
NL - Sluit het netsnoer aan op de generator.
IT - Connettere il cavo della corrente sul generatore.
Branchement air comprimé /Compressed air connection / Druckluftanschluß / Conexión de aire / Aans-
luiting perslucht / Подключение воздуха
FR - Brancher le connecteur air comprimé sur le réseau d’air comprimé. Le
réseau d’air doit délivrer une pression stable comprise entre 6 et 8 bars.
EN - Connect the air connector onto the compressed air network. The air
network must deliver a stable pressure between 6 and 8 bars.
DE - Druckluftanschluß an das Druckluftnetz anschließen. Es muss ein konstan-
ter Druck zwischen 6 und 8 bar gewährleistet sein.
ES - Conectar el conector de aire comprimido con la red de aire comprimido. La
red de aire debe liberar una presión estable entre 6 y 8 bares.
RU - Подсоедините коннектор сжатого воздуха к системе подачи сжатого
воздуха. Система подачи должна выдавать стабильный напор воздуха
между 6 и 8 бар.
NL - Koppel de aansluiting van de perslucht aan op het persluchtnet. De
perslucht moet met een stabiele druk, tussen 6 en 8 bar, aangevoerd worden.
IT - Collegare alla rete dell’aria compressa, l’apposito connettore. La rete
dell’aria compressa deve fornire un livello di pressione stabile tra i 6 e gli 8 bar

5
QUICK SPOT AIR GUN 2
REGLAGE DE LA COURSE / STROKE ADJUSTMENT / EINSTELLUNG / REGLAJE / НАСТРОЙКА ХОДА /
INSTELLING / REGOLAZIONE DELLA FORZA DEL TIRO
FR - Régler le point zéro de la manière suivante
EN - Adjust the zero level with following instructions
DE - Grundstellung justieren
ES - Ajustar el punto « cero » como sigue
RU - Настройте исходную позицию след. образом
NL - Stel het nulpunt als volgt in
IT - Regolare il livello zero in base alle istruzioni sotto
FR - Sans aucun appui sur la gâchette, l’électrode de tirage
dépasse de quelques centimètres par rapport au patin d’ap-
pui.
EN - Without any pressure on the trigger, the pulling elec-
trode extends a few centimetres beyond the bearing pad.
DE - Ohne Druck am Abzug ragt die Zugelektrode einige
Zentimeter über die Fußplatte hinaus.
ES - Sin apretar el gatillo, el electrodo de tiro sobrepasa de
algunos centímetros el patín de sostén.
RU - Не нажимая на курок, электрод вытягивания
выступает на несколько сантиметров относительно
опорного подпятника.
NL - Zonder dat er op de trekker gedrukt wordt, steekt de
elektrode enkele centimeters uit het steunplaatje.
IT - Quando il grilletto non è premuto, l’elettrodo fuoriesce
di alcuni centimetri dalla piastra di appoggio.
FR - Tourner la molette de réglage de course (1) de sorte
que lorsque la gâchette est pressée, l’électrode de tirage
afeure par rapport au patin d’appui.
EN - Turn the stroke adjustment thumbwheel (1) such that
when the trigger is pressed, the tip of the pulling electrode
is aligned with the bearing pad surface.
DE - Die Zugelektrode, bei komplett gedrücktem Abzug,
mittels dem Rändelrad (1) so einstellen, dass sie sich mit
der Fußplatte auf einer Linie bendet.
ES - Girar la rueda de reglaje (1) de tal manera que, al apre-
tar el gatillo, el electrodo de tiro nivele el patín de sostén
RU - Поверните колесико (1) регулировки хода так,
чтобы когда нажимаешь на курок, электрод вытягивания
был на одном уровне с опорным подпятником
NL - Draai het instelwieltje (1) zo dat wanneer de trekker inge-
drukt is, de elektrode op één lijn is met het steunplaatje.
IT - Ruotare la manopola di regolazione (1) della forza del
tiro in modo che quando il grilletto viene premuto, la punta
dell’elettrodo è allineata con la piastra d’appoggio.
1

6
QUICK SPOT AIR GUN 2
UTILISATION / INSTRUCTIONS OF USE / GEBRAUCHSANLEITUNG / UTILIZACION /
ИСПОЛЬЗОВАНИЕ / GEBRUIK / ISTRUZIONI D’USO
FR - Le produit doit être utilisé avec un générateur à détection automatique de tôle. Connecter au préalable le patin de
masse du générateur à la carrosserie. La zone à tirer doit être décapée pour retirer tout revêtement non conducteur. Le
produit est destiné à tirer sur les tôles d’habillage des véhicules (épaisseur 0,6 – 0,8mm, 1mm maximum).
EN - The product must be used with a generator equipped with automatic detection of car body. Connect the earth plate
of the generator to the car body. The area to pull must be grinded in order to remove any non conductive coating. The
product has been designed to pull on skin parts of the vehicle (thickness 0,6 – 0,8mm, 1mm maximum).
DE - Das Produkt muss mit einem Ausbeulspotter mit automatischer Auslösung verwendet werden. Die Fußplatte mit der
„Gummiisolierung“ auf das blank geschliffene Karosserieblech über der Delle aufsetzen. Das Produkt wurde entwickelt,
um Karosseriebleche von 0,6 bis maximal 1,0mm zu ziehen.
ES - Este producto debe utilizarse con un generador con detección de chapa automática. Conectar previamente el patín
de masa del generador a la carrocería. La zona que tirar debe estar decapada para quitar todo revestimiento que no
sea conductor. El producto está dedicado para tirar chapas de revestimiento de los vehiculos (grosor 0,6 – 0,8mm, 1mm
como máximo)
RU - Аппарат должен быть использован с генератором с автоматической детекцией контакта с металлом.
Предварительно подсоедините массу генератора к кузову. Зона правки должна быть зачищена так, чтобы не
было непроводниковых покрытий. Аппарат предназначен для вытягивания общивочного металла автомобилей
(толщина 0,6 – 0,8 мм, 1 мм максимум)
NL - Het apparaat moet gebruikt worden in combinatie met een generator met automatische plaatwerkdetectie. Koppel
eerst de massa van de generator aan op de carrosserie. De uit te deuken zone moet goed afgeschuurd zijn, en alle
geleidende deeltjes moeten verwijderd zijn. Het apparaat is bestemd voor het uitdeuken van plaatwerk van voertuigen
(dikte 0,6 - 0,8mm, 1mm maximaal).
IT - Usare con generatore dotato di dispositivo di rilevazione automatica della carrozzeria. Collegare la massa del gene-
ratore sulla carrozzeria. E’ necessario eliminare dall’area che deve essere tirata il rivestimento conduttore. Il prodotto è
stato progettato per tirare su superci “nude” del veicolo (spessore 0,6 – 0,8mm, 1mm massimo)
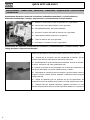
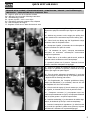
FR - Appliquer la pointe de tirage contre la zone à tirer sur la carrosserie; la
soudure se déclenche automatiquement.
EN - Apply the pulling electrode against the area to pull on the car body; the
welding is triggered automatically.
DE - Die Zugelektrode im tiefsten Punkt auf die Delle setzen. Die Schweißung
wird automatisch ausgelöst.
ES - Apretar la punta de tiro contra la zona que tirar sobre la carrocería, la
soldadura se genera automáticamente.
RU - Приложите кончик электрода к зоне правки на кузове; сварочный
разряд происходит автоматически.
NL - Houd de punt tegen de uit te deuken zone op de carrosserie; de laspunt
wordt onmiddellijk geactiveerd.
IT - Applicare l’elettrodo sulla zona della carrozzeria che deve essere tirata; la
saldatura viene effettuata automaticamente.

7
QUICK SPOT AIR GUN 2
FR - Appuyer légèrement sur la gâchette pour déclencher le tirage. Un tirage
progressif est possible en procédant à un appui progressif sur la gâchette.
EN - Press slightly on the trigger to start pulling. A progressive pulling is pos-
sible with a progressive action on the trigger.
DE - Beim betätigen des Abzugs beginnt der Vorgang. Ein dosierbarer Zughub
ist möglich beim kontrollierten Drücken des Abzugs.
ES - Presione ligeramente sobre el gatillo para activar el tiro. Un tiro progresivo
es posible mediante una presión progresiva sobre el gatillo.
RU - Нажмите слегка на курок для активации вытягивания. Прогрессивное
вытягивание возможно с помощью постепенного нажатия на курок.
NL - Druk zachtjes op de trekker om het trekken op te starten. Wanneer u de
trekker steeds wat meer indrukt, zal het apparaat geleidelijk z’n trekkracht
vergroten.
IT - Premere leggermente sul pulsante per iniziare il tiraggio. Un tiraggio pro-
gessivo è possibile procedendo con una progressiva pressione sul pulsante.
FR - Appuyer à fond sur la gâchette après le tirage, l’électrode fait un quart de
tour automatiquement pour se détacher de la tôle.
EN - Press strongly on the trigger after pulling, the electrode automatically
turns by a quarter to detach from the metal.
DE - Beim festen Drücken des Abzugs nach dem Zughub erfolgt das Lösen der
Zugelektrode vom Blech durch eine automatische Vierteldrehung.
ES - Presione completamente sobre el gatillo tras el tiro, el electrodo hace un
cuarto de vuelta automáticamente para separarse de la chapa.
RU - Нажмите до упора на курок после вытягивания, электрод автоматически
сделает четверть оборота для отсоединения от поверхности листа.
NL - Geef een stevige druk op de trekker na het trekken, de elektrode zal dan
automatisch een kwartslag draaien en zich losmaken van het plaatwerk.
IT - Premere a fondo sul pulsante dopo il tiraggio, l’elettrodo fa un quarto di
giro automaticamente per staccarsi dalla lamiera.
CONSOMMABLES / CONSUMABLES / VERSCHLEISSTEILE / CONSUMIBLES / РАСХОДНИКИ / VER-
BRUIKSARTIKELEN / CONSUMABILI
050839 - FR - Electrodes de tirage (x5)
050839 - EN - Pulling Electrodes (x5)
050839 - DE - Zugelektrode (x5)
050839 - ES - Electrodos de tiro (x5)
050839 - RU - Электроды вытягивания (x5)
050839 - NL - Elektroden (x5)
050839 - IT - Elettrodi (x5)
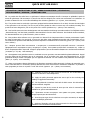
FR - Pour changer l’électrode retirer par rota-
tion le patin d’appuie.
EN - To change the electrode, remove the pad
by rotating it.
DE - Lösen Sie den Aufsatz durch eine kurze
Drehung, um die Zugelektrode zu wechseln.
ES - Para cambiar el electrodo, retire por
rotación la base de apoyo
RU - Для смены электрода снимите
вращением опорный ползунок.
NL - Om de elektrode te vervangen moet het
steunblokje losgedraaid worden.
IT - Per cambiare elettrodo, rimuovere il sup-
porto d’appoggio con una rotazione.

8
GYS SAS
134 bd des loges
53941 Saint-Berthevin
France
-
 1
1
-
 2
2
-
 3
3
-
 4
4
-
 5
5
-
 6
6
-
 7
7
-
 8
8


in andere talen
Gerelateerde papieren
-
GYS QUICK SPOT AIR GUN Data papier
-
GYS GYSPOT COMBI 230 E PRO de handleiding
-
GYS GYSPOT ARCPULL 350 de handleiding
-
-
GYS GYSPOT 3404 de handleiding
-
-
-
-
-
GYS Multi PEARL 200-4 XL Handleiding