Laserliner VideoControl-Master de handleiding
- Type
- de handleiding

FI
PT
SV
50
FR
62
ES
74
IT
86
PL
NO
TR
RU
UK
CS
ET
LV
LT
RO
BG
EL
VideoControl-Master
02
DE
14
EN
26
NL
38
DA
ø 11
60 200
5"
130

Allgemeine Sicherheitshinweise
– Setzen Sie das Gerät ausschließlich gemäß dem Verwendungszweck innerhalb der Spezikationen ein.
– Die Messgeräte und das Zubehör sind kein Kinderspielzeug. Vor Kindern unzugänglich aufbewahren.
– Baulich darf das Gerät nicht verändert werden.
– Setzen Sie das Gerät keiner mechanischen Belastung, enormen Temperaturen, Feuchtigkeit oder starken
Vibrationen aus.
– Das Gerät darf nicht mehr verwendet werden, wenn eine oder mehrere Funktionen ausfallen oder
die Batterieladung schwach ist.
– Bitte beachten Sie die Sicherheitshinweise von lokalen bzw. nationalen Behörden zur sachgemäßen
Benutzung des Gerätes.
Sicherheitshinweise
Umgang mit elektromagnetischer Strahlung
– Das Messgerät hält die Vorschriften und Grenzwerte für die elektromagnetische Verträglichkeit gemäß
EMV-Richtlinie 2014/30/EU ein.
– Lokale Betriebseinschränkungen, z.B. in Krankenhäusern, in Flugzeugen, an Tankstellen, oder in der
Nähe von Personen mit Herzschrittmachern, sind zu beachten. Die Möglichkeit einer gefährlichen
Beeinussung oder Störung von und druch elektronischer Geräte ist gegeben.
02
DE
Lesen Sie die Bedienungsanleitung, das beiliegende Heft „Garantie- und Zusatzhinweise“ sowie
die aktuellen Informationen und Hinweise im Internet-Link am Ende dieser Anleitung vollständig
durch. Befolgen Sie die darin enthaltenen Anweisungen. Diese Unterlage ist aufzubewahren und
bei Weitergabe des Gerätes mitzugeben.
!
Funktion / Verwendung
Der VideoControl-Master ist die Basiseinheit zum Anschluss verschiedener Kameraeinheiten. Zusammen
mit einer Kameraeinheit werden farbige Videobilder an das LCD zur Überprüfung schwer zugänglicher
Stellen wie z.B. in Rohrleitungen, Kanälen, Lüftungs- und Abgasinstallationen gesendet.
a
b
c
d
e
f
g
h
i
j
k
LC-Display
Tastatur
Lautsprecher
Mikrofon
USB 2.0 Schnittstelle
Steckplatz SD-Karte
externer Monitoranschluss
Reset
Ladebuchse
Anschluss Kammeraeinheit
a
b
c
d
e
f
g
h
i
j
Ausklappbarer Ständer /
Wandaufhängung
k

VideoControl-Master
03
DE
m
n
p
r
t
v
o
q
s
u
w
x
ON/OFF
– Zoom /
Bildselektion aufheben
+ Zoom /
Bildselektion
– LED-Beleuchtung /
Lautstärke –
+ LED-Beleuchtung /
Lautstärke +
Aufnahme Foto /
Sprachaufzeichnung Foto /
Bildvergleichsfunktion
Aufnahme Video
Start / Stop
Navigationstaste /
Wiedergabemodus
Navigationstaste /
Wiedergabemodus /
Abspielgeschwindigkeit
ESC: Menü verlassen
Bestätigen /
Sprachaufzeichnung
beenden
Rotation 90° / Systemmenü
m
n
o
p
q
r
s
t
u
v
w
x
2012/01/05 12:50:28
CAMERA
5
1 2
6
9
7
0 cm X 1.0
3
4
8
00 : 00 : 32
12
10
11
0 cm X 1.0
3
4
REC
00 : 00 : 32
16
1413
REC
15
aktuelles Datum
aktuelle Uhrzeit
Meterzähler (nur mit Pipe-
Control-LevelFlex-Camera)
Zoom-Stufe (1.0 - 2.0)
SD-Karte einlegen
Intensität LED-Beleuchtung
1
2
3
4
5
6
Aufnahmemodus
Keine Karte
Aufnahmemodus Video Aufnahmemodus Bild
Batteriestatus
Kamera anschließen
belegter Speicherplatz
Videosymbol
Aufnahme Video
Dauer der Aufnahme
7
8
9
10
11
12
Sprachaufzeichnung
Aufnahme Sprache
Bildsymbol
Dauer der
Sprachaufzeichnung
13
14
15
16
2012/01/05 12:50:28
IMG00001
00 : 00 : 32
0 cm
17
18
19
21 22
26
27
20
23
24
28
2012/01/05 12:50:28
X 1.0
29
30
IMG00001
00 : 00 : 32
21 22
27
28
4
2 X
25
Lautstärke
Aufnahmenummer
Position der Aufnahme
Bildsymbol
Sprachaufzeichnung
26
27
28
29
30
Wiedergabemodus Wiedergabemodus Video Wiedergabemodus Bild
Bild (keine Kennzeichnung)
Bild mit Sprachaufzeichnung
(Mikrofon-Symbol)
Video (Play-Symbol)
Videosymbol
17
18
19
20
Aufnahmedatum
Aufnahmeuhrzeit
Wiedergabe
Pause
Vorlauf Video
21
22
23
24
25

1 2
!
1.
2.
SD-Karte einlegen SD-Karte entfernen
04
DE
3
Menüsprache einstellen
ON
3 sec
MODE
3 sec
Menü
Sprache
Datum/Zeit-Setup
Videoformat
Auto Aus
Eingangsquelle
Sprache ändern
(DE, EN, NL, DA, FR, ES, IT, PL, FI, PT, SV, NO, TR, RU, UK, CS, ET, LV, LT, RO, BG, EL)
Menü
Sprache
Datum/Zeit-Setup
Videoformat
Auto Aus
Eingangsquelle
Sprache
English
Deutsch
Français
Español
Italiano
Sprache
English
Deutsch
Français
Español
Italiano
31
33
35
37
32
34
36
38
Menü
Sprache
Datum/Zeit-Setup
Videoformat
Auto Aus
Eingangsquelle
Meterzähler
Videoausgang
Alles löschen
Einstellungsmodus
Menüsprache
Datum/Uhrzeit
Videoformat PAL / NTSC
Automatische Abschaltung
Eingangsquelle
31
32
33
34
35
36
37
38
Meterzähler (nur mit Pipe-
Control-LevelFlex-Camera)
Videoausgang
Alles löschen

VideoControl-Master
2012/01/05 12:50:28
0 cm X 1.0
4
REC
00 : 00 : 32
4.1 4.2 4.3
1x = 90°
2x = 90°
3x = 90°
4x = 90°
1x = +/- 10%
2x = +/- 20%
...
10x = +/- 100%
1x = +/- 10%
2x = +/- 20%
...
10x = +/- 100%
4.54.4
0 cm X 1.0
2012/01/05 12:50:28
0 cm X 1.0
2012/01/05 12:50:28
0 cm
05
DE
Bild-/Videoaufnahmen
Gerät einschalten, Kamerakopf am Flexschlauch ausrichten und an die gewünschte Position führen. Bei
schlechten Lichtverhältnissen LED-Beleuchtung einschalten. Weiter entfernte oder kleine Objekte heran-
zoomen. Durch die manuelle Bildrotation kann das Bild auf dem Monitor schrittweise um 90° gedreht
werden. Durch kurzes Betätigen der PIC-Taste wird das Bild aufgenommen und auf der SD-Karte ge-
speichert. Langes Drücken der PIC-Taste erstellt ein Bild und die Sprachaufzeichnung wird danach
automatisch gestartet. Kurzes Drücken der OK-Taste beendet die Sprachaufzeichnung. Durch kurzes
Drücken der VID-Taste wird eine Videoaufnahme mit Sprachaufzeichnung gestartet. Erneutes Drücken
beendet die Aufnahme.
Zoom LED-Beleuchtung Bildrotation
BildVideo
START STOP
Mit der Snapshot-Option können Bilder zur Dokumentation während einer laufenden
Videoaufzeichnung aufgenommen werden.
!

2012/01/05 12:50:28
0 cm X 1.0
2012/01/05 12:50:28
0 cm X 1.0
5
4.6
3 sec
REC
00 : 00 : 32
ON
3 sec
5.1 5.2
IMG00001
IMG00002
…
IMG00030
IMG00029
…
06
DE
Wiedergabe von Bild-/Videoaufnahmen
Gerät einschalten und mit den Pfeiltasten in den Wiedergabemodus schalten. Eine Bildübersicht wird auf
dem Display angezeigt. Mit den Pfeiltasten kann vor und zurück navigiert werden. Durch Drücken der
OK-Taste wird das ausgewählte Bild oder Video im Vollbildmodus angezeigt. Kurzes Drücken der OK-Taste
startet die Wiedergabe einer Videoaufnahme oder Sprachaufzeichnung, durch erneutes Drücken wird die
Wiedergabe angehalten.
Bild mit Sprachaufzeichnung
START STOP
Navigieren Vollbildmodus
Die Qualität der Sprachwiedergabe am Gerät ist durch die wassergeschützten Mikro-Lautsprecher
begrenzt. Die Sprachaufzeichnungen können nach dem Übertragen auf einem PC in guter Qualität
abgehört werden.
!

VideoControl-Master
5.3
2012/01/05 12:50:28
IMG00001
0 cm
2012/01/05 12:50:28
IMG00001
00 : 00 : 32
0 cm
2012/01/05 12:50:28
IMG00001
00 : 00 : 32
0 cm
2012/01/05 12:50:28
IMG00001
00 : 00 : 32
0 cm
5.65.4
2012/01/05 12:50:28
IMG00001
00 : 00 : 32
0 cm
2 X 4 X 8 X
2 X
5.5
2012/01/05 12:50:28
X 1.0
IMG00001
00 : 00 : 32
6
07
DE
Wiedergabe Video
LautstärkeVorlauf Video Wiedergabe
Sprachaufzeichnung
0 cm
2012/01/05 12:50:28
IMG00001
6.1
2 sec
Löschen
Ja Nein
Löschen
Ja Nein
Löschen im Vollbildmodus
Löschen von Bild-/Videoaufnahmen
Das Löschen von Aufnahmen erfolgt durch langes Drücken der OK-Taste (Vollbildmodus) bzw.
nach vorherigem Selektieren mehrer Bilder in der Bildübersicht.

2 sec
6.2
7
2012/01/05 12:50:28
0 cm
2012/01/05 12:50:28
0 cm
08
DE
Mehrere Bilder in der Bildübersicht löschen
Löschen ausgewähle Dateien
Ja Nein
Löschen ausgewähle Dateien
Ja Nein
Bildvergleichsfunktion

VideoControl-Master
8
Einstellungsmodus
Der Einstellungsmodus wird nach 10 Sekunden automatisch beendet oder kann durch drücken
der ESC-Taste beendet werden.
!
Menü
Sprache
Datum/Zeit-Setup
Videoformat
Auto Aus
Eingangsquelle
Menü
Sprache
Datum/Zeit-Setup
Videoformat
Auto Aus
Eingangsquelle
Sprache
English
Deutsch
Français
Español
Italiano
Sprache
English
Deutsch
Français
Español
Italiano
8.1
Sprache ändern
(DE, EN, NL, DA, FR, ES, IT, PL, FI, PT, SV, NO, TR, RU, UK, CS, ET, LV, LT, RO, BG, EL)
09
DE
ON
3 sec
MODE
3 sec

10
DE
Datum/Zeit-Setup
Datumsformat
Zeitformat
Setup
Datumsformat
dd.mm.yyyy
yyyy.mm.dd
mm/dd/yyyy
yyyy/dd/mm
dd/mm/yyyy
Datumsformat
dd.mm.yyyy
yyyy.mm.dd
mm/dd/yyyy
yyyy/dd/mm
dd/mm/yyyy
Datum/Zeit-Setup
Datumsformat
Zeitformat
Setup
Zeitformat
24 Stunden
12 Stunden (AM:PM)
Zeitformat
24 Stunden
12 Stunden (AM:PM)
8.2
Menü
Sprache
Datum/Zeit-Setup
Videoformat
Auto Aus
Eingangsquelle
Datum/Zeit-Setup
22 / 21 / …22 / 23 / …
Setup
dd . mm . yyyy
23 . 08 . 2012
12 : 00 : 08
Display Ein
Datum/Zeit-Setup
Datumsformat
Zeitformat
Setup
Setup
dd . mm . yyyy
22 . 08 . 2012
12 : 00 : 08
Display Ein

VideoControl-Master
11
DE
8.3
8.4
Menü
Sprache
Datum/Zeit-Setup
Videoformat
Auto Aus
Eingangsquelle
TV Ausgang
NTSC
PAL
TV Ausgang
NTSC
PAL
Videoformat
Menü
Sprache
Datum/Zeit-Setup
Videoformat
Auto Aus
Eingangsquelle
Automatik aus
Deaktivieren
5 Minuten
10 Minuten
15 Minuten
30 Minuten
Automatik aus
Deaktivieren
5 Minuten
10 Minuten
15 Minuten
30 Minuten
Automatische Abschaltung
8.5
8.6
Meterzähler
Reset
Einheit
Aktivieren / Deaktivieren
Menü
Sprache
Datum/Zeit-Setup
Videoformat
Auto Aus
Eingangsquelle
Eingangsquelle
Direkt
Drahtlos
Eingangsquelle (nur mit Wireless-Kameraeinheit möglich)
Menü
Auto Aus
Eingangsquelle
Meterzähler
Videoausgang
Alles löschen
Meterzähler
Reset
Einheit
Aktivieren / Deaktivieren
Meterzähler (nur mit PipeControl-LevelFlex-Camera)
Eingangsquelle
Direkt
Drahtlos

12
DE
USB-Datenübertragung
Die gespeicherten Daten auf der SD-Karte können entweder mit einem passenden Kartenlesegerät
oder über die USB-Schnittstelle auf den PC übertragen werden. Informationen zur Verbindung zwischen
Computer und Kartenadapter bzw. Kartenleser nden Sie im Handbuch zu Ihrem Kartenleser.
Hinweise zur Benutzung
– Die LCD-Einheit darf nicht in Wasser getaucht werden.
– Das Basisgerät darf nicht mit Flüssigkeit in Berührung kommen.
– Um die Schutzklasse IP65 zu gewährleisten, muss die Abdeckkappe der Anschlüsse
fest verschlossen sein.
Netz-/Ladegerät anschließen
Schließen Sie zum Laden des Gerätes das mitgelieferte Netz-/Ladegerät in die Ladebuchse „i“ und verbinden
es mit einer entsprechenden Stromquelle.
Anschluss an einen Monitor
Der VideoControl-Master kann durch das mitgelieferte Kabel an einen Monitor angeschlossen werden.
Verwenden Sie hierzu Anschluss „g“ und wählen Sie im Menü den entsprechenden Videoausgang aus,
siehe hierzu „8.7 Videoausgang“.
Wechseln des Akkus
Zum Wechseln des Akkus, senden Sie das Gerät an UMAREX-Laserliner.
8.8
Alles löschen
Ja Nein
Menü
Auto Aus
Eingangsquelle
Meterzähler
Videoausgang
Alles löschen
Alles löschen
Ja Nein
Alles löschen
8.7
Zur Nutzung der Funktion
muss der VideoControl-
Master mit einem Monitor
verbunden werden. Das
Display des VideoControl-
Master wird schwarz
und die Funktionen
werden auf dem externen
Monitor angezeigt.
!
Menü
Auto Aus
Eingangsquelle
Meterzähler
Videoausgang
Alles löschen
Videoausgang

VideoControl-Master
13
DE
Technische Daten
Technische Änderungen vorbehalten. 17W46
Bildschirmtyp 5,0" TFT Farbdisplay
Anschlüsse
Industriesteckverbinder für Kamera
TV-Out Anschluß, PAL oder NTSC
USB-Adapter Typ Mini-B
SD-Karten Slot
DC-Adapter für 5V DC-Netzteil
Auflösung Display 640 x 480 Pixel
Bildformat / Bildauflösung JPEG Format / 640 x 480 Pixel
Videoformat / Bildwiederholrate ASF / 30 Frames / Sek.
LED 10 Helligkeitsstufen
Zoom 2-fach Digitalzoom in 10% Schritten
Speicher (extern) 2 GB SD-Karte / Unterstützt SD-Card bis max. 16 GB
Schnittstelle USB 2.0
Autoabschaltung 5 min / 10 min / 15 min / 30 min (einstellbar)
Stromversorgung Li-Ionen Akku / Netzteil
Betriebsdauer 4h
Arbeitsbedingungen
-10°C … 60°C, Luftfeuchtigkeit max. 20 … 85% rH,
nicht kondensierend, Arbeits-höhe max. 4000 m über NN
(Normalnull)
Lagerbedingungen -20°C … 70°C, Luftfeuchtigkeit max. 80% rH
Schutzklasse IP65
Gewicht (inkl. Li-Ionen Akku) 0,86 kg
Abmessungen (B x H x T) 200 mm x 130 mm x 60 mm
EU-Bestimmungen und Entsorgung
Das Gerät erfüllt alle erforderlichen Normen für den freien Warenverkehr
innerhalb der EU.
Dieses Produkt ist ein Elektrogerät und muss nach der europäischen Richtlinie
für Elektro- und Elektronik-Altgeräte getrennt gesammelt und entsorgt werden.
Weitere Sicherheits- und Zusatzhinweise unter: http://laserliner.com/info?an=vcm
Hinweise zur Wartung und Pege
Reinigen Sie alle Komponenten mit einem leicht angefeuchteten Tuch und vermeiden Sie den Einsatz von
Putz-, Scheuer- und Lösungsmitteln. Entnehmen Sie die Batterie/n vor einer längeren Lagerung. Lagern Sie
das Gerät an einem sauberen, trockenen Ort.
Reset
Drücken der Reset-Taste „h“ startet das Gerät neu.
Akku laden
– Das Netz-/Ladegerät nur innerhalb geschlossener Räume verwenden, weder Feuchtigkeit noch Regen
aussetzen, da ansonsten die Gefahr eines elektrischen Stromschlages besteht.
– Vor Einsatz des Gerätes Akku voll aufladen.
– Bitte nur das beiliegende Netz-/Ladegerät benutzen. Wenn ein falsches Netz-/Ladegerät verwendet
wird, erlischt die Garantie.
– Der Akku kann auch während des Betriebes geladen werden.

General safety instructions
– The device must only be used in accordance with its intended purpose and within the scope of the
specications.
– The measuring tools and accessories are not toys. Keep out of reach of children.
– The structure of the device must not be modied in any way.
– Do not expose the device to mechanical stress, extreme temperatures, moisture or signicant vibration.
– The device must no longer be used if one or more of its functions fail or the battery charge is weak.
– Please ensure compliance with the safety regulations set out by local and national authorities with
regard to the correct and proper use of the device.
Safety instructions
Dealing with electromagnetic radiation
– The measuring device complies with electromagnetic compatibility regulations and limit values in
accordance with EMC-Directive 2014/30/EU.
– Local operating restrictions – for example, in hospitals, aircraft, petrol stations or in the vicinity of people
with pacemakers – may apply. Electronic devices can potentially cause hazards or interference or be
subject to hazards or interference.
14
EN
Completely read through the operating instructions, the "Warranty and Additional Information"
booklet as well as the latest information under the internet link at the end of these instructions.
Follow the instructions they contain. This document must be kept in a safe place and passed on
together with the device.
!
Function / Application
VideoControl-Master is the base unit for connecting various camera units. Working with a camera unit,
colour video images are sent to the LCD for inspecting all places that are difcult to access such as
pipelines, canals, ventilation pipes and exhaust gas systems.
a
b
c
d
e
f
g
h
i
j
k
LCD
Keypad
Speaker
Microphone
USB 2.0 port
Slot for SD card
external monitor socket
Reset
Charging socket
Camera unit connection
a
b
c
d
e
f
g
h
i
j
Fold-out stand/wall
mounting
k

VideoControl-Master
15
EN
2012/01/05 12:50:28
IMG00001
00 : 00 : 32
0 cm
17
18
19
21 22
26
27
20
23
24
28
2012/01/05 12:50:28
CAMERA
5
1 2
6
9
7
0 cm X 1.0
3
4
8
2012/01/05 12:50:28
X 1.0
29
30
IMG00001
00 : 00 : 32
21 22
27
28
4
00 : 00 : 32
12
10
11
0 cm X 1.0
3
4
REC
00 : 00 : 32
16
1413
REC
15
2 X
25
current date
current time
Length measure (only with
PipeControl-LevelFlex-Camera)
Zoom level (1.0 - 2.0)
Insert SD card
Intensity of LED lighting
Battery status
Connect camera
assigned storage location
Video symbol
Video record
Recording time
Voice recording
Voice record
Photo symbol
Voice recording time
m
n
p
r
t
v
o
q
s
u
w
x

16
EN
1 2
!
1.
2.
Inserting SD card Removing the SD card
3
ON
3 sec
MODE
3 sec
Changing the language
(DE, EN, NL, DA, FR, ES, IT, PL, FI, PT, SV, NO, TR, RU, UK, CS, ET, LV, LT, RO, BG, EL)
Menu
Language
Date/time setup
Video format
Auto power off
Input source
Language
English
Deutsch
Français
Español
Italiano
Language
English
Deutsch
Français
Español
Italiano
Setting the menu language
Menu
Language
Date/time setup
Video format
Auto power off
Input source
36
37
38
Length measure (only with
PipeControl-LevelFlex-Camera)
Video output
Delete all
31
33
35
37
32
34
36
38
Menu
Language
Date/time setup
Video format
Auto power off
Input source
Length measure
Video output
Delete all
Settings mode
Menu language
Date/Time
Video format PAL / NTSC
Auto power off
Input source
31
32
33
34
35

VideoControl-Master
4
17
EN
Still images/Video recordings
Switch on unit, line up the camera head on the ex cable and move it to the required position. If lighting
conditions are poor, switch on the LED lighting. Zoom in on distant or small objects. The manual image
rotation function enables the image to be rotated by 90° in steps on the monitor. Briey press the PIC
button to take a still image and save it to the SD card. Press and hold the PIC button to take an image
and automatically start voice recording. Briey press the OK button to stop voice recording. Briey press
the VID button to start video recording with voice recording. Press the button again to stop recording.
2012/01/05 12:50:28
0 cm X 1.0
REC
00 : 00 : 32
4.1 4.2 4.3
1x = 90°
2x = 90°
3x = 90°
4x = 90°
1x = +/- 10%
2x = +/- 20%
...
10x = +/- 100%
1x = +/- 10%
2x = +/- 20%
...
10x = +/- 100%
4.54.4
0 cm X 1.0
2012/01/05 12:50:28
0 cm X 1.0
2012/01/05 12:50:28
0 cm
Zoom LED lighting Image rotation
Still imageVideo
START STOPP
For documentation purposes, still images can be taken during a video recording with
the snapshot option.
!

2012/01/05 12:50:28
0 cm X 1.0
2012/01/05 12:50:28
0 cm X 1.0
5
4.6
3 sec
REC
00 : 00 : 32
ON
3 sec
5.1 5.2
IMG00001
IMG00002
…
IMG00030
IMG00029
…
18
EN
Playback of still images/video recordings
Switch on unit and select the playback mode with the arrow keys. The display shows an overview of
image recordings. Use the arrow keys to browse forward and back through the recordings. Press OK to
show the selected image or video in full screen mode. Briey press the OK button to start playback of
a video or voice recording and press the button again to stop playback.
Still image with voice recording
START STOPP
Navigation Full screen mode
The quality of the voice playback from the unit is limited by the waterproof micro speakers.
You can listen to high quality voice recordings after transfer to a PC.
!

VideoControl-Master
5.3
2012/01/05 12:50:28
IMG00001
0 cm
2012/01/05 12:50:28
IMG00001
00 : 00 : 32
0 cm
2012/01/05 12:50:28
IMG00001
00 : 00 : 32
0 cm
2012/01/05 12:50:28
IMG00001
00 : 00 : 32
0 cm
5.65.4
2012/01/05 12:50:28
IMG00001
00 : 00 : 32
0 cm
2 X 4 X 8 X
2 X
5.5
2012/01/05 12:50:28
X 1.0
IMG00001
00 : 00 : 32
6
19
EN
Video playback
VolumeVideo forward Voice recording
playback
0 cm
2012/01/05 12:50:28
IMG00001
6.1
2 sec
Delete
Yes No
Delete
Yes No
Deleting in full screen mode
Deleting still images/video recordings
You can delete recordings by pressing and holding the OK button (full screen mode) or after previously
selecting several images in the image overview.

2 sec
6.2
7
2012/01/05 12:50:28
0 cm
2012/01/05 12:50:28
0 cm
20
EN
Deleting several images in the image overview
Delete selected les
Yes No
Delete selected les
Yes No
Image comparison function

VideoControl-Master
8
8.1
ON
3 sec
MODE
3 sec
21
EN
Settings mode
Setting mode is automatically deactivated after 10 seconds or can be cancelled by pressing the
ESC button.
!
Menu
Language
Date/time setup
Video format
Auto power off
Input source
Menu
Language
Date/time setup
Video format
Auto power off
Input source
Language
English
Deutsch
Français
Español
Italiano
Language
English
Deutsch
Français
Español
Italiano
Changing the language
(DE, EN, NL, DA, FR, ES, IT, PL, FI, PT, SV, NO, TR, RU, UK, CS, ET, LV, LT, RO, BG, EL)

8.2
22 / 21 / …22 / 23 / …
22
EN
Menu
Language
Date/time setup
Video format
Auto power off
Input source
Date/time setup
Date/time setup
Date format
Time format
Setup
Date format
dd.mm.yyyy
yyyy.mm.dd
mm/dd/yyyy
yyyy/dd/mm
dd/mm/yyyy
Date format
dd.mm.yyyy
yyyy.mm.dd
mm/dd/yyyy
yyyy/dd/mm
dd/mm/yyyy
Date/time setup
Date format
Time format
Setup
Time format
24 hours
12 hours (AM:PM)
Time format
24 hours
12 hours (AM:PM)
Setup
dd . mm . yyyy
23 . 08 . 2012
12 : 00 : 08
Display On
Date/time setup
Date format
Time format
Setup
Setup
dd . mm . yyyy
22 . 08 . 2012
12 : 00 : 08
Display On

VideoControl-Master
8.3
8.4
8.5
8.6
23
EN
Length measure
Reset
Unit
Disable / Enable
Menu
Language
Date/time setup
Video format
Auto power off
Input source
TV output
NTSC
PAL
TV output
NTSC
PAL
Video format
Menu
Language
Date/time setup
Video format
Auto power off
Input source
Auto off
Disable
5 min
10 min
15 min
30 min
Auto off
Disable
5 min
10 min
15 min
30 min
Auto power off
Menu
Language
Date/time setup
Video format
Auto power off
Input source
Input source
Direct
Wireless
Input source (only possible with wireless camera unit)
Menu
Auto power off
Input source
Length measure
Video output
Delete all
Length measure
Reset
Unit
Disable / Enable
Length measure (only with PipeControl-LevelFlex-Camera)
Input source
Direct
Wireless

8.8
24
EN
Delete all
Yes No
Menu
Auto power off
Input source
Length measure
Video output
Delete all
Delete all
Yes No
Delete all
USB data transfer
Data saved on the SD card can be transferred to PC either with a suitable card reader or directly via the
USB port. Please refer to the manual supplied with your card reader for information about connecting
your card adapter or card reader to a PC.
Instructions for use
– The LCD unit must not be immersed in water.
– The base unit must not come in contact with liquids.
– To maintain the IP65 protection class, the caps on the connections must be rmly locked in.
Connect power supply/battery charger
To charge the unit, plug the supplied power supply/battery charger into charging socket „i“ and connect
it to a corresponding power source.
Connecting to a monitor
The VideoControl-Master can be connected to a monitor with the supplied cable. Use connection „g“ for this
purpose and select the corresponding video output in the menu, see „8.7 Video Output“.
Changing the battery
Send in the unit to UMAREX-Laserliner for the battery to be changed.
8.7
Menu
Auto power off
Input source
Length measure
Video output
Delete all
Video output
To use this function, the
VideoControl-Master
must be connected to a
monitor. The display on
the VideoControl-Master
is blanked out and the
functions are shown on
the external monitor.
!

VideoControl-Master
Information on maintenance and care
Clean all components with a damp cloth and do not use cleaning agents, scouring agents and solvents.
Remove the battery(ies) before storing for longer periods. Store the device in a clean and dry place.
25
EN
Technical data
Subject to technical alterations. 17W46
Screen type 5.0“ TFT colour display
Connections
Industrial connector for camera
TV-Out port, PAL or NTSC
USB adapter, Type Mini-B
SD card slot
DC adapter for 5V DC power pack
Display resolution 640 x 480
pixels
Image format /
Image resolution
JPEG format / 640 x 480
pixels
Video format / Image refresh rate ASF / 30 frames / sec
LED 10 brightness levels
Zoom 2x digital zoom in 10% increments
External memory 2 GB SD card (supports up to max. 16 GB)
Port USB 2.0
Auto shutdown 5 min / 10 min / 15 min / 30 min (adjustable)
Power supply Li-Ion rechargeable battery / power pack
Operating time 4 hours
Operating conditions
-10°C … 60°C, Max. humidity 20 … 85% rH, no condensation,
Max. working altitude 4000 m above sea level
Storage conditions -20°C … 70°C, Max. humidity 80% rH
Protection class IP65
Weight
(incl. Li-Ion rechargeable battery) 0,86 kg
Dimensions (W x H x D) 200 mm x 130 mm x 60 mm
EU directives and disposal
This device complies with all necessary standards for the free movement
of goods within the EU.
This product is an electric device and must be collected separately for disposal
according to the European Directive on waste electrical and electronic equipment.
Further safety and supplementary notices at: http://laserliner.com/info?an=vcm
Reset
Pressing the Reset button „h“ will restart the unit.
Battery charging
– Use the power supply/charger unit only in closed rooms; do not expose to moisture or rain otherwise risk
of electric shock.
– Charge the device‘s battery completely prior to use.
– Please only use the power pack/charger supplied. Using any other power pack/charger will invalidate
the warranty.
– The battery can also be charged while using the device.

Algemene veiligheidsaanwijzingen
– Gebruik het apparaat uitsluitend doelmatig binnen de aangegeven specicaties.
– De meetapparaten en het toebehoren zijn geen kinderspeelgoed. Buiten het bereik van kinderen bewaren.
– De bouwwijze van het apparaat mag niet worden veranderd!
– Stel het apparaat niet bloot aan mechanische belasting, extreme temperaturen, vocht of sterke trillingen.
– Het apparaat mag niet meer worden gebruikt als een of meerdere functies uitvallen of de batterijlading
zwak is.
– Neem de veiligheidsvoorschriften van lokale resp. nationale instantiesvoor het veilige en deskundige
gebruik van het apparaat in acht.
Veiligheidsinstructies
Omgang met elektromagnetische straling
– Het meettoestel voldoet aan de voorschriften en grenswaarden voor de elektromagnetische
compatibiliteit volgens de EMC-richtlijn 2014/30/EU.
– Plaatselijke gebruiksbeperkingen, bijv. in ziekenhuizen, in vliegtuigen, op pompstations of in
de buurt van personen met een pacemaker, moeten in acht worden genomen. Een gevaarlijk effect
op of storing van en door elektronische apparaten is mogelijk.
26
NL
Lees de handleiding, de bijgevoegde brochure 'Garantie- en aanvullende aanwijzingen' evenals de
actuele informatie en aanwijzingen in de internet-link aan het einde van deze handleiding volledig
door. Volg de daarin beschreven aanwijzingen op. Bewaar deze documentatie en geef ze door als
u het apparaat doorgeeft.
!
Functie / toepassing
De VideoControl-Master is de basiseenheid voor de aansluiting op verschillende camera-eenheden. Samen
met een camera-eenheid worden gekleurde videobeelden naar het lcd gestuurd ter controle van moeilijk
toegankelijke plaatsen zoals bijv. buisleidingen, rioleringen, ventilatie- en uitlaatgasinstallaties.
a
b
c
d
e
f
g
h
i
j
k
LC-display
Toetsenbord
Luidspreker
Microfoon
USB 2.0 interface
Steekplaats SD-kaart
externe monitoraansluiting
Reset
Laadbus
Aansluiting camera-eenheid
a
b
c
d
e
f
g
h
i
j
Uitklapbare standaard /
wandophanging
k

VideoControl-Master
27
NL
2012/01/05 12:50:28
IMG00001
00 : 00 : 32
0 cm
17
18
19
21 22
26
27
20
23
24
28
2012/01/05 12:50:28
CAMERA
5
1 2
6
9
7
0 cm X 1.0
3
4
8
2012/01/05 12:50:28
X 1.0
29
30
IMG00001
00 : 00 : 32
21 22
27
28
4
00 : 00 : 32
12
10
11
0 cm X 1.0
3
4
REC
00 : 00 : 32
16
1413
REC
15
2 X
25
actuele datum
actuele tijd
Lengte te meten (alleen met
PipeControl-LevelFlex-Camera)
Zoom-stand (1.0 - 2.0)
SD-kaart plaatsen
1
2
3
4
5
Positie van de opname
Fotosymbool
Spraakopname
28
29
30
Weergavemodus Weergavemodus video
Opnamemodus
Geen kaart
Opnamemodus video Opnamemodus foto
Weergavemodus foto
Intensiteit LED-verlichting
Batterijstatus
Camera aansluiten
toegewezen geheugenplaats
Videosymbool
Opname video
6
7
8
9
10
11
Duur van de opname
Spraakopname
Opname spraak
Fotosymbool
Duur van de spraakopname
12
13
14
15
16
Foto (geen kenmerking)
Foto met spraakopname
(Microfoonsymbool)
Video (Play-symbool)
Videosymbool
Opnamedatum
17
18
19
20
21
Opnametijd
Weergave
Pauze
Vooruitspoelen video
Volume
Opnamenummer
22
23
24
25
26
27
m
n
p
r
t
v
o
q
s
u
w
x
ON/OFF
– Zoom / Fotoselectie
ongedaan maken
+ Zoom /
Fotoselectie
– LED-verlichting /
Volume –
+ LED-verlichting /
Volume +
Opname foto /
Spraakopname foto /
Foto-vergelijkingsfunctie
Opname video
Start / stop
Navigatietoets /
Weergavemodus
Navigatietoets /
Weergavemodus /
Afspeelsnelheid
ESC: menu verlaten
Bevestigen /
Spraakopname beëindigen
Rotatie 90° / Systeemmenu
m
n
o
p
q
r
s
t
u
v
w
x

1 2
!
1.
2.
SD-kaart plaatsen SD-kaart verwijderen
28
NL
3
ON
3 sec
MODE
3 sec
Taal wijzigen
(DE, EN, NL, DA, FR, ES, IT, PL, FI, PT, SV, NO, TR, RU, UK, CS, ET, LV, LT, RO, BG, EL)
Menu
Taal
Datum/Tijd-instellingen
Video formaat
Automatisch uitschakelen
Invoerbron
Taal
English
Deutsch
Français
Español
Italiano
Taal
English
Deutsch
Français
Español
Italiano
Menu-taal instellen
Menu
Taal
Datum/Tijd-instellingen
Video formaat
Automatisch uitschakelen
Invoerbron
36
37
38
Lengte te meten (alleen met
PipeControl-LevelFlex-Camera)
Video uitgang
Alles wissen
Menu
Taal
Datum/Tijd-instellingen
Video formaat
Automatisch uitschakelen
Invoerbron
Lengte te meten
Video uitgang
Alles wissen
31
33
35
37
Instellingsmodus
Menu-taal
Datum/tijd
Video formaat PAL / NTSC
Automatische uitschakeling
Invoerbron
31
32
33
34
35
32
34
36
38

VideoControl-Master
2012/01/05 12:50:28
0 cm X 1.0
4
REC
00 : 00 : 32
4.1 4.2 4.3
1x = 90°
2x = 90°
3x = 90°
4x = 90°
1x = +/- 10%
2x = +/- 20%
...
10x = +/- 100%
1x = +/- 10%
2x = +/- 20%
...
10x = +/- 100%
4.54.4
0 cm X 1.0
2012/01/05 12:50:28
0 cm X 1.0
2012/01/05 12:50:28
0 cm
29
NL
Foto- / video-opnames
Schakel het apparaat in, richt de camerakop aan het uiteinde van de exibele slang en beweeg hem
vervolgens naar de gewenste positie. Schakel de ledverlichting in geval van slechte lichtomstandigheden
in. U kunt kleine objecten of objecten op afstand dichterbij halen (zoomen). Het beeld op de monitor
kan met behulp van de beeldrotatie stapsgewijs 90° worden gedraaid. Druk kort op de toets PIC om een
foto te maken en op de SD-kaart op te slaan. Druk lang op de PIC-toets om een foto te maken en daarna
automatisch de spraakopname te starten. Druk kort op de OK-toets om de spraakopname te stoppen.
Druk kort op de VID-toets om de video-opname met spraakopname te starten. Druk opnieuw op de
toets om de opname te stoppen.
Zoom LED-verlichting Beeldrotatie
FotoVideo
START STOP
Met behulp van de snapshot-functie kunt u ter documentatie foto‘s maken tijdens een lopende
video-opname.
!

2012/01/05 12:50:28
0 cm X 1.0
2012/01/05 12:50:28
0 cm X 1.0
5
4.6
3 sec
REC
00 : 00 : 32
ON
3 sec
5.1 5.2
IMG00001
IMG00002
…
IMG00030
IMG00029
…
30
NL
Weergave van foto- / video-opnames
Schakel het apparaat in en kies de weergavemodus met behulp van de pijltoetsen. Een foto-overzicht wordt
op het display weergegeven. Met de pijltoetsen kunt u vooruit en achteruit navigeren. Door indrukken van
de toets OK wordt de gekozen foto of video weergegeven op het volledige beeldscherm. Door kort op de
toets OK te drukken start de weergave van een video- of een spraakopname, door hernieuwd indrukken
wordt de weergave gestopt.
Foto met spraakopname
START STOP
Navigeren Weergave op volledig beeldscherm
De kwaliteit van de spraakweergave via het apparaat is beperkt op grond van de waterbeschermde
micro-luidsprekers. De spraakopname kan na de overdracht op een pc in goede kwaliteit worden
beluisterd.
!

VideoControl-Master
5.3
2012/01/05 12:50:28
IMG00001
0 cm
2012/01/05 12:50:28
IMG00001
00 : 00 : 32
0 cm
2012/01/05 12:50:28
IMG00001
00 : 00 : 32
0 cm
2012/01/05 12:50:28
IMG00001
00 : 00 : 32
0 cm
5.65.4
2012/01/05 12:50:28
IMG00001
00 : 00 : 32
0 cm
2 X 4 X 8 X
2 X
5.5
2012/01/05 12:50:28
X 1.0
IMG00001
00 : 00 : 32
6
31
NL
Videoweergave
VolumeVooruitspoelen video Weergave
spraakopname
0 cm
2012/01/05 12:50:28
IMG00001
6.1
2 sec
Wissen
Ja Nee
Wissen
Ja Nee
Wissen tijdens de weergave op het volledige beeldscherm
Wissen van foto- / video-opnames
Voor het wissen van opnames drukt u lang op de toets OK (weergave volledig beeldscherm)
of na voorafgaande selectie van meerdere foto‘s in het foto-overzicht.

2 sec
6.2
7
2012/01/05 12:50:28
0 cm
2012/01/05 12:50:28
0 cm
32
NL
Meerdere foto‘s wissen in het foto-overzicht
Geselecteerde bestanden wissen
Ja Nee
Geselecteerde bestanden wissen
Ja Nee
Foto-vergelijkingsfunctie

VideoControl-Master
8
ON
3 sec
MODE
3 sec
8.1
33
NL
Instellingsmodus
De instelmodus wordt automatisch na 10 seconden beëindigd of kan worden beëindigd door het
indrukken van de toets ESC.
!
Menu
Taal
Datum/Tijd-instellingen
Video formaat
Automatisch uitschakelen
Invoerbron
Menu
Taal
Datum/Tijd-instellingen
Video formaat
Automatisch uitschakelen
Invoerbron
Taal
English
Deutsch
Français
Español
Italiano
Taal
English
Deutsch
Français
Español
Italiano
Taal wijzigen
(DE, EN, NL, DA, FR, ES, IT, PL, FI, PT, SV, NO, TR, RU, UK, CS, ET, LV, LT, RO, BG, EL)

8.2
22 / 21 / …22 / 23 / …
34
NL
Menu
Taal
Datum/Tijd-instellingen
Video formaat
Automatisch uitschakelen
Invoerbron
Datum/Tijd-instellingen
Datum/Tijd-instellingen
Datumaanduiding
Tijdsaanduiding
Setup
Datumaanduiding
dd.mm.yyyy
yyyy.mm.dd
mm/dd/yyyy
yyyy/dd/mm
dd/mm/yyyy
Datumaanduiding
dd.mm.yyyy
yyyy.mm.dd
mm/dd/yyyy
yyyy/dd/mm
dd/mm/yyyy
Datum/Tijd-instellingen
Datumaanduiding
Tijdsaanduiding
Setup
Tijdsaanduiding
24 uur
12 uur (am/pm)
Tijdsaanduiding
24 uur
12 uur (am/pm)
Setup
dd . mm . yyyy
23 . 08 . 2012
12 : 00 : 08
Weergave Aan
Datum/Tijd-instellingen
Datumaanduiding
Tijdsaanduiding
Setup
Setup
dd . mm . yyyy
22 . 08 . 2012
12 : 00 : 08
Weergave Aan

VideoControl-Master
8.3
8.4
8.5
8.6
35
NL
Lengte te meten
Reset
Unit
Uitschakelen / Inschakelen
Menu
Taal
Datum/Tijd-instellingen
Video formaat
Automatisch uitschakelen
Invoerbron
TV uitgang
NTSC
PAL
TV uitgang
NTSC
PAL
Video formaat
Menu
Taal
Datum/Tijd-instellingen
Video formaat
Automatisch uitschakelen
Invoerbron
Automatisch uit
Deactiveren
5 min
10 min
15 min
30 min
Automatisch uit
Deactiveren
5 min
10 min
15 min
30 min
Automatische uitschakeling
Menu
Taal
Datum/Tijd-instellingen
Video formaat
Automatisch uitschakelen
Invoerbron
Invoerbron
Rechtstreeks
Draadloos
Invoerbron (alleen mogelijk met wireless-camera-eenheid)
Menu
Automatisch uitschakelen
Invoerbron
Lengte te meten
Video uitgang
Alles wissen
Lengte te meten
Reset
Unit
Uitschakelen / Inschakelen
Lengte te meten (alleen met PipeControl-LevelFlex-Camera)
Invoerbron
Rechtstreeks
Draadloos

8.8
36
NL
Alles wissen
Ja Nee
Menu
Automatisch uitschakelen
Invoerbron
Lengte te meten
Video uitgang
Alles wissen
Alles wissen
Ja Nee
Alles wissen
USB-gegevensoverdracht
De opgeslagen gegevens op de SD-kaart kunnen met een geschikte kaartlezer of direct via de
USB-interface naar de pc worden overgedragen. Informatie over de verbinding tussen de computer
en de kaartadapter resp. de kaartlezer vindt u in de gebruiksaanwijzing voor uw kaartlezer.
Bedieningsaanwijzingen
– De LCD-eenheid mag niet onder water worden gedompeld.
– Het basisapparaat mag niet in contact komen met vloeistoffen.
– De afdekkap van de aansluitingen moet vast gesloten zijn, zodat de veiligheidsklasse IP65 gewaarborgd is.
Net-/laadtoestel aansluiten
Sluit het bijgeleverde net-/laadtoestel aan op de laadbus ‚i‘ en verbind het met een dienovereenkomstige
stroombron om het apparaat op te laden.
Aansluiting op een monitor
De VideoControl-Master kan met behulp van de bijgeleverde kabel worden aangesloten op een monitor.
Gebruik hiervoor de aansluiting ‚g‘ en kies de betreffende video-uitgang in het menu, zie hiervoor ‚8.7
Video-uitgang‘.
Vervangen van de accu
Voor de vervanging van de accu stuurt u het apparaat naar UMAREX-Laserliner.
8.7
Menu
Automatisch uitschakelen
Invoerbron
Lengte te meten
Video uitgang
Alles wissen
Video uitgang
Voor het gebruik van
de functie moet de
VideoControl-Master
op een monitor worden
aangesloten. Het display
van de VideoControl-
Master wordt zwart en
de functies worden
weergegeven op de
externe monitor.
!

VideoControl-Master
37
NL
Opmerkingen inzake onderhoud en reiniging
Reinig alle componenten met een iets vochtige doek en vermijd het gebruik van reinigings-, schuur- en
oplosmiddelen. Verwijder de batterij(en) voordat u het apparaat gedurende een langere tijd niet gebruikt.
Bewaar het apparaat op een schone, droge plaats.
Technische gegevens
Technische wijzigingen voorbehouden. 17W46
Beeldschermtype 5,0“ TFT-kleurendisplay
Aansluitingen
Industriesteekverbinder voor camera / Tv-out-aansluiting,
PAL of NTSC / Usb-adapter type mini-B / SD-kaartsleuf /
DC-adapter voor 5V-DC-netadapter
Resolutie display 640 x 480 pixel
Fotoformaat / Resolutie foto JPEG-formaat / 640 x 480 pixel
Videoformaat / Beeldherhalingsfrequentie ASF / 30 frames / sec.
LED 10
helderheidsstanden
Zoom 2 -voudige digitale zoom in stappen van 10 %
Geheugen (extern) 2 GB SD-kaart / Ondersteunt SD-kaart tot max. 16 GB
Interface USB 2.0
Automatische uitschakeling 5 min. / 10 min. / 15 min. / 30 min. (instelbaar)
Voeding Li-ion-accu / netadapter
Gebruiksduur 4 uur
Werkomstandigheden
-10°C … 60°C, Luchtvochtigheid max. 20 … 85% rH,
niet-condenserend, Werkhoogte max. 4000 m boven
NAP (Nieuw Amsterdams Peil)
Opslagvoorwaarden -20°C … 70°C, Luchtvochtigheid max. 80% rH
Veiligheidsklasse IP65
Gewicht (incl. li-ion-accu) 0,86 kg
Afmetingen (B x H x D) 200 mm x 130 mm x 60 mm
EU-bepalingen en afvoer
Het apparaat voldoet aan alle van toepassing zijnde normen
voor het vrije goederenverkeer binnen de EU.
Dit product is een elektrisch apparaat en moet volgens
de Europese richtlijn voor oude elektrische en elektronische
apparatuur gescheiden verzameld en afgevoerd worden.
Verdere veiligheids- en aanvullende instructies onder:
http://laserliner.com/info?an=vcm
Reset
Druk op de resettoets ‚h‘ om het apparaat opnieuw te starten.
Accu laden
– De netadapter/het laadtoestel mag alleen in gesloten ruimten gebruikt en niet aan vocht of regen
blootgesteld worden omdat anders gevaar voor elektrische schokken bestaat.
– Laad de accu vóór het gebruik van het apparaat compleet op.
– Gebruik alléén de/het bijgevoegde netadapter/laadtoestel. Als u een verkeerd(e) netadapter/laadtoestel
gebruikt, komt de garantie te vervallen.
– De accu kan ook tijdens het bedrijf worden opgeladen.

Almindelige sikkerhedshenvisninger
– Apparatet må kun bruges til det tiltænkte anvendelsesformål inden for de givne specikationer.
– Måleapparaterne og tilbehøret er ikke legetøj. Skal opbevares utilgængeligt for børn.
– Konstruktionsmæssigt må apparatet ikke ændres.
– Undgå at udsætte apparatet for mekaniske belastninger, meget høje temperaturer, fugt eller kraftige
vibrationer.
– Apparatet må ikke anvendes længere, hvis en eller ere funktioner svigter, eller hvis batteriladningen
er svag.
– Iagttag sikkerhedsforanstaltningerne fra lokale og/eller nationale myndigheder med henblik på saglig
korrekt brug af apparatet.
Sikkerhedsanvisninger
Omgang med elektromagnetisk stråling
– Måleapparatet overholder forskrifterne og grænseværdierne for elektromagnetisk kompatibilitet iht.
EMC-direktiv 2014/30/EU.
– Lokale anvendelsesrestriktioner, f.eks. på hospitaler, i y eller i nærheden af personer med pacemaker,
skal iagttages. Risikoen for farlig påvirkning eller fejl i eller pga. elektronisk udstyr er til stede.
38
DA
Du bedes venligst læse betjeningsvejledningen, det vedlagte hæfte „Garanti- og supplerende
anvisninger“ samt de aktuelle oplysninger og henvisninger på internet-linket i slutning af
denne vejledning fuldstændigt igennem. Følg de heri indeholdte instrukser. Dette dokument
skal opbevares og følge med apparatet, hvis dette overdrages til en ny ejer.
!
Funktion / anvendelse
VideoControl-Master er grundenheden for tilslutning af forskellige kameraenheder. Sammen med en
kameraenhed sendes videobilleder i farver til LCD-enheden for at kontrollere vanskeligt tilgængelige
steder fx i rørledninger, kanaler, ventilations- og udluftningsinstallationer.
a
b
c
d
e
f
g
h
i
j
k
LC-display
Tastatur
Højttaler
Mikrofon
USB 2.0-interface
Port til SD-kort
ekstern Monitortilslutning
Reset
Ladestik
Tilslutning kameraenhed
a
b
c
d
e
f
g
h
i
j
Udklapbar fod /
vægophængning
k

VideoControl-Master
39
DA
2012/01/05 12:50:28
CAMERA
5
1 2
6
9
7
0 cm X 1.0
3
4
8
00 : 00 : 32
12
10
11
0 cm X 1.0
3
4
REC
00 : 00 : 32
16
1413
REC
15
2012/01/05 12:50:28
IMG00001
00 : 00 : 32
0 cm
17
18
19
21 22
26
27
20
23
24
28
2012/01/05 12:50:28
X 1.0
29
30
IMG00001
00 : 00 : 32
21 22
27
28
4
2 X
25
aktuel dato
aktuelt klokkeslæt
Længde foranstaltning
(kun med PipeControl-
LevelFlex-Camera)
Zoom-trin (1.0 - 2.0)
Indsæt SD-kort
1
2
3
4
5
Optagelsesposition
Billedsymbol
Stemmeoptagelse
28
29
30
Gengivelsesmodus Gengivelsesmodus video
Optagelsesmodus
Ikke noget kort
Optagelsesmodus video Optagelsesmodus billede
Gengivelsesmodus billede
Intensitet diodelampe
Batteristatus
Tilslut kamera
optaget hukommelsesplads
Videosymbol
Optagelse video
6
7
8
9
10
11
Optagelsens varighed
Stemmeoptagelse
Optagelse stemme
Billedsymbol
Varighed af
stemmeoptagelse
12
13
14
15
16
Billede (uden mærkning)
Billede med stemme-
optagelse (Mikrofon-symbol)
Video (Play-symbol)
Videosymbol
Optagelsesdato
17
18
19
20
21
Optagelsesklokkeslæt
Gengivelse
Pause
Fremadspoling video
Lydstyrke
Optagelsesnummer
22
23
24
25
26
27
m
n
p
r
t
v
o
q
s
u
w
x
ON/OFF
– Zoom /
Annuller billedvalg
+ Zoom /
Billedvalg
– Diodelampe /
Lydstyrke –
+ Diodelampe /
Lydstyrke +
Optagelse foto /
Lydoptagelse foto /
Billedsammenlignings-
funktion
Optagelse video
Start / Stop
Navigationstast /
Gengivelsesmodus
Navigationstast /
Gengivelsesmodus /
Afspilningshastighed
ESC: Afslut menu
Bekræft /
Afslut lydoptagelse
Rotation 90° / Systemmenu
m
n
o
p
q
r
s
t
u
v
w
x

1 2
!
1.
2.
Indsæt SD-kort Tag SD-kort ud
40
DA
3
ON
3 sec
MODE
3 sec
Skift sprog
(DE, EN, NL, DA, FR, ES, IT, PL, FI, PT, SV, NO, TR, RU, UK, CS, ET, LV, LT, RO, BG, EL)
Menu
Sprog
Dato/tid indst.
Video format
Autom. Sluk
Ingangskilde
Sprog
English
Deutsch
Français
Español
Italiano
Sprog
English
Deutsch
Français
Español
Italiano
Indstil menusprog
Menu
Sprog
Dato/tid indst.
Video format
Autom. Sluk
Ingangskilde
36
37
38
Længde foranstaltning
(kun med PipeControl-
LevelFlex-Camera)
Videoudgang
Slet alle
31
33
35
37
Menu
Sprog
Dato/tid indst.
Video format
Autom. Sluk
Ingangskilde
Længde foranstaltning
Videoudgang
Slet alt
Indstillingsmodus
Menusprog
Dato/klokkeslæt
Video format PAL / NTSC
Automatisk slukning
Ingangskilde
31
32
33
34
35
32
34
36
38

VideoControl-Master
4
41
DA
Billed-/videooptagelse
Tænd for apparatet, indstil kamerahovedet på exslangen og anbring det i den ønskede position.
Under dårlige lysforhold kan man tænde diodelampen. Man kan zoome ind på fjerne eller små
objekter. Via den manuelle billedrotation kan billedet drejes i trin a 90° på monitoren. Når man
trykker kortvarigt på PIC-knappen, optages billedet og gemmes på SD-kortet. Når man holder PIC-
knappen inde, oprettes et billede, hvorefter stemmeoptagelsen starter automatisk. Et kortvarigt
tryk på OK-knappen afslutter stemmeoptagelsen. Via et kortvarigt tryk på VID-knappen startes en
videooptagelse med stemmeoptagelse. Optagelsen afsluttes ved at trykke på knappen igen.
2012/01/05 12:50:28
0 cm X 1.0
REC
00 : 00 : 32
4.1 4.2 4.3
1x = 90°
2x = 90°
3x = 90°
4x = 90°
1x = +/- 10%
2x = +/- 20%
...
10x = +/- 100%
1x = +/- 10%
2x = +/- 20%
...
10x = +/- 100%
4.54.4
0 cm X 1.0
2012/01/05 12:50:28
0 cm X 1.0
2012/01/05 12:50:28
0 cm
Zoom Diodelampe Billedrotation
BilledeVideo
START STOP
Med Snapshot-funktionen kan man optage billeder til dokumentationsformål under
en igangværende videooptagelse.
!

2012/01/05 12:50:28
0 cm X 1.0
2012/01/05 12:50:28
0 cm X 1.0
5
4.6
3 sec
REC
00 : 00 : 32
42
DA
Gengivelse af billed-/videooptagelser
Tænd for apparatet, og skift til gengivelsesmodus ved hjælp af piletasterne. Der vises en billedoversigt på
displayet. Med piletasterne kan man navigere frem og tilbage. Når man trykker på OK-knappen, vises det
valgte billede eller den valgte video i fuld skærmmodus. Trykker man kortvarigt på OK-knappen, starter
afspilningen af en video- eller stemmeoptagelse; næste gang der trykkes, stopper gengivelsen.
Billede med stemmeoptagelse
START STOP
ON
3 sec
5.1 5.2
IMG00001
IMG00002
…
IMG00030
IMG00029
…
Navigering Fuld skærmmodus
Kvaliteten af stemmeoptagelsen på apparatet er begrænset af den vandbeskyttede mikrohøjttaler.
Stemmeoptagelser kan aflyttes i god lydkvaltet, hvis man overfører dem til en pc.
!

VideoControl-Master
5.3
2012/01/05 12:50:28
IMG00001
0 cm
2012/01/05 12:50:28
IMG00001
00 : 00 : 32
0 cm
2012/01/05 12:50:28
IMG00001
00 : 00 : 32
0 cm
2012/01/05 12:50:28
IMG00001
00 : 00 : 32
0 cm
5.65.4
2012/01/05 12:50:28
IMG00001
00 : 00 : 32
0 cm
2 X 4 X 8 X
2 X
5.5
2012/01/05 12:50:28
X 1.0
IMG00001
00 : 00 : 32
6
43
DA
Gengivelse video
LydstyrkeFremadspoling video Gengivelse
stemmeoptagelse
0 cm
2012/01/05 12:50:28
IMG00001
6.1
2 sec
Slet
Ja Nej
Slet
Ja Nej
Sletning i fuld skærmmodus
Sletning af billed-/videooptagelser
Man sletter optagelser ved at holde OK-knappen inde et stykke tid (fuld skærmmodus) eller i
billedoversigten, eftet at man forinden har udvalgt en række billeder.

2 sec
6.2
7
2012/01/05 12:50:28
0 cm
2012/01/05 12:50:28
0 cm
44
DA
Sletning af ere billeder i billedoversigten
Sletning af udvalgte ler
Ja Nej
Sletning af udvalgte ler
Ja Nej
Billedsammenligningsfunktion

VideoControl-Master
8
ON
3 sec
MODE
3 sec
8.1
45
DA
Indstillingsmodus
Indstillingsmodus afsluttes automatisk efter 10 sekunder - eller kan afsluttes ved at trykke
på ESC-knappen.
!
Menu
Sprog
Dato/tid indst.
Video format
Autom. Sluk
Ingangskilde
Menu
Sprog
Dato/tid indst.
Video format
Autom. Sluk
Ingangskilde
Sprog
English
Deutsch
Français
Español
Italiano
Sprog
English
Deutsch
Français
Español
Italiano
Skift sprog
(DE, EN, NL, DA, FR, ES, IT, PL, FI, PT, SV, NO, TR, RU, UK, CS, ET, LV, LT, RO, BG, EL)

8.2
22 / 21 / …22 / 23 / …
46
DA
Menu
Sprog
Dato/tid indst.
Video format
Autom. Sluk
Ingangskilde
Dato/tid indst.
Dato/tid indst.
Datoformat
Tidsformat
Opsætning
Datoformat
dd.mm.yyyy
yyyy.mm.dd
mm/dd/yyyy
yyyy/dd/mm
dd/mm/yyyy
Datoformat
dd.mm.yyyy
yyyy.mm.dd
mm/dd/yyyy
yyyy/dd/mm
dd/mm/yyyy
Dato/tid indst.
Datoformat
Tidsformat
Opsætning
Tidsformat
24-timer
12-timer (AM:PM)
Tidsformat
24-timer
12-timer (AM:PM)
Opsætning
dd . mm . yyyy
23 . 08 . 2012
12 : 00 : 08
Vise Tænd
Dato/tid indst.
Datoformat
Tidsformat
Opsætning
Opsætning
dd . mm . yyyy
22 . 08 . 2012
12 : 00 : 08
Vise Tænd

VideoControl-Master
8.3
8.4
8.5
8.6
47
DA
Længde foranstaltning
Reset
Unit
Deaktiver / Aktivér
Menu
Sprog
Dato/tid indst.
Video format
Autom. Sluk
Ingangskilde
TV udgang
NTSC
PAL
TV udgang
NTSC
PAL
Video format
Menu
Sprog
Dato/tid indst.
Video format
Autom. Sluk
Ingangskilde
Autom. Sluk
Deaktiver
5 min
10 min
15 min
30 min
Autom. Sluk
Deaktiver
5 min
10 min
15 min
30 min
Automatisk slukning
Menu
Sprog
Dato/tid indst.
Video format
Autom. Sluk
Ingangskilde
Ingangskilde
Direkte
Trådløs
Ingangskilde (kun muligt med wireless-kameraenhed)
Menu
Autom. Sluk
Ingangskilde
Længde foranstaltning
Videoudgang
Slet alt
Længde foranstaltning
Reset
Unit
Deaktiver / Aktivér
Ingangskilde
Direkte
Trådløs

8.8
48
DA
Slet alt
Ja Nej
Menu
Autom. Sluk
Ingangskilde
Længde foranstaltning
Videoudgang
Slet alt
Slet alt
Ja Nej
Slet alt
USB-dataoverførsel
De lagrede data på SD-kortet kan overføres til pc’en enten med en passende kortlæser eller direkte via
USB-interfacet. Oplysninger om forbindelse mellem computer og kort-adapter eller kortlæser ndes i
manualen til kortlæseren.
Anmærkninger vedr. anvendelsen
– Lysdiodeenheden må ikke dyppes ned i vand.
– Basisapparatet må ikke komme i kontakt med væske.
– For at opretholde beskyttelsesklasse IP65 skal dækkappen over tilslutningerne være lukket ordentligt til.
Tilslutning af lysnetoplader
Når apparatet skal oplades, sætter man den medfølgende lysnetoplader i ladestikket „i“ og forbinder den med
en passende strømkilde.
Tilslutning til en monitor
VideoControl-Master kan sluttes til en monitor ved det medfølgende kabel. Man benytter tilslutningen „g“
og vælger den ønskede videoudgang i menuen, se „8.7 Videoudgang“.
Udskiftning af batterier
Hvis de genopladelige batterier skal udskiftes, skal man sende apparatet til UMAREX-Laserliner.
8.7
Menu
Autom. Sluk
Ingangskilde
Længde foranstaltning
Videoudgang
Slet alt
Videoudgang
Inden funktionen
kan anvendes, skal
VideoControl-Master
forbindes med en
monitor. Displayet på
VideoControl-Master
bliver sort, og
funktionerne vises på
den eksterne monitor.
!

VideoControl-Master
Anmærkninger vedr. vedligeholdelse og pleje
Alle komponenter skal rengøres med en let fugtet klud, og man skal undlade brug af rengørings-,
skure- og opløsningsmidler. Batterierne skal tages ud inden længere opbevaringsperioder. Apparatet skal
opbevares på et rent og tørt sted.
49
DA
Tekniske Data
Forbehold for tekniske ændringer. 17W46
Skærmtype 5,0“ TFT-farvedisplay
Tilslutninger
Industristik til kamera
TV-Out-tilslutning, PAL eller NTSC
USB-adapter type Mini-B
Slot til SD-kort
DC-adapter til 5V DC-adapter
Opløsning display 640 x 480 pixel
Billedformat / Opløsning billede JPEG-format / 640 x 480 pixel
Videoformat / Billedopdateringshastighed ASF / 30 frames / sek.
LED (lysdiode) 10 lysstyrketrin
Zoom 2 -dobbelt digitalzoom i trin på 10%
Hukommelse (ekstern) 2 GB SD-kort / Understøtter SD-kort op til 16 GB
Interface USB 2.0
Auto-slukfunktion 5 min / 10 min / 15 min / 30 min (indstilbar)
Strømforsyning Lithium-ion-batteri / lysnetadapter
Drifttid 4 timer
Arbejdsbetingelser
-10°C … 60°C, Luftfugtighed maks. 20 … 85% rH,
ikke-kondenserende, Arbejdshøjde maks. 4000 m.o.h.
Opbevaringsbetingelser -20°C … 70°C, Luftfugtighed maks. 80% rH
Beskyttelsesklasse IP65
Vægt (inkl. li-ion-batteri) 0,86 kg
Mål (B x H x L) 200 mm x 130 mm x 60 mm
EU-bestemmelser og bortskaffelse
Apparatet opfylder alle påkrævede standarder for fri vareomsætning inden for EU.
Dette produkt er et elapparat og skal indsamles og bortskaffes separat i henhold til
EF-direktivet for (brugte) elapparater.
Flere sikkerhedsanvisninger og supplerende tips på:
http://laserliner.com/info?an=vcm
Reset
Når man trykker på Reset-knappen „h“, genstarter apparatet.
Oplad akku
– Strømforsyningen/opladeren må kun bruges i lukkede rum; må ikke udsættes for fugt eller regn,
da der ellers er risiko for elektrisk stød.
– Inden apparatet tages i brug, skal batterierne lades helt op.
– Man må kun benytte den vedlagte lysnetadapter/oplader. Hvis der benyttes en forkert
lysnetadapter/oplader, bortfalder garantien.
– Det genopladelige batteri kan også oplades under drift.

50

VideoControl-Master
51
Date actuelle
Heure actuelle
Mesurer la longueur
(uniquement avec la fonction
PipeControl-LevelFlex-Camera)
Degré de zoom (1.0 - 2.0)
Introduire la carte SD
Intensité de l’éclairage DEL
État de charge des piles
Brancher une caméra
Emplacement
mémoire occupé
Symbole vidéo
Enregistrement vidéo
Durée de l‘enregistrement
Enregistrement vocal
Enregistrement vocal
Symbole image
Durée de
l‘enregistrement vocal

1 2
!
1.
2.
Introduire la carte SD Retirer la carte SD
52
FR
3
ON
3 sec
MODE
3 sec
Modier la langue
(DE, EN, NL, DA, FR, ES, IT, PL, FI, PT, SV, NO, TR, RU, UK, CS, ET, LV, LT, RO, BG, EL)
Menu
Langue
Date/Temps
Format de vidéo
Arrêt auto
Source d’entree
Langue
English
Deutsch
Français
Español
Italiano
Langue
English
Deutsch
Français
Español
Italiano
Réglage de la langue du menu
Menu
Langue
Date/Temps
Format de vidéo
Arrêt auto
Source d’entree
36
37
38
Mesurer la longueur
(uniquement avec la fonction
PipeControl-LevelFlex-Camera)
Sortie de vidéo
Tout supprimer
31
33
35
37
Menu
Langue
Date/Temps
Format de vidéo
Arrêt auto
Source d’entree
Mesurer la longueur
Sortie de vidéo
Tout supprimer
Mode de réglage
Langue du menu
Date/Temps
Format de vidéo PAL / NTSC
Arrêt automatique
Source d’entree
31
32
33
34
35
32
34
36
38

VideoControl-Master
4
53
FR
Enregistrement d’images/vidéo
Mettre l‘appareil sous tension, orienter la tête de la caméra au niveau du tuyau exible et la mettre à la
position souhaitée. Activer l’éclairage DEL en cas de mauvaise visibilité. Zoomer sur des objets de petite
taille ou éloignés. La rotation manuelle permet de faire tourner l‘image de 90° sur le moniteur. Actionner
brièvement la touche PIC pour enregistrer une image et la mémoriser sur la carte SD. Une pression
prolongée de la touche PIC permet de générer une image et l‘enregistrement vocal démarre automatique-
ment après. Appuyer brièvement sur la touche OK pour mettre n à l‘enregistrement vocal. Appuyer
brièvement sur la touche VID pour lancer un enregistrement vidéo avec enregistrement vocal. Un nouvel
actionnement de la touche met n à l‘enregistrement.
2012/01/05 12:50:28
0 cm X 1.0
REC
00 : 00 : 32
4.1 4.2 4.3
1x = 90°
2x = 90°
3x = 90°
4x = 90°
1x = +/- 10%
2x = +/- 20%
...
10x = +/- 100%
1x = +/- 10%
2x = +/- 20%
...
10x = +/- 100%
4.54.4
0 cm X 1.0
2012/01/05 12:50:28
0 cm X 1.0
2012/01/05 12:50:28
0 cm
Zoom Éclairage DEL Rotation de l‘image
ImageVidéo
MARCHE ARRÊT
L‘option de prise de vue permet de prendre des photos pour la documentation tandis
qu‘un enregistrement vidéo est en cours.
!

2012/01/05 12:50:28
0 cm X 1.0
2012/01/05 12:50:28
0 cm X 1.0
5
4.6
REC
00 : 00 : 32
ON
3 sec
5.1 5.2
IMG00001
IMG00002
…
IMG00030
IMG00029
…
3 sec
54
FR
Reproduction d’images/d’enregistrement vidéo
Mettre l‘appareil sous tension et activer le mode de lecture en utilisant les touches échées. Une vue
d‘ensemble des images s‘afche à l‘écran. Il est possible de naviguer en avant et en arrière avec les
touches échées. Appuyer sur la touche OK pour afcher l‘image ou la vidéo sélectionnée en plein
écran. Appuyer brièvement sur la touche OK pour démarrer la lecture d‘un enregistrement vidéo ou
audio, puis appuyer de nouveau sur la touche pour stopper la lecture.
Image avec enregistrement vocal
Navigation Mode image plein écran
Le micro haut-parleur protégé contre l‘eau limite la qualité de la reproduction vocale de l‘appareil.
Il est possible d‘écouter les enregistrements vocaux dans une bonne qualité après les avoir transmis
sur un PC.
!
MARCHE ARRÊT

VideoControl-Master
5.3
2012/01/05 12:50:28
IMG00001
0 cm
2012/01/05 12:50:28
IMG00001
00 : 00 : 32
0 cm
2012/01/05 12:50:28
IMG00001
00 : 00 : 32
0 cm
2012/01/05 12:50:28
IMG00001
00 : 00 : 32
0 cm
5.65.4
2012/01/05 12:50:28
IMG00001
00 : 00 : 32
0 cm
2 X 4 X 8 X
2 X
5.5
2012/01/05 12:50:28
X 1.0
IMG00001
00 : 00 : 32
6
55
FR
Lecture vidéo
VolumeAvance vidéo Lecture
enregistrement vocal
0 cm
2012/01/05 12:50:28
IMG00001
6.1
2 sec
Supprimer
Oui Non
Supprimer
Oui Non
Effacement en mode plein écran
Suppression d’images/d’enregistrements vidéo
Il suft d‘appuyer longuement sur la touche OK (mode plein écran) après avoir sélectionné auparavant
plusieurs images dans la vue d‘ensemble des images pour effacer des images.

2 sec
6.2
7
2012/01/05 12:50:28
0 cm
2012/01/05 12:50:28
0 cm
56
FR
Effacement de plusieurs images dans la vue d‘ensemble
Effacer des images sélectionnées
Oui Non
Effacer des images sélectionnées
Oui Non
Fonction de comparaison des images

VideoControl-Master
8
ON
3 sec
MODE
3 sec
8.1
57
FR
Mode de réglage
Le système quitte automatiquement le mode de réglage au bout de 10 secondes ou il est possible
d‘y mettre fin en appuyant sur la touche ESC (ECHAP).
!
Menu
Langue
Date/Temps
Format de vidéo
Arrêt auto
Source d’entree
Menu
Langue
Date/Temps
Format de vidéo
Arrêt auto
Source d’entree
Langue
English
Deutsch
Français
Español
Italiano
Langue
English
Deutsch
Français
Español
Italiano
Modier la langue
(DE, EN, NL, DA, FR, ES, IT, PL, FI, PT, SV, NO, TR, RU, UK, CS, ET, LV, LT, RO, BG, EL)

8.2
22 / 21 / …22 / 23 / …
58
FR
Menu
Langue
Date/Temps
Format de vidéo
Arrêt auto
Source d’entree
Date/Temps
Date/Temps
Format de la date
Format de l‘heure
Conguration
Format de la date
dd.mm.yyyy
yyyy.mm.dd
mm/dd/yyyy
yyyy/dd/mm
dd/mm/yyyy
Format de la date
dd.mm.yyyy
yyyy.mm.dd
mm/dd/yyyy
yyyy/dd/mm
dd/mm/yyyy
Date/Temps
Format de la date
Format de l‘heure
Conguration
Format de l‘heure
24 heures
12 heures (matin/après-midi)
Format de l‘heure
24 heures
12 heures (matin/après-midi)
Conguration
dd . mm . yyyy
23 . 08 . 2012
12 : 00 : 08
Afchage On
Date/Temps
Format de la date
Format de l‘heure
Conguration
Conguration
dd . mm . yyyy
22 . 08 . 2012
12 : 00 : 08
Afchage On

VideoControl-Master
8.3
8.4
8.5
8.6
59
FR
Mesurer la longueur
Reset
Unité
Desactiver / Activer
Menu
Langue
Date/Temps
Format de vidéo
Arrêt auto
Source d’entree
Sortie de TV
NTSC
PAL
Sortie de TV
NTSC
PAL
Format de vidéo
Menu
Langue
Date/Temps
Format de vidéo
Arrêt auto
Source d’entree
Auto off
Déactiver
5 min
10 min
15 min
30 min
Auto off
Déactiver
5 min
10 min
15 min
30 min
Arrêt automatique
Menu
Langue
Date/Temps
Format de vidéo
Arrêt auto
Source d’entree
Source d’entree
Direct
Sans-l
Source d’entree (uniquement possible avec une unité de caméra sans l)
Menu
Arrêt auto
Source d’entree
Mesurer la longueur
Sortie de vidéo
Tout supprimer
Mesurer la longueur
Reset
Unité
Desactiver / Activer
Source d’entree
Direct
Sans-l

8.8
60
FR
Tout supprimer
Oui Non
Menu
Arrêt auto
Source d’entree
Mesurer la longueur
Sortie de vidéo
Tout supprimer
Tout supprimer
Oui Non
Tout supprimer
Remarques relatives à l’utilisation
– Ne pas plonger l’écran ACL dans l’eau.
– L’appareil de base ne doit pas entrer en contact avec des liquides.
– Le capuchon des raccords doit être parfaitement fermé an de garantir la catégorie de protection IP65.
Branchement du bloc secteur/chargeur
Brancher le bloc secteur/chargeur fourni avec l‘appareil dans la prise de recharge „i“ et le raccorder à la source
de courant adaptée.
Branchement sur un moniteur
Il est possible de brancher le VideoControl-Master sur un moniteur en utilisant le câble fourni avec l‘appareil.
Pour cela, utiliser le raccord „g“, puis sélectionner la sortie vidéo correspondante au menu, voir à ce sujet la
section „8.7 Sortie vidéo“.
Transmission des données par USB
Les données mémorisées sur la carte SD peuvent être transmises à un ordinateur soit en utilisant le lecteur
de cartes correspondant, soit via l’interface USB. Prière de consulter le manuel relatif au lecteur de cartes
pour obtenir de plus amples informations sur la liaison entre l’ordinateur et l’adaptateur de carte ou le
lecteur de cartes.
Remplacement de l‘accu
Pour remplacer l‘accu, renvoyer l‘appareil à UMAREX-Laserliner.
8.7
Menu
Arrêt auto
Source d’entree
Mesurer la longueur
Sortie de vidéo
Tout supprimer
Sortie de vidéo
Il est nécessaire de
raccorder le Video
Control-Master à un
moniteur afin de pouvoir
utiliser cette fonction.
L‘écran du VideoControl-
Master devient noir et
les fonctions s‘affichent
sur le moniteur externe.
!

VideoControl-Master
Remarques concernant la maintenance et l‘entretien
Nettoyer tous les composants avec un chiffon légèrement humide et éviter d‘utiliser des produits
de nettoyage, des produits à récurer ou des solvants. Retirer la/les pile(s) avant tout stockage prolongé
de l‘appareil. Stocker l‘appareil à un endroit sec et propre.
61
FR
Donnés techniques
Sous réserve de modications techniques. 17W46
Type de l’écran Ecran d‘affichage TFT de 5,0 po
Raccords
Connecteur à fiches pour la caméra / Raccords de sortie TV,
PAL ou NTSC / Adaptateur USB du type Mini-B / Fente pour
les cartes SD / Adaptateur CC pour le bloc d‘alimentation CC
de 5 V
Résolution de l’écran d’affichage 640 x 480 pixels
Format de l’image / Résolution de l’image Format JPEG / 640 x 480 pixels
Format de la vidéo /
Taux de rafraîchissement des images
ASF / 30 images / seconde
DEL 10 degrés de luminosité
Zoom zoom numérique double à pas de 10%
Mémoire (externe)
Carte SD 2 GB / Prend en charge une
carte SD jusqu‘à 16 GB au maximum
Interface USB 2.0
Arrêt automatique 5 min / 10 min / 15 min / 30 min (réglable)
Alimentation électrique Accu li-ion / Bloc d‘alimentation électrique
Durée de fonctionnement 4 h
Conditions de travail
-10°C … 60°C, Humidité relative de l’air max. 20 … 85% rH,
non condensante, Altitude de travail max. de 2000m
au-dessus du niveau moyen de la mer
Conditions de stockage -20°C … 70°C, Humidité relative de l’air max. 80% rH
Catégorie de protection IP65
Poids (y compris accu li-ion) 0,86 kg
Dimensions (L x H x P) 200 mm x 130 mm x 60 mm
Réglementation UE et élimination des déchets
L‘appareil est conforme à toutes les normes nécessaires pour la libre
circulation des marchandises dans l‘Union européenne.
Ce produit est un appareil électrique et doit donc faire l‘objet d‘une collecte
et d‘une mise au rebut sélectives conformément à la directive européenne
sur les anciens appareils électriques et électroniques (directive DEEE).
Autres remarques complémentaires et consignes
de sécurité sur http://laserliner.com/info?an=vcm
Remise à zéro
Appuyer sur la touche de remise à zéro „h“, puis redémarrer l‘appareil.
Chargement de l‘accu
– N’utiliser le chargeur / l’appareil secteur que dans des pièces fermées, ne les exposer ni à l’humidité
ni à la pluie car il y a sinon un risque de décharge électrique.
– Avant utilisation, recharger complètement l‘accu de l‘appareil.
– Veuillez utiliser uniquement le bloc d‘alimentation électrique/chargeur joint à l’appareil. Le droit à
la garantie expire en cas d’utilisation d’un bloc d‘alimentation électrique/chargeur non adapté.
– Il est également possible de charger l’accu pendant le fonctionnement.

Indicaciones generales de seguridad
– Utilice el aparato únicamente para los usos previstos dentro de las especicaciones.
– Los instrumentos de medición y los accesorios no son juguetes infantiles. Manténgalos fuera del alcance
de los niños.
– No está permitido modicar la construcción del aparato.
– No exponga el aparato a cargas mecánicas, temperaturas muy elevadas, humedad o vibraciones fuertes.
– No se puede seguir utilizando el aparato cuando falla alguna función o la carga de la batería es débil.
– Por favor respete las medidas de seguridad dispuestas por las autoridades locales o nacionales en
relación al uso adecuado del aparato.
62
ES
Lea atentamente las instrucciones y el libro adjunto de «Garantía e información complementaria»,
así como toda la información e indicaciones en el enlace de Internet indicado al final de estas
instrucciones. Siga las instrucciones indicadas en ellas. Conserve esta documentación y entréguela
con el dispositivo si cambia de manos.
!
Funcionamiento y uso
El VideoControl-Master es la unidad básica a la que se conectan las diferentes unidades de cámaras. Una
unidad de cámara envía al LCD imágenes de vídeo en color para la comprobación de puntos de difícil
acceso como en tuberías, canales, instalaciones de ventilación y de gases de escape.
Instrucciones de seguridad
Manejo de radiación electromagnética
– El instrumento de medición cumple las normas y limitaciones de compatibilidad electromagnética según
la Directiva 2014/30/UE de compatibilidad electromagnética (EMC).
– Es necesario observar las limitaciones de uso locales, por ejemplo en hospitales, aviones, gasolineras
o cerca de personas con marcapasos. Se pueden producir efectos peligrosos o interferencias sobre los
dispositivos electrónicos o por causa de estos.
a
b
c
d
e
f
g
h
i
j
k
Pantalla LC
Teclado
Altavoz
Micrófono
Puerto USB 2.0
Ranura para tarjeta SD
Conexión monitor externo
Reset
Entrada de carga
Conexión de cámaras
a
b
c
d
e
f
g
h
i
j
Trípode / suspensión
para pared desplegable
k

VideoControl-Master
63
ES
2012/01/05 12:50:28
CAMERA
5
1 2
6
9
7
0 cm X 1.0
3
4
8
00 : 00 : 32
12
10
11
0 cm X 1.0
3
4
REC
00 : 00 : 32
16
1413
REC
15
2012/01/05 12:50:28
IMG00001
00 : 00 : 32
0 cm
17
18
19
21 22
26
27
20
23
24
28
2012/01/05 12:50:28
X 1.0
29
30
IMG00001
00 : 00 : 32
21 22
27
28
4
2 X
25
1
2
3
4
5
Posición de la grabación
Símbolo de imagen
Grabación de voz
28
29
30
Modo de reproducción Modo de reproducción
de vídeos
Modo de grabación
No hay tarjeta
Modo de grabación de vídeo Modo de toma de imágenes
Modo de reproducción
de imágenes
6
7
8
9
10
11
12
13
14
15
16
Imagen (sin marcación)
Imagen con grabación de
voz (Símbolo de micrófono)
Vídeo (Símbolo de Play)
Símbolo de vídeo
Fecha de la grabación
17
18
19
20
21
Hora de la grabación
Reproducción
Pausa
Avanzar vídeo
Volumen
N° de grabación
22
23
24
25
26
27
m
n
p
r
t
v
o
q
s
u
w
x
ON/OFF
Zoom – / Cancelar
selección de imágenes
Zoom + /
Selección de imagen
– Iluminación LED /
Volumen –
+ Iluminación LED /
Volumen +
Tomar fotos /
grabar voz foto /
comparación de imágenes
Grabar vídeo
Inicio / Stop
Tecla de navegación /
Modo de reproducción
Tecla de navegación /
Modo de reproducción /
Velocidad de reproducción
ESC: salir del menú
Conrmar /
Finalizar grabación de voz
Rotación de 90° /
Sistema de menú
m
n
o
p
q
r
s
t
u
v
w
x

1 2
!
1.
2.
Introducir tarjeta SD Retirar tarjeta SD
64
ES
3
ON
3 sec
MODE
3 sec
Modicar idioma
(DE, EN, NL, DA, FR, ES, IT, PL, FI, PT, SV, NO, TR, RU, UK, CS, ET, LV, LT, RO, BG, EL)
Menu
Idioma
Ajustar fecha/hora
Formato de video
Auto apagado
Fuente de entrada
Idioma
English
Deutsch
Français
Español
Italiano
Idioma
English
Deutsch
Français
Español
Italiano
Especicar idioma
Menu
Idioma
Ajustar fecha/hora
Formato de video
Auto apagado
Fuente de entrada
36
37
38
Medir la longitud (solo con
PipeControl-LevelFlex-Camera)
Salida de video
Eliminar todo
31
33
35
37
Menu
Idioma
Ajustar fecha/hora
Formato de video
Auto apagado
Fuente de entrada
Medir la longitud
Salida de video
Eliminar todo
Modo de conguración
Idioma de los menús
Fecha y hora
Formato de video PAL / NTSC
Apagado automático
Fuente de entrada
31
32
33
34
35
32
34
36
38

VideoControl-Master
4
65
ES
Toma de imágenes y vídeos
Encender el aparato, orientar el cabezal de la cámara del tubo exible y llevarlo a la posición deseada. Si
las condiciones lumínicas son malas, encienda la iluminación LED. Acerque o amplíe los objetos que se
encuentren alejados o sean muy pequeños. Con la rotación manual de imágenes se puede girar la imagen
paso a paso hasta 90° en el monitor. Una pulsación breve de la tecla PIC inicia la toma de imagen y se
guarda ésta en la tarjeta SD. Una pulsación prolongada de la tecla PIC crea una imagen y luego se inicia
automáticamente la grabación de voz. Una pulsación breve de la tecla OK naliza la grabación de voz.
Pulsar brevemente la tecla VID inicia la grabación de vídeo con voz. Repetir la pulsación naliza la
grabación.
2012/01/05 12:50:28
0 cm X 1.0
REC
00 : 00 : 32
4.1 4.2 4.3
1x = 90°
2x = 90°
3x = 90°
4x = 90°
1x = +/- 10%
2x = +/- 20%
...
10x = +/- 100%
1x = +/- 10%
2x = +/- 20%
...
10x = +/- 100%
4.54.4
0 cm X 1.0
2012/01/05 12:50:28
0 cm X 1.0
2012/01/05 12:50:28
0 cm
Zoom Iluminación LED
Rotación de imágenes
FotografíaVideo
INICIO STOP
Con la opción Snapshot se puede tomar imágenes para una documentación durante
una grabación de vídeo en curso.
!

2012/01/05 12:50:28
0 cm X 1.0
2012/01/05 12:50:28
0 cm X 1.0
5
4.6
3 sec
REC
00 : 00 : 32
ON
3 sec
5.1 5.2
IMG00001
IMG00002
…
IMG00030
IMG00029
…
66
ES
Reproducción de fotos y vídeos
Encender el aparato y cambiar al modo de reproducción con las echas. En la pantalla se visualiza una
pantalla general de las imágenes. Con las teclas de echas puede pasar las imágenes hacia adelante
o hacia atrás. Con la telca OK se amplía la imagen o el vídeo seleccionados en el modo de pantalla
completa. Una pulsación breve de la tecla OK inicia la reproducción de un vídeo y pulsar esa tecla de
nuevo detiene la reproducción.
Imagen con grabación de voz
INICIO STOP
Navegar Modo de pantalla completa
La calidad de la reproducción de voz en el aparato es limitada debido a la protección contra el
agua de los micro-altavoces. Las grabaciones de voz pueden ser reproducidas con buena calidad
descargándolas en un PC.
!

VideoControl-Master
5.3
2012/01/05 12:50:28
IMG00001
0 cm
2012/01/05 12:50:28
IMG00001
00 : 00 : 32
0 cm
2012/01/05 12:50:28
IMG00001
00 : 00 : 32
0 cm
2012/01/05 12:50:28
IMG00001
00 : 00 : 32
0 cm
5.65.4
2012/01/05 12:50:28
IMG00001
00 : 00 : 32
0 cm
2 X 4 X 8 X
2 X
5.5
2012/01/05 12:50:28
X 1.0
IMG00001
00 : 00 : 32
6
67
ES
Reproducción de vídeo
VolumenAvanzar vídeo Reproducción de
grabación de voz
0 cm
2012/01/05 12:50:28
IMG00001
6.1
2 sec
Eliminar
Si No
Eliminar
Si No
Borrar en el modo de pantalla completa
Borrar imágenes y vídeos
El borrado de las tomas y grabaciones se realiza con una pulsación prolongada de la tecla OK (modo de
pantalla completa) o bien tras una selección previa de varias imágenes en la pantalla general.

2 sec
6.2
7
2012/01/05 12:50:28
0 cm
2012/01/05 12:50:28
0 cm
68
ES
Borrar varias imágenes en la pantalla general
Borrar archivos seleccionados
Si No
Borrar archivos seleccionados
Si No
Función de comparación de imágenes

VideoControl-Master
8
ON
3 sec
MODE
3 sec
8.1
69
ES
Modo de conguración
El modo de ajuste finaliza automáticamente al cabo de 10 segundos o bien al pulsar la tecla ESC.
!
Menu
Idioma
Ajustar fecha/hora
Formato de video
Auto apagado
Fuente de entrada
Menu
Idioma
Ajustar fecha/hora
Formato de video
Auto apagado
Fuente de entrada
Idioma
English
Deutsch
Français
Español
Italiano
Idioma
English
Deutsch
Français
Español
Italiano
Modicar idioma
(DE, EN, NL, DA, FR, ES, IT, PL, FI, PT, SV, NO, TR, RU, UK, CS, ET, LV, LT, RO, BG, EL)

8.2
22 / 21 / …22 / 23 / …
70
ES
Menu
Idioma
Ajustar fecha/hora
Formato de video
Auto apagado
Fuente de entrada
Ajustar fecha/hora
Ajustar fecha/hora
Formato de fecha
Formato de hora
Conguración
Formato de fecha
dd.mm.yyyy
yyyy.mm.dd
mm/dd/yyyy
yyyy/dd/mm
dd/mm/yyyy
Formato de fecha
dd.mm.yyyy
yyyy.mm.dd
mm/dd/yyyy
yyyy/dd/mm
dd/mm/yyyy
Ajustar fecha/hora
Formato de fecha
Formato de hora
Conguración
Formato de hora
24 h
12 h (AM:PM)
Formato de hora
24 h
12 h (AM:PM)
Conguración
dd . mm . yyyy
23 . 08 . 2012
12 : 00 : 08
Mostrar Encendido
Ajustar fecha/hora
Formato de fecha
Formato de hora
Conguración
Conguración
dd . mm . yyyy
22 . 08 . 2012
12 : 00 : 08
Mostrar Encendido

VideoControl-Master
8.3
8.4
8.5
8.6
71
ES
Medir la longitud
Reset
Unidad
Deshabilitar / Activar
Menu
Idioma
Ajustar fecha/hora
Formato de video
Auto apagado
Fuente de entrada
Salida de TV
NTSC
PAL
Salida de TV
NTSC
PAL
Formato de video
Menu
Idioma
Ajustar fecha/hora
Formato de video
Auto apagado
Fuente de entrada
Auto apagado
Desactivar
5 min
10 min
15 min
30 min
Auto apagado
Desactivar
5 min
10 min
15 min
30 min
Apagado automático
Menu
Idioma
Ajustar fecha/hora
Formato de video
Auto apagado
Fuente de entrada
Fuente de entrada
Directa
Inalámbrica
Fuente de entrada (Solo es posible con la unidad de cámara wireless.)
Menu
Auto apagado
Fuente de entrada
Medir la longitud
Salida de video
Eliminar todo
Medir la longitud
Reset
Unidad
Deshabilitar / Activar
Fuente de entrada
Directa
Inalámbrica

8.8
72
ES
Eliminar todo
Si No
Menu
Auto apagado
Fuente de entrada
Medir la longitud
Salida de video
Eliminar todo
Eliminar todo
Si No
Eliminar todo
Transmisión de datos por USB
La transmisión de los datos almacenados en la tarjeta SD puede efectuarse bien con un lector de tarjetas
compatible o bien directamente en el PC a través del puerto USB. Las instrucciones para conectar el
ordenador y el adaptador de tarjetas o el lector de tarjetas guran en el manual de su lector de tarjetas.
Notas sobre el uso
– No se puede sumergir la unidad LCD en agua.
– El aparato básico no debe estar en contacto con líquidos.
– Para garantizar la clase de protección IP65 es imprescindible que esté bien cerrada la tapa de protección
de las conexiones.
Conectar alimentador de red/ cargador
Para cargar el aparato, enchufe la fuente de alimentación adjunta en la entrada „i“ y luego en la toma de
corriente correspondiente.
Conexión a un monitor
El VideoControl-Master puede ser conectado a un monitor con el cable adjunto. Utilice para ello la entrada „g“
y seleccione en el menú la correspondiente salida de vídeo. Véase al respecto el punto 8.7 „Salida de vídeo“.
Cambio de batería
Para cambiar la batería envíe el aparato a UMAREX-Laserliner.
8.7
Menu
Auto apagado
Fuente de entrada
Medir la longitud
Salida de video
Eliminar todo
Salida de video
Para utilizar la función
es necesario que el
VideoControl-Master
esté conectado a un
monitor. La pantalla del
VideoControl-Master
se pone negra y las
funciones se visualizan
en el monitor externo.
!

VideoControl-Master
Indicaciones sobre el mantenimiento y el cuidado
Limpie todos los componentes con un paño ligeramente humedecido y evite el uso de productos de
limpieza, abrasivos y disolventes. Retire la/s pila/s para guardar el aparato por un periodo prolongado.
Conserve el aparato en un lugar limpio y seco.
73
ES
Datos técnicos
Sujeto a modicaciones técnicas. 17W46
Tipo de pantalla Pantalla TFT en color de 5.0“
Conexiones
Enchufe industrial para cámara / Conexión TV-Out, PAL o NTSC /
Adaptador USB tipo mini-B / Ranura para tarjetas SD / Adaptador
de DC para fuente de alimentación 5 V DC
Resolución de la pantalla 640 x 480 pixel
Formato de las imágenes /
Resolución de las imágenes
Formato JPEG / 640 x 480 pixel
Formato de las vídeos /
Tasa de repetición de imágenes
ASF / 30 Frames / seg.
LED 10 niveles de brillo
Zoom zoom digital doble en intervalos de 10%
Memoria (externa)
tarjetas SD de 2 GB / Compatible con tarjetas SD hasta
un máximo de 16 GB
Puerto USB 2.0
Apagado automático 5 min / 10 min / 15 min / 30 min (ajustable)
Alimentación Batería de iones de litio / fuente de alimentación
Autonomía de trabajo 4 h
Condiciones de trabajo
-10°C … 60°C, Humedad del aire máx. 20 … 85% r.h.,
No condensante, Altitud de trabajo máx. 4000 m sobre el nivel
del mar (nivel normal cero)
Condiciones de almacén -20°C … 70°C, Humedad del aire máx. 80% r.h.
Clase de protección IP65
Peso (incl. batería de iones de litio) 0,86 kg
Dimensiones (An x Al x F) 200 mm x 130 mm x 60 mm
Disposiciones europeas y eliminación
El aparato cumple todas las normas requeridas para el libre tráfico
de mercancías en la UE.
Se trata de un aparato eléctrico, por lo que debe ser recogido
y eliminado por separado conforme a la directiva europea relativa
a los aparatos eléctricos y electrónicos usados.
Más información detallada y de seguridad en:
http://laserliner.com/info?an=vcm
Reset
Pulsar la tecla Reset „h“ reinicia el aparato.
Carga de la batería
– Utilizar el alimentador de red o el cargador únicamente dentro de espacios cerrados; no exponer
a la humedad ni a la lluvia, en caso contrario, existe riesgo de descarga eléctrica.
– Cargar completamente la batería antes de usar el aparato.
– Por favor, utilice exclusivamente el alimentador de red/ cargador adjunto. El uso de un alimentador
de red/cargador erróneo anula la garantía.
– También se puede cargar la batería durante el funcionamiento.

74
IT
Leggere attentamente le istruzioni per l‘uso, l’opuscolo allegato „Ulteriori informazioni
e indicazioni garanzia“, nonché le informazioni e le indicazioni più recenti raggiungibili con
il link riportato al termine di queste istruzioni. Questo documento deve essere conservato
e fornito insieme all‘apparecchio in caso questo venga inoltrato a terzi.
!
Indicazioni generali di sicurezza
– Utilizzare l‘apparecchio esclusivamente in conformità con gli scopi previsti e nei limiti delle specicazioni.
– Gli apparecchi di misurazione e gli accessori non sono giocattoli. Conservare lontano dalla portata di
bambini.
– La struttura dell‘apparecchio non deve essere modicata.
– Non sottoporre l`apparecchio a carichi meccanici, elevate temperature, umidità o forti vibrazioni.
– Non utilizzare più l‘apparecchio in caso di guasto di una o più funzioni oppure se le batterie sono
quasi scariche.
– Attenersi alle misure di sicurezza stabilite dagli enti locali e nazionali relative al corretto utilizzo
dell‘apparecchio.
Indicazioni di sicurezza
Lavorare in presenza di radiazione elettromagnetica
– L’apparecchio rispetta le norme e i valori limite per la compatibilità elettromagnetica ai sensi della
direttiva EMC 2014/30/UE.
– Rispettare le restrizioni locali all’uso, ad es. in ospedali, a bordo di aerei, in stazioni di servizio o nelle
vicinanze di persone portatrici di pacemaker. Presenza di un inusso pericoloso o di un disturbo degli
e da parte degli apparecchi elettronici.
Funzione / utilizzo
VideoControl-Master è l‘unità base alla quale si possono collegare diverse unità telecamera. In combi-
nazione con un‘unità obiettivo vengono inviate immagini video a colori all‘LCD per il controllo di punti
difcilmente raggiungibili, per esempio, in tubature, canali, impianti di aerazione e scarico gas combusti.
a
b
c
d
e
f
g
h
i
j
k
Display LC
Tastiera
Altoparlante
Microfono
Porta USB 2.0
Slot per SD Card
Attacco esterno del monitor
Reset
Connettore di ricarica
Attacco unità telecamera
a
b
c
d
e
f
g
h
i
j
Supporto ribaltabile /
attacco a parete
k

VideoControl-Master
75
IT
2012/01/05 12:50:28
CAMERA
5
1 2
6
9
7
0 cm X 1.0
3
4
8
00 : 00 : 32
12
10
11
0 cm X 1.0
3
4
REC
00 : 00 : 32
16
1413
REC
15
2012/01/05 12:50:28
IMG00001
00 : 00 : 32
0 cm
17
18
19
21 22
26
27
20
23
24
28
2012/01/05 12:50:28
X 1.0
29
30
IMG00001
00 : 00 : 32
21 22
27
28
4
2 X
25
1
2
3
4
5
Numero di ripresa
Posizione della ripresa
Simbolo immagine
Registrazione voce
27
28
29
30
Modalità di riproduzione Modalità di riproduzione video
Modalità di ripresa
Nessuan carta
Modalità di ripresa video Modalità di ripresa immagini
Modalità di riproduzione
immagine
6
7
8
9
10
11
12
13
14
15
16
Immagine (nessuna
identicazione)
Immagine con registrazione
voce (simbolo del microfono)
Video (simbolo di Play)
Simbolo video
17
18
19
20
Data di ripresa
Ora di ripresa
Riproduzione
Pausa
Avanzamento video
Volume
21
22
23
24
25
26
m
n
p
r
t
v
o
q
s
u
w
x
ON/OFF
Zoom – / Conservare
selezione immagini
Zoom + /
Selezione immagini
Illuminazione LED – /
Volume –
Illuminazione LED + /
Volume +
Foto di ripresa /
foto con registrazione voce/
funzione confronto immagini
Ripresa video
Start / Stop
Tasto di navigazione /
Modalità di riproduzione
Tasto di navigazione /
Modalità di riproduzione /
Velocità di riproduzione
ESC: per uscire dal menu
Conferma /
Terminare registrazione voce
Rotazione 90° /
Menu del sistema
m
n
o
p
q
r
s
t
u
v
w
x

1 2
!
1.
2.
Inserire scheda SD Rimuovere la SD Card
76
IT
3
ON
3 sec
MODE
3 sec
Modica della lingua
(DE, EN, NL, DA, FR, ES, IT, PL, FI, PT, SV, NO, TR, RU, UK, CS, ET, LV, LT, RO, BG, EL)
Menu
Lingua
Impostazione Data/Ora
Formato video
Spegnimento automatico
Origine ingresso
Lingua
English
Deutsch
Français
Español
Italiano
Lingua
English
Deutsch
Français
Español
Italiano
Impostare la lingua del menu
Menu
Lingua
Impostazione Data/Ora
Formato video
Spegnimento automatico
Origine ingresso
36
37
38
Misura di lunghezza (solo con
PipeControl-LevelFlex-Camera)
Uscita video
Cancellare tutto
31
33
35
37
Menu
Lingua
Impostazione Data/Ora
Formato video
Spegnimento automatico
Origine ingresso
Misura di lunghezza
Uscita video
Cancellare tutto
Modalità di impostazione
Lingua del menu
Data/Ora
Formato video PAL / NTSC
Spegnimento automatico
Origine ingresso
31
32
33
34
35
32
34
36
38

VideoControl-Master
4
77
IT
Ripresa di immagini/video
Accendere l‘apparecchio, posizionare la testa dell‘obiettivo sul tubo essibile e condurla al punto desiderato.
In caso di ridotta luminosità accendere il LED di illuminazione. Utilizzare lo zoom per ingrandire oggetti
piccoli o lontani. L‘immagine può essere ruotata progressivamente di 90° sul monitor con la funzione di
rotazione manuale. Premendo brevemente il tasto PIC, l‘immagine viene fotografata e memorizzata sulla
scheda SD. Premendo a lungo il tasto PIC si crea un‘immagine e in seguito viene avviata automaticamente
la registrazione voce. Premendo brevemente il tasto OK si termina la registrazione voce. Premendo
brevemente il tasto VID, si avvia una ripresa video con registrazione voce. Premendolo di nuovo si
termina la ripresa.
2012/01/05 12:50:28
0 cm X 1.0
REC
00 : 00 : 32
4.1 4.2 4.3
1x = 90°
2x = 90°
3x = 90°
4x = 90°
1x = +/- 10%
2x = +/- 20%
...
10x = +/- 100%
1x = +/- 10%
2x = +/- 20%
...
10x = +/- 100%
4.54.4
0 cm X 1.0
2012/01/05 12:50:28
0 cm X 1.0
2012/01/05 12:50:28
0 cm
Zoom LED di illuminazione Rotazione immagine
ImmagineVideo
START STOP
Con l‘opzione Snapshot si possono fotografare immagini per la documentazione durante una
ripresa video in corso.
!

2012/01/05 12:50:28
0 cm X 1.0
2012/01/05 12:50:28
0 cm X 1.0
5
4.6
3 sec
REC
00 : 00 : 32
ON
3 sec
5.1 5.2
IMG00001
IMG00002
…
IMG00030
IMG00029
…
78
IT
Riproduzione di immagini/video
Accendere l‘apparecchio e passare alla modalità di riproduzione utilizzando i tasti freccia. A display viene
visualizzata una panoramica delle immagini. Con i tasti freccia ci si può spostare in avanti o indietro tra
le immagini. Premendo il tasto OK, viene visualizzata l‘immagine o il video selezionati a schermo intero.
Premendo brevemente il tasto OK, si avvia la riproduzione di un video o di una registrazione voce,
premendolo di nuovo la si interrompe.
Immagine con registrazione voce
START STOP
Navigazione Modalità a schermo intero
La qualità della riproduzione voce sull‘apparecchio è limitata dal microaltoparlante impermeabile.
Le registrazioni voce possono essere ascoltate in buona qualità dopo averle scaricate su un PC.
!

VideoControl-Master
5.3
2012/01/05 12:50:28
IMG00001
0 cm
2012/01/05 12:50:28
IMG00001
00 : 00 : 32
0 cm
2012/01/05 12:50:28
IMG00001
00 : 00 : 32
0 cm
2012/01/05 12:50:28
IMG00001
00 : 00 : 32
0 cm
5.65.4
2012/01/05 12:50:28
IMG00001
00 : 00 : 32
0 cm
2 X 4 X 8 X
2 X
5.5
2012/01/05 12:50:28
X 1.0
IMG00001
00 : 00 : 32
6
79
IT
Riproduzione video
VolumeAvanzamento video Riproduzione
registrazione voce
0 cm
2012/01/05 12:50:28
IMG00001
6.1
2 sec
Cancellare
Sì No
Cancellare
Sì No
Cancellare nella modalità a schermo intero
Cancellare le riprese immagini/video
Per cancellare le riprese e le immagini si deve premere a lungo il tasto OK (a schermo intero) o, dopo aver
selezionato precedentemente più immagini, nella panoramica immagini.

2 sec
6.2
7
2012/01/05 12:50:28
0 cm
2012/01/05 12:50:28
0 cm
80
IT
Cancellare più immagini nella panoramica immagini
Cancellare i le selezionati
Sì No
Cancellare i le selezionati
Sì No
Funzione di confronto immagini

VideoControl-Master
8
ON
3 sec
MODE
3 sec
8.1
81
IT
Modalità di impostazione
La modalità di impostazione termina automaticamente dopo 10 secondi o può essere interrotta
premendo il tasto ESC.
!
Menu
Lingua
Impostazione Data/Ora
Formato video
Spegnimento automatico
Origine ingresso
Menu
Lingua
Impostazione Data/Ora
Formato video
Spegnimento automatico
Origine ingresso
Lingua
English
Deutsch
Français
Español
Italiano
Lingua
English
Deutsch
Français
Español
Italiano
Modica della lingua
(DE, EN, NL, DA, FR, ES, IT, PL, FI, PT, SV, NO, TR, RU, UK, CS, ET, LV, LT, RO, BG, EL)

8.2
22 / 21 / …22 / 23 / …
82
IT
Menu
Lingua
Impostazione Data/Ora
Formato video
Spegnimento automatico
Origine ingresso
Impostazione Data/Ora
Impostazione Data/Ora
Formato data
Formato ora
Set up
Formato data
dd.mm.yyyy
yyyy.mm.dd
mm/dd/yyyy
yyyy/dd/mm
dd/mm/yyyy
Formato data
dd.mm.yyyy
yyyy.mm.dd
mm/dd/yyyy
yyyy/dd/mm
dd/mm/yyyy
Impostazione Data/Ora
Formato data
Formato ora
Set up
Formato ora
24 ore
12 ore (AM:PM)
Formato ora
24 ore
12 ore (AM:PM)
Set up
dd . mm . yyyy
23 . 08 . 2012
12 : 00 : 08
Schermo Acceso
Impostazione Data/Ora
Formato data
Formato ora
Set up
Set up
dd . mm . yyyy
22 . 08 . 2012
12 : 00 : 08
Schermo Acceso

VideoControl-Master
8.3
8.4
8.5
8.6
83
IT
Misura di lunghezza
Reset
Unità
Disabilita / Abilita
Menu
Lingua
Impostazione Data/Ora
Formato video
Spegnimento automatico
Origine ingresso
Uscita TV
NTSC
PAL
Uscita TV
NTSC
PAL
Formato video
Menu
Lingua
Impostazione Data/Ora
Formato video
Spegnimento automatico
Origine ingresso
Spegnimento automatico
Disattiva
5 min
10 min
15 min
30 min
Spegnimento automatico
Disattiva
5 min
10 min
15 min
30 min
Spegnimento automatico
Menu
Lingua
Impostazione Data/Ora
Formato video
Spegnimento automatico
Origine ingresso
Origine ingresso
Diretto
Wireless
Origine ingresso (possibile solo con unità telecamera wireless)
Menu
Spegnimento automatico
Origine ingresso
Misura di lunghezza
Uscita video
Cancellare tutto
Misura di lunghezza
Reset
Unità
Disabilita / Abilita
Origine ingresso
Diretto
Wireless

8.8
84
IT
Cancellare tutto
Sì No
Menu
Spegnimento automatico
Origine ingresso
Misura di lunghezza
Uscita video
Cancellare tutto
Cancellare tutto
Sì No
Cancellare tutto
Trasmissione dati USB
I dati salvati sulla SD Card possono essere trasmessi al PC con un lettore di schede adatto o direttamente
attraverso la porta USB. Per informazioni sul collegamento tra computer e adattatore o lettore di schede
consultare il manuale del lettore di schede.
Note sull‘utilizzo
– L‘unità LCD non deve essere immersa in acqua.
– L’apparecchio base non deve venire a contatto con liquidi.
– Per garantire la classe di protezione IP65, la cappa protettiva degli attacchi deve essere chiusa
completamente.
Collegare alimentatore/caricabatteria
Per caricare l‘apparecchio collegare l‘alimentatore/il caricabatteria in dotazione al connettore di ricarica "i" e
allacciarlo a una relativa fonte di corrente.
Collegamento a un monitor
VideoControl-Master può essere collegato a un monitor servendosi del cavo in dotazione. Utilizzare a tal ne
l‘attacco "g" e selezionare nel menu la rispettiva uscita video, si veda il punto "8.7 Uscita video".
Sostituzione delle batterie
Per sostituire le batterie ricaricabili, inviate l‘apparecchio a UMAREX-Laserliner.
8.7
Menu
Spegnimento automatico
Origine ingresso
Misura di lunghezza
Uscita video
Cancellare tutto
Uscita video
Per l‘utilizzo della
funzione il Video-
Control-Master deve
essere collegato a un
monitor. Il display di
VideoControl-Master
si oscura e le funzioni
vengono visualizzate
sul monitor esterno.
!

VideoControl-Master
Indicazioni per la manutenzione e la cura
Pulire tutti i componenti con un panno leggermente inumidito ed evitare l‘impiego di prodotti
detergenti, abrasivi e solventi. Rimuovere la batteria/le batterie prima di un immagazzinamento
prolungato. Immagazzinare l‘apparecchio in un luogo pulito e asciutto.
85
IT
Dati tecnici
Con riserva di modiche tecniche. 17W46
Tipo di display Display a colori TFT da 5.0“
Attacchi
Connettore industriale per telecamere
Attacco TV-Out, PAL o NTSC
Adattatore USB del tipo mini-B
Slot schede SD
Adattatore DC per alimentatore DC da 5V
Risoluzione del display 640 x 480 pixel
Formato immagine / Risoluzione immagine Formato JPEG / 640 x 480 pixel
Formato video / Frequenza immagini ASF / 30 frame / sec.
LED 10 livelli di luminosità
Zoom Zoom digitale a 2 ingrandimenti con incrementi del 10%
Memoria (esterna) 2 GB SD
Card
/ Supporta la scheda SD fino a max. 16 GB
Interfaccia USB 2.0
Spegnimento automatico 5 min / 10 min / 15 min / 30 min (regolabile)
Alimentazione elettrica Batteria litio-ioni / alimentatore
Durata di esercizio 4 ore
Condizioni di lavoro
da -10 °C a 60 °C, umidità dell‘aria max. da 20 a 85% rH,
non condensante, altezza di lavoro max. 4000 m sopra il
livello del mare (zero normale)
Condizioni di stoccaggio da -20 °C a 70 °C, umidità dell‘aria max. 80% rH
Classe di protezione IP65
Peso (incl. batteria litio-ioni) 0,86 kg
Dimensioni (L x A x P) 200 mm x 130 mm x 60 mm
Norme UE e smaltimento
L‘apparecchio soddisfa tutte le norme necessarie per la libera circolazione
di merci all‘interno dell‘UE.
Questo prodotto è un apparecchio elettrico e deve pertanto essere
raccolto e smaltito separatamente in conformità con la direttiva europea
sulle apparecchiature elettriche ed elettroniche usate.
Per ulteriori informazioni ed indicazioni di sicurezza:
http://laserliner.com/info?an=vcm
Reset
Premendo il tasto Reset "h" si avvia l‘apparecchio di nuovo.
Caricare l‘accumulatore
– Utilizzare l’alimentatore/il caricabatterie solo in locali chiusi evitando di esporlo all’umidità
o alla pioggia altrimenti si corre il rischio di scosse elettriche.
– Prima di utilizzare l‘apparecchio caricare completamente l‘accumulatore.
– Utilizzare solo l‘alimentatore/il caricabatterie in dotazione. L‘utilizzo di alimentatori/caricabatterie
non idonei fa decadere la garanzia.
– La batteria può essere ricaricata anche durante l‘esercizio.

Ogólne zasady bezpieczeństwa
– Wykorzystywać urządzenie wyłącznie do zastosowania podanego wspecykacji.
– Przyrządy pomiarowe oraz akcesoria nie są zabawkami dla dzieci. Przechowywać wmiejscu
niedostępnym dla dzieci.
– Nie modykować konstrukcji urządzenia.
– Nie należy narażać urządzenia na wpływ obciążeń mechanicznych, ekstremalnej temperatury, wilgoci
ani silnych wstrząsów.
– Nie wolno używać urządzenia, jeżeli nastąpi awaria jednej lub kilku funkcji lub gdy baterie są zbyt słabe.
– Proszę przestrzegać środków bezpieczeństwa lokalnych lub krajowych organów w celu prawidłowego
stosowania urządzenia.
Zasady bezpieczeństwa
Postępowanie z promieniowaniem elektromagnetycznym
– Przyrząd pomiarowy został skonstruowany zgodnie z przepisami i wartościami granicznymi
kompatybilności elektromagnetycznej wg dyrektywy EMC 2014/30/UE.
– Należy zwracać uwagę na lokalne ograniczenia stosowania np. w szpitalach, w samolotach, na stacjach
paliw oraz w pobliżu osób z rozrusznikami serca. Występuje możliwość niebezpiecznego oddziaływania
lub zakłóceń wurządzeniach elektronicznych iprzez urządzenia elektroniczne.
86
PL
Należy przeczytać wcałości instrukcję obsługi, dołączoną broszurę „Zasady gwarancyjne
idodatkowe” oraz aktualne informacje iwskazówki dostępne przez łącze internetowe na końcu
niniejszej instrukcji.Postępować zgodnie z zawartymi w nich instrukcjami. Niniejszą instrukcję
należy zachować i,w przypadku przekazania urządzenia, wręczyć kolejnemu posiadaczowi.
!
Funkcja / zastosowanie
VideoControl-Master jest bazową jednostką do podłączenia różnego rodzaju jednostek kamerowych.
Z jednostki kamerowej przesyłane są barwne obrazy wideo na wyświetlacz LCD w celu kontroli trudno
dostępnych miejsc, takich jak np. przewody rurowe, kanały, instalacje wentylacyjne i odprowadzania spalin.
a
b
c
d
e
f
g
h
i
j
k
Wyświetlacz LCD
Przyciski
Głośnik
Mikrofon
Interfejs USB 2.0
Port karty SD
Podłączenie zewnętrznego
monitora
Reset
Gniazdo ładowania
a
b
c
d
e
f
g
h
i
Podłączenie jednostek
kamerowych
Rozkładany stojak /
zawieszka ścienna
j
k

VideoControl-Master
87
PL
2012/01/05 12:50:28
CAMERA
5
1 2
6
9
7
0 cm X 1.0
3
4
8
00 : 00 : 32
12
10
11
0 cm X 1.0
3
4
REC
00 : 00 : 32
16
1413
REC
15
2012/01/05 12:50:28
IMG00001
00 : 00 : 32
0 cm
17
18
19
21 22
26
27
20
23
24
28
2012/01/05 12:50:28
X 1.0
29
30
IMG00001
00 : 00 : 32
21 22
27
28
4
2 X
25
aktualna data
aktualna godzina
Długość środek (tylko z Pipe-
Control-LevelFlex-Camera)
Ustawienie zoomu (1.0 - 2.0)
Włożyć kartę SD
1
2
3
4
5
Pozycja zapisu
Symbol obrazu
Zapis mowy
28
29
30
Tryb odtwarzania Tryb odtwarzania wideo
Tryb nagrywania
Brak karty
Tryb zapisu wideo Tryb zapisu obrazów
Tryb odtwarzania obrazów
Intensywność oświetlenia
diodą LED
Status baterii
Podłączenie kamery
Zajęte miejsce w pamięci
Symbol wideo
6
7
8
9
10
Zapis wideo
Czas trwania nagrania
Zapis mowy
Nagranie mowy
Symbol obrazu
Czas trwania zapisu mowy
11
12
13
14
15
16
Obraz (brak oznaczenia)
Obraz z zapisem mowy
(Symbol mikrofonu)
Wideo (Symbol odtwarzania)
Symbol wideo
Data rejestracji obrazu
17
18
19
20
21
Godzina rejestracji obrazu
Odtwarzanie
Pauza
Przewijanie do przodu wideo
Głośność
Numer zdjęcia
22
23
24
25
26
27
m
n
p
r
t
v
o
q
s
u
w
x
ON/OFF
– Zoom / Anulowanie
wyboru obrazów
+ Zoom /
Wybór obrazów
– Oświetlenie LED /
Głośność –
+ Oświetlenie LED /
Głośność +
Zapis zdjęcia /
Zapis mowy zdjęcia /
Funkcja porównywania
obrazów
Zapis wideo
Start / Stop
Nawigacja /
Tryb odtwarzania
Nawigacja /
Tryb odtwarzania /
Szybkość odczytu
ESC: wyjście z menu
Potwierdzenie /
Zakończenie zapisu mowy
Rotacja 90° / Menu systemu
m
n
o
p
q
r
s
t
u
v
w
x

1 2
!
1.
2.
Wkładanie karty SD
Wyjęcie karty pamięci SD
88
PL
3
ON
3 sec
MODE
3 sec
Zmiana języka
(DE, EN, NL, DA, FR, ES, IT, PL, FI, PT, SV, NO, TR, RU, UK, CS, ET, LV, LT, RO, BG, EL)
Menu
Jezyk
Data/Czas
Format wideo
Auto wylaczanie
Źr. wejścia
Jezyk
English
Deutsch
Français
Español
Italiano
Jezyk
English
Deutsch
Français
Español
Italiano
Ustawienie języka menu
Menu
Jezyk
Data/Czas
Format wideo
Auto wylaczanie
Źr. wejścia
36
37
38
Długość środek (tylko z Pipe-
Control-LevelFlex-Camera)
Wyjście wideo
Usuń wszystkie
31
33
35
37
Menu
Jezyk
Data/Czas
Format wideo
Auto wylaczanie
Źr. wejścia
Długość środek
Wyjscie wideo
Usun wszystkie
Tryb konguracji
Język menu
Data/Czas
Format wideo PAL / NTSC
Automatyczne wyłączanie
Źr. wejścia
31
32
33
34
35
32
34
36
38

VideoControl-Master
4
89
PL
Rejestracja zdjęć / wideo
Włączyć urządzenie, głowicę kamery na elastycznym przewodzie wyprostować i umieścić w wymaganej
pozycji. W przypadku złej widoczności włączyć oświetlenie LED. Obiekty oddalone lub mniejsze przybliżyć
za pomocą zoomu. Za pomocą manualnego obrotu obrazu można obracać obraz na monitorze etapami
o 90°. Poprzez krótkie przyciśnięcie przycisku PIC obraz jest rejestrowany i zapisywany na karcie SD.
Długim przyciśnięciem przycisku PIC tworzone jest zdjęcie, a zapis mowy jest następnie automatycznie
uruchamiany. Krótkie przyciśnięcie przycisku OK kończy zapis mowy. Krótkie przyciśnięcie przycisku VID
rozpoczyna zapis wideo z zapisem mowy. Ponowne przyciśnięcie kończy nagrywanie.
2012/01/05 12:50:28
0 cm X 1.0
REC
00 : 00 : 32
4.1 4.2 4.3
1x = 90°
2x = 90°
3x = 90°
4x = 90°
1x = +/- 10%
2x = +/- 20%
...
10x = +/- 100%
1x = +/- 10%
2x = +/- 20%
...
10x = +/- 100%
4.54.4
0 cm X 1.0
2012/01/05 12:50:28
0 cm X 1.0
2012/01/05 12:50:28
0 cm
Zoom
Oświetlenie diodą LED
Rotacja obrazu
ZdjęcieWideo
START STOP
Za pomocą opcji Snapshot rejestrować można obrazy przeznaczone do dokumentacji podczas
trwania zapisu wideo.
!

2012/01/05 12:50:28
0 cm X 1.0
2012/01/05 12:50:28
0 cm X 1.0
5
4.6
3 sec
REC
00 : 00 : 32
ON
3 sec
5.1 5.2
IMG00001
IMG00002
…
IMG00030
IMG00029
…
90
PL
Odtwarzanie zdjęć i nagrań wideo
Włączyć urządzenie i za pomocą przycisków ze strzałkami uruchomić tryb odtwarzania. Na wyświetlaczu
pojawia się podgląd obrazów. Za pomocą przycisków ze strzałkami przesuwać można obrazy do
tyłu i do przodu. Po przyciśnięciu przycisku OK wybrane zdjęcie lub wideo wyświetlane są w trybie
pełnoekranowym. Krótkie przyciśnięcie przycisku OK uruchamia odtwarzanie nagrania wideo, a ponowne
przyciśnięcie zatrzymuje odtwarzanie.
Obraz z zapisem mowy
START STOP
Nawigacja Tryb pełnoekranowy
Jakość odtwarzania mowy przez urządzenie jest ograniczona, ponieważ mikro-głośnik
chroniony jest przed wpływem wody. Zapisy mowy mogą zostać po ich transmisji odsłuchane
w dobrej jakości na komputerze.
!

VideoControl-Master
5.3
2012/01/05 12:50:28
IMG00001
0 cm
2012/01/05 12:50:28
IMG00001
00 : 00 : 32
0 cm
2012/01/05 12:50:28
IMG00001
00 : 00 : 32
0 cm
2012/01/05 12:50:28
IMG00001
00 : 00 : 32
0 cm
5.65.4
2012/01/05 12:50:28
IMG00001
00 : 00 : 32
0 cm
2 X 4 X 8 X
2 X
5.5
2012/01/05 12:50:28
X 1.0
IMG00001
00 : 00 : 32
6
91
PL
Odtwarzanie wideo
Głośność Przewijanie
do przodu wideo
Odtwarzanie
zapisu mowy
0 cm
2012/01/05 12:50:28
IMG00001
6.1
2 sec
Usun
Tak Nie
Usun
Tak Nie
Usuwanie w trybie pełnoekranowym
Usuwanie zdjęć/ nagrań wideo
Usuwanie zapisów następuje poprzez długie przyciśnięcie przycisku OK (tryb pełnoekranowy) bądź po
uprzednim wyborze kilku obrazów w trybie podglądu obrazów.

2 sec
6.2
7
2012/01/05 12:50:28
0 cm
2012/01/05 12:50:28
0 cm
92
PL
Usuwanie kilku obrazów w podglądzie obrazów
Usuń wybrane pliki
Tak Nie
Usuń wybrane pliki
Tak Nie
Funkcja porównywania obrazów

VideoControl-Master
8
ON
3 sec
MODE
3 sec
8.1
93
PL
Tryb konguracji
Tryb ustawień wyłącza się automatycznie po 10 sekundach lub może zostać wyłączony
przyciskiem ESC.
!
Menu
Jezyk
Data/Czas
Format wideo
Auto wylaczanie
Źr. wejścia
Menu
Jezyk
Data/Czas
Format wideo
Auto wylaczanie
Źr. wejścia
Jezyk
English
Deutsch
Français
Español
Italiano
Jezyk
English
Deutsch
Français
Español
Italiano
Zmiana języka
(DE, EN, NL, DA, FR, ES, IT, PL, FI, PT, SV, NO, TR, RU, UK, CS, ET, LV, LT, RO, BG, EL)

8.2
22 / 21 / …22 / 23 / …
94
PL
Menu
Jezyk
Data/Czas
Format wideo
Auto wylaczanie
Źr. wejścia
Data/Czas
Data/Czas
Format daty
Format czasu
Konguracja
Format daty
dd.mm.yyyy
yyyy.mm.dd
mm/dd/yyyy
yyyy/dd/mm
dd/mm/yyyy
Format daty
dd.mm.yyyy
yyyy.mm.dd
mm/dd/yyyy
yyyy/dd/mm
dd/mm/yyyy
Data/Czas
Format daty
Format czasu
Konguracja
Format czasu
24 h
12 h (AM:PM)
Format czasu
24 h
12 h (AM:PM)
Konguracja
dd . mm . yyyy
23 . 08 . 2012
12 : 00 : 08
Wyswietl Wlacz
Data/Czas
Format daty
Format czasu
Konguracja
Konguracja
dd . mm . yyyy
22 . 08 . 2012
12 : 00 : 08
Wyswietl Wlacz

VideoControl-Master
8.3
8.4
8.5
8.6
95
PL
Długość środek
Reset
Unit
Wyłącz / Włącz
Menu
Jezyk
Data/Czas
Format wideo
Auto wylaczanie
Źr. wejścia
TV Out
NTSC
PAL
TV Out
NTSC
PAL
Format wideo
Menu
Jezyk
Data/Czas
Format wideo
Auto wylaczanie
Źr. wejścia
Auto wylaczanie
Wylacz
5 min
10 min
15 min
30 min
Auto wylaczanie
Wylacz
5 min
10 min
15 min
30 min
Automatyczne wyłączanie
Menu
Jezyk
Data/Czas
Format wideo
Auto wylaczanie
Źr. wejścia
Źr. wejścia
Bezpośr.
Bezprzewod.
Źr. wejścia (możliwe tylko z bezprzewodową jednostką kamerową)
Menu
Auto wylaczanie
Źr. wejścia
Długość środek
Wyjscie wideo
Usun wszystkie
Długość środek
Reset
Unit
Wyłącz / Włącz
Źr. wejścia
Bezpośr.
Bezprzewod.

8.8
PL
Usun wszystkie
Tak Nie
Menu
Auto wylaczanie
Źr. wejścia
Długość środek
Wyjscie wideo
Usun wszystkie
Usun wszystkie
Tak Nie
Transmisja danych poprzez port USB
Zapisane na karcie pamięci dane mogą być przeniesione na PC albo za pomocą odpowiedniego czytnika
kart albo poprzez port USB. Informacje o połączeniu pomiędzy komputerem i adapterem bądź czytnikiem
kart znajdziecie Państwo w instrukcji czytnika kart.
Wskazówki odnośnie użytkowania
– Jednostka LCD nie może być zanurzana w wodzie.
– Urządzenie bazowe nie może mieć kontaktu z cieczami.
– Aby zapewnić stopień ochrony IP65, pokrywa podłączeń musi być na stałe zamknięta.
Podłączyć ładowarkę / zasilacz
W celu naładowania urządzenia proszę podłączyć dołączony zasilacz do gniazda „i“, a następnie podłączyć go
do zasilania.
Podłączenie do monitora
VideoControl-Master może zostać podłączony do monitora za pomocą dostarczanego z urządzeniem kabla.
Proszę używać wyjścia „g“ i wybrać w menu odpowiednie wyjście wideo, patrz punkt „8.7 wyjście wideo“.
Wymiana akumulatora
W celu wymiany akumulatora proszę przesłać urządzenie do UMAREX-Laserliner.
8.7
Menu
Auto wylaczanie
Źr. wejścia
Długość środek
Wyjscie wideo
Usun wszystkie
Wyjscie wideo
W celu używania tej
funkcji VideoControl-
Master musi być połączony
z monitorem. Wyświetlacz
VideoControl-Master
nie działa, a funkcje
wyświetlane są na
zewnętrznym monitorze.
!

VideoControl-Master
Wskazówki dotyczące konserwacji ipielęgnacji
Oczyścić wszystkie komponenty lekko zwilżoną ściereczką; unikać stosowania środków czyszczących,
środków do szorowania irozpuszczalników. Przed dłuższym składowaniem wyjąć baterie. Przechowywać
urządzenie wczystym, suchym miejscu.
PL
Dane techniczne
Zastrzega się możliwość zmian technicznych. 17W46
Typ wyświetlacza Wyświetlacz kolorowy 5,0“ TFT
Podłączenia
Przemysłowe złącze wtykowe do kamery / Podłączenie
TV-Out, PAL lub NTSC / Adapter USB typ Mini-B / Slot karty
SD / Adapter DC do zasilacza 5V DC
Rozdzielczość wyświetlacza 640 x 480 pikseli
Format zdjęć
/ Rozdzielczość zdjęcie Format JPEG / 640 x 480 pikseli
Format wideo /
Stopień powtarzalności obrazów
ASF / 30 Frames / Sek.
Dioda LED 10 stopni jasności
Zoom 2 -krotny zoom cyfrowy w stopniach 10-procentowych
Pamięć (zewnętrzna) 2 GB karta SD / Obsługuje karty pamięci do maksymalnie 16 GB
Interfejs USB 2.0
Automatyczne wyłączenie 5 min. / 10 min. / 15 min. / 30 min. (podlega regulacji)
Zasilanie Akumulator litowo-jonowy/ zasilacz
Czas pracy baterie 4 godzin
Warunki pracy
-10°C … 60°C, Wilgotność powietrza maks. 20 … 85%
wilgotności względnej, bez skraplania, Wysokość robocza
maks. 4000 m nad punktem zerowym normalnym
Warunki przechowywania
-20°C … 70°C, Wilgotność powietrza maks. 80% wilgotności
względnej
Stopień ochrony IP65
Masa (z akumulatorem litowo-jonowym) 0,86 kg
Wymiary (szer. x wys. x gł.) 200 mm x 130 mm x 60 mm
Przepisy UE i usuwanie
Przyrząd spełnia wszystkie normy wymagane do wolnego obrotu towarów w UE.
Produkt ten jest urządzeniem elektrycznym i zgodnie z europejską dyrektywą
dotyczącą złomu elektrycznego i elektronicznego należy je zbierać i usuwać
oddzielnie.
Dalsze wskazówki dotyczące bezpieczeństwa i informacje dodatkowe patrz:
http://laserliner.com/info?an=vcm
Reset
Przyciśnięcie przycisku resetu „h“ powoduje ponowne uruchomienie urządzenia.
Ładowanie akumulatora
– Zasilacz-ładowarkę wolno używać wyłącznie wzamkniętych pomieszczeniach. Wystawianie
go na działanie wilgoci lub deszczu grozi porażeniem prądem elektrycznym.
– Przed użyciem urządzenia całkowicie naładować akumulator.
– Stosować tylko załączony zasilacz / ładowarkę. Stosowanie nieprawidłowego zasilacza /
ładowarki powoduje utratę gwarancji.
– La batteria può essere ricaricata anche durante l‘esercizio.

98

VideoControl-Master
99

VideoControl-Master
SERVICE
Umarex GmbH & Co. KG
– Laserliner –
Möhnestraße 149, 59755 Arnsberg, Germany
Tel.: +49 2932 638-300, Fax: +49 2932 638-333
info@laserliner.com
Umarex GmbH & Co. KG
Donnerfeld 2
59757 Arnsberg, Germany
Tel.: +49 2932 638-300, Fax: -333
www.laserliner.com
8.084.96.01.1 / Rev17W46
-
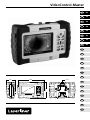 1
1
-
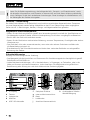 2
2
-
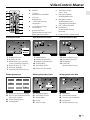 3
3
-
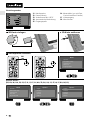 4
4
-
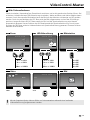 5
5
-
 6
6
-
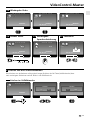 7
7
-
 8
8
-
 9
9
-
 10
10
-
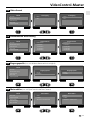 11
11
-
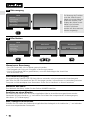 12
12
-
 13
13
-
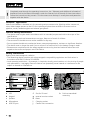 14
14
-
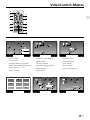 15
15
-
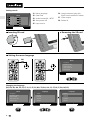 16
16
-
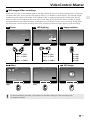 17
17
-
 18
18
-
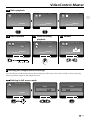 19
19
-
 20
20
-
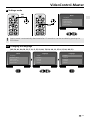 21
21
-
 22
22
-
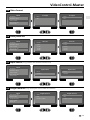 23
23
-
 24
24
-
 25
25
-
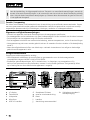 26
26
-
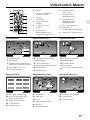 27
27
-
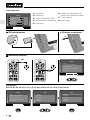 28
28
-
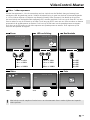 29
29
-
 30
30
-
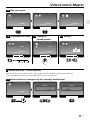 31
31
-
 32
32
-
 33
33
-
 34
34
-
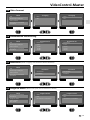 35
35
-
 36
36
-
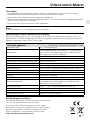 37
37
-
 38
38
-
 39
39
-
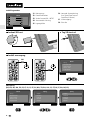 40
40
-
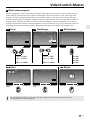 41
41
-
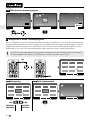 42
42
-
 43
43
-
 44
44
-
 45
45
-
 46
46
-
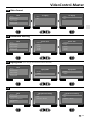 47
47
-
 48
48
-
 49
49
-
 50
50
-
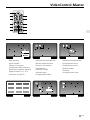 51
51
-
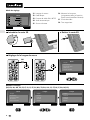 52
52
-
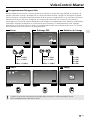 53
53
-
 54
54
-
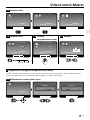 55
55
-
 56
56
-
 57
57
-
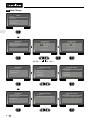 58
58
-
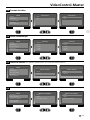 59
59
-
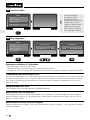 60
60
-
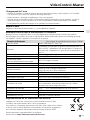 61
61
-
 62
62
-
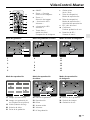 63
63
-
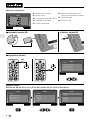 64
64
-
 65
65
-
 66
66
-
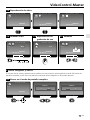 67
67
-
 68
68
-
 69
69
-
 70
70
-
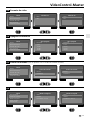 71
71
-
 72
72
-
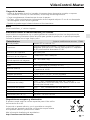 73
73
-
 74
74
-
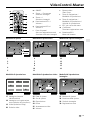 75
75
-
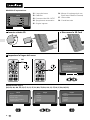 76
76
-
 77
77
-
 78
78
-
 79
79
-
 80
80
-
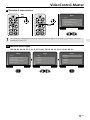 81
81
-
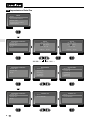 82
82
-
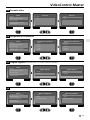 83
83
-
 84
84
-
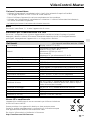 85
85
-
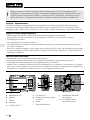 86
86
-
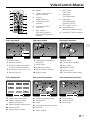 87
87
-
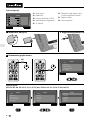 88
88
-
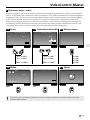 89
89
-
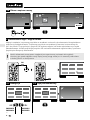 90
90
-
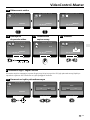 91
91
-
 92
92
-
 93
93
-
 94
94
-
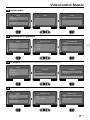 95
95
-
 96
96
-
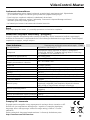 97
97
-
 98
98
-
 99
99
-
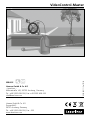 100
100


Laserliner VideoControl-Master de handleiding
- Type
- de handleiding
in andere talen
- italiano: Laserliner VideoControl-Master Manuale del proprietario
- français: Laserliner VideoControl-Master Le manuel du propriétaire
- español: Laserliner VideoControl-Master El manual del propietario
- Deutsch: Laserliner VideoControl-Master Bedienungsanleitung
- polski: Laserliner VideoControl-Master Instrukcja obsługi
Gerelateerde artikelen
Andere documenten
-
Medion GoPal P4440 MD 98530 de handleiding
-
-
Lenco Xemio-861PK de handleiding
-
SSS Siedle BTCV 850-02 Operating Instructions Manual
-
VOLTCRAFT BS-1500T Operating Instructions Manual
-
-
-
Quintezz HD 720P Handleiding
-
-
Bahco BE210 Handleiding