Yamaha CLP- 645 de handleiding
- Categorie
- Digitale piano's
- Type
- de handleiding

Owner’s Manual
Mode d’emploi
CLP
-
685
CLP
-
675
CLP
-
645
CLP
-
635
CLP
-
695GP
CLP
-
665GP
FR
EN
Nous vous remercions d’avoir choisi le Yamaha Clavinova.
Afin d’exploiter votre Clavinova au maximum de ses performances et de ses fonctions, lisez attentivement ce mode
d’emploi et conservez-le pour le consulter ultérieurement.
Avant d’utiliser l’instrument, lisez attentivement la section « PRÉCAUTIONS D’USAGE » aux pages 6 et 7.
Pour plus d’informations sur l’assemblage de l’instrument, reportez-vous aux instructions figurant à la fin de ce
manuel.
Thank you for choosing the Yamaha Clavinova.
In order to make the most of your Clavinova’s performance potential and features, please read this Owner’s Manual
thoroughly, and keep it in a safe place for later reference.
Before using the instrument, be sure to read “PRECAUTIONS” on pages 6−7.
For information on assembling the instrument, refer to the instructions at the end of this manual.
EnglishFrançais

SPECIAL MESSAGE SECTION
P
RODUCT SAFETY MARKINGS:
Yamaha electronic
products may have either labels similar to the graphics
shown below or molded/stamped facsimiles of these
graphics on the enclosure. The explanation of these
graphics appears on this page. Please observe all
cautions indicated on this page and those indicated in the
safety instruction section.
See bottom of Keyboard enclosure for graphic symbol markings.
The exclamation point within the
equilateral triangle is intended to alert
the user to the presence of important
operating and maintenance
(servicing) instructions in the
literature accompanying the product.
The lightning flash with arrowhead
symbol, within the equilateral
triangle, is intended to alert the user
to the presence of uninsulated
“dangerous voltage” within the
product’s enclosure that may be of
sufficient magnitude to constitute a
risk of electrical shock.
IMPORTANT NOTICE: All Yamaha electronic
products are tested and approved by an independent
safety testing laboratory in order that you may be sure
that when it is properly installed and used in its normal
and customary manner, all foreseeable risks have been
eliminated. DO NOT modify this unit or commission
others to do so unless specifically authorized by Yamaha.
Product performance and/or safety standards may be
diminished. Claims filed under the expressed warranty
may be denied if the unit is/has been modified. Implied
warranties may also be affected.
SPECIFICATIONS SUBJECT TO CHANGE: The
information contained in this manual is believed to be
correct at the time of printing. However, Yamaha
reserves the right to change or modify any of the
specifications without notice or obligation to update
existing units.
ENVIRONMENTAL ISSUES: Yamaha strives to
produce products that are both user safe and
environmentally friendly. We sincerely believe that our
products and the production methods used to produce
them, meet these goals. In keeping with both the letter
and the spirit of the law, we want you to be aware of the
following:
Battery Notice: This product MAY contain a small non-
rechargeable battery which (if applicable) is soldered in
place. The average life span of this type of battery is
approximately five years. When replacement becomes
necessary, contact a qualified service representative to
perform the replacement.
Warning: Do not attempt to recharge, disassemble, or
incinerate this type of battery. Keep all batteries away
from children. Dispose of used batteries promptly and as
regulated by applicable laws. Note: In some areas, the
servicer is required by law to return the defective parts.
However, you do have the option of having the servicer
dispose of these parts for you.
Disposal Notice: Should this product become damaged
beyond repair, or for some reason its useful life is
considered to be at an end, please observe all local, state,
and federal regulations that relate to the disposal of
products that contain lead, batteries, plastics, etc.
NOTICE: Service charges incurred due to lack of
knowledge relating to how a function or effect works
(when the unit is operating as designed) are not covered
by the manufacturer’s warranty, and are therefore the
owners responsibility. Please study this manual carefully
and consult your dealer before requesting service.
NAME PLATE LOCATION: The graphic below
indicates the location of the name plate. The model
number, serial number, power requirements, etc., are
located on this plate. You should record the model
number, serial number, and the date of purchase in the
spaces provided below and retain this manual as a
permanent record of your purchase.
Model
Serial No.
Purchase Date
CAUTION
RISK OF ELECTRIC SHOCK
DO NOT OPEN
CAUTION: TO REDUCE THE RISK OF ELECTRIC SHOCK.
DO NOT REMOVE COVER (OR BACK).
NO USER-SERVICEABLE PARTS INSIDE.
REFER SERVICING TO QUALIFIED SERVICE PERSONNEL.
92-469- 1 (bottom)
For CLP-685, CLP-675, CLP-645, CLP-695GP, CLP-665GP

SPECIAL MESSAGE SECTION
This product utilizes batteries or an external power
supply (adapter). DO NOT connect this product to any
power supply or adapter other than one described in
the manual, on the name plate, or specifically recom-
mended by Yamaha.
WARNING: Do not place this product in a position
where anyone could walk on, trip over, or roll anything
over power or connecting cords of any kind. The use of
an extension cord is not recommended! If you must
use an extension cord, the minimum wire size for a 25’
cord (or less) is 18 AWG. NOTE: The smaller the AWG
number, the larger the current handling capacity. For
longer extension cords, consult a local electrician.
This product should be used only with the components
supplied or; a cart, rack, or stand that is recommended
by Yamaha. If a cart, etc., is used, please observe all
safety markings and instructions that accompany the
accessory product.
SPECIFICATIONS SUBJECT TO
CHANGE:
The information contained in this manual is believed to
be correct at the time of printing. However, Yamaha
reserves the right to change or modify any of the spec-
ifications without notice or obligation to update existing
units.
This product, either alone or in combination with an
amplifier and headphones or speaker/s, may be capa-
ble of producing sound levels that could cause perma-
nent hearing loss. DO NOT operate for long periods of
time at a high volume level or at a level that is uncom-
fortable. If you experience any hearing loss or ringing
in the ears, you should consult an audiologist.
IMPORTANT: The louder the sound, the shorter the
time period before damage occurs.
Some Yamaha products may have benches and / or
accessory mounting fixtures that are either supplied
with the product or as optional accessories. Some of
these items are designed to be dealer assembled or
installed. Please make sure that benches are stable
and any optional fixtures (where applicable) are well
secured BEFORE using.
Benches supplied by Yamaha are designed for seating
only. No other uses are recommended.
NOTICE:
Service charges incurred due to a lack of knowledge
relating to how a function or effect works (when the unit
is operating as designed) are not covered by the manu-
facturer’s warranty, and are therefore the owners
responsibility. Please study this manual carefully and
consult your dealer before requesting service.
ENVIRONMENTAL ISSUES:
Yamaha strives to produce products that are both user
safe and environmentally friendly. We sincerely believe
that our products and the production methods used to
produce them, meet these goals. In keeping with both
the letter and the spirit of the law, we want you to be
aware of the following:
Battery Notice:
This product MAY contain a small non-rechargeable
battery which (if applicable) is soldered in place. The
average life span of this type of battery is approxi-
mately five years. When replacement becomes neces-
sary, contact a qualified service representative to
perform the replacement.
This product may also use “household” type batteries.
Some of these may be rechargeable. Make sure that
the battery being charged is a rechargeable type and
that the charger is intended for the battery being
charged.
When installing batteries, never mix old batteries with
new ones, and never mix different types of batteries.
Batteries MUST be installed correctly. Mismatches or
incorrect installation may result in overheating and bat-
tery case rupture.
Warning:
Do not attempt to disassemble, or incinerate any bat-
tery. Keep all batteries away from children. Dispose of
used batteries promptly and as regulated by the laws in
your area. Note: Check with any retailer of household
type batteries in your area for battery disposal informa-
tion.
Disposal Notice:
Should this product become damaged beyond repair,
or for some reason its useful life is considered to be at
an end, please observe all local, state, and federal reg-
ulations that relate to the disposal of products that con-
tain lead, batteries, plastics, etc. If your dealer is
unable to assist you, please contact Yamaha directly.
NAME PLATE LOCATION:
The name plate is located on the bottom of the product.
The model number, serial number, power require-
ments, etc., are located on this plate. You should
record the model number, serial number, and the date
of purchase in the spaces provided below and retain
this manual as a permanent record of your purchase.
Model
Serial No.
Purchase Date
PLEASE KEEP THIS MANUAL
92-BP (bottom)
For CLP-635
3

* This applies only to products distributed by YAMAHA CORPORATION OF AMERICA. (FCC DoC)
COMPLIANCE INFORMATION STATEMENT
(DECLARATION OF CONFORMITY PROCEDURE)
Responsible Party : Yamaha Corporation of America
Address : 6600 Orangethorpe Ave., Buena Park, Calif. 90620
Telephone : 714-522-9011
Type of Equipment : Digital Piano
Model Name : CLP-685, CLP-675, CLP-645, CLP-635, CLP-695GP, CLP-665GP
This device complies with Part 15 of the FCC Rules.
Operation is subject to the following two conditions:
1) this device may not cause harmful interference, and
2) this device must accept any interference received including interference that may cause undesired operation.
See user manual instructions if interference to radio reception is suspected.
For the instrument
For the instrument and the AC adaptor
1. IMPORTANT NOTICE: DO NOT MODIFY
THIS UNIT!
This product, when installed as indicated in the
instructions contained in this manual, meets FCC
requirements. Modifications not expressly approved
by Yamaha may void your authority, granted by the
FCC, to use the product.
2. IMPORTANT: When connecting this product to
accessories and/or another product use only high
quality shielded cables. Cable/s supplied with this
product MUST be used. Follow all installation
instructions. Failure to follow instructions could void
your FCC authorization to use this product in the
USA.
3. NOTE: This product has been tested and found to
comply with the requirements listed in FCC
Regulations, Part 15 for Class “B” digital devices.
Compliance with these requirements provides a
reasonable level of assurance that your use of this
product in a residential environment will not result in
harmful interference with other electronic devices.
This equipment generates/uses radio frequencies
and, if not installed and used according to the
instructions found in the users manual, may cause
interference harmful to the operation of other
electronic devices. Compliance with FCC regulations
* This applies only to products distributed by YAMAHA CORPORATION OF AMERICA. (class B)
does not guarantee that interference will not occur in
all installations. If this product is found to be the
source of interference, which can be determined by
turning the unit “OFF” and “ON”, please try to
eliminate the problem by using one of the following
measures:
Relocate either this product or the device that is
being affected by the interference.
Utilize power outlets that are on different branch (circuit
breaker or fuse) circuits or install AC line filter/s.
In the case of radio or TV interference, relocate/
reorient the antenna. If the antenna lead-in is 300
ohm ribbon lead, change the lead-in to co-axial type
cable.
If these corrective measures do not produce
satisfactory results, please contact the local retailer
authorized to distribute this type of product. If you can
not locate the appropriate retailer, please contact
Yamaha Corporation of America, Electronic Service
Division, 6600 Orangethorpe Ave, Buena Park,
CA90620
The above statements apply ONLY to those products
distributed by Yamaha Corporation of America or its
subsidiaries.
FCC INFORMATION (U.S.A.)
For the AC Adaptor
This device complies with Part 15 of the FCC Rules. Operation is subject to the following two conditions:
(1) this device may not cause harmful interference, and (2) this device must accept any interference received, includ-
ing interference that may cause undesired operation.
CAN ICES-3 (B)/NMB-3(B)
• This applies only to products distributed by Yamaha Canada Music Ltd.
• Ceci ne s’applique qu’aux produits distribués par Yamaha Canada Musique Ltée.
(can_b_01)
(fcc_sengen)
4
CLP-685, CLP-675, CLP-645, CLP-635, CLP-695GP, CLP-665GP Owner’s Manual

The above warning is located on the bottom of the unit.
Explanation of Graphical Symbols
The lightning flash with arrowhead symbol
within an equilateral triangle is intended to
alert the user to the presence of uninsulated
“dangerous voltage” within the product’s
enclosure that may be of sufficient magnitude
to constitute a risk of electric shock to
persons.
The exclamation point within an equilateral
triangle is intended to alert the user to the
presence of important operating and
maintenance (servicing) instructions in the
literature accompanying the product.
IMPORTANT SAFETY INSTRUCTIONS
1 Read these instructions.
2 Keep these instructions.
3 Heed all warnings.
4 Follow all instructions.
5 Do not use this apparatus near water.
6 Clean only with dry cloth.
7 Do not block any ventilation openings. Install in
accordance with the manufacturer’s instructions.
8 Do not install near any heat sources such as
radiators, heat registers, stoves, or other
apparatus (including amplifiers) that produce
heat.
9 Do not defeat the safety purpose of the polarized
or grounding-type plug. A polarized plug has two
blades with one wider than the other. A
grounding type plug has two blades and a third
grounding prong. The wide blade or the third
prong are provided for your safety. If the provided
plug does not fit into your outlet, consult an
electrician for replacement of the obsolete outlet.
10 Protect the power cord from being walked on or
pinched particularly at plugs, convenience
receptacles, and the point where they exit from
the apparatus.
11 Only use attachments/accessories specified by
the manufacturer.
12 Use only with the cart, stand,
tripod, bracket, or table specified
by the manufacturer, or sold with
the apparatus. When a cart is
used, use caution when moving
the cart/apparatus combination
to avoid injury from tip-over.
13 Unplug this apparatus during lightning storms or
when unused for long periods of time.
14 Refer all servicing to qualified service personnel.
Servicing is required when the apparatus has
been damaged in any way, such as power-supply
cord or plug is damaged, liquid has been spilled
or objects have fallen into the apparatus, the
apparatus has been exposed to rain or moisture,
does not operate normally, or has been dropped.
CAUTION: TO REDUCE THE RISK OF
ELECTRIC SHOCK, DO NOT REMOVE
COVER (OR BACK). NO USER-SERVICEABLE
PARTS INSIDE. REFER SERVICING TO
QUALIFIED SERVICE PERSONNEL.
CAUTION
RISK OF ELECTRIC SHOCK
DO NOT OPEN
WARNING
TO REDUCE THE RISK OF FIRE OR ELECTRIC SHOCK, DO NOT EXPOSE THIS APPARATUS TO RAIN OR
MOISTURE.
(UL60065_03)
For the instrument (except CLP-635) and the AC adaptor
For the instrument (except CLP-635)
5
CLP-685, CLP-675, CLP-645, CLP-635, CLP-695GP, CLP-665GP Owner’s Manual

6
CLP-685, CLP-675, CLP-645, CLP-635, CLP-695GP, CLP-665GP Owner’s Manual
PRECAUTIONS
PLEASE READ CAREFULLY BEFORE PROCEEDING
Please keep this manual in a safe and handy place for future reference.
WARNING
• This AC adaptor is designed for use with only Yamaha electronic instruments. Do
not use for any other purpose.
• Indoor use only. Do not use in any wet environments.
CAUTION
• When setting up, make sure that the AC outlet is easily accessible. If some
trouble or malfunction occurs, immediately turn off the power switch of the
instrument and disconnect the AC adaptor from the outlet. When the AC adaptor
is connected to the AC outlet, keep in mind that electricity is flowing at the
minimum level, even if the power switch is turned off. When you are not using
the instrument for a long time, make sure to unplug the power cord from the wall
AC outlet.
WARNING
Always follow the basic precautions listed below to avoid the possibility of serious injury or even death from electrical
shock, short-circuiting, damages, fire or other hazards. These precautions include, but are not limited to, the
following:
• Do not place the power cord near heat sources such as heaters or radiators. Also,
do not excessively bend or otherwise damage the cord, or place heavy objects on
it.
• Only use the voltage specified as correct for the instrument. The required voltage
is printed on the name plate of the instrument.
• (CLP-635) Use the specified adaptor (page 132) only. Using the wrong adaptor
can result in damage to the instrument or overheating.
• Use only the supplied power cord/plug.
• Check the electric plug periodically and remove any dirt or dust which may have
accumulated on it.
• This instrument contains no user-serviceable parts. Do not open the instrument
or attempt to disassemble or modify the internal components in any way. If it
should appear to be malfunctioning, discontinue use immediately and have it
inspected by qualified Yamaha service personnel.
(For information on whether Bluetooth functionality is included or not, refer to
page 81.)
• Radio waves may affect electro-medical devices.
- Do not use this product near medical devices or inside areas in which the use
of radio waves is restricted.
- Do not use this product within 15 cm (6 in.) of persons with a heart pacemaker
implant.
• Do not expose the instrument to rain, use it near water or in damp or wet
conditions, or place on it any containers (such as vases, bottles or glasses)
containing liquids which might spill into any openings. If any liquid such as
water seeps into the instrument, turn off the power immediately and unplug the
power cord from the AC outlet. Then have the instrument inspected by qualified
Yamaha service personnel.
• Never insert or remove an electric plug with wet hands.
• Do not put burning items, such as candles, on the unit. A burning item may fall
over and cause a fire.
• When one of the following problems occur, immediately turn off the power switch
and disconnect the electric plug from the outlet. Then have the device inspected
by Yamaha service personnel.
- The power cord or plug becomes frayed or damaged.
- It emits unusual smells or smoke.
- Some object has been dropped into the instrument.
- There is a sudden loss of sound during use of the instrument.
For AC adaptor (CLP-635)
For CLP-685, CLP-675, CLP-645, CLP-635, CLP-695GP, CLP-665GP
Power supply/Power cord
Power supply/AC adaptor (CLP-635)
Do not open
Location (if
Bluetooth
functionality is included)
Water warning
Fire warning
If you notice any abnormality
DMI-5 1/2

7
CLP-685, CLP-675, CLP-645, CLP-635, CLP-695GP, CLP-665GP Owner’s Manual
CAUTION
Always follow the basic precautions listed below to avoid the possibility of physical injury to you or others, or damage
to the instrument or other property. These precautions include, but are not limited to, the following:
• Do not connect the instrument to an electrical outlet using a multiple-connector.
Doing so can result in lower sound quality, or possibly cause overheating in the
outlet.
• When removing the electric plug from the instrument or an outlet, always hold
the plug itself and not the cord. Pulling by the cord can damage it.
• Remove the electric plug from the outlet when the instrument is not to be used for
extended periods of time, or during electrical storms.
• Read carefully the attached documentation explaining the assembly process.
Failure to assemble the instrument in the proper sequence might result in
damage to the instrument or even injury.
• Do not place the instrument in an unstable position where it might accidentally
fall over.
• (CLP-685, CLP-675, CLP-645, CLP-635) When transporting or moving the
instrument, always use two or more people. Attempting to lift the instrument by
yourself may damage your back, result in other injury, or cause damage to the
instrument itself.
• (CLP-695GP, CLP-665GP) Since this product is very heavy, make sure that a
sufficient number of people are on hand to help, so you can lift and move it safely
and easily. Attempting to lift or move the instrument by force may damage your
back, result in other injury, or cause damage to the instrument itself.
• Before moving the instrument, remove all connected cables, to prevent damage
to the cables or injury to anyone who might trip over them.
• When setting up the product, make sure that the AC outlet you are using is easily
accessible. If some trouble or malfunction occurs, immediately turn off the power
switch and disconnect the plug from the outlet. Even when the power switch is
turned off, electricity is still flowing to the product at the minimum level. When
you are not using the product for a long time, make sure to unplug the power
cord from the wall AC outlet.
• Before connecting the instrument to other electronic components, turn off the
power for all components. Before turning the power on or off for all components,
set all volume levels to minimum.
• Be sure to set the volumes of all components at their minimum levels and
gradually raise the volume controls while playing the instrument to set the
desired listening level.
• Do not insert a finger or hand in any gaps on the key cover or instrument. Also
take care that the key cover does not pinch your finger.
• (CLP-685) Do not apply excessive force when closing the key cover. A key cover
equipped with the SOFT-CLOSE™ mechanism closes the cover slowly. Applying
excessive force to the key cover when closing it could damage the SOFT-
CLOSE™ mechanism, and possibly result in injury to your hands and fingers
caught under the closing key cover.
• Never insert or drop paper, metallic, or other objects into the gaps on the key
cover, panel or keyboard. This could cause physical injury to you or others,
damage to the instrument or other property, or operational failure.
• Do not rest your weight on, or place heavy objects on the instrument, and do not
use excessive force on the buttons, switches or connectors.
• Do not use the instrument/device or headphones for a long period of time at a
high or uncomfortable volume level, since this can cause permanent hearing
loss. If you experience any hearing loss or ringing in the ears, consult a
physician.
• Do not place the bench in an unstable position where it might accidentally fall
over.
• Do not play carelessly with or stand on the bench. Using it as a tool or stepladder
or for any other purpose might result in accident or injury.
• Only one person should sit on the bench at a time, in order to prevent the
possibility of accident or injury.
• For benches that can be adjusted, do not adjust the bench height while sitting on
the bench, since this can cause excessive force to be imposed on the adjustment
mechanism, possibly resulting in damage to the mechanism or even injury.
• If the bench screws become loose due to extensive long-term use, tighten them
periodically using the specified tool in order to prevent the possibility of accident
or injury.
• Keep special watch over any small children so that they don’t fall off the rear of
the bench. Since the bench does not have a backrest, unsupervised use may
result in accident or injury.
Always turn the power off when the instrument is not in use.
Even when the [ ] (Standby/On) switch is in standby status (power lamp is off), electricity is still flowing to the instrument at the minimum level.
When you are not using the instrument for a long time, make sure you unplug the power cord from the wall AC outlet.
Power supply/Power cord
Power supply/AC adaptor (CLP-635)
Assembly
Location
Connections
Handling caution
Using the bench (If included)
Yamaha cannot be held responsible for damage caused by improper use or modifications to the instrument, or data that is lost or destroyed.
DMI-5 2/2

8
CLP-685, CLP-675, CLP-645, CLP-635, CLP-695GP, CLP-665GP Owner’s Manual
NOTICE
To avoid the possibility of malfunction/ damage to the
product, damage to data, or damage to other property,
follow the notices below.
Handling
• Do not use the instrument in the vicinity of a TV, radio, stereo
equipment, mobile phone, or other electric devices.
Otherwise, the instrument, TV, or radio may generate noise.
When you use the instrument along with a smart device, such
as an iPhone, iPad, etc., we recommend that you set that
device’s “Airplane Mode” to on and then the Wi-Fi/Bluetooth
setting to on in order to avoid noise caused by
communication.
• Do not expose the instrument to excessive dust or vibrations,
or extreme cold or heat (such as in direct sunlight, near a
heater, or in a car during the day) to prevent the possibility of
panel disfiguration, damage to the internal components or
unstable operation. (Verified operating temperature range:
5° – 40°C, or 41° – 104°F.)
• Do not place vinyl, plastic or rubber objects on the
instrument, since this might discolor the panel or keyboard.
• In the case of a model with a polished finish, bumping the
surface of the instrument with metal, porcelain, or other hard
objects can cause the finish to crack or peel. Use caution.
Maintenance
• When cleaning the instrument, use a soft and dry/slightly
damp cloth. Do not use paint thinners, solvents, alcohol,
cleaning fluids, or chemical-impregnated wiping cloths.
• In the case of a model with a polished finish, gently remove
dust and dirt with a soft cloth. Do not wipe too hard since
small particles of dirt can scratch the instrument’s finish.
• During extreme changes in temperature or humidity,
condensation may occur and water may collect on the surface
of the instrument. If water is left, the wooden parts may
absorb the water and be damaged. Make sure to wipe any
water off immediately with a soft cloth.
• When cleaning the bench, use a soft and dry cloth (or, if
necessary, one that is slightly damp). Do not use paint
thinners, solvents, alcohol, cleaning fluids, or chemical-
impregnated wiping cloths.
Saving data
• Some of the data of this instrument (page 100) and the Song
data saved to the internal memory of this instrument
(page 52) are retained when the power is turned off. However,
the saved data may be lost due to some failure, an operation
mistake, etc. Save the Song data to a USB flash drive or an
external device such as a computer (page 74). Before using a
USB flash drive, make sure to refer to page 72.
• To protect against data loss through USB flash drive damage,
we recommend that you save your important data onto spare
USB flash drive or an external device such as a computer as
backup data.
Information
About copyrights
• Copying of the commercially available musical data including
but not limited to MIDI data and/or audio data is strictly
prohibited except for your personal use.
• This product incorporates and bundles contents in which
Yamaha owns copyrights or with respect to which Yamaha has
license to use others’ copyrights. Due to copyright laws and
other relevant laws, you are NOT allowed to distribute media
in which these contents are saved or recorded and remain
virtually the same or very similar to those in the product.
* The contents described above include a computer program,
Accompaniment Style data, MIDI data, WAVE data, voice
recording data, a score, score data, etc.
* You are allowed to distribute medium in which your
performance or music production using these contents is
recorded, and the permission of Yamaha Corporation is not
required in such cases.
About functions/data bundled with the
instrument
• Some of the preset songs have been edited for length or
arrangement, and may not be exactly the same as the original.
• This device is capable of using various types/formats of music
data by optimizing them to the proper format music data for
use with the device in advance. As a result, this device may
not play them back precisely as their producers or composers
originally intended.
• The bitmap fonts used in this instrument have been provided
by and are the property of Ricoh Co., Ltd.
About this manual
• The illustrations and LCD screens as shown in this manual
are for instructional purposes only, and may appear
somewhat different from those on your instrument.
• Windows is a registered trademark of Microsoft® Corporation
in the United States and other countries.
• iPhone, iPad, iPod touch are trademarks of Apple Inc.,
registered in the U.S. and other countries.
• The company names and product names in this manual are
the trademarks or registered trademarks of their respective
companies.
Tuning
• Unlike an acoustic piano, this instrument does not need to be
tuned by an expert (although the pitch can be user-adjusted to
match other instruments). This is because the pitch of digital
instruments is always maintained perfectly.
About Bluetooth
•For information on handling Bluetooth communications,
refer to “About Bluetooth” on page 138.

9
CLP-685, CLP-675, CLP-645, CLP-635, CLP-695GP, CLP-665GP Owner’s Manual
Included Accessories
Owner’s Manual (this book)
Data List (CLP-685 and CLP-695GP only)
“50 Classical Music Masterpieces” (Music Book)
Online Member Product Registration
Power cord (except CLP-635)
Power cord*, AC adaptor* (CLP-635)
Bench*
War ra nty *
* May not be included depending on your area. Check
with your Yamaha dealer.
About the Manuals
This instrument has the following documents and
instructional materials.
Included Documents
Owner’s Manual (this book)
This document explains how to use the
Clavinova.
• Introduction:
This section explains how to set up and start using your
Clavinova. Setup is so simple, you can start playing right
away.
•Main Operations:
This section explains various functions useful for your
practice, such as Preset Song playback and Song
recording.
• Detailed Settings:
This section explains how to make detailed settings for
the Clavinova’s various functions. Refer to this section as
necessary.
• Appendix:
This section introduces Message List, a description of
Preset Voices, and other reference material.
Data List (CLP-685 and CLP-695GP only)
This document contains lists of XG Voices
and XG Drum Kit that can be selected on the
CLP-685 and CLP-695GP.
Online Materials (Downloadable from
the web)
iPhone/iPad Connection Manual
Explains how to connect the instrument to
smart devices, such as iPhone, iPad, etc.
Computer-related Operations
Includes instructions on connecting this
instrument to a computer, and operations
related to transferring song data.
MIDI Reference
Contains the MIDI-related information.
To obtain these manuals, access the Yamaha
Downloads, enter the model name for searching
the desired files.
Icons on this manual
Example:
This indicates that the relevant function is only
available on certain models. These icons indicate that
the function is available on the CLP-685 but not on
the CLP-675, CLP-645, CLP-635, CLP-695GP or
CLP-665GP.
Yamaha Downloads
http://download.yamaha.com/
Smart Device App “Smart Pianist”
Enjoy easy operation by connecting your smart
device. To use this, you'll need to install the “Smart
Pianist” app (free for download; see page 83).
685 675 645 635 695GP 665GP
(bottom_en_01)
The model number, serial number, power requirements, etc., may be found on
or near the name plate, which is at the bottom of the unit. You should note this
serial number in the space provided below and retain this manual as a
permanent record of your purchase to aid identification in the event of theft.
Model No.
Serial No.
The name plate
is located on the
bottom of the
unit.

10
CLP-685, CLP-675, CLP-645, CLP-635, CLP-695GP, CLP-665GP Owner’s Manual
Features
page24
page39
page51
page52
The CLP-685, CLP-675 and CLP-695GP feature a brand new keyboard, which reproduces the authentic touch and feel
of an actual grand piano. Its improved keyboard mechanism provides a wider range of touch response, with
exceptionally expressive control from pianissimo to fortissimo. Moreover, the keys have an even longer pivot point
distance (length from the front side to the pivot point), for more natural feeling, even when playing the inner part of a
key. In addition, all models feature piano sounds created with samples of the Yamaha CFX flagship concert grand piano
and the famed Vienna-made Bösendorfer grand piano. Moreover, the VRM function on all models simulates the
luscious resonance effect on acoustic pianos—where the sound of one string causes sympathetic vibration in other
strings and the soundboard. You can customize the piano sound (in a special “Piano Room” setting group) by adjusting
various parameters such as string resonance, damper resonance and touch response.
When headphones are connected, the piano sounds are automatically adjusted to impart a natural sound distance
sensation. Also, selecting the CFX Voice calls up a binaural sampling sound, enabling realistic, natural sound when
using headphones (page20). Altogether, these models deliver widely variegated and rich sounds that are faithful to
actual acoustic pianos.
* Bösendorfer is a subsidiary company of Yamaha.
Also built into this instrument are 50 classical music masterpieces, plus 303 lesson Songs for mastering the piano. You
can simply enjoy listening to these built-in Songs, or use them for separate right-hand/left-hand practicing.* The 303
lesson Songs consist of practice pieces taken from various standard piano instruction manuals, including “The Virtuoso
Pianist.” Moreover, you can input the audio from a smart device to this instrument via Bluetooth** and hear it through
the built-in speakers of the instrument. Refer to page81 for details.
*The part on/off function is available only for MIDI songs that have both right- and left-hand parts.
**The models CLP-685, CLP-675, CLP-645, CLP-695GP and CLP-665GP are equipped with Bluetooth functionality; however, even these
models may not support Bluetooth, depending on the country in which you purchased the product. For information on whether Bluetooth
functionality is included or not, refer to page138.
Playing along with one of the twenty basic rhythms built into the instrument is a great way to add excitement to your
performances. They feature a variety of different patterns from jazz, popular music, and the like, to give you what you
need to make playing more fun and lively.
The instrument lets you save your performance to internal memory or a USB flash drive (sold separately). You can
record your performance using one of two methods, MIDI or Audio recording, according to your needs. MIDI
recording is ideal for making independent tracks—for example, recording a right-hand part to Track 1 first, and then a
left-hand part to Track 2—allowing you to create pieces that would be difficult to play live with both hands together.
Audio recording on the other hand, saves recorded data in stereo, CD-quality WAV format to a USB flash drive, for
storing to computer and playing on portable music players.
Full-scale piano performance
Song playback for both listening enjoyment
and practice purposes
Twenty different rhythms
Recording your performances

11
CLP-685, CLP-675, CLP-645, CLP-635, CLP-695GP, CLP-665GP Owner’s Manual
Table of Contents
PRECAUTIONS ....................................................6
NOTICE ......................................................................8
Information ................................................................8
Included Accessories ..................................................9
About the Manuals .....................................................9
Features .....................................................................10
Introduction 12
Panel Controls and Terminals .................................12
Control Panel ........................................................................12
Getting Started — Playing the Clavinova ................14
Turning the Power On or Off .............................................14
Music Rest .............................................................................17
Lid ...........................................................................................18
Setting the Volume — [MASTER VOLUME] ..................19
Using Headphones ...............................................................19
Using the Pedals ....................................................................21
Basic Operations on Display ....................................22
Main Operations 24
Enjoying the Piano Performance .............................24
Selecting two Grand Piano Voices from the panel directly
..................................................................................................24
Customizing the Sound and the Touch Response of Piano
Voices (Piano Room) ...........................................................25
Playing Various Musical Instrument Sounds (Voices)
....................................................................................28
Selecting Voices ....................................................................28
Enhancing and Customizing the Sound ............................30
Playing Two Voices Simultaneously (Dual) .....................32
Splitting the Keyboard Range and Playing Two Different
Voices (Split Mode) ..............................................................33
Using Dual and Split Simultaneously ................................34
Playing Duo ...........................................................................35
Using the Metronome ..........................................................36
Playing Back Songs ...................................................39
Listening to the Voice Demos .............................................40
Playback of Songs .................................................................41
Playing a One-hand Part — Part Cancel Function (MIDI
Songs) .....................................................................................44
Playing Back a Song Repeatedly .........................................45
Adjusting the Volume Balance ...........................................48
Useful Playback Functions ..................................................50
Playing the Keyboard along with Rhythm Playback 51
Recording Your Performance ..................................52
Recording Methods ..............................................................52
Quick MIDI Recording ........................................................53
MIDI Recording — Independent Tracks ..........................55
MIDI Recording to the USB Flash Drive ..........................57
Audio Recording to the USB Flash Drive .........................58
Other Recording Techniques ..............................................59
Handling Song Files .................................................63
Song Types and File Operation Limitations .................... 63
Basic Song File Operation ................................................... 64
Deleting Files — Delete ....................................................... 65
Copying Files — Copy ......................................................... 65
Moving Files — Move ......................................................... 66
Convert a MIDI Song to an Audio Song during Playback
— MIDI to Audio ................................................................ 67
Renaming Files — Rename ................................................. 68
Connections ..............................................................69
Connectors ............................................................................ 69
Connecting USB Devices (USB [TO DEVICE] Terminal)
................................................................................................. 72
Connecting External MIDI Devices (MIDI Terminals).. 73
Connecting to a Computer/Smart Device (USB [TO HOST]
Terminal, USB [TO DEVICE] Terminal, MIDI Terminals)
................................................................................................. 74
Effective Use of a Computer or Smart Device with the
Instrument ................................................................81
Listening to Audio Data from a Smart Device through this
Instrument (Bluetooth* Audio Function) ......................... 81
Using a Smart Device App .................................................. 83
Transmitting/Receiving Audio Data (USB Audio Interface
function) ................................................................................ 84
Detailed Settings 85
Basic Operations .......................................................85
Voice Menu ...............................................................86
Song Menu ................................................................90
Metronome/Rhythm Menu ......................................93
Recording Menu .......................................................94
System Menu .............................................................95
Appendix 102
Preset Voice List .....................................................102
Song List .................................................................106
50 Classics ...........................................................................106
Lesson Songs ....................................................................... 106
Rhythm List ............................................................107
Message List ............................................................108
Troubleshooting .....................................................110
Assembling the Clavinova ......................................112
Specifications ..........................................................130
Index .......................................................................136
About Bluetooth* ....................................................138
*For information on whether Bluetooth functionality is included
or not, refer to page 138.

12
CLP-685, CLP-675, CLP-645, CLP-635, CLP-695GP, CLP-665GP Owner’s Manual
Introduction
Panel Controls and Terminals
Control Panel
[ ] (Standby/On) switch.................... page 15
For turning the power on or setting it to standby.
[MASTER VOLUME] slider ............... page 19
For adjusting the overall volume.
[ ]/[ ]/[<]/[>] buttons, display......... page 22
For selecting an item or setting a value using the
buttons corresponding to the display indication.
[FUNCTION] button.......................... page 85
Pressing this button alternates the displays among
“Voice” menu, “Song” menu, “Metronome/Rhythm”
menu, “Recording” menu and “System” menu, from
which you can make detailed settings for the related
functions.
(Bluetooth logo).............................. page 81
The models CLP-685, CLP-675, CLP-645, CLP-
695GP and CLP-665GP are equipped with Bl uetooth
functionality; however, even these models may not
support Bluetooth, depending on the country in
which you purchased the product. If the Bluetooth
logo is printed on the control panel, this means that
the product is equipped with Bluetooth functionality.
[EXIT] button ..................................... page 22
Pressing this button exits from the current display, or
returns to the Voice or Song display.
[CFX GRAND] button........................ page 24
For selecting the “CFX Grand” Voice.
[BÖSENDORFER] button.................. page 24
For selecting the “Bösendorfer” Voice.
[VOICE] button.................................. page 28
Calls up the Voice list display.
[DUAL/SPLIT] button........................ page 32
For playing two Voices simultaneously, or different
Voices on the left- and right-hand sections of the
keyboard.
[PIANO ROOM] button..................... page 25
Calls up the Piano Room display where you can
select an optimum piano sound and adjust the touch
response.
[SONG/DEMO] button ...................... page 39
Calls up Song List for selecting a demo Song or a
Song to playback or edit.
[REC] button....................................... page 52
For recording your keyboard performance.
[ / ](Play/Pause) button.................. page 41
For alternately playing back and pausing the Preset
Songs or your recorded material.
[METRONOME] button..................... page 36
For using the metronome functions.
[RHYTHM] button............................. page 51
For using the rhythm functions.
[TEMPO] button ................................ page 36
For setting the tempo.
A-1 B-1 C0 D0 E0 F0 G0 A0 B0 C1 D1 E1 F1 G1 A1 B1
Each key has a note name; for example, the
lowest (farthest left) key on the keyboard
corresponds to A-1, and the highest
(farthest right) key to C7.

Panel Controls and Terminals
13
CLP-685, CLP-675, CLP-645, CLP-635, CLP-695GP, CLP-665GP Owner’s Manual
C2 D2 E2 F2 G2 A2 B2 C3 D3 E3 F3 G3 A3 B3 C4 D4 E4 F4 G4 A4 B4 C5 D5 E5 F5 G5 A5 B5 C6 D6 E6 F6 G6 A6 B6 C7
Key cover (page 15)
Music rest
(page 17)
Pedals
(page 21)
Music braces
(page 18)
Music rest
(page 18)
Key cover
(page 15)
Pedals
(page 21)
Terminal panel
(page 69)
Terminal panel
(page 69)
USB
[TO DEVICE]
terminal
(page 72)
USB
[TO DEVICE]
terminal
(page 72)
CLP-685 CLP-675, CLP-645, CLP-635
(CLP-675)
Terminal panel
(page 69)
[PHONES] jacks
(page 19)
[PHONES]
jacks
(page 19)
(CLP-645/635)
Terminal panel
(page 69)
CLP-695GP, CLP-665GP
Music braces
(page 18)
Key cover (page 15)
[AC IN] connector (page 14)
Pedals (page 21)
[PHONES] jacks (page 19)
Lid (page 18)
Music rest
(page 18)
(CLP-665GP)
Terminal panels (page 69)
Music braces
(page 17)
[AC IN] connector
(page 14)
(CLP-675)
[AC IN] connector
(page 14)
(CLP-635)
DC IN jack
(page 14)
(CLP-645)
[AC IN] connector
(page 14)
(CLP-695GP)
Terminal panel (page 69)

14
CLP-685, CLP-675, CLP-645, CLP-635, CLP-695GP, CLP-665GP Owner’s Manual
Getting Started — Playing the Clavinova
This section explains how to set up and start using your Clavinova. Setup is so
simple, you can start playing right away.
1. Connect the power cord and AC adaptor (CLP-635 only).
First insert the plug of the power cord into the AC connector on this
instrument, then plug the other end of the cord into a proper AC outlet on
the wall. In some areas a plug adaptor may be provided to match the pin
configuration of the AC wall outlets in your area.
For more information on connecting the power cord, refer to the assembly
instructions on pages 115, 119, 121, 126 or 129.
Connect the plugs of the AC adaptor in the order shown in the illustration.
Turning the Power On or Off
685 675 645 635 695GP 665GP
1-1 1-2
The shape of the plug and outlet differ
depending on the particular locale.
[AC IN] connector
(page 13)
WARNING
• Use only the AC power cord
supplied with your
instrument. If the supplied
cord is lost or damaged and
needs to be replaced,
contact your Yamaha
dealer. The use of an
inappropriate replacement
can pose a fire and shock
hazard!
• The type of AC power cord
provided with your
instrument may be different
depending on the country
in which it is purchased. (In
some areas a plug adaptor
may be provided to match
the pin configuration of the
AC wall outlets in your
area.) Do NOT modify the
plug provided with your
instrument. If the plug does
not fit the outlet, have a
proper outlet installed by a
qualified electrician.
WARNING
Use the specified adaptor
(page 132) only. The use of
other adaptors may result in
irreparable damage to both
the adaptor and the
instrument.
NOTE
When disconnecting the power
cord/AC adaptor, first turn off
the power, then follow this
procedure in reverse order.
685 675 645 635 695GP 665GP
AC
adaptor
AC outlet
DC IN jack (page 13)
Power cord
DC plug
AC plug
1-1
1-2
1-3
CAUTION
When setting up the product,
make sure that the AC outlet
you are using is easily
accessible. If some trouble or
malfunction occurs,
immediately turn off the
power switch and disconnect
the plug from the outlet.

15
CLP-685, CLP-675, CLP-645, CLP-635, CLP-695GP, CLP-665GP Owner’s Manual
Getting Started — Playing the Clavinova
2. Open the key cover.
2-1. With both hands, hold the hand grip, then lift and open the
key cover.
2-2. Fold down the top of the key cover.
Lift the cover slightly, then
push and slide it to the end.
3. Turn down the [MASTER VOLUME]
slider at the right end of the front panel
to “MIN.”
4. Press the [] (Standby/On) switch at the right end of the
front panel to turn the power on.
The display located at the left end of the front panel and the power indicator
located below the left end of the keyboard both light up.
685 675 645 635 695GP 665GP
CAUTION
• Do not place objects such
as pieces of paper or metal
on top of the key cover.
Small objects placed on
the key cover may fall
inside the unit when the
cover is opened and may
be nearly impossible to
remove. This could cause
electric shock, short
circuit, fire or other serious
damage to the instrument.
• Hold the cover with both
hands when opening or
closing it. Do not release it
until it is fully opened or
closed. Be careful to avoid
catching fingers (yours or
others, especially
children’s) between the
cover and the unit.
2-2
Be careful to avoid catching your fingers
when opening or closing the cover.
CAUTION
2-1
Be careful to avoid catching your fingers
when opening or closing the cover.
CAUTION
685 675 645 635 695GP 665GP
NOTICE
Press only the [] (Stand by/
On) switch when turning the
power on. Any other
operations, such as pressing
the keys, buttons or pedals may
cause the instrument to
malfunction.
[ ] (Standby/On) switch
The power indicator
lights up.

16
CLP-685, CLP-675, CLP-645, CLP-635, CLP-695GP, CLP-665GP Owner’s Manual
Getting Started — Playing the Clavinova
5. Play the keyboard.
While playing the keyboard, adjust the volume level by using the [MASTER
VOLUME] slider. For details, refer to “Setting the volume — [MASTER
VOLUME]” on page 19.
6. After you use the instrument, press and hold the
[] (Standby/On) switch for a second to turn the power
off.
The display and the power indicator are turned off.
7. Close the key cover.
7-1. If the music rest is unfolded,
fold it back.
7-2. With both hands, open the
folded top of the key cover,
and close it gently.
The key cover is equipped with the
special SOFT-CLOSE™ mechanism
which closes the cover slowly.
Slide the cover toward you
and gently lower the cover
over the keys.
CAUTION
Even when the instrument is
turned off, electricity is still
flowing to the instrument at
the minimum level. When you
are not using the instrument
for a long time or during
electrical storms, make sure
you unplug the AC power
plug from the wall AC outlet.
CAUTION
Do not apply excessive force
when closing the key cover.
Applying excessive force to
the key cover when closing it
could damage the SOFT-
CLOSE™ mechanism, and
possibly result in injury to
your hands and fingers
caught under the closing key
cover.
Be careful to avoid catching your fingers
when opening or closing the cover.
CAUTION
685 675 645 635 695GP 665GP
Be careful to avoid catching your fingers
when opening or closing the cover.
CAUTION
685 675 645 635 695GP 665GP

17
CLP-685, CLP-675, CLP-645, CLP-635, CLP-695GP, CLP-665GP Owner’s Manual
Getting Started — Playing the Clavinova
Auto Power Off function
To prevent unnecessary power consumption, this instrument features an Auto
Power Off function that automatically turns the power off if the instrument is
not operated for a specified period of time. The amount of time that elapses
before the power is automatically turned off is approximately 30 minutes by
default; however, you can change the setting (page 99).
Unfold the music rest:
1. Unfold the music rest, which is on the inside of the key cover.
2. Unfold the music braces, which allow you to hold the pages of music
books in place.
Fold the music rest:
1. Fold the music braces if they are unfolded.
2. Fold the music rest before closing the key cover.
NOTICE
•Any data which are not saved
will be lost if the power
automatically turns off. Make
sure to save your data before
this happens.
• Depending on the instrument
status, the power may not
turn off automatically, even
after the specified period of
time elapses. Always turn off
the power manually when the
instrument is not in use.
Disabling Auto Power Off (simple method)
Turn the power on while holding down the lowest key on the keyboard. An
“Auto power off disabled” message appears briefly and Auto Power Off is
disabled.
Music Rest
+
The lowest key
685 675 645 635 695GP 665GP
NOTE
Fold down the top of the key
cover (see step 2 on page 15.)
when using the music rest.
NOTICE
Do not put anything heavy on
the music rest for a long period
of time. Doing so may damage
the music rest.
1
2
Music brace
2
1
Music brace

18
CLP-685, CLP-675, CLP-645, CLP-635, CLP-695GP, CLP-665GP Owner’s Manual
Getting Started — Playing the Clavinova
To raise the music rest:
1.
Pull the music rest up and toward
yourself as far as it will go.
2. Flip down the two metal
supports at the left and right on
the rear of the music rest.
3. Lower the music rest so that the
metal supports latch into place.
Music braces allow you to hold the pages of music books in place.
To lower the music rest:
Close the Music braces if they are open,
and then lower the music rest by
following the instructions below.
1. Pull the music rest toward
yourself as far as it will go.
2. Raise the two metal supports
(at the rear of the music rest).
3. Gently lower the music rest backward until it is all the way down.
To open the lid:
1.
Raise and hold the right side of
the lid (viewed from the
keyboard end of the instrument).
2. Raise the lid stay and carefully
lower the lid so that the end of
the stay fits into the recess in
the lid.
To close the lid:
1. Hold the lid stay and carefully
raise the lid.
2. Hold the lid in its raised
position and lower the lid stay.
3. Carefully lower the lid.
685 675 645 635 695GP 665GP
Music braces
CAUTION
Do not try to use the music
rest in a half-raised position.
Also, when raising or
lowering the music rest, do
not release your hands from
the music rest until it is all
the way up or down.
Lid
Music braces
685 675 645 635 695GP 665GP
WARNING
• Do not let children open or
close the lid. Also, be
careful to avoid catching
fingers (yours or others,
and especially those of
children) when raising or
lowering the lid.
• Make sure that the end of
the stay fits securely in the
lid recess. If the stay is not
properly seated in the
recess, the lid may fall,
causing damage or injury.
• Be careful that you or
others do not bump the
stay while the lid is raised.
The stay may be dislodged
from the lid recess causing
the lid to fall.

19
CLP-685, CLP-675, CLP-645, CLP-635, CLP-695GP, CLP-665GP Owner’s Manual
Getting Started — Playing the Clavinova
To adjust the volume, use the [MASTER VOLUME]
slider located at the right of the panel. Play the
keyboard to actually produce sound while you
adjust the volume.
Intelligent Acoustic Control (IAC)
IAC is a function which automatically adjusts and controls the sound quality
according to the overall volume of the instrument. Even when the volume is
low, it permits both low sounds and high sounds to be clearly heard.
IAC Control is effective only from the sound output of the instrument speakers.
You can set the IAC setting On or Off via the “System” menu display: Press the
[FUNCTION] button repeatedly to call up the “System” menu display →
“Sound”
“IAC.” The default setting for this function is “On.”
Connect a pair of headphones to one of the [PHONES] jacks. When the headphones are plugged into either
of the [PHONES] jacks, the internal speaker system is automatically shut off. Two [PHONES] jacks are
provided. Two sets of standard stereo headphones can be plugged in. (If you are using only one pair of
headphones, you can plug them into either of these jacks.)
CAUTION
Do not use headphones at a high volume for an extended period of time. Doing so may cause hearing loss.
Setting the Volume — [MASTER VOLUME]
Decreases
the level.
Increases
the level.
Master Volume: The
volume level of the entire
keyboard sound.
Adjusting the [MASTER
VOLUME] slider also affects
the output level of the
[PHONES] jacks and the
output level of the AUX OUT
jacks.
CAUTION
Do not use the instrument at
a high volume level for a long
period of time, or your
hearing may be damaged.
NOTE
“System” menu display
(page 95)
Using Headphones
685 675 645 635 695GP 665GP 685 675 645 635 695GP 665GP
Standard stereo
phone plug
Standard stereo
phone plug
Underside of
keyboard
Underside of keyboard
685 675 645 635 695GP 665GP
Underside of keyboard
Standard stereo
phone plug

20
CLP-685, CLP-675, CLP-645, CLP-635, CLP-695GP, CLP-665GP Owner’s Manual
Getting Started — Playing the Clavinova
Reproducing the Natural Sensation of Sound Distance
—Binaural Sampling and Stereophonic Optimizer
This instrument features two advanced technologies that allow you to enjoy
exceptionally realistic, natural sound, even when listening on headphones.
Binaural Sampling (“CFX Grand” Voice only)
Binaural sampling is a method that uses two special microphones set at the ear
position of a performer and records the sound from a piano as it is. Listening to the
sound with this effect through headphones gives the impression of being immersed
in the sound, as if it was actually emanating from the piano. Moreover, you can
enjoy the sound naturally for a long time without ear strain. When the default voice,
“CFX Grand” (page 24) is selected, connecting the headphones automatically
enables the binaural sampling sound.
Stereophonic Optimizer (Voices in the Piano group other than
“CFX Grand”)
The Stereophonic Optimizer is an effect which reproduces natural sound distance
like the sound of binaural sampling even though you hear it on headphones. When
a Voice in the Piano group other than “CFX Grand” is selected, connecting the
headphones automatically enables the Stereophonic Optimizer.
Using the headphone hanger
You can conveniently hang the headphones on the instrument when not using
them. Install the headphone hanger by following the instruction at the end of
this manual (CLP-685: page 116, CLP-675: page 119, CLP-645/635: page 122,
CLP-695GP: page 126, CLP-665GP: page 129).
Sampling
A technology which records
the sounds of an acoustic
instrument then stores them to
the tone generator to be played
based on information received
from the keyboard.
NOTE
Voices in the Piano group are
those contained in the “Piano”
category in the Preset Voice
List (page 102). For details
about selecting Voices, refer to
page 24.
When headphones are connected, the Voices in the Piano group automatically
change to the sound of Binaural Sampling or the sound enhanced with the
Stereophonic Optimizer, by the default settings. Since these sounds are optimized for
listening with headphones, we recommend that you set this function to “OFF” in the
following situations.
• Playing the piano sound of this instrument with an external powered speaker
system, while monitoring the sound output from this instrument on connected
headphones.
• Making an audio recording (page 52) and then playing that recorded audio Song
through speakers of this instrument. (Make sure to turn off these functions before
audio recording.)
You can set this setting On or Off via the “System” menu display. Press the
[FUNCTION] button repeatedly to call up the “System” menu display: “Sound” →
“Binaural” (page 96).
NOTICE
Do not hang anything other
than the headphones on the
hanger. Otherwise, the
instrument or the hanger may
be damaged.
NOTE
Before connecting an external
powered speaker system, be
sure to read “Connections”
(page 69).

21
CLP-685, CLP-675, CLP-645, CLP-635, CLP-695GP, CLP-665GP Owner’s Manual
Getting Started — Playing the Clavinova
This instrument is equipped with three foot pedals:
damper pedal (right), sostenuto pedal (center), and
soft pedal (left).
Damper pedal (right pedal)
When you press the damper pedal, the notes you play
have a longer sustain.
When you select a Voice in the Piano group, pressing
the damper pedal activates the VRM (page 26) to
accurately recreate the unique resonance of an acoustic
grand piano’s soundboard and strings.
Sostenuto pedal (center pedal)
If you play a note or chord on the keyboard and press
the sostenuto pedal while holding the note(s), the
notes will sustain as long as the pedal is held. All
subsequent notes will not sustain.
Soft pedal (left pedal)
The soft pedal reduces the volume and slightly changes the timbre of notes played
while the pedal is pressed. The soft pedal will not affect notes that are already
playing when it is pressed. In order to apply this effect, play notes after pressing the
pedal.
Keep in mind that this pedal function will be changed from the Soft pedal
depending on the selected Voice. When the “Mellow Organ” is selected, pressing
and releasing this pedal switches between “fast” and “slow” of the Rotary Speaker
speed (“Rotary Speed” on page 87). When the Vibraphone is selected, this pedal
switches Vibrato on and off (“VibeRotor” on page 87).
Using the Pedals
When you press the damper
pedal here, the notes you
play before you release the
pedal have a longer sustain.
NOTE
Voices in the Piano group are
those contained in the “Piano”
category in the Preset Voice
List (page 102). For details
about selecting Voices, refer to
page 24.
NOTE
You can assign other functions
to each pedal by using “Pedal
Assign” in “Voice” menu
display (page 88).
Half-pedal function
This instrument also has a Half-pedal function which allows you to use half-damper
techniques, in which the damper is pressed somewhere between all the way down and all
the way up. In this half-damper state (on a real piano), the damper felts only partially
mute the strings. The Half-pedal function on the Clavinova lets you delicately and
expressively control the damper muting, and create subtle nuances in your performance,
by finely controlling the point at which pressure on the pedal affects the damper muting.
This can be set via the “System” menu display: Press the [FUNCTION] button repeatedly
to call up the “System” menu display: “Pedal”
“Half Pedal Point” (page 96).
GP Responsive Damper Pedal
The damper pedal of the CLP-685, CLP-675 and CLP-695GP is the GP Responsive
Damper Pedal. This special pedal has been designed to provide enhanced tactile response
and, when pressed, is much closer in feel to the pedal of an actual grand piano. It makes it
easier to physically experience the half-pedal point and more easily apply the half-pedal
effect than other pedals. Since the pressing sensation may vary depending on the
situation, including the location where the instrument is installed, you should adjust the
half-pedal point described above to the desired setting.
685 675 645 635 695GP 665GP
NOTE
The pedals are covered with
vinyl covers when shipped
from the factory. If your
instrument features the GP
Responsive Damper Pedal,
remove the cover from the
damper pedal for optimum use
of the pedal effect.
When you press the sostenuto
pedal here while holding the
note(s), the notes will sustain as
long as you hold the pedal.
NOTE
While the sostenuto (center)
pedal is held, a sustained (non-
decaying) type of Voice such
as strings or organ may sound
continuously without decay
after the notes have been
released.
NOTE
The center pedal or left pedal
can also be used as a [
/ ]
(Play/Pause) button. You can
assign this function via the
“System” menu display: Press
the [FUNCTION] button
repeatedly to call up the
“System” menu display:
“Pedal” “Play/Pause”
(page 96).

22
CLP-685, CLP-675, CLP-645, CLP-635, CLP-695GP, CLP-665GP Owner’s Manual
Basic Operations on Display
On the screen display, you can call up three main functions: Voice, Song and Demo. In addition, various
detailed settings can be made, for even greater playability and performance potential.
1.
1.
2.
2.
1.
2.
Select a Voice, Song or
Demo Song
When this is shown here,
you can scroll through the
display vertically.
Press the [EXIT] button to return to the Voice display or the Song display,
depending on which display was previously shown.
While the pop-up window is shown, pressing the [EXIT] button returns to
the previously shown display.
Select from the list, or change the display.
Selecting Voices
Press the [VOICE] button
to call up the Voice List
display.
Press the [
] or [ ] button
to select a Voice group.
Selecting Song/Demo
When this is shown here,
you can scroll through the
display vertically.
Press the [SONG/DEMO]
button to call up the Song
category list.
Detailed Settings
Select from the list, or change the display.
Menu icon Menu name
Press the [ ] or [ ] button
to select a Song category.
Press the [FUNCTION]
button repeatedly to
select the desired menu.
Press the [
] or [ ] button
to select a parameter of the
current menu.
Return to the Voice/Song display

Basic Operations on Display
23
CLP-685, CLP-675, CLP-645, CLP-635, CLP-695GP, CLP-665GP Owner’s Manual
Voi ce : Instrument sound for playing from the keyboard. In addition to the Piano sounds, a wide variety of other musical
instrument sounds are available.
Song: A piece of music for listening enjoyment or for playing back and practicing along with.
Demo: Voice Demos let you experience the characteristics of the Voices.
3.
4.
3.
3.
4.
4.
4.
Selecting a value from a list
[ ] to select a Voice.
[ ] to return.
[] to select a Voice.
[ ] to return.
This indicates the current
position in the Voice group.
Press the [ ] or [ ] button to select a Voice.
Press the [ ] and [ ] buttons simultaneously
to select the first Voice in the list.
Play the keyboard.
Press the [ ] or [ ] button to select the previous
or next Voice. Press the [
] and [ ]
simultaneously to select the first Voice in the
Voice group.
Voice display
[ ] to select a Song.
[ ] to return.
[] to select a Song.
[ ] to return.
Press the [ ] or [ ] button to select
a Song.
When “Lesson” is selected, press the [ ] or
[
] button to select a Lesson type.
Press the [ / ] (Play/Pause)
button to playback the Song.
Use the [ ] or [ ] button to select the
previous or next bars.
Song display
[ ] to detailed
settings.
[EXIT] to return
to the previous
display.
[ ] to detailed settings.
[ ] to return.
Adjusting the value on the
slider pop-up window
Press the [ ] or [ ] button to adjust the
value, press the [EXIT] button to close the
pop-up window.
To reset the default value, press the [ ] and [ ]
buttons simultaneously.
Press the [ ] or [ ]
button to select a
parameter.
A checkmark is
shown at the right of
the selection.
Use the [ ][ ] buttons or the [ ] button
to select a setting.
Press the [ ] button to return to the previous
display.
Note that the hierarchy depth
differs depending on the
selected parameter.
You can select the “CFX Grand” and the “Bösendorfer” Voices
directly from the control panel buttons.

24
CLP-685, CLP-675, CLP-645, CLP-635, CLP-695GP, CLP-665GP Owner’s Manual
Main Operations
Enjoying the Piano Performance
This instrument puts the sounds of two renowned grand pianos, the Yamaha CFX and Bösendorfer
Imperial, as well as other piano sounds—each with its own distinctive appeal and sonic characteristics.
Simply select the particular piano sound desired, according to the music you intend to play or your
personal preferences.
1. Press the [CFX GRAND] button or the [BÖSENDORFER]
button to select the piano type.
A Voice is called up from the selected Voice button and its name appears
on the Voice display.
CFX Grand
Yamaha’s CFX concert grand piano sound with a wide dynamic range for
maximum expressive control. Suitable for playing in any music genre and
style.
Bösendorfer
The famed sound of the Vienna-made Bösendorfer Imperial concert
grand piano. Its spacious sound evokes the size of the instrument, and is
ideal for expressing tenderness in compositions.
2. Play the Keyboard.
Selecting two Grand Piano Voices from the panel directly
1
Voice display
Voice name
NOTE
You can hear and experience
the characteristics of the
Voices by listening to the Demo
Songs for each Voice
(page 40).
Selecting Other Piano Voices
Press the [ ][ ] buttons to select other piano Voices than “CFX Grand”
and “Bösendorfer.” You can also select the other Voices by pressing the
[VOICE] button (page 28).

25
CLP-685, CLP-675, CLP-645, CLP-635, CLP-695GP, CLP-665GP Owner’s Manual
Enjoying the Piano Performance
You can adjust the detailed settings of Voices in the Piano group in the Piano
Room. Try creating a custom piano sound by adjusting the various parameters
such as lid position, string resonance, damper resonance and so on.
1. Press the [PIANO ROOM] button to call up the Piano
Room display.
2. Press the [ ]/[ ] buttons to select items (page 26).
3. Press the [ ]/[ ] buttons to change the settings (page 26).
4. Press the [EXIT] button to exit from the Piano Room
display.
Customizing the Sound and the Touch Response of
Piano Voices (Piano Room)
2, 3
1
4
NOTE
If a Voice other than in the
Piano group is selected,
pressing the [PIANO ROOM]
button changes it to “CFX
Grand.”
NOTE
Pressing the [PIANO ROOM]
button disables the Dual/Split/
Duo functions.
Piano Room display

26
CLP-685, CLP-675, CLP-645, CLP-635, CLP-695GP, CLP-665GP Owner’s Manual
Enjoying the Piano Performance
What you can do in the Piano Room
Item Icon Descriptions
Default
settings
Setting Range
Lid Position Determines how much the Lid is opened. Full Full, Half, Close
Brightness Adjusts the brilliance of sound. Differs
depending on
the Voice.
0 – 10
Touch Determines how the sound responds to your playing
strength. You should adjust this setting according to the
specific Voice you’re playing or the particular Song you’re
performing, as desired.
Medium Soft2, Soft1,
Medium, Hard1,
Hard2, Fixed
Reverb Determines the Reverb type which is applied to all the entire
sound including the keyboard performance, Song playback
and MIDI data input from an external MIDI device.
Differs
depending on
the Voice.
Refer to the
Reverb Type
List (page 89)
Reverb
Depth
Adjusts the Reverb depth. When “Reverb” is set to “off” or a
value of “0,” no effect is produced.
Differs
depending on
the Voice.
0 – 127
Master Tune Fine tunes the pitch of the entire instrument. This function is
useful when you play this instrument along with other
instruments or CD music.
A3 = 440.0 Hz A3 = 414.8 Hz –
466.8 Hz
(approx. 0.2 Hz
steps)
VRM Turns the VRM effect on/off. For information about the VRM
function, refer to page 27. For details about the Piano Voices
compatible with VRM, refer to the “Preset Voice List” on
page 102.
Listening to the VRM Demo
You can hear the difference of
VRM On/Off by pressing the [
/ ]
(Play/Pause) button while VRM On/
Off display is being displayed.
If you press the [
/ ] (Play/Pause)
button while VRM is On, the Demo
Song of VRM On will play back. If you press the [
/ ] (Play/
Pause) button while VRM Off, the Demo Song of VRM Off will
play back.
On On, Off
Damper Res. Determines the depth of the string resonance effect which is
applied when the damper pedal is pressed. This parameter
can be set when VRM is on.
50 – 10
String Res. Determines the depth of the string resonance effect which is
applied when a note on the keyboard is pressed. This
parameter can be set when VRM is on.
50 – 10
Aliquot Res. Adjusts the sympathetic vibrations of the Aliquot resonance
effect. For details about Aliquot, refer to “What is Aliquot?”
(page 27).
50 – 10
Body Res. Adjusts the resonance of the piano itself, i.e. soundboard, the
sides, the frame and so on. This parameter can be set when
VRM is on.
50 – 10
Key Off Sample Determines the volume of the key-off sound (the subtle sound
that occurs when you release a key) which is available only
for some Voices. For Voices to which this effect is applied,
refer to the Voice List (page 102).
50 – 10
Half Pedal Point Specify the point to which you must depress the right pedal
before the effect of “Sustain Continuously” begins to be
applied. This setting applies only to the “Sustain
Continuously” effect (page 89) that is assigned to the right
pedal.
0
-2 (effective with
the shallowest
press) – 0 – +4
(effective with the
deepest press)

27
CLP-685, CLP-675, CLP-645, CLP-635, CLP-695GP, CLP-665GP Owner’s Manual
Enjoying the Piano Performance
What is VRM?
The VRM (Virtual Resonance Modeling) function uses sophisticated physical
modeling to simulate the actual string resonance sound that occurs when the
damper pedal on a real piano is pressed or keys are played and held.
On an actual acoustic piano, if you press the damper pedal and play a key, not
only does the string of the pressed key vibrate, it also causes other strings and
the soundboard to vibrate, with each influencing the rest, creating a rich and
brilliant resonance that sustains and spreads. The VRM (Virtual Resonance
Modeling) technology featured in this instrument reproduces the complicated
interaction of both string and soundboard resonance faithfully using a virtual
musical instrument (physical modeling), and makes the sound more like a real
acoustic piano. Since instantaneous resonance is made at the moment according
to the state of the keyboard or pedal, you can vary the sound expressively by
changing the timing of your pressing the keys, and the timing and depth of your
pressing the pedal.
What is Aliquot?
Aliquot is a stringing method for pianos that uses extra, un-struck strings in the
upper octaves to enhance the tone. These strings sympathetically vibrate with
other strings in an acoustic piano, resonating with overtones, and adding
richness, brilliance and complex color to the sound. Since they do not have a
damper, they will continue sounding even after you release your hands from the
keyboard.

28
CLP-685, CLP-675, CLP-645, CLP-635, CLP-695GP, CLP-665GP Owner’s Manual
Playing Various Musical Instrument Sounds
(Voices)
In addition to the wonderfully realistic piano sounds, you can select and play other musical instrument
sounds (Voices), such as organ or stringed instruments.
The Voices of the instrument are conveniently divided into groups of
instrument types. Select a desired Voice and play the piano.
You can also select a Voice from the XG Voices (CLP-685 and CLP-695GP
only). For instructions, refer to page 29.
1. Press the [VOICE] button to call up the Voice List display.
Voice groups are listed in the display. The currently selected Voice is
highlighted.
2. Use the [ ]/[ ] buttons to select the Voice group.
Highlight the Voice group name you want to use.
Selecting Voices
NOTE
To hear and experience the
characteristics of the Voices,
listen to the Demo Songs for
each Voice (page 40).
NOTE
Touch Response (page 95) will
not be applied to some Voices.
For information about the
Voices to which Touch
Response can be applied,
refer to the “Preset Voice List”
on page 102.
XG
XG is a major enhancement of
the GM System level 1 format
(page 39), and was developed
by Yamaha specially to provide
more Voices and variations, as
well as greater expressive
control over Voices and effects,
and to ensure compatibility of
data well into the future.
NOTE
For information about the
Voices, refer to the “Preset
Voice List” (page 102).
2, 3, 4
1
Voice group
Voice List display

29
CLP-685, CLP-675, CLP-645, CLP-635, CLP-695GP, CLP-665GP Owner’s Manual
Playing Various Musical Instrument Sounds (Voices)
3. Press the [ ] button.
The Voices in the selected group are listed in the display.
4. Use the [ ]/[ ] buttons to scroll through the Voice list,
and then press the [ ] button to select the desired Voice.
The currently selected Voice name is shown in the display.
You can select other Voices in order using the [ ]/[ ] buttons via the
Voice displ ay.
Press the [
] button to go back to the Voice List display.
5. Play the keyboard.
NOTE
Press the [<] button to return to
the Voice List for selecting the
Voice Group.
Voice
Voice display
NOTE
You can specify the Touch
Response (how the sound
responds to the way you play
the keys). You should adjust
this setting according to the
specific Voice you’re playing or
the particular Song you’re
performing, as desired. You
can make the settings via the
“System” menu display: Press
the [FUNCTION] button
repeatedly to select the
“System” menu display
“Keyboard” “Touch”
(page 95). You can also adjust
the Touch Response for the
Voices in the Piano group from
the Piano Room display
(page 26).
Selecting XG Voices
If you want to select a Voice from the XG voices, select “XG” in step 2.
Because the XG Voice group has an extremely large number of Voices, the group
is divided into sub-groups. Press the [
] button to call up the Voice group list,
then select the desired Voice group from the list by using the [
]/[ ] buttons.
After this, follow the procedure beginning with step 3 above.
*For details on XG Voices, refer to the “XG Voice list” in the separate Data List.
685 675 645 635 695GP 665GP
Scroll to the bottom of the display
by pressing the [
] button.

30
CLP-685, CLP-675, CLP-645, CLP-635, CLP-695GP, CLP-665GP Owner’s Manual
Playing Various Musical Instrument Sounds (Voices)
Applying the following effects gives you greater and richer expressive
capabilities.
Brilliance
For adjusting the brightness of the sound. This setting is applied commonly to
all parts (keyboard Voices/Song/MIDI).
1. Press the [FUNCTION] button repeatedly to call up the
“System” menu display, then select the highlighted item in
each display as illustrated below.
Use the [ ]/[ ] buttons to select the desired tonality in the Brilliance
display. To reset to the default setting, press the [
] and [ ] buttons
simultaneously.
•Mellow 1 – 3
Soft and mellow tone. The sound becomes more mellow and rounder as
the number increases.
• Normal
Standard tone.
•Bright 1 – 3
Bright tone. The sound becomes brighter as the number increases.
Enhancing and Customizing the Sound
1
1
“System” menu display
1-1. Use the [ ]/[ ] buttons
to select “Sound.”
1-2. Press the [>] button to
call up the next display.
1-3. Use the [ ]/[ ] buttons
to select “Brilliance.”
1-4. Press the [>] button to
call up the next display.
1-5. Use the [ ]/[ ] buttons
to select the value.
Checkmark
Sound display Brilliance display
Default setting: Normal
NOTE
If you select Bright 1 – 3 as the
type of brilliance, the volume
level will increase slightly.
Under this condition, if you
raise the [MASTER VOLUME]
slider setting, the sound may
become distorted. If this
happens, lower the volume
accordingly.

31
CLP-685, CLP-675, CLP-645, CLP-635, CLP-695GP, CLP-665GP Owner’s Manual
Playing Various Musical Instrument Sounds (Voices)
Reverb
This control adds reverberation to the sound by simulating the natural
reverberation of a concert hall. The ideal Reverb type is automatically selected
whenever you select a Voice, but you can select any of the available Reverb types.
To select a desired Reverb type, use the “Voice” menu display: “Reverb”
(page 86). You can also select the Reverb type for Voices in the Piano group
from the Piano Room display (page 26).
This setting is applied commonly to all parts (keyboard Voices/Song/MIDI).
Chorus
This control adds warmth and spaciousness to the sound. The ideal Chorus
type is automatically selected whenever you select a Voice, but you can select
any of the available Chorus types.
To select a desired Chorus type, use the “Voice” menu display: “Chorus”
(page 86).
This setting is applied commonly to all parts (keyboard Voices/Song/MIDI).
Effects
This instrument features a wide variety of Effects, letting you apply
enhancements such as Echo or Tremolo to the selected Voice for your keyboard
performance. You can select any of the available Effect types from the “Voice”
menu display: “Voice Edit” “Effect” (page 87).
NOTE
You can adjust the Reverb
depth for the selected Voice
from the “Voice” menu display:
“Voice Edit” “Reverb Depth”
(page 87).
NOTE
You can adjust the Chorus
depth for the selected Voice
from the “Voice” menu display:
“Voice Edit” “Chorus Depth”
(page 87).
NOTE
When you want to apply the
Chorus effect to a Voice whose
Chorus type is set to off by
default, set the Chorus type to
something other than “Off,”
then set the Chorus depth
value as desired (greater than
“0”).

32
CLP-685, CLP-675, CLP-645, CLP-635, CLP-695GP, CLP-665GP Owner’s Manual
Playing Various Musical Instrument Sounds (Voices)
Two Voices can be played simultaneously. You can create warm and richly
textured Voices by using Voices from different groups simultaneously in a layer,
or by using Voices in the same group.
1. To enter the Dual mode, press the [DUAL/SPLIT] button
once so that the lamp lights in red.
The Voice which is displayed at top is Voice 1, and the one at bottom is
Voice 2.
2. Select the Voices for layering.
2-1. Use the [ ]/[ ] buttons to highlight (Voice 1) in the
display.
2-2. Use the [ ]/[ ] buttons or the [VOICE] button to select the
desired Voice.
If you use the [VOICE] button to call up the Voice List display, press the
[
] button to select a Voice, and then return to the previous display.
Use the [
]/[ ] buttons to highlight (Voice 2), select a Voice in the
same way.
3. Play the keyboard.
4. To exit from the Dual mode, press the [DUAL/SPLIT]
button repeatedly to turn the lamp off.
Playing Two Voices Simultaneously (Dual)
2
2
1, 4
Voice 1
Voice 2
Lit in red

33
CLP-685, CLP-675, CLP-645, CLP-635, CLP-695GP, CLP-665GP Owner’s Manual
Playing Various Musical Instrument Sounds (Voices)
Split mode enables you to play two different Voices on the keyboard—one with
your left hand and another with your right.
1. To enter the Split mode, press the [DUAL/SPLIT] button
repeatedly to light it in green.
The Voice which is displayed at top is Voice R, and the one at bottom is
Voice L.
2. Select a Voice for the right-hand area and left-hand area.
2-1. Use the [ ]/[ ] buttons to highlight (Voice R) in the
display.
2-2. Use the [ ]/[ ] buttons or the [VOICE] button to select the
desired Voice.
If you use the [VOICE] button to call up the Voice List display, press the
[
] button to select a Voice, and then return to the previous display.
Use the [
]/[ ] buttons to highlight (Voice L), and select a Voice in
the same way.
3. Play the keyboard.
Changing the Split Point
You can change the Split Point (the border between the right- and left-
hand ranges) from the default setting “F 2” to any other key. While in the
Split mode, hold down the [DUAL/SPLIT] button, and press the key you
wish to assign as the Split Point.
4. To exit from the Split mode, press the [DUAL/SPLIT]
button repeatedly so that the lamp turns off.
Splitting the Keyboard Range and Playing Two
Different Voices (Split Mode)
2
2
1, 3, 4
Voice R
Voice L
Lit in green
NOTE
The specified Split Point key is
included in the left-hand range.
NOTE
The Split Point can also be set
via the “System” menu display:
Press the [FUNCTION] button
repeatedly to call up the
“System” menu display
“Keyboard” “Split Point”
(page 96).
Center “C”

34
CLP-685, CLP-675, CLP-645, CLP-635, CLP-695GP, CLP-665GP Owner’s Manual
Playing Various Musical Instrument Sounds (Voices)
1. To enter the Dual and Split modes simultaneously, press
the [DUAL/SPLIT] button repeatedly so that the lamp
lights in orange.
The Voice which is displayed at top is Voice R1, and the one in the middle
is Voice R2, and the one at bottom is Voice L.
2. Select the Voices for layering and for the left-hand area.
2-1. Use the [ ]/[ ] buttons to highlight (Voice R1) in the
display.
2-2. Use the [<]/[>] buttons or the [VOICE] button to select the
desired Voice.
If you use the [VOICE] button to call up the Voice List display, press the
[
] button to select a Voice, and then return to the previous display.
Use the [
]/[ ] buttons to highlight (Voice R2) and (Voice L),
and select Voices in the same way.
3. Play the keyboard.
4. Press the [DUAL/SPLIT] button to exit from the Dual and
Split mode.
The lamp of the [DUAL/SPLIT] button turns off.
Using Dual and Split Simultaneously
2
2
1, 4
Voice R1
Voice R2
Lit in orange
Voice L
NOTE
The specified Split Point key is
included in the left-hand range.
NOTE
For the information on setting
the Split Point, refer to page 33.

35
CLP-685, CLP-675, CLP-645, CLP-635, CLP-695GP, CLP-665GP Owner’s Manual
Playing Various Musical Instrument Sounds (Voices)
This function allows two different players to play the instrument, one on the
left and the other on the right. This is convenient for practicing duets over the
same octave range.
1. Press the [FUNCTION] button repeatedly to call up the
“System” menu display, and then select the highlighted
item in each display as illustrated below.
The keyboard is divided into two sections, with the E3 key as the Split
Point.
The pedal function changes as follows.
Playing Duo
1
2
1
4
“System” menu display
1-1. Use the [ ]/[ ] buttons
to select “Keyboard.”
1-2. Press the [>] button to
call up the next display.
1-3. Use the [ ]/[ ] buttons
to select “Duo.”
1-4. Press the [>] button to
select “On.”
Keyboard display
NOTE
While Duo is on, the Reverb,
VRM and Stereophonic
Optimizer functions are
disabled (page 20).
NOTE
The specified Split Point key is
included in the left-hand range.
Right Pedal Damper pedal for the right-hand range
Center Pedal Damper pedal for both the right-hand and left hand ranges
Left Pedal Damper pedal for the left-hand range
Left section
Split Point E3Equivalent to C3 (middle C) Equivalent to C3 (middle C)
Right section

36
CLP-685, CLP-675, CLP-645, CLP-635, CLP-695GP, CLP-665GP Owner’s Manual
Playing Various Musical Instrument Sounds (Voices)
2. Press the [EXIT] button to exit from the menu display.
When Duo is on, the [DUAL/SPLIT] button is lit in green and the [Duo]
is shown on the Voice display.
3. Play the keyboard.
The sound of left-hand range is emitted from the left, the sound of right-
hand range is emitted from the right.
4. Press the [DUAL/SPLIT] button to exit from the Duo
mode.
You can also exit from the Duo mode by following either of the
instructions below.
• Press any of the [CFX GRAND], [BÖSENDORFER], [PIANO ROOM]
buttons.
• Repeat the same procedure from step 1 to set it to “Off.”
The instrument has a built-in metronome (a device that keeps an accurate
tempo)—a convenient tool for practice.
1. Press the [METRONOME] button to start the metronome.
This calls up the Tempo display, from which you can adjust the tempo.
For details, see next section.
2. Press the [METRONOME] button to stop the metronome.
To close the Tempo display, press the [EXIT] button.
Adjusting the Tempo
Using the Metronome
Lit in green
NOTE
You can set the metronome
volume, BPM and so on from
the “Metronome/Rhythm” menu
display (page 93).
2
3
1
Metronome

37
CLP-685, CLP-675, CLP-645, CLP-635, CLP-695GP, CLP-665GP Owner’s Manual
Playing Various Musical Instrument Sounds (Voices)
1. Press the [TEMPO] button to call up the Tempo display.
2. Use the [<]/[>] buttons to adjust the tempo.
You can adjust the tempo value (number of beats per minute) using the
[<]/[>] buttons. To reset the tempo to the default setting, press the [<]
and [>] buttons simultaneously.
3. Press the [EXIT] button to close the Tempo display.
Setting the metronome time signature
1. Press the [FUNCTION] button repeatedly to call up the
“Metronome/Rhythm” menu display.
2. Use the [ ]/[ ] buttons to select “Time Sig.” and then
press the [ ] button.
3. Use the [ ]/[ ] buttons to select the desired time
signature.
Setting range: 2/2, 1/4, 2/4, 3/4, 4/4, 5/4, 6/4, 7/4, 3/8, 6/8, 7/8, 9/8, 12/8
Default setting: 4/4 (Selecting a MIDI Song will change the tempo value to
that specified in the selected MIDI Song data.)
NOTE
For information on setting the
time signature, refer to
page 37.
Tempo value
2, 3
5
1
Time Signature
Time Signature display

38
CLP-685, CLP-675, CLP-645, CLP-635, CLP-695GP, CLP-665GP Owner’s Manual
Playing Various Musical Instrument Sounds (Voices)
Tempo indication and Setting range
Tempo is displayed as “note type=xxx” (For example: =120). Selecting
the Time Signature changes the available parameters as follows.
* When the tempo value of the selected MIDI Song is outside the setting range on the instrument,
the value will be changed to fit within the setting range.
* Note type will be fixed to quarter note as long as the “BPM” parameter in the “Metronome/Rhythm”
menu display is set to “Crotchet” regardless of the Time Signature you set.
4. Turn the “Bell” setting on.
For details, refer to “Bell” in the “Metronome/Rhythm” menu (page 93).
The Metronome plays back according to the selected Time Signature with
the Bell sound on the first beat of each measure.
5. Press the [EXIT] button to close the “Metronome/
Rhythm” menu display.
Note type Time Signature Setting range
2/2 3 – 250
1/4, 2/4, 3/4, 4/4, 5/4,6/4, 7/4 5 – 500
6/8, 9/8, 12/8 4 – 332 (even numbers only)
3/8, 7/8 10 – 998 (even numbers only)
and 999
Half note
Quarter note
Dotted quarter note
Eighth note
Note type
The length of one beat
Metronome detailed
settings
You can set the metronome
volume, BPM and so on from
the “Metronome/Rhythm” menu
display (page 93).

39
CLP-685, CLP-675, CLP-645, CLP-635, CLP-695GP, CLP-665GP Owner’s Manual
Playing Back Songs
This instrument can play Preset Songs, Songs you recorded on this instrument, or commercially available
Songs. In addition to listening to these Songs, you can play the keyboard as the Song plays back.
You can play back the following types of Songs in this instrument.
• Preset Voice Demo Songs (Voice Demo).
•P
reset Songs: 50 classical Preset Songs (“50 Classics”) and 303 Lesson Songs
(“Lesson”)
• Your own recorded Songs (see page 52 for instructions on recording)
• Commercially available MIDI Song data: SMF (Standard MIDI File)
The maximum size for playback on this instrument is approx. 500KB per single
MIDI Song.
• Commercially available Audio Song data: Wav (file extension = .wav with
44.1 kHz sample rate, 16-bit resolution, stereo, and maximum 80 minutes length)
MIDI Songs and Audio Songs
There are two kinds of Songs that can be recorded and played back on this
instrument: MIDI Songs and Audio Songs.
A MIDI Song is comprised of your keyboard performance information and is not a
recording of the actual sound itself. The performance information refers to which
keys are played, at what timing, and at what strength—just as in a musical score.
Based on the recorded performance information, the tone generator (of the
Clavinova, etc.) outputs the corresponding sound. A MIDI Song uses a small amount
of data capacity in comparison to an Audio song, and allows you to easily change
aspects of the sound, such as Voices used, etc.
An Audio Song is a recording of the performed sound itself. This data is recorded in
the same way as that used in recording cassette tapes, or with voice recorders, etc.
This data can be played with a portable music player, etc., allowing you to easily let
other people hear your performance.
The CLP-685 and CLP-695GP are compatible with the following formats.
GM System Level 2
“GM (General MIDI)” is one of the most common Voice allocation formats. “GM System Level
2” is a standard specification that enhances the original “GM” and improves Song data
compatibility. It provides for increased polyphony, greater Voice selection, expanded Voice
parameters, and integrated effect processing.
XG
XG is a major enhancement of the GM System Level 1 format, and was developed by Yamaha
specifically to provide more Voices and variations, as well as greater expressive control over
Voices and effects, and to ensure compatibility of data well into the future.
GS
GS was developed by the Roland Corporation. In the same way as Yamaha XG, GS is a major
enhancement of the GM specifically to provide more Voices and Drum kits and their
variations, as well as greater expressive control over Voices and effects.
Availability of functions differs between MIDI Songs and Audio Songs. In this chapter, the
following icons indicate whether or not the explanation applies to MIDI Songs or Audio Songs
individually.
Example:
685 675 645 635 695GP 665GP
MIDI Audio
Indicates explanation applies
only to MIDI Songs

40
CLP-685, CLP-675, CLP-645, CLP-635, CLP-695GP, CLP-665GP Owner’s Manual
Playing Back Songs
For each Voice group, the instrument contains several Demo recordings that
showcase the special characteristics of the corresponding Voices. For
information about the Voices which feature Demos that can be played back,
refer to the “Preset Voice List” on page 102.
1. Press the [SONG/DEMO] button to call up the Song list
display.
2. Use the [ ]/[ ] buttons to select “Demo,” and then press
the [ ] button to call up the next display.
3. Use the [ ]/[ ] buttons to select the desired Voice Demo,
and then press the [ ] button to call up the Demo display.
The currently selected Voice Demo name is shown in the display.
4. Press the [ / ] (Play/Pause) button to start playback.
5. Press the [ / ] (Play/Pause) button again to stop
playback.
The Piano Demo stops automatically when Piano Demo playback reaches
the end.
Selecting Other Demos
Press the [ ] button to return to the Song list display, then repeat steps 3
– 4 of this section.
Listening to the Voice Demos
1
4, 5
2, 3, 4
Demo display
NOTE
Recording operations cannot
be used during Voice Demo
playback.

41
CLP-685, CLP-675, CLP-645, CLP-635, CLP-695GP, CLP-665GP Owner’s Manual
Playing Back Songs
1. If you want to play back a Song in a USB flash drive,
connect the USB flash drive containing Song data to the
USB [TO DEVICE] terminal beforehand.
Audio files to be played must be on a USB flash drive.
2. Press the [SONG/DEMO] button to call up the Song List
display, then select the desired category using [ ]/[ ]
buttons.
Select the desired one from “50 Classics,” “Lesson,” “User” or “USB”
referring to the category descriptions below.
Playback of Songs
MIDI Audio
NOTE
The instrument can
automatically select a Song file
saved in the root directory of
the USB flash drive as soon as
the USB flash drive is
connected. For instructions,
refer to “USB Autoload” on
page 98.
2
5, 6
2, 3, 4
NOTE
Before using a USB flash drive,
be sure to read “Connecting
USB Devices (USB [TO
DEVICE] terminal)” on
page 72.
Demo
Voice Demos let you experience the characteristics of the Voices
(MIDI Song) (page 40).
50 Classics
50 classical Preset Songs (MIDI Songs). For these Songs, see the music
book “50 Classical Music Masterpieces,” included with this instrument.
For details, refer to the “Song List” on page 106.
Lesson
303 Preset Songs (MIDI Songs) ideal for practice, taken from “The Virtuoso
P
ianist” and others. For these Songs, refer to the Lesson Songs on
page 106.
Lesson Songs are divided into several folders depending on the
types.
User
MIDI Songs which have been recorded and saved to the instrument by
using the Record function (page 52), and MIDI Songs which have been
copied/moved to the instrument using File operations (page 63).
USB
MIDI/Audio Songs saved to the USB flash drive by recording them with this
instrument or Audio Songs converted from MIDI Songs (page 67), or MIDI/
Audio Songs saved to the USB flash drive.
Song category
[ ] button

42
CLP-685, CLP-675, CLP-645, CLP-635, CLP-695GP, CLP-665GP Owner’s Manual
Playing Back Songs
3. Press the [>] button to display the Songs in the specified
category, and then select a desired Song using the [ ]/[ ]
buttons.
When “User” or “USB” category is selected, the icon indicating Song
types are shown to the left of the Song name.
Since the Lesson Songs are conveniently divided into specific folders,
select the desired folder, press the [>] button, and then select a Song.
To select a recorded Song saved to USB flash drive:
When you record a Song and save it to a USB flash drive, the recorded
Song will automatically be saved to the USER FILES folder on a USB flash
drive. If you want to select the Song from the USER FILES folder, select
USB in step 2, and USER FILES folder in step 3.
4. Press the [>] button to select the desired Song.
The Song display is shown letting you to see the currently selected Song
name and its category name.
5. Press the [ / ] (Play/Pause) button to start playback.
The current position of the Song playback will be shown.
You can play the keyboard along with Song playback. You can also change
the Voice for your keyboard performance. To adjust the volume balance
between your keyboard performance and MIDI Song playback, or to
adjust the Audio Volume, set the appropriate Volume parameters
individually in the “Song” menu display (page 48).
NOTE
Press the [<] button to return to
the category/folder.
Icon
Song List
icon Data format
Folder
MIDI Songs
Audio Songs
NOTE
“NoSong” will be shown in the
display when no data exists in
that folder.
When Songs cannot be
read from a USB flash drive
If the song cannot be read, you
may need to change the
Language setting for the Song
name in the “System” menu
display (page 99).
NOTE
Press the [ ] button to return to
the Song list.
Song
name
Song display: MIDI Song Song display: Audio Song
Song
name
Category name Category name
NOTE
When the Song title is too long
to be displayed, press the [
]
button to see the full title.
Song display: MIDI Song Song display: Audio Song
Current position Current position
NOTE
If a Song has been selected,
the original tempo of the Song
is used, and the Metronome
setting (page 36) will be
ignored.

43
CLP-685, CLP-675, CLP-645, CLP-635, CLP-695GP, CLP-665GP Owner’s Manual
Playing Back Songs
6. Press the [ / ] (Play/Pause) button again to stop
playback.
Even if you don’t press the [ / ] (Play/Pause) button, the Song stops
automatically when Song playback reaches the end.
Rewind/Fast forward
1. Use the [<] and [>] buttons to move back or forth through
the Song (in bars or seconds), while the Song display is
shown.
Holding one of the buttons scrolls backward/forward continuously.
Pressing the [<] and [>] buttons simultaneously returns to the top
position of the Song.
Adjusting the tempo
You can adjust the playback tempo of a Song.
1. Press the [TEMPO] button to call up the Tempo display.
For a MIDI Song, press the [TEMPO] button during Song playback or
while the Song display is shown. For an Audio Song, press the [TEMPO]
button during Song playback.
2. Change the Tempo value using the [<]/[>] buttons.
The original tempo of the current Song can be recalled by pressing the [<]
and [>] buttons simultaneously.
When a MIDI Song is selected, the tempo range differs depending on the
Time Signature for a selected Song. Available setting values may only
include even numbers (multiples of 2), depending on the Time Signature.
For more information, refer to page 37.
When an Audio Song is selected, the tempo range is between 75% –
125%. 100% is the original tempo value. Higher values result in a faster
tempo.
3. Press the [EXIT] button to exit from the Tempo display.
NOTE
Useful playback functions are
described on pages 44 – 50.
NOTE
Pressing the [<] and [>]
buttons simultaneously returns
to the top position of the Song.
Song display: MIDI Song Song display: Audio Song
Measure number Elapsed time
NOTE
Changing the tempo of an
Audio Song may change its
tonal characteristics.
MIDI Song Audio Song
Tempo Tempo

44
CLP-685, CLP-675, CLP-645, CLP-635, CLP-695GP, CLP-665GP Owner’s Manual
Playing Back Songs
Some MIDI Songs, such as Preset Songs, are divided into right-hand and left-
hand parts. By using such Song data, you can practice the left hand by turning
on only the right-hand part, and practice the right hand by turning on only the
left-hand part—allowing you to practice parts separately for easy mastery of
difficult material.
1. Select a Song for practicing.
For instructions, refer to page 41. Song categories “50 Classics” and
“Lesson” are recommended for this.
2. Select a part you want to practice, then set the part to off.
Press the [FUNCTION] button repeatedly to call up the “Song” menu
display, then select the highlighted item in each display as illustrated
below.
In the “L/R” display, select the part (track) you want to mute for
practicing. Select “R” for practicing the right-hand part, or “L” for the left-
hand part.
3. Use the [>] button to select “Off” for the selected part.
4. Press the [ / ] (Play/Pause) button to start playback.
Play and practice the part you just muted.
Playing a One-hand Part — Part Cancel
Function (MIDI Songs)
MIDI Audio
4, 5
2
2, 3
NOTE
The parts can be turned on or
off even during playback.
NOTE
Usually, Channel 1 is assigned
to “R,” Channel 2 is assigned
to “L,” and Channels 3 – 16 are
assigned to “Extra.” However,
the assignments may differ
depending on the particular
Song. Channels assigned to
“Extra” cannot be set to on or
off individually.
NOTE
Some songs in “50 Classics”
and “Lesson” categories are
duet songs. Refer to page 106
about part assignment for the
duet songs.
NOTE
Whenever you select another
MIDI Song, both parts are
automatically turned on.
“Song” menu display
2-1. Use the [ ]/[ ] buttons
to select “L/R.”
2-2. Press the [>] button to
call up the next display.
2-3. Use the [ ]/[ ] buttons
to select desired track.
L/R display

45
CLP-685, CLP-675, CLP-645, CLP-635, CLP-695GP, CLP-665GP Owner’s Manual
Playing Back Songs
5. Press the [ / ] (Play/Pause) button again to stop
playback.
Even if you don’t press the [ / ] (Play/Pause) button, the Song stops
automatically when Song playback reaches the end.
There are three Repeat items as follows. These are convenient for repeatedly
practicing difficult phrases. It is a good idea to use this function and the Part
Cancel function (above) for practicing difficult phrases, in the case of MIDI
Songs.
•
AB Repeat ............. Play a MIDI Song repeatedly by designating a specific
range within the Song.
•
Phrase Repeat...... Play a MIDI Song repeatedly by designating a phrase or
phrases within the Song.
•
Song Repeat.......... Play a MIDI/Audio Song repeatedly, or play all MIDI/
Audio Songs saved in a designated folder repeatedly in
order or in random order.
The explanations here apply only to AB Repeat and Song Repeat. For Phrase
Repeat, refer to page 90.
1. Select a Song to be played back.
For instructions, refer to page 41.
2. Call up the Repeat display.
Press the [FUNCTION] button repeatedly to call up the “Song” menu
display. Select “Repeat,” then press the [>] button.
Playing Back a Song Repeatedly
2
2, 3, 4
“Song” menu display Repeat display

46
CLP-685, CLP-675, CLP-645, CLP-635, CLP-695GP, CLP-665GP Owner’s Manual
Playing Back Songs
3. In the Repeat display, select a desired item using the [ ]/
[ ] buttons, then press the [>] button.
If you want to set AB Repeat, select “A – B.”
If you want to set Song Repeat, select “Song.”
4. Set in the appropriate setting display.
•AB Repeat .................See below.
•Song Repeat...............See page 47.
AB Repeat setting
Specify the repeat range.
4-1. Press the [ / ] (Play/Pause) button to start Song
playback.
4-2. Press the [>] button at the starting point (A) of the range
to be repeated.
4-3. Press the [>] button again at the ending point (B).
After an automatic lead-in (to help guide you into the phrase), the
range from Point A to Point B is played back repeatedly.
5.
To turn off the Repeat function, press the [>] button
while “Repeat Off” is highlighted, or select another Song
.
MIDI Audio
A – B display
Specifying the top of a
Song as Point A
Specify Point A before starting
playback, then start playback
and specify Point B.
Specifying the end of a
Song as Point B
Specifying only Point A results
in repeat playback between
Point A and the Song end (as
Point B).
NOTE
You can also specify the repeat
range by the following
procedure.
1 Highlight the measure
number using the [
] button,
then fast-forward the Song to
Point A using the [<]/[>]
buttons.
2 Highlight “Set A” using the
[
] button, then press the [>]
button.
After specifying Point A, the
display for specifying Point
B is called up.
3 Specify Point B in the same
way as Point A.

47
CLP-685, CLP-675, CLP-645, CLP-635, CLP-695GP, CLP-665GP Owner’s Manual
Playing Back Songs
Song Repeat setting
4-1. Select the desired Repeat type using the [ ]/[ ] buttons
in the setting display.
• Off:
Disables repeated playback.
•Single:
Plays through the selected file repeatedly.
•All:
Continuously plays back all Songs within a designated range in order.
•Random:
Continuously plays back all Songs within a designated range in
random order.
4-2. Press the [ / ] (Play/Pause) button to start Repeat
playback.
Icons corresponding to each Repeat setting are shown on the Song
display.
While the Repeat setting is on, (Single), (All), or
(Random) is shown in the upper right corner of the Song display.
5. To turn off the Repeat function, press the [ / ] (Play/
Pause) button again to stop playback, and then select
“Off” in step 4-1.
MIDI Audio
Setting display
Checkmark
Icon

48
CLP-685, CLP-675, CLP-645, CLP-635, CLP-695GP, CLP-665GP Owner’s Manual
Playing Back Songs
When a MIDI Song is selected, you can adjust the Volume balance between the
Song playback and the sound you are playing on the keyboard, or between the
Right and Left parts of the selected Song. When an Audio Song is selected, you
can adjust the Audio Song volume.
Select the desired Song beforehand. For instructions, refer to page 41.
1. Press the [FUNCTION] button repeatedly to call up the
“Song” menu display. Select “Volume,” and then press the
[>] button.
2. When a MIDI Song is selected, select “Song – Keyboard”
or “Song L – R” using the [ ]/[ ] buttons, then press the
[>] button to call up the setting display.
When an Audio Song is selected, use the [<]/[>] buttons to
set the Audio playback volume. After setting the value, go
on to step 4.
•Song – Keyboard
Adjust the Volume balance between the MIDI Song playback and the
sound you are playing on the keyboard.
•Song L – R
Adjust the Volume balance between the Right and Left parts of the
selected MIDI Song.
Adjusting the Volume Balance
MIDI Audio
4
1
1, 2, 3
“Song” menu display (When a MIDI Song is selected)
“Song” menu display (When an Audio Song is selected)
NOTE
Some commercially available
music data contain extremely
high volumes. When using
such data (MIDI Song), adjust
the “Song – Keyboard” setting.

49
CLP-685, CLP-675, CLP-645, CLP-635, CLP-695GP, CLP-665GP Owner’s Manual
Playing Back Songs
3. Adjust the Volume balance by using the [<]/[>] buttons.
In the case of “Song – Keyboard”:
In the case of “Song L – R”:
4. Press the [EXIT] button twice to exit from the “Song”
menu display.
Whenever you select another MIDI Song, the setting for “Song L – R” is
restored to its default setting. As for “Song – Keyboard” and Audio
Volume, selecting another Song will not reset the value.
The Song playback volume will be lower.The volume of your playing will be lower.
R part volume will be lower. L part volume will be lower.
NOTE
The selected parameters of
“Song – Keyboard” will be
maintained (Backup Setting)
even when the power is turned
off. Make sure not to set the
volume levels to minimum.
Otherwise the sound of
keyboard or songs will not be
played. You can change the
settings to maintain the
selected parameter or not. For
details, refer to “Backup
Setting” on page 100.

50
CLP-685, CLP-675, CLP-645, CLP-635, CLP-695GP, CLP-665GP Owner’s Manual
Playing Back Songs
Starting/pausing playback by using a pedal
You can assign the Song Play/Pause function (equivalent to the [ / ] (Play/
Pause) button) to the center or the left pedal in the “System” menu. Press the
[FUNCTION] button repeatedly to call up the “System” menu display, and then
select “Pedal” → “Play/Pause” to make the assignment.
This is convenient for starting or pausing playback when you are performing
and can’t take your hands from the keyboard.
Transposing the pitch of a Song
You can shift the pitch of Song playback up or down in semitone intervals. You
can change the settings via the “Song” menu display: Press the [FUNCTION]
button repeatedly to call up the “Song” menu display → “Transpose” (page 90).
Useful Playback Functions
MIDI Audio

51
CLP-685, CLP-675, CLP-645, CLP-635, CLP-695GP, CLP-665GP Owner’s Manual
Playing the Keyboard along with Rhythm
Playback
This instrument features various rhythm patterns. In time with the Rhythm playback, you can enjoy your
keyboard performance.
1. Press the [RHYTHM] button to start Rhythm playback.
Intro playback starts followed by the Rhythm playback.
2. Use the [<]/[>] buttons to call up the desired Rhythm.
For details on the available Rhythms, refer to the Rhythm List (page 107).
3. Play the keyboard along with Rhythm playback.
4. To stop Rhythm playback, press the [RHYTHM] button
again.
The Rhythm will automatically stop after the Ending is played.
5. Press the [EXIT] button to exit from the Rhythm display.
1, 4
5
2
About the Rhythm Tempo
• The Rhythm tempo is
equivalent to that set for the
Metronome (page 36).
• Although you set the Rhythm
tempo, selecting a MIDI Song
will change the tempo value
to that specified in the
selected MIDI Song data.
Detailed Settings for the
Rhythm
From the “Metronome/Rhythm”
menu display (page 93), you
can set detailed parameters,
such as Rhythm volume and
Sync Start, with which pressing
a key will start Rhythm
playback.
NOTE
The Rhythm display cannot be
called up during the Song
playback or recording.
To set the Intro/Ending on
or off
“Intro” and “Ending” allow you
to vary the arrangement of the
accompaniment. You can set
“Intro” and “Ending” on/off via
“Intro” or “Ending” in the
“Metronome/Rhythm” menu
display (page 93).

52
CLP-685, CLP-675, CLP-645, CLP-635, CLP-695GP, CLP-665GP Owner’s Manual
Recording Your Performance
This instrument allows you to record your performance in the following two methods.
• MIDI Recording
With this method, recorded performances are saved to the instrument or a USB flash drive as an SMF
(format 0) MIDI file. If you want to re-record a specific section or edit parameters such as Voice, use this
method. Also you can record your performance to each Track one by one. Since a MIDI Song can be
converted to an Audio Song after recording (page 67), you may want to use MIDI recording (with
overdubbing and multiple parts) to first create a complex arrangement you would not otherwise be able to
play live, then convert it to an Audio Song. This instrument allows you to record approximately 500 KB of
data per Song.
•Audio Recording
With this method, recorded performances are saved to a USB flash drive as an Audio file. Recording is done
without designating the recorded part. Since it is saved in stereo WAV format of normal CD quality
resolution (44.1 kHz/16 bit) by default, it can be transmitted to and played on portable music players by
using a computer. Because audio signals, such as those from the [AUX IN] jack, are also recorded, you can
record your keyboard performance along with the performance sound of the connected CD player or
portable music players. This instrument allows you to record up to 80 minutes per single recording.
For details about the difference between MIDI Songs and Audio Songs, refer to page 39.
This chapter covers the following four methods. Note that the created data
format differs depending on the method, MIDI or Audio.
• Quick MIDI Recording .......................................page 53
This method lets you start recording most quickly. Your performance will be
recorded and saved to the “User” category in this instrument’s internal
memory.
• MIDI Recording — Independent Tracks ............ page 55
This lets you record the right, left and extra parts separately. Since you can
record the left part while playing back the right, this is useful for recording both
parts of a duet. Since you can record up to sixteen parts separately, record the
performance of each instrument part one by one and create fully orchestrated
compositions.
• MIDI Recording to the USB Flash Drive ............ page 57
This method is useful when you want to overwrite the already recorded MIDI
Song in the USB flash drive or create a New MIDI Song on the USB flash drive.
• Audio Recording to the USB Flash Drive ...........page 58
This method lets you record your performance as Audio data to the USB flash
drive connected to the USB [TO DEVICE] terminal.
MIDI
Audio
Recording Methods
MIDI
MIDI
MIDI
Audio

53
CLP-685, CLP-675, CLP-645, CLP-635, CLP-695GP, CLP-665GP Owner’s Manual
Recording Your Performance
This method is the quickest way to start recording.
1. Make the necessary settings such as Voice selection and
time signature.
Before starting the Recording operation, select a Voice (page 28) for your
keyboard performance, turn Dual/Split/Duo on or off as desired, set the
time signature of the Metronome/Rhythm (page 36), then select a
Reverb/Chorus/Effect type as desired.
2. Press the [REC] (Record) button to enter the Recording
mode.
The blank new Song for recording is automatically set.
The [
/ ] (Play/Pause) button will flash at the current tempo.
To exit from the Recording mode, press the [REC] (Record) button again.
3. Play the keyboard to start recording.
When you wish to record an empty section at the start of the Song, press
the [
/ ] (Play/Pause) button to start recording.
Quick MIDI Recording
MIDI
3, 6
5
2, 4
NOTE
If you want to record the left-
hand and right-hand parts
individually, refer to “MIDI
Recording—independent
Tracks” (page 55), since the
Recording method here
assumes that both the left and
right parts are being recorded
together.
Using the Metronome/
Rhythm
You can use the Metronome/
Rhythm while recording. While
the Metronome sound cannot
be recorded, the Rhythm
sound can. Make sure to start
enter the Recording mode
before starting Rhythm
playback, since entering the
Recording mode during
playback of the Rhythm stops
its playback.
NOTE
The “Song – Keyboard” Volume
Balance (page 48) will not be
recorded.
NOTE
With MIDI recording, the
performance will be recorded
to Track 1. However, in the
Dual/Split/Duo mode, the
tracks assigned for recording
and the tracks actually used for
recording are different. For
details refer to “Recording
Track Assignment” on page 55.
Mode:
A mode is a status under which
you can execute a certain
function. In Recording mode,
you can record Songs.
NOTE
Pressing and holding the [REC]
button for a second will call up
the display which lists the
Recording Target Songs. In this
case, select “New Song” then
press the [>] button referring to
the table on page 57.
To start recording as soon
as a Rhythm starts:
When a Rhythm (page 51) is
selected, press the [RHYTHM]
button to start Rhythm
playback and MIDI recording
simultaneously.
Measure number
REC display
REC display (during recording)

54
CLP-685, CLP-675, CLP-645, CLP-635, CLP-695GP, CLP-665GP Owner’s Manual
Recording Your Performance
4. After you finish your performance, press the [REC]
(Record) button again to stop recording.
This operation exits from the Recording mode and calls up the display for
saving the recorded performance data.
5. If you want to save the recorded performance, press the [>]
button to execute the Save operation while “Save” is
highlighted.
After the Save operation is completed, the display shows “Save
Completed” then returns to the Song display. The recorded Song will be
named “USERSONGxxx” (xxx: number) and saved in the “User”
category.
• If you are not satisfied with your performance and want to record
again, highlight “Retry” then press the [>] button. Try recording again
from step 3.
• If you do not want to save the recorded data, highlight “Cancel” then
press the [>] button.
6. To hear the recorded performance, press the [ / ] (Play/
Pause) button.
NOTICE
The recorded MIDI Song will be
lost if you change to another
Song or you turn the power off
without execu ting the Save
operation.
Renaming the recorded
Song
The recorded Songs are
named automatically, but you
can rename Songs as you like
(page 68).
Data that can be recorded to MIDI Songs
Data for each Track
• Note data (your keyboard performance)
•Voice selection
• Pedal operations (Damper/Soft/Sostenuto)
•Reverb Depth
•Chorus Depth
•Effect Depth
• Sound brightness — “Brightness”
• Resonance effect setting — “HarmonicContent”
•Octave
• Volume setting for each Voice — “Volume”
•Pan for each Voice
•Detune
•Touch Sensitivity
Data commonly for all
Tracks
•Scale
•Tempo
•Time Signature
• Reverb Type
•Chorus Type
•Effect Type
NOTE
Parameter settings other than
Voice and Tempo, such as note
data, pedal (Damper/Soft/
Sostenuto) data, octave setting
and time signature, cannot be
changed after recording.

55
CLP-685, CLP-675, CLP-645, CLP-635, CLP-695GP, CLP-665GP Owner’s Manual
Recording Your Performance
With MIDI Recording, you can create a MIDI Song consisting of 16 tracks by
recording your performance to each track one by one. In recording a piano
piece, for example, you can record the right-hand part to Track 1 then record
the left-hand part to Track 2, allowing you create a complete piece which may
be difficult to play live with both hands together. To record a performance with
Rhythm playback, for example, record Rhythm playback to Tracks 9 – 10, then
record melodies to Track 1 while listening to the already recorded Rhythm
playback. In this way, you can create an entire Song which would otherwise be
difficult, or even impossible, to play live.
1. Execute the same operations as in step 1 and step 2 on
page 53 to enter the Recording mode with a new blank
Song selected.
2. Use the [<]/[>] buttons to select a Recording Track.
When you want to record the right-hand part, highlight “R” (Track 1).
When you want to record the left-hand part, highlight “L” (Track 2).
Alternately, when you want to record your performance to Tracks 3 – 16,
call up the desired one by pressing the [<]/[>] buttons repeatedly.
3. Play the keyboard to start recording.
4. After you finish your performance, press the [REC]
(Record) button to stop recording.
This operation exits from the Recording mode and calls up the display for
saving the recorded performance data.
MIDI Recording — Independent Tracks
MIDI
NOTE
If you want to record your
performance to the USB flash
drive or you want to add the
recording to the MIDI Song in
the USB flash drive, refer to
“MIDI Recording to the USB
flash drive” (page 57).
NOTE
Rhythm cannot be added to a
recorded Song. When you want
to record Rhythm, make sure to
record the Rhythm playback
first.
When you want to record a new track of an already recorded
MIDI Song:
After selecting the target MIDI Song (steps 1 – 4 on pages 41 – 42), press and hold
the [REC] (Record) button for a second to call up the display which lists the
Recording Target Songs, select the 4th item (the selected MIDI Song), press the [>]
button, then go to step 2 described on this page.
12345678910111213141516
Example:
Right-hand part
Left-hand part
NOTE
If you record your performance
with both hands to R then to L,
both are played back at the
same time as a single Song.
Recording Track
Assignment
When Dual/Split/Duo is on, only
the R1 Voice performance will
be recorded to the selected
Track, and the R2 Voice
performance will be recorded
to the Track number which is 6
plus the selected Track, and
the L Voice performance of
Split/Duo will be recorded to
the Track number which is 3
plus the selected Track.
Rhythm playback will be
recorded to Tracks 9/10.
NOTICE
Note that recording your
performance to a Track
containing data will overwrite
the previously recorded data.
Recording Track
Track Data Status
Contains data.
Contains no data.

56
CLP-685, CLP-675, CLP-645, CLP-635, CLP-695GP, CLP-665GP Owner’s Manual
Recording Your Performance
5. If you want to save the recorded performance, press the [>]
button to execute the Save operation while “Save” is
highlighted.
After the Save operation is completed, the display shows “Save
Completed” then returns to the Song display. The recorded Song will be
named “USERSONGxxx” (xxx: number) and saved in the “User”
category.
• If you are not satisfied with your performance and want to record
again, highlight the cursor to “Retry” then press the [>] button. Try
recording again from step 3.
• If you do not want to save the recorded data, highlight “Cancel” then
press the [>] button.
6. To hear the recorded performance, press the [ / ] (Play/
Pause) button.
7. To record another Track, enter the Song Recording mode
again.
7-1. Press and hold the [REC] (Record) button for a second.
The Recording Target Songs will be listed on the display.
7-2. Use the [ ] button to select existing MIDI Song (at the
bottom of the list), then press the [>] button.
You can check whether or not each Track contains recorded data by the
mark appears in upper right of each Track.
Track Data Status
8. Record your performance to another track by repeating
steps 2 – 6 of this section.
In step 2, select a track which has no recorded data. In step 3, play the
keyboard while listening to the already recorded data.
NOTICE
The recorded MIDI Song will be
lost if you change to another
Song or you turn the power off
without execu ting the save
operation.
Renaming the recorded
Song
The recorded Songs are
named automatically, but you
can rename Songs as desired
(page 68).
Contains data.
Contains no data.
NOTICE
Note that recording your
performance to a Track
containing data will overwrite
the previously recorded data.

57
CLP-685, CLP-675, CLP-645, CLP-635, CLP-695GP, CLP-665GP Owner’s Manual
Recording Your Performance
These instructions describe how to overwrite an already recorded MIDI Song
in the USB flash drive or how to create a New MIDI Song on the USB flash
drive.
1. Connect the USB flash drive to the USB [TO DEVICE]
terminal.
2. Select a MIDI Song as Recording target, then enter the
Recording mode.
2-1. If you want to record an additional Track to the already
recorded MIDI Song, select the desired MIDI Song in the USB
flash drive. If you want to record from scratch, skip this step.
2-2. Press and hold the [REC] (Record) button for a second to call
up the display which lists the Recording Target Songs.
2-3. From the Recording Target Songs, select “New Song (USB)”
or the MIDI Song selected in step 2-1 (4th item below) using
the [
]/[ ] buttons, then press the [>] button to enter the
Recording mode.
* Can be selected only when the USB flash drive is connected to the USB [TO DEVICE]
terminal.
** Will not be shown when an already recorded MIDI Song is not selected in step 2-1 above,
or when a Preset Song or Protected Song is selected in step 2-1.
MIDI Recording to the USB Flash Drive
MIDI
NOTE
To connect a USB flash drive,
be sure to read the section
“Connecting USB Devices
(USB [TO DEVICE] terminal)”
on page 72.
NOTE
Before starting the Recording
operation, check the remaining
memory capacity of the USB
flash drive. “System” menu:
“Utility” “USB Properties”
(page 98).
Recording Target
Song
Description
New Song Select this when you want to record your performance to a
blank MIDI Song and save to “User” category in this
instrument’s internal memory.
New Song (USB)* Select this when you want to record your performance to a
blank MIDI Song and save to the USB flash drive.
New Audio (USB)* Select this when you want to record your performance to
blank audio data and save to the USB flash drive.
xxxxx (MIDI Song
selected in step 2-1
above)**
Select this when you want to record additionally to/overwrite
the currently selected MIDI Song.

58
CLP-685, CLP-675, CLP-645, CLP-635, CLP-695GP, CLP-665GP Owner’s Manual
Recording Your Performance
3. Execute the Recording operation, then save the recorded
performance.
• When you want to record additionally to the currently
selected MIDI Song, or record to a specified track on a
blank MIDI Song:
Execute steps 2 – 8 in “MIDI Recording—Independent Tracks” on
page 55.
• When you want to quick record to a blank MIDI Song:
Execute steps 3 – 6 in “Quick MIDI Recording” on page 53.
These instructions describe how to record your performance as audio data.
Note that an audio file to which your performance is to be recorded can be
saved only to a USB flash drive. This is why you should prepare your USB flash
drive device before starting the Recording operation.
1. Connect the USB flash drive to the USB [TO DEVICE]
terminal.
2. Press and hold the [REC] (Record) button for a second to
call up the display which lists the Recording Target Songs.
3. Use the [ ]/[ ] buttons to select “New Audio (USB)” then
press the [>] button.
4. Execute steps 3 – 6 in “Quick MIDI Recording” (page 53).
Unlike with MIDI Recording, the elapsed time is shown on the display
while Audio Recording is being executed.
NOTICE
Note that recording your
performance to a Track
containing data will overwrite
the previously recorded data.
NOTE
The time signature and tempo
cannot be changed when
replacing the part of an
existing MIDI Song.
Audio Recording to the USB Flash Drive
Audio
NOTE
To connect a USB flash drive,
be sure to read the section
“Connecting USB Devices
(USB [TO DEVICE] terminal)”
on page 72.
NOTE
Before starting the Recording
operation, check the remaining
memory capacity of the USB
flash drive. “System” menu:
“Utility” “USB Properties”
(page 98).
NOTE
With Audio recording, distorted
sound may be produced if the
Voice Volume is set to the value
higher than the default setting.
Make sure to set the Voice
Volume to the default value or
less before recording from the
“Voice” menu display: “Voice
Edit” “Volume” (page 87).
NOTE
With Audio recording, audio
signals such as those from the
[AUX IN] jack are also
recorded.

59
CLP-685, CLP-675, CLP-645, CLP-635, CLP-695GP, CLP-665GP Owner’s Manual
Recording Your Performance
Re-recording a MIDI Song in parts
You can re-record a specific range of the MIDI Song.
1. Set the parameters which determine how recording starts
and stops.
1-1. Press the [FUNCTION] button repeatedly to call up the
“Recording” menu display.
1-2. Use the [ ]/[ ] buttons to select “RecStart,” then select the
value which determines how recording starts by using the [>]
button.
•Normal
The already recorded data will be replaced with the new one as soon
as recording starts.
• KeyOn
The already recorded data will be maintained until you press a key,
and actual recording starts as soon as you press a key.
1-3. Use the [ ]/[ ] buttons to select “RecEnd,” then select the
value which determines how recording stops by using the [>]
button.
•Replace
The data after the point you stop recording will also be erased.
•PunchOut
The data after the point you stop recording will remain.
Other Recording Techniques
MIDI
4, 7, 10
1
1, 4, 5, 6
2
5, 8

60
CLP-685, CLP-675, CLP-645, CLP-635, CLP-695GP, CLP-665GP Owner’s Manual
Recording Your Performance
2. Press the [SONG/DEMO] button to call up the Song List
display.
3. Select the desired MIDI Song.
For instructions, refer to page 41.
4. Specify the start point you wish to re-record.
Use the [<]/[>] buttons to move the playback position (measure number)
to the desired point. Alternately, press the [
/ ] (Play/Pause) button to
start playback, then press the [
/ ] button again slightly prior to the
desired point.
If necessary, select the settings (Voice and other parameters).
Select the desired settings, if you wish to change the previous ones.
5. Press and hold the [REC] (Record) button for a second to
call up the display which lists the Recording Target Songs,
then select the 4th item (Song selected in step 3), then
press the [>] button to enter the recording mode.
6. Use the [<]/[>] buttons to select a Track for re-recording.
7. Play the keyboard or press the [ / ] (Play/Pause) button
to start recording.
8. Press the [REC] (Record) button to stop recording.
9. Save the recorded performance by following step 5 on
page 56.
10.To hear the recorded performance, press the [ / ] (Play/
Pause) button.
NOTE
The time signature cannot be
changed when replacing the
part of an existing Song.

61
CLP-685, CLP-675, CLP-645, CLP-635, CLP-695GP, CLP-665GP Owner’s Manual
Recording Your Performance
Changing the tempo or the Voice of a previously
recorded MIDI Song
For MIDI Songs, you can change the tempo and Voice after recording to change
a feel or to set a more suitable tempo.
To change the tempo:
1. Select the MIDI Song you wish to change.
For instructions, refer to page 41.
2. Press the [TEMPO] button to call up the Tempo display,
then set the desired Tempo.
For instructions, refer to page 36.
3. Press the [FUNCTION] button repeatedly to call up the
“Song” menu display, then select the highlighted item in
each display as illustrated below.
4. Apply the selected Tempo value to the current MIDI Song
data.
Press the [ ] button to highlight “Execute,” then press the [>] button to
apply the new Tempo value to the current MIDI Song data.
MIDI
3
2
5
3, 4
“Song” menu display
3-1. Use the [ ]/[ ] buttons
to select “Edit.”
3-2. Press the [>] button to
call up the next display.
3-3. Use the [ ]/[ ] buttons
to select “Tempo Change.”
3-4. Press the [>] button to call up
the next display.
Edit display Tempo Change display

62
CLP-685, CLP-675, CLP-645, CLP-635, CLP-695GP, CLP-665GP Owner’s Manual
Recording Your Performance
When this operation is completed, “Completed” is shown on the display,
and the Tempo Change display will be restored after a while.
5. Press the [EXIT] button to exit from the “Song” menu
display.
To change the Voice:
1. Select the MIDI Song you wish to change.
For instructions, refer to page 41.
2. Select the desired Voice.
For instructions, refer to page 28.
3. Press the [FUNCTION] button repeatedly to call up the
“Song” menu display, then select the highlighted item in
each display as illustrated below.
4.
Press the [>] button to call up the setting display, then select
the desired Track using the [ ]/[ ] buttons.
5. Apply the Voice selected in step 2 for the Track selected in
step 4 to the current MIDI Song data.
Press the [<] button to return to the Voice Change display. Press the [ ]
button to highlight “Execute,” then press the [>] button to apply the new
Voice to the current MIDI Song data.
When this operation is completed, “Completed” is shown on the display,
and the Voice Change display will be restored after a while.
6. Press the [EXIT] button to exit from the “Song” menu
display.
“Song” menu display
3-1. Use the [ ]/[ ] buttons
to select “Edit.”
3-2. Press the [>] button to
call up the next display.
3-3. Use the [ ]/[ ] buttons
to select “Voice Change.”
3-4. Press the [>] button to
call up the next display.
Edit display Voice Change display

63
CLP-685, CLP-675, CLP-645, CLP-635, CLP-695GP, CLP-665GP Owner’s Manual
Handling Song Files
The “File” menu in the “Song” menu display (page 90) enables you to apply various operations to Song files
— Songs you recorded on this instrument or commercially available Songs.
To
connect a USB flash drive, be sure to read the section “Precautions when using the USB [TO DEVICE]
terminal” on page 72.
Settings marked with a “*” are effective only when a MIDI Song is selected.
Song Types and File Operation Limitations
Song types are indicated as the category name and icon in the Song display. The
following chart shows the Song type and restrictions on File operations.
* The icon appears only when you select a Song in the “User” or “USB” category.
: Yes, ×: No
* There are two types of Songs: original and edited. Original and edited Songs should be saved in the same folder. If not, playback cannot be done.
Operation File menu Page
Deleting files Delete pages 64, 65
Copying files *Copy pages 64, 65
Moving files *Move pages 64, 66
Converting a MIDI Song to an Audio Song during playback *MIDI to Audio pages 64, 67
Renaming files Rename pages 64, 68
File
A file contains a group of data.
On this instrument, a Song file
includes Song data and a Song
name.
Restrictions for protected
Songs
Commercially available Song
data may be copy protected to
prevent illegal copying or
accidental erasure.
Song name
Icon*
Category name
Data Location
Song Type
Deleting
files
Renaming
files
Copying
files
Moving
files
Convert a
MIDI Song to
an Audio
Song during
playback
Category
Instrument Demo Demo (Voice Demo) ×××× ×
50 Classics
50 classical Preset Songs ×××× ×
Lesson Lesson Preset Songs ×××× ×
User Your own recorded Songs
(MIDI)
MIDI Songs with protect
applied
×× ×
MIDI Songs with Yamaha’s
proprietary protect applied
× ×
USB flash
drive device
USB MIDI Songs
Audio Songs ×× ×
MIDI Songs with protect
applied
×× ××
MIDI Songs with Yamaha’s
proprietary protect applied
× ×
*
*

64
CLP-685, CLP-675, CLP-645, CLP-635, CLP-695GP, CLP-665GP Owner’s Manual
Handling Song Files
Basic Song File Operation
Song files can be handled via the instructions shown below.
1. Connect the appropriate USB flash drive containing the
desired files to the USB [TO DEVICE] terminal.
2. Select a Song for handling.
For information on selecting a Song, see page 41.
3. Call up the File mode.
3-1. Press the [FUNCTION] button repeatedly to call up the
“Song” menu display. Use the [
]/[ ] buttons to select “File”
then press the [>] button.
3-2. Select the desired operation from “Delete,” “Copy,” “Move,”
“MIDI to Audio” or “Rename.”
From here, if you wish to close the File mode, press the [EXIT] button
once or twice.
4. Execute the selected operation.
For specific instructions, refer to the corresponding section.
•
Delete....................................page 65
•
Copy......................................page 65
•
Move .....................................page 66
•
MIDI to Audio...................page 67
•
Rename ................................page 68
During operation, messages (information, confirmation, etc.) may be
shown on the display. For explanations and details, refer to “Message List”
on page 108.
5. Press the [EXIT] button to close the File mode.
“Song” menu display
For example: Renaming files
NOTICE
Do not disconnect the USB
flash drive during file handling
or when a USB flash drive is
mounted. Doing so may delete
all data in the USB flash drive
and the instrument.

65
CLP-685, CLP-675, CLP-645, CLP-635, CLP-695GP, CLP-665GP Owner’s Manual
Handling Song Files
For details about Song types which can be deleted, refer to page 63.
See page 64 for information on basic operations.
The following is a detailed procedure of step 4 on that page.
4-1. While “Delete” is highlighted, press the [>] button to call
up the setting display.
4-2. Highlight “Execute” by pressing [ ] button, and then
press the [>] button.
After the Song is deleted, the display returns to the Song List display.
For details about Song types which can be copied, refer to page 63.
Range of the Copy/Move operation
As for a MIDI Song in the “User” category in the instrument, you can Copy/
Move it only to the USER FILES folder on a USB flash drive. Selecting a MIDI
Song from “User” for copying/moving automatically specifies the USER FILES
folder as the destination.
As for a MIDI Song in a USB flash drive, you can Copy/Move it to the “User”
category in the instrument.
See page 64 for information on basic operations.
The following is a detailed procedure of step 4 on that page.
Deleting Files — Delete
NOTICE
Do not turn off the power or
eject the USB flash drive while
“Executing” is shown in the
display.
Copying Files — Copy
USER FILES folder
If the USB flash drive device
plugged into the instrument
contains no USER FILES folder,
one will be created
automatically when you format
or record a Song to that device.
The recorded Song will then be
saved in that folder.
NOTE
Please note that the copy
features are intended for your
personal use only.
NOTE
Folders cannot be copied.
Root:
The highest level of a
hierarchical structure. This
indicates an area which does
not belong to a folder.
Instrument
USB flash drive
User
Can be copied/moved.
Can be copied/moved.
Root
USER FILES
folder

66
CLP-685, CLP-675, CLP-645, CLP-635, CLP-695GP, CLP-665GP Owner’s Manual
Handling Song Files
4-1. While “Copy” is highlighted, press the [>] button to call
up the setting display.
4-2. Highlight “Execute” by pressing [ ] button, then press
the [>] button.
The selected Song will be copied to the destination with the same name
as the copy source file.
For details about Song types which can be moved, refer to page 63.
See page 64 for information on basic operations.
The following is a detailed procedure of step 4 on that page.
4-1. While “Move” is highlighted, press the [>] button to call
up the setting display.
4-2. Highlight “Execute” by pressing the [ ] button, then
press the [>] button.
The selected Song will be moved to the destination and the display
returns to the Song list display.
File
name
Copy destination
Copy destination:
“USB” will be shown when the
copy destination is the USB
flash drive or “User” when the
instrument is the copy
destination. A file copied to the
USB flash drive is stored to the
USER FILES folder on it.
NOTE
A message appears when a
Song with the same name
already exists in the copy
destination. Select “Overwrite”
when you want to overwrite the
selected Song, or “Cancel” to
cancel by using the [
]/[ ]
buttons, and then press the [>]
button.
NOTICE
Overwrite operations erase any
existing data of the copy
destination file and overwrite
with data of the copy source
file.
NOTICE
Do not turn off the power or
eject the USB flash drive while
“Executing” is shown in the
display.
Moving Files — Move
Move destination
“USB” will be shown when the
move destination is the USB
flash drive or “User” when the
instrument is the move
destination. A file moved to the
USB flash drive is stored to the
USER FILES folder on it.
NOTE
A message appears when a
Song with same name already
exists in the move destination.
Select “Overwrite” when you
want to overwrite the selected
Song, or “Cancel” to cancel by
using the [
]/[ ] buttons, then
press the [>] button.
NOTICE
Overwrite operations erase any
existing data of the move
destination file and overwrite
with data of the move source
file.
NOTICE
Do not turn off the power or
eject the USB flash drive while
“Executing” is shown in the
display.
Move destination
File
name

67
CLP-685, CLP-675, CLP-645, CLP-635, CLP-695GP, CLP-665GP Owner’s Manual
Handling Song Files
A MIDI Song in the “User” memory of the instrument or on a USB flash drive
can be converted to an Audio Song then saved to the USER FILES folder on a
USB flash drive. For information about which Song types can be converted,
refer to page 63.
See page 64 for information on basic operations.
The following is a detailed procedure of step 4 on that page.
4-1. While “MIDI to Audio” is highlighted, press the [>]
button to call up the setting display.
4-2. Highlight “Execute” by pressing the [ ] button, then
press the [>] button.
This operation starts playback and conversion from MIDI to Audio.
This is basically the same as that of Audio Song Recording, which
allows you to record your keyboard performance and other audio, such
as that from [AUX IN]. After you convert the Song, a message “Convert
completed” will be shown and the display returns to Song List display.
Convert a MIDI Song to an Audio Song during
Playback — MIDI to Audio
NOTE
After conversion, the MIDI
Song remains in the original
data location.
NOTICE
Do not turn off the power or
disconnect the USB flash drive
during the conversion.
Otherwise the data will be lost.
NOTE
A message appears when a
Song with same name already
exists in the copy destination.
Select “Overwrite” when you
want to overwrite the selected
Song by using the [
]/[ ]
buttons, then press the [>]
button.
NOTE
To cancel this operation, press
the [EXIT] button during the
conversion. When the
operation is canceled, the
converted Audio Song will not
be saved.

68
CLP-685, CLP-675, CLP-645, CLP-635, CLP-695GP, CLP-665GP Owner’s Manual
Handling Song Files
For details about Song types which can be renamed, refer to page 63.
See page 64 for information on basic operations.
The following is a detailed procedure of step 4 on that page.
4-1. While “Rename” is highlighted, press the [>] button to
call up the setting display.
4-2. Assign a name to the Song.
Use the [<]/[>] buttons to move the highlight (underline).
Use the [
]/[ ] buttons to change the character at the current cursor
position. Pressing both buttons simultaneously will delete the character
at the current cursor position.
A Song name can contain up to 46 characters. Characters which extend
beyond the display capacity and are not visible can be viewed by
moving the highlight by using the [<]/[>] buttons.
4-3. Press the [FUNCTION] button.
After the Song is renamed, the display returns to Song List display
where the renamed Song can be selected.
Renaming Files — Rename
Cursor
NOTE
For information about the
character types available for
the Song name, refer to
“Language” on page 99.
NOTICE
Do not turn off the power or
eject the USB flash drive while
“Executing” is shown in the
display.

69
CLP-685, CLP-675, CLP-645, CLP-635, CLP-695GP, CLP-665GP Owner’s Manual
Connections
For information about location of these connectors, refer to “Panel Controls
and Terminals” on page 13.
Connectors
CAUTION
Before connecting the
instrument to other
electronic components, turn
off the power of all the
components. Also, before
turning any components on
or off, make sure to set all
volume levels to minimum
(0). Otherwise, damage to the
components, electrical
shock, or even permanent
hearing loss may occur.
685 675 645 635 695GP 665GP
Terminals under the keyboard
Bottom (rear view)
685 675 645 635 695GP 665GP
Terminals under the keyboard
Bottom (rear view)
CLP-675
CLP-645/635/665GP
Right
(higher-key side)
Left
(lower-key side)
Right
(higher-key side)
Left
(lower-key side)

70
CLP-685, CLP-675, CLP-645, CLP-635, CLP-695GP, CLP-665GP Owner’s Manual
Connections
USB [TO DEVICE] terminal
This terminal allows connection to a USB flash drive or a smart device, such as
an iPhone/iPad. For details, refer to “Connecting USB Devices” on page 72 and
“Connecting to a Computer/Smart Device” on page 74.
USB [TO HOST] terminal
This terminal allows connection to a computer or a smart device, such as an
iPhone/iPad. For details, refer to “Connecting to a Computer/Smart Device” on
page 74.
MIDI [IN], [OUT], [THRU] terminals
These terminals are used to connect external MIDI devices, such as a
synthesizer or a sequencer. For details, refer to “Connecting External MIDI
Devices” on page 73.
[AUX PEDAL] jack (CLP-685, CLP-695GP)
A separately sold FC7 foot controller or FC4A/FC5 foot switch can be
connected to this jack.
By using an FC7 you can control the volume while playing to add expression to
your performance, or control various other functions. By using an FC4A/FC5,
you can switch various selected functions on/off. To select the function that will
be controlled, use the “Aux Assign” (page 96) in the “System” menu display.
[AUX IN] jack
You can connect the headphone jack of a portable audio player to the
instrument’s [AUX IN] jack, letting you hear the sound of that audio player
through the built-in speakers of the instrument.
NOTE
There are two different types of
USB terminals on the
instrument: USB [TO DEVICE]
and USB [TO HOST]. Take care
not to confuse the two
terminals and the
corresponding cable
connectors. Be careful to
connect the proper plug in the
proper direction.
NOTE
• Connect or disconnect the
pedal when the power of this
instrument is turned off.
• Do not press the footswitch/
foot pedal while turning the
power on. Doing this
changes the recognized
polarity of the footswitch,
resulting in reversed
footswitch operation.
NOTICE
When the Clavinova’s [AUX IN]
jack is connected to an external
device, first turn on the power to
the external device, then to the
Clavinova. Reverse this order
when you turn the power off.
NOTE
The instrument’s [MASTER
VOLUME] setting affects the
input signal from the [AUX IN]
jack.
NOTE
Use audio cables and adaptor
plugs having no (zero)
resistance.
Instrument
Phone plug (stereo mini) Phone plug (stereo mini)
Portable audio player
Audio cable
Headphone jack
Audio signal

71
CLP-685, CLP-675, CLP-645, CLP-635, CLP-695GP, CLP-665GP Owner’s Manual
Connections
AUX OUT [L/L+R] [R] jacks (CLP-685, CLP-695GP)
AUX OUT [R] [L/L+R] jacks (CLP-675/645/635/665GP)
These jacks let you connect the Clavinova to external powered speaker systems,
for playing in larger venues at higher volumes.
The Clavinova’s [MASTER VOLUME] setting will affect the sound that is
output from AUX OUT jacks. When the Clavinova’s AUX OUT jacks are
connected to an external speaker and you want to turn off the speaker sound of
the Clavinova, switch the “speaker” parameter to off via the “System” menu:
“Utility” “Speaker” (page 98).
[PEDAL] jack
This jack allows connection to the pedal cord (CLP-685: page 115, CLP-675:
page 119, CLP-645/635: page 121, CLP-695GP: page 126, CLP-665GP:
page 128).
NOTE
Use only the [L/L+R] jack for
connection with a monaural
device.
NOTICE
•To avoid possible damage,
first turn on the power to the
instrument, then to the
external device. When turning
off the power, first turn off the
power to the external device,
then to the instrument. Since
this instrument’s power may
automatically be turned off
due to the Auto Power Off
function (page 17), turn off
the power to the external
device, or disable Auto Power
Off when you do not intend to
operate the instrument.
• Do not route the output from
the AUX OUT jacks to the
[AUX IN] jack. If you make
this connection, the signal
input at the [AUX IN] jack is
output from the AUX OUT
jacks. These connections
could res
ult in a
feedbac
k
loop that will make normal
performance impossible, and
may even damage the
equipment.
NOTE
Use audio cables and adaptor
plugs having no (zero)
resistance.
NOTE
When you are monitoring the
sound output via the AUX OUT
jacks from headphones
connected to the instrument,
we recommend that you set the
Binaural Sampling and
Stereophonic Optimizer
functions to off. For details,
refer to page 20.
685 675 645 635 695GP 665GP
Clavinova
AUX OUT Input jack
Powered speaker
Audio signal
Phone plug (standard) Phone plug (standard)
Audio cable
685 675 645 635 695GP 665GP
Clavinova
AUX OUT Input jack
Powered speaker
Audio cable
Phone plug (standard) Phone plug (standard)
Audio signal

72
CLP-685, CLP-675, CLP-645, CLP-635, CLP-695GP, CLP-665GP Owner’s Manual
Connections
You can connect a USB flash drive or a USB wireless LAN adaptor (sold separately) to the USB [TO DEVICE]
terminal. You can save data you’ve created on the instrument to the USB flash drive (pages 63, 100), or you
can connect the instrument to a smart device such as an iPad via wireless LAN (page 74).
Connecting USB Devices (USB [TO DEVICE] Terminal)
Precautions when using the USB
[TO DEVICE] terminal
This instrument features a built-in USB [TO DEVICE]
terminal. When connecting a USB device to the
terminal, be sure to handle the USB device with care.
Follow the important precautions below.
NOTE
For more information about the handling of USB devices, refer
to the owner’s manual of the USB device.
Compatible USB devices
•USB flash drive
•USB hub
• USB wireless LAN adaptor UD-WL01 (sold separately;
may not be available in some areas)
Other USB devices such as a computer keyboard or
mouse cannot be used.
The instrument does not necessarily support all
commercially available USB devices. Yamaha cannot
guarantee operation of USB devices that you purchase.
Before purchasing a USB device for use with this
instrument, please visit the following web page:
http://download.yamaha.com/
After selecting your country and clicking on
“Documents and Data” from the “Support” page,
select the desired Language and Product Category,
and then enter the model name into the search box.
Although USB devices 2.0 to 3.0 can be used on this
instrument, the amount of time for saving to or
loading from the USB device may differ depending
on the type of data or the status of the instrument.
USB 1.1 devices cannot be used on this instrument.
NOTE
The rating of the USB [TO DEVICE] terminal is a maximum of 5V/
500mA. Do not connect USB devices having a rating above this,
since this can cause damage to the instrument itself.
Connecting a USB device
When connecting a USB device to
the USB [TO DEVICE] terminal,
make sure that the connector on
the device is appropriate and that
it is connected in the proper
direction.
NOTICE
•Avoid connecting or disconnecting the USB device during
playback/recording and file management operations (such
as Save, Copy, Delete and Format), or when accessing the
USB device. Failure to observe this may result in “freezing”
of the operation of the instrument or corruption of the USB
device and the data.
NOTICE
• When connecting then disconnecting the USB device (and
vice versa), make sure to wait a few seconds between the
two operations.
NOTE
• If you intend to connect two or three devices at the same
time to a terminal, you should use a bus-powered USB hub.
Only one USB hub can be used. If an error message
appears while using the USB hub, disconnect the hub from
the instrument, then turn on the power of the instrument and
re-connect the USB hub.
• Do not use an extension cable when you connect a USB
device.
Using USB Flash Drives
By connecting the instrument to a USB flash drive,
you can save data you’ve created to the connected
device, as well as read data from the connected USB
flash drive.
Number of USB flash drives that can be
used
Only one USB flash drive can be connected to the
USB [TO DEVICE] terminal. (If necessary, use a USB
hub. The number of USB flash drives that can be used
simultaneously with musical instruments even when
a USB hub is used is only one.)
Formatting a USB flash drive
You should format the USB flash drive only with this
instrument (page 98). A USB flash drive formatted on
another device may not operate properly.
NOTICE
The format operation overwrites any previously existing data.
Make sure that the USB flash drive you are formatting does not
contain important data. Proceed with caution, especially when
connecting multiple USB flash drive.
To protect your data (write-protect)
To prevent important data from being inadvertently
erased, apply the write-protect provided with each
USB flash drive. If you are saving data to the USB
flash drive, make sure to disable write-protect.
Turning off the instrument
When turning off the instrument, make sure that the
instrument is NOT accessing the USB flash drive by
playback/recording or file management (such as
during Save, Copy, Delete and Format operations).
Failure to do so may corrupt the USB flash drive and
the data.

73
CLP-685, CLP-675, CLP-645, CLP-635, CLP-695GP, CLP-665GP Owner’s Manual
Connections
The sophisticated MIDI functions give you powerful tools to expand your
music performance and creation possibilities. Use the MIDI terminals and
standard MIDI cables to connect external MIDI devices (keyboard, sequencer,
etc.)
• MIDI [IN]..........Receives MIDI messages from another MIDI device.
• MIDI [OUT]......Transmits MIDI messages generated on this instrument to
another MIDI device.
• MIDI [THRU]...Simply relays the MIDI messages received at MIDI IN.
Connecting External MIDI Devices (MIDI
Ter mi na ls )
CAUTION
Before connecting the
instrument to other MIDI
devices, turn off the power of
all the components.
NOTE
For details about MIDI, refer to
“MIDI Basics” downloadable
from the Yamaha website
(page 9).
NOTE
Since MIDI data that can be
transmitted or received varies
depending on the type of MIDI
device, check the MIDI Data
Format to find out what MIDI
data and commands your
devices can transmit or
receive. The MIDI Data Format
is contained in the “MIDI
Reference” downloadable from
the Yamaha website (page 9).
685 675 645 635 695GP 665GP
Clavinova
MIDI IN MIDI INMIDI OUT MIDI OUT
MIDI transmit
MIDI receive
External MIDI device
685 675 645 635 695GP 665GP
Clavinova
MIDI IN MIDI IN
MIDI OUT
MIDI OUT
MIDI receive
MIDI transmit
External MIDI device

74
CLP-685, CLP-675, CLP-645, CLP-635, CLP-695GP, CLP-665GP Owner’s Manual
Connections
By connecting this instrument to a computer or a smart device, such as an
iPhone, iPad, etc., you can take advantage of convenient functions and get more
enjoyment out of it. For details on what you can do by using the connections,
refer to page 81.
Connection example
For more information, refer to the “Computer-related Operations” and the
“iPhone/iPad Connection Manual” on the website (page 9).
If you use the smart device app “Smart Pianist” (page 83) with the instrument,
the connection wizard on the app helps you to connect the instrument to your
smart device properly.
NOTICE
• Use an AB type USB cable of less than 3 meters. USB 3.0 cables cannot be used.
•If you are using a DAW (digital audio workstation) application with this instrument, set the Audio Loop
Back function (page 84) to off. Otherwise, a loud sound may occur, depending on the settings of the
computer or the application software.
• Do not place your computer or smart device in an unstable position. Doing so may cause the device
to fall and result in damage.
Connecting via Wireless LAN (with the UD-WL01*)
*The USB wireless LAN adaptor UD-WL01 (sold separately) may not be available
depending on your area.
When connecting a smart device by using the USB wireless LAN adaptor, start
wireless connection according to the instructions in the “iPhone/iPad
Connection Manual” on the website, then make sure to set up the instrument
appropriately, using the following instructions “Displaying the Wireless LAN
Networks and Connecting to a Network,” “Automatic Setup by WPS,” “Manual
Setup” or “Connecting by the Accesspoint Mode.” Refer to pages 77 – 80 in this
Owner’s Manual for the required operations on this instrument.
Connecting to a Computer/Smart Device (USB
[TO HOST] Terminal, USB [TO DEVICE]
Terminal, MIDI Terminals)
Computer
USB cable
USB terminal
USB wireless
LAN adaptor
W
i
r
e
l
e
s
s
L
A
N
Smart device
Clavinova
NOTE
• When using a USB cable to
connect the instrument to
your computer or smart
device, make the connection
directly without passing
through a USB hub.
• Before using the USB [TO
DEVICE] terminal, be sure to
read “Precautions when
using the USB [TO DEVICE]
terminal” on page 72.
• For information on setting up
your sequence software,
refer to the owner’s manual of
the relevant software.
• When transmitting or
receiving audio signals by
using a computer running
Windows, the Yamaha
Steinberg USB Driver should
be installed to the computer.
For details, refer to the
“Computer-related
Operations” on the website.
• When you use the instrument
along with a smart device, we
recommend that you set that
device’s “Airplane Mode” to
on and then the Wi-Fi/
Bluetooth setting to on in
order to avoid noise caused
by communication.
• The instrument will begin
transmission a short time
after the computer or smart
device is connected.

75
CLP-685, CLP-675, CLP-645, CLP-635, CLP-695GP, CLP-665GP Owner’s Manual
Connections
The following menu is shown only when you connect the USB wireless LAN adaptor to the USB [TO
DEVICE] terminal on this instrument.
Menus marked with * differ in the Wireless LAN Mode parameters between the two modes: “Infrastructure” and “Accesspoint.” The default setting for the Wireless
LAN Mode is “Infrastructure.”
To call up the desired parameter:
Press the [FUNCTION] button several times to select “System” menu, then use the [ ]/[ ]/[<]/[>] buttons to select the desired
parameter.
[>]
[<]
[>]
[<]
[>]
[<]
[>]
[<]
[>]
[<]
Description
Default
setting
Setting range
Utility Wireless LAN*
(In the
“Infrastructure”
mode)
Select
Network
(Networks) Connect to an access point by
selecting the network.
––
Other SSID Set the SSID. – Up to 32 characters (half
size), alphanumeric
characters, marks
Security Set the Security. None None, WEP,
WPA-PSK (TKIP),
WPA-PSK (AES),
WPA2-PSK (AES),
WPA/WPA2 mixed PSK
Password Set the Password. – Up to 64 characters (half
size), alphanumeric
characters, marks
Connect Connect using the settings in
“Other” display.
––
Detail DHCP Set the wireless LAN detailed
settings. IP Address, Subnet
Mask, Gateway, DNS Server1,
DNS Server2 can be set when
DHCP is set to Off while cannot be
set when DHCP set to On. Use the
[<]/[>] buttons to select each
octet in the entry display, then
enter the value using the [
]/[ ]
buttons. To finalize the setting,
press the [FUNCTION] button.
On On/Off
IP Address 0.0.0.0 0.0.0.0-255.255.255.255
Subnet Mask 0.0.0.0 0.0.0.0-255.255.255.255
Gateway 0.0.0.0 0.0.0.0-255.255.255.255
DNS Server1 0.0.0.0 0.0.0.0-255.255.255.255
DNS Server2 0.0.0.0 0.0.0.0-255.255.255.255
Save Save the settings in the “Detail”
display. Move the highlight to
“Save,” then press the [>] button
to execute the Saving.
––
Wireless LAN
Option
Wireless LAN
Mode
Infrastructure Mode Determines whether the access
point is used for wireless LAN
connection (Infrastructure Mode)
or not (Accesspoint Mode).
Infrastructure
Mode
–
Accesspoint Mode
Initialize Cancel Initialize the settings in the
wireless LAN display. Move the
highlight to “Execute,” then press
the [>] button to execute the
initialization.
Cancel –
Execute
Detail Host Name Set the Host name. [CLP-****]-
[xxxxxx (MAC
address lower
6 figure)]
Up to 57 characters (half
size) including
alphanumeric
characters, the
“_” (underscore) and
“-” (hyphen) character.
Mac Address Display the MAC address of the
USB wireless LAN adaptor.
––
Status Display the error code of network
function.
––

76
CLP-685, CLP-675, CLP-645, CLP-635, CLP-695GP, CLP-665GP Owner’s Manual
Connections
Wireless LAN in the Accesspoint Mode
To call up the desired parameter:
Press the [FUNCTION] button several times to select “System” menu, then use the [ ]/[ ]/[<]/[>] buttons to select the desired
parameter.
[>]
[<]
[>]
[<]
[>]
[<]
Description Default setting Setting range
Utility Wireless LAN* (In the
“Accesspoint” mode)
SSID Set the SSID as an access
point.
ap-[CLP-****]-[xxxxxx (MAC
address lower 6 figure)]
Up to 32 characters (half size),
alphanumeric characters, marks
Security Set the Security as an
access point.
WPA2-PSK (AES) None, WEP, WPA-PSK (TKIP),
WPA-PSK (AES),
WPA2-PSK (AES),
WPA/WPA2 mixed PSK
Password Set the Password as an
access point.
00000000 Up to 64 characters (half size),
alphanumeric characters, marks
Channel Set the channel as an
access point.
11 Differs depending on the USB
wireless LAN adaptor models.
• Models for United States and
Canada: 1 – 11
• Others: 1 – 13
When no USB wireless LAN
adaptor is connected, setting
range is channels 1 – 13.
DHCP Server Set the IP address related
settings.
On On, Off
IP Address 192.168.0.1 192. 168. 0-255. 1-254.
Subnet Mask 255.255.255.0 255.255.0.0, 255.255.128.0,
255.255.192.0, 255.255.224.0,
255.255.240.0, 255.255.248.0,
255.255.252.0, 255.255.254.0,
255.255.255.0
Save Save the settings you set in
the Wireless LAN display (in
the “Accesspoint” mode)
––

77
CLP-685, CLP-675, CLP-645, CLP-635, CLP-695GP, CLP-665GP Owner’s Manual
Connections
Displaying the Wireless LAN Networks and
connecting to a Network
Make sure to connect the USB wireless LAN adaptor (sold separately) to the
USB [TO DEVICE] terminal, otherwise the displays for setup below will not be
shown.
1. Press the [FUNCTION] button repeatedly to call up the
“System” menu display, then select the highlighted item in
each display as illustrated below.
2. Press the [>] button to call up the network list.
For a network with a lock icon , you need to enter the proper
password.
3. Connect the instrument to the Network.
3-1. Select the desired network, then press the [>] button.
The name of the selected network will be fully shown in the display,
letting you confirm this is the network you want to use.
3-2. Press the [>] button.
• For a network without a lock icon:
Connecting starts.
• For a network with a lock icon:
You need to enter the proper password. For details on how to enter
characters, refer to the “Renaming files” on page 68. After entering the
password, press the [FUNCTION] button to finalize the setting. This
operation starts connecting automatically.
When connection is done successfully, “Completed” is shown in the
display, and returns to the “Select Network” display.
4. Connect the smart device to the access point.
For instructions on the setup for the smart device, refer to the “iPhone/
iPad Connection Manual” on the website (page 9).
NOTE
If the menus shown in the
Wireless LAN display, are
different from those shown
here, the instrument is in the
Accesspoint mode. Set the
Wireless LAN Mode parameter
to “Infrastructure Mode” by
following the step 1 on
page 79.
“System” menu display
1-1. Use the [ ]/[ ] buttons
to select “Utility.”
1-2. Press the [>] button to
call up the next display.
1-3. Use the [ ]/[ ] buttons
to select “Wireless LAN.”
1-4. Press the [>] button to
call up the next display.
1-5. Use the [ ]/[ ] buttons
to select “Select
Network.”
Utility display Wireless LAN display
NOTE
If no signal from the access
point is received, the access
point cannot be listed. Also,
closed access points cannot
be listed.

78
CLP-685, CLP-675, CLP-645, CLP-635, CLP-695GP, CLP-665GP Owner’s Manual
Connections
Automatic Setup by WPS
Please make sure to connect the USB wireless LAN adaptor (sold separately) to
the USB [TO DEVICE] terminal, otherwise the displays for setup will not be
shown.
If your access point supports WPS, you can easily connect the instrument to
access point by WPS, without making settings, such as password input, etc.
Press the WPS button on the USB wireless LAN adaptor more than 3 seconds,
and press the WPS button on your access point within two minutes.
When connection is done successfully, “Completed” is shown in the display,
and the Voice display will be shown.
Finally, connect the smart device to the access point. For instructions on the
setup for the smart device, refer to the “iPhone/iPad Connection Manual” on
the website (page 9).
Manual Setup
Make sure to connect the USB wireless LAN adaptor (sold separately) to the
USB [TO DEVICE] terminal, otherwise the displays for setup will not be
shown.
1. To call up the network list, perform steps 1 – 2 in the
“Displaying the Wireless LAN Networks and connecting to
a Network” (page 77).
2. Select “Other” at the bottom of the network list, then press
the [>] button.
3. Set the SSID, Security and Password to the same as the
settings on the access point.
3-1. Select the “SSID” then press the [>] button to call up the
display for SSID input, then enter the SSID.
For details on how to enter the characters, refer to “Renaming files” on
page 68. After entering the SSID, press the [FUNCTION] button to
finalize the setting. Operation returns to the “Other” display.
NOTE
WPS setup is not available
while the instrument is in the
following modes or conditions:
• While a Song or a Demo
Song is playing back or
being paused temporarily, or
while the instrument is in the
Song Recording mode.
• When Wireless LAN mode is
set to “Accesspoint Mode” in
the “System” menu.

79
CLP-685, CLP-675, CLP-645, CLP-635, CLP-695GP, CLP-665GP Owner’s Manual
Connections
3-2. Select “Security” then press the [>] button to call up the
Security list. Select the security then return to the “Other”
display by pressing the [<] button.
3-3. Select “Password,” then set the password in the same way as
SSID.
4. Select “Connect >” at the bottom of the display shown in
step 3, then press the [>] button to start connecting.
When connection is done successfully, “Completed” is shown in the
display, and returns to the “Select Network” display.
5. Connect the smart device to the access point.
For instructions on the setup for the smart device, refer to the “iPhone/
iPad Connection Manual” on the website (page 9).
Connecting by the Accesspoint Mode
Please make sure to connect the USB wireless LAN adaptor (sold separately) to
the USB [TO DEVICE] terminal, otherwise the displays for setup will not be
shown.
1. Switch the instrument to the “Accesspoint Mode.”
Press the [FUNCTION] button repeatedly to call up the “System” menu
display, then select the highlighted item in each display as illustrated
below.
When mode change is done successfully, “Completed” is shown in the
display, operation returns to the Wireless LAN Mode display.
NOTE
The password cannot be set
when you select “none” for the
security setting.
NOTE
This cannot be used to connect
to the internet or another
wireless LAN device.
“System” menu display
1-1. Use the [ ]/[ ] buttons
to select “Utility.”
1-2. Press the [>] button to
call up the next display.
1-3. Use the [ ]/[ ] buttons to
select “Wireless LAN Option.”
1-4. Press the [>] button to call up
the next display.
1-5. Use the [ ]/[ ] buttons to
select “Wireless LAN Mode.”
1-6. Press the [>] button to call
up the next display.
Utility display
Wireless LAN Option display
1-7. Use the [ ]/[ ] buttons to
select “Accesspoint Mode.”
Wireless LAN Mode display

80
CLP-685, CLP-675, CLP-645, CLP-635, CLP-695GP, CLP-665GP Owner’s Manual
Connections
2. Set SSID, Security, Password and Channel.
2-1. From the “System” menu display, select the highlighted item
in each display as illustrated below.
2-2. Set the SSID, Security, Password and Channel.
Select and enter each value/setting in the same way as in step 3 in
“Manual Setup.” For the setting range for each item, refer to the table on
page 76.
3. Save the setting.
Select “Save >” at the bottom of the Wireless LAN display, then press the
[>] button to start saving.
When saving is done successfully, “Completed” is shown in the display,
and operation returns to the Utility display.
4. Connect the smart device to the instrument (as an access
point).
For instructions on the setup for the smart device, refer to the “iPhone/
iPad Connection Manual” on the website (page 9).
“System” menu display Utility display Wireless LAN display

81
CLP-685, CLP-675, CLP-645, CLP-635, CLP-695GP, CLP-665GP Owner’s Manual
Effective Use of a Computer or Smart Device
with the Instrument
Connecting this instrument to a computer or a smart device gives you the
following advantages and possibilities.
What you can do by connecting to a computer/smart device:
• Listen to the audio data in the smart device through this instrument
(Bluetooth Audio function, page 81)
• Use a smart device app (page 83)
• Transmit and receive audio data (USB Audio Interface function, page 84)
• Transmit and receive MIDI data
• Transfer MIDI Songs (extension: .mid, SMF Format 0 or 1) or backup files
Before using the Bluetooth function, be sure to read “About Bluetooth” on
page 138.
You can input the sound of the audio data saved in a Bluet oot h-equipped
device, such as a smart phone or digital audio player, to this instrument and
listen to it through the built-in speaker of the instrument. Also, you can record
the input audio data as an Audio Song (page 58).
You can set whether the Audio sound input to the instrument by using this
function is output or not to a computer or smart device along with the
performance played on the instrument. For details, refer to “Audio Loop Back
On/Off” on page 84.
NOTE
For details on transmitting/
receiving MIDI data or
transferring MIDI Songs/
backup files to a computer,
refer to “Computer-related
Operations” on the website.
Listening to Audio Data from a Smart Device through
this Instrument (
Bluetooth
Audio Function)
Bluetooth availability
The models CLP-685, CLP-675, CLP-
645, CLP-695GP and CLP-665GP are
equipped with Bluetooth functionality;
however, even these models may not
support Bluetooth, depending on the
country in which you purchased the
product. If the Bluetooth logo is printed on the control panel, this means that the
product is equipped with Bluetooth functionality.
685 675 645 635 695GP 665GP
Bluetooth logo
NOTE
In this manual, “Bluetooth-
equipped device” refers to a
device that can transmit audio
data saved in it to the
instrument using the Bluetooth
function, via wireless
communication. For proper
operation, the device must be
compatible with A2DP
(Advanced Audio Distribution
Profile). The Bluetooth Audio
function is explained here by
using a smart device as an
example of such Bluetooth-
equipped devices.

82
CLP-685, CLP-675, CLP-645, CLP-635, CLP-695GP, CLP-665GP Owner’s Manual
Effective Use of a Computer or Smart Device with the Instrument
Pairing with Smart Devices
If you wish to connect your smart device to the instrument via Bluet oo th, the
smart device needs to be paired with the instrument first. Once the smart
device has been paired with this instrument, there is no need to perform
pairing again.
1. Hold down the [FUNCTION] button for 3 seconds.
The pop-up window will appear which indicates that the instrument is
standing by for pairing.
To cancel the pairing, press the [EXIT] button.
2. On the smart device, set the Bluetooth function to on and
select “CLPxxx” from the connection list.
For details, refer to the smart device owner’s manual.
After pairing is completed, the pop-up window will close, and the
Bluetooth icon appears on the Voice display and Song display.
3. Play back audio data on the smart device to confirm that
the built-in speakers of the instrument can output the
audio sound.
When you turn on the instrument the next time, the last-connected smart
device will be connected to this instrument automatically, if the Bluetooth
function of the smart device and the instrument is set to on. If it is not
connected automatically, select the model name of the instrument from
the connection list on the smart device.
Pairing
“Pairing” means to register
Bluetooth-equipped smart
devices on this instrument,
and establish the mutual
recognition for wireless
communication between the
two.
NOTE
Only one smart device can be
connected to this instrument at
a time (although up to 8 smart
devices can be paired to this
instrument). When pairing with
the 9th smart device has
succeeded, pairing data for
the device with the oldest
connection date will be
deleted.
NOTE
When the Bluetooth function of
this instrument is set to “Off,”
standby for pairing with the
instrument is not enabled
when holding the [FUNCTION]
button for 3 seconds. In this
case, set Bluetooth to “On”
(page 83), and then start
pairing.
NOTE
Make sure to complete the
settings on the smart device
within 5 minutes.
NOTE
If you are required to enter a
passkey, enter the numerals
“0000.”
NOTE
You can adjust the volume of
the sound input via Bluetooth
by the [MASTER VOLUME]
slider. To adjust the volume
balance between your
keyboard performance and the
input sound via Bluetooth,
adjust the volume on the smart
device.
NOTE
You can start pairing from the
“System” menu display: Press
the [FUNCTION] button
repeatedly to call up the
“System” menu display
“Bluetooth” “Pairing,” and
then press the [>] button.
Voice display
Bluetooth icon

83
CLP-685, CLP-675, CLP-645, CLP-635, CLP-695GP, CLP-665GP Owner’s Manual
Effective Use of a Computer or Smart Device with the Instrument
Switching the Bluetooth Function On/Off
By default, the Bluetooth function will be on right after turning the instrument’s
power on, however you can set the function to off.
1. Press the [FUNCTION] button repeatedly to call up the
“System” menu display, then select the highlighted item in
each display as illustrated below.
2. Press the [>] button to switch on/off.
To exit from the “System” menu display, press the [EXIT] button.
By using the compatible smart device app, you can get more enjoyment out of
this instrument.
For information about the compatible apps and smart devices, access the web
page of the respective apps on the following page:
http://www.yamaha.com/kbdapps/
For information on connecting without using the connection wizard of the
“Smart Pianist” app, refer to the “iPhone/iPad Connection Manual” on the
website (page 9).
Using a Smart Device App
Smart device app “Smart Pianist”
The smart device app “Smart Pianist” (available as a free download) lets you
select the Voice and make Metronome settings intuitively, and allows you to
display the notation, depending on the selected data. For details, access the
“Smart Pianist” page on the website above.
For instructions on connecting the instrument to a smart device, the
connection wizard of the “Smart Pianist” will guide you according to the
operating condition and environment.
To start the connection wizard, tap “ ” (Menu) located at the upper left on
the “Smart Pianist” screen to open the Menu, and then tap “Instrument” →
“Start Connection Wizard.”
“System” menu display
1-1. Confirm that “Bluetooth”
is selected.
1-2. Press the [>] button to
call up the next display.
1-3. Confirm that “Bluetooth” is
selected.
Bluetooth display
NOTICE
Activating the “Smart Pianist”
app while the instrument is
connected to the smart device
overwrites the settings on the
instrument by that of “Smart
Pianist.” Save your important
setup data as a backup file to a
USB flash drive or computer
(pages 100, 101).
NOTE
When using the “Smart Pianist”
app, you cannot use any
buttons on the instrument other
than the [EXIT] button. Control
the instrument by using “Smart
Pianist.” Pressing the [EXIT]
button on the instrument
disconnects the instrument
from the “Smart Pianist” app,
and enables you to control the
instrument by using its
buttons.

84
CLP-685, CLP-675, CLP-645, CLP-635, CLP-695GP, CLP-665GP Owner’s Manual
Effective Use of a Computer or Smart Device with the Instrument
By connecting a computer or a smart device to the USB [TO HOST] terminal
via a USB cable, digital audio data can be transmitted/received. This USB
Audio Interface function provides the following advantages:
• Playing back audio data with high sound quality
This gives you direct, clear sound in which the sound quality has less noise
and deterioration than that from the [AUX IN] jack.
• Recording performance on the instrument as audio data by using a
recording software or a music production software
The recorded audio data can be played back on the computer or smart
device.
Audio Loop Back On/Off
This allows you to set whether audio sound input from the connected
computer or smart device is output to a computer or a smart device or not
along with the performance played on the instrument. To output the audio
input sound, set the Audio Loop Back to “On.”
For example, if you want to record the audio input sound as well as the sound
played on the instrument by using the computer or the smart device, set this to
“On.” If you intend to record only the sound played on the instrument by using
the computer or the smart device, set this to “Off.”
To make the setting, press the [FUNCTION] button repeatedly to call up the
“System” menu display: “Utility” → “Audio Loop Back” (page 98).
Transmitting/Receiving Audio Data (USB Audio
Interface function)
NOTE
• The Audio Loop Back
function also affects the
audio input sound when
using the Bluetooth Audio
function (page 81) or the
wireless LAN connection
(page 74).
• The volume of the audio
sound input can be adjusted
from a computer or smart
device.
• The playback sound of an
Audio Song (page 39) is also
output to a computer or smart
device when this is set to “On,”
while the sound is not output
when this is set to “Off.”
• With Audio Recording
(page 52), the audio input
sound from the connected
computer or smart device is
recorded when this is set to
“On,” while the sound is not
recorded when this is set to
“Off.”

85
CLP-685, CLP-675, CLP-645, CLP-635, CLP-695GP, CLP-665GP Owner’s Manual
Detailed Settings
Pressing the [FUNCTION] button gives you access to a variety of important settings for Voices, Song
playback, Metronome, Song recording and the entire system of this instrument.
Basic Operations
1. As necessary, make the Voice settings or select a Song.
• If you want to edit Voice-related parameters (by calling up the “Voice” menu), select a Voice. If you
want to edit parameters related to the R1/R2/L Voices, such as volume balance, turn on Dual/Split/
Duo, then select the desired Voices.
• If you want to set Song playback parameters, such as Repeat, select a Song.
• If you want to edit your recorded MIDI Song data (by calling up Edit in the “Song” menu), select
the recorded MIDI Song.
2. Press the [FUNCTION] button several times to select the desired menu.
Pressing the [FUNCTION] button repeatedly will call up the following menu displays in
order, according to the vertical menu at the left of the display.
“Voice” menu (page 86)
“Song” menu (page 90)
“Metronome/Rhythm” menu (page 93)
“Recording” menu (page 94)
/“System” menu (page95)
3. Use the [ ]/[ ]/[<]/[>] buttons to select
the desired parameter.
While referring as needed to the parameter list on
each page listed in step 2, use the [
]/[ ] buttons to
navigate through the display vertically and use the
[<]/[>] buttons to navigate through display
horizontally.
4. On the display called up in step 3, select a
value or execute the operation.
Most displays allow you to select a value by simply
using the [
]/[ ] buttons, although some, such as
Edit in the “Song” menu and Backup in the “System”
menu, let you execute an operation.
If a pop-up window is shown, set the value with the
[<]/[>] buttons, then exit from the window using the
[EXIT] button.
Also, when the selected parameter provides only two
options (on and off, for example), simply pressing the
[>] button will alternate the value between the two
options.
5. To exit from the menu display, press the [EXIT] button.
[>]
[<]
[>]
[<]
[>]
[<]
L/R* R, L, Other –
Repeat A – B* (Setting display
Phrase* Phrase Mark

Voice Menu
86
CLP-685, CLP-675, CLP-645, CLP-635, CLP-695GP, CLP-665GP Owner’s Manual
Voice Menu
This menu lets you edit or set various parameters related to keyboard performance, such as Voice
parameters. By turning on Dual/Split/Duo, you can make the settings for each Voice or each Voice
combination. While playing the keyboard and hearing the sound, change a parameter value to find your
desired sound. Note that you should turn on Dual/Split/Duo before calling up the “Voice” menu display.
NOTE
Parameters with * are shown only when Dual/Split/Duo is on.
To call up the desired parameter:
Turn on Dual, Split or Duo as necessary, select Voices as necessary, press the [FUNCTION] button several times to select
“Voice” menu, then use the [ ]/[ ]/[<]/[>] buttons to select the desired parameter.
[>]
[<]
[>]
[<]
[>]
[<]
Description Default setting Setting range
Transpose (Pop-up
window)
– Shifts the pitch of the entire keyboard up or down in
semitone intervals to facilitate playing in difficult key
signatures, and to let you easily match the pitch of the
keyboard to the range of a singer or other instruments.
For example, if you set this parameter to “5,” playing key
C produces pitch F. In this way, you can play the F major
song as if it were in C major.
NOTE
The setting here will not affect Song playback. If you want to
transpose Song playback, use the Transpose parameter in
the “Song” menu (page 90).
NOTE
Your keyboard performance data will be transmitted with the
transposed note numbers while MIDI note numbers received
from an external MIDI device or computer will not be affected
by the Transpose setting.
0 -12 (-1 octave) – 0
(normal pitch) –
+12 (+1 octave)
Piano
Setting
Lid Position (Setting
display)
Determines how much the Lid is opened. Full Full, Half, Close
VRM – Turns the VRM effect on/off. For the information about the
function of VRM, refer to page 27. For details about the
Piano Voices compatible with VRM, refer to the “Preset
Voice List” on page 102.
On On, Off
Damper
Res.
(Setting
display)
Determines the depth of the string resonance effect
which is applied when the damper pedal is pressed. This
is available only when VRM is on.
50 – 10
String Res. (Setting
display)
Determines the depth of the string resonance effect
which is applied when a note on the keyboard is
pressed. This is available only when VRM is on.
50 – 10
Aliquot Res. (Setting
display)
Adjusts the sympathetic vibrations of Aliquot. This is
available only when VRM is on. For details, refer to “What
is Aliquot?” (page 27).
50 – 10
Body Res. (Setting
display)
Adjusts the resonance of the soundboard, the sides, the
frame, and the grand piano itself. This is available only
when VRM is on.
50 – 10
Key Off Sample (Setting
display)
Determines the volume of the key-off sound (the subtle
sound that occurs when you release a key) which is
available only for some Voices. For Voices to which this
effect is applied, refer to the Voice List (page 102).
5 0 – 10
Reverb (Setting
display)
– Determines the Reverb type which is applied to all the
entire sound including the keyboard performance, Song
playback and MIDI data input from an external MIDI
device.
Differs depending
on the Voice or
Voice
combination.
Refer to the
Reverb Type List
(page 89)
Chorus (Setting
display)
– Determines the Chorus type which is applied to all the
entire sound including the keyboard performance, Song
playback and MIDI data input from an external MIDI
device.
Differs depending
on the Voice or
Voice
combination.
Refer to the
Chorus Type List
(page 89)

Voice Menu
87
CLP-685, CLP-675, CLP-645, CLP-635, CLP-695GP, CLP-665GP Owner’s Manual
Voice Edit (Voice names)* Octave Shifts the pitch of the keyboard up and down in octave
steps. This parameter can be set for each Voices when
Dual/Split/Duo is on.
Differs depending
on the Voice or
Voice
combination.
-2 (two octaves
lower) – 0 (no
pitch shift) – +2
(two octaves
higher)
Volume Adjusts the volume for each of the R1/R2/L Voices. This
lets you adjust the balance between the R1/R2/L Voices
when Dual/Split/Duo is on.
Differs depending
on the Voice or
Voice
combination.
0 – 127
Reverb Depth Adjusts the Reverb depth for each of the R1/R2/L Voices.
This lets you adjust the balance between the R1/R2/L
Voices when Dual/Split/Duo is on. The “0” setting will
produce no effect.
NOTE
When a VRM Voice is used for several parts simultaneously,
unexpected sounds may result since the Reverb depth for a
part which has priority will become the common setting for the
parts. During Song playback, setting for a Song part is used
(priority order: Ch. 1, Ch. 2...Ch. 16), while the setting for a
keyboard part is used when Song playback is stopped
(priority order: R1, L and R2 Voices).
Differs depending
on the Voice or
Voice
combination.
0 – 127
Chorus Depth Adjusts the Chorus depth for each of the R1/R2/L Voices.
This lets you adjust the balance between the R1/R2/L
Voices when Dual/Split/Duo is on. The “0” setting will
produce no effect.
NOTE
When a VRM Voice is used for several parts simultaneously,
unexpected sounds may result since the Chorus depth for a
part which has priority will become the common setting for the
parts. During Song playback, setting for a Song part is used
(priority order: Ch. 1, Ch. 2...Ch. 16), while the setting for a
keyboard part is used when Song playback is stopped
(priority order: R1, L and R2 Voices).
Differs depending
on the Voice or
Voice
combination.
0 – 127
Effect In addition Reverb and Chorus, another Effect can be
applied to the R1/R2/L Voices of the keyboard
independently. Note that this Effect type can be selected
for up to two Voices.
Differs depending
on the Voice or
Voice
combination.
Refer to the Effect
Type List
(page 89).
Rotary Speed Available only for the Voice of which the Effect Type is set
to “Rotary.” This parameter determines the rotation
speed of the Rotary Speaker effect.
Differs depending
on the Voice or
Voice
combination.
Fast, Slow
VibeRotor Available only for the Voice of which the Effect Type is set
to “VibeRotor.” This parameter turns on or off the
VibeRotor effect.
Differs depending
on the Voice or
Voice
combination.
On, Off
VibeRotor
Speed
Available only for the Voice of which the Effect Type is set
to “VibeRotor.” This parameter determines the speed of
the Vibraphone vibrato effect.
Differs depending
on the Voice or
Voice
combination.
1 – 10
Effect Depth Adjusts the Effect depth for each of the R1/R2/L Voices.
Note that some Effect types do not allow you to adjust the
depth.
Differs depending
on the Voice or
Voice
combination.
1 – 127
Pan Adjusts the stereo pan position for each of the R1/R2/L
Voices.
Differs depending
on the Voice or
Voice
combination.
L64 (leftmost) – C
(center) – R63
(rightmost)
To call up the desired parameter:
Turn on Dual, Split or Duo as necessary, select Voices as necessary, press the [FUNCTION] button several times to select
“Voice” menu, then use the [ ]/[ ]/[<]/[>] buttons to select the desired parameter.
[>]
[<]
[>]
[<]
[>]
[<]
Description Default setting Setting range

Voice Menu
88
CLP-685, CLP-675, CLP-645, CLP-635, CLP-695GP, CLP-665GP Owner’s Manual
Voice Edit (Voice names)* Harmonic Cont Produces a distinctive “peaky” tone by raising the
Resonance value of the Filter. This parameter can be set
for each of the R1/R2/L Voices when Dual/Split/Duo is on.
NOTE
Harmonic content may have little audible effect or not be
applied to some Voices.
Differs depending
on the Voice or
Voice
combination.
-64 – +63
Brightness Adjusts the brightness of the R1/R2/L Voices
independently.
Differs depending
on the Voice or
Voice
combination.
-64 – +63
Touch Sens. Determines the degree to which the volume level
changes in response to your touch on the keyboard (how
hard you play). Since the volume level of some Voices
such as Harpsichord and Organ do not change
regardless of how you play the keyboard, the default
setting for these Voices is 127.
Differs depending
on the Voice or
Voice
combination.
0 (softest) – 64
(largest changes in
the level) – 127
(which produces the
loudest volume
regardless of how
you play the
keyboard)
RPedal Turns the Right pedal function on or off for each of the
R1/R2/L Voices. This parameter is useful when you want
to ensure, for example, that the pedal function affects the
right-hand performance but does not affect the left-hand
performance.
Differs depending
on the Voice or
Voice
combination.
On, Off
CPedal Turns the Center pedal function on or off for each of the
R1/R2/L Voices. This parameter is useful when you want
to ensure, for example, that the pedal function affects the
right-hand performance but does not affect the left-hand
performance.
Differs depending
on the Voice or
Voice
combination.
On, Off
LPedal Turns the Left pedal function on or off for each of the R1/
R2/L Voices. This parameter is useful when you want to
ensure, for example, that the pedal function affects the
right-hand performance but does not affect the left-hand
performance.
Differs depending
on the Voice or
Voice
combination.
On, Off
Pedal
Assign
Right (Setting
display)
Assigns one of various functions (other than the original
one) to the Right pedal.
SustainCont Refer to the Pedal
Function List
(page 89).
Center (Setting
display)
Assigns one of various functions (other than the original
one) to the Center pedal.
Sostenuto Refer to the Pedal
Function List
(page 89).
Left (Setting
display)
Assigns one of various functions (other than the original
one) to the Left pedal.
Rotary Speed
(Mellow Organ),
Vibe Rotor
(Vibraphone), Soft
(other Voices)
Refer to the Pedal
Function List
(page 89).
Balance* Volume
R2 – R1*
(Pop-up
window)
Adjusts the volume balance between R1 and R2 Voices
when Dual is on. After adjusting this with the [<]/[>]
buttons, press the [EXIT] button to exit from the pop-up
window.
Differs depending
on the Voice or
Voice
combination.
R2+10 – 0 –
R1+10
Volume L – R* (Pop-up
window)
Adjusts the volume balance between the left and right
keyboard sections when Split/Duo is on. After adjusting
via the [<]/[>] buttons, press the [EXIT] button to exit
from the pop-up window.
Differs depending
on the Voice or
Voice
combination.
L+10 – 0 – R+10
Detune* (Pop-up
window)
Detunes the R1 Voice and R2 Voice in Dual mode to
create a thicker sound.
On the display, move the slider rightward via the [>]
button will raise the R1 Voice pitch and lower the R2
Voice pitch, and vice versa. After adjusting this, press the
[EXIT] button to exit from the pop-up window.
Differs depending
on the Voice or
Voice
combination.
R2+20 – 0 –
R1+20
To call up the desired parameter:
Turn on Dual, Split or Duo as necessary, select Voices as necessary, press the [FUNCTION] button several times to select
“Voice” menu, then use the [ ]/[ ]/[<]/[>] buttons to select the desired parameter.
[>]
[<]
[>]
[<]
[>]
[<]
Description Default setting Setting range

Voice Menu
89
CLP-685, CLP-675, CLP-645, CLP-635, CLP-695GP, CLP-665GP Owner’s Manual
Reverb Type List
Chorus Type List
Effect Type List
Pedal Function List
When you want to assign a function marked with * to the pedal connected to the [AUX PEDAL] jack (CLP-685, CLP-695GP), you should use a Foot
Controller (page 70). For other functions, you should use a Footswitch (page 70).
Off No effect
Recital Hall Simulates clear reverberation in a mid-sized hall suitable for piano recital.
Concert Hall Simulates brilliant reverberation in a large hall for public orchestra performances.
Chamber Simulates the elegant reverberation in a small room suitable for chamber music.
Cathedral Simulates the solemn reverberation in a high-ceiling stone-made cathedral.
Club Simulates the lively reverberation in a jazz club or a small bar.
Plate Simulates the bright sound of vintage reverb equipment used in recording studios.
Off No effect
Chorus Adds a rich, spacious sound.
Celeste Adds swell and a spacious sound.
Flanger Adds swell effects similar to the sound of an ascending or descending jet plane.
Off No effect
DelayLCR Delay applied at left, center, and right positions.
DelayLR Delay applied at left and right positions.
Echo Echo-like delay
CrossDelay Left and right delays cross each other in alternation.
Symphonic Adds a rich and deep acoustic effect.
Rotary Adds the vibrato effect of a rotary speaker.
Tremolo The volume level changes in rapid cycles.
VibeRotor The vibrato effect of a vibraphone.
AutoPan The sound pans left to right and back and forth.
Phaser The phase changes periodically, swelling the sound.
AutoWah The center frequency of the wah filter changes periodically.
Function Description
Available pedal
(O: Can be assigned, X: Cannot)
Left
pedal
Center
pedal
Right pedal and pedal
connected to the
[AUX PEDAL] jack
(CLP-685, CLP-695GP)
Sustain (Switch) On/off switch type damper O O O
Sustain
Continuously *
Damper that sustains the sound proportionately to how deeply you press
the pedal (page 21)
XX O
Sostenuto Sostenuto (page 21) O O O
Soft Soft (page 21) O O O
Expression* A function that lets you create changes in dynamics (volume) as you play X X O
PitchBend Up* A function that smoothly raises the pitch X X O
PitchBend Down* A function that smoothly lowers the pitch X X O
Rotary Speed Changes the rotational speed of the MellowOrgan rotary speaker (switches
between fast and slow each time you press the pedal)
OO O
VibeRotor Switches the vibraphone vibrato on/off (switches on/off each time you
press the pedal)
OO O

Song Menu
90
CLP-685, CLP-675, CLP-645, CLP-635, CLP-695GP, CLP-665GP Owner’s Manual
Song Menu
This menu lets you set various parameters related to Song playback and edit the Song data with a single
touch.
NOTE
• The parameters marked with * will be available only when a MIDI Song is selected. These parameters are not shown when an Audio
Song is selected.
• The parameters marked with ** will be available only when an Audio Song is selected.
• When using the “Edit” menu, select a MIDI Song other than the preset Song.
• Execute is a function that edits or changes the current Song data. Note that pressing the [>] button will actually change the Song data.
• The content of the “Song” menu differs depending on the type of Song currently selected (MIDI/Audio).
To call up the desired parameter:
Select a Song as necessary, press the [FUNCTION] button several times to select “Song” menu, then use the [ ]/[ ]/[<]/[>]
buttons to select the desired parameter.
[>]
[<]
[>]
[<]
[>]
[<]
Description Default setting Setting range
L/R* R, L, Other – Turns on (Play) or off (Mute) each of the Song tracks.
For details, refer to page 44.
On On, Off
Repeat A – B* (Setting display) Lets you play back a specified range (from Point A to B)
of the current Song repeatedly. For instructions, refer to
page 45.
Off On, Off
Phrase* Phrase Mark This parameter is available only when a MIDI Song
containing the Phrase Mark. By specifying a Phrase
number here, you can play back the current Song from
the mark point, or to play back the corresponding
phrase repeatedly. If you start Song playback with a
Phrase set to “On,” the countdown starts, followed by
repeated playback of the specified phrase or phrases
until you press the [
/ ] (Play/Pause) button.
000 000 – the last
phrase number of
the Song
Repeat Off On (repeat
playback)/Off (no
repeat)
Song (Setting display) By setting this parameter, you can play back only a
specific Song, or specific Songs in order repeatedly or
randomly. For details, refer to page 45.
Off Off, Single, All,
Random
Volume Song –
Keyboard*
(Pop-up
window)
Adjusts the volume balance between the Song
playback sound and keyboard performance.
0 Key+64 – 0 –
Song+64
Song L – R* (Pop-up
window)
Adjusts the volume balance between the right-hand
part left-hand parts of Song playback.
0 L+64 – 0 – R+64
(Pop-up window)** Adjusts the Audio volume. 100 0 – 127
Transpose (Setting display) – Shifts the pitch of Song playback up or down in
semitone intervals. For example, if you set this
parameter to “5,” a Song created in C major will be
played back in F major.
NOTE
The Transpose setting will not affect the audio signals, such
as those input from the [AUX IN] jack.
NOTE
MIDI Song playback data will be transmitted with the
transposed note numbers while MIDI note numbers
received from an external MIDI device or computer will not
be affected by the Transpose setting.
NOTE
Applying transpose to an Audio Song may change its tonal
characteristics.
0 -12 (-1 octave) – 0
(normal pitch) –
+12 (+1 octave)
File Delete Cancel Deletes a specific Song. For details about Song types
which can be deleted, refer to page 63.
––
Execute ––
Copy* Cancel Copies a specific MIDI Song then saves it to a different
location. For details about Song types which can be
copied, refer to page 63.
––
Execute ––

Song Menu
91
CLP-685, CLP-675, CLP-645, CLP-635, CLP-695GP, CLP-665GP Owner’s Manual
NOTE
Tempo of Song playback can be set on the display called up by pressing the [TEMPO] button. For instructions, refer to page 43.
File Move* Cancel Moves a MIDI Song to a different location. For details
about Song types which can be moved, refer to
page 63.
––
Execute ––
MIDI to Audio* Cancel Converts a MIDI Song to an Audio file. For details about
Song types which can be converted, refer to page 63.
––
Execute ––
Rename (Setting display) Edits a Song name. For details about Song types which
can be renamed, refer to page 63.
––
Edit* Quantize Quantize The Quantize function allows you to align all the notes in
the current MIDI Song to the correct timing, such as 8th
note or 16th note.
1. Set the Quantize value to the smallest notes in the
MIDI Song.
2. Set the Strength value which determines how
strongly the notes will be quantized.
3. Move the highlight to “Execute” then press the
[>] button to actually change the MIDI Song data.
1/16 Refer to “Quantize
setting range.”
(page 92)
Strength 100% 0% – 100%
Refer to “Strength
setting range.”
(page 92)
Execute ––
Track Delete Track Deletes a specific track data of the current MIDI Song.
1. Select the desired track to be deleted.
2. Move the highlight to “Execute,” then press the
[>] button to actually delete the specified track data.
Track 1 Track 1 – Track 16
Execute ––
Tempo Change Cancel Changes the tempo value of the current MIDI Song as
data. Before calling up the “Song” menu display, set the
desired Tempo value for changing.
Move the highlight to “Execute,” then press the [>] button
to actually change the Tempo value as MIDI Song data.
Differs depending
on the Song
–
Execute ––
Voice Change Track Changes the Voice of a specific track in the current
MIDI Song to the current Voice as data.
1. Select a track of which the Voice will be changed.
2. Move the highlight to “Execute,” then press the
[>] button to actually change the Voice as MIDI Song
data.
Track 1 Track 1 – Track 16
Execute ––
Others* Quick Play – This parameter enables you to specify whether a Song
that starts from the middle of a bar, or a Song with a
silence prior to the first note, should be played from the
first note or from the top of the bar (rest or blank). This
parameter is useful for a MIDI Song that starts with a
short one-or two-beat pick-up or lead-in.
On On, Off
Track Listen Track This lets you play back only the selected Track to listen
to its contents. To do this, select a Track, move the
highlight to “Start,” then press and hold the [>] button to
start playback from the first note. Playback continues
while holding the [>] button.
Track 1 Track 1 – Track 16
Start
Play Track – This parameter enables you to specify the tracks for
playing back on this instrument. When “1&2” is
selected, only tracks 1 and 2 will be played back, while
tracks 3 to 16 will be transmitted via MIDI. When “All” is
selected, all tracks will be played back on this
instrument.
All All, 1&2
To call up the desired parameter:
Select a Song as necessary, press the [FUNCTION] button several times to select “Song” menu, then use the [ ]/[ ]/[<]/[>]
buttons to select the desired parameter.
[>]
[<]
[>]
[<]
[>]
[<]
Description Default setting Setting range

92
CLP-685, CLP-675, CLP-645, CLP-635, CLP-695GP, CLP-665GP Owner’s Manual
Song Menu
Quantize Supplementary
Quantize setting range
The three Quantize settings marked with asterisks (*) are exceptionally
convenient, since they allow you to quantize two different note values
at the same time. For example, when the straight eighth notes and
eighth notes triplet are contained in the same part, if you quantize by
straight eighth notes, all notes in the part are quantized to straight
eighth notes—completely eliminating any triplet feel. However, if you
use the eighth note + eighth note triplet setting, both the straight and
triplet notes will be quantized correctly.
Strength setting range
1/4................
1/8................
1/16..............
1/6................
1/12..............
1/24..............
1/8+1/12.......
1/16+1/24.....
1/32..............
1/16+1/12.....
quarter note
quarter note triplet
eighth note
eighth note triplet
sixteenth note
sixteenth note triplet
thirty-second note
eighth note + eighth note triplet*
sixteenth note + eighth note triplet*
sixteenth note + sixteenth triplet*
Original data
Quantizing strength = 100
Quantizing strength = 50
Quarter-note length

Metronome/Rhythm Menu
93
CLP-685, CLP-675, CLP-645, CLP-635, CLP-695GP, CLP-665GP Owner’s Manual
Metronome/Rhythm Menu
This menu lets you set the volume and tempo indication format of the Metronome (page 36) or Rhythm
(page 51). In addition, you can set the bell sound of the Metronome to play back at the first beat and adjust
parameters related to Rhythm playback variation.
Setting the Tempo
Tempo of Metronome/Rhythm can be set on the display called up by pressing the [TEMPO] button. For
details on setting the Tempo for the Metronome or Rhythm, refer to page 36.
To call up the desired parameter:
Press the [FUNCTION] button several times to select “Metronome/Rhythm” menu, then use the [ ]/[ ] buttons to select the
desired parameter.
[>]
[<]
[>]
[<]
[>]
[<]
Description Default setting Setting range
Time
Signature
(Setting display) – Determines the time signature of the metronome. When
you select or playback MIDI Songs, this will automatically
be changed to the time signature of the selected songs.
4/4 2/2, 1/4, 2/4, 3/4,
4/4, 5/4, 6/4, 7/4,
3/8, 6/8, 7/8, 9/8,
12/8
Volume (Pop-up
window)
– Determines the volume of the Metronome or Rhythm. You
can adjust the volume balance between the keyboard
performance and Metronome/Rhythm playback.
82 0 – 127
BPM – – Determines whether the note type of the tempo indication
is affected by the Metronome Time Signature (page 37)
or not (crotchet). When “Time Sig.” is selected, the
denominator of the Time Signature is shown as the note
type of the tempo indication. (The dotted quarter note is
shown as the note type of the tempo indication only when
the Time Signature is set to “6/8,” “9/8,” or “12/8.”)
Time Sig. Time Sig.,
Crotchet
Bell – – Determines whether or not the bell sound is played back
at the first beat of the specified Time Signature.
Off On, Off
Intro – – Determines whether the Intro is played back or not
before the Rhythm pattern is started.
NOTE
During Song playback, the Intro cannot be played back even
if you start the Rhythm with this parameter set to “On.”
On On, Off
Ending – – Determines whether the Ending is played back or not
before the Rhythm pattern is stopped.
On On, Off
SyncStart – – When this is set to “On,” you can start Rhythm playback
also by pressing any note on the keyboard.
When you want to use this function, follow the instructions
below:
1. Set this function to on.
2. Press the [RHYTHM] button to enter the Synchro start
standby mode.
The [RHYTHM] button flashes.
3. Press any key to start with the rhythm.
Off On, Off

Recording Menu
94
CLP-685, CLP-675, CLP-645, CLP-635, CLP-695GP, CLP-665GP Owner’s Manual
Recording Menu
This menu lets you make detailed settings related to MIDI Recording (page 52).
NOTE
The settings here will not affect Audio Recording.
To call up the desired parameter:
Press the [FUNCTION] button several times to select “Recording” menu, then use the [ ]/[ ] buttons to select the desired
parameter.
[>]
[<]
[>]
[<]
[>]
[<]
Description Default setting Setting range
RecStart – – This parameter, which is used when you overwrite the
already recorded MIDI Song, determines when the actual
MIDI Recording starts after you execute the Recording
Start operation. When set to “Normal,” actual recording
will starts as soon as you execute the Recording Start
operation. When set to “KeyOn,” actual recording starts
as soon as you press any key after you execute the
Recording Start operation.
Normal Normal, KeyOn
RecEnd – – This parameter, which is used when you overwrite the
already recorded MIDI Song, determines whether the
existing data after the point at which you stop recording
will be erased or not.
Replace Replace,
PunchOut
RecRhythm – – Determines whether or not Rhythm playback will be
recorded during MIDI Recording.
On On, Off

System Menu
95
CLP-685, CLP-675, CLP-645, CLP-635, CLP-695GP, CLP-665GP Owner’s Manual
System Menu
This menu lets you make the overall settings applied to the entire instrument.
Bluetooth compatibility is indicated by the following icons. (For details on Bluetooth compatibility, see
page 138.)
: models equipped with Bluetooth
: models not equipped with Bluetooth
NOTE
Parameters marked with * are available only if the instrument is equipped with Bluetooth functionality.
To call up the desired parameter:
Press the [FUNCTION] button several times to select “System” menu, then use the [ ]/[ ]/[<]/[>] buttons to select the desired
parameter.
[>]
[<]
[>]
[<]
[>]
[<]
Description Default setting Setting range
Bluetooth* Bluetooth (Setting display) Switches the Bluetooth function on/off (page 83). On On, Off
Pairing (Setting display) For registering (pairing) the Bluetooth device (page 81). – –
Tuning Master Tune (Pop-up
window)
Fine tunes the pitch of the entire instrument. This
function is useful when you play this instrument along
with other instruments or CD music.
NOTE
These settings will not be applied to the Drum Kit Voices or
Audio Song. Also, these settings will not be recorded to a
MIDI Song.
A3 = 440.0 Hz A3 = 414.8 Hz –
466.8 Hz (approx.
0.2 Hz steps)
Scale Tune (Setting display) Modern acoustic pianos are tuned almost exclusively in
equal temperament, which divides one octave into
twelve equal intervals. Likewise, this digital piano
employs equal temperament, but it can be changed at
the touch of a button to play in historical temperaments
used in the 16th to 19th centuries.
Equal
Temperament
Refer to the
“Scale Tune List”
(page 99)
Base Note (Setting display) Determines the base note for the Scale selected above.
When the base note is changed, the pitch of the
keyboard is transposed, yet maintains the original pitch
relationship between the notes. This setting is
necessary when Scale Tune is set to something other
than “Equal Temperament.”
NOTE
When Scale Tune is set to “Equal Temperament,” “---” is
shown on the display and this parameter cannot be edited.
C C, C , D, E , E, F,
F , G, A , A, B ,
B
Keyboard Touch (Setting display) Determines how the sound responds to your playing
strength. This setting does not change the weight of the
keyboard.
• Soft2: Produces relatively high volume even with light
playing strength. Best for players with a light touch.
• Soft1: Produces high volume with moderate playing
strength.
• Medium: Standard Touch Sensitivity.
• Hard1: Requires moderately strong playing for high
volume.
• Hard2: Requires strong playing to produce high
volume. Best for players with a heavy touch.
• Fixed: No touch response. The volume level will be the
same regardless of how hard you play the keys.
NOTE
The setting here will not be recorded to a MIDI Song and not
be transmitted as MIDI messages.
Medium Soft 2, Soft 1,
Medium, Hard 1,
Hard 2, Fixed
Fixed Velocity (Pop-up
window)
Determines the velocity with which you play the keys
when Touch (above) is set to “Fixed.”
NOTE
The setting here will not be recorded to a MIDI Song and not
be transmitted as MIDI messages.
64 1 – 127

System Menu
96
CLP-685, CLP-675, CLP-645, CLP-635, CLP-695GP, CLP-665GP Owner’s Manual
Keyboard Duo (Setting display) Splits the keyboard into two ranges, allowing you to play
duets over the same octave range (page 35).
Off On, Off
Split Point (Setting display) Determines the Split Point (the boundary between the
right-hand and left-hand keyboard areas).
F 2 (Split),
E3 (Duo)
A-1 – C7
Pedal Half Pedal Point (Pop-up
window)
Here you can specify the point to which you must
depress the right pedal or a pedal connected to the
[AUX PEDAL] jack (CLP-685, CLP-695GP) before the
assigned effect begins to be applied. This setting
applies only to the “Sustain Continuously” effect
(page 89) that is assigned to the right or AUX pedal
(CLP-685, CLP-695GP).
0 -2 (effective with
the shallowest
press) – 0 – +4
(effective with the
deepest press)
Soft Pedal
Depth
(Pop-up
window)
Determines how deeply the Soft pedal effect is applied.
This parameter is available only for the pedal to which
“Soft” (page 89) is assigned.
51 – 10
Pitch Bend
Range
(Pop-up
window)
Determines the range of the pitch bend that is produced
via the pedal in semitone steps. This setting is available
only for the pedal to which “Pitch Bend Up” or “Pitch
Bend Down” (page 89) is assigned.
NOTE
For some Voices, the pitch may not be changed according to
the Pitch Bend Range value set here.
2 0 – +12 (pressing
the pedal will
raise/lower the
pitch by 12
semitones
[1 octave])
Aux Polarity
(CLP-685,
CLP-695GP)
– A pedal connected to the [AUX PEDAL] jack may switch
on and off differently. For example, some pedals turn the
effects on and others turn them off when you press
them. Use this parameter to reverse this mechanism.
Make Make, Break
Aux Assign
(CLP-685,
CLP-695GP)
(Setting display) Assigns a function to the pedal connected to the [AUX
PEDAL] jack.
Expression Refer to the Pedal
Function List
(page 89).
Aux Area
(CLP-685,
CLP-695GP)
(Setting display) Determines the keyboard area to which the function of
the pedal connected to the [AUX PEDAL] jack is
applied.
All All, Right, Left
Play/Pause (Setting display)
Assigns the [ /] (Play/Pause) button’s function to one
of the Left pedal, Center pedal and pedal connected to
the [AUX PEDAL] jack (CLP-685, CLP-695GP). If a value
other than “Off” is selected here, the corresponding
pedal's function assigned in the “Voice” menu (page 88)
is disabled.
Off Off, Left, Center,
AUX (CLP-685,
CLP-695GP)
Sound Brilliance (Setting display) Adjusts the brilliance of Voices played via the entire
keyboard.
Normal Mellow 1 – 3,
Normal,
Bright 1 – 3
IAC – Turns the IAC effect on or off. For details about IAC,
refer to page 19.
On On, Off
IAC depth (Pop-up
window)
Determines the depth of the IAC. The higher the value,
the more clearly the low/high sounds at lower volume
levels.
0-3 – +3
Binaural – Turns the Binaural Sampling function (when
headphones are connected) on or off. When the
function is on and headphones are connected, the
sound from this instrument changes to the sound of
Binaural Sampling or the sound enhanced with the
Stereophonic Optimizer, allowing you to enjoy more
realistic sound (page 20).
On On, Off
To call up the desired parameter:
Press the [FUNCTION] button several times to select “System” menu, then use the [ ]/[ ]/[<]/[>] buttons to select the desired
parameter.
[>]
[<]
[>]
[<]
[>]
[<]
Description Default setting Setting range

System Menu
97
CLP-685, CLP-675, CLP-645, CLP-635, CLP-695GP, CLP-665GP Owner’s Manual
MIDI MIDI OUT (Setting display) Determines the MIDI channel on which the MIDI
messages generated via the keyboard performance will
be transmitted from the MIDI [OUT] or USB [TO HOST]
terminal. When Dual/Split/Duo is on, the MIDI channels
are assigned as follows.
• Performance via the R1 Voice = n (setting value)
• Performance via the R2 Voice = n+2
• Performance via the L Voice = n+1
Ch1 Ch1 – Ch16, Off
(not transmitted)
MIDI IN (Setting display) Determines which part of the instrument will be
controlled by each channel data of the MIDI messages
coming from the MIDI [IN] and USB [TO HOST] terminal.
• Song: Song part is controlled by the MIDI messages.
• Keyboard: The entire keyboard is controlled
regardless of the Dual/Split/Duo setting.
• R1: The keyboard performance via the R1 Voice is
controlled.
• L: The keyboard performance via the L Voice is
controlled.
• R2: The keyboard performance via the R2 Voice is
controlled.
• Off: No part is controlled.
“Song” for each of
all MIDI channels
For each MIDI
channel:
•Song
•Keyboard
•R1
•L
•R2
•Off
Local Control – “Local Control On” is a state in which this instrument
produces the sound from its tone generator when you
play the keyboard. In “Local Control Off” state, the
keyboard and the tone generator are cut off from each
other. This means that even if you play the keyboard,
this instrument will produce no sound. Instead, the
keyboard data can be transmitted via MIDI to a
connected MIDI device or computer, which can
produce the sound. The “Local Control Off” setting is
useful when you wish to play only an external sound
source while playing the keys on this instrument.
On On, Off
Receive Param. (Setting display) Determines which types of MIDI messages can be
received or recognized by this instrument.
MIDI message types:
Note on/off, Control Change, Program Change, Pitch
Bend, System Exclusive
On (for all the
MIDI messages)
On, Off (for each
MIDI message)
Transmit Param. (Setting display) Determines which types of MIDI messages can be
transmitted from this instrument.
MIDI message types:
Note on/off, Control Change, Program Change, Pitch
Bend, SystemRealTime, System Exclusive
On (for all the
messages)
On, Off (for each
message)
Initial Setup Cancel Transmits the current panel settings such as Voice
selection to a connected MIDI device or computer.
Before you start recording your performance to a
connected MIDI device or computer, execute this
operation to record the current panel settings at the
beginning of your performance data. It causes that the
same panel settings are called up when the recorded
performance is played back.
Operation:
Move the highlight to “Execute,” then press the [>]
button to transmit the panel settings as MIDI messages.
––
Execute
Backup Backup Setting – For instructions about these functions, refer to pages
100 – 101.
––
Backup –
Restore –
Factory Set –
To call up the desired parameter:
Press the [FUNCTION] button several times to select “System” menu, then use the [ ]/[ ]/[<]/[>] buttons to select the desired
parameter.
[>]
[<]
[>]
[<]
[>]
[<]
Description Default setting Setting range

System Menu
98
CLP-685, CLP-675, CLP-645, CLP-635, CLP-695GP, CLP-665GP Owner’s Manual
Utility USB Format Cancel This lets you format or initialize the USB flash drive
connected to the USB [TO DEVICE] terminal.
NOTICE
Executing the Format operation will delete all data saved in
the USB flash drive. Save important data to a computer or
another storage device.
NOTE
When connecting the USB flash drive to the USB [TO DEVICE]
terminal, a message prompting you to execute the Format
operation may appear. If such a case occurs, execute the
Format operation.
Operation
Move the highlight to “Execute,” then press the [>]
button to start the Format operation. After Formatting is
completed, a message appears then the instrument
returns to the Utility display after a while.
NOTICE
Never turn off the power or disconnect the USB flash drive
while “Executing” is shown in the display.
––
Execute
USB Properties – Shows the amount of free space and entire memory in
the USB flash drive connected to the USB [TO DEVICE]
terminal.
––
USB Autoload – When this is set to “On,” the Song saved in the root
directory can be selected (shown on the display)
automatically as soon as the USB flash drive is
connected to the USB [TO DEVICE] terminal.
Off On, Off
Speaker (Setting display) Lets you switch the speaker on/off.
• Normal
The speaker will sound only if headphones are not
connected.
• On
The speaker will always sound.
• Off
The speaker will not sound.
Normal Normal, On, Off
Audio Loop
Back
– Determines whether audio input from the connected
computer or smart device is output to a computer or a
smart device or not (page 84).
On On, Off
Audio EQ
(CLP-695GP)
– The optimum EQ (also called “Equalizer”) settings are
provided for audio playback on this instrument. When
this EQ is not required, set this parameter to “Off.”
On On, Off
Contrast (Pop-up
window)
Adjusts the contrast of the display. 0 -5 – +5
To call up the desired parameter:
Press the [FUNCTION] button several times to select “System” menu, then use the [ ]/[ ]/[<]/[>] buttons to select the desired
parameter.
[>]
[<]
[>]
[<]
[>]
[<]
Description Default setting Setting range
Amount of
free space
Amount of
entire memory

System Menu
99
CLP-685, CLP-675, CLP-645, CLP-635, CLP-695GP, CLP-665GP Owner’s Manual
Scale Tune List (Temperament List)
Utility Auto Power Off (Setting display) Lets you set the amount of time that elapses before the
power is turned off by Auto Power Off function
(page 17). To disable Auto Power Off, select “Off.”
Disabling Auto Power Off
30 (minutes) Off, 5, 10, 15, 30,
60, 120 (minutes)
Version – Displays the model name and the firmware version of
this instrument.
––
Language System Determines the type of characters shown on the display
for the System (general indication other than Song
name) and Song (Song name) individually.
Character list
International Japanese,
International
Song
Wireless LAN,
Wireless LAN
Option
– Refer to page 75. – –
Equal Temperament One octave is divided into twelve equal intervals. Currently most popular piano tuning scale.
PureMajor/PureMinor Based on natural overtones, three major chords using these scales produce a beautiful, pure sound.
Pythagorean This scale was devised by Pythagoras, the famous Greek philosopher and is created from a series of perfect fifths,
which are collapsed into a single octave. The 3rd in this tuning is slightly unstable, but the 4th and 5th are beautiful and
suitable for some leads.
MeanTone This scale was created as an improvement on the Pythagorean scale, by making the major third interval more “in tune.”
It was especially popular from the 16th century to the 18th century. Handel, among others, used this scale.
Werckmeister/
Kirnberger
These scales combine Mean Tone and Pythagorean in different ways. With these scales, modulation changes the
impression and feel of the Songs. They were often used in the era of Bach and Beethoven. They are also often used now
to reproduce the music of that era on harpsichords.
To call up the desired parameter:
Press the [FUNCTION] button several times to select “System” menu, then use the [ ]/[ ]/[<]/[>] buttons to select the desired
parameter.
[>]
[<]
[>]
[<]
[>]
[<]
Description Default setting Setting range
+
Turn the power on while holding down the lowest key
on the keyboard. A message appears briefly and Auto
Power Off is disabled.
Japanese
International

100
CLP-685, CLP-675, CLP-645, CLP-635, CLP-695GP, CLP-665GP Owner’s Manual
System Menu
This lets you set whether some settings of the Backup
Setting (below) are maintained or not when the power
is turned off. The Backup Setting consists of two
groups, “Voice” (including Voice related settings such
as Voice selection) and “Other” (including various
settings such as Song Repeat and Tuning), which can
be set individually.
*For information on whether Bluetooth functionality
is included with the instrument or not, refer to
page 138.
1. Press the [FUNCTION] button several times
to select “System” menu.
2. Use the [ ]/[ ] buttons to select “Backup,”
use the [>] button to call up the next display,
then use the [
]/[ ] buttons to select
“Backup Setting.”
3. Use the [>] then the [ ]/[ ] buttons to select
“Voice,” then use the [>] button to select “On”
or “Off.”
Each “Voice” contains the following settings:
• Voice selection for R1, R2 and L
• All the parameters other than Transpose in the
“Voice” menu
4. Use the [ ]/[ ] buttons to select “Other,”
then use the [>] button to select “On” or
“Off.”
The “Other” contains the following settings:
• In the “Song” menu: Song Repeat, Song-Keyboard,
Audio Volume, Quick Play, Play Track
• In the “Metronome/Rhythm” menu: Volume, BPM,
Bell On/Off, Intro, Ending
• In the “System” menu: Tuning, Keyboard (except
“Duo”), Pedal, Sound, MIDI
5. Press the [EXIT] button to exit from the
“System” menu display.
This lets you save data on internal memory to the
connected USB flash drive as a backup file (named
“clp-***.bup”). This backup file can be loaded to the
instrument via the Restore function (page 101) for
future.
NOTICE
• It may take 1 – 2 minutes to complete this operation. Never turn
off the power during this operation (while “Executing” is shown).
Doing so could result in damage to the data.
• If the same backup file (clp-***.bup) is already saved in the USB
flash drive, this operation will overwrite or replace this file with
new one.
1. Connect the USB flash drive to the USB [TO
DEVICE] terminal.
2. Press the [FUNCTION] button several times
to select “System” menu.
3. Use the [ ]/[ ] buttons to select “Backup,”
use the [>] button to call up the next display,
then use the [
]/[ ] buttons to select
“Backup.”
4. Use the [>] button to call up the next display,
then use the [
]/[ ] buttons to select
“Execute.”
5. Press the [>] button to execute the Backup
operation.
6. Press the [EXIT] button to exit from the
“System” menu display.
NOTE
When you want to restore the settings in the backup file, execute
the Restore function.
NOTE
Protected Songs cannot be backed up.
Backup Setting
(Selecting parameters maintained even when the
power is turned off)
Data and settings maintained even when the
power is turned off
• User MIDI Song (saved in this instrument’s
“User” memory)
• Bluetooth* (“System” menu)
• Utility (“System” menu; excepting “Audio EQ”
on the CLP-695GP)
•Backup Setting (explained here)
Backup
(Saving the Backup file for internal data)

System Menu
101
CLP-685, CLP-675, CLP-645, CLP-635, CLP-695GP, CLP-665GP Owner’s Manual
This lets you load the backup file (clp-***.bup) saved
via the Backup function (page 100) to the instrument
on.
NOTICE
• It may take 1 – 2 minutes to complete this operation. Never turn
off the power during this operation (while “Executing” is shown).
Doing so could result in damage to the data.
• If Protected Songs or recorded Songs reside on “User” memory,
make sure to move the Songs to the USB flash drive by following
the instructions page 66 before executing this operation. If you
do not, the Songs will be deleted via this operation.
1. Connect the USB flash drive containing the
Backup file to the USB [TO DEVICE]
terminal.
2. Press the [FUNCTION] button several times
to select “System” menu.
3. Use the [ ]/[ ] buttons to select “Backup,”
use the [>] button to call up the next display,
then use the [
]/[ ] buttons to select
“Restore.”
4. Use the [>] button to call up the next display,
then use the [
]/[ ] button select “Execute.”
5. Press the [>] button to execute the Restore
operation.
A message indicating that the operation is
completed appears, then the instrument will restart
after a while.
This lets you reset this instrument to its factory
default settings which refers to the initial setting
preprogrammed when shipped from the factory, and
is called up when you first turn on the power to this
instrument.
Note that the following points.
• This operation resets the Backup Setting (page 100) to the
default setting.
• This operation will not delete the Songs saved in the User
folder.
• This operation will not delete the Bluetooth* pairing
information (page 82).
*For information on whether Bluetooth functionality is included
with the instrument or not, refer to page 138.
NOTICE
Never turn off the power during this operation (while “Factory set
executing” is shown). Doing so could result in damage to the data.
1. Press the [FUNCTION] button several times
to select “System” menu.
2. Use the [ ]/[ ] buttons to select “Backup,”
use the [>] button to call up the next display,
then use the [
]/[ ] buttons to select
“Factory Set.”
3. Use the [>] button to call up the next display,
then use the [
]/[ ] buttons to select
“Execute.”
4. Press the [>] button to execute the Restore
operation.
A message indicating that the operation is
completed appears, then the instrument will restart
after a while.
Alternate method for restoring the default
settings
Press and hold down the white key on the right end
(C7) and press the [] (Standby/On) switch to turn
on the power to this instrument. This operation will
not delete the Songs in the User folder.
Restore
(Restarting the instrument with the Backup file
loaded)
Factory Set
(Restarting the instrument with the initial
factory settings loaded)
[ ] Standby/On switch
C7

102
CLP-685, CLP-675, CLP-645, CLP-635, CLP-695GP, CLP-665GP Owner’s Manual
Appendix
Preset Voice List
CLP-685, CLP-695GP
Voice
Group
Voice Name
Stereo
Sampling
Touch
Sense
Key-off
Sampling
VRM
Voice
Demo
Voice description
Piano CFX Grand
(1)
Yamaha’s CFX concert grand piano sound with a wide dynamic range for maximum
expressive control. Suitable for playing in any music genre and style.
(Binaural
CFX Grand)
—
Yamaha’s CFX concert grand piano sound sampled by Binaural Sampling, the method
optimized for headphone use. Listening this through headphones gives the impression of
being immersed in the sound, as if it was actually emanating from the piano. This Voice is
selected automatically when headphones are connected.
Bösendorfer
(2)
The famed sound of the Vienna-made Bösendorfer Imperial concert grand piano. Its spacious
sound evokes the size of the instrument, and is ideal for expressing tenderness in
compositions.
Upright Piano
—
(3)
The sound sampled from an upright piano, the Yamaha SU7. Enjoy the unique tonal character
and a lighter, more casual feel.
Studio Grand The sound of Yamaha’s C7 grand piano, which is often used in recording studios. Its bright
and clear sound is good for popular styles.
Bright Grand
— Bright piano sound. Good for clear expression and “cutting through” other instruments in an
ensemble.
Mellow Grand
—
Mellow piano sound. Good for quiet and slow music.
Ballad Grand
—
Grand piano sound with a soft and warm tone. Good for playing ballads.
Warm Grand
—
—
Warm and soft piano sound. Good for relaxing music.
Pop Grand
—
A slightly brighter piano sound. Good for popular styles.
Jazz Grand
—
—
A piano sound with unique tonal character. Good for jazz styles.
Rock Grand
—
A bright-sounding piano. Ideal for rock styles.
HonkyTonk Pf
—
—
A honky-tonk style piano. Enjoy a tonal character that is quite different than a grand piano.
E.Piano Stage E.Piano
—
—
The sound of an electric piano using hammer-struck metallic “tines.” Soft tone when played
lightly, and an aggressive tone when played hard.
DX E.Piano
—
——
An electronic piano sound produced by an FM synthesizer. The tone will change as you vary
your playing touch. Ideal for popular music.
Vintage EP
—
—
A different type of electric piano sound than Stage E.piano. Widely used in rock and popular
music.
Soft EP
—
——
An electric piano with a characteristic panning effect. Good for playing quiet ballads.
Phaser EP
—
——
A distinctive phaser effect makes this ideal for fusion styles.
DX Bright
—
———
A variation of electronic piano sound produced by an FM synthesizer. Its bright and sparkling
sound character spice up the music.
Tremolo Vintage
—
——
Includes tremolo ideal for Vintage EP. Frequently used in rock music.
Organ Organ GrandJeu
———
A registration sound famous for use in French organ compositions. This dramatic sound is
ideal for ending a performance.
Organ Principal
————
This Voice features the combination of pipes (8'+4'+2') of a principal (brass instrument)
organ. It is suitable for Baroque church music.
Organ Tutti
———
This Voice features a full coupler of a pipe organ, famous for the sound used in Toccata and
Fugue by Bach.
Jazz Organ 1
————
The sound of a “tonewheel” type electric organ. Sampled with Rotary SP effect, its rotation
speed is slow. Often heard in jazz and rock idioms.
Jazz Organ 2
—————
A same type of electric organ sound as Jazz Organ 1. This was sampled with the fast rotation
speed of the rotary speaker effect. Switch Voices between Jazz Organ 1 and Jazz Organ 2 to
add variations to your performance.
Mellow Organ
—————
A mellow electric organ sound. Ideal for calmer songs.
Organ Flute 1
————
A pipe organ sound that combines flute-type (woodwind type) stops of different pitches (8' +
4'). This is a gentle sound that is ideal for accompanying hymns.
Organ Flute 2
————
A pipe organ sound that combines flute-type (woodwind type) stops of different pitches (8' +
4' + 1-1/3'). This is brighter than Organ Flute1, and is suitable for solos.
Strings Strings
——
Stereo-sampled, large-scale strings ensemble with realistic reverb. Try combining this Voice
with piano in the Dual mode.
Slow Strings
———
The sound of a string ensemble, with a slow attack. Suitable for use in Dual mode with piano
or electric piano.
Choir
——
A big, spacious choir Voice. Perfect for creating rich harmonies in slow pieces.

Preset Voice List
103
CLP-685, CLP-675, CLP-645, CLP-635, CLP-695GP, CLP-665GP Owner’s Manual
VRM
Simulated string resonance sound with physical modeling when the damper pedal is pressed or keys are pressed.
Key-off Sampling
Samples of the very delicate noises that are produced when keys are released.
The Voice Demos with () listed above are short rearranged excerpts of the original compositions. All other Demo Songs are Yamaha original (© Yamaha Corporation).
Strings Slow Choir
———
The sound of a choir with a slow attack. Suitable for use in Dual mode with piano or electric
piano.
Mellow Strings
———
A mellow string ensemble. Enjoy a tonal character that is different from a Strings.
Synth Pad 1
—
——
A warm, mellow, and spacious synth sound. Ideal for sustained parts in the background of an
ensemble, or for use in Dual mode with piano or electric piano.
Synth Pad 2
—
———
String-like synth sound with a late attack. Ideal for use in Dual mode with bright tone piano or
electric piano.
Synth Pad 3
———
A unique and spacious synth sound. Ideal for playing slow music or for use in Dual mode with
piano or electric piano.
Bass Acoustic Bass
—
——
The sound of a finger-plucked upright bass. Frequently used in jazz and Latin music.
Bass & Cymbal
—
———
The sound of a cymbal has been layered onto the bass. Effective when used for jazz walking-
bass lines.
Electric Bass
—
——
The sound of an electric bass. Frequently used in jazz, rock, and popular music.
Fretless Bass
—
——
The sound of a fretless bass. Suitable for styles such as jazz and fusion.
Vintage Bass
—
———
A different type of electric bass with a rich sound.
Others Harpsichord 8'
—
—
(4)
The sound of the instrument frequently used in baroque music. Variations in playing touch
will not affect the volume, and a characteristic sound will be heard when you release the key.
Harpsi. 8'+4'
—
——
A harpsichord with an added upper octave. Produces a more brilliant sound.
Harp
—
——
This sound was sampled from a grand harp. This sound, with a bright attack, is ideal for
playing gorgeous phrases.
Vibraphone
——
A Vibraphone sound, sampled in stereo. Its spacious and clear sound is ideal for popular
music.
Marimba
———
A marimba sound, sampled in stereo for spaciousness and realism.
Celesta
———
The sound of a celesta (a percussion instrument in which hammers strike metallic bars to
produce sound). This instrument is well-known for its appearance in “Dance of the Sugar-
plum Fairies” from Tchaikovsky’s “Nutcracker Suite.”
Nylon Guitar
——
Stereo-sampled, nylon-string guitar with natural reality. Suitable for any style of musics.
Steel Guitar
—
———
A bright steel-string guitar sound. Ideal for popular music.
Scat
—
———
You can enjoy jazz “scatting” with this Voice. Depending on how hard and what note range
you play, different sounds will be produced.
XG
—
—
——
For details on XG Voices, refer to the “XG Voice list” in the separate Data List.
Voice Group Voice Name Title Composer
(1)
Piano CFX Grand Impromptu No.1 op.29 F. F. Chopin
(Binaural CFX Grand)
(2)
Bösendorfer Mädchens Wunsch (6 Chants polonaise S.480 R.145) F. Liszt / F. F. Chopin
(3)
Upright Piano Sonatine F dur Anh5(2) 1st mov. L. v. Beethoven
(4)
Others Harpsichord 8' Concerto a cembalo obbligato, 2 violini, viola e continuo No.7, BWV 1058 J. S. Bach
Voice
Group
Voice Name
Stereo
Sampling
Touch
Sense
Key-off
Sampling
VRM
Voice
Demo
Voice description

Preset Voice List
104
CLP-685, CLP-675, CLP-645, CLP-635, CLP-695GP, CLP-665GP Owner’s Manual
CLP-675, CLP-645, CLP-635, CLP-665GP
Voice
Group
Voice Name
Stereo
Sampling
Touch
Sense
Key-off
Sampling
VRM
Voice
Demo
Voice description
Piano CFX Grand
(1)
Yamaha’s CFX concert grand piano sound with a wide dynamic range for maximum
expressive control. Suitable for playing in any music genre and style.
(Binaural
CFX Grand)
— Yamaha’s CFX concert grand piano sound sampled by Binaural Sampling, the method
optimized for headphone use. Listening this through headphones gives the impression of
being immersed in the sound, as if it was actually emanating from the piano. This Voice is
selected automatically when headphones are connected.
Bösendorfer
(2)
The famed sound of the Vienna-made Bösendorfer Imperial concert grand piano. Its spacious
sound evokes the size of the instrument, and is ideal for expressing tenderness in
compositions.
Upright Piano
—
(3)
The sound sampled from an upright piano, the Yamaha SU7. Enjoy the unique tonal character
and a lighter, more casual feel.
Bright Grand Bright piano sound. Good for clear expression and “cutting through” other instruments in an
ensemble.
Mellow Grand
—
Mellow piano sound. Good for quiet and slow music.
Warm Grand
—
—
Warm and soft piano sound. Good for relaxing music.
Pop Grand
—
A slightly brighter piano sound. Good for popular styles.
Jazz Grand
—
—
A piano sound with unique tonal character. Good for jazz styles.
Rock Grand
—
A bright-sounding piano. Ideal for rock styles.
HonkyTonk Pf
—
—
A honky-tonk style piano. Enjoy a tonal character that is quite different than a grand piano.
E.Piano Stage E.Piano
—
—
The sound of an electric piano using hammer-struck metallic “tines.” Soft tone when played
lightly, and an aggressive tone when played hard.
DX E.Piano
—
——
An electronic piano sound produced by an FM synthesizer. The tone will change as you vary
your playing touch. Ideal for popular music.
Vintage EP
—
—
A different type of electric piano sound than Stage E.piano. Widely used in rock and popular
music.
Soft EP
—
——
An electric piano with a characteristic panning effect. Good for playing quiet ballads.
Phaser EP
—
——
A distinctive phaser effect makes this ideal for fusion styles.
DX Bright
—
———
A variation of electronic piano sound produced by an FM synthesizer. Its bright and sparkling
sound character spice up the music.
Tremolo Vintage
—
——
Includes tremolo ideal for Vintage EP. Frequently used in rock music.
Organ OrganPrincipal
———
(4)
This Voice features the combination of pipes (8'+4'+2') of a principal (brass instrument)
organ. It is suitable for Baroque church music.
Organ Tutti
———
This Voice features a full coupler of a pipe organ, famous for the sound used in Toccata and
Fugue by Bach.
Jazz Organ 1
————
The sound of a “tonewheel” type electric organ. Sampled with Rotary SP effect, its rotation
speed is slow. Often heard in jazz and rock idioms.
Jazz Organ 2
————
—
A same type of electric organ sound as Jazz Organ 1. This was sampled with the fast rotation
speed of the rotary speaker effect. Switch Voices between Jazz Organ 1 and Jazz Organ 2 to
add variations to your performance.
Mellow Organ
————
—
A mellow electric organ sound. Ideal for calmer songs.
Strings Strings
——
Stereo-sampled, large-scale strings ensemble with realistic reverb. Try combining this Voice
with piano in the Dual mode.
Slow Strings
——
—
The sound of a string ensemble, with a slow attack. Suitable for use in Dual mode with piano
or electric piano.
Choir
—
——
A big, spacious choir Voice. Perfect for creating rich harmonies in slow pieces.
Slow Choir
—
——
—
The sound of a choir with a slow attack. Suitable for use in Dual mode with piano or electric
piano.
Synth Pad
—
——
A warm, mellow, and spacious synth sound. Ideal for sustained parts in the background of an
ensemble, or for use in Dual mode with piano or electric piano.
Bass Acoustic Bass
—
——
The sound of a finger-plucked upright bass. Frequently used in jazz and Latin music.
Bass & Cymbal
—
——
—
The sound of a cymbal has been layered onto the bass. Effective when used for jazz walking-
bass lines.
Electric Bass
—
——
The sound of an electric bass. Frequently used in jazz, rock, and popular music.
Fretless Bass
—
——
The sound of a fretless bass. Suitable for styles such as jazz and fusion.
Others Harpsichord 8'
—
—
(5)
The sound of the instrument frequently used in baroque music. Variations in playing touch
will not affect the volume, and a characteristic sound will be heard when you release the key.
Harpsi. 8'+4'
—
——
A harpsichord with an added upper octave. Produces a more brilliant sound.

Preset Voice List
105
CLP-685, CLP-675, CLP-645, CLP-635, CLP-695GP, CLP-665GP Owner’s Manual
VRM
Simulated string resonance sound with physical modeling when the damper pedal is pressed or keys are pressed.
Key-off Sampling
Samples of the very delicate noises that are produced when keys are released.
The Voice Demos with () listed above are short rearranged excerpts of the original compositions. All other Demo Songs are Yamaha original (© Yamaha Corporation).
Others Vibraphone
——
A Vibraphone sound, sampled in stereo. Its spacious and clear sound is ideal for popular
music.
Nylon Guitar
——
Stereo-sampled, nylon-string guitar with natural reality. Suitable for any style of musics.
Steel Guitar
—
———
A bright steel-string guitar sound. Ideal for popular music.
Voice group Voice name Title Composer
(1)
Piano CFX Grand Impromptu No.1 op.29 F. F. Chopin
(Binaural CFX Grand)
(2)
Bösendorfer Mädchens Wunsch (6 Chants polonaise S.480 R.145) F. Liszt / F. F. Chopin
(3)
Upright Piano Sonatine F dur Anh5(2) 1st mov. L. v. Beethoven
(4)
Organ Organ Principal Herr Christ, der ein'ge Gottes-Sohn, BWV 601 J. S. Bach
(5)
Others Harpsichord8' Concerto a cembalo obbligato, 2 violini, viola e continuo No.7, BWV 1058 J. S. Bach
Voice
Group
Voice Name
Stereo
Sampling
Touch
Sense
Key-off
Sampling
VRM
Voice
Demo
Voice description

106
CLP-685, CLP-675, CLP-645, CLP-635, CLP-695GP, CLP-665GP Owner’s Manual
Song List
50 Classics Lesson Songs
No. Song Title Composer
Arrangements
1 Canon D dur J. Pachelbel
2 Air On the G String J. S. Bach
3 Jesus, Joy of Man’s Desiring J. S. Bach
4 Twinkle, Twinkle, Little Star Traditional
5 Piano Sonate op.31-2 “Tempest” 3rd mov. L. v. Beethoven
6 Ode to Joy L. v. Beethoven
7 Wiegenlied op.98-2 F. P. Schubert
8 Grande Valse Brillante F. F. Chopin
9 Polonaise op.53 “Héroïque” F. F. Chopin
10 La Campanella F. Liszt
11 Salut d’amour op.12 E. Elgar
12 From the New World A. Dvořák
13 Sicilienne G. U. Fauré
14 Clair de lune C. A. Debussy
15 Jupiter (The Planets) G. Holst
Duets
16 Menuett (Eine kleine Nachtmusik K.525) W. A. Mozart
17 Menuett G dur L. v. Beethoven
18 Marcia alla Turca L. v. Beethoven
19 Piano Concerto No.1 op.11 2nd mov. F. F. Chopin
20 The Nutcracker Medley P. I. Tchaikovsky
Original Compositions
21 Prelude (Wohltemperierte Klavier I No.1) J. S. Bach
22 Menuett G dur BWV Anh.114 J. S. Bach
23 Piano Sonate No.15 K.545 1st mov. W. A. Mozart
24 Turkish March W. A. Mozart
25 Piano Sonate op.13 “Pathétique” 2nd mov. L. v. Beethoven
26 Für Elise L. v. Beethoven
27 Piano Sonate op.27-2 “Mondschein” 1st mov. L. v. Beethoven
28 Impromptu op.90-2 F. P. Schubert
29 Frühlingslied op.62-6 J. L. F.
Mendelssohn
30 Fantaisie-Impromptu F. F. Chopin
31 Etude op.10-3 “Chanson de l’adieu” F. F. Chopin
32 Etude op.10-12 “Revolutionary” F. F. Chopin
33 Valse op.64-1 “Petit chien” F. F. Chopin
34 Nocturne op.9-2 F. F. Chopin
35 Nocturne KK4a-16/BI 49 [Posth.] F. F. Chopin
36 Träumerei R. Schumann
37 Barcarolle P. I. Tchaikovsky
38 La prière d’une Vierge T. Badarzewska
39 Liebesträume No.3 F. Liszt
40 Blumenlied G. Lange
41 Humoresque A. Dvořák
42 Arietta E. H. Grieg
43 Tango (España) I. Albéniz
44 The Entertainer S. Joplin
45 Maple Leaf Rag S. Joplin
46 La Fille aux Cheveux de Lin C. A. Debussy
47 Arabesque No.1 C. A. Debussy
48 Cakewalk C. A. Debussy
49 Je te veux E. Satie
50 Gymnopédies No.1 E. Satie
Album Title No. /Song Title Composer
Vorschule im
Klavierspiel op.101
1–106 F. Beyer
25 Etudes faciles et
progressives op.100
1 La candeur J. F.
Burgmüller
2 Arabesque
3Pastorale
4 Petite réunion
5 Innocence
6 Progrès
7 Courant limpide
8 La gracieuse
9 La chasse
10 Tendre fleur
11 La bergeronnette
12 Adieu
13 Consolation
14 La styrienne
15 Ballade
16 Douce plainte
17 Babillarde
18 Inquiétude
19 Ave Maria
20 Tarentelle
21 Harmonie des anges
22 Barcarolle
23 Retour
24 L'hirondelle
25 La chevaleresque
100 Übungsstücke
op.139
1–100 C. Czerny
30 Etudes de
mécanisme op.849
1–30 C. Czerny
The Virtuoso Pianist 1–20
1-Variation. 1–22
C-L. Hanon
About Duet Songs
The songs listed below are duet songs.
• Nos.16-20 of “50 Classics”
• Nos. 1–11 of the Vorschule im Klavierspiel op.101
of “Lesson Songs” as well as 32–34, 41–44, 63–64,
and 86–87
The right-hand part is for the right hand of the first
player, the left-hand part is for the left hand of the
first player, and Extra part is for the both hands of
the second player.

107
CLP-685, CLP-675, CLP-645, CLP-635, CLP-695GP, CLP-665GP Owner’s Manual
Rhythm List
Category No. Name
Pops&Rock 1 8Beat
2 16Beat
3 Shuffle1
4 Shuffle2
5 Shuffle3
6 8BeatBallad
7 6-8SlowRock
Jazz 8 Swing
9 SwingFast
10 Five-Four
11 JazzWaltz
Latin 12 Samba
13 BossaNova
14 Rumba
15 Salsa
16 Tango
Kids&Holiday 17 2-4Kids
18 6-8March
19 ChristmasSwing
20 Christmas3-4

108
CLP-685, CLP-675, CLP-645, CLP-635, CLP-695GP, CLP-665GP Owner’s Manual
Message List
Some message display remains open. In this case, press the [EXIT] button to close message display.
Message Meaning
Access error The operation has failed. The following causes can be considered. If the following are not responsible, the
file may be damaged.
• The file operation is wrong. Follow the instructions in “Handling Song Files” (page 63) or “Backup”/
“Restore” (pages 100 – 101).
• The connected USB flash drive is not compatible with this instrument. For information on compatible USB
flash drive, see page 72.
• The protected Song on which you attempted the operation is defective.
Bluetooth pairing... The instrument is standing by for Bluetooth pairing. Refer to the instructions on page 81.
Cannot be executed The operation has failed. The following causes can be considered. Solve the causes, and try again.
• The file operation you attempted cannot be executed to Preset Songs or an Audio Song. For information
on the limitation of handling Song files, see page 63.
• The Song file operation cannot be made to an empty Song file (page 53) or NoSong.
NoSong: This is displayed when you select a folder which does not contain any Songs.
Change to Current Tempo This message indicates that you are applying the current tempo to the selected Song.
Change to Current Voice This message indicates that you are changing the Voice of the Song with the current Voice.
Completed This message indicates that the operation is completed. Go on to the next step.
Completed
Restart now
Restore is completed. The instrument is automatically turned on again.
Convert canceled This message appears when the convert operation is canceled.
Convert completed to USB/
USERFILES/
This message appears when the convert operation to the “USER FILES” folder on a USB flash drive is
completed.
Convert to Audio This message appears during the convert operation.
Copy completed to USB/
USERFILES/
This message appears when the copy operation to the “USER FILES” folder on a USB flash drive is
completed.
Copy completed to User This message appears when the copy operation to the “User” on this instrument is completed.
Device busy The operation, such as converting to the Audio Song or Audio Song playback/recording, has failed. This
message appears when you attempt to use a USB flash drive to which recording/deleting operations are
repeated. Execute the Format operation after making sure there is no important data in the USB flash drive
(page 98), and try again.
Device removed This message appears when the USB flash drive is removed from the instrument.
Duplicate name This message indicates that an identically named file already exists. Rename the file (page 68).
Executing The instrument is executing the operation. Wait until the message disappears, then go on to the next step.
Factory set executing
Memory Song excluded
The default settings (except the Songs in the “User”) have been restored (page 101).
This message also appears if you press and hold down the C7 key and turn on the power to the instrument.
FactorySet Completed
Restart
Factory set is completed. The instrument is then restarted.
Incompatible device This message appears when an incompatible USB flash drive is connected. Use a device whose
compatibility has been confirmed by Yamaha (page 72).
Internal hardware error A malfunction has occurred in the instrument. Contact your nearest Yamaha dealer or authorized distributor.
Last power off invalid
Checking memory
This message appears when the power is turned on after turning off the power while handling a Song file
(page 63) or saving a backup file (page 100). The internal memory is being checked while this message
appears. If the internal settings are damaged, they will be reset to the default settings. If the Songs in the
“User” are damaged, they will be deleted.
Maximum no. of devices
exceeded
The number of devices exceed the limitation. Up to two USB devices can be connected simultaneously. For
details, see page 72.
Memory full Since the capacity and the number of files in the “User”/USB flash drive are full, the operation cannot be
completed. Delete some Songs in the “User”/USB flash drive or move Songs to another USB flash drive,
and try again.
Move completed to USB/
USERFILES/
This message appears when the move operation to the “USER FILES” folder on a USB flash drive is
completed.
Move completed to User This message appears when the move operation to “User” on the instrument is completed.

Message List
109
CLP-685, CLP-675, CLP-645, CLP-635, CLP-695GP, CLP-665GP Owner’s Manual
No device A USB flash drive was not connected to the instrument when you attempted to perform a device-related
operation. Connect the device, and try again.
No response
from USB device
The instrument cannot communicate with the connected USB device. Redo the connection (page 72). If
you still see this message, the USB device may be damaged.
Notice:
Protected Song
This message appears when you attempt to handle the Protected Song. For information on the limitation of
file operations, see page 63.
Please wait The instrument is processing the data. Wait until the message disappears, then go on to the next step.
Protected device This message appears when you attempt a file operation (page 63), record your performance or save the
data on a read-only USB flash drive. Cancel the read-only setting, if possible, and try again. If you still see
this message, the USB flash drive is internally protected (such as commercially available music data). You
cannot make the file operation or record your performance to such a device.
Protected Song You attempted a file operation to a Protected Song or read-only file. Data of those types have handling
limitations (page 63), and also cannot be used for editing (page 59). Use a read-only file after cancelling
the read-only setting.
Remaining space
on drive is low
Since the remaining space on the “User”/USB flash drive is low, delete any unnecessary files (page 65)
before recording.
Same file name exists This message appears to prompt you to confirm if overwriting or not when executing a Copy/Move/
MIDI to Audio operation.
Song error This message appears, if a problem is found with the Song data when you select a Song or while the Song
is playing. In this case, reselect the Song, and try again to play back. If the message still appears, the Song
data may have been damaged.
Song too large The size of Song data (MIDI/Audio) exceeds the limitation. The following causes can be considered.
• The Song size you attempt to play back exceeds the limitation. The limitation for playback is approx.
500KB (MIDI), 80 minutes (Audio).
• The Song size exceeds the limitation during recording. The limitation for recording is approx. 500KB
(MIDI), 80 minutes (Audio). The recording will end automatically and the recorded data before the end is
saved.
• The Song size exceeds the limitation during converting a MIDI Song to an Audio Song. The limitation is 80
minutes (Audio).
System limit This message appears when the number of files exceeds the system limit. The maximum number of files
and folders which can be saved in a folder is 250. Try again after deleting/moving the unnecessary file(s).
This data format is not
supported
This message appears when you attempted to load a Song of unsupported format to this instrument. Refer
to the page 39 about supported Song formats.
Unformatted device This message appears when you attempt to use an unformatted USB flash drive. Format it (page 98), and
try again.
Unsupported device This message appears when an unsupported USB flash drive is connected. Use a device whose
compatibility has been confirmed by Yamaha (page 72).
USB device
overcurrent error
Communication with the USB device has been cut off because of an abnormal power surge to the device.
Disconnect the USB device from the USB [TO DEVICE] terminal and turn the [] (Standby/On) switch of
the instrument standby and on again.
USB hub
hierarchical error
The USB hub is connected in two layers. USB hub use is limited to one layer.
USB power consumption
exceeded
A
bus-powered USB hub is usually recommended. When this message appears, however, use a self-powered
USB hub (with its own power source) and turn the power to on, or use a device whose compatibility
has been
confirmed by Yamaha (page 72).
Wrong device The file operation cannot be made to the connected USB flash drive. The following causes can be
considered.
• The USB flash drive in not formatted. Format it (page 98), and try again.
• The number of files exceeds the system limit. The maximum number of files and folders which can be
saved in a folder is 250. Try again after deleting/moving the unnecessary file(s).
Wrong name The Song name is not appropriate. This message appears during the “Renaming files” (page 68) operation
because of the following causes. Rename the Song correctly.
• No character has been input.
• You used a period or space at the beginning/ending of a Song name.
Message Meaning

110
CLP-685, CLP-675, CLP-645, CLP-635, CLP-695GP, CLP-665GP Owner’s Manual
Troubleshooting
When a message is displayed, refer to the “Message List” (page 108) for troubleshooting aid.
Problem Possible Cause and Solution
The instrument does not turn
on.
The instrument has not been plugged in properly. Securely insert the female plug into the socket on the
instrument, and the male plug into a proper AC outlet (page 14).
A click or pop is heard when
the power is turned on or off.
This is normal when electrical current is being applied to the instrument.
The power is automatically
turned off.
This is normal and due to the Auto Power Off function. If necessary, set the parameter of the Auto Power Off
function (page 99).
The message “USB device
overcurrent error” is shown
and the USB device does not
respond.
Communication with the USB device has been shut down because of the overcurrent to the USB device.
Disconnect the device from the USB [TO DEVICE] terminal, then turn on the power of the instrument.
Noise is heard from the
speakers or headphones.
The noise may be due to interference caused by the use of a mobile phone in close proximity to the instrument.
Turn off the mobile phone, or use it further away from the instrument.
Noise is heard from the
instrument’s speakers or
headphones when using the
instrument with your smart
device, such as an iPhone/
iPad.
When you use the instrument along with your smart device, we recommend that you set that device’s “Airplane
Mode” to on and then the Wi-Fi/Bluetooth setting to on on your smart device, in order to avoid noise caused by
communication.
The overall volume is low, or
no sound is heard.
The Master Volume is set too low; set it to an appropriate level using the [MASTER VOLUME] slider (page 19).
The volume level for the keyboard performance is set too low. Adjust the volume balance to increase the
keyboard volume via the “Song” menu display: “Volume” “Song - Keyboard” (page 48).
Headphones are connected when the Speaker setting is “Normal” (page 98). Disconnect the headphone plug.
The Speaker setting is “Off.” Set the Speaker to “Normal” via the “System” menu display: “Utility” “Speaker”
(page 98).
Local Control is “Off.” Set Local Control “On” via the “System” menu display: “MIDI” “Local Control” (page 97).
“Expression” is assigned to the right pedal or the AUX pedal (CLP-685, CLP-695GP). Assign any function other
than “Expression” to the pedal (page 88) via the “Voice” menu display: “Pedal Assign” “Right” (page 88) or
the “System” menu display: “Pedal” “Aux Assign” (CLP-685, CLP-695GP) (page 96).
The speakers do not switch
off when a pair of
headphones is connected to
the [PHONES] jack.
The Speaker setting is “On.” Set the speaker setting to “Normal” via the “System” menu display: “Utility”
“Speaker” (page 98).
Pedals do not function. The pedal cord may not be securely connected to the [PEDAL] jack. Be sure to insert the pedal cord all the way
until the metal part of the cord plug disappears from view (pages 115, 119, 121 or 128).
(CLP-685, CLP-695GP)
The on/off setting of the pedal
connected to the AUX PEDAL
jack is reversed.
Some types of pedals may turn on and off in opposite fashion. Set to the appropriate parameter via the “System”
menu display: “Pedal” “Aux Polarity” (page 96).
The keyboard volume is
lower than the Song playback
volume.
The volume level for the keyboard performance is set too low. Adjust the volume balance to increase the
keyboard volume via the “Song” menu display: “Volume” “Song - Keyboard” (page 48).
The buttons do not respond. While you are using a function, some buttons not used for the function are disabled. If the Song is playing, stop
playback. Otherwise, press the [EXIT] button to return to the Voice or Song display, Then, perform the desired
operation.
Higher or lower notes do not
sound correctly when the
transpose or octave setting is
made.
This instrument can cover the range of C -2 – G8 when you set the transposition or octave. If notes lower than C
-2 are played, the sound is moved one octave higher. If notes higher than G8 are played, the sound is moved
one octave lower.
Performance in Dual/Split/
Duo mode is not recorded, or
part data is lost
unexpectedly.
Switching to Dual/Split/Duo mode in the middle of the Song is not recorded. Also, the recording part for the Voice
2 (Dual mode) or the left Voice (Split/Duo mode) is automatically assigned (page 55). If the assigned part
already has data, the data will be overwritten and deleted when you record.
Depending on the selected
Voice, the keyboard sound in
Duo mode may be output
from only one speaker.
This is because the default pan setting differs depending on the Voice.
Change the settings from the “Voice” menu “Voice Edit” “Voice name” “Pan” (page
87).

Troubleshooting
111
CLP-685, CLP-675, CLP-645, CLP-635, CLP-695GP, CLP-665GP Owner’s Manual
*For information on whether Bluetooth functionality is included or not, refer to page 138.
The Song title is not correct. The “Language” setting may be different than that is selected when you named the Song. Also, if the Song was
recorded on another instrument, the title might be displayed incorrectly. Set the “Language” parameter
(page 99) via the “System” menu display: “Utility” “Language” “Song” to change the setting. However, if the
Song was recorded on another instrument, changing the “Language” parameter setting may not resolve the
problem.
Menu display cannot be
called up.
When Song is being played back, menu display other than “Voice” menu and “Song” menu will not appear. Stop
the Song by pressing the [ /] (Play/Pause) button. Also, in the recording ready mode, only “Recording” menu
display will appear.
Rhythm does not start. “SynchStart” setting is on. Set “SynchStart” off in the “Metronome/Rhythm” menu display.
The contents of the Wireless
LAN is not shown in the
display even though the USB
wireless LAN adaptor is
connected.
Disconnect the USB wireless LAN adaptor and connect it again.
The Bluetooth-equipped
smart device cannot be
paired with nor connected to
the instrument.
Check the Bluetooth function of the smart device is activated. To connect the smart device and the instrument
via Bluetooth, both devices need to be functional.
The smart device and the instrument need to be paired to connect each other via Bluetooth (page 81).
In case there is a device (microwave oven, wireless LAN device, etc.) that outputs signals in the 2.4 GHz
frequency band nearby, move this instrument away from the device that is emitting radio-frequency signals.
Sound input via the [AUX IN]
jack or Bluetooth is
interrupted.
The Noise Gate function of this instrument cuts unwanted noise from the input sound. However, this may result in
wanted sounds also being cut, such as the soft decay sound of a piano. This is normal and not a sign of
malfunction.
Problem Possible Cause and Solution

112
CLP-685, CLP-675, CLP-645, CLP-635, CLP-695GP, CLP-665GP Owner’s Manual
Assembling the Clavinova
CAUTION
• Assemble the unit on a hard and flat floor with ample space.
• Be careful not to confuse parts, and be sure to install all
parts in the correct orientation. Please assemble the unit in
accordance with the sequence given below.
• (CLP-685, CLP-675, CLP-645, CLP-635) Assembly should be
carried out by at least two persons.
• (CLP-695GP, CLP-665GP) Assembly should be carried out
by at least four persons.
• Be sure to use only the included screws of the specified
sizes. Do not use any other screws. Use of incorrect screws
can cause damage or malfunction of the product.
• Be sure to tighten all screws upon completing assembly of
the unit.
• To disassemble the unit, reverse the assembly sequence
given below. Failure to do so can result in damage to the
instrument or personal injury.
Assembling the Clavinova
After completing the assembly, please
check the following.
• Are there any parts left over?
Review the assembly procedure and correct any errors.
• Is the instrument clear of doors and other
movable fixtures?
Move the instrument to an appropriate location.
• Does the instrument make a rattling noise
when you shake it?
Tighten all screws.
• Does the pedal box rattle or give way when you
step on the pedals?
Turn the adjuster so that it is set firmly against the floor.
• Are the pedal and power cords inserted
securely into the sockets?
Check the connection.
When Moving the Instrument
After Assembly
CAUTION
• When moving the instrument after assembly, always hold
the bottom of the main unit.
• Do not hold the key cover or top portion. Improper handling
can result in damage to the instrument or personal injury.
NOTICE
Rotate the adjuster under the pedal until it separates from the floor
surface. Contact with the adjuster can result in damage to the floor
surface.
Transporti ng
If you move to another location, refer to the “Transporting” on
page 129.
Assembly Precautions
Have a Phillips-head (+) screwdriver of the
appropriate size ready.
Reference page
CLP-685 page 113
CLP-675 page 117
CLP-645 page 120
CLP-635 page 120
CLP-695GP page 123
CLP-665GP page 127
CAUTION
If the unit creaks or is otherwise unsteady when you play on the
keyboard, refer to the assembly diagrams and retighten all screws.
685 675 645 635 695GP 665GP
Do not hold here.
Hold here.
Rotate the adjuster under the pedal
until it separates from the floor
surface.
685 675 645 635 695GP 665GP
Do not hold here.
Do not hold here.
Key cover
Top Position

Assembling the Clavinova
113
CLP-685, CLP-675, CLP-645, CLP-635, CLP-695GP, CLP-665GP Owner’s Manual
Remove all parts from the package and make sure
you have all of the items.
1. Attach E and F to D.
1-1. Remove the twist tie from the folded pedal
cord.
Don’t discard the twist tie, you’ll need it later in
step 6.
1-2. While pushing the lower part of E and F
from the outside, secure D using four 6 ×
20 mm round head screws.
2. Attach B.
2-1. Insert B between E and F as shown in the
illustration.
CLP-685 Assembly
A
B
C
D
FE
Foamed styrol pads
Remove foamed styrol pads from the package, position them on the
floor, then place A on top of them. Position the pads so that they will
not hide the connector panel on the bottom of A.
Connector
panel
Bundled pedal
cord inside
The pedals are covered with vinyl covers when
shipped from the factory. Before starting the
assembly, please make sure to remove the
cover from the damper pedal.
6 × 20 mm round head screws × 4
6 × 20 mm flat head screws × 6
4 × 14 mm round head screws × 10
Power cord
Cord holders × 2
4 × 10 mm thin screws × 2
Headphone hanger
E
D
F
1-2
1-1
F
E
B
D
D
2-1
2-2
2-2
Proper way
to hold B

Assembling the Clavinova
114
CLP-685, CLP-675, CLP-645, CLP-635, CLP-695GP, CLP-665GP Owner’s Manual
2-2. Align and attach B to the front side of D, E
and F, then align the larger holes on
brackets of B to the screws on D.
2-3. Temporarily secure with six 4 × 14 mm
round head screws.
Insert six screws into the smaller holes on the
brackets.
3. Mount A.
Be sure to place your hands at least 15 cm away from
either end of the main unit when positioning it.
CAUTION
• Be extra careful not to drop the main unit or let your fingers
be pinched by it.
• Do not hold the main unit in any position other than the
position specified above.
4. Attach A.
4-1. Adjust the position of A so that the left and
right ends of A will project beyond E and F
equally (as seen from the rear).
4-2. Secure A using two 6 × 20 mm flat head
screws from the rear.
4-3. Secure A using four 6 × 20 mm flat head
screws from the front.
4-4. Firmly tighten the screws from the upper
parts you temporarily fastened in previous
step 2-3 above (assembly B).
B
2-3
A
F
E
Align the screw holes.
At least 15 cm
4-2
4-3
A
4-1
4-4

Assembling the Clavinova
115
CLP-685, CLP-675, CLP-645, CLP-635, CLP-695GP, CLP-665GP Owner’s Manual
5. Connect the speaker cord.
5-1. Remove the twist tie attaching the speaker
cord.
5-2. Insert the speaker cord plug into the
connector so that the tab extends toward
the front when viewed from the rear.
6. Connect the pedal cord.
6-1. Insert the pedal cord plug into the
[PEDAL] connector.
6-2. Attach the cord holders to the instrument,
then clip the cord into the holders. At this
time, be careful that the pedal cord isn’t
loose between the plug and cord holder.
6-3. Use a twist tie to bundle the pedal cord.
7. Insert the plug of the power cord
into the [AC IN] connector.
8. Attach C.
8-1. Attach the 4 × 14 mm round head screws to
the brackets on the upper side of E and F.
Make sure to leave a slight gap by not fully
tightening the screws.
Insert the pedal cord securely
until the metal part of the
cord plug disappears from
view. Otherwise, the pedal
may not function properly.
6-3
6-2
6-1
F
E
8-1
8-1

Assembling the Clavinova
116
CLP-685, CLP-675, CLP-645, CLP-635, CLP-695GP, CLP-665GP Owner’s Manual
8-2. Hook C with holes onto the screws attached
in step 8-1.
8-3. Secure the lower part of C using two 4 ×
14 mm round head screws.
8-4. Securely tighten the screws on the upper
part of C.
9. Set the adjuster.
Rotate the adjuster until it comes in firm contact
with the floor surface.
10. Attach the headphone hanger.
Use the two thin screws (4 × 10 mm) to attach the
hanger as shown in the illustration.
F
E
C
8-2
8-3
8-4

Assembling the Clavinova
117
CLP-685, CLP-675, CLP-645, CLP-635, CLP-695GP, CLP-665GP Owner’s Manual
Remove all parts from the package and make sure
you have all of the items.
1. Attach C to D and E.
1-1. Untie and straighten out the bundled pedal
cord. Do not discard the vinyl tie. You will
need it later in step 5.
1-2. Insert the protrusions into the holes on the
brackets, then attach D and E to C by
tightening the four thick screws (6 × 20 mm).
2. Attach B.
Depending on the model of digital piano you
purchased, the surface color of one side of B may
be different from the other side. If so, position B
so that the side similar in color to D and E faces
the player.
CLP-675 Assembly
A
DE
B
C
Foamed styrol pads
Remove foamed styrol pads from the package, position them on the
floor, then place A on top of them. Position the pads so that they will
not block the speaker box on the bottom of A.
Bundled pedal
cord inside
The pedals are covered with vinyl covers
when shipped from the factory. Before
starting the assembly, please make sure to
remove the cover from the damper pedal.
6 × 20 mm thick screws × 10
4 × 12 mm thin screws × 2
4 × 20 mm tapping screws × 4
Power cord
Cord holders × 2
4 × 10 mm thin screws × 2
Headphone hanger
DD
EE
CC
1-2
1-2
1-2
1-1
2-1, 2-3
2-2
D
B
E

Assembling the Clavinova
118
CLP-685, CLP-675, CLP-645, CLP-635, CLP-695GP, CLP-665GP Owner’s Manual
2-1.
Align the screw holes on the upper side of B
with the bracket holes on D and E, then attach
the upper corners of B to D and E by finger-
tightening two thin screws (4 × 12 mm).
2-2. Secure the bottom end of B using four
tapping screws (4 × 20 mm).
2-3. Securely tighten the screws on the top of B
that were attached in step 2-1.
3. Mount A.
Be sure to place your hands at least 15 cm away from
either end of the main unit when positioning it.
CAUTION
• Be extra careful not to drop the main unit or let your fingers
be pinched by it.
• Do not hold the main unit in any position other than the
position specified above.
4. Secure A.
4-1. Adjust the position of A so that the left and
right ends of A will project beyond D and E
equally (as seen from the front).
4-2. Secure A by tightening six thick screws (6 ×
20 mm) from the front.
AA
Align the screw holes.
At least 15 cm
AA
4-2
4-1
AA

Assembling the Clavinova
119
CLP-685, CLP-675, CLP-645, CLP-635, CLP-695GP, CLP-665GP Owner’s Manual
5. Connect the pedal cord and power
cord.
5-1. Insert the plug of the pedal cord into the
pedal connector.
5-2. Attach the cord holders to the rear panel as
shown, then clip the cord into the holders.
5-3. Use a vinyl tie to take up any slack in the
pedal cord.
5-4. Insert the plug of the power cord into the
[AC IN] connector.
6. Set the adjuster.
Rotate the adjuster until it comes in firm contact
with the floor surface.
7. Attach the headphone hanger.
Use the two thin screws (4 × 10 mm) to attach the
hanger as shown in the illustration.
Insert the pedal cord securely
until the metal part of the
cord plug disappears from
view. Otherwise, the pedal
may not function properly.
5-4
5-2
5-3
5-1
5-1
PEDAL

Assembling the Clavinova
120
CLP-685, CLP-675, CLP-645, CLP-635, CLP-695GP, CLP-665GP Owner’s Manual
Remove all parts from the package and make sure
you have all of the items.
1. Attach C to D and E.
1-1. Untie and straighten out the bundled pedal
cord. Do not discard the vinyl tie. You will
need it later in step 5.
1-2. Insert the protrusions into the holes on the
brackets, then attach D and E to C by
tightening the four thick screws (6 × 20 mm).
2. Attach B.
Depending on the model of digital piano you
purchased, the surface color of one side of B may
be different from the other side. If so, position B
so that the side similar in color to D and E faces
the player.
CLP-645, CLP-635 Assembly
Foamed styrol pads
Remove foamed styrol pads from the package, position them on
the floor, then place A on top of them. Position the pads so that
they will not hide the connectors on the bottom of A.
Bundled pedal cord inside
CLP-645 CLP-635
6 × 20 mm thick screws × 10
4 × 12 mm thin screws × 2
4 × 20 mm tapping screws × 4
Power cord
Cord holders × 2
4 × 10 mm thin screws × 2
Headphone hanger
Power cord
AC adaptor
1-2
1-2
1-2
1-1
DD
EE
CC
2-1, 2-3
2-2
D
B
E

Assembling the Clavinova
121
CLP-685, CLP-675, CLP-645, CLP-635, CLP-695GP, CLP-665GP Owner’s Manual
2-1.
Align the screw holes on the upper side of B
with the bracket holes on D and E, then attach
the upper corners of B to D and E by finger-
tightening two thin screws (4 × 12 mm).
2-2. Secure the bottom end of B using four
tapping screws (4 × 20 mm).
2-3. Securely tighten the screws on the top of B
that were attached in step 2-1.
3. Mount A.
Be sure to place your hands at least 15 cm away from
either end of the main unit when positioning it.
CAUTION
• Be extra careful not to drop the main unit or let your fingers
be pinched by it.
• Do not hold the main unit in any position other than the
position specified above.
4. Secure A.
4-1. Adjust the position of A so that the left and
right ends of A will project beyond D and E
equally (as seen from the front).
4-2. Secure A by tightening six thick screws (6 ×
20mm) from the front.
5. Connect the pedal cord and power
cord (CLP-645)/AC adaptor (CLP-
635).
A
At least 15 cm
Align the screw holes.
AA
AA
4-1
4-2
5-1
5-3
5-2
5-4
CLP-645

Assembling the Clavinova
122
CLP-685, CLP-675, CLP-645, CLP-635, CLP-695GP, CLP-665GP Owner’s Manual
5-1. Insert the plug of the pedal cord into the
pedal connector.
5-2. Attach the cord holders to the rear panel
as shown, then clip the cord into the
holders.
5-3. Use a vinyl tie to take up any slack in the
pedal cord.
5-4. Insert the plug of the power cord into
the [AC IN] connector.
5-1. Insert the plug of the pedal cord into the
pedal connector.
5-2. Attach the cord holders to the rear panel
as shown, then clip the cord into the
holders.
5-3. Use a vinyl tie to take up any slack in the
pedal cord.
5-4. Connect one end of the power cord to
the AC adaptor.
5-5. Insert the DC plug of the AC adaptor
into the DC IN jack.
6. Set the adjuster.
Rotate the adjuster until it comes in firm contact
with the floor surface.
7. Attach the headphone hanger.
Use the two thin screws (4 × 10 mm) to attach the
hanger as shown in the illustration.
Insert the pedal cord
securely until the metal part
of the cord plug disappears
from view. Otherwise, the
pedal may not function properly.
Insert the pedal cord
securely until the metal part
of the cord plug disappears
from view. Otherwise, the
pedal may not function properly.
PEDAL
5-1
5-3
5-2
5-5
CLP-635
PEDAL

Assembling the Clavinova
123
CLP-685, CLP-675, CLP-645, CLP-635, CLP-695GP, CLP-665GP Owner’s Manual
Remove all parts from the package and make sure
you have all of the items.
1. Lean the main unit against the wall
as shown below.
CAUTION
Be careful not to pinch your fingers.
1-1. Spread a large soft cloth, such as a blanket,
as shown to protect the floor and wall
surfaces.
1-2. Lean the main unit against the wall with
the key cover closed and the keyboard side
on the bottom.
CLP-695GP Assembly
Pedal box
Main unit
Cord holder
Power cord
To prevent damage to the connector panels located at the bottom of
main unit, make sure to place main unit on the styrofoam pads.
Also, make sure that the pads do not touch the connector panels.
Bundled pedal cord inside.
The pedals are covered with
vinyl covers when shipped from
the factory. Remove the cover
from damper pedal for optimum
use of the GP Responsive
Damper Pedal effect.
Legs
Leg beams
Lyre braces
Headphone hanger
4 x 10 mm thin screws
(2 pcs.)
6 × 20 mm fixing screws
(4 pcs.)
6 × 40 mm fixing screws
(12 pcs.)
4 x 16 mm thin screws
(4 pcs.)
4 x 10 mm thin screws
(12 pcs.)
Connector panel Connector panel
Incorrect
NOTICE
Do not place the main unit as shown in the illustration here.
Incorrect
Incorrect

Assembling the Clavinova
124
CLP-685, CLP-675, CLP-645, CLP-635, CLP-695GP, CLP-665GP Owner’s Manual
2. Attach the three legs and three leg
beams.
Refer to the diagram below to verify the
orientation of the legs.
2-1. Install and tighten four screws on each leg,
starting with one of the front legs.
2-2. Slide the leg beams over the legs, and attach
them to each of the legs using four thin
screws (4 x 10 mm).
Make sure that the gradually inclined side of the
leg beams faces the inside of the unit as shown.
3. Attach the lyre braces.
3-1. Attach the lyre braces using the four thin
screws (4 x 16 mm).
4. Raise the unit to the standing
position.
Use the front legs as support to raise the unit.
Rear leg
Front leg
Front leg
6 × 40 mm fixing screws
4 × 10 mm
thin screws
The gradually
inclined side
faces the inside.
3-1
4 × 16 mm
thin screws

Assembling the Clavinova
125
CLP-685, CLP-675, CLP-645, CLP-635, CLP-695GP, CLP-665GP Owner’s Manual
5. Install the pedal box.
5-1. Remove the twist tie and tape that affix the
pedal cord to the upper portion of the
pedal box.
5-2. Attach the front side of the pedal box to the
bottom of the unit by finger-tightening the
two fixing screws (6 x 20 mm).
5-3. Insert the lyre braces into the pedal box
recesses and make sure they fit securely.
5-4. Align the cord with the groove on the unit
and attach the backside of the pedal box
using the two fixing screws (6 x 20 mm),
and then securely tighten the two screws of
the front side of the pedal box that were
attached in step 5-2.
5-5. Loosen the four screws that were attached
in step 3, and then securely tighten the four
screws again while pushing the lyre braces
in the direction of arrows as illustrated.
Tape
Twist tie
6 x 20 mm
fixing screws
6 x 20 mm fixing screws

Assembling the Clavinova
126
CLP-685, CLP-675, CLP-645, CLP-635, CLP-695GP, CLP-665GP Owner’s Manual
5-6. Insert the pedal cord plug into the pedal
connector. Insert the plug so the arrow side
faces front (toward the keyboard).
If the plug will not go in easily, do not force it.
Double-check the orientation of the plug, then try
again.
5-7. Attach the cord holder to the bottom of the
main unit as shown, then clip the holder
around the cord.
6. Rotate the adjuster until it comes in
firm contact with the floor surface.
7. Plug the power cord into the [AC
IN] connector.
8. Attach the headphone hanger.
Attach the headphone hanger using two thin
screws (4 x 10 mm) as shown in the illustration.
CAUTION
To disassemble the unit, reverse the assembly sequence.
Failure to do so can result in damage to the instrument or
personal injury. In particular, if you lay down the main unit
without detaching the pedal box, the pedals will break.
5-6
5-7
Insert the pedal
cord securely
until the metal
part of the cord
plug disappears
from view.
Otherwise, the
pedal may not
function
properly.
Right leg on the bottom of the main unit,
when viewed from front
4 x 10 mm thin screws

Assembling the Clavinova
127
CLP-685, CLP-675, CLP-645, CLP-635, CLP-695GP, CLP-665GP Owner’s Manual
Remove all parts from the package and make sure
you have all of the items.
1. Lean the unit against the wall as
shown below.
CAUTION
Be careful not to pinch your fingers.
1-1. Spread a large soft cloth, such as a blanket,
as shown to protect the floor and wall
surfaces.
1-2. Lean the main unit against the wall with
the key cover closed and the keyboard side
on the bottom.
CLP-665GP Assembly
Legs Pedal box
Main unit
6 × 40 mm fixing screws × 12
Cord holder
6 × 20 mm fixing screws × 4
4 x 10 mm thin screws x 2
Power cord
Headphone hanger
To prevent damage to the connector panel located at the bottom of
main unit, make sure to place main unit on the styrofoam pads. Also,
make sure that the pads do not touch the connector panel.
Bundled pedal cord inside.
The pedals are covered with
vinyl covers when shipped from
the factory. Before starting the
assembly, please make sure to
remove the cover from the
damper pedal.
Connector
panel
Be sure to position the
keyboard side on the bottom.
Incorrect
NOTICE
Do not place the main unit as shown in the illustration here.
Incorrect
Incorrect

Assembling the Clavinova
128
CLP-685, CLP-675, CLP-645, CLP-635, CLP-695GP, CLP-665GP Owner’s Manual
2. Attach two front legs and a rear leg.
Refer to the diagram below to verify the
orientation of the legs.
2-1. Install and tighten four screws on each leg,
starting with one of the front legs.
3. Install the pedal box.
3-1. Remove the twist tie that affixes the pedal
cord to the upper portion of the pedal box.
3-2. Align the cord with the groove on the unit,
and attach the pedal box using four screws.
3-3. Insert the pedal cord plug into the pedal
connector. Insert the plug so the arrow side
faces front (toward the keyboard). If the
plug will not go in easily, do not force it.
Double-check the orientation of the plug,
then try again.
Insert the pedal cord securely until the metal part
of the cord plug disappears from view. Otherwise,
the pedal may not function properly.
3-4. Attach the cord holder to the bottom of the
main unit as shown, then clip the holder
around the cord.
Rear leg
Front leg Front leg
6 × 40 mm fixing screws
Twist tieTape
6 × 20 mm fixing screws
3-3
3-4

Assembling the Clavinova
129
CLP-685, CLP-675, CLP-645, CLP-635, CLP-695GP, CLP-665GP Owner’s Manual
4. Raising the unit to the standing
position.
Use the front legs as support to raise the unit.
CAUTION
Be careful not to pinch your fingers. When you raise the unit,
do not hold the key cover.
5. Plug the power cord into the
[AC IN] connector.
6. Rotate the adjuster until it comes in
firm contact with the floor surface.
7. Attach the headphone hanger.
Attach the headphone hanger using two thin
screws (4 x10 mm) as shown in the illustration.
Right leg on the bottom of the main unit,
when viewed from front
Tran sporting
If you move to another location, you can transport
the instrument along with other belongings. You can
move the unit as it is (assembled) or you can
disassemble the unit down to the condition it was in
when you first took it out of the box. Transport the
keyboard horizontally. Do not lean it up against a
wall or stand it up on its side. Do not subject the
instrument to excessive vibration or shock. When
transporting the assembled instrument, make sure all
screws are properly tightened and have not been
loosened by moving the instrument.
4 x 10 mm thin screws

130
CLP-685, CLP-675, CLP-645, CLP-635, CLP-695GP, CLP-665GP Owner’s Manual
Specifications
Specifications (CLP-685, CLP-675, CLP-645, CLP-635)
Refer to page 133 for specifications of the CLP-695GP and CLP-665GP.
Items CLP-685 CLP-675 CLP-645 CLP-635
Product Name
Digital Piano
Size/Weight
Width
[For models with polished finish]
1461 mm (57-1/2")
[1467 mm (57-3/4")]
1461 mm (57-1/2")
[1466 mm (57-11/16")]
Height
[For models with
polished finish]
With music rest closed
1027 mm (40-7/16")
[1029 mm (40-1/2")]
967 mm (38-1/16")
[970 mm (38-3/16")]
927 mm (36-1/2")
[930 mm (36-5/8")]
With music rest raised
— 1136 mm (44-3/4")
[1137 mm (44-3/4")]
1096 mm (43-1/8")
[1097 mm (43-3/16")]
1081 mm (42-9/16")
[1082 mm (42-5/8")]
Depth
[For models with polished finish]
477 mm (18-3/4")
[477 mm (18-3/4")]
465 mm (18-5/16")
[465 mm (18-5/16")]
459 mm (18-1/16")
[459 mm (18-1/16")]
Weight
[For models with polished finish]
83.0 kg
(183 lbs., 0 oz.)
[89.0 kg
(196 lbs., 3 oz.)]
69.0 kg
(152 lbs., 2 oz.)
[71.0 kg
(156 lbs., 8 oz.)]
60.0 kg
(132 lbs., 4 oz.)
[66.0 kg
(145 lbs., 8 oz.)]
56.0 kg
(123 lbs., 7 oz.)
[62.0 kg
(136 lbs., 11 oz.)]
Control
Interface
Keyboard Number of Keys
88
Typ e
GrandTouch Keyboard: wooden keys (white
only), synthetic ebony and ivory key tops,
escapement
NWX (Natural Wood
X) keyboard: wooden
keys (white only),
synthetic ebony and
ivory keytops,
escapement
GH3X (Graded
Hammer 3X)
keyboard: synthetic
ebony and ivory
keytops, escapement
Touch Response
Hard2/Hard1/Medium/Soft1/Soft2/Fixed
88-key Linear Graded
Hammers
Yes —
Counter weight
Yes —
Pedal Number of Pedals
3
Half Pedal
Yes (Damper)
Assignable Functions
Sustain (Switch), Sustain Continuously, Sostenuto, Soft, Expression, Pitch Bend Up,
Pitch Bend Down, Rotary Speed, Vibe Rotor, Song Play/Pause
GP Responsive Damper
Pedal
Yes —
Display Type
Full Dots LCD
Size
128 x 64 dots
Language
English, Japanese
Panel Language
English
Cabinet
Key Cover Style
Folding Sliding
Music Rest
Yes
Music Braces
Yes
Voices
Tone Generation Piano Sound
Yamaha CFX, Bösendorfer Imperial
Binaural Sampling
Yes (CFX Grand Voice only)
Piano Effects VRM
Yes
Key-off Samples
Yes
Smooth Release
Yes
Polyphony
256
Preset Number of Voices
49 Voices +
14 Drum/SFX Kits +
480 XG Voices
36
Compatibility
XG (GM), GS (for
Song playback), GM2
(for Song playback)
—
Effects
Typ es Reverb
6 types
Chorus
3 types
Brilliance
7 types
Effect
11 types

Specifications
131
CLP-685, CLP-675, CLP-645, CLP-635, CLP-695GP, CLP-665GP Owner’s Manual
Effects
Types Intelligent Acoustic
Control (IAC)
Yes
Stereophonic Optimizer
Yes
Functions Dual
Yes
Split
Yes
Duo
Yes
Songs (MIDI)
Preset Number of
Preset Songs
21 Voice Demo
Songs + 50 Classics
+ 303 Lesson Songs
19 Voice Demo Songs + 50 Classics + 303 Lesson Songs
Recording Number of Songs
250
Number of Tracks
16
Data Capacity
Approx. 500KB/Song
Playback Data Capacity
Approx. 500KB/Song
Format Playback
SMF (Format 0, Format 1)
Recording
SMF (Format 0)
Recording/
Playback
(Audio)
Recording Time (max.)
80 minutes/Song
Format Playback
.wav (44.1 kHz sample rate, 16-bit resolution, stereo)
Recording
.wav (44.1 kHz sample rate, 16-bit resolution, stereo)
Functions
Rhythms Preset
20
Overall Controls Metronome
Yes
Tempo Range
5 – 500
Transpose
-12 – 0 – +12
Tuning
414.8 – 440.0 – 466.8 Hz (approx. 0.2Hz increments)
Scale Type
7 types
USB audio interface
44.1 kHz, 16 bit, stereo
Bluetooth Bluetooth version
4.1 —
Supported profile
A2DP —
Compatible codec
SBC —
Wireless output
Bluetooth class 2 —
Maximum communication
distance
Approx. 10 m —
Range of transmit
frequency
2402 – 2480MHz —
Maximum RF output
power
4dBm —
The
Bluetooth
-equipped models CLP-685, CLP-675, and CLP-645 may not actually have
Bluetooth
functionality, depending
on the country in which you purchased the product. Refer to page 138 for details.
Piano Room
Yes
Storage and
Connectivity
Storage Internal Memory
Total maximum size approx. 1.5MB
External Device
USB flash drive
Connectivity DC IN
—16V
Headphones
Standard stereo phone jack (x 2)
MIDI
[IN] [OUT] [THRU]
AUX IN
Stereo Mini
AUX OUT
[L/L+R] [R]
AUX PEDAL
Yes —
USB TO DEVICE
Yes
USB TO HOST
Yes
Sound System
Amplifiers
(50W + 50W + 50W) x
2
(35W + 50W + 20W) x
2
(25W + 25W) x 2 30W x 2
Speakers
(16 cm + 8 cm + 2.5
cm (dome)) x 2,
Spruce Cone
Speaker
(16 cm + 8 cm + 5
cm) x 2
(16 cm + 8 cm) x 2 16 cm x 2
Acoustic Optimizer
Yes
Items CLP-685 CLP-675 CLP-645 CLP-635

Specifications
132
CLP-685, CLP-675, CLP-645, CLP-635, CLP-695GP, CLP-665GP Owner’s Manual
The contents of this manual apply to the latest specifications as of the publishing date. To obtain the latest manual, access the Yamaha website then download
the manual file. Since specifications, equipment or separately sold accessories may not be the same in every locale, please check with your Yamaha dealer.
*1: Power consumption is described on or near the name plate, which is at the bottom of the unit. For details about the name plate location, refer to page 9.
Power Supply
AC Adaptor
— PA-300C
or an equivalent
recommended by
Yamaha
Power Consumption
Refer to note *1 below. 20W
(When using
PA-300C AC adaptor)
Auto Power Off
Yes
Included Accessories
• Owner’s Manual
• Data List (CLP-685)
• Warranty*
• “50 Classical Music Masterpieces” Music Book
• Online Member Product Registration
• Bench*
• Power cord (CLP-685, CLP-675, CLP-645)
• Power cord*/AC power adaptor* (CLP-635):
PA-300C or an equivalent recommended by Yamaha
*May not be included depending on your area. Check with your Yamaha dealer.
Separately Sold Accessories
(May not be available depending on your area.)
• Headphones HPH-150/HPH-100/HPH-50
• Footswitches FC4A/FC5 (CLP-685)
• Foot controller FC7 (CLP-685)
• AC power adaptor: PA-300C or an equivalent recommended by Yamaha (CLP-635)
• USB Wireless LAN Adaptor UD-WL01
• Wireless MIDI Adaptor MD-BT01/UD-BT01
Items CLP-685 CLP-675 CLP-645 CLP-635

Specifications
133
CLP-685, CLP-675, CLP-645, CLP-635, CLP-695GP, CLP-665GP Owner’s Manual
Specifications (CLP-695GP, CLP-665GP)
Refer to page 130 for specifications of the CLP-685, CLP-675, CLP-645 and CLP-635.
Items CLP-695GP CLP-665GP
Product Name
Digital Piano
Size/Weight
Width
1430 mm (56-5/16")
Height With music rest closed
932 mm (36-11/16")
With music rest raised
1103 mm (43-7/16")
Height with lid up
1577 mm (62-1/16") 1400 mm (55-1/8")
Depth
1237 mm (48-11/16") 1147 mm (45-3/16")
Weight
127 kg (280 lbs., 0 oz.) 103 kg (227 lbs., 1 oz.)
Control
Interface
Keyboard Number of Keys
88
Typ e
GrandTouch Keyboard: wooden keys (white
only), synthetic ebony and ivory key tops,
escapement
GH3X (Graded Hammer 3X) keyboard:
synthetic ebony and ivory keytops,
escapement
Touch Response
Hard2/Hard1/Medium/Soft1/Soft2/Fixed
88-key Linear Graded
Hammers
Yes —
Counter weight
Yes —
Pedal Number of Pedals
3
Half Pedal
Yes (Damper)
Assignable Functions
Sustain (Switch), Sustain Continuously, Sostenuto, Soft, Expression, Pitch Bend Up,
Pitch Bend Down, Rotary Speed, Vibe Rotor, Song Play/Pause
GP Responsive Damper
Pedal
Yes —
Display Type
Full Dots LCD
Size
128 x 64 dots
Language
English, Japanese
Panel Language
English
Cabinet
Key Cover Style
Sliding
Music Rest
Yes
Music Braces
Yes
Voices
Tone Generation Piano Sound
Yamaha CFX, Bösendorfer Imperial
Binaural Sampling
Yes (CFX Grand Voice only)
Piano Effects VRM
Yes
Key-off Samples
Yes
Smooth Release
Yes
Polyphony
256
Preset Number of Voices
49 Voices + 14 Drum/SFX Kits + 480 XG
Voices
36
Compatibility
XG (GM), GS (for Song playback),
GM2 (for Song playback)
—
Effects
Typ es Reverb
6 types
Chorus
3 types
Brilliance
7 types
Effect
11 types
Intelligent Acoustic
Control (IAC)
Yes
Stereophonic Optimizer
Yes
Functions Dual
Yes
Split
Yes
Duo
Yes

Specifications
134
CLP-685, CLP-675, CLP-645, CLP-635, CLP-695GP, CLP-665GP Owner’s Manual
Songs (MIDI)
Preset Number of
Preset Songs
21 Voice Demo Songs + 50 Classics +
303 Lesson Songs
19 Voice Demo Songs + 50 Classics +
303 Lesson Songs
Recording Number of Songs
250
Number of Tracks
16
Data Capacity
Approx. 500KB/Song
Playback Data Capacity
Approx. 500KB/Song
Format Playback
SMF (Format 0, Format 1)
Recording
SMF (Format 0)
Recording/
Playback
(Audio)
Recording Time (max.)
80 minutes/Song
Format Playback
.wav (44.1 kHz sample rate, 16-bit resolution, stereo)
Recording
.wav (44.1 kHz sample rate, 16-bit resolution, stereo)
Functions
Rhythms Preset
20
Overall Controls Metronome
Yes
Tempo Range
5 – 500
Transpose
-12 – 0 – +12
Tuning
414.8 – 440.0 – 466.8 Hz (approx. 0.2Hz increments)
Scale Type
7 types
USB audio interface
44.1 kHz, 16 bit, stereo
Bluetooth Bluetooth version
4.1
Supported profile
A2DP
Compatible codec
SBC
Wireless output
Bluetooth class 2
Maximum communication
distance
Approx. 10 m
Range of transmit
frequency
2402 – 2480MHz
Maximum RF output
power
4dBm
The
Bluetooth
-equipped models CLP-695GP and CLP-665GP may not actually have
Bluetooth
functionality, depending on
the country in which you purchased the product. Refer to page 138 for details.
Piano Room
Yes
Storage and
Connectivity
Storage Internal Memory
Total maximum size approx. 1.5MB
External Device
USB flash drive
Connectivity Headphones
Standard stereo phone jack (x 2)
MIDI
[IN] [OUT] [THRU]
AUX IN
Stereo Mini
AUX OUT
[L/L+R] [R]
AUX PEDAL
Yes —
USB TO DEVICE
Yes
USB TO HOST
Yes
Sound System
Amplifiers
(50W + 50W + 50W) x 2 (25W + 10W) x 2
Speakers
(16 cm + 8 cm + 2.5 cm (dome)) ×2,
Spruce Cone Speaker,
Twisted Flare Port
(16 cm + 5 cm) x 2
Acoustic Optimizer
Yes
Power Supply
Power Consumption
Refer to note *1 below.
Auto Power Off
Yes
Included Accessories
• Owner’s Manual
• Data List (CLP-695GP)
• Warranty*
• “50 Classical Music Masterpieces” Music Book
• Online Member Product Registration
• Bench*
• Power cord
*May not be included depending on your area. Check with your Yamaha dealer.
Items CLP-695GP CLP-665GP

Specifications
135
CLP-685, CLP-675, CLP-645, CLP-635, CLP-695GP, CLP-665GP Owner’s Manual
The contents of this manual apply to the latest specifications as of the publishing date. To obtain the latest manual, access the Yamaha website then download
the manual file. Since specifications, equipment or separately sold accessories may not be the same in every locale, please check with your Yamaha dealer.
*1: Power consumption is described on or near the name plate, which is at the bottom of the unit. For details about the name plate location, refer to page 9.
Separately Sold Accessories
(May not be available depending on your area.)
• Headphones HPH-150/HPH-100/HPH-50
• Footswitches FC4A/FC5 (CLP-695GP)
• Foot controller FC7 (CLP-695GP)
• USB Wireless LAN Adaptor UD-WL01
• Wireless MIDI Adaptor MD-BT01/UD-BT01
Items CLP-695GP CLP-665GP

136
CLP-685, CLP-675, CLP-645, CLP-635, CLP-695GP, CLP-665GP Owner’s Manual
Index
Numerics
50 Classics ................................................................ 41, 106
A
AB Repeat ..........................................................................46
AC adaptor ........................................................................14
Access point ......................................................................79
Aliquot ...............................................................................27
Aliquot Resonance (Aliquot Res.) .................................26
Assembly .........................................................................112
Audio EQ ...........................................................................98
Audio Loop Back ....................................................... 84, 98
Audio Recording ..............................................................52
Audio Song ........................................................................39
Auto Power Off ................................................................17
Aux Assign ........................................................................96
B
Backup .............................................................................100
Backup Setting ................................................................100
Bell ......................................................................................93
Binaural .............................................................................20
Bluetooth .................................................................. 81, 138
Body Resonance (Body Res.) ..........................................26
Brightness ..........................................................................26
Brilliance ............................................................................30
C
Chorus ...............................................................................31
Chorus Type List ..............................................................89
Computer ..........................................................................74
Computer-related Operations ..........................................9
Connections ......................................................................69
Contrast .............................................................................98
Convert ..............................................................................67
Copy ...................................................................................65
D
Damper pedal ...................................................................21
Damper Resonance (Damper Res.) ...............................26
Delete .................................................................................65
Demo .................................................................................40
Detailed Settings ...............................................................85
Display ...............................................................................22
Dual ....................................................................................32
Duo .....................................................................................35
E
Edit (Song) ........................................................................91
Edit (Voice) .......................................................................87
Effect ..................................................................................31
Effect Depth ......................................................................87
Effect Type List .................................................................89
Ending ...............................................................................51
F
Factory Set .......................................................................101
Fast forward ......................................................................43
File Operation ...................................................................63
Format (instrument) .....................................................101
Format (Song) ..................................................................39
Format (USB flash drive) ................................................98
G
GP Responsive Damper Pedal ........................................21
H
Half Pedal Point ...............................................................26
Half-pedal .........................................................................21
Headphones ......................................................................19
I
IAC .....................................................................................19
Initial Setup .......................................................................97
Intro ...................................................................................51
iPhone/iPad Connection Manual ....................................9
K
Key cover .....................................................................15, 16
Key Off Sample .................................................................26
L
Language ...........................................................................99
Lid ......................................................................................18
Lid Position .......................................................................26
Local Control ....................................................................97
M
Master Tune ......................................................................26
MASTER VOLUME ........................................................19
Message List ....................................................................108
Metronome .......................................................................36
Metronome/Rhythm menu ............................................93
MIDI ..................................................................................97

137
CLP-685, CLP-675, CLP-645, CLP-635, CLP-695GP, CLP-665GP Owner’s Manual
Index
MIDI Recording ...............................................................52
MIDI Reference ..................................................................9
MIDI Song ........................................................................39
MIDI to Audio ..................................................................67
Move ..................................................................................66
Music Rest .........................................................................17
N
Network .............................................................................77
O
Octave ................................................................................87
P
Pairing ................................................................................82
Part Cancel ........................................................................44
Pedal ............................................................................ 21, 96
Pedal Function List ..........................................................89
Piano Room ......................................................................25
Piano Setting .....................................................................86
Pitch Bend .........................................................................96
Playback (Rhythm) ..........................................................51
Playback (Song) ................................................................41
Power .................................................................................14
Power cord ........................................................................14
R
Recording ..........................................................................52
Recording menu ...............................................................94
Rename ..............................................................................68
Repeat ................................................................................45
Restore .............................................................................101
Reverb ......................................................................... 26, 31
Reverb Type List ...............................................................89
Rewind ...............................................................................43
Rhythm ..............................................................................51
Rhythm List .....................................................................107
S
Save (Backup file) ...........................................................100
Scale Tune .........................................................................99
Smart device ......................................................................74
Soft pedal ...........................................................................21
Song ............................................................................. 39, 63
Song category ....................................................................41
Song List ..........................................................................106
Song menu ........................................................................90
Song Repeat .......................................................................47
Sostenuto pedal ................................................................21
Sound .................................................................................96
Speaker ..............................................................................98
Split ....................................................................................33
Split Point ..........................................................................33
Stereophonic Optimizer ..................................................20
String Resonance (String Res.) .......................................26
System menu .....................................................................95
T
Tempo ................................................................................36
Tempo (Song) ...................................................................43
Time signature ..................................................................37
Touch .................................................................................26
Track ..................................................................................55
Transpose (Keyboard) .....................................................86
Transpose (Song) .............................................................90
Troubleshooting .............................................................110
Tuning ...............................................................................95
U
USB Audio Interface ........................................................84
USB Autoload ...................................................................98
USB flash drive .................................................................72
USB Format ......................................................................98
USB Properties .................................................................98
User ....................................................................................41
Utility .................................................................................98
V
Version ..............................................................................99
Voice ..................................................................................28
Voice List .........................................................................102
Voice menu .......................................................................86
Volume ..............................................................................19
Volume (Audio Song) .....................................................48
Volume (Metronome) .....................................................93
Volume (MIDI Song) ......................................................48
Volume balance ................................................................48
VRM .............................................................................26, 27
VRM Demo .......................................................................26
W
Wireless LAN ...................................................................74
WPS ...................................................................................78
X
XG ................................................................................28, 29

138
CLP-685, CLP-675, CLP-645, CLP-635, CLP-695GP, CLP-665GP Owner’s Manual
About
Bluetooth
• Bluetooth is a technology for wireless communication between devices within an area of about 10 meters
(33 ft.) employing the 2.4 GHz frequency band.
•The Bluetooth® word mark and logos are registered trademarks owned by Bluetooth SIG, Inc. and any use
of such marks by Yamaha is under license.
Handling Bluetooth communications
• The 2.4 GHz band used by Bluetooth compatible devices is a radio band shared by many types of
equipment. While Bluetooth compatible devices use a technology minimizing the influence of other
components using the same radio band, such influence may reduce the speed or distance of
communications and in some cases interrupt communications.
• The speed of signal transfer and the distance at which communication is possible differs according to the
distance between the communicating devices, the presence of obstacles, radio wave conditions and the
type of equipment.
• Yamaha does not guarantee all wireless connections between this unit and devices compatible with
Bluetooth function.
Bluetooth availability
The models CLP-685, CLP-675, CLP-645, CLP-695GP and CLP-665GP
are equipped with Bluetooth functionality; however, even these models
may not support Bluetooth, depending on the country in which you
purchased the product. If the Bluetooth logo is printed on the control
panel, this means that the product is equipped with Bluetooth
functionality.
Bluetooth logo

139
MEMO

140
For U.S.A.
For CANADA
For U.S.A. and CANADA
This transmitter must not be co-located or operated in conjunction with any other antenna or transmitter.
This device complies with Industry Canada licence-exempt RSS standard(s). Operation is subject to the following
two conditions: (1) this device may not cause interference, and (2) this device must accept any interference,
including interference that may cause undesired operation of the device.
Le présent appareil est conforme aux CNR d’Industrie Canada applicables aux appareils radio exempts de licence.
L’exploitation est autorisée aux deux conditions suivantes : (1) l’appareil ne doit pas produire de brouillage, et (2)
l’utilisateur de l’appareil doit accepter tout brouillage radioélectrique subi, même si le brouillage est susceptible d’en
compromettre le fonctionnement.
This equipment complies with FCC/IC radiation exposure limits set forth for an uncontrolled envir
onment and meets
th
e FCC radio frequency (RF) Exposure Guidelines and RSS-102 of the IC radio frequency (RF) Exposure rules.
This equipment has very low levels of RF energy that are deemed to comply without testing of specific absorption
rate (SAR).
Cet équipement est conforme aux limites d’exposition aux rayonnements énoncées pour un environnement non
contrôlé et respecte les règles les radioélectriques (RF) de la FCC lignes directrices d’exposition et d’exposition aux
fréquences radioélectriques (RF) CNR-102 de l’IC. Cet équipement émet une énergie RF très faible qui est
considérée conforme sans évaluation du débit d’absorption spécifique (DAS).

141
For EU countries
BG Bulgarian
ОПРОСТЕНА ЕС ДЕКЛАРАЦИЯ ЗА СЪОТВЕТСТВИЕ
С настоящото Yamaha Music Europe GmbH декларира, че този тип радиосъоръжение [CLP-685,
CLP-675, CLP-645, CLP-695GP, CLP-665GP] е в съответствие с Директива 2014/53/ЕС. Цялостният
текст на ЕС декларацията за съответствие може да се намери на следния интернет адрес:
https://europe.yamaha.com/en/support/compliance/doc.html
ES Spanish
DECLARACIÓN UE DE CONFORMIDAD SIMPLIFICADA
Por la presente, Yamaha Music Europe GmbH declara que el tipo de equipo radioeléctrico [CLP-
685, CLP-675, CLP-645, CLP-695GP, CLP-665GP] es conforme con la Directiva 2014/53/UE. El
texto completo de la declaración UE de conformidad está disponible en la dirección Internet
siguiente:
https://europe.yamaha.com/en/support/compliance/doc.html
CS Czech
ZJEDNODUŠENÉ EU PROHLÁŠENÍ O SHODĚ
Tímto Yamaha Music Europe GmbH prohlašuje, že typ rádiového zařízení [CLP-
685, CLP-675, CLP-645, CLP-695GP, CLP-665GP] je v souladu se směrnicí 2014/
53/EU. Úplné znění EU prohlášení o shodě je k dispozici na této internetové adrese:
https://europe.yamaha.com/en/support/compliance/doc.html
DA Danish
FORENKLET EU-OVERENSSTEMMELSESERKLÆRING
Hermed erklærer Yamaha Music Europe GmbH, at radioudstyrstypen [CLP-685, CLP-
675, CLP-645, CLP-695GP, CLP-665GP] er i overensstemmelse med direktiv 2014/53/
EU. EU-overensstemmelseserklæringens fulde tekst kan findes på følgende internet-
adresse:
https://europe.yamaha.com/en/support/compliance/doc.html
DE German
VEREINFACHTE EU-KONFORMITÄTSERKLÄRUNG
Hiermit erklärt Yamaha Music Europe GmbH, dass der Funkanlagentyp [CLP-685, CLP-
675, CLP-645, CLP-695GP, CLP-665GP] der Richtlinie 2014/53/EU entspricht. Der
vollständige Text der EU-Konformitätserklärung ist unter der folgenden Internetadresse
verfügbar:
https://europe.yamaha.com/en/support/compliance/doc.html
ET Estonian
LIHTSUSTATUD ELI VASTAVUSDEKLARATSIOON
Käesolevaga deklareerib Yamaha Music Europe GmbH, et käesolev raadioseadme tüüp
[CLP-685, CLP-675, CLP-645, CLP-695GP, CLP-665GP] vastab direktiivi 2014/53/EL
nõuetele. ELi vastavusdeklaratsiooni täielik tekst on kättesaadav järgmisel internetiaad-
ressil:
https://europe.yamaha.com/en/support/compliance/doc.html
EL Greek
ΑΠΛΟΥΣΤΕΥΜΕΝΗ ΔΗΛΩΣΗ ΣΥΜΜΟΡΦΩΣΗΣ ΕΕ
Με την παρούσα ο/η Yamaha Music Europe GmbH, δηλώνει ότι ο ραδιοεξοπλισμός [CLP-
685, CLP-675, CLP-645, CLP-695GP, CLP-665GP] πληροί την οδηγία 2014/53/ΕΕ. Το πλή-
ρες κείμενο της δήλωσης συμμόρφωσης ΕΕ διατίθεται στην ακόλουθη ιστοσελίδα στο διαδί-
κτυο:
https://europe.yamaha.com/en/support/compliance/doc.html
EN English
SIMPLIFIED EU DECLARATION OF CONFORMITY
Hereby, Yamaha Music Europe GmbH declares that the radio equipment type [CLP-685,
CLP-675, CLP-645, CLP-695GP, CLP-665GP] is in compliance with Directive 2014/53/
EU. The full text of the EU declaration of conformity is available at the following internet
address:
https://europe.yamaha.com/en/support/compliance/doc.html
FR French
DECLARATION UE DE CONFORMITE SIMPLIFIEE
Le soussigné, Yamaha Music Europe GmbH, déclare que l'équipement radioélectrique du type
[CLP-685, CLP-675, CLP-645, CLP-695GP, CLP-665GP] est conforme à la directive 2014/53/
UE. Le texte complet de la déclaration UE de conformité est disponible à l'adresse internet sui-
vante:
https://europe.yamaha.com/en/support/compliance/doc.html
HR Croatian
POJEDNOSTAVLJENA EU IZJAVA O SUKLADNOSTI
Yamaha Music Europe GmbH ovime izjavljuje da je radijska oprema tipa [CLP-685,
CLP-675, CLP-645, CLP-695GP, CLP-665GP] u skladu s Direktivom 2014/53/EU.
Cjeloviti tekst EU izjave o sukladnosti dostupan je na sljedećoj internetskoj adresi:
https://europe.yamaha.com/en/support/compliance/doc.html
IT Italian
DICHIARAZIONE DI CONFORMITÀ UE SEMPLIFICATA
Il fabbricante, Yamaha Music Europe GmbH, dichiara che il tipo di apparecchiatura radio
[CLP-685, CLP-675, CLP-645, CLP-695GP, CLP-665GP] è conforme alla direttiva 2014/53/
UE. Il testo completo della dichiarazione di conformità UE è disponibile al seguente indirizzo
Internet:
https://europe.yamaha.com/en/support/compliance/doc.html
LV Latvian
VIENKĀRŠOTA ES ATBILSTĪBAS DEKLARĀCIJA
Ar šo Yamaha Music Europe GmbH deklarē, ka radioiekārta [CLP-685, CLP-675, CLP-645, CLP-
695GP, CLP-665GP] atbilst Direktīvai 2014/53/ES. Pilns ES atbilstības deklarācijas teksts ir pieejams
šādā interneta vietnē:
https://europe.yamaha.com/en/support/compliance/doc.html
LT Lithuanian
SUPAPRASTINTA ES ATITIKTIES DEKLARACIJA
Aš, Yamaha Music Europe GmbH, patvirtinu, kad radijo įrenginių tipas [CLP-685,
CLP-675, CLP-645, CLP-695GP, CLP-665GP] atitinka Direktyvą 2014/53/ES. Visas
ES atitikties deklaracijos tekstas prieinamas šiuo interneto adresu:
https://europe.yamaha.com/en/support/compliance/doc.html
HU Hungarian
EGYSZERŰSÍTETT EU-MEGFELELŐSÉGI NYILATKOZAT
Yamaha Music Europe GmbH igazolja, hogy a [CLP-685, CLP-675, CLP-645, CLP-
695GP, CLP-665GP] típusú rádióberendezés megfelel a 2014/53/EU irányelvnek.
Az EU-megfelelőségi nyilatkozat teljes szövege elérhető a következő internetes
címen:
https://europe.yamaha.com/en/support/compliance/doc.html
NL Dutch
VEREENVOUDIGDE EU-CONFORMITEITSVERKLARING
Hierbij verklaar ik, Yamaha Music Europe GmbH, dat het type radioapparatuur [CLP-685,
CLP-675, CLP-645, CLP-695GP, CLP-665GP] conform is met Richtlijn 2014/53/EU. De volle-
dige tekst van de EU-conformiteitsverklaring kan worden geraadpleegd op het volgende inter-
netadres:
https://europe.yamaha.com/en/support/compliance/doc.html
PL Polish
UPROSZCZONA DEKLARACJA ZGODNOŚCI UE
Yamaha Music Europe GmbH niniejszym oświadcza, że typ urządzenia radiowego [CLP-
685, CLP-675, CLP-645, CLP-695GP, CLP-665GP] jest zgodny z dyrektywą 2014/53/UE.
Pełny tekst deklaracji zgodności UE jest dostępny pod następującym adresem interneto-
wym:
https://europe.yamaha.com/en/support/compliance/doc.html
PT Portuguese
DECLARAÇÃO UE DE CONFORMIDADE SIMPLIFICADA
O(a) abaixo assinado(a) Yamaha Music Europe GmbH declara que o presente tipo de equipamento de
rádio [CLP-685, CLP-675, CLP-645, CLP-695GP, CLP-665GP] está em conformidade com a Diretiva
2014/53/UE. O texto integral da declaração de conformidade está disponível no seguinte endereço de
Internet:
https://europe.yamaha.com/en/support/compliance/doc.html
RO Romanian
DECLARAȚIA UE DE CONFORMITATE SIMPLIFICATĂ
Prin prezenta, Yamaha Music Europe GmbH declară că tipul de echipamente radio [CLP-
685, CLP-675, CLP-645, CLP-695GP, CLP-665GP] este în conformitate cu Directiva 2014/
53/UE. Textul integral al declarației UE de conformitate este disponibil la următoarea
adresă internet:
https://europe.yamaha.com/en/support/compliance/doc.html
SK Slovak
ZJEDNODUŠENÉ EÚ VYHLÁSENIE O ZHODE
Yamaha Music Europe GmbH týmto vyhlasuje, že rádiové zariadenie typu [CLP-
685, CLP-675, CLP-645, CLP-695GP, CLP-665GP] je v súlade so smernicou 2014/
53/EÚ. Úplné EÚ vyhlásenie o zhode je k dispozícii na tejto internetovej adrese:
https://europe.yamaha.com/en/support/compliance/doc.html
SL Slovenian
POENOSTAVLJENA IZJAVA EU O SKLADNOSTI
Yamaha Music Europe GmbH potrjuje, da je tip radijske opreme [CLP-685, CLP-
675, CLP-645, CLP-695GP, CLP-665GP] skladen z Direktivo 2014/53/EU. Celotno
besedilo izjave EU o skladnosti je na voljo na naslednjem spletnem naslovu:
https://europe.yamaha.com/en/support/compliance/doc.html
FI Finnish
YKSINKERTAISTETTU EU-VAATIMUSTENMUKAISUUSVAKUUTUS
Yamaha Music Europe GmbH vakuuttaa, että radiolaitetyyppi [CLP-685, CLP-675,
CLP-645, CLP-695GP, CLP-665GP] on direktiivin 2014/53/EU mukainen. EU-
vaatimustenmukaisuusvakuutuksen täysimittainen teksti on saatavilla seuraavassa
internetosoitteessa:
https://europe.yamaha.com/en/support/compliance/doc.html
SV Swedish
FÖRENKLAD EU-FÖRSÄKRAN OM ÖVERENSSTÄMMELSE
Härmed försäkrar Yamaha Music Europe GmbH att denna typ av radioutrustning [CLP-
685, CLP-675, CLP-645, CLP-695GP, CLP-665GP] överensstämmer med direktiv 2014/
53/EU. Den fullständiga texten till EU-försäkran om överensstämmelse finns på följande
webbadress:
https://europe.yamaha.com/en/support/compliance/doc.html
TR Turkey
BASİTLEŞTİRİLMİŞ AVRUPA BİRLİĞİ UYGUNLUK BİLDİRİMİ
İşbu belge ile, Yamaha Music Europe GmbH, radyo cihaz tipinin [CLP-685, CLP-
675, CLP-645, CLP-695GP, CLP-665GP], Direktif 2014/53/AB'ye uygunluğunu
beyan eder. AB uyumu beyanının tam metni aşağıdaki internet adresinden
edinilebilir:
https://europe.yamaha.com/en/support/compliance/doc.html

142
(weee_eu_en_02)
(weee_eu_fr_02)
Information for users on collection and disposal of old equipment:
This symbol on the products, packaging, and/or accompanying documents means that used electrical
and electronic products should not be mixed with general household waste.
For proper treatment, recovery and recycling of old products, please take them to applicable collection
points, in accordance with your national legislation.
By disposing of these products correctly, you will help to save valuable resources and prevent any
potential negative effects on human health and the environment which could otherwise arise from
inappropriate waste handling.
For more information about collection and recycling of old products, please contact your local
municipality, your waste disposal service or the point of sale where you purchased the items.
For business users in the European Union:
If you wish to discard electrical and electronic equipment, please contact your dealer or su
pplier for
further information.
Information on Disposal in other Countries outside the European Union:
This symbol is only valid in the European Union. If you wish to discard these items, please contact your
local authorities or dealer and ask for the correct method of disposal.
Informations concernant la collecte et le traitement des déchets d’équipements
électriques et électroniques
Le symbole sur les produits, l'emballage et/ou les documents joints signifie que les produits électriques
ou électroniques usagés ne doivent pas être mélangés avec les déchets domestiques habituels.
Pour un traitement, une récupération et un recyclage appropriés des déchets d’équipements
électriques et électroniques, veuillez les déposer aux points de collecte prévus à cet effet,
conformément à la réglementation nationale.
En vous débarrassant correctement des déchets d’équipements électriques et électroniques, vous
contribuerez à la sauvegarde de précieuses ressources et à la prévention de potentiels effets négatifs
sur la santé humaine qui pourraient advenir lors d'un tr
ait
ement inapproprié des déchets.
Pour plus d'informations à propos de la collecte et du recyclage des déchets d’équipements
électriques et électroniques, veuillez contacter votre municipalité, votre service de traitement des
déchets ou le point de vente où vous avez acheté les produits.
Pour les professionnels dans l'Union européenne :
Si vous souhaitez vous débarrasser des déchets d’équipements électriques et électroniques, veuillez
contacter votre vendeur ou fournisseur pour plus d'informations.
Informations sur la mise au rebut dans d'autres pays en dehors de l'Union européenne :
Ce symbole est seulement valable dans l'Union européenne. Si vous souhaitez vous débarr
asser d
e
déchets d’équipements électriques et électroniques, veuillez contacter les autorités locales ou votre
fournisseur et demander la méthode de traitement appropriée.
(standby)
OBSERVERA!
Apparaten kopplas inte ur växelströmskällan (nätet) så länge som den ar ansluten till vägguttaget, även om själva
apparaten har stängts av.
ADVARSEL: Netspændingen til dette apparat er IKKE afbrudt, sålænge netledningen sidder i en stikkontakt,
som er tændt — også selvom der er slukket på apparatets afbryder.
VAROITUS: Laitteen toisiopiiriin kytketty käyttökytkin ei irroita koko laitetta verkosta.


Yamaha Global Site
https://www.yamaha.com/
Yamaha Downloads
http://download.yamaha.com/
Manual Development Group
© 2017 Yamaha Corporation
Published 04/2018 MWMA*.*- **C0
ZY94030
ZY94030
-
 1
1
-
 2
2
-
 3
3
-
 4
4
-
 5
5
-
 6
6
-
 7
7
-
 8
8
-
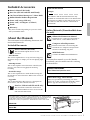 9
9
-
 10
10
-
 11
11
-
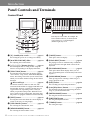 12
12
-
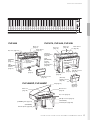 13
13
-
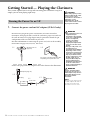 14
14
-
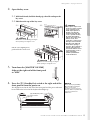 15
15
-
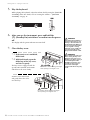 16
16
-
 17
17
-
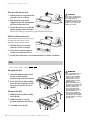 18
18
-
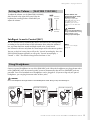 19
19
-
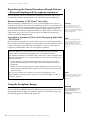 20
20
-
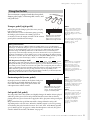 21
21
-
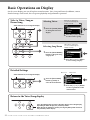 22
22
-
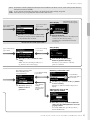 23
23
-
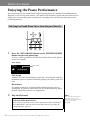 24
24
-
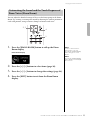 25
25
-
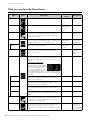 26
26
-
 27
27
-
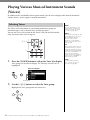 28
28
-
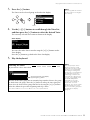 29
29
-
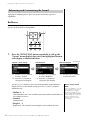 30
30
-
 31
31
-
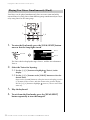 32
32
-
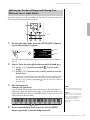 33
33
-
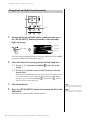 34
34
-
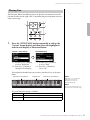 35
35
-
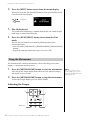 36
36
-
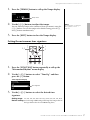 37
37
-
 38
38
-
 39
39
-
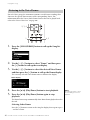 40
40
-
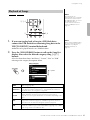 41
41
-
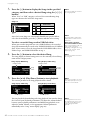 42
42
-
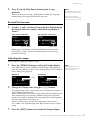 43
43
-
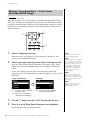 44
44
-
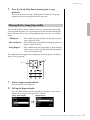 45
45
-
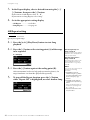 46
46
-
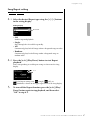 47
47
-
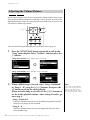 48
48
-
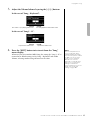 49
49
-
 50
50
-
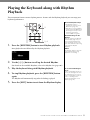 51
51
-
 52
52
-
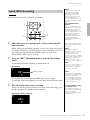 53
53
-
 54
54
-
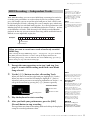 55
55
-
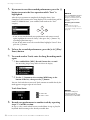 56
56
-
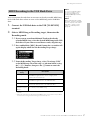 57
57
-
 58
58
-
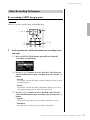 59
59
-
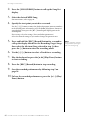 60
60
-
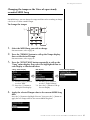 61
61
-
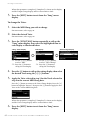 62
62
-
 63
63
-
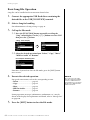 64
64
-
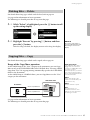 65
65
-
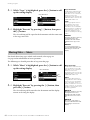 66
66
-
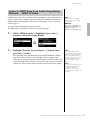 67
67
-
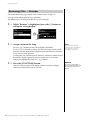 68
68
-
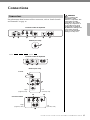 69
69
-
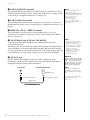 70
70
-
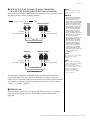 71
71
-
 72
72
-
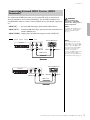 73
73
-
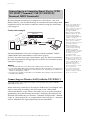 74
74
-
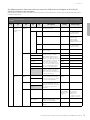 75
75
-
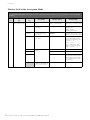 76
76
-
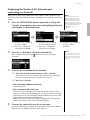 77
77
-
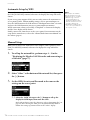 78
78
-
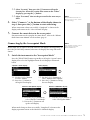 79
79
-
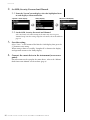 80
80
-
 81
81
-
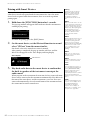 82
82
-
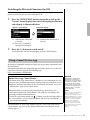 83
83
-
 84
84
-
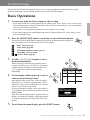 85
85
-
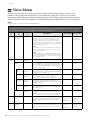 86
86
-
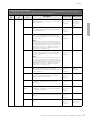 87
87
-
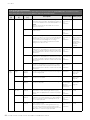 88
88
-
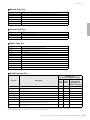 89
89
-
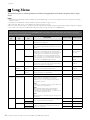 90
90
-
 91
91
-
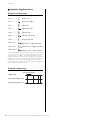 92
92
-
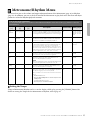 93
93
-
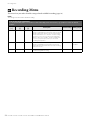 94
94
-
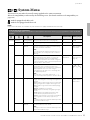 95
95
-
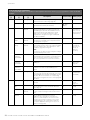 96
96
-
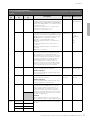 97
97
-
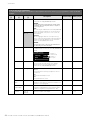 98
98
-
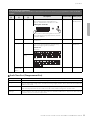 99
99
-
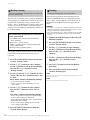 100
100
-
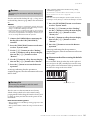 101
101
-
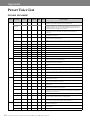 102
102
-
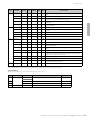 103
103
-
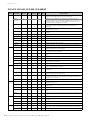 104
104
-
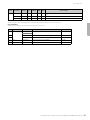 105
105
-
 106
106
-
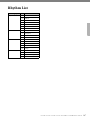 107
107
-
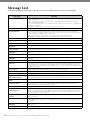 108
108
-
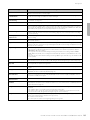 109
109
-
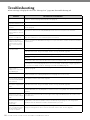 110
110
-
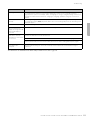 111
111
-
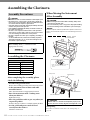 112
112
-
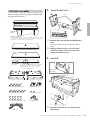 113
113
-
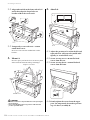 114
114
-
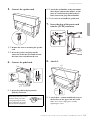 115
115
-
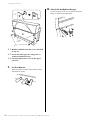 116
116
-
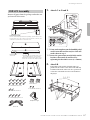 117
117
-
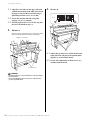 118
118
-
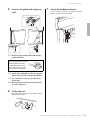 119
119
-
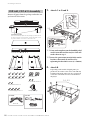 120
120
-
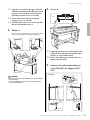 121
121
-
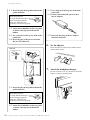 122
122
-
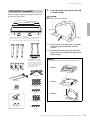 123
123
-
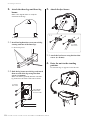 124
124
-
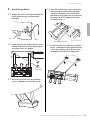 125
125
-
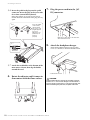 126
126
-
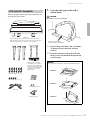 127
127
-
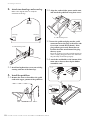 128
128
-
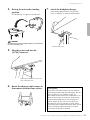 129
129
-
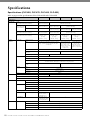 130
130
-
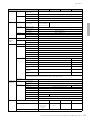 131
131
-
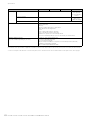 132
132
-
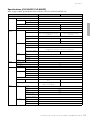 133
133
-
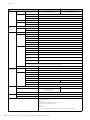 134
134
-
 135
135
-
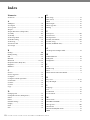 136
136
-
 137
137
-
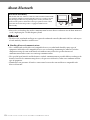 138
138
-
 139
139
-
 140
140
-
 141
141
-
 142
142
-
 143
143
-
 144
144


Yamaha CLP- 645 de handleiding
- Categorie
- Digitale piano's
- Type
- de handleiding
in andere talen
- English: Yamaha CLP- 645 Owner's manual
- italiano: Yamaha CLP- 645 Manuale del proprietario
- русский: Yamaha CLP- 645 Инструкция по применению
- français: Yamaha CLP- 645 Le manuel du propriétaire
- español: Yamaha CLP- 645 El manual del propietario
- Deutsch: Yamaha CLP- 645 Bedienungsanleitung
- português: Yamaha CLP- 645 Manual do proprietário
- dansk: Yamaha CLP- 645 Brugervejledning
- suomi: Yamaha CLP- 645 Omistajan opas
- čeština: Yamaha CLP- 645 Návod k obsluze
- 日本語: Yamaha CLP- 645 取扱説明書
- svenska: Yamaha CLP- 645 Bruksanvisning
- Türkçe: Yamaha CLP- 645 El kitabı
- polski: Yamaha CLP- 645 Instrukcja obsługi
- română: Yamaha CLP- 645 Manualul proprietarului