Futech MULTISCAN de handleiding
- Categorie
- Beveiligingsapparaat componenten
- Type
- de handleiding
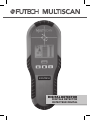
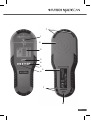
Hieronder vindt u korte informatie voor MULTISCAN. De FUTECH MULTISCAN is ontworpen voor het opsporen van metalen (magnetisch en niet magnetisch), balken en draden/geleiders, al dan niet onder stroom, in muren, plafonds en vloeren. De detector kan ook hout detecteren. Het apparaat schakelt na 5 minuten automatisch uit om de batterijen te sparen en werkt met alkalische of oplaadbare batterijen. Het instrument detecteert objecten onder het sensorgedeelte. De diepte van detectie is afhankelijk van het materiaal, de afmeting van het object en de conditie van de constructie.
Hieronder vindt u korte informatie voor MULTISCAN. De FUTECH MULTISCAN is ontworpen voor het opsporen van metalen (magnetisch en niet magnetisch), balken en draden/geleiders, al dan niet onder stroom, in muren, plafonds en vloeren. De detector kan ook hout detecteren. Het apparaat schakelt na 5 minuten automatisch uit om de batterijen te sparen en werkt met alkalische of oplaadbare batterijen. Het instrument detecteert objecten onder het sensorgedeelte. De diepte van detectie is afhankelijk van het materiaal, de afmeting van het object en de conditie van de constructie.


-
 1
1
-
 2
2
-
 3
3
-
 4
4
-
 5
5
-
 6
6
-
 7
7
-
 8
8
-
 9
9
-
 10
10
-
 11
11
-
 12
12
-
 13
13
-
 14
14
-
 15
15
-
 16
16
-
 17
17
-
 18
18
-
 19
19
-
 20
20
-
 21
21
-
 22
22
-
 23
23
-
 24
24
-
 25
25
-
 26
26
-
 27
27
-
 28
28
-
 29
29
-
 30
30
-
 31
31
-
 32
32


Futech MULTISCAN de handleiding
- Categorie
- Beveiligingsapparaat componenten
- Type
- de handleiding
Hieronder vindt u korte informatie voor MULTISCAN. De FUTECH MULTISCAN is ontworpen voor het opsporen van metalen (magnetisch en niet magnetisch), balken en draden/geleiders, al dan niet onder stroom, in muren, plafonds en vloeren. De detector kan ook hout detecteren. Het apparaat schakelt na 5 minuten automatisch uit om de batterijen te sparen en werkt met alkalische of oplaadbare batterijen. Het instrument detecteert objecten onder het sensorgedeelte. De diepte van detectie is afhankelijk van het materiaal, de afmeting van het object en de conditie van de constructie.
in andere talen
- English: Futech MULTISCAN Owner's manual
- français: Futech MULTISCAN Le manuel du propriétaire
Andere documenten
-
Bosch PDO Multi de handleiding
-
Bosch DMF 10 ZOOM Operating Instructions Manual
-
Renkforce 1596296 de handleiding
-
-
-
Sony HMD-A220 Handleiding
-
-
Bosch PDO 6 de handleiding
-
-