Lexibook K710 Handleiding
- Categorie
- Speelgoed
- Type
- Handleiding
Deze handleiding is ook geschikt voor

K710 series
MODE D’EMPLOI
INSTRUCTION MANUAL
MANUAL DE INSTRUCCIONES
MANUAL DE INSTRUÇÕES
MANUALE DI ISTRUZIONI
BEDIENUNGSANLEITUNG
GEBRUIKSAANWIJZING
Clavier électronique avec Microphone
Electronic Keyboard with Mic
Elektronisches Keyboard mit Mikrofon
www.lexibook.com
Booklet size: 105(W) x 148(H)mm
K710seriesIM1198_V13_217.indb 1 8/5/18 10:19 am

1819
K710seriesIM1198_V13_217.indb 2 8/5/18 10:19 am

3
FRANÇAIS
Découvre ton clavier
Découvre ton nouveau clavier et apprends à bien connaître les différentes parties de ton instrument en t’aidant du
schéma en première page du livret.
Lors du déballage, assure-toi que les pièces suivantes soient incluses :
1 x clavier à 37 touches / 1 x microphone / 1 x pied à micro / 1 x porte micro / 1 x mode d’emploi
ATTENTION : Les éléments d’emballage tels que films plastiques, rubans adhésifs, étiquettes et rubans de fixation
métalliques ne font pas partie de ce produit et doivent être enlevés par raison de sécurité avant toute utilisation
par un enfant.
1. Bouton Marche / Arrêt
2. Bouton RYTHME
3. 16 Rythmes
4. Bouton PERCU/LUMIÈRE
5. Gamme de 16 sons
6. Bouton SON
7. Bouton Démos
8. Bouton VOLUME –
9. Bouton VOLUME +
10. Bouton d’enregistrement REC
11. Bouton REJOUER
12. Bouton TEMPO +
13. Bouton TEMPO -
14. Bouton STOP
Alimentation
Pour jouer du clavier correctement, il faut maintenir une bonne posture et bien placer ses mains sur le clavier. La
qualité et l’aisance du jeu en dépendent.
Posture et positionnement des mains
Assieds-toi à l’avant d’un banc ou d’un tabouret.
Tiens-toi droit, face au centre du clavier, puis
penche-toi légèrement vers l’avant tout en
gardant tes épaules décontractées.
15. Touches noires (x 15)
16. Touches blanches (x 22)
17. Enceintes
18. Prise microphone (3,5mm)
19. Prise d’alimentation
Lorsque tu poses tes mains sur les touches, tes coudes
doivent être légèrement devant toi. Tes avant-bras et mains
dessinent une ligne horizontale lorsque tes doigts reposent
sur le clavier. Tes doigts doivent être légèrement recourbés.
Ne pas recharger les piles non rechargeables. Retirer les accumulateurs de l’appareil avant de les recharger. Ne charger les
accumulateurs que sous la surveillance d’un adulte. Ne pas mélanger différents types de piles ou accumulateurs, ou des piles
et accumulateurs neufs et usagés. Les piles et accumulateurs doivent être mis en place en respectant la polarité. Les piles
et accumulateurs usagés doivent être enlevés de l’appareil. Les bornes d’une pile ou d’un accumulateur ne doivent pas être
mises en court-circuit. Ne pas jeter les piles au feu. Retirer les piles en cas de non utilisation prolongée. Cet appareil doit être
alimenté avec les piles spécifiées seulement.
Les batteries ne doivent jamais être exposées à une source de chaleur excessive, par exemple la lumière du soleil ou un feu.
ATTENTION : D’importantes interférences électromagnétiques ou des décharges électrostatiques peuvent provoquer un
dysfonctionnement ou une perte de données. Si l’appareil ne fonctionne pas correctement, enlevez puis remettez les piles, ou
débranchez l’adaptateur secteur de la prise de courant puis rebranchez-le.
Attention : Débranchez l’adaptateur en cas de non-utilisation prolongée afin d’éviter tout échauffement. Lorsque le clavier est
alimenté par un adaptateur, ne jouez pas à l’extérieur. Vérifiez régulièrement l’état de l’adaptateur et des fils de branchement.
En cas de détérioration, n’utilisez pas l’adaptateur jusqu’à réparation. Le jouet ne doit être utilisé qu’avec un transformateur pour
jouets. L’adaptateur n’est pas un jouet. Le clavier doit être déconnectée de l’alimentation pour être nettoyée si des liquides sont
utilisés pour le nettoyage. Ce jouet n’est pas destiné aux enfants de moins de 3 ans. Une mauvaise utilisation de l’adaptateur
peut provoquer une électrocution.
Conseil aux parents : Le transformateur et l’adaptateur ne sont pas destinés à être utilisés comme des jouets. Ils
doivent être utilisés sous la surveillance des parents.
Le jouet ne doit être branché que sur un équipement de Classe II portant le symbole suivant.
Connexion à l’alimentation
1. S’assurer que l’appareil soit éteint.
2. Insérer une extrémité du câble CA à la prise d’alimentation à l’arrière du clavier.
3. Brancher l’autre extrémité du câble CA à une prise électrique murale.
Mise en place des piles
1. Ouvrir le compartiment des piles situé en dessous du clavier.
2. Insérer 4 x piles 1,5V de type AA / LR6 (non fournies) en respectant la polarité
indiquée au fond du compartiment et comme indiqué sur le schéma.
3. Fermer le compartiment des piles.
Note : L’adaptateur secteur doit être déconnecté de la prise secteur située sous
l’appareil afin que le produit puisse fonctionner avec des piles.
Le clavier fonctionne avec 4 piles AA / LR6 de type 1,5V (non fournies) ou un adapateur (non fourni) de 5V
500mA, à centre positif .
Entrée: 100-240V ~ 50/60Hz, 0.3A Sortie: 5V 500mA
1,5V AA OU LR6
1,5V AA OU LR6
1,5V AA OU LR6
1,5V AA OU LR6
K710seriesIM1198_V13_217.indb 3 8/5/18 10:19 am

4
5
FRANÇAIS
Notes : la note grisée désigne le FA central. Les DO se trouvent à gauche du groupe de deux touches noires.
Commençons par un
exercice facile.
Le système de numérotage permet
de déterminer où poser tes doigts
sur le clavier. À chaque doigt est
assigné un numéro.
Comment allumer/éteindre ton instrument
1. Pour allumer ton clavier électronique avec microphone pousse l’interrupteur marche/arrêt vers la droite.
2. Pour l’éteindre, pousse le même interrupteur vers la gauche.
Comment régler le volume
Appuie sur les boutons du volume pour régler le niveau sonore souhaité de la musique à l’allumage, ton clavier, les
sons et démonstrations musicales.
Il y a 14 niveaux sonores et le niveau établit par défaut à l’allumage est le niveau 8.
ATTENTION : Baisse toujours le niveau du volume. Autrement ton audition pourrait être endommagée.
Comment utiliser les boutons du tempo
Appuie sur les boutons du tempo pour accélérer ou ralentir ta musique. Tu peux utiliser cette option non seulement
pour la musique que tu joues au clavier mais aussi pour le rythme et les démos choisies.
Numérotage des doigts
Réglages musicaux
Main gauche Main droite
5 1
1 5
4 23 32 4
La première touche et la dernière touche du clavier à 37 touches sont des DO. Le K710 series est composé de
touches blanches et de touches noires. Les touches noires sont réparties en groupe de deux et de trois.
Schéma du clavier
Note : Joue avec le bout de tes doigts.
Tu peux appuyer sur les touches noires avec les doigts correspondant aux touches blanches.
MAIN GAUCHE
Doigt 5 4 3 2 1
Note do ré mi fa sol
A
2 3 2 3 2 3
do
sol
ré lami sifa do
sol
ré lami sifa do
sol
ré lami sifa do
B
FA central
sol la si do
do ré mi fa sol la si do ré mi fa
si
do
ré
mi
fa
sol
la
5
5
4
4
3
3
2
2
1 1
MAIN DROITE
Doigt 1 2 3 4 5
Note do ré mi fa sol
K710seriesIM1198_V13_217.indb 4 8/5/18 10:19 am

4
5
FRANÇAIS
Choisis le son
1. Le réglage des sons te permet de sélectionner différents instruments. Pour sélectionner un son parmi les 16
indiqués dans le tableau ci-dessus, appuie sur le bouton SON une fois pour les sons A et choisis l’instrument en
appuyant sur un des 8 boutons (n°5 sur le schéma) de 01 à 08.
2. Pour accéder aux sons B, appuie sur le bouton SON encore une fois et sélectionne l’instrument que tu veux
jouer entre 09 et 16.
Choisis le rythme
1. Pour choisir le rythme parmi les 16 indiqués dans le tableau ci-dessus, appuie sur le bouton RYTHME une fois
pour les rythmes A et choisis un rythme parmi les 8 boutons (n°3) entre 01 et 08.
2. Pour accéder aux rythmes B, appuie encore une fois sur le bouton RYTHME et sélectionne le rythme voulu
entre 09 et 16.
2. Pour arrêter le rythme en cours appuie sur le bouton STOP.
Laisse-toi porter par les percussions
Appuie sur le bouton PERCU/LUMIERE pour sélectionner la percussion souhaité parmi (de gauche à droite) : la
GROSSE CAISSE, la CAISSE CLAIRE, la CYMBALE et le CHARLESTON.
Pratique avec les mélodies
1. Appuie sur le bouton Démos pour écouter les démonstrations musicales ordonnées dans l’ordre suivant:
· Petite étoile · Salut d’amour
· Lettre à Elise · The Little Donkey
· Valse du petit chien · Hymne à la joie
· Symphonie n°5 de Beethoven · Si tu aimes le soleil
2. Pour écouter le morceau suivant appuie d’abord sur le bouton Démos pour arrêter la musique en cours puis
encore une fois pour écouter la mélodie suivante.
3. Pour arrêter la musique appuie sur le bouton STOP.
Enregistre ta musique
1. Pour enregistrer ta musique, appuie sur le bouton d’enregistrement REC et joue ta musique jusqu’à 54 notes.
2. Lorsque tu as terminé, pour réécouter appuie sur le bouton REJOUER.
3. Pour arrêter appuie sur le bouton STOP
Note: En mode enregistrement, n’appuie sur aucun bouton au risque d’annuler automatiquement l’enregistrement
en cours.
L’option enregistrement ne peut enregistrer les démonstrations musicales ni les rythmes. En revanche, tu peux
enregistrer la musique jouée sur le clavier avec l’instrument sélectionné.
L’appareil n’enregistre pas la voix au microphone.
Comment utiliser ton microphone amovible
1. Assemble le pied du microphone et le porte-micro. Puis fixe-les sur le clavier.
2. Connecte le câble du microphone à la prise située à l’arrière du clavier (18).
3. Place le microphone amovible sur le porte-micro ou commence simplement à chanter !
HYMNE A LA JOIE de Beethoven
Pratique la musique
sol la si do
15
16
Sons A
PIANO (PIANO)
SYNTH BASS (SYNTHÉ BASSE)
HARMONICA (HARMONICA)
FRENCH HORN (COR D’HARMONIE)
A-STEEL GUITAR (GUITARE HAWAÏENNE)
SAXOPHONE (SAXOPHONE)
HAMMOND (ORGUE HAMMOND)
HARP (HARPE)
ELECTRIC BASS (BASSE ÉLECTRIQUE)
CLARINET (CLARINETTE)
ELECTRIC GUITAR (GUITARE ÉLECTRIQUE)
OBOE (HAUTBOIS)
ACCORDION (ACORDÉON)
TUBA (TUBA)
VIBRAPHONE (VIBRAPHONE)
VIOLIN (VIOLON)
01
02
09
10
03
04
11
12
05
06
13
14
07
08
Sons B
Rythmes A
MARCH (MARCHE)
SOKA
SLOW ROCK
WALTZ (VALSE)
DISCO
POP
SHUFFLE
SAMBA
CHA CHA (CHA CHA CHA)
SLOW SOUL
NEW NEW
TANGO
ROCK
SOUL
RUMBA
BLUES
01
02
09
10
03
04
11
12
05
06
13
14
07
08
15
16
Rythmes B
COMPTE
MAIN DROITE
MAIN GAUCHE
3 4 5
1 2 3 4
5 4 3 2
1 2 3 4
1 1 2 3
1 2 3 4
3 2
1 2 3 4
5
1
5
1
K710seriesIM1198_V13_217.indb 5 8/5/18 10:19 am

6
6
FRANÇAIS
Ce produit est couvert par notre garantie de deux ans. Pour toute mise en oeuvre de la garantie ou du service
après-vente, vous devez vous adresser à votre revendeur muni de votre preuve d’achat. Notre garantie couvre les
vices de matériel ou de montage imputables au constructeur à l’exclusion de toute détérioration provenant du non-
respect de la notice d’utilisation ou de toute intervention intempestive sur l’article (telle que démontage, exposition
à la chaleur ou à l’humidité…).
Note : Veuillez garder ce mode d’emploi, il contient d’importantes informations. Le contenu de ce mode d’emploi
peut changer sans préavis. Aucune partie de ce mode d’emploi ne doit être reproduite sans le consentement écrit
du fabricant.
ATTENTION! Ne convient pas aux enfants de moins de 3 ans. Risque de suffocation en raison des petites pièces.
Référence : K710 series
© LEXIBOOK®
www.lexibook.com
Pour éviter tout incendie ou électrocution, débranchez l’appareil de l’alimentation en courant CA quand vous le
nettoyez. Nettoyez l’appareil en l’essuyant avec un chiffon à poussière comme pour un meuble. Nettoyez et essuyez
les parties en plastique avec précaution. Il est conseillé d’utiliser un pour nettoyer la partie frontale.
· Utiliser avec précautions. Ne pas laisser tomber ou soumettre le clavier à des chocs ou pressions excessives.
· Ne pas exposer le clavier à un environnement humide ou poussiéreux.
· Garder le clavier à l’abri de toute source de chaleur extrême.
· Ne pas utiliser de produits nettoyants ou aérosols.
· Ne pas utiliser d’accessoires non recommandés par le fabricant.
· Garder le clavier loin de l’eau, d’une baignoire, un bol d’eau, l’évier de la cuisine ou une machine à laver, une
cave humide ou une piscine.
· Ne jamais mettre d’objets quels qu’ils soient dans les orifices dans la mesure où ils pourraient heurter des éléments
sous tension dangereux ou provoquer des courts-circuits et ainsi entraîner un risque d’incendie ou d’électrocution.
Garantie
Entretien
Précautions
Informations sur la protection de l’environnement
Tout appareil électrique usé est une matière recyclable et ne devrait pas faire partie des ordures ménagères!
Nous vous demandons de bien vouloir nous soutenir en contribuant activement au ménagement des ressources
et à la protection de l’environnement en déposant cet appareil dans des sites de collectes (si existants).
Lexibook S.A.
6 avenue des Andes
Bâtiment 11
91940 Les Ulis
France
Pour vos demandes concernant un problème SAV ou une réclamation, composez
le 01 84 88 58 59 ou écrivez à [email protected].
Pour toutes vos autres demandes (conseil d’achat, choix d’un produit,
renseignement avant-vente sur l’utilisation d’un produit …), composez le
08 92 23 27 26 (0,34€ TTC /minute) ou écrivez à
Tous les papiers
sont recyclables
Note : la double barre indique la fin du morceau.
MAIN GAUCHE
MAIN GAUCHE
MAIN DROITE
MAIN DROITE
2 3 1
1 2 3 4
3 4 5
2 4 3 1
1 2 3 4
5 4 3 2
2 4 3 2
1 2 3 4
1 1 2 3
1 2 5
1 2 3 4
2 1 1
1 5 1 5 1 5
1 5
1 5
5
5
1
MAIN GAUCHE
MAIN DROITE
1 2 3 4
3 4 5
1 2 3 4
5 4 3 2
1 2 3 4
1 1 2 3
1 2 3 4
2 1
1 5
5
5
1
K710seriesIM1198_V13_217.indb 6 8/5/18 10:19 am

7
ENGLISH
Discovering Your Keyboard
Discover your new keyboard and learn to identify the various parts of your instrument using the diagram on the
first page of the booklet.
When unpacking, ensure that the following elements are included:
1 x 37-key keyboard / 1 x mic / 1 x mic stand / 1 x pole holder/ 1 x instruction manual
WARNING: All packaging materials, such as tape, plastic sheets, wire ties and tags are not part of this product and
should be discarded for your child’s safety.
1. On/Off Switch
2. RHYTHM switch
3. 16 Rhythms
4. DRUM/LIGHT button
5. 16 instruments
6. INST switch
7. DEMO SOUNDS button
8. VOLUME – button
9. VOLUME + button
10. RECORD button
11. REPLAY button
12. TEMPO + button
13. TEMPO – button
14. STOP button
Power sources
To play the keyboard correctly, you must maintain a proper posture and properly place your hands on the keyboard.
The quality and ease of play depend on this.
Posture and Hand Position
Sit down with your legs in front on a bench or
stool. Keep your back straight, facing the centre
of the keyboard, and then lean slightly forward
while keeping your shoulders relaxed.
15. Black key (x 15)
16. White key (x 22)
17. SPEAKER
18. MICROPHONE input (3.5mm)
19. Power supply
When you place your hands on the keys, your elbows must
be slightly in front of you. Your forearm and hands draw a
horizontal line when your fingers are resting on the keyboard.
Your fingers must be slightly curved.
Non-rechargeable batteries are not to be recharged. Rechargeable batteries are to be removed from the product before being
charged. Rechargeable batteries are only to be charged under adult supervision. Different types of batteries or new and used
batteries are not to be mixed. Only batteries of the same or equivalent type as recommended are to be used. Batteries are to
be inserted with the correct polarity. Exhausted batteries are to be removed from the product. The supply terminals are not to
be short circuited. Do not throw batteries into a fire. Remove the batteries if you are not going to use the unit for a long period
of time. Battery shall not be exposed to excessive heat such as sunshine, fire or the like.
WARNING: Malfunction or loss of memory may be caused by strong frequency interference or electrostatic discharge. Should
any abnormal function occur, remove the batteries and insert them again, or unplug the AC adapter from the mains socket and
plug it back in.
Warning: Disconnect the adapter if the game is not used for a long period of time to prevent overheating. When the Keyboard is
powered by an adapter, do not play outside. Check the state of the adapter and the connection cords regu larly. If their condition is
deteriorating, do not use the adapter until it has been repaired. The toy shall only be used with a transformer for toys. The adapter
is not a toy. The Keyboard should be disconnected from the power supply to be cleaned if liquids are used for cleaning. The toy
is not intended for children under 3 years old. Misuse of transformer can cause electrical shock.
Parental advisory: transformer and adaptor for toys are not intended to be used as a toy. The usage must be under
parental advice.
The toy is only to be connected to Class II equipment bearing the following symbol.
The keyboard operates with 4 x AA/LR6 1.5V type batteries (not included) or a 5V 500mA adaptor with
positive centre (not included).
Input: 100-240V ~ 50/60Hz, 0.3A Output: 5V 500mA
1.5V AA OR LR6
1.5V AA OR LR6
1.5V AA OR LR6
1.5V AA OR LR6
AC operation
1. Check that the unit is switched off.
2. Insert the AC/DC adaptor’s plug into the device’s DC jack at the back.
3. Then plug the adaptor in an outlet.
Batteries installation
1. To install the battery, open the battery compartment located at the bottom of the
keyboard.
2. Insert 4 x AA/LR6 type 1.5V batteries (sold separately) observing the polarity
indicated in the battery compartment, and as per the diagram shown.
3. Replace the battery compartment cover.
Note: The AC adapter must be disconnected from the DC socket at the bottom of the
unit in order for the product to operate on battery power.
K710seriesIM1198_V13_217.indb 7 8/5/18 10:19 am

8
9
ENGLISH
Notes: the greyed note indicates middle F. The C notes are located to the left of the groups of two black keys.
Let’s start with an
easy exercise.
The finger numbering system helps
you determine where to place your
fingers on the keyboard. Each finger
is assigned a number.
How to turn the instrument On/Off
1. To turn on your Electronic Keyboard with Microphone push the On/Off switch to the right.
2. To turn it off, push the switch to the left.
How to use the volume buttons
Press volume buttons to define the level of volume you want to set for the opening music when turning on the device,
your keyboard, the tones and demo songs.
There are 14 levels and the volume set by default when powering on the keyboard is level 8.
CAUTION : Too high volume, can damage your hearing. For this reason, please turn the volume down.
How to use the tempo buttons
Press tempo buttons to speed up or slow down your music. It works not only for the music you play but also for the
rhythm you choose and the demo songs you can listen to.
Fingering
Music set up
Left hand Right hand
5 1
1 5
4 23 32 4
The first and last key of the 37-key keyboard are C notes. The K710 series is comprised of white keys and black
keys. The black keys are divided into groups of two and three.
Keyboard Diagram
Note: Play with the tips of your fingers.
You can press the black keys with the finger corresponding to the white key.
LEFT HAND
Finger 5 4 3 2 1
Key C D E F G
A
2 3 2 3 2 3
C
G
D AE BF C
G
D AE BF C
G
D AE BF C
B
middle-F
G A B C
C D E F G A B C D E F
B
C
D
E
F
G
A
5
5
4
4
3
3
2
2
1 1
RIGHT HAND
Finger 1 2 3 4 5
Key C D E F G
K710seriesIM1198_V13_217.indb 8 8/5/18 10:19 am

8
9
ENGLISH
Set up the tone
1. The tone setup allows you to select different instruments. To select one tone among the 16 tones shown in the
table above, press INST switch one time for Tones A and select the tone by pressing one of the 8 buttons (no 5
shown on the diagram) from 01 to 08.
2. To access Tones B, press INST switch again and select the tone you wish to play from 09 to 16.
Set up the rhythm
1. To select the rhythm among the 16 rhythms shown in the table above press RHYTHM switch one time for Rhythm
A then select the rhythm by pressing one of the 8 buttons (no 3 on the diagram) from 01 to 08.
2. To access Rhythm B, press RHYTHM switch again and select the rhythm for your music from 09 to 16.
3. To stop press STOP button.
Get into beat of drums
Press DRUM/LIGHT button to select the percussion sound you want among (from left to right button): BASS DRUM,
SNARE DRUM, CYMBAL and HI-HAT.
Practice with the demonstration music
1. Press DEMO button to hear the demo music listed in the following order:
· Little Star · Salut d’amour
· For Elise · The Little Donkey
· Dog Waltz · Ode To Joy
· Beethoven symphony no 5 · If You’re Happy Clap
2. To play the next track press DEMO button once to stop the music and once again to play the next music.
3. To stop the music press STOP button.
Record your music
1. To record your music, press RECORD button and play your own music up to 54 notes.
2. When you are finished, to playback the notes press REPLAY button.
3. To stop press STOP button.
Note: Under record mode, please avoid pressing buttons or the record will automatically be cancelled.
The record feature cannot record demo songs, drum sounds or rhythms but records the music played on the
keyboard under the tone selected. The device does not record the voice on the microphone.
How to use your removable Microphone
1. Assemble the microphone stand and pole holder together. Then fit them into the base located on the keyboard.
2. Connect the microphone cable to its input at the back of the keyboard (18).
3. Place the removable microphone on the pole holder or just start singing!
ODE TO JOY by Beethoven
Practice music
15
16
Tone A
PIANO
SYNTH BASS
HARMONICA
FRENCH HORN
A-STEEL GUITAR
SAXOPHONE
HAMMOND
HARP
ELECTRIC BASS
CLARINET
ELECTRIC GUITAR
OBOE
ACCORDION
TUBA
VIBRAPHONE
VIOLIN
01
02
09
10
03
04
11
12
05
06
13
14
07
08
Tone B
Rythmes A
MARCH
SOKA
SLOW ROCK
WALTZ
DISCO
POP
SHUFFLE
SAMBA
CHA CHA
SLOW SOUL
NEW NEW
TANGO
ROCK
SOUL
RUMBA
BLUES
01
02
09
10
03
04
11
12
05
06
13
14
07
08
15
16
Rythmes B
COUNT
RIGHT HAND
LEFT HAND
3 4 5
1 2 3 4
5 4 3 2
1 2 3 4
1 1 2 3
1 2 3 4
3 2
1 2 3 4
5
1
5
1
G A B C
K710seriesIM1198_V13_217.indb 9 8/5/18 10:19 am

10
10
ENGLISH
This product is covered by our 2-years warranty.
For any claim under the warranty or after sale service, please contact your distributor and present a valid proof
of purchase. Our warranty covers any manufacturing material and workmanship defect, with the exception of any
deterioration arising from the non-observance of the instruction manual or from any careless action implemented
on this item (such as dismantling, exposition to heat and humidity, etc.). It is recommended to keep the packaging
for any further reference.
In a bid to keep improving our services, we could implement modification on the colours and the details of the
product shown on the packaging.
NOTE: Please keep this instruction manual, it contains important information.
WARNING! Not suitable for children under 3 years. Choking Hazard-Small parts.
Reference: K710 series
Designed and developed in Europe – Made in China
© LEXIBOOK®
www.lexibook.com
Note: the double bar indicates the end of the piece.
LEFT HAND
LEFT HAND
RIGHT HAND
RIGHT HAND
2 3 1
1 2 3 4
3 4 5
2 4 3 1
1 2 3 4
5 4 3 2
2 4 3 2
1 2 3 4
1 1 2 3
1 2 5
1 2 3 4
2 1 1
1 5 1 5 1 5
1 5
1 5
5
5
1
LEFT HAND
RIGHT HAND
1 2 3 4
3 4 5
1 2 3 4
5 4 3 2
1 2 3 4
1 1 2 3
1 2 3 4
2 1
1 5
5
5
1
To prevent fire or shock hazard, disconnect your unit from the power source when cleaning. The finish on your unit
may be cleaned with a dust cloth and cared for as other furniture. Use a soft, clean and dry cloth to clean the exterior
of the unit. Use caution when cleaning and wiping the plastic parts.
· Handle with care. Do not drop or subject the keyboard to excessive force or shock.
· Do not expose the keyboard to high humidity or dusty environments.
· Do not expose the keyboard to extreme temperatures from any source.
· Do not use liquid or aerosol cleansers.
· Do not use attachments not recommended by the manufacturer.
· Do not use the keyboard near water, a bathtub, wash bowl, kitchen sink or laundry tub; in a wet basement or near
a swimming pool.
· Never put objects of any kind into the keyboard through its openings as they may touch dangerous voltage points
or short-out parts and could result in fire or electric shock. Never spill liquid of any kind onto the keyboard.
Warranty
Maintenance
Precautions
Environmental Protection
Unwanted electrical appliances can be recycled and should not be discarded along with regular household
waste! Please actively support the conservation of resources and help protect the environment by returning this
appliance to a collection centre (if available).
United Kingdom & Ireland
For after-sales service, please contact us at
+33 1 84 88 58 59.
K710seriesIM1198_V13_217.indb 10 8/5/18 10:19 am

11
DEUTSCH
Lerne dein Klavier kennen
Erkunde dein neues Klavier und mache dich mit den verschiedenen Teilen deines Instrumentes mithilfe des
Schaubildes auf der ersten Seite des Begleitheftes vertraut.
Wenn Sie das Gerät auspacken, stellen Sie sicher, dass die folgenden Teile enthalten sind:
1 x 37-Tasten-Keyboard / 1 x Mikrofon/1 x Mikrofonständer/ 1 x Stangenhalter/ 1 x Bedienungsanleitung
WARNUNG: Alle Verpackungsmaterialien wie z. B. Klebeband, Plastikfolie, Drahtbinder und Etiketten, sind nicht Teil
dieses Produktes und sollten zur Sicherheit Ihres Kindes entsorgt werden.
1. Ein-/Ausschalter
2. RHYTHMUS-Schalter
3. 16 Rhythmen
4. SCHLAGZEUG/LICHT-Taste
5. 16 Instrumente
6. INST-Schalter
7. DEMOSONG-Taste
8. LAUTSTÄRKE – Taste
9. LAUTSTÄRKE + Taste
10. AUFNAHME-Taste
11. WIEDERGABE-Taste
12. TEMPO + Taste
13. TEMPO – Taste
14. STOPP-Taste
Stromversorgung
Um korrekt Klavier zu spielen, ist eine gute Haltung wichtig und die Hände müssen korrekt auf der Tastatur
positioniert werden. Davon hängen die Qualität und die Leichtigkeit der Spielweise ab.
Haltung und Position der Hände
Setze dich auf den vorderen Teil einer Bank oder
eines Hockers. Sitze aufrecht vor der Mitte des
Klaviers,
beuge dich
dann leicht
nach vorne
und spanne
dabei deine
Schultern
nicht an.
15. Schwarze Taste (x 15)
16. Weiße Taste (x 22)
17. LAUTSPRECHER
18. MIKROFON-Eingang (3,5 mm)
19. Netzanschluss
Wenn du deine Hände auf die Tasten legst, müssen deine
Ellbogen leicht vor dir sein. Deine Unterarme und Hände
bilden eine waagerechte Linie, wenn deine Finger auf den
Tasten ruhen. Deine Finger sollten leicht gekrümmt sein.
Nicht wieder aufladbare Batterien können nicht aufgeladen werden. Aufladbare Batterien müssen vor der Aufladung aus dem
Spielzeug genommen werden. Batterien dürfen nur unter Aufsicht eines Erwachsenen aufgeladen werden. Unterschiedliche
Batterietypen bzw. alte und neue Batterien dürfen nicht gemischt werden. Es dürfen nur solche Batterien verwendet werden, die
gleichwertig zum empfohlenen Batterietyp sind. Die Batterien müssen korrekt entsprechend der Polaritätsmarkierungen eingelegt
werden. Leere Batterien müssen aus dem Spielzeug genommen werden. Die Anschlüsse dürfen nicht kurz geschlossen werden.
Batterien niemals ins Feuer werfen. Entfernen Sie die Batterien, wenn Sie das Spielzeug für längere Zeit nicht benutzen. Wenn
der Sound schwächer wird oder das Spielzeug anfängt, nicht mehr direkt zu reagieren, deutet dieses ebenfalls darauf hin, dass
es Zeit wird, neue Batterien einzusetzen.
Die Batterien dürfen keinen übermäßigen Hitzequellen ausgesetzt werden,zum Beispiel Sonnenschein oder Feuer.
WARNUNG: Funktionsstörungen oder Speicherverlust können möglicherweise durch starke Frequenzstörungen oder
elektrostatische Entladung verursacht werden. Sollte es zu unnormalen Funktionen kommen, entfernen Sie die Batterien und
legen Sie die Batterien wieder ein ; oder trennen Sie die Verbindung des AC/DC-Adapters mit der Netzsteckdose und stellen
Sie die Verbindung wieder her.
Warnung: Ziehen Sie den Stecker des Netzadapters, wenn das Spiel für längere Zeit nicht benutzt wird, um ein Überhitzen zu
verhindern. Wenn das Keyboard über einen Adapter betrieben wird, spielen Sie nicht im Freien. Prüfen Sie den Zustand des
Adapters und der Verbindungskabel regelmäßig. Wenn Adapter oder Kabel nicht in einwand freiem Zustand sind, benutzen Sie
den Adapter nicht, bis er repariert worden ist. Das Spielzeug darf nur mit einem Transformator für Spielzeuge benutzt werden.
Der Adapter ist kein Spielzeug. Die Keyboard sollte zum Reinigen vom Netzstrom getrennt werden, falls Flüssigkeiten zum
Reinigen verwendet werden. Das Spielzeug ist nicht für Kinder unter 3 Jahren geeignet. Die unsachgemäße Benutzung des
Transformators kann einen Stromschlag verursachen. Hinweis für Eltern: Transformatoren und Netzgeräte für Spielzeuge sind
nicht dazu geeignet, als Spielzeuge benutzt
zu werden. Die Benutzung muss unter ständiger Überwachung der Eltern erfolgen.
Hinweis für Eltern: Transformatoren und Netzgeräte für Spielzeuge sind nicht dazu geeignet, als Spielzeuge
benutzt zu werden. Die Benutzung muss unter ständiger Überwachung der Eltern erfolgen.
Das Spielzeug darf nur mit Geräten der Klasse II verbunden werden, die mit dem folgenden Symbol versehen sind.
AC-Betrieb
1. Stellen Sie sicher, dass das Gerät ausgeschaltet ist.
2. Den Stecker des AC/DC-Adapters mit der DC-Buchse auf der Rückseite des
Gerätes verbinden.
3. Verbinden Sie dann den Adapter mit einer Steckdose, um das Gerät einzuschalten.
Batterie einlegen
1. Um die Batterien einzulegen, öffnen Sie das Batteriefach am Boden des Gerätes.
2. Legen Sie 4 x 1,5V-Batterien vom Typ AA/LR6 (nicht inbegriffen) unter
Beachtung der am Boden des Batteriefaches markierten und im Schaubild unten
angezeigten Polarität ein.
3. Schließen Sie die Batteriefachabdeckung wieder.
Hinweis: Das AC-Netzkabel muss aus der AC-Buchse auf der Rückseite des Gerätes
gezogen werden, damit das Produkt mit Batteriestrom betrieben werden kann.
Das Klavier funktioniert mit 4 x 1,5V-Batterien vom Typ AA/LR6 (nicht inbegriffen) oder einem 5V 500mA-
Adapter (nicht inbegriffen) mit positiver Mitte .
Eintrag: 100-240V ~ 50/60Hz, 0.3A Ausfahrt: 5V 500mA
1,5V AA ODER LR6
1,5V AA ODER LR6
1,5V AA ODER LR6
1,5V AA ODER LR6
K710seriesIM1198_V13_217.indb 11 8/5/18 10:19 am

12
13
DEUTSCH
Hinweis: Die graue Note kennzeichnet das mittleres F. Die Cs finden sich links von den Zweiergruppen der
schwarzen Tasten.
Wir beginnen mit einer
leichten Übung.
Das Nummerierungssystem ermöglicht
zu bestimmen, wo du deine Finger auf
die Klaviatur legst. Jeder Finger ist einer
Nummer zugeordnet.
Ein-/Ausschalten des Gerätes
1. Um dein elektronisches Keyboard mit Mikrofon einzuschalten, schiebe den Ein-/Ausschalter nach rechts.
2. Um es auszuschalten, schiebe den Schalter nach links.
Einstellen der Lautstärke
Drücke die Lautstärke-Tasten, um den Lautstärkepegel für die Begrüßungsmusik bei Einschalten des Keyboards, für
das Keyboard, die Töne und die Demosongs einzustellen.
Es gibt 14 Lautstärkestufen und die voreingestellte Lautstärke bei Einschalten des Keyboards ist Stufe 8.
VORSICHT: Eine zu hohe Lautstärke kann dein Gehör schädigen. Stelle aus diesem Grund die Lautstärke nicht
zu laut ein.
Die Tempo-Tasten
Drücke die Tempo-Tasten, um deine Musik schneller oder langsamer abzuspielen. Das funktioniert nicht nur mit
der Musik, die du spielst, sondern auch mit dem Rhythmus, den du wählst, und den Demosongs zum Anhören.
Nummerieren der Finger
Vorbereitung
Linke Hand Rechte Hand
5 1
1 5
4 23 32 4
Die erste Taste und die letzte Taste des 37-Tasten-Klaviers sind Cs. Das K710 series besteht aus weißen und
schwarzen Tasten. Die schwarzen Tasten sind in Gruppen von zwei und drei Tasten aufgeteilt.
Schema des Klaviers
Hinweis: Spiele mit den Fingerspitzen.
Du kannst die schwarzen Tasten mit den Fingern für die entsprechenden weißen Tasten drücken.
LINKE HAND
Finger 5 4 3 2 1
Note C D E F G
5
5
4
4
3
3
2
2
1 1
RECHTE HAND
Finger 1 2 3 4 5
Note C D E F G
A
2 3 2 3 2 3
C
G
D AE
H aso
F C
G
D AE
H aso
F C
G
D AE
H aso
F C
B
Mittleres F
G A
H aso
C
C D E F G A
H aso
C D E F
H aso
C
D
E
F
G
A
K710seriesIM1198_V13_217.indb 12 8/5/18 10:19 am

12
13
DEUTSCH
Einstellen des Klangs
1. Das Einstellen des Klangs ermöglicht dir, verschiedene Instrumente auszuwählen. Um einen Klang aus den
16 in der obenstehenden Tabelle aufgeführten Klängen auszuwählen, drücke den INST-Schalter einmal für die
A-Klänge und wähle einen aus, indem du eine der Tasten von 01 bis 08 (Nr. 5 im Schaubild) drückst.
2. Um einen der B-Klänge auszuwählen, drücke den INST-Schalter erneut und wähle den gewünschten Klang von
09 bis 16 aus.
Einstellen des Rhythmus
1. Um einen Rhythmus von den 16 in der Tabelle aufgeführten Rhythmen auszuwählen, drücke den RHYTMUS-
Schalter einmal für die A-Rhythmen. Wähle dann den Rhythmus durch Drücken einer der Tasten von 01 bis 08
(Nr. 3 im Schaubild) aus.
2. Um einen B-Rhythmus auszuwählen, drücke erneut den RHYTHMUS-Schalter und wähle den Rhythmus für
deine Musik von 09 bis 16.
3. Um abzubrechen, drücke die STOPP-Taste.
Schlagzeug
Drücke die SCHLAGZEUG/LICHT-Taste, um den gewünschten Schlagzeugklang von (Tasten von links nach rechts)
BASSTROMMEL, KLEINE TROMMEL, BECKER und HI-HAT auszuwählen.
Üben mit der Demo-Musik
1. Drücke die DEMO-Taste, um die Demosongs in der folgenden Reihenfolge zu hören:
· Little Star · Salut d’amour
· Für Elise · The Little Donkey
· Dog Waltz · An die Freude
· Beethoven Symphonie Nr. 5 · If You’re Happy Clap
2. Um den nächsten Titel zu spielen, drücke einmal die DEMO-Taste, um die Musik abzubrechen, und noch einmal,
um den nächsten Titel zu spielen.
3. Um die Musik abzubrechen, drücke die STOPP-Taste.
Aufnehmen deiner Musik
1. Um deine Musik aufzunehmen, drücke die AUFNAHME-Taste und spiele deine eigene Musik mit bis zu 54 Tönen.
2. Wenn du fertig bist, drücke die WIEDERGABE-Taste, um die Töne abzuspielen.
3. Um die Wiedergabe abzubrechen, drücke die STOPP-Taste.
Hinweis: Wenn du in den Aufnahme-Modus geschaltet bist, drücke bitte keine anderen Funktionstasten, sonst wird
die Aufnahme automatisch abgebrochen.
Die Aufnahmefunktion kann keine Demosongs, Schlagzeuglaute oder Rhythmen aufnehmen, sondern nur die auf
dem Keyboard gespielte Musik in dem Klang des gewählten Instruments. Das Gerät nimmt nicht die Stimme über
das Mikrofon auf.
Benutzung deines abnehmbaren Mikrofons
1. Baue den Mikrofonständer und den Stangenhalter zusammen. Befestige sie dann an der Basis am Keyboard.
2. Verbinde das Mikrofonkabel mit seinem Eingang an der Rückseite des Keyboards (18).
3. Setze das abnehmbare Mikrofon auf den Stangenhalter oder fange einfach an zu singen!
15
16
A- Klänge
SYNTH BASS (Synthie-Bass)
HARMONICA (Harmonika)
FRENCH HORN (Waldhorn)
A-STEEL GUITAR (A-Steel-Gitarre)
SAXOPHONE (Saxofon)
HAMMOND (Hammondorgel)
HARP (Harfe)
ELECTRIC BASS (E-Bass-Gitarre)
CLARINET (Klarinette)
ELECTRIC GUITAR (E-Gitarre)
OBOE (Oboe)
ACCORDION (Akkordeon)
TUBA (Tuba)
VIBRAPHONE (Vibraphon)
VIOLIN (Violine)
01
02
09
10
03
04
11
12
05
06
13
14
07
08
B- Klänge
HYMNE AN DIE FREUDE von Beethoven
Übungen
Zähle
RECHTE HAND
LINKE HAND
3 4 5
1 2 3 4
5 4 3 2
1 2 3 4
1 1 2 3
1 2 3 4
3 2
1 2 3 4
5
1
5
1
PIANO (Klavier)
A-Rhythmen
MARCH (MARCHE)
SOKA
SLOW ROCK
WALTZ (VALSE)
DISCO
POP
SHUFFLE
SAMBA
CHA CHA (CHA CHA CHA)
SLOW SOUL
NEW NEW
TANGO
ROCK
SOUL
RUMBA
BLUES
01
02
09
10
03
04
11
12
05
06
13
14
07
08
15
16
B-Rhythmen
G A
H aso
C
K710seriesIM1198_V13_217.indb 13 8/5/18 10:19 am

14
14
DEUTSCH
Hinweis: Der Doppelbalken markiert das Ende des Stücks.
LINKE HAND
LINKE HAND
RECHTE HAND
RECHTE HAND
2 3 1
1 2 3 4
3 4 5
2 4 3 1
1 2 3 4
5 4 3 2
2 4 3 2
1 2 3 4
1 1 2 3
1 2 5
1 2 3 4
2 1 1
1 5 1 5 1 5
1 5
1 5
5
5
1
LINKE HAND
RECHTE HAND
1 2 3 4
3 4 5
1 2 3 4
5 4 3 2
1 2 3 4
1 1 2 3
1 2 3 4
2 1
1 5
5
5
1
2 Jahre Garantie. Die gesetzlichen Gewährleistungsrechte bleiben neben der Garantie bestehen.
Bei Beanstandungen, die unter diese Garantie fallen oder sollten Sie den Kundendienst benötigen, wenden Sie
sich bitte an Ihren Händler und legen Sie einen gültigen Kaufbeleg vor. Unsere Garantie deckt alle Material- und
Verarbei¬tungsmängel ab, mit Ausnahme jeglicher Verschleißerscheinungen, die aus der Nichtbeachtung der
Bedienungsanleitung resultieren oder durch jedwede fahrlässige Handlung an diesem Produkt verursacht wurden
(wie demontieren, Hitze oder Feuchtigkeit aussetzen, usw.). Es wird empfohlen, die Verpackung für etwaige
zukünftige Bezugnahmen aufzubewahren.
In dem Bemühen unsere Leistungen kontinuierlich zu verbessern, könnte es sein, dass wir Veränderungen an den
Farben oder der Produktausführung, wie auf der Verpackung abgebildet, vornehmen.
HINWEIS: Bitte bewahren Sie diese Bedienungsanleitung auf, da sie wichtige Informationen enthält.
WARNUNG! Nicht für Kinder unter 3 Jahren geeignet. Verschluckungsgefahr - kleine Teile.
Referenznummer: K710 series
Design und Entwicklung in Europa -
Hergestellt in China
© LEXIBOOK®
www.lexibook.com
Um Brand- oder Stromschlaggefahr zu vermeiden, trennen Sie das Gerät von der AC-Stromquelle, wenn Sie es
reinigen. Die Politur Ihres Gerätes kann mit einem Staubtuch gereinigt und wie andere Möbelstücke gepflegt
werden. Reinigen Sie das Äußere des Gerätes mit einem weichen, sauberen Tuch, das mit klarem, lauwarmen
Wasser angefeuchtet ist. Seien Sie vorsichtig, wenn Sie die Plastikteile reinigen und abwischen.
· Gib gut auf dein Keyboard acht. Lasse es nicht fallen und schütze es vor extremer Krafteinwirkung und
Erschütterungen.
· Benutze dein Keyboard nicht in sehr feuchten oder staubigen Umgebungen.
· Halte dein Keyboard von extremen Temperaturen von Wärmequellen fern.
· Verwende keine flüssigen oder Sprayreiniger.
· Benutze kein Zubehör, das nicht vom Hersteller empfohlen wird.
· Benutze das Keyboard nicht in der Nähe von Wasser, einer Badewanne, einem Waschbecken, einer Küchenspüle
oder einer Wäschewanne, in einem feuchten Keller oder in der Nähe eines Schwimmbeckens.
Stecke niemals irgendwelche Gegenstände durch die Öffnungen in das Keyboard, da diese gefährlichen
Spannungspunkte berühren oder Komponenten kurzschließen können, was zu einem Feuer oder Stromschlag
führen würde. Vergieße niemals Flüssigkeiten gleich welcher Art über dem Keyboard.
Garantie
Pege
Sicherheitshinweise
Hinweise zum Umweltschutz
Alt-Elektrogeräte sind Wertstoffe, sie gehören daher nicht in den Hausmüll! Wir möchten Sie daher bitten, uns mit
Ihrem aktiven Beitrag bei der Ressourcenschonung und beim Umweltschutz zu unterstützen und dieses Gerät
bei den (falls vorhanden) eingerichteten Rücknahmestellen abzugeben.
Deutschland & Österreich
Für den Kundendienst wenden Sie sich
bitte an unsere Teams:
Tel: 01805 010931 (0,14 Euro/Minute)
E-Mail: [email protected]
K710seriesIM1198_V13_217.indb 14 8/5/18 10:19 am

15
ESPAÑOL
Descubre tu teclado
Descubre tu nuevo teclado y aprende a conocer perfectamente las diferentes partes de tu instrumento ayudándote
del esquema de la primera página del folleto.
Cuando desembale el equipo, asegúrese de que están incluidos los siguientes elementos:
1 teclado de 37 teclas / 1 micrófono / 1 soporte de micrófono / 1 soporte para poste/ 1 manual de instrucciones
¡ADVERTENCIA! Todos los elementos utilizados para el embalaje, como por ejemplo cintas, recubrimientos
plásticos, ataduras metálicas y etiquetas no forman parte del aparato y, deberán desecharse.
1. Interruptor de encendido/apagado
2. Interruptor de RITMO
3. 16 Ritmos
4. Botón de BATERÍA/LUZ
5. 16 instrumentos
6. Interruptor de INSTRUMENTOS
7. Botón de SONIDOS de DEMOSTRACIÓN
8. Botón de VOLUMEN –
9. Botón de VOLUMEN +
10. Botón de GRABACIÓN
11. Botón de REPRODUCCIÓN
12. Botón de TEMPO +
13. Botón de TEMPO –
14. Botón de STOP
Alimentación
Para tocar el teclado correctamente, deberás mantener una postura adecuada y colocar adecuadamente las manos
sobre el mismo. La calidad y la facilidad de la ejecución dependerán de ello.
Postura y posicionamiento de las manos
Siéntate en la parte delantera de un banco
o taburete. Mantente recto, con la cara en
el centro del
teclado y, a
continuación,
inclínate
ligeramente
hacia adelante
con los
hombros
distendidos.
15. Tecla de retroceso (x 15)
16. Tecla blanca (x 22)
17. ALTAVOZ
18. Toma de MICRÓFONO
(3,5mm)
19. Alimentación energética
Cuando coloques las manos sobre las teclas, los codos
deberán quedar ligeramente por delante de ti. Los antebrazos
y las manos deberán trazar una línea horizontal cuando los
dedos reposen sobre el teclado. Los dedos habrán de estar
ligeramente curvados.
No intente nunca recargar pilas no recargables. Para cargar las pilas recargables, antes retírelas del juguete. Las pilas
recargables deben recargarse siempre bajo la supervisión de un adulto. No mezcle pilas de distinto tipo, o pilas nuevas con
pilas usadas. Utilice únicamente pilas del tipo recomendado o equivalentes. Colocar siempre las pilas en la posición correcta,
de acuerdo con la polaridad indicada en el compartimento. Retire del juguete las pilas gastadas. No permita que entren en
contacto eléctrico los terminales de la alimentación. Si prevé que el juguete no va a utilizarse durante un periodo largo de
tiempo, retire las pilas. Cuando el sonido se hace débil o el juego no responde adecuadamente es señal de que debe sustituir
las pilas. Deberá evitarse exponer las baterías a temperaturas excesivamente elevadas tales como las generadas por la la
acción de los rayos del sol o de las llamas.
ADVERTENCIA: Interferencias fuertes de señales de radio o descargas electrostáticas pueden provocar un mal funcionamiento
de la unidad o que se pierda el contenido de la memoria. En caso de que se produzca un funcionamiento anormal, retire y vuelva
a colocar las pilas, o desenchufe el adaptador CA/CC de la toma de red y vuelva a enchufarlo de nuevo.
ADVERTENCIA: Desconecte el adaptador si no va a utilizar el teclado por un largo periodo de tiempo para evitar
sobrecalentamientos. Cuando el teclado esté alimentada mediante el adaptador, no la use a la intemperie. Compruebe
periódicamente el estado del adaptador y de los cables de conexión. Si observa algún deterioro en el adaptador, no lo use hasta
que haya sido reparado. El juguete solo debe utilizarse con un transformador para juguetes. El adaptador no es un juguete. Si
va a limpiar el teclado con algún tipo de líquido, desenchúfela antes de la toma de corriente. Este juguete no es apto para niños
menores de 3 años. Un uso incorrecto del transformador puede causar descargas eléctricas.
Advertencia a los padres: los transformadores y adaptadores para juguetes no están destinados a ser utilizados
como juguetes. Su uso debe realizarse bajo supervisión parental.
El juguete solo debe conectarse a equipos de clase II que lleven este símbolo.
Funcionamiento CA
1. Compruebe que el equipo esté apagado.
2. Conecte el adaptador de alimentación en la toma de alimentación DC del
dispositivo situada en la parte trasera de la unidad.
3. A continuación, conecte el adaptador a una toma de corriente.
Colocación de las pilas
1. Para colocar las pilas, abre el compartimento de las pilas, situado en la parte
inferior de la unidad.
2. Coloque 4 pilas tipo AA/LR6 de 1,5V (no incluidas) en la posición adecuada,
de acuerdo con las marcas de polaridad que se muestran en el interior del
compartimento de las pilas, tal como se muestra en la figura más abajo.
3. Vuelva a colocar la tapa del compartimento.
Nota: Para que la unidad funcione con las pilas, debe desconectarse de la parte
trasera de la unidad el adaptador CA.
El teclado funciona con 4 pilas tipo AA/LR6 de 1,5V (no incluidas) o un adaptador (no incluida) de 500mA
de 5V con centro positivo .
Entrada: 100-240V ~ 50/60Hz, 0.3A Salida: 5V 500mA
1.5V AA O LR6
1.5V AA O LR6
1.5V AA O LR6
1.5V AA O LR6
K710seriesIM1198_V13_217.indb 15 8/5/18 10:19 am

16
17
ESPAÑOL
Notas: La nota en gris indica el FA central. Los DO se encuentran a la izquierda del grupo de dos teclas negras.
Comencemos por un
ejercicio sencillo.
El sistema de numeración permite
determinar o colocar los dedos
sobre el teclado. Cada dedo tiene
asignado un número.
Cómo encender/apagar el instrumento
1. Para encender el teclado electrónico con micrófono presiona el interruptor de encendido/apagado hacia la
derecha.
2. Para apagarlo, presiona el interruptor hacia la izquierda.
Cómo usar los botones de volumen
Presiona los botones de volumen para determinar el nivel de volumen deseado para la música de inicio al encender
el instrumento, el teclado, los tonos y las canciones de demostración.
Hay 14 niveles y el nivel de volumen por defecto al encender el teclado es el nivel 8.
PRECAUCIÓN: Un volumen demasiado alto puede dañar el oído y por esta razón se recomienda bajarlo a un
nivel moderado.
Cómo usar los botones de tempo
Presiona los botones de tempo para acelerar o disminuir la velocidad de la música. Además ser aplicable a la
música, también lo es al ritmo que selecciones y a las canciones de demostración que desees escuchar.
Numeración de los dedos
Conguración músical
Mano izquierda Mano derecha
5 1
1 5
4 23 32 4
La primera tecla y la última tecla del teclado de 37 teclas son la nota DO. El K710 series está compuesto por teclas
blancas y negras. Las teclas negras están repartidas en grupos de dos y tres teclas.
Esquema del teclado
Nota: Toca con la yema de los dedos.
Puedes presionar las teclas negras con el dedo que corresponde a las teclas blancas.
MANO IZQUIERDA
Dedo 5 4 3 2 1
Nota do re mi fa sol
A
2 3 2 3 2 3
do
sol
ré lami sifa do
sol
ré lami sifa do
sol
ré lami sifa do
B
FA central
sol la si do
do ré mi fa sol la si do ré mi fa
si
do
ré
mi
fa
sol
la
5
5
4
4
3
3
2
2
1 1
MANO DERECHA
Dedo 1 2 3 4 5
Nota do re mi fa sol
K710seriesIM1198_V13_217.indb 16 8/5/18 10:19 am

16
17
ESPAÑOL
Configuración de sonido
1. La configuración de sonido permite seleccionar diferentes instrumentos. Para seleccionar un sonido de entre los
16 de la tabla anterior, presiona el interruptor de INSTRUMENTOS una vez para los sonidos A y elige el sonido
presionando uno de los 8 botones (el sonido 5 no aparece en el diagrama) del 01 al 08.
2. Para acceder a los sonidos B, presiona el interruptor INSTRUMENTOS de nuevo y selecciona el sonido que
deseas tocar del 09 al 16.
Configuración del ritmo
1. Para seleccionar un ritmo entre los 16 de la tabla anterior, presiona el interruptor de RITMO una vez para los
ritmos A y luego, elige el ritmo presionando uno de los 8 botones (el 3 no aparece en el diagrama) del 01 al 08.
2. Para acceder a los ritmos B, presiona el interruptor de RITMO de nuevo y selecciona el ritmo para tu música
del 09 al 16.
3. Para detener el ritmo, presiona el botón STOP.
Pon ritmo con la batería
Presiona el botón BATERÍA/LUZ para seleccionar el sonido de percusión que desees entre (del botón izquierdo al
derecho): BOMBO, CAJA, PLATILLO y HI-HAT.
Practica con la música de demostración
1. Presiona el botón de DEMOSTRACIÓN para escuchar la música de demostración en el orden de la siguiente lista:
· Estrellita dónde estás · Saludo de amor
· Para Elisa · Mi burrito sabanero
· El vals del perrito · Himno de la Alegría
· 5ª sinfonía de Beethoven · If You’re Happy Clap
2. Para reproducir la pista siguiente, presiona el botón de DEMOSTRACIÓN una vez para detener la música y
presiónalo de nuevo para reproducir la pista siguiente.
3. Para detener la música, presiona el botón STOP.
Graba tu propia música
1. Para grabar tu propia música, presiona el botón de GRABACIÓN y toca tu propia música hasta un total de 54
notas.
2. Cuando termines, presiona el botón de REPRODUCCIÓN para reproducir las notas que has tocado.
3. Para detener la reproducción, presiona el botón STOP.
Nota: En el modo de grabación, no toques ningún botón porque la grabación se cancelaría de inmediato.
La función de grabación no puede grabar canciones de demostración, sonidos de percusión o ritmos pero graba la
música que se toca en el teclado en el sonido seleccionado. El dispositivo no graba la voz del micrófono.
Cómo usar el micrófono extraíble
1. Monta el soporte y el poste del micrófono. Luego, colócalos en la base ubicada en el teclado.
2. Conecta el cable del micrófono a su entrada en la parte posterior del teclado (18).
3. Coloca el micrófono extraíble en el soporte del poste ¡o simplemente empieza a cantar!
HIMNO DE LA ALEGRÍA de Beethoven
Práctica musical
15
16
Sonidos A
PIANO (PIANO)
SYNTH BASS (SINTETIZADOR DE BAJOS)
HARMONICA (ARMÓNICA)
FRENCH HORN (TROMPA)
A-STEEL GUITAR (GUITARRA DE ACERO)
SAXOPHONE (SAXOFÓN)
HAMMOND (ÓRGANO)
HARP (ARPA)
ELECTRIC BASS (BAJO ELÉCTRICO)
CLARINET (CLARINETE)
ELECTRIC GUITAR (GUITARRA ELÉCTRICA)
OBOE (OBOE)
ACCORDION (ACORDEÓN)
TUBA (TUBA)
VIBRAPHONE (VIBRAPHONE)
VIOLIN (VIOLÍN)
01
02
09
10
03
04
11
12
05
06
13
14
07
08
Sonidos B
CUENTA
MANO DERECHA
MANO IZQUIERDA
3 4 5
1 2 3 4
5 4 3 2
1 2 3 4
1 1 2 3
1 2 3 4
3 2
1 2 3 4
5
1
5
1
Ritmos A
MARCH
SOKA
SLOW ROCK
WALTZ (VALS)
DISCO
POP
SHUFFLE
SAMBA
CHA CHA
SLOW SOUL
NEW NEW
TANGO
ROCK
SOUL
RUMBA
BLUES
01
02
09
10
03
04
11
12
05
06
13
14
07
08
15
16
Ritmos B
sol la si do
K710seriesIM1198_V13_217.indb 17 8/5/18 10:19 am

18
18
ESPAÑOL
Este producto tiene una garantía de 2 años.
Para cualquier reclamación sobre la garantía o servicio posventa, contacte con su distribuidor y presente una
prueba válida de compra. Nuestra garantía cubre cualquier defecto de fabricación por material o por mano de obra,
con excepción de cualquier deterioro que resulte de la inobservancia de las instrucciones de este manual, o de
alguna acción imprudente realizada sobre la unidad (como desmontarla, exposición al calor o a la humedad, etc.).
Se recomienda conservar el embalaje para consultas en el futuro.
En nuestro compromiso por mejorar nuestros servicios, podrían haberse realizado modificaciones en los colores y
detalles del producto mostrado en el embalaje.
Nota: Conserve este manual de instrucciones ya que contiene información importante.
ADVERTENCIA! No apto para niños menores de 3 años. Peligro de asfixia debido a lapresencia de piezas
pequeñas.
Referencia: K710 series
Diseñado y desarrollado en Europa – Fabricado en China
© LEXIBOOK®
www.lexibook.com
Para servicio postventa, entre en
contacto con nuestros equipos:
Nota: la barra doble indica el final de la sección.
MANO IZQUIERDA
MANO IZQUIERDA
MANO DERECHA
MANO DERECHA
2 3 1
1 2 3 4
3 4 5
2 4 3 1
1 2 3 4
5 4 3 2
2 4 3 2
1 2 3 4
1 1 2 3
1 2 5
1 2 3 4
2 1 1
1 5 1 5 1 5
1 5
1 5
5
5
1
MANO IZQUIERDA
MANO DERECHA
1 2 3 4
3 4 5
1 2 3 4
5 4 3 2
1 2 3 4
1 1 2 3
1 2 3 4
2 1
1 5
5
5
1
Para evitar fuego o peligro de descarga eléctrica, desconecta la unidad de la red eléctrica de CA antes de proceder
a su limpieza. El acabado de la unidad puede limpiarse con un paño de polvo y requiere los mismos cuidados que
cualquier otro aparato. Utiliza un paño blando, limpio, seco para limpiar el exterior de la unidad. Ten cuidado cuando
limpies y frotes las partes de plástico.
· Manejar con cuidado. No dejar caer el teclado ni someterlo a fuerzas excesivas o golpes.
· No exponer el teclado a entornos polvorientos con alta humedad.
· No exponer el teclado a temperaturas extremas de cualquier origen.
· No usar productos de limpieza líquidos o en aerosol.
· No usar accesorios no recomendados por el fabricante.
· No usar el teclado cerca del agua, de bañeras, lavabos, fregaderos o pilas de lavar, ni en sótanos húmedos o cerca
de piscinas.
· No introducir nunca objetos de ningún tipo en las ranuras del teclado porque podrían entrar en contacto con puntos
voltaje peligroso, o provocar un cortocircuito, y producir descargas eléctricas. No derramar nunca líquidos de
ningún tipo sobre el teclado.
Garantía
Mantenimiento
Precauciones
Protección medioambiental
¡Los aparatos eléctricos pueden ser reciclados y no deben ser desechados junto con la basura doméstica
habitual! Apoye activamente el aprovechamiento racional de los recursos y ayude a proteger el medio ambiente
enviando este producto a un centro de recolección para reciclaje (en caso de estar disponible).
K710seriesIM1198_V13_217.indb 18 8/5/18 10:19 am

19
PORTUGUÊS
Descobre o teu órgão
Descobre o teu novo órgão e aprende a conhecer bem as diferentes partes do teu instrumento, apoiando-te na
imagem na primeira página do manual.
Quando retirar o aparelho da caixa, certifique-se de que os seguintes elementos se encontram incluídos:
1 x órgão com 37 teclas / 1 x microfone / 1 x suporte para microfone / 1 x suporte da haste / 1 x manual de instruções
AVISO: Todos os materiais de empacotamento, como fita, películas de plástico, arames e etiquetas não fazem parte
da unidade e devemser eliminados.
1. Interruptor de ligar/desligar
2. Interruptor do RITMO
3. 16 Ritmos
4. Botão da BATERIA/LUZ
5. 16 instrumentos
6. Interruptor INST
7. Botão de SONS DE DEMONSTRAÇÃO
8. Botão VOLUME -
9. Botão VOLUME +
10. Botão de GRAVAR
11. Botão de REPRODUZIR
12. Botão do TEMPO +
13. Botão do TEMPO -
14. Botão de PARAR
Alimentação
Para tocar correctamente o órgão, tem de manter uma boa postura e colocar correctamente as mãos no teclado. A
qualidade e facilidade do aparelho dependem disso.
Postura e posicionamento das mãos
Sente-se na parte da frente de um banco.
Mantenha-se
direito, de
frente para
o centro do
teclado, depois
incline-se
ligeiramente
para a frente,
mantendo
os ombros
descontraídos.
15. Teclas pretas (x 15)
16. Teclas brancas (x 22)
17. ALTIFALANTE
18. Entrada para MICROFONE
(3,5mm)
19. Alimentação
Quando colocar as mãos nas teclas, os cotovelos devem
estar ligeiramente à sua frente. Os antebraços e as mãos
desenham uma linha horizontal quando os dedos repousarem
no teclado. Os dedos devem estar ligeiramente curvados.
As pilhas recarregáveis deverão ser retiradas do brinquedo antes de serem recarregadas e só deverão ser
recarregadas sob a supervisão de um adulto. Não misture diferentes tipos de pilhas ou pilhas novas com pilhas
usadas. Só deverá utilizar pilhas do mesmo tipo ou de um tipo equivalente às recomendadas. As pilhas deverão
ser colocadas com a polaridade correcta. Deverá retirar as pilhas gastas do brinquedo. Não coloque os terminais
em curto-circuito. Não atire as pilhas para o fogo. Retire as pilhas caso não utilize a unidade durante um longo
período de tempo. Quando o som ficar fraco ou o jogo não responder, pense em substituir as pilhas. As pilhas
não deverão ser expostas a calor em excesso, como luz directa do sol, fogo ou algo parecido.
AVISO: Uma descarga electrostática ou frequências fortes podem dar origem a um mau funcionamento ou perda
de memória. Caso ocorra algum funcionamento anormal, retire e volte a colocar as pilhas, ou desligue o adaptador
AC/DC da tomada e volte a ligá-la.
Aviso: Desligue o adaptador, se el teclado não for utilizado por um longo período de tempo, para evitar o seu
sobreaquecimento. Quando el teclado for alimentado por um adaptador, não o utilize no exterior.
Verifique o estado do adaptador e dos fios de ligação regularmente. Se o seu estado se deteriorar, não use o
adaptador até que seja reparado. O brinquedo só deve ser usado com um transformador para brinquedos.. O
adaptador não é um brinquedo. A teclado deverá ser desligada da alimentação para ser limpa, se usar líquidos para
proceder à limpeza. O brinquedo não foi criado para crianças com menos de 3 anos de idade. Uma má utilização
do transformador pode causar um choque eléctrico.
Aviso parental: O transformador e adaptador para os brinquedos não foram criados para serem usados como
brinquedos. A sua utilização deverá ser feita sob supervisão de um adulto.
O brinquedo só pode ser ligado a equipamento de Classe II com o seguinte símbolo.
3. A seguir, ligue o adaptador numa tomada.
Colocação das pilhas
1. Para colocar as pilhas, abra a tampa do compartimento das pilhas, que se
encontra na parte traseira da unidade.
2. Coloque 4 pilhas AA/LR6 de 1,5V (não incluída), tendo em conta a
polaridade indicada no compartimento das pilhas e de acordo com a imagem
apresentada em baixo.
3. Volte a colocar a tampa do compartimento das pilhas.
Nota: O adaptador AC/DC tem de ser desligado da entrada DC na parte traseira da
unidade para que o produto funcione a pilhas.
O órgão funciona com 4 pilhas AA/LR6 de 1,5V (não incluída), ou um adaptador (não incluída) de 5V
500mA com um centro positivo .
Entrada: 100-240V ~ 50/60Hz, 0.3A Saida: 5V 500mA
Funcionamento AC
1. Certifique-se de que a unidade está desligada.
2. Insira a ficha do adaptador AC/DC na entrada DC do aparelho, na parte traseira da unidade.
1,5V AA OU LR6
1,5V AA OU LR6
1,5V AA OU LR6
1,5V AA OU LR6
K710seriesIM1198_V13_217.indb 19 8/5/18 10:19 am

20
21
PORTUGUÊS
Notas: A nota cinzenta designa o FÁ central. Os DÓ encontram-se à esquerda do grupo de duas teclas pretas.
Comecemos por um
exercício fácil.
O sistema de numeração permite
determinar onde colocar os dedos
no teclado. Cada dedo é atribuído
a um número.
Como ligar/desligar o instrumento
1. Para ligar o seu órgão eletrónico com microfone, prima o interruptor de ligar/desligar para a direita.
2. Para desligar, prima o interruptor para a esquerda.
Como usar os botões do volume
Prima os botões do volume para definir o nível de volume desejado para a música inicial quando ligar o aparelho, o
seu órgão, tons e músicas de demonstração.
Existem 14 níveis e o volume predefinido quando ligar o órgão é o nível 8.
CUIDADO: O volume demasiado alto pode causar lesões auditivas. Assim, baixe o volume.
Como usar os botões do ritmo
Prima os botões do ritmo para aumentar ou diminuir o ritmo da música. Não só funciona para a música que estiver
a tocar, mas para o ritmo desejado e as músicas de demonstração que escutar.
Numeração dos dedos
Conguração musical
Mão esquerda Mão direita
5 1
1 5
4 23 32 4
A primeira e a última tecla do teclado de 37 teclas são os DÓ. O K710 series tem teclas brancas e teclas pretas. As
teclas pretas estão divididas em grupos de dois e de três.
Imagem do teclado
Nota: Toque com a ponta dos dedos.
Pode premir as teclas pretas com o dedo correspondente à tecla branca.
MÃO ESQUERDA
Dedo 5 4 3 2 1
Nota dó ré mi fá sol
A
2 3 2 3 2 3
dó
sol
ré lámi sifá dó
sol
ré lámi sifá dó
sol
ré lámi sifá dó
B
FÁ central
sol la si do
dó ré mi fá sol lá si dó ré mi fá
si
dó
ré
mi
fá
sol
lá
5
5
4
4
3
3
2
2
1 1
MÃO DIREITA
Dedo 1 2 3 4 5
Nota dó ré mi fá sol
K710seriesIM1198_V13_217.indb 20 8/5/18 10:19 am

20
21
PORTUGUÊS
Configurar o tom
1. A configuração do tom permite-lhe selecionar diferentes instrumentos. Para selecionar um entre os 16 toms
apresentados na tabela anterior, prima o interruptor INT uma vez para os Toms A e selecione o tom premindo um
dos 8 botões (nº 5 apresentado na imagem) de 01 a 08.
2. Para aceder aos Toms B, prima de novo o interruptor INST e selecione o tom que deseja tocar de 09 a 16.
Configurar o ritmo
1. Para selecionar o ritmo entre os 16 ritmos apresentados na tabela anterior, prima o interruptor RITMO uma vez
para os Ritmos A e selecione o ritmo premindo um dos 8 botões (nº 3 apresentado na imagem) de 01 a 08.
2. Para aceder aos Ritmos B, prima de novo o interruptor RITMO e selecione o ritmo para a sua música, de 09 a 16.
3. Para parar, prima o botão de PARAR.
Entrar na batida da bateria
Prima o botão BATERIA/LUZ para selecionar o som de percussão desejado (o botão da esquerda para a direita):
BATERIA BAIXA, TAMBOR, CÍMBALO e PRATOS.
Pratique com a música de demonstração
1. Prima o botão de DEMONSTRAÇÃO para ouvir a música de demonstração listada pela seguinte ordem:
· Estrelinha · Salut d’amour
· Para a Elise · Burrinho
· Valsa do cachorrinho · Hino à Alegria
· 5ª Sinfonia de Beethoven · Bate as palmas
2. Para reproduzir a faixa seguinte, prima o botão de DEMONSTRAÇÃO para parar a música e volte a premir para
reproduzir a música seguinte.
3. Para parar a música, prima o botão de PARAR.
Gravar a sua música
1. Para gravar a sua música, prima o botão de GRAVAR e toque a sua música com até 54 notas.
2. Quando terminar, para reproduzir as notas, prima o botão de REPRODUZIR.
3. Para parar, prima o botão de PARAR.
Nota: No modo de gravação, evite premir botões, ou a gravação é cancelada automaticamente.
A opção de gravação não pode gravar músicas de demonstração, sons de bateria ou ritmos, mas grava a música
tocada no órgão com o tom selecionado. O aparelho não grava a voz no microfone.
Como usar o seu microfone amovível
1. Monte o suporte do microfone ao suporte da haste. A seguir, coloque na base que se encontra no órgão.
2. Ligue o fio do microfone na respetiva entrada na parte traseira do órgão (18).
3. Coloque o microfone amovível no suporte da haste, ou simplesmente comece a cantar!
15
16
Toms A
PIANO (PIANO)
SYNTH BASS (BAIXO SINTÉTICO)
HARMONICA (HARMÓNICA)
FRENCH HORN (TROMBETA)
A-STEEL GUITAR (VIOLÃO)
SAXOPHONE (SAXOFONE)
HAMMOND (ÓRGÃO HAMMOND)
HARP (HARPA)
ELECTRIC BASS (BAIXO ELÉTRICO)
CLARINET (CLARINETE)
ELECTRIC GUITAR (GUITARRA ELÉTRICA)
OBOE (OBOÉ)
ACCORDION (ACORDEÃO)
TUBA (TUBA)
VIBRAPHONE (VIBRAFONE)
VIOLIN (VIOLINO)
01
02
09
10
03
04
11
12
05
06
13
14
07
08
Toms B
HINO À ALEGRIA de BeethAoven
Praticar música
CONTE
MÃO DIREITA
MÃO ESQUERDA
3 4 5
1 2 3 4
5 4 3 2
1 2 3 4
1 1 2 3
1 2 3 4
3 2
1 2 3 4
5
1
5
1
Ritmos A
MARCH
SOKA
SLOW ROCK
WALTZ (VALSA)
DISCO
POP
SHUFFLE
SAMBA
CHA CHA
SLOW SOUL
NEW NEW
TANGO
ROCK
SOUL
RUMBA
BLUES
01
02
09
10
03
04
11
12
05
06
13
14
07
08
15
16
Ritmos B
sol la si do
K710seriesIM1198_V13_217.indb 21 8/5/18 10:19 am

22
22
PORTUGUÊS
Nota: A barra dupla indica o fim do fragmento.
MÃO ESQUERDA
MÃO ESQUERDA
MÃO DIREITA
MÃO DIREITA
2 3 1
1 2 3 4
3 4 5
2 4 3 1
1 2 3 4
5 4 3 2
2 4 3 2
1 2 3 4
1 1 2 3
1 2 5
1 2 3 4
2 1 1
1 5 1 5 1 5
1 5
1 5
5
5
1
MÃO ESQUERDA
MÃO DIREITA
1 2 3 4
3 4 5
1 2 3 4
5 4 3 2
1 2 3 4
1 1 2 3
1 2 3 4
2 1
1 5
5
5
1
Este produto é abrangido pela nossa garantia de 2 anos.
Para utilizar a sua garantia ou o serviço pós-venda, por favor, contacte o seu distribuidor e apresente uma prova
de compra válida. A nossa garantia abrange qualquer defeito de material ou de mão-de-obra, com a excepção de
qualquer deterioração devido à não observância do manual de instruções, ou de quaisquer acções sem cuidado
implementadas neste aparelho (como desmontar, expor ao calor e à humidade, etc.). Recomendamos que guarde
a caixa para futuras referências.
Num esforço constante para melhorar os nossos serviços, podemos implementar modificações nas cores e
pormenores do produto apresentado na caixa.
NOTA: Por favor, guarde este manual de instruções, pois contém informações importantes.
ATENÇÃO! Não é adequado para crianças de idade inferior a 3 anos. Perigo de engasgamento devido à presença
de peças pequenas.
Referência: K710 series
Criado e desenvolvido na Europa – Fabricado na China
© LEXIBOOK®
Para qualquer serviço pós-venda, por favor, contacte as nossas equipas:
www.lexibook.com
Para prevenir fogo ou perigo de choque, desligue a sua unidade da alimentação quando proceder à limpeza. O
acabamento na sua unidade pode ser limpo com um pano do pó e pode tratá-lo tal como a qualquer peça de mobília.
Use um pano suave e limpo, seco para limpar o exterior da unidade. Tenha cuidado quando limpar e secar as peças
de plástico. Pode usar um pano ligeiramente embebido em água e detergente neutro para limpar o painel dianteiro.
· Manuseie com cuidado. Não deixe o órgão cair nem o exponha a forças excessivas ou choque.
· Não exponha o órgão a ambientes com muita humidade ou pó.
· Não exponha o órgão a temperaturas extremas, sejam de que tipo for.
· Não utilize produtos de limpeza líquidos ou aerossóis.
· Não use acessórios que não sejam recomendados pelo fabricante.
· Não use o órgão perto de água, uma banheira, lavatório, lava-loiça ou tanque; numa cave húmida, ou perto de uma piscina.
· Nunca introduza nenhum objeto nas aberturas deste órgão, pois pode tocar em pontos de voltagem perigosos ou colocar
peças em curto-circuito, podendo ocorrer um incêndio ou choque elétrico. Nunca derrame qualquer tipo de líquido no
órgão.
Garantia
Manutenção
Precauções
Protecção ambiental
Os aparelhos eléctricos indesejados podem ser reciclados e não deverão ser deitados fora juntamente com
o lixo convencional! Por favor, apoie activamente a conservação de recursos e ajude a proteger o ambiente,
devolvendo esta unidade a um centro de recolha (se disponível).
K710seriesIM1198_V13_217.indb 22 8/5/18 10:19 am

23
ITALIANO
Scopri la tua nuova tastiera
Scopri la tua nuova tastiera e impara a riconoscere le diverse parti del tuo strumento aiutandoti con lo schema sulla
prima pagina del manuale.
Quando si apre la confezione, controllare che contenga i seguenti elementi:
1 x pianola a 37 tasti / 1 x microfono / 1 x portamicrofono / 1 x ingresso per supporto / 1 x manuale di istruzioni
AVVERTENZA: tutti i materiali da imballaggio quali nastro adesivo, fogli di plastica, cavi e linguette non fanno parte
dal prodotto e vanno gettati.
1. Interruttore acceso/spento
2. Interruttore RITMO
3. 16 ritmi
4. Tasto BATTERIA/LUCI
5. 16 strumenti
6. Interruttore STRUM
7. Tasto SUONI DEMO
8. Tasto VOLUME –
9. Tasto VOLUME +
10. Tasto REGISTRA
11. Tasto REPLAY
12. Tasto TEMPO +
13. Tasto TEMPO –
14. Tasto STOP
Fonti di Alimentazione
Per suonare la tastiera in modo corretto, è necessario mantenere una buona postura e posizionare correttamente le
mani sulla tastiera. Da ciò dipendono la qualità e la disinvoltura dell’esecuzione.
Postura e posizione delle mani
Siediti sulla parte anteriore di una panca o di
uno sgabello. Raddrizza la schiena, rivolgiti
verso il centro della tastiera, quindi inclinati
leggermente in avanti mantenendo le spalle
rilassate.
15. Tasto nero (x 15)
16. Tasto bianco (x 22)
17. ALTOPARLANTE
18. Ingresso MICROFONO (3,5 mm)
19. Alimentazione elettrica
Quando posizioni le mani sui tasti, i gomiti devono essere
leggermente davanti a te. Gli avambracci e le mani disegnano
una linea orizzontale, mentre le dita sono appoggiate sulla
tastiera. Le dita devono essere leggermente incurvate.
Le batterie ricaricabili devono essere tolte dal giocattolo prima di essere ricaricate; le batterie ricaricabili devono essere
caricate unicamente con la supervisione di un adulto; non mischiare differenti tipi di batterie o batterie nuove e usate;
utilizzare unicamente batterie del tipo raccomandato o equivalenti; inserire le batterie rispettando le polarità; rimuovere le
batterie esaurite dal giocattolo; non cortocircuitare i terminali di alimentazione. Non buttare le batterie nel fuoco. Rimuovere le
batterie se non si usa il gioco per molto tempo. Sostituire le batterie quando il suono diventa debole o il gioco non funziona.
Non esporre le batterie a un calore eccessivo, ad esempio la luce del sole o un fuoco.
AVVERTENZA: Una forte interferenza di frequenza o scariche elettrostatiche possono causare malfunzionamenti o perdite di
memoria. Se si dovessero verificare funzionamenti anormali, resettare l’unità o togliere e reinserire le batterie, oppure staccare
l’adattatore CA/CC dalla presa di corrente e reinserirlo.
Attenzione: Rimuovere l’adattatore se il prodotto non viene usato per un lungo periodo di tempo, in modo da evitare il
surriscaldamento. Se il prodotto è alimentato dall’adattatore, non giocare all’aperto. Controllare con regolarità lo stato
dell’adattatore e del cavo di alimentazione. In caso di deterioramento delle condizioni, non usare l’adattatore senza averlo prima
fatto riparare. Utilizzare il giocattolo solo con un trasformatore per giocattoli. L’adattatore non è un giocattolo. Se si utilizzano dei
liquidi per pulirela tastiera, scollegarla prima dalla sorgente di alimentazione. Questo giocattolo non è adatto ai bambini di età
inferiore a 3 anni. L’utilizzo scorretto del trasformatore può causare scosse elettriche.
Raccomandazione per i genitori: il trasformatore e l’adattatore non sono giocattoli. Utilizzare sempre sotto la
supervisione di un adulto.
Il giocattolo deve essere collegato esclusivamente a un apparecchio di Classe II che rechi il seguente simbolo.
Funzionamento da rete
1. Controllare che l’unità sia spenta.
2. Inserire la spina dell’adattatore CA/CD nella spina CD sulla parte inferiore del
dispositivo.
3. Collegare l’adattatore a una presa di corrente per accendere l’unità.
Installazione battere
1. Per inserire le batterie, aprire il vano batterie collocato sul fondo dell’unità.
2. Inserire 4 batterie tipo 1,5V tipo AA/LR6 (non fornite) osservando la polarità
indicata nel vano batterie e come da schema a lato.
3. Riposizionare il coperchio del vano batterie.
Nota: Il adattatore AC/DC deve essere scollegato dalla presa di corrente sul retro
dell’unità perché il prodotto possa funzionare da batteria.
Il tastiera funziona con 4 batterie AA/LR6 tipo 1,5V (non inclusa) o un adattatore (non inclusa) 5V 500mA
con centro positivo .
Ingresso: 100-240V ~ 50/60Hz, 0.3A Uscita: 5V 500mA
1,5V AA OPPURE LR6
1,5V AA OPPURE LR6
1,5V AA OPPURE LR6
1,5V AA OPPURE LR6
K710seriesIM1198_V13_217.indb 23 8/5/18 10:19 am

24
25
ITALIANO
Nota: la nota in grigio rappresenta il FA centrale. I DO si trovano a sinistra del gruppo di due tasti neri.
Iniziamo con un facile
esercizio.
Il sistema di numerazione permette
di determinare dove appoggiare
le dita sulla tastiera. A ogni dito è
assegnato un numero.
Come accendere/spegnere lo strumento
1. Per accendere la tua Pianola Elettronica con Microfono, premi l’interruttore acceso/spento sulla destra.
2. Per spegnerla, premi l’interruttore sulla sinistra.
Come usare i tasti volume
Premi i tasti volume per definire il livello di volume che desideri impostare per il brano iniziale all’accensione del
dispositivo, della pianola, degli strumenti e dei brani demo.
Sono disponibili 14 livelli e il volume predefinito all’accensione del dispositivo è sul livello 8.
ATTENZIONE: un volume troppo elevato può danneggiare l’udito. Si raccomanda di abbassare il volume.
Come usare i tasti tempo
Premi i tasti tempo per accelerare o rallentare la musica. Puoi regolare il tempo della musica che suoni, così come
dei ritmi che scegli e i brani demo che ascolti.
Numerazione delle dita
Impostazione dello strumento
Mano sinistra Mano destra
5 1
1 5
4 23 32 4
Il primo tasto e l’ultimo tasto della tastiera a 37 tasti sono dei DO. K710 series è composta da tasti bianchi e tasti
neri. I tasti neri sono suddivisi in gruppi da due e da tre.
Schema della tastiera
Nota: suona con i polpastrelli delle dita.
Puoi premere i tasti neri con le dita corrispondenti ai tasti bianchi.
MANO SINISTRA
Dito 5 4 3 2 1
Nota do re mi fa sol
A
2 3 2 3 2 3
do
sol
ré lami sifa do
sol
ré lami sifa do
sol
ré lami sifa do
B
FA centrale
sol la si do
do ré mi fa sol la si do ré mi fa
si
do
ré
mi
fa
sol
la
5
5
4
4
3
3
2
2
1 1
MANO DESTRA
Dito 1 2 3 4 5
Nota do re mi fa sol
K710seriesIM1198_V13_217.indb 24 8/5/18 10:19 am

24
25
ITALIANO
Impostare gli strumenti
1. L’impostazione degli strumenti ti consente di scegliere lo strumento da suonare. Per selezionare uno strumento
fra i 16 visualizzati nella tabella di seguito, premi il tasto INST una volta per gli Strumenti A e seleziona lo
strumento premendo uno degli 8 tasti (n. 5 visualizzato nello schema) da 1 a 8.
2. Per accedere agli strumenti B, premi di nuovo il tasto INST e seleziona lo strumento che desideri da 9 a 16.
Impostare il ritmo
1. Per selezionare il ritmo fra i 16 disponibili nella tabella, premi l’interruttore RITMO una volta per il gruppo di Ritmi
A, poi seleziona il ritmo premendo uno degli 8 tasti (n. 3 sullo schema) da 01 a 08.
2. Per accedere ai ritmi B, premi di nuovo l’interruttore RITMO per selezionare un ritmo da 09 a 16.
3. Per interrompere, premi il tasto STOP.
Scegliere la batteria
Premi il tasto BATTERIA/LUCI per selezionare la percussione che desideri usare (tasto da sinistra a destra):
CASSA, RULLANTE, PIATTO E CHARLESTON.
Pratica con brani demo
1. Premere il tasto DEMO per ascoltare il brano demo, secondo l’elenco di seguito:
· Stella Stellina · Salut d’amour
· Per Elisa · The Little Donkey
· Dog Waltz · Inno alla Gioia
· Sinfonia n. 5 di Beethoven · Se sei felice e tu lo sai batti le mani
2. Per riprodurre il brano successivo premi il tasto DEMO una volta per interromopere la musica, e un’altra volta
per riprodurre il brano successivo.
3. Per interrompere la musica premi il tasto STOP.
Registrare la musica
1. Per registrare la tua musica, premi il tasto REGISTRA e suona la tua musica preferita fino a 54 note.
2. Al termine, per ascoltare la registrazione premi il tasto REPLAY.
3. Per interrompere premi il tasto STOP.
Nota: in modalità registrazione, non premere alcun tasto funzione altrimenti la registrazione verrà annullata.
La funzione di registrazione non può registrare brani demo, suoni di batteria o ritmi, ma registra la musica suonata
con i tasti della pianola con lo strumento selezionato. Il dispositivo non registra la voce.
Come usare il microfono removibile
1. Monta il supporto del microfono e l’asta, poi inseriscili nella base della pianola.
2. Collega il cavo del microfono al suo ingresso sul retro della tastiera (18).
3. Colloca il microfono sull’asta, o afferralo e inizia a cantare!
15
16
Strumenti A
PIANO (PIANOFORTE)
SYNTH BASS (BASSO SINTETICO)
HARMONICA (ARMONICA)
FRENCH HORN (CORNO)
A-STEEL GUITAR (CHITARRA STEEL)
SAXOPHONE (SASSOFONO)
HAMMOND (HAMMOND)
HARP (ARPA)
ELECTRIC BASS (BASSO ELETTRICO)
CLARINET (CLARINETTO)
ELECTRIC GUITAR (CHITARRA ELETTRICA)
OBOE (OBOE)
ACCORDION (FISARMONICA)
TUBA (TUBA)
VIBRAPHONE (VIBRAFONO)
VIOLIN (VIOLINO)
01
02
09
10
03
04
11
12
05
06
13
14
07
08
Strumenti B
INNO ALLA GIOIA di Beethoven
Pratica musicale
CONTA
MANO DESTRA
MANO SINISTRA
3 4 5
1 2 3 4
5 4 3 2
1 2 3 4
1 1 2 3
1 2 3 4
3 2
1 2 3 4
5
1
5
1
Ritmi A
MARCH
SOKA
SLOW ROCK
WALTZ (VALZER)
DISCO
POP
SHUFFLE
SAMBA
CHA CHA
SLOW SOUL
NEW NEW
TANGO
ROCK
SOUL
RUMBA
BLUES
01
02
09
10
03
04
11
12
05
06
13
14
07
08
15
16
Ritmi B
sol la si do
K710seriesIM1198_V13_217.indb 25 8/5/18 10:19 am

26
26
ITALIANO
Questo prodotto è coperto dalla nostra garanzia di 2 anni.
Per eventuali reclami coperti da garanzia o dal servizio postvendita, contattare il vostro distributore e presentare
uno scontrino valido. La nostra garanzia copre tutti i difetti costruttivi di componentistica e di manodopera, con
l’eccezione di eventuali deterioramenti che derivano dalla non osservanza del manuale di istruzioni o dall’uso poco
attento del prodotto (ad es. smontaggio, esposizione a calore e umidità, ecc.). Si consiglia di conservare l’imballo
per eventuali riferimenti futuri.
Allo scopo di continuare a migliorare il nostro servizio, potremmo implementare modifiche a colori e particolari del
prodotto illustrato sull’imballo.
Nota: Conservare il manuale di istruzioni, contiene informazioni importanti.
ATTENZIONE! Articolo non adatto a bambini di età inferiore ai 3 anni. Rischio di soffocamento dovuto alla presenza
di elementi di piccolo dimensioni.
Riferimento: K710 series
Progettato e sviluppato in Europa – Fabbricato in Cina
© LEXIBOOK®
Per i servizi di assistenza post-vendita, contattare i nostri team:
www.lexibook.com
· Maneggiare con cautela. Non fare cadere la pianola e non sottoporla a sforzi o urti eccessivi.
· Non esporre la pianola a forte umidità o ambienti polverosi.
· Non esporre la pianola a temperature estreme da qualsiasi fonte.
· Non usare detergenti liquidi o aerosol.
· Non usare accessori non consigliati dal produttore.
· Non usare la tastiera vicino ad acqua, vasche da bagno, lavabi, lavandini o altri contenitori d’acqua, in ambienti
umidi o vicino a piscine.
· Non inserire oggetti di alcun tipo attraverso le fessure della pianola poiché potrebbero toccare punti elettrificati
pericolosi o causare cortocircuiti, provocando il rischio di fiamme o scosse elettriche. Non versare mai liquidi nella
pianola.
Garanzia
Manutenzione
Precauzioni
Protezione ambientale
I dispositivi elettrici possono essere riciclati, non vanno pertanto gettati insieme ai rifiuti domestici. Sostenete
attivamente la difesa delle risorse e aiutate a proteggere l’ambiente restituendo l’apparecchio ad un centro di
raccolta (se disponibile).
Nota: la doppia barra indica la fine del brano.
MANO SINISTRA
MANO SINISTRA
MANO DESTRA
MANO DESTRA
2 3 1
1 2 3 4
3 4 5
2 4 3 1
1 2 3 4
5 4 3 2
2 4 3 2
1 2 3 4
1 1 2 3
1 2 5
1 2 3 4
2 1 1
1 5 1 5 1 5
1 5
1 5
5
5
1
MANO SINISTRA
MANO DESTRA
1 2 3 4
3 4 5
1 2 3 4
5 4 3 2
1 2 3 4
1 1 2 3
1 2 3 4
2 1
1 5
5
5
1
Per impedire pericolo di incendio o di folgorazione, scollegare l’unità dalla presa AC durante la pulizia. La finitura
dell’unità può essere pulita con un panno per la polvere e trattata come un normale accessorio. Utilizzare un panno
pulito e secco per pulire la parte esterna dell’unità. Prestare attenzione quando si puliscono e si strofinano le parti
in plastica.
K710seriesIM1198_V13_217.indb 26 8/5/18 10:19 am

27
NEDERLANDS
Maak kennis met je klavier
Maak kennis met je nieuw klavier en de verschillende onderdelen van je muziekinstrument met behulp van het
schema op de eerste pagina van deze handleiding.
Bij het uitpakken, dient u na te gaan of de volgende elementen inbegrepen zijn:
1 x keyboard met 37 toetsen / 1 x microfoon / 1 x microfoonstander / 1 x paalhouder / 1 x gebruiksaanwijzing
WAARSCHUWING: Al het verpakkingsmateriaal zoals plakband, plastic vellen, draadklemmen en labels die niet
deel uitmaken van dit apparaat dienen weggegooid te worden.
1. Aan/Uit-schakelaar
2. RITME schakelaar
3. 16 ritmes
4. DRUM/LICHT knop
5. 16 instrumenten
6. INST schakelaar
7. DEMOGELUIDEN knop
8. VOLUME – knop
9. VOLUME + knop
10. OPNAME knop
11. AFSPELEN knop
12. TEMPO + knop
13. TEMPO – knop
14. STOP knop
Stroombronnen
Om op een juiste manier op het klavier te spelen, handhaaf een juiste houding en positie van je handen op het
klavier. Dit heeft een invloed op de kwaliteit en het gemak van het spelen.
Houding en positie van de handen
Zit op een bankje of kruk voor het klavier. Met
de rug recht en je gezicht in het midden van
het klavier,
buig lichtjes
voorover
terwijl je je
schouders
ontspannen
houdt.
15. Zwarte toets (x 15)
16. Witte toets (x 22)
17. LUIDSPREKER
18. MICROFOON ingang (3,5mm)
19. Voedingsaansluiting
Wanneer je je handen op de toetsen plaatst, moeten je
ellebogen zich iets voor je bevinden. Je voorarmen en
handen vormen een horizontale lijn wanneer je vingers op
het klavier rusten. Je vingers moeten lichtjes gebogen zijn.
Niet-heroplaadbare batterijen kunnen niet worden heropgeladen; oplaadbare batterijen moeten uit het speelgoed worden
verwijderd alvorens deze op te laden; heroplaadbare batterijen mogen alleen onder toezicht van een volwassene worden
opgeladen; verschillende types batterijen of nieuwe en oude batterijen mogen niet onderling gebruikt worden; gebruik alleen
batterijen van hetzelfde of equivalente type zoals aangeraden door de fabrikant; batterijen moeten volgens de juiste polariteit
worden ingestoken; lege batterijen moeten uit het speelgoed worden verwijderd; de toevoerterminals mogen geen kortsluiting
ondervinden. Gelieve de verpakking te bewaren als referentie voor later daar het belangrijke informatie bevat. Gooi batterijen
nooit in open vuur. Indien je het spel voor langere tijd niet zal gebruiken, neem de batterijen uit het spel. Wanneer het geluid
verzwakt of het spel niet reageert, vervang dan de batterijen. Stel de batterijen nooit bloot aan een warmtebron, zoals
zonlicht of vuur.
WAARSCHUWING: Een storing of geheugenverlies kan veroorzaakt worden door een sterke frequentie-interferentie of
een elektrostatische ontlading. Indien er zich een abnormale functie voordoet, stel het toestel opnieuw in of verwijder
en verbind opnieuw de batterijen, of haal de AC/DC-adapter uit het stopcontact en steek deze er daarna opnieuw in.
Waarschuwing: Koppel de adapter los als het spel gedurende een lange periode niet gebruikt zal worden, om oververhitting te
vermijden. Speel niet buiten als de Klavier door een adapter van stroom wordt voorzien. Controleer regelmatig de toestand van
de adapter en de aansluitkabels. Als de toestand verslechtert, gebruik de adapter niet langer totdat deze is gerepareerd. Gebruik
dit speelgoed alleen met een transformator die specifiek voor speelgoed is ontworpen. De adapter is geen speelgoed. Haal de
stekker uit het stopcontact als de Klavier met vloeistoffen wordt schoongemaakt. Het speelgoed is niet geschikt voor kinderen
jonger dan 3 jaar oud. De transformator verkeerd gebruiken kan een elektrische schok veroorzaken.
Mededeling voor ouders: De transformator en adapter voor het speelgoed zijn niet bestemd om als speelgoed te
worden gebruikt. Het gebruik ervan dient onder het toezicht van een ouder te gebeuren.
Het speelgoed mag alleen op een Klasse II uitrusting worden aangesloten die het volgend symbool draagt.
Toegang tot voedsel:
1. Ga na of het apparaat uitgeschakeld is.
2. Steek de stekker van de AC/DC-adapter in de DC-aansluiting op de achterzijde van
het apparaat.
3. Steek vervolgens de stekker in een stopcontact om het toestel in te schakelen.
Batterijinstallatie
1. Om de batterijen te plaatsen, dient u het batterijcompartiment te openen dat zich aan
de onderkant van het apparaat.
2. Plaats 4 x AA/LR6 batterijen van 1,5V (niet inbegrepen) waarbij u de polariteit
aangegeven in het batterijcompartiment, alsook op de onderstaande schets, naleeft.
3. Plaats de cover van het batterijcompartiment terug.
Opmerking: De AC stroomkabel moet losgekoppeld zijn van de DC aansluiting op de
achterzijde van het apparaat om het product te laten werken op batterijen.
AC werking
De klavier werkt op 4 x AA/LR6-batterij van 1,5V (niet inbegrepen) of een adapter (niet inbegrepen) van 5V
500mA met positief centrale pool .
Binnenkomst: 100-240V ~ 50/60Hz, 0.3A Uitgang: 5V 500mA
1,5V AA OF LR6
1,5V AA OF LR6
1,5V AA OF LR6
1,5V AA OF LR6
K710seriesIM1198_V13_217.indb 27 8/5/18 10:19 am

28
29
NEDERLANDS
Opmerking: de grijze toets is de centrale FA. De DO’s bevinden zich links van de groepen met twee zwarte toetsen.
Laten we met een
eenvoudig voorbeeld
beginnen.
Het nummersysteem stelt je in
staat om te bepalen waar je vingers
op het klavier geplaatst moeten
worden. Er is een nummer aan elke
vinger toegekend.
Het instrument in-/uitschakelen
1. Om uw elektronisch keyboard met microfoon in te schakelen, duw de Aan/Uit-schakelaar naar rechts.
2. Om uit te schakelen, duw de schakelaar naar links.
De volumeknoppen gebruiken
Druk op de volumeknoppen om het gewenste volume van de tonen en demoliedjes voor uw keyboard in te stellen.
Het volume kan op 14 verschillende niveaus worden ingesteld. Het volume is bij inschakeling standaard op niveau
8 ingesteld.
OPGELET: Een te hoog volume, kan tot gehoorbeschadiging leiden. Stel het volume aldus niet te hoog in.
De tempoknoppen gebruiken
Druk op de tempoknoppen om de snelheid van uw muziek te versnellen of te vertragen. Deze functie werkt niet
alleen voor de muziek die u speelt, maar tevens voor uw gekozen ritme of de demoliedjes die u kunt beluisteren.
De vingers nummeren
Muziek spelen
Linkerhand Rechterhand
5 1
1 5
4 23 32 4
De eerste en laatste toets van het klavier met 37 toetsen zijn een DO. De K710 series bestaat uit witte en zwarte
toetsen. De zwarte toetsen zijn ingedeeld in groepen van twee of drie toetsen.
Schema van het klavier
Opmerking: Speel met uw vingertoppen.
U kunt de zwarte toetsen induwen met de vinger die met de witte toets overeenstemt.
LINKERHAND
Vinger 5 4 3 2 1
Noot do re mi fa sol
A
2 3 2 3 2 3
do
sol
re lami sifa do
sol
re lami sifa do
sol
re lami sifa do
B
centrale FA
sol la si do
do re mi fa sol la si do re mi fa
si
do
re
mi
fa
sol
la
5
5
4
4
3
3
2
2
1 1
RECHTERHAND
Vinger 1 2 3 4 5
Noot do re mi fa sol
K710seriesIM1198_V13_217.indb 28 8/5/18 10:19 am

28
29
NEDERLANDS
De toon instellen
1. Stel de toon van uw gewenst muziekinstrument in. Om één van de 16 tonen te selecteren die in bovenstaande
tabel zijn weergegeven, druk eenmaal op de INST schakelaar om tussen de Tonen A te kiezen en selecteer
vervolgens de gewenste toon door op een van de 8 knoppen, tussen 01 en 08, te drukken (nr. 5 is in de afbeelding
weergegeven).
2. Om toegang tot de Tonen B te krijgen, druk nogmaals op de INST schakelaar en selecteer vervolgens uw
gewenste toon, tussen 09 en 16.
Het ritme instellen
1. Om één van de 16 ritmes te selecteren die in bovenstaande tabel zijn weergegeven, druk eenmaal op de
RHYTHM schakelaar om tussen de Ritmes A te kiezen en selecteer vervolgens het gewenste ritme door op een
van de 8 knoppen, tussen 01 en 08, te drukken (nr. 3 is in de afbeelding weergegeven).
2. Om toegang tot de Ritmes B te krijgen, druk nogmaals op de RHYTHM schakelaar en selecteer vervolgens uw
gewenste toon, tussen 09 en 16.
3. Om te stoppen, druk op de STOP knop.
Sla ritmisch op de drums
Druk op de DRUM/LIGHT knop om het gewenste percussiegeluid te selecteren (van links naar rechts): GROTE
TROM, KLEINE TROM, BEKKEN en (HIHAT).
Oefen met de demoliedjes
1. Druk op de DEMO knop om de demoliedjes in de volgende volgorde te beluisteren:
· Kleine ster · Salut d’amour
· Voor Elise · De kleine ezel
· Dog Waltz · Lofdicht aan de vreugde
· Beethoven symfonie nr. 5 · If you’re happy clap
2. Om het volgend liedje af te spelen, druk eenmaal op de DEMO knop om de muziek te stoppen en druk nogmaals
om het volgend liedje af te spelen.
3. Om de muziek te stoppen, druk op de STOP knop.
Uw muziek opnemen
1. Om uw muziek op te nemen, druk op de RECORD knop en speel uw eigen muziek tot 54 noten.
2. Om uw opgenomen muziek af te spelen eenmaal voltooid, druk op de REPLAY knop.
3. Om te stoppen, druk op de STOP knop.
Opmerking: Druk tijdens het opnemen niet op de knoppen om het automatisch annuleren van de opname te
vermijden.
De opnamefunctie kan geen demoliedjes, drumgeluiden of ritmes opnemen. Het neemt enkel de muziek op die
op het keyboard onder de gekozen toon wordt gespeeld. Het apparaat neemt de stem op de microfoon niet op.
Uw afneembare microfoon gebruiken
1. Zet de microfoonstander en de paalhouder in elkaar. Maak ze vervolgens in de voet op het keyboard vast.
2. Sluit de kabel van de microfoon aan op de ingang aan de achterkant van het keyboard (18).
3. Plaats de afneembare microfoon op de paalhouder en start met zingen!
Lofdicht aan de vreugde van Beethoven
Muziek spelen
15
16
Tonen A
PIANO (PIANO)
SYNTH BASS (SYNTHESIZER BAS)
HARMONICA (HARMONICA)
FRENCH HORN (HOORN)
A-STEEL GUITAR (AKOESTISCHE GITAAR)
SAXOPHONE (SAXOFOON)
HAMMOND (ORGEL)
HARP (HARP)
ELECTRIC GUITAR (ELEKTRISCHE GITAAR)
CLARINET (KLARINET)
ELECTRIC GUITAR (ELEKTRISCHE GITAAR)
OBOE(HOBO)
ACCORDION (ACCORDEON)
TUBA (TUBA)
VIBRAPHONE (VIBRAFOON)
VIOLIN (VIOOL)
01
02
09
10
03
04
11
12
05
06
13
14
07
08
Tonen B
TEL
RECHTERHAND
LINKERHAND
3 4 5
1 2 3 4
5 4 3 2
1 2 3 4
1 1 2 3
1 2 3 4
3 2
1 2 3 4
5
1
5
1
Ritmes A
MARCH (MARCHE)
SOKA
SLOW ROCK
WALTZ (WALS)
DISCO
POP
SHUFFLE
SAMBA
CHA CHA (CHA CHA CHA)
SLOW SOUL
NEW NEW
TANGO
ROCK
SOUL
RUMBA
BLUES
01
02
09
10
03
04
11
12
05
06
13
14
07
08
15
16
Ritmes B
sol la si do
K710seriesIM1198_V13_217.indb 29 8/5/18 10:19 am

30
30
NEDERLANDS
IM code: K710seriesIM1198
Dit product wordt gedekt door onze 2 jaar garantie.
Voor een claim onder de garantie of de dient na verkoop, dient u contact op te nemen met uw verdeler en een geldig
bewijs van aankoop voor te leggen. Onze garantie dekt fabricage- en uitvoeringsfouten, met de uitzondering van
enige beschadiging die voortvloeit uit de niet naleving van de handleiding of uit een nalatige actie (zoals het uit
mekaar halen, blootstelling aan hitte en vochtigheid, enz.). Het is aanbevolen dat u de verpakking bewaart voor het
geval u ze later nog zou nodig hebben.
In een poging om onze diensten te verbeteren, kan het gebeuren dat er wijzigingen doorgevoerd worden aan de
kleuren en de details van het product zoals afgebeeld op de verpakking.
Opmerking: Gelieve deze handleiding te bewaren, daar ze belangrijke informatie bevat.
WAARSCHUWING! Niet geschikt voor kinderen onder de 3 jaar. Gevaar voor verstikking - Kleine onderdelen.
Referentie: K710 series
Bedacht en ontworpen in Europa – Gemaakt in China
© LEXIBOOK®
Voor service na verkoop, neem contact op met onze teams:
www.lexibook.com
Om brand of schokgevaar te voorkomen, dient u uw apparaat van de AC stroombron los te koppelen alvorens het
schoon te maken. De afwerking van uw apparaat kan schoongemaakt worden met een stofdoek en behandeld
worden zoals andere meubelen. Gebruik een zachte, propere doek bevochtigd met zuiver, lauw water om de
buitenkant van het apparaat schoon te maken. Wees voorzichtig bij het schoonmaken en afvegen van de plastic
onderdelen.
· Wees voorzichtig. Laat het keyboard niet vallen en stel het niet bloot aan hevige schokken of stoten.
· Stel het keyboard niet bloot aan hoge vochtigheid of stof.
· Stel het keyboard niet bloot aan extreme temperaturen.
· Gebruik geen vloeibare schoonmaakmiddelen of schoonmaakmiddelen in spuitbussen.
· Gebruik geen opzetstukken die niet door de fabrikant zijn aanbevolen.
· Gebruik het keyboard niet in de nabijheid van water, bijv. in de buurt van een bad, wastafel, gootsteen, wasmachine,
in een vochtige kelder of nabij een zwembad.
· Steek nooit voorwerpen in de openingen van het keyboard, deze kunnen gevaarlijke spanningspunten aanraken
of kortsluitingen veroorzaken die kunnen leiden tot brand of elektrische schokken. Mors geen vloeistof op het
keyboard.
Garantie
Onderhoud
Voorzorgsmaatregelen
Milieubescherming
Niet langer bruikbare electrische apparaten kunnen gerecycleerd worden en mogen niet weggegooid worden
met het gewone huisvuil! Gelieve actief de bescherming van bronnen te ondersteunen en deel te nemen in
de bescherming van het milieu door dit toestel terug te zenden naar een verzamelcentrum (indien aanwezig).
Opmerking: de dubbele balk geeft het einde van een stuk aan.
LINKERHAND
LINKERHAND
RECHTERHAND
RECHTERHAND
2 3 1
1 2 3 4
3 4 5
2 4 3 1
1 2 3 4
5 4 3 2
2 4 3 2
1 2 3 4
1 1 2 3
1 2 5
1 2 3 4
2 1 1
1 5 1 5 1 5
1 5
1 5
5
5
1
LINKERHAND
RECHTERHAND
1 2 3 4
3 4 5
1 2 3 4
5 4 3 2
1 2 3 4
1 1 2 3
1 2 3 4
2 1
1 5
5
5
1
K710seriesIM1198_V13_217.indb 30 8/5/18 10:19 am
-
 1
1
-
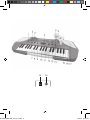 2
2
-
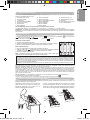 3
3
-
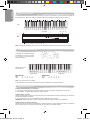 4
4
-
 5
5
-
 6
6
-
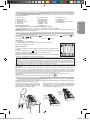 7
7
-
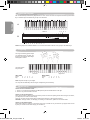 8
8
-
 9
9
-
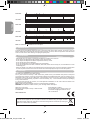 10
10
-
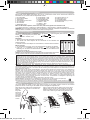 11
11
-
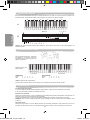 12
12
-
 13
13
-
 14
14
-
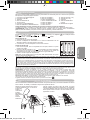 15
15
-
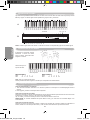 16
16
-
 17
17
-
 18
18
-
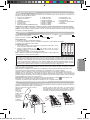 19
19
-
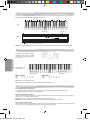 20
20
-
 21
21
-
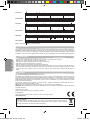 22
22
-
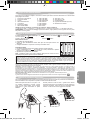 23
23
-
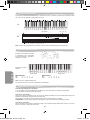 24
24
-
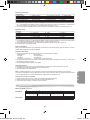 25
25
-
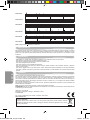 26
26
-
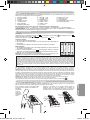 27
27
-
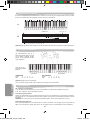 28
28
-
 29
29
-
 30
30


Lexibook K710 Handleiding
- Categorie
- Speelgoed
- Type
- Handleiding
- Deze handleiding is ook geschikt voor
in andere talen
- italiano: Lexibook K710 Manuale utente
- français: Lexibook K710 Manuel utilisateur
- español: Lexibook K710 Manual de usuario
- Deutsch: Lexibook K710 Benutzerhandbuch
- português: Lexibook K710 Manual do usuário
Gerelateerde papieren
-
Lexibook K731 Handleiding
-
-
-
-
-
-
-
-
Lexibook IT750NO SING N PLAY NODDY OUI-OUI Handleiding
-
Andere documenten
-
iON DISCOVER DRUMS de handleiding
-
-
Yamaha PS-55 de handleiding
-
-
-
-
Chicco DJ MIXER GUITAR de handleiding
-
BONTEMPI 24 5872 de handleiding
-
Barbie Barbie Mix & Magic Real Food Kitchen Handleiding
-
Bugaboo Donkey de handleiding