Lenco L-3809BK Handleiding
- Categorie
- Audio draaitafels
- Type
- Handleiding
Deze handleiding is ook geschikt voor

1
Model: L-3809
User manual - Direct drive turntable with USB recording
Gebruikshandleiding - Direct aangedreven platenspeler met USB-opnamefunctie
Bedienungsanleitung - Direktangetriebener Plattenspieler mit USB-Aufzeichnung
Guide d’utilisation - Platine tourne-disque à entraînement direct avec
enregistrement USB
Manual de usuario - Unidad de tocadiscos directa con grabación USB
Manuale dell'utente - Giradischi a trazione diretta con registrazione USB
Руководство пользователя - Виниловый проигрыватель с прямым приводом и
функцией записи через USB

2
English .................................................................................................................................. 3
Nederlands ......................................................................................................................... 17
Deutsch ............................................................................................................................... 34
Français............................................................................................................................... 51
Español ............................................................................................................................... 68
Italiano ................................................................................................................................ 85
Русский ............................................................................................................................ 101
Version: 2.0
INDEX

3
English
L-3809
CAUTION:
Usage of controls or adjustments or performance of procedures other than those specified
herein may result in hazardous radiation exposure.
PRECAUTIONS BEFORE USE
KEEP THESE INSTRUCTIONS IN MIND:
1. Do not cover or block any ventilation openings. When placing the device on a shelf, leave
5 cm (2”) free space around the whole device.
2. Install in accordance with the supplied user manual.
3. Keep the device away from heat sources such as radiators, heaters, stoves, candles and
other heat-generating products or naked flame. The device can only be used in moderate
climates. Extremely cold or warm environments should be avoided. Working temperature
between 0° and 35°C.
4. Avoid using the device near strong magnetic fields.
5. Electrostatic discharge can disturb normal usage of this device. If so, simply reset and
restart the device following the instruction manual. During file transmission, please handle
with care and operate in a static-free environment.
6. Warning! Never insert an object into the product through the vents or openings. High
voltage flows through the product and inserting an object can cause electric shock and/or
short circuit internal parts. For the same reason, do not spill water or liquid on the product.
7. Do not use in wet or moist areas such as bathrooms, steamy kitchens or near swimming
pools.
8. The device shall not be exposed to dripping or splashing and make sure that no objects
filled with liquids, such as vases, are placed on or near the apparatus.
9. Do not use this device when condensation may occur. When the unit is used in a warm wet
room with damp, water droplets or condensation may occur inside the unit and the unit
may not function properly; let the unit stand in power OFF for 1 or 2 hours before turning
on the power: the unit should be dry before getting any power.
10. Although this device is manufactured with the utmost care and checked several times
before leaving the factory, it is still possible that problems may occur, as with all electrical
appliances. If you notice smoke, an excessive build-up of heat or any other unexpected
phenomena, you should disconnect the plug from the main power socket immediately.
11. This device must operate on a power source as specified on the specification label. If you
are not sure of the type of power supply used in your home, consult your dealer or local
power company.
12. Keep away from animals. Some animals enjoy biting on power cords.
13. To clean the device, use a soft dry cloth. Do not use solvents or petrol based fluids. To
remove severe stains, you may use a damp cloth with dilute detergent.
14. The supplier is not responsible for damage or lost data caused by malfunction, misuse,
modification of the device or battery replacement.
15. Do not interrupt the connection when the device is formatting or transferring files.
Otherwise, data may be corrupted or lost.
16. If the unit has USB playback function, the USB memory stick should be plugged into the unit
directly. Don’t use an USB extension cable because it can cause interference resulting in
failing of data.
17. The rating label has been marked on the bottom or back panel of the device.
18. This device is not intended for use by people (including children) with physical, sensory or
mental disabilities, or a lack of experience and knowledge, unless they’re under supervision
or have received instructions about the correct use of the device by the person who is
responsible for their safety.
19. This product is intended for non-professional use only and not for commercial or industrial
use.
20. Make sure the unit is adjusted to a stable position. Damage caused by using this product in
an unstable position vibrations or shocks or by failure to follow any other warning or
precaution contained within this user manual will not be covered by warranty.
21. Never remove the casing of this device.

4
22. Never place this device on other electrical equipment.
23. Do not allow children access to plastic bags.
24. Only use attachments/accessories specified by the manufacturer.
25. Refer all servicing to qualified service personnel. Servicing is required when the device has
been damaged in any way, such as the power supply cord or the plug, when liquid has been
spilled or objects have fallen into the device, when the device has been exposed to rain or
moisture, does not operate normally, or has been dropped.
26. Long exposure to loud sounds from personal music players may lead to temporary or
permanent hearing loss.
27. If the product is delivered with power cable or AC power adaptor:
⚫ If any trouble occurs, disconnect the AC power cord and refer servicing to qualified
personnel.
⚫ Don’t step on or pinch the power adaptor. Be very careful, particularly near the plugs
and the cable’s exit point. Do not place heavy items on the power adaptor, which may
damage it. Keep the entire device out of children’s reach! When playing with the power
cable, they can seriously injure themselves.
⚫ Unplug this device during lightning storms or when unused for a long period.
⚫ The socket outlet must be installed near the equipment and must be easily accessible.
⚫ Do not overload ac outlets or extension cords. Overloading can cause fire or electric
shock.
⚫ Devices with class 1 construction should be connected to a main socket outlet with a
protective earthed connection.
⚫ Devices with class 2 construction do not require a earthed connection.
⚫ Always hold the plug when pulling it out of the main supply socket. Do not pull the
power cord. This can cause a short circuit.
⚫ Do not use a damaged power cord or plug or a loose outlet. Doing so may result in fire
or electric shock.
28. If the product contains or is delivered with a remote control containing coin/cell batteries:
Warning:
⚫ “Do not ingest battery, Chemical Burn Hazard” or equivalent working.
⚫ [The remote control supplied with] This product contains a coin/button cell battery. If
the battery is swallowed, it can cause severe internal burns in just 2 hours and can lead
to death.
⚫ Keep new and used batteries away from children.
⚫ If the battery compartment does not close securely, stop using the product and keep it
away from children.
⚫ If you think batteries might have been swallowed or placed inside any part of the body,
seek immediate medical attention.
29. Caution about the use of Batteries:
⚫ Danger of explosion if battery is incorrectly replaced. Replace only with the same or
equivalent type.
⚫ Battery cannot be subjected to high or low extreme temperatures, low air pressure at
high altitude during use, storage or transportation.
⚫ Replacement of a battery with an incorrect type that can result in an explosion or the
leakage of flammable liquid or gas.
⚫ Disposal of a battery into fire or a hot oven, or mechanically crushing or cutting of a
battery that can result in an explosion.
⚫ Leaving a battery in an extremely high temperature surrounding environment that can
result in an explosion or that leakage of flammable liquid or gas.
⚫ A battery subjected to extremely low air pressure that may result in an explosion or the
leakage of flammable liquid or gas.
⚫ Attention should be drawn to the environmental aspects of battery disposal.

5
Deliver Content
1 x Manual
1 x RCA audio cable
1 x Power cord

6
1 x USB connection cable
1 x Platter
1x Felt mat

7
Description
1. TURNTABLE PLATTER
The platter is equipped with a feltmat. This makes it easier to manipulate the record for
scratch performance. Place vinyl records centered on the turntable platter.
2. COUNTERWEIGHT
Adjustment creates the proper downward pressure of the stylus to the record. Attach now by
sliding the counterweight onto the rear of the tone arm.
3. STYLUS PRESSURE ADJUSTMENT SCALE
Adjust stylus cartridge’s pressure alignment.
4. ANTISKATING KNOB
This applies inward force to the tone arm so it doesn’t skip outward across the record due to
the centrifugal force of the record spinning.
5. TONEARM LIFTER
Control the up and down action of the tonearm.
6. HEADSHELL
Install cartridge here. During installation, attach the stylus protector to guard the stylus tip
from damage.

8
Attach wires as follows:
White (L+)
Left channel +
Blue (L-)
Left channel –
Red (R+)
Right channel +
Green (R-)
Right channel –
7. PLAY/PAUSE BUTTON
Press this button to start playback or to resume playback after a pause.
8. 33/45 ROTATION SPEED SETTING BUTTON
Press these buttons to select the platter’s rotation according to the speed indicated on the
record for 33, 45 revolutions per minute.
9. Headshell locking nut
Attach the head shell by inserting it into the front end of the tone arm and then turn the
locking nut clockwise.
10. Pitch fader
Used to change the playback speed of the playing trace.
11. Power switch / Stroboscopic light
Turn the switch clockwise to turn on the unit. Turn the switch counter-clockwise to turn off
the unit. The stroboscopic light will automatically turn on when the unit is on.

9
1. RCA OUTPUT
OUTPUT L and R are used for connecting the turntable to the RCA analog input on your
amplifier.
2. LINE/PHONO SWITCH
The turntable has a built-in PHONO pre-amplifier that is disengaged if you have an external
pre-amplifier. If you want to use the signals amplified by the internal amplifier of the
turntable, move the switch to LINE. If you want to use an external PHONO preamplifier, move
the switch to PHONO.
With the PRE-AMP switch at ON never connect to a Phono input.
Audio will be strongly distorted then and there is a risk that Amplifier and/or
speakers will be damaged.
3. USB PORT
The sound of your vinyl record is converted to digital with a maximum resolution of 48KHz /
16bits. Use the USB cable that came with the device to connect the turntable to your
computer. The Audacity software should be downloaded
4. AC IN
Plug the power cord here.
5. POWER ON/OFF
Use to turn the turntable on and off.

10
Turntable Assembly:
1. Removing from carton:
Carefully remove the main unit with the packing material intact from the box. Remove the
packing material once the unit has been removed from the shipping carton. Be sure to locate
all the accessories located in the packing material.
2. 45rpm Adapter:
Locate and remove the 45-rpm adapter from the packing material and place it in the 45
adapter cutout on the top of the main unit.
3. Turntable Platter:
Remove the turntable platter from the packing material and gently place the platter onto the
CENTER SPINDLE of the turntable base.
4. Feltmat:
Remove the black feltmat from the packaging and place it on the PLATTER.
5. Headshell:
Insert the HEADSHELL into the front end of the TONEARM ASSEMBLY. While holding
HEADSHELL firmly into the front end of the tonearm assembly, turn the HEADSHELL LOCKING
NUT counter- clockwise to firmly secure the HEADSHELL to TONEARM ASSEMBLY.
6. Counterweight:
Locate and remove the tonearm COUNTERWEIGHT from the packaging. Slide
COUNTERWEIGHT onto the rear of the TONEARM ASSEMBLY. Turn it lightly and it will screw
onto the rear shaft of the tonearm.

11
Turntable Quick-Start:
1. Changing Platter Speed
Press the 33/45 ROTATION SPEED SETTING buttons to change the platter rotation speed.
2. Starting and Stopping the Platter
Use the PLAY/PAUSE BUTTON to switch back and forth between platter rotations and pause
modes.
3. Pitch Control
1) The pitch adjustment is a fine adjustment to the platter's RPMs.
2) The pitch adjustment is variable and may be adjusted between -10% and +10% of the
platter-selected speed.
3) The pitch is changed by sliding the Pitch Slider in an up and down motion.
4) The indicator dots on the rim of the TURNTABLE PLATTER can be used to visual
approximate the platter pitch. These indicators are lit by the STROBOSCOPIC LIGHT as they
pass by the POWER SWITCH. At different pitch levels each row of STROBE INDICATORS may
appear stand still.
Note: The use of heavy fluorescent lighting directly above the turntable will defeat the
STROBE LAMP PILOT LAMP affect indicator accuracy.
Set-up
Turntable Installation:
1. Do not place the unit in a location where it will be exposed to direct sunlight or near any type
of heating appliance.
2. Do not place the unit in a location where there is high humidity or a lot of dust.
3. Cartridge may pick up slight sound pressure or vibrations of nearby speakers. For best results,
do not install this unit too close to speakers.
4. Install this unit on a horizontal surface that is stable and vibration free.
5. The rubber feet have been specially designed to isolate the unit from excess vibration. The
feet may also be used to stabilize the main body horizontally. Adjust the height of the unit by
turning the feet in a clockwise or counter-clockwise direction.
Tonearm Balance and Stylus Pressure:
1. Adjustment of horizontal zero balance and stylus pressure:
2. Remove the stylus protective cover, if so equipped. Never touch the stylus tip during the
adjustment.
3. Lower the TONEARM LEVER.
4. Release the tonearm clamp and release the tonearm from the arm rest.
5. Set the ANTI-SKATE adjustment to zero.
6. Rotate the COUNTERWEIGHT in either direction until the TONEARM is perfectly balanced
horizontally (floats freely).
7. Return the TONEARM to the arm rest and lock it in place.

12
8. Hold the COUNTERWEIGHT stationary with one hand and rotate only the stylus-pressure ring
(3) bring the number “0” of the ring into alignment with the center line on the tonearm rear
shaft.
9. Rotate the COUNTERWEIGHT counterclockwise until the scale value corresponding to the
recommended stylus pressure.
Note: The recommended stylus pressure of the optional cartridge that may have been
included with your unit is 2,5 to 3 grams. For all other cartridge systems please refer to the
manufactures specification included with the cartridge.
Anti-Skate:
The anti-skate adjustment prevents the TONEARM ASSEMBLY from skipping across the record
from the centrifugal force that is caused spinning rotation of the PLATTER. The ANTI-SKATING
control knob should be set to the same value as the stylus pressure. For example if your
COUNTERWEIGHT is set to 2.5 grams the ANTI-SKATE value should also be set to 2.5.
Product Service:
1. Clean the stylus periodically with a soft brush to prevent the accumulation of dust.
2. When sound becomes distorted or noisy, check the stylus. If the stylus is worn out, replace it
with a new one.
3. From time to time, the dust cover and turntable cabinet should be wiped down with a soft,
dry cloth.
4. Volatile materials should not be used, such as: alcohol, thinner, benzine etc. They may
remove the paint or damage the luster.
Audacity software overview
Audacity is free software, licensed under the GNU General Public License (GPL). More
information as well as open source code can be found on the web at
https://www.audacityteam.org/download/
* Please ensure you have installed the software before starting.
Setting up your PC to work with Audacity
1. Connect the provided USB cable to the turntable.
2. Connect the left USB plug of this USB cable to your pc.
3. Install the Audacity recording software.
4. Open the Audacity program.
5. Select Preference from the Edit tab in the Audacity Menu.

13
6. Select Audio I/O tab at the top left.
Under Playback, Device, select your internal sound card.
Under Recording, Device, select USB Audio CODEC.
Under Recording, Channels, select 2 (Stereo).
Check the box marked Play other tracks while recording new one.
Check the box marked Software Playthrough.
Recording Albums with Audacity
1. Saving a project
Audacity writes all the changed and recorded audio to a directory called
Projectname_data, which is located right where you saved the project file itself.
Thus, select Save Project as from your Audacity File tab and choose a location and filename
for your project.
Please note that when you startup Audacity fresh, only the “Save As...” menu option is
available.

14
2. How to record
Set your USB turntable up to play the song or album you want to record.
Click on the red Record button to begin recording.
Lower tone arm on USB turntable onto album and track you want to record.
Click on the blue Pause button to pause the recording. Press it again to continue.
Click on the yellow Stop button .
That's it. You can now play around with your recording and explore the editing capabilities of
Audacity. Remember that you can use the Undo function almost without limits while the project
is open.
NOTE: CD's cannot be burned directly from the Audacity application. Other CD burning applications
should be used.

15
Specification
General
Model:
L-3809
Dimensions:
430(W) x 350(D) x 155(H)mm
Weight:
6.18Kg
Power supply:
AC 230V~ 50Hz (Netherlands); AC 240V~ 50Hz(U.K.)
Power consumption:
30W
Standard test condition:
Ambient Temperature: 20 +/- 2 deg.C
Relative Humidity:
65% +/- 5%
NOTE: Measurements can be carried out between 5 deg.C to 35 deg.C and 45% to 85% relative
humidity.
Turntable Section:
Type:
2-speed full manual
Motor:
16pole, 3phase,brushless
Driving Method:
Direct drive
Turntable Platter:
332mm (Aluminum)
Speeds:
33
1/3
and 45rpm
Wow and Flutter:
Less than 0.3% WRMS (JIS WTD) with 33
1/3
rpm
S/N Ratio:
More than 50dB (DIN-B)
Pitch Controls:
+/- 10%
Starting Torque:
More than 3.6 kgf.cm
Braking System:
Electronic brake
Starting Time:
Less than 1 sec.
Braking Time:
Less than 1 sec.
Time for Speed Change:
Less than 1 sec. from 33
1/3
to 45 rpm.
Less than 1 sec. from 45 to 33
1/3
rpm.
USB Function:
USB rec. Function
16BIT 44.1KHz or 48KHz
Computer interface:
USB 1.1 compliant 7/8/10 or MAC OSX
Tonearm section:
Type:
Static balanced S-shaped tone arm
Effective Arm Length:
220mm
Overhang:
10mm
Tracking Error Angle:
Less than 3 degree
Tracking Force Adjustment Range:
3-4g
Cartridge MM Type:
Audio Technica AT-3600L
Stylus pressure:
3.5±0.5g
Cartridge weight:
5±0.5g
Anti-skating Range:
0~4g
Channel Separation:
More than 18 dB
Channel Balance:
Within 2.5dB at 1KHz

16
Pre-Amplifier
Output:
150mV +/-4dB (IN: 2.5mV 1KHz)
RIAA (Frequency Response):
20Hz~20KHz +1/-3dB (IN: 1.5mV 1KHz)
Guarantee
Lenco offers service and warranty in accordance with the European law, which means that in case
of repairs (both during and after the warranty period) you should contact your local dealer.
Important note: It is not possible to send products that need repairs to Lenco directly.
Important note: If this unit is opened or accessed by a non-official service center in any way, the
warranty expires.
This device is not suitable for professional use. In case of professional use, all warranty
obligations of the manufacturer will be voided.
Disclaimer
Updates to Firmware and/or hardware components are made regularly. Therefore some of the
instruction, specifications and pictures in this documentation may differ slightly from your
particular situation. All items described in this guide for illustration purposes only and may not
apply to particular situation. No legal right or entitlements may be obtained from the description
made in this manual.
Disposal of the Old Device
This symbol indicates that the relevant electrical product or battery should not
be disposed of as general household waste in Europe. To ensure the correct
waste treatment of the product and battery, please dispose them in accordance
to any applicable local laws of requirement for disposal of electrical equipment
or batteries. In so doing, you will help to conserve natural resources and
improve standards of environmental protection in treatment and disposal of
electrical waste (Waste Electrical and Electronic Equipment Directive).
CE Marking
Products with the CE marking comply with the EMC Directive (2014/30/EU)
and the Low Voltage Directive (2014/35/EU) issued by the Commission of the
European Community.
Hereby, Lenco Benelux BV, Thermiekstraat 1a, 6361 HB Nuth, The
Netherlands, declares that this product is in compliance with the essential
requirements.
The declaration of conformity may be consulted at techdoc@lenco.com
Service
For more information and helpdesk support, please visit www.lenco.com
Lenco Benelux BV, Thermiekstraat 1a, 6361 HB Nuth, The Netherlands.

17
Nederlands
L-3809
LET OP:
Gebruik van bedieningen of afstellingen of uitvoer van procedures anders dan gespecificeerd in
deze documentatie kan leiden tot blootstelling aan schadelijke straling.
VOORZORGSMAATREGELEN VOOR GEBRUIK
ONTHOUD DE VOLGENDE INSTRUCTIES:
1. Bedek of blokkeer de ventilatieopeningen niet. Wanneer u het apparaat op een schap
plaatst, dient u 5 cm (2”) vrije ruimte rondom het gehele apparaat te behouden.
2. Installeer het product volgens de meegeleverde gebruikershandleiding.
3. Houd het apparaat uit de buurt van hittebronnen, zoals radiatoren, verwarmingen, kachels,
kaarsen en andere hittegenererende producten of open vuur. Het apparaat kan alleen
worden gebruikt in een gematigd klimaat. Extreem koude of warme omgevingen dienen te
worden vermeden. Bedrijfstemperatuur tussen 0 °C en 35 °C.
4. Gebruik dit apparaat niet in de buurt van krachtige magnetische velden.
5. Elektrostatische ontlading kan normaal gebruik van dit apparaat verstoren. U hoeft het
apparaat in dit geval slechts te resetten en opnieuw op te starten volgens de
gebruikershandleiding. Wees voorzichtig tijdens bestandsoverdracht en gebruik het product
in een omgeving zonder statische interferentie.
6. Waarschuwing! Steek nooit een voorwerp via de ventilatie- of andere openingen in het
product. Er is hoogspanning in het product aanwezig en als u er een object insteekt, kan dat
een elektrische schok veroorzaken en/of kortsluiting in de interne onderdelen. Mors om
dezelfde reden geen water of vloeistof op het product.
7. Gebruik het toestel niet in vochtige ruimtes, zoals badkamers, stomende keukens of in de
buurt van zwembaden.
8. Het apparaat mag niet worden blootgesteld aan druppels en spetters en zorg ervoor dat er
geen met vloeistof gevulde voorwerpen, zoals vazen, op of in de buurt van het apparaat
worden geplaatst.
9. Gebruik dit apparaat niet wanneer condensatie kan optreden. Wanneer het apparaat in een
warme en vochtige kamer wordt gebruikt, dan kunnen er waterdruppeltjes of condensatie
binnenin het apparaat worden gevormd waardoor het apparaat mogelijk niet meer goed
werkt; houd en apparaat 1 of 2 uur op UIT staan voordat u de voeding weer inschakelt: het
apparaat dient droog te zijn voordat deze stroom ontvangt.
10. Alhoewel dit apparaat met grote zorg gefabriceerd en verschillende keren geïnspecteerd is
voordat het de fabriek verlaat, is het nog steeds mogelijk dat er problemen optreden, zoals
met alle elektrische apparaten. Als u rook, een overmatige hitteontwikkeling of enig ander
onverwacht verschijnsel opmerkt, moet u onmiddellijk de stekker van het netsnoer uit het
stopcontact halen.
11. Dit apparaat moet werken op een voedingsbron, zoals aangegeven op het
specificatieplaatje. Als u twijfelt over het type voeding dat gebruikt wordt in uw huis,
raadpleeg dan uw dealer of plaatselijk energiebedrijf.
12. Buiten bereik van dieren houden. Sommige dieren bijten graag op voedingskabels.
13. Gebruik een zacht, droog doekje om het apparaat te reinigen. Gebruik geen oplosmiddelen
of op benzine gebaseerde vloeistoffen. U kunt een vochtig doekje met verdund
schoonmaakmiddel gebruiken om hardnekkige vlekken te verwijderen.
14. De leverancier is niet verantwoordelijk voor schade of verloren gegevens veroorzaakt door
storing, misbruik, modificatie van het apparaat of batterijvervanging.
15. Onderbreek nooit de verbinding wanneer het apparaat formatteert of bestanden
overdraagt. De gegevens kunnen anders corrupt of verloren raken.
16. Indien het apparaat een USB-afspeelfunctie heeft, moet de USB-geheugenstick rechtstreeks
op het apparaat worden aangesloten. Gebruik geen USB-verlengkabel, omdat die kan leiden
tot storingen met foutieve gegevens als gevolg.
17. Het nominale specificatielabel is te vinden op het paneel aan de onder- of achterkant van
het apparaat.
18. Dit apparaat is niet bestemd voor gebruik door mensen (inclusief kinderen) met fysieke,
zintuiglijke of geestelijke gebreken of gebrek aan kennis en ervaring, tenzij zij onder toezicht

18
staan of instructies hebben over het juiste gebruik van het apparaat hebben gekregen van
de persoon die verantwoordelijk is voor hun veiligheid.
19. Dit product is alleen voor niet-professioneel gebruik bedoeld en niet voor commercieel of
industrieel gebruik.
20. Verzeker u ervan dat het apparaat in een stabiele positie staat opgesteld. Beschadigingen
veroorzaakt door het gebruik van dit apparaat in een onstabiele positie, trillingen of
schokken of door het niet opvolgen van andere waarschuwingen of voorzorgsmaatregelen
beschreven in deze gebruikshandleiding worden niet gedekt door de garantie.
21. Verwijder nooit de behuizing van dit apparaat.
22. Plaats dit apparaat nooit op andere elektrische apparatuur.
23. Geef kinderen geen gelegenheid in aanraking met plastic zakken te komen.
24. Gebruik uitsluitend uitbreidingen/accessoires gespecificeerd door de fabrikant.
25. Laat alle reparaties over aan gekwalificeerd onderhoudspersoneel. Onderhoud is vereist als
het toestel hoe dan ook is beschadigd, zoals bijvoorbeeld het netsnoer of de stekker,
wanneer er vloeistof of een voorwerp in het apparaat is terechtgekomen, wanneer het
apparaat is blootgesteld aan regen of vocht, als het niet normaal werkt of is gevallen.
26. Langdurige blootstelling aan harde geluiden van persoonlijke muziekspelers kan leiden tot
tijdelijk of permanent gehoorverlies.
27. Als het product wordt geleverd met voedingskabel of AC-stroomadapter:
⚫ Als er problemen optreden, koppel de wisselstroomvoedingskaart dan los en laat
reparaties over aan bevoegd personeel.
⚫ Nooit op de stroomadapter stappen of deze indrukken. Wees voornamelijk voorzichtig
in de buurt van de stekkers en het punt waar de kabel uit het apparaat komt. Plaats
geen zware voorwerpen op de stroomadapter, om beschadiging ervan te voorkomen.
Houd het gehele apparaat buiten bereik van kinderen! Wanneer kinderen met de
voedingskabel spelen, kunnen zij ernstig letsel oplopen.
⚫ Haal de stekker uit het stopcontact tijdens onweer of wanneer u deze langere tijd niet
gebruikt.
⚫ Het stopcontact moet in de buurt van de apparatuur zijn geïnstalleerd en eenvoudig te
bereiken zijn.
⚫ Overbelast stopcontacten of verlengsnoeren niet. Overbelasting kan brand of een
elektrische schok veroorzaken.
⚫ Apparaten met een Klasse 1 structuur dienen te worden aangesloten op een
stopcontact met een beschermende aardverbinding.
⚫ Apparaten met een Klasse 2 structuur vereisen geen aardverbinding.
⚫ Houd altijd de stekker vast wanneer u deze uit het stopcontact trekt. Trek nooit aan de
voedingskabel. Dit kan tot een kortsluiting leiden.
⚫ Gebruik nooit een beschadigde voedingskabel of stekker of een los stopcontact. Dit
vormt namelijk een risico op brand of elektrische schokken.
28. Indien het product knoopcelbatterijen bevat of wordt geleverd met een afstandsbediening
die knoopcelbatterijen bevat:
Waarschuwing:
⚫ "Batterij niet inslikken, chemisch brandgevaar" of gelijkwaardige werking.
⚫ [De afstandsbediening meegeleverd met] Dit product bevat een munt/knoopcelbatterij.
Als de batterij wordt ingeslikt, kan deze in slechts 2 uur ernstige interne brandwonden
veroorzaken en tot de dood leiden.
⚫ Houd nieuwe en gebruikte batterijen buiten bereik van kinderen.
⚫ Als de batterijhouder niet goed kan worden gesloten, dient u het product niet meer te
gebruiken en buiten bereik van kinderen te houden.
⚫ Als u denkt dat batterijen zijn ingeslikt of binnenin een willekeurig lichaamsdeel terecht
zijn gekomen, dient u onmiddellijk medische hulp te zoeken.
29. Waarschuwing m.b.t. het gebruik van batterijen:
⚫ Als de batterij onjuist wordt geplaatst, bestaat er explosiegevaar. Vervang de batterij
alleen door een zelfde of vergelijkbare soort batterij.
⚫ Stel de batterij niet bloot aan extreem hoge of lage temperaturen of een lage luchtdruk
op grote hoogte tijdens gebruik, opslag of transport.
⚫ Vervanging van een batterij door een incorrect type kan leiden tot een ontploffing of de
lekkage van ontvlambare vloeistoffen of gas.

19
⚫ Verwijdering van een batterij in vuur of een hete oven of het mechanisch verpletteren
of snijden van een batterij kan leiden tot een ontploffing.
⚫ Laat een batterij nooit achter in omgevingen met extreem hoge temperaturen, anders
kan dit leiden tot een ontploffing of de lekkage van ontvlambare vloeistoffen of gas.
⚫ Stel een batterij nooit bloot aan een extreem lage luchtdruk, anders kan dit leiden tot
een ontploffing of de lekkage van ontvlambare vloeistoffen of gas.
⚫ Aandacht voor het milieu is nodig bij het verwijderen van de batterijen.

20
Verpakkingsinhoud
1x gebruikershandleiding
1x RCA-audiokabel
1x voedingskabel

21
1x USB-kabel
1x plateau
1x vilt mat

22
Omschrijving
1. PLATENSPELERPLATEAU
Het plateau is voorzien van een vilt mat. Dit maakt het gemakkelijker om de plaat te draaien
om te scratchen. Plaats de platen gecentreerd op het plateau.
2. TEGENGEWICHT
Door het tegengewicht af te stellen creëert u de juiste neerwaartse naalddruk op de plaat.
Bevestig het tegengewicht door het op de achterkant van de toonarm te schuiven.
3. AFSTELSCHAAL NAALDDRUK
Hiermee kunt u de naald- en patroondruk afstellen.
4. DWARSKRACHTCOMPENSATIEKNOP
Hiermee voorkomt u dat de toonarm over de plaat springt wegens de middelpuntvliedende
kracht veroorzaakt door het draaien van het plateau.
5. HEFBOOM TOONARM
Hiermee kunt u de toonarm op en neer bewegen.
6. KOPBEHUIZING
Installeer de patroon hier. Tijdens installatie, bevestig een naaldbeveiliging om de tip van de
naald te beschermen tegen beschadiging.
Bevestig de draden als volgt:

23
Wit (L+)
Linker kanaal +
Blauw (L-)
Linker kanaal –
Rood (R+)
Rechter kanaal +
Groen (R-)
Rechter kanaal –
7. TOETS AFSPELEN/PAUZE
Druk op deze toets om het afspelen te starten of het afspelen te pauzeren. Druk nogmaals op
deze toets om het afspelen te hervatten na een pauze.
8. TOETSEN 33/45 TPM SNELHEID
Druk op deze toetsen om de snelheid van het draaiplateau te selecteren, overeenkomstig de
snelheid die op de plaat staat, in 33 of 45 tpm.
9. Borgmoer kopbehuizing
Bevestig de kopbehuizing door het in de voorkant van de toonarm te steken en vervolgens de
borgmoer rechtsom te draaien.
10. Pitchfader
Wordt gebruikt om de afspeelsnelheid van het afgespeelde spoor te wijzigen.
11. Aan/uit-schakelaar/stroboscoopverlichting
Draai de schakelaar rechtsom om het apparaat in te schakelen. Draai de schakelaar linksom
om het apparaat uit te schakelen. De stroboscoopverlichting wordt autmatisch ingeschakeld
als het apparaat ingeschakeld is.
1. RCA-UITVOER
OUTPUT L en R worden gebruikt voor het aansluiten van de platenspeler op de anloge
RCA-ingang van uw versterker.
2. LINE/PHONO-SCHAKELAAR
De platenspeler heeft een ingebouwde PHONO-voorversterker die wordt uitgeschakeld als u
een externe voorversterker heeft. Als u de signalen wilt gebruiken die door de interne
versterker van de platenspeler worden versterkt, zet u de schakelaar op LINE. Als u een
externe PHONO-voorversterker wilt gebruiken, zet u de schakelaar op PHONO.

24
Wanneer de schakelaar PRE-AMP is ingesteld op ON, dient u nooit aan te sluiten op
een Phono-ingang.
Audio zal in dit geval erg worden verstoord en er bestaat een kans dat de versterker
en/of luidsprekers beschadigd raken.
3. USB-POORT
Het geluid van uw plaat wordt omgezet naar digitaal met een maximale resolutie van 48
Khz/16 bits. Gebruik de USB-kabel die bij het apparaat is geleverd om de platenspeler aan te
sluiten op uw computer. De Audacity-software moet worden gedownload.
4. AC-IN
Sluit hier de voedingskabel aan.
5. AAN/UIT
Gebruik om de platenspeler in en uit te schakelen.

25
Assemblage platenspeler:
1. Verwijderen uit de verpakking:
Haal het hoofdapparaat voorzichtig uit de doos met het verpakkingsmateriaal intact.
Verwijder het verpakkingsmateriaal nadat het apparaat eenmaal uit de doos is gehaald. Zorg
ervoor alle accessoires uit het verpakkingsmateriaal te halen.
2. 45-tpm adapter:
Haal de 45-tpm adapter uit het verpakkingsmateriaal en plaats deze in de 45-tpm
adapterinkeping boven op het hoofdapparaat.
3. Draaitafel:
Verwijder het plateau uit het verpakkingsmateriaal en plaats het plateau voorzichtig op de
MIDDENAS van de draaitafel.
4. Vilt mat:
Remove the black feltmat from the packaging and place it on the PLATTER.
5. Kopbehuizing:
Steek de KOPBEHUIZING in het vooreinde van de TOONARMASSEMBLAGE. Terwijl u de
KOPBEHUIZING stevig in het vooreinde van de toonarmassemblage houdt, draai de
VERGRENDELMOER van de KOPBEHUIZING linksom om de KOPBEHUIZING stevig vast te zetten
op de TOONARMASSEMBLAGE.
EN
NL
HEADSHELL
KOPBEHUIZING
TONEARM ASSEMBLY
TOONARMASSEMBLAGE
HEADSHELL LOCKING NUT
VERGRENDELMOER KOPBEHUIZING
6. Tegengewicht:
Haal het TEGENGEWICHT voor de toonarm uit de verpakking. Schuif het TEGENGEWICHT op
de achterzijde van de TOONARMASSEMBLAGE. Draai het lichtjes om het op de achteras van
de toonarm te schroeven.

26
EN
NL
TONEARM ASSEMBLY
TOONARMASSEMBLAGE
COUNTERWEIGHT
TEGENGEWICHT
Snel aan de slag met de platenspeler:
1. Plateausnelheid veranderen
Druk op de toetsen 33/45 TPM snelheid om de snelheid van het plateau te wijzigen.
2. Het plateau starten en stoppen
Gebruik de toets afspelen/pauze om te schakelen tussen plateausnelheden en pauzemodi.
3. Pitchregeling
1) De pitchregeling wordt gebruikt om het toerental van het plateau fijner af te stellen.
2) De pitchafstelling is variabel en kan worden ingesteld tussen -10% en +10% van de
geselecteerde plateausnelheid.
3) De pitch wordt veranderd door de pitchschuif omhoog en omlaag te schuiven.
4) De indicatoren op de rand van het DRAAIPLATEAU kunnen worden gebruikt om de
pitchhoogte van de plaat visueel in te schatten. Deze indicatoren worden verlicht door de
STROBOSCOOPVERLICHTING als het apparaat wordt ingeschakeld door middel van de
AAN-/UITSCHAKELAAR. Elke rij van de STROBE-INDICATOREN kan op verschillende
pitchniveaus stil lijken te staan.
Opmerking: Het gebruik van krachtige fluorescerende verlichting direct boven de
platenspeler zal de indicatienauwkeurigheid van het STROBE-INDICATIELAMPJE
aantasten.

27
Installatie
De platenspeler installeren:
1. Plaats het apparaat niet op een plek blootgesteld aan direct zonlicht of in de buurt van
enigerlei type verwarmingsapparatuur.
2. Plaats het apparaat niet op een plek met een hoge luchtvochtigheid of teveel stof.
3. De cartridge kan lichte geluidsdruk of trillingen van nabijgelegen luidsprekers opvangen.
Installeer dit apparaat voor de beste resultaten dus niet te dicht in de buurt van luidsprekers.
4. Installeer dit apparaat op een horizontaal en stabiel oppervlak, zonder trillingen.
5. De rubberen voetstukjes zijn speciaal ontworpen om het apparaat te beschermen tegen
teveel trillingen. De voetstukjes kunnen ook worden gebruikt om de hoofdbehuizing
horizontaal te stabiliseren. Pas de hoogte van het apparaat aan door de voetstukjes rechtsom
of linksom te draaien.
Balans van de toonarm en naalddruk:
1. De horizontale nulbalans en naalddruk afstellen:
2. Verwijder de beschermkap van de naald, indien geïnstalleerd. Raak de tip van de naald tijdens
deze afstelling nooit aan.
3. Laat het TOONARMHENDEL zakken.
4. Ontgrendel de klem van de toonarm en haal de toonarm van de houder af.
5. Stel de afstelling DWARSKRACHTCOMPENSATIE in op nul.
6. Draai het TEGENGEWICHT in een willekeurige richting totdat de TOONARM perfect
horizontaal gebalanceerd is (moet vrij zweven).
7. Leg de TOONARM terug op de houder en sluit de vergrendeling.
8. Houd het TEGENGEWICHT met de ene hand stil en draai met de andere hand alleen de (3)
drukring van de naald om het cijfer “0” van de ring af te stemmen op de middenlijn van de
achteras van de toonarm.
9. Draai het TEGENGEWICHT linksom totdat de schaalwaarde overeenkomt met de aanbevolen
naalddruk.
Opmerking: De aanbevolen naalddruk van de optionele patroon mogelijk meegeleverd met
uw apparaat is 2,5 naar 3 gram. Voor alle andere patroonsystemen dient u de specificaties
van de fabrikant te raadplegen die zijn meegeleverd met de patroon.
Dwarskrachtcompensatie:
De DWARSKRACHTCOMPENSATIE-afstelling voorkomt dat de TOOMARMASSEMBLAGE over de
plaat springt wegens de middelpuntvliedende kracht veroorzaakt door het draaien van het
PLATEAU. De DWARSKRACHTCOMPENSATIE-bedieningsknop dient te worden ingesteld op
dezelfde waarde als de naalddruk. Als uw TEGENGEWICHT bijvoorbeeld is ingesteld op 2,5 gram,
dient ook de waarde van de DWARSKRACHTCOMPENSATIE te worden ingesteld op 2,5 gram.

28
Product onderhoud:
1. Reinig de naald regelmatig met een zacht borsteltje om stofophoping tegen te gaan.
2. Controleer de naald wanneer het geluid vervormd raakt of ruis vertoont. Als de naald is
versleten, dient u deze door een nieuwe te vervangen.
3. De stofkap en de behuizing van de platenspeler dienen af en toe te worden afgeveegd met
een zacht, droog doekje.
4. Vluchtige materialen dienen niet te worden gebruikt, waaronder: alcohol, verdunner,
benzine, enz. omdat hierdoor de verf kan verdwijnen of de glans beschadigd kan raken.
Overzicht Audacity-software
Audacity is gratis software, onder licentie van de GNU Algemene Publieke Licentie (GPL).
Meer informatie en tevens open broncodes zijn te vinden op de website
https://www.audacityteam.org/download/
* Zorg er a.u.b. voor dat de software is geïnstalleerd voordat u van start gaat.
Uw PC instellen om met Audacity te werken
1. Sluit de meegeleverde USB-kabel aan op de platenspeler.
2. Sluit de linker USB-stekker van deze USB-kabel aan op uw pc.
3. Installeer de Audacity opnamesoftware.
4. Open het Audacity programma.
5. Selecteer “Preference” (Voorkeur) op het tabblad “Edit” (Bewerken) in het Audacity Menu.
6. Selecteer het tabblad Audio I/O linksboven op het scherm.
Onder Afspelen, Apparaat, selecteer uw interne geluidskaart.
Onder Opnemen, Apparaat, selecteer USB Audio CODEC.
Onder Opname, Kanalen, selecteer 2 (Stereo).
Vink de box af gemarkeerd Play other tracks while recording new one (Andere tracks
afspelen terwijl een nieuwe wordt opgenomen).

29
Vink de box af gemarkeerd Software Playthrough (Software Afspelen).
Albums opnemen met Audacity
1. Een project opslaan
Audacity schrijft alle veranderde en opgenomen audio naar een folder met de naam
Projectname_data, te vinden rechts van waar u het projectbestand zelf hebt opgeslagen.
Selecteer dus Save Project as (project opslaan als) op het tabblad Audacity Bestand en kies
een locatie en bestandsnaam voor uw project.
Vergeet a.u.b. niet dat als u Audacity opnieuw start, alleen de menuoptie “Save As...”
(opslaan als) beschikbaar is.

30
2. Opnemen
Stel uw USB-platenspeler in om de track of het album af te spelen dat u wilt opnemen.
Klik op de rode knop Opnemen om te beginnen met opnemen.
Laat de toonarm op de USB-platenspeler zakken op het album of de track die u wilt
opnemen.
Klik op de blauwe knop Pauze om de opname te pauzeren. Druk nogmaals in om te
vervolgen.
Klik op de gele Stoptoets .
Dat is alles. U kunt nu aan de slag met uw opname en de bewerkfuncties van Audacity
uitproberen. Vergeet niet dat u de functie Ongedaan Maken vrijwel zonder beperkingen kunt
gebruiken terwijl het project is geopend.
OPMERKING: CD's kunnen niet direct worden gebrand met de Audacity applicatie. Voor het
branden van CD’s zijn andere applicaties nodig.

31
Specificaties
Algemeen
Model:
L-3809
Afmetingen:
430 x 350 x 155 (B x D x H) mm
Gewicht:
6,18 kg
Stroomvoorziening:
AC 230 V~ 50 Hz (Nederland); AC 240 V~ 50 Hz(VK)
Opgenomen vermogen:
30 W
Standaard testconditie:
Omgevingstemperatuur: 20 °C +/-2 °C
Relatieve vochtigheid:
65% +/- 5%
OPMERKING: Metingen kunnen worden uitgevoerd tussen 5 graden C tot 35 graden C en met
een relatieve vochtigheid van 45% tot 85%.
Draaitafel:
Type:
2-snelhden volledig handmatig
Motor:
16-polig, 3-fasig, zonder borstels
Aandrijfmethode:
Directe aandrijving
Draaitafel:
332 mm (Aluminium)
Snelheden:
33
1/3
en 45 tpm
Wow en Flutter:
Minder dan 0,3% WRMS (JIS WTD) bij 33
1/3
tpm
S/R verhouding:
Meer dan 50 dB (DIN-B)
Pitchregeling:
+/- 10%
Startdraaioment:
Meer dan 3,6 kgf/cm
Remsysteem:
Elektronische rem
Starttijd:
Minder dan 1 sec.
Remtijd:
Minder dan 1 sec.
Tijd voor snelheidsverandering:
Minder dan 1 sec. van 33
1/3
naar 45 tpm.
Minder dan 1 sec. van 45 naar 33
1/3
tpm.
USB-functie:
USB-opname Functie
16 bits 44,1 KHz of 48 KHz
Computerinterface:
USB 1.1 compatibel Windows 7/8/10 of MAC OSX
Toonarm:
Type:
Statische gebalanceerde S-vormige toonarm
Effectieve armlengte:
220 mm
Overhang:
10 mm
Storingshoek tracking:
Minder dan 3 graden
Verstelbereik trackingkracht:
3-4 g
Type patroon MM:
Audio Technica AT-3600L
Naalddruk:
3,5 ±0,5 g
Patroongewicht:
5 ±0,5 g
Bereik dwarskrachtcompensatie:
0~4 g
Kanaalscheiding:
Meer dan 18 dB
Kanaalbalans:
Binnen 2,5 dB op 1 KHz

32
Voorversterker
Uitvoer:
150 mV +/-4 dB (IN: 2,5 mV, 1 KHz)
RIAA (frequentierespons):
20 Hz~20 KHz +1/-3 dB (IN: 1,5 mV, 1 KHz)
Garantie
Lenco biedt service en garantie aan overeenkomstig met de Europese wetgeving. Dit houdt in dat
u, in het geval van reparaties (zowel tijdens als na de garantieperiode), contact moet opnemen
met uw lokale handelaar.
Belangrijke opmerking: Het is niet mogelijk om producten die moeten worden gerepareerd
rechtstreeks naar Lenco te sturen.
Belangrijke opmerking: De garantie verloopt als een onofficieel servicecenter het apparaat op
wat voor manier dan ook heeft geopend, of er toegang toe heeft gekregen.
Het apparaat is niet geschikt voor professioneel gebruik. In het geval van professioneel gebruik
worden alle garantieverplichtingen van de fabrikant nietig verklaard.
Disclaimer
Er worden regelmatig updates in de firmware en/of hardwarecomponenten gemaakt. Daardoor
kunnen gedeelten van de instructie, de specificaties en afbeeldingen in deze documentatie
enigszins verschillen van uw eigen situatie. Alle onderwerpen die staan beschreven in deze
handleiding zijn bedoeld als illustratie en zijn niet van toepassing op specifieke situaties. Aan de
beschrijving in dit document kunnen geen rechten worden ontleend.
Afvoer van het oude apparaat
Dit symbool geeft aan dat het betreffende elektrische product of de
accu/batterij niet mag worden verwijderd als algemeen huishoudelijk afval in
Europa. Zorg voor een juiste afvalverwerking door het product en de
accu/batterij in overeenstemming met alle van toepassing zijnde lokale wetten
voor het verwijderen van elektrische apparatuur of accu's/batterijen te
verwijderen. Als u dit doet, helpt u de natuurlijke bronnen te behouden en de
standaard van milieubescherming te verbeteren bij de behandeling en
verwijdering van elektrisch afval (Afgedankte Elektrische en Elektronische
Apparatuur).
CE-markering
Producten met een CE keurmerk houden zich aan de EMC richtlijn
(2014/30/EC) en de Richtlijn voor Lage Voltage (2014/35/EC) uitgegeven door
de Europese Commissie.
Hierbij verklaart Lenco Benelux BV, Thermiekstraat 1a, 6361 HB Nuth,
Nederland, dat dit product voldoet aan de essentiële eisen.
De conformiteitsverklaring kan worden geraadpleegd op techdoc@lenco.com


34
Deutsch
L-3809
ACHTUNG:
Eine andere als die hier beschriebene Bedienung, Einstellung oder Verwendung der Funktionen
kann zu gefährlicher Strahlenbelastung führen.
VORSICHTSMASSNAHMEN VOR DER BENUTZUNG
BEFOLGEN SIE IMMER FOLGENDE ANWEISUNGEN:
1. Blockieren oder bedecken Sie keine Lüftungsöffnungen. Wenn Sie das Gerät auf ein Regal
stellen, lassen Sie um das gesamte Gerät 5 cm (2”) freien Platz.
2. Stellen Sie das Gerät entsprechend den Anweisungen der mitgelieferten
Bedienungsanleitung auf.
3. Halten Sie das Gerät von Hitzequellen wie Radiatoren, Heizern, Öfen, Kerzen oder anderen
hitzeerzeugenden Produkten oder offenen Flammen fern. Das Gerät darf nur bei
gemäßigtem Klima verwendet werden. Sehr kalte oder heiße Umgebungen sind zu
vermeiden. Die Betriebstemperatur liegt zwischen 0 °C und 35 °C.
4. Meiden Sie bei der Beutzung des Produkts die Nähe starker Magnetfelder.
5. Elektrostatische Entladungen können die normale Benutzung dieses Geräts stören. Sollte
dies geschehen, führen Sie einfach einen Reset aus und starten Sie dann das Gerät
entsprechend den Anweisungen dieser Bedienungsanleitung neu. Gehen Sie besonders bei
Datenübertragungen mit dem Gerät vorsichtig um und führen Sie diese nur in einer
antielektrostatischen Umgebung aus.
6. Warnung! Niemals Gegenstände durch die Lüftungsschlitze oder Öffnungen in das Gerät
stecken. In diesem Gerät fließt Hochspannung und das Hineinstecken von Gegenständen
kann zu elektrischem Schock und/oder Kurzschluss interner elektrischer Bauteile führen.
Spritzen/Gießen Sie aus dem gleichen Grund kein Wasser oder Flüssigkeiten auf das Gerät.
7. Benutzen Sie das Gerät nicht in nasser oder feuchter Umgebung wie Bad, Dampfküche oder
in der Nähe von Schwimmbecken.
8. Das Gerät darf weder Tropf- noch Spritzwasser ausgesetzt werden und es dürfen keine mit
Flüssigkeit gefüllten Behälter wie z. B. Vasen auf das Gerät oder in der Nähe des Gerätes
gestellt werden.
9. Benutzen Sie das Gerät nicht, wenn Kondensation entstehen kann. Wenn Sie das Gerät in
einem warmen feuchten Raum mit Dampf benutzen, dann können Wassertropfen oder
Kondensation in das Gerät eindringen und u. U. zu Fehlfunktionen des Geräts führen.
Schalten Sie in diesem Fall das Gerät für 1 – 2 Stunden aus, bevor Sie es erneut einschalten,
wobei Sie darauf achten sollten, dass das Gerät vollständig getrocknet ist, bevor Sie es
wieder einschalten.
10. Obwohl dieses Gerät unter größter Sorgfalt hergestellt und vor Auslieferung mehrmals
überprüft wurde, können trotzdem wie bei jedem anderen elektrischen Gerät auch
Probleme auftauchen. Trennen Sie das Gerät bei Rauchentwicklung, starker
Hitzeentwicklung oder jeder anderen unnatürlichen Erscheinung sofort vom Stromnetz.
11. Dieses Gerät ist durch eine Stromquelle wie auf dem Typenschild angegeben zu betreiben.
Halten Sie bei Unsicherheiten über die Art Ihrer Stromversorgung in Ihrer Wohnung
Rücksprache mit Ihrem Händler oder Ihrer Stromzuliefererfirma.
12. Halten Sie das Gerät von Haustieren fern. Einige Nagetiere lieben es, an Netzkabeln zu
nagen.
13. Benutzen Sie für die Reinigung ein weiches und trockenes Tuch. Benutzen Sie niemals
Lösungsmittel oder Flüssigkeiten auf Ölbasis. Benutzen Sie zum Entfernen hartnäckiger
Flecken ein feuchtes Tuch mit mildem Reinigungsmittel.
14. Der Hersteller haftet nicht für Beschädigungen oder Datenverluste durch Fehlfunktion,
Zweckentfremdung oder Modifikation des Geräts oder durch das Wechseln der Batterie.
15. Unterbrechen Sie die Verbindung nicht während einer Formatierung oder einer
Datenübertragung. Bei Unterbrechung drohen Datenverlust und Datenbeschädigung.
16. Wenn das Gerät eine USB-Wiedergabefunktion besitzt, dann stecken Sie den USB-Stick
direkt in das Gerät. Verwenden Sie kein USB-Verlängerungskabel, weil die erhöhte
Störungsanfälligkeit zu Datenverlust führen kann.
17. Das Typenschild befindet sich an der Unter- oder Rückseite des Gerätes.

35
18. Dieses Gerät ist nicht zur Benutzung durch Personen (einschließlich Kinder) mit physischen,
sensorischen oder mentalen Beeinträchtigungen oder ohne ausreichender Erfahrung
vorgesehen, es sei denn, sie werden durch eine verantwortliche Person beaufsichtigt oder
wurden in die ordnungsgemäße Bedienung des Gerätes durch eine für ihre Sicherheit
verantwortlichen Person eingewiesen.
19. Dieses Produkt ist nur für den nicht-professionellen Gebrauch und nicht für gewerbliche
oder industrielle Zwecke bestimmt.
20. Stellen Sie sicher, dass das Gerät in einer stabilen Position aufgestellt ist. Schäden, die durch
Verwendung dieses Produkts in einer instabilen Position, durch Vibrationen, Stöße oder
Nichtbeachtung der anderen in diesem Handbuch enthaltenen Warnungen und
Sicherheitsmaßnahmen entstehen, werden nicht durch die Garantie abgedeckt.
21. Entfernen Sie niemals das Gehäuse dieses Geräts.
22. Stellen Sie dieses Gerät niemals auf andere elektrische Geräte.
23. Halten Sie Kinder von den Plastiktüten fern.
24. Benutzen Sie nur vom Hersteller spezifizierte Erweiterungen/Zubehörteile.
25. Lassen Sie alle Wartungs-/Reparaturarbeiten von qualifiziertem Servicepersonal ausführen.
Reparatur/Wartung wird notwendig, wenn das Gerät in irgendeiner Weise wie
beispielsweise am Netzkabel oder am Netzstecker beschädigt wurde oder wenn Flüssigkeit
in das Gerät gelangt ist bzw. Gegenstände in das Gerät gefallen sind, das Gerät Regen oder
Feuchtigkeit ausgesetzt war, es heruntergefallen ist oder nicht ordnungsgemäß funktioniert.
26. Langes Hören lauter Töne aus einem Musikgerät kann zum zeitweiligen oder permanenten
Hörverlust führen.
27. Wenn zum Lieferumfang des Produkts ein Netzkabel oder ein Netzadapter gehört:
⚫ Wenn irgendwelche Probleme auftreten, dann trennen Sie das Gerät vom Stromnetz
und setzen Sie sich anschließend mit einer qualifizierten Fachkraft in Verbindung.
⚫ Treten Sie nicht auf den Netzadapter und klemmen Sie ihn auch nicht ein. Seien Sie
besonders im näheren Bereich des Netzsteckers und an der Stelle vorsichtig, an der das
Netzkabel aus dem Gerät herausgeführt wird. Stellen Sie keine schweren Gegenstände
auf den Netzadapter, weil er dadurch beschädigt werden kann. Halten Sie das gesamte
Gerät außerhalb der Reichweite von Kindern! Durch Spielen mit dem Netzkabel können
sie sich ernsthafte Verletzungen zuziehen.
⚫ Trennen Sie das Gerät während eines Gewitters oder bei längerer Nichtbenutzung vom
Netz.
⚫ Die Netzsteckdose muss sich in der Nähe des Geräts befinden und einfach zu erreichen
sein.
⚫ Überlasten Sie Steckdosen und Verlängerungsleitungen nicht. Eine Überlastung kann zu
Brandgefahr bzw. Stromschlag führen.
⚫ Geräte der Schutzklasse 1 müssen Sie an eine Netzsteckdose mit Schutzleiter
anschließen.
⚫ Geräte der Schutzklasse 2 benötigen keinen Schutzleiteranschluss.
⚫ Halten Sie den Netzstecker in der Hand, wenn Sie ihn aus der Netzsteckdose ziehen.
Ziehen Sie ihn nicht durch Zerren am Kabel heraus. Das kann zu einem Kurzschluss
führen.
⚫ Verwenden Sie weder ein beschädigtes Netzkabel noch einen beschädigten Netzstecker
oder eine lockere Steckdose. Missachtung kann zu Brand oder Stromschlag führen.
28. Wenn das Produkt mit einer Fernbedienung mit Batterien/Knopfzellen geliefert wird oder
das Produkt eine derartige Fernbedienung umfasst:
Warnung:
⚫ Die Batterie nicht einnehmen – Verätzungsgefahr!
⚫ Die mit diesem Produkt mitgelieferte Fernbedienung enthält eine Knopfzelle. Das
Verschlucken der Batterie kann innerhalb von nur 2 Stunden zu schwersten inneren
Verbrennungen mit Todesfolge führen.
⚫ Halten Sie neue und gebrauchte Batterien von Kindern fern.
⚫ Falls sich das Batteriefach nicht richtig schließen lässt, dann benutzen Sie das Gerät
nicht mehr und halten Sie es von Kindern fern.
⚫ Wenn Sie vermuten, dass Batterien verschluckt oder in eine Körperöffnung eingeführt
worden sind, dann suchen Sie umgehend eine/-n Ärztin/Arzt auf.

36
29. Warnhinweise bzgl. der Verwendung von Batterien:
⚫ Es besteht Explosionsgefahr, wenn die Batterien nicht ordnungsgemäß ersetzt wird.
Tauschen Sie die Batterie nur gegen eine Batterie des gleichen Typs aus.
⚫ Die Batterie darf während der Benutzung, Aufbewahrung oder des Transports weder
sehr hohen oder sehr niedrigen Temperaturen noch niedrigem Luftdruck in großen
Höhenlagen ausgesetzt werden.
⚫ Die Ersetzung der Batterie mit einem falschen Batterietyp kann zum Explodieren der
Batterie oder zum Entweichen von entflammbarem Gas oder Auslaufen von
entflammbarer Flüssigkeit aus der Batterie führen.
⚫ Die Entsorgung der Batterie in Feuer oder einem heißen Ofen oder das mechanische
Zerkleinern oder Zerteilen der Batterie kann zu Explosionen führen.
⚫ Das Verbleiben der Batterie in einer Umgebung mit sehr hohen Temperaturen kann
zum Explodieren der Batterie oder zum Entweichen von entflammbarem Gas oder
Auslaufen von entflammbarer Flüssigkeit aus der Batterie führen.
⚫ Eine einem sehr niedrigen Luftdruck ausgesetzte Batterie kann explodieren oder es
kann aus einer einem sehr niedrigen Luftdruck ausgesetzten Batterie entflammbares
Gas entweichen oder entflammbare Flüssigkeit auslaufen.
⚫ Legen Sie besonderes Augenmerk auf den ökologischen Aspekt der Batterieentsorgung.

37
Mitgeliefertes Zubehör
1 x Bedienungsanleitung
1 x Cinch-Audiokabel
1 x Netzkabel

38
1 x USB-Verbindungskabel
1 x Plattenteller
1 x Filzmatte

39
Beschreibung
1. PLATTENTELLER
Der Plattenteller ist mit einer Filzmatte ausgestattet. Dadurch wird das Scratchen der
Schallplatte erleichtert. Legen Sie Vinylschallplatten mittig auf den Plattenteller.
2. GEGENGEWICHT
Durch Einstellen des Gegengewichts erhält die Tonnadel den geeigneten Auflagedruck auf die
Schallplatte. Sie können das Gegengewicht durch Aufschrauben auf das Tonarmende
anbringen.
3. TONNADELAUFLAGEDRUCKEINSTELLSKALE
Hierüber können Sie den Auflagedruck der Tonnadel anpassen.
4. ANTISKATING-KNOPF
Durch ihn wird im Geräteinneren auf den Tonarm eine Kraft ausgeübt, sodass er nicht durch
die Fliehkraft der sich drehenden Schallplatte nach außen springt.
5. TONARMHEBEL
Mit ihm steuern Sie die Auf- und Abwärtsbewegung des Tonarms.
6. TONKOPF
Montieren Sie hier den Tonabnehmer. Setzen Sie während der Montage den Tonnadelschutz
auf die Tonnadel, um sie vor Beschädigung zu schützen.

40
Verbinden Sie die Kabel wie folgt:
Weiß (L+)
Linker Kanal +
Blau (L-)
Linker Kanal –
Rot (R+)
Rechter Kanal +
Grün (R-)
Rechter Kanal –
7. WIEDERGABE/PAUSE-TASTE
Drücken Sie diese Taste, um die Wiedergabe zu starten, zu pausieren oder die pausierte
Wiedergabe fortzusetzen.
8. 33/45-U/MIN-EINSTELLTASTEN
Drücken Sie diese Taste, um die Umdrehungsgeschwindigkeit des Plattentellers entsprechend
der Angabe auf der Schallplatte auf 33 oder 45 U/min einzustellen.
9. Tonkopfsicherungsmutter
Montieren Sie den Tonkopf, indem Sie ihn am vorderen Ende des Tonarms einsetzen. Drehen
Sie anschließend zur Fixierung des Tonkopfs die Tonkopfsicherungsmutter in Uhrzeigersinn.
10. Pitchfader
Mit ihm ändern Sie die Wiedergabegeschwindigkeit der Tonrille.
11. Ein/Aus-Schalter/Stroboskoplicht
Drehen Sie diesen Schalter in Uhrzeigersinn, um das Gerät einzuschalten. Drehen Sie den
Schalter gegen den Uhrzeigersinn, um das Gerät auszuschalten. Das Stroboskoplicht wird
automatisch eingeschaltet, wenn Sie das Gerät einschalten.
1. CINCH-AUSGANG
Über den Ausgang LINE OUT L und R können Sie den Plattenspieler an den analogen
Cinch-Eingängen Ihres Verstärkers anschließen.

41
2. LINE/PHONO-UMSCHALTER
Der Plattenspieler besitzt einen integrierten PHONO-Vorverstärker, den Sie jedoch umgehen
können, wenn Sie einen externen Vorverstärker benutzen. Wenn Sie ein durch den
integrierten Vorverstärker verstärktes Signal benutzen möchten, dann schieben Sie den
Schalter auf die Stellung LINE. Wenn Sie jedoch einen externen PHONO-Vorverstärker
benutzen möchten, dann schieben Sie den Schalter auf die Stellung PHONO.
Stellen Sie niemals eine Verbindung zu einem PHONO-Eingang her, wenn Sie den
integrierten Vorverstärker benutzen.
Sollten Sie es dennoch versuchen, dann wird das Audio extrem verzerrt
wiedergegeben und es besteht ein sehr hohes Risiko, dass der Verstärker und/oder
die Lautsprecher beschädigt werden.
3. USB-PORT
Der Klang Ihrer Vinylschallplatte wird in ein digitales Signal mit einer maximalen Auflösung
von 48 kHz/16 Bit umgewandelt. Schließen Sie den Plattenspieler mit Hilfe des mit diesem
Gerät mitgelieferten USB-Kabels an Ihrem Computer an. Die Audacity-Software sollte
heruntergeladen werden.
4. AC-NETZANSCHLUSSBUCHSE
Schließen Sie hier das Netzkabel an.
5. EIN/AUS
Schalten Sie hierüber den Plattenspieler ein oder aus.

42
Zusammenbauen und Einstellen des Plattenspielers:
1. Herausnehmen aus der Verpackung:
Nehmen Sie den Plattenspieler zusammen mit dem unbeschädigten Verpackungsmaterial
vorsichtig aus der Versandverpackung. Entfernen Sie das Verpackungsmaterial, nachdem Sie
ihn aus der Versandverpackung herausgenommen haben. Überprüfen Sie, ob sich im
Verpackungsmaterial alle Zubehörteile befinden.
2. 45-U/min-Adapter:
Nehmen Sie den 45-U/min-Adapter aus der Verpackung und setzen Sie ihn in der Aussparung
für den 45-U/min-Adapter auf der Geräteoberseite ein.
3. Plattenteller:
Nehmen Sie den Plattenteller aus der Verpackung und setzen Sie ihn vorsichtig mittig auf die
ANTRIEBSSPINDEL des Plattenspielers.
4. Filzmatte:
Nehmen Sie die schwarze Filzmatte aus der Verpackung und legen Sie sie auf den
PLATTENTELLER.
5. Tonkopf:
Setzen Sie den TONKOPF am vorderen Ende der TONARMEINHEIT ein. Drehen Sie die
TONKOPFSICHERUNGSMUTTER gegen den Uhrzeigersinn, während Sie den TONKOPF fest an
das vordere Ende der Tonarmeinheit drücken, um den TONKOPF an der TONARMEINHEIT zu
fixieren.
EN
DE
HEADSHELL
TONKOPF
TONEARM ASSEMBLY
TONARMEINHEIT
HEADSHELL LOCKING NUT
TONKOPFSICHERUNGSMUTTER
6. Gegengewicht:
Nehmen Sie das TONARMGEGENGEWICHT aus der Verpackung. Schieben Sie das
GEGENGEWICHT auf das hintere Ende der TONARMEINHEIT. Wenn Sie das Gegengewicht zum
Einfädeln leicht drehen, dann können Sie es auf das hintere Ende des Tonarms schrauben.

43
EN
DE
TONEARM ASSEMBLY
TONARMEINHEIT
COUNTERWEIGHT
GEGENGEWICHT
Plattenspieler-Schnellstartanleitung:
1. Ändern der Plattentellergeschwindigkeit
Drücken Sie die 33/45-U/min-EINSTELLTASTEN, um die gewünschte Geschwindigkeit des
Plattentellers auszuwählen.
2. Starten und Stoppen des Plattentellers
Benutzen Sie die WIEDERGABE/PAUSE-TASTE BUTTON, um zwischen dem Modus für das
Drehen und dem pausierten Drehen des Plattentellers zu wechseln.
3. Pitchfader
1) Die Pitcheinstellung ist die Feineinstellung der Drehgeschwindigkeit des Plattentellers.
2) Sie können die Drehgeschwindigkeit des Plattentellers in einem Bereich zwischen -10 %
und +10 % der ausgewählten Geschwindigkeit des Plattentellers stufenlos feineinstellen.
3) Schieben Sie hierfür den Pitchfader nach oben oder unten.
4) Die Anzeigepunkte auf dem Rand des PLATTENTELLERS können Sie hierbei als visuelle Hilfe
für die ungefähre Pitcheinstellung des Plattentellers nehmen. Diese Anzeigepunkte werden
durch das STROBOSKOPLICHT beleuchtet, wenn Sie das Gerät mit Hilfe des
EIN/AUS-SCHALTERS einschalten. Bei verschiedenen Pitchstufen scheinen die einzelnen
Reihen der STROBOSKOPANZEIGEN stillzustehen.
Hinweis: Durch das Benutzen starker fluoreszierender Beleuchtung direkt über dem
Plattenspieler wird das Licht der STROBOSKOPLAMPE überlagert und führt dadurch zu
einer Beeinflussung der Anzeigegenauigkeit.

44
AUF- UND EINSTELLEN
Aufstellen des Plattenspielers:
1. Stellen Sie das Gerät an keinem Ort auf, wo es direkter Sonneneinstrahlung ausgesetzt ist.
Stellen Sie es weiterhin nicht neben Heizgeräten jeglicher Art auf.
2. Stellen Sie das Gerät nicht an Orten mit hoher Luftfeuchtigkeit oder Staubbelastung auf.
3. Der Tonkopf kann leicht den Schalldruck oder die Schwingungen sich in der Nähe befindlicher
Lautsprecher aufnehmen. Stellen Sie deshalb für beste Klangergebnisse den Plattenspieler
nicht zu nah an Lautsprechern auf.
4. Stellen Sie den Lautsprecher auf einer horizontalen Oberfläche auf, die stabil und
vibrationsfrei ist.
5. Die Gummifüße sind speziell dafür konstruiert worden, um übermäßige Vibrationen vom
Gerät fernzuhalten. Darüber hinaus können Sie die Gummifüße benutzen, um den
Plattenspieler zu nivellieren. Sie können die Neigung des Geräts durch Drehen der Standfüße
in oder gegen den Uhrzeigersinn einstellen.
Tonarmbalance und Tonnadelauflagedruck:
1. Einstellen des horizontalen Nullpunktes und des Tonnadelauflagedrucks:
2. Nehmen Sie den Tonnadelschutz ab, falls dieser sich noch am Tonkopf befindet. Berühren Sie
während der Einstellung niemals die Tonnadelspitze.
3. Senken Sie den TONARMHEBEL.
4. Entriegeln Sie die Tonarmklammer und nehmen Sie anschließend den Tonarm aus der
Tonarmaufnahme.
5. Stellen Sie den ANTISKATE-Regler auf null.
6. Drehen Sie das GEGENGEWICHT solange entweder in oder gegen den Uhrzeigersinn, bis der
TONARM perfekt horizontal ausbalanciert (freischwebend) ist.
7. Führen Sie den TONARM zurück zur Tonarmaufnahme und rasten Sie in dort wieder ein.
8. Halten Sie mit einer Hand das GEGENGEWICHT fest und drehen Sie nur am
Tonnadelauflagedruckeinstellring (3) solange, bis die Zahl „0“ auf dem Ring der Mittellinie auf
der hinteren Tonarmwelle gegenübersteht.
9. Drehen Sie das GEGENGEWICHT solange gegen den Uhrzeigersinn, bis der Wert auf der Skale
dem empfohlenen Tonnadelauflagedruck entspricht.
Hinweis: Der empfohlene Tonnadelauflagedruck des optional mit Ihrem Gerät
mitlieferbaren Tonkopfs beträgt 2,5 bis 3 Gramm. Schlagen Sie bitte für alle anderen
Tonkopfsysteme in den mit dem Tonkopf mitgelieferten Spezifikationen des Herstellers
nach.
Antiskate:
Mit der Antiskateeinstellung beugen Sie einem Springen der TONARMEINHEIT über die
Schallplatte aufgrund der durch die Rotation des PLATTENTELLERS verursachten Fliehkraft vor.
Der ANTISKATING-Drehregler sollte auf den gleichen Wert wie der Tonnadelauflagedruck
eingestellt werden. Wenn Sie beispielsweise das GEGENGEWICHT auf 2,5 Gramm eingestellt
haben, dann sollten Sie für ANTISKATE ebenfalls den Wert 2,5 einstellen.

45
Produktwartung:
1. Reinigen Sie die Tonnadel regelmäßig mit einem weichen Pinsel, um einer Ansammlung von
Staub vorzubeugen.
2. Wenn die Klangwiedergabe verzerrt oder verrauscht ist, dann überprüfen Sie die Tonnadel.
Wenn die Tonnadel abgenutzt ist, dann ersetzen Sie sie mit einer neuen Tonnadel.
3. Wischen Sie von Zeit zu Zeit die Staubschutzabdeckung und das Plattenspielergehäuse mit
einem weichen, trockenen Tuch ab.
4. Benutzen Sie keine flüchtigen Reinigungsmittel wie Alkohol, Verdünner, Benzin usw. Diese
können die Farbe ablösen oder die Glanzschicht beschädigen.
Überblick über die Audiosoftware Audacity
Audacity ist eine kostenlose Software unter Lizenz von GNU General Public License (GPL).
Nähere Informationen sowie den offenen Quellcode finden Sie im Internet unter
https://www.audacityteam.org/download/
* Bitte vergewissern Sie sich vor dem Start der Software, dass Sie sie installiert haben.
Einrichten Ihres PCs für die Arbeit mit Audacity
1. Schließen Sie das mitgelieferte USB-Kabel am Plattenspieler an.
2. Verbinden Sie den verbleibenden USB-Stecker mit Ihrem Computer.
3. Installieren Sie die Audiosoftware Audacity.
4. Starten Sie das Programm Audacity.
5. Wählen Sie im Audacity-Menü unter dem Reiter Edit (Bearbeiten) Preferences (Einstellungen)
aus.
6. Klicken Sie oben links auf den Reiter Audio I/O (Audioschnittstelle).
Wählen Sie unter Playback (Wiedergabe) bei Device (Gerät) Ihre interne Soundkarte aus.
Wählen Sie unter Recording (Aufnahme) bei Device (Gerät) USB Audio CODEC

46
(USB-Audio-CODEC) aus.
Wählen Sie unter Recording (Aufnahme) bei Channels (Kanäle) 2 (Stereo) aus.
Setzen Sie einen Haken bei Play other tracks while recording new one (Andere Spuren
während Aufnahme abspielen (Overdub)).
Setzen Sie einen Haken bei Software Playthrough (Eingang per Software durchschleifen).
Aufzeichnen von Alben mit Audacity
1. Speichern eines Projekts
Audacity speichert alle geänderten und aufgezeichneten Audiodateien im Verzeichnis
Projektname_data, das sich dort befindet, wo Sie Ihr Projekt gespeichert haben.
Wählen Sie unter dem Audacity-Reiter File (Datei) Save Project as (Projekt speichern als)
aus und wählen Sie danach den Speicherort und den Namen für Ihr Projekt aus.
Bitte beachten Sie, dass Ihnen nur die Option „Save As...“ (Speichern als) zur Verfügung
steht, wenn Sie Audacity neu gestartet haben.

47
2. Aufzeichnen
Bereiten Sie Ihren über USB verbundenen Plattenspieler für die Wiedergabe des Titels
oder Albums vor, den/das Sie aufzeichnen möchten.
Klicken Sie zum Starten der Aufzeichnung die rote Aufzeichnungstaste .
Senken Sie den Tonarm des über USB verbundenen Plattenspielers bei dem Titel/Album ab,
den/das Sie aufzeichnen möchten.
Klicken Sie auf die blaue Pausetaste , um die Aufzeichnung zu pausieren. Klicken Sie sie
erneut an, um die Aufzeichnung fortzusetzen.
Klicken Sie auf die gelbe Stopptaste .
Das war’s auch schon. Sie können jetzt mit Ihrer Aufzeichnung herumexperimentieren und die
vielen Bearbeitungsmöglichkeiten von Audacity erkunden. Sie können die Undo-Funktion
(Rückgängig machen) fast unbegrenzt benutzen, solange das Projekt geöffnet ist.
HINWEIS: CDs können direkt aus Audacity heraus nicht gebrannt werden. Hierfür benötigen Sie
ein separates CD-Brennprogramm.

48
Technische Daten
Allgemein
Modell:
L-3809
Abmessung:
430 (B) x 350 (T) x 155 (H) mm
Gewicht:
6,18 kg
Stromversorgung:
230 V~/50 Hz (die Niederlande); 240 V~/50 Hz (GB)
Leistungsaufnahme:
30W
Standardtestbedingung:
Umgebungstemperatur: 20 °C ± 2 °C
Relative Luftfeuchtigkeit:
65 % ± 5 %
HINWEIS: Messungen können zwischen 5 und 35 °C und einer relativen Luftfeuchtigkeit zwischen
45 % und 85 % durchgeführt werden.
Spezifikationen Plattenspieler:
Typ:
Manueller Plattenspieler mit 2 Geschwindigkeitsstufen
Motor:
16polig, 3phasig, bürstenlos
Antriebsmethode:
Direktantrieb
Plattenteller:
332 mm (Aluminium)
Geschwindigkeiten:
33
1/3
und 45 U/min
Gleichlaufschwankungen:
<0,3 % WRMS (JIS-WTD) bei 33
1/3
U/min
Rauschabstand:
>50 dB (DIN-B)
Pitchfader:
±10 %
Anlaufdrehmoment:
>3,6 kgf cm
Bremssystem:
Elektronische Bremse
Anlaufzeit:
<1 s
Abbremszeit:
<1 s
Zeit für
Rotationsgeschwindigkeitswechsel:
<1 s bei Wechsel von 33
1/3
auf 45 U/min.
<1 s bei Wechsel von 45 auf 33
1/3
U/min.
USB-Funktion:
USB-Aufzeichnung Auflösung
16 Bit/44,1 oder 48 kHz
Computerschnittstelle:
Windows 7, 8, 10, MAC OSX oder Linux mit USB
1.1-kompatiblen USB-Port
Spezifikationen Tonarm:
Typ:
Feststehend balancierter S-förmiger Tonarm
Effektive Tonarmlänge:
220 mm
Überstand:
10 mm
Spurfehlerwinkel:
<3°
Auflagekrafteinstellbereich:
3 – 4 g
MM-Tonkopftyp:
Audio Technica AT-3600L
Tonnadelauflagedruck:
3,5 ± 0,5 g
Tonkopfgewicht:
5 ± 0,5 g
Antiskatingbereich:
0 – 4 g

49
Kanaltrennung:
>18 dB
Kanalbalance:
Innerhalb 2,5 dB bei 1 kHz
Vorverstärker
Ausgangsspannung:
150 mV ± 4 dB (Eingangsspannung: 2,5 mV bei 1 kHz)
RIAA (Frequenzgang):
20 Hz – 20 kHz +1/-3 dB (Eingangsspannung: 1,5 mV bei 1
kHz)
Garantie
Lenco bietet Leistungen und Garantien im Einklang mit Europäischem Recht. Setzen Sie sich
deshalb im Falle von Reparaturen (sowohl während als auch nach Ablauf der Garantiezeit) mit
Ihrem Fachhändler in Verbindung.
Wichtiger Hinweis: Es ist nicht möglich, Produkte für Reparaturen direkt an Lenco zu schicken.
Wichtiger Hinweis: Wenn dieses Gerät für welchen Grund auch immer durch ein nicht offizielles
Servicezentrum geöffnet wurde oder durch dieses Servicezentrum darauf zugegriffen wurde,
erlischt die Garantie.
Dieses Gerät ist nicht für professionelle Zwecke geeignet. Falls das Gerät für professionelle
Zwecke eingesetzt wird, erlöschen alle Garantieverpflichtungen seitens des Herstellers.
Haftungsausschluss
Aktualisierungen der Firmware und/oder Hardware-Komponenten werden regelmäßig
durchgeführt. Aus diesem Grund können einige der Anleitungen, Spezifikationen und
Abbildungen in dieser Dokumentation zu dem Ihnen vorliegenden Gerät leicht abweichen. Alle in
diesem Handbuch beschriebenen Elemente dienen nur zur Illustration und treffen auf Ihre
individuelle Situation möglicherweise nicht zu. Aus der in diesem Handbuch getätigten
Beschreibung können keine Rechtsansprüche oder Leistungsanforderungen geltend gemacht
werden.
Entsorgung des Altgeräts
Dieses Symbol zeigt an, dass das entsprechende Produkt oder dessen
Akku/Batterie in Europa nicht mit dem normalen Hausmüll entsorgt werden
darf. Um die ordnungsgemäße Abfallbehandlung des Produkts und dessen
Akku/Batterie zu gewährleisten, müssen diese im Einklang mit allen
anwendbaren örtlichen Vorschriften zur Entsorgung von Elektrogeräten und
Akkus/Batterien entsorgt werden. Dabei helfen Sie, natürliche Ressourcen zu
schonen und Umweltschutzstandards zur Verwertung und Entsorgung von
Altgeräten aufrecht zu halten (Richtlinie über Entsorgung Elektrischer und
Elektronischer Altgeräte).

50
CE-Kennzeichen
Produkte mit der CE-Kennzeichnung entsprechen der von der EU-Kommission
herausgegebenen EMV-Richtlinie (2014/30/EU) und
Niederspannungsrichtlinie (2014/35/EU).
Hiermit erklärt Lenco Benelux BV, Thermiekstraat 1a, 6361 HB Nuth, The
Netherlands, dass dieses Produkt den grundsätzlichen Anforderungen
entspricht.
Die Konformitätserklärung kann unter folgendem Link abgerufen werden:
Service
Besuchen Sie bitte für weitere Informationen und unseren Kundendienst unsere Homepage
www.lenco.com
Lenco Benelux BV, Thermiekstraat 1a, 6361 HB Nuth, The Netherlands.

51
Français
L-3809
ATTENTION :
L’utilisation de commandes ou de réglages ou l’exécution de procédures autres que celles
spécifiées dans ce manuel peut entraîner une exposition à des rayonnements dangereux.
PRÉCAUTIONS AVANT UTILISATION
GARDEZ CES INSTRUCTIONS À L’ESPRIT :
1. Ne couvrez pas et n’obturez pas les ouvertures de ventilation. Lorsque vous placez l’appareil
sur une étagère, laissez 5 cm (2”) d’espace libre tout autour.
2. Installez-le conformément au mode d’emploi fourni.
3. Gardez l’appareil à l’écart des sources de chaleur telles que des radiateurs, appareils de
chauffage, fours, bougies et autres produits générant de la chaleur ou une flamme nue.
L’appareil ne peut être utilisé que dans des climats modérés. Les environnements
extrêmement froids ou chauds doivent être évités. Température de fonctionnement entre 0°
et 35° C.
4. Évitez d’utiliser l’appareil à proximité de champs magnétiques puissants.
5. Des décharges électrostatiques peuvent perturber le fonctionnement de cet appareil. Dans
ce cas, il suffit de réinitialiser et de redémarrer l’appareil en suivant le mode d’emploi.
Pendant le transfert de fichiers, manipulez l’appareil avec précaution et faites-le fonctionner
dans un environnement sans électricité statique.
6. Mise en garde ! N’introduisez jamais un objet dans l’appareil par les ouvertures et les fentes
de ventilation. Étant donné que des tensions élevées sont présentes à l’intérieur du produit,
l’insertion d’un objet peut entraîner une électrocution et/ou court-circuiter les composants
internes. Pour les mêmes raisons, ne versez pas de l’eau ou un liquide sur le produit.
7. Ne l’utilisez pas dans des endroits humides tels qu’une salle de bain, une cuisine pleine de
vapeur ou à proximité d’une piscine.
8. L’appareil ne doit pas être exposé à des écoulements ou des éclaboussures et aucun objet
contenant un liquide, tel qu’un vase, ne doit être posé sur ou près de l’appareil.
9. N’utilisez pas cet appareil lorsque de la condensation est possible. Lorsque l’appareil est
utilisé dans une pièce chaude et humide, des gouttelettes d’eau ou de la condensation
peuvent se former à l’intérieur de l’appareil et affecter son fonctionnement adéquat. Si tel
est le cas, laissez l’appareil hors tension pendant 1 ou 2 heures avant de le mettre en
marche : l’appareil doit être sec avant toute remise en marche.
10. Bien que ce dispositif soit fabriqué avec le plus grand soin et contrôlé à plusieurs reprises
avant de quitter l’usine, des problèmes peuvent néanmoins survenir, comme avec tous les
appareils électriques. Si l’appareil émet de la fumée ou en cas d’accumulation excessive de
la chaleur ou d’un phénomène inattendu, débranchez immédiatement la fiche
d’alimentation du secteur.
11. Cet appareil doit fonctionner avec la source d’alimentation indiquée sur la plaque
signalétique. Si vous n’êtes pas sûr du type d’alimentation utilisé chez vous, contactez votre
revendeur ou le fournisseur local d’électricité.
12. Tenez l’appareil à l’abri des animaux. Certains animaux aiment mordre sur les cordons
électriques.
13. Pour nettoyer l’appareil, servez-vous d’un chiffon doux et sec. N’utilisez pas de solvant ni
d’autre liquide à base de pétrole. Pour enlever les taches importantes, vous pouvez vous
servir d’un chiffon humide imbibé d’une solution de détergent diluée.
14. Le fournisseur n’est pas responsable des dommages ou pertes de données causés par un
dysfonctionnement, une utilisation abusive, une modification de l’appareil ou un
remplacement de la batterie.
15. N’interrompez pas la connexion lorsque l’appareil formate ou transfère des fichiers. Dans le
cas contraire, les données pourraient être endommagées ou perdues.
16. Si l’appareil a une fonction de lecture USB, il faut brancher la clé USB directement sur
l’appareil. N’utilisez pas un câble d’extension USB, car cela peut causer des interférences
entraînant des pertes de données.
17. La plaque signalétique se situe en dessous ou à l’arrière de l’appareil.
18. Cet appareil ne doit pas être utilisé par des personnes (enfants compris) souffrant de
handicaps physiques, sensoriels ou mentaux, ou manquant d’expérience et de

52
connaissances, sauf si elles sont sous surveillance ou ont reçu des instructions sur
l’utilisation correcte de l’appareil par la personne qui est responsable de leur sécurité.
19. Ce produit est réservé à un usage non professionnel, et non pas à un usage commercial ni
industriel.
20. Vérifiez que l’appareil est en position stable. La garantie ne couvre pas les dégâts
occasionnés par l’utilisation de cet appareil en position instable, par les vibrations, les chocs
ou par la non-observation de tout autre avertissement ou précaution contenus dans ce
mode d’emploi.
21. N’ouvrez jamais cet appareil.
22. Ne placez jamais cet appareil sur un autre appareil électrique.
23. Ne laissez pas les sacs en plastique à la portée des enfants.
24. Utilisez uniquement les accessoires recommandés par le fabricant.
25. Confiez l’entretien et les réparations à un personnel qualifié. Une réparation est nécessaire
lorsque l’appareil a été endommagé de quelque façon que ce soit, par exemple lorsque le
cordon d’alimentation ou la prise sont endommagés, lorsqu’un liquide s'est déversé ou des
objets ont été introduits dans l’appareil, lorsque l’appareil a été exposé à la pluie ou à
l’humidité, lorsqu’il ne fonctionne pas correctement ou est tombé.
26. Une exposition prolongée à la musique avec un volume élevé peut entraîner une perte
auditive temporaire ou permanente.
27. Si l’appareil est livré avec un câble d’alimentation ou un adaptateur secteur :
⚫ En cas de problème, débranchez le cordon d’alimentation CA et confiez l’entretien à un
personnel qualifié.
⚫ Ne marchez pas sur l’adaptateur secteur ou ne le coincez pas. Faites très attention, en
particulier à proximité des fiches et du point de sortie du câble. Ne placez pas d’objets
lourds sur l’adaptateur secteur, car ils pourraient l’endommager. Gardez l’appareil hors
de portée des enfants ! Ils pourraient se blesser gravement s’ils jouent avec le câble
d’alimentation.
⚫ Débranchez cet appareil pendant les orages ou lorsqu’il n’est pas utilisé pendant une
longue durée.
⚫ La prise secteur doit être installée près de l’appareil et doit être facilement accessible.
⚫ Ne surchargez pas les prises de courant ou les rallonges. Une surcharge peut entraîner
un incendie ou une électrocution.
⚫ Les appareils de classe 1 doivent être branchés à une prise de courant disposant d’une
connexion protectrice à la terre.
⚫ Les appareils de classe 2 ne nécessitent pas de connexion à la terre.
⚫ Tirez toujours sur la fiche pour débrancher le cordon de la prise secteur. Ne tirez pas sur
le cordon d’alimentation. Cela pourrait provoquer un court-circuit.
⚫ N’utilisez pas un cordon ou une fiche d’alimentation endommagé ni une prise desserrée.
Vous courez un risque d’incendie ou de décharge électrique.
28. Si le produit contient ou est livré avec une télécommande contenant des piles boutons :
Avertissement :
⚫ « N’ingérez pas la pile, car vous risquez une brûlure chimique » ou une formule
équivalente.
⚫ [La télécommande fournie avec] Ce produit contient une pile bouton. Si la pile est
avalée, elle peut causer de graves brûlures internes en seulement 2 heures et peut
entraîner la mort.
⚫ Tenez les piles neuves et usagées hors de portée des enfants.
⚫ Si le compartiment à piles ne se ferme pas correctement, cessez d’utiliser l’appareil et
tenez-le hors de portée des enfants.
⚫ Si vous pensez que les piles ont été avalées ou placées à l’intérieur d’une partie du
corps, consultez un médecin immédiatement.
29. Mise en garde relative à l’utilisation des piles :
⚫ Risque d’explosion si la pile est mal remplacée. Remplacez les piles par des piles d’un
type identique ou équivalent.
⚫ Pendant l’utilisation, le stockage ou le transport, la pile ne doit pas être soumise à des
températures extrêmement élevées ou basses, à une faible pression d’air à haute
altitude.

53
⚫ Le remplacement d’une pile par une autre de type incorrect peut entraîner une
explosion ou une fuite de liquide ou de gaz inflammable.
⚫ L’introduction d’une pile dans le feu ou dans un four chaud, l’écrasement ou le
découpage mécanique peut entraîner une explosion.
⚫ L’exposition d’une pile dans un environnement à température extrêmement élevée
peut entraîner une explosion ou une fuite de liquide ou de gaz inflammable.
⚫ L’exposition d’une pile à une pression d’air extrêmement basse peut entraîner une
explosion ou une fuite de liquide ou de gaz inflammable.
⚫ Veuillez considérer les questions environnementales lors de la mise au rebut des piles.

54
Contenu du produit
1 Manuel
1 Câble audio RCA
1 Cordon d'alimentation

55
1 Câbler de raccordement USB
1 Plateau
1 Tapis de feutre

56
Description
1. PLATEAU DE TOURNE-DISQUE
Le plateau est équipé d’un tapis de feutre. Il est ainsi plus facile de manipuler le disque pour
les performances scratch. Placez les disques vinyles au centre du plateau du tourne-disque.
2. CONTREPOIDS
L’ajustement crée la pression appropriée vers le bas du stylet sur le disque. Fixez maintenant
en faisant glisser le contrepoids à l’arrière du bras de lecture.
3. ÉCHELLE DE RÉGLAGE DE LA PRESSION DU STYLET
Ajustez l’alignement de la pression de la cartouche du stylet.
4. BOUTON ANTIDÉRAPANT
Celui-ci applique une force sur le bras de lecture vers l’intérieur afin qu’il ne saute pas vers
l’extérieur à travers le disque en raison de la force centrifuge de la rotation du disque.
5. ÉLÉVATEUR DU BRAS DE LECTURE
Contrôlez l’action de montée et de descente du bras de lecture.
6. TETE DE LECTURE
Installez la cartouche ici. Pendant l’installation, mettre la protection de pointe pour ne pas
l’endommager.
Raccordez les fils comme suit :

57
Blanc (L+)
Canal gauche +
Bleu (L-)
Canal gauche –
Rouge (R+)
Canal droit +
Vert (R-)
Canal droit –
7. BOUTON LECTURE/PAUSE
Appuyez sur ce bouton pour lancer la lecture, appuyez à nouveau pour suspendre, puis une
nouvelle fois pour reprendre la lecture.
8. BOUTONS DE RÉGLAGE DE LA VITESSE DE ROTATION 33/45
Appuyez sur ces touches pour sélectionner la rotation du plateau en fonction de la vitesse
indiquée sur le disque pour 33, 45 tours par minute.
9. Écrou de blocage de la coquille
Fixez la coquille de tête en l’insérant dans l’extrémité avant du bras de lecture, puis tournez
l’écrou de blocage dans le sens horaire.
10. Curseur de vitesse
Utilisé pour modifier la vitesse de lecture de la piste.
11. Commutateur d’alimentation / Lumière stroboscopique
Tournez le commutateur dans le sens horaire pour mettre l’appareil en marche. Tournez le
commutateur dans le sens antihoraire pour arrêter l’appareil. La lumière stroboscopique
s’allume automatiquement lorsque l’appareil est en marche.
1. SORTIE RCA
Les sorties L et R sont utilisées pour connecter le tourne-disque à l’entrée analogique RCA de
votre amplificateur.
2. COMMUTATEUR LINE/PHONO
Le tourne-disque possède un préamplificateur PHONO intégré qui est désactivé si vous
disposez d’un préamplificateur externe. Si vous voulez utiliser les signaux amplifiés par
l’amplificateur interne de la platine, déplacez le commutateur sur LINE. Si vous souhaitez
utiliser un préamplificateur PHONO externe, déplacez le commutateur sur PHONO.
Avec le pré-ampli sur ON, ne jamais connecter l’entrée Phono.
L’audio sera fortement distordue et il y a un risque que l’Amplificateur et/ou les
haut-parleurs soi(en)t endommagé(s).

58
3. PORT USB
Le son de votre disque vinyle est converti en numérique avec une résolution maximale de
48 KHz / 16 bits. Utilisez le câble USB fourni avec l’appareil pour connecter le tourne-disque à
votre ordinateur. Le logiciel Audacity doit être téléchargé.
4. ENTRÉE SECTEUR
Branchez le cordon d’alimentation ici.
5. COMMUTATEUR DE MARCHE/ARRÊT
Permet d’allumer et d’éteindre le tourne-disque.

59
Montage du tourne-disque :
1. Retrait de l’emballage :
Enlever doucement l’unité principale avec l’emballage intact de la boite. retirer l’emballage
une fois que l’unité est enlevée du carton d’expédition. S’assurer que tous les accessoires sont
dans l’emballage.
2. Adaptateur 45 tr/min :
Situer et enlever l’adaptateur 45 tours de l’emballage et le placer sur l’adaptateur 45 sur le
dessus de l’unité.
3. Plateau :
Retirez le plateau du tourne-disque de l’emballage et placez-le délicatement sur la BROCHE
CENTRALE de la base du plateau.
4. Tapis de feutre :
Retirez le tapis de feutre noir de l’emballage et placez-le sur le PLATEAU.
5. Tete de lecture :
Insérer la TETE DE LECTURE sur le BRAS. En tenant fermement la TETE DE LECTURE sur le bras,
tourner l’ECROU DE VERROUILLAGE de la TETE DE LECTURE dans le sens antihoraire pour la
sécuriser sur le BRAS.
EN
FR
HEADSHELL
TETE DE LECTURE
TONEARM ASSEMBLY
BRAS
HEADSHELL LOCKING NUT
ECROU DE VERROUILLAGE de la TETE DE
LECTURE
6. Contrepoids :
Situer et retirer le CONTREPOIDS de bras de son emballage. Glisser le CONTREPOIDS à l’arrière
du BRAS. Le tourner légèrement et il se visse sur l’arbre arrière du bras.

60
EN
FR
TONEARM ASSEMBLY
BRAS
COUNTERWEIGHT
CONTREPOIDS
Démarrage rapide du tourne-disque :
1. Changer la vitesse du plateau
Appuyez sur les boutons de RÉGLAGE DE LA VITESSE DE ROTATION 33/45 pour modifier la
vitesse de rotation du plateau.
2. Démarrage et arrêt du plateau
Utilisez le BOUTON LECTURE/PAUSE pour naviguer entre les rotations de plateau et les modes
de suspension.
3. Contrôle d’écartement
1) Le réglage de l’écartement est un réglage précis en fonction de la vitesse du plateau.
2) Le réglage de l’écartement est variable et peut être réglé entre -10% et +10% selon la
vitesse sélectionnée du plateau.
3) L’écartement est changé en glissant la glissière d’écartement en haut ou en bas.
4) Les points indicateurs sur le bord du PLATEAU DU TOURNE-DISQUE peuvent être utilisés
pour donner une approximation visuelle de la vitesse du plateau. Ces indicateurs sont
allumés par la LUMIÈRE STROBOSCOPIQUE en actionnant le COMMUTATEUR
D’ALIMENTATION sur l’appareil. A différentes vitesse, chaque rangée des INDICATEURS
STROBOSCOPIQUES peut sembler immobile.
Remarque : L’utilisation d’un éclairage fluorescent puissant au-dessus du tourne-disque
annihilera la LAMPE STROBOSCOPIQUE et affectera la précision de l’indicateur.

61
Configuration
Installation de tourne-disque :
1. Ne pas placer l’unité sous les rayons directs du soleil ou près d’un appareil de chauffage.
2. Ne pas placer l’unité dans un endroit très humide ou plein de poussière.
3. La cartouche peut capter une légère pression sonore ou des vibrations des haut-parleurs
situés à proximité. Pour de meilleurs résultats, ne pas installer cette unité trop près des
haut-parleurs.
4. Installer cette unité sur une surface horizontale et stable et ne subissant pas de vibration.
5. Les pieds en caoutchouc sont spécialement conçus pour isoler l’unité des fortes vibrations. Les
pieds peuvent aussi servir à stabiliser l’ensemble horizontalement. Ajuster la hauteur de
l’unité en tournant le pied dans le sens horaire ou antihoraire.
Équilibre du bras et pression sur la pointe de lecture :
1. Ajustement de l‘équilibre zéro horizontal et pression sur la pointe de lecture :
2. Retirer le cache protecteur de la pointe, le cas échéant. Ne jamais toucher la pointe de lecture
au cours du réglage.
3. Baisser le LEVIER DE BRAS.
4. Ôter le clip de bras et enlever le bras de son support.
5. Mettre l’ANTI-SKATE (compensation de force centripète) sur zéro.
6. Tourner le CONTREPOIDS dans un sens ou un autre jusqu’à ce que le BRAS soit en équilibre
horizontal (bouge librement).
7. Remettre le BRAS sur son support et le clipper.
8. Maintenir en place le CONTREPOIDS avec une main et ne tourner que la bague de pression de
pointe (3) de lecture pour amener le « 0 » de la bague en alignement avec la ligne centrale de
l’arbre arrière du bras.
9. Tourner le CONTREPOIDS dans le sens antihoraire jusqu’à ce que la valeur sur l’échelle
corresponde à la pression recommandée sur la pointe de lecture.
Remarque : La pression recommandée sur la pointe de lecture de la cartouche en option
pouvant être comprise dans l’unité est de 2,5 de 3 grammes. Pour tous les autres systèmes
de cartouche, voir les spécifications du fabricant données avec la cartouche.
Antiskating :
L’ajustement d’anti-skate empêche l’ENSEMBLE DE BRAS de glisser à travers le disque par la force
centrifuge due à la rotation du PLATEAU. Le bouton de contrôle d’ANTISKATING doit être réglé sur
la même valeur que la pression sur la pointe de lecture. Par exemple, si le CONTREPOIDS est réglé
sur 2,5 grammes, la valeur d’ANTI-SKATE doit également être réglée sur 2,5.

62
Entretien du produit :
1. Nettoyer périodiquement la pointe de lecture avec une brosse douce pour éviter
l’accumulation de poussière.
2. Quand le son devient distordant ou bruyant, vérifier la pointe de lecture. Si la pointe de
lecture est usée, la remplacer avec une neuve.
3. De temps en temps, le couvercle et le boitier du tourne-disque doivent être essuyés avec un
chiffon doux et sec.
4. Les matières volatiles telles que l’alcool, le diluant, le benzine, etc. ne doivent pas être
utilisées. Elles peuvent enlever la peinture ou endommager le lustre.
Aperçu du logiciel Audacity
Audacity est un logiciel gratuit, licencié sous GNU Licence Publique Générale (GPL). Plus
d’informations, de même que le code de source ouverte peuvent être trouvés sur le Web à
https://www.audacityteam.org/download/
* Veuillez vous assurer que vous avez installé le logiciel avant de commencer.
Paramétrer votre PC avant de travailler avec Audacity
1. Connectez le câble USB fourni au tourne-disque
2. Connectez l’autre fiche USB de ce câble à votre PC.
3. Installer le logiciel d’enregistrement Audacity.
4. Ouvrir le programme Audacity.
5. Sélectionner Preference (Préférence) sur Edit (Modifier) dans le Menu Audacity.
6. Sélectionner Audio I/O (M/A audio) en haut à gauche.
Sous Lecture, Appareil, sélectionner votre internal sound card.
Sous Enregistrement, Appareil, sélectionner USB Audio CODEC (CODEC audio USB).
Sous Enregistrement, Canaux, sélectionner 2 (Stereo) (2 (stéréo)).

63
Vérifier la case marquée Play other tracks while recording new one (Jouer d’autres
morceaux pendant l’enregistrement d’un nouveau).
Vérifier la case marquée Software Playthrough (Jouer dans le logiciel).
Enregistrement d’album avec Audacity
1. Sauvegarde d’un projet
Audacity inscrit tous les audios changés et enregistrés sur un répertoire appelé
Projectname_data, situé à droite d’où vous avez sauvegardé le fichier de projet lui-même.
Puis, sélectionner Save Project as (Sauvegarder le projet sous) sur le Fichier Audacity, et
choisir un endroit et un nom de fichier pour votre projet.
veuillez noter que lorsque vous démarrez Audacity pour la première fois, seule l’option
“Save As...” (Sauvegarder sous…) est disponible.

64
2. Comment enregistrer
Mettre le tourne-disque en état de jouer un morceau ou un album que vous voulez
enregistrer.
Cliquez sur le bouton rouge d'enregistrement pour commencer l'enregistrement.
Abaisser le bras sur l’album posé sur le tourne-disque USB et chercher ce que vous désirez
enregistrer.
Cliquez sur le bouton bleu de suspension pour suspendre l'enregistrement. Réappuyer
dessus pour reprendre.
Cliquer sur la touche jaune Arrêt .
Voilà. Vous pouvez maintenant vous amuser avec votre enregistreur et explorer les capacités
d’Audacity. Rappelez-vous que vous pouvez utiliser la fonction Undo pratiquement sans limite
quand le projet est ouvert.
REMARQUE : Le CD ne peut pas être imprimé directement depuis l’application Audacity. D’autres
applications d’impression de CD doivent être utilisées.

65
Caractéristiques
Caractéristiques Générales
Modèle :
L-3809
Dimensions :
430(L) x 350(P) x 155(H)mm
Poids :
6,18 kg
Alimentation électrique :
230 V CA~ 50 Hz (Pays-Bas); 240 V CA~ 50 Hz(R-U.)
Puissance consommée :
30 W
Conditions de test standard :
Température ambiante : 20 +/- 2 degrés.C
Humidité relative :
65 % +/- 5 %
REMARQUE : Les mesures peuvent être effectuées entre 5 et 35°C, et avec 45 à 85% d’humidité
relative.
Section tourne-disque :
Type :
2 vitesses manuelles
Mot. :
16 pôles, 3 phases, sans balais
Méthode d’entrainement :
Entraînement direct
Plateau :
332 mm (Aluminium)
Vitesses :
33
1/3
et 45 tr/min
Pleurage et scintillement :
Moins de 0,3 % WRMS (JIS WTD) avec 33
1/3
tr/min
Rapport signal/bruit :
Plus de 50 dB (DIN-B)
Contrôle d’écartement :
+/-10 % :
Couple au démarrage :
Plus de 3,6 kgf.cm
Système de freinage :
Frein électronique
Durée de démarrage :
Moins de 1 seconde
Durée de freinage :
Moins de 1 seconde
Durée de changement de vitesse :
Moins de 1 sec. de 33
1/3
à 45 tours.
Moins de 1 sec. de 45 à 33
1/3
tours.
Fonction USB :
Enreg. USB Résolution
16 BIT 44,1 KHz ou 48 KHz
Interface d’ordinateur :
Compatible USB 1.1 Windows 7/8/10 ou MAC OSX
Section bras de lecture :
Type :
Bras de lecture statique équilibré en forme de S
Longueur de bras :
220 mm
Porte-à-faux :
10 mm
Erreur d’angle de traçage :
Moins de 3 degrés
Plage de réglage de force de traçage :
3 à 4 g
Type de cartouche MM :
Technique audio AT-3600L
Pression du stylet :
3,5+0,5 g
Poids de la cartouche :
5+0,5 g
Gamme Antiskating :
0 à 4 g
Séparation de canal :
Plus de 18 dB
Équilibre de canal :
Environ 2,5 dB à 1 KHz

66
Préamplificateur
Sortie :
150 mV +/- 4 dB (ENTREE : 2,5 mV 1 KHz)
RIAA (Réponse de fréquence) :
20 Hz à 20 KHz +1/-3 dB (ENTREE : 1,5mV 1 KHz)
Garantie
Lenco propose un service et une garantie conformément à la législation européenne, ce qui
signifie qu’en cas de besoin de réparation (aussi bien pendant et après la période de garantie),
vous pouvez contacter votre revendeur le plus proche.
Remarque importante : Il n’est pas possible de renvoyer l’appareil pour réparation directement à
Lenco.
Remarque importante : si l’appareil est ouvert ou modifié de quelque manière que ce soit par un
réparateur non agréé, la garantie sera caduque.
Cet appareil ne convient pas à une utilisation professionnelle. En cas d’utilisation professionnelle,
les obligations de garantie du fabricant seront annulées.
Clause de non-responsabilité
Des mises à jour du logiciel et/ou des composants informatiques sont régulièrement effectuées. Il
se peut donc que certaines instructions, caractéristiques et images présentes dans ce document
diffèrent légèrement de votre configuration spécifique. Tous les articles décrits dans ce guide
sont fournis uniquement à des fins d’illustration et peuvent ne pas s’appliquer à une
configuration spécifique. Aucun droit légal ne peut être obtenu depuis les informations
contenues dans ce manuel.
Mise au rebut de l’appareil usagé
Ce symbole indique que le produit électrique concerné ainsi que les piles ne
doivent pas être jetés avec les autres déchets ménagers en Europe. Pour
garantir un traitement correct des piles et de l’appareil usagés, veuillez les
mettre au rebut conformément aux réglementations locales en vigueur
relatives aux appareils électriques et autres piles. En agissant de la sorte, vous
contribuerez à la préservation des ressources naturelles et à l’amélioration des
niveaux de protection environnementale concernant le traitement et la
destruction des déchets électriques (directive sur les déchets des équipements
électriques et électroniques).
Marquage CE
Les produits avec la marque CE sont conformes à la directive CEM
(2014/30/CE) et à la directive basse tension (2014/35/CE) émises par la
commission de la communauté européenne.
Par la présente, Lenco Benelux BV, Thermiekstraat 1a, 6361 HB Nuth,
Pays-Bas, déclare que ce produit est conforme aux exigences principales.
La déclaration de conformité peut être consultée au lien :


68
Español
L-3809
PRECAUCIÓN:
El uso de los controles o ajustes o el funcionamiento de los procedimientos excepto a aquellos
especificados aquí pueden provocar una exposición peligrosa a la radiación.
PRECAUCIONES PREVIAS AL USO
TENGA ESTAS INSTRUCCIONES EN MENTE:
1. No cubra o bloquee ninguna apertura de ventilación. Cuando coloque el dispositivo en una
estantería, deje 5 cm (2”) de espacio libre alrededor de todo el dispositivo.
2. Instálelo conforme al manual de usuario que se adjunta.
3. Mantenga el aparato alejado de fuentes de calor, como radiadores, calentadores, estufas,
velas u otros productos que generen calor o llama viva. El aparato solo puede usarse en
climas moderados. Se deben evitar los ambientes extremadamente fríos o cálidos.
Temperatura de funcionamiento entre 0 ° y 35 °C.
4. Evite usar el dispositivo cerca de campos magnéticos fuertes.
5. Una descarga electrostática puede entorpecer el uso normal de este dispositivo. En tal caso,
simplemente reinícielo siguiendo el manual de instrucciones. Durante la transmisión de
archivos, por favor manéjelo con cuidado opérelo en un entorno libre de electricidad
estática.
6. ¡Advertencia! Nunca inserte un objeto en el producto a través de las ventilaciones o
aperturas. Alto voltaje fluye a través del producto e insertar un objeto puede provocar una
descarga eléctrica y/o un cortocircuito de sus componentes internos. Por el mismo motivo,
no derrame agua o líquidos en el producto.
7. No lo utilice en zonas húmedas, como cuartos de baño, cocinas en las que se forme vapor ni
cerca de piscinas.
8. El aparato no debe exponerse a goteos o salpicaduras y asegúrese de que se colocan sobre
o cerca del aparato objetos llenos de líquidos, como jarrones.
9. No use este dispositivo cuando se pueda producir condensación. Cuando utilice la unidad
en una habitación húmeda y cálida con humedad, pueden generarse gotas de agua o
condensación dentro de la unidad y es posible que no funcione correctamente; apague la
unidad durante 1 o 2 horas antes de encenderla de nuevo: el aparato debe estar seco antes
de conectarse a una fuente de alimentación.
10. Aunque este dispositivo está fabricado con el máximo cuidado y comprobado varias veces
antes de salir de fábrica, todavía es posible que se puedan producir problemas, al igual que
con todos los aparatos eléctricos. Si observa la aparición de humo, una acumulación
excesiva de calor o cualquier otro fenómeno inesperado, deberá desconectar
inmediatamente el enchufe de la toma de corriente.
11. Este dispositivo debe funcionar con una fuente de alimentación que se especifica en la
etiqueta de especificaciones. Si no está seguro del tipo de alimentación que se usa en su
hogar, consulte con el distribuidor o una compañía eléctrica local.
12. Manténgalo alejado de los animales. A algunos animales les gusta morder los cables de
alimentación.
13. Para limpiar el dispositivo use un paño seco y suave. No utilice líquidos disolventes ni con
base de petróleo. Para eliminar manchas difíciles, puede usar un paño húmedo con
detergente diluido.
14. El proveedor no asume ninguna responsabilidad por daños o datos perdidos provocados
por un funcionamiento incorrecto, uso incorrecto, modificación del dispositivo o sustitución
de la batería.
15. No interrumpa la conexión cuando el dispositivo esté formateando o transfiriendo archivos.
En caso contrario, los datos se pueden estropear o perder.
16. Si la unidad dispone de función de reproducción USB, se debe conectar la memoria USB
directamente en la unidad. No utilice cables de extensión USB ya que pueden crear
interferencias que causen una pérdida de datos.
17. La etiqueta de calificación aparece marcada en el panel inferior o posterior del dispositivo.
18. Este aparato no está diseñado para su uso por personas (incluyendo niños) con
discapacidades físicas, sensoriales o mentales o con falta de experiencia o conocimientos,

69
salvo que estén bajo la supervisión o hayan recibido formación sobre el uso correcto del
dispositivo por parte de una persona responsable de su seguridad.
19. Este producto está diseñado para un uso no profesional únicamente y no para un uso
comercial o industrial.
20. Asegúrese de que la unidad esté fijada en una posición estable. La garantía no cubrirá los
daños derivados de usar este producto en una posición inestable, vibraciones o golpes o
por no seguir otras advertencias o precauciones que aparecen en este manual de usuario.
21. Nunca retire la carcasa del dispositivo.
22. Nunca coloque este dispositivo sobre otro equipo eléctrico.
23. Mantenga las bolsas de plástico fuera del alcance de los niños.
24. Use únicamente los dispositivos/accesorios especificados por el fabricante.
25. Remita todas las reparaciones al personal cualificado. Es necesario el mantenimiento
cuando el dispositivo presenta daños en cualesquiera manera, como el cable de
alimentación o el enchufe, cuando se haya vertido líquido o se hayan caído objetos en el
dispositivo, cuando el dispositivo se haya expuesto a la lluvia o humedad, cuando no
funcione normalmente o cuando se haya caído.
26. Una larga exposición a sonidos elevados de reproductores de música personales puede
provocar una pérdida de audición temporal o permanente.
27. Si el producto viene con un cable de alimentación o un adaptador de corriente de CA:
⚫ Si se produce cualquier problema, desconecte el cable de alimentación CA y remítase al
mantenimiento de personal cualificado.
⚫ No pise o pince el adaptador de alimentación. Tenga mucho cuidado, en especial cerca
de las tomas y el punto de salida del cable. No coloque objetos pesados en el
adaptador de alimentación, ya que pueden dañarlo. ¡Mantenga el dispositivo fuera del
alcance de los niños! Si juegan con el cable de alimentación, puede sufrir lesiones
graves.
⚫ Desconecte el dispositivo durante tormentas eléctricas o cuando no vaya a usarse
durante periodos prolongados de tiempo.
⚫ La salida de la toma debe instalarse cerca del equipo y debe ser fácilmente accesible.
⚫ No sobrecargue las tomas CA o los cables de extensión. La sobrecarga puede provocar
un incendio o una descarga eléctrica.
⚫ Los dispositivos con construcción de Clase 1 deben estar conectados a una toma de
corriente con una conexión a tierra protegida.
⚫ Los dispositivos con construcción Clase 2 no requieren una conexión a tierra.
⚫ Sujete siempre el enchufe cuando los extraiga de la toma de corriente. No tire del cable
de alimentación. Esto puede provocar un cortocircuito.
⚫ No utilice un cable de alimentación o enchufe deteriorado o una toma suelta. Si lo hace,
podría provocar un incendio o una descarga eléctrica.
28. Si el producto contiene o se entrega con un mando a distancia que contiene pilas de botón
/ celdas:
Advertencia:
⚫ “Ni ingiera la pila, riesgo de quemadura química” o frase equivalente.
⚫ [El mando a distancia que se suministra] Este producto contiene una pila de tipo
botón/moneda. Si la pila se traga, puede provocar graves quemaduras internas en sólo
2 horas y podría ocasionar la muerte.
⚫ Mantenga las pilas nuevas o usadas fuera del alcance de los niños.
⚫ Si el compartimiento de las pilas no se cierra correctamente, deje de usar el producto y
no lo deje al alcance los niños.
⚫ Si tiene la sospecha de que una pila ha sido ingerida o se encuentra en algún lugar del
cuerpo, busque inmediatamente atención médica.
29. Precaución sobre el uso de las pilas:
⚫ Existe riesgo de explosión si la pila no se sustituye correctamente. Sustitúyala
únicamente con otra del mismo tipo u otro equivalente.
⚫ No se pueden exponer las pilas a temperaturas extremadamente altas o bajas, baja
presión de aire a gran altitud durante el uso, almacenamiento o transporte.
⚫ Si cambia las pilas por otras que no son las correctas, se puede producir una explosión
o la fuga de líquidos o gases inflamables.

70
⚫ Si arroja las pilas al fuego o a un horno caliente, o aplasta o cortar mecánicamente una
pila, podría provocar una explosión.
⚫ Si deja las pilas en un lugar con temperaturas extremadamente altas, se puede producir
una explosión o una fuga de líquido o gas inflamable.
⚫ Si se exponen las pilas a una presión de aire extremadamente baja, se puede producir
una explosión o la fuga de líquidos o gases inflamables.
⚫ Se debe prestar atención a los aspectos medioambientales sobre la eliminación de
baterías.

71
Contenidos que se entregan
1 manual
1 cable de audio RCA
1 cable de alimentación

72
1 cable de conexión USB
1 plato
1 alfombrilla de fieltro

73
Descripción
1. PLATO DEL TOCADISCOS
El plato está equipado con una alfombrilla de fieltro. Esto facilita la manipulación del disco
para el funcionamiento de rasgado. Coloque los discos de vinilo centrados en el plato del
tocadiscos.
2. CONTRAPESO
El ajuste crea la presión descendente adecuada de la aguja sobre el disco. Fíjelo ahora
deslizando el contrapeso sobre el centro del brazo.
3. ESCALA DE AJUSTE DE LA PRESIÓN DE LA AGUJA
Ajuste la alineación de la presión del cartucho de la aguja.
4. DIAL ANTIPATINAZO
Esto se aplica a la fuerza hacia adentro del brazo de forma que no se salte hacia afuera del
disco debido a la fuerza centrífuga del giro del disco.
5. LEVANTADOR DEL BRAZO
Controla la acción de subida y bajada del brazo.
6. CARCASA
Instale aquí el cartucho. Coloque el protector de aguja para proteger la punta de la aguja de
daños durante la instalación.

74
Fije los cables de la manera siguiente:
Blanco (L+)
Canal izquierdo +
Azul (L-)
Canal izquierdo –
Rojo (R+)
Canal derecho +
Verde (R-)
Canal derecho –
7. BOTÓN REPRODUCIR/PAUSA
Pulse este botón para iniciar la reproducción; para hacer una pausa vuélvalo a pulsar o para
reanudar la reproducción tras una pausa.
8. BOTÓN DE CONFIGURACIÓN DE VELOCIDAD DE GIRO 33/45
Pulse estos botones para seleccionar el giro del plato según la velocidad indicada en el disco
para 33, 45 revoluciones por minuto.
9. Tuerca de bloqueo del cabezal
Fije el cabezal insertándolo en el extremo delantero del brazo y girando la tuerca de bloqueo
en sentido horario.
10. Potenciómetro de tono
Se usa para cambiar la velocidad de reproducción de la pista que se está reproduciendo.
11. Interruptor de alimentación /luz estroboscópica
Gire el interruptor en sentido horario para encender la unidad. Gire el interruptor en sentido
antihorario para apagar la unidad. La luz estroboscópica se encenderá automáticamente
cuando la unidad esté encendida.
1. SALIDA RCA
La SALIDA L y R se usan para conectar el tocadiscos a la entrada analógica RCA del
amplificador.

75
2. INTERRUPTOR DE LÍNEA /FONO
El tocadiscos dispone de un preamplificador de FONO integrado que está desconectado si
dispone de un preamplificador externo. Si desea usar las señales amplificadas por el
amplificador interno del tocadiscos, mueva el interruptor a LINE. Si desea usar un
preamplificador externo FONO, mueva el interruptor a PHONO.
Si el interruptor PRE-AMP está en posición ON, nunca conecte la unidad a una
entrada de fonógrafo.
El sonido se oirá muy distorsionado de vez en cuando y existe el riesgo de que los
amplificadores y/o altavoces resulten dañados.
3. PUERTO USB
El sonido del disco de vinilo se convierte a digital con una resolución máxima de 48KHz /
16bits. Use el cable USB que se presenta con el dispositivo para conectar el tocadiscos al
ordenador. El software Audacity debe descargarse.
4. ENTRADA CA
Enchufe aquí el cable de alimentación.
5. ALIMENTACIÓN CONECTADA/DESCONECTADA
Úselo para conectar y desconectar el tocadiscos.

76
Montaje del tocadiscos:
1. Sacarlo de la caja:
Saque cuidadosamente la unidad principal de la caja con el material de embalaje intacto.
Quite el material de embalaje después de sacar la unidad de la caja de transporte. Asegúrese
de encontrar todos los accesorios en el material de embalaje.
2. Adaptador de 45rpm:
Encuentre y saque el adaptador de 45 rpm del material de embalaje y colóquelo en el recorte
para el adaptador de 45 de la parte superior de la unidad principal.
3. Plato de tocadiscos:
Retire el plato del tocadiscos del material de embalaje y coloque el plato suavemente en el
EJE CENTRAL de la base del tocadiscos.
4. Alfombrilla de fieltro:
Retire la alfombrilla de fieltro negra del envase y colóquela en el PLATO.
5. Carcasa:
Inserte la CARCASA en el extremo frontal del CONJUNTO DEL BRAZO. Sostenga firmemente la
CARCASA en el extremo frontal del conjunto del brazo y gire la TUERCA DE SEGURIDAD DE LA
CARCASA en sentido contrario a las agujas del reloj para asegurar la CARCASA en el
CONJUNTO DEL BRAZO.
EN
ES
HEADSHELL
CARCASA
TONEARM ASSEMBLY
CONJUNTO DEL BRAZO
HEADSHELL LOCKING NUT
TUERCA DE SEGURIDAD DE LA CARCASA
6. Contrapeso:
Encuentre y saque el CONTRAPESO del brazo del embalaje. Deslice el CONTRAPESO hacia la
parte trasera del CONJUNTO DEL BRAZO. Gírelo ligeramente y se atornillará en el eje trasero
del brazo

77
EN
ES
TONEARM ASSEMBLY
CONJUNTO DEL BRAZO
COUNTERWEIGHT
CONTRAPESO
Inicio rápido del tocadiscos:
1. Cambiar la velocidad del plato
Pulse los botones de configuración de velocidad de giro 33/45 para cambiar la velocidad de
giro delo plato.
2. Arranque y parada del plato
Use el BOTÓN REPRODUCCIÓN/PAUSA para cambiar entre los giros del plato y los modos de
pausa.
3. Control de modulación
1) El ajuste de la modulación es un ajuste fino de las rpm del plato.
2) El ajuste de la modulación es variable y se puede ajustar entre -10% y +10% de la velocidad
del plato seleccionada.
3) La modulación se cambia subiendo y bajando el deslizador de modulación.
4) Los puntos del indicador en el borde del PLATO DEL TOCADISCOS pueden usarse para tener
una aproximación visual al tono del plato. Estos indicadores se iluminan mediante la luz
estroboscópica a medida que pasan encendiendo el dispositivo con el interruptor de
alimentación. Es posible que cada fila de INDICADORES ESTROBOSCÓPICOS quede quieta
en diferentes niveles de modulación.
Nota: El uso de luces fluorescentes intensas encima del tocadiscos puede afectar la
precisión del indicador de la LUZ PILOTO ESTROBOSCÓPICA.

78
Instalación
Instalación del tocadiscos:
1. No coloque la unidad en un lugar expuesto a la luz directa del sol ni cerca de un aparato de
calefacción de cualquier tipo.
2. No coloque la unidad en un lugar con un nivel de humedad elevado o con mucho polvo.
3. El cartucho puede recoger una ligera presión o vibración del sonido de los altavoces cercanos.
No instale esta unidad muy cerca de altavoces para conseguir los mejores resultados.
4. Instale esta unidad en una superficie horizontal estable y sin vibraciones.
5. Los pies de goma han sido diseñados especialmente para aislar la unidad de vibraciones
excesivas. También se pueden usar los pies para estabilizar horizontalmente el cuerpo
principal. Ajuste la altura de la unidad girando los pies en el sentido de las agujas del reloj o
en sentido contrario.
Equilibrio del brazo y presión de la aguja:
1. Ajuste del equilibrio horizontal cero y de la presión de la aguja:
2. Retire la cubierta protectora de la aguja, si está equipada. Nunca toque la punta de la aguja
durante el ajuste.
3. Baje la PALANCA DEL BRAZO.
4. Libere la abrazadera del brazo y retire el brazo del apoyabrazos.
5. Ajuste el ANTIPATINAJE en cero.
6. Gire el CONTRAPESO en cualquier dirección hasta que el BRAZO esté perfectamente
equilibrado en horizontal (flotando libremente).
7. Vuelva a colocar el BRAZO sobre el apoyabrazos y fíjelo.
8. Mantenga el BRAZO inmóvil con una mano y gire solo el anillo de presión de la aguja (3) para
alinear el número “0” del anillo con la línea central del eje trasero del brazo.
9. Gire el contrapeso en dirección contraria a las agujas del reloj hasta llegar al valor de la escala
correspondiente a la presión recomendada de la aguja.
Nota: La presión recomendada de la aguja del cartucho opcional que puede venir incluido
con su unidad es 2,5 a 3 gramos. Para otros sistemas de cartucho, consulte las
especificaciones del fabricante incluidas con el cartucho.
Antipatinaje:
El ajuste antipatinaje evita que el CONJUNTO DEL BRAZO salte en el disco por la fuerza centrífuga
causada por la rotación del PLATO. Se debe ajustar la perilla de control ANTIPATINAJE con el
mismo valor que la presión de la aguja. Por ejemplo, si el CONTRAPESO está ajustado en 2,5
gramos, el valor de ANTIPATINAJE también debe estar ajustado en 2,5.

79
Mantenimiento del producto:
1. Limpie periódicamente la aguja con un cepillo suave para prevenir la acumulación de polvo.
2. Compruebe la aguja si el sonido se oye distorsionado o con ruido. Sustituya la aguja con una
nueva si está desgastada.
3. Se debe limpiar el polvo de la cubierta y del gabinete del tocadiscos con un trapo suave y
seco de vez en cuando.
4. No se deben usar materiales volátiles, como: alcohol, disolvente, bencina, etc. Podrían
quitar la pintura o dañar el brillo.
Vista general del software Audacity
Audacity es un software gratuito con la Licencia Pública General (GPL, por sus siglas en inglés) de GNU.
Puede encontrar más información y el código fuente abierto en la página web
https://www.audacityteam.org/download/
* Asegúrese de instalar el software antes de empezar.
Configurar el PC para trabajar con Audacity
1. Conecte el cable USB que se adjunta al tocadiscos.
2. Conecte la toma USB izquierda de este cable USB a su PC.
3. Instale el software de grabación Audacity.
4. Abra el programa Audacity.
5. Seleccione Preference (Preferencias) en la pestaña Edit (Editar) del menú de Audacity.
6. Seleccione la pestaña Audio I/O (E/S de audio) en la esquina superior izquierda.
En Reproducción, Dispositivo, seleccione su tarjeta de sonido interna.
En Grabación, Dispositivo, seleccione Códec de audio USB (USB Audio CODEC).
En Grabación, Canales, seleccione 2 (Stereo) (2 (Estéreo)).

80
Marque la casilla Play other tracks while recording new one (Reproducir otras pistas
mientras se graba una nueva).
Marque la casilla Software Playthrough (Playthrough de software).
Grabar álbumes con Audacity
1. Guardar un proyecto
Audacity escribe todo el audio grabado y modificado en un directorio llamado
Projectname_data, ubicado donde se guardó el archivo de proyecto.
Por tanto, seleccione Save Project as (Guardar proyecto como) en la pestaña Archivo (File)
de Audacity y elija una ubicación y nombre de archivo para el proyecto.
Tenga en cuenta que cuando inicie Audacity por primera vez sólo estará disponible la
opción “Save As...” (Guardar como…) en el menú.

81
2. Cómo grabar
Ajuste el tocadiscos USB para reproducir la canción o álbum que desea grabar.
Haga clic en el botón rojo de grabación para empezar la grabación.
Baje el brazo del tocadiscos USB sobre el álbum y la pista que desea grabar.
Haga clic en el botón azul de pausa para hacer una pausa en la grabación. Vuelva a
pulsarlo para continuar.
Pulse el botón amarillo de Parar .
Ya está. Ahora puede practicar con las grabaciones y probar las opciones de edición de Audacity.
Recuerde que puede usar la función Deshacer de forma casi ilimitada mientras el proyecto esté
abierto.
NOTA: No se pueden grabar CD directamente con la aplicación Audacity. Deberá usar otras
aplicaciones de grabación de CD.

82
Especificaciones
General
Modelo:
L-3809
Dimensiones:
430(A) x 350(D) x 155(A) mm
Peso:
6,18 Kg
Alimentación eléctrica:
AC 230 V~ 50 Hz (Países Bajos); AC 240 V~ 50 Hz
(Reino Unido)
Consumo de energía:
30 W
Condiciones de prueba estándar:
Temperatura ambiente: 20 +/- 2 grados C
Humedad relativa:
65% +/- 5%
NOTA: Se pueden realizar mediciones entre 5 °C y 35 °C y una humedad relativa de 45% a 85%.
Sección del tocadiscos:
Tipo:
2 velocidades, manual
Motor:
16 polos, 3 fases, sin cepillo
Método de accionamiento:
Accionamiento directo
Plato de tocadiscos:
332 mm (aluminio)
Velocidad:
33
1/3
y 45 rpm
Sorpresa y vibración:
Menos de 0,3% WRMS (JIS WTD) con 33
1/3
rpm
Proporción Señal/Ruido:
Más de 50 dB (DIN-B)
Controles de modulación:
+/- 10%
Par de arranque:
Más de 3,6 kgf.cm
Sistema de frenado:
Freno electrónico
Tiempo de inicio:
Menos de 1 segundo
Tiempo de frenado:
Menos de 1 segundo
Tiempo para cambio de velocidad:
Menos de 1 segundo de 33
1/3
a 45 rpm.
Menos de 1 segundo de 45 a 33
1/3
rpm.
Función USB:
Grabación USB Resolución
16 bit 44,1 KHz o 48 KHz
Interfaz informática:
USB 1.1 que se compatible con Windows 7/8/10 o
MAC OSX
Sección del brazo:
Tipo:
Brazo en forma de S con equilibrio estático
Longitud efectiva:
220 mm
Saliente:
10 mm
Ángulo de error de tracción:
Menos de 3 grados
Rango de ajuste de fuerza de
tracción:
3-4 g
Tipo de cartucho MM:
Audio Technica AT-3600L
Presión de la aguja:
3,5 ± 0,5 g
Peso del cartucho:
5 ± 0,5 g
Alcance antipatinaje:
0-4 g

83
Separación de canal:
Más de 18 dB
Balance de canal:
En un rango de 2,5 dB a 1KHz
Preamplificador
Salida:
150 mV +/-4 dB (entrada: 2,5 mV 1 KHz)
RIAA (respuesta de frecuencia):
20 Hz-20 KHz +1/-3 dB (entrada: 1,5 mV 1 KHz)
Garantía
Lenco ofrece servicio y garantía en cumplimiento con las leyes de la Unión Europea, lo cual
implica que, en caso de que su producto precise ser reparado (tanto durante como después del
periodo de garantía), deberá contactar directamente con su distribuidor.
Nota importante: No es posible enviar sus reparaciones directamente a Lenco.
Nota importante: Si la unidad es abierta por un centro de servicio no oficial, la garantía quedará
anulada.
Este aparato no es adecuado para el uso profesional. En caso de darle un uso profesional, todas
las obligaciones de garantía del fabricante quedarán anuladas.
Exención de responsabilidad
Regularmente se llevan a cabo actualizaciones en el Firmware y en los componentes del
hardware. Por esta razón, algunas de las instrucciones, especificaciones e imágenes incluidas en
este documento pueden diferir ligeramente respecto a su situación particular. Todos los
elementos descritos en esta guía tienen un objetivo de mera ilustración, y pueden no ser de
aplicación en su situación particular. No se puede obtener ningún derecho ni derecho legal a
partir de la descripción hecha en este manual.
Eliminación del antiguo dispositivo
Este símbolo indica que no deberá deshacerse del producto eléctrico o batería
en cuestión junto con los residuos domésticos, en el ámbito de la UE. Para
garantizar un tratamiento residual correcto del producto y su batería, por favor,
elimínelos cumpliendo con las leyes locales aplicables sobre requisitos para el
desechado de equipos eléctricos y baterías. De hacerlo, ayudará a conservar
recursos naturales y mejorar los estándares de protección medioambiental en
el tratamiento y eliminación de residuos eléctricos (Directiva sobre la
Eliminación de Equipos Eléctricos y Electrónicos).
Marca CE
Los productos con la marca CE cumplen con la Directiva EMC (2014/30/EU) y
con la Directiva de Bajas Tensiones (2014/35/EU) emitida por la Comisión de
la Unión Europea.
Por la presente, Lenco Benelux BV, Thermiekstraat 1a, 6361 HB Nuth, Países
Bajos, declara que este producto cumple con las exigencias esenciales.
La declaración de conformidad puede consultarse en [email protected]


85
Italiano
L-3809
ATTENZIONE:
L'utilizzo di controlli o regolazioni o l'esecuzione di procedure diverse da quelle specificate può
causare l'esposizione a radiazioni pericolose.
PRECAUZIONI PRIMA DELL'USO
CONSERVARE QUESTE ISTRUZIONI:
Non coprire o bloccare le aperture di ventilazione. Quando si posiziona il dispositivo su uno
scaffale, lasciare uno spazio libero di 5 cm (2") attorno all'intero perimetro.
Installare secondo quanto riportato nel manuale fornito.
Tenere il dispositivo lontano da sorgenti termiche come radiatori, termosifoni, stufe, candele
e altri prodotti che generano calore o fiamme libere. Il dispositivo può essere utilizzato solo
in climi moderati. Evitare ambienti estremamente freddi o caldi. Temperatura operativa
compresa tra 0° e 35°C.
Evitare l'uso del dispositivo in presenza di forti campi magnetici.
Le scariche elettrostatiche possono interferire con il normale utilizzo di questo dispositivo. In
tal caso, è sufficiente ripristinare e riavviare il dispositivo seguendo il manuale di istruzioni.
Durante la trasmissione di file, maneggiarlo con cura e operare in un ambiente privo di
elettricità statica.
Avviso! Non inserire mai oggetti nel prodotto attraverso le prese d'aria o le aperture.
All'interno del prodotto sono presenti tensioni elevate e l'inserimento di un oggetto può
provocare scariche elettriche e/o cortocircuiti. Per lo stesso motivo, non versare acqua o
liquidi sul prodotto.
Non utilizzare in aree umide o bagnate come bagni, cucine con vapore o piscine.
Non esporre il dispositivo a schizzi o gocciolamenti di liquidi; non poggiare sopra o accanto al
dispositivo oggetti contenenti liquidi, ad esempio vasi.
Non utilizzare questo dispositivo in caso di condensa. Quando l'unità viene utilizzata in una
stanza calda e umida, all'interno dell'unità possono formarsi goccioline d'acqua o condensa e
l'unità potrebbe non funzionare correttamente; lasciare l'unità spenta per 1 o 2 ore prima di
accenderla: l'unità deve essere asciutta prima di essere alimentata.
Sebbene questo dispositivo sia fabbricato con la massima cura e controllato più volte prima
di lasciare la fabbrica, è comunque possibile che si verifichino problemi come per qualsiasi
altra apparecchiatura elettrica. Se si nota fumo, eccessivo accumulo di calore o altri fenomeni
imprevisti, scollegare immediatamente la spina dalla presa di alimentazione principale.
Questo dispositivo deve funzionare con una fonte di alimentazione con i valori indicati
sull'etichetta delle specifiche. Se non si è sicuri del tipo di alimentazione utilizzata in casa,
consultare il rivenditore o la compagnia elettrica locale.
Tenere fuori dalla portata degli animali domestici, Ad alcuni animali piace mordere i cavi di
alimentazione.
Per pulire il dispositivo, utilizzare un panno morbido e asciutto. Non usare solventi o liquidi a
base di benzina. Per rimuovere le macchie persistenti, è possibile utilizzare un panno umido
con detergente diluito.
Il fornitore non è responsabile per danni o perdita di dati causati da malfunzionamento, uso
improprio, modifica del dispositivo o sostituzione della batteria.
Non interrompere la connessione quando il dispositivo sta formattando o trasferendo file. In
caso contrario, i dati potrebbero essere danneggiati o andare persi.
Se l'unità dispone della funzione di riproduzione USB, la chiavetta USB deve essere collegata
direttamente all'unità. Non utilizzare una prolunga USB perché può causare interferenze con
conseguenti anomalie dati.
L'etichetta di classificazione è stata contrassegnata sul pannello inferiore o posteriore del
dispositivo.
Questo dispositivo non è destinato all'uso da parte di persone (compresi i bambini) con
disabilità fisiche, sensoriali o mentali, o mancanti di esperienza e conoscenza, a meno che
non siano sotto supervisione o abbiano ricevuto istruzioni circa l'uso corretto del dispositivo
da parte di chi è responsabile per la loro sicurezza.
Questo prodotto è destinato esclusivamente a un uso non professionale e non può essere
utilizzato per scopi commerciali o industriali.

86
Assicurarsi che l'unità sia collocata in una posizione stabile. I danni causati dall'uso di questo
prodotto in una posizione instabile, vibrazioni o urti o la mancata osservanza di qualsiasi altro
avvertimento o precauzione indicati in questo manuale utente non saranno coperti da
garanzia.
Non rimuovere mai la carcassa di questo dispositivo.
Non posizionare mai questo dispositivo su altre apparecchiature elettriche.
Non permettere ai bambini di accedere ai sacchetti di plastica.
Utilizzare solo collegamenti/accessori specificati dal produttore.
Rivolgersi a personale qualificato per l'assistenza. L'assistenza è necessaria quando il
dispositivo è stato in qualche modo danneggiato, come il cavo di alimentazione o la spina,
quando è stato versato del liquido o sono caduti oggetti nel dispositivo, quando il dispositivo
è stato esposto a pioggia o umidità, non funziona normalmente o è stato abbandonato.
L'esposizione prolungata ai suoni ad alto volume dei lettori musicali può causare una perdita
temporanea o permanente dell'udito.
Se il prodotto viene consegnato con cavo di alimentazione o adattatore di alimentazione CA:
⚫ In caso di problemi, scollegare la scheda di alimentazione CA e rivolgersi a personale
qualificato.
⚫ Non calpestare o schiacciare l'alimentatore. Fare molta attenzione, in particolare vicino
alle prese e al punto di uscita del cavo. Non posizionare oggetti pesanti
sull'alimentatore in quanto potrebbero danneggiarlo. Tenere il dispositivo fuori dalla
portata dei bambini. Giocando con il cavo di alimentazione possono infortunarsi
seriamente.
⚫ Scollegare il dispositivo durante i temporali o quando non viene utilizzato per un lungo
periodo.
⚫ La presa di corrente deve essere installata vicino all'apparecchio e deve essere
facilmente accessibile.
⚫ Non sovraccaricare le prese CA né le prolunghe. Il sovraccarico può causare incendi o
scariche elettriche.
⚫ I dispositivi con struttura di classe 1 devono essere collegati a una presa di rete con
connessione di messa a terra di protezione.
⚫ I dispositivi con struttura di classe 2 non richiedono un collegamento a terra.
⚫ Tenere sempre la spina quando la si estrae dalla presa di rete. Non tirare il cavo di
alimentazione. Ciò può causare un cortocircuito.
⚫ Non utilizzare un cavo o una presa di alimentazione danneggiati o una presa non
fissata. Tale azione potrebbe provocare incendi o scariche elettriche.
Se il prodotto contiene o viene consegnato con un telecomando contenente batterie a
pulsante/a bottone:
Avvertenza:
⚫ "Non ingerire la batteria, pericolo di ustioni chimiche" o funzionamento equivalente.
⚫ (Il telecomando in dotazione con) Il presente prodotto contiene una pila a bottone. Se
ingerita, la batteria può causare gravi ustioni interne in sole 2 ore e portare alla morte.
⚫ Tenere le batterie, nuove o usate, fuori dalla portata dei bambini.
⚫ Se il vano batteria non si chiude completamente, interrompere l’uso del dispositivo e
tenerlo fuori della portata dei bambini.
⚫ Se si teme che delle batterie possano essere state inghiottite o essere venute a
contatto con qualsiasi parte interna del corpo, contattare immediatamente un medico.
Precauzioni sull'uso delle batterie:
⚫ Pericolo di esplosione se la batteria viene sostituita in modo errato. Sostituire solo con
lo stesso tipo o equivalente.
⚫ Non sottoporre le batterie a temperature estreme alte o basse, bassa pressione
dell'aria ad alta quota durante l'uso, lo stoccaggio o il trasporto.
⚫ La sostituzione con una batteria di tipo errato può provocare un'esplosione o la perdita
di liquidi o gas infiammabili.
⚫ Lo smaltimento di una batteria nel fuoco o in un forno caldo o lo schiacciamento o il
taglio meccanico di una batteria possono provocare un'esplosione.
⚫ Lasciare una batteria in un ambiente circostante a temperatura estremamente elevata
può provocare un'esplosione o una perdita di liquidi o gas infiammabili.

87
⚫ Una batteria soggetta a una pressione dell'aria estremamente bassa può provocare
un'esplosione o una perdita di liquidi o gas infiammabili.
⚫ È necessario prestare attenzione agli aspetti ambientali legati allo smaltimento delle
batterie.

88
Fornitura
1 Manuale
1 Cavo audio RCA
1 Cavo di alimentazione

89
1 Cavo di collegamento USB
1 Piatto
1 Tappetino in feltro

90
Descrizione
1. PIATTO GIREVOLE
Il piatto è dotato di un tappetino in feltro che facilita la manipolazione del disco durante
l'esecuzione dello scratching. Posizionare i dischi in vinile al centro del piatto del giradischi.
2. CONTRAPPESO
La regolazione crea la giusta pressione verso il basso della puntina sul disco. Fissare ora il
contrappeso facendolo scorrere sulla parte posteriore del braccio.
3. SCALA DI REGOLAZIONE DELLA PRESSIONE DELLA PUNTINA
Consente l'allineamento della pressione sulla testina del braccio.
4. MANOPOLA ANTISKATING
Applica una forza verso l'esterno al braccio del giradischi, in modo che questo non scivoli
verso l'interno del disco a causa della forza centrifuga del disco che gira.
5. LEVA DI SOLLEVAMENTO BRACCIO
Controlla il sollevamento e l'abbassamento del braccio.
6. PORTATESTINA
Installare qui la testina. Per proteggere la puntina da eventuali danni, durante l'installazione
applicare l'apposita protezione.

91
Collegare i cavi come indicato di seguito:
Bianco (L+)
Canale sinistro +
Blu (L-)
Canale sinistro –
Rosso (R+)
Canale destro +
Verde (R-)
Canale destro –
7. PULSANTE RIPRODUZIONE/PAUSA
Premere questo pulsante per avviare la riproduzione o riprenderla dopo una pausa.
8. PULSANTE DI SELEZIONE VELOCITÀ 33/45 GIRI
Premere questi pulsanti per selezionare la velocità di rotazione del piatto come indicato sul
disco ( 33 o 45 giri al minuto).
9. Dado di bloccaggio portatestina
Per fissare il portatestina, inserirlo nell'estremità anteriore del braccio del giradischi, quindi
ruotare il dado di bloccaggio in senso orario.
10. Regolatore del pitch
Utilizzato per cambiare la velocità della traccia in riproduzione.
11. Interruttore/Luce stroboscopica
Girare la manopola in senso orario per accendere l'unità. Girare la manopola in senso
antiorario per spegnere l'unità. La luce stroboscopica si attiva automaticamente quando
l'unità è accesa.

92
1. USCITA RCA
Le uscite L e R sono utilizzate per la connessione dell'ingresso analogico di un amplificatore.
2. SELETTORE LINE/PHONO
Il giradischi è dotato di un preamplificatore PHONO integrato che viene disinserito se collega
un preamplificatore esterno. Se si desidera utilizzare i segnali amplificati dall'amplificatore
interno del giradischi, spostare l'interruttore su LINE. Se invece si vuole utilizzare un
preamplificatore esterno PHONO, spostare l'interruttore su PHONO.
Non collegare mai a un ingresso Phono se l'interruttore PRE-AMP è su ON.
L'audio risulterà fortemente distorto e c'è il rischio che l'amplificatore e/o gli
altoparlanti vengano danneggiati.
3. PORTA USB
Il suono dei dischi in vinile viene convertito in un formato digitale con una risoluzione
massima di 48 KHz/16 bit. Utilizzare il cavo USB fornito con il dispositivo per collegare il
giradischi al computer. Occorre scaricare il software Audacity
4. AC IN
Collegare qui il cavo di alimentazione.
5. ACCENDI/SPEGNI
Utilizzare per accendere e spegnere il giradischi.1

93
Montaggio del giradischi:
1. Rimozione dalla scatola:
Estrarre con cautela l'unità principale dalla scatola insieme al materiale d'imballaggio intatto,
quindi rimuovere quest'ultimo dall'unità. Accertarsi che tutti gli accessori si trovino nel
materiale d'imballaggio.
2. Adattatore 45 giri:
Rimuovere l'adattatore per 45 giri dal materiale d'imballaggio e posizionarlo nell'apposito
spazio sulla parte superiore dell'unità principale.
3. Piatto del giradischi:
Rimuovere il piatto del giradischi dal materiale d'imballaggio e posizionarlo delicatamente sul
perno centrale della base del giradischi.
4. Tappetino in feltro:
Rimuovere il tappetino in feltro dal materiale d'imballaggio e posizionarlo sul PIATTO.
5. Portatestina:
Inserire il PORTATESTINA nella parte anteriore del GRUPPO BRACCIO. Tenendo ben fermo il
PORTATESTINA nella parte anteriore del gruppo braccio, girare il DADO DI BLOCCAGIO DEL
PORTATESTINA in senso antiorario per fissare saldamene quest'ultimo al GRUPPO BRACCIO.
EN
IT
HEADSHELL
PORTATESTINA
TONEARM ASSEMBLY
GRUPPO BRACCIO
HEADSHELL LOCKING NUT
DADO DI BLOCCAGGIO PORTATESTINA
6. Contrappeso:
Estrarre il CONTRAPPESO del braccio dalla confezione. Far scorrere il CONTRAPPESO sul retro
del GRUPPO BRACCIO. Ruotarlo leggermente per avvitarlo sul perno posteriore del braccio.

94
EN
IT
TONEARM ASSEMBLY
GRUPPO BRACCIO
COUNTERWEIGHT
CONTRAPPESO
Avvio rapido del giradischi:
1. Modifica della velocità del piatto
Premere il pulsante di SELEZIONE DELLA VELOCITÀ 33/45 GIRI per cambiare la velocità di
rotazione del piatto.
2. Avvio e arresto del piatto
Utilizzare il pulsante di RIPRODUZIONE/PAUSA per avviare e interrompere la rotazione del
piatto.
3. Controllo del pitch
1) La regolazione del pitch consente una regolazione precisa del numero di giri al minuto del
piatto.
2) La regolazione del pitch è variabile e può essere regolata tra -10% e +10% della velocità
selezionata sul piatto.
3) Il pitch può essere modificato facendo scorrere l'apposito cursore con un movimento verso
l'alto e verso il basso.
4) I punti indicatori sul bordo del PIATTO DEL GIRADISCHI forniscono una visualizzazione
approssimata del pitch del piatto. Gli indicatori sono illuminati dalla LUCE STROBOSCOPICA
mentre passano vicino all'INTERRUTTORE. A diversi livelli di pitch, ogni fila di INDICATORI
STROBOSCOPICI può apparire ferma.
Nota: L'uso di un'illuminazione fluorescente molto intensa direttamente sopra il
giradischi compromette la precisione dell'indicatore della LAMPADA PILOTA DELLA LUCE
STROBOSCOPICA.

95
Impostazione
Installazione del giradischi:
1. Collocare l'unità in un luogo non esposto alla luce diretta del sole e lontano da qualsiasi tipo di
apparecchio per riscaldamento.
2. Non collocare l'unità in luoghi eccessivamente umidi o molto polverosi.
3. La testina può rilevare una leggera pressione sonora o le vibrazioni di altoparlanti vicini. Per
ottenere risultati ottimali, non installare l'unità troppo vicino agli altoparlanti.
4. Installare l'unità su una superficie orizzontale stabile e priva di vibrazioni.
5. I piedini di gomma sono stati appositamente progettati per isolare l'unità da vibrazioni
eccessive. I piedini possono anche essere utilizzati per stabilizzare il corpo principale in
orizzontale. Regolare l'altezza dell'unità girando i piedini in senso orario o antiorario.
Bilanciamento braccio e pressione puntina:
1. Regolazione del bilanciamento zero orizzontale e pressione puntina:
2. Rimuovere la copertura protettiva della puntina, se presente. Non toccare mai la punta della
puntina durante la regolazione.
3. Abbassare la LEVA DEL BRACCIO.
4. Rilasciare il morsetto del braccio e rilasciare il braccio dal supporto.
5. Impostare la regolazione ANTI-SKATE a zero.
6. Ruotare il CONTRAPPESO in entrambe le direzioni fino a quando il BRACCIO non è
perfettamente bilanciato in orizzontale (galleggia liberamente).
7. Riportare il BRACCIO sul supporto e bloccarlo in posizione.
8. Tenere il CONTRAPPESO fermo con una mano e ruotare solo l'anello di pressione della puntina
(3) in modo da allineare il numero "0" dell'anello con la linea centrale dell'albero posteriore
del braccio.
9. Ruotare il CONTRAPPESO in senso antiorario fino al valore della scala corrispondente alla
pressione della puntina consigliata.
Nota: la pressione consigliata per la testina opzionale che può essere stata inclusa con
l'unità è di 2,5 - 3 grammi. Per tutte le altre testine fare riferimento alle specifiche del
produttore incluse con la testina.
Antiskating:
La regolazione dell'antiskating previene al BRACCIO di saltare sul disco a causa della forza
centrifuga che è causata dalla rotazione del PIATTO. La manopola di controllo ANTI-SKATING
dovrebbe essere impostata sullo stesso valore della pressione della puntina. Ad esempio, se il tuo
CONTRAPPESO è impostato su 2,5 grammi, anche il valore ANTI-SKATE dovrebbe essere
impostato su 2,5.

96
Manutenzione del prodotto:
1. Pulire regolarmente la puntina con una spazzola morbida per evitare l'accumulo di polvere.
2. Quando il suono diventa distorto o disturbato, controllare la puntina e se questa presenta
segni di usura, sostituirla con una nuova.
3. Di tanto in tanto, pulire il coperchio antipolvere e il mobile del giradischi con un panno
morbido e asciutto.
4. Non utilizzare materiali volatili quali alcool, diluente, benzina, ecc. in quanto potrebbero
rimuovere la vernice o intaccare la lucentezza.
Panoramica software Audacity
Audacity è un software gratuito, concesso in licenza con GNU General Public License (GPL).
Ulteriori informazioni e codice open source sono disponibili sul Web all'indirizzo
https://www.audacityteam.org/download/
* Assicurarsi di aver installato il software prima di iniziare.
Configurare il PC per lavorare con Audacity
1. Collegare il cavo USB fornito al giradischi.
2. Collegare il connettore USB sinistro di questo cavo USB al proprio PC.
3. Installare il software di registrazione Audacity.
4. Aprire il programma Audacity.
5. Selezionare Preferenza dalla scheda Modifica nel menu Audacity.
6. Selezionare la scheda Audio I/O in alto a sinistra.
In Riproduzione, Dispositivo, selezionare your internal sound card (la propria scheda audio
interna).

97
In Registrazione, Dispositivo, selezionare USB Audio CODEC.
In Registrazione, Canali, selezionare 2 (Stereo).
Spuntare la casella contrassegnata con Play other tracks while recording new one
(Riproduci altre tracce mentre ne si registra una).
Spuntare la casella contrassegnata con Software Playthrough (Video esplicativo del
software).
Registrazione di album con Audacity
1. Salvataggio di un progetto
Audacity scrive tutti gli audio modificati e registrati in una directory chiamata
Projectname_data, che si trova proprio dove si è salvato il file del progetto stesso.
Quindi, selezionare Salva progetto come dalla scheda File Audacity e scegliere una posizione
e nome del file per il progetto.
Si noti che quando si avvia Audacity, solo l'opzione del menu “Save As...” (“Salva come...”) è
disponibile.

98
2. Come registrare
Impostare il giradischi USB per riprodurre il brano o l'album che si desidera registrare.
Fare clic sul pulsante Registra per avviare la registrazione.
Abbassare il braccio sul giradischi USB sul disco e la traccia che si desidera registrare.
Fare clic sul pulsante Pausa blu per mettere in pausa la registrazione. Premere per
continuare.
Fare clic sul pulsante Stop giallo.
Ecco fatto. Ora è possibile muoversi nella registrazione ed esplorare le capacità di editing di
Audacity. Ricordarsi che è possibile usare la funzione Annulla quasi senza limiti mentre il
progetto è aperto.
NOTA: CD non può essere masterizzato direttamente dall'applicazione Audacity. Devono essere
usate altre applicazioni per la masterizzazione di CD.

99
Specifiche
Generale
Modello:
L-3809
Dimensioni:
430(L) x 350(P) x 155(A) mm
Peso:
6,18 kg
Alimentazione:
230 V CA 50 Hz (Paesi Bassi); 240 V CA 50 Hz (Regno
Unito)
Consumo:
30W
Condizioni di test standard:
Temperatura ambiente: 20 +/- 2 °C
Umidità relativa:
65% +/- 5%
NOTA: Misurazioni possono essere eseguite tra 5°C e 35°C e un'umidità relativa tra il 45% e l'85%.
Sezione giradischi:
Tipo:
completamente manuale a 2 velocità
Motore:
16 poli, trifase, senza spazzole
Metodo di trasmissione:
Trazione diretta
Piatto del giradischi:
332 mm (alluminio)
Velocità:
33
1/3
e 45 rpm
Wow and Flutter:
WRMS inferiore allo 0,3% (JIS WTD) con 33
1/3
rpm
Rapporto S/N:
Oltre 50dB (DIN-B)
Controlli della frequenza:
+/- 10%
Coppia di avvio:
Più di 3,6 kgf.cm
Sistema frenante:
freno elettronico
Tempo di avvio:
Meno di 1 sec.
Tempo di frenata:
Meno di 1 sec.
Tempo per cambio di velocità:
Meno di 1 secondo da 33
1/3
a 45 giri.
Meno di 1 secondo da 45 a 33
1/3
giri.
Funzione USB:
registrazione USB Funzione
16 bit 44,1 KHz o 48 KHz
Interfaccia computer:
Compatibile con USB 1.1 7/8/10 o MAC OSX
Sezione braccio:
Tipo:
Braccio a forma di S bilanciato statico
Lunghezza del braccio effettiva:
220mm
Sporgenza:
10 mm
Tracciamento angolo di errore:
Meno di 3 gradi
Tracciamento intervallo regolazione
forza:
3-4g
Tipo testina MM:
Audio Technica AT-3600L
Pressione puntina:
3,5±0,5g
Peso testina:
5±0,5g
Intervallo anti-skating:
0~4g
Separazione canale:
Oltre 18 dB

100
Bilanciamento canale:
Entro 2,5dB a 1KHz
Pre-amplificatore
Uscita:
150mV +/-4dB (IN: 2,5mV 1KHz)
RIAA (Risposta in frequenza):
20Hz~20KHz +1/-3dB (IN: 1,5mV 1KHz)
Garanzia
Lenco offre assistenza post-vendita e garanzia in conformità con i regolamenti europei. Pertanto,
nell’eventualità si rendano necessarie riparazioni (durante e dopo il periodo di garanzia), è
opportuno rivolgersi al locale rivenditore di fiducia.
Nota importante: Non è possibile inviare direttamente a Lenco i prodotti da riparare.
Nota importante: Qualora l’unità venga aperta o manomessa in qualsiasi modo da un centro di
assistenza non riconosciuto, la garanzia decade.
Questo dispositivo non è adatto per l’uso professionale. Qualora l’unità venga utilizzata per scopi
professionali, tutti gli obblighi del produttore derivanti dalla garanzia sono nulli.
Clausola di esclusione della responsabilità
Il firmware e/o i componenti hardware vengono aggiornati regolarmente. Pertanto, è possibile
che alcune parti relative a istruzioni, specifiche e immagini contenute nella presente
documentazione siano diverse da quanto riscontrato nel singolo caso. Tutte le descrizioni incluse
in questa guida sono fornite a puro titolo illustrativo e non si applicano necessariamente alla
specifica situazione. Nessun diritto legale o contrattuale può derivare dalle descrizioni contenute
nel presente libretto di istruzioni.
Smaltimento a fine vita del dispositivo
Questo simbolo indica che in Europa è vietato gettare il relativo prodotto
elettrico o batteria tra i rifiuti domestici. Per il corretto smaltimento a fine vita
del prodotto e della batteria, attenersi alle vigenti normative locali per il
trattamento dei rifiuti da apparecchiature elettriche ed elettroniche e delle
batterie. In tal modo si contribuisce a salvaguardare le risorse naturali e a
migliorare gli standard per la protezione dell’ambiente nel trattamento dei
rifiuti da apparecchiature elettriche ed elettroniche (Direttiva RAEE).
Marchio CE
I prodotti con il marchio CE sono conformi alla Direttiva EMC (2014/30/UE) e
alla Direttiva Bassa Tensione (2014/35/UE) emanate dalla Commissione della
Comunità Europea.
Con la presente, Lenco Benelux BV, Thermiekstraat 1a, 6361 HB Nuth, Paesi
Bassi, dichiara che questo prodotto è conforme ai requisiti essenziali.
La dichiarazione di conformità può essere consultata a tec[email protected]
Assistenza
Per ulteriori informazioni e accesso all’helpdesk, visitare il sito www.lenco.com
Lenco Benelux BV, Thermiekstraat 1a, 6361 HB, Nuth, Paesi Bassi.

101
Русский
L-3809
ВНИМАНИЕ:
Использование элементов управления или регулирования или выполнение процедур,
отличных от указанных в данном документе, может привести к опасному радиационному
облучению.
МЕРЫ ПРЕДОСТОРОЖНОСТИ ПЕРЕД ЭКСПЛУАТАЦИЕЙ
СОБЛЮДАЙТЕ СЛЕДУЮЩИЕ ИНСТРУКЦИИ:
1. Не закрывайте и не блокируйте вентиляционные отверстия. При размещении
устройства на полке оставьте вокруг него 5 см (2 дюйма) свободного пространства.
2. Установите устройство в соответствии с руководством пользователя, входящим в
комплект поставки.
3. Устройство должно находиться вдали от источников тепла, таких как батареи,
обогреватели, нагревательные печи, свечи и другие изделия, выделяющие тепло, или
открытое пламя. Устройство можно использовать только в условиях умеренного
климата. Следует избегать чрезмерно высоких или низких температур окружающей
среды. Рабочая температура составляет от 0 ° до 35 °C..
4. Не используйте устройство вблизи сильных магнитных полей.
5. Электростатический разряд может помешать нормальной эксплуатации устройства.
Если это так, просто перезагрузите и перезапустите устройство, следуя инструкции по
эксплуатации. Соблюдайте осторожность при передаче файлов и эксплуатируйте
устройство в среде, свободной от атмосферных помех.
6. Предупреждение! Не вставляйте какие-либо предметы в изделие через
вентиляционные отверстия или проемы. Через изделие проходит высокое
напряжение, и вставленный предмет может вызвать поражение электрическим током
и/или короткое замыкание внутренних частей. По той же причине не проливайте на
изделие воду или любую другую жидкость.
7. Не используйте устройство в помещениях с повышенной влажностью, таких как
ванные комнаты, кухни, насыщенные паром, или около бассейнов.
8. Не допускайте попадания на устройство капель или брызг. Следите за тем, чтобы на
устройство или рядом с ним не ставились предметы, наполненные жидкостью,
например вазы.
9. Не используйте это устройство в среде, где возможно образование конденсата. При
использовании в теплом и влажном помещении, внутри устройства может
образовываться конденсат, что приведет к некорректной работе проигрывателя.
Оставьте проигрыватель в выключенном состоянии на 1-2 часа и только после этого
включайте заново. Перед включением убедитесь, что устройство полностью высохло.
10. Несмотря на то, что это устройство изготовлено с особой тщательностью и несколько
раз проверено перед выпуском с завода, возникновение проблем все же возможно,
как и со всеми электрическими приборами. Если Вы заметили дым, чрезмерное
нагревание или любые другие неожиданные явления, Вам следует немедленно
отключить вилку от розетки электропитания.
11. Это устройство должно работать от такого источника питания, как указано на
заводской табличке со спецификациями. Если Вы не уверены в том, какой тип
источника питания используется в Вашем доме, проконсультируйтесь с Вашим
торговым посредником или местной электроэнергетической компанией.
12. Размещайте устройство подальше от животных. Некоторым животным нравится кусать
шнур питания.
13. Для очистки устройства используйте мягкую сухую ткань. Не используйте растворители
или жидкости на основе бензина. Чтобы удалить устойчивые пятна, Вы можете
использовать влажную ткань с разбавленным моющим средством.
14. Поставщик не несет ответственности за повреждение или потерю данных, вызванные
неисправностью, неправильным использованием, реконструкцией устройства или
заменой батареи.
15. Не прерывайте соединение, когда устройство форматирует или передает файлы. В
противном случае данные могут быть повреждены или утеряны.

102
16. Если в устройстве есть функция воспроизведения через USB, карту памяти USB следует
подключать напрямую к устройству. Не используйте удлинительный кабель USB, так
как он может вызывать помехи, что приведет к потере данных.
17. Табличка с техническими данными находится на нижней или задней панели
устройства.
18. Это устройство не предназначено для использования людьми (включая детей) с
физическими, умственными расстройствами, расстройствами чувственного
восприятия или с недостатком опыта и знаний, если они не находятся под
наблюдением или не получили инструкции по правильному использованию
устройства со стороны лица, отвечающего за их безопасность.
19. Это изделие не предназначено для профессионального, коммерческого или
промышленного использования.
20. Убедитесь, что устройство установлено в устойчивое положение. Гарантия не
распространяется на повреждения, вызванные эксплуатацией этого изделия в
нестабильном положении, вибрациями или ударами, либо несоблюдением любых
других предупреждений или мер предосторожности, содержащихся в данном
руководстве пользователя.
21. Никогда не снимайте корпус этого устройства.
22. Никогда не помещайте это устройство на другое электрическое оборудование.
23. Не допускайте игр детей с пластиковыми пакетами, используемыми для упаковки
устройства.
24. Используйте только приспособления/принадлежности, указанные производителем.
25. Поручите все обслуживание квалифицированному обслуживающему персоналу.
Обслуживание требуется, когда устройство было повреждено, например, его шнур
электропитания или вилка, когда была пролита жидкость или какие-либо предметы
упали на устройство, когда устройство подверглось воздействию дождя или влаги,
когда устройство работает ненормально, или когда произошло падение устройства.
26. Длительное воздействие громких звуков личных музыкальных проигрывателей может
привести к временной или постоянной потере слуха.
27. Если устройство поставляется в комплекте с адаптером питания или кабелем питания:
При возникновении каких-либо проблем, отключите адаптер питания из розетки и
обратитесь к квалифицированному сервисному инженеру.
Не наступайте на адаптер питания и не зажимайте его. Будьте очень осторожны,
особенно возле штекеров и кабельного вывода. Не размещайте на адаптере
электропитания тяжелые предметы, так как они могут повредить его. Храните
устройство в недоступном для детей месте! Играя с кабелем электропитания, они
могут серьезно пораниться.
Отключайте это устройство от сети во время грозы или если не используете в течение
длительного времени.
Штепсельная розетка должна быть установлена рядом с оборудованием и быть в
непосредственном доступе.
Не перегружайте розетки переменного тока или удлинительные шнуры. Перегрузка
может вызвать возгорание или поражение электрическим током.
Устройства, спроектированные в соответствии с первым классом
электрооборудования по европейским стандартам, «class 1», необходимо
подключать к заземленным розеткам электропитания.
Устройства, спроектированные в соответствии со вторым классом
электрооборудования по европейским стандартам, «class 2», не требуют наличия
заземления в сети электропитания.
Вынимая вилку из штепсельной розетки, всегда держитесь за вилку. Не тяните за
шнур питания. Это может вызвать короткое замыкание.
Не используйте поврежденный шнур питания, вилку или плохо закрепленную
розетку. Это может привести к возгоранию или поражению электрическим током.
28. Если продукт содержит или поставляется с пультом дистанционного управления с
батареей типа «таблетка»/ «монетка»:
Предупреждение:
«Не проглатывать батарею, опасность химического ожога» или аналогичные
действия.

103
[Пульт дистанционного управления, входящий в комплект] Этот продукт содержит
батарейку типа «таблетка»/ «монетка». Если проглотить батарейку, это может
вызвать серьезные внутренние ожоги всего за 2 часа и привести к смерти.
Храните новые и использованные батареи в недоступном для детей месте.
Если батарейный отсек закрывается ненадежно, прекратите использование продукта
и храните его в недоступном для детей месте.
Если Вы считаете, что батарейки могли быть проглотить или они могли попасть в
какую-либо часть тела, немедленно обратитесь за медицинской помощью.
29. Предостережение при использовании батареек:
Опасность взрыва, если батарейка заменена некорректно. Используйте только
батарейки аналогичного типа.
Не подвергайте батарейки высоким или низким температурам, низкому или
высокому давлению.
Замена на некорректную батарейку может привести к взрыву или протеканию
огнеопасной жидкости.
Не подвергайте батарейки воздействию открытого огня или микроволновых волн.
Избегайте механического воздействия.
Проконсультируйтесь с местным законодательством касательно утилизации
батареек.
Комплект поставки
Руководство пользователя – 1 шт.
Кабель RCA – 1 шт.
Кабель питания – 1 шт.

104
Кабель USB – 1 шт.
Опорный диск (тарелка) - 1 шт.
Войлочный мат (слипмат) – 1 шт.

105
Элементы управления и функции
1. ОПОРНЫЙ ДИСК
Опорный диск комплектуется слипматом из войлока что благоприятно сказывается на
воспроизведении записей и защищает их. Размещайте записи по центру диска.
2. ПРОТИВОВЕС
Противовес используется для балансирования тонарма и установки необходимой силы
давления иглы звукоснимателя.
3. ШКАЛА ПРИЖИМНОЙ СИЛЫ ИГЛЫ
Настройка прижимной силы картриджа.
4. РЕГУЛИРОВКА АНТИ-СКЕЙТИНГА
Система анти-скейтинга компенсирует центробежную силу, предотвращая
проскальзывание иголки звукоснимателя во время воспроизведения. Ручка
регулировки силы анти-скейтинга должна быть установлена на то же значение, что и
сила давления иглы звукоснимателя.
5. РЫЧАГ УСТАНОВКИ ТОНАРМА
Этот рычаг позволяет плавно опускать и поднимать тонарм не повреждая поверхность
пластинки.
6. ГОЛОВНАЯ ЧАСТЬ ТОНАРМА

106
Место для установки картриджа. Во время установки наденьте защитную крышку на
иглу, чтобы избежать ее повреждения.
Подключите провода следующим образом:
Белый (L+)
Левый канал +
Синий (L-)
Левый канал –
Красный (R+)
Правый канал +
Зеленый (R-)
Правый канал –
7. КНОПКА PLAY/PAUSE
Нажмите эту кнопку, чтобы начать проигрыание или возобновить проигрывание после
паузы.
8. КНОПКА ВЫБОРА СКОРОСТИ 33/45-RPM
Нажатие этих кнопок активирует режим работы проигрывателя со скоростью вращения
диска 33 или 45 оборотов в минуту (RPM).
9. Стопорная гайка головки тонарма
Установите картридж вставив его во фронтальную часть тонарма и закрутив стопорную
гайку по часовой стрелке.
10. СЛАЙДЕР ПОДСТРОЙКИ ТОНА (Pitch fader)
Этот слайдер позволяет плавно изменять скорость вращения и, соответственно,
скорость и тон звучания записи.
11. Кнопка питания / Строб свет
Поверните переключатель по часовой стрелке, чтобы включить проигрыватель.
Поверните переключатель против часовой стрелки, чтобы выключить проигрыватель.
Строб свет включится автоматически после включения проигрывателя.

107
1. ВЫХОДНЫЕ РАЗЪЕМЫ RCA
Разъемы используются для подключения ко входу усилителя, предусилителя или
фонокорректора в зависимости от положения переключателя «PHONO/LINE». Красная и
белая маркировка разъемов RCA обозначает правый и левый каналы соответственно.
Заземление подключается к «земле» предусилителя или фонокорректора.
2. ПЕРЕКЛЮЧАТЕЛЬ «PHONO/LINE»
Этот переключатель служит для включения / выключения встроенного фонокорректора.
Это позволяет использовать как внешний усилитель с линейными входами, так и
внешний фонокорректор или усилитель с блоком фонокорректора. Чтобы использовать
встроенный фонокорректор, переведите переключатель в положение LINE. Чтобы
использовать внешний предусилитель, переведите переключатель в положение
PHONO.
Ни в коем случае не подключайте предусилитель при включенном
фонокорректоре! Это вызовет искажение звучания и может повредить
усилитель/динамики.
3. РАЗЪЕМ USB
Записи с пластинок конвертируются в цифровые версии (48 кГц / 16 бит). Используйте
комплектный кабель USB для подключения к компьютеру. Для оцифровки необходимо
скачать ПО Audacity.
4. РАЗЪЕМ ПОДКЛЮЧЕНИЯ КАБЕЛЯ ПИТАНИЯ
Подключите комплектный кабель питания в этот разъем.
5. КНОПКА ВКЛЮЧЕНИЯ/ВЫКЛЮЧЕНИЯ
Используйте для включения или выключения проигрывателя.

108
Сборка проигрывателя:
1. Достаньте проигрыватель из упаковки:
Аккуратно извлеките проигрыватель вместе с упаковойчным материалом из упаковки.
Снимите упаковочный материал с проигрывателя после извлечения из упаковки.
Убедитесь, что внутри коробки находится полный комплект поставки.
2. Адаптер на 45 оборотов:
Найдите и извлеките адаптер на 45 оборотов из упаковочного материала и разместите
адаптер в специальной выемке на виниловом проигрывателе.
3. Диск проигрывателя:
Извлеките диск из упаковочного материала и аккуратно разместите его на центральном
шпинделе винилового проигрывателя.
4. Войлочный мат (слипмат):
Извлеките войлочный мат (слипмат) из упаковки и разместите на диске.
5. Картридж:
Вставьте картридж во фронтальную часть тонарма. Придерживая вставленный в тонарм
картридж аккуратно закрутите стопорную гайку против часовой стрелки, чтобы
зафиксировать картридж в тонарме.
6. Противовес:
Найдите и извлеките из упаковки противовес. Разместите противовес в задней части
тонарма. Слегка проверните, чтобы противовес наделся на заднюю часть тонарма.

109
Начало работы с устройством:
1. Изменение скорости проигрывания записей
Нажимайте кнопку выбора скорости 33/45 оборотов, чтобы изменять скорость вращения
диска.
2. Запуск и остановка диска
Используйте кнопку PLAY/PAUSE, чтобы запускать и останавливать вращение диска.
3. Подстройка тона (Pitch Control)
1) Подстройка тона позволяет более точно настроить скорость воспроизведения, по
сравнению со скоростью вращения диска.
2) Настройка тона вариативна и имеет выбор между -10% и +10% от выбранной
скорости вращения диска.
3) Настройка тона производится переводом соответствующего ползунка вверх и вниз.
4) Индикаторные точки на диске могут использоваться для примерного понимания
текущей настройки тона. Данные точки подсвечиваются строб подсветкой во время
их прохождения рядом с кнопкой включения. При разных уровнях тона может
показаться, что индикаторы находятся в неподвижном состоянии.
Примечание: Использование флуорисцентных ламп, расположенных над
проигрывателем, может привести к нарушению точности отображения
индикаторами.
Установка
Установка проигрывателя:
1. Не размещайте проигрыватель в местах, где он может быть подввергнут воздействию
прямых солнечных лучей или другим источникам тепла.
2. Не размещайте проигрыватель вместе с высокой влажностью или большой
концентрацией пыли.
3. Картридж может захватывать звук или вибрацию от находящихся рядом колонок. Для
достижения максимально чистого звука, не размещайте проигрыватель рядом с
колонками.
4. Размещайте проигрыватель только на ровных горизонтальных поверхностях, не
подверженных вибрациям.
5. Прорезиненные ножки разработаны с целью минимизации вибрации. Также их можно
использовать для более точного расположения устройства по горизонтали – для этого
достаточнно повернуть одну из ножек по часовой, либо против часовой стрелки.
Балансировка тонарма и прижимная сила иглы:
1. Настройка горизонтального баланса тонарма и прижимной силы иглы:
2. Удалите защитный колпачок с иглы, при его наличии. Не прикасайте к кончику иглы во
время настройки!
3. Опустите рычаг тонарама.
4. Разблокируйте тонарм и поднимите его.

110
5. Установите антискейтиниг в положение ноль.
6. Поверните противовес в любом направлении до того момента, когда он будет идеально
сбалансирован (будет свободно передвигаться).
7. Верните тонарм на место и зафиксируйте его положение.
8. Удерживая противовес одной рукой, прокрутите кольцо регулировки прижимной силы
иглы (3) другой рукой. Цифра (ноль) должна быть точно посередине задней части
тонарма.
9. Прокрутите противовес против часовой стрелки, пока на не покажется значение
прижимной силы, рекомендуемое для установленной иглы.
Примечание: Рекомендуемая прижимная сила опционального картриджа, который
может поставляться с проигрывателем в комплекте, равна 2,5-3 граммам. Для
получения информации о прижимной силе картрджей других производителей
необходимо свериться с инструкцией к данным картриджам.
Антискейтинг:
Настройка антискейтинга не дает тонарму съезжать с дорожек на записи из-за действия
центробежной силы. Ручка контроля антискейтинга должна быть установлена в том же
положении, что и прижимная сила иглы. Для примера: при установке противовеса в
значение 2,5 грамма, антискейтинг должен быть установлен в положение 2,5.
Обслуживание:
1. Периодически очищайте иглу с помощью мягкой щетки, чтобы избежать скопления
пыли.
2. Если звук наполнился шумами, проверьте иглу. Если игла износилась, замените ее на
новую.
3. Время от времени протирайте защитную крышку и корпус с помощью мягкой, сухой
тканью.
4. Не используйте для очистки вещества типа бензина, спирта, растворителя и так далее.
Они могут повредить отделку проигрывателя.
Audacity software overview
Программное обеспечение «Audacity» является бесплатным c лицензией «General Public
License» (GPL). Более подробную информацию можно найти на сайте
https://www.audacityteam.org/download/
• Для работы ПО требуется установка на компьютер.
Установка и запуск ПО Audacity
1. Подключите USB кабель к проигрывателю.

111
2. Подключите USB кабель к компьютеру.
3. Установите ПО «Audacity» на компьютер.
4. Запустите ПО «Audacity».
5. В меню «Edit» выберите пункт «Preferences».
6. В открывшемся окне «Audacity Preferences» выберите вкладку «Audio I/O».
• В поле «Playback» выберите установленное на компьютере устройство вывода
аудио (аудио карту).
• В поле «Recording», в строке «Device», выберите «USB Audio CODEC».
• В поле «Recording», в строке «Channels», выберите «2 (Stereo)».
• Установите галочку в пункте «Play other tracks while recording new one».
• Установите галочку в пункте «Software Playthrough».
Запись альбомов в программе «Audacity»
1. Создание и сохранение проекта
ПО «Audacity» сохраняет все изменения и файлы записей в папке

112
«Projectname_data», находящейся в той же директории, где был сохранен файл
проекта.
Для начала работы сохраните файл проекта, выбрав пункт «Save Project as…» в
меню «File».
При запуске ПО «Audacity» или создании нового проекта доступна только функция
«Save Project as…», так как проект еще не был сохранен.
2. How to record
Запустите вращение опорного диска на проигрывателе кнопкой «START/STOP»..
Нажмите кнопку «Record» в ПО «Audacity» для начала записи.
Опустите иголку звукоснимателя на пластинку, используя рычаг установки
тонарма.
Для приостановки записи используйте кнопку «Pause» ПО «Audacity».
Повторное нажатие этой кнопки снова запускает запись.
Для остановки записи нажмите кнопку «Stop».
Вот и все. После завершения записи вы можете воспроизводить ее на компьютере и
редактировать в ПО «Audacity». Функция «Undo» позволяет возвращаться на любое
количество шагов назад при внесении изменений в запись до момента закрытия

113
проекта.
ПРИМЕЧАНИЕ: ПО «Audacity» не имеет функции записи на CD диски. Для записи CD
необходимо использовать дополнительное ПО.

114
Спецификация
Общая информация
Модель:
L-3809
Размеры:
430(Ш) x 350(Г) x 155(В) мм
Вес:
6.18 кг
Адаптер питания:
AC 230V~ 50Hz (Netherlands); AC 240V~ 50Hz(U.K.)
Потребляемая мощность:
30 Вт
Условия тестирования:
Температура: 20 +/- 2 градуса C
Относительная влажность:
65% +/- 5%
ПРИМЕЧАНИЕ: Использование проигрывателя возможно в диапазоне от 5 до 35 градусов С
и относительной влажности от 45% до 85%.
Проигрыватель:
Тип:
2-х скоростной с ручным управлением
Мотор:
16 полярный, 3 фазный вентильный электропривод
Тип привода
Прямой привод
Опорный диск (тарелка)
332 мм (алюминий)
Скорости вращения
33
1
/
3
и 45 оборотов в минуту
Нестабильность вращения:
Менее 0.3% WRMS (JIS WTD) при 33
1/3
rpm
Соотношение сигнал/шум (S/N
Ratio):
More than 50dB (DIN-B)
Диапазон тона (Pitch control):
+/- 10%
Стартовый момент вращения:
более 3.6 кгс∙см
Система торможения:
Электронный тормоз
Время разгона диска:
менее 1 сек.
Время торможения диска:
менее 1 сек.
Time for Speed Change:
Less than 1 sec. from 33
1/3
to 45 rpm.
Less than 1 sec. from 45 to 33
1/3
rpm.
Функция USB:
Запись через USB соединение
16 бит 44.1KHz или 48KHz USB (на выбор)
Интерфейс подключения:
USB 1.1 Windows 7/8/10 или MAC OSX
Тонарм:
Тип тонарма
Балансируемый S-образный тонарм
Эффективная длина тонарма
220 мм
Смещение головки относительно
центра (Overhang)
10 мм
Угол ошибки (Tracking Error Angle)
менее 3 градусов
Компенсация центробежной
силы
3-4 г
Тип ММ картриджа:
Audio Technica AT-3600L
Прижимная сила картриджа:
3.5±0.5 г
Вес картриджа:
5±0.5 г

115
Диапазон регулировки
анти-скейтинга
0~4 г
Разделение каналов:
Более 18 дБ
Баланс каналов:
В пределах 2.5 дБ при 1KHz
Пред-усилитель
Выходная мощность:
150mV +/-4dB (ВХОД: 2.5mV 1KHz)
RIAA (АЧХ):
20Hz~20KHz +1/-3dB (ВХОД: 1.5mV 1KHz)
Гарантийные обязательства
Срок гарантии составляет 1 (один) год с даты продажи. Срок службы – до 5 (пяти) лет.
Важное примечание: Компания Lenco не обеспечивает обслуживание оборудования в
случае непосредственного обращения в головной офис компании.
Важное примечание: Гарантия не действует, если устройство вскрывалось или
подвергалось изменениям вне официального сервисного центра.
Это устройство не предназначено для профессионального использования. В случае
профессионального использования гарантийные обязательства производителя не будут
выполняться.
Заявление об ограничении ответственности
Обновления микропрограмм и/или компонентов аппаратного обеспечения производятся
регулярно. Поэтому некоторые инструкции, спецификации и изображения в этой
документации могут незначительно отличаться от Вашей конкретной ситуации. Все
элементы, описанные в данном руководстве, предназначены только для иллюстрации и
могут не относиться к конкретной ситуации. Из описания, приведенного в этом руководстве,
нельзя получить никаких юридических прав.
Утилизация оборудования
Этот символ означает, что соответствующее электрооборудование
или батарея не может быть утилизирована как обычные бытовые
отходы в Европе. Чтобы обеспечить корректную утилизацию данного
оборудования руководствуйтесь местными законами или
требованиями по утилизации электронного оборудования и батарей.
Поступая таким образом, Вы поможете сохранить природные
ресурсы и улучшить стандарты защиты окружающей среды при
обработке и утилизации электрических отходов (Директива ЕС об
отходах электрического и электронного оборудования).
Маркировка «CE»
Продукция с маркировкой CE соответствует требованиям Директиве
ЕС по электромагнитной совместимости (2014/30/EС) и Директиве ЕС
по вопросам качества низковольтных электротехнических изделий
(2014/35/EС), принятых Комиссией Европейского Союза. Настоящим

116
компания «Ленко Бенелюкс БВ» (Lenco Benelux BV), Термикстраат 1а, Нют, 6361 HB,
Нидерланды (Thermiekstraat 1a, 6361 HB Nuth, The Netherlands) заявляет, что этот
продукт соответствует основным требованиям. С декларацией соответствия можно
ознакомиться по адресу techdoc@lenco.com. «Ленко Бенелюкс БВ», Термикстраат 1а, Нют,
6361 HB, Нидерланды
Маркировка «EAC»
Товар сертифицирован для использования на территории Таможенного
Союза без каких-либо ограничений. Соответствует требованиям ТР ТС
004/2011 «О безопасности низковольтового оборудования» и ТР ТС
020/2011 «Электромагнитная совместимость технических средств».
Импортер и организация, уполномоченная на принятие претензий: ООО
"Бизнес-фабрика", 123458 г. Москва, ул. Маршала Прошлякова, д. 30, офис 503, +7 495
787 5900. Изготовитель: «Ленко Бенелюкс БВ», Термикстраат 1а, Нют, 6361 HB, Нидерланды
/ Филиал: Эс.Ти.Ай. Электроникс Лтд., Юнит 903-907, 9/ЭФ, Лоз Коммершиал Плаза, 788
Чонг Ша Ван Роуд, Коулун, Гонконг. Сделано в Китае
Обслуживание
Для получения дополнительной информации и обращения в службу поддержки клиентов
посетите наш веб-сайт: www.lenco.ru. Дизайн и спецификация могут быть изменены
производителем без предварительного информирования.
Дата изготовления продукции
Год и месяц изготовления продукции указаны в номере партии и серийном номере
продукта. Ниже описаны способы уточнения этой даты.
• По номеру партии (номер партии указан либо на упаковке устройства, либо на
транспортировочной упаковке).
o Формат номера партии: AAAABDDMY
• По серийному номеру продукта (серийный номер указан на устройстве).
o Формат серийного номера: AAAABDDMYSSSSSS
Где M (восьмой символ слева) равен месяцу производства, а Y (девятый символ слева)
равен году производства. Месяц производства указывается одной из букв латинского
алфавита.
Соответствие буквенных обозначений месяца производства:
A
B
C
D
E
F
Январь
Февраль
Март
Апрель
Май
Июнь
G
H
I
J
K
L

117
Июль
Август
Сентябрь
Октябрь
Ноябрь
Декабрь
Год производства указывается одной цифрой, которая соответствует последней цифре года
производства (цифра 1 равна 2021 году производства).
Пример расшифровки по номеру партии:
• Номер партии: 2461A05C0
• Где буква C это месяц (Март), а цифра 0 – последняя цифра года производства (2020
год).
Пример расшифровки по серийному номеру:
• 2461A05A1123456
Где буква A это месяц (Январь), а цифра 1 – последняя цифра года производства (2021 год).

118
Гарантийный талон
Информация об устройстве
Модель:
Серийный
номер:
Дата
продажи:
срок гарантии – 1 (один) год с даты продажи
Информация о продавце
Название торговой
организации:
Телефон торговой
организации:
Адрес, e-mail:
Подпись продавца______________________ М.П.
Подпись покупателя_____________________
Изделие получил в исправном состоянии и в полной комплектации. С условиями гарантии
ознакомлен и согласен.
ВНИМАНИЕ! Гарантийный талон недействителен без печати продавца.
Поддержка: www.lenco.ru
Documenttranscriptie
Model: L-3809 User manual - Direct drive turntable with USB recording Gebruikshandleiding - Direct aangedreven platenspeler met USB-opnamefunctie Bedienungsanleitung - Direktangetriebener Plattenspieler mit USB-Aufzeichnung Guide d’utilisation - Platine tourne-disque à entraînement direct avec enregistrement USB Manual de usuario - Unidad de tocadiscos directa con grabación USB Manuale dell'utente - Giradischi a trazione diretta con registrazione USB Руководство пользователя - Виниловый проигрыватель с прямым приводом и функцией записи через USB 1 INDEX English .................................................................................................................................. 3 Nederlands ......................................................................................................................... 17 Deutsch............................................................................................................................... 34 Français............................................................................................................................... 51 Español ............................................................................................................................... 68 Italiano................................................................................................................................ 85 Русский ............................................................................................................................ 101 Version: 2.0 2 English L-3809 CAUTION: Usage of controls or adjustments or performance of procedures other than those specified herein may result in hazardous radiation exposure. PRECAUTIONS BEFORE USE KEEP THESE INSTRUCTIONS IN MIND: 1. Do not cover or block any ventilation openings. When placing the device on a shelf, leave 5 cm (2”) free space around the whole device. 2. Install in accordance with the supplied user manual. 3. Keep the device away from heat sources such as radiators, heaters, stoves, candles and other heat-generating products or naked flame. The device can only be used in moderate climates. Extremely cold or warm environments should be avoided. Working temperature between 0° and 35°C. 4. Avoid using the device near strong magnetic fields. 5. Electrostatic discharge can disturb normal usage of this device. If so, simply reset and restart the device following the instruction manual. During file transmission, please handle with care and operate in a static-free environment. 6. Warning! Never insert an object into the product through the vents or openings. High voltage flows through the product and inserting an object can cause electric shock and/or short circuit internal parts. For the same reason, do not spill water or liquid on the product. 7. Do not use in wet or moist areas such as bathrooms, steamy kitchens or near swimming pools. 8. The device shall not be exposed to dripping or splashing and make sure that no objects filled with liquids, such as vases, are placed on or near the apparatus. 9. Do not use this device when condensation may occur. When the unit is used in a warm wet room with damp, water droplets or condensation may occur inside the unit and the unit may not function properly; let the unit stand in power OFF for 1 or 2 hours before turning on the power: the unit should be dry before getting any power. 10. Although this device is manufactured with the utmost care and checked several times before leaving the factory, it is still possible that problems may occur, as with all electrical appliances. If you notice smoke, an excessive build-up of heat or any other unexpected phenomena, you should disconnect the plug from the main power socket immediately. 11. This device must operate on a power source as specified on the specification label. If you are not sure of the type of power supply used in your home, consult your dealer or local power company. 12. Keep away from animals. Some animals enjoy biting on power cords. 13. To clean the device, use a soft dry cloth. Do not use solvents or petrol based fluids. To remove severe stains, you may use a damp cloth with dilute detergent. 14. The supplier is not responsible for damage or lost data caused by malfunction, misuse, modification of the device or battery replacement. 15. Do not interrupt the connection when the device is formatting or transferring files. Otherwise, data may be corrupted or lost. 16. If the unit has USB playback function, the USB memory stick should be plugged into the unit directly. Don’t use an USB extension cable because it can cause interference resulting in failing of data. 17. The rating label has been marked on the bottom or back panel of the device. 18. This device is not intended for use by people (including children) with physical, sensory or mental disabilities, or a lack of experience and knowledge, unless they’re under supervision or have received instructions about the correct use of the device by the person who is responsible for their safety. 19. This product is intended for non-professional use only and not for commercial or industrial use. 20. Make sure the unit is adjusted to a stable position. Damage caused by using this product in an unstable position vibrations or shocks or by failure to follow any other warning or precaution contained within this user manual will not be covered by warranty. 21. Never remove the casing of this device. 3 22. 23. 24. 25. 26. 27. 28. 29. Never place this device on other electrical equipment. Do not allow children access to plastic bags. Only use attachments/accessories specified by the manufacturer. Refer all servicing to qualified service personnel. Servicing is required when the device has been damaged in any way, such as the power supply cord or the plug, when liquid has been spilled or objects have fallen into the device, when the device has been exposed to rain or moisture, does not operate normally, or has been dropped. Long exposure to loud sounds from personal music players may lead to temporary or permanent hearing loss. If the product is delivered with power cable or AC power adaptor: ⚫ If any trouble occurs, disconnect the AC power cord and refer servicing to qualified personnel. ⚫ Don’t step on or pinch the power adaptor. Be very careful, particularly near the plugs and the cable’s exit point. Do not place heavy items on the power adaptor, which may damage it. Keep the entire device out of children’s reach! When playing with the power cable, they can seriously injure themselves. ⚫ Unplug this device during lightning storms or when unused for a long period. ⚫ The socket outlet must be installed near the equipment and must be easily accessible. ⚫ Do not overload ac outlets or extension cords. Overloading can cause fire or electric shock. ⚫ Devices with class 1 construction should be connected to a main socket outlet with a protective earthed connection. ⚫ Devices with class 2 construction do not require a earthed connection. ⚫ Always hold the plug when pulling it out of the main supply socket. Do not pull the power cord. This can cause a short circuit. ⚫ Do not use a damaged power cord or plug or a loose outlet. Doing so may result in fire or electric shock. If the product contains or is delivered with a remote control containing coin/cell batteries: Warning: ⚫ “Do not ingest battery, Chemical Burn Hazard” or equivalent working. ⚫ [The remote control supplied with] This product contains a coin/button cell battery. If the battery is swallowed, it can cause severe internal burns in just 2 hours and can lead to death. ⚫ Keep new and used batteries away from children. ⚫ If the battery compartment does not close securely, stop using the product and keep it away from children. ⚫ If you think batteries might have been swallowed or placed inside any part of the body, seek immediate medical attention. Caution about the use of Batteries: ⚫ Danger of explosion if battery is incorrectly replaced. Replace only with the same or equivalent type. ⚫ Battery cannot be subjected to high or low extreme temperatures, low air pressure at high altitude during use, storage or transportation. ⚫ Replacement of a battery with an incorrect type that can result in an explosion or the leakage of flammable liquid or gas. ⚫ Disposal of a battery into fire or a hot oven, or mechanically crushing or cutting of a battery that can result in an explosion. ⚫ Leaving a battery in an extremely high temperature surrounding environment that can result in an explosion or that leakage of flammable liquid or gas. ⚫ A battery subjected to extremely low air pressure that may result in an explosion or the leakage of flammable liquid or gas. ⚫ Attention should be drawn to the environmental aspects of battery disposal. 4 Deliver Content 1 x Manual 1 x RCA audio cable 1 x Power cord 5 1 x USB connection cable 1 x Platter 1x Felt mat 6 Description 1. TURNTABLE PLATTER The platter is equipped with a feltmat. This makes it easier to manipulate the record for scratch performance. Place vinyl records centered on the turntable platter. 2. COUNTERWEIGHT Adjustment creates the proper downward pressure of the stylus to the record. Attach now by sliding the counterweight onto the rear of the tone arm. 3. STYLUS PRESSURE ADJUSTMENT SCALE Adjust stylus cartridge’s pressure alignment. 4. ANTISKATING KNOB This applies inward force to the tone arm so it doesn’t skip outward across the record due to the centrifugal force of the record spinning. 5. TONEARM LIFTER Control the up and down action of the tonearm. 6. HEADSHELL Install cartridge here. During installation, attach the stylus protector to guard the stylus tip from damage. 7 Attach wires as follows: White (L+) Left channel + Blue (L-) Red (R+) Green (R-) Left channel – Right channel + Right channel – 7. PLAY/PAUSE BUTTON Press this button to start playback or to resume playback after a pause. 8. 33/45 ROTATION SPEED SETTING BUTTON Press these buttons to select the platter’s rotation according to the speed indicated on the record for 33, 45 revolutions per minute. 9. Headshell locking nut Attach the head shell by inserting it into the front end of the tone arm and then turn the locking nut clockwise. 10. Pitch fader Used to change the playback speed of the playing trace. 11. Power switch / Stroboscopic light Turn the switch clockwise to turn on the unit. Turn the switch counter-clockwise to turn off the unit. The stroboscopic light will automatically turn on when the unit is on. 8 1. RCA OUTPUT OUTPUT L and R are used for connecting the turntable to the RCA analog input on your amplifier. 2. LINE/PHONO SWITCH The turntable has a built-in PHONO pre-amplifier that is disengaged if you have an external pre-amplifier. If you want to use the signals amplified by the internal amplifier of the turntable, move the switch to LINE. If you want to use an external PHONO preamplifier, move the switch to PHONO. With the PRE-AMP switch at ON never connect to a Phono input. Audio will be strongly distorted then and there is a risk that Amplifier and/or speakers will be damaged. 3. USB PORT The sound of your vinyl record is converted to digital with a maximum resolution of 48KHz / 16bits. Use the USB cable that came with the device to connect the turntable to your computer. The Audacity software should be downloaded 4. AC IN Plug the power cord here. 5. POWER ON/OFF Use to turn the turntable on and off. 9 Turntable Assembly: 1. Removing from carton: Carefully remove the main unit with the packing material intact from the box. Remove the packing material once the unit has been removed from the shipping carton. Be sure to locate all the accessories located in the packing material. 2. 45rpm Adapter: Locate and remove the 45-rpm adapter from the packing material and place it in the 45 adapter cutout on the top of the main unit. 3. Turntable Platter: Remove the turntable platter from the packing material and gently place the platter onto the CENTER SPINDLE of the turntable base. 4. Feltmat: Remove the black feltmat from the packaging and place it on the PLATTER. 5. Headshell: Insert the HEADSHELL into the front end of the TONEARM ASSEMBLY. While holding HEADSHELL firmly into the front end of the tonearm assembly, turn the HEADSHELL LOCKING NUT counter- clockwise to firmly secure the HEADSHELL to TONEARM ASSEMBLY. 6. Counterweight: Locate and remove the tonearm COUNTERWEIGHT from the packaging. Slide COUNTERWEIGHT onto the rear of the TONEARM ASSEMBLY. Turn it lightly and it will screw onto the rear shaft of the tonearm. 10 Turntable Quick-Start: 1. Changing Platter Speed Press the 33/45 ROTATION SPEED SETTING buttons to change the platter rotation speed. 2. Starting and Stopping the Platter Use the PLAY/PAUSE BUTTON to switch back and forth between platter rotations and pause modes. 3. Pitch Control 1) The pitch adjustment is a fine adjustment to the platter's RPMs. 2) The pitch adjustment is variable and may be adjusted between -10% and +10% of the platter-selected speed. 3) The pitch is changed by sliding the Pitch Slider in an up and down motion. 4) The indicator dots on the rim of the TURNTABLE PLATTER can be used to visual approximate the platter pitch. These indicators are lit by the STROBOSCOPIC LIGHT as they pass by the POWER SWITCH. At different pitch levels each row of STROBE INDICATORS may appear stand still. Note: The use of heavy fluorescent lighting directly above the turntable will defeat the STROBE LAMP PILOT LAMP affect indicator accuracy. Set-up Turntable Installation: 1. Do not place the unit in a location where it will be exposed to direct sunlight or near any type of heating appliance. 2. Do not place the unit in a location where there is high humidity or a lot of dust. 3. Cartridge may pick up slight sound pressure or vibrations of nearby speakers. For best results, do not install this unit too close to speakers. 4. Install this unit on a horizontal surface that is stable and vibration free. 5. The rubber feet have been specially designed to isolate the unit from excess vibration. The feet may also be used to stabilize the main body horizontally. Adjust the height of the unit by turning the feet in a clockwise or counter-clockwise direction. Tonearm Balance and Stylus Pressure: 1. Adjustment of horizontal zero balance and stylus pressure: 2. Remove the stylus protective cover, if so equipped. Never touch the stylus tip during the adjustment. 3. Lower the TONEARM LEVER. 4. Release the tonearm clamp and release the tonearm from the arm rest. 5. Set the ANTI-SKATE adjustment to zero. 6. Rotate the COUNTERWEIGHT in either direction until the TONEARM is perfectly balanced horizontally (floats freely). 7. Return the TONEARM to the arm rest and lock it in place. 11 8. Hold the COUNTERWEIGHT stationary with one hand and rotate only the stylus-pressure ring (3) bring the number “0” of the ring into alignment with the center line on the tonearm rear shaft. 9. Rotate the COUNTERWEIGHT counterclockwise until the scale value corresponding to the recommended stylus pressure. Note: The recommended stylus pressure of the optional cartridge that may have been included with your unit is 2,5 to 3 grams. For all other cartridge systems please refer to the manufactures specification included with the cartridge. Anti-Skate: The anti-skate adjustment prevents the TONEARM ASSEMBLY from skipping across the record from the centrifugal force that is caused spinning rotation of the PLATTER. The ANTI-SKATING control knob should be set to the same value as the stylus pressure. For example if your COUNTERWEIGHT is set to 2.5 grams the ANTI-SKATE value should also be set to 2.5. Product Service: 1. 2. Clean the stylus periodically with a soft brush to prevent the accumulation of dust. When sound becomes distorted or noisy, check the stylus. If the stylus is worn out, replace it with a new one. 3. From time to time, the dust cover and turntable cabinet should be wiped down with a soft, dry cloth. Volatile materials should not be used, such as: alcohol, thinner, benzine etc. They may 4. remove the paint or damage the luster. Audacity software overview Audacity is free software, licensed under the GNU General Public License (GPL). More information as well as open source code can be found on the web at https://www.audacityteam.org/download/ * Please ensure you have installed the software before starting. Setting up your PC to work with Audacity 1. Connect the provided USB cable to the turntable. 2. Connect the left USB plug of this USB cable to your pc. 3. Install the Audacity recording software. 4. Open the Audacity program. 5. Select Preference from the Edit tab in the Audacity Menu. 12 6. Select Audio I/O tab at the top left. Under Playback, Device, select your internal sound card. Under Recording, Device, select USB Audio CODEC. Under Recording, Channels, select 2 (Stereo). Check the box marked Play other tracks while recording new one. Check the box marked Software Playthrough. Recording Albums with Audacity 1. Saving a project Audacity writes all the changed and recorded audio to a directory called Projectname_data, which is located right where you saved the project file itself. Thus, select Save Project as from your Audacity File tab and choose a location and filename for your project. Please note that when you startup Audacity fresh, only the “Save As...” menu option is available. 13 2. How to record Set your USB turntable up to play the song or album you want to record. Click on the red Record button to begin recording. Lower tone arm on USB turntable onto album and track you want to record. Click on the blue Pause button to pause the recording. Press it again to continue. Click on the yellow Stop button . That's it. You can now play around with your recording and explore the editing capabilities of Audacity. Remember that you can use the Undo function almost without limits while the project is open. NOTE: CD's cannot be burned directly from the Audacity application. Other CD burning applications should be used. 14 Specification General Model: Dimensions: L-3809 430(W) x 350(D) x 155(H)mm Weight: Power supply: Power consumption: 6.18Kg AC 230V~ 50Hz (Netherlands); AC 240V~ 50Hz(U.K.) 30W Standard test condition: Ambient Temperature: 20 +/- 2 deg.C Relative Humidity: 65% +/- 5% NOTE: Measurements can be carried out between 5 deg.C to 35 deg.C and 45% to 85% relative humidity. Turntable Section: Type: Motor: Driving Method: 2-speed full manual 16pole, 3phase,brushless Direct drive Turntable Platter: Speeds: Wow and Flutter: 332mm (Aluminum) 331/3 and 45rpm Less than 0.3% WRMS (JIS WTD) with 33 1/3 rpm S/N Ratio: Pitch Controls: Starting Torque: More than 50dB (DIN-B) +/- 10% More than 3.6 kgf.cm Braking System: Starting Time: Braking Time: Electronic brake Less than 1 sec. Less than 1 sec. Time for Speed Change: USB Function: Less than 1 sec. from 331/3 to 45 rpm. Less than 1 sec. from 45 to 33 1/3 rpm. USB rec. Function Computer interface: 16BIT 44.1KHz or 48KHz USB 1.1 compliant 7/8/10 or MAC OSX Tonearm section: Type: Effective Arm Length: Static balanced S-shaped tone arm 220mm Overhang: Tracking Error Angle: Tracking Force Adjustment Range: 10mm Less than 3 degree 3-4g Cartridge MM Type: Stylus pressure: Cartridge weight: Audio Technica AT-3600L 3.5±0.5g 5±0.5g Anti-skating Range: Channel Separation: Channel Balance: 0~4g More than 18 dB Within 2.5dB at 1KHz 15 Pre-Amplifier Output: 150mV +/-4dB (IN: 2.5mV 1KHz) RIAA (Frequency Response): 20Hz~20KHz +1/-3dB (IN: 1.5mV 1KHz) Guarantee Lenco offers service and warranty in accordance with the European law, which means that in case of repairs (both during and after the warranty period) you should contact your local dealer. Important note: It is not possible to send products that need repairs to Lenco directly. Important note: If this unit is opened or accessed by a non-official service center in any way, the warranty expires. This device is not suitable for professional use. In case of professional use, all warranty obligations of the manufacturer will be voided. Disclaimer Updates to Firmware and/or hardware components are made regularly. Therefore some of the instruction, specifications and pictures in this documentation may differ slightly from your particular situation. All items described in this guide for illustration purposes only and may not apply to particular situation. No legal right or entitlements may be obtained from the description made in this manual. Disposal of the Old Device This symbol indicates that the relevant electrical product or battery should not be disposed of as general household waste in Europe. To ensure the correct waste treatment of the product and battery, please dispose them in accordance to any applicable local laws of requirement for disposal of electrical equipment or batteries. In so doing, you will help to conserve natural resources and improve standards of environmental protection in treatment and disposal of electrical waste (Waste Electrical and Electronic Equipment Directive). CE Marking Products with the CE marking comply with the EMC Directive (2014/30/EU) and the Low Voltage Directive (2014/35/EU) issued by the Commission of the European Community. Hereby, Lenco Benelux BV, Thermiekstraat 1a, 6361 HB Nuth, The Netherlands, declares that this product is in compliance with the essential requirements. The declaration of conformity may be consulted at [email protected] Service For more information and helpdesk support, please visit www.lenco.com Lenco Benelux BV, Thermiekstraat 1a, 6361 HB Nuth, The Netherlands. 16 Nederlands L-3809 LET OP: Gebruik van bedieningen of afstellingen of uitvoer van procedures anders dan gespecificeerd in deze documentatie kan leiden tot blootstelling aan schadelijke straling. VOORZORGSMAATREGELEN VOOR GEBRUIK ONTHOUD DE VOLGENDE INSTRUCTIES: 1. Bedek of blokkeer de ventilatieopeningen niet. Wanneer u het apparaat op een schap plaatst, dient u 5 cm (2”) vrije ruimte rondom het gehele apparaat te behouden. 2. Installeer het product volgens de meegeleverde gebruikershandleiding. 3. Houd het apparaat uit de buurt van hittebronnen, zoals radiatoren, verwarmingen, kachels, kaarsen en andere hittegenererende producten of open vuur. Het apparaat kan alleen worden gebruikt in een gematigd klimaat. Extreem koude of warme omgevingen dienen te worden vermeden. Bedrijfstemperatuur tussen 0 °C en 35 °C. 4. Gebruik dit apparaat niet in de buurt van krachtige magnetische velden. 5. Elektrostatische ontlading kan normaal gebruik van dit apparaat verstoren. U hoeft het apparaat in dit geval slechts te resetten en opnieuw op te starten volgens de gebruikershandleiding. Wees voorzichtig tijdens bestandsoverdracht en gebruik het product in een omgeving zonder statische interferentie. 6. Waarschuwing! Steek nooit een voorwerp via de ventilatie- of andere openingen in het product. Er is hoogspanning in het product aanwezig en als u er een object insteekt, kan dat een elektrische schok veroorzaken en/of kortsluiting in de interne onderdelen. Mors om dezelfde reden geen water of vloeistof op het product. 7. Gebruik het toestel niet in vochtige ruimtes, zoals badkamers, stomende keukens of in de buurt van zwembaden. 8. Het apparaat mag niet worden blootgesteld aan druppels en spetters en zorg ervoor dat er geen met vloeistof gevulde voorwerpen, zoals vazen, op of in de buurt van het apparaat worden geplaatst. 9. Gebruik dit apparaat niet wanneer condensatie kan optreden. Wanneer het apparaat in een warme en vochtige kamer wordt gebruikt, dan kunnen er waterdruppeltjes of condensatie binnenin het apparaat worden gevormd waardoor het apparaat mogelijk niet meer goed werkt; houd en apparaat 1 of 2 uur op UIT staan voordat u de voeding weer inschakelt: het apparaat dient droog te zijn voordat deze stroom ontvangt. 10. Alhoewel dit apparaat met grote zorg gefabriceerd en verschillende keren geïnspecteerd is voordat het de fabriek verlaat, is het nog steeds mogelijk dat er problemen optreden, zoals met alle elektrische apparaten. Als u rook, een overmatige hitteontwikkeling of enig ander onverwacht verschijnsel opmerkt, moet u onmiddellijk de stekker van het netsnoer uit het stopcontact halen. 11. Dit apparaat moet werken op een voedingsbron, zoals aangegeven op het specificatieplaatje. Als u twijfelt over het type voeding dat gebruikt wordt in uw huis, raadpleeg dan uw dealer of plaatselijk energiebedrijf. 12. Buiten bereik van dieren houden. Sommige dieren bijten graag op voedingskabels. 13. Gebruik een zacht, droog doekje om het apparaat te reinigen. Gebruik geen oplosmiddelen of op benzine gebaseerde vloeistoffen. U kunt een vochtig doekje met verdund schoonmaakmiddel gebruiken om hardnekkige vlekken te verwijderen. 14. De leverancier is niet verantwoordelijk voor schade of verloren gegevens veroorzaakt door storing, misbruik, modificatie van het apparaat of batterijvervanging. 15. Onderbreek nooit de verbinding wanneer het apparaat formatteert of bestanden overdraagt. De gegevens kunnen anders corrupt of verloren raken. 16. Indien het apparaat een USB-afspeelfunctie heeft, moet de USB-geheugenstick rechtstreeks op het apparaat worden aangesloten. Gebruik geen USB-verlengkabel, omdat die kan leiden tot storingen met foutieve gegevens als gevolg. 17. Het nominale specificatielabel is te vinden op het paneel aan de onder- of achterkant van het apparaat. 18. Dit apparaat is niet bestemd voor gebruik door mensen (inclusief kinderen) met fysieke, zintuiglijke of geestelijke gebreken of gebrek aan kennis en ervaring, tenzij zij onder toezicht 17 19. 20. 21. 22. 23. 24. 25. 26. 27. 28. 29. staan of instructies hebben over het juiste gebruik van het apparaat hebben gekregen van de persoon die verantwoordelijk is voor hun veiligheid. Dit product is alleen voor niet-professioneel gebruik bedoeld en niet voor commercieel of industrieel gebruik. Verzeker u ervan dat het apparaat in een stabiele positie staat opgesteld. Beschadigingen veroorzaakt door het gebruik van dit apparaat in een onstabiele positie, trillingen of schokken of door het niet opvolgen van andere waarschuwingen of voorzorgsmaatregelen beschreven in deze gebruikshandleiding worden niet gedekt door de garantie. Verwijder nooit de behuizing van dit apparaat. Plaats dit apparaat nooit op andere elektrische apparatuur. Geef kinderen geen gelegenheid in aanraking met plastic zakken te komen. Gebruik uitsluitend uitbreidingen/accessoires gespecificeerd door de fabrikant. Laat alle reparaties over aan gekwalificeerd onderhoudspersoneel. Onderhoud is vereist als het toestel hoe dan ook is beschadigd, zoals bijvoorbeeld het netsnoer of de stekker, wanneer er vloeistof of een voorwerp in het apparaat is terechtgekomen, wanneer het apparaat is blootgesteld aan regen of vocht, als het niet normaal werkt of is gevallen. Langdurige blootstelling aan harde geluiden van persoonlijke muziekspelers kan leiden tot tijdelijk of permanent gehoorverlies. Als het product wordt geleverd met voedingskabel of AC-stroomadapter: ⚫ Als er problemen optreden, koppel de wisselstroomvoedingskaart dan los en laat reparaties over aan bevoegd personeel. ⚫ Nooit op de stroomadapter stappen of deze indrukken. Wees voornamelijk voorzichtig in de buurt van de stekkers en het punt waar de kabel uit het apparaat komt. Plaats geen zware voorwerpen op de stroomadapter, om beschadiging ervan te voorkomen. Houd het gehele apparaat buiten bereik van kinderen! Wanneer kinderen met de voedingskabel spelen, kunnen zij ernstig letsel oplopen. ⚫ Haal de stekker uit het stopcontact tijdens onweer of wanneer u deze langere tijd niet gebruikt. ⚫ Het stopcontact moet in de buurt van de apparatuur zijn geïnstalleerd en eenvoudig te bereiken zijn. ⚫ Overbelast stopcontacten of verlengsnoeren niet. Overbelasting kan brand of een elektrische schok veroorzaken. ⚫ Apparaten met een Klasse 1 structuur dienen te worden aangesloten op een stopcontact met een beschermende aardverbinding. ⚫ Apparaten met een Klasse 2 structuur vereisen geen aardverbinding. ⚫ Houd altijd de stekker vast wanneer u deze uit het stopcontact trekt. Trek nooit aan de voedingskabel. Dit kan tot een kortsluiting leiden. ⚫ Gebruik nooit een beschadigde voedingskabel of stekker of een los stopcontact. Dit vormt namelijk een risico op brand of elektrische schokken. Indien het product knoopcelbatterijen bevat of wordt geleverd met een afstandsbediening die knoopcelbatterijen bevat: Waarschuwing: ⚫ "Batterij niet inslikken, chemisch brandgevaar" of gelijkwaardige werking. ⚫ [De afstandsbediening meegeleverd met] Dit product bevat een munt/knoopcelbatterij. Als de batterij wordt ingeslikt, kan deze in slechts 2 uur ernstige interne brandwonden veroorzaken en tot de dood leiden. ⚫ Houd nieuwe en gebruikte batterijen buiten bereik van kinderen. ⚫ Als de batterijhouder niet goed kan worden gesloten, dient u het product niet meer te gebruiken en buiten bereik van kinderen te houden. ⚫ Als u denkt dat batterijen zijn ingeslikt of binnenin een willekeurig lichaamsdeel terecht zijn gekomen, dient u onmiddellijk medische hulp te zoeken. Waarschuwing m.b.t. het gebruik van batterijen: ⚫ Als de batterij onjuist wordt geplaatst, bestaat er explosiegevaar. Vervang de batterij alleen door een zelfde of vergelijkbare soort batterij. ⚫ Stel de batterij niet bloot aan extreem hoge of lage temperaturen of een lage luchtdruk op grote hoogte tijdens gebruik, opslag of transport. ⚫ Vervanging van een batterij door een incorrect type kan leiden tot een ontploffing of de lekkage van ontvlambare vloeistoffen of gas. 18 ⚫ Verwijdering van een batterij in vuur of een hete oven of het mechanisch verpletteren of snijden van een batterij kan leiden tot een ontploffing. ⚫ Laat een batterij nooit achter in omgevingen met extreem hoge temperaturen, anders kan dit leiden tot een ontploffing of de lekkage van ontvlambare vloeistoffen of gas. ⚫ Stel een batterij nooit bloot aan een extreem lage luchtdruk, anders kan dit leiden tot een ontploffing of de lekkage van ontvlambare vloeistoffen of gas. ⚫ Aandacht voor het milieu is nodig bij het verwijderen van de batterijen. 19 Verpakkingsinhoud 1x gebruikershandleiding 1x RCA-audiokabel 1x voedingskabel 20 1x USB-kabel 1x plateau 1x vilt mat 21 Omschrijving 1. PLATENSPELERPLATEAU Het plateau is voorzien van een vilt mat. Dit maakt het gemakkelijker om de plaat te draaien om te scratchen. Plaats de platen gecentreerd op het plateau. 2. TEGENGEWICHT Door het tegengewicht af te stellen creëert u de juiste neerwaartse naalddruk op de plaat. Bevestig het tegengewicht door het op de achterkant van de toonarm te schuiven. 3. AFSTELSCHAAL NAALDDRUK Hiermee kunt u de naald- en patroondruk afstellen. 4. DWARSKRACHTCOMPENSATIEKNOP Hiermee voorkomt u dat de toonarm over de plaat springt wegens de middelpuntvliedende kracht veroorzaakt door het draaien van het plateau. 5. HEFBOOM TOONARM Hiermee kunt u de toonarm op en neer bewegen. 6. KOPBEHUIZING Installeer de patroon hier. Tijdens installatie, bevestig een naaldbeveiliging om de tip van de naald te beschermen tegen beschadiging. Bevestig de draden als volgt: 22 Wit (L+) Blauw (L-) Linker kanaal + Linker kanaal – Rood (R+) Rechter kanaal + Groen (R-) Rechter kanaal – 7. TOETS AFSPELEN/PAUZE Druk op deze toets om het afspelen te starten of het afspelen te pauzeren. Druk nogmaals op deze toets om het afspelen te hervatten na een pauze. 8. TOETSEN 33/45 TPM SNELHEID Druk op deze toetsen om de snelheid van het draaiplateau te selecteren, overeenkomstig de snelheid die op de plaat staat, in 33 of 45 tpm. 9. Borgmoer kopbehuizing Bevestig de kopbehuizing door het in de voorkant van de toonarm te steken en vervolgens de borgmoer rechtsom te draaien. 10. Pitchfader Wordt gebruikt om de afspeelsnelheid van het afgespeelde spoor te wijzigen. 11. Aan/uit-schakelaar/stroboscoopverlichting Draai de schakelaar rechtsom om het apparaat in te schakelen. Draai de schakelaar linksom om het apparaat uit te schakelen. De stroboscoopverlichting wordt autmatisch ingeschakeld als het apparaat ingeschakeld is. 1. RCA-UITVOER OUTPUT L en R worden gebruikt voor het aansluiten van de platenspeler op de anloge RCA-ingang van uw versterker. 2. LINE/PHONO-SCHAKELAAR De platenspeler heeft een ingebouwde PHONO-voorversterker die wordt uitgeschakeld als u een externe voorversterker heeft. Als u de signalen wilt gebruiken die door de interne versterker van de platenspeler worden versterkt, zet u de schakelaar op LINE. Als u een externe PHONO-voorversterker wilt gebruiken, zet u de schakelaar op PHONO. 23 Wanneer de schakelaar PRE-AMP is ingesteld op ON, dient u nooit aan te sluiten op een Phono-ingang. Audio zal in dit geval erg worden verstoord en er bestaat een kans dat de versterker en/of luidsprekers beschadigd raken. 3. USB-POORT Het geluid van uw plaat wordt omgezet naar digitaal met een maximale resolutie van 48 Khz/16 bits. Gebruik de USB-kabel die bij het apparaat is geleverd om de platenspeler aan te sluiten op uw computer. De Audacity-software moet worden gedownload. 4. AC-IN Sluit hier de voedingskabel aan. 5. AAN/UIT Gebruik om de platenspeler in en uit te schakelen. 24 Assemblage platenspeler: 1. Verwijderen uit de verpakking: Haal het hoofdapparaat voorzichtig uit de doos met het verpakkingsmateriaal intact. Verwijder het verpakkingsmateriaal nadat het apparaat eenmaal uit de doos is gehaald. Zorg ervoor alle accessoires uit het verpakkingsmateriaal te halen. 2. 45-tpm adapter: Haal de 45-tpm adapter uit het verpakkingsmateriaal en plaats deze in de 45-tpm adapterinkeping boven op het hoofdapparaat. 3. Draaitafel: Verwijder het plateau uit het verpakkingsmateriaal en plaats het plateau voorzichtig op de MIDDENAS van de draaitafel. 4. Vilt mat: Remove the black feltmat from the packaging and place it on the PLATTER. 5. Kopbehuizing: Steek de KOPBEHUIZING in het vooreinde van de TOONARMASSEMBLAGE. Terwijl u de KOPBEHUIZING stevig in het vooreinde van de toonarmassemblage houdt, draai de VERGRENDELMOER van de KOPBEHUIZING linksom om de KOPBEHUIZING stevig vast te zetten op de TOONARMASSEMBLAGE. EN NL HEADSHELL KOPBEHUIZING TONEARM ASSEMBLY TOONARMASSEMBLAGE HEADSHELL LOCKING NUT VERGRENDELMOER KOPBEHUIZING 6. Tegengewicht: Haal het TEGENGEWICHT voor de toonarm uit de verpakking. Schuif het TEGENGEWICHT op de achterzijde van de TOONARMASSEMBLAGE. Draai het lichtjes om het op de achteras van de toonarm te schroeven. 25 EN NL TONEARM ASSEMBLY TOONARMASSEMBLAGE COUNTERWEIGHT TEGENGEWICHT Snel aan de slag met de platenspeler: 1. Plateausnelheid veranderen Druk op de toetsen 33/45 TPM snelheid om de snelheid van het plateau te wijzigen. 2. Het plateau starten en stoppen Gebruik de toets afspelen/pauze om te schakelen tussen plateausnelheden en pauzemodi. 3. Pitchregeling 1) De pitchregeling wordt gebruikt om het toerental van het plateau fijner af te stellen. 2) De pitchafstelling is variabel en kan worden ingesteld tussen -10% en +10% van de geselecteerde plateausnelheid. 3) De pitch wordt veranderd door de pitchschuif omhoog en omlaag te schuiven. 4) De indicatoren op de rand van het DRAAIPLATEAU kunnen worden gebruikt om de pitchhoogte van de plaat visueel in te schatten. Deze indicatoren worden verlicht door de STROBOSCOOPVERLICHTING als het apparaat wordt ingeschakeld door middel van de AAN-/UITSCHAKELAAR. Elke rij van de STROBE-INDICATOREN kan op verschillende pitchniveaus stil lijken te staan. Opmerking: Het gebruik van krachtige fluorescerende verlichting direct boven de platenspeler zal de indicatienauwkeurigheid van het STROBE-INDICATIELAMPJE aantasten. 26 Installatie De platenspeler installeren: 1. Plaats het apparaat niet op een plek blootgesteld aan direct zonlicht of in de buurt van enigerlei type verwarmingsapparatuur. 2. Plaats het apparaat niet op een plek met een hoge luchtvochtigheid of teveel stof. 3. De cartridge kan lichte geluidsdruk of trillingen van nabijgelegen luidsprekers opvangen. Installeer dit apparaat voor de beste resultaten dus niet te dicht in de buurt van luidsprekers. 4. Installeer dit apparaat op een horizontaal en stabiel oppervlak, zonder trillingen. 5. De rubberen voetstukjes zijn speciaal ontworpen om het apparaat te beschermen tegen teveel trillingen. De voetstukjes kunnen ook worden gebruikt om de hoofdbehuizing horizontaal te stabiliseren. Pas de hoogte van het apparaat aan door de voetstukjes rechtsom of linksom te draaien. Balans van de toonarm en naalddruk: 1. De horizontale nulbalans en naalddruk afstellen: 2. Verwijder de beschermkap van de naald, indien geïnstalleerd. Raak de tip van de naald tijdens deze afstelling nooit aan. 3. Laat het TOONARMHENDEL zakken. 4. Ontgrendel de klem van de toonarm en haal de toonarm van de houder af. 5. Stel de afstelling DWARSKRACHTCOMPENSATIE in op nul. 6. Draai het TEGENGEWICHT in een willekeurige richting totdat de TOONARM perfect horizontaal gebalanceerd is (moet vrij zweven). 7. Leg de TOONARM terug op de houder en sluit de vergrendeling. 8. Houd het TEGENGEWICHT met de ene hand stil en draai met de andere hand alleen de (3) drukring van de naald om het cijfer “0” van de ring af te stemmen op de middenlijn van de achteras van de toonarm. 9. Draai het TEGENGEWICHT linksom totdat de schaalwaarde overeenkomt met de aanbevolen naalddruk. Opmerking: De aanbevolen naalddruk van de optionele patroon mogelijk meegeleverd met uw apparaat is 2,5 naar 3 gram. Voor alle andere patroonsystemen dient u de specificaties van de fabrikant te raadplegen die zijn meegeleverd met de patroon. Dwarskrachtcompensatie: De DWARSKRACHTCOMPENSATIE-afstelling voorkomt dat de TOOMARMASSEMBLAGE over de plaat springt wegens de middelpuntvliedende kracht veroorzaakt door het draaien van het PLATEAU. De DWARSKRACHTCOMPENSATIE-bedieningsknop dient te worden ingesteld op dezelfde waarde als de naalddruk. Als uw TEGENGEWICHT bijvoorbeeld is ingesteld op 2,5 gram, dient ook de waarde van de DWARSKRACHTCOMPENSATIE te worden ingesteld op 2,5 gram. 27 Product onderhoud: 1. 2. Reinig de naald regelmatig met een zacht borsteltje om stofophoping tegen te gaan. Controleer de naald wanneer het geluid vervormd raakt of ruis vertoont. Als de naald is versleten, dient u deze door een nieuwe te vervangen. 3. De stofkap en de behuizing van de platenspeler dienen af en toe te worden afgeveegd met een zacht, droog doekje. Vluchtige materialen dienen niet te worden gebruikt, waaronder: alcohol, verdunner, 4. benzine, enz. omdat hierdoor de verf kan verdwijnen of de glans beschadigd kan raken. Overzicht Audacity-software Audacity is gratis software, onder licentie van de GNU Algemene Publieke Licentie (GPL). Meer informatie en tevens open broncodes zijn te vinden op de website https://www.audacityteam.org/download/ * Zorg er a.u.b. voor dat de software is geïnstalleerd voordat u van start gaat. Uw PC instellen om met Audacity te werken 1. Sluit de meegeleverde USB-kabel aan op de platenspeler. 2. Sluit de linker USB-stekker van deze USB-kabel aan op uw pc. 3. Installeer de Audacity opnamesoftware. 4. Open het Audacity programma. 5. Selecteer “Preference” (Voorkeur) op het tabblad “Edit” (Bewerken) in het Audacity Menu. 6. Selecteer het tabblad Audio I/O linksboven op het scherm. Onder Afspelen, Apparaat, selecteer uw interne geluidskaart. Onder Opnemen, Apparaat, selecteer USB Audio CODEC. Onder Opname, Kanalen, selecteer 2 (Stereo). Vink de box af gemarkeerd Play other tracks while recording new one (Andere tracks afspelen terwijl een nieuwe wordt opgenomen). 28 Vink de box af gemarkeerd Software Playthrough (Software Afspelen). Albums opnemen met Audacity 1. Een project opslaan Audacity schrijft alle veranderde en opgenomen audio naar een folder met de naam Projectname_data, te vinden rechts van waar u het projectbestand zelf hebt opgeslagen. Selecteer dus Save Project as (project opslaan als) op het tabblad Audacity Bestand en kies een locatie en bestandsnaam voor uw project. Vergeet a.u.b. niet dat als u Audacity opnieuw start, alleen de menuoptie “Save As...” (opslaan als) beschikbaar is. 29 2. Opnemen Stel uw USB-platenspeler in om de track of het album af te spelen dat u wilt opnemen. Klik op de rode knop Opnemen om te beginnen met opnemen. Laat de toonarm op de USB-platenspeler zakken op het album of de track die u wilt opnemen. Klik op de blauwe knop Pauze vervolgen. Klik op de gele Stoptoets om de opname te pauzeren. Druk nogmaals in om te . Dat is alles. U kunt nu aan de slag met uw opname en de bewerkfuncties van Audacity uitproberen. Vergeet niet dat u de functie Ongedaan Maken vrijwel zonder beperkingen kunt gebruiken terwijl het project is geopend. OPMERKING: CD's kunnen niet direct worden gebrand met de Audacity applicatie. Voor het branden van CD’s zijn andere applicaties nodig. 30 Specificaties Algemeen Model: Afmetingen: L-3809 430 x 350 x 155 (B x D x H) mm Gewicht: Stroomvoorziening: Opgenomen vermogen: 6,18 kg AC 230 V~ 50 Hz (Nederland); AC 240 V~ 50 Hz(VK) 30 W Standaard testconditie: Omgevingstemperatuur: 20 °C +/-2 °C Relatieve vochtigheid: 65% +/- 5% OPMERKING: Metingen kunnen worden uitgevoerd tussen 5 graden C tot 35 graden C en met een relatieve vochtigheid van 45% tot 85%. Draaitafel: Type: Motor: Aandrijfmethode: 2-snelhden volledig handmatig 16-polig, 3-fasig, zonder borstels Directe aandrijving Draaitafel: Snelheden: Wow en Flutter: 332 mm (Aluminium) 331/3 en 45 tpm Minder dan 0,3% WRMS (JIS WTD) bij 33 1/3 tpm S/R verhouding: Pitchregeling: Startdraaioment: Meer dan 50 dB (DIN-B) +/- 10% Meer dan 3,6 kgf/cm Remsysteem: Starttijd: Remtijd: Elektronische rem Minder dan 1 sec. Minder dan 1 sec. Tijd voor snelheidsverandering: USB-functie: Minder dan 1 sec. van 33 1/3 naar 45 tpm. Minder dan 1 sec. van 45 naar 33 1/3 tpm. USB-opname Functie Computerinterface: 16 bits 44,1 KHz of 48 KHz USB 1.1 compatibel Windows 7/8/10 of MAC OSX Toonarm: Type: Effectieve armlengte: Statische gebalanceerde S-vormige toonarm 220 mm Overhang: Storingshoek tracking: Verstelbereik trackingkracht: 10 mm Minder dan 3 graden 3-4 g Type patroon MM: Naalddruk: Patroongewicht: Audio Technica AT-3600L 3,5 ±0,5 g 5 ±0,5 g Bereik dwarskrachtcompensatie: Kanaalscheiding: Kanaalbalans: 0~4 g Meer dan 18 dB Binnen 2,5 dB op 1 KHz 31 Voorversterker Uitvoer: RIAA (frequentierespons): 150 mV +/-4 dB (IN: 2,5 mV, 1 KHz) 20 Hz~20 KHz +1/-3 dB (IN: 1,5 mV, 1 KHz) Garantie Lenco biedt service en garantie aan overeenkomstig met de Europese wetgeving. Dit houdt in dat u, in het geval van reparaties (zowel tijdens als na de garantieperiode), contact moet opnemen met uw lokale handelaar. Belangrijke opmerking: Het is niet mogelijk om producten die moeten worden gerepareerd rechtstreeks naar Lenco te sturen. Belangrijke opmerking: De garantie verloopt als een onofficieel servicecenter het apparaat op wat voor manier dan ook heeft geopend, of er toegang toe heeft gekregen. Het apparaat is niet geschikt voor professioneel gebruik. In het geval van professioneel gebruik worden alle garantieverplichtingen van de fabrikant nietig verklaard. Disclaimer Er worden regelmatig updates in de firmware en/of hardwarecomponenten gemaakt. Daardoor kunnen gedeelten van de instructie, de specificaties en afbeeldingen in deze documentatie enigszins verschillen van uw eigen situatie. Alle onderwerpen die staan beschreven in deze handleiding zijn bedoeld als illustratie en zijn niet van toepassing op specifieke situaties. Aan de beschrijving in dit document kunnen geen rechten worden ontleend. Afvoer van het oude apparaat Dit symbool geeft aan dat het betreffende elektrische product of de accu/batterij niet mag worden verwijderd als algemeen huishoudelijk afval in Europa. Zorg voor een juiste afvalverwerking door het product en de accu/batterij in overeenstemming met alle van toepassing zijnde lokale wetten voor het verwijderen van elektrische apparatuur of accu's/batterijen te verwijderen. Als u dit doet, helpt u de natuurlijke bronnen te behouden en de standaard van milieubescherming te verbeteren bij de behandeling en verwijdering van elektrisch afval (Afgedankte Elektrische en Elektronische Apparatuur). CE-markering Producten met een CE keurmerk houden zich aan de EMC richtlijn (2014/30/EC) en de Richtlijn voor Lage Voltage (2014/35/EC) uitgegeven door de Europese Commissie. Hierbij verklaart Lenco Benelux BV, Thermiekstraat 1a, 6361 HB Nuth, Nederland, dat dit product voldoet aan de essentiële eisen. De conformiteitsverklaring kan worden geraadpleegd op [email protected] 32 Service Bezoek voor meer informatie en helpdeskondersteuning www.lenco.com Lenco Benelux BV, Thermiekstraat 1a, 6361 HB, Nuth, Nederland. 33 Deutsch L-3809 ACHTUNG: Eine andere als die hier beschriebene Bedienung, Einstellung oder Verwendung der Funktionen kann zu gefährlicher Strahlenbelastung führen. VORSICHTSMASSNAHMEN VOR DER BENUTZUNG BEFOLGEN SIE IMMER FOLGENDE ANWEISUNGEN: 1. Blockieren oder bedecken Sie keine Lüftungsöffnungen. Wenn Sie das Gerät auf ein Regal stellen, lassen Sie um das gesamte Gerät 5 cm (2”) freien Platz. 2. Stellen Sie das Gerät entsprechend den Anweisungen der mitgelieferten Bedienungsanleitung auf. 3. Halten Sie das Gerät von Hitzequellen wie Radiatoren, Heizern, Öfen, Kerzen oder anderen hitzeerzeugenden Produkten oder offenen Flammen fern. Das Gerät darf nur bei gemäßigtem Klima verwendet werden. Sehr kalte oder heiße Umgebungen sind zu vermeiden. Die Betriebstemperatur liegt zwischen 0 °C und 35 °C. 4. Meiden Sie bei der Beutzung des Produkts die Nähe starker Magnetfelder. 5. Elektrostatische Entladungen können die normale Benutzung dieses Geräts stören. Sollte dies geschehen, führen Sie einfach einen Reset aus und starten Sie dann das Gerät entsprechend den Anweisungen dieser Bedienungsanleitung neu. Gehen Sie besonders bei Datenübertragungen mit dem Gerät vorsichtig um und führen Sie diese nur in einer antielektrostatischen Umgebung aus. 6. Warnung! Niemals Gegenstände durch die Lüftungsschlitze oder Öffnungen in das Gerät stecken. In diesem Gerät fließt Hochspannung und das Hineinstecken von Gegenständen kann zu elektrischem Schock und/oder Kurzschluss interner elektrischer Bauteile führen. Spritzen/Gießen Sie aus dem gleichen Grund kein Wasser oder Flüssigkeiten auf das Gerät. 7. Benutzen Sie das Gerät nicht in nasser oder feuchter Umgebung wie Bad, Dampfküche oder in der Nähe von Schwimmbecken. 8. Das Gerät darf weder Tropf- noch Spritzwasser ausgesetzt werden und es dürfen keine mit Flüssigkeit gefüllten Behälter wie z. B. Vasen auf das Gerät oder in der Nähe des Gerätes gestellt werden. 9. Benutzen Sie das Gerät nicht, wenn Kondensation entstehen kann. Wenn Sie das Gerät in einem warmen feuchten Raum mit Dampf benutzen, dann können Wassertropfen oder Kondensation in das Gerät eindringen und u. U. zu Fehlfunktionen des Geräts führen. Schalten Sie in diesem Fall das Gerät für 1 – 2 Stunden aus, bevor Sie es erneut einschalten, wobei Sie darauf achten sollten, dass das Gerät vollständig getrocknet ist, bevor Sie es wieder einschalten. 10. Obwohl dieses Gerät unter größter Sorgfalt hergestellt und vor Auslieferung mehrmals überprüft wurde, können trotzdem wie bei jedem anderen elektrischen Gerät auch Probleme auftauchen. Trennen Sie das Gerät bei Rauchentwicklung, starker Hitzeentwicklung oder jeder anderen unnatürlichen Erscheinung sofort vom Stromnetz. 11. Dieses Gerät ist durch eine Stromquelle wie auf dem Typenschild angegeben zu betreiben. Halten Sie bei Unsicherheiten über die Art Ihrer Stromversorgung in Ihrer Wohnung Rücksprache mit Ihrem Händler oder Ihrer Stromzuliefererfirma. 12. Halten Sie das Gerät von Haustieren fern. Einige Nagetiere lieben es, an Netzkabeln zu nagen. 13. Benutzen Sie für die Reinigung ein weiches und trockenes Tuch. Benutzen Sie niemals Lösungsmittel oder Flüssigkeiten auf Ölbasis. Benutzen Sie zum Entfernen hartnäckiger Flecken ein feuchtes Tuch mit mildem Reinigungsmittel. 14. Der Hersteller haftet nicht für Beschädigungen oder Datenverluste durch Fehlfunktion, Zweckentfremdung oder Modifikation des Geräts oder durch das Wechseln der Batterie. 15. Unterbrechen Sie die Verbindung nicht während einer Formatierung oder einer Datenübertragung. Bei Unterbrechung drohen Datenverlust und Datenbeschädigung. 16. Wenn das Gerät eine USB-Wiedergabefunktion besitzt, dann stecken Sie den USB-Stick direkt in das Gerät. Verwenden Sie kein USB-Verlängerungskabel, weil die erhöhte Störungsanfälligkeit zu Datenverlust führen kann. 17. Das Typenschild befindet sich an der Unter- oder Rückseite des Gerätes. 34 18. 19. 20. 21. 22. 23. 24. 25. 26. 27. 28. Dieses Gerät ist nicht zur Benutzung durch Personen (einschließlich Kinder) mit physischen, sensorischen oder mentalen Beeinträchtigungen oder ohne ausreichender Erfahrung vorgesehen, es sei denn, sie werden durch eine verantwortliche Person beaufsichtigt oder wurden in die ordnungsgemäße Bedienung des Gerätes durch eine für ihre Sicherheit verantwortlichen Person eingewiesen. Dieses Produkt ist nur für den nicht-professionellen Gebrauch und nicht für gewerbliche oder industrielle Zwecke bestimmt. Stellen Sie sicher, dass das Gerät in einer stabilen Position aufgestellt ist. Schäden, die durch Verwendung dieses Produkts in einer instabilen Position, durch Vibrationen, Stöße oder Nichtbeachtung der anderen in diesem Handbuch enthaltenen Warnungen und Sicherheitsmaßnahmen entstehen, werden nicht durch die Garantie abgedeckt. Entfernen Sie niemals das Gehäuse dieses Geräts. Stellen Sie dieses Gerät niemals auf andere elektrische Geräte. Halten Sie Kinder von den Plastiktüten fern. Benutzen Sie nur vom Hersteller spezifizierte Erweiterungen/Zubehörteile. Lassen Sie alle Wartungs-/Reparaturarbeiten von qualifiziertem Servicepersonal ausführen. Reparatur/Wartung wird notwendig, wenn das Gerät in irgendeiner Weise wie beispielsweise am Netzkabel oder am Netzstecker beschädigt wurde oder wenn Flüssigkeit in das Gerät gelangt ist bzw. Gegenstände in das Gerät gefallen sind, das Gerät Regen oder Feuchtigkeit ausgesetzt war, es heruntergefallen ist oder nicht ordnungsgemäß funktioniert. Langes Hören lauter Töne aus einem Musikgerät kann zum zeitweiligen oder permanenten Hörverlust führen. Wenn zum Lieferumfang des Produkts ein Netzkabel oder ein Netzadapter gehört: ⚫ Wenn irgendwelche Probleme auftreten, dann trennen Sie das Gerät vom Stromnetz und setzen Sie sich anschließend mit einer qualifizierten Fachkraft in Verbindung. ⚫ Treten Sie nicht auf den Netzadapter und klemmen Sie ihn auch nicht ein. Seien Sie besonders im näheren Bereich des Netzsteckers und an der Stelle vorsichtig, an der das Netzkabel aus dem Gerät herausgeführt wird. Stellen Sie keine schweren Gegenstände auf den Netzadapter, weil er dadurch beschädigt werden kann. Halten Sie das gesamte Gerät außerhalb der Reichweite von Kindern! Durch Spielen mit dem Netzkabel können sie sich ernsthafte Verletzungen zuziehen. ⚫ Trennen Sie das Gerät während eines Gewitters oder bei längerer Nichtbenutzung vom Netz. ⚫ Die Netzsteckdose muss sich in der Nähe des Geräts befinden und einfach zu erreichen sein. ⚫ Überlasten Sie Steckdosen und Verlängerungsleitungen nicht. Eine Überlastung kann zu Brandgefahr bzw. Stromschlag führen. ⚫ Geräte der Schutzklasse 1 müssen Sie an eine Netzsteckdose mit Schutzleiter anschließen. ⚫ Geräte der Schutzklasse 2 benötigen keinen Schutzleiteranschluss. ⚫ Halten Sie den Netzstecker in der Hand, wenn Sie ihn aus der Netzsteckdose ziehen. Ziehen Sie ihn nicht durch Zerren am Kabel heraus. Das kann zu einem Kurzschluss führen. ⚫ Verwenden Sie weder ein beschädigtes Netzkabel noch einen beschädigten Netzstecker oder eine lockere Steckdose. Missachtung kann zu Brand oder Stromschlag führen. Wenn das Produkt mit einer Fernbedienung mit Batterien/Knopfzellen geliefert wird oder das Produkt eine derartige Fernbedienung umfasst: Warnung: ⚫ Die Batterie nicht einnehmen – Verätzungsgefahr! ⚫ Die mit diesem Produkt mitgelieferte Fernbedienung enthält eine Knopfzelle. Das Verschlucken der Batterie kann innerhalb von nur 2 Stunden zu schwersten inneren Verbrennungen mit Todesfolge führen. ⚫ Halten Sie neue und gebrauchte Batterien von Kindern fern. ⚫ Falls sich das Batteriefach nicht richtig schließen lässt, dann benutzen Sie das Gerät nicht mehr und halten Sie es von Kindern fern. ⚫ Wenn Sie vermuten, dass Batterien verschluckt oder in eine Körperöffnung eingeführt worden sind, dann suchen Sie umgehend eine/-n Ärztin/Arzt auf. 35 29. Warnhinweise bzgl. der Verwendung von Batterien: ⚫ Es besteht Explosionsgefahr, wenn die Batterien nicht ordnungsgemäß ersetzt wird. Tauschen Sie die Batterie nur gegen eine Batterie des gleichen Typs aus. ⚫ Die Batterie darf während der Benutzung, Aufbewahrung oder des Transports weder sehr hohen oder sehr niedrigen Temperaturen noch niedrigem Luftdruck in großen Höhenlagen ausgesetzt werden. ⚫ Die Ersetzung der Batterie mit einem falschen Batterietyp kann zum Explodieren der Batterie oder zum Entweichen von entflammbarem Gas oder Auslaufen von entflammbarer Flüssigkeit aus der Batterie führen. ⚫ Die Entsorgung der Batterie in Feuer oder einem heißen Ofen oder das mechanische Zerkleinern oder Zerteilen der Batterie kann zu Explosionen führen. ⚫ Das Verbleiben der Batterie in einer Umgebung mit sehr hohen Temperaturen kann zum Explodieren der Batterie oder zum Entweichen von entflammbarem Gas oder Auslaufen von entflammbarer Flüssigkeit aus der Batterie führen. ⚫ Eine einem sehr niedrigen Luftdruck ausgesetzte Batterie kann explodieren oder es kann aus einer einem sehr niedrigen Luftdruck ausgesetzten Batterie entflammbares Gas entweichen oder entflammbare Flüssigkeit auslaufen. ⚫ Legen Sie besonderes Augenmerk auf den ökologischen Aspekt der Batterieentsorgung. 36 Mitgeliefertes Zubehör 1 x Bedienungsanleitung 1 x Cinch-Audiokabel 1 x Netzkabel 37 1 x USB-Verbindungskabel 1 x Plattenteller 1 x Filzmatte 38 Beschreibung 1. PLATTENTELLER Der Plattenteller ist mit einer Filzmatte ausgestattet. Dadurch wird das Scratchen der Schallplatte erleichtert. Legen Sie Vinylschallplatten mittig auf den Plattenteller. 2. GEGENGEWICHT Durch Einstellen des Gegengewichts erhält die Tonnadel den geeigneten Auflagedruck auf die Schallplatte. Sie können das Gegengewicht durch Aufschrauben auf das Tonarmende anbringen. 3. TONNADELAUFLAGEDRUCKEINSTELLSKALE Hierüber können Sie den Auflagedruck der Tonnadel anpassen. 4. ANTISKATING-KNOPF Durch ihn wird im Geräteinneren auf den Tonarm eine Kraft ausgeübt, sodass er nicht durch die Fliehkraft der sich drehenden Schallplatte nach außen springt. 5. TONARMHEBEL Mit ihm steuern Sie die Auf- und Abwärtsbewegung des Tonarms. 6. TONKOPF Montieren Sie hier den Tonabnehmer. Setzen Sie während der Montage den Tonnadelschutz auf die Tonnadel, um sie vor Beschädigung zu schützen. 39 Verbinden Sie die Kabel wie folgt: Weiß (L+) Linker Kanal + Blau (L-) Rot (R+) Grün (R-) Linker Kanal – Rechter Kanal + Rechter Kanal – 7. WIEDERGABE/PAUSE-TASTE Drücken Sie diese Taste, um die Wiedergabe zu starten, zu pausieren oder die pausierte Wiedergabe fortzusetzen. 8. 33/45-U/MIN-EINSTELLTASTEN Drücken Sie diese Taste, um die Umdrehungsgeschwindigkeit des Plattentellers entsprechend der Angabe auf der Schallplatte auf 33 oder 45 U/min einzustellen. 9. Tonkopfsicherungsmutter Montieren Sie den Tonkopf, indem Sie ihn am vorderen Ende des Tonarms einsetzen. Drehen Sie anschließend zur Fixierung des Tonkopfs die Tonkopfsicherungsmutter in Uhrzeigersinn. 10. Pitchfader Mit ihm ändern Sie die Wiedergabegeschwindigkeit der Tonrille. 11. Ein/Aus-Schalter/Stroboskoplicht Drehen Sie diesen Schalter in Uhrzeigersinn, um das Gerät einzuschalten. Drehen Sie den Schalter gegen den Uhrzeigersinn, um das Gerät auszuschalten. Das Stroboskoplicht wird automatisch eingeschaltet, wenn Sie das Gerät einschalten. 1. CINCH-AUSGANG Über den Ausgang LINE OUT L und R können Sie den Plattenspieler an den analogen Cinch-Eingängen Ihres Verstärkers anschließen. 40 2. LINE/PHONO-UMSCHALTER Der Plattenspieler besitzt einen integrierten PHONO-Vorverstärker, den Sie jedoch umgehen können, wenn Sie einen externen Vorverstärker benutzen. Wenn Sie ein durch den integrierten Vorverstärker verstärktes Signal benutzen möchten, dann schieben Sie den Schalter auf die Stellung LINE. Wenn Sie jedoch einen externen PHONO-Vorverstärker benutzen möchten, dann schieben Sie den Schalter auf die Stellung PHONO. Stellen Sie niemals eine Verbindung zu einem PHONO-Eingang her, wenn Sie den integrierten Vorverstärker benutzen. Sollten Sie es dennoch versuchen, dann wird das Audio extrem verzerrt wiedergegeben und es besteht ein sehr hohes Risiko, dass der Verstärker und/oder die Lautsprecher beschädigt werden. 3. USB-PORT Der Klang Ihrer Vinylschallplatte wird in ein digitales Signal mit einer maximalen Auflösung von 48 kHz/16 Bit umgewandelt. Schließen Sie den Plattenspieler mit Hilfe des mit diesem Gerät mitgelieferten USB-Kabels an Ihrem Computer an. Die Audacity-Software sollte heruntergeladen werden. 4. AC-NETZANSCHLUSSBUCHSE Schließen Sie hier das Netzkabel an. 5. EIN/AUS Schalten Sie hierüber den Plattenspieler ein oder aus. 41 Zusammenbauen und Einstellen des Plattenspielers: 1. Herausnehmen aus der Verpackung: Nehmen Sie den Plattenspieler zusammen mit dem unbeschädigten Verpackungsmaterial vorsichtig aus der Versandverpackung. Entfernen Sie das Verpackungsmaterial, nachdem Sie ihn aus der Versandverpackung herausgenommen haben. Überprüfen Sie, ob sich im Verpackungsmaterial alle Zubehörteile befinden. 2. 45-U/min-Adapter: Nehmen Sie den 45-U/min-Adapter aus der Verpackung und setzen Sie ihn in der Aussparung für den 45-U/min-Adapter auf der Geräteoberseite ein. 3. Plattenteller: Nehmen Sie den Plattenteller aus der Verpackung und setzen Sie ihn vorsichtig mittig auf die ANTRIEBSSPINDEL des Plattenspielers. 4. Filzmatte: Nehmen Sie die schwarze Filzmatte aus der Verpackung und legen Sie sie auf den PLATTENTELLER. 5. Tonkopf: Setzen Sie den TONKOPF am vorderen Ende der TONARMEINHEIT ein. Drehen Sie die TONKOPFSICHERUNGSMUTTER gegen den Uhrzeigersinn, während Sie den TONKOPF fest an das vordere Ende der Tonarmeinheit drücken, um den TONKOPF an der TONARMEINHEIT zu fixieren. EN DE HEADSHELL TONKOPF TONEARM ASSEMBLY TONARMEINHEIT HEADSHELL LOCKING NUT TONKOPFSICHERUNGSMUTTER 6. Gegengewicht: Nehmen Sie das TONARMGEGENGEWICHT aus der Verpackung. Schieben Sie das GEGENGEWICHT auf das hintere Ende der TONARMEINHEIT. Wenn Sie das Gegengewicht zum Einfädeln leicht drehen, dann können Sie es auf das hintere Ende des Tonarms schrauben. 42 EN DE TONEARM ASSEMBLY TONARMEINHEIT COUNTERWEIGHT GEGENGEWICHT Plattenspieler-Schnellstartanleitung: 1. Ändern der Plattentellergeschwindigkeit Drücken Sie die 33/45-U/min-EINSTELLTASTEN, um die gewünschte Geschwindigkeit des Plattentellers auszuwählen. 2. Starten und Stoppen des Plattentellers Benutzen Sie die WIEDERGABE/PAUSE-TASTE BUTTON, um zwischen dem Modus für das Drehen und dem pausierten Drehen des Plattentellers zu wechseln. 3. Pitchfader 1) Die Pitcheinstellung ist die Feineinstellung der Drehgeschwindigkeit des Plattentellers. 2) Sie können die Drehgeschwindigkeit des Plattentellers in einem Bereich zwischen -10 % und +10 % der ausgewählten Geschwindigkeit des Plattentellers stufenlos feineinstellen. 3) Schieben Sie hierfür den Pitchfader nach oben oder unten. 4) Die Anzeigepunkte auf dem Rand des PLATTENTELLERS können Sie hierbei als visuelle Hilfe für die ungefähre Pitcheinstellung des Plattentellers nehmen. Diese Anzeigepunkte werden durch das STROBOSKOPLICHT beleuchtet, wenn Sie das Gerät mit Hilfe des EIN/AUS-SCHALTERS einschalten. Bei verschiedenen Pitchstufen scheinen die einzelnen Reihen der STROBOSKOPANZEIGEN stillzustehen. Hinweis: Durch das Benutzen starker fluoreszierender Beleuchtung direkt über dem Plattenspieler wird das Licht der STROBOSKOPLAMPE überlagert und führt dadurch zu einer Beeinflussung der Anzeigegenauigkeit. 43 AUF- UND EINSTELLEN Aufstellen des Plattenspielers: 1. Stellen Sie das Gerät an keinem Ort auf, wo es direkter Sonneneinstrahlung ausgesetzt ist. Stellen Sie es weiterhin nicht neben Heizgeräten jeglicher Art auf. 2. Stellen Sie das Gerät nicht an Orten mit hoher Luftfeuchtigkeit oder Staubbelastung auf. 3. Der Tonkopf kann leicht den Schalldruck oder die Schwingungen sich in der Nähe befindlicher Lautsprecher aufnehmen. Stellen Sie deshalb für beste Klangergebnisse den Plattenspieler nicht zu nah an Lautsprechern auf. 4. Stellen Sie den Lautsprecher auf einer horizontalen Oberfläche auf, die stabil und vibrationsfrei ist. 5. Die Gummifüße sind speziell dafür konstruiert worden, um übermäßige Vibrationen vom Gerät fernzuhalten. Darüber hinaus können Sie die Gummifüße benutzen, um den Plattenspieler zu nivellieren. Sie können die Neigung des Geräts durch Drehen der Standfüße in oder gegen den Uhrzeigersinn einstellen. Tonarmbalance und Tonnadelauflagedruck: 1. Einstellen des horizontalen Nullpunktes und des Tonnadelauflagedrucks: 2. Nehmen Sie den Tonnadelschutz ab, falls dieser sich noch am Tonkopf befindet. Berühren Sie während der Einstellung niemals die Tonnadelspitze. 3. Senken Sie den TONARMHEBEL. 4. Entriegeln Sie die Tonarmklammer und nehmen Sie anschließend den Tonarm aus der Tonarmaufnahme. 5. Stellen Sie den ANTISKATE-Regler auf null. 6. Drehen Sie das GEGENGEWICHT solange entweder in oder gegen den Uhrzeigersinn, bis der TONARM perfekt horizontal ausbalanciert (freischwebend) ist. 7. Führen Sie den TONARM zurück zur Tonarmaufnahme und rasten Sie in dort wieder ein. 8. Halten Sie mit einer Hand das GEGENGEWICHT fest und drehen Sie nur am Tonnadelauflagedruckeinstellring (3) solange, bis die Zahl „0“ auf dem Ring der Mittellinie auf der hinteren Tonarmwelle gegenübersteht. 9. Drehen Sie das GEGENGEWICHT solange gegen den Uhrzeigersinn, bis der Wert auf der Skale dem empfohlenen Tonnadelauflagedruck entspricht. Hinweis: Der empfohlene Tonnadelauflagedruck des optional mit Ihrem Gerät mitlieferbaren Tonkopfs beträgt 2,5 bis 3 Gramm. Schlagen Sie bitte für alle anderen Tonkopfsysteme in den mit dem Tonkopf mitgelieferten Spezifikationen des Herstellers nach. Antiskate: Mit der Antiskateeinstellung beugen Sie einem Springen der TONARMEINHEIT über die Schallplatte aufgrund der durch die Rotation des PLATTENTELLERS verursachten Fliehkraft vor. Der ANTISKATING-Drehregler sollte auf den gleichen Wert wie der Tonnadelauflagedruck eingestellt werden. Wenn Sie beispielsweise das GEGENGEWICHT auf 2,5 Gramm eingestellt haben, dann sollten Sie für ANTISKATE ebenfalls den Wert 2,5 einstellen. 44 Produktwartung: 1. 2. 3. 4. Reinigen Sie die Tonnadel regelmäßig mit einem weichen Pinsel, um einer Ansammlung von Staub vorzubeugen. Wenn die Klangwiedergabe verzerrt oder verrauscht ist, dann überprüfen Sie die Tonnadel. Wenn die Tonnadel abgenutzt ist, dann ersetzen Sie sie mit einer neuen Tonnadel. Wischen Sie von Zeit zu Zeit die Staubschutzabdeckung und das Plattenspielergehäuse mit einem weichen, trockenen Tuch ab. Benutzen Sie keine flüchtigen Reinigungsmittel wie Alkohol, Verdünner, Benzin usw. Diese können die Farbe ablösen oder die Glanzschicht beschädigen. Überblick über die Audiosoftware Audacity Audacity ist eine kostenlose Software unter Lizenz von GNU General Public License (GPL). Nähere Informationen sowie den offenen Quellcode finden Sie im Internet unter https://www.audacityteam.org/download/ * Bitte vergewissern Sie sich vor dem Start der Software, dass Sie sie installiert haben. Einrichten Ihres PCs für die Arbeit mit Audacity 1. Schließen Sie das mitgelieferte USB-Kabel am Plattenspieler an. 2. Verbinden Sie den verbleibenden USB-Stecker mit Ihrem Computer. 3. Installieren Sie die Audiosoftware Audacity. 4. Starten Sie das Programm Audacity. 5. Wählen Sie im Audacity-Menü unter dem Reiter Edit (Bearbeiten) Preferences (Einstellungen) aus. 6. Klicken Sie oben links auf den Reiter Audio I/O (Audioschnittstelle). Wählen Sie unter Playback (Wiedergabe) bei Device (Gerät) Ihre interne Soundkarte Wählen Sie unter Recording (Aufnahme) bei Device (Gerät) USB Audio CODEC 45 aus. (USB-Audio-CODEC) aus. Wählen Sie unter Recording (Aufnahme) bei Channels (Kanäle) 2 (Stereo) aus. Setzen Sie einen Haken bei Play other tracks while recording new one (Andere Spuren während Aufnahme abspielen (Overdub)). Setzen Sie einen Haken bei Software Playthrough (Eingang per Software durchschleifen). Aufzeichnen von Alben mit Audacity 1. Speichern eines Projekts Audacity speichert alle geänderten und aufgezeichneten Audiodateien im Verzeichnis Projektname_data, das sich dort befindet, wo Sie Ihr Projekt gespeichert haben. Wählen Sie unter dem Audacity-Reiter File (Datei) Save Project as (Projekt speichern als) aus und wählen Sie danach den Speicherort und den Namen für Ihr Projekt aus. Bitte beachten Sie, dass Ihnen nur die Option „Save As...“ (Speichern als) zur Verfügung steht, wenn Sie Audacity neu gestartet haben. 46 2. Aufzeichnen Bereiten Sie Ihren über USB verbundenen Plattenspieler für die Wiedergabe des Titels oder Albums vor, den/das Sie aufzeichnen möchten. Klicken Sie zum Starten der Aufzeichnung die rote Aufzeichnungstaste . Senken Sie den Tonarm des über USB verbundenen Plattenspielers bei dem Titel/Album ab, den/das Sie aufzeichnen möchten. Klicken Sie auf die blaue Pausetaste , um die Aufzeichnung zu pausieren. Klicken Sie sie erneut an, um die Aufzeichnung fortzusetzen. Klicken Sie auf die gelbe Stopptaste . Das war’s auch schon. Sie können jetzt mit Ihrer Aufzeichnung herumexperimentieren und die vielen Bearbeitungsmöglichkeiten von Audacity erkunden. Sie können die Undo-Funktion (Rückgängig machen) fast unbegrenzt benutzen, solange das Projekt geöffnet ist. HINWEIS: CDs können direkt aus Audacity heraus nicht gebrannt werden. Hierfür benötigen Sie ein separates CD-Brennprogramm. 47 Technische Daten Allgemein Modell: Abmessung: L-3809 430 (B) x 350 (T) x 155 (H) mm Gewicht: Stromversorgung: Leistungsaufnahme: 6,18 kg 230 V~/50 Hz (die Niederlande); 240 V~/50 Hz (GB) 30W Standardtestbedingung: Umgebungstemperatur: 20 °C ± 2 °C Relative Luftfeuchtigkeit: 65 % ± 5 % HINWEIS: Messungen können zwischen 5 und 35 °C und einer relativen Luftfeuchtigkeit zwischen 45 % und 85 % durchgeführt werden. Spezifikationen Plattenspieler: Typ: Motor: Antriebsmethode: Manueller Plattenspieler mit 2 Geschwindigkeitsstufen 16polig, 3phasig, bürstenlos Direktantrieb Plattenteller: Geschwindigkeiten: Gleichlaufschwankungen: 332 mm (Aluminium) 331/3 und 45 U/min <0,3 % WRMS (JIS-WTD) bei 331/3 U/min Rauschabstand: Pitchfader: Anlaufdrehmoment: >50 dB (DIN-B) ±10 % >3,6 kgf cm Bremssystem: Anlaufzeit: Abbremszeit: Elektronische Bremse <1 s <1 s Zeit für Rotationsgeschwindigkeitswechsel: <1 s bei Wechsel von 331/3 auf 45 U/min. <1 s bei Wechsel von 45 auf 33 1/3 U/min. USB-Funktion: Computerschnittstelle: USB-Aufzeichnung Auflösung 16 Bit/44,1 oder 48 kHz Windows 7, 8, 10, MAC OSX oder Linux mit USB 1.1-kompatiblen USB-Port Spezifikationen Tonarm: Typ: Effektive Tonarmlänge: Überstand: Feststehend balancierter S-förmiger Tonarm 220 mm 10 mm Spurfehlerwinkel: Auflagekrafteinstellbereich: MM-Tonkopftyp: <3° 3–4g Audio Technica AT-3600L Tonnadelauflagedruck: Tonkopfgewicht: Antiskatingbereich: 3,5 ± 0,5 g 5 ± 0,5 g 0–4g 48 Kanaltrennung: Kanalbalance: >18 dB Innerhalb 2,5 dB bei 1 kHz Vorverstärker Ausgangsspannung: 150 mV ± 4 dB (Eingangsspannung: 2,5 mV bei 1 kHz) RIAA (Frequenzgang): 20 Hz – 20 kHz +1/-3 dB (Eingangsspannung: 1,5 mV bei 1 kHz) Garantie Lenco bietet Leistungen und Garantien im Einklang mit Europäischem Recht. Setzen Sie sich deshalb im Falle von Reparaturen (sowohl während als auch nach Ablauf der Garantiezeit) mit Ihrem Fachhändler in Verbindung. Wichtiger Hinweis: Es ist nicht möglich, Produkte für Reparaturen direkt an Lenco zu schicken. Wichtiger Hinweis: Wenn dieses Gerät für welchen Grund auch immer durch ein nicht offizielles Servicezentrum geöffnet wurde oder durch dieses Servicezentrum darauf zugegriffen wurde, erlischt die Garantie. Dieses Gerät ist nicht für professionelle Zwecke geeignet. Falls das Gerät für professionelle Zwecke eingesetzt wird, erlöschen alle Garantieverpflichtungen seitens des Herstellers. Haftungsausschluss Aktualisierungen der Firmware und/oder Hardware-Komponenten werden regelmäßig durchgeführt. Aus diesem Grund können einige der Anleitungen, Spezifikationen und Abbildungen in dieser Dokumentation zu dem Ihnen vorliegenden Gerät leicht abweichen. Alle in diesem Handbuch beschriebenen Elemente dienen nur zur Illustration und treffen auf Ihre individuelle Situation möglicherweise nicht zu. Aus der in diesem Handbuch getätigten Beschreibung können keine Rechtsansprüche oder Leistungsanforderungen geltend gemacht werden. Entsorgung des Altgeräts Dieses Symbol zeigt an, dass das entsprechende Produkt oder dessen Akku/Batterie in Europa nicht mit dem normalen Hausmüll entsorgt werden darf. Um die ordnungsgemäße Abfallbehandlung des Produkts und dessen Akku/Batterie zu gewährleisten, müssen diese im Einklang mit allen anwendbaren örtlichen Vorschriften zur Entsorgung von Elektrogeräten und Akkus/Batterien entsorgt werden. Dabei helfen Sie, natürliche Ressourcen zu schonen und Umweltschutzstandards zur Verwertung und Entsorgung von Altgeräten aufrecht zu halten (Richtlinie über Entsorgung Elektrischer und Elektronischer Altgeräte). 49 CE-Kennzeichen Produkte mit der CE-Kennzeichnung entsprechen der von der EU-Kommission herausgegebenen EMV-Richtlinie (2014/30/EU) und Niederspannungsrichtlinie (2014/35/EU). Hiermit erklärt Lenco Benelux BV, Thermiekstraat 1a, 6361 HB Nuth, The Netherlands, dass dieses Produkt den grundsätzlichen Anforderungen entspricht. Die Konformitätserklärung kann unter folgendem Link abgerufen werden: [email protected] Service Besuchen Sie bitte für weitere Informationen und unseren Kundendienst unsere Homepage www.lenco.com Lenco Benelux BV, Thermiekstraat 1a, 6361 HB Nuth, The Netherlands. 50 Français L-3809 ATTENTION : L’utilisation de commandes ou de réglages ou l’exécution de procédures autres que celles spécifiées dans ce manuel peut entraîner une exposition à des rayonnements dangereux. PRÉCAUTIONS AVANT UTILISATION GARDEZ CES INSTRUCTIONS À L’ESPRIT : 1. Ne couvrez pas et n’obturez pas les ouvertures de ventilation. Lorsque vous placez l’appareil sur une étagère, laissez 5 cm (2”) d’espace libre tout autour. 2. Installez-le conformément au mode d’emploi fourni. 3. Gardez l’appareil à l’écart des sources de chaleur telles que des radiateurs, appareils de chauffage, fours, bougies et autres produits générant de la chaleur ou une flamme nue. L’appareil ne peut être utilisé que dans des climats modérés. Les environnements extrêmement froids ou chauds doivent être évités. Température de fonctionnement entre 0° et 35° C. 4. Évitez d’utiliser l’appareil à proximité de champs magnétiques puissants. 5. Des décharges électrostatiques peuvent perturber le fonctionnement de cet appareil. Dans ce cas, il suffit de réinitialiser et de redémarrer l’appareil en suivant le mode d’emploi. Pendant le transfert de fichiers, manipulez l’appareil avec précaution et faites-le fonctionner dans un environnement sans électricité statique. 6. Mise en garde ! N’introduisez jamais un objet dans l’appareil par les ouvertures et les fentes de ventilation. Étant donné que des tensions élevées sont présentes à l’intérieur du produit, l’insertion d’un objet peut entraîner une électrocution et/ou court-circuiter les composants internes. Pour les mêmes raisons, ne versez pas de l’eau ou un liquide sur le produit. 7. Ne l’utilisez pas dans des endroits humides tels qu’une salle de bain, une cuisine pleine de vapeur ou à proximité d’une piscine. 8. L’appareil ne doit pas être exposé à des écoulements ou des éclaboussures et aucun objet contenant un liquide, tel qu’un vase, ne doit être posé sur ou près de l’appareil. 9. N’utilisez pas cet appareil lorsque de la condensation est possible. Lorsque l’appareil est utilisé dans une pièce chaude et humide, des gouttelettes d’eau ou de la condensation peuvent se former à l’intérieur de l’appareil et affecter son fonctionnement adéquat. Si tel est le cas, laissez l’appareil hors tension pendant 1 ou 2 heures avant de le mettre en marche : l’appareil doit être sec avant toute remise en marche. 10. Bien que ce dispositif soit fabriqué avec le plus grand soin et contrôlé à plusieurs reprises avant de quitter l’usine, des problèmes peuvent néanmoins survenir, comme avec tous les appareils électriques. Si l’appareil émet de la fumée ou en cas d’accumulation excessive de la chaleur ou d’un phénomène inattendu, débranchez immédiatement la fiche d’alimentation du secteur. 11. Cet appareil doit fonctionner avec la source d’alimentation indiquée sur la plaque signalétique. Si vous n’êtes pas sûr du type d’alimentation utilisé chez vous, contactez votre revendeur ou le fournisseur local d’électricité. 12. Tenez l’appareil à l’abri des animaux. Certains animaux aiment mordre sur les cordons électriques. 13. Pour nettoyer l’appareil, servez-vous d’un chiffon doux et sec. N’utilisez pas de solvant ni d’autre liquide à base de pétrole. Pour enlever les taches importantes, vous pouvez vous servir d’un chiffon humide imbibé d’une solution de détergent diluée. 14. Le fournisseur n’est pas responsable des dommages ou pertes de données causés par un dysfonctionnement, une utilisation abusive, une modification de l’appareil ou un remplacement de la batterie. 15. N’interrompez pas la connexion lorsque l’appareil formate ou transfère des fichiers. Dans le cas contraire, les données pourraient être endommagées ou perdues. 16. Si l’appareil a une fonction de lecture USB, il faut brancher la clé USB directement sur l’appareil. N’utilisez pas un câble d’extension USB, car cela peut causer des interférences entraînant des pertes de données. 17. La plaque signalétique se situe en dessous ou à l’arrière de l’appareil. 18. Cet appareil ne doit pas être utilisé par des personnes (enfants compris) souffrant de handicaps physiques, sensoriels ou mentaux, ou manquant d’expérience et de 51 19. 20. 21. 22. 23. 24. 25. 26. 27. 28. 29. connaissances, sauf si elles sont sous surveillance ou ont reçu des instructions sur l’utilisation correcte de l’appareil par la personne qui est responsable de leur sécurité. Ce produit est réservé à un usage non professionnel, et non pas à un usage commercial ni industriel. Vérifiez que l’appareil est en position stable. La garantie ne couvre pas les dégâts occasionnés par l’utilisation de cet appareil en position instable, par les vibrations, les chocs ou par la non-observation de tout autre avertissement ou précaution contenus dans ce mode d’emploi. N’ouvrez jamais cet appareil. Ne placez jamais cet appareil sur un autre appareil électrique. Ne laissez pas les sacs en plastique à la portée des enfants. Utilisez uniquement les accessoires recommandés par le fabricant. Confiez l’entretien et les réparations à un personnel qualifié. Une réparation est nécessaire lorsque l’appareil a été endommagé de quelque façon que ce soit, par exemple lorsque le cordon d’alimentation ou la prise sont endommagés, lorsqu’un liquide s'est déversé ou des objets ont été introduits dans l’appareil, lorsque l’appareil a été exposé à la pluie ou à l’humidité, lorsqu’il ne fonctionne pas correctement ou est tombé. Une exposition prolongée à la musique avec un volume élevé peut entraîner une perte auditive temporaire ou permanente. Si l’appareil est livré avec un câble d’alimentation ou un adaptateur secteur : ⚫ En cas de problème, débranchez le cordon d’alimentation CA et confiez l’entretien à un personnel qualifié. ⚫ Ne marchez pas sur l’adaptateur secteur ou ne le coincez pas. Faites très attention, en particulier à proximité des fiches et du point de sortie du câble. Ne placez pas d’objets lourds sur l’adaptateur secteur, car ils pourraient l’endommager. Gardez l’appareil hors de portée des enfants ! Ils pourraient se blesser gravement s’ils jouent avec le câble d’alimentation. ⚫ Débranchez cet appareil pendant les orages ou lorsqu’il n’est pas utilisé pendant une longue durée. ⚫ La prise secteur doit être installée près de l’appareil et doit être facilement accessible. ⚫ Ne surchargez pas les prises de courant ou les rallonges. Une surcharge peut entraîner un incendie ou une électrocution. ⚫ Les appareils de classe 1 doivent être branchés à une prise de courant disposant d’une connexion protectrice à la terre. ⚫ Les appareils de classe 2 ne nécessitent pas de connexion à la terre. ⚫ Tirez toujours sur la fiche pour débrancher le cordon de la prise secteur. Ne tirez pas sur le cordon d’alimentation. Cela pourrait provoquer un court-circuit. ⚫ N’utilisez pas un cordon ou une fiche d’alimentation endommagé ni une prise desserrée. Vous courez un risque d’incendie ou de décharge électrique. Si le produit contient ou est livré avec une télécommande contenant des piles boutons : Avertissement : ⚫ « N’ingérez pas la pile, car vous risquez une brûlure chimique » ou une formule équivalente. ⚫ [La télécommande fournie avec] Ce produit contient une pile bouton. Si la pile est avalée, elle peut causer de graves brûlures internes en seulement 2 heures et peut entraîner la mort. ⚫ Tenez les piles neuves et usagées hors de portée des enfants. ⚫ Si le compartiment à piles ne se ferme pas correctement, cessez d’utiliser l’appareil et tenez-le hors de portée des enfants. ⚫ Si vous pensez que les piles ont été avalées ou placées à l’intérieur d’une partie du corps, consultez un médecin immédiatement. Mise en garde relative à l’utilisation des piles : ⚫ Risque d’explosion si la pile est mal remplacée. Remplacez les piles par des piles d’un type identique ou équivalent. ⚫ Pendant l’utilisation, le stockage ou le transport, la pile ne doit pas être soumise à des températures extrêmement élevées ou basses, à une faible pression d’air à haute altitude. 52 ⚫ Le remplacement d’une pile par une autre de type incorrect peut entraîner une explosion ou une fuite de liquide ou de gaz inflammable. ⚫ L’introduction d’une pile dans le feu ou dans un four chaud, l’écrasement ou le découpage mécanique peut entraîner une explosion. ⚫ L’exposition d’une pile dans un environnement à température extrêmement élevée peut entraîner une explosion ou une fuite de liquide ou de gaz inflammable. ⚫ L’exposition d’une pile à une pression d’air extrêmement basse peut entraîner une explosion ou une fuite de liquide ou de gaz inflammable. ⚫ Veuillez considérer les questions environnementales lors de la mise au rebut des piles. 53 Contenu du produit 1 Manuel 1 Câble audio RCA 1 Cordon d'alimentation 54 1 Câbler de raccordement USB 1 Plateau 1 Tapis de feutre 55 Description 1. PLATEAU DE TOURNE-DISQUE Le plateau est équipé d’un tapis de feutre. Il est ainsi plus facile de manipuler le disque pour les performances scratch. Placez les disques vinyles au centre du plateau du tourne-disque. 2. CONTREPOIDS L’ajustement crée la pression appropriée vers le bas du stylet sur le disque. Fixez maintenant en faisant glisser le contrepoids à l’arrière du bras de lecture. 3. ÉCHELLE DE RÉGLAGE DE LA PRESSION DU STYLET Ajustez l’alignement de la pression de la cartouche du stylet. 4. BOUTON ANTIDÉRAPANT Celui-ci applique une force sur le bras de lecture vers l’intérieur afin qu’il ne saute pas vers l’extérieur à travers le disque en raison de la force centrifuge de la rotation du disque. 5. ÉLÉVATEUR DU BRAS DE LECTURE Contrôlez l’action de montée et de descente du bras de lecture. 6. TETE DE LECTURE Installez la cartouche ici. Pendant l’installation, mettre la protection de pointe pour ne pas l’endommager. Raccordez les fils comme suit : 56 Blanc (L+) Bleu (L-) Canal gauche + Canal gauche – Rouge (R+) Canal droit + Vert (R-) Canal droit – 7. BOUTON LECTURE/PAUSE Appuyez sur ce bouton pour lancer la lecture, appuyez à nouveau pour suspendre, puis une nouvelle fois pour reprendre la lecture. 8. BOUTONS DE RÉGLAGE DE LA VITESSE DE ROTATION 33/45 Appuyez sur ces touches pour sélectionner la rotation du plateau en fonction de la vitesse indiquée sur le disque pour 33, 45 tours par minute. 9. Écrou de blocage de la coquille Fixez la coquille de tête en l’insérant dans l’extrémité avant du bras de lecture, puis tournez l’écrou de blocage dans le sens horaire. 10. Curseur de vitesse Utilisé pour modifier la vitesse de lecture de la piste. 11. Commutateur d’alimentation / Lumière stroboscopique Tournez le commutateur dans le sens horaire pour mettre l’appareil en marche. Tournez le commutateur dans le sens antihoraire pour arrêter l’appareil. La lumière stroboscopique s’allume automatiquement lorsque l’appareil est en marche. 1. SORTIE RCA Les sorties L et R sont utilisées pour connecter le tourne-disque à l’entrée analogique RCA de votre amplificateur. 2. COMMUTATEUR LINE/PHONO Le tourne-disque possède un préamplificateur PHONO intégré qui est désactivé si vous disposez d’un préamplificateur externe. Si vous voulez utiliser les signaux amplifiés par l’amplificateur interne de la platine, déplacez le commutateur sur LINE. Si vous souhaitez utiliser un préamplificateur PHONO externe, déplacez le commutateur sur PHONO. Avec le pré-ampli sur ON, ne jamais connecter l’entrée Phono. L’audio sera fortement distordue et il y a un risque que l’Amplificateur et/ou les haut-parleurs soi(en)t endommagé(s). 57 3. PORT USB Le son de votre disque vinyle est converti en numérique avec une résolution maximale de 48 KHz / 16 bits. Utilisez le câble USB fourni avec l’appareil pour connecter le tourne-disque à votre ordinateur. Le logiciel Audacity doit être téléchargé. 4. ENTRÉE SECTEUR Branchez le cordon d’alimentation ici. 5. COMMUTATEUR DE MARCHE/ARRÊT Permet d’allumer et d’éteindre le tourne-disque. 58 Montage du tourne-disque : 1. Retrait de l’emballage : Enlever doucement l’unité principale avec l’emballage intact de la boite. retirer l’emballage une fois que l’unité est enlevée du carton d’expédition. S’assurer que tous les accessoires sont dans l’emballage. 2. Adaptateur 45 tr/min : Situer et enlever l’adaptateur 45 tours de l’emballage et le placer sur l’adaptateur 45 sur le dessus de l’unité. 3. Plateau : Retirez le plateau du tourne-disque de l’emballage et placez-le délicatement sur la BROCHE CENTRALE de la base du plateau. 4. Tapis de feutre : Retirez le tapis de feutre noir de l’emballage et placez-le sur le PLATEAU. 5. Tete de lecture : Insérer la TETE DE LECTURE sur le BRAS. En tenant fermement la TETE DE LECTURE sur le bras, tourner l’ECROU DE VERROUILLAGE de la TETE DE LECTURE dans le sens antihoraire pour la sécuriser sur le BRAS. EN FR HEADSHELL TETE DE LECTURE TONEARM ASSEMBLY BRAS HEADSHELL LOCKING NUT ECROU DE VERROUILLAGE de la TETE DE LECTURE 6. Contrepoids : Situer et retirer le CONTREPOIDS de bras de son emballage. Glisser le CONTREPOIDS à l’arrière du BRAS. Le tourner légèrement et il se visse sur l’arbre arrière du bras. 59 EN FR TONEARM ASSEMBLY BRAS COUNTERWEIGHT CONTREPOIDS Démarrage rapide du tourne-disque : 1. Changer la vitesse du plateau Appuyez sur les boutons de RÉGLAGE DE LA VITESSE DE ROTATION 33/45 pour modifier la vitesse de rotation du plateau. 2. Démarrage et arrêt du plateau Utilisez le BOUTON LECTURE/PAUSE pour naviguer entre les rotations de plateau et les modes de suspension. 3. Contrôle d’écartement 1) Le réglage de l’écartement est un réglage précis en fonction de la vitesse du plateau. 2) Le réglage de l’écartement est variable et peut être réglé entre -10% et +10% selon la vitesse sélectionnée du plateau. 3) L’écartement est changé en glissant la glissière d’écartement en haut ou en bas. 4) Les points indicateurs sur le bord du PLATEAU DU TOURNE-DISQUE peuvent être utilisés pour donner une approximation visuelle de la vitesse du plateau. Ces indicateurs sont allumés par la LUMIÈRE STROBOSCOPIQUE en actionnant le COMMUTATEUR D’ALIMENTATION sur l’appareil. A différentes vitesse, chaque rangée des INDICATEURS STROBOSCOPIQUES peut sembler immobile. Remarque : L’utilisation d’un éclairage fluorescent puissant au-dessus du tourne-disque annihilera la LAMPE STROBOSCOPIQUE et affectera la précision de l’indicateur. 60 Configuration Installation de tourne-disque : 1. Ne pas placer l’unité sous les rayons directs du soleil ou près d’un appareil de chauffage. 2. Ne pas placer l’unité dans un endroit très humide ou plein de poussière. 3. La cartouche peut capter une légère pression sonore ou des vibrations des haut-parleurs situés à proximité. Pour de meilleurs résultats, ne pas installer cette unité trop près des haut-parleurs. 4. Installer cette unité sur une surface horizontale et stable et ne subissant pas de vibration. 5. Les pieds en caoutchouc sont spécialement conçus pour isoler l’unité des fortes vibrations. Les pieds peuvent aussi servir à stabiliser l’ensemble horizontalement. Ajuster la hauteur de l’unité en tournant le pied dans le sens horaire ou antihoraire. Équilibre du bras et pression sur la pointe de lecture : 1. Ajustement de l‘équilibre zéro horizontal et pression sur la pointe de lecture : 2. Retirer le cache protecteur de la pointe, le cas échéant. Ne jamais toucher la pointe de lecture au cours du réglage. 3. Baisser le LEVIER DE BRAS. 4. Ôter le clip de bras et enlever le bras de son support. 5. Mettre l’ANTI-SKATE (compensation de force centripète) sur zéro. 6. Tourner le CONTREPOIDS dans un sens ou un autre jusqu’à ce que le BRAS soit en équilibre horizontal (bouge librement). 7. Remettre le BRAS sur son support et le clipper. 8. Maintenir en place le CONTREPOIDS avec une main et ne tourner que la bague de pression de pointe (3) de lecture pour amener le « 0 » de la bague en alignement avec la ligne centrale de l’arbre arrière du bras. 9. Tourner le CONTREPOIDS dans le sens antihoraire jusqu’à ce que la valeur sur l’échelle corresponde à la pression recommandée sur la pointe de lecture. Remarque : La pression recommandée sur la pointe de lecture de la cartouche en option pouvant être comprise dans l’unité est de 2,5 de 3 grammes. Pour tous les autres systèmes de cartouche, voir les spécifications du fabricant données avec la cartouche. Antiskating : L’ajustement d’anti-skate empêche l’ENSEMBLE DE BRAS de glisser à travers le disque par la force centrifuge due à la rotation du PLATEAU. Le bouton de contrôle d’ANTISKATING doit être réglé sur la même valeur que la pression sur la pointe de lecture. Par exemple, si le CONTREPOIDS est réglé sur 2,5 grammes, la valeur d’ANTI-SKATE doit également être réglée sur 2,5. 61 Entretien du produit : 1. 2. 3. 4. Nettoyer périodiquement la pointe de lecture avec une brosse douce pour éviter l’accumulation de poussière. Quand le son devient distordant ou bruyant, vérifier la pointe de lecture. Si la pointe de lecture est usée, la remplacer avec une neuve. De temps en temps, le couvercle et le boitier du tourne-disque doivent être essuyés avec un chiffon doux et sec. Les matières volatiles telles que l’alcool, le diluant, le benzine, etc. ne doivent pas être utilisées. Elles peuvent enlever la peinture ou endommager le lustre. Aperçu du logiciel Audacity Audacity est un logiciel gratuit, licencié sous GNU Licence Publique Générale (GPL). Plus d’informations, de même que le code de source ouverte peuvent être trouvés sur le Web à https://www.audacityteam.org/download/ * Veuillez vous assurer que vous avez installé le logiciel avant de commencer. Paramétrer votre PC avant de travailler avec Audacity 1. Connectez le câble USB fourni au tourne-disque 2. Connectez l’autre fiche USB de ce câble à votre PC. 3. Installer le logiciel d’enregistrement Audacity. 4. Ouvrir le programme Audacity. 5. Sélectionner Preference (Préférence) sur Edit (Modifier) dans le Menu Audacity. 6. Sélectionner Audio I/O (M/A audio) en haut à gauche. Sous Lecture, Appareil, sélectionner votre internal sound card. Sous Enregistrement, Appareil, sélectionner USB Audio CODEC (CODEC audio USB). Sous Enregistrement, Canaux, sélectionner 2 (Stereo) (2 (stéréo)). 62 Vérifier la case marquée Play other tracks while recording new one (Jouer d’autres morceaux pendant l’enregistrement d’un nouveau). Vérifier la case marquée Software Playthrough (Jouer dans le logiciel). Enregistrement d’album avec Audacity 1. Sauvegarde d’un projet Audacity inscrit tous les audios changés et enregistrés sur un répertoire appelé Projectname_data, situé à droite d’où vous avez sauvegardé le fichier de projet lui-même. Puis, sélectionner Save Project as (Sauvegarder le projet sous) sur le Fichier Audacity, et choisir un endroit et un nom de fichier pour votre projet. veuillez noter que lorsque vous démarrez Audacity pour la première fois, seule l’option “Save As...” (Sauvegarder sous…) est disponible. 63 2. Comment enregistrer Mettre le tourne-disque en état de jouer un morceau ou un album que vous voulez enregistrer. Cliquez sur le bouton rouge d'enregistrement pour commencer l'enregistrement. Abaisser le bras sur l’album posé sur le tourne-disque USB et chercher ce que vous désirez enregistrer. Cliquez sur le bouton bleu de suspension dessus pour reprendre. Cliquer sur la touche jaune Arrêt pour suspendre l'enregistrement. Réappuyer . Voilà. Vous pouvez maintenant vous amuser avec votre enregistreur et explorer les capacités d’Audacity. Rappelez-vous que vous pouvez utiliser la fonction Undo pratiquement sans limite quand le projet est ouvert. REMARQUE : Le CD ne peut pas être imprimé directement depuis l’application Audacity. D’autres applications d’impression de CD doivent être utilisées. 64 Caractéristiques Caractéristiques Générales Modèle : Dimensions : L-3809 430(L) x 350(P) x 155(H)mm Poids : Alimentation électrique : Puissance consommée : 6,18 kg 230 V CA~ 50 Hz (Pays-Bas); 240 V CA~ 50 Hz(R-U.) 30 W Conditions de test standard : Température ambiante : 20 +/- 2 degrés.C Humidité relative : 65 % +/- 5 % REMARQUE : Les mesures peuvent être effectuées entre 5 et 35°C, et avec 45 à 85% d’humidité relative. Section tourne-disque : Type : Mot. : Méthode d’entrainement : 2 vitesses manuelles 16 pôles, 3 phases, sans balais Entraînement direct Plateau : Vitesses : Pleurage et scintillement : 332 mm (Aluminium) 331/3 et 45 tr/min Moins de 0,3 % WRMS (JIS WTD) avec 33 1/3 tr/min Rapport signal/bruit : Contrôle d’écartement : Couple au démarrage : Plus de 50 dB (DIN-B) +/-10 % : Plus de 3,6 kgf.cm Système de freinage : Durée de démarrage : Durée de freinage : Frein électronique Moins de 1 seconde Moins de 1 seconde Durée de changement de vitesse : Fonction USB : Moins de 1 sec. de 331/3 à 45 tours. Moins de 1 sec. de 45 à 33 1/3 tours. Enreg. USB Résolution Interface d’ordinateur : 16 BIT 44,1 KHz ou 48 KHz Compatible USB 1.1 Windows 7/8/10 ou MAC OSX Section bras de lecture : Type : Longueur de bras : Bras de lecture statique équilibré en forme de S 220 mm Porte-à-faux : Erreur d’angle de traçage : Plage de réglage de force de traçage : 10 mm Moins de 3 degrés 3à4g Type de cartouche MM : Pression du stylet : Poids de la cartouche : Technique audio AT-3600L 3,5+0,5 g 5+0,5 g Gamme Antiskating : Séparation de canal : Équilibre de canal : 0à4g Plus de 18 dB Environ 2,5 dB à 1 KHz 65 Préamplificateur Sortie : 150 mV +/- 4 dB (ENTREE : 2,5 mV 1 KHz) RIAA (Réponse de fréquence) : 20 Hz à 20 KHz +1/-3 dB (ENTREE : 1,5mV 1 KHz) Garantie Lenco propose un service et une garantie conformément à la législation européenne, ce qui signifie qu’en cas de besoin de réparation (aussi bien pendant et après la période de garantie), vous pouvez contacter votre revendeur le plus proche. Remarque importante : Il n’est pas possible de renvoyer l’appareil pour réparation directement à Lenco. Remarque importante : si l’appareil est ouvert ou modifié de quelque manière que ce soit par un réparateur non agréé, la garantie sera caduque. Cet appareil ne convient pas à une utilisation professionnelle. En cas d’utilisation professionnelle, les obligations de garantie du fabricant seront annulées. Clause de non-responsabilité Des mises à jour du logiciel et/ou des composants informatiques sont régulièrement effectuées. Il se peut donc que certaines instructions, caractéristiques et images présentes dans ce document diffèrent légèrement de votre configuration spécifique. Tous les articles décrits dans ce guide sont fournis uniquement à des fins d’illustration et peuvent ne pas s’appliquer à une configuration spécifique. Aucun droit légal ne peut être obtenu depuis les informations contenues dans ce manuel. Mise au rebut de l’appareil usagé Ce symbole indique que le produit électrique concerné ainsi que les piles ne doivent pas être jetés avec les autres déchets ménagers en Europe. Pour garantir un traitement correct des piles et de l’appareil usagés, veuillez les mettre au rebut conformément aux réglementations locales en vigueur relatives aux appareils électriques et autres piles. En agissant de la sorte, vous contribuerez à la préservation des ressources naturelles et à l’amélioration des niveaux de protection environnementale concernant le traitement et la destruction des déchets électriques (directive sur les déchets des équipements électriques et électroniques). Marquage CE Les produits avec la marque CE sont conformes à la directive CEM (2014/30/CE) et à la directive basse tension (2014/35/CE) émises par la commission de la communauté européenne. Par la présente, Lenco Benelux BV, Thermiekstraat 1a, 6361 HB Nuth, Pays-Bas, déclare que ce produit est conforme aux exigences principales. La déclaration de conformité peut être consultée au lien : [email protected] 66 Service après-vente Pour en savoir plus et obtenir de l’assistance, visitez www.lenco.com Lenco Benelux BV, Thermiekstraat 1a, 6361 HB, Nuth, Pays-Bas. 67 Español L-3809 PRECAUCIÓN: El uso de los controles o ajustes o el funcionamiento de los procedimientos excepto a aquellos especificados aquí pueden provocar una exposición peligrosa a la radiación. PRECAUCIONES PREVIAS AL USO TENGA ESTAS INSTRUCCIONES EN MENTE: 1. No cubra o bloquee ninguna apertura de ventilación. Cuando coloque el dispositivo en una estantería, deje 5 cm (2”) de espacio libre alrededor de todo el dispositivo. 2. Instálelo conforme al manual de usuario que se adjunta. 3. Mantenga el aparato alejado de fuentes de calor, como radiadores, calentadores, estufas, velas u otros productos que generen calor o llama viva. El aparato solo puede usarse en climas moderados. Se deben evitar los ambientes extremadamente fríos o cálidos. Temperatura de funcionamiento entre 0 ° y 35 °C. 4. Evite usar el dispositivo cerca de campos magnéticos fuertes. 5. Una descarga electrostática puede entorpecer el uso normal de este dispositivo. En tal caso, simplemente reinícielo siguiendo el manual de instrucciones. Durante la transmisión de archivos, por favor manéjelo con cuidado opérelo en un entorno libre de electricidad estática. 6. ¡Advertencia! Nunca inserte un objeto en el producto a través de las ventilaciones o aperturas. Alto voltaje fluye a través del producto e insertar un objeto puede provocar una descarga eléctrica y/o un cortocircuito de sus componentes internos. Por el mismo motivo, no derrame agua o líquidos en el producto. 7. No lo utilice en zonas húmedas, como cuartos de baño, cocinas en las que se forme vapor ni cerca de piscinas. 8. El aparato no debe exponerse a goteos o salpicaduras y asegúrese de que se colocan sobre o cerca del aparato objetos llenos de líquidos, como jarrones. 9. No use este dispositivo cuando se pueda producir condensación. Cuando utilice la unidad en una habitación húmeda y cálida con humedad, pueden generarse gotas de agua o condensación dentro de la unidad y es posible que no funcione correctamente; apague la unidad durante 1 o 2 horas antes de encenderla de nuevo: el aparato debe estar seco antes de conectarse a una fuente de alimentación. 10. Aunque este dispositivo está fabricado con el máximo cuidado y comprobado varias veces antes de salir de fábrica, todavía es posible que se puedan producir problemas, al igual que con todos los aparatos eléctricos. Si observa la aparición de humo, una acumulación excesiva de calor o cualquier otro fenómeno inesperado, deberá desconectar inmediatamente el enchufe de la toma de corriente. 11. Este dispositivo debe funcionar con una fuente de alimentación que se especifica en la etiqueta de especificaciones. Si no está seguro del tipo de alimentación que se usa en su hogar, consulte con el distribuidor o una compañía eléctrica local. 12. Manténgalo alejado de los animales. A algunos animales les gusta morder los cables de alimentación. 13. Para limpiar el dispositivo use un paño seco y suave. No utilice líquidos disolventes ni con base de petróleo. Para eliminar manchas difíciles, puede usar un paño húmedo con detergente diluido. 14. El proveedor no asume ninguna responsabilidad por daños o datos perdidos provocados por un funcionamiento incorrecto, uso incorrecto, modificación del dispositivo o sustitución de la batería. 15. No interrumpa la conexión cuando el dispositivo esté formateando o transfiriendo archivos. En caso contrario, los datos se pueden estropear o perder. 16. Si la unidad dispone de función de reproducción USB, se debe conectar la memoria USB directamente en la unidad. No utilice cables de extensión USB ya que pueden crear interferencias que causen una pérdida de datos. 17. La etiqueta de calificación aparece marcada en el panel inferior o posterior del dispositivo. 18. Este aparato no está diseñado para su uso por personas (incluyendo niños) con discapacidades físicas, sensoriales o mentales o con falta de experiencia o conocimientos, 68 19. 20. 21. 22. 23. 24. 25. 26. 27. 28. 29. salvo que estén bajo la supervisión o hayan recibido formación sobre el uso correcto del dispositivo por parte de una persona responsable de su seguridad. Este producto está diseñado para un uso no profesional únicamente y no para un uso comercial o industrial. Asegúrese de que la unidad esté fijada en una posición estable. La garantía no cubrirá los daños derivados de usar este producto en una posición inestable, vibraciones o golpes o por no seguir otras advertencias o precauciones que aparecen en este manual de usuario. Nunca retire la carcasa del dispositivo. Nunca coloque este dispositivo sobre otro equipo eléctrico. Mantenga las bolsas de plástico fuera del alcance de los niños. Use únicamente los dispositivos/accesorios especificados por el fabricante. Remita todas las reparaciones al personal cualificado. Es necesario el mantenimiento cuando el dispositivo presenta daños en cualesquiera manera, como el cable de alimentación o el enchufe, cuando se haya vertido líquido o se hayan caído objetos en el dispositivo, cuando el dispositivo se haya expuesto a la lluvia o humedad, cuando no funcione normalmente o cuando se haya caído. Una larga exposición a sonidos elevados de reproductores de música personales puede provocar una pérdida de audición temporal o permanente. Si el producto viene con un cable de alimentación o un adaptador de corriente de CA: ⚫ Si se produce cualquier problema, desconecte el cable de alimentación CA y remítase al mantenimiento de personal cualificado. ⚫ No pise o pince el adaptador de alimentación. Tenga mucho cuidado, en especial cerca de las tomas y el punto de salida del cable. No coloque objetos pesados en el adaptador de alimentación, ya que pueden dañarlo. ¡Mantenga el dispositivo fuera del alcance de los niños! Si juegan con el cable de alimentación, puede sufrir lesiones graves. ⚫ Desconecte el dispositivo durante tormentas eléctricas o cuando no vaya a usarse durante periodos prolongados de tiempo. ⚫ La salida de la toma debe instalarse cerca del equipo y debe ser fácilmente accesible. ⚫ No sobrecargue las tomas CA o los cables de extensión. La sobrecarga puede provocar un incendio o una descarga eléctrica. ⚫ Los dispositivos con construcción de Clase 1 deben estar conectados a una toma de corriente con una conexión a tierra protegida. ⚫ Los dispositivos con construcción Clase 2 no requieren una conexión a tierra. ⚫ Sujete siempre el enchufe cuando los extraiga de la toma de corriente. No tire del cable de alimentación. Esto puede provocar un cortocircuito. ⚫ No utilice un cable de alimentación o enchufe deteriorado o una toma suelta. Si lo hace, podría provocar un incendio o una descarga eléctrica. Si el producto contiene o se entrega con un mando a distancia que contiene pilas de botón / celdas: Advertencia: ⚫ “Ni ingiera la pila, riesgo de quemadura química” o frase equivalente. ⚫ [El mando a distancia que se suministra] Este producto contiene una pila de tipo botón/moneda. Si la pila se traga, puede provocar graves quemaduras internas en sólo 2 horas y podría ocasionar la muerte. ⚫ Mantenga las pilas nuevas o usadas fuera del alcance de los niños. ⚫ Si el compartimiento de las pilas no se cierra correctamente, deje de usar el producto y no lo deje al alcance los niños. ⚫ Si tiene la sospecha de que una pila ha sido ingerida o se encuentra en algún lugar del cuerpo, busque inmediatamente atención médica. Precaución sobre el uso de las pilas: ⚫ Existe riesgo de explosión si la pila no se sustituye correctamente. Sustitúyala únicamente con otra del mismo tipo u otro equivalente. ⚫ No se pueden exponer las pilas a temperaturas extremadamente altas o bajas, baja presión de aire a gran altitud durante el uso, almacenamiento o transporte. ⚫ Si cambia las pilas por otras que no son las correctas, se puede producir una explosión o la fuga de líquidos o gases inflamables. 69 ⚫ Si arroja las pilas al fuego o a un horno caliente, o aplasta o cortar mecánicamente una pila, podría provocar una explosión. ⚫ Si deja las pilas en un lugar con temperaturas extremadamente altas, se puede producir una explosión o una fuga de líquido o gas inflamable. ⚫ Si se exponen las pilas a una presión de aire extremadamente baja, se puede producir una explosión o la fuga de líquidos o gases inflamables. ⚫ Se debe prestar atención a los aspectos medioambientales sobre la eliminación de baterías. 70 Contenidos que se entregan 1 manual 1 cable de audio RCA 1 cable de alimentación 71 1 cable de conexión USB 1 plato 1 alfombrilla de fieltro 72 Descripción 1. PLATO DEL TOCADISCOS El plato está equipado con una alfombrilla de fieltro. Esto facilita la manipulación del disco para el funcionamiento de rasgado. Coloque los discos de vinilo centrados en el plato del tocadiscos. 2. CONTRAPESO El ajuste crea la presión descendente adecuada de la aguja sobre el disco. Fíjelo ahora deslizando el contrapeso sobre el centro del brazo. 3. ESCALA DE AJUSTE DE LA PRESIÓN DE LA AGUJA Ajuste la alineación de la presión del cartucho de la aguja. 4. DIAL ANTIPATINAZO Esto se aplica a la fuerza hacia adentro del brazo de forma que no se salte hacia afuera del disco debido a la fuerza centrífuga del giro del disco. 5. LEVANTADOR DEL BRAZO Controla la acción de subida y bajada del brazo. 6. CARCASA Instale aquí el cartucho. Coloque el protector de aguja para proteger la punta de la aguja de daños durante la instalación. 73 Fije los cables de la manera siguiente: Blanco (L+) Canal izquierdo + Azul (L-) Rojo (R+) Verde (R-) Canal izquierdo – Canal derecho + Canal derecho – 7. BOTÓN REPRODUCIR/PAUSA Pulse este botón para iniciar la reproducción; para hacer una pausa vuélvalo a pulsar o para reanudar la reproducción tras una pausa. 8. BOTÓN DE CONFIGURACIÓN DE VELOCIDAD DE GIRO 33/45 Pulse estos botones para seleccionar el giro del plato según la velocidad indicada en el disco para 33, 45 revoluciones por minuto. 9. Tuerca de bloqueo del cabezal Fije el cabezal insertándolo en el extremo delantero del brazo y girando la tuerca de bloqueo en sentido horario. 10. Potenciómetro de tono Se usa para cambiar la velocidad de reproducción de la pista que se está reproduciendo. 11. Interruptor de alimentación /luz estroboscópica Gire el interruptor en sentido horario para encender la unidad. Gire el interruptor en sentido antihorario para apagar la unidad. La luz estroboscópica se encenderá automáticamente cuando la unidad esté encendida. 1. SALIDA RCA La SALIDA L y R se usan para conectar el tocadiscos a la entrada analógica RCA del amplificador. 74 2. INTERRUPTOR DE LÍNEA /FONO El tocadiscos dispone de un preamplificador de FONO integrado que está desconectado si dispone de un preamplificador externo. Si desea usar las señales amplificadas por el amplificador interno del tocadiscos, mueva el interruptor a LINE. Si desea usar un preamplificador externo FONO, mueva el interruptor a PHONO. Si el interruptor PRE-AMP está en posición ON, nunca conecte la unidad a una entrada de fonógrafo. El sonido se oirá muy distorsionado de vez en cuando y existe el riesgo de que los amplificadores y/o altavoces resulten dañados. 3. PUERTO USB El sonido del disco de vinilo se convierte a digital con una resolución máxima de 48KHz / 16bits. Use el cable USB que se presenta con el dispositivo para conectar el tocadiscos al ordenador. El software Audacity debe descargarse. 4. ENTRADA CA Enchufe aquí el cable de alimentación. 5. ALIMENTACIÓN CONECTADA/DESCONECTADA Úselo para conectar y desconectar el tocadiscos. 75 Montaje del tocadiscos: 1. Sacarlo de la caja: Saque cuidadosamente la unidad principal de la caja con el material de embalaje intacto. Quite el material de embalaje después de sacar la unidad de la caja de transporte. Asegúrese de encontrar todos los accesorios en el material de embalaje. 2. Adaptador de 45rpm: Encuentre y saque el adaptador de 45 rpm del material de embalaje y colóquelo en el recorte para el adaptador de 45 de la parte superior de la unidad principal. 3. Plato de tocadiscos: Retire el plato del tocadiscos del material de embalaje y coloque el plato suavemente en el EJE CENTRAL de la base del tocadiscos. 4. Alfombrilla de fieltro: Retire la alfombrilla de fieltro negra del envase y colóquela en el PLATO. 5. Carcasa: Inserte la CARCASA en el extremo frontal del CONJUNTO DEL BRAZO. Sostenga firmemente la CARCASA en el extremo frontal del conjunto del brazo y gire la TUERCA DE SEGURIDAD DE LA CARCASA en sentido contrario a las agujas del reloj para asegurar la CARCASA en el CONJUNTO DEL BRAZO. EN ES HEADSHELL CARCASA TONEARM ASSEMBLY CONJUNTO DEL BRAZO HEADSHELL LOCKING NUT TUERCA DE SEGURIDAD DE LA CARCASA 6. Contrapeso: Encuentre y saque el CONTRAPESO del brazo del embalaje. Deslice el CONTRAPESO hacia la parte trasera del CONJUNTO DEL BRAZO. Gírelo ligeramente y se atornillará en el eje trasero del brazo 76 EN ES TONEARM ASSEMBLY CONJUNTO DEL BRAZO COUNTERWEIGHT CONTRAPESO Inicio rápido del tocadiscos: 1. Cambiar la velocidad del plato Pulse los botones de configuración de velocidad de giro 33/45 para cambiar la velocidad de giro delo plato. 2. Arranque y parada del plato Use el BOTÓN REPRODUCCIÓN/PAUSA para cambiar entre los giros del plato y los modos de pausa. 3. Control de modulación 1) El ajuste de la modulación es un ajuste fino de las rpm del plato. 2) El ajuste de la modulación es variable y se puede ajustar entre -10% y +10% de la velocidad del plato seleccionada. 3) La modulación se cambia subiendo y bajando el deslizador de modulación. 4) Los puntos del indicador en el borde del PLATO DEL TOCADISCOS pueden usarse para tener una aproximación visual al tono del plato. Estos indicadores se iluminan mediante la luz estroboscópica a medida que pasan encendiendo el dispositivo con el interruptor de alimentación. Es posible que cada fila de INDICADORES ESTROBOSCÓPICOS quede quieta en diferentes niveles de modulación. Nota: El uso de luces fluorescentes intensas encima del tocadiscos puede afectar la precisión del indicador de la LUZ PILOTO ESTROBOSCÓPICA. 77 Instalación Instalación del tocadiscos: 1. No coloque la unidad en un lugar expuesto a la luz directa del sol ni cerca de un aparato de calefacción de cualquier tipo. 2. No coloque la unidad en un lugar con un nivel de humedad elevado o con mucho polvo. 3. El cartucho puede recoger una ligera presión o vibración del sonido de los altavoces cercanos. No instale esta unidad muy cerca de altavoces para conseguir los mejores resultados. 4. Instale esta unidad en una superficie horizontal estable y sin vibraciones. 5. Los pies de goma han sido diseñados especialmente para aislar la unidad de vibraciones excesivas. También se pueden usar los pies para estabilizar horizontalmente el cuerpo principal. Ajuste la altura de la unidad girando los pies en el sentido de las agujas del reloj o en sentido contrario. Equilibrio del brazo y presión de la aguja: 1. Ajuste del equilibrio horizontal cero y de la presión de la aguja: 2. Retire la cubierta protectora de la aguja, si está equipada. Nunca toque la punta de la aguja durante el ajuste. 3. Baje la PALANCA DEL BRAZO. 4. Libere la abrazadera del brazo y retire el brazo del apoyabrazos. 5. Ajuste el ANTIPATINAJE en cero. 6. Gire el CONTRAPESO en cualquier dirección hasta que el BRAZO esté perfectamente equilibrado en horizontal (flotando libremente). 7. Vuelva a colocar el BRAZO sobre el apoyabrazos y fíjelo. 8. Mantenga el BRAZO inmóvil con una mano y gire solo el anillo de presión de la aguja (3) para alinear el número “0” del anillo con la línea central del eje trasero del brazo. 9. Gire el contrapeso en dirección contraria a las agujas del reloj hasta llegar al valor de la escala correspondiente a la presión recomendada de la aguja. Nota: La presión recomendada de la aguja del cartucho opcional que puede venir incluido con su unidad es 2,5 a 3 gramos. Para otros sistemas de cartucho, consulte las especificaciones del fabricante incluidas con el cartucho. Antipatinaje: El ajuste antipatinaje evita que el CONJUNTO DEL BRAZO salte en el disco por la fuerza centrífuga causada por la rotación del PLATO. Se debe ajustar la perilla de control ANTIPATINAJE con el mismo valor que la presión de la aguja. Por ejemplo, si el CONTRAPESO está ajustado en 2,5 gramos, el valor de ANTIPATINAJE también debe estar ajustado en 2,5. 78 Mantenimiento del producto: 1. 2. Limpie periódicamente la aguja con un cepillo suave para prevenir la acumulación de polvo. Compruebe la aguja si el sonido se oye distorsionado o con ruido. Sustituya la aguja con una nueva si está desgastada. 3. Se debe limpiar el polvo de la cubierta y del gabinete del tocadiscos con un trapo suave y seco de vez en cuando. No se deben usar materiales volátiles, como: alcohol, disolvente, bencina, etc. Podrían 4. quitar la pintura o dañar el brillo. Vista general del software Audacity Audacity es un software gratuito con la Licencia Pública General (GPL, por sus siglas en inglés) de GNU. Puede encontrar más información y el código fuente abierto en la página web https://www.audacityteam.org/download/ * Asegúrese de instalar el software antes de empezar. Configurar el PC para trabajar con Audacity 1. Conecte el cable USB que se adjunta al tocadiscos. 2. Conecte la toma USB izquierda de este cable USB a su PC. 3. Instale el software de grabación Audacity. 4. Abra el programa Audacity. 5. Seleccione Preference (Preferencias) en la pestaña Edit (Editar) del menú de Audacity. 6. Seleccione la pestaña Audio I/O (E/S de audio) en la esquina superior izquierda. En Reproducción, Dispositivo, seleccione su tarjeta de sonido interna. En Grabación, Dispositivo, seleccione Códec de audio USB (USB Audio CODEC). En Grabación, Canales, seleccione 2 (Stereo) (2 (Estéreo)). 79 Marque la casilla Play other tracks while recording new one (Reproducir otras pistas mientras se graba una nueva). Marque la casilla Software Playthrough (Playthrough de software). Grabar álbumes con Audacity 1. Guardar un proyecto Audacity escribe todo el audio grabado y modificado en un directorio llamado Projectname_data, ubicado donde se guardó el archivo de proyecto. Por tanto, seleccione Save Project as (Guardar proyecto como) en la pestaña Archivo (File) de Audacity y elija una ubicación y nombre de archivo para el proyecto. Tenga en cuenta que cuando inicie Audacity por primera vez sólo estará disponible la opción “Save As...” (Guardar como…) en el menú. 80 2. Cómo grabar Ajuste el tocadiscos USB para reproducir la canción o álbum que desea grabar. Haga clic en el botón rojo de grabación para empezar la grabación. Baje el brazo del tocadiscos USB sobre el álbum y la pista que desea grabar. Haga clic en el botón azul de pausa pulsarlo para continuar. Pulse el botón amarillo de Parar para hacer una pausa en la grabación. Vuelva a . Ya está. Ahora puede practicar con las grabaciones y probar las opciones de edición de Audacity. Recuerde que puede usar la función Deshacer de forma casi ilimitada mientras el proyecto esté abierto. NOTA: No se pueden grabar CD directamente con la aplicación Audacity. Deberá usar otras aplicaciones de grabación de CD. 81 Especificaciones General Modelo: Dimensiones: L-3809 430(A) x 350(D) x 155(A) mm Peso: Alimentación eléctrica: 6,18 Kg AC 230 V~ 50 Hz (Países Bajos); AC 240 V~ 50 Hz (Reino Unido) Consumo de energía: Condiciones de prueba estándar: Humedad relativa: 30 W Temperatura ambiente: 20 +/- 2 grados C 65% +/- 5% NOTA: Se pueden realizar mediciones entre 5 °C y 35 °C y una humedad relativa de 45% a 85%. Sección del tocadiscos: Tipo: Motor: Método de accionamiento: 2 velocidades, manual 16 polos, 3 fases, sin cepillo Accionamiento directo Plato de tocadiscos: Velocidad: Sorpresa y vibración: 332 mm (aluminio) 331/3 y 45 rpm Menos de 0,3% WRMS (JIS WTD) con 33 1/3 rpm Proporción Señal/Ruido: Controles de modulación: Par de arranque: Más de 50 dB (DIN-B) +/- 10% Más de 3,6 kgf.cm Sistema de frenado: Tiempo de inicio: Tiempo de frenado: Freno electrónico Menos de 1 segundo Menos de 1 segundo Tiempo para cambio de velocidad: Menos de 1 segundo de 331/3 a 45 rpm. Menos de 1 segundo de 45 a 33 1/3 rpm. Grabación USB Resolución Función USB: Interfaz informática: 16 bit 44,1 KHz o 48 KHz USB 1.1 que se compatible con Windows 7/8/10 o MAC OSX Sección del brazo: Tipo: Brazo en forma de S con equilibrio estático Longitud efectiva: Saliente: Ángulo de error de tracción: 220 mm 10 mm Menos de 3 grados Rango de ajuste de fuerza de tracción: Tipo de cartucho MM: 3-4 g Presión de la aguja: Peso del cartucho: Alcance antipatinaje: 3,5 ± 0,5 g 5 ± 0,5 g 0-4 g Audio Technica AT-3600L 82 Separación de canal: Balance de canal: Más de 18 dB En un rango de 2,5 dB a 1KHz Preamplificador Salida: 150 mV +/-4 dB (entrada: 2,5 mV 1 KHz) RIAA (respuesta de frecuencia): 20 Hz-20 KHz +1/-3 dB (entrada: 1,5 mV 1 KHz) Garantía Lenco ofrece servicio y garantía en cumplimiento con las leyes de la Unión Europea, lo cual implica que, en caso de que su producto precise ser reparado (tanto durante como después del periodo de garantía), deberá contactar directamente con su distribuidor. Nota importante: No es posible enviar sus reparaciones directamente a Lenco. Nota importante: Si la unidad es abierta por un centro de servicio no oficial, la garantía quedará anulada. Este aparato no es adecuado para el uso profesional. En caso de darle un uso profesional, todas las obligaciones de garantía del fabricante quedarán anuladas. Exención de responsabilidad Regularmente se llevan a cabo actualizaciones en el Firmware y en los componentes del hardware. Por esta razón, algunas de las instrucciones, especificaciones e imágenes incluidas en este documento pueden diferir ligeramente respecto a su situación particular. Todos los elementos descritos en esta guía tienen un objetivo de mera ilustración, y pueden no ser de aplicación en su situación particular. No se puede obtener ningún derecho ni derecho legal a partir de la descripción hecha en este manual. Eliminación del antiguo dispositivo Este símbolo indica que no deberá deshacerse del producto eléctrico o batería en cuestión junto con los residuos domésticos, en el ámbito de la UE. Para garantizar un tratamiento residual correcto del producto y su batería, por favor, elimínelos cumpliendo con las leyes locales aplicables sobre requisitos para el desechado de equipos eléctricos y baterías. De hacerlo, ayudará a conservar recursos naturales y mejorar los estándares de protección medioambiental en el tratamiento y eliminación de residuos eléctricos (Directiva sobre la Eliminación de Equipos Eléctricos y Electrónicos). Marca CE Los productos con la marca CE cumplen con la Directiva EMC (2014/30/EU) y con la Directiva de Bajas Tensiones (2014/35/EU) emitida por la Comisión de la Unión Europea. Por la presente, Lenco Benelux BV, Thermiekstraat 1a, 6361 HB Nuth, Países Bajos, declara que este producto cumple con las exigencias esenciales. La declaración de conformidad puede consultarse en [email protected] 83 Servicio Para obtener más información y soporte del departamento técnico, por favor, visite la página web www.lenco.com Lenco Benelux BV, Thermiekstraat 1a, 6361 HB, Nuth, Países Bajos. 84 Italiano L-3809 ATTENZIONE: L'utilizzo di controlli o regolazioni o l'esecuzione di procedure diverse da quelle specificate può causare l'esposizione a radiazioni pericolose. PRECAUZIONI PRIMA DELL'USO CONSERVARE QUESTE ISTRUZIONI: Non coprire o bloccare le aperture di ventilazione. Quando si posiziona il dispositivo su uno scaffale, lasciare uno spazio libero di 5 cm (2") attorno all'intero perimetro. Installare secondo quanto riportato nel manuale fornito. Tenere il dispositivo lontano da sorgenti termiche come radiatori, termosifoni, stufe, candele e altri prodotti che generano calore o fiamme libere. Il dispositivo può essere utilizzato solo in climi moderati. Evitare ambienti estremamente freddi o caldi. Temperatura operativa compresa tra 0° e 35°C. Evitare l'uso del dispositivo in presenza di forti campi magnetici. Le scariche elettrostatiche possono interferire con il normale utilizzo di questo dispositivo. In tal caso, è sufficiente ripristinare e riavviare il dispositivo seguendo il manuale di istruzioni. Durante la trasmissione di file, maneggiarlo con cura e operare in un ambiente privo di elettricità statica. Avviso! Non inserire mai oggetti nel prodotto attraverso le prese d'aria o le aperture. All'interno del prodotto sono presenti tensioni elevate e l'inserimento di un oggetto può provocare scariche elettriche e/o cortocircuiti. Per lo stesso motivo, non versare acqua o liquidi sul prodotto. Non utilizzare in aree umide o bagnate come bagni, cucine con vapore o piscine. Non esporre il dispositivo a schizzi o gocciolamenti di liquidi; non poggiare sopra o accanto al dispositivo oggetti contenenti liquidi, ad esempio vasi. Non utilizzare questo dispositivo in caso di condensa. Quando l'unità viene utilizzata in una stanza calda e umida, all'interno dell'unità possono formarsi goccioline d'acqua o condensa e l'unità potrebbe non funzionare correttamente; lasciare l'unità spenta per 1 o 2 ore prima di accenderla: l'unità deve essere asciutta prima di essere alimentata. Sebbene questo dispositivo sia fabbricato con la massima cura e controllato più volte prima di lasciare la fabbrica, è comunque possibile che si verifichino problemi come per qualsiasi altra apparecchiatura elettrica. Se si nota fumo, eccessivo accumulo di calore o altri fenomeni imprevisti, scollegare immediatamente la spina dalla presa di alimentazione principale. Questo dispositivo deve funzionare con una fonte di alimentazione con i valori indicati sull'etichetta delle specifiche. Se non si è sicuri del tipo di alimentazione utilizzata in casa, consultare il rivenditore o la compagnia elettrica locale. Tenere fuori dalla portata degli animali domestici, Ad alcuni animali piace mordere i cavi di alimentazione. Per pulire il dispositivo, utilizzare un panno morbido e asciutto. Non usare solventi o liquidi a base di benzina. Per rimuovere le macchie persistenti, è possibile utilizzare un panno umido con detergente diluito. Il fornitore non è responsabile per danni o perdita di dati causati da malfunzionamento, uso improprio, modifica del dispositivo o sostituzione della batteria. Non interrompere la connessione quando il dispositivo sta formattando o trasferendo file. In caso contrario, i dati potrebbero essere danneggiati o andare persi. Se l'unità dispone della funzione di riproduzione USB, la chiavetta USB deve essere collegata direttamente all'unità. Non utilizzare una prolunga USB perché può causare interferenze con conseguenti anomalie dati. L'etichetta di classificazione è stata contrassegnata sul pannello inferiore o posteriore del dispositivo. Questo dispositivo non è destinato all'uso da parte di persone (compresi i bambini) con disabilità fisiche, sensoriali o mentali, o mancanti di esperienza e conoscenza, a meno che non siano sotto supervisione o abbiano ricevuto istruzioni circa l'uso corretto del dispositivo da parte di chi è responsabile per la loro sicurezza. Questo prodotto è destinato esclusivamente a un uso non professionale e non può essere utilizzato per scopi commerciali o industriali. 85 Assicurarsi che l'unità sia collocata in una posizione stabile. I danni causati dall'uso di questo prodotto in una posizione instabile, vibrazioni o urti o la mancata osservanza di qualsiasi altro avvertimento o precauzione indicati in questo manuale utente non saranno coperti da garanzia. Non rimuovere mai la carcassa di questo dispositivo. Non posizionare mai questo dispositivo su altre apparecchiature elettriche. Non permettere ai bambini di accedere ai sacchetti di plastica. Utilizzare solo collegamenti/accessori specificati dal produttore. Rivolgersi a personale qualificato per l'assistenza. L'assistenza è necessaria quando il dispositivo è stato in qualche modo danneggiato, come il cavo di alimentazione o la spina, quando è stato versato del liquido o sono caduti oggetti nel dispositivo, quando il dispositivo è stato esposto a pioggia o umidità, non funziona normalmente o è stato abbandonato. L'esposizione prolungata ai suoni ad alto volume dei lettori musicali può causare una perdita temporanea o permanente dell'udito. Se il prodotto viene consegnato con cavo di alimentazione o adattatore di alimentazione CA: ⚫ In caso di problemi, scollegare la scheda di alimentazione CA e rivolgersi a personale qualificato. ⚫ Non calpestare o schiacciare l'alimentatore. Fare molta attenzione, in particolare vicino alle prese e al punto di uscita del cavo. Non posizionare oggetti pesanti sull'alimentatore in quanto potrebbero danneggiarlo. Tenere il dispositivo fuori dalla portata dei bambini. Giocando con il cavo di alimentazione possono infortunarsi seriamente. ⚫ Scollegare il dispositivo durante i temporali o quando non viene utilizzato per un lungo periodo. ⚫ La presa di corrente deve essere installata vicino all'apparecchio e deve essere facilmente accessibile. ⚫ Non sovraccaricare le prese CA né le prolunghe. Il sovraccarico può causare incendi o scariche elettriche. ⚫ I dispositivi con struttura di classe 1 devono essere collegati a una presa di rete con connessione di messa a terra di protezione. ⚫ I dispositivi con struttura di classe 2 non richiedono un collegamento a terra. ⚫ Tenere sempre la spina quando la si estrae dalla presa di rete. Non tirare il cavo di alimentazione. Ciò può causare un cortocircuito. ⚫ Non utilizzare un cavo o una presa di alimentazione danneggiati o una presa non fissata. Tale azione potrebbe provocare incendi o scariche elettriche. Se il prodotto contiene o viene consegnato con un telecomando contenente batterie a pulsante/a bottone: Avvertenza: ⚫ "Non ingerire la batteria, pericolo di ustioni chimiche" o funzionamento equivalente. ⚫ (Il telecomando in dotazione con) Il presente prodotto contiene una pila a bottone. Se ingerita, la batteria può causare gravi ustioni interne in sole 2 ore e portare alla morte. ⚫ Tenere le batterie, nuove o usate, fuori dalla portata dei bambini. ⚫ Se il vano batteria non si chiude completamente, interrompere l’uso del dispositivo e tenerlo fuori della portata dei bambini. ⚫ Se si teme che delle batterie possano essere state inghiottite o essere venute a contatto con qualsiasi parte interna del corpo, contattare immediatamente un medico. Precauzioni sull'uso delle batterie: ⚫ Pericolo di esplosione se la batteria viene sostituita in modo errato. Sostituire solo con lo stesso tipo o equivalente. ⚫ Non sottoporre le batterie a temperature estreme alte o basse, bassa pressione dell'aria ad alta quota durante l'uso, lo stoccaggio o il trasporto. ⚫ La sostituzione con una batteria di tipo errato può provocare un'esplosione o la perdita di liquidi o gas infiammabili. ⚫ Lo smaltimento di una batteria nel fuoco o in un forno caldo o lo schiacciamento o il taglio meccanico di una batteria possono provocare un'esplosione. ⚫ Lasciare una batteria in un ambiente circostante a temperatura estremamente elevata può provocare un'esplosione o una perdita di liquidi o gas infiammabili. 86 ⚫ ⚫ Una batteria soggetta a una pressione dell'aria estremamente bassa può provocare un'esplosione o una perdita di liquidi o gas infiammabili. È necessario prestare attenzione agli aspetti ambientali legati allo smaltimento delle batterie. 87 Fornitura 1 Manuale 1 Cavo audio RCA 1 Cavo di alimentazione 88 1 Cavo di collegamento USB 1 Piatto 1 Tappetino in feltro 89 Descrizione 1. 2. PIATTO GIREVOLE Il piatto è dotato di un tappetino in feltro che facilita la manipolazione del disco durante l'esecuzione dello scratching. Posizionare i dischi in vinile al centro del piatto del giradischi. CONTRAPPESO La regolazione crea la giusta pressione verso il basso della puntina sul disco. Fissare ora il contrappeso facendolo scorrere sulla parte posteriore del braccio. 3. SCALA DI REGOLAZIONE DELLA PRESSIONE DELLA PUNTINA Consente l'allineamento della pressione sulla testina del braccio. 4. MANOPOLA ANTISKATING Applica una forza verso l'esterno al braccio del giradischi, in modo che questo non scivoli verso l'interno del disco a causa della forza centrifuga del disco che gira. 5. LEVA DI SOLLEVAMENTO BRACCIO Controlla il sollevamento e l'abbassamento del braccio. 6. PORTATESTINA Installare qui la testina. Per proteggere la puntina da eventuali danni, durante l'installazione applicare l'apposita protezione. 90 Collegare i cavi come indicato di seguito: Bianco (L+) Canale sinistro + Blu (L-) Rosso (R+) Verde (R-) Canale sinistro – Canale destro + Canale destro – 7. PULSANTE RIPRODUZIONE/PAUSA Premere questo pulsante per avviare la riproduzione o riprenderla dopo una pausa. 8. PULSANTE DI SELEZIONE VELOCITÀ 33/45 GIRI Premere questi pulsanti per selezionare la velocità di rotazione del piatto come indicato sul disco ( 33 o 45 giri al minuto). 9. Dado di bloccaggio portatestina Per fissare il portatestina, inserirlo nell'estremità anteriore del braccio del giradischi, quindi ruotare il dado di bloccaggio in senso orario. 10. Regolatore del pitch Utilizzato per cambiare la velocità della traccia in riproduzione. 11. Interruttore/Luce stroboscopica Girare la manopola in senso orario per accendere l'unità. Girare la manopola in senso antiorario per spegnere l'unità. La luce stroboscopica si attiva automaticamente quando l'unità è accesa. 91 1. USCITA RCA Le uscite L e R sono utilizzate per la connessione dell'ingresso analogico di un amplificatore. 2. SELETTORE LINE/PHONO Il giradischi è dotato di un preamplificatore PHONO integrato che viene disinserito se collega un preamplificatore esterno. Se si desidera utilizzare i segnali amplificati dall'amplificatore interno del giradischi, spostare l'interruttore su LINE. Se invece si vuole utilizzare un preamplificatore esterno PHONO, spostare l'interruttore su PHONO. Non collegare mai a un ingresso Phono se l'interruttore PRE-AMP è su ON. L'audio risulterà fortemente distorto e c'è il rischio che l'amplificatore e/o gli altoparlanti vengano danneggiati. 3. PORTA USB Il suono dei dischi in vinile viene convertito in un formato digitale con una risoluzione massima di 48 KHz/16 bit. Utilizzare il cavo USB fornito con il dispositivo per collegare il giradischi al computer. Occorre scaricare il software Audacity 4. AC IN Collegare qui il cavo di alimentazione. 5. ACCENDI/SPEGNI Utilizzare per accendere e spegnere il giradischi.1 92 Montaggio del giradischi: 1. Rimozione dalla scatola: Estrarre con cautela l'unità principale dalla scatola insieme al materiale d'imballaggio intatto, quindi rimuovere quest'ultimo dall'unità. Accertarsi che tutti gli accessori si trovino nel materiale d'imballaggio. 2. Adattatore 45 giri: Rimuovere l'adattatore per 45 giri dal materiale d'imballaggio e posizionarlo nell'apposito spazio sulla parte superiore dell'unità principale. 3. Piatto del giradischi: Rimuovere il piatto del giradischi dal materiale d'imballaggio e posizionarlo delicatamente sul perno centrale della base del giradischi. 4. Tappetino in feltro: Rimuovere il tappetino in feltro dal materiale d'imballaggio e posizionarlo sul PIATTO. 5. Portatestina: Inserire il PORTATESTINA nella parte anteriore del GRUPPO BRACCIO. Tenendo ben fermo il PORTATESTINA nella parte anteriore del gruppo braccio, girare il DADO DI BLOCCAGIO DEL PORTATESTINA in senso antiorario per fissare saldamene quest'ultimo al GRUPPO BRACCIO. EN IT HEADSHELL PORTATESTINA TONEARM ASSEMBLY GRUPPO BRACCIO HEADSHELL LOCKING NUT DADO DI BLOCCAGGIO PORTATESTINA 6. Contrappeso: Estrarre il CONTRAPPESO del braccio dalla confezione. Far scorrere il CONTRAPPESO sul retro del GRUPPO BRACCIO. Ruotarlo leggermente per avvitarlo sul perno posteriore del braccio. 93 EN IT TONEARM ASSEMBLY GRUPPO BRACCIO COUNTERWEIGHT CONTRAPPESO Avvio rapido del giradischi: 1. Modifica della velocità del piatto Premere il pulsante di SELEZIONE DELLA VELOCITÀ 33/45 GIRI per cambiare la velocità di rotazione del piatto. 2. Avvio e arresto del piatto Utilizzare il pulsante di RIPRODUZIONE/PAUSA per avviare e interrompere la rotazione del piatto. 3. Controllo del pitch 1) La regolazione del pitch consente una regolazione precisa del numero di giri al minuto del piatto. 2) La regolazione del pitch è variabile e può essere regolata tra -10% e +10% della velocità selezionata sul piatto. 3) Il pitch può essere modificato facendo scorrere l'apposito cursore con un movimento verso l'alto e verso il basso. 4) I punti indicatori sul bordo del PIATTO DEL GIRADISCHI forniscono una visualizzazione approssimata del pitch del piatto. Gli indicatori sono illuminati dalla LUCE STROBOSCOPICA mentre passano vicino all'INTERRUTTORE. A diversi livelli di pitch, ogni fila di INDICATORI STROBOSCOPICI può apparire ferma. Nota: L'uso di un'illuminazione fluorescente molto intensa direttamente sopra il giradischi compromette la precisione dell'indicatore della LAMPADA PILOTA DELLA LUCE STROBOSCOPICA. 94 Impostazione Installazione del giradischi: 1. Collocare l'unità in un luogo non esposto alla luce diretta del sole e lontano da qualsiasi tipo di apparecchio per riscaldamento. 2. Non collocare l'unità in luoghi eccessivamente umidi o molto polverosi. 3. La testina può rilevare una leggera pressione sonora o le vibrazioni di altoparlanti vicini. Per ottenere risultati ottimali, non installare l'unità troppo vicino agli altoparlanti. 4. Installare l'unità su una superficie orizzontale stabile e priva di vibrazioni. 5. I piedini di gomma sono stati appositamente progettati per isolare l'unità da vibrazioni eccessive. I piedini possono anche essere utilizzati per stabilizzare il corpo principale in orizzontale. Regolare l'altezza dell'unità girando i piedini in senso orario o antiorario. Bilanciamento braccio e pressione puntina: 1. Regolazione del bilanciamento zero orizzontale e pressione puntina: 2. Rimuovere la copertura protettiva della puntina, se presente. Non toccare mai la punta della puntina durante la regolazione. 3. Abbassare la LEVA DEL BRACCIO. 4. Rilasciare il morsetto del braccio e rilasciare il braccio dal supporto. 5. Impostare la regolazione ANTI-SKATE a zero. 6. Ruotare il CONTRAPPESO in entrambe le direzioni fino a quando il BRACCIO non è perfettamente bilanciato in orizzontale (galleggia liberamente). 7. Riportare il BRACCIO sul supporto e bloccarlo in posizione. 8. Tenere il CONTRAPPESO fermo con una mano e ruotare solo l'anello di pressione della puntina (3) in modo da allineare il numero "0" dell'anello con la linea centrale dell'albero posteriore del braccio. 9. Ruotare il CONTRAPPESO in senso antiorario fino al valore della scala corrispondente alla pressione della puntina consigliata. Nota: la pressione consigliata per la testina opzionale che può essere stata inclusa con l'unità è di 2,5 - 3 grammi. Per tutte le altre testine fare riferimento alle specifiche del produttore incluse con la testina. Antiskating: La regolazione dell'antiskating previene al BRACCIO di saltare sul disco a causa della forza centrifuga che è causata dalla rotazione del PIATTO. La manopola di controllo ANTI-SKATING dovrebbe essere impostata sullo stesso valore della pressione della puntina. Ad esempio, se il tuo CONTRAPPESO è impostato su 2,5 grammi, anche il valore ANTI-SKATE dovrebbe essere impostato su 2,5. 95 Manutenzione del prodotto: 1. 2. Pulire regolarmente la puntina con una spazzola morbida per evitare l'accumulo di polvere. Quando il suono diventa distorto o disturbato, controllare la puntina e se questa presenta segni di usura, sostituirla con una nuova. 3. Di tanto in tanto, pulire il coperchio antipolvere e il mobile del giradischi con un panno morbido e asciutto. Non utilizzare materiali volatili quali alcool, diluente, benzina, ecc. in quanto potrebbero 4. rimuovere la vernice o intaccare la lucentezza. Panoramica software Audacity Audacity è un software gratuito, concesso in licenza con GNU General Public License (GPL). Ulteriori informazioni e codice open source sono disponibili sul Web all'indirizzo https://www.audacityteam.org/download/ * Assicurarsi di aver installato il software prima di iniziare. Configurare il PC per lavorare con Audacity 1. Collegare il cavo USB fornito al giradischi. 2. Collegare il connettore USB sinistro di questo cavo USB al proprio PC. 3. Installare il software di registrazione Audacity. 4. Aprire il programma Audacity. 5. Selezionare Preferenza dalla scheda Modifica nel menu Audacity. 6. Selezionare la scheda Audio I/O in alto a sinistra. In Riproduzione, Dispositivo, selezionare your internal sound card (la propria scheda audio interna). 96 In Registrazione, Dispositivo, selezionare USB Audio CODEC. In Registrazione, Canali, selezionare 2 (Stereo). Spuntare la casella contrassegnata con Play other tracks while recording new one (Riproduci altre tracce mentre ne si registra una). Spuntare la casella contrassegnata con Software Playthrough (Video esplicativo del software). Registrazione di album con Audacity 1. Salvataggio di un progetto Audacity scrive tutti gli audio modificati e registrati in una directory chiamata Projectname_data, che si trova proprio dove si è salvato il file del progetto stesso. Quindi, selezionare Salva progetto come dalla scheda File Audacity e scegliere una posizione e nome del file per il progetto. Si noti che quando si avvia Audacity, solo l'opzione del menu “Save As...” (“Salva come...”) è disponibile. 97 2. Come registrare Impostare il giradischi USB per riprodurre il brano o l'album che si desidera registrare. Fare clic sul pulsante Registra Abbassare il braccio sul giradischi USB sul disco e la traccia che si desidera registrare. Fare clic sul pulsante Pausa continuare. Fare clic sul pulsante Stop per avviare la registrazione. blu per mettere in pausa la registrazione. Premere per giallo. Ecco fatto. Ora è possibile muoversi nella registrazione ed esplorare le capacità di editing di Audacity. Ricordarsi che è possibile usare la funzione Annulla quasi senza limiti mentre il progetto è aperto. NOTA: CD non può essere masterizzato direttamente dall'applicazione Audacity. Devono essere usate altre applicazioni per la masterizzazione di CD. 98 Specifiche Generale Modello: Dimensioni: L-3809 430(L) x 350(P) x 155(A) mm Peso: Alimentazione: 6,18 kg 230 V CA 50 Hz (Paesi Bassi); 240 V CA 50 Hz (Regno Unito) Consumo: Condizioni di test standard: Umidità relativa: 30W Temperatura ambiente: 20 +/- 2 °C 65% +/- 5% NOTA: Misurazioni possono essere eseguite tra 5°C e 35°C e un'umidità relativa tra il 45% e l'85%. Sezione giradischi: Tipo: Motore: Metodo di trasmissione: completamente manuale a 2 velocità 16 poli, trifase, senza spazzole Trazione diretta Piatto del giradischi: Velocità: Wow and Flutter: 332 mm (alluminio) 331/3 e 45 rpm WRMS inferiore allo 0,3% (JIS WTD) con 33 1/3 rpm Rapporto S/N: Controlli della frequenza: Coppia di avvio: Oltre 50dB (DIN-B) +/- 10% Più di 3,6 kgf.cm Sistema frenante: Tempo di avvio: Tempo di frenata: freno elettronico Meno di 1 sec. Meno di 1 sec. Tempo per cambio di velocità: Funzione USB: Meno di 1 secondo da 331/3 a 45 giri. Meno di 1 secondo da 45 a 33 1/3 giri. registrazione USB Funzione Interfaccia computer: 16 bit 44,1 KHz o 48 KHz Compatibile con USB 1.1 7/8/10 o MAC OSX Sezione braccio: Tipo: Lunghezza del braccio effettiva: Braccio a forma di S bilanciato statico 220mm Sporgenza: Tracciamento angolo di errore: Tracciamento intervallo regolazione 10 mm Meno di 3 gradi 3-4g forza: Tipo testina MM: Pressione puntina: Audio Technica AT-3600L 3,5±0,5g Peso testina: Intervallo anti-skating: Separazione canale: 5±0,5g 0~4g Oltre 18 dB 99 Bilanciamento canale: Pre-amplificatore Entro 2,5dB a 1KHz Uscita: RIAA (Risposta in frequenza): 150mV +/-4dB (IN: 2,5mV 1KHz) 20Hz~20KHz +1/-3dB (IN: 1,5mV 1KHz) Garanzia Lenco offre assistenza post-vendita e garanzia in conformità con i regolamenti europei. Pertanto, nell’eventualità si rendano necessarie riparazioni (durante e dopo il periodo di garanzia), è opportuno rivolgersi al locale rivenditore di fiducia. Nota importante: Non è possibile inviare direttamente a Lenco i prodotti da riparare. Nota importante: Qualora l’unità venga aperta o manomessa in qualsiasi modo da un centro di assistenza non riconosciuto, la garanzia decade. Questo dispositivo non è adatto per l’uso professionale. Qualora l’unità venga utilizzata per scopi professionali, tutti gli obblighi del produttore derivanti dalla garanzia sono nulli. Clausola di esclusione della responsabilità Il firmware e/o i componenti hardware vengono aggiornati regolarmente. Pertanto, è possibile che alcune parti relative a istruzioni, specifiche e immagini contenute nella presente documentazione siano diverse da quanto riscontrato nel singolo caso. Tutte le descrizioni incluse in questa guida sono fornite a puro titolo illustrativo e non si applicano necessariamente alla specifica situazione. Nessun diritto legale o contrattuale può derivare dalle descrizioni contenute nel presente libretto di istruzioni. Smaltimento a fine vita del dispositivo Questo simbolo indica che in Europa è vietato gettare il relativo prodotto elettrico o batteria tra i rifiuti domestici. Per il corretto smaltimento a fine vita del prodotto e della batteria, attenersi alle vigenti normative locali per il trattamento dei rifiuti da apparecchiature elettriche ed elettroniche e delle batterie. In tal modo si contribuisce a salvaguardare le risorse naturali e a migliorare gli standard per la protezione dell’ambiente nel trattamento dei rifiuti da apparecchiature elettriche ed elettroniche (Direttiva RAEE). Marchio CE I prodotti con il marchio CE sono conformi alla Direttiva EMC (2014/30/UE) e alla Direttiva Bassa Tensione (2014/35/UE) emanate dalla Commissione della Comunità Europea. Con la presente, Lenco Benelux BV, Thermiekstraat 1a, 6361 HB Nuth, Paesi Bassi, dichiara che questo prodotto è conforme ai requisiti essenziali. La dichiarazione di conformità può essere consultata a [email protected] Assistenza Per ulteriori informazioni e accesso all’helpdesk, visitare il sito www.lenco.com Lenco Benelux BV, Thermiekstraat 1a, 6361 HB, Nuth, Paesi Bassi. 100 Русский L-3809 ВНИМАНИЕ: Использование элементов управления или регулирования или выполнение процедур, отличных от указанных в данном документе, может привести к опасному радиационному облучению. МЕРЫ ПРЕДОСТОРОЖНОСТИ ПЕРЕД ЭКСПЛУАТАЦИЕЙ СОБЛЮДАЙТЕ СЛЕДУЮЩИЕ ИНСТРУКЦИИ: 1. Не закрывайте и не блокируйте вентиляционные отверстия. При размещении устройства на полке оставьте вокруг него 5 см (2 дюйма) свободного пространства. 2. Установите устройство в соответствии с руководством пользователя, входящим в комплект поставки. 3. Устройство должно находиться вдали от источников тепла, таких как батареи, обогреватели, нагревательные печи, свечи и другие изделия, выделяющие тепло, или открытое пламя. Устройство можно использовать только в условиях умеренного климата. Следует избегать чрезмерно высоких или низких температур окружающей среды. Рабочая температура составляет от 0 ° до 35 °C.. 4. Не используйте устройство вблизи сильных магнитных полей. 5. Электростатический разряд может помешать нормальной эксплуатации устройства. Если это так, просто перезагрузите и перезапустите устройство, следуя инструкции по эксплуатации. Соблюдайте осторожность при передаче файлов и эксплуатируйте устройство в среде, свободной от атмосферных помех. 6. Предупреждение! Не вставляйте какие-либо предметы в изделие через вентиляционные отверстия или проемы. Через изделие проходит высокое напряжение, и вставленный предмет может вызвать поражение электрическим током и/или короткое замыкание внутренних частей. По той же причине не проливайте на изделие воду или любую другую жидкость. 7. Не используйте устройство в помещениях с повышенной влажностью, таких как ванные комнаты, кухни, насыщенные паром, или около бассейнов. 8. Не допускайте попадания на устройство капель или брызг. Следите за тем, чтобы на устройство или рядом с ним не ставились предметы, наполненные жидкостью, например вазы. 9. Не используйте это устройство в среде, где возможно образование конденсата. При использовании в теплом и влажном помещении, внутри устройства может образовываться конденсат, что приведет к некорректной работе проигрывателя. Оставьте проигрыватель в выключенном состоянии на 1-2 часа и только после этого включайте заново. Перед включением убедитесь, что устройство полностью высохло. 10. Несмотря на то, что это устройство изготовлено с особой тщательностью и несколько раз проверено перед выпуском с завода, возникновение проблем все же возможно, как и со всеми электрическими приборами. Если Вы заметили дым, чрезмерное нагревание или любые другие неожиданные явления, Вам следует немедленно отключить вилку от розетки электропитания. 11. Это устройство должно работать от такого источника питания, как указано на заводской табличке со спецификациями. Если Вы не уверены в том, какой тип источника питания используется в Вашем доме, проконсультируйтесь с Вашим торговым посредником или местной электроэнергетической компанией. 12. Размещайте устройство подальше от животных. Некоторым животным нравится кусать шнур питания. 13. Для очистки устройства используйте мягкую сухую ткань. Не используйте растворители или жидкости на основе бензина. Чтобы удалить устойчивые пятна, Вы можете использовать влажную ткань с разбавленным моющим средством. 14. Поставщик не несет ответственности за повреждение или потерю данных, вызванные неисправностью, неправильным использованием, реконструкцией устройства или заменой батареи. 15. Не прерывайте соединение, когда устройство форматирует или передает файлы. В противном случае данные могут быть повреждены или утеряны. 101 16. 17. 18. 19. 20. 21. 22. 23. 24. 25. 26. 27. 28. Если в устройстве есть функция воспроизведения через USB, карту памяти USB следует подключать напрямую к устройству. Не используйте удлинительный кабель USB, так как он может вызывать помехи, что приведет к потере данных. Табличка с техническими данными находится на нижней или задней панели устройства. Это устройство не предназначено для использования людьми (включая детей) с физическими, умственными расстройствами, расстройствами чувственного восприятия или с недостатком опыта и знаний, если они не находятся под наблюдением или не получили инструкции по правильному использованию устройства со стороны лица, отвечающего за их безопасность. Это изделие не предназначено для профессионального, коммерческого или промышленного использования. Убедитесь, что устройство установлено в устойчивое положение. Гарантия не распространяется на повреждения, вызванные эксплуатацией этого изделия в нестабильном положении, вибрациями или ударами, либо несоблюдением любых других предупреждений или мер предосторожности, содержащихся в данном руководстве пользователя. Никогда не снимайте корпус этого устройства. Никогда не помещайте это устройство на другое электрическое оборудование. Не допускайте игр детей с пластиковыми пакетами, используемыми для упаковки устройства. Используйте только приспособления/принадлежности, указанные производителем. Поручите все обслуживание квалифицированному обслуживающему персоналу. Обслуживание требуется, когда устройство было повреждено, например, его шнур электропитания или вилка, когда была пролита жидкость или какие-либо предметы упали на устройство, когда устройство подверглось воздействию дождя или влаги, когда устройство работает ненормально, или когда произошло падение устройства. Длительное воздействие громких звуков личных музыкальных проигрывателей может привести к временной или постоянной потере слуха. Если устройство поставляется в комплекте с адаптером питания или кабелем питания: При возникновении каких-либо проблем, отключите адаптер питания из розетки и обратитесь к квалифицированному сервисному инженеру. Не наступайте на адаптер питания и не зажимайте его. Будьте очень осторожны, особенно возле штекеров и кабельного вывода. Не размещайте на адаптере электропитания тяжелые предметы, так как они могут повредить его. Храните устройство в недоступном для детей месте! Играя с кабелем электропитания, они могут серьезно пораниться. Отключайте это устройство от сети во время грозы или если не используете в течение длительного времени. Штепсельная розетка должна быть установлена рядом с оборудованием и быть в непосредственном доступе. Не перегружайте розетки переменного тока или удлинительные шнуры. Перегрузка может вызвать возгорание или поражение электрическим током. Устройства, спроектированные в соответствии с первым классом электрооборудования по европейским стандартам, «class 1», необходимо подключать к заземленным розеткам электропитания. Устройства, спроектированные в соответствии со вторым классом электрооборудования по европейским стандартам, «class 2», не требуют наличия заземления в сети электропитания. Вынимая вилку из штепсельной розетки, всегда держитесь за вилку. Не тяните за шнур питания. Это может вызвать короткое замыкание. Не используйте поврежденный шнур питания, вилку или плохо закрепленную розетку. Это может привести к возгоранию или поражению электрическим током. Если продукт содержит или поставляется с пультом дистанционного управления с батареей типа «таблетка»/ «монетка»: Предупреждение: «Не проглатывать батарею, опасность химического ожога» или аналогичные действия. 102 [Пульт дистанционного управления, входящий в комплект] Этот продукт содержит батарейку типа «таблетка»/ «монетка». Если проглотить батарейку, это может вызвать серьезные внутренние ожоги всего за 2 часа и привести к смерти. Храните новые и использованные батареи в недоступном для детей месте. Если батарейный отсек закрывается ненадежно, прекратите использование продукта и храните его в недоступном для детей месте. Если Вы считаете, что батарейки могли быть проглотить или они могли попасть в какую-либо часть тела, немедленно обратитесь за медицинской помощью. 29. Предостережение при использовании батареек: Опасность взрыва, если батарейка заменена некорректно. Используйте только батарейки аналогичного типа. Не подвергайте батарейки высоким или низким температурам, низкому или высокому давлению. Замена на некорректную батарейку может привести к взрыву или протеканию огнеопасной жидкости. Не подвергайте батарейки воздействию открытого огня или микроволновых волн. Избегайте механического воздействия. Проконсультируйтесь с местным законодательством касательно утилизации батареек. Комплект поставки Руководство пользователя – 1 шт. Кабель RCA – 1 шт. Кабель питания – 1 шт. 103 Кабель USB – 1 шт. Опорный диск (тарелка) - 1 шт. Войлочный мат (слипмат) – 1 шт. 104 Элементы управления и функции 1. ОПОРНЫЙ ДИСК Опорный диск комплектуется слипматом из войлока что благоприятно сказывается на воспроизведении записей и защищает их. Размещайте записи по центру диска. 2. ПРОТИВОВЕС Противовес используется для балансирования тонарма и установки необходимой силы давления иглы звукоснимателя. 3. ШКАЛА ПРИЖИМНОЙ СИЛЫ ИГЛЫ Настройка прижимной силы картриджа. 4. РЕГУЛИРОВКА АНТИ-СКЕЙТИНГА Система анти-скейтинга компенсирует центробежную силу, предотвращая проскальзывание иголки звукоснимателя во время воспроизведения. Ручка регулировки силы анти-скейтинга должна быть установлена на то же значение, что и сила давления иглы звукоснимателя. 5. РЫЧАГ УСТАНОВКИ ТОНАРМА Этот рычаг позволяет плавно опускать и поднимать тонарм не повреждая поверхность пластинки. 6. ГОЛОВНАЯ ЧАСТЬ ТОНАРМА 105 Место для установки картриджа. Во время установки наденьте защитную крышку на иглу, чтобы избежать ее повреждения. Подключите провода следующим образом: Белый (L+) Левый канал + Синий (L-) Красный (R+) Зеленый (R-) Левый канал – Правый канал + Правый канал – 7. КНОПКА PLAY/PAUSE Нажмите эту кнопку, чтобы начать проигрыание или возобновить проигрывание после паузы. 8. КНОПКА ВЫБОРА СКОРОСТИ 33/45-RPM Нажатие этих кнопок активирует режим работы проигрывателя со скоростью вращения диска 33 или 45 оборотов в минуту (RPM). 9. Стопорная гайка головки тонарма Установите картридж вставив его во фронтальную часть тонарма и закрутив стопорную гайку по часовой стрелке. 10. СЛАЙДЕР ПОДСТРОЙКИ ТОНА (Pitch fader) Этот слайдер позволяет плавно изменять скорость вращения и, соответственно, скорость и тон звучания записи. 11. Кнопка питания / Строб свет Поверните переключатель по часовой стрелке, чтобы включить проигрыватель. Поверните переключатель против часовой стрелки, чтобы выключить проигрыватель. Строб свет включится автоматически после включения проигрывателя. 106 1. ВЫХОДНЫЕ РАЗЪЕМЫ RCA Разъемы используются для подключения ко входу усилителя, предусилителя или фонокорректора в зависимости от положения переключателя «PHONO/LINE». Красная и белая маркировка разъемов RCA обозначает правый и левый каналы соответственно. Заземление подключается к «земле» предусилителя или фонокорректора. 2. ПЕРЕКЛЮЧАТЕЛЬ «PHONO/LINE» Этот переключатель служит для включения / выключения встроенного фонокорректора. Это позволяет использовать как внешний усилитель с линейными входами, так и внешний фонокорректор или усилитель с блоком фонокорректора. Чтобы использовать встроенный фонокорректор, переведите переключатель в положение LINE. Чтобы использовать внешний предусилитель, переведите переключатель в положение PHONO. Ни в коем случае не подключайте предусилитель при включенном фонокорректоре! Это вызовет искажение звучания и может повредить усилитель/динамики. 3. РАЗЪЕМ USB Записи с пластинок конвертируются в цифровые версии (48 кГц / 16 бит). Используйте комплектный кабель USB для подключения к компьютеру. Для оцифровки необходимо скачать ПО Audacity. 4. РАЗЪЕМ ПОДКЛЮЧЕНИЯ КАБЕЛЯ ПИТАНИЯ Подключите комплектный кабель питания в этот разъем. 5. КНОПКА ВКЛЮЧЕНИЯ/ВЫКЛЮЧЕНИЯ Используйте для включения или выключения проигрывателя. 107 Сборка проигрывателя: 1. Достаньте проигрыватель из упаковки: Аккуратно извлеките проигрыватель вместе с упаковойчным материалом из упаковки. Снимите упаковочный материал с проигрывателя после извлечения из упаковки. Убедитесь, что внутри коробки находится полный комплект поставки. 2. Адаптер на 45 оборотов: Найдите и извлеките адаптер на 45 оборотов из упаковочного материала и разместите адаптер в специальной выемке на виниловом проигрывателе. 3. Диск проигрывателя: Извлеките диск из упаковочного материала и аккуратно разместите его на центральном шпинделе винилового проигрывателя. 4. Войлочный мат (слипмат): Извлеките войлочный мат (слипмат) из упаковки и разместите на диске. 5. Картридж: Вставьте картридж во фронтальную часть тонарма. Придерживая вставленный в тонарм картридж аккуратно закрутите стопорную гайку против часовой стрелки, чтобы зафиксировать картридж в тонарме. 6. Противовес: Найдите и извлеките из упаковки противовес. Разместите противовес в задней части тонарма. Слегка проверните, чтобы противовес наделся на заднюю часть тонарма. 108 Начало работы с устройством: 1. Изменение скорости проигрывания записей Нажимайте кнопку выбора скорости 33/45 оборотов, чтобы изменять скорость вращения диска. 2. Запуск и остановка диска Используйте кнопку PLAY/PAUSE, чтобы запускать и останавливать вращение диска. 3. Подстройка тона (Pitch Control) 1) Подстройка тона позволяет более точно настроить скорость воспроизведения, по сравнению со скоростью вращения диска. 2) Настройка тона вариативна и имеет выбор между -10% и +10% от выбранной скорости вращения диска. 3) Настройка тона производится переводом соответствующего ползунка вверх и вниз. 4) Индикаторные точки на диске могут использоваться для примерного понимания текущей настройки тона. Данные точки подсвечиваются строб подсветкой во время их прохождения рядом с кнопкой включения. При разных уровнях тона может показаться, что индикаторы находятся в неподвижном состоянии. Примечание: Использование флуорисцентных ламп, расположенных над проигрывателем, может привести к нарушению точности отображения индикаторами. Установка Установка проигрывателя: 1. Не размещайте проигрыватель в местах, где он может быть подввергнут воздействию прямых солнечных лучей или другим источникам тепла. 2. Не размещайте проигрыватель вместе с высокой концентрацией пыли. влажностью или большой 3. Картридж может захватывать звук или вибрацию от находящихся рядом колонок. Для достижения максимально чистого звука, не размещайте проигрыватель рядом с колонками. 4. Размещайте проигрыватель только на ровных горизонтальных поверхностях, не подверженных вибрациям. 5. Прорезиненные ножки разработаны с целью минимизации вибрации. Также их можно использовать для более точного расположения устройства по горизонтали – для этого достаточнно повернуть одну из ножек по часовой, либо против часовой стрелки. Балансировка тонарма и прижимная сила иглы: 1. Настройка горизонтального баланса тонарма и прижимной силы иглы: 2. Удалите защитный колпачок с иглы, при его наличии. Не прикасайте к кончику иглы во время настройки! 3. Опустите рычаг тонарама. 4. Разблокируйте тонарм и поднимите его. 109 5. Установите антискейтиниг в положение ноль. 6. Поверните противовес в любом направлении до того момента, когда он будет идеально сбалансирован (будет свободно передвигаться). 7. Верните тонарм на место и зафиксируйте его положение. 8. Удерживая противовес одной рукой, прокрутите кольцо регулировки прижимной силы иглы (3) другой рукой. Цифра (ноль) должна быть точно посередине задней части тонарма. 9. Прокрутите противовес против часовой стрелки, пока на не покажется значение прижимной силы, рекомендуемое для установленной иглы. Примечание: Рекомендуемая прижимная сила опционального картриджа, который может поставляться с проигрывателем в комплекте, равна 2,5-3 граммам. Для получения информации о прижимной силе картрджей других производителей необходимо свериться с инструкцией к данным картриджам. Антискейтинг: Настройка антискейтинга не дает тонарму съезжать с дорожек на записи из-за действия центробежной силы. Ручка контроля антискейтинга должна быть установлена в том же положении, что и прижимная сила иглы. Для примера: при установке противовеса в значение 2,5 грамма, антискейтинг должен быть установлен в положение 2,5. Обслуживание: 1. Периодически очищайте иглу с помощью мягкой щетки, чтобы избежать скопления 2. пыли. Если звук наполнился шумами, проверьте иглу. Если игла износилась, замените ее на новую. 3. 4. Время от времени протирайте защитную крышку и корпус с помощью мягкой, сухой тканью. Не используйте для очистки вещества типа бензина, спирта, растворителя и так далее. Они могут повредить отделку проигрывателя. Audacity software overview Программное обеспечение «Audacity» является бесплатным c лицензией «General Public License» (GPL). Более подробную информацию можно найти на сайте https://www.audacityteam.org/download/ • Для работы ПО требуется установка на компьютер. Установка и запуск ПО Audacity 1. Подключите USB кабель к проигрывателю. 110 2. Подключите USB кабель к компьютеру. 3. Установите ПО «Audacity» на компьютер. 4. Запустите ПО «Audacity». 5. В меню «Edit» выберите пункт «Preferences». 6. В открывшемся окне «Audacity Preferences» выберите вкладку «Audio I/O». • • • • • В поле «Playback» выберите установленное на компьютере устройство вывода аудио (аудио карту). В поле «Recording», в строке «Device», выберите «USB Audio CODEC». В поле «Recording», в строке «Channels», выберите «2 (Stereo)». Установите галочку в пункте «Play other tracks while recording new one». Установите галочку в пункте «Software Playthrough». Запись альбомов в программе «Audacity» 1. Создание и сохранение проекта ПО «Audacity» сохраняет все изменения 111 и файлы записей в папке «Projectname_data», находящейся в той же директории, где был сохранен файл проекта. Для начала работы сохраните файл проекта, выбрав пункт «Save Project as…» в меню «File». При запуске ПО «Audacity» или создании нового проекта доступна только функция «Save Project as…», так как проект еще не был сохранен. 2. How to record Запустите вращение опорного диска на проигрывателе кнопкой «START/STOP».. Нажмите кнопку «Record» в ПО «Audacity» для начала записи. Опустите иголку звукоснимателя на пластинку, используя рычаг установки тонарма. Для приостановки записи используйте кнопку «Pause» ПО «Audacity». Повторное нажатие этой кнопки снова запускает запись. Для остановки записи нажмите кнопку «Stop». Вот и все. После завершения записи вы можете воспроизводить ее на компьютере и редактировать в ПО «Audacity». Функция «Undo» позволяет возвращаться на любое количество шагов назад при внесении изменений в запись до момента закрытия 112 проекта. ПРИМЕЧАНИЕ: ПО «Audacity» не имеет функции записи на CD диски. Для записи CD необходимо использовать дополнительное ПО. 113 Спецификация Общая информация Модель: Размеры: L-3809 430(Ш) x 350(Г) x 155(В) мм Вес: Адаптер питания: Потребляемая мощность: 6.18 кг AC 230V~ 50Hz (Netherlands); AC 240V~ 50Hz(U.K.) 30 Вт Условия тестирования: Температура: 20 +/- 2 градуса C Относительная влажность: 65% +/- 5% ПРИМЕЧАНИЕ: Использование проигрывателя возможно в диапазоне от 5 до 35 градусов С и относительной влажности от 45% до 85%. Проигрыватель: Тип: Мотор: 2-х скоростной с ручным управлением Тип привода Опорный диск (тарелка) Скорости вращения Нестабильность вращения: Прямой привод 332 мм (алюминий) 331/3 и 45 оборотов в минуту Соотношение Ratio): 16 полярный, 3 фазный вентильный электропривод сигнал/шум Менее 0.3% WRMS (JIS WTD) при 331/3 rpm (S/N Диапазон тона (Pitch control): Стартовый момент вращения: Система торможения: Время разгона диска: Время торможения диска: Time for Speed Change: More than 50dB (DIN-B) +/- 10% более 3.6 кгс∙см Электронный тормоз менее 1 сек. менее 1 сек. Less than 1 sec. from 331/3 to 45 rpm. Less than 1 sec. from 45 to 33 1/3 rpm. Функция USB: Запись через USB соединение 16 бит 44.1KHz или 48KHz USB (на выбор) Интерфейс подключения: USB 1.1 Windows 7/8/10 или MAC OSX Тонарм: Тип тонарма Эффективная длина тонарма Смещение головки относительно центра (Overhang) Угол ошибки (Tracking Error Angle) Компенсация центробежной силы Балансируемый S-образный тонарм Тип ММ картриджа: Прижимная сила картриджа: Вес картриджа: Audio Technica AT-3600L 3.5±0.5 г 5±0.5 г 220 мм 10 мм менее 3 градусов 3-4 г 114 Диапазон анти-скейтинга регулировки 0~4 г Разделение каналов: Баланс каналов: Пред-усилитель Более 18 дБ В пределах 2.5 дБ при 1KHz Выходная мощность: RIAA (АЧХ): 150mV +/-4dB (ВХОД: 2.5mV 1KHz) 20Hz~20KHz +1/-3dB (ВХОД: 1.5mV 1KHz) Гарантийные обязательства Срок гарантии составляет 1 (один) год с даты продажи. Срок службы – до 5 (пяти) лет. Важное примечание: Компания Lenco не обеспечивает обслуживание оборудования в случае непосредственного обращения в головной офис компании. Важное примечание: Гарантия не действует, если устройство вскрывалось или подвергалось изменениям вне официального сервисного центра. Это устройство не предназначено для профессионального использования. В случае профессионального использования гарантийные обязательства производителя не будут выполняться. Заявление об ограничении ответственности Обновления микропрограмм и/или компонентов аппаратного обеспечения производятся регулярно. Поэтому некоторые инструкции, спецификации и изображения в этой документации могут незначительно отличаться от Вашей конкретной ситуации. Все элементы, описанные в данном руководстве, предназначены только для иллюстрации и могут не относиться к конкретной ситуации. Из описания, приведенного в этом руководстве, нельзя получить никаких юридических прав. Утилизация оборудования Этот символ означает, что соответствующее электрооборудование или батарея не может быть утилизирована как обычные бытовые отходы в Европе. Чтобы обеспечить корректную утилизацию данного оборудования руководствуйтесь местными законами или требованиями по утилизации электронного оборудования и батарей. Поступая таким образом, Вы поможете сохранить природные ресурсы и улучшить стандарты защиты окружающей среды при обработке и утилизации электрических отходов (Директива ЕС об отходах электрического и электронного оборудования). Маркировка «CE» Продукция с маркировкой CE соответствует требованиям Директиве ЕС по электромагнитной совместимости (2014/30/EС) и Директиве ЕС по вопросам качества низковольтных электротехнических изделий (2014/35/EС), принятых Комиссией Европейского Союза. Настоящим 115 компания «Ленко Бенелюкс БВ» (Lenco Benelux BV), Термикстраат 1а, Нют, 6361 HB, Нидерланды (Thermiekstraat 1a, 6361 HB Nuth, The Netherlands) заявляет, что этот продукт соответствует основным требованиям. С декларацией соответствия можно ознакомиться по адресу [email protected]. «Ленко Бенелюкс БВ», Термикстраат 1а, Нют, 6361 HB, Нидерланды Маркировка «EAC» Товар сертифицирован для использования на территории Таможенного Союза без каких-либо ограничений. Соответствует требованиям ТР ТС 004/2011 «О безопасности низковольтового оборудования» и ТР ТС 020/2011 «Электромагнитная совместимость технических средств». Импортер и организация, уполномоченная на принятие претензий: ООО "Бизнес-фабрика", 123458 г. Москва, ул. Маршала Прошлякова, д. 30, офис 503, +7 495 787 5900. Изготовитель: «Ленко Бенелюкс БВ», Термикстраат 1а, Нют, 6361 HB, Нидерланды / Филиал: Эс.Ти.Ай. Электроникс Лтд., Юнит 903-907, 9/ЭФ, Лоз Коммершиал Плаза, 788 Чонг Ша Ван Роуд, Коулун, Гонконг. Сделано в Китае Обслуживание Для получения дополнительной информации и обращения в службу поддержки клиентов посетите наш веб-сайт: www.lenco.ru. Дизайн и спецификация могут быть изменены производителем без предварительного информирования. Дата изготовления продукции Год и месяц изготовления продукции указаны в номере партии и серийном номере продукта. Ниже описаны способы уточнения этой даты. • По номеру партии (номер партии указан либо на упаковке устройства, либо на транспортировочной упаковке). o • Формат номера партии: AAAABDDMY По серийному номеру продукта (серийный номер указан на устройстве). o Формат серийного номера: AAAABDDMYSSSSSS Где M (восьмой символ слева) равен месяцу производства, а Y (девятый символ слева) равен году производства. Месяц производства указывается одной из букв латинского алфавита. Соответствие буквенных обозначений месяца производства: A B C D E F Январь Февраль Март Апрель Май Июнь G H I J K L 116 Июль Август Сентябрь Октябрь Ноябрь Декабрь Год производства указывается одной цифрой, которая соответствует последней цифре года производства (цифра 1 равна 2021 году производства). Пример расшифровки по номеру партии: • Номер партии: 2461A05C0 • Где буква C это месяц (Март), а цифра 0 – последняя цифра года производства (2020 год). Пример расшифровки по серийному номеру: • 2461A05A1123456 Где буква A это месяц (Январь), а цифра 1 – последняя цифра года производства (2021 год). 117 Гарантийный талон Информация об устройстве Модель: Серийный номер: Дата срок гарантии – 1 (один) год с даты продажи продажи: Информация о продавце Название торговой организации: Телефон торговой организации: Адрес, e-mail: Подпись продавца______________________ М.П. Подпись покупателя_____________________ Изделие получил в исправном состоянии и в полной комплектации. С условиями гарантии ознакомлен и согласен. ВНИМАНИЕ! Гарантийный талон недействителен без печати продавца. Поддержка: www.lenco.ru 118-
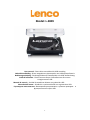 1
1
-
 2
2
-
 3
3
-
 4
4
-
 5
5
-
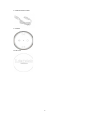 6
6
-
 7
7
-
 8
8
-
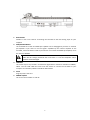 9
9
-
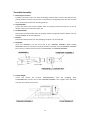 10
10
-
 11
11
-
 12
12
-
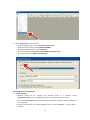 13
13
-
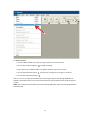 14
14
-
 15
15
-
 16
16
-
 17
17
-
 18
18
-
 19
19
-
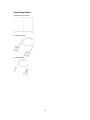 20
20
-
 21
21
-
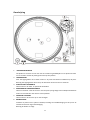 22
22
-
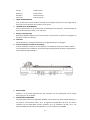 23
23
-
 24
24
-
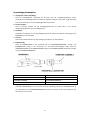 25
25
-
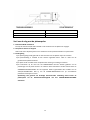 26
26
-
 27
27
-
 28
28
-
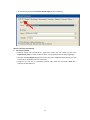 29
29
-
 30
30
-
 31
31
-
 32
32
-
 33
33
-
 34
34
-
 35
35
-
 36
36
-
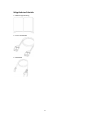 37
37
-
 38
38
-
 39
39
-
 40
40
-
 41
41
-
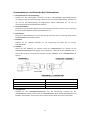 42
42
-
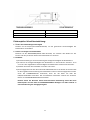 43
43
-
 44
44
-
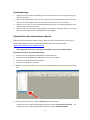 45
45
-
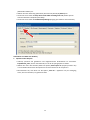 46
46
-
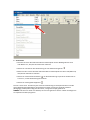 47
47
-
 48
48
-
 49
49
-
 50
50
-
 51
51
-
 52
52
-
 53
53
-
 54
54
-
 55
55
-
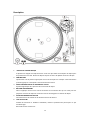 56
56
-
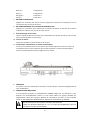 57
57
-
 58
58
-
 59
59
-
 60
60
-
 61
61
-
 62
62
-
 63
63
-
 64
64
-
 65
65
-
 66
66
-
 67
67
-
 68
68
-
 69
69
-
 70
70
-
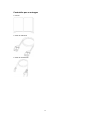 71
71
-
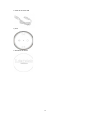 72
72
-
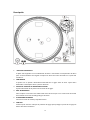 73
73
-
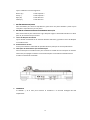 74
74
-
 75
75
-
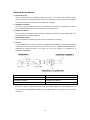 76
76
-
 77
77
-
 78
78
-
 79
79
-
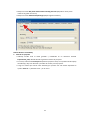 80
80
-
 81
81
-
 82
82
-
 83
83
-
 84
84
-
 85
85
-
 86
86
-
 87
87
-
 88
88
-
 89
89
-
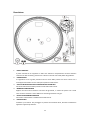 90
90
-
 91
91
-
 92
92
-
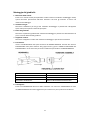 93
93
-
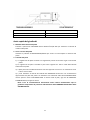 94
94
-
 95
95
-
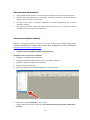 96
96
-
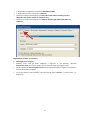 97
97
-
 98
98
-
 99
99
-
 100
100
-
 101
101
-
 102
102
-
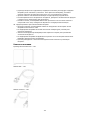 103
103
-
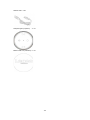 104
104
-
 105
105
-
 106
106
-
 107
107
-
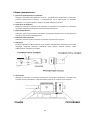 108
108
-
 109
109
-
 110
110
-
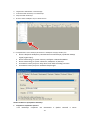 111
111
-
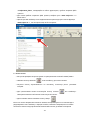 112
112
-
 113
113
-
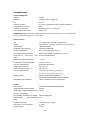 114
114
-
 115
115
-
 116
116
-
 117
117
-
 118
118


Lenco L-3809BK Handleiding
- Categorie
- Audio draaitafels
- Type
- Handleiding
- Deze handleiding is ook geschikt voor
in andere talen
- English: Lenco L-3809BK User manual
- italiano: Lenco L-3809BK Manuale utente
- русский: Lenco L-3809BK Руководство пользователя
- français: Lenco L-3809BK Manuel utilisateur
- español: Lenco L-3809BK Manual de usuario
- Deutsch: Lenco L-3809BK Benutzerhandbuch
Gerelateerde papieren
Andere documenten
-
DJ-Tech vinyl usb 5c Handleiding
-
iON LP DOCK Snelstartgids
-
Ibiza LP300 Handleiding
-
TEAC TN-280BT de handleiding
-
Ibiza Sound LP300 de handleiding
-
Kr ger Matz KM0516 TT-501 de handleiding
-
Roadstar TTL-6970EPC Handleiding
-
Yamaha GT-5000 de handleiding
-
Crosley C62 Handleiding
-
JBSYSTEMS LIGHT HIGH Q30 D MK2 de handleiding