
inductie kookplaat
INDUCTION HOB
IKI6020
• gebruiksaanwijzing
• instruction manual
IKI6021
IKI6022
IKI6023
IKI7821
IKI9021

2 •

1. veiligheidsvoorschriften pagina 4
2. product omschrijving pagina 8
3. voor het eerste gebruik pagina 10
4. bediening van de kookplaat pagina 10
5. pannen voor inductie pagina 13
6. reiniging & onderhoud pagina 13
7. installatie voorschrift pagina 14
8. storingen & oplossingen pagina 18
9. product kaart pagina 19
Garantie & service pagina 36
1. safety instructions page 21
2. appliance description page 24
3. before first use page 26
4. operation of the appliance page 26
5. cookware for induction page 29
6. cleaning & maintenance page 29
7. installation instructions page 30
8. problems & solutions page 34
9. product fiche page 35
Guarantee & after sales Service page 38
Nederlands
English
• 3

• Lees eerst de gebruiksaanwijzing aandachtig en geheel
door voordat u het apparaat gaat gebruiken en bewaar deze
zorgvuldig voor latere raadpleging.
• Gebruik dit apparaat uitsluitend voor de in de gebruiksaanwijzing
beschreven doeleinden. Gebruik de kookplaat alleen voor het
bereiden van gerechten. Het toestel is niet geschikt om ruimtes te
verwarmen.
• WAARSCHUWING: het apparaat en de toegankelijke delen
worden heet tijdens het gebruik. Raak hete delen niet aan. Houd
kinderen jonger dan 8 jaar uit de buurt tenzij er voortdurend op
hen wordt gelet.
• Het apparaat kan worden gebruikt door kinderen van 8 jaar en ouder
en door personen met beperkte fysieke, zintuiglijke of mentale
vermogens of gebrek aan ervaring of kennis, wanneer zij het apparaat
onder toezicht gebruiken of zijn geïnstrueerd over het veilige gebruik
ervan en zij de daaruit voortkomende gevaren begrijpen.
• Kinderen mogen niet met het apparaat spelen.
• Het apparaat mag niet door kinderen worden gereinigd of
onderhouden, tenzij dit onder toezicht gebeurt.
• Bewaar geen voorwerpen in kastjes boven of achter het apparaat die
voor kinderen interessant zijn.
• De kookzones worden warm tijdens het gebruik en blijven na gebruik
ook nog een tijd warm. Laat geen kleine kinderen in de buurt tijdens
en vlak na het koken.
• Wanneer de veiligheidsvoorschriften en waarschuwingen niet
worden opgevolgd, kan de fabrikant niet aansprakelijk worden
gesteld voor de schade die daarvan het gevolg is.
• Open nooit de behuizing van het apparaat.
• Verwarm geen dichte blikken op de kookplaat. Er ontstaat een
overdruk waardoor de blikken kunnen exploderen. U kunt zich
hierdoor verwonden/verbranden.
•
WAARSCHUWING: brandgevaar: laat niets onbeheerd op de
kookplaat staan.
•
WAARSCHUWING
:
koken met vet of olie op een kookplaat
zonder toezicht kan gevaarlijk zijn en kan brand tot gevolg
hebben. Probeer NOOIT de brand te blussen met water,
maar zet het apparaat uit en dek de vlammen daarna af met
Nederlands
veiligheidsvoorschriften
1
4 • Nederlands

Nederlands • 5
bijvoorbeeld een deksel of een blusdeken.
• Het apparaat mag niet buiten gebruikt worden.
• Gebruik het apparaat niet als werkblad. Het apparaat kan per ongeluk
worden ingeschakeld of nog heet zijn, waardoor voorwerpen kunnen
smelten, heet worden of vlam vatten.
• Dek het apparaat nooit af met een doek of iets dergelijks. Als het
apparaat nog heet is of wordt ingeschakeld, bestaat er brandgevaar.
• Gebruik nooit een hogedruk- of stoomreiniger voor het reinigen van
de kookplaat.
• Gebruik het apparaat niet in een ruimte met een
omgevingstemperatuur beneden 5°C.
• Als het apparaat voor de eerste keer gebruikt wordt, zal het ‘nieuw’
ruiken. Dit is normaal. Door te ventileren verdwijnt de geur vanzelf.
•
WAARSCHUWING
:
indien de glasplaat van de kookplaat is
gebroken:
- schakel onmiddellijk alle branders en elektrische
verwarmingselementen uit en verbreek de stroomtoevoer naar
het apparaat.
- raak het oppervlak van het apparaat niet aan.
- gebruik het apparaat niet.
• Wanneer onder het apparaat een lade toegestaan is, zonder
tussenbodem, mogen daarin geen licht ontvlambare voorwerpen/
stoffen worden bewaard. Zorg voor enkele centimeters afstand
tussen de onderkant van de kookplaat en de inhoud van een lade.
• Het apparaat is niet bedoeld om te worden bediend door middel van
een externe timer of een apart afstandsbedieningssysteem.
• Plaats geen metalen voorwerpen zoals messen, vorken, lepels en
deksels op het oppervlak van de kookplaat. Deze kunnen heet worden.
• Zodra u de pan van een inductiekookplaat verwijdert, stopt de
kookactiviteit automatisch. Wen uzelf er echter aan altijd de
kookplaat of kookzone na gebruik uit te schakelen om onbedoeld
inschakelen te voorkomen. Schakel de kookzone na gebruik uit met
de bediening en vertrouw niet alleen op de pandetectie.
• De glaskeramische plaat is zeer sterk, maar niet onbreekbaar.
Wanneer er iets op valt, bijvoorbeeld een kruidenpotje of een puntig
voorwerp, kan er een breuk ontstaan.
•
WAARSCHUWING
:
als het oppervlak is gebarsten, schakelt
u het apparaat uit om het risico van een elektrische schok te
vermijden.
• Houd rekening met de zeer snelle opwarmtijd op de hogere standen.
Blijf er altijd bij staan als u een kookzone op een hogere stand heeft
ingesteld.

• Houd tijdens het gebruik van de inductiekookplaat magnetiseerbare
voorwerpen (creditcards, bankpasjes, diskettes, horloges e.d.) uit de
buurt van het apparaat. Wij adviseren dragers van pacemakers om
eerst uw arts te raadplegen.
• Dit apparaat mag alleen door een erkend installateur worden
aangesloten.
• Defecte onderdelen mogen alleen vervangen worden door originele
onderdelen. Alleen van die onderdelen kan de fabrikant garanderen
dat zij aan de veiligheidseisen voldoen.
• Schade ontstaan door verkeerd aansluiten, verkeerd inbouwen of
verkeerd gebruik valt niet onder de garantie.
• Indien de aansluitkabel beschadigd is, mag deze alleen worden
vervangen door de fabrikant, zijn service-organisatie of gelijkwaardig
gekwalificeerde personen, teneinde gevaarlijke situaties te
voorkomen.
• De elektrische aansluiting moet voldoen aan de nationale en lokale
voorschriften.
• De wandcontactdoos en de stekker moeten altijd bereikbaar blijven.
• Het apparaat mag niet via een verdeelstekker of verlengsnoer op het
elektriciteitsnet worden aangesloten. Hiermee kan veilig gebruik van
het apparaat niet worden gewaarborgd.
• Het apparaat moet altijd geaard zijn.
• Gebruik voor het aansluiten een goedgekeurde kabel met juiste kabel
diameters behorend bij de aansluiting. De kabel ommanteling moet
van rubber zijn (bij voorkeur een kabel welke voldoet aan de richtlijn
60227 IEC 53).
• De aansluitkabel moet vrij hangen en niet door een lade worden
aangestoten. Let op: maximale snoerlengte is 200 cm.
• Het werkblad waarin de kookplaat wordt ingebouwd, moet vlak zijn.
• De wanden en het werkblad rondom het apparaat moeten minimaal
tot 85°C hittebestendig zijn. Ook al wordt het apparaat zelf niet
warm, door de warmte van een hete pan kan de wand verkleuren of
vervormen.
• Huishoudelijke apparaten mogen niet bij het gewone huisvuil
worden gevoegd. Breng het apparaat naar een speciaal centrum
voor gescheiden afvalinzameling van uw gemeente om op
verantwoorde wijze en conform overheidsbepalingen recycled
te worden.
6 • Nederlands

Nederlands • 7

Kookplaat
1. Kookzone linksachter (Ø 200 mm)
2. Kookzone linksvoor (Ø 160 mm)
3. Kookzone rechtsvoor (Ø 200 mm)
4. Kookzone rechtsachter (Ø 160 mm)
product omschrijving
2
IKI6020 - IKI6021 - IKI6022 - IKI6023
8 • Nederlands
1
2 3 4
1
2 3 4
IKI7821
IKI6020 IKI6021 IKI6022 IKI7821
6
7
8
9
14
12
9
13
6
7
8
9
12
9
13
10
11
14
IKI6023
6
8
9
14
7
9
13
12
10
11
Bedieningspaneel
6. Pauzetoets
7. Vermogenstoetsen + en - /
slider control - geldt alleen voor model IKI6023
8. Vermogen/restwarmte indicatie
9. Kookzonetoets
10. Timertoets
11. Display timer
12. Boost-toets
13. Aan-/ uittoets
14. Toets voor toetsenblokkering

IKI9021
1
2 3 45
Nederlands • 9
Bedieningspaneel
6. Pauzetoets
7. Toets voor toetsenblokkering
8. Vermogen/restwarmte indicatie
9. Kookzonetoets
10. Timertoets
11. Boost-toets
12. Aan-/ uittoets
13. Vermogenstoetsen + en -
14. Display timer
IKI9021
Kookplaat
1. Kookzone linksachter (Ø 200 mm)
2. Kookzone linksvoor (Ø 160 mm)
3. Kookzone rechtsvoor (Ø 200 mm)
4. Kookzone rechtsachter (Ø 160 mm)
5. Kookzone midden (Ø 250 mm)
8
6
7
9
10
9
8
11
12
6
12
11
8
9
10
9
8
7
6
12
11
8
9
10
7
14
14
14
13
13
13
13
13

bediening van de kookplaat
4
Gebruik alleen pannen die geschikt zijn voor een inductie kookplaat.
Nadat de kookplaat is aangesloten op het stroomnet licht kan gedurende een moment het hele display oplichten. Zodra dit voorbij is,
staat de kookplaat op stand-by en is deze klaar voor gebruik.
De kookplaat functioneert door elektronische sensoren die worden bediend door de corresponderende tiptoets aan te raken. Bij elke
aanraking van een tiptoets klinkt er een geluidssignaal.
DE KOOKPLAAT INSCHAKELEN
Schakel de kookplaat in door gedurende enkele seconden op de AAN/UIT toets te drukken. De displays van alle kookzones tonen een
[0.] en de stippen knipperen. Als er binnen 20 seconden geen kookzone wordt geselecteerd, zal de kookplaat automatisch uit gaan.
DE KOOKPLAAT UITSCHAKELEN
Schakel de kookplaat op elk moment uit door enkele seconden op de AAN/UIT toets te drukken.
De AAN/UIT toets heeft altijd prioriteit in de uitschakel-functie.
EEN KOOKZONE INSCHAKELEN
Druk op de tiptoets van de kookzone die u wilt gebruiken. De stip blijft aan bij de gekozen kookzone en bij de andere kookzones gaat
deze uit.
Plaats de pan op de kookzone. Selecteer het gewenste vermogen met de + toets of met de - toets. Let op: model IKI6023 heeft in
plaats van een + en - toets slider bediening. Regel het vermogen door licht met uw vinger over de slider te schuiven.
Om het eten snel aan de kook te brengen, selecteert u het gewenste vermogen en raakt u de P toets aan om de Boost functie te
activeren.
BOOST FUNCTIE
De Boost functie geeft extra vermogen en is instelbaar voor alle zones. Een kookzone moet geselecteerd zijn, het vermogen moet op
de gewenste stand staan en de toets (Boost) moet aangedrukt zijn. De Boost functie is geactiveerd als er een P verschijnt in het
display van de betreffende kookzone.
Bij het gebruik van de Boost functie wordt het maximaal beschikbare vermogen verdeelt tussen twee kookzones die als een paar
samenwerken.
Het is mogelijk dat het maximaal beschikbare vermogen voor deze twee kookzones samen wordt overschreden. In dat geval zal
het vermogen van de tweede kookzone automatisch verminderd worden. De nodige vermogensvermindering zal getoond worden
door het knipperen van de betreffende kookzone. Het display knippert gedurende 3 seconden en gedurende die tijd kunnen er
aanpassingen gedaan worden voordat het vermogen automatisch wordt verminderd.
Voordat u het apparaat voor de eerste maal in gebruik neemt, dient u als volgt te werk te gaan: pak de kookplaat voorzichtig uit en
verwijder al het verpakkingsmateriaal. De verpakking (plastic zakken en karton) buiten het bereik van kinderen houden. Controleer
na het uitpakken het apparaat zorgvuldig op uiterlijke schade, mogelijk ontstaan tijdens transport. Reinig de glasplaat met een licht
vochtige doek. Controleer of de spanning overeenkomt met die vermeld is op het typeplaatje. Voor de installatie van de kookplaat
volgt u de instructies in hoofdstuk 7.
voor het eerste gebruik
3
10 • Nederlands

De tijdsduur van de Boost functie is afhankelijk van het ingestelde vermogen van de betreffende kookzone.
Vermogen + Boost Boost functie schakelt automatisch uit na Vermogen + Boost Boost functie schakelt automatisch uit na
Stand 1 + P 1 minuut Stand 6 + P 6 minuten
Stand 2 + P 2 minuten Stand 7 + P 7 minuten
Stand 3 + P 3 minuten Stand 8 + P 8 minuten
Stand 4 + P 4 minuten Stand 9 + P 9 minuten
Stand 5 + P 5 minuten - -
EEN KOOKZONE UITSCHAKELEN
Selecteer de kookzone die u uit wilt schakelen door op de bijbehorende toets te drukken. Raak de - toets aan om het vermogen terug
te zetten op [0]. Door tegelijkertijd op de toetsen + en - te drukken, gaat het vermogen direct op [0].
Als de kookzone heet is, zal in het display een [H] staan in plaats van [0].
ALLE KOOKZONES TEGELIJK UITSCHAKELEN
Om alle kookzones in één keer uit te schakelen, drukt u op de AAN/UIT toets aan. Op het display van alle kookzones die nog heet zijn,
staat een [H].
RESTWARMTE INDICATIE
De restwarmte indicatie geeft aan dat het glas nog te heet is om aan te raken in het gebied van de kookzone.
Als het gebied van de kookzone nog te heet is, verschijnt er een [H] in het display van de betreffende kookzone. Zodra de temperatuur
gezakt is, zal de [H] indicatie verdwijnen.
PAUZE FUNCTIE
Wanneer de pauze functie geactiveerd wordt, verminderd het vermogen van alle kookzones die in gebruik zijn. Zodra de pauze functie
gede-activeerd wordt, schakelen alle kookzones weer terug naar het oorspronkelijk geselecteerde vermogen.
• Als de pauze functie niet gede-activeerd wordt, zal de kookplaat na 30 minuten uitschakelen.
• Druk op de pauze toets om de pauze functie te activeren. Het vermogen van de ingeschakelde kookzones wordt verminderd
en [II] staat in de displays.
• Druk opnieuw op de pauze toets om de pauze functie te de-activeren. [II] verdwijnt en de kookzones functioneren weer op het
oorspronkelijke geselecteerde vermogen.
VEILIGE AUTOMATISCHE UITSCHAKELING
Elke kookzone zal automatisch uitgeschakeld worden na een gedefinieerde maximum kookduur als het vermogen niet is gewijzigd.
De maximale kookduur is afhankelijk van het geselecteerde vermogen.
Vermogen Veilige automatische uitschakeling na:
1 - 2 6 uur
3 - 4 5 uur
5 4 uur
6 - 9 1½ uur
KINDERSLOT
Het kinderslot voorkomt dat de kookplaat onbedoeld gebruikt wordt. Nadat de kookplaat is ingeschakeld, kan het kinderslot
geactiveerd worden. Stel geen kookzone in. Om het kinderslot in te schakelen, drukt u tegelijkertijd op de + en - toets en daarna
weer de + toets. [L] (Locked = vergrendeld) verschijnt in de displays en geeft aan dat de bediening niet gewijzigd kan worden. Als een
kookzone nog heet is, wisselen [L] en [H] elkaar af in het display.
De kookplaat blijft vergrendeld totdat deze vergrendeling opgeheven wordt, zelfs als de kookplaat uit en weer aan gezet wordt.
Om het kinderslot te de-activeren schakelt u eerst de kookplaat in. Druk tegelijkertijd op de + en de - toets en daarna weer de - toets.
[L] verdwijnt en de kookplaat schakelt uit.
TOETSENBLOKKERING
De toetsenblokkering is voor het blokkeren en het instellen van een veilige modus gedurende het gebruik. Het aanpassen van een
hoger vermogen of andere wijzigingen is niet mogelijk. Het is in deze modus alleen mogelijk om de kookplaat uit te schakelen.
De toetsenblokkering is geactiveerd als de toetsblokkering gedurende 2 seconden is ingedrukt. Dit wordt bevestigd door een
geluidssignaal. De indicatie voor de toetsenblokkering licht op en de bediening van de kookplaat is geblokkeerd.
Nederlands • 11

TIMER FUNCTIE INSTELLEN (niet beschikbaar op model IKI6020)
De timer functie kan op twee manieren gebruikt worden: kookwekker en kooktimer.
Kookwekker
De kookwekker kan gebruikt worden zonder dat er kookzones in gebruik zijn. Schakel de kookplaat in en druk op de TIMER toets en
het display toont
. Stel de gewenste tijd in met de + en - toets. De kookwekker kan ingesteld worden van 0 tot 99 minuten. Als er
gedurende 10 seconden geen toetsen ingedrukt worden, verdwijnt de stip bij de kookwekker en wordt de tijd afgeteld.
Wanneer de ingestelde tijd voorbij is, klinkt er een piepsignaal en de timer knippert. Het piepsignaal stopt automatisch na 30
seconden of nadat u een willekeurige toets heeft aangeraakt.
Om de tijd te wijzigen, drukt u nogmaals op de TIMER toets en pas de tijd aan met de + en - toets.
Kooktimer
De kooktimer is gekoppeld aan een kookzone en kan voor elke kookzone apart ingesteld worden. In tegenstelling tot de kookwekker
schakelt de kooktimer de kookzone uit als de ingestelde tijd voorbij is.
• Schakel de kookplaat in en selecteer een kookzone.
• Stel het vermogen in met de + en - toets.
• Druk op de TIMER toets
. Het display toont . Nu functioneert de timer als kookwekker.
• Druk nogmaals op de TIMER toets tot de bijbehorende LED knippert om de kooktimer te activeren. Rond de timer zitten vier
LED’s. Deze geven aan voor welke kookzone de kooktimer is ingesteld.
• Stel de gewenste tijd in met de + en - toets.
• 10 seconden na de laatste instelling, zal het display de tijd aangeven van de kookzone waarvan de tijd het eerste verstrijkt (indien er
meerdere kookzones geprogrammeerd zijn).
Om een extra kooktimer in te stellen, doet u het volgende:
• Selecteer een andere kookzone.
• Stel het vermogen in met de + en - toets.
• Druk op de TIMER toets . Nu functioneert de timer als kookwekker.
• Druk nogmaals op de TIMER toets tot de bijbehorende LED knippert om de kooktimer te activeren.
• Stel de gewenste tijd in met de + en - toets.
• 10 seconden na de laatste instelling, zal het display de tijd aangeven van de kookzone waarvan de tijd het eerste verstrijkt (indien er
meerdere kookzones geprogrammeerd zijn).
Wanneer de ingestelde tijd voorbij is, klinkt er een piepsignaal en de timer staat op “00”. De geprogrammeerde kookzone zal
uitgeschakeld worden en “H” verschijnt in het display als het gebied van de kookzone heet is.
Het piepsignaal stopt automatisch na 30 seconden of nadat u een willekeurige toets heeft aangeraakt.
GELUIDSSIGNAAL
Wanneer de kookplaat in gebruik is, zal bij de volgende activiteiten een geluidssignaal te horen zijn:
• normale toetsbediening met een kort geluid
• continue aanraken van toetsen gedurende een langere tijd (10 seconden) met een langer, onderbroken geluidssignaal.
DISPLAYAANDUIDING
Aanduiding op het display Beschrijving
Er is een storing opgetreden. Controleer de melding volgens de tabel in
hoofdstuk 7.
Restwarmte-indicatie: de kookzone is nog warm.
Het kinderslot is ingeschakeld.
Foutmelding. Er is iets geplaatst op de bediening of het kookgerei is niet
geschikt of te klein.
Plaats een pan op de actieve kookzone of schakel deze uit.
12 • Nederlands

reiniging & onderhoud
6
Laat alle kookzones afkoelen voordat u de kookplaat schoonmaakt en schakel het kinderslot in voodat u begint.
• Gebruik geen agressieve schurende reinigingsmiddelen, spuitbussen of scherpe voorwerpen om het oppervlak van de
kookplaat te reinigen die niet voor dit doel ontwikkeld zijn.
• Reinig het oppervlak van de kookplaat dagelijks met een vochtige doek en een mild reinigingsmiddel, zoals afwasmiddel. Goed
droog maken met keukenpapier of een droge theedoek.
• Overgekookt voedsel kunt u verwijderen door de plek in te laten weken met een vochtige doek en een beetje afwasmiddel of
gebruik een glasschraper. Let op: de glasschraper is scherp. Houd deze uit de buurt van de kinderen.
• Gebruik een speciaal reinigingsmiddel voor keramische/inductie kookplaten voor hardnekkige vlekken. Let op: volg de aanwijzingen
op de verpakking.
pannen voor inductie
5
Pannen die al eerder op een andere kookplaat zijn gebruikt, bijvoorbeeld een gaskookplaat, zijjn niet meer geschikt voor een inductie
kookplaat. Schaf daarom voor het eerste gebruik nieuwe pannen aan als u geen geschikte pannen heeft.
• Gebruik pannen met een dikke, vlakke bodem die dezelfde diameter heeft als een kookzone. Dit vermindert de kooktijd.
• Pannen gemaakt van metaal, geëmailleerd metaal, gietijzer en roestvrijstaal geven het beste resultaat.
• Let op de aanwijzingen van de fabrikant of de pan geschikt is voor gebruik op een inductie kookplaat.
• Pannen gemaakt van geëmailleerd metaal of aluminium of koperen bodems kunnen kunnen een metaalachtige substantie op de
glasplaat achterlaten. Verwijder dit direct naar het gebruik, anders wordt het steeds moeilijker om dit te verwijderen.
• Een pan is geschikt voor inductie als er een magneet aan de bodem vast blijft zitten.
• Een pan moet in het midden van kookzone geplaatst worden.
• Bij het gebruik van sommige pannen kunt u wisselen geluiden horen. Dit wordt veroorzaakt door de vorm van de pan en heeft geen
invloed op de werking of de veiligheid van de kookplaat.
ENERGIEBESPARING
• Een inductie kookzone past zich automatisch aan de diameter van de bodem van de gebruikte pan aan tot op zekere hoogte. Het
magnetische deel van de panbodem moet echter wel een bepaalde minimum diameter hebben afhankelijk van de afmeting van de
kookzone.
• Plaats de pan op de kookzone voordat deze ingeschakeld is. Als u een kookzone inschakelt zonder dat er een pan op staat, zal de
kookzone niets doen.
• Gebruik altijd een deksel op de pan om de kooktijd te reduceren.
• Schakel het vermogen terug wanneer vloeistof kookt.
• Gebruik niet te veel vocht of vet. Het koken of bakken duurt langer als u teveel gebruikt.
• Selecteer het juiste vermogen voor de verschillende kookmogelijkheden.
Onderstaande tabel is een indicatie voor de verschillende kookmogelijkheden.
Standen Gebruik voor:
0 kookzone uit
1 - 3 warmhouden
4 - 5 zachtjes sudderen en rustig opwarmen
6 - 7 opwarmen en snel sudderen
8 koken, bakken en dichtschroeien
9 maximaal vermogen
P boost functie
correct fout fout
Nederlands • 13

installatievoorschrift
7
• De veiligheid tijdens het gebruik is alleen gegarandeerd als de montage technisch correct en in overeenstemming met dit
installatievoorschrift is uitgevoerd. De installateur is aansprakelijk voor schade veroorzaakt door een foutieve montage.
• De elektrische aansluiting mag alleen worden uitgevoerd door een bevoegde electriciën. Deze is op de hoogte van de landelijke en
regionale veiligheidsvoorschriften waaraan de aansluiting moet voldoen.
• De kookplaat behoort tot beschermingsklasse I en mag alleen worden gebruikt in combinatie met een geaarde aansluiting. De
fabrikant is niet aansprakelijk voor de ongeschikte werking en de mogelijke schade veroorzaakt door ongeschikte elektrische
installaties.
• De kookplaat moet worden aangesloten op een vaste installatie waarin middelen voor uitschakeling zijn ingebouwd, in
overeenstemming met de voorschriften van de installatie.
• Inductiekookplaten mogen alleen worden geïnstalleerd boven een lade, oven met gedwongen ventilatie of vaatwasser, altijd met
een minimale afstand voor de ventilatie. Onder de kookplaat mogen geen koelkasten, ovens zonder ventilatie of wasmachines
geïnstalleerd worden.
• Zorg ervoor dat de voedingskabel niet bekneld raakt tijdens de installatie of langs scherpe randen loopt. Indien er een oven onder
gemonteerd is, laat de kabel dan via de achterste hoeken van de oven tot de aansluitkast lopen. Hij moet zo geplaatst worden dat er
geen hete delen van de kookplaat of de oven geraakt worden.
• Het aansluitpunt, de wandcontactdoos en/of de stekker moeten altijd toegankelijk zijn.
• Het werkblad waarin de kookplaat wordt gemonteerd moet vlak, horizontaal en stabiel zijn. Volg de instructies van de fabrikant van
het werkblad op.
• Door verkeerde installatie, aansluiting of montage vervalt de garantie.
• Attentie: elke wijziging in het apparaat, inclusief het monteren en het vervangen van de voedingskabel, moet worden uitgevoerd
door een erkende installateur.
RUIMTE RONDOM DE KOOKPLAAT
Voor een veilig gebruik is voldoende ruimte rondom de kookplaat noodzakelijk. Controleer of deze ruimte aanwezig is.
14 • Nederlands

590
560
53
490
520
min. 25*
min. 25*
* 40mm bij gebruik van een houten
achter- of zijwand.
INBOUWMATEN
In onderstaande afbeeldingen zijn de afmetingen van de uitsparingen aangegeven in mm. Let op dat u de juiste tekening gebruikt voor
het model wat u heeft.
IKI6020 - IKI6021 - IKI6022 - IKI6023
890
860
53
490
520
min. 40**
min. 25*
* 60mm bij gebruik van een houten
achterwand.
** 150mm bij gebruik van een houten
zijwand.
IKI9021
780
750
53
490
520
min. 40**
min. 25*
* 60mm bij gebruik van een houten
achterwand.
** 150mm bij gebruik van een houten
zijwand.
IKI7821
Nederlands • 15

BELUCHTING
De elektronica in de kookplaat heeft koeling nodig. De kookplaat schakelt na korte tijd uit wanneer er onvoldoende lucht circuleert en
oververhitting optreedt. Aan de onderzijde van de kookplaat bevinden zich de ventilatie-openingen. Door deze openingen moet koele
lucht aangezogen kunnen worden. Aan de voorzijde is de kookplaat voorzien van uitblaasopeningen om de warme lucht af te voeren.
Beluchting vindt plaats via de plint en de achterzijde van de kast. Zaag de beluchtingsopeningen (min. 100cm
2
) uit. Luchtaanvoer via
de plint is overbodig wanneer er, in combinatie met de opening aan de achterzijde van de kast, ergens anders een opening is waar
lucht aangezogen kan worden.
Zorg voor voldoende toevoer en afvoer van lucht.
• Maak een ventilatieopening aan de voorzijde van het keukenmeubel van minimaal de toestelbreedte en met een hoogte van
minimaal 5 mm als de kookplaat boven een oven, lade of tussensteun wordt ingebouwd.
• Zorg voor een afstand van minimaal 10 mm tussen de oven, de lade of de tussensteun en de kookplaat.
Door de ventilatie van de kookplaat kunnen metalen voorwerpen in de lade heet worden. Als dit gebeurt, adviseren wij om een
tussensteun te gebruiken. Dat kan een houten paneel zijn.
• Let op: bij inbouw boven een oven moet de dikte van het werkblad minimaal 35 mm en boven een lade moet de dikte van het
werkblad minimaal 20 mm zijn.
• Zorg ervoor dat de traverselat de luchtdoorvoer niet hindert. Schaaf of zaag de traverselat [C] zonodig schuin af.
Inbouwen boven een oven - A Inbouwen boven een lade - B
16 •

bevestigingsbeugel
HET INBOUWEN VAN DE KOOKPLAAT
• Controleer of het keukenmeubel en de uitsparing voldoen aan de gestelde eisen ten aanzien van afmetingen en ventilatie.
• Verwijder de spaanders na de snijwerkzaamheden in de opening van het werkblad en behandel bij kunststof of houten werkbladen
de kopse kanten met eventueel afdichtvernis, om uitzetten van het werkblad door vocht te voorkomen.
• Leg de kookplaat omgekeerd op het aanrechtblad.
• Monteer de aansluitkabel aan de kookplaat conform de gestelde eisen.
• Verwijder de beschermfolie van het afdichtband en plak het band op de rand van de glasplaat. Let hierbij op dat u het op het glas
plakt en niet op het metalen gedeelte. Plak de afdichtband niet door de hoek, maar knip 4 stukken die goed aansluiten in de hoek.
Let op: schade die ontstaan is door het niet plaatsen van de afdichtband heeft gevolgen voor de garantie.
• Monteer de meegeleverde bevestigingsbeugels d.m.v. de meegeleverde schroefjes in de kookplaat.
• Keer de kookplaat om en leg het in de uitsparing.
• Sluit de kookplaat aan op het elektriciteitsnet. De kookplaat is nu gebruiksklaar.
• Controleer de werking. Indien de kookplaat fout is aangesloten, zal het een geluidssignaal geven of een foutcode in de displays
laten zien.
HET UITBOUWEN VAN DE KOOKPLAAT
Sluit het apparaat af van het stroomnet. Verwijder de kookplaat uit door van beneden af druk uit te oefenen. Attentie! Pas op voor
schade aan het apparaat! Probeer de kookplaat niet te verwijderen door hem van bovenaf uit het werkblad te wippen.
ELEKTRISCHE AANSLUITING
-
60 EN 78 CM BREED
Sluit de kookplaat volgens het aansluitschema aan.
Dit apparaat is standaard ingesteld voor 2x 1 fase (230V
DC) en maakt gebruik van een zogenaamde 5-polige Perilex
stekker. Deze groepen in de meterkast moeten gezekerd
zijn met minimaal 16 Ampère elk. De aansluitkabel moet een
aderdoorsnede hebben van minimaal 2,5 mm².
LET OP
:
deze kookplaat is niet geschikt voor een ander
aansluitschema.
5x2,5 mm²
L1-N1 L2-N2
220V 220V
240V 240V
5x2,5 mm² 3N~
Model: IKI6020
IKI6021
IKI6022
IKI6023
IKI7821
Model: IKI9021
Nederlands • 17
ELEKTRISCHE AANSLUITING
-
90 CM BREED
Sluit de kookplaat volgens het aansluitschema aan.
Dit apparaat is standaard ingesteld voor krachtstroom, 3
fases (400V DC) en maakt gebruik van een speciale 5-polige
stekker. De aansluitkabel moet een aderdoorsnede hebben van
minimaal 2,5 mm². De aansluiting dient te worden verricht door
een erkende installateur.
LET OP
:
deze kookplaat is niet geschikt voor een ander
aansluitschema.

storingen & oplossingen
8
Indien er zich een probleem voordoet dan zal dit getoond worden op de displays.
Storingscode Oorzaak Oplossing
E1 Ventilatie functioneert niet. Neem contact op met de servicedienst van Inventum.
E3 Het voltage is te hoog. Laat uw aansluiting door een electriciën controleren.
E4
Netfrequentie verschilt van de
aangegeven waardes (50Hz).
Laat uw aansluiting door een electriciën controleren.
E5 De kookplaat is oververhit.
Schakel de kookplaat uit en laat de kookzones
afkoelen.
E6 Besturing defect. Neem contact op met de servicedienst van Inventum.
E7 Inductie sensor defect. Neem contact op met de servicedienst van Inventum.
E8 Temperatuursensor defect. Neem contact op met de servicedienst van Inventum.
E9 Kalibratie fout. Neem contact op met de servicedienst van Inventum.
18 • Nederlands

product kaart
9
Fabrikant INVENTUM INVENTUM INVENTUM INVENTUM INVENTUM INVENTUM
Typenummer IKI6020 IKI6021 IKI6022 IKI6023 IKI7821 IKI9021
Type apparaat inductie kookplaat inductie kookplaat inductie kookplaat inductie kookplaat inductie kookplaat inductie kookplaat
Aantal kookzones 4 4 4 4 4 5
Verwarmingstechnologie inductie inductie inductie inductie inductie inductie
Diameter per kookzone [cm] (linksvoor) Ø 16 Ø 16 Ø 16 Ø 16 Ø 16 Ø 16
Diameter per kookzone [cm] (rechtsachter) Ø 16 Ø 16 Ø 16 Ø 16 Ø 16 Ø 16
Diameter per kookzone [cm] (linksachter) Ø 20 Ø 20 Ø 20 Ø 20 Ø 20 Ø 20
Diameter per kookzone [cm] (rechtsvoor) Ø 20 Ø 20 Ø 20 Ø 20 Ø 20 Ø 20
Diamter per kookzone [cm] (midden) Ø 25
Energieverbruik per kookzone [Wh/kg] (linksvoor) 194 194 194 194 194 194
Energieverbruik per kookzone [Wh/kg] (rechtsachter) 194 194 194 194 194 194
Energieverbruik per kookzone [Wh/kg] (linksachter) 192 192 192 192 192 192
Energieverbruik per kookzone [Wh/kg] (rechtsvoor) 192 192 192 192 192 192
Energieverbruik per kookzone [Wh/kg] (midden) 190
Energieverbruik van de kookplaat [kg] 193 193 193 193 193 192,4
Restwarmte indicator per kookzone per kookzone per kookzone per kookzone per kookzone per kookzone
Aan/ uit toets � � � � � �
Spanning aan-indicator � � � � � �
Timer � � � � �
Uitvoering
Materiaal glas glas glas glas glas glas
Bediening tiptoetsen tiptoetsen tiptoetsen tiptoetsen + slider tiptoetsen tiptoetsen
Displays LED LED LED LED LED LED
Technische gegevens
Afmeting (bxdxh) in mm 590 x 520 x 53 590 x 520 x 53 590 x 520 x 53 590 x 520 x 53 780 x 520 x 53 890 x 520 x 53
Netto gewicht in kg 10,6 10,6 10,6 10,6 11,7 15,7
Elektrische aansluitwaarde [W] 7400 7400 7400 7400 7400 10800
Netspanning [V] / netfrequentie [Hz] 220-230V 220-230V 220-230V 220-230V 220-230V 220-230V
Opmerking: Op het typeplaatje - welke aan de onderzijde geplaatst is - vindt u de de technische gegevens van de kookplaat ook vermeldt.
Nederlands • 19

20 •

• Please read these instructions before operating the appliance
and retain for future use.
• The appliance is intended solely for domestic use within the home.
The hob is only to be used for the preparation of food. The appliance
is not designed for heating rooms.
• WARNING: this appliance and the accessible parts will become
hot during use. Do not touch hot parts. Keep children younger
than 8 away from the appliance unless they are under continuous
supervision.
• This appliance can be used by children aged 8 years and over, as well
as by people with reduced physical, sensory or mental capabilities
or lack or experience and knowledge, provided they are supervised
and instructed in the safe use of the appliance and understand the
hazards involved.
• Children must not play with the appliance.
• Cleaning and maintenance shall not be made by children.
• Do not keep objects that children might find interesting in cupboards
above or behind the appliance.
• The cooking zones heat up during use and stay hot for a while
afterwards. Keep young children away from the hob during and
immediately after cooking.
• The manufacturer cannot be held liable for any damage resulting from
failure to follow the safety instructions and warnings.
• Never open the casing of the appliance.
• Do not warm closed tins on the hob. There will be a build-up of
pressure that will cause tins to explode. You might get injured or
scalded.
•
WARNING
:
danger of fire: never leave anything unsupervised on
the hob.
•
WARNING
:
cooking with fat or oil on a hob without supervision
can be dangerous and can lead to fire. NEVER try to extinguish a
fire with water. Instead, switch the appliance off and then cover
the flames with for example a lid or a fire blanket.
• The appliance should not be placed or used outdoors.
• Do not use the appliance as a worktop. The appliance may
accidentally be switched on or still be hot or catch fire.
• Never cover the appliance with a cloth or something similar. If the
English
safety instructions
1
English • 21

appliance is still hot or is switched on, there is a risk of fire.
• Never use a pressure cleaner or steam cleaner to clean the hob.
• Do not use the appliance in temperatures below 5°C.
• When you use the hob for the first time you will notice a “new smell”.
Don’t worry, this is normal. If the kitchen is well ventilated, the smell will
soon disappear.
•
WARNING
:
in case of hotplate glass breakage:
- shut immediately off any electrical heating element and isolate
the appliance from the power supply;
- do not touch the appliance surface;
- do not use the appliance.
• If a drawer underneath the appliance is permitted, without an
intermediate bottom, this should not be used to store highly
flammable objects/ materials. Ensure that there is adequate
clearance of a few centimetres between the bottom of the hob and
the contents of any drawers.
• The appliance is not intended to be operated by means of an external
timer or separate remote control system.
• Do not place metal objects such as knives, forks, spoons and lids on
the surface of the hob, they may become hot.
• As soon as you remove the pan from the hob, the cooking process will
stop automatically. Get into the habit of switching off the cooking zone
or hob manually to avoid unintentionally switching on the appliance.
After use, switch off the hob element using the controls and don’t rely
only on the pan detector.
• The ceramic top is extremely strong, but not unbreakable. For
example, a spice jar or sharp utensil falling on it could cause it to break.
•
WARNING
:
if the surface is cracked, switch off the appliance to
reduce the risk of electric shock.
• Remember that if the hob is used on a high setting the heating time will
be very short. Do not leave the hob unattended if you are using a zone
on a high setting.
• When the induction hob is in use, keep objects that are sensitive to
magnetic fields (credit cards, bank cards, discs, watches and similar
items) away from the hob. We advise anyone with a pacemaker to
consult their cardiologist first.
• This appliance should only be connected by a registered installer.
• Faulty parts may only be replaced by original parts meet safety
requirements.
• Damage caused by incorrect connection, incorrect fitting, or incorrect
use is not covered by the warranty.
• If the connecting cable is damaged, it may only be replaced by the
22 • English

manufacturer, the manufacturer’s service organisation or equivalently
qualified persons, in order to avoid dangerous situations.
• The electrical connection must comply with national and local
regulations.
• The wall plug socket and plug should always be accessible.
• For connecting, use an approved cable with the correct cable
diameters appropriate for the connection. The cable casing should
be made of rubber (preferably a cable that meets the directive 60227
IEC 53).
• The connection cable must hang freely and should not be fed through
a drawer. Attention: the maximum power cord length is 200 cm.
• The worktop into which the hob is fitted, should be flat.
• The walls and the worktop surrounding the appliance must be heat
resistant up to at least 85°C. Even though the appliance itself does not
get hot, the heat of a hot pan could discolour or deform the wall.
• Legislation requires that all electrical and electronic equipment
must be collected for reuse and recycling. Electrical and
electronic equipment marked with the symbol indicating
separate collection of such equipment must be returned to a
municipal waste collection point.
English • 23

appliance description
2
24 • English
Hob
1. Cooking zone rear left (Ø 200 mm)
2. Cooking zone front left (Ø 160 mm)
3. Cooking zone front right (Ø 200 mm)
4. Cooking zone rear right (Ø 160 mm)
IKI6020 - IKI6021 - IKI6022 - IKI6023
1
2 3 4
1
2 3 4
IKI7821
IKI6020 IKI6021 IKI6022 IKI7821
6
7
8
9
14
12
9
13
6
7
8
9
12
9
13
10
11
14
IKI6023
6
8
9
14
7
9
13
12
10
11
Control panel
6. Pause key
7. Heat setting keys+ and - /
slider control - only available on model IKI6023
8. Heat setting/ residual heat display
9. Cooking zone key
10. Timer key
11. Display timer
12. Boost key
13. On/ off key
14. Key lock

English • 25
IKI9021
1
2 3 45
Bedieningspaneel
6. Pause key
7. Key lock
8. Heat setting/ residual heat display
9. Cooking zone key
10. Timer key
11. Boost key
12. On/ off key
13. Heat setting keys + and -
14. Display timer
IKI9021
Hob
1. Cooking zone rear left (Ø 200 mm)
2. Cooking zone front left (Ø 160 mm)
3. Cooking zone front right (Ø 200 mm)
4. Cooking zone rear right (Ø 160 mm)
5. Cooking zone middle (Ø 250 mm)
8
6
7
9
10
9
8
11
12
6
12
11
8
9
10
9
8
7
6
12
11
8
9
10
7
14
14
14
13
13
13
13
13

26 • English
before first use
3
Before you use the appliance for the first time, please do as follows: Carefully unpack the appliance and remove all the packaging
material. Keep the material (plastic bags and cardboard) out of reach of children. Check the appliance after unpacking for any
damage, possible from transportation. Clean the glass with a damp cloth. Check that the voltage in your home corresponds with the
voltage printed on the bottom of the appliance and plug it in a socket. Follow the installation instructions in chapter 7 for installing the
hob.
operation of the appliance
4
Use only suitable cookware on the induction hob .
After the mains voltage is applied all displays can light up for a moment. After that, the hob is in stand-by mode and is ready for use.
The hob is controlled with electronic sensors which are operated by touching the related keys. Each sensor activation is followed by a
sound signal.
SWITCHING THE APPLIANCE ON
Switch the hob on by touching the ON/OFF key for a few seconds. The displays of the cooking zones all show [0.] and the dots blink. If
there is no cooking zone selected within 20 seconds, the hob will automatically shut off.
SWITCHING THE APPLIANCE OFF
Switch the hob off at any time by touching the ON/OFF key for a few seconds.
The ON/OFF key always has priority in the switch off function.
SWITCHING ON A COOKING ZONE
Press on the key of the cooking zone you wish to use. There is a static dot indication on the selected cooking zone display and the dots
on the other displays turn off.
Place the pan on the cooking zone. Select the heat setting by using the increase heat setting key + or the decrease heat setting key -.
Attention: model IKI6023 has a slider control instead of + and -. Select the heat setting by sliding your finger over the slider.
To get food quickly to the boil, select the desired heat setting and touch the P key to activate the Boost function.
BOOST FUNCTION
The Boost function gives extra power and can be activated for each cooking zone. A cooking zone must be selected, the heat setting
set on the desired setting and the key (Boost) must be pressed. The Boost function is activated when a P appears in the display of
the selected cooking zone.
When using the Boost function the maximum available power will be divided between two cooking zones which work as a pair.
It is possible that the maximum available power for these two cooking zones together is exceeded. In that case the power of the
second cooking zone will be decreased automatically. The necessary power reduction is shown by blinking of the corresponding
cooking zone display. The display will blink for 3 seconds and during that time further adaptations of the settings are allowed before
the power is automatically reduced.
The duration of the Boost function depends on the selected heat setting of the corresponding cooking zone.
Setting + Boost Boost function automatically shuts off after Setting + Boost Boost function automatically shut off after
Setting 1 + P 1 minute Setting 6 + P 6 minutes
Setting 2 + P 2 minutes Setting 7 + P 7 minutes
Setting 3 + P 3 minutes Setting 8 + P 8 minutes
Setting 4 + P 4 minutes Setting 9 + P 9 minutes
Setting 5 + P 5 minutes - -

English • 27
SWITCHING A COOKING ZONE OFF
Select the cooking zone you want to switch off by pressing the corresponding key. Touch the - key to decrease the heat setting to [0].
By pressing the keys + and - simultaneously, the setting turns directly to [0].
If the cooking zone is hot, the displays shows an [H] instead of [0].
SWITCHING OFF ALL COOKING ZONES AT ONCE
To switch off all cooking zones at once, press the ON/OFF key. The displays which are still hot an [H] appears.
RESIDUAL HEAT DISPLAY
The residual heat display shows the glass is still too hot to touch around the cooking zone.
After switching off the cooking zone, the corresponding display shows [H]. As soon as the temperature has decreased enough the [H]
indication will disappear.
PAUSE FUNCTION
When pause is activated, it reduces the power of all cooking zones which are being used at that moment. As soon as pause is
deactivated, all cooking zones automatically switch back to the original heat settings.
• When the pause function is not deactivated, the hob will switch off after 30 minutes.
• Press the pause key to activate the pause function. The power of the activated cooking zones will be decreased and [II] is visible
in the displays.
• Press the pause key again to deactive the pause function. [II] disappears and the cooking zones switch back to the original heat
settings.
SAFETY SWITCH OFF
Each cooking zone will automatically be switched off after a defined maximum operation time if the heat setting is not modified.
The maximum operation time depends on the selected temperature level.
Heat setting Safety switch off after:
1 - 2 6 hours
3 - 4 5 hours
5 4 hours
6 - 9 1½ hours
CHILD LOCK
The child lock prevents an unintentional use of the hob. After switching on the control, the child lock function can be activated.
Do not select a cooking zone. To activate the child lock, press simultaneously the + and - keys and then the + key again. [L] appears in
the displays and indicates the controls can’t be changed. If a cooking zone is still hot, [L] and [H] will be displayed in alternation.
The hob will remain locked until it gets unlocked, even if the control has been switched off and on.
To deactivate the child lock, first switch on the hob. Press simultaneously the + and - keys and then the - key again. [L] disappears in
the displays and the hob will be switched off.
KEY LOCK
The key lock function is for blocking and setting the hob in a save mode during use. Setting a higher heat setting or other alterations are
not possible. It is only possible to switch the appliance off.
The key lock is activated when the key lock key is pressed for 2 seconds. This activation is confirmed by a sound signal. The
indicator for the key lock lights up and the controls are blocked.
TIMER FUNCTION (not available on model IKI6020)
The timer function can be used in two ways: minute minder timer and cooking zone timer.
Minute minder timer
The minute minder timer can be operated without active cooking zones. Switch the hob on and press the TIMER key . The display
shows
. Set the desired time with the + and - keys. The range of the minute minder timer is between 0 to 99 minutes. If there are
no controls touched in 10 seconds, the minute minder time will be set and the dot will disappear. The time runs down according to the
setting.
When the time is over, a signal sounds and the timer display blinks. The sound signal will stop automatically after 30 seconds or by
operating any key.
To change the timer, press the TIMER key again and change the time with the + and - key.

28 • English
Cooking zone timer
The cooking zone timer is connected to a cooking zone and can be set separately for each cooking zone. In contrast to the minute
minder timer the cooking zone timer switches off the cooking zone when the set time runs out.
• Switch on the hob and activate a cooking zone.
• Set the heat setting with the + and - key.
• Press on the TIMER key
. The display shows . The timer will now function as a minute minder timer.
• Press the TIMER key
again until the corresponding LED blinks to activate the cooking zone timer. Around the timer display there
a four LED’s. They indicate for which cooking zone, the cooking zone timer is set.
• Set the desired time with the + and - key.
• 10 seconds after the last control touch, the display will show the time of the cooking zone which runs out first (in case of
programming more than one cooking zone).
To set an extra cooking zone timer, do as follows:
• Activate another cooking zone.
• Set the heat setting with the + and - key.
• Press on the TIMER key
. The timer will now function as a minute minder timer.
• Press the TIMER key
again until the corresponding LED blinks to activate the cooking zone timer.
• Set the desired time with the + and - key.
• 10 seconds after the last control touch, the display will show the time of the cooking zone which runs out first (in case of
programming more than one cooking zone).
When the selected time has runs down, a signal sounds and the timer display shows [00]. The programmed cooking zone will be
switched off and [H] appears in the display if the cooking zone is hot.
The sound signal will stop automatically after 30 seconds or by operating any key.
SOUND SIGNAL
When the hob is in operation, the following activities will be signalled by means of a sound signal:
• normal key activation with a short sound signal
• continuous operation of keys over a longer period of time (10 seconds) with a longer, intermittend sound signal.
DISPLAY INDICATION
Indication on the display Description
An error has occured. Check the notification according to the table in
chapter 7.
Residual heat indication: the cooking zone is still hot.
The child lock is activated.
Fault. There is something placed on the controls or the cookware is not
suitable or too small.
Place a pan on the active cooking zone or switch it off.

English • 29
cookware for induction
5
Cookware which has been used on other hobs, such as a gas hob, are no longer suitable for use on an induction hob.
Therefore purchase before the first use new cookware if you do not have suitable pans.
• Use thick, flat smooth bottomed cookware that are the same diameter as the cooking zone. This will help reduce cooking times.
• Cookware made of steel, enamelled steel, cast iron and stainless steel will give the best results.
• Check the indications of the manufacturer whether the pan is suitable for use on an induction hob.
• Cookware made of enamelled steel or aluminium or copper bottoms can cause a metallic residue to remain on the hob. If left, this
becomes difficult to remove. Clean the hob after every use.
• Cookware is suitable for induction when a magnet sticks to the bottom of the cookware.
• Cookware must be placed centrally on the cooking zone.
• When using certain pans, you may get various noises from the pans, this is due to the design of the pans and does not effect the
performance or safety of the hob.
ENERGY SAVING
• Induction cooking zones adapt automatically to the size of the cookware bottom up to a certain limit. However the magnetic part
of the cookware bottom must have a minimum diameter depending upon the size of the cooking zone.
• Place the cookware on the cooking zone before it is switched on. If it is switched on before placing any cookware, the cooking zone
will not operate.
• Always use a lid to reduce cooking time.
• Decrease the heat setting when a liquid comes to the boil.
• Minimise the amount of liquid or fat to reduce cooking times.
• Select the correct heat setting for the several cooking options.
The following table is an indication for the several cooking options.
Settings Use for:
0 cooking zone off
1 - 3 keep warm
4 - 5 gentle simmering, slow warming
6 - 7 reheating and rapid simmering
8 boiling, saute and searing
9 maximum heat
P Boost function
correct false false
cleaning & maintenance
6
Make sure all the cooking zones are cooled down before cleaning the hob and lock the hob with the child lock.
• Do not use abrasive pads, corrosive cleaners, aerosol cleaners or sharp objects to clean the surface of the hob which are
not intended for this purpose.
• Clean the surface daily with a damp cloth and a mild detergent, such as washing-up liquid. Dry thoroughly with kitchen paper or a
clean cloth.
• Spilt food can be removed by soaking the spot with a damp cloth and some washing-up liquid or a special scraper. Attention: the
glass scraper has a razor, therefore, it must be kept away from children.
• Use a special cleaner for ceramic/induction hobs for difficult stains. Attention: follow the instructions on the product.

30 • English
installation instructions
7
• The safety during use can only be guaranteed when the hob is installed correctly and according to the regulations. The installer is
responsible for any damage caused by a faulty installation.
• The electrical connection must be made by a qualified electricien. This person is aware of the national and local regulations the
installation must comply with.
• The appliance falls under protection class I and can only be used in combination with a grounding conductor connection. The
manufacturer accepts no responsibility for any malfunction or damage caused by incorrect electrical installations.
• The appliance must be connected to a fixed installation and the means of disconnecting it from the fixed installation must be
installed according to the installation instructions.
• The induction hobs may only be installed over a drawer, ovens with forced ventilation from the same brand and dishwashers from
the same brand. Refrigerators, unventilated ovens and washing machines may not be installed beneath the hob.
• The connection cable must hang freely. Do not tie the power cable or pass it along sharp edges. If there is an oven installed below,
pass the cable along the rear corners of the oven to the connection box. It must be positioned so that it does not touch any of the
hot parts of the hob or the oven.
• The connection point, the wall socket and/or plug must always be accessible.
• The worktop into which the hob is fitted should be flat. Follow the instructions of the manufacturer of the worktop.
• Damage caused by incorrect connection, incorrect use or incorrect fitting is not covered by the guarantee.
• Attention: any change to the appliance’s interior, including fitting and changing the power cable, must only be performed by a
qualified electricien.
SPACE AROUND THE HOB
Sufficient clearance around the hob is essential for a safe use of the hob. Check that there is sufficient clearance.

590
560
53
520
490
min. 25*
min. 25*
* 40mm when the neighbouring walls
are wood.
INSTALLATION DIMENSIONS
In the drawings below, all the dimenions are displayed in mm. Make sure you use the right drawing for the model you have.
IKI6020 - IKI6021 - IKI6022 - IKI6023
890
860
53
490
520
min. 40**
min. 25*
* 60mm when using a back of wood.
** 150mm when using a sidewall of
wood.
IKI9021
780
750
53
490
520
min. 40**
min. 25*
* 60mm when using a back of wood.
** 150mm when using a sidewall of
wood.
IKI7821
English • 31

VENTILATION
The electronics in the hob need to cool. The hob will automatically switch off if there is insufficient air circulation and the hob will
overheat. There are ventilation openings on the underside of the appliance. It must be possible for cool air to be drawn in through
these openings. There are outlet openings to the front of the appliance.
Ventilation occurs through the plinth and the back of the cupboard. Saw out the ventilation openings (min. 100cm
2
). Air supply
through the plinth is superflous if, together with an opening at the back of the cupboard, there’s an opening somewhere else through
which air can be drawn in.
Ensure that there is sufficient air circulation.
• Make a ventilation opening to the front of the kitchen unit at least the width of the hob and to a minimum height of 5 mm if the hob
is built-in above a drawer or plank.
• Ensure there is a minimum height of 10 mm between the oven, the drawer or separator and the hob.
Metal objects can become hot because of the ventilation. If this occurs, we advise to use a separator. This can be a wooden panel.
• Attention: when fitting the hob above an oven the thickness of the worktop must be at least 35 mm and above a drawer the
thickness of the worktop must be at least 20 mm.
• Ensure the crossbar does not impede the airflow. Plane or saw the crossbar [C] diagonally if necessary.
Fitting above an oven - A Fitting above a drawer - B
32 •

THE FITTING OF THE APPLIANCE
• Check that the cabinet and the cut-out meet the dimension and ventilation requirements.
• Remove the chips from the cutting job in the opening of the worktop and treat the saw ends of wooden or synthetic worktops with
sealing varnish if necessary, to prevent moisture causing the worktop to swell.
• Lay the hob upside down on the worktop.
• Fit the connecting cable to the appliance in compliance with requirements.
• Remove the protective layer from the sealing tape and apply the tape on the edge of the glass plate. Make sure to apply the tape
to the glass and not on the metal part. Do not stick the tape around the corners, but cut 4 separate pieces to seal the corners well.
Attention: any damage that occurs when not applying the tape has concequences for the warranty.
• Fit the supllied mounting brackets on the appliance.
• Turn the hob over and lay it in the recess.
• Connect the appliance to the mains. The appliance is ready for use.
• Check that it works properly. If the appliance has been wrongly connected either a bleep will sound or an error code will appear on
the displays.
REMOVING THE HOB
Disconnect the hob from the mains. Remove the hob by pushing it upwards from the bottom. Attention! Beware of damage to the
appliance! Do not try to remove it from the top.
ELECTRICAL CONNECTION FOR 60 AND 78 CM WIDE HOBS
Connect the hob according to the wiring diagram.
This device is set for 2 x 1 phase (230V DC) and uses a so-called
5-pin Perilex plug. These groups in the meter must be secured
with at least 16 amps each. The connection cable must have a
cross-section of at least 2.5 mm ².
ATTENTION
:
this hob is not suited for a different wiring
diagram.
5x2,5 mm²
L1-N1 L2-N2
220V 220V
240V 240V
5x2,5 mm² 3N~
Model: IKI6020
IKI6021
IKI6022
IKI6023
IKI7821
Model: IKI9021
ELECTRICAL CONNECTION FOR A 90 CM WIDE HOB
Connect the hob according to the wiring diagram.
This device is set for three phase, three phase (400V DC) and
uses a special 5-pin plug. The connection cable must have a
cross-section of at least 2.5 mm ². The connection must be
performed by a qualified installer.
ATTENTION
:
this hob is not suited for a different wiring
diagram.
English • 33

problems & solutions
8
If there is an error, an error code will be shown at the displays.
Error code Cause Solution
E1 Cooling fan is disabled. Contact the service department of Inventum.
E3 Supply voltage is too high.
Have the installation checked by a qualified
electricien.
E4
Supply frequency is different from
the rated values (50Hz).
Have the installation checked by a qualified
electricien.
E5 The hob is overheated.
Switch the appliance off and let the cooking zones
cool down.
E6 Control defect. Contact the service department of Inventum.
E7 Coil temperature sensor is defect. Contact the service department of Inventum.
E8
Cooler temperature sensor is
defect.
Contact the service department of Inventum.
E9 Calibration error. Contact the service department of Inventum.
34 • English

product fiche
9
Manufacturer INVENTUM INVENTUM INVENTUM INVENTUM INVENTUM INVENTUM
Model IKI6020 IKI6021 IKI6022 IKI6023 IKI7821 IKI9021
Type of appliance induction hob induction hob induction hob induction hob induction hob induction hob
Number of cooking zones 4 4 4 4 4 5
Heating technology induction induction induction induction induction induction
Diameter per cooking zone [cm] (front left) Ø 16 Ø 16 Ø 16 Ø 16 Ø 16 Ø 16
Diameter per cooking zone [cm] (rear right) Ø 16 Ø 16 Ø 16 Ø 16 Ø 16 Ø 16
Diameter per cooking zone [cm] (rear left) Ø 20 Ø 20 Ø 20 Ø 20 Ø 20 Ø 20
Diameter per cooking zone [cm] (front right) Ø 20 Ø 20 Ø 20 Ø 20 Ø 20 Ø 20
Diamter per cooking zone [cm] (middle) Ø 25
Energy consumption per cooking zone [Wh/kg] (front left) 194 194 194 194 194 194
Energy consumption per cooking zone [Wh/kg] (rear right) 194 194 194 194 194 194
Energy consumption per cooking zone [Wh/kg] (rear left) 192 192 192 192 192 192
Energy consumption per cooking zone [Wh/kg] (front right) 192 192 192 192 192 192
Energy consumption per cooking zone [Wh/kg] (middle) 190
Energy consumption of the appliance [kg] 193 193 193 193 193 192,4
Residual heat indicator per cooking zone per cooking zone per cooking zone per cooking zone per cooking zone per cooking zone
On/ off key � � � � � �
Power on - indicator � � � � � �
Timer � � � � �
Execution
Material glass glass glass glass glass glass
Control touch keys touch keys touch keys touch keys + slider touch keys touch keys
Displays LED LED LED LED LED LED
Technical specifications
Dimensions (wxdxh) in mm 590 x 520 x 53 590 x 520 x 53 590 x 520 x 53 590 x 520 x 53 780 x 520 x 53 890 x 520 x 53
Nett weight in kg 10,6 10,6 10,6 10,6 11,7 15,7
Power consumption [W] 7400 7400 7400 7400 7400 10800
Rated voltage [V] / frequency [Hz] 220-230V 220-230V 220-230V 220-230V 220-230V 220-230V
Remark: on the rating label - which can be found at the bottom of the appliance - you will find the technical specifications of the appliance.
English • 35

36 • Nederlands
Hoe belangrijk service is, hoeven we je niet te vertellen. We ontwikkelen onze producten zodat je er jarenlang onbezorgd
plezier van kan hebben. Ontstaat er toch een probleem, dan vinden we dat je direct een oplossing mag verwachten. Daarom
bieden we je op onze producten een omruilservice, bovenop de rechten en vorderingen die je op grond van de wet toekomen.
Door een product of onderdeel om te ruilen, besparen we je tijd, moeite en kosten.
2 jaar volledige fabrieksgarantie
1. Op alle producten van Inventum krijg je als consument standaard 2 jaar volledige fabrieksgarantie. Binnen deze periode
wordt een defect product of onderdeel altijd gratis omgeruild voor een nieuw exemplaar. Om aanspraak te maken op de 2
jaar volledige fabrieksgarantie, kun je teruggaan naar de winkel waar je het product hebt gekocht of contact opnemen met de
consumentenservice van Inventum via het contactformulier op www.inventum.eu/service-aanvraag.
2. De garantieperiode van 2 jaar begint te lopen op de datum van aankoop van het product.
3. Voor het recht op garantie dien je een kopie van het originele aankoopbewijs te kunnen overleggen.
4. De garantie geldt uitsluitend bij normaal huishoudelijk gebruik van de Inventum producten binnen Nederland.
5 jaar Inventum garantie
1. Op de meeste groot huishoudelijke apparatuur en een selectie klein huishoudelijke producten biedt Inventum de 5 jaar Inventum
garantie. Deze 5 jaar Inventum garantie bestaat uit de 2 jaar volledige fabrieksgarantie en daarna 3 jaar aanvullende garantie. Het
enige dat je hoeft te doen voor het recht op 3 jaar aanvullende garantie is het product te registreren binnen 45 dagen na aankoop.
In de volgende paragraaf lees je meer over het registreren van het product.
2. Voor de 5 jaar Inventum garantie geldt dat een defect product of onderdeel gedurende de eerste 2 jaar altijd gratis wordt omgeruild
voor een nieuw exemplaar. Gedurende het 3e tot en met het 5e jaar betaal je alleen de omruilkosten. De actuele omruilkosten kun
je terugvinden op www.inventum.eu/omruilkosten.
3. Om aanspraak te maken op de 5 jaar Inventum garantie kun je teruggaan naar de winkel waar je het product hebt gekocht of
contact opnemen met de consumentenservice van Inventum via het formulier op www.inventum.eu/service-aanvraag.
4. De garantieperiode van 5 jaar begint te lopen op de datum van aankoop van het product.
5. Voor het recht op garantie dien je een kopie van het originele aankoopbewijs te kunnen overleggen.
6. De garantie geldt uitsluitend bij normaal huishoudelijk gebruik van de Inventum producten binnen Nederland.
Productregistratie
1. De 3 jaar aanvullende garantie is eenvoudig en kosteloos te regelen door het product binnen 45 dagen na aankoop te registreren
via de website www.inventum.eu/garantieregistratie. Wanneer je het product niet binnen 45 dagen na aankoop hebt geregistreerd,
heb je nog tot 2 jaar na aankoop de tijd om dit te regelen. Er zijn dan wel kosten aan deze registratie verbonden. De eenmalige
registratiekosten bedragen € 89,- voor elk afzonderlijk product. Registreren is alleen mogelijk voor producten waar de 5 jaar
Inventum garantie op van toepassing is. Of het product in aanmerking komt voor de 5 jaar Inventum garantie vind je in de
gebruiksaanwijzing van het product en bij de informatie over het product op de website van Inventum.
2. De garantieperiode begint steeds te lopen vanaf de datum van aankoop van het product. Ook wanneer het product pas later voor
aanvullende garantie wordt geregistreerd, wordt de garantieperiode vanaf de originele aankoopdatum berekend.
3. De 3 jaar aanvullende garantie kun je alleen aanvragen als je beschikt over een kopie van het originele aankoopbewijs en het
Inventum 5 jaar garantiecertificaat.
Groot huishoudelijke apparatuur
1. Storingen of defecten aan groot huishoudelijke apparatuur (vrijstaand- en inbouw witgoed) kunnen worden gemeld via het
formulier op www.inventum.eu/service-aanvraag, telefonisch bij de consumentenservice van Inventum of via de winkel waar je de
apparatuur hebt gekocht. Het telefoonnummer van de consumentenservice vind je op www.inventum.eu.
2. Bij gemelde storingen of defecten aan groot huishoudelijke apparatuur heeft Inventum de mogelijkheid om ter plaatse bij de
consument in Nederland een witgoedmonteur het defecte apparaat te laten onderzoeken en vervolgens een reparatie uit te laten
voeren. De consumentenservice van Inventum kan ook besluiten dat het apparaat wordt omgeruild.
3. Als je een storing of defect aan groot huishoudelijke apparatuur meldt in de eerste 2 jaar vanaf de datum van aankoop, brengt
Inventum geen kosten in rekening voor omruilen, voorrijden, onderdelen, materiaalgebruik en arbeidsloon.
4. Als je het product op de hiervoor beschreven wijze hebt geregistreerd op www.inventum.eu/garantie-registratie en je vervolgens
een storing aan groot huishoudelijke apparatuur meldt in het 3e t/m 5e jaar vanaf de datum van aankoop, dan is de 5 jaar Inventum
garantie van toepassing en wordt het apparaat kosteloos gerepareerd of omgeruild. Je bent dan bij reparatie of omruiling van het
apparaat alleen omruilkosten verschuldigd. De actuele omruilkosten kun je terugvinden op www.inventum.eu/omruilkosten. Indien
je het product niet hebt geregistreerd, dan is de 3 jaar aanvullende garantie niet van toepassing.
5. Bij een melding van een storing of defect zal een monteur binnen 1 werkdag contact opnemen voor het maken van een
bezoekafspraak. Bij melding in het weekend of op feestdagen is dit de eerstvolgende werkdag.
6. Indien je een storing of defect meldt via het formulier op www.inventum.eu/service-aanvraag, word je via mobiele berichten en
e-mail op de hoogte gehouden van de voortgang.
7. De garantieperiode begint te lopen op de datum van aankoop van het product.
8. Voor het recht op garantie dien je een kopie van het originele aankoopbewijs en het Inventum 5 jaar garantiecertificaat te kunnen
overleggen.
9. De garantie geldt uitsluitend bij normaal huishoudelijk gebruik van de Inventum producten binnen Nederland.
algemene service- en garantievoorwaarden

Nederlands • 37
Storingen of defecten buiten de garantieperiode
1. In geval van storingen of defecten aan klein huishoudelijke apparatuur of groot huishoudelijke apparatuur buiten de
garantieperiode, kan hiervan melding worden gemaakt bij de consumentenservice via het contactformulier www.inventum.eu/
service-aanvraag of door te bellen met de consumentenservice.
2. De consumentenservice kan je vragen het product voor onderzoek of reparatie op te sturen. De kosten van verzending zijn voor
jouw rekening.
3. Aan het onderzoek naar de mogelijkheid tot repareren zijn kosten verbonden. Je moet hier vooraf toestemming voor geven.
4. Bij groot huishoudelijke apparatuur kan Inventum op jouw verzoek een witgoedmonteur sturen. De voorrijkosten, onderdeel- en
materiaalkosten en arbeidsloon worden dan aan je in rekening gebracht.
5. In geval van opdracht tot reparatie moeten de reparatiekosten vooraf worden voldaan. Bij reparatie door een witgoedmonteur,
dienen de kosten van de reparatie ter plaatse bij de monteur, bij voorkeur via pinbetaling, te worden afgerekend.
Uitgesloten van garantie
1. De hiervoor genoemde garanties gelden niet in geval van:
• normale slijtage;
• onoordeelkundig of oneigenlijk gebruik;
• onvoldoende onderhoud;
• het niet in acht nemen van de bedienings- en onderhoudsvoorschriften;
• ondeskundige montage of reparatie door derden of door de consument zelf;
• door de consument toegepaste niet originele onderdelen;
• zakelijk of bedrijfsmatig gebruik;
• het serienummer en/of rating-label is verwijderd.
2. Tevens geldt de garantie niet voor normale verbruiksartikelen, zoals:
• kneedhaken, bakblikken, (koolstof)filters, etc.;
• batterijen, lampjes, koolstoffilters, vetfilters enz.;
• externe verbindingskabels;
• glazen accessoires en glazen delen zoals ovendeuren;
• en soortgelijke zaken.
3. Buiten de garantie vallen transportschades, voor zover deze niet door Inventum zijn veroorzaakt. Controleer daarom je nieuwe
apparatuur voordat je deze in gebruik neemt. Als je beschadigingen aantreft, dien je deze binnen 5 werkdagen na aankoop te
melden bij de winkel waar je het product hebt gekocht, of bij de consumentenservice van Inventum via het contactformulier op
de website www.inventum.eu/service-aanvraag. Indien transportschades niet binnen deze termijn worden gemeld, aanvaardt
Inventum geen enkele aansprakelijkheid ter zake.
4. Van garantie en/of vervanging zijn uitgesloten: defecten aan, verlies en beschadiging aan het apparaat als gevolg van een
gebeurtenis die gewoonlijk verzekerd is onder de inboedelverzekering.
Van belang om te weten
1. Vervanging of herstel van een defect product of een onderdeel daarvan leidt niet tot verlenging van de oorspronkelijke
garantietermijn.
2. Vervangen onderdelen, verpakkingsmateriaal en omgewisselde apparaten worden meegenomen door de witgoedmonteur en
worden eigendom van Inventum.
3. Indien een klacht ongegrond is, komen alle kosten die daardoor zijn ontstaan voor rekening van de consument.
4. Na verloop van de garantietermijn worden alle kosten voor herstel of vervanging, inclusief administratie-, verzend- en voorrijkosten
aan de consument in rekening gebracht.
5. Inventum is niet aansprakelijk voor schade die is ontstaan als gevolg van onjuiste inbouwsituaties.
6. Inventum is niet aansprakelijk voor schade veroorzaakt door van buiten het apparaat ontstane oorzaken, tenzij deze
aansprakelijkheid voortvloeit uit dwingendrechtelijke bepalingen.
7. Op deze garantie- en servicevoorwaarden is Nederlands recht van toepassing. Geschillen zullen uitsluitend worden berecht door
de bevoegde Nederlandse rechter.

38 • English
We do not need to remind you of the importance of service. After all, we develop our products to a standard so that you
can enjoy them for many years, without any concerns. If, nevertheless, there is a problem, we believe you are entitled to a
solution straight away. Hence our products come with an exchange service, on top of the rights and claims you are entitled to
by law. By exchanging a product or part, we save you time, effort and costs.
2-year full manufacturer’s warranty
1. Customers enjoy a 2-year full manufacturer’s warranty on all Inventum products. Within this period, a faulty product or part will
always be exchanged for a new model, free of charge. In order to claim under the 2-year full manufacturer’s warranty, you can either
return the product to the shop you bought it from or contact the Inventum costumer service department via the form at www.
inventum.eu/service-aanvraag.
2. The 2-year warranty period starts from the date the product is bought.
3. In order to claim under the warranty, you must produce a copy of the original receipt.
4. The warranty applies only to normal domestic use of Inventum products within the Netherlands.
5-year Inventum warranty
1. Inventum offers a 5-year warranty on most large domestic appliances and a selection of small domestic appliances. This 5-year
Inventum warranty consists of a 2-year full manufacturer’s warranty, extended by a further 3-year warranty. The only thing you
need to do to qualify for the 3-year extended warranty is to register the product within 45 days of purchase. You can read more
about registering the product in the following paragraph.
2. In accordance with the 5-year Inventum warranty provisions, a faulty product or part will always be exchanged for a new model
during the first 2 years under the warranty. During the 3rd to 5th year under the warranty, you will only pay the costs of exchange.
The current costs of exchange are listed at www.inventum.eu/omruilkosten.
3. In order to claim under the 5-year Inventum warranty, you can either return the product to the shop you bought it from or contact
the Inventum costumer service department via the form at www.inventum.eu/service-aanvraag.
4. The 5-year warranty period starts from the date the product is bought.
5. In order to claim under the warranty, you must produce a copy of the original receipt.
6. The warranty applies only to normal domestic use of Inventum products within the Netherlands.
Product registration
1. The 3-year extended warranty is easy to obtain, free of charge, by registering the product within 45 days of purchase, via the
website www.inventum.eu/garantie- registratie. If you did not register the product within 45 days of purchase, you can still do so
up to 2 years after the purchase date. However, there will be a charge. The one-off registration charge is € 89 for each separate
product. Registration is possible only for products that are subject to the 5-year Inventum warranty. Whether the product qualifies
for the 5-year Inventum warranty is stated in the product user manual and in the product information sheet, on Inventum’s website.
2. The warranty period always starts from the date the product is bought. If the product is registered for the extended warranty at a
later date, the warranty period still starts from the original date of purchase.
3. The 3-year extended warranty can only be applied for if you are in the possession of a copy of the original receipt and the Inventum
5-year warranty certificate.
Large domestic appliances
1. Breakdowns or faults in large domestic appliances (separate and built-in white goods) can be registered via the form at
www.inventum.eu/service-aanvraag, by calling the Inventum costumer service department or in the store where you bought the
device. The telephone number of the costumer service department can be found at www.inventum.eu.
2. In the event of breakdowns or faults in large domestic appliances, Inventum will have the option to have a service engineer inspect
the faulty device onsite at the customer in the Netherlands and to carry out repairs, there and then. The Inventum customer
service department can also decide to have the device exchanged.
3. If you suffer a breakdown or fault in a large domestic appliance during the first 2 years from the date of purchase, Inventum will not
charge any costs for the exchange, call-out or for parts and labour.
4. If you registered the product as described before at www.inventum.eu/garantie-registratie and you subsequently report a
breakdown of a large domestic appliance in the 3rd to 5th year of the date of purchase, the 5-year Inventum warranty applies and
the device will be repaired or exchanged, free of charge. In the event of a repair or exchange of the device, you only pay the costs
of exchange. The current costs of exchange are listed at www.inventum.eu/omruilkosten. If you did not register the product, the
3-year extended warranty does not apply.
5. When reporting a breakdown or fault, a service engineer will contact the customer within 1 working day in order to make an
appointment. When the report is made in a weekend or during a public holiday, this will be the next working day.
6. If you report a breakdown or fault via the form at www.inventum.eu/service-aanvraag, you will be kept informed of the progress via
mobile messages and e-mail.
7. The warranty period starts from the date the product is bought.
8. In order to claim under the warranty, you must produce a copy of the original receipt and the Inventum 5-year warranty certificate.
9. The warranty applies only to normal domestic use of Inventum products within the Netherlands.
general terms and conditions of service and warranty

Breakdowns or faults outside the warranty period
1. Breakdowns or faults in small or large domestic appliances outside the warranty period, can be reported to the costumer services
department via the form at www.inventum.eu/service-aanvraag or by calling the costumer services department.
2. The costumer services department may ask you to send the product for inspection or repair. The costs of dispatch will be at your
expense.
3. The inspection to establish whether repair is possible involves a charge. You need to grant your permission for this, in advance.
4. In the event of a large domestic appliance, Inventum, at your request, can send out a service engineer. In that case, you will be
charged the call-out costs, as well as parts and labour.
5. In the event of an instruction to repair, the repair costs must be paid in advance. In the event of a repair by a service engineer, the
costs of the repair must be settled with the engineer onsite, preferably by means of PIN payment.
Warranty exclusions
1. The following is excluded from the aforesaid warranties:
• normal wear and tear;
• improper use or misuse;
• insufficient maintenance;
• failure to comply with the operating and maintenance instructions;
• unprofessional installation or repairs by third parties or the customer himself;
• non-original parts used by the customer;
• use for commercial or business purposes;
• removal of the serial number and/or rating label.
2. In addition, the warranty does not apply to normal consumer goods, such as:
• dough hooks, baking tins, (carbon) filters, etc.;
• batteries, bulbs, carbon filters, fat filters etc.;
• external connection cables;
• glass accessories and glass parts such as oven doors;
• and similar items.
3. Transport damage not caused by Inventum is also excluded. Therefore, inspect your new device before starting to use it. If you
detect any damage, you must report this to the store where you purchased the product within 5 working days, or to the Inventum
customer service department via the form at www.inventum.eu/service-aanvraag. If transport damage is not reported within this
period, Inventum does not accept any liability in this respect.
4. The following are excluded from warranty and/or replacement: faults, loss of and damage to the device as a result of an event that
is normally insured under the home contents insurance.
Important to know
1. The replacement or repair of a faulty product, or a part thereof, does not lead to an extension of the original warranty period.
2. Parts that have been replaced, packaging material and exchanged devices are taken back by the service engineer and become the
property of Inventum.
3. If a complaint is unfounded, all costs arising from it will be at the customer’s expense.
4. Following expiry of the warranty period, all costs of repair or replacement, including administration costs, dispatch and call-out
charges, will be charged to the customer.
5. Inventum cannot be held liable for damage as a result of devices built in incorrectly.
6. Inventum cannot be held liable for damage caused by external events, unless this liability arises from mandatory statutory
provisions.
7. These warranty and service provisions are governed by Dutch law. Disputes will be settled exclusively by the competent Dutch
court.
English • 39

IKI-serie/02.0516
Wijzigingen en drukfouten voorbehouden/ Änderungen und Druckfehler vorbehalten/
Sous réserve de modification / Modifications and printing errors reserved
Inventum Huishoudelijke
Apparaten B.V.
Meander 861
6825 MH Arnhem
Tel: 0800-4583688
info@inventum.eu
www.inventum.eu
twitter.com/inventum1908
facebook.com/inventum1908
youtube.com/inventum1908
persoonlijke verzorgingklein huishoudelijk witgoed inbouwwitgoed vrijstaand
-
 1
1
-
 2
2
-
 3
3
-
 4
4
-
 5
5
-
 6
6
-
 7
7
-
 8
8
-
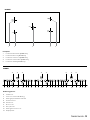 9
9
-
 10
10
-
 11
11
-
 12
12
-
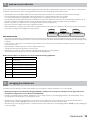 13
13
-
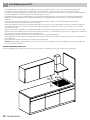 14
14
-
 15
15
-
 16
16
-
 17
17
-
 18
18
-
 19
19
-
 20
20
-
 21
21
-
 22
22
-
 23
23
-
 24
24
-
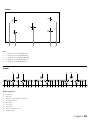 25
25
-
 26
26
-
 27
27
-
 28
28
-
 29
29
-
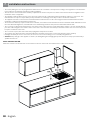 30
30
-
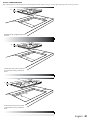 31
31
-
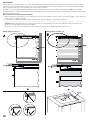 32
32
-
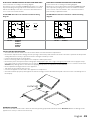 33
33
-
 34
34
-
 35
35
-
 36
36
-
 37
37
-
 38
38
-
 39
39
-
 40
40


Inventum IKI6020 Handleiding
- Categorie
- Kookplaten
- Type
- Handleiding
in andere talen
- English: Inventum IKI6020 User manual
Gerelateerde papieren
-
Inventum IKI9035 Handleiding
-
Inventum VKC6010WIT Handleiding
-
Inventum IKC6010 Handleiding
-
Inventum IKI3020 Handleiding
-
Inventum IKI6010 Handleiding
-
Inventum IKC6031 Handleiding
-
-
Inventum VKI6010ZWA Handleiding
-
Inventum VKI3010ZWA Handleiding
-
Inventum IKI7735 de handleiding