
Installatievoorschrift
Inductiekookplaten
Installation instructions
Induction hobs
Installationsanleitung
Induktionskochfeld
Instructions d’installation
Plaque de cuisson induction
05
05
GBNL
BE
FR
BE
DE
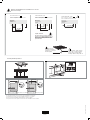
A (mm) C (mm) D (mm)
min. 650 min. 450 min. 40
A (mm) B (mm) C (mm) D (>mm) E (>mm)
560 600 490 40 70
L1 (W) L2 (W) L3 (W) Total load (W)
3700 3700 - 7400
D
C
E
A
B
A (mm) B (mm) C (mm) D (mm)
KI2160ZT / KI1160ZT /IK1264 590 520 56 60
KI2160RVS 592.5 522.5 57 61
AB
C
D
Dit toestel moet altijd geaard zijn.
Dieses Gerät muß jederzeit geerdet sein.
This appliance must be earthed.
Cet appareil doit être mis à la terre.
De elektrische aansluiting moet voldoen aan de nationale en lokale voorschriften.
Der elektrische Anschluß muß den nationalen und kommunalen Vorschriften entsprechen.
The electrical connection must comply with national and local regulations.
Le branchement électrique doit satisfaire aux prescriptions nationales et locales.
Belangrijk om te weten/Wichtig zu wissen
Important information/Important à savoir
Gebruikte pictogrammen/Verwendete Piktogramme/Pictograms used
Pictogrammes utilisés
Aansluitwaarden/Anschlussleistung/Connected load/Charge connectée
Elektrische aansluiting/Elektrische anschluß
Electrical connection/Branchement électrique
A
B
min.
B+D
C
D
Vrije ruimte rondom toestel
Freier Raum rundum das Gerät
Free space around appliance
Espace libre autour de l'appareil
Dit toestel mag alleen door een erkend installateur worden aangesloten. Lees de veiligheidsvoorschriften.
Dieses Gerät darf nur von einem anerkannten Installateur angeschlossen werden! Bitte lesen Sie die Sicherheitsbestimmungen.
The fitting of the appliance should only be carried out by a registered Corgi qualified installer. Please read the safety regulations.
Cet appareil ne peut être installé que par un technicien gazier agréé. Lisez les instructions de sécurité.
F
Voorbereidingen voor montage/Vorbereitung der Montage/Preparations for installation
Préparation avant installation
oven Bereikbaarheid!
Accessibility!
Accessibilité!
Zugänglichkeit! F
F
Afdichtband plaatsen/Placing sealing tape
Placement de la bande d'étanchéité/Abdichtband anbringen
Aanrechtblad
Worktop
Plan de travail
Arbeitsplatte

825810
825810 / VER 4 / 15-02-2022
Op onze website kunt u de meest recente versie van het installatievoorschrift vinden.
You can nd the most recent version of the installation instructions on our website.
Die neueste Version der Installationsanleitung nden Sie auf unserer Website.
Vous pouvez trouver la version la plus récente des instructions d’installation sur notre site Web.
Beluchting/Belüftung/Ventilation
05
A1
min. 100 cm 2
1
2
3
3
Elektrische aansluiting/Elektrische anschluß/Electrical connection
Branchement électrique
220-240V
1 fase - 1 nul / 1 phase - 1 neutral
1 Phase - 1 Nullanschluss / 1 phase et 1 neutre
Aderdoorsnede
Aderquerschnitt
Cross sectional area
l diamètre
1 1N 220-240V 50/60Hz - 1x 32A
220-240V
220-240V
2N 380-415V 50/60Hz - 2x 16A
2 fase - 1 nul / 2 phases - 1 neutral
2 Phasen - 1 Nullanschluss / 2 phases et 1 neutre
Aderdoorsnede
Aderquerschnitt
Cross sectional area
l diamètre
220-240V
220-240V
Hob power conguration
Aderdoorsnede
Aderquerschnitt
Cross sectional area
l diamètre
2-2N 220-240V 50Hz - 2x 16A
2 fase - 2 nullen / 2 phases - 2 neutral
2 Phasen - 2 Nullanschlusse / 2 phases et 2 neutres
5 draads kabel / lengte 140 cm
Câble 5 ls / Longueur 140 cm
5 wire cable / Length 140 cm
5-adriges Kabel / Länge 140 cm
Aansluitschema’s
Connection diagrams
Schémas de connexion
Anschlusspläne
min. 20 mm
Min. 20 mmMin. 20 mm
10-50
10-50
2 - 6 mm*
2 - 6 mm*
* To reach the best hob performance, we advise a ventilation gap as large as possible.
De 2 fasen van de kookgroep-automaat
moeten door 1 aardlekschakelaar gevoed
worden. Het is niet toegestaan om L1/N1
via een andere aardlekschakelaar te laten
lopen dan L2/N2
Only NL / Alleen NL
-
 1
1
-
 2
2


in andere talen
- français: ETNA KI460ZT Guide d'installation
Gerelateerde papieren
Andere documenten
-
Pelgrim IKA7072 Handleiding
-
Plug Play Induction Hobs Installatie gids
-
-
Asko CRAFT OP8664B STEKEOVN Installatie gids
-
Foster 7334240 Handleiding
-
Atag hi 9271 m de handleiding
-
M-system MFCDI94AN de handleiding
-
 De Dietrich WE5659E11 de handleiding
-
Inventum IKI9021 Handleiding
-
NOVY 1754 de handleiding
