iGuzzini Q737 Installatie gids
- Categorie
- Thermostaten
- Type
- Installatie gids

IS13522/00

V6215-742-00 01/17
KNX Multi-Touch ProArt.-Nr. MTN6215-5910© Schneider-Electric 2014V6215-742-0001/17
– Komplettieren Sie den KNX Multi-Touch Pro mit einem
System Design-Rahmen.
– Demontageschutz Art.-Nr. MTN6270-0000
– Fernfühler für Universal Raumtemperaturregler mit
Touch-Display Art.-Nr. MTN5775-0003
¼GEFAHR
Gefahr von schweren Sach- und Personen-
schäden, z. B. durch Brand oder elektrischen
Schlag, aufgrund einer unsachgemäßen
Elektroinstallation.
Eine sichere Elektroinstallation kann nur gewähr-
leistet werden, wenn die handelnde Person nach-
weislich über Grundkenntnisse auf folgenden
Ge biete n ve r f ü g t :
• Anschluss an Installationsnetze
• Verbindung mehrerer Elektrogeräte
• Verlegung von Elektroleitungen
• Anschluss und Errichtung von KNX-Netzwer-
ken
Über diese Kenntnisse und Erfahrungen verfü-
gen in der Regel nur ausgebildete Fachkräfte im
Bereich der Elektro-Installationstechnik. Bei
Nichterfüllung dieser Mindestanforderungen
oder Missachtung droht für Sie die persönliche
Haftung bei Sach- und Personenschäden.
*V6215-742-00*
KNX Multi-Touch Pro
Gebrauchsanleitung
Art.-Nr. MTN6215-5910
Notwendiges Zubehör
Zubehör
Lieferumfang
KNX Multi-Touch Pro mit Busanschlussklem-
me
Tragring
Für Ihre Sicherheit
fr itde nl
KNX Multi-Touch Pro ist eine KNX-Steuerungseinheit mit
der Sie bis zu 32 unterschiedliche Raumfunktionen steu-
ern können, wie z. B. Licht schalten oder dimmen, Ja-
lousien steuern oder Szenen aufrufen. Darüber hinaus
ist ein Raumtemperaturregler integriert der unterschied-
liche Regelungsarten unterstützt.
Alle Funktionen werden auf einem berührungsempfindli-
chen Bildschirm angezeigt und mit einfachen Fingerbe-
wegungen aufgerufen.
KNX Multi-Touch Pro besitzt einen integrierten Busank-
oppler; die Stromversorgung erfolgt über den KNX-Bus.
Die Näherungsfunktion
Bei aktivierter Näherungsfunktion wird der Startbild-
schirm erst dann sichtbar, wenn Sie sich KNX Multi-
Touch Pro bis auf ca. 20 cm nähern. Sobald keine Nähe-
rung mehr erkannt wird, geht das Gerät nach einer be-
stimmten Zeit (0-600 s) wieder in den Ruhezustand.
|Die Näherung wird optimal erkannt, wenn die
Hand frontal auf das Gerät zubewegt wird. Die
Reichweite A kann aufgrund örtlicher Gegeben-
heiten (z. B. Umgebungshelligkeit) etwas
schwanken.
Die Gestenfunktion
Mit eingeschalteter Gestenfunktion kann KNX Multi-
Touch Pro eine Handbewegung erkennen und so eine
von Ihnen festgelegte Funktion aufrufen. So lässt sich
beim Betreten des Raumes über eine Geste z. B. das
Licht einschalten.
Sie können zwischen 2 Gesten wählen, die das Gerät er-
kennt:
Geste 1: horizontale Handbewegung
Geste 2: vertikale Handbewegung
Die Geste wird in einer Entfernung von ca. 5 cm vor dem
Gerät erkannt (bitte Hinweis der Näherungsfunktion be-
achten).
Reinigungsmodus
Wenn Sie den Reinigungsmodus aktivieren, dann er-
kennt der Bildschirm für 30 s - 90 s weder Berührungen
noch Gesten.
Weitere Funktionen
• Hintergrundbeleuchtung anpassen
• Bildschirmschoner einstellen
• Bildschirmsperre
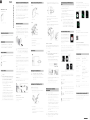
KNX Multi-Touch Pro kennenlernen
ETS-Gerätefunktionen
AReichweite ca.
20 cm
A
Die Vorderseite
ABerührungsempfindlicher Bildschirm
Die Rückseite
BBusanschlussklemme und Busanschluss
CProgrammiertaster
DProgrammier-LED
EAnschlussklemme Fernfühler
FService-Schnittstelle
|Funktionsstörung durch direkte Sonnenein-
strahlung
Direkte Sonneneinstrahlung auf das Gerät führt
ggf. dazu, dass keine Näherung mehr erkannt
wird.
• Platzieren Sie das Gerät immer in Bereichen
mit normalen Lichtverhältnissen.
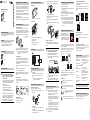
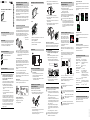
Montage eines Einzelgerätes
Zur Montage benötigen Sie einen Rahmen.
1Tragring mit dem Pfeil nach oben auf die Einbaudo-
se montieren.
2Busanschluss A:
- Rote Busader (+) an die rote Busanschlussklem-
me anschließen.
- Schwarze Busader (-) an die dunkelgraue Busan-
schlussklemme anschließen.
Anzeigen und Bedienelemente
Anschlüsse
Montageort auswählen
KNX Multi-Touch Pro montieren
A
CD
E
F
B
3Schirm- und Beilaufdraht sowie weiße und gelbe
Adern B isolieren und in die Einbaudose legen.
4Optional: Fernfühler anschließen
5Gerät mit unten liegendem Busanschluss in den
Rahmen setzen.
6Busanschlussklemme auf den Busanschluss ste-
cken.
7Gerät mit Rahmen auf den Tragring stecken und ein-
rasten.
Montage einer Kombination
In Kombination mit Geräten mit 230 V-Anschluss (z. B.
Steckdosen) beachten Sie zusätzlich folgende Montage-
hinweise.
¼WARNUNG
Lebensgefahr durch elektrischen Schlag.
Das Gerät kann beschädigt werden.
Bei SELV-Leitungen muss die Basisisolierung
zum Tragring immer gewährleistet sein.
• Beachten Sie folgende Abisolierlängen und die
Leitungsverlegung.
Wenn nur noch die Einzeladerisolierung zur Ver-
fügung steht, dann müssen Sie die Basisisolie-
rung wieder herstellen.
• Ziehen Sie einen Isolierschlauch oder den
Busleitungsmantel über die Einzeladern.
|Hinweise zur Montage:
• Wählen Sie den Montageort so, dass der Fern-
fühler die Temperatur frei messen kann.
• Verlegen Sie den Fernfühler bis zur Messauf-
nahme in einem Leerrohr.
• Fußbodenmontage: Verlegen Sie den Fernfüh-
ler in einem Fühlerschutzrohr, damit der Fern-
fühler nicht durch Fliesenkleber oder Estrich
beschädigt wird.
• Die Fühlerleitung kann mit einer 2-adrigen Lei-
tung für Netzspannung (1,5 mm2) oder mit ei-
ner Klingelleitung verlängert werden (<10 m).
• Anzugsmoment der Schrauben: max. 0,4 Nm
|Beachten Sie die Hinweise zur Abisolierlänge
und zur Leitungsverlegung im Kapitel “Montage
einer Kombination”.
Fernfühler: Montagehinweise
A
B
15 mm 5 mm
1Programmiertaste drücken.
Die Programmier-LED leuchtet.
2Physikalische Adresse und Applikation aus der ETS
in das Gerät laden.
Die Programmier-LED erlischt.
Das Gerät geht für einige Sekunden in den Konfigurati-
onsmodus. Während dieser Zeit werden Sie über das
Display aufgefordert zu warten.
|Im Konfigurationsmodus wird der Näherungssen-
sor an die örtlichen Gegebenheiten angepasst.
Um ein optimales Ergebnis zu erzielen, darf das
Gerät in dieser Zeit keine Bewegungen registrie-
ren. Anderenfalls beginnt die Konfiguration im-
mer wieder von neuem oder das Ergebnis wird
verfälscht.
Streichen Sie nach rechts oder links und Sie gelangen
auf weitere maximal 7 Hauptfunktionsseiten und auf die
Allgemeinen Einstellungen.
Jeder Hauptfunktionsseite stehen maximal bis zu 3 Un-
terfunktionsseiten zur Verfügung auf denen Sie z. B. die
Lamellenposition oder die Schaltuhr einstellen.
In den Allgemeinen Einstellungen machen Sie generelle
Angaben zum Bildschirmschoner, der Näherungsfunkti-
on oder der Gestenfunktion.
So bedienen Sie
KNX Multi-Touch Pro in Betrieb nehmen
Die Benutzeroberfläche in Kürze
Sobald KNX Multi-Touch Pro be-
triebsbereit ist, wird die von Ihnen ge-
wünschte Startseite angezeigt. Dies
ist z. B die Hauptfunktionsseite des
Raumtemperaturreglers mit Informa-
tionen zur Temperatur und Betriebs-
art.
So navigieren Sie durch das Menü
Streichen rechts/links: zwischen den Funkti-
onsseiten wechseln
Tippen: zwischen Hauptfunktionsseite und Un-
terfunktionsseite springen, Funktionen aufrufen,
Werte einstellen
Streichen kreisförmig, Streichen rauf/
runter: Wertebereiche durchfahren,
Werte aufrufen.
Tippen und halten: Spezielle Funktionen aufrufen
wie z. B. Szenen speichern oder Jalousie fahren.
Die Darstellung der Raumfunktionen
Ihre Raumfunktionen können Sie in unterschiedlichen
Designs darstellen.
Im folgenden Beispiel wird die Funktion “Jalousie fahren
und Lamellen schrittweise verstellen” in den 3 Designs
gezeigt.
Die Anleitung zum Menü
Die komplette Anleitung zum Menü finden Sie hier zum
Download.
Kundenspezifische Anpassungen
Wenn Sie Farben und Symbole der Benutzeroberfläche
anpassen möchten, dann wenden Sie sich an Ihr Custo-
mer Care Center von Schneider Electric.
www.schneider-electric.com
|Übergeben Sie diese Gebrauchsanleitung zur
dauerhaften Aufbewahrung an Ihren Kunden.
Bei technischen Fragen wenden Sie sich bitte an das
Customer Care Centre in Ihrem Land.
schneider-electric.com/contact
1. 2. 3.
www.schneider-electric.com/ww/en
Technische Daten
Versorgung aus KNX: DC 24 V, ca. 28 mA
Anzeigeelemente: Programmier-LED
Bedienelemente: berührungsempfindlicher Bild-
schirm, Programmiertaster
Größe Bildschirm: 7,1 cm (2,8”)
Umgebungstemperatur
Betrieb: -5 °C bis +45 °C
Max. Feuchtigkeit: 93 % relative Feuchtigkeit,
keine Betauung
Umgebung: Das Gerät ist für eine Einsatz-
höhe bis 2000 m über Meeres-
spiegel (MSL) ausgelegt.
Schutzart: IP 20
Anschluss KNX: zwei 1 mm-Stifte für Busan-
schlussklemme
Anschlussklemme
Fernfühler:
2x 0,14 mm2 - 1,5 mm2
Schneider Electric Industries SAS

V6215-742-00 01/17
Commande multiTouch KNX ProArt. no. MTN6215-5910© Schneider-Electric 2014V6215-742-0001/17
– Complétez la commande multiTouch KNX Pro avec un
cadre System Design.
– Protection de désassemblage, réf. MTN6270-0000
– Télécapteur pour thermostat d'ambiance universel
avec écran tactile, réf. MTN5775-0003
¼DANGER
Risque de graves dommages matériels et de
blessures corporelles sérieuses dus, par
exemple, au feu ou à un choc électrique
ayant pour origine des installations élec-
triques incorrectes.
Seule une personne justifiant de connaissances
de base dans les domaines suivants peut assurer
des installations électriques sécurisées :
• Raccordement aux réseaux d'installation
• Raccordement de différents appareils élec-
triques
• Pose de câbles électriques
• Connexion et établissement de réseaux élec-
triques KNX
Seuls les professionnels compétents ayant été
formés dans le domaine de la technologie des
installations électriques possèdent, en règle gé-
nérale, ces compétences et cette expérience. Si
ces conditions minimum ne sont pas remplies ou
si elles sont ignorées d'une manière ou d'une
autre, vous serez entièrement responsable en
cas de dommages sur des biens ou de dom-
mages corporels.
*V6215-742-00*
Commande multiTouch KNX Pro
Notice d'utilisation
Art. no. MTN6215-5910
Accessoires nécessaires
Accessoires
Contenu de la livraison
Commande multiTouch KNX PRO avec
borne de raccordement de bus
Bague de support
Pour votre sécurité
fr itde nl
Le multiTouch KNX Pro est une unité de commande
KNX avec laquelle vous pouvez commander jusqu'à 32
fonctions pièce différentes, telles que allumage ou gra-
dation de la lumière, commande des stores ou appel de
scénarios. En outre, il possède un régulateur de tempé-
rature ambiante intégré qui prend en charge différents
types de contrôle.
Toutes les fonctions sont affichées sur un écran tactile et
sont appelées par des mouvements simples du doigt.
Le multiTouch KNX Pro a un coupleur de bus intégré et
son alimentation est fournie par le bus KNX.
La détection de proximité
Lorsque la détection de proximité est active, l'écran d'ac-
cueil est visible seulement lorsque vous approchez à en-
viron 20 cm du multiTouch KNX Pro. Dès qu'aucun
mouvement vers l'appareil n'est plus détecté, il retourne
en mode veille après un certain temps (0 à 600 s).
|Pour détecter au mieux la proximité, bougez la
paume de la main sur le devant, en direction de
l'appareil. La plage A peut varier légèrement en
raison des facteurs environnementaux (luminosi-
té ambiante, p. ex.).
La commande par geste
Si la commande par geste est activée, le multiTouch
KNX Pro peut détecter un mouvement de main et ainsi
appeler une fonction que vous avez définie. Ainsi, la lu-
mière peut être allumée par un geste lorsque vous péné-
trez dans la pièce, par exemple.
Vous avez le choix entre 2 gestes que l'appareil
reconnaît :
Geste 1 : mouvement de main horizontal
Geste 2 : mouvement de main vertical
Le geste est détecté à une distance d'env. 5 cm devant
l'appareil (veuillez vous reporter aux informations sur la
détection de proximité).
Mode nettoyage
Si vous activez le mode nettoyage, l'écran ne détecte ni
le toucher, ni les gestes pendant 30 à 90 s.
Fonctions supplémentaires
• Réglage de l'éclairage de fond
• Réglage de l'écran de veille
• Verrouillage d'écran
Se familiariser avec la commande
multiTouch KNX Pro
Fonctions de l'appareil ETS
APlage de détec-
tion env. 20 cm
A
L'avant
AÉcran tactile
L'arrière
BBorne de raccordement de bus et connexion de bus
CTouche de programmation
DDEL de programmation
EBorne de raccordement du télécapteur
FInterface maintenance
|Erreur de fonctionnement due à la lumière di-
recte du soleil
Le fait que l'appareil soit soumis à la lumière di-
recte du soleil peut empêcher la détection de
proximité dans certains cas.
• Toujours placer l'appareil dans des zones sans
lumière directe du soleil.
Installation d'un appareil individuel
Un cadre est nécessaire pour l'installation.
1Fixez la bague de support sur la boîte d'encastre-
ment avec les flèches orientées vers le haut.
2Connexion bus A:
- Raccordez le câble de bus rouge (+) à la borne de
raccordement de bus rouge.
- Raccordez le câble de bus noir (-) à la borne de
raccordement de bus gris foncé.
Affichages et éléments de commande
Connexions
Choisir le site d'installation
Installation de la commande
multiTouch KNX Pro
A
CD
E
F
B
3Isolez le fil d'écran et de stabilité ainsi que les
câbles blanc et jaune B, puis insérez-les dans la
boîte d'encastrement.
4En option : Raccordement du télécapteur
5Placez l'appareil dans le cadre avec la connexion
de bus à la base.
6Raccordez la borne de raccordement de bus à la
connexion de bus.
7Insérez l'appareil avec le cadre dans la bague de
support et encliquetez l'ensemble.
Installation d'une combinaison
Observez les instructions de montage complémentaires
suivantes lorsque vous installez des appareils en asso-
ciation avec une connexion 230 V (p. ex. des prises).
¼AVERTISSEMENT
Risque de blessures mortelles dû à un choc
électrique. Risque d'endommagement de
l'appareil.
Pour les câbles SELV, garantissez toujours une
isolation de base vers la bague de retenue.
• Respectez les longueurs de dénudage sui-
vantes et les instructions sur la pose de câbles.
Si seule une isolation à brin unique est dispo-
nible, rétablissez une isolation de base.
• Tirez une gaine isolante ou le manteau du
câble bus sur chaque brin.
|Remarques au sujet de l'installation :
• Choisissez un lieu d'installation qui permette
au télécapteur de mesurer librement la tempé-
rature.
• Placez le télécapteur dans un tube vide aussi
éloigné que l'entrée de mesure.
• Installation au sol : Placez le télécapteur dans
un tube de protection du capteur pour qu'il ne
soit pas endommagé par du ciment de carre-
lage ou de la chape.
• La ligne de capteur peut être prolongée au
moyen d'un câble à 2 fils pour la tension de
secteur (1,5 mm2) ou d'un câble de sonnerie
(<10 m).
• Couple de serrage des vis : 0,4 Nm max.
|Respectez les instructions sur les longueurs de
dénudage et la pose de câbles du chapitre
« Installation d'une combinaison ».
Télécapteur : Instructions de montage
A
B
15 mm 5 mm
1Appuyez sur la touche de programmation.
la LED de programmation s'allume.
2Chargez l'adresse physique et l'application dans
l'appareil à partir de l'ETS.
la LED de programmation s'éteint.
L'appareil entre en mode configuration pour quelques
secondes. Pendant ce temps, un message apparaît sur
l'écran, vous demandant d'attendre.
|Le capteur de proximité est adapté aux condi-
tions spécifiques en mode configuration. Pour
obtenir les meilleurs résultats, l'appareil ne peut
alors pas enregistrer les mouvements pendant ce
délai. Sinon, la configuration recommencera de-
puis le début à plusieurs reprises ou le résultat
sera faussé.
Effleurer vers la droite ou la gauche pour accéder aux 7
autres écrans de fonction principale et aux réglages gé-
néraux.
Chaque écran de fonction principale a accès à 3 écrans
de sous-fonction sur la plupart desquels vous pouvez ré-
gler la position des lamelles ou la minuterie, par
exemple.
Dans les réglages généraux, vous définissez les ré-
glages généraux pour l'écran de veille, la détection de
proximité ou la commande par geste.
Comment opérer
Mise en service de la commande
multiTouch KNX Pro
L'interface utilisateur en bref
Dès que la commande multiTouch
KNX Pro est prête à fonctionner,
l'écran d'accueil que vous avez sé-
lectionné s'affiche. Cela peut être,
par exemple, l'écran fonction princi-
pal de l'unité de contrôle de tempéra-
ture ambiante avec des informations
sur la température et le mode de
fonctionnement.
Comment naviguer à travers le menu
Effleurer droite/gauche : commute entre les
écrans fonction
Toucher : saute entre l'écran fonction principal et
l'écran sous-fonction, appelle les fonctions, règle
les valeurs
Effleurer en cercle, effleurer haut/bas :
défile entre les plages de valeurs, ap-
pelle les valeurs
Toucher-maintenir : appelle les fonctions spé-
ciales telles que l'enregistrement de scénarios ou
le déplacement des stores.
Vue des fonctions pièce
Vous pouvez afficher vos fonctions pièce selon différents
profils.
Dans l'exemple suivant, la fonction « Déplacer le store et
ajuster les lamelles progressivement » est illustrée dans
les 3 profils.
Instructions de menu
Les instructions de menu complètes peuvent être télé-
chargées ici.
Adaptations personnalisées
Si vous désirez ajuster couleurs et symboles sur l'inter-
face utilisateur, veuillez contacter le service d'assistance
client Schneider Electric.
www.schneider-electric.com
|Remettez ce mode d'emploi à votre client qui le
conservera.
En cas de questions techniques, veuillez contacter le
Support Clients de votre pays.
schneider-electric.com/contact
1. 2. 3.
www.schneider-electric.com/ww/en
Caractéristiques techniques
Alimentation électrique
fournie par KNX : 24 V CC, 28 mA env.
Éléments d'affichage : DEL de programmation
Éléments de com-
mande
Écran tactile, touche de pro-
grammation
Taille de l'écran 7,1 cm (2.8”)
Température ambiante
de fonctionnement : -5 °C à +45 °C
Humidité max. : 93% d'humidité relative,
pas de condensation
Environnement : L'appareil est conçu pour une
utilisation à une altitude pou-
vant atteindre 2 000 m au-des-
sus du niveau de la mer.
Indice de protection IP : IP 20
Connexion KNX : deux broches de 1 mm pour la
borne de raccordement de bus
Borne de raccordement
du télécapteur : 2x 0,14 mm2 - 1,5 mm2
Schneider Electric Industries SAS

V6215-742-00 01/17
Multitouch KNX ProArt. no. MTN6215-5910© Schneider-Electric 2014V6215-742-0001/17
– Completare il dispositivo Multitouch KNX Pro con una
cornice System Design.
– Smontaggio protezione art. n. MTN6270-0000
– Sensore remoto regolatore temp. ambiente universale
con display a sfioramento art. n. MTN5775-0003
¼PERICOLO
Sussiste il rischio di gravi danni a beni e le-
sioni personali, ad es. a causa di fiamme o
scosse elettriche, riconducibili a un'errata in-
stallazione elettrica.
Un'installazione elettrica sicura può essere ga-
rantita solo se il tecnico addetto all'installazione
dimostra di possedere competenze di base nei
seguenti campi:
• Collegamento di impianti elettrici
• Collegamento di molteplici dispositivi elettrici
• Posa di cavi elettrici
• Collegamento e realizzazione di reti KNX
Tutte le suddette competenze ed esperienze
sono di solito possedute solo da professionisti
qualificati che hanno ricevuto una formazione nel
campo della tecnologia delle installazioni elettri-
che. Nel caso in cui questi requisiti essenziali non
siano soddisfatti o rispettati in qualsiasi modo, la
persona in questione sarà la sola a essere ritenu-
ta responsabile di ogni tipo di danno a beni o di le-
sioni personali.
*V6215-742-00*
Multitouch KNX Pro
Istruzioni di servizio
Art. no. MTN6215-5910
Accessori necessari
Accessori
Fornitura
Multitouch KNX Pro con morsetto di connes-
sione bus
Anello di supporto
Per la vostra sicurezza
fr itde nl
Il KNX Multi-Touch Pro è un regolatore KNX che vi con-
sente di controllare fino a 32 diverse funzioni ambiente,
come accendere o smorzare le luci, controllare le tende
alla veneziana o richiamare scene. Inoltre dispone di un
regolatore temperatura ambiente integrato che supporta
diversi tipi di controllo.
Tutte le funzioni sono visualizzate su uno schermo sen-
sibile al tocco e vengono richiamate usando semplici
movimenti delle dita.
Il KNX Multi-Touch Pro dispone di un accoppiatore bus
integrato ed è alimentato attraverso il bus KNX.
La funzione di prossimità
Quando la funzione di prossimità è attiva, la schermata
iniziale è solo visibile avvicinandosi entro circa 20 cm dal
Multitouch KNX Pro. Non appena non viene più rilevato
alcun movimento in direzione del dispositivo, torna in
modalità standby dopo un determinato periodo (0-
600 s).
|La portata viene rilevata in modo ottimale spo-
stando il palmo della mano frontalmente verso il
dispositivo. Il campo A può fluttuare leggermen-
te a causa di fattori ambientali (es. Luminosità
ambientale).
La funzione dei gesti
Quando la funzione dei gesti è attivata, il KNX Multi-Tou-
ch Pro è in grado di rilevare un movimento della mano e
quindi richiamare una funzione che avete definito. In
questo modo è ad esempio possibile accendere la luce
con un gesto quando entrate nella stanza.
È possibile scegliere tra 2 gesti che il dispositivo ricono-
sce:
Gesto 1: movimento orizzontale della mano
Gesto 2: movimento verticale della mano
Il gesto viene rilevato a una distanza di circa 5 cm di fron-
te al dispositivo (fare riferimento alle informazioni sulla
funzione di prossimità).
Modalità di pulizia
Attivando la modalità di pulizia, lo schermo non rileva
tocchi o gesti per 30 s - 90 s.
Funzioni supplementari
• Regolazione della retroilluminazione
• Impostazione del salvaschermo
• Blocco dello schermo
Descrizione del Multitouch KNX Pro
Funzioni ETS del dispositivo
APortata circa 20
cm
A
Il fronte
ATouch screen
Il retro
BMorsetto di collegamento bus e collegamento bus.
CPulsante di programmazione
DLED di programmazione
EMorsetto di collegamento sensore remoto
FInterfaccia servizio
|Errore di funzionamento dovuto a luce solare
diretta
La luce solare diretta sul dispositivo può impedire
di individuare la prossimità in determinati casi.
• Posizionare sempre il dispositivo in aree con
condizioni di luce normale.
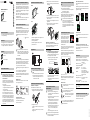
Installazione di un dispositivo
Per l'installazione è necessaria una cornice.
1Collegare l'anello di supporto B sulla scatola di
montaggio con la freccia che punta verso l’alto.
2Collegamento al bus A:
- Collegare il conduttore rosso bus (+) al morsetto
bus rosso.
- Collegare il conduttore bus nero (+) al morsetto
bus grigio scuro.
Indicatori ed elementi di comando
Collegamenti
Scelta del punto di montaggio
Installazione del Multitouch KNX Pro
A
CD
E
F
B
3Isolare lo schermo e il filo di continuità così come i
conduttori B bianco e giallo e inserirli nella scatola
di montaggio.
4Opzionalmente: Collegamento del sensore remoto
5Collocare il dispositivo con la connessione bus alla
base nella cornice.
6Collegare il morsetto di collegamento bus al colle-
gamento bus.
7Inserire il dispositivo con la cornice nell'anello di
supporto e innestare in posizione.
Installazione di una combinazione
Osservare le seguenti istruzioni di installazione supple-
mentari in caso di installazione di dispositivi con una
connessione di 230 V (ad es. prese).
¼AVVERTENZA
Rischio di lesioni mortali per scossa elettri-
ca. Rischio di danneggiare l'apparecchio.
L'isolamento di base all'anello di ritegno deve es-
sere sempre garantito per cavi SELV.
• Osservare le seguenti lunghezze isolanti di
spellatura e le istruzioni sui cavi riposti.
Se è disponibile l'isolamento di un solo filo, ripri-
stinare l'isolamento di base.
• Estrarre il tubetto isolante o il cavo bus che co-
pre i singoli fili.
|Note sull’installazione:
• Selezionare un punto di montaggio che con-
senta al sensore remoto di misurare liberamen-
te la temperatura.
• Posare il sensore remoto in un tubo vuoto fino
all'ingresso di misurazione.
• Installazione a pavimento: Posare il sensore re-
moto in un tubo di protezione in modo che il
sensore remoto non venga danneggiato
dall'adesivo per piastrelle o dal massetto.
• La linea del sensore può essere estesa con un
cavo a 2 conduttori per la tensione di rete
(1,5 mm2) o con un cavo da campanello
(<10 m).
• Coppia di serraggio delle viti: max. 0,4 Nm
|Osservare le istruzioni sulla lunghezza isolante di
spellatura e sui cavi riposti nel capitolo "Installa-
zione di una combinazione".
Sensore remoto: istruzioni
d’installazione
A
B
15 mm 5 mm
1Premere il pulsante di programmazione.
Si accende il LED di programmazione.
2Caricare l'indirizzo di memoria fisica e l'applicazio-
ne nell'apparecchio dall'ETS.
Si spegne il LED di programmazione.
Il dispositivo entra per alcuni secondi nella modalità di
configurazione. Durante questo periodo, sul display ap-
pare un messaggio chiedendovi di attendere.
|L’interruttore di prossimità è adattato alle circo-
stanze specifiche nella modalità di configurazio-
ne. Per ottenere un risultato ottimale, al
dispositivo non è consentito registrare movimenti
durante questo periodo. Altrimenti la configura-
zione continuerà a ripartire dall’inizio o il risultato
sarà falsificato.
Scorrere con il dito verso destra o sinistra per accedere
a un massimo di 7 ulteriori schermate di funzione princi-
pali e alle Impostazioni Generali.
Ciascuna schermata di funzione generale dà accesso a
un massimo di 3 schermate di funzione secondaria sulle
quali è ad esempio possibile impostare la posizione del-
le lamelle o l’interruttore a tempo.
Nelle Impostazioni Generali è possibile definire le impo-
stazioni per il salvaschermo, la funzione di prossimità o
la funzione dei gesti.
Messa in funzione
Messa in funzione del Multitouch KNX
Pro
L’interfaccia utente in breve
Non appena il Multitouch KNX Pro è
pronto per funzionare, verrà visualiz-
zata la schermata iniziale che avete
scelto. Questa è per esempio la
schermata di funzione principale del
regolatore temperatura ambiente con
informazioni sulla temperatura e sulla
modalità operativa.
Navigazione attraverso il menu
Scorrimento da destra a sinistra: commutare tra
le schermate di funzione
Tocco: saltare tra la schermata di funzione princi-
pale e la schermata di funzione secondaria, ri-
chiamare funzioni, impostare valori
Strumento ruota, scorrimento dall’alto
verso il basso: spostarsi tra le gamme
di valori, richiamare valori.
Tocco e pressione prolungata: richiamare funzio-
ni speciali come salvare schermate o azionare
tende alla veneziana.
Vista delle funzioni ambiente
Potete visualizzare le vostre funzioni ambiente in diversi
design.
Nell’esempio seguente, la funzione “Azionare la tenda
alla veneziana e regolare gradualmente le lamelle” è vi-
sualizzata nei 3 design.
Istruzioni del menu
Le istruzioni complete del menu possono essere scari-
cate qui.
Adattamenti in base alle esigenze dei clienti
Se desiderate adeguare i colori e simboli sull’interfaccia
utente, contattate il vostro centro di assistenza clienti
Schneider Electric.
www.schneider-electric.com
|Consegnare queste istruzioni d’uso al cliente da
conservare.
In caso di domande tecniche si prega di contattare il
Centro Servizio Clienti del proprio paese.
schneider-electric.com/contact
1. 2. 3.
www.schneider-electric.com/ww/en
Dati tecnici
Alimentazione dal KNX: 24 V CC, circa 28 mA
Elementi di controllo: LED di programmazione
Elementi di comando Touch-screen pulsante di pro-
grammazione
Dimensione schermo 7,1 cm (2,8”)
Temperatura ambiente
di funzionamento: da -5 °C a +45 °C
Umidità max.: 93% umidità relativa,
senza condensazione
Ambiente: l'apparecchio è progettato per
essere impiegato fino a 2000 m
sul livello del mare.
Grado di protezione IP. IP 20
Collegamento KNX: due contatti da 1 mm per il
morsetto bus
Morsetto di collegamen-
to sensore remoto: 2x 0,14 mm2 - 1,5 mm2
Schneider Electric Industries SAS

V6215-742-00 01/17
KNX-multitouch ProArt. no. MTN6215-5910© Schneider-Electric 2014V6215-742-0001/17
– Voltooi de KNX-multitouch Pro met een System De-
sign-frame.
– Ontmantelbescherming art. nr. MTN6270-0000
– Sensor op afstand voor universele ruimte-tempera-
tuurregelaar met touchdisplay art.nr. MTN5775-0003
¼GEVAAR
Gevaar voor ernstige materiële schade en
persoonlijk letsel, bijv. door brand of elektri-
sche schok, veroorzaakt door incorrecte
elektrische aansluiting.
De veiligheid van de elektrische aansluiting kan
alleen worden gewaarborgd als de desbetreffen-
de persoon over fundamentele kennis van de vol-
gende gebieden beschikt:
• Aansluiten op elektriciteitsnetwerken
• Aansluiten van meerdere elektrische appara-
ten
• Leggen van elektrische leidingen
• Aansluiten en tot stand brengen van KNX-net-
werken
In de regel beschikken alleen opgeleide vaklie-
den op het gebied van elektrische installatietech-
niek over deze vaardigheden en ervaring. Als aan
deze minimumvereisten niet wordt voldaan of
deze op welke manier dan ook worden veron-
achtzaamd, bent u als enige aansprakelijk voor
materiële schade of persoonlijk letsel.
*V6215-742-00*
KNX-multitouch Pro
Gebruiksaanwijzing
Art. no. MTN6215-5910
Benodigde accessoires
Accessoires
Inhoud van de levering
KNX-multitouch Pro met busaansluitklem
Borgring
Voor uw veiligheid
fr itde nl
De KKNX-multitouch Pro is een KNX-regelaar waarmee
u maximaal 32 verschillende kamerfuncties kunt rege-
len, bijv. schakelen of licht dimmen, jaloezieën regelen of
scènes oproepen. Bovendien bevat deze een geïnte-
greerde kamertermperatuurregelaar die verschillende
typen regeling ondersteunt.
Alle functies worden weergegeven op een aanraak-
scherm en worden opgeroepen met eenvoudige vinger-
bewegingen.
De KNX-multitouch Pro heeft een geïntegreerde bus-
koppeling en wordt gevoed via de KNX-bus.
De naderingsfunctie
Als de naderingsfunctie actief is, is het startscherm al-
leen zichtbaar als u de KNX-multitouch Pro binnen een
afstand van ong. 20 cm nadert. Zodra er geen verdere
beweging in de richting van het apparaat wordt gedetec-
teerd, schakelt het na een bepaalde tijd (0-600 s) terug
in de stand-bymodus.
|Naderingsdetectie is optimaal als de hand fron-
taal naar het apparaat toe wordt bewogen. Het
bereik A kan enigszins variëren vanwege plaat-
selijke omstandigheden (bijv. omgevingslicht).
De handgebaarfunctie
Als de handgebaarfunctie is ingeschakeld, detecteert de
KNX-multitouch Pro handbewegingen en zodoende een
door u gedefinieerde functie oproepen. Op die manier
kan bijvoorbeeld als u de kamer binnenloopt het licht met
een handgebaar worden ingeschakeld.
U kunt kiezen tussen 2 gebaren die het apparaat her-
kent:
Gebaar 1: Horizontale handbeweging
Gebaar 2: Verticale handbeweging
Het handgebaar wordt op een afstand van ongeveer 5
cm van de voorkant van het apparaat gedetecteerd
(raadpleeg de informatie over de naderingsfunctie).
Reinigingsmodus
Als u reinigingsmodus activeert, detecteert het scherm
30 s - 90 s lang geen aanrakingen of gebaren.
Aanvullende functies
• De displayverlichting aanpassen
• De screensaver instellen
• Schermvergrendeling
Kennismaken met de KNX-multitouch
Pro
Functies ETS-apparaat
ABereik ong.
20 cm
A
De voorkant
AAanraakscherm
De achterkant
BBusaansluitklem en busaansluiting
CProgrammeerknop
DProgrammeerled
EAansluitklem externe sensor
FService-interface
|Functiefout door direct zonlicht
Als zonlicht direct op het apparaat valt, kan de af-
stand in bepaalde gevallen niet worden gedetec-
teerd.
• Plaats het apparaat steeds in gebieden met
normale lichtomstandigheden.
Een individueel apparaat installeren
Voor installatie is een frame vereist.
1Bevestig de borgring op de inbouwdoos met de pij-
len omhoog.
2Busaansluiting A:
- Sluit de rode busader (+) aan op de rode busaan-
sluitklem.
- Sluit de zwarte busader (+) aan op de donkergrijze
busaansluitklem.
Displays en bedieningselementen
Aansluitingen
De montagelocatie kiezen
De KNX-multitouch Pro installeren
A
CD
E
F
B
3Isoleer de scherm- en merkdraad en de witte en
gele aders B en breng ze onder in de montage-
kast.
4Optioneel: De externe sensor aansluiten
5Plaats het apparaat met de busaansluiting onder in
het frame.
6Sluit de busaansluitklem aan op de busaansluiting.
7Breng het apparaat samen met het frame in de bor-
gring en klik deze vast op zijn plaats.
Een combinatie installeren
Raadpleeg de volgende extra instructies voor de instal-
latie als u apparaten samen met een 230V-aansluiting
(bijv. contactdozen) installeert.
¼WAARSCHUWING
Levensgevaar door elektrische schok. Het
apparaat kan beschadigd raken.
Basisisolatie naar de borgring moet voor SELV-
kabels steeds aanwezig zijn.
• Respecteer de volgende striplengtes voor de
isolaties en de instructies voor het leggen van
kabels.
Als alleen eendraadse isolatie beschikbaar is,
moet u de basisisolatie herstellen.
• Trek een isolatiehuls of de buskabelmantel
over de individuele draden.
|Opmerkingen over installatie:
• Kies voor de installatie een locatie uit waar de
externe sensor niet wordt gehinderd om de
temperatuur te meten.
• Leg de externe sensor in een lege buis tot aan
het meetpunt.
• Vloerinstallatie: Leg de externe sensor in een
sensorbeschermbuis zodat de externe sensor
niet door tegelcement of plakspaan wordt be-
schadigd.
• De sensorlijn kan worden verlengd met een 2-
aderige kabel voor netspanning (1,5 mm 2) of
met een schelledraad (<10 m).
• Aanhaalmoment: max. 0,4 Nm
|Raadpleeg de instructies voor de striplengte van
de isolatie en voor het leggen van kabels in het
hoofdstuk "Een combinatie installeren".
Externe sensor: Instructies voor
installatie
A
B
15 mm 5 mm
1Druk op de programmeertoets.
De programmeerled gaat branden.
2Lees het fysieke adres en de toepassing uit de ETS
in het apparaat.
De programmeerled gaat uit.
Het apparaat schakelt een paar seconden in de configu-
ratiemodus. Gedurende deze periode verschijnt er op
het display een melding waarin u wordt gevraagd om te
wachten.
|De naderingssensor wordt in de configuratiemo-
dus aangepast aan de specifieke omstandighe-
den. Voor een optimaal resultaat mag het
apparaat gedurende deze periode geen bewe-
gingen detecteren. Als dit wel gebeurt, dan blijft
de configuratie telkens weer opnieuw opstarten
of zal het resultaat niet correct zijn.
Veeg naar links of rechts voor toegang tot maximaal 7
andere hoofdfunctieschermen en de algemene instellin-
gen
Elk hoofdfunctiescherm geeft toegang tot maximaal 3
subfunctieschermen, waarop u bijvoorbeeld de latposi-
tie of de tijdklokschakelaar kunt instellen.
In de Algemene instellingen definieert u algemene in-
stellingen voor de screensaver, de naderingsfunctie of
de handbewegingsfunctie.
Ge b r u i k s i n s t r u c t i e s
De KNX-multitouch Pro in gebruik
nemen
Beknopte uitleg van de
gebruikersinterface
Zodra de KNX-multitouch Pro klaar is
voor gebruik, wordt het door u geko-
zen startscherm weergegeven. Dit is
bijvoorbeeld het hoofdfunctiescherm
van de kamertemperatuurregelaar
met informatie over temperatuur en
gebruiksmodus.
Door het menu navigeren
Naar rechts/links vegen Wisselen tussen de func-
tieschermen
Aantikken: Springen tussen het het hoofdfunctie-
scherm en subfunctiescherm, functies oproepen,
waarden instellen
In cirkelbeweging vegen, omhoog/om-
laag vegen Door de waardebereiken
lopen, waarden oproepen
Aantikken en ingedrukt houden: Speciale func-
ties oproepen, zoals scènes opslaan of jaloezie-
ën bedienen
Weergave van de kamerfuncties
U kunt uw kamerfuncties in verschillende ontwerpen
weergeven.
In het volgende voorbeeld wordt de functie "Jaloezie be-
wegen en latten langzamerhand in positie brengen" in de
3 ontwerpen getoond:
Menu-instructies
De complete menu-instructies kunnen hier worden ge-
download.
Klantspecifieke aanpassingen
Neem contact op met het Schneider Electric Customer
Care Center als u kleuren en symbolen op de gebruiker-
sinterface wilt aanpassen.
www.schneider-electric.com
|Geef deze gebruiksinstructies mee aan de klant.
Neem bij technische vragen contact op met de klanten-
service in uw land.
schneider-electric.com/contact
1. 2. 3.
www.schneider-electric.com/ww/en
Technische gegevens
Voeding vanuit KNX: DC 24 V / ongeveer 28 mA
Displayelementen: Programmeerled
Bedieningselementen Aanraakscherm, program-
meerknop
Displaygrootte 7,1 cm (2,8”)
Omgevingstemperatuur
tijdens het bedrijf: -5 °C tot +45 °C
Max. luchtvochtigheid: 93% relatieve luchtvochtig-
heid,
niet-condenserend
Omgeving: Het apparaat is ontworpen
voor gebruik tot 2000 m boven
de zeespiegel.
Beschermingsgraad IP. IP 20
KNX-aansluiting: twee 1 mm-pennen voor
busaansluitklem
Aansluitklem externe
sensor: 2x 0,14 mm2 - 1,5 mm2
Schneider Electric Industries SAS

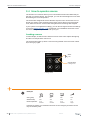
IS13523/00

210/2017MTN6215-0310 | MTN6215-5910 | MTN6216-5910
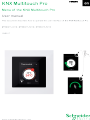
Menu of the KNX Multitouch Pro
Legal information
The Schneider Electric brand and all registered trademarks of Schneider Electric
Industries SAS referred to in this manual are the sole property of Schneider Electric
SA and its subsidiaries. They may not be used without the written approval of the
owner. This manual and all its content are in accordance with the law on trade-
marks. You agree not to duplicate the manual, in whole or in part, on media of any
kind, without the written approval of Schneider Electric, other than for personal,
non-commercial use as dened by the code of law. Furthermore, you agree not
to create any hyperlinks to this manual or its contents. Schneider Electric does
not grant the right or permission to use the manual or its content for personal and
non-commercial use, with the sole exception of the non-exclusive right to view the
current version of the manual and its content, at the viewer’s own risk. All other
rights reserved. Electrical equipment must be installed, operated, maintained and
repaired by qualied personnel only. Schneider Electric accepts no liability for the
consequences of using this material.
Trademarks
Other brands and registered trademarks are the property of the relevant owner.

3
10/2017 MTN6215-0310 | MTN6215-5910 | MTN6216-5910
Menu of the KNX Multitouch Pro
Notes
Read through the following instructions carefully and familiarise yourself with the
device prior to operation.
NOTE
NOTE provides information about procedures that do not present any risk
of material damage.
Further information
You will nd additional information here to make your work easier.
Depictions in this document
Style and text features used
Depiction Meaning
Operation section Cross-references
Symbol for operation in the user interface
(Symbols --> 26)
Symbol in the user interface (Sym-
bols --> 26)
Text features used

410/2017MTN6215-0310 | MTN6215-5910 | MTN6216-5910
Table of contents Menu of the KNX Multitouch Pro
Table of contents
1 Familiarising yourself with the user interface ............ 5
2 How to operate the menu ............................. 7
2.1 Starting operation............................................7
2.2 Navigation .................................................8
2.3 How to activate functions ......................................9
Control dial design .......................................10
Vertical design ..........................................11
3 Function examples ................................. 14
3.1 How to switch and dim the lights ...............................14
3.2 How to move blinds and adjust slats ............................15
3.3 How to adjust the room temperature control unit ...................16
Adjusting the room temperature in heating mode ...............17
Adjusting the room temperature in cooling mode................18
Jumping from the room function to the sub functions ............19
Activating comfort, ECO or night mode .......................20
Activating comfort mode on a timer . . . . . . . . . . . . . . . . . . . . . . . . . . 21
Activating protection mode.................................22
Adjusting the speed of the fan . . . . . . . . . . . . . . . . . . . . . . . . . . . . . . 23
3.4 How to operate scenes ......................................24
Loading scenes .........................................24
Saving scenes ..........................................25
4 Symbols .......................................... 26
4.1 Operation and navigation .....................................26
4.2 Settings ..................................................26
4.3 Lighting and switching .......................................27
4.4 Blind .....................................................27
4.5 Room temperature control unit.................................28
4.6 General ..................................................28
4.7 Scenes ...................................................29
4.8 Information ................................................29
4.9 Service messages ..........................................30

5
10/2017 MTN6215-0310 | MTN6215-5910 | MTN6216-5910
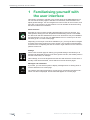
Familiarising yourself with the user interface Menu of the KNX Multitouch Pro
1 Familiarising yourself with
the user interface
This section provides an overview of the screen pages of the KNX Multitouch Pro.
You can use the screen pages to activate room functions, read information and
adjust general settings. You can navigate from room function to room function, and
from each room function to its sub functions. You can activate the functions using
the service buttons and controllers.
Room functions
Examples of room functions including switching lights on and off, dimming, con-
trolling blinds, altering the room temperature and activating scenes. Your installa-
tion technician will have installed the correct room functions to suit your installation
and requirements. You can use your KNX Multitouch Pro to control up to 32 room
functions (up to 4 on each screen page).
Depending on the scope of functions available to you, you may be able to navigate
to further sub function pages from a room function. You can then use these pages
for actions such as adjusting the slats of a blind or night reduction for the room tem-
perature control unit.
Settings
There is also a screen page for altering your general settings. This allows you to
activate and deactivate functions such as the gesture function, the standby function
and the screen saver, for example.
Other settings, such as the brightness and the time after which the screen saver or
standby mode will be activated, can be altered on the sub function pages.
Messages and information
If you wish, you can set the system to display messages such as "Strong wind" or
"Person detected" on a screen page.
The outdoor and indoor temperature, current energy consumption and other infor-
mation can also be displayed. These values will appear on a screen page.
Light
Settings
225 kWk
Energy
consumption

610/2017MTN6215-0310 | MTN6215-5910 | MTN6216-5910
Familiarising yourself with the user interface Menu of the KNX Multitouch Pro
Navigation overview
A
B
AMain functions
BSub functions
Gesture function
When the gesture function is switched on, the KNX Multitouch Pro can detect a
hand movement and respond by activating a function that you have dened. In this
way, the light can be switched on by a gesture when you enter the room, for exam-
ple. The gesture is detected at a distance of about 10 cm in front of the device. The
system can detect both horizontal and vertical movements, as well as the direction
of movement. This means that you can set an upwards movement to switch the
light on and a downwards movement to switch it off, for example. If your system is
congured accordingly, you can activate and deactivate the gesture function on the
settings screen page.

7
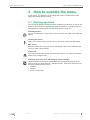
10/2017 MTN6215-0310 | MTN6215-5910 | MTN6216-5910
How to operate the menu Menu of the KNX Multitouch Pro
2 How to operate the menu
In this section, you will learn how to activate the screen, navigate to the screen
pages and activate all the functions.
2.1 Starting operation
You can choose whether to keep the screen switched on at all times or set it to only
switch on when touched or approached. When the display is in standby mode, the
backlight will be switched off or a screen saver will be running on it.
Proximity function
If you come within 20 cm of the device, the main screen or the last used screen will
appear.
Touching the screen
When you touch the screen, the main screen or the last used screen will appear.
Main screen
When the system is running, the main screen appears after a user-dened period
of time, or after a device restart.
Screen lock
If a screen lock has been set up, you can lock the device. You can then unlock the
device using a 4-gure code.
Activating the screen saver and switching off the backlight
The time until the screen saver is activated and the backlight is switched off can
each be set to any value between 1 and 600 seconds. This time is reset each time
one of the following events occurs:
•Proximity
•Gesture
•Action on the screen

810/2017MTN6215-0310 | MTN6215-5910 | MTN6216-5910
How to operate the menu Menu of the KNX Multitouch Pro
2.2 Navigation
In this section, you will learn how to navigate to all the screen pages. Navigation is
performed using 2 nger movements.
Swiping right/left
Go to the next screen page and back.
Tapping
Jump to the next sub function page and back.
Navigation overview

9
10/2017 MTN6215-0310 | MTN6215-5910 | MTN6216-5910
How to operate the menu Menu of the KNX Multitouch Pro
2.3 How to activate functions
In this section, you will learn how to activate the functions on the screen pages. You
can activate the functions by either tapping or swiping.
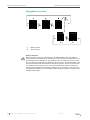
How functions are displayed
Functions are displayed in one of three ways:
•Control dial design
•Vertical design
•Button design
The blind function is shown in this example. With the control dial design, you can
adjust the slats on a sub function page. With the vertical design, both functions are
on one screen. The button design, allows you to operate up to 4 blinds, depending
on your conguration.
Control dial design Vertical design Button design
Which movements activate which functions?
You can activate the functions by either tapping or swiping.
Movement Functions
Tapping
–Activate
–Activate and deactivate
–Retrieve values directly
–Change values incrementally
Tap and hold –Special action, e.g. move blind when held down
–Activates the second function, e.g. save values
Swipe up/down Change values continuously
Swipe circular Change values continuously

10 10/2017MTN6215-0310 | MTN6215-5910 | MTN6216-5910
How to operate the menu Menu of the KNX Multitouch Pro
Control dial design
Marking point
...............
Example: dimmer
Function symbol for lighting
How to operate a control dial
Values
Adjust continuously
Adjusting values
Values
Adjust
directly
Current status
Marking point
...............
Function symbol
Value scale
Current status
Function symbol

11
10/2017 MTN6215-0310 | MTN6215-5910 | MTN6216-5910
How to operate the menu Menu of the KNX Multitouch Pro
How to operate a vertical control
Adjusting values
Values
Adjust directly
Current status
Position of marking
point
...............
Values
Adjust continuously
Example: adjusting brightness
The marking point indicates the selected brightness on the value
scale.
Vertical design
...............
Marking point
Function symbol
Value scale

12 10/2017MTN6215-0310 | MTN6215-5910 | MTN6216-5910
How to operate the menu Menu of the KNX Multitouch Pro
Activation buttons
...............
How to activate a function
Activating functions
Function
Activate
Current status
Activated
Current status
Deactivated
Button
Function symbol
Example: comfort mode
White service button = comfort mode activated
Grey service button = comfort mode deactivated

13
10/2017 MTN6215-0310 | MTN6215-5910 | MTN6216-5910
How to operate the menu Menu of the KNX Multitouch Pro
Buttons for incremental adjustment in the vertical de-
sign
Button
Function display
01:30
..............
Example: duration of comfort mode
01:30
The set duration is shown.
How to change values incrementally
Changing values
Values
Change incrementally
Current status
Set value
01:30
..............

14 10/2017MTN6215-0310 | MTN6215-5910 | MTN6216-5910
Function examples Menu of the KNX Multitouch Pro
Light
On/off
Current status
Off
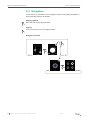
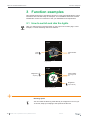
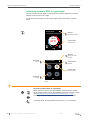
3 Function examples
This chapter shows how to operate the device for a few typical applications. These
instructions are intended solely as examples. Your installation technician will have
installed the correct room functions to suit your installation and requirements.
3.1 How to switch and dim the lights
Here, you will see how to switch and dim on the Light room function page. In this
example, a control dial design has been selected.
Brightness
Adjusting
Current status
50% brightness
On
Brightness
Adjust directly
Light
Light
Light on/off
Adjusting brightness
Dimming speed
You can follow the dimming result directly as it happens in front of you.
To do this, adapt your swiping to the speed of the dimmer.

15
10/2017 MTN6215-0310 | MTN6215-5910 | MTN6216-5910
Function examples Menu of the KNX Multitouch Pro
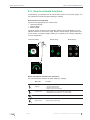
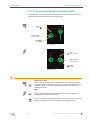
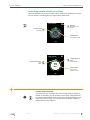
3.2 How to move blinds and adjust slats
In this example, a vertical design has been selected. Here, you can raise or lower
the blind and adjust the slats on a room function page.
Current status
Middle position
Blind
Move
Adjusting the slats
Slats
Adjust directly
Current status
Blind in middle
Blind
Stop
Moving a blind
Blind moving time
You can set the desired position straight away. The blind will generally
reach this position a little later. Depending on its speed and the distance
it needs to travel, a blind may take several minutes to complete the
required movement.
Slats
You can follow the adjustment of the slats live. To do this, adapt your
swiping to the movement of the slats.
You can set blinds with different angles of opening. The symbol does not
reect the actual angle at which the slats of your blind are open.
Slats
Adjust

16 10/2017MTN6215-0310 | MTN6215-5910 | MTN6216-5910
Function examples Menu of the KNX Multitouch Pro
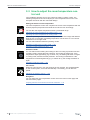
3.3 How to adjust the room temperature con-
trol unit
Your installation will have set up your system for heating, cooling or both. The
following examples show how to adjust your room temperature control unit. The
examples are shown with the control dial design.
Setting the desired current temperature
The room temperature control unit compares the current room temperature with the
desired (setpoint) temperature and heats and cools the room accordingly.
You can alter the setpoint temperature within a pre-dened range:
Adjusting the room temperature in heating mode --> 17
Adjusting the room temperature in cooling mode --> 18
There are operating modes with different setpoints to suit room usage and different
times of day. For example, the heating temperature can be set to 21°C for comfort
mode and 17°C for night mode.
You can switch between different operating modes:
Activating comfort, ECO or night mode --> 20
Activating comfort mode on a timer --> 21
Protection mode
You can switch off the heating and cooling for the room using a protection function.
In heating mode, activate the frost protection. The heating is switched off. If the
temperature drops signicantly (e.g. to below 7°C), the heating will switch on again.
In cooling mode, activate the heat protection. The cooling is switched off. If the
temperature increases signicantly (e.g. to above 35°C), the cooling will switch on
again.
Activating protection mode --> 22
Fan control
When fan coil units are in use, the speed of the fan changes. The speed depends
on the control system, and is set automatically. If necessary, you can alter the
speed:
Adjusting the speed of the fan --> 23
Navigation
You can adjust the room temperature control unit on the room function page and
the sub function pages:
Jumping from the room function to the sub functions --> 19
Thermostat
Thermostat
2
Thermostat
20°C
24°C
01:28
24°C
20°C
Thermostat

17
10/2017 MTN6215-0310 | MTN6215-5910 | MTN6216-5910
Function examples Menu of the KNX Multitouch Pro
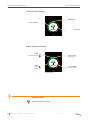
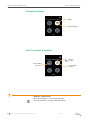
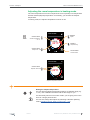
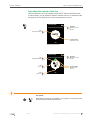
Adjusting the room temperature in heating mode
The room temperature control unit compares the current (actual) room temperature
with the desired (setpoint) temperature. If necessary, you can alter the setpoint
temperature.
In heating mode, the setpoint temperature is shown in red.
Current status
Setpoint 24 °C
20°C
24°C
01:28
24°C
20°C
Thermostat
Adjusting the temperature
Setpoint
Adjust
Setpoint
Adjust directly
Current status
Actual temperature
20 °C
24°C
Current status
Setpoint reached
Thermostat
Current status
Comfort mode
Setting the setpoint temperature
You can alter the setpoint temperature within a pre-dened range (e.g.
+/-5°C). Your installation technician will set this range for you.
You will usually want to use comfort mode if you are going to be in the
room for a longer period of time.
You can also change the setpoint by activating a different operating
mode (Activating comfort, ECO or night mode --> 20).
Setpoint temperature reached

18 10/2017MTN6215-0310 | MTN6215-5910 | MTN6216-5910
Function examples Menu of the KNX Multitouch Pro
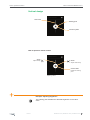
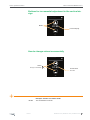
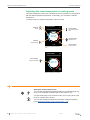
Adjusting the room temperature in cooling mode
The room temperature control unit compares the current (actual) room temperature
with the desired (setpoint) temperature. If necessary, you can alter the setpoint
temperature.
In cooling mode, the setpoint temperature is shown in blue.
Setpoint
Adjust directly
20°C
24°C
Thermostat
Setting the setpoint tempera-
ture
Setpoint
Adjust Current status
Actual temperature
24°C
20°C
Current status
Setpoint reached
Thermostat
Current status
Comfort mode
Setting the setpoint temperature
You can alter the setpoint temperature within a pre-dened range (e.g.
±5°C). Your installation technician will set this range for you.
You will usually want to use comfort mode if you are going to be in the
room for a longer period of time.
You can also change the setpoint by activating a different operating
mode (Activating comfort, ECO or night mode --> 20).
Current status
Setpoint 20°C
Setpoint temperature reached

19
10/2017 MTN6215-0310 | MTN6215-5910 | MTN6216-5910
Function examples Menu of the KNX Multitouch Pro
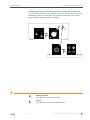
Jumping from the room function to the sub functions
You can access other sub function pages from the room function page for the room
temperature control unit. These allow you to adjust the time limit on the comfort
mode and select operating modes, for example.
Swiping right/left
Go to the next screen page and back
Tapping
Jump to the next sub function page and back

20 10/2017MTN6215-0310 | MTN6215-5910 | MTN6216-5910
Function examples Menu of the KNX Multitouch Pro
Activating comfort, ECO or night mode
You can activate comfort, ECO or night mode if you want to adjust the room tem-
perature to the current room usage.
On the sub function page, you can choose night mode, ECO mode or comfort
mode.
Activating comfort, ECO or night
mode
Comfort mode
Activate
Current status
Comfort mode
ECO mode
Activate Thermostat
Night mode
Activate
20°C
24°C
01:28
24°C
20°C
Current status
Comfort mode
Navigate
To the sub functions
Thermostat
Navigate
Back to the room
function
Comfort and ECO mode
Activating comfort, ECO or night mode
When you are in a room, you will generally want to keep the system
set to comfort mode. You can also adjust the setpoint using the control
dial (Adjusting the room temperature in heating mode --> 17).
In heating mode, the temperature is reduced by 2°C, for example.
In heating mode, the temperature is reduced by 4°C, for example.

21
10/2017 MTN6215-0310 | MTN6215-5910 | MTN6216-5910
Function examples Menu of the KNX Multitouch Pro
15
min
Activating comfort mode on a timer
This example shows you how to activate comfort mode for a limited period of time.
You can switch to comfort mode from night mode or ECO mode.
Duration of comfort mode
Comfort mode du-
ration
Adjust directly
Thermostat
Current status
Time running
Duration 15 min
Comfort mode dura-
tion
Adjust
Current status
Time control ended
Navigate
Back to the room
function
Thermostat
Start comfort mode
Comfort mode
Start/stop
Comfort mode with timer
You are in the room for longer than usual. If night mode is already ac-
tivated, for example, you can activate comfort mode. Night mode will
be activated automatically when the set time period has elapsed. This
helps you to save energy. You can also switch to another operating
mode before the time elapses.

22 10/2017MTN6215-0310 | MTN6215-5910 | MTN6216-5910
Function examples Menu of the KNX Multitouch Pro
Activating protection mode
This example shows you how to activate and deactivate protection mode.
In heating mode, activate the frost protection. The heating is switched off. If the
temperature drops signicantly (e.g. to below 7°C), the heating will switch on again.
In cooling mode, activate the heat protection. The cooling is switched off. If the
temperature increases signicantly (e.g. to above 35°C), the cooling will switch on
again.
Protection mode
Activate/deactivate
Thermostat
Navigate
To the sub functions
Current status
Protection mode
Frost/heat protection
Your installation technician will set the frost protection setpoint for you. A setpoint
of 7°C will usually ensure that the water in the pipes cannot freeze. In some cas-
es, however, the individual radiator may be too small. As such, we recommend
closing the windows when you are not in the room and, in case of frost, only
opening the windows to air out the room.
Your installation technician will set the heat protection setpoint for you (e.g.
35°C).
Your installation technician can set the frost/heat protection to come on automati-
cally when a window is opened, for example. In such cases, the protection mode
will not be deactivated automatically until the window is closed again.
Thermostat
Activating and deactivating
protection mode
Current status
Protection mode
Protection mode
Protection mode
Activate/deactivate
Navigate
Back to the room
function
Thermostat

23
10/2017 MTN6215-0310 | MTN6215-5910 | MTN6216-5910
Function examples Menu of the KNX Multitouch Pro
Adjusting the speed of the fan
This example shows you how to adjust the fan level or switch to automatic mode.
In manual mode, you can adjust the speed or switch the fan off. In automatic mode,
the speed of the fan depends on the room temperature control unit.
AUTO
Current status
Automatic mode
Navigate
Back to the room
function
Thermostat
Fan
Automatic/manual
2
Navigate
Back to the room
function
Thermostat
Setting the fan
Current status
Manual mode
Level 2
Fan speed
Depending on which fan is installed in your system, it may take a while
for it to reach the selected power level.
Fan
Level 1
Fan
Switch off
Automatic/manual mode
Fan
Manual/automatic

24 10/2017MTN6215-0310 | MTN6215-5910 | MTN6216-5910
Function examples Menu of the KNX Multitouch Pro
3.4 How to operate scenes
The Scenes room function allows you to load several functions simultaneously at
the push of a service button. For example, you can dim several lights at once while
also altering the room temperature.
The scenes are designed to suit the different ways the room can be used. For ex-
ample, the "Video" scene switches off the lamps or dims them to minimum bright-
ness, while the "Dinner" scene makes the lights above the dining table brighter.
If your system is congured accordingly, you can also change and save the settings
for a scene (Saving scenes --> 25). Please ask your installation technician to nd
out which saving concept has been set up for you.
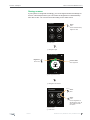
Loading scenes
In this example, we will load four different scenes. Each scene adjusts the lighting
and the room temperature control unit.
The scene button lights up when a scene is being loaded. Once the scene is load-
ed, it turns grey again.
Loading scenes
Current status
Loading scene
Scene
Load
Scenes
Example
Ceiling lamp On Off OFF OFF
Standard lamp 60% 30% 100% 0%
Room temperature 21°C
Comfort
21°C
Comfort
21°C
Comfort
17°C
Night
Instead of the symbols, your installation technician can also congure your buttons so that
they are labelled by name.

25
10/2017 MTN6215-0310 | MTN6215-5910 | MTN6216-5910
Function examples Menu of the KNX Multitouch Pro
Saving scenes
If your system is congured accordingly, you can change and save the settings for
a scene. This example shows you how to alter the brightness of a standard lamp
from 30% to 50%. You can then save this setting for the Video scene.
5 Save scene
6 Load scene
Scene
Load
Current brightness of
standard lamp: 50%. All
other settings remain
the same.
Scenes >0.5 s
Scene
Save
Brightness
Set to 50% Current status
50% brightness
Standard lamp
3 Set brightness to 50%
2 Navigate to light
4 Navigate to the scenes
1 Load scene
Scenes Scene
Load
Current standard lamp
brightness 30%

26 10/2017MTN6215-0310 | MTN6215-5910 | MTN6216-5910
Symbols Menu of the KNX Multitouch Pro
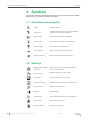
4 Symbols
This section shows the symbols that may appear on the screen pages of the KNX
Multitouch Pro. The lists are arranged by function.
4.1 Operation and navigation
Tapping Activating functions
Tap and hold Activating the 2nd function (e.g. save settings) Special
action (e.g. move blind when held down)
Swipe up/down Change values continuously using a slider
Swipe circular Change values continuously using a control dial
Swiping right/left Go to the next screen page and back
Load sub function Switch from the main level to a sub function
Return to main level Back to room function, information or setting
4.2 Settings
Standby function / Always
On function
Standby when approching or touching the screen /
Always On without standby
Gesture function Activates a function (e.g. switch on light)
Screen saver Page with information or saved images
Time for screen saver Start and adjust time until the screen saver comes on
Day/night mode Brightness in day/night mode
Brightness Screen backlight
Function on/off Start and adjust time until the screen is switched off
Device is locked Enter 4-gure code to unlock
Device is unlocked The device can be locked

27
10/2017 MTN6215-0310 | MTN6215-5910 | MTN6216-5910
Symbols Menu of the KNX Multitouch Pro
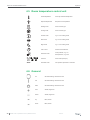
4.3 Lighting and switching
Table/standard lamp
Ceiling lamp
Spotlight
Incandescent lamp
Incandescent lamp with spotlight
function
Brightness
4.4 Blind
Blind position
Slats position
Blind up
Blind down
Turn slats down
Turn slats up

28 10/2017MTN6215-0310 | MTN6215-5910 | MTN6216-5910
Symbols Menu of the KNX Multitouch Pro
4.5 Room temperature control unit
Actual temperature Currently measured temperature
Setpoint temperature Required room temperature
Heating mode Current control type
Cooling mode Current control type
Comfort mode e.g. 21°C in heating mode
ECO mode e.g. 19°C in heating mode
Night mode e.g. 17°C in heating mode
Time control Comfort mode with timer
Protection mode Frost protection, e.g. 7°C
Heat protection, e.g. 35°C
Fan level Current fan speed (0-3)
AUTO
Automatic mode Fan-speed is dependent on controller
4.6 General
On General switching command function
Off General switching command function
Start General switching command function
Plus Values, brightness
Minus Values, brightness
Up Blind, values
Down Blind, values

29
10/2017 MTN6215-0310 | MTN6215-5910 | MTN6216-5910
Symbols Menu of the KNX Multitouch Pro
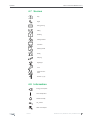
4.7 Scenes
Day
Night
Energy-saving
Sitting
Reading
Getting dressed
Television
Meeting friends
Dining
Sleeping
Night light
Lock
Presence simu-
lation
Number 1 (1-6)
4.8 Information
Energy consumption
Room temperature
Relative humidity
CO2 content
Water consumption

30 10/2017MTN6215-0310 | MTN6215-5910 | MTN6216-5910
Symbols Menu of the KNX Multitouch Pro
4.9 Service messages
Cleaning
Service call
First aid
Do not disturb

MTN621x-0310_5910_SW_UI_EN
Schneider Electric SA
35 rue Joseph Monier
92500 Rueil Malmaison - France
Phone: +33 (0) 1 41 29 70 00
Fax: +33 (0) 1 41 29 71 00
If you have any technical questions, please contact the Customer Care Centre in your country.
schneider-electric.com/contact
© 2017 Schneider Electric, all rights reserved
-
 1
1
-
 2
2
-
 3
3
-
 4
4
-
 5
5
-
 6
6
-
 7
7
-
 8
8
-
 9
9
-
 10
10
-
 11
11
-
 12
12
-
 13
13
-
 14
14
-
 15
15
-
 16
16
-
 17
17
-
 18
18
-
 19
19
-
 20
20
-
 21
21
-
 22
22
-
 23
23
-
 24
24
-
 25
25
-
 26
26
-
 27
27
-
 28
28
-
 29
29
-
 30
30
-
 31
31
-
 32
32
-
 33
33
-
 34
34
-
 35
35
-
 36
36


iGuzzini Q737 Installatie gids
- Categorie
- Thermostaten
- Type
- Installatie gids
in andere talen
- italiano: iGuzzini Q737 Guida d'installazione
- français: iGuzzini Q737 Guide d'installation
- Deutsch: iGuzzini Q737 Installationsanleitung
Gerelateerde papieren
Andere documenten
-
Hager WDT030 Handleiding
-
Schneider Electric A9MEM152 Handleiding
-
ABB i-bus KNX EnOcean EG/A 32.2.1 Installation and Operating Instructions
-
JUNG MR-SONOS-REG Handleiding
-
-
Hager TX502 User Instructions
-
Hager TYB621C Handleiding
-
-