Pagina wordt geladen...

NL
F
GB
F
NL
GB
Installations & User Guide
Mode d’emploi et instructions de
montage
Gebruiks-en montageaanwijzing
Gebruiks-/Montageaanwijzing
Licht- en glasbreuksensor
TCLS1ED
1. Licht-en glasbreuksensor TCLS1ED
1.1. LED,
1.2. Knop 1
1.3. Knop 2
1.4. De sensor moet altijd horizontaal worden
bevestigd.
1.5. Als de sensor (bij glasbreuk) niet, of té gevoelig
reageerd, kunt hem door draaien opnieuw
uitrichten.Draaien tegen de klok = verhoogde
gevoeligheid.
Draaien in klokrichting = verminderde gevoeligheid.
1.6. Als de glasbreuksensor na een trilling of beving
gereageerd heeft, kan hij pas na 60 sekonden opnieuw
reageren.
1.7. Technische gegevens
- Lichtafhankelijke sturing van één of meer rolluiken in
verbinding met de ontvangers TCRX3ED, TCRX2ED
en de programmeerbare tijdschakelklok TCTRX2ED.
-Schaduw voor korte duur
-Automaties sluiten van de rolluiken als het donker
wordt.
-Ingebouwde glasbreukvoeler. Sluit vanzelf de
rolluiken als er tegen het venster wordt geslagen
-64 Bit Rolling Veiligheidscode
1.8. Inleggen nieuwe batterijen bij de TCLS1ED
na ca. drie jaar, (afhankelijk van gebruik). Draai de
TCLS1ED om en neemt U voorzichtig de voorkant eraf,
Nu ziet U de batterijen en kunt ze wisselen. Daarvoor
heeft U twee batterijen nodig van Type: 3V / CR 2016
(2x),Sluiten: Eenvoudig het dekseltje er weer op
drukken.
2. Belangrijk: Voor de montage moet U hier
opletten
2.1. Veiligheidsaanwijzingen
2.2. Zulke waarschuwings tekens beduiden “Wees
voorzichtig”, U moet deze waarschuwingen bevolgen,
anders kunnen er ongelukken aan lijf en leven van
personen en/of schade aan de apparatuur en andere
zakelijke waarden ontstaan. Deze waarschuwingen
voor gebruik zorgvuldig lezen.
2.3. Niet bevolgen van de volgende regels voor de
veiligheid, kan zware ongelukken aan lijf en leven van
personen en/of schade aan de apparatuur en andere
zakelijke waarden veroorzaken.
2.4. Waarschuwing: Voor de veiligheid van personen
is het heel belangrijk, deze instrukties op te volgen.
Deze instrukties goed opbewaren.
2.5. De opbouw, het testen en het eerste gebruik van
de 230 Volt aansluiting mag uitsluitend door een
bekwaam vakman worden uitgevoerd
2.6. Aansluiten en het verleggen van de stroomkabels
moet volgens de plaatselijke Bouw - en
elektrovoorschriften worden uitgevoerd.
2.7. Verhinder dat kinderen met de bedieningen
spelen, bedieningen goed opbergen, zorgt U ervoor,
dat kinderen er niet kunnen aankomen.
2.8. Het programma van de zender moet U instellen
vóór dat U de apparaten monteerd (zie ook
Verbinding), Daarbij mag de afstand tussen de twee
apparate niet meer als 5 Meter bedragen.
2.9. Bereik : ca. 100m aan de open lucht, en ca. 30m
binnen huis
2.10 Voordat U de sensor bevestigt, eerst alles
instellen
2.11 Technische gegevens
Voedingsspanning...........6V, Typ CR 2016
Frequentie...............433,92MHz
Stroomnetbeveiliging.........IP 40
Bedrijfstemperatuur tussen.......0°C tot 4°C
Effectief bereik.......ca. 30m
Keurmerk......CE
2.12. Technische wijzigingen voorbehouden.
3. Verbinding tussen TCRX3ED, TCRX2ED en
TCTRX2ED
3.1. We beginnen nu met de TCLS1ED op de
ontvanger TCRX3ED of TCRX2ED of de schakelklok
TCTRX2ED te programmeren:
3.2. TCRX3ED: Zwarte Knop aan de bovenkant van
de TCRX3ED kort indrukken, U hoort een ritmies
signaal, De knop boven op de TCLS1ED drukken. Het
signaal stopt. (De programmering is beeindigd.)
3.3. TCRX2ED: De twee zwarte knopjes van de
TCRX2ED drukken. U hoort weer een ritmiese
signaaltoon. Bovenste knop van de TCLS1ED drukken.
Het signaal stopt, (De programmering is beeindigd.)
3.4. TCTRX2ED: Kies nu de menu-mode van de
TCTRX2ED, en kies Einstl. Vervolgens kiest U Funk en
dann Lernen. Op het display verscheint het woord
Senden. Toets één van de twee knopjes van de
TCLS1ED. Nu ziet U het woord Sensor. (Eind van de
programmering.)
4. De schaduwfunktie
4.1.
Plakt U de TCLS1ED ongeveer op de die plaats
aan het raam waar bij zonlicht uw rolluik stoppen moet.
4.3. Druk nu de beide knopjes aan TCLS1ED. De LED
wordt rood. Laat de knopjes los. De LEDs knipperen
nog ongeveer 8 Sekonden lang groen en geel.
Terwijl de LEDs knipperen druk het knopje 1. De LED
blinkt even groen. Het programeren is nu klaar. Om de
Verdonkerings functie te testen drukt U op de sensor.
Nu wordt de test gedann (dit is alleen maar één keer
mogelijk). Het rolluik gaat naar beneden, stopt op
ongeveer de hoogte van de sensor en gaat iets
omhoog an de sensor weer vrijtegenen en stopt dan.
4.5. Nu sluit het rolluik ongeveer 15 Minuten na dat
de ingestelde lichtwaarde werd bereikt en opent
ongeveer 15 Minuten nadat deze instelling wordt
onderschreden.
4.6. Uitschakelen von de schaduwfunktie.
Beide knopjes van de TCLS1ED gelijktijdig drukken tot
de LED een keer rood blinkt. Knopjes los laten, De
LEDs blinken nu geel en groen. Bovenste knop van de
sensor drukken, tot de rode LED blinkt. De schaduw
funktie is nu uitgeschakeld, Deze instellingen blijven
behouden.
4.7. opnieuw inschakelen van schaduw-funktie.
Toets beide knopjes van de sensor gelijktijdig tot de
rode LED kort blinkt, Knopjes los laten, De gele en
groene LEDs blinken. Bovenste knop drukken tot het
groene LED een keer aangaat, De schaduwfunktie is
weer ingeschakeld,
5. ´s Avonds volledig sluiten
5.1. Wacht het tijdpunt van de dag af, dat het rolluik
moet gaan sluiten. Druk gelijktijdig beide knopjes aan
de sensor, De LED blinkt kort rood, dan loslaten. De
LED knippert vervolgens geel en groen.
5.2. Toets tijdens het knipperen knop 2 van de sensor.
De gele LED gaat een keer aan. Het rolluik zal nu 15
Minuten na bereiken van de ingestelde lichtwaarde
volledig gaan sluiten,
5.3. Geheel sluiten funktie weer uitschakelen.
Beide knopjes van de TCLS1ED gelijktijdig drukken,
tot de rode LED een keer kort aangaat. Knopjes los
laten. De gele en groene LEDs knipperen. Onderste
knop van de sensor drukken, tot de rode LED een keer
blinkt, Het komplete sluiten is nu uitgeschakeld. De
ingestelde waardes worden gebufferd.
5.4. Opnieuw inschakelen van het komplete sluiten.
Toets gelijktijdig beide knopjes van de sensor tot de
rode LED gaat een keer aan. Knopjes los laten, De
gele en groene LEDs knipperen. Onderste knop van
de sensor gedruckt houden tot de LED geel blinkt. Het
komplete sluiten is opnieuw ingeschakeld.
6. Glasbreuksensor
6.1. De TCLS1ED voelt als er tegen het raam word
geslagen en laat dan het rolluik geheel naar beneden.
6.2. Inschakelen van de Glasbreuksensor - funktie:
drukt U beide knopjes aan de sensor, tot de roode LED
kort een keer aangaat, Houdt U beide knopjes gedrukt
tot de LED na ongeveer 4 Sekonden een tweede keer
rood aangaat. De glasbreuksensor – funktie is
geaktiveerd. Reageert de sensor op al te geringe
bevingen, draait U het Apparaat ongever om 2°-3°om
zijn eigen as, daarbij wordt de gevoeligheid
verminderd.
6.4. Uitschakelen van de Glasbreuksensor - funktie.
Drukt U beide knopjes aan de sensor, tot de roode LED
kort aangaat, Houdt U beide knopjes ingedrukt, tot de
groene LED na circa 4 Sekonden een keer aangaat,
De Glasbreuksensor -funktie is uitgeschakeld.
7. Voor het geval dat hij het niet doet....
7.1. Plaats de sensor altijd horizontal. (Streep aan de
sensor parallel naar horizont uitrichten.)
7.2. Draai de sensor um ein tot zwei Grad, als hij te
gevoelig reageerd (glasbreuksensor funktie).
7.3. Gedurende het programmeren mag de afstand
tussen sensor en klok niet meer als vijf Meter
betragen.
7.4. Wissel de twee batterijen in de sensor.
7.5.Houdt beide knopjes bij aanvorderung ook
gelijktijdig goed ingedrukt.
7.6. Werd de klok/ontvanger juist aangesloten. Heeft
hij ook stroom?
7.5. Vergeet niet Uw keuze in het menu van de
TCTRX2ED altijd met de “Omhoog”- Knop te
bevestigen.
7.6.Hotline +49 (0) 68 38 907 100
8. Verklaring
8.1.De Licht-/Glasbreuksensor Modell Nr. TCLS1ED,
beantwoordt aan alle richtlijnen van de normen:
EN55014, EN61000-, ETS RES 0908, EN60555, &
EN60335-1 en 73/23/EEC, 89/336/EEC
8.2. Verklaring van integratie
De Licht-/Glasbreuksensor Modell TCLS1ED
beantwoord, als ze tezamen met een rolluik volgens
de instrukties van de fabrikant wordt geinstalleerd en
onderhouden, aan alle voorschriften van de EU-
richtlijn 89/392/EEC en hun supplementaires.
8.3.Ik, de ondergetekende, verklaar hiermede, dat
het voorgenoemde apparaat en het in de
montageaanwijzing genoemde toebehoor aan de
eerder genoemde voorschriften en richtlijnen voldoet.
Colin B.Willmott -Chefingenieur-Chamberlain GmbH
D-66793 Saarwellingen
Februar, 2001 © 2001 Chamberlain GmbH
9. Garantie
Chamberlain GmbH garandeerd de eerste koper van de Licht-en
glasbreuksensor voor de duur van 24 maanden (2 jaren vanaf het
datum van aankoop, dat dit produkt zonder materiaal-en /of fouten in
de verwerking is. De eerste koper is verplicht, het produkt bij
ontvangst op zichtbare defekte te kontrolleren. Kondities: De
garantie beperkt zich uitsluitend tot de reparatie of deuitwisseling
van defekte onderdelen en dekt niet de kosten of het transportrisiko
van de defekte onderdelen of produkten. Deze garantie strekt zich
niet uit tot schades, die geen defekte zijn, maar door verkeerd
gebruik werden veroorzaakt.( zoals het gebruik bij slechts
gedeeltelijk bevolgen van Chamberlain GmbHs
montagevoorschriften, het gebruik en onderhoud; verzuimd
onderhoud of instelling; elke aanpassing of verandering aan het
produkt), uurloon, werkkosten voor de afbouw of het opnieuw
inbouwen van een gerepareerde of uitgewisselde eenheid en/of
uitwisseling van de batterijen. Het ligt in het bemeten van
Chambeerlain GmbH, of een door de garantie gedektes produkt, dat
material- of bewerkingsfouten aantoont, kostenloos wordt
gerepareerd of vervangen. Chamberlain GmbH behoudt zich het
recht voor, te beslissen of de defekte onderdelen worden
gerepareerd of door nieuwe of in de fabriek gereviseerde
onderdelen vervangen worden,Als het Produkt gedurende de
garantietijd defekt is, richt U zich a.u.b. aan Uw detailhandelaar.
Deze garantie tast de rechten van de koper volgens de nationaal
geldige Wetten niet aan. Ze heeft ook geen uitwerking op de rechten
van de koper tegenover de verkoper, die uit het koopverdrag
voortvloeien. Daar, waar geen geldende nationale of EEC-Wetten
gelden, is deze garantie het enige rechtelijke middel van de koper
en nog de Chamberlain GmbH nog hun filialen of Handelaren zijn
voor schade, of schade die daruit voortvloeit, voor uitdrukkelijke of
stilzwijgende garanties in samenhang met dit produkt aansprakelijk.
Niemand, ook geen vertegenwoordiger, is geautoriseerd om namens
Chamberlain GmbH andere aansprakelijkheden in verband met de
verkoop van deze produkte te overnemen.
Gebruiks- /montageaanwijzing
Kabellichtsensor WTMLS1
1.Kabellichtsensor WTMLS1
1.1. Aansluiting naar Tijdschakelklok TCT2ED
1.2. Zuignap
1.3. Lichtsensor
1.5. Technische gegevens
- Lichafhankelijke besturing voor een rolluik in
verbindung met de programmeerbare tijdschakelklok
TCT2ED.
- Kan ook voor korte schaduwperiodes worden
gebruikt.
- Sluit zelfstandig de rolluiken als het donker wordt..
2. Voor de montage moet U volgende
veiligheidsvoorschriften opvolgen:
2.1. Veiligheidsaanwijzing
2.2. Zulke tekens waarschuwen, betekenen “Wees
voorzichtig”, oproep deze te bevolgen, door niet
bevolgen kann personen- en/of. schade an zakelijke
waardes ontstaan. Leest U a.u.b. deze
waarschuwingen heel zorgvuldig.
2.3. Het niet opvolgen van de veiligheidsvoorschriften
kan ernstige personen- of zakelijke schades
veroorzaken.
2.4. Waarschuwing: Voor de veiligheid van personen
is het belangrijk, deze instrukties na te komen. Deze
instrukties goed opbewaren.
2.5. Montage, testen en eerste gebruik van de 230
Volt aansluiting mag uitsluitend door een erkend
vakman (electricien) worden uitgevoerd.
2.6. Montage en verleggen van de kabels moeten
volgens de plaatselijke Bouw - en Elektrovoorschriften
worden uitgevoerd.
2.7. Kinderen niet met de Bediening laten spelen,
bediening voor kinderen ontoegankelijk opbewaren.
3. Montage van de WTMLS1 aan deTCT2ED
3.1. De WTMLS1 wordt met een Kabel aan de
0TCT2ED verbonden. Trek het moduul voorzichtig uit
het raamelement en steek de koppeling in de
insteekgleuf aan de zijkant onder het display van de
TCT2ED.
3.2. Zet nu de klok opnieuw in het element.
4. Schaduw- funktie
4.1. Sluit het rolluik van hand, tot de gewenste
schaduw-werking is bereikt.
Markeer dit punt en
beweeg het rolluik weer naar boven.
4.2. Druk de Saugknop van binnen tegen het venster.
4.3. Gaat U bij de TCT2ED in de menümode. Nu kiest
U Einstl., dan kiest U Sensor.
4.4. De momentele hoeveelheid licht is op het display
als zwarte streep te zien. De hoeveelheid licht, waar
vanaf het rolluik moet gaan sluiten, is als kleine punt in
bovenste balkendeel afgebeeld. Beweeg de punt met
de “Omlaag”-knop, tot hij rechts aan het einde van de
zwarte streep is en drukt U dann twee keer de
“Omhoog”- knop. Kies nu “Zurück”.
4.5. Nu kiest U Modus, dan Sensor en daarna Nur +
Zonsymbol. Het rolluik sluit en opent na bereiken van
de ingestelde hoeveelheid licht met een vertraging van
15 Minuten.
5. ´s Avonds volledig sluiten
5.1. Wacht U het tijdpunt van de dag af, dat het rolluik
moet gaan sluiten.
5.2. Druk de zuigknop van binnen tegen het
vensterglas (als het al niet voor schadaar-werking
is geprogrammeerd!).
5.3. Gaat U bij de TCT2ED in de Menumode. Kies
Einstl., dan Sensor en drukt U de omhoog-knop. Het
zonnnetje rechts boven op het display verandert sich
in een maantje.
5.4. De hoeveelheid licht, die er op dit moment is,
wordt weer als zwart streepje aangetoond. En de
hoeveelheid licht, waar vanaf zich het rolluik moet aan
sluiten, is als een puntje in onderste balkendeel te
zien. Beweeg nu met de “omlaag”-knop deze punt tot
aan het rechte eind van de streep en druk twee keer
de “omhoog”-knop. Kies Zurück.
5.5. Nu kiest U Modus, dan Sensor daarna “Nur”+
maansymbool. Het rolluik sluit volledig op het tevoren
ingestelde licht.
5.6. Is in de TCT2ED een vaste sluitingstijd
geprogrammerd en wordt de ingestelde lichtwaarde
vroeger bereikt, omdat het sneller donker wordt, dan
sluit het rolluik ook vroeger. Maar het rolluik sluit wèl,
op het ingestelde tijdstip, als het langer licht blijft.
6. Verklaring
6.1.De Lichtsensor Modell Nr. WTMLS1, beantwoordt
aan alle richtlijnen van de normen: EN55014,
EN61000-, ETS RES 0908, EN60555, & EN60335-1
en 73/23/EEC, 89/336/EEC
6.2.De Lichtsensor modell WTMLS1 voldoet, als ze in
verbinding met een rolluik volgens voorschrift van de
fabrikant geinstalleerd en onderhouden wordt, aan alle
aanvorderingen van de EEC richtlijn 89/392/EEC en
hun toevoegingen.
6.3. Ik, als ondergetekende, verklaar hiermede, dat
het voorgenoemde apparaat en het in de
montageaanwijzing opgevoerde toebehoor aan de
voorheen genoemde voorschriften en richtlijnen
voldoet.
Colin B.Willmott -Chefingenieur-
Chamberlain GmbH
D-66793 Saarwellingen
Februar, 2001 © 2001 Chamberlain GmbH
7. Garantie
Chamberlain GmbH garandeerd de eerste koper van de lichtsensor
voor de duur van 24 maanden (2 jaren vanaf het datum van
aankoop, dat dit produkt zonder materiaal-en /of fouten in de
verwerking is. De eerste koper is verplicht, het produkt bij ontvangst
op zichtbare defekte te kontrolleren. Kondities: De garantie beperkt
zich uitsluitend tot de reparatie of de uitwisseling van defekte
onderdelen en dekt niet de kosten of het transportrisiko van de
defekte onderdelen of produkten. Deze garantie strekt zich niet uit
tot schades, die geen defekte zijn, maar door verkeerd gebruik
werden veroorzaakt.( zoals het gebruik bij slechts gedeeltelijk
bevolgen van Chamberlain GmbHs montagevoorschriften, het
gebruik en onderhoud; verzuimd onderhoud of instelling; elke
aanpassing of verandering aan het produkt), uurloon, werkkosten
voor de afbouw of het opnieuw inbouwen van een gerepareerde of
uitgewisselde eenheid en/of uitwisseling van de batterijen. Het ligt in
het bemeten van Chambeerlain GmbH, of een door de garantie
gedektes produkt, dat material- of bewerkingsfouten aantoont,
kostenloos wordt gerepareerd of vervangen. Chamberlain GmbH
behoudt zich het recht voor, te beslissen of de defekte onderdelen
worden gerepareerd of door nieuwe of in de fabriek gereviseerde
onderdelen vervangen worden.Als het Produkt gedurende de
garantietijd defekt is, richt U zich a.u.b. aan Uw detailhandelaar.
Deze garantie tast de rechten van de koper volgens de nationaal
geldige Wetten niet aan. Ze heeft ook geen uitwerking op de rechten
van de koper tegenover de verkoper, die uit het koopverdrag
voortvloeien. Daar, waar gen geldende nationale of EEC-Wetten
gelden, is deze garantie het enige rechtelijke middel van de koper
en nog de Chamberlain GmbH nog hun filialen of Handelaren zijn
voor schade, of schade die daruit voortvloeit, voor uitdrukkelijke of
LiftMaster
Optical and Glass Breakage Sensor
TCLS1ED
1. Optical and glass breakage sensor TCLS1ED
1.1. LED
1.2. Key 1
1.3. Key 2
1.4. The sensor must always be horizontally installed.
1.5. If the sensor (glass breakage function) doesn’t react or
if it reacts too sensitively, please realign it by turning it.
Turning it anti-clockwise gives greater sensitivity. Turning it
clockwise gives less sensitivity.
1.6. If the sensor is triggered by vibration it triggers again
after 60 seconds.
1.7. Technical features
- Brightness-dependent control of one or more roller shutters
in connection with the TCRX3ED and TCRX2ED receiver
modules and the TCTRX2ED programmable time switch.
-Triggering of short-term shading.
-Automatic closing of the roller shutters when darkness falls
-Built-in glass breakage sensor. Closes the roller shutters
automatically if anything hits the glass
-64 Bit rolling safety code
1.8. Battery changing on the TCLS1ED
(Approx. every three years, according to use). Turn the
TCLS1ED and carefully remove the front panel from the
housing. Now you can see the batteries and they can be
changed.
You require two batteries of type: 3V / CR 2016 (2x) The
housing can be closed again simply by pressing the cover
and base elements together.
2.Please read before installation
2.1.Safety Instructions
2.2.These safety alert symbols mean Caution - a personal
safety or property damage instruction. Please read those
warnings carefully.
2.3. Failure to comply with the following instructions may
result in serious personal injury or property damage.
2.4.Warning: IT IS IMPORTANT FOR THE SAFETY OF
PERSONS TO FOLLOW THESE INSTRUCTIONS. SAVE
THESE INSTRUCTIONS.
2.5.Installation, examination and operation of the 230V
connection should be performed by an electrician.
2.6.Installation and wiring must be in compliance with your
local building and electrical codes.
2.7.Do not allow children to play with fixed controls. Keep
remote controls away from children.
2.8. Programming of the device (see 3. Linking…) should be
done before the final installation of the transmitter. During
this the devices should be no further than 5 metres from one
another.
2.9. Range: About.100m in the open air, approx. 30m in
buildings
2.10. Please carry out all the necessary settings before
fitting the sensor.
2.11 Technical data
Operating voltage .....6V, type CR 2016
Frequency ....433.92 MHz
Type of enclosure ....IP 40
Operating temperature range ....0°C to 40°C
Range approx ....30m
Conformity mark ....CE
2.12. We reserve the right to make technical changes in the
interests of progress.
3. Linking to TCRX2E and TCTRX2ED
3.1 First the TCLS1ED must be programmed to the
TCRX3EDor TCRX2ED receiver module or the TCTRX2ED
timer switch:
3.2. TCRX3ED: Briefly press the black knob on the top of
the TCRX3ED. You will hear a pulsating signal. Press the top
key on the TCLS1ED. The signal will stop. (Programming is
complete)
3.3. TCRX2ED: Press the two knobs on the TCRX2ED. You
will hear a pulsating signal. Press the top key on the
TCLS1ED. The signal will stop. (Programming is complete).
3.4. TCTRX2ED: Select menu mode on the TCTRX2ED.
Select Setup. Select Radio and then Learn. On the display
appears the word Transmit. Press one of the two knobs on
the TCLS1ED. The word Sensor now appears. (Programming
is complete).
4. Shading function
4.1. Stick the TCLS1ED on the glass pane at the position
the shutter should travel to for desired lighting.
4.3. Press the two knobs on the TCLS1ED simultaneously.
The LED will light up in red. Release the knobs. The LED will
flash in green and yellow for about 8 seconds. While it is
flashing press knob 1. The LED will briefly light up in green.
Programming is then complete. In order to test the shading
function, push the lower button of the sensor. The test will
then be performed (this is possibly only once). The shutter
will travel downwards until it reaches the level of the sensor.
It will then stop, reverse until the light sensor is no longer
obstructed and then stop again.
4.5. The roller shutter will now close approx.15 minutes
after the set brightness level has been reached and open
again approx. 15 minutes after deletion of the set brightness
level.
4.6. Deactivation of the shading function.
Press the two knobs on the TCLS1ED simultaneously until
the LED briefly lights up in red. Release the knobs. The LED
will flash in green and yellow. Press the top knob on the
sensor until the LED lights up in red. The shading function
has now been deactivated but the settings are retained.
4.10. Reactivation of the shading function. Press the two
knobs on the sensor simultaneously until the LED briefly
lights up in red. Release the knobs. The LED will flash in
green and yellow. Press the top knob until the LED lights up
in green. The shading function has now been reactivated.
5. Complete closing in the evening
5.1. Wait until the time of day when the roller shutters
should close. Press both knobs on the sensor
simultaneously. The LED briefly lights up in red, release
knobs. The LED then flashes in yellow and green.
5.2. While it is flashing press key 2 on the sensor. The LED
lights up in yellow. The roller shutters will completely close
now 15 minutes after reaching the set brightness level.
5.3. Deactivation of complete closing.
Press the two knobs on the TCLS1ED simultaneously until
the LED briefly lights up in red. Release the knobs. The LED
will flash in green and yellow. Press the lower knob on the
sensor until the LED lights up in red. Complete closing has
now been deactivated but the settings are retained.
5.10. Reactivation of complete closing
Press the two knobs on the sensor simultaneously until the
LED lights up in red. Release the knobs. The LED will flash
in green and yellow. Press lower knob until the LED turns
yellow. The shading function has now been reactivated.
6. Glass breakage sensor
6.1. The TCLS1ED will react against blows against the
window pane and will trigger complete closure of the roller
shutters.
6.2. Activation of the glass breakage sensor function: Press
the two knobs on the sensor simultaneously until the LED
briefly lights up in red. Hold down both knobs until the LED
lights up in red for a second time after about 4 seconds. The
glass breakage sensor function is now activated. If the
sensor reacts too sensitively against slight vibrations turn
the device about its axis to reduce the sensitivity.
6.4 Deactivation of the glass breakage sensor function.
Press the two knobs on the sensor simultaneously until the
LED briefly lights up in red. Hold down both knobs for about
4 seconds until the LED lights up in green. The glass
breakage sensor function is now deactivated.
7. If it doesn’t function...
7.1. Always place the sensor horizontally. (Align the line on
the sensor parallel to the horizontal plane)
7.2. Turn the sensor by one to two degrees if it reacts too
sensitively (glass breakage function).
7.3. During programming the distance between the sensor
and timer should be no more than 5 metres.
7.4. Replace the two batteries in the sensor.
7.5. Ensure that you are firmly holding down the two knobs
as required as well as simultaneously.
7.6. Has the timer/receiver been correctly connected and is
there a power supply?
7.5. Don’t forget to always confirm your menu selection on
the TCTRX2ED with the UP key.
7.6. Hotline +49 (0) 68 38 907 100
8.Declaration of Conformity
8.1.The Light & Glass Breakage sensor Model No.
TCLS1ED,
is in conformity to the applicable EN55014, EN61000-3,
sections of StandardsETS RES 0908, EN60555, &
EN60335-1 per the provisions & all amendments
of the EU Directives 73/23/EEC, 89/336/EEC
8.2.Declaration of Incorporation
The Light and Glass Breakage Sensor Model TCLS1ED,
when installed and maintained according to all the
Manufacturer’s instructions in combination with a shutter,
which has also been installed and maintained according to
all the Manufacturer’s instructions, meet the provisions of EU
Directive 89/392/EEC and all amendments.
8.3.I, the undersigned, hereby declare that the equipment
specified above and any accessory listed in the manual
conforms to the above Directives and Standards.
Colin B. Willmot -Chefingenieur-
Chamberlain GmbH
D-66793 Saarwellingen
Februar, 2001 © 2001 Chamberlain GmbH
9.Warranty
Chamberlain GmbH to the first retail purchaser of this product that the
product shall be free from any defect in materials and/or workmanship for a
period of 24 full months (2 years) from the date of purchase. Upon receipt
of the product, the first retail purchaser is under obligation to check the
product for any visible defects. Conditions: The warranty is strictly limited to
the reparation or replacement of the parts of this product which are found to
be defective and does not cover the costs or risks of transportation of the
defective parts or product.This warranty does not cover non-defect damage
caused by unreasonable use (including use not in complete accordance with
Chamberlain GmbHs instructions for installation, operation and care; failure
to provide necessary maintenance and adjustment; or any adaptations of or
alterations to the products), labor charges for dismantling or reinstalling of
a repaired or replaced unit or replacement batteries.A product under
warranty which is determined to be defective in materials and/or
workmanship will be repaired or replaced (at Chamberlain GmbH’s option)
at no cost to the owner for the repair and/or replacement parts and/or
product. Defective parts will be repaired or replaced with new or factory
rebuilt parts at Chamberlain GmbH’s option.If, during the warranty period,
the product appears as though it may be defective, contact your original
place of purchase.This warranty does not affect the purchaser’s statutory
rights under applicable national legislation in force nor the purchaser’s
rights against the retailer arising from their sales/purchase contract. In the
absence of applicable national or EU legislation, this warranty will be the
purchaser’s sole and exclusive remedy, and neither Chamberlain GmbH nor
its affiliates or distributors shall be liable for any incidental or consequential
damages for any express or implied warranty relating to this product.No
representative or person is authorized to assume for Chamberlain GmbH
any other liability in connection with the sale of this product.
LiftMaster
Optical Cable Sensor
WTMLS1
1. Optical cable sensor WTMLS1
1.1. Connection to time switch, TCT2ED
1.2. Suction bell
1.3. Optical sensor
1.5. Technical features
- Brightness level-dependent control of a roller shutter in
connection with the TCT2ED programmable timer switch.
- Triggering of short-term shading processes.
- Automatic closing of the roller shutter when darkness falls.
2. Please read before installation
2.1. Safety Instructions
2.2.These safety alert symbols mean Caution - a personal
safety or property damage instruction. Please read those
warnings carefully.
2.3. Failure to comply with the following instructions may
result in serious personal injury or property damage.
2.4.Warning: IT IS IMPORTANT FOR THE SAFETY OF
PERSONS TO FOLLOW THESE INSTRUCTIONS. SAVE
THESE INSTRUCTIONS.
2.5.Installation, examination and operation of the 230V
connection should be performed by an electrician.
2.6.Installation and wiring must be in compliance with your
local building and electrical codes.
2.7.Do not allow children to play with fixed controls. Keep
remote controls away from children.
3. Connection of the WTMLS1 to the TCT2ED
3.1. The WTMLS1 is connected to the TCT2ED with a
cable. Pull the module out of its frame and plug the coupling
into the socket on the bottom edge under the TCT2ED
display.
3.2. Now replace the timer in the frame.
4. Shading function
4.1. Close the roller shutter manually until the desired
shading effect has been achieved. Mark this position and
reopen the shutter.
4.2. Press the suction bell onto the inside of the window
pane.
4.3. On the TCT2ED unit go to menu mode. Select Setup,
then select Sensor.
4.4. The present level of brightness is shown in the display
as a black bar. The level of light after which the roller
shutters should close (set value), is shown as a small dot in
the upper right corner of the bar. Move this dot with the
DOWN key to the right end of the black bar and then press
the UP key twice. Then select Back.
4.5. Now select Mode, then Sensor and then Only+ Sun
symbol. The roller shutter closes and opens again on
reaching the set brightness levels with a delay of 15 minutes.
5. Complete closing in the evening
5.1. Wait until the time of day when the roller shutter should
close.
5.2. Press the suction head onto the inside of the window
pane (in case the shading function has not already been
adjusted).
5.3. On the TCT2ED unit go to menu mode. Select Setup,
then select Sensor and press the UP key. The sun symbol at
the top right of the display now changes into a moon symbol.
5.4. The present level of brightness is again showed as a
black bar. The level of light after which the roller shutters
should close (set value), is shown as a small dot in the lower
left corner of the bar. Move this dot with the DOWN key to the
right end of the black bar and then press the UP key twice.
Then select Back.
5.5. Now select Mode, then Sensor and then Only+ Moon
symbol. The roller shutter now closes completely upon
reaching the set brightness level.
5.6. If a fixed closing time has been programmed into the
TCT2ED and if the set value is reached earlier the roller
shutter will also close earlier. If the set value is not reached
until after the programmed closing time the shutter will still
close at the programmed time.
6.Declaration of Conformity
6.1.The Light sensor Model No. WTMLS1,
is in conformity to the applicable EN55014, EN61000-3,
sections of StandardsETS RES 0908, EN60555, &
EN60335-1 per the provisions & all amendments
of the EU Directives 73/23/EEC, 89/336/EEC
6.2.Declaration of Incorporation
The Light Sensor Model TCLS1ED, when installed and
maintained according to all the Manufacturer’s instructions in
combination with a shutter, which has also been installed
and maintained according to all the Manufacturer’s
instructions, meet the provisions of EU Directive 89/392/EEC
and all amendments.
6.3.I, the undersigned, hereby declare that the equipment
specified above and any accessory listed in the manual
conforms to the above Directives and Standards.
Colin B. Willmot -Chefingenieur-
Chamberlain GmbH
D-66793 Saarwellingen
February, 2001 © 2001 Chamberlain GmbH
7. Warranty
Chamberlain GmbH to the first retail purchaser of this product that the
product shall be free from any defect in materials and/or workmanship for a
period of 24 full months (2 years) from the date of purchase. Upon receipt
of the product, the first retail purchaser is under obligation to check the
product for any visible defects. Conditions: The warranty is strictly limited to
the reparation or replacement of the parts of this product which are found to
be defective and does not cover the costs or risks of transportation of the
defective parts or product.This warranty does not cover non-defect damage
caused by unreasonable use (including use not in complete accordance with
Chamberlain GmbHs instructions for installation, operation and care; failure
to provide necessary maintenance and adjustment; or any adaptations of or
alterations to the products), labor charges for dismantling or reinstalling of
a repaired or replaced unit or replacement batteries.A product under
warranty which is determined to be defective in materials and/or
workmanship will be repaired or replaced (at Chamberlain GmbH’s option)
at no cost to the owner for the repair and/or replacement parts and/or
product. Defective parts will be repaired or replaced with new or factory
rebuilt parts at Chamberlain GmbH’s option.If, during the warranty period,
the product appears as though it may be defective, contact your original
place of purchase.This warranty does not affect the purchaser’s statutory
rights under applicable national legislation in force nor the purchaser’s
rights against the retailer arising from their sales/purchase contract. In the
absence of applicable national or EU legislation, this warranty will be the
purchaser’s sole and exclusive remedy, and neither Chamberlain GmbH nor
its affiliates or distributors shall be liable for any incidental or consequential
damages for any express or implied warranty relating to this product.No
representative or person is authorized to assume for Chamberlain GmbH
any other liability in connection with the sale of this product.
Notice de montage et d’utilisation
du capteur de lumière et de vitre brisée
TCLS1ED
1.Capteur de lumière et de vitre brisée TCLS1ED
1.1.Voyant lumineux
1.2.Touche 1, 1.3.Touche 2
1.4.Le capteur doit toujours être installé
horizontalement.
1.5.Si le capteur (fonction bris de vitre) ne réagit pas
ou est trop sensible, veuillez le tourner pour régler sa
sensibilité. Rotation dans le sens antihoraire :
davantage de sensibilité. Rotation dans le sens
horaire : moins de sensibilité.
1.6.En cas de déclenchement du capteur si la vitre
est brisée ou après une vibration, le capteur ne se
déclenche à nouveau qu'après 60 secondes.
1.7.Caractéristiques techniques
-Commande dépendant de la clarté pour un ou
plusieurs volets roulants fonctionnant avec les
modules de réception TCRX3ED, TCRX2ED et le
minuteur programmable TCTRX2ED.
-Déclenchement de la fermeture/l'ouverture de courte
durée en fonction de la pénombre.
-Fermeture automatique des volets roulants à la
tombée de la nuit.
-Capteur de bris de vitre intégré. Fermeture
automatique des volets roulants en cas de choc contre
la vitre.
-Code de sécurité de roulement 64 bits.
1.8.Changement de piles du TCLS1ED
(Env. tous les trois ans, selon l’utilisation). Tournez le
TCLS1ED et enlevez soigneusement la partie avant du
boîtier. Les piles sont alors visibles et peuvent être
changées. Il faut deux piles de type :
3 V / CR 2016 (2x)
Pour fermer le boîtier, il suffit simplement de presser le
couvercle et l’élément de prise l’un contre l’autre.
2. Veuillez lire avant la montage
2.1.Règles de sécurité
2.2.Ces symboles d’avertissement de sécurité vous
demandent de faire attention - ils indiquent des
instructions pour éviter un risque de sécurité
personnelle ou de dommage matériel. Il faut lire ces
instructions attentivement.
2.3.Le non-respect des instructions ci-dessous peut
conduire à des blessures graves ou des dommages
matériels.
2.4.ATTENTION: Pour la sécurité des personnes,
respectez les présentes instructions. CONSERVEZ
SOIGNEUSEMENT LES PRESENTES
INSTRUCTIONS.
2.5.La mise en place, la vérification et la connexion
d’une installation en 230V ne devra être entreprise et
réalisée que par les électriciens professionnels
habilités.
2.6.Le montage et le câblage doivent correspondre
aux normes locales de construction et d’électrification.
2.7.Ne laissez pas les enfants jouer avec les unités
de commande. Tenez les télécommandes hors de leur
portée.
2.8. La programmation et la connexion des appareils
doivent se faire avant le montage définitif. Pour cela,
les appareils doivent être éloignés d’une distance
n’excédant pas 5 mètres.
2.9. Portée : env. 100 m à l’extérieur, env. 30 m à
l’intérieur.
2.10. Veuillez entreprendre tous les réglages
nécessaires avant de mettre le capteur en marche.
2.11. Informations techniques
Tension de service ....6 V, type CR 2016
Fréquence ....433,92 MHz
Protection ....IP 40
Plage de température de service ....0°C à 40 °C
Portée ....env. 30 m
Marque de conformité ....CE
2.12. Les modifications techniques suivent l’état de la
technique et demeurent sous réserve.
3. Connexion au TCRX3ED, TCRX2ED et TCTRX2ED
3.1. Il faut d’abord programmer le TCLS1ED en
fonction du module de réception TCRX3ED ou
TCRX2ED ou du minuteur TCTRX2ED:
3.2. TCRX3ED: appuyez brièvement sur le bouton
noir sur le côté supérieur du TCRX3ED. Un signal
sonore discontinu est émis. Appuyez sur la touche
supérieure du TCLS1ED. Le signal sonore cesse. (La
programmation est terminée).
3.3. TCRX2ED: appuyez sur les deux boutons du
TCRX2ED. Un signal sonore discontinu est émis.
Appuyez sur la touche supérieure du TCLS1ED. Le
signal sonore cesse. (La programmation est terminée).
3.4. TCTRX2ED: sélectionnez le mode Menu du
TCTRX2ED. Choisissez Ajuster. Sélectionnez radio
puis apprend. Le mot activez apparaît à l’écran.
Appuyez sur les deux boutons du TCLS1ED. Le mot
capteur s’affiche. (La programmation est terminée).
4. Fonction Ombrager
4.1. Collez le TCLS1ED à l’endroit de la vitre jusqu’à
le volet devra descendre pour ombrager correctement.
4.3. Appuyez simultanément sur les deux boutons
noirs du TCLS1ED. Le voyant lumineux s’allume en
rouge. Relâchez la pression sur les boutons. Le voyant
lumineux clignote pendant environ 8 secondes en vert
et jaune. Pendant que le voyant clignote, appuyez sur
la touche 1. Le voyant s’allume brièvement en vert. La
programmation est terminée. Afin de tester la fonction
ombrager, appuyez brièvement sur le bouton noir
inférieur du capteur (ce test n’est possible qu une
seule fois). Le volet descend, s’arrête à hauteur du
capteur, remonte légèrement de manière à libérer le
capteur, puis s’arrête à nouveau.
4.5. Le volet roulant se baisse maintenant environ
15 minutes après que la luminosité paramétrée a été
atteinte et s’ouvre environ 15 minutes après que la
luminosité paramétrée a disparu.
4.6. Désactivation de la fonction Ombrager
Appuyez sur les deux boutons du TCLS1ED jusqu’à ce
que le voyant lumineux s’allume brièvement en rouge.
Relâchez la pression sur les boutons. Le voyant
lumineux clignote en jaune et vert. Appuyez sur le
bouton supérieur du capteur jusqu’à ce que le voyant
s’allume en rouge. La fonction Ombrager est
maintenant désactivée. La configuration demeure
inchangée.
4.7. Réactivation de la fonction Ombrager
Appuyez simultanément sur les deux boutons du
capteur jusqu'à ce que le voyant s’allume en rouge.
Relâchez la pression sur les boutons. Le voyant
clignote en jaune et vert. Appuyez sur le bouton
supérieur jusqu’à ce que le voyant s’allume en vert.
La fonction Ombrager est à nouveau activée.
5. Fermeture complète du volet le soir
5.1. Attendez le moment de la journée où vous
souhaitez fermer le volet.
Appuyez simultanément sur les deux boutons du
capteur. Le voyant s’allume brièvement en rouge puis
relâchez la pression sur les boutons. DEL clignote en
jaune et vert.
5.2. Pendant le clignotement, appuyez sur la touche
2 du capteur. Le voyant s’allume en jaune. Le volet
roulant se ferme maintenant complètement 15 minutes
après que la valeur de luminosité paramétrée a été
atteinte.
5.3. Désactivation de la fermeture complète
Appuyez simultanément sur les deux boutons du
TCLS1ED jusqu’à ce que le voyant s’allume
brièvement en rouge. Relâchez la pression sur les
boutons. Le voyant clignote en jaune et vert. Appuyez
sur le bouton inférieur du capteur jusqu’à ce que le
voyant s’allume en rouge. La fermeture complète est
maintenant désactivée. La configuration demeure
inchangée.
5.4. Réactivation de la fermeture complète
Appuyez simultanément sur les deux boutons du
capteur puis le voyant s’allume en rouge. Relâchez la
pression sur les boutons. Le voyant clignote en jaune
et vert. Appuyez et maintenez enforcée la touche
inférieur du capteur jusqu’à ce que DEL s’allume en
jaune. La fermeture complète est à nouveau activée.
6. Capteur de bris de vitre
6.1. Le TCLS1ED perçoit les chocs contre la vitre et
déclenche un processus de fermeture complète du
volet roulant.
6.2. Activation de la fonction Capteur de bris de vitre:
Appuyez sur les deux boutons du capteur jusqu’à ce
que le voyant s’allume brièvement en rouge.
Maintenez les deux boutons enfoncés jusqu’à ce que
le voyant s’allume en rouge une nouvelle fois, au bout
de 4 secondes environ. La fonction Capteur de bris de
vitre est activée. Si le capteur réagit à la moindre
vibration, tournez l’appareil d’environ 2-3 ° autour de
son axe pour en réduire la sensibilité.
6.4. Désactivation de la fonction Capteur de bris de
vitre. Appuyez sur les deux boutons du capteur jusqu’à
ce que le voyant s’allume brièvement en rouge.
Maintenez les deux boutons enfoncés jusqu’à ce que
le voyant s’allume en vert, au bout de 4 secondes
environ. La fonction Capteur de bris de vitre est
désactivée.
7. Que faire si cela ne fonctionne pas…
7.1. Mettez toujours le capteur à l’horizontale (ligne
du capteur à l’horizontale).
7.2. Tournez le capteur d’un ou deux degrés quand il
est trop sensible (fonction bris de vitre).
7.3. Lors de la programmation, il ne faut pas que la
distance entre le capteur et le minuteur excède cinq
mètres.
7.4. Echangez les piles du capteur.
7.5. Lorsque cela est demandé, appuyez bien
simultanément et fermement sur les deux boutons.
7.6. Le minuteur/récepteur est-il bien connecté ?.
Est-il bien alimenté ?
7.5. N’oubliez pas de confirmer avec la touche Haut
le choix de menus pour le TCTRX2ED.
7.6. Hotline + 49 (0) 68 38 907 100
8. Garantie
Chamberlain GmbH garantit au premier acheteur de ce produit chez
un détaillant que le produit en question est exempt de tout défaut de
fabrication ou de matériel pendant une période de deux ans à partir
de la date d’achat. Dès réception du produit, le premier détaillant est
tenu de vérifier tout défaut apparent de celui-ci. Conditions: Cette
garantie constitue le seul recours disponible pour l’acheteur selon la
loi, pour tout dommage en liaison avec ou résultant d’une pièce
défectueuse et/ou du produit. La garantie est strictement limitée à la
réparation ou au remplacement des pièces de ce produit qui
s’avèreraient défectueuses. Cette garantie ne couvre pas les
dommages qui ne sont pas causés par un appareil défectueux et qui
résultent d'une utilisation abusive (y compris une utilisation qui n'est
pas exactement conforme aux consignes d'installation, de
fonctionnement et d'entretien préconisées par Chamberlain GmbH,
un manque d'entretien et de réglage nécessaires, toute adaptation
ou modification des appareils, tous frais associés au démontage ou
à la réinstallation d'une pièce réparée ou changée et au
remplacement des piles. Un produit sous garantie dont le défaut de
fabrication et/ou de matériel est reconnu sera réparé ou remplacé
(au choix de Chamberlain GmbH) sans frais pour le propriétaire en
ce qui concerne la réparation ou le remplacement de la pièce
défectueuse ou du produit. Les pièces défectueuses seront réparées
ou remplacées par des pièces neuves ou réusinées, au choix de
Chamberlain GmbH. Si durant la période de garantie le produit
semble présenter un défaut, contactez votre revendeur. Cette
garantie n'affecte pas les droits statutaires de l'acheteur sous la
législation nationale applicable en vigueur. Cette garantie n'affecte
pas non plus les droits de l'acheteur à l'égard du revendeur
conformément aux termes du contrat de vente/achat. En l'absence
de législation nationale ou CE applicable, cette garantie constituera
le seul recours exclusif de l'acheteur et, dans le cadre de toute
garantie expresse ou implicite concernant ce produit, ni
Chamberlain GmbH ni ses associés ou distributeurs ne seront
responsables de tous dommages accidentels ou relationnels.
Aucune personne n’est mandatée ni autorisée par Chamberlain
GmbH à assumer quelqu'autre responsabilité que ce soit en liaison
avec la vente de ce produit.
9. Déclaration de conformité
17.1.Le horloge programmable Modèle Nr. TCLS1ED, est conforme
aux secions applicables EN55014, EN61000-3,des Normes ETS
RES 0908, EN60555, & EN60335-1selon les clauses et toutes les
modifications des directives EU 73/23/EEC, 89/336/EEC
17.2.Déclaration d’incorporation
Le horloge programmable, modèle TCLS1ED, si installé et maintenu
selon toutes les instructions du fabricant, de concert avec un volet
qui a, lui aussi, été installé et maintenu selon toutes les instructions
du fabricant, satisfait aux clauses de la Directive EU 89/392/EEC et
de toutes ses modifactions.
17.3. Je soussigné déclare par la présente que l’equipement
spécifié ci-dessus et tout accessoire mentionné dans ce manuel est
conforme aux Directives et Normes ci-dessus.
Colin B. Willmott -Chefingenieur-
Chamberlain GmbH, D-66793 Saarwellingen
Février 2001, 709134-FR ©2001 Chamberlain GmbH,
Notice de montage et d’utilisation
du capteur de lumière à fil WTMLS1
1. Capteur de lumière WTMLS1
1.1.Connexion pour le minuteur TCT2ED
1.2. Ventouse
1.3.Capteur de lumière
1.5 Caractéristiques techniques
-Commande dépendant de la clarté pour volet roulant
reliée au minuteur programmable TCT2ED.
-Déclenchement de la fermeture/l'ouverture de courte
durée en fonction de la pénombre.
-Fermeture automatique des volets roulants à la
tombée de la nuit.
2. Veuillez lire avant la montage
2.1.Règles de sécurité
2.2.Ces symboles d’avertissement de sécurité vous demandent de
faire attention - ils indiquent des instructions pour éviter un risque
de sécurité personnelle ou de dommage matériel. Il faut lire ces
instructions attentivement.
2.3.Le non-respect des instructions ci-dessous peut conduire à des
blessures graves ou des dommages matériels.
2.4.ATTENTION: Pour la sécurité des personnes, respectez les
présentes instructions. CONSERVEZ SOIGNEUSEMENT LES
PRESENTES INSTRUCTIONS.
2.5.La mise en place, la vérification et la connexion d’une
installation en 230V ne devra être entreprise et réalisée que par les
électriciens professionnels habilités.
2.6.Le montage et le câblage doivent correspondre aux normes
locales de construction et d’électrification.
2.7.Ne laissez pas les enfants jouer avec les unités de commande.
Tenez les télécommandes hors de leur portée.
3. Connexion du WTMLS1 au TCT2ED
3.1. Le WTMLS1 est connecté au TCT2ED par un
câble. Retirez le module du cadre et insérez le câble
dans la fiche située sur le côté, sous l’affichage du
TCT2ED.
3.2. Remettez le minuteur dans le cadre.
4. Fonction Ombrager
4.1. Baissez manuellement le volant roulant jusqu’à
l'obtention du niveau d’ombre souhaité. Markieren Sie
diesen Punkt und fahren Sie den Rollladen danach
wieder hoch.
4.2. Appliquez la ventouse sur la vitre à l’intérieur.
4.3. Sélectionnez le mode Menu sur le TCT2ED.
Choisissez ajuster puis capteur.
4.4. La quantité de lumière est représentée par un
bâton noir sur l’écran. La quantité de lumière à partir
de laquelle le volant roulant doit se fermer (valeur
théorique) est représentée par un petit point imoberen
Balkenteil. Déplacez le point avec la touche Bas vers
l’extrémité droite du bâton noir puis appuyez deux fois
sur la touche Haut. Sélectionnez ensuite retour.
4.5. Choisissez alors mode, puis capteur puis encore
seul+ symbole soleil. Le volant roulant se ferme et
s‘ouvre avec un décalage de 15 minutes après que la
quantité de lumière paramétrée a été atteinte.
5. Fermeture complète du volet le soir
5.1. Attendez le moment de la journée où vous
souhaitez fermer le volet.
5.2. Appliquez la ventouse sur la vitre à l’intérieur,
(falls nicht bereits für Beschattungsfunktion
ausgerichtet!).
5.3. Sélectionnez le mode Menu sur le TCT2ED.
Choisissez ajuster puis capteur et appuyez sur la touche
Haut. Le symbole du soleil à droite en haut de l’affichage
se transforme en symbole de lune.
5.4. La quantité de lumière est à nouveau représentée
par un bâton noir sur l’écran. La quantité de lumière à
partir de laquelle le volant roulant doit se fermer (valeur
théorique) est représentée par un petit point im unteren
Balkenteil. Déplacez le point avec la touche Bas vers
l'extrémité droite du bâton noir puis appuyez deux fois
sur la touche Haut. Choisissez ensuite retour.
5.5. Choisissez alors mode, puis capteur puis encore
seul+ symbole lune. Le volet roulant se ferme
maintenant complètement dès que la quantité de lumière
paramétrée a été atteinte.
5.6. Si une heure de fermeture fixe est programmée sur
le TCT2ED et si la valeur théorique est atteinte plus tôt,
le volet se ferme plus tôt. Si la valeur théorique est
atteinte après l’heure programmée, le volet se ferme à
l’heure programmée.
8. Garantie
Chamberlain GmbH garantit au premier acheteur de ce produit chez
un détaillant que le produit en question est exempt de tout défaut de
fabrication ou de matériel pendant une période de deux ans à partir
de la date d’achat. Dès réception du produit, le premier détaillant est
tenu de vérifier tout défaut apparent de celui-ci. Conditions: Cette
garantie constitue le seul recours disponible pour l’acheteur selon la
loi, pour tout dommage en liaison avec ou résultant d’une pièce
défectueuse et/ou du produit. La garantie est strictement limitée à la
réparation ou au remplacement des pièces de ce produit qui
s’avèreraient défectueuses. Cette garantie ne couvre pas les
dommages qui ne sont pas causés par un appareil défectueux et qui
résultent d'une utilisation abusive (y compris une utilisation qui n'est
pas exactement conforme aux consignes d'installation, de
fonctionnement et d'entretien préconisées par Chamberlain GmbH,
un manque d'entretien et de réglage nécessaires, toute adaptation
ou modification des appareils, tous frais associés au démontage ou
à la réinstallation d'une pièce réparée ou changée et au
remplacement des piles. Un produit sous garantie dont le défaut de
fabrication et/ou de matériel est reconnu sera réparé ou remplacé
(au choix de Chamberlain GmbH) sans frais pour le propriétaire en
ce qui concerne la réparation ou le remplacement de la pièce
défectueuse ou du produit. Les pièces défectueuses seront réparées
ou remplacées par des pièces neuves ou réusinées, au choix de
Chamberlain GmbH. Si durant la période de garantie le produit
semble présenter un défaut, contactez votre revendeur. Cette
garantie n'affecte pas les droits statutaires de l'acheteur sous la
législation nationale applicable en vigueur. Cette garantie n'affecte
pas non plus les droits de l'acheteur à l'égard du revendeur
conformément aux termes du contrat de vente/achat. En l'absence
de législation nationale ou CE applicable, cette garantie constituera
le seul recours exclusif de l'acheteur et, dans le cadre de toute
garantie expresse ou implicite concernant ce produit, ni
Chamberlain GmbH ni ses associés ou distributeurs ne seront
responsables de tous dommages accidentels ou relationnels.
Aucune personne n’est mandatée ni autorisée par Chamberlain
GmbH à assumer quelqu'autre responsabilité que ce soit en liaison
avec la vente de ce produit.
9. Déclaration de conformité
17.1.Le horloge programmable Modèle Nr. WTMLS1, est conforme
aux secions applicables EN55014, EN61000-3,des Normes ETS
RES 0908, EN60555, & EN60335-1selon les clauses et toutes les
modifications des directives EU 73/23/EEC, 89/336/EEC
17.2.Déclaration d’incorporation
Le horloge programmable, modèle WTMLS1, si installé et maintenu
selon toutes les instructions du fabricant, de concert avec un volet
qui a, lui aussi, été installé et maintenu selon toutes les instructions
du fabricant, satisfait aux clauses de la Directive EU 89/392/EEC et
de toutes ses modifactions.
17.3. Je soussigné déclare par la présente que l’equipement
spécifié ci-dessus et tout accessoire mentionné dans ce manuel est
conforme aux Directives et Normes ci-dessus.
Colin B. Willmott -Chefingenieur-
TCLS1ED
WTMLS1
709167
709167
Documenttranscriptie
Notice de montage et d’utilisation du capteur de lumière et de vitre brisée TCLS1ED F TCLS1ED GB F NL Installations & User Guide Mode d’emploi et instructions de montage Gebruiks-en montageaanwijzing WTMLS1 LiftMaster Optical and Glass Breakage Sensor TCLS1ED GB 1. Optical and glass breakage sensor TCLS1ED 1.1. LED 1.2. Key 1 1.3. Key 2 1.4. The sensor must always be horizontally installed. 1.5. If the sensor (glass breakage function) doesn’t react or if it reacts too sensitively, please realign it by turning it. Turning it anti-clockwise gives greater sensitivity. Turning it clockwise gives less sensitivity. 1.6. If the sensor is triggered by vibration it triggers again after 60 seconds. 1.7. Technical features - Brightness-dependent control of one or more roller shutters in connection with the TCRX3ED and TCRX2ED receiver modules and the TCTRX2ED programmable time switch. -Triggering of short-term shading. -Automatic closing of the roller shutters when darkness falls -Built-in glass breakage sensor. Closes the roller shutters automatically if anything hits the glass -64 Bit rolling safety code 1.8. Battery changing on the TCLS1ED (Approx. every three years, according to use). Turn the TCLS1ED and carefully remove the front panel from the housing. Now you can see the batteries and they can be changed. You require two batteries of type: 3V / CR 2016 (2x) The housing can be closed again simply by pressing the cover and base elements together. 2.Please read before installation 2.1.Safety Instructions 2.2.These safety alert symbols mean Caution - a personal safety or property damage instruction. Please read those warnings carefully. 2.3. Failure to comply with the following instructions may result in serious personal injury or property damage. 2.4.Warning: IT IS IMPORTANT FOR THE SAFETY OF PERSONS TO FOLLOW THESE INSTRUCTIONS. SAVE THESE INSTRUCTIONS. 2.5.Installation, examination and operation of the 230V connection should be performed by an electrician. 2.6.Installation and wiring must be in compliance with your local building and electrical codes. 2.7.Do not allow children to play with fixed controls. Keep remote controls away from children. 2.8. Programming of the device (see 3. Linking…) should be done before the final installation of the transmitter. During this the devices should be no further than 5 metres from one another. 2.9. Range: About.100m in the open air, approx. 30m in buildings 2.10. Please carry out all the necessary settings before fitting the sensor. 2.11 Technical data Operating voltage .....6V, type CR 2016 Frequency ....433.92 MHz Type of enclosure ....IP 40 Operating temperature range ....0°C to 40°C Range approx ....30m Conformity mark ....CE 2.12. We reserve the right to make technical changes in the interests of progress. 3. Linking to TCRX2E and TCTRX2ED 3.1 First the TCLS1ED must be programmed to the TCRX3EDor TCRX2ED receiver module or the TCTRX2ED timer switch: 3.2. TCRX3ED: Briefly press the black knob on the top of the TCRX3ED. You will hear a pulsating signal. Press the top key on the TCLS1ED. The signal will stop. (Programming is complete) 3.3. TCRX2ED: Press the two knobs on the TCRX2ED. You will hear a pulsating signal. Press the top key on the TCLS1ED. The signal will stop. (Programming is complete). 3.4. TCTRX2ED: Select menu mode on the TCTRX2ED. Select Setup. Select Radio and then Learn. On the display appears the word Transmit. Press one of the two knobs on the TCLS1ED. The word Sensor now appears. (Programming is complete). 4. Shading function 4.1. Stick the TCLS1ED on the glass pane at the position the shutter should travel to for desired lighting. 4.3. Press the two knobs on the TCLS1ED simultaneously. The LED will light up in red. Release the knobs. The LED will flash in green and yellow for about 8 seconds. While it is flashing press knob 1. The LED will briefly light up in green. Programming is then complete. In order to test the shading function, push the lower button of the sensor. The test will then be performed (this is possibly only once). The shutter will travel downwards until it reaches the level of the sensor. It will then stop, reverse until the light sensor is no longer obstructed and then stop again. 4.5. The roller shutter will now close approx.15 minutes after the set brightness level has been reached and open again approx. 15 minutes after deletion of the set brightness level. 4.6. Deactivation of the shading function. Press the two knobs on the TCLS1ED simultaneously until the LED briefly lights up in red. Release the knobs. The LED will flash in green and yellow. Press the top knob on the sensor until the LED lights up in red. The shading function has now been deactivated but the settings are retained. 4.10. Reactivation of the shading function. Press the two knobs on the sensor simultaneously until the LED briefly lights up in red. Release the knobs. The LED will flash in green and yellow. Press the top knob until the LED lights up in green. The shading function has now been reactivated. 5. Complete closing in the evening 5.1. Wait until the time of day when the roller shutters should close. Press both knobs on the sensor simultaneously. The LED briefly lights up in red, release knobs. The LED then flashes in yellow and green. 5.2. While it is flashing press key 2 on the sensor. The LED lights up in yellow. The roller shutters will completely close now 15 minutes after reaching the set brightness level. 5.3. Deactivation of complete closing. Press the two knobs on the TCLS1ED simultaneously until the LED briefly lights up in red. Release the knobs. The LED will flash in green and yellow. Press the lower knob on the sensor until the LED lights up in red. Complete closing has now been deactivated but the settings are retained. 5.10. Reactivation of complete closing Press the two knobs on the sensor simultaneously until the LED lights up in red. Release the knobs. The LED will flash in green and yellow. Press lower knob until the LED turns yellow. The shading function has now been reactivated. 6. Glass breakage sensor 6.1. The TCLS1ED will react against blows against the window pane and will trigger complete closure of the roller shutters. 6.2. Activation of the glass breakage sensor function: Press the two knobs on the sensor simultaneously until the LED briefly lights up in red. Hold down both knobs until the LED lights up in red for a second time after about 4 seconds. The glass breakage sensor function is now activated. If the sensor reacts too sensitively against slight vibrations turn the device about its axis to reduce the sensitivity. 6.4 Deactivation of the glass breakage sensor function. Press the two knobs on the sensor simultaneously until the LED briefly lights up in red. Hold down both knobs for about 4 seconds until the LED lights up in green. The glass breakage sensor function is now deactivated. 7. If it doesn’t function... 7.1. Always place the sensor horizontally. (Align the line on the sensor parallel to the horizontal plane) 7.2. Turn the sensor by one to two degrees if it reacts too sensitively (glass breakage function). 7.3. During programming the distance between the sensor and timer should be no more than 5 metres. 7.4. Replace the two batteries in the sensor. 7.5. Ensure that you are firmly holding down the two knobs as required as well as simultaneously. 7.6. Has the timer/receiver been correctly connected and is there a power supply? 7.5. Don’t forget to always confirm your menu selection on the TCTRX2ED with the UP key. 7.6. Hotline +49 (0) 68 38 907 100 8.Declaration of Conformity 8.1.The Light & Glass Breakage sensor Model No. TCLS1ED, is in conformity to the applicable EN55014, EN61000-3, sections of StandardsETS RES 0908, EN60555, & EN60335-1 per the provisions & all amendments of the EU Directives 73/23/EEC, 89/336/EEC 8.2.Declaration of Incorporation The Light and Glass Breakage Sensor Model TCLS1ED, when installed and maintained according to all the Manufacturer’s instructions in combination with a shutter, which has also been installed and maintained according to all the Manufacturer’s instructions, meet the provisions of EU Directive 89/392/EEC and all amendments. 8.3.I, the undersigned, hereby declare that the equipment specified above and any accessory listed in the manual conforms to the above Directives and Standards. Colin B. Willmot -ChefingenieurChamberlain GmbH D-66793 Saarwellingen Februar, 2001 © 2001 Chamberlain GmbH 9.Warranty Chamberlain GmbH to the first retail purchaser of this product that the product shall be free from any defect in materials and/or workmanship for a period of 24 full months (2 years) from the date of purchase. Upon receipt of the product, the first retail purchaser is under obligation to check the product for any visible defects. Conditions: The warranty is strictly limited to the reparation or replacement of the parts of this product which are found to be defective and does not cover the costs or risks of transportation of the defective parts or product.This warranty does not cover non-defect damage caused by unreasonable use (including use not in complete accordance with Chamberlain GmbHs instructions for installation, operation and care; failure to provide necessary maintenance and adjustment; or any adaptations of or alterations to the products), labor charges for dismantling or reinstalling of a repaired or replaced unit or replacement batteries.A product under warranty which is determined to be defective in materials and/or workmanship will be repaired or replaced (at Chamberlain GmbH’s option) at no cost to the owner for the repair and/or replacement parts and/or product. Defective parts will be repaired or replaced with new or factory rebuilt parts at Chamberlain GmbH’s option.If, during the warranty period, the product appears as though it may be defective, contact your original place of purchase.This warranty does not affect the purchaser’s statutory rights under applicable national legislation in force nor the purchaser’s rights against the retailer arising from their sales/purchase contract. In the absence of applicable national or EU legislation, this warranty will be the purchaser’s sole and exclusive remedy, and neither Chamberlain GmbH nor its affiliates or distributors shall be liable for any incidental or consequential damages for any express or implied warranty relating to this product.No representative or person is authorized to assume for Chamberlain GmbH any other liability in connection with the sale of this product. LiftMaster Optical Cable Sensor WTMLS1 1. Optical cable sensor WTMLS1 1.1. Connection to time switch, TCT2ED 1.2. Suction bell 1.3. Optical sensor 1.5. Technical features - Brightness level-dependent control of a roller shutter in connection with the TCT2ED programmable timer switch. - Triggering of short-term shading processes. - Automatic closing of the roller shutter when darkness falls. 2. Please read before installation 2.1. Safety Instructions 2.2.These safety alert symbols mean Caution - a personal safety or property damage instruction. Please read those warnings carefully. 2.3. Failure to comply with the following instructions may result in serious personal injury or property damage. 2.4.Warning: IT IS IMPORTANT FOR THE SAFETY OF PERSONS TO FOLLOW THESE INSTRUCTIONS. SAVE THESE INSTRUCTIONS. 2.5.Installation, examination and operation of the 230V connection should be performed by an electrician. 2.6.Installation and wiring must be in compliance with your local building and electrical codes. 2.7.Do not allow children to play with fixed controls. Keep remote controls away from children. 3. Connection of the WTMLS1 to the TCT2ED 3.1. The WTMLS1 is connected to the TCT2ED with a cable. Pull the module out of its frame and plug the coupling into the socket on the bottom edge under the TCT2ED display. 3.2. Now replace the timer in the frame. 4. Shading function 4.1. Close the roller shutter manually until the desired shading effect has been achieved. Mark this position and reopen the shutter. 4.2. Press the suction bell onto the inside of the window pane. 4.3. On the TCT2ED unit go to menu mode. Select Setup, then select Sensor. 4.4. The present level of brightness is shown in the display as a black bar. The level of light after which the roller shutters should close (set value), is shown as a small dot in the upper right corner of the bar. Move this dot with the DOWN key to the right end of the black bar and then press the UP key twice. Then select Back. 4.5. Now select Mode, then Sensor and then Only+ Sun symbol. The roller shutter closes and opens again on reaching the set brightness levels with a delay of 15 minutes. 5. Complete closing in the evening 5.1. Wait until the time of day when the roller shutter should close. 5.2. Press the suction head onto the inside of the window pane (in case the shading function has not already been adjusted). 5.3. On the TCT2ED unit go to menu mode. Select Setup, then select Sensor and press the UP key. The sun symbol at the top right of the display now changes into a moon symbol. 5.4. The present level of brightness is again showed as a black bar. The level of light after which the roller shutters should close (set value), is shown as a small dot in the lower left corner of the bar. Move this dot with the DOWN key to the right end of the black bar and then press the UP key twice. Then select Back. 5.5. Now select Mode, then Sensor and then Only+ Moon symbol. The roller shutter now closes completely upon reaching the set brightness level. 5.6. If a fixed closing time has been programmed into the TCT2ED and if the set value is reached earlier the roller shutter will also close earlier. If the set value is not reached until after the programmed closing time the shutter will still close at the programmed time. 6.Declaration of Conformity 6.1.The Light sensor Model No. WTMLS1, is in conformity to the applicable EN55014, EN61000-3, sections of StandardsETS RES 0908, EN60555, & EN60335-1 per the provisions & all amendments of the EU Directives 73/23/EEC, 89/336/EEC 6.2.Declaration of Incorporation The Light Sensor Model TCLS1ED, when installed and maintained according to all the Manufacturer’s instructions in combination with a shutter, which has also been installed and maintained according to all the Manufacturer’s instructions, meet the provisions of EU Directive 89/392/EEC and all amendments. 6.3.I, the undersigned, hereby declare that the equipment specified above and any accessory listed in the manual conforms to the above Directives and Standards. Colin B. Willmot -ChefingenieurChamberlain GmbH D-66793 Saarwellingen February, 2001 © 2001 Chamberlain GmbH 7. Warranty Chamberlain GmbH to the first retail purchaser of this product that the product shall be free from any defect in materials and/or workmanship for a period of 24 full months (2 years) from the date of purchase. Upon receipt of the product, the first retail purchaser is under obligation to check the product for any visible defects. Conditions: The warranty is strictly limited to the reparation or replacement of the parts of this product which are found to be defective and does not cover the costs or risks of transportation of the defective parts or product.This warranty does not cover non-defect damage caused by unreasonable use (including use not in complete accordance with Chamberlain GmbHs instructions for installation, operation and care; failure to provide necessary maintenance and adjustment; or any adaptations of or alterations to the products), labor charges for dismantling or reinstalling of a repaired or replaced unit or replacement batteries.A product under warranty which is determined to be defective in materials and/or workmanship will be repaired or replaced (at Chamberlain GmbH’s option) at no cost to the owner for the repair and/or replacement parts and/or product. Defective parts will be repaired or replaced with new or factory rebuilt parts at Chamberlain GmbH’s option.If, during the warranty period, the product appears as though it may be defective, contact your original place of purchase.This warranty does not affect the purchaser’s statutory rights under applicable national legislation in force nor the purchaser’s rights against the retailer arising from their sales/purchase contract. In the absence of applicable national or EU legislation, this warranty will be the purchaser’s sole and exclusive remedy, and neither Chamberlain GmbH nor its affiliates or distributors shall be liable for any incidental or consequential damages for any express or implied warranty relating to this product.No representative or person is authorized to assume for Chamberlain GmbH any other liability in connection with the sale of this product. 1.Capteur de lumière et de vitre brisée TCLS1ED 1.1.Voyant lumineux 1.2.Touche 1, 1.3.Touche 2 1.4.Le capteur doit toujours être installé horizontalement. 1.5.Si le capteur (fonction bris de vitre) ne réagit pas ou est trop sensible, veuillez le tourner pour régler sa sensibilité. Rotation dans le sens antihoraire : davantage de sensibilité. Rotation dans le sens horaire : moins de sensibilité. 1.6.En cas de déclenchement du capteur si la vitre est brisée ou après une vibration, le capteur ne se déclenche à nouveau qu'après 60 secondes. 1.7.Caractéristiques techniques -Commande dépendant de la clarté pour un ou plusieurs volets roulants fonctionnant avec les modules de réception TCRX3ED, TCRX2ED et le minuteur programmable TCTRX2ED. -Déclenchement de la fermeture/l'ouverture de courte durée en fonction de la pénombre. -Fermeture automatique des volets roulants à la tombée de la nuit. -Capteur de bris de vitre intégré. Fermeture automatique des volets roulants en cas de choc contre la vitre. -Code de sécurité de roulement 64 bits. 1.8.Changement de piles du TCLS1ED (Env. tous les trois ans, selon l’utilisation). Tournez le TCLS1ED et enlevez soigneusement la partie avant du boîtier. Les piles sont alors visibles et peuvent être changées. Il faut deux piles de type : 3 V / CR 2016 (2x) Pour fermer le boîtier, il suffit simplement de presser le couvercle et l’élément de prise l’un contre l’autre. 2. Veuillez lire avant la montage 2.1.Règles de sécurité 2.2.Ces symboles d’avertissement de sécurité vous demandent de faire attention - ils indiquent des instructions pour éviter un risque de sécurité personnelle ou de dommage matériel. Il faut lire ces instructions attentivement. 2.3.Le non-respect des instructions ci-dessous peut conduire à des blessures graves ou des dommages matériels. 2.4.ATTENTION: Pour la sécurité des personnes, respectez les présentes instructions. CONSERVEZ SOIGNEUSEMENT LES PRESENTES INSTRUCTIONS. 2.5.La mise en place, la vérification et la connexion d’une installation en 230V ne devra être entreprise et réalisée que par les électriciens professionnels habilités. 2.6.Le montage et le câblage doivent correspondre aux normes locales de construction et d’électrification. 2.7.Ne laissez pas les enfants jouer avec les unités de commande. Tenez les télécommandes hors de leur portée. 2.8. La programmation et la connexion des appareils doivent se faire avant le montage définitif. Pour cela, les appareils doivent être éloignés d’une distance n’excédant pas 5 mètres. 2.9. Portée : env. 100 m à l’extérieur, env. 30 m à l’intérieur. 2.10. Veuillez entreprendre tous les réglages nécessaires avant de mettre le capteur en marche. 2.11. Informations techniques Tension de service ....6 V, type CR 2016 Fréquence ....433,92 MHz Protection ....IP 40 Gebruiks-/Montageaanwijzing Licht- en glasbreuksensor TCLS1ED NL 1. Licht-en glasbreuksensor TCLS1ED 1.1. LED, 1.2. Knop 1 1.3. Knop 2 1.4. De sensor moet altijd horizontaal worden bevestigd. 1.5. Als de sensor (bij glasbreuk) niet, of té gevoelig reageerd, kunt hem door draaien opnieuw uitrichten.Draaien tegen de klok = verhoogde gevoeligheid. Draaien in klokrichting = verminderde gevoeligheid. 1.6. Als de glasbreuksensor na een trilling of beving gereageerd heeft, kan hij pas na 60 sekonden opnieuw reageren. 1.7. Technische gegevens - Lichtafhankelijke sturing van één of meer rolluiken in verbinding met de ontvangers TCRX3ED, TCRX2ED en de programmeerbare tijdschakelklok TCTRX2ED. -Schaduw voor korte duur -Automaties sluiten van de rolluiken als het donker wordt. -Ingebouwde glasbreukvoeler. Sluit vanzelf de rolluiken als er tegen het venster wordt geslagen -64 Bit Rolling Veiligheidscode 1.8. Inleggen nieuwe batterijen bij de TCLS1ED na ca. drie jaar, (afhankelijk van gebruik). Draai de TCLS1ED om en neemt U voorzichtig de voorkant eraf, Nu ziet U de batterijen en kunt ze wisselen. Daarvoor heeft U twee batterijen nodig van Type: 3V / CR 2016 (2x),Sluiten: Eenvoudig het dekseltje er weer op drukken. 2. Belangrijk: Voor de montage moet U hier opletten 2.1. Veiligheidsaanwijzingen 2.2. Zulke waarschuwings tekens beduiden “Wees voorzichtig”, U moet deze waarschuwingen bevolgen, anders kunnen er ongelukken aan lijf en leven van personen en/of schade aan de apparatuur en andere zakelijke waarden ontstaan. Deze waarschuwingen voor gebruik zorgvuldig lezen. 2.3. Niet bevolgen van de volgende regels voor de veiligheid, kan zware ongelukken aan lijf en leven van personen en/of schade aan de apparatuur en andere zakelijke waarden veroorzaken. 2.4. Waarschuwing: Voor de veiligheid van personen is het heel belangrijk, deze instrukties op te volgen. Deze instrukties goed opbewaren. 2.5. De opbouw, het testen en het eerste gebruik van de 230 Volt aansluiting mag uitsluitend door een bekwaam vakman worden uitgevoerd 2.6. Aansluiten en het verleggen van de stroomkabels moet volgens de plaatselijke Bouw - en elektrovoorschriften worden uitgevoerd. 2.7. Verhinder dat kinderen met de bedieningen spelen, bedieningen goed opbergen, zorgt U ervoor, dat kinderen er niet kunnen aankomen. 2.8. Het programma van de zender moet U instellen vóór dat U de apparaten monteerd (zie ook Verbinding), Daarbij mag de afstand tussen de twee apparate niet meer als 5 Meter bedragen. 2.9. Bereik : ca. 100m aan de open lucht, en ca. 30m binnen huis 2.10 Voordat U de sensor bevestigt, eerst alles instellen 2.11 Technische gegevens Voedingsspanning...........6V, Typ CR 2016 Frequentie...............433,92MHz Plage de température de service ....0°C à 40 °C Portée ....env. 30 m Marque de conformité ....CE 2.12. Les modifications techniques suivent l’état de la technique et demeurent sous réserve. 3. Connexion au TCRX3ED, TCRX2ED et TCTRX2ED 3.1. Il faut d’abord programmer le TCLS1ED en fonction du module de réception TCRX3ED ou TCRX2ED ou du minuteur TCTRX2ED: 3.2. TCRX3ED: appuyez brièvement sur le bouton noir sur le côté supérieur du TCRX3ED. Un signal sonore discontinu est émis. Appuyez sur la touche supérieure du TCLS1ED. Le signal sonore cesse. (La programmation est terminée). 3.3. TCRX2ED: appuyez sur les deux boutons du TCRX2ED. Un signal sonore discontinu est émis. Appuyez sur la touche supérieure du TCLS1ED. Le signal sonore cesse. (La programmation est terminée). 3.4. TCTRX2ED: sélectionnez le mode Menu du TCTRX2ED. Choisissez Ajuster. Sélectionnez radio puis apprend. Le mot activez apparaît à l’écran. Appuyez sur les deux boutons du TCLS1ED. Le mot capteur s’affiche. (La programmation est terminée). 4. Fonction Ombrager 4.1. Collez le TCLS1ED à l’endroit de la vitre jusqu’à le volet devra descendre pour ombrager correctement. 4.3. Appuyez simultanément sur les deux boutons noirs du TCLS1ED. Le voyant lumineux s’allume en rouge. Relâchez la pression sur les boutons. Le voyant lumineux clignote pendant environ 8 secondes en vert et jaune. Pendant que le voyant clignote, appuyez sur la touche 1. Le voyant s’allume brièvement en vert. La programmation est terminée. Afin de tester la fonction ombrager, appuyez brièvement sur le bouton noir inférieur du capteur (ce test n’est possible qu une seule fois). Le volet descend, s’arrête à hauteur du capteur, remonte légèrement de manière à libérer le capteur, puis s’arrête à nouveau. 4.5. Le volet roulant se baisse maintenant environ 15 minutes après que la luminosité paramétrée a été atteinte et s’ouvre environ 15 minutes après que la luminosité paramétrée a disparu. 4.6. Désactivation de la fonction Ombrager Appuyez sur les deux boutons du TCLS1ED jusqu’à ce que le voyant lumineux s’allume brièvement en rouge. Relâchez la pression sur les boutons. Le voyant lumineux clignote en jaune et vert. Appuyez sur le bouton supérieur du capteur jusqu’à ce que le voyant s’allume en rouge. La fonction Ombrager est maintenant désactivée. La configuration demeure inchangée. 4.7. Réactivation de la fonction Ombrager Appuyez simultanément sur les deux boutons du capteur jusqu'à ce que le voyant s’allume en rouge. Relâchez la pression sur les boutons. Le voyant clignote en jaune et vert. Appuyez sur le bouton supérieur jusqu’à ce que le voyant s’allume en vert. La fonction Ombrager est à nouveau activée. 5. Fermeture complète du volet le soir 5.1. Attendez le moment de la journée où vous souhaitez fermer le volet. Appuyez simultanément sur les deux boutons du capteur. Le voyant s’allume brièvement en rouge puis relâchez la pression sur les boutons. DEL clignote en jaune et vert. 5.2. Pendant le clignotement, appuyez sur la touche 2 du capteur. Le voyant s’allume en jaune. Le volet roulant se ferme maintenant complètement 15 minutes après que la valeur de luminosité paramétrée a été atteinte. 5.3. Désactivation de la fermeture complète Appuyez simultanément sur les deux boutons du TCLS1ED jusqu’à ce que le voyant s’allume brièvement en rouge. Relâchez la pression sur les boutons. Le voyant clignote en jaune et vert. Appuyez Stroomnetbeveiliging.........IP 40 Bedrijfstemperatuur tussen.......0°C tot 4°C Effectief bereik.......ca. 30m Keurmerk......CE 2.12. Technische wijzigingen voorbehouden. 3. Verbinding tussen TCRX3ED, TCRX2ED en TCTRX2ED 3.1. We beginnen nu met de TCLS1ED op de ontvanger TCRX3ED of TCRX2ED of de schakelklok TCTRX2ED te programmeren: 3.2. TCRX3ED: Zwarte Knop aan de bovenkant van de TCRX3ED kort indrukken, U hoort een ritmies signaal, De knop boven op de TCLS1ED drukken. Het signaal stopt. (De programmering is beeindigd.) 3.3. TCRX2ED: De twee zwarte knopjes van de TCRX2ED drukken. U hoort weer een ritmiese signaaltoon. Bovenste knop van de TCLS1ED drukken. Het signaal stopt, (De programmering is beeindigd.) 3.4. TCTRX2ED: Kies nu de menu-mode van de TCTRX2ED, en kies Einstl. Vervolgens kiest U Funk en dann Lernen. Op het display verscheint het woord Senden. Toets één van de twee knopjes van de TCLS1ED. Nu ziet U het woord Sensor. (Eind van de programmering.) 4. De schaduwfunktie 4.1. Plakt U de TCLS1ED ongeveer op de die plaats aan het raam waar bij zonlicht uw rolluik stoppen moet. 4.3. Druk nu de beide knopjes aan TCLS1ED. De LED wordt rood. Laat de knopjes los. De LEDs knipperen nog ongeveer 8 Sekonden lang groen en geel. Terwijl de LEDs knipperen druk het knopje 1. De LED blinkt even groen. Het programeren is nu klaar. Om de Verdonkerings functie te testen drukt U op de sensor. Nu wordt de test gedann (dit is alleen maar één keer mogelijk). Het rolluik gaat naar beneden, stopt op ongeveer de hoogte van de sensor en gaat iets omhoog an de sensor weer vrijtegenen en stopt dan. 4.5. Nu sluit het rolluik ongeveer 15 Minuten na dat de ingestelde lichtwaarde werd bereikt en opent ongeveer 15 Minuten nadat deze instelling wordt onderschreden. 4.6. Uitschakelen von de schaduwfunktie. Beide knopjes van de TCLS1ED gelijktijdig drukken tot de LED een keer rood blinkt. Knopjes los laten, De LEDs blinken nu geel en groen. Bovenste knop van de sensor drukken, tot de rode LED blinkt. De schaduw funktie is nu uitgeschakeld, Deze instellingen blijven behouden. 4.7. opnieuw inschakelen van schaduw-funktie. Toets beide knopjes van de sensor gelijktijdig tot de rode LED kort blinkt, Knopjes los laten, De gele en groene LEDs blinken. Bovenste knop drukken tot het groene LED een keer aangaat, De schaduwfunktie is weer ingeschakeld, 5. ´s Avonds volledig sluiten 5.1. Wacht het tijdpunt van de dag af, dat het rolluik moet gaan sluiten. Druk gelijktijdig beide knopjes aan de sensor, De LED blinkt kort rood, dan loslaten. De LED knippert vervolgens geel en groen. 5.2. Toets tijdens het knipperen knop 2 van de sensor. De gele LED gaat een keer aan. Het rolluik zal nu 15 Minuten na bereiken van de ingestelde lichtwaarde volledig gaan sluiten, 5.3. Geheel sluiten funktie weer uitschakelen. Beide knopjes van de TCLS1ED gelijktijdig drukken, tot de rode LED een keer kort aangaat. Knopjes los laten. De gele en groene LEDs knipperen. Onderste knop van de sensor drukken, tot de rode LED een keer blinkt, Het komplete sluiten is nu uitgeschakeld. De ingestelde waardes worden gebufferd. 5.4. Opnieuw inschakelen van het komplete sluiten. Toets gelijktijdig beide knopjes van de sensor tot de rode LED gaat een keer aan. Knopjes los laten, De gele en groene LEDs knipperen. Onderste knop van sur le bouton inférieur du capteur jusqu’à ce que le voyant s’allume en rouge. La fermeture complète est maintenant désactivée. La configuration demeure inchangée. 5.4. Réactivation de la fermeture complète Appuyez simultanément sur les deux boutons du capteur puis le voyant s’allume en rouge. Relâchez la pression sur les boutons. Le voyant clignote en jaune et vert. Appuyez et maintenez enforcée la touche inférieur du capteur jusqu’à ce que DEL s’allume en jaune. La fermeture complète est à nouveau activée. 6. Capteur de bris de vitre 6.1. Le TCLS1ED perçoit les chocs contre la vitre et déclenche un processus de fermeture complète du volet roulant. 6.2. Activation de la fonction Capteur de bris de vitre: Appuyez sur les deux boutons du capteur jusqu’à ce que le voyant s’allume brièvement en rouge. Maintenez les deux boutons enfoncés jusqu’à ce que le voyant s’allume en rouge une nouvelle fois, au bout de 4 secondes environ. La fonction Capteur de bris de vitre est activée. Si le capteur réagit à la moindre vibration, tournez l’appareil d’environ 2-3 ° autour de son axe pour en réduire la sensibilité. 6.4. Désactivation de la fonction Capteur de bris de vitre. Appuyez sur les deux boutons du capteur jusqu’à ce que le voyant s’allume brièvement en rouge. Maintenez les deux boutons enfoncés jusqu’à ce que le voyant s’allume en vert, au bout de 4 secondes environ. La fonction Capteur de bris de vitre est désactivée. 7. Que faire si cela ne fonctionne pas… 7.1. Mettez toujours le capteur à l’horizontale (ligne du capteur à l’horizontale). 7.2. Tournez le capteur d’un ou deux degrés quand il est trop sensible (fonction bris de vitre). 7.3. Lors de la programmation, il ne faut pas que la distance entre le capteur et le minuteur excède cinq mètres. 7.4. Echangez les piles du capteur. 7.5. Lorsque cela est demandé, appuyez bien simultanément et fermement sur les deux boutons. 7.6. Le minuteur/récepteur est-il bien connecté ?. Est-il bien alimenté ? 7.5. N’oubliez pas de confirmer avec la touche Haut le choix de menus pour le TCTRX2ED. 7.6. Hotline + 49 (0) 68 38 907 100 8. Garantie Chamberlain GmbH garantit au premier acheteur de ce produit chez un détaillant que le produit en question est exempt de tout défaut de fabrication ou de matériel pendant une période de deux ans à partir de la date d’achat. Dès réception du produit, le premier détaillant est tenu de vérifier tout défaut apparent de celui-ci. Conditions: Cette garantie constitue le seul recours disponible pour l’acheteur selon la loi, pour tout dommage en liaison avec ou résultant d’une pièce défectueuse et/ou du produit. La garantie est strictement limitée à la réparation ou au remplacement des pièces de ce produit qui s’avèreraient défectueuses. Cette garantie ne couvre pas les dommages qui ne sont pas causés par un appareil défectueux et qui résultent d'une utilisation abusive (y compris une utilisation qui n'est pas exactement conforme aux consignes d'installation, de fonctionnement et d'entretien préconisées par Chamberlain GmbH, un manque d'entretien et de réglage nécessaires, toute adaptation ou modification des appareils, tous frais associés au démontage ou à la réinstallation d'une pièce réparée ou changée et au remplacement des piles. Un produit sous garantie dont le défaut de fabrication et/ou de matériel est reconnu sera réparé ou remplacé (au choix de Chamberlain GmbH) sans frais pour le propriétaire en ce qui concerne la réparation ou le remplacement de la pièce défectueuse ou du produit. Les pièces défectueuses seront réparées ou remplacées par des pièces neuves ou réusinées, au choix de Chamberlain GmbH. Si durant la période de garantie le produit semble présenter un défaut, contactez votre revendeur. Cette garantie n'affecte pas les droits statutaires de l'acheteur sous la législation nationale applicable en vigueur. Cette garantie n'affecte pas non plus les droits de l'acheteur à l'égard du revendeur conformément aux termes du contrat de vente/achat. En l'absence de législation nationale ou CE applicable, cette garantie constituera le seul recours exclusif de l'acheteur et, dans le cadre de toute garantie expresse ou implicite concernant ce produit, ni de sensor gedruckt houden tot de LED geel blinkt. Het komplete sluiten is opnieuw ingeschakeld. 6. Glasbreuksensor 6.1. De TCLS1ED voelt als er tegen het raam word geslagen en laat dan het rolluik geheel naar beneden. 6.2. Inschakelen van de Glasbreuksensor - funktie: drukt U beide knopjes aan de sensor, tot de roode LED kort een keer aangaat, Houdt U beide knopjes gedrukt tot de LED na ongeveer 4 Sekonden een tweede keer rood aangaat. De glasbreuksensor – funktie is geaktiveerd. Reageert de sensor op al te geringe bevingen, draait U het Apparaat ongever om 2°-3°om zijn eigen as, daarbij wordt de gevoeligheid verminderd. 6.4. Uitschakelen van de Glasbreuksensor - funktie. Drukt U beide knopjes aan de sensor, tot de roode LED kort aangaat, Houdt U beide knopjes ingedrukt, tot de groene LED na circa 4 Sekonden een keer aangaat, De Glasbreuksensor -funktie is uitgeschakeld. 7. Voor het geval dat hij het niet doet.... 7.1. Plaats de sensor altijd horizontal. (Streep aan de sensor parallel naar horizont uitrichten.) 7.2. Draai de sensor um ein tot zwei Grad, als hij te gevoelig reageerd (glasbreuksensor funktie). 7.3. Gedurende het programmeren mag de afstand tussen sensor en klok niet meer als vijf Meter betragen. 7.4. Wissel de twee batterijen in de sensor. 7.5.Houdt beide knopjes bij aanvorderung ook gelijktijdig goed ingedrukt. 7.6. Werd de klok/ontvanger juist aangesloten. Heeft hij ook stroom? 7.5. Vergeet niet Uw keuze in het menu van de TCTRX2ED altijd met de “Omhoog”- Knop te bevestigen. 7.6.Hotline +49 (0) 68 38 907 100 8. Verklaring 8.1.De Licht-/Glasbreuksensor Modell Nr. TCLS1ED, beantwoordt aan alle richtlijnen van de normen: EN55014, EN61000-, ETS RES 0908, EN60555, & EN60335-1 en 73/23/EEC, 89/336/EEC 8.2. Verklaring van integratie De Licht-/Glasbreuksensor Modell TCLS1ED beantwoord, als ze tezamen met een rolluik volgens de instrukties van de fabrikant wordt geinstalleerd en onderhouden, aan alle voorschriften van de EUrichtlijn 89/392/EEC en hun supplementaires. 8.3.Ik, de ondergetekende, verklaar hiermede, dat het voorgenoemde apparaat en het in de montageaanwijzing genoemde toebehoor aan de eerder genoemde voorschriften en richtlijnen voldoet. Colin B.Willmott -Chefingenieur-Chamberlain GmbH D-66793 Saarwellingen Februar, 2001 © 2001 Chamberlain GmbH 9. Garantie Chamberlain GmbH garandeerd de eerste koper van de Licht-en glasbreuksensor voor de duur van 24 maanden (2 jaren vanaf het datum van aankoop, dat dit produkt zonder materiaal-en /of fouten in de verwerking is. De eerste koper is verplicht, het produkt bij ontvangst op zichtbare defekte te kontrolleren. Kondities: De garantie beperkt zich uitsluitend tot de reparatie of deuitwisseling van defekte onderdelen en dekt niet de kosten of het transportrisiko van de defekte onderdelen of produkten. Deze garantie strekt zich niet uit tot schades, die geen defekte zijn, maar door verkeerd gebruik werden veroorzaakt.( zoals het gebruik bij slechts gedeeltelijk bevolgen van Chamberlain GmbHs montagevoorschriften, het gebruik en onderhoud; verzuimd onderhoud of instelling; elke aanpassing of verandering aan het produkt), uurloon, werkkosten voor de afbouw of het opnieuw inbouwen van een gerepareerde of uitgewisselde eenheid en/of uitwisseling van de batterijen. Het ligt in het bemeten van Chambeerlain GmbH, of een door de garantie gedektes produkt, dat Chamberlain GmbH ni ses associés ou distributeurs ne seront responsables de tous dommages accidentels ou relationnels. Aucune personne n’est mandatée ni autorisée par Chamberlain GmbH à assumer quelqu'autre responsabilité que ce soit en liaison avec la vente de ce produit. 9. Déclaration de conformité 17.1.Le horloge programmable Modèle Nr. TCLS1ED, est conforme aux secions applicables EN55014, EN61000-3,des Normes ETS RES 0908, EN60555, & EN60335-1selon les clauses et toutes les modifications des directives EU 73/23/EEC, 89/336/EEC 17.2.Déclaration d’incorporation Le horloge programmable, modèle TCLS1ED, si installé et maintenu selon toutes les instructions du fabricant, de concert avec un volet qui a, lui aussi, été installé et maintenu selon toutes les instructions du fabricant, satisfait aux clauses de la Directive EU 89/392/EEC et de toutes ses modifactions. 17.3. Je soussigné déclare par la présente que l’equipement spécifié ci-dessus et tout accessoire mentionné dans ce manuel est conforme aux Directives et Normes ci-dessus. Colin B. Willmott -ChefingenieurChamberlain GmbH, D-66793 Saarwellingen Février 2001, 709134-FR ©2001 Chamberlain GmbH, Notice de montage et d’utilisation du capteur de lumière à fil WTMLS1 1. Capteur de lumière WTMLS1 1.1.Connexion pour le minuteur TCT2ED 1.2. Ventouse 1.3.Capteur de lumière 1.5 Caractéristiques techniques -Commande dépendant de la clarté pour volet roulant reliée au minuteur programmable TCT2ED. -Déclenchement de la fermeture/l'ouverture de courte durée en fonction de la pénombre. -Fermeture automatique des volets roulants à la tombée de la nuit. 2. Veuillez lire avant la montage 2.1.Règles de sécurité 2.2.Ces symboles d’avertissement de sécurité vous demandent de faire attention - ils indiquent des instructions pour éviter un risque de sécurité personnelle ou de dommage matériel. Il faut lire ces instructions attentivement. 2.3.Le non-respect des instructions ci-dessous peut conduire à des blessures graves ou des dommages matériels. 2.4.ATTENTION: Pour la sécurité des personnes, respectez les présentes instructions. CONSERVEZ SOIGNEUSEMENT LES PRESENTES INSTRUCTIONS. 2.5.La mise en place, la vérification et la connexion d’une installation en 230V ne devra être entreprise et réalisée que par les électriciens professionnels habilités. 2.6.Le montage et le câblage doivent correspondre aux normes locales de construction et d’électrification. 2.7.Ne laissez pas les enfants jouer avec les unités de commande. Tenez les télécommandes hors de leur portée. 3. Connexion du WTMLS1 au TCT2ED 3.1. Le WTMLS1 est connecté au TCT2ED par un câble. Retirez le module du cadre et insérez le câble dans la fiche située sur le côté, sous l’affichage du TCT2ED. 3.2. Remettez le minuteur dans le cadre. seul+ symbole soleil. Le volant roulant se ferme et s‘ouvre avec un décalage de 15 minutes après que la quantité de lumière paramétrée a été atteinte. 5. Fermeture complète du volet le soir 5.1. Attendez le moment de la journée où vous souhaitez fermer le volet. 5.2. Appliquez la ventouse sur la vitre à l’intérieur, (falls nicht bereits für Beschattungsfunktion ausgerichtet!). 5.3. Sélectionnez le mode Menu sur le TCT2ED. Choisissez ajuster puis capteur et appuyez sur la touche Haut. Le symbole du soleil à droite en haut de l’affichage se transforme en symbole de lune. 5.4. La quantité de lumière est à nouveau représentée par un bâton noir sur l’écran. La quantité de lumière à partir de laquelle le volant roulant doit se fermer (valeur théorique) est représentée par un petit point im unteren Balkenteil. Déplacez le point avec la touche Bas vers l'extrémité droite du bâton noir puis appuyez deux fois sur la touche Haut. Choisissez ensuite retour. 5.5. Choisissez alors mode, puis capteur puis encore seul+ symbole lune. Le volet roulant se ferme maintenant complètement dès que la quantité de lumière paramétrée a été atteinte. 5.6. Si une heure de fermeture fixe est programmée sur le TCT2ED et si la valeur théorique est atteinte plus tôt, le volet se ferme plus tôt. Si la valeur théorique est atteinte après l’heure programmée, le volet se ferme à l’heure programmée. 8. Garantie Chamberlain GmbH garantit au premier acheteur de ce produit chez un détaillant que le produit en question est exempt de tout défaut de fabrication ou de matériel pendant une période de deux ans à partir de la date d’achat. Dès réception du produit, le premier détaillant est tenu de vérifier tout défaut apparent de celui-ci. Conditions: Cette garantie constitue le seul recours disponible pour l’acheteur selon la loi, pour tout dommage en liaison avec ou résultant d’une pièce défectueuse et/ou du produit. La garantie est strictement limitée à la réparation ou au remplacement des pièces de ce produit qui s’avèreraient défectueuses. Cette garantie ne couvre pas les dommages qui ne sont pas causés par un appareil défectueux et qui résultent d'une utilisation abusive (y compris une utilisation qui n'est pas exactement conforme aux consignes d'installation, de fonctionnement et d'entretien préconisées par Chamberlain GmbH, un manque d'entretien et de réglage nécessaires, toute adaptation ou modification des appareils, tous frais associés au démontage ou à la réinstallation d'une pièce réparée ou changée et au remplacement des piles. Un produit sous garantie dont le défaut de fabrication et/ou de matériel est reconnu sera réparé ou remplacé (au choix de Chamberlain GmbH) sans frais pour le propriétaire en ce qui concerne la réparation ou le remplacement de la pièce défectueuse ou du produit. Les pièces défectueuses seront réparées ou remplacées par des pièces neuves ou réusinées, au choix de Chamberlain GmbH. Si durant la période de garantie le produit semble présenter un défaut, contactez votre revendeur. Cette garantie n'affecte pas les droits statutaires de l'acheteur sous la législation nationale applicable en vigueur. Cette garantie n'affecte pas non plus les droits de l'acheteur à l'égard du revendeur conformément aux termes du contrat de vente/achat. En l'absence de législation nationale ou CE applicable, cette garantie constituera le seul recours exclusif de l'acheteur et, dans le cadre de toute garantie expresse ou implicite concernant ce produit, ni Chamberlain GmbH ni ses associés ou distributeurs ne seront responsables de tous dommages accidentels ou relationnels. Aucune personne n’est mandatée ni autorisée par Chamberlain GmbH à assumer quelqu'autre responsabilité que ce soit en liaison avec la vente de ce produit. 4. Fonction Ombrager 4.1. Baissez manuellement le volant roulant jusqu’à l'obtention du niveau d’ombre souhaité. Markieren Sie diesen Punkt und fahren Sie den Rollladen danach wieder hoch. 4.2. Appliquez la ventouse sur la vitre à l’intérieur. 4.3. Sélectionnez le mode Menu sur le TCT2ED. Choisissez ajuster puis capteur. 4.4. La quantité de lumière est représentée par un bâton noir sur l’écran. La quantité de lumière à partir de laquelle le volant roulant doit se fermer (valeur théorique) est représentée par un petit point imoberen Balkenteil. Déplacez le point avec la touche Bas vers l’extrémité droite du bâton noir puis appuyez deux fois sur la touche Haut. Sélectionnez ensuite retour. 4.5. Choisissez alors mode, puis capteur puis encore 9. Déclaration de conformité 17.1.Le horloge programmable Modèle Nr. WTMLS1, est conforme aux secions applicables EN55014, EN61000-3,des Normes ETS RES 0908, EN60555, & EN60335-1selon les clauses et toutes les modifications des directives EU 73/23/EEC, 89/336/EEC 17.2.Déclaration d’incorporation Le horloge programmable, modèle WTMLS1, si installé et maintenu selon toutes les instructions du fabricant, de concert avec un volet qui a, lui aussi, été installé et maintenu selon toutes les instructions du fabricant, satisfait aux clauses de la Directive EU 89/392/EEC et de toutes ses modifactions. 17.3. Je soussigné déclare par la présente que l’equipement spécifié ci-dessus et tout accessoire mentionné dans ce manuel est conforme aux Directives et Normes ci-dessus. material- of bewerkingsfouten aantoont, kostenloos wordt gerepareerd of vervangen. Chamberlain GmbH behoudt zich het recht voor, te beslissen of de defekte onderdelen worden gerepareerd of door nieuwe of in de fabriek gereviseerde onderdelen vervangen worden,Als het Produkt gedurende de garantietijd defekt is, richt U zich a.u.b. aan Uw detailhandelaar. Deze garantie tast de rechten van de koper volgens de nationaal geldige Wetten niet aan. Ze heeft ook geen uitwerking op de rechten van de koper tegenover de verkoper, die uit het koopverdrag voortvloeien. Daar, waar geen geldende nationale of EEC-Wetten gelden, is deze garantie het enige rechtelijke middel van de koper en nog de Chamberlain GmbH nog hun filialen of Handelaren zijn voor schade, of schade die daruit voortvloeit, voor uitdrukkelijke of stilzwijgende garanties in samenhang met dit produkt aansprakelijk. Niemand, ook geen vertegenwoordiger, is geautoriseerd om namens Chamberlain GmbH andere aansprakelijkheden in verband met de verkoop van deze produkte te overnemen. Zonsymbol. Het rolluik sluit en opent na bereiken van de ingestelde hoeveelheid licht met een vertraging van 15 Minuten. Gebruiks- /montageaanwijzing Kabellichtsensor WTMLS1 1.Kabellichtsensor WTMLS1 1.1. Aansluiting naar Tijdschakelklok TCT2ED 1.2. Zuignap 1.3. Lichtsensor 1.5. Technische gegevens - Lichafhankelijke besturing voor een rolluik in verbindung met de programmeerbare tijdschakelklok TCT2ED. - Kan ook voor korte schaduwperiodes worden gebruikt. - Sluit zelfstandig de rolluiken als het donker wordt.. 2. Voor de montage moet U volgende veiligheidsvoorschriften opvolgen: 2.1. Veiligheidsaanwijzing 2.2. Zulke tekens waarschuwen, betekenen “Wees voorzichtig”, oproep deze te bevolgen, door niet bevolgen kann personen- en/of. schade an zakelijke waardes ontstaan. Leest U a.u.b. deze waarschuwingen heel zorgvuldig. 2.3. Het niet opvolgen van de veiligheidsvoorschriften kan ernstige personen- of zakelijke schades veroorzaken. 2.4. Waarschuwing: Voor de veiligheid van personen is het belangrijk, deze instrukties na te komen. Deze instrukties goed opbewaren. 2.5. Montage, testen en eerste gebruik van de 230 Volt aansluiting mag uitsluitend door een erkend vakman (electricien) worden uitgevoerd. 2.6. Montage en verleggen van de kabels moeten volgens de plaatselijke Bouw - en Elektrovoorschriften worden uitgevoerd. 2.7. Kinderen niet met de Bediening laten spelen, bediening voor kinderen ontoegankelijk opbewaren. 3. Montage van de WTMLS1 aan deTCT2ED 3.1. De WTMLS1 wordt met een Kabel aan de 0TCT2ED verbonden. Trek het moduul voorzichtig uit het raamelement en steek de koppeling in de insteekgleuf aan de zijkant onder het display van de TCT2ED. 3.2. Zet nu de klok opnieuw in het element. 4. Schaduw- funktie 4.1. Sluit het rolluik van hand, tot de gewenste schaduw-werking is bereikt. Markeer dit punt en beweeg het rolluik weer naar boven. 4.2. Druk de Saugknop van binnen tegen het venster. 4.3. Gaat U bij de TCT2ED in de menümode. Nu kiest U Einstl., dan kiest U Sensor. 4.4. De momentele hoeveelheid licht is op het display als zwarte streep te zien. De hoeveelheid licht, waar vanaf het rolluik moet gaan sluiten, is als kleine punt in bovenste balkendeel afgebeeld. Beweeg de punt met de “Omlaag”-knop, tot hij rechts aan het einde van de zwarte streep is en drukt U dann twee keer de “Omhoog”- knop. Kies nu “Zurück”. 4.5. Nu kiest U Modus, dan Sensor en daarna Nur + Colin B. Willmott -Chefingenieur- 709167 5. ´s Avonds volledig sluiten 5.1. Wacht U het tijdpunt van de dag af, dat het rolluik moet gaan sluiten. 5.2. Druk de zuigknop van binnen tegen het vensterglas (als het al niet voor schadaar-werking is geprogrammeerd!). 5.3. Gaat U bij de TCT2ED in de Menumode. Kies Einstl., dan Sensor en drukt U de omhoog-knop. Het zonnnetje rechts boven op het display verandert sich in een maantje. 5.4. De hoeveelheid licht, die er op dit moment is, wordt weer als zwart streepje aangetoond. En de hoeveelheid licht, waar vanaf zich het rolluik moet aan sluiten, is als een puntje in onderste balkendeel te zien. Beweeg nu met de “omlaag”-knop deze punt tot aan het rechte eind van de streep en druk twee keer de “omhoog”-knop. Kies Zurück. 5.5. Nu kiest U Modus, dan Sensor daarna “Nur”+ maansymbool. Het rolluik sluit volledig op het tevoren ingestelde licht. 5.6. Is in de TCT2ED een vaste sluitingstijd geprogrammerd en wordt de ingestelde lichtwaarde vroeger bereikt, omdat het sneller donker wordt, dan sluit het rolluik ook vroeger. Maar het rolluik sluit wèl, op het ingestelde tijdstip, als het langer licht blijft. 6. Verklaring 6.1.De Lichtsensor Modell Nr. WTMLS1, beantwoordt aan alle richtlijnen van de normen: EN55014, EN61000-, ETS RES 0908, EN60555, & EN60335-1 en 73/23/EEC, 89/336/EEC 6.2.De Lichtsensor modell WTMLS1 voldoet, als ze in verbinding met een rolluik volgens voorschrift van de fabrikant geinstalleerd en onderhouden wordt, aan alle aanvorderingen van de EEC richtlijn 89/392/EEC en hun toevoegingen. 6.3. Ik, als ondergetekende, verklaar hiermede, dat het voorgenoemde apparaat en het in de montageaanwijzing opgevoerde toebehoor aan de voorheen genoemde voorschriften en richtlijnen voldoet. Colin B.Willmott -ChefingenieurChamberlain GmbH D-66793 Saarwellingen Februar, 2001 © 2001 Chamberlain GmbH 7. Garantie Chamberlain GmbH garandeerd de eerste koper van de lichtsensor voor de duur van 24 maanden (2 jaren vanaf het datum van aankoop, dat dit produkt zonder materiaal-en /of fouten in de verwerking is. De eerste koper is verplicht, het produkt bij ontvangst op zichtbare defekte te kontrolleren. Kondities: De garantie beperkt zich uitsluitend tot de reparatie of de uitwisseling van defekte onderdelen en dekt niet de kosten of het transportrisiko van de defekte onderdelen of produkten. Deze garantie strekt zich niet uit tot schades, die geen defekte zijn, maar door verkeerd gebruik werden veroorzaakt.( zoals het gebruik bij slechts gedeeltelijk bevolgen van Chamberlain GmbHs montagevoorschriften, het gebruik en onderhoud; verzuimd onderhoud of instelling; elke aanpassing of verandering aan het produkt), uurloon, werkkosten voor de afbouw of het opnieuw inbouwen van een gerepareerde of uitgewisselde eenheid en/of uitwisseling van de batterijen. Het ligt in het bemeten van Chambeerlain GmbH, of een door de garantie gedektes produkt, dat material- of bewerkingsfouten aantoont, kostenloos wordt gerepareerd of vervangen. Chamberlain GmbH behoudt zich het recht voor, te beslissen of de defekte onderdelen worden gerepareerd of door nieuwe of in de fabriek gereviseerde onderdelen vervangen worden.Als het Produkt gedurende de garantietijd defekt is, richt U zich a.u.b. aan Uw detailhandelaar. Deze garantie tast de rechten van de koper volgens de nationaal geldige Wetten niet aan. Ze heeft ook geen uitwerking op de rechten van de koper tegenover de verkoper, die uit het koopverdrag voortvloeien. Daar, waar gen geldende nationale of EEC-Wetten gelden, is deze garantie het enige rechtelijke middel van de koper en nog de Chamberlain GmbH nog hun filialen of Handelaren zijn voor schade, of schade die daruit voortvloeit, voor uitdrukkelijke of 709167-
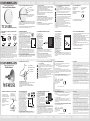 1
1
-
 2
2


Chamberlain TCLS1ED de handleiding
- Type
- de handleiding
- Deze handleiding is ook geschikt voor
in andere talen
- English: Chamberlain TCLS1ED Owner's manual
- français: Chamberlain TCLS1ED Le manuel du propriétaire
- Deutsch: Chamberlain TCLS1ED Bedienungsanleitung
Gerelateerde papieren
-
Chamberlain TCTRX2ED de handleiding
-
Chamberlain RPD25 de handleiding
-
-
-
-
-
-
-
