Venta LW73 Handleiding

Categorie
Luchtbevochtigers
Type
Handleiding
VENTA AEROSTYLE LUFTWÄSCHER
LW73 / LW74
DE BEDIENUNGSANLEITUNG
EN OPERATING MANUAL
FR MODE D‘EMPLOI
NL GEBRUIKSAANWIJZING
IT ISTRUZIONI PER L’USO
RUРУКОВОДСТВОПО
ЭКСПЛУАТАЦИИ
JP 説明書
02 DE
03DE
SEHR GEEHRTER KUNDE,
mit dem Venta AeroStyle Luftwäscher LW73 und LW74 haben Sie ein leistungsstar-
kes Premiumprodukt erworben. Der AeroStyle unterstützt die gesunde Luftfeuchtig-
keit sowie die natürliche Reduzierung von Schadstoffen in der Luft.
So funktioniert das Venta Prinzip
Die Raumluft wird über einen Lüfter in den mit Wasser befüllten Luftwäscher gelei-
tet, in dem ausgeklügelt angeordnete Plattenstapel rotieren. Über deren Flächen wird
hygienisch sauberes Wasser in den Raum verdunstet. Gleichzeitig werden auf den
Platten Schadstoffe wie Staub oder Pollen festgehalten, im Wasser abgewaschen
und im Luftwäscher gesammelt.
VIELEN DANK!
Wir sind überzeugt, dass der Venta Luftwäscher Ihre Erwartungen übertreffen wird,
und wünschen Ihnen viel Freude damit.
Bitte registrieren Sie Ihr Venta-Gerät:
DE
www.venta-luftwaescher.de/produktregistrierung-deutschland
AT
www.venta.at/produktregistrierung-oesterreich
CH
www.venta-luftwaescher.ch/produktregistrierung-schweiz
Bitte lesen Sie diese Bedienungsanleitung vollständig durch, bewahren
Sie sie zur späteren Verwendung auf und beachten Sie alle Sicher-
heitshinweise sowie die bestimmungsgemäße Verwendung.
Die aktuellste Version der Bedienungsanleitung finden Sie auf
unserer Website www.venta-luftwaescher.de
DE
AT
CH
Sicherheitshinweise 04
Liefer umfang 07
Symbole 07
Bestimmungsgemässe verwendung 07
Übersicht 08
Vor der ersten benutzung 08
Inbetriebnahme 09
Anzeigen, funktionen & einstellungen 10
Reinigung & pflege 12
Reinigung vom geräte-oberteil 14
Zubehör 14
Technische daten 15
Recycling & entsorgung 16
Garantie 16
Venta-service-team 17
Was ist, wenn …? 17
INHALT
04 DE
Dieses Gerät ist für den Gebrauch durch Kinder ab 8 Jahren
und Personen mit eingeschränkten körperlichen, sensori-
schen oder mentalen Fähigkeiten oder mit mangelhafter
Erfahrung und Kenntnissen geeignet, sofern sie beaufsich-
tigt werden oder hinsichtlich der sicheren Verwendung des
Gerätes unterwiesen wurden und die bestehenden Gefahren
verstanden haben.
Bedienungsanleitung vor Inbetriebnahme vollständig durch-
lesen und zum späteren Nachschlagen gut aufbewahren.
Das Gerät ist kein Spielzeug für Kinder.
Reinigung und Benutzerpflege darf nicht von Kindern unter
8 Jahren bzw. ohne Aufsicht durchgeführt werden.
Das Gerät und dessen Netzanschlussleitung von Kindern
unter 8 Jahren fernhalten.
Unsachgemäße Verwendung kann das Gerät beschädigen
und Körperverletzungen verursachen.
Das Gerät nur an geeignete Netzsteckdosen anschließen –
Netzspannung gemäß den Typenschildangaben am Gerät.
Dieses Gerät darf nur mit folgender Netzanschlussleitung
betrieben werden: Kaltgerätestecker mit Kleeblattkupplung
IEC 320 C5.
Das Gerät nie in Betrieb nehmen, wenn die Netzanschluss-
leitung beschädigt ist.
Ziehen Sie vor jedem Reinigungs- oder Wartungseingriff
sowie zum Umstellen oder Transportieren des Gerätes den
Netzstecker aus der Steckdose.
! SICHERHEITSHINWEISE
05DE
Das Gerät nie in Betrieb nehmen, wenn dieses herunterge-
fallen ist oder auf eine andere Art beschädigt wurde.
Reparaturen an Elektrogeräten dürfen nur von Fachkräften
durchgeführt werden. Durch unsachgemäße Reparaturen
können erhebliche Gefahren für den Benutzer entstehen.
Setzen Sie sich keinesfalls auf das Gerät und legen Sie kei-
ne Gegenstände darauf.
Stecken Sie keine Fremdgegenstände in das Gerät.
Geräte-Oberteil nie in Wasser oder andere Flüssigkeiten
tauchen.
Das Gerät nie überfüllen.
Das Gerät nie mit vollem Behälter transportieren oder
kippen.
Niemals den Netzstecker an der Netzanschlussleitung oder
mit nassen Händen aus der Steckdose ziehen.
Das Gerät darf nur in komplett zusammengebautem Zu-
stand in Betrieb genommen werden.
Das Gerät nur auf eine ebene, trockene Fläche stellen.
Das Gerät so aufstellen, dass es nicht umgestoßen werden
kann und dass niemand über das Gerät oder die Netzan-
schlussleitung stolpern kann.
Halten Sie folgende Mindestabstände zu Gegenständen und
Wänden:



06 DE
Maximale Aufstellungshöhe: 2000 Meter
Niemals die Lüftungsschlitze abdecken oder blockieren, um
eine Überhitzung/Beschädigung des Gerätes zu verhindern.
Eine dauerhafte relative Raumluftfeuchte von mehr als
-
schen Organismen ermöglichen.
Ein direktes Austreten von Wasser aus dem Gerät, in Form
von Tropfen, Dampf, Nebel oder Kalkniederschlag ist auf-
grund seiner Beschaffenheit und der Kaltverdunstungstech-
nologie bei sachgemäßer Verwendung nicht möglich.
Das Gerät darf nur mit dem dafür vorgesehenen Original-
Venta-Zubehör betrieben werden. Es dürfen keine Duftöle
oder andere Zusätze verwendet werden. Für Schäden durch
Duftöle oder fremde Zusätze übernimmt Venta-Luftscher
GmbH keine Gewähr.
Sofern das Gerät mehrere Tage nicht verwendet, aus-
geschaltet oder für einen längeren Zeitraum eingelagert
wird, ist die Wasserwanne vollständig zu entleeren, von
Schmutzrückständen zu reinigen und zu trocknen, um einer
Geruchsentwicklung oder der Entwicklung biologischer
Organismen in ruhendem Wasser bzw. Wasserrückständen
zu verhindern.
Ziehen Sie den Netzstecker aus der Steckdose, wenn Sie
das Gerät nicht gebrauchen.
07DE
LIEFER UMFANG
1 × Venta Luftscher
1 × Hygienedisk (vormontiert)
1 × Bedienungsanleitung
Falls Teile fehlen oder beschädigt sind, wenden Sie sich bitte an das Venta-Service-
Team oder an Ihren lokalen Händler.
SYMBOLE
! Sicherheitshinweise: Aufmerksam lesen und befolgen, um Personen- und
Sachschäden zu vermeiden.
i Ergänzende Informationen
Hilfreiche Tipps
BESTIMMUNGSGEMÄSSE
VERWENDUNG
Dieses Venta-Gerät ist ein Haushaltsgerät zur Unterstützung guter Raumluftqualität
in Wohn-, Büro- und Aufenthaltsräumen.
Jegliche anderweitige Verwendung oder Veränderung des Geräts wird als unsachge-
mäße Verwendung betrachtet. Der Hersteller haftet nicht für Schäden oder Verlet-
zungen infolge einer unsachgemäßen Verwendung.
Ein nicht bestimmungsgemäßer Gebrauch kann Gesundheit und Leben gefährden.
Dazu zählt der Einsatz unter folgenden Bedingungen:
In Räumen mit explosionsgefährdeten und/oder aggressiven Atmosphären
In Räumen mit hoher Lösemittelkonzentration
In der Nähe von Schwimmbädern oder nassen Geländen
Im Freien
08 DE
ÜBERSICHT
LW73 / LW74
1
6
4
5
3
2
1 Geräte-Oberteil (Technikeinheit)
2 Netzanschlussleitung
3 Verdunstereinheit (inkl. Hygienedisk ,
Antriebszahnrad, Plattenstapel)
4 Herausnehmbare Wasserwanne
5 Geräte-Unterteil
6 Abnehmbare Blende für nachrüst-
bares Venta WiFi/WLAN Modul
VOR DER ERSTEN BENUTZUNG
Gerät auspacken und aufstellen.
Geräte-Oberteil 1 abnehmen.
Verdunstereinheit 3 aus Wasserwanne 4 entnehmen.
09DE
Wasserwanne im Geräte-Unterteil mit
frischem Leitungswasser (ca. 9 Liter)
bis maximal zur Hälfte befüllen.
INBETRIEBNAHME
1
Verdunstereinheit B in Wasserwanne
des Gete-Unterteils A einlegen und
Geräte-Oberteil C seitenrichtig auf
Geräte-Unterteil A setzen.
Netzstecker D an Stromnetz anschließen
und Gerät durch kurzes Berühren auf
Power-Taste einschalten.
i Nur wenn das Gerät am Strom-
netz angeschlossen ist, leuchtet
die Power-Taste zum Ein- und
Ausschalten des Gerätes.
2 3
C
B
D
A
220-240V
50-60Hz
10 DE
Anzeige Funktion
1Drehzahl-
stufe
Geschwindigkeit 1 - 2 - 3 - 4 anzeigen.
i
Die Drehzahlstufen werden als Ringsegmente dargestellt. Mit höherer
Drehzahlstufe verstärkt sich im Uhrzeigersinn das nächste Ringseg-
ment. Beginnend mit Stufe 1 als schmales Ringsegement unten bis Stufe 4 als
stärkstes Ringsegment rechts. In der Abbildung ist Stufe 4 dargestellt.
2humidity Luftfeuchtigkeit
3 und Drehzahlstufe durch kurzes Berühren einstellen: reduziert und
erhöht die Geschwindigkeit.
4Nachtmodus durch kurzes Berühren ein- bzw. ausschalten.
EIN: Gerät dimmt die Displaybeleuchtung, reduziert die Drehzahl-
stufe auf 1 und schaltet das LED-Band 7 aus.
i
Drehzahlstufe 1 ist manuell mit + oder - Taste 3 veränderbar. Automa-
tikbetrieb 6 ist nicht möglich. LED-Band 7 ist nicht einschaltbar.
AUS: Helle Displaybeleuchtung, eingeschaltetes LED-Band 7 und
Gerät läuft mit eingestellter Drehzahlstufe 1 - 4.
LED-Band 7 schaltet nicht ein, wenn es zuvor separat ausgeschaltet
wurde. Durch Berühren und ca. 3 Sek. Halten der Nachtmodus-Taste 4
kann es wieder eingeschaltet werden.
5Get ein- bzw. ausschalten durch kurzes Berühren der
Power-Taste.
i Nur wenn das Gerät am Stromnetz angeschlossen ist, leuchtet die
Power-Taste zum Ein- und Ausschalten des Gerätes.
ANZEIGEN, FUNKTIONEN
& EINSTELLUNGEN
7
2
3
4
5
1
3
6
11DE
6Automatik-Betrieb durch kurzes Berühren ein- bzw. ausschalten.
EIN: Anzeige im Display blinkt kontinuierlich und Gerät regelt
automatisch die Drehzahlstufen je nach Luftfeuchtigkeit im
Raum.
i
Beim Einschalten des Automatik-Betriebes erscheint in Anzeige

zweimal blinkend, anschließend wieder die gemessene Luftfeuchtigkeit
im Raum.
AUS: Anzeige im Display leuchtet kontinuierlich und Gerät
läuft mit eingestellter Drehzahlstufe 1 - 4.
GewünschteLuftfeuchtigkeit30-70 %einstellen:
-Taste 6 berühren und ca. 3 Sek. halten bis Anzeige humidity
2 blinkt. Mit - oder + Taste 3 die gewünschte Luftfeuchtigkeit (in

-Taste 6 erneut berühren und ca. 3 Sek. halten bis Blinken in
Anzeige humidity 2 erlischt und wieder die gemessene Luft-
feuchtigkeit im Raum angezeigt wird.
Bitte vergewissern Sie sich, dass der Automatik-Betrieb einge-
schaltet ist: Anzeige im Display blinkt kontinuierlich!
7LED-Band Kontinuierliches Leuchten signalisiert den Gerätebetrieb.
Kontinuierliches Blinken signalisiert die automatische Geräte-
abschaltung bei Wassermangel.
iDas LED-Band 7 kann im Gerätebetrieb durch Berühren und 3 Sek.
Halten der Nachtmodus-Taste 4 separat aus- und eingeschaltet werden.
12 DE
REINIGUNG & PFLEGE
! Achtung! Sicherstellen, dass bei allen Maßnahmen das Gerät ausgeschaltet
und das Steckernetzteil aus der Steckdose gezogen ist!
Anzeige Maßnahmen
8WATER Geräte-Oberteil abnehmen. Wasserwanne im Geräte-Unterteil
mit frischem Leitungswasser bis maximal WATERLINE-Markie-
rung befüllen. Geräte-Oberteil auf Geräte-Unterteil setzen und
Gerät wieder in Betrieb nehmen.
i Sobald zu wenig Wasser in der Wasserwanne ist, schaltet das Gerät
automatisch ab, das LED-Licht 7 blinkt kontinuierlich und im Display
erscheint die WATER-Anzeige. In Anzeige humidity 2 blinken zwei
Striche und die Raumluftfeuchtigkeit wird nicht angezeigt.
Um die Raumluft kontinuierlich zu befeuchten und Schadstoffe in der

nachzufüllen
9SERVICE Geräte-Oberteil abnehmen. Restwasser aus Wasserwanne lee-
ren. Wasserwanne und Verdunstereinheit gründlich abspülen.
Wasserwanne im Geräte-Unterteil mit frischem Leitungswasser
bis maximal WATERLINE-Markierung befüllen. Gerät wieder
montieren und in Betrieb nehmen. SERVICE-Anzeige 9 im Dis-
play berühren und ca. 3 Sek. halten bis sie erlischt.
i Für einen einwandfrei hygienischen Dauerbetrieb erinnert die
SERVICE-Anzeige alle 14 Tage (auch im Standby-Betrieb), diese
Maßnahme durchzuführen.
811 10 9
13DE
10 CLEANING Geräte-Oberteil abnehmen. Restwasser aus Wasserwanne
leeren, frisches Leitungswasser bis WATERLINE-Markierung

und ca. 2 Stunden in kleiner Stufe laufen lassen. Empfehlung:
Während dieses Reinigungsvorganges bitte lüften, um mögliche
Gerüche zu vermeiden, die bei sehr starker Verschmutzung
entstehen können. Anschließend Geräte-Oberteil abnehmen
und verschmutztes Wasser ausleeren. Wasserwanne und
Verdunstereinheit gründlich abspülen. Wasserwanne im
Geräte-Unterteil mit frischem Leitungswasser bis maximal
WATERLINE-Markierung füllen, Gerät montieren und in Betrieb
nehmen. CLEANING-Anzeige 10 im Display berühren und ca. 3
Sek. halten bis sie erlischt.
i Alle 6 Monate (bei 24-Stunden-Dauerbetrieb) erinnert die CLEANING-
Anzeige, diese Maßnahme durchzuführen.
11 DISK 1. Geräte-Oberteil abnehmen und Verdunstereinheit aus
Wasser wanne entnehmen.
A
abB
C
2. Haltearme a und b vor-
sichtig von Achse lösen
und Tger A von Ver-
dunsterwalze entfernen.
3. Verschluss-
kappe B drehen
und abnehmen.
4. Hygienedisk C
entnehmen und
erneuern.
5. Gerät wieder montieren und in Betrieb nehmen.
6. DISK-Anzeige 11 im Display berühren und ca. 3 Sek. halten
bis sie erlischt
i
Die Nutzungsdauer der Hygienedisk beträgt ca. 4 Monate (bei 24-h
Dauerbetrieb). Die Nutzungsdauer hängt von der Wasserhärte,
Wasserqualität, tägliche Verdunstungsleistung und Betriebsstunden-
zahl ab. Alle 4 Monate (bei 24-Stunden-Dauerbetrieb) erinnert die
DISK-Anzeige, diese Maßnahme durchzuführen.
Im Rahmen des Venta ReNew Recycling-Programms kann die
Hygiene-disk zurückgeschickt werden (siehe RECYCLING & ENTSOR-
GUNG).
14 DE
Die Pflegemaßnahmen SERVICE, CLEANING und DISK können immer bei Bedarf
durchgeführt werden, auch wenn sie nicht angezeigt werden. Im Anschluss einfach
die jeweilige RESET-Funktion durchführen, indem Sie: Power-Taste berühren
und ca. 4 Sek. halten bis sie blinkt und SERVICE, CLEANING sowie DISK im Display
angezeigt werden. Nun die Maßnahmen, die durchgeführt wurden, berühren und ca.
3 Sek. halten bis sie erlöschen. Anschließend blinkende Power-Taste berühren und
ca. 4 Sek. halten bis sie kontinuierlich leuchtet. Die nächsten Erinnerungen für die
durchgeführten Maßnahmen werden nun wieder turnusmäßig angezeigt.
Sämtliche Rückstände in Wasserwanne und an Verdunstereinheit (weiß, grün-
gelbliche oder braune Ablagerungen bzw. Verfärbungen) beeinträchtigen NICHT die
Funktion des Gerätes.
REINIGUNG VOM
GERÄTE-OBERTEIL
! Achtung! Sicherstellen, dass das Gerät ausgeschaltet und der Netzstecker aus
der Steckdose gezogen ist!
Das Geräte-Oberteil mit einem trockenen Tuch/Reinigungspinsel oder einem leicht
angefeuchteten Tuch reinigen!
! Das Geräte-Oberteil darf nicht unter fließendem Wasser gereinigt werden!
Das Display nur mit einem trockenen Tuch oder einem Display-Reinigungstuch
reinigen!
! Das Display darf nicht nass bzw. zu feucht gereinigt werden!
ZUBEHÖR
Venta-Hygienedisk für einen einwandfrei hygienischen Dauerbetrieb
Venta-Reiniger zur halbjährlichen Reinigung
Optional: Venta WLAN/WiFi Modul in Verbindung mit der kostenlosen App von
Venta für perfekte Kontrolle und einfaches Fernsteuern – Auch von unterwegs
Zusätzliches AeroStlye Zubehör Online erhältlich
DE
www.venta-luftwaescher.de
AT
www.venta.at
CH
www.venta-luftwaescher.ch
15DE
TECHNISCHE DATEN
Modell AeroStyle LW73 AeroStyle LW74
Farben Signalweiß / Signalschwarz
Raumgrößeneignung  
LED Statusanzeige Blaues Lichtband
Interaktives Touchdisplay Serienmäßig
App Steuerung WiFi / WLAN-Modul (optional)
Messsensoren Luftfeuchtigkeit
Wasserhygiene Serienmäßig
Leistungsstufen 4 + Automatik
Geräuschentwicklung (Stufe 1–4) 24 / 36 / 44 / 50 dB(A) 27 / 35 / 41 / 47 dB(A)
Stromverbrauch (Stufe 1–4) 7 / 9 / 13 / 18 Watt 11 / 14 / 17 / 24 Watt
Netzspannung 220-240 V / 50-60 Hz
Wasserinhalt (Max.) 9 Liter
Abmessungen 
Gewicht  10,5 kg
Änderungen und Irrtümer vorbehalten
16 DE
RECYCLING & ENTSORGUNG
Das Verpackungsmaterial ist wiederverwertbar. Die Verpackung bitte um-
weltgerecht entsorgen und der Wertstoffsammlung zuführen.
Das Gerät darf nicht im normalen Hausmüll entsorgt werden! Es muss an
einer ausgewiesenen Sammelstelle für Recycling von elektrischen und
elektronischen Geräten entsorgt werden (WEEE). Bitte benutzen Sie die
Ihnen zur Verfügung stehenden lokalen Rückgabe- und Sammelsysteme.
Damit leisten Sie einen wertvollen Beitrag zum Umweltschutz und für die menschli-
che Gesundheit. Für weitere Informationen wenden Sie sich bitte an die örtlichen
Behörden.
KOSTENLOSES Venta Hygienedisk Recycling-Programm für den Schutz der Umwelt
Die original Venta Hygienedisk kann im Rahmen des Venta ReNew Recycling-Pro-
-
ten Venta Hygienedisk können Sie Ihren Beitrag zum Erhalt der Ressourcen unserer
Erde leisten und Sie erhalten außerdem Ihren persönlichen Venta ReNew Umweltbo-
nus, den Sie bei Ihrer nächsten Venta Hygienedisk Bestellung bei Venta Luftwäscher
GmbH einlösen können. Nähere Informationen erhalten Sie über unser Venta-Service
Team.
HINWEIS: Das Venta ReNew Recycling Program ist auf den Verkauf und Versand
innerhalb von Deutschland beschränkt. Unsere Venta Gesellschaften in anderen
Ländern geben Ihnen gern Informationen zu Ihren lokalen/länderspezifischen Pro-
grammen. Wird in Ihrem Land kein ReNew Recycling-Programm angeboten, kann die
Hygienedisk einfach über den Hausmüll entsorgt werden.
GARANTIE
Aufgrund der hohen Qualität garantiert die Venta Luftwäscher GmbH für die Dauer
von zwei Jahren ab Kaufdatum, dass dieses Produkt bei sachgemäßer Verwendung
keine Defekte aufweist. Sollte doch einmal ein Material- oder Verarbeitungsfehler
auftreten, wenden Sie sich bitte an das Venta-Service-Team oder Ihren Händler.
Zudem gelten die allgemeinen Garantiebedingungen von Venta:
www.venta-luftwaescher.de/service/garantie/
17DE
VENTA-SERVICE-TEAM
Sie benötigen weitere Informationen rund um das Venta-Gerät, möchten sich beraten
lassen oder Zubehör bestellen? Kein Problem: Unser Venta-Service-Team ist für Sie
da! Rufen Sie direkt an oder besuchen Sie die Venta Website.
DE
+49 751 5008 88, www.venta-luftwaescher.de
AT
+43 5572 202 539, www.venta.at
CH
+41 41 781 15 15, www.venta-luftwaescher.ch
WAS IST, WENN …?
! Achtung! Vor Durchführung einer der nachfolgenden Maßnahmen sicher-
stellen, dass das Gerät ausgeschaltet und der Netzstecker aus der Steckdose
gezogen ist!
… im Display nicht die Power-Taste zum Einschalten des Gerätes erscheint?
Bitte überprüfen, ob der Netzstecker am Stromnetz angeschlossen ist.
… im Display Water angezeigt wird, obwohl Wasser in der Wasserwanne ist?
Bitte überprüfen, ob genügend Wasser in der Wasserwanne ist und/oder ob das
Geräte-Oberteil seitenrichtig auf dem Geräte-Unterteil sitzt.
i Maßnahme: Geräte-Oberteil abnehmen. Wasserwanne im Geräte-Unterteil mit
Leitungswasser bis maximal WATERLINE-Markierung befüllen. Geräte-Oberteil
seitenrichtig auf Geräte-Unterteil setzen und Gerät wieder in Betrieb nehmen.
... beim Berühren des Displays „weiße Felder“ im Hintergrund sichtbar sind?
In trockenen Räumen können durch elektrostatische Aufladungen weiße Felder im
Hintergrund des Displays sichtbar sein, die weder die Funktion noch die Bedienbar-
keit des Gerätes beeinträchtigen und keinen Defekt darstellen.
... das LED-Band nicht leuchtet, obwohl das Gerät in Betrieb ist?
Bitte überprüfen, ob das LED-Band separat ausgeschaltet wurde. Durch Berühren
und ca. 3 Sek. Halten der Nachtmodus-Taste direkt am Gerät oder mit der Venta
App kann das LED-Band wieder eingeschaltet werden.
i Im Nachtmodus kann das LED-Band nicht eingeschaltet werden.
18 EN
DEAR CUSTOMER,
With the Venta AeroStyle Airwasher LW73 or LW74, you have purchased a high-per-
forming premium product. The AeroStyle promotes healthy humidity and naturally
reduces harmful substances in the air.
Here’s how the Venta principle works
A fan directs the ambient air into the water-filled Airwasher, where it travels through
specially arrayed disk stacks. Hygienically clean air evaporates from their surfaces
into the room. Simultaneously, the stacks trap harmful substances such as dust or
pollen, which are then washed off in the water and collected in the Airwasher.
THANK YOU!
We are confident that the Venta Airwasher will exceed your expectations, and we
hope you enjoy it.
Please register your Venta:
www.venta-luftwaescher.de/produktregistrierung-deutschland
Please read this operating manual in its entirety, keep it for later reference and note
all safety instructions as well as instructions for the proper use of the device.
The most current version of the operating manual can be found on
our website at www.venta-luftwaescher.de
CONTENT
Safety instructions 19
Scope of delivery 21
Symbols 21
Intended use 21
Overview 22
Before first use 22
Putting into operation 23
Displays, functions & settings 24
Cleaning & maintenance 26
Cleaning the upper housing 28
Accessories 28
Technical data 29
Recycling and disposal 30
Warranty 30
Venta-service-team 31
What to do if ... 31
19EN
! SAFETY INSTRUCTIONS
This appliance is not suitable for use by children over the age of 8 years and
people with restricted physical, sensory, or mental capacities or lack of experience
and knowledge unless they are supervised or have received instructions on the
use of the appliance and understand the existing hazards.
Read the operating instructions completely before putting the appliance into oper-
ation and keep them for later reference.
The appliance is not a toy for children.
Cleaning and user maintenance may not be performed by children under the age
of 8 years or without supervision.
Keep the appliance and its power cable out of the reach of children under the age
of 8 years.
Improper use can damage the appliance and cause physical injuries.
Plug the appliance into suitable power outlets only – the mains voltage must cor-
respond to the nameplate data on the appliance.
Only use the appliance with the following power cable: low-heat device socket with
IEC 320 C5 cloverleaf connector.
Never use the appliance if it has a damaged power cable.
Disconnect the power plug before every cleaning or maintenance operation and
before transportation of the appliance.
Never use the Airwasher if it has been dropped or damaged in any other way.
Electrical appliances should only be repaired by professional specialists. Amateur
repairs could result in considerable danger to the user.
Do not sit on the appliance and do not place any objects on it.
Do not put any foreign objects into the appliance.
Do not immerse the upper housing in water or any other liquid.
Never overfill the Airwasher.
Never transport or overbalance the Airwasher with a filled lower housing.
Never disconnect the power plug by pulling on the cable or with wet hands.
The Airwasher should only be operated when it is completely assembled.
Place the Airwasher on a stable surface which is flat and dry.
20 EN
Set up the appliance so that it cannot be knocked over, and so that no one can trip
over it or the cable.
Leave at least the following distances to other objects and walls:




Never cover or block the vents to prevent overheating/damage to the appliance.

enable the formation of biological organisms.
The design of the appliance and the cold evaporation technology make it impossi-
ble for water to leak directly from the Airwasher in the form of droplets, vapor, mist
or lime deposits, providing you use it correctly.
Only operate the appliance with original Venta accessories designed for the
purpose. Do not use aromatic oils or other additives. Venta-Luftwäscher GmbH
accepts no liability for damage due to aromatic oils or other unsuitable additives.
If you do not use the Airwasher for several days or put it into storage for a longer
period, empty the water tray completely, clean it and dry thoroughly to prevent
odors or biological organisms from developing in standing water or water residues.
Disconnect the power plug from the power supply outlet when the appliance is not
in use.
21EN
SCOPE OF DELIVERY
1 × Venta Airwasher
1 × Hygiene disk (pre-assembled)
1 × operating manual
If parts are missing or damaged, please contact the VENTA service team or your
local dealer.
SYMBOLS
! Safety instructions: Read and adhere to these instructions carefully, in order to
avoid personal and material damages.
i Supplementary information
Helpful tips
INTENDED USE
The Venta Airwasher is a domestic appliance for moistening and cleansing the air in
homes, offices and leisure facilities. The appliance is not suitable for outdoor areas.
Any other use or modification of the appliance is considered to be improper
use. The manufacturer is not liable for any damage or injuries resulting from
improper use.
Using the appliance for something other than the intended purpose can endanger
health and lives. This includes use under the following conditions:
in rooms or locations where there is risk of explosion and/or where there is an
aggressive atmosphere.
in rooms where there is a high concentration of solvents.
in the vicinity of swimming pools or other wet areas.
In the outdoors.
22 EN
OVERVIEW
LW73 / LW74
1
6
4
5
3
2
1 Upper housing (technical unit)
2 Power cable
3 Evaporation unit (incl. hygiene disk,
drive wheel, disk stacks)
4 Removable water tray
5 Lower housing
6 Removable cover for retrofitting
Venta WiFi/WLAN module
BEFORE FIRST USE
Unpack the appliance and set it up.
Remove upper housing 1.
Remove evaporation unit 3 from water tray 4
23EN
Fill water tray in lower housing with fresh
tap water (approx. 9 litres) until it is no
more than half full.
PUTTING INTO OPERATION
1
Place evaporation unit B into the water
tray of the lower housing A and place
upper housing C onto lower housing A,
making sure it is the right way round.
Plug power plug D into a mains socket
and switch appliance on by tapping the
Power button .
i The Power button for switching
the appliance on and off only
lights up when the appliance is
plugged in.
2 3
C
B
D
A
220-240V
50-60Hz
24 EN
Display Function
1Speed Displays speed levels 1 - 2 - 3 - 4.
iThe speeds are represented in the form of ring segments. At a higher
speed, the next ring segment in a clockwise direction becomes
thicker. This starts with Level 1 as a thin ring segment at the bottom and
progresses to Level 4 with the thickest ring segment on the right. The
illustration shows Level 4.
2Humidity Displays ambient humidity
3 and Set the speed by tapping: reduces and increases the
speed.
4Tap to switch sleep mode on or off.
ON: Appliance dims the display illumination, reduces the speed
to 1 and switches off LED strip 7.
iYou can change the speed 1 manually using button 3 with + or -.
Automatic operation 6 is not possible. LED strip 7 can not be switched on.
OFF: Display lit up, LED strip 7 switched on and appliance
operates at selected speed 1 - 4.
LED strip 7 does not switch on if it has been separately switched off
previously. Touch and hold the sleep mode button 4 for approx. 3
seconds to switch it on again.
5Switch the appliance off or on by tapping the power button.
i The Power button for switching on or off only lights up when the
appliance is plugged in.
DISPLAYS, FUNCTIONS
& SETTINGS
7
2
3
4
5
1
3
6
25EN
6Switch automatic mode on or off by tapping the button.
ON: Indicator on display flashes continuously and appliance
automatically adjusts the speed to the ambient humidity.
i
When you switch on automatic mode, the humidity indicator 2

the measured ambient humidity again.
OFF: Indicator on display lights up continuously and appli-
ance operates at selected speed 1 - 4.
Setdesiredhumidityto30-70 %:
Touch -button 6 and hold for approx. 3 seconds until humidi-
ty indicator 2 flashes. Set the humidity you want using button 3

Touch -button 6 again and hold for approx. 3 seconds until
humidity indicator 2 stops flashing and again indicates the
measured ambient humidity.
Please ensure that automatic mode is switched on. The indica-
tor on the display flashes continuously.
7LED strip Continuous illumination signals that the appliance is
operating.
Continuous flashing signals that the appliance has
automatically switched off due to lack of water.
iYou can separately switch the LED strip 7 on and off during operation
by touching the sleep mode button 4 and holding for 3 seconds.
26 EN
CLEANING & MAINTENANCE
! Attention! Ensure that the device is switched off during any measures and
the switching power supply is disconnected from the outlet!
Display Measures
8WATER Remove upper housing. Fill water tray in lower housing with
tap water up to maximum level indicated by the WATERLINE
marker. Place upper housing onto lower housing and switch
appliance on again.
i As soon as there is not enough water in the water tray, the appliance
switches off automatically, LED 7 flashes continuously, and the
WATER indicator appears on the display. In the humidity indicator 2,
two dashes flash and the ambient humidity is not displayed.
In order to continuously humidify the ambient air and reduce harmful

water daily.
9SERVICE Remove upper housing. Empty the residual water out of the wa-
ter tray. Rinse out water tray and evaporation unit thoroughly.
Fill water tray in lower housing with tap water up to maximum
level indicated by the WATERLINE marker. Reassemble appli-
ance and switch it on. Touch SERVICE indicator 9 on the display
and hold for approx. 3 seconds until it goes out.
i For perfectly hygienic constant operation, the SERVICE indicator
reminds you to carry out servicing every 14 days (also in standby
mode).
811 10 9
27EN
10 CLEANING Remove upper housing. Empty residual water from water tray,
fill up with tap water to maximum level indicated by the WA-

appliance and let it run for approx. 2 hours at low speed. We
recommend that you ventilate the room during this washing
procedure to avoid any odors which can occur if the appliance
is very dirty. Then remove upper housing and empty out dirty
water. Rinse out water tray and evaporation unit thoroughly. Fill
water tray in lower housing with tap water up to maximum level
indicated by the WATERLINE marker, re-assemble appliance
and switch it on. Touch CLEANING indicator 10 on the display
and hold for approx. 3 seconds until it goes out.
iEvery 6 months (in case of 24-hour constant operation), the
CLEANING indicator reminds you to carry out this action
11 DISK 1. Remove upper housing and take evaporation unit out of the
water tray.
A
abB
C
2. Carefully release
holding arms a and
b from the axle and
remove bracket A from
evaporation roller.
3. Unscrew cap
B and remove it.
4. Remove
hygiene disk C
and replace it.
5. Re-assemble the appliance and switch it on.
6. Touch DISK indicator 11 on the display and hold it for approx.
3 seconds until it goes out
i
The service life of the hygiene disk is approx. 4 months (in the case
of 24-hour constant operation). The service life depends on the
water hardness, water quality, daily evaporation performance and
number of operating hours. The DISK indicator reminds you to carry
out this action every 4 months (in the case of 24-hour constant
operation).
You can use the Venta ReNew recycling program to return the
hygiene disk to us (see RECYCLING & DISPOSAL).
28 EN
You can carry out care actions 9, 10 and 11 at any time, even if they are not indicat-
ed on the display. When you are finished, simply activate the RESET function for
CLEANING, DISK, SERVICE: Touch the Power button and hold for approx. 4 sec-
onds until it flashes and SERVICE, CLEANING and DISK appear on the display. Now
touch the actions you have performed and hold for approx. 3 seconds until they go
out. Finally, touch the flashing Power button and hold for approx. 4 seconds until
it lights up constantly. The next reminders for the actions performed will be indicat-
ed at the normal intervals.
Any residues in the water tray and on the evaporation unit (white, greenish-yellow or
brown deposits/discoloration) do NOT impair the function of the appliance.
CLEANING THE UPPER
HOUSING
! Attention! Ensure that the device is switched off during any measures and the
switching power supply is disconnected from the outlet!
Clean the upper housing with a dry cloth/cleaning brush or a slightly damp cloth.
! Do not clean the upper housing under running water!
Only clean the display with a dry cloth or a display cleaning cloth.
! Do not clean the display with a wet or too-damp cloth!
ACCESSORIES
Venta hygiene disk for perfectly hygienic constant operation
Venta cleaner for six-monthly cleaning
Optional: Venta WLAN/WiFi module in combination with the free app from Venta
for perfect control and easy remote control, even on the go
Additional AeroStyle accessories available online:
DE www.venta-luftwaescher.de
29EN
TECHNICAL DATA
Model AeroStyle LW73 AeroStyle LW74
Colors Signal white / Signal black
Suitable for room size  
LED status display blue light strip
Interactive touch display Standard
App control WiFi/WLAN module (optional)
Measurement sensors Humidity
Water hygiene Standard
Performance levels 4 + automatic
Noise emission (Speeds 1–4) 24 / 36 / 44 / 50 dB(A) 27 / 35 / 41 / 47 dB(A)
Power consumption (Speeds 1–4) 7 / 9 / 13 / 18 Watt 11 / 14 / 17 / 24 Watt
Mains voltage 
Water capacity (max.) 9 liters
Dimensions (L x W x H) 
Weight  10,5 kg
May be subject to change/error
30 EN
RECYCLING AND DISPOSAL
The packaging material is re-usable. Please dispose of the packaging in an
environmentally friendly way and bring it to a collection centre for recycla-
ble materials.
The device may not be disposed of in normal household waste! It must be
disposed of at a selected collection point for the recycling of electric and
electronic devices (WEEE). Please use the local return and collecting
systems that are available to you. By doing so, you are making a valuable
contribution to environmental protection and human health. For additional informa-
tion, please contact the local authorities.
FREE Venta hygiene disk recycling program helps the environment
The Venta ReNew recycling program means original Venta hygiene disks can be

help conserve our planet’s resources. You also receive your personal Venta ReNew
eco-bonus which you can redeem with your next order for hygiene disks from Venta
Luftwäscher GmbH. Our service team will be happy to give you more information.
NOTE: The Venta ReNew recycling program is limited to sales and shipping within
Germany. Our Venta companies in other countries will be happy to give you informa-
tion about their local/national programs. If no ReNew recycling program is available
in your country, simply dispose of the hygiene disk in household waste.
WARRANTY
Due to the high quality of the product, the Venta-Luftwäscher GmbH guarantees
that this product when used properly will not be defective for a duration of two years
from the purchase date. If a material or processing error should occur anyway,
please contact the VENTA service team or your dealer. Venta’s general warranty
conditions also apply: www.venta-luftwaescher.de/en/service/warranty/
31EN
VENTA-SERVICE-TEAM
Do you need additional information about the Venta Airwasher or do you want to
order accessories? No problem: the VENTA service team will take care of it! Call the
team directly or visit the Venta website.
DE
+49 751 5008 88, www.venta-luftwaescher.de
WHAT TO DO IF ...
! Ensure that the device is switched off during any measures and the power
plug is disconnected from the mains socket.
… the Power button for switching the appliance on does not appear on the
display?
Please check whether the appliance is plugged in to the mains.
… “Water” is indicated on the display although there is water in the water tray?
Please check that there is enough water in the water tray and/or that the upper hous-
ing is on the lower housing the right way round.
iAction: Remove upper housing. Fill water tray in lower housing with tap water
up to maximum level indicated by the WATERLINE marker. Place upper housing
onto the lower housing, ensuring it is the right way round, and switch the appliance
on again.
... white spots show up in the background when you touch the display?
In dry rooms, electrostatic charging can cause white areas to appear in the back-
ground on the display. These do not affect the functioning or ability to control the
appliance and do not constitute a defect.
... LED strip does not light up although the appliance is in operation?
Check whether the LED strip has been switched off separately. Touch the sleep
mode button on the appliance and hold for approx. 3 seconds to switch the LED strip
on again. You can also use the Venta app for this function.
i The LED strip can not be switched on in sleep mode.
32 FR
CHER CLIENT,
En acquérant l’Airwasher AeroStyle Venta LW73 et LW74, vous avez opté pour un
produit haut de gamme très performant. LAeroStyle favorise une humidité saine de
l’air et la réduction naturelle de polluants se trouvant dans l’air.
Le principe Venta fonctionne comme suit
L’air ambiant est conduit, via un ventilateur, vers lAirwasher rempli d’eau dans lequel
tourne une pile de disques ingénieusement disposée. Via les surfaces des disques,
de l’eau hygiénique et propre s’évapore dans la pièce. En même temps, la pile fixe les
polluants comme la poussière ou les pollens qui sont lavés dans l’eau et collectés
dans l’Airwasher.
MERCI BEAUCOUP !
Nous sommes convaincus que l‘Airwasher Venta dépassera vos attentes et nous
vous en souhaitons une bonne utilisation.
Enregistrez votre produit Venta:
CH
www.venta-luftwaescher.ch/fr/enregistrement-de-produit-suisse
NL
www.venta-airwasher.nl/fr/enregistrement-de-produit-pays-ba
Veuillez lire ce mode d‘emploi dans son intégralité, le conserver pour
pouvoir vous y reporter ultérieurement et respecter toutes les consig-
nes de sécurité ainsi que l‘usage auquel il est destiné.
Vous trouverez la dernière version du mode d‘emploi sur notre site
Internet www.venta-luftwaescher.ch, www.venta-airwasher.nl
TABLE DES MATIÈRES
CH
NL
Consignes de sécuri 33
Contenu de la livraison 35
Symboles 35
Utilisation conforme 35
Aperçu 36
Avant la première utilisation 36
Mise en service 37
Affichages, fonctions et réglages 38
Nettoyage & entretien 40
Nettoyage de la partie supérieure
de l‘appareil 42
Accessoires 42
Caractéristiques
techniques 43
Recyclage et élimination 44
Garantie 44
Équipe de service venta 45
Que faire si…? 45
33FR
! CONSIGNES DE SÉCURITÉ
Cet appareil n’est pas destiné à être utilisé par des enfants âgés de 8 ans et plus et
par des personnes dont les capacités physiques, sensorielles ou mentales sont
diminuées ou ne disposant pas de l’expérience et de la connaissance nécessaires, à
moins qu’elles ne soient supervisées ou que des instructions pour une utilisation sûre
de l’appareil ne leur aient été fournies et qu‘elles n’aient compris les dangers existants.
Lire le mode d’emploi intégralement avant la mise en service et le conserver en
lieu sûr pour toute consultation ultérieure.
Cet appareil n’est pas un jouet pour enfants.
Le nettoyage et l‘entretien ne doivent pas être effectués par des enfants âgés de
moins de 8 ans ou bien en l’absence de supervision.
Tenir l’appareil et son câble de raccordement hors de portée des enfants âgés de

Une utilisation non conforme est susceptible d’endommager l’appareil et de provo-
quer des blessures corporelles.
Raccorder l’appareil uniquement à des prises courant appropriées – tension du
réseau conformément aux indications sur la plaque signalétique de l’appareil.

avec connecteur en feuille de trèfle CEI 320 C5.
Ne jamais utiliser l’appareil si le câble de raccordement est endommagé.
Avant toute intervention de nettoyage ou de maintenance ainsi que pour déplacer
ou transporter l’appareil, débrancher la fiche de la prise.
Ne jamais utiliser l’Airwasher si ce dernier a chuté ou s’il a été endommagé de
toute autre façon.
Les réparations d’appareils électriques doivent être effectuées uniquement par
des spécialistes. Toute réparation non conforme peut entraîner des risques consi-
dérables pour l’utilisateur.
Ne s’asseoir en aucun cas sur l’appareil et ne poser aucun objet dessus.
Ne pas insérer de corps étranger dans l’appareil.
Ne jamais immerger la partie supérieure de l‘appareil dans l’eau ou dans tout autre
liquide.
Ne jamais remplir trop l’Airwasher.
Ne jamais transporter ou basculer l’Airwasher avec la cuve remplie.
34 FR
Ne jamais retirer la fiche de la prise en tirant sur le câble de raccordement ou avec
des mains humides.
LAirwasher doit être mis en marche uniquement s’il est entièrement assemblé.
Poser l’Airwasher uniquement sur une surface plane et sèche.
Installer l’appareil de sorte à ce que personne ne puisse trébucher sur le câble ou
sur l’appareil ou le renverser.




L‘altitude dinstallation maximale : 2000 mètres.
Ne jamais recouvrir ou bloquer les fentes d’aération afin d’empêcher toute
surchauffe ou tout endommagement de l’appareil.

entraîner la formation d’organismes biologiques.
Une fuite directe d’eau de l’Airwasher, sous la forme de gouttes, de vapeur, de
brouillard ou de dépôts de calcaire n’est pas possible, lors d’une utilisation confor-
me, en raison de sa construction et de la technologie de l’évaporation à froid.
L’appareil ne doit être utilisé quavec les accessoires Venta d’origine prévus à cet
effet. Des huiles parfumées ou dautres additifs ne doivent pas être utilisés. Venta-
Luftwäscher GmbH décline toute responsabilité pour les dommages dus aux
huiles parfumées ou aux additifs tiers.
Dans la mesure où lAirwasher est éteint, non utilisés pendant quelques jours ou
stocké pendant une période prolongée, le bac à eau doit être vidé dans son intég-
ralité, nettoyé de ses résidus de salissures et séché afin d’empêcher la formation
d’odeurs ou le développement dorganismes biologiques dans de l’eau immobile
ou de l’eau résiduelle.
Débrancher la fiche de la prise lorsque vous n’utilisez pas l’appareil.
35FR
CONTENU DE LA LIVRAISON
1 × Airwasher Venta
1 × disque hygiénique (prémonté)
1 × mode d’emploi
En cas de pièces manquantes ou endommagées, veuillez contacter l’équipe du SAV
VENTA ou votre revendeur local.
SYMBOLES
! Consignes de sécurité : Lire attentivement et suivre les instructions pour éviter
les blessures corporelles et les dommages matériels.
i Renseignements complémentaires
Conseils utiles
UTILISATION CONFORME
LAirwasher Venta est un appareil ménager destiné à humidifier et purifier lair des
bureaux, pièces de séjour et d’habitation. Toute autre utilisation ou toute modifi-
cation de l’appareil est considérée comme utilisation non conforme. Le fabricant
décline toute responsabilité en cas de dommages ou de blessures résultant d’une
utilisation non conforme.
Un emploi non conforme peut entraîner un risque pour la santé et la vie. Ceci inclut
l’utilisation dans les conditions suivantes :
dans des pièces à atmosphères explosives et/ou agressives.
dans des pièces à concentration en solvant élevée.
à proximité de piscines ou de terrains humides.
pour une utilisation en extérieur.
36 FR
APERÇU
LW73 / LW74
1
6
4
5
3
2
1 Partie supérieure de l’appareil (unité
technique)
2 Fiche d’alimentation
3 Unité de vaporisation (disque hygi-
énique, roue dentée motrice, pile de
disques incl.)
4 Bac à eau amovible
5 Partie inférieure de l’appareil
6 Panneau décrochable pour le module
Venta WiFi/WLAN installable ultérieu-
rement
AVANT LA PREMIÈRE
UTILISATION
Déballer l‘appareil et linstaller.
1 de l’appareil.
34
37FR
Remplir le bac à eau situé dans la
partie inférieure de l’appareil avec de

maximum jusqu‘à la moitié.
MISE EN SERVICE
1
B dans
le bac à eau de la partie inférieure de
-
C de l’appareil sur le bon côté de la
A de l’appareil.
D sur
le secteur et allumer l‘appareil en
appuyant brièvement sur le bouton
marche/arrêt .
i Le bouton marche/arrêt de
l‘appareil ne s‘allume que
lorsque l‘appareil est branché sur
le secteur.
2 3
C
B
D
A
220-240V
50-60Hz
38 FR
Affichage Fonction
1Niveau de
vitesse
Affichage de la vitesse 1 - 2 - 3 - 4.
iLes niveaux de vitesse sont représentés par des segments circulaires.
En choisissant une vitesse supérieure, le prochain segment circulaire
s’épaissit dans le sens des aiguilles d’une montre. Cela commence par le


2Humidity Affichage de l’humidité
3 et  réduit et
augmente la vitesse.
4Activer et désactiver le mode nuit en appuyant brièvement.
ACTiVÉ : l‘appareil atténue léclairage de l‘écran et réduit le
7.
i


DÉSACTIVÉ :7
est activée et l‘appareil fonctionne à une vitesse réglée aux

7 ne s’allume pas si elle a été éteinte séparément
4

AFFICHAGES, FONCTIONS
ET RÉGLAGES
7
2
3
4
5
1
3
6
39FR
5Allumer ou éteindre l’appareil en appuyant brièvement sur le
bouton marche/arrêt.
i Le bouton marche/arrêt de l‘appareil ne s‘allume que lorsque l‘appareil
est branché sur le secteur.
6Activer et désactiver le mode automatique en appuyant
brièvement.
ACTiVÉ : l’affichage clignote en continu sur l‘écran et
l‘appareil règle automatiquement les niveaux de vitesse en
fonction de lhumidité de la pièce.
i
Lorsque le mode automatique est activé, lhumidité souhaitée

deux fois, suivie de l‘humidité mesurée dans la pièce.
DÉSACTIVÉ : s‘allume en permanence sur l’écran et
l‘appareil fonctionne à une vitesse réglée entre 1 et 4.
Réglerl‘humiditédel‘airsouhaitéesur30-70 %:
Appuyer sur la 6 et la maintenir enfoncée pendant
2 clignote.
3 - ou + pour régler lhumidité souhaitée (par

Appuyer à nouveau sur la 6 et la maintenir enfoncée
-
2 séteigne et que l’humidité mesurée dans la pièce s’affiche.
Veuillez vous assurer que le mode automatique est allumé :
l’affichage sur l’écran clignote en continu !
7Bande
de LED
Un allumage en continu signale que l’appareil est en service.
Un clignotement en continu signale l’arrêt automatique de
l’appareil en cas de manque d’eau.
i7 peut être activée et désactivée séparément,
lorsque l’appareil est en service, en appuyant sur le bouton mode
4 et en le maintenant enfoncé pendant 3 sec.
40 FR
NETTOYAGE & ENTRETIEN
! Attention ! S’assurer, pour toutes les mesures, que le bloc d‘alimentation est
débranché de la prise de courant !
Affichage Mesures
8WATER Retirer la partie supérieure de l’appareil. Remplir le bac à eau
situé dans la partie inférieure de l’appareil avec de l‘eau fraîche
du robinet au maximum jusqu‘au repère WATERLINE. Placer la
partie supérieure sur la partie inférieure et remettre l‘appareil
en service.
i Dès qu‘il y a trop peu d‘eau dans le bac à eau, l‘appareil s’éteint


clignotent et lhumidité de la pièce ne s’affiche pas.
Afin dhumidifier l’air ambiant en continu et de réduire les substances

faire l’appoint d’eau tous les jours.
9SERVICE Retirer la partie supérieure de l’appareil. Vider l’eau résiduelle
du bac à eau. Laver minutieusement le bac à eau et l’unité de
vaporisation. Remplir le bac à eau situé dans la partie inférieure
de l’appareil avec de l‘eau fraîche du robinet au maximum
jusqu‘au repère WATERLINE. Remonter l’appareil et le mettre en
9 sur l’écran et main-

i

(même en mode veille).
811 10 9
41FR
10 CLEANING Retirer la partie supérieure de l’appareil. Vider leau résiduelle se
trouvant dans le bac à eau, remplir avec de l’eau fraîche du robinet



veuillez aérer la pièce pour éviter de possibles odeurs qui peuvent
se former en cas de fortes salissures. Ensuite, retirer la partie
supérieure de l’appareil et vider l’eau sale. Laver minutieusement le
bac à eau et l’unité de vaporisation. Remplir le bac à eau situé dans
la partie inférieure de l’appareil avec de l‘eau fraîche du robinet
au maximum jusqu‘au repère WATERLINE, monter l’appareil et le
10 CLEANING sur l’écran

i

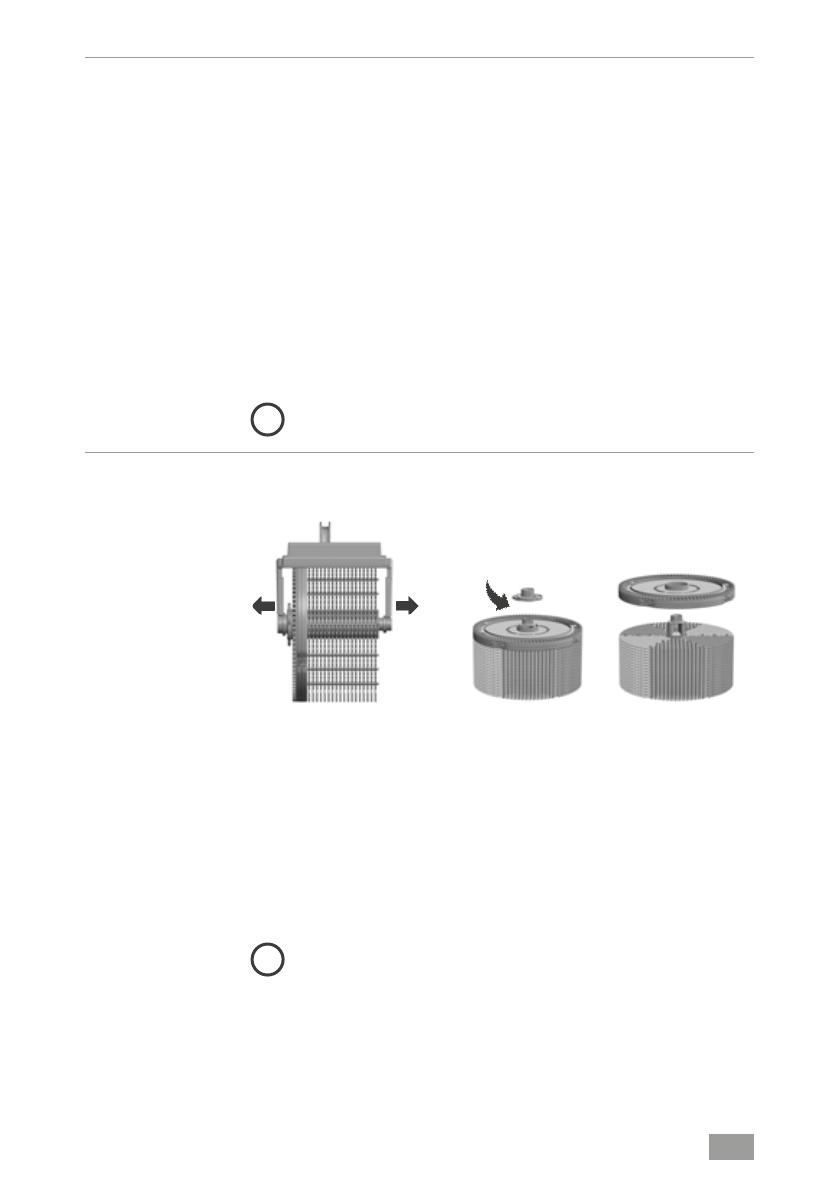
11 DISK 1. Retirer la partie supérieure de l’appareil et enlever l’unité de
vaporisation du bac à eau.
A
abB
C
2. Détacher prudem-
ment de l’axe les bras de


de vaporisation.
3. Tourner le

retirer-le.
4. Retirer
le disque

remplacer-le.
5. Remonter l’appareil et le mettre en service.
6. 11 sur l’écran et maintenir en-

i


fonction de la dureté de l’eau, de la qualité de l’eau, de l’intensité
quotidienne d’évaporation et du nombre d’heures de service.


Dans le cadre du programme de recyclage Venta ReNew, il est pos-
sible de renvoyer le disque hygiénique (voir Recyclage et Élimination).
42 FR

même si elles ne s’affichent pas. Ensuite, exécuter simplement la fonction RÉINI-

arrêt 
SERVICE, CLEANING ainsi que DISK s’affichent sur lécran. Maintenant, appuyer sur

qu’elles disparaissent. Ensuite, appuyer sur le bouton marche/arrêt clignotant et


Tous les résidus présents dans le bac à eau et sur l’unité de vaporisation (pôts ou
décolorations blancs, verts-jaunes ou bruns) n‘altèrent PAS le fonctionnement de
l‘appareil.
NETTOYAGE DE LA PARTIE
SUPÉRIEURE DE LAPPAREIL
! Attention ! S‘assurer que l‘appareil est éteint et que le bloc d‘alimentation est
débranché de la prise de courant !
Nettoyer la partie supérieure de l’appareil avec un chiffon/un pinceau de nettoyage

! La partie supérieure de lappareil ne doit pas être nettoyée sous l’eau
courante!

! Lorsdunettoyage,lécrannedoitpasêtremouilléoutrophumidifié!
ACCESSOIRES
Disque hygiénique Venta pour un fonctionnement hygiénique, parfait en continu
Nettoyant Venta pour le nettoyage une fois par semestre

contrôle parfait et un télépilotage aisé – même lorsque lon est en déplacement
Accessoires AeroStyle supplémentaires disponibles en ligne
CH +41 41 781 15 15, www.venta-luftwaescher.ch
NL +31 418 541 343, www.venta-airwasher.nl
43FR
CARACTÉRISTIQUES
TECHNIQUES
Modèle AeroStyle LW73 AeroStyle LW74
Couleurs blanc de sécurité / noir de sécuri
Taille de la surface adaptée  
Affichage d’état de LED Bande lumineuse bleue
Écran tactile interactif en série
Commande appli module WiFi / WLAN (en option)
Capteurs de mesure humidité de l‘air
Hygne de l’eau en série
Niveaux de performance 4 + mode automatique
Niveau sonore (niveau 1–4) 24 / 36 / 44 / 50 dB(A) 27 / 35 / 41 / 47 dB(A)
Consommation d’énergie
(niveau 1–4) 7 / 9 / 13 / 18 watts 11 / 14 / 17 / 24 watts
Tension du réseau 
Quantité de remplissage (max.) 9 litres
Dimensions  
Poids  10,5 kg
Sous réserve de modifications et d’erreurs
44 FR
RECYCLAGE ET ÉLIMINATION
Le matériel d’emballage est recyclable. Veuillez éliminer les emballa-
ges dans le respect de l’environnement et les renvoyer à la collecte de
recyclage.
L’appareil ne doit pas être jeté avec les ordures ménagères ! Il doit être élimi-
né dans un point de collecte désigné pour le recyclage des équipements
électriques et électroniques (DEEE). Veuillez utiliser les systèmes locaux de
retour et de collecte à votre disposition. Vous apportez ainsi une contributi-
on précieuse à la protection de l’environnement et de la santé humaine. Pour de plus
amples informations, veuillez contacter les autorités locales.
Programme de recyclage Venta GRATUIT du disque hygiénique pour protéger
l’environnement
Dans le cadre du programme de recyclage Venta ReNew, le disque hygiénique
d’origine Venta peut être entièrement recyclé. En renvoyant le disque hygiénique Ven-
ta usagé, vous pouvez contribuer à préserver les ressources de notre planète et vous
recevrez, en outre, votre bonus écologique personnel Venta ReNew que vous pourrez
utiliser lors de votre prochaine commande de disque hygiénique Venta auprès de
Venta-Luftwäscher GmbH. Vous obtiendrez de plus amples informations auprès de
notre équipe de service Venta.
REMARQUE: le programme de recyclage Venta ReNew est limité à la vente et l’envoi
en Allemagne. Nos sociétés Venta situées dans d’autres pays vous donneront volon-
tiers des informations sur vos programmes locaux/nationaux spécifiques. Si aucun
programme de recyclage ReNew n’est proposé dans votre pays, le disque hygiénique
peut être simplement éliminé avec les ordures ménagères.
GARANTIE
En raison de la grande qualité du produit, Venta-Luftwäscher GmbH garantit pour
une période de deux ans à compter de la date d‘achat que ce produit est exempt de
défauts sil est utilisé correctement. Dans le cas improbable où un défaut de maté-
riau ou de fabrication se produirait, veuillez contacter léquipe de service VENTA ou
votre revendeur. En outre, les conditions générales de garantie de Venta s‘appliquent :
www.venta-luftwaescher.de/service/garantie/
www.venta-airwasher.nl/fr/service/garantie/
45FR
ÉQUIPE DE SERVICE VENTA
Vous avez besoin d’informations complémentaires sur l’Airwasher Venta ou vous
souhaitez commander des accessoires ? Aucun problème : Léquipe de service VEN-
TA s’occupe de vous ! Appelez directement ou consultez le site Web de Venta.
CH +41 41 781 15 15, www.venta-luftwaescher.ch
NL +31 418 541 343, www.venta-airwasher.nl
QUE FAIRE SI…?
! Avant de réaliser l’une des mesures suivantes, s’assurer que le bloc
d‘alimentation est débranché de la prise de courant !
… la touche de marche/arrêt pourallumerlappareiln’apparaîtpassurl’écran?
Veuillez vérifier que la fiche secteur est branchée dans le réseau électrique.
…l’écranafficheWaterbienqu’ilyaitdel’eaudanslebacàeau?
Veuillez vérifier qu’il y a assez d’eau dans le bac à eau et/ou la partie supérieure est
bien placée sur le bon côté de la partie inférieure de l’appareil.
iMesure:retirer la partie supérieure de l’appareil. Remplir le bac à eau situé
dans la partie inférieure de l’appareil avec de l‘eau du robinet au maximum
jusqu‘au repère WATERLINE. Placer la partie supérieure sur le bon côté de la partie
inférieure et remettre l‘appareil en service.
... des « taches blanches » apparaissent en arrière-plan en appuyant sur l’écran ?
Dans des pièces sèches, des taches blanches peuvent apparaître dans l’arrière-plan
de l’écran. Elles sont dues aux charges électrostatiques qui ne portent atteinte ni
au fonctionnement, ni à la facilité d’utilisation de lappareil et ne constituent aucun
défaut.
...labandedeLEDnes’allumepasbienquel’appareilsoitenservice?
Veuillez vérifier si la bande de LED a été désactivée séparément. En appuyant et en
maintenant la touche mode nuit enfoncée pendant env. 3 sec.directement sur l’appa-
reil ou avec l’appli Venta, la bande de LED peut être réactivée.
i En mode nuit, la bande de LED ne peut pas être activée.
46 NL
GEACHTE KL ANT,
met de Venta AeroStyle Airwasher LW73 en LW74 heeft u een krachtig premiumpro-
duct aangeschaft. De AeroStyle ondersteunt een gezonde luchtvochtigheid en de
natuurlijke vermindering van schadelijke stoffen in de lucht.
Zo werkt het Venta-principe
De ruimtelucht wordt via een ventilator in de met water gevulde Airwasher geleid,
waarin spitsvondig geplaatste stapels schijven roteren. Via de oppervlakken van
deze schijven wordt hygiënisch schoon water in de ruimte verdampt. Tegelijkertijd
worden schadelijke stoffen als stof of pollen op de schijven vastgehouden, in het
water afgewassen en in de Airwasher verzameld.
HARTELIJK DANK!
wij zijn ervan overtuigd dat de Venta Airwasher uw verwachtingen zal overtreffen en
wensen u veel plezier met dit product.
Registreer uw Venta product:
www.venta-airwasher.nl/productregistratie-venta-benelux
Wij adviseren u de handleiding volledig door te lezen en te bewaren om eventueel
later te kunnen raadplegen. Neem alle veiligheidsinstructies in acht en let op het
juiste gebruik.
Bezoek onze website www.venta-airwasher.nl voor de nieuwste versie van deze
gebruiksaanwijzing.
INHOUD
Veiligheidsinstructies 47
Omvang van de levering 49
Symbolen 49
Gebruik volgens de voorschriften 49
Overzicht 50
Vóór het eerste gebruik 50
Ingebruikname 51
Display, functies en instellingen 52
Reiniging en onderhoud 54
Reinigen van het bovendeel 56
Toebehoren 56
Technische gegevens 57
Recycling en afvoer 58
Garantie 58
Venta serviceteam 59
Wat is er aan de hand wanneer … 59
47NL
! VEILIGHEIDSINSTRUCTIES
Dit apparaat is geschikt voor gebruik door kinderen vanaf 8 jaar en personen met
beperkte lichamelijke, sensorische of mentale capaciteiten of met een gebrekkige erva-
ring en kennis, wanneer zij onder toezicht staan of met betrekking tot een veilig gebruik
van het apparaat werden geïnstrueerd en de bestaande gevaren hebben begrepen.
Lees de gebruiksaanwijzing vóór ingebruikname volledig door en bewaar deze
zorgvuldig om later opnieuw te kunnen raadplegen.
Het apparaat is geen speelgoed voor kinderen.
Reiniging en onderhoud door de gebruiker mogen niet worden uitgevoerd door
kinderen jonger dan 8 jaar of zonder toezicht.
Houd het apparaat en het aansluitsnoer uit de buurt van kinderen jonger dan 8 jaar.
Een ondeskundig gebruik kan het apparaat beschadigen en verwondingen veroorzaken.
Sluit het apparaat alleen aan op geschikte stopcontacten – netspanning volgens
de gegevens op het typeplaatje van het apparaat.
Dit apparaat mag alleen worden gebruikt met het volgende aansluitsnoer:
IEC-stekker met Mickey Mouse-koppeling IEC 320 C5.
Neem het apparaat nooit in gebruik wanneer het aansluitsnoer beschadigd is.
Trek de stekker uit het stopcontact alvorens reinigings- of onderhoudswerkzaam-
heden uit te voeren en ook wanneer het apparaat wordt verplaatst of getranspor-
teerd.
Neem de Airwasher nooit in gebruik wanneer deze is gevallen of op een andere
manier werd beschadigd.
Reparaties aan elektrische apparaten mogen alleen worden uitgevoerd door
erkende elektriciens. Door onvakkundig uitgevoerde reparaties kunnen aanzienlijke
gevaren voor de gebruiker ontstaan.
Ga in geen geval op het apparaat zitten en leg er geen voorwerpen op.
Steek geen vreemde voorwerpen in het apparaat.
De bovenkant van het apparaat nooit in water of andere vloeistoffen dompelen.
De Airwasher nooit te vol vullen.
De Airwasher niet vervoeren of kantelen met een volle waterbak.
Trek de stekker nooit aan het aansluitsnoer en ook niet met natte handen uit het
stopcontact.
48 NL
De Airwasher mag alleen in compleet gemonteerde toestand in gebruik worden
genomen.
Plaats de Airwasher alleen op een vlakke, droge ondergrond.
Zet het apparaat zodanig neer, dat het niet kan worden omgestoten en dat er nie-
mand over het apparaat of over het aansluitsnoer kan struikelen.
Neem de volgende minimumafstanden tot voorwerpen en wanden in acht:
- Aan de voor- en bovenkant: 50


Werkt tot op een hoogte van maximaal: 2000 meter.
Blokkeer de ventilatiesleuf niet en dek deze ook niet af, om oververhitting/bescha-
diging van het apparaat te voorkomen.

name in de winter, kan de vorming van biologische organismen mogelijk maken.
Het direct vrijkomen van water uit de Airwasher in de vorm van druppels, stoom,
nevel of kalkneerslag is vanwege de kwaliteit en de koudeverdampingstechnologie
bij juist gebruik niet mogelijk.
Het apparaat mag alleen worden gebruikt met het daarvoor bestemde originele
Venta-toebehoren. Er mogen geen geuroliën of andere toevoegingen worden
gebruikt. Voor schades door geuroliën of vreemde toevoegingen is Venta-Luft-
scher GmbH niet aansprakelijk.
Wanneer de Airwasher meerdere dagen niet wordt gebruikt, wordt uitgeschakeld
of gedurende een langere periode wordt opgeborgen, moet de waterbak volledig
worden geleegd, moeten vuilresten worden verwijderd en moet de waterbak droog
worden gemaakt, om geurontwikkeling of de ontwikkeling van biologische organis-
men in stilstaand water of waterresten te voorkomen.
Trek de stekker uit het stopcontact wanneer u het apparaat niet gebruikt.
49NL
OMVANG VAN DE LEVERING
1 × Venta Airwasher
1 × Hygiënedisk (voor gemonteerd)
1 × Handleiding
Wanneer er onderdelen ontbreken of beschadigd zijn kunt u contact
opnemen met het VENTA Serviceteam of uw plaatselijke vertegenwoordiger.
SYMBOLEN
! Veiligheidsinstructies: aandachtig lezen en in acht nemen om letsel en materië-
le schade te voorkomen.
i Aanvullende informatie
Handige tips
GEBRUIK VOLGENS DE
VOORSCHRIFTEN
De Venta Airwasher is een huishoudelijk apparaat voor de bevochtiging en reiniging
van lucht in de slaapkamer, woonkamer, in kantoor of in recreatieruimten. Het ap-
paraat is niet voor buitengebruik. Elk ander gebruik of verandering van het apparaat
wordt beschouwd als ongeoorloofd. De fabrikant is niet aansprakelijk voor schades
of letsel als gevolg van ondeskundig gebruik.
Ongeoorloofd gebruik kan de gezondheid in gevaar brengen. Daartoe behoort gebruik
onder de volgende omstandigheden:
In ruimten met een explosiegevaarlijke en/of agressieve atmosfeer.
In ruimten met een hoge oplosmiddelconcentratie.
In de buurt van zwembaden of natte terreinen.
Buitenshuis
50 NL
OVERZICHT
LW73 / LW74
1
6
4
5
3
2
1 Bovenste deel (techniekeenheid)
2 Aansluitsnoer
3 Verdampereenheid (incl. hygiënedisk,
aandrijftandwiel, stapel schijven)
4 Uitneembare waterbak
5 Onderste deel
6 Afneembare kap voor uitbreiding met
Venta wifi-module
VÓÓR HET EERSTE GEBRUIK
Pak het apparaat uit en zet het neer.
Verwijder het bovenste deel 1.
Neem de verdampereenheid 3 uit de waterbak 4.
51NL
Vul de waterbak in het onderste deel van
het apparaat met vers leidingwater (ca. 9
liter), maximaal tot de helft.
INGEBRUIKNAME
1
Leg de verdampereenheid B in de
waterbak van het onderste deel A en
plaats het bovenste deel C met de juis-
te kant op het onderste deel A.
Steek de stekker D in het stopcontact en
schakel het apparaat in door de Power-
toets kort aan te raken.
i Alleen wanneer het apparaat op
het stroomnet is aangesloten
brandt de Power-toets , om het
apparaat in en uit te schakelen.
2 3
C
B
D
A
220-240V
50-60Hz
52 NL
Weergave Functie
1Ventilator-
standen
Snelheid 1 - 2 - 3 - 4 weergeven.
iDe ventilatorstanden worden weergegeven als ringsegmenten. Bij een
hogere ventilatorstand verschijnt een volgend dikker ringsegment met
de wijzers van de klok mee. Beginnend met stand 1 als smal ringsegment
onderaan tot en met stand 4 als dikste ringsegment rechts. Op de afbeelding
wordt stand 4 weergegeven.
2humidity Luchtvochtigheid
3 en Ventilatorstand instellen door kort aan te raken: verlaagt en
verhoogt de snelheid.
4Nachtmodus in- en uitschakelen door kort aan te raken.
AAN: Apparaat dimt de displayverlichting, verlaagt de ventila-
torstand naar 1 en schakelt de LED-ring 7 uit.
iVentilatorstand 1 kan met de hand met de toetsen + of - 3 worden
veranderd. De automatische modus 6 is niet mogelijk. De LED-ring 7
kan niet worden ingeschakeld.
UIT: Heldere displayverlichting, ingeschakelde LED-ring 7 en het
apparaat draait met ingestelde ventilatorstand 1 - 4.
De LED-ring 7 wordt niet ingeschakeld, wanneer deze eerder apart
werd uitgeschakeld. Door de nachtmodus-toets 4 ca. 3 sec. aange-
raakt te houden kan deze weer worden ingeschakeld.
DISPLAY, FUNCTIES EN
INSTELLINGEN
7
2
3
4
5
1
3
6
53NL
5Apparaat in- of uitschakelen door de Power-toets kort aan te
raken.
i Alleen wanneer het apparaat op het stroomnet is aangesloten, brandt
de Power-toets, om het apparaat in en uit te schakelen.
6Automatisch modus in- of uitschakelen door kort aan te raken.
AAN: De weergave op het display knippert continu en het
apparaat regelt de ventilatorstanden automatisch al naargelang
de luchtvochtigheid in de ruimte.
i
Bij het inschakelen van de automatische modus verschijnt de gewens-

het display humidity 2, daarna weer de gemeten luchtvochtigheid in
de ruimte.
UIT: De weergave op het display brandt continu en het ap-
paraat draait met de ingestelde ventilatorstand 1 - 4.
Gewensteluchtvochtigheid30-70 %instellen:
-Raak toets 6 gedurende ca. 3 sec. aan totdat de weergave
humidity 2 knippert. Stel de gewenste luchtvochtigheid (in stap-

-Raak toets 6 opnieuw ca. 3 sec. aan totdat de weergave in
humidity 2 niet meer knippert en de gemeten luchtvochtigheid
in de ruimte weer wordt weergeven.
Zorg ervoor dat de automatische modus ingeschakeld is:
weergave op het display knippert continu!
7LED-ring Continu branden geeft aan het apparaat in gebruik is.
Continu knipperen geeft aan dat het apparaat automatisch
wordt uitgeschakeld bij watertekort.
iDe LED-ring 7 kan tijdens de werking van het apparaat door het 3 sec.
aanraken van de nachtmodus-toets 4 apart worden uit- en
ingeschakeld worden.
54 NL
REINIGING EN ONDERHOUD
! Let op! Zorg ervoor dat het apparaat bij alle handelingen is uitgeschakeld en
dat de stekkervoeding uit het stopcontact is getrokken!
Weergave Maatregelen
8WATER Verwijder het bovenste deel van het apparaat. Vul de waterbak
in het onderste deel met vers leidingwater, maximaal tot de WA-
TERLINE-markering. Plaats het bovenste deel op het onderste
deel en neem het apparaat weer in gebruik.
i Zodra er te weinig water in de waterbak zit, wordt het apparaat
automatisch uitgeschakeld, het LED-lampje 7 knippert continu en op
het display verschijnt de WATER-weergave. Bij de weergave humidity
2 knipperen twee streepjes en de luchtvochtigheid in de ruimte wordt
niet weergegeven.
Om de lucht in de ruimte continu te bevochtigen en schadelijke stof-

dag water bij te vullen.
9SERVICE Verwijder het bovenste deel van het apparaat. Giet restwater
uit de waterbak weg. Spoel de waterbak en de verdamper-
eenheid grondig af. Vul de waterbak in het onderste deel met
vers leiding water, maximaal tot de WATERLINE-markering.
Monteer het apparaat weer en neem het in gebruik. Raak de
SERVICE-weergave 9 op het display ca. 3 sec. aan totdat deze
dooft.
i Voor een vlekkeloze hygiënische continuwerking waarschuwt de
SERVICE-weergave elke 14 dagen (ook in de stand-bymodus) om
deze handeling uit te voeren.
811 10 9
55NL
10 CLEANING Verwijder het bovenste deel van het apparaat. Giet restwater uit
de waterbak weg, vul vers water bij tot de WATERLINE-marke-

en laat het ca. 2 uur op een lage stand draaien. Advies: Tijdens
dit reinigingsproces dient de ruimte te worden geventileerd om
eventuele geuren te voorkomen, die bij zeer sterke vervuiling
kunnen ontstaan. Verwijder vervolgens het bovenste deel en
giet het vervuilde water weg. Spoel de waterbak en de verdam-
pereenheid grondig af. Vul de waterbak in het onderste deel
met vers leidingwater, maximaal tot de WATERLINE-markering,
monteer het apparaat en neem het weer in gebruik. Raak de
CLEANING-weergave 10 op het display ca. 3 sec. aan totdat
deze dooft.
iElke 6 maanden (bij 24 uur continuwerking) waarschuwt de
CLEANING-weergave deze handeling uit te voeren.
11 DISK 1. Verwijder het bovenste deel en neem de verdampereenheid
uit de waterbak.
A
abB
C
2. Maak de bevestigings-
armen a en b voorzichtig
los van de as en ver-
wijder drager A van de
verdamperrol.
3. Draai het
afsluitkapje B en
verwijder het.
4. Verwijder
hygiënedisk C en
vernieuw deze.
5. Monteer het apparaat weer en neem het in gebruik.
6. Raak de DISK-weergave 11 op het display ca. 3 sec. aan
totdat de deze dooft.
i
De gebruiksduur van de hygiënedisk bedraagt ca. 4 maanden (bij 24
uur continuwerking). De gebruiksduur hangt af van de hardheid en
kwaliteit van het water, de dagelijkse verdampingscapaciteit en het
aantal gebruiksuren. Elke 4 maanden (bij 24 uur continuwerking)
waarschuwt de DISK-weergave deze handeling uit te voeren.
In het kader van het Venta ReNew-recyclingprogramma kan de
hygiënedisk worden teruggestuurd (zie RECYCLING EN AFVOER).
56 NL
De onderhoudshandelingen 9, 10 en 11 kunnen altijd indien nodig worden uitge-
voerd, ook al worden ze niet weergegeven. Daarna eenvoudig de RESET-functie voor
CLEANING, DISK, SERVICE uitvoeren: Raak de Power-toets ca. 4 sec. aan totdat
deze knippert en SERVICE, CLEANING en DISK op het display worden weergegeven.
Alleen de handelingen die werden uitgevoerd ca. 3 sec. aanraken totdat deze doven.
Vervolgens de knipperende Power-toets ca. 4 sec. aanraken totdat deze continu
brandt. De volgende waarschuwingen voor de uitgevoerde handelingen worden dan
weer volgens schema weergegeven.
Alle resten in de waterbak en op de verdampereenheid (witte, groen/gelige of bruine
afzettingen of verkleuringen) hebben GEEN nadelige invloed op de functie van het
apparaat.
REINIGEN VAN HET
BOVENDEEL
! Let op! Zorg ervoor dat het apparaat bij alle handelingen is uitgeschakeld en
dat de stekkervoeding uit het stopcontact is getrokken!
Reinig het bovenste deel met een droge doek/kwast of een licht vochtige doek!
! Het bovenste deel van het apparaat mag niet onder stromend water worden
gereinigd!
Reinig het display alleen met een droge doek of een displayreinigingsdoek!
! Het display mag niet nat of te vochtig worden gereinigd!
TOEBEHOREN
Venta-hygiënedisk voor een vlekkeloze hygiënische continuwerking
Venta-reiniger voor de halfjaarlijkse reiniging
Optioneel: Venta wifi-module in combinatie met de gratis app van Venta voor per-
fecte controle en eenvoudig regelen op afstand, ook wanneer men niet thuis is
Extra AeroStlye-toebehoren online verkrijgbaar
NL +31 418 541 343, www.venta-airwasher.nl
57NL
TECHNISCHE GEGEVENS
Model AeroStyle LW73 AeroStyle LW74
Kleuren signaalwit/signaalzwart
Geschikt voor ruimteafmetingen  
LED-statusweergave Blauwe lichtlijst
Interactief touchdisplay Standaard
App-besturing Wifi-module (optioneel)
Meetsensoren Luchtvochtigheid
Waterhygiëne Standaard
Vermogensstanden 4 + mode automatisch
Geluidsontwikkeling (stand 1-4) 24 / 36 / 44 / 50 dB(A) 27 / 35 / 41 / 47 dB(A)
Stroomverbruik (stand 1–4) 7 / 9 / 13 / 18 watt 11 / 14 / 17 / 24 watt
Netspanning 
Capaciteit (max.) 9 liter
Afmetingen  
Gewicht  10,5 kg
Wijzigingen en fouten voorbehouden
58 NL
RECYCLING EN AFVOER
Het verpakkingsmateriaal kan hergebruikt worden. De verpakking s.v.p.
volgens milieuvoorschrift afvoeren resp. inleveren voor recycling.
Het apparaat mag niet met huishoudelijk afval worden afgevoerd! Het
apparaat moet op een inzamellocatie voor de recycling van elektrische
apparatuur worden ingeleverd (WEEE). Maak hiervoor gebruik van de
beschikbare plaatselijke recycling- en inzameldiensten. Hiermee levert u
een waardevolle bijdrage aan de bescherming van het milieu en de algemene
gezondheid. Voor verdere informatie kunt u contact opnemen met de plaatselijke
autoriteiten.
GRATIS Venta-hygiënedisk-recyclingprogramma ter bescherming van het milieu
De originele Venta-hygiënedisk kan in het kader van het Venta ReNew-recyclingpro-

te sturen, kunt u een bijdrage leveren aan het behoud van de hulpbronnen van onze
aarde, en u ontvangt bovendien uw persoonlijke Venta ReNew-milieubonus, die u bij
uw volgende bestelling van de Venta-hygiënedisk bij Venta Luftwäscher GmbH kunt
inwisselen. Meer informatie krijgt u via ons Venta-serviceteam.
AANWIJZING: Het Venta ReNew-recyclingprogramma is beperkt tot verkoop en
verzending binnen Duitsland. Onze Venta-maatschappijen in andere landen geven u
graag informatie over uw lokale/landspecifieke programma‘s. Wanneer in uw land
geen ReNew-recyclingprogramma wordt aangeboden, kan de hygiënedisk via het
huishoudelijk afval worden afgevoerd.
GARANTIE
Op grond van de hoge kwaliteit garandeert Venta Benelux B.V. voor de duur van
twee jaar na de aanschafdatum dat dit product bij correct gebruik geen gebreken
vertoont. Wanneer er desondanks een materiaal- of fabricagefout bestaat, verzoeken
wij u om contact op te nemen met het VENTA Serviceteam of uw verkoper. Daar-
naast gelden de algemene garantievoorwaarden van Venta:
www.venta-airwasher.nl/service/garantie/
59NL
VENTA SERVICETEAM
Heeft u verdere informatie nodig over de Venta Airwasher of wilt u accessoires
bestellen? Geen probleem: het VENTA Serviceteam staat voor u klaar! Neem telefo-
nisch contact op, bezoek de Venta website of stuur ons een e-mail.
NL +31 418 541 343, www.venta-airwasher.nl, Info@venta.nl
WAT IS ER AAN DE HAND
WANNEER …
! Zorg ervoor dat het apparaat bij alle handelingen is uitgeschakeld en dat de
stekkervoeding uit het stopcontact is getrokken!
… op het display niet de Power-toets verschijnt om het apparaat in te
schakelen?
Controleer of de stekker in het stopcontact zit.
… op het display WATER wordt weergegeven, hoewel er water in de waterbak zit?
Controleer of er voldoende water in de waterbak zit en/of het bovenste deel van het
apparaat met de juiste kant op het onderste deel is geplaatst.
iHandeling: Verwijder het bovenste deel van het apparaat. Vul de waterbak in
het onderste deel met leidingwater, maximaal tot de WATERLINE-markering.
Plaats het bovenste deel van het apparaat met de juiste kant op het onderste deel en
neem het apparaat weer in gebruik.
... er bij het aanraken van het display “witte velden” op de achtergrond zichtbaar
zijn?
In droge ruimten kunnen door elektrostatische opladingen witte velden op de achter-
grond van het display zichtbaar zijn, die noch de functie noch de bedienbaarheid van
het apparaat belemmeren en geen mankement vormen.
... de LED-ring niet brandt, hoewel het apparaat in gebruik is?
Controleer of de LED-ring apart werd uitgeschakeld. Door het ca. 3 sec. aangeraakt
houden van de nachtmodus-toets direct op het apparaat of met de Venta-app, kan
de LED-ring weer worden ingeschakeld.
i In de nachtmodus kan de LED-ring niet worden ingeschakeld.
60 IT
EGREGIO CLIENTE,
acquistando il Lavaaria Venta AeroStyle LW73 o LW74 ha scelto un prodotto premi-
um dalle prestazioni ottime. AeroStyle contribuisce a garantire un’umidità dell’aria
salubre e a ridurre in modo naturale le sostanze nocive nell’aria.
Il principio di funzionamento di Venta
Un ventilatore convoglia l’aria dei locali nel Lavaaria contenente acqua, all’interno del
quale ruotano delle batterie di dischi disposte secondo un ordine sofisticato. Attra-
verso le superfici dei dischi l’acqua pulita evapora in modo igienico nell’ambiente.
Allo stesso tempo i dischi trattengono sostanze nocive quali polvere o polline che
vengono lavate via dall’acqua e raccolte nel lavaaria.
GRAZIE PER AVERCI SCELTO!
siamo certi che il lavaaria Venta supererà le Sue aspettative, e Le auguriamo tanta
soddisfazione nel suo uso.
Si prega di registrarsi di prodotto Venta:
www.venta-luftwaescher.ch/produktregistrierung-schweiz
Legga per intero le presenti istruzioni per l‘uso, le conservi per un utilizzo futuro e
osservi le avvertenze di sicurezza e le indicazioni per un impiego conforme ivi speci-
ficate.
La versione più aggiornata delle istruzioni per l‘uso è consultabile sul nostro sito web
www.venta-luftwaescher.ch
SOMMARIO
Avvertenze di sicurezza 61
Contenuto della confezione 63
Simboli 63
Uso conforme 63
Panoramica 64
Indicazioni preventive al primo utilizzo 64
Primo utilizzo 65
Indicatori, funzioni e impostazioni 66
Pulizia e cura dell‘apparecchio 68
Pulizia della parte superiore
dell‘apparecchio 70
Accessori 70
Dati tecnici 71
Riciclaggio e smaltimento 72
Garanzia 72
Servizio di assistenza venta 73
Cosa fare se ...? 73
61IT
! AVVERTENZE DI SICUREZZA
Questo apparecchio è idoneo all‘uso da parte di bambini con un‘età minima di 8
anni e da parte di persone con capacità fisiche, sensoriali o mentali limitate oppu-
re in possesso di poca esperienza e di conoscenze in materia ridotte, sempre che
essi/esse vengano supervisionati o che siano stati istruiti in merito al suo utilizzo
e che abbiano compreso i possibili pericoli.
Leggere per intero le istruzioni per l‘uso prima di mettere in funzione l‘apparecchio
e conservarle in buone condizioni per una eventuale consultazione futura.
L‘apparecchio non è un giocattolo per bambini.
La pulizia e la cura da parte dell‘utilizzatore non deve essere eseguita da bambini
di età inferiore agli 8 anni o senza supervisione.
Tenere l’apparecchio e l’alimentatore lontano dai bambini di età inferiore agli 8
anni.
Un uso improprio può danneggiare l‘apparecchio e causare lesioni corporee.
Collegare l‘apparecchio solamente a prese di corrente idonee – Fare attenzione
che la tensione di rete corrisponda a quella riportata sulla targhetta di omologa-
zione applicata all‘apparecchio.
Questo apparecchio può essere usato solo con i seguenti alimentatori: spina elet-
trica con connettore tripolare IEC 320 C5.
Non accendere mai l’apparecchio se il cavo di alimentazione è danneggiato.
Prima di ogni intervento di pulizia o di manutenzione e per spostare o trasportare
l’apparecchio, estrarre la spina elettrica dalla presa di corrente.
Non mettere mai in funzione il Lavaaria dopo che è caduto per terra o se è stato
danneggiato in altra maniera.
Le riparazioni di apparecchi elettrici devono essere eseguite solamente da per-
sone qualificate. Delle riparazioni non eseguite a regola d‘arte possono generare
notevoli pericoli per l‘utilizzatore.
Non sedersi assolutamente sull‘apparecchio e non appoggiarvi sopra degli
oggetti.
Non infilare oggetti estranei nell‘apparecchio.
Non immergere mai la parte superiore dell’apparecchio nell’acqua o in altri liquidi.
Non riempire mai troppo il Lavaaria.
Non trasportare mai né ribaltare il Lavaaria con il contenitore pieno.
62 IT
Non staccare mai la spina dalla presa di corrente tirandola per il cavo o con le
mani bagnate.
Il Lavaaria deve essere messo in funzione solamente se completamente montato.
Appoggiare il Lavaaria solo su di una superficie piana ed asciutta.
Posizionare l’apparecchio in maniera tale che non possa essere ribaltato e che
nessuno possa inciampare nell’apparecchio o nel cavo.
Mantenere le seguenti distanze minime dagli oggetti e dalle pareti:



Altitudine massima: 2000 metri
Non coprire mai né bloccare le fessure di ventilazione, al fine di evitare un surri-
scaldamento/danneggiamento dell‘apparecchio.
-
tutto in inverno, la formazione di organismi biologici.
In virtù delle caratteristiche dell’apparecchio e della tecnologia di evaporazione a
freddo, è impossibile che dal lavaaria, se usato correttamente, fuoriesca diretta-
mente acqua sotto forma di gocce, vapore, nebbiolina o precipitazione di calcare.
L’apparecchio può essere utilizzato solo con gli appositi accessori originali
Venta. Non usare lapparecchio in combinazione con oli aromatici o altri additivi.
Venta-Luftwäscher GmbH non si assume alcuna responsabilità per danni causati
da oli aromatici o altri additivi.
Se il Lavaaria non viene utilizzato per diversi giorni oppure se rimane spento o
viene immagazzinato per un lungo periodo di tempo, la vaschetta dell’acqua
deve essere svuotata completamente, pulita dai residui di sporcizia e asciugata
per impedire la formazione di odori o di organismi biologici nell’acqua ferma o la
formazione di residui d’acqua.
Staccare la spina dalla presa quando non si usa l’apparecchio.
63IT
CONTENUTO DELLA
CONFEZIONE
1 × Lavaaria Venta
1 × disco igiennizzante (preinstallata)
1 × istruzioni per l‘uso
In caso di assenza di alcuni degli elementi indicati, si prega di rivolgersi al servizio di
assistenza VENTA o al proprio rivenditore locale.
SIMBOLI
! Avvertenze di sicurezza Leggere e rispettare attentamente le seguenti avver-
tenze per evitare danni a persone e cose.
i Informazioni complementari
Consigli utili
USO CONFORME
Il Lavaaria Venta è un elettrodomestico per l‘umidificazione e la depurazione dell‘aria
per ambienti abitativi, di lavoro e di soggiorno. L‘apparecchio non è idoneo all‘uso
esterno.
Qualsiasi altro uso o modifica all‘apparecchio sono da considerarsi uso non consen-
tito. Il produttore non risponde per danni o per lesioni causati da un uso improprio.
Un uso non consentito può mettere in pericolo la salute e la vita delle persone. Fra
tale tipo di uso si conta:
in locali con atmosfere a rischio di esplosione e/o con atmosfera aggressiva.
in ambienti con elevata concentrazione di solventi.
in prossimità di piscine o di terreni bagnati.
64 IT
PANORAMICA
LW73 / LW74
1
6
4
5
3
2
1 Parte superiore dell’apparecchio
(unità tecnica)
2 Cavo di alimentazione
3 Unità di evaporazione (incl. disco
igienizzante, ruota dentata di trasmis-
sione, batteria di dischi)
4 Vaschetta dell’acqua estraibile
5 Parte inferiore dell’apparecchio
6 Sportellino per retrofitting del modulo
WiFi/WLAN Venta
INDICAZIONI PREVENTIVE AL
PRIMO UTILIZZO
Disimballare e posizionare l’apparecchio.
Rimuovere la parte superiore dell’apparecchio 1.
Togliere l’unità di evaporazione 3 dalla vaschetta dell’acqua 4.
65IT
Riempire la vaschetta dell’acqua nella
parte inferiore dell’apparecchio con
acqua corrente (ca. 9 litri) fino alla metà
dell’unità di evaporazione.
PRIMO UTILIZZO
1
Inserire l’unità di evaporazione B nella
vaschetta dell’acqua della parte inferi-
ore dell’apparecchio A e posizionare la
parte superiore dell’apparecchio C sulla
parte inferiore A dal lato corretto.
Allacciare la spina D alla rete elettrica
e accendere l’apparecchio toccando
brevemente il pulsante Power .
i l pulsante Power per
l’accensione e lo spegnimento
dell’apparecchio si accende solo
dopo che l’apparecchio è stato
collegato alla rete elettrica.
2 3
C
B
D
A
220-240V
50-60Hz
66 IT
Indicatore Funzioni
1Livello di giri Indica la velocità 1 - 2 - 3 - 4.
iI livelli di giri sono rappresentati sotto forma di segmenti di un
cerchio. All’aumentare del livello di giri aumenta lo spessore del
segmento successivo del cerchio in senso orario. Al livello 1 corrisponde il
segmento più sottile in basso e al livello 4 il segmento più spesso a destra.
Nell’immagine è raffigurato il livello 4.
2humidity Mostra l’umidità dell’aria 
3 e Imposta il livello di giri se toccato brevemente:
riduce e aumenta la velocità.
4Attiva e disattiva la modalità notte se toccato brevemente.
ON: l’apparecchio regola l’intensità di illuminazione del display,
riduce il numero di giri al livello 1 e spegne la striscia LED 7.
iÈ possibile modificare manualmente il livello di giri 1 tramite il
pulsante + o - 3. La modalità Auto 6 non è attivabile. Non è possibile
accendere la striscia LED 7.
OFF: il display si illumina in maniera vivida, la striscia LED 7 è
accesa e l’apparecchio funziona con il livello di giri impostato
1 - 4.
La striscia LED 7 non si accende se precedentemente è stata spenta
separatamente. Premendo e tenendo premuto per circa 3 sec. il
pulsante della modalità notte 4 è possibile riaccenderla.
INDICATORI, FUNZIONI
E IMPOSTAZIONI
7
2
3
4
5
1
3
6
67IT
5Pulsante Power per accendere e spegnere l’apparecchio se
toccato brevemente.
i Il pulsante Power per l’accensione e lo spegnimento dell’apparecchio
si accende solo se l’apparecchio è collegato alla rete elettrica.
6Attivazione e disattivazione della modalità Auto se toccato
brevemente.
ON: l’indicazione sul display lampeggia continuamente e
l’apparecchio regola automaticamente i livelli di giri a seconda
dell’umidità dell’aria ambiente.
i
Attivando la modalità Auto viene visualizzato nell’area dell’indicazione
humidity 2 il grado di umidità dell’aria desiderato (valore predefinito

dell’aria rilevato.
OFF: l’indicazione sul display rimane accesa e l’apparecchio
funziona con il livello di giri impostato 1 - 4.
Impostazionedell’umiditàdell’ariadesiderata30-70 %:
-Premere e tenere premuto il pulsante 6 per circa 3 sec. fin-
ché l’indicazione humidity 2 non lampeggia. Con il pulsante - o

-Premere e tenere premuto di nuovo per circa 3 sec. il pul-
sante 6 finché l’indicazione humidity 2 smette di lampeggiare e
viene visualizzata di nuovo l’umidità dell’aria ambiente rilevata.
Accertarsi che la modalità Auto sia attivata: l’indicazione sul

7Striscia LED La luce accesa fissa indica che l’apparecchio è in funzione.
La luce lampeggiante continua indica lo spegnimento automa-
tico dell’apparecchio per mancanza d’acqua.
iDurante il funzionamento dell’apparecchio è possibile accendere
e spegnere separatamente la striscia LED 7 tenendo premuto per
3 sec. il pulsante 4 della modalità notte.
68 IT
PULIZIA E CURA
DELLAPPARECCHIO
! Attenzione! Assicurarsi che durante tutte le operazioni l‘apparecchio sia
spento e l‘alimentatore a spina sia staccato dalla presa!
Indicatore Operazioni
8WATER Rimuovere la parte superiore dell’apparecchio. Riempire la
vaschetta dell’acqua nella parte inferiore dellapparecchio con
acqua corrente al massimo fino al contrassegno WATERLINE.
Riassemblare la parte superiore e quella inferiore e rimettere in
funzione l’apparecchio.
i Non appena l’apparecchio rileva un volume d’acqua insufficiente nella
vaschetta dell’acqua, l’apparecchio si spegne automaticamente, il
LED 7 lampeggia continuamente e sul display viene visualizzata l’indicazio-
ne WATER. Nell’area dell’indicazione humidity 2 lampeggiano due trattini e
non viene visualizzato alcun valore dell’umidità dell’aria ambiente.
Per conseguire un’umidificazione continua dell’aria dei locali e ridurre

aggiungere acqua tutti i giorni.
9SERVICE Rimuovere la parte superiore dell’apparecchio. Eliminare l’ac-
qua residua dalla vaschetta dell’acqua. Lavare accuratamente
la vaschetta dell’acqua e l’unità di evaporazione. Riempire la
vaschetta dell’acqua nella parte inferiore dellapparecchio con
acqua corrente al massimo fino al contrassegno WATERLINE.
Rimontare e riaccendere l’apparecchio. Premere e tenere pre-
muta per circa 3 sec. l’indicazione SERVICE 9 sul display.
i Per garantire un esercizio igienico continuo ineccepibile, l’indicazione
SERVICE ricorda di effettuare questa operazione ogni 14 giorni
(anche in modalità Standby).
811 10 9
69IT
10 CLEANING Rimuovere la parte superiore dell’apparecchio. Eliminare l’acqua


Venta. Montare l’apparecchio e farlo funzionare per circa 2 ore
a un livello di giri basso. Consiglio: durante la pulizia aerare l’am-
biente per evitare la formazione di odori in caso di un alto grado
di sporcizia. Rimuovere quindi la parte superiore dell’apparecchio
e rimuovere l’acqua sporca. Lavare accuratamente la vaschetta
dell’acqua e l’unità di evaporazione. Riempire la vaschetta dellac-
qua nella parte inferiore dell’apparecchio con acqua corrente al
-
chio e accenderlo. Premere e tenere premuta per circa 3 sec.
l’indicazione CLEANING 10
iOgni 6 mesi (con funzionamento continuo 24 ore su 24) l’indicazione
CLEANING ricorda di effettuare questa operazione.
11 DISK 1. Rimuovere la parte superiore dell’apparecchio e togliere l’uni-
tà di evaporazione dalla vaschetta dell’acqua.
A
abB
C
2. Staccare con cautela
i bracci di supporto a e
b dall’asse e rimuovere il
sostegno A dal rullo.
3. Svitare
e togliere il
cappuccio B.
4. Rimuovere e
sostituire il disco
igienizzante C.
5. Rimontare e riaccendere l’apparecchio.
6. Toccare l’indicazione DISK 11 sul display per circa 3 sec.
finché non si spegne.
i
Il disco igienizzante ha una vita utile di circa 4 mesi (con funziona-
mento continuo 24 ore su 24). La vita utile dipende dalla durezza
dell’acqua e dalla qualità dell’acqua, dalla capacità di evaporazione
giornaliera e dal numero di ore di esercizio. Ogni 4 mesi (con
funzionamento continuo 24 ore su 24) l’indicazione DISK ricorda di
effettuare questa operazione.
Grazie al programma di riciclaggio Venta ReNew è possibile rinviare
a Venta il disco igienizzante (vedi RICICLAGGIO E SMALTIMENTO).
70 IT
Gli interventi 9, 10 e 11 per la cura dell’apparecchio possono essere eseguiti ogni
qualvolta sia necessario, anche se non sono visualizzati sul display. Al termine di
suddetti interventi eseguire la funzione RESET per CLEANING, DISK e SERVICE:
premere e tenere premuto il pulsante Power per circa 4 sec. finché lampeggia e
sul display vengono visualizzate le indicazioni SERVICE, CLEANING e DISK. A questo
punto toccare le indicazioni relative agli interventi che sono state eseguiti per circa
3 sec. finché non si spengono. Quindi premere e tenere premuto per circa 4 sec. il
pulsante Power lampeggiante finché non diventa fisso. Il promemoria successivo
relativo a ciascuno degli interventi eseguiti sarà visualizzato di nuovo a intervalli
regolari.
I residui nella vaschetta dell’acqua e sull’unità di evaporazione (macchie e depositi
bianchi, verdi giallastri o marroni) NON pregiudicano il funzionamento dell’apparec-
chio.
PULIZIA DELLA PARTE SUPE-
RIORE DELLAPPARECCHIO
! Attenzione! Assicurarsi che durante tutte le operazioni l‘apparecchio sia spen-
to e l‘alimentatore a spina sia staccato dalla presa!
Pulire la parte superiore dell’apparecchio con un panno/pennello asciutto o con un
panno leggermente umido!
! Non lavare la parte superiore dell’apparecchio sotto l’acqua corrente!
Pulire il display solo con un panno asciutto o con un panno apposito per display!
! Non pulire il display con panni bagnati o troppo umidi!
ACCESSORI
Disco igienizzante Venta per un esercizio continuo igienico e ineccepibile
Detergente Venta per la pulizia semestrale
Optional: modulo WLAN/WiFi Venta in combinazione con l’applicazione gratuita di
Venta per un monitoraggio perfetto e un comando a distanza semplice.
Altri accessori per AeroStyle disponibili online
CH www.venta-luftwaescher.ch
71IT
DATI TECNICI
Modello AeroStyle LW73 AeroStyle LW74
Colori bianco segnale / nero segnale
Dimensione locale  
Indicazione di stato LED Banda luminosa blu
Display touch interattivo di serie
Controllo tramite app modulo WiFi / WLAN (optional)
Sensori di misura umidità dell’aria
Igienizzante acqua di serie
Livelli di potenza 4 + Auto
Rumorosità (livelli 1-4) 24 / 36 / 44 / 50 dB(A) 27 / 35 / 41 / 47 dB(A)
Consumo di energia (livelli 1-4) 7 / 9 / 13 / 18 watt 11 / 14 / 17 / 24 watt
Tensione di rete 
Contenuto d’acqua (max) 9 litri
Dimensioni  
Peso  10,5 kg
Salvo modifiche ed errori
72 IT
RICICLAGGIO E SMALTIMENTO
Il materiale di imballaggio è riutilizzabile. Smaltire la confezione nel rispetto
dell’ambiente, consegnandola al centro di raccolta dei materiali riciclabili.
Non smaltire l’apparecchio gettandolo nei comuni rifiuti domestici! Il suo
smaltimento deve avvenire a cura di un apposito centro per la raccolta e il
riciclaggio di apparecchiature elettriche ed elettroniche (RAEE). Si prega di
avvalersi a tal fine dei sistemi di riconsegna e raccolta disponibili sul
territorio. Tale pratica contribuisce in modo prezioso alla tutela dell’ambiente e alla
salute delle persone. Per ulteriori informazioni rivolgersi agli enti preposti locali.
Programma GRATUITO Venta di riciclaggio del disco igienizzante per la tutela
dell’ambiente

igienizzante originale di Venta. Rinviando il disco igenizzante usato di Venta potrete
contribuire alla tutela delle risorse del nostro pianeta e ricevere inoltre un buono
personale Venta ReNew che potrete utilizzare per il vostro prossimo ordine di un di-
sco igienizzante Venta presso Venta Luftwäscher GmbH. Per maggiori informazioni
contattare il team dell’assistenza di Venta.
NOTA: il programma di riciclaggio Venta ReNew è limitato alla vendita e alla spe-
dizione all’interno della Germania. Le nostre società in altri paesi potranno fornire
informazioni sui programmi specifici nella vostra regione o nel vostro paese. Se nel
vostro paese non è attivo il programma di riciclaggio ReNew, potete smaltire il disco
igienizzante nei rifiuti domestici.
GARANZIA
L‘eccellente qualità del prodotto consente a Venta Luftwäscher GmbH di fornire
una garanzia di due anni dalla data di acquisto, assicurando l‘assenza di difetti in
presenza di un utilizzo appropriato. Laddove tuttavia dovessero occasionalmente
presentarsi difetti nei materiali o nella lavorazione, si prega di rivolgersi al servizio di
assistenza VENTA o al proprio rivenditore. Si applicano inoltre in tali casi le condizio-
ni generali di garanzia Venta, consultabili all‘indirizzo:
https://www.venta-luftwaescher.ch/en/service/warranty/
73IT
SERVIZIO DI ASSISTENZA
VENTA
Necessita di ulteriori informazioni sui lavaaria Venta o desidera ordinare degli ac-
cessori? Nessun problema! Il servizio di assistenza VENTA sarà lieto di aiutarla! Può
contattarlo direttamente o visitare il sito web Venta.
CH +41 41 781 15 15, www.venta-luftwaescher.ch
COSA FARE SE ...?
! Assicurarsi che durante tutte le operazioni l‘apparecchio sia spento e l‘ali-
mentatore a spina sia staccato dalla presa!
… sul display non è visualizzato il pulsante Power per l’accensione e lo
spegnimento dell’apparecchio?
Accertarsi che la spina sia collegata alla rete elettrica.
… sul display appare la scritta WATER nonostante sia presente acqua nella
vaschetta dell’acqua?
Verificare che ci sia acqua a sufficienza nella vaschetta dell’acqua e/o che la parte
superiore dell’apparecchio sia posizionata dal lato corretto sulla parte inferiore
dell’apparecchio.
iIntervento: rimuovere la parte superiore dell’apparecchio. Riempire di acqua
corrente la vaschetta dell’acqua nella parte inferiore dell’apparecchio al
massimo fino al contrassegno WATERLINE. Posizionare la parte superiore dell’appa-
recchio dal lato corretto sulla parte inferiore e riaccendere l’apparecchio.
... gli indicatori del display sono azionati con un tocco troppo deciso?
Questa circostanza può causare “ammaccature” visibili, che tuttavia non indicano un
difetto qualitativo: esse scompaiono non appena si smette di esercitare pressione.
... la striscia LED non si accende nonostante l’apparecchio sia in funzione?
Controllare se la striscia LED è stata spenta separatamente. Premendo e tenendo
premuto per circa 3 sec. il pulsante della modalità notte è possibile riaccendere la
striscia LED.
i Nella modalità notte non è possibile accendere la striscia LED.
74 RU

-



ПринципработыVenta


-












 
 
 
 
 
 
 
 

 
 
 
 
 
 
 
 
75RU
! 


































76 RU


























-








77RU

1 ×
1 ×
1 ×

! -
-

i 
 


-




-





-


78 RU

LW73 / LW74
1
6
4
5
3
2
1 
2 
3 



4 
5 
6 




1.
34.
79RU

1



В

А
С


D
 .
i 




2 3
C
B
D
A


80 RU
Индикатор Функция
1 скоростьработывентилятора1-2-3-4
i





2 влажность-

3  

4Ночнойрежим
ВКЛ:
7.
i



ВЫКЛ:-
7

7
4



2
3
4
5
1
3
6
7
81RU
5КнопкаВКЛЫКЛ
i

6Автоматическийрежим.ВКЛ: постоянно
мигает
-

i

-


ВЫКЛ: 
-

Установкажелаемойвлажностивоздуха30-70%:
6 
2

3
6 -

2

-
 
7LED-

Непрерывнаяподсветка

Непрерывноемиганиеподсветки


i7
4



82 RU


! Внимание!

Индикатор Действия
9WATER 
-


i
7
-
2

-
-

10 SERVICE 




SERVICE 10
i
-


912 11 10
83RU
11 CLEANING -

-


-

-


-
11

i


12 DISK 1. 

A
abB
C
2.


-

3. 


4.



5. 
6. 

i




-


84 RU


-

-









! Внимание!

-

! Непромывайтеверхнюючастьприбораподпроточнойводой.


! Непротирайтедисплейвлажнойилисильновлажнойтканью!








85RU


Модель AeroStyle LW73 AeroStyle LW74
Цвета 
Наплощадьпомещения  
LED-индикатор состояния 
Интерактивныйсенсорный
дисплей 
Управлениечерезприложение 
Измерительныйдатчик 
Гигиенаводы 
Режимыработы 
Уровеньшума  
Энергопотребление  
Напряжениевсети 
Объемзаливаемойводы 
Размеры 
Вес  
ДиапазончастотWLAN 
МощностьпередачиWLAN 

86 RU

-
-


-



ХРАНЕНИЕ


-


ПРАВИЛАТРАНСПОРТИРОВКИ




ДАТАИЗГОТОВЛЕНИЯ





-

-






87RU


! Убедитесь,чтоприборвыключенвовремялюбыхманипуляций,а
вилкапроводапитанияотсоединенаотрозетки!
...ИндикаторВКЛ/ВЫКЛдлявключенияприборанеотображаетсяна
дисплее?

...ИндикаторWATERотображаетсянадисплее,несмотрянато,чтовпод-
донеестьвода?


iДействие:

-

…Принажатиинакнопкидисплеянаегофонепоявилисьбелыепятна?
-



...LED-полосканезагорается,хотяприборвключен?
-


i 
...Светодиоднаяполоскамигаетжелтымцветом?





88 JP
お客
の た び は ベン タ 高 性 プ レミ アム 製 AeroStyleウォッシャ LW73およびLW74をお
買い上げいただき誠にあがとざいますAeroStyleは湿度を康なレベルに保ち、
れを自する
ベンタの原以下のよう能します:
ンを通じ、の入ったエアウォッシャーにここ
列 さ れ プ レ ートスク が 水 中 で 回 転 する よに なってい ま す。プ レ ートス
を通て清潔水が気体とて室内に送りまれます時に埃や花粉などはプレ
キャチされ、水で洗わからで収集されます
お買い上げがとございます
ベンタ エアォッシャーなら、のごたすのと確信し
使 って 日 を お ご し く い 。
本取扱説明書を注意深お読み必要保管適切
使い方ならびする注気をみくだ
ョ ン 、弊 ェ ブ
www.venta-luftwaescher.deで ご 覧 い た だ け ま す。
目次
全注意事 89
梱包内容 91
記号 91
使用 91
各部名称 92
ての 使 92
使用開始 93
表 示 、機 能 び 設 9 4
浄および ケア 96
器上部の洗浄 98
付属品 98
クニ 99
イク 1 0 0
保証 100
タ・ 1 0 1
んなきに... 101
89JP
! 意事
器を8歳以上の子どもびに 身体的感覚的精神的能力に障害
もしく 分で使 する
督のまた 全な使用と起こり得る危険について指た上
使用させてださい。
取扱説明書は始動前に熟必要場合に保管さい
本 機 器の 玩 具では ありま
浄およびーによるケアは8以下の子どもが 督な行ってはません。
当機器おび電源ケルは、歳以下のお様の手の届かないよさい。
使用目的使用を行っ合、傷し
をしたりする可あります
器 は 適 な コン セントの み してさ い 。電 圧 は
板に記さています
ケーブルしか使 用しでくださメガ型コネク
源 アダ タ プ IEC 320 C5
電 源 ケ 損 傷して いる 場 に は当 機 器 をして 運 転な いさ い 。
メンナンスの 必ず ケー
ンセ から抜いてださい。
みが くだうとユーザーが
被る可あります
の上 でくださた、の上でくだ
入しなでくだ
水やいでくだ
エアウォッシャーのえてしなでくださ
エアウォッシャーの したりしたりでくださ
コントか抜く プタのケーブル引っったり、
ったりでくださ
電 源 アダ ププ ラグ は 決 してケブ ル を摑 んで 引 いり、濡 れ た 手ン セントに 触 れ
うとしたりでくださ
エアウォッシャーらで 湿
90 JP
機器い場所機器やケルに機器は
かがブルにつまづいたりするとがない 置しださい。
体やから以下の離を保っださい:
- 機器の50 cm
- 機器の左右20 cm
- 機器後5 cm
さ:2000ート
エアウォッシャーを覆ったりブロックしたりしなでくだ
機器の過熱や損傷につな
冬の季節室内の相対湿度が継続60%以上微生物の繁殖が起
や すくな り す。
当 製品 は品 質さと化 式の 採 用 により、使 用目 的に 適った 方法 でご 利
用になれば、滴、気、霧まは石灰分の堆(水垢)などて水が直接エ
ッシャーかることはありませ
ベンタ品しか使いでくだた、アロオイ
ルやその他の添剤を使わないでださい。ロマルやその他の添剤を用いた
による損害に対Venta-Luftwäscher GmbHはいさい責任を負わないものです
日かたってエアウォッシャーを使スイッチオフす合、は長 たり
する必ず水タンクをにし、掃しし、
生したり微 殖したりすることがでくださ
器を使用にならない合には、ブルをコンセンから抜いてださい。
91JP
包内容
ウォッシャ1
1 × ィ ス ク(
取扱明書1
に不足ある、たは傷している場ベンサービスチームまたは
販売店にお問い合わせさい
記号
! 全 に 関 す 意 事 項
人身または物品の事故や損傷を防ぐた意深お読みさい
i 足情
役 に 立 つント
使用目
宅・ フィス 湿
品 で 。本 外 で 使 し て
かなる使用目的以外の使用または機器の変不適切な使みなされ
そのような不な使きたまたどに対してはカーはを負
ません。
機器の適切でない使は健康生命を危険にさす可もあ
でな使用とてはのような使げらます:
爆発の危険性があた刺激性の強い物質室内環境で使用
高い室内環での使用。
プール 付 近ま たは 濡 れ た エリアで の 使 用 。
野 外で の 使 用
92 JP
名称
LW73 / LW74
1
6
4
5
3
2
1 部( ッ ト
2 電 源 アダ プタ
3 湿 ト( ィ ス ク 、
イ ー 、プ
4 取 外で きる水タ
5 器下
6 ベンタWiFiジュール を搭 載 た め
カバー取り外し
ての 使
を梱取り出し、置しま
1 を 取 り 外 し ま す。
水タンク 4 湿 ニット 3を 取し ま す。
93JP
水タンクに
さ( 大 、 9 ッ ト )ま
ま す。
使用開
1
湿 ユ ニット Bを機Aタンクの
に入れ、器上部C正し
下部Aの上にセットしま
プラグ D ン ト ぎ 、機
イッ く 触 れ て イッ チ オ ン
てく だ さ い
i にしっか が って い
に し ス イッ チ ン/
フは
2 3
C
B
D
A


94 JP
表示 機能
1 数レ
ベル
回転数 1 - 2 - 3 - 4 表示ます
i数レはリングセグメン 数レ高くす
るごとに、回りにセグメントのライン太くなっきまル1でリ
ング いラインまり、4リング インにりま
す。図 で は レ ベ ル 4 が 表 示 さ れて い ま す。
2humidity
(湿度)
室内の湿表示 (0)
3 転 数レ ベタッチで設 定ラスマナスで回 転 数高く
り 低 くし たし ま す。
4夜 間 モードを 軽くタッしてフしま す
ON: スプレ暗くなり回 数レルが1り、LEDスト
プライ 7が消えます
i数レ 1ボタ 3+ また- をで押て変えができ
自動運転モ6きません。LEDストライ7ッチオンで
きません。
OFF:ィス プ レ イ 表 示 は 明 る く、LED ップ 7 灯 、機
数レ14の間で運転ます
LEDス ト リ ップ 7は、その前に個別にスッチオフした場には点灯し
ません。夜間モードボタン 4 3 け る 、ま ス イ
ま す。
5ッチれてのスイッチをオン
i 源 に し っ か に し か ス イッ チ の ス イッ チ オ ン/
フはん。
示 、機 お よ
7
2
3
4
5
1
3
6
95JP
6 ー ド オ ン・オ フ し
ON:スプレ続して点滅し、湿
度 に 合 数 レ を 調 節 し ま す。
i のスッチを入れると、humidity(湿度2に設定され
湿 度( フ ォ ル )が 2度点滅しそれから測定された室内湿度が表示
さ れ ま す。
OFF:レイ示が的に点は設ベル
14で運転ます
ご希望の湿度を3070% る:
ボタン 6を約3秒間押し続け表示humidity(湿度)2滅し
。ボ タ ン 3 - たは + し て 、ご 湿 みで
)を す 。
ボタン 6れて約 3秒間押し続表示humidity(湿度)2
の点滅消え、定した室湿示されます
自動転モードでは以下の点にださい:
7LEDトリッ
プ ラ イト
味しま
不足のた停止さこと味しま
iLEDス ト リ ップ 7 、夜 ー ド 4を別に約3押し
こ と で 、ス イ チ オ す 。
96 JP
ケア
! 意 ! どの フになっこと、
電 源 アダ プタン セントか ら抜 か れて いとを 確 認してだ さ
表示 措置
8WATER (水) 機器上部機器下部にあに新鮮な水道
を、 イン しま にセッ
し 、運 を 再 し ま
i タンク内くなりすぎると機スイッチオフし、LED
ランプ 7 、デ ィ ス WATER )と す 。
表示humidity(湿度)22 滅 し 、室 湿
ん。
室内の空気を持続して加湿し空気内の汚れま で 粒 子 )を 浄 す
るには、毎日水を充填することを推奨します
9SERVICE
(サービ)
取 り 外 し 。水 タ ン ク に 残 。水 タ
ンク湿ユトを丁いで浄しますある
に新鮮な水道水最大水充填ます機器
通 り 組 み 立 を 再 開 し ま す。
ィス プ レ イの SERVICE ー ビ )表 9に 触 れ 、約 3押し
ると示が消えます
i 障のなた運転を行うためSERVICE( サ ー ビ )表 14日間
スタンバイモこのメンナンス るようリマ
し ま す。
811 10 9
97JP
10 CLEANING
(掃)
部を取り外します残っている水を捨てて空にし、
新鮮な水道水最大水量で充填
掃液を入れます器をまたうに組み立て2時間低
ベル転しください。奨:この清掃プロセでは
いと悪出る場ありますのできだけ窓を開けて実行し
くだの上取りし、
水タンク湿ユトを丁にすいで浄しまにあ
に新鮮な水道水最大水量充填機器
立て運転開始さい。 デレイCLEANING(清
掃 )表 10に触れ3押し続け消えます
i6か 月 ご と に( 24時間持続運転のCLEANING て 、こ
実 行 するようマインドま す
11 DISK 1. 取り外し、水タンクから加湿トを取り出しま
A
abB
C
2. アーム ab を軸か
重 に 外 し 、ビ Aを加
湿ドラ
3. ップ B を回
て 外 し ま す。
4. ィス C
して 交
ま す。
5. を ま 通 り 組 み 立 て て 運 転 を 再 開 し ま す。
6. ィス プ レ イの DISK )表 示 11に 触 れ 、約 3押し
消えます
i
衛 生 デ の 寿 命 は 約 4か 月( 24時間持続運転の場合)です寿命の長
水の度、水質、毎日の加湿量、て運間によて異なり
す。4 月 ご と に( 24時間持続運転のDISK デ ィ ク )表
て、の 措 置 を実 行 するようマインドま す
ベンタReNewリサイクリングログスクをり返
ことが 可 能(リサイクリング廃 棄参 照のこと
98 JP
手入 910および11は、表示が出も必要に応て行ができます
措 置 が 終了したら最 後CLEANINGDISKSERVICEの リセ ット 能 を 行 してく
:電 ス イ 4押しくださそうすると
SERVICECLEANINGDISKがデプレに表示されます実行たい措置だけ触れ
て 、そ え る 3押しくだ する電スイッチ
して 灯 すま で 約 4くだする の次のリマイン
知 は ま た 的 に 示 さ れ ま す。
水タンクや湿トに殿色した
の)はどれもを与えることはありまん。
器上の洗
! 意 ! どの フになっこと、
電 源 アダ プタン セントか ら抜 か れて いとを 確 認してだ さ
た布ブラシかたは軽く湿らせた布掃しくださ
! 器上部は決て流水で洗浄しないださい
ィス プ レ い た 布 か ディス プ レ 用 クリ ーニ ング クロ ス で し 掃 し い で くだ さ
い。
! スプレイは決して濡た布湿らた布いでください。
付属品
ベンタ スク
年ごとにベンタクリーナー
シ ョ ン :ベ WiFiュールと、完 璧 な 簡 単 なートントロール を外 出 先
からも可能にすアプリ
そのAeroStyleオンラインでおいたけま
99JP
テクニカルータ
モデル AeroStyle LW73 AeroStyle LW74
カラー ワ イト/ ラ ッ ク
適用床面積 最大 最大
LED ステタスプライブル
チ ディスレ イ 標準装備
アプリ制W i F i ジ ュ ー ル( ョ ン
センサー 湿度
水衛生管標準装備
数レ4 + 自動
騒音(レ 1424 / 36 / 44 / 50 dB(A) 27 / 35 / 41 / 47 dB(A)
消費電力(レ 147 / 9 / 13 / 18 W 11 / 14 / 17 / 24 W
供給電圧 
水量(最大) 
寸法(縦高さ) 
重量  10,5 kg
れてるお誤りがれてい ありま
100 JP
リ サイク
包材はリル可能です 梱包材は
慮しし、リサイ理しくだ
として して
ル電気機の回収設に送られ電気機器とて廃棄されなければませ
(WEEE)。地 域のリサイ収 施 設をご 利用くださ
より環 境保 護し人々の 健 康貢 献ことにりまリサイクルと
廃棄に関する詳細は、当該当局にお問い合わせださい。
ンタ生ディスクリサイリンググラムを用くださ
オリジナルベンタスクはベンタが ReNewリ サ イクリ ン グ
よりリサイクリングが使 ベンタ スクを却しくださるこ
の資源を守る運動にできるだけでなお客様はベReNewボー
ナスポイントがにベンタ生ディスクをごさるにはこのポイン
トをVenta Luftwäscher GmbHてお使いください。詳しいはベン
ービ スームに お 問い 合 わい 。
:ベ ン タ の ReNewリサプログラムはドイツ国内の販送に限定されてい
ますドイツ国外の事情に関は、ぞれの国のタ社がお客様のお住いの地
国でされているプログラムについ報を喜んで提いたしますのでお問合わ
く だ さ 。お ReNewリサングプログラされていな合には、
衛 生は 家 ご みとして 廃 棄してさ い 。
保証
Venta-Luftwäscher GmbHでは品の質の高さを誇っており切にご使用にな
は、購入日から2年間の製品保証をます
しながら一材料や製造過程でた場合には、
のサービスチーまたはご入された店にご絡ください。
保 証してはベンタの一 般 保証 条 件が 適 用す:
www.venta-luftwaescher.de/service/garantie/
101JP
タ・ ー ム
ウォッシャ アクセ リー
、ご な く お :ベ ー ム 、お
ご 要お 答えたし
またはベンタトにて絡ください
DE
+49 751 5008 88, www.venta-luftwaescher.de
AT
+43 5572 202 539, www.venta.at
CH
+41 41 781 15 15, www.venta-luftwaescher.ch
...
! どの置を行う際にも、がオフになていること、および
源アタがコンセンら抜かているこを確ださい!
...デプレイに機のオフのたッチ
電 源 アダ プタン セントっか り さ れ確 認してさ い
タンがまだあるのにデスプレイWATER )と れ る
水タンクにれてるか、そし の上正しく取
、確 し て
i 措置機器上機器下に新鮮な水道最大水
量のラまで充しま器上部を正しい方向で機器下部に転を
し ま す。
... レイの表示を強し過ぎと?
そうすると押したはっきりえるありますこれすこ
とはありまなくなるとくなりま
... 機器が運転中なLEDストリップラトが
LEDストライッチオれてるかどうか、認しくだ
ボタに 触 れて 3 秒 間 押し 続 けるとLEDス ト リ ップ ト が ス イッ チ オ
i 夜 間 モード で LEDス ト リ ップ ス イッ オ ン ん 。
Art.-Nr. 7851000 ©2021/06_V01
GERMANY
Venta-Luftwäscher GmbH
Weltestraße 5
88250 Weingarten
Tel.:+49 751 50 08 0
Fax: +49 751 50 08 20
info@venta-air.com
www.venta-air.com
BENELUX
Venta Benelux B.V.
Van Heemstraweg Oost 8
5301 KE Zaltbommel
Niederlande
Tel.:+31 4 18 54 13 43
info-nl@venta-air.com
www.venta-air.com
SWITZERLAND
Venta-Luftwäscher AG
sch 65
6331 Hünenberg
Schweiz
Tel.:+41 41 781 15 15
Fax: +41 41 781 15 50
info-ch@venta-air.com
www.venta-air.com
USA
Venta Air Technologies Inc.
US Headquarters
1005 N Commons Dr
Aurora, IL 60504
United States of America
Tel.:+1-888-333-8218
Fax: +1-224-567-8349
info-us@venta-air.com
www.venta-air.com
AUSTRIA
Stromayer Elektro
Service GmbH
Strohmayergasse 8
1060 Wien
Österreich
Tel.:+43 1 5961706
office@stromayer.at
CHILE
Venta Air Technologies Inc.
US Headquarters
300 North Elizabeth Street
Suite 220 B
Chicago, Il 60607
United States of America
Tel.: +1-888-333-8218
Fax: +1-224-567-8349
www.venta-air.com
CZECH REPUBLIC
LetMeRepair GmbH
Fichtestrasse 1a
02625 Bautzen
service-cz@venta-air.com
www.letmerepair.com
FINLAND
Suomen Allergiakauppa
Länsiportintie 14
13430 HÄMEENLINNA
Finnland
Tel.:+358400855000
www.allergiakauppa.fi
FRANCE
LetMeRepair GmbH
Fichtestrasse 1a
02625 Bautzen
service-fr@venta-air.com
www.letmerepair.com
HUNGARY
LetMeRepair GmbH
Fichtestrasse 1a
02625 Bautzen
service-hu@venta-air.com
www.letmerepair.com
ITALY
LetMeRepair GmbH
Fichtestrasse 1a
02625 Bautzen
service-it@venta-air.com
www.letmerepair.com
JAPAN
Address Service Co., Ltd.
17-9, Shinoda, Togane-shi,
Chiba, 283-0013 Japan
Tel.: 0120-407-554
venta_support@adservice.
co.jp
LATVIA / LITHUANIA
SIA „BALTIJAS
TIRDZNIECĪBAS
UZŅĒMUMS”
rzaugļu iela 1-201,
Riga LV-1012, Latvia
Tel.:+371 67790720
info@btu.lv
MALAYSIA / SINGAPORE /
PHILLIPINES / VIETNAM
GA MAKMUR SDN BHD
No. 27, Jalan PP 11/4,
Alam Perdana Indust-
rial Park, Taman Putra
Perdana, 47130 Puchong,
Selangor, Malaysia
Tel.:+603-8322 6628
Fax: +603-8322 6066
info@gasales.com.my
MONGOLIA
AERIS LLC
SUITE 316, Barilga Archi-
tecture Building, Chinggis
Avenue, Oron Suuts Street,
2nd horoo, Khan-Uul
district, Ulaanbaatar,
Mongolia 17032
Tel.:+976-99101185,
+976-99096696
www.aeris.mn
POLAND
Venta-Polen s.c.
ul. Poznska 37
93-134 Łó, Polen
Tel.:+48 42 68 10 067
Fax: +48 42 68 10 067
PORTUGAL
LetMeRepair GmbH
Fichtestrasse 1a
02625 Bautzen
service-pt@venta-air.com
www.letmerepair.com
RUSSIA
Venta Russia TSK IMPORT
(offizieller Importeur)
124683, Moskau, Seleno-
grad, 1505, Raum III
Russland
Tel.:+7 499 733 10 10
Fax: +7 499 733 10 10
SCOTLAND, UK
LetMeRepair UK Ltd
1 Langlands Court
Kelvin South Business
Park, East Kilbride, G75
0YB, Scotland, UK
Tel.: +44 (0) 1355 241 222
service-uk@venta-air.com
Fax +44 1355 246575
SLOVAKIA
LetMeRepair GmbH
Fichtestrasse 1a
02625 Bautzen
service-sk@venta-air.com
www.letmerepair.com
SPAIN
LetMeRepair GmbH
Fichtestrasse 1a
02625 Bautzen
service-es@venta-air.com
www.letmerepair.com
SOUTH AFRICA
EUROCARE Wellness
5 Star Business Park,
Unit 2, Persimmon Close,
Honeydew, Johannesburg
Südafrika
Tel.:+27 11 888 3255
Fax: +27 11 888 9874
info@eurocarewellness.
co.za
SOUTH KOREA
VENTA KOREA CO., LTD.
3/F., Seojin Bldg., 754,
Seolleung-ro, Gangnam-
Gu, Seoul 135-948, Korea
Tel.:+82 22 03 40 114
Fax: +82 22 03 40 119
UKRAINE
Venta-Centre Ukrein
Schlichtera, 11
Kharkov, Ukraine
Tel.:+38 057 752 72 72
Fax: +38 057 768 01 57
SERVICE AND SUPPORT
SERVICE AND SUPPORT
www.venta-air.com/Service/Service-Support/
VENTA WORLD WIDE
www.venta-air.com/en_de/Venta-worldwide/
  • Page 1 1
  • Page 2 2
  • Page 3 3
  • Page 4 4
  • Page 5 5
  • Page 6 6
  • Page 7 7
  • Page 8 8
  • Page 9 9
  • Page 10 10
  • Page 11 11
  • Page 12 12
  • Page 13 13
  • Page 14 14
  • Page 15 15
  • Page 16 16
  • Page 17 17
  • Page 18 18
  • Page 19 19
  • Page 20 20
  • Page 21 21
  • Page 22 22
  • Page 23 23
  • Page 24 24
  • Page 25 25
  • Page 26 26
  • Page 27 27
  • Page 28 28
  • Page 29 29
  • Page 30 30
  • Page 31 31
  • Page 32 32
  • Page 33 33
  • Page 34 34
  • Page 35 35
  • Page 36 36
  • Page 37 37
  • Page 38 38
  • Page 39 39
  • Page 40 40
  • Page 41 41
  • Page 42 42
  • Page 43 43
  • Page 44 44
  • Page 45 45
  • Page 46 46
  • Page 47 47
  • Page 48 48
  • Page 49 49
  • Page 50 50
  • Page 51 51
  • Page 52 52
  • Page 53 53
  • Page 54 54
  • Page 55 55
  • Page 56 56
  • Page 57 57
  • Page 58 58
  • Page 59 59
  • Page 60 60
  • Page 61 61
  • Page 62 62
  • Page 63 63
  • Page 64 64
  • Page 65 65
  • Page 66 66
  • Page 67 67
  • Page 68 68
  • Page 69 69
  • Page 70 70
  • Page 71 71
  • Page 72 72
  • Page 73 73
  • Page 74 74
  • Page 75 75
  • Page 76 76
  • Page 77 77
  • Page 78 78
  • Page 79 79
  • Page 80 80
  • Page 81 81
  • Page 82 82
  • Page 83 83
  • Page 84 84
  • Page 85 85
  • Page 86 86
  • Page 87 87
  • Page 88 88
  • Page 89 89
  • Page 90 90
  • Page 91 91
  • Page 92 92
  • Page 93 93
  • Page 94 94
  • Page 95 95
  • Page 96 96
  • Page 97 97
  • Page 98 98
  • Page 99 99
  • Page 100 100
  • Page 101 101
  • Page 102 102
  • Page 103 103
  • Page 104 104

Venta LW73 Handleiding

Categorie
Luchtbevochtigers
Type
Handleiding