AEG 86700K-ALHIC8090A Handleiding
- Categorie
- Kookplaten
- Type
- Handleiding
Deze handleiding is ook geschikt voor

86700K
Ceramic glass hob
Table de cuisson vitrocéramique
Glaskeramische kookplaat
Operating and installation instructions
Notice d’utilisation et instructions d’installation
Gebruiksaanwijzing en montage-instructie

2
Dear customer
Please read these operating instructions carefully.
Pay particular attention to the „Safety Instructions” section on the first pages. Please retain
these operating instructions for later reference. Pass them on to any potential new owners
of the appliance.
The following symbols are used in the text:
1. These numbers indicate step by step how to use the appliance as required.
2. ...
3. ...
In the event of any disturbances, these operating instructions contain information on how
to eliminate the fault yourself; refer to the section “Rectifying faults”.
Printed on environmentally compatible paper.
Thinking ecologically means acting ecologically…
Safety information
Warning! Information which serves your personal safety.
Important! Information on how to avoid damaging the appliance.
Information and practical hints
Environmental information

3
Contents
Operating instructions............................................................................. 5
Safety instructions .................................................................................................................... 5
Intended usage ....................................................................................................................................... 5
Appliance operation ............................................................................................................................. 5
Appliance implementation ................................................................................................................. 5
Appliance cleaning ............................................................................................................................... 6
Avoid damage to the appliance ........................................................................................................ 6
Environmental awareness ................................................................................................................... 6
Appliance description ............................................................................................................... 7
Your appliance components .............................................................................................................. 7
Ceramic glass hob ................................................................................................................................. 8
Your appliance functions .................................................................................................................. 10
Operating the hob ................................................................................................................... 12
Before using for the first time ........................................................................................................ 12
Touch Control-Sensor fields ............................................................................................................ 12
Switching on the appliance ....................................................................................................
......... 12
Switching off the appliance ............................................................................................................ 13
Cancelling the safety cut-out ......................................................................................................... 13
Heat setting .......................................................................................................................................... 13
Setting the keep warm function .................................................................................................... 14
Switching off the cooking zone ..................................................................................................... 14
Switching the double ring cooking zone on and off ............................................................... 15
Switching the casserole cooking zone on and off ................................................................... 16
Switching the triple ring cooking zone on and off .................................................................. 17
Using the automatic warm-up function ..................................................................................... 18
Do not use the automatic warm-up function ........................................................................... 18
Using the child safety feature ......................................................................................................... 19
Using the lock function ..................................................................................................................... 21
Using the timer .................................................................................................................................... 21
Hob operation tips .................................................................................................................. 24
Pots and pans .................................................................................................................
...................... 24
Energy saving ....................................................................................................................................... 25
Cooking with and without the automatic warm-up function ............................................. 26

4
Cleaning and care ................................................................................................................... 29
Rectifying faults ...................................................................................................................... 30
Installation instructions ........................................................................34
Technical data .......................................................................................................................... 34
Appliance dimensions ........................................................................................................................ 34
Cut-out dimensions ............................................................................................................................ 34
Safety instructions .................................................................................................................. 34
Appliance assembly ................................................................................................................ 34
Electrical connection .............................................................................................................. 35
Service........................................................................................................36
Hob mounting ..........................................................................................................................112

5
Operating instructions
Safety instructions
The safety aspects of this appliance comply with the accepted technical standards and the
German Appliance Safety Law. However, as the manufacturer we also believe it is our
responsibility to familiarise you with the following safety instructions.
Intended usage
This appliance may only be used for normal cooking and frying of foods in the home.
Appliance operation
The appliance may only be mounted and connected electrically by trained and authorised
specialised personnel.
The appliance may only be operated when properly built into standard, suitable built-in
cabinets or worktops.
In the event of malfunctions and damage (breaks, cracks or fissures) the appliance must be
switched off and disconnected from the power supply.
The appliance may only be repaired by trained and authorised specialised personnel (factory
customer care service, specialist dealers).
Appliance implementation
Careless handling on the cooking zones represents a risk of burns.
Keep small children away from the appliance at all times.
Keep older children under instruction and supervision when they are using the appliance.
Please exercise care and attention when operating the appliance.
The handles of cooking utensils must not project out over the hob.
The handles of cooking utensils must not be positioned above a hot and warm cooking zone.
Be careful when plugging in electrical appliances into main sockets near the appliance.
Connecting leads must not come into contact with any hot parts of the appliance.
Overheated fats and oils catch fire quickly. You should supervise cooking when preparing
foods in fat or oil (e.g. chips).
Please observe these instructions otherwise guarantee claims on the manufacturer
will be nullified.
This appliance complies with the following EU directives
• 73/23/EWG dated 19.02.1973 Low voltage directive
• 89/336/EWG dated 03.05.1989 (EMC-directive including Amending Directive 92/
31/EWG).
• 93/68/EWG dated 22.07.1993 CE Identification directive.

6
Switch off the cooking zones after use.
The residual heat from hot pots or pans heats the ceramic glass hob although the residual
heat display does not indicate this.
Appliance cleaning
Always switch off the appliance before cleaning.
The cooking zones must have cooled down to the extent that they may be touched without
risk of burning.
For reasons of safety, never use a steam jet or a high pressure cleaner to clean the hob.
Avoid damage to the appliance
Never use the hob as a work surface or for storage.
Do not operate the cooking zones with empty pots or pans, or with no pots and pans on
them.
Avoid boiling pots and pans dry.
Ceramic glass is insensitive to temperature shocks and is very robust, however it is not
unbreakable. Especially sharp and hard objects that fall on the cooking surface could
damage it.
Do not use any cast iron pots or pans with damaged bases with rough edges or burrs. Sliding
these across the hob could cause scratches.
Do not place any pots or pans on the frame of the hob. Scratches and damage to the
varnished surface may occur.
Always make sure that no acid-containing liquids such as vinegar, lemon or lime-dissolving
agents are split on the hob or frame as these can cause dull spots to appear and damage the
glass.
Remove sugary substances with a cleaning scraper while still hot. If left to cool down, it may
damage the surface when removed.
Keep objects and materials, liable to melt (e.g. synthetic materials, aluminium foils etc.),
away from the ceramic glass surface.
Remove melted substances with a cleaning scraper while still hot. If left to cool down, it may
damage the surface when removed.
Environmental awareness
All packaging materials used can be recycled.
The materials used must not be disposed of in the household refuse.
The national and regional regulations for the proper and orderly recovery of the packaging
materials and the appliance in the recycling chain are to be observed.

7
Disposing of the packaging material
The plastic materials are identified as follows:
Appliance disposal
The appliance may only be disconnected from the power supply by trained and authorised
specialised personnel.
The specialised person must put the appliance out of commission electrically (removal of
connection cable).
Appliance description
Your appliance components
Your hob components
Ceramic glass cooking surface: The appliance has a ceramic glass surface with four rapid
response cooking zones.
The cooking surface is non-porous and resistant to thermal shock. Pots may therefore be
swapped from a hot to a cold zone.
The smooth surface is easy to clean.
Rapid response cooking zones: The appliance has rapid response cooking zones. The
particularly powerful radiant heater elements substantially shorten the amount of time
taken for the zones to heat up.
On switching on the cooking zones a brief buzzing tone in the heating elements may be
heard. This noise is physically conditioned and has no negative influences on the appliance’s
function. It is no longer heard once the cook zone is sufficiently heated.
Single ring cooking zone: The cooking area has a single ring cooking zone. With this, your
appliance has a cooking zone for smaller pots. This saves energy.
Double ring cooking zone: The cooking area has a double ring cooking zone. With this, your
appliance has a cooking zone with variable size, e.g., for smaller pots. This saves energy.
Triple ring cooking zone: The cooking area has a triple ring cooking zone. With this, your
appliance has a cooking zone with variable size, e.g., for smaller pots. This saves energy.
Casserole cooking zone (multi-purpose cooking zone): The cooking area is equipped with
a casserole cooking zone (multi-purpose cooking zone). Depending on the setting it may be
used as a round or oval cook zone.
Symbol Plastic Use
PE Polyethylene Outer wrapping, bags
PS Polystyrene (CFC free) Cushioning parts

8
Ceramic glass hob

9
Control panel elements
Sensor fields: Your appliance is operated using Touch-Control-sensor fields.
Displays: Digital displays and/or control lamps inform the user about heat settings, selected
functions as well as any possible residual heat of the corresponding cooking zone.
Sensor field Function
On/Off
Switching the appliance on and off (separate
main switch).
Double ring cooking zone Switching outer heating ring on and off.
Triple ring cooking zone
Switching centre heating ring on and off.
Switching outer heating rings on and off.
Casserole cooking zone Switching outer heating ring on and off.
Heat setting selection Increasing heat setting/timer.
Heat setting selection Decreasing heat setting/timer.
Timer Switching the timer on and off.
Locking Locking/unlocking the control panel.
Control lamp Description
On/Off The appliance is switched on/off.
Double ring cooking zone The outer heating ring is switched on.
Bottom triple ring cooking
zone
The centre heating ring is switched on.
Top triple ring cooking zone The outer heating ring is switched on.
Casserole cooking zone The outer heating ring is switched on.
Timer function The respective cooking zone is operated via the timer.

10
Your appliance functions
Automatic warm-up function: All cooking zones may be regulated in fourteen stages and
feature an automatic warm-up function.
Using the automatic warm-up function the cooking zone operates for a specific time at
full power and then switches back automatically to the heat setting selected.
The duration of the warm-up phase depends on the heat setting selected.
Direct control of each cooking zone: Each cooking zone is directly controlled via the
appropriate touch control sensor fields.
Error display: for errors lights up in the display when a malfunction occurs on the
appliance (see section „Rectifying faults“).
Child safety feature: With this function the hob can be locked to prevent any
unintentional switching on of the appliance.
Residual heat display: for residual heat will illuminate if the cooking zone becomes hot
enough for there to be a risk of burning.
When the ceramic glass hob is switched off the residual heat display extinguishes only once
the cooking zone has cooled down to the point that there is no longer a risk of burning.
Control panel safety switch-off: Moisture (e.g. a wet cloth) or liquids boiling over on the
control panel immediately switch off all cooking zones.
Hob safety switch-off: If, once the hob is switched on, a heat setting is selected on a
cooking zone within approx. 10 seconds, the hob will switch off automatically.
If one or several sensor fields are pressed for longer than approx. 10 seconds, e.g. by a pot
resting on it/them, the hob will switch off automatically.
Display Description
The appliance is switched on.
-
Heat setting Set cooking zone heat setting.
. Decimal point Set cooking zone intermediate heat setting.
Keep warm function Keep warm function is set.
Automatic warm-up
function
Automatic warm-up function is activated.
Error display A malfunction has occurred.
Residual heat display The cooking zone is switched off but still hot.
Child safety feature Child safety feature is activated.
Safety cut-out is activated.

11
If all cooking zones are switched off, the hob will switch off automatically after approx. 10
seconds.
Cooking zone safety switch-off: If a cooking zone is not switched off or changed within a
specific period it will switch off automatically.
Timer: The timer features two functions:
• the automatic switch-off function. On the expiry of the set time the cooking zone
switches off automatically.
• the minute minder („Egg timer“). On the expiry of the set time an acoustic signal is
emitted.
The timer may be set in one minute intervals up to 99 minutes.
Keep warm function: Meals may be kept hot using the keep warm function (heat setting
).
Locking: With the exception of the „ON/OFF“ sensor field the control panel may be locked at
any time to avoid the settings being misadjusted.
Heat setting Switch-off after
, , ,
6 hours
, , ,
5 hours
,
4 hours
, , , ,
1.5 hours

12
Operating the hob
Before using for the first time
1. Wash down the ceramic glass hob with hot water and washing-up liquid and rub dry
(with a tea towel).
.
2. Switch on the cooking zones briefly one after another to check them.
Touch Control-Sensor fields
In order to operate the Touch Control sensor fields place your finger from above onto the
required field until the corresponding display lights up or extinguishes, and/or the desired
function is carried out.
For faster setting keep your finger on the sensor field until the required value is attained.
Switching on the appliance
To switch on the appliance completely, touch the „ON/OFF“ sensor field .
IMPORTANT!
Damage to the ceramic glass surface.
Aggressive, scouring cleaning agents may damage the ceramic glass surface.
Use only water and washing-up liquid.
IMPORTANT!
Damage to the ceramic glass surface.
Burnt-on stickers and film damage the ceramic glass surface.
Remove stickers and film.
When used for the first time a slight odour may be detected briefly.

13
Touch the „ON/OFF“ sensor field for approx. two seconds.
is illuminated in the digital display.
Switching off the appliance
To switch off the appliance completely, touch the „ON/OFF“ sensor field .
Touch the „ON/OFF“ sensor field for approx. two seconds.
The digital displays extinguish.
Cancelling the safety cut-out
In order to cancel the activated safety cut-out function the appliance must be switched off
and on again via the „ON/OFF“ sensor field .
The appliance is operational.
Heat setting
The heat setting is selected or changed by the respective „heat setting selection“ and
sensor fields.
Increase heat setting
Touch the „heat setting selection“ sensor field.
The required heat setting lights up in the digital display.
Decrease heat setting
Touch the „heat setting selection“ sensor field.
The required heat setting lights up in the digital display.
If the cooking zone is not set within ten seconds the appliance is switched off
automatically.
Existing residual heat is displayed in the cooking zones’ digital displays.

14
Setting the keep warm function
Heat setting is used as a keep warm function for all cooking zones.
Touch the „heat setting selection“ sensor fields or .
The keep warm function lights up in the digital display .
Switching off the cooking zone
There are two variants for switching off a cooking zone.
Variant 1
Touch the „heat setting selection“ sensor fields or simultaneously.
is illuminated in the digital display.
The cooking zone is switched off.
Variant 2
Touch the „heat setting selection“ sensor field until is indicated in the digital display.
is illuminated in the digital display.
The cooking zone is switched off.
.
WARNING!
Risk of burning due to residual heat.
After switching-off the cooking zone takes some time to cool down.
Check ceramic glass hob.
Check residual heat display .
If all cooking zones are switched off the appliance switches off automatically after
ten seconds.
Existing residual heat is displayed in the cooking zones’ digital displays.

15
Switching the double ring cooking zone on and off
Depending on the size of the pot or pan, the “double ring cooking zone” sensor field can be
used to switch between the two sizes of the zone.
Switch on the outer heating ring
1. Set the desired heat setting.
The required heat setting lights up in the digital displays.
2. Touch the „double ring cooking zone” sensor field .
The outer heating ring is switched on.
The control lamp “double ring cooking zone” illuminates.
In the event a power failure existing residual heat will no longer be indicated in the
digital displays.
Residual heat may be used to melt or keep food hot.
This can only be activated when a heat setting has already been made for the inner
heating ring.

16
Switch off the outer heating ring
Touch the „double ring cooking zone” sensor field .
The outer heating ring is switched off.
The control lamp “double ring cooking zone” extinguishes.
Switching the casserole cooking zone on and off
Depending on the size of the pot or pan, the “casserole cooking zone“ sensor field can be
used to switch between the two sizes of the casserole cooking zone.
Switching on the casserole cooking zone
1. Set the desired heat setting.
The required heat setting lights up in the digital displays.
2. Touch the „casserole cooking zone“ sensor field .
The outer heating ring is switched on.
The control lamp “casserole cooking zone” illuminates.
Switch off the outer heating ring
This can only be activated when a heat setting has already been made for the inner
heating ring.

17
Touch the „casserole cooking zone” sensor field .
The outer heating ring is switched off.
The control lamp “casserole cooking zone” extinguishes.
Switching the triple ring cooking zone on and off
Depending on the size of the pot or pan, the “triple ring cooking zone” sensor field can be
used to switch between the three sizes of the zone.
Switching on the triple ring cooking zone
1. Set the desired heat setting.
The required heat setting lights up in the digital displays.
2. Touch the „triple ring cooking zone” sensor field .
The middle heating ring is switched on.
The control lamp “triple ring cooking zone” illuminates.
3. Touch the „triple ring cooking zone” sensor field .
The outer heating ring is switched on.
The „top triple ring cooking zone“ control lamp lights up.
Switch off the outer heating ring
Touch the „triple ring cooking zone” sensor field .
The outer and middle heating ring, respectively, is switched off.
The relevant control lamp “triple ring cooking zone” extinguishes.
This can only be activated when a heat setting has already been made for the inner
heating ring.

18
Using the automatic warm-up function
Switching on the automatic warm-up function
The duration of the warm-up phase depends on the heat setting selected.
Set the required heat setting ( to ) via the “heat setting selection” sensor field .
The set power level lights up in the digital display.
lights up in the digital display after approx. five seconds.
The automatic warm-up function is activated.
After the end of the warm-up time, the heat setting selected will be shown again.
Switching off the automatic warm-up function
Only an activated automatic warm-up function may be switched off.
Touch the „heat setting selection“ sensor field.
The heat setting selected lights up in the digital display.
The automatic warm-up function is switched off.
Do not use the automatic warm-up function
In the event of residual heat being present the automatic warm-up function will
not be activated for this cooking zone.
When the automatic warm-up function is active select a higher heat setting, e.g.
instead of , the warm-up time will be automatically adjusted to the selected heat
setting.
If you select a lower heat setting the automatic warm-up function will be switched
off immediately.

19
The cooking zone is used without the automatic warm-up function if the required heat level
is set via the „heat setting selection“ sensor field.
Using the child safety feature
With the child safety feature, the hob can be protected against undesirable use.
Switching on the child safety feature
The appliance is switched on and all the cooking zones are switched off.
1. Touch the „locking“ sensor field for approx. 3 seconds.
An acoustic signal is sounded.
2. Touch any of the „heat setting selection“ sensor fields.
In the digital displays, there appears
The child safety feature is activated.
The appliance switches off automatically after a few seconds.
Bypassing the child safety feature
The child safety feature can be bypassed for the one-time use of the appliance (up to the
next switch-off of the appliance). At the next switch-on, the child safety feature is
automatically activated again.

20
1. Switch on the appliance.
is illuminated in the digital display.
2. Touch the „heat setting selection“ sensor fields and for approx. one second
simultaneously.
An acoustic signal is sounded.
is illuminated in the digital display.
The child lock is switched off until the appliance is switched off.
Switching off the child safety feature
1. Switch on the appliance.
is illuminated in the digital display.
2. Touch the „locking“ sensor field for approx. 3 seconds.
An acoustic signal is sounded.
3. Touch any of the „heat setting selection“ sensor fields.
In the digital displays lights up .
The child safety feature is switched off.
The appliance switches off automatically after a few seconds.

21
Using the lock function
At any random time during cooking, the control panel can be locked with the exception of
the sensor field „ON/OFF“ in order to prevent a changing of the settings caused by, for
example, the wiping with a cloth.
Locking the control panel
Touch the „locking“ sensor field for approx. 2 seconds.
lights up for five seconds in the digital displays.
The control panel is locked.
Unlocking the control panel
Touch the „locking“ sensor field for approx. 2 seconds.
The control panel may be used.
Using the timer
You can use the timer in two ways:
•as automatic switch-off function
for a set heat level
•as minute minder („egg timer“) for a switched-off cooking zone.
If a sensor field is touched lights up in the digital displays.
When switching off the appliance, the locking function is automatically
switched off.

22
Cooking zone selection
1. Touch the „timer“ sensor field.
appears in the timer display.
The cooking zone „timer function“ control lamps light up.
The „timer function“ control lamp of the adjustable cooking zone flashes.
2. Touch the „timer“ sensor field.
The „timer function“ control lamp of the next adjustable cooking zone flashes.
Time setting
1. Cooking zone selection.
The „timer function“ control lamp of the adjustable cooking zone flashes.

23
2. Set the required time via the „heat setting selection“ or sensor fields.
The set time is indicated in the timer display.
The time for the selected cooking zone is activated after approx. five seconds.
Once the time has expired is indicated in the timer display, the „timer function“ control
lamp flashes and an acoustic signal is sounded for approx. two minutes.
Remaining time display
1. Select the required cooking zone.
The remaining time is indicated in the timer display.
The “timer function” control lamp belonging to the cooking zone flashes.
Time changing
1. Select the required cooking zone.
The remaining time is indicated in the timer display.
The „timer function“ control lamp of the adjustable cooking zone flashes.
2. The required time is set via the „heat setting selection“ or sensor fields.
The set time is indicated in the timer display.
The time for the selected cooking zone is changed.
Switching off cooking zone and automatic switch-off function
If a cooking zone is switched off the timer settings for this cooking zone are automatically
switched off.
For a faster adjustment, touch the “heat setting selection” sensor fields or for
such time until the required value is obtained.
If the time is set for several cooking zones the timer display will indicate the
shortest cooking time in each case and the „timer function“ control lamp of the
appropriate cooking zone will flash.
The acoustic signal is switched off by touching the „timer“ sensor field.

24
Switching off the timer
1. Select the required cooking zone.
The remaining time is indicated in the timer display.
The „timer function“ control lamp of the adjustable cooking zone flashes.
2. Set the time via the „heat setting selection“ sensor field to zero.
appears in the timer display.
The timer is switched off.
Hob operation tips
Pots and pans
The better the pot, the better the cooking results.
• You can recognise good pots and pans by their bases. The base should be as thick and flat
as possible.
• When buying new pots and pans, pay particular attention to the diameter of the base.
Manufacturers often only state the diameter of the rim.
• Pots with aluminium or copper bases can cause metallic discolouring on the ceramic glass
surface which is very difficult or impossible to remove.
• Do not use cast iron pots or pots with damaged bases which are rough and/ or have burrs
on them. Scratches can occur if they are slid across the surface.
• When cold, pot bases are normally bowed slightly inwards (concave). They should never
be bowed outwards (convex).
• If you use special pots and pans (e.g., a pressure cooker, simmering pan, wok etc.) please
observe the manufacturer’s instructions.

25
General information
• The base should always be clean and dry.
• In order to avoid scratches on the ceramic glass cooking surface, do not slide pots and
pans around but lift them up instead when changing positions.
• Severe scratches may weaken the glass.
• Scratches can result from grains of sand (e.g., after washing out vegetables) which are
dragged with the pot across the cooking surface.
• Always use large pots for dishes with lots of liquid so that nothing can boil over.
Energy saving
• Always position pots and pans before you switch on the cooking zone.
• Dirty cooking zones and pot bases increase power consumption.
• Whenever possible, always have the lid firmly placed on the pots and pans so that they
are completely covered.
• Switch off the cooking zones before the end of the cooking time to use the residual heat
for keeping foods warm or for melting purposes.
• The base of the pot should have the same size as the cooking zone.
• Using a pressure cooker shortens the cooking times by up to 50%.
You will save valuable energy by observing the following points:

26
Cooking with and without the automatic warm-up function
The automatic warm-up function is suitable for:
• Dishes that start off cold, are heated up at high power and do not need to be continually
watched when cooking on the lower heat setting.
• Dishes that are put into a hot frying pan.
The automatic warm-up function is not suitable for:
• Goulash, beef olives and similar braised dishes that need continual turning until browned
correctly, have liquid added and are then braised until cooked,
• Dumplings, pasta dishes with lots of liquid,
• Cooking with pressure cookers,
• Very large quantities of soups/stews with more than 2 litres of liquid.
General information:
• When cooking without the automatic warm-up function, we recommend the use of a
high heat setting to warm up the food (with the -button) and then leaving the dish to
finish cooking at a suitable lower heat setting.
• Pay special attention to the results of your first use of the appliance. You can then decide
which heat setting is the best for „your dishes” in the “quantities you are accustomed to
preparing” with your own „pots and pans”. You will then quickly appreciate the
advantages of the automatic function and will feel secure and relaxed with your new
hob.

27
Duration of the warm-up phase
The duration of the warm-up phase depends on the heat setting selected.
Heat setting Duration of the warm-up phase [min]
1
1,7
3
4,8
5,5
6,5
8,2
10,2
12,3
2
2,5
3,5
4,5
---

28
Typical heat settings for cooking
The details shown in the following table are guidelines. The heat setting required for cooking
depends on the quality of the pans and on the type and quantity of food.
1)
When cooking without the automatic warm-up function, the warm-up time can be
individually selected.
Heat
setting
Warm-up
time of the
automatic
function
1)
[Min.]
Slow cooking
procedure
Examples for use
Warming up
Frying
Deep-fat frying
Warming up large amounts of liquid
boiling pasta,
browning of meat,
(browning goulash, pot-roast)
4,5
Fast frying Steaks, pieces of loin,
potato fritters,
fried sausages,
pancakes/flat cakes
3,5
2,0
Frying Schnitzel/cutlets,
liver, fish,
rissoles, fried eggs
10,2
Boiling
Boiling up to 1.5 l liquid,
potatoes, vegetables
6,5
4,8
Steaming
Sautéing
Poaching
Steaming and sautéing of
small quantities of vegetables,
cooking rice and
milk-based dishes
1,7
1,0
Melting Melting butter,
dissolving gelatine,
melting chocolate
0,5
Keeping warm
Keeping food warm
When heating up or frying, we recommend using the warm-up setting „ “ and
then continue cooking foods that require longer cooking times at a suitable lower
heat setting.

29
Cleaning and care
Hob
Minor soiling
1. Wipe the ceramic glass surface with a damp cloth and a little washing up liquid.
2. Then, rub dry with a clean cloth. Cleaner residues must not remain on the surface.
3. Once a week, you must thoroughly clean the entire ceramic glass cooking surface with a
commercially available ceramic glass or stainless steel cleaner.
4. Then wipe the ceramic glass surface using plenty of clean water and rub dry with a clean
fluff-free cloth.
Stubborn soiling
1. To remove food that has boiled over, or to remove stubborn splashes, use a ceramic hob
scraper.
2. Place the scraper at an angle to the ceramic glass surface.
3. Remove the soiling by sliding the blade.
.
Important! Cleaning agents must not come into contact with the hot ceramic glass
surface! All cleaning agents must be removed with plenty of clean water after
cleaning because they have a caustic effect when the zones are heated up again.
Never use any aggressive cleaners such as grill or oven sprays, coarse scourers or
abrasive pot cleaners.
Clean the ceramic glass surface after every use when it is hand-warm or in a cold
condition. In this way you avoid spillage burning solidly to the surface.
Remove scale and water marks, fat spots and metallic shimmer discolouring with
commercially available ceramic glass or stainless steel cleaner.
Scrapers and ceramic glass cleaners are available from Service Force.

30
Problem soiling
1. Carefully remove burnt-on sugar, melted plastic, aluminium foil or other materials which
melt immediately while they are still hot, using a suitable cleaning scraper.
2. Then clean the hob normally when it has cooled down.
Rectifying faults
It is possible that faults have been caused by a minor error which you can rectify yourself
with the help of the following instructions.
If the malfunction cannot be cleared with the following information please contact your
specialist dealer or Service Force.
If the ceramic glass hob has a glass fracture, please specify to the service centre the three-
digit number, which is printed on the glass plate.
Important! You risk burning yourself when using the cleaning scraper on the hot
cooking zone!
If the cooking zone on which something has melted has already cooled down, warm
it up again before cleaning.
Scratches or dark marks on the ceramic glass surface, caused for example by a pot
or pan base with sharp edges, cannot be removed. However, they do not impair the
functioning of the hob.
If you request a service visit to resolve a fault listed above or because of
improper operation, the visit of the service technician is not free of charge
even during the guarantee period.
Malfunction Cause Remedy
The digital displays go out
of order
The power has failed. 1. Wait for the power cut to
end.
2. Switching on the appliance.
The household fuse has
been tripped.
Insert fuse.
The fuse is tripped again:
1. Switching off the appliance
2. Call a qualified electrician.
The overheat protection
feature has switched off all
cooking zones and
inhibited their functions.
Allow the cooking zones to
cool down.

31
The error display flashes. The overheat protection
feature has switched off
the double ring cooking
zone and inhibited its
functions.
Allow the cooking zone to cool
down.
Liquid or a damp cloth on
the touch control sensor
fields.
1. Disconnect the appliance
from the mains power
supply (remove fuse).
2. Allow the appliance to cool
down.
3. Clean the ceramic glass
hob.
4. Connect the appliance to
the mains power supply
(insert fuse).
5. Switching on the appliance.
The error display continues to
flash:
1. Switch off the appliance
2. Disconnect the appliance
from the mains power
supply (remove fuse).
1. Call the customer care
service.
The ceramic glass hob has
fissures, cracks or breaks.
Hard or sharp objects have
fallen on the ceramic glass
surface.
1. Switch off the appliance.
2. Disconnect the appliance
from the mains power
supply (remove fuse).
3. Call the customer care
service.
The cooking zones do not
work.
The appliance is not
switched on.
Switch on the appliance.
The required cooking zone
is not switched on.
Switch on the cooking zone.
The required heat setting is
not set.
Select the heat setting.
The household fuse has
been tripped.
Insert fuse.
The fuse is tripped again:
1. Switching off the appliance
2. Call a qualified electrician.
Malfunction Cause Remedy

32
The cooking zones cannot
be switched on.
The child safety feature is
switched on.
Switch off the child safety
feature (see „child safety
feature“ section).
Since switching on the
appliance more than 10
seconds have elapsed.
Switch the appliance back on.
Since selecting the cooking
zone more than 10 seconds
have elapsed.
Re-select the cooking zone.
The cooking zones cannot
be switched off.
Since selecting the cooking
zone more than 10 seconds
have elapsed.
Re-select the cooking zone.
The residual heat display
does not display.
The power has failed for a
short time.
1. Wait for the power cut to
end.
Switching on the appliance.
The existing residual heat is no
longer displayed.
The electronics are
defective.
1. Switch off the appliance.
2. Disconnect the appliance
from the mains power
supply (remove fuse).
3. Call the Service Force
Centre.
The residual heat display
does not indicate anything.
The cooking zone was only
switched on for a short
time.
There is no malfunction if the
cooking zone is cold.
The electronics are
defective.
1. Switch off the appliance.
2. Disconnect the appliance
from the mains power
supply (remove fuse).
3. Call the Service Force
Centre.
There was a power cut. The existing residual heat is no
longer displayed.
Malfunction Cause Remedy

33
The automatic warm-up
function cannot be
switched on.
The cooking zone still
features residual heat.
Allow the cooking zone to cool
down.
The heat setting is set via
the „heat setting selection“
sensor field.
1. Switch off the cooking
zone.
2. Set the heat setting via the
“heat setting selection“
sensor field.
The automatic timer
switch-off function cannot
be set.
The cooking zone is not
selected.
Select the cooking zone.
The control panel is locked. Unlock the control panel.
The automatic timer
switch-off function cannot
be switched off.
The cooking zone is not
selected.
Select the cooking zone.
The control panel is locked. Unlock the control panel.
The timer minute minder
cannot be set.
The automatic switch-off
function of one cooking
zone is set.
Switch off the automatic
switch-off function.
The control panel is locked. Unlock the control panel.
The timer minute minder
cannot be switched off.
The control panel is locked. Unlock the control panel.
The appliance does not
respond to control panel
entries.
The appliance is switched
off.
Switch on the appliance.
The electronics are
defective.
1. Switch off the appliance.
2. Disconnect the appliance
from the mains power
supply (remove fuse).
3. Call the customer care
service.
The overheat protection
feature has switched off all
cooking zones and
inhibited their functions.
Allow the cooking zones to
cool down.
Malfunction Cause Remedy

34
Installation instructions
Technical data
Appliance dimensions
Cut-out dimensions
Safety instructions
The appliance may only be mounted and electrically connected by trained and authorised
specialised personnel.
The general guidelines for the operation of electrical appliances, the regulations of the
responsible utility company and the specifications in this assembly manual are to be
observed.
With regard to fire protection this appliance complies with EN 60 335-2-6. Only this type of
appliance may be installed with a high cupboard or wall on one side.
Appliance assembly
The appliance must be disconnected from the mains power supply during mounting,
dismantling and servicing.
On unpacking the appliance please ensure that it is intact and check for evidence of
transportation damage. Damaged appliances must not be mounted or connected.
The supplier and forwarding company must be notified of any transportation damage
immediately.
The packaging should be disposed of in an environment-friendly manner.
The required minimum distances to other appliances (refer to their technical specifications)
in your kitchen must be maintained.
Width 766 mm
Depth 506 mm
Height 47 mm
Width 750 mm
Depth 490 mm
Corner radius R5
Please observe these instructions otherwise guarantee claims on the manufacturer
will be nullified.

35
The appliance must not be mounted directly adjacent to doors or under windows. Windows
opening or bursting open may knock hot cooking utensils off the hob.
Drawers should not be fitted underneath the hob.
Installation must be such as to ensure protection against shock.
The kitchen unit in which the appliance is fitted must satisfy the stability requirements of
DIN 68930.
For protection against moisture, all cut surfaces must be sealed with a suitable sealing
material.
On tiled work surfaces, the joints in the area where the hob is seated must be completely
filled with grout.
On natural, artificial stone or ceramic tops, the snap action springs must be bonded in place
with a suitable artificial resin or two-component adhesive.
Check the seal in the support surround for a perfect fit and continuous contact.
No additional silicone sealing mass must be applied as this will hinder removal for service
purposes.
To remove, the hob must be pushed out from below.
Clean the worktop around the cut-out area.
Electrical connection
1. Connect the mains supply to the correct terminals.
2. Provide cable with a strain relief feature.
3. Appliance cleaning (see „Before first-time use“).
4. Check readiness for operation.
The appliance is connected electrically.
DANGER!
Risk to life due to electrical current.
Voltage may be supplied to the mains terminal.
1. Please observe electrical engineering safety regulations.
2. Switch off the mains terminal.
IMPORTANT!
Damage due to electrical current.
Loose, incorrect terminal connections cause voltage flashovers.

36
Service
In the "Rectifying faults" section a number of malfunctions are listed that you can rectify
yourself Look there first if a fault occurs.
Is it a technical fault?
If so, please contact your customer service centre. (You will find ad-dresses and telephone
numbers in the section "Customer Service Centres".)
Always prepare in advance for the discussion. This will make diagnosis of the problem easier
and also make it easier to decide if a customer service visit is necessary:
Please make a note of the following information as accurately as possible:
• What form does the fault take?
• Under what circumstances does the fault occur?
Prior to the telephone call it is important that you make a note of the following appliance
code numbers that are given on the rating plate:
• model description,
• PNC code (9 digits),
• S No code (8 digits).
We recommend that you record the code numbers here so that you always have them to
hand:
Model: . . . . . . . . . . . . . . . . . . . . . . . . . . . . . . . .
PNC: . . . . . . . . . . . . . . . . . . . . . . . . . . . . . . . . . .
S-No.: . . . . . . . . . . . . . . . . . . . . . . . . . . . . . . . . .
When do you incur costs even during the warranty period?
• if you could have remedied the fault yourself using the fault table (see section "Rectifying
faults"),
• if the customer service technician has to make several journeys because he was not
provided with all the relevant information before his visit and therefore, forexample, has
to fetch spare parts. These multiple trips can be avoided if you prepare your phone call as
described above.

37
Chère cliente,
cher client,
Veuillez lire attentivement cette notice d’utilisation.
Respectez en particulier le chapitre « Indications de sécurité » qui se trouve aux premières
pages. Conserver cette notice d’utilisation pour la consulter ultérieurement. Remettez-la à
un éventuel acheteur de cet appareil.
Les symboles suivants sont utilisés dans le texte :
1. Ces chiffres vous guident pas à pas dans la commande de votre appareil.
2. ...
3. ...
La présente notice d’utilisation contient des recommandations vous permettant de remédier
vous-même à d'éventuelles pannes, voir chapitre « Aide en cas de panne ».
Imprimé sur papier écologique.
Qui pense écologie, agit en faveur de l'écologie...
Indications de sécurité
Avertissement ! Indications qui contribuent à votre sécurité personnelle.
Attention ! Indications qui contribuent à éviter d'endommager l'appareil.
Recommandations et conseils
Informations sur l'environnement

38
Sommaire
Notice d’utilisation .................................................................................40
Indications de sécurité ........................................................................................................... 40
Utilisation conforme .......................................................................................................................... 40
Fonctionnement de l'appareil ......................................................................................................... 40
Utilisation de l'appareil ..................................................................................................................... 40
Nettoyage de l'appareil ..................................................................................................................... 41
Eviter d'endommager l'appareil ...................................................................................................... 41
Agir écologiquement .......................................................................................................................... 42
Description de l'appareil ........................................................................................................ 43
Les éléments de votre appareil ....................................................................................................... 43
La table de cuisson vitrocéramique ............................................................................................... 44
Les fonctions de votre appareil ....................................................................................................... 46
Commande de la table de cuisson ...................................................................................... 48
Avant la première utilisation ........................................................................................................... 48
Touches sensitives « Touch Control » ............................................................................................ 48
Allumer l'appareil ............................................................................................................
.................... 49
Eteindre l'appareil ............................................................................................................................... 49
Supprimer l'arrêt de sécurité ........................................................................................................... 49
Régler la puissance de chauffe ....................................................................................................... 49
Réduire la puissance de chauffe ..................................................................................................... 50
Régler le maintien au chaud ............................................................................................................ 50
Eteindre la zone de cuisson .............................................................................................................. 50
Allumer et éteindre la zone de cuisson à double circuit ........................................................ 51
Allumer et éteindre la zone poissonnière .................................................................................... 52
Allumer et éteindre la zone de cuisson à triple circuit ........................................................... 53
Utiliser la cuisson automatique ...................................................................................................... 54
Ne pas utiliser la cuisson automatique ........................................................................................ 55
Utiliser la sécurité enfants ............................................................................................................... 55
Utiliser le verrouillage ........................................................................................................................ 57
Utiliser le minuteur ............................................................................................................................. 58
Conseils d'utilisation de la table de cuisson .................................................................... 61
Batterie de cuisine .............................................................................................................................. 61
Economiser l'énergie .......................................................................................................................... 62
Cuire avec et sans cuisson automatique ...................................................................................... 63

39
Nettoyage et entretien ........................................................................................................... 66
Aide en cas de panne ............................................................................................................. 68
Instructions d’installation.....................................................................72
Caractéristiques techniques ................................................................................................. 72
Dimensions de l’appareil ................................................................................................................... 72
Dimensions de découpe ..................................................................................................................... 72
Indications de sécurité ........................................................................................................... 72
Encastrement de l'appareil ................................................................................................... 72
Branchement électrique de l'appareil ................................................................................ 73
Service après-vente ................................................................................74
Montage de la table de cuisson...........................................................................................112

40
Notice d’utilisation
Indications de sécurité
La sécurité de cet appareil correspond aux règlements reconnus en matière de technique et
de sécurité des appareils. En tant que constructeur, nous nous voyons néanmoins obligés de
vous familiariser avec les indications de sécurité suivantes.
Utilisation conforme
Cet appareil ne doit être utilisé que pour faire cuire et rôtir des aliments dans le domaine
ménager.
Fonctionnement de l'appareil
Le montage et le branchement électrique de l’appareil ne doivent être effectués que par des
spécialistes formés et autorisés.
L'appareil doit être monté et exploité de manière conforme, dans des placards et/ou des
plaques de travail normés et adéquats.
Arrêter l'appareil et le débrancher du secteur en cas de panne et de dommages (cassures,
fêlures et/ou fissures).
L'appareil ne doit être réparé que par des spécialistes formés et autorisés (S.A.V. usine,
commerçant spécialisé).
Utilisation de l'appareil
Danger de brûlure en cas de manipulation négligente sur la table de cuisson.
Tenir les enfants en bas âge à l'écart de l'appareil.
Ne laisser les enfants plus âgés travailler sur l'appareil que sous les instructions et la
surveillance d'un adulte.
Manipuler l'appareil avec attention et précaution.
Les manches des ustensiles de cuisine ne doivent pas dépasser de la table de cuisson.
Les manches des ustensiles de cuisine ne doivent pas être posés sur une zone de cuisson
brûlante et chaude.
Respecter ces indications, sans quoi le droit de garantie cesse.
Cet appareil répond aux directives CE suivantes :
• 73/23/CEE du 19/02/1973 Directive basse tension
• 89/336/CEE du 03/05/1989 Directive relative à la comptabilité électromécanique,
y compris directive de modification 92/31/CEE
• 93/68/CEE du 22/07/1993 Directive Identification CE.

41
Prudence lors du branchement d'appareils électriques aux prises de courant à proximité de
l'appareil. Les conduites d'alimentation ne doivent pas toucher les foyers brûlants.
Les graisses et les huiles surchauffées s'enflamment rapidement. Ne pas laisser sans
surveillance les cuissons à la graisse ou à l'huile (p.ex. : pommes frites).
Eteindre les zones de cuisson après usage.
La chaleur résiduelle des casseroles ou des poêles brûlantes réchauffe la table de cuisson
vitrocéramique sans que la chaleur résiduelle soit signalée.
Nettoyage de l'appareil
Eteindre l'appareil avant de le nettoyer.
Les zones de cuisson doivent être suffisamment refroidies pour être touchées sans danger de
brûlure.
Le nettoyage de l'appareil au jet de vapeur ou au nettoyeur à haute pression est interdit pour
des raisons de sécurité.
Eviter d'endommager l'appareil
Ne pas utiliser la table de cuisson comme surface de travail ou de rangement.
Ne pas faire fonctionner les zones de cuisson avec des ustensiles de cuisine vides ou sans
ustensile.
Eviter la cuisson à vide des casseroles et des poêles.
La vitrocéramique est insensible aux chocs de température et très résistante, mais pas
indestructible. Les objets pointus et durs qui tombent sur la surface de cuisson peuvent la
détruire.
Ne pas utiliser de casseroles en fonte ou au fond endommagé, qui présentent une rugosité
ou des arêtes. Elles peuvent causer des rayures quand on les déplace.
Ne pas poser de poêles ou de casseroles sur le cadre de la table de cuisson. Des rayures et des
dommages de peinture pourraient survenir.
Faire en sorte que les liquides acides, comme par exemple le vinaigre, le citron ou les
détartrants ne parviennent pas sur le cadre de la table de cuisson. Certains endroits
pourraient perdre leur brillance.
Enlever les substances à base de sucre quand elles sont encore chaudes avec un grattoir. Si
la masse est refroidie, la surface peut être endommagée lors du nettoyage.
Tenir les objets et les matières qui peuvent fondre à l'écart de la surface vitrocéramique
(p. ex : plastiques, feuilles d'aluminium etc.).
Enlever les substances fondues quand elles sont encore chaudes avec un grattoir. Si la masse
est refroidie, la surface peut être endommagée lors du nettoyage.

42
Agir écologiquement
Toutes les matières utilisées peuvent être réutilisées sans limite.
Les matières utilisées ne doivent pas être jetées dans les ordures ménagères.
Respecter les règlements nationaux et régionaux de recyclage conforme des matériaux
d'emballage et de l'appareil.
Eliminer les matériaux d'emballage
Les matières plastiques sont identifiées comme suit :
Mise au rebut de l'appareil
Seuls les spécialistes formés et autorisés sont habilités à débrancher l'appareil du secteur.
Le spécialiste doit rendre l'appareil électriquement inutilisable (enlever le câble
d'alimentation).
Symbole Matières plastiques Utilisation
PE Polyéthylène Enveloppe extérieure, sac
PS Polystyrène (sans CFC) Rembourrages

43
Description de l'appareil
Les éléments de votre appareil
Les éléments de votre table de cuisson
Surface de cuisson vitrocéramique : L'appareil dispose d'une surface de cuisson
vitrocéramique avec quatre zones de cuisson à incandescence rapide.
La surface de cuisson est exempte de porosité et insensible aux écarts brusques de
température. Les casseroles peuvent être posées d'une zone brûlante sur une zone froide.
La surface lisse est facile à nettoyer.
Zones de cuisson à incandescence rapide : L'appareil dispose de zones de cuisson à
incandescence rapide. La durée de chauffage du corps de chauffe est considérablement
réduite grâce aux éléments thermiques à rayonnement.
Un ronronnement bref du corps de chauffe peut être perceptible à l'allumage des zones de
cuisson. Ce bruit est de nature physique, qui n'a aucune influence négative sur le
fonctionnement de l'appareil et qui cesse quand la zone de cuisson est suffisamment
chauffée.
Zone de cuisson monocircuit : La table de cuisson dispose d'une zone de cuisson
monocircuit. Votre appareil est par conséquent équipé d'une zone de cuisson pour les petites
casseroles. Pour une économie d'énergie.
Zone de cuisson à double circuit : La table de cuisson dispose d'une zone de cuisson à
double circuit. Votre appareil est par conséquent équipé d'une zone de cuisson pour les
tailles variables, par exemple les casseroles de petite dimension. Pour une économie
d'énergie.
Zone de cuisson à triple circuit : La table de cuisson dispose d'une zone de cuisson à triple
circuit. Votre appareil est par conséquent équipé d'une zone de cuisson pour les tailles
variables, par exemple les casseroles de petite dimension. Pour une économie d'énergie.
Zone poissonnière (zone à usage multiple) : La table de cuisson est équipée d'une zone
poissonnière (zone à usage multiple). Selon le réglage, elle peut être utilisée comme zone de
cuisson ronde ou ovale.

44
La table de cuisson vitrocéramique

45
Les éléments du bandeau de commande
Touches sensitives : La commande de votre appareil est effectuée par des touches sensitives
« Touch-Control ».
Affichage : L'affichage numérique et/ou les voyants vous informent du réglage des
puissances de chauffe, des fonctions activées et de la chaleur résiduelle éventuellement
présente de la zone de cuisson concernée.
Touches sensitives Fonction
Marche/Arrêt
Allumer/arrêter l'appareil (interrupteur
principal séparé).
Zone de cuisson à double
circuit
Allumer/éteindre le circuit extérieur.
Zone de cuisson à triple
circuit
Allumer/éteindre le circuit intermédiaire.
Allumer/éteindre le circuit extérieur.
Zone poissonnière Allumer/éteindre le circuit extérieur.
Sélection puissance de
chauffe
Augmenter la puissance de chauffe/minuteur.
Sélection puissance de
chauffe
Réduire la puissance de chauffe/minuteur.
Minuteur Allumer/éteindre le minuteur.
Verrouillage
Verrouiller/déverrouiller le bandeau de
commande.
Voyants Description
Marche/Arrêt L'appareil est allumé.
Zone de cuisson à double
circuit
Le circuit extérieur est allumé.
Zone de cuisson à triple circuit
bas
Le circuit intermédiaire est allumé.
Zone de cuisson à triple circuit
haut
Le circuit extérieur est allumé.
Zone poissonnière Le circuit extérieur est allumé.
Fonction minuteur
La zone de cuisson sélectionnée fonctionne avec le
minuteur.

46
Les fonctions de votre appareil
Cuisson automatique : Toutes les zones de la table de cuisson sont équipées de neuf
puissances de chauffe réglables et d'une cuisson automatique.
Avec la cuisson automatique , la zone de cuisson fonctionne pour un temps donné en
puissance maximale avant de commuter automatiquement sur la puissance de chauffe
réglée.
La durée de la reprise de la cuisson automatique dépend de la puissance de chauffe
sélectionnée.
Commande directe de chaque zone de cuisson : Chaque zone de cuisson est commandée
directement par les touches sensitives « Touch-Control » attribuées.
Indication des erreurs : Le symbole pour erreur s’allume sur l’affichage quand une panne
est survenue sur l'appareil (voir chapitre « Aide en cas de panne »).
Sécurité enfants : Cette fonction permet de verrouiller la table de cuisson contre un
allumage non-intentionnel.
Affichage chaleur résiduelle : Le symbole pour chaleur résiduelle est allumé sur
l'affichage quand la zone de cuisson a une température présentant un danger de brûlure.
Lors de l'arrêt de la table de cuisson vitrocéramique, l'affichage de chaleur résiduelle ne
s'éteint que lorsque la zone de cuisson est suffisamment refroidie pour ne présenter aucun
danger de brûlure.
Arrêt de sécurité du bandeau de commande : L'humidité (p.ex. : un chiffon mouillé) ou un
liquide qui déborde sur le bandeau de commande arrête immédiatement toutes les zones de
cuisson.
Affichage Description
L'appareil est allumé.
-
Puissance de chauffe Puissance de chauffe de la zone de cuisson réglée.
. Virgule décimale
Puissance de chauffe intermédiaire de la zone de
cuisson réglée.
Maintien au chaud Le degré de maintien de la chaleur est réglé.
Cuisson automatique La cuisson automatique est activée.
Indication des défauts Erreur de fonctionnement survenue.
Indication chaleur
résiduelle
La zone de cuisson est éteinte, mais encore
brûlante.
Sécurité enfants La sécurité enfants est activée.
L’arrêt de sécurité est activé.

47
Arrêt de sécurité de la table de cuisson : Si la puissance de chauffe d'une zone de cuisson
n'est pas réglée dans un délai d'environ 10 secondes après l'allumage de la table de cuisson,
cette dernière s'éteint automatiquement.
Si une ou plusieurs touches sensitives sont pressées pendant plus d’environ 10 secondes, par
exemple par une casserole posée dessus, la table de cuisson s'éteint automatiquement.
Si toutes les zones de cuisson sont éteintes, la table de cuisson s'éteint automatiquement
après environ 10 secondes.
Arrêt de sécurité de la zone de cuisson : Si une zone de cuisson n'est pas éteinte ou
modifiée dans un délai donné, elle s'éteint automatiquement.
Minuteur : Le minuteur est équipé de deux fonctions :
• l'arrêt automatique. La zone de cuisson s'éteint automatiquement quand le temps réglé
est écoulé.
•la minuterie (« sablier »). Un signal sonore retentit après écoulement d’une durèe réglée.
Le réglage du minuteur s'effectue par intervalles d'une minute, de 1 à 99 minutes.
Maintien au chaud : Cette fonction (puissance de chauffe ) permet de maintenir les
aliments au chaud.
Verrouillage : Le bandeau de commande peut être verrouillé à tout moment, à l'exception
de la touche sensitive « Marche/Arrêt », pour empêcher une modification des réglages.
Puissance de chauffe Arrêt après
, , ,
6 heures
, , ,
5 heures
,
4 heures
, , , ,
1,5 heures

48
Commande de la table de cuisson
Avant la première utilisation
1. Laver la table de cuisson vitrocéramique avec de l'eau chaude et un liquide vaisselle, puis
la sécher en frottant (avec un torchon).
.
2. Allumer brièvement les zones de cuisson l'une après l'autre pour contrôle.
Touches sensitives « Touch Control »
Pour effectuer les commandes à l’aide des touches sensitives « Touch Control », poser le doigt
en haut sur la touche désirée jusqu'à ce que les indications correspondantes s'allument ou
s'éteignent et que la fonction désirée soit exécutée.
Pour un réglage plus rapide, laisser poser le doigt sur la touche sensitive jusqu'à ce que la
valeur désirée soit atteinte.
Tous les réglages sont confirmés par un signal acoustique.
ATTENTION !
Dommages sur la surface vitrocéramique.
Les nettoyants agressifs et abrasifs peuvent endommager la surface vitrocéramique.
Utiliser uniquement de l'eau et un liquide vaisselle.
ATTENTION !
Dommages sur la surface vitrocéramique.
Les adhésifs et les films brûlés endommagent la surface vitrocéramique.
Enlever les adhésifs et les films.
Lors de la première utilisation, une odeur peut se dégager pour un court moment.

49
Allumer l'appareil
L'appareil complet s'allume au moyen de la touche sensitive « Marche/Arrêt » .
Appuyer sur la touche sensitive « Marche/Arrêt » pendant environ deux secondes.
Le symbole s'allume sur l'affichage numérique.
Eteindre l'appareil
L'appareil complet s'éteint au moyen de la touche sensitive « Marche/Arrêt » .
Appuyer sur la touche sensitive « Marche/Arrêt » pendant environ deux secondes.
L'affichage numérique s'éteint.
Supprimer l'arrêt de sécurité
Pour supprimer l'arrêt de sécurité activé, il est nécessaire d'éteindre, puis de rallumer
l'appareil avec la touche sensitive « Marche/Arrêt » .
L'appareil est prêt à fonctionner.
Régler la puissance de chauffe
La puissance de chauffe est réglée et/ou modifiée par les touches sensitives « Sélection
puissance de chauffe » et de la zone de cuisson concernée.
Augmenter la puissance de chauffe
L'appareil s'éteint automatiquement si vous ne réglez pas la puissance de chauffe
dans un délai de dix secondes.
La chaleur résiduelle présente est indiquée sur l'affichage numérique des zones
de cuisson.

50
Appuyer sur la touche sensitive « Sélection puissance de chauffe » .
La puissance de chauffe sélectionnée est indiquée sur l'affichage numérique.
Réduire la puissance de chauffe
Appuyer sur la touche sensitive « Sélection puissance de chauffe » .
La puissance de chauffe sélectionnée est indiquée sur l'affichage numérique.
Régler le maintien au chaud
La puissance de chauffe sert de maintien au chaud pour toutes les zones de cuisson.
Appuyer sur la touche sensitive « Sélection puissance de chauffe » ou .
Le maintien au chaud de la chaleur est indiqué sur l'affichage numérique .
Eteindre la zone de cuisson
Il existe deux moyens d'éteindre une zone de cuisson.
Variante 1
Appuyer simultanément sur les touches sensitives « Sélection puissance de chauffe » et .
L'affichage numérique indique .
La zone de cuisson est éteinte.
Appuyer sur la touche sensitive « Sélection puissance de chauffe » jusqu'à ce que
apparaisse sur l'affichage numérique.
L'affichage numérique indique .
La zone de cuisson est éteinte.
AVERTISSEMENT !
Danger de brûlure à cause de la chaleur résiduelle.
La zone de cuisson a besoin d'un certain temps pour refroidir après avoir été
éteinte.
Observer la table de cuisson vitrocéramique.
Tenir compte de l'indication de chaleur résiduelle .

51
.
Allumer et éteindre la zone de cuisson à double circuit
Selon la dimension des casseroles ou des poêles, la touche sensitive « Zone de cuisson à
double circuit » permet, sur la zone de cuisson à double circuit, d'allumer le grand circuit en
plus de la plus petite zone de cuisson.
Allumer le circuit extérieur
1. Régler la puissance de chauffe désirée.
L'affichage numérique indique la puissance de chauffe désirée.
2. Appuyer sur la touche sensitive « Zone de cuisson à double circuit » .
Le circuit extérieur est allumé.
Le voyant « Zone de cuisson à double circuit » s'allume.
L'appareil s'éteint automatiquement après dix secondes lorsque toutes les zones de
cuisson sont éteintes.
La chaleur résiduelle présente est indiquée sur l'affichage numérique des zones
de cuisson.
Après une panne de courant, la chaleur résiduelle présente n'est plus indiquée sur
l'affichage numérique.
La chaleur résiduelle peut être utilisée pour faire fondre des aliments ou les
conserver au chaud.
Celui-ci ne peut être activé que si une puissance de chauffe est déjà réglée pour le
plus petit circuit.

52
Eteindre le circuit extérieur
Appuyer sur la touche sensitive « Zone de cuisson à double circuit » .
Le circuit extérieur est éteint.
Le voyant « Zone de cuisson à double circuit » s'éteint.
Allumer et éteindre la zone poissonnière
Selon la dimension des casseroles ou des poêles, la touche sensitive « Zone poissonnière »
permet, sur la zone poissonnière, d'allumer le grand circuit en plus de la plus petite zone de
cuisson.
Allumer le circuit extérieur
1. Régler la puissance de chauffe désirée.
L'affichage numérique indique la puissance de chauffe désirée.
2. Appuyer sur la touche sensitive « Zone poissonnière » .
Le circuit extérieur est allumé.
Le voyant « Zone poissonnière » s'allume.
Celui-ci ne peut être activé que si une puissance de chauffe est déjà réglée pour le
plus petit circuit.

53
Eteindre le circuit extérieur
Appuyer sur la touche sensitive « Zone poissonnière » .
Le circuit extérieur est éteint.
Le voyant « Zone poissonnièret » s'éteint.
Allumer et éteindre la zone de cuisson à triple circuit
Selon la dimension des casseroles ou des poêles, la touche sensitive « Zone de cuisson à triple
circuit » permet, sur la zone de cuisson à triple circuit, d'allumer le grand circuit en plus de
la plus petite zone de cuisson.
Allumer la zone de cuisson à triple circuit
1. Régler la puissance de chauffe désirée.
L'affichage numérique indique la puissance de chauffe désirée.
2. Appuyer sur la touche sensitive « Zone de cuisson à triple circuit » .
Le circuit intermédiaire est allumé.
Le voyant « Zone de cuisson à triple circuit bas » s'allume.
Celui-ci ne peut être activé que si une puissance de chauffe est déjà réglée pour le
plus petit circuit.

54
3. Appuyer sur la touche sensitive « Zone de cuisson à triple circuit » .
Le circuit extérieur est allumé.
Le voyant « Zone de cuisson à triple circuit haut » s'allume.
Eteindre le circuit extérieur
Appuyer sur la touche sensitive « Zone de cuisson à triple circuit » .
Le circuit extérieur ou intermédiaire est éteint.
Le voyant correspondant « Zone de cuisson à triple circuit » s'éteint.
Utiliser la cuisson automatique
Allumer la cuisson automatique
La durée de la reprise de la cuisson automatique dépend de la puissance de chauffe
sélectionnée.
Régler la puissance de chauffe désirée ( à ) avec la touche sensitive « Sélection puissance
de chauffe » .
L'affichage numérique indique la puissance de chauffe réglée.
L'affichage numérique s'allume après environ cinq secondes.
La cuisson automatique est activée.
La puissance de chauffe réglée est indiquée après écoulement du temps de la cuisson
automatique.
En cas de chaleur résiduelle présente, la cuisson automatique n'est pas activée pour
cette zone de cuisson.
En cas de sélection d'une puissance de chauffe plus élevée avec cuisson
automatique activée, par exemple au lieu de , le temps de reprise de la cuisson
est automatiquement adapté à la puissance de chauffe sélectionnée.
Si vous sélectionnez une puissance de chauffe inférieure, la cuisson automatique
est aussitôt désactivée.

55
Eteindre la cuisson automatique
Seule une cuisson automatique reglée peut être désactivée.
Appuyer sur la touche sensitive « Sélection puissance de chauffe » .
L'affichage numérique indique la puissance de chauffe réglée.
La cuisson automatique est désactivée.
Ne pas utiliser la cuisson automatique
La zone de cuisson est utilisée sans cuisson automatique quand la puissance de chauffe
désirée est réglée avec la touche sensitive « Sélection puissance de chauffe » .
Utiliser la sécurité enfants
La sécurité enfants permet de verrouiller la table de cuisson contre son usage non désiré.
Activer la sécurité enfants
L'appareil est allumé et toutes les zones de cuisson sont éteintes.
1. Appuyer sur la touche sensitive « Verrouillage » pour environ trois secondes.
Un signal sonore retentit.

56
2. Appuyer sur la touche sensitive « Sélection puissance de chauffe » quelconque.
Le symbole s’allume sur l'affichage numérique.
La sécurité enfants est activée.
L'appareil s'éteint automatiquement après quelques secondes.
Eviter la sécurité enfants
La sécurité enfants peut être évitée par l'utilisation unique de l'appareil (jusqu'à son
prochain arrêt). Au prochain allumage, la sécurité enfants sera de nouveau
automatiquement active.
1. Allumer l'appareil.
Le symbole s'allume sur l'affichage numérique.
2. Appuyer sur les touches sensitives « Sélection puissance de chauffe » et
simultanément pour environ une seconde.
Un signal sonore retentit.
Le symbole s'allume sur l'affichage numérique.
La sécurité enfants est désactivée jusqu'à l'arrêt de l'appareil.
Désactiver la sécurité enfants
1. Allumer l'appareil.
Le symbole s'allume sur l'affichage numérique.

57
2. Appuyer sur la touche sensitive « Verrouillage » pour environ trois secondes.
Un signal sonore retentit.
3. Appuyer sur une touche sensitive« Sélection puissance de chauffe » quelconque.
Le symbole s'allume sur l'affichage numérique.
La sécurité enfants est désactivée.
L'appareil s'éteint automatiquement après quelques secondes.
Utiliser le verrouillage
Le bandeau de commande peut être verrouillé à n'importe quel moment de la cuisson à
l'exception de la touche sensitive « Marche/Arrêt » , pour éviter le déréglage des réglages,
par exemple lors de l'essuyage avec un chiffon.
Verrouiller le bandeau de commande
Appuyer sur la touche sensitive « Verrouillage » pendant environ 2 secondes.
L'affichage numérique s’allume pendant cinq secondes.
Le bandeau de commande est verrouillé.
Le symbole s'allume sur l'affichage numérique si l'on appuie sur une touche
sensitive.

58
Déverrouiller le bandeau de commande
Appuyer sur la touche sensitive « Verrouillage » pendant environ 2 secondes.
Le bandeau de commande est utilisable.
Utiliser le minuteur
Vous pouvez utiliser le minuteur de deux manières :
• comme dispositif d'arrêt automatique avec une puissance de chauffe réglée
• comme minuterie (fonction « sablier ») pour une zone de cuisson éteinte.
Sélectionner une zone de cuisson
1. Appuyer sur la touche sensitive « Minuteur ».
L'affichage minuterie indique .
Les voyants « Fonction minuteur » des zones de cuisson s'allument.
Le voyant « Fonction minuteur » de la zone de cuisson réglable clignote.
2. Appuyer sur la touche sensitive « Minuteur ».
Le voyant « Fonction minuteur » de la prochaine zone de cuisson réglable clignote.
Le verrouillage est automatiquement désactivé à l'arrêt de l'appareil.

59
Régler le temps
1. Sélectionner la zone de cuisson.
Le voyant « Fonction minuteur » de la zone de cuisson réglable clignote.
2. Régler le temps à l’aide des touches sensitives « Sélection puissance de chauffe » ou .
L'affichage minuteur indique le temps réglé.
L'heure de la zone de cuisson sélectionnée est activée après env. cinq secondes.
Quand le temps s'est écoulé, l'affichage minuteur indique ,
le voyant « Fonction minuteur » clignote et un signal acoustique retentit pour env. deux
minutes.
Afficher le temps restant
1. Sélectionner la zone de cuisson désirée.
L'affichage minuteur indique le temps restant.
Le voyant « Fonction minuteur » de la zone de cuisson concernée clignote.
Pour un réglage plus rapide, appuyer sur les touches sensitives « Sélection puissance
de chauffe » ou jusqu'à ce que la valeur souhaitée soit atteinte.
Si un même temps est réglé pour plusieurs zones de cuisson, l'affichage minuteur
indique à chaque fois le temps de cuisson le plus court et le voyant « Fonction
minuteur » de la zone de cuisson concernée clignote.
Le signal acoustique s'arrête si l'on appuie sur la touche sensitive « Minuteur ».

60
Modifier le temps
1. Sélectionner la zone de cuisson désirée.
L'affichage minuteur indique le temps restant.
Le voyant « Fonction minuteur » de la zone de cuisson réglable clignote.
2. Régler le temps désiré à l’aide des touches sensitives « Sélection puissance de chauffe »
ou .
L'affichage minuteur indique le temps réglé.
Le temps de la zone de cuisson sélectionnée est modifié.
Désactiver la zone de cuisson et l'arrêt automatique
Si une zone de cuisson est arrêtée, les réglages minuteur de cette zone sont
automatiquement desactivés.
Arrêter le minuteur
1. Sélectionner la zone de cuisson désirée.
L'affichage minuteur indique le temps restant.
Le voyant « Fonction minuteur » de la zone de cuisson réglable clignote.
2. Remettre à zéro le temps à l’aide de la touche sensitive
« Sélection puissance de chauffe » .
L'affichage minuteur indique .
Le minuteur est arrêté.

61
Conseils d'utilisation de la table de cuisson
Batterie de cuisine
Plus la casserole est de bonne qualité, meilleur est le résultat.
• Une bonne casserole se reconnaît à son fond. Il doit être aussi épais et plat que possible.
• Lors de l'achat de nouvelles casseroles et de poêles, tenez compte du diamètre du fond.
Les fabricants indiquent souvent le diamètre supérieur de l'ustensile.
• Les ustensiles de cuisine avec fond en aluminium ou en cuivre peuvent occasionner des
changements de couleur métalliques de la surface vitrocéramique, qui ne peuvent être
que difficilement enlevés ou pas du tout.
• Ne pas utiliser de casseroles en fonte ou au fond endommagé, qui présentent une rugosité
ou des arêtes. Elles peuvent provoquer des rayures quand on les déplace.
• A l'état froid, le fond de la casserole est normalement légèrement bombé vers l'intérieur
(concave). Il ne doit en aucun cas être bombé vers l'extérieur (convexe).
• Si vous utilisez de la vaisselle spéciale, (p.ex. : autocuiseur, bouilloire, WOK etc.), veuillez
respecter les indications du fabricant.
Recommandations générales
• Le fond doit toujours être propre et sec.
• Pour éviter les rayures sur la surface de cuisson vitrocéramique, ne pas déplacer les
casseroles et les poêles en les poussant, mais en les soulevant.
• Les rayures peuvent aussi être causées par des grains de sable (p.ex. : légumes lavés
auparavant), qui sont tirés avec la casserole sur la surface de cuisson.
• Utiliser des casseroles à bord haut pour les plats demandant beaucoup d'eau pour qu'elle
ne déborde pas.

62
Economiser l'énergie
• Placer les casseroles et les poêles sur la zone de cuisson avant de l'allumer.
• Les zones de cuisson et les fonds de casserole sales augmentent la consommation
d'énergie.
• Si possible, toujours fermer les casseroles et les poêles avec un couvercle.
• Eteindre les zones de cuisson avant la fin du temps de cuisson pour utiliser la chaleur
résiduelle, par exemple pour conserver les aliments au chaud ou les faire fondre.
• Le fond de la casserole et la zone de cuisson devraient être de même dimension.
• L'utilisation d'autocuiseurs permet de réduire de moitié le temps de cuisson.
Vous économiserez l'énergie en respectant les points suivants :

63
Cuire avec et sans cuisson automatique
La cuisson automatique convient aux plats suivants :
• les aliments posés froid qui sont chauffés à forte puissance et dont le degré de la
poursuite de la cuisson ne doit pas être contrôlé en permanence,
• les aliments qui doivent être mis dans la poêle très chaude.
La cuisson automatique ne convient pas aux plats suivants :
• les goulaschs, les roulades et autres plats mijotés de la même manière, qui doivent être
fréquemment retournés jusqu'à ce qu'ils soient bien dorés, arrosés et braisés,
• les quenelles, les pâtes avec une grande quantité d'eau,
• la cuisson en autocuiseur,
• les très grandes quantités de soupes/de pots au feu contenant plus de 2 litres de liquide.
Recommandations générales :
• Si vous cuisez sans cuisson automatique, nous vous recommandons de régler sur une
puissance élevée pour le début de cuisson des aliments (avec la touche ) puis de
terminer la cuisson avec la puissance requise.
• Observez les premières cuissons ! Vous pourrez ainsi déterminer la puissance de chauffe
optimale pour « vos plats » dans la
« quantité qui vous est familière » et avec
« votre batterie de cuisine ». Vous apprécierez bientôt les avantages de la cuisson
automatique et éprouverez un sentiment de sécurité dans l'utilisation de votre nouvelle
table de cuisson.

64
Durée de la reprise de cuisson automatique
La durée de la reprise de cuisson automatique est fonction de la puissance de chauffe
sélectionnée.
Puissance de chauffe Durée de la reprise de cuisson [min]
1
1,7
3
4,8
5,5
6,5
8,2
10,2
12,3
2
2,5
3,5
4,5
---

65
Valeurs de repère pour cuisson avec l'appareil
Les valeurs indiquées dans les tableaux suivants sont indicatives. La position du
commutateur pour la cuisson dépend de la qualité des casseroles ainsi que du type et de la
quantité d'aliments.
1)
Avec cuisson sans cuisson automatique, vous pouvez sélectionner individuellement le
temps de reprise de cuisson.
Position
du
commuta-
teur
Temps de
reprise de la
cuisson
auto-
matique
1)
[min]
Cuisson Exemples d'utilisation
Démarrer la
cuisson
Faire dorer
Frire
Démarrer la cuisson de grandes quantités
de liquide,
faire cuire les spätzle,
faire dorer la viande,
(goulaschs, viande braisée)
4,5
Faire dorer à
feu vif
Bifteck, entrecôte,
galettes de pomme de terre,
saucisses grillées,
crêpes/galettes
3,5
2,0
Faire rôtir Escalopes/côtelettes,
foie, poissons,
boulettes de viande, œufs sur le plat
10,2
Faire cuire
Cuisson jusqu'à 1,5 l de liquide,
pommes de terre, légumes
6,5
4,8
Cuire à la
vapeur
Cuire à l'étuvée
Laisser gonfler
Cuisson à la vapeur et à l'étuvée
de petites quantités de légumes,
laisser gonfler le riz et
les mets à base de lait
1,7
1,0
Faire fondre Faire fondre le beurre,
faire diluer la gélatine,
faire fondre le chocolat
0,5
Conserver au
chaud
Conservation des aliments au chaud
Pour faire démarrer la cuisson ou dorer les aliments, nous vous recommandons de
sélectionner la puissance de chauffe « » et de terminer avec un temps de cuisson
plus long sur la puissance de poursuite de la cuisson requise.

66
Nettoyage et entretien
Table de cuisson
Salissures légères
1. Essuyer la surface vitrocéramique avec un chiffon humide et une petite quantité de
liquide vaisselle main.
2. Sécher en frottant avec un chiffon propre. Aucun résidu de nettoyant ne doit rester sur
la surface.
3. Une fois par semaine, nettoyer soigneusement l'ensemble de la surface vitrocéramique
avec un nettoyant courant pour vitrocéramique ou acier inox.
4. Essuyer ensuite la surface vitrocéramique avec suffisamment d'eau claire, puis la sécher
en la frottant avec un chiffon propre sans fils.
Salissures tenaces
1. Utiliser un grattoir pour éliminer les restes d'aliments qui ont débordé ou les projections
solidifiées.
2. Placer le grattoir obliquement par rapport à la surface vitrocéramique.
3. Eliminer les salissures en faisant glisser la lame.
Attention ! Les nettoyants ne doivent pas être mis en contact avec la surface
vitrocéramique ! Tous les nettoyants doivent être enlevés avec suffisamment d'eau
claire après le nettoyage, car ils peuvent avoir un effet corrosif lors du
réchauffement !
Ne pas utiliser de nettoyants agressifs, comme les sprays de nettoyage pour
barbecues ou fours, les produits de récurage à gros grains ou les nettoyants de
casseroles qui laissent des stries.
Nettoyer la surface de cuisson vitrocéramique après chaque usage, quand elle est à
température supportable au toucher ou froide. Vous éviterez que les salissures
soient brûlées et solides.
Nettoyer les traces d'eau et de calcaire, les projections de graisse et les colorations
métalliques avec un nettoyant courant pour vitrocéramique ou acier inox.

67
.
Salissures spécifiques
1. Eliminer immédiatement le sucre brûlé, le plastique fondu, les feuilles d'aluminium et les
autres matières fusibles avec un grattoir lorsqu'ils sont encore chauds.
2. Pour finir, nettoyer encore une fois la table de cuisson refroidie.
Vous trouverez les grattoirs et les nettoyants pour vitrocéramique dans les magasins
spécialisés.
Attention ! Danger de brûlure en manipulant le grattoir sur une surface de cuisson
brûlante !
Si la zone de cuisson avec la matière fondue est déjà refroidie, chauffer encore une
fois avant de nettoyer.
Les rayures ou les taches sombres de la surface vitrocéramique, provoquées par
exemple par des fonds de casseroles à l'arête tranchante, ne peuvent pas être
éliminées. Elles n'ont aucune influence néfaste sur le bon fonctionnement de la
table de cuisson.

68
Aide en cas de panne
Il est probable que la panne ne provient que d'un petit défaut auquel vous pouvez vous-
même remédier à l'aide des instructions suivantes.
Si vous ne réussissez pas à éliminer la panne à l'aide des informations suivantes, veuillez vous
adresser à votre magasin spécialisé ou au service après-vente.
Si la table de cuisson vitrocéramique présente une cassure du vitrage, veuillez indiquer au
S.A.V. le numéro de trois chiffres qui se trouve sur la plaque en verre.
Si vous faites appel au service après-vente à cause d'une erreur de
manipulation, la visite du technicien du S.A.V. peut être facturé, même
pendant la période de garantie.
Panne Cause Remède
L'affichage numérique ne
fonctionne pas.
Le courant est interrompu. 1. Attendre la fin de
l'interruption du courant.
2. Allumer l'appareil.
Le fusible de l'installation
principale de la maison a
disjoncté.
Remettre le fusible.
Le fusible disjoncte de
nouveau:
1. Eteindre l'appareil
2. Appeler un électricien
certifié.
La protection anti-
surchauffe a éteint toutes
les zones de cuisson et
verrouillé leurs fonctions.
Laisser refroidir les zones de
cuisson.

69
L'indication des erreurs
clignote.
La protection anti-
surchauffe a éteint la zone
de cuisson à double circuit
et verrouillé leurs
fonctions.
Laisser refroidir la zone de
cuisson.
Liquide ou un chiffon
humide sur les touches
sensitives.
1. Débrancher l'appareil du
secteur (ôter le fusible).
2. Laisser refroidir l'appareil.
3. Nettoyer la table de cuisson
vitrocéramique.
4. Brancher l'appareil au
secteur (remettre le
fusible).
5. Allumer l'appareil.
L'indication des erreurs
continue à clignoter :
1. Eteindre l'appareil
2. Débrancher l'appareil du
secteur (ôter le fusible).
3. Appeler le service après-
vente.
La surface vitrocéramique
présente des fêlures, des
fissures ou des cassures.
Des objets durs ou pointus
sont tombés sur la surface
vitrocéramique.
1. Eteindre l'appareil.
2. Débrancher l'appareil du
secteur (ôter le fusible).
3. Appeler le service après-
vente.
Les zones de cuisson ne
fonctionnent pas.
L'appareil n'est pas allumé. Allumer l'appareil.
La zone de cuisson requise
n'est pas allumée.
Allumer la zone de cuisson.
La puissance de chauffe
requise n'est pas réglée.
Régler la puissance de chauffe.
Le fusible de l'installation
principale de la maison a
sauté.
Remettre le fusible.
Le fusible saute de nouveau :
1. Eteindre l'appareil
2. Appeler un électricien
certifié.
Panne Cause Remède

70
Il est impossible d'allumer
les zones de cuisson.
La sécurité enfants est
activée.
Désactiver la sécurité enfants
(voir chapitre « Sécurité
enfants »).
Plus de 10 secondes se sont
écoulées depuis l'allumage
de l'appareil.
Allumer de nouveau l'appareil.
Plus de 10 secondes se sont
écoulées depuis la sélection
de la zone de cuisson.
Sélectionner de nouveau la
zone de cuisson.
Il est impossible d'éteindre
les zones de cuisson.
Plus de 10 secondes se sont
écoulées depuis la sélection
de la zone de cuisson.
Sélectionner de nouveau la
zone de cuisson.
L'indication de chaleur
résiduelle est en panne.
Il y a eu une brève
interruption de courant.
1. Attendre la fin de
l'interruption du courant.
Allumer l'appareil.
La chaleur résiduelle restante
n'est plus affichée.
L'électronique est
défectueuse.
1. Eteindre l'appareil.
2. Débrancher l'appareil du
secteur (ôter le fusible).
3. Appeler le service après-
vente.
L'affichage de chaleur
résiduelle n'indique rien.
La zone de cuisson n'a été
allumée que trop peu de
temps.
Si la zone de cuisson est froide,
il n'y a pas de panne.
L'électronique est
défectueuse.
1. Eteindre l'appareil.
2. Débrancher l'appareil du
secteur (ôter le fusible).
3. Appeler le service après-
vente.
Le courant était
interrompu.
La chaleur résiduelle restante
n'est plus affichée.
Panne Cause Remède

71
La cuisson automatique ne
peut pas être allumée.
La zone de cuisson
présente encore de la
chaleur résiduelle.
Laisser refroidir la zone de
cuisson.
La puissance de chauffe a
été réglée avec le panneau
sensitif « Sélection
puissance de chauffe » .
1. Eteindre la zone de cuisson.
2. Régler la puissance de
chauffe avec le panneau
sensitif « Sélection
puissance de chauffe » .
L'arrêt automatique du
minuteur ne peut plus être
réglé.
La zone de cuisson n'est
pas sélectionnée.
Sélectionner une zone de
cuisson.
Le bandeau de commande
est verrouillé.
Déverrouiller le bandeau de
commande.
L'arrêt automatique du
minuteur ne peut plus être
éteinte.
La zone de cuisson n'est
pas sélectionnée.
Sélectionner une zone de
cuisson.
Le bandeau de commande
est verrouillé.
Déverrouiller le bandeau de
commande.
La minuterie du minuteur
(fonction « sablier ») ne
peut pas être réglée.
L'arrêt automatique d'une
zone de cuisson est réglée.
Eteindre l'arrêt automatique.
Le bandeau de commande
est verrouillé.
Déverrouiller le bandeau de
commande.
La minuterie du minuteur
(fonction « sablier ») ne
peut pas être éteinte.
Le bandeau de commande
est verrouillé.
Déverrouiller le bandeau de
commande.
L'appareil ne réagit pas aux
entrées effectuées sur le
bandeau de commande.
L'appareil est éteint. Allumer l'appareil.
L'électronique est
défectueuse.
1. Eteindre l'appareil.
2. Débrancher l'appareil du
secteur (ôter le fusible).
3. Appeler le service après-
vente.
La protection anti-
surchauffe a éteint toutes
les zones de cuisson et
verrouillé leurs fonctions.
Laisser refroidir les zones de
cuisson.
Panne Cause Remède

72
Instructions d’installation
Caractéristiques techniques
Dimensions de l’appareil
Dimensions de découpe
Indications de sécurité
L’installation et le branchement électrique de l’appareil ne doivent être effectués que par des
spécialistes formés et autorisés.
Respecter les directives générales concernant l'exploitation des appareils électriques et les
règlements de l'entreprise compétente d'alimentation en énergie ainsi que les indications
contenues dans ces instructions d’installation.
Cet appareil répond à la norme EN 60 335-2-6 sur la protection contre les risques d'incendie.
Les appareils de ce type peuvent être montés d'un seul côté à des placards ou des murs.
Encastrement de l'appareil
Débrancher l'appareil du secteur pour le monter, le démonter et pour les opérations
d'entretien.
Lors du déballage de l'appareil, contrôler qu'il est en parfait état et ne présente aucun
dommage de transport. Ne pas monter ni brancher les appareils endommagés.
Effectuer immédiatement les réclamations concernant d'éventuels dommages de transport
auprès du fournisseur et/ou du transporteur.
Eliminer l'emballage dans le respect de l'environnement.
Respecter les distances minimales exigées avec d'autres appareils de votre cuisine (voir leurs
spécifications techniques).
Largeur 766 mm
Profondeur 506 mm
Hauteur 47 mm
Largeur 750 mm
Profondeur 490 mm
Rayon d'angle R5
Respecter ces indications, sans quoi le droit de garantie cesse.

73
L'appareil ne doit pas être monté directement à côté de portes et sous les fenêtres. Les
fenêtres qui se relèvent ou s'ouvrent brusquement peuvent faire tomber les ustensiles
brûlants de la table de cuisson.
Ne pas monter de tiroirs sous la table de cuisson.
La protection contre tout contact doit être garantie par l’encastrement.
La stabilité de l'armoire encastrable doit satisfaire à la norme DIN 68930.
Pour garantir la protection contre l'humidité, enduire toutes les surfaces découpées d'un
produit d'étanchéité approprié.
Pour ce qui est des surfaces de travail carrelées, les joints de la zone support de la partie
cuisson doivent être entièrement remplis de matière de remplissage.
Pour ce qui est des plaques en pierre naturelle, artificielle ou en céramique, les ressorts à
déclic doivent être collés avec une résine synthétique appropriée ou une colle à deux
composants.
Contrôler le parfait logement du joint et sa bonne pose dans le cadre support.
Ne pas enduire de matériau d'étanchéité aux silicones, car cela rend le montage difficile en
cas de service après-vente.
Pour le démontage, sortez la table de cuisson par le bas.
Nettoyer le plan de travail dans la zone de découpe.
Branchement électrique de l'appareil
1. Brancher le câble à l'appareil et à la borne de branchement au secteur.
2. Décharger le câble par traction.
3. Contrôler les accouplements de serrage.
4. Nettoyer l'appareil (voir « Avant la première utilisation »).
5. Contrôler l'état de service.
Le branchement électrique de l'appareil est effectué.
DANGER !
Danger de mort par décharge électrique.
La borne de branchement au secteur peut être sous tension.
1. Respecter les règles de sécurité en électrotechnique.
2. Mettre la borne de branchement au secteur sans tension.
ATTENTION !
Dommage dû au courant électrique.
Les accouplements de serrage lâches et non conformes peuvent provoquer des
décharges de tension.
1. Effectuer les accouplements de serrage de manière conforme.
2. Décharger le câble par traction.

74
Service après-vente
Vous trouverez dans le paragraphe « Aide en cas de panne » quelques pannes que vous
pourrez vous-même éliminer.
En cas de panne, consultez ce paragraphe.
S'agit-il d'une défaillance technique ?
Veuillez alors vous adresser à notre service après-vente ou à un des nos partenaires.
Toujours bien se préparer à l'entretien dans chaque cas. Vous faciliterez ainsi le diagnostic et
la décision concernant une éventuelle visite du S.A.V.
A déterminer le plus précisément possible :
• Comment la panne se manifeste-t-elle ?
• Dans quelles circonstances se produit-elle ?
Pour l'entretien noter impérativement les numéros indicatifs de votre appareil qui se
trouvent sur la plaque signalétique :
• Désignation du modèle,
• N° de produit (9 chiffres),
• N° de série (8 chiffres).
Nous vous recommandons d'inscrire ici les numéros indicatifs, pour que vous les ayez
toujours sous la main :
Modèle : . . . . . . . . . . . . . . . . . . . . . . . . . . . . . . .
N° de produit : . . . . . . . . . . . . . . . . . . . . . . . ..
N° de série : . . . . . . . . . . . . . . . . . . . . . . . . . . .
Dans quels cas des frais vous sont-ils occasionnés pendant la période de garantie ?
• Si vous aviez pu éliminer vous-même la panne à l'aide du tableau des pannes (voir
paragraphe « Aide en cas de panne »),
• si le technicien du service après-vente doit se déplacer plusieurs fois, parce qu'il n'a pas
reçu toutes les informations importantes avant sa visite et devait par exemple aller
chercher des pièces de rechange. Vous pouvez éviter ces déplacements répétés si vous
préparez correctement votre appel de la manière décrite ci-dessus.

75
Geachte klant,
Lees deze gebruiksaanwijzing aandachtig door.
Schenk vooral de nodige aandacht aan het hoofdstuk „Veiligheidsinstructies“ op de eerste
pagina’s. Bewaar deze gebruiksaanwijzing zodat u hem later nog eens kunt gebruiken. Geef
ze eventueel door aan de volgende eigenaar van het apparaat.
In de tekst worden de volgende symbolen gebruikt:
1. Deze cijfers begeleiden u stap voor stap bij het bedienen van het apparaat.
2. ...
3. ...
Voor het geval dat er storingen optreden, bevat deze gebruiksaanwijzing instructies
waarmee u de storingen zelf kunt verhelpen. Kijk daartoe in de paragraaf „Hulp bij
storingen“.
Gedrukt op milieuvriendelijk vervaardigd papier.
Wie ecologisch denkt, handelt ook zo...
Veiligheidsinstructies
Waarschuwing! Instructies, bedoeld voor uw persoonlijke veiligheid.
Let op! Instructies ter voorkoming van beschadigingen aan het apparaat.
Opmerkingen en praktische tips
Milieu-informatie

76
Inhoudsopgave
Gebruiksaanwijzing ................................................................................78
Veiligheidsinstructies ............................................................................................................. 78
Doelmatig gebruik .............................................................................................................................. 78
Het apparaat gebruiken .................................................................................................................... 78
Het apparaat bedienen ...................................................................................................................... 78
Het apparaat schoonmaken ............................................................................................................. 79
Beschadigingen aan het apparaat voorkomen .......................................................................... 79
Handel milieubewust ......................................................................................................................... 80
Beschrijving van het apparaat ............................................................................................. 81
De onderdelen van uw apparaat .................................................................................................... 81
De glaskeramische kookplaat .......................................................................................................... 82
De functies van uw apparaat .......................................................................................................... 84
De kookplaat bedienen .......................................................................................................... 86
Vóór het eerste gebruik ..................................................................................................................... 86
Touch control-tiptoetsen .................................................................................................................. 86
Apparaat inschakelen ..........................................................................................................
............... 87
Apparaat uitschakelen ....................................................................................................................... 87
Veiligheidsuitschakeling opheffen ................................................................................................. 87
De kookstand instellen ...................................................................................................................... 87
De warmhoudstand instellen ........................................................................................................... 88
De kookzone uitschakelen ................................................................................................................ 88
De kookzone met twee cirkels in- en uitschakelen .................................................................. 89
De braadpanzone in- en uitschakelen .......................................................................................... 90
De kookzone met drie cirkels in- en uitschakelen .................................................................... 91
De aankookautomaat gebruiken .................................................................................................... 92
De aankookautomaat niet gebruiken ........................................................................................... 93
De kinderbeveiliging gebruiken ...................................................................................................... 93
De vergrendeling gebruiken ............................................................................................................ 95
Tips voor het gebruik van de kookplaat ............................................................................ 99
Kookpannen .......................................................................................................................................... 99
Energie besparen ..............................................................................................................
................. 100
Koken met en zonder aankookautomaat .................................................................................. 100

77
Reiniging en onderhoud ..................................................................................................... 103
Hulp bij storingen ................................................................................................................ 104
Montage-instructie ............................................................................. 109
Technische gegevens ........................................................................................................... 109
Afmetingen van het apparaat ....................................................................................................... 109
Uitsnijmaten ....................................................................................................................................... 109
Veiligheidsinstructies .......................................................................................................... 109
Het apparaat monteren ...................................................................................................... 109
Het apparaat elektrisch aansluiten .................................................................................. 110
Service..................................................................................................... 111
De kookplaat monteren..........................................................................................................112

78
Gebruiksaanwijzing
Veiligheidsinstructies
De veiligheid van dit apparaat voldoet aan de erkende regels der techniek en de (Duitse) Wet
op de veiligheid van apparatuur. Als fabrikant voelen wij ons echter ook verplicht, u
vertrouwd te maken met de onderstaande veiligheidinstructies.
Doelmatig gebruik
Dit apparaat mag uitsluitend gebruikt worden voor het huishoudelijk koken en braden van
spijzen.
Het apparaat gebruiken
Het apparaat mag uitsluitend gemonteerd en elektrisch aangesloten worden door hiervoor
opgeleide en bevoegde vakmensen.
Het apparaat mag alleen op de juiste wijze gebruikt worden in gestandaardiseerde en
passende inbouwkasten c.q. werkbladen.
In geval van storingen en beschadigingen (breuken, barsten of scheuren) dient u het
apparaat uit te schakelen en af te koppelen van het elektriciteitsnet.
Reparaties aan het apparaat mogen uitsluitend verricht worden door hiervoor opgeleide en
bevoegde vakmensen (servicemonteurs, vakhandel).
Het apparaat bedienen
Als u onachtzaam te werk gaat, bestaat op de kookzones Kans op verbrandingen.
Houd kleine kinderen altijd uit de buurt van het apparaat.
Laat grotere kinderen alleen onder toezicht en na het geven van instructies aan het apparaat
werken.
Bedien het apparaat oplettend en zorgvuldig.
Stelen van pannen mogen niet buiten de kookplaat uitsteken.
Stelen van pannen mogen zich niet boven een hete of warme kookzone bevinden.
Wees voorzichtig als u elektrische apparaten in de buurt van de kookplaat op het
stopcontact aansluit. Elektrische draden mogen niet op hete kookzones terecht komen.
Houdt u zich a.u.b. aan deze instructies, want anders verliezen uw garantie-
aanspraken jegens de fabrikant hun geldigheid.
Dit apparaat voldoet aan de volgende EG-Richtlijnen:
• 73/23/EEG van 19-2-1973 Laagspanningsrichtlijn
• 89/336/EEG van 3-5-1989 EMC-Richtlijn inclusief de wijzigingsrichtlijn 92/31/
EEG
• 93/68/EEG van 22-7-1993 CE-markeringsrichtlijn.

79
Oververhit vet en olie kan snel in brand vliegen. Blijf in de buurt als u kookt met vet of olie
(bijv. als u frituurt).
Schakel de kookzones na gebruik uit.
De restwarmte van hete potten of pannen verwarmt de glaskeramische kookplaat zonder dat
de restwarmte-indicatie dit aangeeft.
Het apparaat schoonmaken
U moet het apparaat uitschakelen voordat u het schoonmaakt.
De kookzones moeten zodanig afgekoeld zijn dat u ze kunt aanraken zonder dat u zich
verbrandt.
Om veiligheidsredenen mag u het apparaat niet schoonmaken met een dampstraal of een
hogedrukreiniger.
Beschadigingen aan het apparaat voorkomen
Gebruik de kookplaat niet als werkblad of om er dingen op neer te zetten.
De kookzones mogen niet gebruikt worden als ze leeg zijn of als er geen pannen op staan.
Zorg ervoor dat potten en pannen niet kunnen leegkoken.
Glaskeramiek is ongevoelig voor temperatuurschokken en zeer resistent, maar niet
onbreekbaar. Vooral spitse en harde voorwerpen die op het kookvlak vallen, kunnen het
glaskeramiek beschadigen.
Gebruik geen gietijzeren pannen of pannen waarvan de bodem beschadigd is, die ruw zijn of
bramen hebben. Tijdens het schuiven kunnen er krassen ontstaan.
Zet geen pannen of potten op het frame van de kookplaat. Er kunnen krassen en
beschadigingen aan de lak ontstaan.
Zorg ervoor dat er geen zuurhoudende vloeistoffen, bijv. azijn, citroen of kalkoplossende
middelen op het frame van de kookplaat terecht komen. Hierdoor kunnen er matte plekken
ontstaan.
Suikerhoudende substanties moet u met een reinigingsschraper verwijderen terwijl deze
substanties nog warm zijn. Als de massa afkoelt, kunt u bij het verwijderen ervan het
oppervlak van de kookplaat beschadigen.
Houd smeltbare voorwerpen en materialen (bijv. kunststof, aluminiumfolie e.d.) uit de buurt
van het glaskeramische oppervlak.
Vastgesmolten substanties moet u met een reinigingsschraper verwijderen terwijl deze
substanties nog warm zijn. Als de massa afkoelt, kunt u bij het verwijderen ervan het
oppervlak van de kookplaat beschadigen.

80
Handel milieubewust
Alle gebruikte materialen kunnen onbeperkt hergebruikt worden.
Gooi de gebruikte materialen niet bij het normale huisvuil.
U dient zich te houden aan de nationale en regionale voorschriften die aangeven hoe de
verpakkingsmaterialen en het apparaat gerecycleerd moeten worden.
Het verpakkingsmateriaal opruimen
De kunststoffen zijn als volgt gemarkeerd:
Het apparaat opruimen
Het apparaat mag uitsluitend door hiervoor opgeleide en bevoegde vakmensen van het
elektriciteitsnet worden afgekoppeld.
Deze vakman moet het apparaat elektrisch onbruikbaar maken (de aansluitkabel
verwijderen).
Symbool Kunststof Gebruik
PE Polyethyleen buiten omhulsel, zakken
PS Polystyrol (CFK-vrij) Stootkussens

81
Beschrijving van het apparaat
De onderdelen van uw apparaat
De onderdelen van de kookplaat
Glaskeramisch kookvlak: Het apparaat heeft een kookvlak van glaskeramiek met vier
kookzones voor snelle opwarming.
Het kook vlak is porievrij en bovendien ongevoelig voor snelle temperatuurschommelingen.
Daarom kunt u pannen gewoon van een hete op een koude zone zetten.
Het gladde oppervlak is eenvoudig schoon te maken.
Kookzones voor snelle opwarming: Het apparaat heeft kookzones voor snelle opwarming.
Dankzij de bijzonder krachtige stralingselementen wordt de opwarmduur van het
verwarmingselement aanzienlijk verkort.
Als u de kookzones inschakelt, is het mogelijk dat u even een zoemend geluid in het
verwarmingselement hoort. Dit geluid is van fysische aard en heeft geen negatieve
uitwerkingen op de werking van het apparaat. Zodra de kookzone warm genoeg is, verdwijnt
ook het geluid.
Kookzone met één cirkel: De kookplaat heeft een zone met één cirkel. Daardoor biedt uw
apparaat u een kookzone voor kleinere pannen. U kunt dus energie besparen.
Kookzone met twee cirkels: De kookplaat heeft een zone met twee cirkels. Daardoor biedt
uw apparaat u een kookzone met variabele grootte, bijv. voor kleinere pannen. U kunt dus
energie besparen.
Kookzone met drie cirkels: De kookplaat heeft een zone met drie cirkels. Daardoor biedt uw
apparaat u een kookzone met variabele grootte, bijv. voor kleinere pannen. U kunt dus
energie besparen.
Braadpanzone (multifunctionele kookzone): De kookplaat is uitgerust met een
braadpanzone (multifunctionele kookzone). Al naar gelang de instelling kunt u deze zone
gebruiken als ronde of als ovale kookzone.

82
De glaskeramische kookplaat

83
De onderdelen van het bedieningsveld
Tiptoetsen: U bedient uw apparaat met touch-control-tiptoetsen.
Indicaties: Digitale indicaties en verklikkerlampen informeren u over de ingestelde
kookstanden, de functies die u geactiveerd hebt en over de eventueel beschikbare
restwarmte van de betreffende kookzone.
Tiptoets Functie
Aan/Uit
Apparaat in-/uitschakelen (aparte
hoofdschakelaar).
Kookzone met twee cirkels Buitenste verwarmingscirkel in-/uitschakelen.
Kookzone met drie cirkels
Middelste verwarmingscirkel in-/uitschakelen.
Buitenste verwarmingscirkels in-/uitschakelen.
Braadpanzone Buitenste verwarmingscirkel in-/uitschakelen.
Kookstand-keuze Kookstand / timer verhogen.
Kookstand-keuze Kookstand / timer verlagen.
Timer Timer in-/uitschakelen.
Vergrendeling Bedieningsveld ver-/ontgrendelen.
Verklikkerlampje Beschrijving
Aan/Uit Het apparaat is in-/uitgeschakeld.
Kookzone met twee cirkels De buitenste verwarmingscirkel is ingeschakeld.
Kookzone met drie cirkels
voren
De middelste verwarmingscirkel is ingeschakeld.
Kookzone met drie cirkels
achteren
De buitenste verwarmingscirkel is ingeschakeld.
Braadpanzone De buitenste verwarmingscirkel is ingeschakeld.
Timerfunctie De betreffende kookzone wordt bediend met de timer.

84
De functies van uw apparaat
Aankookautomaat: Alle kookzones van de kookplaat zijn regelbaar in veertien trappen en
zijn uitgerust met een aankookautomaat.
Met de aankookautomaat werkt de kookzone gedurende een bepaalde tijd op volle
capaciteit en schakelt dan automatisch terug naar de ingestelde kookstand.
De duur van de automatische aankookkracht is afhankelijk van de gekozen kookstand.
Rechtstreekse regeling van elke kookzone: Elke kookzone wordt rechtstreeks geregeld met
behulp van bijbehorende touch-control-tiptoetsen.
Foutindicatie: Een van Fout is zichtbaar op het display, als er een storing in het apparaat
is opgetreden (zie de paragraaf „Hulp bij storingen“).
Kinderbeveiliging: Met deze functie kunt u het kookveld vergrendelen zodat het niet per
ongeluk kan worden ingeschakeld.
Restwarmte-indicatie: Een van Restwarmte is zichtbaar op het display als de kookzone
een temperatuur heeft, waarbij er kans is op verbrandingen.
Als de glaskeramische kookplaat is uitgeschakeld, gaat de restwarmte-indicatie pas uit als de
kookzone zodanig is afgekoeld dat er geen kans meer is op verbrandingen.
Veiligheidsuitschakeling bedieningsveld: Als er vocht (bijv. een natte doek) of overkokende
vloeistof op het bedieningsveld terecht komt, worden alle kookzones onmiddellijk
uitgeschakeld.
Veiligheidsuitschakeling kookplaat: Als u – nadat u de kookplaat hebt ingeschakeld – niet
binnen ca. 10 seconden een kookstand op één van de kookzones hebt ingesteld, schakelt de
kookplaat zichzelf automatisch uit.
Als u één of meerdere tiptoetsen langer dan ca. 10 seconden ingedrukt houdt, bijv. doordat
u er een pan op hebt gezet, schakelt de kookplaat zichzelf automatisch uit.
Indicatie Beschrijving
Apparaat is ingeschakeld.
-
Kookstand Ingestelde kookstand van de kookzone.
. Decimaalpunt Ingestelde tussenkookstand van de kookzone.
Warmhoud-stand Warmhoudstand is ingesteld.
Aankook-automaat Aankookautomaat is geactiveerd.
Foutindicatie Er is een storing opgetreden.
Restwarmte-indicatie De kookzone is uitgeschakeld, maar nog heet.
Kinder-beveiliging Kinderbeveiliging is geactiveerd.
Veiligheidsuitschakeling is geactiveerd.

85
Als alle kookzones uitgeschakeld worden, schakelt het kookveld zichzelf na ca. 10 seconden
automatisch uit.
Veiligheidsuitschakeling kookzone: Als u een kookzone binnen een bepaalde tijd niet
uitschakelt resp. verandert, schakelt de kookzone zichzelf automatisch uit.
Timer: De timer is voorzien van twee functies:
•van de automatische uitschakeling. Als de ingestelde tijd is verstreken, schakelt de
kookzone zichzelf automatisch uit.
•de programmaklok („eierwekker“). Als de ingestelde tijd is verstreken, weerklinkt er een
akoestisch signaal.
De timer kan in intervallen van telkens één minuut ingesteld worden van een tot 99 minuten.
Warmhoudstand: Met de warmhoudstand (kookstand ) kunt u spijzen warmhouden.
Vergrendeling: U kunt het bedieningsveld met uitzondering van de tiptoets „Aan/Uit“ op elk
gewenst moment vergrendelen om te voorkomen dat de instellingen versteld worden.
Kookstand Uitschakeling na
, , ,
6 uur
, , ,
5 uur
,
4 uur
, , , ,
1,5 uur

86
De kookplaat bedienen
Vóór het eerste gebruik
1. Was de glaskeramische kookplaat schoon met warm water en afwasmiddel en wrijf ze
droog (met een vaatdoek).
.
2. Zet de kookzones ter controle achtereenvolgens even aan.
Touch control-tiptoetsen
Om de touch control-tiptoetsen te bedienen, legt u uw vinger van boven af op het gewenste
veld, totdat de betreffende indicaties oplichten of uit gaan of totdat de gewenste functie
wordt uitgevoerd.
Voor een snellere instelling houdt u uw vinger op de tiptoets, totdat de gewenste waarde
bereikt is.
Alle instellingen worden bevestigd met een akoestisch signaal.
Let op!
Schade aan het glaskeramische oppervlak.
Scherpe en schurende reinigingsmiddelen kunnen het glaskeramische oppervlak
beschadigen.
Gebruik uitsluitend water en afwasmiddel.
Let op!
Schade aan het glaskeramische oppervlak.
Ingebrande stickers en folie beschadigen het glaskeramische oppervlak.
Verwijder stickers en folie.
Als u de kookplaat voor het eerst gebruikt, bestaat de kans dat er even een lichte
geur verspreid wordt.

87
Apparaat inschakelen
Het hele apparaat wordt ingeschakeld met de tiptoets „Aan/Uit“ .
Houd uw vinger gedurende ca. twee seconden op de tiptoets „Aan/Uit“ .
Op de digitale indicatie brandt .
Apparaat uitschakelen
Om het apparaat helemaal uit te schakelen, moet u op de tiptoets „Aan/Uit“ drukken.
Houd uw vinger gedurende ca. twee seconden op de tiptoets „Aan/Uit“ .
De digitale indicatie gaat uit.
Veiligheidsuitschakeling opheffen
Om de geactiveerde veiligheidsuitschakeling op te kunnen heffen, moet u het apparaat met
de tiptoets „Aan/Uit“ uitschakelen en opnieuw inschakelen.
Nu is het apparaat bedrijfsklaar.
De kookstand instellen
U stelt de kookstand in met de tiptoetsen „Kookstandkeuze“ en die bij de kookzone
horen u verandert ze ook met deze toetsen.
De kookstand hoger zetten
Als u niet binnen de tien seconden een kookstand instelt, schakelt het apparaat
zichzelf automatisch uit.
De digitale indicatie van de kookzones geeft aan dat er restwarmte is.

88
Raak de tiptoets „Kookstandkeuze“ aan.
Op de digitale indicatie is de gewenste kookstand zichtbaar.
Kookstand lager zetten
Raak de tiptoets „Kookstandkeuze“ aan.
Op de digitale indicatie is de gewenste kookstand zichtbaar.
De warmhoudstand instellen
De kookstand doet bij alle kookzones ook dienst als warmhoudstand.
Raak de tiptoets „Kookstandkeuze“ of aan.
Op de digitale indicatie is de gewenste wamhoudstand zichtbaar .
De kookzone uitschakelen
Er zijn twee manieren om een kookzone uit te schakelen.
Manier 1
Raak de tiptoetsen „Kookstandkeuze“ en tegelijkertijd aan.
Op de digitale indicatie brandt .
De kookzone is uitgeschakeld.
Manier 2
Raak de tiptoets „Kookstandkeuze“ aan totdat op de digitale indicatie verschijnt.
Op de digitale indicatie brandt .
De kookzone is uitgeschakeld.
Waarschuwing!
Kans op verbrandingen als gevolg van restwarmte.
Als u de kookzone hebt uitgeschakeld, heeft deze enige tijd nodig om af te koelen.
Houd de glaskeramische kookplaat in het oog.
Houd de restwarmte-indicatie in het oog.
Als alle kookzones zijn uitgeschakeld, schakelt het kookveld zichzelf na 10 seconden
automatisch uit.

89
.
De kookzone met twee cirkels in- en uitschakelen
Al naar gelang de grootte van de poten en pannen kunt u bij de kookzone met twee cirkels
met de tiptoets „Kookzone met twee cirkels“ behalve de kleine kookzone ook de grotere
verwarmingscirkel mee inschakelen.
De buitenste verwarmingscirkel inschakelen
1. Stel de gewenste kookstand in.
Op de digitale indicatie is de gewenste kookstand zichtbaar.
2. Raak de tiptoets „Kookzone met twee cirkels“ aan.
De buitenste verwarmingscirkel wordt ingeschakeld.
Het verklikkerlampje „Kookzone met twee cirkels“ brandt.
De digitale indicatie van de kookzones geeft aan dat er restwarmte is.
Na een stroomuitval wordt de beschikbare restwarmte niet meer op de digitale
indicatie aangegeven.
De restwarmte kan gebruikt worden om spijzen te smelten en warm te houden.
U kunt deze alleen mee inschakelen als u voor de kleinere verwarmingscirkel reeds
een kookstand hebt ingesteld.

90
De buitenste verwarmingscirkel uitschakelen
Raak de tiptoets „Kookzone met twee cirkels“ aan.
De buitenste verwarmingscirkel wordt uitgeschakeld.
Het verklikkerlampje „Kookzone met twee cirkels“ gaat uit.
De braadpanzone in- en uitschakelen
Al naar gelang de grootte van de poten en pannen kunt u bij de braadpanzone met de
tiptoets „Braadpanzone“ behalve de kleine kookzone ook de grotere verwarmingscirkel mee
inschakelen.
De braadpanzone inschakelen
1. Stel de gewenste kookstand in.
Op de digitale indicatie is de gewenste kookstand zichtbaar.
2. Raak de tiptoets „Braadpanzone“ aan.
De buitenste verwarmingscirkel wordt ingeschakeld.
Het verklikkerlampje „Braadpanzone“ brandt.
U kunt deze alleen mee inschakelen als u voor de kleinere verwarmingscirkel reeds
een kookstand hebt ingesteld.

91
De buitenste verwarmingscirkel uitschakelen
Raak de tiptoets „Braadpanzone“ aan
De buitenste verwarmingscirkel wordt uitgeschakeld.
Het verklikkerlampje „Braadpanzone“ gaat uit.
De kookzone met drie cirkels in- en uitschakelen
Al naar gelang de grootte van de poten en pannen kunt u bij de kookzone met drie cirkels
met de tiptoets „Kookzone met drie cirkels“ behalve de kleine kookzone ook de grotere
verwarmingscirkel mee inschakelen.
Kookzone met drie cirkels inschakelen
1. Stel de gewenste kookstand in.
Op de digitale indicatie is de gewenste kookstand zichtbaar.
2. Raak de tiptoets „Kookzone met drie cirkels“ aan.
De middelste verwarmingscirkel wordt ingeschakeld.
Het verklikkerlampje „Kookzone met drie cirkels voren“ brandt.
U kunt deze alleen mee inschakelen als u voor de kleinere verwarmingscirkel reeds
een kookstand hebt ingesteld.

92
3. Raak de tiptoets „Kookzone met drie cirkels“ aan.
De buitenste verwarmingscirkel wordt ingeschakeld.
Het verklikkerlampje „Kookzone met drie cirkels achteren“ brandt.
De buitenste verwarmingscirkel uitschakelen
Raak de tiptoets „Kookzone met drie cirkels“ aan.
De buitenste resp. de middelste verwarmingscirkel wordt uitgeschakeld.
Het bijbehorende verklikkerlampje „Kookzone met drie cirkels“ gaat uit.
De aankookautomaat gebruiken
De aankookautomaat inschakelen
De duur van de automatische aankookkracht is afhankelijk van de gekozen kookstand.
Stel met de tiptoets „Kookstandkeuze“ de gewenste kookstand ( tot ) in.
Op de digitale indicatie is de ingestelde kookstand zichtbaar.
Op de digitale indicatie licht na ca. vijf seconden op.
De aankookautomaat is geactiveerd.
Als de aankooktijd verstreken is, wordt de ingestelde kookstand zichtbaar.
De aankookautomaat uitschakelen
U kunt de aankookautomaat alleen uitschakelen als deze geactiveerd is.
Raak de tiptoets „Kookstandkeuze“ aan.
Op de digitale indicatie is de ingestelde kookstand zichtbaar.
De aankookautomaat is uitgeschakeld.
Als er restwarmte beschikbaar is, wordt de aankookautomaat voor deze kookzone
niet in werking gesteld.
Als u bij geactiveerde aankookfunctie een hogere kookstand kiest, bijv. in plaats
van , dan wordt de aankooktijd automatisch aan de gekozen kookstand
aangepast.
Als u een lagere kookstand kiest, wordt de aankookautomaat onmiddellijk
uitgeschakeld.

93
De aankookautomaat niet gebruiken
U gebruikt de kookzone zonder aankookautomaat als u de gewenste kookstand instelt met
de tiptoets „Kookstandkeuze“ .
De kinderbeveiliging gebruiken
Met de kinderbeveiliging kunt u het kookveld beveiligen tegen ongewenst gebruik.
De kinderbeveiliging inschakelen
Het apparaat is ingeschakeld en alle kookzones zijn uitgeschakeld.
1. Raak de tiptoets „Vergrendeling“ gedurende ca. drie seconden aan.
Er weerklinkt een signaal.
2. Raak een willekeurige tiptoets „Kookstandkeuze“ aan.
Op de digitale indicatie verschijnt
De kinderbeveiliging is geactiveerd.
Het apparaat schakelt zichzelf na enkele seconden automatisch uit.

94
De kinderbeveiliging overbruggen
Als u het apparaat eenmalig wilt gebruiken, kunt u de kinderbeveiliging overbruggen (totdat
u het apparaat de volgende keer uitschakelt). Als u het apparaat de volgende keer inschakelt,
is de kinderbeveiliging automatisch weer actief.
1. Het apparaat inschakelen.
Op de digitale indicatie brandt .
2. Raak de tiptoetsen „Kookstandkeuze“ en tegelijkertijd gedurende één seconde aan.
Er weerklinkt een signaal.
Op de digitale indicatie brandt .
De kinderbeveiliging is uitgeschakeld totdat het apparaat wordt uitgeschakeld.
De kinderbeveiliging uitschakelen
1. Het apparaat inschakelen.
Op de digitale indicatie brandt .
2. Raak de tiptoets „Vergrendeling“ gedurende ca. drie seconden aan
Er weerklinkt een signaal.

95
3. Raak een willekeurige tiptoets „Kookstandkeuze“ aan.
Op de digitale indicatie brandt
De kinderbeveiliging is uitgeschakeld.
Het apparaat schakelt zichzelf na enkele seconden automatisch uit.
De vergrendeling gebruiken
Op elk willekeurig tijdstip van het koken kunt u het bedieningsveld met uitzondering van de
tiptoets “Aan/Uit“ vergrendelen om te voorkomen dat de instellingen versteld worden,
bijv. doordat men er met een doek over heen veegt.
Het bedieningsveld vergrendelen
Raak de tiptoets „Vergrendeling“ gedurende ca. twee seconden aan.
Op de digitale indicatie licht gedurende vijf seconden op.
Het bedieningsveld is vergrendeld.
Als u een tiptoets aanraakt, brandt op de digitale weergav .

96
Het bedieningsveld ontgrendelen
Raak de tiptoets „Vergrendeling“ gedurende ca. twee seconden aan.
U kunt het bedieningsveld gebruiken.
U kunt de timer op twee manieren gebruiken:
•als automatische uitschakeling
voor een kookstand die u hebt ingesteld
•als programmaklok („eierwekker“) bij een uitgeschakelde kookzone.
Kies een kookzone
1. Raak de tiptoets „Timer“ aan.
Op de timerindicatie verschijnt .
De verklikkerlampjes „Timerfunctie“ van de kookzones branden.
Het verklikkerlampje „Timerfunctie“ van de instelbare kookzone knippert.
2. Raak de tiptoets „Timer“ aan.
Het verklikkerlampje „Timerfunctie“ van de volgende instelbare kookzone knippert.
Als u het apparaat uitschakelt, wordt de vergrendeling automatisch
opgeheven.

97
De tijd instellen
1. Kies een kookzone.
Het verklikkerlampje „Timerfunctie“ van de instelbare kookzone knippert.
2. Stel de gewenste tijd in met de tiptoetsen „Kookstandkeuze“ of .
Op de timerindicatie verschijnt de ingestelde tijd.
De tijd voor de gekozen kookzone is na ca. vijf seconden geactiveerd.
Als de tijd verstreken is, verschijnt op de timerindicatie , de verklikkerlamp „Timerfunctie“
knippert en er weerklinkt gedurende ca. twee minuten een akoestisch signaal.
De overgebleven tijd tonen
1. Kies de gewenste kookzone.
Op de timerindicatie verschijnt de overgebleven tijd.
Het verklikkerlampje „Timerfunctie“ dat bij de kookzone hoort, knippert.
De tijd veranderen
1. Kies de gewenste kookzone.
Op de timerindicatie verschijnt de overgebleven tijd.
Het verklikkerlampje „Timerfunctie“ van de instelbare kookzone knippert.
Voor een snellere instelling kunt u de tiptoetsen „Kookstandkeuze“ of
aanraken totdat de gewenste waarde bereikt is.
Als u een tijd voor meerdere kookzones hebt ingesteld, geeft de timerindicatie altijd
de kortste gaarkookduur aan en knippert het controlelampje „Timerfunctie“ van de
bijbehorende kookzone.
U schakelt het akoestische signaal uit door de tiptoets „Timer“ aan te raken.

98
2. Stel de gewenste tijd in met de tiptoetsen „Kookstandkeuze“ of .
Op de timerindicatie verschijnt de ingestelde tijd.
De tijd voor de gekozen kookzone is nu veranderd.
De kookzone en de automatische uitschakeling uitschakelen
Als u een kookzone uitschakelt, zijn automatisch ook de timerinstellingen van deze kookzone
uitgeschakeld.
De timer uitschakelen
1. Kies de gewenste kookzone.
Op de timerindicatie verschijnt de overgebleven tijd.
Het verklikkerlampje „Timerfunctie“ van de instelbare kookzone knippert.
2. Stel de tijd met de tiptoets „Kookstandkeuze“ in op nul.
Op de timerindicatie verschijnt .
De timer is uitgeschakeld.

99
Tips voor het gebruik van de kookplaat
Kookpannen
Hoe beter de pan, des te beter is het kookresultaat.
• Goede kookpannen herkent u aan de bodem van de pan. De bodem moet zo dik en zo vlak
mogelijk zijn.
• Als u nieuwe potten en pannen koopt, moet u letten op de diameter van de bodem.
Fabrikant geven vaak de bovenste diameter van de rand van de pan aan.
• Pannen met een bodem van aluminium of koper kunnen metallische verkleuringen op het
glaskeramische oppervlak achterlaten. Die zijn moeilijk of helemaal niet meer weg te
krijgen.
• Gebruik geen gietijzeren pannen of pannen waarvan de bodem beschadigd is, die ruw zijn
of bramen hebben. Tijdens het schuiven kunnen er krassen ontstaan die u niet meer
wegkrijgt.
• Als ze koud zijn, zijn panbodems meestal lichtjes naar binnen toe gewelfd (concaaf). Zij
mogen in geen geval naar buiten toe gewelfd (convex) zijn.
• Als u speciale pannen gebruikt, (bijv. snelkookpannen, dubbelwandige kookpannen, woks
enz.) moet u zich houden aan de informatie van de fabrikant.
Algemene instructies
• De bodem moet altijd schoon en droog zijn.
• Om lelijke krassen op het glaskeramische kookoppervlak te voorkomen, mag u de potten
en pannen bij het verplaatsen niet schuiven, maar moet u ze optillen.
• Krassen kunnen ook ontstaan als gevolg van zandkorrels (bijv. van de zojuist
schoongemaakte groente) die samen met de pan over het kookoppervlak getrokken
worden.
• Gebruik hoge pannen voor gerechten met veel vloeistof, dan kan er ook niets overkoken.

100
Energie besparen
• Zet potten en pannen altijd eerst op de kookplaat voordat u de kookzone inschakelt.
• Vuile kookzones en vuile onderkanten van pannen verhogen het stroomverbruik.
• Doe – indien mogelijk – altijd een deksel op uw potten en pannen.
• Zet de kookzones altijd uit voordat de gaarkooktijd verstreken is. Zo maakt u gebruik van
de restwarmte, bijv. om spijzen warm te houden of te smelten.
• De bodem van de pan en de kookzone moeten even groot zijn.
• Bij gebruikmaking van een snelkookpan is de gaarkooktijd tot 50% korter.
Koken met en zonder aankookautomaat
De aankookautomaat is geschikt voor:
• Gerechten die koud opgezet worden, op een hoge pit verhit worden en in de gaarstand
niet permanent in het oog moeten worden gehouden,
• gerechten die in een hete pan gedaan worden.
De aankookautomaat is niet geschikt voor:
• hachee, rollades en andere stoofgerechten, die totdat ze goed bruin zijn tijdens het
braden vaak omgedraaid, overgoten en klaargestoofd moeten worden,
• knoedels, pastagerechten met veel vloeistof,
• het gaarkoken met snelkookpannen,
• zeer grote hoeveelheden soep/eenpansgerechten met meer dan 2 liter vocht.
U bespaart waardevolle energie, als u zich houdt aan de onderstaande punten:

101
Algemene instructies:
• Bij het koken zonder aankookautomaat raden wij u aan om voor het aankoken/aanbraden
van de spijzen een hoge stand te kiezen (met de -toets) en de spijzen vervolgens gaar
te laten worden in de desbetreffende gaarkookstand.
• Houd de eerste kookprocessen in het oog! Hierbij kunt u vaststellen welke kookstand voor
"uw gerechten" in de door "u normaal gesproken klaargemaakte hoeveelheid" met "uw
kookpannen" optimaal is. U zult de voordelen van de automaat dan snel op hun waarde
weten te schatten en u krijgt een goed gevoel voor uw nieuwe kookplaat.
Duur van de aankookkracht
De duur van de automatische aankookkracht is afhankelijk van de gekozen kookstand.
Kookstand Duur van de aankookkracht [min]
1
1,7
3
4,8
5,5
6,5
8,2
10,2
12,3
2
2,5
3,5
4,5
---

102
Richtwaarden voor het koken met het fornuis
De gegevens in de volgende tabellen zijn richtwaarden. Welke schakelaarstand voor
kookprocessen nodig is, hangt af van de kwaliteit van de pannen en van de levensmiddelen
(soort en hoeveelheid) die u gebruikt.
1)
Bij het koken zonder automaat kunt u de aankooktijd voor elke situatie apart kiezen.
Schakelaar-
stand
Aankooktijd
van de
automaat
1)
[min.]
Gaarkookfase Voorbeelden van de toepassing
Aankoken
Aanbraden
Frituren
Aankoken van grote hoeveelheden
vocht,
pasta koken,
aanbraden van vlees,
(hachee aanbraden, gestoofd vlees)
4,5
Sterk braden Biefstukken, lendestukken,
rijfkoek,
braadworsten,
pannekoeken
3,5
2,0
Gebraad Schnitzels/karbonades,
lever, vis,
gehaktballen, spiegeleieren
10,2
Koken
Koken tot 1,5 l vocht,
aardappelen, groente
6,5
4,8
Smoren
Stoven
Wellen
Smoren en stoven van
kleine hoeveelheden groente,
wellen van rijst en
melkgerechten
1,7
1,0
Smelten Boter smelten,
gelatine oplossen,
chocolade smelten
0,5
Warm houden
Spijzen warm houden
Wij raden u aan, de schakelaar bij het aankoken of aanbraden in de aankookstand
„ “ te zetten en spijzen met een langere gaarkooktijd vervolgens in de
desbetreffende gaarkookstand gaar te laten worden.

103
Reiniging en onderhoud
Kookplaat
Lichte verontreinigingen
1. Veeg het glaskeramische oppervlak schoon met een vochtige doek en een beetje
afwasmiddel.
2. Wrijf het oppervlak vervolgens droog met een schone doek. Er mogen geen resten van het
reinigingsmiddel op het oppervlak achterblijven.
3. Maak het hele glaskeramische oppervlak eenmaal per week grondig schoon met een
normaal in de handel verkrijgbare reiniger voor glaskeramiek of edelstaal.
4. Maak het glaskeramische oppervlak vervolgens schoon met veel schoon water en veeg het
droog met een schone, pluisvrije doek.
Vastgeplakte verontreinigingen
1. Om overgekookte spijzen of vastgeplakte spatten te verwijderen, moet u een
reinigingsschraper gebruiken.
2. Zet de reinigingsschraper schuin op het glaskeramisch oppervlak.
3. Verwijder de verontreinigingen door met het mes een glijdende beweging te maken.
Let op! U mag niet met reinigingsmiddelen aan een heet glaskeramisch oppervlak
komen! Alle reinigingsmiddelen moeten na het reinigen met veel schoon water
verwijderd worden, omdat zij etsend kunnen gaan werken als ze opnieuw verhit
worden!
Gebruik geen bijtende reinigingsmiddelen zoals gril- of ovensprays, grove
schuurmiddelen of krassende pannenreinigsmiddelen.
Maak het glaskeramische kookoppervlak telkens na gebruik schoon, als het
handwarm of koud is. Op die manier voorkomt u dat vuil kan vastbranden.
Verwijder kalk- en waterranden, vetspatten en metallisch glimmende verkleuringen
met een normaal in de handel verkrijgbare reiniger voor glaskeramiek of edelstaal.

104
.
Speciale verontreinigingen
1. Ingebrande suiker, gesmolten kunststof, aluminiumfolie of andere smeltbare materialen
moet u onmiddellijk, terwijl ze nog heet zijn met een reinigingsschraper verwijderen.
2. Vervolgens moet u de afgekoelde kookplaat normaal reinigen.
Hulp bij storingen
Mogelijk is de storing slechts een kleine fout die u aan de hand van de volgende instructies
zelf kunt verhelpen.
Als u de storing met de onderstaande informatie niet kunt verhelpen, neem dan contact op
met uw dealer of met de klantendienst.
Als de glaskeramische kookplaat gebroken mocht zijn, vermeld dan tijdens uw gesprek met
de klantenservice het driecijferige getal dat op de glasplaat staat.
Reinigingsschrapers en glaskeramische reinigers krijgt u bij de vakhandel.
Let op! Als u met een reinigingsschraper op een hete kookzone werkt, loopt u kans
op verbrandingen!
Voor het geval dat de kookzone met de daarop gesmolten materialen reeds is
afgekoeld, moet u deze vóór het reinigen nogmaals opwarmen.
Krassen of donkere vlekken in het glaskeramische oppervlak die bijv. ontstaan zijn
als gevolg van pannenbodems met scherpe kanten, kunt u niet meer verwijderen. Zij
hebben echter geen nadelige invloed op de werking van de kookplaat.
Als u een beroep doet op de klantendienst en mocht blijken dat de fout
veroorzaakt wordt door foutieve bediening, dan is het bezoek van de
servicemonteur ook tijdens de garantieperiode niet gratis.

105
Storing Oorzaak Oplossing
De digitale indicatie is
uitgevallen.
De stroom is uitgevallen. 1. Wacht totdat de
stroomuitval voorbij is.
2. Apparaat inschakelen.
De zekering in de
huisinstallatie is
doorgeslagen.
Nieuwe zekering inzetten.
De zekering slaat opnieuw
door:
1. Apparaat uitschakelen
2. Waarschuw een elektricien.
De beveiliging tegen
oververhitting heeft alle
kookzones uitgeschakeld
en de werking ervan
geblokkeerd.
Laat de kookzones afkoelen.
De foutindicatie knippert. De beveiliging tegen
oververhitting heeft de
kookzone met twee cirkels
uitgeschakeld en de
werking ervan geblokkeerd.
Laat de kookzone afkoelen.
Er is vloeistof of een
vochtige doek op de
touch-control-tiptoetsen
terechtgekomen.
1. Koppel het apparaat van
het elektriciteitsnet af
(zekering verwijderen).
2. Laat het apparaat afkoelen.
3. Maak de glaskeramische
kookplaat schoon.
4. Koppel het apparaat aan
het elektriciteitsnet
(zekering inzetten).
5. Apparaat inschakelen.
De foutindicatie blijft
knipperen:
1. Apparaat uitschakelen
2. Koppel het apparaat van
het elektriciteitsnet af
(zekering verwijderen).
3. Waarschuw de
klantenservice.

106
Het glaskeramische
oppervlak heeft scheuren,
barsten of breuken.
Er zijn harde resp. spitse
voorwerpen op het
glaskeramische oppervlak
gevallen.
1. Apparaat uitschakelen.
2. Koppel het apparaat van
het elektriciteitsnet af
(zekering verwijderen).
3. Waarschuw de
klantenservice.
De kookzones werken niet. Het apparaat is niet
ingeschakeld.
Apparaat inschakelen.
De gewenste kookzone is
niet ingeschakeld..
Kookzone inschakelen.
De gewenste kookstand is
niet ingesteld.
De kookstand instellen.
De zekering in de
huisinstallatie is
doorgeslagen.
Nieuwe zekering inzetten.
De zekering slaat opnieuw
door:
1. Apparaat uitschakelen
2. Waarschuw een elektricien.
De kookzones kunnen niet
worden ingeschakeld.
De kinderbeveiliging is niet
ingeschakeld.
Kinderbeveiliging uitschakelen
(zie de paragraaf
„Kinderbeveiliging“).
Nadat het apparaat is
ingeschakeld, zijn er meer
dan 10 seconden
verstreken.
Apparaat opnieuw
inschakelen.
Nadat de kookzone is
gekozen, zijn er meer dan
10 seconden verstreken.
Kies opnieuw een kookzone.
De kookzones kunnen niet
worden uitgeschakeld.
Nadat de kookzone is
gekozen, zijn er meer dan
10 seconden verstreken.
Kies opnieuw een kookzone.
Storing Oorzaak Oplossing

107
De restwarmte-indicatie is
uitgevallen.
De stroom is even
uitgevallen.
1. Wacht totdat de
stroomuitval voorbij is.
Apparaat inschakelen.
De beschikbare restwarmte
wordt niet meer aangegeven.
De elektronica is defect. 1. Apparaat uitschakelen.
2. Koppel het apparaat van
het elektriciteitsnet af
(zekering verwijderen).
3. Waarschuw de
klantenservice.
De restwarmte-indicatie
geeft niets aan.
De kookzone was slechts
kort ingeschakeld.
Als de kookzone koud is, is er
geen sprake van een storing.
De elektronica is defect. 1. Apparaat uitschakelen.
2. Koppel het apparaat van
het elektriciteitsnet af
(zekering verwijderen).
3. Waarschuw de
klantenservice.
De stroom was uitgevallen. De beschikbare restwarmte
wordt niet meer aangegeven.
De aankookautomaat kan
niet worden ingeschakeld.
De kookzone heeft nog
restwarmte.
Laat de kookzone afkoelen.
De kookstand is ingesteld
met de tiptoets
„Kookstandkeuze“ .
1. De kookzone uitschakelen.
2. De kookstand instellen met
de tiptoets
„Kookstandkeuze“ .
De automatische
uitschakeling van de timer
kan niet ingesteld worden.
Er is geen kookzone
gekozen.
Kies een kookzone.
Het bedieningsveld is
vergrendeld.
Bedieningsveld ontgrendelen.
De automatische
uitschakeling van de timer
kan niet uitgeschakeld
worden.
Er is geen kookzone
gekozen.
Kies een kookzone.
Het bedieningsveld is
vergrendeld.
Bedieningsveld ontgrendelen.
Storing Oorzaak Oplossing

108
De programmaklok van de
timer kan niet ingesteld
worden.
De automatische
uitschakeling van een
kookzone is ingesteld.
Automatische uitschakeling
uitschakelen.
Het bedieningsveld is
vergrendeld.
Bedieningsveld ontgrendelen.
De programmaklok van de
timer kan niet
uitgeschakeld worden.
Het bedieningsveld is
vergrendeld.
Bedieningsveld ontgrendelen.
Het apparaat reageert niet
gegevens die met het
bedieningsveld ingevoerd
worden.
Apparaat is uitgeschakeld. Apparaat inschakelen.
De elektronica is defect. 1. Apparaat uitschakelen.
2. Koppel het apparaat van
het elektriciteitsnet af
(zekering verwijderen).
3. Waarschuw de
klantenservice.
De beveiliging tegen
oververhitting heeft alle
kookzones uitgeschakeld
en de werking ervan
geblokkeerd.
Laat de kookzones afkoelen.
Storing Oorzaak Oplossing

109
Montage-instructie
Technische gegevens
Afmetingen van het apparaat
Uitsnijmaten
Veiligheidsinstructies
Het apparaat mag uitsluitend gemonteerd en elektrisch aangesloten worden door hiervoor
opgeleide en bevoegde vakmensen.
De algemene richtlijnen voor het gebruik van elektrische apparatuur, de voorschriften van
uw energiebedrijf en de instructies in deze montage-instructie dienen in acht te worden
genomen.
Dit apparaat voldoet voor wat de bescherming tegen brandgevaar betreft aan de norm EN
60 335-2-6. Apparaten van dit type mogen eenzijdig ingebouwd worden naast hoge kasten
of muren.
Het apparaat monteren
Bij het inbouwen, uitbouwen en in geval van reparaties moet het apparaat van het
elektriciteitsnet afgekoppeld worden.
Als u het apparaat uitpakt, moet u eerst controleren of het helemaal onbeschadigd is en of
er geen sprake is van duidelijke transportschade. Beschadigde apparaten mogen niet
gemonteerd resp. aangesloten worden.
Eventuele transportschade dient onmiddellijk bij de leverancier of het transportbedrijf
gereclameerd te worden.
De verpakking dient op milieuvriendelijke wijze opgeruimd te worden.
Breedte 766 mm
Diepte 506 mm
Hoogte 47 mm
Breedte 750 mm
Diepte 490 mm
Hoekradius R5
Houdt u zich a.u.b. aan deze instructies, want anders verliezen uw garantie-
aanspraken jegens de fabrikant hun geldigheid.

110
U dient zich te houden aan de vereiste minimumafstanden ten opzichte van andere
apparatuur in uw keuken (kijk in de technische specificaties van die apparatuur).
Het apparaat mag niet meteen naast deuren of onder vensters gemonteerd worden.
Opengaande en openspringende vensters kunnen de hete kookpannen van de kookplaat
slaan.
Er mogen geen schuiflades onder de kookplaat gemonteerd worden.
De contactbeveiliging moet door inbouw gegarandeerd zijn.
De stevige stand van de inbouwkast moet voldoen aan DIN 68930.
Ter bescherming tegen vocht dienen alle uitgezaagde snijvlakken met geschikt
afdichtingsmateriaal verzegeld te worden.
Bij betegelde werkbladen moeten de voegen van het opleggedeelte van de kookplaat
helemaal gevoegd zijn.
Bij platen van natuursteen, kunststeen of keramiek moeten de snapveren met een geschikte
kunsthars of met tweecomponentenlijm vastgeplakt worden.
Controleer of de afdichting in het oplegframe perfect zit en geen openingen heeft.
U mag geen extra silicone-afdichting aanbrengen. Dit bemoeilijkt het uitbouwen in geval
van reparaties.
Bij demontage moet de kookplaat vanaf de onderzijde eruit gedrukt worden.
Maak het uitgezaagde gedeelte van het werkblad schoon.
Het apparaat elektrisch aansluiten
1. Sluit de kabel op het apparaat en op de netaansluitklem aan.
2. Breng een trekontlasting op de kabel aan.
3. Klemverbindingen controleren.
4. Maak het apparaat reinigen (zie „Vóór het eerste gebruik“).
5. Controleer of het apparaat bedrijfsklaar is.
Het apparaat is elektrisch aangesloten.
GEVAAR!
Levensgevaarlijk door elektrische stroom.
Op de netaansluitklem kan spanning staan.
1. Houdt u zich aan de veiligheidsregels van de elektrotechniek.
2. Maak de netaansluitklem spanningsvrij.
Let op!
Schade door elektrische stroom.
Loszittende en onvakkundig gemaakte klemverbindingen veroorzaken
spanningsoverslagen.
1. Houdt u zich aan de voorschriften bij het maken van klemverbindingen.
2. Breng een trekontlasting op de kabel aan.

111
Service
In de paragraaf „Hulp bij storingen“ staan enkele storingen vermeld die u zelf kunt
verhelpen.
Lees in geval van een storing eerst die paragraaf.
Is het een technische storing?
Neem dan contact op met onze klantenservice of met één van onze servicepartners.
Bereid het gesprek in elk geval goed voor. Zo vereenvoudigt u de diagnose en de beslissing
of een bezoek van een servicemonteur echt noodzakelijk is.
Noteer het volgende zo nauwkeurig mogelijk:
• Welke storing treedt er op?
• Wanneer treedt de storing op?
Noteer voor het gesprek absoluut de volgende identificatienummers op het type-
aanduidingsplaatje van uw apparaat:
• Modelbenaming,
• prod.nr. (9 cijfers),
•ser.nr. (8 cijfers).
Wij raden u aan, de identificatienummers hier te noteren, zodat u ze steeds bij de hand hebt:
Model: . . . . . . . . . . . . . . . . . . . . . . . . . . . . . . .
Prod. nr.: . . . . . . . . . . . . . . . . . . . . . . . . . . . . .
Ser.nr.: . . . . . . . . . . . . . . . . . . . . . . . . . . . . . . .
Wanneer moeten wij u ook tijdens de garantieperiode kosten in rekening brengen?
• Als u de storing met behulp van de storingstabel (zie de paragraaf „Hulp bij storingen“)
zelf had kunnen verhelpen,
• als de servicemonteur meerdere malen langs moet komen, omdat hij vóór zijn bezoek niet
alle belangrijke informatie gekregen heeft en dus bijv. reserve-onderdelen moet gaan
halen. U kunt deze extra ritten voorkomen als u het telefoongesprek op de in het
bovenstaande beschreven wijze goed voorbereidt.

112
Hob mounting / Montage de la table de cuisson /
De kookplaat monteren
Step / Etape / Stap 1
Step / Etape / Stap 2
The electrical connection should be performed by a qualified electrician according
to the information in the „Electrical connection“ section on page 35.
Le branchement électrique doit être effectué par un électricien spécialisé confor-
mément aux informations du chapitre « Branchement électrique de l'appareil » page
73.
De elektrische aansluiting dient gemaakt te worden door een vakkundig elektricien
conform de informatie in de paragraaf „Het apparaat elektrisch aansluiten“ op
pagina 110.

113
Step / Etape / Stap 3
Step / Etape / Stap 4
Step / Etape / Stap 5

114

115

Hier Typenschild aufkleben
(nur für Werk)
AEG Hausgeräte
Postfach 1036
D-90327 Nürnberg
http://www.aeg.hausgeraete.de
© Copyright by AEG
822 924 333-F-240204
Subject to modification without notice
Sous réserve de modifications
Wijzigingen voorbehouden
-
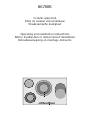 1
1
-
 2
2
-
 3
3
-
 4
4
-
 5
5
-
 6
6
-
 7
7
-
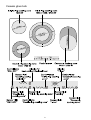 8
8
-
 9
9
-
 10
10
-
 11
11
-
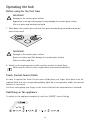 12
12
-
 13
13
-
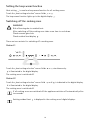 14
14
-
 15
15
-
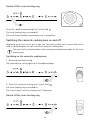 16
16
-
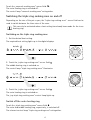 17
17
-
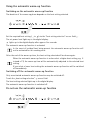 18
18
-
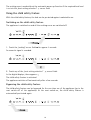 19
19
-
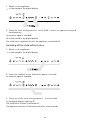 20
20
-
 21
21
-
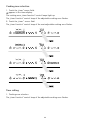 22
22
-
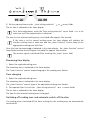 23
23
-
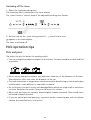 24
24
-
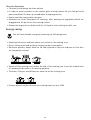 25
25
-
 26
26
-
 27
27
-
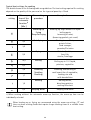 28
28
-
 29
29
-
 30
30
-
 31
31
-
 32
32
-
 33
33
-
 34
34
-
 35
35
-
 36
36
-
 37
37
-
 38
38
-
 39
39
-
 40
40
-
 41
41
-
 42
42
-
 43
43
-
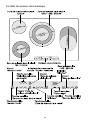 44
44
-
 45
45
-
 46
46
-
 47
47
-
 48
48
-
 49
49
-
 50
50
-
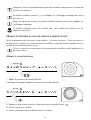 51
51
-
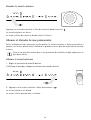 52
52
-
 53
53
-
 54
54
-
 55
55
-
 56
56
-
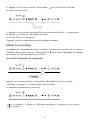 57
57
-
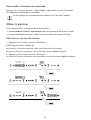 58
58
-
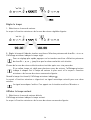 59
59
-
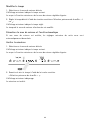 60
60
-
 61
61
-
 62
62
-
 63
63
-
 64
64
-
 65
65
-
 66
66
-
 67
67
-
 68
68
-
 69
69
-
 70
70
-
 71
71
-
 72
72
-
 73
73
-
 74
74
-
 75
75
-
 76
76
-
 77
77
-
 78
78
-
 79
79
-
 80
80
-
 81
81
-
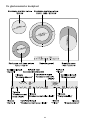 82
82
-
 83
83
-
 84
84
-
 85
85
-
 86
86
-
 87
87
-
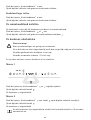 88
88
-
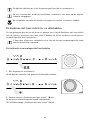 89
89
-
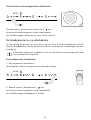 90
90
-
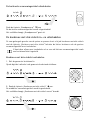 91
91
-
 92
92
-
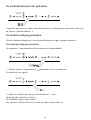 93
93
-
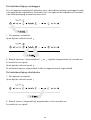 94
94
-
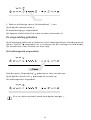 95
95
-
 96
96
-
 97
97
-
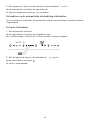 98
98
-
 99
99
-
 100
100
-
 101
101
-
 102
102
-
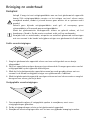 103
103
-
 104
104
-
 105
105
-
 106
106
-
 107
107
-
 108
108
-
 109
109
-
 110
110
-
 111
111
-
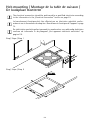 112
112
-
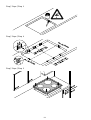 113
113
-
 114
114
-
 115
115
-
 116
116


AEG 86700K-ALHIC8090A Handleiding
- Categorie
- Kookplaten
- Type
- Handleiding
- Deze handleiding is ook geschikt voor
in andere talen
- English: AEG 86700K-ALHIC8090A User manual
- français: AEG 86700K-ALHIC8090A Manuel utilisateur