audizio Nimes Stereo HiFi System de handleiding
- Categorie
- CD-radio's
- Type
- de handleiding

Nimes Stereo HiFi System
Ref. nr.: 102.310,102.311
INSTRUCTION MANUAL
GEBRUIKSAANWIJZING
BEDIENUNGSANLEITUNG
MANUAL DE INSTRUCCIONES
MANUEL D'INSTRUCTIONS
INSTRUKCJA OBSŁUGI
V1.3

2

3
Congratulations to the purchase of this Audizio product. Please read this manual thoroughly prior to using the unit in order to
benefit fully from all features.
Read the manual prior to using the unit. Follow the instructions in order not to invalidate the warranty. Take all precautions to
avoid fire and/or electrical shock. Repairs must only be carried out by a qualified technician in order to avoid electrical shock.
Keep the manual for future reference.
• Prior to using the unit, please ask advice from a
specialist. When the unit is switched on for the first
time, some smell may occur. This is normal and will
disappear after a while.
• The unit contains voltage carrying parts. Therefore do
NOT open the housing.
• Do not place metal objects or pour liquids into the unit
This may cause electrical shock and malfunction.
• Do not place the unit near heat sources such as
radiators, etc. Do not place the unit on a vibrating
surface. Do not cover the ventilation holes.
• The unit is not suitable for continuous use.
• Be careful with the mains lead and do not damage it. A
faulty or damaged mains lead can cause electrical shock
and malfunction.
• When unplugging the unit from a mains outlet, always
pull the plug, never the lead.
• Do not plug or unplug the unit with wet hands.
• If the plug and/or the mains lead are damaged, they
need to be replaced by a qualified technician.
• If the unit is damaged to such an extent that internal
parts are visible, do NOT plug the unit into a mains
outlet and DO NOT switch the unit on. Contact your
dealer. Do NOT connect the unit to a rheostat or
dimmer.
• To avoid fire and shock hazard, do not expose the unit
to rain and moisture.
• All repairs should be carried out by a qualified
technician only.
• Connect the unit to an earthed mains outlet (220-
240Vac/50Hz) protected by a 10-16A fuse.
• During a thunderstorm or if the unit will not be used for
a longer period of time, unplug it from the mains. The
rule is: Unplug it from the mains when not in use.
• If the unit has not been used for a longer period of time,
condensation may occur. Let the unit reach room
temperature before you switch it on. Never use the unit
in humid rooms or outdoors.
• To prevent accidents in companies, you must follow the
applicable guide lines and follow the instructions.
• Do not repeatedly switch the fixture on and off. This
shortens the life time.
• Keep the unit out of the reach of children. Do not leave
the unit unattended.
• Do not use cleaning sprays to clean switches. The
residues of these sprays cause deposits of dust and
grease. In case of malfunction, always seek advice from
a specialist.
• Do not force the controls.
• This unit is with speaker inside which can cause
magnetic field. Keep this unit at least 60cm away from
computer or TV.
• If this product have a built-in lead-acid rechargeable
battery. Please recharge the battery every 3 months if
you are not going to use the product for a long period of
time. Otherwise the battery may be permanently
damaged.
• If the battery is damaged please replace with same
specifications battery. And dispose the damaged
battery environment friendly.
• If the unit has fallen, always have it checked by a
qualified technician before you switch the unit on
again.
• Do not use chemicals to clean the unit. They damage
the varnish. Only clean the unit with a dry cloth.
• Keep away from electronic equipment that may cause
interference.
• Only use original spares for repairs, otherwise serious
damage and/or dangerous radiation may occur.
• Switch the unit off prior to unplugging it from the mains
and/or other equipment. Unplug all leads and cables
prior to moving the unit.
• Make sure that the mains lead cannot be damaged when
people walk on it. Check the mains lead before every
use for damages and faults!
• The mains voltage is 220-240Vac/50Hz. Check if power
outlet match. If you travel, make sure that the mains
voltage of the country is suitable for this unit.
• Keep the original packing material so that you can
transport the unit in safe conditions.
This mark attracts the attention of the user to high voltages that are present inside the housing and that are of sufficient
magnitude to cause a shock hazard.
This mark attracts the attention of the user to important instructions that are contained in the manual and that he
should read and adhere to.
The unit has been certified CE. It is prohibited to make any changes to the unit. They would invalidate the CE certificate and
their guarantee!
NOTE: To make sure that the unit will function normally, it must be used in rooms with a temperature between 5°C/41°F and
35°C/95°F.
Electric products must not be put into household waste. Please bring them to a recycling centre. Ask your local authorities or your
dealer about the way to proceed. The specifications are typical. The actual values can slightly change from one unit to the other.
Specifications can be changed without prior notice.
Do not attempt to make any repairs yourself. This would invalid your warranty. Do not make any changes to the unit. This would also invalid
your warranty. The warranty is not applicable in case of accidents or damages caused by inappropriate use or disrespect of the warnings
contained in this manual. Audizio cannot be held responsible for personal injuries caused by a disrespect of the safety recommendations and
warnings. This is also applicable to all damages in whatever form.

4
CAUTION! Immediately upon receiving the product, carefully unpack the carton, check the contents to ensure that all parts
are present, and have been received in good condition. Notify the shipper immediately and retain packing material for
inspection if any parts appear damage from shipping or the package itself shows signs of mishandling. Save the package and
all packing materials. In the event that the product must be returned to the factory, it is important that the product be
returned in the original factory box and packing.
If the device has been exposed to drastic temperature fluctuation (e.g. after transportation), do not switch it on immediately.
The arising condensation water might damage your device. Leave the device switched off until it has reached room
temperature.
1. POWER ON/OFF
Standby on/off
2. SOURCE
Switch between FM/CD/BT or aux in
3. BACK BUTTON
Previews track, or searching manual FM sender
4. FORWARD BUTTON
Next track, or searching FM sender
5. PLAY/PAUZE/FM SCAN
Push to do a automatically search
6. STOP
7. MEMORY
Push to select on of the storage senders
8. VOLUME +
9. VOLUME –
10. AUDIO IN
11. USB
12. PHONES
13. SPEAKERS
14. CD TRAY
15. DISPLAY
16. RC SENSOR
1 STANDBY/ON
2 SLEEP (PRESS REPEATEDLY TO ADJUST)
3 EQ (PRESS REPEATEDLY FOR PRESET)
4 PLAY / PAUSE / FM SCAN
5 PREVIOUS TRACK / STATION
6 X-BASS ON/OFF
7 PRESET/FOLDER LEFT
8 MUTE (TOGGLE MUTE ON/OFF)
9 SOURCE (PRESS REPEATEDLY FOR SELECTION)
10 MONO/ST. (FM)
11 CLOCK / TIMER
12 PLAY MODE (REPEAT & RANDOM MODES)
13 NEXT TRACK / STATION
14 MEMORY (STATION PRESETS)
15 FOLDER (TOGGLE FOLDER MODE MP3)
16 STOP
17 PRESET/FOLDER RIGHT
18 VOL-
19 VOL+

5
1. Unpack the digital radio and remove all packing materials.
2. Completely unwind the power cord and plug it into the wall outlet.
• Press the ON/STAND-BY button to turn the power off.
• Press and hold the CLOCK/TIMER button 2 seconds, to adjust the day.
• Press [ ] Or [ ] to choose 12h / 24h display format and confirm with CLOCK/TIMER.
• To set the hour, use [ ] Or [ ], then press CLOCK/TIMER.
• Repeat, to set the minutes.
In this example, the clock is set for the 24-hour (0:00) display.
• Press the CLOCK/TIMER Button once to turn the TIME function on. The TIME indicator will appear in the DISPLAY.
• Press the CLOCK/TIMER button 2 seconds, Operation again CLOCK/ TIMER button until ”ON” Appears.
• Press [ ] Or [ ] to select Timer set and press the CLOCK/TIMER button.
• Press [ ] Or [ ] to select “OFF”, and press the CLOCK/TIMER button.
• Set the time to finish as in steps 3 and 4 above.
• To select the timer playback source (TU, CD, USB), press the or button. Press the CLOCK/ TIMER button.
• Adjust the volume using the VOLUME (+ or -) on the main unit or VOL +/- on the remote control, and then press the
CLOCK/TIMER button. Do not turn the volume up too high.
• The indicator lights up and the unit is ready for timer playback.
This function allows you to program the system to switch off itself after a set period of time. You can set your sleep time in
power on mode:
• To activate the sleep function, press the SLEEP button on the remote, the display will show “SL 90, 80, 70, 60, 50, 40, 30,
20, 10, 00” .
• When the display shows your desired sleep time, release the button, the sleep timer is now activated. The display will
show “SL10” is to indicate “10 minutes” sleep time and so on. When the sleep time counts to zero, the unit will go off.
• To cancel sleep, press the SLEEP button once again until you see ‘’SL00’’, the sleep function will turn off.
You can use the FM Scan function to automatically scan for new digital radio
stations and remove inactive stations.
Press and hold the PLAY / PAUSE / FM SCAN button on the stereo system or on the remote control for 2 seconds to select [Scan].
Scan will be displayed during the automatic station scan. When the automatic
station scan is finished, the last station
listened to will be tuned in. If the last listened station is not available, the first station in the alphabetical list is tuned
in.
To manually tune in a specific radio station, tap the
[ ] Or [ ]
button on the
stereo or remote control repeatedly.
STATION STORE
Calling up saved stations
If you are in radio mode, you can call up the stored radio stations by repeatedly
pressing PRESET LEFT
or PRESET RIGHT
on the
remote control. When
you access the preset stations for the first time, [P01] blinks on the display.
• Use a connection lead to connect the portable audio player etc. to the AUDIO IN socket
• Press the ON/STAND-BY button to turn the power on.
• Press the SOURCE button on the remote control or main unit repeatedly to select AUDIO IN function.
• Play the connected equipment. If volume level of the connected device is too high, sound distortion may occur. Should
this happen, lower the volume of the connected device. If volume level is too low, increase the volume of the connected
device.
The AUDIO IN terminal allows you to connect various devices such as an MP3 player, cassette player, minidisc player, DVD
player, etc.

6
• Switch the unit on and switch it to CD mode with SOURCE Button.
• Open the CD tray by pressing the upper left corner („Open/Close“) and insert a CD with the top facing you.
• The CD will play as soon as the device has read the contents. This may take a few seconds.
Repeat and random mode
• Press PLAY MODE on the remote control to select REPEAT1 (plays the current track in a loop), REPEAT ALL (plays the entire
CD in a loop) or RANDOM (plays the tracks on the CD in random order). A logo is displayed in the top right corner of
the display.
• Press PLAY MODE again to return to normal play mode.
Programmed play (Playlist)
You can choose up to 32 selections for playback in the order you like. NOTE: Program can only be set in STOP mode.
• While in stop mode, press MEMORY on the remote control to enter the programming mode.
• Press [ ] Or [ ]
on the remote control to select the desired track.
• Press MEMORY to save the track number.
• Repeat for other tracks. Up to 32 tracks can be programmed. If you want to check the programmed tracks, press the
MEMORY button repeatedly.
• Press the play button to start playback.
Folder mode
1. Select USB mode using SOURCE button on the unit or the remote control.
2. Connect a USB mass storage device (USB stick, MP3 player) that contains MP3 files, this will take a few seconds.
3. Use the FOLDER button on the remote control to switch to FOLDER mode, "FOLD" will appear in the display.
4. Use the left/right arrow key on the remote control to select the desired folder that already stored in the USB device.
5. Navigate with BACK or FORWARD or PLAY/PAUSE button on the unit or on the remote control.
BT wireless technology is a short-range radio technology that enables wireless
communication between various types of digital
devices, such as mobile phone
or computer. It operates within a range of about 10 meters.
Pairing with BT devices:
Press the ON/STAND-BY button to turn the power on.
Press the SOURCE button (remote control or unit) to select BT function.
("----" flashes)Perform pairing procedure on the source device to detect this unit. “Audizio Nimes” will appear in the detected devices list (if
available) in the source device. (Refer the source device operating manual for details).
Notes
Place the devices to be paired within 1 meter (3 feet) of each other when pairing.
Select “Audizio Nimes” from the source list. If Passcode* is required, enter “0000”. Passcode may be called PIN Code, Passkey, PIN number or
Password.
Pairing indicator (conn) will appearonce the unit is successfully paired with the source device.(Pairing information is now memorized in the
unit.) Some audio source devices may connect with the unit
automatically after pairing is completed, otherwise follow the instructions in the source device operating manual to start
connection
MUTE
The Volume is muted temporarily when pressing the MUTE button on the remote control. Press
again to restore the volume.
X-BASS
When the power is first turned on, the unit will enter the extra bass mode which emphasizes the bass frequencies, and “X-
BASS” indicator will appear. To cancel the extra bass mode, press the X-BASS button on the remote control.
EQ
When the EQ button on the remote control, the current mode setting will be displayed. To change to a different mode, press
the EQ MODE button repeatedly until the desired sound mode appears (“CLASSIC, POPS, JAZZ, ROCK”).

7
Hartelijk dank voor de aanschaf van dit Audizio product. Neemt u a.u.b. een paar momenten de tijd om deze handleiding
zorgvuldig te lezen, aangezien wij graag willen dat u onze producten snel en volledig gebruikt.
Lees deze handleiding eerst door alvorens het product te gebruiken. Volg de instructies op anders zou de garantie wel eens
kunnen vervallen. Neem ook altijd alle veiligheidsmaatregelen om brand en/of een elektrische schok te voorkomen. Tevens
is het ook raadzaam om reparaties / modificaties e.d. over te laten aan gekwalificeerd personeel om een elektrische schok te
voorkomen. Bewaar deze handleiding ook voor toekomstig gebruik.
• Bewaar de verpakking zodat u indien het apparaat defect is,
dit in de originele verpakking kunt opsturen om
beschadigingen te voorkomen.
• Voordat het apparaat in werking wordt gesteld, altijd eerst
een deskundige raadplegen. Bij het voor de eerste keer
inschakelen kan een bepaalde reuk optreden. Dit is normaal
en verdwijnt na een poos.
• In het apparaat bevinden zich onder spanning staande
onderdelen; open daarom NOOIT dit apparaat.
• Plaats geen metalen objecten en mors geen vloeistof in het
effect. Dit kan leiden tot elektrische schokken of defecten.
• Toestel niet opstellen in de buurt van warmtebronnen zoals
radiatoren etc. en niet op een vibrerende onder- grond
plaatsen. Dek ventilatieopeningen nooit af.
• Het apparaat is niet geschikt voor continu gebruik.
• Wees voorzichtig met het netsnoer en beschadig deze niet.
Als het snoer kapot of beschadigd is, kan dit leiden tot
elektrische schokken of defecten.
• Als u de stekker uit het stopcontact neemt, trek dan niet aan
het snoer, maar aan de stekker.
• Om brand of elektrische schok te voorkomen, dient u dit
apparaat niet bloot te stellen aan regen of vocht.
• Verwijder of plaats een stekker nooit met natte handen
resp. uit en in het stopcontact.
• Indien zowel de stekker en/of netsnoer als snoeringang in
het apparaat beschadigd zijn dient dit door een vakman
hersteld te worden.
• Indien het apparaat zo beschadigd is dat inwendige
(onder)delen zichtbaar zijn mag de stekker NOOIT in het
stopcontact worden geplaatst en het apparaat NOOIT
worden ingeschakeld. Neem in dit geval contact op met de
dealer.
• Sluit het apparaat nooit op een dimmer aan.
• Reparatie aan het apparaat dient te geschieden door een
vakman of een deskundige.
• Sluit het apparaat alleen aan op een 220-240VAC / 50Hz
(geaard) stopcontact, verbonden met een 10-16A
meterkastgroep.
• Bij onweer altijd de stekker uit het stopcontact halen, zo ook
wanneer het apparaat voor een langere tijd niet gebruikt
wordt. Stelregel: Bij geen gebruik stekker verwijderen.
• Als u het apparaat lang niet gebruikt heeft en het weer wil
gebruiken kan er condens ontstaan; laat het apparaat eerst
op kamertemperatuur komen alvorens het weer in werking
te stellen.
• Apparaat nooit in vochtige ruimten en buiten gebruiken.
• Om ongevallen in bedrijven te voorkomen moet rekening
worden gehouden met de daarvoor geldende richtlijnen
en moeten de aanwijzingen/waarschuwingen worden
gevolgd.
• Het apparaat buiten bereik van kinderen houden.
Bovendien mag het apparaat nooit onbeheerd gelaten
worden.
• Gebruik geen schoonmaakspray om de schakelaars te
reinigen. Restanten van deze spray zorgen ervoor dat
smeer en stof ophopen. Raadpleeg bij storing te allen
tijde een deskundige.
• Gebruik geen overmatige kracht bij het bedienen van het
apparaat.
• Dit apparaat kan magnetisch veld veroorzaken. Houd dit
apparaat ten minste 60 cm afstand van de computer of tv.
• Indien dit apparaat beschikt over een loodaccu, dient deze
tenminste elke 3 maanden opgeladen te worden indien
deze voor een langere periode niet wordt gebruikt anders
bestaat de kans dat de accu permanent beschadigd.
• Bij een ongeval met dit product altijd eerst een des-
kundige raadplegen alvorens opnieuw te gebruiken.
• Tracht het apparaat niet schoon te maken met chemische
oplossingen. Dit kan de lak beschadigen. Gebruik een
droge doek om schoon te maken.
• Blijf uit de buurt van elektronische apparatuur die
bromstoringen zouden kunnen veroorzaken.
• Bij reparatie dienen altijd originele onderdelen te worden
gebruikt om onherstelbare beschadigingen en/of
ontoelaatbare straling te voorkomen.
• Schakel eerst het toestel uit voordat u het netsnoer
verwijdert. Verwijder netsnoer en aansluitsnoeren
voordat u dit product gaat verplaatsen.
• Zorg ervoor dat het netsnoer niet beschadigd/defect kan
raken wanneer mensen erover heen lopen. Het netsnoer
vóór ieder gebruik controleren op breuken/defecten!
• In Nederland/België is de netspanning 220-240Vac/50Hz.
Indien u reist (en u neemt het apparaat mee) informeer
dan naar de netspanning in het land waar u verblijft.
Deze markering wordt weergegeven om u erop attent te maken dat een levensgevaarlijke spanning in het product
aanwezig is en dat bij aanraking van deze delen een elektrische schok wordt verkregen.
Deze instructiemarkering wordt weergegeven om u erop te wijzen dat de instructie zeer belangrijk is om te lezen
en/of op te volgen.
OPMERKING: Om zeker te zijn van een correcte werking, dient u dit apparaat in een ruimte te gebruiken waar de
temperatuur tussen de 5°C/41°F en 35°C/95°F ligt.
Raadpleeg eventueel www.wecycle.nl en/of www.vrom.nl v.w.b. het afdanken van elektronische apparaten in het kader van de
WEEE-regeling. Vele artikelen kunnen worden gerecycled, gooi ze daarom niet bij het huisvuil maar lever ze in bij een gemeentelijk depot of
uw dealer. Lever ook afgedankte batterijen in bij uw gemeentelijk depot of bij de dealer, zie www.stibat.nl
Alle (defecte) artikelen dienen gedurende de garantieperiode altijd retour te worden gezonden in de originele verpakking. Voer zelf geen reparaties uit aan het
toestel; in élk geval vervalt de totale garantie. Ook mag het toestel niet eigenmachtig worden gemodificeerd, ook in dit geval vervalt de totale garantie. Ook
vervalt de garantie bij ongevallen en beschadigingen in élke vorm t.g.v. onoordeelkundig gebruik en het niet in achtnemen van het gestelde in deze
gebruiksaanwijzing. Tevens aanvaardt Audizio geen enkele aansprakelijkheid in geval van persoonlijke ongelukken als gevolg van het niet naleven van
veiligheidsinstructies en waarschuwingen . Dit geldt ook voor gevolgschade in wélke vorm dan ook.

8
LET OP! Onmiddellijk na ontvangst, zorgvuldig uitpakken van de doos, controleer de inhoud om ervoor te zorgen dat alle
onderdelen aanwezig zijn en zijn in goede staat zijn ontvangen. Bij transportschade of ontbreken van onderdelen
onmiddellijk de verkopende partij inlichten. Bewaar de verpakking en het verpakkingsmateriaal. Indien het product moet
worden teruggestuurd, is het belangrijk dat het product in originele verpakking wordt geretourneerd.
Als het apparaat is blootgesteld aan drastische temperatuurverschillen (bv. na het transport), schakel het apparaat niet
onmiddellijk in. De ontstane condensatie kan het apparaat beschadigen. Zorg ervoor dat het apparaat op kamertemperatuur
komt en steek vervolgens de voeding stekker in het stopcontact/wandcontactdoos.
1. POWER AAN/UIT
Stand-by aan/uit
2. SOURCE
Omschakelen tussen FM/CD/BT of aux in
3. TERUG TOETS
Previews van track, of zoeken naar handmatige FM
zender
4. VOORUIT-KNOP
Volgende track, of zoeken naar FM zender
5. PLAY/PAUZE/FM SCAN
Indrukken om automatisch te zoeken
6. STOP
7. GEHEUGEN
Indrukken om een van de geheugenzenders te kiezen
8. VOLUME +
9. VOLUME -
10. AUDIO IN
11. USB
12. PHONES
13. SPEAKERS
14. CD-LADE
15. DISPLAY
16. RC-SENSOR
1. STANDBY/ON
2. SLEEP (HERHAALDE MALEN INDRUKKEN OM AAN TE PASSEN)
3. EQ (HERHAALDELIJK INDRUKKEN VOOR VOORINSTELLING)
4. PLAY / PAUSE / FM SCAN
5. VORIG NUMMER / ZENDER
6. X-BASS AAN/UIT
7. PRESET/FOLDER LINKS
8. MUTE (DEMPEN AAN/UIT)
9. SOURCE (HERHAALDE MALEN INDRUKKEN VOOR SELECTIE)
10. MONO/ST. (FM)
11. KLOK / TIMER
12. AFSPEELMODUS (HERHALEN & WILLEKEURIGE MODUS)
13. VOLGENDE NUMMER / ZENDER
14. GEHEUGEN (VOORKEUZEZENDERS)
15. MAP (OMSCHAKELEN NAAR MAPMODUS MP3)
16. STOP
17. PRESET/FOLDER RECHTS
18. VOL-

9
19. VOL+
1. Pak de digitale radio uit en verwijder al het verpakkingsmateriaal.
2. Wikkel het netsnoer volledig af en steek de stekker in het stopcontact.
- Druk op de toets ON/STAND-BY om het toestel uit te schakelen.
- Houd de CLOCK/TIMER toets 2 seconden ingedrukt, om de dag in te stellen.
- Druk op [ ] of [ ]
om 12u / 24u weergave formaat te kiezen en bevestig met CLOCK/TIMER.
- Om het uur in te stellen, gebruikt u [ ] of [ ]
en drukt u vervolgens op CLOCK/TIMER.
- Herhaal dit om de minuten in te stellen.
In dit voorbeeld is de klok ingesteld op de 24-uurs weergave (0:00).
- Druk eenmaal op de CLOCK/TIMER toets om de TIJD functie aan te zetten. De TIME indicator verschijnt op het DISPLAY.
- Druk 2 seconden op de CLOCK/TIMER toets, Bedien nogmaals de CLOCK/TIMER toets totdat "ON" verschijnt.
- Druk op [ ] of [ ]
om Timer in te stellen en druk op de CLOCK/TIMER toets.
- Druk op [ ] of [ ] om "OFF" te kiezen en druk op de toets CLOCK/TIMER.
- Stel de tijd tot het einde in zoals in stappen 3 en 4 hierboven.
- Om de bron voor timerweergave (TU, CD, USB) te selecteren, drukt u op de toets of . Druk op de toets CLOCK/ TIMER.
- Stel het volume in met VOLUME (+ of -) op het hoofdtoestel of VOL +/- op de afstandsbediening, en druk vervolgens op de
toets CLOCK/TIMER. Zet het volume niet te hoog.
- De indicator licht op en het apparaat is klaar voor timerweergave.
Met deze functie kunt u het systeem zo programmeren dat het zichzelf na een bepaalde tijd uitschakelt. U kunt de slaaptijd
instellen in de inschakelmodus:
- Om de slaapfunctie te activeren, drukt u op de SLEEP toets op de afstandsbediening, het display toont "SL,90,80,70, 60, 50,
40, 30, 20, 10, 00" .
- Wanneer het display de gewenste slaaptijd toont, laat u de knop los, de slaaptimer is nu geactiveerd. Het display zal "SL10"
tonen om de "10 minuten" slaaptijd aan te geven, enzovoort. Wanneer de slaaptijd tot nul is geteld, gaat het apparaat uit.
- Om de slaapfunctie te annuleren, drukt u nogmaals op de SLEEP toets totdat u ''SL00'' ziet, de slaapfunctie wordt dan
uitgeschakeld.
U kunt de FM Scan functie gebruiken om automatisch te scannen naar nieuwe digitale radiozenders en inactieve zenders te
verwijderen.
Houd de toets PLAY / PAUSE / FM SCAN op het stereosysteem of op de afstandsbediening 2 seconden lang ingedrukt om
[Scan] te selecteren. Scan zal worden weergegeven tijdens de automatische zenderzoekloop. Wanneer het automatisch
zoeken naar zenders is voltooid, wordt er afgestemd op de laatst beluisterde zender. Als de laatst beluisterde zender niet
beschikbaar is, wordt afgestemd op de eerste zender in de alfabetische lijst.
Om handmatig op een bepaalde radiozender af te stemmen, tikt u herhaaldelijk op de toets [ ] of [ ]
op de stereo-
installatie of de afstandsbediening.
STATION STORE
Opgeslagen zenders oproepen
Als u in radiomodus bent, kunt u de opgeslagen radiozenders oproepen door herhaaldelijk op de PRESET LINKS of PRESET
RECHTS
op de
afstandsbediening te drukken. Wanneer u de voorkeurzenders voor de eerste keer oproept, knippert [P01] op
het display.
- Gebruik een aansluitsnoer om de draagbare audiospeler enz. op de AUDIO IN aansluiting aan te sluiten
- Druk op de toets ON/STAND-BY om het toestel in te schakelen.
- Druk herhaaldelijk op de toets SOURCE op de afstandsbediening of op het hoofdtoestel om de AUDIO IN functie te
selecteren.

10
- Speel de aangesloten apparatuur af. Als het volume van het aangesloten apparaat te hoog is, kan er geluidsvervorming
optreden. Mocht dit het geval zijn, verlaag dan het volume van het aangesloten apparaat. Indien het volume te laag is,
verhoog dan het volume van het aangesloten apparaat.
Op de AUDIO IN aansluiting kunt u diverse apparaten aansluiten, zoals een MP3-speler, cassettespeler, minidiscspeler, DVD-
speler, enz.
- Schakel het toestel in en zet het in CD-modus met SOURCE Knop.
- Open de CD-lade door op de linkerbovenhoek te drukken ("Open/Close") en plaats een CD met de bovenkant naar u toe.
- De CD wordt afgespeeld zodra het apparaat de inhoud heeft gelezen. Dit kan enkele seconden duren.
Herhalen en willekeurige modus
- Druk op PLAY MODE van de afstandsbediening om REPEAT1 (herhaalt het huidige nummer in een lus), REPEAT ALL (herhaalt
de hele CD in een lus) of RANDOM (herhaalt de nummers op de CD in willekeurige volgorde) te selecteren. Een logo
verschijnt in de rechterbovenhoek van het display.
- Druk nogmaals op PLAY MODE om terug te keren naar de normale afspeelmodus.
Geprogrammeerde weergave (Playlist)
U kunt tot 32 selecties kiezen om af te spelen in de volgorde die u wenst. OPMERKING: Programma's kunnen alleen in de
STOP modus worden ingesteld.
- Druk in de stop modus op MEMORY op de afstandsbediening om naar de programmeer modus te gaan.
- Druk op [ ] of [ ] op de afstandsbediening om het gewenste fragment te selecteren.
- Druk op MEMORY om het track nummer op te slaan.
- Herhaal dit voor andere fragmenten. Er kunnen maximaal 32 fragmenten worden geprogrammeerd. Als u de
geprogrammeerde fragmenten wilt controleren, drukt u herhaaldelijk op de MEMORY toets.
- Druk op de play-toets om de weergave te starten.
Mapmodus
1. Selecteer de USB-modus met de toets SOURCE op het toestel of met de afstandsbediening.
2. Sluit een USB-apparaat voor massaopslag (USB-stick, MP3-speler) aan dat MP3-bestanden bevat, dit duurt een paar
seconden.
3. Gebruik de toets FOLDER op de afstandsbediening om over te schakelen naar de modus FOLDER, "FOLD" verschijnt op
het display.
4. Gebruik de links/rechts pijltjestoets op de afstandsbediening om de gewenste map te selecteren die al in het USB-
apparaat is opgeslagen.
5. Navigeer met BACK of FORWARD of PLAY/PAUSE toets op het apparaat of op de afstandsbediening.
BT draadloze technologie is een radiotechnologie met een kort bereik die draadloze communicatie mogelijk maakt tussen
verschillende soorten digitale apparaten, zoals een mobiele telefoon of een computer. Het werkt binnen een bereik van
ongeveer 10 meter.
Koppelen met BT-apparaten:
Druk op de toets ON/STAND-BY om het toestel in te schakelen.
Druk op de toets SOURCE (afstandsbediening of toestel) om de BT-functie te selecteren.
("----" knippert)Voer de koppelingsprocedure uit op het bronapparaat om dit apparaat te detecteren. "Audizio Nimes"
verschijnt in de lijst met gedetecteerde apparaten (indien beschikbaar) op het bronapparaat. (Raadpleeg de handleiding van
het bronapparaat voor meer informatie).
Opmerkingen
Plaats de te koppelen apparaten binnen 1 meter van elkaar tijdens het koppelen.
Selecteer "Audizio Nimes" in de lijst met bronnen. Als een wachtwoord* vereist is, voert u "0000" in. Passcode kan ook PIN-
code, Passkey, PIN-nummer of Wachtwoord worden genoemd.
De koppelingsindicator (conn) verschijnt zodra het toestel met succes aan het bronapparaat is gekoppeld. (De
koppelingsinformatie is nu in het toestel opgeslagen.) Sommige audiobron apparaten kunnen automatisch verbinding maken
met het toestel
Sommige audiobronnen maken automatisch verbinding met het toestel nadat de koppeling is voltooid, anders volgt u de
instructies in de gebruiksaanwijzing van het bronapparaat om de verbinding te starten
MUTE
Het volume wordt tijdelijk gedempt wanneer u op de toets MUTE van de afstandsbediening drukt. Druk op
opnieuw om het volume te herstellen.
X-BASS

11
Wanneer het toestel voor het eerst wordt ingeschakeld, schakelt het over naar de extra basmodus die de basfrequenties
benadrukt, en verschijnt de "X-BASS" indicator. Om de extra basfunctie te annuleren, drukt u op de X-BASS toets van de
afstandsbediening.
EQ
Wanneer u op de EQ toets van de afstandsbediening drukt, zal de huidige modus instelling worden getoond. Om naar een
andere modus over te schakelen, drukt u herhaaldelijk op de EQ MODE toets totdat de gewenste geluidsmodus verschijnt
("CLASSIC, POPS, JAZZ, ROCK").
Vielen Dank für den Kauf dieses Audizio gerat. Nehmen Sie sich einen Augenblick Zeit, um diese Anleitung sorgfältig
durchzulesen, damit sie die Möglichkeiten, die unser Produkt bietet, sofort voll ausnutzen können.
Lesen Sie erst die Anleitung vollständig vor der ersten Inbetriebnahme durch. Befolgen Sie die Anweisung, da sonst jeglicher
Garantieanspruch verfällt. Treffen Sie stets alle Sicherheits-vorkehrungen um Feuer und/oder Stromschlag zu vermeiden.
Reparaturen dürfen nur von qualifiziertem Fachpersonal ausgeführt werden, um Stromschlag zu vermeiden. Bewahren Sie
diese Anleitung für spätere Bezugnahme auf.
• Bewahren Sie die Verpackung auf, um das Gerät im
Bedarfsfall sicher transportieren zu können.
• Bevor das Gerät in Betrieb genommen wird, muss es erst
von einem Fachmann überprüft werden. Bei der ersten
Benutzung kann etwas Geruch auftreten. Das ist normal und
verschwindet nach einer Weile
• Das Gerät enthält unter Spannung stehende Teile. Daher
NIEMALS das Gehäuse öffnen.
• Keine Metallgegenstände oder Flüssigkeiten ins Gerät
dringen lassen. Sie können zu Stromschlag und Defekten
führen.
• Gerät nicht in der Nähe von Wärmequellen wie Heizkörpern
aufstellen. Nicht auf eine vibrierende Oberfläche stellen.
Niemals die Belüftungsschlitze abdecken.
• Das Gerät ist nicht für Dauerbetrieb geeignet.
• Gehen Sie vorsichtig mit dem Netzkabel um und
beschädigen Sie es nicht. Eine beschädigte Netzschnur kann
zu Stromschlag und Defekten führen.
• Wenn Sie das Gerät vom Netz trennen, immer am Stecker
ziehen, niemals an der Schnur.
• Um Feuer und Stromschlag zu vermeiden, das Gerät vor
Regen und Feuchtigkeit schützen.
• Den Stecker nie mit nassen Händen in eine Netzsteckdose
stecken oder abziehen.
• Wenn sowohl der Stecker und/oder die Netzschnur bzw. der
Kabeleintritt ins Gerät beschädigt sind, müssen sie von
einem Fachmann repariert werden.
• Wenn das Gerät so beschädigt ist, dass Innenteile sichtbar
sind, darf der Stecker NICHT in eine Steckdose gesteckt
werden und das Gerät darf NICHT eingeschaltet werden.
Wenden Sie sich in dem Fall an Ihren Fachhändler. Das Gerät
darf nicht an einen Dimmer angeschlossen werden.
• Reparaturen dürfen nur von einem Fachmann oder
Sachverständigen ausgeführt werden.
• Das Gerät nur an eine geerdete 10-16A Netzsteckdose mit
220-240V AC/50Hz Spannung anschließen.
• Bei Gewitter oder längerem Nichtgebrauch den Netzstecker
abziehen. Die Regel gilt: Bei Nichtgebrauch Netzstecker
abziehen.
• Wenn das Gerät längere Zeit nicht benutzt wurde, kann sich
Kondenswasser gebildet haben. Lassen Sie das Gerät erst
auf Zimmertemperatur kommen, bevor Sie es einschalten.
Das Gerät nicht in feuchten Räumen oder im Freien
benutzen.
• Um Unfällen in der Öffentlichkeit vorzubeugen, müssen
die geltenden Richtlinien beachtet und die
Anweisungen/Warnungen befolgt werden.
• Niemals das Gerät kurz hintereinander ein- und
ausschalten. Dadurch verkürzt sich die Lebensdauer
erheblich.
• Das Gerät außerhalb der Reichweite von Kindern halten.
Das Gerät niemals unbeaufsichtigt lassen.
• Die Regler nicht mit Reinigungssprays reinigen. Diese
hinterlassen Rückstände, die zu Staub- und
Fettansammlungen führen. Bei Störungen immer einen
Fachmann um Rat fragen.
• Das Gerät nur mit sauberen Händen bedienen.
• Das Gerät nicht mit Gewalt bedienen.
• Dieses Gerät kann dazu führen Magnetfeld. Halten Sie das
Gerät mindestens 60 cm vom Computer oder Fernseher.
• Wenn dieses Gerät eine Blei-Säure-Batterie hat, soll dies
jede 3 Monate zumindest wieder aufgeladen werden,
wenn es nicht für eine längere Zeit nicht benutzt wird,
sonst ist es möglich, dass die Batterie dauerhaft
beschädigt.
• Fachmann um Rat fragen, bevor Sie es wieder einschalten.
• Keine chemischen Reinigungsmittel benutzen, die den
Lack beschädigen. Das Gerät nur mit einem trockenen
Tuch abwischen.
• Nicht in der Nähe von elektronischen Geräten benutzen,
die Brummstörungen verursachen können.
• Bei Reparaturen nur die Original-Ersatzteile verwenden,
um starke Schäden und/oder gefährliche Strahlungen zu
vermeiden.
• Bevor Sie das Netz- und/oder Anschlusskabel abziehen,
erst das Gerät ausschalten. Netz- und Anschlusskabel
abziehen, bevor Sie das Gerät umstellen.
• Sorgen Sie dafür, dass das Netzkabel nicht beschädigt
werden kann, wenn Menschen darüber laufen. Das
Netzkabel vor jedem Einsatz auf Brüche/Schadstellen
überprüfen.
• In Deutschland beträgt die Netzspannung 220-240V AC /
50Hz. Wenn Sie das Gerät auf Reisen mitnehmen, prüfen
Sie, ob die örtliche Netzspannung den Anforderungen des
Geräts entspricht.
Dieses Zeichen weist den Benutzer darauf hin, dass lebensgefährliche Spannungen im Gerät anliegen, die bei Berührung einen
Stromschlag verursachen.
Dieses Zeichen lenkt die Aufmerksamkeit des Benutzers auf wichtige Hinweise in der Anleitung hin, die unbedingt eingehalten
werden müssen.
HINWEIS: Um einen einwandfreien Betrieb zu gewährleisten, muss die Raumtemperatur zwischen 5° und 35°C.
liegen.
Tronios BV Registrierungsnummer : DE51181017 (ElektroG).

12
Dieses Produkt darf am Ende seiner Lebensdauer nicht über den normalen Haushaltsabfall entsorgt werden, sondern muss an einem Sammelpunkt für das
Recycling abgegeben werden. Hiermit leisten Sie einen wichtigen Beitrag zum Schutze unserer Umwelt.
Tronios BV Registrierungsnummer : 21003000 (BatterieG).
Lithiumbatterien und Akkupacks sollten nur im entladenen Zustand in die Altbatteriesammelgefäße bei Handel und bei öffentlich-rechtlichen
Entsorgungsträgern gegeben werden. Bei nicht vollständig entladenen Batterien Vorsorge gegen Kurzschlüß treffen durch Isolieren der Pole mit Klebestreifen.
Der Endnutzer ist zur Rückgabe von Altbatterien gesetzlich verpflichtet.
Packen Sie das Gerät sofort nach Empfang aus und prüfen Sie den Inhalt. Wenn Teile fehlen oder beschädigt sind,
benachrichtigen Sie sofort den Spediteur und bewahren Sie die Verpackung auf. Falls ein Gerät ins Werk zurückgeschickt
werden muss, ist es wichtig, dass es in der Originalverpackung versandt wird.
Das Gerät darf nicht in Betrieb genommen werden, nachdem es von einem kalten in einen warmen Raum gebracht wurde. Das
dabei entstehende Kondenswasser kann unter Umständen Ihr Gerät zerstören. Lassen Sie das Gerät solange ausgeschaltet,
bis es Zimmertemperatur erreicht hat!
1. POWER EIN/AUS
Standby ein/aus
2. SOURCE
Umschalten zwischen FM/CD/BT oder Aux-Eingang
3. ZURÜCK-TASTE
Vorschau des Titels oder Suche nach einem manuellen FM-
Sender
4. VORWÄRTS-TASTE
Nächster Titel, oder Suche nach FM-Sendern
5. PLAY/PAUZE/FM SCAN
Drücken, um einen automatischen Suchlauf durchzuführen
6. STOPP
7. SPEICHER
Drücken Sie diese Taste, um einen der Speichersender auszuwählen.
8. LAUTSTÄRKE +
9. LAUTSTÄRKE -
10. AUDIO-EINGANG
11. USB
12. PHONES
13. LAUTSPRECHER
14. CD-TRAY
15. DISPLAY
16. RC-SENSOR
1. STANDBY/ON
2. SLEEP (ZUM EINSTELLEN WIEDERHOLT DRÜCKEN)
3. EQ (ZUR VOREINSTELLUNG WIEDERHOLT DRÜCKEN)
4. ABSPIELEN / PAUSE / FM SCAN
5. VORHERIGER TITEL / SENDER
6. X-BASS EIN/AUS
7. PRESET/FOLDER LINKS
8. MUTE (SCHALTET DIE STUMMSCHALTUNG EIN/AUS)
9. SOURCE (ZUR AUSWAHL WIEDERHOLT DRÜCKEN)
10. MONO/ST. (FM)
11. UHR / TIMER
12. WIEDERGABEMODUS (WIEDERHOLUNGS- UND ZUFALLSMODUS)
13. NÄCHSTER TITEL / SENDER
14. SPEICHER (SENDERSPEICHER)
15. ORDNER (UMSCHALTEN DES ORDNER-MODUS MP3)
16. STOP
Reparieren Sie das Gerät niemals selbst und nehmen Sie niemals eigenmächtig Veränderungen am Gerät vor. Sie verlieren dadurch den Garantieanspruch. Der
Garantieanspruch verfällt ebenfalls bei Unfällen und Schäden in jeglicher Form, die durch unsachgemäßen Gebrauch und Nichtbeachtung der Warnungen und
Sicherheitshinweise in dieser Anleitung entstanden sind. Audizio ist in keinem Fall verantwortlich für persönliche Schäden in Folge von Nichtbeachtung der
Sicherheitsvorschriften und Warnungen. Dies gilt auch für Folgeschäden jeglicher Form.

13
17. PRESET/FOLDER RECHTS
18. VOL-
19. VOL+

14
1. Packen Sie das Digitalradio aus und entfernen Sie das gesamte Verpackungsmaterial.
2. Wickeln Sie das Netzkabel vollständig ab und stecken Sie es in eine Steckdose.
- Drücken Sie die Taste ON/STAND-BY, um das Gerät auszuschalten.
- Halten Sie die Taste CLOCK/TIMER 2 Sekunden lang gedrückt, um den Tag einzustellen.
- Drücken Sie [ ] oder [ ], um das 12h/24h-Anzeigeformat auszuwählen und bestätigen Sie mit CLOCK/TIMER.
- Um die Stunde einzustellen, verwenden Sie [ ] oder [ ] und drücken Sie CLOCK/TIMER.
- Wiederholen Sie den Vorgang, um die Minuten einzustellen.
In diesem Beispiel ist die Uhr auf die 24-Stunden-Anzeige (0:00) eingestellt.
- Drücken Sie die Taste CLOCK/TIMER einmal, um die Funktion TIME zu aktivieren. Die Anzeige TIME erscheint auf dem
DISPLAY.
- Drücken Sie die Taste CLOCK/TIMER für 2 Sekunden und dann erneut die Taste CLOCK/TIMER, bis "ON" erscheint.
- Drücken Sie [ ] oder [ ] um Timer zu wählen, und drücken Sie die Taste CLOCK/TIMER.
- Drücken Sie [ ] oder [ ], um "OFF" auszuwählen, und drücken Sie die Taste CLOCK/TIMER.
- Stellen Sie die Zeit bis zum Ende wie in Schritt 3 und 4 oben ein.
- Um die Timer-Wiedergabequelle (TU, CD, USB) zu wählen, drücken Sie die Taste oder . Drücken Sie die Taste CLOCK/ TIMER.
- Stellen Sie die Lautstärke mit VOLUME (+ oder -) am Hauptgerät oder VOL +/- auf der Fernbedienung ein und drücken Sie
dann die Taste CLOCK/ TIMER. Stellen Sie die Lautstärke nicht zu hoch ein.
- Die Anzeige leuchtet auf und das Gerät ist bereit für die Timeranzeige.
Mit dieser Funktion können Sie das System so programmieren, dass es sich nach einer bestimmten Zeit selbst ausschaltet. Sie
können die Ruhezeit im Einschaltmodus einstellen:
- Um die Einschlaffunktion zu aktivieren, drücken Sie die SLEEP-Taste auf der Fernbedienung, das Display zeigt "SL 90,80,70,
60, 50, 40, 30, 20, 10, 00".
- Wenn das Display die gewünschte Einschlafzeit anzeigt, lassen Sie die Taste los, der Einschlaftimer ist nun aktiviert. Auf
dem Display wird "SL10" angezeigt, um die "10 Minuten" Schlafzeit anzuzeigen usw. Wenn die Einschlafzeit auf Null
heruntergezählt wurde, schaltet sich das Gerät aus.
- Um die Einschlaffunktion abzubrechen, drücken Sie die SLEEP-Taste erneut, bis Sie "SL00" sehen; die Einschlaffunktion wird
dann ausgeschaltet.
Mit der Funktion FM-Scan können Sie automatisch nach neuen digitalen Radiosendern suchen und inaktive Sender entfernen.
Halten Sie die Taste PLAY / PAUSE / FM SCAN an der Stereoanlage oder auf der Fernbedienung 2 Sekunden lang gedrückt, um
[Scan] auszuwählen. Scan wird während der automatischen Sendersuche angezeigt. Wenn die automatische Sendersuche
beendet ist, wird der zuletzt gehörte Sender eingestellt. Wenn der zuletzt gehörte Sender nicht verfügbar ist, wird der erste
Sender aus der alphabetischen Liste eingestellt.
Um einen bestimmten Radiosender manuell einzustellen, tippen Sie wiederholt auf die Taste [ ] oder [ ] an der
Stereoanlage oder auf der Fernbedienung.
STATION STORE
Abrufen von gespeicherten Sendern
Wenn Sie sich im Radiomodus befinden, können Sie die gespeicherten Radiosender durch wiederholtes Drücken PRESET
LINKS oder PRESET RECHTS
auf die
Fernbedienung abrufen. Wenn Sie die voreingestellten Sender zum ersten Mal abrufen,
blinkt [P01] auf dem Display.
- Verwenden Sie ein Verbindungskabel, um den tragbaren Audio-Player usw. an die AUDIO IN-Buchse anzuschließen.
- Drücken Sie die Taste ON/STAND-BY, um das Gerät einzuschalten.
- Drücken Sie wiederholt die Taste SOURCE auf der Fernbedienung oder auf dem Hauptgerät, um die Funktion AUDIO IN
auszuwählen.
- Spielen Sie die angeschlossenen Geräte ab. Wenn die Lautstärke der angeschlossenen Geräte zu hoch ist, kann es zu
Klangverzerrungen kommen. Reduzieren Sie in diesem Fall die Lautstärke des angeschlossenen Geräts. Wenn die Lautstärke
zu niedrig ist, erhöhen Sie die Lautstärke des angeschlossenen Geräts.
Sie können verschiedene Geräte an die AUDIO IN-Buchse anschließen, z. B. einen MP3-Player, Kassettenspieler, Minidisc-
Player, DVD-Player usw.

15
- Schalten Sie das Gerät ein und stellen Sie es mit SOURCE Taste auf CD-Betrieb.
- Öffnen Sie das CD-Fach, indem Sie auf die obere linke Ecke ("Open/Close") drücken und eine CD mit der Oberseite zu Ihnen
hin einlegen.
- Die CD wird abgespielt, sobald das Gerät den Inhalt gelesen hat. Dies kann ein paar Sekunden dauern.
Wiederholungs- und Zufallsmodus
- Drücken Sie PLAY MODE auf der Fernbedienung, um REPEAT1 (wiederholt den aktuellen Titel in einer Schleife), REPEAT ALL
(wiederholt die gesamte CD in einer Schleife) oder RANDOM (wiederholt die Titel auf der CD in zufälliger Reihenfolge)
auszuwählen. In der oberen rechten Ecke des Displays erscheint ein Logo.
- Drücken Sie erneut PLAY MODE, um zum normalen Wiedergabemodus zurückzukehren.
Programmierte Wiedergabe (Wiedergabeliste)
Sie können bis zu 32 Titel auswählen, die in der von Ihnen gewünschten Reihenfolge abgespielt werden. HINWEIS:
Programme können nur im STOP-Modus eingestellt werden.
- Drücken Sie MEMORY auf der Fernbedienung, um in den Programmiermodus zu gelangen, während Sie sich im Stoppmodus
befinden.
- Drücken Sie [ ] oder [ ] auf der Fernbedienung, um den gewünschten Titel auszuwählen.
- Drücken Sie MEMORY, um die Titelnummer zu speichern.
- Wiederholen Sie den Vorgang für andere Titel. Es können bis zu 32 Titel programmiert werden. Wenn Sie die
programmierten Titel überprüfen möchten, drücken Sie wiederholt die MEMORY-Taste.
- Drücken Sie die Wiedergabetaste, um die Wiedergabe zu starten.
Ordner-Modus
1. Wählen Sie den USB-Modus mit der SOURCE-Taste auf dem Gerät oder der Fernbedienung.
2. Schließen Sie ein USB-Massenspeichergerät (USB-Stick, MP3-Player) mit MP3-Dateien an, dies dauert einige Sekunden.
3. Verwenden Sie die FOLDER-Taste auf der Fernbedienung, um in den FOLDER-Modus zu wechseln; "FOLD" erscheint auf
dem Display.
4. Verwenden Sie die Links/Rechts-Pfeiltasten auf der Fernbedienung, um den gewünschten Ordner auszuwählen, der
bereits auf dem USB-Gerät gespeichert ist.
5. Navigieren Sie mit der Taste BACK oder FORWARD oder PLAY/PAUSE auf dem Gerät oder auf der Fernbedienung.
Bei der BT-Wireless-Technologie handelt es sich um eine Funktechnologie mit kurzer Reichweite, die die drahtlose
Kommunikation zwischen verschiedenen digitalen Geräten wie Mobiltelefonen oder Computern ermöglicht. Es funktioniert
innerhalb einer Reichweite von etwa 10 Metern.
Kopplung mit BT-Geräten:
Drücken Sie die Taste ON/STAND-BY, um das Gerät einzuschalten.
Drücken Sie die SOURCE-Taste (Fernbedienung oder Gerät), um die BT-Funktion auszuwählen.
("----" blinkt)Führen Sie das Kopplungsverfahren auf dem Quellgerät durch, um dieses Gerät zu erkennen. "Audizio Nimes"
erscheint in der Liste der erkannten Geräte (falls vorhanden) auf dem Quellgerät. (Einzelheiten finden Sie in der
Bedienungsanleitung des Quellgeräts).
Anmerkungen
Stellen Sie die zu koppelnden Geräte während des Koppelns nicht weiter als 1 Meter voneinander entfernt auf.
Wählen Sie "Audizio Nimes" aus der Quellenliste. Wenn ein Passcode* erforderlich ist, geben Sie "0000" ein. Der Passcode
kann auch als PIN-Code, Passkey, PIN-Nummer oder Passwort bezeichnet werden.
Die Kopplungsanzeige (conn) erscheint, wenn das Gerät erfolgreich mit dem Quellgerät gekoppelt wurde. (Die
Paarungsinformationen sind jetzt im Gerät gespeichert.) Einige Audioquellen können automatisch mit dem Gerät verbunden
werden.
Einige Audioquellen verbinden sich automatisch mit dem Gerät, nachdem das Pairing abgeschlossen ist, andernfalls folgen
Sie den Anweisungen in der Bedienungsanleitung des Quellgeräts, um die Verbindung herzustellen.
MUTE
Die Lautstärke wird vorübergehend stummgeschaltet, wenn die MUTE-Taste auf der Fernbedienung gedrückt wird. Presse
erneut, um das Volumen wiederherzustellen.
X-BASS
Wenn das Gerät zum ersten Mal eingeschaltet wird, wechselt es in den Extra-Bass-Modus, der die Bassfrequenzen betont, und
die Anzeige "X-BASS" erscheint. Drücken Sie die Taste X-BASS auf der Fernbedienung, um die Extrabassfunktion zu
deaktivieren.
EQ
Wenn Sie die Taste EQ auf der Fernbedienung drücken, wird die aktuelle Moduseinstellung angezeigt. Um zu einem anderen
Modus zu wechseln, drücken Sie wiederholt die Taste EQ MODE, bis der gewünschte Klangmodus erscheint ("CLASSIC, POPS,
JAZZ, ROCK").

16
Felicitaciones a la compra de este producto Audizio. Por favor lea atentamente este manual antes de usar el aparato para
disfrutar al completo de sus prestaciones.
Seguir las instrucciones le permite no invalidar la garantía. Tome todas las precauciones para evitar que se produzca fuego o
una descarga eléctrica. Las reparaciones solo deben llevarse a cabo por técnicos cualificados para evitar descargas eléctricas.
Guarde el manual para futuras consultas.
sentirse cierto olor. Esto es normal y desaparece al poco tiempo.
• Este aparato contiene piezas que llevan voltaje. Por lo
tanto NO abra la carcasa.
• No coloque objetos metálicos o vierta líquidos dentro
del aparato Podría producir descargas eléctricas y fallos
en el funcionamiento.
• No coloque el aparato cerca de fuentes de calor tipo
radiadores, etc. No coloque el aparato en superficies
vibratorias. No tape los agujeros de ventilación.
• Este aparato no está preparado para un uso continuado.
• Tenga cuidado con el cable de alimentación y no lo
dañe. Un daño o defecto en el cable de alimentación
puede producir una descarga eléctrica o fallo en el
funcionamiento.
• Cuando desconecte el aparato de la toma de corriente,
siempre tire de la clavija, nunca del cable.
• No enchufe o desenchufe el aparato con las manos
mojadas.
• Si la clavija y/o el cable de alimentación están dañados,
necesitan reemplazarse por un técnico cualificado.
• Si el aparato está dañado de modo que puedan verse
sus partes internas, NO conecte el aparato a la toma de
corriente y NO lo encienda. Contacte con su
distribuidor. NO conecte el aparato a un reostato o
dimmer.
• Para evitar un fuego o peligro de descarga, no exponga
el aparato a la lluvia y a la humedad.
• Todas las reparaciones deben llevarse a cabo
exclusivamente por técnicos cualificados.
• Conecte el aparato a una toma de corriente con toma de
tierra (220-240Vca/50Hz) protegida por un fusible de
10-16A.
• Durante una tormenta o si el aparato no va a usarse
durante un periodo largo de tiempo, desconéctelo de la
toma de corriente. La regla es: Desconéctelo si no lo va
a usar.
• Si el aparato no se ha usado en mucho tiempo puede
producirse condensación. Deje el aparato a temperatura
ambiente antes de encenderlo. Nunca utilice el aparato
en ambientes húmedos o en el exterior.
• Para prevenir accidentes en las empresas, debe seguir
las directrices aplicables y seguir las instrucciones.
• No lo apague y encienda repetidamente. Esto acorta su
tiempo de vida.
• Mantenga el aparato fuera del alcance de los niños. No
deje el aparato sin vigilancia.
• No utilice sprays limpiadores para limpiar los
interruptores. Los residuos de estos sprays producen
depósitos de polvo y grasa. En caso de mal
funcionamiento, siempre consulte a un profesional.
• No fuerce los controles.
• Si el aparato se ha caído, siempre haga que lo verifique
un técnico cualificado antes de encenderlo otra vez.
• NO utilice productos químicos para limpiar el aparato.
Dañan el barniz. Tan solo límpielo con un trapo seco.
• Manténgalo lejos de equipos electrónicos ya que
pueden producir interferencias.
• Si este producto incorpora una batería recargable con
base ácida, por favor recarge bateria cada 3 meses si no
va a usar la unidad por un tiempo prolongado. En caso
contrario la batería podría dañarse.
• Solo utilice recambios originales para las reparaciones,
de otro modo pueden producirse daños serios y/o
radiaciones peligrosas.
• Apague el aparato antes de desconectarlo de la toma de
corriente y/o de otros equipos. Desconecte todos los
cables y conexiones antes de mover el aparato.
• Asegúrese de que el cable de alimentación no puede
dañarse cuando la gente lo pise. Compruebe el cable de
alimentación antes de cada uso por si hay daños o
defectos.
• El voltaje de funcionamiento es 220-240Vca/50Hz.
Compruebe que la toma de corriente coincide. Si tiene
que viajar, asegúrese de que el voltaje del país es el
adecuado para este aparato.
• Guarde el embalaje original para poder transportar el
aparato en condiciones seguras.
Esta señal advierte al usuario de la presencia de alto voltaje en el interior de la carcasa y que es de la suficiente
magnitud como para producir una descarga eléctrica.
Esta señal advierte al usuario de que el manual contiene instrucciones importantes que han de leerse y seguirse al pie de la
letra.
NOTA: Para asegurarse de que el aparato funcione correctamente, debe usarse en ambientes a una temperatura de
entre 5°C/41°F y 35°C/95°F.
Los productos electrónicos no pueden tirarse a la basura normal. Por favor lleve este producto a un centro de reciclaje. Pregunte a la
autoridad local en caso de duda. Las especificaciones son generales. Los valores actuales pueden variar de una unidad a otra. Las
especificaciones pueden variar sin previo aviso.
Nunca intente reparar usted mismo este equipo. Esta manipulación anulará la garantía. No realice cambios en la unidad. Esta manipulación
anulará la garantía. Esta garantía no es aplicable en caso de accidente o daños ocasionados por uso indebido del aparato o mal uso del
mismo. Audizio no se hace responsable de daños personales causados por el no seguimiento de las normas e instrucciones de este manual.
Esto es aplicable también a los daños de cualquier tipo.

17
ATENCIÓN! Inmediatamente después de recibir un dispositivo, desempaque cuidadosamente la caja de cartón, compruebe el
contenido para asegurarse de que todas las partes están presentes, y se han recibido en buenas condiciones. Notifique
inmediatamente al transportista y conserve el material de embalaje para la inspección por si aparecen daños causados por el
transporte o el propio envase muestra signos de mal manejo. Guarde el paquete y todos los materiales de embalaje. En el
caso de que deba ser devuelto a la fábrica, es importante que el aparato sea devuelto en la caja de la fábrica y embalaje
originales.
Si el aparato ha estado expuesto a grandes cambios de temperatura (tras el transporte), no lo enchufe inmediatamente. La
condensación de agua producida podría dañar su aparato. Deje el dispositivo apagado hasta que se haya alcanzado la
temperatura ambiente.
1. ENCENDIDO/APAGADO
Activación/desactivación del modo de espera
2. SOURCE
Cambia entre FM/CD/BT o entrada auxiliar
3. BOTÓN DE ATRÁS
Previsualiza la pista, o busca el emisor FM manual
4. BOTÓN ADELANTE
Siguiente pista, o búsqueda de emisor FM
5. PLAY/PAUZE/FM SCAN
Pulse para hacer una búsqueda automática
6. STOP
7. MEMORIA
Pulse para seleccionar uno de los emisores de memoria
8. VOLUMEN +
9. VOLUMEN -
10. AUDIO IN
11. USB
12. PHONES
13. ALTAVOCES
14. BANDEJA DE CD
15. PANTALLA
16. SENSOR RC
1. STANDBY/ON
2. SLEEP (PULSAR REPETIDAMENTE PARA AJUSTAR)
3. EQ (PULSAR REPETIDAMENTE PARA PREAJUSTAR)
4. PLAY / PAUSE / FM SCAN
5. PISTA ANTERIOR / EMISORA
6. X-BASS ON/OFF
7. PRESET/FOLDER IZQUIERDA
8. MUTE (ACTIVAR/DESACTIVAR MUTE)
9. FUENTE (PULSAR REPETIDAMENTE PARA SELECCIONAR)
10. MONO/ST. (FM)
11. RELOJ / TEMPORIZADOR
12. MODO DE REPRODUCCIÓN (MODOS DE REPETICIÓN Y ALEATORIO)
13. SIGUIENTE PISTA / EMISORA
14. MEMORIA (PRESELECCIÓN DE EMISORAS)
15. CARPETA (CAMBIAR EL MODO DE CARPETA MP3)
16. PARAR
17. PRESET/FOLDER DERECHA
18. VOL-
19. VOL+

18
1. Desembale la radio digital y retire todo el material de embalaje.
2. Desenrolla completamente el cable de alimentación y conéctalo a una toma de corriente.
- Pulse el botón ON/STAND-BY para apagar el aparato.
- Mantenga pulsado el botón CLOCK/TIMER durante 2 segundos para ajustar el día.
- Pulse [ ] o [ ] para seleccionar el formato de visualización 12h / 24h y confirme con RELOJ/TIMER.
- Para ajustar la hora, utilice [ ] o [ ] y pulse RELOJ/TIMER.
- Repita la operación para ajustar los minutos.
En este ejemplo, el reloj está ajustado a la indicación de 24 horas (0:00).
- Pulse una vez el botón CLOCK/TIMER para activar la función TIME. El indicador de HORA aparece en la PANTALLA.
- Pulse el botón CLOCK/TIMER durante 2 segundos, pulse de nuevo el botón CLOCK/TIMER hasta que aparezca "ON".
- Pulse [ ] o [ ] para seleccionar Timer y pulse el botón CLOCK/TIMER.
- Pulse [ ] o [ ] para seleccionar "OFF" y pulse el botón CLOCK/TIMER.
- Ajuste la hora de finalización como en los pasos 3 y 4 anteriores.
- Para seleccionar la fuente de reproducción con temporizador (TU, CD, USB), pulse el botón o. Pulse el botón CLOCK/ TIMER.
- Ajuste el volumen mediante VOLUME (+ o -) en la unidad principal o VOL +/- en el mando a distancia, y luego pulse el botón
CLOCK/ TIMER. No pongas el volumen demasiado alto.
- El indicador se ilumina y el aparato está listo para la visualización del temporizador.
Esta función permite programar el sistema para que se apague después de un periodo de tiempo determinado. Puedes ajustar
el tiempo de reposo en el modo de encendido:
- Para activar la función sleep, pulse el botón SLEEP del mando a distancia, la pantalla muestra "SL 90, 80, 70, 60, 50, 40, 30,
20, 10, 00" y parpadea.
- Cuando la pantalla muestre el tiempo de sueño deseado, suelte el botón, el temporizador de sueño está ahora activado. La
pantalla mostrará "SL10" para indicar el tiempo de sueño de "10 minutos" y así sucesivamente. Cuando el tiempo de reposo
haya llegado a cero, la unidad se apagará.
- Para cancelar la función sleep, pulse de nuevo el botón SLEEP hasta que vea ''SL00'', la función sleep se desactivará.
BÚSQUEDA AUTOMÁTICA DE EMISORAS (FM SCAN)
Puedes utilizar la función de búsqueda de FM para buscar automáticamente nuevas emisoras de radio digital y eliminar las
inactivas.
Mantenga pulsado el botón PLAY / PAUSE / FM SCAN en el sistema estéreo o en el mando a distancia durante 2 segundos para
seleccionar [Scan]. El escaneo encontrado se mostrará durante la búsqueda automática de emisoras. Cuando la búsqueda
automática de emisoras haya terminado, se sintonizará la última emisora escuchada. Si la última emisora escuchada no está
disponible, se sintonizará la primera emisora de la lista alfabética.
Para sintonizar manualmente una emisora de radio determinada, pulse repetidamente los botones [ ] o [ ] del equipo de
música o del mando a distancia.
TIENDA DE LA ESTACIÓN
Recuperación de estaciones almacenadas
Si está en modo radio, puede recuperar las emisoras de radio almacenadas pulsando repetidamente PRESET IZQUIERDA o
PRESET DERECHA en el mando a distancia. Cuando se recuperan las emisoras preseleccionadas por primera vez, [P01]
parpadea en la pantalla.
- Utilice un cable de conexión para conectar el reproductor de audio portátil, etc. a la toma AUDIO IN
- Pulse el botón ON/STAND-BY para encender la unidad.
- Pulse el botón SOURCE del mando a distancia o de la unidad principal repetidamente para seleccionar la función AUDIO IN.
- Toca el equipo conectado. Si el volumen del equipo conectado es demasiado alto, puede producirse una distorsión del
sonido. Si esto ocurre, reduzca el volumen del dispositivo conectado. Si el volumen es demasiado bajo, aumente el volumen
del dispositivo conectado.
Puedes conectar varios dispositivos a la toma AUDIO IN, como un reproductor de MP3, un reproductor de casetes, un
reproductor de minidiscos, un reproductor de DVD, etc.

19
- Encienda el aparato y póngalo en modo CD con SOURCE botón.
- Abra la bandeja de CD pulsando la esquina superior izquierda ("Open/Close") e introduzca un CD con la parte superior hacia
usted.
- El CD comenzará a reproducirse en cuanto la unidad lea el contenido. Esto puede tardar unos segundos.
- Pulse PLAY MODE en el mando a distancia para seleccionar REPEAT1 (repite la pista actual en bucle), REPEAT ALL (repite
todo el CD en bucle) o RANDOM (repite las pistas del CD en orden aleatorio). Aparecerá un logotipo en la esquina superior
derecha de la pantalla.
- Pulse de nuevo PLAY MODE para volver al modo de reproducción normal.
Reproducción programada (lista de reproducción)
Puede elegir hasta 32 selecciones para reproducirlas en el orden que desee. NOTA: Los programas sólo pueden ajustarse en
el modo STOP.
- Pulse MEMORIA en el mando a distancia para entrar en el modo de programación mientras está en modo de parada.
- Pulse [ ] o [ ] en el mando a distancia para seleccionar la pista deseada.
- Pulse MEMORIA para guardar el número de pista.
- Repite la operación para las demás pistas. Se pueden programar hasta 32 pistas. Si desea comprobar las pistas programadas,
pulse repetidamente el botón MEMORIA.
- Pulse el botón de reproducción para iniciar la reproducción.
Modo carpeta
1.Seleccione el modo USB con el botón SOURCE del aparato o del mando a distancia.
2.Conecte un dispositivo de almacenamiento masivo USB (memoria USB, reproductor de MP3) que contenga archivos MP3,
esto tomará unos segundos.
3.Utilice el botón FOLDER del mando a distancia para cambiar al modo FOLDER, en la pantalla aparecerá "FOLD".
4.Utilice el botón de flecha izquierda/derecha del mando a distancia para seleccionar la carpeta deseada ya almacenada en el
dispositivo USB.
5.Navegue con los botones ATRÁS o ADELANTE o REPRODUCCIÓN/PAUSA en el dispositivo o en el mando a distancia.
La tecnología inalámbrica BT es una tecnología de radio de corto alcance que permite la comunicación inalámbrica entre
distintos tipos de dispositivos digitales, como un teléfono móvil o un ordenador. Funciona en un rango de unos 10 metros.
Emparejamiento con dispositivos BT:
Pulse el botón ON/STAND-BY para encender la unidad.
Pulse el botón SOURCE (mando a distancia o unidad) para seleccionar la función BT.
("----" parpadea)Realice el procedimiento de emparejamiento en el dispositivo de origen para detectar este dispositivo.
"Audizio Nimes" aparece en la lista de dispositivos detectados (si están disponibles) en el dispositivo de origen. (Para más
detalles, consulte el manual del dispositivo de origen).
Notas
Coloque los dispositivos a emparejar a menos de 1 metro de distancia durante el emparejamiento.
Seleccione "Audizio Nimes" en la lista de fuentes. Si se requiere un código de acceso*, introduzca "0000". El código de acceso
también puede llamarse código PIN, clave de acceso, número PIN o contraseña.
El indicador de emparejamiento (conn) aparece cuando la unidad se empareja correctamente con el dispositivo de origen. (La
información de emparejamiento se almacena ahora en la unidad). Algunos dispositivos de fuente de audio pueden conectarse
a la unidad automáticamente.
Algunas fuentes de audio se conectan automáticamente a la unidad una vez completado el emparejamiento; en caso
contrario, sigue las instrucciones del manual de instrucciones del dispositivo fuente para iniciar la conexión.
MUTE
El volumen se silenciará temporalmente cuando se pulse el botón MUTE del mando a distancia. Pulse
de nuevo para restaurar el volumen.
X-BASS
Cuando el aparato se enciende por primera vez, entra en el modo de extra-graves que enfatiza las frecuencias graves, y
aparece el indicador "X-BASS". Para cancelar la función de graves adicionales, pulse el botón X-BASS del mando a distancia.
EQ
Al pulsar el botón EQ del mando a distancia, se mostrará el ajuste del modo actual. Para cambiar de modo, pulse el botón EQ
MODE repetidamente hasta que aparezca el modo de sonido deseado ("CLASSIC, POPS, JAZZ, ROCK").

20
Nous vous remercions d’avoir acheté un produit Audizio. Veuillez lire la présente notice avant l’utilisation afin de pouvoir en
profiter pleinement. Veuillez lire la notice avant toute utilisation. Respectez impérativement les instructions afin de
continuer à bénéficier de la garantie. Prenez toutes les précautions nécessaires pour éviter tout incendie ou décharge
électrique. Seul un technicien spécialisé peut effectuer les réparations. Nous vous conseillons de conserver la présente
notice pour pouvoir vous y reporter ultérieurement.
• Avant d’utiliser l’appareil, prenez conseil auprès d’un
spécialiste. Lors de la première mise sous tension, il est
possible qu’une odeur soit perceptible. C’est normal,
l’odeur disparaîtra peu de temps après.
• L’appareil contient des composants porteurs de tension.
N’OUVREZ JAMAIS le boîtier.
• Ne placez pas des objets métalliques ou du liquide sur
l’appareil, cela pourrait causer des décharges
électriques et dysfonctionnements..
• Ne placez pas l’appareil à proximité de sources de
chaleur, par exemple radiateur. Ne positionnez pas
l’appareil sur une surface vibrante. N’obturez pas les
ouïes de ventilation.
• L’appareil n’est pas conçu pour une utilisation en
continu.
• Faites attention au cordon secteur, il ne doit pas être
endommagé.
• Lorsque vous débranchez l’appareil de la prise secteur,
tenez-le par la prise, ne tirez jamais sur le cordon.
• Ne branchez pas et ne débranchez pas l’appareil avec
les mains mouillées.
• Seul un technicien spécialisé peut remplacer la fiche
secteur et / ou le cordon secteur.
• Si l’appareil est endommagé et donc les éléments
internes sont visibles, ne branchez pas l’appareil, NE
L’ALLUMEZ PAS. Contactez votre revendeur. NE
BRANCHEZ PAS l’appareil à un rhéostat ou un dimmer.
• Pour éviter tout risque d’incendie ou de décharge
électrique, n’exposez pas l’appareil à la pluie ou à
l’humidité.
• Seul un technicien habilité et spécialisé peut effectuer
les réparations
• Branchez l’appareil à une prise secteur 220-240 Vac/50
Hz avec terre, avec un fusible 10-16 A.
• Pendant un orage ou en cas de non utilisation
prolongée de l’appareil, débranchez l’appareil du
secteur.
• En cas de non utilisation prolongée de l’appareil, de la
condensation peut être créée. Avant de l’allumer,
laissez l’appareil atteindre la température ambiante. Ne
l’utilisez jamais dans des pièces humides ou en
extérieur.
• Afin d’éviter tout accident en entreprise, vous devez
respecter les conseils et instructions.
• N’allumez pas et n’éteignez pas l’appareil de manière
répétée. Cela réduit sa durée de vie.
• Conservez l’appareil hors de la portée des enfants. Ne
laissez pas l’appareil sans surveillance.
• N’utilisez pas d’aérosols pour nettoyer les
interrupteurs. Les résidus créent des dépôts et de la
graisse. En cas de dysfonctionnement, demandez
conseil à un spécialiste.
• Ne forcez pas les réglages.
• L’appareil contient un haut-parleur pouvant engendrer
des champs magnétiques. Tenez cet appareil à 60 cm au
moins d’un téléviseur ou ordinateur.
• Si le produit comprend un accumulateur intégré plomb-
acide, rechargez l'accumulateur tous les 3 mois en cas
de non utilisation prolongée de l'appareil. Sinon,
l'accumulateur pourrait être endommagé de manière
permanente.
• Si l’accumulateur est endommagé, remplacez-le par un
accumulateur de même type et déposez l’ancien
accumulateur dans un container de recyclage adapté.
• Si l’appareil est tombé, faites-le toujours vérifier par un
technicien avant de le rallumer.
• Pour nettoyer l’appareil, n’utilisez pas de produits
chimiques qui abîment le revêtement, utilisez
uniquement un tissu sec.
• Tenez toujours l’appareil éloigné de tout équipement
électrique pouvant causer des interférences.
• Pour toute réparation, il faut impérativement utiliser
des pièces d’origine, sinon il y a risque de dommages
graves et / ou de radiations dangereuses.
• Eteignez toujours l’appareil avant de le débrancher du
secteur et de tout autre appareil. Débranchez tous les
cordons avant de déplacer l’appareil.
• Assurez-vous que le cordon secteur n’est pas abîmé si
des personnes viennent à marcher dessus. Avant toute
utilisation, vérifiez son état.
• La tension d’alimentation est de 220-240Vac/50 Hz.
Vérifiez la compatibilité. Si vous voyagez, vérifiez que
la tension d’alimentation du pays est compatible avec
l’appareil.
• Conservez l’emballage d’origine pour pouvoir
transporter l’appareil en toute sécurité
Ce symbole doit attirer l’attention de l’utilisateur sur les tensions élevées présentes dans le boîtier de l’appareil,
pouvant engendrer une décharge électrique.
Ce symbole doit attirer l’attention de l’utilisateur sur des instructions importantes détaillées dans la notice, elles doivent être
lues et respectées.
Cet appareil porte le symbole CE. Il est interdit d’effectuer toute modification sur l’appareil. La certification CE et la
garantie deviendraient caduques !
NOTE: Pour un fonctionnement normal de l’appareil, il doit être utilisé en intérieur avec une plage de température maximale
autorisée entre 5°C/41°F et 35°C/95°F.
Ne jetez pas les produits électriques dans la poubelle domestique. Déposez-les dans une décharge. Demandez conseil aux
autorisés ou à votre revendeur. Données techniques réservées. Les valeurs actuelles peuvent varier d’un produit à l’autre. Tout
droit de modification réservé sans notification préalable.
N’essayez pas de réparer l’appareil vous-même. Vous perdriez tout droit à la garantie. Ne faites aucune modification sur l’appareil. Vous
perdriez tout droit à la garantie La garantie deviendrait également caduque en cas d’accidents ou dommages causes par une utilisation
inappropriée de l’appareil ou un non respect des consignes présentes dans cette notice. Audizio ne pourrait être tenu responsable en cas
de dommages matériels ou corporels causés par un non respect des consignes de sécurité et avertissements. Cela est également valable
pour tous les dommages quelle que soit la forme.

21
ATTENTION ! Immédiatement après réception, vérifiez le contenu du carton et assurez-vous que tous les éléments sont bien
présents et en bon état. Si besoin, faites les réserves nécessaires si le matériel ou les cartons sont endommagés. SI l’appareil
doit être retourné, faites-le dans l’emballage d’origine.
Si l’appareil a été exposé à des fluctuations importantes de températures (par exemple après le transport), ne l’allumez pas
immédiatement. De la condensation peut survenir. Laissez l’appareil éteint le temps qu’il atteigne la température ambiante.
1. MARCHE/ARRÊT DE L'ALIMENTATION
Marche/arrêt de la mise en veille.
2. SOURCE
Commutation entre FM/CD/BT ou entrée auxiliaire.
3. BOUTON DE RETOUR
Prévisualisation de la piste ou recherche d'un émetteur FM
manuel.
4. BOUTON FORWARD
Piste suivante, ou recherche d'un émetteur FM.
5. PLAY/PAUZE/FM SCAN
Appuyez pour effectuer une recherche automatique.
6. STOP
7. MEMOIRE
Appuyer pour sélectionner l'un des émetteurs de mémoire.
8. VOLUME +
9. VOLUME -
10. AUDIO IN
11. USB
12. PHONES
13. HAUT-PARLEURS
14. PLATEAU CD
15. DISPLAY
16. DÉTECTEUR DE TÉLÉCOMMANDE
1. STANDBY/ON
2. SLEEP (APPUYEZ À PLUSIEURS REPRISES POUR RÉGLER)
3. EQ (APPUYEZ À PLUSIEURS REPRISES POUR LE PRÉRÉGLAGE)
4. LECTURE / PAUSE / BALAYAGE FM
5. PISTE PRÉCÉDENTE / STATION
6. X-BASS ON/OFF
7. PRESET/FOLDER GAUCHE
8. MUTE (ACTIVER/DÉSACTIVER LE MUTE)
9. SOURCE (APPUYEZ À PLUSIEURS REPRISES POUR LA SÉLECTION)
10. MONO/ST. (FM)
11. HORLOGE / MINUTERIE
12. MODE DE LECTURE (MODES RÉPÉTITION ET ALÉATOIRE)
13. PISTE / STATION SUIVANTE
14. MÉMOIRE (PRÉSÉLECTIONS DE STATIONS)
15. DOSSIER (BASCULEMENT DU MODE DOSSIER MP3)
16. STOP
17. PRESET/FOLDER DROITE
18. VOL-
19. VOL+

22
1. Déballez la radio numérique et retirez tous les matériaux d'emballage.
2. Déroulez complètement le cordon d'alimentation et branchez-le dans une prise murale.
- Appuyez sur le bouton ON/STAND-BY pour éteindre l'appareil.
- Appuyez sur la touche CLOCK/TIMER pendant 2 secondes pour régler le jour.
- Appuyez sur [ ] ou [ ] pour sélectionner le format d'affichage 12h / 24h et confirmez avec CLOCK/TIMER.
- Pour régler l'heure, utilisez [ ] ou [ ] et appuyez sur CLOCK/TIMER.
- Répétez l'opération pour régler les minutes.
Dans cet exemple, l'horloge est réglée sur l'affichage 24 heures (0:00).
- Appuyez une fois sur la touche CLOCK/TIMER pour activer la fonction TIME. L'indicateur TIME apparaît sur l'AFFICHAGE.
- Appuyez sur le bouton CLOCK/TIMER pendant 2 secondes, puis appuyez à nouveau sur le bouton CLOCK/TIMER jusqu'à ce
que "ON" apparaisse.
- Appuyez sur [ ] ou [ ], pour sélectionner Timer et appuyez sur le bouton CLOCK/TIMER.
- Appuyez sur [ ] ou [ ] pour sélectionner "OFF" et appuyez sur le bouton CLOCK/TIMER.
- Réglez l'heure de fin comme dans les étapes 3 et 4 ci-dessus.
- Pour sélectionner la source de lecture programmée (TU, CD, USB), appuyez sur la touche ou . Appuyez sur le bouton CLOCK/
TIMER.
- Réglez le volume à l'aide de la touche VOLUME (+ ou -) de l'unité principale ou VOL +/- de la télécommande, puis appuyez
sur la touche CLOCK/ TIMER. Ne réglez pas le volume trop fort.
- L'indicateur s'allume et l'appareil est prêt pour l'affichage de la minuterie.
Cette fonction vous permet de programmer le système pour qu'il s'éteigne de lui-même après un laps de temps déterminé.
Vous pouvez définir le temps de veille en mode de mise sous tension :
- Pour activer la fonction sommeil, appuyez sur la touche SLEEP de la télécommande, l'écran affiche "SL 90, 80, 70 ,60, 50, 40,
30, 20, 10, 00".
- Lorsque l'écran affiche la durée de sommeil souhaitée, relâchez le bouton, la minuterie de sommeil est maintenant activée.
L'écran affiche "SL10" pour indiquer le temps de sommeil de "10 minutes" et ainsi de suite. Lorsque le temps de sommeil a
été décompté jusqu'à zéro, l'appareil s'éteint.
- Pour annuler la fonction sommeil, appuyez à nouveau sur le bouton SLEEP jusqu'à ce que vous voyiez ''SL00'', la fonction
sommeil sera désactivée.
Vous pouvez utiliser la fonction de balayage FM pour rechercher automatiquement les nouvelles stations de radio numérique
et supprimer les stations inactives.
Appuyez sur la touche PLAY / PAUSE / FM SCAN de la chaîne stéréo ou de la télécommande pendant 2 secondes pour
sélectionner [Scan]. Le balayage trouvé s'affiche pendant la recherche automatique de la station. Lorsque la recherche
automatique de stations est terminée, la dernière station écoutée est syntonisée. Si la dernière station que vous avez
écoutée n'est pas disponible, la première station de la liste alphabétique sera syntonisée.
Pour syntoniser manuellement une station de radio particulière, appuyez plusieurs fois sur la touche [ ] ou [ ] de la chaîne
stéréo ou de la télécommande.
MAGASIN DE LA STATION
Rappel des stations stockées
Si vous êtes en mode radio, vous pouvez rappeler les stations de radio mémorisées en appuyant plusieurs fois sur PRESET
GAUCHE ou PRESET DROIT de la télécommande. Lorsque les stations préréglées sont rappelées pour la première fois, [P01]
clignote à l'écran.
- Utilisez un cordon de raccordement pour connecter le lecteur audio portable, etc. à la prise AUDIO IN.
- Appuyez sur le bouton ON/STAND-BY pour allumer l'appareil.
- Appuyez plusieurs fois sur la touche SOURCE de la télécommande ou de l'unité principale pour sélectionner la fonction
AUDIO IN.
- Lisez l'équipement connecté. Si le volume de l'équipement connecté est trop élevé, une distorsion du son peut se produire.
Si cela se produit, réduisez le volume de l'appareil connecté. Si le volume est trop faible, augmentez le volume de l'appareil
connecté. Vous pouvez connecter divers appareils à la prise AUDIO IN, comme un lecteur MP3, un lecteur de cassettes, un
lecteur de minidisques, un lecteur de DVD, etc.

23
- Mettez l'appareil en marche et réglez-le sur le mode CD avec SOURCE bouton.
- Ouvrez le tiroir à CD en appuyant sur le coin supérieur gauche ("Open/Close") et insérez un CD en orientant sa partie
supérieure vers vous.
- La lecture du CD commence dès que l'appareil en lit le contenu. Cela peut prendre quelques secondes.
Mode répétition et aléatoire
- Appuyez sur PLAY MODE de la télécommande pour sélectionner REPEAT1 (répète la piste en cours en boucle), REPEAT ALL
(répète tout le CD en boucle) ou RANDOM (répète les pistes du CD dans un ordre aléatoire). Un logo apparaît dans le coin
supérieur droit de l'écran.
- Appuyez à nouveau sur PLAY MODE pour revenir au mode de lecture normal.
Lecture programmée (liste de lecture)
Vous pouvez choisir jusqu'à 32 sélections à lire dans l'ordre que vous souhaitez. REMARQUE : les programmes ne peuvent
être définis qu'en mode STOP.
- Appuyez sur la touche MEMORY de la télécommande pour accéder au mode de programmation en mode d'arrêt.
- Appuyez sur [ ] ou [ ] sur la télécommande pour sélectionner la piste souhaitée.
- Appuyez sur MEMORY pour enregistrer le numéro de la piste.
- Répétez l'opération pour les autres pistes. Il est possible de programmer jusqu'à 32 pistes. Si vous voulez vérifier les pistes
programmées, appuyez plusieurs fois sur le bouton MEMORY.
- Appuyez sur le bouton de lecture pour lancer la lecture.
Mode dossier
1. Sélectionnez le mode USB à l'aide de la touche SOURCE de l'appareil ou de la télécommande.
2. Connectez un périphérique de stockage de masse USB (clé USB, lecteur MP3) contenant des fichiers MP3, cela
prendra quelques secondes.
3. Utilisez la touche FOLDER de la télécommande pour passer en mode FOLDER, "FOLD" s'affiche à l'écran.
4. Utilisez la touche fléchée gauche/droite de la télécommande pour sélectionner le dossier souhaité déjà stocké dans
le périphérique USB.
5. Naviguez avec le bouton BACK ou FORWARD ou PLAY/PAUSE sur l'appareil ou sur la télécommande.
La technologie sans fil BT est une technologie radio à courte portée qui permet la communication sans fil entre différents
types d'appareils numériques, tels qu'un téléphone mobile ou un ordinateur. Il fonctionne dans un rayon d'environ 10
mètres.
Appariement avec des appareils BT :
Appuyez sur le bouton ON/STAND-BY pour allumer l'appareil.
Appuyez sur la touche SOURCE (télécommande ou appareil) pour sélectionner la fonction BT.
("----" clignote)Effectuez la procédure de jumelage sur l'appareil source pour détecter cet appareil. "Audizio Nimes" apparaît
dans la liste des appareils détectés (si disponible) sur l'appareil source. (Pour plus de détails, reportez-vous au manuel de
l'appareil source).
Notes
Placez les appareils à jumeler à moins d'un mètre les uns des autres pendant le jumelage.
Sélectionnez "Audizio Nimes" dans la liste des sources. Si un code d'accès* est requis, entrez "0000". Le code d'accès peut
également être appelé code PIN, clé d'accès, numéro PIN ou mot de passe.
L'indicateur d'appairage (conn) apparaît lorsque l'appareil est apparié avec succès avec le périphérique source. (Les
informations d'appariement sont maintenant stockées dans l'appareil.) Certains appareils sources audio peuvent se
connecter automatiquement à l'appareil.
Certaines sources audio se connectent automatiquement à l'appareil une fois le jumelage effectué, sinon suivez les
instructions du manuel d'utilisation de l'appareil source pour initier la connexion.
MUTE
Le volume est temporairement coupé lorsque vous appuyez sur la touche MUTE de la télécommande. Appuyez sur
à nouveau pour restaurer le volume.
X-BASS
Lorsque l'appareil est mis sous tension pour la première fois, il passe en mode de basses supplémentaires qui accentue les
fréquences basses, et l'indicateur "X-BASS" apparaît. Pour annuler la fonction de basses supplémentaires, appuyez sur la
touche X-BASS de la télécommande.
EQ
Lorsque vous appuyez sur le bouton EQ de la télécommande, le réglage du mode actuel s'affiche. Pour passer à un autre
mode, appuyez plusieurs fois sur la touche EQ MODE jusqu'à ce que le mode sonore souhaité apparaisse ("CLASSIC, POPS,
JAZZ, ROCK").

24
Gratulujemy zakupu urządzenia marki Power Dynamics. Proszę o przeczytanie instrukcji przed użyciem urządzenia, aby jak
najlepiej móc wykorzystać jego możliwości. Przeczytaj tę instrukcję przed pierwszym użyciem urządzenia. Postępuj zgodnie z
instrukcją, aby nie utracić gwarancji. Zwróć uwagę na wszystkie ostrzeżenia, aby uniknąć pożaru lub/oraz porażenia prądem.
Naprawy mogą być przeprowadzane jedynie przez autoryzowany serwis. Zatrzymaj tę instrukcję na wypadek potrzeby w
przyszłości.
• Przed rozpoczęciem użytkowania urządzenia należy
zasięgnąć porady specjalisty. Przy pierwszym
włączeniu urządzenia może pojawić się nieprzyjemny
zapach. Jest to normalne i po chwili zniknie.
• Urządzenie zawiera części przewodzące napięcie.
Dlatego NIE należy otwierać obudowy.
• Nie należy umieszczać metalowych przedmiotów ani
wlewać płynów do urządzenia. Może to spowodować
porażenie prądem elektrycznym i nieprawidłowe
działanie.
• Nie należy umieszczać urządzenia w pobliżu źródeł
ciepła, takich jak grzejniki itp. Nie umieszczać
urządzenia na wibrującej powierzchni. Nie zakrywać
otworów wentylacyjnych.
• Urządzenie nie nadaje się do pracy ciągłej.
• Należy zachować ostrożność z przewodem
zasilającym i nie wolno go uszkodzić. Wadliwy lub
uszkodzony przewód sieciowy może spowodować
porażenie prądem elektrycznym i wadliwe działanie.
• Podczas odłączania urządzenia od gniazdka
sieciowego należy zawsze wyciągać wtyczkę, a nie
przewód.
• Nie należy podłączać ani odłączać urządzenia
mokrymi rękami.
• Jeśli wtyczka i/lub przewód sieciowy są uszkodzone,
należy je wymienić przez wykwalifikowanego
technika.
• Jeśli urządzenie jest uszkodzone w takim stopniu, że
widoczne są części wewnętrzne, NIE podłączać
urządzenia do gniazdka sieciowego i NIE włączać
urządzenia. Skontaktować się ze sprzedawcą.
• Aby uniknąć zagrożenia pożarem i porażeniem
prądem, nie wystawiać urządzenia na działanie
deszczu i wilgoci.
• Wszystkie naprawy powinny być wykonywane
wyłącznie przez wykwalifikowanego technika.
• Podłączyć urządzenie do uziemionego gniazdka
sieciowego (220-240Vac/50Hz) zabezpieczonego
bezpiecznikiem 10-16A.
• Podczas burzy z piorunami lub jeśli urządzenie nie
będzie używane przez dłuższy okres czasu, należy
odłączyć je od sieci elektrycznej. Zasada jest taka
sama: Gdy urządzenie nie jest używane, należy je
odłączyć od sieci zasilającej.
• Jeśli urządzenie nie było używane przez dłuższy
okres czasu, może dojść do kondensacji pary wodnej.
Przed włączeniem urządzenie powinno osiągnąć
temperaturę pokojową.
• Nigdy nie używać urządzenia w wilgotnych
pomieszczeniach lub na zewnątrz.
• Aby zapobiec wypadkom w firmach, należy
postępować zgodnie z obowiązującymi wytycznymi i
instrukcjami.
• Nie należy wielokrotnie włączać i wyłączać
urządzenia. Skraca to żywotność urządzenia.
• Przechowywać urządzenie w miejscu niedostępnym
dla dzieci. Nie pozostawiać urządzenia bez nadzoru.
• Do czyszczenia przełączników nie używać sprayów
czyszczących. Pozostałości tych sprayów powodują
osadzanie się kurzu i smaru. W przypadku awarii
należy zawsze zasięgnąć porady specjalisty.
• Nie wolno wymuszać używania elementów
sterujących.
• Wewnątrz urządzenia znajduje się głośnik, który
może powodować pole magnetyczne. Urządzenie
należy trzymać w odległości co najmniej 60 cm od
komputera lub telewizora.
• Jeśli ten produkt ma wbudowany akumulator
kwasowo-ołowiowy. Jeśli nie zamierzasz używać
produktu przez dłuższy okres czasu, ładuj go co 3
miesiące. W przeciwnym razie bateria może ulec
trwałemu uszkodzeniu.
• Jeśli bateria jest uszkodzona, należy wymienić ją na
baterię o tej samej specyfikacji. Uszkodzoną baterię
należy utylizować w sposób przyjazny dla środowiska.
• Jeśli urządzenie upadło, przed ponownym
włączeniem należy je sprawdzić przez
wykwalifikowanego technika.
• Do czyszczenia urządzenia nie należy używać
środków chemicznych. Uszkodzą one lakier.
Urządzenie należy czyścić wyłącznie suchą
ściereczką.
• Trzymać z dala od sprzętu elektronicznego, który
może powodować zakłócenia.
• Do napraw należy używać wyłącznie oryginalnych
części zamiennych, w przeciwnym razie może dojść
do poważnych uszkodzeń i/lub niebezpiecznego
promieniowania.
• Przed odłączeniem urządzenia od sieci elektrycznej
i/lub innych urządzeń należy je wyłączyć. Przed
przeniesieniem urządzenia należy odłączyć wszystkie
przewody i kable.
• Upewnić się, że przewód zasilający nie może zostać
uszkodzony, gdy ludzie chodzą po nim. Przed każdym
użyciem należy sprawdzić przewód sieciowy pod
kątem uszkodzeń i usterek!
• Napięcie sieciowe wynosi 220-240Vac/50Hz.
Sprawdź, czy gniazdo zasilania pasuje. W przypadku
podróży należy upewnić się, że napięcie sieciowe w
danym kraju jest odpowiednie dla tego urządzenia.
• Należy zachować oryginalne opakowanie, aby
umożliwić bezpieczny transport urządzenia.
• Przetłumaczono przy pomocy.
Ten znak zwraca uwagę użytkownika na wysokie napięcie, które jest obecne w środku obudowy urządzenia. Napięcie jest
wystarczające, aby porazić użytkownika.
WAŻNA INFORMACJA: Urządzenia elektryczne muszą być składowane w miejscach do tego przeznaczonych. Sprawdź,
gdzie w Twojej okolicy znajduje się najbliższe centrum recyklingu. Specyfikacja techniczna poszczególnych
urządzeniach może się nieznacznie różnić. Specyfikacja może ulec zmian bez powiadomień.
Nie próbuj dokonywać żadnych napraw samodzielnie, to spowoduje unieważnienie gwarancji. Gwarancja nie dotyczy uszkodzeń
spowodowanych niewłaściwym użytkowaniem sprzętu, niezgodnie z instrukcją. Power Dynamics nie jest odpowiedzialny za
uszczerbek na zdrowiu oraz kontuzje spowodowane niestosowaniem się do zaleceń bezpieczeństwa. Dotyczy to wszelakich
uszkodzeń.

25
UWAGA! Natychmiast po otrzymaniu produktu należy ostrożnie rozpakować karton, sprawdzić zawartość, aby upewnić się, że
wszystkie części są obecne i zostały dostarczone w dobrym stanie. Jeśli jakiekolwiek części wyglądają na uszkodzone podczas
transportu lub opakowanie nosi ślady niewłaściwego obchodzenia się z produktem, należy natychmiast powiadomić o tym
fakcie nadawcę i zachować materiały opakowaniowe do kontroli. Należy zachować opakowanie i wszystkie materiały
opakowaniowe. W przypadku, gdy produkt musi zostać zwrócony do fabryki, ważne jest, aby był on zwrócony w oryginalnym
pudełku fabrycznym i opakowaniu. Jeśli urządzenie było narażone na drastyczne zmiany temperatury (np. po transporcie), nie
należy go natychmiast włączać. Powstająca woda kondensacyjna może uszkodzić urządzenie. Urządzenie należy pozostawić
wyłączone do czasu, aż osiągnie temperaturę pokojową.
1. POWER ON/OFF
Włączanie/wyłączanie trybu czuwania.
2. SOURCE
Przełączanie między FM/CD/BT lub wejściem dodatkowym.
3. PRZYCISK BACK BUTTON
Wyświetlanie podglądu utworu lub wyszukiwanie ręczne
nadajnika FM.
4. PRZYCISK FORWARD
Następny utwór, lub wyszukiwanie nadawcy FM.
5. PLAY/PAUZE/FM SCAN
Naciśnij, aby wykonać automatyczne wyszukiwanie.
6. STOP
7. MEMORY
Naciśnij, aby wybrać jeden z nadajników pamięci.
8. VOLUME +
9. VOLUME -
10. AUDIO IN
11. USB
12. PHONES
13. GŁOŚNIKI
14. UCHWYT NA PŁYTY CD
15. WYŚWIETLACZ
16. CZUJNIK RC
1. GOTOWOŚĆ/WŁĄCZENIE
2. SLEEP (NACIŚNIJ KILKAKROTNIE, ABY WYREGULOWAĆ)
3. EQ (NACIŚNIJ KILKAKROTNIE, ABY USTAWIĆ)
4. PLAY / PAUZA / SKANOWANIE FM
5. POPRZEDNI UTWÓR / STACJA
6. X-BASS ON/OFF
7. PRESET/FOLDER LEWO
8. MUTE (WŁĄCZANIE/WYŁĄCZANIE WYCISZENIA)
9. ŹRÓDŁO (NACIŚNIJ KILKAKROTNIE, ABY WYBRAĆ)
10. MONO/ST. (FM)
11. ZEGAR / TIMER
12. TRYB ODTWARZANIA (POWTARZANIE I TRYB LOSOWY)
13. NASTĘPNY UTWÓR / STACJA
14. PAMIĘĆ (ZAPROGRAMOWANE STACJE)
15. FOLDER (PRZEŁĄCZANIE TRYBU FOLDERU MP3)
16. STOP
17. PRESET/FOLDER W PRAWO
18. VOL-
19. VOL+

26
1. Rozpakuj radio cyfrowe i usuń wszystkie materiały opakowaniowe.
2. Całkowicie rozwinąć przewód zasilający i podłączyć go do gniazdka ściennego.
- Aby wyłączyć urządzenie, należy nacisnąć przycisk ON/STAND-BY.
- Naciśnij i przytrzymaj przycisk CLOCK/TIMER przez 2 sekundy, aby ustawić dzień.
- Naciśnij przycisk [ ] lub [ ], aby wybrać format wyświetlania 12h / 24h i potwierdź przyciskiem CLOCK/TIMER.
- Aby ustawić godzinę, użyj przycisków [ ] lub [ ] i naciśnij przycisk CLOCK/TIMER.
- Powtórz czynność, aby ustawić minuty.
W tym przykładzie zegar jest ustawiony na wyświetlanie 24-godzinne (0:00).
- Naciśnij raz przycisk CLOCK/TIMER, aby włączyć funkcję TIME. Na wyświetlaczu pojawi się wskaźnik CZAS.
- Naciśnij przycisk CLOCK/TIMER na 2 sekundy, a następnie naciśnij ponownie przycisk CLOCK/TIMER, aż pojawi się napis
"ON".
- Naciśnij przycisk [ ] lub [ ] aby wybrać opcję Timer, a następnie naciśnij przycisk CLOCK/TIMER.
- Naciśnij przycisk [ ] lub [ ], aby wybrać opcję "OFF", a następnie naciśnij przycisk CLOCK/TIMER.
- Ustaw czas do końca w sposób opisany w punktach 3 i 4 powyżej.
- Aby wybrać źródło odtwarzania timera (TU, CD, USB), naciśnij przycisk lub . Naciśnij przycisk CLOCK/ TIMER.
- Wyreguluj głośność za pomocą przycisku VOLUME (+ lub -) na urządzeniu głównym lub VOL +/- na pilocie, a następnie
naciśnij przycisk CLOCK/ TIMER. Nie należy ustawiać zbyt wysokiego poziomu głośności.
- Wskaźnik zaświeci się, a urządzenie jest gotowe do wyświetlania timera.
Ta funkcja umożliwia zaprogramowanie systemu tak, aby wyłączał się po upływie określonego czasu. Czas uśpienia można
ustawić w trybie włączonym:
- Aby włączyć funkcję uśpienia, naciśnij przycisk SLEEP na pilocie, na wyświetlaczu pojawi się napis "SL 90, 80, 70, 60, 50, 40,
30, 20, 10, 00"
- Gdy na wyświetlaczu pojawi się żądany czas uśpienia, zwolnij przycisk - timer uśpienia jest teraz aktywny. Na wyświetlaczu
pojawi się napis "SL10" oznaczający "10 minut" czasu uśpienia itd. Gdy czas uśpienia zostanie odliczony do zera, urządzenie
wyłączy się.
- Aby anulować funkcję uśpienia, naciśnij ponownie przycisk SLEEP, aż pojawi się komunikat ''SL00''. Funkcja uśpienia
zostanie wyłączona.
Za pomocą funkcji Skanowanie FM można automatycznie wyszukiwać nowe cyfrowe stacje radiowe i usuwać stacje
nieaktywne.
Naciśnij i przytrzymaj przez 2 sekundy przycisk PLAY / PAUSE / FM SCAN na systemie stereo lub na pilocie, aby wybrać opcję
[Scan]. Podczas automatycznego wyszukiwania stacji zostanie wyświetlone znalezione skanowanie. Po zakończeniu
automatycznego wyszukiwania stacji zostanie włączona ostatnio słuchana stacja. Jeśli ostatnio słuchana stacja jest
niedostępna, zostanie włączona pierwsza stacja z listy alfabetycznej.
Aby ręcznie dostroić się do określonej stacji radiowej, naciśnij kilkakrotnie przycisk [ ] lub [ ] na zestawie stereo lub na
pilocie.
SKLEP STACJONARNY
Przywoływanie zapisanych stacji
W trybie radia można przywołać zaprogramowane stacje radiowe, naciskając kilkakrotnie przycisk PRESET LEWY lub PRESET
PRAWY na pilocie. Gdy zaprogramowane stacje są przywoływane po raz pierwszy, na wyświetlaczu miga symbol [P01].
- Do podłączenia przenośnego odtwarzacza audio itp. do gniazda AUDIO IN należy użyć przewodu połączeniowego.
- Aby włączyć urządzenie, należy nacisnąć przycisk ON/STAND-BY.
- Naciśnij kilkakrotnie przycisk SOURCE na pilocie zdalnego sterowania lub na urządzeniu głównym, aby wybrać funkcję
AUDIO IN.
- Odtwarzanie podłączonego sprzętu. Jeśli poziom głośności podłączonego sprzętu jest zbyt wysoki, mogą wystąpić
zniekształcenia dźwięku. Jeśli tak się stanie, należy zmniejszyć głośność podłączonego urządzenia. Jeśli poziom głośności jest
zbyt niski, należy zwiększyć głośność podłączonego urządzenia.
Do gniazda AUDIO IN można podłączyć różne urządzenia, takie jak odtwarzacz MP3, odtwarzacz kasetowy, odtwarzacz
minidisc, odtwarzacz DVD itp.

27
- Włączyć urządzenie i ustawić je w trybie CD za pomocą przycisku SOURCE.
- Otwórz tackę na płyty CD, naciskając lewy górny róg ("Otwórz/zamknij") i włóż płytę CD górną częścią do siebie.
- Płyta CD zacznie być odtwarzana, gdy tylko urządzenie odczyta jej zawartość. Może to potrwać kilka sekund.
Powtarzanie i tryb losowy
- Naciśnij PLAY MODE na pilocie, aby wybrać REPEAT1 (powtarza w pętli bieżący utwór), REPEAT ALL (powtarza w pętli całą
płytę CD) lub RANDOM (powtarza utwory na płycie CD w kolejności losowej). W prawym górnym rogu ekranu zostanie
wyświetlone logo.
- Naciśnij ponownie PLAY MODE, aby powrócić do normalnego trybu odtwarzania.
Można wybrać do 32 utworów, które będą odtwarzane w żądanej kolejności. UWAGA: Programy można ustawiać tylko w
trybie STOP.
- Naciśnij przycisk MEMORY na pilocie, aby przejść do trybu programowania w trybie zatrzymania.
- Naciśnij przycisk [ ] lub [ ] na pilocie, aby wybrać żądaną ścieżkę.
- Naciśnij przycisk MEMORY, aby zapisać numer ścieżki.
- Powtórz czynność dla innych ścieżek. Można zaprogramować do 32 ścieżek. Jeśli chcesz sprawdzić zaprogramowane utwory,
naciśnij kilkakrotnie przycisk MEMORY.
- Naciśnij przycisk odtwarzania, aby rozpocząć odtwarzanie.
Tryb folderów
1. Wybierz tryb USB za pomocą przycisku SOURCE na urządzeniu lub na pilocie zdalnego sterowania.
2. Podłącz urządzenie pamięci masowej USB (pamięć USB, odtwarzacz MP3) zawierające pliki MP3 - zajmie to kilka
sekund.
3. Użyj przycisku FOLDER na pilocie, aby przejść do trybu FOLDER, na wyświetlaczu pojawi się napis "FOLD".
4. Użyj przycisku strzałki w lewo/prawo na pilocie, aby wybrać żądany folder zapisany już w urządzeniu USB.
5. Nawiguj za pomocą przycisków BACK lub FORWARD lub PLAY/PAUSE na urządzeniu lub na pilocie.
Technologia bezprzewodowa BT to technologia radiowa krótkiego zasięgu, która umożliwia bezprzewodową komunikację
między różnymi typami urządzeń cyfrowych, takimi jak telefon komórkowy czy komputer. Działa w zasięgu około 10 metrów.
Parowanie z urządzeniami BT:
Aby włączyć urządzenie, należy nacisnąć przycisk ON/STAND-BY.
Naciśnij przycisk SOURCE (pilot lub urządzenie), aby wybrać funkcję BT.
("----" miga)Wykonaj procedurę parowania w urządzeniu źródłowym, aby wykryć to urządzenie. Na liście wykrytych urządzeń
(jeśli jest dostępna) w urządzeniu źródłowym pojawi się napis "Audizio Nimes". (Szczegółowe informacje znajdują się w
instrukcji obsługi urządzenia źródłowego).
Uwagi
Podczas parowania należy umieścić urządzenia, które mają być sparowane, w odległości nie większej niż 1 metr od siebie.
Z listy źródeł wybierz "Audizio Nimes". Jeśli wymagane jest podanie kodu dostępu*, wpisz "0000". Passcode może być
również nazywany kodem PIN, kluczem dostępu, numerem PIN lub hasłem.
Wskaźnik parowania (conn) pojawia się, gdy urządzenie zostanie pomyślnie sparowane z urządzeniem źródłowym.
(Informacje o parowaniu są teraz zapisywane w urządzeniu). Niektóre urządzenia źródłowe audio mogą łączyć się z
urządzeniem automatycznie.
Niektóre źródła dźwięku automatycznie łączą się z urządzeniem po zakończeniu parowania, w przeciwnym razie należy
postępować zgodnie z instrukcją obsługi urządzenia źródłowego, aby zainicjować połączenie.
MUTE
Głośność zostanie tymczasowo wyciszona po naciśnięciu przycisku MUTE na pilocie. Naciśnij
ponownie, aby przywrócić wolumin.
X-BASS
Po pierwszym włączeniu urządzenia przechodzi ono w tryb dodatkowych tonów niskich, w którym uwydatnione zostają
częstotliwości tonów niskich, i pojawia się wskaźnik "X-BASS". Aby anulować funkcję dodatkowych tonów niskich, należy
nacisnąć przycisk X-BASS na pilocie zdalnego sterowania.
EQ
Po naciśnięciu przycisku EQ na pilocie zostanie wyświetlone bieżące ustawienie trybu. Aby przełączyć się na inny tryb, należy
kilkakrotnie nacisnąć przycisk EQ MODE, aż pojawi się żądany tryb dźwięku ("CLASSIC, POPS, JAZZ, ROCK").

28
Playback options BT streaming, CD, FM radio, USB
Input connections 3.5mm Jack, USB
Output connections 3.5mm Jack
Output power 50W
Impedance 4 Ohm
Power supply 220-240VAC 50Hz
Dimensions (L x W x H) 380 x 240 x 90mm
Weight 1,55
The specifications are typical. The actual values can slightly change from one unit to the other. Specifications can
be changed without prior notice.
The products referred to in this manual conform to the European Community Directives to which they are
subject:
Specifications and design are subject to change without prior notice.
www.Tronios.com
Copyright © 2022 by Tronios The Netherlands
European Union
United Kingdom
Tronios B.V.,
Bedrijvenpark Twente Noord 18,
7602KR Almelo, The Netherlands
Tronios Ltd.,
130 Harley Street,
London W1G 7JU, United Kingdom
2014/35/EU
S.I. 2016:1101
2014/30/EU
S.I. 2016:1091
2011/65/EC
S.I. 2012:3032
2014/53/EU
S.I. 2017:1206
-
 1
1
-
 2
2
-
 3
3
-
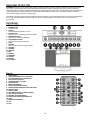 4
4
-
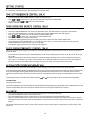 5
5
-
 6
6
-
 7
7
-
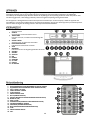 8
8
-
 9
9
-
 10
10
-
 11
11
-
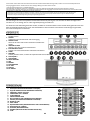 12
12
-
 13
13
-
 14
14
-
 15
15
-
 16
16
-
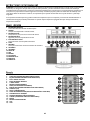 17
17
-
 18
18
-
 19
19
-
 20
20
-
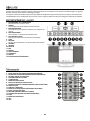 21
21
-
 22
22
-
 23
23
-
 24
24
-
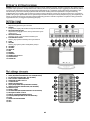 25
25
-
 26
26
-
 27
27
-
 28
28


audizio Nimes Stereo HiFi System de handleiding
- Categorie
- CD-radio's
- Type
- de handleiding
in andere talen
Gerelateerde papieren
-
audizio Cannes Stereo Radio de handleiding
-
-
-
-
-
audizio Padova DAB+ Radio Wood de handleiding
-
-
-
audizio AD420B de handleiding