
PRODUCT OF
DO266A
Handleiding Mobiele airco
Mode d’emploi Climatiseur mobile
Gebrauchsanleitung Mobile Klimaanlage
Instruction booklet Mobile air conditioning
Manual de instrucciones Acondicionador
Istruzioni per l’uso Condizionatore d’aria portatile
Návod k použití Mobilní klimatizace
Návod na použitie Mobilná klimatizácia

Required for R32/R290 Refrigerant only
CAUTION
: RISK OF FIRE
Lees aandachtig alle instructies - bewaar deze handleiding voor latere raadpleging.
Lisez attentivement les instructions - gardez le mode d’emploi pour utilisation ultérieur.
Lesen Sie genau die Anweisungen - bewahren Sie die Gebrauchsanleitung für spätere
heranziehung.
Read all instructions carefully - save this instruction manual for future reference.
Lea detenidamente todas las instrucciones - Conserve este manual para futura referencia.
Leggere con attenzione le istruzioni - conservarle per future consultazioni
Před použitím si důkladně přečtěte tento manuál - manuál si uschovejte i pro případ
budoucího nahlédnutí.
Pred použitím si dôkladne prečítajte tento manuál - manuál si uschovajte aj pre prípad
budúceho nahliadnutie.
NL Nederlands 3
FR Français 19
DE Deutsch 34
EN English 50
ES Espagnol 65
IT Italiano 81
CZ Čeština 97
SK Slovenčina 111

3
DO266A
www.domo-elektro.be
NL
GARANTIE
Geachte klant,
Al onze producten ondergaan steeds een strenge kwaliteitscontrole,
alvorens ze aan je worden aangeboden. Mocht je desondanks toch nog
problemen hebben met jouw toestel, dan betreuren wij dit ten zeerste.
In dat geval verzoeken wij je contact op te nemen met onze klantendienst.
Onze medewerkers zullen je met plezier verder helpen.
+32 14 21 71 91 [email protected]
Maandag – Donderdag : 8.30u – 12.00u en van 13.00u – 17.00u
Vrijdag : 8.30u – 12.00u en van 13.00u – 16.30u
Dit apparaat heeft een garantietermijn van 2 jaar vanaf de datum van aankoop. Gedurende
de garantieperiode zal de distributeur volledige verantwoording op zich nemen voor
gebreken die aanwijsbaar berusten op materiaal- of constructiefouten. Wanneer dergelijke
gebreken voorkomen, zal het apparaat, indien nodig, vervangen of gerepareerd worden. De
garantieperiode van 2 jaar zal op dit moment niet terug beginnen, maar loopt verder tot 2
jaar na de aankoop van het toestel. De garantie wordt verleend op basis van het kassaticket.
Indien je apparaat defect is binnen de garantietermijn van 2 jaar, dan mag je het toestel
samen met het originele kassaticket binnenbrengen in de winkel waar je het toestel hebt
aangekocht.
De garantie op accessoires en onderdelen die onderhevig zijn aan slijtage, bedraagt 6
maanden.
De garantie en verantwoordelijkheid/aansprakelijkheid van de leverancier en fabrikant
vervallen automatisch in de volgende gevallen:
· Bij het niet naleven van de instructies in deze handleiding.
· Bij verkeerde aansluiting, vb. te hoge elektrische spanning.
· Bij verkeerd, hardhandig of abnormaal gebruik.
· Bij onvoldoende of verkeerd onderhoud.
· Bij herstelling of wijziging van het toestel door de consument of niet gemachtigde derden.
· Bij gebruik van onderdelen of accessoires welke niet worden aanbevolen of geleverd door
de leverancier / fabrikant.

4
DO266A
NL
VEILIGHEIDSVOORSCHRIFTEN
Wanneer je elektrische toestellen gebruikt, moeten volgende veiligheidsinstructies in acht
genomen worden:
· Lees deze instructies zorgvuldig door. Bewaar deze handleiding om later te raadplegen.
· Verwijder voor het eerste gebruik alle verpakkingsmaterialen en eventuele promotionele
stickers. Zorg ervoor dat kinderen niet met de verpakkingsmaterialen spelen.
· Dit toestel is geschikt om te gebruiken in de huishoudelijke omgeving en in gelijkaardige
omgevingen zoals:
· Keukenhoek voor personeel van winkels, kantoren en andere gelijkaardige
professionele omgevingen
· Boerderijen
· Hotel- en motelkamers en andere omgevingen met een residentieel karakter
· Gastenkamers, of gelijkaardige
· Dit toestel mag gebruikt worden door kinderen vanaf 16 jaar en personen met een fysieke
of sensoriële beperking of mensen met een beperkte mentale capaciteit of gebrek aan
ervaring of kennis, op voorwaarde dat deze personen toezicht krijgen of instructies hebben
gekregen over het gebruik van het toestel op een veilige manier en dat ze ook de gevaren
kennen bij het gebruik van het toestel. Kinderen mogen niet met het toestel spelen. Het
onderhoud en de reiniging van het toestel mogen niet door kinderen gebeuren tenzij ze
ouder zijn dan 16 jaar en onder toezicht staan.
· Houd het toestel en de voedingskabel buiten het bereik van kinderen jonger dan 16 jaar.
· Opgelet: het toestel mag niet gebruikt worden met een externe timer.
· Kijk voor gebruik na of het voltage vermeld op het toestel overeenkomt met het voltage
van het elektriciteitsnet bij je thuis.
· De voedingskabel moet steeds aangesloten worden op een stopcontact dat geïnstalleerd
en geaard is volgens de lokale standaarden en normen.
· Laat het snoer niet op een heet oppervlak of over de rand van een tafel of aanrecht
hangen.
· Gebruik het toestel nooit wanneer het snoer of de stekker beschadigd is, na een slechte
werking van het toestel of wanneer het toestel beschadigd is. Breng het toestel dan naar
het dichtsbijzijnde gekwaliceerde service center voor nazicht en reparatie.
· Streng toezicht is noodzakelijk wanneer het toestel door of in de buurt van kinderen
gebruikt wordt.
· Het gebruik van accessoires die niet aanbevolen of verkocht worden door de fabrikant, kan
brand, elektrische schokken of verwondingen veroorzaken.
· Trek de stekker uit het stopcontact wanneer het toestel niet in gebruik is, vooraleer
onderdelen te monteren of demonteren en vooraleer het toestel te reinigen. Zet eerst alle
knoppen in de ‘uit’-stand en trek de stekker bij de stekker zelf uit het stopcontact. Trek
nooit aan het snoer om de stekker uit het stopcontact te trekken.
· Laat een werkend toestel niet zonder toezicht achter.

5
DO266A
www.domo-elektro.be
NL
· Zet dit toestel nooit op of in de buurt van een gasvuur of elektrisch vuur of op een plaats
waar het in contact zou kunnen komen met een warm toestel.
· Gebruik het toestel niet buiten.
· Gebruik het toestel enkel voor het doel waarvoor het bestemd is.
· Gebruik het toestel altijd op een stevig, droog, een oppervlak.
· Gebruik het toestel alleen voor huishoudelijk gebruik. De fabrikant is niet verantwoordelijk
voor ongelukken die een gevolg zijn van verkeerd gebruik van het toestel, of het niet
naleven van de regels zoals ze vermeld zijn in deze handleiding.
· Alle herstellingen, buiten het gewone onderhoud van het toestel, moeten uitgevoerd
worden door de fabrikant of zijn dienst na verkoop.
· Dompel het toestel, het elektrisch snoer of de stekker nooit onder in water of een andere
vloeistof.
· Zorg ervoor dat kinderen het elektrisch snoer of het toestel niet kunnen aanraken.
· Hou het snoer uit de buurt van scherpe randen en hete onderdelen of andere
warmtebronnen.
· Plaats het toestel nooit in de buurt van een gastoestel, vuur of een lichtontvlambare
vloeistof.
· Sla nooit op het toestel of schud niet met het toestel, om schade te voorkomen.
· Dek de luchtinlaat en -uitlaat nooit af, om oververhitting te voorkomen.
· Besprenkel het toestel nooit met water of plaats het toestel nooit in de buurt van water,
om elektrocutie te voorkomen.
· Deel de stroomtoevoer naar de airco nooit met een ander toestel.
· Steek de stekker nooit in het stopcontact of verwijder de stekker nooit uit het stopcontact
met natte handen.
· Steek nooit vreemde voorwerpen in de openingen van het toestel.
· Gebruik nooit een verlengsnoer.
· Laat kinderen nooit in de buurt van het toestel spelen.
· Wanneer je het toestel uitzet en kort daarna terug aanzet, zal de compressor minstens 3
minuten nodig hebben om terug op te starten.
· Plaats het toestel minstens op 1 meter afstand van tv of radio, om storingen te voorkomen.
· Plaats het toestel niet in rechtstreeks zonlicht, om verkleuring van het toestel te
voorkomen.
· Laat het toestel nooit meer dan 35° hellen wanneer je het verplaatst. Verplaats de airco
altijd rechtopstaand. Verplaats het toestel nooit ondersteboven.
· Verwijder steeds het water uit het toestel voor je het opbergt, zo verleng je de levensduur
van het toestel.
· Gebruik geen chemische middelen om het toestel te reinigen, dit zal het toestel
beschadigen.
· Zorg er steeds voor dat je de stroom uitschakelt voor je het luchtinlaatrooster weghaalt of
plaatst.

6
DO266A
NL
· Zorg ervoor dat de airco steeds beschermd is tegen vocht, zoals condensatie, spatwater,
etc. Zorg ervoor dat de airco zo staat dat hij niet in water of een andere vloeistof kan
vallen. Wanneer hij toch in water of een vloeistof moest vallen, verwijder dan onmiddellijk
de stekker uit het stopcontact.
· Gebruik de airco niet in een vochtige ruimte zoals een badkamer of wasplaats.
· Neem steeds contact op met een gekwaliceerde persoon om het toestel te laten
herstellen.
· Zorg ervoor dat de vrije ruimte rondom het toestel minstens 30 cm bedraagt.
· Bedien de toetsen van het toestel alleen met je vingers en met geen enkel ander voorwerp.
· Verwijder geen vaste delen van de airco. Gebruik het toestel niet wanneer het niet naar
behoren functioneert, wanneer het toestel gevallen of beschadigd is.
· Gebruik nooit de stekker om het toestel aan of uit te zetten. Gebruik steeds de knoppen op
het bedieningspaneel.
· Gebruik het toestel niet in de buurt van licht ontvlambare stoen, zoals alcohol,
insecticide, petroleum, …
· Herstellingen, detectie van lekken en werkzaamheden aan de installatie dienen te
gebeuren door bevoegde personen voorzien van de relevante certicaten.
· De installatie moet worden uitgevoerd volgens de installatie-instructies. Een onjuiste
installatie kan waterlekkage, elektrische schokken of brand veroorzaken.
· Raak het apparaat niet aan met natte of vochtige handen of op blote voeten.
· Als de airconditioner tijdens gebruik wordt omgestoten, schakel het apparaat dan uit en
trek de stekker onmiddellijk uit het stopcontact. Inspecteer het toestel om er zeker van
te zijn dat er geen schade is. Als je vermoedt dat het apparaat beschadigd is, neem dan
contact op met een technicus of klantenservice.
· Schakel het toestel uit bij onweer en trek de stekker uit het stopcontact om schade aan het
toestel door blikseminslag te voorkomen.
· Als de drainagefunctie niet in gebruik is, bevestig beide rubberen pluggen in de
drainageopeningen. Bewaar de rubberen pluggen zorgvuldig wanneer je deze niet gebruikt
om te voorkomen dat kinderen stikken.
· Laat het snoer niet onder vloerbedekking lopen. Bedek het snoer niet met vloerkleden,
lopers of soortgelijke bedekkingen. Leg het snoer niet onder meubels of apparaten. Leg
het snoer uit de buurt van een doorgang en waar niemand over kan struikelen.
· Schakel het toestel uit en trek de stekker uit het stopcontact als er vreemde geluiden,
geuren of rook uit het toestel komen.
· Lees grondig alle waarschuwingen.
· Gebruik bij het ontdooien en reinigen van het apparaat geen andere gereedschappen dan
de gereedschappen aanbevolen door het productiebedrijf.
· Het apparaat moet worden geplaatst in een ruimte zonder permanente
ontstekingsbronnen (bijvoorbeeld: open vlammen, gasapparaten of elektrische apparaten
in werking).

7
DO266A
www.domo-elektro.be
NL
· Het mag niet worden doorprikt of verbrand.
· Koelgassen kunnen geurloos zijn.
· Het apparaat moet worden geïnstalleerd, gebruikt en bewaard in een ruimte die groter is
dan 7 m
2
.
· Dit apparaat bevat een aantal grammen R290 koelgas (zie het typeplaatje achteraan op
het systeem).
· R290 is een koelgas dat voldoet aan de Europese milieurichtlijnen. Geen enkel onderdeel
van het koelcircuit mag worden doorprikt.
· Als het apparaat geïnstalleerd, gebruikt of bewaard wordt in een niet-geventileerde
ruimte, moet deze ruimte ontworpen zijn om de opbouw van koelmiddellekken te
voorkomen, omdat deze lekken leiden tot een risico op brand of explosies door de
ontsteking van het koelmiddel, die wordt veroorzaakt door elektrische verwarming,
elektrische kachels of andere ontstekingsbronnen.
· Het apparaat moet zodanig worden bewaard dat mechanische defecten worden
voorkomen.
· Personen die het koelcircuit gebruiken of er werkzaamheden aan uitvoeren, moeten
beschikken over de juiste certicaten, verstrekt door een geaccrediteerde organisatie,
die een garantie biedt van bevoegdheid in de behandeling van koelmiddelen, in
overeenstemming met een specieke beoordeling erkend door verenigingen in de sector.
· Reparaties moeten worden uitgevoerd op basis van de aanbevelingen van het
productiebedrijf. Onderhoud en reparaties waarvoor de assistentie van ander
gekwaliceerd personeel nodig is, moeten worden uitgevoerd onder toezicht van een
persoon die is aangeduid voor het gebruik van ontvlambare koelmiddelen.
Voorzichtig: gevaar voor brand / ontvlambare materialen.
Dit apparaat gebruikt een ontvlambaar koelmiddel. Als het koelmiddel lekt en
is blootgesteld aan een externe ontstekingsbron, is er gevaar voor brand.
BEWAAR DEZE INSTRUCTIES
ENERGIETIPS
· Gebruik het toestel alleen in ruimtes welke niet groter zijn dan de aanbevolen grootte.
· Plaat het toestel zo, dat luchtstroom niet belemmerd wordt door meubelen of andere
voorwerpen.
· Hou gordijnen gesloten tijdens het warmste uur van de dag.
· Zorg ervoor dat de lters altijd zuiver zijn.
· Houd ramen en deuren steeds gesloten om de koude lucht binnen te houden en de warme
lucht buiten.

8
DO266A
NL
ONDERDELEN
1. Controlepaneel
2. Luchtuitlaat
3. Luchtlter
4. Luchtinlaat
5. Luchtuitlaat
6. Drainage
7. Drainageslang
8. Afstandsbediening
9. Luchtuitlaatslang
9 a. Koppelstuk luchtuitlaatslang
10. Muurbevestiging
10 a. Muuradapter
10 b. Koppelstuk muurbevestiging
11. Raambevestiging
11 a. Raamadapter
11 b. Koppelstuk raambevestiging
11 c. Dichtingen
11 d. Adapterstop
11 e. L-ijzer met schroeven
11b 11c
11
11e
1
2
3
4
5
6
8
7

9
DO266A
www.domo-elektro.be
NL
INSTALLATIE
· Plaats de airco op een solide en stabiele ondergrond, om de
geluidshinder en vibratie tot een minimum te beperken. Zorg er
ook voor dat de ondergrond sterk genoeg is om het gewicht van
het toestel te dragen.
· Om het toestel makkelijk te kunnen verplaatsen, is het voorzien
van wieltjes. Zorg ervoor dat je het toestel alleen rolt over een
gladde en vlakke ondergrond. Wees voorzichtig wanneer je het
toestel al rollend verplaatst over een tapijt. Rol het toestel nooit
over een object.
· De voedingskabel moet steeds aangesloten worden op een
stopcontact dat geïnstalleerd en geaard is volgens de lokale
standaarden en normen.
· Plaats geen voorwerpen binnen een straal van 30 cm rondom het toestel.
· De luchtuitlaatslang moet geplaatst worden tijdens de instelling COOL of AUTO. Tijdens
de instelling FAN en DRY heb je de luchtuitlaatslang niet nodig.
· Zorg er ook voor dat zich rondom de luchtuitlaat buiten, in een straal van 50 cm, geen
obstakels bevinden.
· Zorg ervoor dat de luchtuitlaatslang niet te fel gebogen is bij het gebruik.
max 120 cm
min 30 cm
· Plaats het koppelstuk van de luchtuitlaatslang op het uiteinde van de slang.
· Plaats de luchtuitlaatslang op de luchtuitlaat aan de achterzijde van het toestel.
max 120 cm
min 30 cm
· Plaats het koppelstuk van de raambevestiging op het andere uiteinde van de
luchtuitlaatslang.
· Plaats de raamadapter in je venster. Dit kan voor zowel horizontale als verticale
schuiframen. Blokkeer de raamadapter op de gewenste lengte.
· Bevestig de slang met koppelstuk op de raamadapter.
· Maak gebruik van de raamdichtingen om eventuele openingen in het venster af te sluiten.
· Blokkeer de raamadapter op de gewenste lengte met behulp van de meegeleverde
raamadapter stop.
max 120 cm
min 30 cm

10
DO266A
NL
· Indien gewenst kan je het raam vastzetten met het L-ijzer en 2 schroeven.
max 120 cm
min 30 cm
max 120 cm
min 30 cm
· Plaats het koppelstuk van de luchtuitlaatslang op het uiteinde van de slang.
· Plaats de luchtuitlaatslang op de luchtuitlaat aan de achterzijde van het toestel.
max 120 cm
min 30 cm
· Maak een opening in de muur ter grootte van de muuradapter.
· Plaats de muuradapter in de opening. Bevestig de muuradapter met de meegeleverde
schroeven.
· Plaats het koppelstuk van de muurbevestiging op het andere uiteinde van de
luchtuitlaatslang.
· Bevestig de slang met koppelstuk op de muuradapter.
max 120 cm
min 30 cm

11
DO266A
www.domo-elektro.be
NL
De horizontale lamellen aan de voorzijde van de airco kan je manueel open en dicht klappen
om zo de luchtuitlaat beter te kunnen richten.
CONTROLEPANEEL
12
4
3
1. ON-OFF - toets
Om het toestel in en uit te schakelen.
2. “+” en “-” - toetsen
Om de temperatuurinstelling aan te passen. De temperatuur kan ingesteld worden tussen
17°C en 30°C (COOL mode). Als je beide toetsen tegelijkertijd ingedrukt houdt gedurende 3
sec, kan je wisselen tussen “°C” en “°F”.
3. MODE - toets
Met deze toets selecteer je de gewenste gebruiksinstelling. Telkens je op de toets drukt,
zal de gebruiksinstelling wijzigen: COOL, FAN en DRY. Het desbetreende lichtje op
het controlepaneel zal oplichten. Als je de FAN-instelling kiest, blaast de ventilatie op
automatische stand. Je kan de ventilatiesnelheid enkel aanpassen met de afstandsbediening.
4. LED display
Toont de ingestelde temperatuur. Wanneer het toestel in de DRY of FAN instelling staat, zal
op het display de kamertemperatuur weergegeven worden.
Zorg bij het gebruik van de afstandsbediening dat je
deze steeds richt naar het toestel. Als je dit niet doet,
kan je na het wijzigen van een bepaalde instelling de
afstandsbediening nog even richten naar het toestel en op
de ON-OFF toets drukken.
Als het toestel een signaal ontvangt van de
afstandsbediening hoor je een piep. De afstandsbediening
moet in een straal van 8 meter rond het toestel gebruikt
worden.
1
2
3
4
5
6
7
8

12
DO266A
NL
1. ON-OFF - toets
Om het toestel in en uit te schakelen.
2. MODE - toets
Met deze toets selecteer je de gewenste gebruiksinstelling. Telkens je op de toets drukt, zal
de gebruiksinstelling wijzigen: AUTO, COOL, DRY en FAN. Het desbetreende lichtje op het
controlepaneel zal oplichten.
3. FAN - toets
Met deze toets kan je de ventilatiesnelheid instellen. Er zijn drie instellingen: LOW
55
66
MODE display
Displays the current
mode, including:
AUTO
COOL
DRY
HEAT
FAN
Transmission Indicator
Lights up when remote sends
signal to unit
ON/OFF display
Appears when the unit is turned on,
and disappears when it is turned off
TIMER ON display
Displays when TIMER
ON is set
TIMER OFF display
Displays when TIMER
OFF is set
SLEEP display
Battery display
SILENT display
ECO display
Displays when
SLEEP function
is activated
FOLLOW ME
display
Indicates that
the FOLLOW ME
function is on
FAN SPEED display
Displays selected FAN SPEED:
HIGH, MED,
or LOW
This display is blank when
set to AUTO speed.
Temperature/Timer display
Displays the set temperature by default, or timer setting
when using TIMER ON/OFF functions
o O O
Temperature range: 17-30 C(62 F-86 F)
Timer setting range: 0-24 hours
This display is blank when operating in FAN mode.
1. Press the MODE button to select
COOL mode.
2. Set your desired temperature using
the Temp or Temp button.
3. Press the FAN button to select the
fan speed: AUTO, LOW, MED,or
HIGH.
4. Press the ON/OFF button to start the
unit.
In AUTO mode, the unit will automatically
select the COOL, FAN, HEAT or DRY mode
based on the set temperature.
1. Press the MODE button to select Auto mode.
2. Set your desired temperature using the
Temp or Temp button.
3. Press the ON/OFF button to start the unit.
,
NOTE: FAN SPEED can t be set in Auto mode.
SETTING TEMPERATURE
AUTO operation
The operating temperature range for units is
O O O
17-30 C(62 F-86 F). You can increase or
O O
decrease the set tmeperature in 1 C(1 F)
increments.
COOL operation
1
3
2
1
3
2
4
Not available for this unit
Not available for
this unit
Not available for
this unit
Low battery
detection
Remote LED Screen Indicators
How To Use The Basic Functions
ON/OFF
ON/OFF
TEMP
TEMP
SHORT
CUT
SHORT
CUT
TIMER
ON
TIMER
ON
TIMER
OFF
TIMER
OFF
MODE
MODE
FAN
FAN
SLEEP
SLEEP
LED
LED
FOLLOW
ION
SWING
ME
FOLLOW
ION
SWING
ME
, HIGH
55
66
MODE display
Displays the current
mode, including:
AUTO
COOL
DRY
HEAT
FAN
Transmission Indicator
Lights up when remote sends
signal to unit
ON/OFF display
Appears when the unit is turned on,
and disappears when it is turned off
TIMER ON display
Displays when TIMER
ON is set
TIMER OFF display
Displays when TIMER
OFF is set
SLEEP display
Battery display
SILENT display
ECO display
Displays when
SLEEP function
is activated
FOLLOW ME
display
Indicates that
the FOLLOW ME
function is on
FAN SPEED display
Displays selected FAN SPEED:
HIGH, MED,
or LOW
This display is blank when
set to AUTO speed.
Temperature/Timer display
Displays the set temperature by default, or timer setting
when using TIMER ON/OFF functions
o O O
Temperature range: 17-30 C(62 F-86 F)
Timer setting range: 0-24 hours
This display is blank when operating in FAN mode.
1. Press the MODE button to select
COOL mode.
2. Set your desired temperature using
the Temp or Temp button.
3. Press the FAN button to select the
fan speed: AUTO, LOW, MED,or
HIGH.
4. Press the ON/OFF button to start the
unit.
In AUTO mode, the unit will automatically
select the COOL, FAN, HEAT or DRY mode
based on the set temperature.
1. Press the MODE button to select Auto mode.
2. Set your desired temperature using the
Temp or Temp button.
3. Press the ON/OFF button to start the unit.
,
NOTE: FAN SPEED can t be set in Auto mode.
SETTING TEMPERATURE
AUTO operation
The operating temperature range for units is
O O O
17-30 C(62 F-86 F). You can increase or
O O
decrease the set tmeperature in 1 C(1 F)
increments.
COOL operation
1
3
2
1
3
2
4
Not available for this unit
Not available for
this unit
Not available for
this unit
Low battery
detection
Remote LED Screen Indicators
How To Use The Basic Functions
ON/OFF
ON/OFF
TEMP
TEMP
SHORT
CUT
SHORT
CUT
TIMER
ON
TIMER
ON
TIMER
OFF
TIMER
OFF
MODE
MODE
FAN
FAN
SLEEP
SLEEP
LED
LED
FOLLOW
ION
SWING
ME
FOLLOW
ION
SWING
ME
en AUTO.
4. SLEEP - toets
Gebruik je om de “sleep” functie in te stellen.
Wanneer je deze instelling selecteert, zal de ingestelde temperatuur binnen 30 min. met 1°C
stijgen. Na nog 30 min. zal de temperatuur opnieuw met 1°C stijgen. Deze temperatuur zal
aangehouden worden voor de komende 7 uur. Na deze tijd gaat de temperatuur terug naar de
origineel ingestelde temperatuur en wordt de SLEEP-instelling beëindigd.
NOTA: deze instelling kan niet geselecteerd worden bij FAN- en DRY-instelling.
5. TEMP - toets
Om de temperatuurinstelling aan te passen. De temperatuur kan ingesteld worden tussen
17°C en 30°C. Als je de volledige TEMP-toets ingedrukt houdt gedurende 3 sec, kan je wisselen
tussen “°C” en “°F”.
6. SHORT CUT - toets
Met deze toets kan je een voorkeursinstelling vastleggen en inschakelen.
7. TIMER ON - toets
Met deze toets kan je de tijd instellen wanneer het toestel moet inschakelen.
8. TIMER OFF - toets
Met deze toets kan je de tijd instellen wanneer het toestel moet uitschakelen.
9. LED - toets
Deze toets schakelt het LED display van het controlepaneel uit. Deze kan je gebruiken als het
display teveel licht geeft als je wil slapen. Als je een tweede keer op de knop drukt, schakelt
het display terug in.

13
DO266A
www.domo-elektro.be
NL
55
66
MODE display
Displays the current
mode, including:
AUTO
COOL
DRY
HEAT
FAN
Transmission Indicator
Lights up when remote sends
signal to unit
ON/OFF display
Appears when the unit is turned on,
and disappears when it is turned off
TIMER ON display
Displays when TIMER
ON is set
TIMER OFF display
Displays when TIMER
OFF is set
SLEEP display
Battery display
SILENT display
ECO display
Displays when
SLEEP function
is activated
FOLLOW ME
display
Indicates that
the FOLLOW ME
function is on
FAN SPEED display
Displays selected FAN SPEED:
HIGH, MED,
or LOW
This display is blank when
set to AUTO speed.
Temperature/Timer display
Displays the set temperature by default, or timer setting
when using TIMER ON/OFF functions
o O O
Temperature range: 17-30 C(62 F-86 F)
Timer setting range: 0-24 hours
This display is blank when operating in FAN mode.
1. Press the MODE button to select
COOL mode.
2. Set your desired temperature using
the Temp or Temp button.
3. Press the FAN button to select the
fan speed: AUTO, LOW, MED,or
HIGH.
4. Press the ON/OFF button to start the
unit.
In AUTO mode, the unit will automatically
select the COOL, FAN, HEAT or DRY mode
based on the set temperature.
1. Press the MODE button to select Auto mode.
2. Set your desired temperature using the
Temp or Temp button.
3. Press the ON/OFF button to start the unit.
,
NOTE: FAN SPEED can t be set in Auto mode.
SETTING TEMPERATURE
AUTO operation
The operating temperature range for units is
O O O
17-30 C(62 F-86 F). You can increase or
O O
decrease the set tmeperature in 1 C(1 F)
increments.
COOL operation
1
3
2
1
3
2
4
Not available for this unit
Not available for
this unit
Not available for
this unit
Low battery
detection
Remote LED Screen Indicators
How To Use The Basic Functions
ON/OF F
ON/OF F
TEMP
TEMP
SHORT
CUT
SHORT
CUT
TIMER
ON
TIMER
ON
TIMER
OFF
TIMER
OFF
MODE
MODE
FAN
FAN
SLEEP
SLEEP
LED
LED
FOLLO W
ION
SWING
ME
FOLLO W
ION
SWING
ME
In de instelling AUTO kiest het toestel automatisch de gepaste instelling in functie van de
gekozen temperatuur. Deze instelling kan je enkel kiezen met de afstandsbediening.
1. Kies met de MODE - toets op de afstandsbediening voor AUTO.
2. Stel de gewenste temperatuur in met de TEMP - toets. Het toestel gaat in functie
hiervan de instelling bepalen.
In AUTO-modus kan je de snelheid van de ventilatie (FAN) niet aanpassen.
55
66
MODE display
Displays the current
mode, including:
AUTO
COOL
DRY
HEAT
FAN
Transmission Indicator
Lights up when remote sends
signal to unit
ON/OFF display
Appears when the unit is turned on,
and disappears when it is turned off
TIMER ON display
Displays when TIMER
ON is set
TIMER OFF display
Displays when TIMER
OFF is set
SLEEP display
Battery display
SILENT display
ECO display
Displays when
SLEEP function
is activated
FOLLOW ME
display
Indicates that
the FOLLOW ME
function is on
FAN SPEED display
Displays selected FAN SPEED:
HIGH, MED,
or LOW
This display is blank when
set to AUTO speed.
Temperature/Timer display
Displays the set temperature by default, or timer setting
when using TIMER ON/OFF functions
o O O
Temperature range: 17-30 C(62 F-86 F)
Timer setting range: 0-24 hours
This display is blank when operating in FAN mode.
1. Press the MODE button to select
COOL mode.
2. Set your desired temperature using
the Temp or Temp button.
3. Press the FAN button to select the
fan speed: AUTO, LOW, MED,or
HIGH.
4. Press the ON/OFF button to start the
unit.
In AUTO mode, the unit will automatically
select the COOL, FAN, HEAT or DRY mode
based on the set temperature.
1. Press the MODE button to select Auto mode.
2. Set your desired temperature using the
Temp or Temp button.
3. Press the ON/OFF button to start the unit.
,
NOTE: FAN SPEED can t be set in Auto mode.
SETTING TEMPERATURE
AUTO operation
The operating temperature range for units is
O O O
17-30 C(62 F-86 F). You can increase or
O O
decrease the set tmeperature in 1 C(1 F)
increments.
COOL operation
1
3
2
1
3
2
4
Not available for this unit
Not available for
this unit
Not available for
this unit
Low battery
detection
Remote LED Screen Indicators
How To Use The Basic Functions
ON/OF F
ON/OF F
TEMP
TEMP
SHORT
CUT
SHORT
CUT
TIMER
ON
TIMER
ON
TIMER
OFF
TIMER
OFF
MODE
MODE
FAN
FAN
SLEEP
SLEEP
LED
LED
FOLLO W
ION
SWING
ME
FOLLO W
ION
SWING
ME
Met de COOL-functie kan je de ruimte aoelen tot een bepaalde temperatuur.
1. Druk op de MODE - toets tot het COOL-indicatielampje brandt.
2. Gebruik de “+” en “-” toetsen op het controlepaneel of de TEMP - toets op de
afstandsbediening, om de gewenste kamertemperatuur in te stellen.
3. Gebruik de FAN - toets op de afstandsbediening om de gewenste ventilatiesnelheid
in te stellen. Er zijn drie instellingen: LOW
55
66
MODE display
Displays the current
mode, including:
AUTO
COOL
DRY
HEAT
FAN
Transmission Indicator
Lights up when remote sends
signal to unit
ON/OFF display
Appears when the unit is turned on,
and disappears when it is turned off
TIMER ON display
Displays when TIMER
ON is set
TIMER OFF display
Displays when TIMER
OFF is set
SLEEP display
Battery display
SILENT display
ECO display
Displays when
SLEEP function
is activated
FOLLOW ME
display
Indicates that
the FOLLOW ME
function is on
FAN SPEED display
Displays selected FAN SPEED:
HIGH, MED,
or LOW
This display is blank when
set to AUTO speed.
Temperature/Timer display
Displays the set temperature by default, or timer setting
when using TIMER ON/OFF functions
o O O
Temperature range: 17-30 C(62 F-86 F)
Timer setting range: 0-24 hours
This display is blank when operating in FAN mode.
1. Press the MODE button to select
COOL mode.
2. Set your desired temperature using
the Temp or Temp button.
3. Press the FAN button to select the
fan speed: AUTO, LOW, MED,or
HIGH.
4. Press the ON/OFF button to start the
unit.
In AUTO mode, the unit will automatically
select the COOL, FAN, HEAT or DRY mode
based on the set temperature.
1. Press the MODE button to select Auto mode.
2. Set your desired temperature using the
Temp or Temp button.
3. Press the ON/OFF button to start the unit.
,
NOTE: FAN SPEED can t be set in Auto mode.
SETTING TEMPERATURE
AUTO operation
The operating temperature range for units is
O O O
17-30 C(62 F-86 F). You can increase or
O O
decrease the set tmeperature in 1 C(1 F)
increments.
COOL operation
1
3
2
1
3
2
4
Not available for this unit
Not available for
this unit
Not available for
this unit
Low battery
detection
Remote LED Screen Indicators
How To Use The Basic Functions
ON/OFF
ON/OFF
TEMP
TEMP
SHORT
CUT
SHORT
CUT
TIMER
ON
TIMER
ON
TIMER
OFF
TIMER
OFF
MODE
MODE
FAN
FAN
SLEEP
SLEEP
LED
LED
FOLLOW
ION
SWING
ME
FOLLOW
ION
SWING
ME
, HIGH
55
66
MODE display
Displays the current
mode, including:
AUTO
COOL
DRY
HEAT
FAN
Transmission Indicator
Lights up when remote sends
signal to unit
ON/OFF display
Appears when the unit is turned on,
and disappears when it is turned off
TIMER ON display
Displays when TIMER
ON is set
TIMER OFF display
Displays when TIMER
OFF is set
SLEEP display
Battery display
SILENT display
ECO display
Displays when
SLEEP function
is activated
FOLLOW ME
display
Indicates that
the FOLLOW ME
function is on
FAN SPEED display
Displays selected FAN SPEED:
HIGH, MED,
or LOW
This display is blank when
set to AUTO speed.
Temperature/Timer display
Displays the set temperature by default, or timer setting
when using TIMER ON/OFF functions
o O O
Temperature range: 17-30 C(62 F-86 F)
Timer setting range: 0-24 hours
This display is blank when operating in FAN mode.
1. Press the MODE button to select
COOL mode.
2. Set your desired temperature using
the Temp or Temp button.
3. Press the FAN button to select the
fan speed: AUTO, LOW, MED,or
HIGH.
4. Press the ON/OFF button to start the
unit.
In AUTO mode, the unit will automatically
select the COOL, FAN, HEAT or DRY mode
based on the set temperature.
1. Press the MODE button to select Auto mode.
2. Set your desired temperature using the
Temp or Temp button.
3. Press the ON/OFF button to start the unit.
,
NOTE: FAN SPEED can t be set in Auto mode.
SETTING TEMPERATURE
AUTO operation
The operating temperature range for units is
O O O
17-30 C(62 F-86 F). You can increase or
O O
decrease the set tmeperature in 1 C(1 F)
increments.
COOL operation
1
3
2
1
3
2
4
Not available for this unit
Not available for
this unit
Not available for
this unit
Low battery
detection
Remote LED Screen Indicators
How To Use The Basic Functions
ON/OFF
ON/OFF
TEMP
TEMP
SHORT
CUT
SHORT
CUT
TIMER
ON
TIMER
ON
TIMER
OFF
TIMER
OFF
MODE
MODE
FAN
FAN
SLEEP
SLEEP
LED
LED
FOLLOW
ION
SWING
ME
FOLLOW
ION
SWING
ME
en AUTO.
55
66
MODE display
Displays the current
mode, including:
AUTO
COOL
DRY
HEAT
FAN
Transmission Indicator
Lights up when remote sends
signal to unit
ON/OFF display
Appears when the unit is turned on,
and disappears when it is turned off
TIMER ON display
Displays when TIMER
ON is set
TIMER OFF display
Displays when TIMER
OFF is set
SLEEP display
Battery display
SILENT display
ECO display
Displays when
SLEEP function
is activated
FOLLOW ME
display
Indicates that
the FOLLOW ME
function is on
FAN SPEED display
Displays selected FAN SPEED:
HIGH, MED,
or LOW
This display is blank when
set to AUTO speed.
Temperature/Timer display
Displays the set temperature by default, or timer setting
when using TIMER ON/OFF functions
o O O
Temperature range: 17-30 C(62 F-86 F)
Timer setting range: 0-24 hours
This display is blank when operating in FAN mode.
1. Press the MODE button to select
COOL mode.
2. Set your desired temperature using
the Temp or Temp button.
3. Press the FAN button to select the
fan speed: AUTO, LOW, MED,or
HIGH.
4. Press the ON/OFF button to start the
unit.
In AUTO mode, the unit will automatically
select the COOL, FAN, HEAT or DRY mode
based on the set temperature.
1. Press the MODE button to select Auto mode.
2. Set your desired temperature using the
Temp or Temp button.
3. Press the ON/OFF button to start the unit.
,
NOTE: FAN SPEED can t be set in Auto mode.
SETTING TEMPERATURE
AUTO operation
The operating temperature range for units is
O O O
17-30 C(62 F-86 F). You can increase or
O O
decrease the set tmeperature in 1 C(1 F)
increments.
COOL operation
1
3
2
1
3
2
4
Not available for this unit
Not available for
this unit
Not available for
this unit
Low battery
detection
Remote LED Screen Indicators
How To Use The Basic Functions
ON/OF F
ON/OF F
TEMP
TEMP
SHORT
CUT
SHORT
CUT
TIMER
ON
TIMER
ON
TIMER
OFF
TIMER
OFF
MODE
MODE
FAN
FAN
SLEEP
SLEEP
LED
LED
FOLLO W
ION
SWING
ME
FOLLO W
ION
SWING
ME
Met deze functie kan je de ruimte ontvochtigen. Houd ramen en deuren gesloten bij deze
functie.
1. Druk op de MODE - toets tot het DRY - indicatielampje brandt.
2. Bij deze instelling kan je de ventilatiesnelheid niet instellen.
55
66
MODE display
Displays the current
mode, including:
AUTO
COOL
DRY
HEAT
FAN
Transmission Indicator
Lights up when remote sends
signal to unit
ON/OFF display
Appears when the unit is turned on,
and disappears when it is turned off
TIMER ON display
Displays when TIMER
ON is set
TIMER OFF display
Displays when TIMER
OFF is set
SLEEP display
Battery display
SILENT display
ECO display
Displays when
SLEEP function
is activated
FOLLOW ME
display
Indicates that
the FOLLOW ME
function is on
FAN SPEED display
Displays selected FAN SPEED:
HIGH, MED,
or LOW
This display is blank when
set to AUTO speed.
Temperature/Timer display
Displays the set temperature by default, or timer setting
when using TIMER ON/OFF functions
o O O
Temperature range: 17-30 C(62 F-86 F)
Timer setting range: 0-24 hours
This display is blank when operating in FAN mode.
1. Press the MODE button to select
COOL mode.
2. Set your desired temperature using
the Temp or Temp button.
3. Press the FAN button to select the
fan speed: AUTO, LOW, MED,or
HIGH.
4. Press the ON/OFF button to start the
unit.
In AUTO mode, the unit will automatically
select the COOL, FAN, HEAT or DRY mode
based on the set temperature.
1. Press the MODE button to select Auto mode.
2. Set your desired temperature using the
Temp or Temp button.
3. Press the ON/OFF button to start the unit.
,
NOTE: FAN SPEED can t be set in Auto mode.
SETTING TEMPERATURE
AUTO operation
The operating temperature range for units is
O O O
17-30 C(62 F-86 F). You can increase or
O O
decrease the set tmeperature in 1 C(1 F)
increments.
COOL operation
1
3
2
1
3
2
4
Not available for this unit
Not available for
this unit
Not available for
this unit
Low battery
detection
Remote LED Screen Indicators
How To Use The Basic Functions
ON/OF F
ON/OF F
TEMP
TEMP
SHORT
CUT
SHORT
CUT
TIMER
ON
TIMER
ON
TIMER
OFF
TIMER
OFF
MODE
MODE
FAN
FAN
SLEEP
SLEEP
LED
LED
FOLLO W
ION
SWING
ME
FOLLO W
ION
SWING
ME
1. Druk op de MODE - toets tot het FAN-indicatielampje brandt.
2. Druk op de FAN-toets van de afstandsbediening om de ventilatiesnelheid in te
stellen. Er zijn drie instellingen: LOW
55
66
MODE display
Displays the current
mode, including:
AUTO
COOL
DRY
HEAT
FAN
Transmission Indicator
Lights up when remote sends
signal to unit
ON/OFF display
Appears when the unit is turned on,
and disappears when it is turned off
TIMER ON display
Displays when TIMER
ON is set
TIMER OFF display
Displays when TIMER
OFF is set
SLEEP display
Battery display
SILENT display
ECO display
Displays when
SLEEP function
is activated
FOLLOW ME
display
Indicates that
the FOLLOW ME
function is on
FAN SPEED display
Displays selected FAN SPEED:
HIGH, MED,
or LOW
This display is blank when
set to AUTO speed.
Temperature/Timer display
Displays the set temperature by default, or timer setting
when using TIMER ON/OFF functions
o O O
Temperature range: 17-30 C(62 F-86 F)
Timer setting range: 0-24 hours
This display is blank when operating in FAN mode.
1. Press the MODE button to select
COOL mode.
2. Set your desired temperature using
the Temp or Temp button.
3. Press the FAN button to select the
fan speed: AUTO, LOW, MED,or
HIGH.
4. Press the ON/OFF button to start the
unit.
In AUTO mode, the unit will automatically
select the COOL, FAN, HEAT or DRY mode
based on the set temperature.
1. Press the MODE button to select Auto mode.
2. Set your desired temperature using the
Temp or Temp button.
3. Press the ON/OFF button to start the unit.
,
NOTE: FAN SPEED can t be set in Auto mode.
SETTING TEMPERATURE
AUTO operation
The operating temperature range for units is
O O O
17-30 C(62 F-86 F). You can increase or
O O
decrease the set tmeperature in 1 C(1 F)
increments.
COOL operation
1
3
2
1
3
2
4
Not available for this unit
Not available for
this unit
Not available for
this unit
Low battery
detection
Remote LED Screen Indicators
How To Use The Basic Functions
ON/OFF
ON/OFF
TEMP
TEMP
SHORT
CUT
SHORT
CUT
TIMER
ON
TIMER
ON
TIMER
OFF
TIMER
OFF
MODE
MODE
FAN
FAN
SLEEP
SLEEP
LED
LED
FOLLOW
ION
SWING
ME
FOLLOW
ION
SWING
ME
, HIGH
55
66
MODE display
Displays the current
mode, including:
AUTO
COOL
DRY
HEAT
FAN
Transmission Indicator
Lights up when remote sends
signal to unit
ON/OFF display
Appears when the unit is turned on,
and disappears when it is turned off
TIMER ON display
Displays when TIMER
ON is set
TIMER OFF display
Displays when TIMER
OFF is set
SLEEP display
Battery display
SILENT display
ECO display
Displays when
SLEEP function
is activated
FOLLOW ME
display
Indicates that
the FOLLOW ME
function is on
FAN SPEED display
Displays selected FAN SPEED:
HIGH, MED,
or LOW
This display is blank when
set to AUTO speed.
Temperature/Timer display
Displays the set temperature by default, or timer setting
when using TIMER ON/OFF functions
o O O
Temperature range: 17-30 C(62 F-86 F)
Timer setting range: 0-24 hours
This display is blank when operating in FAN mode.
1. Press the MODE button to select
COOL mode.
2. Set your desired temperature using
the Temp or Temp button.
3. Press the FAN button to select the
fan speed: AUTO, LOW, MED,or
HIGH.
4. Press the ON/OFF button to start the
unit.
In AUTO mode, the unit will automatically
select the COOL, FAN, HEAT or DRY mode
based on the set temperature.
1. Press the MODE button to select Auto mode.
2. Set your desired temperature using the
Temp or Temp button.
3. Press the ON/OFF button to start the unit.
,
NOTE: FAN SPEED can t be set in Auto mode.
SETTING TEMPERATURE
AUTO operation
The operating temperature range for units is
O O O
17-30 C(62 F-86 F). You can increase or
O O
decrease the set tmeperature in 1 C(1 F)
increments.
COOL operation
1
3
2
1
3
2
4
Not available for this unit
Not available for
this unit
Not available for
this unit
Low battery
detection
Remote LED Screen Indicators
How To Use The Basic Functions
ON/OFF
ON/OFF
TEMP
TEMP
SHORT
CUT
SHORT
CUT
TIMER
ON
TIMER
ON
TIMER
OFF
TIMER
OFF
MODE
MODE
FAN
FAN
SLEEP
SLEEP
LED
LED
FOLLOW
ION
SWING
ME
FOLLOW
ION
SWING
ME
en AUTO.
3. De temperatuur kan niet worden ingesteld.
Met deze functie kan je het toestel uitgesteld laten starten, tot maximum 24 uur.
1. Druk op de TIMER ON - toets op de afstandsbediening.
2. Op het display van de afstandsbediening kan je nu aezen over hoeveel tijd de airco
zal beginnen werken.
3. Druk meerdere keren op de TIMER ON - toets om de tijd te verhogen. Of houd de
toets ingedrukt.
4. Eens de gewenste tijd is ingesteld, zal je op het display van de afstandsbediening
“Timer on” zien staan. Op het display van het controlepaneel zijn er 2 verlichte
bolletjes te zien.

14
DO266A
NL
5. Als je de timer wil uitschakelen, druk dan meerdere keren op de TIMER ON - toets, tot
de teller op “0” komt te staan. Of houd de toets ingedrukt.
Met deze functie kan je het toestel automatisch laten uitschakelen na verloop van tijd.
1. Druk op de TIMER OFF - toets op de afstandsbediening.
2. Op het display van de afstandsbediening kan je nu aezen over hoeveel tijd de airco
zal uitschakelen.
3. Druk meerdere keren op de TIMER OFF - toets om de tijd te verhogen. Of houd de
toets ingedrukt.
4. Eens de gewenste tijd is ingesteld, zal je op het display van de afstandsbediening
“Timer o” zien staan.
5. Als je de timer wil uitschakelen, druk dan meerdere keren op de TIMER OFF - toets,
tot de teller op “0” komt te staan.
Je kan beide functies ook gelijktijdig inschakelen. Hierdoor bepaal je wanneer het toestel
inschakelt, maar ook wanneer het toestel uitschakelt.
Let op: deze tijd is telkens vanaf het uur dat je de instelling programmeert. Bijvoorbeeld: het
is nu 13:00. Je wil het toestel laten werken van 16:30 tot 18:00. Stel de functie TIMER ON in op
3,5 h en de TIMER OFF op 5,0 h.
Wanneer je deze instelling selecteert, zal de ingestelde temperatuur binnen 30 min. met 1°C
stijgen. Na nog 30 min. zal de temperatuur opnieuw met 1°C stijgen. Deze temperatuur zal
aangehouden worden voor de komende 7 uur. Na deze tijd gaat de temperatuur terug naar de
origineel ingestelde temperatuur en wordt de SLEEP-instelling beëindigd.
NOTA: deze instelling kan niet geselecteerd worden bij FAN en DRY-instelling.
Met deze toets kan je een voorkeursinstelling vastleggen en inschakelen.
Als je een bepaalde instelling vaker gebruikt, kan je deze vastleggen door de SHORTCUT -
toets gedurende 3 seconden ingedrukt te houden. Het toestel onthoudt dan de instellingen
die op het moment van indrukken ingeschakeld zijn. Deze instellingen kunnen zijn: de
gebruiksinstelling (MODE), ingestelde temperatuur, ventilatiesnelheid (FAN) en eventueel
ook de SLEEP-instelling.
Op het moment dat je op de SHORTCUT - toets drukt, zal het toestel werken op de eerder
vastgelegde instellingen.

15
DO266A
www.domo-elektro.be
NL
DRAINAGE
Tijdens het ontvochtigen, kan je een permanente drainage gebruiken.
1. Verwijder de drainage afsluiting en het rubber dopje in het midden, achteraan het
toestel.
2. Bevestig de drainageslang aan de drainage opening.
3. Zorg ervoor dat het water op een veilige en permanente manier kan wegvloeien.
1
2
Wanneer je geen gebruik maakt van de permanente drainage, zal het water opgevangen
worden in de drainagebak, onderaan het toestel.
· Wanneer deze vol is, zal je enkele biepsignalen horen en
op het display verschijnt de code “P1”. De ontvochtiging of
airconditioning zal stoppen. De ventilator blijft wel werken,
dit is normaal.
· Verplaats het toestel voorzichtig naar een plaats waar je het
water makkelijk kan laten weglopen.
· Verwijder de afsluiting van de drainage opening onderaan het
toestel (A). Het water zal nu weglopen.
· Nadat het water volledig verwijderd is, plaats je de afsluiting
terug op de drainage opening.
· Je kan nu het toestel terug opstarten. Let er op dat de
code “P1” op het display verdwijnt. Indien de code niet
onmiddellijk verdwijnt, kan je enkele malen proberen om
het toestel uit en terug in te schakelen. Wanneer de code
zich blijft herhalen, moet je contact opnemen met de
servicedienst.
· NOTA: installeer altijd eerst de drainage afsluiting, voordat je het toestel terug aanzet.
· Verwijder steeds de stekker uit het stopcontact alvorens het toestel te reinigen.
· Gebruik geen chemische of schurende producten om het toestel te reinigen.
A

16
DO266A
NL
· Was het toestel nooit met water of een andere vloeistof, dit kan elektrocutie tot gevolg
hebben.
· Wanneer het elektrisch snoer beschadigd is, moet het vervangen of hersteld worden door
de dienst na verkoop van de fabrikant of een gekwaliceerd persoon.
· Reinig de luchtlter minstens om de 2 weken. Om te
voorkomen dat de ventilator slecht gaat werken door stof
in de lter.
· Reinig de lter in lauw water met een mild detergent.
Spoel de lter grondig en laat deze aan de lucht drogen.
· Als de lter volledig droog is, kan je deze terug in het
toestel plaatsen.
Gebruik een vochtige, zachte doek en een beetje mild detergent om de buitenkant van het
toestel te reinigen. Maak het toestel achteraf grondig droog met een zachte, droge doek.
Voor je het toestel opbergt voor een langere tijd, kan je best eerst het volgende doen, om
schade aan het toestel te voorkomen :
· Verwijder al het water uit het toestel met behulp van de drainage.
· Zet het toestel daarna aan op de FAN-instelling. Laat het toestel gedurende een halve dag
in een verwarmde ruimte werken. Zo kan het toestel volledig drogen aan de binnenkant en
voorkom je schimmelvorming.
· Zet het toestel uit, verwijder de stekker uit het stopcontact en verwijder de batterijen uit
de afstandsbediening.
· Maak de lter schoon en plaats deze terug in het toestel.
· Berg het toestel op in een droge, donkere ruimte.
Het toestel werkt niet wanneer je op de ON/OFF - toets drukt.
· Op het display staat P1: verwijder het water uit het toestel.
· De kamertemperatuur is lager dan de ingestelde temperatuur. Pas de temperatuur op het
toestel aan.
De ruimte koelt niet voldoende af.
· De ramen en deuren zijn niet gesloten. Zorg ervoor dat alle ramen en deuren gesloten zijn.
· Er zijn warmte producerende toestellen in de ruimte. Verwijder indien mogelijk de
warmtebronnen.

17
DO266A
www.domo-elektro.be
NL
· De luchtuitlaatslang is niet aangesloten of geblokkeerd. Sluit de slang aan en zorg ervoor
dat ze naar behoren kan functioneren.
· De ingestelde temperatuur is te hoog. Pas de ingestelde temperatuur aan.
· De luchtlter is vuil. Reinig de luchtlter.
Het toestel maakt te veel lawaai of zorgt voor trillingen.
· De vloer is niet recht of vlak genoeg. Plaats het toestel op een rechte, vlakke ondergrond.
· De luchtlter is vuil. Reinig de luchtlter.
Het toestel maakt een gorgelend geluid.
· Het geluid komt van de koelvloeistof in het toestel. Dit is normaal.
Volgende error codes kunnen verschijnen op het display van het toestel:
E1: de sensor van de kamertemperatuur werkt niet. Zet het toestel uit en verwijder de stekker
uit het stopcontact. Wacht 10 sec. en steek de stekker terug in het stopcontact. Zet het toestel
opnieuw aan. Wanneer de error code opnieuw verschijnt, moet je contact opnemen met de
hersteldienst.
E2: de sensor van de luchtverdamper werkt niet. Zet het toestel uit en verwijder de stekker uit
het stopcontact. Wacht 10 sec. en steek de stekker terug in het stopcontact. Zet het toestel
opnieuw aan. Wanneer de error code opnieuw verschijnt, moet je contact opnemen met de
hersteldienst.
E4: het display werkt niet naar behoren. Zet het toestel uit en verwijder de stekker uit het
stopcontact. Wacht 10 sec. en steek de stekker terug in het stopcontact. Zet het toestel
opnieuw aan. Wanneer de error code opnieuw verschijnt, moet je contact opnemen met de
hersteldienst.
P1: het waterreservoir is vol. Verwijder het water volgens het hoofdstuk “drainage” van deze
handleiding.

18
DO266A
NL
EN
Dit symbool op het product of op de verpakking wijst erop dat
dit product niet als huishoudafval mag worden behandeld.
Het moet naar een plaats worden gebracht waar elektrische
en elektronische apparatuur wordt gerecycleerd. Als je ervoor
zorgt dat dit product op de correcte manier wordt verwijderd,
voorkom je mogelijk voor mens en milieu negatieve gevolgen
die zich zouden kunnen voordoen in geval van verkeerde
afvalbehandeling. Voor meer details in verband met het
recycleren van dit product, neem je best contact op met de
gemeentelijke instanties, het bedrijf of de dienst belast met
de verwijdering van huishoudafval of de winkel waar je het
product hebt gekocht.
Het verpakkingsmateriaal is recycleerbaar. Behandel de
verpakking milieubewust.

19
DO266A
www.domo-elektro.be
FR
GARANTIE
Cher client,
Tous nos produits sont soumis à des contrôles qualité stricts avant
d’être proposés à la vente. Si vous deviez toutefois rencontrer
un problème avec votre appareil, nous le déplorons vivement.
Dans ce cas, nous vous invitons à prendre contact avec notre service clientèle.
Nos collaboratrices se feront un plaisir de vous aider !
+32 14 21 71 91 [email protected]
Du lundi au jeudi : 8 h 30 – 12 h et 13 h – 17 h
Vendredi : 8 h 30 – 12 h et 13 h – 16 h 30
Cet appareil est garanti 2 ans à compter de la date d’achat. Durant la période de garantie, le
distributeur assumera l’entière responsabilité en cas de défauts de fonctionnement (matériel)
ou de fabrication. Si un tel problème survient, l’appareil sera remplacé ou réparé. La période
de garantie de 2 ans ne reprend pas à zéro, mais se poursuit (jusqu’à 2 ans à compter de la
date d’achat de l’appareil). La garantie est accordée sur la base du ticket de caisse.
Pour les accessoires et les éléments d’usure, une garantie de 6 mois s’applique.
La garantie et la responsabilité du fournisseur et du fabricant n’ont plus eet dans les cas
suivants :
· Les instructions du manuel n’ont pas été suivies.
· Mauvais raccordement, par ex. tension électrique trop forte.
· Utilisation contraire, brutale ou anormale.
· Entretien insusant ou non conforme.
· Réparation ou modication de l’appareil par le consommateur ou un tiers non autorisé.
· Utilisation d’éléments ou d’accessoires qui ne sont pas recommandés ou fournis par le
fournisseur/fabricant.

20
DO266A
FR
Les consignes de sécurité suivantes doivent être respectées lors de l’utilisation de tout
appareil électrique:
· Lisez ces consignes très attentivement. Conservez ce mode d’emploi an de pouvoir le
consulter ultérieurement.
· Avant la première utilisation, enlevez tous les éléments d’emballage et les éventuels
autocollants promotionnels. Veillez à ce que les enfants ne jouent pas avec les matériaux
d’emballage.
· Cet appareil est conçu pour être utilisé dans un environnement domestique ou dans des
environnements comparables, tels que :
· Coin-cuisine du personnel dans les commerces, les bureaux et autres environnements
professionnels comparables
· Fermes
· Chambres d’hôtel ou de motel et autres environnements à caractère résidentiel
· Chambres d’hôtes ou comparables
· Cet appareil peut être utilisé par des enfants âgés de 16 ans ou plus et par des personnes
présentant un handicap physique ou sensoriel, une capacité mentale limitée ou un manque
d’expérience ou de connaissances, à condition que ces personnes soient sous surveillance
ou qu’elles aient reçu des instructions sur la manière d’utiliser l’appareil en toute sécurité et
qu’elles connaissent les dangers liés à son utilisation. Les enfants ne peuvent pas jouer avec
cet appareil. L’entretien et le nettoyage de l’appareil ne peuvent pas être eectués par des
enfants, sauf s’ils sont âgés de plus de 16 ans et sous la surveillance d’un adulte.
· Gardez l’appareil et le cordon électrique hors de portée des enfants.
· Attention: l’appareil ne peut pas être utilisé avec une minuterie externe.
· Vériez avant usage si la tension indiquée sur l’appareil correspond à la tension du réseau
électrique de votre domicile.
· Le cordon d’alimentation doit toujours être branché dans une prise de courant placée et
mise à la terre conformément aux normes et standards locaux.
· Ne laissez pas le cordon pendre sur une surface chaude ou sur le rebord d’une table.
· N’utilisez jamais l’appareil lorsque le cordon ou la che sont endommagés, après un
mauvais fonctionnement de l’appareil ou lorsque l’appareil est endommagé. Amenez alors
l’appareil au centre de services le plus proche pour contrôle et réparation.
· Soyez très attentif lorsque l’appareil est utilisé par des enfants ou à proximité d’enfants.
· L’utilisation d’accessoires non préconisés par le fabricant peut provoquer un incendie, une
électrocution ou des blessures.
· Retirez la che de la prise lorsque l’appareil n’est pas utilisé, avant d’installer ou d’enlever
des pièces et avant de nettoyer l’appareil. Mettez tous les boutons en position « arrêt » et
retirez la che de la prise. Ne tirez jamais sur le câble pour retirer la che de la prise.
· Ne laissez jamais un appareil en service sans surveillance.
· Ne placez jamais cet appareil sur ou à proximité d’un feu au gaz ou d’un feu électrique où il
pourrait entrer en contact avec un appareil chaud.

21
DO266A
www.domo-elektro.be
FR
· N’utilisez pas l’appareil à l’extérieur.
· Utilisez l’appareil uniquement dans le but auquel il est destiné.
· Utilisez toujours l’appareil sur une surface solide, sèche et plane.
· Cet appareil ne convient qu’à un usage domestique. Le fabricant décline toute
responsabilité pour des accidents qui découleraient d’un mauvais usage de l’appareil ou du
non-respect des instructions fournies dans ce manuel.
· Toutes les réparations, en dehors de l’entretien ordinaire de l’appareil, doivent être
réalisées par le fabricant ou son service après-vente.
· N’immergez jamais le cordon électrique, la che ou l’appareil lui-même dans l’eau ou tout
autre milieu liquide.
· Veillez à ce que les enfants ne puissent pas toucher à l’appareil ou au cordon électrique.
· Tenez le cordon éloigné de rebords tranchants et de pièces brûlantes ou d’autres sources
de chaleur.
· Avant la première utilisation, enlevez tous les éléments d’emballage et les éventuels
autocollants promotionnels.
· Ne placez jamais l’appareil à proximité d’un appareil au gaz, d’un feu ou d’un liquide
facilement inammable.
· Pour éviter tout dommage, ne frappez et ne secouez jamais l’appareil.
· Pour éviter toute surchaue, ne recouvrez jamais l’arrivée d’air et la sortie d’air.
· Pour éviter toute électrocution, n’aspergez jamais l’appareil avec de l’eau et ne le placez
jamais à proximité d’un point d’eau.
· Ne partagez jamais l’alimentation électrique du climatiseur avec un autre appareil.
· Ne branchez/débranchez jamais la che de l’appareil sur une prise de courant si vous avez
les mains mouillées.
· N’insérez jamais des corps étrangers dans les ouvertures de l’appareil.
· N’utilisez jamais un cordon prolongateur.
· Ne laissez jamais des enfants jouer à proximité de l’appareil.
· Si vous éteignez l’appareil et que vous le rallumez juste après, la compresseur aura besoin
d’un délai de 3 minutes au moins pour redémarrer.
· Placez l’appareil à au moins 1 mètre de distance d’un téléviseur ou d’une radio pour éviter
des interférences.
· Pour éviter toute décoloration, n’exposez pas l’appareil à la lumière directe du soleil.
· N’inclinez jamais l’appareil à plus de 35° lorsque vous le déplacez. Déplacez toujours le
climatiseur à la verticale. Ne déplacez jamais l’appareil à l’envers.
· Eliminez toujours l’eau contenue dans l’appareil avant de le ranger, vous prolongerez ainsi
sa durée de vie.
· N’utilisez pas de produits chimiques pour nettoyer l’appareil, ils risqueraient fort de
l’abîmer.
· Veillez toujours à éteindre l’appareil avant d’enlever ou de replacer la grille d’arrivée d’air.

22
DO266A
FR
· Veillez toujours à protéger le climatiseur contre l’humidité, la condensation, les projections
d’eau, etc.
· Veillez à installer le climatiseur de telle manière qu’il ne puisse pas tomber dans l’eau ou
un autre liquide. S’il arrivait malgré tout que l’appareil tombe dans l’eau ou un liquide,
débranchez immédiatement la che électrique.
· N’utilisez pas le climatiseur dans un local humide comme une salle de bain ou une
buanderie.
· Eteignez totalement l’appareil lorsque vous ne l’utilisez pas.
· Faites toujours appel à un technicien qualié pour faire réparer l’appareil si besoin.
· Veillez à laisser un espace libre d’au moins 30 cm tout autour de l’appareil.
· Si le climatiseur a été renversé, débranchez immédiatement la che électrique.
· Ne touchez pas l’appareil lorsque vous avez les mains humides ou lorsque vous marchez
pieds nus.
· N’actionnez les touches de l’appareil qu’avec les doigts, jamais avec un autre objet.
· Ne retirez aucune partie xe du climatiseur. N’utilisez pas l’appareil s’il ne fonctionne pas
correctement, s’il est tombé ou s’il est endommagé.
· N’utilisez jamais la che pour allumer ou éteindre l’appareil. Utilisez toujours les boutons
du panneau de commande.
· Ne recouvrez jamais la grille d’arrivée d’air ou de sortie d’air de l’appareil.
· N’utilisez pas l’appareil à proximité de substances facilement inammables telles que
alcool, insecticide, essence,...
· Les réparations, la détection de fuites et toutes les autres interventions à l’installation
doivent être faites par des personnes qualiées, prévues des certicates rélévantes.
· L’installation doit être eectuée conformément aux instructions. Une installation
incorrecte peut provoquer une fuite d’eau, un choc électrique ou un incendie.
· Ne touchez pas l’appareil si vous avez les mains humides ou mouillées ni si vous êtes pieds
nus.
· Si le climatiseur est renversé alors qu’il fonctionne, coupez l’alimentation électrique et
débranchez-le immédiatement. Inspectez l’appareil pour vous assurer qu’il n’est pas
endommagé. Si vous pensez que c’est le cas, prenez contact avec un technicien ou le
service à la clientèle.
· Le courant doit être coupé en cas d’orage pour éviter que la foudre n’endommage
l’appareil.
· Si la fonction de drainage n’est pas utilisée, xez les deux bouchons en caoutchouc dans les
trous de drainage. Rangez soigneusement le exible de vidange lorsqu’il n’est pas utilisé
pour éviter que les enfants ne s’étranglent.
· Ne faites pas passer le l sous le revêtement de sol. Ne le couvrez pas avec des tapis ou
d’autres revêtements. Ne le faites pas passer sous des meubles ou appareils. Éloignez le l
du passage pour éviter tout trébuchement.
· Débranchez l’appareil s’il émet des bruits, odeurs ou fumées étranges.

23
DO266A
www.domo-elektro.be
FR
· Lisez attentivement tous les avertissements.
· Lors du dégivrage et du nettoyage de l’appareil, n’utilisez pas d’outils autres que ceux
conseillés par le fabricant.
· L’appareil doit être installé dans un espace sans sources continues d’inammation, par
exemple,des ammes nues, des appareils électriques ou fonctionnant au gaz en continu.
· Ne pas percer, ne pas brûler.
· Les frigorigènes peuvent être sans odeur.
· L’appareil doit être installé, utilisé et stocké dans une pièce dont la supercie est supérieure
à 7 m
2
.
· Cet appareil contient une certaine quantité de frigorigène R290 (reportez-vous à l’étiquette
signalétique à l’arrière de l’appareil).
· R290 est un frigorigène conforme aux directives européennes en matière d’environnement.
Ne percez jamais le circuit de réfrigération.
· Si l’appareil est installé, utilisé ou stocké dans une zone non-ventilée, la pièce doit être
conçue de sorte à éviter toute accumulation de frigorigène, suite à des fuites, pouvant
entraîner un incendie ou une explosion à cause de l’inammation du frigorigène causé par
des chauages, fours électriques ou autres sources d’inammation.
· L’appareil doit être stocké de sorte à éviter toute défaillance mécanique.
· Toute personne travaillant ou intervenant sur un circuit de uide frigorigène doit
être titulaire d’un certicat valide délivré par un organisme accrédité qui autorise sa
compétence à la manipulation des frigorigènes conformément à une évaluation spécique
reconnue par des associations de l’industrie.
· Les réparations doivent être eectuées sur la base des recommandations du fabricant. Les
travaux d ‘entretien et de réparation nécessitant l’assistance d’autres personnes qualiées
doivent être eectués sous la supervision de la personne qualiée pour l’utilisation de
uides frigorigènes inammables.
Attention : risque d’incendie / matériaux inammables
Cet appareil contient un agent réfrigérant inammable. Cet agent réfrigérant
risque donc de s’enammer en cas d’exposition à une source d’ignition.
CONSERVEZ CES INSTRUCTIONS
· N’utilisez l’appareil que dans des espaces qui ne dépassent pas la supercie recommandée.
· Placez l’appareil de manière à ce que le ux d’air ne soit pas gêné par des meubles ou
d’autres objets.
· Gardez les rideaux fermés pendant l’heure la plus chaude de la journée.
· Veillez à ce que les ltres soient toujours propres.
· Gardez les portes et les fenêtres fermées pour garder l’air froid à l’intérieur et l’air chaud à
l’extérieur.

24
DO266A
FR
PARTIES
1. Panneau de
commande
2. Évacuation d’air
3. Filtre d’arrivée d’air
4. Arrivée d’air
5. Évacuation d’air
6. Vidange
7. Flexible de vidange
8. Télécommande
9. Tuyau d’évacuation d’air
9 a. Connecteur tuyau d’évacuation d’air
10. Kit de xation murale
10 a. Adaptateur mural
10 b. Connecteur kit de xation murale
11. Kit de xation à la fenêtre
11 a. Adaptateur de fenêtre
11 b. Connecteur kit de xation à la fenêtre
11 c. Étanchéité de la fenêtre
11 d. Bouchon adaptateur
11 e. Cornière avec vis
1
2
3
4
5
6
8
7
11b 11c
11
11e

25
DO266A
www.domo-elektro.be
FR
max 120 cm
min 30 cm
INSTALLATION
· Placez la climatisation sur une surface stable et solide, an de
limiter à un minimum les nuisances sonores et les vibrations.
Veillez à ce que la surface soit susamment solide pour
supporter le poids de l’appareil.
· L’appareil est muni de roulettes, pour pouvoir le déplacer
facilement. Veillez à ce que la surface soit lisse et plate si vous
déplacez seul l’appareil. Soyez prudent lorsque vous déplacez
l’appareil sur un tapis. Ne faites jamais rouler l’appareil sur un
objet.
· Le cordon d’alimentation doit toujours être branché dans une
prise de courant placée et mise à la terre conformément aux
normes et standards locaux.
· Ne placez pas d’objets dans un rayon de 30 cm autour de l’appareil.
· Le tuyau d’évacuation d’air doit être placé pendant le réglage « froid » ou « auto ».
Vous n’avez pas besoin du tuyau d’évacuation d’air lorsque vous vous trouvez en mode
« ventilateur » et « sec ».
· Veillez à ce qu’il n’y ait pas d’obstacles autour de l’évacuation d’air, dans un rayon de 50 cm.
· Veillez à ce que le tuyau d’évacuation d’air ne soit pas trop plié lors de l’utilisation.
max 120 cm
min 30 cm
· Placez l’embout du tuyau d’évacuation d’air à l’extrémité du tuyau.
· Placez le tuyau d’évacuation d’air sur la sortie d’air prévue à l’arrière de l’appareil.
max 120 cm
min 30 cm
· Placez l’embout du kit de fenêtre à l’autre extrémité du tuyau d’évacuation d’air.
· Placez le kit de fenêtre sur votre fenêtre. Celui-ci peut être posé tant verticalement
qu’horizontalement. Bloquez le kit de fenêtre à la longueur souhaitée.
· Fixez le tuyau au kit de fenêtre à l’aide de l’embout prévu à cet eet.
· Utilisez les joints de la fenêtre pour fermer les éventuelles ouvertures dans la fenêtre.
· Bloquez l’adaptateur de châssis à la longueur désirée à l’aide du bouchon adaptateur de
châssis fourni.
· Si vous le souhaitez, vous pouvez xer le châssis au moyen de la cornière et de 2 vis.

26
DO266A
FR
max 120 cm
min 30 cm
max 120 cm
min 30 cm
· Placez l’embout du tuyau d’évacuation d’air à l’extrémité du tuyau.
· Placez le tuyau d’évacuation d’air sur la sortie d’air prévue à l’arrière de l’appareil.
max 120 cm
min 30 cm
· Faites dans le mur une ouverture de la taille de l’adaptateur mural.
· Placez l’adaptateur mural dans l’ouverture. Fixer l’adaptateur mural à l’aide des vis fournies.
· Placez l’embout de l’adaptateur mural à l’autre extrémité du tuyau d’évacuation d’air.
· Fixez le tuyau à l’adaptateur mural à l’aide de l’embout prévu à cet eet.
max 120 cm
min 30 cm

27
DO266A
www.domo-elektro.be
FR
1
2
3
4
5
6
7
8
Vous pouvez orienter le ux d’air manuellement en relevant ou en abaissant les lamelles de la
grille située à l’avant de l’appareil.
12
4
3
1. Touche MARCHE-ARRÊT
Pour allumer et éteindre l’appareil.
2. Touches «+» et «-»
Utilisez ces touches pour modier le paramètre de température. Vous pouvez choisir une
température comprise entre 17 °C et 30 °C. (COOL mode) Maintenez les deux èches
enfoncées simultanément pendant 3 secondes pour permuter entre « C° » et « F° ».
3. Touche MODE
Cette touche vous permet de sélectionner le paramètre utilisateur souhaité. Chaque pression
sur la touche modie le paramètre d’utilisation : FROID, SEC et VENTILATEUR. Le témoin
correspondant s’allume sur le panneau de commande. Si vous choisissez le mode FAN, le
climatiseur souera selon un réglage automatique. Vous ne pourrez modier la vitesse de
ventilation qu’à l’aide de la télécommande.
4. Écran LED
Ache le paramètre déni de température. Lorsque l’appareil se trouve en mode SEC ou
VENTILATEUR, l’écran ache la température ambiante.
Veillez à toujours diriger la télécommande vers l’appareil.
Si vous ne le faites pas, vous pouvez toujours diriger la
télécommande vers l’appareil et appuyer sur le bouton
ON/OFF après avoir modié un réglage.
Lorsque l’appareil reçoit un signal émis par la
télécommande, il émet un signal sonore. La
télécommande fonctionne dans un rayon de 8 mètres
autour de l’appareil.

28
DO266A
FR
1. Touche MARCHE-ARRÊT
Pour allumer et éteindre l’appareil.
2. Touche MODE
Cette touche vous permet de sélectionner le paramètre utilisateur souhaité. Chaque pression
sur la touche modie le paramètre d’utilisation : FROID, SEC et VENTILATEUR. Le témoin
correspondant s’allume sur le panneau de commande.
3. Touche VENTILATEUR
Cette touche vous permet de régler la vitesse de la ventilation. Trois paramètres sont
possibles : FAIBLE
55
66
MODE display
Displays the current
mode, including:
AUTO
COOL
DRY
HEAT
FAN
Transmission Indicator
Lights up when remote sends
signal to unit
ON/OFF display
Appears when the unit is turned on,
and disappears when it is turned off
TIMER ON display
Displays when TIMER
ON is set
TIMER OFF display
Displays when TIMER
OFF is set
SLEEP display
Battery display
SILENT display
ECO display
Displays when
SLEEP function
is activated
FOLLOW ME
display
Indicates that
the FOLLOW ME
function is on
FAN SPEED display
Displays selected FAN SPEED:
HIGH, MED,
or LOW
This display is blank when
set to AUTO speed.
Temperature/Timer display
Displays the set temperature by default, or timer setting
when using TIMER ON/OFF functions
o O O
Temperature range: 17-30 C(62 F-86 F)
Timer setting range: 0-24 hours
This display is blank when operating in FAN mode.
1. Press the MODE button to select
COOL mode.
2. Set your desired temperature using
the Temp or Temp button.
3. Press the FAN button to select the
fan speed: AUTO, LOW, MED,or
HIGH.
4. Press the ON/OFF button to start the
unit.
In AUTO mode, the unit will automatically
select the COOL, FAN, HEAT or DRY mode
based on the set temperature.
1. Press the MODE button to select Auto mode.
2. Set your desired temperature using the
Temp or Temp button.
3. Press the ON/OFF button to start the unit.
,
NOTE: FAN SPEED can t be set in Auto mode.
SETTING TEMPERATURE
AUTO operation
The operating temperature range for units is
O O O
17-30 C(62 F-86 F). You can increase or
O O
decrease the set tmeperature in 1 C(1 F)
increments.
COOL operation
1
3
2
1
3
2
4
Not available for this unit
Not available for
this unit
Not available for
this unit
Low battery
detection
Remote LED Screen Indicators
How To Use The Basic Functions
ON/OFF
ON/OFF
TEMP
TEMP
SHORT
CUT
SHORT
CUT
TIMER
ON
TIMER
ON
TIMER
OFF
TIMER
OFF
MODE
MODE
FAN
FAN
SLEEP
SLEEP
LED
LED
FOLLOW
ION
SWING
ME
FOLLOW
ION
SWING
ME
, ÉLEVÉ
55
66
MODE display
Displays the current
mode, including:
AUTO
COOL
DRY
HEAT
FAN
Transmission Indicator
Lights up when remote sends
signal to unit
ON/OFF display
Appears when the unit is turned on,
and disappears when it is turned off
TIMER ON display
Displays when TIMER
ON is set
TIMER OFF display
Displays when TIMER
OFF is set
SLEEP display
Battery display
SILENT display
ECO display
Displays when
SLEEP function
is activated
FOLLOW ME
display
Indicates that
the FOLLOW ME
function is on
FAN SPEED display
Displays selected FAN SPEED:
HIGH, MED,
or LOW
This display is blank when
set to AUTO speed.
Temperature/Timer display
Displays the set temperature by default, or timer setting
when using TIMER ON/OFF functions
o O O
Temperature range: 17-30 C(62 F-86 F)
Timer setting range: 0-24 hours
This display is blank when operating in FAN mode.
1. Press the MODE button to select
COOL mode.
2. Set your desired temperature using
the Temp or Temp button.
3. Press the FAN button to select the
fan speed: AUTO, LOW, MED,or
HIGH.
4. Press the ON/OFF button to start the
unit.
In AUTO mode, the unit will automatically
select the COOL, FAN, HEAT or DRY mode
based on the set temperature.
1. Press the MODE button to select Auto mode.
2. Set your desired temperature using the
Temp or Temp button.
3. Press the ON/OFF button to start the unit.
,
NOTE: FAN SPEED can t be set in Auto mode.
SETTING TEMPERATURE
AUTO operation
The operating temperature range for units is
O O O
17-30 C(62 F-86 F). You can increase or
O O
decrease the set tmeperature in 1 C(1 F)
increments.
COOL operation
1
3
2
1
3
2
4
Not available for this unit
Not available for
this unit
Not available for
this unit
Low battery
detection
Remote LED Screen Indicators
How To Use The Basic Functions
ON/OFF
ON/OFF
TEMP
TEMP
SHORT
CUT
SHORT
CUT
TIMER
ON
TIMER
ON
TIMER
OFF
TIMER
OFF
MODE
MODE
FAN
FAN
SLEEP
SLEEP
LED
LED
FOLLOW
ION
SWING
ME
FOLLOW
ION
SWING
ME
et AUTO.
4. Touche VEILLE
Utilisez cette touche pour paramétrer la fonction « veille ».
Lorsque vous sélectionnez ce paramètre, la température augmente de 1°C dans les 30
minutes. Après encore 30 minutes, la température augmente à nouveau de 1°C. Cette
température est conservée pour les 7 heures suivantes. Ensuite, la température revient à la
température réglée d’origine et le mode « veille » est terminé.
NOTE : ce paramètre ne peut pas être sélectionné pour les modes « ventilateur » et « sec ».
5. Touche TEMP
Utilisez ces touches pour modier le paramètre de température. Vous pouvez choisir
une température comprise entre 17 °C et 30 °C. Maintenez les deux èches enfoncées
simultanément pendant 3 secondes pour permuter entre « C° » et « F° ».
6. Touche SHORTCUT
Cette touche vous permet d’enregistrer et d’utiliser un réglage spécique.
7. Touche TIMER ON
Cette touche permet de régler la durée pendant laquelle l’appareil doit être allumé.
8. Touche TIMER OFF
Cette touche permet de régler la durée pendant laquelle l’appareil doit être éteint.
9. Touche LED
Ce bouton vous permet d’éteindre l’écran LED du panneau de commande. Vous pouvez par
exemple l’utiliser si vous souhaitez dormir et que la lumière émise par l’écran vous dérange.
Appuyez à nouveau sur ce bouton pour rallumer l’écran.

29
DO266A
www.domo-elektro.be
FR
55
66
MODE display
Displays the current
mode, including:
AUTO
COOL
DRY
HEAT
FAN
Transmission Indicator
Lights up when remote sends
signal to unit
ON/OFF display
Appears when the unit is turned on,
and disappears when it is turned off
TIMER ON display
Displays when TIMER
ON is set
TIMER OFF display
Displays when TIMER
OFF is set
SLEEP display
Battery display
SILENT display
ECO display
Displays when
SLEEP function
is activated
FOLLOW ME
display
Indicates that
the FOLLOW ME
function is on
FAN SPEED display
Displays selected FAN SPEED:
HIGH, MED,
or LOW
This display is blank when
set to AUTO speed.
Temperature/Timer display
Displays the set temperature by default, or timer setting
when using TIMER ON/OFF functions
o O O
Temperature range: 17-30 C(62 F-86 F)
Timer setting range: 0-24 hours
This display is blank when operating in FAN mode.
1. Press the MODE button to select
COOL mode.
2. Set your desired temperature using
the Temp or Temp button.
3. Press the FAN button to select the
fan speed: AUTO, LOW, MED,or
HIGH.
4. Press the ON/OFF button to start the
unit.
In AUTO mode, the unit will automatically
select the COOL, FAN, HEAT or DRY mode
based on the set temperature.
1. Press the MODE button to select Auto mode.
2. Set your desired temperature using the
Temp or Temp button.
3. Press the ON/OFF button to start the unit.
,
NOTE: FAN SPEED can t be set in Auto mode.
SETTING TEMPERATURE
AUTO operation
The operating temperature range for units is
O O O
17-30 C(62 F-86 F). You can increase or
O O
decrease the set tmeperature in 1 C(1 F)
increments.
COOL operation
1
3
2
1
3
2
4
Not available for this unit
Not available for
this unit
Not available for
this unit
Low battery
detection
Remote LED Screen Indicators
How To Use The Basic Functions
ON/OF F
ON/OF F
TEMP
TEMP
SHORT
CUT
SHORT
CUT
TIMER
ON
TIMER
ON
TIMER
OFF
TIMER
OFF
MODE
MODE
FAN
FAN
SLEEP
SLEEP
LED
LED
FOLLO W
ION
SWING
ME
FOLLO W
ION
SWING
ME
Lorsque vous réglez le climatiseur en mode « AUTO », l’appareil choisit le réglage adéquat
en fonction de la température dénie. Ce mode ne peut être activé qu’à l’aide de la
télécommande.
1. Utilisez le bouton « MODE » pour choisir le mode « AUTO ».
2. Réglez la température souhaitée à l’aide du bouton « TEMP ». L’appareil se réglera en
fonction de celle-ci.
Vous ne pouvez pas régler la vitesse de ventilation (« FAN ») lorsque le mode « AUTO
» est activé.
55
66
MODE display
Displays the current
mode, including:
AUTO
COOL
DRY
HEAT
FAN
Transmission Indicator
Lights up when remote sends
signal to unit
ON/OFF display
Appears when the unit is turned on,
and disappears when it is turned off
TIMER ON display
Displays when TIMER
ON is set
TIMER OFF display
Displays when TIMER
OFF is set
SLEEP display
Battery display
SILENT display
ECO display
Displays when
SLEEP function
is activated
FOLLOW ME
display
Indicates that
the FOLLOW ME
function is on
FAN SPEED display
Displays selected FAN SPEED:
HIGH, MED,
or LOW
This display is blank when
set to AUTO speed.
Temperature/Timer display
Displays the set temperature by default, or timer setting
when using TIMER ON/OFF functions
o O O
Temperature range: 17-30 C(62 F-86 F)
Timer setting range: 0-24 hours
This display is blank when operating in FAN mode.
1. Press the MODE button to select
COOL mode.
2. Set your desired temperature using
the Temp or Temp button.
3. Press the FAN button to select the
fan speed: AUTO, LOW, MED,or
HIGH.
4. Press the ON/OFF button to start the
unit.
In AUTO mode, the unit will automatically
select the COOL, FAN, HEAT or DRY mode
based on the set temperature.
1. Press the MODE button to select Auto mode.
2. Set your desired temperature using the
Temp or Temp button.
3. Press the ON/OFF button to start the unit.
,
NOTE: FAN SPEED can t be set in Auto mode.
SETTING TEMPERATURE
AUTO operation
The operating temperature range for units is
O O O
17-30 C(62 F-86 F). You can increase or
O O
decrease the set tmeperature in 1 C(1 F)
increments.
COOL operation
1
3
2
1
3
2
4
Not available for this unit
Not available for
this unit
Not available for
this unit
Low battery
detection
Remote LED Screen Indicators
How To Use The Basic Functions
ON/OF F
ON/OF F
TEMP
TEMP
SHORT
CUT
SHORT
CUT
TIMER
ON
TIMER
ON
TIMER
OFF
TIMER
OFF
MODE
MODE
FAN
FAN
SLEEP
SLEEP
LED
LED
FOLLO W
ION
SWING
ME
FOLLO W
ION
SWING
ME
Le mode « COOL » vous permet de refroidir la pièce pour obtenir la température dénie.
1. Appuyez sur le bouton « MODE » jusqu’à ce que le témoin « COOL » s’allume.
2. Utilisez les boutons « + » et « - » du panneau de commande ou le bouton « TEMP » de
la télécommande pour dénir la température souhaitée.
3. Utilisez la touche « FAN » de la télécommande pour dénir la vitesse de ventilation
souhaitée. Trois paramètres sont disponibles : LOW
55
66
MODE display
Displays the current
mode, including:
AUTO
COOL
DRY
HEAT
FAN
Transmission Indicator
Lights up when remote sends
signal to unit
ON/OFF display
Appears when the unit is turned on,
and disappears when it is turned off
TIMER ON display
Displays when TIMER
ON is set
TIMER OFF display
Displays when TIMER
OFF is set
SLEEP display
Battery display
SILENT display
ECO display
Displays when
SLEEP function
is activated
FOLLOW ME
display
Indicates that
the FOLLOW ME
function is on
FAN SPEED display
Displays selected FAN SPEED:
HIGH, MED,
or LOW
This display is blank when
set to AUTO speed.
Temperature/Timer display
Displays the set temperature by default, or timer setting
when using TIMER ON/OFF functions
o O O
Temperature range: 17-30 C(62 F-86 F)
Timer setting range: 0-24 hours
This display is blank when operating in FAN mode.
1. Press the MODE button to select
COOL mode.
2. Set your desired temperature using
the Temp or Temp button.
3. Press the FAN button to select the
fan speed: AUTO, LOW, MED,or
HIGH.
4. Press the ON/OFF button to start the
unit.
In AUTO mode, the unit will automatically
select the COOL, FAN, HEAT or DRY mode
based on the set temperature.
1. Press the MODE button to select Auto mode.
2. Set your desired temperature using the
Temp or Temp button.
3. Press the ON/OFF button to start the unit.
,
NOTE: FAN SPEED can t be set in Auto mode.
SETTING TEMPERATURE
AUTO operation
The operating temperature range for units is
O O O
17-30 C(62 F-86 F). You can increase or
O O
decrease the set tmeperature in 1 C(1 F)
increments.
COOL operation
1
3
2
1
3
2
4
Not available for this unit
Not available for
this unit
Not available for
this unit
Low battery
detection
Remote LED Screen Indicators
How To Use The Basic Functions
ON/OFF
ON/OFF
TEMP
TEMP
SHORT
CUT
SHORT
CUT
TIMER
ON
TIMER
ON
TIMER
OFF
TIMER
OFF
MODE
MODE
FAN
FAN
SLEEP
SLEEP
LED
LED
FOLLOW
ION
SWING
ME
FOLLOW
ION
SWING
ME
, HIGH
55
66
MODE display
Displays the current
mode, including:
AUTO
COOL
DRY
HEAT
FAN
Transmission Indicator
Lights up when remote sends
signal to unit
ON/OFF display
Appears when the unit is turned on,
and disappears when it is turned off
TIMER ON display
Displays when TIMER
ON is set
TIMER OFF display
Displays when TIMER
OFF is set
SLEEP display
Battery display
SILENT display
ECO display
Displays when
SLEEP function
is activated
FOLLOW ME
display
Indicates that
the FOLLOW ME
function is on
FAN SPEED display
Displays selected FAN SPEED:
HIGH, MED,
or LOW
This display is blank when
set to AUTO speed.
Temperature/Timer display
Displays the set temperature by default, or timer setting
when using TIMER ON/OFF functions
o O O
Temperature range: 17-30 C(62 F-86 F)
Timer setting range: 0-24 hours
This display is blank when operating in FAN mode.
1. Press the MODE button to select
COOL mode.
2. Set your desired temperature using
the Temp or Temp button.
3. Press the FAN button to select the
fan speed: AUTO, LOW, MED,or
HIGH.
4. Press the ON/OFF button to start the
unit.
In AUTO mode, the unit will automatically
select the COOL, FAN, HEAT or DRY mode
based on the set temperature.
1. Press the MODE button to select Auto mode.
2. Set your desired temperature using the
Temp or Temp button.
3. Press the ON/OFF button to start the unit.
,
NOTE: FAN SPEED can t be set in Auto mode.
SETTING TEMPERATURE
AUTO operation
The operating temperature range for units is
O O O
17-30 C(62 F-86 F). You can increase or
O O
decrease the set tmeperature in 1 C(1 F)
increments.
COOL operation
1
3
2
1
3
2
4
Not available for this unit
Not available for
this unit
Not available for
this unit
Low battery
detection
Remote LED Screen Indicators
How To Use The Basic Functions
ON/OFF
ON/OFF
TEMP
TEMP
SHORT
CUT
SHORT
CUT
TIMER
ON
TIMER
ON
TIMER
OFF
TIMER
OFF
MODE
MODE
FAN
FAN
SLEEP
SLEEP
LED
LED
FOLLOW
ION
SWING
ME
FOLLOW
ION
SWING
ME
et AUTO.
55
66
MODE display
Displays the current
mode, including:
AUTO
COOL
DRY
HEAT
FAN
Transmission Indicator
Lights up when remote sends
signal to unit
ON/OFF display
Appears when the unit is turned on,
and disappears when it is turned off
TIMER ON display
Displays when TIMER
ON is set
TIMER OFF display
Displays when TIMER
OFF is set
SLEEP display
Battery display
SILENT display
ECO display
Displays when
SLEEP function
is activated
FOLLOW ME
display
Indicates that
the FOLLOW ME
function is on
FAN SPEED display
Displays selected FAN SPEED:
HIGH, MED,
or LOW
This display is blank when
set to AUTO speed.
Temperature/Timer display
Displays the set temperature by default, or timer setting
when using TIMER ON/OFF functions
o O O
Temperature range: 17-30 C(62 F-86 F)
Timer setting range: 0-24 hours
This display is blank when operating in FAN mode.
1. Press the MODE button to select
COOL mode.
2. Set your desired temperature using
the Temp or Temp button.
3. Press the FAN button to select the
fan speed: AUTO, LOW, MED,or
HIGH.
4. Press the ON/OFF button to start the
unit.
In AUTO mode, the unit will automatically
select the COOL, FAN, HEAT or DRY mode
based on the set temperature.
1. Press the MODE button to select Auto mode.
2. Set your desired temperature using the
Temp or Temp button.
3. Press the ON/OFF button to start the unit.
,
NOTE: FAN SPEED can t be set in Auto mode.
SETTING TEMPERATURE
AUTO operation
The operating temperature range for units is
O O O
17-30 C(62 F-86 F). You can increase or
O O
decrease the set tmeperature in 1 C(1 F)
increments.
COOL operation
1
3
2
1
3
2
4
Not available for this unit
Not available for
this unit
Not available for
this unit
Low battery
detection
Remote LED Screen Indicators
How To Use The Basic Functions
ON/OF F
ON/OF F
TEMP
TEMP
SHORT
CUT
SHORT
CUT
TIMER
ON
TIMER
ON
TIMER
OFF
TIMER
OFF
MODE
MODE
FAN
FAN
SLEEP
SLEEP
LED
LED
FOLLO W
ION
SWING
ME
FOLLO W
ION
SWING
ME
Ce mode vous permet de déshumidier la pièce. Fermez les fenêtres et les portes lorsque vous
utilisez ce mode.
1. Appuyez sur le bouton « MODE » jusqu’à ce que le témoin « DRY » s’allume.
2. Ce mode ne permet pas de régler la vitesse de ventilation.
55
66
MODE display
Displays the current
mode, including:
AUTO
COOL
DRY
HEAT
FAN
Transmission Indicator
Lights up when remote sends
signal to unit
ON/OFF display
Appears when the unit is turned on,
and disappears when it is turned off
TIMER ON display
Displays when TIMER
ON is set
TIMER OFF display
Displays when TIMER
OFF is set
SLEEP display
Battery display
SILENT display
ECO display
Displays when
SLEEP function
is activated
FOLLOW ME
display
Indicates that
the FOLLOW ME
function is on
FAN SPEED display
Displays selected FAN SPEED:
HIGH, MED,
or LOW
This display is blank when
set to AUTO speed.
Temperature/Timer display
Displays the set temperature by default, or timer setting
when using TIMER ON/OFF functions
o O O
Temperature range: 17-30 C(62 F-86 F)
Timer setting range: 0-24 hours
This display is blank when operating in FAN mode.
1. Press the MODE button to select
COOL mode.
2. Set your desired temperature using
the Temp or Temp button.
3. Press the FAN button to select the
fan speed: AUTO, LOW, MED,or
HIGH.
4. Press the ON/OFF button to start the
unit.
In AUTO mode, the unit will automatically
select the COOL, FAN, HEAT or DRY mode
based on the set temperature.
1. Press the MODE button to select Auto mode.
2. Set your desired temperature using the
Temp or Temp button.
3. Press the ON/OFF button to start the unit.
,
NOTE: FAN SPEED can t be set in Auto mode.
SETTING TEMPERATURE
AUTO operation
The operating temperature range for units is
O O O
17-30 C(62 F-86 F). You can increase or
O O
decrease the set tmeperature in 1 C(1 F)
increments.
COOL operation
1
3
2
1
3
2
4
Not available for this unit
Not available for
this unit
Not available for
this unit
Low battery
detection
Remote LED Screen Indicators
How To Use The Basic Functions
ON/OF F
ON/OF F
TEMP
TEMP
SHORT
CUT
SHORT
CUT
TIMER
ON
TIMER
ON
TIMER
OFF
TIMER
OFF
MODE
MODE
FAN
FAN
SLEEP
SLEEP
LED
LED
FOLLO W
ION
SWING
ME
FOLLO W
ION
SWING
ME
1. Appuyez sur le bouton « MODE » jusqu’à ce que le témoin « FAN » s’allume.
2. Appuyez sur la touche « FAN » de la télécommande pour régler la vitesse de
ventilation. Trois paramètres sont disponibles : LOW
55
66
MODE display
Displays the current
mode, including:
AUTO
COOL
DRY
HEAT
FAN
Transmission Indicator
Lights up when remote sends
signal to unit
ON/OFF display
Appears when the unit is turned on,
and disappears when it is turned off
TIMER ON display
Displays when TIMER
ON is set
TIMER OFF display
Displays when TIMER
OFF is set
SLEEP display
Battery display
SILENT display
ECO display
Displays when
SLEEP function
is activated
FOLLOW ME
display
Indicates that
the FOLLOW ME
function is on
FAN SPEED display
Displays selected FAN SPEED:
HIGH, MED,
or LOW
This display is blank when
set to AUTO speed.
Temperature/Timer display
Displays the set temperature by default, or timer setting
when using TIMER ON/OFF functions
o O O
Temperature range: 17-30 C(62 F-86 F)
Timer setting range: 0-24 hours
This display is blank when operating in FAN mode.
1. Press the MODE button to select
COOL mode.
2. Set your desired temperature using
the Temp or Temp button.
3. Press the FAN button to select the
fan speed: AUTO, LOW, MED,or
HIGH.
4. Press the ON/OFF button to start the
unit.
In AUTO mode, the unit will automatically
select the COOL, FAN, HEAT or DRY mode
based on the set temperature.
1. Press the MODE button to select Auto mode.
2. Set your desired temperature using the
Temp or Temp button.
3. Press the ON/OFF button to start the unit.
,
NOTE: FAN SPEED can t be set in Auto mode.
SETTING TEMPERATURE
AUTO operation
The operating temperature range for units is
O O O
17-30 C(62 F-86 F). You can increase or
O O
decrease the set tmeperature in 1 C(1 F)
increments.
COOL operation
1
3
2
1
3
2
4
Not available for this unit
Not available for
this unit
Not available for
this unit
Low battery
detection
Remote LED Screen Indicators
How To Use The Basic Functions
ON/OFF
ON/OFF
TEMP
TEMP
SHORT
CUT
SHORT
CUT
TIMER
ON
TIMER
ON
TIMER
OFF
TIMER
OFF
MODE
MODE
FAN
FAN
SLEEP
SLEEP
LED
LED
FOLLOW
ION
SWING
ME
FOLLOW
ION
SWING
ME
, HIGH
55
66
MODE display
Displays the current
mode, including:
AUTO
COOL
DRY
HEAT
FAN
Transmission Indicator
Lights up when remote sends
signal to unit
ON/OFF display
Appears when the unit is turned on,
and disappears when it is turned off
TIMER ON display
Displays when TIMER
ON is set
TIMER OFF display
Displays when TIMER
OFF is set
SLEEP display
Battery display
SILENT display
ECO display
Displays when
SLEEP function
is activated
FOLLOW ME
display
Indicates that
the FOLLOW ME
function is on
FAN SPEED display
Displays selected FAN SPEED:
HIGH, MED,
or LOW
This display is blank when
set to AUTO speed.
Temperature/Timer display
Displays the set temperature by default, or timer setting
when using TIMER ON/OFF functions
o O O
Temperature range: 17-30 C(62 F-86 F)
Timer setting range: 0-24 hours
This display is blank when operating in FAN mode.
1. Press the MODE button to select
COOL mode.
2. Set your desired temperature using
the Temp or Temp button.
3. Press the FAN button to select the
fan speed: AUTO, LOW, MED,or
HIGH.
4. Press the ON/OFF button to start the
unit.
In AUTO mode, the unit will automatically
select the COOL, FAN, HEAT or DRY mode
based on the set temperature.
1. Press the MODE button to select Auto mode.
2. Set your desired temperature using the
Temp or Temp button.
3. Press the ON/OFF button to start the unit.
,
NOTE: FAN SPEED can t be set in Auto mode.
SETTING TEMPERATURE
AUTO operation
The operating temperature range for units is
O O O
17-30 C(62 F-86 F). You can increase or
O O
decrease the set tmeperature in 1 C(1 F)
increments.
COOL operation
1
3
2
1
3
2
4
Not available for this unit
Not available for
this unit
Not available for
this unit
Low battery
detection
Remote LED Screen Indicators
How To Use The Basic Functions
ON/OFF
ON/OFF
TEMP
TEMP
SHORT
CUT
SHORT
CUT
TIMER
ON
TIMER
ON
TIMER
OFF
TIMER
OFF
MODE
MODE
FAN
FAN
SLEEP
SLEEP
LED
LED
FOLLOW
ION
SWING
ME
FOLLOW
ION
SWING
ME
et AUTO.
3. La température ne peut pas être réglée.
Cette fonction vous permet de retarder le démarrage du climatiseur de maximum 24 heures.
1. Appuyez sur la touche « TIMER ON » de la télécommande.
2. L’écran de la télécommande ache dans combien de temps le climatiseur
commencera à fonctionner.
3. Appuyez à plusieurs reprises sur le bouton « TIMER ON » pour faire augmenter cette
durée. Vous pouvez également maintenir le bouton appuyé.
4. Une fois que vous avez réglé la durée souhaitée, l’écran de la télécommande ache «

30
DO266A
FR
TIMER ON ». Deux petits indicateurs ronds seront en outre allumés sur le panneau de
commande.
5. Si vous souhaitez désactiver la minuterie, appuyez à plusieurs reprises sur le bouton
« TIMER ON » jusqu’à ce que la durée achée soit « 0 ». Vous pouvez également
maintenir le bouton appuyé.
Grâce à cette fonction, l’appareil s’éteint automatiquement après un laps de temps prédéni.
1. Appuyez sur la touche « TIMER OFF » de la télécommande.
2. L’écran de la télécommande ache dans combien de temps le climatiseur s’éteindra.
3. Appuyez à plusieurs reprises sur le bouton « TIMER OFF » pour faire augmenter cette
durée. Vous pouvez également maintenir le bouton appuyé.
4. Une fois que vous avez réglé la durée souhaitée, l’écran de la télécommande ache «
TIMER OFF ».
5. Si vous souhaitez désactiver la minuterie, appuyez à plusieurs reprises sur le bouton «
TIMER OFF » jusqu’à ce que la durée achée soit « 0 ».
Vous pouvez activer ces deux fonctions en même temps. Vous déterminerez ainsi quand le
climatiseur s’allumera et quand il s’éteindra.
Attention : l’heure l’allumage et d’arrêt de l’appareil dépend de l’heure à laquelle vous
programmez la minuterie. Exemple : il est actuellement 13 h. Vous voulez que l’appareil
fonctionne de 16 h 30 à 18 00. Vous devez dans ce cas régler la fonction « TIMER ON » sur 3,5
h, et la fonction « TIMER OFF » sur 5 h.
Lorsque vous sélectionnez ce paramètre, la température augmente de 1°C dans les 30
minutes. Après encore 30 minutes, la température augmente à nouveau de 1°C. Cette
température est conservée pour les 7 heures suivantes. Ensuite, la température revient à la
température réglée d’origine et le mode « veille » est terminé.
NOTE : ce paramètre ne peut pas être sélectionné pour les modes « ventilateur » et « sec ».
Cette touche vous permet d’enregistrer et d’utiliser un réglage spécique.
Si vous paramétrez souvent l’appareil de la même manière, vous pouvez enregistrer ce
réglage en maintenant le bouton « SHORTCUT » enfoncé pendant 3 secondes. L’appareil
retient alors les paramètres actifs au moment où vous maintenez la touche enfoncée. Ces
paramètres peuvent être : le mode d’utilisation (« MODE »), la température dénie, la vitesse
de ventilation (« FAN »), et éventuellement le réglage du mode veille (« SLEEP »).
Par la suite, l’appareil reviendra à ces paramètres dès que vous enfoncerez la touche «
SHORTCUT ».

31
DO266A
www.domo-elektro.be
FR
A
Vous pouvez utiliser une vidange permanente pendant la déshumidication.
1. Enlevez le bouchon de vidange et le capuchon en caoutchouc, au milieu à l’arrière de
votre appareil.
2. Fixez le tuyau de vidange sur l’ouverture de vidange.
3. Veillez à ce que l’eau puisse s’écouler de manière sûre et continue.
1
2
Si vous n’utilisez pas la vidange continue, l’eau sera récupérée dans le bac de vidange, au bas
de l’appareil.
· Lorsque ce bac est plein, l’appareil émet quelques tonalités et le code P1 apparaît à
l’écran. La déshumidication ou la climatisation s’arrête. Le
ventilateur continue à fonctionner, c’est normal.
· Déplacez l’appareil prudemment vers un endroit où vous
pouvez laisser l’eau s’évacuer facilement.
· Enlevez le bouchon de la vidange au bas de votre appareil. (A)
L’eau s’évacue alors.
· Lorsque l’eau est totalement évacuée, replacez le bouchon
sur l’ouverture de vidange.
· Vous pouvez ensuite redémarrer l’appareil. Veillez à ce que
le code « P1 » disparaisse de l’écran. Si le code ne disparaît
pas immédiatement, vous pouvez essayer plusieurs fois
d’éteindre et de rallumer l’appareil. Si le code se répète,
veuillez prendre contact avec le service à la clientèle.
· NOTE : installez toujours d’abord le bouchon de vidange
avant d’allumer à nouveau l’appareil.
NETTOYAGE
· Enlevez toujours la che de la prise de courant avant de nettoyer l’appareil.
· N’utilisez pas de produits chimiques ou abrasifs pour nettoyer l’appareil.

32
DO266A
FR
· Ne lavez jamais l’appareil à l’eau ou avec d’autres liquides car cela pourrait provoquer une
électrocution.
· Lorsque le cordon électrique est endommagé, il doit être remplacé ou réparé par le service
après-vente du fabricant ou par une personne qualiée.
· Nettoyez le ltre à air au moins toutes les deux semaines.
Pour éviter tout dysfonctionnement du ventilateur en
raison de poussière dans le ltre.
· Nettoyez le ltre dans l’eau tiède avec un détergent doux.
Rincez soigneusement le ltre et laissez-le sécher à l’air.
· Lorsque le ltre est sec, vous pouvez le replacer dans
l’appareil.
Utilisez un chion doux humide avec un peu de détergent doux pour nettoyer l’extérieur de
l’appareil. Séchez ensuite l’appareil entièrement avec un chion sec et doux.
Avant de stocker l’appareil pour une plus longue durée, procédez comme suit pour éviter tout
dommage à l’appareil :
· Enlevez toute l’eau de l’appareil à l’aide du tuyau de vidange.
· Mettez ensuite l’appareil en mode « ventilateur », laissez l’appareil allumé une demi-
journée dans une salle chauée. L’appareil peut de cette manière entièrement sécher à
l’intérieur. Vous évitez de la sorte la formation de champignons.
· Éteignez l’appareil, enlevez la che de la prise et enlevez les piles de la télécommande.
· Nettoyez les ltres et replacez-les dans l’appareil.
· Rangez l’appareil dans un endroit sec et sombre.
L’appareil ne fonctionne pas lorsque vous appuyez sur la touche marche/arrêt.
· L’écran indique P1 : enlevez l’eau de l’appareil.
· La température de la pièce est inférieure à la température réglée sur l’appareil. Adaptez la
température sur votre appareil.
La pièce ne refroidit pas susamment.
· Les portes et les fenêtres ne sont pas fermées. Veillez à ce que toutes les portes et les
fenêtres soient fermées.
· Il y a dans la pièce des appareils qui génèrent de la chaleur. Enlevez autant que possible les
sources de chaleur.

33
DO266A
www.domo-elektro.be
FR
· Le tuyau d’évacuation d’air n’est pas raccordé ou est bloqué. Raccordez le tuyau et veillez à
ce qu’il fonctionne correctement.
· La température réglée est trop élevée. Adaptez la température réglée.
L’appareil fait trop de bruit ou génère des vibrations.
· Le sol n’est pas susamment droit ou plane. Placez l’appareil sur une surface plane, si
possible.
· Le ltre à air est sale. Nettoyez le ltre à air.
Votre appareil fait un bruit d’écoulement d’eau.
· Le bruit provient du liquide de refroidissement de votre appareil. C’est normal.
· Le ltre à air est sale. Nettoyez le ltre à air.
Ce symbole sur le produit ou son emballage indique que ce
produit ne peut être traité comme déchet ménager. Il doit
plutôt être remis au point de ramassage concerné, se chargeant
du recyclage du matériel électrique et électronique. En vous
assurant que ce produit est éliminé correctement, vous favorisez
la prévention des conséquences négatives pour l’environnement
et la santé humaine qui, sinon, seraient le résulat d’un
traitement inapproprié des déchets de ce produit. Pour obtenir
plus de détails sur le recyclage de ce produit, veuillez prendre
contact avec le bureau municipal de votre région, votre service
d’éliminiation des déchets ménagers ou le magasin où vous avez
acheté le produit.
L’emballage est recyclable. Traitez l’emballage écologiquement.

34
DO266A
DE
GARANTIE
Sehr geehrter Kunde,
Sämtliche unserer Produkte unterliegen einer strengen Qualitätskontrolle,
bevor Sie Ihnen angeboten werden. Sollten dennoch
Probleme mit Ihrem Gerät auftreten, bedauern wir dies zutiefst.
Wir möchten Sie in diesem Fall bitten, unseren Kundenservice zu kontaktieren.
Unsere Mitarbeiter helfen Ihnen gern weiter!
+32 14 21 71 91 [email protected]
Montag – Donnerstag: 8:30 Uhr – 12:00 Uhr und von 13:00 Uhr – 17:00 Uhr
Freitag: 8:30 Uhr – 12:00 Uhr und von 13:00 Uhr – 16:30 Uhr
Dieses Gerät hat eine Garantiefrist von 2 Jahren ab dem Kaufdatum. Während der Garantiezeit
übernimmt der Hersteller die vollständige Verantwortung für Mängel, die nachweislich auf
Material- oder Konstruktionsfehler zurückzuführen sind. Wenn derartige Mängel auftreten,
wird das Gerät wenn nötig ausgetauscht oder repariert. Die Garantiezeit von 2 Jahren beginnt
in diesem Moment nicht erneut, sondern sie läuft bis 2 Jahre nach dem Kaufdatum weiter. Die
Garantie wird auf der Grundlage des Kassenbons gewährt.
Die Garantie auf Accessoires und Verschleißteile beträgt 6 Monate.
Die Garantie und die Verantwortung/Haftung des Lieferanten und Herstellers entfallen
automatisch in den folgenden Fällen:
· Bei Nichtbeachtung der Anweisungen in dieser Bedienungsanleitung.
· Bei falschem Anschluss, z.B. bei einer zu hohen Stromspannung.
· Bei falscher, grober oder abnormaler Verwendung.
· Bei unzureichender oder falscher Wartung.
· Bei vom Verbraucher oder von nicht ermächtigten Dritten vorgenommenen Reparaturen
oder Änderungen am Gerät.
· Bei der Verwendung von Ersatzteilen oder Accessoires, die nicht vom Lieferanten /
Hersteller empfohlen oder geliefert werden.

35
DO266A
www.domo-elektro.be
DE
Wenn Sie elektrische Geräte verwenden, müssen folgende Sicherheitshinweise beachtet
werden:
· Lesen Sie diese Hinweise sorgfältig durch. Bewahren Sie diese Bedienungsanleitung zum
späteren Nachschlagen auf.
· Entfernen Sie vor dem ersten Gebrauch alle Verpackungsmaterialien und möglichen
Werbeauleber. Sorgen Sie dafür, dass Kinder nicht mit den Verpackungsmaterialien
spielen.
· Dieses Gerät eignet sich für den Einsatz im Haushalt und in ähnlichen Umfeldern, zum
Beispiel in folgenden Bereichen:
· Küchenbereich für Mitarbeiter von Geschäften, Büros und anderen ähnlichen
beruichen Umfeldern.
· Bauernhöfe
· Hotel- und Motelzimmer und andere Bereiche mit wohnungsähnlichem Charakter
· Gästezimmer oder Ähnliches
· Diese Gerät darf von Kindern ab 16 Jahren und Menschen mit körperlichen oder
sensorischen Behinderungen oder Menschen mit eingeschränkten geistigen Fähigkeiten
oder mangelnder Erfahrung bzw. Sachkenntnis unter der Bedingung verwendet werden,
dass diese Personen beaufsichtigt werden oder sie eine Anleitung zur sicheren Verwendung
des Geräts erhalten haben und sich der Gefahren bei der Verwendung des Geräts bewusst
sind. Kinder dürfen nicht mit dem Gerät spielen. Die Wartung und Reinigung des Geräts
darf nicht durch Kinder ausgeführt werden, außer diese sind älter als 16 Jahre und werden
von einem Erwachsenen beaufsichtigt.
· Achtung: das Gerät darf nicht mit einer externen Zeitschaltuhr.
· Vor der Benutzung prüfen, ob die Spannung, die auf dem Gerät angegeben ist, mit der
Spannung Ihres Stromnetzes übereinstimmt.
· Das Netzkabel muss stets an eine Steckdose angeschlossen werden, die gemäß den
örtlichen Standards und Normen isoliert und geerdet wurde.
· Lassen Sie das Netzkabel nicht über den Tisch oder die Anrichte hängen, oder in Kontakt
mit heißen Oberächen kommen.
· Benutzen Sie das Gerät niemals, wenn die Kabelschnur oder der Stecker beschädigt
ist, nach beeinträchtigtem Funktionieren des Gerätes, oder wenn das Gerät beschädigt
ist. Bringen Sie in solchen Fällen das Gerät zur nächsten qualizierten Servicestelle zur
Überprüfung und/oder Reparatur.
· Beim Einsatz des Gerätes in Anwesenheit von Kindern ist strenge Aufsicht geboten.
· Die Verwendung von Zubehör, das nicht vom Hersteller empfohlen oder verkauft wird,
besteht die Gefahr von Brand, elektrischen Schlages oder von Verletzungen.
· Ziehen Sie den Stecker aus der Steckdose, wenn das Gerät nicht im Einsatz ist, Einzelteile
montiert oder demontiert werden, oder das Gerät gereinigt wird. Ziehen Sie den Stecker
direkt am Stecker selber und nicht an der Kabelschnur aus der Steckdose.
· Lassen Sie das im Betrieb bendliche Gerät nicht unbeaufsichtigt.

36
DO266A
DE
· Stellen Sie das Gerät nicht in der Nähe oder auf einer Gasamme, einer elektrischen Platte
oder an einer Stelle ab, auf der es in Kontakt mit einem Elektroofen oder einem anderen
heißen Geräten kommen kann.
· Benutzen Sie das Gerät nicht im Freien.
· Benutzen Sie das Gerät ausschließlich für den Zweck, für den es gedacht ist.
· Stellen Sie das Gerät immer auf eine stabile, ache und trockene Oberäche.
· Das Gerät ist nur auf den privaten Gebrauch ausgelegt. Der Hersteller ist nicht
verantwortlich für Unfälle, die als Folge von unsachgemäßem Gebrauch des Geräts oder
Nichtbefolgen der in dieser Anleitung aufgeführten Regeln entstehen.
· Sämtliche Reparaturen, abgesehen von der gewöhnlichen Pege, sind durch den Hersteller
oder dessen Kundendienst zu übernehmen.
· Das Gerät, das Kabel oder den Stecker niemals in Wasser oder in andere Flüssigkeiten
tauchen.
· Sorgen Sie dafür, dass Kinder das Netzkabel oder das Gerät nicht berühren können.
· Netzkabel vor scharfen Kanten, heißen Gegen-ständen oder anderen Wärmequellen
schützen.
· Beim ersten Gebrauch Verpackungsmaterial und mögliche Werbeauleber komplett
entfernen.
· Stellen Sie das Gerät nicht in die Nähe von Gasbrennern, Feuerstellen oder leicht
entammbaren Stoen, wie z.B. Alkohol, Chemikalien, Insektenvernichtungsmitteln, etc.
· Vermeiden Sie gegen das Gerät zu stoßen oder daran zu wackeln. So können Sie Schäden
am Gerät vermeiden.
· Sorgen Sie dafür, dass die Luft-Zu- und -abfuhr nicht abgedeckt sind. Das Gerät könnte
sonst überhitzen.
· Vermeiden Sie, dass das Gerät Wasserspritzer abbekommt und stellen Sie es nicht in die
Nähe von Wasserquellen. So vermeiden Sie, dass es zu Kurzschlüssen kommt.
· Schließen Sie auf der gleichen Stromzufuhr, an der die Klimaanlage angeschlossen ist, kein
weiteres Gerät an.
· Bedienen Sie den Stecker nicht mit nassen Händen.
· Stecken Sie keine fremden Gegenstände in die Önungen des Gerätes.
· Benutzen Sie keine Verlängerungsschnur.
· Lassen Sie das Gerät nicht unbeaufsichtigt, wenn Kinder in der Nähe sind.
· Wenn Sie das Gerät innerhalb von kurzer Zeit an- und ausschalten dauert es etwa 3 min. bis
der Kompressor wieder einsatzbereit ist.
· Stellen Sie das Gerät zur Vermeidung von Störungen nicht in einen Umkreis von 1m zu
Fernseher oder Radio.
· Um Verfärbungen am Gehäuse zu vermeiden stellen Sie das Gerät nicht in direktes
Sonnenlicht.
· Kippen Sie das Gerät nicht mehr als 35° wenn Sie es transportieren und transportieren Sie
es niemals mit der Unterseite nach oben. Transportieren Sie das Gerät immer aufrecht.
· Stellen Sie das Gerät auf einen achen Untergrund.

37
DO266A
www.domo-elektro.be
DE
· Zur Verlängerung der Lebensdauer des Gerätes entfernen Sie stets das Wasser aus dem
Gerät, sofern Sie es für längere Zeit wegstellen und nicht benutzen.
· Benutzen Sie zur Reinigung des Gerätes keine chemischen Mittel, da diese das Gerät
beschädigen könnten.
· Achten Sie darauf, dass das Gerät nicht an den Strom angeschlossen ist, wenn Sie den
Lüftungsrost einsetzen oder entnehmen.
· Achten Sie darauf, dass die Klimaanlage nicht in Kontakt mit Feuchtigkeit kommt (z.B.
Kondenswasser, Spritzwasser etc.). Sollte das Gerät zufälligerweise in Wasser oder andere
Flüssigkeiten gefallen sein, ziehen Sie unmittelbar den Stecker aus der Steckdose.
· Benutzen Sie das Gerät nicht in feuchten Räumen, wie z.B. Badezimmern oder
Waschküchen.
· Wenn das Gerät nicht funktioniert nehmen Sie bitte Kontakt mit einem qualizierten
Fachhändler auf.
· Sorgen Sie dafür, dass rund um das Gerät mindestens 30 cm Freiraum ist.
· Falls die Klimaanlage umgefallen ist muss sofort der Stecker aus der Steckdose gezogen
werden.
· Berühren Sie das Gerät nicht, wenn Sie nasse Hände oder nackte Füße haben.
· Entfernen Sie keine festmontierten Teile des Gerätes und benutzen Sie das Gerät nicht,
wenn es nicht vernünftig funktioniert, gefallen oder beschädigt ist.
· Benutzen Sie nicht den Stecker zum An- und Abschalten. Verwenden Sie immer die Tasten
auf dem Bedienfeld.
· Reparaturen, Detektion von Leckagen sowie Arbeiten an der Anlage müssen von
qualizierten Personen die über die geeigneten Zertikate verfügen, ausgeführt werden.
· Die Installation muss gemäß der Installationsanleitung durchgeführt werden. Eine
unsachgemäße Installation kann zu Wasseraustritt, Stromschlag oder Brand führen.
· Berühren Sie das Gerät nicht mit nassen oder feuchten Händen oder auf bloßen Füßen.
· Wenn die Klimaanlage während des Betriebs umgestoßen wird, schalten Sie das Gerät aus
und ziehen Sie sofort den Netzstecker. Inspizieren Sie das Gerät, um sicherzustellen, dass
es nicht beschädigt ist. Wenn Sie vermuten, dass das Gerät beschädigt ist, wenden Sie sich
an einen Techniker oder den Kundendienst.
· Während eines Gewitters muss der Strom abgeschaltet werden, um Schäden am Gerät
durch Blitzschlag zu vermeiden.
· Wenn die Abussfunktion nicht verwendet wird, bringen Sie beide Gummistopfen in den
Abusslöchern an. Bewahren Sie den Ablaufschlauch bei Nichtgebrauch sorgfältig auf, um
Kinder vor dem Ersticken zu schützen.
· Verlegen Sie das Kabel nicht unter Teppichböden. Bedecken Sie das Kabel nicht mit
Teppichen, Läufern oder ähnlichen Belägen. Verlegen Sie das Kabel nicht unter Möbeln
oder Geräten. Verlegen Sie das Kabel außerhalb eines Durchgangs und so, dass niemand
darüber stolpern kann.
· Trennen Sie das Gerät von der Stromversorgung, wenn ungewöhnliche Geräusche,
Gerüche oder Rauch aus dem Gerät austreten.

38
DO266A
DE
· Bitte lesen Sie alle Warnhinweise aufmerksam durch.
· Verwenden Sie beim Abtauen oder bei der Reinigung des Geräts keine anderen als vom
Hersteller empfohlenen Werkzeuge.
· Das Gerät muss in einem Raum auewahrt werden, in dem keine permanent betriebenen
Zündquellen vorhanden sind (zum Beispiel: oene Flammen, ein eingeschaltetes Gasgerät
oder laufende Elektroheizung).
· Nicht durchstechen oder verbrennen.
· Kältemittel können geruchlos sein.
· Das Gerät muss in einem Raum aufgebaut, verwendet und gelagert werden, der größer als
7 m
2
ist.
· Das Gerät enthält eine gewisse Menge (siehe Typenschild auf der Geräterückseite) des
Kältemittels R290.
· Das Kältemittel R290 entspricht den europäischen Umweltrichtlinien. Beschädigen Sie
nicht den Kältekreislauf.
· Wird das Gerät in einem unbelüfteten Raum aufgestellt, betrieben oder gelagert, muss
der Raum so gestaltet sein, dass sich das Kältemittel bei einer Leackage nicht sammeln
und eine Explosions- und Brandgefahr darstellen kann, aufgrund der Entzündung des
Kältemittels durch Elektroheizungen, Öfen oder anderen Zündquellen.
· Das Gerät ist so zu lagern, dass mechanische Schäden ausgeschlossen werden.
· Alle Personen, die an einem Kältemittelkreislauf arbeiten oder in ihn eingreifen, müssen im
Besitz eines gültigen Zertikats von einer anerkannten Prüfstelle sein, die ihnen bestätigt,
dass sie sicher im Umgang mit Kältemitteln gemäß der anerkannten Spezikationen sind.
· Reparaturen sind entsprechend der Empfehlungen des Hersteller durchzuführen.
Wartungs- und Reparaturarbeiten, bei denen weitere Fachkräfte assistieren müssen,
sind unter der Aufsicht der Person, die in der Verwendung von brennbaren Kältemitteln
geschult ist, durchzuführen.
Vorsicht: Brandgefahr / brennbare Materialien
Dieses Gerät verwendet ein brennbares Kühlmittel. Wenn das Kühlmittel
austritt und einer externen Zündquelle ausgesetzt ist, besteht Brandgefahr.
BEWAHREN SIE DIESE ANWEISUNGEN AUF
ENERGIETIPPS
· Benutzen Sie das Gerät nicht in Räumen, die größer sind als für das Gerät empfohlen.
· Stellen Sie das Gerät so auf, dass der Luftstrom nicht durch Möbel oder andere
Gegenstände behindert wird.
· Halten Sie Gardinen während der wärmsten Tageszeit geschlossen.
· Achten Sie darauf, dass die Filter immer sauber sind.
· Halten Sie Fenster und Türen geschlossen, um die gekühlte Luft drinnen und die warme
Luft draußen zu halten.

39
DO266A
www.domo-elektro.be
DE
TEILE
1. Bedienpanel
2. Luftauslass
3. Luftlter
4. Lufteinlass
5. Luftauslass
6. Drainage
7. Drainageschlauch
8. Fernbedienung
9. Luftauslassschlauch
9 a. Kopplung Luftauslassschlauch
10. Wandbefestigungssatz
10 a. Wandadapter
10 b.Kopplung
11. Fensterbefestigungssatz
11 a. Fensteradapter
11 b. Kopplung Fensterbefestigungssatz
11 c. Fensterdichtung
11 d. Adapterstecker
11 e. L-Eisen mit Schrauben
1
2
3
4
5
6
8
7
11b 11c
11
11e

40
DO266A
DE
max 120 cm
min 30 cm
· Stellen Sie die Klimaanlage auf einen soliden, stabilen Untergrund, um Lärmbelästigung
und Vibrationen zu reduzieren.
· Achten Sie darauf, dass der Untergrund stark genug ist, um dass
Gewicht des Gerätes zu tragen.
· Um das Gerät einfach transportieren zu können hat es Rollen.
Rollen Sie das Gerät ausschließlich über glatte, ache Böden
und nicht über Gegenstände. Beim Rollen über Teppiche sollte
man besonders vorsichtig sein.
· Das Netzkabel muss stets an eine Steckdose angeschlossen
werden, die gemäß den örtlichen Standards und Normen
isoliert und geerdet wurde.
· Achten Sie darauf, dass sich rund um das Gerät 30 cm Freiraum
benden.
· Der Luftablassschlauch muss während der COOL- oder AUTO-Funktion angeschlossen
werden. Im FAN- oder DRY-Modus haben Sie den Luftablassschlauch nicht nötig.
· Achten Sie darauf, dass sich im Umkreis von 50 cm von der Luftabfuhr keine Hindernisse
benden.
· Achten Sie darauf, dass der Luftablassschlauch bei der Montage nicht zu stark gebogen
wird
max 120 cm
min 30 cm
· Bringen Sie die Koppelung des Luftauslassschlauchs am Schlauchende an.
· Bringen Sie den Luftauslassschlauch an der Rückseite des Geräts an.
max 120 cm
min 30 cm
· Bringen Sie die Koppelung der Fensterbefestigung am anderen Ende des
Luftauslassschlauches an.
· Bringen Sie den Fensteradapter im Fenster an. Dies ist sowohl für horizontale wie auch
vertikale Schieberahmen möglich. Blockieren Sie den Fensteradapter auf der gewünschten
Länge.
· Befestigen Sie den Schlauch mit Koppelung auf dem Fensteradapter.
· Verwenden Sie die Fensterdichtungen, um eventuelle Önungen im Fenster zu
verschließen.

41
DO266A
www.domo-elektro.be
DE
· Setzen Sie die gewünschte Länge des Fensteradapters mit dem mitgelieferten
Fensteradapterstopper fest.
· Auf Wunsch können Sie das Fenster mit dem L-Eisen und 2 Schrauben befestigen.
max 120 cm
min 30 cm
max 120 cm
min 30 cm
· Bringen Sie die Koppelung des Luftauslassschlauchs am Schlauchende an.
· Bringen Sie den Luftauslassschlauch an der Rückseite des Geräts an.
max 120 cm
min 30 cm
· Bringen Sie eine Önung in der Mauer in der Größe des Maueradapters an.
· Bringen Sie den Maueradapter in der Önung an. Befestigen Sie die Wandhalterung mit
den im Lieferumfang enthaltenen Schrauben.
· Bringen Sie die Koppelung der Mauerbefestigung am anderen Ende des
Luftauslassschlauches an.
· Befestigen Sie den Schlauch mit Koppelung auf dem Maueradapter.
max 120 cm
min 30 cm

42
DO266A
DE
1
2
3
4
5
6
7
8
Die horizontalen Lamellen an der Vorderseite der Klimaanlage können Sie manuell önen und
schließen, um so den Luftauslass besser ausrichten zu können.
12
4
3
1. ON-OFF-Taste
Mit dieser Taste können Sie das Gerät an- oder ausschalten.
2. “+” und “-”-Tasten
Diese Tasten müssen Sie benutzen, wenn Sie die Temperatureinstellung ändern wollen. Die
Temperatur kann auf einen Wert zwischen 17 °C und 30 °C eingestellt werden. Wenn Sie beide
Pfeil-Tasten gleichzeitig 3 sek. Gedrückt halten können Sie zwischen °C und °F wählen.
3. MODE-Taste
Mit dieser Taste können Sie die gewünschte Gebrauchseinstellung wählen. Bei jedem
Druck auf diese Taste wird die Gebrauchseinstellung verändern: COOL, DRY und FAN.
Das entsprechende Kontrolllämpchen auf dem Panel wird aueuchten. Wenn Sie die
FAN-Einstellung wählen, bläst die Lüftung im automatischen Stand. Sie können die
Lüftungsgeschwindigkeit nur mit der Fernbedienung anpassen.
4. LED-Display
Das LED-Display gibt die eingestellte Temperatureinstellung wieder. Wenn das Gerät im
DRY- oder FAN-Modus steht, wird auf dem Display die
Zimmertemperatur wiedergegeben.
Achten Sie bei Verwendung der Fernbedienung immer
darauf, sie in Richtung des Geräts zu richten. Wenn Sie dies
unterlassen, können Sie nach dem Ändern einer bestimmten
Einstellung die Fernbedienung noch auf das Gerät richten
und auf die EIN-AUS-Taste drücken.
Wenn das Gerät ein Signal der Fernbedienung empfängt,
hören Sie einen Piepston. Die Fernbedienung muss in einem
Radius von 8 Metern um das Gerät verwendet werden.

43
DO266A
www.domo-elektro.be
DE
1. ON-OFF-Taste
Mit dieser Taste können Sie das Gerät an- oder ausschalten.
2. MODE-Taste
Mit dieser Taste können Sie die gewünschte Gebrauchseinstellung wählen. Bei jedem
Druck auf diese Taste wird die Gebrauchseinstellung verändern: COOL, DRY und FAN. Das
entsprechende Kontrolllämpchen auf dem Panel wird aueuchten.
3. FAN-Taste
Mit dieser Taste können Sie die Geschwindigkeit des Ventilators einstellen. Sie können
zwischen drei Geschwindigkeiten wählen: LOW
55
66
MODE display
Displays the current
mode, including:
AUTO
COOL
DRY
HEAT
FAN
Transmission Indicator
Lights up when remote sends
signal to unit
ON/OFF display
Appears when the unit is turned on,
and disappears when it is turned off
TIMER ON display
Displays when TIMER
ON is set
TIMER OFF display
Displays when TIMER
OFF is set
SLEEP display
Battery display
SILENT display
ECO display
Displays when
SLEEP function
is activated
FOLLOW ME
display
Indicates that
the FOLLOW ME
function is on
FAN SPEED display
Displays selected FAN SPEED:
HIGH, MED,
or LOW
This display is blank when
set to AUTO speed.
Temperature/Timer display
Displays the set temperature by default, or timer setting
when using TIMER ON/OFF functions
o O O
Temperature range: 17-30 C(62 F-86 F)
Timer setting range: 0-24 hours
This display is blank when operating in FAN mode.
1. Press the MODE button to select
COOL mode.
2. Set your desired temperature using
the Temp or Temp button.
3. Press the FAN button to select the
fan speed: AUTO, LOW, MED,or
HIGH.
4. Press the ON/OFF button to start the
unit.
In AUTO mode, the unit will automatically
select the COOL, FAN, HEAT or DRY mode
based on the set temperature.
1. Press the MODE button to select Auto mode.
2. Set your desired temperature using the
Temp or Temp button.
3. Press the ON/OFF button to start the unit.
,
NOTE: FAN SPEED can t be set in Auto mode.
SETTING TEMPERATURE
AUTO operation
The operating temperature range for units is
O O O
17-30 C(62 F-86 F). You can increase or
O O
decrease the set tmeperature in 1 C(1 F)
increments.
COOL operation
1
3
2
1
3
2
4
Not available for this unit
Not available for
this unit
Not available for
this unit
Low battery
detection
Remote LED Screen Indicators
How To Use The Basic Functions
ON/OFF
ON/OFF
TEMP
TEMP
SHORT
CUT
SHORT
CUT
TIMER
ON
TIMER
ON
TIMER
OFF
TIMER
OFF
MODE
MODE
FAN
FAN
SLEEP
SLEEP
LED
LED
FOLLOW
ION
SWING
ME
FOLLOW
ION
SWING
ME
, HIGH
55
66
MODE display
Displays the current
mode, including:
AUTO
COOL
DRY
HEAT
FAN
Transmission Indicator
Lights up when remote sends
signal to unit
ON/OFF display
Appears when the unit is turned on,
and disappears when it is turned off
TIMER ON display
Displays when TIMER
ON is set
TIMER OFF display
Displays when TIMER
OFF is set
SLEEP display
Battery display
SILENT display
ECO display
Displays when
SLEEP function
is activated
FOLLOW ME
display
Indicates that
the FOLLOW ME
function is on
FAN SPEED display
Displays selected FAN SPEED:
HIGH, MED,
or LOW
This display is blank when
set to AUTO speed.
Temperature/Timer display
Displays the set temperature by default, or timer setting
when using TIMER ON/OFF functions
o O O
Temperature range: 17-30 C(62 F-86 F)
Timer setting range: 0-24 hours
This display is blank when operating in FAN mode.
1. Press the MODE button to select
COOL mode.
2. Set your desired temperature using
the Temp or Temp button.
3. Press the FAN button to select the
fan speed: AUTO, LOW, MED,or
HIGH.
4. Press the ON/OFF button to start the
unit.
In AUTO mode, the unit will automatically
select the COOL, FAN, HEAT or DRY mode
based on the set temperature.
1. Press the MODE button to select Auto mode.
2. Set your desired temperature using the
Temp or Temp button.
3. Press the ON/OFF button to start the unit.
,
NOTE: FAN SPEED can t be set in Auto mode.
SETTING TEMPERATURE
AUTO operation
The operating temperature range for units is
O O O
17-30 C(62 F-86 F). You can increase or
O O
decrease the set tmeperature in 1 C(1 F)
increments.
COOL operation
1
3
2
1
3
2
4
Not available for this unit
Not available for
this unit
Not available for
this unit
Low battery
detection
Remote LED Screen Indicators
How To Use The Basic Functions
ON/OFF
ON/OFF
TEMP
TEMP
SHORT
CUT
SHORT
CUT
TIMER
ON
TIMER
ON
TIMER
OFF
TIMER
OFF
MODE
MODE
FAN
FAN
SLEEP
SLEEP
LED
LED
FOLLOW
ION
SWING
ME
FOLLOW
ION
SWING
ME
und AUTO.
4. SLEEP-Taste
Mit dieser Taste können Sie das Gerät in Schlafmodus setzen.
Wenn Sie diese Funktion wählen wird die eingestellte Temperatur innerhalb von 30 min. um
1 °C steigen. Nach weiteren 30 min. wird die Temperatur nochmals um 1 °C steigen. Die dann
erreichte Temperatur wird anschließend für die nächsten 7 Std. konstant gehalten. Danach
sinkt die Temperatur auf ihre ursprüngliche Einstellung und ist der „SLEEP“-Modus beendet.
HINWEIS: Diese Funktion kann nicht bei „DRY“- oder „FAN“-Funktion gewählt werden.
5. TEMP-Taste
Diese Tasten müssen Sie benutzen, wenn Sie die Temperatureinstellung ändern wollen. Die
Temperatur kann auf einen Wert zwischen 17 °C und 30 °C eingestellt werden. Wenn Sie beide
Pfeil-Tasten gleichzeitig 3 sek. Gedrückt halten können Sie zwischen °C und °F wählen.
6. SHORT CUT-Taste
Mit dieser Taste können Sie eine bevorzugte Einstellungen festlegen und einschalten.
7. TIMER ON-Taste
Mit dieser Taste können Sie die Zeit einstellen, wann das Gerät sich anstellen soll.
8. TIMER OFF-Taste
Mit dieser Taste können Sie die Zeit einstellen, wann das Gerät sich ausstellen soll.
9. LED-Taste
Mit dieser Taste wird das LED-Display des Bedienfelds ausgeschaltet. Sie können sie
verwenden, wenn das Display zu viel Licht abgibt, wenn Sie schlafen möchten. Wenn Sie ein
zweites Mal auf die Taste drücken, schaltet sich das Display wieder ein.
44
DO266A
DE
55
66
MODE display
Displays the current
mode, including:
AUTO
COOL
DRY
HEAT
FAN
Transmission Indicator
Lights up when remote sends
signal to unit
ON/OFF display
Appears when the unit is turned on,
and disappears when it is turned off
TIMER ON display
Displays when TIMER
ON is set
TIMER OFF display
Displays when TIMER
OFF is set
SLEEP display
Battery display
SILENT display
ECO display
Displays when
SLEEP function
is activated
FOLLOW ME
display
Indicates that
the FOLLOW ME
function is on
FAN SPEED display
Displays selected FAN SPEED:
HIGH, MED,
or LOW
This display is blank when
set to AUTO speed.
Temperature/Timer display
Displays the set temperature by default, or timer setting
when using TIMER ON/OFF functions
o O O
Temperature range: 17-30 C(62 F-86 F)
Timer setting range: 0-24 hours
This display is blank when operating in FAN mode.
1. Press the MODE button to select
COOL mode.
2. Set your desired temperature using
the Temp or Temp button.
3. Press the FAN button to select the
fan speed: AUTO, LOW, MED,or
HIGH.
4. Press the ON/OFF button to start the
unit.
In AUTO mode, the unit will automatically
select the COOL, FAN, HEAT or DRY mode
based on the set temperature.
1. Press the MODE button to select Auto mode.
2. Set your desired temperature using the
Temp or Temp button.
3. Press the ON/OFF button to start the unit.
,
NOTE: FAN SPEED can t be set in Auto mode.
SETTING TEMPERATURE
AUTO operation
The operating temperature range for units is
O O O
17-30 C(62 F-86 F). You can increase or
O O
decrease the set tmeperature in 1 C(1 F)
increments.
COOL operation
1
3
2
1
3
2
4
Not available for this unit
Not available for
this unit
Not available for
this unit
Low battery
detection
Remote LED Screen Indicators
How To Use The Basic Functions
ON/OF F
ON/OF F
TEMP
TEMP
SHORT
CUT
SHORT
CUT
TIMER
ON
TIMER
ON
TIMER
OFF
TIMER
OFF
MODE
MODE
FAN
FAN
SLEEP
SLEEP
LED
LED
FOLLO W
ION
SWING
ME
FOLLO W
ION
SWING
ME
In der Einstellung AUTO wählt das Gerät automatisch die passende Einstellung abhängig von
der gewählten Temperatur. Diese Einstellung können Sie lediglich mit der Fernbedienung
wählen.
1. Wählen Sie mit der MODUS-Taste auf der Fernbedienung AUTO aus.
2. Regeln Sie die Temperatur mit der TEMP-Taste. Das Gerät bestimmt die Einstellung
abhängig hiervon.
Im AUTO-Modus können Sie die Geschwindigkeit der Lüftung (FAN) nicht einstellen.
55
66
MODE display
Displays the current
mode, including:
AUTO
COOL
DRY
HEAT
FAN
Transmission Indicator
Lights up when remote sends
signal to unit
ON/OFF display
Appears when the unit is turned on,
and disappears when it is turned off
TIMER ON display
Displays when TIMER
ON is set
TIMER OFF display
Displays when TIMER
OFF is set
SLEEP display
Battery display
SILENT display
ECO display
Displays when
SLEEP function
is activated
FOLLOW ME
display
Indicates that
the FOLLOW ME
function is on
FAN SPEED display
Displays selected FAN SPEED:
HIGH, MED,
or LOW
This display is blank when
set to AUTO speed.
Temperature/Timer display
Displays the set temperature by default, or timer setting
when using TIMER ON/OFF functions
o O O
Temperature range: 17-30 C(62 F-86 F)
Timer setting range: 0-24 hours
This display is blank when operating in FAN mode.
1. Press the MODE button to select
COOL mode.
2. Set your desired temperature using
the Temp or Temp button.
3. Press the FAN button to select the
fan speed: AUTO, LOW, MED,or
HIGH.
4. Press the ON/OFF button to start the
unit.
In AUTO mode, the unit will automatically
select the COOL, FAN, HEAT or DRY mode
based on the set temperature.
1. Press the MODE button to select Auto mode.
2. Set your desired temperature using the
Temp or Temp button.
3. Press the ON/OFF button to start the unit.
,
NOTE: FAN SPEED can t be set in Auto mode.
SETTING TEMPERATURE
AUTO operation
The operating temperature range for units is
O O O
17-30 C(62 F-86 F). You can increase or
O O
decrease the set tmeperature in 1 C(1 F)
increments.
COOL operation
1
3
2
1
3
2
4
Not available for this unit
Not available for
this unit
Not available for
this unit
Low battery
detection
Remote LED Screen Indicators
How To Use The Basic Functions
ON/OF F
ON/OF F
TEMP
TEMP
SHORT
CUT
SHORT
CUT
TIMER
ON
TIMER
ON
TIMER
OFF
TIMER
OFF
MODE
MODE
FAN
FAN
SLEEP
SLEEP
LED
LED
FOLLO W
ION
SWING
ME
FOLLO W
ION
SWING
ME
Mit der Kühlfunktion können Sie den Raum auf eine bestimmte Temperatur abkühlen.
1. Drücken Sie auf die MODUS-Taste, bis die COOL-Anzeigeleuchte brennt.
2. Verwenden Sie die „+”- und „-”-Tasten auf dem Bedienfeld oder die TEMP-Taste auf
der Fernbedienung, um die gewünschte Zimmertemperatur einzustellen.
3. Verwenden Sie die FAN-Taste auf der Fernbedienung, um die gewünschte
Lüftungsgeschwindigkeit einzustellen. Es gibt drei Einstellungen. LOW
55
66
MODE display
Displays the current
mode, including:
AUTO
COOL
DRY
HEAT
FAN
Transmission Indicator
Lights up when remote sends
signal to unit
ON/OFF display
Appears when the unit is turned on,
and disappears when it is turned off
TIMER ON display
Displays when TIMER
ON is set
TIMER OFF display
Displays when TIMER
OFF is set
SLEEP display
Battery display
SILENT display
ECO display
Displays when
SLEEP function
is activated
FOLLOW ME
display
Indicates that
the FOLLOW ME
function is on
FAN SPEED display
Displays selected FAN SPEED:
HIGH, MED,
or LOW
This display is blank when
set to AUTO speed.
Temperature/Timer display
Displays the set temperature by default, or timer setting
when using TIMER ON/OFF functions
o O O
Temperature range: 17-30 C(62 F-86 F)
Timer setting range: 0-24 hours
This display is blank when operating in FAN mode.
1. Press the MODE button to select
COOL mode.
2. Set your desired temperature using
the Temp or Temp button.
3. Press the FAN button to select the
fan speed: AUTO, LOW, MED,or
HIGH.
4. Press the ON/OFF button to start the
unit.
In AUTO mode, the unit will automatically
select the COOL, FAN, HEAT or DRY mode
based on the set temperature.
1. Press the MODE button to select Auto mode.
2. Set your desired temperature using the
Temp or Temp button.
3. Press the ON/OFF button to start the unit.
,
NOTE: FAN SPEED can t be set in Auto mode.
SETTING TEMPERATURE
AUTO operation
The operating temperature range for units is
O O O
17-30 C(62 F-86 F). You can increase or
O O
decrease the set tmeperature in 1 C(1 F)
increments.
COOL operation
1
3
2
1
3
2
4
Not available for this unit
Not available for
this unit
Not available for
this unit
Low battery
detection
Remote LED Screen Indicators
How To Use The Basic Functions
ON/OFF
ON/OFF
TEMP
TEMP
SHORT
CUT
SHORT
CUT
TIMER
ON
TIMER
ON
TIMER
OFF
TIMER
OFF
MODE
MODE
FAN
FAN
SLEEP
SLEEP
LED
LED
FOLLOW
ION
SWING
ME
FOLLOW
ION
SWING
ME
, HIGH
55
66
MODE display
Displays the current
mode, including:
AUTO
COOL
DRY
HEAT
FAN
Transmission Indicator
Lights up when remote sends
signal to unit
ON/OFF display
Appears when the unit is turned on,
and disappears when it is turned off
TIMER ON display
Displays when TIMER
ON is set
TIMER OFF display
Displays when TIMER
OFF is set
SLEEP display
Battery display
SILENT display
ECO display
Displays when
SLEEP function
is activated
FOLLOW ME
display
Indicates that
the FOLLOW ME
function is on
FAN SPEED display
Displays selected FAN SPEED:
HIGH, MED,
or LOW
This display is blank when
set to AUTO speed.
Temperature/Timer display
Displays the set temperature by default, or timer setting
when using TIMER ON/OFF functions
o O O
Temperature range: 17-30 C(62 F-86 F)
Timer setting range: 0-24 hours
This display is blank when operating in FAN mode.
1. Press the MODE button to select
COOL mode.
2. Set your desired temperature using
the Temp or Temp button.
3. Press the FAN button to select the
fan speed: AUTO, LOW, MED,or
HIGH.
4. Press the ON/OFF button to start the
unit.
In AUTO mode, the unit will automatically
select the COOL, FAN, HEAT or DRY mode
based on the set temperature.
1. Press the MODE button to select Auto mode.
2. Set your desired temperature using the
Temp or Temp button.
3. Press the ON/OFF button to start the unit.
,
NOTE: FAN SPEED can t be set in Auto mode.
SETTING TEMPERATURE
AUTO operation
The operating temperature range for units is
O O O
17-30 C(62 F-86 F). You can increase or
O O
decrease the set tmeperature in 1 C(1 F)
increments.
COOL operation
1
3
2
1
3
2
4
Not available for this unit
Not available for
this unit
Not available for
this unit
Low battery
detection
Remote LED Screen Indicators
How To Use The Basic Functions
ON/OFF
ON/OFF
TEMP
TEMP
SHORT
CUT
SHORT
CUT
TIMER
ON
TIMER
ON
TIMER
OFF
TIMER
OFF
MODE
MODE
FAN
FAN
SLEEP
SLEEP
LED
LED
FOLLOW
ION
SWING
ME
FOLLOW
ION
SWING
ME
und AUTO.
55
66
MODE display
Displays the current
mode, including:
AUTO
COOL
DRY
HEAT
FAN
Transmission Indicator
Lights up when remote sends
signal to unit
ON/OFF display
Appears when the unit is turned on,
and disappears when it is turned off
TIMER ON display
Displays when TIMER
ON is set
TIMER OFF display
Displays when TIMER
OFF is set
SLEEP display
Battery display
SILENT display
ECO display
Displays when
SLEEP function
is activated
FOLLOW ME
display
Indicates that
the FOLLOW ME
function is on
FAN SPEED display
Displays selected FAN SPEED:
HIGH, MED,
or LOW
This display is blank when
set to AUTO speed.
Temperature/Timer display
Displays the set temperature by default, or timer setting
when using TIMER ON/OFF functions
o O O
Temperature range: 17-30 C(62 F-86 F)
Timer setting range: 0-24 hours
This display is blank when operating in FAN mode.
1. Press the MODE button to select
COOL mode.
2. Set your desired temperature using
the Temp or Temp button.
3. Press the FAN button to select the
fan speed: AUTO, LOW, MED,or
HIGH.
4. Press the ON/OFF button to start the
unit.
In AUTO mode, the unit will automatically
select the COOL, FAN, HEAT or DRY mode
based on the set temperature.
1. Press the MODE button to select Auto mode.
2. Set your desired temperature using the
Temp or Temp button.
3. Press the ON/OFF button to start the unit.
,
NOTE: FAN SPEED can t be set in Auto mode.
SETTING TEMPERATURE
AUTO operation
The operating temperature range for units is
O O O
17-30 C(62 F-86 F). You can increase or
O O
decrease the set tmeperature in 1 C(1 F)
increments.
COOL operation
1
3
2
1
3
2
4
Not available for this unit
Not available for
this unit
Not available for
this unit
Low battery
detection
Remote LED Screen Indicators
How To Use The Basic Functions
ON/OF F
ON/OF F
TEMP
TEMP
SHORT
CUT
SHORT
CUT
TIMER
ON
TIMER
ON
TIMER
OFF
TIMER
OFF
MODE
MODE
FAN
FAN
SLEEP
SLEEP
LED
LED
FOLLO W
ION
SWING
ME
FOLLO W
ION
SWING
ME
Mit dieser Funktion können Sie den Raum entfeuchten. Halten Sie bei Betrieb dieser Funktion
Fenster und Türen geschlossen.
1. Drücken Sie auf die MODUS-Taste, bis die DRY-Anzeigeleuchte brennt.
2. Verwenden Sie die „+”- und „-”-Tasten auf dem Bedienfeld oder die TEMP-Taste auf
der Fernbedienung, um die gewünschte Zimmertemperatur einzustellen.
3. Bei dieser Einstellung können Sie die Lüftungsgeschwindigkeit nicht einstellen.
55
66
MODE display
Displays the current
mode, including:
AUTO
COOL
DRY
HEAT
FAN
Transmission Indicator
Lights up when remote sends
signal to unit
ON/OFF display
Appears when the unit is turned on,
and disappears when it is turned off
TIMER ON display
Displays when TIMER
ON is set
TIMER OFF display
Displays when TIMER
OFF is set
SLEEP display
Battery display
SILENT display
ECO display
Displays when
SLEEP function
is activated
FOLLOW ME
display
Indicates that
the FOLLOW ME
function is on
FAN SPEED display
Displays selected FAN SPEED:
HIGH, MED,
or LOW
This display is blank when
set to AUTO speed.
Temperature/Timer display
Displays the set temperature by default, or timer setting
when using TIMER ON/OFF functions
o O O
Temperature range: 17-30 C(62 F-86 F)
Timer setting range: 0-24 hours
This display is blank when operating in FAN mode.
1. Press the MODE button to select
COOL mode.
2. Set your desired temperature using
the Temp or Temp button.
3. Press the FAN button to select the
fan speed: AUTO, LOW, MED,or
HIGH.
4. Press the ON/OFF button to start the
unit.
In AUTO mode, the unit will automatically
select the COOL, FAN, HEAT or DRY mode
based on the set temperature.
1. Press the MODE button to select Auto mode.
2. Set your desired temperature using the
Temp or Temp button.
3. Press the ON/OFF button to start the unit.
,
NOTE: FAN SPEED can t be set in Auto mode.
SETTING TEMPERATURE
AUTO operation
The operating temperature range for units is
O O O
17-30 C(62 F-86 F). You can increase or
O O
decrease the set tmeperature in 1 C(1 F)
increments.
COOL operation
1
3
2
1
3
2
4
Not available for this unit
Not available for
this unit
Not available for
this unit
Low battery
detection
Remote LED Screen Indicators
How To Use The Basic Functions
ON/OF F
ON/OF F
TEMP
TEMP
SHORT
CUT
SHORT
CUT
TIMER
ON
TIMER
ON
TIMER
OFF
TIMER
OFF
MODE
MODE
FAN
FAN
SLEEP
SLEEP
LED
LED
FOLLO W
ION
SWING
ME
FOLLO W
ION
SWING
ME
1. Drücken Sie auf die MODUS-Taste, bis die FAN-Anzeigeleuchte brennt.
2. Verwenden Sie die FAN-Taste auf der Fernbedienung, um die gewünschte
Lüftungsgeschwindigkeit einzustellen. Es gibt drei Einstellungen. LOW
55
66
MODE display
Displays the current
mode, including:
AUTO
COOL
DRY
HEAT
FAN
Transmission Indicator
Lights up when remote sends
signal to unit
ON/OFF display
Appears when the unit is turned on,
and disappears when it is turned off
TIMER ON display
Displays when TIMER
ON is set
TIMER OFF display
Displays when TIMER
OFF is set
SLEEP display
Battery display
SILENT display
ECO display
Displays when
SLEEP function
is activated
FOLLOW ME
display
Indicates that
the FOLLOW ME
function is on
FAN SPEED display
Displays selected FAN SPEED:
HIGH, MED,
or LOW
This display is blank when
set to AUTO speed.
Temperature/Timer display
Displays the set temperature by default, or timer setting
when using TIMER ON/OFF functions
o O O
Temperature range: 17-30 C(62 F-86 F)
Timer setting range: 0-24 hours
This display is blank when operating in FAN mode.
1. Press the MODE button to select
COOL mode.
2. Set your desired temperature using
the Temp or Temp button.
3. Press the FAN button to select the
fan speed: AUTO, LOW, MED,or
HIGH.
4. Press the ON/OFF button to start the
unit.
In AUTO mode, the unit will automatically
select the COOL, FAN, HEAT or DRY mode
based on the set temperature.
1. Press the MODE button to select Auto mode.
2. Set your desired temperature using the
Temp or Temp button.
3. Press the ON/OFF button to start the unit.
,
NOTE: FAN SPEED can t be set in Auto mode.
SETTING TEMPERATURE
AUTO operation
The operating temperature range for units is
O O O
17-30 C(62 F-86 F). You can increase or
O O
decrease the set tmeperature in 1 C(1 F)
increments.
COOL operation
1
3
2
1
3
2
4
Not available for this unit
Not available for
this unit
Not available for
this unit
Low battery
detection
Remote LED Screen Indicators
How To Use The Basic Functions
ON/OFF
ON/OFF
TEMP
TEMP
SHORT
CUT
SHORT
CUT
TIMER
ON
TIMER
ON
TIMER
OFF
TIMER
OFF
MODE
MODE
FAN
FAN
SLEEP
SLEEP
LED
LED
FOLLOW
ION
SWING
ME
FOLLOW
ION
SWING
ME
, HIGH
55
66
MODE display
Displays the current
mode, including:
AUTO
COOL
DRY
HEAT
FAN
Transmission Indicator
Lights up when remote sends
signal to unit
ON/OFF display
Appears when the unit is turned on,
and disappears when it is turned off
TIMER ON display
Displays when TIMER
ON is set
TIMER OFF display
Displays when TIMER
OFF is set
SLEEP display
Battery display
SILENT display
ECO display
Displays when
SLEEP function
is activated
FOLLOW ME
display
Indicates that
the FOLLOW ME
function is on
FAN SPEED display
Displays selected FAN SPEED:
HIGH, MED,
or LOW
This display is blank when
set to AUTO speed.
Temperature/Timer display
Displays the set temperature by default, or timer setting
when using TIMER ON/OFF functions
o O O
Temperature range: 17-30 C(62 F-86 F)
Timer setting range: 0-24 hours
This display is blank when operating in FAN mode.
1. Press the MODE button to select
COOL mode.
2. Set your desired temperature using
the Temp or Temp button.
3. Press the FAN button to select the
fan speed: AUTO, LOW, MED,or
HIGH.
4. Press the ON/OFF button to start the
unit.
In AUTO mode, the unit will automatically
select the COOL, FAN, HEAT or DRY mode
based on the set temperature.
1. Press the MODE button to select Auto mode.
2. Set your desired temperature using the
Temp or Temp button.
3. Press the ON/OFF button to start the unit.
,
NOTE: FAN SPEED can t be set in Auto mode.
SETTING TEMPERATURE
AUTO operation
The operating temperature range for units is
O O O
17-30 C(62 F-86 F). You can increase or
O O
decrease the set tmeperature in 1 C(1 F)
increments.
COOL operation
1
3
2
1
3
2
4
Not available for this unit
Not available for
this unit
Not available for
this unit
Low battery
detection
Remote LED Screen Indicators
How To Use The Basic Functions
ON/OFF
ON/OFF
TEMP
TEMP
SHORT
CUT
SHORT
CUT
TIMER
ON
TIMER
ON
TIMER
OFF
TIMER
OFF
MODE
MODE
FAN
FAN
SLEEP
SLEEP
LED
LED
FOLLOW
ION
SWING
ME
FOLLOW
ION
SWING
ME
und AUTO.
3. Die Temperatur kann nicht eingestellt werden.
Mit dieser Funktion können Sie das Gerät zeitverzögert starten, bis zu maximal 24 Stunden.
1. Drücken Sie auf der Fernbedienung auf die Taste „TIMER ON“.
2. Auf dem Display der Fernbedienung können Sie jetzt ablesen, zu welchem Zeitpunkt
die Klimaanlage den Betrieb aufnimmt.

45
DO266A
www.domo-elektro.be
DE
3. Drücken Sie mehrmals auf die Taste TIMER ON, um den Wert der Zeit zu erhöhen.
Oder halten Sie die Taste eingedrückt.
4. Erst wenn die gewünschte Zeit eingestellt ist, wird auf dem Display der
Fernbedienung „Timer on“ stehen. Auf dem Display des Bedienfelds sind 2
erleuchtete Kugeln zu sehen.
5. Wenn Sie den Timer ausschalten möchten, drücken Sie mehrmals auf die Taste TIMER
ON, bis der Zähler auf „0“ steht. Oder halten Sie die Taste eingedrückt.
Mit dieser Funktion können Sie das Gerät nach Ablauf der Zeit automatisch ausschalten
lassen.
1. Drücken Sie auf der Fernbedienung auf die Taste „TIMER OFF“.
2. Auf dem Display der Fernbedienung können Sie jetzt ablesen, zu welchem Zeitpunkt
die Klimaanlage abgeschaltet wird.
3. Drücken Sie mehrmals auf die Taste TIMER OFF, um den Wert der Zeit zu erhöhen.
Oder halten Sie die Taste eingedrückt.
4. Erst wenn die gewünschte Zeit eingestellt ist, wird auf dem Display der
Fernbedienung „Timer o“ stehen. Auf dem Display des Bedienfelds sind 2
erleuchtete Kugeln zu sehen.
5. Wenn Sie den Timer ausschalten möchten, drücken Sie mehrmals auf die Taste TIMER
OFF, bis der Zähler auf „0“ steht.
Sie können auch beide Funktionen gleichzeitig einschalten. Damit bestimmen Sie, wann das
Gerät eingeschaltet wird, aber auch, wann das Gerät ausgeschaltet wird.
Wichtig: Diese Zeit gilt ab dem Zeitpunkt, an dem Sie die Einstellung programmieren.
Beispiel: Es ist jetzt 13:00. Sie möchten das Gerät von 16:30 bis 19:00 betrieben. Stellen Sie
die Funktion TIMER ON auf 3,5 Stunden ein und TIMER OFF auf 5,0 Stunden.
Wenn Sie diese Funktion wählen wird die eingestellte Temperatur innerhalb von 30 min. um
1 °C steigen. Nach weiteren 30 min. wird die Temperatur nochmals um 1 °C steigen. Die dann
erreichte Temperatur wird anschließend für die nächsten 7 Std. konstant gehalten. Danach
sinkt die Temperatur auf ihre ursprüngliche Einstellung und ist der „SLEEP“-Modus beendet.
HINWEIS: Diese Funktion kann nicht bei „DRY“- oder „FAN“-Funktion gewählt werden.
Mit dieser Taste können Sie eine bevorzugte Einstellungen festlegen und einschalten.
Wenn Sie eine bestimmte Einstellung häuger verwenden, können Sie sie einstellen, indem
Sie die SHORTCUT-Taste 3 Sekunden lang eingedrückt halten. Das Gerät speichert dann

46
DO266A
DE
A
die Einstellungen, die zum Zeitpunkt des Drückens eingeschaltet sind. Diese Einstellungen
können sein: die Gebrauchseinstellung (MODE), die eingestellte Temperatur, die
Lüftungsgeschwindigkeit (FAN) und eventuell auch noch die SLEEP-Einstellung.
Zu dem Zeitpunkt, an dem Sie die SHORTCUT-Taste betätigen, arbeitet das Gerät in
Übereinstimmung mit den zuvor festgelegten Einstellungen.
Während des Entfeuchtungsvorgangs können Sie am Besten eine permanente Drainage
benutzen.
1. Entfernen Sie den Drainage-Verschluss und die Gummikappe auf der Rückseite des
Gerätes.
2. Befestigen Sie den Drainageschlauch an der Drainage-Önung.
3. Achten Sie darauf, dass das Wasser sicher und dauerhaft abießen kann.
1
2
Wenn Sie nicht von einer permanenten Drainage Gebrauch
machen, läuft das Wasser in den Auangbehälter unten am Gerät.
· Wenn der Behälter voll ist wird der Hinweis „P1“ auf
dem Display erscheinen. Der Entfeuchtungsprozess/
Kühlungsprozess wird stoppen, aber der Ventilator wird sich
weiterhin drehen.
· Bringen Sie das Gerät an einen Ort, wo Sie das Wasser einfach
ablassen können.
· Entfernen Sie den Verschluss von der Drainage-Önung unten
am Gerät. Das Wasser wird nun ablaufen.
· Nachdem das Wasser vollständig abgelaufen ist, drehen Sie
bitte wieder den Verschluss auf die Drainage-Önung. (A)
· Nun können Sie das Gerät wieder anschalten. Achten Sie
darauf, dass die Meldung „P1“ nicht mehr auf dem Display
steht.

47
DO266A
www.domo-elektro.be
DE
· Falls die Meldung nicht verschwunden ist, können Sie das Gerät einige Male an- und
ausschalten. Sollte die Meldung dann noch stets auf dem Display erscheinen, wenden Sie
sich bitte an den Fachhändler.
· HINWEIS: Verschließen Sie immer erst wieder die Drainage-Önung, bevor Sie das Gerät
wieder einschalten.
· Ziehen Sie immer erst den Stecker aus der Steckdose, bevor Sie das Gerät reinigen.
· Benutzen Sie keine chemischen oder scheuernden Reinigungsmittel.
· Spülen Sie das Gerät niemals mit Wasser ab, da dies zu Kurzschlüssen und Unfällen führen
kann.
· Falls das Kabel des Gerätes beschädigt ist, muss dieses durch den Hersteller oder einen
qualizierten Fachhandel repariert werden.
· Um zu gewährleisten, dass der Ventilator problemlos
funktioniert und sich nicht zu viel Staub im Filter bendet,
reinigen Sie den Luftlter mindestens alle zwei Wochen.
· Waschen Sie den Filter in lauwarmem Wasser mit etwas
mildem Spülmittel vorsichtig aus. Spülen Sie den Filter
danach mit sauberem Wasser ab und lassen Sie den Filter
an der Luft trockenen.
· Erst wenn der Filter völlig trocken ist können Sie dieser
wieder ins Gerät einsetzen.
Das Gehäuse kann mit einem weichen, feuchten Tuch mit etwas mildem Spülmittel
abgewaschen werden. Trocknen Sie das Gehäuse nach dem Abwaschen gründlich mit einem
weichen, trockenen Tuch ab.
Bevor Sie das Gerät für eine längere Zeit verstauen, empfehlen wir Ihnen folgende
Wartungsschritte:
· Entfernen Sie sämtliches Wasser mit Hilfe des Drainageschlauchs aus dem Gerät.
· Stellen bei dem Gerät anschließend die „FAN“-Funktion ein und lassen es einen halben Tag
in einem erwärmten Raum stehen. Auf diese Art und Weise kann das Gerät auch von Innen
vollständig trockenen und wird sich kein Schimmel bilden.
· Schalten Sie das Gerät danach ab und ziehen Sie den Stecker aus der Steckdose. Entfernen
Sie anschließend die Batterien aus der Fernbedienung.
· Reinigen Sie die Filter und setzen Sie diese wieder ins Gerät ein.
· Verstauen Sie das Gerät in einem trockenen, dunklen Raum.

48
DO266A
DE
Das Gerät springt nicht an, wenn man auf den ON/OFF-Taste drückt
· Auf dem Display steht „P1“. Entfernen Sie das Wasser aus dem Gerät.
· Die Zimmertemperatur ist niedriger als die Temperatur, die Sie eingestellt haben. Ändern
Sie entsprechend die Temperatureinstellung am Gerät.
Das Zimmer kühlt nicht entsprechend ab
· Fenster und Türen sind nicht geschlossen. Sorgen Sie dafür, dass Fenster und Türen
geschlossen werden.
· Es benden sich wärmeerzeugende Geräte im Raum. Entfernen Sie, wenn möglich, die
Wärmequellen.
· Der Luftablassschlauch ist nicht angeschlossen oder blockiert. Schließen Sie den Schlauch
an und sorgen Sie dafür, dass er nicht zu sark gekrümmt ist.
· Die eingestellte Temperatur ist zu hoch. Passen Sie die Temperatureingabe entsprechend
an.
· Der Luftlter ist verschmutzt. Reinigen Sie den Luftlter.
Das Gerät macht zu viel Lärm und sorgt für Vibrationen
· Der Boden, auf dem das Gerät steht, ist nicht ach genug. Stellen Sie das Gerät an einen
anderen Platz, wo der Boden ach und eben ist.
· Der Luftlter ist verschmutzt. Reinigen Sie den Luftlter.
Das Gerät macht gurgelnde Geräusche
· Die Geräusche kommen vom Kühlmittel im Gerät und sind völlig normal.
Folgende Error-Meldungen können bei Störungen auf dem Display erscheinen:
E1: Der Sensor für die Zimmertemperatur funktioniert nicht. Schalten Sie das Gerät ab und
ziehen Sie den Stecker aus der Steckdose. Warten Sie ca. 10 sek. und stecken Sie den Stecker
erneut in die Steckdose. Schalten Sie das Gerät wieder ein. Sollte die gleiche Error-Meldung
auf dem Display erscheinen nehmen Sie bitte Kontakt mit dem Reparaturservice auf.
E2: Der Sensor vom Luftverdampfer funktioniert nicht. Schalten Sie das Gerät ab und ziehen
Sie den Stecker aus der Steckdose. Warten Sie ca. 10 sek. und stecken Sie den Stecker erneut
in die Steckdose. Schalten Sie das Gerät wieder ein. Sollte die gleiche Error-Meldung auf dem
Display erscheinen nehmen Sie bitte Kontakt mit dem Reparaturservice auf.
E4: Das Display funktioniert nicht vernünftig. Schalten Sie das Gerät ab und ziehen Sie den
Stecker aus der Steckdose. Warten Sie ca. 10 sek. und stecken Sie den Stecker erneut in
die Steckdose. Schalten Sie das Gerät wieder ein. Sollte die gleiche Error-Meldung auf dem
Display erscheinen nehmen Sie bitte Kontakt mit dem Reparaturservice auf.

49
DO266A
www.domo-elektro.be
DE
P1: Das Wasserreservoir ist voll. Schließen Sie den Drainageschlauch unten am Gerät an und
lassen Sie das Wasser ablaufen. Sollte die gleiche Error-Meldung auf dem Display erscheinen
nehmen Sie bitte Kontakt mit dem Reparaturservice auf.
ENTSORGEN
Dieses Symbol auf dem Produkt oder seiner Verpackung
weist darauf hin, dass dieses Produkt nicht als normaler
Haushaltsabfall zu behandeln ist, sondern an einem
Sammelpunkt für das Recyling von elektrischen und
elektronischen Geräten abgegeben werden muss. Durch Ihren
Beitrag zum korrekten Entsorgen dieses Produkts schützen
Sie die Umwelt und die Gesundheit Ihrer Mitmenschen.
Umwelt und Gesundheit werden durch falsches Entsorgen
gefährdet. Weitere Informationen über das Recycling dieses
Produkts erhalten Sie von Ihren Rathaus, Ihrer Müllabfuhr
oder dem Geschäft, in dem Sie das Produkt gekauft haben.
Das Verpackungsmaterial ist wiederverwertbar. Entsorgen
Sie die Verpackung umweltgerecht und führen Sie sie der
Wertstosammlung zu.

50
DO266A
EN
Dear client ,
All of our products are always submitted to a strict quality control before they are sold to you.
Should you nevertheless experience problems with your device, we sincerely regret this.
In that case, we kindly request you to contact our customer service.
Our sta will gladly assist you.
+32 14 21 71 91 [email protected]
Monday – Thursday: 8.30 – 12.00 and 13.00 – 17.00
Friday: 8.30 – 12.00 and 13.00 – 16.30
This appliance has a two year warranty period. During this period the manufacturer is
responsible for any failures that are the direct result of construction failure. When these
failures occur the appliance will be repaired or replaced if necessary. The warranty will not be
valid when the damage to the appliance is caused by wrong use, not following the instructions
or repairs executed by a third party. The guarantee is issued with the original till receipt. All
parts, which are subject to wear, are excluded from the warranty.
If your device breaks down within the 2-year warranty period, you can return the device
together with your receipt to the shop where you purchased it.
The guarantee on accessories and components that are liable to wear-and-tear is only 6
months.
The guarantee and responsibility of the supplier and manufacturer lapse automatically in the
following cases:
· If the instructions in this manual have not been followed.
· In case of incorrect connection, e.g., electrical voltage that is too high.
· In case of incorrect, rough or abnormal use.
· In case of insucient or incorrect maintenance.
· In case of repairs or alterations to the device by the consumer or non-authorised third
parties.
· If the customer used parts or accessories that are not recommended or provided by the
supplier / manufacturer.

51
DO266A
www.domo-elektro.be
EN
When using electrical appliances, basic safety precautions should always be taken, including
the following:
· Read all instructions carefully. Keep this manual for future reference.
· Make sure all packaging materials and promotional stickers have been removed before
using the appliance for the rst time. Make sure children cannot play with the packaging
materials.
· This appliance is intended to be used in household and similar applications such as:
· sta kitchen areas in shops, oces and other working environments;
· farm houses;
· by clients in hotels, motels and other residential type environments;
· bed and breakfast type environments.
· Children should be supervised to ensure that they do not play with the appliance.
· This appliance can be used by children aged from 16 years and above and persons with
reduced physical, sensory or mental capabilities or lack of experience and knowledge if
they have been given supervision or instruction concerning use of the appliance in a safe
way and understand the hazards involved. Children shall not play with the appliance.
Cleaning and user maintenance shall not be made by children unless they are older than 16
and supervised.
· Keep the appliance and its cord out of reach of children younger than 16 years.
· Attention: This appliance cannot be used with an external timer.
· Before use, check if the voltage stated on the appliance corresponds with the voltage of
the power net at your home.
· The plug must be plugged into an appropriate outlet that is installed and grounded in
accordance with all local standards and requirements.
· Do not let the cord hang on a hot surface or on the edge of a table or counter top.
· Never use the appliance when the cord or plug is damaged, after malfunction or when the
appliance itself is damaged. In that case, take the appliance to the nearest qualied service
center for check-up and repair.
· Close supervision is necessary when the appliance is used near or by children.
· The use of accessories that are not recommended or sold by the manufacturer can cause
re, electrical shock or injuries.
· Unplug the appliance when it is not in use, before assembling or disassembling any parts
and before cleaning the appliance. Put all buttons and knobs into the ‘o’ position and
unplug the appliance by grasping the plug. Never unplug by pulling the cord.
· Do not leave a working appliance unattended.
· Never place this appliance near a gas stove or electrical stove or in a place where it may
come into contact with a warm appliance.
· Do not use the appliance outdoors.

52
DO266A
EN
· Only use the appliance for its intended use.
· Always use the appliance on a steady, dry and level surface.
· Only use the appliance for domestic use. The manufacturer cannot be held responsible for
accidents that result from improper use of the appliance or not following the instructions
described in this manual.
· All repairs should be carried out by the manufacturer or its aftersales service.
· Never immerse the appliance, the cord or the plug in water or any other liquid.
· Make sure that children do not touch the cord or appliance.
· Keep the cord away from sharp edges and hot parts or other heat sources.
· Before use, remove all packaging materials and any promotional stickers.
· Never place the unit near a stove, re or highly inammable liquids.
· Never hit or shake the unit, to prevent damage.
· Never cover the air inlet or air outlet, to prevent overheating the unit.
· Never splash water on the unit, or place the unit near water, to prevent electrocution.
· Never place another appliance on the same electrical circuit as the air conditioning.
· Never handle the plug with wet hands.
· Never put any foreign objects in the openings of the air conditioning.
· Never use an extension cord.
· Never let children play near the unit.
· When you turn o the unit and want to turn it on immediately afterwards, the compressor
will need 3 min.to start up again.
· Always place the unit at least 1m away from TV or radio, to prevent disturbance.
· Never place the unit in direct sun light, to prevent discoloration of the air conditioning.
· Make sure the angle of the unit is never more than 35°, when you move the air
conditioning. Never place the unit upside down.
· Always remove the water from the water tank, when storing the air conditioning. This will
keep your air conditioning in optimal condition for a long time.
· Never use any chemicals to clean the unit, this will cause damage.
· Always make sure to disconnect the unit from the electrical supply before attaching or
removing the air inlet grill.
· Make sure the air conditioning is always protected against condensation, splashing water,
etc. Make sure the air conditioning can’t come in contact or be pulled into water or any
other liquid. If for some reason the air conditioning will fall in to water or any other liquid,
immediately remove the plug form the socket.
· Never use the air conditioning in a damp room such as a bathroom or a laundry room.
· Always contact a qualied person for repairing the unit.
· Make sure that the free space around the unit is at least 30 cm.
· Never touch the unit with wet hands or bare feed.
· Do not press the buttons on the control panel with anything other than your ngers.

53
DO266A
www.domo-elektro.be
EN
· Never remove xed parts from the air conditioning. Never use the unit when it is not
working properly, or when the unit has fallen or has been damaged.
· Never use the plug to turn the unit on or o. Always use the buttons on the control panel.
· Reparations, checking for leaks or other services need to happen by a qualied technician
with the right certicates.
· Installation must be performed according to the installation instructions. Improper
installation can cause water leakage, electrical shock, or re.
· Do not touch the unit with wet or damp hands or when barefoot.
· If the air conditioner is knocked over during use, turn o the unit and unplug it from
the main power supply immediately. Inspect the unit to ensure there is no damage. If
you suspect the unit has been damaged, contact a technician or customer service for
assistance.
· In a thunderstorm, the power must be cut o to avoid damage to the machine due to
lightning.
· When the water drainage function is not in use, keep the upper and the lower drain plug
rmly to the unit. When the drain plug is not in use, keep it carefully to prevent children
from choking.
· Do not run cord under carpeting. Do not cover cord with throw rugs, runners, or similar
coverings. Do not route cord under furniture or appliances. Arrange cord away from trac
area and where it will not be tripped over.
· Disconnect the power if strange sounds, smell, or smoke comes from it.
· Thoroughly read all of the warnings.
· When defrosting and cleaning the appliance, do not use any tools other than those
recommended by the manufacturing company.
· The appliance must be placed in an area without any continuous sources of ignition (for
example: open ames, gas or electrical appliances in operation).
· Do not puncture and do not burn.
· Refrigerant gases can be odourless.
· The appliance must be installed, used and stored in an area that is greater than 7 m
2
.
· This appliance contains a certain number of grams (see rating label back of unit) of R290
refrigerant gas.
· R290 is a refrigerant gas that complies with the European directives on the environment.
Do not puncture any part of the refrigerant circuit.
· If the appliance is installed, operated or stored in a nonventilated area, the room must
be designed to prevent the accumulation of refrigerant leaks resulting in a risk of re or
explosion due to ignition of the refrigerant caused by electric heaters, stoves, or other
sources of ignition.
· The appliance must be stored in such a way as to prevent mechanical failure.

54
DO266A
EN
· Individuals who operate or work on the refrigerant circuit must have the appropriate
certication issued by an accredited organisation that ensures competence in handling
refrigerants according to a specic evaluation recognized by associations in the industry.
· Repairs must be performed based on the recommendations from the manufacturing
company. Maintenance and repairs that require the assistance of other qualied personnel
must be performed under the supervision of an individual specied in the use of ammable
refrigerants.
Caution: risk of re / ammable materials
This appliance uses a ammable refrigerant. If the refrigerant is leaked and
exposed to an external ignition source, there is a risk of re.
SAVE THESE INSTRUCTIONS
· Never use the unit it rooms that are bigger than the recommended room size.
· Make sure that the airow of the unit is not blocked by furniture or other objects.
· Keep curtains closed during the warmest hours of the day.
· Make sure the lters of the air conditioning are always clean.
· Always keep doors and windows closed to keep the cool air inside and the warm air
outside.

55
DO266A
www.domo-elektro.be
EN
PARTS
1. Control panel
2. Air outlet
3. Air lter
4. Air inlet
5. Air outlet
6. Drain
7. Drain hose
8. Remote control
9. Air outlet hose
9 a. Air outlet hose connection
10. Wall installation kit
10 a. Wall adaptor
10 b. Wall installation kit connection
11. Window installation kit
11 a. Window adaptor
11 b. Window installation kit connection
11 c. Window seal
11 d. Adapter plug
11 e. L-iron with screws
1
2
3
4
5
6
8
7
11b 11c
11
11e

56
DO266A
EN
INSTALLATION
· Place the air conditioning on a solid and stable oor, this way
you will prevent excessive noise and vibrations. Make sure
that the oor is strong enough to support the weight of the
appliance.
· The appliance has small wheels for easy moving. Make sure only
to move the air conditioning over a at and level surface. Be
careful when moving the air conditioning over carpet. Never roll
the unit over an object.
· The plug must be plugged into an appropriate outlet that is
installed and grounded in accordance with all local standards
and requirements.
· Never place any object within 30 cm round the air conditioning.
· The air outlet hose must be used in the “cool” or “auto” mode. During the “fan” or “dry”
mode, you don’t need to attach the air outlet hose.
· Make sure there is a free surrounding of at least 50 cm around the outlet.
· Make sure the air outlet hose isn’t bend during use.
max 120 cm
min 30 cm
· Place the coupling of the air outlet hose on the end of the hose.
· Place the air outlet hose on the air outlet at the back of the appliance.
max 120 cm
min 30 cm
· Place the coupling of the window attachment on the other end of the air outlet hose.
· Place the window adaptor in your window. This is possible for horizontal and vertical sliding
windows. Block the window adapter at the desired length.
· Attach the hose with the coupling to the window adapter.
· Make use of the window seals to close o any possible openings in the window.
· Block the window adapter at the desired length using the supplied window adapter plug.
· If desired, you can x the window with the L-iron and 2 screws.
max 120 cm
min 30 cm

57
DO266A
www.domo-elektro.be
EN
max 120 cm
min 30 cm
max 120 cm
min 30 cm
· Place the coupling of the air outlet hose on the end of the hose.
· Place the air outlet hose on the air outlet at the back of the appliance.
max 120 cm
min 30 cm
· Make an opening in the wall the size of the wall adapter.
· Place the wall adapter in the opening. Attach the wall adapter using the screws supplied.
· Place the coupling of the wall attachment on the other end of the air outlet hose.
· Attach the hose with coupling to the wall adapter.
max 120 cm
min 30 cm
The horizontal strip on the front of the air conditioning can be opened and shut manually in
order to aim the air outlet better.
12
4
3

58
DO266A
EN
1. ON/OFF touch
To turn the unit o or on.
2. ”+” and “-” touch
Use these touches to select the temperature. The temperature can be set between 17°C and
30°C. When pressing both buttons at the same time you can switch between “°C” or “°F”.
3. MODE- touch
With this touch you can select the desired function. Every time when pressing this touch
the function will change: COOL – DRY – FAN. The related indication light will turn on on the
control panel. If you choose the FAN setting, the ventilation blows on the automatic position.
You can only adapt the ventilation speed with the remote control.
4. LED display
Will show het temperature selections. When the “dry or “fan” mode is selected, the display
will show the room temperature.
When using the remote control make sure that you always
aim it towards the apparatus. If you don’t do this, you can
briey aim the remote control towards the apparatus and
press the ON-OFF button.
When the apparatus receives a signal of the remote
control you hear a beep. The remote control must be used
within an eight-metre radius around the apparatus.
1. ON/OFF touch
To turn the unit o or on.
2. MODE- touch
With this touch you can select the desired function. Every time when pressing this touch
the function will change: COOL – DRY – FAN. The related indication light will turn on on the
control panel.
3. FAN touch
With this touch you can select the fan speed: LOW
55
66
MODE display
Displays the current
mode, including:
AUTO
COOL
DRY
HEAT
FAN
Transmission Indicator
Lights up when remote sends
signal to unit
ON/OFF display
Appears when the unit is turned on,
and disappears when it is turned off
TIMER ON display
Displays when TIMER
ON is set
TIMER OFF display
Displays when TIMER
OFF is set
SLEEP display
Battery display
SILENT display
ECO display
Displays when
SLEEP function
is activated
FOLLOW ME
display
Indicates that
the FOLLOW ME
function is on
FAN SPEED display
Displays selected FAN SPEED:
HIGH, MED,
or LOW
This display is blank when
set to AUTO speed.
Temperature/Timer display
Displays the set temperature by default, or timer setting
when using TIMER ON/OFF functions
o O O
Temperature range: 17-30 C(62 F-86 F)
Timer setting range: 0-24 hours
This display is blank when operating in FAN mode.
1. Press the MODE button to select
COOL mode.
2. Set your desired temperature using
the Temp or Temp button.
3. Press the FAN button to select the
fan speed: AUTO, LOW, MED,or
HIGH.
4. Press the ON/OFF button to start the
unit.
In AUTO mode, the unit will automatically
select the COOL, FAN, HEAT or DRY mode
based on the set temperature.
1. Press the MODE button to select Auto mode.
2. Set your desired temperature using the
Temp or Temp button.
3. Press the ON/OFF button to start the unit.
,
NOTE: FAN SPEED can t be set in Auto mode.
SETTING TEMPERATURE
AUTO operation
The operating temperature range for units is
O O O
17-30 C(62 F-86 F). You can increase or
O O
decrease the set tmeperature in 1 C(1 F)
increments.
COOL operation
1
3
2
1
3
2
4
Not available for this unit
Not available for
this unit
Not available for
this unit
Low battery
detection
Remote LED Screen Indicators
How To Use The Basic Functions
ON/OFF
ON/OFF
TEMP
TEMP
SHORT
CUT
SHORT
CUT
TIMER
ON
TIMER
ON
TIMER
OFF
TIMER
OFF
MODE
MODE
FAN
FAN
SLEEP
SLEEP
LED
LED
FOLLOW
ION
SWING
ME
FOLLOW
ION
SWING
ME
– HIGH
55
66
MODE display
Displays the current
mode, including:
AUTO
COOL
DRY
HEAT
FAN
Transmission Indicator
Lights up when remote sends
signal to unit
ON/OFF display
Appears when the unit is turned on,
and disappears when it is turned off
TIMER ON display
Displays when TIMER
ON is set
TIMER OFF display
Displays when TIMER
OFF is set
SLEEP display
Battery display
SILENT display
ECO display
Displays when
SLEEP function
is activated
FOLLOW ME
display
Indicates that
the FOLLOW ME
function is on
FAN SPEED display
Displays selected FAN SPEED:
HIGH, MED,
or LOW
This display is blank when
set to AUTO speed.
Temperature/Timer display
Displays the set temperature by default, or timer setting
when using TIMER ON/OFF functions
o O O
Temperature range: 17-30 C(62 F-86 F)
Timer setting range: 0-24 hours
This display is blank when operating in FAN mode.
1. Press the MODE button to select
COOL mode.
2. Set your desired temperature using
the Temp or Temp button.
3. Press the FAN button to select the
fan speed: AUTO, LOW, MED,or
HIGH.
4. Press the ON/OFF button to start the
unit.
In AUTO mode, the unit will automatically
select the COOL, FAN, HEAT or DRY mode
based on the set temperature.
1. Press the MODE button to select Auto mode.
2. Set your desired temperature using the
Temp or Temp button.
3. Press the ON/OFF button to start the unit.
,
NOTE: FAN SPEED can t be set in Auto mode.
SETTING TEMPERATURE
AUTO operation
The operating temperature range for units is
O O O
17-30 C(62 F-86 F). You can increase or
O O
decrease the set tmeperature in 1 C(1 F)
increments.
COOL operation
1
3
2
1
3
2
4
Not available for this unit
Not available for
this unit
Not available for
this unit
Low battery
detection
Remote LED Screen Indicators
How To Use The Basic Functions
ON/OFF
ON/OFF
TEMP
TEMP
SHORT
CUT
SHORT
CUT
TIMER
ON
TIMER
ON
TIMER
OFF
TIMER
OFF
MODE
MODE
FAN
FAN
SLEEP
SLEEP
LED
LED
FOLLOW
ION
SWING
ME
FOLLOW
ION
SWING
ME
– AUTO.
4. SLEEP touch
You can use this touch for activating the “sleep” mode.
1
2
3
4
5
6
7
8

59
DO266A
www.domo-elektro.be
EN
When pressing the “sleep” touch, the selected temperature will be elevated with 1 °C after 30
min. After another 30 min the temperature will increase with another 1°C. The air conditioning
will maintain this temperature for 7 hours. After this time, the air conditioning will go back to
the original set temperature and the “sleep” function will end.
NOTE: this function cannot be selected with the “fan” or “dry” function.
5. TEMP touch
Use these touches to select the temperature. The temperature can be set between 17°C and
30°C. When pressing both buttons at the same time you can switch between “°C” or “°F”.
6. SHORT CUT touch
With this button you can x and switch on a preferential setting.
7. TIMER ON touch
With this function you can select when the unit must turn on.
8. TIMER OFF touch
With this function you can select when the unit must turn o.
9. LED touch
This button turns o the control panel’s LED display. This can be used if the display gives too
much light when you want to sleep. If you press the button a second time, the display will
switch on again.
55
66
MODE display
Displays the current
mode, including:
AUTO
COOL
DRY
HEAT
FAN
Transmission Indicator
Lights up when remote sends
signal to unit
ON/OFF display
Appears when the unit is turned on,
and disappears when it is turned off
TIMER ON display
Displays when TIMER
ON is set
TIMER OFF display
Displays when TIMER
OFF is set
SLEEP display
Battery display
SILENT display
ECO display
Displays when
SLEEP function
is activated
FOLLOW ME
display
Indicates that
the FOLLOW ME
function is on
FAN SPEED display
Displays selected FAN SPEED:
HIGH, MED,
or LOW
This display is blank when
set to AUTO speed.
Temperature/Timer display
Displays the set temperature by default, or timer setting
when using TIMER ON/OFF functions
o O O
Temperature range: 17-30 C(62 F-86 F)
Timer setting range: 0-24 hours
This display is blank when operating in FAN mode.
1. Press the MODE button to select
COOL mode.
2. Set your desired temperature using
the Temp or Temp button.
3. Press the FAN button to select the
fan speed: AUTO, LOW, MED,or
HIGH.
4. Press the ON/OFF button to start the
unit.
In AUTO mode, the unit will automatically
select the COOL, FAN, HEAT or DRY mode
based on the set temperature.
1. Press the MODE button to select Auto mode.
2. Set your desired temperature using the
Temp or Temp button.
3. Press the ON/OFF button to start the unit.
,
NOTE: FAN SPEED can t be set in Auto mode.
SETTING TEMPERATURE
AUTO operation
The operating temperature range for units is
O O O
17-30 C(62 F-86 F). You can increase or
O O
decrease the set tmeperature in 1 C(1 F)
increments.
COOL operation
1
3
2
1
3
2
4
Not available for this unit
Not available for
this unit
Not available for
this unit
Low battery
detection
Remote LED Screen Indicators
How To Use The Basic Functions
ON/OF F
ON/OF F
TEMP
TEMP
SHORT
CUT
SHORT
CUT
TIMER
ON
TIMER
ON
TIMER
OFF
TIMER
OFF
MODE
MODE
FAN
FAN
SLEEP
SLEEP
LED
LED
FOLLO W
ION
SWING
ME
FOLLO W
ION
SWING
ME
In the AUTO function, the apparatus automatically chooses the right setting depending on the
chosen temperature. This setting can also be chosen with the remote control.
1. Choose AUTO with the MODE button on the remote control.
2. Set the desired temperature with the TEMP button. The apparatus will determine the
setting accordingly.
You cannot adapt the speed of the ventilation (FAN) in AUTO modus.
55
66
MODE display
Displays the current
mode, including:
AUTO
COOL
DRY
HEAT
FAN
Transmission Indicator
Lights up when remote sends
signal to unit
ON/OFF display
Appears when the unit is turned on,
and disappears when it is turned off
TIMER ON display
Displays when TIMER
ON is set
TIMER OFF display
Displays when TIMER
OFF is set
SLEEP display
Battery display
SILENT display
ECO display
Displays when
SLEEP function
is activated
FOLLOW ME
display
Indicates that
the FOLLOW ME
function is on
FAN SPEED display
Displays selected FAN SPEED:
HIGH, MED,
or LOW
This display is blank when
set to AUTO speed.
Temperature/Timer display
Displays the set temperature by default, or timer setting
when using TIMER ON/OFF functions
o O O
Temperature range: 17-30 C(62 F-86 F)
Timer setting range: 0-24 hours
This display is blank when operating in FAN mode.
1. Press the MODE button to select
COOL mode.
2. Set your desired temperature using
the Temp or Temp button.
3. Press the FAN button to select the
fan speed: AUTO, LOW, MED,or
HIGH.
4. Press the ON/OFF button to start the
unit.
In AUTO mode, the unit will automatically
select the COOL, FAN, HEAT or DRY mode
based on the set temperature.
1. Press the MODE button to select Auto mode.
2. Set your desired temperature using the
Temp or Temp button.
3. Press the ON/OFF button to start the unit.
,
NOTE: FAN SPEED can t be set in Auto mode.
SETTING TEMPERATURE
AUTO operation
The operating temperature range for units is
O O O
17-30 C(62 F-86 F). You can increase or
O O
decrease the set tmeperature in 1 C(1 F)
increments.
COOL operation
1
3
2
1
3
2
4
Not available for this unit
Not available for
this unit
Not available for
this unit
Low battery
detection
Remote LED Screen Indicators
How To Use The Basic Functions
ON/OF F
ON/OF F
TEMP
TEMP
SHORT
CUT
SHORT
CUT
TIMER
ON
TIMER
ON
TIMER
OFF
TIMER
OFF
MODE
MODE
FAN
FAN
SLEEP
SLEEP
LED
LED
FOLLO W
ION
SWING
ME
FOLLO W
ION
SWING
ME
With the COOL function you can cool the room up to a certain temperature.
1. Press the MODE button until the COOL indicator lamp is on.
2. Use the “+” and “-” buttons on the control panel or the TEMP button on the remote
control to set the desired room temperature.
3. Use the FAN button on the remote control to set the desired ventilation speed. There
are three settings: LOW
55
66
MODE display
Displays the current
mode, including:
AUTO
COOL
DRY
HEAT
FAN
Transmission Indicator
Lights up when remote sends
signal to unit
ON/OFF display
Appears when the unit is turned on,
and disappears when it is turned off
TIMER ON display
Displays when TIMER
ON is set
TIMER OFF display
Displays when TIMER
OFF is set
SLEEP display
Battery display
SILENT display
ECO display
Displays when
SLEEP function
is activated
FOLLOW ME
display
Indicates that
the FOLLOW ME
function is on
FAN SPEED display
Displays selected FAN SPEED:
HIGH, MED,
or LOW
This display is blank when
set to AUTO speed.
Temperature/Timer display
Displays the set temperature by default, or timer setting
when using TIMER ON/OFF functions
o O O
Temperature range: 17-30 C(62 F-86 F)
Timer setting range: 0-24 hours
This display is blank when operating in FAN mode.
1. Press the MODE button to select
COOL mode.
2. Set your desired temperature using
the Temp or Temp button.
3. Press the FAN button to select the
fan speed: AUTO, LOW, MED,or
HIGH.
4. Press the ON/OFF button to start the
unit.
In AUTO mode, the unit will automatically
select the COOL, FAN, HEAT or DRY mode
based on the set temperature.
1. Press the MODE button to select Auto mode.
2. Set your desired temperature using the
Temp or Temp button.
3. Press the ON/OFF button to start the unit.
,
NOTE: FAN SPEED can t be set in Auto mode.
SETTING TEMPERATURE
AUTO operation
The operating temperature range for units is
O O O
17-30 C(62 F-86 F). You can increase or
O O
decrease the set tmeperature in 1 C(1 F)
increments.
COOL operation
1
3
2
1
3
2
4
Not available for this unit
Not available for
this unit
Not available for
this unit
Low battery
detection
Remote LED Screen Indicators
How To Use The Basic Functions
ON/OFF
ON/OFF
TEMP
TEMP
SHORT
CUT
SHORT
CUT
TIMER
ON
TIMER
ON
TIMER
OFF
TIMER
OFF
MODE
MODE
FAN
FAN
SLEEP
SLEEP
LED
LED
FOLLOW
ION
SWING
ME
FOLLOW
ION
SWING
ME
, HIGH
55
66
MODE display
Displays the current
mode, including:
AUTO
COOL
DRY
HEAT
FAN
Transmission Indicator
Lights up when remote sends
signal to unit
ON/OFF display
Appears when the unit is turned on,
and disappears when it is turned off
TIMER ON display
Displays when TIMER
ON is set
TIMER OFF display
Displays when TIMER
OFF is set
SLEEP display
Battery display
SILENT display
ECO display
Displays when
SLEEP function
is activated
FOLLOW ME
display
Indicates that
the FOLLOW ME
function is on
FAN SPEED display
Displays selected FAN SPEED:
HIGH, MED,
or LOW
This display is blank when
set to AUTO speed.
Temperature/Timer display
Displays the set temperature by default, or timer setting
when using TIMER ON/OFF functions
o O O
Temperature range: 17-30 C(62 F-86 F)
Timer setting range: 0-24 hours
This display is blank when operating in FAN mode.
1. Press the MODE button to select
COOL mode.
2. Set your desired temperature using
the Temp or Temp button.
3. Press the FAN button to select the
fan speed: AUTO, LOW, MED,or
HIGH.
4. Press the ON/OFF button to start the
unit.
In AUTO mode, the unit will automatically
select the COOL, FAN, HEAT or DRY mode
based on the set temperature.
1. Press the MODE button to select Auto mode.
2. Set your desired temperature using the
Temp or Temp button.
3. Press the ON/OFF button to start the unit.
,
NOTE: FAN SPEED can t be set in Auto mode.
SETTING TEMPERATURE
AUTO operation
The operating temperature range for units is
O O O
17-30 C(62 F-86 F). You can increase or
O O
decrease the set tmeperature in 1 C(1 F)
increments.
COOL operation
1
3
2
1
3
2
4
Not available for this unit
Not available for
this unit
Not available for
this unit
Low battery
detection
Remote LED Screen Indicators
How To Use The Basic Functions
ON/OFF
ON/OFF
TEMP
TEMP
SHORT
CUT
SHORT
CUT
TIMER
ON
TIMER
ON
TIMER
OFF
TIMER
OFF
MODE
MODE
FAN
FAN
SLEEP
SLEEP
LED
LED
FOLLOW
ION
SWING
ME
FOLLOW
ION
SWING
ME
and AUTO.

60
DO266A
EN
55
66
MODE display
Displays the current
mode, including:
AUTO
COOL
DRY
HEAT
FAN
Transmission Indicator
Lights up when remote sends
signal to unit
ON/OFF display
Appears when the unit is turned on,
and disappears when it is turned off
TIMER ON display
Displays when TIMER
ON is set
TIMER OFF display
Displays when TIMER
OFF is set
SLEEP display
Battery display
SILENT display
ECO display
Displays when
SLEEP function
is activated
FOLLOW ME
display
Indicates that
the FOLLOW ME
function is on
FAN SPEED display
Displays selected FAN SPEED:
HIGH, MED,
or LOW
This display is blank when
set to AUTO speed.
Temperature/Timer display
Displays the set temperature by default, or timer setting
when using TIMER ON/OFF functions
o O O
Temperature range: 17-30 C(62 F-86 F)
Timer setting range: 0-24 hours
This display is blank when operating in FAN mode.
1. Press the MODE button to select
COOL mode.
2. Set your desired temperature using
the Temp or Temp button.
3. Press the FAN button to select the
fan speed: AUTO, LOW, MED,or
HIGH.
4. Press the ON/OFF button to start the
unit.
In AUTO mode, the unit will automatically
select the COOL, FAN, HEAT or DRY mode
based on the set temperature.
1. Press the MODE button to select Auto mode.
2. Set your desired temperature using the
Temp or Temp button.
3. Press the ON/OFF button to start the unit.
,
NOTE: FAN SPEED can t be set in Auto mode.
SETTING TEMPERATURE
AUTO operation
The operating temperature range for units is
O O O
17-30 C(62 F-86 F). You can increase or
O O
decrease the set tmeperature in 1 C(1 F)
increments.
COOL operation
1
3
2
1
3
2
4
Not available for this unit
Not available for
this unit
Not available for
this unit
Low battery
detection
Remote LED Screen Indicators
How To Use The Basic Functions
ON/OF F
ON/OF F
TEMP
TEMP
SHORT
CUT
SHORT
CUT
TIMER
ON
TIMER
ON
TIMER
OFF
TIMER
OFF
MODE
MODE
FAN
FAN
SLEEP
SLEEP
LED
LED
FOLLO W
ION
SWING
ME
FOLLO W
ION
SWING
ME
With this function you can dehumidify the room. Keep windows and doors closed for this
function.
1. Press the MODE button until the DRY indicator lamp is on.
2. Use the “+” and “-” buttons on the control panel or the TEMP button on the remote
control to set the desired room temperature.
3. You cannot set the ventilation speed in this setting.
FAN
55
66
MODE display
Displays the current
mode, including:
AUTO
COOL
DRY
HEAT
FAN
Transmission Indicator
Lights up when remote sends
signal to unit
ON/OFF display
Appears when the unit is turned on,
and disappears when it is turned off
TIMER ON display
Displays when TIMER
ON is set
TIMER OFF display
Displays when TIMER
OFF is set
SLEEP display
Battery display
SILENT display
ECO display
Displays when
SLEEP function
is activated
FOLLOW ME
display
Indicates that
the FOLLOW ME
function is on
FAN SPEED display
Displays selected FAN SPEED:
HIGH, MED,
or LOW
This display is blank when
set to AUTO speed.
Temperature/Timer display
Displays the set temperature by default, or timer setting
when using TIMER ON/OFF functions
o O O
Temperature range: 17-30 C(62 F-86 F)
Timer setting range: 0-24 hours
This display is blank when operating in FAN mode.
1. Press the MODE button to select
COOL mode.
2. Set your desired temperature using
the Temp or Temp button.
3. Press the FAN button to select the
fan speed: AUTO, LOW, MED,or
HIGH.
4. Press the ON/OFF button to start the
unit.
In AUTO mode, the unit will automatically
select the COOL, FAN, HEAT or DRY mode
based on the set temperature.
1. Press the MODE button to select Auto mode.
2. Set your desired temperature using the
Temp or Temp button.
3. Press the ON/OFF button to start the unit.
,
NOTE: FAN SPEED can t be set in Auto mode.
SETTING TEMPERATURE
AUTO operation
The operating temperature range for units is
O O O
17-30 C(62 F-86 F). You can increase or
O O
decrease the set tmeperature in 1 C(1 F)
increments.
COOL operation
1
3
2
1
3
2
4
Not available for this unit
Not available for
this unit
Not available for
this unit
Low battery
detection
Remote LED Screen Indicators
How To Use The Basic Functions
ON/OF F
ON/OF F
TEMP
TEMP
SHORT
CUT
SHORT
CUT
TIMER
ON
TIMER
ON
TIMER
OFF
TIMER
OFF
MODE
MODE
FAN
FAN
SLEEP
SLEEP
LED
LED
FOLLO W
ION
SWING
ME
FOLLO W
ION
SWING
ME
1. Press the MODE button until the FAN indicator lamp is on.
2. Press the FAN button of the remote control to set the ventilation speed. There are
three settings: LOW
55
66
MODE display
Displays the current
mode, including:
AUTO
COOL
DRY
HEAT
FAN
Transmission Indicator
Lights up when remote sends
signal to unit
ON/OFF display
Appears when the unit is turned on,
and disappears when it is turned off
TIMER ON display
Displays when TIMER
ON is set
TIMER OFF display
Displays when TIMER
OFF is set
SLEEP display
Battery display
SILENT display
ECO display
Displays when
SLEEP function
is activated
FOLLOW ME
display
Indicates that
the FOLLOW ME
function is on
FAN SPEED display
Displays selected FAN SPEED:
HIGH, MED,
or LOW
This display is blank when
set to AUTO speed.
Temperature/Timer display
Displays the set temperature by default, or timer setting
when using TIMER ON/OFF functions
o O O
Temperature range: 17-30 C(62 F-86 F)
Timer setting range: 0-24 hours
This display is blank when operating in FAN mode.
1. Press the MODE button to select
COOL mode.
2. Set your desired temperature using
the Temp or Temp button.
3. Press the FAN button to select the
fan speed: AUTO, LOW, MED,or
HIGH.
4. Press the ON/OFF button to start the
unit.
In AUTO mode, the unit will automatically
select the COOL, FAN, HEAT or DRY mode
based on the set temperature.
1. Press the MODE button to select Auto mode.
2. Set your desired temperature using the
Temp or Temp button.
3. Press the ON/OFF button to start the unit.
,
NOTE: FAN SPEED can t be set in Auto mode.
SETTING TEMPERATURE
AUTO operation
The operating temperature range for units is
O O O
17-30 C(62 F-86 F). You can increase or
O O
decrease the set tmeperature in 1 C(1 F)
increments.
COOL operation
1
3
2
1
3
2
4
Not available for this unit
Not available for
this unit
Not available for
this unit
Low battery
detection
Remote LED Screen Indicators
How To Use The Basic Functions
ON/OFF
ON/OFF
TEMP
TEMP
SHORT
CUT
SHORT
CUT
TIMER
ON
TIMER
ON
TIMER
OFF
TIMER
OFF
MODE
MODE
FAN
FAN
SLEEP
SLEEP
LED
LED
FOLLOW
ION
SWING
ME
FOLLOW
ION
SWING
ME
, HIGH
55
66
MODE display
Displays the current
mode, including:
AUTO
COOL
DRY
HEAT
FAN
Transmission Indicator
Lights up when remote sends
signal to unit
ON/OFF display
Appears when the unit is turned on,
and disappears when it is turned off
TIMER ON display
Displays when TIMER
ON is set
TIMER OFF display
Displays when TIMER
OFF is set
SLEEP display
Battery display
SILENT display
ECO display
Displays when
SLEEP function
is activated
FOLLOW ME
display
Indicates that
the FOLLOW ME
function is on
FAN SPEED display
Displays selected FAN SPEED:
HIGH, MED,
or LOW
This display is blank when
set to AUTO speed.
Temperature/Timer display
Displays the set temperature by default, or timer setting
when using TIMER ON/OFF functions
o O O
Temperature range: 17-30 C(62 F-86 F)
Timer setting range: 0-24 hours
This display is blank when operating in FAN mode.
1. Press the MODE button to select
COOL mode.
2. Set your desired temperature using
the Temp or Temp button.
3. Press the FAN button to select the
fan speed: AUTO, LOW, MED,or
HIGH.
4. Press the ON/OFF button to start the
unit.
In AUTO mode, the unit will automatically
select the COOL, FAN, HEAT or DRY mode
based on the set temperature.
1. Press the MODE button to select Auto mode.
2. Set your desired temperature using the
Temp or Temp button.
3. Press the ON/OFF button to start the unit.
,
NOTE: FAN SPEED can t be set in Auto mode.
SETTING TEMPERATURE
AUTO operation
The operating temperature range for units is
O O O
17-30 C(62 F-86 F). You can increase or
O O
decrease the set tmeperature in 1 C(1 F)
increments.
COOL operation
1
3
2
1
3
2
4
Not available for this unit
Not available for
this unit
Not available for
this unit
Low battery
detection
Remote LED Screen Indicators
How To Use The Basic Functions
ON/OFF
ON/OFF
TEMP
TEMP
SHORT
CUT
SHORT
CUT
TIMER
ON
TIMER
ON
TIMER
OFF
TIMER
OFF
MODE
MODE
FAN
FAN
SLEEP
SLEEP
LED
LED
FOLLOW
ION
SWING
ME
FOLLOW
ION
SWING
ME
and AUTO.
3. The temperature cannot be adjusted.
With this function you can delay the start of the apparatus, up to maximum 24 hours.
1. Press the TIMER ON button on the remote control.
2. You can now read on the display of the remote control when the air conditioning will
go on.
3. Press the TIMER ON button several times to increase the time. Or keep the button
pressed.
4. Once the desired time is set, you will see “Timer on” on the display of the remote
control. Two lights will light up on the control panel’s display.
5. If you want to switch o the timer, press the TIMER ON button several times until the
counter goes to “0”. Or keep the button pressed.
With this function you can switch o the apparatus automatically after some time.
1. Press the TIMER OFF button on the remote control.
2. You can now read on the display of the remote control when the air conditioning will
go o.
3. Press the TIMER OFF button several times to increase the time. Or keep the button
pressed.
4. Once the desired time is set, you will see “Timer o” on the display of the remote
control. Two lights will light up on the control panel’s display.
5. If you want to switch o the timer, press the TIMER OFF button several times until the
counter goes to “0”.

61
DO266A
www.domo-elektro.be
EN
You can also switch on both functions simultaneously. This determines when you switch on
the apparatus, but also when the apparatus switches o.
Please note: this time is always from the hour when you programme the setting. For example:
it is now 1 pm. You want the apparatus to work from 4:30 to 6 pm. Set the TIMER ON on 3.5 h
and TIMER OFF on 5.0 h.
When pressing the “sleep” touch, the selected temperature will be elevated with 1 °C after 30
min. After another 30 min the temperature will increase with another 1°C. The air conditioning
will maintain this temperature for 7 hours. After this time, the air conditioning will go back to
the original set temperature and the “sleep” function will end.
NOTE: this function cannot be selected with the “fan” or “dry” function.
With this button you can set and switch on a preferential setting.
If you use a certain setting more often, you can set this by pressing the SHORTCUT button
for three seconds. The apparatus then remembers the settings that are switched on at the
moment of pressing. These settings can include: the user setting (MODE), set temperature,
ventilation speed (FAN) and possibly also the SLEEP setting.
The moment you press the SHORTCUT button, the apparatus will work at the previously
determined settings.
DRAINING
During the “dry” mode you can use a permanent drainage.
1. Remove the drain plug and the rubber top.
2. Attach the drain hose on the drain.
3. Make sure the water is drained in a save and permanent way.
1
2

62
DO266A
EN
When you don’t use the permanent drain, the non recycled
condensation water, will be stored in the water tank.
· When the water tank is full a few beep signals will be heard and
on the display the code P1 will appear. The “cool” or “dry” mode
will end automatically. The fan will continue to operate, this is
normal.
· Move the unit over to a place where you can easily drain the
water.
· Remove the drain plug at the bottom of your unit (A) and drain
the water.
· After fully draining the water tank, place the drain plug back on
the drain opening.
· Restart the unit, make sure the error code P1 is no longer
displayed. When the code doesn’t disappear, try turning o and
on the unit a few times. When the error code continues, please
contact the after sales service.
· NOTE : always make sure to install the drain plug, before turning the unit back on.
CLEANING
· Always remove the plug from the socket before cleaning the unit.
· Never use any chemical or abrasive products to clean the unit.
· Never clean the unit with water or any other liquid, this can cause electrocution.
· When the power cord is damaged it must be repaired or replaced by the after sales surface
of the manufacturer or by a qualied person.
· Clean the air lter at least ever 2 weeks. To make sure the
air conditioning can operate in optimal conditions.
· Clean the air lter in lukewarm water with a bit of
detergent. Rinse the lter thoroughly and let it dry.
· Make sure the lter is completely dry before placing it
back in to the air conditioning.
Use a damp, soft cloth and a bit of mild detergent, to clean the outside of the unit. Make sure
the unit is thoroughly dried afterwards.
A

63
DO266A
www.domo-elektro.be
EN
Before storing the unit for a longer period of time, please follow the next steps :
· Drain all the water from the appliance.
· Afterwards turn on the unit in the “fan” mode for half a day. Make sure the unit is placed in
a heated room. This will dry the unit completely and prevent the forming of mold.
· Turn o the unit, remove the plug from the socket and remove the batteries from the
remote control.
· Clean the lters and place them back in the unit.
· Store the unit in a dry, dark place.
The appliance isn’t working when pressing the on/o touch.
· The error code P1 is displayed , drain the water from the air conditioning.
· The room temperature is lower than the selected temperature. Adjust the selected
temperature.
The room is not cool enough.
· The windows and doors aren’t closed. Make sure all windows and doors are closed.
· There are heat sources in the room. Remove all heat sources if possible.
· The air outlet hose is not connected or blocked. Attach the hose and check if there is no
blockage.
· The selected temperature is too high. Adjust the selected temperature.
· The air lter is dirty. Clean the air lter.
The appliance is making too much noise or is causing vibrations.
· The oor is not level or at. Place the appliance on the at and level surface if possible.
· The air lter is dirty. Clean the air lter.
Your appliance makes a gurgling sound
· The sound is produced by the refrigerant in your appliance, this is normal.
Following error codes can be displayed on your air conditioning :
E1 : the sensor for the room temperature is not working. Turn o the unit and remove the plug
from the socket. Wait for 10 sec and plug the unit back in. Turn on the unit. When the error
codes repeats, you need to contact the after sales service.

64
DO266A
EN
E2 : The sensor of the dehumidier doesn’t work. Turn o the unit and remove the plug from
the socket. Wait for 10 sec and plug the unit back in. Turn on the unit. When the error codes
repeats, you need to contact the after sales service.
E4 : The display is not functioning properly. Remove the plug from the socket. Wait for 10
seconds. Plug the unit back in. When the error codes repeats, you need to contact the after
sales service.
P1 : The water tank is full. Connect the drain hose to the bottom drain and remove the water.
When the error codes repeats, you need to contact the after sales service.
This symbol on the product or on its packaging indicates
that this product may not be treated as household waste.
Instead it must be brought to the applicable collection point
for recycling of electrical and electronic equipment. By
ensuring this product is disposed of correctly, you will help
prevent potential negative consequences for the environment
and human health, which could otherwise be caused by
inappropriate waste handling of this product. For more
detailed information about recycling of this product, please
contact your local city oce, your household waste disposal
service or the shop where you purchased the product.
The packaging is recyclable. Please treat the packaging
ecologically.

65
DO266A
www.domo-elektro.be
ES
GARANTIA
Este aparato tiene un periodo de garantía de 2 años a partir de la fecha de compra. Durante
el periodo de garantía, el distribuidor será completamente responsable de los defectos
directamente asignables a errores del material y fabricación. Cuando se detecten este tipo de
errores, y siempre que se estime necesario, el aparato se sustituirá o reparará. A partir de ese
momento, el periodo de garantía de 2 años no volverá a iniciarse, sino que seguirá siendo de 2
años a partir del momento de compra. La garantía se concede sobre la base del recibo de caja.
La garantía de los accesorios y componentes sujetos a desgaste es de 6 meses.
La garantía y la responsabilidad/imputabilidad del proveedor y el fabricante expiran
automáticamente en los siguientes casos:
· Cuando no se cumplan las instrucciones que aparecen en este manual.
· En el caso de una conexión inadecuada, por ejemplo, a una tensión eléctrica demasiado
alta.
· En caso de uso incorrecto, brusco o anormal.
· En caso de insuciente o incorrecto mantenimiento.
· Si el consumidor o un tercero no autorizado realizan reparaciones o modicaciones en el
aparato.
· Si se usan componentes o accesorios que no están recomendados o que no son
suministrados por el proveedor/fabricante.
Cuando utilice aparatos eléctricos, se deben seguir las instrucciones de seguridad
mencionadas a continuación:
· Lea detenidamente estas instrucciones. Conserve este manual para consultarlo
posteriormente.
· Antes del primer uso retire todos los materiales de embalaje y etiquetas promocionales.
Asegúrese de que los niños no puedan jugar con el material de embalaje.
· Este aparato es adecuado para su uso en el ámbito doméstico y entornos similares como:
· Zona de cocina para el personal de tiendas, ocinas y otros entornos profesionales
similares.
· Granjas.
· Habitaciones de hoteles y moteles, y otros entornos de carácter residencial.
· Habitaciones de invitados o similares.
· Supervise en todo momento a los niños para que no jueguen con el aparato.
· Este aparato puede ser utilizado por niños de 16 años o más, personas con discapacidad
física o sensorial, o personas con capacidad mental limitada o falta de experiencia o
conocimiento, siempre, y en tanto en cuanto, dichas personas estén vigiladas o hayan
recibido instrucciones sobre el uso del aparato de manera segura y conozcan los peligros
del uso del mismo. Los niños no deben jugar con el ventilador. El mantenimiento y la
limpieza del dispositivo no deben ser realizados por niños, a menos que tengan 16 años o
más y estén supervisados por un adulto.

66
DO266A
ES
· Mantenga el aparato fuera del alcance de los niños.
· Atención: el aparato no debe utilizarse con un temporizador externo.
· Antes de utilizarlo, asegúrese de que el voltaje indicado en el aparato se corresponde con
el voltaje de la red eléctrica de su hogar.
· El cable de alimentación debe estar conectado a una toma de corriente que debe haber
sido instalada y conectada a tierra de acuerdo con las normas y reglamentos locales.
· No deje el cable sobre una supercie caliente o sobre el borde de una mesa o encimera.
· Nunca utilice el aparato si el cable o el enchufe están dañados, si el aparato no funciona
correctamente o si está dañado. Si esto ocurre, lleve el aparato al centro de servicio
cualicado más cercano para su inspección y reparación.
· Es necesaria una supervisión estricta cuando el aparato es utilizado por niños o cerca de
ellos.
· El uso de accesorios no recomendados o vendidos por el fabricante puede provocar
incendios, descargas eléctricas o lesiones.
· Desenchufe este aparato cuando no se esté utilizando, antes de ensamblar o desensamblar
cualquier parte y antes de limpiarlo. Gire todos los botones a la posición “apagada” y
desenchufe el cable de alimentación de la toma de corriente. Nunca tire del cable para
retirar el enchufe de la toma de corriente.
· No deje un aparato en funcionamiento sin supervisión.
· Nunca coloque este aparato sobre, o cerca de, un fuego de gas o eléctrico, o en un lugar
donde pueda entrar en contacto con un aparato caliente.
· No use el aparato al aire libre.
· No use el aparato para nes distintos de los previstos.
· Utilice siempre el aparato sobre una supercie rme, seca y lisa.
· Utilice el aparato exclusivamente para uso doméstico. El fabricante no se hace responsable
de los accidentes resultantes del mal uso del aparato ni del incumplimiento de las normas
establecidas en este manual.
· Todas las reparaciones, excepto el mantenimiento normal del aparato, deberán ser
efectuadas por el fabricante o por su servicio posventa.
· Nunca sumerja el aparato, el cable de alimentación o el enchufe en agua u otro líquido.
· No permita que los niños toquen el cable de alimentación o el aparato.
· Mantenga el cable alejado de bordes alados, partes calientes u otras fuentes de calor.
· Nunca coloque el aparato cerca de un aparato de gas, fuego o líquido altamente
inamable.
· Nunca golpee o sacuda el aparato para evitar daños.
· Para evitar el sobrecalentamiento, nunca cubra la entrada y la salida de aire.
· Para evitar el riesgo de electrocución, nunca rocíe el aparato con agua ni lo coloque cerca
del agua.
· Nunca comparta la fuente de alimentación del aire acondicionado con ningún otro aparato.
· No enchufe ni desenchufe el aire acondicionado cuando sus manos estén mojadas.

67
DO266A
www.domo-elektro.be
ES
· Nunca inserte objetos extraños en las aberturas del aparato.
· Nunca utilice un cable alargador.
· Nunca permita que los niños jueguen cerca del aparato.
· Cuando haya apagado el aparato y vuelva a encenderlo poco después, el compresor
tardará, como mínimo, 3 minutos en volver a arrancar.
· Para evitar interferencias, coloque el aparato a una distancia mínima de 1 metro de un
televisor o radio.
· No exponga el aparato a la luz solar directa para evitar la decoloración del mismo.
· No incline el aparato más de 35° cuando lo cambie de sitio. Si desplaza el aire
acondicionado debe hacerlo en posición vertical. Nunca desplace la unidad boca abajo.
· Si siempre retira el agua del aparato antes de guardarlo, prolongará su vida útil.
· No use productos químicos para limpiar el aparato, ya que estos podrían dañarlo.
· Asegúrese de que siempre desconecta la corriente antes de retirar o instalar la rejilla de
entrada de aire.
· Asegúrese de que el aire acondicionado esté siempre protegido contra la humedad, como
condensación, salpicaduras de agua, etc. Asegúrese de que el aire acondicionado esté
colocado de tal manera que no pueda caerse en agua ni en ningún otro líquido. Si se cae en
el agua o en un líquido, retire el enchufe de la toma de corriente inmediatamente.
· No utilice el aire acondicionado en un ambiente húmedo, como un cuarto baño o el cuarto
de la colada.
· Póngase siempre en contacto con una persona cualicada para que repare el aparato.
· Asegúrese de que el espacio libre alrededor del aparato sea de al menos 30 cm.
· Si el aire acondicionado se ha caído, desenchufe inmediatamente el enchufe de la toma de
corriente.
· Accione los botones del aparato solo con los dedos y no lo haga con ningún otro objeto.
· No retire ninguna parte sólida del aire acondicionado. No utilice el aparato si no funciona
correctamente, si se ha caído o si está dañado.
· Nunca utilice el enchufe para encender o apagar el aparato. Utilice siempre los botones del
panel de control.
· No utilice el aparato cerca de sustancias altamente inamables como alcohol, insecticidas,
petróleo, etc.
· Las reparaciones, la detección de fugas y las actividades en la instalación deben ser
realizadas por personal cualicado que disponga de los certicados correspondientes.
· La instalación se debe realizar siguiendo las instrucciones de instalación proporcionadas.
Una instalación incorrecta puede provocar fugas de agua, descargas eléctricas o incendios.
· No toque el aparato con las manos mojadas o húmedas, ni con los pies descalzos.
· Si el acondicionador de aire se golpea durante el funcionamiento, desconecte la
alimentación y retire el enchufe inmediatamente de la toma de corriente. Inspeccione
el aparato para asegurarse de que no presenta daños. Si sospecha que el aparato está
dañado, póngase en contacto con un técnico o con el servicio de atención al cliente.

68
DO266A
ES
· En caso de tormenta, la alimentación se debe desconectar para evitar daños por rayos en
el aparato.
· Si la función de drenaje no se está utilizando, coloque ambos tapones de goma en los
oricios de drenaje. Para evitar un peligro de ahogamiento, guarde la manguera de drenaje
con cuidado cuando no la utilice.
· No pase el cable por debajo de una moqueta o alfombra. No cubra el cable con alfombras,
alfombrillas o revestimientos similares. No coloque el cable debajo de muebles o aparatos.
Coloque el cable alejado de las zonas de paso y de aquellos lugares donde alguien podría
tropezar con el mismo.
· Desconecte la alimentación si el aparato emite sonidos extraños, olores o humo.
· Lea detenidamente todas las advertencias.
· Al descongelar y limpiar el aparato, no utilice herramientas que no sean las recomendadas
por el fabricante.
· El aparato debe colocarse en un espacio en el que no haya fuentes permanentes de ignición
(por ejemplo: llamas abiertas, aparatos de gas o aparatos eléctricos en funcionamiento).
· El aparato no se puede perforar o quemar.
· Los gases refrigerantes pueden ser inodoros.
· El aparato debe instalarse, utilizarse y almacenarse en un espacio superior a 7 m
2
.
· Este aparato contiene varios gramos de gas refrigerante R290 (consulte la placa de datos
en la parte trasera del sistema).
· El R290 es un gas refrigerante que cumple las directrices medioambientales europeas. No
se puede perforar ninguna parte del circuito de refrigeración.
· Si el aparato se instala, utiliza o almacena en un área no ventilada, esta área debe
diseñarse para evitar la acumulación de fugas de refrigerante. Este tipo de fugas conllevan
un riesgo de incendio o explosión por la ignición del refrigerante que podría ser ocasionada
por calentamiento eléctrico, calentadores eléctricos u otras fuentes de ignición.
· El aparato debe almacenarse de tal manera que se eviten defectos mecánicos.
· Las personas que utilicen el circuito de refrigeración o que realicen trabajos en el mismo
deben tener los certicados correspondientes, emitidos por una organización acreditada,
que ofrezcan una garantía de competencia en la manipulación de refrigerantes de acuerdo
con una evaluación especíca reconocida por las asociaciones del sector.
· Las reparaciones deben realizarse de acuerdo con las recomendaciones del fabricante. El
mantenimiento y las reparaciones que requieren la asistencia de otro personal cualicado
deben realizarse bajo la supervisión de una persona designada para el uso de refrigerantes
inamables.

69
DO266A
www.domo-elektro.be
ES
Precaución: peligro de incendio/materiales inamables.
Este aparato utiliza un refrigerante inamable. Existe un riesgo de incendio si
el refrigerante se derrama y está expuesto a una fuente de ignición externa.
GUARDE ESTAS INSTRUCCIONES
· Solo debe usar el aparato en habitaciones que no sean más grandes que el tamaño
recomendado.
· Coloque el aparato de tal manera que el ujo de aire no sea obstruido por muebles u otros
objetos.
· Mantenga las cortinas cerradas durante las horas más calurosas del día.
· Asegúrese de que los ltros siempre están limpios.
· Mantenga siempre las ventanas y puertas cerradas para mantener el aire frío en el interior
y el aire caliente en el exterior.

70
DO266A
ES
PIEZAS
1. Panel de control
2. Salida de aire
3. Filtro de aire
4. Entrada de aire
5. Salida de aire
6. Drenaje
7. Manguera de drenaje
8. Mando a distancia
9. Tubo de salida del aire
9 a. Conexión del tubo de salida del aire
10. Kit de anclaje a la pared
10 a. Adaptador de pared
10 b. Conexión del kit de anclaje a la pared
11. Kit de anclaje a ventana
11 a. Adaptado de la ventana
11 b. Conexión del kit de anclaje a ventana
11 c. Sellado de la ventana
11 d. Tope de adaptador
11 e. Barra en L con tornillos
1
2
3
4
5
6
8
7
11b 11c
11
11e

71
DO266A
www.domo-elektro.be
ES
max 120 cm
min 30 cm
INSTALACIÓN
· Coloque el acondicionador de aire en una supercie sólida y estable, para reducir a
un mínimo el ruido y la vibración. Tenga cuidado de que la
supercie sea sucientemente fuerte para soportar el peso del
aparato.
· El aparato está equipado con ruedas para poder trasladarlo
fácilmente. Asegúrese de que el acondicionador sólo ruede
sobre una supercie lisa y plana. Tenga cuidado al mover
el aparato y al rodar sobre una alfombra. No haga rodar el
acondicionador nunca sobre un objeto.
· El cable de alimentación debe estar conectado a una toma de
corriente que debe haber sido instalada y conectada a tierra de
acuerdo con las normas y reglamentos locales.
· No coloque objetos dentro de un radio de 30 cm alrededor de la unidad.
· El tubo de salida del aire debe colocarse al ajustar “Cool” o “Auto”. Durante el ajuste “Fan”
y “Deshumidicación” no necesita la manguera de escape de aire.
· Asegúrese también de que no haya obstrucciones a la salida de aire en un radio de 50 cm.
· Asegúrese de que la manguera de escape de aire no quede demasiado doblada durante la
instalación
max 120 cm
min 30 cm
· Coloque el conector de la manguera de salida de aire en el extremo de la manguera.
· Coloque la manguera de entrada de aire en la parte posterior del aparato.
max 120 cm
min 30 cm
· Coloque el conector para la jación en la ventana en el otro extremo de la manguera de
salida de aire.
· Coloque el adaptador de ventana en su ventana. Esto puede hacerse tanto en ventanas
correderas tanto horizontales como verticales. Bloquee el adaptador de ventana en la
longitud deseada.
· Fije la manguera con el conector al adaptador de ventana.
· Utilice las juntas de ventanas para sellar las posibles aberturas en la ventana.
· Bloquee el adaptador de ventana en la longitud deseada utilizando el tope del adaptador
de ventana suministrado.

72
DO266A
ES
· Si lo desea, puede jar la ventana con la barra en L y 2 tornillos.
max 120 cm
min 30 cm
max 120 cm
min 30 cm
· Coloque el conector de la manguera de salida de aire en el extremo de la manguera.
· Coloque la manguera de entrada de aire en la parte posterior del aparato.
max 120 cm
min 30 cm
· Haga un oricio en la pared del tamaño del adaptador de pared.
· Coloque el adaptador de pared en la abertura. Fije el adaptador de pared con los tornillos
suministrados.
· Coloque el conector para la jación en la pared en el otro extremo de la manguera de salida
de aire.
· Fije el conector al adaptador de ventana.
max 120 cm
min 30 cm

73
DO266A
www.domo-elektro.be
ES
1
2
3
4
5
6
7
8
Las láminas horizontales en la parte delantera del aire acondicionado se pueden abrir y cerrar
manualmente para poder orientar mejor la salida de aire.
12
4
3
1. Tecla ON-OFF
Para encender y apagar la unidad.
2. Teclas “+” “-”
Se usan para ajustar la temperatura. La temperatura se puede ajustar entre 17°C y 30°C. Si
mantiene ambas echas pulsadas simultáneamente durante 3 segundos puede cambiar entre
“°C” y “°F”.
3. Tecla MODE
Esta tecla puede seleccionar el ajuste de funcionamiento deseado. Cada vez que se pulsa la
tecla, el modo de funcionamiento cambiará: AUTO, COOL DRY y FAN. La luz correspondiente
del panel de control se iluminará. Si selecciona el ajuste FAN (ventilador), la ventilación
soplará en la posición automática. Solo puede ajustar la velocidad de ventilación con el mando
a distancia.
4. Pantalla LED
Muestra la temperatura del sistema. Si el aparato está
ajustado en DRY o FAN la temperatura se mostrará en la
pantalla.
Cuando use el mando a distancia, asegúrese de orientarlo
hacia el aparato. Si no lo hace, después del cambio de un
ajuste determinado, todavía puede orientar el mando a
distancia hacia el aparato y pulsar en la tecla ON-OFF.
Cuando el aparato reciba una señal del mando a distancia
oirá un pitido. El mando a distancia se debe utilizar en un
radio de 8 metros alrededor del aparato.

74
DO266A
ES
1. Tecla ON-OFF
Para encender y apagar la unidad.
2. Tecla MODE
Esta tecla puede seleccionar el ajuste de funcionamiento deseado. Cada vez que se pulsa la
tecla, el modo de funcionamiento cambiará: AUTO, COOL DRY y FAN. La luz correspondiente
del panel de control se iluminará.
3. Tecla FAN (VENTILADOR)
Con esta tecla puede ajustar la velocidad de ventilación. Hay tres opciones: LOW (Bajo)
55
66
MODE display
Displays the current
mode, including:
AUTO
COOL
DRY
HEAT
FAN
Transmission Indicator
Lights up when remote sends
signal to unit
ON/OFF display
Appears when the unit is turned on,
and disappears when it is turned off
TIMER ON display
Displays when TIMER
ON is set
TIMER OFF display
Displays when TIMER
OFF is set
SLEEP display
Battery display
SILENT display
ECO display
Displays when
SLEEP function
is activated
FOLLOW ME
display
Indicates that
the FOLLOW ME
function is on
FAN SPEED display
Displays selected FAN SPEED:
HIGH, MED,
or LOW
This display is blank when
set to AUTO speed.
Temperature/Timer display
Displays the set temperature by default, or timer setting
when using TIMER ON/OFF functions
o O O
Temperature range: 17-30 C(62 F-86 F)
Timer setting range: 0-24 hours
This display is blank when operating in FAN mode.
1. Press the MODE button to select
COOL mode.
2. Set your desired temperature using
the Temp or Temp button.
3. Press the FAN button to select the
fan speed: AUTO, LOW, MED,or
HIGH.
4. Press the ON/OFF button to start the
unit.
In AUTO mode, the unit will automatically
select the COOL, FAN, HEAT or DRY mode
based on the set temperature.
1. Press the MODE button to select Auto mode.
2. Set your desired temperature using the
Temp or Temp button.
3. Press the ON/OFF button to start the unit.
,
NOTE: FAN SPEED can t be set in Auto mode.
SETTING TEMPERATURE
AUTO operation
The operating temperature range for units is
O O O
17-30 C(62 F-86 F). You can increase or
O O
decrease the set tmeperature in 1 C(1 F)
increments.
COOL operation
1
3
2
1
3
2
4
Not available for this unit
Not available for
this unit
Not available for
this unit
Low battery
detection
Remote LED Screen Indicators
How To Use The Basic Functions
ON/OFF
ON/OFF
TEMP
TEMP
SHORT
CUT
SHORT
CUT
TIMER
ON
TIMER
ON
TIMER
OFF
TIMER
OFF
MODE
MODE
FAN
FAN
SLEEP
SLEEP
LED
LED
FOLLOW
ION
SWING
ME
FOLLOW
ION
SWING
ME
,
HIGH (Alto)
55
66
MODE display
Displays the current
mode, including:
AUTO
COOL
DRY
HEAT
FAN
Transmission Indicator
Lights up when remote sends
signal to unit
ON/OFF display
Appears when the unit is turned on,
and disappears when it is turned off
TIMER ON display
Displays when TIMER
ON is set
TIMER OFF display
Displays when TIMER
OFF is set
SLEEP display
Battery display
SILENT display
ECO display
Displays when
SLEEP function
is activated
FOLLOW ME
display
Indicates that
the FOLLOW ME
function is on
FAN SPEED display
Displays selected FAN SPEED:
HIGH, MED,
or LOW
This display is blank when
set to AUTO speed.
Temperature/Timer display
Displays the set temperature by default, or timer setting
when using TIMER ON/OFF functions
o O O
Temperature range: 17-30 C(62 F-86 F)
Timer setting range: 0-24 hours
This display is blank when operating in FAN mode.
1. Press the MODE button to select
COOL mode.
2. Set your desired temperature using
the Temp or Temp button.
3. Press the FAN button to select the
fan speed: AUTO, LOW, MED,or
HIGH.
4. Press the ON/OFF button to start the
unit.
In AUTO mode, the unit will automatically
select the COOL, FAN, HEAT or DRY mode
based on the set temperature.
1. Press the MODE button to select Auto mode.
2. Set your desired temperature using the
Temp or Temp button.
3. Press the ON/OFF button to start the unit.
,
NOTE: FAN SPEED can t be set in Auto mode.
SETTING TEMPERATURE
AUTO operation
The operating temperature range for units is
O O O
17-30 C(62 F-86 F). You can increase or
O O
decrease the set tmeperature in 1 C(1 F)
increments.
COOL operation
1
3
2
1
3
2
4
Not available for this unit
Not available for
this unit
Not available for
this unit
Low battery
detection
Remote LED Screen Indicators
How To Use The Basic Functions
ON/OFF
ON/OFF
TEMP
TEMP
SHORT
CUT
SHORT
CUT
TIMER
ON
TIMER
ON
TIMER
OFF
TIMER
OFF
MODE
MODE
FAN
FAN
SLEEP
SLEEP
LED
LED
FOLLOW
ION
SWING
ME
FOLLOW
ION
SWING
ME
y AUTO (Automático).
4. Tecla SLEEP
Se utiliza para jar el modo “Sleep”.
Al seleccionar esta opción, la temperatura jada aumentará 1ºC dentro de 30 minutos. Tras
otros 30 minutos, la temperatura se elevará de nuevo 1ºC. Esta temperatura se mantendrá
durante las siguientes 7 horas. Después de este tiempo, la temperatura vuelve a la
conguración original de temperatura y se naliza el ajuste “Sleep”.
NOTA: Este ajuste no se puede seleccionar en el modo “Fan” o “Dry”.
5. Tecla TEMP
Se usan para ajustar la temperatura. La temperatura se puede ajustar entre 17°C y 30°C. Si
mantiene ambas echas pulsadas simultáneamente durante 3 segundos puede cambiar entre
“°C” y “°F”.
6. Tecla SHORT CUT
Con esta tecla puede determinar y activar un ajuste preferente.
7. Tecla TIMER ON
Con este botón se puede jar el tiempo en el que el aparato se enciende.
8. Tecla TIMER OFF
Con este botón se puede jar el tiempo en el que el aparato se apaga.
9. Tecla LED
Esta tecla activa la pantalla LED del panel de control. Puede utilizarla cuando la pantalla
emite demasiada luz y quiere dormir. Si pulsa dos veces este botón, la pantalla se volverá a
encender.

75
DO266A
www.domo-elektro.be
ES
55
66
MODE display
Displays the current
mode, including:
AUTO
COOL
DRY
HEAT
FAN
Transmission Indicator
Lights up when remote sends
signal to unit
ON/OFF display
Appears when the unit is turned on,
and disappears when it is turned off
TIMER ON display
Displays when TIMER
ON is set
TIMER OFF display
Displays when TIMER
OFF is set
SLEEP display
Battery display
SILENT display
ECO display
Displays when
SLEEP function
is activated
FOLLOW ME
display
Indicates that
the FOLLOW ME
function is on
FAN SPEED display
Displays selected FAN SPEED:
HIGH, MED,
or LOW
This display is blank when
set to AUTO speed.
Temperature/Timer display
Displays the set temperature by default, or timer setting
when using TIMER ON/OFF functions
o O O
Temperature range: 17-30 C(62 F-86 F)
Timer setting range: 0-24 hours
This display is blank when operating in FAN mode.
1. Press the MODE button to select
COOL mode.
2. Set your desired temperature using
the Temp or Temp button.
3. Press the FAN button to select the
fan speed: AUTO, LOW, MED,or
HIGH.
4. Press the ON/OFF button to start the
unit.
In AUTO mode, the unit will automatically
select the COOL, FAN, HEAT or DRY mode
based on the set temperature.
1. Press the MODE button to select Auto mode.
2. Set your desired temperature using the
Temp or Temp button.
3. Press the ON/OFF button to start the unit.
,
NOTE: FAN SPEED can t be set in Auto mode.
SETTING TEMPERATURE
AUTO operation
The operating temperature range for units is
O O O
17-30 C(62 F-86 F). You can increase or
O O
decrease the set tmeperature in 1 C(1 F)
increments.
COOL operation
1
3
2
1
3
2
4
Not available for this unit
Not available for
this unit
Not available for
this unit
Low battery
detection
Remote LED Screen Indicators
How To Use The Basic Functions
ON/OF F
ON/OF F
TEMP
TEMP
SHORT
CUT
SHORT
CUT
TIMER
ON
TIMER
ON
TIMER
OFF
TIMER
OFF
MODE
MODE
FAN
FAN
SLEEP
SLEEP
LED
LED
FOLLO W
ION
SWING
ME
FOLLO W
ION
SWING
ME
En el ajuste AUTO, el aparato selecciona automáticamente el ajuste adecuado en función de
la temperatura seleccionada. Este ajuste solo se puede seleccionar con el mando a distancia.
1. Con la tecla MODE, seleccione AUTO en el mando a distancia.
2. Ajuste la temperatura deseada con el botón TEMP. En función de esto, el aparato
determinará el ajuste.
En el modo AUTO no puede ajustar la velocidad de la ventilación (FAN).
55
66
MODE display
Displays the current
mode, including:
AUTO
COOL
DRY
HEAT
FAN
Transmission Indicator
Lights up when remote sends
signal to unit
ON/OFF display
Appears when the unit is turned on,
and disappears when it is turned off
TIMER ON display
Displays when TIMER
ON is set
TIMER OFF display
Displays when TIMER
OFF is set
SLEEP display
Battery display
SILENT display
ECO display
Displays when
SLEEP function
is activated
FOLLOW ME
display
Indicates that
the FOLLOW ME
function is on
FAN SPEED display
Displays selected FAN SPEED:
HIGH, MED,
or LOW
This display is blank when
set to AUTO speed.
Temperature/Timer display
Displays the set temperature by default, or timer setting
when using TIMER ON/OFF functions
o O O
Temperature range: 17-30 C(62 F-86 F)
Timer setting range: 0-24 hours
This display is blank when operating in FAN mode.
1. Press the MODE button to select
COOL mode.
2. Set your desired temperature using
the Temp or Temp button.
3. Press the FAN button to select the
fan speed: AUTO, LOW, MED,or
HIGH.
4. Press the ON/OFF button to start the
unit.
In AUTO mode, the unit will automatically
select the COOL, FAN, HEAT or DRY mode
based on the set temperature.
1. Press the MODE button to select Auto mode.
2. Set your desired temperature using the
Temp or Temp button.
3. Press the ON/OFF button to start the unit.
,
NOTE: FAN SPEED can t be set in Auto mode.
SETTING TEMPERATURE
AUTO operation
The operating temperature range for units is
O O O
17-30 C(62 F-86 F). You can increase or
O O
decrease the set tmeperature in 1 C(1 F)
increments.
COOL operation
1
3
2
1
3
2
4
Not available for this unit
Not available for
this unit
Not available for
this unit
Low battery
detection
Remote LED Screen Indicators
How To Use The Basic Functions
ON/OF F
ON/OF F
TEMP
TEMP
SHORT
CUT
SHORT
CUT
TIMER
ON
TIMER
ON
TIMER
OFF
TIMER
OFF
MODE
MODE
FAN
FAN
SLEEP
SLEEP
LED
LED
FOLLO W
ION
SWING
ME
FOLLO W
ION
SWING
ME
Con la función COOL puede refrigerar la estancia hasta una temperatura determinada.
1. Pulse en la tecla MODE hasta que se encienda la lámpara indicadora COOL.
2. Use las teclas “+” y “-” en el panel de control o la tecla TEMP en el mando a distancia
para ajustar la temperatura ambiente deseada.
3. Use la tecla FAN en el mando a distancia para ajustar la velocidad de ventilación
deseada. Hay tres ajustes: LOW
55
66
MODE display
Displays the current
mode, including:
AUTO
COOL
DRY
HEAT
FAN
Transmission Indicator
Lights up when remote sends
signal to unit
ON/OFF display
Appears when the unit is turned on,
and disappears when it is turned off
TIMER ON display
Displays when TIMER
ON is set
TIMER OFF display
Displays when TIMER
OFF is set
SLEEP display
Battery display
SILENT display
ECO display
Displays when
SLEEP function
is activated
FOLLOW ME
display
Indicates that
the FOLLOW ME
function is on
FAN SPEED display
Displays selected FAN SPEED:
HIGH, MED,
or LOW
This display is blank when
set to AUTO speed.
Temperature/Timer display
Displays the set temperature by default, or timer setting
when using TIMER ON/OFF functions
o O O
Temperature range: 17-30 C(62 F-86 F)
Timer setting range: 0-24 hours
This display is blank when operating in FAN mode.
1. Press the MODE button to select
COOL mode.
2. Set your desired temperature using
the Temp or Temp button.
3. Press the FAN button to select the
fan speed: AUTO, LOW, MED,or
HIGH.
4. Press the ON/OFF button to start the
unit.
In AUTO mode, the unit will automatically
select the COOL, FAN, HEAT or DRY mode
based on the set temperature.
1. Press the MODE button to select Auto mode.
2. Set your desired temperature using the
Temp or Temp button.
3. Press the ON/OFF button to start the unit.
,
NOTE: FAN SPEED can t be set in Auto mode.
SETTING TEMPERATURE
AUTO operation
The operating temperature range for units is
O O O
17-30 C(62 F-86 F). You can increase or
O O
decrease the set tmeperature in 1 C(1 F)
increments.
COOL operation
1
3
2
1
3
2
4
Not available for this unit
Not available for
this unit
Not available for
this unit
Low battery
detection
Remote LED Screen Indicators
How To Use The Basic Functions
ON/OFF
ON/OFF
TEMP
TEMP
SHORT
CUT
SHORT
CUT
TIMER
ON
TIMER
ON
TIMER
OFF
TIMER
OFF
MODE
MODE
FAN
FAN
SLEEP
SLEEP
LED
LED
FOLLOW
ION
SWING
ME
FOLLOW
ION
SWING
ME
, HIGH
55
66
MODE display
Displays the current
mode, including:
AUTO
COOL
DRY
HEAT
FAN
Transmission Indicator
Lights up when remote sends
signal to unit
ON/OFF display
Appears when the unit is turned on,
and disappears when it is turned off
TIMER ON display
Displays when TIMER
ON is set
TIMER OFF display
Displays when TIMER
OFF is set
SLEEP display
Battery display
SILENT display
ECO display
Displays when
SLEEP function
is activated
FOLLOW ME
display
Indicates that
the FOLLOW ME
function is on
FAN SPEED display
Displays selected FAN SPEED:
HIGH, MED,
or LOW
This display is blank when
set to AUTO speed.
Temperature/Timer display
Displays the set temperature by default, or timer setting
when using TIMER ON/OFF functions
o O O
Temperature range: 17-30 C(62 F-86 F)
Timer setting range: 0-24 hours
This display is blank when operating in FAN mode.
1. Press the MODE button to select
COOL mode.
2. Set your desired temperature using
the Temp or Temp button.
3. Press the FAN button to select the
fan speed: AUTO, LOW, MED,or
HIGH.
4. Press the ON/OFF button to start the
unit.
In AUTO mode, the unit will automatically
select the COOL, FAN, HEAT or DRY mode
based on the set temperature.
1. Press the MODE button to select Auto mode.
2. Set your desired temperature using the
Temp or Temp button.
3. Press the ON/OFF button to start the unit.
,
NOTE: FAN SPEED can t be set in Auto mode.
SETTING TEMPERATURE
AUTO operation
The operating temperature range for units is
O O O
17-30 C(62 F-86 F). You can increase or
O O
decrease the set tmeperature in 1 C(1 F)
increments.
COOL operation
1
3
2
1
3
2
4
Not available for this unit
Not available for
this unit
Not available for
this unit
Low battery
detection
Remote LED Screen Indicators
How To Use The Basic Functions
ON/OFF
ON/OFF
TEMP
TEMP
SHORT
CUT
SHORT
CUT
TIMER
ON
TIMER
ON
TIMER
OFF
TIMER
OFF
MODE
MODE
FAN
FAN
SLEEP
SLEEP
LED
LED
FOLLOW
ION
SWING
ME
FOLLOW
ION
SWING
ME
y AUTO (bajo, alto y
automático).
55
66
MODE display
Displays the current
mode, including:
AUTO
COOL
DRY
HEAT
FAN
Transmission Indicator
Lights up when remote sends
signal to unit
ON/OFF display
Appears when the unit is turned on,
and disappears when it is turned off
TIMER ON display
Displays when TIMER
ON is set
TIMER OFF display
Displays when TIMER
OFF is set
SLEEP display
Battery display
SILENT display
ECO display
Displays when
SLEEP function
is activated
FOLLOW ME
display
Indicates that
the FOLLOW ME
function is on
FAN SPEED display
Displays selected FAN SPEED:
HIGH, MED,
or LOW
This display is blank when
set to AUTO speed.
Temperature/Timer display
Displays the set temperature by default, or timer setting
when using TIMER ON/OFF functions
o O O
Temperature range: 17-30 C(62 F-86 F)
Timer setting range: 0-24 hours
This display is blank when operating in FAN mode.
1. Press the MODE button to select
COOL mode.
2. Set your desired temperature using
the Temp or Temp button.
3. Press the FAN button to select the
fan speed: AUTO, LOW, MED,or
HIGH.
4. Press the ON/OFF button to start the
unit.
In AUTO mode, the unit will automatically
select the COOL, FAN, HEAT or DRY mode
based on the set temperature.
1. Press the MODE button to select Auto mode.
2. Set your desired temperature using the
Temp or Temp button.
3. Press the ON/OFF button to start the unit.
,
NOTE: FAN SPEED can t be set in Auto mode.
SETTING TEMPERATURE
AUTO operation
The operating temperature range for units is
O O O
17-30 C(62 F-86 F). You can increase or
O O
decrease the set tmeperature in 1 C(1 F)
increments.
COOL operation
1
3
2
1
3
2
4
Not available for this unit
Not available for
this unit
Not available for
this unit
Low battery
detection
Remote LED Screen Indicators
How To Use The Basic Functions
ON/OF F
ON/OF F
TEMP
TEMP
SHORT
CUT
SHORT
CUT
TIMER
ON
TIMER
ON
TIMER
OFF
TIMER
OFF
MODE
MODE
FAN
FAN
SLEEP
SLEEP
LED
LED
FOLLO W
ION
SWING
ME
FOLLO W
ION
SWING
ME
Con esta función puede deshumidicar la estancia. Mantenga las ventanas y las puertas
cerradas cuando use esta función.
1. Pulse en la tecla MODE hasta que se encienda la lámpara indicadora DRY.
2. Use las teclas “+” y “-” en el panel de control o la tecla TEMP en el mando a distancia
para ajustar la temperatura ambiente deseada.
3. En este ajuste no puede ajustar la velocidad de ventilación.
55
66
MODE display
Displays the current
mode, including:
AUTO
COOL
DRY
HEAT
FAN
Transmission Indicator
Lights up when remote sends
signal to unit
ON/OFF display
Appears when the unit is turned on,
and disappears when it is turned off
TIMER ON display
Displays when TIMER
ON is set
TIMER OFF display
Displays when TIMER
OFF is set
SLEEP display
Battery display
SILENT display
ECO display
Displays when
SLEEP function
is activated
FOLLOW ME
display
Indicates that
the FOLLOW ME
function is on
FAN SPEED display
Displays selected FAN SPEED:
HIGH, MED,
or LOW
This display is blank when
set to AUTO speed.
Temperature/Timer display
Displays the set temperature by default, or timer setting
when using TIMER ON/OFF functions
o O O
Temperature range: 17-30 C(62 F-86 F)
Timer setting range: 0-24 hours
This display is blank when operating in FAN mode.
1. Press the MODE button to select
COOL mode.
2. Set your desired temperature using
the Temp or Temp button.
3. Press the FAN button to select the
fan speed: AUTO, LOW, MED,or
HIGH.
4. Press the ON/OFF button to start the
unit.
In AUTO mode, the unit will automatically
select the COOL, FAN, HEAT or DRY mode
based on the set temperature.
1. Press the MODE button to select Auto mode.
2. Set your desired temperature using the
Temp or Temp button.
3. Press the ON/OFF button to start the unit.
,
NOTE: FAN SPEED can t be set in Auto mode.
SETTING TEMPERATURE
AUTO operation
The operating temperature range for units is
O O O
17-30 C(62 F-86 F). You can increase or
O O
decrease the set tmeperature in 1 C(1 F)
increments.
COOL operation
1
3
2
1
3
2
4
Not available for this unit
Not available for
this unit
Not available for
this unit
Low battery
detection
Remote LED Screen Indicators
How To Use The Basic Functions
ON/OF F
ON/OF F
TEMP
TEMP
SHORT
CUT
SHORT
CUT
TIMER
ON
TIMER
ON
TIMER
OFF
TIMER
OFF
MODE
MODE
FAN
FAN
SLEEP
SLEEP
LED
LED
FOLLO W
ION
SWING
ME
FOLLO W
ION
SWING
ME
1. Pulse en la tecla MODE hasta que se encienda la lámpara indicadora FAN.
2. Use la tecla FAN en el mando a distancia para ajustar la velocidad de ventilación. Hay
tres ajustes: LOW
55
66
MODE display
Displays the current
mode, including:
AUTO
COOL
DRY
HEAT
FAN
Transmission Indicator
Lights up when remote sends
signal to unit
ON/OFF display
Appears when the unit is turned on,
and disappears when it is turned off
TIMER ON display
Displays when TIMER
ON is set
TIMER OFF display
Displays when TIMER
OFF is set
SLEEP display
Battery display
SILENT display
ECO display
Displays when
SLEEP function
is activated
FOLLOW ME
display
Indicates that
the FOLLOW ME
function is on
FAN SPEED display
Displays selected FAN SPEED:
HIGH, MED,
or LOW
This display is blank when
set to AUTO speed.
Temperature/Timer display
Displays the set temperature by default, or timer setting
when using TIMER ON/OFF functions
o O O
Temperature range: 17-30 C(62 F-86 F)
Timer setting range: 0-24 hours
This display is blank when operating in FAN mode.
1. Press the MODE button to select
COOL mode.
2. Set your desired temperature using
the Temp or Temp button.
3. Press the FAN button to select the
fan speed: AUTO, LOW, MED,or
HIGH.
4. Press the ON/OFF button to start the
unit.
In AUTO mode, the unit will automatically
select the COOL, FAN, HEAT or DRY mode
based on the set temperature.
1. Press the MODE button to select Auto mode.
2. Set your desired temperature using the
Temp or Temp button.
3. Press the ON/OFF button to start the unit.
,
NOTE: FAN SPEED can t be set in Auto mode.
SETTING TEMPERATURE
AUTO operation
The operating temperature range for units is
O O O
17-30 C(62 F-86 F). You can increase or
O O
decrease the set tmeperature in 1 C(1 F)
increments.
COOL operation
1
3
2
1
3
2
4
Not available for this unit
Not available for
this unit
Not available for
this unit
Low battery
detection
Remote LED Screen Indicators
How To Use The Basic Functions
ON/OFF
ON/OFF
TEMP
TEMP
SHORT
CUT
SHORT
CUT
TIMER
ON
TIMER
ON
TIMER
OFF
TIMER
OFF
MODE
MODE
FAN
FAN
SLEEP
SLEEP
LED
LED
FOLLOW
ION
SWING
ME
FOLLOW
ION
SWING
ME
, HIGH
55
66
MODE display
Displays the current
mode, including:
AUTO
COOL
DRY
HEAT
FAN
Transmission Indicator
Lights up when remote sends
signal to unit
ON/OFF display
Appears when the unit is turned on,
and disappears when it is turned off
TIMER ON display
Displays when TIMER
ON is set
TIMER OFF display
Displays when TIMER
OFF is set
SLEEP display
Battery display
SILENT display
ECO display
Displays when
SLEEP function
is activated
FOLLOW ME
display
Indicates that
the FOLLOW ME
function is on
FAN SPEED display
Displays selected FAN SPEED:
HIGH, MED,
or LOW
This display is blank when
set to AUTO speed.
Temperature/Timer display
Displays the set temperature by default, or timer setting
when using TIMER ON/OFF functions
o O O
Temperature range: 17-30 C(62 F-86 F)
Timer setting range: 0-24 hours
This display is blank when operating in FAN mode.
1. Press the MODE button to select
COOL mode.
2. Set your desired temperature using
the Temp or Temp button.
3. Press the FAN button to select the
fan speed: AUTO, LOW, MED,or
HIGH.
4. Press the ON/OFF button to start the
unit.
In AUTO mode, the unit will automatically
select the COOL, FAN, HEAT or DRY mode
based on the set temperature.
1. Press the MODE button to select Auto mode.
2. Set your desired temperature using the
Temp or Temp button.
3. Press the ON/OFF button to start the unit.
,
NOTE: FAN SPEED can t be set in Auto mode.
SETTING TEMPERATURE
AUTO operation
The operating temperature range for units is
O O O
17-30 C(62 F-86 F). You can increase or
O O
decrease the set tmeperature in 1 C(1 F)
increments.
COOL operation
1
3
2
1
3
2
4
Not available for this unit
Not available for
this unit
Not available for
this unit
Low battery
detection
Remote LED Screen Indicators
How To Use The Basic Functions
ON/OFF
ON/OFF
TEMP
TEMP
SHORT
CUT
SHORT
CUT
TIMER
ON
TIMER
ON
TIMER
OFF
TIMER
OFF
MODE
MODE
FAN
FAN
SLEEP
SLEEP
LED
LED
FOLLOW
ION
SWING
ME
FOLLOW
ION
SWING
ME
y AUTO (bajo, alto y automático).
3. La temperatura no se puede ajustar.
Con esta función puede poner en marcha su aparato en el momento deseado, hasta un
máximo de 24 horas.
1. Pulse la techa TIMER ON en el mando a distancia.
2. En la pantalla del mando a distancia podrá leer en cuánto tiempo empezará a
funcionar el aire acondicionado.
3. Pulse varias veces en la tecla TIMER ON para aumentar el tiempo. O mantenga la
tecla presionada.

76
DO266A
ES
4. Una vez que se haya ajustado el tiempo deseado, en la pantalla del mando a distancia
verá “Timer on”. En la pantalla del panel de control se pueden ver dos esferas
iluminadas.
5. Si desea desactivar el temporizador, pulse varias veces la tecla TIMER ON hasta que el
contador llegue a “0”. O mantenga la tecla presionada.
Con esta función puede apagar automáticamente el aparato cuando pase el tiempo
establecido.
1. Pulse la techa TIMER OFF en el mando a distancia.
2. En la pantalla del mando a distancia podrá leer en cuánto tiempo se apagará el aire
acondicionado.
3. Pulse varias veces la tecla TIMER OFF para aumentar el tiempo. O mantenga la tecla
presionada.
4. Una vez que se haya ajustado el tiempo deseado, en la pantalla del mando a distancia
verá “Timer o”. En la pantalla del panel de control se pueden ver dos esferas
iluminadas.
5. Si desea desactivar el temporizador, pulse varias veces la tecla TIMER OFF hasta que
el contador llegue a “0”.
También puede activar ambas funciones al mismo tiempo. De esta manera determina cuándo
se enciende el aparato, pero también cuándo se apaga.
Atención: este tiempo también es aplicable desde la hora en la que programa el ajuste. Por
ejemplo: ahora son las 13:00 h. Quiere que el aparato funcione entre las 16:30 y las 18:00 h.
Ajuste la función TIMER ON en 3,5 h y TIMER OFF en 5,0 h.
Al seleccionar esta opción, la temperatura jada aumentará 1ºC dentro de 30 minutos. Tras
otros 30 minutos, la temperatura se elevará de nuevo 1ºC. Esta temperatura se mantendrá
durante las siguientes 7 horas. Después de este tiempo, la temperatura vuelve a la
conguración original de temperatura y se naliza el ajuste “Sleep”.
NOTA: Este ajuste no se puede seleccionar en el modo “Fan” o “Dry”.
Con esta tecla puede determinar y activar un ajuste preferente.
Si utiliza un ajuste con más frecuencia, puede almacenar este ajuste manteniendo pulsada la
tecla SHORTCUT durante 3 segundos. Si lo hace, el aparato recordará los ajustes que estaban
activos al pulsar. Estos ajustes pueden ser: el ajuste de uso (MODE), la temperatura ajustada,
la velocidad de ventilación (FAN) y, en su caso, el ajuste SLEEP.

77
DO266A
www.domo-elektro.be
ES
A
Cuando pulse la tecla SHORTCUT, el aparato funcionará con los ajustes previamente
ajustados.
Durante la deshumidicación, puede utilizar un drenaje permanente.
1. Retire el cierre de drenaje y la tapa de goma de la parte central posterior del aparato.
2. Conecte la manguera de drenaje a la abertura de drenaje.
3. Asegúrese de que el agua pueda salir de forma segura y permanente.
1
2
Si no utiliza el drenaje continuo, el agua se recogerá en la bandeja colectora de la parte baja
del aparato.
· Cuando la bandeja está llena escuchará unos pitidos y en
la pantalla aparecerá el código P1. El deshumidicador o
el aire acondicionado se pararán. El ventilador continuará
funcionando, esto es normal.
· Traslade el aparato con cuidado a un lugar donde se puede
drenar el agua con facilidad.
· Retire el cierre del drenaje en la parte inferior el
acondicionador. (A) El agua saldrá.
· Después de haber vaciado el agua por completo, ponga el
cierre de nuevo en la abertura de drenaje.
· Ahora puede arrancar el aparato de nuevo. Fíjese en que
el código de “P1” desaparece de la pantalla. Si el código
no desaparece de inmediato, puede probar varias veces a
encender y apagar el aparato. Si el código persiste debe
comunicarse con el departamento de servicio.
· NOTA: instale siempre primero el cierre del drenaje antes de
encender de nuevo la unidad.

78
DO266A
ES
· Retire siempre el enchufe de la toma de corriente antes de limpiarlo.
· No utilice productos químicos o abrasivos para limpiar la unidad.
· Nunca lave el acondicionador con agua pues eso puede causar descargas eléctricas.
· Cuando el cable de alimentación esté dañado debe ser reemplazado o reparado por el
servicio post-venta del fabricante o una persona cualicada.
· Limpie el ltro de aire al menos cada 2 semanas para
evitar que el ventilador funcione mal por el polvo.
· Limpie el ltro en agua tibia con un detergente suave.
Enjuague bien el ltro y déjelo secar al aire.
· Cuando el ltro está completamente seco, se puede
colocarlo de nuevo en la unidad.
Use un paño húmedo y un poco de detergente suave para limpiar el exterior del
acondicionador. Seque el aparato después a fondo con un paño suave y seco.
Antes de guardar el acondicionador durante un período prolongado de tiempo debe hacer lo
siguiente para prevenir daños a la unidad:
· Retire toda el agua del acondicionador utilizando la manguera de drenaje.
· Encienda el aparato en el modo “Fan”, y deje el acondicionador durante medio día en una
sala con calefacción. Así el interior del aparato puede secarse completamente y se evita el
crecimiento de hongos.
· Apague la unidad, retire el enchufe de la toma de corriente y retire las pilas del mando a
distancia.
· Limpie los ltros y vuelva colocarlos en la unidad.
· Guarde el acondicionador en un lugar oscuro y seco.
El acondicionador no funciona cuando se pulsa la tecla de encendido.
· En la pantalla aparece P1: elimine el agua de la unidad.
· La temperatura ambiente es inferior a la temperatura jada en el aparato. Ajuste la
temperatura del aparato.

79
DO266A
www.domo-elektro.be
ES
El local no se enfría lo suciente.
· Las ventanas y las puertas no están cerradas. Asegúrese de que todas las ventanas y
puertas estén cerradas.
· Existen aparatos que producen calor en el local. Si es posible, retire la fuente de calor.
· La manguera de salida de aire se desconecta o se bloquea. Conecte la manguera y
asegúrese de que funciona correctamente.
· La temperatura jada es demasiado alta. Ajuste la temperatura adecuada.
· El ltro de aire está sucio. Reinig de luchtlter.
El acondicionador es demasiado ruidoso o produce vibraciones.
· El suelo no es horizontal o lo sucientemente plano. Coloque el acondicionador sobre una
supercie plana y horizontal si es posible.
· El ltro de aire está sucio. Reinig de luchtlter.
El aparato emite un sonido de gorgoteo.
· El sonido procede del refrigerante del aparato. Esto es normal.
Los códigos de error siguientes pueden aparecer en la pantalla del acondicionador :
- E1: el sensor de temperatura de la habitación no funciona. Apague el aparato y retire el
enchufe de la toma. Espere 10 seg. y vuelva a insertar el enchufe en la toma de la pared.
Vuelva a encender el aparato. Si el código de error vuelve a aparecer, comuníquese con el
centro de servicio.
- E2: el sensor del evaporador de aire no está funcionando. Apague el aparato y retire el
enchufe de la toma. Espere 10 seg. y meta de nuevo enchufe en la toma de la pared. Encienda
de nuevo el aparato. Si el código de error vuelve a aparecer, comuníquese con el centro de
servicio.
- E4: la pantalla no funciona correctamente. Apague el aparato y retire el enchufe de la toma.
Espere 10 seg. e inserte el enchufe en la pared. Encienda de nuevo el aparato. Si el código de
error vuelve a aparecer, póngase en contacto con el centro de servicio.
- P1: El tanque de agua está lleno - conecte la manguera de drenaje en la parte inferior y retire
el agua. Si el código de error vuelve a aparecer, comuníquese con el centro de servicio.

80
DO266A
ES
DIRECTR
El símbolo en el producto o en el embalaje indica que este
producto no puede ser tratado como residuo doméstico. Se
debe llevar a un lugar en el que se reciclan equipos eléctricos
y electrónicos. Si se asegura de que este producto se desecha
correctamente, usted ayudará a evitar posibles consecuencias
negativas para las personas y el medio ambiente que serían
causadospor un tratamiento de residuos inadecuado. Para
obtener información más detallada sobre el reciclaje de
este producto, póngase en contacto con su ayuntamiento, o
con la empresa o departamento responsable del servicio de
recogida de basura doméstica, o con la tienda donde adquirió
el producto.
El material de embalaje es reciclable. Trate el embalaje de una
manera medioambientalmente responsable.

81
DO266A
www.domo-elektro.be
IT
GARANZIA
La garanzia dell’apparecchio è valida per 2 anni a partire dalla data di acquisto. Durante il
periodo di validità della garanzia, il distributore si assume la piena responsabilità dei difetti
dei materiali o di quelli di fabbricazione. In caso di presenza di tali difetti, se necessario,
si procederà alla sostituzione o alla riparazione dell’apparecchio. Il periodo di garanzia
di 2 anni non ricomincia in quel momento, ma continua per 2 anni dalla data di acquisto
dell’apparecchio. Per la garanzia fa fede la data riportata sullo scontrino. Se l’apparecchio si
rivela difettoso nel periodo di validità della garanzia, cioè 2 anni, potete portarlo, insieme allo
scontrino, nel negozio dove l’avete acquistato.
La garanzia sugli accessori e sui componenti soggetti a usura è di 6 mesi.
La garanzia e la responsabilità del negoziante e del produttore decadono automaticamente
nei seguenti casi:
· mancata osservanza delle istruzioni contenute nel presente manuale;
· errato collegamento, per esempio con tensione elettrica troppo alta;
· uso errato, anormale e manesco;
· manutenzione insuciente o errata;
· riparazione o modiche all’apparecchio eseguite dal cliente o da terzi non autorizzati;
· uso di accessori o componenti non raccomandati o forniti dal negoziante o dal produttore.
· Quando si utilizzano dispositivi elettrici, è necessario tenere presenti le seguenti istruzioni
di sicurezza:
· Leggere con attenzione le presenti istruzioni. Conservare le istruzioni per possibili future
consultazioni.
· Prima di utilizzare il prodotto, togliere tutti gli imballi e gli eventuali adesivi promozionali.
Assicurarsi che i bambini non giochino con gli imballaggi.
· Questo apparecchio è destinato unicamente all’uso domestico e in ambienti analoghi,
quali:
· angoli cottura riservati al personale nei negozi, negli uci e in altri ambienti
professionali
· Fattorie
· Camere di alberghi, motel e altre strutture ricettive residenziali
· Camere per vacanze o ambienti analoghi
· L’apparecchio può essere utilizzato da bambini di età superiore a 16 anni e da persone con
ridotte capacità siche, sensoriali o mentali, o con mancanza di esperienza o conoscenza,
solo se sorvegliati o se hanno ricevuto istruzioni sull’uso sicuro dell’apparecchio e ne
comprendono i rischi. I bambini non possono giocare con l’apparecchio. Le operazioni di
pulizia e di manutenzione non devono essere eettuate dai bambini di età inferiore a 16
anni e senza sorveglianza.
· Tenere l’apparecchio fuori dalla portata dei bambini di età inferiore a 16 anni.

82
DO266A
IT
· Attenzione: non utilizzare l’apparecchio con un timer esterno.
· Prima dell’uso, vericare se la tensione indicata sull’apparecchio corrisponde alla tensione
della rete elettrica domestica.
· Il cavo di alimentazione deve essere sempre collegato a una presa installata correttamente
e con messa a terra in conformità alla normativa locale vigente.
· Non lasciare che il cavo rimanga appeso su una supercie calda o sul bordo di un tavolo o di
un bancone.
· Non utilizzare mai l’apparecchio se il cavo o la spina sono danneggiati, se l’apparecchio
non funziona correttamente o se l’apparecchio è danneggiato. In questi casi, portare
l’apparecchio presso il centro di assistenza qualicato più vicino per l’ispezione e la
riparazione.
· Una rigorosa supervisione è necessaria quando l’apparecchio viene utilizzato da o nelle
vicinanze di bambini.
· L’uso di accessori non consigliati o non venduti dal produttore può causare incendi,
elettrocuzioni o lesioni.
· Rimuovere la spina dalla presa quando l’apparecchio non è in uso, prima di montare o
rimuovere parti e prima di pulire l’apparecchio. Ruotare tutti i pulsanti in posizione spenta e
staccare la spina dalla presa stessa. Non tirare mai il cavo per estrarre la spina dalla presa.
· Non lasciare incustodito un apparecchio in funzione.
· Non posizionare mai l’apparecchio sopra o vicino a una stufa a gas o fuoco elettrico o in un
luogo in cui potrebbe entrare in contatto con un apparecchio caldo.
· Non usare l’apparecchio all’aperto.
· Utilizzare l’apparecchio solo per lo scopo per il quale è destinato.
· Utilizzare sempre l’apparecchio su una supercie solida, asciutta e piana.
· Utilizzare l’apparecchio solo per uso domestico. Il produttore non è responsabile per
incidenti derivanti da un uso improprio dell’apparecchio o dall’inosservanza delle regole
riportate nel presente manuale.
· Tutte le riparazioni, diverse dalla normale manutenzione dell’apparecchio, devono essere
eseguite dal produttore o dal suo servizio post-vendita.
· Non immergere mai l’apparecchio, il cavo elettrico o la spina in acqua o altri liquidi.
· Assicurarsi di tenere il cavo elettrico o l’apparecchio al di fuori della portata dei bambini.
· Tenere il cavo lontano da spigoli vivi, parti calde o altre fonti di calore.
· Non posizionare mai l’apparecchio in prossimità di un apparecchio a gas, fuoco o un liquido
altamente inammabile.
· Non colpire né scuotere mai l’apparecchio, per evitare danni.
· Non coprire mai l’ingresso e l’uscita dell’aria, per evitare il surriscaldamento.
· Non cospargere mai acqua sull’apparecchio né posizionarlo in prossimità dell’acqua, per
evitare elettrocuzioni.
· Non condividere mai con un altro apparecchio l’alimentazione elettrica al condizionatore
d’aria.

83
DO266A
www.domo-elektro.be
IT
· Non inserire nella presa né togliere mai la spina dalla presa con le mani bagnate.
· Non inserire mai oggetti estranei nelle aperture dell’apparecchio.
· Non utilizzare mai una prolunga per il cavo di alimentazione.
· Non lasciar mai giocare i bambini in prossimità dell’apparecchio.
· Quando l’apparecchio viene spento e poi riacceso, il compressore ha bisogno di almeno 3
minuti per ripartire.
· Posizionare l’apparecchio ad almeno un metro di distanza da televisori o radio, per evitare
disturbi.
· Non posizionare l’apparecchio direttamente sotto la luce del sole, per evitare che si
scolorisca.
· Non inclinare mai l’apparecchio di più di 35° quando lo si sposta. Spostare il condizionatore
d’aria tenendolo sempre in posizione diritta. Non spostare mai l’apparecchio a testa in giù.
· Eliminare sempre l’acqua dall’apparecchio prima di riporlo. Ciò ne prolunga la durata.
· Non utilizzare prodotti chimici per pulire l’apparecchio. Ciò lo danneggerebbe.
· Assicurarsi di spegnere l’alimentazione elettrica prima di rimuovere o montare la griglia di
ingresso dell’aria.
· Assicurarsi che il condizionatore d’aria sia sempre protetto contro l’umidità, come la
condensazione, gli schizzi d’acqua ecc. Assicurarsi che il condizionatore d’aria sia collocato
in modo che non possa cadere in acqua o in un altro liquido. Se dovesse tuttavia cadere in
acqua o in un altro liquido, scollegare immediatamente la spina dalla presa di corrente.
· Non utilizzare il condizionatore d’aria in ambienti umidi come ad esempio un bagno o una
lavanderia.
· Rivolgersi sempre a una persona qualicata per far riparare l’apparecchio.
· Assicurarsi che lo spazio libero attorno all’apparecchio sia di almeno 30 cm.
· Se il condizionatore d’aria cade, togliere immediatamente la spina dalla presa.
· Utilizzare i tasti dell’apparecchio usando solo le dita e nessun altro oggetto.
· Non rimuovere componenti ssi del condizionatore d’aria. Non utilizzare l’apparecchio se
non funziona correttamente e se è caduto o danneggiato.
· Non utilizzare mai la spina per accendere o spegnere l’apparecchio. Utilizzare sempre i
pulsanti sul pannello di controllo.
· Non utilizzare mai l’apparecchio in prossimità di sostanze leggermente inammabili, come
alcol, insetticidi, petrolio ecc.
· Riparazioni, individuazioni di perdite e interventi all’installazione devono essere eseguiti da
persone qualicate dotate delle certicazioni rilevanti.
· L’installazione deve essere eseguita secondo le istruzioni di installazione. Un’installazione
errata può causare perdite d’acqua, elettrocuzioni e incendi.
· Non toccare l’apparecchio con mani bagnate o umide o se si è scalzi.
· Se il condizionatore d’aria viene fatto cadere durante l’utilizzo, spegnerlo e scollegare
immediatamente la spina dalla presa elettrica. Ispezionare l’apparecchio per assicurarsi che
non vi siano danni. Se si pensa che l’apparecchio sia danneggiato, rivolgersi a un tecnico o
al servizio clienti.

84
DO266A
IT
· In caso di temporale, spegnere la corrente per evitare danni all’apparecchio causati da
eventuali fulmini.
· Se la funzione di drenaggio non è utilizzata, ssare entrambi i tappi in gomma nelle
aperture di drenaggio Riporre con cautela il tubo di drenaggio quando non è utilizzato, per
evitare l’accidentale soocamento di bambini.
· Non far correre il cavo sotto rivestimenti per pavimenti. Non coprire il cavo con
rivestimenti per pavimenti, tappeti o simili. Non posizionare il cavo sotto mobili
apparecchi. Passare il cavo lontano da vie di passaggio ma piuttosto dove nessuno possa
inciamparvi.
· Spegnere la corrente se l’apparecchio emette strani rumori, odori o fumo.
· Leggere attentamente tutte le avvertenze.
· Per lo scongelamento e la pulizia dell’apparecchio non utilizzare utensili diversi da quelli
raccomandati dall’azienda produttrice.
· L’apparecchio deve essere posizionato in ambienti privi di sorgenti di ignizione permanenti
(ad esempio: amme libere, apparati a gas o apparati elettrici in funzione).
· Non forare né bruciare l’apparecchio.
· I gas refrigeranti possono essere inodori.
· L’apparecchio va installato, utilizzato e conservato in uno spazio maggiore di 7 m
2
.
· Questo apparecchio contiene una certa quantità di grammi di gas refrigerante R290
(vedere la targhetta sul retro del sistema).
· L’R290 è un gas refrigerante conforme alle linee guida europee in materia di ambiente.
Non forare nessun componente del circuito di refrigerazione.
· Se l’apparecchio viene installato, utilizzato e conservato in un ambiente non ventilato,
tale ambiente deve essere progettato in modo da prevenire l’accumulazione di perdite
di sostanze refrigeranti, poiché tali perdite possono comportare un rischio di incendio o
esplosione mediante ignizione del refrigerante, causata da riscaldamento elettrico, stufe
elettriche o altre sorgenti di ignizione.
· L’apparecchio deve essere conservato in modo da evitare difetti meccanici.
· Le persone che utilizzano il circuito di refrigerazione o vi eseguono interventi, devono
disporre delle giuste certicazioni, assegnate da un ente accreditato, che garantiscono
la competenza nella gestione di refrigeranti, in conformità con una valutazione specica
riconosciuta da associazioni di settore.
· Le riparazioni devono essere eseguite in base alle raccomandazioni dell’azienda
produttrice. Le operazioni di manutenzione e riparazione per cui è necessaria l’assistenza
di altro personale qualicato devono essere eseguite sotto la sorveglianza di una persona
designata per l’utilizzo di refrigeranti inammabili.

85
DO266A
www.domo-elektro.be
IT
Attenzione: rischio di incendio / materiali inammabili.
Questo apparecchio utilizza un refrigerante inammabile. Se il refrigerante
perde ed è esposto a una sorgente di ignizione esterna sussiste il rischio di
incendio.
CONSERVARE QUESTE ISTRUZIONI
· Non utilizzare l’apparecchio in spazi più grandi della grandezza consigliata.
· Posizionare l’apparecchio in modo che il usso d’aria non sia ostacolato da mobili o altri
oggetti.
· Tenere chiuse le tende nelle ore più calde della giornata.
· Assicurarsi che i ltri siano sempre puliti.
· Tenere porte e nestre chiuse in modo che l’aria fresca rimanga all’interno e a quella calda
all’esterno.

86
DO266A
IT
1. Pannello di
controllo
2. Uscita dell’aria
3. Filtro dell’aria
4. Ingresso dell’aria
5. Uscita dell’aria
6. Drenaggio
7. Tubo di drenaggio
8. Telecomando
9. Tubo di uscita dell’aria
9 a. Attacco per tubo di uscita dell’aria
10. Accessorio per ssaggio a muro
10 a. Adattatore per muro
10 b. Attacco per ssaggio a muro
11. Accessorio per ssaggio a nestra
11 a. Adattatore per nestra
11 b. Attacco per ssaggio a nestra
11 c. Guarnizioni
11 d. Chiusura adattatore
11 e. Staa angolare con viti
1
2
3
4
5
6
8
7
11b 11c
11
11e

87
DO266A
www.domo-elektro.be
IT
INSTALLAZIONE
· Posizionare il condizionatore d’aria su una supercie solida e
stabile per ridurre al minimo il rumore e le vibrazioni. Assicurarsi
inoltre che la supercie sia abbastanza resistente per sostenere
il peso dell’apparecchio.
· L’apparecchio è dotato di ruote per essere spostato facilmente.
Assicurarsi di spostare l’apparecchio facendolo scorrere solo
su superci piane e levigate. Fare attenzione quando si sposta
l’apparecchio facendolo scorrere su un tappeto o una moquette.
Non spostare mai l’apparecchio facendolo scorrere su un
oggetto.
· Il cavo di alimentazione deve essere sempre collegato a una
presa installata correttamente e con messa a terra in conformità alla normativa locale
vigente.
· Non posizionare oggetti entro un raggio di 30 cm attorno all’apparecchio.
· Il tubo di uscita dell’aria deve essere applicato durante le modalità COOL o AUTO. Per le
modalità FAN e DRY il tubo di uscita dell’aria non occorre.
· Assicurarsi inoltre che non vi siano ostacoli attorno all’uscita dell’aria in esterno, in un
raggio di 50 cm.
· Assicurarsi che il tubo di uscita dell’aria non sia eccessivamente piegato durante l’uso.
max 120 cm
min 30 cm
· Applicare l’attacco del tubo di uscita dell’aria all’estremità del tubo.
· Applicare il tubo di uscita dell’aria all’uscita dell’aria sul retro dell’apparecchio.
max 120 cm
min 30 cm
· Applicare l’attacco dell’accessorio per ssaggio a nestra all’altra estremità del tubo di
uscita dell’aria.
· Posizionare l’adattatore per nestra nella nestra. Questo è possibile con nestre
scorrevoli sia orizzontalmente che verticalmente. Bloccare l’adattatore per nestra alla
giusta altezza.
· Fissare il tubo con l’attacco all’adattatore per nestra.
max 120 cm
min 30 cm

88
DO266A
IT
· Utilizzare le guarnizioni della nestra per chiudere eventuali aperture nella nestra stessa
· Bloccare l’adattatore per nestra alla giusta altezza utilizzando la chiusura adattatore per
nestra fornita.
· Se lo si desidera è possibile ssare la nestra con la staa angolare e due viti.
max 120 cm
min 30 cm
max 120 cm
min 30 cm
· Applicare l’attacco del tubo di uscita dell’aria all’estremità del tubo.
· Applicare il tubo di uscita dell’aria all’uscita dell’aria sul retro dell’apparecchio.
max 120 cm
min 30 cm
· Creare un’apertura nel muro delle dimensioni dell’adattatore per muro.
· Posizionare l’adattatore per muro nell’apertura. Fissare l’adattatore per muro con le viti
fornite.
· Applicare l’attacco dell’accessorio per ssaggio a muro all’altra estremità del tubo di uscita
dell’aria.
· Fissare il tubo con l’attacco all’adattatore per muro.
max 120 cm
min 30 cm

89
DO266A
www.domo-elektro.be
IT
Le lamelle orizzontali sul lato frontale del condizionatore d’aria possono essere regolate
manualmente per direzionare meglio l’uscita dell’aria.
12
4
3
1. Tasto ON-OFF
Per accendere e spegnere l’apparecchio.
2. Tasti “+” e “-”
Per regolare la temperatura. La temperatura può essere impostata tra 17°C e 30°C (modalità
COOL). Premendo entrambi i tasti contemporaneamente per 3 secondi si passa da “°C” e “°F”
e viceversa.
3. Tasto MODE
Questo tasto consente di selezionare la modalità d’uso desiderata. Ogni volta che si preme
il tasto, la modalità d’uso cambia: COOL, FAN e DRY. Si accenderà il relativo indicatore
luminoso sul pannello di controllo. Se si seleziona la modalità FAN, la ventilazione avviene
con impostazione automatica. La velocità di ventilazione può essere regolata solo con il
telecomando.
4. Display LED
Indica la temperatura selezionata. Quando l’apparecchio è nelle modalità DRY o FAN, sul
display è riportata la temperatura ambiente.
Quando si usa il telecomando, assicurarsi di rivolgerlo
verso l’apparecchio. Se questo non viene fatto, dopo aver
modicato una determinata impostazione, è possibile
rivolgere ancora il telecomando verso l’apparecchio e
premere il tasto ON-OFF.
Quando l’apparecchio riceve segnale dal telecomando,
si udirà un segnale acustico Il telecomando va utilizzato
entro un raggio di 8 metri dall’apparecchio.
1
2
3
4
5
6
7
8

90
DO266A
IT
1. Tasto ON-OFF
Per accendere e spegnere l’apparecchio.
2. Tasto MODE
Questo tasto consente di selezionare la modalità d’uso desiderata. Ogni volta che si preme il
tasto, la modalità d’uso cambia: AUTO, COOL, DRY e FAN. Si accenderà il relativo indicatore
luminoso sul pannello di controllo.
3. Tasto FAN
Questo tasto consente di regolare la velocità di ventilazione.
Sono disponibili tre livelli: LOW
55
66
MODE display
Displays the current
mode, including:
AUTO
COOL
DRY
HEAT
FAN
Transmission Indicator
Lights up when remote sends
signal to unit
ON/OFF display
Appears when the unit is turned on,
and disappears when it is turned off
TIMER ON display
Displays when TIMER
ON is set
TIMER OFF display
Displays when TIMER
OFF is set
SLEEP display
Battery display
SILENT display
ECO display
Displays when
SLEEP function
is activated
FOLLOW ME
display
Indicates that
the FOLLOW ME
function is on
FAN SPEED display
Displays selected FAN SPEED:
HIGH, MED,
or LOW
This display is blank when
set to AUTO speed.
Temperature/Timer display
Displays the set temperature by default, or timer setting
when using TIMER ON/OFF functions
o O O
Temperature range: 17-30 C(62 F-86 F)
Timer setting range: 0-24 hours
This display is blank when operating in FAN mode.
1. Press the MODE button to select
COOL mode.
2. Set your desired temperature using
the Temp or Temp button.
3. Press the FAN button to select the
fan speed: AUTO, LOW, MED,or
HIGH.
4. Press the ON/OFF button to start the
unit.
In AUTO mode, the unit will automatically
select the COOL, FAN, HEAT or DRY mode
based on the set temperature.
1. Press the MODE button to select Auto mode.
2. Set your desired temperature using the
Temp or Temp button.
3. Press the ON/OFF button to start the unit.
,
NOTE: FAN SPEED can t be set in Auto mode.
SETTING TEMPERATURE
AUTO operation
The operating temperature range for units is
O O O
17-30 C(62 F-86 F). You can increase or
O O
decrease the set tmeperature in 1 C(1 F)
increments.
COOL operation
1
3
2
1
3
2
4
Not available for this unit
Not available for
this unit
Not available for
this unit
Low battery
detection
Remote LED Screen Indicators
How To Use The Basic Functions
ON/OFF
ON/OFF
TEMP
TEMP
SHORT
CUT
SHORT
CUT
TIMER
ON
TIMER
ON
TIMER
OFF
TIMER
OFF
MODE
MODE
FAN
FAN
SLEEP
SLEEP
LED
LED
FOLLOW
ION
SWING
ME
FOLLOW
ION
SWING
ME
, HIGH
55
66
MODE display
Displays the current
mode, including:
AUTO
COOL
DRY
HEAT
FAN
Transmission Indicator
Lights up when remote sends
signal to unit
ON/OFF display
Appears when the unit is turned on,
and disappears when it is turned off
TIMER ON display
Displays when TIMER
ON is set
TIMER OFF display
Displays when TIMER
OFF is set
SLEEP display
Battery display
SILENT display
ECO display
Displays when
SLEEP function
is activated
FOLLOW ME
display
Indicates that
the FOLLOW ME
function is on
FAN SPEED display
Displays selected FAN SPEED:
HIGH, MED,
or LOW
This display is blank when
set to AUTO speed.
Temperature/Timer display
Displays the set temperature by default, or timer setting
when using TIMER ON/OFF functions
o O O
Temperature range: 17-30 C(62 F-86 F)
Timer setting range: 0-24 hours
This display is blank when operating in FAN mode.
1. Press the MODE button to select
COOL mode.
2. Set your desired temperature using
the Temp or Temp button.
3. Press the FAN button to select the
fan speed: AUTO, LOW, MED,or
HIGH.
4. Press the ON/OFF button to start the
unit.
In AUTO mode, the unit will automatically
select the COOL, FAN, HEAT or DRY mode
based on the set temperature.
1. Press the MODE button to select Auto mode.
2. Set your desired temperature using the
Temp or Temp button.
3. Press the ON/OFF button to start the unit.
,
NOTE: FAN SPEED can t be set in Auto mode.
SETTING TEMPERATURE
AUTO operation
The operating temperature range for units is
O O O
17-30 C(62 F-86 F). You can increase or
O O
decrease the set tmeperature in 1 C(1 F)
increments.
COOL operation
1
3
2
1
3
2
4
Not available for this unit
Not available for
this unit
Not available for
this unit
Low battery
detection
Remote LED Screen Indicators
How To Use The Basic Functions
ON/OFF
ON/OFF
TEMP
TEMP
SHORT
CUT
SHORT
CUT
TIMER
ON
TIMER
ON
TIMER
OFF
TIMER
OFF
MODE
MODE
FAN
FAN
SLEEP
SLEEP
LED
LED
FOLLOW
ION
SWING
ME
FOLLOW
ION
SWING
ME
e AUTO.
4. Tasto SLEEP
Questo tasto serve per selezionare la funzione “sleep” (sospensione).
Se si seleziona questa modalità, la temperatura impostata salirà di 1°C entro 30 minuti. Dopo
altri 30 minuti, la temperatura salirà ancora di 1°C. Questa temperatura rimarrà invariata per
le 7 ore successive. Dopodiché la temperatura passerà a quella originariamente selezionata e
la modalità SLEEP sarà terminata.
NOTA: questa opzione non può essere selezionata con le modalità FAN e DRY.
5. Tasto TEMP
Per regolare la temperatura. La temperatura può essere impostata tra 17°C e 30°C. Premendo
l’intero tasto TEMP per la regolazione della temperatura contemporaneamente per 3 secondi
si passa da “°C” e “°F” e viceversa.
6. Tasto SHORTCUT
Questo tasto consente di impostare e attivare una modalità di propria preferenza.
7. Tasto TIMER ON
Questo tasto consente di impostare un orario di accensione dell’apparecchio.
8. Tasto TIMER OFF
Questo tasto consente di impostare un orario di spegnimento dell’apparecchio.
9. Tasto LED
Questo tasto spegne il display LED del pannello di controllo, operazione utile se il display
emette troppa luce quando si vuole dormire. Premendo nuovamente tasto, il display si
riaccende.

91
DO266A
www.domo-elektro.be
IT
55
66
MODE display
Displays the current
mode, including:
AUTO
COOL
DRY
HEAT
FAN
Transmission Indicator
Lights up when remote sends
signal to unit
ON/OFF display
Appears when the unit is turned on,
and disappears when it is turned off
TIMER ON display
Displays when TIMER
ON is set
TIMER OFF display
Displays when TIMER
OFF is set
SLEEP display
Battery display
SILENT display
ECO display
Displays when
SLEEP function
is activated
FOLLOW ME
display
Indicates that
the FOLLOW ME
function is on
FAN SPEED display
Displays selected FAN SPEED:
HIGH, MED,
or LOW
This display is blank when
set to AUTO speed.
Temperature/Timer display
Displays the set temperature by default, or timer setting
when using TIMER ON/OFF functions
o O O
Temperature range: 17-30 C(62 F-86 F)
Timer setting range: 0-24 hours
This display is blank when operating in FAN mode.
1. Press the MODE button to select
COOL mode.
2. Set your desired temperature using
the Temp or Temp button.
3. Press the FAN button to select the
fan speed: AUTO, LOW, MED,or
HIGH.
4. Press the ON/OFF button to start the
unit.
In AUTO mode, the unit will automatically
select the COOL, FAN, HEAT or DRY mode
based on the set temperature.
1. Press the MODE button to select Auto mode.
2. Set your desired temperature using the
Temp or Temp button.
3. Press the ON/OFF button to start the unit.
,
NOTE: FAN SPEED can t be set in Auto mode.
SETTING TEMPERATURE
AUTO operation
The operating temperature range for units is
O O O
17-30 C(62 F-86 F). You can increase or
O O
decrease the set tmeperature in 1 C(1 F)
increments.
COOL operation
1
3
2
1
3
2
4
Not available for this unit
Not available for
this unit
Not available for
this unit
Low battery
detection
Remote LED Screen Indicators
How To Use The Basic Functions
ON/OF F
ON/OF F
TEMP
TEMP
SHORT
CUT
SHORT
CUT
TIMER
ON
TIMER
ON
TIMER
OFF
TIMER
OFF
MODE
MODE
FAN
FAN
SLEEP
SLEEP
LED
LED
FOLLO W
ION
SWING
ME
FOLLO W
ION
SWING
ME
Nella modalità AUTO, l’apparecchio sceglie automaticamente la modalità adatta in
funzione della temperatura selezionata. Questa modalità può essere selezionata solo con il
telecomando.
1. Sul telecomando, usare il tasto MODE per selezionare AUTO.
2. Selezionare la temperatura desiderata mediante il tasto TEMP. L’apparecchio imposta
la modalità adatta in base alla temperatura selezionata.
Nella modalità AUTO non è possibile regolare la velocità della ventilazione (FAN).
55
66
MODE display
Displays the current
mode, including:
AUTO
COOL
DRY
HEAT
FAN
Transmission Indicator
Lights up when remote sends
signal to unit
ON/OFF display
Appears when the unit is turned on,
and disappears when it is turned off
TIMER ON display
Displays when TIMER
ON is set
TIMER OFF display
Displays when TIMER
OFF is set
SLEEP display
Battery display
SILENT display
ECO display
Displays when
SLEEP function
is activated
FOLLOW ME
display
Indicates that
the FOLLOW ME
function is on
FAN SPEED display
Displays selected FAN SPEED:
HIGH, MED,
or LOW
This display is blank when
set to AUTO speed.
Temperature/Timer display
Displays the set temperature by default, or timer setting
when using TIMER ON/OFF functions
o O O
Temperature range: 17-30 C(62 F-86 F)
Timer setting range: 0-24 hours
This display is blank when operating in FAN mode.
1. Press the MODE button to select
COOL mode.
2. Set your desired temperature using
the Temp or Temp button.
3. Press the FAN button to select the
fan speed: AUTO, LOW, MED,or
HIGH.
4. Press the ON/OFF button to start the
unit.
In AUTO mode, the unit will automatically
select the COOL, FAN, HEAT or DRY mode
based on the set temperature.
1. Press the MODE button to select Auto mode.
2. Set your desired temperature using the
Temp or Temp button.
3. Press the ON/OFF button to start the unit.
,
NOTE: FAN SPEED can t be set in Auto mode.
SETTING TEMPERATURE
AUTO operation
The operating temperature range for units is
O O O
17-30 C(62 F-86 F). You can increase or
O O
decrease the set tmeperature in 1 C(1 F)
increments.
COOL operation
1
3
2
1
3
2
4
Not available for this unit
Not available for
this unit
Not available for
this unit
Low battery
detection
Remote LED Screen Indicators
How To Use The Basic Functions
ON/OF F
ON/OF F
TEMP
TEMP
SHORT
CUT
SHORT
CUT
TIMER
ON
TIMER
ON
TIMER
OFF
TIMER
OFF
MODE
MODE
FAN
FAN
SLEEP
SLEEP
LED
LED
FOLLO W
ION
SWING
ME
FOLLO W
ION
SWING
ME
La modalità COOL consente di rareddare l’ambiente no a una temperatura stabilita.
1. Premere il tasto MODE no a quando non si accende l’indicatore luminoso COOL.
2. Utilizzare i tasti “+” e “-” sul pannello di controllo o il tasto TEMP sul telecomando per
selezionare la temperatura ambiente desiderata.
3. Utilizzare il tasto FAN sul telecomando per regolare la velocità di ventilazione
desiderata. Sono disponibili tre livelli: LOW
55
66
MODE display
Displays the current
mode, including:
AUTO
COOL
DRY
HEAT
FAN
Transmission Indicator
Lights up when remote sends
signal to unit
ON/OFF display
Appears when the unit is turned on,
and disappears when it is turned off
TIMER ON display
Displays when TIMER
ON is set
TIMER OFF display
Displays when TIMER
OFF is set
SLEEP display
Battery display
SILENT display
ECO display
Displays when
SLEEP function
is activated
FOLLOW ME
display
Indicates that
the FOLLOW ME
function is on
FAN SPEED display
Displays selected FAN SPEED:
HIGH, MED,
or LOW
This display is blank when
set to AUTO speed.
Temperature/Timer display
Displays the set temperature by default, or timer setting
when using TIMER ON/OFF functions
o O O
Temperature range: 17-30 C(62 F-86 F)
Timer setting range: 0-24 hours
This display is blank when operating in FAN mode.
1. Press the MODE button to select
COOL mode.
2. Set your desired temperature using
the Temp or Temp button.
3. Press the FAN button to select the
fan speed: AUTO, LOW, MED,or
HIGH.
4. Press the ON/OFF button to start the
unit.
In AUTO mode, the unit will automatically
select the COOL, FAN, HEAT or DRY mode
based on the set temperature.
1. Press the MODE button to select Auto mode.
2. Set your desired temperature using the
Temp or Temp button.
3. Press the ON/OFF button to start the unit.
,
NOTE: FAN SPEED can t be set in Auto mode.
SETTING TEMPERATURE
AUTO operation
The operating temperature range for units is
O O O
17-30 C(62 F-86 F). You can increase or
O O
decrease the set tmeperature in 1 C(1 F)
increments.
COOL operation
1
3
2
1
3
2
4
Not available for this unit
Not available for
this unit
Not available for
this unit
Low battery
detection
Remote LED Screen Indicators
How To Use The Basic Functions
ON/OFF
ON/OFF
TEMP
TEMP
SHORT
CUT
SHORT
CUT
TIMER
ON
TIMER
ON
TIMER
OFF
TIMER
OFF
MODE
MODE
FAN
FAN
SLEEP
SLEEP
LED
LED
FOLLOW
ION
SWING
ME
FOLLOW
ION
SWING
ME
, HIGH
55
66
MODE display
Displays the current
mode, including:
AUTO
COOL
DRY
HEAT
FAN
Transmission Indicator
Lights up when remote sends
signal to unit
ON/OFF display
Appears when the unit is turned on,
and disappears when it is turned off
TIMER ON display
Displays when TIMER
ON is set
TIMER OFF display
Displays when TIMER
OFF is set
SLEEP display
Battery display
SILENT display
ECO display
Displays when
SLEEP function
is activated
FOLLOW ME
display
Indicates that
the FOLLOW ME
function is on
FAN SPEED display
Displays selected FAN SPEED:
HIGH, MED,
or LOW
This display is blank when
set to AUTO speed.
Temperature/Timer display
Displays the set temperature by default, or timer setting
when using TIMER ON/OFF functions
o O O
Temperature range: 17-30 C(62 F-86 F)
Timer setting range: 0-24 hours
This display is blank when operating in FAN mode.
1. Press the MODE button to select
COOL mode.
2. Set your desired temperature using
the Temp or Temp button.
3. Press the FAN button to select the
fan speed: AUTO, LOW, MED,or
HIGH.
4. Press the ON/OFF button to start the
unit.
In AUTO mode, the unit will automatically
select the COOL, FAN, HEAT or DRY mode
based on the set temperature.
1. Press the MODE button to select Auto mode.
2. Set your desired temperature using the
Temp or Temp button.
3. Press the ON/OFF button to start the unit.
,
NOTE: FAN SPEED can t be set in Auto mode.
SETTING TEMPERATURE
AUTO operation
The operating temperature range for units is
O O O
17-30 C(62 F-86 F). You can increase or
O O
decrease the set tmeperature in 1 C(1 F)
increments.
COOL operation
1
3
2
1
3
2
4
Not available for this unit
Not available for
this unit
Not available for
this unit
Low battery
detection
Remote LED Screen Indicators
How To Use The Basic Functions
ON/OFF
ON/OFF
TEMP
TEMP
SHORT
CUT
SHORT
CUT
TIMER
ON
TIMER
ON
TIMER
OFF
TIMER
OFF
MODE
MODE
FAN
FAN
SLEEP
SLEEP
LED
LED
FOLLOW
ION
SWING
ME
FOLLOW
ION
SWING
ME
e AUTO.
55
66
MODE display
Displays the current
mode, including:
AUTO
COOL
DRY
HEAT
FAN
Transmission Indicator
Lights up when remote sends
signal to unit
ON/OFF display
Appears when the unit is turned on,
and disappears when it is turned off
TIMER ON display
Displays when TIMER
ON is set
TIMER OFF display
Displays when TIMER
OFF is set
SLEEP display
Battery display
SILENT display
ECO display
Displays when
SLEEP function
is activated
FOLLOW ME
display
Indicates that
the FOLLOW ME
function is on
FAN SPEED display
Displays selected FAN SPEED:
HIGH, MED,
or LOW
This display is blank when
set to AUTO speed.
Temperature/Timer display
Displays the set temperature by default, or timer setting
when using TIMER ON/OFF functions
o O O
Temperature range: 17-30 C(62 F-86 F)
Timer setting range: 0-24 hours
This display is blank when operating in FAN mode.
1. Press the MODE button to select
COOL mode.
2. Set your desired temperature using
the Temp or Temp button.
3. Press the FAN button to select the
fan speed: AUTO, LOW, MED,or
HIGH.
4. Press the ON/OFF button to start the
unit.
In AUTO mode, the unit will automatically
select the COOL, FAN, HEAT or DRY mode
based on the set temperature.
1. Press the MODE button to select Auto mode.
2. Set your desired temperature using the
Temp or Temp button.
3. Press the ON/OFF button to start the unit.
,
NOTE: FAN SPEED can t be set in Auto mode.
SETTING TEMPERATURE
AUTO operation
The operating temperature range for units is
O O O
17-30 C(62 F-86 F). You can increase or
O O
decrease the set tmeperature in 1 C(1 F)
increments.
COOL operation
1
3
2
1
3
2
4
Not available for this unit
Not available for
this unit
Not available for
this unit
Low battery
detection
Remote LED Screen Indicators
How To Use The Basic Functions
ON/OF F
ON/OF F
TEMP
TEMP
SHORT
CUT
SHORT
CUT
TIMER
ON
TIMER
ON
TIMER
OFF
TIMER
OFF
MODE
MODE
FAN
FAN
SLEEP
SLEEP
LED
LED
FOLLO W
ION
SWING
ME
FOLLO W
ION
SWING
ME
Questa modalità consente di deumidicare l’ambiente. Quando si usa questa modalità, tenere
porte e nestre chiuse.
1. Premere il tasto MODE no a quando non si accende l’indicatore luminoso DRY.
2. Con questa modalità è possibile regolare la velocità di ventilazione.
55
66
MODE display
Displays the current
mode, including:
AUTO
COOL
DRY
HEAT
FAN
Transmission Indicator
Lights up when remote sends
signal to unit
ON/OFF display
Appears when the unit is turned on,
and disappears when it is turned off
TIMER ON display
Displays when TIMER
ON is set
TIMER OFF display
Displays when TIMER
OFF is set
SLEEP display
Battery display
SILENT display
ECO display
Displays when
SLEEP function
is activated
FOLLOW ME
display
Indicates that
the FOLLOW ME
function is on
FAN SPEED display
Displays selected FAN SPEED:
HIGH, MED,
or LOW
This display is blank when
set to AUTO speed.
Temperature/Timer display
Displays the set temperature by default, or timer setting
when using TIMER ON/OFF functions
o O O
Temperature range: 17-30 C(62 F-86 F)
Timer setting range: 0-24 hours
This display is blank when operating in FAN mode.
1. Press the MODE button to select
COOL mode.
2. Set your desired temperature using
the Temp or Temp button.
3. Press the FAN button to select the
fan speed: AUTO, LOW, MED,or
HIGH.
4. Press the ON/OFF button to start the
unit.
In AUTO mode, the unit will automatically
select the COOL, FAN, HEAT or DRY mode
based on the set temperature.
1. Press the MODE button to select Auto mode.
2. Set your desired temperature using the
Temp or Temp button.
3. Press the ON/OFF button to start the unit.
,
NOTE: FAN SPEED can t be set in Auto mode.
SETTING TEMPERATURE
AUTO operation
The operating temperature range for units is
O O O
17-30 C(62 F-86 F). You can increase or
O O
decrease the set tmeperature in 1 C(1 F)
increments.
COOL operation
1
3
2
1
3
2
4
Not available for this unit
Not available for
this unit
Not available for
this unit
Low battery
detection
Remote LED Screen Indicators
How To Use The Basic Functions
ON/OF F
ON/OF F
TEMP
TEMP
SHORT
CUT
SHORT
CUT
TIMER
ON
TIMER
ON
TIMER
OFF
TIMER
OFF
MODE
MODE
FAN
FAN
SLEEP
SLEEP
LED
LED
FOLLO W
ION
SWING
ME
FOLLO W
ION
SWING
ME
1. Premere il tasto MODE no a quando non si accende l’indicatore luminoso FAN.
2. Premere il tasto FAN sul telecomando per regolare la velocità di ventilazione. Sono
disponibili tre livelli: LOW
55
66
MODE display
Displays the current
mode, including:
AUTO
COOL
DRY
HEAT
FAN
Transmission Indicator
Lights up when remote sends
signal to unit
ON/OFF display
Appears when the unit is turned on,
and disappears when it is turned off
TIMER ON display
Displays when TIMER
ON is set
TIMER OFF display
Displays when TIMER
OFF is set
SLEEP display
Battery display
SILENT display
ECO display
Displays when
SLEEP function
is activated
FOLLOW ME
display
Indicates that
the FOLLOW ME
function is on
FAN SPEED display
Displays selected FAN SPEED:
HIGH, MED,
or LOW
This display is blank when
set to AUTO speed.
Temperature/Timer display
Displays the set temperature by default, or timer setting
when using TIMER ON/OFF functions
o O O
Temperature range: 17-30 C(62 F-86 F)
Timer setting range: 0-24 hours
This display is blank when operating in FAN mode.
1. Press the MODE button to select
COOL mode.
2. Set your desired temperature using
the Temp or Temp button.
3. Press the FAN button to select the
fan speed: AUTO, LOW, MED,or
HIGH.
4. Press the ON/OFF button to start the
unit.
In AUTO mode, the unit will automatically
select the COOL, FAN, HEAT or DRY mode
based on the set temperature.
1. Press the MODE button to select Auto mode.
2. Set your desired temperature using the
Temp or Temp button.
3. Press the ON/OFF button to start the unit.
,
NOTE: FAN SPEED can t be set in Auto mode.
SETTING TEMPERATURE
AUTO operation
The operating temperature range for units is
O O O
17-30 C(62 F-86 F). You can increase or
O O
decrease the set tmeperature in 1 C(1 F)
increments.
COOL operation
1
3
2
1
3
2
4
Not available for this unit
Not available for
this unit
Not available for
this unit
Low battery
detection
Remote LED Screen Indicators
How To Use The Basic Functions
ON/OFF
ON/OFF
TEMP
TEMP
SHORT
CUT
SHORT
CUT
TIMER
ON
TIMER
ON
TIMER
OFF
TIMER
OFF
MODE
MODE
FAN
FAN
SLEEP
SLEEP
LED
LED
FOLLOW
ION
SWING
ME
FOLLOW
ION
SWING
ME
, HIGH
55
66
MODE display
Displays the current
mode, including:
AUTO
COOL
DRY
HEAT
FAN
Transmission Indicator
Lights up when remote sends
signal to unit
ON/OFF display
Appears when the unit is turned on,
and disappears when it is turned off
TIMER ON display
Displays when TIMER
ON is set
TIMER OFF display
Displays when TIMER
OFF is set
SLEEP display
Battery display
SILENT display
ECO display
Displays when
SLEEP function
is activated
FOLLOW ME
display
Indicates that
the FOLLOW ME
function is on
FAN SPEED display
Displays selected FAN SPEED:
HIGH, MED,
or LOW
This display is blank when
set to AUTO speed.
Temperature/Timer display
Displays the set temperature by default, or timer setting
when using TIMER ON/OFF functions
o O O
Temperature range: 17-30 C(62 F-86 F)
Timer setting range: 0-24 hours
This display is blank when operating in FAN mode.
1. Press the MODE button to select
COOL mode.
2. Set your desired temperature using
the Temp or Temp button.
3. Press the FAN button to select the
fan speed: AUTO, LOW, MED,or
HIGH.
4. Press the ON/OFF button to start the
unit.
In AUTO mode, the unit will automatically
select the COOL, FAN, HEAT or DRY mode
based on the set temperature.
1. Press the MODE button to select Auto mode.
2. Set your desired temperature using the
Temp or Temp button.
3. Press the ON/OFF button to start the unit.
,
NOTE: FAN SPEED can t be set in Auto mode.
SETTING TEMPERATURE
AUTO operation
The operating temperature range for units is
O O O
17-30 C(62 F-86 F). You can increase or
O O
decrease the set tmeperature in 1 C(1 F)
increments.
COOL operation
1
3
2
1
3
2
4
Not available for this unit
Not available for
this unit
Not available for
this unit
Low battery
detection
Remote LED Screen Indicators
How To Use The Basic Functions
ON/OFF
ON/OFF
TEMP
TEMP
SHORT
CUT
SHORT
CUT
TIMER
ON
TIMER
ON
TIMER
OFF
TIMER
OFF
MODE
MODE
FAN
FAN
SLEEP
SLEEP
LED
LED
FOLLOW
ION
SWING
ME
FOLLOW
ION
SWING
ME
e AUTO.
3. Non è possibile regolare la temperatura.
Questa modalità consente di far avviare l’apparecchio in un momento successivo, entro
massimo 24 ore.
1. Premere il tasto TIMER ON sul telecomando.
2. Sul display del telecomando è ora possibile leggere tra quanto tempo si avvierà il
condizionatore d’aria.
3. Premere più volte il tasto TIMER ON per incrementare l’intervallo di tempo. In
alternativa, tenere premuto il tasto.

92
DO266A
IT
4. Una volta selezionato l’intervallo di tempo desiderato, sul display del telecomando
compare “Timer on”. Sul display del pannello di controllo compaiono due puntini
illuminati.
5. Per disattivare il timer, premere più volte il tasto TIMER ON no a quando non
compare “0”. In alternativa, tenere premuto il tasto.
Questa modalità consente di far spegnere l’apparecchio automaticamente dopo un intervallo
di tempo.
1. Premere il tasto TIMER OFF sul telecomando.
2. Sul display del telecomando è ora possibile leggere tra quanto tempo si spegnerà il
condizionatore d’aria.
3. Premere più volte il tasto TIMER OFF per incrementare l’intervallo di tempo. In
alternativa, tenere premuto il tasto.
4. Una volta selezionato l’intervallo di tempo desiderato, sul display del telecomando
compare “Timer o”.
5. Per disattivare il timer, premere più volte il tasto TIMER OFF no a quando non
compare “0”.
È inoltre possibile attivare contemporaneamente entrambe le modalità. In questo modo si
stabilisce sia quando l’apparecchio si avvia sia quando si spegne.
Attenzione: il tempo parte dall’ora in cui viene programmate la modalità. Ad esempio:
attualmente sono le 13:00. Si desidera avere l’apparecchio in funzione dalle 16:30 alle 18:00.
Impostare la funzione TIMER ON su 3,5 ore e TIMER OFF su 5 ore.
Se si seleziona questa modalità, la temperatura impostata salirà di 1°C entro 30 minuti. Dopo
altri 30 minuti, la temperatura salirà ancora di 1°C. Questa temperatura rimarrà invariata per
le 7 ore successive. Dopodiché la temperatura passerà a quella originariamente selezionata e
la modalità SLEEP sarà terminata.
NOTA: questa modalità non può essere selezionata con FAN e DRY.
Questo tasto consente di impostare e attivare una modalità di propria preferenza.
Se si utilizza spesso una determinata modalità, è possibile memorizzarla tenendo premuto
per 3 secondi il tasto SHORTCUT. L’apparecchio memorizza le impostazioni attive nel
momento in cui si preme il tasto. Le impostazioni possono essere: la modalità d’uso (MODE),
la temperatura selezionata, la velocità di ventilazione (FAN) ed eventualmente la modalità
SLEEP. Quando si preme il tasto SHORTCUT, l’apparecchio funzionerà con le impostazioni
selezionate.

93
DO266A
www.domo-elektro.be
IT
DRENAGGIO
Durante la deumidicazione è possibile utilizzare un drenaggio permanente.
1. Rimuovere la chiusura di drenaggio e il tappo in gomma al centro, sul retro
dell’apparecchio.
2. Fissare il tubo di drenaggio all’apertura di drenaggio.
3. Assicurarsi che l’acqua possa fuoriuscire in modo sicuro e permanente.
1
2
Quando non si ricorre al drenaggio permanente, l’acqua viene
raccolta nel vano di drenaggio, sotto l’apparecchio.
· Quando il vano è pieno, si udiranno alcuni segnali acustici e
sul display compare il codice “P1”. La deumidicazione o il
condizionamento dell’aria si interromperanno. Il ventilatore
rimane in funzione, questo è normale.
· Spostare l’apparecchio con cautela in un luogo dove è
possibile far fuoriuscire facilmente l’acqua.
· Rimuovere la chiusura dell’apertura di drenaggio sotto
l’apparecchio (A). A questo punto l’acqua fuoriuscirà
· Una volta rimossa tutta l’acqua, richiudere l’apertura di
drenaggio.
· A questo punto è possibile riaccendere l’apparecchio.
Accertarsi che il codice “P1” sul display scompaia. Se il
codice non scopare immediatamente, provare a spegnere e
riaccendere più volte l’apparecchio. Se il codice continua ad
essere visualizzato, rivolgersi al servizio di assistenza.
· NOTA: applicare sempre la chiusura di drenaggio prima di riaccendere l’apparecchio.
· Rimuovere sempre la spina dalla presa di corrente prima di pulire l’apparecchio.
· Non utilizzare prodotti chimici o abrasivi per pulire l’apparecchio.
A

94
DO266A
IT
· Non lavare mai l’apparecchio con acqua o altri liquidi, ciò può causare elettrocuzioni.
· Se il cavo elettrico è danneggiato deve essere riparato o sostituito dal servizio post-vendita
del fabbricante o da una persona qualicata.
· Pulire il ltro dell’aria almeno ogni 2 settimane, per evitare
che il ventilatore funzioni male a causa di polvere nel ltro.
· Pulire il ltro in acqua tiepida con un detergente delicato.
Sciacquare bene il ltro e lasciarlo asciugare all’aria.
· Quando il ltro è completamente asciutto è possibile
riapplicarlo all’apparecchio.
Usare un panno morbido umido e del detergente delicato per pulire la parte esterna
dell’apparecchio. Dopodiché, asciugare bene l’apparecchio con un panno morbido asciutto.
Prima di riporre l’apparecchio per un lungo periodo, è opportuno procedere come segue per
evitare che si danneggi:
· Eliminare tutta l’acqua dall’apparecchio ricorrendo al drenaggio.
· Dopodiché, attivare la modalità FAN. Lasciare l’apparecchio in funzione per mezza
giornata in un ambiente riscaldato. In questo modo l’esterno dell’apparecchio potrà
asciugarsi completamente e si previene la formazione di mua.
· Spegnere l’apparecchio, scollegare la spina dalla presa di corrente e rimuovere le batterie
dal telecomando.
· Pulire il ltro e reinserirlo nell’apparecchio.
· Riporre l’apparecchio in un luogo asciutto e buio.
L’apparecchio non funziona quando si preme il tasto ON/OFF.
· Sul display compare il codice P1: rimuovere l’acqua dall’apparecchio.
· La temperatura ambiente è più bassa della temperatura selezionata. Regolare la
temperatura sull’apparecchio.
L’ambiente non si raredda sucientemente.
· Porte e nestre non sono chiuse. Accertarsi che tutte le porte e le nestre siano chiuse.
· Nell’ambiente sono presenti apparecchi che producono calore. Se possibile, eliminare le
fonti di calore.
· Il tubo di uscita dell’aria non è collegato o è bloccato. Collegare il tubo e accertarsi che
funzioni correttamente.

95
DO266A
www.domo-elektro.be
IT
· La temperatura impostata è troppo alta. Regolare la temperatura selezionata.
· Il ltro dell’aria è sporco. Pulire il ltro dell’aria.
L’apparecchio fa troppo rumore o provoca vibrazioni.
· Il pavimento non è abbastanza piano o dritto. Posizionare il dispositivo su una supercie
piana e dritta.
· Il ltro dell’aria è sporco. Pulire il ltro dell’aria.
L’apparecchio emette un gorgoglio.
· Il rumore proviene dal liquido refrigerante all’interno dell’apparecchio. Questo è normale.
Sul display dell’apparecchio possono comparire i seguenti codici di errore:
E1: il sensore della temperatura ambiente non funziona. Spegnere l’apparecchio e scollegare
la spina dalla presa di corrente. Attendere 10 secondi e ricollegare la spina alla presa di
corrente. Riaccendere l’apparecchio. Se il codice continua ad essere visualizzato, rivolgersi al
servizio di assistenza.
E2: il sensore dell’umidicatore non funziona. Spegnere l’apparecchio e scollegare la spina
dalla presa di corrente. Attendere 10 secondi e ricollegare la spina alla presa di corrente.
Riaccendere l’apparecchio. Se il codice continua ad essere visualizzato, rivolgersi al servizio di
assistenza.
E4: il display non funziona correttamente. Spegnere l’apparecchio e scollegare la spina
dalla presa di corrente. Attendere 10 secondi e ricollegare la spina alla presa di corrente.
Riaccendere l’apparecchio. Se il codice continua ad essere visualizzato, rivolgersi al servizio di
assistenza.
P1: il serbatoio dell’acqua è pieno. Rimuovere l’acqua attenendosi alla sezione “Drenaggio”
della presente guida.

96
DO266A
IT
Il simbolo sul prodotto o sulla confezione indica che esso non
deve essere trattato come riuto domestico. Deve, al contrario,
essere conferito al punto di raccolta predisposto per il riciclo delle
apparecchiature elettriche ed elettroniche. Facendo in modo che
questo prodotto venga smaltito correttamente aiuterete a prevenire
potenziali conseguenze negative per l’ambiente e la salute dell’uomo,
che potrebbero essere causate da uno smaltimento non corretto. Per
maggiori informazioni sul riciclo di questo prodotto, consultare le
autorità comunali, l’azienda o il servizio responsabili della raccolta dei
riuti domestici o il negozio in cui il prodotto è stato acquistato.
Il materiale di imballaggio è riciclabile. Lo smaltimento
dell’imballaggio deve avvenire al ne di tutelare l’ambiente.

97
DO266A
www.domo-elektro.be
CZ
Práva a povinnosti prodávajícího a kupujícího ohledně práv z vadného plnění se řídí
příslušnými obecně závaznými předpisy dle občanského zákoníku.
1. Trvání záruky: 2 roky
2. Záruka se nevztahuje
a) na mechanické poškození
b) nesprávné používání v rozporu s návodem k použití
3. Záruka zaniká:
- při použití spotřebiče jinak než v je uvedeno v manuálu (nesprávným postupem)
- při provádění opravy nebo změny na spotřebiči osobou jinou než pověřenou naším
servisem
Prodávající odpovídá kupujícímu, že zboží při převzetí nemá vady. Zejména prodávající
odpovídá kupujícímu, že v době, kdy kupující zboží převzal:
· má zboží takové vlastnosti, které výrobce v tomto návodu popisuje,
· se zboží hodí k účelu, ke kterému výrobce uvádí,
· zboží odpovídá jakostí nebo provedením smluvenému vzorku nebo předloze, byla-li jakost
nebo provedení určeno podle smluveného vzorku nebo předlohy,
· zboží vyhovuje požadavkům právních předpisů.
Projeví-li se vada v průběhu šesti měsíců od převzetí, má se za to, že zboží bylo vadné již při
převzetí.
Pokud není u výrobku uvedeno jinak, činí záruční doba 24 měsíců. Záruční doba počíná běžet
od převzetí věci kupujícím.
Práva z vadného plnění uplatňuje kupující u prodávajícího na adrese jeho provozovny, v níž
je přijetí reklamace možné s ohledem na sortiment prodávaného zboží, případně i v sídle
nebo místě podnikání. Za okamžik uplatnění reklamace se považuje okamžik, kdy prodávající
obdržel od kupujícího reklamované zboží.
Reklamaci lze také uplatnit v servisním středisku na adrese
Pro rychlé a bezproblémové vyřízení reklamace doporučujeme přiložit k reklamaci doklad o koupi
a průvodní dopis s popisem závady a zpáteční adresou s telefonickým kontaktem.

98
DO266A
CZ
· Pečlivě si přečtěte tyto informace a manuál nechte i pro pozdější nahlédnutí.
· Ujistěte se, že před použitím odlepíte a odstraníte veškeré reklamní a ochranné fólie.
· Děti si s ochrannými ani reklamními polepy nesmí hrát.
· Přístroj je určen pro používání v domácnostech a podobných prostředích, tak jako je:
· kuchyňky v obchodech, kancelářích atd.
· chaty, chalupy
· hotely, penziony a jiné dočasné ubytování
· Dohlédněte, aby si děti nehrály s přístrojem.
· Tento spotřebič mohou používat děti ve věku 16 let a starší a osoby se sníženými fyzickými,
smyslovými nebo mentálními schopnostmi, nebo nedostatkem zkušeností a znalostí
pokud jsou pod neustálým dozorem nebo byly poučeny o používání spotřebiče bezpečným
způsobem a rozumí případným nebezpečím. Děti si s přístrojem nesmějí hrát. Čištění a
údržbu prováděnou uživatelem nesmějí provádět děti bez dozoru.
· Čistění a běžnou údržbu smí provádět pouze osoby starší 16 let a při tom být pod
dohledem.
· Přístroj a jeho el. kabel skladujte mimo dosah dětí.
· Upozornění: Přístroj se nesmí používat s externími časovači.
· Před použitím důkladně zkontrolujte, zda napětí a frekvence el. sítě ve vaší domácnosti
odpovídají požadavkům uvedeným na přístroji.
· Zástrčku (přívodní kabel) zapojujte vždy jen do zásuvky, která je bez vad a nainstalována,
uzemněna v souladu se všemi místními normami.
· Nikdy neumisťujte přístroj v blízkosti trouby, ohně, nebo vysoce hořlavých tekutin.
· Nikdy do přístroje nebouchejte a netřeste s ním, mohli byste jej poškodit.
· Nikdy nezakrývejte sání vzduchu, ani výfuk, mohli byste způsobit přehřátí přístroje.
· Dávejte pozor, abyste přístroj nepocákali vodou a neumisťujte jej v blízkosti zdrojů vody,
aby nemohlo dojít ke zkratu.
· Poškozený napájecí kabel musí být vyměněn výrobcem, nebo v odborném servisu, či
kvalikovanou osobou.
· Nikdy nezapojujte jiný elektrický přístroj do stejného okruhu, jako klimatizaci.
· Nikdy neberte zástrčku do mokrých rukou.
· Nikdy nestrkejte do otvorů přístroje cizí objekty.
· Nepoužívejte přístroj s prodlužovací šňůrou.
· Nedovolte dětem, aby si hráli s přístrojem, nebo blízko něj.
· Po vypnutí přístroje počkejte alespoň 3 minuty, než jej zapnete znovu. Kompresor
potřebuje nějaký čas, aby nedošlo k jeho poškození.
· Přístroj umisťujte alespoň 1m od televize, nebo rádia, abyste zamezili rušení.

99
DO266A
www.domo-elektro.be
CZ
· Abyste zachovali barvu přístroje, nestavte jej na přímé sluneční světlo.
· Nikdy při manipulaci s přístroje nenaklánějte přístroj o více než 35o. Nikdy přístroj
nepokládejte, nebo neotáčejte dnem vzhůru.
· Přístroj vždy umístěte na rovný a stabilní povrch.
· Než přístroj uschováte, nezapomeňte z něj vylít zkondenzovanou vodu. Zajistíte tak Vaší
klimatizaci dobrou funkčnost po delší dobu.
· Na čištění přístroje nikdy nepoužívejte chemikálie.
· Přístroj vždy vypněte a odpojte od elektrické sítě, než budete nasazovat nebo sundávat
mřížku nasávání.
· Vždy se ujistěte, že nemůžete dojít k vniknutí vody do přístroje vlivem kondenzace vody,
nebo stříkající vodou apod.
· Dbejte na to, aby přístroj nemohl přijít do styku s vodou, nebo jinou tekutinou. Pokud k
tomu dojde, okamžitě přístroj odpojte od elektrické sítě.
· Nikdy nepoužívejte přístroj ve vlhkých místnostech, jako je například koupelna, ložnice,
nebo prádelna.
· Pokud přístroj nepoužíváte, vypněte jej.
· Opravy přístroje smí provádět pouze autorizovaný servis, nebo kvalikovaná osoba.
· Kolem přístroj musíte zachovat volný prostor 30 cm.
· Nikdy se přístroje nedotýkejte mokrýma rukama.
· Dotýkejte se prsty pouze ovládacího panelu.
· Nesnažte se z přístroje odstraňovat jeho pevné části.
· Nikdy nepoužívejte přístroj pokud nepracuje správně, pokud Vám spadl, nebo je jinak
poškozený.
· Přístroj nevypínejte vytažením ze zásuvky. Vždy používejte tlačítka na ovládacím panelu.
· Používejte přístroj pouze k účelům, ke kterým je určený.
· Všetky opravy, úpravy, kontrola tesnosti a prípadných porúch musia byť vykonávané len
odborným certikovaným servisom.
· Spotřebič obsahuje uorované skleníkové plyny zahrnuté v Kjotském protokolu.
· Instalace a zapojení musí být provedeno odborně a dle pokynů v návodu. Nesprávná
instalace může způsobit únik vody, úraz elektrickým proudem nebo požár.
· Nesahejte na přístroj, pokud jste naboso, nesahejte na něj ani s mokrýma/vlhkýma rukama.
· Pokud dojde během používání k převrácení klimatizační jednotky, tak ji ihned vypněte
a okamžitě odpojte od napájení (el. sítě). Následně zvedněte a vizuálně důkladně
zkontrolujte, zda není poškozená. Pokud máte podezření, že byl přístroj poškozen, tak
zavolejte do odborného servisu a nechejte překontrolovat jeho stav.
· Pokud je (nebo hrozí) v lokalitě bouřka, tak přístroj vypojte z el. sítě. Jinak hrozí poškození
přístroje a případně i požár.
· Pokud nepoužíváte trvalý odvod kondenzátu, tak mějte oba (horní i spodní) vypouštěcí
vývody dostatečně uzavřené, aby nehrozilo riziko zadušení. Pokud vypouštěcí vývody
nepoužíváte, pečlivě je udržujte uzavřené, aby se zabránilo zadušení dětí nebo zvířat.

100
DO266A
CZ
· Přívodní kabel nikdy neveďte pod kobercem ani ho nijak nezakrývejte. Nepokládejte
kabel pod nábytek ani pod přístroj samotný. Přívodní kabel by měl být veden tak, aby o něj
nemohl nikdo zakopnout a přitom nebyl překrytý ani zatížený žádným předmětem.
· Pokud se z přístroje začnou ozývat divné zvuky, bude cítit kouř nebo se začne linout dým,
tak ho ihned vypněte a vypojte z el. sítě.
· Proces odmrazování nebo čištění neurychlujte použitím prostředků, které k tomu nejsou
určeny výrobcem.
· Spotřebič musí být skladován v místnosti, ve které nejsou nepřetržité zdroje zážehu/
vznícení (např. otevřený oheň, spuštěný plynový spotřebič nebo spuštěný elektrický
ohřívač).
· Nepropichujte ani nezapalujte.
· Berte na vědomí, že chladivo nemusí mít žádný zápach.
· Zařízení DO266A by mělo být nainstalováno, provozováno a skladováno v místnosti, jejíž
podlahová plocha přesahuje 7 m
2
.
· Musí být dodrženy veškeré vnitrostátní předpisy o plynu.
· Okolí ventilačních otvorů udržujte bez překážek.
· Spotřebič musí být skladován tak, aby se zabránilo jeho mechanickému poškození.
· Spotřebič musí být skladován v dobře větraném prostoru, jehož rozměry odpovídají
minimálním uvedeným rozmě-rům, které jsou nutné pro správný provoz spotřebiče.
· Jakákoli osoba, která zasahuje do okruhu chladiva, musí mít aktuální a platné osvědčení
udělené hodnotícím orgá-nem, který je akreditovaný v rámci odpovídajícího průmyslu
a který může ručit za jejich schopnost bezpečně zpraco-vávat chladiva v souladu s
uznávaným hodnotícím požadavkem.
· Servis může být prováděn pouze v souladu s doporučením výrobce. Údržba a opravy, které
vyžadují zapojení jiného odborného personálu, se musí provádět pod dohledem osoby,
která je způsobilá k zacházení s hořlavými chladivy.
Pozor: Nebezpečí vzniku požáru / hořlavé materiály
Tento spotřebič používá hořlavé chladivo. Pokud by chladivo prosakovalo či
unikalo ven, kde by mohlo hrozit riziko zapálení, tak hrozí nebezpečí požáru.
· Nikdy nepoužívejte přístroj v místnostech, které jsou větší, než je doporučená velikost.
· Dbejte na to, aby žádné otvory přístroje nebyly ucpané, nebo blokované nábytkem apod.
· Během nejteplejších dnů zatáhněte i žaluzie, nebo záclony na oknech, aby se vzduch
v místnosti zbytečně znovu neohříval.
· Kontrolujte ltry, aby byly vždy čisté.
· Mějte vždy zavřené dveře a okna, abyste udržely studený vzduch v místnosti a teplý Vám
z venku neproudil dovnitř.

101
DO266A
www.domo-elektro.be
CZ
TENTO MANUÁL SI USCHOVEJTE I PRO POZDĚJŠÍ NAHLÉDNUTÍ.
1. Ovládací panel
2. Výstup vzduchu
3. Vzduchový ltr
4. Vstup
vzduchu
5. Výstup vzduchu
6. Odtok
7. Hadice odtoku
8. Dálkový ovladač
9. Výfuková hadice
9 a. Napojení výfukové hadice
10. Sada pro montáž na zeď
10 a. Adaptér na zeď
10 b. Sada pro přichycení
11. Sada pro montáž do okna
11 a. Okenní adaptér
11 b. Sada pro upevnění
11 c. Okenní utěsnění
11 d. Zásuvka
11 e. Železné „L“ vzpěry
1
2
3
4
5
6
8
7
11b 11c
11
11e

102
DO266A
CZ
· Umístěte přístroj na stabilní a rovnou plochu. Tak předejdete
obtěžujícím zvukům a vibracím. Ujistěte se, že podlaha pod
přístrojem je dostatečně pevná, aby přístroj unesla.
· Přístroj má malá kolečka pro snazší manipulaci. Přesouvejte
přístroj pouze po rovné a hladké ploše. Dbejte zvýšené opatrnosti
při posunování přístrojem po koberci. Nikdy se nesnažte
přístrojem přejíždět předměty na zemi.
· Umístěte přístroj co nejblíže uzemněné zásuvce.
· Kolem klimatizace ponechte do všech směrů volný prostor
minimálně 30 cm.
· Hadici pro odvod teplého vzduchu musíte používat vždy, když nastavíte funkci „cool“,
nebo „auto“. Během používání funkcí „fan“ a „dry“, hadice není potřeba.
· Zajistěte dostatek prostoru okolo výstupu vzduchu - alespoň 50 cm.
· Zjistěte, aby se hadice během používání nijak neohýbala.
max 120 cm
min 30 cm
· Nejdříve na výfukovou hadici nasaďte spojku k okenní koncovce.
· Potom celou hadici nasaďte na otvor výfuku v zadní části přístroje.
max 120 cm
min 30 cm
· Na druhý konec hadice napevno připojte okenní koncovku.
· Do okna umístěte okenní adaptér. Ten je možné umístit v horizontální I vertikální rovině.
Adaptér zajistěte ve Vámi požadované délce.
· Do zajištěného adaptéru v okně nacvakněte okenní koncovku (která je přichycena na
hadici).
· Pokud je potřeba, tak můžete okolí ještě utěsnit.
· Okenní adaptér si zaxujte na požadovanou délku.
· Pokud je potřeba, tak si můžete okno zaxovat pomocí železných „L vzpěr“ a šroubky.
max 120 cm
min 30 cm
max 120 cm
min 30 cm
max 120 cm
min 30 cm

103
DO266A
www.domo-elektro.be
CZ
· Nejdříve na výfukovou hadici nasaďte spojku k okenní koncovce.
· Potom celou hadici nasaďte na otvor výfuku v zadní části přístroje.
max 120 cm
min 30 cm
· Na druhý konec hadice napevno připojte koncovku do zdi .
· Ve zdi připravte otvor s odpovídajícím rozměrem vůči koncovce
· Koncovku připevněte do otvoru ve zdi a zajistěte.
max 120 cm
min 30 cm
Horizontálně položený díl v přední části klimatizace můžete v případě potřeby ručně vysunout
/ zasunout. Tento díl zlepšuje výstup vzduchu .
12
4
3
1. Hlavní spínač ON/OFF
Tímto tlačítkem přístroj zapnete/vypnete

104
DO266A
CZ
2. Tlačítka ”+” a “-”
Tlačítka slouží k nastavování teploty. Požadovaná teplota může být nastavena v rozmezí od
17°C do 30°C. Na přístroji si můžete volit mezi nastavení stupňů “°C “a “°F”. Změnu jednotek
provedete stiskem obou tlačítek na ráz.
3. Tlačítko FUNKCE
Tlačítkem si můžete volit jednu z funkcí přístroje. Každým stiskem tlačítka se přepne funkce:
KLIMATIZACE – ODVLHČOVÁNÍ – VENTILACE. Vybraná funkce bude na ovládacím panelu
podsvícená. Pokud si zvolíte funkcí ventilace, tak se přístroj přepne do automatického režimu.
Vy můžete volit jen rychlost ventilace.
4. LED displej
Displej ukazuje nastavenou teplotu. Pokud máte vybranou funkci “ventilace”, tak na displeji
bude zobrazena aktuální pokojová teplota.
Při používání ovladače musíte vždy mířit přímo proti
přístroji. Pokud ovladač nereaguje, tak ho zaměřte přímo na
přístroj a zkuste opět stisknout ON/OFF.
Jakmile se přístroj zapne (vypínač reaguje), tak se ozve
zvukový signál. Dálkový ovladač pracuje v dosahu 8 m od
přístroje.
1. Hlavní spínač ON/OFF
Tímto tlačítkem přístroj zapnete/vypnete
2. Tlačítko FUNKCE
Tlačítkem si můžete volit jednu z funkcí přístroje. Každým stiskem tlačítka se přepne funkce:
KLIMATIZACE – ODVLHČOVÁNÍ – VENTILACE. Vybraná funkce bude na ovládacím panelu
podsvícená.
3. Tlačítko FAN (ventilace)
Tímto tlačítkem si volíte rychlost ventilátoru: LOW
55
66
MODE display
Displays the current
mode, including:
AUTO
COOL
DRY
HEAT
FAN
Transmission Indicator
Lights up when remote sends
signal to unit
ON/OFF display
Appears when the unit is turned on,
and disappears when it is turned off
TIMER ON display
Displays when TIMER
ON is set
TIMER OFF display
Displays when TIMER
OFF is set
SLEEP display
Battery display
SILENT display
ECO display
Displays when
SLEEP function
is activated
FOLLOW ME
display
Indicates that
the FOLLOW ME
function is on
FAN SPEED display
Displays selected FAN SPEED:
HIGH, MED,
or LOW
This display is blank when
set to AUTO speed.
Temperature/Timer display
Displays the set temperature by default, or timer setting
when using TIMER ON/OFF functions
o O O
Temperature range: 17-30 C(62 F-86 F)
Timer setting range: 0-24 hours
This display is blank when operating in FAN mode.
1. Press the MODE button to select
COOL mode.
2. Set your desired temperature using
the Temp or Temp button.
3. Press the FAN button to select the
fan speed: AUTO, LOW, MED,or
HIGH.
4. Press the ON/OFF button to start the
unit.
In AUTO mode, the unit will automatically
select the COOL, FAN, HEAT or DRY mode
based on the set temperature.
1. Press the MODE button to select Auto mode.
2. Set your desired temperature using the
Temp or Temp button.
3. Press the ON/OFF button to start the unit.
,
NOTE: FAN SPEED can t be set in Auto mode.
SETTING TEMPERATURE
AUTO operation
The operating temperature range for units is
O O O
17-30 C(62 F-86 F). You can increase or
O O
decrease the set tmeperature in 1 C(1 F)
increments.
COOL operation
1
3
2
1
3
2
4
Not available for this unit
Not available for
this unit
Not available for
this unit
Low battery
detection
Remote LED Screen Indicators
How To Use The Basic Functions
ON/OFF
ON/OFF
TEMP
TEMP
SHORT
CUT
SHORT
CUT
TIMER
ON
TIMER
ON
TIMER
OFF
TIMER
OFF
MODE
MODE
FAN
FAN
SLEEP
SLEEP
LED
LED
FOLLOW
ION
SWING
ME
FOLLOW
ION
SWING
ME
– HIGH
55
66
MODE display
Displays the current
mode, including:
AUTO
COOL
DRY
HEAT
FAN
Transmission Indicator
Lights up when remote sends
signal to unit
ON/OFF display
Appears when the unit is turned on,
and disappears when it is turned off
TIMER ON display
Displays when TIMER
ON is set
TIMER OFF display
Displays when TIMER
OFF is set
SLEEP display
Battery display
SILENT display
ECO display
Displays when
SLEEP function
is activated
FOLLOW ME
display
Indicates that
the FOLLOW ME
function is on
FAN SPEED display
Displays selected FAN SPEED:
HIGH, MED,
or LOW
This display is blank when
set to AUTO speed.
Temperature/Timer display
Displays the set temperature by default, or timer setting
when using TIMER ON/OFF functions
o O O
Temperature range: 17-30 C(62 F-86 F)
Timer setting range: 0-24 hours
This display is blank when operating in FAN mode.
1. Press the MODE button to select
COOL mode.
2. Set your desired temperature using
the Temp or Temp button.
3. Press the FAN button to select the
fan speed: AUTO, LOW, MED,or
HIGH.
4. Press the ON/OFF button to start the
unit.
In AUTO mode, the unit will automatically
select the COOL, FAN, HEAT or DRY mode
based on the set temperature.
1. Press the MODE button to select Auto mode.
2. Set your desired temperature using the
Temp or Temp button.
3. Press the ON/OFF button to start the unit.
,
NOTE: FAN SPEED can t be set in Auto mode.
SETTING TEMPERATURE
AUTO operation
The operating temperature range for units is
O O O
17-30 C(62 F-86 F). You can increase or
O O
decrease the set tmeperature in 1 C(1 F)
increments.
COOL operation
1
3
2
1
3
2
4
Not available for this unit
Not available for
this unit
Not available for
this unit
Low battery
detection
Remote LED Screen Indicators
How To Use The Basic Functions
ON/OFF
ON/OFF
TEMP
TEMP
SHORT
CUT
SHORT
CUT
TIMER
ON
TIMER
ON
TIMER
OFF
TIMER
OFF
MODE
MODE
FAN
FAN
SLEEP
SLEEP
LED
LED
FOLLOW
ION
SWING
ME
FOLLOW
ION
SWING
ME
– AUTO.
4. Tlačítko SLEEP (spánek)
Tlačítkem aktivujete režim na spánek – sleep
V režimu “sleep” je zvolená teplota postupně navyšována o 1°C za 30 min. Za dalších 30
minut se teplota zvýší o další 1oC. Klimatizace bude tuto teplotu udržovat dalších 7 hodin.
Po uplynutí tohoto času se klimatizace přepne zpět do původního nastavení teploty a funkce
„sleep“ se ukončí. POZNÁMKA: tuto funkci nemůžete nastavit zároveň s „fan“, nebo „dry“
funkcí.
1
2
3
4
5
6
7
8

105
DO266A
www.domo-elektro.be
CZ
5. Tlačítko TEMP (teplota)
Na přístroji si můžete nastavit požadovanou teplotu v rozmezí 17-30 °C. Jakmile stisknete obě
tlačítka zároveň, tak se přehodí jednotky teploty “°C” a “°F”.
6. Tlačítko RYCHLÉ VOLBY (SHORTCUT)
K tomuto tlačítku si můžete nastavit předvolenou funkci a následně jí jedním stiskem zapínat/
vypínat.
7. Tlačítko zapnutí časovače (TIMER ON)
Tímto tlačítkem zapínáte časovač.
8. Tlačítko vypnutí časovače (TIMER OFF )
Tímto tlačítkem časovač vypínáte.
9. Tlačítko pro sepnutí LED osvícení
Tímto tlačítkem vypnete LED podsvícení. To uvítáte pokud chcete spát a osvětlení displeje Vás
ruší. Jakmile stisknete tlačítko znovu, tak se displej opět rozsvítí.
55
66
MODE display
Displays the current
mode, including:
AUTO
COOL
DRY
HEAT
FAN
Transmission Indicator
Lights up when remote sends
signal to unit
ON/OFF display
Appears when the unit is turned on,
and disappears when it is turned off
TIMER ON display
Displays when TIMER
ON is set
TIMER OFF display
Displays when TIMER
OFF is set
SLEEP display
Battery display
SILENT display
ECO display
Displays when
SLEEP function
is activated
FOLLOW ME
display
Indicates that
the FOLLOW ME
function is on
FAN SPEED display
Displays selected FAN SPEED:
HIGH, MED,
or LOW
This display is blank when
set to AUTO speed.
Temperature/Timer display
Displays the set temperature by default, or timer setting
when using TIMER ON/OFF functions
o O O
Temperature range: 17-30 C(62 F-86 F)
Timer setting range: 0-24 hours
This display is blank when operating in FAN mode.
1. Press the MODE button to select
COOL mode.
2. Set your desired temperature using
the Temp or Temp button.
3. Press the FAN button to select the
fan speed: AUTO, LOW, MED,or
HIGH.
4. Press the ON/OFF button to start the
unit.
In AUTO mode, the unit will automatically
select the COOL, FAN, HEAT or DRY mode
based on the set temperature.
1. Press the MODE button to select Auto mode.
2. Set your desired temperature using the
Temp or Temp button.
3. Press the ON/OFF button to start the unit.
,
NOTE: FAN SPEED can t be set in Auto mode.
SETTING TEMPERATURE
AUTO operation
The operating temperature range for units is
O O O
17-30 C(62 F-86 F). You can increase or
O O
decrease the set tmeperature in 1 C(1 F)
increments.
COOL operation
1
3
2
1
3
2
4
Not available for this unit
Not available for
this unit
Not available for
this unit
Low battery
detection
Remote LED Screen Indicators
How To Use The Basic Functions
ON/OF F
ON/OF F
TEMP
TEMP
SHORT
CUT
SHORT
CUT
TIMER
ON
TIMER
ON
TIMER
OFF
TIMER
OFF
MODE
MODE
FAN
FAN
SLEEP
SLEEP
LED
LED
FOLLO W
ION
SWING
ME
FOLLO W
ION
SWING
ME
V režimu AUTO si sám přístroj upravuje výkon a sepnutí klimatizace, tak aby se požadovaná
teplota okolí měnila co nejméně. Tato funkce může být zapnuta I přes dálkové ovládání.
1. Na ovladači si navolte režim AUTO pomocí tlačítka MODE.
2. Nastavte si požadovanou teplotu a přístroj si už sám zvolí stupeň potřebné
klimatizace.
Během automatického režimu vy nemůžete regulovat rychlost ventilátoru.
55
66
MODE display
Displays the current
mode, including:
AUTO
COOL
DRY
HEAT
FAN
Transmission Indicator
Lights up when remote sends
signal to unit
ON/OFF display
Appears when the unit is turned on,
and disappears when it is turned off
TIMER ON display
Displays when TIMER
ON is set
TIMER OFF display
Displays when TIMER
OFF is set
SLEEP display
Battery display
SILENT display
ECO display
Displays when
SLEEP function
is activated
FOLLOW ME
display
Indicates that
the FOLLOW ME
function is on
FAN SPEED display
Displays selected FAN SPEED:
HIGH, MED,
or LOW
This display is blank when
set to AUTO speed.
Temperature/Timer display
Displays the set temperature by default, or timer setting
when using TIMER ON/OFF functions
o O O
Temperature range: 17-30 C(62 F-86 F)
Timer setting range: 0-24 hours
This display is blank when operating in FAN mode.
1. Press the MODE button to select
COOL mode.
2. Set your desired temperature using
the Temp or Temp button.
3. Press the FAN button to select the
fan speed: AUTO, LOW, MED,or
HIGH.
4. Press the ON/OFF button to start the
unit.
In AUTO mode, the unit will automatically
select the COOL, FAN, HEAT or DRY mode
based on the set temperature.
1. Press the MODE button to select Auto mode.
2. Set your desired temperature using the
Temp or Temp button.
3. Press the ON/OFF button to start the unit.
,
NOTE: FAN SPEED can t be set in Auto mode.
SETTING TEMPERATURE
AUTO operation
The operating temperature range for units is
O O O
17-30 C(62 F-86 F). You can increase or
O O
decrease the set tmeperature in 1 C(1 F)
increments.
COOL operation
1
3
2
1
3
2
4
Not available for this unit
Not available for
this unit
Not available for
this unit
Low battery
detection
Remote LED Screen Indicators
How To Use The Basic Functions
ON/OF F
ON/OF F
TEMP
TEMP
SHORT
CUT
SHORT
CUT
TIMER
ON
TIMER
ON
TIMER
OFF
TIMER
OFF
MODE
MODE
FAN
FAN
SLEEP
SLEEP
LED
LED
FOLLO W
ION
SWING
ME
FOLLO W
ION
SWING
ME
Funkce “COOL” je klimatizace a snižuje teplotu v místnosti.
1. Navolte si tuto funkci COOL tlačítkem MODE, jakmile bude zvolena, tak bude na
ovládacím panelu svítit.
2. Pomocí šipek na panelu nebo na ovladači si nastavte požadovanou teplotu v
místnosti.
3. Tlačítkem „fan“ nebo na ovladači si nastavte požadovanou rychlost ventilátoru. Jsou
zde 3 rychlosti.
55
66
MODE display
Displays the current
mode, including:
AUTO
COOL
DRY
HEAT
FAN
Transmission Indicator
Lights up when remote sends
signal to unit
ON/OFF display
Appears when the unit is turned on,
and disappears when it is turned off
TIMER ON display
Displays when TIMER
ON is set
TIMER OFF display
Displays when TIMER
OFF is set
SLEEP display
Battery display
SILENT display
ECO display
Displays when
SLEEP function
is activated
FOLLOW ME
display
Indicates that
the FOLLOW ME
function is on
FAN SPEED display
Displays selected FAN SPEED:
HIGH, MED,
or LOW
This display is blank when
set to AUTO speed.
Temperature/Timer display
Displays the set temperature by default, or timer setting
when using TIMER ON/OFF functions
o O O
Temperature range: 17-30 C(62 F-86 F)
Timer setting range: 0-24 hours
This display is blank when operating in FAN mode.
1. Press the MODE button to select
COOL mode.
2. Set your desired temperature using
the Temp or Temp button.
3. Press the FAN button to select the
fan speed: AUTO, LOW, MED,or
HIGH.
4. Press the ON/OFF button to start the
unit.
In AUTO mode, the unit will automatically
select the COOL, FAN, HEAT or DRY mode
based on the set temperature.
1. Press the MODE button to select Auto mode.
2. Set your desired temperature using the
Temp or Temp button.
3. Press the ON/OFF button to start the unit.
,
NOTE: FAN SPEED can t be set in Auto mode.
SETTING TEMPERATURE
AUTO operation
The operating temperature range for units is
O O O
17-30 C(62 F-86 F). You can increase or
O O
decrease the set tmeperature in 1 C(1 F)
increments.
COOL operation
1
3
2
1
3
2
4
Not available for this unit
Not available for
this unit
Not available for
this unit
Low battery
detection
Remote LED Screen Indicators
How To Use The Basic Functions
ON/OF F
ON/OF F
TEMP
TEMP
SHORT
CUT
SHORT
CUT
TIMER
ON
TIMER
ON
TIMER
OFF
TIMER
OFF
MODE
MODE
FAN
FAN
SLEEP
SLEEP
LED
LED
FOLLO W
ION
SWING
ME
FOLLO W
ION
SWING
ME
Funkce DRY je funkce odvlhčování a vy si tak můžete regulovat vlhkost v místnosti. Při
používání zavřete dveře i okna, aby odvlhčení místnosti bylo co nejlepší.

106
DO266A
CZ
1. Stiskem tlačítka „MODE“ nastavte funkci „DRY“ – rozsvítí se příslušná kontrolka na
panelu.
2. Pomocí šipek na panelu nebo na ovladači si nastavte požadovanou hodnotu.
3. Pro tuto funkci nelze nastavovat rychlost ventilátoru.
55
66
MODE display
Displays the current
mode, including:
AUTO
COOL
DRY
HEAT
FAN
Transmission Indicator
Lights up when remote sends
signal to unit
ON/OFF display
Appears when the unit is turned on,
and disappears when it is turned off
TIMER ON display
Displays when TIMER
ON is set
TIMER OFF display
Displays when TIMER
OFF is set
SLEEP display
Battery display
SILENT display
ECO display
Displays when
SLEEP function
is activated
FOLLOW ME
display
Indicates that
the FOLLOW ME
function is on
FAN SPEED display
Displays selected FAN SPEED:
HIGH, MED,
or LOW
This display is blank when
set to AUTO speed.
Temperature/Timer display
Displays the set temperature by default, or timer setting
when using TIMER ON/OFF functions
o O O
Temperature range: 17-30 C(62 F-86 F)
Timer setting range: 0-24 hours
This display is blank when operating in FAN mode.
1. Press the MODE button to select
COOL mode.
2. Set your desired temperature using
the Temp or Temp button.
3. Press the FAN button to select the
fan speed: AUTO, LOW, MED,or
HIGH.
4. Press the ON/OFF button to start the
unit.
In AUTO mode, the unit will automatically
select the COOL, FAN, HEAT or DRY mode
based on the set temperature.
1. Press the MODE button to select Auto mode.
2. Set your desired temperature using the
Temp or Temp button.
3. Press the ON/OFF button to start the unit.
,
NOTE: FAN SPEED can t be set in Auto mode.
SETTING TEMPERATURE
AUTO operation
The operating temperature range for units is
O O O
17-30 C(62 F-86 F). You can increase or
O O
decrease the set tmeperature in 1 C(1 F)
increments.
COOL operation
1
3
2
1
3
2
4
Not available for this unit
Not available for
this unit
Not available for
this unit
Low battery
detection
Remote LED Screen Indicators
How To Use The Basic Functions
ON/OF F
ON/OF F
TEMP
TEMP
SHORT
CUT
SHORT
CUT
TIMER
ON
TIMER
ON
TIMER
OFF
TIMER
OFF
MODE
MODE
FAN
FAN
SLEEP
SLEEP
LED
LED
FOLLO W
ION
SWING
ME
FOLLO W
ION
SWING
ME
1. Stiskem tlačítka „MODE“ nastavte funkci „FAN“ – rozsvítí se příslušná kontrolka na
panelu.
2. Tlačítkem „fan“ nebo na ovladači si nastavte požadovanou rychlost ventilátoru. Jsou
zde 3 rychlosti (LOW
55
66
MODE display
Displays the current
mode, including:
AUTO
COOL
DRY
HEAT
FAN
Transmission Indicator
Lights up when remote sends
signal to unit
ON/OFF display
Appears when the unit is turned on,
and disappears when it is turned off
TIMER ON display
Displays when TIMER
ON is set
TIMER OFF display
Displays when TIMER
OFF is set
SLEEP display
Battery display
SILENT display
ECO display
Displays when
SLEEP function
is activated
FOLLOW ME
display
Indicates that
the FOLLOW ME
function is on
FAN SPEED display
Displays selected FAN SPEED:
HIGH, MED,
or LOW
This display is blank when
set to AUTO speed.
Temperature/Timer display
Displays the set temperature by default, or timer setting
when using TIMER ON/OFF functions
o O O
Temperature range: 17-30 C(62 F-86 F)
Timer setting range: 0-24 hours
This display is blank when operating in FAN mode.
1. Press the MODE button to select
COOL mode.
2. Set your desired temperature using
the Temp or Temp button.
3. Press the FAN button to select the
fan speed: AUTO, LOW, MED,or
HIGH.
4. Press the ON/OFF button to start the
unit.
In AUTO mode, the unit will automatically
select the COOL, FAN, HEAT or DRY mode
based on the set temperature.
1. Press the MODE button to select Auto mode.
2. Set your desired temperature using the
Temp or Temp button.
3. Press the ON/OFF button to start the unit.
,
NOTE: FAN SPEED can t be set in Auto mode.
SETTING TEMPERATURE
AUTO operation
The operating temperature range for units is
O O O
17-30 C(62 F-86 F). You can increase or
O O
decrease the set tmeperature in 1 C(1 F)
increments.
COOL operation
1
3
2
1
3
2
4
Not available for this unit
Not available for
this unit
Not available for
this unit
Low battery
detection
Remote LED Screen Indicators
How To Use The Basic Functions
ON/OFF
ON/OFF
TEMP
TEMP
SHORT
CUT
SHORT
CUT
TIMER
ON
TIMER
ON
TIMER
OFF
TIMER
OFF
MODE
MODE
FAN
FAN
SLEEP
SLEEP
LED
LED
FOLLOW
ION
SWING
ME
FOLLOW
ION
SWING
ME
, HIGH
55
66
MODE display
Displays the current
mode, including:
AUTO
COOL
DRY
HEAT
FAN
Transmission Indicator
Lights up when remote sends
signal to unit
ON/OFF display
Appears when the unit is turned on,
and disappears when it is turned off
TIMER ON display
Displays when TIMER
ON is set
TIMER OFF display
Displays when TIMER
OFF is set
SLEEP display
Battery display
SILENT display
ECO display
Displays when
SLEEP function
is activated
FOLLOW ME
display
Indicates that
the FOLLOW ME
function is on
FAN SPEED display
Displays selected FAN SPEED:
HIGH, MED,
or LOW
This display is blank when
set to AUTO speed.
Temperature/Timer display
Displays the set temperature by default, or timer setting
when using TIMER ON/OFF functions
o O O
Temperature range: 17-30 C(62 F-86 F)
Timer setting range: 0-24 hours
This display is blank when operating in FAN mode.
1. Press the MODE button to select
COOL mode.
2. Set your desired temperature using
the Temp or Temp button.
3. Press the FAN button to select the
fan speed: AUTO, LOW, MED,or
HIGH.
4. Press the ON/OFF button to start the
unit.
In AUTO mode, the unit will automatically
select the COOL, FAN, HEAT or DRY mode
based on the set temperature.
1. Press the MODE button to select Auto mode.
2. Set your desired temperature using the
Temp or Temp button.
3. Press the ON/OFF button to start the unit.
,
NOTE: FAN SPEED can t be set in Auto mode.
SETTING TEMPERATURE
AUTO operation
The operating temperature range for units is
O O O
17-30 C(62 F-86 F). You can increase or
O O
decrease the set tmeperature in 1 C(1 F)
increments.
COOL operation
1
3
2
1
3
2
4
Not available for this unit
Not available for
this unit
Not available for
this unit
Low battery
detection
Remote LED Screen Indicators
How To Use The Basic Functions
ON/OFF
ON/OFF
TEMP
TEMP
SHORT
CUT
SHORT
CUT
TIMER
ON
TIMER
ON
TIMER
OFF
TIMER
OFF
MODE
MODE
FAN
FAN
SLEEP
SLEEP
LED
LED
FOLLOW
ION
SWING
ME
FOLLOW
ION
SWING
ME
, AUTO)
3. Pro tuto funkci nelze nastavovat teplotu místnosti.
Tímto tlačítkem zapnete časovač, který odloží start klimatizace a přístroj sepne.
1. Časovač zapnete stiskem tlačítka TIMER ON na ovladači.
2. Na displeji ovladače se zobrazí čas za jak dlouho by se přístroj sepnul.
3. Každé stisknutí (nebo podržení) tlačítka zvýší nastavený čas. Čas udává za jak dlouho
se přístroj spustí.
4. Po nastavení času, začne přístroj čas odpočítávat a displeji svítí “TIMER ON”. Na
ovládacím panelu budou svítit 2 světelné kontrolky.
5. Pokud časovač chcete vypnout, tak tímto tlačítkem přenastavte čas až do “0”. Tlačítko
můžete mačkat nebo podržet.
Tímto tlačítkem nastavíte časovač, pro automatické vypnutí klimatizace po určité době..
1. Stiskněte tlačítko TIMER OFF na ovladači.
2. Na displeji ovladače se zobrazí čas za jak dlouho by se přístroj vypnul.
3. Každé stisknutí (nebo podržení) tlačítka zvýší nastavený čas. Čas udává za jak dlouho
se přístroj vypne.
4. Po nastavení času, začne přístroj čas odpočítávat a displeji svítí “TIMER OFF”. Na
ovládacím panelu budou svítit 2 světelné kontrolky.
5. Pokud časovač vypnutí chcete zrušit, tak tímto tlačítkem přenastavte čas až do “0”.
Tlačítko můžete mačkat nebo podržet.
Výše zmíněné funkce časovače můžete samozřejmě nastavit i současně. Nastavení pak bude
automaticky udávat, kdy se přístroj sepne ale i kdy se následně vypne.
POZNÁMKA: Čas nastavení vždy vyhází z aktuálního času a dopočítává jej. Příklad. Je-li nyní
13 hodin a my chceme klimatizaci sepnout v 16:30 a v 18 hodin opět vypnout. Tak musíte na
časovači zapnutí (TIMER ON) nastavit 3,5 hodiny a na časovači vypnutí (TIMER OFF) 5,0 hodin.

107
DO266A
www.domo-elektro.be
CZ
Po aktivaci funkce „sleep“ se po 30 minutách zvýší teplota o 1oC. Za dalších 30 minut se
teplota zvýší o další 1oC. Klimatizace bude tuto teplotu udržovat dalších 7 hodin. Po uplynutí
tohoto času se klimatizace přepne zpět do původního nastavení teploty a funkce „sleep“ se
ukončí.
POZNÁMKA: tuto funkci nemůžete nastavit zároveň s ventilací („fan“), ani funkcí
odvlhčování („dry“).
K tomuto tlačítku si můžete nastavit předvolenou funkci a následně jí jedním stiskem zapínat/
vypínat.
Pokud nějaké nastavení přístroje používáte častěji, tak si jej můžete uložit do paměti. Uložíte
podržením tlačítka na 3 vteřiny. Přístroj si uloží nastavení, které je zvoleno právě v momentě
ukládání. Pod volbu nastavení je možné si uložit: funkci (MODE), požadovanou teplotu,
rychlost ventilace a případně I nastavení časovače,
Kdykoli potom stiskněte tlačítko (SHORTCUT), tak přístroj začne pracovat na uložené a
zapamatované nastavení.
1. Během funkce “odvlhčování“ můžete použít trvalé odvodnění. Odstraňte zátku vyústění
trvalého odtoku.
2. Připojte vypouštěcí hadici na místo pro stálý odtok kondenzátu a druhý konec odveďte
do odpadu v místnosti.
3. Ujistěte se, že voda je bezpečně odváděna a nic jí nestojí v cestě.
1
2
Pokud nepoužíváte trvalý odtok, nerecyklovaná kondenzovaná voda bude uchovávána v
nádržce na vodu.
· Po naplnění nádržky na vodu se ozve několik zvukových signálů a na displeji se zobrazí kód
P1. Funkce “chlazení“ a “odvlhčování“ se automaticky ukončí. Ventilátor nadále poběží, což
je normální.

108
DO266A
CZ
· Přesuňte přístroj na místo, kde můžete snadno vodu vypustit/
vylít.
· Vyjměte vypouštěcí zátku na spodní části přístroje (A) a vypusťte
vodu.
· Po úplném vypuštění nádržky na vodu umístěte vypouštěcí
zátku zpět na otvor pro odtok.
· Restartujte přístroj a ujistěte se, že chybový kód P1 na displeji
již není zobrazen. Pokud kód nezmizí, zkuste přístroj několikrát
vypnout a zapnout. Pokud je i nadále kód zobrazený, prosím
kontaktujte poprodejní servis.
· POZNÁMKA: Před opětovným spuštěním přístroje se vždy
ujistěte, že jste nádržku opět uzavřeli.
· Před čištěním přístroje vždy vytáhněte zástrčku ze zásuvky.
· Nikdy na čistění přístroje nepoužívejte žádná chemické nebo
drsné prostředky.
· Nikdy přístroj nečistěte vodou nebo jinými kapalinami, to by mohlo způsobit poškození
elektrickým proudem.
· Pokud je poškozený přívodní kabel, musí být opraven nebo nahrazen poprodejním
servisem nebo kvalikovanou osobou.
· Čistěte vzduchový ltr alespoň každé dva týdny. Ujistěte se,
že klimatizace může pracovat v optimálních podmínkách.
· Čistěte vzduchový ltr ve vlažné vodě s trochou mycího
prostředku. Filtr důkladně vypláchněte a nechte uschnout.
· Před umístěním ltru zpět do klimatizace se ujistěte, že je
kompletně suchý.
Pro vyčištění vnější části přístroje používejte vlhký měkký hadřík s trochou jemného čistícího
prostředku. Ujistěte se, že je přístroj důkladně vysušen.
Před skladováním přístroje na delší dobu, prosím postupujte podle následujících kroků:
· Vypusťte veškerou vodu ze spotřebiče.
· Potom na půl dne zapněte přístroj ve funkci “foukání“. Ujistěte se, že je přístroj umístěn ve
vyhřívaném prostoru. To přístroj kompletně vysuší a předejte utváření plísní.
· Přístroj vypněte, vytáhněte zástrčku ze zásuvky a odejměte baterie z dálkového ovládání.
A

109
DO266A
www.domo-elektro.be
CZ
· Vyčistěte ltry a umístěte je zpět do přístroje.
· Uchovávejte přístroj na suchém a tmavém místě.
Přístroj nefunguje, když mačkáte tlačítko on/o.
· Pokud je zobrazen chybový kód P1, vypusťte vodu z klimatizace.
· Pokud je teplota v místnosti nižší, než zvolená teplota, upravte zvolenou teplotu.
Místnost není dostatečně chladná.
· Okna a dveře nejsou zavřeny. Ujistěte se, že všechny okna a dveře jsou zavřeny.
· V místnosti může být nějaký zdroj tepla. Pokud je to možné, odstraňte všechny zdroje
tepla.
· Vzduchová hadice není připojena nebo je blokována. Přípojte hadici a zkontrolujte, zda
není blokována.
· Zvolená teplota je vysoká. Upravte zvolenou teplotu.
· Vzduchový ltr je znečištěný. Vyčistěte vzduchový ltr.
Přístroj vydává moc hluku nebo vibruje.
· Podlaha není hladká nebo rovná. Pokud je to možné, umístěte přístroj na hladký a rovný
povrch.
· Vzduchový ltr je znečištěný. Vyčistěte vzduchový ltr.
Přístroj vydává bublavý zvuk
· Tento zvuk vytváří chladící náplň, který je v přístroji. Tento občasný zvuk je v pořádku.
Na vaší klimatizaci se mohou zobrazit následující chybové kódy:
E1: Nefunguje senzor pro snímání teploty v místnosti.
Vypněte přístroj a odejměte zástrčku ze zásuvky.
Počkejte 10 sekund a zapojte přístroj zpět. Zapněte přístroj. Pokud chybový kód přetrvává,
kontaktujte servis.
E2: Senzor vlhkosti nefunguje.
Vypněte přístroj a odejměte zástrčku ze zásuvky. Počkejte 10 sekund a zapojte přístroj zpět.
Zapněte přístroj. Pokud chybový kód přetrvává, kontaktujte servis.
E4: Displej nefunguje správně.
Vypněte přístroj a odejměte zástrčku ze zásuvky. Počkejte 10 sekund a zapojte přístroj zpět.
Zapněte přístroj. Pokud chybový kód přetrvává, kontaktujte servis.

110
DO266A
CZ
P1: Nádržka na vodu je plná.
Připojte vypouštěcí hadici na dolní místo pro odtok kondenzátu. Když chybový kód přetrvává,
kontaktujte servis.
Symbol na přístroji či na jeho obalu znamená, že s tímto
výrobkem není možno nakládat jako s běžným domovním
odpadem, nýbrž musí být odevzdán na místech určených
ke sběru a likvidaci elektrických a elektronických zařízení.
Dodržením tohoto doporučení chráníte životní prostředí a
zdraví spoluobčanů. Více informací o možnostech likvidace
nebezpečného odpadu obdržíte na obecních nebo městských
úřadech, sběrných dvorech nebo v prodejně, kde jste přístroj
zakoupili.
Obalové materiály jsou recyklovatelné, nakládejte s nimi
podle předpisů pro životní prostředí.

111
DO266A
www.domo-elektro.be
SK
Práva a povinnosti predávajúceho a kupujúceho ohľadom práv z chybného plnenia sa riadi
príslušnými všeobecne záväznými predpismi podľa občianskeho zákonníka.
1. Trvanie záruky: 2 roky
2. Záruka sa nevzťahuje
a) na mechanické poškodenie
b) nesprávne používanie v rozpore s návodom na použitie
3. Záruka zaniká:
- pri použití spotrebiča inak ako v je uvedené v manuále (nesprávnym postupom)
- pri vykonávaní opravy alebo zmeny na spotrebiči osobou inou než poverenou
naším servisom
Predávajúci zodpovedá kupujúcemu, že tovar pri prevzatí nemá vady. Najmä predávajúci
zodpovedá kupujúcemu, že v čase, keď kupujúci tovar prevzal:
· má tovar také vlastnosti, ktoré výrobca v tomto návode popisuje,
· sa tovar hodí k účelu, ku ktorému výrobca uvádza,
· tovar zodpovedá kvalitou alebo prevedením dohovorené vzorky alebo predlohe, ak bola
akosť alebo prevedenie určené podľa dohodnutého vzorky alebo predlohy,
· tovar vyhovuje požiadavkám právnych predpisov.
Ak sa prejavia vada v priebehu šiestich mesiacov od prevzatia, má sa za to, že tovar bol chybný
už pri prevzatí.
Pokiaľ nie je pri výrobku uvedené inak, je záručná doba 24 mesiacov. Záručná doba začína
plynúť od prevzatia veci kupujúcim.
Práva z chybného plnenia uplatňuje kupujúci u predávajúceho na adrese jeho prevádzky, v
ktorej je prijatie reklamácie možné s ohľadom na sortiment predávaného tovaru, prípadne aj
v sídle alebo mieste podnikania. Za okamih uplatnenia reklamácie sa považuje okamih, kedy
predávajúci dostal od kupujúceho reklamovaný tovar.
Reklamáciu možno tiež uplatniť v servisnom stredisku na adrese
Pre rýchle a bezproblémové vybavenie reklamácie odporúčame priložiť k reklamácii doklad o kúpe
a sprievodný list s popisom závady a spiatočnou adresou s telefonickým kontaktom.

112
DO266A
SK
Pri používaní jakkéhokoli el. spotrebiče dbajte na zvýšenú opatrnosť a dodržujte určité
bezpečnostné pravidlá:
· Starostlivo si prečítajte tieto informácie a manuál nechajte aj k neskoršiemu nahliadnutiu.
· Uistite sa, že pred použitím odlepíte a odstránite všetky reklamné a ochranné fólie.
· Deti sa s ochrannými ani reklamnými polepy nesmie hrať.
· Prístroj je určený pre používanie v domácnostiach a podobných prostrediach, tak ako je:
· kuchynky v obchodoch, kanceláriách atď.
· chaty, chalupy
· hotely, penzióny a iné dočasné ubytovanie
· Dohliadnite, aby sa deti nehrali s prístrojom.
· Tento spotrebič môžu používať deti vo veku 16 rokov a staršie a osoby so zníženými
fyzickými, zmyslovými alebo mentálnymi schopnosťami, alebo nedostatkom skúseností
a znalostí ak sú pod neustálym dozorom alebo boli poučené o používaní spotrebiča
bezpečným spôsobom a rozumejú prípadným nebezpečenstvom. Deti si s prístrojom
nesmú hrať. Čistenie a údržbu vykonávanú používateľom nesmú vykonávať deti bez
dozoru.
· Čistenie a bežnú údržbu môžu vykonávať len osoby staršie ako 16 rokov a pri tom byť pod
dohľadom.
· Prístroj a jeho el. kábel skladujte mimo dosahu detí.
· Upozornenie: Prístroj sa nesmie používať s externými časovači.
· Pred použitím dôkladne skontrolujte, či napätie a frekvencia el. siete vo vašej domácnosti
zodpovedajú požiadavkám uvedeným na prístroji.
· Zástrčku (prívodný kábel) zapájajte vždy len do zásuvky, ktorá je bez chýb a nainštalovaná,
uzemnená v súlade so všetkými miestnymi normami.
· Nikdy neumiestňujte prístroj v blízkosti rúry, ohňa, alebo vysoko horľavých tekutín.
· Nikdy do prístroja nebúchajte a netraste s ním, mohli by ste ho poškodiť.
· Nikdy nezakrývajte nasávanie vzduchu, ani výfuk, mohli by ste spôsobiť prehriatie
prístroja.
· Dávajte pozor, aby ste prístroj nepocákali vodou a neumiestňujte ho v blízkosti zdrojov
vody, aby nemohlo dôjsť ku skratu.
· Poškodený prívodný kábel musí byť vymenený výrobcom, alebo v odbornom servise, či
kvalikovanú osobou.
· Nikdy nezapájajte iný elektrický prístroj do rovnakého okruhu, ako klimatizáciu.
· Nikdy neberte zástrčku do mokrých rúk.
· Nikdy nestrkajte do otvorov prístroja cudzie objekty.
· Nepoužívajte prístroj s predlžovacie šnúrou.
· Nedovoľte deťom, aby sa hrali s prístrojom, alebo blízko neho.

113
DO266A
www.domo-elektro.be
SK
· Po vypnutí prístroja počkajte aspoň 3 minúty, než ho zapnete znova. Kompresor potrebuje
nejaký čas, aby nedošlo k jeho poškodeniu.
· Prístroj umiestňujte aspoň 1m od televízie, alebo rádia, aby ste zamedzili rušeniu.
· Aby ste zachovali farbu prístroje, nestavajte ho na priame slnečné svetlo.
· Nikdy pri manipulácii s prístroja nenakláňajte prístroj o viac než 35o. Nikdy prístro
neklaďte, alebo neotáčajte dnom nahor.
· Prístroj vždy umiestnite na rovný a stabilný povrch.
· Než prístroj uschováte, nezabudnite z neho vyliať skondenzovanú vodu. Zaistíte tak Vašej
klimatizáciu dobrú funkčnosť po dlhšiu dobu.
· Na čistenie prístroja nikdy nepoužívajte chemikálie.
· Prístroj vždy vypnite a odpojte od elektrickej siete, než budete nasadzovať alebo dávať
dole mriežku nasávanie.
· Vždy sa uistite, že nemôžete dôjsť k vniknutiu vody do prístroja vplyvom kondenzácie
vody, alebo striekajúcou vodou a pod.
· Dbajte na to, aby prístroj nemohol prísť do styku s vodou, alebo inou tekutinou. Ak k tomu
dôjde, okamžite prístroj odpojte od elektrickej siete.
· Nikdy nepoužívajte prístroj vo vlhkých miestnostiach, ako je napríklad kúpeľňa, spálňa,
alebo práčovňa.
· Pokiaľ prístroj nepoužívate, vypnite ho.
· Opravy prístroja môže vykonávať len autorizovaný servis, alebo kvalikovaná osoba.
· Okolo prístroj musíte zachovať voľný priestor 30 cm.
· Nikdy sa prístroja nedotýkajte mokrými rukami.
· Dotýkajte sa prstami len ovládacieho panelu.
· Nesnažte sa z prístroja odstraňovať jeho pevné časti.
· Nikdy nepoužívajte prístroj pokiaľ nepracuje správne, ak Vám spadol, alebo je inak
poškodený.
· Prístroj nevypínajte vytiahnutím zo zásuvky. Vždy používajte tlačidlá na ovládacom paneli.
· Používajte prístroj iba na účely, na ktoré je určený.
· Všetky opravy, úpravy, kontrola tesnosti a prípadných porúch musí sa vykonávať ľan
odborným certikovaným servisom.
· Spotrebič obsahuje uórované skleníkové plyny zahrnuté v Kjótskom protokole.
· Inštalácia a zapojenie musí byť vykonané odborne a podľa pokynov v návode. Nesprávna
inštalácia môže spôsobiť únik vody, zasiahnutie elektrickým prúdom alebo požiar.
· Nesiahajte na prístroj, ak ste naboso, nesiahajte na neho ani s mokrými / vlhkými rukami.
· Pokiaľ dôjde počas používania k prevráteniu klimatizačné jednotky, tak ju ihneď vypnite
a okamžite odpojte od napájania (el. Siete). Následne zdvihnite a vizuálne dôkladne
skontrolujte, či nie je poškodená. Ak máte podozrenie, že bol prístroj poškodený, tak
zavolajte do odborného servisu a nechajte prekontrolovať jeho stav.
· Ak je (alebo hrozí) v lokalite búrka, tak prístroj vypojte z el. siete. Inak hrozí poškodenie
prístroja a prípadne i požiar.

114
DO266A
SK
· Ak nepoužívate trvalý odvod kondenzátu, tak majte obaja (horné i spodné) vypúšťací
vývody dostatočne uzavreté, aby nehrozilo riziko zadusenia. Ak vypúšťací vývody
nepoužívate, starostlivo je udržujte uzavreté, aby sa zabránilo zaduseniu detí alebo zvierat.
nepoužívate, starostlivo je udržujte uzavreté, aby sa zabránilo zaduseniu detí alebo zvierat.
· Prívodný kábel nikdy neveďte pod kobercom ani ho nijako nezakrývajte. Neklaďte kábel
pod nábytok ani pod prístroj samotný. Prívodný kábel by mal byť vedený tak, aby o neho
nemohol nikto zakopnúť a pritom nebol prekrytý ani zatěžkaný žiadnym predmetom.
· Ak sa z prístroja začnú ozývať divné zvuky, bude cítiť dym alebo sa začne šíriť dym, tak ho
ihneď vypnite a vypojte z el. siete.
· Proces odmrazovanie alebo čistenie neurýchľujte použitím prostriedkov, ktoré na to nie sú
určené výrobcom.
· Spotrebič musí byť skladovaný v miestnosti, v ktorej nie sú nepretržité zdroje zážihu
vznietenia (napr. otvorený oheň, spustený plynový spotrebič alebo spustený elektrický
ohrievač).
· Neprepichujte ani nezapaľujte.
· Berte na vedomie, že chladivo nemusí mať žiadny zápach.
· Zariadenie DO266A by malo byť nainštalované, prevádzkované a skladuje v miestnosti,
ktorej podlahová plocha presahuje 7 m
2
.
· Musia byť dodržané všetky vnútroštátne predpisy o plyne.
· Okolie ventilačných otvorov udržujte bez prekážok.
· Spotrebič musí byť skladovaný tak, aby sa zabránilo jeho mechanickému poškodeniu.
· Spotrebič musí byť skladovaný v dobre vetranom priestore, ktorého rozmery zodpovedajú
minimálnym uvedeným rozme-rom, ktoré sú nutné pre správnu prevádzku spotrebiča.
· Akákoľvek osoba, ktorá zasahuje do okruhu chladiva, musí mať aktuálne a platné
osvedčenie udelené hodnotiacom orgá-nom, ktorý je akreditovaný v rámci
zodpovedajúceho priemysle a ktorý môže ručiť za ich schopnosť bezpečne spra-vávať
chladiva v súlade s uznávaným hodnotiacim požiadavkou.
· Servis môže byť vykonávaný len v súlade s odporúčaním výrobcu. Údržba a opravy, ktoré
vyžadujú zapojenie iného odborného personálu, sa musí robiť pod dohľadom osoby, ktorá
je spôsobilá na zaobchádzanie s horľavými chladivami.
Pozor: Nebezpečenstvo vzniku požiaru / horľavé materiály
Tento spotrebič používa horľavé chladivo. Ak by chladivo presakovalo či
unikalo von, kde by mohlo hroziť riziko zapálenia, tak hrozí nebezpečenstvo
požiaru.
TENTO MANUÁL SI USCHOVAJTE AJ K NEJSKORŠIEMU NAHLIADNUTIU

115
DO266A
www.domo-elektro.be
SK
· Nikdy nepoužívajte prístroj v miestnostiach, ktoré sú väčšie, než je odporúčaná veľkosť.
· Dbajte na to, aby žiadne otvory prístroja neboli upchaté, alebo blokované nábytkom a pod.
· Počas najteplejších dní zatiahnite i žalúzie, alebo záclony na oknách, aby sa vzduch v
miestnosti zbytočne znova neohrieval.
· Kontrolujte ltre, aby boli vždy čisté.
· Majte vždy zatvorené dvere a okná, aby ste udržali studený vzduch v miestnosti a teplý
Vám z vonku neprúdil dovnútra.

116
DO266A
SK
1. Ovládací panel
2. Výstup vzduchu
3. Vzduchový lter
4. Vstup vzduchu
5. Výstup vzduchu
6. Odtok
7. Hadica odtoku
8. Diaľkový ovládač
9. Výfuková hadica
9 a. Napojenie výfukové hadice
10. Sada pre montáž na stenu
10 a. Adaptér na stenu
10 b. Sada pre prichytenie
11. Sada pre montáž do okna
11 a. Okenné adaptér
11 b. Súprava pre upevnenie
11 c. Okenné utesnenie
11 d. Zásuvka
11 e. Železné “L” vzpery
1
2
3
4
5
6
8
7
11b 11c
11
11e

117
DO266A
www.domo-elektro.be
SK
· Umiestnite prístroj na stabilný a rovnú plochu. Tak predídete
obťažujúcim zvukom a vibráciám. Uistite sa, že podlaha pod
prístrojom je dostatočne pevná, aby prístroj uniesla.
· Prístroj má malé kolieska pre ľahšiu manipuláciu. Presúvajte
prístroj len po rovnej a hladkej ploche. Dbajte na zvýšenú
opatrnosť pri posunovaní prístrojom po koberci. Nikdy sa
nesnažte prístrojom prechádzať predmety na zemi.
· Umiestnite prístroj čo najbližšie uzemnenej zásuvke.
· Okolo klimatizácie ponechajte do všetkých smerov voľný
priestor minimálne 30 cm.
· Hadicu pre odvod teplého vzduchu musíte používať vždy, keď nastavíte funkciu “cool”,
alebo “auto”. Počas používania funkcií “fan” a “dry”, hadica nie je potreba.
· Zaistite dostatok priestoru okolo výstupu vzduchu - aspoň 50 cm.
· Zistite, aby sa hadica počas používania nijako neohýbali.
max 120 cm
min 30 cm
· Najskôr na výfukovú hadicu nasaďte spojku k okenné koncovke.
· Potom celú hadicu nasaďte na otvor výfuku v zadnej časti prístroja.
max 120 cm
min 30 cm
· Na druhý koniec hadice napevno pripojte okenné koncovku.
· Do okna umiestnite okenný adaptér. Ten je možné umiestniť v horizontálnej i vertikálnej
rovine. Adaptér zaistite vo Vami požadovanej dĺžke.
· Do zaisteného adaptéra v okne nacvaknite okenné koncovku (ktorá je prichytená na
hadicu).
· Ak je potreba, tak môžete okolí ešte utesniť.
· Okenné adaptér si zaxujte na požadovanú dĺžku.
· Ak je potreba, tak si môžete okno zaxovať pomocou železných “L vzpier” a skrutky.
max 120 cm
min 30 cm
max 120 cm
min 30 cm
max 120 cm
min 30 cm

118
DO266A
SK
· Najskôr na výfukovú hadicu nasaďte spojku k okenné koncovke.
· Potom celú hadicu nasaďte na otvor výfuku v zadnej časti prístroja.
max 120 cm
min 30 cm
· Na druhý koniec hadice napevno pripojte koncovku do steny.
· V stene pripravte otvor so zodpovedajúcim rozmerom voči koncovke
· Koncovku pripevnite do otvoru v stene a zaistite.
max 120 cm
min 30 cm
Horizontálne položený diel v prednej časti klimatizácie môžete v prípade potreby ručne
vysunúť / zasunúť. Tento diel zlepšuje výstup vzduchu.
12
4
3

119
DO266A
www.domo-elektro.be
SK
1. Hlavný spínač ON / OFF
Týmto tlačidlom prístroj zapnete / vypnete
2. Tlačidlá “+” a “-”
Tlačidlá slúžia na nastavovanie teploty. Požadovaná teplota môže byť nastavená v rozmedzí
od 17°C do 30°C. Na prístroji si môžete voliť medzi nastavenie stupňov “°C” a “°F”. Zmenu
jednotiek vykonáte stlačením oboch tlačidiel na ráz.
3. Tlačidlo FUNKCIE (MODE)
Tlačidlom si môžete voliť jednu z funkcií prístroja. Každým stlačením tlačidla sa prepne
funkcie: KLIMATIZÁCIA - ODVLHČOVANIA - VENTILÁCIE. Vybraná funkcia bude na
ovládacom paneli podsvietená. Pokiaľ si zvolíte funkcií ventilácie, tak sa prístroj prepne do
automatického režimu. Vy môžete voliť len rýchlosť ventilácie.
4. LED displej
Displej ukazuje nastavenú teplotu. Pokiaľ máte vybranú funkciu “ventilácia”, tak na displeji
bude zobrazená aktuálna izbová teplota.
Pri používaní ovládača musíte vždy mieriť priamo proti
prístroji. Ak ovládač nereaguje, tak ho zamerajte priamo
na prístroj a skúste opäť stlačiť ON / OFF.
Akonáhle sa prístroj zapne (vypínač reaguje), tak sa ozve
zvukový signál. Diaľkový ovládač pracuje v dosahu 8 m od
prístroja.
1. Hlavný spínač ON / OFF
Týmto tlačidlom prístroj zapnete / vypnete
2. Tlačidlo FUNKCIE (MODE)
Tlačidlom si môžete voliť jednu z funkcií prístroja. Každým stlačením tlačidla sa prepne
funkcie: KLIMATIZÁCIA - ODVLHČOVANIA - VENTILÁCIE. Vybraná funkcia bude na
ovládacom paneli podsvietená.
3. Tlačidlo FAN (ventilácia)
Týmto tlačidlom si volíte rýchlosť ventilátora: LOW
55
66
MODE display
Displays the current
mode, including:
AUTO
COOL
DRY
HEAT
FAN
Transmission Indicator
Lights up when remote sends
signal to unit
ON/OFF display
Appears when the unit is turned on,
and disappears when it is turned off
TIMER ON display
Displays when TIMER
ON is set
TIMER OFF display
Displays when TIMER
OFF is set
SLEEP display
Battery display
SILENT display
ECO display
Displays when
SLEEP function
is activated
FOLLOW ME
display
Indicates that
the FOLLOW ME
function is on
FAN SPEED display
Displays selected FAN SPEED:
HIGH, MED,
or LOW
This display is blank when
set to AUTO speed.
Temperature/Timer display
Displays the set temperature by default, or timer setting
when using TIMER ON/OFF functions
o O O
Temperature range: 17-30 C(62 F-86 F)
Timer setting range: 0-24 hours
This display is blank when operating in FAN mode.
1. Press the MODE button to select
COOL mode.
2. Set your desired temperature using
the Temp or Temp button.
3. Press the FAN button to select the
fan speed: AUTO, LOW, MED,or
HIGH.
4. Press the ON/OFF button to start the
unit.
In AUTO mode, the unit will automatically
select the COOL, FAN, HEAT or DRY mode
based on the set temperature.
1. Press the MODE button to select Auto mode.
2. Set your desired temperature using the
Temp or Temp button.
3. Press the ON/OFF button to start the unit.
,
NOTE: FAN SPEED can t be set in Auto mode.
SETTING TEMPERATURE
AUTO operation
The operating temperature range for units is
O O O
17-30 C(62 F-86 F). You can increase or
O O
decrease the set tmeperature in 1 C(1 F)
increments.
COOL operation
1
3
2
1
3
2
4
Not available for this unit
Not available for
this unit
Not available for
this unit
Low battery
detection
Remote LED Screen Indicators
How To Use The Basic Functions
ON/OFF
ON/OFF
TEMP
TEMP
SHORT
CUT
SHORT
CUT
TIMER
ON
TIMER
ON
TIMER
OFF
TIMER
OFF
MODE
MODE
FAN
FAN
SLEEP
SLEEP
LED
LED
FOLLOW
ION
SWING
ME
FOLLOW
ION
SWING
ME
- HIGH
55
66
MODE display
Displays the current
mode, including:
AUTO
COOL
DRY
HEAT
FAN
Transmission Indicator
Lights up when remote sends
signal to unit
ON/OFF display
Appears when the unit is turned on,
and disappears when it is turned off
TIMER ON display
Displays when TIMER
ON is set
TIMER OFF display
Displays when TIMER
OFF is set
SLEEP display
Battery display
SILENT display
ECO display
Displays when
SLEEP function
is activated
FOLLOW ME
display
Indicates that
the FOLLOW ME
function is on
FAN SPEED display
Displays selected FAN SPEED:
HIGH, MED,
or LOW
This display is blank when
set to AUTO speed.
Temperature/Timer display
Displays the set temperature by default, or timer setting
when using TIMER ON/OFF functions
o O O
Temperature range: 17-30 C(62 F-86 F)
Timer setting range: 0-24 hours
This display is blank when operating in FAN mode.
1. Press the MODE button to select
COOL mode.
2. Set your desired temperature using
the Temp or Temp button.
3. Press the FAN button to select the
fan speed: AUTO, LOW, MED,or
HIGH.
4. Press the ON/OFF button to start the
unit.
In AUTO mode, the unit will automatically
select the COOL, FAN, HEAT or DRY mode
based on the set temperature.
1. Press the MODE button to select Auto mode.
2. Set your desired temperature using the
Temp or Temp button.
3. Press the ON/OFF button to start the unit.
,
NOTE: FAN SPEED can t be set in Auto mode.
SETTING TEMPERATURE
AUTO operation
The operating temperature range for units is
O O O
17-30 C(62 F-86 F). You can increase or
O O
decrease the set tmeperature in 1 C(1 F)
increments.
COOL operation
1
3
2
1
3
2
4
Not available for this unit
Not available for
this unit
Not available for
this unit
Low battery
detection
Remote LED Screen Indicators
How To Use The Basic Functions
ON/OFF
ON/OFF
TEMP
TEMP
SHORT
CUT
SHORT
CUT
TIMER
ON
TIMER
ON
TIMER
OFF
TIMER
OFF
MODE
MODE
FAN
FAN
SLEEP
SLEEP
LED
LED
FOLLOW
ION
SWING
ME
FOLLOW
ION
SWING
ME
– AUTO.
4. Tlačidlo SLEEP (spánok)
Tlačidlom aktivujete režim na spánok - sleep
1
2
3
4
5
6
7
8

120
DO266A
SK
V režime “sleep” je zvolená teplota postupne zvyšovať o 1 ° C za 30 min. Za ďalších 30 minút
sa teplota zvýši o ďalšie 1 ° C. Klimatizácia bude túto teplotu udržiavať ďalších 7 hodín. Po
uplynutí tohto času sa klimatizácia prepne späť do pôvodného nastavenia teploty a funkcie
“sleep” sa ukončí.
POZNÁMKA: túto funkciu nemôžete nastaviť zároveň s “fan”, alebo “dry” funkcií.
5. Tlačidlo TEMP (teplota)
Na prístroji si môžete nastaviť požadovanú teplotu v rozmedzí 17-30 ° C. Akonáhle stlačíte obe
tlačidlá zároveň, tak sa prehodí jednotky teploty “° C” a “° F”.
6. Tlačidlo RÝCHLE VOĽBY (SHORTCUT)
K tomuto tlačidlu si môžete nastaviť predvolenú funkciu a následne jej jedným stlačením
zapínať / vypínať.
7. Tlačidlo zapnutia časovača (TIMER ON)
Týmto tlačidlom zapínate časovač.
8. Tlačidlo vypnutia časovača (TIMER OFF)
Týmto tlačidlom časovač vypínate.
9. Tlačidlo pre zopnutie LED osvietenie
Týmto tlačidlom vypnete LED podsvietenie. To uvítate ak chcete spať a osvetlenie displeja Vás
ruší. Akonáhle stlačíte tlačidlo znova, tak sa displej opäť rozsvieti.
55
66
MODE display
Displays the current
mode, including:
AUTO
COOL
DRY
HEAT
FAN
Transmission Indicator
Lights up when remote sends
signal to unit
ON/OFF display
Appears when the unit is turned on,
and disappears when it is turned off
TIMER ON display
Displays when TIMER
ON is set
TIMER OFF display
Displays when TIMER
OFF is set
SLEEP display
Battery display
SILENT display
ECO display
Displays when
SLEEP function
is activated
FOLLOW ME
display
Indicates that
the FOLLOW ME
function is on
FAN SPEED display
Displays selected FAN SPEED:
HIGH, MED,
or LOW
This display is blank when
set to AUTO speed.
Temperature/Timer display
Displays the set temperature by default, or timer setting
when using TIMER ON/OFF functions
o O O
Temperature range: 17-30 C(62 F-86 F)
Timer setting range: 0-24 hours
This display is blank when operating in FAN mode.
1. Press the MODE button to select
COOL mode.
2. Set your desired temperature using
the Temp or Temp button.
3. Press the FAN button to select the
fan speed: AUTO, LOW, MED,or
HIGH.
4. Press the ON/OFF button to start the
unit.
In AUTO mode, the unit will automatically
select the COOL, FAN, HEAT or DRY mode
based on the set temperature.
1. Press the MODE button to select Auto mode.
2. Set your desired temperature using the
Temp or Temp button.
3. Press the ON/OFF button to start the unit.
,
NOTE: FAN SPEED can t be set in Auto mode.
SETTING TEMPERATURE
AUTO operation
The operating temperature range for units is
O O O
17-30 C(62 F-86 F). You can increase or
O O
decrease the set tmeperature in 1 C(1 F)
increments.
COOL operation
1
3
2
1
3
2
4
Not available for this unit
Not available for
this unit
Not available for
this unit
Low battery
detection
Remote LED Screen Indicators
How To Use The Basic Functions
ON/OF F
ON/OF F
TEMP
TEMP
SHORT
CUT
SHORT
CUT
TIMER
ON
TIMER
ON
TIMER
OFF
TIMER
OFF
MODE
MODE
FAN
FAN
SLEEP
SLEEP
LED
LED
FOLLO W
ION
SWING
ME
FOLLO W
ION
SWING
ME
V režime AUTO si sám prístroj upravuje výkon a zopnutie klimatizácie, tak aby sa požadovaná
teplota okolia menila čo najmenej. Táto funkcia môže byť zapnutá Aj cez diaľkové ovládanie.
1. Na ovládači si navoľte režim AUTO pomocou tlačidla MODE.
2. Nastavte si požadovanú teplotu a prístroj si už sám zvolí stupeň potrebnej klimatizácie.
Počas automatického režimu vy nemôžete regulovať rýchlosť ventilátora.
55
66
MODE display
Displays the current
mode, including:
AUTO
COOL
DRY
HEAT
FAN
Transmission Indicator
Lights up when remote sends
signal to unit
ON/OFF display
Appears when the unit is turned on,
and disappears when it is turned off
TIMER ON display
Displays when TIMER
ON is set
TIMER OFF display
Displays when TIMER
OFF is set
SLEEP display
Battery display
SILENT display
ECO display
Displays when
SLEEP function
is activated
FOLLOW ME
display
Indicates that
the FOLLOW ME
function is on
FAN SPEED display
Displays selected FAN SPEED:
HIGH, MED,
or LOW
This display is blank when
set to AUTO speed.
Temperature/Timer display
Displays the set temperature by default, or timer setting
when using TIMER ON/OFF functions
o O O
Temperature range: 17-30 C(62 F-86 F)
Timer setting range: 0-24 hours
This display is blank when operating in FAN mode.
1. Press the MODE button to select
COOL mode.
2. Set your desired temperature using
the Temp or Temp button.
3. Press the FAN button to select the
fan speed: AUTO, LOW, MED,or
HIGH.
4. Press the ON/OFF button to start the
unit.
In AUTO mode, the unit will automatically
select the COOL, FAN, HEAT or DRY mode
based on the set temperature.
1. Press the MODE button to select Auto mode.
2. Set your desired temperature using the
Temp or Temp button.
3. Press the ON/OFF button to start the unit.
,
NOTE: FAN SPEED can t be set in Auto mode.
SETTING TEMPERATURE
AUTO operation
The operating temperature range for units is
O O O
17-30 C(62 F-86 F). You can increase or
O O
decrease the set tmeperature in 1 C(1 F)
increments.
COOL operation
1
3
2
1
3
2
4
Not available for this unit
Not available for
this unit
Not available for
this unit
Low battery
detection
Remote LED Screen Indicators
How To Use The Basic Functions
ON/OF F
ON/OF F
TEMP
TEMP
SHORT
CUT
SHORT
CUT
TIMER
ON
TIMER
ON
TIMER
OFF
TIMER
OFF
MODE
MODE
FAN
FAN
SLEEP
SLEEP
LED
LED
FOLLO W
ION
SWING
ME
FOLLO W
ION
SWING
ME
Funkcia “COOL” je klimatizácia a znižuje teplotu v miestnosti.
1. Navoľte si túto funkciu COOL tlačidlom MODE, akonáhle bude zvolená, tak bude na
ovládacom paneli svietiť.
2. Pomocou šípok na paneli alebo na ovládači si nastavte požadovanú teplotu v miestnosti.
3. Tlačidlom “fan” alebo na ovládači si nastavte požadovanú rýchlosť ventilátora. Sú tu 3
rýchlosti.

121
DO266A
www.domo-elektro.be
SK
55
66
MODE display
Displays the current
mode, including:
AUTO
COOL
DRY
HEAT
FAN
Transmission Indicator
Lights up when remote sends
signal to unit
ON/OFF display
Appears when the unit is turned on,
and disappears when it is turned off
TIMER ON display
Displays when TIMER
ON is set
TIMER OFF display
Displays when TIMER
OFF is set
SLEEP display
Battery display
SILENT display
ECO display
Displays when
SLEEP function
is activated
FOLLOW ME
display
Indicates that
the FOLLOW ME
function is on
FAN SPEED display
Displays selected FAN SPEED:
HIGH, MED,
or LOW
This display is blank when
set to AUTO speed.
Temperature/Timer display
Displays the set temperature by default, or timer setting
when using TIMER ON/OFF functions
o O O
Temperature range: 17-30 C(62 F-86 F)
Timer setting range: 0-24 hours
This display is blank when operating in FAN mode.
1. Press the MODE button to select
COOL mode.
2. Set your desired temperature using
the Temp or Temp button.
3. Press the FAN button to select the
fan speed: AUTO, LOW, MED,or
HIGH.
4. Press the ON/OFF button to start the
unit.
In AUTO mode, the unit will automatically
select the COOL, FAN, HEAT or DRY mode
based on the set temperature.
1. Press the MODE button to select Auto mode.
2. Set your desired temperature using the
Temp or Temp button.
3. Press the ON/OFF button to start the unit.
,
NOTE: FAN SPEED can t be set in Auto mode.
SETTING TEMPERATURE
AUTO operation
The operating temperature range for units is
O O O
17-30 C(62 F-86 F). You can increase or
O O
decrease the set tmeperature in 1 C(1 F)
increments.
COOL operation
1
3
2
1
3
2
4
Not available for this unit
Not available for
this unit
Not available for
this unit
Low battery
detection
Remote LED Screen Indicators
How To Use The Basic Functions
ON/OF F
ON/OF F
TEMP
TEMP
SHORT
CUT
SHORT
CUT
TIMER
ON
TIMER
ON
TIMER
OFF
TIMER
OFF
MODE
MODE
FAN
FAN
SLEEP
SLEEP
LED
LED
FOLLO W
ION
SWING
ME
FOLLO W
ION
SWING
ME
Funkcia DRY je funkcia odvlhčovania a vy si tak môžete regulovať vlhkosť v miestnosti. Pri
používaní zatvorte dvere aj okná, aby odvlhčenie miestnosti bolo čo najlepšie.
1. Stlačením tlačidla “MODE” nastavte funkciu “DRY” - rozsvieti sa príslušná kontrolka na
paneli.
2. Pomocou šípok na paneli alebo na ovládači si nastavte požadovanú hodnotu.
3. Pre túto funkciu nie je možné nastavovať rýchlosť ventilátora.
55
66
MODE display
Displays the current
mode, including:
AUTO
COOL
DRY
HEAT
FAN
Transmission Indicator
Lights up when remote sends
signal to unit
ON/OFF display
Appears when the unit is turned on,
and disappears when it is turned off
TIMER ON display
Displays when TIMER
ON is set
TIMER OFF display
Displays when TIMER
OFF is set
SLEEP display
Battery display
SILENT display
ECO display
Displays when
SLEEP function
is activated
FOLLOW ME
display
Indicates that
the FOLLOW ME
function is on
FAN SPEED display
Displays selected FAN SPEED:
HIGH, MED,
or LOW
This display is blank when
set to AUTO speed.
Temperature/Timer display
Displays the set temperature by default, or timer setting
when using TIMER ON/OFF functions
o O O
Temperature range: 17-30 C(62 F-86 F)
Timer setting range: 0-24 hours
This display is blank when operating in FAN mode.
1. Press the MODE button to select
COOL mode.
2. Set your desired temperature using
the Temp or Temp button.
3. Press the FAN button to select the
fan speed: AUTO, LOW, MED,or
HIGH.
4. Press the ON/OFF button to start the
unit.
In AUTO mode, the unit will automatically
select the COOL, FAN, HEAT or DRY mode
based on the set temperature.
1. Press the MODE button to select Auto mode.
2. Set your desired temperature using the
Temp or Temp button.
3. Press the ON/OFF button to start the unit.
,
NOTE: FAN SPEED can t be set in Auto mode.
SETTING TEMPERATURE
AUTO operation
The operating temperature range for units is
O O O
17-30 C(62 F-86 F). You can increase or
O O
decrease the set tmeperature in 1 C(1 F)
increments.
COOL operation
1
3
2
1
3
2
4
Not available for this unit
Not available for
this unit
Not available for
this unit
Low battery
detection
Remote LED Screen Indicators
How To Use The Basic Functions
ON/OF F
ON/OF F
TEMP
TEMP
SHORT
CUT
SHORT
CUT
TIMER
ON
TIMER
ON
TIMER
OFF
TIMER
OFF
MODE
MODE
FAN
FAN
SLEEP
SLEEP
LED
LED
FOLLO W
ION
SWING
ME
FOLLO W
ION
SWING
ME
1. Stlačením tlačidla “MODE” nastavte funkciu “FAN” - rozsvieti sa príslušná kontrolka na
paneli.
2. Tlačidlom “fan” alebo na ovládači si nastavte požadovanú rýchlosť ventilátora. Sú tu 3
rýchlosti (LOW
55
66
MODE display
Displays the current
mode, including:
AUTO
COOL
DRY
HEAT
FAN
Transmission Indicator
Lights up when remote sends
signal to unit
ON/OFF display
Appears when the unit is turned on,
and disappears when it is turned off
TIMER ON display
Displays when TIMER
ON is set
TIMER OFF display
Displays when TIMER
OFF is set
SLEEP display
Battery display
SILENT display
ECO display
Displays when
SLEEP function
is activated
FOLLOW ME
display
Indicates that
the FOLLOW ME
function is on
FAN SPEED display
Displays selected FAN SPEED:
HIGH, MED,
or LOW
This display is blank when
set to AUTO speed.
Temperature/Timer display
Displays the set temperature by default, or timer setting
when using TIMER ON/OFF functions
o O O
Temperature range: 17-30 C(62 F-86 F)
Timer setting range: 0-24 hours
This display is blank when operating in FAN mode.
1. Press the MODE button to select
COOL mode.
2. Set your desired temperature using
the Temp or Temp button.
3. Press the FAN button to select the
fan speed: AUTO, LOW, MED,or
HIGH.
4. Press the ON/OFF button to start the
unit.
In AUTO mode, the unit will automatically
select the COOL, FAN, HEAT or DRY mode
based on the set temperature.
1. Press the MODE button to select Auto mode.
2. Set your desired temperature using the
Temp or Temp button.
3. Press the ON/OFF button to start the unit.
,
NOTE: FAN SPEED can t be set in Auto mode.
SETTING TEMPERATURE
AUTO operation
The operating temperature range for units is
O O O
17-30 C(62 F-86 F). You can increase or
O O
decrease the set tmeperature in 1 C(1 F)
increments.
COOL operation
1
3
2
1
3
2
4
Not available for this unit
Not available for
this unit
Not available for
this unit
Low battery
detection
Remote LED Screen Indicators
How To Use The Basic Functions
ON/OFF
ON/OFF
TEMP
TEMP
SHORT
CUT
SHORT
CUT
TIMER
ON
TIMER
ON
TIMER
OFF
TIMER
OFF
MODE
MODE
FAN
FAN
SLEEP
SLEEP
LED
LED
FOLLOW
ION
SWING
ME
FOLLOW
ION
SWING
ME
, HIGH
55
66
MODE display
Displays the current
mode, including:
AUTO
COOL
DRY
HEAT
FAN
Transmission Indicator
Lights up when remote sends
signal to unit
ON/OFF display
Appears when the unit is turned on,
and disappears when it is turned off
TIMER ON display
Displays when TIMER
ON is set
TIMER OFF display
Displays when TIMER
OFF is set
SLEEP display
Battery display
SILENT display
ECO display
Displays when
SLEEP function
is activated
FOLLOW ME
display
Indicates that
the FOLLOW ME
function is on
FAN SPEED display
Displays selected FAN SPEED:
HIGH, MED,
or LOW
This display is blank when
set to AUTO speed.
Temperature/Timer display
Displays the set temperature by default, or timer setting
when using TIMER ON/OFF functions
o O O
Temperature range: 17-30 C(62 F-86 F)
Timer setting range: 0-24 hours
This display is blank when operating in FAN mode.
1. Press the MODE button to select
COOL mode.
2. Set your desired temperature using
the Temp or Temp button.
3. Press the FAN button to select the
fan speed: AUTO, LOW, MED,or
HIGH.
4. Press the ON/OFF button to start the
unit.
In AUTO mode, the unit will automatically
select the COOL, FAN, HEAT or DRY mode
based on the set temperature.
1. Press the MODE button to select Auto mode.
2. Set your desired temperature using the
Temp or Temp button.
3. Press the ON/OFF button to start the unit.
,
NOTE: FAN SPEED can t be set in Auto mode.
SETTING TEMPERATURE
AUTO operation
The operating temperature range for units is
O O O
17-30 C(62 F-86 F). You can increase or
O O
decrease the set tmeperature in 1 C(1 F)
increments.
COOL operation
1
3
2
1
3
2
4
Not available for this unit
Not available for
this unit
Not available for
this unit
Low battery
detection
Remote LED Screen Indicators
How To Use The Basic Functions
ON/OFF
ON/OFF
TEMP
TEMP
SHORT
CUT
SHORT
CUT
TIMER
ON
TIMER
ON
TIMER
OFF
TIMER
OFF
MODE
MODE
FAN
FAN
SLEEP
SLEEP
LED
LED
FOLLOW
ION
SWING
ME
FOLLOW
ION
SWING
ME
, AUTO)
3. Pre túto funkciu nie je možné nastavovať teplotu miestnosti.
Týmto tlačidlom zapnete časovač, ktorý odloží štart klimatizácie a prístroj zopne.
1. Časovač zapnete stlačením tlačidla TIMER ON na ovládači.
2. Na displeji ovládača sa zobrazí čas za ako dlho by sa prístroj zapol.
3. Každé stlačenie (alebo podržaním) tlačidla zvýši nastavený čas. Čas udáva za ako dlho sa
prístroj spustí.
4. Po nastavení času, začne prístroj čas odpočítavať a displeji svieti “TIMER ON”. Na
ovládacom paneli budú svietiť 2 svetelné kontrolky.
5. Ak časovač chcete vypnúť, tak týmto tlačidlom prenastavte čas až do “0”. Tlačidlo
môžete stláčať alebo podržať.
Týmto tlačidlom nastavíte časovač, pre automatické vypnutie klimatizácie po určitej dobe ..
1. Stlačte tlačidlo TIMER OFF na ovládači.
2. Na displeji ovládača sa zobrazí čas za ako dlho by sa prístroj vypol.
3. Každé stlačenie (alebo podržaním) tlačidla zvýši nastavený čas. Čas udáva za ako dlho sa
prístroj vypne.
4. Po nastavení času, začne prístroj čas odpočítavať a displeji svieti “TIMER OFF”. Na
ovládacom paneli budú svietiť 2 svetelné kontrolky.
5. Ak časovač vypnutia chcete zrušiť, tak týmto tlačidlom prenastavte čas až do “0”. Tlačidlo
môžete stláčať alebo podržať.

122
DO266A
SK
Vyššie spomínané funkcie časovača môžete samozrejme nastaviť aj súčasne. Nastavenie
potom bude automaticky udávať, kedy sa prístroj zopne ale aj kedy sa následne vypne.
POZNÁMKA: Čas nastavenia vždy vyhází z aktuálneho času a dopočítava ho. Príklad. Ak je
teraz 13 hodín a my chceme klimatizáciu zopnúť o 16:30 a v 18 hodín opäť vypnúť. Tak musíte
na časovači zapnutie (TIMER ON) nastaviť 3,5 hodiny a na časovači vypnutie (TIMER OFF) 5,0
hodín.
Po aktivácii funkcie “sleep” sa po 30 minútach zvýši teplota o 1 ° C. Za ďalších 30 minút sa
teplota zvýši o ďalšie 1 ° C. Klimatizácia bude túto teplotu udržiavať ďalších 7 hodín. Po
uplynutí tohto času sa klimatizácia prepne späť do pôvodného nastavenia teploty a funkcie
“sleep” sa ukončí.
POZNÁMKA: túto funkciu nemôžete nastaviť zároveň s ventiláciou ( “fan”), ani funkcií
odvlhčovanie ( “dry”).
K tomuto tlačidlu si môžete nastaviť predvolenú funkciu a následne jej jedným stlačením
zapínať / vypínať.
Ak nejaké nastavenie prístroja používate častejšie, tak si ho môžete uložiť do pamäte.
Uložíte podržaním tlačidla na 3 sekundy. Prístroj si uloží nastavenie, ktoré je zvolené práve v
momente ukladania. Pod voľbu nastavenia je možné si uložiť: funkciu (MODE), požadovanú
teplotu, rýchlosť ventilácie a prípadne Aj nastavenie časovača,
Kedykoľvek potom stlačte tlačidlo (SHORTCUT), tak prístroj začne pracovať na uložené a
zapamätané nastavenia.
ODVODNENIE
Počas funkcie “odvlhčovanie” môžete použiť trvalé odvodnenie.
1. Odstráňte zátku vyústenie trvalého odtoku.
2. Pripojte vypúšťaciu hadicu na miesto pre stály odtok kondenzátu a druhý koniec odveďte
do odpadu v miestnosti.
3. Uistite sa, že voda je bezpečne odvádzaná a nič jej nestojí v ceste.
1
2

123
DO266A
www.domo-elektro.be
SK
Ak nepoužívate trvalý odtok, nerecyklovaný kondenzovaná voda bude uchovávaná v nádržke
na vodu.
· Po naplnení nádržky na vodu sa ozve niekoľko zvukových
signálov a na displeji sa zobrazí kód P1. Funkcia “chladenie”
a “odvlhčovanie” sa automaticky ukončí. Ventilátor naďalej
pobeží, čo je normálne.
· Presuňte prístroj na miesto, kde môžete ľahko vodu vypustiť
/ vyliať.
· Odstráňte vypúšťací zátku na spodnej časti prístroja (A) a
vypustite vodu.
· Po úplnom vypustení nádržky na vodu umiestnite vypúšťací
zátku späť na otvor pre odtok.
· Reštartujte prístroj a uistite sa, že chybový kód P1 na
displeji už nie je zobrazený. Ak kód nezmizne, skúste prístroj
niekoľkokrát vypnúť a zapnúť. Ak je aj naďalej kód zobrazený,
prosím kontaktujte popredajný servis.
· POZNÁMKA: Pred opätovným spustením prístroja sa vždy
uistite, že ste nádržku opäť uzavreli.
· Pred čistením prístroja vždy vytiahnite zástrčku zo zásuvky.
· Nikdy na čistenie prístroja nepoužívajte žiadne chemické alebo drsné prostriedky.
· Nikdy prístroj nečistite vodou alebo inými kvapalinami, to by mohlo spôsobiť poškodenie
elektrickým prúdom.
· Ak je poškodený prívodný kábel, musí byť opravený alebo nahradený popredajným
servisom alebo kvalikovanou osobou.
· Čistite vzduchový lter aspoň každé dva týždne. Uistite
sa, že klimatizácia môže pracovať v optimálnych
podmienkach.
· Čistite vzduchový lter vo vlažnej vode s trochou
umývacieho prostriedku. Filter dôkladne vypláchnite a
nechajte uschnúť.
· Pred umiestnením ltra späť do klimatizácie sa uistite, že
je kompletne suchý.
A

124
DO266A
SK
Pre vyčistenie vonkajšej časti prístroja používajte vlhkú mäkkú handričku s trochou jemného
čistiaceho prostriedku. Uistite sa, že je prístroj dôkladne vysušený.
Pred skladovaním prístroja na dlhšiu dobu, prosím postupujte podľa nasledujúcich krokov:
· Vypustite všetku vodu zo spotrebiča.
· Potom na pol dňa zapnite prístroj vo funkcii “fúkanie”. Uistite sa, že je prístroj umiestnený
vo vyhrievanom priestore. To prístroj kompletne vysuší a odovzdajte utváranie plesní.
· Prístroj vypnite, vytiahnite zástrčku zo zásuvky a odoberte batérie z diaľkového ovládania.
· Vyčistite ltre a umiestnite ich späť do prístroja.
· Uchovávajte prístroj na suchom a tmavom mieste.
Prístroj nefunguje, keď stláčate tlačidlo on / o.
· Ak je zobrazený chybový kód P1, vypustite vodu z klimatizácie.
· Ak je teplota v miestnosti nižšia, než zvolená teplota, upravte zvolenú teplotu.
Miestnosť nie je dostatočne chladná.
· Okná a dvere nie sú zatvorené. Uistite sa, že všetky okná a dvere sú zatvorené.
· V miestnosti môže byť nejaký zdroj tepla. Ak je to možné, odstráňte všetky zdroje tepla.
· Vzduchová hadica nie je pripojená alebo je blokovaná. Pripojte hadicu a skontrolujte, či nie
je blokovaná.
· Zvolená teplota je vysoká. Upravte zvolenú teplotu.
· Vzduchový lter je znečistený. Vyčistite vzduchový lter.
Prístroj vydáva moc hluku alebo vibruje.
· Podlaha nie je hladká alebo rovná. Ak je to možné, umiestnite prístroj na hladký a rovný
povrch.
· Vzduchový lter je znečistený. Vyčistite vzduchový lter.
Prístroj vydáva bublavý zvuk
· Tento zvuk vytvára chladiaci náplň, ktorý je v prístroji. Tento občasný zvuk je v poriadku.

125
DO266A
www.domo-elektro.be
SK
Na vašej klimatizáciu sa môžu zobraziť nasledujúce chybové kódy:
E1: Nefunguje senzor pre snímanie teploty v miestnosti.
Vypnite prístroj a odoberte zástrčku zo zásuvky.
Počkajte 10 sekúnd a zapojte prístroj späť. Zapnite prístroj. Ak chybový kód pretrváva,
kontaktujte servis.
E2: Senzor vlhkosti nefunguje.
Vypnite prístroj a odoberte zástrčku zo zásuvky. Počkajte 10 sekúnd a zapojte prístroj späť.
Zapnite prístroj. Ak chybový kód pretrváva, kontaktujte servis.
E4: Displej nefunguje správne.
Vypnite prístroj a odoberte zástrčku zo zásuvky. Počkajte 10 sekúnd a zapojte prístroj späť.
Zapnite prístroj. Ak chybový kód pretrváva, kontaktujte servis.
P1: Nádržka na vodu je plná.
Pripojte vypúšťaciu hadicu na dolnej miesto pre odtok kondenzátu. Keď chybový kód
pretrváva, kontaktujte servis.
Symbol na prístroji alebo na jeho obale znamená, že s
týmto výrobkom nie je možné nakladať ako s domovým
odpadom, ale musí byť odovzdaný na miestach určených
na zber a likvidáciu elektrických a elektronických zariadení.
Dodržaním tohto odporúčania chránite životné prostredie
a zdravie spoluobčanov. Viac informácií o možnostiach
likvidácie nebezpečného odpadu obdržíte na obecných alebo
mestských úradoch, zberných dvoroch alebo v predajni, kde
ste prístroj zakúpili.
Obalové materiály sú recyklovateľné, nakladajte s nimi podľa
predpisov pre životné prostredie.

126
DO266A

127
DO266A
www.domo-elektro.be

LINEA 2000 BV - Dompel 9 - 2200 Herentals - Belgium - Tel: +32 14 21 71 91 - Fax: +32 14 21 54 63
BESTEL
de originele
Domo-accessoires
en -onderdelen
online via:
of scan hier:
COMMANDEZ
d’authentiques
accessoires et
pièces Domo en
ligne sur:
ou scannez ici:
BESTELLEN SIE
die Domo
Original-Zubehör
und -Ersatzteile
online über:
oder hier scannen:
ORDER
the original
Domo
accessories and
parts online at:
or scan here:
webshop.domo-elektro.be
Webshop
Documenttranscriptie
DO266A Handleiding Mobiele airco Mode d’emploi Climatiseur mobile Gebrauchsanleitung Mobile Klimaanlage Instruction booklet Mobile air conditioning Manual de instrucciones Acondicionador Istruzioni per l’uso Condizionatore d’aria portatile Návod k použití Mobilní klimatizace Návod na použitie Mobilná klimatizácia PRODUCT OF Required for R32/R290 Refrigerant only CAUTION : RISK OF FIRE Lees aandachtig alle instructies - bewaar deze handleiding voor latere raadpleging. Lisez attentivement les instructions - gardez le mode d’emploi pour utilisation ultérieur. Lesen Sie genau die Anweisungen - bewahren Sie die Gebrauchsanleitung für spätere heranziehung. Read all instructions carefully - save this instruction manual for future reference. Lea detenidamente todas las instrucciones - Conserve este manual para futura referencia. Leggere con attenzione le istruzioni - conservarle per future consultazioni Před použitím si důkladně přečtěte tento manuál - manuál si uschovejte i pro případ budoucího nahlédnutí. Pred použitím si dôkladne prečítajte tento manuál - manuál si uschovajte aj pre prípad budúceho nahliadnutie. NL Nederlands 3 FR Français 19 DE Deutsch 34 EN English 50 ES Espagnol 65 IT Italiano 81 CZ Čeština 97 SK Slovenčina 111 NL GARANTIE Geachte klant, Al onze producten ondergaan steeds een strenge kwaliteitscontrole, alvorens ze aan je worden aangeboden. Mocht je desondanks toch nog problemen hebben met jouw toestel, dan betreuren wij dit ten zeerste. In dat geval verzoeken wij je contact op te nemen met onze klantendienst. Onze medewerkers zullen je met plezier verder helpen. +32 14 21 71 91 [email protected] Maandag – Donderdag : 8.30u – 12.00u en van 13.00u – 17.00u Vrijdag : 8.30u – 12.00u en van 13.00u – 16.30u Dit apparaat heeft een garantietermijn van 2 jaar vanaf de datum van aankoop. Gedurende de garantieperiode zal de distributeur volledige verantwoording op zich nemen voor gebreken die aanwijsbaar berusten op materiaal- of constructiefouten. Wanneer dergelijke gebreken voorkomen, zal het apparaat, indien nodig, vervangen of gerepareerd worden. De garantieperiode van 2 jaar zal op dit moment niet terug beginnen, maar loopt verder tot 2 jaar na de aankoop van het toestel. De garantie wordt verleend op basis van het kassaticket. Indien je apparaat defect is binnen de garantietermijn van 2 jaar, dan mag je het toestel samen met het originele kassaticket binnenbrengen in de winkel waar je het toestel hebt aangekocht. De garantie op accessoires en onderdelen die onderhevig zijn aan slijtage, bedraagt 6 maanden. De garantie en verantwoordelijkheid/aansprakelijkheid van de leverancier en fabrikant vervallen automatisch in de volgende gevallen: · Bij het niet naleven van de instructies in deze handleiding. · Bij verkeerde aansluiting, vb. te hoge elektrische spanning. · Bij verkeerd, hardhandig of abnormaal gebruik. · Bij onvoldoende of verkeerd onderhoud. · Bij herstelling of wijziging van het toestel door de consument of niet gemachtigde derden. · Bij gebruik van onderdelen of accessoires welke niet worden aanbevolen of geleverd door de leverancier / fabrikant. www.domo-elektro.be DO266A 3 NL VEILIGHEIDSVOORSCHRIFTEN Wanneer je elektrische toestellen gebruikt, moeten volgende veiligheidsinstructies in acht genomen worden: · Lees deze instructies zorgvuldig door. Bewaar deze handleiding om later te raadplegen. · Verwijder voor het eerste gebruik alle verpakkingsmaterialen en eventuele promotionele stickers. Zorg ervoor dat kinderen niet met de verpakkingsmaterialen spelen. · Dit toestel is geschikt om te gebruiken in de huishoudelijke omgeving en in gelijkaardige omgevingen zoals: · Keukenhoek voor personeel van winkels, kantoren en andere gelijkaardige professionele omgevingen · Boerderijen · Hotel- en motelkamers en andere omgevingen met een residentieel karakter · Gastenkamers, of gelijkaardige · Dit toestel mag gebruikt worden door kinderen vanaf 16 jaar en personen met een fysieke of sensoriële beperking of mensen met een beperkte mentale capaciteit of gebrek aan ervaring of kennis, op voorwaarde dat deze personen toezicht krijgen of instructies hebben gekregen over het gebruik van het toestel op een veilige manier en dat ze ook de gevaren kennen bij het gebruik van het toestel. Kinderen mogen niet met het toestel spelen. Het onderhoud en de reiniging van het toestel mogen niet door kinderen gebeuren tenzij ze ouder zijn dan 16 jaar en onder toezicht staan. · Houd het toestel en de voedingskabel buiten het bereik van kinderen jonger dan 16 jaar. · Opgelet: het toestel mag niet gebruikt worden met een externe timer. · Kijk voor gebruik na of het voltage vermeld op het toestel overeenkomt met het voltage van het elektriciteitsnet bij je thuis. · De voedingskabel moet steeds aangesloten worden op een stopcontact dat geïnstalleerd en geaard is volgens de lokale standaarden en normen. · Laat het snoer niet op een heet oppervlak of over de rand van een tafel of aanrecht hangen. · Gebruik het toestel nooit wanneer het snoer of de stekker beschadigd is, na een slechte werking van het toestel of wanneer het toestel beschadigd is. Breng het toestel dan naar het dichtsbijzijnde gekwalificeerde service center voor nazicht en reparatie. · Streng toezicht is noodzakelijk wanneer het toestel door of in de buurt van kinderen gebruikt wordt. · Het gebruik van accessoires die niet aanbevolen of verkocht worden door de fabrikant, kan brand, elektrische schokken of verwondingen veroorzaken. · Trek de stekker uit het stopcontact wanneer het toestel niet in gebruik is, vooraleer onderdelen te monteren of demonteren en vooraleer het toestel te reinigen. Zet eerst alle knoppen in de ‘uit’-stand en trek de stekker bij de stekker zelf uit het stopcontact. Trek nooit aan het snoer om de stekker uit het stopcontact te trekken. · Laat een werkend toestel niet zonder toezicht achter. 4 DO266A NL · Zet dit toestel nooit op of in de buurt van een gasvuur of elektrisch vuur of op een plaats waar het in contact zou kunnen komen met een warm toestel. · Gebruik het toestel niet buiten. · Gebruik het toestel enkel voor het doel waarvoor het bestemd is. · Gebruik het toestel altijd op een stevig, droog, effen oppervlak. · Gebruik het toestel alleen voor huishoudelijk gebruik. De fabrikant is niet verantwoordelijk voor ongelukken die een gevolg zijn van verkeerd gebruik van het toestel, of het niet naleven van de regels zoals ze vermeld zijn in deze handleiding. · Alle herstellingen, buiten het gewone onderhoud van het toestel, moeten uitgevoerd worden door de fabrikant of zijn dienst na verkoop. · Dompel het toestel, het elektrisch snoer of de stekker nooit onder in water of een andere vloeistof. · Zorg ervoor dat kinderen het elektrisch snoer of het toestel niet kunnen aanraken. · Hou het snoer uit de buurt van scherpe randen en hete onderdelen of andere warmtebronnen. · Plaats het toestel nooit in de buurt van een gastoestel, vuur of een lichtontvlambare vloeistof. · Sla nooit op het toestel of schud niet met het toestel, om schade te voorkomen. · Dek de luchtinlaat en -uitlaat nooit af, om oververhitting te voorkomen. · Besprenkel het toestel nooit met water of plaats het toestel nooit in de buurt van water, om elektrocutie te voorkomen. · Deel de stroomtoevoer naar de airco nooit met een ander toestel. · Steek de stekker nooit in het stopcontact of verwijder de stekker nooit uit het stopcontact met natte handen. · Steek nooit vreemde voorwerpen in de openingen van het toestel. · Gebruik nooit een verlengsnoer. · Laat kinderen nooit in de buurt van het toestel spelen. · Wanneer je het toestel uitzet en kort daarna terug aanzet, zal de compressor minstens 3 minuten nodig hebben om terug op te starten. · Plaats het toestel minstens op 1 meter afstand van tv of radio, om storingen te voorkomen. · Plaats het toestel niet in rechtstreeks zonlicht, om verkleuring van het toestel te voorkomen. · Laat het toestel nooit meer dan 35° hellen wanneer je het verplaatst. Verplaats de airco altijd rechtopstaand. Verplaats het toestel nooit ondersteboven. · Verwijder steeds het water uit het toestel voor je het opbergt, zo verleng je de levensduur van het toestel. · Gebruik geen chemische middelen om het toestel te reinigen, dit zal het toestel beschadigen. · Zorg er steeds voor dat je de stroom uitschakelt voor je het luchtinlaatrooster weghaalt of plaatst. www.domo-elektro.be DO266A 5 NL · Zorg ervoor dat de airco steeds beschermd is tegen vocht, zoals condensatie, spatwater, etc. Zorg ervoor dat de airco zo staat dat hij niet in water of een andere vloeistof kan vallen. Wanneer hij toch in water of een vloeistof moest vallen, verwijder dan onmiddellijk de stekker uit het stopcontact. · Gebruik de airco niet in een vochtige ruimte zoals een badkamer of wasplaats. · Neem steeds contact op met een gekwalificeerde persoon om het toestel te laten herstellen. · Zorg ervoor dat de vrije ruimte rondom het toestel minstens 30 cm bedraagt. · Bedien de toetsen van het toestel alleen met je vingers en met geen enkel ander voorwerp. · Verwijder geen vaste delen van de airco. Gebruik het toestel niet wanneer het niet naar behoren functioneert, wanneer het toestel gevallen of beschadigd is. · Gebruik nooit de stekker om het toestel aan of uit te zetten. Gebruik steeds de knoppen op het bedieningspaneel. · Gebruik het toestel niet in de buurt van licht ontvlambare stoffen, zoals alcohol, insecticide, petroleum, … · Herstellingen, detectie van lekken en werkzaamheden aan de installatie dienen te gebeuren door bevoegde personen voorzien van de relevante certificaten. · De installatie moet worden uitgevoerd volgens de installatie-instructies. Een onjuiste installatie kan waterlekkage, elektrische schokken of brand veroorzaken. · Raak het apparaat niet aan met natte of vochtige handen of op blote voeten. · Als de airconditioner tijdens gebruik wordt omgestoten, schakel het apparaat dan uit en trek de stekker onmiddellijk uit het stopcontact. Inspecteer het toestel om er zeker van te zijn dat er geen schade is. Als je vermoedt dat het apparaat beschadigd is, neem dan contact op met een technicus of klantenservice. · Schakel het toestel uit bij onweer en trek de stekker uit het stopcontact om schade aan het toestel door blikseminslag te voorkomen. · Als de drainagefunctie niet in gebruik is, bevestig beide rubberen pluggen in de drainageopeningen. Bewaar de rubberen pluggen zorgvuldig wanneer je deze niet gebruikt om te voorkomen dat kinderen stikken. · Laat het snoer niet onder vloerbedekking lopen. Bedek het snoer niet met vloerkleden, lopers of soortgelijke bedekkingen. Leg het snoer niet onder meubels of apparaten. Leg het snoer uit de buurt van een doorgang en waar niemand over kan struikelen. · Schakel het toestel uit en trek de stekker uit het stopcontact als er vreemde geluiden, geuren of rook uit het toestel komen. Specifieke informatie over apparaten met R290 koelgas · Lees grondig alle waarschuwingen. · Gebruik bij het ontdooien en reinigen van het apparaat geen andere gereedschappen dan de gereedschappen aanbevolen door het productiebedrijf. 6 · Het apparaat moet worden geplaatst in een ruimte zonder permanente ontstekingsbronnen (bijvoorbeeld: open vlammen, gasapparaten of elektrische apparaten in werking). DO266A NL · Het mag niet worden doorprikt of verbrand. · Koelgassen kunnen geurloos zijn. · Het apparaat moet worden geïnstalleerd, gebruikt en bewaard in een ruimte die groter is dan 7 m2. · Dit apparaat bevat een aantal grammen R290 koelgas (zie het typeplaatje achteraan op het systeem). · R290 is een koelgas dat voldoet aan de Europese milieurichtlijnen. Geen enkel onderdeel van het koelcircuit mag worden doorprikt. · Als het apparaat geïnstalleerd, gebruikt of bewaard wordt in een niet-geventileerde ruimte, moet deze ruimte ontworpen zijn om de opbouw van koelmiddellekken te voorkomen, omdat deze lekken leiden tot een risico op brand of explosies door de ontsteking van het koelmiddel, die wordt veroorzaakt door elektrische verwarming, elektrische kachels of andere ontstekingsbronnen. · Het apparaat moet zodanig worden bewaard dat mechanische defecten worden voorkomen. · Personen die het koelcircuit gebruiken of er werkzaamheden aan uitvoeren, moeten beschikken over de juiste certificaten, verstrekt door een geaccrediteerde organisatie, die een garantie biedt van bevoegdheid in de behandeling van koelmiddelen, in overeenstemming met een specifieke beoordeling erkend door verenigingen in de sector. · Reparaties moeten worden uitgevoerd op basis van de aanbevelingen van het productiebedrijf. Onderhoud en reparaties waarvoor de assistentie van ander gekwalificeerd personeel nodig is, moeten worden uitgevoerd onder toezicht van een persoon die is aangeduid voor het gebruik van ontvlambare koelmiddelen. Voorzichtig: gevaar voor brand / ontvlambare materialen. Dit apparaat gebruikt een ontvlambaar koelmiddel. Als het koelmiddel lekt en is blootgesteld aan een externe ontstekingsbron, is er gevaar voor brand. BEWAAR DEZE INSTRUCTIES ENERGIETIPS · Gebruik het toestel alleen in ruimtes welke niet groter zijn dan de aanbevolen grootte. · Plaat het toestel zo, dat luchtstroom niet belemmerd wordt door meubelen of andere voorwerpen. · Hou gordijnen gesloten tijdens het warmste uur van de dag. · Zorg ervoor dat de filters altijd zuiver zijn. · Houd ramen en deuren steeds gesloten om de koude lucht binnen te houden en de warme lucht buiten. www.domo-elektro.be DO266A 7 NL ONDERDELEN Voorzijde 1. Controlepaneel 2. Luchtuitlaat Achterzijde 3. Luchtfilter 4. Luchtinlaat 5. Luchtuitlaat 6. Drainage 1 3 2 5 4 6 Onderdelen 7. Drainageslang 8. Afstandsbediening 9. Luchtuitlaatslang 9 a. Koppelstuk luchtuitlaatslang 10. Muurbevestiging 10 a. Muuradapter 10 b. Koppelstuk muurbevestiging 7 11. Raambevestiging 11 a. Raamadapter 11 b. Koppelstuk raambevestiging 11 c. Dichtingen 11 d. Adapterstop 8 11 e. L-ijzer met schroeven 9 9a 10 10b 10a 11 11a 8 DO266A 11b 11c 11d 11e NL INSTALLATIE · Plaats de airco op een solide en stabiele ondergrond, om de geluidshinder en vibratie tot een minimum te beperken. Zorg er ook voor dat de ondergrond sterk genoeg is om het gewicht van het toestel te dragen. · Om het toestel makkelijk te kunnen verplaatsen, is het voorzien van wieltjes. Zorg ervoor dat je het toestel alleen rolt over een gladde en vlakke ondergrond. Wees voorzichtig wanneer je het max 120 cm toestel al rollend verplaatst over een tapijt. Rol het toestel nooit over een object. min 30 cm · De voedingskabel moet steeds aangesloten worden op een stopcontact dat geïnstalleerd en geaard is volgens de lokale standaarden en normen. · Plaats geen voorwerpen binnen een straal van 30 cm rondom het toestel. · De luchtuitlaatslang moet geplaatst worden tijdens de instelling COOL of AUTO. Tijdens de instelling FAN en DRY heb je de luchtuitlaatslang niet nodig. · Zorg er ook voor dat zich rondom de luchtuitlaat buiten, in een straal van 50 cm, geen obstakels bevinden. · Zorg ervoor dat de luchtuitlaatslang niet te fel gebogen is bij het gebruik. INSTALLATIE VAN DE RAAMBEVESTIGING · Plaats het koppelstuk van de luchtuitlaatslang op het uiteinde van de slang. · Plaats de luchtuitlaatslang op de luchtuitlaat aan de achterzijde van het toestel. · Plaats het koppelstuk van de raambevestiging op het andere uiteinde van de luchtuitlaatslang. · Plaats de raamadapter in je venster. Dit kan voor zowel horizontale als verticale schuiframen. Blokkeer de raamadapter op de gewenste lengte. · Bevestig de slang met koppelstuk op de raamadapter. · Maak gebruik van de raamdichtingen om eventuele openingen in het venster af te sluiten. · Blokkeer de raamadapter op de gewenste lengte met behulp van de meegeleverde raamadapter stop. www.domo-elektro.be DO266A 9 NL · Indien gewenst kan je het raam vastzetten met het L-ijzer en 2 schroeven. INSTALLATIE MUURBEVESTIGING · Plaats het koppelstuk van de luchtuitlaatslang op het uiteinde van de slang. · Plaats de luchtuitlaatslang op de luchtuitlaat aan de achterzijde van het toestel. · Maak een opening in de muur ter grootte van de muuradapter. · Plaats de muuradapter in de opening. Bevestig de muuradapter met de meegeleverde schroeven. · Plaats het koppelstuk van de muurbevestiging op het andere uiteinde van de luchtuitlaatslang. · Bevestig de slang met koppelstuk op de muuradapter. max 120 cm min 30 cm 10 DO266A NL GEBRUIK De horizontale lamellen aan de voorzijde van de airco kan je manueel open en dicht klappen om zo de luchtuitlaat beter te kunnen richten. CONTROLEPANEEL 4 3 1. 2 1 ON-OFF - toets Om het toestel in en uit te schakelen. 2. “+” en “-” - toetsen Om de temperatuurinstelling aan te passen. De temperatuur kan ingesteld worden tussen 17°C en 30°C (COOL mode). Als je beide toetsen tegelijkertijd ingedrukt houdt gedurende 3 sec, kan je wisselen tussen “°C” en “°F”. 3. MODE - toets Met deze toets selecteer je de gewenste gebruiksinstelling. Telkens je op de toets drukt, zal de gebruiksinstelling wijzigen: COOL, FAN en DRY. Het desbetreffende lichtje op het controlepaneel zal oplichten. Als je de FAN-instelling kiest, blaast de ventilatie op automatische stand. Je kan de ventilatiesnelheid enkel aanpassen met de afstandsbediening. 4. LED display Toont de ingestelde temperatuur. Wanneer het toestel in de DRY of FAN instelling staat, zal op het display de kamertemperatuur weergegeven worden. AFSTANDSBEDIENING Zorg bij het gebruik van de afstandsbediening dat je deze steeds richt naar het toestel. Als je dit niet doet, kan je na het wijzigen van een bepaalde instelling de afstandsbediening nog even richten naar het toestel en op de ON-OFF toets drukken. Als het toestel een signaal ontvangt van de afstandsbediening hoor je een piep. De afstandsbediening moet in een straal van 8 meter rond het toestel gebruikt worden. www.domo-elektro.be 1 2 3 4 6 7 8 5 9 DO266A 11 NL 1. SLEEP dis Displays w SLEEP fun is activated ON-OFF - toets FOLLOW M display Indicates th 2. MODE - toets the FOLLO Met deze toets selecteer je de gewenste gebruiksinstelling. Telkens je op de toets drukt, zal function is de gebruiksinstelling wijzigen: AUTO, COOL, DRY en FAN. Het desbetreffende lichtje op het Not availab controlepaneel zal oplichten. FAN SPEED display this unit Displays selected FAN SILENT display 3. FAN - toets HIGH, FAN SPEED display Not available for this unit or Displays SPEED: , LOW HIGH Met deze selected toets kan FAN je de ventilatiesnelheid instellen. Er zijn drie instellingen: LOW HIGH, MED, en AUTO. This display is blank w or LOW set to AUTO speed. Temperature/Timer display This display is blank when 4. SLEEP - toets Displays the set temperature by default, or timer settin set to AUTO speed. Gebruik je om de “sleep” functie in te stellen.when using TIMER ON/OFF functions Om het toestel in en uit te schakelen. Temperature range:binnen 17-3030C(62 F) Wanneer je deze instelling selecteert, zal de ingestelde temperatuur min. F-86 met 1°C stijgen. Na nog 30 min. zal de temperatuur opnieuw metsetting 1°C stijgen. Deze temperatuur zal Timer range: 0-24 hours aangehouden worden voor de komende 7 uur. Na deze tijd gaat de temperatuur terug naar de display is blank when operating in FAN mode. origineel ingestelde temperatuur en wordt deThis SLEEP-instelling beëindigd. o O O NOTA: deze instelling kan niet geselecteerd worden bij FAN- en DRY-instelling. 5 5. TEMP - toets Om de temperatuurinstelling aan te passen. De temperatuur kan ingesteld worden tussen 17°C en 30°C. Als je de volledige TEMP-toets ingedrukt houdt gedurende 3 sec, kan je wisselen tussen “°C” en “°F”. 6. SHORT CUT - toets Met deze toets kan je een voorkeursinstelling vastleggen en inschakelen. 7. TIMER ON - toets Met deze toets kan je de tijd instellen wanneer het toestel moet inschakelen. 8. TIMER OFF - toets Met deze toets kan je de tijd instellen wanneer het toestel moet uitschakelen. 9. LED - toets Deze toets schakelt het LED display van het controlepaneel uit. Deze kan je gebruiken als het display teveel licht geeft als je wil slapen. Als je een tweede keer op de knop drukt, schakelt het display terug in. 12 DO266A 1 up when remote sen signal to unitLights signal to unit ON/OFF display MODE display ON/OFF Appears when the unitdisplay is turne display Battery display FUNCTIESON/OFF INSTELLEN Low battery Displays theMODE currentdisplay MODE display Appears the and disappears whenwhen it is turn Appears when the unit is turned on, detection Displays the current and disappears when it is turned off Displays the current mode, including: and disappears wh AUTO mode, including: TIMER OFF display SLEEP display TIMER ON display mode, including: AUTO TIMER ON displa AUTO 2 InLED de instelling AUTODisplays kiest when het TIMER toestel Displays automatisch de gepaste Displays when instelling in functie van de when TIMER COOL Remote Screen Indicators How The Basic Func OFF is set ON is set TIME Displays when TI 3 To Use SLEEP function AUTO DRY gekozen temperatuur. Deze instelling kan je enkelCOOL kiezen met de afstandsbediening. ON is set Displ is activated HEAT 1 COOL DRY FAN 1. ON is Kies met de MODE - toets op de afstandsbediening voor AUTO. FOLLOW ME ECO display DRY HEAT Transmission Indicator display Not available for COOL operation Lights up when remote sends 2. Stel de gewenste temperatuur in met de TEMP - toets. Het toestel gaat in functie Indicates that HEAT this unit FAN signal to unit the FOLLOW ME Remote LED Screen Indicators How To Use The Basic 1. Press the MODE button toFunct select hiervan de instelling bepalen. functiondisplay is on FAN Battery ON/OFF display COOL mode. Low battery (FAN) niet aanpassen. In AUTO-modus kan je de snelheid van de ventilatie MODE display Appears when the unit is turned on, 2. Set your desired temperature us TIMER ON MODE TEMP ECO display Not available for this unit Transmission Indicator Lights up when remote sends signal to unit TIMER OFF FAN ION FOLLOW ME SWING SLEEP ON/OFF LED NL HEAT FAN SHORT CUT TIMER ON MODE TEMP TIMER OFF FAN ION SLEEP SWING FOLLOW ME LED Not available for detection Displays the current and disappears when it is turned off the Temp or Temp button this unit mode, including: 3. Press the FAN button to select th Transmission Indicator SLEEP display TIMER OFF display TIMER ON display SILENT display fan speed: AUTO, LOW, MED,or AUTO Lights up when remote sends FAN SPEED display 2 Displays when Displays COOL Displays when TIMER for Not available this unitwhen TIMER HIGH. ON/OFF COOL signal to unit Displays selected FAN SPEED: SHORT SLEEP function OFF is set ON is set 3 4. Press the CUT ON/OFF button to star DRY HIGH, MED, is activated ON/OFF display kan je de ruimte afkoelen tot een bepaalde temperatuur. unit. Met de COOL-functie TIMER MODE or HEAT LOW 1 ON MODE display Appears when the unit is turned on, FAN Temperature/Timer display TEMP FOLLOW ME This display is blank when ECO display Displays the current and disappears when it is turned off TIMER 1. Druk op de MODE toets tot het COOL-indicatielampje brandt. FAN Displays the set temperature by default, ordisplay timer setting OFF set to including: AUTO speed. mode, available for COOL operation when using TIMER ON/OFF functions Not Indicates that ION TIMER OFF display ON “-” display this unit AUTO o O 2. Gebruik deTIMER “+” en toetsen op het controlepaneel MEde TEMP - toets op de 2 17-30 C(62 F-86OF)the FOLLOWof Displays when TIMER Displays Temperature when TIMERrange: 1. Press the MODEFOLLOW button to select COOL SLEEP SWING LED function is on ON/OFF OFF is set ON is set 3 COOL mode. ME SHORT CUT Battery display afstandsbediening, derange: gewenste kamertemperatuur in te stellen. Timerom setting 0-24 hours DRY Low battery yourMODEdesired temperature usi HEAT TIMER Not available for This display is blank when operating in FAN mode. 1 2. Set ON detection the Temp or Temp button 3. Gebruik de FAN - toets op de afstandsbediening FAN TEMP thisdisplay unit om de gewenste ventilatiesnelheid ECO SIL FAN SPEED display Not a FAN SPEED display Displays selected FAN SPEED: Displays selected HIGH, MED,FAN SPEED: 3. Press the FAN button to select th HIGH, MED, orSLEEP , LOW HIGH en AUTO. in te stellen. Er zijnSILENT drie5 instellingen: LOW display display Not available for fan speed: AUTO, LOW, MED,or FAN SPEED display Displays this unit when or Not available for this unit Temperat HIGH. LOW Displays selected FAN SPEED: This display SLEEP function is blank when4. Press the ON/OFF button to start HIGH, MED, Displays th is activated Battery display unit. when or LOW This display is blank set tobattery AUTO speed. Low DRY Temperature/Timer display when usin FOLLOW ME This display is blank when detection Displays the set temperature by default, or timer setting set to AUTO speed. display set to AUTO Metspeed. deze functie kan jewhen deusing ruimte ontvochtigen. bij deze COOL operation TIMER ON/OFF functions Houd ramen en deuren gesloten Temper Indicates that SLEEP display Temperature range: 17-30 C(62 F-86 Displays F) FOLLOW the functie. whenME 1. Press the MODE button toTimer select s function is on SLEEP function Timer setting range: 0-24 hours mode. is activated 1. Druk op de MODE - toets tot het DRY - indicatielampje brandt. 2. COOL Set your desired temperature using This display is blank when operating in FAN mode. Not available for Thisbutton. displa the Temp or Temp FOLLOW MEinstellen. this unit 2. Bij deze instelling kan je de ventilatiesnelheid niet 3. Press the FAN button to select the TIMER OFF FAN ION SLEEP o O SWING FOLLOW ME LED O display Indicates that the FOLLOW ME function is on SILENT5display Not available for this unit COOL operation fan speed: AUTO, LOW, MED,or HIGH. 1. button to to select 4. Press Press the the MODE ON/OFF button start th COOL unit. mode. SILENT FAN SPEED display 2. Set your desired temperature using Temperature/Timer display Not available for This display is blank availa the Temp or TempNotbutton. 1. when Druk op de MODE - toets tot hetbyFAN-indicatielampje brandt. Displays the set temperature default, or this timer setting FAN SPEED display unit Displays selected FAN SPEED: set to AUTO speed. 3. Press the FAN button to select the when using TIMER ON/OFF functions SILENT van display speed: AUTO, LOW, MED,or Displays selected FAN SPEED: HIGH, MED,fan 2. Druk op de FAN-toets de17-30 afstandsbediening om de ventilatiesnelheid in te o O O FAN SPEED display Temperature range: C(62 F-86 F) Not available for this unit HIGH. Displays selected FAN SPEED: HIGH, or , LOW HIGH en AUTO. stellen. Er zijn Timer drie setting instellingen: range: 0-24 LOW hours 4. Press the MED, ON/OFF button to start th HIGH, MED, unit. Temperature/T LOW or LOW This display is blank when operating in FAN mode. or FAN SPEED display Displays selected FAN SPEED: HIGH, MED, FAN or LOW This display is blank when De temperatuur kan niet worden Temperature/Timer display ingesteld. Displays the set temperature by default, timer setting This display is blank when set toor AUTO speed. 5 when using TIMER ON/OFF functions set to AUTO speed. Temperature range: 17-30 C(62 F-86 F) Timer on 3. This display is blank when set to AUTO speed. o O O Timer setting range: 0-24 hours Displays theTe se Dis when using TIM wh Temperature Met deze functie kanThis je display het toestel uitgesteld laten starten, tot maximum 24 uur. is blank when operating in FAN mode. 1. 2. Timer settin Druk op de TIMER ON - toets op de afstandsbediening. This display is 5 Op het display van de afstandsbediening kan je nu aflezen over hoeveel tijd de airco Th zal beginnen werken. 3. Druk meerdere keren op de TIMER ON - toets om de tijd te verhogen. Of houd de toets ingedrukt. 4. Eens de gewenste tijd is ingesteld, zal je op het display van de afstandsbediening “Timer on” zien staan. Op het display van het controlepaneel zijn er 2 verlichte bolletjes te zien. www.domo-elektro.be DO266A 5 13 NL 5. Als je de timer wil uitschakelen, druk dan meerdere keren op de TIMER ON - toets, tot de teller op “0” komt te staan. Of houd de toets ingedrukt. Timer off Met deze functie kan je het toestel automatisch laten uitschakelen na verloop van tijd. 1. Druk op de TIMER OFF - toets op de afstandsbediening. 2. Op het display van de afstandsbediening kan je nu aflezen over hoeveel tijd de airco zal uitschakelen. 3. Druk meerdere keren op de TIMER OFF - toets om de tijd te verhogen. Of houd de toets ingedrukt. 4. Eens de gewenste tijd is ingesteld, zal je op het display van de afstandsbediening “Timer off” zien staan. 5. Als je de timer wil uitschakelen, druk dan meerdere keren op de TIMER OFF - toets, tot de teller op “0” komt te staan. Timer on + Timer off Je kan beide functies ook gelijktijdig inschakelen. Hierdoor bepaal je wanneer het toestel inschakelt, maar ook wanneer het toestel uitschakelt. Let op: deze tijd is telkens vanaf het uur dat je de instelling programmeert. Bijvoorbeeld: het is nu 13:00. Je wil het toestel laten werken van 16:30 tot 18:00. Stel de functie TIMER ON in op 3,5 h en de TIMER OFF op 5,0 h. Sleep Wanneer je deze instelling selecteert, zal de ingestelde temperatuur binnen 30 min. met 1°C stijgen. Na nog 30 min. zal de temperatuur opnieuw met 1°C stijgen. Deze temperatuur zal aangehouden worden voor de komende 7 uur. Na deze tijd gaat de temperatuur terug naar de origineel ingestelde temperatuur en wordt de SLEEP-instelling beëindigd. NOTA: deze instelling kan niet geselecteerd worden bij FAN en DRY-instelling. Shortcut Met deze toets kan je een voorkeursinstelling vastleggen en inschakelen. Als je een bepaalde instelling vaker gebruikt, kan je deze vastleggen door de SHORTCUT toets gedurende 3 seconden ingedrukt te houden. Het toestel onthoudt dan de instellingen die op het moment van indrukken ingeschakeld zijn. Deze instellingen kunnen zijn: de gebruiksinstelling (MODE), ingestelde temperatuur, ventilatiesnelheid (FAN) en eventueel ook de SLEEP-instelling. Op het moment dat je op de SHORTCUT - toets drukt, zal het toestel werken op de eerder vastgelegde instellingen. 14 DO266A NL REINIGING EN ONDERHOUD DRAINAGE Permanente drainage Tijdens het ontvochtigen, kan je een permanente drainage gebruiken. 1. Verwijder de drainage afsluiting en het rubber dopje in het midden, achteraan het toestel. 2. Bevestig de drainageslang aan de drainage opening. 3. Zorg ervoor dat het water op een veilige en permanente manier kan wegvloeien. 2 1 Drainage bij P1 code Wanneer je geen gebruik maakt van de permanente drainage, zal het water opgevangen worden in de drainagebak, onderaan het toestel. · Wanneer deze vol is, zal je enkele biepsignalen horen en op het display verschijnt de code “P1”. De ontvochtiging of airconditioning zal stoppen. De ventilator blijft wel werken, dit is normaal. · Verplaats het toestel voorzichtig naar een plaats waar je het water makkelijk kan laten weglopen. · Verwijder de afsluiting van de drainage opening onderaan het toestel (A). Het water zal nu weglopen. · Nadat het water volledig verwijderd is, plaats je de afsluiting terug op de drainage opening. · Je kan nu het toestel terug opstarten. Let er op dat de code “P1” op het display verdwijnt. Indien de code niet onmiddellijk verdwijnt, kan je enkele malen proberen om het toestel uit en terug in te schakelen. Wanneer de code zich blijft herhalen, moet je contact opnemen met de servicedienst. A · NOTA: installeer altijd eerst de drainage afsluiting, voordat je het toestel terug aanzet. REINIGING · Verwijder steeds de stekker uit het stopcontact alvorens het toestel te reinigen. · Gebruik geen chemische of schurende producten om het toestel te reinigen. www.domo-elektro.be DO266A 15 NL · Was het toestel nooit met water of een andere vloeistof, dit kan elektrocutie tot gevolg hebben. · Wanneer het elektrisch snoer beschadigd is, moet het vervangen of hersteld worden door de dienst na verkoop van de fabrikant of een gekwalificeerd persoon. Luchtfilter · Reinig de luchtfilter minstens om de 2 weken. Om te voorkomen dat de ventilator slecht gaat werken door stof in de filter. · Reinig de filter in lauw water met een mild detergent. Spoel de filter grondig en laat deze aan de lucht drogen. · Als de filter volledig droog is, kan je deze terug in het toestel plaatsen. Behuizing Gebruik een vochtige, zachte doek en een beetje mild detergent om de buitenkant van het toestel te reinigen. Maak het toestel achteraf grondig droog met een zachte, droge doek. Opbergen Voor je het toestel opbergt voor een langere tijd, kan je best eerst het volgende doen, om schade aan het toestel te voorkomen : · Verwijder al het water uit het toestel met behulp van de drainage. · Zet het toestel daarna aan op de FAN-instelling. Laat het toestel gedurende een halve dag in een verwarmde ruimte werken. Zo kan het toestel volledig drogen aan de binnenkant en voorkom je schimmelvorming. · Zet het toestel uit, verwijder de stekker uit het stopcontact en verwijder de batterijen uit de afstandsbediening. · Maak de filter schoon en plaats deze terug in het toestel. · Berg het toestel op in een droge, donkere ruimte. PROBLEMEN EN HUN OPLOSSING Het toestel werkt niet wanneer je op de ON/OFF - toets drukt. · Op het display staat P1: verwijder het water uit het toestel. · De kamertemperatuur is lager dan de ingestelde temperatuur. Pas de temperatuur op het toestel aan. De ruimte koelt niet voldoende af. · De ramen en deuren zijn niet gesloten. Zorg ervoor dat alle ramen en deuren gesloten zijn. 16 · Er zijn warmte producerende toestellen in de ruimte. Verwijder indien mogelijk de warmtebronnen. DO266A NL · De luchtuitlaatslang is niet aangesloten of geblokkeerd. Sluit de slang aan en zorg ervoor dat ze naar behoren kan functioneren. · De ingestelde temperatuur is te hoog. Pas de ingestelde temperatuur aan. · De luchtfilter is vuil. Reinig de luchtfilter. Het toestel maakt te veel lawaai of zorgt voor trillingen. · De vloer is niet recht of vlak genoeg. Plaats het toestel op een rechte, vlakke ondergrond. · De luchtfilter is vuil. Reinig de luchtfilter. Het toestel maakt een gorgelend geluid. · Het geluid komt van de koelvloeistof in het toestel. Dit is normaal. ERROR CODES Volgende error codes kunnen verschijnen op het display van het toestel: E1: de sensor van de kamertemperatuur werkt niet. Zet het toestel uit en verwijder de stekker uit het stopcontact. Wacht 10 sec. en steek de stekker terug in het stopcontact. Zet het toestel opnieuw aan. Wanneer de error code opnieuw verschijnt, moet je contact opnemen met de hersteldienst. E2: de sensor van de luchtverdamper werkt niet. Zet het toestel uit en verwijder de stekker uit het stopcontact. Wacht 10 sec. en steek de stekker terug in het stopcontact. Zet het toestel opnieuw aan. Wanneer de error code opnieuw verschijnt, moet je contact opnemen met de hersteldienst. E4: het display werkt niet naar behoren. Zet het toestel uit en verwijder de stekker uit het stopcontact. Wacht 10 sec. en steek de stekker terug in het stopcontact. Zet het toestel opnieuw aan. Wanneer de error code opnieuw verschijnt, moet je contact opnemen met de hersteldienst. P1: het waterreservoir is vol. Verwijder het water volgens het hoofdstuk “drainage” van deze handleiding. www.domo-elektro.be DO266A 17 NL MILIEURICHTLIJNEN Dit symbool op het product of op de verpakking wijst erop dat dit product niet als huishoudafval mag worden behandeld. Het moet naar een plaats worden gebracht waar elektrische en elektronische apparatuur wordt gerecycleerd. Als je ervoor zorgt dat dit product op de correcte manier wordt verwijderd, voorkom je mogelijk voor mens en milieu negatieve gevolgen die zich zouden kunnen voordoen in geval van verkeerde afvalbehandeling. Voor meer details in verband met het recycleren van dit product, neem je best contact op met de gemeentelijke instanties, het bedrijf of de dienst belast met de verwijdering van huishoudafval of de winkel waar je het product hebt gekocht. Het verpakkingsmateriaal is recycleerbaar. Behandel de verpakking milieubewust. 18 DO266A GARANTIE Cher client, FR Tous nos produits sont soumis à des contrôles qualité stricts avant d’être proposés à la vente. Si vous deviez toutefois rencontrer un problème avec votre appareil, nous le déplorons vivement. Dans ce cas, nous vous invitons à prendre contact avec notre service clientèle. Nos collaboratrices se feront un plaisir de vous aider ! +32 14 21 71 91 [email protected] Du lundi au jeudi : 8 h 30 – 12 h et 13 h – 17 h Vendredi : 8 h 30 – 12 h et 13 h – 16 h 30 Cet appareil est garanti 2 ans à compter de la date d’achat. Durant la période de garantie, le distributeur assumera l’entière responsabilité en cas de défauts de fonctionnement (matériel) ou de fabrication. Si un tel problème survient, l’appareil sera remplacé ou réparé. La période de garantie de 2 ans ne reprend pas à zéro, mais se poursuit (jusqu’à 2 ans à compter de la date d’achat de l’appareil). La garantie est accordée sur la base du ticket de caisse. Pour les accessoires et les éléments d’usure, une garantie de 6 mois s’applique. La garantie et la responsabilité du fournisseur et du fabricant n’ont plus effet dans les cas suivants : · Les instructions du manuel n’ont pas été suivies. · Mauvais raccordement, par ex. tension électrique trop forte. · Utilisation contraire, brutale ou anormale. · Entretien insuffisant ou non conforme. · Réparation ou modification de l’appareil par le consommateur ou un tiers non autorisé. · Utilisation d’éléments ou d’accessoires qui ne sont pas recommandés ou fournis par le fournisseur/fabricant. www.domo-elektro.be DO266A 19 CONSIGNES DE SÉCURITÉ FR Les consignes de sécurité suivantes doivent être respectées lors de l’utilisation de tout appareil électrique: · Lisez ces consignes très attentivement. Conservez ce mode d’emploi afin de pouvoir le consulter ultérieurement. · Avant la première utilisation, enlevez tous les éléments d’emballage et les éventuels autocollants promotionnels. Veillez à ce que les enfants ne jouent pas avec les matériaux d’emballage. · Cet appareil est conçu pour être utilisé dans un environnement domestique ou dans des environnements comparables, tels que : · Coin-cuisine du personnel dans les commerces, les bureaux et autres environnements professionnels comparables · Fermes · Chambres d’hôtel ou de motel et autres environnements à caractère résidentiel · Chambres d’hôtes ou comparables · Cet appareil peut être utilisé par des enfants âgés de 16 ans ou plus et par des personnes présentant un handicap physique ou sensoriel, une capacité mentale limitée ou un manque d’expérience ou de connaissances, à condition que ces personnes soient sous surveillance ou qu’elles aient reçu des instructions sur la manière d’utiliser l’appareil en toute sécurité et qu’elles connaissent les dangers liés à son utilisation. Les enfants ne peuvent pas jouer avec cet appareil. L’entretien et le nettoyage de l’appareil ne peuvent pas être effectués par des enfants, sauf s’ils sont âgés de plus de 16 ans et sous la surveillance d’un adulte. · Gardez l’appareil et le cordon électrique hors de portée des enfants. · Attention: l’appareil ne peut pas être utilisé avec une minuterie externe. · Vérifiez avant usage si la tension indiquée sur l’appareil correspond à la tension du réseau électrique de votre domicile. · Le cordon d’alimentation doit toujours être branché dans une prise de courant placée et mise à la terre conformément aux normes et standards locaux. · Ne laissez pas le cordon pendre sur une surface chaude ou sur le rebord d’une table. · N’utilisez jamais l’appareil lorsque le cordon ou la fiche sont endommagés, après un mauvais fonctionnement de l’appareil ou lorsque l’appareil est endommagé. Amenez alors l’appareil au centre de services le plus proche pour contrôle et réparation. · Soyez très attentif lorsque l’appareil est utilisé par des enfants ou à proximité d’enfants. · L’utilisation d’accessoires non préconisés par le fabricant peut provoquer un incendie, une électrocution ou des blessures. · Retirez la fiche de la prise lorsque l’appareil n’est pas utilisé, avant d’installer ou d’enlever des pièces et avant de nettoyer l’appareil. Mettez tous les boutons en position « arrêt » et retirez la fiche de la prise. Ne tirez jamais sur le câble pour retirer la fiche de la prise. · Ne laissez jamais un appareil en service sans surveillance. 20 · Ne placez jamais cet appareil sur ou à proximité d’un feu au gaz ou d’un feu électrique où il pourrait entrer en contact avec un appareil chaud. DO266A · N’utilisez pas l’appareil à l’extérieur. · Utilisez l’appareil uniquement dans le but auquel il est destiné. · Cet appareil ne convient qu’à un usage domestique. Le fabricant décline toute responsabilité pour des accidents qui découleraient d’un mauvais usage de l’appareil ou du non-respect des instructions fournies dans ce manuel. FR · Utilisez toujours l’appareil sur une surface solide, sèche et plane. · Toutes les réparations, en dehors de l’entretien ordinaire de l’appareil, doivent être réalisées par le fabricant ou son service après-vente. · N’immergez jamais le cordon électrique, la fiche ou l’appareil lui-même dans l’eau ou tout autre milieu liquide. · Veillez à ce que les enfants ne puissent pas toucher à l’appareil ou au cordon électrique. · Tenez le cordon éloigné de rebords tranchants et de pièces brûlantes ou d’autres sources de chaleur. · Avant la première utilisation, enlevez tous les éléments d’emballage et les éventuels autocollants promotionnels. · Ne placez jamais l’appareil à proximité d’un appareil au gaz, d’un feu ou d’un liquide facilement inflammable. · Pour éviter tout dommage, ne frappez et ne secouez jamais l’appareil. · Pour éviter toute surchauffe, ne recouvrez jamais l’arrivée d’air et la sortie d’air. · Pour éviter toute électrocution, n’aspergez jamais l’appareil avec de l’eau et ne le placez jamais à proximité d’un point d’eau. · Ne partagez jamais l’alimentation électrique du climatiseur avec un autre appareil. · Ne branchez/débranchez jamais la fiche de l’appareil sur une prise de courant si vous avez les mains mouillées. · N’insérez jamais des corps étrangers dans les ouvertures de l’appareil. · N’utilisez jamais un cordon prolongateur. · Ne laissez jamais des enfants jouer à proximité de l’appareil. · Si vous éteignez l’appareil et que vous le rallumez juste après, la compresseur aura besoin d’un délai de 3 minutes au moins pour redémarrer. · Placez l’appareil à au moins 1 mètre de distance d’un téléviseur ou d’une radio pour éviter des interférences. · Pour éviter toute décoloration, n’exposez pas l’appareil à la lumière directe du soleil. · N’inclinez jamais l’appareil à plus de 35° lorsque vous le déplacez. Déplacez toujours le climatiseur à la verticale. Ne déplacez jamais l’appareil à l’envers. · Eliminez toujours l’eau contenue dans l’appareil avant de le ranger, vous prolongerez ainsi sa durée de vie. · N’utilisez pas de produits chimiques pour nettoyer l’appareil, ils risqueraient fort de l’abîmer. · Veillez toujours à éteindre l’appareil avant d’enlever ou de replacer la grille d’arrivée d’air. www.domo-elektro.be DO266A 21 · Veillez toujours à protéger le climatiseur contre l’humidité, la condensation, les projections d’eau, etc. FR · Veillez à installer le climatiseur de telle manière qu’il ne puisse pas tomber dans l’eau ou un autre liquide. S’il arrivait malgré tout que l’appareil tombe dans l’eau ou un liquide, débranchez immédiatement la fiche électrique. · N’utilisez pas le climatiseur dans un local humide comme une salle de bain ou une buanderie. · Eteignez totalement l’appareil lorsque vous ne l’utilisez pas. · Faites toujours appel à un technicien qualifié pour faire réparer l’appareil si besoin. · Veillez à laisser un espace libre d’au moins 30 cm tout autour de l’appareil. · Si le climatiseur a été renversé, débranchez immédiatement la fiche électrique. · Ne touchez pas l’appareil lorsque vous avez les mains humides ou lorsque vous marchez pieds nus. · N’actionnez les touches de l’appareil qu’avec les doigts, jamais avec un autre objet. · Ne retirez aucune partie fixe du climatiseur. N’utilisez pas l’appareil s’il ne fonctionne pas correctement, s’il est tombé ou s’il est endommagé. · N’utilisez jamais la fiche pour allumer ou éteindre l’appareil. Utilisez toujours les boutons du panneau de commande. · Ne recouvrez jamais la grille d’arrivée d’air ou de sortie d’air de l’appareil. · N’utilisez pas l’appareil à proximité de substances facilement inflammables telles que alcool, insecticide, essence,... · Les réparations, la détection de fuites et toutes les autres interventions à l’installation doivent être faites par des personnes qualifiées, prévues des certificates rélévantes. · L’installation doit être effectuée conformément aux instructions. Une installation incorrecte peut provoquer une fuite d’eau, un choc électrique ou un incendie. · Ne touchez pas l’appareil si vous avez les mains humides ou mouillées ni si vous êtes pieds nus. · Si le climatiseur est renversé alors qu’il fonctionne, coupez l’alimentation électrique et débranchez-le immédiatement. Inspectez l’appareil pour vous assurer qu’il n’est pas endommagé. Si vous pensez que c’est le cas, prenez contact avec un technicien ou le service à la clientèle. · Le courant doit être coupé en cas d’orage pour éviter que la foudre n’endommage l’appareil. · Si la fonction de drainage n’est pas utilisée, fixez les deux bouchons en caoutchouc dans les trous de drainage. Rangez soigneusement le flexible de vidange lorsqu’il n’est pas utilisé pour éviter que les enfants ne s’étranglent. · Ne faites pas passer le fil sous le revêtement de sol. Ne le couvrez pas avec des tapis ou d’autres revêtements. Ne le faites pas passer sous des meubles ou appareils. Éloignez le fil du passage pour éviter tout trébuchement. · Débranchez l’appareil s’il émet des bruits, odeurs ou fumées étranges. 22 DO266A Informations spécifiques concernant les appareils contenant du fluide frigorigène R290 · Lisez attentivement tous les avertissements. · L’appareil doit être installé dans un espace sans sources continues d’inflammation, par exemple,des flammes nues, des appareils électriques ou fonctionnant au gaz en continu. FR · Lors du dégivrage et du nettoyage de l’appareil, n’utilisez pas d’outils autres que ceux conseillés par le fabricant. · Ne pas percer, ne pas brûler. · Les frigorigènes peuvent être sans odeur. · L’appareil doit être installé, utilisé et stocké dans une pièce dont la superficie est supérieure à 7 m2. · Cet appareil contient une certaine quantité de frigorigène R290 (reportez-vous à l’étiquette signalétique à l’arrière de l’appareil). · R290 est un frigorigène conforme aux directives européennes en matière d’environnement. Ne percez jamais le circuit de réfrigération. · Si l’appareil est installé, utilisé ou stocké dans une zone non-ventilée, la pièce doit être conçue de sorte à éviter toute accumulation de frigorigène, suite à des fuites, pouvant entraîner un incendie ou une explosion à cause de l’inflammation du frigorigène causé par des chauffages, fours électriques ou autres sources d’inflammation. · L’appareil doit être stocké de sorte à éviter toute défaillance mécanique. · Toute personne travaillant ou intervenant sur un circuit de fluide frigorigène doit être titulaire d’un certificat valide délivré par un organisme accrédité qui autorise sa compétence à la manipulation des frigorigènes conformément à une évaluation spécifique reconnue par des associations de l’industrie. · Les réparations doivent être effectuées sur la base des recommandations du fabricant. Les travaux d ‘entretien et de réparation nécessitant l’assistance d’autres personnes qualifiées doivent être effectués sous la supervision de la personne qualifiée pour l’utilisation de fluides frigorigènes inflammables. Attention : risque d’incendie / matériaux inflammables Cet appareil contient un agent réfrigérant inflammable. Cet agent réfrigérant risque donc de s’enflammer en cas d’exposition à une source d’ignition. CONSERVEZ CES INSTRUCTIONS CONSEILS ÉNERGÉTIQUES · N’utilisez l’appareil que dans des espaces qui ne dépassent pas la superficie recommandée. · Placez l’appareil de manière à ce que le flux d’air ne soit pas gêné par des meubles ou d’autres objets. · Gardez les rideaux fermés pendant l’heure la plus chaude de la journée. · Veillez à ce que les filtres soient toujours propres. · Gardez les portes et les fenêtres fermées pour garder l’air froid à l’intérieur et l’air chaud à l’extérieur. www.domo-elektro.be DO266A 23 PARTIES FR Face avant 1. Panneau de commande 2. Évacuation d’air 1 3 2 Face arrière 3. Filtre d’arrivée d’air 4. Arrivée d’air 5. Évacuation d’air 6. Vidange 5 4 6 Parties 7. Flexible de vidange 8. Télécommande 9. Tuyau d’évacuation d’air 9 a. Connecteur tuyau d’évacuation d’air 10. Kit de fixation murale 10 a. Adaptateur mural 7 10 b. Connecteur kit de fixation murale 11. Kit de fixation à la fenêtre 11 a. Adaptateur de fenêtre 11 b. Connecteur kit de fixation à la fenêtre 11 c. Étanchéité de la fenêtre 11 d. Bouchon adaptateur 8 11 e. Cornière avec vis 9 9a 10 10b 10a 11 11a 24 DO266A 11b 11c 11d 11e INSTALLATION FR · Placez la climatisation sur une surface stable et solide, afin de limiter à un minimum les nuisances sonores et les vibrations. Veillez à ce que la surface soit suffisamment solide pour supporter le poids de l’appareil. · L’appareil est muni de roulettes, pour pouvoir le déplacer facilement. Veillez à ce que la surface soit lisse et plate si vous déplacez seul l’appareil. Soyez prudent lorsque vous déplacez l’appareil sur un tapis. Ne faites jamais rouler l’appareilmax sur120 un cm objet. min 30 cm · Le cordon d’alimentation doit toujours être branché dans une prise de courant placée et mise à la terre conformément aux normes et standards locaux. · Ne placez pas d’objets dans un rayon de 30 cm autour de l’appareil. · Le tuyau d’évacuation d’air doit être placé pendant le réglage « froid » ou « auto ». Vous n’avez pas besoin du tuyau d’évacuation d’air lorsque vous vous trouvez en mode « ventilateur » et « sec ». · Veillez à ce qu’il n’y ait pas d’obstacles autour de l’évacuation d’air, dans un rayon de 50 cm. · Veillez à ce que le tuyau d’évacuation d’air ne soit pas trop plié lors de l’utilisation. INSTALLATION KIT DE FIXATION À LA FENÊTRE · Placez l’embout du tuyau d’évacuation d’air à l’extrémité du tuyau. · Placez le tuyau d’évacuation d’air sur la sortie d’air prévue à l’arrière de l’appareil. · Placez l’embout du kit de fenêtre à l’autre extrémité du tuyau d’évacuation d’air. · Placez le kit de fenêtre sur votre fenêtre. Celui-ci peut être posé tant verticalement qu’horizontalement. Bloquez le kit de fenêtre à la longueur souhaitée. · Fixez le tuyau au kit de fenêtre à l’aide de l’embout prévu à cet effet. · Utilisez les joints de la fenêtre pour fermer les éventuelles ouvertures dans la fenêtre. · Bloquez l’adaptateur de châssis à la longueur désirée à l’aide du bouchon adaptateur de châssis fourni. · Si vous le souhaitez, vous pouvez fixer le châssis au moyen de la cornière et de 2 vis. www.domo-elektro.be DO266A 25 FR INSTALLATION KIT DE FIXATION MURALE · Placez l’embout du tuyau d’évacuation d’air à l’extrémité du tuyau. · Placez le tuyau d’évacuation d’air sur la sortie d’air prévue à l’arrière de l’appareil. · Faites dans le mur une ouverture de la taille de l’adaptateur mural. · Placez l’adaptateur mural dans l’ouverture. Fixer l’adaptateur mural à l’aide des vis fournies. · Placez l’embout de l’adaptateur mural à l’autre extrémité du tuyau d’évacuation d’air. · Fixez le tuyau à l’adaptateur mural à l’aide de l’embout prévu à cet effet. max 120 cm min 30 cm 26 DO266A UTILISATION FR Vous pouvez orienter le flux d’air manuellement en relevant ou en abaissant les lamelles de la grille située à l’avant de l’appareil. PANNEAU DE COMMANDE 4 3 1. 2 1 Touche MARCHE-ARRÊT Pour allumer et éteindre l’appareil. 2. Touches «+» et «-» Utilisez ces touches pour modifier le paramètre de température. Vous pouvez choisir une température comprise entre 17 °C et 30 °C. (COOL mode) Maintenez les deux flèches enfoncées simultanément pendant 3 secondes pour permuter entre « C° » et « F° ». 3. Touche MODE Cette touche vous permet de sélectionner le paramètre utilisateur souhaité. Chaque pression sur la touche modifie le paramètre d’utilisation : FROID, SEC et VENTILATEUR. Le témoin correspondant s’allume sur le panneau de commande. Si vous choisissez le mode FAN, le climatiseur soufflera selon un réglage automatique. Vous ne pourrez modifier la vitesse de ventilation qu’à l’aide de la télécommande. 4. Écran LED Affiche le paramètre défini de température. Lorsque l’appareil se trouve en mode SEC ou VENTILATEUR, l’écran affiche la température ambiante. TÉLÉCOMMANDE Veillez à toujours diriger la télécommande vers l’appareil. Si vous ne le faites pas, vous pouvez toujours diriger la télécommande vers l’appareil et appuyer sur le bouton ON/OFF après avoir modifié un réglage. Lorsque l’appareil reçoit un signal émis par la télécommande, il émet un signal sonore. La télécommande fonctionne dans un rayon de 8 mètres autour de l’appareil. www.domo-elektro.be 1 2 3 4 6 7 8 5 9 DO266A 27 1. Touche MARCHE-ARRÊT Pour allumer et éteindre l’appareil. FR 2. Touche MODE Cette touche vous permet de sélectionner le paramètre utilisateur souhaité. Chaque pression sur la touche modifie le paramètre d’utilisation : FROID, SEC et VENTILATEUR. Le témoin correspondant s’allume sur le panneau de commande. SILENT display SILENT Not available for this unitdisplay Not available for this Displays selected SPEED: MED, Cette touche vous permet deHIGH, régler la vitesse de laFAN ventilation. Trois paramètres sont HIGH, MED, or LOW , ÉLEVÉ et AUTO. possibles : FAIBLE Temperature/Timer display This display isorblank LOW when Temperature/Timer displ Displays the set temperature by default This display is blank when set to AUTO speed. 4. Touche VEILLE Displays the setfunctions temperatu when using TIMER ON/OFF set to AUTO speed. o O when using TIMER ON/OF Utilisez cette touche pour paramétrer la fonction « veille ». Temperature range: 17-30 C(62 F-86 3. FAN SPEED display Touche VENTILATEUR FAN FAN SPEED display Displays selected SPEED: range: 17 Lorsque vous sélectionnez ce paramètre, la température augmente de 1°C dansTemperature les 30 0-24 hours Timer setting range: minutes. Après encore 30 minutes, la température augmente à nouveau de 1°C.Timer Cette setting range: 0This display is blank when température est conservée pour les 7 heures suivantes. Ensuite, la température revient à la operating in This display is blank when température réglée d’origine et le mode « veille » est terminé. NOTE : ce paramètre ne peut pas être sélectionné pour les modes « ventilateur 5 » et « sec ». 5 5. Touche TEMP Utilisez ces touches pour modifier le paramètre de température. Vous pouvez choisir une température comprise entre 17 °C et 30 °C. Maintenez les deux flèches enfoncées simultanément pendant 3 secondes pour permuter entre « C° » et « F° ». 6. Touche SHORTCUT Cette touche vous permet d’enregistrer et d’utiliser un réglage spécifique. 7. Touche TIMER ON Cette touche permet de régler la durée pendant laquelle l’appareil doit être allumé. 8. Touche TIMER OFF Cette touche permet de régler la durée pendant laquelle l’appareil doit être éteint. 9. Touche LED Ce bouton vous permet d’éteindre l’écran LED du panneau de commande. Vous pouvez par exemple l’utiliser si vous souhaitez dormir et que la lumière émise par l’écran vous dérange. Appuyez à nouveau sur ce bouton pour rallumer l’écran. 28 DO266A 1 Transmission How ToIndicator Use The Transmissio Lights up when remote se signal to unitLights up wh Transmission Indicator signal to unit Battery display UTILISATION DES MODES ET FONCTION Lights up when remote sends Low battery ON/OFF display signal to unit detection MODE display MODE « AUTO » ON/O Appears when th ON/OFF display SLEEP display MODE display Displays the current MODE display Appe and disappears w Appears when the unit is turned on, Lorsque vous réglez le and climatiseur en mode « AUTO », l’appareilDisplays choisit le réglage adéquat when Displays the current disappears when it is turned off SLEEP including: function Displays the current and mode, including: en fonction de la température définie. Ce mode ne peut être mode, activé qu’à l’aide de la TIMER OFF display is activated TIMER ON display AUTO TIM AUTO mode, including: télécommande. Displays when TIMER Displays when TIMER COOL Remote LED Screen Indicators How To Use The B FOLLOW ME OFF is set ON is set Disp 3 AUTO COOL DRY display ON 1. Utilisez le bouton « MODE » pour choisir le mode « AUTO ». COOL operation HEAT Indicates COOL 1 DRYthat FAN the FOLLOW ME ECO display 1. Press 2. Réglez Transmission la température souhaitée à l’aide du bouton « TEMP ».is on L’appareil se réglera en the MODE b DRY function HEAT Indicator Not available for COOL mode. Lights when remote sends fonction deup celle-ci. thisFAN unit HEAT 2. Set your desired te Not available for signal to unit the or Te Remote Screenpas Indicators To Temp Use The B VousLED ne pouvez régler la vitesse de ventilation (« FAN »)display lorsque leFAN modeHow « AUTO this unit Battery 3. Press the FAN butt ON/OFF display Low battery SILENT display fan speed: AUTO, » est activé. MODE display Appears when the unit is turned on, FAN SPEED display HEAT MODE FAN LED Screen Indicators Remote TEMP ECO display Not available for this unit FAN ION FO SWING FR SLEEP ON/OFF MODE TEMP FAN ION SLEEP SWING FOL M detection available HIGH. Displays currentFAN and disappears when itNot is turned off for this unit Displaysthe selected SPEED: 4. Press the ON/OFF mode, including: HIGH, MED, Transmission Indicator SLEEP display unit. TIMER OFF display TIMER ON display or AUTO LOW Lights up when remote sends Displays Temperature/Timer display when TIMERDisplays when MODE « display COOL » when Displays when TIMER unit ThisCOOL issignal blank to ON/OFF SLEEP function OFF is set ON isDisplays set 3 the set temperature by default, or timer setting set DRY to AUTO speed. is activated when using TIMER ON/OFFpour functions ON/OFF display de Le mode « COOL » vous permet refroidir la pièce obtenir la température définie. HEAT MODE 1 MODE display Appears when the unitTemperature is turned on,range: 17-30oC(62OF-86OF) FAN TEMP FOLLOW ME ECO display the currentsurand disappears « when it is turned off 1.Displays Appuyez le bouton MODE » jusqu’à ce que le témoin « COOL » s’allume. FAN display Timer setting range: 0-24 hours mode, including: Not available for COOL operation Indicates that TIMER OFF ON display this mode. unit ou le bouton « TEMP » de ION This when operating in FAN 2. AUTO Utilisez les boutons «TIMER + » et «display - » duis blank panneau de display commande the FOLLOW ME Displays when TIMER Displays when TIMER 1. Press the MODEFOLLOW bu COOL SLEEP SWING function is on ON/OFF ME OFF is set ON is set 3 COOL mode. Battery display la télécommande pour définir la température souhaitée. DRY Low battery 5 2. Set your desired tem HEAT MODE Not available for 1 the Temp detection or Tem 3. FAN Utilisez la touche « FAN » de la télécommande pour définir TEMP this display unitla vitesse de ventilation ECO FAN SPEED display FAN SPEED display Displays selected FAN SPEED: Displays selected HIGH, MED,FAN SPEED 3. Press the FAN butto HIGH, MED,L or SLEEP LOW HIGH et AUTO. souhaitée. Trois paramètres sont disponibles : LOW display SILENT display Not ,available for fan speed: AUTO, FAN SPEED display Displays this unit whenor Not available for this unit Te HIGH. LOW Displays selected FAN SPEED: ThisSLEEP display is blank when 4. Press the ON/OFF b function HIGH, MED, D is activated Battery display unit. when or LOW display is blank set Low to AUTO speed. battery This MODE « DRY » Temperature/Timer display w FOLLOW ME This display is blank when detection Displays the set temperature by default, or timer settingset to AUTO speed. display set to AUTO Ce mode vousspeed. permet de déshumidifier laTIMER pièce. Fermez les fenêtres et les portes lorsque vous COOL operation when using ON/OFF functions Indicates that SLEEP display Temperature range: 17-30 C(62 F-86 Displays F) the FOLLOW utilisez ce mode. whenME 1. Press the MODE butt FAN ION SLEEP o O SWING FOLLOW ME O functionfunction is on SLEEP Timer setting range: 0-24 hours COOL mode. 2. Set your desired temp Th the Temp or Tem 2. Ce mode ne permet pas de régler la vitesse de 3. Press the FAN button SILENT5display COOL operation fan speed: AUTO, LO FAN SPEED display Not available for this unit HIGH. Displays selected FAN SPEED: 1. Press the MODE butto 4. Press the ON/OFF bu HIGH, MED, MODE «LOW FAN » COOL unit. mode. or FAN SPEED display 2. Set your desired temp Temperature/Timer display Not available for This is blank when the Temp or Temp 1. display Appuyez sur le bouton «Displays MODE cebyque leDisplays témoin « selected FAN » s’allume. the » setjusqu’à temperature default, or this timer setting FAN SPEED display unit FAN SPEED: set to AUTO speed. 3. Press the FAN button when using TIMER ON/OFF functions SILENT fan speed: LO Displays FAN AUTO, SPEED HIGH, 2. SPEED Appuyez » dedisplay la télécommande la vitesse selected de MED, o O O pour régler FAN displaysur la touche « FAN Temperature range: 17-30 Not available for this unitC(62 F-86 F) HIGH. Displays selected FAN SPEED: HIGH, MED or LOW , HIGH et AUTO. ventilation. Trois paramètres Timer sont setting disponibles range: 0-24 hours: LOW 4. Press the ON/OFF bu HIGH, MED, T or LOW unit. or LOW This display is blank when operating in FAN mode. 1. is activated Appuyez sur le bouton « This MODE » jusqu’à ce que le témoin « DRY » s’allume. display is blank when operating in FAN mode. 3. La température ne peutTemperature/Timer pas être réglée. display Not available for FOLLOW this unit ME ventilation. display Indicates that the FOLLOW ME function is on This display is blank when set to AUTO speed. Fonction « Timer on » This display is blank when display is blank when set to AUTOThis speed. set to AUTO speed. Temperature range: 17-30 C(62 F-86 F) Displays the set temperature by default, or timer setting 5 when using TIMER ON/OFF functions o O O D w Timer setting range: 0-24 hours Cette fonction vous permet de retarder démarrage du inclimatiseur de maximum 24 heures. This display le is blank when operating FAN mode. 1. Appuyez sur la touche « TIMER ON » de la télécommande. 2. L’écran de la télécommande affiche dans combien de temps le climatiseur commencera à fonctionner. 3. Appuyez à plusieurs reprises sur le bouton « TIMER ON » pour faire augmenter cette durée. Vous pouvez également maintenir le bouton appuyé. 4. Une fois que vous avez réglé la durée souhaitée, l’écran de la télécommande affiche « T 5 www.domo-elektro.be DO266A 29 TIMER ON ». Deux petits indicateurs ronds seront en outre allumés sur le panneau de commande. Si vous souhaitez désactiver la minuterie, appuyez à plusieurs reprises sur le bouton « TIMER ON » jusqu’à ce que la durée affichée soit « 0 ». Vous pouvez également maintenir le bouton appuyé. FR 5. FONCTION « TIMER OFF » Grâce à cette fonction, l’appareil s’éteint automatiquement après un laps de temps prédéfini. 1. Appuyez sur la touche « TIMER OFF » de la télécommande. 2. L’écran de la télécommande affiche dans combien de temps le climatiseur s’éteindra. 3. Appuyez à plusieurs reprises sur le bouton « TIMER OFF » pour faire augmenter cette durée. Vous pouvez également maintenir le bouton appuyé. 4. Une fois que vous avez réglé la durée souhaitée, l’écran de la télécommande affiche « TIMER OFF ». 5. Si vous souhaitez désactiver la minuterie, appuyez à plusieurs reprises sur le bouton « TIMER OFF » jusqu’à ce que la durée affichée soit « 0 ». Fonction « Timer on » + fonction « Timer off » Vous pouvez activer ces deux fonctions en même temps. Vous déterminerez ainsi quand le climatiseur s’allumera et quand il s’éteindra. Attention : l’heure l’allumage et d’arrêt de l’appareil dépend de l’heure à laquelle vous programmez la minuterie. Exemple : il est actuellement 13 h. Vous voulez que l’appareil fonctionne de 16 h 30 à 18 00. Vous devez dans ce cas régler la fonction « TIMER ON » sur 3,5 h, et la fonction « TIMER OFF » sur 5 h. Fonction SLEEP Lorsque vous sélectionnez ce paramètre, la température augmente de 1°C dans les 30 minutes. Après encore 30 minutes, la température augmente à nouveau de 1°C. Cette température est conservée pour les 7 heures suivantes. Ensuite, la température revient à la température réglée d’origine et le mode « veille » est terminé. NOTE : ce paramètre ne peut pas être sélectionné pour les modes « ventilateur » et « sec ». Fonction « SHORTCUT » Cette touche vous permet d’enregistrer et d’utiliser un réglage spécifique. Si vous paramétrez souvent l’appareil de la même manière, vous pouvez enregistrer ce réglage en maintenant le bouton « SHORTCUT » enfoncé pendant 3 secondes. L’appareil retient alors les paramètres actifs au moment où vous maintenez la touche enfoncée. Ces paramètres peuvent être : le mode d’utilisation (« MODE »), la température définie, la vitesse de ventilation (« FAN »), et éventuellement le réglage du mode veille (« SLEEP »). 30 Par la suite, l’appareil reviendra à ces paramètres dès que vous enfoncerez la touche « SHORTCUT ». DO266A NETTOYAGE ET ENTRETIEN ÉVACUATION D’EAU Vous pouvez utiliser une vidange permanente pendant la déshumidification. 1. Enlevez le bouchon de vidange et le capuchon en caoutchouc, au milieu à l’arrière de votre appareil. 2. Fixez le tuyau de vidange sur l’ouverture de vidange. 3. Veillez à ce que l’eau puisse s’écouler de manière sûre et continue. FR Vidange permanente 2 1 Vidange code P1 Si vous n’utilisez pas la vidange continue, l’eau sera récupérée dans le bac de vidange, au bas de l’appareil. · Lorsque ce bac est plein, l’appareil émet quelques tonalités et le code P1 apparaît à l’écran. La déshumidification ou la climatisation s’arrête. Le ventilateur continue à fonctionner, c’est normal. · Déplacez l’appareil prudemment vers un endroit où vous pouvez laisser l’eau s’évacuer facilement. · Enlevez le bouchon de la vidange au bas de votre appareil. (A) L’eau s’évacue alors. · Lorsque l’eau est totalement évacuée, replacez le bouchon sur l’ouverture de vidange. · Vous pouvez ensuite redémarrer l’appareil. Veillez à ce que le code « P1 » disparaisse de l’écran. Si le code ne disparaît pas immédiatement, vous pouvez essayer plusieurs fois d’éteindre et de rallumer l’appareil. Si le code se répète, veuillez prendre contact avec le service à la clientèle. A · NOTE : installez toujours d’abord le bouchon de vidange avant d’allumer à nouveau l’appareil. NETTOYAGE · Enlevez toujours la fiche de la prise de courant avant de nettoyer l’appareil. · N’utilisez pas de produits chimiques ou abrasifs pour nettoyer l’appareil. www.domo-elektro.be DO266A 31 · Ne lavez jamais l’appareil à l’eau ou avec d’autres liquides car cela pourrait provoquer une électrocution. FR · Lorsque le cordon électrique est endommagé, il doit être remplacé ou réparé par le service après-vente du fabricant ou par une personne qualifiée. Filtre à air · Nettoyez le filtre à air au moins toutes les deux semaines. Pour éviter tout dysfonctionnement du ventilateur en raison de poussière dans le filtre. · Nettoyez le filtre dans l’eau tiède avec un détergent doux. Rincez soigneusement le filtre et laissez-le sécher à l’air. · Lorsque le filtre est sec, vous pouvez le replacer dans l’appareil. Boîtier Utilisez un chiffon doux humide avec un peu de détergent doux pour nettoyer l’extérieur de l’appareil. Séchez ensuite l’appareil entièrement avec un chiffon sec et doux. Stockage Avant de stocker l’appareil pour une plus longue durée, procédez comme suit pour éviter tout dommage à l’appareil : · Enlevez toute l’eau de l’appareil à l’aide du tuyau de vidange. · Mettez ensuite l’appareil en mode « ventilateur », laissez l’appareil allumé une demijournée dans une salle chauffée. L’appareil peut de cette manière entièrement sécher à l’intérieur. Vous évitez de la sorte la formation de champignons. · Éteignez l’appareil, enlevez la fiche de la prise et enlevez les piles de la télécommande. · Nettoyez les filtres et replacez-les dans l’appareil. · Rangez l’appareil dans un endroit sec et sombre. PROBLÈMES POSSIBLES ET LEUR SOLUTION L’appareil ne fonctionne pas lorsque vous appuyez sur la touche marche/arrêt. · L’écran indique P1 : enlevez l’eau de l’appareil. · La température de la pièce est inférieure à la température réglée sur l’appareil. Adaptez la température sur votre appareil. La pièce ne refroidit pas suffisamment. · Les portes et les fenêtres ne sont pas fermées. Veillez à ce que toutes les portes et les fenêtres soient fermées. 32 · Il y a dans la pièce des appareils qui génèrent de la chaleur. Enlevez autant que possible les sources de chaleur. DO266A · Le tuyau d’évacuation d’air n’est pas raccordé ou est bloqué. Raccordez le tuyau et veillez à ce qu’il fonctionne correctement. L’appareil fait trop de bruit ou génère des vibrations. · Le sol n’est pas suffisamment droit ou plane. Placez l’appareil sur une surface plane, si possible. FR · La température réglée est trop élevée. Adaptez la température réglée. · Le filtre à air est sale. Nettoyez le filtre à air. Votre appareil fait un bruit d’écoulement d’eau. · Le bruit provient du liquide de refroidissement de votre appareil. C’est normal. · Le filtre à air est sale. Nettoyez le filtre à air. MISE AU REBUT Ce symbole sur le produit ou son emballage indique que ce produit ne peut être traité comme déchet ménager. Il doit plutôt être remis au point de ramassage concerné, se chargeant du recyclage du matériel électrique et électronique. En vous assurant que ce produit est éliminé correctement, vous favorisez la prévention des conséquences négatives pour l’environnement et la santé humaine qui, sinon, seraient le résulat d’un traitement inapproprié des déchets de ce produit. Pour obtenir plus de détails sur le recyclage de ce produit, veuillez prendre contact avec le bureau municipal de votre région, votre service d’éliminiation des déchets ménagers ou le magasin où vous avez acheté le produit. L’emballage est recyclable. Traitez l’emballage écologiquement. www.domo-elektro.be DO266A 33 GARANTIE Sehr geehrter Kunde, Sämtliche unserer Produkte unterliegen einer strengen Qualitätskontrolle, bevor Sie Ihnen angeboten werden. Sollten dennoch Probleme mit Ihrem Gerät auftreten, bedauern wir dies zutiefst. Wir möchten Sie in diesem Fall bitten, unseren Kundenservice zu kontaktieren. DE Unsere Mitarbeiter helfen Ihnen gern weiter! +32 14 21 71 91 [email protected] Montag – Donnerstag: 8:30 Uhr – 12:00 Uhr und von 13:00 Uhr – 17:00 Uhr Freitag: 8:30 Uhr – 12:00 Uhr und von 13:00 Uhr – 16:30 Uhr Dieses Gerät hat eine Garantiefrist von 2 Jahren ab dem Kaufdatum. Während der Garantiezeit übernimmt der Hersteller die vollständige Verantwortung für Mängel, die nachweislich auf Material- oder Konstruktionsfehler zurückzuführen sind. Wenn derartige Mängel auftreten, wird das Gerät wenn nötig ausgetauscht oder repariert. Die Garantiezeit von 2 Jahren beginnt in diesem Moment nicht erneut, sondern sie läuft bis 2 Jahre nach dem Kaufdatum weiter. Die Garantie wird auf der Grundlage des Kassenbons gewährt. Die Garantie auf Accessoires und Verschleißteile beträgt 6 Monate. Die Garantie und die Verantwortung/Haftung des Lieferanten und Herstellers entfallen automatisch in den folgenden Fällen: · Bei Nichtbeachtung der Anweisungen in dieser Bedienungsanleitung. · Bei falschem Anschluss, z.B. bei einer zu hohen Stromspannung. · Bei falscher, grober oder abnormaler Verwendung. · Bei unzureichender oder falscher Wartung. · Bei vom Verbraucher oder von nicht ermächtigten Dritten vorgenommenen Reparaturen oder Änderungen am Gerät. · Bei der Verwendung von Ersatzteilen oder Accessoires, die nicht vom Lieferanten / Hersteller empfohlen oder geliefert werden. 34 DO266A SICHERHEITSVORKEHRUNGEN Wenn Sie elektrische Geräte verwenden, müssen folgende Sicherheitshinweise beachtet werden: · Lesen Sie diese Hinweise sorgfältig durch. Bewahren Sie diese Bedienungsanleitung zum späteren Nachschlagen auf. · Entfernen Sie vor dem ersten Gebrauch alle Verpackungsmaterialien und möglichen Werbeaufkleber. Sorgen Sie dafür, dass Kinder nicht mit den Verpackungsmaterialien spielen. DE · Dieses Gerät eignet sich für den Einsatz im Haushalt und in ähnlichen Umfeldern, zum Beispiel in folgenden Bereichen: · Küchenbereich für Mitarbeiter von Geschäften, Büros und anderen ähnlichen beruflichen Umfeldern. · Bauernhöfe · Hotel- und Motelzimmer und andere Bereiche mit wohnungsähnlichem Charakter · Gästezimmer oder Ähnliches · Diese Gerät darf von Kindern ab 16 Jahren und Menschen mit körperlichen oder sensorischen Behinderungen oder Menschen mit eingeschränkten geistigen Fähigkeiten oder mangelnder Erfahrung bzw. Sachkenntnis unter der Bedingung verwendet werden, dass diese Personen beaufsichtigt werden oder sie eine Anleitung zur sicheren Verwendung des Geräts erhalten haben und sich der Gefahren bei der Verwendung des Geräts bewusst sind. Kinder dürfen nicht mit dem Gerät spielen. Die Wartung und Reinigung des Geräts darf nicht durch Kinder ausgeführt werden, außer diese sind älter als 16 Jahre und werden von einem Erwachsenen beaufsichtigt. · Achtung: das Gerät darf nicht mit einer externen Zeitschaltuhr. · Vor der Benutzung prüfen, ob die Spannung, die auf dem Gerät angegeben ist, mit der Spannung Ihres Stromnetzes übereinstimmt. · Das Netzkabel muss stets an eine Steckdose angeschlossen werden, die gemäß den örtlichen Standards und Normen isoliert und geerdet wurde. · Lassen Sie das Netzkabel nicht über den Tisch oder die Anrichte hängen, oder in Kontakt mit heißen Oberflächen kommen. · Benutzen Sie das Gerät niemals, wenn die Kabelschnur oder der Stecker beschädigt ist, nach beeinträchtigtem Funktionieren des Gerätes, oder wenn das Gerät beschädigt ist. Bringen Sie in solchen Fällen das Gerät zur nächsten qualifizierten Servicestelle zur Überprüfung und/oder Reparatur. · Beim Einsatz des Gerätes in Anwesenheit von Kindern ist strenge Aufsicht geboten. · Die Verwendung von Zubehör, das nicht vom Hersteller empfohlen oder verkauft wird, besteht die Gefahr von Brand, elektrischen Schlages oder von Verletzungen. · Ziehen Sie den Stecker aus der Steckdose, wenn das Gerät nicht im Einsatz ist, Einzelteile montiert oder demontiert werden, oder das Gerät gereinigt wird. Ziehen Sie den Stecker direkt am Stecker selber und nicht an der Kabelschnur aus der Steckdose. · Lassen Sie das im Betrieb befindliche Gerät nicht unbeaufsichtigt. www.domo-elektro.be DO266A 35 · Stellen Sie das Gerät nicht in der Nähe oder auf einer Gasflamme, einer elektrischen Platte oder an einer Stelle ab, auf der es in Kontakt mit einem Elektroofen oder einem anderen heißen Geräten kommen kann. · Benutzen Sie das Gerät nicht im Freien. · Benutzen Sie das Gerät ausschließlich für den Zweck, für den es gedacht ist. · Stellen Sie das Gerät immer auf eine stabile, flache und trockene Oberfläche. DE · Das Gerät ist nur auf den privaten Gebrauch ausgelegt. Der Hersteller ist nicht verantwortlich für Unfälle, die als Folge von unsachgemäßem Gebrauch des Geräts oder Nichtbefolgen der in dieser Anleitung aufgeführten Regeln entstehen. · Sämtliche Reparaturen, abgesehen von der gewöhnlichen Pflege, sind durch den Hersteller oder dessen Kundendienst zu übernehmen. · Das Gerät, das Kabel oder den Stecker niemals in Wasser oder in andere Flüssigkeiten tauchen. · Sorgen Sie dafür, dass Kinder das Netzkabel oder das Gerät nicht berühren können. · Netzkabel vor scharfen Kanten, heißen Gegen-ständen oder anderen Wärmequellen schützen. · Beim ersten Gebrauch Verpackungsmaterial und mögliche Werbeaufkleber komplett entfernen. · Stellen Sie das Gerät nicht in die Nähe von Gasbrennern, Feuerstellen oder leicht entflammbaren Stoffen, wie z.B. Alkohol, Chemikalien, Insektenvernichtungsmitteln, etc. · Vermeiden Sie gegen das Gerät zu stoßen oder daran zu wackeln. So können Sie Schäden am Gerät vermeiden. · Sorgen Sie dafür, dass die Luft-Zu- und -abfuhr nicht abgedeckt sind. Das Gerät könnte sonst überhitzen. · Vermeiden Sie, dass das Gerät Wasserspritzer abbekommt und stellen Sie es nicht in die Nähe von Wasserquellen. So vermeiden Sie, dass es zu Kurzschlüssen kommt. · Schließen Sie auf der gleichen Stromzufuhr, an der die Klimaanlage angeschlossen ist, kein weiteres Gerät an. · Bedienen Sie den Stecker nicht mit nassen Händen. · Stecken Sie keine fremden Gegenstände in die Öffnungen des Gerätes. · Benutzen Sie keine Verlängerungsschnur. · Lassen Sie das Gerät nicht unbeaufsichtigt, wenn Kinder in der Nähe sind. · Wenn Sie das Gerät innerhalb von kurzer Zeit an- und ausschalten dauert es etwa 3 min. bis der Kompressor wieder einsatzbereit ist. · Stellen Sie das Gerät zur Vermeidung von Störungen nicht in einen Umkreis von 1m zu Fernseher oder Radio. · Um Verfärbungen am Gehäuse zu vermeiden stellen Sie das Gerät nicht in direktes Sonnenlicht. · Kippen Sie das Gerät nicht mehr als 35° wenn Sie es transportieren und transportieren Sie es niemals mit der Unterseite nach oben. Transportieren Sie das Gerät immer aufrecht. 36 · Stellen Sie das Gerät auf einen flachen Untergrund. DO266A · Zur Verlängerung der Lebensdauer des Gerätes entfernen Sie stets das Wasser aus dem Gerät, sofern Sie es für längere Zeit wegstellen und nicht benutzen. · Benutzen Sie zur Reinigung des Gerätes keine chemischen Mittel, da diese das Gerät beschädigen könnten. · Achten Sie darauf, dass das Gerät nicht an den Strom angeschlossen ist, wenn Sie den Lüftungsrost einsetzen oder entnehmen. · Benutzen Sie das Gerät nicht in feuchten Räumen, wie z.B. Badezimmern oder Waschküchen. · Wenn das Gerät nicht funktioniert nehmen Sie bitte Kontakt mit einem qualifizierten Fachhändler auf. DE · Achten Sie darauf, dass die Klimaanlage nicht in Kontakt mit Feuchtigkeit kommt (z.B. Kondenswasser, Spritzwasser etc.). Sollte das Gerät zufälligerweise in Wasser oder andere Flüssigkeiten gefallen sein, ziehen Sie unmittelbar den Stecker aus der Steckdose. · Sorgen Sie dafür, dass rund um das Gerät mindestens 30 cm Freiraum ist. · Falls die Klimaanlage umgefallen ist muss sofort der Stecker aus der Steckdose gezogen werden. · Berühren Sie das Gerät nicht, wenn Sie nasse Hände oder nackte Füße haben. · Entfernen Sie keine festmontierten Teile des Gerätes und benutzen Sie das Gerät nicht, wenn es nicht vernünftig funktioniert, gefallen oder beschädigt ist. · Benutzen Sie nicht den Stecker zum An- und Abschalten. Verwenden Sie immer die Tasten auf dem Bedienfeld. · Reparaturen, Detektion von Leckagen sowie Arbeiten an der Anlage müssen von qualifizierten Personen die über die geeigneten Zertifikate verfügen, ausgeführt werden. · Die Installation muss gemäß der Installationsanleitung durchgeführt werden. Eine unsachgemäße Installation kann zu Wasseraustritt, Stromschlag oder Brand führen. · Berühren Sie das Gerät nicht mit nassen oder feuchten Händen oder auf bloßen Füßen. · Wenn die Klimaanlage während des Betriebs umgestoßen wird, schalten Sie das Gerät aus und ziehen Sie sofort den Netzstecker. Inspizieren Sie das Gerät, um sicherzustellen, dass es nicht beschädigt ist. Wenn Sie vermuten, dass das Gerät beschädigt ist, wenden Sie sich an einen Techniker oder den Kundendienst. · Während eines Gewitters muss der Strom abgeschaltet werden, um Schäden am Gerät durch Blitzschlag zu vermeiden. · Wenn die Abflussfunktion nicht verwendet wird, bringen Sie beide Gummistopfen in den Abflusslöchern an. Bewahren Sie den Ablaufschlauch bei Nichtgebrauch sorgfältig auf, um Kinder vor dem Ersticken zu schützen. · Verlegen Sie das Kabel nicht unter Teppichböden. Bedecken Sie das Kabel nicht mit Teppichen, Läufern oder ähnlichen Belägen. Verlegen Sie das Kabel nicht unter Möbeln oder Geräten. Verlegen Sie das Kabel außerhalb eines Durchgangs und so, dass niemand darüber stolpern kann. · Trennen Sie das Gerät von der Stromversorgung, wenn ungewöhnliche Geräusche, Gerüche oder Rauch aus dem Gerät austreten. www.domo-elektro.be DO266A 37 Detaillierte Informationen bezüglich der Geräte mit dem Kältemittel R290 · Bitte lesen Sie alle Warnhinweise aufmerksam durch. · Verwenden Sie beim Abtauen oder bei der Reinigung des Geräts keine anderen als vom Hersteller empfohlenen Werkzeuge. · Das Gerät muss in einem Raum aufbewahrt werden, in dem keine permanent betriebenen Zündquellen vorhanden sind (zum Beispiel: offene Flammen, ein eingeschaltetes Gasgerät oder laufende Elektroheizung). · Nicht durchstechen oder verbrennen. DE · Kältemittel können geruchlos sein. · Das Gerät muss in einem Raum aufgebaut, verwendet und gelagert werden, der größer als 7 m2 ist. · Das Gerät enthält eine gewisse Menge (siehe Typenschild auf der Geräterückseite) des Kältemittels R290. · Das Kältemittel R290 entspricht den europäischen Umweltrichtlinien. Beschädigen Sie nicht den Kältekreislauf. · Wird das Gerät in einem unbelüfteten Raum aufgestellt, betrieben oder gelagert, muss der Raum so gestaltet sein, dass sich das Kältemittel bei einer Leackage nicht sammeln und eine Explosions- und Brandgefahr darstellen kann, aufgrund der Entzündung des Kältemittels durch Elektroheizungen, Öfen oder anderen Zündquellen. · Das Gerät ist so zu lagern, dass mechanische Schäden ausgeschlossen werden. · Alle Personen, die an einem Kältemittelkreislauf arbeiten oder in ihn eingreifen, müssen im Besitz eines gültigen Zertifikats von einer anerkannten Prüfstelle sein, die ihnen bestätigt, dass sie sicher im Umgang mit Kältemitteln gemäß der anerkannten Spezifikationen sind. · Reparaturen sind entsprechend der Empfehlungen des Hersteller durchzuführen. Wartungs- und Reparaturarbeiten, bei denen weitere Fachkräfte assistieren müssen, sind unter der Aufsicht der Person, die in der Verwendung von brennbaren Kältemitteln geschult ist, durchzuführen. Vorsicht: Brandgefahr / brennbare Materialien Dieses Gerät verwendet ein brennbares Kühlmittel. Wenn das Kühlmittel austritt und einer externen Zündquelle ausgesetzt ist, besteht Brandgefahr. BEWAHREN SIE DIESE ANWEISUNGEN AUF ENERGIETIPPS · Benutzen Sie das Gerät nicht in Räumen, die größer sind als für das Gerät empfohlen. · Stellen Sie das Gerät so auf, dass der Luftstrom nicht durch Möbel oder andere Gegenstände behindert wird. · Halten Sie Gardinen während der wärmsten Tageszeit geschlossen. · Achten Sie darauf, dass die Filter immer sauber sind. · Halten Sie Fenster und Türen geschlossen, um die gekühlte Luft drinnen und die warme Luft draußen zu halten. 38 DO266A TEILE Vorderseite 1. Bedienpanel 2. Luftauslass 1 3 2 Rückseite Luftfilter 4. Lufteinlass 5. Luftauslass 6. Drainage 5 4 DE 3. 6 Teile 7. Drainageschlauch 8. Fernbedienung 9. Luftauslassschlauch 9 a. Kopplung Luftauslassschlauch 10. Wandbefestigungssatz 10 a. Wandadapter 10 b.Kopplung 7 11. Fensterbefestigungssatz 11 a. Fensteradapter 11 b. Kopplung Fensterbefestigungssatz 11 c. Fensterdichtung 11 d. Adapterstecker 8 11 e. L-Eisen mit Schrauben 9 9a 10 10b 10a 11 11a www.domo-elektro.be 11b 11c 11d 11e DO266A 39 MONTAGE · Stellen Sie die Klimaanlage auf einen soliden, stabilen Untergrund, um Lärmbelästigung und Vibrationen zu reduzieren. DE · Achten Sie darauf, dass der Untergrund stark genug ist, um dass Gewicht des Gerätes zu tragen. · Um das Gerät einfach transportieren zu können hat es Rollen. Rollen Sie das Gerät ausschließlich über glatte, flache Böden und nicht über Gegenstände. Beim Rollen über Teppiche sollte man besonders vorsichtig sein. max 120 cm · Das Netzkabel muss stets an eine Steckdose angeschlossen werden, die gemäß den örtlichen Standards und Normen min 30 cm isoliert und geerdet wurde. · Achten Sie darauf, dass sich rund um das Gerät 30 cm Freiraum befinden. · Der Luftablassschlauch muss während der COOL- oder AUTO-Funktion angeschlossen werden. Im FAN- oder DRY-Modus haben Sie den Luftablassschlauch nicht nötig. · Achten Sie darauf, dass sich im Umkreis von 50 cm von der Luftabfuhr keine Hindernisse befinden. · Achten Sie darauf, dass der Luftablassschlauch bei der Montage nicht zu stark gebogen wird MONTAGE DER FENSTER-LUFTABFUHR · Bringen Sie die Koppelung des Luftauslassschlauchs am Schlauchende an. · Bringen Sie den Luftauslassschlauch an der Rückseite des Geräts an. · Bringen Sie die Koppelung der Fensterbefestigung am anderen Ende des Luftauslassschlauches an. · Bringen Sie den Fensteradapter im Fenster an. Dies ist sowohl für horizontale wie auch vertikale Schieberahmen möglich. Blockieren Sie den Fensteradapter auf der gewünschten Länge. · Befestigen Sie den Schlauch mit Koppelung auf dem Fensteradapter. · Verwenden Sie die Fensterdichtungen, um eventuelle Öffnungen im Fenster zu verschließen. 40 DO266A max 120 cm min 30 cm · Setzen Sie die gewünschte Länge des Fensteradapters mit dem mitgelieferten Fensteradapterstopper fest. · Auf Wunsch können Sie das Fenster mit dem L-Eisen und 2 Schrauben befestigen. DE MONTAGE DER WAND-LUFTABFUHR · Bringen Sie die Koppelung des Luftauslassschlauchs am Schlauchende an. · Bringen Sie den Luftauslassschlauch an der Rückseite des Geräts an. · Bringen Sie eine Öffnung in der Mauer in der Größe des Maueradapters an. · Bringen Sie den Maueradapter in der Öffnung an. Befestigen Sie die Wandhalterung mit den im Lieferumfang enthaltenen Schrauben. · Bringen Sie die Koppelung der Mauerbefestigung am anderen Ende des Luftauslassschlauches an. · Befestigen Sie den Schlauch mit Koppelung auf dem Maueradapter. max 120 cm min 30 cm www.domo-elektro.be DO266A 41 GEBRAUCH Die horizontalen Lamellen an der Vorderseite der Klimaanlage können Sie manuell öffnen und schließen, um so den Luftauslass besser ausrichten zu können. BEDIENPANEL DE 4 3 1. 2 1 ON-OFF-Taste Mit dieser Taste können Sie das Gerät an- oder ausschalten. 2. “+” und “-”-Tasten Diese Tasten müssen Sie benutzen, wenn Sie die Temperatureinstellung ändern wollen. Die Temperatur kann auf einen Wert zwischen 17 °C und 30 °C eingestellt werden. Wenn Sie beide Pfeil-Tasten gleichzeitig 3 sek. Gedrückt halten können Sie zwischen °C und °F wählen. 3. MODE-Taste Mit dieser Taste können Sie die gewünschte Gebrauchseinstellung wählen. Bei jedem Druck auf diese Taste wird die Gebrauchseinstellung verändern: COOL, DRY und FAN. Das entsprechende Kontrolllämpchen auf dem Panel wird aufleuchten. Wenn Sie die FAN-Einstellung wählen, bläst die Lüftung im automatischen Stand. Sie können die Lüftungsgeschwindigkeit nur mit der Fernbedienung anpassen. 4. LED-Display Das LED-Display gibt die eingestellte Temperatureinstellung wieder. Wenn das Gerät im DRY- oder FAN-Modus steht, wird auf dem Display die Zimmertemperatur wiedergegeben. FERNBEDIENUNG Achten Sie bei Verwendung der Fernbedienung immer darauf, sie in Richtung des Geräts zu richten. Wenn Sie dies unterlassen, können Sie nach dem Ändern einer bestimmten 1 2 Einstellung die Fernbedienung noch auf das Gerät richten und auf die EIN-AUS-Taste drücken. 3 42 Wenn das Gerät ein Signal der Fernbedienung empfängt, 4 hören Sie einen Piepston. Die Fernbedienung muss in einem Radius von 8 Metern um das Gerät verwendet werden. DO266A 6 7 8 5 9 1. ON-OFF-Taste Mit dieser Taste können Sie das Gerät an- oder ausschalten. 2. MODE-Taste Mit dieser Taste können Sie die gewünschte Gebrauchseinstellung wählen. Bei jedem Druck auf diese Taste wird die Gebrauchseinstellung verändern: COOL, DRY und FAN. Das entsprechende Kontrolllämpchen auf dem Panel wird aufleuchten. SILEN FAN SPEED display Not ava FAN SPEED display Displays selected FAN SPEED: Displays selected FAN SPEED: HIGH, MED, Mit dieser Taste können Sie die Geschwindigkeit des Ventilators einstellen. Sie können HIGH, MED, or , LOW HIGH und AUTO. zwischen drei Geschwindigkeiten wählen: LOW Temperature or LOW This display is blank when Displays theT display is blank when set to AUTOThis speed. 4. SLEEP-Taste D when using T set to AUTO speed. w Mit dieser Taste können Sie das Gerät in Schlafmodus setzen. Temperatu FAN-Taste DE 3. Wenn Sie diese Funktion wählen wird die eingestellte Temperatur innerhalb von 30 min. um Timer sett 1 °C steigen. Nach weiteren 30 min. wird die Temperatur nochmals um 1 °C steigen. Die dann erreichte Temperatur wird anschließend für die nächsten 7 Std. konstant gehalten. DanachThis display T sinkt die Temperatur auf ihre ursprüngliche Einstellung und ist der „SLEEP“-Modus beendet. 5 HINWEIS: Diese Funktion kann nicht bei „DRY“- oder „FAN“-Funktion gewählt werden. 5. TEMP-Taste Diese Tasten müssen Sie benutzen, wenn Sie die Temperatureinstellung ändern wollen. Die Temperatur kann auf einen Wert zwischen 17 °C und 30 °C eingestellt werden. Wenn Sie beide Pfeil-Tasten gleichzeitig 3 sek. Gedrückt halten können Sie zwischen °C und °F wählen. 6. SHORT CUT-Taste Mit dieser Taste können Sie eine bevorzugte Einstellungen festlegen und einschalten. 7. TIMER ON-Taste Mit dieser Taste können Sie die Zeit einstellen, wann das Gerät sich anstellen soll. 8. TIMER OFF-Taste Mit dieser Taste können Sie die Zeit einstellen, wann das Gerät sich ausstellen soll. 9. LED-Taste Mit dieser Taste wird das LED-Display des Bedienfelds ausgeschaltet. Sie können sie verwenden, wenn das Display zu viel Licht abgibt, wenn Sie schlafen möchten. Wenn Sie ein zweites Mal auf die Taste drücken, schaltet sich das Display wieder ein. www.domo-elektro.be DO266A 43 1 Remote LED Screen Indicators ECO display HEAT FAN TEMP TIMER OFF FAN Not available for this unit Transmission Indicator Lights up when remote sends signal to unit EINSTELLUNG DER FUNKTIONEN ION SLEEP Battery display Low battery detection Transmission Indicator Lights up when remote sends signal to unit EC No this Transm Lights u Bat signalLow to TIMER ON MODE SWING FOLLOW ME LED ON/OFF display MODEAUTO display Appears when the unit is turned on, Displays the current and disappears when it is turned off SLEEP display mode,In including: der Einstellung AUTO wählt das Gerät automatisch die passende Einstellung abhängig von Displays when TIMER OFF display SLEEP function TIMER ON display AUTO 2 der gewählten Temperatur. Diese Einstellung können Sie lediglich mit der Fernbedienung Displays when TIMER Displays when TIMER COOL is activated ON/OFF SHORT OFF is set ON is set 3 CUT DRY wählen. Remote LED Screen Indicators How Func FOLLOW ME HEAT TIMER 1 To UseMODEThe Basic ON display FAN 1. TEMP Wählen Sie mit der MODUS-Taste auf der Fernbedienung AUTO aus. COOL operation ECO display Indicates that TIMER FAN OFF Not the available FOLLOW for ME Press theIONMODE button to select 2.Transmission RegelnIndicator Sie die Temperatur mit der TEMP-Taste. Das Gerät bestimmt 1. die Einstellung this unit function is on COOL mode. FOLLOW Lightsabhängig up when remote sends SWING LED hiervon. ME 2. Set your SLEEP desired temperature us Battery display Not available for signal to unit the Temp or Temp button Low battery Im AUTO-Modus können Sie die Geschwindigkeit der Lüftung (FAN) 3. nicht einstellen. this unit Press the FAN button to select th detection ON/OFF display SILENTon, display fan speed: AUTO, LOW, MED,or MODE displaydisplay Appears when the unit is turned FAN SPEED available HIGH. SLEEP display Displays currentFANand disappears when it Not is turned off for this unit Displaysthe selected SPEED: 4. Press the ON/OFF buttonFunct to star Remote LED Indicators How To Use The Basic Displays when mode, including: HIGH,Screen MED, COOL unit. SLEEP function TIMER OFF display TIMER ON display or AUTO LOW 2 Temperature/Timer display when TIMER is activated Displays when TIMER Mitisder Kühlfunktion Sie denDisplays Raum eine bestimmte Temperatur3abkühlen. ThisCOOL display blank when ON/OFF SHORT OFF is setbyauf ON können isDisplays set CUT the set temperature default, or timer setting DRY set to AUTO speed. FOLLOW ME Indicator when using TIMER ON/OFF functions HEAT TIMER MODE 1.Transmission Drücken Sie auf die MODUS-Taste, bis die COOL-Anzeigeleuchte brennt. 1 ON Lights up when remote sends Temperature range: 17-30oC(62OF-86OF)display FAN COOL operation TEMP Indicates that ECO display signal to unit TIMER FAN 2. Verwenden Sie die „+”und „-”-Tasten dem Bedienfeld oder die TEMP-Taste auf OFF Timer setting range: 0-24 hours aufNot theavailable FOLLOW forME 1. Press the MODE button to select function ON/OFF display This display is blank when operating in FAN ION this unit is on mode. der Fernbedienung, um die gewünschte Zimmertemperatur einzustellen. COOL mode. MODE display Appears when the unit is turned on, FOLLOW SWING LED 2. Set yourSLEEP desired temperature usi ME Displays the current Not available for and disappears when it is turned off Battery display the Temp or Temp button 3. Verwenden Sie die FAN-Taste auf der Fernbedienung, um die gewünschte mode, including: thisbattery unit Low 5 3. Press the FAN button to select th TIMER OFF display TIMER ON display AUTO , HIGH Lüftungsgeschwindigkeit einzustellen. Es detection gibt drei Einstellungen. LOW SILENT display 2 fan speed: AUTO, LOW, MED,or FANCOOL SPEED display Displays when TIMER Displays when TIMER ON/OFF SHORT Not available for this unit HIGH. OFF is set ON is set 3 Displays CUT und AUTO. SLEEP display DRY selected FAN SPEED: 4. Press the ON/OFF button to start MED, Displays when HEAT HIGH, TIMER 1 unit. MODE ON or FAN LOW SLEEP function TEMP Temperature/Timer display ECO display is activated TIMER FAN This display is blank when OFF Displays the set temperature by default, or timer setting Not available for DRY set to AUTO speed. when using TIMER ON/OFF functions this ION FOLLOW unit ME o O O display FOLLOW Temperature range: 17-30 C(62 F-86 F) SWING SLEEP LED Mit dieser Funktion können Sie den Raum entfeuchten. Halten Sie bei Betrieb dieser Funktion COOL operation ME Battery display Indicates that Timer setting range: 0-24 hours o O O Low battery the FOLLOW ME Fenster und Türen geschlossen. 1. Press the MODE button to select detection function is on This display is blank when operating in FAN mode. DE MODE display Displays the current mode, including: AUTO COOL DRY HEAT FAN det ON/OFF display Appears when the unit is turned on, and disappears when it is turned off TIMER ON display Displays when TIMER ON is set MODE display Displays the currentSLE Dis mode, including: SLE AUTO is a COOL TIMER OFF display DRY FO Displays when TIMER dis OFFHEAT is set FAN Ind the fun EC No Not this FAN SPEED display this Displays selected FAN S Bat SILENT display HIGH, Low Not available foror this unit LOW det FAN SPEED display Displays selected FAN SPEED: HIGH, MED, or LOW This display is blank whe set to AUTO speed. SLE Temperature/Timer display Dis This display is blank when Displays the set temperature by default, or tim SLE set to AUTO speed. when using TIMER ON/OFF functions is a Temperature range: 17-30 C(62 F-86 F) COOL mode. FO 1. Drücken Sie auf die MODUS-Taste, bis die DRY-Anzeigeleuchte brennt. Timer setting range: hours 2. Set 0-24 your desired temperature using SLEEP display Not available for the Temp or Temp button. dis 5 Displays when this unit 2. Verwenden Sie die „+”- und „-”-Tasten aufSLEEP dem Bedienfeld die3.TEMP-Taste Press the FAN auf button to the function This display oder is blank when operating inselect FANInd m SILENT display fan speed: AUTO, LOW, MED,or is activated FAN SPEED display der Fernbedienung, um die gewünschte Zimmertemperatur einzustellen. Not available for this unit HIGH. the Displays selected FAN SPEED: 4. Press the ON/OFF button to start th FOLLOW ME HIGH, MED, 3. Bei dieser Einstellung können Sie die Lüftungsgeschwindigkeit nicht einstellen. fun unit. display or LOW This display is blank when set to AUTO speed. Indicates that Temperature/Timer display FOLLOW Displays the set temperature by default, or the timer setting ME function is on when using TIMER ON/OFF functions 5 COOL operation 1. Press the MODE button to select Not COOL mode. FAN display using 2. Set yourSPEED desired temperature this the Temp selected or Temp FAN button. 1. brennt. Displays SP 3. Press the FAN button to select the SILENT display fan speed: AUTO, LOW, MED,or HIGH, FAN SPEED display 2. Verwenden Sie die FAN-Taste auf der Fernbedienung, um die gewünschte FAN SPEED display Not available for this unit Not available forHIGH. unit Displays selected FAN Displays SPEED: orthisthe selected FAN SPEED: ,LOW HIGH button to start th Lüftungsgeschwindigkeit einzustellen. Es gibt drei Einstellungen. LOW 4. Press ON/OFF 5 HIGH, MED, unit. HIGH, MED, or LOW FAN Temperature range: 17-30oC(62OF-86OF) Not available for Drücken Sie auf diesetting MODUS-Taste, FAN-Anzeigeleuchte Timer range: 0-24 hoursbis diethis unit This display is blank when operating in FAN mode. SILENT display und AUTO. LOW This display is blank when set to AUTO speed. Temperature/Timer display Displays the set temperature by default, or tim when using TIMER ON/OFF functions Temperature/Timer display This display is blank when Displays the set temperature by default, or timer setting 3. Die Temperatur kann nicht eingestellt werden. set to AUTO speed. when using TIMER ON/OFF functions or This display isTemperature blank when range: 17-30 C(62 F-86 F) set to AUTO speed. Timer setting range: 0-24 hours Timer on This display is blank when operating in FAN mode. o O O Temperature range: 17-30 C(62 F-86 F) Mit dieser Funktion können Sie das Gerät zeitverzögert starten, bis zu maximal 24 Stunden. 44 o O O 5 1. Drücken Sie auf der Fernbedienung auf die TasteTimer „TIMERsetting ON“. range: 0-24 hours 2. Auf dem Display der Fernbedienung können Sie jetzt ablesen, zu welchem Zeitpunkt in FAN m This display is blank when operating die Klimaanlage den Betrieb aufnimmt. DO266A 5 3. Drücken Sie mehrmals auf die Taste TIMER ON, um den Wert der Zeit zu erhöhen. Oder halten Sie die Taste eingedrückt. 4. Erst wenn die gewünschte Zeit eingestellt ist, wird auf dem Display der Fernbedienung „Timer on“ stehen. Auf dem Display des Bedienfelds sind 2 erleuchtete Kugeln zu sehen. 5. Wenn Sie den Timer ausschalten möchten, drücken Sie mehrmals auf die Taste TIMER ON, bis der Zähler auf „0“ steht. Oder halten Sie die Taste eingedrückt. Mit dieser Funktion können Sie das Gerät nach Ablauf der Zeit automatisch ausschalten lassen. 1. Drücken Sie auf der Fernbedienung auf die Taste „TIMER OFF“. 2. Auf dem Display der Fernbedienung können Sie jetzt ablesen, zu welchem Zeitpunkt die Klimaanlage abgeschaltet wird. 3. Drücken Sie mehrmals auf die Taste TIMER OFF, um den Wert der Zeit zu erhöhen. Oder halten Sie die Taste eingedrückt. 4. Erst wenn die gewünschte Zeit eingestellt ist, wird auf dem Display der Fernbedienung „Timer off“ stehen. Auf dem Display des Bedienfelds sind 2 erleuchtete Kugeln zu sehen. 5. Wenn Sie den Timer ausschalten möchten, drücken Sie mehrmals auf die Taste TIMER OFF, bis der Zähler auf „0“ steht. DE Timer off Timer on + Timer off Sie können auch beide Funktionen gleichzeitig einschalten. Damit bestimmen Sie, wann das Gerät eingeschaltet wird, aber auch, wann das Gerät ausgeschaltet wird. Wichtig: Diese Zeit gilt ab dem Zeitpunkt, an dem Sie die Einstellung programmieren. Beispiel: Es ist jetzt 13:00. Sie möchten das Gerät von 16:30 bis 19:00 betrieben. Stellen Sie die Funktion TIMER ON auf 3,5 Stunden ein und TIMER OFF auf 5,0 Stunden. Sleep Wenn Sie diese Funktion wählen wird die eingestellte Temperatur innerhalb von 30 min. um 1 °C steigen. Nach weiteren 30 min. wird die Temperatur nochmals um 1 °C steigen. Die dann erreichte Temperatur wird anschließend für die nächsten 7 Std. konstant gehalten. Danach sinkt die Temperatur auf ihre ursprüngliche Einstellung und ist der „SLEEP“-Modus beendet. HINWEIS: Diese Funktion kann nicht bei „DRY“- oder „FAN“-Funktion gewählt werden. Shortcut Mit dieser Taste können Sie eine bevorzugte Einstellungen festlegen und einschalten. Wenn Sie eine bestimmte Einstellung häufiger verwenden, können Sie sie einstellen, indem Sie die SHORTCUT-Taste 3 Sekunden lang eingedrückt halten. Das Gerät speichert dann www.domo-elektro.be DO266A 45 die Einstellungen, die zum Zeitpunkt des Drückens eingeschaltet sind. Diese Einstellungen können sein: die Gebrauchseinstellung (MODE), die eingestellte Temperatur, die Lüftungsgeschwindigkeit (FAN) und eventuell auch noch die SLEEP-Einstellung. Zu dem Zeitpunkt, an dem Sie die SHORTCUT-Taste betätigen, arbeitet das Gerät in Übereinstimmung mit den zuvor festgelegten Einstellungen. REINIGUNG UND WARTUNG WASSERABFUHR DE Permanente Drainage Während des Entfeuchtungsvorgangs können Sie am Besten eine permanente Drainage benutzen. 1. Entfernen Sie den Drainage-Verschluss und die Gummikappe auf der Rückseite des Gerätes. 2. Befestigen Sie den Drainageschlauch an der Drainage-Öffnung. 3. Achten Sie darauf, dass das Wasser sicher und dauerhaft abfließen kann. 2 1 Drainage Hinweis „P1“ Wenn Sie nicht von einer permanenten Drainage Gebrauch machen, läuft das Wasser in den Auffangbehälter unten am Gerät. · Wenn der Behälter voll ist wird der Hinweis „P1“ auf dem Display erscheinen. Der Entfeuchtungsprozess/ Kühlungsprozess wird stoppen, aber der Ventilator wird sich weiterhin drehen. · Bringen Sie das Gerät an einen Ort, wo Sie das Wasser einfach ablassen können. · Entfernen Sie den Verschluss von der Drainage-Öffnung unten am Gerät. Das Wasser wird nun ablaufen. · Nachdem das Wasser vollständig abgelaufen ist, drehen Sie bitte wieder den Verschluss auf die Drainage-Öffnung. (A) · Nun können Sie das Gerät wieder anschalten. Achten Sie darauf, dass die Meldung „P1“ nicht mehr auf dem Display steht. 46 DO266A A · Falls die Meldung nicht verschwunden ist, können Sie das Gerät einige Male an- und ausschalten. Sollte die Meldung dann noch stets auf dem Display erscheinen, wenden Sie sich bitte an den Fachhändler. · HINWEIS: Verschließen Sie immer erst wieder die Drainage-Öffnung, bevor Sie das Gerät wieder einschalten. REINIGUNG · Ziehen Sie immer erst den Stecker aus der Steckdose, bevor Sie das Gerät reinigen. · Spülen Sie das Gerät niemals mit Wasser ab, da dies zu Kurzschlüssen und Unfällen führen kann. DE · Benutzen Sie keine chemischen oder scheuernden Reinigungsmittel. · Falls das Kabel des Gerätes beschädigt ist, muss dieses durch den Hersteller oder einen qualifizierten Fachhandel repariert werden. Luftfilter · Um zu gewährleisten, dass der Ventilator problemlos funktioniert und sich nicht zu viel Staub im Filter befindet, reinigen Sie den Luftfilter mindestens alle zwei Wochen. · Waschen Sie den Filter in lauwarmem Wasser mit etwas mildem Spülmittel vorsichtig aus. Spülen Sie den Filter danach mit sauberem Wasser ab und lassen Sie den Filter an der Luft trockenen. · Erst wenn der Filter völlig trocken ist können Sie dieser wieder ins Gerät einsetzen. Gehäuse Das Gehäuse kann mit einem weichen, feuchten Tuch mit etwas mildem Spülmittel abgewaschen werden. Trocknen Sie das Gehäuse nach dem Abwaschen gründlich mit einem weichen, trockenen Tuch ab. Verstauen Bevor Sie das Gerät für eine längere Zeit verstauen, empfehlen wir Ihnen folgende Wartungsschritte: · Entfernen Sie sämtliches Wasser mit Hilfe des Drainageschlauchs aus dem Gerät. · Stellen bei dem Gerät anschließend die „FAN“-Funktion ein und lassen es einen halben Tag in einem erwärmten Raum stehen. Auf diese Art und Weise kann das Gerät auch von Innen vollständig trockenen und wird sich kein Schimmel bilden. · Schalten Sie das Gerät danach ab und ziehen Sie den Stecker aus der Steckdose. Entfernen Sie anschließend die Batterien aus der Fernbedienung. · Reinigen Sie die Filter und setzen Sie diese wieder ins Gerät ein. · Verstauen Sie das Gerät in einem trockenen, dunklen Raum. www.domo-elektro.be DO266A 47 MÖGLICHE PROBLEME UND PROBLEMLÖSUNGEN Das Gerät springt nicht an, wenn man auf den ON/OFF-Taste drückt · Auf dem Display steht „P1“. Entfernen Sie das Wasser aus dem Gerät. · Die Zimmertemperatur ist niedriger als die Temperatur, die Sie eingestellt haben. Ändern Sie entsprechend die Temperatureinstellung am Gerät. Das Zimmer kühlt nicht entsprechend ab DE · Fenster und Türen sind nicht geschlossen. Sorgen Sie dafür, dass Fenster und Türen geschlossen werden. · Es befinden sich wärmeerzeugende Geräte im Raum. Entfernen Sie, wenn möglich, die Wärmequellen. · Der Luftablassschlauch ist nicht angeschlossen oder blockiert. Schließen Sie den Schlauch an und sorgen Sie dafür, dass er nicht zu sark gekrümmt ist. · Die eingestellte Temperatur ist zu hoch. Passen Sie die Temperatureingabe entsprechend an. · Der Luftfilter ist verschmutzt. Reinigen Sie den Luftfilter. Das Gerät macht zu viel Lärm und sorgt für Vibrationen · Der Boden, auf dem das Gerät steht, ist nicht flach genug. Stellen Sie das Gerät an einen anderen Platz, wo der Boden flach und eben ist. · Der Luftfilter ist verschmutzt. Reinigen Sie den Luftfilter. Das Gerät macht gurgelnde Geräusche · Die Geräusche kommen vom Kühlmittel im Gerät und sind völlig normal. ERROR-MELDUNGEN Folgende Error-Meldungen können bei Störungen auf dem Display erscheinen: E1: Der Sensor für die Zimmertemperatur funktioniert nicht. Schalten Sie das Gerät ab und ziehen Sie den Stecker aus der Steckdose. Warten Sie ca. 10 sek. und stecken Sie den Stecker erneut in die Steckdose. Schalten Sie das Gerät wieder ein. Sollte die gleiche Error-Meldung auf dem Display erscheinen nehmen Sie bitte Kontakt mit dem Reparaturservice auf. E2: Der Sensor vom Luftverdampfer funktioniert nicht. Schalten Sie das Gerät ab und ziehen Sie den Stecker aus der Steckdose. Warten Sie ca. 10 sek. und stecken Sie den Stecker erneut in die Steckdose. Schalten Sie das Gerät wieder ein. Sollte die gleiche Error-Meldung auf dem Display erscheinen nehmen Sie bitte Kontakt mit dem Reparaturservice auf. E4: Das Display funktioniert nicht vernünftig. Schalten Sie das Gerät ab und ziehen Sie den Stecker aus der Steckdose. Warten Sie ca. 10 sek. und stecken Sie den Stecker erneut in die Steckdose. Schalten Sie das Gerät wieder ein. Sollte die gleiche Error-Meldung auf dem Display erscheinen nehmen Sie bitte Kontakt mit dem Reparaturservice auf. 48 DO266A P1: Das Wasserreservoir ist voll. Schließen Sie den Drainageschlauch unten am Gerät an und lassen Sie das Wasser ablaufen. Sollte die gleiche Error-Meldung auf dem Display erscheinen nehmen Sie bitte Kontakt mit dem Reparaturservice auf. Dieses Symbol auf dem Produkt oder seiner Verpackung weist darauf hin, dass dieses Produkt nicht als normaler Haushaltsabfall zu behandeln ist, sondern an einem Sammelpunkt für das Recyling von elektrischen und elektronischen Geräten abgegeben werden muss. Durch Ihren Beitrag zum korrekten Entsorgen dieses Produkts schützen Sie die Umwelt und die Gesundheit Ihrer Mitmenschen. Umwelt und Gesundheit werden durch falsches Entsorgen gefährdet. Weitere Informationen über das Recycling dieses Produkts erhalten Sie von Ihren Rathaus, Ihrer Müllabfuhr oder dem Geschäft, in dem Sie das Produkt gekauft haben. DE ENTSORGEN Das Verpackungsmaterial ist wiederverwertbar. Entsorgen Sie die Verpackung umweltgerecht und führen Sie sie der Wertstoffsammlung zu. www.domo-elektro.be DO266A 49 WARRANTY Dear client , All of our products are always submitted to a strict quality control before they are sold to you. Should you nevertheless experience problems with your device, we sincerely regret this. In that case, we kindly request you to contact our customer service. Our staff will gladly assist you. +32 14 21 71 91 [email protected] Monday – Thursday: 8.30 – 12.00 and 13.00 – 17.00 EN Friday: 8.30 – 12.00 and 13.00 – 16.30 This appliance has a two year warranty period. During this period the manufacturer is responsible for any failures that are the direct result of construction failure. When these failures occur the appliance will be repaired or replaced if necessary. The warranty will not be valid when the damage to the appliance is caused by wrong use, not following the instructions or repairs executed by a third party. The guarantee is issued with the original till receipt. All parts, which are subject to wear, are excluded from the warranty. If your device breaks down within the 2-year warranty period, you can return the device together with your receipt to the shop where you purchased it. The guarantee on accessories and components that are liable to wear-and-tear is only 6 months. The guarantee and responsibility of the supplier and manufacturer lapse automatically in the following cases: · If the instructions in this manual have not been followed. · In case of incorrect connection, e.g., electrical voltage that is too high. · In case of incorrect, rough or abnormal use. · In case of insufficient or incorrect maintenance. · In case of repairs or alterations to the device by the consumer or non-authorised third parties. · If the customer used parts or accessories that are not recommended or provided by the supplier / manufacturer. 50 DO266A SAFETY INSTRUCTIONS When using electrical appliances, basic safety precautions should always be taken, including the following: · Read all instructions carefully. Keep this manual for future reference. · Make sure all packaging materials and promotional stickers have been removed before using the appliance for the first time. Make sure children cannot play with the packaging materials. · This appliance is intended to be used in household and similar applications such as: · staff kitchen areas in shops, offices and other working environments; · farm houses; · by clients in hotels, motels and other residential type environments; · bed and breakfast type environments. · This appliance can be used by children aged from 16 years and above and persons with reduced physical, sensory or mental capabilities or lack of experience and knowledge if they have been given supervision or instruction concerning use of the appliance in a safe way and understand the hazards involved. Children shall not play with the appliance. Cleaning and user maintenance shall not be made by children unless they are older than 16 and supervised. EN · Children should be supervised to ensure that they do not play with the appliance. · Keep the appliance and its cord out of reach of children younger than 16 years. · Attention: This appliance cannot be used with an external timer. · Before use, check if the voltage stated on the appliance corresponds with the voltage of the power net at your home. · The plug must be plugged into an appropriate outlet that is installed and grounded in accordance with all local standards and requirements. · Do not let the cord hang on a hot surface or on the edge of a table or counter top. · Never use the appliance when the cord or plug is damaged, after malfunction or when the appliance itself is damaged. In that case, take the appliance to the nearest qualified service center for check-up and repair. · Close supervision is necessary when the appliance is used near or by children. · The use of accessories that are not recommended or sold by the manufacturer can cause fire, electrical shock or injuries. · Unplug the appliance when it is not in use, before assembling or disassembling any parts and before cleaning the appliance. Put all buttons and knobs into the ‘off’ position and unplug the appliance by grasping the plug. Never unplug by pulling the cord. · Do not leave a working appliance unattended. · Never place this appliance near a gas stove or electrical stove or in a place where it may come into contact with a warm appliance. · Do not use the appliance outdoors. www.domo-elektro.be DO266A 51 · Only use the appliance for its intended use. · Always use the appliance on a steady, dry and level surface. · Only use the appliance for domestic use. The manufacturer cannot be held responsible for accidents that result from improper use of the appliance or not following the instructions described in this manual. · All repairs should be carried out by the manufacturer or its aftersales service. · Never immerse the appliance, the cord or the plug in water or any other liquid. · Make sure that children do not touch the cord or appliance. · Keep the cord away from sharp edges and hot parts or other heat sources. · Before use, remove all packaging materials and any promotional stickers. · Never place the unit near a stove, fire or highly inflammable liquids. · Never hit or shake the unit, to prevent damage. · Never cover the air inlet or air outlet, to prevent overheating the unit. EN · Never splash water on the unit, or place the unit near water, to prevent electrocution. · Never place another appliance on the same electrical circuit as the air conditioning. · Never handle the plug with wet hands. · Never put any foreign objects in the openings of the air conditioning. · Never use an extension cord. · Never let children play near the unit. · When you turn off the unit and want to turn it on immediately afterwards, the compressor will need 3 min.to start up again. · Always place the unit at least 1m away from TV or radio, to prevent disturbance. · Never place the unit in direct sun light, to prevent discoloration of the air conditioning. · Make sure the angle of the unit is never more than 35°, when you move the air conditioning. Never place the unit upside down. · Always remove the water from the water tank, when storing the air conditioning. This will keep your air conditioning in optimal condition for a long time. · Never use any chemicals to clean the unit, this will cause damage. · Always make sure to disconnect the unit from the electrical supply before attaching or removing the air inlet grill. · Make sure the air conditioning is always protected against condensation, splashing water, etc. Make sure the air conditioning can’t come in contact or be pulled into water or any other liquid. If for some reason the air conditioning will fall in to water or any other liquid, immediately remove the plug form the socket. · Never use the air conditioning in a damp room such as a bathroom or a laundry room. · Always contact a qualified person for repairing the unit. · Make sure that the free space around the unit is at least 30 cm. · Never touch the unit with wet hands or bare feed. 52 · Do not press the buttons on the control panel with anything other than your fingers. DO266A · Never remove fixed parts from the air conditioning. Never use the unit when it is not working properly, or when the unit has fallen or has been damaged. · Never use the plug to turn the unit on or off. Always use the buttons on the control panel. · Reparations, checking for leaks or other services need to happen by a qualified technician with the right certificates. · Installation must be performed according to the installation instructions. Improper installation can cause water leakage, electrical shock, or fire. · Do not touch the unit with wet or damp hands or when barefoot. · If the air conditioner is knocked over during use, turn off the unit and unplug it from the main power supply immediately. Inspect the unit to ensure there is no damage. If you suspect the unit has been damaged, contact a technician or customer service for assistance. · When the water drainage function is not in use, keep the upper and the lower drain plug firmly to the unit. When the drain plug is not in use, keep it carefully to prevent children from choking. EN · In a thunderstorm, the power must be cut off to avoid damage to the machine due to lightning. · Do not run cord under carpeting. Do not cover cord with throw rugs, runners, or similar coverings. Do not route cord under furniture or appliances. Arrange cord away from traffic area and where it will not be tripped over. · Disconnect the power if strange sounds, smell, or smoke comes from it. Specific information regarding appliances with R290 refrigerant gas. · Thoroughly read all of the warnings. · When defrosting and cleaning the appliance, do not use any tools other than those recommended by the manufacturing company. · The appliance must be placed in an area without any continuous sources of ignition (for example: open flames, gas or electrical appliances in operation). · Do not puncture and do not burn. · Refrigerant gases can be odourless. · The appliance must be installed, used and stored in an area that is greater than 7 m2. · This appliance contains a certain number of grams (see rating label back of unit) of R290 refrigerant gas. · R290 is a refrigerant gas that complies with the European directives on the environment. Do not puncture any part of the refrigerant circuit. · If the appliance is installed, operated or stored in a nonventilated area, the room must be designed to prevent the accumulation of refrigerant leaks resulting in a risk of fire or explosion due to ignition of the refrigerant caused by electric heaters, stoves, or other sources of ignition. · The appliance must be stored in such a way as to prevent mechanical failure. www.domo-elektro.be DO266A 53 · Individuals who operate or work on the refrigerant circuit must have the appropriate certification issued by an accredited organisation that ensures competence in handling refrigerants according to a specific evaluation recognized by associations in the industry. · Repairs must be performed based on the recommendations from the manufacturing company. Maintenance and repairs that require the assistance of other qualified personnel must be performed under the supervision of an individual specified in the use of flammable refrigerants. Caution: risk of fire / flammable materials This appliance uses a flammable refrigerant. If the refrigerant is leaked and exposed to an external ignition source, there is a risk of fire. SAVE THESE INSTRUCTIONS EN ENERGY TIPS · Never use the unit it rooms that are bigger than the recommended room size. · Make sure that the airflow of the unit is not blocked by furniture or other objects. · Keep curtains closed during the warmest hours of the day. · Make sure the filters of the air conditioning are always clean. · Always keep doors and windows closed to keep the cool air inside and the warm air outside. 54 DO266A PARTS Front 1. Control panel 2. Air outlet 1 3 2 Back 3. Air filter 4. Air inlet 5. Air outlet 6. Drain 5 4 6 7. Drain hose 8. Remote control 9. Air outlet hose EN Parts 9 a. Air outlet hose connection 10. Wall installation kit 10 a. Wall adaptor 10 b. Wall installation kit connection 7 11. Window installation kit 11 a. Window adaptor 11 b. Window installation kit connection 11 c. Window seal 11 d. Adapter plug 8 11 e. L-iron with screws 9 9a 10 10b 10a 11 11a www.domo-elektro.be 11b 11c 11d 11e DO266A 55 INSTALLATION · Place the air conditioning on a solid and stable floor, this way you will prevent excessive noise and vibrations. Make sure that the floor is strong enough to support the weight of the appliance. · The appliance has small wheels for easy moving. Make sure only max Be 120 cm to move the air conditioning over a flat and level surface. careful when moving the air conditioning over carpet. Never roll min 30 cm the unit over an object. · The plug must be plugged into an appropriate outlet that is installed and grounded in accordance with all local standards and requirements. · Never place any object within 30 cm round the air conditioning. EN · The air outlet hose must be used in the “cool” or “auto” mode. During the “fan” or “dry” mode, you don’t need to attach the air outlet hose. · Make sure there is a free surrounding of at least 50 cm around the outlet. · Make sure the air outlet hose isn’t bend during use. INSTALLATION OF THE WINDOW KIT · Place the coupling of the air outlet hose on the end of the hose. · Place the air outlet hose on the air outlet at the back of the appliance. · Place the coupling of the window attachment on the other end of the air outlet hose. · Place the window adaptor in your window. This is possible for horizontal and vertical sliding windows. Block the window adapter at the desired length. · Attach the hose with the coupling to the window adapter. · Make use of the window seals to close off any possible openings in the window. · Block the window adapter at the desired length using the supplied window adapter plug. · If desired, you can fix the window with the L-iron and 2 screws. 56 DO266A INSTALLATION WALL KIT · Place the coupling of the air outlet hose on the end of the hose. · Place the air outlet hose on the air outlet at the back of the appliance. · Place the wall adapter in the opening. Attach the wall adapter using the screws supplied. · Place the coupling of the wall attachment on the other end of the air outlet hose. EN · Make an opening in the wall the size of the wall adapter. · Attach the hose with coupling to the wall adapter. max 120 cm min 30 cm USE The horizontal strip on the front of the air conditioning can be opened and shut manually in order to aim the air outlet better. CONTROL PANEL 4 3 www.domo-elektro.be 2 1 DO266A 57 1. ON/OFF touch To turn the unit off or on. EN 2. Remote LED Screen Indicators Remote LED Screen Indi ”+” and “-” touch Indicator Use these touches to select the temperature. The temperature can Transmission be set between 17°C and Transmission Indica up“°C” when remote sends 30°C. When pressing both buttons at the same time you can switch Lights between or “°F”. signal to unitLights up when remo signal to unit ON/OFF display 3. MODE- touch MODE display ON/OFF Appears when the unitdisp is t With this touch you can select the desired function. Every time when pressing this touch Displays the MODE current display Appears whe and disappears when it is the function will change: COOL – DRY – FAN. The related indication light will turn on on the Displays the current mode, including: and disappea control panel. If you choose the FAN setting, the ventilation blows on the automatic position. mode, including: TIMER ON d AUTO You can only adapt the ventilation speed with the remote control. Displays whe AUTO COOL ON is set COOL DRY 4. LED display DRY HEAT Will show het temperature selections. When the “dry orFAN “fan” mode isHEAT selected, the display FAN will show the room temperature. REMOTE CONTROL When using the remote control make sure that you always aim it towards the apparatus. If you don’t do this, you can briefly aim the remote control towards the apparatus and 1 press the ON-OFF button. 2 When the apparatus receives a signal of the remote control you hear a beep. The remote control must be used 3 within an eight-metre radius around the apparatus. 4 1. 6 7 8 5 9 ON/OFF touch To turn the unit off or on. 2. MODE- touch With this touch you can select the desired function. Every time when pressing this touch the function will change: COOL – DRY – FAN. The related indication light will turn on on the control panel. SIL FAN SPEED display Not a FAN SPEED display Displays selected FAN SPEED: 3. FAN touch Displays selected HIGH, MED,FAN SPEED: MED, or –LOW HIGH –HIGH, AUTO. With this touch you can select the fan speed: LOW Temperat or LOW This display is blank when Displays t display is blank when set to AUTO This speed. 4. SLEEP touch when usin set to AUTO speed. You can use this touch for activating the “sleep” mode. Temper 58 Timer s DO266A This displa When pressing the “sleep” touch, the selected temperature will be elevated with 1 °C after 30 min. After another 30 min the temperature will increase with another 1°C. The air conditioning will maintain this temperature for 7 hours. After this time, the air conditioning will go back to the original set temperature and the “sleep” function will end. NOTE: this function cannot be selected with the “fan” or “dry” function. 5. Remote LED Screen Indicators Remote LED Screen Indicators TEMP touch EN Use these touches to select the temperature. The temperature can be set between 17°C and 30°C. When pressing both buttons at the same time you can switch between “°C” or “°F”. Transmission Indicator Transmission Indicator Lights up when remote sends 6. SHORT CUT touch signal to unitLights up when remote sends With this button you can fix and switch on a preferential setting. signal to unit ON/OFF display MODE display ON/OFF Appears when the unitdisplay is turned on, 7. TIMER ON touch MODE display Displays the current Appears when the unit and disappears when it is turned offis turne Remote LED Screen Indicators How To Use The Basic Fun the With this function you can selectmode, when the unitDisplays must turn on.current including: and disappears when it is turn TIM TIMER ON display AUTO mode, including: Transmission Indicator Dis TIMER ON displ Displays when TIMER AUTO COOL 8. TIMER OFF Lights up whentouch remote sends ON is set Displays whenOF T COOL signal to unit DRY ON is set With this function you can select when the unit must turn off. ON/OFF display DRY HEAT MODE display Appears when the unit is turned on, HEAT Displays the current and disappears when it is turned off FAN mode, including: FAN 9. LED touch TIMER OFF display AUTO TIMER ON display Remote Displays when TIMER COOLLED Screen Indicators Displays when TIMER 2 How To Use The Basic Fun ON/OFF SHORT is set ON iscontrol set This button turns off the panel’sOFF LED display. This can be used if the display gives too 3 DRY HEAT much light when you want to sleep. If you press the button a second time, the1display will FAN ECO display switchTransmission on again. Indicator CUT TIMER ON MODE TEMP Lights up when remote sends signal to unit Not available for this unit TIMER OFF FAN ION SLEEP SWING FOLLOW LED ME ON/OFF display Battery display SET FUNCTIONS Low battery MODE display Appears when the unit is turned on, detection Displays the current and disappears when it is turned off mode,AUTO including: TIMER OFF display SLEEP display TIMER ON display AUTO 2 In the AUTO function, the apparatus chooses the right setting depending on the Displays when Displays when TIMER Displays when TIMER automatically COOL ON/OFF SHORT OFF is set ON is set 3 CUT function DRY chosen temperature. This setting can also be chosenSLEEP with the remote control. is activated HEAT TIMER MODE 1 ON FAN 1. TEMP Choose AUTO with the MODE button on theECO remote FOLLOW MEcontrol. display TIMER FAN OFF display Not available for COOL operation 2. Set the desired temperature with the TEMPthis button. The apparatus will determine the Indicates ION unit that the FOLLOW ME FOLLOW SWING SLEEP LED to select 1. Press the MODE button setting accordingly. ME functiondisplay is on Battery COOL mode. Low battery You cannot adapt the speed of the ventilation (FAN) in AUTO modus.2. Set your desired temperature us Not available for detection the Temp or Temp button this unit 3. Press the FAN button to select th SLEEP display SILENT display fan speed: AUTO, LOW, MED,or FAN SPEED display Displays when COOL Not available for this unit HIGH. Displays selected FAN SPEED: SLEEP function 4. Press the ON/OFF button to star HIGH, MED, is activated With the COOL function you can cool the room up to a certain temperature. unit. or LOW Temperature/Timer display FOLLOW ME This display is blank when 1. Press the MODE button until the COOL indicator lamp is on. Displays the set temperature by default, ordisplay timer setting set to AUTO speed. COOL operation when using TIMER ON/OFF functions Indicates that o control O O panel 2. Use the “+” and “-” buttons on the or the METEMP button on the remote Temperature range: 17-30 C(62 F-86 F)the FOLLOW 1. Press the MODE button to select function is on control to set theTimer desired temperature. setting room range: 0-24 hours COOL mode. SILENT display FAN SPEED display SILENT Not available for this FAN SPEED display Displays selected FAN SPEED: 2. Set your desired temperature usi Not availa Not available for This display is blank when operating in FAN mode. Displays selected MED,FAN SPEED: the Temp or Temp button 3. Use the FAN button on the remoteHIGH, control to this set unit the desired ventilation speed. There 3. Press the FAN button to select th HIGH, MED, fan speed: AUTO, LOW, MED,or or , LOW HIGH and AUTO. are three settings: SILENT LOW 5 display FAN SPEED display Not available for this unit or Temperature/Timer displa HIGH. LOW 59 Displays selected FAN SPEED: This display is blank when 4. Press the ON/OFF button to start HIGH, MED, Temperature/ Displays the set temperatu DO266A www.domo-elektro.be unit. or LOW display is blank when set to AUTOThis speed. Temperature/Timer display DisplaysON/OF the s when using TIMER This display is blank when mode, including: AUTO COOL DRY HEAT FAN Low battery TIMER OFF displaydetection Displays when TIMER OFF is set SLEEP display Displays when SLEEP function ECO display is activated Not available for FOLLOW this unit ME displaywindows dehumidify the room. Keep Battery display Indicates that Low battery ME the FOLLOW detection function is on TIMER ON display Displays when TIMER ON is set DRY With this function you can function. 3 1 2 ON/OFF SHORT CUT TIMER ON MODE TEMP TIMER OFF FAN ION and doors closed for this COOL operation SLEEP SWING FOLLOW ME LED 1. Press the MODE button to select COOL mode. 2. Set your desired temperature using SLEEP display Not available for the Temp or Temp button. this unit when 2. Use the “+” and “-” buttons on the controlDisplays panel or the TEMP button on the 3. Press theremote FAN button to select the SLEEP function SILENT display fan speed: AUTO, LOW, MED,or is activated FAN SPEED display control to set the desired room temperature. Not available for this unit HIGH. Displays selected FAN SPEED: 4. Press the ON/OFF button to start th FOLLOW ME HIGH, MED, 3. You cannot set the ventilation speed in this setting. unit. display or LOW COOL operation 1. Press the MODE button until the DRY indicator lamp is on. This display is blank when set to AUTO speed. Indicates that Temperature/Timer display FOLLOW Displays the set temperature by default, or the timer setting ME function is on when using TIMER ON/OFF functions 1. Press the MODE button to select COOL mode. display SILENT FAN SPEED display 2. Set your desired temperature using SILENT di Not available for this unit the Temp or Temp button. 1. Press the is on. FAN SPEED display Displays selected FAN SPEED: 3. Press the FAN button toavailable select the Not fan speed: AUTO, Displays selected FAN SPEED:speed. HIGH, 2. Press the FAN button of the remote control toMED, set the ventilation There are LOW, MED,or FAN SPEED display Not available for this unit HIGH. Displays selected FAN SPEED: HIGH, MED, or LOW , HIGH and AUTO. three settings: LOW 4. Press the ON/OFF button to start th 5 HIGH, MED, unit. Temperature/Timer display or LOW or LOW FAN Temperature range: 17-30oC(62OF-86OF) Not available for MODE button until0-24 thehours FAN indicator Timer setting range: this unit lamp This display is blank when operating in FAN mode. SILENT display This display is blank when The temperature cannot be adjusted. Temperature/Timer display Displays set the set by default, or timer setting display is blank when totemperature AUTOThis speed. when using TIMER ON/OFF functions set to AUTO speed. Temperature range: 17-30 C(62 F-86 F) Timer on 3. EN This display is blank when set to AUTO speed. o O O Timer setting range: 0-24 hours Displays theTemperature/Tim set temperature b DisplaysON/OFF the set te when using TIMER fu when using17-30 TIMEo Temperature range: With this function you delay the start of the apparatus, up to maximumTimer 24 hours. Thiscan display is blank when operating in FAN mode. settingTemperature range: 0-24 ra h 1. 2. Timer setting r This display is blank when ope 5 You can now read on the display of the remote control when the air conditioning Thiswill display is bla go on. Press the TIMER ON button on the remote control. 5 3. Press the TIMER ON button several times to increase the time. Or keep the button pressed. 4. Once the desired time is set, you will see “Timer on” on the display of the remote control. Two lights will light up on the control panel’s display. 5. If you want to switch off the timer, press the TIMER ON button several times until the counter goes to “0”. Or keep the button pressed. Timer off With this function you can switch off the apparatus automatically after some time. 60 1. Press the TIMER OFF button on the remote control. 2. You can now read on the display of the remote control when the air conditioning will go off. 3. Press the TIMER OFF button several times to increase the time. Or keep the button pressed. 4. Once the desired time is set, you will see “Timer off” on the display of the remote control. Two lights will light up on the control panel’s display. 5. If you want to switch off the timer, press the TIMER OFF button several times until the counter goes to “0”. DO266A 5 Timer on + Timer off You can also switch on both functions simultaneously. This determines when you switch on the apparatus, but also when the apparatus switches off. Please note: this time is always from the hour when you programme the setting. For example: it is now 1 pm. You want the apparatus to work from 4:30 to 6 pm. Set the TIMER ON on 3.5 h and TIMER OFF on 5.0 h. Sleep When pressing the “sleep” touch, the selected temperature will be elevated with 1 °C after 30 min. After another 30 min the temperature will increase with another 1°C. The air conditioning will maintain this temperature for 7 hours. After this time, the air conditioning will go back to the original set temperature and the “sleep” function will end. EN NOTE: this function cannot be selected with the “fan” or “dry” function. Shortcut With this button you can set and switch on a preferential setting. If you use a certain setting more often, you can set this by pressing the SHORTCUT button for three seconds. The apparatus then remembers the settings that are switched on at the moment of pressing. These settings can include: the user setting (MODE), set temperature, ventilation speed (FAN) and possibly also the SLEEP setting. The moment you press the SHORTCUT button, the apparatus will work at the previously determined settings. CLEANING AND MAINTENANCE DRAINING Permanent drain During the “dry” mode you can use a permanent drainage. 1. Remove the drain plug and the rubber top. 2. Attach the drain hose on the drain. 3. Make sure the water is drained in a save and permanent way. 2 1 www.domo-elektro.be DO266A 61 Drain code P1 When you don’t use the permanent drain, the non recycled condensation water, will be stored in the water tank. · When the water tank is full a few beep signals will be heard and on the display the code P1 will appear. The “cool” or “dry” mode will end automatically. The fan will continue to operate, this is normal. · Move the unit over to a place where you can easily drain the water. · Remove the drain plug at the bottom of your unit (A) and drain the water. EN · After fully draining the water tank, place the drain plug back on the drain opening. A · Restart the unit, make sure the error code P1 is no longer displayed. When the code doesn’t disappear, try turning off and on the unit a few times. When the error code continues, please contact the after sales service. · NOTE : always make sure to install the drain plug, before turning the unit back on. CLEANING · Always remove the plug from the socket before cleaning the unit. · Never use any chemical or abrasive products to clean the unit. · Never clean the unit with water or any other liquid, this can cause electrocution. · When the power cord is damaged it must be repaired or replaced by the after sales surface of the manufacturer or by a qualified person. Air filter · Clean the air filter at least ever 2 weeks. To make sure the air conditioning can operate in optimal conditions. · Clean the air filter in lukewarm water with a bit of detergent. Rinse the filter thoroughly and let it dry. · Make sure the filter is completely dry before placing it back in to the air conditioning. Air conditioning body Use a damp, soft cloth and a bit of mild detergent, to clean the outside of the unit. Make sure the unit is thoroughly dried afterwards. 62 DO266A Storing Before storing the unit for a longer period of time, please follow the next steps : · Drain all the water from the appliance. · Afterwards turn on the unit in the “fan” mode for half a day. Make sure the unit is placed in a heated room. This will dry the unit completely and prevent the forming of mold. · Turn off the unit, remove the plug from the socket and remove the batteries from the remote control. · Clean the filters and place them back in the unit. · Store the unit in a dry, dark place. POSSIBLE PROBLEMS AND THEIR SOLUTIONS The appliance isn’t working when pressing the on/off touch. · The error code P1 is displayed , drain the water from the air conditioning. EN · The room temperature is lower than the selected temperature. Adjust the selected temperature. The room is not cool enough. · The windows and doors aren’t closed. Make sure all windows and doors are closed. · There are heat sources in the room. Remove all heat sources if possible. · The air outlet hose is not connected or blocked. Attach the hose and check if there is no blockage. · The selected temperature is too high. Adjust the selected temperature. · The air filter is dirty. Clean the air filter. The appliance is making too much noise or is causing vibrations. · The floor is not level or flat. Place the appliance on the flat and level surface if possible. · The air filter is dirty. Clean the air filter. Your appliance makes a gurgling sound · The sound is produced by the refrigerant in your appliance, this is normal. ERROR CODES Following error codes can be displayed on your air conditioning : E1 : the sensor for the room temperature is not working. Turn off the unit and remove the plug from the socket. Wait for 10 sec and plug the unit back in. Turn on the unit. When the error codes repeats, you need to contact the after sales service. www.domo-elektro.be DO266A 63 E2 : The sensor of the dehumidifier doesn’t work. Turn off the unit and remove the plug from the socket. Wait for 10 sec and plug the unit back in. Turn on the unit. When the error codes repeats, you need to contact the after sales service. E4 : The display is not functioning properly. Remove the plug from the socket. Wait for 10 seconds. Plug the unit back in. When the error codes repeats, you need to contact the after sales service. P1 : The water tank is full. Connect the drain hose to the bottom drain and remove the water. When the error codes repeats, you need to contact the after sales service. ENVIRONMENTAL GUIDELINES EN This symbol on the product or on its packaging indicates that this product may not be treated as household waste. Instead it must be brought to the applicable collection point for recycling of electrical and electronic equipment. By ensuring this product is disposed of correctly, you will help prevent potential negative consequences for the environment and human health, which could otherwise be caused by inappropriate waste handling of this product. For more detailed information about recycling of this product, please contact your local city office, your household waste disposal service or the shop where you purchased the product. The packaging is recyclable. Please treat the packaging ecologically. 64 DO266A GARANTIA Este aparato tiene un periodo de garantía de 2 años a partir de la fecha de compra. Durante el periodo de garantía, el distribuidor será completamente responsable de los defectos directamente asignables a errores del material y fabricación. Cuando se detecten este tipo de errores, y siempre que se estime necesario, el aparato se sustituirá o reparará. A partir de ese momento, el periodo de garantía de 2 años no volverá a iniciarse, sino que seguirá siendo de 2 años a partir del momento de compra. La garantía se concede sobre la base del recibo de caja. La garantía de los accesorios y componentes sujetos a desgaste es de 6 meses. La garantía y la responsabilidad/imputabilidad del proveedor y el fabricante expiran automáticamente en los siguientes casos: · Cuando no se cumplan las instrucciones que aparecen en este manual. · En el caso de una conexión inadecuada, por ejemplo, a una tensión eléctrica demasiado alta. · En caso de uso incorrecto, brusco o anormal. · En caso de insuficiente o incorrecto mantenimiento. · Si el consumidor o un tercero no autorizado realizan reparaciones o modificaciones en el aparato. · Si se usan componentes o accesorios que no están recomendados o que no son suministrados por el proveedor/fabricante. ES INSTRUCCIONES DE SEGURIDAD Cuando utilice aparatos eléctricos, se deben seguir las instrucciones de seguridad mencionadas a continuación: · Lea detenidamente estas instrucciones. Conserve este manual para consultarlo posteriormente. · Antes del primer uso retire todos los materiales de embalaje y etiquetas promocionales. Asegúrese de que los niños no puedan jugar con el material de embalaje. · Este aparato es adecuado para su uso en el ámbito doméstico y entornos similares como: · Zona de cocina para el personal de tiendas, oficinas y otros entornos profesionales similares. · Granjas. · Habitaciones de hoteles y moteles, y otros entornos de carácter residencial. · Habitaciones de invitados o similares. · Supervise en todo momento a los niños para que no jueguen con el aparato. · Este aparato puede ser utilizado por niños de 16 años o más, personas con discapacidad física o sensorial, o personas con capacidad mental limitada o falta de experiencia o conocimiento, siempre, y en tanto en cuanto, dichas personas estén vigiladas o hayan recibido instrucciones sobre el uso del aparato de manera segura y conozcan los peligros del uso del mismo. Los niños no deben jugar con el ventilador. El mantenimiento y la limpieza del dispositivo no deben ser realizados por niños, a menos que tengan 16 años o más y estén supervisados por un adulto. www.domo-elektro.be DO266A 65 · Mantenga el aparato fuera del alcance de los niños. · Atención: el aparato no debe utilizarse con un temporizador externo. · Antes de utilizarlo, asegúrese de que el voltaje indicado en el aparato se corresponde con el voltaje de la red eléctrica de su hogar. · El cable de alimentación debe estar conectado a una toma de corriente que debe haber sido instalada y conectada a tierra de acuerdo con las normas y reglamentos locales. · No deje el cable sobre una superficie caliente o sobre el borde de una mesa o encimera. · Nunca utilice el aparato si el cable o el enchufe están dañados, si el aparato no funciona correctamente o si está dañado. Si esto ocurre, lleve el aparato al centro de servicio cualificado más cercano para su inspección y reparación. · Es necesaria una supervisión estricta cuando el aparato es utilizado por niños o cerca de ellos. · El uso de accesorios no recomendados o vendidos por el fabricante puede provocar incendios, descargas eléctricas o lesiones. · Desenchufe este aparato cuando no se esté utilizando, antes de ensamblar o desensamblar cualquier parte y antes de limpiarlo. Gire todos los botones a la posición “apagada” y desenchufe el cable de alimentación de la toma de corriente. Nunca tire del cable para retirar el enchufe de la toma de corriente. ES · No deje un aparato en funcionamiento sin supervisión. · Nunca coloque este aparato sobre, o cerca de, un fuego de gas o eléctrico, o en un lugar donde pueda entrar en contacto con un aparato caliente. · No use el aparato al aire libre. · No use el aparato para fines distintos de los previstos. · Utilice siempre el aparato sobre una superficie firme, seca y lisa. · Utilice el aparato exclusivamente para uso doméstico. El fabricante no se hace responsable de los accidentes resultantes del mal uso del aparato ni del incumplimiento de las normas establecidas en este manual. · Todas las reparaciones, excepto el mantenimiento normal del aparato, deberán ser efectuadas por el fabricante o por su servicio posventa. · Nunca sumerja el aparato, el cable de alimentación o el enchufe en agua u otro líquido. · No permita que los niños toquen el cable de alimentación o el aparato. · Mantenga el cable alejado de bordes afilados, partes calientes u otras fuentes de calor. · Nunca coloque el aparato cerca de un aparato de gas, fuego o líquido altamente inflamable. · Nunca golpee o sacuda el aparato para evitar daños. · Para evitar el sobrecalentamiento, nunca cubra la entrada y la salida de aire. · Para evitar el riesgo de electrocución, nunca rocíe el aparato con agua ni lo coloque cerca del agua. · Nunca comparta la fuente de alimentación del aire acondicionado con ningún otro aparato. · No enchufe ni desenchufe el aire acondicionado cuando sus manos estén mojadas. 66 DO266A · Nunca inserte objetos extraños en las aberturas del aparato. · Nunca utilice un cable alargador. · Nunca permita que los niños jueguen cerca del aparato. · Cuando haya apagado el aparato y vuelva a encenderlo poco después, el compresor tardará, como mínimo, 3 minutos en volver a arrancar. · Para evitar interferencias, coloque el aparato a una distancia mínima de 1 metro de un televisor o radio. · No exponga el aparato a la luz solar directa para evitar la decoloración del mismo. · No incline el aparato más de 35° cuando lo cambie de sitio. Si desplaza el aire acondicionado debe hacerlo en posición vertical. Nunca desplace la unidad boca abajo. · Si siempre retira el agua del aparato antes de guardarlo, prolongará su vida útil. · No use productos químicos para limpiar el aparato, ya que estos podrían dañarlo. · Asegúrese de que siempre desconecta la corriente antes de retirar o instalar la rejilla de entrada de aire. · Asegúrese de que el aire acondicionado esté siempre protegido contra la humedad, como condensación, salpicaduras de agua, etc. Asegúrese de que el aire acondicionado esté colocado de tal manera que no pueda caerse en agua ni en ningún otro líquido. Si se cae en el agua o en un líquido, retire el enchufe de la toma de corriente inmediatamente. · Póngase siempre en contacto con una persona cualificada para que repare el aparato. · Asegúrese de que el espacio libre alrededor del aparato sea de al menos 30 cm. ES · No utilice el aire acondicionado en un ambiente húmedo, como un cuarto baño o el cuarto de la colada. · Si el aire acondicionado se ha caído, desenchufe inmediatamente el enchufe de la toma de corriente. · Accione los botones del aparato solo con los dedos y no lo haga con ningún otro objeto. · No retire ninguna parte sólida del aire acondicionado. No utilice el aparato si no funciona correctamente, si se ha caído o si está dañado. · Nunca utilice el enchufe para encender o apagar el aparato. Utilice siempre los botones del panel de control. · No utilice el aparato cerca de sustancias altamente inflamables como alcohol, insecticidas, petróleo, etc. · Las reparaciones, la detección de fugas y las actividades en la instalación deben ser realizadas por personal cualificado que disponga de los certificados correspondientes. · La instalación se debe realizar siguiendo las instrucciones de instalación proporcionadas. Una instalación incorrecta puede provocar fugas de agua, descargas eléctricas o incendios. · No toque el aparato con las manos mojadas o húmedas, ni con los pies descalzos. · Si el acondicionador de aire se golpea durante el funcionamiento, desconecte la alimentación y retire el enchufe inmediatamente de la toma de corriente. Inspeccione el aparato para asegurarse de que no presenta daños. Si sospecha que el aparato está dañado, póngase en contacto con un técnico o con el servicio de atención al cliente. www.domo-elektro.be DO266A 67 · En caso de tormenta, la alimentación se debe desconectar para evitar daños por rayos en el aparato. · Si la función de drenaje no se está utilizando, coloque ambos tapones de goma en los orificios de drenaje. Para evitar un peligro de ahogamiento, guarde la manguera de drenaje con cuidado cuando no la utilice. · No pase el cable por debajo de una moqueta o alfombra. No cubra el cable con alfombras, alfombrillas o revestimientos similares. No coloque el cable debajo de muebles o aparatos. Coloque el cable alejado de las zonas de paso y de aquellos lugares donde alguien podría tropezar con el mismo. · Desconecte la alimentación si el aparato emite sonidos extraños, olores o humo. Información específica sobre aparatos con gas refrigerante R290 · Lea detenidamente todas las advertencias. · Al descongelar y limpiar el aparato, no utilice herramientas que no sean las recomendadas por el fabricante. · El aparato debe colocarse en un espacio en el que no haya fuentes permanentes de ignición (por ejemplo: llamas abiertas, aparatos de gas o aparatos eléctricos en funcionamiento). · El aparato no se puede perforar o quemar. · Los gases refrigerantes pueden ser inodoros. ES · El aparato debe instalarse, utilizarse y almacenarse en un espacio superior a 7 m2. · Este aparato contiene varios gramos de gas refrigerante R290 (consulte la placa de datos en la parte trasera del sistema). · El R290 es un gas refrigerante que cumple las directrices medioambientales europeas. No se puede perforar ninguna parte del circuito de refrigeración. · Si el aparato se instala, utiliza o almacena en un área no ventilada, esta área debe diseñarse para evitar la acumulación de fugas de refrigerante. Este tipo de fugas conllevan un riesgo de incendio o explosión por la ignición del refrigerante que podría ser ocasionada por calentamiento eléctrico, calentadores eléctricos u otras fuentes de ignición. · El aparato debe almacenarse de tal manera que se eviten defectos mecánicos. · Las personas que utilicen el circuito de refrigeración o que realicen trabajos en el mismo deben tener los certificados correspondientes, emitidos por una organización acreditada, que ofrezcan una garantía de competencia en la manipulación de refrigerantes de acuerdo con una evaluación específica reconocida por las asociaciones del sector. · Las reparaciones deben realizarse de acuerdo con las recomendaciones del fabricante. El mantenimiento y las reparaciones que requieren la asistencia de otro personal cualificado deben realizarse bajo la supervisión de una persona designada para el uso de refrigerantes inflamables. 68 DO266A Precaución: peligro de incendio/materiales inflamables. Este aparato utiliza un refrigerante inflamable. Existe un riesgo de incendio si el refrigerante se derrama y está expuesto a una fuente de ignición externa. GUARDE ESTAS INSTRUCCIONES CONSEJOS PARA AHORRAR ENERGÍA · Solo debe usar el aparato en habitaciones que no sean más grandes que el tamaño recomendado. · Coloque el aparato de tal manera que el flujo de aire no sea obstruido por muebles u otros objetos. · Mantenga las cortinas cerradas durante las horas más calurosas del día. · Asegúrese de que los filtros siempre están limpios. ES · Mantenga siempre las ventanas y puertas cerradas para mantener el aire frío en el interior y el aire caliente en el exterior. www.domo-elektro.be DO266A 69 PIEZAS Parte delantera 1. Panel de control 2. Salida de aire 1 3 2 Parte trasera 3. Filtro de aire 4. Entrada de aire 5. Salida de aire 6. Drenaje 5 4 6 Piezas 7. Manguera de drenaje 8. Mando a distancia 9. Tubo de salida del aire 9 a. Conexión del tubo de salida del aire 10. Kit de anclaje a la pared ES 10 a. Adaptador de pared 10 b. Conexión del kit de anclaje a la pared 7 11. Kit de anclaje a ventana 11 a. Adaptado de la ventana 11 b. Conexión del kit de anclaje a ventana 11 c. Sellado de la ventana 11 d. Tope de adaptador 8 11 e. Barra en L con tornillos 9 9a 10 10b 10a 11 11a 70 DO266A 11b 11c 11d 11e INSTALACIÓN · Coloque el acondicionador de aire en una superficie sólida y estable, para reducir a un mínimo el ruido y la vibración. Tenga cuidado de que la superficie sea suficientemente fuerte para soportar el peso del aparato. · El aparato está equipado con ruedas para poder trasladarlo fácilmente. Asegúrese de que el acondicionador sólo ruede sobre una superficie lisa y plana. Tenga cuidado al mover el aparato y al rodar sobre una alfombra. No haga rodar maxel120 cm acondicionador nunca sobre un objeto. min 30de cm · El cable de alimentación debe estar conectado a una toma corriente que debe haber sido instalada y conectada a tierra de acuerdo con las normas y reglamentos locales. · No coloque objetos dentro de un radio de 30 cm alrededor de la unidad. · El tubo de salida del aire debe colocarse al ajustar “Cool” o “Auto”. Durante el ajuste “Fan” y “Deshumidificación” no necesita la manguera de escape de aire. · Asegúrese también de que no haya obstrucciones a la salida de aire en un radio de 50 cm. ES · Asegúrese de que la manguera de escape de aire no quede demasiado doblada durante la instalación INSTALACIÓN DE LA SALIDA DE LA VENTANA · Coloque el conector de la manguera de salida de aire en el extremo de la manguera. · Coloque la manguera de entrada de aire en la parte posterior del aparato. · Coloque el conector para la fijación en la ventana en el otro extremo de la manguera de salida de aire. · Coloque el adaptador de ventana en su ventana. Esto puede hacerse tanto en ventanas correderas tanto horizontales como verticales. Bloquee el adaptador de ventana en la longitud deseada. · Fije la manguera con el conector al adaptador de ventana. · Utilice las juntas de ventanas para sellar las posibles aberturas en la ventana. · Bloquee el adaptador de ventana en la longitud deseada utilizando el tope del adaptador de ventana suministrado. www.domo-elektro.be DO266A 71 · Si lo desea, puede fijar la ventana con la barra en L y 2 tornillos. INSTALACIÓN DE LA SALIDA DE LA PARED · Coloque el conector de la manguera de salida de aire en el extremo de la manguera. · Coloque la manguera de entrada de aire en la parte posterior del aparato. · Haga un orificio en la pared del tamaño del adaptador de pared. · Coloque el adaptador de pared en la abertura. Fije el adaptador de pared con los tornillos suministrados. ES · Coloque el conector para la fijación en la pared en el otro extremo de la manguera de salida de aire. · Fije el conector al adaptador de ventana. max 120 cm min 30 cm 72 DO266A USO Las láminas horizontales en la parte delantera del aire acondicionado se pueden abrir y cerrar manualmente para poder orientar mejor la salida de aire. PANEL DE CONTROL 4 3 1. 2 1 Tecla ON-OFF Para encender y apagar la unidad. 2. Teclas “+” “-” 3. ES Se usan para ajustar la temperatura. La temperatura se puede ajustar entre 17°C y 30°C. Si mantiene ambas flechas pulsadas simultáneamente durante 3 segundos puede cambiar entre “°C” y “°F”. Tecla MODE Esta tecla puede seleccionar el ajuste de funcionamiento deseado. Cada vez que se pulsa la tecla, el modo de funcionamiento cambiará: AUTO, COOL DRY y FAN. La luz correspondiente del panel de control se iluminará. Si selecciona el ajuste FAN (ventilador), la ventilación soplará en la posición automática. Solo puede ajustar la velocidad de ventilación con el mando a distancia. 4. Pantalla LED Muestra la temperatura del sistema. Si el aparato está ajustado en DRY o FAN la temperatura se mostrará en la pantalla. MANDO A DISTANCIA Cuando use el mando a distancia, asegúrese de orientarlo hacia el aparato. Si no lo hace, después del cambio de un ajuste determinado, todavía puede orientar el mando a distancia hacia el aparato y pulsar en la tecla ON-OFF. Cuando el aparato reciba una señal del mando a distancia oirá un pitido. El mando a distancia se debe utilizar en un radio de 8 metros alrededor del aparato. www.domo-elektro.be 1 2 3 4 6 7 8 5 9 DO266A 73 1. Tecla ON-OFF Para encender y apagar la unidad. 2. Tecla MODE Esta tecla puede seleccionar el ajuste de funcionamiento deseado. Cada vez que se pulsa la tecla, el modo de funcionamiento cambiará: AUTO, COOL DRY y FAN. La luz correspondiente del panel de control se iluminará. FAN SPEED displ Displays selected SILENT display 3. Tecla FAN HIGH, FAN(VENTILADOR) SPEED display Not available for thisorunit LOW Displays selected FAN SPEED: , Con esta tecla puede ajustar la velocidad de ventilación. Hay tres opciones: LOW (Bajo) MED, yHIGH, AUTO (Automático). HIGH (Alto) This display is blan or LOW set to AUTO speed Temperature/Timer display This display is blank when 4. Tecla SLEEP Displays the set temperature by default, or set to AUTO speed. when using TIMER ON/OFF functions Se utiliza para fijar el modo “Sleep”. Temperature range: 17-30 Al seleccionar esta opción, la temperatura fijada aumentará 1ºC dentro de 30 minutos. TrasC(62 F-86 F) otros 30 minutos, la temperatura se elevará de nuevo 1ºC. Esta temperatura se mantendrá Timer setting range: 0-24 hours durante las siguientes 7 horas. Después de este tiempo, la temperatura vuelve a la This display is blank when operating in FAN configuración original de temperatura y se finaliza el ajuste “Sleep”. o ES NOTA: Este ajuste no se puede seleccionar en el modo “Fan” o “Dry”. 5. 5 Tecla TEMP Se usan para ajustar la temperatura. La temperatura se puede ajustar entre 17°C y 30°C. Si mantiene ambas flechas pulsadas simultáneamente durante 3 segundos puede cambiar entre “°C” y “°F”. 6. Tecla SHORT CUT Con esta tecla puede determinar y activar un ajuste preferente. 7. Tecla TIMER ON Con este botón se puede fijar el tiempo en el que el aparato se enciende. 8. Tecla TIMER OFF Con este botón se puede fijar el tiempo en el que el aparato se apaga. 9. Tecla LED Esta tecla activa la pantalla LED del panel de control. Puede utilizarla cuando la pantalla emite demasiada luz y quiere dormir. Si pulsa dos veces este botón, la pantalla se volverá a encender. 74 DO266A O O 1 HEAT FAN ECO display Not available for this unit Transmission Indicator Lights up when remote sends signal to unit TIMER ON MODE TEMP Transmission Indicator Transmission Indicator Lights up when remote sends ON/OFF display Battery display up when remote sends AJUSTAR LAS FUNCIONES Lights signal to unit Low battery MODE display Appears when the unit is turned on, detection Displays the current and disappears when it is turned off signal to unit mode,AUTO including: ON/OFF display TIMER OFF display SLEEP display TIMER ON display AUTO 2 MODE display En el ajuste AUTO, elDisplays aparato automáticamente el when ajuste adecuado función ON/OFF Appears the unitdisplay isen turned on,de Displays when Displays when TIMER whenselecciona TIMER COOL OFF is set ON is set 3is turned SLEEP function DRY display Displays theMODE current Appears when the unit is turned on, and disappears when it off la temperatura seleccionada. Este ajuste solo se puede seleccionar con el mando a distancia. is activated Remote LED Screen Indicators How Use The Basic Func HEAT 1 To when Displays the current mode, including: and disappears it is turned off FAN 1. Con la tecla MODE, seleccione AUTO en el mando aMEdistancia. FOLLOW ECO display TIMER O TIMER ONCOOL display display AUTO mode, including: Not available for operation 2.Transmission AjusteIndicator la temperatura deseada con el botónthis TEMP. En función de esto, el aparato unit that Displays TIMER ON display Displays when TIMER AUTO Indicates COOL the FOLLOW ME Lightsdeterminará up when remote sends OFF se ON is set 1. Press the MODE button to is select el ajuste. function is on Displays when TIMER Battery display COOL Low battery signal to unit DRY COOL mode. ON is set En el modo AUTO no puede ajustar la velocidad de la ventilación (FAN). 2. Set your desired temperature us Not available for DRY detection HEAT ON/OFF display the Temp or Temp button this unit MODE display Appears when the unit is turned on, 3. Press the FAN button to select th HEAT FAN SLEEP display Displays the current and disappears when it isSILENT turned off display AUTO, LOW, MED,or FAN SPEED display Remote LED Screen Indicators Howfan Tospeed: Use The Basic Funct Displays when mode, including: COOL Not available for this unit FAN HIGH. Displays selected FAN SPEED: TIMER OFF FAN ION FOLLOW ME SWING SLEEP ON/OFF LED SHORT CUT TIMER ON MODE TEMP TIMER OFF FAN ION SLEEP SWING FOLLOW ME LED TIMER OFF display SLEEP function TIMER ON display AUTO 4. Press the ON/OFF button to 2 star HIGH, MED, Displays when TIMER is activated Displays whenrefrigerar TIMER COOL Con la función COOL laisestancia hasta una temperatura determinada. SHORT OFF set ON puede is set LOW 3 unit. ON/OFF CUT DRY FOLLOW ME Indicator Temperature/Timer display ThisHEAT display is blankPulse when en TIMER 1.Transmission la tecla MODE hasta que se encienda lámpara indicadora 1 COOL. MODE Displays the set temperature by default, ordisplay timerlasetting ON Lights up when remote sends set FAN to AUTO speed. COOL operation TEMP when using TIMER ON/OFF functions Indicates that ECO display signal to unit TIMER FAN o O O the OFF 2. Use las teclas “+”Temperature y “-” en range: el panel de control o la tecla TEMP en el mando a distancia FOLLOW ME Not available for 17-30 C(62 F-86 F) 1. Press the MODE button to select function ON/OFF display ION this unit is on para ajustar la temperatura ambiente Timer setting range: 0-24 hours deseada. COOL mode. MODE display Appears when the unit is turned on, FOLLOW SWING LED 2. Set yourSLEEP desired temperature usi ME Displays the current Not available for and disappears when it is turnedisoff This display blank when operating in FAN mode. Battery display the Temp or Temp button 3. Use la tecla FAN en el mando a distancia para ajustar la velocidad de ventilación mode, including: thisbattery unit Low 3. Press the FAN button to select th TIMER OFF, display TIMER ON display AUTO HIGHdetection y AUTO (bajo, alto y deseada. Hay tres ajustes: LOW SILENT 2 fan speed: AUTO, LOW, MED,or 5 display FANCOOL SPEED display Displays when TIMER Displays when TIMER ON/OFF SHORT Not available for this unit HIGH. OFF is set ON is set 3 Displays SPEED: CUT automático). SLEEP display DRY selected FAN 4. Press the ON/OFF button to start MED, Displays when HEAT HIGH, TIMER 1 unit. MODE ON or FAN LOW SLEEP function TEMP Temperature/Timer display ECO display is activated TIMER FAN This display is blank when OFF Displays the set temperature by default, or timer setting Not available for DRY set to AUTO speed. when using TIMER ON/OFF functions this ION FOLLOW unit ME o O O display FOLLOW Temperature range: 17-30 C(62 F-86 F)Mantenga las ventanas y SLEEP SWING LED Con esta función puede deshumidificar la estancia.Battery las puertas COOL operation ME display Indicates that Timer setting range: 0-24 hours Low battery the FOLLOW ME cerradas cuando use esta función. 1. Press the MODE button to select detection function is on This display is blank when operating in FAN mode. or SILENT disp FAN SPEED display S Not available fo FAN SPEED display Displays selected FAN SPEED: No Displays selected HIGH, MED,FAN SPEED: HIGH, MED, or LOW Temperature/Timer or LOW This display is blank when Displays theTemper set tem display is blank when set to AUTOThis speed. Display when using TIMER set to AUTO speed. when u Temperature ran ES Timer settingTemp ran Time COOL mode. This display is blank Pulse en la tecla MODE hasta que se encienda la lámpara indicadora DRY. 2. Set your desired temperature using SLEEP display Not available for dis the Temp or Temp This button. Displays this unit Use las teclas “+” y “-”5en el panel de control o lawhen tecla TEMP en el mando a distancia 3. Press the FAN button to select the SLEEP function SILENT display fan speed: AUTO, LOW,5 MED,or is activated para ajustar la temperatura ambiente deseada. Not available for this unit HIGH. 1. 2. FAN SPEED display Displays selected FAN SPEED: HIGH, MED, 3. En este or LOW This display is blank when set to AUTO speed. FAN FOLLOW ME ajuste no puede ajustar la velocidad de ventilación. display Indicates that Temperature/Timer display FOLLOW Displays the set temperature by default, or the timer setting ME function is on when using TIMER ON/OFF functions 4. Press the ON/OFF button to start th unit. COOL operation 1. Press the MODE button to select COOL mode. SILENT display FAN SPEED display 2. Set your desired temperature using SILENT disp Not available this button. unit Temp or for Temp 1. Pulse en la indicadora the FAN. FAN SPEED display Displays selected FAN SPEED: 3. Press the FANNot button to select thefo available speed: AUTO, LOW, MED,or Displays selected FAN la SPEED: HIGH, MED, 2. Use la tecla FAN en el mando a distancia para ajustar velocidad defan ventilación. Hay FAN SPEED display Not available for this unit HIGH. Displays selected FAN SPEED: HIGH, MED, or LOW , HIGH y AUTO (bajo, alto y automático). tres ajustes: LOW 4. Press the ON/OFF button to start th 5 HIGH, MED, unit. Temperature/Timer display or LOW or LOW This display is blank when 3. La temperatura no se puede ajustar. Temperature/Timer display Temperature/Timer Displays the set temperature by This display is blank when Displays temperature bydisplay default, or timer setting when This is blank set the toset AUTO speed. set to AUTO speed. when using TIMER ON/OFF functions DisplaysON/OFF the set tem when using TIMER func set to AUTO speed. Temperature range: 17-30 C(62 F-86 F) o when using17-30 TIMER O Timer on Temperature range: C(6 Timer setting range: 0-24 hours Temperature Con esta función puede poneris en su aparato en el momento deseado, un This display blankmarcha when operating in FAN mode. Timerhasta setting range: 0-24 rang hou máximo de 24 horas. Timer setting rang This display is blank when opera 5 1. Pulse la techa TIMER ON en el mando a distancia. This display is blank 2. En la pantalla del mando a distancia podrá leer en cuánto tiempo empezará a 5 funcionar el aire acondicionado. Temperature range: 17-30oC(62OF-86OF) Not available for tecla MODE hasta0-24 que se encienda Timer setting range: hours this unitla lámpara This display is blank when operating in FAN mode. SILENT display o 3. O O Pulse varias veces en la tecla TIMER ON para aumentar el tiempo. O mantenga la tecla presionada. www.domo-elektro.be DO266A 5 75 4. Una vez que se haya ajustado el tiempo deseado, en la pantalla del mando a distancia verá “Timer on”. En la pantalla del panel de control se pueden ver dos esferas iluminadas. 5. Si desea desactivar el temporizador, pulse varias veces la tecla TIMER ON hasta que el contador llegue a “0”. O mantenga la tecla presionada. Timer off ES Con esta función puede apagar automáticamente el aparato cuando pase el tiempo establecido. 1. Pulse la techa TIMER OFF en el mando a distancia. 2. En la pantalla del mando a distancia podrá leer en cuánto tiempo se apagará el aire acondicionado. 3. Pulse varias veces la tecla TIMER OFF para aumentar el tiempo. O mantenga la tecla presionada. 4. Una vez que se haya ajustado el tiempo deseado, en la pantalla del mando a distancia verá “Timer off”. En la pantalla del panel de control se pueden ver dos esferas iluminadas. 5. Si desea desactivar el temporizador, pulse varias veces la tecla TIMER OFF hasta que el contador llegue a “0”. Timer on + Timer off También puede activar ambas funciones al mismo tiempo. De esta manera determina cuándo se enciende el aparato, pero también cuándo se apaga. Atención: este tiempo también es aplicable desde la hora en la que programa el ajuste. Por ejemplo: ahora son las 13:00 h. Quiere que el aparato funcione entre las 16:30 y las 18:00 h. Ajuste la función TIMER ON en 3,5 h y TIMER OFF en 5,0 h. Sleep Al seleccionar esta opción, la temperatura fijada aumentará 1ºC dentro de 30 minutos. Tras otros 30 minutos, la temperatura se elevará de nuevo 1ºC. Esta temperatura se mantendrá durante las siguientes 7 horas. Después de este tiempo, la temperatura vuelve a la configuración original de temperatura y se finaliza el ajuste “Sleep”. NOTA: Este ajuste no se puede seleccionar en el modo “Fan” o “Dry”. Shortcut Con esta tecla puede determinar y activar un ajuste preferente. Si utiliza un ajuste con más frecuencia, puede almacenar este ajuste manteniendo pulsada la tecla SHORTCUT durante 3 segundos. Si lo hace, el aparato recordará los ajustes que estaban activos al pulsar. Estos ajustes pueden ser: el ajuste de uso (MODE), la temperatura ajustada, la velocidad de ventilación (FAN) y, en su caso, el ajuste SLEEP. 76 DO266A Cuando pulse la tecla SHORTCUT, el aparato funcionará con los ajustes previamente ajustados. LIMPIEZA Y MANTENIMIENTO DRENAJE DEL AGUA Drenaje permanente Durante la deshumidificación, puede utilizar un drenaje permanente. 1. Retire el cierre de drenaje y la tapa de goma de la parte central posterior del aparato. 2. Conecte la manguera de drenaje a la abertura de drenaje. 3. Asegúrese de que el agua pueda salir de forma segura y permanente. 2 1 Si no utiliza el drenaje continuo, el agua se recogerá en la bandeja colectora de la parte baja del aparato. ES Drenaje código de “P1” · Cuando la bandeja está llena escuchará unos pitidos y en la pantalla aparecerá el código P1. El deshumidificador o el aire acondicionado se pararán. El ventilador continuará funcionando, esto es normal. · Traslade el aparato con cuidado a un lugar donde se puede drenar el agua con facilidad. · Retire el cierre del drenaje en la parte inferior el acondicionador. (A) El agua saldrá. · Después de haber vaciado el agua por completo, ponga el cierre de nuevo en la abertura de drenaje. · Ahora puede arrancar el aparato de nuevo. Fíjese en que el código de “P1” desaparece de la pantalla. Si el código no desaparece de inmediato, puede probar varias veces a encender y apagar el aparato. Si el código persiste debe comunicarse con el departamento de servicio. A · NOTA: instale siempre primero el cierre del drenaje antes de encender de nuevo la unidad. www.domo-elektro.be DO266A 77 LIMPIEZA · Retire siempre el enchufe de la toma de corriente antes de limpiarlo. · No utilice productos químicos o abrasivos para limpiar la unidad. · Nunca lave el acondicionador con agua pues eso puede causar descargas eléctricas. · Cuando el cable de alimentación esté dañado debe ser reemplazado o reparado por el servicio post-venta del fabricante o una persona cualificada. Filtro de aire · Limpie el filtro de aire al menos cada 2 semanas para evitar que el ventilador funcione mal por el polvo. · Limpie el filtro en agua tibia con un detergente suave. Enjuague bien el filtro y déjelo secar al aire. · Cuando el filtro está completamente seco, se puede colocarlo de nuevo en la unidad. Carcasa ES Use un paño húmedo y un poco de detergente suave para limpiar el exterior del acondicionador. Seque el aparato después a fondo con un paño suave y seco. Almacenaje Antes de guardar el acondicionador durante un período prolongado de tiempo debe hacer lo siguiente para prevenir daños a la unidad: · Retire toda el agua del acondicionador utilizando la manguera de drenaje. · Encienda el aparato en el modo “Fan”, y deje el acondicionador durante medio día en una sala con calefacción. Así el interior del aparato puede secarse completamente y se evita el crecimiento de hongos. · Apague la unidad, retire el enchufe de la toma de corriente y retire las pilas del mando a distancia. · Limpie los filtros y vuelva colocarlos en la unidad. · Guarde el acondicionador en un lugar oscuro y seco. POSIBLES PROBLEMAS Y SU SOLUCIÓN El acondicionador no funciona cuando se pulsa la tecla de encendido. · En la pantalla aparece P1: elimine el agua de la unidad. · La temperatura ambiente es inferior a la temperatura fijada en el aparato. Ajuste la temperatura del aparato. 78 DO266A El local no se enfría lo suficiente. · Las ventanas y las puertas no están cerradas. Asegúrese de que todas las ventanas y puertas estén cerradas. · Existen aparatos que producen calor en el local. Si es posible, retire la fuente de calor. · La manguera de salida de aire se desconecta o se bloquea. Conecte la manguera y asegúrese de que funciona correctamente. · La temperatura fijada es demasiado alta. Ajuste la temperatura adecuada. · El filtro de aire está sucio. Reinig de luchtfilter. El acondicionador es demasiado ruidoso o produce vibraciones. · El suelo no es horizontal o lo suficientemente plano. Coloque el acondicionador sobre una superficie plana y horizontal si es posible. · El filtro de aire está sucio. Reinig de luchtfilter. El aparato emite un sonido de gorgoteo. · El sonido procede del refrigerante del aparato. Esto es normal. CÓDIGOS DE ERROR - E1: el sensor de temperatura de la habitación no funciona. Apague el aparato y retire el enchufe de la toma. Espere 10 seg. y vuelva a insertar el enchufe en la toma de la pared. Vuelva a encender el aparato. Si el código de error vuelve a aparecer, comuníquese con el centro de servicio. ES Los códigos de error siguientes pueden aparecer en la pantalla del acondicionador : - E2: el sensor del evaporador de aire no está funcionando. Apague el aparato y retire el enchufe de la toma. Espere 10 seg. y meta de nuevo enchufe en la toma de la pared. Encienda de nuevo el aparato. Si el código de error vuelve a aparecer, comuníquese con el centro de servicio. - E4: la pantalla no funciona correctamente. Apague el aparato y retire el enchufe de la toma. Espere 10 seg. e inserte el enchufe en la pared. Encienda de nuevo el aparato. Si el código de error vuelve a aparecer, póngase en contacto con el centro de servicio. - P1: El tanque de agua está lleno - conecte la manguera de drenaje en la parte inferior y retire el agua. Si el código de error vuelve a aparecer, comuníquese con el centro de servicio. www.domo-elektro.be DO266A 79 DIRECTRICES MEDIOAMBIENTALES El símbolo en el producto o en el embalaje indica que este producto no puede ser tratado como residuo doméstico. Se debe llevar a un lugar en el que se reciclan equipos eléctricos y electrónicos. Si se asegura de que este producto se desecha correctamente, usted ayudará a evitar posibles consecuencias negativas para las personas y el medio ambiente que serían causadospor un tratamiento de residuos inadecuado. Para obtener información más detallada sobre el reciclaje de este producto, póngase en contacto con su ayuntamiento, o con la empresa o departamento responsable del servicio de recogida de basura doméstica, o con la tienda donde adquirió el producto. ES El material de embalaje es reciclable. Trate el embalaje de una manera medioambientalmente responsable. 80 DO266A GARANZIA La garanzia dell’apparecchio è valida per 2 anni a partire dalla data di acquisto. Durante il periodo di validità della garanzia, il distributore si assume la piena responsabilità dei difetti dei materiali o di quelli di fabbricazione. In caso di presenza di tali difetti, se necessario, si procederà alla sostituzione o alla riparazione dell’apparecchio. Il periodo di garanzia di 2 anni non ricomincia in quel momento, ma continua per 2 anni dalla data di acquisto dell’apparecchio. Per la garanzia fa fede la data riportata sullo scontrino. Se l’apparecchio si rivela difettoso nel periodo di validità della garanzia, cioè 2 anni, potete portarlo, insieme allo scontrino, nel negozio dove l’avete acquistato. La garanzia sugli accessori e sui componenti soggetti a usura è di 6 mesi. La garanzia e la responsabilità del negoziante e del produttore decadono automaticamente nei seguenti casi: · mancata osservanza delle istruzioni contenute nel presente manuale; · errato collegamento, per esempio con tensione elettrica troppo alta; · uso errato, anormale e manesco; · manutenzione insufficiente o errata; · riparazione o modifiche all’apparecchio eseguite dal cliente o da terzi non autorizzati; · uso di accessori o componenti non raccomandati o forniti dal negoziante o dal produttore. INDICAZIONI DI SICUREZZA · Quando si utilizzano dispositivi elettrici, è necessario tenere presenti le seguenti istruzioni di sicurezza: · Prima di utilizzare il prodotto, togliere tutti gli imballi e gli eventuali adesivi promozionali. Assicurarsi che i bambini non giochino con gli imballaggi. IT · Leggere con attenzione le presenti istruzioni. Conservare le istruzioni per possibili future consultazioni. · Questo apparecchio è destinato unicamente all’uso domestico e in ambienti analoghi, quali: · angoli cottura riservati al personale nei negozi, negli uffici e in altri ambienti professionali · Fattorie · Camere di alberghi, motel e altre strutture ricettive residenziali · Camere per vacanze o ambienti analoghi · L’apparecchio può essere utilizzato da bambini di età superiore a 16 anni e da persone con ridotte capacità fisiche, sensoriali o mentali, o con mancanza di esperienza o conoscenza, solo se sorvegliati o se hanno ricevuto istruzioni sull’uso sicuro dell’apparecchio e ne comprendono i rischi. I bambini non possono giocare con l’apparecchio. Le operazioni di pulizia e di manutenzione non devono essere effettuate dai bambini di età inferiore a 16 anni e senza sorveglianza. · Tenere l’apparecchio fuori dalla portata dei bambini di età inferiore a 16 anni. www.domo-elektro.be DO266A 81 · Attenzione: non utilizzare l’apparecchio con un timer esterno. · Prima dell’uso, verificare se la tensione indicata sull’apparecchio corrisponde alla tensione della rete elettrica domestica. · Il cavo di alimentazione deve essere sempre collegato a una presa installata correttamente e con messa a terra in conformità alla normativa locale vigente. · Non lasciare che il cavo rimanga appeso su una superficie calda o sul bordo di un tavolo o di un bancone. · Non utilizzare mai l’apparecchio se il cavo o la spina sono danneggiati, se l’apparecchio non funziona correttamente o se l’apparecchio è danneggiato. In questi casi, portare l’apparecchio presso il centro di assistenza qualificato più vicino per l’ispezione e la riparazione. · Una rigorosa supervisione è necessaria quando l’apparecchio viene utilizzato da o nelle vicinanze di bambini. · L’uso di accessori non consigliati o non venduti dal produttore può causare incendi, elettrocuzioni o lesioni. · Rimuovere la spina dalla presa quando l’apparecchio non è in uso, prima di montare o rimuovere parti e prima di pulire l’apparecchio. Ruotare tutti i pulsanti in posizione spenta e staccare la spina dalla presa stessa. Non tirare mai il cavo per estrarre la spina dalla presa. · Non lasciare incustodito un apparecchio in funzione. · Non posizionare mai l’apparecchio sopra o vicino a una stufa a gas o fuoco elettrico o in un luogo in cui potrebbe entrare in contatto con un apparecchio caldo. · Non usare l’apparecchio all’aperto. · Utilizzare l’apparecchio solo per lo scopo per il quale è destinato. IT · Utilizzare sempre l’apparecchio su una superficie solida, asciutta e piana. · Utilizzare l’apparecchio solo per uso domestico. Il produttore non è responsabile per incidenti derivanti da un uso improprio dell’apparecchio o dall’inosservanza delle regole riportate nel presente manuale. · Tutte le riparazioni, diverse dalla normale manutenzione dell’apparecchio, devono essere eseguite dal produttore o dal suo servizio post-vendita. · Non immergere mai l’apparecchio, il cavo elettrico o la spina in acqua o altri liquidi. · Assicurarsi di tenere il cavo elettrico o l’apparecchio al di fuori della portata dei bambini. · Tenere il cavo lontano da spigoli vivi, parti calde o altre fonti di calore. · Non posizionare mai l’apparecchio in prossimità di un apparecchio a gas, fuoco o un liquido altamente infiammabile. · Non colpire né scuotere mai l’apparecchio, per evitare danni. · Non coprire mai l’ingresso e l’uscita dell’aria, per evitare il surriscaldamento. · Non cospargere mai acqua sull’apparecchio né posizionarlo in prossimità dell’acqua, per evitare elettrocuzioni. · Non condividere mai con un altro apparecchio l’alimentazione elettrica al condizionatore d’aria. 82 DO266A · Non inserire nella presa né togliere mai la spina dalla presa con le mani bagnate. · Non inserire mai oggetti estranei nelle aperture dell’apparecchio. · Non utilizzare mai una prolunga per il cavo di alimentazione. · Non lasciar mai giocare i bambini in prossimità dell’apparecchio. · Quando l’apparecchio viene spento e poi riacceso, il compressore ha bisogno di almeno 3 minuti per ripartire. · Posizionare l’apparecchio ad almeno un metro di distanza da televisori o radio, per evitare disturbi. · Non posizionare l’apparecchio direttamente sotto la luce del sole, per evitare che si scolorisca. · Non inclinare mai l’apparecchio di più di 35° quando lo si sposta. Spostare il condizionatore d’aria tenendolo sempre in posizione diritta. Non spostare mai l’apparecchio a testa in giù. · Eliminare sempre l’acqua dall’apparecchio prima di riporlo. Ciò ne prolunga la durata. · Non utilizzare prodotti chimici per pulire l’apparecchio. Ciò lo danneggerebbe. · Assicurarsi di spegnere l’alimentazione elettrica prima di rimuovere o montare la griglia di ingresso dell’aria. · Assicurarsi che il condizionatore d’aria sia sempre protetto contro l’umidità, come la condensazione, gli schizzi d’acqua ecc. Assicurarsi che il condizionatore d’aria sia collocato in modo che non possa cadere in acqua o in un altro liquido. Se dovesse tuttavia cadere in acqua o in un altro liquido, scollegare immediatamente la spina dalla presa di corrente. · Non utilizzare il condizionatore d’aria in ambienti umidi come ad esempio un bagno o una lavanderia. · Rivolgersi sempre a una persona qualificata per far riparare l’apparecchio. · Assicurarsi che lo spazio libero attorno all’apparecchio sia di almeno 30 cm. · Utilizzare i tasti dell’apparecchio usando solo le dita e nessun altro oggetto. · Non rimuovere componenti fissi del condizionatore d’aria. Non utilizzare l’apparecchio se non funziona correttamente e se è caduto o danneggiato. IT · Se il condizionatore d’aria cade, togliere immediatamente la spina dalla presa. · Non utilizzare mai la spina per accendere o spegnere l’apparecchio. Utilizzare sempre i pulsanti sul pannello di controllo. · Non utilizzare mai l’apparecchio in prossimità di sostanze leggermente infiammabili, come alcol, insetticidi, petrolio ecc. · Riparazioni, individuazioni di perdite e interventi all’installazione devono essere eseguiti da persone qualificate dotate delle certificazioni rilevanti. · L’installazione deve essere eseguita secondo le istruzioni di installazione. Un’installazione errata può causare perdite d’acqua, elettrocuzioni e incendi. · Non toccare l’apparecchio con mani bagnate o umide o se si è scalzi. · Se il condizionatore d’aria viene fatto cadere durante l’utilizzo, spegnerlo e scollegare immediatamente la spina dalla presa elettrica. Ispezionare l’apparecchio per assicurarsi che non vi siano danni. Se si pensa che l’apparecchio sia danneggiato, rivolgersi a un tecnico o al servizio clienti. www.domo-elektro.be DO266A 83 · In caso di temporale, spegnere la corrente per evitare danni all’apparecchio causati da eventuali fulmini. · Se la funzione di drenaggio non è utilizzata, fissare entrambi i tappi in gomma nelle aperture di drenaggio Riporre con cautela il tubo di drenaggio quando non è utilizzato, per evitare l’accidentale soffocamento di bambini. · Non far correre il cavo sotto rivestimenti per pavimenti. Non coprire il cavo con rivestimenti per pavimenti, tappeti o simili. Non posizionare il cavo sotto mobili apparecchi. Passare il cavo lontano da vie di passaggio ma piuttosto dove nessuno possa inciamparvi. · Spegnere la corrente se l’apparecchio emette strani rumori, odori o fumo. Informazioni specifiche relative agli apparati con gas refrigerante R290 · Leggere attentamente tutte le avvertenze. · Per lo scongelamento e la pulizia dell’apparecchio non utilizzare utensili diversi da quelli raccomandati dall’azienda produttrice. · L’apparecchio deve essere posizionato in ambienti privi di sorgenti di ignizione permanenti (ad esempio: fiamme libere, apparati a gas o apparati elettrici in funzione). · Non forare né bruciare l’apparecchio. · I gas refrigeranti possono essere inodori. · L’apparecchio va installato, utilizzato e conservato in uno spazio maggiore di 7 m2. · Questo apparecchio contiene una certa quantità di grammi di gas refrigerante R290 (vedere la targhetta sul retro del sistema). IT · L’R290 è un gas refrigerante conforme alle linee guida europee in materia di ambiente. Non forare nessun componente del circuito di refrigerazione. · Se l’apparecchio viene installato, utilizzato e conservato in un ambiente non ventilato, tale ambiente deve essere progettato in modo da prevenire l’accumulazione di perdite di sostanze refrigeranti, poiché tali perdite possono comportare un rischio di incendio o esplosione mediante ignizione del refrigerante, causata da riscaldamento elettrico, stufe elettriche o altre sorgenti di ignizione. · L’apparecchio deve essere conservato in modo da evitare difetti meccanici. · Le persone che utilizzano il circuito di refrigerazione o vi eseguono interventi, devono disporre delle giuste certificazioni, assegnate da un ente accreditato, che garantiscono la competenza nella gestione di refrigeranti, in conformità con una valutazione specifica riconosciuta da associazioni di settore. · Le riparazioni devono essere eseguite in base alle raccomandazioni dell’azienda produttrice. Le operazioni di manutenzione e riparazione per cui è necessaria l’assistenza di altro personale qualificato devono essere eseguite sotto la sorveglianza di una persona designata per l’utilizzo di refrigeranti infiammabili. 84 DO266A Attenzione: rischio di incendio / materiali infiammabili. Questo apparecchio utilizza un refrigerante infiammabile. Se il refrigerante perde ed è esposto a una sorgente di ignizione esterna sussiste il rischio di incendio. CONSERVARE QUESTE ISTRUZIONI CONSIGLI PER IL RISPARMIO ENERGETICO · Non utilizzare l’apparecchio in spazi più grandi della grandezza consigliata. · Posizionare l’apparecchio in modo che il flusso d’aria non sia ostacolato da mobili o altri oggetti. · Tenere chiuse le tende nelle ore più calde della giornata. · Assicurarsi che i filtri siano sempre puliti. IT · Tenere porte e finestre chiuse in modo che l’aria fresca rimanga all’interno e a quella calda all’esterno. www.domo-elektro.be DO266A 85 COMPONENTI Lato anteriore 1. Pannello di controllo 2. Uscita dell’aria 1 3 2 Lato posteriore 3. Filtro dell’aria 4. Ingresso dell’aria 5. Uscita dell’aria 6. Drenaggio 5 4 6 Componenti 7. Tubo di drenaggio 8. Telecomando 9. Tubo di uscita dell’aria 9 a. Attacco per tubo di uscita dell’aria 10. Accessorio per fissaggio a muro 10 a. Adattatore per muro 7 10 b. Attacco per fissaggio a muro 11. Accessorio per fissaggio a finestra 11 a. Adattatore per finestra 11 b. Attacco per fissaggio a finestra IT 11 c. Guarnizioni 11 d. Chiusura adattatore 8 11 e. Staffa angolare con viti 9 9a 10 10b 10a 11 11a 86 DO266A 11b 11c 11d 11e INSTALLAZIONE · Posizionare il condizionatore d’aria su una superficie solida e stabile per ridurre al minimo il rumore e le vibrazioni. Assicurarsi inoltre che la superficie sia abbastanza resistente per sostenere il peso dell’apparecchio. · L’apparecchio è dotato di ruote per essere spostato facilmente. Assicurarsi di spostare l’apparecchio facendolo scorrere solo su superfici piane e levigate. Fare attenzione quando si sposta l’apparecchio facendolo scorrere su un tappeto o una moquette. Non spostare mai l’apparecchio facendolo scorrere su un max 120 cm oggetto. · Il cavo di alimentazione deve essere sempre collegato a una min 30 cm presa installata correttamente e con messa a terra in conformità alla normativa locale vigente. · Non posizionare oggetti entro un raggio di 30 cm attorno all’apparecchio. · Il tubo di uscita dell’aria deve essere applicato durante le modalità COOL o AUTO. Per le modalità FAN e DRY il tubo di uscita dell’aria non occorre. · Assicurarsi inoltre che non vi siano ostacoli attorno all’uscita dell’aria in esterno, in un raggio di 50 cm. · Assicurarsi che il tubo di uscita dell’aria non sia eccessivamente piegato durante l’uso. IT INSTALLAZIONE DELL’ACCESSORIO PER FISSAGGIO A FINESTRA · Applicare l’attacco del tubo di uscita dell’aria all’estremità del tubo. · Applicare il tubo di uscita dell’aria all’uscita dell’aria sul retro dell’apparecchio. · Applicare l’attacco dell’accessorio per fissaggio a finestra all’altra estremità del tubo di uscita dell’aria. · Posizionare l’adattatore per finestra nella finestra. Questo è possibile con finestre scorrevoli sia orizzontalmente che verticalmente. Bloccare l’adattatore per finestra alla giusta altezza. · Fissare il tubo con l’attacco all’adattatore per finestra. www.domo-elektro.be DO266A 87 max 120 cm min 30 cm · Utilizzare le guarnizioni della finestra per chiudere eventuali aperture nella finestra stessa · Bloccare l’adattatore per finestra alla giusta altezza utilizzando la chiusura adattatore per finestra fornita. · Se lo si desidera è possibile fissare la finestra con la staffa angolare e due viti. INSTALLAZIONE DELL’ACCESSORIO PER FISSAGGIO A MURO · Applicare l’attacco del tubo di uscita dell’aria all’estremità del tubo. · Applicare il tubo di uscita dell’aria all’uscita dell’aria sul retro dell’apparecchio. · Creare un’apertura nel muro delle dimensioni dell’adattatore per muro. · Posizionare l’adattatore per muro nell’apertura. Fissare l’adattatore per muro con le viti fornite. · Applicare l’attacco dell’accessorio per fissaggio a muro all’altra estremità del tubo di uscita dell’aria. IT · Fissare il tubo con l’attacco all’adattatore per muro. max 120 cm min 30 cm 88 DO266A UTILIZZO Le lamelle orizzontali sul lato frontale del condizionatore d’aria possono essere regolate manualmente per direzionare meglio l’uscita dell’aria. PANNELLO DI CONTROLLO 4 3 1. 2 1 Tasto ON-OFF Per accendere e spegnere l’apparecchio. 2. Tasti “+” e “-” Per regolare la temperatura. La temperatura può essere impostata tra 17°C e 30°C (modalità COOL). Premendo entrambi i tasti contemporaneamente per 3 secondi si passa da “°C” e “°F” e viceversa. 3. Tasto MODE IT Questo tasto consente di selezionare la modalità d’uso desiderata. Ogni volta che si preme il tasto, la modalità d’uso cambia: COOL, FAN e DRY. Si accenderà il relativo indicatore luminoso sul pannello di controllo. Se si seleziona la modalità FAN, la ventilazione avviene con impostazione automatica. La velocità di ventilazione può essere regolata solo con il telecomando. 4. Display LED Indica la temperatura selezionata. Quando l’apparecchio è nelle modalità DRY o FAN, sul display è riportata la temperatura ambiente. TELECOMANDO Quando si usa il telecomando, assicurarsi di rivolgerlo verso l’apparecchio. Se questo non viene fatto, dopo aver modificato una determinata impostazione, è possibile rivolgere ancora il telecomando verso l’apparecchio e premere il tasto ON-OFF. Quando l’apparecchio riceve segnale dal telecomando, si udirà un segnale acustico Il telecomando va utilizzato entro un raggio di 8 metri dall’apparecchio. www.domo-elektro.be 1 2 3 4 6 7 8 5 9 DO266A 89 1. Tasto ON-OFF Per accendere e spegnere l’apparecchio. 2. Tasto MODE Questo tasto consente di selezionare la modalità d’uso desiderata. Ogni volta che si preme il tasto, la modalità d’uso cambia: AUTO, COOL, DRY e FAN. Si accenderà il relativo indicatore luminoso sul pannello di controllo. SILENT display FAN SPEED display SILENT Not available for this u FAN SPEED display Displays selected FAN SPEED: Not availa Displays selected HIGH, MED,FAN SPEED: Questo tasto consente di regolare la velocità di ventilazione. MED, or , LOW HIGH eHIGH, AUTO. Sono disponibili tre livelli: LOW Temperature/Timer displa or LOW This display is blank when Displays theTemperature/T set temperatur display is blank when set to AUTOThis speed. 4. Tasto SLEEP DisplaysON/OFF the se when using TIMER set to AUTO speed. when using TIM Questo tasto serve per selezionare la funzione “sleep” (sospensione). Temperature range: 17-3 3. Tasto FAN Temperature Se si seleziona questa modalità, la temperatura impostata salirà di 1°C entro 30 minuti. Dopo Timer setting range: 0-24 altri 30 minuti, la temperatura salirà ancora di 1°C. Questa temperatura rimarrà invariata perTimer setting This selezionata display is blank when o le 7 ore successive. Dopodiché la temperatura passerà a quella originariamente e This display is b la modalità SLEEP sarà terminata. NOTA: questa opzione non può essere selezionata con le modalità FAN e DRY. 5. 5 Tasto TEMP IT Per regolare la temperatura. La temperatura può essere impostata tra 17°C e 30°C. Premendo l’intero tasto TEMP per la regolazione della temperatura contemporaneamente per 3 secondi si passa da “°C” e “°F” e viceversa. 6. Tasto SHORTCUT Questo tasto consente di impostare e attivare una modalità di propria preferenza. 7. Tasto TIMER ON Questo tasto consente di impostare un orario di accensione dell’apparecchio. 8. Tasto TIMER OFF Questo tasto consente di impostare un orario di spegnimento dell’apparecchio. 9. Tasto LED Questo tasto spegne il display LED del pannello di controllo, operazione utile se il display emette troppa luce quando si vuole dormire. Premendo nuovamente tasto, il display si riaccende. 90 DO266A 5 1 Indicator Transmission Lights up when remote sends ECO display Lights up when remote sends signal to unit Not available for Transmission Indicator this unit signal to unit Lights up when remote sends ON/OFF display signal to unit Battery display REGOLAZIONE DELLE FUNZIONI MODE display Low batteryAppears when ON/OFF the unitdisplay is turned on, ON/OFF display detection display theMODE current MODEAUTO display Appears the unit and disappears whenwhen it is turned offis turn Appears when the unit is turned Displays on, Displays the current and disappears when it is turned off SLEEP the display Displays current mode, including: and disappears when it is tur mode,Nella including: modalità AUTO, l’apparecchio sceglie automaticamente Displays when la modalità adatta in TIMER OFF display TIMER ON display mode, including: AUTO TIMERsolo ONcon display SLEEP function AUTO 2TI funzione della temperatura selezionata. Questa modalità può essere selezionata il Displays when TIMER Displays when TIMER COOL is activated Remote LED Screen Indicators How To Use The Basic Func OFF is set ON is set Di TIMER ON disp Displays when TIMER 3 AUTO COOL DRY telecomando. ON1 is set Displays whenOF FOLLOW ME HEAT T COOL DRY display FAN 1. ON is set Sul telecomando, usare il tasto MODE per selezionare AUTO. COOL operation ECO display Indicates that DRY HEAT Transmission Indicator Not the available FOLLOW for ME up when remote sends 1. Press theimposta MODE button to select 2.LightsSelezionare la temperatura desiderata mediante TEMP. L’apparecchio this unit ilis tasto HEAT FAN function on signal to unit COOL mode. Remote LED Screen Indicators How To Use The Basic Funct la modalità adatta in base alla temperaturaBattery selezionata. FAN 2. Set your desired temperature us display Not available for ON/OFF display the Temp or Temp button Low battery Nella modalità AUTO non è possibile regolare la velocità della ventilazione (FAN). this unit MODE display Appears when the unit is turned on, 3. Press the FAN button to select th HEAT FAN TIMER ON MODE TEMP TIMER OFF FAN ION SLEEP FOLLOW ME SWING ON/OFF LED SHORT CUT TIMER ON MODE TEMP TIMER OFF FAN ION SLEEP SWING FOLLOW ME LED detection Displays the current and disappears when it isSILENT turned off display fan speed: AUTO, LOW, MED,or FAN SPEED display mode, including: Transmission Indicator Not available for this unit HIGH. Displays FAN SPEED: TIMER OFF display SLEEP display TIMER AUTOselected Lights up when remote sendsON display 4. Press the ON/OFF button to 2 star HIGH, MED, Displays when TIMER Displays when COOL Displays when TIMER COOL signal to unit SHORT SLEEP function OFF is set ON is set or LOW 3 unit. ON/OFF CUT DRY is activated Temperature/Timer display ON/OFF display La modalità COOL consente di raffreddare l’ambiente fino a una temperatura ThisHEAT display is blank when TIMER MODE 1 stabilita. Displays the set temperature by default, or timer setting ON MODE display set FAN to AUTO speed. Appears when the unit is turned on, TEMP FOLLOW ME when using TIMER ON/OFF functions ECO display l’indicatore luminoso COOL. Displays the current and disappears when itMODE is turned fino off TIMER 1. Premere il tasto a quando non si accende FAN o O O display OFF mode, including: COOL operation Temperature range: 17-30 C(62 F-86 Not F) available for Indicates that ION TIMER display display this unit o il tasto TEMP sul telecomando AUTO 2. Utilizzare iTIMER tastiON “+” esetting “-” sul pannello di controllo per Timer range: 0-24OFF hours the FOLLOW ME 2 Displays when TIMER Displays when TIMER 1. Press the MODEFOLLOW button to select COOL SLEEP SWING LED function is on ON/OFF OFF is set ON is set This display is blankambiente when operating in FAN mode. 3 COOL mode. ME SHORT CUT Battery display selezionare la temperatura desiderata. DRY Low battery yourMODEdesired temperature usi HEAT TIMER Not available for 1 2. Set ON detection the Temp or Temp button 3. Utilizzare il tasto FAN sul regolare la velocità di ventilazione FAN TEMP this unit 5 telecomando perECO display 3. Press the TIMERto select th FAN FAN button OFF ,display HIGH e AUTO. desiderata. Sono disponibili tre livelli: LOW SLEEP SILENT display Not available for fan speed: AUTO, LOW, MED,or FAN SPEED display Displays this unit when Not available for this unit HIGH. ION Displays selected FAN SPEED: SLEEP function 4. Press the to start FOLLOW button SWING SLEEP ON/OFF LED HIGH, MED, ME is activated Battery display unit. or LOW Low battery DRY Temperature/Timer display FOLLOW ME This display is blank when detection Displays the set temperature by default, or timer setting display Quando si usa questa modalità, tenere set to AUTO speed. modalità consente di deumidificare l’ambiente. Questa COOL operation when using TIMER ON/OFF functions Indicates that SLEEP display o O O Temperature range: 17-30 C(62 F-86 F) FOLLOW the porte e finestre chiuse. Displays whenME 1. Press the MODE button to select functionfunction is on SLEEP Timer setting range: 0-24 hours COOL mode. 1. Premere il tasto MODE fino a quando nonissiactivated accende l’indicatore luminoso 2. Set yourDRY. desired temperature using This display is blank when operating in FAN mode. Not available for the Temp or Temp button. FOLLOW thisvelocità unit ME di ventilazione. 2. Con questa modalità è possibile regolare la 3. Press the FAN button to select the display SILENT5display COOL operation fan speed: AUTO, LOW, MED,or FAN SPEED display Indicates that Not available for this unit HIGH. Displays selected FAN SPEED: the FOLLOW ME 1. button to to select 4. Press Press the the MODE ON/OFF button start th HIGH, MED, function is on FAN COOL unit. mode. or LOW 2. Set your desired temperature using Temperature/Timer display Not available for This display is blank the Temp 1. when Premere il tasto MODE fino a quando non si unit accende l’indicatore luminoso FAN.or Temp button. Displays the set temperature by default, or this timer setting set to AUTO speed. 3. Press the FAN button to select the when using TIMER ON/OFF functions SILENTsul display fan speed: AUTO, 2. Premere il tasto FAN telecomando per regolare la velocità di ventilazione. SonoLOW, MED,or o O O FAN SPEED display Temperature range: 17-30 Not available for this unitC(62 F-86 F) HIGH. Displays selected FAN SPEED: , HIGH e AUTO. disponibili tre livelli: LOW Timer setting range: 0-24 hours 4. Press the ON/OFF button to start th HIGH, MED, unit. or LOW This display is blank when operating in FAN mode. 3. Non è possibile regolare ladisplay temperatura. Temperature/Timer This display is blank when Displays the set temperature by default, or timer setting set to AUTO speed. 5 when using TIMER ON/OFF functions SIL FAN SPEED display Not a FAN SPEED display Displays selected FAN SPEED: Displays selected HIGH, MED,FAN SPEED: HIGH, MED, or LOW Tempera or LOW This display is blank when Displays display is blank when set to AUTOThis speed. when usin set to AUTO speed. Tempe Timer This displ IT SILENT display FAN SPEED display SILEN Not available for this FAN SPEED display Displays selected FAN SPEED: Not avai Displays selected HIGH, MED,FAN SPEED: HIGH, MED, or LOW Temperature/Timer disp This display or is blankLOW when Displays theTemperature set temperat display is blank when set to AUTOThis speed. DisplaysON/O the when using TIMER set to AUTO speed. Temperature range: 17-30 C(62 F-86 F) when using T Temperature range: 17 Timer ON o O O Timer setting range: 0-24 hours Questa modalità consente di isfar avviare l’apparecchio entrosettingTemperatu This display blank when operating in FAN mode.in un momento successivo, Timer range: 0massimo 24 ore. Timer sett This display is blank when 5 1. Premere il tasto TIMER ON sul telecomando. This display i 2. Sul display del telecomando è ora possibile leggere tra quanto tempo si avvierà il 5 condizionatore d’aria. 3. 5 Premere più volte il tasto TIMER ON per incrementare l’intervallo di tempo. In alternativa, tenere premuto il tasto. www.domo-elektro.be DO266A 91 4. Una volta selezionato l’intervallo di tempo desiderato, sul display del telecomando compare “Timer on”. Sul display del pannello di controllo compaiono due puntini illuminati. 5. Per disattivare il timer, premere più volte il tasto TIMER ON fino a quando non compare “0”. In alternativa, tenere premuto il tasto. Timer OFF Questa modalità consente di far spegnere l’apparecchio automaticamente dopo un intervallo di tempo. 1. Premere il tasto TIMER OFF sul telecomando. 2. Sul display del telecomando è ora possibile leggere tra quanto tempo si spegnerà il condizionatore d’aria. 3. Premere più volte il tasto TIMER OFF per incrementare l’intervallo di tempo. In alternativa, tenere premuto il tasto. 4. Una volta selezionato l’intervallo di tempo desiderato, sul display del telecomando compare “Timer off”. 5. Per disattivare il timer, premere più volte il tasto TIMER OFF fino a quando non compare “0”. Timer ON + Timer OFF È inoltre possibile attivare contemporaneamente entrambe le modalità. In questo modo si stabilisce sia quando l’apparecchio si avvia sia quando si spegne. IT Attenzione: il tempo parte dall’ora in cui viene programmate la modalità. Ad esempio: attualmente sono le 13:00. Si desidera avere l’apparecchio in funzione dalle 16:30 alle 18:00. Impostare la funzione TIMER ON su 3,5 ore e TIMER OFF su 5 ore. Sleep Se si seleziona questa modalità, la temperatura impostata salirà di 1°C entro 30 minuti. Dopo altri 30 minuti, la temperatura salirà ancora di 1°C. Questa temperatura rimarrà invariata per le 7 ore successive. Dopodiché la temperatura passerà a quella originariamente selezionata e la modalità SLEEP sarà terminata. NOTA: questa modalità non può essere selezionata con FAN e DRY. Shortcut Questo tasto consente di impostare e attivare una modalità di propria preferenza. 92 Se si utilizza spesso una determinata modalità, è possibile memorizzarla tenendo premuto per 3 secondi il tasto SHORTCUT. L’apparecchio memorizza le impostazioni attive nel momento in cui si preme il tasto. Le impostazioni possono essere: la modalità d’uso (MODE), la temperatura selezionata, la velocità di ventilazione (FAN) ed eventualmente la modalità SLEEP. Quando si preme il tasto SHORTCUT, l’apparecchio funzionerà con le impostazioni selezionate. DO266A PULIZIA E MANUTENZIONE DRENAGGIO Drenaggio permanente Durante la deumidificazione è possibile utilizzare un drenaggio permanente. 1. Rimuovere la chiusura di drenaggio e il tappo in gomma al centro, sul retro dell’apparecchio. 2. Fissare il tubo di drenaggio all’apertura di drenaggio. 3. Assicurarsi che l’acqua possa fuoriuscire in modo sicuro e permanente. 2 1 Drenaggio con codice P1 Quando non si ricorre al drenaggio permanente, l’acqua viene raccolta nel vano di drenaggio, sotto l’apparecchio. · Quando il vano è pieno, si udiranno alcuni segnali acustici e sul display compare il codice “P1”. La deumidificazione o il condizionamento dell’aria si interromperanno. Il ventilatore rimane in funzione, questo è normale. · Spostare l’apparecchio con cautela in un luogo dove è possibile far fuoriuscire facilmente l’acqua. IT · Rimuovere la chiusura dell’apertura di drenaggio sotto l’apparecchio (A). A questo punto l’acqua fuoriuscirà · Una volta rimossa tutta l’acqua, richiudere l’apertura di drenaggio. A · A questo punto è possibile riaccendere l’apparecchio. Accertarsi che il codice “P1” sul display scompaia. Se il codice non scopare immediatamente, provare a spegnere e riaccendere più volte l’apparecchio. Se il codice continua ad essere visualizzato, rivolgersi al servizio di assistenza. · NOTA: applicare sempre la chiusura di drenaggio prima di riaccendere l’apparecchio. PULIZIA · Rimuovere sempre la spina dalla presa di corrente prima di pulire l’apparecchio. · Non utilizzare prodotti chimici o abrasivi per pulire l’apparecchio. www.domo-elektro.be DO266A 93 · Non lavare mai l’apparecchio con acqua o altri liquidi, ciò può causare elettrocuzioni. · Se il cavo elettrico è danneggiato deve essere riparato o sostituito dal servizio post-vendita del fabbricante o da una persona qualificata. Filtro dell’aria · Pulire il filtro dell’aria almeno ogni 2 settimane, per evitare che il ventilatore funzioni male a causa di polvere nel filtro. · Pulire il filtro in acqua tiepida con un detergente delicato. Sciacquare bene il filtro e lasciarlo asciugare all’aria. · Quando il filtro è completamente asciutto è possibile riapplicarlo all’apparecchio. Alloggiamento Usare un panno morbido umido e del detergente delicato per pulire la parte esterna dell’apparecchio. Dopodiché, asciugare bene l’apparecchio con un panno morbido asciutto. Conservazione Prima di riporre l’apparecchio per un lungo periodo, è opportuno procedere come segue per evitare che si danneggi: · Eliminare tutta l’acqua dall’apparecchio ricorrendo al drenaggio. · Dopodiché, attivare la modalità FAN. Lasciare l’apparecchio in funzione per mezza giornata in un ambiente riscaldato. In questo modo l’esterno dell’apparecchio potrà asciugarsi completamente e si previene la formazione di muffa. IT · Spegnere l’apparecchio, scollegare la spina dalla presa di corrente e rimuovere le batterie dal telecomando. · Pulire il filtro e reinserirlo nell’apparecchio. · Riporre l’apparecchio in un luogo asciutto e buio. RISOLUZIONE DEI PROBLEMI L’apparecchio non funziona quando si preme il tasto ON/OFF. · Sul display compare il codice P1: rimuovere l’acqua dall’apparecchio. · La temperatura ambiente è più bassa della temperatura selezionata. Regolare la temperatura sull’apparecchio. L’ambiente non si raffredda sufficientemente. · Porte e finestre non sono chiuse. Accertarsi che tutte le porte e le finestre siano chiuse. · Nell’ambiente sono presenti apparecchi che producono calore. Se possibile, eliminare le fonti di calore. 94 · Il tubo di uscita dell’aria non è collegato o è bloccato. Collegare il tubo e accertarsi che funzioni correttamente. DO266A · La temperatura impostata è troppo alta. Regolare la temperatura selezionata. · Il filtro dell’aria è sporco. Pulire il filtro dell’aria. L’apparecchio fa troppo rumore o provoca vibrazioni. · Il pavimento non è abbastanza piano o dritto. Posizionare il dispositivo su una superficie piana e dritta. · Il filtro dell’aria è sporco. Pulire il filtro dell’aria. L’apparecchio emette un gorgoglio. · Il rumore proviene dal liquido refrigerante all’interno dell’apparecchio. Questo è normale. CODICI DI ERRORE Sul display dell’apparecchio possono comparire i seguenti codici di errore: E1: il sensore della temperatura ambiente non funziona. Spegnere l’apparecchio e scollegare la spina dalla presa di corrente. Attendere 10 secondi e ricollegare la spina alla presa di corrente. Riaccendere l’apparecchio. Se il codice continua ad essere visualizzato, rivolgersi al servizio di assistenza. E2: il sensore dell’umidificatore non funziona. Spegnere l’apparecchio e scollegare la spina dalla presa di corrente. Attendere 10 secondi e ricollegare la spina alla presa di corrente. Riaccendere l’apparecchio. Se il codice continua ad essere visualizzato, rivolgersi al servizio di assistenza. P1: il serbatoio dell’acqua è pieno. Rimuovere l’acqua attenendosi alla sezione “Drenaggio” della presente guida. www.domo-elektro.be DO266A IT E4: il display non funziona correttamente. Spegnere l’apparecchio e scollegare la spina dalla presa di corrente. Attendere 10 secondi e ricollegare la spina alla presa di corrente. Riaccendere l’apparecchio. Se il codice continua ad essere visualizzato, rivolgersi al servizio di assistenza. 95 MISURE AMBIENTALI Il simbolo sul prodotto o sulla confezione indica che esso non deve essere trattato come rifiuto domestico. Deve, al contrario, essere conferito al punto di raccolta predisposto per il riciclo delle apparecchiature elettriche ed elettroniche. Facendo in modo che questo prodotto venga smaltito correttamente aiuterete a prevenire potenziali conseguenze negative per l’ambiente e la salute dell’uomo, che potrebbero essere causate da uno smaltimento non corretto. Per maggiori informazioni sul riciclo di questo prodotto, consultare le autorità comunali, l’azienda o il servizio responsabili della raccolta dei rifiuti domestici o il negozio in cui il prodotto è stato acquistato. IT Il materiale di imballaggio è riciclabile. Lo smaltimento dell’imballaggio deve avvenire al fine di tutelare l’ambiente. 96 DO266A ZÁRUKA Práva a povinnosti prodávajícího a kupujícího ohledně práv z vadného plnění se řídí příslušnými obecně závaznými předpisy dle občanského zákoníku. 1. Trvání záruky: 2 roky 2. Záruka se nevztahuje a) na mechanické poškození b) nesprávné používání v rozporu s návodem k použití 3. Záruka zaniká: - při použití spotřebiče jinak než v je uvedeno v manuálu (nesprávným postupem) - při provádění opravy nebo změny na spotřebiči osobou jinou než pověřenou naším servisem Prodávající odpovídá kupujícímu, že zboží při převzetí nemá vady. Zejména prodávající odpovídá kupujícímu, že v době, kdy kupující zboží převzal: · má zboží takové vlastnosti, které výrobce v tomto návodu popisuje, · se zboží hodí k účelu, ke kterému výrobce uvádí, · zboží odpovídá jakostí nebo provedením smluvenému vzorku nebo předloze, byla-li jakost nebo provedení určeno podle smluveného vzorku nebo předlohy, · zboží vyhovuje požadavkům právních předpisů. Projeví-li se vada v průběhu šesti měsíců od převzetí, má se za to, že zboží bylo vadné již při převzetí. Práva z vadného plnění uplatňuje kupující u prodávajícího na adrese jeho provozovny, v níž je přijetí reklamace možné s ohledem na sortiment prodávaného zboží, případně i v sídle nebo místě podnikání. Za okamžik uplatnění reklamace se považuje okamžik, kdy prodávající obdržel od kupujícího reklamované zboží. CZ Pokud není u výrobku uvedeno jinak, činí záruční doba 24 měsíců. Záruční doba počíná běžet od převzetí věci kupujícím. Reklamaci lze také uplatnit v servisním středisku na adrese DOMO-elektro s.r.o., Na Kobyle 783, 345 06 Kdyně, Česká republika, tel. (+420) 379 422 550, [email protected] Pro rychlé a bezproblémové vyřízení reklamace doporučujeme přiložit k reklamaci doklad o koupi a průvodní dopis s popisem závady a zpáteční adresou s telefonickým kontaktem. www.domo-elektro.be DO266A 97 BEZPEČNOSTNÍ POKYNY Při používání jakkéhokoli el. spotřebiče dbejte zvýšené opatrnosti a dodržujte určitá bezpečnostní pravidla: · Pečlivě si přečtěte tyto informace a manuál nechte i pro pozdější nahlédnutí. · Ujistěte se, že před použitím odlepíte a odstraníte veškeré reklamní a ochranné fólie. · Děti si s ochrannými ani reklamními polepy nesmí hrát. · Přístroj je určen pro používání v domácnostech a podobných prostředích, tak jako je: · kuchyňky v obchodech, kancelářích atd. · chaty, chalupy · hotely, penziony a jiné dočasné ubytování · Dohlédněte, aby si děti nehrály s přístrojem. · Tento spotřebič mohou používat děti ve věku 16 let a starší a osoby se sníženými fyzickými, smyslovými nebo mentálními schopnostmi, nebo nedostatkem zkušeností a znalostí pokud jsou pod neustálým dozorem nebo byly poučeny o používání spotřebiče bezpečným způsobem a rozumí případným nebezpečím. Děti si s přístrojem nesmějí hrát. Čištění a údržbu prováděnou uživatelem nesmějí provádět děti bez dozoru. · Čistění a běžnou údržbu smí provádět pouze osoby starší 16 let a při tom být pod dohledem. · Přístroj a jeho el. kabel skladujte mimo dosah dětí. · Upozornění: Přístroj se nesmí používat s externími časovači. · Před použitím důkladně zkontrolujte, zda napětí a frekvence el. sítě ve vaší domácnosti odpovídají požadavkům uvedeným na přístroji. · Zástrčku (přívodní kabel) zapojujte vždy jen do zásuvky, která je bez vad a nainstalována, uzemněna v souladu se všemi místními normami. · Nikdy neumisťujte přístroj v blízkosti trouby, ohně, nebo vysoce hořlavých tekutin. · Nikdy do přístroje nebouchejte a netřeste s ním, mohli byste jej poškodit. · Nikdy nezakrývejte sání vzduchu, ani výfuk, mohli byste způsobit přehřátí přístroje. CZ · Dávejte pozor, abyste přístroj nepocákali vodou a neumisťujte jej v blízkosti zdrojů vody, aby nemohlo dojít ke zkratu. · Poškozený napájecí kabel musí být vyměněn výrobcem, nebo v odborném servisu, či kvalifikovanou osobou. · Nikdy nezapojujte jiný elektrický přístroj do stejného okruhu, jako klimatizaci. · Nikdy neberte zástrčku do mokrých rukou. · Nikdy nestrkejte do otvorů přístroje cizí objekty. · Nepoužívejte přístroj s prodlužovací šňůrou. · Nedovolte dětem, aby si hráli s přístrojem, nebo blízko něj. · Po vypnutí přístroje počkejte alespoň 3 minuty, než jej zapnete znovu. Kompresor potřebuje nějaký čas, aby nedošlo k jeho poškození. 98 · Přístroj umisťujte alespoň 1m od televize, nebo rádia, abyste zamezili rušení. DO266A · Abyste zachovali barvu přístroje, nestavte jej na přímé sluneční světlo. · Nikdy při manipulaci s přístroje nenaklánějte přístroj o více než 35o. Nikdy přístroj nepokládejte, nebo neotáčejte dnem vzhůru. · Přístroj vždy umístěte na rovný a stabilní povrch. · Než přístroj uschováte, nezapomeňte z něj vylít zkondenzovanou vodu. Zajistíte tak Vaší klimatizaci dobrou funkčnost po delší dobu. · Na čištění přístroje nikdy nepoužívejte chemikálie. · Přístroj vždy vypněte a odpojte od elektrické sítě, než budete nasazovat nebo sundávat mřížku nasávání. · Vždy se ujistěte, že nemůžete dojít k vniknutí vody do přístroje vlivem kondenzace vody, nebo stříkající vodou apod. · Dbejte na to, aby přístroj nemohl přijít do styku s vodou, nebo jinou tekutinou. Pokud k tomu dojde, okamžitě přístroj odpojte od elektrické sítě. · Nikdy nepoužívejte přístroj ve vlhkých místnostech, jako je například koupelna, ložnice, nebo prádelna. · Pokud přístroj nepoužíváte, vypněte jej. · Opravy přístroje smí provádět pouze autorizovaný servis, nebo kvalifikovaná osoba. · Kolem přístroj musíte zachovat volný prostor 30 cm. · Nikdy se přístroje nedotýkejte mokrýma rukama. · Dotýkejte se prsty pouze ovládacího panelu. · Nesnažte se z přístroje odstraňovat jeho pevné části. · Nikdy nepoužívejte přístroj pokud nepracuje správně, pokud Vám spadl, nebo je jinak poškozený. · Přístroj nevypínejte vytažením ze zásuvky. Vždy používejte tlačítka na ovládacím panelu. · Používejte přístroj pouze k účelům, ke kterým je určený. · Všetky opravy, úpravy, kontrola tesnosti a prípadných porúch musia byť vykonávané len odborným certifikovaným servisom. · Spotřebič obsahuje fluorované skleníkové plyny zahrnuté v Kjotském protokolu. · Nesahejte na přístroj, pokud jste naboso, nesahejte na něj ani s mokrýma/vlhkýma rukama. CZ · Instalace a zapojení musí být provedeno odborně a dle pokynů v návodu. Nesprávná instalace může způsobit únik vody, úraz elektrickým proudem nebo požár. · Pokud dojde během používání k převrácení klimatizační jednotky, tak ji ihned vypněte a okamžitě odpojte od napájení (el. sítě). Následně zvedněte a vizuálně důkladně zkontrolujte, zda není poškozená. Pokud máte podezření, že byl přístroj poškozen, tak zavolejte do odborného servisu a nechejte překontrolovat jeho stav. · Pokud je (nebo hrozí) v lokalitě bouřka, tak přístroj vypojte z el. sítě. Jinak hrozí poškození přístroje a případně i požár. · Pokud nepoužíváte trvalý odvod kondenzátu, tak mějte oba (horní i spodní) vypouštěcí vývody dostatečně uzavřené, aby nehrozilo riziko zadušení. Pokud vypouštěcí vývody nepoužíváte, pečlivě je udržujte uzavřené, aby se zabránilo zadušení dětí nebo zvířat. www.domo-elektro.be DO266A 99 · Přívodní kabel nikdy neveďte pod kobercem ani ho nijak nezakrývejte. Nepokládejte kabel pod nábytek ani pod přístroj samotný. Přívodní kabel by měl být veden tak, aby o něj nemohl nikdo zakopnout a přitom nebyl překrytý ani zatížený žádným předmětem. · Pokud se z přístroje začnou ozývat divné zvuky, bude cítit kouř nebo se začne linout dým, tak ho ihned vypněte a vypojte z el. sítě. Varování (lze použít pouze s chladivem R290 · Proces odmrazování nebo čištění neurychlujte použitím prostředků, které k tomu nejsou určeny výrobcem. · Spotřebič musí být skladován v místnosti, ve které nejsou nepřetržité zdroje zážehu/ vznícení (např. otevřený oheň, spuštěný plynový spotřebič nebo spuštěný elektrický ohřívač). · Nepropichujte ani nezapalujte. · Berte na vědomí, že chladivo nemusí mít žádný zápach. · Zařízení DO266A by mělo být nainstalováno, provozováno a skladováno v místnosti, jejíž podlahová plocha přesahuje 7 m2. · Musí být dodrženy veškeré vnitrostátní předpisy o plynu. · Okolí ventilačních otvorů udržujte bez překážek. · Spotřebič musí být skladován tak, aby se zabránilo jeho mechanickému poškození. · Spotřebič musí být skladován v dobře větraném prostoru, jehož rozměry odpovídají minimálním uvedeným rozmě-rům, které jsou nutné pro správný provoz spotřebiče. · Jakákoli osoba, která zasahuje do okruhu chladiva, musí mít aktuální a platné osvědčení udělené hodnotícím orgá-nem, který je akreditovaný v rámci odpovídajícího průmyslu a který může ručit za jejich schopnost bezpečně zpraco-vávat chladiva v souladu s uznávaným hodnotícím požadavkem. · Servis může být prováděn pouze v souladu s doporučením výrobce. Údržba a opravy, které vyžadují zapojení jiného odborného personálu, se musí provádět pod dohledem osoby, která je způsobilá k zacházení s hořlavými chladivy. Pozor: Nebezpečí vzniku požáru / hořlavé materiály CZ Tento spotřebič používá hořlavé chladivo. Pokud by chladivo prosakovalo či unikalo ven, kde by mohlo hrozit riziko zapálení, tak hrozí nebezpečí požáru. TIPY NA NIŽŠÍ SPOTŘEBU ENERGIE · Nikdy nepoužívejte přístroj v místnostech, které jsou větší, než je doporučená velikost. · Dbejte na to, aby žádné otvory přístroje nebyly ucpané, nebo blokované nábytkem apod. · Během nejteplejších dnů zatáhněte i žaluzie, nebo záclony na oknech, aby se vzduch v místnosti zbytečně znovu neohříval. · Kontrolujte filtry, aby byly vždy čisté. · Mějte vždy zavřené dveře a okna, abyste udržely studený vzduch v místnosti a teplý Vám z venku neproudil dovnitř. 100 DO266A TENTO MANUÁL SI USCHOVEJTE I PRO POZDĚJŠÍ NAHLÉDNUTÍ. ČÁSTI Přední část 1. Ovládací panel 2. Výstup vzduchu Zadní část 3. Vzduchový filtr 4. Vstup vzduchu 5. Výstup vzduchu 6. Odtok 1 3 2 5 4 6 Části 7. Hadice odtoku 8. Dálkový ovladač 9. Výfuková hadice 9 a. Napojení výfukové hadice 10. Sada pro montáž na zeď 10 a. Adaptér na zeď 7 10 b. Sada pro přichycení 11. Sada pro montáž do okna 11 a. Okenní adaptér 11 b. Sada pro upevnění 11 c. Okenní utěsnění 11 d. Zásuvka 8 9 9a CZ 11 e. Železné „L“ vzpěry 10 10b 10a 11 11a www.domo-elektro.be 11b 11c 11d 11e DO266A 101 ZAPOJENÍ A INSTALACE · Umístěte přístroj na stabilní a rovnou plochu. Tak předejdete obtěžujícím zvukům a vibracím. Ujistěte se, že podlaha pod přístrojem je dostatečně pevná, aby přístroj unesla. max 120 cm · Přístroj má malá kolečka pro snazší manipulaci. Přesouvejte přístroj pouze po rovné a hladké ploše. Dbejte zvýšené opatrnosti min 30 cm při posunování přístrojem po koberci. Nikdy se nesnažte přístrojem přejíždět předměty na zemi. · Umístěte přístroj co nejblíže uzemněné zásuvce. · Kolem klimatizace ponechte do všech směrů volný prostor minimálně 30 cm. · Hadici pro odvod teplého vzduchu musíte používat vždy, když nastavíte funkci „cool“, nebo „auto“. Během používání funkcí „fan“ a „dry“, hadice není potřeba. · Zajistěte dostatek prostoru okolo výstupu vzduchu - alespoň 50 cm. · Zjistěte, aby se hadice během používání nijak neohýbala. INSTALACE OKENNÍHO ADAPTÉRU · Nejdříve na výfukovou hadici nasaďte spojku k okenní koncovce. · Potom celou hadici nasaďte na otvor výfuku v zadní části přístroje. · Na druhý konec hadice napevno připojte okenní koncovku. CZ · Do okna umístěte okenní adaptér. Ten je možné umístit v horizontální I vertikální rovině. max 120 cm Adaptér zajistěte ve Vámi požadované délce. min 30 cm · Do zajištěného adaptéru v okně nacvakněte okenní koncovku (která je přichycena na hadici). · Pokud je potřeba, tak můžete okolí ještě utěsnit. · Okenní adaptér si zafixujte na požadovanou délku. · Pokud je potřeba, tak si můžete okno zafixovat pomocí železných „L vzpěr“ a šroubky. 102 DO266A INSTALACE NA ZEĎ · Nejdříve na výfukovou hadici nasaďte spojku k okenní koncovce. · Potom celou hadici nasaďte na otvor výfuku v zadní části přístroje. · Na druhý konec hadice napevno připojte koncovku do zdi . · Ve zdi připravte otvor s odpovídajícím rozměrem vůči koncovce · Koncovku připevněte do otvoru ve zdi a zajistěte. max 120 cm min 30 cm POUŽITÍ Horizontálně položený díl v přední části klimatizace můžete v případě potřeby ručně vysunout / zasunout. Tento díl zlepšuje výstup vzduchu . OVLÁDACÍ PANEL CZ 4 3 1. 2 1 Hlavní spínač ON/OFF Tímto tlačítkem přístroj zapnete/vypnete www.domo-elektro.be DO266A 103 Remote LED Screen Indicators Remote LED Screen Indi 2. Tlačítka ”+” a “-” Indicator Tlačítka slouží k nastavování teploty. Požadovaná teplota může býtTransmission nastavena v rozmezí od Transmission Indica when remote sends 17°C do 30°C. Na přístroji si můžete volit mezi nastavení stupňů “°C Lights “a “°F”.up Změnu jednotek Lights up when remo signal to unit provedete stiskem obou tlačítek na ráz. signal to unit ON/OFF display MODE display ON/OFF Appears when the unitdisp is 3. Tlačítko FUNKCE Displays the MODE current display Appears whe and disappears when it is Tlačítkem si můžete volit jednu z funkcí přístroje. Každým stiskem tlačítka se přepne funkce: Displays the current mode, including: and disappea KLIMATIZACE – ODVLHČOVÁNÍ – VENTILACE. Vybraná funkce bude na ovládacím panelu mode, including: TIMER ON d AUTO podsvícená. Pokud si zvolíte funkcí ventilace, tak se přístroj přepne do automatického režimu. Displays whe AUTO COOL Vy můžete volit jen rychlost ventilace. ON is set COOL DRY DRY HEAT 4. LED displej HEAT FAN FAN tak na displeji Displej ukazuje nastavenou teplotu. Pokud máte vybranou funkci “ventilace”, bude zobrazena aktuální pokojová teplota. DÁLKOVÉ OVLÁDÁNÍ Při používání ovladače musíte vždy mířit přímo proti přístroji. Pokud ovladač nereaguje, tak ho zaměřte přímo na přístroj a zkuste opět stisknout ON/OFF. Jakmile se přístroj zapne (vypínač reaguje), tak se ozve zvukový signál. Dálkový ovladač pracuje v dosahu 8 m od přístroje. 1. Hlavní spínač ON/OFF 1 2 3 4 6 7 8 5 9 Tímto tlačítkem přístroj zapnete/vypnete CZ 2. 104 Tlačítko FUNKCE Tlačítkem si můžete volit jednu z funkcí přístroje. Každým stiskem tlačítka se přepne funkce: KLIMATIZACE – ODVLHČOVÁNÍ – VENTILACE. Vybraná funkce bude na ovládacím panelu podsvícená. SIL FAN SPEED display Not a FAN SPEED display Displays selected FAN SPEED: 3. Tlačítko FAN (ventilace) Displays selected HIGH, MED,FAN SPEED: MED, or –LOW HIGH –HIGH, AUTO. Tímto tlačítkem si volíte rychlost ventilátoru: LOW Temperat or LOW This display is blank when Displays t display is blank when set to AUTO This speed. 4. Tlačítko SLEEP (spánek) when usin set to AUTO speed. Tlačítkem aktivujete režim na spánek – sleep Tempe V režimu “sleep” je zvolená teplota postupně navyšována o 1°C za 30 min. Za dalších 30 Timer s minut se teplota zvýší o další 1oC. Klimatizace bude tuto teplotu udržovat dalších 7 hodin. Po uplynutí tohoto času se klimatizace přepne zpět do původního nastavení teploty a funkce This displa „sleep“ se ukončí. POZNÁMKA: tuto funkci nemůžete nastavit zároveň s „fan“, nebo „dry“ funkcí. DO266A 5. Tlačítko TEMP (teplota) Na přístroji si můžete nastavit požadovanou teplotu v rozmezí 17-30 °C. Jakmile stisknete obě tlačítka zároveň, tak se přehodí jednotky teploty “°C” a “°F”. 6. Tlačítko RYCHLÉ VOLBY (SHORTCUT) K tomuto tlačítku si můžete nastavit předvolenou funkci a následně jí jedním stiskem zapínat/ vypínat. Remote LED Screen Indicators 7. How To Use The Basic Fun Tlačítko zapnutí časovače (TIMER ON) Tímto tlačítkem zapínáte časovač. 8. Transmission Indicator Lights up when remote sends signal to unit Tlačítko vypnutí časovače (TIMER OFF ) ON/OFF display MODE displaytlačítkem Appears when the vypínáte. unit is turned on, Tímto časovač Displays the current and disappears when it is turned off mode, including: TIMER OFF display TIMER ON display AUTO Displays when TIMER Remotepro LED Screen Indicators Displays when TIMER COOL 9. Tlačítko sepnutí osvícení OFF is set ON is LED set DRY HEAT Tímto tlačítkem vypnete LED podsvícení. To uvítáte pokud chcete FAN ECO display ruší. Jakmile stisknete tlačítko znovu, tak se displej opět rozsvítí. Transmission Indicator Not available for Lights up when remote sends this unit signal to unit display NASTAVENÍ FUNKCÍON/OFF MODE display Appears when the unit is turned on, Displays the current AUTO mode, including: and disappears when it is turned off 2 How To Use The SHORT 3 spát a osvětlení displeje Vás 1 ON/OFF MODE CUT TIMER ON TEMP TIMER OFF FAN ION SLEEP Battery display Low battery detection SWING FOLLOW ME LED CZ SLEEP TIMER OFFdisplay display TIMER ON display AUTO V režimu AUTO výkon klimatizace, tak aby se požadovaná Displays when Displays when TIMER Displays when TIMERa sepnutí COOL si sám přístroj upravuje ON/OFF OFFSLEEP is set function ON is set DRYměnila co nejméně. Tato funkce může být zapnuta I přes dálkové ovládání. 3 teplotaRemote okolí is activated LED Screen Indicators How To Use The HEAT MODE 1 FAN TEMP 1. Na ovladači si navolte režim AUTO pomocí tlačítka MODE. FOLLOW ME ECO display FAN display Not available for COOL operation 2. Nastavte Transmission si požadovanou teplotu a přístroj siIndicates už sám stupeň potřebné thatzvolí ION this unit Indicator the FOLLOW ME F Lights up when remote sends SWING 1. Press the MODE buttonSLEEP to select klimatizace. function is on Battery display signal to unit COOL mode. Low battery ventilátoru. Během automatického režimu vy nemůžete regulovat rychlost 2. Set your desired temperature us Not available fordetection ON/OFF display the Temp or Temp button this unit MODE display Appears when the unit is turned on, 3. Press the FAN button to select th SLEEP display Displays the current and disappears when it is turned off SILENT display fan speed: AUTO, LOW, MED,or FAN SPEED display Displays when including: COOL –mode, chlazení Not available for this unit HIGH. Displays selected FAN AUTO SPEED: SLEEP function TIMER OFF display TIMER ON display 4. Press the ON/OFF button to star HIGH, MED, is activated Displays when TIMER Displays when TIMER v místnosti. COOL Funkce “COOL” je klimatizace a snižuje teplotu unit. ON/OFF OFF is set ON is set or LOW 3 DRY Temperature/Timer display FOLLOW ME This display is blankNavolte when HEAT MODE 1. si tuto funkci COOL tlačítkem MODE, jakmile bude zvolena, tak bude na 1 Displays the set temperature by default, or timer setting display set to AUTO speed. FAN COOL operationTEMP when using TIMER ON/OFF functions Indicates that ECO display ovládacím panelu svítit. FAN the NotFOLLOW availableME for Temperature range: 17-30oC(62OF-86OF) 1. Press the MODE b function is on ION this unit 2. Pomocí šipek na Timer panelu nebo ovladači si nastavte požadovanou teplotu v setting range:na 0-24 hours COOL mode. místnosti. Not available for Battery display this Lowunit battery detection požadovanou rychlost This display is blank when operating in FAN mode. 3. FANTlačítkem „fan“ nebo na si nastavte SILENT display 5 ovladači SPEED display Not available for this unit Displays FAN SPEED: zdeselected 3 rychlosti. SLEEP SWING te 2. Set your desired the Temp or Te 3. Press the FAN butt ventilátoru. Jsou fan speed: AUTO, HIGH. 4. Press the ON/OFF unit. SLEEP display Displays when SLEEP function Temperature/Timer display is activated This display is blank when Displays the set temperature by default, or timer setting DRY-odvlhčování set to AUTO speed. when using TIMER ON/OFF functions FOLLOW ME o 17-30regulovat C(62OF-86OF) display Funkce DRY je funkce odvlhčování aTemperature vy si takrange: můžete vlhkost v místnosti. Indicates that setting range: 0-24 hours FOLLOW ME používání zavřete dveře i okna, aby Timer odvlhčení místnosti bylo co the nejlepší. This display is blank when operating in FAN function mode. is on or HIGH, LOW www.domo-elektro.be MED, 5 SILENT display Not available for this unit Při COOL operation 1. Press the MODE b COOL mode. 2. Set your desired te DO266A the Temp or Te 3. Press the FAN but fan speed: AUTO, 105 this unit ION SLEEP Battery display Low battery detection 1. Stiskem tlačítka „MODE“ nastavte funkci „DRY“ – rozsvítí se příslušná kontrolka na SLEEP display panelu. Displays when 2. is activated Pomocí šipek na panelu nebo na ovladači si nastavte požadovanou hodnotu. 3. Pro tuto funkci nelze nastavovat rychlost ventilátoru.FOLLOW ME SWING FOLLOW ME SLEEP function display Indicates that the FOLLOW ME function is on COOL operation 1. Press the MODE but FAN – ventilace COOL mode. 2. Set your desired tem Not available for SILENT the display 1. Stiskem tlačítka „MODE“ nastavte funkci „FAN“ – rozsvítí se příslušná kontrolka naTemp or Tem this unit FAN SPEED display 3. PressSILENT the FAN butto dis Not available for this unit panelu. SILENT display fan speed: AUTO, LO FAN SPEED display Displays selected FAN SPEED: FAN SPEED display Not available for this unit HIGH. Not available Displays selected FAN SPEED: Displays selected HIGH, MED,FAN SPEED: 2. Tlačítkem „fan“ nebo na ovladači si nastavte požadovanou rychlost ventilátoru. 4. Jsou Press the ON/OFF b HIGH, MED, unit. HIGH, MED, or LOW or LOW , HIGH , AUTO) zde 3 rychlosti (LOW Temperature/Timer display This display is blank when Temperature/Timer display or LOW Displays the set temperature by default, or timer setting Thisnastavovat display is blank when 3.set to AUTO Pro tuto teplotu místnosti. speed.funkci nelze when using TIMER ON/OFF functions Displays theTemperature/Tim set temperature b This display is blank set to AUTO speed. Temperature range: 17-30 C(62 F-86 F) when the set te when using Displays TIMER ON/OFF fu set to AUTO speed. Timer setting range: 0-24 hours when using TIMER Timer on – automatické zapnutí Temperature range: 17-30o This display is blank when operating in FAN mode. Temperature Tímto tlačítkem zapnete časovač, který odloží start klimatizace a přístroj sepne. Timer setting range: 0-24rah o 1. 2. O O 5 Timer setting ra This display is blank when ope Na displeji ovladače se zobrazí čas za jak dlouho by se přístroj sepnul. This display is bla Časovač zapnete stiskem tlačítka TIMER ON na ovladači. 3. Každé stisknutí (nebo podržení) tlačítka zvýší nastavený čas. Čas udává za jak dlouho 5 se přístroj spustí. 4. Po nastavení času, začne přístroj čas odpočítávat a displeji svítí “TIMER ON”. Na ovládacím panelu budou svítit 2 světelné kontrolky. 5. Pokud časovač chcete vypnout, tak tímto tlačítkem přenastavte čas až do “0”. Tlačítko můžete mačkat nebo podržet. Timer off – automatické vypnutí CZ Tímto tlačítkem nastavíte časovač, pro automatické vypnutí klimatizace po určité době.. 1. Stiskněte tlačítko TIMER OFF na ovladači. 2. Na displeji ovladače se zobrazí čas za jak dlouho by se přístroj vypnul. 3. Každé stisknutí (nebo podržení) tlačítka zvýší nastavený čas. Čas udává za jak dlouho se přístroj vypne. 4. Po nastavení času, začne přístroj čas odpočítávat a displeji svítí “TIMER OFF”. Na ovládacím panelu budou svítit 2 světelné kontrolky. 5. Pokud časovač vypnutí chcete zrušit, tak tímto tlačítkem přenastavte čas až do “0”. Tlačítko můžete mačkat nebo podržet. Automatické vypnutí/zapnutí (Timer on + Timer off) Výše zmíněné funkce časovače můžete samozřejmě nastavit i současně. Nastavení pak bude automaticky udávat, kdy se přístroj sepne ale i kdy se následně vypne. 106 POZNÁMKA: Čas nastavení vždy vyhází z aktuálního času a dopočítává jej. Příklad. Je-li nyní 13 hodin a my chceme klimatizaci sepnout v 16:30 a v 18 hodin opět vypnout. Tak musíte na časovači zapnutí (TIMER ON) nastavit 3,5 hodiny a na časovači vypnutí (TIMER OFF) 5,0 hodin. DO266A 5 Sleep Po aktivaci funkce „sleep“ se po 30 minutách zvýší teplota o 1oC. Za dalších 30 minut se teplota zvýší o další 1oC. Klimatizace bude tuto teplotu udržovat dalších 7 hodin. Po uplynutí tohoto času se klimatizace přepne zpět do původního nastavení teploty a funkce „sleep“ se ukončí. POZNÁMKA: tuto funkci nemůžete nastavit zároveň s ventilací („fan“), ani funkcí odvlhčování („dry“). RYCHLÁ VOLBA (Shortcut) K tomuto tlačítku si můžete nastavit předvolenou funkci a následně jí jedním stiskem zapínat/ vypínat. Pokud nějaké nastavení přístroje používáte častěji, tak si jej můžete uložit do paměti. Uložíte podržením tlačítka na 3 vteřiny. Přístroj si uloží nastavení, které je zvoleno právě v momentě ukládání. Pod volbu nastavení je možné si uložit: funkci (MODE), požadovanou teplotu, rychlost ventilace a případně I nastavení časovače, Kdykoli potom stiskněte tlačítko (SHORTCUT), tak přístroj začne pracovat na uložené a zapamatované nastavení. ČIŠTĚNÍ A ÚDRŽBA ODVODNĚNÍ Trvalý odtok 1. Během funkce “odvlhčování“ můžete použít trvalé odvodnění. Odstraňte zátku vyústění trvalého odtoku. 2. Připojte vypouštěcí hadici na místo pro stálý odtok kondenzátu a druhý konec odveďte do odpadu v místnosti. 3. Ujistěte se, že voda je bezpečně odváděna a nic jí nestojí v cestě. 2 CZ 1 Odtok: kód P1 Pokud nepoužíváte trvalý odtok, nerecyklovaná kondenzovaná voda bude uchovávána v nádržce na vodu. · Po naplnění nádržky na vodu se ozve několik zvukových signálů a na displeji se zobrazí kód P1. Funkce “chlazení“ a “odvlhčování“ se automaticky ukončí. Ventilátor nadále poběží, což je normální. www.domo-elektro.be DO266A 107 · Přesuňte přístroj na místo, kde můžete snadno vodu vypustit/ vylít. · Vyjměte vypouštěcí zátku na spodní části přístroje (A) a vypusťte vodu. · Po úplném vypuštění nádržky na vodu umístěte vypouštěcí zátku zpět na otvor pro odtok. · Restartujte přístroj a ujistěte se, že chybový kód P1 na displeji již není zobrazen. Pokud kód nezmizí, zkuste přístroj několikrát vypnout a zapnout. Pokud je i nadále kód zobrazený, prosím kontaktujte poprodejní servis. · POZNÁMKA: Před opětovným spuštěním přístroje se vždy ujistěte, že jste nádržku opět uzavřeli. A ČIŠTĚNÍ · Před čištěním přístroje vždy vytáhněte zástrčku ze zásuvky. · Nikdy na čistění přístroje nepoužívejte žádná chemické nebo drsné prostředky. · Nikdy přístroj nečistěte vodou nebo jinými kapalinami, to by mohlo způsobit poškození elektrickým proudem. · Pokud je poškozený přívodní kabel, musí být opraven nebo nahrazen poprodejním servisem nebo kvalifikovanou osobou. Vzduchový filtr · Čistěte vzduchový filtr alespoň každé dva týdny. Ujistěte se, že klimatizace může pracovat v optimálních podmínkách. · Čistěte vzduchový filtr ve vlažné vodě s trochou mycího prostředku. Filtr důkladně vypláchněte a nechte uschnout. CZ · Před umístěním filtru zpět do klimatizace se ujistěte, že je kompletně suchý. Tělo klimatizace Pro vyčištění vnější části přístroje používejte vlhký měkký hadřík s trochou jemného čistícího prostředku. Ujistěte se, že je přístroj důkladně vysušen. Skladování Před skladováním přístroje na delší dobu, prosím postupujte podle následujících kroků: · Vypusťte veškerou vodu ze spotřebiče. · Potom na půl dne zapněte přístroj ve funkci “foukání“. Ujistěte se, že je přístroj umístěn ve vyhřívaném prostoru. To přístroj kompletně vysuší a předejte utváření plísní. · Přístroj vypněte, vytáhněte zástrčku ze zásuvky a odejměte baterie z dálkového ovládání. 108 DO266A · Vyčistěte filtry a umístěte je zpět do přístroje. · Uchovávejte přístroj na suchém a tmavém místě. MOŽNÉ PROBLÉMY A JEJICH ŘEŠENÍ Přístroj nefunguje, když mačkáte tlačítko on/off. · Pokud je zobrazen chybový kód P1, vypusťte vodu z klimatizace. · Pokud je teplota v místnosti nižší, než zvolená teplota, upravte zvolenou teplotu. Místnost není dostatečně chladná. · Okna a dveře nejsou zavřeny. Ujistěte se, že všechny okna a dveře jsou zavřeny. · V místnosti může být nějaký zdroj tepla. Pokud je to možné, odstraňte všechny zdroje tepla. · Vzduchová hadice není připojena nebo je blokována. Přípojte hadici a zkontrolujte, zda není blokována. · Zvolená teplota je vysoká. Upravte zvolenou teplotu. · Vzduchový filtr je znečištěný. Vyčistěte vzduchový filtr. Přístroj vydává moc hluku nebo vibruje. · Podlaha není hladká nebo rovná. Pokud je to možné, umístěte přístroj na hladký a rovný povrch. · Vzduchový filtr je znečištěný. Vyčistěte vzduchový filtr. Přístroj vydává bublavý zvuk · Tento zvuk vytváří chladící náplň, který je v přístroji. Tento občasný zvuk je v pořádku. CHYBOVÉ KÓDY Na vaší klimatizaci se mohou zobrazit následující chybové kódy: Vypněte přístroj a odejměte zástrčku ze zásuvky. Počkejte 10 sekund a zapojte přístroj zpět. Zapněte přístroj. Pokud chybový kód přetrvává, kontaktujte servis. CZ E1: Nefunguje senzor pro snímání teploty v místnosti. E2: Senzor vlhkosti nefunguje. Vypněte přístroj a odejměte zástrčku ze zásuvky. Počkejte 10 sekund a zapojte přístroj zpět. Zapněte přístroj. Pokud chybový kód přetrvává, kontaktujte servis. E4: Displej nefunguje správně. Vypněte přístroj a odejměte zástrčku ze zásuvky. Počkejte 10 sekund a zapojte přístroj zpět. Zapněte přístroj. Pokud chybový kód přetrvává, kontaktujte servis. www.domo-elektro.be DO266A 109 P1: Nádržka na vodu je plná. Připojte vypouštěcí hadici na dolní místo pro odtok kondenzátu. Když chybový kód přetrvává, kontaktujte servis. OHLED NA ŽÍVOTNÍ PROSTŘEDÍ Symbol na přístroji či na jeho obalu znamená, že s tímto výrobkem není možno nakládat jako s běžným domovním odpadem, nýbrž musí být odevzdán na místech určených ke sběru a likvidaci elektrických a elektronických zařízení. Dodržením tohoto doporučení chráníte životní prostředí a zdraví spoluobčanů. Více informací o možnostech likvidace nebezpečného odpadu obdržíte na obecních nebo městských úřadech, sběrných dvorech nebo v prodejně, kde jste přístroj zakoupili. CZ Obalové materiály jsou recyklovatelné, nakládejte s nimi podle předpisů pro životní prostředí. 110 DO266A ZÁRUKA Práva a povinnosti predávajúceho a kupujúceho ohľadom práv z chybného plnenia sa riadi príslušnými všeobecne záväznými predpismi podľa občianskeho zákonníka. 1. Trvanie záruky: 2 roky 2. Záruka sa nevzťahuje a) na mechanické poškodenie b) nesprávne používanie v rozpore s návodom na použitie 3. Záruka zaniká: - pri použití spotrebiča inak ako v je uvedené v manuále (nesprávnym postupom) - pri vykonávaní opravy alebo zmeny na spotrebiči osobou inou než poverenou naším servisom Predávajúci zodpovedá kupujúcemu, že tovar pri prevzatí nemá vady. Najmä predávajúci zodpovedá kupujúcemu, že v čase, keď kupujúci tovar prevzal: · má tovar také vlastnosti, ktoré výrobca v tomto návode popisuje, · sa tovar hodí k účelu, ku ktorému výrobca uvádza, · tovar zodpovedá kvalitou alebo prevedením dohovorené vzorky alebo predlohe, ak bola akosť alebo prevedenie určené podľa dohodnutého vzorky alebo predlohy, · tovar vyhovuje požiadavkám právnych predpisov. Ak sa prejavia vada v priebehu šiestich mesiacov od prevzatia, má sa za to, že tovar bol chybný už pri prevzatí. Pokiaľ nie je pri výrobku uvedené inak, je záručná doba 24 mesiacov. Záručná doba začína plynúť od prevzatia veci kupujúcim. Práva z chybného plnenia uplatňuje kupujúci u predávajúceho na adrese jeho prevádzky, v ktorej je prijatie reklamácie možné s ohľadom na sortiment predávaného tovaru, prípadne aj v sídle alebo mieste podnikania. Za okamih uplatnenia reklamácie sa považuje okamih, kedy predávajúci dostal od kupujúceho reklamovaný tovar. Pre rýchle a bezproblémové vybavenie reklamácie odporúčame priložiť k reklamácii doklad o kúpe a sprievodný list s popisom závady a spiatočnou adresou s telefonickým kontaktom. www.domo-elektro.be DO266A SK Reklamáciu možno tiež uplatniť v servisnom stredisku na adrese DOMO-elektro s.r.o., Na Kobyle 783, 345 06 Kdyně, Česká republika, tel. (+420) 379 422 550, [email protected] 111 BEZPEČNOSTNÉ POKYNY Pri používaní jakkéhokoli el. spotrebiče dbajte na zvýšenú opatrnosť a dodržujte určité bezpečnostné pravidlá: · Starostlivo si prečítajte tieto informácie a manuál nechajte aj k neskoršiemu nahliadnutiu. · Uistite sa, že pred použitím odlepíte a odstránite všetky reklamné a ochranné fólie. · Deti sa s ochrannými ani reklamnými polepy nesmie hrať. · Prístroj je určený pre používanie v domácnostiach a podobných prostrediach, tak ako je: · kuchynky v obchodoch, kanceláriách atď. · chaty, chalupy · hotely, penzióny a iné dočasné ubytovanie · Dohliadnite, aby sa deti nehrali s prístrojom. · Tento spotrebič môžu používať deti vo veku 16 rokov a staršie a osoby so zníženými fyzickými, zmyslovými alebo mentálnymi schopnosťami, alebo nedostatkom skúseností a znalostí ak sú pod neustálym dozorom alebo boli poučené o používaní spotrebiča bezpečným spôsobom a rozumejú prípadným nebezpečenstvom. Deti si s prístrojom nesmú hrať. Čistenie a údržbu vykonávanú používateľom nesmú vykonávať deti bez dozoru. · Čistenie a bežnú údržbu môžu vykonávať len osoby staršie ako 16 rokov a pri tom byť pod dohľadom. · Prístroj a jeho el. kábel skladujte mimo dosahu detí. · Upozornenie: Prístroj sa nesmie používať s externými časovači. · Pred použitím dôkladne skontrolujte, či napätie a frekvencia el. siete vo vašej domácnosti zodpovedajú požiadavkám uvedeným na prístroji. · Zástrčku (prívodný kábel) zapájajte vždy len do zásuvky, ktorá je bez chýb a nainštalovaná, uzemnená v súlade so všetkými miestnymi normami. · Nikdy neumiestňujte prístroj v blízkosti rúry, ohňa, alebo vysoko horľavých tekutín. · Nikdy do prístroja nebúchajte a netraste s ním, mohli by ste ho poškodiť. · Nikdy nezakrývajte nasávanie vzduchu, ani výfuk, mohli by ste spôsobiť prehriatie prístroja. · Dávajte pozor, aby ste prístroj nepocákali vodou a neumiestňujte ho v blízkosti zdrojov vody, aby nemohlo dôjsť ku skratu. · Poškodený prívodný kábel musí byť vymenený výrobcom, alebo v odbornom servise, či kvalifikovanú osobou. SK · Nikdy nezapájajte iný elektrický prístroj do rovnakého okruhu, ako klimatizáciu. · Nikdy neberte zástrčku do mokrých rúk. · Nikdy nestrkajte do otvorov prístroja cudzie objekty. · Nepoužívajte prístroj s predlžovacie šnúrou. · Nedovoľte deťom, aby sa hrali s prístrojom, alebo blízko neho. 112 DO266A · Po vypnutí prístroja počkajte aspoň 3 minúty, než ho zapnete znova. Kompresor potrebuje nejaký čas, aby nedošlo k jeho poškodeniu. · Prístroj umiestňujte aspoň 1m od televízie, alebo rádia, aby ste zamedzili rušeniu. · Aby ste zachovali farbu prístroje, nestavajte ho na priame slnečné svetlo. · Nikdy pri manipulácii s prístroja nenakláňajte prístroj o viac než 35o. Nikdy prístro neklaďte, alebo neotáčajte dnom nahor. · Prístroj vždy umiestnite na rovný a stabilný povrch. · Než prístroj uschováte, nezabudnite z neho vyliať skondenzovanú vodu. Zaistíte tak Vašej klimatizáciu dobrú funkčnosť po dlhšiu dobu. · Na čistenie prístroja nikdy nepoužívajte chemikálie. · Prístroj vždy vypnite a odpojte od elektrickej siete, než budete nasadzovať alebo dávať dole mriežku nasávanie. · Vždy sa uistite, že nemôžete dôjsť k vniknutiu vody do prístroja vplyvom kondenzácie vody, alebo striekajúcou vodou a pod. · Dbajte na to, aby prístroj nemohol prísť do styku s vodou, alebo inou tekutinou. Ak k tomu dôjde, okamžite prístroj odpojte od elektrickej siete. · Nikdy nepoužívajte prístroj vo vlhkých miestnostiach, ako je napríklad kúpeľňa, spálňa, alebo práčovňa. · Pokiaľ prístroj nepoužívate, vypnite ho. · Opravy prístroja môže vykonávať len autorizovaný servis, alebo kvalifikovaná osoba. · Okolo prístroj musíte zachovať voľný priestor 30 cm. · Nikdy sa prístroja nedotýkajte mokrými rukami. · Dotýkajte sa prstami len ovládacieho panelu. · Nesnažte sa z prístroja odstraňovať jeho pevné časti. · Nikdy nepoužívajte prístroj pokiaľ nepracuje správne, ak Vám spadol, alebo je inak poškodený. · Prístroj nevypínajte vytiahnutím zo zásuvky. Vždy používajte tlačidlá na ovládacom paneli. · Používajte prístroj iba na účely, na ktoré je určený. · Všetky opravy, úpravy, kontrola tesnosti a prípadných porúch musí sa vykonávať ľan odborným certifikovaným servisom. · Spotrebič obsahuje fluórované skleníkové plyny zahrnuté v Kjótskom protokole. · Inštalácia a zapojenie musí byť vykonané odborne a podľa pokynov v návode. Nesprávna inštalácia môže spôsobiť únik vody, zasiahnutie elektrickým prúdom alebo požiar. · Pokiaľ dôjde počas používania k prevráteniu klimatizačné jednotky, tak ju ihneď vypnite a okamžite odpojte od napájania (el. Siete). Následne zdvihnite a vizuálne dôkladne skontrolujte, či nie je poškodená. Ak máte podozrenie, že bol prístroj poškodený, tak zavolajte do odborného servisu a nechajte prekontrolovať jeho stav. · Ak je (alebo hrozí) v lokalite búrka, tak prístroj vypojte z el. siete. Inak hrozí poškodenie prístroja a prípadne i požiar. www.domo-elektro.be DO266A SK · Nesiahajte na prístroj, ak ste naboso, nesiahajte na neho ani s mokrými / vlhkými rukami. 113 · Ak nepoužívate trvalý odvod kondenzátu, tak majte obaja (horné i spodné) vypúšťací vývody dostatočne uzavreté, aby nehrozilo riziko zadusenia. Ak vypúšťací vývody nepoužívate, starostlivo je udržujte uzavreté, aby sa zabránilo zaduseniu detí alebo zvierat. nepoužívate, starostlivo je udržujte uzavreté, aby sa zabránilo zaduseniu detí alebo zvierat. · Prívodný kábel nikdy neveďte pod kobercom ani ho nijako nezakrývajte. Neklaďte kábel pod nábytok ani pod prístroj samotný. Prívodný kábel by mal byť vedený tak, aby o neho nemohol nikto zakopnúť a pritom nebol prekrytý ani zatěžkaný žiadnym predmetom. · Ak sa z prístroja začnú ozývať divné zvuky, bude cítiť dym alebo sa začne šíriť dym, tak ho ihneď vypnite a vypojte z el. siete. Varovanie (možno použiť len s chladivom R290 · Proces odmrazovanie alebo čistenie neurýchľujte použitím prostriedkov, ktoré na to nie sú určené výrobcom. · Spotrebič musí byť skladovaný v miestnosti, v ktorej nie sú nepretržité zdroje zážihu vznietenia (napr. otvorený oheň, spustený plynový spotrebič alebo spustený elektrický ohrievač). · Neprepichujte ani nezapaľujte. · Berte na vedomie, že chladivo nemusí mať žiadny zápach. · Zariadenie DO266A by malo byť nainštalované, prevádzkované a skladuje v miestnosti, ktorej podlahová plocha presahuje 7 m2. · Musia byť dodržané všetky vnútroštátne predpisy o plyne. · Okolie ventilačných otvorov udržujte bez prekážok. · Spotrebič musí byť skladovaný tak, aby sa zabránilo jeho mechanickému poškodeniu. · Spotrebič musí byť skladovaný v dobre vetranom priestore, ktorého rozmery zodpovedajú minimálnym uvedeným rozme-rom, ktoré sú nutné pre správnu prevádzku spotrebiča. · Akákoľvek osoba, ktorá zasahuje do okruhu chladiva, musí mať aktuálne a platné osvedčenie udelené hodnotiacom orgá-nom, ktorý je akreditovaný v rámci zodpovedajúceho priemysle a ktorý môže ručiť za ich schopnosť bezpečne spra-vávať chladiva v súlade s uznávaným hodnotiacim požiadavkou. · Servis môže byť vykonávaný len v súlade s odporúčaním výrobcu. Údržba a opravy, ktoré vyžadujú zapojenie iného odborného personálu, sa musí robiť pod dohľadom osoby, ktorá je spôsobilá na zaobchádzanie s horľavými chladivami. Pozor: Nebezpečenstvo vzniku požiaru / horľavé materiály SK Tento spotrebič používa horľavé chladivo. Ak by chladivo presakovalo či unikalo von, kde by mohlo hroziť riziko zapálenia, tak hrozí nebezpečenstvo požiaru. TENTO MANUÁL SI USCHOVAJTE AJ K NEJSKORŠIEMU NAHLIADNUTIU 114 DO266A TIPY NA NIŽŠIE ENERGIE · Nikdy nepoužívajte prístroj v miestnostiach, ktoré sú väčšie, než je odporúčaná veľkosť. · Dbajte na to, aby žiadne otvory prístroja neboli upchaté, alebo blokované nábytkom a pod. · Počas najteplejších dní zatiahnite i žalúzie, alebo záclony na oknách, aby sa vzduch v miestnosti zbytočne znova neohrieval. · Kontrolujte filtre, aby boli vždy čisté. SK · Majte vždy zatvorené dvere a okná, aby ste udržali studený vzduch v miestnosti a teplý Vám z vonku neprúdil dovnútra. www.domo-elektro.be DO266A 115 ČASTI Predná časť 1. Ovládací panel 2. Výstup vzduchu 1 3 Zadná časť 3. Vzduchový filter 4. Vstup vzduchu 5. Výstup vzduchu 6. Odtok 2 5 4 6 Časti 7. Hadica odtoku 8. Diaľkový ovládač 9. Výfuková hadica 9 a. Napojenie výfukové hadice 10. Sada pre montáž na stenu 10 a. Adaptér na stenu 10 b. Sada pre prichytenie 7 11. Sada pre montáž do okna 11 a. Okenné adaptér 11 b. Súprava pre upevnenie 11 c. Okenné utesnenie 11 d. Zásuvka 11 e. Železné “L” vzpery 9 8 9a 10 10b 10a SK 11 116 11a DO266A 11b 11c 11d 11e ZAPOJENIE A INŠTALÁCIA · Umiestnite prístroj na stabilný a rovnú plochu. Tak predídete obťažujúcim zvukom a vibráciám. Uistite sa, že podlaha pod prístrojom je dostatočne pevná, aby prístroj uniesla. max 120 cm · Prístroj má malé kolieska pre ľahšiu manipuláciu. Presúvajte prístroj len po rovnej a hladkej ploche. Dbajte na zvýšenú min 30 cm opatrnosť pri posunovaní prístrojom po koberci. Nikdy sa nesnažte prístrojom prechádzať predmety na zemi. · Umiestnite prístroj čo najbližšie uzemnenej zásuvke. · Okolo klimatizácie ponechajte do všetkých smerov voľný priestor minimálne 30 cm. · Hadicu pre odvod teplého vzduchu musíte používať vždy, keď nastavíte funkciu “cool”, alebo “auto”. Počas používania funkcií “fan” a “dry”, hadica nie je potreba. · Zaistite dostatok priestoru okolo výstupu vzduchu - aspoň 50 cm. · Zistite, aby sa hadica počas používania nijako neohýbali. INŠTALÁCIA OKENNÉHO ADAPTÉRA · Najskôr na výfukovú hadicu nasaďte spojku k okenné koncovke. · Potom celú hadicu nasaďte na otvor výfuku v zadnej časti prístroja. · Na druhý koniec hadice napevno pripojte okenné koncovku. · Do okna umiestnite okenný adaptér. Ten je možné umiestniť v horizontálnej i vertikálnej max 120 cm rovine. Adaptér zaistite vo Vami požadovanej dĺžke. min 30 cm · Do zaisteného adaptéra v okne nacvaknite okenné koncovku (ktorá je prichytená na hadicu). · Ak je potreba, tak môžete okolí ešte utesniť. · Okenné adaptér si zafixujte na požadovanú dĺžku. SK · Ak je potreba, tak si môžete okno zafixovať pomocou železných “L vzpier” a skrutky. www.domo-elektro.be DO266A 117 INŠTALÁCIA NA STENU · Najskôr na výfukovú hadicu nasaďte spojku k okenné koncovke. · Potom celú hadicu nasaďte na otvor výfuku v zadnej časti prístroja. · Na druhý koniec hadice napevno pripojte koncovku do steny. · V stene pripravte otvor so zodpovedajúcim rozmerom voči koncovke · Koncovku pripevnite do otvoru v stene a zaistite. max 120 cm min 30 cm POUŽITIE Horizontálne položený diel v prednej časti klimatizácie môžete v prípade potreby ručne vysunúť / zasunúť. Tento diel zlepšuje výstup vzduchu. OVLÁDACÍ PANEL 4 SK 3 118 DO266A 2 1 1. Hlavný spínač ON / OFF Týmto tlačidlom prístroj zapnete / vypnete 2. Remote LED Screen Indicators Remote LED Screen Indi Tlačidlá “+” a “-” Transmission Indicator Tlačidlá slúžia na nastavovanie teploty. Požadovaná teplota môže byť nastavená v rozmedzí Transmission Indica Lights when remote sends od 17°C do 30°C. Na prístroji si môžete voliť medzi nastavenie stupňov “°C”up a “°F”. Zmenu signal to unitLights up when remo jednotiek vykonáte stlačením oboch tlačidiel na ráz. signal to unit ON/OFF display MODE display ON/OFF Appears when the unitdisp is 3. Tlačidlo FUNKCIE (MODE) Displays theMODE currentdisplay Appears whe and disappears when it is Tlačidlom si môžete voliť jednu z funkcií prístroja. Každým stlačením tlačidla sa prepne Displays the current mode, including: and disappea funkcie: KLIMATIZÁCIA - ODVLHČOVANIA - VENTILÁCIE. Vybraná funkcia bude na including: TIMER ON d AUTO mode, ovládacom paneli podsvietená. Pokiaľ si zvolíte funkcií ventilácie, tak sa prístroj prepne do Displays wh AUTO COOL automatického režimu. Vy môžete voliť len rýchlosť ventilácie. ON is set COOL DRY DRY HEAT 4. LED displej HEAT FAN FAN tak na displeji Displej ukazuje nastavenú teplotu. Pokiaľ máte vybranú funkciu “ventilácia”, bude zobrazená aktuálna izbová teplota. DIAĽKOVÉ OVLÁDANIE Pri používaní ovládača musíte vždy mieriť priamo proti prístroji. Ak ovládač nereaguje, tak ho zamerajte priamo na prístroj a skúste opäť stlačiť ON / OFF. Akonáhle sa prístroj zapne (vypínač reaguje), tak sa ozve 1 zvukový signál. Diaľkový ovládač pracuje v dosahu 8 m od 2 prístroja. 3 1. Hlavný spínač ON / OFF 4 6 7 8 5 9 Týmto tlačidlom prístroj zapnete / vypnete 2. Tlačidlo FUNKCIE (MODE) SK Tlačidlom si môžete voliť jednu z funkcií prístroja. Každým stlačením tlačidla sa prepne funkcie: KLIMATIZÁCIA - ODVLHČOVANIA - VENTILÁCIE. Vybraná funkcia bude na ovládacom paneli podsvietená. SIL FAN SPEED display Not a FAN SPEED display Displays selected FAN SPEED: 3. Tlačidlo FAN (ventilácia) Displays selected HIGH, MED,FAN SPEED: MED, or -LOW HIGH –HIGH, AUTO. Týmto tlačidlom si volíte rýchlosť ventilátora: LOW Temperat or LOW This display is blank when Displays t display is blank when set to AUTO This speed. 4. Tlačidlo SLEEP (spánok) when usin set to AUTO speed. Tlačidlom aktivujete režim na spánok - sleep Tempe www.domo-elektro.be DO266A Timer 119 This displ V režime “sleep” je zvolená teplota postupne zvyšovať o 1 ° C za 30 min. Za ďalších 30 minút sa teplota zvýši o ďalšie 1 ° C. Klimatizácia bude túto teplotu udržiavať ďalších 7 hodín. Po uplynutí tohto času sa klimatizácia prepne späť do pôvodného nastavenia teploty a funkcie “sleep” sa ukončí. POZNÁMKA: túto funkciu nemôžete nastaviť zároveň s “fan”, alebo “dry” funkcií. 5. Tlačidlo TEMP (teplota) Na prístroji si môžete nastaviť požadovanú teplotu v rozmedzí 17-30 ° C. Akonáhle stlačíte obe tlačidlá zároveň, tak sa prehodí jednotky teploty “° C” a “° F”. 6. Tlačidlo RÝCHLE VOĽBY (SHORTCUT) K tomuto tlačidlu si môžete nastaviť predvolenú funkciu a následne jej jedným stlačením zapínať / vypínať. Remote LED Screen Indicators 7. How To Use The Basic Fun Tlačidlo zapnutia časovača (TIMER ON) Týmto tlačidlom zapínate časovač. 8. Transmission Indicator Lights up when remote sends signal to unit Tlačidlo vypnutia časovača (TIMER OFF) ON/OFF display MODE display tlačidlom Appears when the unit is turned on, Týmto časovač vypínate. Displays the current and disappears when it is turned off mode, including: Remote LED Screen Indicators How To Use The TIMER OFF display TIMER ON display AUTO 2 Displays when TIMER DisplaysLED when osvietenie TIMER COOL 9. Tlačidlo pre zopnutie ON/OFF SHORT OFF is set ON is set 3 CUT DRY HEAT Týmto tlačidlom vypnete LED podsvietenie. To uvítate ak chcete spať a osvetlenie displeja Vás TIMER MODE Transmission Indicator 1 ON FAN TEMP Lights up when remote sends ECO rozsvieti. display ruší. Akonáhle stlačíte tlačidlo znova, tak sa displej opäť TIMER FAN signal to unit OFF Not available for ION this unit ON/OFF display FOLLOW MODE display Appears when the unit is turned on, SLEEP SWING LED ME Battery display Displays theFUNKCIÍ current and disappears when it is turned off NASTAVENIE Low battery mode, including: detection TIMER OFF display TIMER ON display AUTO AUTO Displays when TIMER Displays when TIMER COOL ON/OFF OFF is set display SLEEP ON is set 3 DRY V režime AUTO si sám prístroj upravuje výkon a zopnutie tak aby sa požadovaná Displaysklimatizácie, when HEAT MODE 1 SLEEP function teplota okolia byť zapnutá Aj cez diaľkové ovládanie. FAN menila čo najmenej. Táto funkcia môže TEM is activated ECO display FAN Not available for 1. Na ovládači si navoľte režim AUTO pomocou tlačidla MODE. FOLLOW ME ION this unit display COOL operation SLEEP SWING 2. Nastavte si požadovanú teplotu a prístroj si už sám zvolí Indicates that stupeň potrebnej klimatizácie. Battery display the FOLLOW MELow battery 1. Press the MODE button to select Počas automatického režimu vy nemôžete regulovať rýchlosť ventilátora. function is on detection COOL mode. 2. Set your desired temperature us the Temp or Temp button 3. Press the FAN button to select th COOL - chladenie SLEEP function SILENT display fan speed: AUTO, LOW, MED,or FAN SPEED display Not available for this unit HIGH. “COOL” a znižuje teplotu v miestnosti. is activated DisplaysFunkcia selected FAN SPEED: je klimatizácia 4. Press the ON/OFF button to star HIGH, MED, FOLLOW ME or LOW 1. Navoľte si túto funkciu COOL tlačidlom MODE, akonáhle bude zvolená, takunit. bude na display COOL operation Temperature/Timer display SK Not available for SLEEP display this unit Displays when This display is blank when ovládacom set to AUTO speed. 120 paneli Displays svietiť.the set temperature by default, or timer setting when using TIMER ON/OFF functions Indicates that the FOLLOW ME function is on 1. Press the MODE b Not available for 2. Set your desired t 2. Pomocou šípok na paneli alebo na17-30 ovládači si nastavte požadovanú teplotu v miestnosti. COOL mode. Temperature range: C(62 F-86 F) 3. Timer range: si 0-24 hours Tlačidlom “fan” alebo nasetting ovládači nastavte požadovanú rýchlosť ventilátora. Sú tu 3the Temp or T this unit 3. Press the FAN but This display is blank when operating in FAN mode. rýchlosti. SILENT display fan speed: AUTO FAN SPEED display o Displays selected FAN SPEED: HIGH, MED, DO266A or LOW This display is blank when 5 O O Not available for this unit Temperature/Timer display Displays the set temperature by default, or timer setting HIGH. 4. Press the ON/OFF unit. mode, including: AUTO COOL DRY HEAT FAN Low battery TIMER OFF display detection Displays when TIMER ON/OFF OFF is set 3 SLEEP display Displays when MODE 1 SLEEP function TEMP ECO is display activated FAN Not available for DRY-odvlhčovanie ION ME this FOLLOW unit display FOLLO SLEEP SWING Funkcia DRY je funkcia odvlhčovania a vy si tak môžete regulovať vlhkosť v miestnosti. Pri COOL operation ME Battery display Indicates that Lowthe battery ME používaní zatvorte dvere aj okná, aby odvlhčenie miestnosti bolo čoFOLLOW najlepšie. 1. Press the MODE detection function is on TIMER ON display Displays when TIMER ON is set 1. COOL mode. Stlačením tlačidla “MODE” nastavte funkciu “DRY” - rozsvieti sa príslušná kontrolka na 2. Set your desired SLEEP Not display available for the Temp or paneli. Displays when this unit 2. SILENT display is activated FAN SPEED display Pomocou šípok na paneli alebo naNot ovládači si nastavte požadovanú hodnotu. available for this unit 3. Displays selected FAN SPEED: FOLLOW ME HIGH, nieMED, Pre túto funkciu je možné nastavovať rýchlosť ventilátora. or display Indicates that Temperature/Timer display ME Displays the set temperature by default,the or FOLLOW timer setting when using TIMER ON/OFF functions function is on LOW This display is blank when set to AUTO speed. 1. Press the MODE but COOL mode. 2. Set your desired tem SILENT display Stlačením tlačidla “MODE” display kontrolka the na Temp or Tem FAN SPEED Pressdisplay the FAN butto Not available SILENT for3.this unit paneli. fan speed: AUTO, L FAN SPEED display Displays selected FAN SPEED: FAN SPEED display Not available for this unit HIGH. Not available for this Displays selected FAN SPEED: Displayssiselected FAN SPEED: HIGH, Tlačidlom “fan” alebo na ovládači nastavte požadovanú rýchlosť ventilátora. Sú 4.tuPress 3 the ON/OFF b 5 MED, HIGH, MED, unit. HIGH, MED, or LOW or LOW FAN - ventilácia 1. 2. 3. Press the FAN b fan speed: AUTO HIGH. 4. Press the ON/OF unit. COOL operation SLEEP function Temperature range: 17-30oC(62OF-86OF) Not available for nastavte “FAN” - rozsvieti Timer funkciu setting range: 0-24 hours this unitsa príslušná This displaydisplay is blank when operating in FAN mode. SILENT , HIGH , AUTO) Temperature/Timer display Temperature/Timer display or LOW thewhen set temperature default, or timer setting This display isDisplays blank je možné nastavovať teplotuby miestnosti. when using TIMER ON/OFF functions displ Displays theTemperature/Timer set temperature by defau displayrange: is blank when set to AUTOThis speed. Temperature 17-30 C(62 F-86 F) the set temperatu when using Displays TIMER ON/OFF functions set to AUTO speed. Timer setting range: 0-24 hours o O whenrange: using17-30 TIMER ON/OF Timer on - automatické zapnutie Temperature C(62 FThis display is blank when operating in FAN mode. Temperature range: 17 Týmto tlačidlom zapnete časovač, ktorý odloží štart klimatizácie aTimer prístrojsetting zopne. range: 0-24 hours rýchlosti (LOW 3. This display is blank when Pre túto speed. funkciu nie set to AUTO o 1. 2. 3. O O 5 Timer setting range: 0Časovač zapnete stlačením tlačidla TIMER ON na ovládači. This display is blank when operating in Na displeji ovládača sa zobrazí čas za ako dlho by sa prístroj zapol. This display is blank when Každé stlačenie (alebo podržaním) tlačidla zvýši nastavený čas. Čas udáva za ako dlho sa 5 prístroj spustí. 4. Po nastavení času, začne prístroj čas odpočítavať a displeji svieti “TIMER ON”. Na ovládacom paneli budú svietiť 2 svetelné kontrolky. 5. Ak časovač chcete vypnúť, tak týmto tlačidlom prenastavte čas až do “0”. Tlačidlo môžete stláčať alebo podržať. 5 Timer off - automatické vypnutie 1. Stlačte tlačidlo TIMER OFF na ovládači. 2. Na displeji ovládača sa zobrazí čas za ako dlho by sa prístroj vypol. 3. Každé stlačenie (alebo podržaním) tlačidla zvýši nastavený čas. Čas udáva za ako dlho sa prístroj vypne. 4. Po nastavení času, začne prístroj čas odpočítavať a displeji svieti “TIMER OFF”. Na ovládacom paneli budú svietiť 2 svetelné kontrolky. 5. Ak časovač vypnutia chcete zrušiť, tak týmto tlačidlom prenastavte čas až do “0”. Tlačidlo môžete stláčať alebo podržať. www.domo-elektro.be DO266A SK Týmto tlačidlom nastavíte časovač, pre automatické vypnutie klimatizácie po určitej dobe .. 121 Automatické vypnutie / zapnutie (Timer on + Timer off) Vyššie spomínané funkcie časovača môžete samozrejme nastaviť aj súčasne. Nastavenie potom bude automaticky udávať, kedy sa prístroj zopne ale aj kedy sa následne vypne. POZNÁMKA: Čas nastavenia vždy vyhází z aktuálneho času a dopočítava ho. Príklad. Ak je teraz 13 hodín a my chceme klimatizáciu zopnúť o 16:30 a v 18 hodín opäť vypnúť. Tak musíte na časovači zapnutie (TIMER ON) nastaviť 3,5 hodiny a na časovači vypnutie (TIMER OFF) 5,0 hodín. Sleep Po aktivácii funkcie “sleep” sa po 30 minútach zvýši teplota o 1 ° C. Za ďalších 30 minút sa teplota zvýši o ďalšie 1 ° C. Klimatizácia bude túto teplotu udržiavať ďalších 7 hodín. Po uplynutí tohto času sa klimatizácia prepne späť do pôvodného nastavenia teploty a funkcie “sleep” sa ukončí. POZNÁMKA: túto funkciu nemôžete nastaviť zároveň s ventiláciou ( “fan”), ani funkcií odvlhčovanie ( “dry”). RÝCHLA VOĽBA (Shortcut) K tomuto tlačidlu si môžete nastaviť predvolenú funkciu a následne jej jedným stlačením zapínať / vypínať. Ak nejaké nastavenie prístroja používate častejšie, tak si ho môžete uložiť do pamäte. Uložíte podržaním tlačidla na 3 sekundy. Prístroj si uloží nastavenie, ktoré je zvolené práve v momente ukladania. Pod voľbu nastavenia je možné si uložiť: funkciu (MODE), požadovanú teplotu, rýchlosť ventilácie a prípadne Aj nastavenie časovača, Kedykoľvek potom stlačte tlačidlo (SHORTCUT), tak prístroj začne pracovať na uložené a zapamätané nastavenia. ČISTENIE A ÚDRŽBA ODVODNENIE Trvalý odtok Počas funkcie “odvlhčovanie” môžete použiť trvalé odvodnenie. 1. Odstráňte zátku vyústenie trvalého odtoku. 2. Pripojte vypúšťaciu hadicu na miesto pre stály odtok kondenzátu a druhý koniec odveďte do odpadu v miestnosti. 3. Uistite sa, že voda je bezpečne odvádzaná a nič jej nestojí v ceste. 2 SK 1 122 DO266A Odtok: kód P1 Ak nepoužívate trvalý odtok, nerecyklovaný kondenzovaná voda bude uchovávaná v nádržke na vodu. · Po naplnení nádržky na vodu sa ozve niekoľko zvukových signálov a na displeji sa zobrazí kód P1. Funkcia “chladenie” a “odvlhčovanie” sa automaticky ukončí. Ventilátor naďalej pobeží, čo je normálne. · Presuňte prístroj na miesto, kde môžete ľahko vodu vypustiť / vyliať. · Odstráňte vypúšťací zátku na spodnej časti prístroja (A) a vypustite vodu. · Po úplnom vypustení nádržky na vodu umiestnite vypúšťací zátku späť na otvor pre odtok. · Reštartujte prístroj a uistite sa, že chybový kód P1 na displeji už nie je zobrazený. Ak kód nezmizne, skúste prístroj niekoľkokrát vypnúť a zapnúť. Ak je aj naďalej kód zobrazený, prosím kontaktujte popredajný servis. A · POZNÁMKA: Pred opätovným spustením prístroja sa vždy uistite, že ste nádržku opäť uzavreli. ČISTENIE · Pred čistením prístroja vždy vytiahnite zástrčku zo zásuvky. · Nikdy na čistenie prístroja nepoužívajte žiadne chemické alebo drsné prostriedky. · Nikdy prístroj nečistite vodou alebo inými kvapalinami, to by mohlo spôsobiť poškodenie elektrickým prúdom. · Ak je poškodený prívodný kábel, musí byť opravený alebo nahradený popredajným servisom alebo kvalifikovanou osobou. Vzduchový filter · Čistite vzduchový filter aspoň každé dva týždne. Uistite sa, že klimatizácia môže pracovať v optimálnych podmienkach. · Čistite vzduchový filter vo vlažnej vode s trochou umývacieho prostriedku. Filter dôkladne vypláchnite a nechajte uschnúť. www.domo-elektro.be SK · Pred umiestnením filtra späť do klimatizácie sa uistite, že je kompletne suchý. DO266A 123 Telo klimatizácia Pre vyčistenie vonkajšej časti prístroja používajte vlhkú mäkkú handričku s trochou jemného čistiaceho prostriedku. Uistite sa, že je prístroj dôkladne vysušený. Skladovanie Pred skladovaním prístroja na dlhšiu dobu, prosím postupujte podľa nasledujúcich krokov: · Vypustite všetku vodu zo spotrebiča. · Potom na pol dňa zapnite prístroj vo funkcii “fúkanie”. Uistite sa, že je prístroj umiestnený vo vyhrievanom priestore. To prístroj kompletne vysuší a odovzdajte utváranie plesní. · Prístroj vypnite, vytiahnite zástrčku zo zásuvky a odoberte batérie z diaľkového ovládania. · Vyčistite filtre a umiestnite ich späť do prístroja. · Uchovávajte prístroj na suchom a tmavom mieste. MOŽNÉ PROBLÉMY A ICH RIEŠENIA Prístroj nefunguje, keď stláčate tlačidlo on / off. · Ak je zobrazený chybový kód P1, vypustite vodu z klimatizácie. · Ak je teplota v miestnosti nižšia, než zvolená teplota, upravte zvolenú teplotu. Miestnosť nie je dostatočne chladná. · Okná a dvere nie sú zatvorené. Uistite sa, že všetky okná a dvere sú zatvorené. · V miestnosti môže byť nejaký zdroj tepla. Ak je to možné, odstráňte všetky zdroje tepla. · Vzduchová hadica nie je pripojená alebo je blokovaná. Pripojte hadicu a skontrolujte, či nie je blokovaná. · Zvolená teplota je vysoká. Upravte zvolenú teplotu. · Vzduchový filter je znečistený. Vyčistite vzduchový filter. Prístroj vydáva moc hluku alebo vibruje. · Podlaha nie je hladká alebo rovná. Ak je to možné, umiestnite prístroj na hladký a rovný povrch. · Vzduchový filter je znečistený. Vyčistite vzduchový filter. SK Prístroj vydáva bublavý zvuk 124 · Tento zvuk vytvára chladiaci náplň, ktorý je v prístroji. Tento občasný zvuk je v poriadku. DO266A CHYBOVÉ KÓDY Na vašej klimatizáciu sa môžu zobraziť nasledujúce chybové kódy: E1: Nefunguje senzor pre snímanie teploty v miestnosti. Vypnite prístroj a odoberte zástrčku zo zásuvky. Počkajte 10 sekúnd a zapojte prístroj späť. Zapnite prístroj. Ak chybový kód pretrváva, kontaktujte servis. E2: Senzor vlhkosti nefunguje. Vypnite prístroj a odoberte zástrčku zo zásuvky. Počkajte 10 sekúnd a zapojte prístroj späť. Zapnite prístroj. Ak chybový kód pretrváva, kontaktujte servis. E4: Displej nefunguje správne. Vypnite prístroj a odoberte zástrčku zo zásuvky. Počkajte 10 sekúnd a zapojte prístroj späť. Zapnite prístroj. Ak chybový kód pretrváva, kontaktujte servis. P1: Nádržka na vodu je plná. Pripojte vypúšťaciu hadicu na dolnej miesto pre odtok kondenzátu. Keď chybový kód pretrváva, kontaktujte servis. OHĽAD NA ŽIVOTNÉ PROSTREDIE Symbol na prístroji alebo na jeho obale znamená, že s týmto výrobkom nie je možné nakladať ako s domovým odpadom, ale musí byť odovzdaný na miestach určených na zber a likvidáciu elektrických a elektronických zariadení. Dodržaním tohto odporúčania chránite životné prostredie a zdravie spoluobčanov. Viac informácií o možnostiach likvidácie nebezpečného odpadu obdržíte na obecných alebo mestských úradoch, zberných dvoroch alebo v predajni, kde ste prístroj zakúpili. SK Obalové materiály sú recyklovateľné, nakladajte s nimi podľa predpisov pre životné prostredie. www.domo-elektro.be DO266A 125 126 DO266A www.domo-elektro.be DO266A 127 Webshop BESTEL de originele Domo-accessoires en -onderdelen online via: COMMANDEZ d’authentiques accessoires et pièces Domo en ligne sur: BESTELLEN SIE die Domo Original-Zubehör und -Ersatzteile online über: ORDER the original Domo accessories and parts online at: webshop.domo-elektro.be of scan hier: ou scannez ici: oder hier scannen: or scan here: LINEA 2000 BV - Dompel 9 - 2200 Herentals - Belgium - Tel: +32 14 21 71 91 - Fax: +32 14 21 54 63-
 1
1
-
 2
2
-
 3
3
-
 4
4
-
 5
5
-
 6
6
-
 7
7
-
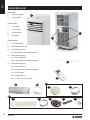 8
8
-
 9
9
-
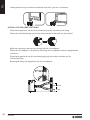 10
10
-
 11
11
-
 12
12
-
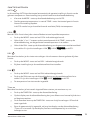 13
13
-
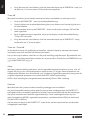 14
14
-
 15
15
-
 16
16
-
 17
17
-
 18
18
-
 19
19
-
 20
20
-
 21
21
-
 22
22
-
 23
23
-
 24
24
-
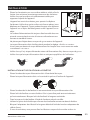 25
25
-
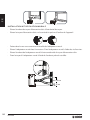 26
26
-
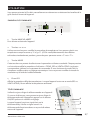 27
27
-
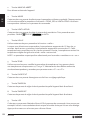 28
28
-
 29
29
-
 30
30
-
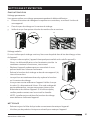 31
31
-
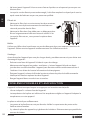 32
32
-
 33
33
-
 34
34
-
 35
35
-
 36
36
-
 37
37
-
 38
38
-
 39
39
-
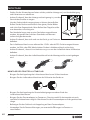 40
40
-
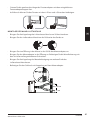 41
41
-
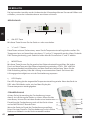 42
42
-
 43
43
-
 44
44
-
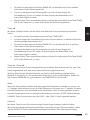 45
45
-
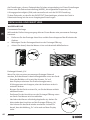 46
46
-
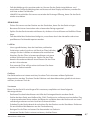 47
47
-
 48
48
-
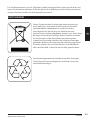 49
49
-
 50
50
-
 51
51
-
 52
52
-
 53
53
-
 54
54
-
 55
55
-
 56
56
-
 57
57
-
 58
58
-
 59
59
-
 60
60
-
 61
61
-
 62
62
-
 63
63
-
 64
64
-
 65
65
-
 66
66
-
 67
67
-
 68
68
-
 69
69
-
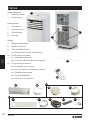 70
70
-
 71
71
-
 72
72
-
 73
73
-
 74
74
-
 75
75
-
 76
76
-
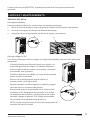 77
77
-
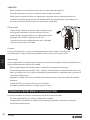 78
78
-
 79
79
-
 80
80
-
 81
81
-
 82
82
-
 83
83
-
 84
84
-
 85
85
-
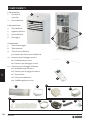 86
86
-
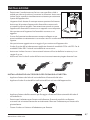 87
87
-
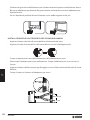 88
88
-
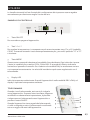 89
89
-
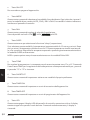 90
90
-
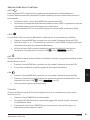 91
91
-
 92
92
-
 93
93
-
 94
94
-
 95
95
-
 96
96
-
 97
97
-
 98
98
-
 99
99
-
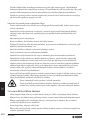 100
100
-
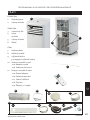 101
101
-
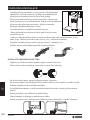 102
102
-
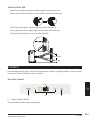 103
103
-
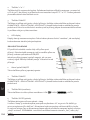 104
104
-
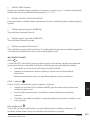 105
105
-
 106
106
-
 107
107
-
 108
108
-
 109
109
-
 110
110
-
 111
111
-
 112
112
-
 113
113
-
 114
114
-
 115
115
-
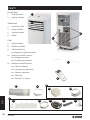 116
116
-
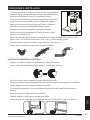 117
117
-
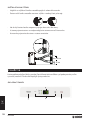 118
118
-
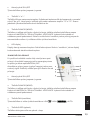 119
119
-
 120
120
-
 121
121
-
 122
122
-
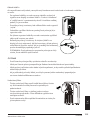 123
123
-
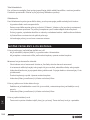 124
124
-
 125
125
-
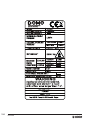 126
126
-
 127
127
-
 128
128


in andere talen
- English: Domo DO266A Owner's manual
- italiano: Domo DO266A Manuale del proprietario
- français: Domo DO266A Le manuel du propriétaire
- español: Domo DO266A El manual del propietario
- Deutsch: Domo DO266A Bedienungsanleitung
- slovenčina: Domo DO266A Návod na obsluhu
- čeština: Domo DO266A Návod k obsluze
Gerelateerde papieren
-
Domo DO263A de handleiding
-
Domo DO1034A de handleiding
-
-
Domo DO362A de handleiding
-
Domo Klimaanlage für Räume bis 30m² de handleiding
-
Domo DO360A de handleiding
-
-
Domo DO361A de handleiding
-