
TV-L2BT
Bedienungs anleitung (DE)
User Guide (GB)
Mode d’emploi (FR)
Istruzioni d'uso (IT)
Manual de instrucciones (ES)
Manual de Instruções (PT)
Handleiding (NL)


1
ÜBERSICHT
Empfänger (Headset)
1 Ein-/Aus-Schalter
2 Kontroll-Anzeige-LED
3 Lautstärkeeinstellung
4 Balance-Einstellung
5 Einstellung der Klangverbesserung
6 NFC
7 Wiedergabe / Pause / Anruf annehmen / Anruf beenden
8 Mikrofontaste zum Hören von Geräuschen in der Umgebung /
Taste zum Koppeln mit Bluetooth-Geräten (PAIR)
9 Mikrofon
10 Einstellbarer Ohrhörer (rechts)
11 Einstellbarer Ohrhörer (links)
12 Anschluss für Ladekabel (Micro USB)
13 Ladekontakt (zum Laden des Empfängers im Sender)
Sender
1 Ladekontakte
2 Taste zum Koppeln mit Bluetooth-Geräten (PAIR)
3 Kontroll-Anzeige-LED (für Spannungsversorgung/Kopplung (PAIR))
4 Anschluss für Netzteil (Micro USB)
5 3,5 mm Audio-Eingang
6 Optischer Audio-Eingang TOSLINK

2
TV-L2BT IN BETRIEB NEHMEN
Verpackungsinhalt
• 1 Empfänger mit Ohrhörer-Muscheln
• 1 Sender
• 1 Netzteil (für Sender oder Empfänger)
• 1 Paar zusätzliche Ohrhörer-Muscheln
• 1 Analoges Audiokabel (2 x 3,5 mm Klinkenstecker)
• 1 Audioadapter (RCA) für analoges Audiokabel
• 1 Optisches TOSLINK Digital-Audiokabel
• 1 Bedienungsanleitung
Wichtig: Lesen Sie bitte zuerst die Sicherheitshinweise auf Seite 9, bevor
Sie das Gerät in Betrieb nehmen.
Sender anschließen
1 Verbinden Sie den Stecker des Netzteils mit der Micro-USB-Anschlussbuchse
an der Rückseite des Senders.
2 Stecken Sie das Netzteil in eine Steckdose.
Die blaue Betriebsanzeige blinkt, sobald die Netzspannung vorhanden ist.
3 Verbinden Sie den Sender mit Ihrer gewünschten Tonquelle.
Für die unterschiedlichen Anschlussmöglichkeiten (Fernsehgerät, Stereo-
Anlage, MP3-Player etc.) sind im Lieferumfang mehrere Adapter vorhanden.
Bitte beachten Sie, dass nur ein Eingang (entweder analoger Audio-Ein-
gang oder optischer Audio-Eingang/TOSLINK) angeschlossen sein darf.
Netzgerät
Steck-
dose

Sind sowohl der analoge Audio-Eingang als auch der optische Audio-
Eingang/TOSLINK angeschlossen, wird das Signal des analogen Audio-
Eingangs verwendet.
Verwendung des Optischen TOSLINK Digital-Audiokabels
Wenn Ihre Tonquelle über einen optischen Audioausgang (TOSLINK/S-PDIF)
verfügt, verbinden Sie die beiden Geräte mit dem beiliegenden optischen TOS-
LINK Digital-Audiokabel. Diese Verbindung bietet eine höhere Übertragungsquali-
tät und eine geringere Anfälligkeit gegenüber elektrischen und magnetischen
Störeinkopplungen.
Bitte beachten Sie, dass das optische TOSLINK Digital-Audiokabel nicht geknickt
werden darf! Vermeiden Sie auch enge Biegeradien.
3
RCA-
Anschluss
3,5 mm
Kopfhörer-
anschluss
oder
Optischer
Anschluss

4
Akku im Empfänger laden
Laden Sie den Akku im Empfänger vor der ersten Inbe-
triebnahme für ca. 3 Stunden.
1 Schieben Sie den Ein-/Aus-Schalter am Empfänger in
die Position „OFF“.
2 Stellen Sie den Empfänger in die Lademulde des Sen-
ders.
3 Während des Ladevorgangs blinkt die grüne Anzeige-
LED am Empfänger langsam. Nach ca. 2 Stunden
leuchtet sie konstant und zeigt an, dass der Akku voll
geladen ist.
4 Wenn der Ein-/Aus-Schalter während des Ladens in der
Position „ON“ steht, schieben Sie ihn nach Beenden des Lagevorgangs einmal
in die Position „OFF“ und dann wieder auf „ON“, um die Verbindung wieder
herzustellen.
5 Sie können den Empfänger auch direkt mit dem mitgelieferten Netzteil laden.
Nutzen Sie dazu den Micro-USB-Anschluss am Empfänger.
• Ein voll geladener Akku ermöglicht eine Betriebszeit von bis zu 6 Stun-
den.
Netzgerät
Steck-
dose

• Um Akkukapazität zu sparen wird der Empfänger automatisch ausge-
schaltet, wenn für ca. 5 Minuten kein Signal vom Sender empfangen
wird oder der Signalpegel zu niedrig ist.
• Standby-Zeit: bis zu 180 Stunden (wenn der Empfänger mit einem Blue-
tooth-Gerät verbunden ist, ohne dass ein Signal übertragen wird)
• Auto-Off: Wenn der Empfänger eingeschaltet ist, ohne dass eine Verbin-
dung mit einem Bluetooth-Gerät besteht, schaltet er sich nach 5 Minuten
automatisch wieder aus. Um den Empfänger wieder einzuschalten,
schieben Sie den Ein-/Ausschalter in die Position „OFF“ und danach
wieder auf „ON“.
• Nach Auto-Off: Wenn der Ein-/Ausschalter nicht in die Position „OFF“
geschoben wird hält der Akku bis zu 1,5 Monate lang.
BETRIEB
Lautes Hören schädigt das Gehör!
An diesem Hörer kann eine höhere Lautstärke eingestellt werden als bei
herkömmlichen Geräten. Bei Personen mit gesundem Gehör und bei Kin-
dern kann dies zu Hörschäden führen.
• Stellen Sie vor dem Aufsetzen eine niedrige Lautstärke am Hörer ein.
• Setzen Sie sich nicht ständig hoher Lautstärke aus.
1 Schalten Sie den Sender ein. Schalten Sie das Gerät, von dem Sie den Ton
hören wollen, ein. Die blaue Betriebsanzeige am Sender blinkt.
2 Schieben Sie den Ein-/Ausschalter am Kopfhörer in die Position „ON“, die
blaue LED blinkt ebenfalls. Sender und Empfänger verbinden sich automa-
tisch. Falls die Verbindung nicht automatisch hergestellt wird, drücken Sie die
Taste „PAIR“ am Empfänger und halten Sie sie für ca. 5 s gedrückt, die LED
flackert blau und die Verbindung wird hergestellt.
3 Biegen Sie die Arme des Kopfhörers auseinander so dass die Ohrhörer-
Muscheln in die Ohren gesteckt werden können. Bitte beachten Sie, dass die
Ohrhörer-Muscheln nach oben, unten und seitwärts bewegt werden können,
so dass sie tief ins Ohr gesteckt werden können. Dadurch wird die Klangqua-
lität und die Lautstärke verbessert. Drücken Sie die Ohrhörer-Muscheln vor-
sichtig in Ihre Ohren, so dass sie angenehm sitzen und der Klang am besten
ist.
5

4 Stellen Sie die gewünschte Lautstärke ein.
5 Ändern Sie ggf. die Klangeinstellung nach Ihren Bedürfnissen.
Zum Ändern des Klanges drücken Sie jeweils kurz die „TONE“-Taste.
- 1 kurzer Piepton: Anhebung der Höhen.
- 2 kurze Pieptöne: Anhebung der Bässe und Anhebung der Höhen.
- 3 kurze Pieptöne: Anhebung der Bässe.
- 1 langer Piepton: Neutral.
6 Stellen Sie ggf. die Balance (links/rechts) ein.
Hinweis: Wenn der Akku fast leer ist, flackert die Kontroll-LED blau (bei Blue-
tooth-Betrieb) bzw. grün (bei Mikrofon-Betrieb). Sie hören 3 kurze Pieptöne im
Minutenabstand im Hörer. In der 4. Minute hören Sie einen doppelten Piep-
ton. In der 5. Minute wird der Empfänger dann automatisch abgeschaltet.
Die Mikrofontaste (MIC)
Die Mikrofonöffnung am unteren Teil der Vorderseite des Empfängers nimmt die
Geräusche aus Ihrer Umgebung auf. Wenn das Mikrofon eingeschaltet ist, hören
Sie Ihre Umgebung lauter. Sie können also beispielsweise Ihre Türklingel, Ihr
Telefon oder Ihren Gesprächspartner hören, auch wenn Sie den Empfänger tra-
gen.
Um das Mikrofon einzuschalten, drücken Sie die Mikrofontaste (MIC). Die
Betriebsanzeige wechselt zu grün und Sie hören einen kurzen Piepton.
Achten Sie darauf, dass die Mikrofonöffnung nicht abgedeckt ist. Sie hören Ihre
Umgebung und können den Empfänger als Hörverstärker verwenden, um Ihren
Gesprächspartner besser zu verstehen.
Zum Ausschalten des Mikrofons drücken Sie die Mikrofontaste (MIC) noch ein-
mal. Sie hören zwei kurze Pieptöne, und die Betriebsanzeige leuchtet wieder
blau.
Vorsicht! Beim Umschalten zwischen Mikrofon und Musik-/Ton-Quelle ist zu
beachten, dass die Lautstärke sich in Abhängigkeit vom Signaleingangspegel
wesentlich ändern kann! Als Vorsichtsmaßnahme sollte die Lautstärkeeinstellung
vor dem Umschalten generell verringert werden.
6

Multi-Point-Verbindung herstellen
(gleichzeitige Verwendung von Audio-Quelle und Mobiltelefon)
1 Verbinden Sie den Sender mit der Spannungsversorgung, so dass dieser ein-
geschaltet ist. Schalten Sie dann den Empfänger ein (Schalter auf „ON“) und
drücken Sie sowohl am Sender als auch am Empfänger die Taste „PAIR“.
Nach wenigen Sekunden ist die Verbindung hergestellt.
2 Trennen Sie den Sender vom Netz und drücken Sie die Taste „PAIR“ am
Empfänger und halten Sie sie für ca. 5 s gedrückt, die LED flackert blau.
3 Schalten Sie die Bluetooth-Funktion an Ihrem Mobiltelefon ein und suchen Sie
nach Bluetooth-Geräten. Wählen Sie den Eintrag TV-L2BT, um den Empfän-
ger mit dem Mobiltelefon zu verbinden.
4 Schalten Sie die Bluetooth-Funktion an Ihrem Mobiltelefon wieder aus. Ver-
binden Sie den Sender wieder mit dem Stromnetz, so dass sich der Sender
wieder mit dem Empfänger automatisch verbindet.
5 Schalten Sie jetzt an Ihrem Mobiltelefon die Bluetooth-Funktion wieder ein
und wählen Sie TV-L2BT, um die Verbindung zum Empfänger wieder herzu-
stellen.
6 Damit ist die Multi-Point-Verbindung hergestellt und Sie können mit Ihrem
Empfänger Anrufe von Ihrem Mobiltelefon annehmen, während Sie einen Film
ansehen oder Musik hören.
Bluetooth-Verbindung herstellen (NFC)
Verfügt Ihr Mobiltelefon über die Funktion NFC (Near Field Communication),
schalten Sie die NFC-Funktion und den Empänger ein und halten Sie den
Bereich des Empfängers, an dem das NFC-Logo ( ) aufgedruckt ist, für einige
Sekunden möglichst dicht an die entsprechende Stelle am Mobiltelefon. Die
Kopplung/Verbindung wird automatisch hergestellt.
Die Telefontaste (PHONE)
Haben Sie Ihren Empfänger mit einem Mobiltelefon/Smartphone verbunden, kön-
nen Sie durch kurzes Drücken auf die Telefontaste ein Telefongespräch anneh-
men bzw. beenden. Wenn Sie einen eingehenden Anruf erhalten, wird der Klin-
7

gelton von Ihrem Handy an den Kopfhörer übertragen, und Sie können ihn dann
in den Hörmuscheln hören. Nach kurzem Drücken der Telefontaste auf dem
Empfänger können Sie mit dem Anrufer sprechen. Das Mikrofon am Empfänger
nimmt Ihre Stimme auf. Drücken Sie die Telefontaste noch einmal, um den Anruf
zu beenden.
Ohrhörer-Muscheln austauschen
Im Lieferumfang sind 2 Paar Ohrhörer-Muscheln.
Ein Paar ist bereits am Kopfhörer montiert.
1 Zum Austauschen der Ohrhörer-Muscheln greifen Sie die Spitze der montier-
ten Ohrhörer-Muscheln und ziehen sie einfach ab.
2 Schieben Sie die Austausch-Ohrhörer-Muscheln auf die offenen Enden und
lassen Sie sie einrasten.
Fehlersuche
Kein Ton
- Kontrollieren Sie den Schalter am Empfänger (Stellung ON).
- Möglicherweise ist der Akku im Empfänger entladen. Laden Sie den Akku für
ca. 3 Stunden.
- Prüfen Sie, ob die Bluetooth-Verbindung aufgebaut ist.
- Die am Empfänger eingestellte Lautstärke ist zu niedrig. Stellen Sie eine höhe-
re Lautstärke ein.
Störgeräusche
- Möglicherweise ist der Akku im Empfänger entladen. Laden Sie den Akku für
ca. 3 Stunden.
- Möglicherweise ist die Entfernung des Empfängers zum Bluetooth-Sender
(z. B. Smartphone etc.) zu groß. Probieren Sie aus, ob die Qualität besser
wird, wenn Sie näher am Sender sind.
8

9
ANHANG
Sicherheitshinweise
• Lesen Sie diese Bedienungsanleitung sorgfältig durch und bewahren Sie sie
gut auf.
• Vermeiden Sie Belastungen durch Rauch, Staub, Erschütterungen, Chemika-
lien, Feuchtigkeit, Hitze oder direkte Sonneneinstrahlung.
• Da die heutigen Möbel mit einer unübersehbaren Vielfalt von Lacken und
Kunststoffen beschichtet sind und mit unterschiedlichen Pflegemitteln behan-
delt werden, ist es nicht auszuschließen, dass manche dieser Stoffe die
Kunststoff-Füße des Gerätes angreifen und erweichen. Die so veränderten
Gerätefüße können auf der Oberfläche der Möbel unliebsame Spuren hinter-
lassen. Verwenden Sie daher für Ihr Gerät bitte eine rutschfeste Unterlage.
• Der Empfänger ist in der Lage, sehr hohe Lautstärken wiederzugeben. Stel-
len Sie daher, besonders wenn das Gerät von mehreren Personen benutzt
wird, die Lautstärke immer auf ein Minimum, bevor Sie die Hörer in Ihre
Ohren stecken.
• Verwenden Sie nur das mitgelieferte Netzteil, da andere Netzteile die Geräte
beschädigen können.
• Versperren Sie nicht den Zugang zum Netzteil durch Möbel oder andere
Gegenstände.
Bestimmungsgemäße Verwendung
Dieses Gerät wurde entwickelt, um Tonsignale eines Senders kabellos an einen
Empfänger zu übertragen (Bluetooth). Jede andere Verwendung gilt als nicht
bestimmungsgemäß. Eigenmächtige Veränderungen oder Umbauten sind nicht
zulässig. Öffnen Sie die Geräte in keinem Fall selbst und führen Sie keine eige-
nen Reparaturversuche durch.
Benutzer mit Herzschrittmacher
Wenn Sie einen Herzschrittmacher tragen, sollten Sie Ihren Arzt fragen, bevor
Sie dieses Produkt verwenden. Das Gerät muss sofort ausgeschaltet werden,
wenn Sie irgendwelche Beeinträchtigungen spüren oder vermuten.

10
Netzteil
Achtung: Verwenden Sie nur das mitgelieferte Netzteil, da andere Netzteile
die Geräte beschädigen können. Achten Sie darauf, dass der Zugang zum
Netzteil nicht durch Möbel oder andere Gegenstände versperrt wird.
Achten Sie beim Betrieb auf den einwandfreien Zustand der Kabel und Stecker.
Abgeknickte oder durchgescheuerte Kabel sind lebensgefährlich!
Das Netzteil erfüllt die Ökodesign-Anforderungen der Europäischen Union (Richt-
linie 2005/32/EG). Dies bedeutet, dass sowohl im Betrieb als auch im Ruhezu-
stand der Stromverbrauch im Vergleich zu Netzteilen älterer Bauart deutlich nied-
riger ist.
Entsorgung
Wollen Sie Ihr Gerät entsorgen, bringen Sie es zur Sammelstelle
Ihres kommunalen Entsorgungsträgers (z. B. Wertstoffhof). Nach
dem Elektro− und Elektronikgerätegesetz sind Besitzer von Altgerä-
ten gesetzlich verpflichtet, alte Elektro− und Elektronikgeräte einer
getrennten Abfallerfassung zuzuführen. Das nebenstehende Symbol
bedeutet, dass Sie das Gerät auf keinen Fall in den Hausmüll werfen
dürfen!
Gefährdung von Gesundheit und Umwelt durch Akkus und Bat-
terien! Akkus und Batterien nie öffnen, beschädigen, verschlucken
oder in die Umwelt gelangen lassen. Sie können giftige und umwelt-
schädliche Schwermetalle enthalten.
Sie sind gesetzlich verpflichtet, Akkus und Batterien beim batterie-
vertreibenden Handel sowie bei zuständigen Sammelstellen, die ent-
sprechende Behälter bereitstellen, sicher zu entsorgen. Die Entsor-
gung ist unentgeltlich. Die nebenstehenden Symbole bedeuten, dass
Sie Akkus und Batterien auf keinen Fall in den Hausmüll werfen dür-
fen, sondern dass diese über Sammelstellen der Entsorgung zuge-
führt werden müssen.
Verpackungsmaterialien entsorgen Sie entsprechend den lokalen
Vorschriften.

11
Service−Hotline
Bei technischen Problemen wenden Sie sich an unsere Service-Hotline.
Schweiz: Tel. 0900 00 1675 (Kosten national, Swisscom bei Drucklegung:
CHF 2,60/min). Bei Garantieansprüchen wenden Sie sich an Ihren Fachhändler.
Konformitätserklärung
Dieses Gerät erfüllt die Anforderungen der EU−Richtlinie:
1999/5/EG Richtlinie über Funkanlagen und Telekommunikations-
endeinrichtungen und die gegenseitige Anerkennung ihrer Konformität.
Die Konformität mit der o. a. Richtlinie wird durch das CE−Zeichen auf dem
Gerät bestätigt.
Für die komplette Konformitätserklärung nutzen Sie bitte den kostenlosen
Download von unserer Website www.switel.com.
Telgo AG, Rte. D’Englisberg 11, 1763 Granges-Paccot, Switzerland
Pflegehinweise
• Reinigen Sie die Gehäuseoberflächen mit einem weichen und fusselfreien
Tuch.
• Verwenden Sie keine Reinigungsmittel oder Lösungsmittel.
Technische Daten
Übertragung Bluetooth 4.1 / 2,4 GHz
Reichweite bis zu 10 m (bei optimalen Bedingungen)
Frequenzbereich 70 Hz - 18 kHz
Max. Lautstärke 120 dB
Klirrfaktor < 1,0 %
Signal/Rausch-Abstand > 75 dB
Stromversorgung (Empfänger) Akku 3,7 V / 380 mA Lithium Polymer
Betriebsdauer Mit vollem Akku bis zu 6 Stunden
Ladezeit Für leeren Akku ca. 3 Stunden
Gewicht Empfänger 65 g

12
LED Sender Status
LED Empfänger Status
Blau, blinkt langsam Stand-by
Blau, blinkt langsam Stand-by
Grün, blinkt langsam Akku wird geladen
Grün, blinkt schnell Akku schwach
im Mikrofon-Modus
Blau, blinkt schnell (PAIR-Taste 1x drück.) Kopplung
Blau, blinkt schnell
(PAIR-Taste 5 s drück.) Kopplung
Blau, blinkt schnell Akku schwach
im Bluetooth-Modus
Blau, ständig an Gekoppelt
Blau, ständig an Gekoppelt
Grün, ständig an Akku voll geladen
Grün + Blau, ständig an Eintreffendes Telefongespräch
Grün, ständig an
(MIC-Taste 1x drück.) Mikrofon-Modus ein
LED Anzeige

13
Garantie
SWITEL-Geräte werden nach den modernsten Produktionsverfahren hergestellt
und geprüft.
Ausgesuchte Materialien und hoch entwickelte Technologien sorgen für einwand-
freie Funktion und lange Lebensdauer. Ein Garantiefall liegt nicht vor, wenn die
Ursache einer Fehlfunktion des Geräts bei dem Telefonnetzbetreiber liegt. Die
Garantie gilt nicht für die in den Produkten verwendeten Batterien, Akkus oder
Akkupacks. Die Garantiezeit beträgt 24 Monate, gerechnet vom Tage des Kaufs.
Innerhalb der Garantiezeit werden alle Mängel, die auf Material- oder Herstel-
lungsfehler zurückzuführen sind, kostenlos beseitigt.
Der Garantieanspruch erlischt bei Eingriffen durch den Käufer oder durch Dritte.
Schäden, die durch unsachgemäße Behandlung oder Bedienung, natürliche
Abnutzung, durch falsches Aufstellen oder Aufbewahren, durch unsachgemäßen
Anschluss oder Installation sowie durch höhere Gewalt oder sonstige äußere
Einflüsse entstehen, fallen nicht unter die Garantieleistung. Wir behalten uns
vor, bei Reklamationen die defekten Teile auszubessern, zu ersetzen oder das
Gerät auszutauschen. Ausgetauschte Teile oder ausgetauschte Geräte gehen
in unser Eigentum über. Schadenersatzansprüche sind ausgeschlossen, soweit
sie nicht auf Vorsatz oder grober Fahrlässigkeit des Herstellers beruhen. Sollte
Ihr Gerät dennoch einen Defekt innerhalb der Garantiezeit aufweisen, wenden
Sie sich bitte unter Vorlage Ihrer Kaufquittung ausschließlich an das Geschäft,
in dem Sie Ihr SWITEL-Gerät gekauft haben.
Alle Gewährleistungsansprüche nach diesen Bestimmungen sind ausschließlich
gegenüber Ihrem Fachhändler geltend zu machen. Nach Ablauf von zwei Jahren
nach Kauf und Übergabe unserer Produkte können Gewährleistungsrechte nicht
mehr geltend gemacht werden.

14

15
AT A GLANCE
Receiver (Headset)
1 Power ON/OFF
2 Signal LED Indicator
3 Volume Control
4 Balance Control
5 Sound Enhancement Button
6 NFC
7 Play/Pause/Call Pickup/End Call Button
8 Mic/Pair Button
9 Microphone
10 Right Adjustable Earbud
11 Left Adjustable Earbud
12 Micro USB Port (For Direct Charging the Headset Receiver)
13 Charging Contact (For Charging the Headset Receiver on the Transmitter)
Transmitter
1 Charging Pins
2 Pair Button
3 Signal LED Indicator (For Power/Pair)
4 Micro USB Socket (for Power Adaptor Only)
5 3.5 mm Audio Socket (Audio Line In)
6 Optical Audio-In Socket TOSLINK

16
GETTING STARTED
Box contents
• 1 Receiver with rubber ear buds
• 1 Transmitter
• 1 AC/DC adapter (for trasnmitter or for charging the receiver)
• 1 Additional pair of rubber ear buds
• 1 Analogue Audio cable (both ends with 3.5 mm stereo plug)
• 1 Adapter cable (RCA) for analogue audio cable
• 1 Optical TOSLINK digital audio cable
• 1 User guide
Important: please make sure you’ve read the safety information on page 23
before you set up your device.
Connecting the transmitter
1 Connect the power adapter to the DC IN Micro USB input socket located on
the transmitter rear panel.
2 Connect the power adapter provided to an electrical outlet. The Blue LED
indicator will flash as soon as you have connected the power adapter to the
Electrical Outlet
3 Connect the transmitter to your audio source. RCA adapter cable, audio cable
and optical cable are provided for various type of connection to your audio
source (e.g. TV set, Hi-Fi system, MP3 or iPod).

17
Please note that only one input (either analogue audio input or optical
input/TOSLINK) must be connected. If both the analogue audio input and
the optical input/TOSLINK are connected, the priority use is analogue
input.
Using the optical TOSLINK digital audio cable
If your audio source has an optical audio output (TOSLINK/S-PDIF), connect the
two devices with the included optical TOSLINK digital audio cable. This
connection offers a higher transmission quality and a lower susceptibility to
electrical and magnetic interference.
Please make sure the optical TOSLINK digital audio cable does not get bent or
folded! Avoid tight bending radii.

18
Charging the receiver battery
Charge the battery for about 3 hours before first use.
1 Switch off the receiver (position OFF).
2 Place the headset receiver on the transmitter.
3 The green LED indicator on the headset receiver will
flash slowly when charging. It will glow in green steadily
in about 2 hours after the battery is fully charged.
4 If the receiver power is at ON position during charging,
after charging, slide the switch to OFF and ON again for
connection to use with transmitter.
5 The Headset Receiver can also be charged with the
supplied Power Adaptor through the Micro USB port on the Headset Receiver.
• A fully charged battery provides up to 6 hours of listening enjoyment.
• To conserve battery power, the receiver automatically shuts off if no
signal is detected for a period of approx. 5 minutes or when the level is
too low.

• Standby time: up to 180 hours (when the receiver is connected to a
device but not playing any sound)
• Auto off: when the receiver is turned on without any connection to
Bluetooth devices, it will be turned off after 5 minutes. To turn on the
receiver again, you should first slide the power button to the “OFF“
position. Then slide it back to “ON“ again.
• After Auto off: if the power button is not slided to “OFF“ the battery can
last up to 1.5 months.
OPERATION
Hearing damage due to high volumes!
This receiver allows you to set higher volumes than conventional
headphones. This can cause hearing damage in persons with healthy
hearing and especially in children.
• Before putting the receiver on, set the volume on the receiver to a low
value.
• Do not continuously expose yourself to high volumes.
1 Power on the transmitter. Switch on the audio source. The blue indicator LED
on the transmitter will flash.
2 Switch the On/Off switch on the headset receiver to ON position, then the blue
LED indicator will flash. The transmitter and the headset receiver will then be
connected automatically. If transmitter and headset receiver are not connected
with each other, press and hold the “PAIR“ button on the receiver for about 5
seconds, the blue LED flashes quickly and the units will be connected.
3 Flex the head set arms outwards until the ear buds can be inserted in the ear.
Please note the ear buds can be angled through a movement up, down or
sideways, so as to enter the ear a little deeper. This will improve the sound quality
and volume. Gently press the ear buds further into the ear to find a comfortable
position for the ear buds and an ideal position for the sound.
4 Adjust the desired volume.
5 Adjust the tone clarity setting if necessary.
To set the tone clarity briefly press the TONE button repeatedly.
19

20
- 1 short beep: Treble boost
- 2 short beeps: Bass boost and treble boost
- 3 short beeps: Bass boost
- 1 long beep: Flat
6 Adjust the balance (left/right) if neccessary.
Note: When the battery level is low, the indicator LED sparkles in blue
(Bluetooth mode) or in green (MIC mode). You will hear 3 beeps every minute
and 1 double-beep in the forth minute. The receiver will switch off
automatically in the fifth minute.
The MIC button
The microphone opening at the lower part of the receiver front picks up the
sounds of your surroundings. When the microphone is switched on, you will hear
your surroundings louder. You can hear for example your door bell, your
telephone or your conversational partner even when you are wearing the receiver.
Press the MIC button to switch the microphone on. The power on indicator will
turn to green and one short beeps is to be heard. Make sure that the microphone
opening is not covered!
You can hear your surroundings and you use the receiver as an assistive listening
device which helps you to better hear other people.
Press the MIC button again to switch off the microphone. The power on indicator
will return to blue and two short beeps are to be heard.
Caution: When switching between the microphone and music source please be
aware that the volume level can change substantially dependant upon signal input
levels. As a precaution the volume level should be lowered prior to switching
between the microphone and music.

21
Establishing a Multi-point connection
(using an audio source and a mobile phone simultaneously)
1 Turn on the transmitter, plug the main adaptor to the wall outlet and connect to
the transmitter first, then power ON the headset receiver, press the “PAIR”
button of the transmitter and headset receiver, then the transmitter and the
headset receiver will be paired automatically in few seconds.
2 Unplug the main adaptor to turn off the transmitter, then press and hold the
headset receiver “PAIR” button for about 5 seconds, the blue LED on the
headset receiver flashes quickly.
3 Turn on Bluetooth function of your mobile phone and scan for Bluetooth
devices. Select TV-L2BT to connect the headset receiver to the mobile phone.
4 Switch OFF the Bluetooth function of your mobile phone. Plug the main
adaptor to turn on the transmitter again, the transmitter and the headset
receiver will be connected automatically.
5 Turn ON the Bluetooth function of your mobile phone again, then select
TV-L2BT on the mobile phone screen to connect the headset receiver.
6 Now, the Multi-point connection is completed, you can now receive and
answer mobile phone call with the same headset receiver while watching TV
or movie with the transmitter connected to TV, HiFi or CD.
NFC pairing
If your sending device (e.g. your mobile phone/smartphone) supports NFC (Near
Field Communication), turn on the NFC function and turn on the headset receiver.
Attach the headset receiver’s area marked with the NFC-Logo ( ), as near as
possible to the relevant area on the transmitter for a few seconds. It will then
activate the Bluetooth function and pair with each other automatically.
The PHONE button
Do you have your receiver connected to a mobile phone / smartphone, you can
answer or end a phone call by briefly pressing the phone button. When an
incoming call is received the ringing tone from the mobile phone will be
transmitted to the headset which in turn will be heard in the earpieces. Press and

22
release the ‘Phone’ button on the TV-L2BT and then you can converse with the
caller. The microphone in the headset will pick up your voice. To end the call
simply press and release the ‘Phone’ button again.
Changing the rubber ear buds
Two pairs of ear buds are delivered with the device.
One pair is already mounted on the headset.
1 For changing the ear buds pick the mounted ear buds at the end and tear
them off simply.
2 Position the spare ear buds onto the “open ends“ and let them snap into place.
Troubleshooting
No sound
- Ensure that the receiver power ON/OFF switch is switched to ON.
- The charge level of the battery inside receiver may be too low. Recharge the
battery for approx. 3 hours.
- Ensure that the Bluetooth connection is established.
- The receiver output level is set too low. Adjust the volume to a suitable level.
Distortion
- The charge level of the battery inside the receiver may be too low. Recharge the
battery for approx. 3 hours.
- The receiver may be too far away from the Bluetooth transmitter (e.g.
smartphone etc.). Move closer to it.

23
APPENDIX
Safety Information
• Please read this operating instruction manual thoroughly and keep it for
further use.
• Prevent excessive exposure to smoke, dust, vibration, chemicals, moisture,
heat and direct sunlight.
• Furniture polish, over time, may disintegrate the rubber feet of the transmitter
which may stain your furniture. To avoid a potential stain, you may want to
place the transmitter on a pad or mat.
• This listener allows you to amplify sounds to a loud volume, but listening to
earphones at a high volume over an extended period of time may damage
your hearing; especially in children. Thus, we suggest that you set the volume
to a level that is comfortable to your hearing.
• Only use the power adapter plug contained in the material supplied since
other power adapter plugs could damage the devices.
• Ensure access to the power adapter plug is not obstructed by furniture or
such.
Intended use
This device was developed to transmit audio signals from an audio source to a
receiver, using Bluetooth. Any other use is considered unintended use.
Unauthorised modification or reconstruction is not permitted. Under no
circumstances open the devices or complete any repair work yourself.
For users wearing a pacemaker
It is recommended that if you have a pacemaker fitted you check with a medical
expert or your health adviser before using this product. Switch the device off
immediately if you notice or suspect any adverse effects.

Power adapter plug
Attention: Only use the power adapter plug contained in the material
supplied since other power adapter plugs could damage the devices.
Ensure access to the power adapter plug is not obstructed by furniture or
such.
Pay attention that the plug and cable are in perfect condition. Kinked or worn
cable represents the risk of a fatal accident!
The power adapter plug supplied fulfils the ecodesign requirements of the
European Union (Directive 2005/32/EC). This means that, both in an operating
state and in an idling state, the power consumption is considerably lower
compared to power adapter plugs with an older design.
Disposal
In order to dispose of your device, take it to a collection point
provided by your local public waste authorities (e.g. recycling centre).
According to laws on the disposal of electronic and electrical devices,
owners are obliged to dispose of old electronic and electrical
devices in a separate waste container. The adjacent symbol
indicates that the device must not be disposed of in normal domestic
waste!
Batteries represent a hazard to health and the environment!
Never open, damage or swallow batteries or allow them to pollute the
environment. They may contain toxic, ecologically hazardous heavy
metals. You are legally obliged to dispose of power packs and
batteries at the point of sale or in the corresponding containers
provided at collection points provided by local public waste
authorities. Disposal is free of charge. The adjacent symbols indicate
that the batteries must not be disposed of in normal domestic waste
and must be brought to collection points provided by local public
waste authorities. Packaging materials must be disposed of
according to local regulations.
24

25
Service hotline
In the case of technical problems, contact our Service hotline.
Switzerland: Tel. 0900 00 1675 (national charges, Swisscom at time of going to
print: CHF 2.60/min). In the case of claims under the terms of guarantee, contact
your sales outlet.
Declaration of conformity
This device fulfils the requirements stipulated in the EU directive:
1999/5 EU directive on radio equipment and telecommunications
terminal equipment and the mutual recognition of their conformity.
Conformity with the above mentioned directive is confirmed by the CE symbol on
the device.
To view the complete Declaration of Conformity, please refer to the free download
available on our website www.switel.com.
Telgo AG, Rte. D’Englisberg 11, 1763 Granges-Paccot, Switzerland
Maintenance
• Clean the housing surfaces with a soft, fluff−free cloth.
• Never use cleaning agents or solvents.
Technical data
Transmission mode Bluetooth 4.1 / 2,4 GHz
Range Up to 10 meters (open area)
Frequency response 70 Hz - 18 kHz
Max volume 120 dB
Distortion < 1.0 %
Signal-to-noise ratio > 75 dB
Operating voltage (Receiver) 3.7 V, 380 mA Lithium Polymer Battery
Operation time With fully charged battery up to 6 hours
Charging time For empty battery approx. 3 hours
Weight receiver 65 g

5
26
LED indicator

27
Guarantee
SWITEL equipment is produced and tested according to the latest production
methods. The implementation of carefully chosen materials and highly developed
technologies ensure trouble free functioning and a long service life.
The terms of the guarantee do not apply to the rechargeable batteries or power
packs used in the products. The period of guarantee is 24 months from the date
of purchase.
All deficiencies resulting from material of production faults which occur during the
period of guarantee will be eliminated free of charge. Rights to claims under the
terms of guarantee are annulled following intervention by the purchaser or third
parties. Damage caused as a result of improper handling or operation, incorrect
positioning or storing, improper connection or installation, Acts of God or other
external influence are not covered by the terms of guarantee.
In the case of complaints, we reserve the right to repair or replace defect parts or
provide a replacement device. Replacement parts or devices become our
property.
Rights to compensation in the case of damage are excluded where there is no
evidence or intent or gross negligence by the manufacturer.
If your equipment shows signs of defect during the period of guarantee, please
return to the sales outlet in which you purchased the SWITEL equipment together
with the purchase receipt. All rights to claims under the terms of guarantee in
accordance with this agreement must be asserted exclusively with regard to your
sales outlet.
Two years after the purchase of our products, claims under the terms of
guarantee can no longer be asserted.

28

29
APERÇU
Récepteur
1 Interrupteur marche/arrêt
2 Voyant de contrôle LED
3 Réglage du volume
4 Réglage de la balance
5 Réglage de l'amélioration de la sonorité
6 NFC
7 Lecture / Pause / Répondre / Raccrocher
8 Touche microphone pour écouter les bruits environnants / touche pour le
couplage d’appareils Bluetooth (PAIR)
9 Microphone
10 Écouteur réglable (droit)
11 Écouteur réglable (gauche)
12 Raccord pour câble de chargement (Micro USB)
13 Contact de chargement (pour charger le récepteur dans l’émetteur)
Emetteur
1 Contacts de chargement
2 Touche pour le couplage d'appareils (pair)
3 Voyant de contrôle LED (pour alimentation/couplage (PAIR))
4 Raccord pour bloc d'alimentation (Micro USB)
5 Entrée audio analogique (3,5 mm)
6 Entrée audio optique TOSLINK

30
MISE EN SERVICE TV-L2BT
Contenu de l’emballage
• 1 récepteur avec oreillettes
• 1 émetteur
• 1 bloc d'alimentation (pour émetteur ou récepteur)
• 1 paire d’oreillettes supplémentaires
• 1 câble audio analogique (2 x jack de 3,5 mm)
• 1 adaptateur audio (RCA) pour câble audio analogique
• 1 câble audio numérique optique TOSLINK
• 1 mode d’emploi
Important : veuillez lire d’abord les indications de sécurité page 37 avant de
mettre l’appareil en service.
Raccorder l’émetteur
1 Connectez la fiche du bloc d’alimentation et la prise de raccordement (Micro
USB) au dos de l’émetteur.
2 Branchez le bloc d'alimentation dans une prise de courant.
Le voyant de service bleu clignote dès que la tension de service est établie.
3 Connectez l’émetteur à votre source de son souhaitée.
Pour les différents raccordements possibles (téléviseur, chaîne hifi, lecteur
mp3 etc.) la livraison comprend plusieurs adaptateurs.
Notez qu’il n’est possible de raccorder qu’une seule entrée (soit une
entrée audio analogique, soit une entrée audio optique/TOSLINK).
Bloc d’alimentation
Prise de
courant

Si les 2 entrées (audio analogue et optical/TOSLINK) sont connectées en
même temps, la signale de l'entrée audio analogue sera utilisée (priorité).
Utilisation du câble audio numérique optique TOSLINK
Si votre source du son dispose d’une sortie audio optique (TOSLINK/S-PDIF),
connectez les deux appareils avec le câble audio numérique optique
TOSLINK livré. Cette connexion offre une qualité supérieure de transmission
et une sensibilité plus faible par rapport aux couplages parasites électriques
et magnétiques.
Notez que le câble audio numérique optique TOSLINK ne doit pas être plié!
Evitez aussi les rayons de courbure étroits.
31
Raccord
RCA
Raccord pour
casque 3,5 mm
ou
Raccord
optique

32
Charger l’accumulateur du récepteur
Avant la mise en service, chargez l’accumulateur du
récepteur pendant environ 3 heures.
1 Poussez l’interrupteur marche/arrêt du récepteur sur
« OFF ».
2 Placez le récepteur dans le creux de chargement de
l’émetteur.
3 Le voyant LED vert du récepteur clignote lentement
pendant le chargement. Deux heures plus tard, il brille
en permanence et indique que l’accumulateur est
complètement chargé.
4 Quand l'interrupteur marche/arrêt est sur la position
« ON » pendant le chargement, poussez-le une fois sur « OFF » à la fin du
chargement, puis à nouveau sur « ON » pour rétablir la liaison.
5 Vous pouvez aussi charger l’émetteur directement avec le bloc d'alimentation.
Utilisez pour cela le raccord micro USB du récepteur.
• Un accumulateur complètement chargé offre jusqu'à 6 heures de
fonctionnement.
Bloc d'alimentation
Prise de
courant

• Pour économiser la capacité de l’accumulateur, le récepteur est
désactivé automatiquement quand aucun signal n’est reçu de l’émetteur
pendant env. 5 minutes ou quand le niveau de signal est trop faible.
• En veille : jusqu’à 180 heures (quand le récepteur est connecté à un
appareil, mais sans émettre aucun son)
• Auto off : le récepteur s’éteindra après 5 minutes quand il est allumé
sans aucune connexion à des appareils Bluetooth. Pour rallumer le
récepteur, glissez d’abord le bouton ON/OFF dans la position « OFF ».
Glissez-le à nouveau sur « ON ».
• Après Auto off : si le bouton ON/OFF n’est pas glissé sur « OFF », la
batterie peut durer jusqu’à 1,5 mois.
UTILISATION
L’écoute à volume élevé nuit à l’audition !
Il est possible de régler un volume plus élevé sur cet écouteur comme pour
les appareils conventionnels. L'augmentation du volume peut entraîner des
troubles de l'audition chez les personnes ayant une bonne audition et chez
les enfants.
• Réglez un volume bas sur l’écouteur avant de mettre le casque sur les
oreilles.
• Ne vous soumettez pas constamment à un volume élevé.
1 Allumez l'émetteur. Allumez l’appareil dont vous souhaitez entendre le son. Le
voyant de service bleu clignote sur l’émetteur.
2 Poussez le bouton On/Off du récepteur en position « ON », la LED bleue
clignote également. La liaison entre l’émetteur et le récepteur s’établit
automatiquement. Si la liaison n’est pas établie automatiquement, appuyez sur
la touche « PAIR » du récepteur et tenez-la appuyée pendant env. 5 s, la LED
bleu scintille et la liaison est établie.
3 Séparer et plier les bras du casque afin de pouvoir insérer les oreillettes dans
les oreilles. Notez que les oreillettes peuvent être bougées vers le haut, le bas
et les côtés de sorte à pouvoir entrer profondément dans l’oreille. La qualité du
son et le volume en sont ainsi améliorés. Enfoncez les oreillettes dans l’oreille
avec précaution pour un positionnement agréable et le meilleur son.
4 Réglez le volume souhaité.
33

5 Le cas échéant, modifiez le réglage du son en fonction de vos besoins. Pour
modifier le son, appuyez brièvement et respectivement sur la touche « TONE ».
- 1 bip court : augmentation des aigus.
- 2 bips courts : augmentation des basses et augmentation des aigus.
- 3 bips courts : augmentation des basses.
- 1 bip long : neutre.
6 Le cas échéant, réglez la balance (gauche/droite).
Remarque: quand l’accumulateur est presque vide, le voyant de contrôle à
LED scintille en bleu (en mode Bluetooth) ou en vert (en mode microphone).
Vous entendez 3 bips courts dans le combiné à intervalle d’une minute. Vous
entendez un double bip à la 4e minute. Le récepteur est éteint
automatiquement à la 5e minute.
La touche microphone (MIC)
L’ouverture du microphone située dans la partie inférieure et avant du récepteur
recueille les bruits dans votre environnement. Quand le microphone est activé,
vous entendez votre environnement avec un volume plus élevé. Vous pouvez
donc entendre par exemple votre sonnerie de porte, votre téléphone ou votre
interlocuteur, même si vous portez le récepteur.
Pour activer le microphone, appuyez sur la touche du microphone (MIC). Le
voyant de service passe au vert et vous entendez un bip court. Veillez à ne pas
couvrir l’ouverture du microphone. Vous entendez votre environnement et pouvez
utiliser le récepteur comme amplificateur d’écoute pour mieux comprendre votre
interlocuteur.
Pour désactiver le microphone, appuyez encore une fois sur la touche du
microphone (MIC). Vous entendez deux bips courts et le voyant de service brille à
nouveau en bleu.
Attention ! Notez que, lors de la commutation entre le microphone et la source
sonore/de musique, le volume peut changer considérablement en fonction du
niveau d’entrée du signal. Par précaution, il est recommandé de réduire le
réglage du volume de manière générale avant d’effectuer toute commutation.
34

Établir la liaison Multi-Point
(Utilisation simultanée de la source audio et du mobile)
1 Branchez l’émetteur à l’alimentation afin d'allumer celui-ci. Puis, allumez le
récepteur (interrupteur sur « ON ») et appuyez sur la touche « PAIR » à la fois
de l’émetteur que du récepteur. La liaison est établie quelques secondes plus
tard.
2 Débranchez l’émetteur et appuyez sur la touche « PAIR » du récepteur et
tenez-la appuyée pendant env. 5 s, la LED scintille en bleu.
3 Activez la fonction Bluetooth de votre mobile et cherchez des appareils
Bluetooth. Sélectionnez l’entrée TV-L2BT pour relier le récepteur au mobile.
4 Désactivez à nouveau la fonction Bluetooth de votre mobile. Branchez à
nouveau l’émetteur au réseau électrique afin que la liaison se rétablisse
automatiquement entre l’émetteur et le récepteur.
5 Réactivez maintenant la fonction Bluetooth de votre mobile et sélectionnez
TV-L2BT pour rétablir la liaison avec le récepteur.
6 La liaison Multi-Point est ainsi établie et vous pouvez répondre aux appels de
votre mobile avec votre récepteur tout en regardant un film ou en écoutant de
la musique.
Etablir une liaison Bluetooth (NFC)
Si votre émetteur (par exemple votre mobile/Smartphone) possède une
fonction NFC (Near Field Communication), activez-la et allumez le récepteur.
Tenez pendant quelques secondes la partie du récepteur, sur laquelle le logo
NFC ( ) est imprimé, aussi proche que possible de l’emplacement
correspondant sur l’émetteur. Le couplage/la liaison est établi(e)
automatiquement.
La touche Téléphone (PHONE)
Si vous avez relié votre récepteur à un téléphone mobile/Smartphone, vous
pouvez accepter ou terminer une conversation téléphonique par une courte
pression sur la touche Téléphone. Quand vous recevez un appel entrant, la
sonnerie du téléphone portable sera transmise vers le casque qui à son tour sera
35

entendu dans les écouteurs. Appuyez sur le bouton « téléphone » sur le
récepteur, puis relâchez-le et vous pourrez alors converser avec l’appelant.
Le microphone dans le casque captera votre voix. Pour terminer l’appel, appuyer
simplement à nouveau sur le bouton « téléphone », puis le relâcher.
Remplacer les oreillettes
La livraison inclut deux paires d'oreillettes.
Une paire est déjà montée sur le casque.
1 Pour remplacer les oreillettes, saisissez la pointe des oreillettes montées et
retirez-la simplement.
2 Poussez les oreillettes de rechange sur les deux extrémités et faites-les
s’enclencher.
Recherche de défauts
Aucun son
- Contrôlez l'interrupteur du récepteur (position ON).
- Il est possible que l’accumulateur du récepteur soit déchargé. Chargez
l’accumulateur pendant env. 3 heures.
- Vérifiez que la liaison Bluetooth est établie.
- Le volume réglé sur le récepteur est trop bas. Réglez un volume plus élevé.
Parasites
- Il est possible que l’accumulateur du récepteur soit déchargé. Chargez
l’accumulateur pendant env. 3 heures.
- Il est possible que le récepteur soit trop éloigné de l'émetteur Bluetooth (par ex.
Smartphone etc.). Vérifiez si la qualité est meilleure en vous rapprochant de
l'émetteur.
36

37
ANNEXE
Indications de sécurité
• Lisez ce mode d’emploi entièrement avec soin et conservez-le bien.
• Évitez les nuisances causées par la fumée, la poussière, les secousses, les
produits chimiques, l’humidité, la chaleur ou un ensoleillement direct.
• Les meubles d’aujourd’hui étant revêtus d’une immense variété de laques et
de matières synthétiques et traités avec différents produits d’entretien de la
laque, il ne peut pas être exclu que certaines de ces substances attaquent et
ramollissent les pieds en plastique de l'appareil. Les pieds de l’appareil ainsi
modifiés peuvent laisser des traces désagréables à la surface des meubles.
Par conséquent, utilisez une base antidérapante pour votre appareil.
• Le récepteur est capable de restituer des volumes très élevés. C’est pourquoi,
vous devez toujours réduire le volume au minimum avant d'insérer les
écouteurs dans vos oreilles, surtout si l'appareil est utilisé par plusieurs
personnes.
• Utilisez seulement le bloc d'alimentation livré, car d’autres blocs
d'alimentation peuvent endommager le système.
• Ne bloquez pas l’accès au bloc d’alimentation par des meubles ou d’autres
objets.
Utilisation conforme aux dispositions
Cet appareil a été développé pour transmettre les signaux sonores d’un émetteur
sans fil à un récepteur (Bluetooth). Toute autre utilisation est considérée comme
non-conforme aux dispositions. Les modifications ou transformations d'un propre
gré sont interdites. N’ouvrez les appareils en aucun cas et n'essayez pas de les
réparer vous-même.
Utilisateurs munis d’un stimulateur cardiaque
Si vous portez un stimulateur cardiaque, consultez un médecin avant d’utiliser ce
produit. Eteindre immédiatement l’appareil, si vous sentez ou supposez des
altérations quelconques.

38
Bloc d’alimentation
Attention : utilisez seulement le bloc d'alimentation livré, car d’autres blocs
d'alimentation peuvent endommager le système. Ne bloquez pas l’accès au
bloc d’alimentation par des meubles ou d’autres objets.
Pour le fonctionnement avec un bloc d’alimentation, veillez à l’état parfait des
câbles et des fiches. Les câbles pliés ou élimés sont très dangereux !
Le bloc d’alimentation livré répond aux exigences de l’Union européenne en
matière d’éco-conception (directive 2005/32/CE). Cela signifie que, tant en
service qu’au repos, la consommation électrique est nettement plus faible par
rapport aux blocs d’alimentation de modèles plus anciens.
Élimination des déchets
Si vous souhaitez éliminer votre appareil, apportez-le au centre
de collecte de votre commune en charge de l’élimination des
déchets (par exemple : déchetterie). Selon la loi sur les appareils
électriques et électroniques, les propriétaires d’appareils usagés
sont dans l’obligation de séparer les vieux appareils électriques
et électroniques et les autres déchets. Le symbole ci-contre signifie
que vous ne devez en aucun cas jeter l’appareil dans les
ordures ménagères !
Mise en danger de la santé et de l’environnement par les
accumulateurs et les piles ! Ne pas ouvrir, endommager, ingérer
les accumulateurs et les piles ou les laisser accéder à
l’environnement. Ils peuvent contenir des métaux lourds toxiques et
polluants. Vous êtes dans l’obligation d’éliminer en toute sécurité les
accumulateurs et les piles dans le commerce distributeur de piles
ainsi qu’auprès de centres de collecte compétents, qui mettent des
bacs correspondants à votre disposition. L’élimination des déchets
est gratuite. Les symboles ci-après signifient que vous ne devez en
aucun cas jeter les accumulateurs et les piles dans les ordures
ménagères et ceux-ci doivent être recyclés via des centres de
collecte. Les matériaux d’emballage sont à éliminer selon les consignes locales.

39
Hotline du service-clients
En cas de problèmes techniques, veuillez s'il vous plaît contacter notre service
d'assistance téléphonique. Suisse : Tél. 0900 00 1675 (tarif national, Swisscom
au moment de l'impression : 2,60 CHF/min). Pour les demandes de garantie,
veuillez s'il vous plaît contacter votre revendeur.
Déclaration de conformité
Cet appareil répond aux exigences de la directive UE :
Directive 1999/5/CE concernant les équipements hertziens et les
équipements terminaux de télécommunications et la reconnaissance mutuelle de
leur conformité. La conformité avec la directive citée ci-avant est confirmée par le
marquage CE apposé sur cet appareil.
Pour obtenir la déclaration de conformité complète, veuillez la télécharger
gratuitement sur notre site internet : www.switel.com.
Telgo AG, Rte. D’Englisberg 11, 1763 Granges-Paccot, Switzerland
Indications d’entretien
• Nettoyez les surfaces du boîtier avec un chiffon doux et sans peluche.
• N’utilisez aucun nettoyant ni solvant.
Caractéristiques techniques
Transmission Bluetooth 4.1 / 2,4 GHz
Portée jusqu’à 10 m (dans des conditions optimales)
Plage de fréquences 70 Hz - 18 kHz
Volume max. 120 dB
Facteur de distorsion < 1,0 %
Distance signal/bruit > 75 dB
Alimentation électrique (récepteur) Accumulateur lithium polymère 3,7 V / 380 mA
Durée de service Avec un accumulateur chargé :
jusqu’à 6 heures
Durée de charge Pour accus vides : env. 3 heures
Poids de l’émetteur 65 g

40
Émetteur LED Statut
Récepteur LED Statut
bleu, clignote lentement Veille
bleu, clignote lentement Veille
vert, clignote lentement Accumulateur en charge
vert, clignote vite Accumulateur faible
mode micro
bleu, clignote vite
(appuyer 1 fois sur la touche PAIR)
Couplage
bleu, clignote vite
(appuyer 5 fois sur la touche PAIR)
Couplage
bleu, clignote vite Accumulateur faible
mode Bluetooth
bleu, brille en permanence Couplé
bleu, brille en permanence Couplé
vert, brille en permanence Accumulateur compl. chargé
vert + bleu, brille en permanence Appel entrant
vert, brille en permanence
(appuyer 1 fois sur la touche MIC)
Mode micro activé
Voyant LED

41
Garantie
Les appareils SWITEL sont fabriqués et testés selon les procédés de
production les plus modernes. Les matériaux choisis et la haute technologie
assurent un fonctionnement parfait et une longue durée de vie.
La durée de garantie est de 24 mois à partir de la date d’achat. La garantie
ne s’applique pas à la pile rechargeable standard ou aux packs de piles
rechargeables utilisés dans le produit.
Pendant la période de garantie, tous les défauts dus à des erreurs de matériel
et de fabrication sont réparés gratuitement. La garantie expire en cas
d’interventions de l’acheteur ou d’un tiers. Les dommages engendrés par
une manipulation ou une utilisation inadéquate, par un mauvais emplacement
ou rangement, par un raccordement ou une installation inadéquate
ainsi qu’en cas de force majeure ou d’autres influences extérieures ne sont
pas inclus dans la prestation de garantie. En cas de réclamations, nous nous
réservons le droit de réparer ou de remplacer les pièces défectueuses ou
d’échanger l’appareil. Les pièces ou appareils échangés deviennent notre
propriété. Tout droit de prétention à des dédommagements est exclu, sauf
si ce dommage est basé sur une préméditation ou une négligence grave du
fabricant.
Si votre appareil comporte cependant un défaut pendant la période de
garantie, veuillez vous adresser exclusivement au magasin dans lequel vous
avez acheté votre appareil SWITEL en présentant votre bon d’achat.
Tous les droits de garantie basés sur ces dispositions ne peuvent être
revendiqués qu’auprès de votre revendeur. A l’échéance des deux ans après
l’achat et le transfert de nos produits, les législations en matière de garantie
ne sont plus applicables.

42

43
PANORAMICA
Ricevitore
1 Interruttore on/off
2 Spia di controllo a LED
3 Impostazione volume
4 Equalizzatore
5 Regolazione dell'ottimizzazione del suono
6 NFC
7 Riproduzione / pausa / accettazione chiamata / conclusione chiamata
8 Tasto microfono per l'ascolto di rumori ambientali / tasto per l'accoppiamen-
to con apparecchi Bluetooth (PAIR)
9 Microfono
10 Cuffia intra-auricolare regolabile (destra)
11 Cuffia intra-auricolare regolabile (sinistra)
12 Collegamento per cavo di carica (micro USB)
13 Contatto di carica (per caricare il ricevitore nell’emittente)
Emittente
1 Contatti di carica
2 Tasto per l’accoppiamento con apparecchi Bluetooth (PAIR)
3 Spia di controllo a LED (per alimentazione elettrica/accoppiamento (PAIR))
4 Collegamento per alimentatore (micro USB)
5 Ingresso audio analogico (3,5 mm)
6 Ingresso audio ottico TOSLINK

44
METTERE IN FUNZIONE TV-L2BT
Contenuto del pacchetto
• 1 ricevitore con ricevitori con auricolari
• 1 emittente
• 1 adattatore (per emittente o ricevitore)
• 1 coppia di ricevitori con auricolari
• 1 cavo audio analogico (2 connettori jack da 3,5 mm)
• 1 adattatore audio (RCA) per cavo audio analogico
• 1 cavo audio digitale ottico TOSLINK
• 1 manuale d’istruzioni
Importante: Legga innanzitutto le istruzioni di sicurezza a pagina 51,
prima di mettere in funzione l'apparecchio.
Collegare l‘emittente
1 Colleghi la presa dell’adattatore con la scatola di collegamento (Micro USB)
sul retro dell’emittente.
2 Inserisca l’adattatore in una presa. La spia di funzionamento blu lampeggia
non appena è disponibile la tensione di rete.
3 Colleghi l’emittente con la Sua fonte di tono desiderata.
Per le diverse possibilità di collegamento (apparecchio televisivo, impianto
stereo, lettore MP3, etc.) nel volume di consegna sono disponibili diversi
adattatori. Notare che può essere collegato solo un ingresso (ingresso
audio analogico o ingresso audio ottico/TOSLINK).
Alimentatore
Presa

Qualora sia l’ingresso audio analogico che l’ingresso audio
ottico/TOSLINK siano collegati, verrà utilizzato il segnale dell’ingresso
audio analogico.
Uso del cavo audio digitale ottico TOSLINK
Qualora la propria fonte audio disponga di un’uscita audio ottica (TOSLINK/
S-PDIF), collegare entrambi gli apparecchi con il cavo audio digitale ottico
TOSLINK fornito. Tale collegamento offre una qualità di trasmissione superiore e
una minore inclinazione alle interferenze elettriche e magnetiche.
Tener presente che il cavo audio ottico TOSLINK non può essere piegato!
Evitare anche raggi di curvatura stretti.
45
Collegamento
RCA
3,5 mm
collegamento
cuffie
oppure
Collegamento
ottico

46
Carica della batteria
Caricare la batteria nel ricevitore per circa 3 ore prima di
utilizzare l’apparecchio per la prima volta.
1 Spingere l’interruttore di accensione/spegnimento sul
ricevitore in posizione “OFF”.
2 Posizionare il ricevitore sulla base di carica
dell’emittente.
3 Durante il ciclo di carica, il LED verde sul ricevitore
lampeggia lentamente. Dopo circa 2 ore, si illumina in
modo costante e indica che la batteria è completamente
carica.
4 Qualora l’interruttore di accensione/spegnimento si trovi
in posizione “ON” durante la carica, una volta terminato il ciclo di carica
spingerlo una volta in posizione “OFF” e nuovamente in posizione “ON”, per
ripristinare il collegamento.
5 È anche possibile caricare il ricevitore direttamente con l’alimentatore fornito.
Per farlo, servirsi della presa micro USB sul ricevitore.
• Una batteria completamente carica offre un tempo di funzionamento fino
a 6 ore.
Alimentatore
Presa

• Per risparmiare energia, il ricevitore si spegne automaticamente se per
circa 5 minuti non viene rilevato alcun segnale dall’emittente o qualora il
livello del segnale sia troppo basso.
• Durata in stand-by: fino a 180 ore (quando il ricevitore è collegato a un
dispositivo, ma non riproduce alcun suono)
• Spegnimento automatico: quando il ricevitore è acceso, ma senza alcun
collegamento a dispositivi Bluetooth, verrà spento dopo 5 minuti. Per
accendere nuovamente il ricevitore occorre prima spingere il tasto di
accensione in posizione "OFF". Dopodiché spingerlo nuovamente in
posizione “ON”.
• Dopo lo spegnimento automatico: se il tasto di accensione non viene
spinto in posizione “OFF”, la batteria può durare fino a 1,5 mesi.
USO
Un volume troppo alto danneggia l’udito!
Su queste cuffie è possibile impostare un volume più alto rispetto agli
apparecchi tradizionali. In soggetti non audiolesi e nei bambini ciò
potrebbe comportare dei danni all’udito.
• Impostare un volume basso sulle cuffie prima di indossarle.
• Non esporsi costantemente a un volume elevato.
1 Accendere l’emittente. Accenda l’apparecchio dal quale desidera sentire il
tono. La spia blu di funzionamento sull’emittente lampeggia.
2 Sposti il dispositivo di accensione / spegnimento sulla cuffia nella posizione
“ON“, anche il LED blu lampeggia. Emittente e ricevitore si collegano
automaticamente. Qualora il collegamento non venga instaurato
automaticamente, premere il tasto "PAIR” sul ricevitore e tenerlo premuto per
circa 5 sec., il LED tremola in blu e viene instaurato il collegamento.
3 Separare i braccetti delle cuffie piegandoli in modo tale che la protezione intra-
auricolare possa essere inserita nelle orecchie. Notare che le protezioni
intra-auricolari possono essere mosse verso l’alto, verso il basso e
lateralmente in modo tale da poter essere inserite in profondità nell’orecchio.
In tal modo si migliora sia la qualità del suono che il volume di ascolto.
Premere delicatamente le protezioni intra-auricolari nelle orecchie in modo che
si posizionino comodamente e il suono sia ottimale.
47

4 Impostare il volume desiderato.
5 Modificare eventualmente la regolazione del suono in base alle proprie
esigenze. Per modificare il suono premere brevemente il tasto “TONE”.
- 1 bip breve: aumento degli alti.
- 2 bip brevi: aumento dei bassi e aumento degli alti.
- 3 bip brevi: aumento dei bassi.
- 1 bip lungo: neutro.
6 Impostare eventualmente l’equalizzazione (sinistra/destra).
Nota: qualora la batteria sia quasi scarica, la spia LED di controllo presenta
una luce blu (in caso di funzionamento con Bluetooth) o verde (in caso di
funzionamento con microfono) tremolante. Si udiranno nelle cuffie 3 brevi bip a
intervalli di un minuto. Nel 4° minuto si udirà un bip doppio. Nel 5° minuto il
ricevitore si spegnerà automaticamente.
Il tasto microfono (MIC)
L'apertura del microfono sull'estremità inferiore del lato frontale del ricevitore
percepisce i rumori ambientali. Attivando il microfono, i suoni ambientali vengono
percepiti con maggiore intensità. Il campanello della porta, il telefono o il proprio
interlocutore, per fare un esempio, si sentono, quindi, anche se si indossa il
ricevitore.
Per attivare il microfono premere il tasto microfono (MIC). La spia di
funzionamento diventa verde e si sente un breve bip. Accertarsi che l’apertura del
microfono non sia coperta. Si percepiscono i suoni ambientali e si può utilizzare il
ricevitore quale amplificatore per poter comprendere meglio il proprio
interlocutore.
Per spegnere il microfono premere nuovamente il tasto microfono (MIC). Si
udiranno due brevi bip e la spia di funzionamento si illuminerà nuovamente di blu.
Attenzione! Passando dal microfono alla fonte musicale/audio occorre tener conto
del fatto che il volume può variare notevolmente in funzione del livello di ingresso
del segnale. Quale misura di sicurezza è di norma opportuno abbassare il volume
prima della commutazione.
48

Creazione del collegamento multi point
(utilizzo contemporaneo di una fonte audio e del cellulare)
1 Collegare l’emittente all’alimentazione elettrica in modo tale che sia acceso.
Accendere poi il ricevitore (interruttore su “ON”) e premere il tasto “PAIR” sia
sull’emittente che sul ricevitore. Il collegamento si instaura dopo pochi
secondi.
2 Staccare l’emittente dall’alimentazione e premere il tasto “PAIR” sul ricevitore,
tenendolo premuto per circa 5 sec., il LED tremola in blu.
3 Attivare la funzione Bluetooth sul proprio cellulare e cercare altri apparecchi
Bluetooth. Selezionare la voce TV-L2BT per collegare il ricevitore con il
cellulare.
4 Disattivare nuovamente la funzione Bluetooth sul proprio cellulare. Ricollegare
l’emittente all’alimentazione elettrica, affinché l’emittente si ricolleghi
automaticamente al ricevitore.
5 A questo punto, riattivare la funzione Bluetooth sul proprio cellulare e
selezionare TV-L2BT per ripristinare il collegamento con il ricevitore.
6 In tal modo, il collegamento multi point è stato instaurato e sarà possibile
accettare chiamate dal proprio cellulare con il ricevitore mentre si guarda un
film o si ascolta della musica.
Creazione del collegamento Bluetooth (NFC)
Qualora il proprio apparecchio emittente (p.es. il proprio cellulare/smartphone)
disponga della funzione NFC (Near Field Communication), attivarla e attivare il
ricevitore. Tenere la parte del ricevitore su cui è stampato il logo NFC ( ) per
alcuni secondi il più vicino possibile al relativo settore sull'emittente.
L’accoppiamento/collegamento verrà instaurato automaticamente.
Tasto telefono (PHONE)
Se il proprio ricevitore è stato collegato a un cellulare/smartphone si potrà
accettare o terminare una conversazione telefonica premendo brevemente il tasto
telefono. Quando si riceve una chiamata entrante, la suoneria verrà trasmessa
dal cellulare alle cuffie auricolari e a sua volta si sentirà negli auricolari. Premere
49

e rilasciare il tasto “Phone” sul il ricevitore e si potrà conversare con il chiamante.
Il microfono sulle cuffie auricolari trasmetterà la propria voce. Per terminare la
chiamata basta premere nuovamente il tasto “Phone”.
Sostituzione delle protezioni per cuffie intra-auricolari
Nella confezione sono incluse due paia di protezioni per cuffie intra-auricolari.
Un paio è già montato sulle cuffie.
1 Per sostituire le protezioni per cuffie intra-auricolari è sufficiente afferrare la
punta della protezione per cuffie intra-auricolari montata e sfilarla.
2 Spingere le protezioni sostitutive per cuffie intra-auricolari sulle estremità
aperte e farle scattare in posizione.
Ricerca anomalie
Nessun suono
- Controllare l’interruttore sul ricevitore (posizione ON).
- Può darsi che la batteria nel ricevitore sia scarica. Caricare la batteria per circa
3 ore.
- Verificare che il collegamento Bluetooth sia stato instaurato.
- Il volume impostato sul ricevitore è troppo basso. Impostare un volume più alto.
Interferenze
- Può darsi che la batteria nel ricevitore sia scarica. Caricare la batteria per circa
3 ore.
- Può darsi che la distanza del ricevitore dall’emittente Bluetooth (p.es.
smartphone) sia eccessiva. Verificare se la qualità migliora avvicinandosi
all’emittente.
50

51
ALLEGATO
Indicazioni di sicurezza
• Leggere attentamente le istruzioni per l’uso e conservarle con cura.
• Eviti sollecitazioni da fumo, polvere, urti, sostanze chimiche, umidità, calore o
insolazione diretta.
• Visto che i mobili di oggi sono coperti di strati variegati di lacca e materiali
sintetici e vengono trattati con diversi mezzi di cura, non si può escludere che
alcune di queste sostanze intacchino o immorbidiscano i piedini di plastica
dell’apparecchio. I piedini dell’apparecchio modificati in questo modo possono
lasciare tracce spiacevoli sulla superficie dei mobili. Per questo per il Suo
apparecchio La preghiamo di usare un sottofondo anti-sdrucciolo..
• Il ricevitore è in grado di riprodurre volumi altissimi. Per questo soprattutto se
l’apparecchio viene usato da diverse persone imposti sempre il volume ad un
minimo prima di appoggiare la cornetta alle Sue orecchie.
• Utilizzare soltanto l’alimentatore fornito, poiché altri alimentatori possono
danneggiare gli apparecchi.
• Non deve bloccare l'accesso all'adattatore per mezzo di mobili o altri oggetti.
Utilizzo secondo le disposizioni
Questo apparecchio è stato progettato per trasmettere i segnali sonori di
un’emittente a un ricevitore (Bluetooth). Qualsiasi altro utilizzo non è conforme
alle disposizioni. Non sono consentite modifiche o trasformazioni arbitrarie. Non
aprire in alcun caso l’apparecchio da sé e non eseguire personalmente alcun
tentativo di riparazione.
Utenti con pacemaker
Se si è portatori di pacemaker occorre consultare il proprio medico prima di
utilizzare questo prodotto. L’apparecchio deve essere immediatamente spento
qualora si avvertano o si presumano dei danni.

52
Alimentatore
Attenzione: Utilizzare soltanto l’alimentatore fornito, poiché altri
alimentatori possono danneggiare gli apparecchi. Non bloccare l’accesso
all’alimentatore con mobili o altri oggetti.
Fare attenzione, durante il funzionamento, che cavo e spina siano in perfette
condizioni. I cavi piegati o logorati sono pericolosissimi!
L’alimentatore soddisfa i requisiti di ecodesign dell'Unione Europea (direttiva
2005/32/CE). Ciò significa che sia durante il funzionamento che in stand-by il
consumo di energia è nettamente inferiore se rapportato ad alimentatori di più
vecchia generazione.
Smaltimento
Se desidera smaltire il Suo apparecchio, lo porti al punto di raccolta
del Suo gestore comunale di smaltimento (ad es. punto di raccolta di
materiali di valore). Secondo la legge delle apparecchiature elettriche
e elettroniche i proprietari di apparecchi usati hanno l'obbligo legale
di smaltire separatamente le apparecchiature elettriche e
elettroniche usate. Il simbolo qui a lato indica che l'apparecchio non
deve assolutamente essere smaltito nei rifiuti domestici!
Pericolo per la salute e l'ambiente causato da accumulatori e
batterie! Non aprire, danneggiare, ingerire o emettere nell'ambiente
in nessun caso accumulatori e batterie. Potrebbero contenere metalli
pesanti velenosi e dannosi per l'ambiente. Ha un obbligo per legge di
smaltire in modo sicuro accumulatori e batterie presso rivenditori di
batterie e presso punti di raccolta competenti che mettono a
disposizione i rispettivi contenitori. Lo smaltimento è a titolo gratuito.
I simboli a lati indicano che gli accumulatori e le batterie non
devono assolutamente essere gettate nei rifiuti domestici e che
devono essere consegnati presso i punti di raccolta addetti allo
smaltimento.
I materiali d'imballaggio deve smaltirli secondo le prescrizioni locali.

53
Service Hotline
In caso di problemi tecnici rivolgersi alla nostra Service Hotline.
Svizzera: Tel. 0900 00 1675 (costi sul territorio nazionale, Swisscom al momento
della stampa: CHF 2,60/min). In caso di reclami entro il periodo di garanzia,
rivolgersi al rivenditore autorizzato..
Dichiarazione di conformità
Quest'apparecchio corrisponde ai requisiti della direttiva UE:
Direttiva UE 1999 / 5 riguardante gli impianti radio e le installazioni di
telecomunicazione e il riconoscimento reciproco della loro conformità.
La conformità con la direttiva sopra citata viene confermata con il simbolo
CE sull'apparecchio. La dichiarazione di conformità completa la puo scaricare
gratuitamente dal nostro sito web allo www.switel.com.
Telgo AG, Rte. D’Englisberg 11, 1763 Granges-Paccot, Switzerland
Indicazioni di manutenzione
• Pulire le superfici dell’involucro con un panno morbido e che non lasci fibre.
• Non utilizzare detergenti o solventi.
Dati tecnici
Trasmissione Bluetooth 4.1 / 2,4 GHz
Portata fino a 10 m (in condizioni ottimali)
Campo di frequenza 70 Hz - 18 kHz
Volume massimo 120 dB
Fattore di distorsione < 1,0 %
Intervallo segnale / rumore > 75 dB
Alimentazione (ricevitore) Batt. da 3,7 V / 380 mA ai polimeri di litio
Durata di funzionamento con batterie cariche fino a 6 ore
Tempo di carica per batterie scariche circa 3 ore
Peso ricevitore 65 g

54
LED Emittente Status
LED Ricevitore Status
Blu, lampeggia lentamente Stand-by
Blu, lampeggia lentamente Stand-by
Verde, lampeggia lentamente Batteria in carica
Verde, lampeggia rapidamente Batteria scarica
in modalità microfono
Blu, lampeggia rapidamente
(premere 1s. il tasto PAIR)
Accoppiamento
Blu, lampeggia rapidamente
(premere 5s. il tasto PAIR)
Accoppiamento
Blu, lampeggia rapidamente Batteria scarica
in modalità Bluetooth
Blu, costante Accoppiato
Blu, costante Accoppiato
Verde, costante Batteria carica
Verde + blu, costanti Chiamata in arrivo
Verde, costante (prem. tasto MIC 1 v) Modalità microfono on
Spia LED

55
Garanzia
Gli apparecchi di SWITEL vengono prodotti e controllati secondo le procedure di
produzione più innovative. L'uso di materiali selezionati con attenzione e di
tecnologie altamente sviluppate garantisce un funzionamento privo di disturbi e
un ciclo di vita lungo. La garanzia non si applica alle batterie ricaricabili, gli
accumulatori o i pacchetti di batterie impiegate nei prodotti. La durata di garanzia
ammonta a 24 mesi a partire dalla data d'acquisto.
All'interno del periodo di garanzia tutte le carenze riconducibili a errori di materiale
o di produzione vengono eliminate gratuitamente. Il diritto di garanzia si estingue
dopo interventi del compratore o di terzi. Danni causati da uso o maneggio
scorretti, posizionamento o conservazione errati, collegamenti scorretti o
installazione errata, forza maggiore o altri influssi esterni non sono contenuti nella
prestazione di garanzia.
Ci riserviamo il diritto di riparare o sostituire parti difettose in caso di reclami e/o di
mettere a disposizione un apparecchio sostitutivo. Parti o apparecchi sostituiti
diventano di nostra proprietà.
Diritti di risarcimento danni sono esclusi almeno che al produttore non si dimostri
di aver agito con premeditazione e grave negligenza.
Se il Suo apparecchio dovesse evidenziare un difetto durante il periodo di
garanzia, La preghiamo di rivolgersi al negozio in cui ha acquistato il Suo
apparecchio SWITEL, presentando il Suo scontrino di acquisto. Tutti i diritti di
garanzia secondo queste normative sono da far valere esclusivamente presso il
rivenditore specializzato.
Due anni dopo l'acquisto dei prodotti non si possono più far valere diritti di
garanzia.

56

57
VISIÓN GENERAL
Receptor
1 Interruptor On/Off
2 LED indicador de control
3 Configuración volumen
4 Ajuste de balance
5 Ajuste de la mejora de sonido
6 NFC
7 Reproducción / Pausa / Contestar llamada / Finalizar llamada
8 Tecla de micrófono para escuchar sonidos del entorno / Tecla de sincroniza-
ción con dispositivos Bluetooth (PAIR)
9 Micrófono
10 Auricular ajustable (derecha)
11 Auricular ajustable (izquierda)
12 Entrada para cable de carga (Micro USB)
13 Contacto de carga (para cargar el receptor en el transmisor)
Transmisor
1 Contactos de carga
2 Tecla para sincronizar con dispositivos Bluetooth (PAIR)
3 LED indicador de control (para suministro de energía / sincronización
(PAIR))
4 Entrada para adaptador de corriente
5 Entrada analógica de audio (3,5 mm)
6 Entrada óptica de audio TOSLINK

58
PUESTA EN FUNCIONAMIENTO TV-L2BT
Contenido del paquete
• 1 Receptor con audífono para auricular
• 1 Transmisor
• 1 Fuente de alimentación (para el transmisor o receptor)
• 1 Par de audífonos para auricular
• 1 Cable de audio analógico (clavija jack de 2 x 3,5 mm)
• 1 Adaptador de audio (RCA) para cable de audio analógico
• 1 Cable de audio digital óptico TOSLINK
• 1 Manual de instrucciones
Importante: Antes de usar el aparato lea las instrucciones de seguridad
en la página 65
Conectar el transmisor
1 Conecte la fuente de alimentación a la entrada de conexión (Micro USB)
situada en la parte posterior del transmisor.
2 Conecte la fuente de alimentación en un enchufe.
El indicador de funcionamiento azul se enciende si existe tensión en la red.
3 Conecte el transmisor en su fuente de audio deseada.
Para las diversas opciones de conectividad (TV, equipo de música,
reproductor MP3, etc.) se incluye en la entrega más de un adaptador.
Tenga en cuenta que únicamente se puede conectar una entrada (o la
entrada analógica de audio o la entrada óptica de audio/TOSLINK).
Fuente de
alimentación
Enchufe

Si las 2 entradas (audio analógica y la óptica/TOSLINK) están
conectadas a la vez, la señal de la entrada analógica sera utilizada
(prioridad).
Utilización del cable de audio digital óptico TOSLINK
En el caso de que su fuente de audio disponga de una salida de audio óptica
(TOSLINK/S-PDIF), conecte ambos dispositivos con el cable de audio digital
óptico TOSLINK que desee. Esta conexión ofrece una mejor calidad de
transmisión y una menor susceptibilidad a sufrir averías que las interferencias de
acoplamientos eléctricos y magnéticos.
¡Asegúrese de que el cable de audio digital óptico TOSLINK no se doble!
Evite también los radios de flexión reducidos.
59
Conector
RCA
Conexión de
auriculares
3.5 mm
o
Entrada
óptica

60
Cargar batería
Antes de utilizar el dispositivo por primera vez cargue la
batería en el receptor durante unas 3 horas.
1 Deslice el interruptor On/Off en el receptor en posición
"ON".
2 Coloque el receptor en la base de carga del transmisor.
3 Durante el proceso de carga el indicador LED verde del
receptor parpadea lentamente. Después de
aproximadamente 2 horas se enciende de forma
constante e indica que la batería está completamente
cargada.
4 Si el interruptor On/Off está durante el proceso de carga
en posición "ON" deslícelo tras finalizar el proceso de carga en la posición
"OFF" y luego nuevamente en "ON" con el fin de restablecer la conexión.
5 Puede cargar el receptor directamente con el adaptador de corriente incluido.
Para ello utilice el puerto micro-USB en el receptor.
• Una batería completamente cargada permite ofrece un tiempo de
funcionamiento de hasta 6 horas.
Fuente de
alimentación
Enchufe

• Para ahorrar la energía de la batería, el receptor se apaga
automáticamente si durante aprox. 5 minutos no recibe ninguna señal
desde el transmisor o si el nivel de señal es demasiado bajo.
• Tiempo en espera: hasta 180 horas (cuando el receptor está conectado a
un dispositivo sin reproducir ningún sonido)
• Auto apagado: cuando el receptor está encendido sin ninguna conexión
con dispositivos Bluetooth se apaga después de 5 minutos. Para
encender el receptor de nuevo, primero debe deslizar el botón de
encendido en posición "OFF". Luego deslícelo de nuevo en posición
"ON".
• Después del auto apagado: si el botón de encendido no se ha deslizado
en posición "OFF" la batería puede durar hasta 1,5 meses.
MANEJO
¡Un volumen muy elevado daña el oído!
En este auricular se pueden ajustar altos niveles de volumen al igual
que en los dispositivos convencionales. En las personas con oídos sanos
y en niños se pueden producir daños en la audición.
• Antes de colocarse los auriculares ajuste un volumen bajo.
• No utilice de forma permanente altos niveles de volumen.
1 Encienda el transmisor. Encienda el dispositivo desde el que desea escuchar
el sonido. El indicador de funcionamiento azul parpadea en el transmisor.
2 Deslice el interruptor de encendido/apagado del auricular en posición "ON", el
LED azul parpadea igualmente. El transmisor y el receptor se conectan
automáticamente. En caso de que la conexión no se establezca
automáticamente pulse la tecla "PAIR" en el receptor y manténgala pulsada
durante unos 5 seg., el LED parpadea de color azul y se establece la
conexión.
3
Doble los brazos del auricular de manera que los audífonos del auricular puedan
introducirse en la oreja. Por favor, tenga en cuenta que los audífonos del
auricular pueden moverse hacia arriba, abajo y lateralmente, de manera que
puedan introducirse bien al fondo de la oreja. De esta manera se mejora la
calidad del sonido y el volumen. Inserte cuidadosamente su audífono para
auriculares en sus orejas de manera que le esté cómodo y el sonido sea óptimo.
61

4 Ajuste la intensidad del volumen que desee.
5 En caso necesario, modifique el ajuste de sonido a su gusto.
Para cambiar el sonido presione brevemente la tecla “TONE”.
- 1 Pitido corto: Aumento de los altos.
- 2 Pitidos cortos: Aumento de los bajos y aumento de los altos.
- 3 Pitidos cortos: Aumento de los bajos.
- 1 Pitido largo: Neutral.
6 En caso necesario ajuste el balance (izquierda/derecha).
Advertencia: Cuando la batería esté a punto de agotarse la LED de control
empezará a parpadear en azul (en funcionamiento Bluetooth) o en verde (en
funcionamiento micrófono). Escuchará 3 cortos tonos de señal en el auricular
en el intervalo de un minuto. En el cuarto minuto escuchará un tono de señal
doble. En el quinto minuto el receptor se apagará automáticamente.
La tecla de micrófono (MIC)
La apertura del micrófono en la parte inferior frontal del receptor graba los ruidos
de su entorno. Cuando el micrófono está encendido podrá oír los sonidos de su
entorno con mayor claridad. Por lo que, por ejemplo, podrá escuchar el timbre de
su casa, su teléfono o su interlocutor incluso si lleva el receptor.
Para activar el micrófono pulse el micrófono (MIC). El indicador de encendido se
pone verde y oirá un pitido corto. Asegúrese de que la apertura del micrófono no
está cubierta. Escucha su entorno y puede utilizar el receptor como un
amplificador de sonido para entender mejor a su interlocutor.
Para apagar el micrófono pulse de nuevo la tecla de micrófono (MIC).
Escuchará dos pitidos cortos y la luz de funcionamiento se podrá en azul de
nuevo.
¡Cuidado! Al cambiar entre micrófono y fuente de audio/música deberá tener en
cuenta que dependiendo del volumen del nivel de señal de entrada el volumen
puede variar considerablemente! Como medida de precaución es conveniente
que reduzca el ajuste del volumen antes de realizar el cambio.
62

Establecer conexión de múltiples puntos
(Uso simultáneo de la fuente de audio y del teléfono móvil)
1 Conecte el transmisor con el suministro eléctrico de manera que se encienda.
Conecte el receptor (interruptor en "ON") y presione tanto en el transmisor
como en el receptor la tecla "PAIR". Después de unos segundos se establece
la conexión.
2 Desconecte el transmisor de la red y presione la tecla "PAIR" en el receptor y
manténgala pulsada durante unos 5 segundos, el LED parpadea en azul.
3 Active la función Bluetooth en su teléfono móvil y busque dispositivos
Bluetooth. Seleccione la entrada TV-L2BT para conectar el receptor con el
teléfono móvil.
4 Vuelva a desactivar la función Bluetooth en su teléfono móvil.
Conecte el transmisor de nuevo con la red eléctrica de manera que el
transmisor se conecte de nuevo automáticamente al receptor.
5 Ahora encienda de nuevo la función Bluetooth de su teléfono móvil y
seleccione TV-L2BT para volver a establecer la conexión con el receptor.
6 De este modo, se establece la conexión de múltiples puntos y también puede
aceptar llamadas desde su teléfono móvil mientras ve una película o escucha
música.
Iniciar conexión Bluetooth (NFC)
Si su dispositivo transmisor (por ejemplo, su móvil/smartphone) incluye la
función NFC (Near Field Communication), active dicha función y encender el
receptor. Mantenga el área del receptor en el que aparece el logo NFC ( )
durante unos segundos lo más cerca posible a la posición correspondiente del
dispositivo transmisor. La conexión/emparejamiento se realizará de forma
automática.
La tecla de teléfono (PHONE)
Una vez que se haya conectado con su receptor mediante móvil/Smartphone
podrá iniciar o finalizar una conversación presionando brevemente sobre la tecla
de teléfono. Cuando reciba una llamada entrante la señal de tono del teléfono
63

móvil será transmitida a los audífonos que a su vez se escucharán en los
auriculares. Pulse y suelte el botón "Teléfono" del receptor para poder conversar
a continuación con el interlocutor. El micrófono en el auricular capturará su voz.
Para finalizar la llamada simplemente presione y suelte de nuevo el botón
"Teléfono".
Cambiar audífonos del auricular
La entrega incluye 2 pares de audífonos para auricular.
Un par ya está montado en el auricular.
1 Para cambiar el audífono de los auriculares basta que tire de la punta de los
audífonos para auricular.
2 Empuje el nuevo par de audífonos para auricular en el extremo abierto hasta
que se acoplen.
Solución de problemas
Ningún sonido
- Compruebe el interruptor en el receptor (posición ON).
- Posiblemente la batería del receptor se ha agotado. Cargue la batería durante
aproximadamente 3 horas.
- Comprobar que la conexión Bluetooth esté establecida.
- El volumen ajustado en el receptor es demasiado bajo. Establezca un volumen
más alto.
Interferencias
- Posiblemente la batería del receptor se ha agotado. Cargue la batería durante
aproximadamente 3 horas.
- Posiblemente la distancia del receptor con el emisor Bluetooth sea demasiado
grande (por ejemplo, Smartphone, etc.). Compruebe si la calidad mejora
colocándose más cerca del emisor.
64

65
ANEXO
Indicaciones de seguridad
• Lea atentamente este manual de instrucciones y consérvelo para cualquier
consulta futura.
• Evite la exposición al humo, polvo, vibraciones, productos químicos,
humedad, calor y luz solar directa.
• Puesto que en la actualidad muchos muebles están revestidos con una gran
variedad de pinturas y barnizados y son tratados con diferentes productos
químicos, no se descarta que algunas de estas sustancias ataquen y
suavicen los apoyos de goma del aparato. En caso de que los apoyos se
vean afectados, éstos pueden dejar marcas desagradables en la superficie
de los muebles. De esta forma, utilice para su aparato una superficie
antideslizante.
• El receptor es capaz de reproducir unos niveles de volumen muy elevados.
Por este motivo, antes de colocarse los auriculares es aconsejable regular el
volumen al mínimo, especialmente si el aparato es usado por varias
personas.
• Utilice solamente el adaptador de corriente suministrado, ya que otros
adaptadores de corriente podrían dañar el dispositivo.
• No bloquee el acceso a la fuente de alimentación por muebles u otros objetos.
Uso previsto
Este dispositivo ha sido desarrollado para transmitir de forma inalámbrica señales
de tono de un emisor a un receptor (Bluetooth). Cualquier otro uso se
considerará inapropiado. Los cambios o modificaciones en el aparato no están
permitidos. No abra ni trate de reparar el dispositivo por sí mismo bajo ningún
concepto.
Usuarios con marcapasos
Si utiliza un marcapasos deberá consultar a su médico si puede utilizar este
producto. Apague el aparato inmediatamente si nota o sospecha que pueda
provocar una alteración en su salud.

66
Fuente de alimentación
Atención: Utilice solamente el adaptador de corriente suministrado, ya que
otros adaptadores de corriente podrían dañar el dispositivo. No obstruya el
acceso a la fuente de alimentación por muebles u otros objetos.
Asegúrese de que los cables y enchufes estén en buen estado. Los cables
doblados y desgastados pueden provocar lesiones mortales.
La fuente de alimentación cumple con los requisitos de diseño ecológico de la
Unión Europea (Directiva 2005/32/CE). Esto significa que, en comparación con
otros componentes de red más antiguos, el consumo de energía del aparato, ya
sea en funcionamiento o en reposo, es mucho menor.
Eliminación
Para desechar su aparato, llévelo al punto de recogida de un
organismo de eliminación local (por ejemplo, un centro de reciclaje).
Según la ley sobre aparatos eléctricos y electrónicos, los propietarios
de aparatos usados están obligados por ley a realizar una
clasificación de residuos separada para los aparatos eléctricos y
electrónicos usados. ¡El símbolo significa que en ningún caso debe
tirar el aparato a la basura doméstica! ¡Peligro para la salud y el
medio ambiente provocado por baterías recargables y pilas!
Jamás se deben abrir, dañar, ingerir o dejar que las baterías
recargables y pilas penetren en el medio ambiente. Pueden contener
metales pesados tóxicos y dañinos para el medio ambiente.
Usted está obligado por ley a desechar de forma segura las baterías
recargables y pilas a través del comercio de distribución de baterías,
así como en los puntos de recogida competentes que ponen a
disposición los recipientes correspondientes. La eliminación es
gratuita. Los símbolos significan que en ningún caso debe tirar las
baterías recargables y pilas a la basura doméstica y que estas deben
ser eliminadas a través de los puntos de recogida. Los materiales de
embalaje se deben eliminar según las prescripciones locales.

67
Centro de atención
En caso de que surjan problemas técnicos, por favor póngase en contacto con
nuestro centro de atención. Suiza: Tel. 0900 00 1675 (coste nacional, Swisscom
por presión: 2.60 CHF / min). Para reparación y las reclamaciones de garantía
póngase en contacto con su distribuidor.
Declaración de conformidad
Este dispositivo cumple con los requisitos de la Directiva de la UE:
Directiva 1999/5/CE sobre equipos radioeléctricos y equipos terminales
de telecomunicación y reconocimiento mutuo de su conformidad. La conformidad
con la directiva mencionada anteriormente se confirma mediante el símbolo CE
que aparece en el dispositivo.
Para obtener la declaración de conformidad completa utilice por favor la
descarga gratuita de nuestro sitio web www.switel.com.
Telgo AG, Rte. D’Englisberg 11, 1763 Granges-Paccot, Switzerland
Instrucciones de mantenimiento
• Limpie la superficie de la carcasa con un trapo libre de polvo y húmedo.
• No utilice detergentes o disolventes.
Datos técnicos
Transferencia Bluetooth 4.1 / 2,4 GHz
Alcance hasta 10 m (en condiciones óptimas)
Rango de frecuencia 70 Hz - 18 kHz
Volumen máx. 120 dB
THD < 1,0 %
Distancia de señal/ruido de fondo > 75 dB
Suministro eléctrico (receptor) batería 3,7 V / 380 mA polímero de litio
Tiempo de funcionamiento con batería llena hasta 6 horas
Tiempo de carga para batería vacía aprox. 3 horas
Peso receptor 65 g

68
Transmisor LED Estado
Receptor LED Estado
Azul parpadea lentamente En espera
Azul parpadea lentamente En espera
Verde parpadea intermitentemente Batería se está cargando
Verde parpadeo rápido Batería baja
en modo micrófono
Azul parpadea rápido (presionar tecla PAIR x1) Acople
Azul parpadea rápido
(presionar tecla PAIR durante 5 s.)
Acople
Azul parpadea rápido Batería baja
en modo Bluetooth
Azul constantemente encendido Acoplado
Azul constantemente encendido Acoplado
Verde constantemente encendido Batería está totalmente
Verde + Azul constantemente Llamada telefónica entrante
Verde constantemente encendido
(presionar tecla MIC x1)
Modo micrófono encendido
Indicador LED

69
Garantía
Los dispositivos SWITEL son fabricados y probados de acuerdo con los últimos
métodos de producción. Los materiales seleccionados y el uso de tecnologías
avanzadas garantizan un funcionamiento sin problemas y de larga vida.
La garantía no se aplica a las pilas o baterías utilizadas en el producto. El
período de garantía es de 24 meses a partir de la fecha de compra.
Dentro del periodo de garantía todos los defectos materiales o de fábrica serán
solventados de forma gratuita. La garantía será nula si el comprador o terceras
personas manipulan el aparato. La garantía no se aplicará si se producen
desperfectos o daños causados por el manejo inadecuado del aparato, la red de
conexión y la instalación o por el desgaste natural debido a un mantenimiento y
almacenamiento incorrecto del dispositivo o por causas de fuerza mayor o
influencias externas.
En caso de reclamación nos reservamos el derecho a reparar las piezas
defectuosas, sustituirlas o reemplazar el dispositivo. Las piezas o el dispositivo
reemplazado deberán ser de nuestra propiedad. Las reclamaciones por daños y
perjuicios quedan excluidas, a menos que se demuestre intencionalidad o
negligencia grave por parte del fabricante.
Si dentro del periodo de garantía el dispositivo sigue mostrando defectos,
póngase en contacto con su recibo de compra únicamente en la tienda donde
compró su dispositivo SWITEL. Todas las reclamaciones de garantía conforme a
estas disposiciones sólo tendrán validez frente al distribuidor del producto. Los
derechos de garantía dejarán de tener validez una vez finalizado el plazo de
garantía de 2 años.

70

71
VISTA GERAL
Receptor
1 Interruptor ON/OFF
2 Indicador de controlo LED
3 Regular o volume
4 Regular o balanço
5 Definir a qualidade do som
6 NFC
7 Reprodução / Pausa / Atender chamada / terminar chamada
8 Botão do microfone para ouvir sons no ambiente / Botão para acoplamento
com dispositivos Bluetooth (PAIR)
9 Microfone
10 Auricular ajustável (à direita)
11 Auricular ajustável (à esquerda)
12 Conexão para cabo de carga (Micro USB)
13 Contacto de carga (para carregar o recetor no transmissor)
Transmissor
1 Contacto de carga
2 Botão para acoplamento com dispositivos Bluetooth (PAIR)
3 Indicador de controlo LED (para fonte de alimentação / acoplamento
(PAIR))
4 Conexão para fonte de alimentação (Micro USB)
5 Entrada de áudio analógico (3,5 mm)
6 Entrada de áudio óptica TOSLINK

72
COLOCAR EM FUNCIONAMENTO TV-L2BT
Conteúdo da embalagem
• 1 Receptor com audiofone para auricular
• 1 Transmissor
• 1 Fonte de alimentação (para transmissor ou recetor)
• 1 Par de audiofones para auricular
• 1 Cabo de áudio analógico (2 trincos de tomada de 3,5 mm)
• 1 Adaptador de áudio (RCA) para cabo de áudio analógico
• 1 Cabo de áudio digital óptico TOSLINK
• 1 Manual de Instruções
Importante: Antes de usar o aparelho, leia as instruções de segurança que
se encontram na página 79.
Ligar o transmissor
1 Ligue a fonte de alimentação à entrada de conectores (Micro USB) situada na
parte posterior do transmissor.
2 Ligue a fonte de alimentação à uma tomada.
O indicador de alimentação azul pisca quando há tensão da rede.
3 Ligue o transmissor à sua fonte de áudio desejada.
Para as diversas opções de ligação (TV, aparelho de música, Leitor MP3 etc.)
vários adaptadores estão incluídos na entrega.
Por favor, note que apenas se deve conectar uma entrada (entrada de
áudio analógico ou entrada de áudio óptica/TOSLINK).
Fonte de
alimentação
Tomada

Quando a entrada de áudio analógico e a entrada de áudioóptico/
TOSLINK estiverem ligados, o sinal de entrada de áudio analógico é
utilizado.
Utilização do cabo áudio digital óptico TOSLINK
Se a fonte de som tiver uma saída de áudio óptica (TOSLINK/S-PDIF), conecte
os dois aparelhos com o cabo de áudio digital TOSLINK incluído na embalagem.
Esta conexão fornece melhor qualidade de som e é menos susceptível a
interferências de acoplamento eléctrico e magnético.
Por favor, note que o cabo de áudio digital óptico TOSLINK não deve ser
dobrado! Além disso, evite curvas acentuadas.
73
Conector
RCA
Ligação de
auriculares
3,5 mm
ou
Conexão
óptica

74
Carregar a bateria
Antes da primeira utilização, carregar a bateria no receptor
durante cerca de 3 horas.
1 Colocar o interruptor ON/OFF em posição „OFF“ no
recetor.
2 Colocar o recetor na base de carga do transmissor.
3 Durante o processo de carga, o indicador LED verde
pisca lentamente no recetor. Passadas 2 horas, o
indicador LED verde acende em luz contínua, indicando
que a bateria está totalmente carregada.
4 Quando o interruptor ON/OFF está em posição ON
durante o carregamento, colocar o interruptor na
posição OFF depois do carregamento e colocar outra vez em ON para
estabelecer a ligação.
5 Pode-se carregar o recetor diretamente com o adaptador fornecido.
Para esse efeito, utilize a conexão Micro-USB do recetor.
• Uma bateria completamente carregada permite um funcionamento de
cerca de 6 horas.
Fonte de
alimentação
Tomada

• Para poupar a energia da bateria, o receptor desliga-se automaticamente
após aprox. 5 minutos, quando não recebe nenhum sinal do transmissor
ou quando o nível do sinal é demasiado baixo.
• Em Standby: até 180 horas (quando o receptor está conectado a um
dispositivo, mas não emitir qualquer som)
• Auto off: quando o receptor está ligado, sem qualquer ligação a
dispositivos Bluetooth, este será desligado após 5 minutos. Para ativar o
receptor novamente, deverá deslizar o botão de alimentação para a
posição "OFF", e de seguida deslize-o de volta para "ON".
• Depois do Auto off: se o botão de alimentação não se encontrar
arrastado para a posição "OFF", então a bateria pode durar até 1,5
meses.
MANUSEAMENTO
Um volume muito elevado prejudica o ouvido!
Neste auricular pode-se ajustar um alto nível de volume, como nos
dispositivos convencionais. Em pessoas com ouvidos saudáveis e em
crianças isso pode prejudicar a audição.
• Antes de pôr os auriculares, ajuste um volume mais baixo.
• Não utilize de forma permanente altos níveis de volume.
1 Ligue o transmissor. Ligue o dispositivo do qual deseja captar o som. O
indicador de carga azul no transmissor pisca.
2 Ponha o interruptor ON/OFF do auricular na posição "ON", LED azul também
pisca. A comunicação entre transmissor e receptor é efetuada
automaticamente. Se a ligação não for estabelecida automaticamente, premir
o botão "PAIR" no recetor e mantenha-o premido por cerca de 5 segundos, o
LED pisca em azul e a ligação é estabelecida.
3 Dobrar as patilhas dos auscultadores para conseguir meter os audiofones de
auricular nos ouvidos. Os audiofonesde auricular podem moverse para cima,
para baixo e para os lados, de modo a poder penetrar profundamente no
ouvido. Desta forma melhora-se a qualidade do som e do volume. Pressionar
ligeiramente os audiofonesdoauricular colocados nos seus ouvidos, de forma
a encontrar a posição mais cómoda para receber o melhor som.
4 Configurar o volume desejado.
75

5 Se for necessário, alterar a configuração de som, conforme as suas
necessidades. Para alterar o som, premir brevemente a respectiva Tecla
„TONE“.
- 1 tom de apito curto: Acentuação dos agudos.
- 2 tons de apito curtos: Acentuação dos graves e acentuação dos agudos.
- 3 tons de apito curtos: Acentuação dos graves.
- 1 tom de apito longo: neutro.
6 Configurar, se necessário, o volume (esquerda/direita).
Nota: Quando a bateria estiver quase sem carga, o indicador LED pisca em
azul (em funcionamento Bluetooth) ou em verde (em funcionamento de
microfone). Ouvirá no auricular 3 apitos curtos em intervalos de um minuto.
No 4.° minuto ouvirá um apito duplo. No 5.° minuto os auriculares desligam
então automaticamente.
A tecla do microfone (MIC)
A entrada do microfone na parte frontal inferior do receptor capta os sons do seu
ambiente. Quando o microfone estiver ligado, ouvirá os sons do ambiente mais
alto. Ou seja, mesmo com os auriculares postos poderá ouvir por exemplo a
campainha da porta, o telefone ou o seu interlocutor.
Para activar o microfone, prima a tecla do microfone (MIC). O indicador de
funcionamento muda para verde e ouvirá um apito curto. Verificar se a entrada do
microfone não está tapada. Ouvirá os sons do ambiente e poderá utilizar os
auriculares como amplificadores de som, para ouvir melhor o seu interlocutor.
Para desactivar o microfone, voltar a premir a tecla de microfone (MIC).
Ouvirá dois apitos curtos e o indicador de funcionamento acende novamente em
azul.
Atenção! Ao comutar entre microfone e fonte de música/som deve ter em
atenção que o volume poderá alterar-se dependendo do nível de sinal de
entrada! Como medida de segurança deverá, normalmente, antes de comutar
baixar o volume.
76

Estabelecer ligação multiponto
(utilização simultânea de fonte de áudio e telecomunicação móvel)
1 Ligar o transmissor à tensão da rede. Ligar depois o recetor (interruptor em
ON) e premir o botão "PAIR" no transmissor e no recetor. A ligação é feita em
poucos segundos.
2 Desligar o transmissor da rede e premir o btão "PAIR" no recetor, e mantenha-
o premido por cerca de 5 segundos. O LED pisca em azul.
3 Ligar a função Bluetooth no seu telemóvel e procurar dispositivos Bluetooth.
Selecionar o registo TV-L2BT para ligar o recetor ao telemóvel.
4 Desligar novamente a função Bluetooth no seu telemóvel.
Ligar o transmissor novamente à rede elétrica, de modo que o transmissor se
ligue automaticamente ao recetor.
5 Ligar outra vez a função Bluetooth no seu telemóvel e selecionar TV-L2BT,
para estabelecer a ligação com o recetor.
6 Com isso foi efetuada a ligação multiponto que lhe permite atender chamadas
do seu telemóvel a partir do recetor, enquanto vê um filme ou ouve música.
Ligação do Bluetooth (NFC)
Seo seu transmissor (p. ex. o seu telemóvel/smartphone) tiver a função NFC
(Near Field Communication), ativar essa função e ligue o receptor. Aperte a área
do transmissor que contém o símbolo NFC ( ) durante alguns segundos bem
junto a respectiva área do transmissor. A conexão/ligação é estabelecida
automaticamente.
A tecla do telefone (PHONE)
Se ligar os auriculares ao seu telemóvel/smartphone, poderá atender ou desligar
uma chamada premindo a teclade telefone. Quando uma chamada é recebida, o
tom de toque do telefone móvel é transmitido para o auscultador, que por sua vez
será ouvido nos auriculares.
Pressione e solte o botão "Telefone" no receptor e poderá conversar com o
interlocutor. O microfone no colar indutivo irá captar a sua voz. Para terminar a
chamada basta pressionar e soltar novamente o botão 'Telefone'.
77

Trocar os audiofones de auricular
A encomenda inclui 2 pares de audiofones de auricular.
Um par já está aplicado no auricular.
1 Para trocar os audiofonesde auricular, agarrar as pontas dos audiofones
auriculares aplicados nos auscultadores e retirar simplesmente.
2 Empurrar os novos audiofonesde auricular para as extremidades abertas e
encaixar os audiofones.
Solução de problemas
Não hásom
- Verificar o interruptor dos auriculares (posição ON).
- é possível que a bateria dos auriculares esteja sem carga. Carregar a bateria
durante cerca de 3 horas.
- Verificar se a ligação do Bluetooth está a funcionar.
- o volume nos auriculares está demasiado baixo. Ajustar para um volume mais
alto.
Sinalização de avaria
- É possível que a bateria dos auriculares esteja sem carga. Carregar a bateria
durante cerca de 3 horas.
- Possivelmente a distância entre os auriculares e o transmissor Bluetooth (p. ex.
smartphone etc.) é demasiado grande. Verificar se a qualidade é melhor,
quando se aproxima do transmissor.
78

79
APÊNDICE
Indicações de segurança
• Leia este Manual de Instruções com atenção e guarde-o num local seguro.
• Evite a exposição ao fumo, pó, vibrações, produtos químicos, humidade,
calor e luz solar directa.
• Hoje em dia, existem muitos móveis revestidos com uma grande variedade
de tintas e vernizes e tratados com diferentes produtos químicos, pelo que
não se deve excluir a hipótese de algumas dessas substâncias atacarem e
desgastarem os apoios de borracha do aparelho. Caso fiquem danificados,
os apoios poderão deixar marcas desagradáveis na superfície dos móveis.
Por isso, utilize uma superfície antiderrapante para o seu aparelho.
• O receptor consegue reproduzir níveis de volume muito elevados. Assim,
antes de pôr os auriculares, é conveniente regular o volume para o mínimo,
sobretudo se o aparelho for utilizado por várias pessoas.
• Utilize apenas o adaptador fornecido, porque outras fontes de alimentação
podem danificar o equipamento.
• Não bloqueie o acesso à fonte de alimentação com móveis ou outros objetos.
Finalidade do Aparelho
Este dispositivo foi concebido, para transmitirsinais de som de um transmissor
sem fios a um receptor (Bluetooth). Qualquer outra finalidade será considerada
imprópria. Não são permitidas modificações ou conversões não autorizadas. Não
abra o aparelho nem tente efectuar reparos em circunsância alguma.
Utilizadores com pacemaker
Se é portador de um pacemaker, deverá consultar o seu médico antes de adquirir
este produto. O dispositivo deve ser imediatamente desactivado/ desligado,
sempre que se sentir prejudicado ou suspeitar alg um incómodo.

80
Fonte de alimentação
Precaução: Utilize apenas o adaptador fornecido, porque outras fontes de
alimentação podem danificar o equipamento. Não bloqueie o acesso à fonte
de alimentação com móveis ou outros objetos.
Verifique se o cabo e a tomada se encontram em bom estado durante a
utilização. Os cabos dobrados e desgastados podem produzir ferimentos graves!
A fonte de alimentação cumpre os requisitos de design ecológico da União
Europea (Diretiva 2005/32/CE). Isto significa que, em comparação com outros
componentes de rede mais antigos, o consumo de energia do aparelho, quer em
funcionamento quer em repouso, é muito menor.
Eliminação
Para se eliminar o seu aparelho, leve-o ao ponto de recolha de um
organismo de eliminação local (por exemplo, um centro de
reciclagem). De acordo com a lei sobre aparelhos elétricos e
electrónicos, os proprietários de aparelhos usados são obrigados por
lei a realizar uma classificação de resíduos separada para os
aparelhos elétricos e electrónicos usados. O símbolo significa que
nunca deve deitar o aparelho no lixo doméstico!
Perigo para a saúde e para o meio ambiente provocado por
baterias recarregáveis e pilhas!
Nunca deverá abrir, danificar, ingerir ou deixar que as baterias
recarregáveis e pilhas penetrem no meio ambiente. Podem conter
metais pesados tóxicos e prejudiciais para o meio ambiente. É
obrigatório por lei eliminar de forma segura as baterias recarregáveis
e pilhas através das redes comerciais de distribuição de baterias,
bem como nos pontos de recolha pertinentes que disponibilizam os
respetivos contentores. A eliminação é gratuita. Os símbolos
significam que nunca deverá deitar as baterias recarregáveis e pilhas
no lixo doméstico, e que estas deverão ser eliminadas através dos
pontos de recolha. Os mate- riais de embalagem deverão ser
eliminados de acordo com as prescrições locais.

81
Central de atendimento
Em caso de problemas técnicos, por favor, entre em contato com nossa central
de atendimento. Suíça: Tel. 0900 00 1675 (Custos nacionais, Swisscom na
impressão: CHF 2,60/min). Para reclamações de reparação e garantia entre em
contato com o seu distribuidor autorizado.
Declaração de conformidade
Este dispositivo cumpre os requisitos da Diretiva da UE:
Diretiva 1999/5/CE sobre equipamentos radio-eléctricos e terminais de
telecomunicação e reconhecimento mútuo da sua conformidade.
A conformidade com a diretiva anteriormente referida é confirmada pelo símbolo
CE que aparece no dispositivo. Poderá descarregar gratuitamente a declaração
de conformidade completa no nosso site www.switel.com.
Telgo AG, Rte. D’Englisberg 11, 1763 Granges-Paccot, Switzerland
Instruções de manutenção
• Limpe as superfícies da caixa com um pano suave e sem pelos.
• Não utilize detergentes nem dissolventes.
Dados técnicos
Transmissão Bluetooth 4.1 / 2,4 GHz
Alcance até 10 m (em condições óptimas)
Intervalo de frequência 70 Hz - 18 kHz
Volume máx. 120 dB
THD < 1,0 %
Relação sinal / ruído > 75 dB
Fonte de energia (Receptor) Bateria 3,7 V / 380 mA lítio polímero
Tempo de funcionamento Com bateria totalmente carregada até 6
horas
Tempo de carga Para bateria vazia cerca de 3 horas
Peso Receptor 65 g

82
LED no transmissor Estado
LED no recetor Estado
Azul, pisca lentamente Stand-by
Azul, pisca lentamente Stand-by
Verde, pisca lentamente Bateria a ser carregada
Verde, pisca rapidamente Bateria fraca
em modo de microfone
Azul, pisca rapidamente (botão PAIR premir 1x) Acoplamento
Azul, pisca rapidamente
(botão PAIR premir 5 segundos)
Acoplamento
Azul, pisca rapidamente Bateria fraca
em modo Bluetooth
Azul, luz contínua Acoplado
Azul, luz contínua Acoplado
Verde, luz contínua Bateria totalmente caregada
Verde + Azul, luz contínua Entrada de chamada telefónica
Verde, luz contínua
(botão MIC premir 1x.) Modo microfone ON
Indicador LED

83
Garantia
Os dispositivos SWITEL são fabricados e testados de acordo com os mais
recentes métodos de produção. Os materiais selecionados e o uso de
tecnologias avançadas garantem um funcionamento sem problemas e de longa
duração.
A garantia não se aplica às pilhas ou baterias utilizadas no produto. O período de
garantia é de 24 meses a partir da data de compra.
Durante o período de garantia, todos os defeitos materiais ou de fábrica serão
reparados de forma gratuita. A garantia será nula em caso de manipulação do
aparelho por parte do comprador ou de terceiros.
A garantia não se aplicará em caso de defeitos ou danos devidos a
manuseamento inadequado do aparelho, à rede de ligação, à instalação, ao
desgaste natural resultante de manutenção e armazenamento incorretos do
dispositivo ou a motivos de força maior ou influências externas.
Em caso de reclamação, reservamo-nos o direito de reparar as peças
defeituosas, substituí-las ou substituir o dispositivo. As peças ou o dispositivo
substituídos ficam na nossa empresa. As reclamações por danos e prejuízos
ficam excluídas, a não ser que se demonstre intencionalidade ou negligência
grave por parte do fabricante.
Caso o dispositivo continue a apresentar defeitos durante o período de garantia,
entre em contacto unicamente com a loja onde adquiriu o seu dispositivo
SWITEL, munido do seu recibo de compra. Todas as reclamações de garantia de
acordo com estas disposições só serão válidas junto do distribuidor do produto.
Os direitos de garantia perderão a validade depois de terminado o prazo de
garantia de 2 anos.

84

85
OVERZICHT
Ontvanger
1 Aan/uit-schakelaar
2 Aan/uit-indicatorlampje
3 Volumeregelaar
4 Balansregelaar
5 Klankregelaar
6 NFC
7 Afspelen/Pauze/Oproep beantwoorden/Oproep beëindigen
8 Microfoontoets om omgevingsgeluid te horen/Toets voor het koppelen van
Bluetooth-apparaten (PAIR)
9 Microfoon
10 Instelbare oordop (rechts)
10 Instelbare oordop (links)
12 Ingang voor laadkabel (micro-USB)
13 Laadcontact (voor het laden van de ontvanger van de zender)
Zender
1 Laadcontacten
2 Toets voor het koppelen van Bluetooth-apparaten
3 Aan/uit-indicatorlampje (voor stroomvoorziening/koppeling (PAIR)
4 Aansluiting voor adapter (micro-USB)
5 Analoge audio-ingang (3,5 mm)
6 Optische audio-ingang TOSLINK

86
TV-L2BT IN GEBRUIK NEMEN
Verpakkingsinhoud
• 1 Ontvanger met oordopkapjes
• 1 Zender
• 1 Stroomaansluiting (voor zender of ontvanger)
• 1 Paar extra oordopkapjes
• 1 Analoge audiokabel (2 audiostekkers van 3,5 mm)
• 1 Audio adapter (RCA) voor analoge audiokabel
• 1 Optische digitale TOSLINK-audiokabel
• 1 Handleiding
Belangrijk: Lees eerst de veiligheidsaanwijzingen op pagina 93 voordat u
het apparaat in gebruik neemt.
Zender aansluiten
1 Verbind de stekker van de netstroom met de DC IN-aansluiting (Micro USB)
aan de achterkant van de zender.
2 Steek de stroomkabel in een stopcontact. Zodra er netspanning is, begint het
blauwe aan/uit-lampje te knipperen.
3 Verbind de zender met uw audiobron.
Voor diverse aansluitmogelijkheden (tv, stereo-installatie, mp3-speler etc.)
worden meerdere adapters meegeleverd.
Houd er rekening mee dat slechts één ingang tegelijkertijd mag gebruik
worden (ofwel de analoge audio-ingang ofwel de optische TOSLINK
audio-ingang).
Stroomaansluiting
Stopcontact

Als u zowel op de analoge audio-ingang als op de optische audio-ingang
TOSLINK een apparaat aansluit, dan wordt het signaal van de analoge
audio-ingang gebruikt.
De optische digitale audiokabel TOSLINK gebruiken
Wanneer uw audiobron is uitgerust met een optische audio-uitgang (TOSLINK/
S-PDIF), kunt u beide apparaten op elkaar aansluiten met behulp van de
meegeleverde optische digitale audiokabel. Deze verbinding zorgt voor een
hogere audio-overdrachtskwaliteit en minder elektrische en magnetische
interferentie van andere apparaten.
Houd er rekening mee dat de optische digitale audiokabel TOSLINK niet mag
worden geknikt! Vermijd ook scherpe bochten.
87
RCA-
connector
3,5 mm
Koptelefoonconnector
ofwel
Optische
Aansluiting

88
De batterij laden
Laad de batterij ongeveer 3 uur lang op voordat u het
toestel in gebruik neemt.
1 Schuif de aan/uit-schakelaar van de ontvanger naar de
stand "OFF".
2 Zet dan de ontvanger in het laadstation van de zender.
3 Tijdens het laden knippert langzaam het groene aan/uit-
indicatorlampje op de ontvanger. Na ongeveer 2 uur
brandt het lampje continu om aan te geven dat de
batterij geladen is.
4 Wanneer de aan/uit-schakelaar tijdens het laden in de
stand "ON" stond, dan schuift u hem na het laden
eenmaal in de stand "OFF" en dan weer in "ON" om de verbinding te
herstellen.
5 U kunt de ontvanger ook direct met de meegeleverde adapter laden.
Gebruik daartoe de micro-USB-ingang van de ontvanger.
• Volledig geladen batterijen gaan tot 6 uur mee.
• Om het batterijvermogen te sparen, schakelt de ontvanger automatisch
Stroomaansluiting
Stopcontact

uit wanneer hij ongeveer 5 minuten lang geen signaal van de zender
ontvangt of wanneer het signaal te zwak is.
• Standby-tijd: tot 180 uur (wanneer de ontvanger is aangesloten op een
apparaat maar geen audio speelt)
• Automatische uitschakeling: wanneer de ontvanger ingeschakeld is
zonder aansluiting op Bluetooth-apparaten, schakelt hij na 5 minuten
automatisch uit. Om de ontvanger terug in te schakelen, schuift u eerst
de aan/uit-knop naar de stand "OFF". Vervolgens schuift u hem terug
naar de stand "ON".
• Na automatische uitschakeling: als de aan/uit-knop niet op “OFF” stat,
kan de batterij 1,5 maand meegaan.
BEDIENING
Een hoog volume beschadigt het gehoor!
Op deze koptelefoon kan een hoger volume worden ingesteld dan bij
traditionele toestellen. Bij personen met een gezond gehoor en bij kinderen
kan een hoog volume tot schade aan het gehoor leiden.
• Stel, voordat u de koptelefoon opzet, het volume op een laag niveau in.
• Stel het volume niet continu hoog in.
1 Schakel de zender in. Schakel het apparaat in dat de audio moet afspelen. Het
blauwe aan/uit-lampje van de zender knippert.
2 Schuif de aan/uit-schakelaar van de koptelefoon in de "ON"-stand, het blauwe
indicatorlampje begint ook te knipperen. De zender en ontvanger maken
automatisch verbinding. Als de verbinding niet automatisch wordt opgestart,
houd dan de knop "PAIR" van de ontvanger ongeveer 5 seconden ingedrukt.
Het blauwe indicatorlampje knippert nu en de verbinding wordt opgestart.
3 Buig de armen van de koptelefoon uiteen zodat u de oordopjes in uw oren
kunt steken. Zorg ervoor dat de oordopjes naar boven, onderen en opzij
kunnen bewegen, zodat u ze diep in de oren kunt steken. Dit zorgt voor een
betere geluidskwaliteit en een beter volume. Druk de oordopjes voorzichtig in
uw oren, totdat ze aangenaam zitten en het geluid optimaal is.
4 Stel het gewenste volume in.
5 Pas de geluidsinstellingen naar wens aan.
Om de klank in te stellen, drukt u kort op de knop "TONE".
89

- 1 korte pieptoon: de hoge tonen verhogen.
- 2 korte pieptonen: de lage en hoge tonen verhogen.
- 3 korte pieptonen: de lage tonen verhogen.
- 1 lange pieptoon: neutraal.
6 Stel indien nodig de balans (links/rechts) in.
Opmerking: Wanneer de batterij leeg is, knippert het blauwe indicatorlampje
(in Bluetooth-modus) of het groene lampje (in microfoon-modus). U hoort in de
koptelefoon 3 korte pieptonen met een interval van een minuut. In de 4e
minuut hoort u een dubbele pieptoon. In de 5e minuut wordt de ontvanger
automatisch uitgeschakeld.
De microfoon-knop (MIC)
De microfoon-opening op de voorkant van de ontvanger neemt de geluiden uit de
omgeving op. Wanneer de microfoon ingeschakeld is, hoort u uw omgeving luider.
Zo kunt u bv. uw deurbel, uw telefoon of uw gesprekspartner horen, zelfs als u de
ontvanger draagt.
Om de microfoon in te schakelen, drukt u op de microfoontoets (MIC). Het
indicatorlampje wordt groen en u hoort een korte pieptoon. Zorg ervoor dat de
microfoon-opening niet afgedekt is. U hoort uw omgeving en kunt de ontvanger
als gehoorversterker gebruiken om uw gesprekspartner beter te verstaan.
Om de microfoon uit te schakelen, drukt u nogmaals op de microfoontoets (MIC).
U hoort twee korte pieptonen en het indicatorlichtje wordt terug blauw.
Opgelet! Bij het schakelen tussen microfoon en muziek-/audiobron kan,
afhankelijk van het niveau van de signaalingang, het volume beduidend
verschillen!
Reduceer, als voorzorgsmaatregel, het volume voordat u tussen microfoon en
muziek-/audiobron schakelt.
90

Meerpuntse verbinding aanmaken
(gelijktijdig gebruik van audiobron en mobiele telefoon)
1 Sluit de zender aan op de netstroom om hem in te schakelen. Schakel
vervolgens de ontvanger in (schakelaar op "ON") en druk zowel op de zender
als op de ontvanger op de knop "PAIR". Na enkele seconden is de verbinding
aangemaakt.
2 Haal de zender uit het stroomnet en houd op knop "PAIR" op de ontvanger
ongeveer 5 seconden ingedrukt totdat het blauwe indicatorlampje begint te
knipperen.
3 Schakel de Bluetooth-functie van uw mobiele telefoon in en zoek naar
Bluetooth-apparaten. Selecteer optie TV-L2BT om de ontvanger met uw
mobiele telefoon te verbinden.
4 Schakel de Bluetooth-functie van uw mobiele telefoon opnieuw uit.
Sluit de zender opnieuw aan op het stroomnet zodat de zender zich
automatisch opnieuw met de ontvanger verbindt.
5 Schakel nu opnieuw de Bluetooth-functie van uw mobiele telefoon in en
selecteer TV-L2BT om opnieuw verbinding met de ontvanger te maken.
6 Nu is de meerpuntse verbinding klaar en kunt u met uw ontvanger
binnenkomende oproepen van uw mobiele telefoon aannemen terwijl u naar
een film kijkt of muziek beluistert.
De Bluetooth-verbinding aanmaken (NFC)
Heeft uw zender (bv. uw mobiele telefoon/smartphone) een NFC-functie
(Near Field Communication), schakel deze functie dan in en schakel de
ontvanger in. Houd dan het NFC-logo ( ) op de ontvanger enkele seconden
lang zo dicht mogelijk bij het NFC-logo op uw zender. De apparaten worden dan
automatisch gekoppeld.
De telefoonknop (PHONE)
Hebt u uw ontvanger aangesloten op een mobiele telefoon/smartphone, dan kunt
u met een druk op de telefoonknop een gesprek aannemen of beëindigen.
Wanneer u een binnenkomende oproep ontvangt, wordt de beltoon van uw
91

mobiele telefoon verzonden naar uw koptelefoon, zodat u het in de oordopjes
hoort. Druk kort op de knop "Telefoon" op de ontvanger om met de beller te
spreken. De microfoon in de koptelefoon vangt uw stem op.
Om het gesprek te stoppen, drukt u opnieuw op de knop "Telefoon".
Oordopjes verwisselen
Bij het apparaat worden 2 paar oordopjes meegeleverd.
Een paar oordopjes is reeds aangesloten op de koptelefoon.
1 Om de oordopjes te verwisselen, grijpt u de bovenkant van de gemonteerde
oordopjes vast en trekt u ze eraf.
2 Schuif de nieuwe oordopjes op de open uiteinden tot ze vastzitten.
Storingen oplossen
Geen klank
- Controleer de schakelaar op de ontvanger (stand ON).
- De batterij van de ontvanger is mogelijk leeg. Laat de batterij ongeveer 3 uur
laden.
- Controleer of de Bluetooth-verbinding beschikbaar is.
- Het op de ontvanger ingestelde volume is te laag. Zet het volume hoger.
Geruis
- De batterij van de ontvanger is mogelijk leeg. Laat de batterij ongeveer 3 uur
laden.
- De afstand tussen de ontvanger en de Bluetooth-zender (bv. smartphone etc.)
is te groot. Controleer of de kwaliteit verbetert wanneer u dichter bij de zender
staat.
92

93
BIJLAGE
Veiligheidsaanwijzingen
• Lees deze handleiding zorgvuldig door en bewaar hem goed.
• Vermijd blootstelling aan rook, stof, trillingen, chemische stoffen, vocht, hitte
of direct zonlicht.
• Aangezien meubels tegenwoordig met een veelvoud van laksoorten en
kunststoffen behandeld worden, kan het gebeuren dat veel van die stoffen de
rubberen pootjes van dit toestel kunnen aantasten en vlekken op uw meubels
kunnen maken. Gebruik daarom een slipvaste onderlegger voor uw toestel.
• Deze ontvanger kan grote geluidsvolumes opwekken. Als dit toestel door
meerdere personen gebruikt wordt, is het beter het volume altijd op de laagste
stand te zetten voordat u de luisterhulp in uw oren aanbrengt.
• Gebruik uitsluitend de meegeleverde adapter, want andere adapters kunnen
de telefoon beschadigen.
• De toegang tot de adapter mag niet worden belemmerd door meubels of
andere voorwerpen.
Rechtmatig gebruik
Dit apparaat is bedoeld om audiosignalen van een zender draadloos over te
dragen naar een ontvanger (Bluetooth). Elk ander gebruik wordt als oneigenlijk
gebruik beschouwd. Zelf uitgevoerde wijzigingen aan het apparaat zijn verboden.
Open nooit zelf het apparaat en probeert het nooit zelf te repareren.
Gebruikers met pacemaker
Wanneer u een pacemaker draagt, dient u uw arts te raadplegen voordat u dit
product gebruikt. Schakel onmiddellijk het apparaat uit wanneer u er de invloed
van merkt of vermoedt.

94
Adapter
Opgelet: Gebruik uitsluitend de meegeleverde adapter, want andere
adapters kunnen de telefoon beschadigen. De toegang tot de adapter mag
niet worden belemmerd door meubels of andere voorwerpen.
Zorg bij gebruik van de adapter ervoor dat de kabel en stekker niet beschadigd
zijn. Geknakte of versleten kabels zijn levensgevaarlijk!
De adapter voldoet aan de vereisten voor ecologisch ontwerp van de Europese
Unie (Richtlijn 2005/32/EG). Dit betekent dat wanneer het apparaat in gebruik of
in stand-by staat, het stroomverbruik in vergelijking met oudere types adapters
beduidend lager is.
Afvalverwijdering
Wanneer u het apparaat wilt afvoeren, brengt u het naar een
verzamelpunt van uw plaatselijke afvalverwerkingsbedrijf (bv. een
containerpark). Krachtens de wetgeving betreffende afgedankte
elektrische en elektronische apparaten zijn eigenaars van afgedankte
apparaten wettelijk verplicht oude elektrische en elektronische
apparaten apart af te voeren. Het symbool hiernaast betekent dat het
apparaat in geen geval bij het huisvuil mag worden geworpen!
Gevaar voor de gezondheid en voor het milieu door accu's en
batterijen!
Accu's en batterijen nooit openen, beschadigen, inslikken of in het
milieu introduceren. Ze kunnen giftige en milieuschadelijke zware
metalen bevatten. U bent wettelijk verplicht om accu's en batterijen
op een veilige manier af te voeren via een handelaar die batterijen
verkoopt of via een inzamelpunt voor batterijen, waar geschikte
containers ter beschikking staan. Het afvoeren gebeurt kosteloos. De
symbolen hiernaast betekenen dat u accu's en batterijen in geen
geval in het huisvuil mag werpen en dat u ze naar een geschikt
inzamelpunt moet brengen.
De verpakkingsmaterialen moeten worden afgevoerd in
overeenstemming met de lokale voorschriften.

95
Service−hotline
In geval van technische problemen kunt u contact opnemen met onze service-
hotline. Zwitserland: Tel: 0900 00 1675 (in Zwitserland, Swisscom-tarief bij ter
perse gaan: CHF 2,60/min). Bij garantieaanspraken neemt u contact op met uw
handelaar.
Conformiteitsverklaring
Dit apparaat voldoet aan de vereisten van de EU-richtlijn:
1999/5/EG Richtlijn betreffende radioapparatuur en telecommunicatie-
eindapparatuur en de wederzijdse erkenning van hun conformiteit. De
conformiteit met bovengenaamde richtlijn wordt bevestigd door het CE-kenteken
op het apparaat. De volledige conformiteitsverklaring kunt u gratis downloaden
van onze website www.switel.com.
Telgo AG, Rte. D’Englisberg 11, 1763 Granges-Paccot, Switzerland
Onderhoud
• Reinig de behuizing met een zachte en pluisvrije doek.
• Gebruik geen reinigingsmiddelen of oplossingsmiddelen.
Technische gegevens
Overdracht Bluetooth 4.1 / 2,4 GHz
Reikwijdte Tot 10 m (in optimale omstandigheden)
Frequentiebereik 70 Hz - 18 kHz
Max. volume 120 dB
Vervormingsfactor < 1,0 %
Signaal/geruis-afstand > 75 dB
Stroomvoorziening (ontvanger) Batterij 3,7 V / 380 mA lithium-polymeer
Bedrijfsduur Met volle batterij tot6 uur
Laadtijd Voor lege batterij ongeveer 3 uur
Gewicht ontvanger 65 g

96
Indicatorlampje zender Status
Indicatorlampje ontvanger Status
Blauw, knippert langzaam Stand-by
Blauw, knippert langzaam Stand-by
Groen, knippert langzaam Batterij wordt geladen
Groen, knippert snel Batterij bijna leeg
in microfoon-modus
Blauw, knippert snel (PAIR-knop 1x indrukken) Koppeling
Blauw, knippert snel
(PAIR-knop 5 sec. ingedrukt houden)
Koppeling
Blauw, knippert snel Batterij bijna leeg
in Bluetoothmodus
Blauw, continu brandend Gekoppeld
Blauw, continu brandend Gekoppeld
Groen, continu brandend Batterij vol
Groen + blauw, continu brandend Binnenkomend gesprek
Groen, continu brandend
(MIC-knop 1x indrukken)
Microfoon-modus aan
LED-indicatorlampje

97
Garantie
SWITEL-apparaten worden geproduceerd en getest met de modernste
productieprocessen. Nauwkeurig geselecteerde materialen en geavanceerde
technologieën zorgen voor een probleemloze werking en een lange levensduur.
De garantieperiode bedraagt 24 maanden, berekend vanaf de dag van aankoop.
De garantie geldt niet voor de batterijen, accu's of accupacks gebruikt in het
product.
Binnen de garantieperiode worden alle defecten die te wijten zijn aan materiaal-
of fabricagefouten, kosteloos gerepareerd. De garantie vervalt bij ingrepen aan
het apparaat door de koper of door derden. Schade die door onrechtmatige
hantering of bediening, natuurlijke slijtage, verkeerd opstellen of bewaren,
onrechtmatige aansluiting of installatie, geweld of andere externe invloeden is
ontstaan, wordt niet gedekt door de garantie.
Wij behouden ons het recht voor, in geval van een klacht, om naar eigen
goeddunken de defecte delen te repareren of te vervangen, of het volledige
apparaat te ruilen. Ingeruilde onderdelen of ingeruilde apparaten worden onze
eigendom. Aanspraken op schadevergoeding zijn uitgesloten, in zoverre ze niet
gebaseerd zijn op opzet of grote nalatigheid vanwege de fabrikant.
Indien uw apparaat toch een defect vertoont binnen de garantieperiode, neemt u
uitsluitend contact op met de handelszaak waar u het SWITEL-apparaat hebt
gekocht, op vertoon van uw aankoopbewijs. Alle garantieclaims volgens deze
bepaling kunnen enkel geldig worden gemaakt bij uw handelaar. Na twee jaar na
aankoop en overhandiging van onze producten vervallen de garantierechten.

Telgo AG, Rte. D’Englisberg 11, 1763 Granges-Paccot, Switzerland
03/2017 – Version 1.0
-
 1
1
-
 2
2
-
 3
3
-
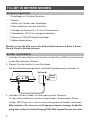 4
4
-
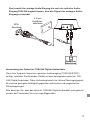 5
5
-
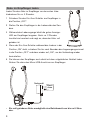 6
6
-
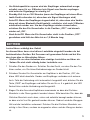 7
7
-
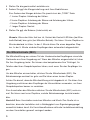 8
8
-
 9
9
-
 10
10
-
 11
11
-
 12
12
-
 13
13
-
 14
14
-
 15
15
-
 16
16
-
 17
17
-
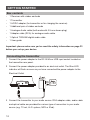 18
18
-
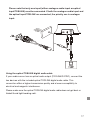 19
19
-
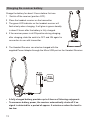 20
20
-
 21
21
-
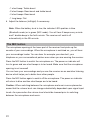 22
22
-
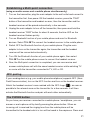 23
23
-
 24
24
-
 25
25
-
 26
26
-
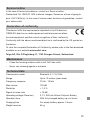 27
27
-
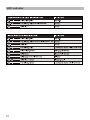 28
28
-
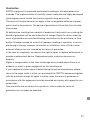 29
29
-
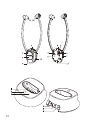 30
30
-
 31
31
-
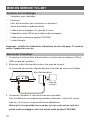 32
32
-
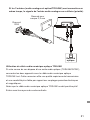 33
33
-
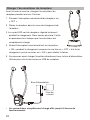 34
34
-
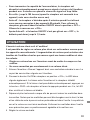 35
35
-
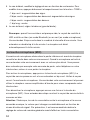 36
36
-
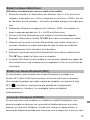 37
37
-
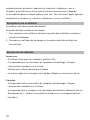 38
38
-
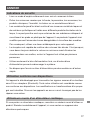 39
39
-
 40
40
-
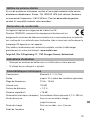 41
41
-
 42
42
-
 43
43
-
 44
44
-
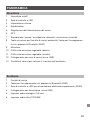 45
45
-
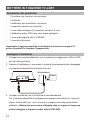 46
46
-
 47
47
-
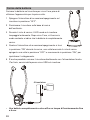 48
48
-
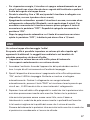 49
49
-
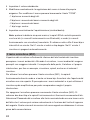 50
50
-
 51
51
-
 52
52
-
 53
53
-
 54
54
-
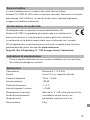 55
55
-
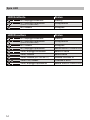 56
56
-
 57
57
-
 58
58
-
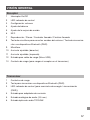 59
59
-
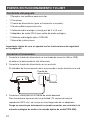 60
60
-
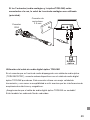 61
61
-
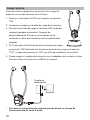 62
62
-
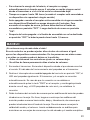 63
63
-
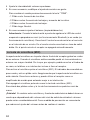 64
64
-
 65
65
-
 66
66
-
 67
67
-
 68
68
-
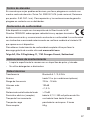 69
69
-
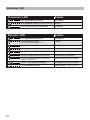 70
70
-
 71
71
-
 72
72
-
 73
73
-
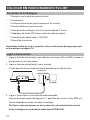 74
74
-
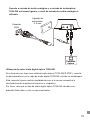 75
75
-
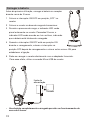 76
76
-
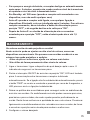 77
77
-
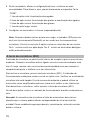 78
78
-
 79
79
-
 80
80
-
 81
81
-
 82
82
-
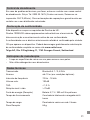 83
83
-
 84
84
-
 85
85
-
 86
86
-
 87
87
-
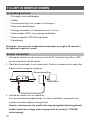 88
88
-
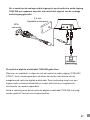 89
89
-
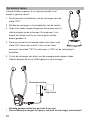 90
90
-
 91
91
-
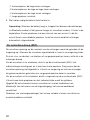 92
92
-
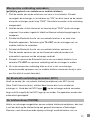 93
93
-
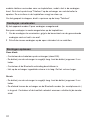 94
94
-
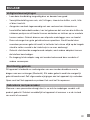 95
95
-
 96
96
-
 97
97
-
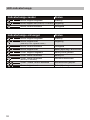 98
98
-
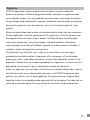 99
99
-
 100
100


SWITEL TV-L2BT Handleiding
- Type
- Handleiding
- Deze handleiding is ook geschikt voor
in andere talen
- English: SWITEL TV-L2BT User manual
- italiano: SWITEL TV-L2BT Manuale utente
- français: SWITEL TV-L2BT Manuel utilisateur
- español: SWITEL TV-L2BT Manual de usuario
- Deutsch: SWITEL TV-L2BT Benutzerhandbuch
- português: SWITEL TV-L2BT Manual do usuário
Gerelateerde papieren
Andere documenten
-
Amplicomms TV 2510NL Handleiding
-
 T'nB BTADAJ1 Handleiding
-
 T'nB BTADAJ1 Handleiding
-
Muse M-280 CTV Handleiding
-
Lenco HPW-400BK de handleiding
-
Amplicom TV 150-1 Handleiding
-
-
-
-
Geemarc CL7150 Gebruikershandleiding

