
DESCRIPTION DE L’APPAREIL
LOCATION AND DESCRIPTION OF CONTROLS
DESCRIÇÃO DO APARELHO
BESCHREIBUNG DES GERÄTES
ATTENTION: Pour éviter tout risque de choc électrique,
ne démontez pas l’appareil. Aucune pièce interne n’est
réparable par l’utilisateur. Conez tout entretien à un
technicien qualié.
ATTENTION: To reduce the risk of electric shock, do not
remove the cover or back. There are no user serviceable
parts inside the unit. Refer all servicing to qualied personnel.
ATENÇÃO: Para evitar o risco de choque eléctrico, não
desmonte o aparelho. Este não contém qualquer peça
passível de ser reparada pelo utilizador. Cone todas as
operações de manutenção a um técnico qualicado.
Le symbole de l’éclair terminé par une èche à l’intérieur d’un triangle avertit
l’utilisateur de la présence d’une «tension dangereuse» dans l’appareil.
The lightning ash with arrowhead symbol within the triangle is a warning
sign alerting the user of "dangerous voltage" inside the unit.
O símbolo de um relâmpago com uma seta na extremidade no interior de
um triângulo equilátero destina-se a alertar o utilizador para a presença de
uma “tensão perigosa” no aparelho.
Le point d’exclamation situé à l’intérieur d’un triangle avertit l’utilisateur de la
présence d’instructions importantes dans la documentation accompagnant
l’appareil.
The exclamation point within the triangle is a warning sign alerting the user
of important instructions accompanying the product.
O ponto de exclamação no interior de um triângulo equilátero destina-
se a alertar o utilizador para a existência de instruções importantes na
documentação que acompanha o aparelho.
La plaque de précaution est située à l’arrière de l’appareil.
AVERTISSEMENT - An de réduire le risque d’incendie ou de choc électrique,
n’exposez pas cet appareil à la pluie ou à l’humidité.
The Caution mark is located at the back of the device.
WARNING: TO PREVENT FIRE OR SHOCK HAZARD, DO NOT EXPOSE THIS
APPLIANCE TO RAIN OR MOISTURE.
O símbolo de Cuidado é encontrado na parte de trás do dispositivo.
AVISO – Para reduzir o risco de incêndios ou choques elétricos, não exponha
o aparelhoà chuva ou umidade.
Si à l’avenir vous désirez vous débarrasser de cet appareil, veuillez noter
que les appareils électriques ne doivent pas être jetés avec les ordures
ménagères. Renseignez-vous pour connaître le centre de recyclage le
plus proche. Consultez les autorités locales ou votre revendeur pour
plus de détails (Directive sur les déchets des équipements électriques
et électroniques).
If at any time in the future you should need to dispose of this product
please note that Waste electrical products should not be disposed of
with household waste. Please recycle where facilities exist. Check with
your Local Authority or retailer for recycling advice.(Waste Electrical and
Electronic Equipment Directive)
Caso, em algum momento no futuro, tenha de se descartar deste
aparelho, tenha em conta que os produtos eléctricos não devem ser
descartados com o lixo doméstico. Informe-se para conhecer o centro
de reciclagem mais próximo. Consulte as autoridades locais ou o seu
revendedor local para a obtenção de pormenores adicionais (Directiva
sobre os Resíduos dos Equipamentos Eléctricos e Electrónicos).
1. Entrée MIC. 1
2. Entrée MIC. 2
3. Port USB PLAY / USB CHARGE
(USB lecture / Chargeur)
4. AUX IN Entrée Auxiliaire
5. Touche ECHO
6. Touche M.VOL
7. Touche EQ
8. Touche MEGA BASS
9. Touche LIGHT MODE
10. Touche MIC. PRIO
11. Touche TONE
12. MIC. VOL molette de réglage du
MIC volume
13. VOL molette de réglage du volume
14. Touche (Mise Sous Tension/veille)
15. Touche MODE
Touche REPEAT
1. MIC. 1 Jack
2. MIC. 2 Jack
3. USB PLAY / USB CHARGE port
4. AUX IN Jack
5. ECHO Button
6. M.VOL Button
7. EQ Button
8. MEGA BASS Button
9. LIGHT MODE Button
10. MIC. PRIO Button
11. TONE Button
12. MIC. VOL Knob
13. VOL Knob
14. STANDBY Button
15. MODE Button
REPEAT Button
16. Button (Previous)
1. Entrada MIC. 1
2. Entrada MIC. 2
3. USB PLAY / USB CHARGE
(Entrada USB / Carregador USB)
4. Tomada AUX IN
5. Botão ECHO
6. Botão M.VOL
7. Botão EQ (equalizador)
8. Botão MEGA BASS
9. Botão LIGHT MODE
10. Botão MIC. PRIO
11. Botão TONE
12. MIC. VOL ajustar o volume
13. VOL ajustar o volume
14. Botão (LIGAR/STANDBY)
15. Botão MODE
Botão REPEAT
16. Botão (sintonização para trás
em modo rádio / salto para a faixa
anterior)
1. Eingang MIC. 1
2. Eingang MIC. 2
3. USB PLAY / USB CHARGE-port
4. Zusatzeingang AUX IN
5. Taste ECHO
6. Taste M.VOL
7. Taste EQ
8. Taste MEGA BASS
9. Taste LIGHT MODE
10. Taste MIC. PRIO
11. Taste TONE
12. MIC. VOL Lautstärkeregler
13. VOL Lautstärkeregler
14. Taste Einschalten / Bereitschaft
15. Taste MODE
Taste REPEAT
16. (VORANGEHENDER TITEL /
RUNTER)
16. Touche (recherche arrière)
17. LECTURE/PAUSE
Arrêter le morceau
ATS: Stations préréglées
18. Touche (recherche avant)
19. Touche (retour rapide)
20. Touche (Avance rapide)
21. Écran
22. Éclairage de couleur
23. Commande de luminosité
24. Haut-parleurs
25. Poignée télescopique
26. Antenne laire FM
27. ON/OFF Commutateur (marche/
arrêt)
28. Entrée alimentation
29. Roues
30. Indicateur de Chargeur
17. (Play/Pause)
(Stop)
ATS (Automatic search and
storage)
18. Button (Next)
19. Button (Fast Rewind)
20. Button (Fast Forward)
21. Display
22. Color Lights
23. Light knob
24. Speakers
25. Telescopic pulling handle
26. FM Antenna
27. Power On/O Switch
28. DC IN jack
29. Wheels
30. Charging indicator
17. (Reproduηγo/pausa)
(Parar a reprodução)
ATS (Sintonização e
armazenamento automático)
18. Botão (sintonização para a frente
em modo rádio / salto para a faixa
seguinte)
19. Botão (Retrocesso rápido)
20. Botão (Avanço rápido)
21. Tela
22. luz de colorida
23. Botão de iluminação
24. Caixa de som principais
25. Puxador telescópico
26. Antena de o FM
27. Comutador ON/OFF (ligar/ desligar)
28. Entrada para adaptador de corrente
29. Rodas
30. Oplaad-indicator
17. Wiedergabe/Pause
(Um die Wiedergabe zu beenden.)
ATS (Radiosender suchen und
speichern)
18. (NÄCHSTER TITEL / HOCH)
19. Taste (Suchlauf rückwärts)
20. Taste (Suchlauf vorwärts)
21. Anzeige
22. Farbbeleuchtung
23. Beleuchtungstaste
24. Lautsprecher
25. Teleskopgri
26. FM-Drahtantenne
27. ON/OFF-Schalter (Ein-/Aus-
Schalter)
28. Gleichstromanschluss
29. Räder
30. Ladeanzeige
ACCESSOIRES
ACCESSORIES
ACESSÓRIOS
ZUBEHÖR
ALIMENTATION
POWER SUPPLY
ALIMENTAÇÃO
STROMVERSORGUNG
UTILISATION DE L’ENTRÉE AUXILIAIRE (AUX.IN)
LISTENING TO AUXILIARY SOURCE
UTILIZAÇÃO DA ENTRADA AUXILIAR
CHARGEUR USB
USB CHARGER- A Power USB Port
CARREGADOR USB
BLUETOOTH COUPLAGE ET CONNEXION
BLUETOOTH PAIRING & LINKING OPERATION
BLUETOOTH PAREANDO E VINCULANDO
CHANTER AVEC LA PRISE MICRO
SINGING THROUGH MIC JACK
CANTANDO PELO CONECTOR DO MICROFONE
RÉGLAGE DES LAMPES LED
ADJUSTING THE LED LIGHTS
AJUSTAR AS LUZES LED
FONCTIONS DE BASE
GENERAL OPERATION
UTILIZAÇÃO DE BASE
GRUNDLEGENDE VERWENDUNG
ÉCOUTE DE LA RADIO
LISTENING TO THE RADIO AUDIÇÃO DO RÁDIO
LECTURE D’UNE CLE USB
USB PLAYBACK
LEITURA DE UMA CHAVE USB
SPÉCIFICATIONS
SPECIFICATIONS
CARACTERÍSTICAS TÉCNICAS
AVERTISSEMENTS
SAFETY INSTRUCTION
ADVERTÊNCIAS
GUIDE DE DÉPANNAGE
TROUBLESHOOTING GUIDE
RESOLUÇÃO DE PROBLEMAS
L’adaptateur secteur x 1
Microphone laire x 1
Roues x 2
AC/DC adaptor x 1
Wire microphone x 1
Wheels x 2
Adattatore di rete x 1
Microfone com o x 1
Rodas x 2
Netzstromadapters 1x
Schnurgebundenes Mikrofon 1x
Räder 2x
Utilisation de l’adaptateur secteur
L'adaptateur secteur fonctionne sur une alimentation AC comprise entre 100V
et 240V . L’adaptateur secteur fourni ne peut en aucun cas être utilisé sur un
autre type d’alimentation.
Avertissements
* L’adaptateur secteur fourni est exclusivement destiné à être utilisé avec cet
appareil. Ne l’utilisez donc pas avec d’autres appareils.
* An d’éviter d’abîmer l’appareil, éteignez-le avant de débrancher l’adaptateur
secteur de l’appareil.
* En cas de non-utilisation prolongée, débranchez l’adaptateur secteur de la prise
murale.
* Veillez à ce que la prise secteur se trouve à proximité et soit facilement accessible.
En cas de disfonctionnement, débranchez immédiatement la che d’alimentation
de la prise secteur.
* L’adaptateur secteur permet de débrancher l’appareil. Il doit rester facilement
accessible durant l’utilisation. Pour couper complètement l’alimentation de
l’appareil, débranchez l’adaptateur de la prise secteur.
* N’utilisez pas l’adaptateur secteur s’il est abîmé. Placez les câbles de manière
sûre et veillez à ce qu’ils ne soient ni coincés, ni pincés. Si le câble d’alimentation
est abîmé, contactez un technicien qualié.
Utilisation de la batterie intégrée
Cet appareil est équipé d’une batterie au plomb-acide rechargeable intégrée
Chargez la batterie intégrée avant la première utilisation. L'indicateur de charge
s'allume en rouge et s'éteint après une charge complète.
Avertissements:
• Rechargez la batterie intégrée lorsque vous avez l’intention de l’utiliser juste
après.
• Lors de l’utilisation de la batterie intégrée, la température ambiante doit être
comprise entre 5°C et 35°C.
• An d’allonger la durée de vie de la batterie intégrée, veuillez la recharger à une
température d’intérieur.
• La batterie intégrée de cet appareil peut présenter un risque d’incendie ou de
brûlure chimique en cas d’utilisation incorrecte. Ne démontez pas la batterie, ne
la chauez pas à plus de 100°C et ne la jetez pas au feu.
• N’exposez pas la batterie à une chaleur excessive, comme les rayons du soleil, le
feu ou d’autres sources de chaleur similaires.
• Lorsque vous vous débarrassez de la batterie, veillez au respect de
l’environnement et conformez-vous à la législation en vigueur.
• Lorsque la charge de la batterie intégrée est faible, vous serez averti par une
notication sonore.
REMARQUE:
Dans un soucis d'économie d'énergie, à la n de la lecture ou bien encore si
le volume d'écoute est réglé à un niveau très bas et qu’aucune opération n'est
eectuée sur l'appareil pendant une période de 20 minutes celui-ci se mettra
automatiquement en mode veille.
Using the AC adaptor
The supplied AC adaptor is suitable for use on AC mains supplies of 100-240V
50/60Hz and should only be connected to a mains supply within these parameters.
Cautions:
* The AC adaptor included with this unit is for its use only. Do not use it with other
equipment.
* Turn o the unit before unplugging the AC adaptor from the unit so as to avoid
the unit being damaged.
* When the unit is not going to be used for long time, disconnect the AC adaptor
from the AC outlet.
* Be sure to use it near the wall outlet and easily accessible. If a malfunction occurs,
disconnect the plug from the wall outlet at once.
* AC adaptor is used as the disconnect device. It shall remain readily operable and
should not be obstructed during intended use. To be completely disconnected
the apparatus from supply mains, the AC adaptor of the apparatus shall be
disconnected from the mains socket outlet completely.
* Never use an AC adaptor that is damaged, route power lead in a safe manner and
make sure it is not subjected to trapping or pinching. If the power lead is damaged
refer to a qualied service agent.
Using the Built- in battery
The unit has a built-in rechargeable battery (Lead-acid). Charge the built-in battery
before using it for the rst time. The charging indicator will light red and will be o
after fully charge.
Warnings:
• Recharge the built-in battery when you are ready to use it again.
• While using the built-in battery, the environmental temperature should be 5°C
(41°F) to 35°C (95°F).
• To get the longest service life of the built-in battery, charge at indoor-temperature.
• The built-in battery in this device may present a risk of re or chemical burn if
mistreated. Do not disassemble, heat above 100°C (212°F), or incinerate.
• The unit should not be exposed to excessive heat such as sunshine, re or the
like.
• When discarding the unit, environmental problems must be considered and local
rules or laws governing the disposal of such products must be strictly followed.
• When the built-in battery power is low, a warning sound will be heard.
Note:
In a concern of saving energy, when playback has reached to the end or listening
volume is set at a very low level and no control is operated on the device for a
period of 20 minutes, the unit will automatically switch to Standby mode.
Utilizzo dell’adattatore di rete
L’adattatore di rete funziona tramite un’alimentazione AC compresa tra 100V
e 240V . L’adattatore di rete fornito in dotazione non può in alcun caso essere
utilizzato con un altro tipo di alimentazione.
Attenzione:
* L’adattatore di rete fornito in dotazione è destinato ad essere utilizzato
esclusivamente con questo apparecchio. Non utilizzatelo dunque con altri
apparecchi.
* Per evitare di rovinare l’apparecchio, spegnetelo prima di scollegare l’adattatore
di rete dall’apparecchio.
* In caso di un prolungato periodo di non utilizzo, scollegate l’adattatore di rete
dalla presa a muro.
* Fate in modo che la presa di rete sia vicina e che resti facilmente accessibile. In
caso di malfunzionamento, scollegate immediatamente la spina di alimentazione
dalla presa di rete.
* L’adattatore di rete permette di scollegare l’apparecchio. Deve pertanto restare
facilmente accessibile durante l’uso. Per mettere del tutto l’apparecchio fuori
tensione, scollegate il cavo di alimentazione.
* Non utilizzate l’adattatore di rete se è danneggiato. Posizionate i cavi in modo
sicuro facendo attenzione che non vengano incastrati o schiacciati. Se il cavo di
alimentazione è danneggiato, rivolgetevi a un tecnico qualicato.
Utilizar a bateria integrada
A unidade possui uma bateria recarregável incorporada (chumbo ácido). Carregue
a bateria integrada antes de a utilizar pela primeira vez. O indicador de carga irá
car vermelho e desliga-se após a carga total.
Avisos:
• Recarregue a bateria integrada quando estiver pronto para a utilizar novamente.
• Enquanto utiliza a bateria integrada, a temperatura ambiental deverá ser entre
5°C (41°F) e 35°C (95°F).
• Para obter a maior duração possível da bateria integrada, carregue a temperaturas
de interior.
• A bateria integrada deste dispositivo pode apresentar risco de fogo ou
queimaduras químicas se não for devidamente manuseada. Não a desmonte,
não a exponha a temperaturas superiores a 100°C (212°F) e não a incinere.
• A unidade não deverá ser exposta a calor excessivo como luz solar, fogo ou
semelhantes.
• Quando eliminar a unidade devem ser consideradas as questões ambientais
e as regras ou leis locais que regem a eliminação de tais produtos devem ser
rigorosamente respeitadas.
• Quando a bateria interna estiver fraca, um aviso será ouvido.
Nota:
No interesse de economizar energia, quando uma reprodução terminar ou o nível
de volume for denido como muito baixo e nenhuma operação for realizada por um
período de 20 minutos, o aparelho entrará automaticamente no modo de Espera.
Verwendung des Netzstromadapters
Der Netzstromadapter funktioniert mit Wechselstrom zwischen 100 und 240V
Wechselstrom.
Der mitgelieferte Netzstromadapter darf auf keinen Fall mit einer Stromquelle mit
anderen Kenndaten als den genannten verwendet werden.
Vorsicht:
* Verwenden Sie den mitgelieferten Netzstromadapter ausschließlich für diesen
Player. Verwenden Sie ihn nicht mit anderen Geräten.
* Schalten Sie den Player aus, bevor Sie den Netzstromadapter aus der Steckdose
oder dem Player herausziehen; anderenfalls könnte der Player beschädigt
werden.
* Falls der Player über längere Zeit hinweg nicht benutzt werden soll, ziehen Sie
den Netzstromadapter aus der Netzsteckdose heraus.
* Vergewissern Sie sich, dass sichdie Netzsteckdose in der Nähe bendet
und leicht erreichbar ist. Falls eine Fehlfunktion auftritt, ziehen Sie sofort den
Netzstromadapter aus der Netzsteckdose heraus.
* Über den Netzstromadapter kann das Gerät von der Netzspannung getrennt
werden. Er sollte schnell eingeschaltet werden können und während der
vorgesehnen Verwendung nicht blockiert sein. Um das Gerät vollständig vom
Netzstrom zu trennen, muss der Netzstromadapter von der Netzsteckdose
vollständig getrennt werden.
* Verwenden Sie niemals einen beschädigten Netzstromadapter, verlegen Sie
das Netzanschlusskabel so, dass es sicher ist und nirgendwo eingeklemmt oder
gequetscht werden kann. Falls das Netzkabel beschädigt ist, wenden sie sich an
einen qualizierten Fachbetrieb.
Verwendung des eingebauten Akkus
Das Gerät verfügt über eine integrierte wiederauadbare Batterie (Bleisäure).
Laden Sie den eingebauten Akku auf, bevor Sie das Gerät zum ersten Mal
in Gebrauch nehmen. Die Ladeanzeige leuchtet rot und erlischt nach dem
vollständigen Auaden.
Warnungen:
• Laden Sie am besten die Batterie erst kurz vor ihrem nächsten Gebrauch wieder
auf.
• Bei Verwendung des eingebauten Akkus sollte die Umgebungstemperatur
zwischen 5°C (41°F) und 35°C (95°F) betragen.
• Um eine maximale Lebensdauer des eingebauten Akkus zu erzielen, laden Sie
ihn möglichst bei Zimmertemperatur auf.
• Der in diesem Gerät eingebaute Akku kann bei falscher Verwendung eine
Gefahrenquelle von Feuer oder chemischer Verbrennung darstellen. Nicht
zerlegen, über 100°C (212°F) erhitzen oder verbrennen.
• Das Gerät darf keiner übermäßig großen Hitze, wie etwa Sonnenlicht, einem
Feuer oder ähnlichem ausgesetzt werden.
• Beim Entsorgen des Gerätes müssen Umweltprobleme und regionale Regeln
oder Gesetze beachtet werden, die beim Entsorgen solcher Produkte streng
befolgt werden müssen.
• Bei niedriger Kapazität der integrierten Batterie ertönt ein Warnton.
HINWEISE:
Aus Energiespargründen aktiviert das Gerät automatisch den Standby-Modus,
wenn das Ende der Wiedergabe erreicht oder eine sehr geringe Lautstärke
eingestellt ist und 20 Minuten lang keine Eingabe am Gerät erfolgt.
1. Branchez votre source auxiliaire (par exemple un lecteur iPod, iPad, MP3) à la
prise AUX (3.5mm).
2. Appuyez sur la touche pour mettre l’appareil en marche. Appuyez sur la
touche MODE à plusieurs reprises jusqu'à ce que «AUX» s'ache sur l'écran.
3. Démarrez la lecture sur votre source auxiliaire.
4. Ajustez le volume sonore au niveau désiré.
5. Pour arrêter la lecture, déconnectez votre source auxiliaire de la prise AUX.
1. Connect your auxiliary source (e.g. iPod / iPad / MP3 player) to the AUX IN jack
(3.5mm ).
2. Press the button to turn on the unit. Press the MODE Button repeatedly until
the “AUX” appears on display.
3. Start playback from your auxiliary source.
4. Adjust the volume to desired level.
5. To stop playback, disconnect your auxiliary source from the AUX jack.
1. Conecte sua fonte externa (por ex., um aparelho de iPod, iPad, mp3) na AUX
IN (3.5MM).
2. Prima o botão para ligar o aparelho. Pressione o botão MODE várias vezes
até que “AUX” apareça na tela.
3. Inicie a reprodução da fonte externa.
4. Ajuste o volume para o volume desejado.
5. Para interromper a reprodução, disconecte a origem auxiliary da conexão AUX.
Connectez votre câble USB (non fourni) et branchez la prise USB standard dans le
port de chargement USB sur le dessus de l'unité.
Remarque:
• La tension maximum du port de chargement USB est de 5V, 1.0 A. CC Vous
pouvez charger tous les appareils rechargeables par USB avec une intensité de
chargement inférieure, comme les iPod, iPhone, iPad, lecteur MP3, etc.
• La fonction de chargement n'est disponible en mode veille. La fonction de
chargement n'est pas disponible en mode USB.
• Certains appareils peuvent être incompatibles.
• Lorsque le câble de charge USB est connecté à l'appareil, la lecture de musique
en mode Bluetooth est interrompue. Appuyez sur pour reprendre la lecture.
Connect your device to USB cable (not included) and plug the standard USB plug
into the USB charging port on the top of the unit.
NOTES:
• The maximum output from the USB charging port is DC 5V, 1A. You can
charge any rechargeable USB devices charging current less than it, such as iPod,
iPhone, iPad, MP3 Player…etc.
• Charging function is available in Standby mode. Charging function is not available
in USB mode.
• Some devices may be incompatible.
• When the USB charging cable is connected to the unit, music playback in
Bluetooth mode will suspend. Press to resume playback.
Conecte o seu dispositivo em um cabo USB (não incluso) e conecte o conector
USB padrão na porta de recarga na parte de cima do aparelho.
Nata:
• A tensão máxima da porta de recarga USB é DC 5V, 1,0A. Você poderá
recarregar quaisquer dispositivos USB que tenham a corrente de carga menor
que essa, como iPods, iPhones, iPads, MP3 players, etc.
• A função de recarga não estará disponível no modo de Espera (Standby).
• Alguns dispositivos poderão ser incompatíveis.
• Quando o cabo de carregamento USB estiver conectado à unidade, a reprodução
de música no modo Bluetooth será suspensa. Pressione para retomar a
reprodução.
Le mot Bluetooth® ainsi que les marques et logo sont des marques commerciales
déposées détenues par Bluetooth SIG, Inc. et l'utilisation de ces marques par New
One S.A.S se fait dans le cadre d'une autorisation. Les autres marques et noms
commerciaux sont les propriétés de leurs titulaires respectifs.
1. Désactivez la fonctionnalité Bluetooth des autres appareils qui étaient couplés
avec votre unité.
2. Appuyez sur la touche pour mettre l’appareil en marche.
3. Appuyez sur la touche MODE à plusieurs reprises jusqu'à ce que «bt» s'ache
sur l'écran.
4. Sur l'appareil Bluetooth, activez le Bluetooth et sélectionnez «M-1938 DJ» dans
la liste des appareils. (Consultez le manuel d'instruction de l'appareil pour les
détails de connexion). Si l'appareil Bluetooth vous demande un mot de passe,
utilisez '0000'. Certains appareils Bluetooth vous demanderont d'accepter la
connexion. Si les unités sont couplées correctement, vous entendrez la musique
de conrmation.
5. Vous pouvez déconnecter l'appareil actuel en appuyant longuement sur la
touche .
Par la présente, NEW ONE S.A.S déclare que l'appareil "MUSE M-1938 DJ"
est conforme aux exigences essentielles et autres dispositions pertinentes de la
directive 2014/53/EU. La déclaration de conformité peut être consultée sur le site
www.muse-europe.com
Jouer des chiers audio depuis des appareils Bluetooth.
Assurez-vous que la connexion Bluetooth entre l’unité et l’appareil est activée.
1. Appuyez sur la touche pour mettre la lecture en pause. Appuyez une nouvelle
fois sur la touché pour la reprendre.
2. Appuyez sur la touche ou pour passer à la plage suivante ou précédente.
Remarques: Les touches et / risquent de ne pas fonctionner avec certains
lecteurs de votre source Bluetooth.
The Bluetooth® word mark and logos are registered trademarks owned by Bluetooth
SIG, Inc. and any use of such marks by New One S.A.S is under license. Other
trademarks and trade names are those of their respective owners.
1. Turn o the Bluetooth functionality of other devices that were paired with your unit.
2. Press the button to turn on the unit.
3. Press MODE button until “bt” appears on display.
4. On the Bluetooth device, enable Bluetooth and select “M-1938 DJ” from the
Device List.(Refer to the user manual of the device to be connected for detailed
operations.) If the Bluetooth device prompts for a passcode, use “0000”. Some
Bluetooth devices will ask you to accept the connection. If the units are paired
properly, you will hear the conrmation music.
5. You can disconnect current device directly by long pressing button.
Hereby, NEW ONE S.A.S, declares that this MUSE M-1938 DJ is in compliance with
the essential requirements and other relevant provisions of Directive 2014/53/EU.
The declaration of conformity may be consulted at www.muse-europe.com
Play MUSIC from Bluetooth devices.
Make sure the Bluetooth connection between the unit and the device is active.
1. Press to suspend momentarily the playing track. Press again to resume
playing.
2. Press button to skip forward to next track and to skip backward to previous
track.
Note: and / buttons may not work with some of the players in your Bluetooth
source.
O nome Bluetooth® e logotipos são marcas registradas de propriedade da Bluetooth
SIG, Inc. e quaisquer usos destas marcas pela New One S.A.S estão licenciados.
Outras marcas e nomes registrados pertencem aos seus respectivos proprietários.
1. Desligue a função de Bluetooth de quaisquer outros dispositivos com os quais
seu aparelho já esteja pareado.
2. Prima o botão para ligar o aparelho.
3. Pressione o botão MODE várias vezes até que “BT” apareça na tela.
4. No dispositivo com Bluetooth, ative o Bluetooth e selecione "M-1938 DJ" na
Lista de Dispositivos. (Consulte o manual de instruções do dispositivo que
estiver sendo conectado para mais detalhes). Caso o dispositivo com bluetooth
solicite uma senha, utilize "0000". Alguns dispositivos com Bluetooth solicitarão
que você aceite a conexão. Se as unidades estiverem adequadamente
emparelhadas, ouvirá a música de conrmação.
5. Você pode desconectar o dispositivo atual diretamente ao manter o botão
pressionado.
A NEW ONE S.A.S aqui declara que este produto MUSE M-1938 DJ cumpre os
requisitos essenciais e outras disposições relevantes da Norma 2014/53/EU. A
declaração de conformidade pode ser consultada em www.muse-europe.com
Reproduzindo arquivos de áudio de dispositivos Bluetooth.
Certique-se de que a conexão Bluetooth entre o aparelho e o dispositivo está
ativa.
1. Durante a reprodução, pressione o botão para colocar a reprodução em
pausa. Pressione mais uma vez o botão para retomar a reprodução.
2. Pressione a tecla para saltar para a próxima faixa e pressione a tecla para
retornar a faixa anterior.
Nota: Os botões e / poderão não funcionar com alguns aparelhos através
de conexão bluetooth.
1. Chantez en cœur avec la musique en branchant le microphone fourni dans l'une
des prises MIC (1/2) sur l'unité.
Remarque:
* Appuyez sur le bouton M.VOL, puis tournez le bouton MIC.VOL pour régler le
volume à votre guise.
* Lorsque le microphone est placé près du haut-parleur, un eet de larsen
(phénomène de rétroaction acoustique) peut se produire. En cas de larsen,
éloignez le microphone du haut-parleur.
Avertissement: Taper ou faire tomber le microphone peut endommager de
manière permanente votre microphone. Ne pas faire tourner le microphone par
le cordon.
2. MIC. PRIO: Appuyez sur la touche MIC. PRIO. Cela permet de rendre le son du
microphone supérieur à celui de la musique lorsque vous chantez. Appuyez à
nouveau sur le bouton pour rétablir le son d'origine.
3. ECHO Ajustez le contrôle d'ECHO pour augmenter la voix du chanteur pour un
eet de salle de concert. En appuyant sur le bouton ÉCHO, et en tournant la
commande MIC. VOL pour régler le micro.
1. Sing along with the music by plugging in the provided microphone into either one
of the MIC (1/2) jacks on the unit.
Notes:
* Press the M.VOL button, then rotate the MIC. VOL to adjust the volume as desired.
* If the microphone is placed near the loudspeaker, a howling eect (acoustic
feedback) may occur. If this happens, place microphone away from the loudspeaker.
Warning: Tapping or dropping the microphone can permanently damage your
microphone. Resist the urge to swing the microphone around by the cord.
2. MIC. PRIO: press the MIC. PRIO button. It make the mic.volume louder than the
music volume during singing. Press the button again to resume.
3. ECHO: adjust the ECHO control to enhance the singer’s voice for a concert hall
eect. By pressing the ECHO button, and rotate the MIC. VOL knob to adjust the it.
1. Cante com a música tocando ao conectar um dos microfones inclusos em um
dos dois conecectores MIC (1/2) no aparelho,
Observação:
* Gire o MIC. VOL diretamente para ajustar o nível de volume desejado.
* Caso o microfone tenha sido posicionado próximo a um alto falante, um som
agudo (microfonia) poderá ocorrer. Caso isso ocorra, afaste o microfone do alto
falante.
Advertência: Bater ou derrubar o microfone poderá danicar permanentemente o
microfone. Não balance o microfone pelo o.
2. MIC. PRIO: Prima o botão MIC. PRIO. Isso faz com que o volume de microfone
que mais alto do que o volume da música quanto estiver a cantar. Pressione o
botão novamente para continuar.
3. ECHO: Ajuste o controle ECHO para realçar a voz do cantor ao dá-la um efeito
de teatro. Ao pressionar no botão ECHO, e girar o botão MIC VOL. para ajustar.
1. Tournez la commande de réglage de la lumière pour sélectionner l'eet de
projection de la lumière LED supérieure.
2. Sélection des modes lumineux.
- Pas de signal audio, les lumières clignotent lentement. Appuyez sur le bouton
LIGHT MODE pour régler la couleur des lumières du haut-parleur, 8 modes sont
disponibles.
- Lorsqu'un signal audio est présent, les lumières clignotent lorsque la musique est
diusée. Appuyez sur le bouton LIGHT MODE pour régler la couleur des lumières
du haut-parleur, 9 modes sont disponibles.
1. Rotate the light knob to select the projection eect of top LED light.
2. Select the Light Modes.
- No audio signal, the lights will ash slowly. Press the LIGHT MODE button to
adjust the color of speaker lights, and there are 8 kinds of modes for selection.
- With Audio Signal, the lights will ash along with the music. Press the LIGHT
MODE button to adjust the color of speaker lights, and there are 9 kinds of light
modes for selection.
1. Gire o botão de iluminação para selecionar o efeito de projeção da luz LED
superior.
2. Selecione os Modos de Iluminação.
- Sem sinal de áudio, as luzes piscarão lentamente. Pressione o botão LIGHT
MODE para ajustar a cor das luzes do altifalante, existem 8 tipos de modos para
seleção.
- Com sinal de áudio, as luzes piscarão junto com a música. Pressione o botão
LIGHT MODE para ajustar a cor das luzes do altifalante, existem 9 tipos de
modos para seleção.
Avertissement
- L'appareil ne doit pas être exposé ni aux égouttements, ni aux éclaboussures
d’eau. Veuillez également ne pas poser des objets remplis de liquide sur
l'appareil, tels que des vases.
- N’obstruez aucune voie de ventilation. Installez conformément aux instructions
du fabricant.
- N’installez pas à proximité de sources de chaleur telles que feu, radiateurs,
registre de chaleur, poêle ou autres appareils (y compris les amplicateurs) qui
produisent de la chaleur.
- Protégez le cordon d’alimentation contre les piétinements ou les pincements,
particulièrement au niveau des branchements, prises de courant, et du point d’où
il sort de l’appareil.
- N’utilisez que les extensions/accessoires spéciés par le fabricant.
- Débranchez cet appareil lors des orages ou lorsqu’il n’est pas inutilisé pendant
une longue période.
- Ne surchargez pas les prises secteur et les cordons de rallonge car ceux-ci
pourraient entrainer un risque d’incendie ou de choc électrique.
- Lorsque des pièces de remplacement sont nécessaires, assurez-vous que le
technicien de réparation utilise des pièces de remplacement spéciées par le
fabricant ou celle qui ont les mêmes caractéristiques que les pièces d’origine. Des
substitutions non autorisées peuvent aboutir à des incendies ou des électrochocs
ou d’autres risques.
Warning
- The apparatus shall not be exposed to dripping or splashing place. And don’t put
the objects that lled with liquids on the apparatus, such as vases.
- Do not block any ventilation openings. Install in accordance with the manufacturer’s
instructions.
- Do not install near any heat sources such as re, radiators, heat registers, stoves,
or other apparatus (including ampliers) that produce heat.
- Protect the power cord from being walked on or pinched particularly at plugs,
convenience receptacles, and the point where they exit from the apparatus.
- Only use attachments / accessories specied by the manufacturer.
- Unplug this apparatus during lightning storms or when unused for long periods
of time.
- Do not overload wall outlets and extension cords as this can result in a risk or re
or electric shock.
- When replacement parts are required, be sure the service technician uses
replacement parts specied by the manufacturer or those that have the same
characteristics as the original part. Unauthorized substitutions may resu in re or
electric shock or other hazards.
ADVERTÊNCIAS
- O aparelho não deve estar exposto à chuva ou salpicos. E não coloque os objetos
com líquidos no aparelho, como por exemplo, vasos.
- Não obstrua as aberturas para ventilação. Instale o aparelho de acordo com as
instrução do fabricante.
- Não instale o aparelho próximo a fontes de calor como Proteja o o de energia
para que não seja pisado ou Proteja o o de energia para que não seja pisado
ou aquecedores, registros de calor, fornos, ou quaisquer outros itens que emitam
calor (incluindo amplicadores).
- Proteja o o de energia para que não seja pisado ou amassado, especialmente
próximo a tomadas, apoios ou pelo próprio aparelho.
- Utilize apenas encaixes/acessórios especicados pelos fabricantes.
- Desconecte o aparelho durante tempestades de raios ou quando não for utilizá-lo
por um longo período de tempo.
- Não sobrecarregue tomadas ou extensões pois isso poderá criar o risco de
incêndios ou choques elétricos.
- Quando houver a necessidade de substituição de peças, certique-se de que
um técnico especializado pelo fabricante e que as peças tenham as mesmas
características da peça original. Substituições não autorizadas poderão resultar
em riscos de incêndios, choques elétricos ou outros tipos de acidente.
1. Connectez le cordon d'alimentation secteur sur l'unité et la prise murale, et
appuyez sur l'interrupteur POWER pour allumer l'unité, l'indicateur s'allume.
Appuyez sur la touche pour passer en mode veille.
2. Appuyez sur la touche MODE a plusieurs reprises pour choisir la source de
lecture désirée: Bluetooth / FM / Aux / USB.
Remarque: Seul le branchement d'un câble USB ou d'un câble audio 3,5 mm peut
activer le mode USB ou AUX.
3. Pendant la lecture:
- Ajustez le volume sonore au niveau désiré.
- Utilisez la fonction EQ pour régler la qualité du son: FLAT(normal)/ CLAS
(classic)/ rOC(rock)/ POP/ JAZZ/ LIVE/ CLUB/ DANC(dance)/ HALL/ SOFT.
- Appuyez sur la touché pour mettre la lecture en pause. Appuyez une nouvelle
fois sur la touché pour la reprendre.
- Appuyez sur pour passer a la piste suivante. Appuyez la touche pour
jouer la piste précédente.
Remarque:
• REPEAT fonctionne uniquement en mode USB.
• MEGA BASS: C'est un mode de basses distinct qui peut être sélectionné en
présence d'un signal audio.
• TONE: Lorsqu'il y a un signal audio, appuyez sur ce bouton pour sélectionner les
aigus ou les graves.
4. Appuyez sur la touche POWER pour arrêter l’appareil.
1. Connect the AC adaptor to the unit and wall outlet, press the POWER switch
to power on the unit, and the display will lights up. Press button to enter
standby mode,
2. Press the MODE button repeatedly to switch to desired mode: Bluetooth / FM/
AUX / USB.
Note: Only insert USB driver or 3.5mm audio cable could switch into USB or AUX
mode.
3. During Playback:
- Rotate the VOL knob to adjust the level as desired.
- Press the EQ button to set EQ (equalizers) mode as desired: FLAT(normal)/
CLAS (classic)/ rOC(rock)/ POP/ JAZZ/ LIVE/ CLUB/ DANC(dance)/ HALL/
SOFT.
- Press button to play or pause.
- Press the button to skip to the next track. Press the button to skip to the
previous track.
Note:
• REPEAT functions only work in USB mode.
• MEGA BASS: It is a separated bass mode can be selected when there is audio
signal.
• TONE: When there is audio signal, press this button to select treble or bass.
4. When nished listening, press the POWER switch to turn o the unit.
1. Conecte o cabo de adattatore di rete no aparelho e na tomada, e pressione o
botão de POWER para ligar o aparelho, a tela se acenderá. Pressione o botão
para entrar no modo de espera.
2. Pressione o botão MODE várias vezes para selecionar reprodução como a
origem de som desejada: Bluetooth / FM / Aux / USB.
Nota: Insira apenas a pendrive ou o cabo de áudio de 3,5 mm pode mudar para
o modo USB ou AUX.
3. Durante a reprodução:
- Gire o botão VOL para ajustar o nível conforme desejado.
- Prima o botão EQ de forma repetida para seleccionar os diferentes modos:
FLAT(normal)/ CLAS (classic)/ rOC(rock)/ POP/ JAZZ/ LIVE/ CLUB/
DANC(dance)/ HALL/ SOFT.
- Pressione o botão para colocar a reprodução em pausa. Pressione mais uma
vez o botão para retomar a reprodução.
- Pressione a tecla para saltar para a próxima faixa e pressione a tecla
para retornar a faixa anterior.
Nota:
• REPETIR: funciona apenas no modo USB.
• MEGA BASS: É um modo bass separado, pode ser selecionado quando há sinal
de áudio.
• TONE: Quando houver um sinal de áudio, pressione este botão para selecionar
agudos ou graves.
4. Quando terminar de escutar, pressione o comutador POWER para desligar o
aparelho.
1. Schließen Sie das Netzstromadapters an das Gerät und eine Steckdose an,
und drücken Sie dann den POWER-Schalter zum Einschalten des Gerätes.
Das Display leuchtet auf. Drücken Sie die Taste , um den Standby-Modus
zu aktivieren.
2. Stellen Sie durch wiederholtes Drücken der Taste MODE den Wiedergabemodus
entsprechend ein: Bluetooth / FM / Aux / USB.
Hinweis: Der USB- bzw. AUX-Modus wird nur aktiviert, sofern ein USB-Gerät bzw.
ein 3,5 mm Audiokabel angeschlossen wurde.
3. Während der Wiedergabe:
- Drehen Sie den VOL-Regler zur Einstellung der Lautstärke.
- Betätigen Sie die EQ Taste, um einen voreingestellten Musik-Equalizer zu
wählen: HALL/ SOFT/ FLAT(normal)/ CLAS (classic)/ rOC(rock)/ POP/ JAZZ/
LIVE/ CLUB/ DANC(dance).
- Betätigen Sie die Taste , um die Wiedergabe des Titels vorübergehend
anzuhalten. Betätigen Sie die Taste ein weiteres Mal, um mit der Wiedergabe
fortzufahren.
- Betätigen Sie , um zum nächsten Titel zu springen. Betätigen Sie die Taste
, um zum vorigen Titel zu springen.
Hinweis:
• REPEAT: Diese Funktionen sind nur im USB-Modus verfügbar.
• MEGA BASS: Bei Abspielen eines Audiosignals kann ein separater Bass-Modus
ausgewählt werden.
• TONE: Drücken Sie diese Taste, wenn ein Audiosignal empfangen wird, um Bass
oder Treble auszuwählen.
4. Betätigen Sie die Taste POWER, um das Gerät auszuschalten.
Recherche manuelle
1. Connectez l'unité principale sur la prise murale et alimentez l'unité comme pour
les procédures précédentes.
2. Appuyez sur la touche MODE à plusieurs reprises jusqu'à ce que la fréquence
FM s'ache sur l'écran.
3. Pour une meilleure réception, étendre l'antenne laire FM.
4. Réglez le volume par VOL au niveau désiré.
5. Appuyez sur le bouton. / pour rechercher manuellement une station
par pas ; maintenez enfoncé le bouton. / pour eectuer une recherche
automatique jusqu'à la prochaine station, la recherche s'arrête alors.
Recherche et mémorisation automatiques
Appuyez et maintenez le bouton ATS, la recherche automatique recherche les
stations ayant un signal conséquent, l'unité enregistrera automatiquement les 60
premières stations radio FM. Appuyez à nouveau sur le bouton pour interrompre
l'opération. Lorsque vous mémorisez sur une station déjà préréglée, celle-ci sera
eacée et remplacée par la nouvelle station mise en mémoire.
Remarque:
Au cours de l'opération de recherche le niveau sonore est automatiquement mis
en sourdine.
Stations préréglées
Cet appareil peut mémoriser 60 stations FM.
Écoute des stations préréglées
Appuyez sur la touche ou et recommencer l'opération autant de fois que
nécessaire pour sélectionner votre station.
Manual search
1. Connect the main unit to the wall outlet and power on the unit as previous
procedures.
2. Press MODE button repeatedly until the FM frequency appears on the display.
3. For best reception, extend the FM wire antenna.
4. Adjust the volume by VOL to the desired level.
5. Press / for step forward/rewind to search located station manually; press
and hold / for step forward/rewind to search located station automatically
until one station is found then unit will stop to search.
Automatic search and storage
Press and hold the ATS button, the automatic search located strong station, and
the unit will save the rst 60 FM stations automatically. Press the button again to
stop the operation. When you store on a channel already been preset, the previous
station will automatically be cleared and replaced by the new station.
Note:
During the search operation, the sound level is automatically muted.
Preset stations
This unit can store 60 FM stations.
Listen to station presets
Press or repeatly as many times as necessary to select your station.
Ouvir as pré-programações
Utilize os botões e para seleccionar directamente uma estação pré-
programada.
Sintonização manual
1. Conecte o aparelho na tomada e ligue-o conforme visto acima.
2. Pressione o botão MODE várias vezes até que a frequência de rádio seja exibida
na tela.
3. Para uma melhor recepção FM, estique a antena de o.
4. Utilize o botão rotativo VOL para regular o volume.
5. Pressione / para avançar/retroceder para sintonizar a estação localizada
manualmente; Pressione e segure / para avançar/retroceder para
sintonizar a estação localizada automaticamente até que uma estação seja
encontrada e a unidade irá parar de pesquisar.
Sintonização e armazenamento automático
Mantenha o botão ATS, a sintonização automática localiza a estação e a
unidade salvará as primeiras 60 estações de FM automaticamente. Pressione
o botão novamente para parar a operação. Se pretender modicar as estações
memorizadas, execute as operações indicadas anteriormente. As estações antigas
serão substituídas pelas novas.
Nota:
O som é automaticamente cortado durante a procura.
Pré-programação de estações
O dispositivo tem capacidade para memorizar até 60 estações FM.
Vous pouvez connecter une clé USB (non fourni) sur le port USB sur l'unité pour
lire les chiers MP3.
1. Insérez la clé USB, l'appareil lit le contenu de la clé USB et lit automatiquement
la musique une fois «USB» aché à l'écran.
2. Appuyez sur la touché pour mettre la lecture en pause. Appuyez une nouvelle
fois sur la touché pour la reprendre.
3. Maintenez le bouton enfoncé pour arrêter la lecture.
4. Appuyez sur la touche ou pour passer à la plage suivante ou précédente.
Appuyez sur le bouton ou pour eectuer une avance rapide/retour rapide.
5. Maintenez le bouton REPEAT enfoncé pour choisir de répéter la piste en cours
ou de répéter toutes les pistes.
Remarque:
• L'appareil bascule automatiquement en mode USB et démarre la lecture lorsque
la clé USB est connectée.
• L’unité est compatible avec les appareils de mémoire suivants (source): Clé USB.
• Formats pris en charge: MP3 (32kbps-320kbps), WMA, WAV.
You can connect a USB ash drive (not included) to the USB port on the unit to
play MP3 les.
1. Insert USB driver, the unit will read USB driver and play music automatically as
“USB” appear on display.
2. Press to suspend momentarily the playing track. Press again to resume
playing.
3. Press and hold to stop the playback.
4. Press button to skip to next track and to skip to previous track. Press the
or button for step forward/rewind to search.
5. Press and hold REPEAT button to select to repeat current track or repeat all
tracks.
Note:
• The unit will automatically switch to USB mode and start playback when the USB
ash drive is connected.
• The unit is compatible with the following Memory Device (Source): USB ash
drive.
• Supporting format: MP3 (32kbps-320kbps), WMA, WAV.
• The total number of MP3 les on the Memory Device should not exceed 9999.
• There are many USB devices in the market. We cannot guarantee to support all
dierent models. Please try another USB device if your device is not supported.
Você pode conectar um pendrive (não incluso) na porta USB do aparelho para
reproduzir arquivos MP3.
1. Insira a pendriver, a unidade irá a pendrive e reproduzirá músicas automaticamente
à medida que "USB" aparecer no visor.
2. Durante a reprodução, pressione o botão para colocar a reprodução em pausa.
Pressione mais uma vez o botão para retomar a reprodução.
3. Prima e segure para parar a reprodução.
4. Pressione a tecla para saltar para a próxima faixa e pressione a tecla para
retornar a faixa anterior. Pressione o botão ou para avançar/retroceder
para pesquisar.
5. Prima e segure o botão REPEAT para selecionar para repetir a faixa atual ou
repetir todas as faixas.
Nota:
• A unidade irá mudar automaticamente para o modo USB e iniciar a reprodução
quando a pen USB estiver conectada.
• Este aparelho é compatível com os seguintes Dispositivo de Memória (Origem):
Discos Flash USB.
• Formatos suportados: MP3 (32kbps-320kbps), WMA, WAV.
• Número total de arquivos de MP3 em um Dispositivo de Memória não poderá
exceder 9999.
• Existem numerosos modelos de periféricos USB. Não é possível garantir que o
aparelho suporte todos estes modelos. Se o seu periférico USB não é suportado,
deve tentar um outro.
Alimentation: CA 100-240V 50/60 Hz
Radio Coverage: FM 87.5 -108.0 MHz
Version Bluetooth: V4.2+EDR
Bluetooth: 2.402-2.48GHz
Puissance de sortie des RF (fréquences radios): -4.009 dBm
Bluetooth Distance de fonctionnement: Jusqu’à 10 mètres mesurés par champ
libre. (Les murs et structures peuvent inuer sur la portée de l’appareil)
Durée de fonctionnement: Environ 7 heures à 50% du volume après chargement
complet
Temps de chargement: Environ 7 heures
Les caractéristiques et les spécications sont sujettes à modication sans préavis.
Power source: AC 100-240V 50/60 Hz
Radio Coverage: FM 87.5 -108.0 MHz
Bluetooth Version: V4.2+EDR
Bluetooth: 2.402-2.48GHz
RF Output Power: -4.009 dBm
Bluetooth working distance: Up to 10 meters measured in open space. (Wall and
structures may aect range of device)
Operating Time: Approx. 7 hours at 50% volume after fully charged
Charging Time: Approx. 7 hours
Specications are subject to change without notice.
Bluetooth Alcance de funcionamento: Até 10 metros em espaços abertos. (Paredes
e outros objetos poderão afetar o alcance do aparelho)
Tempo de Funcionamento: Aprox. 7 horas com o volume em 50% depois de uma
recarga completa.
Tempo de recarga: Aprox. 7 horas
O desenho e as especicações estão sujeitas a mudanças sem aviso prévio.
Alimentação: AC 100-240V 50/60 Hz
Alcance da sintonia: FM 87.5 -108.0 MHz
Versão do Bluetooth: V4.2 + EDR
Bluetooth: 2.402-2.48GHz
Potência de saíde de RF (Rádio Frequência): -4.009 dBm
• Le nombre total de chiers MP3 sur le dispositif de stockage ne peut pas dépasser
9999.
• Il existe de nombreux modèles de périphériques USB. Nous ne pouvons garantir
que l’appareil supporte tous ces modèles. Si votre périphérique USB n’est pas
supporté, veuillez en essayer un autre.
NEW ONE S.A.S
10, Rue de la Mission, 25480 Ecole Valentin, France
NEW ONE S.A.S
10, Rue de la Mission, 25480 Ecole Valentin, France
NEW ONE S.A.S
10, Rue de la Mission, 25480 Ecole Valentin, France
ENCEINTE PARTY BOX BLUETOOTH AVEC TUNER
FM ET BATTERIE
BLUETOOTH PARTY BOX SPEAKER
WITH FM AND BATTERY
CAIXA DE FESTA - ALTIFALANTE BLUETOOTH COM
FM E BATERIA
BLUETOOTH-PARTY LAUTSPRECHER MIT FM UND
BATTERIE
FR
GB
PT
DE
FR Manuel d’utilisation
GB User Manual
PT Manual do Utilizador
Bedienungsanleitung
DE
ES Manual de instrucciones
Manuale di istruzioni
IT
NL Gebruiksaanwijzingen M-1938 DJ
Nos emballages peuvent faire l’objet d’une consigne de tri, pour en
savoir plus: www.quefairedemesdechets.fr
Symptômes Cause Remède
Impossible de
mettre en marche
l’appareil.
Adaptateur secteur non
connecté.
Connectez l’adaptateur secteur
correctement.
L’unité est en mode
veille.
Appuyez sur la touche pour
mettre l’appareil en marche.
Pas de son.
Le niveau de volume est
réglé sur le minimum.
Réglez le volume sur le niveau
de votre choix.
L’appareil connecté n’est
pas en mode lecture.
Lire de la musique sur l’appareil
connecté.
Le son émis de l’appareil
connecté est faible.
Réglez le volume de votre
appareil connecté.
Distortion sonore.
Le niveau du volume est
trop fort.
Réduisez le niveau de volume
en appuyant sur la touche VOL.
Le niveau de volume de
l’appareil connecté est
trop fort.
Réduisez le niveau de volume
sur l’appareil connecté.
La réception
Bluetooth ne
fonctionne pas.
L’appareil n’est pas en
mode Bluetooth.
Essayez de connecter à
nouveau.
Symptom Cause Solution
No power
AC adaptor not connected. Connect the AC adaptor
correctly.
The unit is in Standby
mode.
Press the button to turn on
the unit.
No sound
Volume in minimum. Adjust volume to a desired
level.
The connected device is
not in playback mode.
Play the music in the
connected device.
Sound output of the
connected device weak.
Adjust volume of connected
device.
Sound distortion
Volume level too high Reduce the volume level by
press the VOL button.
Volume level of the
connected device too high.
Reduce the volume level of
the connected device.
Bluetooth
reception failure Not in the Bluetooth mode. Try to do connection again.
SINTOMA CAUSA SOLUÇÃO
Não liga.
A fonte não está conectada na
energia.
Conecte a adaptador de
corrente na energia.
O aparelho está no modo de
Espera (Standby).
Prima o botγo para
ligar o aparelho.
Sem som.
Volume no mínimo. Ajuste o volume.
O dispositivo conectado não
está no modo de reprodução
Reproduza a música no
dispositivo conectado.
A saída de som do dispositivo
conectado está baixa.
Ajuste o volume do
dispositivo conectado.
Distorção do
som
Nível de volume está muito alto Reduza o volume através
do botão VOL.
Nível de volume do dispositivo
conectado está muito alto.
Reduza o volume do
dispositivo conectado.
Falha na
recepção do
Bluetooth
Não está no modo Bluetooth. Tente conectá-lo
novamente.
FR Veuillez lire attentivement ce manuel avant toute utilisation.
GB Please read the instruction carefully before operating the unit.
PT Leia este manual com atenção antes de qualquer utilização.
DE Bitte lesen Sie dieses Handbuch vor der Benutzung sorgfältig durch.
ES Lea atentamente este manual antes de usar el aparato.
IT Leggete attentamente questo manuale prima di utilizzare l’apparecchio.
NL Gelieve voor gebruik deze handleiding aandachtig te lezen.
RADIO HÖREN
Manuelle Sendersuche
1. Schließen Sie das Hauptgerät an eine Steckdose an und schalten Sie es ein.
2. Drücken Sie wiederholt die Taste MODE, bis im Display die FM-Frequenz
angezeigt wird.
3. Für einen besseren UKW-Empfang, rollen Sie die Kabelantenne aus.
4. Drehen Sie den VOL-Regler zur Einstellung der Lautstärke.
Roue
Wheel
Roda
Rad

M-1938DJ/IB/V1
FUNCIONAMIENTO DE LA RADIO
ASCOLTO DELLA RADIO
NAAR DE RADIO LUISTEREN
5. Drücken Sie die Taste / für die schrittweise Sendersuche, um manuell
vorwärts oder rückwärts nach Sendern zu suchen. Halten Sie die Taste /
für die automatische schrittweise Sendersuche gedrückt; die Suche wird
beendet, sobald das Gerät einen Sender gefunden hat.
Sender automatisch suchen und speichern
Halten Sie die Tasten ATS, mit der automatischen Suchfunktion werden Sender
mit starkem Signal gesucht. Die ersten 60 UKW-Sender werden automatisch
gespeichert. Drücken Sie die Taste erneut, um die Funktion zu beenden. Wenn Sie
die gespeicherten Sender ändern wollen, gehen Sie wie unten beschrieben vor: Die
alten Sender werden durch die neuen ersetzt.
Hinweis:
Während der Sendersuche wird der Ton automatisch abgeschaltet.
Vorauswahl der Sender
Das Gerät kann maximal 60 Sender pro FM -Sender speichern.
Hören der vorausgewählten Sender
Verwenden Sie die Tasten und zum direkten Auswählen einer
Vorauswahlspeicherstelle. Sintonización manual
1. Conecte la unidad principal a la toma de corriente y encienda la unidad como se
ha explicado anteriormente.
2. Pulse el botón MODE repetidamente hasta que la frecuencia FM aparezca en
el display.
3. Extienda la antena alámbrica hasta obtener la mejor recepción posible en la
banda FM.
4. Para subir o bajar el volumen, gire el VOL hacia la derecha o hacia la izquierda.
5. Pulse / para avanzar/retroceder en la búsqueda de emisoras
manualmente; mantenga pulsado / para avanzar/retroceder en la
búsqueda automática de emisoras de radio, la unidad se detendrá cuando
encuentre una emisora de radio.
Búsqueda automática y almacenamiento
Mantenga presionado el botón ATS, la búsqueda automática detectará emisoras
con señal fuerte y la unidad almacenará automáticamente las 60 primeras
emisoras FM. Pulse de nuevo el botón para detener la operación. Si desea
modicar las emisoras memorizadas, siga el procedimiento descrito anteriormente.
Las emisoras nuevas reemplazarán a las antiguas.
NOTA:
El sonido se cortará automáticamente durante la búsqueda.
Memorización de emisoras
Esta unidad es capaz de almacenar 60 estaciones para de FM en la memoria.
Escucha de las emisoras memorizadas
Utilice los botones y para seleccionar directamente una emisora memorizada.
Sintonizzazione manuale
1. Collegare l'apparecchio a una presa a muro e accendetelo.
2. Premere più volte il tasto MODE no a quando la frequenza FM non viene
visualizzata sul display.
3. Per migliorare la ricezione FM, stendere l’antenna a lo.
4. Utilizzare la rotella del VOL per regolare il volume.
5. Premere / per cambiare la frequenza durante la ricerca manuale; tenere
premuto / per avviare la ricerca automatica no alla prima stazione rilevata.
Ricerca e memorizzazione automatica
Mantenere premuto il tasto ATS, la ricerca automatica rileverà le stazioni con
segnale più potente, e salverà automaticamente le prime 60 stazioni FM. Premere
nuovamente lo stesso tasto per annullare l’operazione. Se desiderate modicare
le stazioni memorizzare, procedete come indicato qui sopra. Le vecchie stazioni
saranno sostituite dalle nuove.
NOTE:
L’audio è automaticamente interrotto durante la ricerca.
Preselezione delle stazioni
L’apparecchio può memorizzare no a 60 stazioni FM.
Ascoltare le preselezioni
Utilizzate i tasti o per selezionare direttamente una preselezione di stazione.
Handmatige afstemming
1. Sluit het hoofdapparaat aan op het stopcontact en schakel het apparaat zoals
eerder beschreven in.
2. Druk herhaaldelijk op MODE tot de FM-frequentie op het display verschijnt.
3. Trek voor een betere FM-ontvangst de draadantenne uit.
4. Gebruik de draaiknop VOL om het volume in te stellen.
5. Druk op / om de frequentie met stappen te verhogen of verlagen en
handmatig een zender te zoeken; druk lang op / om automatisch naar
zenders met een hogere/lagere frequentie te zoeken. De luidspreker stopt
automatisch met zoeken als er een zender wordt gevonden.
Automatisch zoeken en opslaan
Houd de ATS toets om automatisch naar zenders met een sterk signaal te zoeken.
De luidspreker slaat de eerste 60 gevonden FM-zenders automatisch op. Druk
nogmaals op de knop om deze functie te stoppen. Als u de gememoriseerde
radiostations wilt wijzigen, ga dan als volgt te werk: De oude radiostations zullen
vervangen worden door de nieuwe.
Opmerking:
Het geluid wordt automatisch uitgeschakeld tijdens het zoeken.
Voorselecties van radiostations
Het apparaat kan tot 60 FM -stations bewaren.
Luister naar de voorselecties
Gebruik de of om onmiddellijk een radiostation uit de voorselectie te kiezen.
ACHTUNG! Um Elektroschockgefahr zu vermeiden, dürfen
Sie das Gerät nicht auseinander nehmen. Es enthält keine
Teile, die der Be¬nutzer selbst reparieren kann. Vertrauen
Sie alle Reparaturen einem qualizierten Techniker an.
ATENCIÓN: Para reducir el riesgo de descarga eléctrica,
no desmonte el aparato. En su interior no existe ninguna
pieza que pueda ser reparada por el usuario. Cualquier
servicio de mantenimiento y reparación debe conarse a
personal técnico cualicado.
ATTENZIONE: per ridurre il rischio di scossa elettrica, non
smontate l’apparecchio. All'interno non ci sono parti su cui
l'utente può eettuare operazioni di manutenzione. Per ogni
riparazione rivolgetevi esclusivamente a tecnici qualicati.
OPGELET: Om het risico om een elektrische schok te
beperken, demonteer het toestel niet. Er mag geen enkel
onderdeel gerepareerd worden door de gebruiker. Vertrouw
ieder onderhoud toe aan een gekwaliceerd technicus.
Das Blitzsymbol mit einem Pfeil in einen Dreieck weist den Benutzer auf
das Anliegen einer „gefährlichen Spannung“ im Inneren des Geräts hin.
El símbolo del rayo con una echa dentro de un triángulo equilátero
advierte al usuario de la presencia de voltaje peligroso no aislado en el
interior del producto.
Il simbolo del fulmine con una freccia all’estremità all’interno di un
triangolo avverte l’utente della presenza di una “tensione pericolosa”
nell’apparecchio.
Het symbool van een bliksem met aan het uiteinde een pijl in een driehoek
waarschuwt de gebruiker voor de aanwezigheid van een “gevaarlijke
spanning” inhet toestel.
Das Ausrufezeichen in einem Dreieck weist den Benutzer auf die wichtigen
Anweisungen in der mit dem Gerät gelieferten Dokumentation hin.
El punto de exclamación dentro de un triángulo equilátero es un símbolo
que alerta al usuario sobre la existencia de importantes instrucciones que
se incluyen con el producto.
Il punto esclamativo all’interno di un triangolo avverte l’utente della presenza
di istruzioni importanti nel manuale fornito insieme all’apparecchio.
Het uitroepteken in een driehoek waarschuwt de gebruiker voor de
aanwezigheid van belangrijke instructies in de documentatie die bij uw
toestel zit.
Der Sicherheitshinweis bendet sich an der Rückseite des Geräts.
WARNUNG: UM BRANDGEFAHR UND ELEKTROSCHOCK ZU VERMEIDEN,
DARF DIESES GERΔT WEDER REGEN NOCH FEUCHTIGKEIT AUSGESETZT
WERDEN.
La marca de precaución se encuentra en la parte posterior del dispositivo.
ADVERTENCIA: Para reducir el riesgo de incendio o de descarga eléctrica,
no exponga este aparato a la lluvia o la humedad.
Il simbolo di allerta è posto sul retro del dispositivo.
AVVERTENZA: PER EVITARE IL RISCHIO DI INCENDIO O SCOSSA ELETTRICA,
NON ESPONETE L’APPARECCHIO ALLA PIOGGIA O ALL’UMIDITÀ.
De waarschuwingsmarketing zit op de achterkant van het apparaat.
Om het brandgevaar of het risico op een elektrische schok te beperken, stel
het toestel niet bloot aan regen of vochtigheid.
Sollten Sie diese Gerät in der Zukunft nicht mehr verwenden, dürfen Sie
es nicht in den Hausmüll werfen. Informieren Sie sich über die nächst
gelegene Recycling-Sammelstelle. Die lokalen Behörden oder Ihr
Händler können Sie ausführlicher informieren (Europäische Richtlinie zu
elektrischem und elektronischem Abfall).
Si en el futuro desea deshacerse de este producto, recuerde que los
productos eléctricos no se deben tirar junto a la basura doméstica.
Deposítelo en centros de reciclaje adecuados. Consulte a las autoridades
locales o a su proveedor a este respecto. (Directiva sobre Residuos de
Aparatos Eléctricos y Electrónicos).
Quando vorrete disfarvi dell’apparecchio, ricordate che le apparecchiature
elettriche non vanno smaltite insieme ai riuti domestici. Informatevi per
conoscere il centro di raccolta più vicino. Rivolgetevi alle autorità locali o
al vostro rivenditore per ottenere ulteriori informazioni (direttiva sui riuti
di apparecchiature elettriche ed elettroniche).
Indien u dit toestel in de toekomst wenst weg te gooien, gelieve op te
merken dat elektrische apparaten niet bij het huishoudelijk afval gegooid
mogen worden. Informeer u voor het dichtstbijzijnde recyclagecentrum.
Raadpleeg de lokale overheid of uw verkoper voor meer details
(Richtlijnen over elektrisch en elektronisch afval).
VERWENDUNG DES EINGANGS FÜR ZUSATZGERÄTE
OÍR UNA FUENTE AUXILIAR
UTILIZZO DELL’INgRESSO AUSILIARIO
GEBRUIK VAN DE HULPINGANG
USB-LADEGERÄTE
CARGADOR USB
CARICABATTERIA USB
USB-OPLADER
VERBINDUNGSAUFBAU UND VERKNÜPFUNG (PAIRING)
COUPLAGE ET CONNEXION
BLUETOOTH ACCOPPIAMENTO E COLLEGAMENTO
BLUETOOTH PAIREN & VERBINDING MAKEN
MIKROFON ANSCHLIESSEN UND MITSINGEN
PARA CANTAR POR LA TOMA MIC
AMPLIFICAZIONE DEL MICROFONO
ZINGEN MET DE MIC-AANSLUITING
EINSTELLUNG DER LED-BELEUCHTUNG
AJUSTAR LA ILUMINACIÓN LED
REGOLAZIONE DELLE LUCI LED
DE LED-VERLICHTING INSTELLEN
WIEDERGABE VON EINEM USB-STICK
REPRODUCCIÓN DE UN DISPOSITIVO USB
RIPRODUZIONE DI UNA PERIFERICA USB
WEERGAVE VAN EEN USB-APPARAAT
TECHNISCHE DATEN
ESPECIFICACIONES
SPECIFICHE TECNICHE
SPECIFICATIES
SICHERHEITSANWEISUNGEN
MEDIDAS DE SEGURIDAD
AVVERTENZE DI SICUREZZA
WAARSCHUWINGEN
TROUBLESHOOTING GUIDE
GUÍA DE RESOLUCIÓN DE PROBLEMAS
GUIDA ALLA SOLUZIONE DEI PROBLEMI
PROBLEMEN OPLOSSEN
1. Schließen Sie Ihr Audiogerät (z. B. ein iPod/ iPad/ MP3-Player) am AUX-
Anschluss an (3.5mm).
2. Drücken Sie die Taste , um das Gerät einzuschalten. Drücken Sie wiederholt
die Taste MODE, bis im Display „AUX“ erscheint.
3. Starten Sie die Wiedergabe auf dem angeschlossenen Audiogerät.
4. Stellen Sie die Lautstärke auf den gewünschten Lautstärkepegel.
5. Trennen Sie das externe Gerät von der AUX-Buchse, um die Wiedergabe zu
beenden.
1. Conecte su fuente auxiliar (p. ej. reproductor iPod/ iPad/ MP3) a la entrada AUX
(3.5mm).
2. Pulse para encender la unidad. Pulse el botón MODE repetidamente hasta
que “AUX” aparezca en el display.
3. Empiece la reproducción de su fuente auxiliar.
4. Ajuste el volumen al nivel deseado.
5. Para detener la reproducción, desconecte su fuente auxiliar de la toma AUX.
1. Collegare la fonte ausiliaria (ad es. un lettore iPod, iPad, mp3) alla presa AUX
IN (3.5mm).
2. Premere il tasto per accendere l’apparecchio. Premere più volte il tasto
MODE no a quando la dicitura “AUX” non viene visualizzata sul display.
3. Avviare la riproduzione dalla fonte ausiliaria.
4. Regolare il volume sul livello desiderato.
5. Per arrestare la riproduzione, scollegare la fonte ausiliaria dal jack AUX.
1. Sluit uw hulpbron (bijv. iPod, iPad, mp3-speler) aan op de AUX aansluiting
(3.5mm).
2. Druk om het toestel aan te zetten op de toets . Druk herhaaldelijk op MODE
tot “AUX” op het display verschijnt.
3. Start het afspelen van uw hulpbron.
4. Stel het volume naar wens in.
5. Haal de stekker van uw hulpbron uit de AUX-poort om het afspelen te stoppen.
Schließen Sie ein USB-Kabel (nicht enthalten) an Ihr Gerät an, und schließen Sie
dann den standardmäßigen USB-Stecker an den USB-Ausgang an der Oberseite
des Geräts an.
Hinweis:
• Die maximale Ausgabeleistung des USB-Ausgangs beträgt DC 5V, 1,0A. Sie
können alle wiederauadbaren USB-Geräte auaden, die über eine geringere
Ladespannung verfügen, wie z.B. iPod, iPhone, iPad, MP3-Spieler…usw.
• Die Ladefunktion ist im Standby-Modus verfügbar. Die Ladefunktion ist im USB-
Modus nicht verfügbar.
• Einige Geräte sind möglicherweise nicht kompatibel.
• Wenn das USB-Ladekabel mit dem Gerät verbunden ist, wird die Musikwiedergabe
im Bluetooth-Modus unterbrochen. Drücken Sie , um die Wiedergabe
fortzusetzen.
Conecte su dispositivo a un cable USB (no incluido) y la clavija USB estándar al
puerto de carga USB de la parte superior de la unidad.
Nota:
• La salida máxima del puerto de carga USB es DC 5V, 1.0A. Podrá cargar
cualquier dispositivo USB recargable con una corriente inferior a la indicada,
como un iPod, iPhone, iPad, reproductor MP3, etc.
• La función de carga estará disponible en el modo en espera. La función de carga
no estará disponible en el modo en USB.
• Algunos dispositivos podrían ser incompatibles.
• Cuando el cable de carga USB se conecta a la unidad, la reproducción de música
en modo Bluetooth se suspenderá. Presione para continuar la reproducción.
Collegare il proprio dispositivo con un cavo USB (non incluso) e inserire la spina
USB standard nella porta USB posta sul lato superiore dell’apparecchio.
Nota:
• L’uscita massima della porta USB per la ricarica è DC 5V, 1,0 A. È possibile
ricaricare un qualsiasi dispositivo USB compatibile con tale carica elettrica, come
iPod, iPhone, iPad, MP3 player…ecc.
• La funzione di ricarica non è disponibile con l’apparecchio in standby.
• Alcuni dispositivi potrebbe non essere compatibili.
• La riproduzione dei brani via Bluetooth si interromperà quando si collega il cavo di
ricarica USB all'unità. Premere per riprendere l'ascolto.
Sluit de USB-kabel (niet meegeleverd) aan op uw apparaat en steek de standaard
USB-stekker in de USB-oplaadpoort op de bovenkant van het apparaat.
Opmerking:
• Het maximale vermogen van de USB-oplaadpoort is DC 5V, 1.0A. U kunt alle
oplaadbare USB-apparaten die minder laadstroom vereisen opladen, zoals iPod,
iPhone, iPad, MP3-speler…etc.
• De oplaadfunctie is niet beschikbaar in de standbymodus.
• Het is mogelijk dat sommige apparaten niet compatibel zijn.
• Als de USB-oplaadkabel wordt aangesloten op het apparaat, zal het afspelen van
muziek in de Bluetooth-modus worden onderbroken. Druk op om het afspelen
te hervatten.
Der Bluetooth®-Markenname und damit verbundene Logos sind Eigentum der
Firma Bluetooth SIG, Inc. Jegliche Benutzung dieser Marken durch die Firma New
One S.A.S stehen unter Lizenz. Alle anderen Produkt- und Markennamen sind
Eigentum der jeweiligen Besitzer.
1. Deaktivieren Sie die Bluetooth-Funktion anderer Geräte, die mit Ihrem Gerät
verknüpft waren.
2. Drücken Sie die Taste , um das Gerät einzuschalten.
3. Drücken Sie die Taste MODE, bis im Display „bt“ erscheint.
4. Aktivieren Sie die Bluetooth-Funktion auf Ihrem Bluetooth-Gerät, und wählen Sie
"M-1938 DJ" in der Geräteliste. (Lesen Sie bitte die Bedienungsanleitung des
jeweiligen Geräts für detaillierte Bedienungsschritte zum Verbindungsaufbau.)
Wenn das Bluetooth-Gerät Sie zur Eingabe eines Schlüssels auordert, geben
Sie bitte "0000" ein. Manche Bluetooth-Geräte erfordern es zudem, dass die
Verbindung bestätigt wird. Nach erfolgreichem Verbindungsaufbau ertönt ein
Bestätigungssignal.
5. Trennen Sie das aktuelle Gerät, indem Sie die Taste länger drücken.
NEW ONE S.A.S erklärt hiermit, dass dieser MUSE M-1938 DJ den wesentlichen
Anforderungen und anderen geltenden Vorgaben der Richtlinie 2014/53/EU
entspricht. Die Konformitätserklärung lässt sich unter www.muse-europe.com
herunterladen.
Wiedergabe von Audiodateien von Bluetooth-Geräten
Vergewissern Sie sich, dass die Bluetooth-Verbindung zwischen den beiden
Geräten aktiv ist.
1. Um die Wiedergabe der Musik zu unterbrechen (Pause), drücken Sie die Taste .
Um die Musik wieder normal abzuspielen, drücken Sie noch einmal dieTaste .
2. Betätigen Sie die Taste , um zum nächsten Titel zu springen bzw. die Taste ,
um zum vorigen Titel zu springen.
Hinweis: Die Tasten und / funktionieren möglicherweise nicht mit allen
Bluetooth Geräten.
Los logos y nombres Bluetooth® son marcas registradas que pertenecen a Bluetooth
SIG, Inc. y cualquier uso de dichas marcas por parte de New One S.A.S tiene sus
respectivas licencias. Otras marcas comerciales y registradas son propiedad de sus
respectivos propietarios.
1. Apague la función del Bluetooth de otros dispositivos que estuvieran asociados
a su aparato.
2. Pulse para encender la unidad.
3. Pulse el botón MODE hasta que “bt” aparezca en el display.
4. En el dispositivo Bluetooth, habilite Bluetooth y seleccione “M-1938 DJ” de la lista
de dispositivos. (Para obtener el detalle de operaciones para conectarse, consulte
el manual de usuario del dispositivo). Si el dispositivo Bluetoothle solicita una
contraseña de acceso, utilice“0000”. Algunos dispositivos Bluetooth le indicarán
que acepte la conexión. Si las unidades está emparejadas correctamente, oirá
un sonido de conrmación.
5. Podrá desconectar directamente el dispositivo conectado manteniendo pulsado
el botón .
Por la presente, NEW ONE S.A.S declara que el MUSE M-1938 DJ cumple con los
requerimientos esenciales y otras provisiones aplicables de la Directiva 2014/53/
EU. La declaración de conformidad podrá consultarse en www.muse-europe.com
Reproducir archivos de audio desde dispositivos Bluetooth
Asegúrese de que la conexión Bluetooth entre el aparato y el dispositivo está
activada.
1. Durante la reproducción, pulse el botón para interrumpirla momentáneamente.
Vuelva a pulsar el botón para reanudar la reproducción.
2. Pulse el botón para saltar adelante a la siguiente pista y para saltar atrás a
la pista anterior. Pulse y sostenga or para buscar rápidamente en una pista.
Nota: Los botones y / podrían no funcionar con algunos de los reproductores
de su fuente Bluetooth.
Il marchio denominativo Bluetooth® e i relativi loghi sono marchi registrati di Bluetooth
SIG, Inc., utilizzati da New One S.A.S su licenza. Altri marchi e nomi commerciali
sono di proprietà dei rispettivi titolari.
1. Disattivare la funzionalità Bluetooth degli altri dispositivi accoppiati all’apparecchio.
2. Premere il tasto per accendere l’apparecchio.
3. Premere il tasto MODE no a quando la dicitura “bt” non viene visualizzata sul
display.
4. Attivare la funzione Bluetooth sul proprio dispositivo Bluetooth e selezionare
“M-1938 DJ” dall’elenco dei dispositivi rilevati (consultare il manuale di istruzioni
del dispositivo per informazioni dettagliate su come connettere il dispositivo). Se
il dispositivo Bluetooth richiede la digitazione di una password, inserire “0000”.
Alcuni dispositivi Bluetooth richiedono di accettare la connessione. Se dispositivo e
unità sono stati associati correttamente, l'apparecchio emette un segnale acustico.
5. È possibile disconnettere direttamente il dispositivo corrente tenendo premuto il
tasto .
Con la presente, NEW ONE S.A.S dichiara che MUSE M-1938 DJ T è conforme
ai requisiti essenziali e alle altre disposizioni fondamentali della direttiva 2014/53/
EU. La dichiarazione di conformità è consultabile all'indirizzo www.muse-europe.com
Riproduzione le audio da dispositivo Bluetooth
Assicurarsi che la connessione Bluetooth tra l’apparecchio e il dispositivo sia attiva.
1. Durante la riproduzione premete il tasto per mettere la riproduzione in pausa.
Premete di nuovo il tasto per riprendere la riproduzione.
2. Premere il tasto per passare al brano successivo, e il tasto per quello
precedente.
Nota: i tasti e / potrebbero non funzionare con alcuni lettori in modalità
Bluetooth.
De Bluetooth® markering en de logo’s zijn geregistreerde handelsmerken die
eigendom zijn van Bluetooth SIG, Inc. en het gebruik van deze markeringen door
New One S.A.S is onder licentie. Andere handelsmerken en handelsnemen zijn van
hun respectieve eigenaars.
1. Schakel de Bluetooth-functionaliteit van andere apparaten die eerder zijn
gepaird met uw apparaat uit.
2. Druk om het toestel aan te zetten op de toets .
3. Druk op MODE tot “bt” op het display verschijnt.
4. Schakel Bluetooth in op het Bluetooth-apparaat en selecteer “M-1938 DJ” uit de
lijst met apparaten.(Kijk in de handleiding van het apparaat waarmee u verbinding
wilt maken voor gedetailleerde instructies.) Als het Bluetooth-apparaat vraagt om
een wachtwoord, voer dan “0000” in. Sommige Bluetooth-apparaten zullen u
vragen de verbinding te accepteren. Als de apparaten goed zijn gekoppeld, er
klinkt een conrmatiemuziekje.
5. U kunt de verbinding met het huidige apparaat direct verbreken door lang op
te drukken.
Hierbij verklaart NEW ONE S.A.S dat deze MUSE M-1938 DJ voldoet aan de
essentiële eisen en andere relevante bepalingen uit richtlijn 2014/53/EU. De
verklaring van conformiteit kan worden geraadpleegd op www.muse-europe.com.
Audiobestanden afspelen vanaf Bluetooth-apparaten.
Zorg ervoor dat de Bluetooth-verbinding tussen de luidspreker en het hulpapparaat
actief is.
1. Druk tijdens het afspelen op de toets om het afspelen te pauzeren. Druk
opnieuw op de toets als u wilt verder gaan met afspelen.
2. Druk op de toets om naar de volgende track te gaan en druk op om naar
de vorige track te gaan.
Opmerking: Het is mogelijk dat en / niet werken met bepaalde spelers in
de Bluetooth-modus.
1. Singen Sie mit, indem Sie ein Mikrofon an einen der beiden MIC-Eingänge (1/2)
am Gerät anschließen.
Hinweise:
* Drücken Sie die M.VOL-Taste und drehen Sie dann das MIC.VOL, um die Lautstärke
wie gewünscht einzustellen.
* Falls Sie das Mikrofon zu nah an einem Lautsprecher verwenden, kann ein
dröhnendes Geräusch (Rückkopplung) verursacht werden. Bewegen Sie das
Mikrofon in solch einem Fall vom Lautsprecher weg.
Warnung: Durch Aufprall oder Herunterfallen kann das Mikrofon permanent
beschädigt werden. Schwenken Sie das Mikrofon nicht am Kabel haltend umher.
2. MIC. PRIO: Drücken Sie die Taste MIC. PRIO. Die Lautstärke des Mikrofons ist
während des Gesangs höher als die Lautstärke der Musik. Drücken Sie die Taste
erneut, um fortzufahren.
3. ECHO: Stellen Sie mit ECHO die Echounterdrückung ein, um die Stimme des
Sängers für einen Konzert- bzw. Halleneekt zu verstärken. Nehmen Sie die
Einstellung durch Drücken der Taste ECHO und Drehen des Reglers MIC. VOL vor.
1. Cante a coro con la música conectando el micrófono que se incluyeen una de las
tomas MIC (1/2) de la unidad.
Notas:
* Presione el botón M.VOL, luego gire el MIC.VOL para ajustar el volumen como
desee.
* Si colocara el micrófono cerca del altavoz, podría darse un efecto de eco
(retroalimentación acústica). de ser así, aleje el micrófono del altavoz.
Advertencia: Si golpea o deja caer el micrófono podría dañarlo permanentemente.
Resista la tentación de darle vueltas al micrófono por el cable.
2. MIC. PRIO: Pulse el botón MIC. PRIO. Hará que el volumen del micrófono sea
mayor que el volumen de la música mientras canta. Pulse de nuevo el botón
para continuar.
3. ECHO: Ajuste el control ECHO para realzar la voz del cantante para un efecto
de sala de conciertos. Pulse el botón ECHO y gire la manecilla MIC. VOL para
ajustarlo.
1. Per amplicare il microfono e cantare mentre si suona, collegare il microfono
fornito a una delle due prese MIC (1/2) sull'apparecchio.
Note:
* Ruotare MIC. VOL per regolare direttamente il volume al livello desiderato.
* L’avvicinamento del microfono alla cassa può causare feedback acustico (eetto
Larsen). In tal caso, allontanare il microfono dalla cassa.
Attenzione: picchiettare sul microfono o sottoporre il microfono a cadute può
causarne il danneggiamento. Non far oscillare il microfono aerrandolo dal cavo.
2. MIC. PRIO: Premete il tasto MIC. PRIO. Ciò renderà il volume del microfono più
alto del volume della musica mentre si canta. Premere nuovamente lo stesso
tasto per riprendere.
3. ECHO: Utilizzare il pomello ECHO per regolare il suono del microfono e donare
alla voce un eetto auditorium. Premere il tasto ECHO, e ruotare la manopola
MIC. VOL per regolarlo.
1. Zing mee met de muziek door de meegeleverde microfoon in een van de MIC
(1/2) aansluitingen op het apparaat te steken.
Opmerkingen:
* Draai rechtstreeks aan de knop MIC. VOL om het volume naar wens in te stellen.
* Als de microfoon in de buurt van de luidspreker wordt gebruikt, dan kan er een
huilend eect (akoestische terugkoppeling) optreden. Als dit het geval is, vergroot
dan de afstand tot de luidspreker.
Waarschuwing: De microfoon laten vallen of kloppen op de microfoon kan de
microfoon permanent beschadigen. Weersta de drang om de microfoon rond te
zwaaien aan het snoer.
2. MIC. PRIO: Druk op de toets MIC.PRIO. Dit zorgt ervoor dat het volume van
de microfoon hoger is dan het volume van de muziek tijdens het zingen. Druk
nogmaals op de knop om het normale afspelen te hervatten.
3. ECHO: Gebruik de ECHO -regelknop voor een concertzaaleect en om de
stem van de zanger te verbeteren. U kunt het eect instellen door op ECHO te
drukken en aan MIC. VOL te draaien.
1. Drehen Sie die Beleuchtungstaste zur Auswahl des Projektionseekts der
oberen LED-Lampe.
2. Lichtmodus auswählen.
- Falls kein Audiosignal vorhanden ist, blinken die Lichter langsam. Drücken Sie die
Taste LIGHT MODE zur Einstellung der Lichtfarbe des Lautsprechers. Es stehen
8 Modi zur Verfügung.
- Falls ein Audiosignal vorhanden ist, blinken die Lichter zum Klang der Musik.
Drücken Sie die Taste LIGHT MODE zur Einstellung der Lichtfarbe des
Lautsprechers. Es stehen 9 Modi zur Verfügung.
1. Gire la manecilla para la iluminación para seleccionar el efecto de proyección de
iluminación LED superior.
2. Seleccione los Modos de iluminación.
- Si no hay señal de audio, las luces parpadearán lentamente. Pulse el botón
LIGHT MODE para ajustar el color de la iluminación del altavoz, dispondrá de 8
tipos de modos seleccionables.
- Con señal de audio, las luces parpadearán junto con la música. Pulse el botón
LIGHT MODE para ajustar el color de la iluminación del altavoz, dispondrá de 9
tipos de modos de iluminación seleccionables.
1. Ruotare la manopola della luce per selezionare l’eetto di proiezione della luce
LED superiore.
2. Seleziona le Modalità Luci
- In assenza di segnale, la luce lampeggerà lentamente. Premere il tasto LIGHT
MODE per regolare il colore delle luci dell’altoparlante, scegliendo tra 8 diverse
modalità.
- Con segnale audio, le luci lampeggeranno insieme al ritmo della musica. Premere
il tasto LIGHT MODE per regolare il colore delle luci dell’altoparlante, scegliendo
tra 9 diverse modalità.
1. Draai aan de lichtknop om het projectie-eect van de bovenste LED-lamp te
selecteren.
2. Selecteer de lichtmodus.
- Als er geen audiosignaal is, knipperen de lampen langzaam. Druk op LIGHT
MODE om de kleur van de lampen op de luidspreker aan te passen. U kunt kiezen
uit 8 verschillende modi.
- Als er wel een audiosignaal is, knipperen de lampen mee met de muziek. Druk op
LIGHT MODE om de kleur van de lampen op de luidspreker aan te passen. U kunt
kiezen uit 9 verschillende modi.
WARNUNGEN
- Das Gerät ist weder spritz- noch tropfwasserdicht. Stellen Sie keine mit
Flüssigkeiten gefüllten Gegenstände wie Vasen auf das Gerät.
- Blockieren Sie keine der Belüftungsönungen. Installieren Sie das Gerät gemäß
den Anleitungen des Herstellers.
- Installieren Sie das Gerät nicht in der Nähe von Feuer, Heizkörpern,
Wärmespeichern, Herden oder anderen wärmeerzeugenden Geräten
(einschließlich Verstärkern).
- Verlegen Sie Netzkabel so, dass sie insbesondere am Stecker, an
Mehrfachsteckdosen und am Geräteausgang nicht durch Treten oder Quetschen
beschädigt werden können.
- Verwenden Sie nur vom Hersteller empfohlenes Zubehör.
- Trennen Sie das Gerät während Gewittern oder längeren Zeiten des
Nichtgebrauchs vom Netz.
- Steckdosen und Verlängerungskabel dürfen nicht überladen werden; es besteht
Brand- und Stromschlaggefahr.
- Wenn Teile ersetzt werden müssen, darf der Servicetechniker nur solche
Ersatzteile verwenden, die vom Hersteller empfohlen wurden oder die gleichen
Eigenschaften wie das Original aufweisen. Unzulässige Teile können Feuer,
Stromschläge oder andere Gefahren verursachen.
Advertencia
- El aparato no debe quedar expuesto a salpicaduras ni goteos. Y no coloque
encima del aparato objetos que haya llenado con líquidos, como por ejemplo
vasos.
- No bloquee las aberturas de ventilación. Instale según las instrucciones del
fabricante.
- No instale cerca de fuentes de calor, como radiadores, fuego, estufas, fuegos de
cocina u otros aparatos (incluyendo amplicadores) que produzcan calor.
- Evite pisar o pellizcar el cable de alimentación, especialmente en la zona del
enchufe, toma de corriente y el punto en el que sale del aparato.
- Utilice únicamente accesorios especicados por el fabricante.
- Desenchufe este aparato durante las tormentas o cuando no lo use por un
periodo prolongado.
- No sobrecargue las tomas de pared ni cables extensores. De hacerlo, esto
supondría un riesgo de incendio o descarga eléctrica.
- Cuando sea precisa la sustitución de alguna de las partes, asegúrese de que el
agente de servicio utiliza repuestos especicados por el fabricante o aquellos con
unas características iguales a las partes originales. La sustitución no autorizada
de las partes podría provocar un incendio, descarga eléctrica u otros peligros.
AVVERTENZE
- Non esporre l’apparecchio a schizzi e sgocciolii, e non porre su di esso oggetti
contenenti liquidi, quali vasi e simili.
- Non ostruire i fori di ventilazione. Collocare l’apparecchio secondo le istruzioni
del produttore.
- Collocare l’apparecchio al riparo da fonti di fuoco, calre, come radiatori, diusori
di aria calda, fornelli o altri apparecchi (inclusi amplicatori) che producono calore.
- Non calpestare o strappare il cavo di alimentazione, soprattutto in corrispondenza
della presa e dell’uscita dall’apparecchio.
- Utilizzare solo attacchi e accessori specicati dal produttore.
- Scollegare l’apparecchio dalla presa durante i temporali o quando non è utilizzato
per un lungo periodo di tempo.
- Non sovraccaricare le prese a muro e le prolunghe, ciò potrebbe causare incendi
o shock elettrici.
- In caso di sostituzione di parti, assicurarsi che i pezzi utilizzati dal tecnico siano
quelli specicati dal produttore o abbiano le stesse caratteristiche degli originali.
Sostituzioni fatte con pezzi non conformi possono causare incendi, shock elettrici
o altri pericoli.
VOORZORGS
- Het apparaat mag niet worden blootgesteld aan druppend of spattend water of op
een plek worden gezet waar water kan opspatten. En er mogen geen voorwerpen
gevuld met vloeistof, zoals vazen, op het apparaat worden gezet.
- Blokkeer de ventilatieopeningen niet. Installeer in overeenkomst met de instructies
van de fabrikant.
- Niet installeren in de buurt van warmtebronnen zoals vuur, radiatoren, kachels of
andere apparaten (waaronder versterkers) die warmte produceren.
- Bescherm het netsnoer tegen stappen of pletten bij de stekker, het stopcontact en
het punt waar ze het apparaat verlaten.
- Gebruik alleen accessoires/hulpstukken die door de fabrikant zijn gespeciceerd.
- Haal de stekker van het apparaat uit het stopcontact tijdens onweer of als het
apparaat voor lange tijd niet wordt gebruikt.
- Overbelast de stopcontacten, verlengkabels of contactdozen niet, omdat dit kan
resulteren in een kans op brand of elektrische schokken.
- Wanneer er reserveonderdelen nodig zijn, zorg er dan voor dat uw
onderhoudsmonteur onderdelen gebruikt die worden aanbevolen door de
fabrikant of die dezelfde eigenschappen hebben als het originele onderdeel.
Niet overeenkomstige onderdelen kunnen leiden tot brandgevaar, elektrische
schokken of andere gevaren.
Sie können für die Wiedergabe von MP3-Dateien ein USB-Flashgerät (nicht
enthalten) an den USB-Port des Geräts anschließen.
1. Schließen Sie ein USB-Gerät an. Das System liest das USB-Gerät und startet
automatisch die Musikwiedergabe; im Display erscheint „USB“.
2. Um die Wiedergabe der Musik zu unterbrechen (Pause) drücken Sie die Taste .
Um die Musik wieder normal abzuspielen, drücken Sie noch einmal dieTaste .
3. Halten Sie die Taste gedrückt, um die Wiedergabe zu beenden.
4. Betätigen Sie die Taste , um zum nächsten Titel zu springen bzw. die Taste
, um zum vorigen Titel zu springen. Drücken Sie die Taste oder für ein
schrittweises Rück- oder Vorspulen innerhalb des Titels.
5. Halten Sie die Taste REPEAT gedrückt, um auszuwählen, ob der aktuelle Titel
oder alle Titel wiederholt werden sollen.
Hinweise:
• Das Gerät aktiviert automatisch den USB-Modus und startet die Wiedergabe,
sobald ein USB-Flashgerät angeschlossen wird.
• Dieses Gerät unterstützt folgende Speichergeräte (Quellen): USB-Flashgeräte.
• Unterstütztes Format: MP3 (32kbps-320kbps), WMA, WAV.
• Die Höchstzahl der MP3-Dateien auf einem Speichergerät darf 9999 nicht
überschreiten.
• Es sind viele USB-Geräte auf dem Markt erhältlich. Wir garantieren nicht, dass
alle Arten von USB-Geräten unterstützt werden. Falls Ihr USB-Gerät nicht
unterstützt wird, versuchen Sie es bitte mit einem anderen Modell.
Podrá conectar una unidad de memoria ash USB (no incluida) al puerto USB de
la unidad para reproducir archivos MP3.
1. Conecte un dispositivo USB, la unidad leerá el dispositivo USB y reproducirá la
música automáticamente al mismo tiempo que “USB” será mostrado en pantalla.
2. Durante la reproducción, pulse el botón para interrumpirla momentáneamente.
Vuelva a pulsar el botón para reanudar la reproducción.
3. Mantenga pulsado para detener la reproducción.
4. Pulse el botón para saltar adelante a la siguiente pista y para saltar atrás a
la pista anterior. Pulse el botón o para avanzar/retroceder en la búsqueda.
5. Mantenga pulsado el botón REPEAT para repetir la pista actual o todas las
pistas.
Nota:
• Cuando la memoria USB se conecta, la unidad cambiará automáticamente al
modo USB y empezará a reproducirse.
• La unidad es compatible con los siguientes dispositivos de memoria (fuente):
unidad de memoria ash USB
• Formato aceptado: MP3 (32kbps-320kbps), WMA, WAV.
• Se recomienda que el número total de archivos MP3 en el dispositivo de memoria
no supere los 9999.
• Existen diferentes modelos de dispositivos USB. No podemos garantizar la
compatibilidad del aparato con todos los tipos de dispositivos USB. Por ello, si su
dispositivo USB no es compatible, inténtelo con otro.
Per riprodurre le MP3, è possibile collegare un'unità Flash USB (non inclusa) alla
porta USB sull'apparecchio.
1. Inserire il dispositivo USB, e l’apparecchio leggerà e riprodurrà automaticamente
la musica in esso contenuta, e sul quadrante si leggerà “USB”.
2. Durante la riproduzione premete il tasto per mettere la riproduzione in pausa.
Premete di nuovo il tasto per riprendere la riproduzione.
3. Mantenere premuto il tasto per arrestare la riproduzione.
4. Premere il tasto per passare al brano successivo, e il tasto per quello
precedente. Premere uno dei tasti o per la ricerca veloce in avanti o
all’indietro.
5. Mantenere premuto il tasto REPEAT per selezionare la ripetizione del brano
corrente o di tutti i brani.
Nota:
• Collegando un dispositivo USB, l'unità passerà automaticamente alla modalità
USB e avvierà la riproduzione dei brani.
• L’apparecchio è compatibile con i seguenti dispositivi di archiviazione (Source):
unità USB Flash.
• Formato supportato: MP3 (32 kb/s-320 kb/s), WMA, WAV.
• I dispositivi di archiviazione non devono contenere più di 9999 le MP3.
• Esistono vari modelli di periferiche USB. Non possiamo garantire che l’apparecchio
supporti tutti questi modelli. Se una periferica USB non è supportata, provate con
un’altra.
U kunt een USB-stick (niet meegeleverd) in de USB-poort op het apparaat steken
om MP3-bestanden af te spelen.
1. Sluit de USB-kabel aan, het apparaat leest de gegevens op het USB-apparaat uit
en speelt automatisch muziek af, terwijl de tekst “USB” op het display verschijnt.
2. Druk tijdens het afspelen op de toets om het afspelen te pauzeren. Druk
opnieuw op de toets als u wilt verder gaan met afspelen.
3. Houd ingedrukt om het afspelen te stoppen.
4. Druk op de toets om naar de volgende track te gaan en druk op om naar de
vorige track te gaan. Druk op of om vooruit of terug te spoelen.
5. Houd REPEAT ingedrukt om de huidige track te herhalen of alle tracks te
herhalen.
Opmerking:
• Als er een USB-apparaat wordt aangesloten, schakelt het apparaat automatisch
naar de USB-modus en wordt het afspelen gestart.
• Het apparaat is compatibel met de volgende soorten geheugenapparaten (Bron):
USB-stick.
• Ondersteunde formaten: MP3 (32kbps-320kbps), WMA, WAV.
• Het totaal aantal MP3-bestanden op het geheugenapparaat mag niet hoger zijn
dan 9999.
• Er bestaan verschillende modellen van USB-randapparaten. Wij kunnen niet
garanderen dat het toestel alle USB-randapparatuur ondersteund. Als dat niet het
geval is, probeer dan een ander.
Wechselstrom: AC 100-240V 50/60 Hz
Frequenzbereich: FM 87.5 -108.0 MHz
Bluetooth-Version: V4.2 + EDR
Bluetooth: 2.402-2.48GHz
RF-Ausgangsleistung (Radiofrequenz-Augangsleistung): -4.009 dBm
Bluetooth Reichweite: bis zu 10 Meter ohne Hindernisse. (Wände und Gegenstände
beeinussen die Reichweite des Geräts)
Betriebsdauer: ca. 7 Stunden bei 50% Volumen und vollem Ladezustand
Ladezeit: ca. 7 Stunden
Gestaltung und Ausführung bleiben Änderungen vorbehalten.
Requisitos de alimentación : AC 100-240V 50/60 Hz
Cobertura de radio: FM 87.5 -108.0 MHz
Versión Bluetooth: V4.2 + EDR
Bluetooth: 2.402-2.48GHz
Salida de corriente RF (radiofrecuencia): -4.009 dBm
Alcance operativo del Bluetooth: Hasta 10 metros en espacios abiertos (las
paredes u otras estructuras podrían afectar al alcance).
Tiempo de funcionamiento: Aproximadamente 7 horas con el volumen al 50%
luego de haberlas cargado completamente
Tiempo de carga: Aproximadamente 7 horas
Las especicaciones están sujetas a cambios sin previo aviso.
Alimentazione: AC 100-240V 50/60 Hz
Gamma di frequenza: FM 87.5 -108.0 MHz
Versione del Bluetooth: V4.2 + EDR
Bluetooth: 2.402-2.48GHz
Potenza RF (radiofrequenza) irradiata: -4.009 dBm
Raggio d’azione: Fino a 10 metri in un luogo aperto (muri e strutture possono
inuire sulla portata del dispositivo)
Durata massima di utilizzo: circa 7 ore col volume al 50% dopo un ciclo di
caricamento completo.
Tempo di ricarica: circa 7 ore.
Il modello e le caratteristiche tecniche possono subire variazioni senza preavviso.
Voeding: AC 100-240V 50/60 Hz
FM Afstembereik FM 87.5 -108.0 MHz
Bluetooth-versie: V4.2 + EDR
Bluetooth: 2.402-2.48GHz
RF-vermogen (radiofrequentievermogen): -4.009 dBm
Werkafstand Bluetooth: Tot 10 meter gemeten in open ruimte. (Muren en
voorwerpen kunnen deze afstand van het apparaat beïnvloeden)
Bedrijfstijd: Ca. 7 uur op 50% volume nadat de batterij volledig is opgeladen
Oplaadtijd: Ca. 7 uur
Ontwerp en specicaties zijn onderhevig aan verandering zonder kennisgeving.
NEW ONE S.A.S
10, Rue de la Mission, 25480 Ecole Valentin, France
NEW ONE S.A.S
10, Rue de la Mission, 25480 Ecole Valentin, France
NEW ONE S.A.S
10, Rue de la Mission, 25480 Ecole Valentin, France
NEW ONE S.A.S
10, Rue de la Mission, 25480 Ecole Valentin, France
Erscheinungsbild Ursache Behebung
Gerät kann nicht
eingeschaltet
werden.
Netzwerkadapter Schließen Sie das
Netzwerkadapter.
Der Standby-Modus ist
aktiviert.
Drücken Sie die Taste ,
um das Gerät einzuschalten.
Kein Ton
Die Lautstärke ist auf das
Minimum gestellt.
Stellen Sie die Lautstärke
auf das gewünschte Niveau.
Der Wiedergabemodus
ist am angeschlossenen
Gerät nicht aktiviert.
Starten Sie die Wiedergabe
am angeschlossenen Gerät.
Die Tonausgabe des
angeschlossenen Geräts
ist schlecht.
Stellen Sie am
angeschlossenen Gerät die
Lautstärke entsprechend
ein.
Tonverzerrungen
Lautstärke zu hoch
Reduzieren Sie die
Lautstärke mit der Taste
VOL.
Lautstärke des
angeschlossenen Geräts
zu hoch.
Reduzieren Sie am
angeschlossenen Gerät die
Lautstärke.
Kein Bluetooth-
Empfang
Bluetooth-Modus nicht
aktiviert. Versuchen Sie es erneut.
SÍNTOMA CAUSA SOLUCIÓN
No enciende.
Adaptador CA de corriente
no conectado.
Conecte el Adaptador
CA de corriente
correctamente.
La unidad se encuentra en
modo en espera.
Pulse para encender la
unidad.
Sin sonido.
Volumen al mínimo. Ajuste el volumen al nivel
deseado.
El dispositivo conectado no
se encuentra en el modo
reproducción.
Reproduzca la música en
el dispositivo conectado.
El audio del dispositivo
conectado es débil.
Ajuste el volumen del
dispositivo conectado.
Distorsión de audio
Volumen demasiado alto. Reduzca el volumen
pulsando VOL.
Volumen del dispositivo
conectado demasiado alto.
Reduzca el volumen del
dispositivo conectado.
Fallo en la recepción
de Bluetooth
No se encuentra en el
modo Bluetooth.
Intente de nuevo la
conexión.
SINTOMO CAUSA SOLUZIONE
Alimentazione
assente.
L'adattatore AC di rete non è
ben collegato.
Collegare correttamente
l'adattatore AC di rete.
L’apparecchio è in standby. Premete il tasto per
accendere l’apparecchio.
Audio assente.
Volume al minimo. Regolare il volume sul
livello desiderato.
Il dispositivo connesso non è
in modalità di riproduzione.
Avviare la riproduzione
sul dispositivo.
L’audio in uscita dal
dispositivo connesso è
debole.
Regolare il volume sul
dispositivo.
Audio distorto
Il volume è troppo alto. Ridurre il volume usando
il tasto VOL.
Il volume sul dispositivo
collegato è troppo alto.
Ridurre il volume sul
dispositivo collegato.
Ricezione Bluetooth
assente
Il dispositivo non è in
modalità Bluetooth.
Ripetere il processo di
associazione.
SYMPTOOM OORZAAK OPLOSSING
Geen stroom.
Netstroomadapter niet
aangesloten.
Sluit het
Netstroomadapter juist
aan.
Het apparaat is in
standbymodus.
Druk om het toestel aan
te zetten op de toets .
Geen geluid.
Volume is ingesteld op
minimum.
Stel het volume naar
wens in.
Het aangesloten apparaat is
niet in afspeelmodus.
Speel muziek af op het
aangesloten apparaat.
Volume bij afspelen van
aangesloten apparaat is zacht.
Stel het volume in op het
aangesloten apparaat.
Vervorming geluid
Volumeniveau is te hoog
Verlaag het
volumeniveau door op
de toets VOL te drukken.
Volumeniveau van het
aangesloten apparaat is te
hoog.
Verlaag het
volumeniveau op het
aangesloten apparaat.
Bluetooth-
ontvangst mislukt Niet in de Bluetooth-modus. Probeer nogmaals
verbinding te maken.
DESCRIPCIÓN DEL APARATO
DESCRIZIONE DEL PRODOTTO
BESCHRIJVING VAN HET TOESTEL
1. Toma MIC. 1
2. Toma MIC. 2
3. Puerto USB PLAY / CHARGE
(reproducción USB /cargador USB)
4. AUX IN auxiliar
5. Puerto ECHO
6. Botón M.VOL
7. Botón EQ
8. Botón MEGA BASS
9. Botón LIGHT MODE
10. Botón MIC. PRIO
11. Botón TONE
12. Perilla MIC. VOL
13. Perilla VOL
14. Botón (ENCENDIDO/ APAGADO)
15. Botón MODE
Botón REPEAT
16. Botón (sintonización hacia atrás
en modo de radio / salto a la pista
anterior)
1. Presa MIC. 1
2. Presa MIC. 2
3. Porta USB PLAY / USB CHARGE
(Riproduzione / Caricabatteria USB)
4. Presa AUX
5. Tasto ECHO (riverbero)
6. Tasto M.VOL
7. Tasto EQ (equalizzatore)
8. Tasto MEGA BASS
9. Tasto LIGHT MODE
10. Tasto MIC. PRIO
11. Tasto TONE
12. Pomello MIC. VOL
13. Pomello VOL
14. Tasto STANDBY
15. Tasto MODE
Tasto REPEAT
16. Tasto (sintonia all’indietro in
modalità radio / salto al brano
precedente)
1. MIC. 1 INGANG
2. MIC. 2 INGANG
3. USB PLAY / USB CHARGE Poort
(weergave / oplader)
4. AUX IN INGANG
5. ECHO regelknop
6. M.VOL regelknop
7. EQ -toets (equalizer)
8. MEGA BASS regelknop
9. LIGHT MODE regelknop
10. MIC. PRIO regelknop
11. TONE regelknop
12. MIC. VOL knop
13. VOL Knop
14. Toets
15. Toets MODE
Toets REPEAT
16. Toets (syntonisatie achterwaarts in
radio-modus / terug naar de vorige track)
17. Reproducción/pausa
(Detener la reproducción)
ATS (Búsqueda automática y
preselección de emisoras de radio
18. Botón (sintonización hacia
delante en modo de radio / salto a
la pista siguiente)
19. Botón (Retroceso rápido)
20. Botón (Avance rápido)
21. Pantalla
22. luz de color
23. Manecilla para la iluminación
24. Altavoces
25. Manija de tracción telescópica
26. Antena alámbrica FM
27. Conmutador ON/OFF (encendido/
apagado)
28. DC IN
29. Ruedas
30. Indicador de carga
17. Riproduzione / pausa
(Arrestare la riproduzione)
ATS (Ricerca e memorizzazione
automatica
18. Tasto (sintonia in avanti in
modalità radio / salto al brano
successivo)
19. Tasto (Avvolgimento Veloce)
20. Tasto (Avanzamento Veloce)
21. Display
22. luce colorata
23. Manopola luce
24. Altoparlanti
25. Maniglia da traino telescopica
26. Antenna a lo FM
27. Interruttore di accensione/
spegnimento
28. Lngresso per alimentatore di rete
29. Ruote
30. Spia di caricamento
17. (Afspelen/pauze)
(Afspelen te stoppen)
ATS (Automatisch zoeken en
opslaan)
18. Toets (syntonisatie vooruit
in radio-modus / verder naar de
volgende track)
19. Toets (terugspoelen)
20. Toets (vooruitspoelen)
21. Scherm
22. Kleurlamp
23. Lichtknop
24. Hoofdluidsprekers
25. Telescoop trekstang
26. FM-draadantenne
27. ON/OFF-schakelaar (aan/uit)
28. Aansluiting netstroomadapter
29. Wielen
30. Oplaad-indicator
ACCESORIOS
ACCESSORI
TOEBEHOREN
ALIMENTACIÓN
ALIMENTAZIONE
VOEDING
FUNCIONAMIENTO BÁSICO
FUNZIONAMENTO DI BASE
BASISFUNCTIES
Adaptador CA x 1
Micrófono por cable x 1
Ruedas x 2
Adattatore di rete x 1
Microfono cablato x 1
Ruote x 2
AC adapter x 1
Bedrade microfoon x 1
Wielen x 2
Utilización del adaptador de red
Este adaptador funciona con una alimentación CA de entre 100V-240V 50/60Hz.
El adaptador de red que se suministra con el aparato no se puede utilizar en ningún
caso con otro tipo de alimentación.
Atención:
* El adaptador de red que se suministra ha sido diseñado para utilizarse
exclusivamente con este aparato. No lo utilice con ningún otro aparato.
* Apague el aparato antes de desenchufar el adaptador de red. De lo contrario, el
aparato podría estropearse.
* Cuando no vaya a utilizar el aparato durante un período de tiempo prolongado,
desenchufe el adaptador de red de la toma de corriente.
* Asegúrese de que la toma de corriente está cerca y de que es fácil acceder a ella.
En caso de fallo en el funcionamiento del aparato, desenchufe inmediatamente el
adaptador de red de la toma de corriente.
* El adaptador de red permite enchufar y desenchufar el aparato. El acceso al
mismo debe permanecer despejado en todo momento. Para cortar por completo
la alimentación del aparato, ha de desenchufar el adaptador de red de la toma
de corriente.
* No utilice el adaptador de red si está estropeado. Coloque los cables de forma
segura y compruebe que no quedan aplastados, doblados ni tensados. Si el cable
de alimentación está estropeado, acuda a un técnico cualicado.
Utilización de la batería integrada
La unidad dispone de una batería interna recargable (plomo-ácido). Cargue la
batería antes de usarla por primera vez El indicador de carga se iluminará en color
rojo y se apagará tras completarse la carga.
Advertencias:
• Recargue la batería cuando tenga la intención de utilizarla inmediatamente
después.
• Durante la utilización de la batería, la temperatura ambiente debe oscilar entre
5 y 35°C.
• Para alargar la vida de la batería, asegúrese de recargarla a una temperatura
de interior.
• No desmonte la batería, ni la exponga a temperaturas superiores a 100°C o la
lance al fuego.
• No exponga la batería a temperaturas demasiado altas, como las producidas
por la exposición directa a los rayos del sol, al fuego o a otras fuentes de calor.
• Cuando se deshaga de la batería, hágalo de acuerdo con la legislación aplicable
y respete el medio ambiente.
• Cuando el nivel de energía de la batería interna sea bajo, sonará una alerta.
NOTA:
Con el objetivo de ahorrar energía, cuando la reproducción haya alcanzado el nal
o el volumen se encuentre a un nivel muy bajo y no se use ningún control en el
dispositivo por un periodo de 20 minutos, la unidad pasará al modo de espera
automáticamente.
• Non smontate la batteria, non scaldatela a più di 100°C e non gettatela nel fuoco.
• Non esponete la batteria a un calore eccessivo, come raggi del sole, fuoco o fonti
di calore analoghe.
• Quando gettate la batteria, pensate a rispettare l’ambiente e agite secondo la
legislazione vigente.
• Quando la batteria incorporata è scarica, verrà emesso un suono di avviso.
NOTA BENE
Per risparmiare energia, al termine della riproduzione oppure quando il volume
è impostato al minimo e nell'arco di 20 minuti non viene eseguita nessuna
operazione, l'apparecchio passa in automatico alla modalità di Standby.
Utilizzo dell’adattatore di rete
L’adattatore di rete funziona tramite un’alimentazione AC compresa tra 100V
e 240V .
L’adattatore di rete fornito in dotazione non può in alcun caso essere utilizzato con
un altro tipo di alimentazione.
Attenzione:
* L’adattatore di rete fornito in dotazione è destinato ad essere utilizzato
esclusivamente con questo apparecchio. Non utilizzatelo dunque con altri
apparecchi.
* Per evitare di rovinare l’apparecchio, spegnetelo prima di scollegare l’adattatore
di rete dall’apparecchio.
* In caso di un prolungato periodo di non utilizzo, scollegate l’adattatore di rete
dalla presa a muro.
* Fate in modo che la presa di rete sia vicina e che resti facilmente accessibile. In
caso di malfunzionamento, scollegate immediatamente la spina di alimentazione
dalla presa di rete.
* L’adattatore di rete permette di scollegare l’apparecchio. Deve pertanto restare
facilmente accessibile durante l’uso. Per mettere del tutto l’apparecchio fuori
tensione, scollegate il cavo di alimentazione.
* Non utilizzate l’adattatore di rete se è danneggiato. Posizionate i cavi in modo
sicuro facendo attenzione che non vengano incastrati o schiacciati. Se il cavo di
alimentazione è danneggiato, rivolgetevi a un tecnico qualicato.
Utilizzo della batteria integrata
L’unità ha una batteria incorporata ricaricabile (plomo-ácido). La batteria integrata
deve essere caricata del tutto per poter procedere al primo utilizzo. La spia che
indica lo stato di ricarica si illuminerà in rosso e si spegnerà a ricarica completata.
Avvertenze:
• Ricaricate la batteria integrata se intendete utilizzarla subito dopo.
• Durante l’utilizzo della batteria integrata, la temperatura ambiente deve essere
compresa tra 5°C e 35°C.
• Per prolungare la durata di vita della batteria integrata, ricaricatela a temperatura
ambiente (interno).
De ingebouwde batterij gebruiken
Het apparaat is uitgerust met een ingebouwde oplaadbare batterij (lead-acid). Laad
de ingebouwde batterij op voor het eerste gebruik De oplaadindicator licht rood op
en schakelt uit nadat de batterij volledig is opgeladen.
Waarschuwingen:
• Herlaad de ingebouwde batterij zodra u deze wilt gaan gebruiken.
• Tijdens het gebruik van de ingebouwde batterij moet de omgevingstemperatuur
liggen tussen 5°C en 35°C.
• Om de batterij een zo lang mogelijke levensduur te geven, herlaadt u bij
kamertemperatuur.
• De ingebouwde batterij in dit toestelkan een risico vormen op brand of chemische
brand bij verkeerd gebruik. Haal de batterij niet uiteen, verwarm niet boven 100°C
en verbrand deze niet.
• Stel het toestel niet bloot aan overdreven hitte, zoals zon of vuur.
• Bij het wegwerpen van het toestel, moet rekening worden gehouden met
milieuproblemen en de plaatselijke regels en wetten voor het verwerken van deze
producten moeten strikt worden nageleefd.
• Als de ingebouwde batterij bijna leeg is, hoort u een waarschuwingsgeluid.
OPMERKINGEN:
Om energie te besparen zal het apparaat automatisch naar de standbymodus
schakelen wanneer het afspelen het eindpunt heeft bereikt of het volume is
ingesteld op een zeer laag niveau en het apparaat niet wordt gebruikt voor een
periode van 20 minuten.
Met de AC adapter
De netstroomadapter gebruikt een netstroom van AC 100V-240V 50/60Hz.
De meegeleverde netstroomadapter mag nooit gebruikt worden op een ander type
voeding.
Opmerkingen:
* De AC adapter inbegrepen in dit toestel mag alleen met dit toestel gebruikt
worden. Nooit gebruiken voor een ander toestel.
* Schakel het toestel uit voor de AC adapter los te maken om schade aan het
toestel te voorkomen.
* Als het toestel lange tijd niet gebruikt wordt, verwijdert u de AC adapter uit het
stopcontact.
* Gebruik het in de buurt van een makkelijk bereikbaar stopcontact. Doet zich een
storing voor, verwijder het contact dan onmiddellijk uit het stopcontact.
* Het moet makkelijk te bedienen blijven en mag tijdens het gebruik niet verstoord
worden. Om volledig losgekoppeld te zijn van stroomtoevoer, moet het toestel via
de AC adapter volledig uit het stopcontact worden verwijderd.
* Gebruik nooit een beschadigde AC adapter, leg de kabels op een veilige manier
vrij van druk of knijpen. Wend u tot een erkende dienstverlener als de kabel
beschadigd is.
1. Conecte el Adaptador CA de corriente a la unidad y a la toma de pared, después
pulse el interruptor POWER para encender la unidad. El display se iluminará.
Pulse el botón para entrar en el modo de espera.
2. Pulse el botón MODE repetidamente para seleccionar la fuente de reproducción
que desee: Bluetooth / FM / AUX/ USB.
Nota: Solo al conectar un dispositivo USB podrá cambiar al modo USB.
1. Collegate l’adattatore di rete all'apparecchio e a una presa a muro, quindi
accendete l'apparecchio scorrendo l'interruttore di accensione, Il display si
illumina. Premete il tasto per accedere alla modalità di standby.
2. Premete più volte il tasto MODE per selezionare l’origine di riproduzione
desiderata: Bluetooth / FM / Aux / USB.
Nota: Inserire solo dispositivi USB o spine audio da 3,5mm per passare alla
modalità USB o AUX.
3. Durante la riproduzione:
- Ruotare la manopola VOL per regolare sul livello desiderato.
- Premete ripetutamente il tasto EQ per selezionare le diverse modalità:
FLAT(normal)/ CLAS(classic)/ rOC(rock)/ POP/ JAZZ/ LIVE/ CLUB/
DANC(dance)/ HALL/ SOFT.
- Durante la riproduzione premete il tasto per mettere la riproduzione in pausa.
Premete di nuovo il tasto per riprendere la riproduzione.
- Premete il tasto per passare al brano successivo, e il tasto per quello
precedente.
Nota:
• REPEAT funzioni disponibili in modalità USB.
• MEGA BASS: Modalità basso separato selezionabile in presenza di segnale
audio.
• TONE: In presenza di segnale, premere questo tasto per selezionare i suoni acuti
o bassi.
4. Per arrestare la riproduzione, scorrete l’interruttore di accensione POWER.
1. Sluit het AC adaptor aan op het apparaat en het stopcontact en druk op de
POWER -schakelaar om het apparaat in te schakelen en het display licht op.
Druk op om naar de standbymodus te schakelen.
2. Druk herhaaldelijk op de toets MODE om de gewenste afspeelbron te selecteren:
Bluetooth / FM / Aux / USB.
Opmerking: Door een USB-kabel of 3,5mm-kabel aan te sluiten, kunt u ook naar
de USB- of Aux-modus schakelen.
3. Tijdens afspelen:
- Draai aan de VOL-knop om het volume naar wens in te stellen.
- Druk meermaals op de EQ-knop om de verschillende modi te selecteren:
FLAT(normal)/ CLAS(classic)/ rOC(rock)/ POP/ JAZZ/ LIVE/ CLUB/
DANC(dance)/ HALL/ SOFT.
- Druk tijdens het afspelen op de toets om het afspelen te pauzeren. Druk
opnieuw op de toets als u wilt verder gaan met afspelen.
- Druk op de toets om naar de volgende track te gaan en druk op om naar
de vorige track te gaan.
Opmerking:
• De REPEAT functie werkt alleen in de USB-modus.
• MEGA BASS: deze speciale bassmodus kan worden geselecteerd als er een
audiosignaal is.
• TONE: Druk op deze knop om treble of bass te selecteren als er een audiosignaal
is.
4. U kunt het afspelen stoppen, Schuif de stroomschakelaar naar de Uitschakelen.
3. Durante la reproducción:
- Para subir o bajar el volumen, gire el VOL hacia la derecha o hacia la izquierda.
- Pulse el botón EQ de forma repetida para seleccionar los diferentes
modos: FLAT(normal)/ CLAS(classic)/ rOC(rock)/ POP/ JAZZ/ LIVE/ CLUB/
DANC(dance)/ HALL/ SOFT.
- Durante la reproducción, pulse el botón para interrumpirla momentáneamente.
Vuelva a pulsar el botón para reanudar la reproducción.
- Pulse el botón para saltar adelante a la siguiente pista y para saltar atrás
a la pista anterior.
Nota:
• REPEAT funciones solo funcionan en el modo USB.
• MEGA BASS: Es un modo separado de graves que puede seleccionarse cuando
haya señal de audio.
• TONE: Cuando haya señal de audio, pulse este botón para seleccionar agudos
o graves.
4. Para apagarlo, utilice el interruptor POWER.
CAJÓN ALTAVOZ BLUETOOTH PARA FIESTAS CON
FM Y BATERÍA
CASSA BLUETOOTH PARTY BOX CON FM E
BATTERIA
BLUETOOTH PARTY BOX LUIDSPREKER MET FM
EN BATTERIJ
ES
IT
NL
Rueda
Ruota
Wiel
-
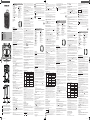 1
1
-
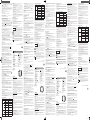 2
2


in andere talen
- italiano: Muse M-1938 Manuale utente
- français: Muse M-1938 Manuel utilisateur
- español: Muse M-1938 Manual de usuario
- Deutsch: Muse M-1938 Benutzerhandbuch
- português: Muse M-1938 Manual do usuário