
User manual
M A N U E L D ' U T I L I S A T I O N
G E B R U I K S A A N W I J Z I N G
G E B R A U C H S A N W E I S U N G
M A N U A L E D I I S T R U Z I O N I
M A N U A L D E I N S T R U C C I O N E S
I N S T R U K C J A O B S
Ł
U G I
N Á V O D K O B S L U Z E
V300 XL

Instrukcje dla wyspecjalizowanego
All rights reserved, including translation.
Tous droits réservés, y compris la traduction.
Alle rechten, inclusief vertaling, voorbehouden.
Alle Rechte, auch an der Übersetzung, vorbehalten.
Tutti i diritti riservati (anche sulla traduzione).
Todos los derechos reservados, incluidos los de la
traducción.
Wszelkie prawa zastrzeżone, łącznie z tłumaczeniem.
Všechna práva vyhrazena, včetně překladu.
EN
Instructions for specialist dealer
This instruction manual is part and parcel of the
product and must accompany every product
sold.
Version: C, 2022-07
FR
Instructions pour les distributeurs
Ce manuel d'instructions fait partie du produit et
doit accompagner chaque produit vendu.
Version : C, 2022-07
NL
Instructies voor de vakhandelaar
Deze handleiding is deel van het product en
dient bij iedere product te worden geleverd.
Versie: C, 2022-07
DE
Hinweise für den Fachhändler
Diese Gebrauchsanweisung ist Bestand-teil des
Produkts und ist bei jeder Produkts
auszuhändigen.
Version: C, 2022-07
IT
Istruzioni per il rivenditore
Il presente Manuale di istruzioni è parte
integrante del prodotto e deve essere fornito
assieme alla prodotto.
Versione: C, 2022-07
ES
Instrucciones destinadas a los distribuidores
especializados
El presente manual de instrucciones es parte
integrante del producto y se debe adjuntar a
todas las producto que se vendan.
Versión: C, 2022-07
PL
sprzedawcy
Niniejsza instrukcja obsługi jest nieodłączną
częścią produktu i musi być dołączona do
każdego sprzedawanego produktu.
Wersja: C, 2022-07
CS
Pokyny pro specializovaného prodejce
Tento návod k obsluze je součástí dodávky a
musí být součástí každého prodaného
produktu.
Verze: C, 2022-07
Basic UDI: 5415174 122106V300XL L3
Multi version: D, 2022-07

V300 XL
2022-07
Contents
1
EN
NL
Contents
Contents ..................................................................................................................... 1
Preface........................................................................................................................ 2
1 Your product .................................................................................................. 3
2 Before use ..................................................................................................... 4
2.1 Intended use ................................................................................................. 4
2.2 General safety instructions ............................................................................ 4
2.3 Symbols on the wheelchair ........................................................................... 4
2.4 Transport ....................................................................................................... 5
2.5 Folding/Unfolding .......................................................................................... 5
2.6 Storage ......................................................................................................... 5
3 Using your wheelchair .................................................................................. 6
3.1 Mounting or removing the footrests ............................................................... 6
3.2 Operating the brakes ..................................................................................... 6
3.3 Mounting or removing the armrests............................................................... 6
3.4 Adjusting anti-tipping (when provided) .......................................................... 7
3.5 Mounting or removing the push bar............................................................... 8
3.6 Transfer in and out of the wheelchair ............................................................ 8
3.7 Riding the wheelchair .................................................................................... 9
4 Maintenance ................................................................................................ 12
4.1 Points of maintenance ................................................................................. 12
4.2 Maintenance instructions ............................................................................ 12
4.3 Troubleshooting .......................................................................................... 13
4.4 Expected lifespan ........................................................................................ 13
4.5 Reuse .......................................................................................................... 13
4.6 End of use ................................................................................................... 13
5 Technical specifications ............................................................................. 14

V300 XL
2022-07
Preface
2
EN
NL
Preface
Congratulations! You are now owner of a Vermeiren wheelchair!
This wheelchair is made by qualified and committed personnel. It is designed and produced
according to high quality standards, guarded by Vermeiren.
Please read this manual carefully; it will help you to get familiar with the operation, capabilities
and limitations of your wheelchair.
If you still have questions after reading this manual, do not hesitate to contact your specialist
dealer. He/she will be glad to help you.
Important note
To ensure your safety, and to prolong the lifetime of your product, please take good care of it and
have it checked and serviced on a regular basis.
This manual reflects the latest product developments. Vermeiren has the right to implement
changes to this type of product without any obligation to adapt or replace similar products
previously delivered.
Pictures are used to clarify the instructions in this manual. Details of the depicted product may
deviate from your product.
Information available
On our website http://www.vermeiren.com/ you will always find the most recent version of the
information in this manual. Please consult this website regularly for possible updates.
Visually impaired people can download the electronic version of this manual and have it read out
by means of a text-to-speech software application.
User manual For user and specialist dealer
Installation instructions For specialist dealer
Service manual for wheelchairs For specialist dealer
EC declaration of conformity

V300 XL
2022-07
Your product
3
EN
NL
1
2
3
4
5
6
8
7
9
1
0
1
1
1
2
1
3
1
4
1
5
1 Your product
1. Handgrips
2. Push bar
3. Backrest
4. Arm pads
5. Armrests
6. Seat
7. Footrests
8. Footplates
9. Steering wheels (front
wheels)
10. Brakes
11. Driving wheels (rear
wheels)
12. Hand rims
13. Tip cap
14. Cross
15. Identification plate

V300 XL
2022-07
Before use
4
EN
NL
2 Before use
2.1 Intended use
Indications and contraindications: This wheelchair is intended for users who are in need of a
larger seat width than 50cm and/or a higher user weight. The user can propel the wheelchair
by himself or have the wheelchair pushed by an attendant. The wheelchair is intended for
elderly people or people with walking difficulties or no walking abilities, such as paralysis, loss
of limbs, limb defects or deformations, stiff or damaged joints, heart insufficiencies and poor
blood circulation, balance disturbances, cachexia (decrease in muscle), … You should NOT
use this wheelchair if you suffer from physical or mental impairments that may put you, or other
people, in danger when driving the wheelchair. For this reason, consult your doctor first and
make sure that your specialist dealer is informed about his advice.
This wheelchair is suitable for indoor and outdoor use.
This wheelchair is designed and produced solely to transport/transfer one (1) person with a
maximum weight of 170kg. It is not designed for transportation of goods or objects, nor for any
use other than previously described.
Only use accessories and spare parts approved by Vermeiren.
Please read all technical details and limits of your wheelchair in chapter 5.
The warranty on this product is based on normal use and maintenance as described in this
manual. Damage to your product caused by improper use or lack of maintenance will cause
the warranty to lapse.
2.2 General safety instructions
Risk of injuries and/or damage
Carefully read and follow the
instructions in this manual. Otherwise you may get injured or your
wheelchair may get damaged.
Keep the following general warnings in mind during use:
Do not use your wheelchair if you are under influence of alcohol, medicines or other substances
that may influence your riding abilities.
Be aware that some parts of your wheelchair may get very hot or cold due to ambient
temperature, solar radiation or heating devices. Be careful when touching. Wear protective
clothing if the weather is cold. When going outdoors, riding gloves can be used to improve the
grip on the hand rims.
Do not modify your wheelchair in any way.
Be aware that your wheelchair may interfere with some types of anti-theft systems, depending on
the settings used. This may cause the shop's alarm to go off.
In case a serious incident has occurred involving your product, notify Vermeiren or your specialist
dealer as well as the competent authority in your country.
2.3 Symbols on the wheelchair
Maximum weight of the user in kg
Indoor/outdoor use
Maximum safe slope in ° (degrees).
CAUTION

V300 XL
2022-07
Before use
5
EN
NL
Type designation
2.4 Transport
2.4.1 Transport by vehicle, as luggage
Risk of injuries
Do NOT use your wheelchair as a seat in a vehicle, see the following symbol.
Make sure that the wheelchair is attached properly to avoid injury from the
passengers during collision or sudden braking.
NEVER use the same seatbelt to secure the wheelchair and passenger.
1. Remove footrests, armrests and accessories.
2. Store footrests, armrests and accessories safely.
3. If possible, fold the wheelchair and remove the rear wheels.
4. Place the wheelchair in the luggage compartment.
5. If the luggage and passenger compartments are NOT separated, attach the frame of the
wheelchair securely to the vehicle. You can use the available safety belts in the vehicle.
2.5 Folding/Unfolding
Risk of injuries
Keep fingers away from moving parts of the wheelchair.
2.5.1 Unfolding the wheelchair
1. Position yourself behind the wheelchair.
2. Use the handgrips to open the wheelchair as much as possible.
3. Position yourself at the front of the wheelchair.
4. Push both seating tubes down till they are fixed in their position.
5. Mount the push bar (see §3.5).
2.5.2 Folding the wheelchair
1. Remove the push bar (see §3.5).
2. Fold the footplates or remove the footrests (see § 3.1).
3. Take the seat on the front side and backside and pull it up.
2.5.3 Mounting the rear wheels
1. Take the rear wheel and push button (1).
2. Keep the button pushed in and mount the rear wheel axle until it
stops.
3. Release the button.
4. Check that the wheel is secured.
2.5.4 Taking off the wheels
1. Make sure the brakes standing in the off position.
2. Take the wheelchair to the side frame where you want to remove
the wheel.
3. Press the button (1) in the center of the wheel hub.
4. Pull the wheel away from the frame.
2.6 Storage
Make sure that your wheelchair is stored in a dry
environment to prevent mould from
growing and the upholstery from being damaged, see also chapter 5.
WARNING
CAUTION
1

V300 XL
2022-07
Using your wheelchair
6
EN
NL
3 Using your wheelchair
Risk of injuries
First read previous chapters and inform yourself about the intended use. Do NOT use your
wheelchair unless you have read and fully understood all instructions.
In case of doubts or questions, do not hesitate to contact your local specialist dealer, your c
are
provider or technical adviser to help you with this.
3.1 Mounting or removing the footrests
Mounting the footrests is done as follows:
1. Hold the footrest sideways at the outside of the wheelchair’s frame
and mount the tube hood (1) into the frame.
2. Swing the footrest inwards until it clicks in position.
3. Swing the footplate downwards.
To take off the footrests:
1. Pull lever (2).
2. Swing the footrest to the outside of the wheelchair until it comes
loose from the guidance.
3. Pull the footrest from the tube hood (1).
3.2 Operating the brakes
Risk of injuries
The brakes are not used to slow down the wheelchair during movements. Use the brake only
to prevent the wheelchair from unintended movements.
Good
operation of the brakes is influenced by wear and contamination of the tires (water, oil,
mud, …). Check the condition of the tires before each use.
The brakes are adjustable and can wear. Check the operation of the brakes before each use.
Make sure
the wheelchair is on a flat horizontal surface before releasing the brakes. Never
release both brakes simultaneously.
To apply the brakes:
1. Push the brake levers forward until you feel a distinctive click.
To release the brakes:
1. Release one brake by pulling the lever backwards.
2. Hold the hand rim of the released wheel with your hand.
3. Release the second brake by pulling the lever backwards.
3.3 Mounting or removing the armrests
Risk of injuries
Keep fingers, buckles and clothes away from the bottom side of the armrest.
The armrests of the wheelchair can be mounted by following instructions.
WARNING
CAUTION
CAUTION
1
2

V300 XL
2022-07
Using your wheelchair
7
EN
NL
1. Mount the rear tube of the armrest in tube hood (1).
2. Make sure the armrest clicks in the locking mechanism.
3. Fold the armrest forward.
4. Click the front tube of the armrest in tube hood (2).
To open and remove the armrest:
1. Press lever (3) and pull the front of the armrest upwards.
2. Fold the armrest backwards.
3. To remove the armrest, press button (4) and pull the rear of the armrest from tube hood (1).
3.4 Adjusting anti-tipping (when provided)
Adjust the height of the anti-tipping in 7 positions (range 120 mm:
steps 20 mm):
1. Loosen the star knob (1) a little bit.
2. Move the tube of the anti-tipping in the desired height.
3. Secure the star knob (1).
4. Make sure that the anti-tipping is firmly secured.
3
2
1
4
1

V300 XL
2022-07
Using your wheelchair
8
EN
NL
3.5 Mounting or removing the push bar
Risk of injuries
Make sure that buttons Ⓐ are tightened.
When equipped with the push bar, the push bar should
always be mounted to increase the
stability of the back
.
To mount the push bar:
1. Mount the push bar Ⓑ with the star knob Ⓐ in the left handgrip.
2. Swing the push bar Ⓑ to the right.
3. Mount hook Ⓒ over the right handgrip Ⓓ as shown on the drawing. Use holes or to
adjust the tension of the backrest.
To take off the push bar:
1. Loosen the star knob Ⓐ on the right handgrip.
2. Remove hook Ⓒ from the right handgrip Ⓓ.
3.6 Transfer in and out of the wheelchair
Risk of injuries
In case you cannot perform the transfer in a safe manner,
ask someone to assist you.
Do not stand on the footplates
.
1. Position the wheelchair as close as possible to the chair,
couch or bed to/from you wish to transfer.
2. Make sure that both brakes of the wheelchair are activated.
3. Fold the foot plates upwards to prevent standing on them.
4. If the transfer is on the side of the wheelchair, remove the
armrest on that side (see § 3.3) and fold the brake lever
down.
5. Transfer to/from the wheelchair.
3.6.1 Correct position in the wheelchair
Some recommendations for a comfortable use of the wheelchair:
Position your backside as close as possible to the backrest.
Make sure your upper legs are horizontal. If needed adjust the length of the footrests (see
installation manual).
WARNING
CAUTION

V300 XL
2022-07
Using your wheelchair
9
EN
NL
3.7 Riding the wheelchair
Risk of injuries and damage
Before every usage, make sure that:
o parking brakes are working properly.
o tires are in good condition, see §4.
Prevent your fingers from being caught by the wheel spokes.
Do not operate the hand rims with wet hands.
Prevent entrapment of your hands on the hand rims when you pass small passages.
Do NOT drive on slopes, obstacles, steps or kerbs larger than specified in §5.
When you stop on a (small) slope, use your brakes.
Make sure all four wheels touch the ground while riding up or down a slope.
Take slopes as slow as possible.
Always stay on the pavement when riding on public roads.
Pay attention if the road has holes or gaps that may cause entrapment of the wheels.
Avoid stones and other objects that may block the wheels.
Make sure that the footplates do not touch ground while taking an obstacle.
Do not use your wheelchair on an escalator.
If available, wear your safety belt.
Always keep the swing range of the footplate in mind to prevent bystanders from being injured
or objects from being damaged.
If you don’t have enough experience riding your wheelchair, ask assistance of an attendant.
Keep your arms away from the wheels and keep your feet on the footplate.
Stairs should always be negotiated with the help of two attendants.
Never try to use stairs that are not appropriate for wheelchairs.
3.7.1 Riding your wheelchair:
1. Release the brakes.
2. Take both hand rims at their highest position.
3. Lean forward and push the hand rims forward until your arms are straight.
4. Move your hands back to the top of the hand rims and repeat the movement.
3.7.2 Moving on slopes
Risk of injuries
Moving on slopes as slow as possible.
If your attendant does not have enough force to control the wheelchair, put on the brakes.
Lean forward to move your centre of gravity forward. To improve a better stability
.
1. If available on the wheelchair, wear the safety belt.
2. Do not attempt moving on too high slopes. The maximum slope angles
(upwards and downwards) are mentioned in table 1.
3. Ask an attendant to help you moving on the slope.
4. Lean forward to move your centre of gravity forward.
3.7.3 Negotiating steps or kerbs
Risk of injuries
If you do not have enough experience with your wheelchair, ask assistance of an attendant.
CAUTION
WARNING
WARNING

V300 XL
2022-07
Using your wheelchair
10
EN
NL
Getting down steps or kerbs
Riding down low kerbs can be done moving forwards. Make sure that the foot bracket does not
touch the ground.
A practiced user can negotiate small steps or kerbs by himself:
1. Bring balance on the rear wheels to reduce the pressure on the front
wheels.
2. Negotiate the kerbs.
Higher kerbs can be taken forward with an attendant:
1. Ask the attendant to tip the wheelchair slightly backwards.
2. Get past the kerbs while moving on the rear wheels.
3. Put the wheelchair back on the four wheels.
An experienced user can negotiate higher kerbs by himself. This is best done backwards.
1. Turn the wheelchair to have the rear wheels facing the kerb.
2. Lean forward to move your centre of gravity forward.
3. Move the wheelchair close to the kerbs.
4. Use the hand rim to roll-off wheelchair from the kerb in a
controlled manner.
Moving up steps or kerbs
Moving up steps or kerbs with attendant as follows:
1. Prevent the foot bracket from touching the kerb.
2. Ask the attendant to tip the wheelchair backwards, just enough to move
the front wheels over the kerb.
3. Lean backwards to move your centre of gravity above the rear wheel.
4. Place the front wheels on the kerb.
5. Roll rear wheels of the wheelchair over the kerb.
Higher kerbs are negotiated backwards:
1. Turn the wheelchair to have the rear wheels facing the kerb.
2. Lean backwards and move your centre of gravity above the rear wheels.
3. Ask the attendant to pull the wheelchair on the kerb.
4. Take back the normal position in the wheelchair.
An experienced user can negotiate kerbs by himself:
1. Drive until the kerbs.
2. Ensure that the foot bracket do not touch the kerbs.
3. Lean backwards so you are balancing on the rear wheels.
4. Role the front wheels balancing over the kerbs.
5. Bend forwards for more stability.
6. Role the rear wheels over the kerbs.

V300 XL
2022-07
Using your wheelchair
11
EN
NL
3.7.4 Taking stairs
Risk of injuries
Stairs should always be taken with the help of two attendants.
Taking of stairs while you staying in the wheelchair shall be according following rules:
1. One attendant tip the wheelchair slightly backwards.
2. The second attendant take the front of the frame.
3. Stay calm, avoid sudden movements and keep your arms inside the wheelchair.
4. Take the steps on the rear wheels of the wheelchair.
WARNING

V300 XL
2022-07
Maintenance
12
EN
NL
4 Maintenance
4.1 Points of maintenance
Risk of injuries and damage
Repairs and replacements may only be undertaken by trained persons and only genuine
replacement parts of Vermeiren should be used.
The service
frequency depends on the frequency and intensity of use. Contact your dealer
to agree to a common timetable for inspection/maintenance/repair.
For the maintenance manual, refer to the Vermeiren website: www.vermeiren.com.
Before each use
Inspect the following points:
All parts: Present and undamaged or unworn.
All parts: Clean, see § 4.2.2.
Wheels, backrest, seat, calf rests, arm rests, footplates: Well secured.
Condition of wheels/tyres, see § 4.2.1;
Condition of frame parts: No deformation, instability, weakness or loose connections
Seat, backrest, arm pads, calf pads and head rest (if applied): No excessive wear (like
dented spots, damage or tears).
Brakes: Undamaged and functioning.
Contact your specialist dealer for possible repairs or part replacements.
Yearly or more often
Have your wheelchair inspected and serviced by your specialist dealer, at least once a year, or
more often. The minimum maintenance frequency depends on use and should therefore be
commonly agreed upon with your specialist dealer.
4.2 Maintenance instructions
4.2.1 Wheels and tyres
Proper working of the brakes depends on the state of the tyres, and can change due to
wear and contamination (water, oil, mud, …).
Keep your wheels free of wires, hair, sand and fibres.
Check the profile of the tyres. If the tread depth is less than 1 mm, the tyres need to be replaced.
Contact your specialist dealer for this matter.
Inflate each pneumatic tyre to the correct pressure (see pressure indication on the tyres).
4.2.2 Cleaning
Risk of damage by moisture
Never use a hose
or high
-
pressure cleaner to clean the wheelchair.
Wipe all rigid parts of the wheelchair with a damp cloth (not drenched).
If necessary, use a mild soap, suitable for varnishes and synthetics.
The upholstery can be cleaned with lukewarm water and a mild soap. Do not use abrasive
cleaning agents to clean.
4.2.3 Disinfection
Risk of damage
Disinfections may only be undertaken by trained persons. Consult your specialist dealer.
CAUTION
CAUTION
CAUTION

V300 XL
2022-07
Maintenance
13
EN
NL
4.3 Troubleshooting
Even if you use your wheelchair properly, a technical problem may occur. In this case, contact
your local specialist dealer.
Risk of injuries and damage to the wheelchair
NEVER repair your wheelchair yourself attempting to solve the problem.
The following symptoms may indicate a serious problem. Therefore always contact your specialist
dealer if you spot any of the following deviations:
Strange sound;
Uneven tread wear on one of the tyres;
Jerky movements;
Wheelchair deflects to one side;
Damaged or broken wheel assemblies.
4.4 Expected lifespan
The average lifespan of your wheelchair is 5 years. Depending on the frequency of use, driving
circumstances and maintenance, the lifespan of your wheelchair will increase or decrease.
4.5 Reuse
Before each reuse, have the wheelchair disinfected, inspected and serviced according to the
instructions in §4.1 and §4.2.
4.6 End of use
At end of life, you need to dispose your wheelchair according to the local environmental
legislation. The best way to do so, is to disassemble the wheelchair to facilitate the transport of
recyclable parts.
WARNING

V300 XL
2022-07
Technical specifications
14
EN
NL
5 Technical specifications
Technical terms below are valid for the wheelchair in standard settings. If other footrests / armrests
or other accessories are used, the tabulated values will change.
Make
Vermeiren
Type
Manual wheelchair
Model
V
3
00
XL
Maximum occupant mass
1
7
0 kg
Description
Min.
dimensions
Max.
dimensions
Overall length with footrest 1085 mm
Effective seat width 530 mm 560 mm 600 mm
Overall width (depends on the seat width) 740 mm 770 mm 810 mm
Folded length 1060 mm
Folded width 350 mm
Folded height (depends on seat height)
840 mm 930 mm
Total mass 21,00 kg
Mass of heaviest part 13,35 kg
Masses of parts that can be dismantled or
removed
Foot supports: 1,75 kg; Armrests: 1,80 kg;
Rear wheels:
4,05 kg
Static stability downhill 6,5°
Static stability uphill 6,5°
Static stability sideways 18°
Obstacle climbing 60 mm
Seat plane angle 0° 10°
Effective seat depth 490 mm 530 mm
Seat surface height at front edge 440 mm 530 mm
Backrest angle 5°
Backrest height 400 mm
Distance between footrest and seat 400 mm
500 mm
Angle between seat and footplate 5°
25°
Angle between seat and leg footrest 105°
Angle between leg footrest and footplate 80°
Distance between arm pad and seat 220 mm 240 mm
Front location of arm pad structure 410 mm
Handrim diameter 535 mm
Horizontal location of axle (deflection) 1,27 mm 61,04 mm
Minimum turning radius 1500 mm
Diameter PU Rear wheels 22" 24"
Tyre pressure, rear (driving) wheels Max. 3,5 bar
Diameter PU steering wheels 200 mm
Tyre pressure, steering wheels Max. 2,5 bar
Frame material Aluminium
Upholstery material Nylon

V300 XL
2022-07
Technical specifications
15
EN
NL
Storage and use temperature + 5 °C + 41 °C
Storage and use humidity 30% 70%
We reserve the right to introduce technical changes. Measurement tolerance ± 15 mm / 1,5 kg /
1,5
°


V300 XL
2022-07
Table des matières
1
EN
FR
NL
Table des matières
Table des matières..................................................................................................... 1
Préface........................................................................................................................ 2
1 Votre produit .................................................................................................. 3
2 Avant l’utilisation .......................................................................................... 4
2.1 Usage prévu .................................................................................................. 4
2.2 Instructions générales de sécurité................................................................. 4
2.3 Les symboles sur le fauteuil roulant .............................................................. 4
2.4 Transport ....................................................................................................... 5
2.5 Pliage/Dépliage ............................................................................................. 5
2.6 Entreposage .................................................................................................. 6
3 Utilisation de votre fauteuil roulant ............................................................. 7
3.1 Placer ou enlever les repose-pieds ............................................................... 7
3.2 Utilisation des freins ...................................................................................... 7
3.3 Montage ou retrait des accoudoirs ................................................................ 7
3.4 Réglage de l'anti-bascule (lorsque prévu) ..................................................... 8
3.5 Montage ou démontage de la barre de poussée ........................................... 9
3.6 Transfert dans et hors du fauteuil roulant ...................................................... 9
3.7 Déplacements avec le fauteuil roulant ........................................................ 10
4 Entretien ...................................................................................................... 13
4.1 Points d’entretien ........................................................................................ 13
4.2 Instructions d’entretien ................................................................................ 13
4.3 Résolution des problèmes ........................................................................... 14
4.4 Durée de vie attendue ................................................................................. 14
4.5 Réutilisation ................................................................................................ 14
4.6 Mise au rebut .............................................................................................. 14
5 Spécifications techniques .......................................................................... 15

V300 XL
2022-07
Préface
2
EN
FR
NL
Préface
Félicitations ! Vous êtes à présent l’heureux propriétaire d'un fauteuil roulant Vermeiren !
Ce fauteuil roulant a été fabriqué par un personnel qualifié et responsable. Il est conçu et produit
conformément aux normes de qualité élevées, appliquées par Vermeiren.
Merci de la confiance que vous accordez aux produits de Vermeiren. Ce manuel est destiné à
vous aider dans l’utilisation de ce fauteuil roulant et de ses options de fonctionnement. Veuillez
le lire attentivement. Vous pourrez ainsi vous familiariser avec le fonctionnement, les capacités
et les limites de votre fauteuil roulant.
Si vous avez encore des questions après la lecture de ce manuel, n’hésitez pas à prendre contact
avec votre revendeur spécialisé. Il vous aidera volontiers.
Remarque importante
Pour assurer votre sécurité et prolonger la durée de vie de votre produit, prenez-en grand soin et
faites-le contrôler ou entretenir régulièrement.
Ce manuel est le reflet des derniers développements du produit. Vermeiren a le droit d’apporter
des modifications à ce type de produit sans être tenu d'adapter ou de remplacer des produits
similaires fournis précédemment.
Les illustrations du produit sont utilisées afin de clarifier les instructions de ce manuel. Les détails
du produit illustré peuvent diverger de votre produit.
Informations disponibles
Sur notre site Internet http://www.vermeiren.com/, vous trouverez toujours la dernière version
des informations décrites dans le présent manuel. Veuillez consulter régulièrement ce site
Internet pour connaître les éventuelles mises à jour.
Les personnes malvoyantes peuvent télécharger la version électronique de ce manuel et la lire
au moyen d'une application de texte-parole.
Manuel d'utilisation
Pour l'utilisateur et le revendeur spécialisé
Instructions d'installation
Pour le revendeur spécialisé
Manuel d'entretien des fauteuils roulants
Pour le revendeur spécialisé
Déclaration de conformité CE

V300 XL
2022-07
Votre produit
3
EN
FR
NL
1
2
3
4
5
6
8
7
9
1
0
1
1
1
2
1
3
1
4
1
5
1 Votre produit
1. Poignées de poussée
2. Barre de poussée
3. Dossier
4. Manchettes
5. Accoudoirs
6. Siège
7. Repose-pieds
8. Palettes
9. Roues directrices
(roues avant)
10. Freins
11. Roues motrices (roues
arrière)
12. Mains-courantes
13. Monte trottoir
14. Croisillon
15. Plaque d'identification

V300 XL
2022-07
Avant l’utilisation
4
EN
FR
NL
2 Avant l’utilisation
2.1 Usage prévu
Indications et contre-indications: Ce fauteuil roulant est destiné aux utilisateurs qui ont besoin
d'une largeur d'assise supérieure à 50 cm et/ou d'un poids d'utilisateur plus élevé. L'utilisateur
peut lui-même faire avancer le fauteuil roulant ou se faire pousser par une autre personne. Le
fauteuil roulant est destiné aux personnes gériatriques ou personnes qui ont des difficultés à
marcher ou sont dans l'impossibilité de marcher, telles que paralysie, de la perte de membres,
déficience ou malformation de membres, de contractions ou d'affections articulatoires,
insuffisances cardiaques et mauvaise circulation sanguine, troubles de l'équilibre, cachexie
(perte musculaire), … Vous ne devez PAS utiliser ce fauteuil roulant si vous souffrez de
handicaps physiques ou mentaux qui pourraient vous mettre, vous-même ou d’autres
personnes, en danger pendant la conduite. C’est pourquoi vous devez d'abord consulter votre
médecin et vous assurer que votre revendeur spécialisé est informé de cet avis.
Ce fauteuil roulant convient à un usage à l'intérieur et à l’extérieur.
Ce fauteuil roulant est conçu et fabriqué uniquement pour le transport d'une (1) personne d'un
poids maximum de 170 kg. Il n'est pas destiné au transport de marchandises ou d'objets, ni à
tout autre usage que celui décrit précédemment.
Utilisez uniquement des accessoires et des pièces de rechange approuvés par Vermeiren.
Consultez également les détails techniques et les limites de votre fauteuil au chapitre 5.
La garantie sur ce produit est basée sur une utilisation et un entretien normaux, tels que décrits
dans le présent manuel. Les dommages à votre produit dus à un usage inapproprié ou à un
manque d’entretien auront pour effet d’annuler la garantie.
2.2 Instructions générales de sécurité
Risque de blessures ou de dommages
Veuillez
lire et suivre les instructions stipulées dans le présent manuel d'utilisation. Autrement,
vous pourriez vous blesser ou votre fauteuil roulant pourrait être endommagé.
Tenez compte des avertissements généraux suivants pendant l’emploi:
N'utilisez pas votre fauteuil roulant si vous êtes sous l'influence de l’alcool, de médicaments
ou d’autres substances qui peuvent influencer vos capacités de conduite.
N'oubliez pas que certaines parties de votre fauteuil roulant peuvent devenir très chaudes ou
très froides en fonction de la température ambiante, des rayons du soleil ou des dispositifs de
chauffage. Faites donc attention lorsque vous les touchez. Portez des vêtements de protection
s'il fait froid. Lorsque vous sortez, des gants peuvent être utilisés pour améliorer la prise sur
les mains courantes.
Ne modifiez en aucun cas votre fauteuil roulant.
Sachez que votre fauteuil roulant peut interférer avec certains types de systèmes antivol, selon
les paramètres utilisés. Cela peut déclencher l'alarme du magasin.
En cas d'incident grave impliquant votre produit, informez Vermeiren ou votre revendeur
spécialisé ainsi que l'autorité compétente de votre pays.
2.3 Les symboles sur le fauteuil roulant
Poids maximum de l'utilisateur en kg
Usage à l’intérieur/extérieur
ATTENTION

V300 XL
2022-07
Avant l’utilisation
5
EN
FR
NL
Déclivité sûre maximale en ° (degrés).
Indication du type
2.4 Transport
2.4.1 Transport par véhicule, comme bagages
Risque de blessures
N’utilisez PAS votre fauteuil roulant comme siège dans un véhicule, voir symbole
suivant.
Vérifiez que le fauteuil roulant est bien fixé. Vous évitez ainsi des blessures des passagers en
cas de collision ou de freinage brutal.
N'utilisez JAMAIS la même ceinture pour fixer le fauteuil roulant et le passager
.
1. Retirez les repose-pieds, les accoudoirs et les accessoires.
2. Stockez les repose-pieds, les accoudoirs et les accessoires en toute sécurité.
3. Si possible, pliez le fauteuil roulant et retirez les roues arrières.
4. Placez le fauteuil roulant dans le compartiment à bagages.
5. Si le fauteuil roulant n'est PAS séparé de l'habitacle, fixez correctement le châssis du fauteuil
roulant au véhicule. Vous pouvez utiliser les ceintures de sécurité du véhicule.
2.5 Pliage/Dépliage
Risque de blessures
N'insérez pas les doigts entre les éléments du fauteuil roulant.
2.5.1 Dépliage du fauteuil roulant
1. Placez-vous derrière le fauteuil roulant.
2. Utilisez les poignées pour ouvrir le fauteuil roulant autant que possible.
3. Placez-vous à l'avant du fauteuil roulant.
4. Poussez sur les deux tubes de l'assise vers le bas jusqu'à ce qu'ils soient fixés à leur place.
5. Montez la barre de poussée (voir §3.5).
2.5.2 Pliage du fauteuil roulant
1. Retirez la barre de poussée (voir §3.5).
2. Pliez les palettes vers le haut ou démontez les repose-pieds (voir § 3.1).
3. Saisissez l'avant et l'arrière du siège et tirez vers le haut.
2.5.3 Montage des roues arrière
1. Prenez la roue arrière et poussez sur le bouton .
2. Maintenez le bouton enfoncé et montez l'essieu arrière jusqu'à
ce qu'il soit bloqué.
3. Relâchez le bouton.
4. Vérifiez que la roue est bloquée.
2.5.4 Retrait des roues arrière
1. Vérifiez que les freins ne sont pas actionnés.
2. Placez-vous du côté du fauteuil roulant dont vous voulez retirer
la roue.
3. Appuyez sur le bouton au centre du moyeu de roue.
4. Tirez la roue hors du châssis.
AVERTISSEMENT
ATTENTION
1

V300 XL
2022-07
Avant l’utilisation
6
EN
FR
NL
2.6 Entreposage
Assurez
-
vous que votre fauteuil roulant est entreposé dans un environnement sec pour
éviter la formation de moisissure et l’endommagement du rembourrage, voir
également le
chapitre 5.

V300 XL
2022-07
Utilisation de votre fauteuil roulant
7
EN
FR
NL
3 Utilisation de votre fauteuil roulant
Risque de blessures
Lisez d'abord les chapitres précédents et informez-vous
à propos de l'usage visé. N’utilisez
PAS votre fauteuil roulant sans avoir d'abord lu et bien compris toutes les instructions.
En cas de doutes ou de questions, n’hésitez pas à prendre contact avec votre revendeur local,
votre prestataire de soins ou vot
re conseiller technique qui pourra vous aider
.
3.1 Placer ou enlever les repose-pieds
L'installation des repose-pieds se fait de la manière suivante :
1. Mettez les repose-pieds latéralement vers l'extérieur du cadre et
montez les repose-pieds avec l'embout dans le cadre.
2. Tournez le repose-pied vers l'intérieur jusqu'à ce qu'il se bloque
en position.
3. Tournez la palette vers le bas.
Vous devez procéder de la manière suivante pour enlever les
repose-pieds :
1. Tirez sur le levier .
2. Basculez le repose-pied vers l'extérieur du fauteuil roulant
jusqu'à ce qu'il ne soit plus fixé au système de guidage.
3. Tirez le repose-pied hors du logement de tube .
3.2 Utilisation des freins
Risque de blessures
Les freins n'ont pas pour but de ralentir le fauteuil roulant lors de déplacements.
Ne les utilisez
que pour éviter des mouvements non souhaités.
Le fonctionnement du freins à mains ont influencé par l'usure et les salissures des pneus (eau,
huile, boue...). Vérifiez l'état des pneus avant chaque utilisation.
Les freins sont réglables et sont sujets à l'usure. Vérifiez leur
fonctionnement avant chaque
utilisation.
Vérifiez que le fauteuil roulant se trouve sur une surface horizontale plane avant de relâcher
les freins. Ne désactivez jamais les deux freins en même temps
.
Pour actionner les freins :
1. Tirez les leviers des freins vers l'avant jusqu'à ce que vous ressentiez un clic clair.
Pour relâcher les freins:
1. Désactivez d'abord un frein en tirant le levier vers l'arrière.
2. Maintenez avec votre main la main-courante de la roue relâchée.
3. Désactivez l'autre frein en tirant le levier vers l'arrière.
3.3 Montage ou retrait des accoudoirs
Risque de blessures
Laissez les doigts, boucles et vêtements à l'écart du bas du repose-bras.
Les repose-bras du fauteuil roulant peuvent être monté en les instructions suivant.
AVERTISSEMENT
ATTENTION
ATTENTION
1
2

V300 XL
2022-07
Utilisation de votre fauteuil roulant
8
EN
FR
NL
1. Montez le tube arrière de l'accoudoir dans le logement de tube
(1).
2. Vérifiez que le support de bras se met bien en place dans le
mécanisme de verrouillage.
3. Pliez l'accoudoir vers l'avant.
4. Verrouillez le tube avant de l'accoudoir dans le logement de
tube (2).
Pour ouvrir et retirer l'accoudoir:
1. Appuyez sur le levier (3) et tirez l'avant de l'accoudoir vers le
haut.
2. Pliez l'accoudoir vers l'arrière.
3. Pour retirer l'accoudoir, appuyez sur le bouton (4) et tirez l'arrière
du repose-bras hors du logement de tube (1).
3.4 Réglage de l'anti-bascule (lorsque prévu)
Réglez la hauteur de l'anti-bascule en 7 positions de la manière
suivante (portée 120 mm: plages de 20 mm):
1. Détachez un peu le bouton croisillon .
2. Déplacez le tube de l'anti-bascule jusqu'à la hauteur
souhaitée.
3. Serrez le bouton croisillon manuellement.
4. Vérifiez que l'anti-bascule soit fermement fixé.
3
2
1
4
1

V300 XL
2022-07
Utilisation de votre fauteuil roulant
9
EN
FR
NL
3.5 Montage ou démontage de la barre de poussée
Risque de blessures
Assurez-vous que les boutons Ⓐ sont correctement serrés.
Si le fauteuil roulant dispose d'une barre du poussoir, elle doit toujours être montée afin
d'augmenter la stabilité.
Pour monter la barre de poussée:
1. Fixez la barre du poussoir Ⓑ avec le bouton à croisillon Ⓐ sur la poignée de gauche.
2. Tournez la barre du poussoir Ⓑ vers la droite.
3. Fixez le crochet Ⓒ sur la poignée de droite Ⓓ comme indiqué sur le dessin. Utiliser les trous
ou pour ajuster la tension du dossier.
Pour supprimer la barre de poussée:
1. Détachez la vis Ⓐ au niveau de la poignée droite.
2. Enlevez le crochet Ⓒ de la poignée droite Ⓓ.
3.6 Transfert dans et hors du fauteuil roulant
Risque de blessures
Si vous ne pouvez pas réaliser le transfert en toute sécurité, demandez à quelqu'un de vous
aider.
Ne vous levez pas sur les palettes
.
1. Placez le fauteuil roulant aussi près que possible de la
chaise, du canapé ou du lit concerné par le transfert.
2. Vérifiez que les deux freins du fauteuil roulant sont
actionnés.
3. Pliez les palettes vers le haut pour éviter de prendre appui
sur elles.
4. Si le transfert est réalisé sur le côté du fauteuil roulant,
enlevez l'accoudoir de ce côté (voir § 3.3) et incliner le levier
de frein vers le bas.
5. Procédez au transfert vers/depuis le fauteuil roulant.
3.6.1 Position correcte du fauteuil roulant
Recommandations pour une utilisation confortable du fauteuil roulant:
Placez votre dos aussi proche que possible du dossier.
Assurez-vous que vos cuisses soient horizontales. Réglez la longueur des repose-pieds
si nécessaire (voir le manuel d’installation).
AVERTISSEMENT
ATTENTION

V300 XL
2022-07
Utilisation de votre fauteuil roulant
10
EN
FR
NL
3.7 Déplacements avec le fauteuil roulant
Risque de blessures et de dommages
Avant tout usage, assurez-vous que :
o les freins de stationnement fonctionnent correctement.
o les pneus sont en bon état, voir § 4.
Faites attention de ne pas vous coincer les doigts dans les rayons des roues.
Ne tenez pas les poignées avec des mains mouillées.
Faites attention de ne pas vous coincer les mains sur les ma
ins courantes lorsque vous roulez
dans des passages étroits.
Ne roulez PAS sur des pentes, obstacles, marches ou bordures plus larges que la dimension
décrite au § 5.
Lorsque vous vous arrêtez sur une (petite) pente, utilisez vos freins.
Assurez-
vous que les quatre roues touchent le sol lorsque vous montez ou descendez une
pente.
Abordez les pentes aussi lentement que possible.
Restez toujours sur le trottoir lorsque vous roulez sur la voie publique.
Faites attention s’il y a des trous ou des fissures dans la route qui peuvent coincer les roues.
Évitez les pierres et autres objets pouvant bloquer les roues.
Assurez-vous que les palettes repose-pieds ne
touchent pas le sol lorsque vous abordez un
obstacle.
N’utilisez pas votre fauteuil roulant sur un escalier mécanique.
Si disponible, portez votre ceinture de sécurité.
Tenez toujours compte de l’amplitude de la palette repose-pied pour ne pas
blesser les
personnes ou endommager les objets aux alentours.
Si vous n’avez pas suffisamment d’expérience dans la conduite de votre fauteuil roulant,
demandez l’aide d'un accompagnateur. Gardez vos mains à l’écart des roues et laissez vos
pieds sur la palette repose-pieds.
Les escaliers doivent toujours être franchis à l’aide de deux accompagnateurs.
N’essayez jamais d’emprunter des escaliers qui ne sont pas appropriés pour les fauteuils
roulants.
3.7.1 Rouler avec votre fauteuil roulant :
1. Relâchez les freins.
2. Saisissez les deux mains courantes à leur position la plus élevée.
3. Penchez-vous en avant et poussez les mains courantes vers l’avant jusqu’à ce que vos bras
soient tendus.
4. Repassez vos mains vers le haut des mains courantes et répétez le mouvement.
3.7.2 Déplacements en pente
Risque de blessures
Déplacez-vous sur les pentes aussi lentement que possible.
Si votre accompagnateur n'a pas assez de force pour contrôler le fauteuil roulant, actionnez
les freins.
Penchez-vous vers l'avant pour
déplacer votre centre de gravité vers l'avant. Vous gagnerez
ainsi en stabilité
.
ATTENTION
AVERTISSEMENT

V300 XL
2022-07
Utilisation de votre fauteuil roulant
11
EN
FR
NL
1. Si le fauteuil roulant est équipé d'une ceinture de sécurité, utilisez-la.
2. N'essayez pas de franchir des pentes trop difficiles. Les angles de pente
maximum (montée et descente) sont indiqués dans le tableau 1.
3. Demandez à un assistant de vous aider à franchir une pente.
4. Penchez-vous vers l'avant pour déplacer votre centre de gravité vers
l'avant.
3.7.3 Passage de marches ou de bordures de trottoirs
Risque de blessures
Si vous n'êtes pas assez expérimenté avec votre fauteuil roulant, demandez de l'aide à
quelqu'un
.
Descente de marches ou de bordures de trottoirs
Il est possible de descendre de petites bordures de trottoirs en avançant. Assurez-vous que le
support de pied ne touchent pas le sol.
Un utilisateur entraîné peut franchir seul de petites marches ou bordures
de trottoirs :
1. Mettez plus de poids sur les roues arrière pour réduire la pression sur
les roues avant.
2. Franchissez les bordures de trottoirs.
Il est possible de franchir des bordures de trottoirs plus hautes avec un assistant :
1. Demandez à l'assistant d'incliner légèrement le fauteuil roulant vers l'arrière.
2. Franchissez les bordures de trottoirs en roulant sur les roues arrière.
3. Reposez le fauteuil roulant sur ses quatre roues.
Un utilisateur entraîné peut franchir seul des bordures de trottoirs plus hautes. L'idéal est de les
franchir en marche arrière.
1. Tournez le fauteuil roulant, roues arrière face à la bordure de trottoir.
2. Penchez-vous vers l'avant pour déplacer votre centre de gravité vers
l'avant.
3. Reculez près de la bordure de trottoir.
4. Utilisez la main-courante pour contrôler la descente de la bordure de
trottoir.
Montée de marches ou de bordures de trottoirs
Montez des marches ou bordures de trottoirs avec un assistant de la manière suivante :
1. Le support de pied ne doivent pas toucher la bordure de trottoir.
2. Demandez à l'assistant d'incliner légèrement le fauteuil roulant vers
l'arrière, juste assez pour placer les roues avant en haut de la
bordure de trottoir.
3. Penchez-vous vers l'arrière pour déplacer votre centre de gravité
au-dessus de la roue arrière.
4. Placez les roues avant sur la bordure de trottoir.
5. Montez la bordure du trottoir avec les roues arrière du fauteuil
roulant.
AVERTISSEMENT

V300 XL
2022-07
Utilisation de votre fauteuil roulant
12
EN
FR
NL
Franchissez les bordures de trottoirs hautes en marche arrière:
1. Tournez le fauteuil roulant, roues arrière face à la bordure de trottoir.
2. Penchez-vous vers l'arrière et déplacez votre centre de gravité au-dessus de la roue arrière.
3. Demandez à l'assistant de tirer le fauteuil roulant sur la bordure de trottoir.
4. Reprenez votre position normale dans le fauteuil roulant.
Un utilisateur entraîné peut franchir seul des bordures de trottoirs.
1. Roulez jusqu'aux bordures de trottoirs.
2. Assurez-vous que le support de pied ne touchent pas les bordures de
trottoirs.
3. Penchez-vous vers l'arrière pour déplacer votre centre de gravité vers
les roues arrière.
4. Franchissez la bordure de trottoir avec les roues avant.
5. Penchez-vous vers l'avant pour plus de stabilité.
6. Franchissez la bordure de trottoir avec les roues arrière.
3.7.4 Passage d'escaliers
Risque de blessures
Toujours passer des escaliers avec 2 assistants
.
Le passage d'escaliers en restant sur le fauteuil roulant doit toujours se faire dans le respect des
règles suivantes :
1. Un assistant incline légèrement le fauteuil roulant vers l'arrière.
2. Le deuxième assistant attrape l'avant du châssis.
3. Restez calme, évitez les mouvements brusques et gardez les bras à l'intérieur du fauteuil
roulant.
4. Passez les marches sur les roues arrière du fauteuil roulant.
AVERTISSEMENT

V300 XL
2022-07
Entretien
13
EN
FR
NL
4 Entretien
4.1 Points d’entretien
Risque de blessures et de dommages
Les réparations et les remplacements ne peuvent être réalisés que par
des personnes formées,
et seules des pièces de remplacement d'origine de Vermeiren peuvent être utilisées.
La fréquence d'entretien dépend de la fréquence et de l'intensité de l'utilisation. Prenez
contact avec votre commerçant pour convenir d'un rendez-
vous pour une inspection/un
entretien/une réparation.
Le mode d'entretien se trouve sur le site Internet de Vermeiren : www.vermeiren.com.
Avant chaque utilisation
Inspectez les points suivants :
Toutes les pièces : Présentes et sans dommage ni usure.
Toutes les pièces : Propres, voir § 4.2.2.
Roues, dossier, siège, repose-jambes, accoudoirs, palettes repose-pieds : Bien serrés.
État des roues/pneus, voir § 4.2.1.
État des pièces du cadre : Pas de déformation, d'instabilité, de faiblesse ou de connexions
desserrées.
Siège, dossier, manchettes, repose-jambes et appuie-tête (si applicable) : Pas d'usure
excessive (bosses, dommages ou déchirures).
Freins : Non endommagés et fonctionnant.
Contactez votre commerçant spécialisé pour les réparations et les remplacements de pièces
éventuels.
Chaque année ou plus souvent
Faites inspecter et entretenir votre fauteuil roulant par votre revendeur spécialisé au moins une
fois par an, ou plus. La fréquence d’entretien minimale dépend de l’usage et doit être déterminée
de commun accord avec votre commerçant spécialisé.
4.2 Instructions d’entretien
4.2.1 Roues et pneus
Un
fonctionnement correct des freins dépend de l’état des pneus, qui peut changer en
raison de l’usure et de la contamination (eau, huile, boue…).
Éliminez les fils, cheveux, le sable et les fibres de vos roues.
Vérifiez le profil des pneus. Si la profondeur de la sculpture est inférieure à 1 mm, les pneus
doivent être remplacés. Prenez contact avec votre revendeur spécialisé à ce propos.
Gonflez chaque pneu à la pression adéquate (cf. les indications de pression sur les pneus).
4.2.2 Nettoyage
Risque de dommages dus à l'humidité
N'utilisez jamais un tuyau ou un nettoyeur à haute pression pour nettoyer le fauteuil roulant.
Essuyez toutes les parties rigides du fauteuil roulant avec un chiffon humide (pas détrempé).
Si nécessaire, utilisez un savon doux, approprié pour les laques et les synthétiques.
Le rembourrage peut être nettoyé à l’eau tiède additionnée de savon doux. N'utilisez pas de
produits de nettoyage abrasifs.
ATTENTION
ATTENTION

V300 XL
2022-07
Entretien
14
EN
FR
NL
4.2.3 Désinfection
Risque de dommages
La désinfection ne peut être réalisée que par des personnes qualifiées. Renseignez-
vous
auprès de votre revendeur spécialisé à cet égard.
4.3 Résolution des problèmes
Même si vous utilisez votre fauteuil roulant de façon appropriée, les problèmes techniques ne
sont pas exclus. Dans ce cas, contactez votre local revendeur spécialisé.
Risque de blessures et de dommages au fauteuil roulant
Ne réparez JAMAIS votre fauteuil roulant vous-même pour tenter de résoudre le problème.
Les symptômes suivants peuvent indiquer un problème grave. Par conséquent, prenez toujours
contact avec votre revendeur spécialisé si vous détectez l’une des anomalies suivantes :
Bruit anormal ;
Usure inégale sur la sculpture de l’un des pneus ;
Mouvements saccadés ;
Le fauteuil roulant dévie d’un côté ;
Ensembles de roues endommagés ou cassés.
4.4 Durée de vie attendue
La durée de vie moyenne de votre fauteuil roulant est de 5 ans. Selon la fréquence d'utilisation,
les circonstances de conduite et d'entretien, la durée de vie de votre fauteuil roulant augmentera
ou diminuera.
4.5 Réutilisation
Avant chaque réutilisation, faites désinfecter, inspecter et entretenir le fauteuil roulant
conformément aux instructions du §4.1 et du §4.2.
4.6 Mise au rebut
À la fin de sa durée de vie, votre fauteuil roulant doit être évacué conformément à la législation
environnementale locale. Il est recommandé de démonter le fauteuil roulant afin de faciliter le
transport des matériaux recyclables.
ATTENTION
AVERTISSEMENT

V300 XL
2022-07
Spécifications techniques
15
EN
FR
NL
5 Spécifications techniques
Les indications techniques ci-dessous sont valides pour le fauteuil roulant avec ses réglages
standard. En cas d'utilisation d'autres repose-pieds/accoudoirs ou autres accessoires, les valeurs
indiquées sont modifies.
Marque
Verm
eiren
Type
Fauteuil roulant
Modèle
V
3
00
XL
Poids max. du patient
1
7
0 kg
Description
Dimensions minimums
Dimensions maximums
Longueur totale avec repose-pied 1085 mm
Largeur d'assise efficace 530 mm 560 mm 600 mm
Largeur totale (en fonction de la largeur
d'assise)
740 mm 770 mm 810 mm
Longueur plié 1060 mm
Largeur pliée 350 mm
Hauteur plié (en fonction de la hauteur
d'assise)
840 mm 930 mm
Masse totale
21,00 kg
Masse de la partie la plus lourde 13,35 kg
Des masses de pièces qui peuvent être
démontés ou retirées
Repose-pieds : 1,75 kg; Accoudoirs : 1,80 kg;
Roues arrières :
4,05 kg
Stabilité statique en descente 6,5°
Stabilité statique en montée 6,5°
Stabilité statique latérale 18°
Passage d'obstacle 60 mm
Angle du plan d'assise 0° 10°
Profondeur d'assise efficace 490 mm 530 mm
Hauteur de la surface d'assise sur le bord
avant
440 mm 530 mm
Angle du dossier 5°
Hauteur du dossier 400 mm
Distance entre le repose-pied et le siège 400 mm 500 mm
Angle entre la palette et le siège 5° 25°
Angle entre le jambe de repose-pied et le
siège
105°
Angle entre le jambe de repose-pied et la
palette
80°
Distance entre la manchette et le siège 220 mm 240 mm
Emplacement avant des manchettes 410 mm
Diamètre de la main-courante 535 mm
Emplacement horizontal de l'essieu (flèche) 1,27 mm 61,04 mm
Diamètre de braquage minimum 1500 mm
Diamètre des roues arrières PU 22" 24"
Pression des pneus, roues arrière (motrices) Max. 3,5 bar

V300 XL
2022-07
Spécifications techniques
16
EN
FR
NL
Diamètre des roues directrices PU 200 mm
Pression des pneus, roues directrices Max. 2,5 bar
Matériau du cadre Aluminium
Matériau du rembourrage Nylon
Température de stockage et d'utilisation + 5 °C + 41 °C
Humidité de stockage et d'utilisation 30% 70%
Nous
nous réservons le droit d’apporter des modifications techniques.
Tolérance de mesures ± 15 mm / 1,5 kg / 1,5°.

V300 XL
2022-07
Inhoud
1
NL
Inhoud
Inhoud ........................................................................................................................ 1
Voorwoord .................................................................................................................. 2
1 Uw product .................................................................................................... 3
2 Voor gebruik .................................................................................................. 4
2.1 Beoogd gebruik ............................................................................................. 4
2.2 Algemene veiligheidsmaatregelen ................................................................ 4
2.3 Symbolen op de rolstoel ................................................................................ 4
2.4 Transport ....................................................................................................... 5
2.5 Opvouwen/Ontvouwen .................................................................................. 5
2.6 Opslag ........................................................................................................... 6
3 Uw rolstoel gebruiken .................................................................................. 7
3.1 Voetsteunen plaatsen of verwijderen ............................................................ 7
3.2 De remmen bedienen .................................................................................... 7
3.3 De armsteunen plaatsen of verwijderen ........................................................ 7
3.4 De anti-tipping verstellen (indien verstrekt) ................................................... 8
3.5 De duwstang plaatsen of verwijderen ........................................................... 9
3.6 Transfer in en uit de rolstoel .......................................................................... 9
3.7 Rijden met de rolstoel ................................................................................. 10
4 Onderhoud .................................................................................................. 13
4.1 Tijdstippen voor onderhoud ......................................................................... 13
4.2 Onderhoudsinstructies ................................................................................ 13
4.3 Probleemoplossing...................................................................................... 14
4.4 Verwachte levensduur ................................................................................. 14
4.5 Hergebruik .................................................................................................. 14
4.6 Beëindiging van gebruik .............................................................................. 14
5 Technische specificaties ............................................................................ 15

V300 XL
2022-07
Voorwoord
2
NL
Voorwoord
Proficiat! u bent eigenaar van een Vermeiren-rolstoel!
Deze rolstoel werd vervaardigd door gekwalificeerd en toegewijd personeel. Hij werd ontworpen
en geproduceerd volgens hoge kwaliteitsnormen, bewaakt door Vermeiren.
Bedankt voor uw vertrouwen in de producten van Vermeiren. Om u te ondersteunen bij het
gebruik van deze rolstoel en zijn bedieningsmogelijkheden, bieden we u deze handleiding aan.
Lees deze informatie zorgvuldig door: het zal u helpen om vertrouwd te raken met de besturing,
mogelijkheden en beperkingen van uw rolstoel.
Indien u na het lezen van deze handleiding nog vragen heeft, aarzel dan niet om contact op te
nemen met uw vakhandelaar. Hij/Zij zal u met plezier verder helpen.
Belangrijke opmerking
Om uw veiligheid te garanderen, en om de levensduur van uw product te verlengen, raden we u
aan om er goed zorg voor te dragen en om regelmatig nazicht en onderhoud te laten uitvoeren.
Deze handleiding houdt rekening met de recentste productontwikkelingen. De Firma Vermeiren
behoudt zich het recht voor om wijzigingen aan dit type product door te voeren zonder verplicht
te zijn om voordien geleverde producten aan te passen of te vervangen.
Afbeeldingen van het product worden gebruikt om de instructies in deze handleiding te
verduidelijken. Details van het afgebeelde product kunnen afwijken van uw aangekochte product.
Beschikbare informatie
Op onze website http://www.vermeiren.com/ kan u steeds de meest recente versie terugvinden
van de informatie in deze handleiding. Contacteer deze website regelmatig voor mogelijke
updates.
Mensen met een visuele beperking kunnen de elektronische versie van deze handleiding
downloaden en laten voorlezen door een tekst-naar-spraak programma.
Gebruiksaanwijzing Voor de gebruiker en vakhandelaar
Installatiehandleiding Voor de vakhandelaar
Onderhoudshandleiding voor rolstoelen Voor de vakhandelaar
EC-conformiteitsverklaring

V300 XL
2022-07
Uw product
3
NL
1
2
3
4
5
6
8
7
9
1
0
1
1
1
2
1
3
1
4
1
5
1 Uw product
1. Handgrepen
2. Duwstang
3. Rug
4. Armleggers
5. Armsteunen
6. Zit
7. Voetsteunen
8. Voetplaten
9. Stuurwielen (voorwielen)
10. Remmen
11. Aandrijfwielen
(achterwielen)
12. Aandrijfhoepels
13. Trapdop
14. Kruis
15. Identificatieplaat

V300 XL
2022-07
Voor gebruik
4
NL
2 Voor gebruik
2.1 Beoogd gebruik
Indicaties en contra-indicaties: Deze rolstoel is bedoeld voor gebruikers die nood hebben aan
een zitbreedte groter dan 50cm en/of een hoger gebruikersgewicht. De gebruiker kan de
rolstoel zelf voortbewegen of laten duwen door een begeleider. De rolstoel is bedoeld voor
oudere personen of mensen die moeilijk of niet kunnen lopen, onder andere door verlamming,
verlies van ledematen, defect of aandoeningen van ledematen, contracturen of
gewrichtsaandoeningen, hart- en bloedsomloopinsufficiëntie, evenwichtsstoornissen ,
cachexie (afname van het spierweefsel), … Gebruik deze rolstoel NIET indien u lijdt aan
psychische of mentale beperkingen waardoor u uzelf of andere mensen in gevaar kan brengen
bij het rijden. Consulteer daarom eerst uw dokter, en informeer uw vakhandelaar over zijn/haar
advies.
Deze rolstoel is geschikt voor gebruik binnen en buiten.
Deze rolstoel is uitsluitend ontworpen voor het vervoer/transfer van één (1) persoon met een
maximumgewicht van 170 kg. Het is niet bedoeld om goederen of objecten te vervoeren, noch
voor enig ander gebruik dan hiervoor beschreven.
Gebruik enkel accessoires en reserveonderdelen die werden goedgekeurd door Vermeiren.
Lees eerst alle technische details en limieten van uw rolstoel in hoofdstuk 5.
De garantie op dit product is gebaseerd op normaal gebruik en onderhoud zoals beschreven
in deze handleiding. De garantie vervalt bij schade die werd veroorzaakt door verkeerd gebruik
of gebrek aan onderhoud.
2.2 Algemene veiligheidsmaatregelen
Gevaar voor letsel en/of beschadiging
Lees de instructies in deze handleiding en volg ze
nauwkeurig op. Zo niet, kan dit leiden tot
lichamelijk letsel of beschadiging aan uw rolstoel.
Houd rekening met de volgende algemene waarschuwingen tijdens het gebruik:
Gebruik de rolstoel niet indien u onder invloed bent van alcohol, medicijnen of andere
substanties die uw rijvermogen verminderen.
Houd er rekening mee dat sommige onderdelen van uw rolstoel zeer warm of koud kunnen
worden door omgevingstemperatuur, de zon of verwarmingstoestellen. Wees daarom
voorzichtig bij het aanraken. Draag beschermende kleding bij koud weer. Bij buitengebruik
kunnen rijhandschoenen de grip op de aandrijfhoepels verbeteren.
Wijzig uw rolstoel op geen enkele manier.
Houd er rekening mee dat uw rolstoel, afhankelijk van de gebruikte instelling, bij sommige
diefstalsystemen interferentie kan geven. Hierdoor kan het winkelalarm in werking gesteld
worden.
Indien zich een ernstig incident heeft voorgedaan met uw product, breng dan Vermeiren of uw
gespecialiseerde dealer op de hoogte, evenals de bevoegde autoriteit in uw land.
2.3 Symbolen op de rolstoel
Maximum gewicht van de gebruiker in kg
Gebruik voor binnen en buiten
Maximale veilige helling in ° (graden)
VOORZICHTIG

V300 XL
2022-07
Voor gebruik
5
NL
Type aanduiding
2.4 Transport
2.4.1 Transport in een voertuig, als bagage
Gevaar voor letsel
Gebruik de rolstoel NIET als zit in een voertuig, zie het symbool.
Zorg ervoor dat de rolstoel voldoende vastgemaakt is, om verwonding van de
inzittenden tijdens aanrijding of plots remmen te voorkomen.
Gebruik voor het vastmaken van de rolstoel en de passagiers NOOIT dezelfde gordel
.
1. Verwijder de voetsteunen, armsteunen en accessoires.
2. Berg de voetsteunen, armsteunen en accessoires veilig op.
3. Indien mogelijk, vouw de rolstoel op en verwijder de achterwielen.
4. Plaats de rolstoel in de bagageruimte.
5. Indien de rolstoel en de passagiersruimte NIET gescheiden zijn, sjor het frame van de rolstoel
goed vast aan het voertuig. U kunt hiervoor gebruik maken van de veiligheidsgordels die in het
voertuig voorhanden zijn.
2.5 Opvouwen/Ontvouwen
Gevaar voor letsel
Houd uw vingers weg van de bewegende onderdelen van de rolstoel.
2.5.1 De rolstoel ontvouwen
1. Ga aan de achterzijde van de rolstoel staan.
2. Gebruik de handgrepen om de rolstoel zo ver mogelijk te openen.
3. Ga aan de voorzijde van de rolstoel staan.
4. Duw beide buizen waaraan de zit bevestigd is verder naar beneden.
5. Monteer de duwstang (zie §3.5).
2.5.2 De rolstoel opvouwen
1. Verwijder de duwstang (zie §3.5).
2. Klap de voetplaten omhoog, of verwijder de voetsteunen (zie § 3.1).
3. Neem de zit aan de voor- en achterzijde vast en trek deze naar boven.
2.5.3 De achterwielen monteren
1. Neem het achterwiel en druk naafknop in.
2. Houd de naafknop ingedrukt en plaats het achterwiel in de asbus
tot deze niet meer verder kan.
3. Laat de naafknop los.
4. Kijk na of het wiel goed vastzit.
2.5.4 De achterwielen demonteren
1. Zorg ervoor dat de remmen afstaan.
2. Neem de rolstoel vast aan het frame aan de zijde waar u het
wiel wil afnemen.
3. Druk op de knop in het midden van de naaf van het wiel.
4. Trek het wiel van het frame weg.
WAARSCHUWING
VOORZICHTIG
1

V300 XL
2022-07
Voor gebruik
6
NL
2.6 Opslag
Zorg ervoor dat uw rolstoel droog wordt bewaard om schimmel of schade aan de bekleding
te voorkomen, zie hoofdstuk 5.

V300 XL
2022-07
Uw rolstoel gebruiken
7
NL
3 Uw rolstoel gebruiken
Gevaar voor letsel
Lees eerst de voorgaande hoofdstukken en informeer uzelf over het beoogde gebruik. Gebruik
uw rolstoel NIET voordat u alle instructies gelezen en begrepen heeft.
Als u nog vragen heeft of als u ergens aan twijfelt, aarzel dan niet om contact op te nemen m
et
uw lokale vakhandelaar, zorgverlener, of technisch adviseur om u te helpen
.
3.1 Voetsteunen plaatsen of verwijderen
Het plaatsen van de voetsteunen gaat als volgt:
1. Houd de voetsteun zijdelings aan de buitenkant van het frame
van de rolstoel en monteer de voetsteun met de dop (1) in het
frame.
2. Zwenk de voetsteun naar binnen tot deze vastklikt.
3. Vouw de voetplaat naar beneden.
Om de voetsteunen te verwijderen gaat u als volgt te werk:
1. Trek aan de hendel (2).
2. Draai de voetsteun naar buiten tot deze uit de geleiding komt.
3. Trek de voetsteun omhoog uit dop (1).
3.2 De remmen bedienen
Gevaar voor letsel
De remmen dienen niet om af te remmen
tijdens het rijden. Gebruik de rem enkel om te
vermijden dat de rolstoel in stilstaande positie wegrolt.
De werking van de handremmen worden beïnvloed door slijtage en vervuiling van de banden
(water, olie, slijk, ...). Controleer voor elk gebruik de staat van de banden.
De remmen zijn instelbaar en kunnen verouderen. Controleer voor elk gebruik de goede
werking van de remmen.
Zorg ervoor dat alvorens de remmen los te zetten, de rolstoel vlak staat. Los nooit beide
remmen tegelijk
.
Om de remmen in te schakelen:
1. Trek de remhendels naar voren tot u een duidelijke klik voelt.
Om de remmen los te zetten:
1. Zet eerst één rem los door de hendel naar achteren te trekken.
2. Houd het ongeremde wiel, met uw hand, vast aan de grijphoepel.
3. Los de andere rem door de hendel naar achteren te trekken.
3.3 De armsteunen plaatsen of verwijderen
Gevaar voor letsel
Houdt vingers, gespen en kledingstukken weg van de onderkant van de armsteun.
De armsteunen van de rolstoel kunnen worden gemonteerd met volgende instructies.
WAARSCHUWING
VOORZICHTIG
VOORZICHTIG
1
2

V300 XL
2022-07
Uw rolstoel gebruiken
8
NL
1. Plaats de achterzijde van de armsteun in dop (1).
2. Zorg ervoor dat de armsteun vastklikt in het systeem.
3. Kantel de armsteun naar voor.
4. Plaats de voorzijde van de armsteun in dop (2) tot deze
vastklikt.
Om de armsteun te openen en af te nemen:
1. Druk op knop (3) en trek de voorzijde van de armsteun omhoog.
2. Klap de armsteun naar achter.
3. Als u de armsteun wilt verwijderen, druk dan op knop (4) en trek
de achterzijde van de armsteun uit dop (1).
3.4 De anti-tipping verstellen (indien verstrekt)
Verstel de hoogte van de anti-tipping in 7 posities als volgt (bereik
120 mm: stappen van 20 mm):
1. Draai de sterknop (1) een beetje los.
2. Beweeg de buis van de anti-tipping in de gewenste hoogte.
3. Draai de sterknop (1) handvast aan.
4. Controleer dat de anti-tipping goed is vastgemaakt.
3
2
1
4
1

V300 XL
2022-07
Uw rolstoel gebruiken
9
NL
3.5 De duwstang plaatsen of verwijderen
Gevaar voor letsel
Zorg ervoor dat de knoppen Ⓐ terug goed zijn vastgemaakt.
Als de rolstoel over een duwstang beschikt, dient deze altijd gemonteerd te zijn ter verhoging
van de stabiliteit.
Om de duwstang te monteren:
1. Monteer de duwstang Ⓑ in de linkse handgreep met behulp van de sterknop Ⓐ .
2. Draai de duwstang Ⓑ naar de rechterkant.
3. Monteer de haak Ⓒ over de rechte handgreep Ⓓ zoals aangegeven in de figuur. Gebruik
de boringen of om de spanning van de rug in te stellen.
Om de duwstang te verwijderen:
1. Maak de sterknop Ⓐ aan de rechtse handgreep los.
2. Verwijder de haak Ⓒ van de rechtse handgreep Ⓓ.
3.6 Transfer in en uit de rolstoel
Gevaar voor letsel
Indien u de transfer niet veilig op eigen kracht kan uitvoeren, vraag dan hulp van
iemand
anders.
Niet op de voetplaten gaan staan
.
1. Plaats de rolstoel zo dicht mogelijk bij de stoel, zetel of bed
van/naar waar u zich wilt verplaatsen.
2. Zorg dat beide remmen van de rolstoel aan staan.
3. Vouw de voetplaten naar boven zodat u er niet op gaat
staan.
4. Indien u zich langs de zijkant in of uit de rolstoel wilt
verplaatsen, verwijder dan de armsteun aan die zijde (zie
§ 3.3) en kantel de remhendel naar beneden.
5. Verplaats u van of naar de rolstoel.
3.6.1 Correcte positie in de rolstoel
Enkele aanbevelingen om comfortabel van uw rolstoel gebruik te maken:
Plaats uw zitvlak zo dicht mogelijk bij de rug.
Zorg dat uw bovenbenen horizontaal zijn. Stel eventueel de lengte van de voetsteunen bij
(zie installatiehandleiding).
WAARSCHUWING
VOORZICHTIG

V300 XL
2022-07
Uw rolstoel gebruiken
10
NL
3.7 Rijden met de rolstoel
Gevaar voor letsel of beschadiging
Voor gebruik, zorg ervoor dat:
o de parkeerremmen goed werken.
o de remmen in goede staat zijn, hoofdstuk 4.
Vermijd dat uw vingers gekneld raken tussen de wielspaken.
Bedien de aandrijfhoepels niet met natte handen.
Vermijd dat uw handen gekneld raken tussen de aandrijfhoepels wanneer u door smalle
doorgangen rijdt.
Rijd NIET op hellingen, hindernissen, treden of stoepranden die groter zijn dan beschreven in
hoofdstuk 5.
Wanneer u stopt op een (kleine) helling, gebruik dan de remmen.
Zorg ervoor dat alle vier wielen de grond raken wanneer u op of af een helling rijdt.
Neem hellingen zo traag mogelijk.
Blijf altijd op het voetpad wanneer u op de openbare weg rijdt.
Pas op als de weg gaten of spleten heeft waardoor de wielen kunnen vastlopen.
Vermijd stenen en andere objecten die de wielen kunnen blokkeren.
Zorg ervoor dat de voetplaten de grond niet raken bij het nemen van een obstakel.
Gebruik uw rolstoel niet op roltrappen.
Indien beschikbaar, bevestig uw veiligheidsgordel.
Houd steeds rekening met de draaicirkel van de voetplaat om te voorkomen dat voorbijgangers
verwond raken, of dat objecten beschadigd raken.
Indien u niet voldoende ervaring heeft om met uw rolstoel te rijden, vraag dan hulp aan een
begeleider. Houd dan uw armen uit de buurt van de wielen, en uw voeten op de voetplaat.
Trappen mogen enkel genomen worden met behulp van twee begeleiders.
Neem geen trappen die ongepast zijn voor rolstoelen.
3.7.1 Rijden met uw rolstoel:
1. Zet de remmen los.
2. Neem de aandrijfhoepels aan de bovenzijde vast.
3. Leun voorwaarts en duw de hoepels naar voor tot uw armen gestrekt zijn.
4. Neem de aandrijfhoepels weer aan de bovenzijde vast en herhaal de beweging.
3.7.2 Rijden op hellingen
Gevaar voor letsel
Neem hellingen steeds met de laagst mogelijke snelheid.
Blokkeer de rem van zodra u merkt dat uw begeleider onvoldoende kracht heeft om
de rolstoel
onder controle te houden.
Leun voorover om uw zwaartepunt naar voor te verplaatsen. Zo kan de stabiliteit beter
behouden blijven
.
1. Bevestig de veiligheidsgordel, als de rolstoel hiermee uitgerust is.
2. Neem geen te steile helling. De maximale hoek bergop en bergaf staat
in tabel 1.
3. Vraag een begeleider om u te helpen de helling te nemen.
4. Buig lichtjes voorover om uw zwaartepunt naar voren te verplaatsen.
VOORZICHTIG
WAARSCHUWING

V300 XL
2022-07
Uw rolstoel gebruiken
11
NL
3.7.3 Nemen van hindernissen (trottoirs)
Gevaar voor letsel
Indien u uw
rolstoel onvoldoende beheerst, vraag hulp van een begeleider
.
Afrijden van trottoirs
Het afrijden van een laag trottoir kan voorwaarts gedaan worden. Let hierbij op dat de voetbeugel
de grond niet raakt.
Het afrijden van lage trottoirs kan door een geoefend gebruiker zelf
gedaan worden:
1. Breng de balans op de achterwielen om de druk op de voorwielen te
verminderen.
2. Neem de hindernis.
Hogere trottoirs kunnen met een begeleider voorwaarts genomen worden:
1. Laat de begeleider de rolstoel lichtjes naar achter kantelen.
2. Rijd op de achterwielen het trottoir af.
3. Zet de rolstoel terug op de vier wielen.
Een geoefend gebruiker kan een hoger trottoir zelf afrijden. Dit kan best achterwaarts gedaan
worden.
1. Draai u met de achterwielen naar het trottoir toe.
2. Leun voorover om het zwaartepunt naar de voorkant van de rolstoel
te verplaatsen.
3. Breng de rolstoel naar de rand van de hindernis .
4. Gebruik de hoepels om uw rolstoel gecontroleerd van het trottoir af te
rollen.
Oprijden van trottoirs
Trottoirs oprijden kan met begeleider als volgt:
1. Zorg er voor dat de voetbeugel het trottoir niet raakt.
2. Laat de begeleider de rolstoel lichtjes achterover kantelen tot er
voldoende ruimte onder de voorwielen is om de hindernis te nemen.
3. Leun hierbij een beetje achterover om het zwaartepunt boven de
achterwielen te houden.
4. Plaats de voorwielen op het trottoir.
5. Laat de rolstoel op de achterwielen over de hindernis duwen.
Een hoger trottoir kan best achterwaarts genomen worden:
1. Draai de rolstoel met de achterwielen naar het trottoir toe.
2. Leun een beetje achterover en breng het zwaartepunt boven de achterwielen.
3. Laat de begeleider de rolstoel op het trottoir trekken.
4. Neem uw normale positie in de rolstoel terug aan.
WAARSCHUWING

V300 XL
2022-07
Uw rolstoel gebruiken
12
NL
Het oprijden van trottoirs kan door een geoefend gebruiker zelf gedaan worden:
1. Rijd tot aan het trottoir.
2. Zorg ervoor dat de voetbeugel het trottoir niet raakt.
3. Leun achterover zodat U op de achterwielen balanceert.
4. Rol al balancerend de voorwielen over het trottoir
5. Leun voorover om meer stabiliteit te hebben.
6. Rol de achterwielen over de hindernis.
3.7.4 Nemen van trappen
Gevaar voor letsel
Voor het nemen van trappen zijn altijd 2 begeleiders nodig
.
Het nemen van trappen terwijl u in de rolstoel zit doet u als volgt.
1. Laat één begeleider de rolstoel lichtjes naar achteren kantelen.
2. De andere begeleider neemt het frame aan de voorzijde vast.
3. Blijf rustig zitten, vermijd plotselinge bewegingen en houd uw armen binnen de rolstoel.
4. Laat de rolstoel op de achterwielen de treden nemen.
WAARSCHUWING

V300 XL
2022-07
Onderhoud
13
NL
4 Onderhoud
4.1 Tijdstippen voor onderhoud
Gevaar voor letsel of beschadiging
Reparaties en vervangingen mogen enkel uitgevoerd worden door opgeleid personeel, en enkel
originele onderdelen van Vermeiren mogen hierbij gebruikt worden.
De onderhoudsfrequentie hangt af van de frequentie en intensiteit van gebruik. Neem
contact op met uw vakhandelaar om een tijdschema vast te leggen voor
nazicht/onderhoud/reparatie.
Voor de onderhoudshandleiding kan u de website van Vermeiren raadplegen:
www.vermeiren.com.
Voor ieder gebruik
Kijk de volgende punten na:
Alle onderdelen: aanwezig en niet beschadigd of versleten.
Alle onderdelen: schoon, zie § 4.2.2
Wielen, rugsteun, zit, kuitsteunen, armsteunen, voetplaten: stevig bevestigd.
Staat van de wielen, zie §4.2.1
Staat van de frameonderdelen: geen vervorming, instabiliteit, zwakte of losse
verbindingen.
Zit, rugsteun, armleggers, kuitsteunen en hoofdsteun (indien van toepassing): geen
overmatige slijtage (bijv. gedeukte plekken, schade of scheuren).
Remmen: onbeschadigd en werkend
Contacteer uw vakhandelaar voor eventuele reparaties of vervanging van onderdelen.
Jaarlijks of vaker
Laat uw rolstoel nakijken en onderhouden door uw vakhandelaar, ten minste één keer per jaar of
vaker. De minimale onderhoudsfrequentie is afhankelijk van het gebruik en moet daarom
besproken worden met uw vakhandelaar.
4.2 Onderhoudsinstructies
4.2.1 Wielen en banden
De goede
werking van de remmen hangt af van de staat van de banden, die onderhevig
zijn aan slijtage en verontreiniging (water, olie, modder,...).
Houd de wielen vrij van draden, haar, zand en vezels.
Kijk het profiel van de banden na. Als de profieldiepte minder dan 1 mm bedraagt, moeten de
banden vervangen worden. Contacteer hiervoor uw vakhandelaar.
Pomp de banden op volgens de correcte spanning (zie drukindicatie op de banden).
4.2.2 Schoonmaak
Gevaar voor beschadiging door vocht
Gebruik nooit een tuinslang of hogedrukreiniger om de rolstoel schoon te maken.
Veeg alle harde onderdelen van de rolstoel schoon met een vochtig doek (niet doorweekt).
Indien nodig, gebruik een milde zeep die geschikt is voor vernis en synthetische materialen.
De bekleding kan schoon worden gemaakt met lauw water en een milde zeep. Gebruik geen
agressieve schoonmaakmiddelen.
VOORZICHTIG
VOORZICHTIG

V300 XL
2022-07
Onderhoud
14
NL
4.2.3 Ontsmetting
Gevaar voor beschadiging
Ontsmetting mag enkel worden uitgevoerd door getraind personeel. Neem contact op met uw
vakhandelaar.
4.3 Probleemoplossing
Ook wanneer u de rolstoel correct gebruikt, is het toch mogelijk dat er een technisch probleem
optreedt. Neem in dat geval contact op met uw vakhandelaar.
Gevaar voor letsel of beschadiging aan de rolstoel
Probeer NOOIT zelf uw rolstoel te
repareren.
De volgende tekenen kunnen wijzen op een ernstig probleem. Neem daarom steeds contact op
met uw vakhandelaar als u een van de volgende afwijkingen opmerkt:
Vreemde geluiden;
Oneven bandenslijtage op een van de banden;
Schokkerige bewegingen;
De rolstoel buigt af naar één kant;
Beschadigde of kapotte wielmontages.
4.4 Verwachte levensduur
De gemiddelde levensduur van uw rolstoel is 5 jaar. De levensduur zal toenemen of afnemen
afhankelijk van de gebruiksfrequentie, rijomstandigheden en onderhoud.
4.5 Hergebruik
Voor ieder hergebruik moet de rolstoel ontsmet, geïnspecteerd en onderhouden worden volgens
de instructies in §4.1 en §4.2.
4.6 Beëindiging van gebruik
Op het einde van de levensduur moet u de rolstoel vernietigen volgens de lokale milieuwetgeving.
De beste manier om dit te doen, is de rolstoel te demonteren om het vervoer van de recycleerbare
onderdelen te vergemakkelijken.
VOORZICHTIG
WAARSCHUWING

V300 XL
2022-07
Technische specificaties
15
NL
5 Technische specificaties
Onderstaande technische gegevens zijn geldig voor de rolstoel in standaard instellingen.
Wanneer er andere voetsteunen / armsteunen of andere accessoires worden gebruikt, worden
de opgegeven waarden gewijzigd.
Merk
Vermeiren
Type
Manuele rolstoel
Model
V
3
00
XL
Maximale massa gebruiker
1
7
0 kg
Beschrijving
Minimale afmetingen
Maximale afmetingen
Totale lengte inclusief voetsteun 1085 mm
Effectieve zitbreedte 530 mm 560 mm 600 mm
Totale breedte (afhankelijk van de zitbreedte)
740 mm 770 mm 810 mm
Lengte dichtgevouwen 1060 mm
Breedte dichtgevouwen 350 mm
Opgevouwen hoogte (afhankelijk van de
zithoogte)
840 mm 930 mm
Totaal gewicht 21,00 kg
Gewicht zwaarste onderdeel 13,35 kg
Massa van afneembare onderdelen Voetsteunen: 1,75 kg; Armsteunen: 1,80 kg;
Achterwielen:
4,05 kg
Statische stabiliteit bergaf 6,5°
Statische stabiliteit bergop 6,5°
Statische stabiliteit zijwaarts 18°
Maximum hoogte hindernis 60 mm
Zithoek 0° 10°
Effectieve zitdiepte 490 mm 530 mm
Zithoogte aan voorzijde 440 mm 530 mm
Rughoek 5°
Rughoogte 400 mm
Afstand tussen zit en voetsteun 400 mm 500 mm
Hoek tussen zit en voetplaat 5° 25°
Hoek tussen zit en been voetsteun 105°
Hoek tussen been voetsteun en voetplaat 80°
Afstand tussen armlegger en zit 220 mm 240 mm
Afstand voorzijde armlegger 410 mm
Diameter aandrijfhoepel 535 mm
Horizontale afstand van de as (uitwijking) 1,27 mm 61,04 mm
Minimale draaicirkel 1500 mm
Diameter PU achterwielen 22" 24"
Bandendruk, achter (aandrijf)wielen Max. 3,5 bar
Diameter PU stuurwielen 200 mm
Bandendruk, stuurwielen Max. 2,5 bar
Materiaal frame Aluminium

V300 XL
2022-07
Technische specificaties
16
NL
Materiaal bekleding Nylon
Opslag en gebruikstemperatuur + 5 °C + 41 °C
Opslag en gebruiksluchtvochtigheid 30% 70%
We behouden ons het recht voor om technische wijzigingen te introduceren.
Meettolerantie ± 15 mm / 1,5 kg / 1,5°

V300 XL
2022-07
Inhalt
1
EN
NL
DE
Inhalt
Inhalt ........................................................................................................................ 1
Vorwort ....................................................................................................................... 2
1 Ihr Produkt ..................................................................................................... 3
2 Vor der Benutzung ........................................................................................ 4
2.1 Bestimmungsgemäße Verwendung .............................................................. 4
2.2 Allgemeine Sicherheitshinweise .................................................................... 4
2.3 Symbole am Rollstuhl ................................................................................... 4
2.4 Transport ....................................................................................................... 5
2.5 Falten / Entfalten ........................................................................................... 5
2.6 Lagerung ....................................................................................................... 6
3 Benutzung des Rollstuhls ............................................................................ 7
3.1 An- oder Abbauen der Fußauflagen ............................................................. 7
3.2 Betätigen der Bremsen ................................................................................. 7
3.3 An-/Abbauender Armlehnen .......................................................................... 7
3.4 Verstellung Kippschutz (wenn vorhanden) .................................................... 8
3.5 Mounting or removing the push bar............................................................... 9
3.6 Setzen in den Rollstuhl ................................................................................. 9
3.7 Fahren mit dem Rollstuhl ............................................................................ 10
4 Wartung ....................................................................................................... 13
4.1 Wartungspunkte .......................................................................................... 13
4.2 Wartungshinweise ....................................................................................... 13
4.3 Störungsbeseitigung ................................................................................... 14
4.4 Voraussichtliche Nutzungsdauer ................................................................. 14
4.5 Wiederbenutzung ........................................................................................ 14
4.6 Nutzungsende ............................................................................................. 14
5 Technische Daten ....................................................................................... 15

V300 XL
2022-07
Inhalt
2
EN
NL
DE
Vorwort
Herzlichen Glückwunsch! Sie sind nun Besitzer eines Vermeiren-Rollstuhls!
Dieser Rollstuhl wurde von versierten und engagierten Mitarbeitern gefertigt. Es entspricht
hinsichtlich Konstruktion und Fertigung den hohen Qualitätsstandards von Vermeiren.
Vielen Dank für Ihr Vertrauen in Produkte von Vermeiren. Dieses Handbuch soll Ihnen bei der
Benutzung dieses Rollstuhls und seiner Bedienmöglichkeiten helfen. Lesen Sie es daher bitte
aufmerksam durch, um sich mit der Bedienung, den Fähigkeiten und Beschränkungen Ihres
Rollstuhls vertraut zu machen.
Sollten Sie nach der Lektüre dieses Handbuchs noch Fragen haben, können Sie sich jederzeit
an Ihren Fachhändler wenden. Er wird Ihnen gerne in dieser Angelegenheit weiterhelfen.
Wichtiger Hinweis
Um Ihre Sicherheit zu gewährleisten und die Nutzungsdauer Ihres Produkts zu verlängern, sollten
Sie es gut behandeln und regelmäßig überprüfen und/oder warten lassen.
Dieses Handbuch enthält die neuesten Produktentwicklungen. Vermeiren behält sich das Recht
vor, Veränderungen an dieser Art von Produkt vorzunehmen, ohne eine Verpflichtung
einzugehen, ähnliche bereits ausgelieferte Produkte anzupassen oder auszutauschen.
Abbildungen des Produkts dienen zur Verdeutlichung der Anweisungen in diesem Handbuch.
Das gezeigte Produkt kann in Details von Ihrem Produkt abweichen.
Verfügbare Informationen
Auf unserer Webseite http://www.vermeiren.com/ finden Sie stets die aktuellste Version der in
diesem Handbuch beschriebenen Informationen. Informieren Sie sich bitte regelmäßig auf dieser
Website nach eventuell verfügbaren Aktualisierungen.
Sehbehinderte Menschen können sich die elektronische Version dieses Handbuchs
herunterladen und mit Hilfe einer Sprachsyntheselösung („Text-to-Speech-Software“) vorlesen
lassen.
Benutzerhandbuch Für Anwender und Fachhändler
Installationsanweisungen Für Fachhändler
Servicehandbuch für Rollstühle Für Fachhändler
EG-Konformitätserklärung

V300 XL
2022-07
Inhalt
3
EN
NL
DE
1
2
3
4
5
6
8
7
9
1
0
1
1
1
2
1
3
1
4
1
5
1 Ihr Produkt
1. Handgriffe
2. Schiebestange
3. Rücken
4. Armpolster
5. Armlehnen
6. Sitz
7. Fußauflagen
8. Fußplatte
9. Lenkräder
(Vorderräder)
10. Bremsen
11. Antriebsräder
(Hinterräder)
12. Greifreifen
13. Kipphilfe
14. Schere
15. Typenschild

V300 XL
2022-07
Inhalt
4
EN
NL
DE
2 Vor der Benutzung
2.1 Bestimmungsgemäße Verwendung
Indikationen und Kontraindikationen: Dieser Rollstuhl ist für Benutzer gedacht, die eine
größere Sitzbreite als 50 cm und/oder ein höheres Benutzergewicht benötigen. Der
Rollstuhlfahrer kann den Rollstuhl entweder selbst antreiben oder von einer zweiten Person
geschoben werden. Der Rollstuhl ist ausschließlich für den Transport von ältere Menschen
oder gehbehinderten oder gehunfähigen Menschen vorgesehen, wie z.B. Lähmungen,
Gliedmaßenverlust, Gliedmaßendefekt oder -deformation, Gelenkkontrakturen oder -schäden,
Herzkrankheiten oder schwachem Blutkreislauf, Gleichgewichtsstörungen, Kachexie
(Muskelschwund), … Sie dürfen diesen Rollstuhl NICHT benutzen, wenn Sie unter seelischen
oder körperlichen Beeinträchtigungen leiden, die Sie oder andere Personen beim Fahren des
Rollstuhls in Gefahr bringen könnten. Suchen Sie daher bitte zunächst Ihren Arzt auf und
stellen Sie sicher, dass Ihr Fachhändler über dessen Rat informiert ist.
Dieser Rollstuhl ist für den Innen- und Außenbereich geeignet.
Er ist ausschließlich dafür konzipiert und gefertigt, eine (1) Person mit einem Gewicht von
maximal 170 kg zu transportieren. Er ist nicht dafür vorgesehen, Sachen oder Objekte zu
transportieren oder zu anderen Zwecken als zuvor beschrieben benutzt zu werden.
Verwenden Sie ausschließlich von Vermeiren genehmigte Zubehör- oder Ersatzteile.
Sehen Sie sich auch die technischen Daten und die Einschränkungen Ihres Rollstuhls in
Abschnitt 5 an.
Die Garantie für dieses Produkt beruht auf dessen normaler Benutzung und Wartung wie in
diesem Handbuch beschrieben. Schäden an Ihrem Produkt, die auf unsachgemäße Benutzung
oder mangelnde Wartung zurückzuführen sind, führen zum Erlöschen der Garantie.
2.2 Allgemeine Sicherheitshinweise
Gefahr von Personen- und/oder Sachschäden
Bitte lesen und befolgen Sie die Anweisungen in dieser Bedienungsanleitung, da andernfalls
Verletzungsgefahr besteht oder Ihr
Rollstuhl beschädigt werden könnte.
Beachten Sie bei der Benutzung die folgenden allgemeinen Warnhinweise:
Benutzen Sie Ihren Rollstuhl nicht, wenn Sie unter dem Einfluss von Alkohol, Medikamenten
oder anderen Substanzen stehen, die Ihre Fahrtüchtigkeit beeinträchtigen könnten.
Beachten Sie, dass bestimmte Teile dieses Rollstuhls infolge der Umgebungstemperatur,
Sonneneinstrahlung, Heizkörpern usw. sehr warm oder sehr kalt werden können. Seien Sie
daher vorsichtig beim Berühren. Tragen Sie bei kaltem Wetter Schutzbekleidung. Wenn Sie
sich im Freien aufhalten, können Reithandschuhe verwendet werden, um den Griff an den
Handrändern zu verbessern.
Nehmen Sie keinerlei Veränderungen an Ihrem Rollstuhl vor.
Bitte beachten sie, dass Ihr Rollstuhl je nach den verwendeten Einstellungen einige Arten von
Diebstahlsicherungssystemen beeinträchtigen kann. Dies kann dazu führen, dass der
Sicherungsalarm des Shops ausgelöst wird.
Sollte sich ein schwerwiegender Zwischenfall mit Ihrem Produkt ereignet haben, benachrichtigen
Sie Vermeiren oder Ihren Fachhändler sowie die zuständige Behörde in Ihrem Land.
2.3 Symbole am Rollstuhl
Maximalgewicht des Benutzers (in kg)
Außen/Innenbenutzung
VORSICHT

V300 XL
2022-07
Inhalt
5
EN
NL
DE
Maximale Neigungssicherheit in ° (Grad).
Typbezeichnung
2.4 Transport
2.4.1 Transport in einem Kraftfahrzeug
Verletzungsgefahr
Benutzen Sie Ihren Rollstuhl NICHT als Sitz in einem Fahrzeug (siehe nächstes
Symbol).
Achten Sie darauf, den Rollstuhl ordnungsgemäß zu befestigen. So vermeiden Sie
Verletzungen der Fahrzeuginsassen bei einer Kollision oder einem plötzlichen
Bremsmanöver.
Verwenden Sie zum Sichern des Rollstuhls und
des Fahrzeuginsassens NIEMALS den
gleichen Sicherheitsgurt
.
1. Entfernen Sie die Fußauflagen und Armlehnen sowie das Zubehör an einem Ort auf.
2. Bewahren Sie die Fußauflagen und Armlehnen sowie das Zubehör an einem sicheren Ort auf.
3. Wenn möglich, klappen Sie den Rollstuhl zusammen und bauen Sie die Hinterräder ab.
4. Transportieren Sie den Rollstuhl nach Möglichkeit im Kofferraum oder Gepäckraum.
5. Wenn der Gepäckraum und der Fahrgastraum NICHT voneinander getrennt sind, befestigen
Sie den Rahmen des Rollstuhls sicher am Fahrzeug. Sie können hierzu verfügbare
Sicherheitsgurte im Fahrzeug verwenden.
2.5 Falten / Entfalten
Verletzungsgefahr
Achten Sie darauf, dass Ihre Finger nicht zwischen die Rollstuhlkomponenten gelangen
.
2.5.1 Auseinanderklappen des Rollstuhl
1. Stellen Sie sich auf die Rückseite des Rollstuhls.
2. Nutzen Sie die Handgriffe, um den Rollstuhl so weit wie möglich zu öffnen.
3. Stellen Sie sich auf die Vorderseite des Rollstuhls.
4. Drücken Sie die beiden Holme, an denen der Sitz befestigt ist, weiter nach unten.
5. Montieren Sie die Schiebestange (siehe §3.5).
2.5.2 Zusammenklappen des Rollstuhls
1. Entfernen Sie die Schiebestange (siehe §3.5).
2. Klappen Sie die Fußplatten hoch oder nehmen Sie die Beinstützen ab (siehe § 3.1).
3. Fassen Sie den Sitz an der Vorder- und Hinterseite an, und ziehen Sie ihn nach oben.
WARNUNG
VORSICHT

V300 XL
2022-07
Inhalt
6
EN
NL
DE
2.5.3 Montage der Hinterräder
1. Nehmen Sie das Hinterrad in die Hand und drücken Sie auf den
Arretierstift .
2. Halten Sie den Arretierstift gedrückt und schieben Sie das
Hinterrad bis zum Anschlag auf die Achse.
3. Lassen Sie den Arretierstift los.
4. Prüfen Sie, ob die Räder sicher auf der Achse sitzen.
2.5.4 Abnehmen der Hinterräder
1. Stellen Sie sicher, dass die Bremsen gelöst sind.
2. Drehen Sie die Seite des Rollstuhls zu sich, an der Sie das Rad
abnehmen möchten.
3. Drücken Sie den Arretierstift in der Mitte der Radnabe.
4. Ziehen Sie das Rad vom Rahmen ab.
2.6 Lagerung
Stellen Sie sicher, dass Ihr Rollstuhl in einer trockenen Umgebung gelagert wird, um
Schimmelbildung und die Beschädigung der Polsterung zu vermeiden, siehe auch Kapitel
5.
1

V300 XL
2022-07
Inhalt
7
EN
NL
DE
3 Benutzung des Rollstuhls
Verletzungsgefahr
Lesen Sie bitte zunächst die vorhergehenden Abschnitte, um sich über die
Benutzungsbedingungen zu informieren. Benutzen Sie den Rollstuhl NICHT, bevor Sie alle
Anweisungen aufmerksam gelesen und vollständig verstanden haben.
Bei Zweifeln oder Fragen
wenden Sie sich bitte zwecks Hilfe an Ihren Fachhändler,
Pflegedienst oder Fachberater.
3.1 An- oder Abbauen der Fußauflagen
Die Fußauflagen werden wie folgt montiert:
1. Halten Sie die Fußauflage seitlich an die Außenseite des
Rollstuhlrahmens und stecken Sie den Zapfen in den Rahmen.
2. Drehen Sie die Fußauflage nach innen bis diese einrasten.
3. Drücken Sie die Fußplatte nach unten.
So bauen Sie die Fußauflagen ab:
1. Ziehen Sie am Hebel .
2. Schwenken Sie die Fußauflage an die Außenseite des
Rollstuhls, bis sie sich aus der Führung löst.
3. Ziehen Sie die Fußauflage mit dem Zapfen aus dem Rahmen .
3.2 Betätigen der Bremsen
Verletzungsgefahr
Die Bremsen dienen nicht
dazu, die Bewegung des Rollstuhls abzubremsen. Sie dienen
ausschließlich dazu, unbeabsichtigte Bewegungen des Rollstuhls zu verhindern.
Die ordnungsgemäße Funktion der Bremsen kann durch Verschleiß oder Schmutz (auch
Wasser, Öl, Schlamm usw.)
beeinträchtigt werden. Überprüfen Sie daher vor jeder
Rollstuhlnutzung den Zustand der Reifen.
Die Bremsen sind einstellbar und können verschleißen. Überprüfen Sie daher vor jeder
Rollstuhlnutzung den Zustand der Bremsen.
Achten Sie darauf, dass der Rolls
tuhl auf einer flachen, horizontalen Fläche steht, bevor Sie
die Bremsen lösen. Lösen Sie niemals beide Bremsen gleichzeitig
.
So betätigen Sie die Bremsen:
1. Drücken Sie die Bremshebel nach vorn, bis sie ein deutliches Klicken fühlen.
So lösen Sie die Bremsen:
1. Lösen Sie eine Bremse, indem Sie den Griff nach hinten ziehen.
2. Fassen Sie den Greifreifen des Rads mit der gelösten Bremse mit Ihrer Hand.
3. Lösen Sie die zweite Bremse, indem Sie den Griff nach hinten ziehen.
3.3 An-/Abbauender Armlehnen
Verletzungsgefahr
Halten Sie Ihre Finger, Schnallen oder Kleidungsstücke fern von der Unterseite der
Armauflage.
Die Armauflagen des Rollstuhl können durch folgende Hinweise angebaut werden.
WARNUNG
VORSICHT
VORSICHT
1
2

V300 XL
2022-07
Inhalt
8
EN
NL
DE
1. Schieben Sie das hintere Rohr der Armauflage in die
Rohraufnahme (1).
2. Achten Sie darauf, dass die Armauflage vollständig in den
Verriegelungsmechanismus einrastet.
3. Klappen Sie die Armauflage nach vorne.
4. Schieben Sie das vordere Rohr der Armauflage in die
Rohraufnahme (2).
So entriegeln Sie eine Armauflage und bauen sie ab:
1. Drücken Sie den Hebel (3) und ziehen Sie die Vorderseite der
Armauflage nach oben.
2. Klappen Sie die Armauflage nach hinten.
3. Zum Abbauen der Armauflage drücken Sie den Knopf (4) und
ziehen den hinteren Teil der Armauflage aus der Aufnahme (1).
3.4 Verstellung Kippschutz (wenn vorhanden)
Die Höhe der Kippschutz wird wie folgt in 7 Positionen eingestellt
(Bereich 120 mm: Schritte von 20 mm):
1. Lösen Sie das Sternrad leicht.
2. Schieben Sie das Kippschutz in die gewünschte Position.
3. Ziehen Sie das Sternrad wieder fest.
4. Prüfen Sie, ob der Kippschutz fest eingerastet ist.
3
2
1
4
1

V300 XL
2022-07
Inhalt
9
EN
NL
DE
3.5 Mounting or removing the push bar
Verletzungsgefahr
Stellen Sie sicher, dass die Sternräder Ⓐ fest sitzen.
Wenn der Rollstuhl über eine Schiebestange verfügt, muss diese immer montiert werden zur
Erhöhung der Stabilität.
So montieren Sie die Schiebestange:
1. Setzen Sie die Schiebestange Ⓑ mit dem Sterngriff Ⓐ in den linken Handgriff.
2. Drehen Sie die Schiebestange Ⓑ nach rechts.
3. Setzen Sie die Aufhängung Ⓒ über den rechten Handgriff Ⓓ wie in der Zeichnung
angegeben. Nutzen Sie die Lochungen oder für unterschiedliche Spannung in der
Rückenlehne.
So bauen Sie die Schiebestange ab:
1. Lösen Sie die Sterngriff Ⓐ am rechten Handgriff.
2. Entfernen Sie die Aufhängung Ⓒ vom rechten Handgriff Ⓓ.
3.6 Setzen in den Rollstuhl
Verletzungsgefahr
Falls Sie sich nicht allein sicher in den Rollstuhl oder aus diesem heraus umsetzen können,
bitten Sie jemanden um Hilfe.
Stellen Sie sich nicht auf die Fußplatten
.
1. Positionieren Sie den Rollstuhl so nah wie möglich an den
Stuhl, die Couch oder das Bett, zu dem bzw. von dem das
Umsetzen vorgenommen werden soll.
2. Achten Sie darauf, dass beide Bremsen des Rollstuhls
betätigt sind.
3. Klappen Sie die Fußplatten nach oben, damit Sie sich nicht
versehentlich darauf stellen.
4. Wenn Sie sich von der Seite in den Rollstuhl setzen,
entfernen Sie die Armlehne an der entsprechenden Seite
(Siehe § 3.3) und falten der Bremshebel nach unten.
5. Setzen Sie sich in den Rollstuhl.
3.6.1 Korrekte Sitzposition im Rollstuhl
Einige Empfehlungen für die komfortable Verwendung des Rollstuhls:
Setzen Sie sich möglichst weit nach hinten, so dass der Rücken an der Rückenlehne
anliegt.
WARNUNG
VORSICHT

V300 XL
2022-07
Inhalt
10
EN
NL
DE
Achten Sie darauf, dass Ihre Oberschenkel möglichst horizontal stehen. Gegebenenfalls
müssen Sie die Länge der Beinstützen einstellen (siehe Installationsanleitung).
3.7 Fahren mit dem Rollstuhl
Gefahr von Verletzungen und Schäden
Achten Sie vor jeder Benutzung auf Folgendes:
o Feststellbremsen funktionieren einwandfrei.
o Reifen sind in gutem Zustand, siehe Kapitel 4.
Verhindern Sie, dass Ihre Finger von den Radspeichen erfasst werden.
Fassen Sie die Greifringe nicht mit nassen Händen an.
Verhindern Sie das Einklemmen Ihrer Hände an den Greifringen, wenn
Sie schmale Passagen
passieren.
Fahren Sie NICHT auf Steigungen, Hindernissen, Stufen oder Bordsteinen, die größer sind als
in Kapitel 5 angegeben.
Wenn Sie auf einem (kleinen) Hang stehen bleiben, benutzen Sie die Bremsen.
Achten Sie bei Bergauf- oder -abfahrten darauf, dass alle vier Räder Bodenkontakt haben.
Fahren Sie auf Gefällen so langsam wie möglich.
Bleiben Sie auf öffentlichen Straßen immer auf der Straße.
Achten Sie darauf, wenn die Straße Löcher oder Lücken aufweist, die zum Einschluss der
Räder führen können.
Vermeiden Sie Steine und andere Gegenstände, die die Räder blockieren könnten.
Stellen Sie sicher, dass die Fußplatten nicht den Boden
berühren, wenn Sie ein Hindernis
nehmen.
Verwenden Sie Ihren Rollstuhl nicht auf einer Rolltreppe.
Falls vorhanden, tragen Sie Ihren Sicherheitsgurt.
Berücksichtigen Sie stets den Schwenkbereich der Fußplatte, um keine Passanten zu
verletzen oder Gegenstände zu beschädigen.
Wenn Sie nicht genug Erfahrung mit dem Rollstuhl haben, wenden Sie sich an einen Begleiter.
Halten Sie Ihre Arme von den Rädern fern und halten Sie die Füße auf der Fußplatte.
Treppen sollten immer mit Hilfe von zwei Begleitpersonen verhandelt werden.
Versuchen Sie niemals Treppen zu benutzen, die nicht für Rollstühle geeignet sind.
3.7.1 Ihren Rollstuhl fahren:
1. Lösen Sie die Bremsen.
2. Bringen Sie beide Greifring in die höchste Position.
3. Lehnen Sie sich nach vorne und drücken Sie die Greifringe nach vorne, bis Ihre Arme gerade
sind.
4. Bewegen Sie Ihre Hände zurück an die Oberseite der Greifringe und wiederholen Sie die
Bewegung.
3.7.2 Bewegen an Steigungen
Verletzungsgefahr
Bewegen Sie sich an Steigungen so langsam wie möglich.
Wenn Ihr Helfer nicht stark genug ist, den Rollstuhl zu kontrollieren, betätigen Sie die Bremsen
.
Lehnen Sie sich nach vorn, um Ihren Schwerpunkt nach
vorne zu verlagern. So sorgen Sie für
bessere Stabilität.
VORSICHT
WARNUNG

V300 XL
2022-07
Inhalt
11
EN
NL
DE
1. Falls Ihr Rollstuhl mit einem Sicherheitsgurt ausgestattet ist, sollten Sie
ihn stets anlegen.
2. Versuchen Sie nicht, zu steile Steigungen hinauf zu fahren. Die
maximalen Steigungswinkel (bergauf und bergab) sind Tabelle 1 zu
entnehmen.
3. Bitten Sie einen Helfer, Sie beim Hinauffahren der Steigung zu
unterstützen.
4. Lehnen Sie sich nach vorn, um Ihren Schwerpunkt nach vorne
zu verlagern.
3.7.3 Überwinden von Stufen und Bordsteinen
Verletzungsgefahr
Falls Sie noch unerfahren im Umgang mit dem Rollstuhl sind, lassen Sie sich helfen
.
Hinunterfahren von Stufen und Bordsteinen
Stufen und Bordsteine können vorwärts überwunden werden. Achten Sie darauf, dass die
Fußauflagen den Boden nicht berühren.
Ein geübter Fahrer kann Stufen und Bordsteine problemlos allein
hinunterfahren:
1. Verlagern Sie das Gewicht auf die Hinterräder, um die Vorderräder zu
entlasten.
2. Fahren Sie den Bordstein hinunter.
Auch höhere Bordsteine können mit einem Helfer vorwärts überwunden werden:
1. Bitten Sie den Helfer, den Rollstuhl etwas nach hinten zu kippen.
2. Fahren Sie den Bordstein hinunter, während Sie die Hinterräder bewegen.
3. Setzen Sie den Rollstuhl wieder auf alle vier Räder.
Ein erfahrener Fahrer kann auch höhere Bordsteine alleine überwinden. Die erfolgt dann am
besten rückwärts.
1. Drehen Sie den Rollstuhl so, dass die Hinterräder zum Bordstein
weisen.
2. Lehnen Sie sich nach vorn, um Ihren Schwerpunkt nach vorne zu
verlagern.
3. Bewegen Sie den Rollstuhl so nah wie möglich an den Bordstein.
4. Drücken Sie vorsichtig am Greifreifen, um den Rollstuhl langsam den
Kantstein hinunterfahren zu lassen.
Hinauffahren von Stufen und Bordsteinen
So überwinden Sie Stufen oder Bordsteine mit einem Helfer:
1. Achten Sie darauf, dass die Fußauflagen den Bordstein nicht berühren.
2. Bitten Sie den Helfer, den Rollstuhl gerade so weit nach hinten zu
kippen, das die Vorderräder über dem Bordstein stehen.
3. Lehnen Sie sich nach hinten, um Ihren Schwerpunkt nach hinten über
die Hinterräder zu verlagern.
4. Setzen Sie die Vorderräder auf den Bordstein.
5. Rollen Sie die Hinterräder des Rollstuhls über den Bordstein.
WARNUNG

V300 XL
2022-07
Inhalt
12
EN
NL
DE
Höhere Bordsteine können Sie rückwärts überwinden:
1. Drehen Sie den Rollstuhl so, dass die Hinterräder zum Bordsteine weisen.
2. Lehnen Sie sich nach hinten, und bringen Sie den Schwerpunkt über die Hinterräder.
3. Bitten Sie die Begleitperson, den Rollstuhl über den Bordstein zu ziehen.
4. Nehmen Sie wieder die normale Position auf dem Rollstuhl ein.
Ein erfahrener Fahrer kann auch Bordsteine alleine überwinden:
1. Fahren Sie bis an den Bordstein heran.
2. Achten Sie darauf, dass die Fußauflagen den Bordstein nicht berühren.
3. Lehnen Sie sich nach hinten, um den Schwerpunkt auf die Hinterräder
zu verlagern.
4. Rollen Sie die Vorderräder vorsichtig über den Bordstein.
5. Lehnen Sie sich nach vorn, um mehr Stabilität zu erhalten.
6. Rollen Sie die Hinterräder über den Bordstein.
3.7.4 Überwinden von Treppen
Verletzungsgefahr
Treppen sollten
immer mit zwei Helfern überwunden werden
.
Auch eine Treppe kann mit einem Rollstuhl überwunden werden, wenn die folgenden Regeln
beachtet werden:
1. Ein Helfer kippt den Rollstuhl etwas nach hinten.
2. Der zweite Helfer fasst den Rollstuhl am vorderen Rahmen.
3. Bleiben Sie ruhig, vermeiden Sie plötzliche Bewegungen, und halten Sie die Arme am
Körper.
4. Überwinden Sie die Stufen mit den Hinterrädern des Rollstuhls.
WARNUNG

V300 XL
2022-07
Inhalt
13
EN
NL
DE
4 Wartung
4.1 Wartungspunkte
Gefahr von Verletzungen und Schäden
Reparaturen und Teileaustausch dürfen nur von geschultem Personal durchgeführt werden und
es dürfen nur Originalersatzteile von Vermeiren verwendet werden.
Die Wartungshäufigkeit hängt von der Häufigkeit und Intensität der Nutzung ab. Wenden
Sie sich an Ihren Händler,
um einen allgemeinen Zeitplan für
Inspektion/Wartung/Reparatur zu vereinbaren.
Hinweise zur Wartung entnehmen Sie bitte der Website von Vermeiren:
www.vermeiren.com
Vor jeder Benutzung
Kontrollieren Sie folgende Punkte:
Alle Komponenten: Vorhanden und nicht beschädigt oder verschlissen sind.
Alle Komponenten: Reinigung siehe Kapitel 4.2.2.
Räder, Rückenlehne, Sitz, Wadenlehnen, Armlehnen, Fußplatte: Sind korrekt gesichert.
Zustand der Räder/Reifen (siehe Kapitel 4.2.1);
Zustand der Rahmenteile: Keine Deformation, Instabilität, Schwachstelle oder lose
Verbindungen
Sitz, Rückenlehne, Armpolster, Wadenpolster und Kopfstütze (falls vorhanden): Kein
übermäßiger Verschleiß (wie Eindellungen, Beschädigungen oder Risse)
Bremsen: Unbeschädigt und funktionsfähig
Wenden Sie sich wegen etwaiger Reparaturen oder Ersatzteile an Ihren Fachhändler.
Jährlich oder häufiger
Lassen Sie Ihren Rollstuhl mindestens einmal pro Jahr oder häufiger von Ihrem Fachhändler
inspizieren und warten. Die minimale Wartungshäufigkeit ist von der Benutzung abhängig und
sollte daher zusammen mit Ihrem Fachhändler abgesprochen werden.
4.2 Wartungshinweise
4.2.1 Räder und Reifen
Die korrekte Funktionsweise der Bremsen ist vom Zustand der Reifen abhängig und kann
sich infolge von Verschleiß und Verunreinigung (Wasser, Öl, Matsch usw.) verändern.
Achten Sie darauf, dass keine Drähte, Haare, Sand oder Fasern an den Rädern anhaften.
Überprüfen Sie regelmäßig das Reifenprofil. Wenn die Profiltiefe weniger als 1 mm beträgt, muss
der Reifen ausgetauscht werden. Wenden Sie sich diesbezüglich bitte an Ihren Fachhändler.
Pumpen Sie jeden Reifen mit dem korrekten Druck auf (siehe Angabe auf dem Reifen).
4.2.2 Reinigung
Beschädigungsgefahr durch Feuchtigkeit
Benutzen Sie keinesfalls einen
Wasserschlauch oder Hochdruckreiniger, um den Rollstuhl zu
reinigen.
Wischen Sie alle festen Teile des Rollstuhls mit einem feuchten (nicht durchnässten) Tuch ab.
Benutzen Sie ggf. eine milde Seife, die für Lacke und Kunststoffe geeignet ist.
Die Polsterung kann mit lauwarmem Wasser und einer milden Seife gereinigt werden. Verwenden
Sie keine scheuernden Reinigungsmittel.
VORSICHT
VORSICHT

V300 XL
2022-07
Inhalt
14
EN
NL
DE
4.2.3 Desinfektion
Beschädigungsgefahr
Eine Desinfektion darf nur von dafür geschultem Personal durchgeführt werden.
Wenden Sie
sich hierfür an Ihren Fachhändler.
4.3 Störungsbeseitigung
Auch bei ordnungsgemäßer Benutzung Ihres Rollstuhls kann ein technisches Problem auftreten.
In diesem Fall wenden Sie sich bitte an Ihren Fachhändler.
Gefahr von Verletzungen und Schäden am Rollstuhl.
Versuchen Sie NIEMALS, den
Sitzschalenstuhl selbst zu reparieren, um ein Problem zu
beheben.
Die nachstehend genannten Symptome können auf ein ernsthaftes Problem hindeuten. Sie
sollten sich daher stets an Ihren Fachhändler wenden, wenn eine der folgenden Situationen
eintritt:
Ungewöhnliche Geräusche
Ungleichmäßige Abnutzung an einem der Reifen
Ruckartige Bewegungen
Rollstuhl zieht zu einer Seite
Beschädigte oder gebrochene Radeinheiten
4.4 Voraussichtliche Nutzungsdauer
Die durchschnittliche Nutzungsdauer Ihres Rollstuhls beträgt 5 Jahre. Je nach
Nutzungshäufigkeit, Betriebsbedingungen und Wartung kann die Nutzungsdauer Ihres Rollstuhls
länger oder kürzer sein.
4.5 Wiederbenutzung
Lassen Sie den Rollstuhl vor jeder Wiederbenutzung desinfizieren, inspizieren und entsprechend
den Anweisungen in Abschnitt 4.1 und 4.2 warten.
4.6 Nutzungsende
Am Ende seiner Nutzungsdauer muss Ihr Rollstuhl gemäß den geltenden Umweltvorschriften
entsorgt werden. Dazu wird er im besten Fall zerlegt, um den Transport wiederverwertbarer Teile
zu erleichtern.
VORSICHT
WARNUNG

V300 XL
2022-07
Inhalt
15
EN
NL
DE
5 Technische Daten
Die im Folgenden aufgeführten technischen Daten gelten für einen Rollstuhl in der
Standardkonfiguration. Wurden eine Fußauflagen und/oder eine Armlehnen oder anderes
Zubehör montiert, ändern sich die in der Tabelle aufgeführten Werte.
Produktname
Vermeiren
Typ
Rollstuhl
Modell
V
3
00
XL
Max. zulässiges Gewicht des Fahrers
1
7
0 kg
Beschreibung
Minimale Abmessungen
Maximale Abmessungen
Gesamtlänge mit Fußstützen 1085 mm
Effektive Sitzbreite 530 mm 560 mm 600 mm
Gesamtbreite (abhängig von der Sitzbreite) 740 mm 770 mm 810 mm
Länge zusammengeklappt 1060 mm
Breite zusammengeklappt 350 mm
Höhe zusammengeklappt (abhängig von der
Sitzhöhe)
840 mm 930 mm
Gesamtgewicht 21,00 kg
Gewicht des schwersten Teils 13,35 kg
Gewichte von Teilen, die demontierbar oder
abnehmbar sind
Fußauflagen: 1,75 kg; Armlehnen: 1,80 kg;
Hinterräder:
4,05 kg
Statische Stabilität, bergab 6,5°
Statische Stabilität, bergauf 6,5°
Statische Stabilität, seitwärts 18°
Überfahren von Hindernissen 60 mm
Winkel der Sitzfläche 0° 10°
Effektive Sitztiefe 490 mm 530 mm
Höhe der Sitzoberfläche an der Vorderkante 440 mm 530 mm
Rückenlehnenwinkel 5°
Rückenlehnenhöhe 400 mm
Abstand zwischen Fußauflagen und Sitz 400 mm 500 mm
Winkel zwischen Sitz und Fußplatte 5° 25°
Winkel zwischen Sitz und Beine Fußauflagen 105°
Winkel zwischen Beine Fußauflagen und
Fußplatte
80°
Abstand zwischen Armpolster und Sitz 220 mm 240 mm
Länge der Armpolster zur Unterfahrbarkeit 410 mm
Greifreifendurchmesser 535 mm
Horizontale Lage der Achse (Deflektion) 1,27 mm 61,04 mm
Kleinster Wenderadius 1500 mm
Durchmesser der PU-Hinterräder 22" 24"
Reifendruck, Hinterräder (Antriebsräder) max. 3,5 bar
Durchmesser der PU-Lenkräder 200 mm
Reifendruck, Lenkräder max. 2,5 bar

V300 XL
2022-07
Inhalt
16
EN
NL
DE
Material Rahmen Aluminium
Material Polsterung Nylon
Temperaturbereich für Lagerung und Nutzung 5 °C +41 °C
Luftfeuchtigkeitsbereich für Lagerung und
Nutzung
30% 70%
Technische Änderungen vorbehalten. Messtoleranzen ± 15 mm / 1,5 kg / 1,5°

V300 XL
2022-07
Indice
1
EN
NL
IT
Indice
Indice ........................................................................................................................ 1
Premessa.................................................................................................................... 2
1 Il prodotto ...................................................................................................... 3
2 Prima dell’uso ............................................................................................... 4
2.1 Uso previsto .................................................................................................. 4
2.2 Istruzioni generali di sicurezza ...................................................................... 4
2.3 Simboli presenti sulla carrozzina ................................................................... 4
2.4 Trasporto ....................................................................................................... 5
2.5 Chiusura / Apertura ....................................................................................... 5
2.6 Magazzinaggio .............................................................................................. 6
3 Uso della carrozzina ..................................................................................... 7
3.1 Montaggio o rimozione dei poggiapiedi ........................................................ 7
3.2 Utilizzo dei freni ............................................................................................. 7
3.3 Montaggio o rimozione dei braccioli .............................................................. 7
3.4 Regolazione delle routine antiribaltamento (quando fornite) ......................... 8
3.5 Montaggio o rimozione della barra di spinta .................................................. 9
3.6 Trasferimento della carrozzina all'interno e all'esterno .................................. 9
3.7 Utilizzo della carrozzina .............................................................................. 10
4 Manutenzione .............................................................................................. 13
4.1 Punti di manutenzione ................................................................................. 13
4.2 Istruzioni per la manutenzione .................................................................... 13
4.3 Soluzione dei problemi di funzionamento .................................................... 14
4.4 Durata prevista ............................................................................................ 14
4.5 Utilizzi successivi ........................................................................................ 14
4.6 Fine vita ...................................................................................................... 14
5 Specifiche tecniche .................................................................................... 15

V300 XL
2022-07
Premessa
2
EN
NL
IT
Premessa
Congratulazioni! Ora possiede una carrozzina Vermeiren!
Questa carrozzina è realizzata da personale qualificato e competente. Essa è progettata e
prodotta secondo gli elevati standard di qualità garantiti da Vermeiren.
Grazie per la fiducia accordata ai prodotti Vermeiren. Questo manuale viene fornito come
supporto per l’uso della carrozzina e delle sue opzioni operative. Leggerlo attentamente, in quanto
aiuta a familiarizzarsi con il funzionamento, le prestazioni e le limitazioni della carrozzina.
Per eventuali ulteriori domande successive alla lettura di questo manuale, rivolgersi al proprio
rivenditore specializzato, che sarà lieto di fornire un supporto.
Nota importante
Per garantire la propria sicurezza e prolungare la durata del prodotto, trattarlo con cura e farlo
controllare e/o sottoporlo a manutenzione con regolarità.
Questo manuale rispecchia gli sviluppi più recenti del prodotto. Vermeiren si riserva il diritto di
introdurre modifiche di questo tipo di prodotto senza alcun obbligo di adattare o sostituire i prodotti
analoghi consegnati in precedenza.
Le immagini del prodotto vengono utilizzate per chiarire le istruzioni contenute nel manuale. I
dettagli del prodotto raffigurato possono essere diversi da quelli del prodotto in uso.
Informazioni disponibili
Sul sito Web di Vermeiren, all'indirizzo http://www.vermeiren.com/, è sempre disponibile la
versione più recente delle informazioni contenute in questo manuale. Visitare con regolarità tale
sito per verificare l’esistenza di eventuali aggiornamenti.
Le persone ipovedenti possono scaricare la versione elettronica di questo manuale e farlo leggere
da un software applicativo di sintesi vocale.
Manuale di istruzioni Per l'utente e il rivenditore specializzato
Istruzioni di installazione Per il rivenditore specializzato
Manuale di assistenza per le carrozzine Per il rivenditore specializzato
Dichiarazione di conformità CE

V300 XL
2022-07
Il prodotto
3
EN
NL
IT
1
2
3
4
5
6
8
7
9
1
0
1
1
1
2
1
3
1
4
1
5
1 Il prodotto
1. Impugnature
2. Barra di spinta
3. Schienale
4. Imbottitura dei braccioli
5. Braccioli
6. Sedile
7. Poggiapiedi
8. Pedane
9. Ruote direttrici
(Ruote anteriori)
10. Freni
11. Ruote motrici (Ruote
posteriori)
12. Corrimano
13. Leva di ribaltamento
14. Crociera
15. Targhetta di
identificazione

V300 XL
2022-07
Prima dell’uso
4
EN
NL
IT
2 Prima dell’uso
2.1 Uso previsto
Indicazioni e controindicazioni: Questa carrozzina è destinata agli utenti che necessitano di
una larghezza del sedile superiore a 50 cm e/o di un peso maggiore. L'occupante può
controllare direttamente il movimento della carrozzina oppure farsi spingere da un
accompagnatore. La carrozzina è destinata a persone anziane o a persone con difficoltà
motorie o incapacità di deambulazione, ad esempio paralisi, amputazione, difetti o
deformazioni degli arti inferiori, contratture o lesioni articolari, insufficienza cardiaca e
cardiocircolatoria, disturbi dell'equilibrio , cachessia (deterioramento della massa muscolare),
… NON utilizzare la carrozzina se si soffre di disabilità fisiche o mentali in grado di mettere in
pericolo sé o altri durante la guida della carrozzina. Consultare pertanto anzitutto il proprio
medico e avere cura di trasmettere il suo parere al proprio rivenditore specializzato.
Questa carrozzina è adatta per l'uso al coperto e all'aperto.
Essa è progettata e realizzata esclusivamente per il trasporto/trasferimento di una (1) persona
di peso non superiore a 170 kg. Essa non è viceversa progettata per il trasporto di merci od
oggetti, né per qualunque uso diverso da quello descritto in precedenza.
Utilizzare esclusivamente accessori e ricambi approvati da Vermeiren.
Leggere tutte le informazioni tecniche di dettaglio e le limitazioni della carrozzina, riportate nel
capitolo 5.
La garanzia del prodotto presuppone un uso e una manutenzione normali del medesimo, come
descritti in questo manuale. I danni al prodotto dovuti a uso improprio o manutenzione carente
causano la decadenza della garanzia.
2.2 Istruzioni generali di sicurezza
Rischio di lesioni e/o danni
Leggere e osservare le istruzioni contenute in questo
manuale. In caso contrario, è possibile
ferirsi o danneggiare la carrozzina.
Durante l’uso, tenere presenti le seguenti avvertenze generali:
Non utilizzare la carrozzina se si è sotto l’effetto di alcool, farmaci o altre sostanze in grado
di influire sulle proprie capacità di manovra.
Non dimenticare che alcune parti della carrozzina possono diventare molto calde o fredde a
causa della temperatura ambiente, della radiazione solare o di dispositivi di riscaldamento.
Prestare attenzione quando si tocca la console. In condizioni climatiche fredde, indossare
indumenti protettivi. In caso di uso all'aperto, è possibile utilizzare guanti da equitazione per
migliorare la presa sui corrimani.
Non modificare in alcun modo la carrozzina.
Tieni presente che il tuo carrozzina potrebbe interferire con qualche sistema di antifurto, a
seconda delle impostazioni utilizzate ciò potrebbe fra scattare l’allarme del negozio.
Nel caso in cui si sia verificato un grave incidente con il vostro prodotto, informate Vermeiren o il
vostro rivenditore specializzato e l'autorità competente del vostro paese.
2.3 Simboli presenti sulla carrozzina
Peso massimo dell’utente, in kg
Uso al coperto / all’aperto
ATTENZIONE

V300 XL
2022-07
Prima dell’uso
5
EN
NL
IT
Pendenza massima di sicurezza, in ° (gradi).
Indicazione del modello
2.4 Trasporto
2.4.1 Trasporto su veicoli, come bagaglio
Rischio di lesioni
NON utilizzare la carrozzina come sedile in un veicolo; vedere il simbolo successivo.
Controllare che la carrozzina sia fissata in modo adeguato, per evitare lesioni ai
passeggeri in caso di collisioni o frenate brusche.
NON utilizzare la stessa cintura di sicurezza
per il passeggero e per la carrozzina
.
1. Rimuovere i poggiapiedi, braccioli e gli accessori.
2. Conservare i pedane, braccioli e gli accessori in un posto sicuro.
3. Se possibile ripiegare la carrozzina e rimuovere le ruote posteriori.
4. Sistemare la carrozzina nel portabagagli.
5. Se lo scomparto della carrozzina e del passeggero NON sono separati, collegare il telaio della
carrozzina in modo saldo al veicolo. È possibile utilizzare le cinture di sicurezza disponibili nel
veicolo.
2.5 Chiusura / Apertura
Rischio di lesioni
Allontanare le dita dalle parti mobili della carrozzina
.
2.5.1 Apertura della carrozzina
1. Posizionarsi dietro la carrozzina.
2. Utilizzare le impugnature per aprire la carrozzina il più possibile.
3. Posizionarsi davanti alla carrozzina.
4. Premere entrambi i profilati tubolari della seduta verso il basso fino a quando non risultano
fissati nella posizione corretta.
5. Montare la barra di spinta (vedere §3.5).
2.5.2 Chiusura della carrozzina
1. Rimuovere la barra di spinta (vedere §3.5).
2. Ripiegare pedane o rimuovere le poggiapiedi (vedere la sezione § 3.1).
3. Afferrare il sedile dalla parte anteriore e dallo schienale e tirarlo verso l'alto.
2.5.3 Montaggio delle ruote posteriori
1. Afferrare la ruota posteriore e premere il pulsante .
2. Tenere premuto il pulsante e montare l'asse delle ruote posteriori
fino al punto d'arresto.
3. Rilasciare il pulsante.
4. Verificare che la ruota sia fissata.
2.5.4 Smontare le ruote
1. Accertarsi i freni siano in posizione corretta.
2. Impugnare la carrozzina dal telaio laterale dove si desidera
rimuovere la ruota.
3. Premere il pulsante al centro del mozzo della ruota.
4. Estrarre la ruota dal telaio.
AVVERTENZA
ATTENZIONE
1

V300 XL
2022-07
Prima dell’uso
6
EN
NL
IT
2.6 Magazzinaggio
Avere cura di immagazzinare la carrozzina in un ambiente asciutto, per evitare la
formazione di muffa o danni alla selleria; vedere inoltre il capitol 5.

V300 XL
2022-07
Uso della carrozzina
7
EN
NL
IT
3 Uso della carrozzina
Rischio di lesioni
Leggere anzitutto il capitolo precedente per familiarizzarsi con l’uso previsto. NON utilizzare la
carrozzina senza avere letto e compreso a fondo tutte le istruzioni.
In caso di dubbi o domande, non esitare a rivolgersi al proprio rivenditore specializza
to di zona,
al proprio fornitore di cure sanitarie o a un consulente tecnico per un aiuto al riguardo
.
3.1 Montaggio o rimozione dei poggiapiedi
Montare i poggiapiedi nel modo seguente:
1. Reggere il poggiapiedi lateralmente dalla parte esterna del telaio
della carrozzina e montare la chiusura del tubo sul telaio.
2. Ruotare della pedana verso l'interno fino a quando non scatta
nella posizione corretta.
3. Ruotare la pedana verso il basso.
Per rimuovere i poggiapiedi:
1. Premere sulla leva .
2. Ruotare il poggiapiedi verso l'esterno della carrozzina finché non
si sgancia dalla guida.
3. Sfilare la pedana dalla chiusura del profilato tubolare .
3.2 Utilizzo dei freni
Rischio di lesioni
Non utilizzare i freni per
rallentare la carrozzina durante la marcia, utilizzarli solo per prevenire
movimenti indesiderati della carrozzina.
Sull'adeguato funzionamento dei freni incidono l'usura e la mancanza di pulizia delle ruote, ad
esempio presenza di acqua, olio o
fango. Verificare le condizioni delle ruote prima di ogni
utilizzo.
I freni sono regolabili e possono usurarsi. Verificare il funzionamento dei freni prima di ogni
utilizzo.
Accertarsi che la carrozzina sia su una superficie piana prima di rilasciare i fr
eni. Non rilasciare
mai entrambi i freni contemporaneamente
.
Per frenare:
1. Spingere le impugnature dei freni in avanti fino a sentire un clic distinto.
Per rilasciare i freni:
1. Rilasciare un freno tirando l'impugnatura all'indietro.
2. Reggere il corrimano della ruota di rilascio con la mano.
3. Rilasciare l'altro freno tirando le impugnature all'indietro.
3.3 Montaggio o rimozione dei braccioli
Rischio di lesioni
Tenere le dita, le fibbie e gli indumenti lontani dalla parte laterale del poggiabraccia.
I poggiabraccia della carrozzine possono essere montato le istruzioni seguendo.
AVVERTENZA
ATTENZIONE
ATTENZIONE
1
2

V300 XL
2022-07
Uso della carrozzina
8
EN
NL
IT
1. Montare il tubo posteriore del bracciolo sul coperchio del tubo
(1).
2. Accertarsi che il poggiabraccia scatti nel meccanismo di
blocco.
3. Piegare in avanti il bracciolo.
4. Far scattare il tubo anteriore del bracciolo sul coperchio del
tubo (2).
Per aprire e rimuovere il bracciolo:
1. Premere la leva (3) e tirare la parte anteriore del bracciolo verso
l'alto.
2. Piegare all'indietro il bracciolo.
3. Per rimuovere il poggiabraccia, premere il pulsante (4) e tirare la
parte posteriore del poggiabraccia dal coperchio del tubo (1).
3.4 Regolazione delle routine antiribaltamento (quando fornite)
Regolare l'altezza delle ruotine antiribaltamento come indicato di
seguito in 7 posizioni (intervallo di 120 mm: con incrementi di 20
mm):
1. Allentare leggermente la manopola a stella .
2. Spostare il profilato tubolare dell’antiribaltamento nella
altezza desiderata.
3. Fissare la manopola a stella .
4. Verificare che la ruotina antiribaltamento sia fissata
saldamente.
3
2
1
4
1

V300 XL
2022-07
Uso della carrozzina
9
EN
NL
IT
3.5 Montaggio o rimozione della barra di spinta
Rischio di lesioni
Accertarsi che le manopole Ⓐ siano fissate saldamente.
Se presente, assicurarsi che la barra di spinta sia montata per aumentare la stabilità dello
schienale della carrozzina
.
Per montare la barra di spinta:
1. Montare la barra di spinta Ⓑ con la manopola a stella Ⓐ nell'impugnatura sinistra.
2. Ruotare la barra di spinta Ⓑ verso destra.
3. Montare il morsetto Ⓒsull'impugnatura destra Ⓓ come mostrato nel designo. Utilizzare i fori
e per regolare la tensione dello schienale.
Per rimuovere la barra di spinta:
1. Allentare la manopola Ⓐ a stella sull'impugnatura destra.
2. Rimuovere il morsetto Ⓒdall'impugnatura destra Ⓓ.
3.6 Trasferimento della carrozzina all'interno e all'esterno
Rischio di lesioni
Nel caso in cui non si riesca a eseguire il trasferimento in modo sicuro, chiedere assistenza.
Non stare in piedi sui pedane
.
1. Posizionare la carrozzina il più vicino possibile alla sedia,
alla poltrona o al letto verso il quale si desidera trasferire il
paziente.
2. Verificare che entrambi i freni della carrozzina siano attivati.
3. Ripiegare le pedane verso l'alto per evitare di reggersi in
piedi sopra di esse.
4. Se il trasferimento avviene dalla parte laterale della
carrozzina, rimuovere il bracciolo (vedere 3.3) e piegare la
leva del freno verso il basso.
5. Trasferire il paziente da/verso la carrozzina.
3.6.1 Posizione corretta della carrozzina
Alcuni consigli per un utilizzo confortevole della carrozzina:
Posizionare la parte posteriore il più vicino possibile allo schienale.
Accertarsi che le cosce siano in posizione orizzontale, se necessario regolare la lunghezza
dei poggiapiedi (vedere il manuale di installazione).
AVVERTENZA
ATTENZIONE

V300 XL
2022-07
Uso della carrozzina
10
EN
NL
IT
3.7 Utilizzo della carrozzina
Rischio di lesioni e danni
Prima di ogni utilizzo, verificare che:
o i freni di parcheggio funzionino correttamente.
o gli pneumatici siano in buone condizioni; vedere il § 4.
Avere cura di evitare che le dita restino impigliate nei raggi delle ruote.
Non azionare i corrimani con le mani bagnate.
Quando si attraversano passaggi
stretti, prestare attenzione a non schiacciarsi le mani sui
corrimani.
NON effettuare spostamenti su superfici inclinate, ostacoli, gradini o cordoli di dimensioni
superiori a quelle specificate nel § 5.
Quando ci si ferma su una superficie (poco) inclinata, utilizzare i freni.
Quando si procede in salita o in discesa su superfici inclinate, accertarsi che tutte e quattro le
ruote siano a contatto con il suolo.
Affrontare le superfici alla minima velocità possibile.
Quando si percorrono strade pubbliche, rimanere sempre sul marciapiede.
Prestare attenzione quando si procede su strade con buche o fessure in cui le ruote possano
incastrarsi.
Evitare sassi o altri oggetti in grado di bloccare le ruote.
Quando si affronta un ostacolo, accertarsi che le pedane non tocchino terra.
Non utilizzare la carrozzina sulle scale mobili.
Se disponibile, indossare la cintura di sicurezza.
Tenere sempre conto del raggio di
rotazione della pedana, per evitare di causare lesioni alle
persone o danni materiali.
Se non si possiede sufficiente esperienza di uso della carrozzina, chiedere aiuto a un
assistente. Tenere le braccia lontane dalle ruote e i piedi sulla pedana.
Le scale devono sempre essere affrontate con l'aiuto di due assistenti.
Non tentare mai di utilizzare scale inadatte alle carrozzine.
3.7.1 Uso della carrozzina:
1. Rilasciare i freni.
2. Afferrare entrambi i corrimani nel punto più alto.
3. Inclinare il busto n avanti e spingere in avanti i corrimani, fino a quando le braccia sono distese.
4. Riportare le mani nel punto più alto dei corrimani e ripetere il movimento.
3.7.2 Spostamento sulle pendenze
Rischio di lesioni
Spostarsi sulle pendenze il più lentamente possibile.
Se l'accompagnatore non ha forza sufficiente a controllare la carrozzina, attivare i freni.
Inclinarsi in avanti per spostare il baricentro in avanti.
Per migliorare la stabilità
.
1. Se disponibile sulla carrozzina, indossare la cintura di sicurezza.
2. Non tentare di spostarsi su pendenze troppo ripide. Le pendenze
massime (in discesa e in salita) sono riportate nella tabella 1.
3. Chiedere all'accompagnatore un aiuto per spostarsi in pendenza.
4. Inclinarsi in avanti per spostare il baricentro in avanti.
ATTENZIONE
AVVERTENZA

V300 XL
2022-07
Uso della carrozzina
11
EN
NL
IT
3.7.3 Affrontare gradini e scalini
Rischio di lesioni
Se non si possiede sufficiente esperienza con la carrozzina, richiedere assistenza a un
accompagnatore
.
Scendere da gradini e scalini
È possibile scendere da piccoli scalini spostandosi in avanti. Accertarsi che
le pedane non tocchino il suolo.
Un utente esperto può affrontare da solo piccoli gradini o scalini:
1. Spostare l'equilibrio sulle ruote posteriori per ridurre la pressione sulle
ruote anteriori.
2. Affrontare gli scalini.
Gli scalini più alti possono essere superati con un accompagnatore:
1. Chiedere all'accompagnatore di inclinare la carrozzina leggermente all'indietro.
2. Superare i gradini procedendo sulle ruote posteriori.
3. Riportare la carrozzina sulle quattro ruote.
Un utente esperto è in grado di affrontare gli scalini da solo. È preferibile procedere all'indietro.
1. Ruotare la carrozzina in modo che le ruote posteriori siano di fronte
allo scalino.
2. Inclinarsi in avanti per spostare il baricentro in avanti.
3. Portare la carrozzina vicino agli scalini.
4. Con il corrimano far scendere la carrozzina dallo scalino
controllandola.
Salire su gradini e scalini
Salire su gradini e scalini con un accompagnatore nel modo seguente:
1. Fare in modo che le pedane non tocchino lo scalino.
2. Chiedere all'accompagnatore di inclinare la carrozzina all'indietro, in
modo sufficiente per consentire alle ruote anteriori di superare lo
scalino.
3. Inclinarsi all'indietro per spostare il baricentro sulle ruote posteriori.
4. Portare le ruote anteriori sullo scalino.
5. Far rotolare le ruote posteriori oltre lo scalino.
Gli scalini più alti vanno affrontati all'indietro:
1. Ruotare la carrozzina in modo che le ruote posteriori siano di fronte allo scalino.
2. Inclinarsi all'indietro per spostare il baricentro sulle ruote posteriori.
3. Chiedere all'accompagnatore di spingere la carrozzina verso lo scalino.
4. Assumere nuovamente la posizione normale nella carrozzina.
Un utente esperto è in grado di affrontare gli scalini più alti da solo.
1. Arrivare agli scalini.
2. Accertarsi che le pedane non tocchino gli scalini.
3. Inclinarsi all'indietro per essere in equilibrio sulle ruote
posteriori.
AVVERTENZA

V300 XL
2022-07
Uso della carrozzina
12
EN
NL
IT
4. Portare l'equilibrio delle ruote anteriori oltre gli scalini.
5. Piegarsi in avanti per una maggiore stabilità.
6. Portare le ruote posteriori oltre gli scalini.
3.7.4 Fare le scale
Rischio di lesioni
È possibile fare le scale facendosi assistere sempre da due accompagnatori
.
È possibile fare le scale nella carrozzina, adottando le regole che seguono:
1. Far inclinare la carrozzina leggermente all'indietro all'accompagnatore.
2. Il secondo accompagnatore deve afferrare la parte anteriore del telaio.
3. Mantenere la calma, evitare movimenti improvvisi e tenere le braccia all'interno della
carrozzina.
4. Fare le scale sulle ruote posteriori della carrozzina.
AVVERTENZA

V300 XL
2022-07
Manutenzione
13
EN
NL
IT
4 Manutenzione
4.1 Punti di manutenzione
Rischio di lesioni e danni
Riparazioni e sostituzioni devono essere eseguite esclusivamente da personale con un’opportuna
formazione e utilizzando unicamente ricambi originali Vermeiren.
La frequenza dell'assistenza dipende dalla frequenza e dall’intensità dell’uso. Concordare
con il proprio rivenditore un calendario comune per le attività di ispezione / manutenzione
/ riparazione.
Per il manuale di manutenzione consultate il sito web Vermeiren: www.vermeiren.com.
Prima di ciascun utilizzo
Verificare i seguenti punti:
Tutti i componenti: presenza, integrità e assenza di usura.
Tutti i componenti: pulizia, vedere il § 4.2.2.
Ruote, schienale, sedile, poggiapolpacci, braccioli e pedane: fissaggio corretto.
Condizioni delle ruote / degli pneumatici: vedere il § 4.2.1;
Condizioni dei componenti del telaio: assenza di deformazioni, instabilità, punti deboli o
raccordi allentati
Sedile, schienale, poggiatesta (se presente) e imbottiture di braccioli e poggiapolpacci:
assenza di usura eccessiva (come ammaccature, danni o lacerazioni).
Freni: integri e funzionanti.
Rivolgersi al proprio rivenditore specializzato per le riparazioni o i ricambi eventualmente
necessari.
Annualmente o con maggiore frequenza
Almeno una volta all’anno, o con maggiore frequenza, richiedere al proprio rivenditore
specializzato un intervento di ispezione e manutenzione della carrozzina. La frequenza minima
di manutenzione dipende dall’uso, e deve pertanto essere concordata con il proprio
concessionario autorizzato.
4.2 Istruzioni per la manutenzione
4.2.1 Ruote e pneumatici
Il funzionamento corretto dei freni dipende dallo stato degli pneumatici, e può variare a
seconda dell'usura e dell'eventuale contaminazione (acqua, olio, fango e così via).
Tenere pulite le ruote da fili, capelli, sabbia e fibre.
Verificare il profilo degli pneumatici. Se la profondità del battistrada è inferiore a 1 mm, occorre
sostituire gli pneumatici. A tale scopo, rivolgersi al proprio rivenditore specializzato.
Gonfiare ciascuno pneumatico alla pressione corretta (facendo riferimento all'indicazione
riportata sul medesimo).
4.2.2 Pulizia
Rischio di danni da umidità
Non pulire la carrozzina con manichette o pulitrici ad alta pressione.
Strofinare tutti i componenti rigidi della carrozzina con un panno umido (non zuppo). Se
necessario, utilizzare un detergente delicato, adatto per smalti e materiali sintetici.
È possibile pulire la selleria con acqua tiepida e un detergente delicato. Non utilizzare detergenti
abrasivi per la pulizia.
ATTENZIONE
ATTENZIONE

V300 XL
2022-07
Manutenzione
14
EN
NL
IT
4.2.3 Disinfezione
Rischio di danni
La disinfezione deve essere eseguita esclusivamente da personale con un’opportuna
formazione. Consultare
il proprio rivenditore specializzato.
4.3 Soluzione dei problemi di funzionamento
Anche se si utilizza la carrozzina nel modo corretto, è comunque possibile che si verifichi un
problema tecnico. In tal caso, rivolgersi al rivenditore specializzato della propria zona.
Rischio di lesioni e di danni alla carrozzina
NON riparare MAI personalmente la carrozzina nel tentativo di risolvere il problema.
I sintomi indicati di seguito possono segnalare un problema grave. Rivolgersi pertanto sempre al
proprio rivenditore specializzato se si rileva una qualunque delle seguenti anomalie:
Rumori strani;
Usura irregolare del battistrada di uno pneumatico;
Movimenti a scatti;
Tendenza della carrozzina a deviare lateralmente;
Gruppi ruota danneggiati o spezzati.
4.4 Durata prevista
La carrozzina ha una durata media prevista di 5 anni. Tale valore aumenta o diminuisce a seconda
della frequenza di utilizzo, delle condizioni di guida e della manutenzione.
4.5 Utilizzi successivi
Prima di ogni utilizzo successivo, fare disinfettare, ispezionare e sottoporre a manutenzione la
carrozzina secondo le istruzioni dei §4.1 e §4.2 .
4.6 Fine vita
A fine vita, occorre smaltire la carrozzina conformemente alla legislazione ambientale locale. Il
modo migliore per farlo consiste nello smontare la carrozzina per agevolare il trasporto dei
componenti riciclabili.
ATTENZIONE
AVVERTENZA

V300 XL
2022-07
Specifiche tecniche
15
EN
NL
IT
5 Specifiche tecniche
I termini tecnici riportati di seguito sono applicabili alla carrozzina con configurazione standard.
Se vengono utilizzati altri tipi di pedane, braccioli o accessori, i valori in tabella saranno diversi.
Marchio
Vermeiren
Tipo
Carrozzina manuale
Modello
V
3
00
XL
Peso massimo dell'utilizzatore
1
7
0 kg
Descrizione
Dimensioni minime
Dimensioni massime
Lunghezza complessiva con poggiapiedi 1085 mm
Larghezza effettiva del sedile 530 mm 560 mm 600 mm
Larghezza complessiva (in base alla
larghezza del sedile)
740 mm 770 mm 810 mm
Lunghezza ripiegata 1060 mm
Larghezza ripiegata 350 mm
Altezza ripiegata (dipende dall’altezza del
sedile)
840 mm 930 mm
Peso totale
21,00 kg
Massa della parte più pesante 13,35 kg
Peso delle parti smontabili o rimovibili Poggiapiedi: 1,75 kg; Braccioli: 1,80 kg;
Ruote posteriori:
4,05 kg
Stabilità statica in discesa 6,5°
Stabilità statica in salita 6,5°
Stabilità statica laterale 18°
Superamento degli ostacoli 60 mm
Basculamento del sedile 0° 10°
Profondità del sedile regolabile 490 mm 530 mm
Altezza da terra del sedile 440 mm 530 mm
Reclinazione dello schienale 5°
Altezza regolabile dello schienale 400 mm
Distanza regolabile tra pedana e sedile 400 mm 500 mm
Angolazione tra sedile e pedana 5° 25°
Inclinazione tra sedile e piatto pedana 105°
Angolazione tra piatto pedana e pedana 80°
Distanza tra imbottitura dei braccioli e sedile 220 mm 240 mm
Posizione anteriore della imbottitura dei
braccioli
410 mm
Diametro dei corrimano 535 mm
Posizione orizzontale dell'asse (deflessione) 1,27 mm 61,04 mm
Raggio di sterzata minimo 1500 mm
Diametro delle ruote posteriori in PU
22" 24"
Pressione di gonfiaggio pneumatici, ruote
motrici/posteriori
Max. 3,5 bar

V300 XL
2022-07
Specifiche tecniche
16
EN
NL
IT
Diametro delle ruote direttrici in PU 200 mm
Pressione di gonfiaggio pneumatici, ruote
direttrici
Max. 2,5 bar
Materiale del telaio Alluminio
Materiale dell'imbottitura Nylon
Temperatura per utilizzo e conservazione + 5 °C + 41 °C
Umidità per utilizzo e conservazione 30% 70%
La casa produttrice si riserva il diritto di apportare modifiche tecniche.
Tolleranza misurazioni
± 15 mm / 1,5 kg / 1,5° .

EN
NL
ES
V300 XL
2022-07
Contenido
1
Índice
Índice ........................................................................................................................ 1
Introducción ............................................................................................................... 2
1 Su producto ................................................................................................... 3
2 Antes de su uso ............................................................................................ 4
2.1 Uso previsto .................................................................................................. 4
2.2 Instrucciones generales de seguridad ........................................................... 4
2.3 Símbolos presentes en la silla de ruedas ...................................................... 4
2.4 Transporte ..................................................................................................... 5
2.5 Plegado / Desplegado ................................................................................... 5
2.6 Almacenamiento ........................................................................................... 6
3 Utilizar la silla de ruedas .............................................................................. 7
3.1 Montaje o desmontaje de los reposapiés ..................................................... 7
3.2 Accionamiento de los frenos ......................................................................... 7
3.3 Montaje y desmontaje de los reposabrazos .................................................. 8
3.4 Ajuste el antivuelco (cuando esté incluido) ................................................... 8
3.5 Montaje o desmontaje de la barra de empuje ............................................... 9
3.6 Traslado a la silla de ruedas y desde esta .................................................... 9
3.7 Conducción de la silla de ruedas ................................................................ 10
4 Mantenimiento............................................................................................. 13
4.1 Puntos de mantenimiento ........................................................................... 13
4.2 Instrucciones de mantenimiento ................................................................. 13
4.3 Resolución de problemas ............................................................................ 14
4.4 Vida útil prevista .......................................................................................... 14
4.5 Reutilizar ..................................................................................................... 14
4.6 Fin de vida útil ............................................................................................. 14
5 Especificaciones técnicas ......................................................................... 15

EN
NL
ES
V300 XL
2022-07
Contenido
2
Introducción
¡Felicidades! Es usted el propietario de una silla de ruedas Vermeiren.
Esta silla de ruedas ha sido fabricada por personal experto y cualificado. Se ha diseñado y
fabricado según los más altos estándares de calidad implementados por Vermeiren.
Le agradecemos su confianza en los productos Vermeiren. Le ofrecemos este manual para
ayudarle en la utilización de su silla de ruedas y sus opciones de manejo. Léalo detenidamente.
Le ayudará a familiarizarse con el manejo, las capacidades y limitaciones de su silla de ruedas.
Si todavía tiene alguna duda después de leer este manual, contacte con su distribuidor
especializado, estará encantado de ayudarle.
Nota importante
Para garantizar su seguridad y prolongar la vida útil de su producto, cuídelo bien y asegúrese de
realizar revisiones y mantenimientos de manera regular.
Este manual refleja los desarrollos más recientes del producto. Vermeiren se reserva el derecho
a implementar cambios en este tipo de producto sin que ello suponga obligación alguna de
adaptar o cambiar productos similares previamente entregados.
Las imágenes del producto están presentes para clarificar las instrucciones contenidas en este
manual. Los detalles del producto mostrado pueden variar con su producto.
Información disponible
En nuestro sitio web http://www.vermeiren.com/ siempre encontrará la versión más reciente de
la información en este manual. Consulte este sitio web de manera regular para estar al tanto de
posibles actualizaciones.
Las personas con discapacidad visual pueden descargarse la versión electrónica del manual y
utilizar un software de síntesis de voz para poder oír su contenido.
Manual de instrucciones
Para el usuario y el distribuidor especializado
Instrucciones de instalación
Para el distribuidor especializado
Manual de mantenimiento para sillas de ruedas
Para el distribuidor especializado
Declaración CE de conformidad

EN
NL
ES
V300 XL
2022-07
Contenido
3
1
2
3
4
5
6
8
7
9
1
0
1
1
1
2
1
3
1
4
1
5
1 Su producto
1. Empuñaduras
2. Barra de empuje
3. Respaldo
4. Almohadillas del
reposabrazos
5. Reposabrazos
6. Asiento
7. Reposapiés
8. Paletas
9. Ruedas de dirección
(Ruedas delanteras)
10. Frenos
11. Ruedas de tracción
(Ruedas traseras)
12. Aros de propulsión
13. Tapón
14. Cruceta
15.
Placa de identificación

EN
NL
ES
V300 XL
2022-07
Contenido
4
2 Antes de su uso
2.1 Uso previsto
Indicaciones y contraindicaciones: Esta silla de ruedas está pensada para usuarios que
necesitan una anchura de asiento superior a 50 cm y/o un peso de usuario superior. El usuario
puede autopropulsar la silla de ruedas o disponer de un acompañante que la empuje. La silla
de ruedas está diseñada para personas mayore o personas con movilidad reducida o nula, así
como personas con parálisis, pérdida de miembros, deformaciones o defectos en los
miembros, articulaciones anquilosadas o dañadas, insuficiencias cardíacas o circulatorias,
problemas de equilibrio , caquexia (atrofia muscular), … NO utilizar la silla de ruedas sin un
auxiliar si sufre de discapacidades físicas o mentales que puedan ponerle en riesgo a usted o
a otras personas al conducir la silla de ruedas. Por tanto, consulte primero con su médico y
asegúrese de que su distribuidor especializado esté al tanto de los consejos de su médico.
Esta silla de ruedas es apta para su uso en interiores y exteriores.
Esta silla de ruedas está diseñada y fabricada exclusivamente para transportar a una (1)
persona con un peso máximo de 170kg. No está diseñada para transportar mercancías u
objetos, o para otros usos que no sean los descritos anteriormente.
Utilizar sólo accesorios y piezas de repuesto aprobadas por Vermeiren.
Consulte todos los datos técnicos y las limitaciones de la silla de ruedas en el capítulo 5.
La garantía de este producto se basa en el uso y mantenimiento normales descritos en este
manual. La garantía se invalida si el producto sufre cualquier daño causado por un uso
indebido o falta de mantenimiento.
2.2 Instrucciones generales de seguridad
Riesgo de lesiones y daños
Lea y siga las
instrucciones contenidas en este manual. De no seguirlas, puede acabar
lesionándose a sí mismo, o acabar rompiendo la silla de ruedas.
Tener en cuenta las siguientes advertencias durante su utilización:
No utilizar la silla de ruedas si ha consumido alcohol, medicamentos u otras sustancias que
afecten la capacidad de conducir.
Téngase en cuenta que ciertas partes de la silla de ruedas pueden llegar a calentarse o
enfriarse demasiado a causa de la temperatura ambiente, la luz del sol o la calefacción.
Téngase cuidado al tocar la silla de ruedas. Llevar ropa protectora cuando haga frío. Cuando
salga al exterior, puede utilizar guantes protectores para mejorar el agarre de los aros
propulsores.
No modificar esta silla de ruedas de ningún modo.
Tenga en cuenta que su silla de ruedas puede interferir con algunos tipos de sistemas antirrobo,
según la configuración utilizada. Esto puede hacer que se active la alarma de la tienda.
En caso de que se produzca un incidente grave con su producto, notifique a Vermeiren o a su
distribuidor especializado, así como a la autoridad competente de su país.
2.3 Símbolos presentes en la silla de ruedas
Peso máximo del usuario en kg
Uso en interior/exterior
Pendiente máxima segura en ° (grados)
PRECAUCIÓN

EN
NL
ES
V300 XL
2022-07
Contenido
5
Tipo de modelo
2.4 Transporte
2.4.1 Transporte mediante vehículo como equipaje
Riesgo de lesiones
NO utilizar la silla de ruedas como asiento en un vehículo; ver siguiente símbolo.
Compruebe que la silla de ruedas está fijada correctamente para no hacer daño a
los pasajeros en caso de colisión o frenada brusca.
No utilice NUNCA el mismo cinturón de seguridad para fijar la silla de ruedas y el pasajero.
1. Retire los reposapiés, reposabrazos y demás accesorios.
2. Guarde de forma segura los reposa piernas, los reposabrazos y demás accesorios.
3. Si es posible, pliegue la silla de ruedas y retire las ruedas traseras.
4. Coloque la silla de ruedas en el compartimento de equipajes.
5. Si la silla de ruedas y el compartimento de los pasajeros NO están separados, sujete el
armazón de la silla de ruedas firmemente al vehículo. Puede utilizar los cinturones de
seguridad disponibles en el vehículo.
2.5 Plegado / Desplegado
Riesgo de lesiones
M
antenga los dedos alejados de las partes móviles de la silla de ruedas.
2.5.1 Desplegado de la silla de ruedas
1. Sitúese detrás de la silla de ruedas.
2. Use las empuñaduras para abrir la silla de ruedas tanto como le sea posible.
3. Sitúese delante de la silla de ruedas.
4. Empuje los dos tubos del asiento hacia abajo hasta que queden fijados en su posición.
5. Monte la barra de empuje (véase §3.5).
2.5.2 Plegado de la silla de ruedas
1. Retire la barra de empuje (véase §3.5).
2. Pliegue las paletas o retire los reposapiés (véase § 3.1).
3. Sujete el asiento por la parte delantera y trasera y tire de él hacia arriba.
2.5.3 Montaje de las ruedas traseras
1. Sujete la rueda trasera y presione el botón (1).
2. Mantenga el botón presionado y monte el eje de las ruedas
traseras hasta el tope.
3. Suelte el botón.
4. Compruebe que la rueda está segura.
2.5.4 Extracción de las ruedas
1. Asegúrese de que los frenos no están accionados.
2. Coloque la silla de ruedas del lado del armazón de la rueda que
desea extraer.
3. Pulse el botón (1) situado en la parte central del cubo de la
rueda.
4. Tire de la rueda para extraerla del chasis.
AVISO
PRECAUCIÓN
1

EN
NL
ES
V300 XL
2022-07
Contenido
6
2.6 Almacenamiento
Asegurarse de que la silla de ruedas se almacena en un lugar seco para evitar la aparición
de moho y que se dañe la tapicería; ver también el apartado 5.

EN
NL
ES
V300 XL
2022-07
Contenido
7
3 Utilizar la silla de ruedas
Riesgo de lesiones
Leer antes los capítulos anteriores e informarse sobre el uso previsto. NO utilizar la silla de
ruedas si no se han leído detenidamente y entendido completamente todas las instrucciones.
En caso de tener dudas o preguntas, contacte con su distribuidor esp
ecializado local,
proveedor de cuidados o asesor técnico para recibir asesoramiento
.
3.1 Montaje o desmontaje de los reposapiés
El montaje de los reposapiés se realiza del modo siguiente:
1. Mantenga el reposapiés en posición vertical por la parte
externa del armazón de las silla de ruedas e inserte el
capuchón del tubo (1) en el armazón.
2. Gire el reposapiés hacia el interior hasta que encaje en su
posición con un clic.
3. Gire la paleta hacia abajo.
Para retirar los reposapiés:
1. Tire de la empuñadura (2).
2. Gire el reposapiés hacia la parte externa de la silla de ruedas
hasta que se afloje de la guía.
3. Saque el reposapiés del capuchón del tubo (1).
3.2 Accionamiento de los frenos
Riesgo de lesiones
Los frenos no se utilizan para reducir la velocidad de la silla de ruedas durante los
movimientos. Utilice los frenos solo para evitar que la silla de ruedas realice movimientos no
deseados.
El buen funcionamiento de los frenos depende de su
desgaste y de las sustancias presentes
en ellas (agua, aceite, barro, etc.). Compruebe las condiciones de las ruedas antes de
utilizarlas.
Los frenos se pueden ajustar y pueden desgastarse. Compruebe el funcionamiento de los
frenos antes de cada uso.
Asegúrese de que la silla de ruedas está en una superficie plana horizontal antes de soltar los
frenos. Nunca suelte ambos frenos a la vez
.
Para accionar los frenos:
1. Empuje las palancas del freno hacia delante hasta que oiga un clic.
Para soltar los frenos:
1. Tire de la palanca hacia atrás para soltar un freno.
2. Sujete el aro de propulsión de la rueda que haya soltado.
3. Tire de la palanca del segundo freno hacia atrás.
AVISO
PRECAUCIÓN
1
2

EN
NL
ES
V300 XL
2022-07
Contenido
8
3.3 Montaje y desmontaje de los reposabrazos
Riesgo de lesiones
Mantenga los dedos, las hebillas y la ropa alejados de la parte inferior del reposabrazos.
Los reposabrazos de la silla de ruedas pueden montaje con las instrucciones siguientes.
1. Monte el tubo posterior del reposabrazos en el capuchón del
tubo (1).
2. Asegúrese de que el reposabrazos hace clic en el mecanismo
de bloqueo.
3. Pliegue el reposabrazos hacia delante.
4. Inserte, hasta oír un clic, el tubo frontal del reposabrazos en
el capuchón del tubo (2).
Para abrir y retirar el reposabrazos:
1. Presione la palanca (3) y tire de la parte delantera del
reposabrazos hacia arriba.
2. Pliegue el reposabrazos hacia atrás.
3. Para retirar el reposabrazos, pulse el botón (4) y extraiga la parte
posterior del reposabrazos del capuchón del tubo (1).
3.4 Ajuste el antivuelco (cuando esté incluido)
Ajuste la altura del antivuelco de la siguiente manera en siete
posiciones (distancia de 120 mm, a intervalos de 20 mm):
1. Afloje un poco el pomo de estrella .
2. Desplace el tubo del antivuelco hasta la altura que desee
3. Fíjelo con el pomo de estrella .
4. Compruebe que el antivuelco esté bien sujeto.
PRECAUCIÓN
3
2
1
4
1

EN
NL
ES
V300 XL
2022-07
Contenido
9
3.5 Montaje o desmontaje de la barra de empuje
Riesgo de lesiones
Asegúrese de que los botones Ⓐ están apretados.
Cuando esté equipada con barra de empuje, ésta siempre deberá montarse para aumentar la
estabilidad del respaldo.
Para montar la barra de empuje:
1. Monte la barra de empuje Ⓑ con el pomo de estrella Ⓐ en la empuñadura izquierda.
2. Gire la barra de empuje Ⓑ hacia la derecha.
3. Monte el gancho Ⓒ en la empuñadura derecha Ⓓ tal y como se muestra en el dibujo. Utilice
los agujeros o para ajustar la tensión del respaldo.
Para retirar la barra de empuje:
1. Afloje el pomo de estrella Ⓐ de la empuñadura derecha.
2. Retire el gancho Ⓒ de la empuñadura derecha Ⓓ.
3.6 Traslado a la silla de ruedas y desde esta
Riesgo de lesiones
En caso de que no pueda realizar el traslado de forma segura, pida a alguien que le ayude.
No se ponga de pie en las paletas
.
1. Coloque la silla de ruedas lo más cerca posible de la silla, el
sillón o la cama desde la que desea trasladarse o a la que
desee ir.
2. Compruebe que los dos frenos de la silla de ruedas estén
accionados.
3. Pliegue las paletas hacia arriba para evitar ponerse de pie
en ellos.
4. Si el traslado se realiza por el lateral de la silla de ruedas,
retirar el reposabrazos de ese lado (véase §3.3) y presione
hacia abajo la palanca de freno.
5. Traslado a/desde la silla de ruedas.
3.6.1 Posición correcta en la silla de ruedas
Algunas recomendaciones para un uso confortable de la silla de ruedas:
Coloque la espalda lo más cerca posible del respaldo.
Asegúrese de que la parte superior de las piernas se encuentre en posición horizontal. En
caso necesario, ajuste la longitud de los reposapiés (véase el manual de instalación).
ADVERTENCIA
PRECAUCIÓN

EN
NL
ES
V300 XL
2022-07
Contenido
10
3.7 Conducción de la silla de ruedas
Riesgo de lesiones y daños
Antes de cada uso, asegurarse de que:
o los frenos de estacionamiento funcionan adecuadamente.
o los neumáticos están en buen estado, ver apartado 4.
Tener cuidado de no pillarse los dedos con los radios de las ruedas.
No manipular los aros propulsores con las manos mojadas.
Tener cuidado de no pillarse las manos con los aros propulsores
cuando esté atravesando
espacios muy estrechos.
NO conducir en pendientes o sobre obstáculos, escalones o bordillos que excedan las
dimensiones que se detallan en el apartado 5.
Cuando se detenga en una pendiente (no muy inclinada), utilizar los frenos.
Asegurarse de que las cuatro ruedas están en contacto con el suelo cuando se esté subiendo
o bajando una pendiente.
A la hora de conducir en zonas de pendiente, hacerlo lo más despacio posible.
Permanecer siempre en la zona pavimentada cuando se circule por vías públicas.
Prestar atención a la carretera para detectar baches o grietas en los que puedan quedar
atrapadas las ruedas.
Evitar las piedras u otros objetos que puedan bloquear las ruedas.
Asegurarse de que los reposapiés no chocan contra el suelo cuando esté atravesando un
obstáculo.
No utilizar la silla de ruedas en escaleras mecánicas.
Si se dispone de él, abrocharse el cinturón de seguridad.
Téngas
e siempre en cuenta el alcance de giro del reposapiés para evitar lesionar a otras
personas o dañar objetos.
Si no se tiene suficiente experiencia manejando la silla de ruedas, pedir ayuda a un auxiliar.
Mantener los brazos alejados de las ruedas y los pies sobre el reposapiés.
A la hora de atravesar escaleras, se debe contar siempre con la ayuda de dos auxiliares.
No tratar nunca de utilizar escaleras que no estén diseñadas para sillas de ruedas.
3.7.1 Conducir la silla de ruedas:
1. Soltar los frenos.
2. Agarrar ambos aros propulsores desde el punto más alto.
3. Inclinarse hacia adelante y empujar los aros propulsores hacia adelante hasta que sus brazos
queden rectos.
4. Mover las manos de nuevo hacia la parte más alta de los aros y repetir el movimiento.
3.7.2 Desplazamiento por pendientes
Riesgo de lesiones
Desplácese por las pendientes con la mayor lentitud posible.
Si su acompañante no tiene fuerza suficiente para controlar la silla de ruedas, active los frenos
.
inclínese hacia delante para desplazar el centro de gravedad hacia delante. Para tener una
mejor estabilidad
.
1. Si hay un cinturón de seguridad disponible en la silla de ruedas,
abrócheselo.
2. No intente desplazarse por pendientes demasiado inclinadas. Los
ángulos de pendiente máximos (ascendentes y descendentes) están
indicados en la tabla 1.
3. Pida a un acompañante que le ayude a desplazarse por la pendiente.
PRECAUCIÓN
ADVERTENCIA

EN
NL
ES
V300 XL
2022-07
Contenido
11
4. Inclínese hacia delante para desplazar su centro de gravedad hacia
delante.
3.7.3 Franqueo de peldaños y bordillos
Riesgo de lesiones
Si no tiene
suficiente experiencia con su silla de ruedas, pida ayuda a un acompañante
.
Bajar peldaños y bordillos
Se pueden bajar bordillos pequeños desplazándose hacia delante. Asegúrese de que los
reposapiés no tocan el suelo.
Los usuarios experimentados puede franquear peldaños y bordillos
pequeños sin ayuda:
1. Mantenga el equilibrio sobre las ruedas traseras para reducir la
presión sobre las ruedas delanteras.
2. Franquee el bordillo.
Salve los bordillos más altos con la ayuda de un acompañante:
1. Pida al acompañante que incline la silla de ruedas ligeramente hacia atrás.
2. Pase el bordillo desplazándose con las ruedas traseras.
3. Coloque la silla de ruedas de nuevo sobre las cuatro ruedas.
Los usuarios experimentados pueden franquear bordillos altos sin ayuda. Esta acción se realiza
mejor de espaldas.
1. Gire la silla de ruedas de forma que las ruedas traseras queden
orientadas al bordillo.
2. Inclínese hacia delante para desplazar su centro de gravedad hacia
delante.
3. Desplace la silla de ruedas cerca del bordillo.
4. Use el aro de propulsión para hacer rodar la silla de ruedas desde el
bordillo de manera controlada.
Subir peldaños y bordillos
Para subir peldaños y bordillos con la ayuda de un acompañante, haga lo siguiente:
1. Evite que los reposapiés toquen el bordillo.
2. Pida al acompañante que incline la silla hacia atrás, lo
suficiente para desplazar las ruedas delanteras por encima del
bordillo.
3. Inclínese hacia atrás para desplazar su centro de gravedad sobre la
rueda trasera.
4. Coloque las ruedas delanteras sobre el bordillo.
5. Haga girar las ruedas traseras de la silla de ruedas sobre el bordillo.
Los bordillos más altos se franquean de espaldas:
1. Gire la silla de ruedas de forma que las ruedas traseras queden orientadas al bordillo.
2. Inclínese hacia atrás y desplace su centro de gravedad sobre las ruedas traseras.
3. Pida al acompañante que tire de la silla sobre el bordillo.
4. Vuelva a la posición normal en la silla de ruedas.
ADVERTENCIA

EN
NL
ES
V300 XL
2022-07
Contenido
12
Los usuarios experimentados pueden franquear bordillos sin ayuda:
1. Acérquese hasta el bordillo.
2. Asegúrese de que el reposapiés no toca el bordillo.
3. Inclínese hacia atrás de forma que mantenga el equilibrio sobre las
ruedas traseras.
4. Haga rodar las ruedas delanteras manteniendo el equilibrio sobre el
bordillo.
5. Inclínese hacia delante para mayor estabilidad.
6. Haga rodar las ruedas traseras sobre el bordillo.
3.7.4 Desplazamientos por escaleras
Riesgo de lesiones
E
l desplazamiento por escaleras deberá realizarse siempre con 2
acompañantes
.
Para desplazarse por las escaleras mientras está en una silla de ruedas, siga las instrucciones
siguientes:
1. Un acompañante inclina la silla de ruedas ligeramente hacia atrás.
2. El segundo acompañante sujeta la parte frontal del chasis.
3. Mantenga la calma, evite los movimientos bruscos y mantenga los brazos dentro de la silla
de ruedas.
4. Para desplazarse por las escaleras utilice las ruedas traseras de la silla.
ADVERTENCIA

EN
NL
ES
V300 XL
2022-07
Contenido
13
4 Mantenimiento
4.1 Puntos de mantenimiento
Riesgo de lesiones y daños
Cualquier reparación o cambios sólo pueden llevarse a cabo por personal debidamente
cualificado y sólo pueden utilizarse piezas de recambio Vermeiren originales.
La frecuencia de los mantenimientos depende de la frecuencia e intensidad de uso.
Póngase e
n contacto con su distribuidor para acordar un horario común para realizar
inspecciones, mantenimientos y reparaciones.
Para consultar el manual de mantenimiento, visite el sitio web de Vermeiren:
www.vermeiren.com.
Antes de cada uso
Inspeccionar los siguientes aspectos:
Todas las piezas: Presentes y sin daños o desgastes.
Todas las piezas: Limpieza, ver apartado 4.2.2.
Ruedas, respaldo, asiento, soportes para pantorrillas, reposabrazos, reposapiés: Bien
asegurados.
Estado de las ruedas/los neumáticos, ver apartado 4.2.1;
Estado de las piezas del bastidor: Sin deformaciones, inestabilidad, debilidad o conexiones
sueltas
Asiento, respaldo, almohadillas para los brazos y para las pantorrillas, reposacabezas (si
corresponde): Sin desgaste excesivo (como abolladuras, daños o grietas).
Frenos: Sin deterioro y en buen estado de funcionamiento.
Póngase en contacto con el distribuidor especializado para posibles reparaciones o sustitución
de piezas.
Anualmente o más regularmente
La silla de ruedas debe superar una inspección y una sesión de mantenimiento realizados por el
distribuidor especializado por lo menos una vez al año, o con mayor frecuencia. La frecuencia
mínima de mantenimiento depende del uso y debe, por tanto, acordarse mutuamente con el
distribuidor especializado.
4.2 Instrucciones de mantenimiento
4.2.1 Ruedas y neumáticos
El correcto funcionamiento de los frenos depende del estado de los neumáticos y puede
cambiar debido al desgaste o la suciedad (agua, aceite, barro…).
Mantener las ruedas libres de cables, pelos, arena y fibras.
Comprobar el perfil de los neumáticos. Si la profundidad del dibujo es inferior a 1 mm, deben
sustituirse los neumáticos. Ponerse en contacto con su distribuidor especializado a este respecto.
Hinchar cada neumático hasta alcanzar la presión correcta (ver la indicación de presión en los
neumáticos).
4.2.2 Limpieza
Riesgo de daños por humedad
No utilizar nunca una manguera o un limpiador a alta presión para limpiar la silla de ruedas.
PRECAUCIÓN
PRECAUCIÓN

EN
NL
ES
V300 XL
2022-07
Contenido
14
Limpiar todas las piezas rígidas de la silla de ruedas con un paño húmedo (no empapado).
Si fuera necesario, utilizar un jabón suave que sea apto para limpiar superficies barnizadas y
sintéticas.
La tapicería puede limpiarse con agua templada y jabón suave. No utilizar productos de limpieza
abrasivos.
4.2.3 Desinfección
Riesgo de daños
La desinfección sólo puede llevarla a cabo personal debidamente cualificado. Consultar con su
distribuidor especializado al respecto.
4.3 Resolución de problemas
Aunque se utilice la silla de ruedas de la manera indicada, a veces pueden surgir problemas
técnicos. En ese caso, póngase en contacto con su distribuidor especializado.
Riesgo de lesiones y daños a la silla de ruedas
No intentar NUNCA reparar la
silla de ruedas por su cuenta.
Los siguientes signos pueden ser indicadores de un problema grave. Se recomienda, por tanto,
ponerse en contacto con su distribuidor especializado si nota los siguientes problemas:
Ruidos extraños;
Desgaste desigual de la banda de uno de los neumáticos;
Movimientos bruscos;
La silla de ruedas se desvía a un lado;
Ensamblajes de las ruedas dañados o rotos.
4.4 Vida útil prevista
La vida útil media de la silla de ruedas es de 5 años. La vida útil aumentará o disminuirá
dependiendo de la frecuencia de uso, las circunstancias de conducción y el mantenimiento.
4.5 Reutilizar
Antes de reutilizar la silla de ruedas, desinfectarla, inspeccionarla y hacer que pase por un
mantenimiento según las instrucciones en el §4.1 y el §4.2.
4.6 Fin de vida útil
Al final de la vida útil, deberá desechar la silla de ruedas siguiendo las leyes medioambientales
de su localidad. Para transportar materiales reciclables de la silla de ruedas de manera más
cómoda, se recomienda que se desmonte primero.
PRECAUCIÓN
AVISO

EN
NL
ES
V300 XL
2022-07
Contenido
15
5 Especificaciones técnicas
Las condiciones técnicas indicadas a continuación son válidas para sillas de ruedas de
configuración estándar. En caso de utilizar reposapiés/reposabrazos u otros accesorios
diferentes a los indicados, los valores cambian.
Ma
rca
Vermeiren
Tipo
Silla de ruedas manual
Modelo
V
3
00
XL
Peso
máximo del ocupante
1
7
0 kg
Descripción
Dimensiones mínimas
Dimensiones máximas
Longitud total con reposapiés 1085 mm
Anchura útil del asiento 530 mm 560 mm 600 mm
Anchura total (depende de la anchura del
asiento)
740 mm 770 mm 810 mm
Longitud plegada 1060 mm
Anchura plegada 350 mm
Altura plegada (depende de la altura de
asiento)
840 mm 930 mm
Peso total 21,00 kg
Peso de la parte más pesada 13,35 kg
Peso de las partes que pueden desmontarse
o quitarse.
Reposapiés: 1,75 kg; Reposabrazos: 1,8 kg;
Ruedas traseras:
4,05 kg
Estabilidad estática en pendientes
descendentes
6,5°
Estabilidad estática en pendientes
ascendentes
6,5°
Estabilidad estática lateral 18°
Superación de obstáculos 60 mm
Ángulo plano del asiento 0° 10°
Profundidad útil del asiento 490 mm 530 mm
Altura de la superficie del asiento en la parte
delantera
440 mm 530 mm
Ángulo del respaldo 5°
Altura del respaldo 400 mm
Distancia entre el reposapiés y el asiento 400 mm
500 mm
Ángulo entre el asiento y la base del
reposapiés
5° 25°
Ángulo entre el asiento y el reposa piernas 105°
Ángulo entre el reposa piernas y la paleta 80°
Distancia entre la almohadilla del
reposabrazos y el asiento
220 mm 240 mm
Ubicación delantera del armazón de la
almohadilla del reposabrazos
410 mm
Diámetro del aro de propulsión 535 mm
Ubicación horizontal del eje (deflexión) 1,27 mm 61,04 mm
Radio de giro mínimo 1500 mm

EN
NL
ES
V300 XL
2022-07
Contenido
16
Diámetro de ruedas traseras PUR 22" 24"
Presión de los neumáticos, ruedas traseras
(de tracción)
Máx. 3,5 bar
Diámetro de las ruedas de dirección PUR 200 mm
Presión de los neumáticos, ruedas de
dirección
Máx. 2,5 bar
Material del chasis Aluminio
Material del tapizado Nylon
Temperatura de almacenamiento y de uso + 5 °C + 41 °C
Humedad de almacenamiento y de uso 30% 70%
Nos reservamos el derecho a aplicar modificaciones técnicas.
Tolerancia de la medida ± 15 mm
/
1,5 kg
/
,
1,5°

V300 XL
2022-07
Content
1
EN
NL
PL
Spis treści
Spis treści .................................................................................................................. 1
Wstęp ........................................................................................................................ 2
1 Twój produkt .................................................................................................. 3
2 Przed użyciem ............................................................................................... 4
2.1 Przewidziane zastosowanie .......................................................................... 4
2.2 Symbole na wózku inwalidzkim ..................................................................... 4
2.3 Symbole na wózku inwalidzkim ..................................................................... 5
2.4 Transport ....................................................................................................... 5
2.5 Składanie / Rozkładanie ................................................................................ 5
2.6 Przechowywanie ............................................................................................ 6
3 Używanie wózka ............................................................................................ 7
3.1 Montaż i demontaż podnóżków .................................................................... 7
3.2 Obsługa hamulców ........................................................................................ 7
3.3 Montaż i demontaż podłokietników ................................................................ 7
3.4 Regulacja zabezpieczenia przed przewróceniem (kiedy zapewniony) .......... 8
3.5 Montaż i demontaż uchwytu poprzecznego ................................................... 9
3.6 Wsiadanie i zsiadanie z wózka inwalidzkiego ................................................ 9
3.7 Jazda na wózku inwalidzkim ....................................................................... 10
4 Konserwacja ................................................................................................ 13
4.1 Czas konserwacji ......................................................................................... 13
4.2 Instrukcje konserwacji ................................................................................. 13
4.3 Rozwiązywania problemów ......................................................................... 14
4.4 Oczekiwany okres użytkowania ................................................................... 14
4.5 Ponowne użycie .......................................................................................... 14
4.6 Zakończenie użytkowania ........................................................................... 14
5 Parametry techniczne ................................................................................. 15

V300 XL
2022-07
Content
2
EN
NL
PL
Wstęp
Gratulacje! Jesteś teraz właścicielem wózka inwalidzkiego Vermeiren!
Wózek zbudował zespół złożony z wykwalifikowanych i zaangażowanych pracowników.
Zaprojektowano go i wyprodukowano zgodnie z wysokimi standardami jakości, jakich przestrzega
Vermeiren.
Dziękujemy za zaufanie firmie Vermeiren i jej produktom. Niniejsza instrukcja pomoże
właścicielowi w eksploatacji wózka inwalidzkiego i korzystaniu z jego opcji. Prosimy o uważne
przeczytanie instrukcji obsługi. Pozwoli ona na zapoznanie się z działaniem, możliwościami i
ograniczeniami wózka.
W razie pytań, na które odpowiedzi nie ma w instrukcji, prosimy o kontakt z Państwa
wyspecjalizowanym sprzedawcą. Sprzedawca chętnie służy pomocą.
Ważna uwaga
Aby zapewnić bezpieczeństwo i wydłużyć okres użytkowania produktu, prosimy o dbanie o niego
oraz regularne dokonywanie przeglądów i serwisowanie.
Instrukcja obejmuje najnowsze rozwiązania zastosowane w produkcie. Firma Vermeiren ma
prawo do wprowadzania zmian w produktach tego typu bez obowiązku adaptowania lub wymiany
podobnych, poprzednio dostarczonych produktów.
Ilustracje produktu stanowią dodatkowe objaśnienia do instrukcji w niniejszym dokumencie.
Szczegóły przedstawionego produktu mogą się różnić od rzeczywistego produktu posiadanego
przez użytkownika.
Dostępne informacje
W naszej witrynie internetowej http://www.vermeiren.com/ zawsze znajduje się najnowsza wersja
informacji zamieszczonych w instrukcji. Prosimy regularnie odwiedzać witrynę, ponieważ
możemy w niej zamieszczać zaktualizowane informacje.
Osoby z zaburzeniami wzroku mogą pobrać elektroniczną wersję niniejszej instrukcji i odsłuchać
ją przy użyciu oprogramowania zamieniającego tekst na mowę.
Instrukcja obsługi
Dla użytkownika i specjalistycznego dystrybutora
Instrukcja instalacji
Dla specjalistycznego dystrybutora
Instrukcja serwisowa dla wózków inwalidzkich
Dla specjalistycznego dystrybutora
Deklaracja zgodności WE

V300 XL
2022-07
Content
3
EN
NL
PL
1
2
3
4
5
6
8
7
9
1
0
1
1
1
2
1
3
1
4
1
5
1 Twój produkt
1. Uchwyty
2. Uchwyt poprzeczny
3. Oparcie
4. Poduszka podłokietnika
5. Podłokietniki
6. Siedzisko
7. Podnóżki
8. Płyty podnóżków
9. Koła skrętne
(przednie koła)
10. Hamulce
11. Koła napędowe (tylne)
12. Obręcze
13. Zaślepka
14. Krzyżak
15. Tabliczka znamionowa

V300 XL
2022-07
Content
4
EN
NL
PL
2 Przed użyciem
2.1 Przewidziane zastosowanie
Wskazania i przeciwwskazania: Ten wózek inwalidzki jest przeznaczony dla użytkowników,
którzy potrzebują większej szerokości siedziska niż 50 cm i/lub większej wagi użytkownika.
Użytkownik może napędzać wózek samodzielnie lub może być popychany przez opiekuna.
Wózek inwalidzki jest przeznaczony dla osób w podeszłym wieku lub osób o ograniczonej
zdolności lub braku zdolności chodzenia, z powodów takich jak paraliż, utrata kończyn,
uszkodzenia lub deformacji kończyn, sztywne lub uszkodzone stawy, niewydolność serca i
słabe krążenie krwi, zaburzenia równowagi, kacheksja (ubytków masy mięśniowej), … NIE
WOLNO używać wózka inwalidzkiego bez pomocy asystenta, jeśli użytkownik cierpi na
zaburzenia fizyczne lub psychiczne, które mogłyby narazić użytkownika lub inne osoby na
niebezpieczeństwo podczas jazdy na wózku. Z wymienionych powodów należy przed
rozpoczęciem użytkowania wózka zasięgnąć porady lekarza i upewnić się, że
wyspecjalizowany sprzedawca zapoznał się z jego poradą.
Niniejszy wózek inwalidzki jest przeznaczony do użytku w pomieszczeniach i na zewnątrz.
Niniejszy wózek inwalidzki jest zaprojektowany i produkowany do transportu wyłącznie jednej
(1) osoby ważącej maksymalnie 170kg. Nie jest przeznaczony do transportu towarów,
przedmiotów ani innego wykorzystania niż wcześniej opisane.
Używać wyłącznie akcesoriów i części zapasowych zatwierdzonych przez Vermeiren.
Należy się zapoznać ze wszystkimi danymi technicznymi i ograniczeniami wózka, które
wskazano w rozdziale 5.
Gwarancja na produkt jest udzielona przy założeniu normalnego użytkowania i konserwacji,
opisanych w niniejszej instrukcji. Uszkodzenie produktu spowodowane nieprawidłową
eksploatacją lub brakiem konserwacji spowoduje unieważnienie gwarancji.
2.2 Symbole na wózku inwalidzkim
Ryzyko obrażeń i/lub uszkodzeń
Należy przeczytać zalecenia podane w niniejszej instrukcji i postępować zgodnie z nimi.
Niestosowanie się do tych zaleceń może spowodować uraz lu
b uszkodzenie wózka
inwalidzkiego.
Podczas użytkowania należy pamiętać o ostrzeżeniach ogólnych:
Nie korzystać z wózka inwalidzkiego będąc pod wpływem alkoholu, leków lub innych substancji
mogących wpływać na zgodności do jazdy.
Należy pamiętać, że niektóre części wózka mogą się mocno rozgrzewać lub ochładzać pod
wpływem temperatury zewnętrznej, promieniowania słonecznego lub urządzeń grzewczych.
Zachować ostrożność podczas dotykania. Nosić odzież ochronną podczas chłodnej pogody.
Będąc na zewnątrz można założyć rękawice do jazdy, poprawiając chwytność obręczy
napędowej.
Nie dokonywać żadnych modyfikacji wózka inwalidzkiego.
Korzystając z wózka inwalidzkiego musisz być świadomym, że w zależności od użytych ustawień
może on kolidować z niektórymi systemami antykradzieżowymi. Może to spowodować
uruchomienie alarmu w sklepie.
W przypadku wystąpienia poważnego incydentu z udziałem produktu, należy powiadomić firmę
Vermeiren lub specjalistycznego sprzedawcę, jak również właściwe władze w swoim kraju.
PRZESTROGA

V300 XL
2022-07
Content
5
EN
NL
PL
2.3 Symbole na wózku inwalidzkim
Maksymalna masa użytkownika w kg
Do użytku na zewnątrz/w pomieszczeniach
Maksymalne bezpieczne nachylenie terenu w ° (stopniach)
Oznaczenie typu
2.4 Transport
2.4.1 Transport w pojeździe jako bagaż
Ryzyko obrażeń
NIE używać wózka inwalidzkiego jako siedzenia w pojeździe, patrz kolejny symbol.
Należy upewnić się, że wózek inwalidzki jest prawidłowo umocowany. Pozwoli to
zapobiec urazom pasażerów podczas kolizji lub gwałtownego hamowania.
NIGDY nie używaj jednego pasa bezpieczeństwa do zabezpieczenia pasażera i wózka
inwalidzkiego.
1. Wymontuj podnóżki, podłokietniki i akcesoria.
2. Umieść podnóżki, podłokietniki i akcesoria w bezpiecznym miejscu.
3. Jeśli to możliwe, złóż wózek inwalidzki i zdejmij tylne koła.
4. Umieść wózek inwalidzki w bagażniku.
5. Jeśli wózek NIE znajduje się w przedziale bagażowym oddzielonym od kabiny pasażerów,
dokładnie umocuj ramę wózka inwalidzkiego do pojazdu. Możesz skorzystać z nieużywanych
pasów bezpieczeństwa.
2.5 Składanie / Rozkładanie
Ryzyko obrażeń
Trzymaj palce w bezpiecznej odległości od ruchomych części wózka inwalidzkiego.
2.5.1 Rozkładanie wózka inwalidzkiego
1. Stań za wózkiem inwalidzkim.
2. Trzymając za uchwyty, maksymalnie rozłóż wózek.
3. Stań przed wózkiem inwalidzkim.
4. Dociśnij obie rurki siedziska w dół, aż zostaną zablokowane na pozycjach.
5. Zamontować uchwyt poprzeczny (patrz § 3.5).
2.5.2 Składanie wózka inwalidzkiego
1. Zdejmij uchwyt poprzeczny (patrz § 3.5).
2. Złóż płyty podnóżek lub wymontuj podnóżek (patrz § 3.1).
3. Chwyć siedzenie za przód i oparcie, a następnie pociągnij w górę.
OSTRZEŻENIE
PRZESTROGA

V300 XL
2022-07
Content
6
EN
NL
PL
2.5.3 Montaż kół tylnich
1. Chwyć tylne koło i naciśnij przycisk .
2. Przytrzymując wciśnięty przycisk, nałóż oś tylnego koła aż do
zablokowania.
3. Zwolnij przycisk.
4. Sprawdź, czy koło jest bezpiecznie zamocowane.
2.5.4 Zdejmowanie kół
1. Upewnij się, że hamulce są zwolnione.
2. Przejdź na stronę wózka, z której chcesz zdjąć koło.
3. Naciśnij przycisk pośrodku osi koła.
4. Zdejmij koło z ramy.
2.6 Przechowywanie
Wózek inwalidzki powinien być przechowywany w suchym środowisku, aby zapobiec
tworzeniu się na nim pleśni i uszkodzeniu tapicerki, patrz też rozdział 5.
1

V300 XL
2022-07
Content
7
EN
NL
PL
3 Używanie wózka
Ryzyko obrażeń
Zacząć od przeczytania poprzednich rozdziałów i zaznajomienia się z przewidzianym
zastosowaniem. NIE używać wózka, dopóki wszystkie instrukcje nie zostaną przeczytane i
zrozumiane.
W razie wątpliwości i pytań prosimy o kontakt z lokalnym wyspecjalizowanym
sprzedawcą,
opiekunem lub doradcą technicznym, który udzieli pomocy.
3.1 Montaż i demontaż podnóżków
Aby zamontować podnóżki:
1. Przytrzymaj podnóżek w poprzek po zewnętrznej stronie ramy
wózka i zamontuj rurkę w ramie.
2. Należy obrócić podnóżek do wewnątrz, aż wskoczy na swoje
miejsce.
3. Obrócić płytę podnóżka w dół.
Aby zdemontować podnóżki:
1. Należy pociągnąć za uchwyt .
2. Obrócić podnóżek na zewnątrz wózka, aż uwolni się z
ograniczników.
3. Wyciągnij rurkę podnóżka z ramy .
3.2 Obsługa hamulców
Ryzyko obrażeń
Hamulce nie służą do spowalniania wózka inwalidzkiego w trakcie ruchu.N
należy ich używać
wyłącznie, aby nie dopuścić do niepożądanych ruchów wózka.
Na prawidłową pracę hamulców wpływ ma zużycie oraz zanieczyszczenie ogumienia (woda,
olej, błoto, ...). Należy sprawdzać stan ogumienia przed każdym użyciem.
Hamulce są regulowane i mogą ulec zużyciu. Należy
sprawdzać stan hamulców przed każdym
użyciem.
przed zwolnieniem hamulców należy upewnić się,
że wózek inwalidzki znajduje się na płaskiej,
poziomej powierzchni. Nigdy nie zwalniaj obu hamulców jednocześnie
.
Aby zaciągnąć hamulec:
1. Należy popchnąć dźwignie hamulców w przód, aż da się słyszeć wyraźne kliknięcie.
Aby zwolnić hamulce:
1. Zwolnij jeden hamulec, pociągając dźwignię w tył.
2. Przytrzymaj dłonią obręcz zwolnionego koła.
3. Zwolnij drugi hamulec, pociągając dźwignię w tył.
3.3 Montaż i demontaż podłokietników
Ryzyko obrażeń
Trzymaj palce, zapięcia i odzież z dala od spodniej części podłokietnika.
Podłokietniki wózka inwalidzkiego można montaż zgodnie z instrukcją.
OSTRZEŻENIE
PRZESTROGA
PRZESTROGA
1
2

V300 XL
2022-07
Content
8
EN
NL
PL
1. Zamontuj tylną rurkę podłokietnika w ramie (1).
2. Upewnij się, że podłokietnik wskoczył do mechanizmu
blokującego.
3. Pochyl podłokietnik w przód.
4. Zamocuj przednią rurkę podłokietnika w ramie (2).
Aby rozłożyć i zdemontować podłokietnik:
1. Naciśnij dźwignię (3) i pociągnij przód podłokietnika w górę.
2. Odchyl podłokietnik w tył.
3. Aby wymontować podłokietnik, naciśnij przycisk (4) i wyciągnij
tył podłokietnika z ramy (1).
3.4 Regulacja zabezpieczenia przed przewróceniem (kiedy zapewniony)
Regulacja wysokości zabezpieczenie przed przewróceniem jedno z 7 położeń (zakres 120 mm:
skokowo co 20 mm):
1. Odkręć nieznacznie pokrętło .
2. Ustaw rurkę zabezpieczenie przed przewróceniem w
odpowiedniej wysokość.
3. Dokręć pokrętło .
4. Sprawdź, czy zabezpieczenie przed przewróceniem jest
odpowiednio zamontowane.
3
2
1
4
1

V300 XL
2022-07
Content
9
EN
NL
PL
3.5 Montaż i demontaż uchwytu poprzecznego
Ryzyko obrażeń
Należy upewnić się, że przycisk Ⓐ są odpowiednio dokręcone.
W przypadku, gdy wózek został wyposażony w drążek poprzeczny powinien on być zawsze
zamontowany aby zwiększyć stabilność oparcia.
Aby zamontować uchwyt poprzeczny:
1. Zamontuj uchwyt poprzeczny Ⓑ za pomocą pokrętła Ⓐ do lewego uchwytu.
2. Przechyl uchwyt poprzeczny Ⓑ w prawą stronę.
3. Przymocuj zaczep Ⓒ do prawego uchwytu Ⓓ tak jak na rysunku. Użyj otworów do
wyregulowania ustawienia odpowiedniego napiecia oparcia.
Aby zdemontować drążek poprzeczny:
1. Odkręć pokrętło Ⓐ przy prawym uchwycie.
2. Zdejmij zaczep Ⓒ z prawego uchwytu Ⓓ.
3.6 Wsiadanie i zsiadanie z wózka inwalidzkiego
Ryzyko obrażeń
Jeśli nie można
samemu bezpiecznie położyć się na łóżku rehabilitacyjnym lub wstać z niego,
należy poprosić kogoś o pomoc.
N
ie wolno stawać na płytach podnóżka
.
1. Ustaw wózek jak najbliżej krzesła, kanapy bądź łóżka, na
które chcesz wysiąść.
2. Sprawdź, czy oba hamulce zostały zaciśnięte.
3. Należy odchylić płyty podnóżka w górę, aby uniknąć
stawania na nich.
4. Jeśli przemieszczanie zachodzi w poprzek wózka należy
zdemontować podłokietnik po tej stronie wózka po z której
będzie wykonywana czynność schodzenia z wózka
(patrz § 3.3) i należy zaciągnąć dźwignię hamulca w dół.
5. Wsiądź na/zsiądź z wózka inwalidzkiego.
3.6.1 Prawidłowa pozycja w wózku inwalidzkim
Zalecenia dotyczące wygodnego korzystania z wózka inwalidzkiego:
Ułóż plecy tak blisko oparcia, jak to możliwe.
Upewnij się, że uda ułożone są w poziomie - w razie potrzeby dostosuj długość podnóżków
(patrz instrukcja instalacji).
OSTRZEŻENIE
PRZESTROGA

V300 XL
2022-07
Content
10
EN
NL
PL
3.7 Jazda na wózku inwalidzkim
Ryzyko obrażeń i uszkodzeń
Przed każdym użyciem należy się upewnić, że:
o hamulce postojowe działają prawidłowo,
o opony są w dobrym stanie, patrz §4.
Uważać, aby nie włożyć palców do szprych koła.
Nie obsługiwać obręczy napędowej mokrymi rękami.
Uważać zablokowanie rąk na obręczy napędowej przejeżdżając przez wąskie przejścia.
NIE przeje
żdżać po stromych nachyleniach, przeszkodach, stopniach lub krawężnikach
większych, niż określono w §5.
Zatrzymując się na (małym) nachyleniu należy użyć hamulców.
Upewnić się, że wszystkie cztery koła dotykają podłoża podczas jazdy w górę i w dół po
nachyleniu.
Nachylenia pokonywać jak najwolniej.
Jeżdżąc po drogach publicznych należy zawsze korzystać z chodnika.
Zwracać uwagę, czy na drodze nie ma dziur ani szczelin, w których koła mogą zostać
uwięzione.
Unikać kamieni i innych obiektów, które mogą zablokować koła.
Upewnić się, że płyty podnóżka nie dotykają podłoża podczas pokonywania przeszkody.
Nie korzystać z wózka inwalidzkiego w windzie.
Jeżeli to możliwe, zapinać pas bezpieczeństwa.
Należy zawsze zwracać uwagę na zakres obrotu płyty podnóżka, aby nie spowodować
obrażeń ciała osób w pobliżu czy uszkodzenia przedmiotów.
W przypadku braku doświadczenia w poruszaniu się wózkiem inwalidzkim należy poprosić o
pomoc drugiej osoby. Odsunąć ręce od kół, a stopy położyć na płycie podnóżka.
Stopnie należy pokonywać zawsze przy pomocy dwóch pomocników.
Nie próbować korzystać ze schodów, które nie są przystosowane do wózków inwalidzkich.
3.7.1 Jazda wózkiem inwalidzkim:
1. Zwolnić hamulce.
2. Chwycić obie obręcze napędowe w najwyższym punkcie.
3. Pochylić się do przodu i popchnąć obręcze napędowe do przodu do momentu wyprostowania
rąk.
4. Przemieścić ręce ponownie na górną część obręczy napędowych i powtórzyć ruch.
3.7.2 Poruszanie się po powierzchniach pochyłych
Ryzyko obrażeń
Na powierzchniach pochyłych poruszaj się jak najwolniej.
Weź pod uwagę możliwości opiekuna.
Jeśli nie dysponuje siłą pozwalającą kontrolować wózek
inwalidzki, zaciągnij hamulce.
P
ochyl się w przód, aby przesunąć środek ciężkości do przodu. Pozwoli to ustabilizować wózek
inwalidzki
.
1. Zapnij pasy bezpieczeństwa, jeśli wózek jest w nie wyposażony.
2. Nie próbuj poruszać się po zbyt dużych pochyłościach. Maksymalne
dopuszczalne kąty nachylenia podłoża (w górę i w dół) zawiera Tabela 1.
3. Poproś opiekuna o pomoc podczas ruchu na pochyłym podłożu.
4. Pochyl się w przód, aby przesunąć środek ciężkości do przodu.
UWAGA
OSTRZEŻENIE

V300 XL
2022-07
Content
11
EN
NL
PL
3.7.3 Pokonywanie progów lub krawężników
Ryzyko obrażeń
Jeśli nie posiadasz wystarczającego doświadczenia w korzystaniu
z wózka inwalidzkiego,
poproś o pomoc opiekuna
.
Zjazd z progów lub krawężników
Z niskiego krawężnika można zjechać, poruszając się w przód. Należy upewnić się, że podpora
nóg nie dotyka podłoża.
Doświadczony użytkownik może samodzielnie pokonać niewielkie progi
lub krawężniki.
1. Utrzymaj równowagę na kołach tylnich, aby zmniejszyć nacisk
na koła przednie.
2. Pokonaj krawężnik.
Wyższe krawężniki można pokonać, poruszając się w przód z pomocą opiekuna.
1. Poproś opiekuna, aby nieznacznie odchylił wózek inwalidzki do tyłu.
2. Pokonuj krawężniki, poruszając się na tylnich kołach.
3. Ponownie oprzyj wózek na wszystkich czterech kołach.
Doświadczony użytkownik może samodzielnie pokonywać wyższe krawężniki. Najłatwiej tego
dokonać, poruszając się do tyłu.
1. Obróć wózek inwalidzki, zwracając go tylnymi kołami w stronę
krawężnika.
2. Pochyl się w przód, aby przesunąć środek ciężkości do przodu.
3. Zbliż wózek do krawędzi krawężnika.
4. Przy użyciu obręczy w kontrolowany sposób zsuń wózek z
krawężnika.
Wjazd na progi lub krawężniki
Aby wjechać na próg lub krawężnik z pomocą opiekuna:
1. Nie należy dopuścić, aby podpora nóg dotknęła krawężnika.
2. Poproś opiekuna o odchylenie wózka do tyłu na tyle, aby unieść
przednie koła nad krawężnik.
3. Odchyl się do tyłu, przenosząc środek ciężkości nad tylne koła.
4. Wjedź przednimi kołami na krawężnik.
5. Przejedź tylnymi kołami przez krawężnik.
Wyższe krawężniki można pokonać, jadąc do tyłu:
1. Obróć wózek inwalidzki, zwracając go tylnymi kołami w stronę krawężnika.
2. Odchyl się w tył, przenosząc środek ciężkości nad tylne koła.
3. Poproś opiekuna o wciągnięcie wózka na krawężnik.
4. Powróć do normalnej pozycji w wózku inwalidzkim.
Doświadczony użytkownik może samodzielnie pokonywać krawężniki.
OSTRZEŻENIE

V300 XL
2022-07
Content
12
EN
NL
PL
1. Podjedź do krawężnika.
2. Należy upewnić się, że podpora nóg nie dotyka krawężnika.
3. Odchyl się w tył, utrzymując równowagę na tylnych kołach.
4. Wjedź przednimi kołami na krawężnik.
5. Pochyl się do przodu, aby ustabilizować wózek.
6. Wjedź tylnymi kołami na krawężnik.
3.7.4 Pokonywanie schodów
Ryzyko obrażeń
Z
awsze pokonuj schody z pomocą 2
opiekunów
.
Schody można pokonywać na wózku inwalidzkim, przestrzegając następujących zasad:
1. Jeden z opiekunów musi nieznacznie odchylić wózek w tył.
2. Drugi opiekun łapie za przód ramy wózka.
3. Zachowaj spokój, unikaj nagłych ruchów i trzymaj ręce wewnątrz wózka inwalidzkiego.
4. Pokonuj schody na tylnych kołach wózka.
OSTRZEŻENIE

V300 XL
2022-07
Content
13
EN
NL
PL
4 Konserwacja
4.1 Czas konserwacji
Ryzyko obrażeń i uszkodzeń
Naprawy i wymiana części mogą być przeprowadzane tylko przez przeszkolone osoby i wolno
korzystać z oryginalnych części zamiennych Vermeiren.
Częstotliwość serwisowania zależy od częstotliwości i intensywności użytkowania.
Skontaktować się z dystrybutorem celem uzgodnienia harmonogramu inspekcji /
konserwacji / naprawy.
Instrukcje dotyczące konserwacji znajdziesz na stronie internetowej firmy Vermeiren:
www.vermeiren.pl
.
Przed każdym użyciem
Przejrzeć następujące punkty:
Wszystkie części: Obecne, nie uszkodzone i nie zużyte.
Wszystkie części: Wyczyścić, patrz § 4.2.2.
Koła, oparcie, siedzisko, podparcie łydki, podłokietnik, płyty podnóżka: Dobrze
zabezpieczone.
Stan kół/opon, patrz § 4.2.1;
Stan części ramy: Brak deformacji, niestabilność, słabe lub luźne połączenia
Siedzisko, oparcie, podpórki ramion, podpórki łydek i oparcia (jeżeli dotyczy): Brak
nadmiernego zużycia (punkty wgnieceń, uszkodzenia lub rozerwania).
Hamulce: Nieuszkodzone i sprawne.
Skontaktować się ze specjalistycznym dystrybutorem pod kątem ewentualnych napraw lub
wymiany.
Raz w roku lub częściej
Co najmniej raz w roku lub częściej zlecać kontrolę i serwisowanie wózka inwalidzkiego
wykwalifikowanemu dystrybutorowi. Minimalna częstotliwość konserwacji jest uzależniona od
użytkowania i należy ją uzgodnić z wykwalifikowanym dystrybutorem.
4.2 Instrukcje konserwacji
4.2.1 Koła i opony
Odpowiednie działanie hamulców jest uzależnione od stanu opon i może się zmieniać ze
względu na zużycie i zanieczyszczenie (woda, olej, błoto, ...)
Usuwać z kół druty, włosy, piasek i włókna.
Sprawdzić profil opon. Jeżeli głębokość bieżnika jest mniejsza, niż 1 mm, opony należy wymienić.
W tej sprawie należy skontaktować się ze specjalistycznym dystrybutorem.
Napompować każdą pneumatyczną oponę odpowiednim ciśnieniem (patrz informacja odnośnie
ciśnienia na oponach).
4.2.2 Czyszczenie
Ryzyko uszkodzenia przez wilgoć.
Do czyszczenia wózka inwalidzkiego nie wolno nigdy stosować węża ani myjki ciśnieniowej.
Wytrzeć wszystkie sztywne części wózka wilgotną szmatką (nie wykręconą).
W razie konieczności użyć łagodnego mydła, odpowiedniego do lakierów i materiałów
syntetycznych.
PRZESTROGA
UWAGA

V300 XL
2022-07
Content
14
EN
NL
PL
Tapicerkę można czyścić letnią wodą i łagodnym mydłem. Do czyszczenia nie używać szorstkich
środków czyszczących.
4.2.3 Dezynfekcja
Ryzyko uszkodzenia
Dezynfekcja może być przeprowadzana tylko przez przeszkolone osoby.
Skonsultować się ze
specjalistycznym dystrybutorem.
4.3 Rozwiązywania problemów
Nawet w przypadku prawidłowego korzystania z wózka może wystąpić problem techniczny. W
takim przypadku należy skontaktować się z lokalnym specjalistycznym dystrybutorem.
Ryzyko obrażeń i uszkodzenia wózka inwalidzkiego
NIGDY nie naprawiać wózka
inwalidzkiego samodzielnie usiłując rozwiązać problem.
Poniższe symptomy mogą oznaczać poważny problem. Dlatego też w przypadku zauważenia
poniższych niezgodności należy zawsze skontaktować się ze specjalistycznym dystrybutorem.
Dziwne dźwięki;
Nierównomierne zużycie bieżnika opon;
Szarpane ruchy;
Wózek inwalidzki ściąga na jedną stronę;
Uszkodzone lub pęknięte zespoły koła.
4.4 Oczekiwany okres użytkowania
Przeciętny okres użytkowania wózka inwalidzkiego to 5 lat. Ten czas może być dłuższy lub
krótszy, zależnie od częstotliwości korzystania, warunków jazdy i konserwacji wózka.
4.5 Ponowne użycie
Przed każdym ponownym użyciem wózek należy zdezynfekować, skontrolować i poddać
konserwacji zgodnie z instrukcjami w §4.1 i §4.2.
4.6 Zakończenie użytkowania
Po zakończeniu okresu użytkowania należy poddać wózek utylizacji, zgodnie z lokalnymi
przepisami ochrony środowiska. Najlepszym sposobem jest demontaż wózka inwalidzkiego, aby
ułatwić transport części poddawanych utylizacji.
UWAGA
OSTRZEŻENIE

V300 XL
2022-07
Content
15
EN
NL
PL
5 Parametry techniczne
Parametry techniczne podane poniżej opisują wózek inwalidzki w konfiguracji standardowej. Jeśli
użytkownik korzysta z innych podnóżków/podłokietników lub innych akcesoriów, wartości będą
się różnić.
Marka
Vermeiren
Typ
Ręczny wózek inwalidzki
Model
V
3
00
XL
Maksymalna waga
użytkownika
1
7
0 kg
Opis
Minimalne wymiary
Maksymalne wymiary
Długość całkowita z podnóżkiem 1085 mm
Szerokość użytkowa siedziska 530 mm 560 mm 600 mm
Szerokość całkowita (zależy od szerokości
siedziska)
740 mm 770 mm 810 mm
Długość po złożeniu 1060 mm
Szerokość po złożeniu 350 mm
Wysokość po złożeniu (zależy od wysokości
siedziska)
840 mm 930 mm
Waga całkowita 21,00 kg
Waga najcięższej części 13,35 kg
Waga części, które można zdemontować lub
zdjąć.
Podnóżki: 1,75 kg; Podłokietniki: 1,80 kg;
Tylne koła:
4,05 kg
Stabilność statyczna przy pochyłości 6,5°
Stabilność statyczna pod górę
6,5°
Stabilność statyczna w poprzek 18°
Zdolność pokonywania przeszkód 60 mm
Kąt nachylenia siedziska 0° 10°
Głębokość użytkowa siedziska 490 mm 530 mm
Wysokość przedniej krawędzi siedziska 440 mm 530 mm
Kąt nachylenia oparcia 5°
Wysokość oparcia 400 mm
Odległość siedziska od podnóżka 400 mm
500 mm
Kąt pomiędzy siedziskiem a płyta podnóżka 5° 25°
Kąt pomiędzy siedziskiem a podnóżkiem 105°
Kąt pomiędzy podnóżkiem a płyta podnóżka 80°
Odległość poduszka podłokietnika od
siedziska
220 mm 240 mm
Przednia pozycja konstrukcji osłony
poduszka podłokietnika
410 mm
Średnica obręczy 535 mm
Pozycja osi w poziomie (odchył) 1,27 mm 61,04 mm
Minimalny promień skrętu 1500 mm
Średnica kół tylnych PU 22" 24"
Ciśnienie w oponach, koła tylne (napędowe) Maksymalnie 3,5 bara

V300 XL
2022-07
Content
16
EN
NL
PL
Średnica kół skrętnych PU 200 mm
Ciśnienie w oponach, koła skrętne Maksymalnie 2,5 bara
Materiał stelaża Aluminium
Materiał tapicerki Nylon
Temperatura przechowywania i użytkowania + 5 °C + 41 °C
Wilgotność powietrza do przechowywania i
użytkowania
30% 70%
Producent zastrzega sobie prawo do wprowadzania zmian
parametrów technicznych.
Tolerancja pomiarów ± 15 mm / 1,5 kg /
1,5
°

V300 XL
2022-07
Obsah
1
EN
NL
PL
CS
Obsah
Obsah ........................................................................................................................ 1
Předmluva .................................................................................................................. 2
1 Tento výrobek ................................................................................................ 3
2 Před použitím ................................................................................................ 4
2.1 Určení použití ................................................................................................ 4
2.2 Obecné bezpečnostní pokyny ....................................................................... 4
2.3 Symboly na invalidním vozíku ....................................................................... 4
2.4 Přeprava ....................................................................................................... 5
2.5 Složení a rozložení........................................................................................ 5
2.6 Skladování .................................................................................................... 6
3 Použití invalidního vozíku ............................................................................ 7
3.1 Montáž a demontáž podnožek ..................................................................... 7
3.2 Ovládání brzd ................................................................................................ 7
3.3 Montáž a demontáž loketních opěrek ........................................................... 8
3.4 Nastavení zařízení proti překlopení (pokud je k dispozici) ............................ 8
3.5 Montáž a demontáž tlačné tyče .................................................................... 9
3.6 Přesun pacienta do a z invalidního vozíku .................................................... 9
3.7 Jízda v invalidním vozíku ............................................................................ 10
4 Údržba .......................................................................................................... 13
4.1 Body údržby ................................................................................................ 13
4.2 Pokyny pro údržbu ...................................................................................... 13
4.3 Řešení problémů ......................................................................................... 14
4.4 Očekávaná životnost ................................................................................... 14
4.5 Znovupoužití výrobku .................................................................................. 14
4.6 Konec používání ......................................................................................... 14
5 Technické údaje .......................................................................................... 15

V300 XL
2022-07
Předmluva
2
EN
NL
PL
CS
Předmluva
Blahopřejeme! Nyní jste vlastníkem invalidního vozíku Vermeiren!
Tento invalidní vozík byl vyroben pečlivými pracovníky s kvalifikací. Navíc byl navržen a vyroben
podle vysokých standardů kvality, nad nimiž dohlíží společnost Vermeiren.
Děkujeme za Vaši důvěru ve výrobky společnosti Vermeiren. Tento návod slouží k tomu, aby vám
pomáhal s použitím tohoto invalidního vozíku a jeho provozních možností. Řádně si jej přečtěte;
pomůže vám seznámit se s provozem, schopnostmi a omezeními tohoto invalidního vozíku.
Máte-li po přečtení tohoto návodu nějaké dotazy, obraťte se bez obav na svého odborného
prodejce. Rád vám pomůže.
Důležitá poznámka
Aby byla zajištěna vaše bezpečnost a prodloužena životnost tohoto výrobku, věnujte mu řádnou
péči a nechávejte jej pravidelně kontrolovat a opravovat.
Tento návod obsahuje nejnovější verzi produktu. Společnost Vermeiren má právo provádět
změny tohoto typu výrobku, aniž by byla povinna upravit nebo nahradit podobné výrobky, které
již byly dodány.
Obrázky výrobku slouží pouze k upřesnění pokynů v tomto návodu. Detaily výrobku na obrázcích
se mohou od daného výrobku lišit.
Dostupné informace
Nejnovější verzi informací z tohoto návodu vždy naleznete na našich webových stránkách
http://www.vermeiren.com/. Tyto webové stránky pravidelně navštěvujte pro případné
aktualizace.
Osoby se zrakovým postižením si mohou stáhnout elektronickou verzi tohoto návodu, kterou jim
může přečíst softwarová aplikace text-to-speech.
Návod k obsluze Pro uživatele a odborné prodejce
Návod k instalaci Pro odborné prodejce
Servisní příručka pro invalidní vozíky Pro odborné prodejce
Prohlášení o shodě (ES)

V300 XL
2022-07
Tento výrobek
3
EN
NL
PL
CS
1
2
3
4
5
6
8
7
9
1
0
1
1
1
2
1
3
1
4
1
5
1 Tento výrobek
1. Madla
2. Tlačná tyč
3. Zádová opěrka
4. Područky
5. Loketní opěrky
6. Sedadlo
7. Podnožky
8. Stupačky
9. Řídicí kola (přední kola)
10. Brzdy
11. Hnací kola (zadní kola)
12. Poháněcí obruče
13. Koncové víčko
14. Kříž
15. Identifikační štítek

V300 XL
2022-07
Před použitím
4
EN
NL
PL
CS
2 Před použitím
2.1 Určení použití
Indikace a kontraindikace: Tento invalidní vozík je určen pro uživatele, kteří potřebují větší
šířku sedadla než 50 cm a/nebo vyšší hmotnost uživatele. Uživatel může invalidní vozík
pohánět sám nebo jej může tlačit asistent. Invalidní vozík je určen pro starší osoby nebo
jedince s potížemi s chůzí nebo s nemožností chůze, jako je ochrnutí, ztráta končetin, vada
nebo deformace končetin, ztuhlé nebo poškozené klouby, srdeční selhání a špatný krevní
oběh, narušení rovnováhy, kachexie (svalová slabost), … Tento invalidní vozík NESMÍTE
používat bez pomoci asistenta, trpíte-li tělesnou či duševní poruchou, která by mohla vás nebo
jiné osoby ohrozit při řízení invalidního vozíku. Z tohoto důvodu se nejprve obraťte na lékaře a
zajistěte, aby byl odborný prodejce informován o jeho posudku.
Tento invalidní vozík je vhodný pro domácí a venkovní použití.
Tento invalidní vozík je konstruován a vyroben výhradně k přepravě/přemístění jedné (1)
osoby o max. hmotnosti 170 kg. Není konstruován pro přepravu zboží či předmětů ani pro
jakýkoli jiný účel, než je popsán výše.
Používejte pouze příslušenství a náhradní díly schválené společností Vermeiren.
Přečtěte si všechny technické detaily a omezení tohoto invalidního vozíku v kapitole 5.
Záruka na tento výrobek je založena na běžném použití a údržbě, jak je to popsáno v tomto
návodu. V případě poškození výrobku způsobeného nesprávným použitím či absencí údržby
tato záruka zanikne.
2.2 Obecné bezpečnostní pokyny
Riziko zranění anebo poškození
Přečtěte si pokyny v tomto návodu a postupujte podle nich. Jinak může dojít k vašemu zranění
nebo k poškození invalidního vozíku.
Při použití mějte na paměti následující obecná upozornění:
Tento invalidní vozík nepoužívejte, jste-li pod vlivem alkoholu, léků či jiných látek, které by
mohly ovlivnit vaše schopnosti jízdy v něm.
Mějte na paměti, že určité části invalidního vozíku mohou být velmi teplé nebo studené vlivem
okolní teploty, slunečního záření či topných těles. Při dotýkání buďte opatrní. Při chladném
počasí používejte ochranný oděv. Při jízdě venku je možné používat speciální rukavice, které
zlepšují úchop ručních ráfků.
Tento invalidní vozík žádným způsobem neupravujte.
Berte na vědomí, že vaše invalidní vozík může v závislosti na použitém nastavení ovlivňovat
některé typy systémů proti krádeži. To může zapříčinit spuštění alarmu v obchodu.
V případě, že došlo k závažnému incidentu s vaším výrobkem, informujte společnost Vermeiren
nebo svého specializovaného prodejce a příslušný úřad ve vaší zemi.
2.3 Symboly na invalidním vozíku
Max. hmotnost uživatele v kg
Domácí/venkovní použití
Max. bezpečný sklon ve ° (stupních).
POZOR

V300 XL
2022-07
Před použitím
5
EN
NL
PL
CS
Typové označení
2.4 Přeprava
2.4.1 Přeprava vozidlem jako zavazadlo
Riziko zranění
Invalidní vozík NIKDY nepoužívejte jako sedadlo ve vozidle, viz následující symbol.
Dohlédněte na to, aby byl invalidní vozík řádně uchycen, aby se předešlo zranění
cestujících při nehodě či náhlém zabrzdění.
P
ro zabezpečení invalidního vozíku a cestujícího NIKDY nepoužívejte stejný bezpečnostní
pás.
1.
Demontujte podnožky, područky a příslušenství.
2.
Bezpečně uložte loketní opěrky a příslušenství.
3.
Pokud je to možné, složte invalidní vozík a sundejte zadní kola.
4.
Umístěte vozík do zavazadlového prostoru.
5.
Pokud prostor pro cestující a invalidní vozík NENÍ oddělený, upevněte rám vozíku bezpečně k
vozidlu. Můžete použít bezpečnostní pásy vozidla.
2.5 Složení a rozložení
Risk of injuries
Udržujte prsty mimo pohyblivé části invalidního vozíku.
2.5.1 Rozkládání invalidního vozíku
1.
Postavte se za invalidní vozík.
2.
Pomocí madel otevřete invalidní vozík do maximální možné polohy.
3.
Postavte se před invalidní vozík.
4.
Zatlačte obě sedací trubky rámu dolů až do fixní polohy.
5.
Namontujte tlačnou tyč (viz §3.5).
2.5.2 Skládání invalidního vozíku
1. Odstraňte tlačný tyč (viz §3.5).
2. Složte stupačky nebo demontujte podnožky (viz kapitola 3.1).
3. Uchopte sedadlo za přední a zadní část a vytáhněte jej.
2.5.3 Montáž zadních kol
1. Uchopte zadní kolo a zmáčkněte tlačítko .
2. Držte tlačítko stisknuté a nasaďte zadní kolo na osu, dokud se
nezastaví.
3. Povolte tlačítko.
4. zkontrolujte bezpečné uchycení kola.
2.5.4 Sejmutí kol
1. Ujistěte se, že jsou brzdy deaktivované.
2. Položte invalidní vozík na bok tam, kde chcete sejmout kolo.
3. Stiskněte tlačítko ve středu osy kola.
4. Vytáhněte kolo z rámu.
VAROVÁNÍ
CAUTION
1

V300 XL
2022-07
Před použitím
6
EN
NL
PL
CS
2.6 Skladování
Dbejte na to, aby byl invalidní vozík uložen v suchém prostředí, aby na něm nemohly růst
plísně a nepoškodilo se čalounění, viz též kapitola 5.

V300 XL
2022-07
Použití invalidního vozíku
7
EN
NL
PL
CS
3 Použití invalidního vozíku
Riziko zranění
Nejprve si přečtěte předchozí kapitoly a seznamte se se zamýšleným použitím. Invalidní vozík
NIKDY nepoužívejte, dokud si nepřečtete a plně neporozumíte všem pokynům.
V případě pochybností či dotazů bez obav
požádejte svého místního odborného prodejce,
poskytovatele péče nebo technického poradce, aby vám pomohl.
3.1 Montáž a demontáž podnožek
Postup montáže podnožek je následující:
1. Podržte podnožky příčně z vnější strany rámu invalidního
vozíku a vložte čepičku trubice do rámu.
2. Otočte podnožky směrem dovnitř, dokud nezacvaknou.
3. Spusťte stupačku směrem dolů.
Postup demontáže podnožek:
1. Zatáhněte za páčku .
2. Vytočte podnožky do vnější strany od invalidního vozíku,
dokud se neuvolní z vodicího prvku.
3. Vytáhněte podnožky z rámu .
3.2 Ovládání brzd
Riziko zranění
Brzy neslouží ke zpomalování pohybu invalidního vozíku. B
rzdy používejte pouze pro
zabránění před nežádoucím pohyby invalidního vozíku.
Správnou funkci brzd ovlivňuje opotřebení a znečištění kol (voda, olej, bláto, ...). P
řed každým
použitím zkontrolujte stav kol.
Brzdy jsou nastavitelné a mohou se opotřebovat. Před každým použitím zkontrolujte stav brzd
.
Před uvolněním brzd se ujistěte, že se invalidní vozík
nachází na horizontálním povrchu. Nikdy
neuvolňujte obě brzdy současně
.
Použití brzd:
1. Zatlačte brzdové páčky směrem vpřed až do zřetelného zacvaknutí.
Postup uvolnění brzd:
1. Uvolněte jednu brzdu zatáhnutím páčky směrem dozadu.
2. Rukou podržte poháněcí obruč odbrzděného kola.
3. Uvolněte druhou brzdu zatáhnutím páčky směrem dozadu.
VAROVÁNÍ
POZOR
1
2

V300 XL
2022-07
Použití invalidního vozíku
8
EN
NL
PL
CS
3.3 Montáž a demontáž loketních opěrek
Riziko zranění
Udržujte prsty, přezky a oděvy mimo spodní stranu loketní opěrky.
Loketní opěrky invalidního vozíku připevněte podle následujících pokynů.
1. Vsuňte zadní trubici loketní opěrky do rámu vozíku (1).
2. Ujistěte se, že loketní opěrka zacvakne do uzamykacího
mechanismu.
3. Sklopte loketní opěrku směrem dopředu.
4. Zacvakněte přední trubici loketní opěrky do rámu vozíku (2).
Postup otevření a sejmutí loketní opěrky:
1. Stiskněte páčku (3) a zatáhněte za přední část opěrky nahoru.
2. Odklopte loketní opěrku směrem dopředu.
3. Pro sejmutí loketní opěrky stiskněte tlačítko (4) a vytáhněte
zadní část loketní opěrky z rámu vozíku (1).
3.4 Nastavení zařízení proti překlopení (pokud je k dispozici)
Výšku zařízení proti překlopení lze nastavit ve 7 polohách (rozsah
120 mm: kroky 20 mm):
1. Uvolněte hvězdicový šroub .
2. Posuňte trubici zařízení proti překlopení do požadované
výšky.
3. Utáhněte hvězdicový šroub .
4. Zkontrolujte, zda je zařízení proti překlopení pevně zajištěné.
POZOR
3
2
1
4
1

V300 XL
2022-07
Použití invalidního vozíku
9
EN
NL
PL
CS
3.5 Montáž a demontáž tlačné tyče
Riziko zranění
Ujistěte se, že jsou hvězdicové úchytky Ⓐ utažené.
P
okud je k dispozici tlačná tyč, vždy musí být nainstalována za účelem zvýšení stability zádové
části
.
Namontování tlačné tyče:
1. Uchyťte tlačnou tyč Ⓑ pomocí hvězdicového šroubu Ⓐ k levému madlu.
2. Dejte tlačnou tyč Ⓑ do vodorovné polohy směrem doprava.
3. Hák Ⓒ zachyťte za pravé Ⓓ podle obrázku. Pro nastavení vypnutí zádové opěrky použijte
otvory (1) nebo (2).
Postup sejmutí tlačné tyče:
1. Uvolněte hvězdicový šroub Ⓐ na pravém madlu.
2. Sejměte hák Ⓒ z pravého madla Ⓓ.
3.6 Přesun pacienta do a z invalidního vozíku
Riziko zranění
Pokud nemůžete vykonat bezpečný přesun sami, požádejte někoho o pomoc.
N
estoupejte na stupačky
.
1. Umístěte invalidní vozík co nejblíže k židli, gauči nebo
posteli, ze které/na kterou má pacient nasednout.
2. Ověřte, že jsou obě brzdy invalidního vozíku zajištěné.
3. Odklopte stupačky směrem nahoru, aby se na ně nedalo
našlápnout.
4. Pokud přesun probíhá na boku invalidního vozíku,
demontujte loketní opěrku na dané straně směrem nahoru
(viz kapitola 3.3) a sklopte brzdovou páčku dolů.
5. Proveďte přesun na/z invalidního vozíku.
3.6.1 Správná poloha v invalidním vozíku
Doporučení pro komfortní používání invalidního vozíku:
Dejte svá záda co nejblíže k zádové opěrce.
Ujistěte se, že máte horní část nohou v horizontální poloze – v případě potřeby upravte
délku podnožek (viz instalační manuál).
VAROVÁNÍ
POZOR

V300 XL
2022-07
Použití invalidního vozíku
10
EN
NL
PL
CS
3.7 Jízda v invalidním vozíku
Riziko zranění a poškození
Před každým použitím ověřte, že:
o parkovací brzdy správně fungují;
o pneumatiky jsou v dobrém stavu, viz odst. 4.
Nedopusťte, aby se do drátů výpletu kola zachytily vaše prsty.
Nepoužívejte ruční ráfky, máte-li mokré ruce.
Při průjezdu úzkými průchody se chraňte před skřípnutím rukou na ručních ráfcích.
NEJEZDĚTE na svazích, přes překážky, schody nebo obrubníky větší, než je předepsáno v
odst. 5.
Když zastavíte na (mírném) svahu, použijte brzdy.
Během jízdy dolů ze svahu dbejte na to, aby se všechna čtyři kola dotýkala země.
Na svazích jezděte co nejpomaleji.
Při jízdě po veřejných komunikacích zůstávejte vždy na chodníku.
Dávejte pozor, zda na silnici nejsou díry nebo spáry, které by mohly způsobit skřípnutí kol.
Vyhýbejte se kamenům a jiným předmětům, které mohou zablokovat kola.
Při přejíždění překážky dávejte pozor, aby se stupátka nedotkla země.
Tento invalidní vozík nepoužívejte na eskalátoru.
Je-li k dispozici bezpečnostní pás, připoutejte se.
Abyste nezranili osoby stojící okolo nebo nepoškodili předměty, myslete vždy na rozsah
pohybu stupátka.
Nemáte-li dostatek zkušeností s
jízdou na svém invalidním vozíku, požádejte doprovod
o asistenci. Nesahejte rukama na kola a nohy nechte spočívat na stupátku.
Schody musejí být vždy zvládány za asistence dvou osob doprovodu.
Nikdy nezkoušejte použív
at schody, které nejsou vhodné pro invalidní vozíky.
3.7.1 Jízda na invalidním vozíku:
1. Odbrzděte brzdy.
2. Uchopte oba ruční ráfky v jejich nejvyšším místě.
3. Nakloňte se dopředu a tlačte ruční ráfky dopředu, dokud se vaše paže nenarovnají.
4. Přemístěte ruce zpět na nejvyšší místo ručních ráfků a opakujte pohyb.
3.7.2 Pohyb ve svahu
Riziko zranění
Ve svahu se pohybujte co nejpomaleji.
Pokud váš asistent není dostatečně zdatný pro ovládání invalidního vozíku, aktivujte brzdy.
Nakloňte se vpřed pro přesunutí těžiště dopředu za účelem získání lepší stability
.
1. Mějte zapnutý bezpečnostní pás, pokud je k dispozici u invalidního
vozíku.
2. Nejezděte příliš vysoko do svahu. Maximální sklony svahu (nahoru a
dolů) jsou uvedeny v tabulce 1.
3. Při jízdě ve svahu požádejte o pomoc asistenta.
4. Nakloňte se vpřed pro přesunutí těžiště dopředu.
3.7.3 Překonávání schodů či obrubníků
Riziko zranění
UPOZORNĚNÍ
VAROVÁNÍ
VAROVÁNÍ

V300 XL
2022-07
Použití invalidního vozíku
11
EN
NL
PL
CS
Pokud s vaším
invalidním vozíkem nemáte dostatečné zkušenosti, požádejte o pomoc
asistenta
.
Jízda z obrubníku nebo ze schodu dolů
Sjíždění nízkých obrubníků lze provést popředu. Ujistěte se, že se podnožky nedotknou země.
Zkušený uživatel může překonávat malé schody nebo obrubníky sám.
1. Přeneste těžiště na zadní kola pro snížení zátěže na předních
kolech.
2. Sjeďte z obrubníku.
Vyšší obrubníky můžete překonat popředu s pomocí asistenta:
1. Požádejte asistenta, aby invalidní vozík naklonil mírně dozadu.
2. Sjeďte z obrubníku po zadních kolech.
3. Postavte invalidní vozík zpět na čtyři kola.
Zkušený uživatel může vyšší obrubníky překonávat sám. Nejlépe to jde pozadu.
1. Otočte invalidní vozík zadními koly směrem k obrubníku.
2. Nakloňte se vpřed pro přesunutí těžiště dopředu.
3. Přibližte se s vozíkem k obrubníku.
4. Pomocí poháněcích obručí kontrolovaně sjeďte invalidním vozíkem z
obrubníku.
Jízda do schodu nebo na obrubník
Postup jízdy do schodu nebo na obrubník s pomocí asistenta:
1. Ujistěte se, aby se podnožky nedotkly obrubníku.
2. Požádejte asistenta, aby naklonil invalidní vozík směrem vzad, tak
akorát, aby přední kola mohla najet na obrubník.
3. Nakloňte se dozadu pro přesunutí těžiště nad zadní kola.
4. Najeďte předními koly na obrubník.
5. Najeďte zadními koly invalidního vozíku na obrubník.
Na vyšší obrubníky se najíždí pozadu:
1. Otočte invalidní vozík zadními koly směrem k obrubníku.
2. Nakloňte se dozadu pro přesunutí těžiště nad zadní kola.
3. Požádejte asistenta, aby s invalidním vozíkem najel na obrubník.
4. Vraťte se do běžné polohy na invalidním vozíku.
Zkušený uživatel může obrubníky překonávat sám:
1. Přijeďte k obrubníku.
2. Ujistěte se, že se podnožky nedotknou obrubníku.
3. Nakloňte se vzad a držte rovnováhu na zadních kolech.
4. Najeďte předními koly na obrubník.
5. Nakloňte se vpřed pro získání větší stability.
6. Najeďte zadními koly na obrubník.

V300 XL
2022-07
Použití invalidního vozíku
12
EN
NL
PL
CS
3.7.4 Po schodech
Riziko zranění
P
ři jízdě po schodech se vyžadují vždy 2 asistenti
.
K jízdě po schodech s invalidním vozíkem se vztahují následující pravidla:
1. Jeden asistent nakloní invalidní vozík mírně dozadu.
2. Druhý asistent uchopí přední část rámu.
3. Buďte klidní, vyvarujte se náhlým pohybům a své ruce mějte uvnitř vozíku.
4. Po schodech jeďte po zadních kolech vozíku.
VAROVÁNÍ

V300 XL
2022-07
Údržba
13
EN
NL
PL
CS
4 Údržba
4.1 Body údržby
Riziko zranění a poškození
Opravy a výměny smějí provádět pouze vyškolené osoby. Přitom je třeba používat pouze
originální náhradní díly společnosti Vermeiren.
Servisní intervaly závisejí na intenzitě a frekvenci používání. Požádejte svého prodejce o
společnou dohodu na rozvrhu kontrol/údržby/oprav.
Viz webových stránkách společnosti Vermeiren: www.vermeiren.com.
Před každým použitím
Zkontrolujte následující:
Všechny části: Přítomné a nepoškozené či neopotřebované.
Všechny části: Čisté, viz odst. 4.2.2.
Kola, opěradlo, sedadlo, lýtkové opěrky, područky, stupátka: Dobré zajištění.
Stav kol/pneumatik, viz § 4.2.1.
Stav součástí rámu: Žádná deformace, nestabilita, zeslabení nebo uvolněné spoje
Sedadlo, opěradlo, opěrky rukou, opěrky lýtek a opěrka hlavy (je-li použita): Bez
nadměrného opotřebení (např. promáčknutá místa, poškození nebo roztržení).
Brzdy: Nepoškozené a funkční.
Pro případné opravy či výměny částí se obraťte na svého odborného prodejce.
Ročně nebo častěji
Tento invalidní vozík nechte u odborného prodejce ke kontrole a provedení servisu alespoň
jednou ročně nebo častěji. Minimální četnost údržby závisí na používání, a proto by měla být
společně dohodnuta s vaším odborným prodejcem.
4.2 Pokyny pro údržbu
4.2.1 Kola a pneumatiky
Správná funkce brzd
závisí na stavu pneumatik a může se měnit kvůli opotřebení
a znečištění (voda, olej, bláto atd.).
Udržujte kola bez drátů, vlasů, písku a vláken.
Zkontrolujte vzorek na pneumatikách. Je-li hloubka dezénu menší než 1 mm, musí být
pneumatiky vyměněny. Obraťte se v této věci na svého odborného prodejce.
Nahustěte každou pneumatiku na správný tlak (viz vyznačení tlaku na pneumatikách).
4.2.2 Čištění
Riziko poškození vlhkostí
K
čištění invalidního vozíku nikdy nepoužívejte hadici ani vysokotlaký čistič.
Otřete všechny pevné části invalidního vozíku vlhkým (nikoli mokrým) hadříkem.
V případě potřeby použijte jemné mýdlo vhodné na laky a syntetické barvy.
Čalounění lze vyčistit vlažnou vodou a jemným mýdlem. K čištění nepoužívejte abrazivní čisticí
prostředky.
4.2.3 Dezinfekce
Riziko poškození
Dezinfekci mohou provádět pouze kvalifikované osoby. Poraďte se se svým prodejcem.
UPOZORNĚNÍ
UPOZORNĚNÍ
UPOZORNĚNÍ

V300 XL
2022-07
Údržba
14
EN
NL
PL
CS
4.3 Řešení problémů
I když tento invalidní vozík používáte správně, může se vyskytnout technický problém. V takovém
případě se obraťte na svého místního odborného prodejce.
Riziko zranění a poškození invalidního vozíku
NIKDY sami nezkoušejte vyřešit problém opravou tohoto invalidního vozíku.
Následující příznaky mohou znamenat vážný problém. Proto se obraťte na svého odborného
prodejce vždy, když zaznamenáte některou z následujících odchylek:
divný zvuk;
nerovnoměrné opotřebení dezénu na jedné z pneumatik;
trhavé pohyby;
invalidní vozík se naklání na jednu stranu;
poškozené či rozbité sestavy kol.
4.4 Očekávaná životnost
Průměrná životnost tohoto invalidního vozíku je 5 let. V závislosti na četnosti použití, jízdních
podmínkách a údržbě se životnost tohoto invalidního vozíku prodlouží nebo zkrátí.
4.5 Znovupoužití výrobku
Před každým dalším použitím nechte invalidní vozík dezinfikovat, zkontrolovat a provést servis
podle pokynů v odst. 4.1 a odst.4.2.
4.6 Konec používání
Po skončení životnosti musí být invalidní vozík zlikvidován podle místní legislativy pro životní
prostředí. Nejlepším způsobem likvidace je rozebrání invalidního vozíku pro usnadnění přepravy
recyklovatelných součástí.
VAROVÁNÍ

V300 XL
2022-07
Technické údaje
15
EN
NL
PL
CS
5 Technické údaje
Technické údaje níže jsou platné pro invalidní vozík ve standardním nastavení. Pokud se
používají podnožky/loketní opěrky nebo další příslušenství, tabulkové hodnoty se změní.
Značka
Vermeiren
Typ
I
nvalidní vozík
Model
V
3
00
XL
Maximální hmotnost uživatele
1
7
0 kg
Popis
Rozměry
–
minimální
Rozměry
–
maximální
Celková délka s podnožkami 1085 mm
Účinná šířka sedadla 530 mm 530 mm 530 mm
Celková šířka (závisí na šířce sedadla) 740 mm 740 mm 740 mm
Délka při složení 1060 mm
Šířka při složení 350 mm
Výška při složení (závisí na výšce sedadla) 840 mm 840 mm
Celková hmotnost 21,00 kg
Hmotnost nejtěžšího dílu 13,35 kg
Hmotnosti dílů, které lze demontovat či
odebrat Podnožky: 1,75 kg; Loketní opěrky: 1,80 kg; Zadní kola: 4,05 kg
Statická stabilita z kopce 6,5°
Statická stabilita do kopce 6,5°
Statická boční stabilita 18°
Překonávání překážek 60 mm
Úhel roviny sedadla 0° 10°
Účinná hloubka sedadla 490 mm 530 mm
Výška povrchu sedadla na předním okraji 440 mm 530 mm
Úhel zádové opěrky 5°
Výška zádové opěrky 400 mm
Vzdálenost mezi podnožkami a sedadlem) 400 mm
500 mm
Úhel mezi sedadlem a stupačkami 5°
25°
Úhel mezi sedadlem a podnožkami 105°
Úhel mezi podnožkami a stupačkami 80°
Vzdálenost mezi područkami a sedadlem 220 mm 240 mm
Přední poloha konstrukce područky 410 mm
Průměr poháněcí obruče 535 mm
Horizontální poloha osy kol (odchylka) 1,27 mm 61,04 mm
Minimální poloměr zatáčení 1500 mm
Průměr PU zadních kol 22" 24"
Tlak pneumatik, zadní (hnací) kola Max. 3,5 bar
Průměr PU řídicích kol 200 mm
Tlak pneumatik, řídicí kola Max. 2,5 bar
Materiál rámu Hliník
Materiál čalounění Nylon

V300 XL
2022-07
Technické údaje
16
EN
NL
PL
CS
Teplota skladování a používání + 5 °C + 41 °C
Vlhkost při skladování a používání 30 % 70 %
Právo na technické změny vyhrazeno. Tolerované odchylky ± 15 mm / 1,5 kg /
1,5
°

Service registration form
Service registration form
This product (name): ……………………………………..
was inspected (I), serviced (S), repaired (R) or disinfected (D):
By (stamp):
Kind of work: I / S / R / D
Date:
By (stamp):
Kind of work: I / S / R / D
Date:
By (stamp):
Kind of work: I / S / R / D
Date:
By (stamp):
Kind of work: I / S / R / D
Date:
By (stamp):
Kind of work: I / S / R / D
Date:
By (stamp):
Kind of work: I / S / R / D
Date:
By (stamp):
Kind of work: I / S / R / D
Date:
By (stamp):
Kind of work: I / S / R / D
Date:
By (stamp):
Kind of work: I / S / R / D
Date:
By (stamp):
Kind of work: I / S / R / D
Date:
By (stamp):
Kind of work: I / S / R / D
Date:
By (stamp):
Kind of work: I / S / R / D
Date:
By (stamp):
Kind of work: I / S / R / D
Date:
By (stamp):
Kind of work: I / S / R / D
Date:
By (stamp):
Kind of work: I / S / R / D
Date:

-
 1
1
-
 2
2
-
 3
3
-
 4
4
-
 5
5
-
 6
6
-
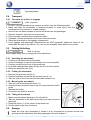 7
7
-
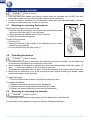 8
8
-
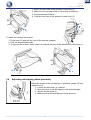 9
9
-
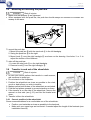 10
10
-
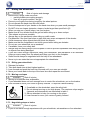 11
11
-
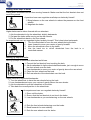 12
12
-
 13
13
-
 14
14
-
 15
15
-
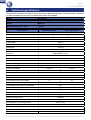 16
16
-
 17
17
-
 18
18
-
 19
19
-
 20
20
-
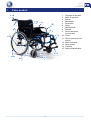 21
21
-
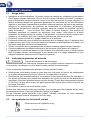 22
22
-
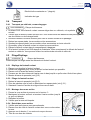 23
23
-
 24
24
-
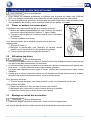 25
25
-
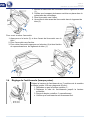 26
26
-
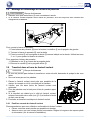 27
27
-
 28
28
-
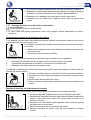 29
29
-
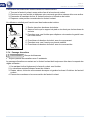 30
30
-
 31
31
-
 32
32
-
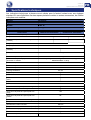 33
33
-
 34
34
-
 35
35
-
 36
36
-
 37
37
-
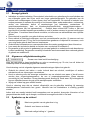 38
38
-
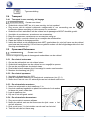 39
39
-
 40
40
-
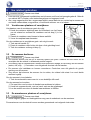 41
41
-
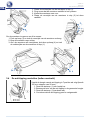 42
42
-
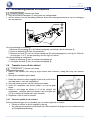 43
43
-
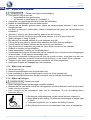 44
44
-
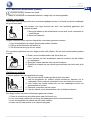 45
45
-
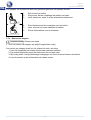 46
46
-
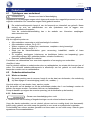 47
47
-
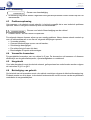 48
48
-
 49
49
-
 50
50
-
 51
51
-
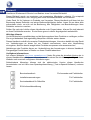 52
52
-
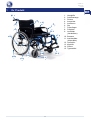 53
53
-
 54
54
-
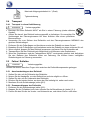 55
55
-
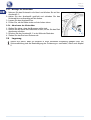 56
56
-
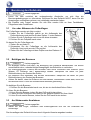 57
57
-
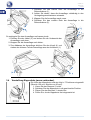 58
58
-
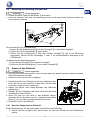 59
59
-
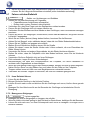 60
60
-
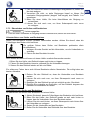 61
61
-
 62
62
-
 63
63
-
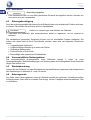 64
64
-
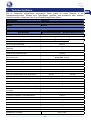 65
65
-
 66
66
-
 67
67
-
 68
68
-
 69
69
-
 70
70
-
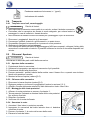 71
71
-
 72
72
-
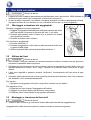 73
73
-
 74
74
-
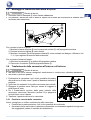 75
75
-
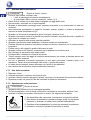 76
76
-
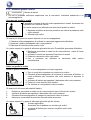 77
77
-
 78
78
-
 79
79
-
 80
80
-
 81
81
-
 82
82
-
 83
83
-
 84
84
-
 85
85
-
 86
86
-
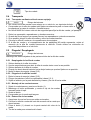 87
87
-
 88
88
-
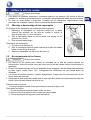 89
89
-
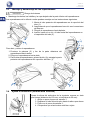 90
90
-
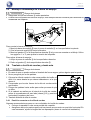 91
91
-
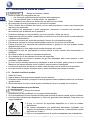 92
92
-
 93
93
-
 94
94
-
 95
95
-
 96
96
-
 97
97
-
 98
98
-
 99
99
-
 100
100
-
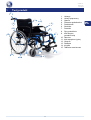 101
101
-
 102
102
-
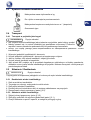 103
103
-
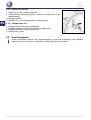 104
104
-
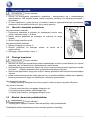 105
105
-
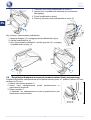 106
106
-
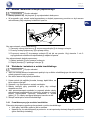 107
107
-
 108
108
-
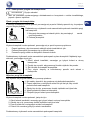 109
109
-
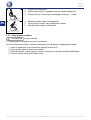 110
110
-
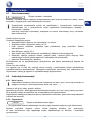 111
111
-
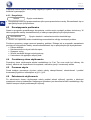 112
112
-
 113
113
-
 114
114
-
 115
115
-
 116
116
-
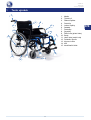 117
117
-
 118
118
-
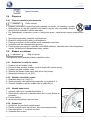 119
119
-
 120
120
-
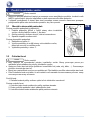 121
121
-
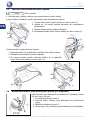 122
122
-
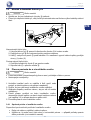 123
123
-
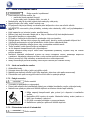 124
124
-
 125
125
-
 126
126
-
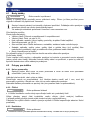 127
127
-
 128
128
-
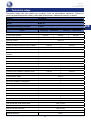 129
129
-
 130
130
-
 131
131
-
 132
132


in andere talen
- italiano: Vermeiren V300 XL Manuale utente
- français: Vermeiren V300 XL Manuel utilisateur
- español: Vermeiren V300 XL Manual de usuario
- Deutsch: Vermeiren V300 XL Benutzerhandbuch
- polski: Vermeiren V300 XL Instrukcja obsługi
Gerelateerde papieren
-
Vermeiren V300 30° Handleiding
-
-
Vermeiren V300 D Handleiding
-
Vermeiren 708D Handleiding
-
-
Vermeiren Eclips+ 30° Handleiding
-
Vermeiren Bobby 24 Handleiding
-
Vermeiren Inovys II-E Handleiding
-
-