HP SCANJET G4050 PHOTO SCANNER Handleiding
- Type
- Handleiding


Guide d'installation et d'assistance
Français

Copyright et licence
© 2006 Copyright Hewlett-Packard
Development Company, L.P.
La reproduction, l'adaptation ou la
traduction dans une autre langue
sans l'autorisation écrite préalable de
Hewlett-Packard est interdite, ou
autorisée conformément aux lois
relatives au copyright.
Les informations contenues dans ce
document sont sujettes à modification
sans préavis.
Les garanties limitées des produits et
services HP sont exclusivement
présentées dans la documentation
accompagnant ces produits et
services. Aucun élément du présent
document ne doit être considéré
comme constituant une garantie
supplémentaire. HP ne pourra être
tenu responsable des erreurs ou
omissions de nature technique ou
rédactionnelle qui pourraient subsister
dans le présent document.
Marques déposées
Microsoft et Windows sont des
marques déposées de Microsoft
Corporation.

Sommaire
1 Démarrage ............................................................................................................4
Etape 1. Vérification du contenu de l'emballage ....................................................4
Etape 2. Installation du logiciel ..............................................................................5
Etape 3. Connexion du câble de l'adaptateur de supports transparents
(TMA) ....................................................................................................................5
Etape 4. Connexion du cordon d'alimentation .......................................................6
Etape 5. Connexion du câble USB ........................................................................6
Etape 6. Test de l'installation .................................................................................8
2 Utilisation du scanner .........................................................................................9
Informations supplémentaires ................................................................................9
Logiciel HP Photosmart Macintosh ......................................................................10
Présentation du panneau avant et des accessoires ............................................10
Boutons du panneau avant ...........................................................................10
Adaptateur de supports transparents (TMA) ................................................11
3 Résolution des problèmes d'installation du scanner .....................................12
Désinstallation et réinstallation du logiciel ...........................................................12
Vérification des câbles .........................................................................................13
4 Informations juridiques et caractéristiques du produit ..................................14
Caractéristiques du scanner ................................................................................14
Caractéristiques de l'adaptateur de supports transparents (TMA) .......................15
Caractéristiques environnementales ...................................................................15
Informations sur le recyclage et la mise au rebut de certains matériaux .............16
Collecte des déchets des particuliers au sein de l'Union européenne .................16
5 Assistance produits ..........................................................................................17
Accessibilité .........................................................................................................17
Site Web HP Scanjet ...........................................................................................17
Obtention d'assistance ........................................................................................18
6 Déclaration de garantie limitée de Hewlett-Packard .......................................19
Guide d'installation et d'assistance
3
Français
Logiciel HP Photosmart Windows ...........................................................................9

1
Démarrage
Procédez comme suit pour configurer le scanner :
Etape 1. Vérification du contenu de l'emballage
Déballez le scanner. Veillez à retirer toutes les bandes adhésives.
1
2
3
4
5
6
1 Scanner HP Scanjet G4010 ou G4050
2
Câble USB
3
Cordon d'alimentation
4 Guide d'installation et d'assistance (le présent manuel)
5 CD des logiciels de numérisation
6 Modèles de l'adaptateur de supports transparents (TMA) (HP
Scanjet G4050 uniquement)
4
HP Scanjet série G4000

Etape 2. Installation du logiciel
Attention Si vous installez le logiciel sur un ordinateur Windows, ne
connectez pas encore le câble USB à l'ordinateur. Installez le logiciel de
numérisation avant de brancher le câble USB. Si vous installez le logiciel sur
un ordinateur Macintosh, vous pouvez connecter le câble USB avant ou après
l'installation du logiciel.
1. Insérez le CD HP Photosmart fourni avec le scanner dans le lecteur de CD de
l'ordinateur.
Pour les installations Windows : attendez que la boîte de dialogue d'installation
s'affiche. Si elle ne s'affiche pas après quelques instants, reportez-vous à la
section Résolution des problèmes d'installation du scanner, page 12.
Pour les installations Macintosh : sur le bureau, double-cliquez sur l'icône du
CD, puis double-cliquez sur l'icône Installer le scanner HP Scanjet pour démarrer
l'installation.
2. Cliquez sur Installer le logiciel pour installer le logiciel de numérisation. Suivez
les instructions à l'écran pour procéder à l'installation du logiciel de numérisation.
Etape 3. Connexion du câble de l'adaptateur de supports
transparents (TMA)
➔
Connectez le câble TMA entre le capot et la base du scanner.
Guide d'installation et d'assistance
5
Français

Etape 4. Connexion du cordon d'alimentation
Le cordon d'alimentation possède un câble associé qui se branche à l'arrière du
scanner.
Un câble secteur est également connecté au cordon d'alimentation à une extrémité et
branché sur une prise électrique ou sur un parasurtenseur à l'autre extrémité.
1. Branchez le câble secteur à l'arrière du cordon d'alimentation.
2. Branchez l'autre extrémité du câble secteur à une prise électrique ou à un
parasurtenseur.
Etape 5. Connexion du câble USB
Attention Si vous effectuez l'installation dans un environnement Windows,
assurez-vous que le logiciel HP Photosmart est installé préalablement à la
connexion du scanner à votre ordinateur via le câble USB. Reportez-vous à la
section Etape 2. Installation du logiciel, page 5. Si vous effectuez l'installation
dans un environnement Macintosh, vous pouvez connecter le câble USB avant
ou après l'installation du logiciel.
Chapitre 1
6
HP Scanjet série G4000

Utilisez le câble USB fourni avec le scanner pour brancher le scanner à l'ordinateur.
1. Raccordez l'embout carré du câble au scanner.
2. Raccordez l'embout rectangulaire du câble à l'ordinateur.
Guide d'installation et d'assistance
7
Français

Etape 6. Test de l'installation
1
2
1. Placez une photo ou un document sur la vitre du scanner comme indiqué sur la
marque de référence du scanner.
2. Appuyez sur le bouton Numériser (
). Si vous effectuez une numérisation à
l'aide du logiciel Windows, la boîte de dialogue Que numérisez-vous ? apparaît.
Suivez les instructions qui s'affichent à l'écran pour terminer la numérisation.
Si vous réalisez une numérisation à l'aide du logiciel Macintosh, l'application HP
Scan Pro s'ouvre et un aperçu du document numérisé s'affiche. Une fois l'aperçu
accepté, l'image numérisée est envoyée vers la destination sélectionnée dans les
paramètres du scanner.
Si ni la boîte de dialogue Que numérisez-vous ? ni la fenêtre HP Scan Pro ne
s'affichent, reportez-vous à la section Résolution des problèmes d'installation du
scanner, page 12.
Chapitre 1
8
HP Scanjet série G4000

2
Utilisation du scanner
Cette rubrique contient une présentation du scanner et des informations sur son
utilisation.
Informations supplémentaires
Vous trouverez d'autres informations sur le scanner et le logiciel dans le fichier d'aide
du scanner. Si vous avez installé le logiciel HP Photosmart fourni avec votre scanner,
double-cliquez sur l'icône Centre de solutions HP située sur votre bureau, puis
cliquez sur Aide et assistance. Sous la section Documentation, cliquez sur Aide
sur les produits.
Pour accéder à la version en ligne du guide de l'utilisateur du scanner, cliquez sur
Démarrer, pointez sur Programmes ou Tous les programmes, puis sur HP,
Scanjet, série G4000 et cliquez sur Guide de l'utilisateur.
Utilisateurs de Macintosh : pour plus d'informations sur les procédures de
numérisation, ouvrez le Gestionnaire de périphériques HP, puis cliquez sur le point
d'interrogation situé en bas de la boîte de dialogue.
Lors de l'installation de HP Photosmart Windows, deux icônes sont ajoutées à votre
bureau. Ces icônes correspondent à deux applications : un logiciel de numérisation et
un logiciel d'édition.
Pour plus d'informations sur l'utilisation du Centre de solutions HP et de HP
Photosmart, consultez les fichiers d'aide du scanner. Double-cliquez sur l'icône
Centre de solutions HP sur votre bureau, puis cliquez sur Aide et assistance. Sous
la section Documentation, cliquez sur Aide sur les produits.
Le Centre de solutions HP est le logiciel qui vous permet de
démarrer la numérisation d'images et de documents. Utilisez le
Centre de solutions HP si vous souhaitez effectuer l'une des
opérations suivantes :
● exécuter des fonctions de numérisation et de copie ;
● consulter les informations d'aide et de résolution des
problèmes ;
● accéder au logiciel HP Photosmart pour modifier vos
images numérisées ;
● modifier les paramètres et les préférences.
HP Photosmart est le logiciel à utiliser pour la manipulation,
l'impression, l'archivage et le partage de vos images une fois
numérisées. Vous pouvez accéder à HP Photosmart à l'aide de
l'icône située sur votre bureau ou par l'intermédiaire du Centre
de solutions HP.
Pour lancer une numérisation :
Guide d'installation et d'assistance
9
Français
Logiciel HP Photosmart Windows

Double-cliquez sur l'icône du Centre de solutions HP située sur votre bureau,
cliquez sur l'onglet correspondant au scanner, puis cliquez sur la tâche que vous
souhaitez réaliser.
Remarque Si l'icône Centre de solutions HP n'est pas disponible sur le
bureau, cliquez sur Démarrer, puis placez le curseur de la souris sur
Programmes ou Tous les programmes, puis sur HP et cliquez sur Centre
de solutions HP.
Logiciel HP Photosmart Macintosh
Lorsque vous installez le programme de numérisation HP sur un ordinateur
Macintosh, deux programmes logiciels sont disponibles dans le Dock : Gestionnaire
de périphériques HP et HP Photosmart Studio. Ces programmes permettent la
numérisation et la modification de vos documents.
Le Gestionnaire de périphériques HP est le logiciel qui vous
permet de démarrer la numérisation d'images et de documents.
Utilisez le gestionnaire de périphériques pour effectuer les
opérations suivantes :
● exécuter des fonctions de numérisation et de copie ;
● consulter les informations d'aide et de résolution des
problèmes ;
● accéder au logiciel HP Photosmart Studio pour modifier vos
images numérisées ;
● modifier les paramètres et les préférences.
HP Photosmart Studio est le logiciel à utiliser pour la
manipulation, l'impression, l'archivage et le partage de vos
images une fois numérisées. Vous pouvez ouvrir HP Photosmart
Studio à partir du Dock ou depuis le menu Applications du
Gestionnaire de périphériques HP.
Présentation du panneau avant et des accessoires
Cette rubrique présente le panneau avant du scanner et l'adaptateur de supports
transparents (TMA).
Boutons du panneau avant
Icône Nom de la
fonction
Description
Bouton
Numériser
Permet de numériser des photos, des images, des
documents ou autres objets.
Bouton
Numériser la
pellicule
Permet de numériser des positifs, comme des
diapositives 35 mm, et des négatifs transparents. La
numérisation de pellicules nécessite l'utilisation de
Chapitre 2
10
HP Scanjet série G4000

Icône Nom de la
fonction
Description
l'adaptateur de supports transparents (TMA) situé
sur la face inférieure du capot.
Bouton Copier Numérise l'élément et l'envoie vers l'imprimante pour
en faire une copie.
Bouton
Numériser au
format PDF
Numérise une ou plusieurs pages et les enregistre
au format PDF pour stockage ou partage.
Remarque Pour plus d'informations sur les actions par défaut de ces boutons
dans un environnement Macintosh, ouvrez le Gestionnaire de
périphériques HP, puis cliquez sur le point d'interrogation situé en bas de la
boîte de dialogue.
Adaptateur de supports transparents (TMA)
Vous pouvez utiliser l'adaptateur de supports transparents (TMA) pour numériser des
diapositives ou des négatifs 35 mm. L'adaptateur de supports transparents (TMA) HP
Scanjet G4050 vous permet également de numériser des pellicules moyens et grands
formats. Pour plus d'informations sur l'adaptateur de supports transparents (TMA),
reportez-vous au guide de l'utilisateur du scanner. Pour savoir comment utiliser le
guide de l'utilisateur, reportez-vous à la section Informations supplémentaires, page 9.
(suite)
Guide d'installation et d'assistance
11
Français

3
Résolution des problèmes
d'installation du scanner
Cette rubrique contient des solutions aux problèmes d'installation et de configuration.
Désinstallation et réinstallation du logiciel
Si le logiciel n'est pas installé complètement, il est possible que le scanner ne soit pas
reconnu ou que le logiciel ne se lance pas correctement. Essayez de désinstaller,
puis de réinstaller le logiciel de numérisation HP. Pour réinstaller le logiciel de
numérisation HP, vous devez disposer du CD du logiciel HP Photosmart.
Environnement Windows :
1. Cliquez sur Démarrer, Paramètres, puis Panneau de configuration (sous
Windows XP, cliquez sur Démarrer, puis Panneau de configuration).
2. Cliquez sur Ajout/Suppression de programmes (dans Windows XP, l'option
s'appelle Ajouter ou supprimer des programmes), puis sélectionnez
HP Scanjet série G4000.
3. Cliquez sur Supprimer.
4. Cliquez sur Ajout/Suppression de programmes (dans Windows XP, l'option
s'appelle Ajouter ou supprimer des programmes) puis sélectionnez le logiciel
HP Photosmart.
5. Cliquez sur Supprimer.
6. Déconnectez le câble USB de l'ordinateur.
7. Réinstallez le logiciel grâce au CD du logiciel HP Photosmart fourni avec votre
scanner. Lorsque vous insérez le CD, l'interface d'installation se lance
automatiquement. Sélectionnez HP Photosmart comme logiciel à installer.
8. Reconnectez le câble USB après avoir installé le logiciel. Pour plus
d'informations, reportez-vous à la section Etape 5. Connexion du câble USB,
page 6
Environnement Macintosh :
1. Accédez à Applications/Hewlett-Packard puis ouvrez le désinstalleur HP.
Remarque Vous devez disposer de privilèges administratifs pour
désinstaller le logiciel.
2. Saisissez votre nom d'utilisateur et votre mot de passe lorsque vous y êtes invité.
La fenêtre du désinstalleur HP s'ouvre et affiche les produits disponibles pour
désinstallation.
3. Sélectionnez le produit série G4000, puis cliquez sur Suivant.
4. Suivez les instructions à l'écran pour procéder à la désinstallation du logiciel.
5. Réinstallez le logiciel grâce au CD du logiciel HP fourni avec votre scanner.
Après avoir inséré le CD, cliquez sur l'icône du CD qui s'affiche sur botre bureau
pour lancer l'installation.
12
HP Scanjet série G4000

Vérification des câbles
Type de câble Action
Câble
d'alimentation
Le câble d'alimentation relie le scanner à une prise secteur.
● Assurez-vous que le câble d'alimentation est bien
connecté au scanner et à une prise électrique ou à un
parasurtenseur en état de marche.
● Si le câble d'alimentation est connecté à un
parasurtenseur, veillez à ce que celui-ci soit bien relié à
une prise électrique et allumé.
● Eteignez le scanner à l'aide de l'interrupteur
d'alimentation, puis mettez l'ordinateur hors tension.
Après 60 secondes, remettez le scanner, puis l'ordinateur
sous tension, en respectant cet ordre.
Câble USB Le câble USB relie le scanner à l'ordinateur.
● Utilisez le câble fourni avec le scanner. Il se peut qu'un
autre câble USB ne soit pas compatible avec le scanner.
● Vérifiez que le câble USB est connecté correctement au
scanner et à l'ordinateur.
● Si le câble USB est connecté à un port USB situé à
l'avant de l'ordinateur, branchez-le sur un autre port USB
à l'arrière de l'ordinateur.
Pour de plus amples informations sur la résolution des
problèmes liés au câble USB, reportez-vous à la
section www.hp.com/support, sélectionnez votre pays/
région, puis utilisez l'outil de recherche pour localiser les
rubriques de résolution des problèmes liés au câble USB.
Câble de
l'adaptateur de
supports
transparents (TMA)
Le câble de l'adaptateur de supports transparents (TMA) relie
l'adaptateur situé dans le capot du scanner à la base du
scanner.
Assurez-vous que ce câble est correctement branché à
l'arrière du scanner.
Guide d'installation et d'assistance
13
Français

4
Informations juridiques et
caractéristiques du produit
Vous trouverez, dans cette rubrique, les informations légales et les caractéristiques
produit des accessoires et du scanner photo HP Scanjet série G4000.
Caractéristiques du scanner
Désignation Description
Type de scanner Scanner à plat avec adaptateur de supports transparents (TMA)
Taille G4010 : 303 mm x 5 088 mm x 98 mm
(11,93 x 20 x 3,86 pouces)
G4050 : 303 mm x 5 088 mm x 108 mm
(11,93 x 20 x 4,25 pouces)
Poids G4010 : 4,4 kg (9,6 livres)
G4050 : 5,3 kg (11,6 livres)
Elément de
numérisation
Elément à couplage de charge
Interface Câble USB 2.0 pleine vitesse
Résolution
matérielle
Résolution matérielle : 4 800 x 9 600 dpi
Choix de la
résolution
Résolution interpolée de 12 à 999,999 dpi (échelle à 100 %)
Tension CA
100-120 V 60 Hz – Amérique du Nord
200-240 V 50 Hz - Europe Continentale, Royaume-Uni, Australie
100-240 V 50 Hz/60 Hz - Reste du monde
Informations
juridiques
Numéro de modèle légal : afin de permettre son identification
sur le plan juridique, un numéro de modèle légal a été attribué
à votre produit. Le numéro de modèle légal de votre produit est
FCLSD-0605. Ce numéro ne doit pas être confondu avec le
nom commercial de votre appareil (HP Scanjet G4010 ou
G4050) ou la référence du produit (L1956A ou L1957A).
La consommation d'énergie est sensiblement réduite en mode
ENERGY STAR®, ce qui permet d'économiser les ressources
naturelles et de réduire les coûts sans affecter les
performances du produit. Ce produit est doté du label ENERGY
STAR (MOU v. 1.0), programme bénévole destiné à favoriser le
14
HP Scanjet série G4000

Désignation Description
développement de produits de bureau à faible consommation
d'énergie.
ENERGY STAR est une marque déposée par l'agence
américaine de protection de l'environnement (EPA), Etats-Unis.
En tant que partenaire du programme ENERGY STAR, HP a
établi que le présent produit remplissait les exigences de la
norme ENERGY STAR sur l'économie d'énergie. Pour plus
d'informations sur les normes ENERGY STAR, rendez-vous sur
le site Web suivant : www.energystar.gov.
Caractéristiques de l'adaptateur de supports
transparents (TMA)
Désignation Description
Types de supports G4010 : jusqu'à cinq diapositives 35 mm ou six
négatifs 35 mm
G4050 : jusqu'à 16 diapositives 35 mm ou 30 négatifs
35 mm, jusqu'à deux pellicules moyen format (pellicule
en bobine 120) ou une pellicule grand format (pellicule
en bobine 220).
Alimentation 12 volts/400 mA max.
Consommation d'énergie
et informations juridiques
Reportez-vous au fichier regulatory_supplement.htm
figurant sur le CD du logiciel HP Photosmart pour plus
de détails sur la consommation d'énergie,
l'alimentation électrique et les informations légales.
Caractéristiques environnementales
Désignation Description
Température Lors du fonctionnement du scanner et de l'adaptateur
de supports transparents (TMA) : 10 °C à 35 °C
Stockage : - 40 °C à 60 °C
Humidité relative Lors du fonctionnement du scanner et de l'adaptateur
de supports transparents : 15 % à 80 % sans
condensation, de 10 ° à 35 °C
Stockage : jusqu'à 90 % (sans condensation) de 0 °C à
60 °C (32 °F à 140 °F)
Guide d'installation et d'assistance
15
Français

Informations sur le recyclage et la mise au rebut de
certains matériaux
Recyclage
HP propose un nombre croissant de programmes de retour produits et de recyclage
dans de nombreux pays et régions. L'entreprise collabore avec les plus grands
centres de recyclage de matériel électronique dans le monde. HP préserve les
ressources en revendant certains de ses produits les plus populaires. Pour plus
d'informations sur le recyclage de produits HP, rendez-vous à
l'adresse : www.hp.com/hpinfo/globalcitizenship/environment/recycle/
Mise au rebut de certains matériaux
Ce produit HP contient des matériaux qui risquent de nécessiter un traitement spécial
lorsqu'ils seront hors d'usage : du mercure dans la lampe fluorescente du scanner et
l'adaptateur de supports transparents (< 5 mg).
Pour plus d'informations sur le recyclage, consultez le site www.hp.com/go/recycle,
les autorités locales ou Electronic Industries Alliance à l'adresse www.eiae.org.
Collecte des déchets des particuliers au sein de l'Union
européenne
Ce symbole, apposé sur le produit ou sur son emballage, indique que ce produit ne
doit pas être jeté avec les ordures ménagères. C'est à vous de le déposer dans un
point de collecte des déchets spécialisé dans le recyclage du matériel électrique et
électronique. La collecte et le recyclage séparés des déchets permettent de préserver
les ressources naturelles et de protéger la santé des individus. Pour plus
d'informations sur les points de collecte des déchets et sur le recyclage, contactez
votre revendeur, la mairie, le service local de ramassage des ordures ou le magasin
dans lequel vous avez acheté le produit.
Chapitre 4
16
HP Scanjet série G4000

5
Assistance produits
Cette section décrit les options de l'Assistance produits.
Accessibilité
Les options d'accessibilité suivantes sont disponibles sur ce scanner :
Environnement Windows :
● Pour éviter que les boutons ne soient involontairement activés, vous pouvez
utiliser l'utilitaire Désactivation des boutons. Cet utilitaire permet également de
réactiver les boutons.
Pour plus d'informations sur l'utilitaire Désactivation des boutons, reportez-vous
au guide de l'utilisateur du scanner.
● Le guide de l'utilisateur du scanner est également disponible dans un format de
fichier d'aide, lisible par la plupart des lecteurs écran. Pour trouver ce fichier,
double-cliquez sur l'icône Centre de solutions HP sur votre bureau, puis cliquez
sur Aide et assistance. Sous la section Documentation, cliquez sur Aide sur
les produits.
Environnement Macintosh :
● Pour éviter que les boutons ne soient involontairement activés, utilisez l'utilitaire
Désactivation des boutons. Cet utilitaire permet également de réactiver les
boutons.
Pour plus d'informations sur l'utilitaire Désactivation des boutons, reportez-vous à
l'aide du scanner HP Scanjet.
● Cette aide est disponible dans un format pris en charge par la plupart des
lecteurs écran. Pour trouver ce fichier, ouvrez le Gestionnaire de
périphériques HP, puis cliquez sur le point d'interrogation situé en bas de la
boîte de dialogue.
Les personnes atteintes d'un handicap peuvent obtenir de l'aide en consultant la page
Web suivante : www.hp.com/hpinfo/community/accessibility/prodserv/ (en
anglais uniquement).
Site Web HP Scanjet
Visitez le site Web www.hp.com et sélectionnez votre pays/langue en haut de la
page. A la page des pays/régions, sélectionnez les scanners dans la liste des
produits. Ce site vous permet d'obtenir notamment les informations suivantes :
● Solutions à des problèmes techniques
● Conseils pour une numérisation plus efficace et créative
● Mises à jour des logiciels et pilotes HP
● Enregistrement de votre produit
● Abonnement aux lettres d'information, mises à jour de pilotes et de logiciels, et
bulletins d'assistance
● Achat d'accessoires et de consommables HP
Guide d'installation et d'assistance
17
Français

Obtention d'assistance
Afin de tirer le meilleur parti de votre produit HP, consultez les offres d'assistance HP
standard suivantes :
1. Consultez la documentation qui accompagne le produit.
– Consultez la section consacrée à la résolution des problèmes ou l'aide en
ligne de ce manuel/CD.
– Consultez la section de l'aide en ligne du logiciel.
2. Visitez le site d'assistance HP en ligne à l'adresse www.hp.com/support ou
contactez votre revendeur local.
L'assistance en ligne HP est disponible pour tous les clients HP. Il s'agit de la
source la plus rapidement accessible pour obtenir des informations à jour sur le
produit et l'assistance d'experts, notamment les fonctionnalités suivantes :
– Accès rapide par messagerie à des spécialistes de l'assistance en ligne
qualifiés
– Logiciels et mises à jour des pilotes pour votre produit
– Informations précieuses relatives à la résolution des problèmes et au produit
pour les problèmes techniques
– Mises à jour des produits proactives, bulletins d'assistance et lettres
d'information HP (disponibles lorsque vous enregistrez votre produit)
3. Assistance HP par téléphone
– Les options d'assistance et les frais varient en fonction du produit, du pays/
de la région et de la langue.
– Les frais et les règles sont sujets à modification sans préavis. Consultez le
site www.hp.com/support pour connaître les dernières informations.
4. Période post-garantie
Après la période de garantie limitée, vous pouvez bénéficier d'une assistance en
ligne à l'adresse www.hp.com/support.
5.
Prolongation ou extension de votre garantie
Si vous souhaitez prolonger ou étendre la garantie du produit, contactez votre
revendeur ou consultez le service HP Care Pack à
l'adresse www.hp.com/support.
6. Si vous avez déjà fait l'acquisition d'un service HP Care Pack, consultez les
conditions d'assistance stipulées dans votre contrat.
Chapitre 5
18
HP Scanjet série G4000

6
Déclaration de garantie limitée
de Hewlett-Packard
Les informations suivantes décrivent les conditions de garantie pour ce produit.
Produit
Durée de la garantie limitée
Scanner HP Scanjet
série G4000
1 an
A. Etendue de la garantie limitée
1. Hewlett-Packard (HP) garantit au client utilisateur final (Client) que chaque
produit HP (Produit) spécifié ci-dessus est exempt de défauts matériels et de
malfaçons pour la période spécifiée ci-dessus. La période de garantie commence
à partir de la date d'achat par le client.
2. Pour tous les logiciels, la garantie limitée de HP s'applique uniquement aux
erreurs d'exécution de programmation. HP ne garantit pas que le fonctionnement
d'un produit, quel qu'il soit, ne sera pas exempt d'interruptions ni d'erreurs.
3. La garantie limitée de HP s'applique uniquement aux défauts résultant d'une
utilisation normale du Produit et ne s'applique pas aux autres défauts, notamment
ceux résultant :
a. d'une utilisation, d'une maintenance, d'un stockage, d'une manipulation ou
d'une modification incorrects,
b. de l'utilisation de logiciels, supports, pièces, accessoires, fournitures,
adaptateurs ou sources d'alimentations non fournis ou pris en charge par HP,
c. d'une utilisation ou autres opérations non conformes aux spécifications du
Produit.
4. Si de tels défauts sont portés à sa connaissance pendant la période de
garantie, HP s'engage, à sa convenance, à remplacer ou à réparer le Produit
défectueux.
5. Si HP n'est pas en mesure de réparer ou de remplacer un Produit défectueux
couvert par la garantie HP, HP se réserve le droit, dans un délai raisonnable
après avoir été averti du problème, de fournir un autre produit aux performances
similaires ou d'effectuer un remboursement basé sur le prix d'achat, prenant en
considération l'utilisation du produit et autres facteurs liés.
6. En aucun cas, HP n'est tenu de procéder à un remplacement, une réparation ou
un remboursement si le client ne renvoie pas le produit défectueux accompagné
d'une preuve d'achat valide.
7. Tout produit de remplacement est neuf ou en excellent état et doit offrir au moins
les mêmes fonctionnalités que le produit remplacé.
Guide d'installation et d'assistance
19
Français

8. Un Produit peut comporter des pièces et des composants remanufacturés et
équivalents à des pièces neuves dans leur fonctionnement.
9. La garantie limitée de HP est valable dans tout pays ou localité où HP a un
centre d'assistance et une présence commerciale pour le Produit. Le niveau des
services de garantie offerts dépend des réglementations locales. Le Client peut
souscrire auprès de HP à des extensions de garantie, comme l'échange le jour
suivant, le service sur site et l'assurance pour les dégâts accidentels.
B. Limitation de garantie
DANS LES LIMITES AUTORISEES PAR LA LEGISLATION EN VIGUEUR, HP ET
SES FOURNISSEURS NE PEUVENT OFFRIR AUCUNE AUTRE GARANTIE OU
CONDITION, DE FAÇON EXPRESSE OU IMPLICITE, SUR UN PRODUIT. HP ET
SES FOURNISSEURS REJETTENT SPECIFIQUEMENT TOUTES GARANTIES OU
CONDITIONS IMPLICITES DE COMMERCIALISATION, DE QUALITE
SATISFAISANTE ET D'ADAPTATION A UN USAGE PARTICULIER.
C. Limitation de responsabilité
1. Dans les limites autorisées par la législation en vigueur, les recours de cette
déclaration de garantie limitée constituent les seuls et uniques recours du client.
2. DANS LES LIMITES AUTORISEES PAR LA LEGISLATION EN VIGUEUR, A
L'EXCEPTION DES OBLIGATIONS PRESENTEES SPECIFIQUEMENT DANS
CETTE DECLARATION DE GARANTIE LIMITEE, NI HP NI SES
FOURNISSEURS NE SERONT TENUS RESPONSABLES DES DOMMAGES
DIRECTS, INDIRECTS, SPECIAUX, FORTUITS OU CONSECUTIFS, FONDES
SUR UN CONTRAT, UN PREJUDICE OU AUTRE, MEME SI HP ET SES
FOURNISSEURS ONT ETE INFORMES DE LA POSSIBILITE DE TELS
DOMMAGES.
D. Législation locale
1. La présente déclaration de garantie limitée donne au client des droits spécifiques.
Le Client peut également disposer d'autres droits selon son pays/région, état ou
province.
2. Dans le cas où la déclaration de garantie limitée serait en contradiction avec la
législation locale, cette déclaration de garantie limitée sera modifiée afin de se
mettre en conformité avec la législation locale. Sous certaines législations
locales, certains rejets et limitations exprimés dans cette déclaration de garantie
limitée peuvent ne pas s'appliquer au Client. Par exemple, le gouvernement
fédéral des Etats-Unis, certains Etats des Etats-Unis ainsi que certains
gouvernements d'autres pays (y compris certaines provinces du Canada)
peuvent :
a. Accorder des garanties supplémentaires au client.
b. Empêcher les rejets et limitations de cette déclaration de garantie limitée de
limiter les droits statutaires du consommateur (exemple : Royaume-Uni).
c. Dans le cas contraire, restreindre l'application de tels rejets ou limitations par
le fabricant.
d. Spécifier la durée des garanties implicites que le fabricant ne peut rejeter.
e. Contredire les limitations de durée des garanties implicites.
Chapitre 6
20
HP Scanjet série G4000

3. Le client peut disposer de droits statutaires complémentaires par le biais de
l'accord d'achat. Ces droits ne sont en aucun cas affectés par cette déclaration
de garantie limitée.
4. Pour les transactions réalisées aux Etats-Unis, toute garantie implicite imposée
par la législation est limitée en temps à la durée de la garantie expresse.
5. POUR LES TRANSACTIONS REALISEES EN AUSTRALIE ET EN NOUVELLE-
ZELANDE, LES TERMES DE LA PRESENTE DECLARATION DE GARANTIE
LIMITEE, DANS LE CADRE AUTORISE PAR LA LEGISLATION EN VIGUEUR,
N'EXCLUENT, NE RESTREIGNENT NI NE MODIFIENT LES DROITS
STATUTAIRES OBLIGATOIRES APPLICABLES A LA VENTE D'UN PRODUIT
AUX CLIENTS.
Vous pouvez disposer de droits statutaires complémentaires par le biais de l'accord
d'achat passé avec votre revendeur. Ces droits ne sont en aucun cas affectés par
cette garantie limitée HP.
Vous trouverez, sur la page de couverture intérieure du présent manuel, les noms et
adresses des entités HP qui accordent la garantie limitée de HP dans votre pays.
Guide d'installation et d'assistance
21
Français


Installatie- en ondersteuningshandleiding
Nederlands

Copyright en licentie
© 2006 Copyright Hewlett-Packard
Development Company, L.P.
Niets in deze uitgave mag worden
verveelvoudigd, gewijzigd of vertaald
zonder voorafgaande schriftelijke
toestemming, behalve voor zover is
toegestaan binnen de
auteursrechtwetgeving.
De informatie in dit document kan
zonder voorafgaande kennisgeving
worden gewijzigd.
De enige garanties voor HP-
producten en -services zijn
beschreven in de garantiebepalingen
die bij de producten en services
horen. Niets in dit document mag
worden beschouwd als een
aanvullende garantie. HP is niet
aansprakelijk voor technische of
redactionele fouten of ontbrekende
gedeelten in dit document.
Handelsmerken
Microsoft en Windows zijn
gedeponeerde handelsmerken van
Microsoft Corporation.

Inhoudsopgave
1 Aan de slag ..........................................................................................................4
Stap 1. Controleer de inhoud van de doos ............................................................4
Stap 2. Installeer de software ................................................................................5
Stap 3. Sluit de kabel van de transparantenadapter aan .......................................5
Stap 4. Sluit de netvoeding aan .............................................................................6
Stap 5. Sluit de USB-kabel aan .............................................................................6
Stap 6. Test de installatie ......................................................................................8
2 Werken met de scanner ......................................................................................9
Aanvullende informatie ..........................................................................................9
HP Photosmart Windows-software ........................................................................9
HP Photosmart Macintosh-software ....................................................................10
Overzicht van het bedieningspaneel en de accessoires ......................................10
Knoppen op het bedieningspaneel ...............................................................10
Transparantenadapter (TMA) .......................................................................11
3 Problemen met de installatie van de scanner oplossen ................................12
Verwijderen en opnieuw installeren van de software ...........................................12
De kabels controleren ..........................................................................................13
4 Informatie over voorschriften en productspecificaties ..................................14
Scannerspecificaties ............................................................................................14
Specificaties transparantenadapter (TMA) ..........................................................15
Omgevingsspecificaties .......................................................................................15
Informatie over recycling en verwerking van materiaal ........................................15
Hoe privéhuishoudens in de Europese Unie afgedankte apparatuur als
afval dienen aan te bieden ................................................................................... 16
5 Productondersteuning ......................................................................................17
Toegankelijkheid ..................................................................................................17
HP Scanjet-website .............................................................................................17
Hulp inroepen ......................................................................................................18
6 Beperkte garantieverklaring van Hewlett-Packard .........................................19
Installatie- en ondersteuningshandleiding
3
Nederlands

1
Aan de slag
Voer de volgende stappen uit om de scanner te installeren:
Stap 1. Controleer de inhoud van de doos
Haal de scannerhardware uit de verpakking. Verwijder alle tape die is gebruikt voor
het transport.
1
2
3
4
5
6
1 HP Scanjet G4010- of G4050-scanner
2
USB-kabel
3
Netvoeding
4 Installatie- en ondersteuningshandleiding (deze handleiding)
5 Cd-rom's met scansoftware
6 TMA-sjablonen (alleen op HP Scanjet G4050)
4
HP Scanjet G4000-serie

Stap 2. Installeer de software
Let op Sluit de USB-kabel nog niet aan op de computer als u de software op
een Windows-computer installeert. Installeer de scansoftware voordat u de
USB-kabel aansluit. Als u de software op een Macintosh-computer installeert,
kunt u de USB-kabel zowel voor als na de installatie van de software aansluiten.
1. Plaats de HP Photosmart-cd die bij de scanner is geleverd in het cd-romstation
van de computer.
Voor Windows-installaties: Wacht totdat het installatiedialoogvenster wordt
weergegeven. Zie Problemen met de installatie van de scanner oplossen
op pagina 12
Voor Macintosh-installaties: Dubbelklik op het cd-pictogram dat op het
bureaublad verschijnt en dubbelklik vervolgens op het installatiepictogram voor
de HP Scanjet-scanner om de installatie te starten.
2. Klik op Software installeren om de scansoftware te installeren. Volg de
instructies op het scherm om de installatie van de scansoftware te voltooien.
Stap 3. Sluit de kabel van de transparantenadapter aan
➔
Sluit de kabel van de transparantenadapter in het deksel van de scanner aan op
het scannerframe.
Installatie- en ondersteuningshandleiding
5
Nederlands

Stap 4. Sluit de netvoeding aan
Aan de netvoeding is een kabel bevestigd die u in de achterzijde van de scanner kunt
steken.
De netvoeding is ook voorzien van een AC-kabel die aan een zijde is verbonden met
de netvoeding en aan de andere zijde in een stopcontact of overspanningsbeveiliging
moet worden gestoken.
1. Sluit de AC-kabel op de achterzijde van de netvoeding aan.
2. Sluit het andere uiteinde van de AC-kabel aan op een stopcontact of
overspanningsbeveiliging.
Stap 5. Sluit de USB-kabel aan
Let op Als u de installatie uitvoert in een Windows-omgeving, zorg er dan
voor dat u de HP Photosmart-software installeert voordat u de scanner met de
USB-kabel aansluit op de computer. Zie Stap 2. Installeer de software
op pagina 5. Als u de installatie uitvoert in een Macintosh-omgeving, kunt u de
USB-kabel zowel vóór als na de installatie van de software aansluiten.
Hoofdstuk 1
6
HP Scanjet G4000-serie

Gebruik de USB-kabel die bij de scanner is geleverd om de scanner op de computer
aan te sluiten.
1. Steek het vierkante uiteinde van de kabel in de scanner.
2. Steek het rechthoekige uiteinde van de kabel in de computer.
Installatie- en ondersteuningshandleiding
7
Nederlands

Stap 6. Test de installatie
1
2
1. Plaats een foto of document op de glasplaat van de scanner, zoals aangegeven
door de referentiemarkering op de scanner.
2. Druk op de knop Scannen (
). Als u scant met Windows-software, wordt het
scherm Wat scant u? weergegeven. Voer de scan uit aan de hand van de
instructies op het scherm.
Als u scant met Macintosh-software, wordt de toepassing HP Scan Pro geopend
en wordt een voorbeeld van de scan weergegeven. Als u tevreden bent met het
voorbeeld, wordt de gescande afbeelding verzonden naar de bestemming die u in
de scannerinstellingen hebt geselecteerd.
Als het dialoogvenster Wat scant u? of het venster HP Scan Pro niet wordt
weergegeven, raadpleegt u Problemen met de installatie van de scanner
oplossen op pagina 12.
Hoofdstuk 1
8
HP Scanjet G4000-serie

2
Werken met de scanner
In dit gedeelte vindt u een overzicht van de scanner en het gebruik ervan.
Aanvullende informatie
Meer informatie over de scanner en de software vindt u in het Help-bestand van de
scanner. Als u de meegeleverde HP Photosmart-software hebt geïnstalleerd,
dubbelklikt u op het bureaublad op het pictogram HP Solution Center en klikt u
vervolgens op Help en ondersteuning. Klik onder het gedeelte Documentatie op
Productondersteuning.
Als u de online handleiding van de scanner wilt raadplegen, klikt u op Start, wijst u
achtereenvolgens Programma's of Alle programma's, HP, Scanjet, G4000-serie
aan en klikt u ten slotte op Gebruikershandleiding.
Macintosh-gebruikers: Open HP-apparaatbeheer en klik op het vraagteken onder
aan het dialoogvenster voor informatie over scanprocedures.
HP Photosmart Windows-software
Bij de installatie van de HP Photosmart Windows-software worden twee
pictogrammen toegevoegd aan het bureaublad. Met deze pictogrammen worden de
programma's voor scannen en bewerken geopend.
Raadpleeg het Help-bestand van de scanner voor meer informatie over het gebruik
van het HP Solution Center en de HP Photosmart-software. Dubbelklik op het
pictogram HP Solution Center op het bureaublad en klik vervolgens op Help en
ondersteuning. Klik onder het gedeelte Documentatie op Productondersteuning.
HP Solution Center is het programma waarmee u begint als u
afbeeldingen en documenten gaat scannen. U kunt het HP
Solution Center gebruiken voor de volgende functies:
● Scannen en kopiëren
● Help opvragen en problemen oplossen
● De HP Photosmart-software openen om uw scans te
bewerken
● Instellingen en voorkeuren wijzigen
HP Photosmart is het programma waarmee u gescande
afbeeldingen kunt bewerken, afdrukken, archiveren en delen. U
kunt de HP Photosmart-software openen via het pictogram op
het bureaublad of vanuit het HP Solution Center.
Een scan starten:
Dubbelklik op het bureaublad op het pictogram HP Solution Center, klik op het
tabblad voor de scanner en klik vervolgens op de taak die u wilt uitvoeren.
Installatie- en ondersteuningshandleiding
9
Nederlands

Opmerking Als het pictogram van het HP Solution Center niet op het
bureaublad staat, klikt u op Start, wijst u achtereenvolgens Programma's of
Alle programma's en HP aan en klikt u vervolgens op HP Solution Center.
HP Photosmart Macintosh-software
softwareprogramma's weergegeven: HP-apparaatbeheer en HP Photosmart Studio. U
kunt deze programma's gebruiken voor scannen en bewerken.
HP-apparaatbeheer is het programma waarmee u begint als u
afbeeldingen en documenten gaat scannen. U kunt
apparaatbeheer gebruiken voor de volgende functies:
● Scannen en kopiëren
● Help opvragen en problemen oplossen
● HP Photosmart Studio openen om uw scans te bewerken
● Instellingen en voorkeuren wijzigen
HP Photosmart Studio is het programma waarmee u gescande
afbeeldingen kunt bewerken, afdrukken, archiveren en delen. U
kunt HP Photosmart Studio openen vanuit het Dock of vanuit het
menu Toepassingen in HP-apparaatbeheer.
Overzicht van het bedieningspaneel en de accessoires
In dit gedeelte wordt een overzicht gegeven van het bedieningspaneel van de scanner
en de transparantenadapter (TMA).
Knoppen op het bedieningspaneel
Picto-
gram
Functie Beschrijving
Knop Scannen Scant foto's, afbeeldingen, documenten of
voorwerpen.
Knop Film
scannen
Scant transparante positieven (zoals 35mm-dia's) en
negatieven. Om film te scannen, moet u de
transparantenadapter (TMA) aan de onderkant van
het deksel van de scanner gebruiken.
Knop Kopiëren Hiermee scant u het item en stuurt u dit naar een
printer om er een kopie van te maken.
Knop Scannen
naar PDF
Hiermee scant u een of meerdere pagina's en slaat
u deze op als een PDF-bestand dat u kunt delen of
opslaan.
Hoofdstuk 2
10
HP Scanjet G4000-serie
Als u de HP-scansoftware op een Macintosh installeert, worden in het Dock twee

Opmerking Raadpleeg voor meer informatie over de standaardfuncties van
deze knoppen in een Macintosh omgeving HP-apparaatbeheer en klik
vervolgens op het vraagteken onder aan het dialoogvenster.
Transparantenadapter (TMA)
U kunt de transparantenadapter (TMA) gebruiken om 35mm-dia's of negatieven te
scannen. Met de transparantenadapter van de HP Scanjet G4050 kunt u ook film van
middelgroot of groot formaat scannen. Raadpleeg de gebruikershandleiding van de
scanner voor meer informatie over de transparantenadapter. Raadpleeg Aanvullende
informatie op pagina 9 voor meer informatie over het vinden van de
gebruikershandleiding.
Installatie- en ondersteuningshandleiding
11
Nederlands

3
Problemen met de installatie
van de scanner oplossen
Dit gedeelte bevat oplossingen voor problemen met het installeren en instellen.
Verwijderen en opnieuw installeren van de software
Als de installatie van de software niet is voltooid, wordt de scanner mogelijk niet
herkend of wordt de software mogelijk niet goed gestart. Probeer de HP-scansoftware
te verwijderen en opnieuw te installeren. U hebt de cd met HP Photosmart-software
nodig om de HP-scansoftware opnieuw te installeren.
Windows-omgeving:
1. Klik op Start, klik op Instellingen en klik vervolgens op Configuratiescherm (in
Windows XP: klik op Start en klik vervolgens op Configuratiescherm).
2. Klik op Software en selecteer vervolgens de HP Scanjet G4000-serie.
3. Klik op Verwijderen.
4. Klik op Software en selecteer vervolgens de HP Photosmart-software.
5. Klik op Verwijderen.
6. Koppel de USB-kabel van de scanner los van de computer.
7. Installeer de HP Photosmart-software opnieuw van de cd die bij de scanner is
geleverd. Wanneer u de cd in het cd-romstation plaatst, wordt het
installatieprogramma automatisch gestart. Installeer de HP Photosmart-software.
8. Sluit de USB-kabel van de scanner opnieuw aan nadat de installatie van de
software is voltooid. Voor meer informatie zie Stap 5. Sluit de USB-kabel aan
op pagina 6
Macintosh-omgeving:
1. Ga naar Toepassingen/Hewlett-Packard en open HP Uninstaller.
Opmerking U hebt beheerdersrechten nodig om de software te kunnen
verwijderen.
2. Als daarom wordt gevraagd, voert u uw gebruikersnaam en wachtwoord in. Het
venster HP Uninstaller wordt geopend en geeft de producten weer die kunnen
worden verwijderd.
3. Selecteer het product uit de G4000-serie en klik op Volgende.
4. Verwijder de software aan de hand van de instructies op het scherm.
5. Installeer de HP-software opnieuw vanaf de cd die bij de scanner is geleverd.
Nadat u de cd hebt geplaatst, klikt u op het cd-pictogram dat op het bureaublad
verschijnt om de installatie te starten.
12
HP Scanjet G4000-serie

De kabels controleren
Kabeltype Actie
Netsnoer Het netsnoer is aangesloten op de scanner en een stopcontact.
● Controleer of het netsnoer op de juiste manier is
aangesloten op de scanner en het stopcontact of een
overspanningsbeveiliging.
● Als het netsnoer is aangesloten op een
overspanningsbeveiliging, controleert u of deze is
aangesloten op het stopcontact en is ingeschakeld.
● Schakel de scanner uit en zet de computer uit. Schakel
de scanner na 60 seconden weer in en zet vervolgens de
computer aan. Doe dit in deze volgorde.
USB-kabel De USB-kabel is aangesloten op de scanner en de computer.
● Gebruik de kabel die bij de scanner wordt geleverd. Een
USB-kabel van een ander type is mogelijk niet compatibel
met de scanner.
● Controleer of de USB-kabel op de juiste wijze is
aangesloten op de scanner en de computer.
● Als de USB-kabel is aangesloten op een USB-poort aan
de voorzijde van de computer, sluit deze dan aan op een
USB-poort aan de achterzijde van de computer.
Voor meer informatie over het oplossen van USB-problemen
raadpleegt u www.hp.com/support, selecteert u uw land/
regio en zoekt u onderwerpen over het oplossen van USB-
problemen met de zoekfunctie.
Kabel van de
transparanten-
adapter
De kabel van de transparantenadapter is aangesloten op de
adapter in het deksel van de scanner en het scannerframe.
Controleer of de kabel goed op de achterzijde van de scanner
is aangesloten.
Installatie- en ondersteuningshandleiding
13
Nederlands

4
Informatie over voorschriften en
productspecificaties
Dit gedeelte bevat informatie over de voorschriften en productspecificaties voor de
HP Scanjet g4000-serie fotoscanners en bijbehorende accessoires.
Scannerspecificaties
Naam Beschrijving
Scannertype Flatbed met transparantenadapter (TMA)
Afmetingen G4010: 303 x 5088 x 98 mm (11,93 x 20,00 x 3,86 inch)
G4050: 303 x 5088 x 108 mm (11,93 x 20,00 x 4,25 inch)
Gewicht G4010: 4,4 kg
G4050: 5,3 kg
Scannerelement CCD (Charged-Coupled Device)
Interface USB 2.0 Hi-Speed
Hardware-
resolutie
4800 x 9600 dpi hardwareresolutie
Selecteerbare
resolutie
12 dpi tot 999.999 enhanced dpi bij een schaal van 100 procent
Netspanning
100-120 V 60 Hz (Noord-Amerika)
200-240 V 50 Hz (Europees vasteland, Verenigd Koninkrijk,
Australië)
100-240 V 50 Hz/60 Hz (alle andere landen/regio's)
Informatie over
voorschriften
Voorgeschreven modelnummer: om te voldoen aan de
wetgeving is aan dit product een voorgeschreven
modelnummer toegekend. Het voorgeschreven modelnummer
van dit product is FCLSD-0605. Dit voorgeschreven nummer
dient niet te worden verward met de productnaam
(HP Scanjet G4010 of G4050) of met het productnummer
(L1956A of L1957A).
Het energieverbruik is aanzienlijk lager wanneer het apparaat
zich in de ENERGY STAR®-modus bevindt. Dit levert een
besparing op van natuurlijke hulpbronnen en geld zonder
gevolgen voor de hoge prestaties van het product. Dit product
voldoet aan ENERGY STAR (MOU [Intentieverklaring] versie
1.0), een programma op basis van vrijwilligheid ter bevordering
14
HP Scanjet G4000-serie

Naam Beschrijving
van de ontwikkeling van energiebesparende kantoorproducten.
ENERGY STAR is een in de VS geregistreerd servicemerk van
de U.S. EPA. Als ENERGY STAR-partner heeft HP vastgesteld
dat dit product voldoet aan ENERGY STAR-richtlijnen voor
energiebesparing. Raadpleeg voor meer informatie over
ENERGY STAR-richtlijnen de volgende
website: www.energystar.gov
Specificaties transparantenadapter (TMA)
Naam Beschrijving
Mediatypen G4010: Maximaal vijf 35mm-dia's of zes 35mm-
negatievenframes
G4050: Maximaal zestien 35mm-dia's, dertig 35mm-
negatievenframes, maximaal twee middelgrote films
(120-rolfilm), of één grote film (220-rolfilm).
Spanningsvereisten Maximaal 12 V/400 mA
Stroomverbruik en
informatie over
voorschriften
Raadpleeg het bestand regulatory_supplement.htm op
de cd-rom met de HP Photosmart-software voor
informatie over stroomverbruik, voeding en
voorschriften.
Omgevingsspecificaties
Naam Beschrijving
Temperatuur Scanner en transparantenadapter in bedrijf: 10 tot 35 °C
Opslag: -40 tot 60 °C
Relatieve luchtvochtigheid Scanner en transparantenadapter in bedrijf: 15 tot 80%
niet-condenserend 10 tot 35 °C
Opslag: maximaal 90% niet condenserend bij 0 tot 60 °C
Informatie over recycling en verwerking van materiaal
Recycling
HP biedt in veel landen/regio's steeds meer programma's voor het retourneren en
recyclen van producten en is partner van een aantal van de grootste recyclingcentra
voor elektronica ter wereld. HP spaart bronnen door een aantal van de populairste
producten opnieuw te verkopen. Voor meer informatie over het recyclen van HP-
Installatie- en ondersteuningshandleiding
15
Nederlands

producten gaat u
naar: www.hp.com/hpinfo/globalcitizenship/environment/recycle/
Hergebruik en verwerking van afval
Dit HP-product bevat de volgende materialen die mogelijk niet als gewoon afval
kunnen worden weggegooid: kwik in de fluorescentielamp van de scanner en in de
transparantenadapter (< 5 mg).
Voor informatie over recycling gaat u naar www.hp.com/go/recycle, de lokale
overheid of de website van Electronic Industries Alliance op: www.eiae.org.
Hoe privéhuishoudens in de Europese Unie afgedankte
apparatuur als afval dienen aan te bieden
Dit symbool op het product of de verpakking geeft aan dat het product niet bij uw
andere huishoudelijke afval mag worden geplaatst. In plaats daarvan moet u deze
apparaten inleveren bij een officieel afvalpunt waar elektrische en elektronische
apparaten worden ingezameld voor recycling. Door apparaten in te zamelen en te
recyclen wanneer u deze afdankt, worden natuurlijke bronnen gespaard en wordt
gezorgd dat de apparaten worden gerecycled op een verantwoorde wijze voor mens
en milieu. Neem contact op met de gemeentelijke afdeling, de afvaldienst of de winkel
waar u het product hebt gekocht voor meer informatie over de plaatsen waar
apparaten worden ingezameld voor recycling.
Hoofdstuk 4
16
HP Scanjet G4000-serie

5
Productondersteuning
In dit gedeelte worden de opties voor productondersteuning beschreven.
Toegankelijkheid
De volgende toegankelijkheidsopties zijn beschikbaar op deze scanner:
Windows-omgeving:
● U kunt met het hulpprogramma Button Disable Utility (Knop uitschakelen) de
knoppen uitschakelen om te voorkomen dat er per ongeluk op knoppen wordt
gedrukt. Met dit hulpprogramma kunt u de knoppen ook weer inschakelen.
Zie de gebruikershandleiding bij de scanner voor meer informatie over de Button
Disable Utility.
● De gebruikershandleiding van de scanner is ook beschikbaar in een Help-indeling
die door de meeste schermlezers kan worden gelezen. Dubbelklik op het
pictogram HP Solution Center op het bureaublad en klik vervolgens op Help en
ondersteuning om het bestand te vinden. Klik onder het gedeelte Documentatie
op Productondersteuning.
Macintosh-omgeving:
● U kunt met het hulpprogramma Button Disable Utility (Knop uitschakelen) de
knoppen uitschakelen om te voorkomen dat er per ongeluk op knoppen wordt
gedrukt. Met dit hulpprogramma kunt u de knoppen ook weer inschakelen.
Zie de Help bij de HP Scanjet-scanner voor meer informatie over de Button
Disable Utility.
● De Help bij de HP Scanjet-scanner is beschikbaar in een indeling die door de
meeste schermlezers kan worden gelezen. Open HP-apparaatbeheer en klik op
het vraagteken onder aan het dialoogvenster om het bestand te vinden.
Klanten met een handicap vinden nuttige informatie
op www.hp.com/hpinfo/community/accessibility/prodserv/ (alleen Engels).
HP Scanjet-website
Ga naar www.hp.com en selecteer boven aan de pagina uw land/taal. Selecteer
scanners in de lijst met producten op de pagina met landen/regio's. Op deze site kunt
u diverse informatie vinden:
● Oplossingen voor technische problemen
● Tips voor een effectiever en creatiever gebruik van de scanner
● Updates voor de HP-stuurprogramma's en -software
● Productregistratie
● Abonneren op nieuwsbrieven, updates voor stuurprogramma's en software, en
ondersteuningswaarschuwingen
● Aanschaf van HP-benodigdheden en accessoires
Installatie- en ondersteuningshandleiding
17
Nederlands

Hulp inroepen
Raadpleeg de volgende standaard HP-ondersteuningspakketten om het meeste uit
uw HP-product te halen:
1. Raadpleeg de productdocumentatie die bij het product is geleverd.
– Bekijk het gedeelte over problemen oplossen of de elektronische Help van
deze handleiding/cd.
– Bekijk het elektronische Help-gedeelte in de software.
2. Bezoek de online ondersteuning van HP op www.hp.com/support of neem
contact op met het verkooppunt.
De online ondersteuning van HP is beschikbaar voor alle klanten van HP. Dit is
de snelste bron voor de nieuwste productinformatie en deskundige assistentie,
inclusief de volgende voorzieningen:
– Snelle toegang tot deskundige online ondersteuningsspecialisten via e-mail.
– Software- en stuurprogramma-updates voor uw product.
– Waardevolle product- en probleemoplossingsinformatie voor technische
problemen.
– Proactieve productupdates, ondersteuningswaarschuwingen en HP-
nieuwsbrieven (beschikbaar wanneer u het product registreert).
3. Telefonische ondersteuning van HP
– De ondersteuningsopties en -kosten verschillen per product, land/regio en
taal.
– De kosten en het beleid kunnen zonder voorafgaande kennisgeving worden
gewijzigd. Bezoek de website www.hp.com/support voor de laatste
informatie.
4. Na de garantieperiode
Na de beperkte-garantieperiode is hulp online beschikbaar
via www.hp.com/support.
5.
De garantie verlengen of uitbreiden
Als u de garantie op het product wilt verlengen of uitbreiden, neemt u contact op
met het verkooppunt of bekijkt u de HP Care Pack-services
op www.hp.com/support.
6. Als u al een HP Care Pack-service hebt aangeschaft, controleert u de
ondersteuningsvoorwaarden in het contract.
Hoofdstuk 5
18
HP Scanjet G4000-serie

6
Beperkte garantieverklaring van
Hewlett-Packard
In het volgende gedeelte wordt de garantie voor dit product beschreven.
Product
Duur van beperkte garantie
HP Scanjet G4000-
serie scanner
1 jaar
A. Duur van beperkte garantie
1. Hewlett-Packard (HP) garandeert de eindgebruiker dat elk hierboven beschreven
HP-product (Product) vrij is van gebreken in materiaal en constructie gedurende
de hierboven aangegeven periode. De garantieperiode gaat in op de dag van de
aankoop door de klant.
2. Voor elk softwareproduct geldt de beperkte garantie van HP alleen als de
programmeerinstructies niet naar behoren worden uitgevoerd. HP garandeert niet
dat een Product ononderbroken of foutloos zal functioneren.
3. De beperkte garantie van HP dekt alleen defecten die zich voordoen als gevolg
van normaal gebruik van een Product en geen andere problemen, zoals
problemen die zich voordoen als gevolg van:
a. onjuist gebruik, onderhoud, opslag, behandeling of wijzigingen;
b. software, media, onderdelen, accessoires, toebehoren of netadapters of
bronnen die niet door HP zijn geleverd of niet door HP worden ondersteund;
c. gebruik of andere omstandigheden die niet onder de productspecificaties
vallen.
4. Indien HP gedurende de desbetreffende garantieperiode in kennis wordt gesteld
van een defect Product, zal HP het defecte Product naar eigen goeddunken laten
vervangen of repareren.
5. Als HP een defect Product dat wordt gedekt door de beperkte garantie van HP
niet kan vervangen of repareren, kan HP binnen een redelijke termijn na melding
van het defect een ander, vergelijkbaar product of een vergoeding van het
aankoopbedrag aanbieden. Deze vergoeding wordt berekend op basis van
gebruik en andere passende factoren.
6. HP is niet verplicht een Product te vervangen, te repareren of te vergoeden totdat
de klant het defecte Product met een geldig aankoopbewijs aan HP heeft doen
toekomen.
7. Vervangende Producten kunnen nieuwe producten zijn of zo goed als nieuw,
vooropgesteld dat de functionaliteit ten minste gelijk is aan die van het product
dat wordt vervangen.
Installatie- en ondersteuningshandleiding
19
Nederlands

8. Een Product kan gereviseerde onderdelen of materialen bevatten die functioneel
gelijkwaardig zijn aan nieuwe.
9. De beperkte garantie van HP is geldig in alle landen en regio's waar
HP ondersteunende service biedt voor dit Product en waar HP dit Product op de
markt heeft gebracht. Afhankelijk van de plaatselijke normen kan het niveau van
de gegarandeerde service variëren. Uitgebreide garantieservices zoals
vervanging op de volgende dag, service ter plekke en schadepreventie kunnen bij
HP tegen betaling worden afgesloten.
B. GARANTIEBEPERKINGEN
VOOR ZOVER BIJ DE PLAATSELIJKE WETGEVING IS TOEGESTAAN, BIEDEN
NOCH HP, NOCH EXTERNE LEVERANCIERS ENIGE OVERIGE EXPLICIETE OF
IMPLICIETE GARANTIES OF CONDITIES OP VERKOOPBAARHEID,
TEVREDENSTELLENDE KWALITEIT EN GESCHIKTHEID VOOR EEN BEPAALD
DOEL VAN EEN PRODUCT.
C. Beperkingen van aansprakelijkheid
1. In de wettelijk toegestane mate zijn de rechtsmiddelen in deze beperkte
garantieverklaring uitsluitend voor de klant bedoeld.
2. MET UITZONDERING VAN HETGEEN IN DEZE BEPERKTE
GARANTIEVERKLARING WORDT VERMELD IS HP (OF ZIJN LEVERANCIERS
VAN HP), IN GEEN GEVAL AANSPRAKELIJK VOOR HET VERLIES VAN
GEGEVENS OF VOOR DIRECTE, SPECIALE, INCIDENTELE OF
GEVOLGSCHADE (WAARONDER WINSTDERVING) OF ANDERE SCHADE;
OF DEZE NU IS GEBASEERD OP CONTRACT, ONRECHTMATIGE DAAD OF
ENIGE ANDERE JURIDISCHE THEORIE.
D. Lokale wetgeving
1. Deze beperkte garantieverklaring geeft de klant speciale wettelijke rechten. De
klant kan ook andere rechten hebben die in de VS van staat tot staat, in Canada
van provincie tot provincie en elders van land tot land kunnen verschillen.
2. Als deze beperkte garantieverklaring in strijd is met de lokale wetgeving, geldt
voor u dat deze garantieverklaring wordt geacht zodanig te zijn gewijzigd dat
deze overeenkomt met de lokale wetgeving. Krachtens de lokale wetgeving is het
mogelijk dat bepaalde uitsluitingen en beperkingen van deze beperkte
garantieverklaring niet gelden voor de klant. De nationale regering van de
Verenigde Staten, een aantal staten in de Verenigde Staten en bepaalde
regeringen buiten de Verenigde Staten (inclusief provincies in Canada), kunnen
bijvoorbeeld:
a. de klant extra garantie verstrekken;
b. de uitsluitingen en beperkingen van deze beperkte garantieverklaring
uitsluiten van het beperken van voorgeschreven rechten van de consument
(bijv. het Verenigd Koninkrijk);
c. op een andere manier de mogelijkheid van een fabrikant beperken om
dergelijke uitsluitingen of beperkingen in te stellen;
d. de duur van een impliciete garantie, die de fabrikant niet kan wijzigen,
opgeven;
e. beperkingen op de duur van een impliciete garantie niet toestaan.
Hoofdstuk 6
20
HP Scanjet G4000-serie

3. De klant heeft mogelijk aanvullende wettelijk voorgeschreven rechten op basis
van de verkoopovereenkomst. Deze rechten worden op geen enkele wijze
beïnvloed door deze beperkte garantieverklaring.
4. Voor consumenten in de Verenigde Staten is de duur van wettelijk verplichte
impliciete garanties beperkt tot de expliciete garantieperiode.
5. VOOR CONSUMENTEN IN AUSTRALIË EN NIEUW ZEELAND VORMEN DE
GARANTIEVOORWAARDEN IN DEZE BEPERKTE GARANTIEVERKLARING,
BEHALVE IN DE WETTELIJK TOEGESTANE MATE, GEEN UITSLUITING,
BEPERKING OF WIJZIGING VAN, MAAR EEN AANVULLING OP DE
VERPLICHTE EN WETTELIJK VOORGESCHREVEN RECHTEN DIE VAN
TOEPASSING ZIJN OP DE VERKOOP VAN DIT PRODUCT.
Mogelijk hebt u op basis van de verkoopovereenkomst aanvullende wettelijk
voorgeschreven rechten tegenover de verkoper. Deze rechten worden op geen
enkele wijze beïnvloed door de beperkte garantie van HP.
U vindt de namen en adressen van de HP-entiteit die verantwoordelijk is voor de
uitvoering van de beperkte garantie van HP in uw land, aan de binnenzijde van het
voorblad van dit drukwerk.
Installatie- en ondersteuningshandleiding
21
Nederlands


Setup and Support Guide
English

Copyright and license
© 2006 Copyright Hewlett-Packard
Development Company, L.P.
Reproduction, adaptation or
translation without prior written
permission is prohibited, except as
allowed under the copyright laws.
The information contained herein is
subject to change without notice.
The only warranties for HP products
and services are set forth in the
express warranty statements
accompanying such products and
services. Nothing herein should be
construed as constituting an
additional warranty. HP shall not be
liable for technical or editorial errors
or omissions contained herein.
Trademark credits
Microsoft and Windows are registered
trademarks of Microsoft Corporation.

Contents
1 Get started ............................................................................................................4
Step 1. Check the box contents .............................................................................4
Step 2. Install the software ....................................................................................5
Step 3. Connect the TMA cable .............................................................................5
Step 4. Connect the power supply .........................................................................6
Step 5. Connect the USB cable .............................................................................6
Step 6. Test the installation ...................................................................................8
2 How to use the scanner ......................................................................................9
Where to get additional information .......................................................................9
HP Photosmart Windows software ........................................................................9
HP Photosmart Macintosh software ....................................................................10
Front panel and accessories overview ................................................................. 10
Front-panel buttons ......................................................................................10
Transparent materials adapter (TMA) ...........................................................10
3 Scanner installation troubleshooting ..............................................................12
Uninstall and reinstall the software ......................................................................12
Check the cables .................................................................................................13
4 Regulatory information and product specifications .......................................14
Scanner specifications .........................................................................................14
Transparent materials adapter (TMA) specifications ...........................................15
Environmental specifications ...............................................................................15
Recycle and restricted material information .........................................................15
Disposal of Waste Equipment by Users in Private Households in the
European Union ...................................................................................................16
5 Product support .................................................................................................17
Accessibility .........................................................................................................17
HP Scanjet Web site ............................................................................................17
Getting assistance ...............................................................................................18
6 Hewlett-Packard limited warranty statement ..................................................19
Setup and Support Guide
3
English

1
Get started
Follow these steps to set up the scanner:
Step 1. Check the box contents
Unpack the scanner hardware. Be sure to remove any shipping tape.
1
2
3
4
5
6
1 HP Scanjet G4010 or G4050 scanner
2
USB cable
3
Power supply
4 Setup and Support Guide (this book)
5 Scanning software CDs
6 TMA templates (HP Scanjet G4050 only)
4
HP Scanjet G4000 series

Step 2. Install the software
Caution If you are installing the software onto a Windows computer, do not
connect the USB cable to the computer yet. Install the scanning software
before connecting the USB cable. If you are installing the software into a
Macintosh computer, you can connect the USB cable either before or after
installing the software.
1. Insert the HP Photosmart CD that came with the scanner into the computer CD
drive.
For Windows installations: Wait for the installation dialog box to display. If the
installation dialog box does not display after a few moments, see Scanner
installation troubleshooting on page 12.
For Macintosh installations: Double-click on the CD icon that appears on the
desktop, and then double click on the HP Scanjet Scanner Install icon to start the
installation.
2. Click Install software to install the scanning software. Follow the onscreen
instructions to complete the scanning software installation.
Step 3. Connect the TMA cable
➔
Connect the TMA cable from the lid to the scanner base.
Setup and Support Guide
5
English

Step 4. Connect the power supply
The power supply has an attached cable that plugs into the back of the scanner.
The power supply also has an AC cable that is connected to the power supply on one
end and plugged into a power outlet or surge protector on the other end.
1. Plug the AC cable into the back of the power supply.
2. Plug the other end of the AC cable into a power outlet or a surge protector.
Step 5. Connect the USB cable
Caution If you are installing in a Windows environment, be sure you install
the HP Photosmart software before connecting the scanner to your computer
with the USB cable. See Step 2. Install the software on page 5. If you are
installing in a Macintosh environment, you can connect the USB cable either
before or after installing the software.
Chapter 1
6
HP Scanjet G4000 series

Use the USB cable that came with the scanner to connect the scanner to the computer.
1. Connect the square end of the cable to the scanner.
2. Connect the rectangular end of the cable to the computer.
Setup and Support Guide
7
English

Step 6. Test the installation
1
2
1. Place a photo or document on the scanner glass as indicated by the reference
mark on the scanner.
2. Press the Scan (
) button. If you are scanning using Windows software, the
What are you scanning? dialog box appears. Follow the onscreen instructions
to complete the scan.
If you are scanning using Macintosh software, the HP Scan Pro application opens
and a preview of the scan is displayed. When the preview is accepted, the
scanned image is sent to the destination that has been selected in the scanner
settings.
If the What are you scanning? dialog box or the HP Scan Pro window does not
appear, see Scanner installation troubleshooting on page 12.
Chapter 1
8
HP Scanjet G4000 series

2
How to use the scanner
This section presents an overview of the scanner and how to use it.
Where to get additional information
More information about the scanner and software can be found in the scanner Help
file. If you have installed the HP Photosmart software that came with the scanner,
double-click the HP Solution Center icon on your desktop, and then click Help and
Support. Under the Documentation section, click Product Help.
To access an online version of the scanner user guide, click Start, point to Programs
or All Programs, point to HP, Scanjet, G4000 series, and then click User Guide.
Macintosh users: For information about scanning procedures, open HP Device
Manager, and then click on the question mark at the bottom of the dialog box.
HP Photosmart Windows software
When you install the HP Photosmart Windows software, two icons are added to your
desktop. These icons open programs for scanning and editing your scans.
For information on how to use HP Solution Center and HP Photosmart software,
see the scanner Help file. Double-click the HP Solution Center icon on your desktop,
and then click Help and Support. Under the Documentation section, click Product
Help.
HP Solution Center is the program that gets you started
scanning pictures and documents. Use the HP Solution Center
for all of the following:
● Perform scanning and copy functions
● Access help and troubleshooting information
● Access the HP Photosmart software to edit your scans
● Modify settings and preferences
HP Photosmart software is the program to use for manipulating,
printing, archiving, and sharing your images after they have
been scanned. You can get to the HP Photosmart software from
the desktop icon or through HP Solution Center.
To start a scan:
Double-click the HP Solution Center icon on the desktop, click the tab for the
scanner, and then click the task you want to perform.
Note If the HP Solution Center icon is not available on the desktop, click
Start, point to Programs or All Programs, point to HP, and then click
HP Solution Center.
Setup and Support Guide
9
English

HP Photosmart Macintosh software
When you install the HP scanning software on a Macintosh, two software programs
are available in the Dock: HP Device Manager and HP Photosmart Studio. These
programs are used for scanning and editing your scans.
HP Device Manager is the program that gets you started
scanning pictures and documents. Use the Device Manager for
all of the following:
● Perform scanning and copy functions
● Access help and troubleshooting information
● Access the HP Photosmart Studio to edit your scans
● Modify settings and preferences
HP Photosmart Studio is the program to use for manipulating,
printing, archiving, and sharing your images after they have
been scanned. You can open HP Photosmart Studio from the
Dock, or from the HP Device Manager Applications menu.
Front panel and accessories overview
This section presents an overview of the scanner front panel and the transparent
materials adapter (TMA).
Front-panel buttons
Icon Feature name Description
Scan button Scans pictures, graphics, documents, or objects.
Scan Film
button
Scans transparent positives (such as 35 mm slides)
and negatives. Scanning film requires that you use
the transparent materials adapter (TMA) located on
the underside of the scanner lid.
Copy button Scans the item and sends it to the printer to make a
copy.
Scan to PDF
button
Scans one or more pages and saves them as a PDF
file for sharing or storing.
Note For more information on the default actions of these buttons in a
Macintosh environment, open HP Device Manager, and then click on the
question mark at the bottom of the dialog box.
Transparent materials adapter (TMA)
You can use the transparent materials adapter (TMA) to scan 35 mm slides or
negatives. With the HP Scanjet G4050 TMA you can also scan medium- and large-
format film. For more information about the TMA, see the scanner user guide. For
Chapter 2
10
HP Scanjet G4000 series

information about how to find the user guide, see Where to get additional information
on page 9.
Setup and Support Guide
11
English

3
Scanner installation
troubleshooting
This section contains solutions for installation and setup problems.
Uninstall and reinstall the software
An incomplete software installation could cause the scanner not to be recognized or
the software not to launch correctly. Try uninstalling and then reinstalling the HP
Scanning software. To reinstall the HP Scanning software, you must have the HP
Photosmart software CD.
Windows environment:
1. Click Start, click Settings, and then click Control Panel (in Windows XP, click
Start, and then click Control Panel).
2. Click Add/Remove Programs (in Windows XP, this is called Add or Remove
Programs) and then select HP Scanjet G4000 series.
3. Click Remove.
4. Click Add/Remove Programs (in Windows XP, this is called Add or Remove
Programs) and then select the HP Photosmart software.
5. Click Remove.
6. Unplug the scanner USB cable from the computer.
7. Reinstall the software, using the HP Photosmart software CD that came with your
scanner. When you insert the CD, an installation interface launches
automatically. Choose the HP Photosmart software to install.
8. Reconnect the scanner USB cable after the software is installed. For more
information see Step 5. Connect the USB cable on page 6.
Macintosh environment:
1. Go to Applications/Hewlett-Packard and open HP Uninstaller.
Note You must have administrative privileges in order to uninstall the
software.
2. When prompted, type your username and password. The HP Uninstaller window
opens and displays the products that are available to be uninstalled.
3. Select the G4000 series product and click Next.
4. Follow the onscreen instructions to complete the uninstall process.
5. Reinstall the software, using the HP software CD that came with your scanner.
After inserting the CD, click on the CD icon that appears on your desktop to begin
the installation.
12
HP Scanjet G4000 series

Check the cables
Cable type Action
Power cable The power cable is connected between the scanner and a
power outlet.
● Ensure that the power cable is securely connected
between the scanner and a live electrical outlet or surge
protector.
● If the power cable is connected to a surge protector,
ensure that the surge protector is plugged into an outlet
and turned on.
● Turn off the scanner power switch and turn off the
computer. After 60 seconds, turn the scanner back on
and then turn on the computer, in that order.
USB cable The USB cable is connected between the scanner and the
computer.
● Use the cable that was included with the scanner.
Another USB cable might not be compatible with the
scanner.
● Ensure that the USB cable is securely connected
between the scanner and the computer.
● If the USB cable is connected to a USB port on the front
of the computer, move it to a USB port on the back of the
computer.
For additional USB troubleshooting information,
see www.hp.com/support, select your country/region, and
then use the search tool to find USB troubleshooting topics.
TMA cable The TMA cable is connected between the TMA in the scanner
lid and the scanner base.
Ensure the cable is securely connected in the back of the
scanner.
Setup and Support Guide
13
English

4
Regulatory information and
product specifications
This section contains regulatory information and product specifications for the
HP Scanjet G4000 series Photo Scanner and accessories.
Scanner specifications
Name Description
Scanner type Flatbed with transparent materials adapter (TMA)
Size G4010: 303 mm x 5088 mm x 98 mm (11.93 x 20.00 x 3.86
inches)
G4050: 303 mm x 5088 mm x 108 mm (11.93 x 20.00 x 4.25
inches)
Weight G4010: 4.4 kg (9.6 lbs)
G4050: 5.3 kg (11.6 lbs)
Scanning element Charged-coupled device
Interface USB 2.0 Hi-Speed
Hardware
resolution
4800 x 9600 dpi hardware resolution
Selectable
resolution
12 dpi to 999,999 enhanced dpi at 100 percent scaling
AC line voltage
100-120 V 60 Hz – North America
200-240 V 50 Hz – Continental Europe, United Kingdom,
Australia
100-240 V 50 Hz/60 Hz – Rest of the world
Regulatory
information
Regulatory model identification number: For regulatory
identification purposes, your product is assigned a Regulatory
Model Number. The Regulatory Model Number for your product
is FCLSD-0605. This regulatory number should not be
confused with the product name (HP Scanjet G4010 or G4050)
or product numbers (L1956A and L1957A).
Energy usage drops significantly while in ENERGY STAR®
mode, which saves natural resources, and saves money
without affecting the high performance of this product. This
product qualifies for ENERGY STAR (MOU v. 1.0), which is a
voluntary program established to encourage the development
of energy-efficient office products.
14
HP Scanjet G4000 series

Name Description
ENERGY STAR is a U.S. registered service mark of the U.S.
EPA. As an ENERGY STAR partner, HP has determined that
this product meets ENERGY STAR guidelines for energy
efficiency. For more information on ENERGY STAR guidelines,
go to the following Web site: www.energystar.gov
Transparent materials adapter (TMA) specifications
Name Description
Media types G4010: Up to five 35 mm slides or six 35 mm negative
frames
G4050: Up to sixteen 35 mm slides, thirty 35 mm
negative frames, up to two medium format film frames
(120 roll film), or one large format film frame (220 roll
film).
Power requirements 12 Volts/400 mA max
Power consumption and
regulatory information
For power consumption data, information on power
supplies, and regulatory information, see the
regulatory_supplement.htm file on the HP Photosmart
software CD.
Environmental specifications
Name Description
Temperature Operating the scanner and TMA: 10° to 35°C (50° to
95°F)
Storage: -40° to 60°C (-40° to 140°F)
Relative humidity Operating the scanner and TMA: 15% to 80%
noncondensing 10° to 35°C (50° to 95°F)
Storage: up to 90% noncondensing at 0° to 60°C (32°
to 140°F)
Recycle and restricted material information
Recycling
HP offers an increasing number of product return and recycling programs in many
countries/regions, and partners with some of the largest electronics recycling centers
throughout the world. HP conserves resources by reselling some of its most popular
Setup and Support Guide
15
English

products. For more information regarding recycling of HP products, please
visit: www.hp.com/hpinfo/globalcitizenship/environment/recycle/
Product restricted material
This HP product contains the following material that might require special handling at
end-of-life: Mercury in the scanner fluorescent lamp and transparent materials adapter
(< 5 mg).
For recycling information, contact www.hp.com/go/recycle, your local authorities, or
the Electronic Industries Alliance at www.eiae.org.
Disposal of Waste Equipment by Users in Private
Households in the European Union
This symbol on the product or on its packaging indicates that this product must not be
disposed of with your other household waste. Instead, it is your responsibility to
dispose of your waste equipment by handing it over to a designated collection point
for the recycling of waste electrical and electronic equipment. The separate collection
and recycling of your waste equipment at the time of disposal will help to conserve
natural resources and ensure that it is recycled in a manner that protects human
health and the environment. For more information about where you can drop off your
waste equipment for recycling, please contact your local city office, your household
waste disposal service, or the shop where you purchased the product.
Chapter 4
16
HP Scanjet G4000 series

5
Product support
This section describes the options for product support.
Accessibility
The following accessibility options are available on this scanner:
Windows environment:
● To prevent buttons from being accidentally pushed, you can use the Button
Disable Utility to disable the buttons. You can use the same utility to re-enable
the buttons.
For more information about the Button Disable Utility, see the scanner User Guide.
● The scanner User Guide is also available in a Help format that is readable by
most screen readers. To find this file, double-click the HP Solution Center icon
on your desktop, and then click Help and Support. Under the Documentation
section, click Product Help.
Macintosh environment:
● To prevent buttons from being accidentally pushed, use the Button Disable Utility
to disable the buttons. You can use the same utility to re-enable the buttons.
For more information about the Button Disable Utility, see the HP Scanjet
Scanner Help.
● The HP Scanjet Scanner Help is available in a format that is readable by most
screen readers. To find this file, open HP Device Manager, and then click on the
question mark at the bottom of the dialog box.
Customers with disabilities can get help by
visiting www.hp.com/hpinfo/community/accessibility/prodserv/ (English only).
HP Scanjet Web site
Visit www.hp.com and select your country/language at the top of the page. On the
country page, select scanners from the list of products. Use this site for a variety of
information:
● Find solutions to technical issues.
● Learn tips for scanning more effectively and creatively.
● Update your HP drivers and software.
● Register your product.
● Subscribe to newsletters, driver and software updates, and support alerts.
● Purchase HP supplies and accessories.
Setup and Support Guide
17
English

Getting assistance
In order to get the best from your HP product, please consult the following standard
HP support offerings:
1. Please consult the product documentation that came with the product.
– Review the troubleshooting section or electronic Help of this manual/CD.
– Review the electronic Help section within the software.
2. Visit the HP online support at www.hp.com/support or contact your point of
purchase.
HP online support is available to all HP customers. It is the fastest source for up-
to-date product information and expert assistance, including the following features:
– Fast E-mail access to qualified online support specialists
– Software and driver updates for your product
– Valuable product and troubleshooting information for technical issues
– Proactive product updates, support alerts, and HP newsletters (available
when you register your product)
3. HP support by phone
– Support options and fees vary by product, country and language.
– Fees and policies are subject to change without notice. Please check the
Web site www.hp.com/support for the latest information.
4. Post-warranty period
After the limited warranty period, help is available online at www.hp.com/support.
5.
Extending or upgrading your warranty
If you would like to extend or upgrade the product’s warranty, please contact your
point of purchase or check the HP Care Pack Services at www.hp.com/support.
6. If you already purchased an HP Care Pack Service, please check the support
conditions in your contract.
Chapter 5
18
HP Scanjet G4000 series

6
Hewlett-Packard limited
warranty statement
The following information outlines the warranty information for this product.
Product
Duration of limited warranty
HP Scanjet G4000
series scanner
1 year
A. Extent of limited warranty
1. Hewlett-Packard (HP) warrants to the end-user customer (Customer) that each
HP product specified above (Product) shall be free from defects in material and
workmanship for the period specified above. The warranty period begins on the
date of purchase by Customer.
2. For each software product, HP’s limited warranty applies only to a failure to
execute programming instructions. HP does not warrant that the operation of any
Product will be uninterrupted or error free.
3. HP’s limited warranty covers only those defects that arise as a result of normal
use of a Product, and does not cover any other problems, including those that
arise as a result of:
a. Improper use, maintenance, storage, handling, or modification;
b. Software, media, parts, accessories, supplies, or power adapters or sources
not provided or supported by HP; or,
c. Operation or other conditions outside a Product’s specifications.
4. If HP receives, during the applicable warranty period, notice of a defect in a
Product, HP shall at its option either replace or repair the defective Product.
5. If HP cannot replace or repair a defective Product that is covered by HP’s limited
warranty, HP may, within a reasonable time after being notified of the defect,
provide either another product similar in performance or a refund of the purchase
price prorated based on usage and other appropriate factors.
6. HP shall have no obligation to replace, repair, or refund until Customer returns
the defective Product to HP and provides a valid proof of purchase.
7. Any replacement product may be either new or like-new, provided it has
functionality at least equal to that of the Product being replaced.
8. A Product may contain remanufactured parts, components, or materials
equivalent to new in performance.
9. HP’s limited warranty is valid in any country or locality where HP has a support
presence for the Product and has marketed the Product. The level of warranty
service may vary according to local standards. Upgraded warranty services, such
as next day exchange, on-site service, and accident protection, may be
purchased from HP.
B. Limitations of Warranty
TO THE EXTENT ALLOWED BY LOCAL LAW, NEITHER HP NOR ITS THIRD
PARTY SUPPLIERS MAKE ANY OTHER WARRANTY OR CONDITION OF ANY
Setup and Support Guide
19
English

KIND, WHETHER EXPRESS OR IMPLIED, WITH RESPECT TO A PRODUCT, AND
SPECIFICALLY DISCLAIM THE IMPLIED WARRANTIES OR CONDITIONS OF
MERCHANTABILITY, SATISFACTORY QUALITY, AND FITNESS FOR A
PARTICULAR PURPOSE.
C. Limitations of Liability
1. To the extent allowed by local law, the remedies provided in this Limited Warranty
Statement (LWS) are Customer’s sole and exclusive remedies.
2. TO THE EXTENT ALLOWED BY LOCAL LAW, EXCEPT FOR THE
OBLIGATIONS SPECIFICALLY SET FORTH IN THIS LWS, IN NO EVENT
SHALL HP OR ITS THIRD PARTY SUPPLIERS BE LIABLE FOR DIRECT,
INDIRECT, SPECIAL, INCIDENTAL, OR CONSEQUENTIAL DAMAGES,
WHETHER BASED ON CONTRACT, TORT, OR ANY OTHER LEGAL THEORY
AND WHETHER ADVISED OF THE POSSIBILITY OF SUCH DAMAGES.
D. Local Law
1. This LWS gives Customer specific legal rights. Customer may also have other
rights that vary from state to state in the United States, from province to province
in Canada, and from country to country elsewhere in the world.
2. To the extent this LWS is inconsistent with local law, this LWS shall be deemed
modified to be consistent with local law. Under local law, certain disclaimers and
limitations of this LWS may not apply to Customer. For example, the federal
government of the United States, some states in the United States, and some
governments outside the United States (including provinces in Canada), may:
a. Grant Customer additional warranty rights;
b. Preclude the disclaimers and limitations in this LWS from limiting the
statutory rights of a consumer (e.g., the United Kingdom);
c. Otherwise restrict the ability of a manufacturer to enforce such disclaimers or
limitations;
d. Specify the duration of implied warranties that the manufacturer cannot
disclaim; or,
e. Disallow limitations on the duration of implied warranties
3. Customer may have additional statutory rights based on its purchase agreement.
Those rights are not in any way affected by this LWS.
4. For consumer transactions in the United States, any implied warranties imposed
by law are limited in duration to the express warranty period.
5. FOR CONSUMER TRANSACTIONS IN AUSTRALIA AND NEW ZEALAND, THE
TERMS IN THIS LWS, EXCEPT TO THE EXTENT LAWFULLY PERMITTED,
DO NOT EXCLUDE, RESTRICT, OR MODIFY, AND ARE IN ADDITION TO,
THE MANDATORY STATUTORY RIGHTS APPLICABLE TO THE SALE OF A
PRODUCT TO SUCH CUSTOMERS.
You may have additional statutory rights against the seller based on your purchase
agreement. Those rights are not in any way affected by this HP Limited Warranty.
You will find on the inside front cover of this book the names and address of the HP
entity responsible for the performance of the HP Limited Warranty in your country.
Chapter 6
20
HP Scanjet G4000 series


ج. دوﺪﺣ ﺔﻴﻟوﺆﺴﻤﻟا
1.ﻲﻓ رﺎﻃإ ﺎﻣ ﺢﻤﺴﻳ ﻪﺑ نﻮﻧﺎﻘﻟا ،ﻲﻠﺤﻤﻟا ﺮﺒﺘﻌﺗ لﻮﻠﺤﻟا ﻲﺘﻟا ﺺﻨﻳ ﺎﻬﻴﻠﻋ نﺎﻴﺑ ﺔﻟﺎﻔﻜﻟا ةدوﺪﺤﻤﻟا اﺬه ﻲه لﻮﻠﺤﻟا ةﺪﻴﺣﻮﻟا
ﺔﻳﺮﺼﺤﻟاو ﻲﺘﻟا ﻞﺼﺤﻳ ﺎﻬﻴﻠﻋ "ﻞﻴﻤﻌﻟا."
2.ﻲﻓ رﺎﻃإ ﺎﻣ ﺢﻤﺴﻳ ﻪﺑ نﻮﻧﺎﻘﻟا ،ﻲﻠﺤﻤﻟا ءﺎﻨﺜﺘﺳﺎﺑ تﺎﻣاﺰﺘﻟﻻا ﻲﺘﻟا ﻢﺗ حﺎﺼﻓﻹا ﺎﻬﻨﻋ ﻞﻜﺸﺑ دﺪﺤﻣ ﻲﻓ نﺎﻴﺑ ﺔﻟﺎﻔﻜﻟا
ةدوﺪﺤﻤﻟا ،اﺬه ﻦﻟ ﻞﻤﺤﺘﺗ ﺔآﺮﺷ HP وأ يأ ﻦﻣ ﺎﻬﻳدرﻮﻣ ﻦﻣ تﺎﻬﺠﻟا ،ىﺮﺧﻷا يﺄﺑ لﺎﺣ ﻦﻣ ،لاﻮﺣﻷا ﺔﻴﻟوﺆﺴﻣ يأ
راﺮﺿأ ًءاﻮﺳ ﺖﻧﺎآ ةﺮﺷﺎﺒﻣ وأ ﺮﻴﻏ ةﺮﺷﺎﺒﻣ وأ ﺔﺻﺎﺧ وأ ﺔﺿرﺎﻋ وأ ،ﺔﻴﻌﺒﺗ ًءاﻮﺳ نﺎآ ﻚﻟذ ًﺎ ﻤ ﺋ ﺎ ﻗ ﻰﻠﻋ ﺪﻗﺎﻌﺗ وأ ىﻮﻋد
رﺮﻀﺘﻟﺎﺑ وأ يأ ﺔﻳﺮﻈﻧ ﺔﻴﻧﻮﻧﺎﻗ ىﺮﺧأ ﻰﺘﺣ ﻮﻟو ﻢﺗ غﻼﺑﻹا ﻦﻋ ﺔﻴﻧﺎﻜﻣإ ثوﺪﺣ راﺮﺿأ ﺔﻠﺛﺎﻤﻣ.
د. ﻦﻴﻧاﻮﻘﻟا ﺔﻴﻠﺤﻤﻟا
1.ﺢﻨﻤﻳ نﺎﻴﺑ ﺔﻟﺎﻔﻜﻟا ةدوﺪﺤﻤﻟا اﺬه "ﻞﻴﻤﻌﻟا" ًﺎ ﻗ ﻮ ﻘ ﺣ ﺔﻴﻧﻮﻧﺎﻗ ةدﺪﺤﻣ. ﺪﻗو نﻮﻜﻳ ﻞﻴﻤﻌﻠﻟ قﻮﻘﺣ ىﺮﺧأ ﻒﻠﺘﺨﺗ ﻦﻣ ﺔﻳﻻو ﻰﻟإ
ىﺮﺧأ ﻲﻓ تﺎﻳﻻﻮﻟا ،ةﺪﺤﺘﻤﻟا ﻦﻣو ﺔﻌﻃﺎﻘﻣ ﻰﻟإ ىﺮﺧأ ﻲﻓ ،اﺪﻨآ ﻦﻣو ﺔﻟود/ﺔﻘﻄﻨﻣ ﻰﻟإ ىﺮﺧأ ﻲﻓ ﺔﻴﻘﺑ ءﺎﺤﻧأ ﻢﻟﺎﻌﻟا.
2.
ﻖﻓاﻮﺘﻳ ﻊﻣ ﻦﻴﻧاﻮﻘﻟا ﺔﻴﻠﺤﻤﻟا. ﺐﺴﺣ ﻦﻴﻧاﻮﻘﻟا ،ﺔﻴﻠﺤﻤﻟا ﺪﻗ ﻻ ﻖﺒﻄﻨﺗ ﺾﻌﺑ تارﺎﻜﻧإ ﺔﻴﻟوﺆﺴﻤﻟا دﻮﻴﻘﻟاو ةدراﻮﻟا ﻲﻓ نﺎﻴﺑ
ﺔﻟﺎﻔﻜﻟا ةدوﺪﺤﻤﻟا اﺬه ﻰﻠﻋ "ﻞﻴﻤﻌﻟا." ﻰﻠﻌﻓ ﻞﻴﺒﺳ ،لﺎﺜﻤﻟا نإ ﺔﻣﻮﻜﺤﻟا ﺔﻴﻟاﺮﻳﺪﻴﻔﻟا تﺎﻳﻻﻮﻠﻟ ،ةﺪﺤﺘﻤﻟا ﺾﻌﺑو تﺎﻳﻻﻮﻟا ﻲﻓ
تﺎﻳﻻﻮﻟا ،ةﺪﺤﺘﻤﻟا ﺾﻌﺑو تﺎﻣﻮﻜﺤﻟا جرﺎﺧ تﺎﻳﻻﻮﻟا ةﺪﺤﺘﻤﻟا )ﺎﻤﺑ ﺎﻬﻴﻓ تﺎﻌﻃﺎﻘﻣ ﺔﻳﺪﻨآ(، ﺎﻤﺑر:
أ.ﺢﻨﻤﺗ "ﻞﻴﻤﻌﻟا" ًﺎ ﻗ ﻮ ﻘ ﺣ ﺔﻴﻓﺎﺿإ ﺐﺟﻮﻤﺑ ؛ﺔﻟﺎﻔﻜﻟا
ب.لﻮﺤﺗ نود ﺪﻴﻴﻘﺗ قﻮﻘﺤﻟا ﺔﻴﻧﻮﻧﺎﻘﻟا ءﻼﻤﻌﻠﻟ ﺔﻄﺳاﻮﺑ تارﺎﻜﻧإ ﺔﻴﻟوﺆﺴﻤﻟا دﻮﻴﻘﻟاو ةدراﻮﻟا ﻲﻓ نﺎﻴﺑ ﺔﻟﺎﻔﻜﻟا ةدوﺪﺤﻤﻟا
اﺬه )،ًﻼﺜﻣ ﺔﻜﻠﻤﻤﻟا ةﺪﺤﺘﻤﻟا(؛
ج.ّﺪ ﺤ ﺗ ﻦﻣ ةرﺪﻗ ﺔآﺮﺸﻟا ،ﺔﻌﻨﺼﻤﻟا ﻞﻜﺸﺑ وأ ،ﺮﺧﺂﺑ ﻰﻠﻋ ﻊﺿو تارﺎﻜﻧإ ﺔﻴﻟوﺆﺴﻤﻟا دﻮﻴﻘﻟاو ﺰّﻴﺣ ؛ﺬﻴﻔﻨﺘﻟا
د.دﺪﺤﺗ ةﺮﺘﻓ تﻻﺎﻔﻜﻟا ﺔﻴﻨﻤﻀﻟا ﻲﺘﻟا ﻻ ﻦﻜﻤﻳ ﺔآﺮﺸﻠﻟ ﺔﻌﻨﺼﻤﻟا ؛ﺎهرﺎﻜﻧإ ،وأ
ـه.ﻲﻐﻠﺗ حﺎﻤﺴﻟا ﻊﺿﻮﺑ دﻮﻴﻗ ﻰﻠﻋ ةﺮﺘﻓ ﺔﻴﺣﻼﺻ تﻻﺎﻔﻜﻟا ﺔﻴﻨﻤﻀﻟا
3.ﺪﻗ نﻮﻜﻳ ـﻟ "ﻞﻴﻤﻌﻟا" قﻮﻘﺣ ﺔﻴﻧﻮﻧﺎﻗ ﺔﻴﻓﺎﺿإ ًا د ﺎ ﻨ ﺘ ﺳ ا ﻰﻟإ ﺔﻴﻗﺎﻔﺗا ءاﺮﺸﻟا. ﻻو ﺮّﺛﺄﺘﺗ ﻩﺬه ،قﻮﻘﺤﻟا يﺄﺑ ﻞﻜﺷ ﻦﻣ ،لﺎﻜﺷﻷا
نﺎﻴﺒﺑ ﺔﻟﺎﻔﻜﻟا ةدوﺪﺤﻤﻟا اﺬه.
4.ﺔﺒﺴﻨﻟﺎﺑ ﻰﻟإ تﻼﻣﺎﻌﻤﻟا ﻊﻣ ءﻼﻤﻌﻟا ﻲﻓ تﺎﻳﻻﻮﻟا ،ةﺪﺤﺘﻤﻟا نﺈﻓ يأ تﻻﺎﻔآ ﺔﻴﻨﻤﺿ ﺔﺿوﺮﻔﻣ ًﺎﻴﻧﻮﻧﺎﻗ ﺪّﻴﻘﺘﺗ ةﺮﺘﻔﺑ ﺔﻟﺎﻔﻜﻟا
ﺔﻨﻠﻌﻤﻟا.
5.ﺎﻣأ ﺔﺒﺴﻨﻟﺎﺑ ﻰﻟإ تﻼﻣﺎﻌﻤﻟا ﻊﻣ ءﻼﻤﻌﻟا ﻲﻓ ﺎﻴﻟاﺮﺘﺳأ ،اﺪﻧﻼﻳزﻮﻴﻧو نﺈﻓ دﻮﻨﺑ نﺎﻴﺑ ﺔﻟﺎﻔﻜﻟا ةدوﺪﺤﻤﻟا ،اﺬه ءﺎﻨﺜﺘﺳﺎﺑ ﺎﻣ ﻮه
حﻮﻤﺴﻣ ﻪﺑ ،ًﺎﻴﻧﻮﻧﺎﻗ ﻻ ﻲﻨﺜﺘﺴﺗ وأ ﺪّﻴﻘﺗ وأ لّﺪﻌﺗ قﻮﻘﺤﻟا ﺔﻴﻧﻮﻧﺎﻘﻟا ﺔﺿوﺮﻔﻤﻟا ﻲﺘﻟا ﻖّﺒﻄﺗ ﻰﻠﻋ ﻊﻴﺑ ﺞﺘﻨﻣ ءﻼﻤﻌﻟ ﻦﻣ اﺬه
،عﻮﻨﻟا ﻞﺑ ﻲه فﺎﻀﺗ ﻰﻟإ ﻩﺬه قﻮﻘﺤﻟا.
ﺪﻗو نﻮﻜﻳ ﻚﻟ قﻮﻘﺣ ﺔﻴﻧﻮﻧﺎﻗ ﺔﻴﻓﺎﺿإ ىﺪﻟ ﻊﺋﺎﺒﻟا ًادﺎﻨﺘﺳا ﻰﻟإ ﺪﻘﻋ ءاﺮﺸﻟا. ﻻو ﺮﺛﺄﺘﺗ ﻩﺬه قﻮﻘﺤﻟا يﺄﺑ ﻞﻜﺷ ﻦﻣ لﺎﻜﺷﻷا ﻩﺬﻬـﺑ
ﺔﻟﺎﻔﻜﻟا ةدوﺪﺤﻤﻟا ﻦﻣ HP.
ﺪﺠﺗ ﻰﻠﻋ فﻼﻐﻟا ﻲﻣﺎﻣﻷا ﻲﻠﺧاﺪﻟا اﺬﻬﻟ ،بﺎﺘﻜﻟا ءﺎﻤﺳأ ﻦﻳوﺎﻨﻋو تﺎآﺮﺸﻟا ﺔﻌﺑﺎﺘﻟا ـﻟ HP ﺔﻟوﺆﺴﻤﻟاو ﻦﻋ ﺬﻴﻔﻨﺗ ﺔﻟﺎﻔآ HP
ةدوﺪﺤﻤﻟا ﻲﻓ كﺪﻠﺑ/ﻚﺘﻘﻄﻨﻣ.
ﻞﺼﻔﻟا ٦
١٩
ﺔﻠﺴﻠﺳ HP Scanjet G4000
ﻲﺑﺮﻋ
ﺚﻴﺤﺑ اﺬه ةدوﺪﺤﻤﻟا ﺔﻟﺎﻔﻜﻟا نﺎﻴﺑ ﻞﻳﺪﻌﺗ ﺐﺟﻮﺘﻳ ،ﺔﻴﻠﺤﻤﻟا ﻦﻴﻧاﻮﻘﻟا ﻊﻣ اﺬه ةدوﺪﺤﻤﻟا ﺔﻟﺎﻔﻜﻟا نﺎﻴﺑ ﻖﻓاﻮﺗ مﺪﻋ لﺎﺣ ﻲﻓ

6
نﺎﻴﺑ ﺔﻟﺎﻔﻜﻟا ةدوﺪﺤﻤﻟا ﺔآﺮﺸﻟ Hewlett-
Packard
ضﺮﻌﺗ تﺎﻣﻮﻠﻌﻤﻟا ﺔﻴﻟﺎﺘﻟا تﺎﻣﻮﻠﻌﻤﻟا ﺔﺻﺎﺨﻟا ﺔﻟﺎﻔﻜﺑ اﺬه ﺞﺘﻨﻤﻟا.
ﺞﺘﻨﻤﻟا
ةﺪﻣ ﺔﻟﺎﻔﻜﻟا ةدوﺪﺤﻤﻟا
ﺔﺤﺳﺎﻤﻟا ﺔﻴﺋﻮﻀﻟا ﺔﻠﺴﻠﺴﻟ HP
Scanjet G4000
ﺔﻨﺳ ةﺪﺣاو
أ. رﺎﻃإ ﺔﻟﺎﻔﻜﻟا ةدوﺪﺤﻤﻟا
1.ﻦﻤﻀﺗ ﺔآﺮﺷ Hewlett-Packard )HP( مﺪﺨﺘﺴﻤﻠﻟ ﻲﺋﺎﻬﻨﻟا )ﻞﻴﻤﻌﻟا( نأ ﻞآ ﺞﺘﻨﻣ ﻦﻣ HP دﺪﺤﻣ ﻩﻼﻋأ )ﺞﺘﻨﻤﻟا(
ﻮه ٍل ﺎ ﺧ ﻦﻣ يأ بﻮﻴﻋ ءاﻮﺳ ﻲﻓ داﻮﻤﻟا وأ ﻊﻴﻨﺼﺘﻟا لﻼﺧ ةﺪﻤﻟا ةدﺪﺤﻤﻟا ﻩﻼﻋأ. أﺪﺒﺗو ةﺮﺘﻓ ﺔﻟﺎﻔﻜﻟا ﺪﻨﻋ ﺦﻳرﺎﺗ ءاﺮﺸﻟا
ﻦﻣ ﻞﺒﻗ ﻞﻴﻤﻌﻟا.
2.ﺔﺒﺴﻨﻟﺎﺑ ﻰﻟإ ﻞآ ﺞﺘﻨﻣ ،ﻲﺠﻣﺮﺑ ﻖﺒﻄﻨﺗ ﺔﻟﺎﻔآ HP ةدوﺪﺤﻤﻟا ﻂﻘﻓ ﺪﻨﻋ ﻞﺸﻓ ﺞﺘﻨﻤﻟا ﻲﻓ ﺬﻴﻔﻨﺗ تادﺎﺷرﻹا ﺔﻴﺠﻣﺮﺒﻟا. ﻻو
ﻦﻤﻀﺗ HP ﻞﻤﻋ يأ ﺞﺘﻨﻣ نود عﺎﻄﻘﻧا وأ نود ءﺎﻄﺧأ.
3.ﻞﻤﺸﺗو ﺔﻟﺎﻔآ HP ةدوﺪﺤﻤﻟا ﻂﻘﻓ بﻮﻴﻌﻟا ﻲﺘﻟا ﺮﻬﻈﺗ ﺔﺠﻴﺘﻨآ ماﺪﺨﺘﺳﻻ ﺞﺘﻨﻤﻟا ﻞﻜﺸﺑ ،يدﺎﻋ ﻻو ﻞﻤﺸﺗ يأ ﻞآﺎﺸﻣ
،ىﺮﺧأ ﺎﻤﺑ ﺎﻬﻴﻓ ﺎﻣ ﺮﻬﻈﻳ ﺔﺠﻴﺘﻨآ ـﻟ:
أ.،ماﺪﺨﺘﺳﻻا وأ ،ﺔﻧﺎﻴﺼﻟا وأ ،ﻦﻳﺰﺨﺘﻟا وأ ،ﻞﻣﺎﻌﺘﻟا وأ ﻞﻳﺪﻌﺘﻟا ﺮﻴﻏ ؛ﻢﺋﻼﻤﻟا
ب.،ﺞﻣاﺮﺒﻟا وأ ،ﻂﺋﺎﺳﻮﻟا وأ ،ﻊﻄﻘﻟا وأ ،تﺎﻘﺤﻠﻤﻟا وأ ،تﺎﻣﺰﻠﺘﺴﻤﻟا وأ تﻻّﻮﺤﻣ ﺔﻗﺎﻄﻟا وأ ﺎهردﺎﺼﻣ ﺮﻴﻏ ﺔﻌّﻨﺼﻤﻟا
ﻦﻣ ﻞﺒﻗ HP وأ ﺮﻴﻏ ةﺪﻤﺘﻌﻤﻟا ﻦﻣ ؛ﺎﻬﻠﺒﻗ ،وأ
ج.ﻞﻴﻐﺸﺘﻟا وأ فوﺮﻈﻟا ىﺮﺧﻷا ﺔﺟرﺎﺨﻟا ﻦﻋ تﺎﻔﺻاﻮﻣ ﺞﺘﻨﻤﻟا.
4.اذإ ﺖﻘﻠﺗ HP، ءﺎﻨﺛأ ةﺮﺘﻓ ﺔﻴﺣﻼﺻ ،ﺔﻟﺎﻔﻜﻟا ًا ر ﺎ ﻌ ﺷ إ دﻮﺟﻮﺑ ﻞﻠﺧ ﻲﻓ "ﺞﺘﻨﻤﻟا"، ﻊﺟﺮﻴﻓ ـﻟ HP رﺎﻴﺧ ﺎﻣإ لاﺪﺒﺘﺳا ﺞﺘﻨﻤﻟا
يﺬﻟا ﻪﻴﻓ ﻞﻠﺧ وأ ﻪﺣﻼﺻإ.
5.اذإ رّﺬﻌﺗ ﻰﻠﻋ HP لاﺪﺒﺘﺳا وأ حﻼﺻإ "ﺞﺘﻨﻣ" ﻪﻴﻓ ﻞﻠﺧ لﻮﻤﺸﻣو ﺔﻟﺎﻔﻜﻟﺎﺑ ةدوﺪﺤﻤﻟا ﻦﻣ HP، ﺪﻘﻓ ﺮﻓﻮﺗ HP، لﻼﺧ
ةﺮﺘﻓ ﺔﻟﻮﻘﻌﻣ ﺪﻌﺑ نأ ﻢﺘﻳ ﺎﻬﻣﻼﻋإ ،ﻞﻠﺨﻟﺎﺑ ﺎﻣإ ًﺎﺠﺘﻨﻣ ﺮﺧﺁ ًﻼ ﺛ ﺎ ﻤ ﻣ لوﻸﻟ ﻲﻓ ءادﻷا وأ ﻊﺟﺮُﺗ ﻦﻤﺛ ءاﺮﺸﻟا ﻊﻣ ﻢﺴﺣ راﺪﻘﻤﺑ
ﺔﺒﺴﻧ ماﺪﺨﺘﺳﻻا ﻞﻣاﻮﻋو ىﺮﺧأ تاذ ﺔﻠﺻ.
6.ﻻ ﺮﺒﺘﻌﺗ ﺔآﺮﺷ HP ًﺔ ﻣ ﺰ ﻠ ﻣ لاﺪﺒﺘﺳﻻﺎﺑ وأ حﻼﺻﻹا وأ عﺎﺟرإ ﻦﻤﺜﻟا ﺎﻣ ﻢﻟ ﻢﻘﻳ "ﻞﻴﻤﻌﻟا" عﺎﺟرﺈﺑ "ﺞﺘﻨﻤﻟا" يﺬﻟا ﻪﻴﻓ
ﻞﻠﺧ ﻰﻟإ ﺔآﺮﺷ HP ﺮﻴﻓﻮﺗو تﺎﺒﺛإ ﺢﻟﺎﺻ ءاﺮﺸﻠﻟ.
7.ﺐﺠﻳ نأ نﻮﻜﻳ يأ ﺞﺘﻨﻣ ٍﻞ ﻳ ﺪ ﺑ ًاﺪﻳﺪﺟ وأ ًﺎ ﻬ ﺑ ﺎ ﺸ ﻣ ،ﺪﻳﺪﺠﻠﻟ طﺮﺷ نأ ﻊﺘﻤﺘﻳ ﻒﺋﺎﻇﻮﻟﺎﺑ ﺎﻬﺴﻔﻧ ﻰﻠﻋ ﻞﻗﻷا ًﺔ ﻧ ر ﺎ ﻘ ﻣ ـﺑ "ﺞﺘﻨﻤﻟا"
يﺬﻟا ﻢﺘﻳ ﻪﻟاﺪﺒﺘﺳا.
8.ﺪﻗ يﻮﺘﺤﻳ "ﺞﺘﻨﻤﻟا" ﻰﻠﻋ ،ءاﺰﺟأ وأ ،تﺎﻧّﻮﻜﻣ وأ داﻮﻣ ﺖﻤﺗ ةدﺎﻋإ ﺎﻬﻌﻴﻨﺼﺗ ﺎﻬﻨﻜﻟو ﺔﻴهﺎﻀﻣ ةﺪﻳﺪﺠﻠﻟ ﻦﻣ ﺚﻴﺣ ءادﻷا.
9.يﺮﺴﺗ ﺔﻟﺎﻔﻜﻟا دوﺪﺤﻤﻟا ﺔﺻﺎﺨﻟا ﺔآﺮﺸﺑ HP ﻲﻓ يأ ﺔﻟود/ﺔﻘﻄﻨﻣ وأ ﺰآﺮﻣ ﻲﻠﺤﻣ ﺚﻴﺣ ﺪﺟﻮﻳ ﻞﺜﻤﻣ ﻢﻋد HP اﺬﻬﻟ
ﺞﺘﻨﻤﻟا ﻲﻓو يأ نﺎﻜﻣ ﺖﻣﺎﻗ ﺔآﺮﺷ HP ﻖﻳﻮﺴﺘﺑ اﺬه ﺞﺘﻨﻤﻟا ﻪﻴﻓ. ﺪﻗو ﻒﻠﺘﺨﻳ ىﻮﺘﺴﻣ ﺔﻣﺪﺨﻟا ﺔﻟﻮﻤﺸﻤﻟا ﺔﻟﺎﻔﻜﻟﺎﺑ فﻼﺘﺧﺎﺑ
ﺮﻴﻳﺎﻌﻤﻟا ﺔﻴﻠﺤﻤﻟا. ﻦﻜﻤﻳو ءاﺮﺷ ﺔﻴﻗﺮﺗ تﺎﻣﺪﺨﻟ ﺔﻟﺎﻔﻜﻟا ﻦﻣ HP، لاﺪﺒﺘﺳﻻﺎآ ﻲﻓ مﻮﻴﻟا ،ﻲﻟﺎﺘﻟا ﺔﻧﺎﻴﺼﻟاو ﻲﻓ ﻊﻗﻮﻣ
،ﻞﻴﻤﻌﻟا ﺔﻳﺎﻤﺤﻟاو ﺪﺿ ثداﻮﺤﻟا.
ب. دﻮﻴﻗ ﺔﻟﺎﻔﻜﻟا
ﻲﻓ رﺎﻃإ ﺎﻣ ﺢﻤﺴﻳ ﻪﺑ نﻮﻧﺎﻘﻟا ،ﻲﻠﺤﻤﻟا ﻻ مﺪﻘﺗ HP وأ وﺮﻓﻮﻣ تﺎﺠﺘﻨﻤﻟا تﺎﻣﺪﺨﻟاو ﻦﻣ تﺎﻬﺟ ﺔﻴﺟرﺎﺧ ووذ ﺔﻠﺼﻟا ـﺑ HP،
يأ تﻻﺎﻔآ ىﺮﺧأ وأ تاﺪﻬﻌﺗ ﻦﻣ يأ ،عﻮﻧ ءاﻮﺳ ﺖﻧﺎآ ﺔﺤﻳﺮﺻ وأ ،ﺔﻴﻨﻤﺿ ﻰﻠﻋ يأ ،ﺞﺘﻨﻣ ﺎﻤآ ﻲﻠﺨﺗ ﺎﻬﺘﻴﻟوﺆﺴﻣ ﻰﻠﻋ ﻪﺟو
صﻮﺼﺨﻟا ﻦﻣ تﻻﺎﻔﻜﻟا وأ تاﺪﻬﻌﺘﻟا ﺔﻴﻨﻤﻀﻟا ﺔﺻﺎﺨﻟا ﺔﻴﻠﺑﺎﻘﺑ ﻊﻴﺒﻟا وأ ةدﻮﺠﻟا ﺔﻴﺿﺮُﻤﻟا وأ ﻪﺘﻣءﻼﻣ ضﺮﻐﻟ ﻦّﻴﻌﻣ.
ﻞﻴﻟد داﺪﻋﻹا ﻢﻋﺪﻟاو
١٨

لﻮﺼﺤﻟا ﻰﻠﻋ ﻢﻋﺪﻟا
لﻮﺼﺤﻠﻟ ﻰﻠﻋ ﻰﻠﻋأ ةدﺎﻔﺘﺳا ﻦﻣ ﺞﺘﻨﻣ HP صﺎﺨﻟا ،ﻚﺑ ﻰﺟﺮﻳ ﺔﻌﺟاﺮﻣ ضوﺮﻋ ﻢﻋد HP ﺔﻴﺳﺎﻴﻘﻟا ﺔﻴﻟﺎﺘﻟا:
١.ﻰﺟﺮﻳ ﺔﻌﺟاﺮﻣ ﻖﺋﺎﺛﻮﻟا ﺔﻘﻓﺮﻤﻟا ﻊﻣ ﺞﺘﻨﻤﻟا.
–ﻢﻗ ﺔﻌﺟاﺮﻤﺑ ﻢﺴﻗ فﺎﺸﻜﺘﺳا ءﺎﻄﺧﻷا ﺎﻬﺣﻼﺻإو وأ تﺎﻤﻴﻠﻌﺘﻟا ﺔﻴﻧوﺮﺘﻜﻟﻹا ﻲﻓ اﺬه ﻞﻴﻟﺪﻟا/صﺮﻘﻟا طﻮﻐﻀﻤﻟا.
–ﻢﻗ ﺔﻌﺟاﺮﻤﺑ ﻢﺴﻗ تﺎﻤﻴﻠﻌﺘﻟا ﺔﻴﻧوﺮﺘﻜﻟﻹا ﻞﺧاد ﺞﻣﺎﻧﺮﺒﻟا.
٢.ﻢﻗ ةرﺎﻳﺰﺑ HP online support )ﺔﻣﺪﺧ ﻢﻋد HP ﺮﺒﻋ ﺖﻧﺮﺘﻧﻹا( ﻰﻠﻋ ناﻮﻨﻌﻟا
www.hp.com/support وأ ﻞﺼﺗا ﻊﺋﺎﺒﻟﺎﺑ.
ﺮﻓﻮﺘﺗ ﺔﻣﺪﺧ ﻢﻋد HP ﺮﺒﻋ ﺖﻧﺮﺘﻧﻹا ﻞﻜﻟ ءﻼﻤﻋ HP. ﻩﺬهو ﺔﻣﺪﺨﻟا ﻲه عﺮﺳأ ردﺎﺼﻤﻟا ﻲﺘﻟا ﻦﻜﻤﻳ ﻦﻣ ﺎﻬﻟﻼﺧ
فﺮﻌﺘﻟا ﻰﻠﻋ تﺎﻣﻮﻠﻌﻣ ﺔﺜﻳﺪﺣ ﻦﻋ ﺞﺘﻨﻤﻟا لﻮﺼﺤﻟاو ﻰﻠﻋ ةﺪﻋﺎﺴﻣ ،ءاﺮﺒﺨﻟا ﺎﻤآ ﻦﻤﻀﺘﺗ تاﺰﻴﻤﻟا ﺔﻴﻟﺎﺘﻟا:
–لﻮﺻﻮﻟا ﻊﻳﺮﺴﻟا ﺮﺒﻋ ﺪﻳﺮﺒﻟا ﻲﻧوﺮﺘﻜﻟﻹا ﻰﻟإ ﻲﻴﺋﺎﺼﺧأ ﻢﻋﺪﻟا ءﺎﻔآﻷا ﻰﻠﻋ ﺖﻧﺮﺘﻧﻹا.
–تﺎﺜﻳﺪﺤﺗ ﺞﻣاﺮﺒﻟا ﺞﻣاﺮﺑو ﻞﻴﻐﺸﺘﻟا ﺞﺘﻨﻤﻠﻟ صﺎﺨﻟا ﻚﺑ.
–تﺎﻣﻮﻠﻌﻣ ةﺪﻴﻔﻣ ًا ﺪ ﺟ لﻮﺣ ﺞﺘﻨﻤﻟا ﺔﻴﻔﻴآو فﺎﺸﻜﺘﺳا ﻪﺋﺎﻄﺧأ ،ﺎﻬﺣﻼﺻإو ﻚﻟذو ﺎﻤﻴﻓ ﻖﻠﻌﺘﻳ تﻼﻜﺸﻤﻟﺎﺑ ﺔﻴﻨﻔﻟا
–ﺮﺧﺁ تﺎﻬﻴﺒﻨﺗ لﻮﺣ تﺎﺜﻳﺪﺤﺗ تﺎﺠﺘﻨﻤﻟا تﺎﻬﻴﺒﻨﺗو ﻢﻋﺪﻟا ﻞﺋﺎﺳرو HP ﺔﻳرﺎﺒﺧﻹا )ﺮﻓﻮﺘﺗ ﺎﻣﺪﻨﻋ ﻢﺘﻳ ﻞﻴﺠﺴﺗ ﺞﺘﻨﻤﻟا(
٣.ﻢﻋد HP ﺮﺒﻋ ﻒﺗﺎﻬﻟا
–ﻒﻠﺘﺨﺗ تارﺎﻴﺧ ﻢﻋﺪﻟا مﻮﺳﺮﻟاو ﺔﻴﻟﺎﻤﻟا ﺔﻘﺤﺘﺴﻤﻟا فﻼﺘﺧﺎﺑ ﺞﺘﻨﻤﻟا ﺔﻟوﺪﻟاو ﺔﻐﻠﻟاو.
–مﻮﺳﺮﻟا ﺔﻴﻟﺎﻤﻟا ﺔﻘﺤﺘﺴﻤﻟا تﺎﺼﻴﻟﻮﺑو ﻦﻴﻣﺄﺘﻟا ﺔﺿﺮُﻋ ﺮﻴﻴﻐﺘﻠﻟ نوﺪﺑ رﺎﻌﺷإ ﻖﺒﺴﻣ. ﻰﺟﺮﻳ ﺔﻌﺟاﺮﻣ ﻊﻗﻮﻤﻟا ﻰﻠﻋ
ﺐﻳﻮﻟا www.hp.com/support لﻮﺼﺤﻠﻟ ﻰﻠﻋ ثﺪﺣأ تﺎﻣﻮﻠﻌﻤﻟا.
٤.ةﺮﺘﻓ ﺎﻣ ﺪﻌﺑ ﺔﻟﺎﻔﻜﻟا
ﺪﻌﺑ ءﺎﻬﺘﻧا ةﺮﺘﻓ ﺔﻟﺎﻔﻜﻟا ،ةدوﺪﺤﻤﻟا ﻢﺘﻳ ﺮﻴﻓﻮﺗ تﺎﻤﻴﻠﻌﺘﻟا ﻰﻠﻋ ﻊﻗﻮﻤﻟا ﻲﻟﺎﺘﻟا www.hp.com/support.
٥.
ﺪﻳﺪﻤﺗ ﺔﻟﺎﻔﻜﻟا وأ ﺎﻬﺘﻴﻗﺮﺗ
اذإ ﺖﻨآ ﺐﻏﺮﺗ ﻲﻓ ﺪﻳﺪﻤﺗ ﺔﻟﺎﻔآ ﺞﺘﻨﻤﻟا وأ ،ﺎﻬﺘﻴﻗﺮﺗ ﻰﺟﺮﻴﻓ لﺎﺼﺗﻻا ﺔﻄﻘﻨﺑ ءاﺮﺸﻟا ﻚﻳﺪﻟ وأ ﺔﻌﺟاﺮﻣ HP Care
Pack Services )تﺎﻣﺪﺧ ﺔﻣﺰﺣ ﺔﻳﺎﻋر ءﻼﻤﻋ HP( ﻰﻠﻋ ﻊﻗﻮﻤﻟا ﻲﻟﺎﺘﻟا www.hp.com/support.
٦.اذإ ﻖﺒﺳ ﻚﻟ نأ ﺖﻳﺮﺘﺷا HP Care Pack Service )ﺔﻣﺪﺧ ﺔﻣﺰﺣ ﺔﻳﺎﻋر ءﻼﻤﻌﻟا(، ﻰﺟﺮﻴﻓ ﺔﻌﺟاﺮﻣ طوﺮﺷ
ﻢﻋﺪﻟا ﻲﻓ كﺪﻘﻋ.
ﻞﺼﻔﻟا ٥
١٧
ﺔﻠﺴﻠﺳ HP Scanjet G4000
ﻲﺑﺮﻋ

٥
ﻢﻋد ﺞﺘﻨﻤﻟا
ﺢﺿﻮﻳ اﺬه ﻢﺴﻘﻟا تارﺎﻴﺧ ﻢﻋد ﺞﺘﻨﻤﻟا.
ووذ تﺎﺟﺎﻴﺘﺣﻻا ﺔﺻﺎﺨﻟا
ﺮﻓﻮﺘﺗ ﻲﻓ ﻩﺬه ﺔﺤﺳﺎﻤﻟا ﺔﻴﺋﻮﻀﻟا تارﺎﻴﺨﻟا ﺔﻴﻟﺎﺘﻟا ﻞﻴﻐﺸﺘﻠﻟ ﻦﻣ ﻞﺒﻗ يوذ تﺎﺟﺎﻴﺘﺣﻻا ﺔﺻﺎﺨﻟا:
ﺔﺌﻴﺑ Windows:
●ﺐﻨﺠﺘﻟ ﻂﻐﺿ رارزﻷا ﻦﻋ ﻖﻳﺮﻃ ،ﺄﻄﺨﻟا ﻚﻨﻜﻤﻳ ماﺪﺨﺘﺳا Button Disable Utility )ةادأ ﻞﻴﻄﻌﺗ رارزﻷا( ﻦﻣ
ﻞﺟأ ﻞﻴﻄﻌﺗ رارزﻷا. ﺎﻤآ ﻚﻨﻜﻤﻳ ماﺪﺨﺘﺳا ﺲﻔﻧ ةادﻷا ةدﺎﻋﻹ ﻦﻴﻜﻤﺗ رارزﻷا.
لﻮﺼﺤﻠﻟ ﻰﻠﻋ ﺪﻳﺰﻣ ﻦﻣ تﺎﻣﻮﻠﻌﻤﻟا لﻮﺣ ةادﻷا Button Disable Utility )ةادأ ﻞﻴﻄﻌﺗ رارزﻷا(، ﻊﺟار ﻞﻴﻟد
مﺪﺨﺘﺴﻤﻟا صﺎﺨﻟا ﺔﺤﺳﺎﻤﻟﺎﺑ ﺔﻴﺋﻮﻀﻟا.
●ﻞﻴﻟد مﺪﺨﺘﺴﻤﻟا صﺎﺨﻟا ﺔﺤﺳﺎﻤﻟﺎﺑ ﺔﻴﺋﻮﻀﻟا ﺮﻓﻮﺘﻣ ًﺎ ﻀ ﻳ أ ﻰﻠﻋ ﻞﻜﺷ ﻒﻠﻣ تﺎﻤﻴﻠﻌﺗ ﻞﺑﺎﻗ ةءاﺮﻘﻠﻟ ﺔﻄﺳاﻮﺑ ﻢﻈﻌﻣ ﺞﻣاﺮﺑ
ةءاﺮﻗ تﺎﺷﺎﺸﻟا. ﺚﺤﺒﻠﻟ ﻦﻋ اﺬه ،ﻒﻠﻤﻟا ﺮﻘﻧا ًا ﺮ ﻘ ﻧ ًﺎ ﺟ و د ﺰ ﻣ قﻮﻓ ﺰﻣﺮﻟا HP Solution Center )ﺰآﺮﻣ لﻮﻠﺤﻟا ـﻟ
HP ( دﻮﺟﻮﻤﻟا ﻰﻠﻋ ﺢﻄﺳ ،ﺐﺘﻜﻤﻟا ﻢﺛ ﺮﻘﻧا قﻮﻓ Help and Support )تﺎﻤﻴﻠﻌﺗ ﻢﻋدو(. ﻦﻤﺿ ﻢﺴﻘﻟا
Documentation )ﻖﺋﺎﺛﻮﻟا(، ﺮﻘﻧا قﻮﻓ Product Help )تﺎﻤﻴﻠﻌﺗ ﺞﺘﻨﻤﻟا(.
ﺔﺌﻴﺑ Macintosh:
●ﺐﻨﺠﺘﻟ ﻂﻐﺿ رارزﻷا ﻦﻋ ﻖﻳﺮﻃ ،ﺄﻄﺨﻟا مﺪﺨﺘﺳا Button Disable Utility )ةادأ ﻞﻴﻄﻌﺗ رارزﻷا( ﻦﻣ ﻞﺟأ
ﻞﻴﻄﻌﺗ رارزﻷا. ﺎﻤآ ﻚﻨﻜﻤﻳ ماﺪﺨﺘﺳا ﺲﻔﻧ ةادﻷا ةدﺎﻋﻹ ﻦﻴﻜﻤﺗ رارزﻷا.
لﻮﺼﺤﻠﻟ ﻰﻠﻋ ﺪﻳﺰﻣ ﻦﻣ تﺎﻣﻮﻠﻌﻤﻟا لﻮﺣ ةادﻷا Button Disable Utility )ةادأ ﻞﻴﻄﻌﺗ رارزﻷا(، ﻊﺟار تﺎﻤﻴﻠﻌﺗ
HP Scanjet Scanner Help.
●تﺎﻤﻴﻠﻌﺗ HP Scanjet Scanner Help ةﺮﻓﻮﺘﻣ ﻖﻴﺴﻨﺘﺑ ﻞﺑﺎﻗ ةءاﺮﻘﻠﻟ ﺔﻄﺳاﻮﺑ ﻢﻈﻌﻣ ﺞﻣاﺮﺑ ةءاﺮﻗ تﺎﺷﺎﺸﻟا.
ﺚﺤﺒﻠﻟ ﻦﻋ اﺬه ،ﻒﻠﻤﻟا ﺢﺘﻓا HP Device Manager )ةرادإ ةﺰﻬﺟﻷا ﻦﻣ HP(، ﺮﻘﻧاو قﻮﻓ ﺔﻣﻼﻋ مﺎﻬﻔﺘﺳﻻا
ﻲﻓ ﻞﻔﺳأ ﻊﺑﺮﻣ راﻮﺤﻟا.
ﻦﻜﻤﻳ ءﻼﻤﻌﻠﻟ ﻦﻣ يوذ تﺎﺟﺎﻴﺘﺣﻻا ﺔﺻﺎﺨﻟا لﻮﺼﺤﻟا ﻰﻠﻋ ةﺪﻋﺎﺴﻤﻟا ﻦﻣ لﻼﺧ ةرﺎﻳز ﻊﻗﻮﻤﻟا ﻲﻟﺎﺘﻟا
www.hp.com/hpinfo/community/accessibility/prodserv/ )ﺔﻳﺰﻴﻠﻜﻧﻹﺎﺑ ﻂﻘﻓ.(
ﻊﻗﻮﻣ ﺐﻳو HP Scanjet
ﻢﻗ ةرﺎﻳﺰﺑ ﻊﻗﻮﻤﻟا www.hp.com دﺪﺣو كﺪﻠﺑ/ﻚﺘﻐﻟ ﻲﻓ ﻰﻠﻋأ ﺔﺤﻔﺼﻟا. ﻲﻓ ﺔﺤﻔﺻ ،ﺪﻠﺒﻟا ﻢﻗ ﺪﻳﺪﺤﺘﺑ تﺎﺤﺳﺎﻤﻟا ﺔﻴﺋﻮﻀﻟا
ﻦﻣ ﺔﻤﺋﺎﻗ تﺎﺠﺘﻨﻤﻟا. ﻚﻨﻜﻤﻳ ماﺪﺨﺘﺳا اﺬه ﻊﻗﻮﻤﻟا لﻮﺼﺤﻠﻟ ﻰﻠﻋ ﺔﻋﻮﻤﺠﻣ ﺔﻋﻮﻨﺘﻣ ﻦﻣ تﺎﻣﻮﻠﻌﻤﻟا ﻞﺜﻣ:
●دﺎﺠﻳإ لﻮﻠﺣ تﻼﻜﺸﻤﻠﻟ ﺔﻴﻨﻔﻟا.
●ﻢﻠﻌﺗ ﺾﻌﺑ تﺎﺤﻴﻤﻠﺘﻟا لﻮﺣ ءاﺮﺟإ ﺢﺴﻤﻟا ﻲﺋﻮﻀﻟا ﻞﻜﺸﺑ ﺮﺜآأ ًة ء ﺎ ﻔ آ ًﺎ ﻋ ا ﺪ ﺑ إ و.
●ﺚﻳﺪﺤﺗ ﺞﻣاﺮﺑ ﻞﻴﻐﺸﺗ HP ﻚﺠﻣاﺮﺑو ىﺮﺧﻷا.
●ﻞﻴﺠﺴﺗ ﺞﺘﻨﻤﻟا صﺎﺨﻟا ﻚﺑ.
●كاﺮﺘﺷﻻا ﻲﻓ ﻞﺋﺎﺳﺮﻟا ﺔﻳرﺎﺒﺧﻹا تﺎﺜﻳﺪﺤﺗو ﺞﻣاﺮﺒﻟا ﺞﻣاﺮﺑو ﻞﻴﻐﺸﺘﻟا تﺎﻣﻼﻋإو ﻢﻋﺪﻟا.
●ءاﺮﺷ تﺎﻣﺰﻠﺘﺴﻣ تﺎﻘﺤﻠﻣو HP.
ﻞﻴﻟد داﺪﻋﻹا ﻢﻋﺪﻟاو
١٦

ﺺﻠﺨﺗ ،ﻦﻴﻣﺪﺨﺘﺴﻤﻟا بﺎﺤﺻأ لزﺎﻨﻤﻟا ،ﺔﺻﺎﺨﻟا ﻦﻣ ةﺰﻬﺟﻷا ﺔﻔﻟﺎﺘﻟا لوﺪﺑ دﺎﺤﺗﻻا
ﻲﺑوروﻷا
ﺮﻴﺸﻳ اﺬه ﺰﻣﺮﻟا دﻮﺟﻮﻤﻟا ﻰﻠﻋ ﺞﺘﻨﻤﻟا وأ ﻰﻠﻋ فﻼﻐﻟا صﺎﺨﻟا ﻪﺑ ﻰﻟإ ﻪﻧأ ﺐﺠﻳ مﺪﻋ ﺺﻠﺨﺘﻟا ﻦﻣ اﺬه ﺞﺘﻨﻤﻟا ﻊﻣ تﺎﻔﻠﺨﻣ
لﺰﻨﻤﻟا ىﺮﺧﻷا. ًﻻ ﺪ ﺑ ﻦﻣ ،ﻚﻟذ ﺮﺒﺘﻌﻳ ﺺﻠﺨﺘﻟا ﻦﻣ كزﺎﻬﺟ ،ﻒﻟﺎﺘﻟا ﻦﻋ ﻖﻳﺮﻃ ﻪﻤﻴﻠﺴﺗ ﻰﻟإ ﺰآﺮﻣ ﻊﻴﻤﺠﺗ ﺺﺼﺨﻣ ةدﺎﻋﻹ
ﻊﻴﻨﺼﺗ ةﺰﻬﺟﻷا ﺔﻴﻧوﺮﺘﻜﻟﻹا ﺔﻴﺋﺎﺑﺮﻬﻜﻟاو ،ﺔﻔﻟﺎﺘﻟا ﻚﺘﻴﻟوﺆﺴﻣ ﺔﻴﺼﺨﺸﻟا. ﺪﻋﺎﺴﻳ ﻊﻴﻤﺠﺘﻟا ﻞﺼﻔﻨﻤﻟا ةﺰﻬﺟﻸﻟ ﺔﻔﻟﺎﺘﻟا ةدﺎﻋإو
ﺎﻬﻌﻴﻨﺼﺗ ﺪﻨﻋ ﺺﻠﺨﺘﻟا ﺎﻬﻨﻣ ﻰﻠﻋ ظﺎﻔﺤﻟا ﻰﻠﻋ دراﻮﻤﻟا ﺔﻴﻌﻴﺒﻄﻟا ﺪآﺄﺘﻟاو ﻦﻣ ةدﺎﻋإ ﺎﻬﻌﻴﻨﺼﺗ ﺔﻘﻳﺮﻄﺑ ﻲﻤﺤﺗ ﺔﺤﺻ نﺎﺴﻧﻹا
ﻲﻤﺤﺗو ﺔﺌﻴﺒﻟا. لﻮﺼﺤﻠﻟ ﻰﻠﻋ ﺪﻳﺰﻣ ﻦﻣ تﺎﻣﻮﻠﻌﻤﻟا لﻮﺣ ﻦآﺎﻣأ ﻢﻴﻠﺴﺗ ةﺰﻬﺟﻷا ﺔﻔﻟﺎﺘﻟا ﻢﺘﺘﻟ ةدﺎﻋإ ،ﺎﻬﻌﻴﻨﺼﺗ ءﺎﺟﺮﻟا لﺎﺼﺗﻻا
ﺐﺘﻜﻤﺑ ﺔﻨﻳﺪﻤﻟا ﻲﻠﺤﻤﻟا ﻚﻳﺪﻟ وأ ﺔﻣﺪﺨﺑ ﺺﻠﺨﺘﻟا ﻦﻣ تﺎﻔﻠﺨﻣ لزﺎﻨﻤﻟا وأ ﻞﺤﻤﻟﺎﺑ يﺬﻟا ﺖﻤﻗ ءاﺮﺸﺑ ﺞﺘﻨﻤﻟا ﻪﻨﻣ.
ﻞﺼﻔﻟا ٤
١٥
ﺔﻠﺴﻠﺳ HP Scanjet G4000
ﻲﺑﺮﻋ

تﺎﻔﺻاﻮﻣ لﻮﺤﻣ داﻮﻤﻟا ﺔﻓﺎﻔﺸﻟا
ﻢﺳﻻاﻒﺻﻮﻟا
عاﻮﻧأ ﻂﺋﺎﺳﻮﻟاG4010: ﺎﻣ ﻞﺼﻳ ﻰﻟإ ٥ ﺢﺋاﺮﺷ سﺎﻘﻣ ٣٥ ﻢﻣ وأ ٦ تارﺎﻃإ رﻮﺻ ﺔﻴﺒﻠﺳ
سﺎﻘﻣ ٣٥ ﻢﻣ
G4050: ﺎﻣ ﻞﺼﻳ ﻰﻟإ ﺖﺳ ةﺮﺸﻋ ﺔﺤﻳﺮﺷ سﺎﻘﻣ ٣٥ ،ﻢﻣ وأ ﻦﻴﺛﻼﺛ رﺎﻃإ
رﻮﺻ ﺔﻴﺒﻠﺳ سﺎﻘﻣ ٣٥ ،ﻢﻣ وأ ﺎﻣ ﻞﺼﻳ ﻰﻟإ يرﺎﻃإ مﻼﻓأ ﻖﻴﺴﻨﺘﻟﺎﺑ ﻂﺳﻮﺘﻤﻟا
ﻢﺠﺤﻟا )ﺔﻓﺎﻔﻟ ﻢﻠﻴﻓ ١٢٠(، وأ رﺎﻃإ ﺪﺣاو ﻢﻠﻴﻔﻟ ﻖﻴﺴﻨﺘﻟﺎﺑ ﺮﻴﺒﻜﻟا ﻢﺠﺤﻟا )ﺔﻓﺎﻔﻟ ﻢﻠﻴﻓ
٢٢٠.(
تﺎﺒﻠﻄﺘﻣ ﺔﻗﺎﻄﻟا١٢ ﺖﻟﻮﻓ/٤٠٠ ﻲﻠﻠﻣ ﺮﻴﺒﻣأ ﺪﺤآ ﻰﺼﻗأ
كﻼﻬﺘﺳا ﺔﻗﺎﻄﻟا تﺎﻣﻮﻠﻌﻤﻟاو ﺔﻴﻤﻴﻈﻨﺘﻟالﻮﺼﺤﻠﻟ ﻰﻠﻋ تﺎﻣﻮﻠﻌﻣ لﻮﺣ تﺎﻧﺎﻴﺑ كﻼﻬﺘﺳا ﺔﻗﺎﻄﻟا داﺪﻣإو ﺔﻗﺎﻄﻟا
تﺎﻣﻮﻠﻌﻤﻟاو ،ﺔﻴﻤﻴﻈﻨﺘﻟا ﻊﺟار ﻒﻠﻤﻟا regulatory_supplement.htm
ﺮﻓﻮﺘﻤﻟا ﻰﻠﻋ صﺮﻘﻟا طﻮﻐﻀﻤﻟا صﺎﺨﻟا ﺞﻣﺎﻧﺮﺒﺑ HP Photosmart.
تﺎﻔﺻاﻮﻤﻟا ﺔﻴﺌﻴﺒﻟا
ﻢﺳﻻاﻒﺻﻮﻟا
ﺔﺟرد ةراﺮﺤﻟاﻞﻴﻐﺸﺗ ﺔﺤﺳﺎﻤﻟا ﺔﻴﺋﻮﻀﻟا لﻮﺤﻣو داﻮﻤﻟا ﺔﻓﺎﻔﺸﻟا: ﻦﻣ ١٠° ﻰﻟإ ٣٥° ﺔﺟرد
ﺔﻳﻮﺌﻣ )ﻦﻣ ٥٠° ﻰﻟإ ٩٥° ﺔﺟرد ﺖﻳﺎﻬﻧﺮﻬﻓ(
ﻦﻳﺰﺨﺘﻟا: ﻦﻣ -٤٠° ﻰﻟإ ٦٠° ﺔﺟرد ﺔﻳﻮﺌﻣ )ﻦﻣ -٤٠° ﻰﻟإ ١٤٠° ﺔﺟرد
ﺖﻳﺎﻬﻧﺮﻬﻓ(
ﺔﺑﻮﻃﺮﻟا ﺔﻴﺒﺴﻨﻟاﻞﻴﻐﺸﺗ ﺔﺤﺳﺎﻤﻟا ﺔﻴﺋﻮﻀﻟا لﻮﺤﻣو داﻮﻤﻟا ﺔﻓﺎﻔﺸﻟا: ﻦﻣ ١٥ ﺔﺋﺎﻤﻟﺎﺑ ﻰﻟإ ٨٠ ﺔﺋﺎﻤﻟﺎﺑ
نود ﺔﻓﺎﺜآ ﻦﻣ ١٠° ﻰﻟإ ٣٥° ﺔﺟرد ﺔﻳﻮﺌﻣ )ﻦﻣ ٥٠° ﻰﻟإ ٩٥° ﺔﺟرد ﺖﻳﺎﻬﻧﺮﻬﻓ(
ﻦﻳﺰﺨﺘﻟا: ﺎﻣ ﻞﺼﻳ ﻰﻟإ ٩٠% نود ﺔﻓﺎﺜآ ﻦﻣ ٠° ﻰﻟإ ٦٠° ﺔﺟرد ﺔﻳﻮﺌﻣ )٣٢°
ﻰﻟإ ١٤٠° ﺔﺟرد ﺖﻳﺎﻬﻧﺮﻬﻓ(
تﺎﻣﻮﻠﻌﻣ ﺔﺻﺎﺧ ةدﺎﻋﺈﺑ ﻊﻴﻨﺼﺘﻟا داﻮﻤﻟاو ةرﻮﻈﺤﻤﻟا
ةدﺎﻋإ ﻊﻴﻨﺼﺘﻟا
مّﺪﻘﺗ HP ًادﺪﻋ ًا ﺪ ﻳ ا ﺰ ﺘ ﻣ ﻦﻣ ﺞﻣاﺮﺑ عﺎﺟرإ تﺎﺠﺘﻨﻤﻟا ةدﺎﻋإو ﺎﻬﻌﻴﻨﺼﺗ ﻲﻓ ةﺪﻋ ناﺪﻠﺑ/،ﻖﻃﺎﻨﻣ ﺔآرﺎﺸﻤﻟﺎﺑ ﻊﻣ ﺾﻌﺑ ﻦﻣ ﺮﺒآأ
ﺰآاﺮﻣ ةدﺎﻋإ ﻊﻴﻨﺼﺗ تﺎﻴﻧوﺮﺘﻜﻟﻹا لﻮﺣ ﻢﻟﺎﻌﻟا. ﻆﻓﺎﺤﺗ HP ﻰﻠﻋ دراﻮﻤﻟا ﻦﻣ لﻼﺧ ةدﺎﻋإ ﻊﻴﺑ ﺾﻌﺑ ﻦﻣ ﺎﻬﺗﺎﺠﺘﻨﻣ ﺮﺜآﻷا
ﺔﻴﺒﻌﺷ. ﺪﻳﺰﻤﻟ ﻦﻣ تﺎﻣﻮﻠﻌﻤﻟا لﻮﺣ ةدﺎﻋإ ﻊﻴﻨﺼﺗ تﺎﺠﺘﻨﻣ HP، ﻰﺟﺮﻳ ةرﺎﻳز ﻊﻗﻮﻤﻟا:
www.hp.com/hpinfo/globalcitizenship/environment/recycle/
داﻮﻣ ﺞﺘﻨﻤﻟا ةرﻮﻈﺤﻤﻟا
يﻮﺘﺤﻳ ﺞﺘﻨﻣ HP اﺬه ﻰﻠﻋ داﻮﻤﻟا ﺔﻴﻟﺎﺘﻟا ﻲﺘﻟا ﺪﻗ ﺐﻠﻄﺘﺗ ﺔﻠﻣﺎﻌﻣ ﺔﺻﺎﺧ ﺪﻨﻋ ءﺎﻬﺘﻧا ةﺮﺘﻓ ﺎﻬﺘﻴﺣﻼﺻ: ﻖﺒﺋﺰﻟا دﻮﺟﻮﻤﻟا ﻲﻓ
حﺎﺒﺼﻣ ﺔﺤﺳﺎﻤﻟا ﺔﻴﺋﻮﻀﻟا يرﻮﻠﻔﻟا ﻲﻓو لﻮﺤﻣ داﻮﻤﻟا ﺔﻓﺎﻔﺸﻟا )ﻞﻗأ ﻦﻣ ٥ ﻲﻠﻠﻣ ماﺮﺟ.(
لﻮﺼﺤﻠﻟ ﻰﻠﻋ تﺎﻣﻮﻠﻌﻣ لﻮﺣ ةدﺎﻋإ ،ﻊﻴﻨﺼﺘﻟا ﻞﺼﺗا ـﺑ www.hp.com/go/recycle، وأ تﺎﻄﻠﺴﻟا ،ﺔﻴﻠﺤﻤﻟا وأ
ﺔﻤﻈﻨﻤـﺑ Electronic Industries Alliance ﻰﻠﻋ ناﻮﻨﻌﻟا www.eiae.org.
ﻞﻴﻟد داﺪﻋﻹا ﻢﻋﺪﻟاو
١٤

٤
تﺎﻔﺻاﻮﻣ ﺞﺘﻨﻤﻟا تﺎﻣﻮﻠﻌﻤﻟاو ﺔﻴﻤﻴﻈﻨﺘﻟا
يﻮﺘﺤﻳ اﺬه ﻢﺴﻘﻟا ﻰﻠﻋ تﺎﻣﻮﻠﻌﻣ ﺔﻴﻤﻴﻈﻨﺗ تﺎﻔﺻاﻮﻣو ﺞﺘﻨﻤﻟا ﺔﺻﺎﺨﻟا ﺔﺤﺳﺎﻤﻟﺎﺑ ﺔﻴﺋﻮﻀﻟا رﻮﺼﻠﻟ HP Scanjet G4000
ﺎﻬﺗﺎﻘﺤﻠﻣو.
تﺎﻔﺻاﻮﻣ ﺔﺤﺳﺎﻤﻟا ﺔﻴﺋﻮﻀﻟا
ﻢﺳﻻاﻒﺻﻮﻟا
عﻮﻧ ﺔﺤﺳﺎﻤﻟا ﺔﻴﺋﻮﻀﻟاﺔﺤﺳﺎﻣ ﺔﻴﺋﻮﺿ ﺔﺤﻄﺴﻣ لﻮﺤﻤﺑ داﻮﻣ ﺔﻓﺎﻔﺷ (TMA)
ﻢﺠﺤﻟا
نزﻮﻟا
ﺮﺼﻨﻋ ﺢﺴﻤﻟا ﻲﺋﻮﻀﻟازﺎﻬﺟ ﻂﺑر تﺎﻨﺤﺸﻟا
لﺎﺼﺗﻻاUSB 2.0 ﻲﻟﺎﻋ ﺔﻋﺮﺴﻟا
ﺔﻗد زﺎﻬﺠﻟا
ﺔﻗد زﺎﻬﺠﻟا ٤٨٠٠ × ٩٦٠٠ dpi
ﺔﻗﺪﻟا ﻲﺘﻟا ﻦﻜﻤﻳ ﺎهﺪﻳﺪﺤﺗﻦﻣ ١٢ ﺔﻄﻘﻧ ﻲﻓ ﺔﺻﻮﺒﻟا ﻰﻟإ ٩٩٩٩٩٩ ﺔﻄﻘﻧ ﻲﻓ ﺔﺻﻮﺒﻟا ﻦّﺴﺤﻣ ﺔﺒﺴﻨﺑ ﺮﻴﻴﻐﺗ ﻢﺠﺣ ١٠٠%
ﺔﻴﺘﻟﻮﻓ ﻂﺧ رﺎﻴﺘﻟا ددﺮﺘﻤﻟا
١٠٠ - ١٢٠ ﺖﻟﻮﻓ ٦٠ ﺰﺗﺮه - ﺎﻜﻳﺮﻣأ ﺔﻴﻟﺎﻤﺸﻟا
٢٠٠-٢٤٠ ﺖﻟﻮﻓ ٥٠ ﺰﺗﺮه - ﺎﺑوروأ ﺔﻜﻠﻤﻤﻟاو ةﺪﺤﺘﻤﻟا ﺎﻴﻟاﺮﺘﺳأو
١٠٠-٢٤٠ ﺖﻟﻮﻓ ٥٠ ﺰﺗﺮه - ﻲﻗﺎﺑ لود ﻢﻟﺎﻌﻟا
تﺎﻣﻮﻠﻌﻤﻟا ﺔﻴﻤﻴﻈﻨﺘﻟاﻢﻗﺮﻟا ﻲﻤﻴﻈﻨﺘﻟا ﻒﻳﺮﻌﺘﻟ زاﺮﻄﻟا: ضاﺮﻏﻷ ﻒﻳﺮﻌﺘﻟا ،ﺔﻴﻤﻴﻈﻨﺘﻟا ﻢﺗ ﻦﻴﻴﻌﺗ ﻢﻗر زاﺮﻃ ﻲﻤﻴﻈﻨﺗ
ﻚﺠﺘﻨﻤﻟ. ﻢﻗر زاﺮﻄﻟا ﻲﻤﻴﻈﻨﺘﻟا ﻚﺠﺘﻨﻤﻟ ﻮه FCLSD-0605. ﺐﺠﻳ مﺪﻋ ﻂﻠﺨﻟا ﻦﻴﺑ اﺬه
ﻢﻗﺮﻟا ﻲﻤﻴﻈﻨﺘﻟا ﻢﺳاو ﺞﺘﻨﻤﻟا )HP Scanjet G4010 وأ G4050( وأ مﺎﻗرأ تﺎﺠﺘﻨﻤﻟا
)L1956A وL1957A.(
ﺾﻔﺨﻨﻳ لﺪﻌﻣ كﻼﻬﺘﺳا ﺔﻗﺎﻄﻟا ﻞﻜﺸﺑ ﺮﻴﺒآ ﺎﻣﺪﻨﻋ نﻮﻜﺗ ﺔﺤﺳﺎﻤﻟا ﺔﻴﺋﻮﻀﻟا ﻲﻓ ﻊﺿو
®ENERGY STAR، ﺎﻤﻣ ﺮﻓﻮﻳ دراﻮﻤﻟا ﺔﻴﻌﻴﺒﻄﻟا ،لﺎﻤﻟاو نود ﺮﻴﺛﺄﺘﻟا ﻰﻠﻋ ءادﻷا ﺪﻴﺠﻟا
اﺬﻬﻟ ﺞﺘﻨﻤﻟا. اﺬه ﺞﺘﻨﻤﻟا ﻞّهﺆﻣ ـﻟ ENERGY STAR )MOU v.1.0( ﻮهو ﺞﻣﺎﻧﺮﺑ
،ﻲﻋﻮﻃ ضﺮﻐﻟا ﻪﻨﻣ ﻮه ﻊﻴﺠﺸﺗ ﺮﻳﻮﻄﺗ تﺎﺠﺘﻨﻣ ﺔﻴﺒﺘﻜﻣ ﺔﻠﻴﻠﻗ كﻼﻬﺘﺳﻻا ﺔﻗﺎﻄﻠﻟ.
ﺪﻌﺗ ENERGY STAR ﺔﻣﻼﻋ ﺔﻣﺪﺧ ﺔﻠّﺠﺴﻣ ﻲﻓ تﺎﻳﻻﻮﻟا ةﺪﺤﺘﻤﻟا ﺔﻴآﺮﻴﻣﻷا ـﻟ .U.S
EPA. ﺎﻬﺘﻔﺼﺑو ًﺎ ﻜ ﻳ ﺮ ﺷ ﻲﻓ ﺞﻣﺎﻧﺮﺑ ENERGY STAR، ﺮﻘﺗ ﺔآﺮﺷ HP ﺔﻘﺑﺎﻄﻤﺑ اﺬه
ﺞﺘﻨﻤﻟا تﺎﻴﺻﻮﺘﻟ ﺞﻣﺎﻧﺮﺑ ENERGY STAR ﺎﻤﻴﻓ ﻖﻠﻌﺘﻳ ةءﺎﻔﻜﺑ كﻼﻬﺘﺳا ﺔﻗﺎﻄﻟا. ﺪﻳﺰﻤﻟ
ﻦﻣ تﺎﻣﻮﻠﻌﻤﻟا لﻮﺣ تﺎﻴﺻﻮﺗ ENERGY STAR، ﻞﻘﺘﻧا ﻰﻟإ ﻊﻗﻮﻤﻟا ﻲﻟﺎﺘﻟا ﻰﻠﻋ ﺐﻳو:
www.energystar.gov
١٣
ﺔﻠﺴﻠﺳ HP Scanjet G4000
ﻲﺑﺮﻋ
(ﺔﺻﻮﺑ ٣,٨٦ × ٢٠,٠٠ × ١١,٩٣) ﻢﻣ ٩٨ × ﻢﻣ ٥٠٨٨ × ﻢﻣ ٣٠٣ :G4010
(ﺔﺻﻮﺑ ٤,٢٥ × ٢٠,٠٠ × ١١,٩٣) ﻢﻣ ١٠٨ × ﻢﻣ ٥٠٨٨ × ﻢﻣ ٣٠٣ :G4050
(ةﺮﺒﻴﻟ ٩,٦) ﻢﺠآ ٤,٤ :G4010
(ةﺮﺒﻴﻟ ١١,٦) ﻢﺠآ ٥,٣ :G4050

ﺺﺤﻓ تﻼﺑﺎﻜﻟا
عﻮﻧ ﻞﺑﺎﻜﻟاءاﺮﺟﻹا
ﻞﺑﺎآ ﺔﻗﺎﻄﻟاﻢﺘﻳ ﻞﻴﺻﻮﺗ ﻞﺑﺎآ ﺔﻗﺎﻄﻟا ﻦﻴﺑ ﺔﺤﺳﺎﻤﻟا ﺔﻴﺋﻮﻀﻟا ﺪﺣأو ﺲﺑﺎﻘﻣ ﺔﻗﺎﻄﻟا.
●ﺪآﺄﺗ ﻦﻣ ﻞﻴﺻﻮﺗ ﻞﺑﺎآ ﺔﻗﺎﻄﻟا مﺎﻜﺣﺈﺑ ﻦﻴﺑ ﺔﺤﺳﺎﻤﻟا ﺔﻴﺋﻮﻀﻟا رﺪﺼﻣو رﺎﻴﺗ ﻲﺋﺎﺑﺮﻬآ
وأ ﻲﻗاو رﺎﻴﺗ ﻞﻣﺎﻋ.
●اذإ نﺎآ ﻞﺑﺎآ ﺔﻗﺎﻄﻟا ًﻼ ﺻ ﻮ ﻣ ﻲﻗاﻮﺑ ،رﺎﻴﺘﻟا ﺪآﺄﺗ ﻦﻣ ﻞﻴﻐﺸﺗ ﻲﻗاو رﺎﻴﺘﻟا ﻪﻠﻴﺻﻮﺗو
رﺪﺼﻤﺑ رﺎﻴﺘﻟا.
●ﻒﻗوأ ﻞﻴﻐﺸﺗ ﺔﺤﺳﺎﻤﻟا ﺔﻴﺋﻮﻀﻟا ﺔﻄﺳاﻮﺑ حﺎﺘﻔﻣ ﺎﻬﻠﻴﻐﺸﺗ ﻒﻗوأو ﻞﻴﻐﺸﺗ ﺮﺗﻮﻴﺒﻤﻜﻟا.
ﺪﻌﺑ ٦٠ ،ﺔﻴﻧﺎﺛ أﺪﺑا ﻞﻴﻐﺸﺗ ﺔﺤﺳﺎﻤﻟا ﺔﻴﺋﻮﻀﻟا ﻦﻣ ﺪﻳﺪﺟ أﺪﺑاو ﻞﻴﻐﺸﺗ ﺮﺗﻮﻴﺒﻤﻜﻟا اﺬﻬﺑ
ﺐﻴﺗﺮﺘﻟا.
ﻞﺑﺎآ USBﻞﺑﺎآ USB لﻮﺻﻮﻣ ﻦﻴﺑ ﺔﺤﺳﺎﻤﻟا ﺔﻴﺋﻮﻀﻟا زﺎﻬﺟو ﺮﺗﻮﻴﺒﻤﻜﻟا.
●مﺪﺨﺘﺳا ﻞﺑﺎﻜﻟا ﻖﻓﺮﻤﻟا ﻊﻣ ﺔﺤﺳﺎﻤﻟا ﺔﻴﺋﻮﻀﻟا. ﺪﻗ ﻻ ﻖﻓاﻮﺘﻳ ﻞﺑﺎآ USB ﺮﺧﺁ ﻊﻣ
ﺔﺤﺳﺎﻤﻟا ﺔﻴﺋﻮﻀﻟا.
●ﺪآﺄﺗ ﻦﻣ ﻞﻴﺻﻮﺗ ﻞﺑﺎآ USB مﺎﻜﺣﺈﺑ ﻦﻴﺑ ﺔﺤﺳﺎﻤﻟا ﺔﻴﺋﻮﻀﻟا زﺎﻬﺟو ﺮﺗﻮﻴﺒﻤﻜﻟا.
●اذإ نﺎآ ﻞﺑﺎآ USB ًﻻﻮﺻﻮﻣ ﺬﻔﻨﻤﺑ USB ﻰﻠﻋ ﺐﻧﺎﺠﻟا ﻲﻣﺎﻣﻷا ،ﺮﺗﻮﻴﺒﻤﻜﻠﻟ ﻪﻠﻘﻧﺎﻓ
ﻰﻟإ ﺬﻔﻨﻣ USB ﻰﻠﻋ ﺐﻧﺎﺠﻟا ﻲﻔﻠﺨﻟا ﺮﺗﻮﻴﺒﻤﻜﻠﻟ.
لﻮﺼﺤﻠﻟ ﻰﻠﻋ تﺎﻣﻮﻠﻌﻣ ﺔﻴﻓﺎﺿإ لﻮﺣ فﺎﺸﻜﺘﺳا ءﺎﻄﺧأ USB ،ﺎﻬﺣﻼﺻإو ﻊﺟار
www.hp.com/support، دﺪﺣو ﺪﻠﺒﻟا/ﺔﻘﻄﻨﻤﻟا ﻲﺘﻟا ﻢﻴﻘﺗ ﺎﻬﻴﻓ ﻢﺛ مﺪﺨﺘﺳا ةادأ ﺚﺤﺒﻟا
لﻮﺼﺤﻠﻟ ﻰﻠﻋ ﻊﻴﺿاﻮﻣ فﺎﺸﻜﺘﺳا ءﺎﻄﺧأ USB ﺎﻬﺣﻼﺻإو.
ﻞﺑﺎآ لﻮﺤﻣ داﻮﻤﻟا ﺔﻓﺎﻔﺸﻟا
(TMA)
ﻞﺑﺎآ لﻮﺤﻣ داﻮﻤﻟا ﺔﻓﺎﻔﺸﻟا ﻞﺻﻮﻣ ﻦﻴﺑ ةﺪﺣو لﻮﺤﻣ داﻮﻤﻟا ﺔﻓﺎﻔﺸﻟا ةدﻮﺟﻮﻤﻟا ﻰﻠﻋ ءﺎﻄﻏ
ﺔﺤﺳﺎﻤﻟا ﺔﻴﺋﻮﻀﻟا ةﺪﻋﺎﻗو ﺔﺤﺳﺎﻤﻟا.
ﺪآﺄﺗ ﻦﻣ نأ ﻞﺑﺎﻜﻟا ﻞﺼﺘﻣ مﺎﻜﺣﺈﺑ ءﺰﺠﻟﺎﺑ ﻲﻔﻠﺨﻟا ﻦﻣ ﺔﺤﺳﺎﻤﻟا ﺔﻴﺋﻮﻀﻟا.
ﻞﻴﻟد داﺪﻋﻹا ﻢﻋﺪﻟاو
١٢

٣
فﺎﺸﻜﺘﺳا ءﺎﻄﺧأ ﺖﻴﺒﺜﺗ ﺔﺤﺳﺎﻤﻟا ﺔﻴﺋﻮﻀﻟا
ﺎﻬﺣﻼﺻإو
يﻮﺘﺤﻳ اﺬه ﻢﺴﻘﻟا ﻰﻠﻋ لﻮﻠﺣ ﻞآﺎﺸﻤﻟ ﺖﻴﺒﺜﺘﻟا داﺪﻋﻹاو.
ءﺎﻐﻟإ ﺖﻴﺒﺜﺗ ﺞﻣﺎﻧﺮﺒﻟا ةدﺎﻋإو ﻪﺘﻴﺒﺜﺗ
ﻦﻣ ﻦﻜﻤﻤﻟا نأ يدﺆﻳ ﺖﻴﺒﺜﺗ ﺞﻣﺎﻧﺮﺒﻟا ﻞﻜﺸﺑ ﺮﻴﻏ ﻞﻣﺎآ ﻰﻟإ مﺪﻋ فّﺮﻌﺘﻟا ﻰﻠﻋ ﺔﺤﺳﺎﻤﻟا ﺔﻴﺋﻮﻀﻟا وأ مﺪﻋ ءﺪﺑ ﻞﻴﻐﺸﺗ ﺞﻣﺎﻧﺮﺒﻟا
ﻞﻜﺸﺑ ﺢﻴﺤﺻ. لوﺎﺣ ءﺎﻐﻟإ ﺖﻴﺒﺜﺗ ﺞﻣﺎﻧﺮﺑ HP Scanning ةدﺎﻋإو ﻪﺘﻴﺒﺜﺗ. مﺰﻠﻳو ةدﺎﻋﻹ ﺖﻴﺒﺜﺘﻟا دﻮﺟو صﺮﻘﻟا طﻮﻐﻀﻤﻟا
صﺎﺨﻟا ﺞﻣﺎﻧﺮﺒﺑ HP Photosmart.
ﺔﺌﻴﺑ Windows:
١.ﺮﻘﻧا قﻮﻓ Start )أﺪﺑا(، ﻢﺛ ﺮﻘﻧا قﻮﻓ Settings )تاداﺪﻋإ(، ﺮﻘﻧاو ٍﺬ ﺋ ﺪ ﻌ ﺑ قﻮﻓ Control Panel )ﺔﺣﻮﻟ
ﻢﻜﺤﺘﻟا( )ﻲﻓ Windows XP، ﺮﻘﻧا قﻮﻓ Start )أﺪﺑا(، ﻢﺛ ﺮﻘﻧا قﻮﻓ Control Panel )ﺔﺣﻮﻟ ﻢﻜﺤﺘﻟا(.(
٢.ﺮﻘﻧا قﻮﻓ Add/Remove Programs )ﺔﻓﺎﺿإ/ﺔﻟازإ ﺞﻣاﺮﺒﻟا( )ﻲﻓ مﺎﻈﻧ ﻞﻴﻐﺸﺗ Windows XP، ﻰّﻤﺴﻳ
Add or Remove Programs )ﺔﻓﺎﺿإ وأ ﺔﻟازإ ﺞﻣاﺮﺒﻟا((، ﻢﺛ دﺪﺣ HP Scanjet G4000 series.
٣.ﺮﻘﻧا قﻮﻓ Remove )ﺔﻟازإ(.
٤.ﺮﻘﻧا قﻮﻓ Add/Remove Programs )ﺔﻓﺎﺿإ/ﺔﻟازإ ﺞﻣاﺮﺒﻟا( )ﻲﻓ مﺎﻈﻧ ﻞﻴﻐﺸﺗ Windows XP، ﻰّﻤﺴﻳ
Add or Remove Programs )ﺔﻓﺎﺿإ وأ ﺔﻟازإ ﺞﻣاﺮﺒﻟا((، ﻢﺛ دﺪﺣ ﺞﻣﺎﻧﺮﺑ HP Photosmart.
٥.ﺮﻘﻧا قﻮﻓ Remove )ﺔﻟازإ(.
٦.ﻢﻗ ﻞﺼﻔﺑ ﻞﺑﺎآ USB ﺔﺤﺳﺎﻤﻠﻟ ﺔﻴﺋﻮﻀﻟا ﻦﻣ زﺎﻬﺟ ﺮﺗﻮﻴﺒﻤﻜﻟا.
٧.ﺪﻋأ ﺖﻴﺒﺜﺗ ،ﺞﻣﺎﻧﺮﺒﻟا ماﺪﺨﺘﺳﺎﺑ صﺮﻘﻟا طﻮﻐﻀﻤﻟا صﺎﺨﻟا ﺞﻣﺎﻧﺮﺒﺑ HP Photosmart ﻖﻓﺮﻤﻟاو ﻊﻣ ﺔﺤﺳﺎﻤﻟا
ﺔﻴﺋﻮﻀﻟا. دﺮﺠﻤﺑو نأ مﻮﻘﺗ لﺎﺧدﺈﺑ صﺮﻘﻟا ،طﻮﻐﻀﻤﻟا ﻢﺘﻳ ﻞﻴﻐﺸﺗ ﺔﻬﺟاو ﺖﻴﺒﺜﺘﻟا ًﺎﻴﺋﺎﻘﻠﺗ. ﺮﺘﺧا ﺞﻣﺎﻧﺮﺑ HP
Photosmart ﻲآ ﻢﺘﻳ ﻪﺘﻴﺒﺜﺗ.
٨.ﺪﻋأ ﻞﻴﺻﻮﺗ ﻞﺑﺎآ USB ﺔﺤﺳﺎﻤﻠﻟ ﺔﻴﺋﻮﻀﻟا ﺪﻌﺑ ءﺎﻬﺘﻧﻻا ﻦﻣ ﺖﻴﺒﺜﺗ ﺞﻣﺎﻧﺮﺒﻟا. ﺪﻳﺰﻤﻟ ﻦﻣ ،تﺎﻣﻮﻠﻌﻤﻟا ﻊﺟار ”ةﻮﻄﺨﻟا ٥.
ﻞﻴﺻﻮﺗ ﻞﺑﺎآ USB “ ﻲﻓ ﺔﺤﻔﺻ ٦
ﺔﺌﻴﺑ Macintosh:
١.ﻞﻘﺘﻧا ﻰﻟإ Applications/Hewlett-Packard )تﺎﻘﻴﺒﻄﺗ/Hewlett-Packard( ﺢﺘﻓاو ﺞﻣﺎﻧﺮﺑ HP
Uninstaller )ءﺎﻐﻟإ ﺖﻴﺒﺜﺘﻟا ﻦﻣ HP(.
ﺔﻈﺣﻼﻣﺐﺠﻳ نأ نﻮﻜﻳ ﻚﻳﺪﻟ تازﺎﻴﺘﻣا لوﺆﺴﻤﻟا ﻲﻜﻟ ﻦﻜﻤﺘﺗ ﻦﻣ ءﺎﻐﻟإ ﺖﻴﺒﺜﺗ ﺞﻣﺎﻧﺮﺒﻟا.
٢.ﺐﺘآا ﻢﺳا مﺪﺨﺘﺴﻤﻟا ﺔﻤﻠآو روﺮﻤﻟا ﺎﻣﺪﻨﻋ ﺐﻠﻄُﻳ ﻚﻨﻣ ﻚﻟذ. ﺢﺘﻔﻳ رﺎﻃﻹا HP Uninstaller )ﺞﻣﺎﻧﺮﺑ ءﺎﻐﻟإ ﺖﻴﺒﺜﺘﻟا
ﻦﻣ HP ( ضﺮﻌﻳو تﺎﺠﺘﻨﻤﻟا ةﺮﻓﻮﺘﻤﻟا ﻲﺘﻟا ﻦﻜﻤﻳ ءﺎﻐﻟإ ﺎﻬﺘﻴﺒﺜﺗ.
٣.دﺪﺣ ﺞﺘﻨﻣ ﺔﻠﺴﻠﺳ G4000 ﺮﻘﻧاو قﻮﻓ Next )ﻲﻟﺎﺘﻟا(.
٤.ﻊﺒﺗا تادﺎﺷرﻹا ﻲﺘﻟا ﺮﻬﻈﺗ ﻰﻠﻋ ﺔﺷﺎﺸﻟا لﺎﻤآﻹ ﺔﻴﻠﻤﻋ ﺢﺴﻤﻟا ﻲﺋﻮﻀﻟا.
٥.ﺪﻋأ ﺖﻴﺒﺜﺗ ،ﺞﻣﺎﻧﺮﺒﻟا ماﺪﺨﺘﺳﺎﺑ صﺮﻘﻟا طﻮﻐﻀﻤﻟا صﺎﺨﻟا ﺞﻣاﺮﺒﺑ HP ﻖﻓﺮﻤﻟاو ﻊﻣ ﺔﺤﺳﺎﻤﻟا ﺔﻴﺋﻮﻀﻟا. ﺪﻌﺑ لﺎﺧدإ
صﺮﻘﻟا ،طﻮﻐﻀﻤﻟا ﺮﻘﻧا قﻮﻓ ﺰﻣر صﺮﻘﻟا طﻮﻐﻀﻤﻟا يﺬﻟا ﺮﻬﻈﻳ ﻰﻠﻋ ﺢﻄﺳ ﺐﺘﻜﻤﻟا ﻦﻣ ﻞﺟأ نأ أﺪﺒﺗ ﺔﻴﻠﻤﻋ ﺖﻴﺒﺜﺘﻟا.
١١
ﺔﻠﺴﻠﺳ HP Scanjet G4000
ﻲﺑﺮﻋ

ﺞﻣﺎﻧﺮﺑ HP Photosmart ـﻟ Macintosh
ﺪﻨﻋ ﺖﻴﺒﺜﺗ ﺞﻣﺎﻧﺮﺑ ﺢﺴﻤﻟا ﻲﺋﻮﻀﻟا ﻦﻣ HP ﻰﻠﻋ ﺮﺗﻮﻴﺒﻤآ Macintosh، ﺮﻓﻮﺘﻳ نﺎﺠﻣﺎﻧﺮﺑ ﻰﻠﻋ ﺢﻄﺳ ﺐﺘﻜﻤﻟا ﻰﻤﺴﻤﻟا
Dock ﺎﻤهو: HP Device Manager وHP Photosmart Studio. مﺪﺨﺘﺴُﻳو ناﺬه نﺎﺠﻣﺎﻧﺮﺒﻟا ءاﺮﺟﻹ ﺢﺴﻤﻟا
ﻲﺋﻮﻀﻟا ﺮﻳﺮﺤﺗو ﺮﺻﺎﻨﻌﻟا ﺔﺣﻮﺴﻤﻤﻟا ًﺎﻴﺋﻮﺿ.
ﺪﻌُﻳ HP Solution Center )ﺰآﺮﻣ لﻮﻠﺤﻟا ـﻟ HP( ﺔﺑﺎﺜﻤﺑ ﺞﻣﺎﻧﺮﺑ ﺢﻴﺘﻳ ﻚﻟ ﺔﻴﻧﺎﻜﻣإ ءﺪﺑ
مﺎﻴﻘﻟا ﺢﺴﻤﺑ رﻮﺼﻟا تاﺪﻨﺘﺴﻤﻟاو ًﺎﻴﺋﻮﺿ. مﺪﺨﺘﺳا Device Manager ﺔﻓﺎﻜﻟ رﻮﻣﻷا ﺔﻴﻟﺎﺘﻟا:
●ءادأ ﻒﺋﺎﻇو ﺢﺴﻤﻟا ﻲﺋﻮﻀﻟا ﺦﺴﻨﻟاو
●لﻮﺻﻮﻟا ﻰﻟإ تﺎﻣﻮﻠﻌﻤﻟا ﺔﺻﺎﺨﻟا تﺎﻤﻴﻠﻌﺘﻟﺎﺑ فﺎﺸﻜﺘﺳاو ءﺎﻄﺧﻷا ﺎﻬﺣﻼﺻإو
●ﺢﺘﻓ ﺞﻣﺎﻧﺮﺑ HP Photosmart Studio ﺮﻳﺮﺤﺘﻟ ﺮﺻﺎﻨﻌﻟا ﺔﺣﻮﺴﻤﻤﻟا ًﺎﻴﺋﻮﺿ
●ﻞﻳﺪﻌﺗ تاداﺪﻋﻹا تﻼﻴﻀﻔﺘﻟاو
ﺪﻌُﻳ ﺞﻣﺎﻧﺮﺑ HP Photosmart Studio ﺔﺑﺎﺜﻤﺑ ﺞﻣﺎﻧﺮﺑ ﻦﻜﻤﻳ ﻪﻣاﺪﺨﺘﺳا ﻲﻓ ﺔﺠﻟﺎﻌﻣ
رﻮﺼﻟا ﺎﻬﺘﻋﺎﺒﻃو ﺎﻬﻈﻔﺣو ﺎﻬﺘآرﺎﺸﻣو ﺪﻌﺑ ءﺎﻬﺘﻧﻻا ﻦﻣ ﺎﻬﺤﺴﻣ ًﺎﻴﺋﻮﺿ. ﻚﻨﻜﻤﻳ ﺢﺘﻓ ﺞﻣﺎﻧﺮﺑ
HP Photosmart Studio ﻦﻣ ﺢﻄﺳ ﺐﺘﻜﻤﻟا ﻰﻤﺴﻤﻟا Dock، وأ ﻦﻣ ﺔﻤﺋﺎﻗ
Applications )تﺎﻘﻴﺒﻄﺘﻟا( ـﻟ HP Device Manager )ةرادإ ةﺰﻬﺟﻷا ـﻟ HP.(
ةﺮﻈﻧ ﺔﻣﺎﻋ ﻰﻠﻋ ﺔﺣﻮﻠﻟا ﺔﻴﻣﺎﻣﻷا تﺎﻘﺤﻠﻤﻟاو
مﺪﻘﻳ اﺬه ﻢﺴﻘﻟا ةﺮﻈﻧ ﺔﻣﺎﻋ ﻰﻠﻋ ﺔﺣﻮﻠﻟا ﺔﻴﻣﺎﻣﻷا ﺔﺤﺳﺎﻤﻠﻟ ﺔﻴﺋﻮﻀﻟا لﻮﺤﻣو داﻮﻤﻟا ﺔﻓﺎﻔﺸﻟا ( TMA) .
رارزأ ﺔﺣﻮﻠﻟا ﺔﻴﻣﺎﻣﻷا
ﺰﻣﺮﻟاﻢﺳا ةﺰﻴﻤﻟاﻒﺻﻮﻟا
رز Scan )ﺢﺴﻣ
ﻲﺋﻮﺿ(
مﻮﻘﻳ ﺢﺴﻤﺑ رﻮﺼﻟا وأ تﺎﻣﻮﺳﺮﻟا وأ تاﺪﻨﺘﺴﻤﻟا وأ تﺎﻨﺋﺎﻜﻟا ًﺎﻴﺋﻮﺿ.
رز Scan Film
)ﺢﺴﻣ ﻢﻠﻴﻔﻟا ًﺎﻴﺋﻮﺿ(
مﻮﻘﻳ ﺢﺴﻤﺑ ﻂﺋاﺮﺷ رﻮﺼﻟا ﺔﺒﺟﻮﻤﻟا )ﻞﺜﻣ ﺢﺋاﺮﺸﻟا سﺎﻘﻣ ٣٥ ﻢﻣ( رﻮﺼﻟاو
ﺔﻴﺒﻠﺴﻟا ﺔﻓﺎﻔﺸﻟا. ﺐﻠﻄﺘﻳو ﺢﺴﻣ ﻢﻠﻴﻔﻟا ًﺎﻴﺋﻮﺿ ماﺪﺨﺘﺳا لﻮﺤﻣ داﻮﻤﻟا ﺔﻓﺎﻔﺸﻟا
)TMA( دﻮﺟﻮﻤﻟا ﻰﻠﻋ ﺐﻧﺎﺠﻟا ﻲﻠﻔﺴﻟا ﻦﻣ ءﺎﻄﻏ ﺔﺤﺳﺎﻤﻟا ﺔﻴﺋﻮﻀﻟا.
رز Copy )ﺦﺴﻧ(مﻮﻘﻳ ﺦﺴﻨﺑ ﺮﺼﻨﻌﻟا ًﺎﻴﺋﻮﺿ ﻪﻟﺎﺳرإو ﻰﻟإ ﺔﻌﺑﺎﻄﻟا ﻞﻤﻌﻟ ﺔﺨﺴﻧ ﻪﻨﻣ.
رز Scan to
PDF )ﺢﺴﻤﻟا ﻰﻟإ
ﻒﻠﻣ PDF(
ﺢﺴﻤﻳ ﺔﺤﻔﺻ ةﺪﺣاو وأ ﺮﺜآأ ًﺎﻴﺋﻮﺿ ﺎﻬﻈﻔﺤﻳو ﻲﻓ ﻒﻠﻣ PDF ﻦﻣ ﻞﺟأ
ﺎﻬﺘآرﺎﺸﻣ ﻊﻣ ﻦﻳﺮﺧﻵا وأ ﺎﻬﻨﻳﺰﺨﺗ.
ﺔﻈﺣﻼﻣلﻮﺼﺤﻠﻟ ﻰﻠﻋ ﺪﻳﺰﻣ ﻦﻣ تﺎﻣﻮﻠﻌﻤﻟا لﻮﺣ تاءاﺮﺟﻹا ﺔﻴﺿاﺮﺘﻓﻻا ﻩﺬﻬﻟ رارزﻷا ﻲﻓ ﺔﺌﻴﺑ Macintosh،
ﺢﺘﻓا HP Device Manager، ﻢﺛ ﺮﻘﻧا قﻮﻓ ﺔﻣﻼﻋ مﺎﻬﻔﺘﺳﻻا ﻲﻓ ﻞﻔﺳأ ﻊﺑﺮﻣ راﻮﺤﻟا.
لﻮﺤﻣ داﻮﻤﻟا ﺔﻓﺎﻔﺸﻟا
ﻚﻨﻜﻤﻳ ماﺪﺨﺘﺳا لﻮﺤﻣ داﻮﻤﻟا ﺔﻓﺎﻔﺸﻟا )TMA( ﺢﺴﻤﻟ ﺢﺋاﺮﺷ وأ ﻂﺋاﺮﺷ رﻮﺼﻟا ﺔﻴﺒﻠﺴﻟا سﺎﻘﻣ ٣٥ ﻢﻣ ﺎًﻴﺋﻮﺿ. ﻚﻨﻜﻤﻳ ًﺎ ﻀ ﻳ أ
ﺢﺴﻣ مﻼﻓﻷا تاذ ﻖﻴﺴﻨﺘﻟا ﻂﺳﻮﺘﻤﻟا ﺮﻴﺒﻜﻟاو ًﺎ ﻴ ﺋ ﻮ ﺿ ﺔﻄﺳاﻮﺑ لﻮﺤﻣ داﻮﻤﻟا ﺔﻓﺎﻔﺸﻟا HP Scanjet G4050 TMA.
لﻮﺼﺤﻠﻟ ﻰﻠﻋ ﺪﻳﺰﻣ ﻦﻣ تﺎﻣﻮﻠﻌﻤﻟا لﻮﺣ لﻮﺤﻣ داﻮﻤﻟا ﺔﻓﺎﻔﺸﻟا )TMA( ﺮﻈﻧا ﻞﻴﻟد ماﺪﺨﺘﺳا ﺔﺤﺳﺎﻤﻟا ﺔﻴﺋﻮﻀﻟا. لﻮﺼﺤﻠﻟ
ﻰﻠﻋ تﺎﻣﻮﻠﻌﻣ ﺔﻴﻔﻴآ ﺚﺤﺒﻟا ﻦﻋ ﻞﻴﻟد ،ماﺪﺨﺘﺳﻻا ﺮﻈﻧا ”ردﺎﺼﻣ لﻮﺼﺤﻟا ﻰﻠﻋ تﺎﻣﻮﻠﻌﻣ ﺔﻴﻓﺎﺿإ “ ﻲﻓ ﺔﺤﻔﺻ ٩.
ﻞﻴﻟد داﺪﻋﻹا ﻢﻋﺪﻟاو
١٠
لﻮﺣ

٢
ﺔﻴﻔﻴآ ماﺪﺨﺘﺳا ﺔﺤﺳﺎﻤﻟا ﺔﻴﺋﻮﻀﻟا
ضﺮﻌﻳ اﺬه ﻢﺴﻘﻟا ةﺮﻈﻧ ﺔﻣﺎﻋ ﻰﻠﻋ ﺔﺤﺳﺎﻤﻟا ﺔﻴﺋﻮﻀﻟا ﺔﻴﻔﻴآو ﺎﻬﻣاﺪﺨﺘﺳا.
ردﺎﺼﻣ لﻮﺼﺤﻟا ﻰﻠﻋ تﺎﻣﻮﻠﻌﻣ ﺔﻴﻓﺎﺿإ
ﻦﻜﻤﻳ رﻮﺜﻌﻟا ﻰﻠﻋ ﺪﻳﺰﻤﻟا ﻦﻣ تﺎﻣﻮﻠﻌﻤﻟا لﻮﺣ ﺔﺤﺳﺎﻤﻟا ﺔﻴﺋﻮﻀﻟا ﺞﻣﺎﻧﺮﺒﻟاو ﻲﻓ ﻒﻠﻣ تﺎﻤﻴﻠﻌﺗ ﺔﺤﺳﺎﻤﻟا ﺔﻴﺋﻮﻀﻟا. اذإو ﺖﻤﻗ
ﺖﻴﺒﺜﺘﺑ ﺞﻣﺎﻧﺮﺑ HP Photosmart ﻖﻓﺮﻤﻟا ﺔﺤﺳﺎﻤﻟﺎﺑ ،ﺔﻴﺋﻮﻀﻟا ﺮﻘﻧﺎﻓ ًا ﺮ ﻘ ﻧ ًﺎ ﺟ و د ﺰ ﻣ قﻮﻓ ﺰﻣر HP Solution
Center )ﺰآﺮﻣ لﻮﻠﺤﻟا ـﻟ HP( دﻮﺟﻮﻤﻟا ﻰﻠﻋ ﺢﻄﺳ ،ﺐﺘﻜﻤﻟا ﻢﺛ ﺮﻘﻧا قﻮﻓ Help and Support )تﺎﻤﻴﻠﻌﺗ ﻢﻋدو(.
ﻦﻤﺿ ﻢﺴﻘﻟا Documentation )ﻖﺋﺎﺛﻮﻟا(، ﺮﻘﻧا قﻮﻓ Product Help )تﺎﻤﻴﻠﻌﺗ ﺞﺘﻨﻤﻟا(.
لﻮﺻﻮﻠﻟ ﻰﻟإ ﺔﺨﺴﻧ ﺔﻳرﻮﻓ ﻞﻴﻟﺪﻟ مﺪﺨﺘﺴﻣ ﺔﺤﺳﺎﻤﻟا ،ﺔﻴﺋﻮﻀﻟا ﺮﻘﻧا قﻮﻓ أﺪﺑا، ﺮﺷأو ﻰﻟإ ﺞﻣاﺮﺒﻟا وأ ﺔﻓﺎآ ﺞﻣاﺮﺒﻟا، ﻰﻟإو HP
،
Scanjet، G4000 series، ﻢﺛ ﺮﻘﻧا قﻮﻓ ﻞﻴﻟد مﺪﺨﺘﺴﻤﻟا.
ﺔﺒﺴﻨﻟﺎﺑ ﻲﻣﺪﺨﺘﺴﻤﻟ ﺔﻤﻈﻧأ ﻞﻴﻐﺸﺗ Macintosh: لﻮﺼﺤﻠﻟ ﻰﻠﻋ تﺎﻣﻮﻠﻌﻣ لﻮﺣ تاءاﺮﺟإ ﺢﺴﻤﻟا ،ﻲﺋﻮﻀﻟا ﺢﺘﻓا HP
Device Manager )ةرادإ ةﺰﻬﺟﻷا ﻦﻣ HP(، ﺮﻘﻧاو قﻮﻓ ﺔﻣﻼﻋ مﺎﻬﻔﺘﺳﻻا ﻲﻓ ﻞﻔﺳأ ﻊﺑﺮﻣ راﻮﺤﻟا.
ﺞﻣﺎﻧﺮﺑ HP Photosmart ـﻟ Windows
ﺪﻨﻋ ﺖﻴﺒﺜﺗ ﺞﻣﺎﻧﺮﺑ HP Photosmart ـﻟ Windows، ﻢﺘﺗ ﺔﻓﺎﺿإ ﻦﻳﺰﻣر ﻰﻟإ ﺢﻄﺳ ﺐﺘﻜﻤﻟا. مﻮﻘﻳو ناﺬه ناﺰﻣﺮﻟا ﺢﺘﻔﺑ
ﺞﻣاﺮﺑ ءاﺮﺟﻹ ﺢﺴﻤﻟا ﻲﺋﻮﻀﻟا ﺮﻳﺮﺤﺗو ﺮﺻﺎﻨﻌﻟا ﺔﺣﻮﺴﻤﻤﻟا ًﺎﻴﺋﻮﺿ.
لﻮﺼﺤﻠﻟ ﻰﻠﻋ تﺎﻣﻮﻠﻌﻣ لﻮﺣ ﺔﻴﻔﻴآ ماﺪﺨﺘﺳا HP Solution Center )ﺰآﺮﻣ لﻮﻠﺤﻟا ـﻟ HP( وHP
Photosmart، ﻊﺟار ﻒﻠﻣ تﺎﻤﻴﻠﻌﺗ ﺔﺤﺳﺎﻤﻟا ﺔﻴﺋﻮﻀﻟا. ﺮﻘﻧا ًا ﺮ ﻘ ﻧ ًﺎ ﺟ و د ﺰ ﻣ قﻮﻓ ﺰﻣﺮﻟا HP Solution Center
)ﺰآﺮﻣ لﻮﻠﺤﻟا ـﻟ HP( دﻮﺟﻮﻤﻟا ﻰﻠﻋ ﺢﻄﺳ ،ﺐﺘﻜﻤﻟا ﻢﺛ ﺮﻘﻧا قﻮﻓ Help and Support )تﺎﻤﻴﻠﻌﺗ ﻢﻋدو(. ﻦﻤﺿ
ﻢﺴﻘﻟا Documentation )ﻖﺋﺎﺛﻮﻟا(، ﺮﻘﻧا قﻮﻓ Product Help )تﺎﻤﻴﻠﻌﺗ ﺞﺘﻨﻤﻟا(.
ﺪﻌُﻳ HP Solution Center )ﺰآﺮﻣ لﻮﻠﺤﻟا ـﻟ HP( ﺔﺑﺎﺜﻤﺑ ﺞﻣﺎﻧﺮﺑ ﺢﻴﺘﻳ ﻚﻟ ﺔﻴﻧﺎﻜﻣإ ءﺪﺑ
مﺎﻴﻘﻟا ﺢﺴﻤﺑ رﻮﺼﻟا تاﺪﻨﺘﺴﻤﻟاو ًﺎ ﻴ ﺋ ﻮ ﺿ. مﺪﺨﺘﺳا HP Solution Center )ﺰآﺮﻣ لﻮﻠﺤﻟا
ـﻟ HP( ﺔﻓﺎﻜﻟ رﻮﻣﻷا ﺔﻴﻟﺎﺘﻟا:
●ءادأ ﻒﺋﺎﻇو ﺢﺴﻤﻟا ﻲﺋﻮﻀﻟا ﺦﺴﻨﻟاو
●لﻮﺻﻮﻟا ﻰﻟإ تﺎﻣﻮﻠﻌﻤﻟا ﺔﺻﺎﺨﻟا تﺎﻤﻴﻠﻌﺘﻟﺎﺑ فﺎﺸﻜﺘﺳاو ءﺎﻄﺧﻷا ﺎﻬﺣﻼﺻإو
●ﺢﺘﻓ ﺞﻣﺎﻧﺮﺑ HP Photosmart ﺮﻳﺮﺤﺘﻟ ﺮﺻﺎﻨﻌﻟا ﺔﺣﻮﺴﻤﻤﻟا ًﺎﻴﺋﻮﺿ
●ﻞﻳﺪﻌﺗ تاداﺪﻋﻹا تﻼﻴﻀﻔﺘﻟاو
ﺪﻌُﻳ ﺞﻣﺎﻧﺮﺑ HP Photosmart ﺔﺑﺎﺜﻤﺑ ﺞﻣﺎﻧﺮﺑ ﻦﻜﻤﻳ ﻪﻣاﺪﺨﺘﺳا ﻲﻓ ﺔﺠﻟﺎﻌﻣ رﻮﺼﻟا
ﺎﻬﺘﻋﺎﺒﻃو ﺎﻬﻈﻔﺣو ﺎﻬﺘآرﺎﺸﻣو ﺪﻌﺑ ءﺎﻬﺘﻧﻻا ﻦﻣ ﺎﻬﺤﺴﻣ ًﺎ ﻴ ﺋ ﻮ ﺿ. ﻚﻨﻜﻤﻳو لﻮﺻﻮﻟا ﻰﻟإ ﺞﻣﺎﻧﺮﺑ
HP Photosmart ﺎﻣإ ﻦﻣ لﻼﺧ ﺰﻣر ﺢﻄﺳ ﺐﺘﻜﻤﻟا وأ ﻦﻣ لﻼﺧ HP Solution
Center )ﺰآﺮﻣ لﻮﻠﺤﻟا ـﻟ HP.(
ءﺪﺒﻟ ﺔﻴﻠﻤﻋ ﺢﺴﻣ ﻲﺋﻮﺿ:
ﺮﻘﻧا ًا ﺮ ﻘ ﻧ ًﺎ ﺟ و د ﺰ ﻣ قﻮﻓ ﺰﻣر HP Solution Center )ﺰآﺮﻣ لﻮﻠﺤﻟا ـﻟ HP( ﻰﻠﻋ ﺢﻄﺳ ،ﺐﺘﻜﻤﻟا ﺮﻘﻧاو قﻮﻓ ﺔﻣﻼﻋ
ﺐﻳﻮﺒﺘﻟا ﺔﺻﺎﺨﻟا ﺔﺤﺳﺎﻤﻟﺎﺑ ،ﺔﻴﺋﻮﻀﻟا ﻢﺛ ﺮﻘﻧا قﻮﻓ ﺔﻤﻬﻤﻟا ﻲﺘﻟا ﺐﻏﺮﺗ ﻲﻓ ﺎﻬﺋاﺮﺟإ.
ﺔﻈﺣﻼﻣ
اذإ نﺎآ ﺰﻣر HP Solution Center)ﺰآﺮﻣ لﻮﻠﺤﻟا ـﻟ HP ( ﺮﻴﻏ ﺮﻓﻮﺘﻣ ﻰﻠﻋ ﺢﻄﺳ ،ﺐﺘﻜﻤﻟا
ﺮﻘﻧﺎﻓ قﻮﻓ Start)أﺪﺑا(، ﺮﺷأو ﻰﻟإ Programs)ﺞﻣاﺮﺒﻟا( وأ All Programs)ﺔﻓﺎآ ﺞﻣاﺮﺒﻟا(، ﺮﺷأو ﻰﻟإ
HP، ﻢﺛ ﺮﻘﻧا قﻮﻓ HP Solution Center)ﺰآﺮﻣ لﻮﻠﺤﻟا ـﻟ HP (.
٩
ﺔﻠﺴﻠﺳ HP Scanjet G4000
ﻲﺑﺮﻋ

ةﻮﻄﺨﻟا ٦. رﺎﺒﺘﺧا ﺖﻴﺒﺜﺘﻟا
1
2
١.ﻊﺿ ةرﻮﺻ ﺔﻴﻓاﺮﻏﻮﺗﻮﻓ وأ ًا ﺪ ﻨ ﺘ ﺴ ﻣ ﻰﻠﻋ جﺎﺟز ﺔﺤﺳﺎﻤﻟا ﺔﻴﺋﻮﻀﻟا ﺎﻤآ ﻮه رﺎﺸﻣ ﺔﻄﺳاﻮﺑ ﺔﻣﻼﻌﻟا ﺔﻴﻌﺟﺮﻤﻟا ﻰﻠﻋ
ﺔﺤﺳﺎﻤﻟا ﺔﻴﺋﻮﻀﻟا.
٢.ﻂﻐﺿا ﻰﻠﻋ رز Scan )ﺢﺴﻣ ﻲﺋﻮﺿ( )
.( اذإ ﺖﻨآ مﻮﻘﺗ ﺢﺴﻤﻟﺎﺑ ﻲﺋﻮﻀﻟا ماﺪﺨﺘﺳﺎﺑ ﺞﻣﺎﻧﺮﺒﻟا صﺎﺨﻟا ـﺑ
Windows، ﺮﻬﻈﺘﻓ ﺔﺷﺎﺸﻟا What are you scanning? )ﺔﺌﻓ ﺮﺻﺎﻨﻋ ﺢﺴﻤﻟا ؟ﻲﺋﻮﻀﻟا( . ﻊﺒﺗا
تادﺎﺷرﻹا ﻲﺘﻟا ﺮﻬﻈﺗ ﻰﻠﻋ ﺔﺷﺎﺸﻟا لﺎﻤآﻹ ﺔﻴﻠﻤﻋ ﺢﺴﻤﻟا ﻲﺋﻮﻀﻟا.
ﺎﻣأ اذإ ﺖﻨآ مﻮﻘﺗ ﺢﺴﻤﻟﺎﺑ ﻲﺋﻮﻀﻟا ماﺪﺨﺘﺳﺎﺑ ﺞﻣﺎﻧﺮﺒﻟا صﺎﺨﻟا ـﺑ Macintosh، ﺢﺘﻔﻴﻓ ﻖﻴﺒﻄﺘﻟا HP Scan Pro
ﻢﺘﻳو ضﺮﻋ ﺔﻨﻳﺎﻌﻣ ﺎﻤﻟ ﻢﺘﻴﺳ ﻪﺤﺴﻣ ًﺎ ﻴ ﺋ ﻮ ﺿ. ﺎﻣﺪﻨﻋ ﻢﺘﺗ ﺔﻘﻓاﻮﻤﻟا ﻰﻠﻋ ،ﺔﻨﻳﺎﻌﻤﻟا ﻢﺘﻳ لﺎﺳرإ ةرﻮﺼﻟا ﺔﺣﻮﺴﻤﻤﻟا ًﺎ ﻴ ﺋ ﻮ ﺿ
ﻰﻟإ ﺔﻬﺟﻮﻟا ﻲﺘﻟا ﻢﺗ ﺎهﺪﻳﺪﺤﺗ ﻲﻓ تاداﺪﻋإ ﺔﺤﺳﺎﻤﻟا ﺔﻴﺋﻮﻀﻟا.
اذإ ﻢﻟ ﺮﻬﻈﻳ ﻊﺑﺮﻣ راﻮﺤﻟا What are you scanning? )ﺔﺌﻓ ﺮﺻﺎﻨﻋ ﺢﺴﻤﻟا ؟ﻲﺋﻮﻀﻟا( وأ رﺎﻃإ HP
Scan Pro ، ﺮﻈﻧﺎﻓ ”فﺎﺸﻜﺘﺳا ءﺎﻄﺧأ ﺖﻴﺒﺜﺗ ﺔﺤﺳﺎﻤﻟا ﺔﻴﺋﻮﻀﻟا ﺎﻬﺣﻼﺻإو “ ﻲﻓ ﺔﺤﻔﺻ ١١.
ﻞﻴﻟد داﺪﻋﻹا ﻢﻋﺪﻟاو
٨

مﺪﺨﺘﺳا ﻞﺑﺎآ USB ﻖﻓﺮﻤﻟا ﻊﻣ ﺔﺤﺳﺎﻤﻟا ﺔﻴﺋﻮﻀﻟا ﺎﻬﻠﻴﺻﻮﺘﻟ زﺎﻬﺠﺑ ﺮﺗﻮﻴﺒﻤﻜﻟا.
١.ﻢﻗ ﻞﻴﺻﻮﺘﺑ فﺮﻃ ﻞﺑﺎﻜﻟا ﻊﺑﺮﻤﻟا ﺔﺤﺳﺎﻤﻟﺎﺑ ﺔﻴﺋﻮﻀﻟا.
٢.ﻢﻗ ﻞﻴﺻﻮﺘﺑ فﺮﻃ ﻞﺑﺎﻜﻟا ﻞﻴﻄﺘﺴﻤﻟا زﺎﻬﺠﺑ ﺮﺗﻮﻴﺒﻤﻜﻟا.
ﻞﺼﻔﻟا ١
٧
ﺔﻠﺴﻠﺳ HP Scanjet G4000
ﻲﺑﺮﻋ

ةﻮﻄﺨﻟا ٤. ﻞﻴﺻﻮﺗ تﻼﺑﺎآ داﺪﻣإ ﺔﻗﺎﻄﻟا
ﺪﺟﻮﻳ ﻊﻣ تﻼﺑﺎآ داﺪﻣإ ﺔﻗﺎﻄﻟا ﻞﺑﺎآ ﻖﺤﻠﻣ ﻢﺘﻳ ﻪﻠﻴﺻﻮﺗ ءﺰﺠﻟﺎﺑ ﻲﻔﻠﺨﻟا ﺔﺤﺳﺎﻤﻠﻟ ﺔﻴﺋﻮﻀﻟا.
ﺎﻤآ يﻮﺘﺤﺗ تﻼﺑﺎآ داﺪﻣإ ﺔﻗﺎﻄﻟا ﻰﻠﻋ ﻞﺑﺎآ رﺎﻴﺗ ددﺮﺘﻣ ﻢﺘﻳ ﻞﻴﺻﻮﺗ ﺪﺣأ ﻪﻴﻓﺮﻃ تﻼﺑﺎﻜﺑ داﺪﻣإ ﺔﻗﺎﻄﻟا ﻞﻴﺻﻮﺗو فﺮﻄﻟا ﺮﺧﻵا
ﺪﺣﺄﺑ ﺲﺑﺎﻘﻣ ﺔﻗﺎﻄﻟا وأ ﻲﻗاﻮﺑ رﺎﻴﺗ.
١.ﻢﻗ ﻞﻴﺻﻮﺘﺑ ﻞﺑﺎآ رﺎﻴﺘﻟا ددﺮﺘﻤﻟا ءﺰﺠﻟﺎﺑ ﻲﻔﻠﺨﻟا ﻦﻣ تﻼﺑﺎآ داﺪﻣإ ﺔﻗﺎﻄﻟا.
٢.ﻢﻗ لﺎﺧدﺈﺑ فﺮﻄﻟا ﺮﺧﻵا ﻞﺑﺎﻜﻟ رﺎﻴﺘﻟا ددﺮﺘﻤﻟا ﺪﺣﺄﺑ ﺲﺑﺎﻘﻣ ﺔﻗﺎﻄﻟا وأ ﻲﻗاﻮﺑ رﺎﻴﺘﻟا.
ةﻮﻄﺨﻟا ٥. ﻞﻴﺻﻮﺗ ﻞﺑﺎآ USB
ﻪﻴﺒﻨﺗاذإ ﺖﻨآ مﻮﻘﺗ ﺖﻴﺒﺜﺘﻟﺎﺑ ﻲﻓ ﺔﺌﻴﺑ Windows، ﺪّآﺄﺘﻓ ﻦﻣ ﺖﻴﺒﺜﺗ ﺞﻣﺎﻧﺮﺑ HP Photosmart ﻞﺒﻗ ﻞﻴﺻﻮﺗ
ﺔﺤﺳﺎﻤﻟا ﺔﻴﺋﻮﻀﻟا ﺮﺗﻮﻴﺒﻤﻜﻟﺎﺑ ﺔﻄﺳاﻮﺑ ﻞﺑﺎآ USB. ﻊﺟار ”ةﻮﻄﺨﻟا ٢. ﺖﻴﺒﺜﺗ ﺞﻣﺎﻧﺮﺒﻟا
“
ﻲﻓ ﺔﺤﻔﺻ ٥. اذإ ﺖﻨآ
مﻮﻘﺗ ﺖﻴﺒﺜﺘﻟﺎﺑ ﻲﻓ ﺔﺌﻴﺑ Macintosh، ﻚﻨﻜﻤﻴﻓ ﻞﻴﺻﻮﺗ ﻞﺑﺎآ USB ﺎﻣإ ﻞﺒﻗ ﺖﻴﺒﺜﺗ ﺞﻣﺎﻧﺮﺒﻟا وأ ﺪﻌﺑ ﻪﺘﻴﺒﺜﺗ.
ﻞﻴﻟد داﺪﻋﻹا ﻢﻋﺪﻟاو
٦

ةﻮﻄﺨﻟا ٢. ﺖﻴﺒﺜﺗ ﺞﻣﺎﻧﺮﺒﻟا
ﻪﻴﺒﻨﺗ
USB ﺮﺗﻮﻴﺒﻤﻜﻟﺎﺑ نﻵا. ﻢﻗ ﺖﻴﺒﺜﺘﺑ ﺞﻣﺎﻧﺮﺑ ﺢﺴﻤﻟا ﻲﺋﻮﻀﻟا ﻞﺒﻗ ﻞﻴﺻﻮﺗ ﻞﺑﺎآ USB. ﻲﻓ ﺔﻟﺎﺣ ﺖﻴﺒﺜﺗ ﺞﻣﺎﻧﺮﺒﻟا
ﻰﻠﻋ زﺎﻬﺟ ﺮﺗﻮﻴﺒﻤآ Macintosh، ﻚﻨﻜﻤﻴﻓ ﻞﻴﺻﻮﺗ ﻞﺑﺎآ USB ﺎﻣإ ﻞﺒﻗ ﺖﻴﺒﺜﺗ ﺞﻣﺎﻧﺮﺒﻟا وأ ﻩﺪﻌﺑ.
١.ﻞﺧدأ صﺮﻘﻟا طﻮﻐﻀﻤﻟا صﺎﺨﻟا ﺞﻣﺎﻧﺮﺒﺑ HP Photosmart ﻖﻓﺮﻤﻟا ﻊﻣ ﺔﺤﺳﺎﻤﻟا ﺔﻴﺋﻮﻀﻟا ﻲﻓ كﺮﺤﻣ صاﺮﻗﻷا
ﺔﻃﻮﻐﻀﻤﻟا صﺎﺨﻟا زﺎﻬﺠﺑ ﺮﺗﻮﻴﺒﻤﻜﻟا.
ﺖﻴﺒﺜﺘﻠﻟ ﻰﻠﻋ ةﺰﻬﺟأ ﻞﻤﻌﺗ مﺎﻈﻨﺑ ﻞﻴﻐﺸﺘﻟا Windows: ﺮﻈﺘﻧا ﻰﺘﺣ ﻢﺘﻳ ضﺮﻋ ﻊﺑﺮﻣ راﻮﺣ ﺖﻴﺒﺜﺘﻟا. ﻲﻓ ﺔﻟﺎﺣ مﺪﻋ
ضﺮﻋ ﻊﺑﺮﻣ راﻮﺣ ﺖﻴﺒﺜﺘﻟا لﻼﺧ ﻊﻀﺑ ،ﻖﺋﺎﻗد ﻊﺟار ”فﺎﺸﻜﺘﺳا ءﺎﻄﺧأ ﺖﻴﺒﺜﺗ ﺔﺤﺳﺎﻤﻟا ﺔﻴﺋﻮﻀﻟا ﺎﻬﺣﻼﺻإو
“
ﻲﻓ ﺔﺤﻔﺻ ١١.
ﺖﻴﺒﺜﺘﻠﻟ ﻰﻠﻋ ةﺰﻬﺟأ ﺮﺗﻮﻴﺒﻤآ Macintosh: ﺮﻘﻧا ًا ﺮ ﻘ ﻧ ًﺎ ﺟ و د ﺰ ﻣ قﻮﻓ ﺰﻣر صﺮﻘﻟا طﻮﻐﻀﻤﻟا ﺮهﺎﻈﻟا ﻰﻠﻋ ﺢﻄﺳ
،ﺐﺘﻜﻤﻟا ﻢﺛ ﺮﻘﻧا ًا ﺮ ﻘ ﻧ ًﺎ ﺟ و د ﺰ ﻣ قﻮﻓ ﺰﻣر HP Scanjet Scanner Install )ﺖﻴﺒﺜﺗ ﺔﺤﺳﺎﻤﻟا ﺔﻴﺋﻮﻀﻟا HP
Scanjet( ءﺪﺒﻟ ﺔﻴﻠﻤﻋ ﺖﻴﺒﺜﺘﻟا.
٢.ﺮﻘﻧا قﻮﻓ Install software )ﺖﻴﺒﺜﺗ ﺞﻣﺎﻧﺮﺒﻟا( ﺖﻴﺒﺜﺘﻟ ﺞﻣﺎﻧﺮﺑ ﺢﺴﻤﻟا ﻲﺋﻮﻀﻟا. ﻊﺒﺗا تادﺎﺷرﻹا ﻲﺘﻟا ﺮﻬﻈﺗ ﻰﻠﻋ
ﺔﺷﺎﺸﻟا لﺎﻤﻜﺘﺳﻻ ﺖﻴﺒﺜﺗ ﺞﻣﺎﻧﺮﺑ ﺢﺴﻤﻟا ﻲﺋﻮﻀﻟا.
ةﻮﻄﺨﻟا ٣. ﻞﻴﺻﻮﺗ ﻞﺑﺎآ لﻮﺤﻣ داﻮﻤﻟا ﺔﻓﺎﻔﺸﻟا
←
ﻢﻗ ﻞﻴﺻﻮﺘﺑ ﻞﺑﺎآ لﻮﺤﻣ داﻮﻤﻟا ﺔﻓﺎﻔﺸﻟا )TMA( ﻦﻣ ءﺎﻄﻐﻟا ﻰﻟإ ةﺪﻋﺎﻗ ﺔﺤﺳﺎﻤﻟا ﺔﻴﺋﻮﻀﻟا.
ﻞﺼﻔﻟا ١
٥
ﺔﻠﺴﻠﺳ HP Scanjet G4000
ﻲﺑﺮﻋ
ﺞﻣﺎﻧ
ﻞﺑﺎآ ﻞﻴﺻﻮﺘﺑ ﻢﻘﺗ ﻻ ،Windows ﻞﻴﻐﺸﺘﻟا مﺎﻈﻨﺑ ﻞﻤﻌﻳ ﺮﺗﻮﻴﺒﻤآ زﺎﻬﺟ ﻰﻠﻋ ﺮﺒﻟا ﺖﻴﺒﺜﺗ ﺔﻟﺎﺣ ﻲﻓ

١
ءﺪﺑ ماﺪﺨﺘﺳﻻا
داﺪﻋﻹ ﺔﺤﺳﺎﻤﻟا ﺔﻴﺋﻮﻀﻟا ﻢﻗ عﺎﺒﺗﺎﺑ تاﻮﻄﺨﻟا ﺔﻴﻟﺎﺘﻟا:
ةﻮﻄﺨﻟا ١. فﺮﻌﺘﻟا ﻰﻠﻋ تﺎﻳﻮﺘﺤﻣ قوﺪﻨﺼﻟا
ﻢﻗ جاﺮﺧﺈﺑ ءاﺰﺟأ ﺔﺤﺳﺎﻤﻟا ﺔﻴﺋﻮﻀﻟا. ﺪآﺄﺗو ﻦﻣ ﺔﻟازإ يأ ﻂﻳﺮﺷ ﻒﻴﻠﻐﺗ.
1
2
3
4
5
6
1ﺔﺤﺳﺎﻤﻟا ﺔﻴﺋﻮﻀﻟا HP Scanjet G4010 وأ G4050 scanner
2
ﻞﺑﺎآ USB
3
تﻼﺑﺎآ داﺪﻣإ ﺔﻗﺎﻄﻟا
4ﻞﻴﻟد داﺪﻋﻹا ﻢﻋﺪﻟاو )ﺐﻴﺘﻜﻟا ﺮﻓﻮﺘﻤﻟا ﻦﻴﺑ ﻚﻳﺪﻳ نﻵا(
5صاﺮﻗﻷا ﺔﻃﻮﻐﻀﻤﻟا ﺞﻣﺎﻧﺮﺒﻟ ﺢﺴﻤﻟا ﻲﺋﻮﻀﻟا
6ﺐﻟاﻮﻗ لّﻮﺤﻣ داﻮﻤﻟا ﺔﻓﺎﻔﺸﻟا TMA ) HP Scanjet G4050 ﻂﻘﻓ(
ﻞﻴﻟد داﺪﻋﻹا ﻢﻋﺪﻟاو
٤

تﺎﻳﻮﺘﺤﻤﻟا
١ءﺪﺑ ماﺪﺨﺘﺳﻻا ... ...... .. ... ... .. ... ... .. ... ... .. ... ... .. ...... .. ... ... ... .. ... ... .. ... ..... ... ... ..... ... .. ... ... .. ... ... ...٤
ةﻮﻄﺨﻟا ١. فﺮﻌﺘﻟا ﻰﻠﻋ تﺎﻳﻮﺘﺤﻣ قوﺪﻨﺼﻟا ..............................................................................٤
ةﻮﻄﺨﻟا ٢. ﺖﻴﺒﺜﺗ ﺞﻣﺎﻧﺮﺒﻟا . ...... ............ ...... ...... ...... ............ ...... ...... ...... ............ ...... ...... .......٥
ةﻮﻄﺨﻟا ٣. ﻞﻴﺻﻮﺗ ﻞﺑﺎآ لﻮﺤﻣ داﻮﻤﻟا ﺔﻓﺎﻔﺸﻟا .. . . . . . . . . .. . . . . . . . . .. . . . . . . . . .. . . . . . . . . .. . . . . . . . . .. . . . . . . . . .. . . . . . . . . .. . . ..٥
ةﻮﻄﺨﻟا ٤. ﻞﻴﺻﻮﺗ تﻼﺑﺎآ داﺪﻣإ ﺔﻗﺎﻄﻟا . .. .. .. .. ... .. .. .... ... .. .. .. ... .. .. .... ... .. .. .. .. ... .. .... ... .. .. .. .. ... .. .... ...٦
ةﻮﻄﺨﻟا ٥. ﻞﻴﺻﻮﺗ ﻞﺑﺎآ USB . . . . . .. . . . . .. . . .. . . . . . .. . .. . . . . . . .. .. . . . . . . . . .. . . . . . . . . ... . . . . . . . .. .. . . . . . . .. . .. . . . . . .. . . ..٦
ةﻮﻄﺨﻟا ٦. رﺎﺒﺘﺧا ﺖﻴﺒﺜﺘﻟا .. .. .. . . .. . . .. . . .. . . . ... . .. . . .. . ... . . .. . . . .. . . .. . . .. .. .. . . . .. . ... . . .. . . ... . .. . . . .. .. .. . . .. . . .. . . ..٨
٢ﺔﻴﻔﻴآ ماﺪﺨﺘﺳا ﺔﺤﺳﺎﻤﻟا ﺔﻴﺋﻮﻀﻟا ... ... ... ... .. ... ... ... ... .. ... ... ... .. ... ...... ... .. ... ... ... .. ... ... ... ... .. ... ... ... ...٩
ردﺎﺼﻣ لﻮﺼﺤﻟا ﻰﻠﻋ تﺎﻣﻮﻠﻌﻣ ﺔﻴﻓﺎﺿإ .. . . . . .. . . . . . . . . .. . . . . . . . . ... . . . . . . . .. . . . . . . . . .. . . . . . .. . .. . . . . . . . . .. . . . . . . . . .. . . ..٩
ﺞﻣﺎﻧﺮﺑ HP Photosmart ـﻟ Windows ... .. .. .. ... .. .. .. .. ... .. .. .. ..... .. .. .. .. ... .. .. .... ... .. .. .. .. ... .. .... ...٩
ﺞﻣﺎﻧﺮﺑ HP Photosmart ـﻟ Macintosh .. . . . . .. .. . . . . . . ... . . . . . . . .. . . . . . . . ... . . . . . . .. .. . . . . . .. . .. . . . . .. . . .. . . ..١٠
ةﺮﻈﻧ ﺔﻣﺎﻋ ﻰﻠﻋ ﺔﺣﻮﻠﻟا ﺔﻴﻣﺎﻣﻷا تﺎﻘﺤﻠﻤﻟاو .... . .. . .. ... .. . .. . .. .. . .. . .. .. ... . .. . .. ... .. . .. .. . .. . .. . .. .. ... . .. .. . ... .. ..١٠
رارزأ ﺔﺣﻮﻠﻟا ﺔﻴﻣﺎﻣﻷا . . . . . . . .. . . . . . .. . .. . . .. . . . . ... . . . . . .. .. . . . .. . . . .. .. . . . . . ... . . . . .. . . .. . .. . . . . . .. . . . . . .. . .. . . ..١٠
لﻮﺤﻣ داﻮﻤﻟا ﺔﻓﺎﻔﺸﻟا .. .. . .. . ... .. .. . .. . .. . .. .. . .. ... . .. .. . ... .. . .. .. . .. . .. . .. . .... . .. . .. . .. .. . .. . .. ... .. . .. . ... .. ..١٠
٣فﺎﺸﻜﺘﺳا ءﺎﻄﺧأ ﺖﻴﺒﺜﺗ ﺔﺤﺳﺎﻤﻟا ﺔﻴﺋﻮﻀﻟا ﺎﻬﺣﻼﺻإو . . . . . . . . . .. . . . . . . . . .. . . . . . . . . .. . . . . . . . . .. . . . . . . . . .. . . . . . . . . .. . . . .١١
ءﺎﻐﻟإ ﺖﻴﺒﺜﺗ ﺞﻣﺎﻧﺮﺒﻟا ةدﺎﻋإو ﻪﺘﻴﺒﺜﺗ ........................................................................................١١
ﺺﺤﻓ تﻼﺑﺎﻜﻟا . ..... ..... ...... ..... ..... ........... ........... ..... ..... ...... ..... ..... ...... ..... ..... ...... ..... ......١٢
٤تﺎﻔﺻاﻮﻣ ﺞﺘﻨﻤﻟا تﺎﻣﻮﻠﻌﻤﻟاو ﺔﻴﻤﻴﻈﻨﺘﻟا . . . . .. . . . . . . . . .. . . . . . . . . .. . . . . . . . . .. . . . . . . . . .. . . . . . . . . .. . . . . . . . . .. . . . . . . . . .. . . . .١٣
تﺎﻔﺻاﻮﻣ ﺔﺤﺳﺎﻤﻟا ﺔﻴﺋﻮﻀﻟا .... .... .... ... ........ .... ... .... .... ... .... ........ ... .... .... ... .... .... ....... .... .... ....١٣
تﺎﻔﺻاﻮﻣ لﻮﺤﻣ داﻮﻤﻟا ﺔﻓﺎﻔﺸﻟا . . . . ... . . . .. . . ... . . . .. . . .. .. . . . .. . .. .. . . . .. . .. . .. . . . .. .. . .. . . . .. .. . . .. . . . ... . . .. . . . ... . . ..١٤
تﺎﻔﺻاﻮﻤﻟا ﺔﻴﺌﻴﺒﻟا ... ... .. ... .. ... .. ... .. ... .. ... .. ... ... .. ... .. ... .. ... .. ... .. ... .. ... ... .. ... .. ... .. ... .. ... .. ... .. ... ...١٤
تﺎﻣﻮﻠﻌﻣ ﺔﺻﺎﺧ ةدﺎﻋﺈﺑ ﻊﻴﻨﺼﺘﻟا داﻮﻤﻟاو ةرﻮﻈﺤﻤﻟا . . .. . . . . . . . . .. . . . . . . . . . . . . . . . . . . .. . . . . . . . . .. . . . . . . . . . . . . . . . . . . .. . . . .١٤
ﺺﻠﺨﺗ ،ﻦﻴﻣﺪﺨﺘﺴﻤﻟا بﺎﺤﺻأ لزﺎﻨﻤﻟا ،ﺔﺻﺎﺨﻟا ﻦﻣ ةﺰﻬﺟﻷا ﺔﻔﻟﺎﺘﻟا لوﺪﺑ دﺎﺤﺗﻻا ﻲﺑوروﻷا . . . . . . . . . .. . . . . . . . . .. . . . .١٥
٥ﻢﻋد ﺞﺘﻨﻤﻟا .. .. . ... .. .. . .. . .. .. . .. . .. ... .. . .. . .... . .. . .. . .. .. . .. . .. .. . .. . .. .. ... . .. . .. ... .. . .. .. . .. . .. . .. .. ... . .. .. . ... .. ..١٦
ووذ تﺎﺟﺎﻴﺘﺣﻻا ﺔﺻﺎﺨﻟا ... . . . . . . . . .. . . . . . . . . .. . .. . . . . . .. . . . . . . . . .. . . . . .. . . .. . . . . . . . . .. . . . . . . . . ... . . . . . . . .. . . . . . . . . .. . . ..١٦
ﻊﻗﻮﻣ ﺐﻳو HP Scanjet . . . . . . . . .. . . . . . . .. .. . . . . . .. . .. . . . .. . . . .. . . .. . . . . .. .. . . . . . . ... . . . . . . ... . . . . . . .. .. . . . . .. . . .. . . ..١٦
لﻮﺼﺤﻟا ﻰﻠﻋ ﻢﻋﺪﻟا . . . . . . .. . . . .. . . . .. . . . . .. . . .. . . . . . .. . .. . . . . . . .. .. . . . . . . . . .. . . . . . . . . ... . . . . . . . .. .. . . . . . . .. . .. . . . . . .. . . ..١٧
٦نﺎﻴﺑ ﺔﻟﺎﻔﻜﻟا ةدوﺪﺤﻤﻟا ﺔآﺮﺸﻟ Hewlett-Packard . . . . . . . .. . . . . . . . . .. . . . . . . . . . . . . . . . . . . .. . . . . . . . . .. . . . . . . . . . . . . . .١٨
٣
ﺔﻠﺴﻠﺳ HP Scanjet G4000
ﻲﺑﺮﻋ

قﻮﻘﺣ ﺮﺸﻨﻟا ﺺﻴﺧﺮﺘﻟاو
2006 Copyright Hewlett-Packard
Development Company, L.P. © .
ﺮﻈﺤُﻳ ﺦﺴﻧ ﻩﺬه ةدﺎﻤﻟا وأ ﺎﻬﻠﻳﺪﻌﺗ وأ ﺎﻬﺘﻤﺟﺮﺗ نوﺪﺑ
ﺢﻳﺮﺼﺗ ﻲﺑﺎﺘآ ،ﻖﺒﺴﻣ ءﺎﻨﺜﺘﺳﺎﺑ ﺎﻣ ﺺﻨﺗ ﻪﻴﻠﻋ ﻦﻴﻧاﻮﻗ
قﻮﻘﺣ ﺮﺸﻨﻟا.
تﺎﻣﻮﻠﻌﻤﻟا ةدراﻮﻟا ﻲﻓ اﺬه ﺪﻨﺘﺴﻤﻟا ﺔﺿﺮُﻋ ﺮﻴﻴﻐﺘﻠﻟ
نوﺪﺑ رﺎﻌﺷإ ﻖﺒﺴﻣ.
ﺪﻌﺗو تﺎﻧﺎﻴﺑ ﺔﻟﺎﻔﻜﻟا ﺔﺤﻳﺮﺼﻟا ﺔﻘﻓﺮﻤﻟا ﻊﻣ تﺎﺠﺘﻨﻣ
تﺎﻣﺪﺧو ﺔآﺮﺷ HP ﻲه ﻞآ تﻻﺎﻔﻜﻟا ﺔﺣﻮﻨﻤﻤﻟا
تﺎﺠﺘﻨﻤﻠﻟ تﺎﻣﺪﺨﻟاو ﻲﺘﻟا ﺎﻬﻣﺪﻘﺗ ﺔآﺮﺸﻟا. ﺐﺠﻳو مﺪﻋ
ﺮﻴﺴﻔﺗ يأ ﻦﻣ صﻮﺼﻨﻟا ةدراﻮﻟا ﻲﻓ اﺬه ﺪﻨﺘﺴﻤﻟا ﻰﻠﻋ
ﺎﻬﻧأ راﺮﻗإ ﺔﻟﺎﻔﻜﺑ ﺔﻴﻓﺎﺿإ. ﺪﻌﺗو ﺔآﺮﺷ HP ﺮﻴﻏ
ﺔﻟوﺆﺴﻣ ﻦﻋ ﺔﻳأ ءﺎﻄﺧأ ﺔﻴﻨﻓ وأ ﺔﻳﺮﻳﺮﺤﺗ وأ يأ فﺬﺣ
دﺮﻳ اﺬﻬﺑ ﺪﻨﺘﺴﻤﻟا.
تﺎﻣﻼﻌﻟا ﺔﻳرﺎﺠﺘﻟا
ﺮﺒﺘﻌُﻳ ﻞآ ﻦﻣ Microsoft وWindows ﻦﻴﺘﻣﻼﻋ
ﻦﻴﺘﻳرﺎﺠﺗ ﻦﻴﺘﻠﺠﺴﻣ ﺔآﺮﺸﻟ Microsoft
Corporation.

ﻞﻴﻟد داﺪﻋﻹا ﻢﻋﺪﻟاو
ﻲﺑﺮﻋ


Documenttranscriptie
Guide d'installation et d'assistance Français Copyright et licence © 2006 Copyright Hewlett-Packard Development Company, L.P. La reproduction, l'adaptation ou la traduction dans une autre langue sans l'autorisation écrite préalable de Hewlett-Packard est interdite, ou autorisée conformément aux lois relatives au copyright. Les informations contenues dans ce document sont sujettes à modification sans préavis. Les garanties limitées des produits et services HP sont exclusivement présentées dans la documentation accompagnant ces produits et services. Aucun élément du présent document ne doit être considéré comme constituant une garantie supplémentaire. HP ne pourra être tenu responsable des erreurs ou omissions de nature technique ou rédactionnelle qui pourraient subsister dans le présent document. Marques déposées Microsoft et Windows sont des marques déposées de Microsoft Corporation. Sommaire 2 3 4 5 6 Démarrage ............................................................................................................4 Etape 1. Vérification du contenu de l'emballage ....................................................4 Etape 2. Installation du logiciel ..............................................................................5 Etape 3. Connexion du câble de l'adaptateur de supports transparents (TMA) ....................................................................................................................5 Etape 4. Connexion du cordon d'alimentation .......................................................6 Etape 5. Connexion du câble USB ........................................................................6 Etape 6. Test de l'installation .................................................................................8 Utilisation du scanner .........................................................................................9 Informations supplémentaires ................................................................................9 Logiciel HP Photosmart Windows ...........................................................................9 Logiciel HP Photosmart Macintosh ......................................................................10 Présentation du panneau avant et des accessoires ............................................10 Boutons du panneau avant ...........................................................................10 Adaptateur de supports transparents (TMA) ................................................11 Résolution des problèmes d'installation du scanner .....................................12 Désinstallation et réinstallation du logiciel ...........................................................12 Vérification des câbles .........................................................................................13 Informations juridiques et caractéristiques du produit ..................................14 Caractéristiques du scanner ................................................................................14 Caractéristiques de l'adaptateur de supports transparents (TMA) .......................15 Caractéristiques environnementales ...................................................................15 Informations sur le recyclage et la mise au rebut de certains matériaux .............16 Collecte des déchets des particuliers au sein de l'Union européenne .................16 Assistance produits ..........................................................................................17 Accessibilité .........................................................................................................17 Site Web HP Scanjet ...........................................................................................17 Obtention d'assistance ........................................................................................18 Déclaration de garantie limitée de Hewlett-Packard .......................................19 Guide d'installation et d'assistance 3 Français 1 1 Démarrage Procédez comme suit pour configurer le scanner : Etape 1. Vérification du contenu de l'emballage Déballez le scanner. Veillez à retirer toutes les bandes adhésives. 6 1 5 2 3 4 4 1 Scanner HP Scanjet G4010 ou G4050 2 Câble USB 3 Cordon d'alimentation 4 Guide d'installation et d'assistance (le présent manuel) 5 CD des logiciels de numérisation 6 Modèles de l'adaptateur de supports transparents (TMA) (HP Scanjet G4050 uniquement) HP Scanjet série G4000 Etape 2. Installation du logiciel 1. 2. Français Attention Si vous installez le logiciel sur un ordinateur Windows, ne connectez pas encore le câble USB à l'ordinateur. Installez le logiciel de numérisation avant de brancher le câble USB. Si vous installez le logiciel sur un ordinateur Macintosh, vous pouvez connecter le câble USB avant ou après l'installation du logiciel. Insérez le CD HP Photosmart fourni avec le scanner dans le lecteur de CD de l'ordinateur. Pour les installations Windows : attendez que la boîte de dialogue d'installation s'affiche. Si elle ne s'affiche pas après quelques instants, reportez-vous à la section Résolution des problèmes d'installation du scanner, page 12. Pour les installations Macintosh : sur le bureau, double-cliquez sur l'icône du CD, puis double-cliquez sur l'icône Installer le scanner HP Scanjet pour démarrer l'installation. Cliquez sur Installer le logiciel pour installer le logiciel de numérisation. Suivez les instructions à l'écran pour procéder à l'installation du logiciel de numérisation. Etape 3. Connexion du câble de l'adaptateur de supports transparents (TMA) ➔ Connectez le câble TMA entre le capot et la base du scanner. Guide d'installation et d'assistance 5 Chapitre 1 Etape 4. Connexion du cordon d'alimentation Le cordon d'alimentation possède un câble associé qui se branche à l'arrière du scanner. Un câble secteur est également connecté au cordon d'alimentation à une extrémité et branché sur une prise électrique ou sur un parasurtenseur à l'autre extrémité. 1. 2. Branchez le câble secteur à l'arrière du cordon d'alimentation. Branchez l'autre extrémité du câble secteur à une prise électrique ou à un parasurtenseur. Etape 5. Connexion du câble USB Attention Si vous effectuez l'installation dans un environnement Windows, assurez-vous que le logiciel HP Photosmart est installé préalablement à la connexion du scanner à votre ordinateur via le câble USB. Reportez-vous à la section Etape 2. Installation du logiciel, page 5. Si vous effectuez l'installation dans un environnement Macintosh, vous pouvez connecter le câble USB avant ou après l'installation du logiciel. 6 HP Scanjet série G4000 Utilisez le câble USB fourni avec le scanner pour brancher le scanner à l'ordinateur. Raccordez l'embout carré du câble au scanner. 2. Raccordez l'embout rectangulaire du câble à l'ordinateur. Français 1. Guide d'installation et d'assistance 7 Chapitre 1 Etape 6. Test de l'installation 1 1. 2. 8 2 Placez une photo ou un document sur la vitre du scanner comme indiqué sur la marque de référence du scanner. Appuyez sur le bouton Numériser ( ). Si vous effectuez une numérisation à l'aide du logiciel Windows, la boîte de dialogue Que numérisez-vous ? apparaît. Suivez les instructions qui s'affichent à l'écran pour terminer la numérisation. Si vous réalisez une numérisation à l'aide du logiciel Macintosh, l'application HP Scan Pro s'ouvre et un aperçu du document numérisé s'affiche. Une fois l'aperçu accepté, l'image numérisée est envoyée vers la destination sélectionnée dans les paramètres du scanner. Si ni la boîte de dialogue Que numérisez-vous ? ni la fenêtre HP Scan Pro ne s'affichent, reportez-vous à la section Résolution des problèmes d'installation du scanner, page 12. HP Scanjet série G4000 2 Utilisation du scanner Français Cette rubrique contient une présentation du scanner et des informations sur son utilisation. Informations supplémentaires Vous trouverez d'autres informations sur le scanner et le logiciel dans le fichier d'aide du scanner. Si vous avez installé le logiciel HP Photosmart fourni avec votre scanner, double-cliquez sur l'icône Centre de solutions HP située sur votre bureau, puis cliquez sur Aide et assistance. Sous la section Documentation, cliquez sur Aide sur les produits. Pour accéder à la version en ligne du guide de l'utilisateur du scanner, cliquez sur Démarrer, pointez sur Programmes ou Tous les programmes, puis sur HP, Scanjet, série G4000 et cliquez sur Guide de l'utilisateur. Utilisateurs de Macintosh : pour plus d'informations sur les procédures de numérisation, ouvrez le Gestionnaire de périphériques HP, puis cliquez sur le point d'interrogation situé en bas de la boîte de dialogue. Logiciel HP Photosmart Windows Lors de l'installation de HP Photosmart Windows, deux icônes sont ajoutées à votre bureau. Ces icônes correspondent à deux applications : un logiciel de numérisation et un logiciel d'édition. Pour plus d'informations sur l'utilisation du Centre de solutions HP et de HP Photosmart, consultez les fichiers d'aide du scanner. Double-cliquez sur l'icône Centre de solutions HP sur votre bureau, puis cliquez sur Aide et assistance. Sous la section Documentation, cliquez sur Aide sur les produits. Le Centre de solutions HP est le logiciel qui vous permet de démarrer la numérisation d'images et de documents. Utilisez le Centre de solutions HP si vous souhaitez effectuer l'une des opérations suivantes : ● ● ● ● exécuter des fonctions de numérisation et de copie ; consulter les informations d'aide et de résolution des problèmes ; accéder au logiciel HP Photosmart pour modifier vos images numérisées ; modifier les paramètres et les préférences. HP Photosmart est le logiciel à utiliser pour la manipulation, l'impression, l'archivage et le partage de vos images une fois numérisées. Vous pouvez accéder à HP Photosmart à l'aide de l'icône située sur votre bureau ou par l'intermédiaire du Centre de solutions HP. Pour lancer une numérisation : Guide d'installation et d'assistance 9 Chapitre 2 Double-cliquez sur l'icône du Centre de solutions HP située sur votre bureau, cliquez sur l'onglet correspondant au scanner, puis cliquez sur la tâche que vous souhaitez réaliser. Remarque Si l'icône Centre de solutions HP n'est pas disponible sur le bureau, cliquez sur Démarrer, puis placez le curseur de la souris sur Programmes ou Tous les programmes, puis sur HP et cliquez sur Centre de solutions HP. Logiciel HP Photosmart Macintosh Lorsque vous installez le programme de numérisation HP sur un ordinateur Macintosh, deux programmes logiciels sont disponibles dans le Dock : Gestionnaire de périphériques HP et HP Photosmart Studio. Ces programmes permettent la numérisation et la modification de vos documents. Le Gestionnaire de périphériques HP est le logiciel qui vous permet de démarrer la numérisation d'images et de documents. Utilisez le gestionnaire de périphériques pour effectuer les opérations suivantes : ● ● ● ● exécuter des fonctions de numérisation et de copie ; consulter les informations d'aide et de résolution des problèmes ; accéder au logiciel HP Photosmart Studio pour modifier vos images numérisées ; modifier les paramètres et les préférences. HP Photosmart Studio est le logiciel à utiliser pour la manipulation, l'impression, l'archivage et le partage de vos images une fois numérisées. Vous pouvez ouvrir HP Photosmart Studio à partir du Dock ou depuis le menu Applications du Gestionnaire de périphériques HP. Présentation du panneau avant et des accessoires Cette rubrique présente le panneau avant du scanner et l'adaptateur de supports transparents (TMA). Boutons du panneau avant Icône 10 Nom de la fonction Description Bouton Numériser Permet de numériser des photos, des images, des documents ou autres objets. Bouton Numériser la pellicule Permet de numériser des positifs, comme des diapositives 35 mm, et des négatifs transparents. La numérisation de pellicules nécessite l'utilisation de HP Scanjet série G4000 (suite) Icône Nom de la fonction Description Bouton Copier Numérise l'élément et l'envoie vers l'imprimante pour en faire une copie. Bouton Numériser au format PDF Numérise une ou plusieurs pages et les enregistre au format PDF pour stockage ou partage. Remarque Pour plus d'informations sur les actions par défaut de ces boutons dans un environnement Macintosh, ouvrez le Gestionnaire de périphériques HP, puis cliquez sur le point d'interrogation situé en bas de la boîte de dialogue. Adaptateur de supports transparents (TMA) Vous pouvez utiliser l'adaptateur de supports transparents (TMA) pour numériser des diapositives ou des négatifs 35 mm. L'adaptateur de supports transparents (TMA) HP Scanjet G4050 vous permet également de numériser des pellicules moyens et grands formats. Pour plus d'informations sur l'adaptateur de supports transparents (TMA), reportez-vous au guide de l'utilisateur du scanner. Pour savoir comment utiliser le guide de l'utilisateur, reportez-vous à la section Informations supplémentaires, page 9. Guide d'installation et d'assistance 11 Français l'adaptateur de supports transparents (TMA) situé sur la face inférieure du capot. 3 Résolution des problèmes d'installation du scanner Cette rubrique contient des solutions aux problèmes d'installation et de configuration. Désinstallation et réinstallation du logiciel Si le logiciel n'est pas installé complètement, il est possible que le scanner ne soit pas reconnu ou que le logiciel ne se lance pas correctement. Essayez de désinstaller, puis de réinstaller le logiciel de numérisation HP. Pour réinstaller le logiciel de numérisation HP, vous devez disposer du CD du logiciel HP Photosmart. Environnement Windows : 1. 2. 3. 4. 5. 6. 7. 8. Cliquez sur Démarrer, Paramètres, puis Panneau de configuration (sous Windows XP, cliquez sur Démarrer, puis Panneau de configuration). Cliquez sur Ajout/Suppression de programmes (dans Windows XP, l'option s'appelle Ajouter ou supprimer des programmes), puis sélectionnez HP Scanjet série G4000. Cliquez sur Supprimer. Cliquez sur Ajout/Suppression de programmes (dans Windows XP, l'option s'appelle Ajouter ou supprimer des programmes) puis sélectionnez le logiciel HP Photosmart. Cliquez sur Supprimer. Déconnectez le câble USB de l'ordinateur. Réinstallez le logiciel grâce au CD du logiciel HP Photosmart fourni avec votre scanner. Lorsque vous insérez le CD, l'interface d'installation se lance automatiquement. Sélectionnez HP Photosmart comme logiciel à installer. Reconnectez le câble USB après avoir installé le logiciel. Pour plus d'informations, reportez-vous à la section Etape 5. Connexion du câble USB, page 6 Environnement Macintosh : 1. Accédez à Applications/Hewlett-Packard puis ouvrez le désinstalleur HP. Remarque Vous devez disposer de privilèges administratifs pour désinstaller le logiciel. 2. 3. 4. 5. 12 Saisissez votre nom d'utilisateur et votre mot de passe lorsque vous y êtes invité. La fenêtre du désinstalleur HP s'ouvre et affiche les produits disponibles pour désinstallation. Sélectionnez le produit série G4000, puis cliquez sur Suivant. Suivez les instructions à l'écran pour procéder à la désinstallation du logiciel. Réinstallez le logiciel grâce au CD du logiciel HP fourni avec votre scanner. Après avoir inséré le CD, cliquez sur l'icône du CD qui s'affiche sur botre bureau pour lancer l'installation. HP Scanjet série G4000 Vérification des câbles Action Câble d'alimentation Le câble d'alimentation relie le scanner à une prise secteur. ● ● ● Câble USB Assurez-vous que le câble d'alimentation est bien connecté au scanner et à une prise électrique ou à un parasurtenseur en état de marche. Si le câble d'alimentation est connecté à un parasurtenseur, veillez à ce que celui-ci soit bien relié à une prise électrique et allumé. Eteignez le scanner à l'aide de l'interrupteur d'alimentation, puis mettez l'ordinateur hors tension. Après 60 secondes, remettez le scanner, puis l'ordinateur sous tension, en respectant cet ordre. Le câble USB relie le scanner à l'ordinateur. ● ● ● Utilisez le câble fourni avec le scanner. Il se peut qu'un autre câble USB ne soit pas compatible avec le scanner. Vérifiez que le câble USB est connecté correctement au scanner et à l'ordinateur. Si le câble USB est connecté à un port USB situé à l'avant de l'ordinateur, branchez-le sur un autre port USB à l'arrière de l'ordinateur. Pour de plus amples informations sur la résolution des problèmes liés au câble USB, reportez-vous à la section www.hp.com/support, sélectionnez votre pays/ région, puis utilisez l'outil de recherche pour localiser les rubriques de résolution des problèmes liés au câble USB. Câble de l'adaptateur de supports transparents (TMA) Guide d'installation et d'assistance Le câble de l'adaptateur de supports transparents (TMA) relie l'adaptateur situé dans le capot du scanner à la base du scanner. Assurez-vous que ce câble est correctement branché à l'arrière du scanner. 13 Français Type de câble 4 Informations juridiques et caractéristiques du produit Vous trouverez, dans cette rubrique, les informations légales et les caractéristiques produit des accessoires et du scanner photo HP Scanjet série G4000. Caractéristiques du scanner Désignation Description Type de scanner Scanner à plat avec adaptateur de supports transparents (TMA) Taille G4010 : 303 mm x 5 088 mm x 98 mm (11,93 x 20 x 3,86 pouces) G4050 : 303 mm x 5 088 mm x 108 mm (11,93 x 20 x 4,25 pouces) Poids G4010 : 4,4 kg (9,6 livres) G4050 : 5,3 kg (11,6 livres) Elément de numérisation Elément à couplage de charge Interface Câble USB 2.0 pleine vitesse Résolution matérielle Résolution matérielle : 4 800 x 9 600 dpi Choix de la résolution Résolution interpolée de 12 à 999,999 dpi (échelle à 100 %) Tension CA 100-120 V 60 Hz – Amérique du Nord 200-240 V 50 Hz - Europe Continentale, Royaume-Uni, Australie 100-240 V 50 Hz/60 Hz - Reste du monde Informations juridiques Numéro de modèle légal : afin de permettre son identification sur le plan juridique, un numéro de modèle légal a été attribué à votre produit. Le numéro de modèle légal de votre produit est FCLSD-0605. Ce numéro ne doit pas être confondu avec le nom commercial de votre appareil (HP Scanjet G4010 ou G4050) ou la référence du produit (L1956A ou L1957A). La consommation d'énergie est sensiblement réduite en mode ENERGY STAR®, ce qui permet d'économiser les ressources naturelles et de réduire les coûts sans affecter les performances du produit. Ce produit est doté du label ENERGY STAR (MOU v. 1.0), programme bénévole destiné à favoriser le 14 HP Scanjet série G4000 Désignation Description ENERGY STAR est une marque déposée par l'agence américaine de protection de l'environnement (EPA), Etats-Unis. En tant que partenaire du programme ENERGY STAR, HP a établi que le présent produit remplissait les exigences de la norme ENERGY STAR sur l'économie d'énergie. Pour plus d'informations sur les normes ENERGY STAR, rendez-vous sur le site Web suivant : www.energystar.gov. Caractéristiques de l'adaptateur de supports transparents (TMA) Désignation Description Types de supports G4010 : jusqu'à cinq diapositives 35 mm ou six négatifs 35 mm G4050 : jusqu'à 16 diapositives 35 mm ou 30 négatifs 35 mm, jusqu'à deux pellicules moyen format (pellicule en bobine 120) ou une pellicule grand format (pellicule en bobine 220). Alimentation 12 volts/400 mA max. Consommation d'énergie et informations juridiques Reportez-vous au fichier regulatory_supplement.htm figurant sur le CD du logiciel HP Photosmart pour plus de détails sur la consommation d'énergie, l'alimentation électrique et les informations légales. Caractéristiques environnementales Désignation Description Température Lors du fonctionnement du scanner et de l'adaptateur de supports transparents (TMA) : 10 °C à 35 °C Stockage : - 40 °C à 60 °C Humidité relative Lors du fonctionnement du scanner et de l'adaptateur de supports transparents : 15 % à 80 % sans condensation, de 10 ° à 35 °C Stockage : jusqu'à 90 % (sans condensation) de 0 °C à 60 °C (32 °F à 140 °F) Guide d'installation et d'assistance 15 Français développement de produits de bureau à faible consommation d'énergie. Chapitre 4 Informations sur le recyclage et la mise au rebut de certains matériaux Recyclage HP propose un nombre croissant de programmes de retour produits et de recyclage dans de nombreux pays et régions. L'entreprise collabore avec les plus grands centres de recyclage de matériel électronique dans le monde. HP préserve les ressources en revendant certains de ses produits les plus populaires. Pour plus d'informations sur le recyclage de produits HP, rendez-vous à l'adresse : www.hp.com/hpinfo/globalcitizenship/environment/recycle/ Mise au rebut de certains matériaux Ce produit HP contient des matériaux qui risquent de nécessiter un traitement spécial lorsqu'ils seront hors d'usage : du mercure dans la lampe fluorescente du scanner et l'adaptateur de supports transparents (< 5 mg). Pour plus d'informations sur le recyclage, consultez le site www.hp.com/go/recycle, les autorités locales ou Electronic Industries Alliance à l'adresse www.eiae.org. Collecte des déchets des particuliers au sein de l'Union européenne Ce symbole, apposé sur le produit ou sur son emballage, indique que ce produit ne doit pas être jeté avec les ordures ménagères. C'est à vous de le déposer dans un point de collecte des déchets spécialisé dans le recyclage du matériel électrique et électronique. La collecte et le recyclage séparés des déchets permettent de préserver les ressources naturelles et de protéger la santé des individus. Pour plus d'informations sur les points de collecte des déchets et sur le recyclage, contactez votre revendeur, la mairie, le service local de ramassage des ordures ou le magasin dans lequel vous avez acheté le produit. 16 HP Scanjet série G4000 5 Assistance produits Français Cette section décrit les options de l'Assistance produits. Accessibilité Les options d'accessibilité suivantes sont disponibles sur ce scanner : Environnement Windows : ● ● Pour éviter que les boutons ne soient involontairement activés, vous pouvez utiliser l'utilitaire Désactivation des boutons. Cet utilitaire permet également de réactiver les boutons. Pour plus d'informations sur l'utilitaire Désactivation des boutons, reportez-vous au guide de l'utilisateur du scanner. Le guide de l'utilisateur du scanner est également disponible dans un format de fichier d'aide, lisible par la plupart des lecteurs écran. Pour trouver ce fichier, double-cliquez sur l'icône Centre de solutions HP sur votre bureau, puis cliquez sur Aide et assistance. Sous la section Documentation, cliquez sur Aide sur les produits. Environnement Macintosh : ● ● Pour éviter que les boutons ne soient involontairement activés, utilisez l'utilitaire Désactivation des boutons. Cet utilitaire permet également de réactiver les boutons. Pour plus d'informations sur l'utilitaire Désactivation des boutons, reportez-vous à l'aide du scanner HP Scanjet. Cette aide est disponible dans un format pris en charge par la plupart des lecteurs écran. Pour trouver ce fichier, ouvrez le Gestionnaire de périphériques HP, puis cliquez sur le point d'interrogation situé en bas de la boîte de dialogue. Les personnes atteintes d'un handicap peuvent obtenir de l'aide en consultant la page Web suivante : www.hp.com/hpinfo/community/accessibility/prodserv/ (en anglais uniquement). Site Web HP Scanjet Visitez le site Web www.hp.com et sélectionnez votre pays/langue en haut de la page. A la page des pays/régions, sélectionnez les scanners dans la liste des produits. Ce site vous permet d'obtenir notamment les informations suivantes : ● ● ● ● ● ● Solutions à des problèmes techniques Conseils pour une numérisation plus efficace et créative Mises à jour des logiciels et pilotes HP Enregistrement de votre produit Abonnement aux lettres d'information, mises à jour de pilotes et de logiciels, et bulletins d'assistance Achat d'accessoires et de consommables HP Guide d'installation et d'assistance 17 Chapitre 5 Obtention d'assistance Afin de tirer le meilleur parti de votre produit HP, consultez les offres d'assistance HP standard suivantes : 1. 2. 3. 4. 5. 6. 18 Consultez la documentation qui accompagne le produit. – Consultez la section consacrée à la résolution des problèmes ou l'aide en ligne de ce manuel/CD. – Consultez la section de l'aide en ligne du logiciel. Visitez le site d'assistance HP en ligne à l'adresse www.hp.com/support ou contactez votre revendeur local. L'assistance en ligne HP est disponible pour tous les clients HP. Il s'agit de la source la plus rapidement accessible pour obtenir des informations à jour sur le produit et l'assistance d'experts, notamment les fonctionnalités suivantes : – Accès rapide par messagerie à des spécialistes de l'assistance en ligne qualifiés – Logiciels et mises à jour des pilotes pour votre produit – Informations précieuses relatives à la résolution des problèmes et au produit pour les problèmes techniques – Mises à jour des produits proactives, bulletins d'assistance et lettres d'information HP (disponibles lorsque vous enregistrez votre produit) Assistance HP par téléphone – Les options d'assistance et les frais varient en fonction du produit, du pays/ de la région et de la langue. – Les frais et les règles sont sujets à modification sans préavis. Consultez le site www.hp.com/support pour connaître les dernières informations. Période post-garantie Après la période de garantie limitée, vous pouvez bénéficier d'une assistance en ligne à l'adresse www.hp.com/support. Prolongation ou extension de votre garantie Si vous souhaitez prolonger ou étendre la garantie du produit, contactez votre revendeur ou consultez le service HP Care Pack à l'adresse www.hp.com/support. Si vous avez déjà fait l'acquisition d'un service HP Care Pack, consultez les conditions d'assistance stipulées dans votre contrat. HP Scanjet série G4000 6 Français Déclaration de garantie limitée de Hewlett-Packard Les informations suivantes décrivent les conditions de garantie pour ce produit. Produit Durée de la garantie limitée Scanner HP Scanjet série G4000 1 an A. Etendue de la garantie limitée 1. Hewlett-Packard (HP) garantit au client utilisateur final (Client) que chaque produit HP (Produit) spécifié ci-dessus est exempt de défauts matériels et de malfaçons pour la période spécifiée ci-dessus. La période de garantie commence à partir de la date d'achat par le client. 2. Pour tous les logiciels, la garantie limitée de HP s'applique uniquement aux erreurs d'exécution de programmation. HP ne garantit pas que le fonctionnement d'un produit, quel qu'il soit, ne sera pas exempt d'interruptions ni d'erreurs. 3. La garantie limitée de HP s'applique uniquement aux défauts résultant d'une utilisation normale du Produit et ne s'applique pas aux autres défauts, notamment ceux résultant : a. d'une utilisation, d'une maintenance, d'un stockage, d'une manipulation ou d'une modification incorrects, b. de l'utilisation de logiciels, supports, pièces, accessoires, fournitures, adaptateurs ou sources d'alimentations non fournis ou pris en charge par HP, c. d'une utilisation ou autres opérations non conformes aux spécifications du Produit. 4. Si de tels défauts sont portés à sa connaissance pendant la période de garantie, HP s'engage, à sa convenance, à remplacer ou à réparer le Produit défectueux. 5. Si HP n'est pas en mesure de réparer ou de remplacer un Produit défectueux couvert par la garantie HP, HP se réserve le droit, dans un délai raisonnable après avoir été averti du problème, de fournir un autre produit aux performances similaires ou d'effectuer un remboursement basé sur le prix d'achat, prenant en considération l'utilisation du produit et autres facteurs liés. 6. En aucun cas, HP n'est tenu de procéder à un remplacement, une réparation ou un remboursement si le client ne renvoie pas le produit défectueux accompagné d'une preuve d'achat valide. 7. Tout produit de remplacement est neuf ou en excellent état et doit offrir au moins les mêmes fonctionnalités que le produit remplacé. Guide d'installation et d'assistance 19 Chapitre 6 8. 9. Un Produit peut comporter des pièces et des composants remanufacturés et équivalents à des pièces neuves dans leur fonctionnement. La garantie limitée de HP est valable dans tout pays ou localité où HP a un centre d'assistance et une présence commerciale pour le Produit. Le niveau des services de garantie offerts dépend des réglementations locales. Le Client peut souscrire auprès de HP à des extensions de garantie, comme l'échange le jour suivant, le service sur site et l'assurance pour les dégâts accidentels. B. Limitation de garantie DANS LES LIMITES AUTORISEES PAR LA LEGISLATION EN VIGUEUR, HP ET SES FOURNISSEURS NE PEUVENT OFFRIR AUCUNE AUTRE GARANTIE OU CONDITION, DE FAÇON EXPRESSE OU IMPLICITE, SUR UN PRODUIT. HP ET SES FOURNISSEURS REJETTENT SPECIFIQUEMENT TOUTES GARANTIES OU CONDITIONS IMPLICITES DE COMMERCIALISATION, DE QUALITE SATISFAISANTE ET D'ADAPTATION A UN USAGE PARTICULIER. C. Limitation de responsabilité 1. Dans les limites autorisées par la législation en vigueur, les recours de cette déclaration de garantie limitée constituent les seuls et uniques recours du client. 2. DANS LES LIMITES AUTORISEES PAR LA LEGISLATION EN VIGUEUR, A L'EXCEPTION DES OBLIGATIONS PRESENTEES SPECIFIQUEMENT DANS CETTE DECLARATION DE GARANTIE LIMITEE, NI HP NI SES FOURNISSEURS NE SERONT TENUS RESPONSABLES DES DOMMAGES DIRECTS, INDIRECTS, SPECIAUX, FORTUITS OU CONSECUTIFS, FONDES SUR UN CONTRAT, UN PREJUDICE OU AUTRE, MEME SI HP ET SES FOURNISSEURS ONT ETE INFORMES DE LA POSSIBILITE DE TELS DOMMAGES. D. Législation locale 1. La présente déclaration de garantie limitée donne au client des droits spécifiques. Le Client peut également disposer d'autres droits selon son pays/région, état ou province. 2. Dans le cas où la déclaration de garantie limitée serait en contradiction avec la législation locale, cette déclaration de garantie limitée sera modifiée afin de se mettre en conformité avec la législation locale. Sous certaines législations locales, certains rejets et limitations exprimés dans cette déclaration de garantie limitée peuvent ne pas s'appliquer au Client. Par exemple, le gouvernement fédéral des Etats-Unis, certains Etats des Etats-Unis ainsi que certains gouvernements d'autres pays (y compris certaines provinces du Canada) peuvent : a. Accorder des garanties supplémentaires au client. b. Empêcher les rejets et limitations de cette déclaration de garantie limitée de limiter les droits statutaires du consommateur (exemple : Royaume-Uni). c. Dans le cas contraire, restreindre l'application de tels rejets ou limitations par le fabricant. d. Spécifier la durée des garanties implicites que le fabricant ne peut rejeter. e. Contredire les limitations de durée des garanties implicites. 20 HP Scanjet série G4000 3. 5. Vous pouvez disposer de droits statutaires complémentaires par le biais de l'accord d'achat passé avec votre revendeur. Ces droits ne sont en aucun cas affectés par cette garantie limitée HP. Vous trouverez, sur la page de couverture intérieure du présent manuel, les noms et adresses des entités HP qui accordent la garantie limitée de HP dans votre pays. Guide d'installation et d'assistance 21 Français 4. Le client peut disposer de droits statutaires complémentaires par le biais de l'accord d'achat. Ces droits ne sont en aucun cas affectés par cette déclaration de garantie limitée. Pour les transactions réalisées aux Etats-Unis, toute garantie implicite imposée par la législation est limitée en temps à la durée de la garantie expresse. POUR LES TRANSACTIONS REALISEES EN AUSTRALIE ET EN NOUVELLEZELANDE, LES TERMES DE LA PRESENTE DECLARATION DE GARANTIE LIMITEE, DANS LE CADRE AUTORISE PAR LA LEGISLATION EN VIGUEUR, N'EXCLUENT, NE RESTREIGNENT NI NE MODIFIENT LES DROITS STATUTAIRES OBLIGATOIRES APPLICABLES A LA VENTE D'UN PRODUIT AUX CLIENTS. Installatie- en ondersteuningshandleiding Nederlands Copyright en licentie © 2006 Copyright Hewlett-Packard Development Company, L.P. Niets in deze uitgave mag worden verveelvoudigd, gewijzigd of vertaald zonder voorafgaande schriftelijke toestemming, behalve voor zover is toegestaan binnen de auteursrechtwetgeving. De informatie in dit document kan zonder voorafgaande kennisgeving worden gewijzigd. De enige garanties voor HPproducten en -services zijn beschreven in de garantiebepalingen die bij de producten en services horen. Niets in dit document mag worden beschouwd als een aanvullende garantie. HP is niet aansprakelijk voor technische of redactionele fouten of ontbrekende gedeelten in dit document. Handelsmerken Microsoft en Windows zijn gedeponeerde handelsmerken van Microsoft Corporation. Inhoudsopgave 1 2 4 5 6 Installatie- en ondersteuningshandleiding 3 Nederlands 3 Aan de slag ..........................................................................................................4 Stap 1. Controleer de inhoud van de doos ............................................................4 Stap 2. Installeer de software ................................................................................5 Stap 3. Sluit de kabel van de transparantenadapter aan .......................................5 Stap 4. Sluit de netvoeding aan .............................................................................6 Stap 5. Sluit de USB-kabel aan .............................................................................6 Stap 6. Test de installatie ......................................................................................8 Werken met de scanner ......................................................................................9 Aanvullende informatie ..........................................................................................9 HP Photosmart Windows-software ........................................................................9 HP Photosmart Macintosh-software ....................................................................10 Overzicht van het bedieningspaneel en de accessoires ......................................10 Knoppen op het bedieningspaneel ...............................................................10 Transparantenadapter (TMA) .......................................................................11 Problemen met de installatie van de scanner oplossen ................................12 Verwijderen en opnieuw installeren van de software ...........................................12 De kabels controleren ..........................................................................................13 Informatie over voorschriften en productspecificaties ..................................14 Scannerspecificaties ............................................................................................14 Specificaties transparantenadapter (TMA) ..........................................................15 Omgevingsspecificaties .......................................................................................15 Informatie over recycling en verwerking van materiaal ........................................15 Hoe privéhuishoudens in de Europese Unie afgedankte apparatuur als afval dienen aan te bieden ................................................................................... 16 Productondersteuning ......................................................................................17 Toegankelijkheid ..................................................................................................17 HP Scanjet-website .............................................................................................17 Hulp inroepen ......................................................................................................18 Beperkte garantieverklaring van Hewlett-Packard .........................................19 1 Aan de slag Voer de volgende stappen uit om de scanner te installeren: Stap 1. Controleer de inhoud van de doos Haal de scannerhardware uit de verpakking. Verwijder alle tape die is gebruikt voor het transport. 6 1 5 2 3 4 4 1 HP Scanjet G4010- of G4050-scanner 2 USB-kabel 3 Netvoeding 4 Installatie- en ondersteuningshandleiding (deze handleiding) 5 Cd-rom's met scansoftware 6 TMA-sjablonen (alleen op HP Scanjet G4050) HP Scanjet G4000-serie Stap 2. Installeer de software Let op Sluit de USB-kabel nog niet aan op de computer als u de software op een Windows-computer installeert. Installeer de scansoftware voordat u de USB-kabel aansluit. Als u de software op een Macintosh-computer installeert, kunt u de USB-kabel zowel voor als na de installatie van de software aansluiten. 1. Plaats de HP Photosmart-cd die bij de scanner is geleverd in het cd-romstation van de computer. Nederlands 2. Voor Windows-installaties: Wacht totdat het installatiedialoogvenster wordt weergegeven. Zie Problemen met de installatie van de scanner oplossen op pagina 12 Voor Macintosh-installaties: Dubbelklik op het cd-pictogram dat op het bureaublad verschijnt en dubbelklik vervolgens op het installatiepictogram voor de HP Scanjet-scanner om de installatie te starten. Klik op Software installeren om de scansoftware te installeren. Volg de instructies op het scherm om de installatie van de scansoftware te voltooien. Stap 3. Sluit de kabel van de transparantenadapter aan ➔ Sluit de kabel van de transparantenadapter in het deksel van de scanner aan op het scannerframe. Installatie- en ondersteuningshandleiding 5 Hoofdstuk 1 Stap 4. Sluit de netvoeding aan Aan de netvoeding is een kabel bevestigd die u in de achterzijde van de scanner kunt steken. De netvoeding is ook voorzien van een AC-kabel die aan een zijde is verbonden met de netvoeding en aan de andere zijde in een stopcontact of overspanningsbeveiliging moet worden gestoken. 1. 2. Sluit de AC-kabel op de achterzijde van de netvoeding aan. Sluit het andere uiteinde van de AC-kabel aan op een stopcontact of overspanningsbeveiliging. Stap 5. Sluit de USB-kabel aan Let op Als u de installatie uitvoert in een Windows-omgeving, zorg er dan voor dat u de HP Photosmart-software installeert voordat u de scanner met de USB-kabel aansluit op de computer. Zie Stap 2. Installeer de software op pagina 5. Als u de installatie uitvoert in een Macintosh-omgeving, kunt u de USB-kabel zowel vóór als na de installatie van de software aansluiten. 6 HP Scanjet G4000-serie Gebruik de USB-kabel die bij de scanner is geleverd om de scanner op de computer aan te sluiten. Steek het vierkante uiteinde van de kabel in de scanner. 2. Steek het rechthoekige uiteinde van de kabel in de computer. Installatie- en ondersteuningshandleiding Nederlands 1. 7 Hoofdstuk 1 Stap 6. Test de installatie 1 1. 2. 8 2 Plaats een foto of document op de glasplaat van de scanner, zoals aangegeven door de referentiemarkering op de scanner. Druk op de knop Scannen ( ). Als u scant met Windows-software, wordt het scherm Wat scant u? weergegeven. Voer de scan uit aan de hand van de instructies op het scherm. Als u scant met Macintosh-software, wordt de toepassing HP Scan Pro geopend en wordt een voorbeeld van de scan weergegeven. Als u tevreden bent met het voorbeeld, wordt de gescande afbeelding verzonden naar de bestemming die u in de scannerinstellingen hebt geselecteerd. Als het dialoogvenster Wat scant u? of het venster HP Scan Pro niet wordt weergegeven, raadpleegt u Problemen met de installatie van de scanner oplossen op pagina 12. HP Scanjet G4000-serie 2 Werken met de scanner In dit gedeelte vindt u een overzicht van de scanner en het gebruik ervan. Aanvullende informatie Meer informatie over de scanner en de software vindt u in het Help-bestand van de scanner. Als u de meegeleverde HP Photosmart-software hebt geïnstalleerd, dubbelklikt u op het bureaublad op het pictogram HP Solution Center en klikt u vervolgens op Help en ondersteuning. Klik onder het gedeelte Documentatie op Productondersteuning. Nederlands Als u de online handleiding van de scanner wilt raadplegen, klikt u op Start, wijst u achtereenvolgens Programma's of Alle programma's, HP, Scanjet, G4000-serie aan en klikt u ten slotte op Gebruikershandleiding. Macintosh-gebruikers: Open HP-apparaatbeheer en klik op het vraagteken onder aan het dialoogvenster voor informatie over scanprocedures. HP Photosmart Windows-software Bij de installatie van de HP Photosmart Windows-software worden twee pictogrammen toegevoegd aan het bureaublad. Met deze pictogrammen worden de programma's voor scannen en bewerken geopend. Raadpleeg het Help-bestand van de scanner voor meer informatie over het gebruik van het HP Solution Center en de HP Photosmart-software. Dubbelklik op het pictogram HP Solution Center op het bureaublad en klik vervolgens op Help en ondersteuning. Klik onder het gedeelte Documentatie op Productondersteuning. HP Solution Center is het programma waarmee u begint als u afbeeldingen en documenten gaat scannen. U kunt het HP Solution Center gebruiken voor de volgende functies: ● ● ● ● Scannen en kopiëren Help opvragen en problemen oplossen De HP Photosmart-software openen om uw scans te bewerken Instellingen en voorkeuren wijzigen HP Photosmart is het programma waarmee u gescande afbeeldingen kunt bewerken, afdrukken, archiveren en delen. U kunt de HP Photosmart-software openen via het pictogram op het bureaublad of vanuit het HP Solution Center. Een scan starten: Dubbelklik op het bureaublad op het pictogram HP Solution Center, klik op het tabblad voor de scanner en klik vervolgens op de taak die u wilt uitvoeren. Installatie- en ondersteuningshandleiding 9 Hoofdstuk 2 Opmerking Als het pictogram van het HP Solution Center niet op het bureaublad staat, klikt u op Start, wijst u achtereenvolgens Programma's of Alle programma's en HP aan en klikt u vervolgens op HP Solution Center. HP Photosmart Macintosh-software Als u de HP-scansoftware op een Macintosh installeert, worden in het Dock twee softwareprogramma's weergegeven: HP-apparaatbeheer en HP Photosmart Studio. U kunt deze programma's gebruiken voor scannen en bewerken. HP-apparaatbeheer is het programma waarmee u begint als u afbeeldingen en documenten gaat scannen. U kunt apparaatbeheer gebruiken voor de volgende functies: ● ● ● ● Scannen en kopiëren Help opvragen en problemen oplossen HP Photosmart Studio openen om uw scans te bewerken Instellingen en voorkeuren wijzigen HP Photosmart Studio is het programma waarmee u gescande afbeeldingen kunt bewerken, afdrukken, archiveren en delen. U kunt HP Photosmart Studio openen vanuit het Dock of vanuit het menu Toepassingen in HP-apparaatbeheer. Overzicht van het bedieningspaneel en de accessoires In dit gedeelte wordt een overzicht gegeven van het bedieningspaneel van de scanner en de transparantenadapter (TMA). Knoppen op het bedieningspaneel Pictogram 10 Functie Beschrijving Knop Scannen Scant foto's, afbeeldingen, documenten of voorwerpen. Knop Film scannen Scant transparante positieven (zoals 35mm-dia's) en negatieven. Om film te scannen, moet u de transparantenadapter (TMA) aan de onderkant van het deksel van de scanner gebruiken. Knop Kopiëren Hiermee scant u het item en stuurt u dit naar een printer om er een kopie van te maken. Knop Scannen naar PDF Hiermee scant u een of meerdere pagina's en slaat u deze op als een PDF-bestand dat u kunt delen of opslaan. HP Scanjet G4000-serie Opmerking Raadpleeg voor meer informatie over de standaardfuncties van deze knoppen in een Macintosh omgeving HP-apparaatbeheer en klik vervolgens op het vraagteken onder aan het dialoogvenster. Transparantenadapter (TMA) U kunt de transparantenadapter (TMA) gebruiken om 35mm-dia's of negatieven te scannen. Met de transparantenadapter van de HP Scanjet G4050 kunt u ook film van middelgroot of groot formaat scannen. Raadpleeg de gebruikershandleiding van de scanner voor meer informatie over de transparantenadapter. Raadpleeg Aanvullende informatie op pagina 9 voor meer informatie over het vinden van de gebruikershandleiding. Nederlands Installatie- en ondersteuningshandleiding 11 3 Problemen met de installatie van de scanner oplossen Dit gedeelte bevat oplossingen voor problemen met het installeren en instellen. Verwijderen en opnieuw installeren van de software Als de installatie van de software niet is voltooid, wordt de scanner mogelijk niet herkend of wordt de software mogelijk niet goed gestart. Probeer de HP-scansoftware te verwijderen en opnieuw te installeren. U hebt de cd met HP Photosmart-software nodig om de HP-scansoftware opnieuw te installeren. Windows-omgeving: 1. 2. 3. 4. 5. 6. 7. 8. Klik op Start, klik op Instellingen en klik vervolgens op Configuratiescherm (in Windows XP: klik op Start en klik vervolgens op Configuratiescherm). Klik op Software en selecteer vervolgens de HP Scanjet G4000-serie. Klik op Verwijderen. Klik op Software en selecteer vervolgens de HP Photosmart-software. Klik op Verwijderen. Koppel de USB-kabel van de scanner los van de computer. Installeer de HP Photosmart-software opnieuw van de cd die bij de scanner is geleverd. Wanneer u de cd in het cd-romstation plaatst, wordt het installatieprogramma automatisch gestart. Installeer de HP Photosmart-software. Sluit de USB-kabel van de scanner opnieuw aan nadat de installatie van de software is voltooid. Voor meer informatie zie Stap 5. Sluit de USB-kabel aan op pagina 6 Macintosh-omgeving: 1. Ga naar Toepassingen/Hewlett-Packard en open HP Uninstaller. Opmerking U hebt beheerdersrechten nodig om de software te kunnen verwijderen. 2. 3. 4. 5. 12 Als daarom wordt gevraagd, voert u uw gebruikersnaam en wachtwoord in. Het venster HP Uninstaller wordt geopend en geeft de producten weer die kunnen worden verwijderd. Selecteer het product uit de G4000-serie en klik op Volgende. Verwijder de software aan de hand van de instructies op het scherm. Installeer de HP-software opnieuw vanaf de cd die bij de scanner is geleverd. Nadat u de cd hebt geplaatst, klikt u op het cd-pictogram dat op het bureaublad verschijnt om de installatie te starten. HP Scanjet G4000-serie De kabels controleren Kabeltype Actie Netsnoer Het netsnoer is aangesloten op de scanner en een stopcontact. ● ● ● De USB-kabel is aangesloten op de scanner en de computer. ● ● ● Gebruik de kabel die bij de scanner wordt geleverd. Een USB-kabel van een ander type is mogelijk niet compatibel met de scanner. Controleer of de USB-kabel op de juiste wijze is aangesloten op de scanner en de computer. Als de USB-kabel is aangesloten op een USB-poort aan de voorzijde van de computer, sluit deze dan aan op een USB-poort aan de achterzijde van de computer. Voor meer informatie over het oplossen van USB-problemen raadpleegt u www.hp.com/support, selecteert u uw land/ regio en zoekt u onderwerpen over het oplossen van USBproblemen met de zoekfunctie. Kabel van de transparantenadapter De kabel van de transparantenadapter is aangesloten op de adapter in het deksel van de scanner en het scannerframe. Controleer of de kabel goed op de achterzijde van de scanner is aangesloten. Installatie- en ondersteuningshandleiding 13 Nederlands USB-kabel Controleer of het netsnoer op de juiste manier is aangesloten op de scanner en het stopcontact of een overspanningsbeveiliging. Als het netsnoer is aangesloten op een overspanningsbeveiliging, controleert u of deze is aangesloten op het stopcontact en is ingeschakeld. Schakel de scanner uit en zet de computer uit. Schakel de scanner na 60 seconden weer in en zet vervolgens de computer aan. Doe dit in deze volgorde. 4 Informatie over voorschriften en productspecificaties Dit gedeelte bevat informatie over de voorschriften en productspecificaties voor de HP Scanjet g4000-serie fotoscanners en bijbehorende accessoires. Scannerspecificaties Naam Beschrijving Scannertype Flatbed met transparantenadapter (TMA) Afmetingen G4010: 303 x 5088 x 98 mm (11,93 x 20,00 x 3,86 inch) G4050: 303 x 5088 x 108 mm (11,93 x 20,00 x 4,25 inch) Gewicht G4010: 4,4 kg G4050: 5,3 kg Scannerelement CCD (Charged-Coupled Device) Interface USB 2.0 Hi-Speed Hardwareresolutie 4800 x 9600 dpi hardwareresolutie Selecteerbare resolutie 12 dpi tot 999.999 enhanced dpi bij een schaal van 100 procent Netspanning 100-120 V 60 Hz (Noord-Amerika) 200-240 V 50 Hz (Europees vasteland, Verenigd Koninkrijk, Australië) 100-240 V 50 Hz/60 Hz (alle andere landen/regio's) Informatie over voorschriften Voorgeschreven modelnummer: om te voldoen aan de wetgeving is aan dit product een voorgeschreven modelnummer toegekend. Het voorgeschreven modelnummer van dit product is FCLSD-0605. Dit voorgeschreven nummer dient niet te worden verward met de productnaam (HP Scanjet G4010 of G4050) of met het productnummer (L1956A of L1957A). Het energieverbruik is aanzienlijk lager wanneer het apparaat zich in de ENERGY STAR®-modus bevindt. Dit levert een besparing op van natuurlijke hulpbronnen en geld zonder gevolgen voor de hoge prestaties van het product. Dit product voldoet aan ENERGY STAR (MOU [Intentieverklaring] versie 1.0), een programma op basis van vrijwilligheid ter bevordering 14 HP Scanjet G4000-serie Naam Beschrijving van de ontwikkeling van energiebesparende kantoorproducten. ENERGY STAR is een in de VS geregistreerd servicemerk van de U.S. EPA. Als ENERGY STAR-partner heeft HP vastgesteld dat dit product voldoet aan ENERGY STAR-richtlijnen voor energiebesparing. Raadpleeg voor meer informatie over ENERGY STAR-richtlijnen de volgende website: www.energystar.gov Specificaties transparantenadapter (TMA) Beschrijving Mediatypen G4010: Maximaal vijf 35mm-dia's of zes 35mmnegatievenframes Nederlands Naam G4050: Maximaal zestien 35mm-dia's, dertig 35mmnegatievenframes, maximaal twee middelgrote films (120-rolfilm), of één grote film (220-rolfilm). Spanningsvereisten Maximaal 12 V/400 mA Stroomverbruik en informatie over voorschriften Raadpleeg het bestand regulatory_supplement.htm op de cd-rom met de HP Photosmart-software voor informatie over stroomverbruik, voeding en voorschriften. Omgevingsspecificaties Naam Beschrijving Temperatuur Scanner en transparantenadapter in bedrijf: 10 tot 35 °C Opslag: -40 tot 60 °C Relatieve luchtvochtigheid Scanner en transparantenadapter in bedrijf: 15 tot 80% niet-condenserend 10 tot 35 °C Opslag: maximaal 90% niet condenserend bij 0 tot 60 °C Informatie over recycling en verwerking van materiaal Recycling HP biedt in veel landen/regio's steeds meer programma's voor het retourneren en recyclen van producten en is partner van een aantal van de grootste recyclingcentra voor elektronica ter wereld. HP spaart bronnen door een aantal van de populairste producten opnieuw te verkopen. Voor meer informatie over het recyclen van HPInstallatie- en ondersteuningshandleiding 15 Hoofdstuk 4 producten gaat u naar: www.hp.com/hpinfo/globalcitizenship/environment/recycle/ Hergebruik en verwerking van afval Dit HP-product bevat de volgende materialen die mogelijk niet als gewoon afval kunnen worden weggegooid: kwik in de fluorescentielamp van de scanner en in de transparantenadapter (< 5 mg). Voor informatie over recycling gaat u naar www.hp.com/go/recycle, de lokale overheid of de website van Electronic Industries Alliance op: www.eiae.org. Hoe privéhuishoudens in de Europese Unie afgedankte apparatuur als afval dienen aan te bieden Dit symbool op het product of de verpakking geeft aan dat het product niet bij uw andere huishoudelijke afval mag worden geplaatst. In plaats daarvan moet u deze apparaten inleveren bij een officieel afvalpunt waar elektrische en elektronische apparaten worden ingezameld voor recycling. Door apparaten in te zamelen en te recyclen wanneer u deze afdankt, worden natuurlijke bronnen gespaard en wordt gezorgd dat de apparaten worden gerecycled op een verantwoorde wijze voor mens en milieu. Neem contact op met de gemeentelijke afdeling, de afvaldienst of de winkel waar u het product hebt gekocht voor meer informatie over de plaatsen waar apparaten worden ingezameld voor recycling. 16 HP Scanjet G4000-serie 5 Productondersteuning In dit gedeelte worden de opties voor productondersteuning beschreven. Toegankelijkheid De volgende toegankelijkheidsopties zijn beschikbaar op deze scanner: Windows-omgeving: ● Macintosh-omgeving: ● ● U kunt met het hulpprogramma Button Disable Utility (Knop uitschakelen) de knoppen uitschakelen om te voorkomen dat er per ongeluk op knoppen wordt gedrukt. Met dit hulpprogramma kunt u de knoppen ook weer inschakelen. Zie de Help bij de HP Scanjet-scanner voor meer informatie over de Button Disable Utility. De Help bij de HP Scanjet-scanner is beschikbaar in een indeling die door de meeste schermlezers kan worden gelezen. Open HP-apparaatbeheer en klik op het vraagteken onder aan het dialoogvenster om het bestand te vinden. Klanten met een handicap vinden nuttige informatie op www.hp.com/hpinfo/community/accessibility/prodserv/ (alleen Engels). HP Scanjet-website Ga naar www.hp.com en selecteer boven aan de pagina uw land/taal. Selecteer scanners in de lijst met producten op de pagina met landen/regio's. Op deze site kunt u diverse informatie vinden: ● ● ● ● ● ● Oplossingen voor technische problemen Tips voor een effectiever en creatiever gebruik van de scanner Updates voor de HP-stuurprogramma's en -software Productregistratie Abonneren op nieuwsbrieven, updates voor stuurprogramma's en software, en ondersteuningswaarschuwingen Aanschaf van HP-benodigdheden en accessoires Installatie- en ondersteuningshandleiding 17 Nederlands ● U kunt met het hulpprogramma Button Disable Utility (Knop uitschakelen) de knoppen uitschakelen om te voorkomen dat er per ongeluk op knoppen wordt gedrukt. Met dit hulpprogramma kunt u de knoppen ook weer inschakelen. Zie de gebruikershandleiding bij de scanner voor meer informatie over de Button Disable Utility. De gebruikershandleiding van de scanner is ook beschikbaar in een Help-indeling die door de meeste schermlezers kan worden gelezen. Dubbelklik op het pictogram HP Solution Center op het bureaublad en klik vervolgens op Help en ondersteuning om het bestand te vinden. Klik onder het gedeelte Documentatie op Productondersteuning. Hoofdstuk 5 Hulp inroepen Raadpleeg de volgende standaard HP-ondersteuningspakketten om het meeste uit uw HP-product te halen: 1. 2. 3. 4. 5. 6. 18 Raadpleeg de productdocumentatie die bij het product is geleverd. – Bekijk het gedeelte over problemen oplossen of de elektronische Help van deze handleiding/cd. – Bekijk het elektronische Help-gedeelte in de software. Bezoek de online ondersteuning van HP op www.hp.com/support of neem contact op met het verkooppunt. De online ondersteuning van HP is beschikbaar voor alle klanten van HP. Dit is de snelste bron voor de nieuwste productinformatie en deskundige assistentie, inclusief de volgende voorzieningen: – Snelle toegang tot deskundige online ondersteuningsspecialisten via e-mail. – Software- en stuurprogramma-updates voor uw product. – Waardevolle product- en probleemoplossingsinformatie voor technische problemen. – Proactieve productupdates, ondersteuningswaarschuwingen en HPnieuwsbrieven (beschikbaar wanneer u het product registreert). Telefonische ondersteuning van HP – De ondersteuningsopties en -kosten verschillen per product, land/regio en taal. – De kosten en het beleid kunnen zonder voorafgaande kennisgeving worden gewijzigd. Bezoek de website www.hp.com/support voor de laatste informatie. Na de garantieperiode Na de beperkte-garantieperiode is hulp online beschikbaar via www.hp.com/support. De garantie verlengen of uitbreiden Als u de garantie op het product wilt verlengen of uitbreiden, neemt u contact op met het verkooppunt of bekijkt u de HP Care Pack-services op www.hp.com/support. Als u al een HP Care Pack-service hebt aangeschaft, controleert u de ondersteuningsvoorwaarden in het contract. HP Scanjet G4000-serie 6 Beperkte garantieverklaring van Hewlett-Packard In het volgende gedeelte wordt de garantie voor dit product beschreven. Product Duur van beperkte garantie HP Scanjet G4000serie scanner 1 jaar Installatie- en ondersteuningshandleiding 19 Nederlands A. Duur van beperkte garantie 1. Hewlett-Packard (HP) garandeert de eindgebruiker dat elk hierboven beschreven HP-product (Product) vrij is van gebreken in materiaal en constructie gedurende de hierboven aangegeven periode. De garantieperiode gaat in op de dag van de aankoop door de klant. 2. Voor elk softwareproduct geldt de beperkte garantie van HP alleen als de programmeerinstructies niet naar behoren worden uitgevoerd. HP garandeert niet dat een Product ononderbroken of foutloos zal functioneren. 3. De beperkte garantie van HP dekt alleen defecten die zich voordoen als gevolg van normaal gebruik van een Product en geen andere problemen, zoals problemen die zich voordoen als gevolg van: a. onjuist gebruik, onderhoud, opslag, behandeling of wijzigingen; b. software, media, onderdelen, accessoires, toebehoren of netadapters of bronnen die niet door HP zijn geleverd of niet door HP worden ondersteund; c. gebruik of andere omstandigheden die niet onder de productspecificaties vallen. 4. Indien HP gedurende de desbetreffende garantieperiode in kennis wordt gesteld van een defect Product, zal HP het defecte Product naar eigen goeddunken laten vervangen of repareren. 5. Als HP een defect Product dat wordt gedekt door de beperkte garantie van HP niet kan vervangen of repareren, kan HP binnen een redelijke termijn na melding van het defect een ander, vergelijkbaar product of een vergoeding van het aankoopbedrag aanbieden. Deze vergoeding wordt berekend op basis van gebruik en andere passende factoren. 6. HP is niet verplicht een Product te vervangen, te repareren of te vergoeden totdat de klant het defecte Product met een geldig aankoopbewijs aan HP heeft doen toekomen. 7. Vervangende Producten kunnen nieuwe producten zijn of zo goed als nieuw, vooropgesteld dat de functionaliteit ten minste gelijk is aan die van het product dat wordt vervangen. Hoofdstuk 6 8. 9. Een Product kan gereviseerde onderdelen of materialen bevatten die functioneel gelijkwaardig zijn aan nieuwe. De beperkte garantie van HP is geldig in alle landen en regio's waar HP ondersteunende service biedt voor dit Product en waar HP dit Product op de markt heeft gebracht. Afhankelijk van de plaatselijke normen kan het niveau van de gegarandeerde service variëren. Uitgebreide garantieservices zoals vervanging op de volgende dag, service ter plekke en schadepreventie kunnen bij HP tegen betaling worden afgesloten. B. GARANTIEBEPERKINGEN VOOR ZOVER BIJ DE PLAATSELIJKE WETGEVING IS TOEGESTAAN, BIEDEN NOCH HP, NOCH EXTERNE LEVERANCIERS ENIGE OVERIGE EXPLICIETE OF IMPLICIETE GARANTIES OF CONDITIES OP VERKOOPBAARHEID, TEVREDENSTELLENDE KWALITEIT EN GESCHIKTHEID VOOR EEN BEPAALD DOEL VAN EEN PRODUCT. C. Beperkingen van aansprakelijkheid 1. In de wettelijk toegestane mate zijn de rechtsmiddelen in deze beperkte garantieverklaring uitsluitend voor de klant bedoeld. 2. MET UITZONDERING VAN HETGEEN IN DEZE BEPERKTE GARANTIEVERKLARING WORDT VERMELD IS HP (OF ZIJN LEVERANCIERS VAN HP), IN GEEN GEVAL AANSPRAKELIJK VOOR HET VERLIES VAN GEGEVENS OF VOOR DIRECTE, SPECIALE, INCIDENTELE OF GEVOLGSCHADE (WAARONDER WINSTDERVING) OF ANDERE SCHADE; OF DEZE NU IS GEBASEERD OP CONTRACT, ONRECHTMATIGE DAAD OF ENIGE ANDERE JURIDISCHE THEORIE. D. Lokale wetgeving 1. Deze beperkte garantieverklaring geeft de klant speciale wettelijke rechten. De klant kan ook andere rechten hebben die in de VS van staat tot staat, in Canada van provincie tot provincie en elders van land tot land kunnen verschillen. 2. Als deze beperkte garantieverklaring in strijd is met de lokale wetgeving, geldt voor u dat deze garantieverklaring wordt geacht zodanig te zijn gewijzigd dat deze overeenkomt met de lokale wetgeving. Krachtens de lokale wetgeving is het mogelijk dat bepaalde uitsluitingen en beperkingen van deze beperkte garantieverklaring niet gelden voor de klant. De nationale regering van de Verenigde Staten, een aantal staten in de Verenigde Staten en bepaalde regeringen buiten de Verenigde Staten (inclusief provincies in Canada), kunnen bijvoorbeeld: a. de klant extra garantie verstrekken; b. de uitsluitingen en beperkingen van deze beperkte garantieverklaring uitsluiten van het beperken van voorgeschreven rechten van de consument (bijv. het Verenigd Koninkrijk); c. op een andere manier de mogelijkheid van een fabrikant beperken om dergelijke uitsluitingen of beperkingen in te stellen; d. de duur van een impliciete garantie, die de fabrikant niet kan wijzigen, opgeven; e. beperkingen op de duur van een impliciete garantie niet toestaan. 20 HP Scanjet G4000-serie 3. 4. 5. De klant heeft mogelijk aanvullende wettelijk voorgeschreven rechten op basis van de verkoopovereenkomst. Deze rechten worden op geen enkele wijze beïnvloed door deze beperkte garantieverklaring. Voor consumenten in de Verenigde Staten is de duur van wettelijk verplichte impliciete garanties beperkt tot de expliciete garantieperiode. VOOR CONSUMENTEN IN AUSTRALIË EN NIEUW ZEELAND VORMEN DE GARANTIEVOORWAARDEN IN DEZE BEPERKTE GARANTIEVERKLARING, BEHALVE IN DE WETTELIJK TOEGESTANE MATE, GEEN UITSLUITING, BEPERKING OF WIJZIGING VAN, MAAR EEN AANVULLING OP DE VERPLICHTE EN WETTELIJK VOORGESCHREVEN RECHTEN DIE VAN TOEPASSING ZIJN OP DE VERKOOP VAN DIT PRODUCT. Mogelijk hebt u op basis van de verkoopovereenkomst aanvullende wettelijk voorgeschreven rechten tegenover de verkoper. Deze rechten worden op geen enkele wijze beïnvloed door de beperkte garantie van HP. Installatie- en ondersteuningshandleiding Nederlands U vindt de namen en adressen van de HP-entiteit die verantwoordelijk is voor de uitvoering van de beperkte garantie van HP in uw land, aan de binnenzijde van het voorblad van dit drukwerk. 21 Setup and Support Guide English Copyright and license © 2006 Copyright Hewlett-Packard Development Company, L.P. Reproduction, adaptation or translation without prior written permission is prohibited, except as allowed under the copyright laws. The information contained herein is subject to change without notice. The only warranties for HP products and services are set forth in the express warranty statements accompanying such products and services. Nothing herein should be construed as constituting an additional warranty. HP shall not be liable for technical or editorial errors or omissions contained herein. Trademark credits Microsoft and Windows are registered trademarks of Microsoft Corporation. Contents 1 2 3 4 6 Setup and Support Guide 3 English 5 Get started ............................................................................................................4 Step 1. Check the box contents .............................................................................4 Step 2. Install the software ....................................................................................5 Step 3. Connect the TMA cable .............................................................................5 Step 4. Connect the power supply .........................................................................6 Step 5. Connect the USB cable .............................................................................6 Step 6. Test the installation ...................................................................................8 How to use the scanner ......................................................................................9 Where to get additional information .......................................................................9 HP Photosmart Windows software ........................................................................9 HP Photosmart Macintosh software ....................................................................10 Front panel and accessories overview ................................................................. 10 Front-panel buttons ......................................................................................10 Transparent materials adapter (TMA) ...........................................................10 Scanner installation troubleshooting ..............................................................12 Uninstall and reinstall the software ......................................................................12 Check the cables .................................................................................................13 Regulatory information and product specifications .......................................14 Scanner specifications .........................................................................................14 Transparent materials adapter (TMA) specifications ...........................................15 Environmental specifications ...............................................................................15 Recycle and restricted material information .........................................................15 Disposal of Waste Equipment by Users in Private Households in the European Union ...................................................................................................16 Product support .................................................................................................17 Accessibility .........................................................................................................17 HP Scanjet Web site ............................................................................................17 Getting assistance ...............................................................................................18 Hewlett-Packard limited warranty statement ..................................................19 1 Get started Follow these steps to set up the scanner: Step 1. Check the box contents Unpack the scanner hardware. Be sure to remove any shipping tape. 6 1 5 2 3 4 4 1 HP Scanjet G4010 or G4050 scanner 2 USB cable 3 Power supply 4 Setup and Support Guide (this book) 5 Scanning software CDs 6 TMA templates (HP Scanjet G4050 only) HP Scanjet G4000 series Step 2. Install the software Caution If you are installing the software onto a Windows computer, do not connect the USB cable to the computer yet. Install the scanning software before connecting the USB cable. If you are installing the software into a Macintosh computer, you can connect the USB cable either before or after installing the software. 1. 2. Insert the HP Photosmart CD that came with the scanner into the computer CD drive. For Windows installations: Wait for the installation dialog box to display. If the installation dialog box does not display after a few moments, see Scanner installation troubleshooting on page 12. For Macintosh installations: Double-click on the CD icon that appears on the desktop, and then double click on the HP Scanjet Scanner Install icon to start the installation. Click Install software to install the scanning software. Follow the onscreen instructions to complete the scanning software installation. English Step 3. Connect the TMA cable ➔ Connect the TMA cable from the lid to the scanner base. Setup and Support Guide 5 Chapter 1 Step 4. Connect the power supply The power supply has an attached cable that plugs into the back of the scanner. The power supply also has an AC cable that is connected to the power supply on one end and plugged into a power outlet or surge protector on the other end. 1. 2. Plug the AC cable into the back of the power supply. Plug the other end of the AC cable into a power outlet or a surge protector. Step 5. Connect the USB cable Caution If you are installing in a Windows environment, be sure you install the HP Photosmart software before connecting the scanner to your computer with the USB cable. See Step 2. Install the software on page 5. If you are installing in a Macintosh environment, you can connect the USB cable either before or after installing the software. 6 HP Scanjet G4000 series Use the USB cable that came with the scanner to connect the scanner to the computer. 1. Connect the square end of the cable to the scanner. 2. Connect the rectangular end of the cable to the computer. English Setup and Support Guide 7 Chapter 1 Step 6. Test the installation 1 1. 2. 8 2 Place a photo or document on the scanner glass as indicated by the reference mark on the scanner. Press the Scan ( ) button. If you are scanning using Windows software, the What are you scanning? dialog box appears. Follow the onscreen instructions to complete the scan. If you are scanning using Macintosh software, the HP Scan Pro application opens and a preview of the scan is displayed. When the preview is accepted, the scanned image is sent to the destination that has been selected in the scanner settings. If the What are you scanning? dialog box or the HP Scan Pro window does not appear, see Scanner installation troubleshooting on page 12. HP Scanjet G4000 series 2 How to use the scanner This section presents an overview of the scanner and how to use it. Where to get additional information More information about the scanner and software can be found in the scanner Help file. If you have installed the HP Photosmart software that came with the scanner, double-click the HP Solution Center icon on your desktop, and then click Help and Support. Under the Documentation section, click Product Help. To access an online version of the scanner user guide, click Start, point to Programs or All Programs, point to HP, Scanjet, G4000 series, and then click User Guide. Macintosh users: For information about scanning procedures, open HP Device Manager, and then click on the question mark at the bottom of the dialog box. HP Photosmart Windows software When you install the HP Photosmart Windows software, two icons are added to your desktop. These icons open programs for scanning and editing your scans. For information on how to use HP Solution Center and HP Photosmart software, see the scanner Help file. Double-click the HP Solution Center icon on your desktop, and then click Help and Support. Under the Documentation section, click Product Help. ● ● ● ● English HP Solution Center is the program that gets you started scanning pictures and documents. Use the HP Solution Center for all of the following: Perform scanning and copy functions Access help and troubleshooting information Access the HP Photosmart software to edit your scans Modify settings and preferences HP Photosmart software is the program to use for manipulating, printing, archiving, and sharing your images after they have been scanned. You can get to the HP Photosmart software from the desktop icon or through HP Solution Center. To start a scan: Double-click the HP Solution Center icon on the desktop, click the tab for the scanner, and then click the task you want to perform. Note If the HP Solution Center icon is not available on the desktop, click Start, point to Programs or All Programs, point to HP, and then click HP Solution Center. Setup and Support Guide 9 Chapter 2 HP Photosmart Macintosh software When you install the HP scanning software on a Macintosh, two software programs are available in the Dock: HP Device Manager and HP Photosmart Studio. These programs are used for scanning and editing your scans. HP Device Manager is the program that gets you started scanning pictures and documents. Use the Device Manager for all of the following: ● ● ● ● Perform scanning and copy functions Access help and troubleshooting information Access the HP Photosmart Studio to edit your scans Modify settings and preferences HP Photosmart Studio is the program to use for manipulating, printing, archiving, and sharing your images after they have been scanned. You can open HP Photosmart Studio from the Dock, or from the HP Device Manager Applications menu. Front panel and accessories overview This section presents an overview of the scanner front panel and the transparent materials adapter (TMA). Front-panel buttons Icon Feature name Description Scan button Scans pictures, graphics, documents, or objects. Scan Film button Scans transparent positives (such as 35 mm slides) and negatives. Scanning film requires that you use the transparent materials adapter (TMA) located on the underside of the scanner lid. Copy button Scans the item and sends it to the printer to make a copy. Scan to PDF button Scans one or more pages and saves them as a PDF file for sharing or storing. Note For more information on the default actions of these buttons in a Macintosh environment, open HP Device Manager, and then click on the question mark at the bottom of the dialog box. Transparent materials adapter (TMA) You can use the transparent materials adapter (TMA) to scan 35 mm slides or negatives. With the HP Scanjet G4050 TMA you can also scan medium- and largeformat film. For more information about the TMA, see the scanner user guide. For 10 HP Scanjet G4000 series information about how to find the user guide, see Where to get additional information on page 9. English Setup and Support Guide 11 3 Scanner installation troubleshooting This section contains solutions for installation and setup problems. Uninstall and reinstall the software An incomplete software installation could cause the scanner not to be recognized or the software not to launch correctly. Try uninstalling and then reinstalling the HP Scanning software. To reinstall the HP Scanning software, you must have the HP Photosmart software CD. Windows environment: 1. 2. 3. 4. 5. 6. 7. 8. Click Start, click Settings, and then click Control Panel (in Windows XP, click Start, and then click Control Panel). Click Add/Remove Programs (in Windows XP, this is called Add or Remove Programs) and then select HP Scanjet G4000 series. Click Remove. Click Add/Remove Programs (in Windows XP, this is called Add or Remove Programs) and then select the HP Photosmart software. Click Remove. Unplug the scanner USB cable from the computer. Reinstall the software, using the HP Photosmart software CD that came with your scanner. When you insert the CD, an installation interface launches automatically. Choose the HP Photosmart software to install. Reconnect the scanner USB cable after the software is installed. For more information see Step 5. Connect the USB cable on page 6. Macintosh environment: 1. Go to Applications/Hewlett-Packard and open HP Uninstaller. Note You must have administrative privileges in order to uninstall the software. 2. 3. 4. 5. 12 When prompted, type your username and password. The HP Uninstaller window opens and displays the products that are available to be uninstalled. Select the G4000 series product and click Next. Follow the onscreen instructions to complete the uninstall process. Reinstall the software, using the HP software CD that came with your scanner. After inserting the CD, click on the CD icon that appears on your desktop to begin the installation. HP Scanjet G4000 series Check the cables Cable type Action Power cable The power cable is connected between the scanner and a power outlet. ● ● ● USB cable Ensure that the power cable is securely connected between the scanner and a live electrical outlet or surge protector. If the power cable is connected to a surge protector, ensure that the surge protector is plugged into an outlet and turned on. Turn off the scanner power switch and turn off the computer. After 60 seconds, turn the scanner back on and then turn on the computer, in that order. The USB cable is connected between the scanner and the computer. ● ● ● Use the cable that was included with the scanner. Another USB cable might not be compatible with the scanner. Ensure that the USB cable is securely connected between the scanner and the computer. If the USB cable is connected to a USB port on the front of the computer, move it to a USB port on the back of the computer. TMA cable English For additional USB troubleshooting information, see www.hp.com/support, select your country/region, and then use the search tool to find USB troubleshooting topics. The TMA cable is connected between the TMA in the scanner lid and the scanner base. Ensure the cable is securely connected in the back of the scanner. Setup and Support Guide 13 4 Regulatory information and product specifications This section contains regulatory information and product specifications for the HP Scanjet G4000 series Photo Scanner and accessories. Scanner specifications Name Description Scanner type Flatbed with transparent materials adapter (TMA) Size G4010: 303 mm x 5088 mm x 98 mm (11.93 x 20.00 x 3.86 inches) G4050: 303 mm x 5088 mm x 108 mm (11.93 x 20.00 x 4.25 inches) Weight G4010: 4.4 kg (9.6 lbs) G4050: 5.3 kg (11.6 lbs) Scanning element Charged-coupled device Interface USB 2.0 Hi-Speed Hardware resolution 4800 x 9600 dpi hardware resolution Selectable resolution 12 dpi to 999,999 enhanced dpi at 100 percent scaling AC line voltage 100-120 V 60 Hz – North America 200-240 V 50 Hz – Continental Europe, United Kingdom, Australia 100-240 V 50 Hz/60 Hz – Rest of the world Regulatory information Regulatory model identification number: For regulatory identification purposes, your product is assigned a Regulatory Model Number. The Regulatory Model Number for your product is FCLSD-0605. This regulatory number should not be confused with the product name (HP Scanjet G4010 or G4050) or product numbers (L1956A and L1957A). Energy usage drops significantly while in ENERGY STAR® mode, which saves natural resources, and saves money without affecting the high performance of this product. This product qualifies for ENERGY STAR (MOU v. 1.0), which is a voluntary program established to encourage the development of energy-efficient office products. 14 HP Scanjet G4000 series Name Description ENERGY STAR is a U.S. registered service mark of the U.S. EPA. As an ENERGY STAR partner, HP has determined that this product meets ENERGY STAR guidelines for energy efficiency. For more information on ENERGY STAR guidelines, go to the following Web site: www.energystar.gov Transparent materials adapter (TMA) specifications Name Description Media types G4010: Up to five 35 mm slides or six 35 mm negative frames G4050: Up to sixteen 35 mm slides, thirty 35 mm negative frames, up to two medium format film frames (120 roll film), or one large format film frame (220 roll film). Power requirements 12 Volts/400 mA max Power consumption and regulatory information For power consumption data, information on power supplies, and regulatory information, see the regulatory_supplement.htm file on the HP Photosmart software CD. Environmental specifications Description Temperature Operating the scanner and TMA: 10° to 35°C (50° to 95°F) English Name Storage: -40° to 60°C (-40° to 140°F) Relative humidity Operating the scanner and TMA: 15% to 80% noncondensing 10° to 35°C (50° to 95°F) Storage: up to 90% noncondensing at 0° to 60°C (32° to 140°F) Recycle and restricted material information Recycling HP offers an increasing number of product return and recycling programs in many countries/regions, and partners with some of the largest electronics recycling centers throughout the world. HP conserves resources by reselling some of its most popular Setup and Support Guide 15 Chapter 4 products. For more information regarding recycling of HP products, please visit: www.hp.com/hpinfo/globalcitizenship/environment/recycle/ Product restricted material This HP product contains the following material that might require special handling at end-of-life: Mercury in the scanner fluorescent lamp and transparent materials adapter (< 5 mg). For recycling information, contact www.hp.com/go/recycle, your local authorities, or the Electronic Industries Alliance at www.eiae.org. Disposal of Waste Equipment by Users in Private Households in the European Union This symbol on the product or on its packaging indicates that this product must not be disposed of with your other household waste. Instead, it is your responsibility to dispose of your waste equipment by handing it over to a designated collection point for the recycling of waste electrical and electronic equipment. The separate collection and recycling of your waste equipment at the time of disposal will help to conserve natural resources and ensure that it is recycled in a manner that protects human health and the environment. For more information about where you can drop off your waste equipment for recycling, please contact your local city office, your household waste disposal service, or the shop where you purchased the product. 16 HP Scanjet G4000 series 5 Product support This section describes the options for product support. Accessibility The following accessibility options are available on this scanner: Windows environment: ● ● To prevent buttons from being accidentally pushed, you can use the Button Disable Utility to disable the buttons. You can use the same utility to re-enable the buttons. For more information about the Button Disable Utility, see the scanner User Guide. The scanner User Guide is also available in a Help format that is readable by most screen readers. To find this file, double-click the HP Solution Center icon on your desktop, and then click Help and Support. Under the Documentation section, click Product Help. Macintosh environment: ● ● To prevent buttons from being accidentally pushed, use the Button Disable Utility to disable the buttons. You can use the same utility to re-enable the buttons. For more information about the Button Disable Utility, see the HP Scanjet Scanner Help. The HP Scanjet Scanner Help is available in a format that is readable by most screen readers. To find this file, open HP Device Manager, and then click on the question mark at the bottom of the dialog box. English Customers with disabilities can get help by visiting www.hp.com/hpinfo/community/accessibility/prodserv/ (English only). HP Scanjet Web site Visit www.hp.com and select your country/language at the top of the page. On the country page, select scanners from the list of products. Use this site for a variety of information: ● ● ● ● ● ● Find solutions to technical issues. Learn tips for scanning more effectively and creatively. Update your HP drivers and software. Register your product. Subscribe to newsletters, driver and software updates, and support alerts. Purchase HP supplies and accessories. Setup and Support Guide 17 Chapter 5 Getting assistance In order to get the best from your HP product, please consult the following standard HP support offerings: 1. 2. 3. 4. 5. 6. 18 Please consult the product documentation that came with the product. – Review the troubleshooting section or electronic Help of this manual/CD. – Review the electronic Help section within the software. Visit the HP online support at www.hp.com/support or contact your point of purchase. HP online support is available to all HP customers. It is the fastest source for upto-date product information and expert assistance, including the following features: – Fast E-mail access to qualified online support specialists – Software and driver updates for your product – Valuable product and troubleshooting information for technical issues – Proactive product updates, support alerts, and HP newsletters (available when you register your product) HP support by phone – Support options and fees vary by product, country and language. – Fees and policies are subject to change without notice. Please check the Web site www.hp.com/support for the latest information. Post-warranty period After the limited warranty period, help is available online at www.hp.com/support. Extending or upgrading your warranty If you would like to extend or upgrade the product’s warranty, please contact your point of purchase or check the HP Care Pack Services at www.hp.com/support. If you already purchased an HP Care Pack Service, please check the support conditions in your contract. HP Scanjet G4000 series 6 Hewlett-Packard limited warranty statement The following information outlines the warranty information for this product. Product Duration of limited warranty HP Scanjet G4000 series scanner 1 year B. Limitations of Warranty TO THE EXTENT ALLOWED BY LOCAL LAW, NEITHER HP NOR ITS THIRD PARTY SUPPLIERS MAKE ANY OTHER WARRANTY OR CONDITION OF ANY Setup and Support Guide 19 English A. Extent of limited warranty 1. Hewlett-Packard (HP) warrants to the end-user customer (Customer) that each HP product specified above (Product) shall be free from defects in material and workmanship for the period specified above. The warranty period begins on the date of purchase by Customer. 2. For each software product, HP’s limited warranty applies only to a failure to execute programming instructions. HP does not warrant that the operation of any Product will be uninterrupted or error free. 3. HP’s limited warranty covers only those defects that arise as a result of normal use of a Product, and does not cover any other problems, including those that arise as a result of: a. Improper use, maintenance, storage, handling, or modification; b. Software, media, parts, accessories, supplies, or power adapters or sources not provided or supported by HP; or, c. Operation or other conditions outside a Product’s specifications. 4. If HP receives, during the applicable warranty period, notice of a defect in a Product, HP shall at its option either replace or repair the defective Product. 5. If HP cannot replace or repair a defective Product that is covered by HP’s limited warranty, HP may, within a reasonable time after being notified of the defect, provide either another product similar in performance or a refund of the purchase price prorated based on usage and other appropriate factors. 6. HP shall have no obligation to replace, repair, or refund until Customer returns the defective Product to HP and provides a valid proof of purchase. 7. Any replacement product may be either new or like-new, provided it has functionality at least equal to that of the Product being replaced. 8. A Product may contain remanufactured parts, components, or materials equivalent to new in performance. 9. HP’s limited warranty is valid in any country or locality where HP has a support presence for the Product and has marketed the Product. The level of warranty service may vary according to local standards. Upgraded warranty services, such as next day exchange, on-site service, and accident protection, may be purchased from HP. Chapter 6 KIND, WHETHER EXPRESS OR IMPLIED, WITH RESPECT TO A PRODUCT, AND SPECIFICALLY DISCLAIM THE IMPLIED WARRANTIES OR CONDITIONS OF MERCHANTABILITY, SATISFACTORY QUALITY, AND FITNESS FOR A PARTICULAR PURPOSE. C. Limitations of Liability 1. To the extent allowed by local law, the remedies provided in this Limited Warranty Statement (LWS) are Customer’s sole and exclusive remedies. 2. TO THE EXTENT ALLOWED BY LOCAL LAW, EXCEPT FOR THE OBLIGATIONS SPECIFICALLY SET FORTH IN THIS LWS, IN NO EVENT SHALL HP OR ITS THIRD PARTY SUPPLIERS BE LIABLE FOR DIRECT, INDIRECT, SPECIAL, INCIDENTAL, OR CONSEQUENTIAL DAMAGES, WHETHER BASED ON CONTRACT, TORT, OR ANY OTHER LEGAL THEORY AND WHETHER ADVISED OF THE POSSIBILITY OF SUCH DAMAGES. D. Local Law 1. This LWS gives Customer specific legal rights. Customer may also have other rights that vary from state to state in the United States, from province to province in Canada, and from country to country elsewhere in the world. 2. To the extent this LWS is inconsistent with local law, this LWS shall be deemed modified to be consistent with local law. Under local law, certain disclaimers and limitations of this LWS may not apply to Customer. For example, the federal government of the United States, some states in the United States, and some governments outside the United States (including provinces in Canada), may: a. Grant Customer additional warranty rights; b. Preclude the disclaimers and limitations in this LWS from limiting the statutory rights of a consumer (e.g., the United Kingdom); c. Otherwise restrict the ability of a manufacturer to enforce such disclaimers or limitations; d. Specify the duration of implied warranties that the manufacturer cannot disclaim; or, e. Disallow limitations on the duration of implied warranties 3. Customer may have additional statutory rights based on its purchase agreement. Those rights are not in any way affected by this LWS. 4. For consumer transactions in the United States, any implied warranties imposed by law are limited in duration to the express warranty period. 5. FOR CONSUMER TRANSACTIONS IN AUSTRALIA AND NEW ZEALAND, THE TERMS IN THIS LWS, EXCEPT TO THE EXTENT LAWFULLY PERMITTED, DO NOT EXCLUDE, RESTRICT, OR MODIFY, AND ARE IN ADDITION TO, THE MANDATORY STATUTORY RIGHTS APPLICABLE TO THE SALE OF A PRODUCT TO SUCH CUSTOMERS. You may have additional statutory rights against the seller based on your purchase agreement. Those rights are not in any way affected by this HP Limited Warranty. You will find on the inside front cover of this book the names and address of the HP entity responsible for the performance of the HP Limited Warranty in your country. 20 HP Scanjet G4000 series اﻟﻔﺼﻞ ٦ ج .ﺣﺪود اﻟﻤﺴﺆوﻟﻴﺔ .1ﻓﻲ إﻃﺎر ﻣﺎ ﻳﺴﻤﺢ ﺑﻪ اﻟﻘﺎﻧﻮن اﻟﻤﺤﻠﻲ ،ﺗﻌﺘﺒﺮ اﻟﺤﻠﻮل اﻟﺘﻲ ﻳﻨﺺ ﻋﻠﻴﻬﺎ ﺑﻴﺎن اﻟﻜﻔﺎﻟﺔ اﻟﻤﺤﺪودة هﺬا هﻲ اﻟﺤﻠﻮل اﻟﻮﺣﻴﺪة واﻟﺤﺼﺮﻳﺔ اﻟﺘﻲ ﻳﺤﺼﻞ ﻋﻠﻴﻬﺎ "اﻟﻌﻤﻴﻞ". .2ﻓﻲ إﻃﺎر ﻣﺎ ﻳﺴﻤﺢ ﺑﻪ اﻟﻘﺎﻧﻮن اﻟﻤﺤﻠﻲ ،ﺑﺎﺳﺘﺜﻨﺎء اﻻﻟﺘﺰاﻣﺎت اﻟﺘﻲ ﺗﻢ اﻹﻓﺼﺎح ﻋﻨﻬﺎ ﺑﺸﻜﻞ ﻣﺤﺪد ﻓﻲ ﺑﻴﺎن اﻟﻜﻔﺎﻟﺔ اﻟﻤﺤﺪودة هﺬا ،ﻟﻦ ﺗﺘﺤﻤﻞ ﺷﺮآﺔ HPأو أي ﻣﻦ ﻣﻮردﻳﻬﺎ ﻣﻦ اﻟﺠﻬﺎت اﻷﺧﺮى ،ﺑﺄي ﺣﺎل ﻣﻦ اﻷﺣﻮال ،ﻣﺴﺆوﻟﻴﺔ أي أﺿﺮار ﺳﻮاءً آﺎﻧﺖ ﻣﺒﺎﺷﺮة أو ﻏﻴﺮ ﻣﺒﺎﺷﺮة أو ﺧﺎﺻﺔ أو ﻋﺎرﺿﺔ أو ﺗﺒﻌﻴﺔ ،ﺳﻮاءً آﺎن ذﻟﻚ ﻗﺎﺋﻤًﺎ ﻋﻠﻰ ﺗﻌﺎﻗﺪ أو دﻋﻮى ﺑﺎﻟﺘﻀﺮر أو أي ﻧﻈﺮﻳﺔ ﻗﺎﻧﻮﻧﻴﺔ أﺧﺮى ﺣﺘﻰ وﻟﻮ ﺗﻢ اﻹﺑﻼغ ﻋﻦ إﻣﻜﺎﻧﻴﺔ ﺣﺪوث أﺿﺮار ﻣﻤﺎﺛﻠﺔ. د .اﻟﻘﻮاﻧﻴﻦ اﻟﻤﺤﻠﻴﺔ .1ﻳﻤﻨﺢ ﺑﻴﺎن اﻟﻜﻔﺎﻟﺔ اﻟﻤﺤﺪودة هﺬا "اﻟﻌﻤﻴﻞ" ﺣﻘﻮﻗًﺎ ﻗﺎﻧﻮﻧﻴﺔ ﻣﺤﺪدة .وﻗﺪ ﻳﻜﻮن ﻟﻠﻌﻤﻴﻞ ﺣﻘﻮق أﺧﺮى ﺗﺨﺘﻠﻒ ﻣﻦ وﻻﻳﺔ إﻟﻰ أﺧﺮى ﻓﻲ اﻟﻮﻻﻳﺎت اﻟﻤﺘﺤﺪة ،وﻣﻦ ﻣﻘﺎﻃﻌﺔ إﻟﻰ أﺧﺮى ﻓﻲ آﻨﺪا ،وﻣﻦ دوﻟﺔ/ﻣﻨﻄﻘﺔ إﻟﻰ أﺧﺮى ﻓﻲ ﺑﻘﻴﺔ أﻧﺤﺎء اﻟﻌﺎﻟﻢ. .2ﻓﻲ ﺣﺎل ﻋﺪم ﺗﻮاﻓﻖ ﺑﻴﺎن اﻟﻜﻔﺎﻟﺔ اﻟﻤﺤﺪودة هﺬا ﻣﻊ اﻟﻘﻮاﻧﻴﻦ اﻟﻤﺤﻠﻴﺔ ،ﻳﺘﻮﺟﺐ ﺗﻌﺪﻳﻞ ﺑﻴﺎن اﻟﻜﻔﺎﻟﺔ اﻟﻤﺤﺪودة هﺬا ﺑﺤﻴﺚ ﻳﺘﻮاﻓﻖ ﻣﻊ اﻟﻘﻮاﻧﻴﻦ اﻟﻤﺤﻠﻴﺔ .ﺣﺴﺐ اﻟﻘﻮاﻧﻴﻦ اﻟﻤﺤﻠﻴﺔ ،ﻗﺪ ﻻ ﺗﻨﻄﺒﻖ ﺑﻌﺾ إﻧﻜﺎرات اﻟﻤﺴﺆوﻟﻴﺔ واﻟﻘﻴﻮد اﻟﻮاردة ﻓﻲ ﺑﻴﺎن اﻟﻜﻔﺎﻟﺔ اﻟﻤﺤﺪودة هﺬا ﻋﻠﻰ "اﻟﻌﻤﻴﻞ" .ﻓﻌﻠﻰ ﺳﺒﻴﻞ اﻟﻤﺜﺎل ،إن اﻟﺤﻜﻮﻣﺔ اﻟﻔﻴﺪﻳﺮاﻟﻴﺔ ﻟﻠﻮﻻﻳﺎت اﻟﻤﺘﺤﺪة ،وﺑﻌﺾ اﻟﻮﻻﻳﺎت ﻓﻲ اﻟﻮﻻﻳﺎت اﻟﻤﺘﺤﺪة ،وﺑﻌﺾ اﻟﺤﻜﻮﻣﺎت ﺧﺎرج اﻟﻮﻻﻳﺎت اﻟﻤﺘﺤﺪة )ﺑﻤﺎ ﻓﻴﻬﺎ ﻣﻘﺎﻃﻌﺎت آﻨﺪﻳﺔ( ،رﺑﻤﺎ: ﺗﻤﻨﺢ "اﻟﻌﻤﻴﻞ" ﺣﻘﻮﻗًﺎ إﺿﺎﻓﻴﺔ ﺑﻤﻮﺟﺐ اﻟﻜﻔﺎﻟﺔ؛ أ. ب .ﺗﺤﻮل دون ﺗﻘﻴﻴﺪ اﻟﺤﻘﻮق اﻟﻘﺎﻧﻮﻧﻴﺔ ﻟﻠﻌﻤﻼء ﺑﻮاﺳﻄﺔ إﻧﻜﺎرات اﻟﻤﺴﺆوﻟﻴﺔ واﻟﻘﻴﻮد اﻟﻮاردة ﻓﻲ ﺑﻴﺎن اﻟﻜﻔﺎﻟﺔ اﻟﻤﺤﺪودة هﺬا )ﻣﺜﻼً ،اﻟﻤﻤﻠﻜﺔ اﻟﻤﺘﺤﺪة(؛ ج .ﺗﺤ ّﺪ ﻣﻦ ﻗﺪرة اﻟﺸﺮآﺔ اﻟﻤﺼﻨﻌﺔ ،ﺑﺸﻜﻞ أو ﺑﺂﺧﺮ ،ﻋﻠﻰ وﺿﻊ إﻧﻜﺎرات اﻟﻤﺴﺆوﻟﻴﺔ واﻟﻘﻴﻮد ﺣﻴّﺰ اﻟﺘﻨﻔﻴﺬ؛ د .ﺗﺤﺪد ﻓﺘﺮة اﻟﻜﻔﺎﻻت اﻟﻀﻤﻨﻴﺔ اﻟﺘﻲ ﻻ ﻳﻤﻜﻦ ﻟﻠﺸﺮآﺔ اﻟﻤﺼﻨﻌﺔ إﻧﻜﺎرهﺎ؛ أو، هـ .ﺗﻠﻐﻲ اﻟﺴﻤﺎح ﺑﻮﺿﻊ ﻗﻴﻮد ﻋﻠﻰ ﻓﺘﺮة ﺻﻼﺣﻴﺔ اﻟﻜﻔﺎﻻت اﻟﻀﻤﻨﻴﺔ .3ﻗﺪ ﻳﻜﻮن ﻟـ "اﻟﻌﻤﻴﻞ" ﺣﻘﻮق ﻗﺎﻧﻮﻧﻴﺔ إﺿﺎﻓﻴﺔ اﺳﺘﻨﺎدًا إﻟﻰ اﺗﻔﺎﻗﻴﺔ اﻟﺸﺮاء .وﻻ ﺗﺘﺄﺛّﺮ هﺬﻩ اﻟﺤﻘﻮق ،ﺑﺄي ﺷﻜﻞ ﻣﻦ اﻷﺷﻜﺎل، ﺑﺒﻴﺎن اﻟﻜﻔﺎﻟﺔ اﻟﻤﺤﺪودة هﺬا. .4ﺑﺎﻟﻨﺴﺒﺔ إﻟﻰ اﻟﻤﻌﺎﻣﻼت ﻣﻊ اﻟﻌﻤﻼء ﻓﻲ اﻟﻮﻻﻳﺎت اﻟﻤﺘﺤﺪة ،ﻓﺈن أي آﻔﺎﻻت ﺿﻤﻨﻴﺔ ﻣﻔﺮوﺿﺔ ﻗﺎﻧﻮﻧﻴًﺎ ﺗﺘﻘﻴّﺪ ﺑﻔﺘﺮة اﻟﻜﻔﺎﻟﺔ اﻟﻤﻌﻠﻨﺔ. .5أﻣﺎ ﺑﺎﻟﻨﺴﺒﺔ إﻟﻰ اﻟﻤﻌﺎﻣﻼت ﻣﻊ اﻟﻌﻤﻼء ﻓﻲ أﺳﺘﺮاﻟﻴﺎ وﻧﻴﻮزﻳﻼﻧﺪا ،ﻓﺈن ﺑﻨﻮد ﺑﻴﺎن اﻟﻜﻔﺎﻟﺔ اﻟﻤﺤﺪودة هﺬا ،ﺑﺎﺳﺘﺜﻨﺎء ﻣﺎ هﻮ ﻣﺴﻤﻮح ﺑﻪ ﻗﺎﻧﻮﻧﻴﺎً ،ﻻ ﺗﺴﺘﺜﻨﻲ أو ﺗﻘﻴّﺪ أو ﺗﻌﺪّل اﻟﺤﻘﻮق اﻟﻘﺎﻧﻮﻧﻴﺔ اﻟﻤﻔﺮوﺿﺔ اﻟﺘﻲ ﺗﻄﺒّﻖ ﻋﻠﻰ ﺑﻴﻊ ﻣﻨﺘﺞ ﻟﻌﻤﻼء ﻣﻦ هﺬا اﻟﻨﻮع ،ﺑﻞ هﻲ ﺗﻀﺎف إﻟﻰ هﺬﻩ اﻟﺤﻘﻮق. وﻗﺪ ﻳﻜﻮن ﻟﻚ ﺣﻘﻮق ﻗﺎﻧﻮﻧﻴﺔ إﺿﺎﻓﻴﺔ ﻟﺪى اﻟﺒﺎﺋﻊ اﺳﺘﻨﺎداً إﻟﻰ ﻋﻘﺪ اﻟﺸﺮاء .وﻻ ﺗﺘﺄﺛﺮ هﺬﻩ اﻟﺤﻘﻮق ﺑﺄي ﺷﻜﻞ ﻣﻦ اﻷﺷﻜﺎل ﺑـﻬﺬﻩ اﻟﻜﻔﺎﻟﺔ اﻟﻤﺤﺪودة ﻣﻦ .HP ﺗﺠﺪ ﻋﻠﻰ اﻟﻐﻼف اﻷﻣﺎﻣﻲ اﻟﺪاﺧﻠﻲ ﻟﻬﺬا اﻟﻜﺘﺎب ،أﺳﻤﺎء وﻋﻨﺎوﻳﻦ اﻟﺸﺮآﺎت اﻟﺘﺎﺑﻌﺔ ﻟـ HPواﻟﻤﺴﺆوﻟﺔ ﻋﻦ ﺗﻨﻔﻴﺬ آﻔﺎﻟﺔ HP اﻟﻤﺤﺪودة ﻓﻲ ﺑﻠﺪك/ﻣﻨﻄﻘﺘﻚ. ﻋﺮﺑﻲ ﺳﻠﺴﻠﺔ HP Scanjet G4000 ١٩ 6 ﺑﻴﺎن اﻟﻜﻔﺎﻟﺔ اﻟﻤﺤﺪودة ﻟﺸﺮآﺔ Hewlett- Packard ﺗﻌﺮض اﻟﻤﻌﻠﻮﻣﺎت اﻟﺘﺎﻟﻴﺔ اﻟﻤﻌﻠﻮﻣﺎت اﻟﺨﺎﺻﺔ ﺑﻜﻔﺎﻟﺔ هﺬا اﻟﻤﻨﺘﺞ. اﻟﻤﻨﺘﺞ ﻣﺪة اﻟﻜﻔﺎﻟﺔ اﻟﻤﺤﺪودة اﻟﻤﺎﺳﺤﺔ اﻟﻀﻮﺋﻴﺔ ﻟﺴﻠﺴﻠﺔ HP Scanjet G4000 ﺳﻨﺔ واﺣﺪة أ .إﻃﺎر اﻟﻜﻔﺎﻟﺔ اﻟﻤﺤﺪودة .1ﺗﻀﻤﻦ ﺷﺮآﺔ (HP) Hewlett-Packardﻟﻠﻤﺴﺘﺨﺪم اﻟﻨﻬﺎﺋﻲ )اﻟﻌﻤﻴﻞ( أن آﻞ ﻣﻨﺘﺞ ﻣﻦ HPﻣﺤﺪد أﻋﻼﻩ )اﻟﻤﻨﺘﺞ( ل ﻣﻦ أي ﻋﻴﻮب ﺳﻮاء ﻓﻲ اﻟﻤﻮاد أو اﻟﺘﺼﻨﻴﻊ ﺧﻼل اﻟﻤﺪة اﻟﻤﺤﺪدة أﻋﻼﻩ .وﺗﺒﺪأ ﻓﺘﺮة اﻟﻜﻔﺎﻟﺔ ﻋﻨﺪ ﺗﺎرﻳﺦ اﻟﺸﺮاء هﻮ ﺧﺎ ٍ ﻣﻦ ﻗﺒﻞ اﻟﻌﻤﻴﻞ. .2ﺑﺎﻟﻨﺴﺒﺔ إﻟﻰ آﻞ ﻣﻨﺘﺞ ﺑﺮﻣﺠﻲ ،ﺗﻨﻄﺒﻖ آﻔﺎﻟﺔ HPاﻟﻤﺤﺪودة ﻓﻘﻂ ﻋﻨﺪ ﻓﺸﻞ اﻟﻤﻨﺘﺞ ﻓﻲ ﺗﻨﻔﻴﺬ اﻹرﺷﺎدات اﻟﺒﺮﻣﺠﻴﺔ .وﻻ ﺗﻀﻤﻦ HPﻋﻤﻞ أي ﻣﻨﺘﺞ دون اﻧﻘﻄﺎع أو دون أﺧﻄﺎء. .3وﺗﺸﻤﻞ آﻔﺎﻟﺔ HPاﻟﻤﺤﺪودة ﻓﻘﻂ اﻟﻌﻴﻮب اﻟﺘﻲ ﺗﻈﻬﺮ آﻨﺘﻴﺠﺔ ﻻﺳﺘﺨﺪام اﻟﻤﻨﺘﺞ ﺑﺸﻜﻞ ﻋﺎدي ،وﻻ ﺗﺸﻤﻞ أي ﻣﺸﺎآﻞ أﺧﺮى ،ﺑﻤﺎ ﻓﻴﻬﺎ ﻣﺎ ﻳﻈﻬﺮ آﻨﺘﻴﺠﺔ ﻟـ: اﻻﺳﺘﺨﺪام ،أو اﻟﺼﻴﺎﻧﺔ ،أو اﻟﺘﺨﺰﻳﻦ ،أو اﻟﺘﻌﺎﻣﻞ ،أو اﻟﺘﻌﺪﻳﻞ ﻏﻴﺮ اﻟﻤﻼﺋﻢ؛ أ. ب .اﻟﺒﺮاﻣﺞ ،أو اﻟﻮﺳﺎﺋﻂ ،أو اﻟﻘﻄﻊ ،أو اﻟﻤﻠﺤﻘﺎت ،أو اﻟﻤﺴﺘﻠﺰﻣﺎت ،أو ﻣﺤﻮّﻻت اﻟﻄﺎﻗﺔ أو ﻣﺼﺎدرهﺎ ﻏﻴﺮ اﻟﻤﺼﻨّﻌﺔ ﻣﻦ ﻗﺒﻞ HPأو ﻏﻴﺮ اﻟﻤﻌﺘﻤﺪة ﻣﻦ ﻗﺒﻠﻬﺎ؛ أو، ج .اﻟﺘﺸﻐﻴﻞ أو اﻟﻈﺮوف اﻷﺧﺮى اﻟﺨﺎرﺟﺔ ﻋﻦ ﻣﻮاﺻﻔﺎت اﻟﻤﻨﺘﺞ. .4إذا ﺗﻠﻘﺖ ،HPأﺛﻨﺎء ﻓﺘﺮة ﺻﻼﺣﻴﺔ اﻟﻜﻔﺎﻟﺔ ،إﺷﻌﺎرًا ﺑﻮﺟﻮد ﺧﻠﻞ ﻓﻲ "اﻟﻤﻨﺘﺞ" ،ﻓﻴﺮﺟﻊ ﻟـ HPﺧﻴﺎر إﻣﺎ اﺳﺘﺒﺪال اﻟﻤﻨﺘﺞ اﻟﺬي ﻓﻴﻪ ﺧﻠﻞ أو إﺻﻼﺣﻪ. .5إذا ﺗﻌﺬّر ﻋﻠﻰ HPاﺳﺘﺒﺪال أو إﺻﻼح "ﻣﻨﺘﺞ" ﻓﻴﻪ ﺧﻠﻞ وﻣﺸﻤﻮل ﺑﺎﻟﻜﻔﺎﻟﺔ اﻟﻤﺤﺪودة ﻣﻦ ،HPﻓﻘﺪ ﺗﻮﻓﺮ ،HPﺧﻼل ﻼ ﻟﻸول ﻓﻲ اﻷداء أو ﺗُﺮﺟﻊ ﺛﻤﻦ اﻟﺸﺮاء ﻣﻊ ﺣﺴﻢ ﺑﻤﻘﺪار ﻓﺘﺮة ﻣﻌﻘﻮﻟﺔ ﺑﻌﺪ أن ﻳﺘﻢ إﻋﻼﻣﻬﺎ ﺑﺎﻟﺨﻠﻞ ،إﻣﺎ ﻣﻨﺘﺠًﺎ ﺁﺧﺮ ﻣﻤﺎﺛ ً ﻧﺴﺒﺔ اﻻﺳﺘﺨﺪام وﻋﻮاﻣﻞ أﺧﺮى ذات ﺻﻠﺔ. .6ﻻ ﺗﻌﺘﺒﺮ ﺷﺮآﺔ HPﻣﻠﺰﻣ ًﺔ ﺑﺎﻻﺳﺘﺒﺪال أو اﻹﺻﻼح أو إرﺟﺎع اﻟﺜﻤﻦ ﻣﺎ ﻟﻢ ﻳﻘﻢ "اﻟﻌﻤﻴﻞ" ﺑﺈرﺟﺎع "اﻟﻤﻨﺘﺞ" اﻟﺬي ﻓﻴﻪ ﺧﻠﻞ إﻟﻰ ﺷﺮآﺔ HPوﺗﻮﻓﻴﺮ إﺛﺒﺎت ﺻﺎﻟﺢ ﻟﻠﺸﺮاء. ﻞ ﺟﺪﻳﺪاً أو ﻣﺸﺎﺑﻬًﺎ ﻟﻠﺠﺪﻳﺪ ،ﺷﺮط أن ﻳﺘﻤﺘﻊ ﺑﺎﻟﻮﻇﺎﺋﻒ ﻧﻔﺴﻬﺎ ﻋﻠﻰ اﻷﻗﻞ ﻣﻘﺎرﻧ ًﺔ ﺑـ "اﻟﻤﻨﺘﺞ" .7ﻳﺠﺐ أن ﻳﻜﻮن أي ﻣﻨﺘﺞ ﺑﺪﻳ ٍ اﻟﺬي ﻳﺘﻢ اﺳﺘﺒﺪاﻟﻪ. .8ﻗﺪ ﻳﺤﺘﻮي "اﻟﻤﻨﺘﺞ" ﻋﻠﻰ أﺟﺰاء ،أو ﻣﻜﻮّﻧﺎت ،أو ﻣﻮاد ﺗﻤﺖ إﻋﺎدة ﺗﺼﻨﻴﻌﻬﺎ وﻟﻜﻨﻬﺎ ﻣﻀﺎهﻴﺔ ﻟﻠﺠﺪﻳﺪة ﻣﻦ ﺣﻴﺚ اﻷداء. .9ﺗﺴﺮي اﻟﻜﻔﺎﻟﺔ اﻟﻤﺤﺪود اﻟﺨﺎﺻﺔ ﺑﺸﺮآﺔ HPﻓﻲ أي دوﻟﺔ/ﻣﻨﻄﻘﺔ أو ﻣﺮآﺰ ﻣﺤﻠﻲ ﺣﻴﺚ ﻳﻮﺟﺪ ﻣﻤﺜﻞ دﻋﻢ HPﻟﻬﺬا اﻟﻤﻨﺘﺞ وﻓﻲ أي ﻣﻜﺎن ﻗﺎﻣﺖ ﺷﺮآﺔ HPﺑﺘﺴﻮﻳﻖ هﺬا اﻟﻤﻨﺘﺞ ﻓﻴﻪ .وﻗﺪ ﻳﺨﺘﻠﻒ ﻣﺴﺘﻮى اﻟﺨﺪﻣﺔ اﻟﻤﺸﻤﻮﻟﺔ ﺑﺎﻟﻜﻔﺎﻟﺔ ﺑﺎﺧﺘﻼف اﻟﻤﻌﺎﻳﻴﺮ اﻟﻤﺤﻠﻴﺔ .وﻳﻤﻜﻦ ﺷﺮاء ﺗﺮﻗﻴﺔ ﻟﺨﺪﻣﺎت اﻟﻜﻔﺎﻟﺔ ﻣﻦ ،HPآﺎﻻﺳﺘﺒﺪال ﻓﻲ اﻟﻴﻮم اﻟﺘﺎﻟﻲ ،واﻟﺼﻴﺎﻧﺔ ﻓﻲ ﻣﻮﻗﻊ اﻟﻌﻤﻴﻞ ،واﻟﺤﻤﺎﻳﺔ ﺿﺪ اﻟﺤﻮادث. ب .ﻗﻴﻮد اﻟﻜﻔﺎﻟﺔ ﻓﻲ إﻃﺎر ﻣﺎ ﻳﺴﻤﺢ ﺑﻪ اﻟﻘﺎﻧﻮن اﻟﻤﺤﻠﻲ ،ﻻ ﺗﻘﺪم HPأو ﻣﻮﻓﺮو اﻟﻤﻨﺘﺠﺎت واﻟﺨﺪﻣﺎت ﻣﻦ ﺟﻬﺎت ﺧﺎرﺟﻴﺔ ذوو اﻟﺼﻠﺔ ﺑـ ،HP أي آﻔﺎﻻت أﺧﺮى أو ﺗﻌﻬﺪات ﻣﻦ أي ﻧﻮع ،ﺳﻮاء آﺎﻧﺖ ﺻﺮﻳﺤﺔ أو ﺿﻤﻨﻴﺔ ،ﻋﻠﻰ أي ﻣﻨﺘﺞ ،آﻤﺎ ﺗﺨﻠﻲ ﻣﺴﺆوﻟﻴﺘﻬﺎ ﻋﻠﻰ وﺟﻪ اﻟﺨﺼﻮص ﻣﻦ اﻟﻜﻔﺎﻻت أو اﻟﺘﻌﻬﺪات اﻟﻀﻤﻨﻴﺔ اﻟﺨﺎﺻﺔ ﺑﻘﺎﺑﻠﻴﺔ اﻟﺒﻴﻊ أو اﻟﺠﻮدة اﻟﻤُﺮﺿﻴﺔ أو ﻣﻼءﻣﺘﻪ ﻟﻐﺮض ﻣﻌﻴّﻦ. ١٨ دﻟﻴﻞ اﻹﻋﺪاد واﻟﺪﻋﻢ اﻟﻔﺼﻞ ٥ اﻟﺤﺼﻮل ﻋﻠﻰ اﻟﺪﻋﻢ ﻟﻠﺤﺼﻮل ﻋﻠﻰ أﻋﻠﻰ اﺳﺘﻔﺎدة ﻣﻦ ﻣﻨﺘﺞ HPاﻟﺨﺎص ﺑﻚ ،ﻳﺮﺟﻰ ﻣﺮاﺟﻌﺔ ﻋﺮوض دﻋﻢ HPاﻟﻘﻴﺎﺳﻴﺔ اﻟﺘﺎﻟﻴﺔ: .١ .٢ .٣ .٤ .٥ .٦ ﻳﺮﺟﻰ ﻣﺮاﺟﻌﺔ اﻟﻮﺛﺎﺋﻖ اﻟﻤﺮﻓﻘﺔ ﻣﻊ اﻟﻤﻨﺘﺞ. – ﻗﻢ ﺑﻤﺮاﺟﻌﺔ ﻗﺴﻢ اﺳﺘﻜﺸﺎف اﻷﺧﻄﺎء وإﺻﻼﺣﻬﺎ أو اﻟﺘﻌﻠﻴﻤﺎت اﻹﻟﻜﺘﺮوﻧﻴﺔ ﻓﻲ هﺬا اﻟﺪﻟﻴﻞ/اﻟﻘﺮص اﻟﻤﻀﻐﻮط. – ﻗﻢ ﺑﻤﺮاﺟﻌﺔ ﻗﺴﻢ اﻟﺘﻌﻠﻴﻤﺎت اﻹﻟﻜﺘﺮوﻧﻴﺔ داﺧﻞ اﻟﺒﺮﻧﺎﻣﺞ. ﻗﻢ ﺑﺰﻳﺎرة ) HP online supportﺧﺪﻣﺔ دﻋﻢ HPﻋﺒﺮ اﻹﻧﺘﺮﻧﺖ( ﻋﻠﻰ اﻟﻌﻨﻮان www.hp.com/supportأو اﺗﺼﻞ ﺑﺎﻟﺒﺎﺋﻊ. ﺗﺘﻮﻓﺮ ﺧﺪﻣﺔ دﻋﻢ HPﻋﺒﺮ اﻹﻧﺘﺮﻧﺖ ﻟﻜﻞ ﻋﻤﻼء .HPوهﺬﻩ اﻟﺨﺪﻣﺔ هﻲ أﺳﺮع اﻟﻤﺼﺎدر اﻟﺘﻲ ﻳﻤﻜﻦ ﻣﻦ ﺧﻼﻟﻬﺎ اﻟﺘﻌﺮف ﻋﻠﻰ ﻣﻌﻠﻮﻣﺎت ﺣﺪﻳﺜﺔ ﻋﻦ اﻟﻤﻨﺘﺞ واﻟﺤﺼﻮل ﻋﻠﻰ ﻣﺴﺎﻋﺪة اﻟﺨﺒﺮاء ،آﻤﺎ ﺗﺘﻀﻤﻦ اﻟﻤﻴﺰات اﻟﺘﺎﻟﻴﺔ: – اﻟﻮﺻﻮل اﻟﺴﺮﻳﻊ ﻋﺒﺮ اﻟﺒﺮﻳﺪ اﻹﻟﻜﺘﺮوﻧﻲ إﻟﻰ أﺧﺼﺎﺋﻴﻲ اﻟﺪﻋﻢ اﻷآﻔﺎء ﻋﻠﻰ اﻹﻧﺘﺮﻧﺖ. – ﺗﺤﺪﻳﺜﺎت اﻟﺒﺮاﻣﺞ وﺑﺮاﻣﺞ اﻟﺘﺸﻐﻴﻞ ﻟﻠﻤﻨﺘﺞ اﻟﺨﺎص ﺑﻚ. – ﻣﻌﻠﻮﻣﺎت ﻣﻔﻴﺪة ﺟﺪًا ﺣﻮل اﻟﻤﻨﺘﺞ وآﻴﻔﻴﺔ اﺳﺘﻜﺸﺎف أﺧﻄﺎﺋﻪ وإﺻﻼﺣﻬﺎ ،وذﻟﻚ ﻓﻴﻤﺎ ﻳﺘﻌﻠﻖ ﺑﺎﻟﻤﺸﻜﻼت اﻟﻔﻨﻴﺔ – ﺁﺧﺮ ﺗﻨﺒﻴﻬﺎت ﺣﻮل ﺗﺤﺪﻳﺜﺎت اﻟﻤﻨﺘﺠﺎت وﺗﻨﺒﻴﻬﺎت اﻟﺪﻋﻢ ورﺳﺎﺋﻞ HPاﻹﺧﺒﺎرﻳﺔ )ﺗﺘﻮﻓﺮ ﻋﻨﺪﻣﺎ ﻳﺘﻢ ﺗﺴﺠﻴﻞ اﻟﻤﻨﺘﺞ( دﻋﻢ HPﻋﺒﺮ اﻟﻬﺎﺗﻒ – ﺗﺨﺘﻠﻒ ﺧﻴﺎرات اﻟﺪﻋﻢ واﻟﺮﺳﻮم اﻟﻤﺎﻟﻴﺔ اﻟﻤﺴﺘﺤﻘﺔ ﺑﺎﺧﺘﻼف اﻟﻤﻨﺘﺞ واﻟﺪوﻟﺔ واﻟﻠﻐﺔ. – اﻟﺮﺳﻮم اﻟﻤﺎﻟﻴﺔ اﻟﻤﺴﺘﺤﻘﺔ وﺑﻮﻟﻴﺼﺎت اﻟﺘﺄﻣﻴﻦ ﻋُﺮﺿﺔ ﻟﻠﺘﻐﻴﻴﺮ ﺑﺪون إﺷﻌﺎر ﻣﺴﺒﻖ .ﻳﺮﺟﻰ ﻣﺮاﺟﻌﺔ اﻟﻤﻮﻗﻊ ﻋﻠﻰ اﻟﻮﻳﺐ www.hp.com/supportﻟﻠﺤﺼﻮل ﻋﻠﻰ أﺣﺪث اﻟﻤﻌﻠﻮﻣﺎت. ﻓﺘﺮة ﻣﺎ ﺑﻌﺪ اﻟﻜﻔﺎﻟﺔ ﺑﻌﺪ اﻧﺘﻬﺎء ﻓﺘﺮة اﻟﻜﻔﺎﻟﺔ اﻟﻤﺤﺪودة ،ﻳﺘﻢ ﺗﻮﻓﻴﺮ اﻟﺘﻌﻠﻴﻤﺎت ﻋﻠﻰ اﻟﻤﻮﻗﻊ اﻟﺘﺎﻟﻲ .www.hp.com/support ﺗﻤﺪﻳﺪ اﻟﻜﻔﺎﻟﺔ أو ﺗﺮﻗﻴﺘﻬﺎ إذا آﻨﺖ ﺗﺮﻏﺐ ﻓﻲ ﺗﻤﺪﻳﺪ آﻔﺎﻟﺔ اﻟﻤﻨﺘﺞ أو ﺗﺮﻗﻴﺘﻬﺎ ،ﻓﻴﺮﺟﻰ اﻻﺗﺼﺎل ﺑﻨﻘﻄﺔ اﻟﺸﺮاء ﻟﺪﻳﻚ أو ﻣﺮاﺟﻌﺔ HP Care ) Pack Servicesﺧﺪﻣﺎت ﺣﺰﻣﺔ رﻋﺎﻳﺔ ﻋﻤﻼء (HPﻋﻠﻰ اﻟﻤﻮﻗﻊ اﻟﺘﺎﻟﻲ .www.hp.com/support إذا ﺳﺒﻖ ﻟﻚ أن اﺷﺘﺮﻳﺖ ) HP Care Pack Serviceﺧﺪﻣﺔ ﺣﺰﻣﺔ رﻋﺎﻳﺔ اﻟﻌﻤﻼء( ،ﻓﻴﺮﺟﻰ ﻣﺮاﺟﻌﺔ ﺷﺮوط اﻟﺪﻋﻢ ﻓﻲ ﻋﻘﺪك. ﻋﺮﺑﻲ ﺳﻠﺴﻠﺔ HP Scanjet G4000 ١٧ ٥ دﻋﻢ اﻟﻤﻨﺘﺞ ﻳﻮﺿﺢ هﺬا اﻟﻘﺴﻢ ﺧﻴﺎرات دﻋﻢ اﻟﻤﻨﺘﺞ. ذوو اﻻﺣﺘﻴﺎﺟﺎت اﻟﺨﺎﺻﺔ ﺗﺘﻮﻓﺮ ﻓﻲ هﺬﻩ اﻟﻤﺎﺳﺤﺔ اﻟﻀﻮﺋﻴﺔ اﻟﺨﻴﺎرات اﻟﺘﺎﻟﻴﺔ ﻟﻠﺘﺸﻐﻴﻞ ﻣﻦ ﻗﺒﻞ ذوي اﻻﺣﺘﻴﺎﺟﺎت اﻟﺨﺎﺻﺔ: ﺑﻴﺌﺔ :Windows ● ● ﻟﺘﺠﻨﺐ ﺿﻐﻂ اﻷزرار ﻋﻦ ﻃﺮﻳﻖ اﻟﺨﻄﺄ ،ﻳﻤﻜﻨﻚ اﺳﺘﺨﺪام ) Button Disable Utilityأداة ﺗﻌﻄﻴﻞ اﻷزرار( ﻣﻦ أﺟﻞ ﺗﻌﻄﻴﻞ اﻷزرار .آﻤﺎ ﻳﻤﻜﻨﻚ اﺳﺘﺨﺪام ﻧﻔﺲ اﻷداة ﻹﻋﺎدة ﺗﻤﻜﻴﻦ اﻷزرار. ﻟﻠﺤﺼﻮل ﻋﻠﻰ ﻣﺰﻳﺪ ﻣﻦ اﻟﻤﻌﻠﻮﻣﺎت ﺣﻮل اﻷداة ) Button Disable Utilityأداة ﺗﻌﻄﻴﻞ اﻷزرار( ،راﺟﻊ دﻟﻴﻞ اﻟﻤﺴﺘﺨﺪم اﻟﺨﺎص ﺑﺎﻟﻤﺎﺳﺤﺔ اﻟﻀﻮﺋﻴﺔ. دﻟﻴﻞ اﻟﻤﺴﺘﺨﺪم اﻟﺨﺎص ﺑﺎﻟﻤﺎﺳﺤﺔ اﻟﻀﻮﺋﻴﺔ ﻣﺘﻮﻓﺮ أﻳﻀًﺎ ﻋﻠﻰ ﺷﻜﻞ ﻣﻠﻒ ﺗﻌﻠﻴﻤﺎت ﻗﺎﺑﻞ ﻟﻠﻘﺮاءة ﺑﻮاﺳﻄﺔ ﻣﻌﻈﻢ ﺑﺮاﻣﺞ ﻗﺮاءة اﻟﺸﺎﺷﺎت .ﻟﻠﺒﺤﺚ ﻋﻦ هﺬا اﻟﻤﻠﻒ ،اﻧﻘﺮ ﻧﻘﺮًا ﻣﺰدوﺟًﺎ ﻓﻮق اﻟﺮﻣﺰ ) HP Solution Centerﻣﺮآﺰ اﻟﺤﻠﻮل ﻟـ (HPاﻟﻤﻮﺟﻮد ﻋﻠﻰ ﺳﻄﺢ اﻟﻤﻜﺘﺐ ،ﺛﻢ اﻧﻘﺮ ﻓﻮق ) Help and Supportﺗﻌﻠﻴﻤﺎت ودﻋﻢ( .ﺿﻤﻦ اﻟﻘﺴﻢ ) Documentationاﻟﻮﺛﺎﺋﻖ( ،اﻧﻘﺮ ﻓﻮق ) Product Helpﺗﻌﻠﻴﻤﺎت اﻟﻤﻨﺘﺞ(. ﺑﻴﺌﺔ :Macintosh ● ● ﻟﺘﺠﻨﺐ ﺿﻐﻂ اﻷزرار ﻋﻦ ﻃﺮﻳﻖ اﻟﺨﻄﺄ ،اﺳﺘﺨﺪم ) Button Disable Utilityأداة ﺗﻌﻄﻴﻞ اﻷزرار( ﻣﻦ أﺟﻞ ﺗﻌﻄﻴﻞ اﻷزرار .آﻤﺎ ﻳﻤﻜﻨﻚ اﺳﺘﺨﺪام ﻧﻔﺲ اﻷداة ﻹﻋﺎدة ﺗﻤﻜﻴﻦ اﻷزرار. ﻟﻠﺤﺼﻮل ﻋﻠﻰ ﻣﺰﻳﺪ ﻣﻦ اﻟﻤﻌﻠﻮﻣﺎت ﺣﻮل اﻷداة ) Button Disable Utilityأداة ﺗﻌﻄﻴﻞ اﻷزرار( ،راﺟﻊ ﺗﻌﻠﻴﻤﺎت .HP Scanjet Scanner Help ﺗﻌﻠﻴﻤﺎت HP Scanjet Scanner Helpﻣﺘﻮﻓﺮة ﺑﺘﻨﺴﻴﻖ ﻗﺎﺑﻞ ﻟﻠﻘﺮاءة ﺑﻮاﺳﻄﺔ ﻣﻌﻈﻢ ﺑﺮاﻣﺞ ﻗﺮاءة اﻟﺸﺎﺷﺎت. ﻟﻠﺒﺤﺚ ﻋﻦ هﺬا اﻟﻤﻠﻒ ،اﻓﺘﺢ ) HP Device Managerإدارة اﻷﺟﻬﺰة ﻣﻦ ،(HPواﻧﻘﺮ ﻓﻮق ﻋﻼﻣﺔ اﻻﺳﺘﻔﻬﺎم ﻓﻲ أﺳﻔﻞ ﻣﺮﺑﻊ اﻟﺤﻮار. ﻳﻤﻜﻦ ﻟﻠﻌﻤﻼء ﻣﻦ ذوي اﻻﺣﺘﻴﺎﺟﺎت اﻟﺨﺎﺻﺔ اﻟﺤﺼﻮل ﻋﻠﻰ اﻟﻤﺴﺎﻋﺪة ﻣﻦ ﺧﻼل زﻳﺎرة اﻟﻤﻮﻗﻊ اﻟﺘﺎﻟﻲ ) /www.hp.com/hpinfo/community/accessibility/prodservﺑﺎﻹﻧﻜﻠﻴﺰﻳﺔ ﻓﻘﻂ(. ﻣﻮﻗﻊ وﻳﺐ HP Scanjet ﻗﻢ ﺑﺰﻳﺎرة اﻟﻤﻮﻗﻊ www.hp.comوﺣﺪد ﺑﻠﺪك/ﻟﻐﺘﻚ ﻓﻲ أﻋﻠﻰ اﻟﺼﻔﺤﺔ .ﻓﻲ ﺻﻔﺤﺔ اﻟﺒﻠﺪ ،ﻗﻢ ﺑﺘﺤﺪﻳﺪ اﻟﻤﺎﺳﺤﺎت اﻟﻀﻮﺋﻴﺔ ﻣﻦ ﻗﺎﺋﻤﺔ اﻟﻤﻨﺘﺠﺎت .ﻳﻤﻜﻨﻚ اﺳﺘﺨﺪام هﺬا اﻟﻤﻮﻗﻊ ﻟﻠﺤﺼﻮل ﻋﻠﻰ ﻣﺠﻤﻮﻋﺔ ﻣﺘﻨﻮﻋﺔ ﻣﻦ اﻟﻤﻌﻠﻮﻣﺎت ﻣﺜﻞ: ● ● ● ● ● ● ١٦ إﻳﺠﺎد ﺣﻠﻮل ﻟﻠﻤﺸﻜﻼت اﻟﻔﻨﻴﺔ. ﺗﻌﻠﻢ ﺑﻌﺾ اﻟﺘﻠﻤﻴﺤﺎت ﺣﻮل إﺟﺮاء اﻟﻤﺴﺢ اﻟﻀﻮﺋﻲ ﺑﺸﻜﻞ أآﺜﺮ آﻔﺎء ًة وإﺑﺪاﻋًﺎ. ﺗﺤﺪﻳﺚ ﺑﺮاﻣﺞ ﺗﺸﻐﻴﻞ HPوﺑﺮاﻣﺠﻚ اﻷﺧﺮى. ﺗﺴﺠﻴﻞ اﻟﻤﻨﺘﺞ اﻟﺨﺎص ﺑﻚ. اﻻﺷﺘﺮاك ﻓﻲ اﻟﺮﺳﺎﺋﻞ اﻹﺧﺒﺎرﻳﺔ وﺗﺤﺪﻳﺜﺎت اﻟﺒﺮاﻣﺞ وﺑﺮاﻣﺞ اﻟﺘﺸﻐﻴﻞ وإﻋﻼﻣﺎت اﻟﺪﻋﻢ. ﺷﺮاء ﻣﺴﺘﻠﺰﻣﺎت وﻣﻠﺤﻘﺎت .HP دﻟﻴﻞ اﻹﻋﺪاد واﻟﺪﻋﻢ اﻟﻔﺼﻞ ٤ ﺗﺨﻠﺺ اﻟﻤﺴﺘﺨﺪﻣﻴﻦ ،أﺻﺤﺎب اﻟﻤﻨﺎزل اﻟﺨﺎﺻﺔ ،ﻣﻦ اﻷﺟﻬﺰة اﻟﺘﺎﻟﻔﺔ ﺑﺪول اﻻﺗﺤﺎد اﻷوروﺑﻲ ﻳﺸﻴﺮ هﺬا اﻟﺮﻣﺰ اﻟﻤﻮﺟﻮد ﻋﻠﻰ اﻟﻤﻨﺘﺞ أو ﻋﻠﻰ اﻟﻐﻼف اﻟﺨﺎص ﺑﻪ إﻟﻰ أﻧﻪ ﻳﺠﺐ ﻋﺪم اﻟﺘﺨﻠﺺ ﻣﻦ هﺬا اﻟﻤﻨﺘﺞ ﻣﻊ ﻣﺨﻠﻔﺎت ﻻ ﻣﻦ ذﻟﻚ ،ﻳﻌﺘﺒﺮ اﻟﺘﺨﻠﺺ ﻣﻦ ﺟﻬﺎزك اﻟﺘﺎﻟﻒ ،ﻋﻦ ﻃﺮﻳﻖ ﺗﺴﻠﻴﻤﻪ إﻟﻰ ﻣﺮآﺰ ﺗﺠﻤﻴﻊ ﻣﺨﺼﺺ ﻹﻋﺎدة اﻟﻤﻨﺰل اﻷﺧﺮى .ﺑﺪ ً ﺗﺼﻨﻴﻊ اﻷﺟﻬﺰة اﻹﻟﻜﺘﺮوﻧﻴﺔ واﻟﻜﻬﺮﺑﺎﺋﻴﺔ اﻟﺘﺎﻟﻔﺔ ،ﻣﺴﺆوﻟﻴﺘﻚ اﻟﺸﺨﺼﻴﺔ .ﻳﺴﺎﻋﺪ اﻟﺘﺠﻤﻴﻊ اﻟﻤﻨﻔﺼﻞ ﻟﻸﺟﻬﺰة اﻟﺘﺎﻟﻔﺔ وإﻋﺎدة ﺗﺼﻨﻴﻌﻬﺎ ﻋﻨﺪ اﻟﺘﺨﻠﺺ ﻣﻨﻬﺎ ﻋﻠﻰ اﻟﺤﻔﺎظ ﻋﻠﻰ اﻟﻤﻮارد اﻟﻄﺒﻴﻌﻴﺔ واﻟﺘﺄآﺪ ﻣﻦ إﻋﺎدة ﺗﺼﻨﻴﻌﻬﺎ ﺑﻄﺮﻳﻘﺔ ﺗﺤﻤﻲ ﺻﺤﺔ اﻹﻧﺴﺎن وﺗﺤﻤﻲ اﻟﺒﻴﺌﺔ .ﻟﻠﺤﺼﻮل ﻋﻠﻰ ﻣﺰﻳﺪ ﻣﻦ اﻟﻤﻌﻠﻮﻣﺎت ﺣﻮل أﻣﺎآﻦ ﺗﺴﻠﻴﻢ اﻷﺟﻬﺰة اﻟﺘﺎﻟﻔﺔ ﻟﺘﺘﻢ إﻋﺎدة ﺗﺼﻨﻴﻌﻬﺎ ،اﻟﺮﺟﺎء اﻻﺗﺼﺎل ﺑﻤﻜﺘﺐ اﻟﻤﺪﻳﻨﺔ اﻟﻤﺤﻠﻲ ﻟﺪﻳﻚ أو ﺑﺨﺪﻣﺔ اﻟﺘﺨﻠﺺ ﻣﻦ ﻣﺨﻠﻔﺎت اﻟﻤﻨﺎزل أو ﺑﺎﻟﻤﺤﻞ اﻟﺬي ﻗﻤﺖ ﺑﺸﺮاء اﻟﻤﻨﺘﺞ ﻣﻨﻪ. ﻋﺮﺑﻲ ﺳﻠﺴﻠﺔ HP Scanjet G4000 ١٥ ﻣﻮاﺻﻔﺎت ﻣﺤﻮل اﻟﻤﻮاد اﻟﺸﻔﺎﻓﺔ اﻻﺳﻢ اﻟﻮﺻﻒ أﻧﻮاع اﻟﻮﺳﺎﺋﻂ :G4010ﻣﺎ ﻳﺼﻞ إﻟﻰ ٥ﺷﺮاﺋﺢ ﻣﻘﺎس ٣٥ﻣﻢ أو ٦إﻃﺎرات ﺻﻮر ﺳﻠﺒﻴﺔ ﻣﻘﺎس ٣٥ﻣﻢ :G4050ﻣﺎ ﻳﺼﻞ إﻟﻰ ﺳﺖ ﻋﺸﺮة ﺷﺮﻳﺤﺔ ﻣﻘﺎس ٣٥ﻣﻢ ،أو ﺛﻼﺛﻴﻦ إﻃﺎر ﺻﻮر ﺳﻠﺒﻴﺔ ﻣﻘﺎس ٣٥ﻣﻢ ،أو ﻣﺎ ﻳﺼﻞ إﻟﻰ إﻃﺎري أﻓﻼم ﺑﺎﻟﺘﻨﺴﻴﻖ اﻟﻤﺘﻮﺳﻂ اﻟﺤﺠﻢ )ﻟﻔﺎﻓﺔ ﻓﻴﻠﻢ ،(١٢٠أو إﻃﺎر واﺣﺪ ﻟﻔﻴﻠﻢ ﺑﺎﻟﺘﻨﺴﻴﻖ اﻟﻜﺒﻴﺮ اﻟﺤﺠﻢ )ﻟﻔﺎﻓﺔ ﻓﻴﻠﻢ .(٢٢٠ ﻣﺘﻄﻠﺒﺎت اﻟﻄﺎﻗﺔ ١٢ﻓﻮﻟﺖ ٤٠٠/ﻣﻠﻠﻲ أﻣﺒﻴﺮ آﺤﺪ أﻗﺼﻰ اﺳﺘﻬﻼك اﻟﻄﺎﻗﺔ واﻟﻤﻌﻠﻮﻣﺎت اﻟﺘﻨﻈﻴﻤﻴﺔ ﻟﻠﺤﺼﻮل ﻋﻠﻰ ﻣﻌﻠﻮﻣﺎت ﺣﻮل ﺑﻴﺎﻧﺎت اﺳﺘﻬﻼك اﻟﻄﺎﻗﺔ وإﻣﺪاد اﻟﻄﺎﻗﺔ واﻟﻤﻌﻠﻮﻣﺎت اﻟﺘﻨﻈﻴﻤﻴﺔ ،راﺟﻊ اﻟﻤﻠﻒ regulatory_supplement.htm اﻟﻤﺘﻮﻓﺮ ﻋﻠﻰ اﻟﻘﺮص اﻟﻤﻀﻐﻮط اﻟﺨﺎص ﺑﺒﺮﻧﺎﻣﺞ .HP Photosmart اﻟﻤﻮاﺻﻔﺎت اﻟﺒﻴﺌﻴﺔ اﻻﺳﻢ اﻟﻮﺻﻒ درﺟﺔ اﻟﺤﺮارة ﺗﺸﻐﻴﻞ اﻟﻤﺎﺳﺤﺔ اﻟﻀﻮﺋﻴﺔ وﻣﺤﻮل اﻟﻤﻮاد اﻟﺸﻔﺎﻓﺔ :ﻣﻦ °١٠إﻟﻰ °٣٥درﺟﺔ ﻣﺌﻮﻳﺔ )ﻣﻦ °٥٠إﻟﻰ °٩٥درﺟﺔ ﻓﻬﺮﻧﻬﺎﻳﺖ( اﻟﺘﺨﺰﻳﻦ :ﻣﻦ °٤٠-إﻟﻰ °٦٠درﺟﺔ ﻣﺌﻮﻳﺔ )ﻣﻦ °٤٠-إﻟﻰ °١٤٠درﺟﺔ ﻓﻬﺮﻧﻬﺎﻳﺖ( اﻟﺮﻃﻮﺑﺔ اﻟﻨﺴﺒﻴﺔ ﺗﺸﻐﻴﻞ اﻟﻤﺎﺳﺤﺔ اﻟﻀﻮﺋﻴﺔ وﻣﺤﻮل اﻟﻤﻮاد اﻟﺸﻔﺎﻓﺔ :ﻣﻦ ١٥ﺑﺎﻟﻤﺎﺋﺔ إﻟﻰ ٨٠ﺑﺎﻟﻤﺎﺋﺔ دون آﺜﺎﻓﺔ ﻣﻦ °١٠إﻟﻰ °٣٥درﺟﺔ ﻣﺌﻮﻳﺔ )ﻣﻦ °٥٠إﻟﻰ °٩٥درﺟﺔ ﻓﻬﺮﻧﻬﺎﻳﺖ( اﻟﺘﺨﺰﻳﻦ :ﻣﺎ ﻳﺼﻞ إﻟﻰ %٩٠دون آﺜﺎﻓﺔ ﻣﻦ °٠إﻟﻰ °٦٠درﺟﺔ ﻣﺌﻮﻳﺔ )°٣٢ إﻟﻰ °١٤٠درﺟﺔ ﻓﻬﺮﻧﻬﺎﻳﺖ( ﻣﻌﻠﻮﻣﺎت ﺧﺎﺻﺔ ﺑﺈﻋﺎدة اﻟﺘﺼﻨﻴﻊ واﻟﻤﻮاد اﻟﻤﺤﻈﻮرة إﻋﺎدة اﻟﺘﺼﻨﻴﻊ ﺗﻘﺪّم HPﻋﺪداً ﻣﺘﺰاﻳﺪًا ﻣﻦ ﺑﺮاﻣﺞ إرﺟﺎع اﻟﻤﻨﺘﺠﺎت وإﻋﺎدة ﺗﺼﻨﻴﻌﻬﺎ ﻓﻲ ﻋﺪة ﺑﻠﺪان/ﻣﻨﺎﻃﻖ ،ﺑﺎﻟﻤﺸﺎرآﺔ ﻣﻊ ﺑﻌﺾ ﻣﻦ أآﺒﺮ ﻣﺮاآﺰ إﻋﺎدة ﺗﺼﻨﻴﻊ اﻹﻟﻜﺘﺮوﻧﻴﺎت ﺣﻮل اﻟﻌﺎﻟﻢ .ﺗﺤﺎﻓﻆ HPﻋﻠﻰ اﻟﻤﻮارد ﻣﻦ ﺧﻼل إﻋﺎدة ﺑﻴﻊ ﺑﻌﺾ ﻣﻦ ﻣﻨﺘﺠﺎﺗﻬﺎ اﻷآﺜﺮ ﺷﻌﺒﻴﺔ .ﻟﻤﺰﻳﺪ ﻣﻦ اﻟﻤﻌﻠﻮﻣﺎت ﺣﻮل إﻋﺎدة ﺗﺼﻨﻴﻊ ﻣﻨﺘﺠﺎت ،HPﻳﺮﺟﻰ زﻳﺎرة اﻟﻤﻮﻗﻊ: /www.hp.com/hpinfo/globalcitizenship/environment/recycle ﻣﻮاد اﻟﻤﻨﺘﺞ اﻟﻤﺤﻈﻮرة ﻳﺤﺘﻮي ﻣﻨﺘﺞ HPهﺬا ﻋﻠﻰ اﻟﻤﻮاد اﻟﺘﺎﻟﻴﺔ اﻟﺘﻲ ﻗﺪ ﺗﺘﻄﻠﺐ ﻣﻌﺎﻣﻠﺔ ﺧﺎﺻﺔ ﻋﻨﺪ اﻧﺘﻬﺎء ﻓﺘﺮة ﺻﻼﺣﻴﺘﻬﺎ :اﻟﺰﺋﺒﻖ اﻟﻤﻮﺟﻮد ﻓﻲ ﻣﺼﺒﺎح اﻟﻤﺎﺳﺤﺔ اﻟﻀﻮﺋﻴﺔ اﻟﻔﻠﻮري وﻓﻲ ﻣﺤﻮل اﻟﻤﻮاد اﻟﺸﻔﺎﻓﺔ )أﻗﻞ ﻣﻦ ٥ﻣﻠﻠﻲ ﺟﺮام(. ﻟﻠﺤﺼﻮل ﻋﻠﻰ ﻣﻌﻠﻮﻣﺎت ﺣﻮل إﻋﺎدة اﻟﺘﺼﻨﻴﻊ ،اﺗﺼﻞ ﺑـ ،www.hp.com/go/recycleأو اﻟﺴﻠﻄﺎت اﻟﻤﺤﻠﻴﺔ ،أو ﺑـﻤﻨﻈﻤﺔ Electronic Industries Allianceﻋﻠﻰ اﻟﻌﻨﻮان .www.eiae.org ١٤ دﻟﻴﻞ اﻹﻋﺪاد واﻟﺪﻋﻢ ٤ ﻣﻮاﺻﻔﺎت اﻟﻤﻨﺘﺞ واﻟﻤﻌﻠﻮﻣﺎت اﻟﺘﻨﻈﻴﻤﻴﺔ ﻳﺤﺘﻮي هﺬا اﻟﻘﺴﻢ ﻋﻠﻰ ﻣﻌﻠﻮﻣﺎت ﺗﻨﻈﻴﻤﻴﺔ وﻣﻮاﺻﻔﺎت اﻟﻤﻨﺘﺞ اﻟﺨﺎﺻﺔ ﺑﺎﻟﻤﺎﺳﺤﺔ اﻟﻀﻮﺋﻴﺔ ﻟﻠﺼﻮر HP Scanjet G4000 وﻣﻠﺤﻘﺎﺗﻬﺎ. ﻣﻮاﺻﻔﺎت اﻟﻤﺎﺳﺤﺔ اﻟﻀﻮﺋﻴﺔ اﻻﺳﻢ اﻟﻮﺻﻒ ﻧﻮع اﻟﻤﺎﺳﺤﺔ اﻟﻀﻮﺋﻴﺔ ﻣﺎﺳﺤﺔ ﺿﻮﺋﻴﺔ ﻣﺴﻄﺤﺔ ﺑﻤﺤﻮل ﻣﻮاد ﺷﻔﺎﻓﺔ )(TMA اﻟﺤﺠﻢ ٣٠٣ :G4010ﻣﻢ × ٥٠٨٨ﻣﻢ × ٩٨ﻣﻢ ) ٣,٨٦ × ٢٠,٠٠ × ١١,٩٣ﺑﻮﺻﺔ( ٣٠٣ :G4050ﻣﻢ × ٥٠٨٨ﻣﻢ × ١٠٨ﻣﻢ ) ٤,٢٥ × ٢٠,٠٠ × ١١,٩٣ﺑﻮﺻﺔ( اﻟﻮزن ٤,٤ :G4010آﺠﻢ ) ٩,٦ﻟﻴﺒﺮة( ٥,٣ :G4050آﺠﻢ ) ١١,٦ﻟﻴﺒﺮة( ﻋﻨﺼﺮ اﻟﻤﺴﺢ اﻟﻀﻮﺋﻲ ﺟﻬﺎز رﺑﻂ اﻟﺸﺤﻨﺎت اﻻﺗﺼﺎل USB 2.0ﻋﺎﻟﻲ اﻟﺴﺮﻋﺔ دﻗﺔ اﻟﺠﻬﺎز دﻗﺔ اﻟﺠﻬﺎز dpi ٩٦٠٠ × ٤٨٠٠ اﻟﺪﻗﺔ اﻟﺘﻲ ﻳﻤﻜﻦ ﺗﺤﺪﻳﺪهﺎ ﻣﻦ ١٢ﻧﻘﻄﺔ ﻓﻲ اﻟﺒﻮﺻﺔ إﻟﻰ ٩٩٩٩٩٩ﻧﻘﻄﺔ ﻓﻲ اﻟﺒﻮﺻﺔ ﻣﺤﺴّﻦ ﺑﻨﺴﺒﺔ ﺗﻐﻴﻴﺮ ﺣﺠﻢ %١٠٠ ﻓﻮﻟﺘﻴﺔ ﺧﻂ اﻟﺘﻴﺎر اﻟﻤﺘﺮدد ١٢٠-١٠٠ﻓﻮﻟﺖ ٦٠هﺮﺗﺰ -أﻣﺮﻳﻜﺎ اﻟﺸﻤﺎﻟﻴﺔ ٢٤٠-٢٠٠ﻓﻮﻟﺖ ٥٠هﺮﺗﺰ -أوروﺑﺎ واﻟﻤﻤﻠﻜﺔ اﻟﻤﺘﺤﺪة وأﺳﺘﺮاﻟﻴﺎ ٢٤٠-١٠٠ﻓﻮﻟﺖ ٥٠هﺮﺗﺰ -ﺑﺎﻗﻲ دول اﻟﻌﺎﻟﻢ اﻟﻤﻌﻠﻮﻣﺎت اﻟﺘﻨﻈﻴﻤﻴﺔ اﻟﺮﻗﻢ اﻟﺘﻨﻈﻴﻤﻲ ﻟﺘﻌﺮﻳﻒ اﻟﻄﺮاز :ﻷﻏﺮاض اﻟﺘﻌﺮﻳﻒ اﻟﺘﻨﻈﻴﻤﻴﺔ ،ﺗﻢ ﺗﻌﻴﻴﻦ رﻗﻢ ﻃﺮاز ﺗﻨﻈﻴﻤﻲ ﻟﻤﻨﺘﺠﻚ .رﻗﻢ اﻟﻄﺮاز اﻟﺘﻨﻈﻴﻤﻲ ﻟﻤﻨﺘﺠﻚ هﻮ .FCLSD-0605ﻳﺠﺐ ﻋﺪم اﻟﺨﻠﻂ ﺑﻴﻦ هﺬا اﻟﺮﻗﻢ اﻟﺘﻨﻈﻴﻤﻲ واﺳﻢ اﻟﻤﻨﺘﺞ ) HP Scanjet G4010أو (G4050أو أرﻗﺎم اﻟﻤﻨﺘﺠﺎت ) L1956Aو.(L1957A ﻳﻨﺨﻔﺾ ﻣﻌﺪل اﺳﺘﻬﻼك اﻟﻄﺎﻗﺔ ﺑﺸﻜﻞ آﺒﻴﺮ ﻋﻨﺪﻣﺎ ﺗﻜﻮن اﻟﻤﺎﺳﺤﺔ اﻟﻀﻮﺋﻴﺔ ﻓﻲ وﺿﻊ ® ،ENERGY STARﻣﻤﺎ ﻳﻮﻓﺮ اﻟﻤﻮارد اﻟﻄﺒﻴﻌﻴﺔ واﻟﻤﺎل ،دون اﻟﺘﺄﺛﻴﺮ ﻋﻠﻰ اﻷداء اﻟﺠﻴﺪ ﻟﻬﺬا اﻟﻤﻨﺘﺞ .هﺬا اﻟﻤﻨﺘﺞ ﻣﺆهّﻞ ﻟـ (MOU v.1.0) ENERGY STARوهﻮ ﺑﺮﻧﺎﻣﺞ ﻃﻮﻋﻲ ،اﻟﻐﺮض ﻣﻨﻪ هﻮ ﺗﺸﺠﻴﻊ ﺗﻄﻮﻳﺮ ﻣﻨﺘﺠﺎت ﻣﻜﺘﺒﻴﺔ ﻗﻠﻴﻠﺔ اﻻﺳﺘﻬﻼك ﻟﻠﻄﺎﻗﺔ. ﺳﻠﺴﻠﺔ HP Scanjet G4000 ﻋﺮﺑﻲ ﺗﻌﺪ ENERGY STARﻋﻼﻣﺔ ﺧﺪﻣﺔ ﻣﺴﺠّﻠﺔ ﻓﻲ اﻟﻮﻻﻳﺎت اﻟﻤﺘﺤﺪة اﻷﻣﻴﺮآﻴﺔ ﻟـ U.S. .EPAوﺑﺼﻔﺘﻬﺎ ﺷﺮﻳﻜًﺎ ﻓﻲ ﺑﺮﻧﺎﻣﺞ ،ENERGY STARﺗﻘﺮ ﺷﺮآﺔ HPﺑﻤﻄﺎﺑﻘﺔ هﺬا اﻟﻤﻨﺘﺞ ﻟﺘﻮﺻﻴﺎت ﺑﺮﻧﺎﻣﺞ ENERGY STARﻓﻴﻤﺎ ﻳﺘﻌﻠﻖ ﺑﻜﻔﺎءة اﺳﺘﻬﻼك اﻟﻄﺎﻗﺔ .ﻟﻤﺰﻳﺪ ﻣﻦ اﻟﻤﻌﻠﻮﻣﺎت ﺣﻮل ﺗﻮﺻﻴﺎت ،ENERGY STARاﻧﺘﻘﻞ إﻟﻰ اﻟﻤﻮﻗﻊ اﻟﺘﺎﻟﻲ ﻋﻠﻰ وﻳﺐ: www.energystar.gov ١٣ ﻓﺤﺺ اﻟﻜﺎﺑﻼت ﻧﻮع اﻟﻜﺎﺑﻞ اﻹﺟﺮاء آﺎﺑﻞ اﻟﻄﺎﻗﺔ ﻳﺘﻢ ﺗﻮﺻﻴﻞ آﺎﺑﻞ اﻟﻄﺎﻗﺔ ﺑﻴﻦ اﻟﻤﺎﺳﺤﺔ اﻟﻀﻮﺋﻴﺔ وأﺣﺪ ﻣﻘﺎﺑﺲ اﻟﻄﺎﻗﺔ. ● ● ● آﺎﺑﻞ USB ﺗﺄآﺪ ﻣﻦ ﺗﻮﺻﻴﻞ آﺎﺑﻞ اﻟﻄﺎﻗﺔ ﺑﺈﺣﻜﺎم ﺑﻴﻦ اﻟﻤﺎﺳﺤﺔ اﻟﻀﻮﺋﻴﺔ وﻣﺼﺪر ﺗﻴﺎر آﻬﺮﺑﺎﺋﻲ أو واﻗﻲ ﺗﻴﺎر ﻋﺎﻣﻞ. ﻼ ﺑﻮاﻗﻲ اﻟﺘﻴﺎر ،ﺗﺄآﺪ ﻣﻦ ﺗﺸﻐﻴﻞ واﻗﻲ اﻟﺘﻴﺎر وﺗﻮﺻﻴﻠﻪ إذا آﺎن آﺎﺑﻞ اﻟﻄﺎﻗﺔ ﻣﻮﺻ ً ﺑﻤﺼﺪر اﻟﺘﻴﺎر. أوﻗﻒ ﺗﺸﻐﻴﻞ اﻟﻤﺎﺳﺤﺔ اﻟﻀﻮﺋﻴﺔ ﺑﻮاﺳﻄﺔ ﻣﻔﺘﺎح ﺗﺸﻐﻴﻠﻬﺎ وأوﻗﻒ ﺗﺸﻐﻴﻞ اﻟﻜﻤﺒﻴﻮﺗﺮ. ﺑﻌﺪ ٦٠ﺛﺎﻧﻴﺔ ،اﺑﺪأ ﺗﺸﻐﻴﻞ اﻟﻤﺎﺳﺤﺔ اﻟﻀﻮﺋﻴﺔ ﻣﻦ ﺟﺪﻳﺪ واﺑﺪأ ﺗﺸﻐﻴﻞ اﻟﻜﻤﺒﻴﻮﺗﺮ ﺑﻬﺬا اﻟﺘﺮﺗﻴﺐ. آﺎﺑﻞ USBﻣﻮﺻﻮل ﺑﻴﻦ اﻟﻤﺎﺳﺤﺔ اﻟﻀﻮﺋﻴﺔ وﺟﻬﺎز اﻟﻜﻤﺒﻴﻮﺗﺮ. ● ● ● اﺳﺘﺨﺪم اﻟﻜﺎﺑﻞ اﻟﻤﺮﻓﻖ ﻣﻊ اﻟﻤﺎﺳﺤﺔ اﻟﻀﻮﺋﻴﺔ .ﻗﺪ ﻻ ﻳﺘﻮاﻓﻖ آﺎﺑﻞ USBﺁﺧﺮ ﻣﻊ اﻟﻤﺎﺳﺤﺔ اﻟﻀﻮﺋﻴﺔ. ﺗﺄآﺪ ﻣﻦ ﺗﻮﺻﻴﻞ آﺎﺑﻞ USBﺑﺈﺣﻜﺎم ﺑﻴﻦ اﻟﻤﺎﺳﺤﺔ اﻟﻀﻮﺋﻴﺔ وﺟﻬﺎز اﻟﻜﻤﺒﻴﻮﺗﺮ. ﻻ ﺑﻤﻨﻔﺬ USBﻋﻠﻰ اﻟﺠﺎﻧﺐ اﻷﻣﺎﻣﻲ ﻟﻠﻜﻤﺒﻴﻮﺗﺮ ،ﻓﺎﻧﻘﻠﻪ إذا آﺎن آﺎﺑﻞ USBﻣﻮﺻﻮ ً إﻟﻰ ﻣﻨﻔﺬ USBﻋﻠﻰ اﻟﺠﺎﻧﺐ اﻟﺨﻠﻔﻲ ﻟﻠﻜﻤﺒﻴﻮﺗﺮ. ﻟﻠﺤﺼﻮل ﻋﻠﻰ ﻣﻌﻠﻮﻣﺎت إﺿﺎﻓﻴﺔ ﺣﻮل اﺳﺘﻜﺸﺎف أﺧﻄﺎء USBوإﺻﻼﺣﻬﺎ ،راﺟﻊ ،www.hp.com/supportوﺣﺪد اﻟﺒﻠﺪ/اﻟﻤﻨﻄﻘﺔ اﻟﺘﻲ ﺗﻘﻴﻢ ﻓﻴﻬﺎ ﺛﻢ اﺳﺘﺨﺪم أداة اﻟﺒﺤﺚ ﻟﻠﺤﺼﻮل ﻋﻠﻰ ﻣﻮاﺿﻴﻊ اﺳﺘﻜﺸﺎف أﺧﻄﺎء USBوإﺻﻼﺣﻬﺎ. آﺎﺑﻞ ﻣﺤﻮل اﻟﻤﻮاد اﻟﺸﻔﺎﻓﺔ )(TMA آﺎﺑﻞ ﻣﺤﻮل اﻟﻤﻮاد اﻟﺸﻔﺎﻓﺔ ﻣﻮﺻﻞ ﺑﻴﻦ وﺣﺪة ﻣﺤﻮل اﻟﻤﻮاد اﻟﺸﻔﺎﻓﺔ اﻟﻤﻮﺟﻮدة ﻋﻠﻰ ﻏﻄﺎء اﻟﻤﺎﺳﺤﺔ اﻟﻀﻮﺋﻴﺔ وﻗﺎﻋﺪة اﻟﻤﺎﺳﺤﺔ. ﺗﺄآﺪ ﻣﻦ أن اﻟﻜﺎﺑﻞ ﻣﺘﺼﻞ ﺑﺈﺣﻜﺎم ﺑﺎﻟﺠﺰء اﻟﺨﻠﻔﻲ ﻣﻦ اﻟﻤﺎﺳﺤﺔ اﻟﻀﻮﺋﻴﺔ. ١٢ دﻟﻴﻞ اﻹﻋﺪاد واﻟﺪﻋﻢ ٣ اﺳﺘﻜﺸﺎف أﺧﻄﺎء ﺗﺜﺒﻴﺖ اﻟﻤﺎﺳﺤﺔ اﻟﻀﻮﺋﻴﺔ وإﺻﻼﺣﻬﺎ ﻳﺤﺘﻮي هﺬا اﻟﻘﺴﻢ ﻋﻠﻰ ﺣﻠﻮل ﻟﻤﺸﺎآﻞ اﻟﺘﺜﺒﻴﺖ واﻹﻋﺪاد. إﻟﻐﺎء ﺗﺜﺒﻴﺖ اﻟﺒﺮﻧﺎﻣﺞ وإﻋﺎدة ﺗﺜﺒﻴﺘﻪ ﻣﻦ اﻟﻤﻤﻜﻦ أن ﻳﺆدي ﺗﺜﺒﻴﺖ اﻟﺒﺮﻧﺎﻣﺞ ﺑﺸﻜﻞ ﻏﻴﺮ آﺎﻣﻞ إﻟﻰ ﻋﺪم اﻟﺘﻌﺮّف ﻋﻠﻰ اﻟﻤﺎﺳﺤﺔ اﻟﻀﻮﺋﻴﺔ أو ﻋﺪم ﺑﺪء ﺗﺸﻐﻴﻞ اﻟﺒﺮﻧﺎﻣﺞ ﺑﺸﻜﻞ ﺻﺤﻴﺢ .ﺣﺎول إﻟﻐﺎء ﺗﺜﺒﻴﺖ ﺑﺮﻧﺎﻣﺞ HP Scanningوإﻋﺎدة ﺗﺜﺒﻴﺘﻪ .وﻳﻠﺰم ﻹﻋﺎدة اﻟﺘﺜﺒﻴﺖ وﺟﻮد اﻟﻘﺮص اﻟﻤﻀﻐﻮط اﻟﺨﺎص ﺑﺒﺮﻧﺎﻣﺞ .HP Photosmart ﺑﻴﺌﺔ :Windows .١ .٢ .٣ .٤ .٥ .٦ .٧ .٨ اﻧﻘﺮ ﻓﻮق ) Startاﺑﺪأ( ،ﺛﻢ اﻧﻘﺮ ﻓﻮق ) Settingsإﻋﺪادات( ،واﻧﻘﺮ ﺑﻌﺪﺋ ٍﺬ ﻓﻮق ) Control Panelﻟﻮﺣﺔ اﻟﺘﺤﻜﻢ( )ﻓﻲ ،Windows XPاﻧﻘﺮ ﻓﻮق ) Startاﺑﺪأ( ،ﺛﻢ اﻧﻘﺮ ﻓﻮق ) Control Panelﻟﻮﺣﺔ اﻟﺘﺤﻜﻢ((. اﻧﻘﺮ ﻓﻮق ) Add/Remove Programsإﺿﺎﻓﺔ/إزاﻟﺔ اﻟﺒﺮاﻣﺞ( )ﻓﻲ ﻧﻈﺎم ﺗﺸﻐﻴﻞ ،Windows XPﻳﺴﻤّﻰ ) Add or Remove Programsإﺿﺎﻓﺔ أو إزاﻟﺔ اﻟﺒﺮاﻣﺞ(( ،ﺛﻢ ﺣﺪد .HP Scanjet G4000 series اﻧﻘﺮ ﻓﻮق ) Removeإزاﻟﺔ(. اﻧﻘﺮ ﻓﻮق ) Add/Remove Programsإﺿﺎﻓﺔ/إزاﻟﺔ اﻟﺒﺮاﻣﺞ( )ﻓﻲ ﻧﻈﺎم ﺗﺸﻐﻴﻞ ،Windows XPﻳﺴﻤّﻰ ) Add or Remove Programsإﺿﺎﻓﺔ أو إزاﻟﺔ اﻟﺒﺮاﻣﺞ(( ،ﺛﻢ ﺣﺪد ﺑﺮﻧﺎﻣﺞ .HP Photosmart اﻧﻘﺮ ﻓﻮق ) Removeإزاﻟﺔ(. ﻗﻢ ﺑﻔﺼﻞ آﺎﺑﻞ USBﻟﻠﻤﺎﺳﺤﺔ اﻟﻀﻮﺋﻴﺔ ﻣﻦ ﺟﻬﺎز اﻟﻜﻤﺒﻴﻮﺗﺮ. أﻋﺪ ﺗﺜﺒﻴﺖ اﻟﺒﺮﻧﺎﻣﺞ ،ﺑﺎﺳﺘﺨﺪام اﻟﻘﺮص اﻟﻤﻀﻐﻮط اﻟﺨﺎص ﺑﺒﺮﻧﺎﻣﺞ HP Photosmartواﻟﻤﺮﻓﻖ ﻣﻊ اﻟﻤﺎﺳﺤﺔ اﻟﻀﻮﺋﻴﺔ .وﺑﻤﺠﺮد أن ﺗﻘﻮم ﺑﺈدﺧﺎل اﻟﻘﺮص اﻟﻤﻀﻐﻮط ،ﻳﺘﻢ ﺗﺸﻐﻴﻞ واﺟﻬﺔ اﻟﺘﺜﺒﻴﺖ ﺗﻠﻘﺎﺋﻴًﺎ .اﺧﺘﺮ ﺑﺮﻧﺎﻣﺞ HP Photosmartآﻲ ﻳﺘﻢ ﺗﺜﺒﻴﺘﻪ. أﻋﺪ ﺗﻮﺻﻴﻞ آﺎﺑﻞ USBﻟﻠﻤﺎﺳﺤﺔ اﻟﻀﻮﺋﻴﺔ ﺑﻌﺪ اﻻﻧﺘﻬﺎء ﻣﻦ ﺗﺜﺒﻴﺖ اﻟﺒﺮﻧﺎﻣﺞ .ﻟﻤﺰﻳﺪ ﻣﻦ اﻟﻤﻌﻠﻮﻣﺎت ،راﺟﻊ ”اﻟﺨﻄﻮة .٥ ﺗﻮﺻﻴﻞ آﺎﺑﻞ “USBﻓﻲ ﺻﻔﺤﺔ ٦ ﺑﻴﺌﺔ :Macintosh .١ اﻧﺘﻘﻞ إﻟﻰ ) Applications/Hewlett-Packardﺗﻄﺒﻴﻘﺎت (Hewlett-Packard/واﻓﺘﺢ ﺑﺮﻧﺎﻣﺞ HP ) Uninstallerإﻟﻐﺎء اﻟﺘﺜﺒﻴﺖ ﻣﻦ .(HP ﻣﻼﺣﻈﺔ ﻳﺠﺐ أن ﻳﻜﻮن ﻟﺪﻳﻚ اﻣﺘﻴﺎزات اﻟﻤﺴﺆول ﻟﻜﻲ ﺗﺘﻤﻜﻦ ﻣﻦ إﻟﻐﺎء ﺗﺜﺒﻴﺖ اﻟﺒﺮﻧﺎﻣﺞ. .٢ .٣ .٤ .٥ اآﺘﺐ اﺳﻢ اﻟﻤﺴﺘﺨﺪم وآﻠﻤﺔ اﻟﻤﺮور ﻋﻨﺪﻣﺎ ﻳُﻄﻠﺐ ﻣﻨﻚ ذﻟﻚ .ﻳﻔﺘﺢ اﻹﻃﺎر ) HP Uninstallerﺑﺮﻧﺎﻣﺞ إﻟﻐﺎء اﻟﺘﺜﺒﻴﺖ ﻣﻦ (HPوﻳﻌﺮض اﻟﻤﻨﺘﺠﺎت اﻟﻤﺘﻮﻓﺮة اﻟﺘﻲ ﻳﻤﻜﻦ إﻟﻐﺎء ﺗﺜﺒﻴﺘﻬﺎ. ﺣﺪد ﻣﻨﺘﺞ ﺳﻠﺴﻠﺔ G4000واﻧﻘﺮ ﻓﻮق ) Nextاﻟﺘﺎﻟﻲ(. اﺗﺒﻊ اﻹرﺷﺎدات اﻟﺘﻲ ﺗﻈﻬﺮ ﻋﻠﻰ اﻟﺸﺎﺷﺔ ﻹآﻤﺎل ﻋﻤﻠﻴﺔ اﻟﻤﺴﺢ اﻟﻀﻮﺋﻲ. أﻋﺪ ﺗﺜﺒﻴﺖ اﻟﺒﺮﻧﺎﻣﺞ ،ﺑﺎﺳﺘﺨﺪام اﻟﻘﺮص اﻟﻤﻀﻐﻮط اﻟﺨﺎص ﺑﺒﺮاﻣﺞ HPواﻟﻤﺮﻓﻖ ﻣﻊ اﻟﻤﺎﺳﺤﺔ اﻟﻀﻮﺋﻴﺔ .ﺑﻌﺪ إدﺧﺎل اﻟﻘﺮص اﻟﻤﻀﻐﻮط ،اﻧﻘﺮ ﻓﻮق رﻣﺰ اﻟﻘﺮص اﻟﻤﻀﻐﻮط اﻟﺬي ﻳﻈﻬﺮ ﻋﻠﻰ ﺳﻄﺢ اﻟﻤﻜﺘﺐ ﻣﻦ أﺟﻞ أن ﺗﺒﺪأ ﻋﻤﻠﻴﺔ اﻟﺘﺜﺒﻴﺖ. ﻋﺮﺑﻲ ﺳﻠﺴﻠﺔ HP Scanjet G4000 ١١ ﺑﺮﻧﺎﻣﺞ HP Photosmartﻟـ Macintosh ﻋﻨﺪ ﺗﺜﺒﻴﺖ ﺑﺮﻧﺎﻣﺞ اﻟﻤﺴﺢ اﻟﻀﻮﺋﻲ ﻣﻦ HPﻋﻠﻰ آﻤﺒﻴﻮﺗﺮ ،Macintoshﻳﺘﻮﻓﺮ ﺑﺮﻧﺎﻣﺠﺎن ﻋﻠﻰ ﺳﻄﺢ اﻟﻤﻜﺘﺐ اﻟﻤﺴﻤﻰ Dockوهﻤﺎ HP Device Manager :و .HP Photosmart Studioوﻳُﺴﺘﺨﺪم هﺬان اﻟﺒﺮﻧﺎﻣﺠﺎن ﻹﺟﺮاء اﻟﻤﺴﺢ اﻟﻀﻮﺋﻲ وﺗﺤﺮﻳﺮ اﻟﻌﻨﺎﺻﺮ اﻟﻤﻤﺴﻮﺣﺔ ﺿﻮﺋﻴًﺎ. ﻳُﻌﺪ ) HP Solution Centerﻣﺮآﺰ اﻟﺤﻠﻮل ﻟـ (HPﺑﻤﺜﺎﺑﺔ ﺑﺮﻧﺎﻣﺞ ﻳﺘﻴﺢ ﻟﻚ إﻣﻜﺎﻧﻴﺔ ﺑﺪء اﻟﻘﻴﺎم ﺑﻤﺴﺢ اﻟﺼﻮر واﻟﻤﺴﺘﻨﺪات ﺿﻮﺋﻴًﺎ .اﺳﺘﺨﺪم Device Managerﻟﻜﺎﻓﺔ اﻷﻣﻮر اﻟﺘﺎﻟﻴﺔ: ● ● ● ● أداء وﻇﺎﺋﻒ اﻟﻤﺴﺢ اﻟﻀﻮﺋﻲ واﻟﻨﺴﺦ اﻟﻮﺻﻮل إﻟﻰ اﻟﻤﻌﻠﻮﻣﺎت اﻟﺨﺎﺻﺔ ﺑﺎﻟﺘﻌﻠﻴﻤﺎت واﺳﺘﻜﺸﺎف اﻷﺧﻄﺎء وإﺻﻼﺣﻬﺎ ﻓﺘﺢ ﺑﺮﻧﺎﻣﺞ HP Photosmart Studioﻟﺘﺤﺮﻳﺮ اﻟﻌﻨﺎﺻﺮ اﻟﻤﻤﺴﻮﺣﺔ ﺿﻮﺋﻴًﺎ ﺗﻌﺪﻳﻞ اﻹﻋﺪادات واﻟﺘﻔﻀﻴﻼت ﻳُﻌﺪ ﺑﺮﻧﺎﻣﺞ HP Photosmart Studioﺑﻤﺜﺎﺑﺔ ﺑﺮﻧﺎﻣﺞ ﻳﻤﻜﻦ اﺳﺘﺨﺪاﻣﻪ ﻓﻲ ﻣﻌﺎﻟﺠﺔ اﻟﺼﻮر وﻃﺒﺎﻋﺘﻬﺎ وﺣﻔﻈﻬﺎ وﻣﺸﺎرآﺘﻬﺎ ﺑﻌﺪ اﻻﻧﺘﻬﺎء ﻣﻦ ﻣﺴﺤﻬﺎ ﺿﻮﺋﻴًﺎ .ﻳﻤﻜﻨﻚ ﻓﺘﺢ ﺑﺮﻧﺎﻣﺞ HP Photosmart Studioﻣﻦ ﺳﻄﺢ اﻟﻤﻜﺘﺐ اﻟﻤﺴﻤﻰ ،Dockأو ﻣﻦ ﻗﺎﺋﻤﺔ ) Applicationsاﻟﺘﻄﺒﻴﻘﺎت( ﻟـ ) HP Device Managerإدارة اﻷﺟﻬﺰة ﻟـ .(HP ﻧﻈﺮة ﻋﺎﻣﺔ ﻋﻠﻰ اﻟﻠﻮﺣﺔ اﻷﻣﺎﻣﻴﺔ واﻟﻤﻠﺤﻘﺎت ﻳﻘﺪم هﺬا اﻟﻘﺴﻢ ﻧﻈﺮة ﻋﺎﻣﺔ ﻋﻠﻰ اﻟﻠﻮﺣﺔ اﻷﻣﺎﻣﻴﺔ ﻟﻠﻤﺎﺳﺤﺔ اﻟﻀﻮﺋﻴﺔ وﻣﺤﻮل اﻟﻤﻮاد اﻟﺸﻔﺎﻓﺔ ).(TMA أزرار اﻟﻠﻮﺣﺔ اﻷﻣﺎﻣﻴﺔ اﻟﺮﻣﺰ اﺳﻢ اﻟﻤﻴﺰة اﻟﻮﺻﻒ زر ) Scanﻣﺴﺢ ﺿﻮﺋﻲ( ﻳﻘﻮم ﺑﻤﺴﺢ اﻟﺼﻮر أو اﻟﺮﺳﻮﻣﺎت أو اﻟﻤﺴﺘﻨﺪات أو اﻟﻜﺎﺋﻨﺎت ﺿﻮﺋﻴًﺎ. زر Scan Film )ﻣﺴﺢ اﻟﻔﻴﻠﻢ ﺿﻮﺋﻴ ًﺎ( ﻳﻘﻮم ﺑﻤﺴﺢ ﺷﺮاﺋﻂ اﻟﺼﻮر اﻟﻤﻮﺟﺒﺔ )ﻣﺜﻞ اﻟﺸﺮاﺋﺢ ﻣﻘﺎس ٣٥ﻣﻢ( واﻟﺼﻮر اﻟﺴﻠﺒﻴﺔ اﻟﺸﻔﺎﻓﺔ .وﻳﺘﻄﻠﺐ ﻣﺴﺢ اﻟﻔﻴﻠﻢ ﺿﻮﺋﻴًﺎ اﺳﺘﺨﺪام ﻣﺤﻮل اﻟﻤﻮاد اﻟﺸﻔﺎﻓﺔ ) (TMAاﻟﻤﻮﺟﻮد ﻋﻠﻰ اﻟﺠﺎﻧﺐ اﻟﺴﻔﻠﻲ ﻣﻦ ﻏﻄﺎء اﻟﻤﺎﺳﺤﺔ اﻟﻀﻮﺋﻴﺔ. زر ) Copyﻧﺴﺦ( ﻳﻘﻮم ﺑﻨﺴﺦ اﻟﻌﻨﺼﺮ ﺿﻮﺋﻴًﺎ وإرﺳﺎﻟﻪ إﻟﻰ اﻟﻄﺎﺑﻌﺔ ﻟﻌﻤﻞ ﻧﺴﺨﺔ ﻣﻨﻪ. زر Scan to ) PDFاﻟﻤﺴﺢ إﻟﻰ ﻣﻠﻒ (PDF ﻳﻤﺴﺢ ﺻﻔﺤﺔ واﺣﺪة أو أآﺜﺮ ﺿﻮﺋﻴًﺎ وﻳﺤﻔﻈﻬﺎ ﻓﻲ ﻣﻠﻒ PDFﻣﻦ أﺟﻞ ﻣﺸﺎرآﺘﻬﺎ ﻣﻊ اﻵﺧﺮﻳﻦ أو ﺗﺨﺰﻳﻨﻬﺎ. ﻣﻼﺣﻈﺔ ﻟﻠﺤﺼﻮل ﻋﻠﻰ ﻣﺰﻳﺪ ﻣﻦ اﻟﻤﻌﻠﻮﻣﺎت ﺣﻮل اﻹﺟﺮاءات اﻻﻓﺘﺮاﺿﻴﺔ ﻟﻬﺬﻩ اﻷزرار ﻓﻲ ﺑﻴﺌﺔ ،Macintosh اﻓﺘﺢ ،HP Device Managerﺛﻢ اﻧﻘﺮ ﻓﻮق ﻋﻼﻣﺔ اﻻﺳﺘﻔﻬﺎم ﻓﻲ أﺳﻔﻞ ﻣﺮﺑﻊ اﻟﺤﻮار. ﻣﺤﻮل اﻟﻤﻮاد اﻟﺸﻔﺎﻓﺔ ﻳﻤﻜﻨﻚ اﺳﺘﺨﺪام ﻣﺤﻮل اﻟﻤﻮاد اﻟﺸﻔﺎﻓﺔ ) (TMAﻟﻤﺴﺢ ﺷﺮاﺋﺢ أو ﺷﺮاﺋﻂ اﻟﺼﻮر اﻟﺴﻠﺒﻴﺔ ﻣﻘﺎس ٣٥ﻣﻢ ﺿﻮﺋﻴًﺎ .ﻳﻤﻜﻨﻚ أﻳﻀًﺎ ﻣﺴﺢ اﻷﻓﻼم ذات اﻟﺘﻨﺴﻴﻖ اﻟﻤﺘﻮﺳﻂ واﻟﻜﺒﻴﺮ ﺿﻮﺋﻴًﺎ ﺑﻮاﺳﻄﺔ ﻣﺤﻮل اﻟﻤﻮاد اﻟﺸﻔﺎﻓﺔ .HP Scanjet G4050 TMA ﻟﻠﺤﺼﻮل ﻋﻠﻰ ﻣﺰﻳﺪ ﻣﻦ اﻟﻤﻌﻠﻮﻣﺎت ﺣﻮل ﻣﺤﻮل اﻟﻤﻮاد اﻟﺸﻔﺎﻓﺔ ) (TMAاﻧﻈﺮ دﻟﻴﻞ اﺳﺘﺨﺪام اﻟﻤﺎﺳﺤﺔ اﻟﻀﻮﺋﻴﺔ .ﻟﻠﺤﺼﻮل ﻋﻠﻰ ﻣﻌﻠﻮﻣﺎت ﺣﻮل آﻴﻔﻴﺔ اﻟﺒﺤﺚ ﻋﻦ دﻟﻴﻞ اﻻﺳﺘﺨﺪام ،اﻧﻈﺮ ”ﻣﺼﺎدر اﻟﺤﺼﻮل ﻋﻠﻰ ﻣﻌﻠﻮﻣﺎت إﺿﺎﻓﻴﺔ“ ﻓﻲ ﺻﻔﺤﺔ .٩ ١٠ دﻟﻴﻞ اﻹﻋﺪاد واﻟﺪﻋﻢ ٢ آﻴﻔﻴﺔ اﺳﺘﺨﺪام اﻟﻤﺎﺳﺤﺔ اﻟﻀﻮﺋﻴﺔ ﻳﻌﺮض هﺬا اﻟﻘﺴﻢ ﻧﻈﺮة ﻋﺎﻣﺔ ﻋﻠﻰ اﻟﻤﺎﺳﺤﺔ اﻟﻀﻮﺋﻴﺔ وآﻴﻔﻴﺔ اﺳﺘﺨﺪاﻣﻬﺎ. ﻣﺼﺎدر اﻟﺤﺼﻮل ﻋﻠﻰ ﻣﻌﻠﻮﻣﺎت إﺿﺎﻓﻴﺔ ﻳﻤﻜﻦ اﻟﻌﺜﻮر ﻋﻠﻰ اﻟﻤﺰﻳﺪ ﻣﻦ اﻟﻤﻌﻠﻮﻣﺎت ﺣﻮل اﻟﻤﺎﺳﺤﺔ اﻟﻀﻮﺋﻴﺔ واﻟﺒﺮﻧﺎﻣﺞ ﻓﻲ ﻣﻠﻒ ﺗﻌﻠﻴﻤﺎت اﻟﻤﺎﺳﺤﺔ اﻟﻀﻮﺋﻴﺔ .وإذا ﻗﻤﺖ ﺑﺘﺜﺒﻴﺖ ﺑﺮﻧﺎﻣﺞ HP Photosmartاﻟﻤﺮﻓﻖ ﺑﺎﻟﻤﺎﺳﺤﺔ اﻟﻀﻮﺋﻴﺔ ،ﻓﺎﻧﻘﺮ ﻧﻘﺮًا ﻣﺰدوﺟًﺎ ﻓﻮق رﻣﺰ HP Solution ) Centerﻣﺮآﺰ اﻟﺤﻠﻮل ﻟـ (HPاﻟﻤﻮﺟﻮد ﻋﻠﻰ ﺳﻄﺢ اﻟﻤﻜﺘﺐ ،ﺛﻢ اﻧﻘﺮ ﻓﻮق ) Help and Supportﺗﻌﻠﻴﻤﺎت ودﻋﻢ(. ﺿﻤﻦ اﻟﻘﺴﻢ ) Documentationاﻟﻮﺛﺎﺋﻖ( ،اﻧﻘﺮ ﻓﻮق ) Product Helpﺗﻌﻠﻴﻤﺎت اﻟﻤﻨﺘﺞ(. ﻟﻠﻮﺻﻮل إﻟﻰ ﻧﺴﺨﺔ ﻓﻮرﻳﺔ ﻟﺪﻟﻴﻞ ﻣﺴﺘﺨﺪم اﻟﻤﺎﺳﺤﺔ اﻟﻀﻮﺋﻴﺔ ،اﻧﻘﺮ ﻓﻮق اﺑﺪأ ،وأﺷﺮ إﻟﻰ اﻟﺒﺮاﻣﺞ أو آﺎﻓﺔ اﻟﺒﺮاﻣﺞ ،وإﻟﻰ ،HP ،G4000 series ،Scanjetﺛﻢ اﻧﻘﺮ ﻓﻮق دﻟﻴﻞ اﻟﻤﺴﺘﺨﺪم. ﺑﺎﻟﻨﺴﺒﺔ ﻟﻤﺴﺘﺨﺪﻣﻲ أﻧﻈﻤﺔ ﺗﺸﻐﻴﻞ :Macintoshﻟﻠﺤﺼﻮل ﻋﻠﻰ ﻣﻌﻠﻮﻣﺎت ﺣﻮل إﺟﺮاءات اﻟﻤﺴﺢ اﻟﻀﻮﺋﻲ ،اﻓﺘﺢ HP ) Device Managerإدارة اﻷﺟﻬﺰة ﻣﻦ ،(HPواﻧﻘﺮ ﻓﻮق ﻋﻼﻣﺔ اﻻﺳﺘﻔﻬﺎم ﻓﻲ أﺳﻔﻞ ﻣﺮﺑﻊ اﻟﺤﻮار. ﺑﺮﻧﺎﻣﺞ HP Photosmartﻟـ Windows ﻋﻨﺪ ﺗﺜﺒﻴﺖ ﺑﺮﻧﺎﻣﺞ HP Photosmartﻟـ ،Windowsﺗﺘﻢ إﺿﺎﻓﺔ رﻣﺰﻳﻦ إﻟﻰ ﺳﻄﺢ اﻟﻤﻜﺘﺐ .وﻳﻘﻮم هﺬان اﻟﺮﻣﺰان ﺑﻔﺘﺢ ﺑﺮاﻣﺞ ﻹﺟﺮاء اﻟﻤﺴﺢ اﻟﻀﻮﺋﻲ وﺗﺤﺮﻳﺮ اﻟﻌﻨﺎﺻﺮ اﻟﻤﻤﺴﻮﺣﺔ ﺿﻮﺋﻴًﺎ. ﻟﻠﺤﺼﻮل ﻋﻠﻰ ﻣﻌﻠﻮﻣﺎت ﺣﻮل آﻴﻔﻴﺔ اﺳﺘﺨﺪام ) HP Solution Centerﻣﺮآﺰ اﻟﺤﻠﻮل ﻟـ (HPوHP ،Photosmartراﺟﻊ ﻣﻠﻒ ﺗﻌﻠﻴﻤﺎت اﻟﻤﺎﺳﺤﺔ اﻟﻀﻮﺋﻴﺔ .اﻧﻘﺮ ﻧﻘﺮًا ﻣﺰدوﺟًﺎ ﻓﻮق اﻟﺮﻣﺰ HP Solution Center )ﻣﺮآﺰ اﻟﺤﻠﻮل ﻟـ (HPاﻟﻤﻮﺟﻮد ﻋﻠﻰ ﺳﻄﺢ اﻟﻤﻜﺘﺐ ،ﺛﻢ اﻧﻘﺮ ﻓﻮق ) Help and Supportﺗﻌﻠﻴﻤﺎت ودﻋﻢ( .ﺿﻤﻦ اﻟﻘﺴﻢ ) Documentationاﻟﻮﺛﺎﺋﻖ( ،اﻧﻘﺮ ﻓﻮق ) Product Helpﺗﻌﻠﻴﻤﺎت اﻟﻤﻨﺘﺞ(. ﻳُﻌﺪ ) HP Solution Centerﻣﺮآﺰ اﻟﺤﻠﻮل ﻟـ (HPﺑﻤﺜﺎﺑﺔ ﺑﺮﻧﺎﻣﺞ ﻳﺘﻴﺢ ﻟﻚ إﻣﻜﺎﻧﻴﺔ ﺑﺪء اﻟﻘﻴﺎم ﺑﻤﺴﺢ اﻟﺼﻮر واﻟﻤﺴﺘﻨﺪات ﺿﻮﺋﻴًﺎ .اﺳﺘﺨﺪم ) HP Solution Centerﻣﺮآﺰ اﻟﺤﻠﻮل ﻟـ (HPﻟﻜﺎﻓﺔ اﻷﻣﻮر اﻟﺘﺎﻟﻴﺔ: ● ● ● ● أداء وﻇﺎﺋﻒ اﻟﻤﺴﺢ اﻟﻀﻮﺋﻲ واﻟﻨﺴﺦ اﻟﻮﺻﻮل إﻟﻰ اﻟﻤﻌﻠﻮﻣﺎت اﻟﺨﺎﺻﺔ ﺑﺎﻟﺘﻌﻠﻴﻤﺎت واﺳﺘﻜﺸﺎف اﻷﺧﻄﺎء وإﺻﻼﺣﻬﺎ ﻓﺘﺢ ﺑﺮﻧﺎﻣﺞ HP Photosmartﻟﺘﺤﺮﻳﺮ اﻟﻌﻨﺎﺻﺮ اﻟﻤﻤﺴﻮﺣﺔ ﺿﻮﺋﻴًﺎ ﺗﻌﺪﻳﻞ اﻹﻋﺪادات واﻟﺘﻔﻀﻴﻼت ﻳُﻌﺪ ﺑﺮﻧﺎﻣﺞ HP Photosmartﺑﻤﺜﺎﺑﺔ ﺑﺮﻧﺎﻣﺞ ﻳﻤﻜﻦ اﺳﺘﺨﺪاﻣﻪ ﻓﻲ ﻣﻌﺎﻟﺠﺔ اﻟﺼﻮر وﻃﺒﺎﻋﺘﻬﺎ وﺣﻔﻈﻬﺎ وﻣﺸﺎرآﺘﻬﺎ ﺑﻌﺪ اﻻﻧﺘﻬﺎء ﻣﻦ ﻣﺴﺤﻬﺎ ﺿﻮﺋﻴًﺎ .وﻳﻤﻜﻨﻚ اﻟﻮﺻﻮل إﻟﻰ ﺑﺮﻧﺎﻣﺞ HP Photosmartإﻣﺎ ﻣﻦ ﺧﻼل رﻣﺰ ﺳﻄﺢ اﻟﻤﻜﺘﺐ أو ﻣﻦ ﺧﻼل HP Solution ) Centerﻣﺮآﺰ اﻟﺤﻠﻮل ﻟـ .(HP ﻟﺒﺪء ﻋﻤﻠﻴﺔ ﻣﺴﺢ ﺿﻮﺋﻲ: ﻋﺮﺑﻲ اﻧﻘﺮ ﻧﻘﺮًا ﻣﺰدوﺟًﺎ ﻓﻮق رﻣﺰ ) HP Solution Centerﻣﺮآﺰ اﻟﺤﻠﻮل ﻟـ (HPﻋﻠﻰ ﺳﻄﺢ اﻟﻤﻜﺘﺐ ،واﻧﻘﺮ ﻓﻮق ﻋﻼﻣﺔ اﻟﺘﺒﻮﻳﺐ اﻟﺨﺎﺻﺔ ﺑﺎﻟﻤﺎﺳﺤﺔ اﻟﻀﻮﺋﻴﺔ ،ﺛﻢ اﻧﻘﺮ ﻓﻮق اﻟﻤﻬﻤﺔ اﻟﺘﻲ ﺗﺮﻏﺐ ﻓﻲ إﺟﺮاﺋﻬﺎ. ﻣﻼﺣﻈﺔ إذا آﺎن رﻣﺰ ) HP Solution Centerﻣﺮآﺰ اﻟﺤﻠﻮل ﻟـ (HPﻏﻴﺮ ﻣﺘﻮﻓﺮ ﻋﻠﻰ ﺳﻄﺢ اﻟﻤﻜﺘﺐ، ﻓﺎﻧﻘﺮ ﻓﻮق ) Startاﺑﺪأ( ،وأﺷﺮ إﻟﻰ ) Programsاﻟﺒﺮاﻣﺞ( أو ) All Programsآﺎﻓﺔ اﻟﺒﺮاﻣﺞ( ،وأﺷﺮ إﻟﻰ ،HPﺛﻢ اﻧﻘﺮ ﻓﻮق ) HP Solution Centerﻣﺮآﺰ اﻟﺤﻠﻮل ﻟـ .(HP ﺳﻠﺴﻠﺔ HP Scanjet G4000 ٩ اﻟﺨﻄﻮة .٦اﺧﺘﺒﺎر اﻟﺘﺜﺒﻴﺖ 2 .١ .٢ ٨ 1 ﺿﻊ ﺻﻮرة ﻓﻮﺗﻮﻏﺮاﻓﻴﺔ أو ﻣﺴﺘﻨﺪًا ﻋﻠﻰ زﺟﺎج اﻟﻤﺎﺳﺤﺔ اﻟﻀﻮﺋﻴﺔ آﻤﺎ هﻮ ﻣﺸﺎر ﺑﻮاﺳﻄﺔ اﻟﻌﻼﻣﺔ اﻟﻤﺮﺟﻌﻴﺔ ﻋﻠﻰ اﻟﻤﺎﺳﺤﺔ اﻟﻀﻮﺋﻴﺔ. اﺿﻐﻂ ﻋﻠﻰ زر ) Scanﻣﺴﺢ ﺿﻮﺋﻲ( ) ( .إذا آﻨﺖ ﺗﻘﻮم ﺑﺎﻟﻤﺴﺢ اﻟﻀﻮﺋﻲ ﺑﺎﺳﺘﺨﺪام اﻟﺒﺮﻧﺎﻣﺞ اﻟﺨﺎص ﺑـ ،Windowsﻓﺘﻈﻬﺮ اﻟﺸﺎﺷﺔ ?) What are you scanningﻓﺌﺔ ﻋﻨﺎﺻﺮ اﻟﻤﺴﺢ اﻟﻀﻮﺋﻲ؟( .اﺗﺒﻊ اﻹرﺷﺎدات اﻟﺘﻲ ﺗﻈﻬﺮ ﻋﻠﻰ اﻟﺸﺎﺷﺔ ﻹآﻤﺎل ﻋﻤﻠﻴﺔ اﻟﻤﺴﺢ اﻟﻀﻮﺋﻲ. أﻣﺎ إذا آﻨﺖ ﺗﻘﻮم ﺑﺎﻟﻤﺴﺢ اﻟﻀﻮﺋﻲ ﺑﺎﺳﺘﺨﺪام اﻟﺒﺮﻧﺎﻣﺞ اﻟﺨﺎص ﺑـ ،Macintoshﻓﻴﻔﺘﺢ اﻟﺘﻄﺒﻴﻖ HP Scan Pro وﻳﺘﻢ ﻋﺮض ﻣﻌﺎﻳﻨﺔ ﻟﻤﺎ ﺳﻴﺘﻢ ﻣﺴﺤﻪ ﺿﻮﺋﻴًﺎ .ﻋﻨﺪﻣﺎ ﺗﺘﻢ اﻟﻤﻮاﻓﻘﺔ ﻋﻠﻰ اﻟﻤﻌﺎﻳﻨﺔ ،ﻳﺘﻢ إرﺳﺎل اﻟﺼﻮرة اﻟﻤﻤﺴﻮﺣﺔ ﺿﻮﺋﻴًﺎ إﻟﻰ اﻟﻮﺟﻬﺔ اﻟﺘﻲ ﺗﻢ ﺗﺤﺪﻳﺪهﺎ ﻓﻲ إﻋﺪادات اﻟﻤﺎﺳﺤﺔ اﻟﻀﻮﺋﻴﺔ. إذا ﻟﻢ ﻳﻈﻬﺮ ﻣﺮﺑﻊ اﻟﺤﻮار ?) What are you scanningﻓﺌﺔ ﻋﻨﺎﺻﺮ اﻟﻤﺴﺢ اﻟﻀﻮﺋﻲ؟( أو إﻃﺎر HP ، Scan Proﻓﺎﻧﻈﺮ ”اﺳﺘﻜﺸﺎف أﺧﻄﺎء ﺗﺜﺒﻴﺖ اﻟﻤﺎﺳﺤﺔ اﻟﻀﻮﺋﻴﺔ وإﺻﻼﺣﻬﺎ“ ﻓﻲ ﺻﻔﺤﺔ .١١ دﻟﻴﻞ اﻹﻋﺪاد واﻟﺪﻋﻢ اﻟﻔﺼﻞ ١ اﺳﺘﺨﺪم آﺎﺑﻞ USBاﻟﻤﺮﻓﻖ ﻣﻊ اﻟﻤﺎﺳﺤﺔ اﻟﻀﻮﺋﻴﺔ ﻟﺘﻮﺻﻴﻠﻬﺎ ﺑﺠﻬﺎز اﻟﻜﻤﺒﻴﻮﺗﺮ. .١ ﻗﻢ ﺑﺘﻮﺻﻴﻞ ﻃﺮف اﻟﻜﺎﺑﻞ اﻟﻤﺮﺑﻊ ﺑﺎﻟﻤﺎﺳﺤﺔ اﻟﻀﻮﺋﻴﺔ. .٢ ﻗﻢ ﺑﺘﻮﺻﻴﻞ ﻃﺮف اﻟﻜﺎﺑﻞ اﻟﻤﺴﺘﻄﻴﻞ ﺑﺠﻬﺎز اﻟﻜﻤﺒﻴﻮﺗﺮ. ﻋﺮﺑﻲ ﺳﻠﺴﻠﺔ HP Scanjet G4000 ٧ اﻟﺨﻄﻮة .٤ﺗﻮﺻﻴﻞ آﺎﺑﻼت إﻣﺪاد اﻟﻄﺎﻗﺔ ﻳﻮﺟﺪ ﻣﻊ آﺎﺑﻼت إﻣﺪاد اﻟﻄﺎﻗﺔ آﺎﺑﻞ ﻣﻠﺤﻖ ﻳﺘﻢ ﺗﻮﺻﻴﻠﻪ ﺑﺎﻟﺠﺰء اﻟﺨﻠﻔﻲ ﻟﻠﻤﺎﺳﺤﺔ اﻟﻀﻮﺋﻴﺔ. آﻤﺎ ﺗﺤﺘﻮي آﺎﺑﻼت إﻣﺪاد اﻟﻄﺎﻗﺔ ﻋﻠﻰ آﺎﺑﻞ ﺗﻴﺎر ﻣﺘﺮدد ﻳﺘﻢ ﺗﻮﺻﻴﻞ أﺣﺪ ﻃﺮﻓﻴﻪ ﺑﻜﺎﺑﻼت إﻣﺪاد اﻟﻄﺎﻗﺔ وﺗﻮﺻﻴﻞ اﻟﻄﺮف اﻵﺧﺮ ﺑﺄﺣﺪ ﻣﻘﺎﺑﺲ اﻟﻄﺎﻗﺔ أو ﺑﻮاﻗﻲ ﺗﻴﺎر. .١ .٢ ﻗﻢ ﺑﺘﻮﺻﻴﻞ آﺎﺑﻞ اﻟﺘﻴﺎر اﻟﻤﺘﺮدد ﺑﺎﻟﺠﺰء اﻟﺨﻠﻔﻲ ﻣﻦ آﺎﺑﻼت إﻣﺪاد اﻟﻄﺎﻗﺔ. ﻗﻢ ﺑﺈدﺧﺎل اﻟﻄﺮف اﻵﺧﺮ ﻟﻜﺎﺑﻞ اﻟﺘﻴﺎر اﻟﻤﺘﺮدد ﺑﺄﺣﺪ ﻣﻘﺎﺑﺲ اﻟﻄﺎﻗﺔ أو ﺑﻮاﻗﻲ اﻟﺘﻴﺎر. اﻟﺨﻄﻮة .٥ﺗﻮﺻﻴﻞ آﺎﺑﻞ USB ﺗﻨﺒﻴﻪ إذا آﻨﺖ ﺗﻘﻮم ﺑﺎﻟﺘﺜﺒﻴﺖ ﻓﻲ ﺑﻴﺌﺔ ،Windowsﻓﺘﺄآّﺪ ﻣﻦ ﺗﺜﺒﻴﺖ ﺑﺮﻧﺎﻣﺞ HP Photosmartﻗﺒﻞ ﺗﻮﺻﻴﻞ اﻟﻤﺎﺳﺤﺔ اﻟﻀﻮﺋﻴﺔ ﺑﺎﻟﻜﻤﺒﻴﻮﺗﺮ ﺑﻮاﺳﻄﺔ آﺎﺑﻞ .USBراﺟﻊ ”اﻟﺨﻄﻮة .٢ﺗﺜﺒﻴﺖ اﻟﺒﺮﻧﺎﻣﺞ“ ﻓﻲ ﺻﻔﺤﺔ .٥إذا آﻨﺖ ﺗﻘﻮم ﺑﺎﻟﺘﺜﺒﻴﺖ ﻓﻲ ﺑﻴﺌﺔ ،Macintoshﻓﻴﻤﻜﻨﻚ ﺗﻮﺻﻴﻞ آﺎﺑﻞ USBإﻣﺎ ﻗﺒﻞ ﺗﺜﺒﻴﺖ اﻟﺒﺮﻧﺎﻣﺞ أو ﺑﻌﺪ ﺗﺜﺒﻴﺘﻪ. ٦ دﻟﻴﻞ اﻹﻋﺪاد واﻟﺪﻋﻢ اﻟﻔﺼﻞ ١ اﻟﺨﻄﻮة .٢ﺗﺜﺒﻴﺖ اﻟﺒﺮﻧﺎﻣﺞ ﺗﻨﺒﻴﻪ ﻓﻲ ﺣﺎﻟﺔ ﺗﺜﺒﻴﺖ اﻟﺒﺮ ﻧﺎﻣﺞ ﻋﻠﻰ ﺟﻬﺎز آﻤﺒﻴﻮﺗﺮ ﻳﻌﻤﻞ ﺑﻨﻈﺎم اﻟﺘﺸﻐﻴﻞ ،Windowsﻻ ﺗﻘﻢ ﺑﺘﻮﺻﻴﻞ آﺎﺑﻞ USBﺑﺎﻟﻜﻤﺒﻴﻮﺗﺮ اﻵن .ﻗﻢ ﺑﺘﺜﺒﻴﺖ ﺑﺮﻧﺎﻣﺞ اﻟﻤﺴﺢ اﻟﻀﻮﺋﻲ ﻗﺒﻞ ﺗﻮﺻﻴﻞ آﺎﺑﻞ .USBﻓﻲ ﺣﺎﻟﺔ ﺗﺜﺒﻴﺖ اﻟﺒﺮﻧﺎﻣﺞ ﻋﻠﻰ ﺟﻬﺎز آﻤﺒﻴﻮﺗﺮ ،Macintoshﻓﻴﻤﻜﻨﻚ ﺗﻮﺻﻴﻞ آﺎﺑﻞ USBإﻣﺎ ﻗﺒﻞ ﺗﺜﺒﻴﺖ اﻟﺒﺮﻧﺎﻣﺞ أو ﺑﻌﺪﻩ. .١ .٢ أدﺧﻞ اﻟﻘﺮص اﻟﻤﻀﻐﻮط اﻟﺨﺎص ﺑﺒﺮﻧﺎﻣﺞ HP Photosmartاﻟﻤﺮﻓﻖ ﻣﻊ اﻟﻤﺎﺳﺤﺔ اﻟﻀﻮﺋﻴﺔ ﻓﻲ ﻣﺤﺮك اﻷﻗﺮاص اﻟﻤﻀﻐﻮﻃﺔ اﻟﺨﺎص ﺑﺠﻬﺎز اﻟﻜﻤﺒﻴﻮﺗﺮ. ﻟﻠﺘﺜﺒﻴﺖ ﻋﻠﻰ أﺟﻬﺰة ﺗﻌﻤﻞ ﺑﻨﻈﺎم اﻟﺘﺸﻐﻴﻞ :Windowsاﻧﺘﻈﺮ ﺣﺘﻰ ﻳﺘﻢ ﻋﺮض ﻣﺮﺑﻊ ﺣﻮار اﻟﺘﺜﺒﻴﺖ .ﻓﻲ ﺣﺎﻟﺔ ﻋﺪم ﻋﺮض ﻣﺮﺑﻊ ﺣﻮار اﻟﺘﺜﺒﻴﺖ ﺧﻼل ﺑﻀﻊ دﻗﺎﺋﻖ ،راﺟﻊ ”اﺳﺘﻜﺸﺎف أﺧﻄﺎء ﺗﺜﺒﻴﺖ اﻟﻤﺎﺳﺤﺔ اﻟﻀﻮﺋﻴﺔ وإﺻﻼﺣﻬﺎ“ ﻓﻲ ﺻﻔﺤﺔ .١١ ﻟﻠﺘﺜﺒﻴﺖ ﻋﻠﻰ أﺟﻬﺰة آﻤﺒﻴﻮﺗﺮ :Macintoshاﻧﻘﺮ ﻧﻘﺮًا ﻣﺰدوﺟًﺎ ﻓﻮق رﻣﺰ اﻟﻘﺮص اﻟﻤﻀﻐﻮط اﻟﻈﺎهﺮ ﻋﻠﻰ ﺳﻄﺢ اﻟﻤﻜﺘﺐ ،ﺛﻢ اﻧﻘﺮ ﻧﻘﺮًا ﻣﺰدوﺟًﺎ ﻓﻮق رﻣﺰ ) HP Scanjet Scanner Installﺗﺜﺒﻴﺖ اﻟﻤﺎﺳﺤﺔ اﻟﻀﻮﺋﻴﺔ HP (Scanjetﻟﺒﺪء ﻋﻤﻠﻴﺔ اﻟﺘﺜﺒﻴﺖ. اﻧﻘﺮ ﻓﻮق ) Install softwareﺗﺜﺒﻴﺖ اﻟﺒﺮﻧﺎﻣﺞ( ﻟﺘﺜﺒﻴﺖ ﺑﺮﻧﺎﻣﺞ اﻟﻤﺴﺢ اﻟﻀﻮﺋﻲ .اﺗﺒﻊ اﻹرﺷﺎدات اﻟﺘﻲ ﺗﻈﻬﺮ ﻋﻠﻰ اﻟﺸﺎﺷﺔ ﻻﺳﺘﻜﻤﺎل ﺗﺜﺒﻴﺖ ﺑﺮﻧﺎﻣﺞ اﻟﻤﺴﺢ اﻟﻀﻮﺋﻲ. اﻟﺨﻄﻮة .٣ﺗﻮﺻﻴﻞ آﺎﺑﻞ ﻣﺤﻮل اﻟﻤﻮاد اﻟﺸﻔﺎﻓﺔ ← ﻗﻢ ﺑﺘﻮﺻﻴﻞ آﺎﺑﻞ ﻣﺤﻮل اﻟﻤﻮاد اﻟﺸﻔﺎﻓﺔ ) (TMAﻣﻦ اﻟﻐﻄﺎء إﻟﻰ ﻗﺎﻋﺪة اﻟﻤﺎﺳﺤﺔ اﻟﻀﻮﺋﻴﺔ. ﻋﺮﺑﻲ ﺳﻠﺴﻠﺔ HP Scanjet G4000 ٥ ١ ﺑﺪء اﻻﺳﺘﺨﺪام ﻹﻋﺪاد اﻟﻤﺎﺳﺤﺔ اﻟﻀﻮﺋﻴﺔ ﻗﻢ ﺑﺎﺗﺒﺎع اﻟﺨﻄﻮات اﻟﺘﺎﻟﻴﺔ: اﻟﺨﻄﻮة .١اﻟﺘﻌﺮف ﻋﻠﻰ ﻣﺤﺘﻮﻳﺎت اﻟﺼﻨﺪوق ﻗﻢ ﺑﺈﺧﺮاج أﺟﺰاء اﻟﻤﺎﺳﺤﺔ اﻟﻀﻮﺋﻴﺔ .وﺗﺄآﺪ ﻣﻦ إزاﻟﺔ أي ﺷﺮﻳﻂ ﺗﻐﻠﻴﻒ. 6 1 5 3 2 4 ٤ 1 اﻟﻤﺎﺳﺤﺔ اﻟﻀﻮﺋﻴﺔ HP Scanjet G4010أو G4050 scanner 2 آﺎﺑﻞ USB 3 آﺎﺑﻼت إﻣﺪاد اﻟﻄﺎﻗﺔ 4 دﻟﻴﻞ اﻹﻋﺪاد واﻟﺪﻋﻢ )اﻟﻜﺘﻴﺐ اﻟﻤﺘﻮﻓﺮ ﺑﻴﻦ ﻳﺪﻳﻚ اﻵن( 5 اﻷﻗﺮاص اﻟﻤﻀﻐﻮﻃﺔ ﻟﺒﺮﻧﺎﻣﺞ اﻟﻤﺴﺢ اﻟﻀﻮﺋﻲ 6 ﻗﻮاﻟﺐ ﻣﺤﻮّل اﻟﻤﻮاد اﻟﺸﻔﺎﻓﺔ HP Scanjet G4050) TMAﻓﻘﻂ( دﻟﻴﻞ اﻹﻋﺪاد واﻟﺪﻋﻢ اﻟﻤﺤﺘﻮﻳﺎت ١ ٢ ٣ ٤ ٥ ٦ ﺑﺪء اﻻﺳﺘﺨﺪام ٤............................................................................................................... اﻟﺨﻄﻮة .١اﻟﺘﻌﺮف ﻋﻠﻰ ﻣﺤﺘﻮﻳﺎت اﻟﺼﻨﺪوق ٤.............................................................................. اﻟﺨﻄﻮة .٢ﺗﺜﺒﻴﺖ اﻟﺒﺮﻧﺎﻣﺞ ٥.................................................................................................. اﻟﺨﻄﻮة .٣ﺗﻮﺻﻴﻞ آﺎﺑﻞ ﻣﺤﻮل اﻟﻤﻮاد اﻟﺸﻔﺎﻓﺔ ٥............................................................................ اﻟﺨﻄﻮة .٤ﺗﻮﺻﻴﻞ آﺎﺑﻼت إﻣﺪاد اﻟﻄﺎﻗﺔ ٦................................................................................... اﻟﺨﻄﻮة .٥ﺗﻮﺻﻴﻞ آﺎﺑﻞ ٦........................................................................................... USB اﻟﺨﻄﻮة .٦اﺧﺘﺒﺎر اﻟﺘﺜﺒﻴﺖ ٨.................................................................................................. آﻴﻔﻴﺔ اﺳﺘﺨﺪام اﻟﻤﺎﺳﺤﺔ اﻟﻀﻮﺋﻴﺔ ٩.......................................................................................... ﻣﺼﺎدر اﻟﺤﺼﻮل ﻋﻠﻰ ﻣﻌﻠﻮﻣﺎت إﺿﺎﻓﻴﺔ ٩.................................................................................. ﺑﺮﻧﺎﻣﺞ HP Photosmartﻟـ ٩............................................................................ Windows ﺑﺮﻧﺎﻣﺞ HP Photosmartﻟـ ١٠........................................................................ Macintosh ﻧﻈﺮة ﻋﺎﻣﺔ ﻋﻠﻰ اﻟﻠﻮﺣﺔ اﻷﻣﺎﻣﻴﺔ واﻟﻤﻠﺤﻘﺎت ١٠............................................................................. أزرار اﻟﻠﻮﺣﺔ اﻷﻣﺎﻣﻴﺔ ١٠............................................................................................. ﻣﺤﻮل اﻟﻤﻮاد اﻟﺸﻔﺎﻓﺔ ١٠............................................................................................... اﺳﺘﻜﺸﺎف أﺧﻄﺎء ﺗﺜﺒﻴﺖ اﻟﻤﺎﺳﺤﺔ اﻟﻀﻮﺋﻴﺔ وإﺻﻼﺣﻬﺎ ١١................................................................. إﻟﻐﺎء ﺗﺜﺒﻴﺖ اﻟﺒﺮﻧﺎﻣﺞ وإﻋﺎدة ﺗﺜﺒﻴﺘﻪ ١١........................................................................................ ﻓﺤﺺ اﻟﻜﺎﺑﻼت ١٢............................................................................................................ ﻣﻮاﺻﻔﺎت اﻟﻤﻨﺘﺞ واﻟﻤﻌﻠﻮﻣﺎت اﻟﺘﻨﻈﻴﻤﻴﺔ ١٣................................................................................ ﻣﻮاﺻﻔﺎت اﻟﻤﺎﺳﺤﺔ اﻟﻀﻮﺋﻴﺔ ١٣.............................................................................................. ﻣﻮاﺻﻔﺎت ﻣﺤﻮل اﻟﻤﻮاد اﻟﺸﻔﺎﻓﺔ ١٤.......................................................................................... اﻟﻤﻮاﺻﻔﺎت اﻟﺒﻴﺌﻴﺔ ١٤......................................................................................................... ﻣﻌﻠﻮﻣﺎت ﺧﺎﺻﺔ ﺑﺈﻋﺎدة اﻟﺘﺼﻨﻴﻊ واﻟﻤﻮاد اﻟﻤﺤﻈﻮرة ١٤.................................................................... ﺗﺨﻠﺺ اﻟﻤﺴﺘﺨﺪﻣﻴﻦ ،أﺻﺤﺎب اﻟﻤﻨﺎزل اﻟﺨﺎﺻﺔ ،ﻣﻦ اﻷﺟﻬﺰة اﻟﺘﺎﻟﻔﺔ ﺑﺪول اﻻﺗﺤﺎد اﻷوروﺑﻲ ١٥......................... دﻋﻢ اﻟﻤﻨﺘﺞ ١٦................................................................................................................ ذوو اﻻﺣﺘﻴﺎﺟﺎت اﻟﺨﺎﺻﺔ ١٦................................................................................................. ﻣﻮﻗﻊ وﻳﺐ ١٦.............................................................................................. HP Scanjet اﻟﺤﺼﻮل ﻋﻠﻰ اﻟﺪﻋﻢ ١٧...................................................................................................... ﺑﻴﺎن اﻟﻜﻔﺎﻟﺔ اﻟﻤﺤﺪودة ﻟﺸﺮآﺔ ١٨............................................................... Hewlett-Packard ﻋﺮﺑﻲ ﺳﻠﺴﻠﺔ HP Scanjet G4000 ٣ ﺣﻘﻮق اﻟﻨﺸﺮ واﻟﺘﺮﺧﻴﺺ Copyright Hewlett-Packard 2006 © .Development Company, L.P. ﻳُﺤﻈﺮ ﻧﺴﺦ هﺬﻩ اﻟﻤﺎدة أو ﺗﻌﺪﻳﻠﻬﺎ أو ﺗﺮﺟﻤﺘﻬﺎ ﺑﺪون ﺗﺼﺮﻳﺢ آﺘﺎﺑﻲ ﻣﺴﺒﻖ ،ﺑﺎﺳﺘﺜﻨﺎء ﻣﺎ ﺗﻨﺺ ﻋﻠﻴﻪ ﻗﻮاﻧﻴﻦ ﺣﻘﻮق اﻟﻨﺸﺮ. اﻟﻤﻌﻠﻮﻣﺎت اﻟﻮاردة ﻓﻲ هﺬا اﻟﻤﺴﺘﻨﺪ ﻋُﺮﺿﺔ ﻟﻠﺘﻐﻴﻴﺮ ﺑﺪون إﺷﻌﺎر ﻣﺴﺒﻖ. وﺗﻌﺪ ﺑﻴﺎﻧﺎت اﻟﻜﻔﺎﻟﺔ اﻟﺼﺮﻳﺤﺔ اﻟﻤﺮﻓﻘﺔ ﻣﻊ ﻣﻨﺘﺠﺎت وﺧﺪﻣﺎت ﺷﺮآﺔ HPهﻲ آﻞ اﻟﻜﻔﺎﻻت اﻟﻤﻤﻨﻮﺣﺔ ﻟﻠﻤﻨﺘﺠﺎت واﻟﺨﺪﻣﺎت اﻟﺘﻲ ﺗﻘﺪﻣﻬﺎ اﻟﺸﺮآﺔ .وﻳﺠﺐ ﻋﺪم ﺗﻔﺴﻴﺮ أي ﻣﻦ اﻟﻨﺼﻮص اﻟﻮاردة ﻓﻲ هﺬا اﻟﻤﺴﺘﻨﺪ ﻋﻠﻰ أﻧﻬﺎ إﻗﺮار ﺑﻜﻔﺎﻟﺔ إﺿﺎﻓﻴﺔ .وﺗﻌﺪ ﺷﺮآﺔ HPﻏﻴﺮ ﻣﺴﺆوﻟﺔ ﻋﻦ أﻳﺔ أﺧﻄﺎء ﻓﻨﻴﺔ أو ﺗﺤﺮﻳﺮﻳﺔ أو أي ﺣﺬف ﻳﺮد ﺑﻬﺬا اﻟﻤﺴﺘﻨﺪ. اﻟﻌﻼﻣﺎت اﻟﺘﺠﺎرﻳﺔ ﻳُﻌﺘﺒﺮ آﻞ ﻣﻦ Microsoftو Windowsﻋﻼﻣﺘﻴﻦ ﺗﺠﺎرﻳﺘﻴﻦ ﻣﺴﺠﻠﺘﻴﻦ ﻟﺸﺮآﺔ Microsoft .Corporation دﻟﻴﻞ اﻹﻋﺪاد واﻟﺪﻋﻢ ﻋﺮﺑﻲ-
 1
1
-
 2
2
-
 3
3
-
 4
4
-
 5
5
-
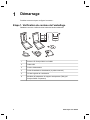 6
6
-
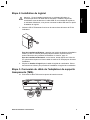 7
7
-
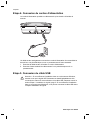 8
8
-
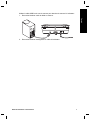 9
9
-
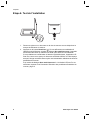 10
10
-
 11
11
-
 12
12
-
 13
13
-
 14
14
-
 15
15
-
 16
16
-
 17
17
-
 18
18
-
 19
19
-
 20
20
-
 21
21
-
 22
22
-
 23
23
-
 24
24
-
 25
25
-
 26
26
-
 27
27
-
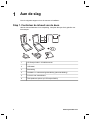 28
28
-
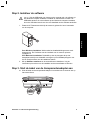 29
29
-
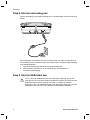 30
30
-
 31
31
-
 32
32
-
 33
33
-
 34
34
-
 35
35
-
 36
36
-
 37
37
-
 38
38
-
 39
39
-
 40
40
-
 41
41
-
 42
42
-
 43
43
-
 44
44
-
 45
45
-
 46
46
-
 47
47
-
 48
48
-
 49
49
-
 50
50
-
 51
51
-
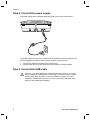 52
52
-
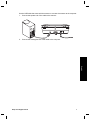 53
53
-
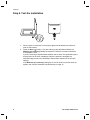 54
54
-
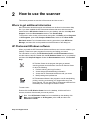 55
55
-
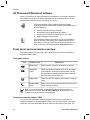 56
56
-
 57
57
-
 58
58
-
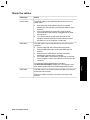 59
59
-
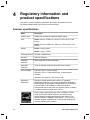 60
60
-
 61
61
-
 62
62
-
 63
63
-
 64
64
-
 65
65
-
 66
66
-
 67
67
-
 68
68
-
 69
69
-
 70
70
-
 71
71
-
 72
72
-
 73
73
-
 74
74
-
 75
75
-
 76
76
-
 77
77
-
 78
78
-
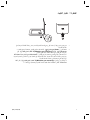 79
79
-
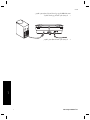 80
80
-
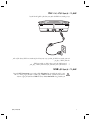 81
81
-
 82
82
-
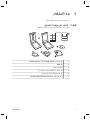 83
83
-
 84
84
-
 85
85
-
 86
86
-
 87
87
-
 88
88


HP SCANJET G4050 PHOTO SCANNER Handleiding
- Type
- Handleiding
in andere talen
Gerelateerde artikelen
-
HP SCANJET G3010 PHOTO SCANNER Installatie gids
-
HP SCANJET G4050 PHOTO SCANNER Handleiding
-
HP scanjet n6350 de handleiding
-
-
-
-
-
-
Compaq 802.11B-G WIRELESS de handleiding
-