
Read on your computer
(PDF file)
EN
DRUM TRIGGER MODULE
DTX700
Read first
Owner’s Manual
(Setup / Basic Operation)
:
This booklet
Reference Manual
(Detailed Operation)
Read when
necessary
Read when
necessary
Data List :
Separate booklet
Please download from this web page:
http://www.yamaha.co.jp/manual/
Read on paper
Owner’s Manual
(Setup / Basic Operation)
(see page 6 for Table of Contents)

2
DTX700 Owner’s Manual
SPECIAL MESSAGE SECTION
This product utilizes batteries or an external power supply (adapter). DO
NOT connect this product to any power supply or adapter other than one
described in the manual, on the name plate, or specifically recom-
mended by Yamaha.
This product should be used only with the components supplied or; a
cart, rack, or stand that is recommended by Yamaha. If a cart, etc., is
used, please observe all safety markings and instructions that accom-
pany the accessory product.
SPECIFICATIONS SUBJECT TO CHANGE:
The information contained in this manual is believed to be correct at the
time of printing. However, Yamaha reserves the right to change or modify
any of the specifications without notice or obligation to update existing units.
This product, either alone or in combination with an amplifier and head-
phones or speaker/s, may be capable of producing sound levels that
could cause permanent hearing loss. DO NOT operate for long periods
of time at a high volume level or at a level that is uncomfortable. If you
experience any hearing loss or ringing in the ears, you should consult an
audiologist.
IMPORTANT: The louder the sound, the shorter the time period before
damage occurs.
NOTICE:
Service charges incurred due to a lack of knowledge relating to how a
function or effect works (when the unit is operating as designed) are not
covered by the manufacturer’s warranty, and are therefore the owners
responsibility. Please study this manual carefully and consult your dealer
before requesting service.
ENVIRONMENTAL ISSUES:
Yamaha strives to produce products that are both user safe and environ-
mentally friendly. We sincerely believe that our products and the produc-
tion methods used to produce them, meet these goals. In keeping with
both the letter and the spirit of the law, we want you to be aware of the
following:
Battery Notice:
This product MAY contain a small non-rechargeable battery which (if
applicable) is soldered in place. The average life span of this type of bat-
tery is approximately five years. When replacement becomes necessary,
contact a qualified service representative to perform the replacement.
This product may also use “household” type batteries. Some of these
may be rechargeable. Make sure that the battery being charged is a
rechargeable type and that the charger is intended for the battery being
charged.
When installing batteries, never mix old batteries with new ones, and
never mix different types of bat
teries. Batteries MUST be installed cor-
rectly. Mismatches or incorrect installation may result in overheating and
battery case rupture.
Warning:
Do not attempt to disassemble, or incinerate any battery. Keep all batter-
ies away from children. Dispose of used batteries promptly and as regu-
lated by the laws in your area. Note: Check with any retailer of household
type batteries in your area for battery disposal information.
Disposal Notice:
Should this product become damaged beyond repair, or for some reason
its useful life is considered to be at an end, please observe all local,
state, and federal regulations that relate to the disposal of products that
contain lead, batteries, plastics, etc. If your dealer is unable to assist you,
please contact Yamaha directly.
NAME PLATE LOCATION:
The name plate is located on the bottom of the product. The model num-
ber, serial number, power requirements, etc., are located on this plate.
Yo u should record the model number, serial number, and the date of pur-
chase in the spaces provided below and retain this manual as a perma-
nent record of your purchase.
Model
Serial No.
Purchase Date
PLEASE KEEP THIS MANUAL
92-BP (bottom)
1. IMPORTANT NOTICE: DO NOT MODIFY THIS UNIT!
This product, when installed as indicated in the instructions contained
in this manual, meets FCC requirements. Modifications not expressly
approved by Yamaha may void your authority, granted by the FCC, to
use the product.
2. IMPORTANT: When connecting this product to accessories and/or
another product use only high quality shielded cables. Cable/s sup-
plied with this product MUST be used. Follow all installation instruc-
tions. Failure to follow instructions could void your FCC authorization
to use this product in the USA.
3. NOTE: This product has been tested and found to comply with the
requirements listed in FCC Regulations, Part 15 for Class “B” digital
devices. Compliance with these requirements provides a reasonable
level of assurance that your use of this product in a residential envi-
ronment will not result in harmful interference with other electronic
devices. This equipment generates/uses radio frequencies and, if not
installed and used according to the instructions found in the users
manual, may cause interference harmful to the operation of other
electronic devices. Compliance with FCC regulations does not guar-
antee that interference will not occur in all installations. If this product
is found to be the source of interference, which can be determined by
turning the unit “OFF” and “ON”, please try to eliminate the problem by
using one of the following measure
s:
Relocate either this product or the device that is being affected by the
interference.
Utilize power outlets that are on different branch (circuit breaker or
fuse) circuits or install AC line filter/s.
In the case of radio or TV interference, relocate/reorient the antenna.
If the antenna lead-in is 300 ohm ribbon lead, change the lead-in to
co-axial type cable.
If these corrective measures do not produce satisfactory results,
please contact the local retailer authorized to distribute this type of
product. If you can not locate the appropriate retailer, please contact
Yamaha Corporation of America, Electronic Service Division, 6600
Orangethorpe Ave, Buena Park, CA90620
The above statements apply ONLY to those products distributed by
Yamaha Corporation of America or its subsidiaries.
* This applies only to products distributed by YAMAHA CORPORATION OF AMERICA. (class B)
FCC INFORMATION (U.S.A.)
COMPLIANCE INFORMATION STATEMENT (DECLARATION OF CONFORMITY PROCEDURE)
Responsible Party : Yamaha Corporation of America
Address : 6600 Orangethorpe Ave., Buena Park, Calif. 90620
Telephone : 714-522-9011
Type of Equipment : Drum Trigger Module
Model Name : DTX700
This device complies with Part 15 of the FCC Rules.
Operation is subject to the following two conditions:
1) this device may not cause harmful interference, and
2) this device must accept any interference received including interfer-
ence that may cause undesired operation.
See user manual instructions if interference to radio reception is suspected.
* This applies only to products distributed by YAMAHA CORPORATION OF AMERICA. (FCC DoC)

DTX700 Owner’s Manual
3
PRECAUTIONS
PLEASE READ CAREFULLY BEFORE PROCEEDING
* Please keep this manual in a safe place for future reference.
WARNING
Always follow the basic precautions listed below to avoid the possibility of serious injury or even death from electrical
shock, short-circuiting, damages, fire or other hazards. These precautions include, but are not limited to, the following:
• Do not place the power cord near heat sources such as heaters or
radiators, and do not excessively bend or otherwise damage the
cord, place heavy objects on it, or place it in a position where
anyone could walk on, trip over, or roll anything over it.
• Only use the voltage specified as correct for the instrument. The
required voltage is printed on the name plate of the instrument.
• Use the specified adaptor (page 57) only. Using the wrong adaptor
can result in damage to the instrument or overheating.
• Check the electric plug periodically and remove any dirt or dust
which may have accumulated on it.
• This instrument contains no user-serviceable parts. Do not attempt
to disassemble or modify the internal components in any way. If it
should appear to be malfunctioning, discontinue use immediately
and have it inspected by qualified Yamaha service personnel.
• Do not expose the instrument to rain, use it near water or in damp or
wet conditions, place on it any containers (such as vases, bottles or
glasses) containing liquids which might spill into any openings. If
any liquid such as water seeps into the instrument, turn off the
power immediately and unplug the power cord from the AC outlet.
Then have the instrument inspected by qualified Yamaha service
personnel.
• Never insert or remove an electric plug with wet hands.
• Do not put burning items, such as candles, on the unit.
A burning item may fall over and cause a fire.
• When one of the following problems occur, immediately turn off the
power switch and disconnect the electric plug from the outlet. Then
have the device inspected by Yamaha service personnel.
• The power cord or plug becomes frayed or damaged.
• It emits unusual smells or smoke.
• Some object has been dropped into the instrument.
• There is a sudden loss of sound during use of the instrument.
CAUTION
Always follow the basic precautions listed below to avoid the possibility of physical injury to you or others, or damage
to the instrument or other property. These precautions include, but are not limited to, the following:
• Do not connect the instrument to an electrical outlet using a
multiple-connector. Doing so can result in lower sound quality, or
possibly cause overheating in the outlet.
• When removing the electric plug from the instrument or an outlet,
always hold the plug itself and not the cord. Pulling by the cord can
damage it.
• Remove the electric plug from the outlet when the instrument is not
to be used for extended periods of time, or during electrical storms.
• Do not place the instrument in an unstable position where it might
accidentally fall over.
• Before moving the instrument, remove all connected cables.
• When setting up the product, make sure that the AC outlet you are
using is easily accessible. If some trouble or malfunction occurs,
immediately turn off the power switch and disconnect the plug from
the outlet. Even when the power switch is turned off, electricity is
still flowing to the product at the minimum level. When you are not
using the product for a long time, make sure to unplug the power
cord from the wall AC outlet.
Power supply/AC power adaptor
Do not open
Water warning
Fire warning
If you notice any abnormality
Power supply/AC power adaptor
Location
DMI-3 1/2

4
DTX700 Owner’s Manual
• Use only the stand/rack specified for the instrument. When attaching
the stand or rack, use the provided screws only. Failure to do so
could cause damage to the internal components or result in the
instrument falling over.
• Before connecting the instrument to other electronic components,
turn off the power for all components. Before turning the power on
or off for all components, set all volume levels to minimum.
• Be sure to set the volumes of all components at their minimum
levels and gradually raise the volume controls while playing the
instrument to set the desired listening level.
• Do not insert a finger or hand in any gaps on the instrument.
• Never insert or drop paper, metallic, or other objects into the gaps
on the panel. This could cause physical injury to you or others,
damage to the instrument or other property, or operational failure.
• Do not rest your weight on, or place heavy objects on the
instrument, and do not use excessive force on the buttons, switches
or connectors.
• Do not use the instrument/device or headphones for a long period of
time at a high or uncomfortable volume level, since this can cause
permanent hearing loss. If you experience any hearing loss or
ringing in the ears, consult a physician.
Always turn the power off when the instrument is not in use.
Even when the power switch is in standby status, electricity is still flowing to the instrument at the minimum level. When you are not using the
instrument for a long time, make sure you unplug the power cord from the wall AC outlet.
NOTICE
To avoid the possibility of malfunction/ damage to the product, damage to data, or damage to other property, follow the notices
below.
Handling and Maintenance
• Do not use the instrument in the vicinity of a TV, radio, stereo equ ipment, mobile phone, or other electric devices. Otherwise, the
instrument, TV, or radio may generate noise.
• Do not expose the instrument to excessive dust or vibrations, or extreme cold or heat (such as in direct sunlight, near a heater,
or in a car during the day) to prevent the possibility of panel disfiguration, damage to the internal components or unstable oper-
ation. (Verified operating temperature range: 5° – 40°C, or 41° – 104°F.)
• Do not place vinyl, plastic or rubber objects on the instrument, since this might discolor the panel or keyboard.
• When cleaning the instrument, use a soft, dry/dry or slightly damp cloth. Do not use paint thinners, solvents, cleaning fluids, or
chemical-impregnated wiping cloths.
Saving data
• Saved data may be lost due to malfunction or incorrect operation. Save important data to a USB storage device/external device
such as a computer.
• To protect against data loss through media damage, we recommend that you save your important data onto two USB storage
devices/external media.
Information
About copyrights
• Copying of the commercially available musical data including but not limited to MIDI data and/or audio data is strictly prohibited except for your
personal use.
• This product incorporates and bundles computer programs and contents in which Yamaha owns copyrights or with respect to which it has
license to use others’ copyrights. Such copyrighted materials include, without limitation, all computer software, style files, MIDI files, WAVE data,
musical scores and sound recordings. Any unauthorized use of such programs and contents outside of personal use is not permitted under rel-
evant laws. Any violation of copyright has legal consequences. DON’T MAKE, DISTRIBUTE OR USE ILLEGAL COPIES.
About this manual
• The illustrations and LCD screens as shown in this manual are for instructional purposes only, and may appear somewhat different from those
on your instrument.
• The company names and product names in this manual are the trademarks or registered trademarks of their respective companies.
Connections
Handling caution
Yamaha cannot be held responsible for damage caused by improper use or modifications to the instrument, or data that is lost or destroyed.
DMI-3 2/2

DTX700 Owner’s Manual
5
Welcome
Thank you for purchasing the Yamaha DTX700 Drum Trigger Module.
To get the most out of your new instrument, be sure to read this owner’s manual carefully.
And after reading through this manual, be sure to store it in a safe place so
that you can refer back to it again as needed.
Using the Manuals
Owner’s Manual – this booklet (Setup / Basic Operation)
This paper manual describes the basic operations performed via the DTX700’s control panel.
Data List
The Data List contains the names of all of the DTX700’s sounds and kits, together with MIDI-related reference material.
Reference Manual (Detailed Operation) *Not bundled with this product.
The Reference Manual provides a description of all of the functions that can be accessed by pressing the [MENU] button on the
DTX700’s control panel. This PDF manual is not bundled with the drum trigger module. If you wish to learn more about your
DTX700 using the Reference Manual, please download it from the Yamaha Manual Library web page:
http://www.yamaha.co.jp/manual/
* Yamaha Corp. reserves the right to modify this URL at any time without prior notice.
Using PDF Manuals
The Reference Manual for your DTX700 is made available in digital format as a PDF document. As such, a computer and suitable
software will be required in order to read it. We recommend that Adobe Reader be used for this purpose as it allows you to quickly
and easily search for keywords, to print out specific sections, and to conveniently jump from page to page by clicking embedded
links. Keyword searching and link-based navigation in particular are extremely useful functions available only with digital-type
documents. The most-recent version of Adobe Reader can be downloaded from the following web page.
http://www.adobe.com/products/reader/
Bundled items
• Power adaptor • Module holder
• Owner’s Manual (this booklet) • Module-holder fixing screws x 4
• Data List
• DVD-ROM (containing DAW software)
Latest Firmware Version
From time to time, Yamaha may update product firmware without prior notice. We recommend, therefore, that you check our web
site (below) for the latest version and keep your DTX700 firmware up to date.
http://dtxdrums.yamaha.com/downloads/
The content of this Owner’s Manual applies to the newest version of the firmware as of printing. Details regarding any functions
ad
ded to later versions will also be made available via the above web site.
Optional Pads
Within this Owner’s Manual, the optional external pads that may be connected to the DTX700 are referred to by model name.
Please note that these model names were up-to-date as of printing of this manual. Details regarding any subsequently released
models will be made available via the following web site.
http://dtxdrums.yamaha.com/downloads/

6
DTX700 Owner’s Manual
Contents
Welcome ................................................................5
Using the Manuals ................................................5
Bundled items .......................................................5
Contents.................................................................6
First Steps.................................................7
Quick Start Guide .....................................8
Component Names & Functions........................10
Control Panel............................................................. 10
Side Panel ..................................................................11
Rear Panel ................................................................ 12
Setting Up for Sound ..........................................13
Connecting the Adaptor............................................. 13
Connecting Speakers or Headphones ...................... 13
Connecting a Music Player........................................ 13
Turning On................................................................. 14
Turning Off................................................................. 14
Auto Power-Off........................................................... 14
Playing Demo Songs ..........................................16
Basic DTX700 Operations ..................................17
Dial (with integrated button)....................................... 17
Changing the Cursor Value ....................................... 17
Moving the Cursor ..................................................... 17
[-/DEC] and [+/INC] Buttons ...................................... 18
[F1], [F2] & [F3] Fu nction Buttons.............................. 18
Adjusting the Volume................................................. 19
Adjusting Display Contrast ........................................ 19
Storing Settings ......................................................... 21
Connecting a USB Memory Device........................... 21
Restoring Default Settings ......................................... 22
Playing Drum Pads..............................................23
Snares & Toms .......................................................... 23
Hi-Hats ...................................................................... 23
Cymbal ...................................................................... 24
Performing on Many Different Kits ....................25
Selecting a Kit ........................................................... 25
Selecting a Sensitivity for the Entire Kit..................... 26
Adjusting Tone........................................................... 27
Turning Off Effects..................................................... 28
Initializing a Kit .......................................................... 28
Switching the Display Mode ...................................... 29
Building Your Own Kit........................................ 30
Selecting Sounds (Instruments) ................................ 30
Adjusting an Instrument’s Sound............................... 31
Playing with a Double Bass Drum ............................. 32
Importing & Assigning Audio Files............................. 32
Naming an Original Kit .............................................. 34
Adjusting the Snare Wire........................................... 35
Playing with Songs for Practice........................ 36
Playing a Song .......................................................... 36
Adjusting the Song Volume ....................................... 36
Adjusting the Volume of a Song’s Drums .................. 37
Muting the Drum Part ................................................ 38
Soloing the Bass Part................................................ 38
Locking a Kit.............................................................. 39
Turning On the Click-Track ................................ 41
Setting the Tempo and Starting the Click-Track......... 41
Setting the Click-Track Volume .................................. 41
Setting the Time Signature........................................ 43
Using the Timer ......................................................... 44
Tap Tempo – Setting the Tempo by Playing Pads...... 44
Using DTX700 Training Functions............................. 45
Recording Your Performances .......................... 48
Recording a Performance.......................................... 48
Playing a Recorded Performance.............................. 48
Deleting a Recorded Performance ............................ 48
Recording Performance & Song Together................. 49
Integrating Accessories..................................... 50
Using an HH65 Hi-hat Controller
as Kick Drum Pedal ............................................... 50
Expanding with a PCY135 Cymbal Pad..................... 50
Connecting Your DTX700 to a Computer ......... 52
Making Connections.................................................. 52
Making Music with a Computer ................................. 53
Setting up Cubase Remote Control ........................... 54
On-Screen Messages ......................................... 55
Troubleshooting ................................................. 56
Specifications ..................................................... 57
Index .................................................................... 58
List of DTX700 Functions .................................. 59
Setup
Basic Operation
* For details regarding these functions, refer to the Reference
Manual PDF document.

DTX700 Owner’s Manual
7
First Steps
Open the boxes to reveal their contents.
• DTX700 Drum Trigger Module (main unit)
• Racks such as the RS500 and RS700
• Pad sets such as the DTP700C, DTP700P, DTP750C, and
DTP750P
Assemble your kit.
• Assemble the racks.
m Refer to the assembly manuals that came with your racks
(RS500, RS700, etc.).
•Mount the pads and the DTX700 on the racks.
m Refer to the assembly manuals that came with your pad
sets (DTX700K, DTX750K, etc.).
Connect your kit.
• Connect your pads to the DTX700 using the correct cables.
m Refer to the assembly manuals that came with your pad
sets (DTX700K, DTX750K, etc.).
•Plug the power adaptor into the DTX700 and turn it on.
m See page 13 of this booklet.
Play your kit.
• See pages 8 and 9 of this booklet for tips on getting started right
away.
•This booklet provides an introduction to your DTX700’s basic
functions. Detailed descriptions of all functions can be found in
the Reference Manual PDF document (see page 5).
1
2
3
4

8
DTX700 Owner’s Manual
Quick Start Guide
q Press the [KIT] button.
w Turn the dial to select new
sounds.
q Press the [SONG] button.
w Turn the dial to select a new song.
e Press the [F3] button to start the
song.
Yo u can also assign sounds individually to
each of the pads (page 25 of Basic Opera-
tion).
Yo u can press the [F2] button to silence
the song’s drum part (page 38 of Basic
Operation).
Choosing sounds to play (page 25 of Basic Operation)
Playing along with a song (page 36 of Basic Operation)

DTX700 Owner’s Manual
9
Quick Start Guide
q Press the [CLICK] button.
w Turn the dial to set the tempo.
e Press the [ ] button to start the
metronome.
q Press the [REC] button.
w Press the [>/
] button to start
recording.
e When you have finished playing,
press the [>/
] button once again
to stop recording.
Yo u can also use the [>/
] button to start
and stop playback of your recorded perfor-
mance (page 48 of Basic Operation).
Practicing with a metronome (page 41 of Basic Operation)
Recording your own performance (page 48 of Basic Operation)

Setup
10
DTX700 Owner’s Manual
Component Names & Functions
q [PHONES] volume knob (page 13)
This knob controls the volume of audio output from the
[PHONES] jack. Turn clockwise to increase the volume
or counter-clockwise to decrease it.
w [MASTER] knob (page 19)
This knob controls the DTX700 master volume (i.e.,
the volume at the OUTPUT jacks). Turn clockwise to
increase the volume or counter-clockwise to decrease
it.
e Display (page 29)
This LCD screen shows information and data needed
to operate the DTX700.
r Dial (page 17)
This dial can be both turned and pressed.
• By pressing it, you can set parameter values and
execute various functions such as the storing of
data.
• By turning it, you can move the cursor within dis-
played pages and change the currently selected
parameter value.
t (Standby/On) button (page 14)
Use this switch to turn your DTX700 on and off.
y [F1], [F2], and [F3] function buttons (page 18)
These buttons are used to access a range of different
functions depending on the page displayed.
u [EXIT] button
Press this button to cancel operations such as the
copying and storing of data. In addition, you can
immediately silence all voices at any time by holding
down the [SHIFT] button and pressing the [EXIT] but-
ton.
i [STORE] button (page 21)
This button is used to store settings and other data in
the DTX700’s internal memory. In addition, it will light
up whenever parameter settings have been changed
but not yet stored.
o [KIT] button (page 25)
This button is used to access the Kit page in order to
select a drum kit.
Control Panel
wq
e
y
@0
!8 !9
!0
!1
o
!3
!4
!2
!6
!7
!5
ui
t
r

DTX700 Owner’s Manual
11
Setup
Component Names & Functions
!0 [SONG] button (page 36)
This button is used to access the Song page in order
to select a song.
!1 [MENU] button (page 20)
This button is used to access the Menu area. From
here, you can select various other pages in order to
configure your DTX700 in many different ways.
*This booklet introduces some of the basic functions avail-
able in the Menu area. For a complete description of all
functions, please download the DTX700 Reference Manual
from this web page:
http://www.yamaha.co.jp/manual/
!2 [INST] button (page 30)
This button is used to access the Instrument page in
order to select instruments.
[Definition] Instrument
In the context of the DTX700, the term “instru-
ment” is used to refer to each of the various
percussion instruments that make up a kit. Typ-
ical examples would be snare drums, tom-toms,
cymbals, and kick drums.
!3 [CLICK] button (page 41)
This button is used to access the Click page in order to
set your DTX700’s click-track (or metronome).
!4 [SHIFT] button
When you press this button, the functions assigned to
the [F1], [F2], and [F3] buttons will change. These
functions can be accessed by holding down the
[SHIFT] button and pressing the corresponding func-
tion button (see page 18). Meanwhile, a number of the
buttons on the DTX700’s control panel have second-
ary functions, indicated just above the buttons them-
selves. These functions can also be accessed by
holding down the [SHIFT] button and pressing the cor-
responding button.
!5 [>/
] button (page 48)
Use this button to start and stop the playback of perfor-
mances that you have recorded on the DTX700.
!6 [REC] button (page 48)
Using this button, you can activate and deactivate
recording of your performances.
!7 [ ] (Click-track) button (page 41)
The Click-track button is used to start and stop the
DTX700’s click-track (or metronome).
!8 [-/DEC] button (page 18)
This button is used to decrease the value at the cursor
position. In addition, the selected value can be
decreased in units of 10 by holding down the [SHIFT]
button and pressing the [-/DEC] button or by holding
down the [-/DEC] button and pressing the [+/INC] but-
ton.
!9 [+/INC] button (page 18)
This button is used to increase the value at the cursor
position. In addition, the selected value can be
increased in units of 10 by holding down the [SHIFT]
button and pressing the [+/INC] button or by holding
down the [+/INC] button and pressing the [-/DEC] but-
ton.
@0 Sliders (page 41)
The sliders are used to adjust the volumes of individ-
ual parts such as the snare and toms, and also the vol-
ume of the click-track.
q [USB TO HOST] port (page 52)
This port is used to connect the DTX700 to a computer
via a USB cable.
w [USB TO DEVICE] port (page 21)
This port is used to plug in a USB memory device
(such as a flash drive), either directly or via a USB
cable.
Side Panel
qw

Setup
12
DTX700 Owner’s Manual
Component Names & Functions
q [LCD CONTRAST] knob (page 19)
This knob is used to set the display contrast for opti-
mum legibility.
w [ ] connector (page 13)
Use this connector for the power adaptor that came
with your DTX700.
e Cord clip (page 13)
Wrap the power adaptor cord around this clip to pre-
vent accidental unplugging during operation.
r MIDI [IN] and [OUT] connectors (page 13)
The MIDI [IN] connector is used to receive control or
performance data from another MIDI device, such as
an external sequencer, via a MIDI cable. When con-
nected in this way, you can play the DTX700’s internal
tone generator and control many of its parameters
using another MIDI device. Meanwhile, the MIDI [OUT]
connector is used to send performance data from the
DTX700 to other devices in the form of MIDI mes-
sages.
t [AUX IN] (auxiliary input) jack (page 13)
External audio signals can be input via this stereo
mini-jack. Using [AUX IN], you can connect a portable
music player, a CD player, or another similar device to
play along with your favorite tunes.
y OUTPUT [L/MONO] and [R] jacks (page 13)
Use these jacks to output line-level stereo mixes from
your DTX700. For example, you can connect each of
the jacks to the left and right inputs of an external ste-
reo amplifier or mixer using mono audio-jack cables.
For mono output, use the [L/MONO] jack only.
u [PHONES] jack (page 13)
Use this standard audio jack to connect a pair of ste-
reo headphones.
i Trigger input jacks [qSNARE] to [i HI-HAT],
and [!1]
These trigger-input jacks are used to connect stereo-
type pads (two- and three-zone). They also support
standard mono-output pads. In addition, these trigger-
input jacks are compatible with pad controllers.
o [HI-HAT CONTROL] jack
This jack is used to connect an HH65 Hi-hat Controller
or an RHH135 Real Hi-hat Pad via its control output.
!0 Trigger input jack [oKICK/!0]
This trigger-input jack is used to connect mono-type
pads such as the KP65 Kick Pad. If using a KP65, fur-
thermore, you can use the input jack on its rear sur-
face to connect an additional mono-type pad.
Meanwhile, you could also use a Y-shaped cable (sold
separately) with this jack in order to connect a pair of
mono-type pads.
!1 Trigger input jack [!2HH-KICK]
This jack is used to connect an HH65 Hi-hat Controller
(sold separately) for use as an alternative kick pad or
as part of a double bass drum configuration (page 50).
Rear Panel
w ert uyq
i
!1 !0 o

DTX700 Owner’s Manual
13
Setup
Setting Up for Sound
1 Ensure that your DTX700 is turned off (i.e.,
the screen is not lit).
2 Insert the power adaptor’s DC plug into the
[ ] connector on the rear
panel.
3 Hook the power adaptor’s cord around the
cord clip to secure it in place.
4 Plug the power adaptor’s AC power cord into
an AC wall socket or another electrical outlet.
Your DTX700 does not come with built-in speakers. In order to
hear it, therefore, you will need to connect headphones or a
DTX-series monitor system, such as the MS40DR.
Connecting Speakers
Connect your speakers to the OUTPUT [L/MONO] and [R]
jacks (standard mono-audio).
Connecting Headphones
Connect your headphones to the [PHONES] jack (standard
stereo-audio). The [PHONES] knob on the control panel can
be used to adjust the volume of the headphones.
You can connect a portable music player or another similar
source of audio to your DTX700 via the [AUX IN] (auxiliary
input) stereo mini-jack. This makes it possible to play along
with your favorite songs.
NOTICE
• Whenever connecting other devices, ensure that the
cables you use have plugs that match the input or out-
put connectors on those devices.
• Before making connections, furthermore, you should
also turn the volume on the other devices fully down.
• When all connections have been made, use each
device’s volume controller to balance its output with
that of the DTX700.
Connecting the Adaptor
CAUTION
• Excessive bending can damage the power adap-
tor’s cord and create a fire hazard. Ensure, there-
fore, that the power cord is not bent at an extreme
angle when wrapped around the clip.
WARNING
• Use only the power adaptor that came with your
DTX700.
CAUTION
• The DTX700 remains charged and draws a small
amount of power even when the (Standby/On)
button is set to the Standby position. For this rea-
son, you should always unplug the power adaptor
from the wall socket if the instrument will not be
used for an extended period of time.
Cord clip
Power adaptor cord
Connecting Speakers or Headphones
CAUTION
• To prevent hearing loss, avoid using headphones at
high volumes for extended periods of time.
Connecting a Music Player
Speakers with
a built-in amplifier
External MIDI device
MIDI
OUT
Standard stereo-
audio jack (6.3-mm
dia.)
Mini stereo
audio cable
(3.5-mm dia.)
Mobile music
player, etc.
Standard mono audio
cable (6.3-mm dia.)
MIDI
cable
MIDI
IN

Setup
14
DTX700 Owner’s Manual
Setting Up for Sound
1 Turn the [MASTER] knob fully counterclock-
wise to minimize the output volume.
2 Press the (Standby/On) button.
The opening pages will be displayed, followed by the Kit
page.
3 If you have connected any amplified speakers
or other similar external devices, turn them
on now.
NOTE
• When powering down your system, be sure to turn off
external devices before the DTX700.
1 Press the (Standby/On) button.
The display will turn off.
NOTICE
• If you turn off the DTX700 without storing any
changes you have made to settings, those changes
will be lost. For details on how to store changed set-
tings, see page 21.
If no controls are operated or no data is exchanged with external
devices (such as a computer or MIDI instrument) for a predeter-
mined length of time, your DTX700 will turn off automatically.
This function is called Auto Power-Off.
NOTICE
• If you do not store changed settings before the Auto
Power-Off function activates, your changes may be per-
manently lost. Be sure, therefore, to store new settings
whenever you are happy with them.
Setting the Auto Power-Off Function
Use the following procedure to set the time until the Auto
Power-Off function activates or to disable the function.
1 Press the [MENU] button.
2 Turn the dial to move the cursor to “Utility”.
3 Press the dial.
4 Turn the dial to move the cursor to “General”.
5 Press the dial.
6 Turn the dial to move the cursor to the “Auto-
PowerOff” row of the displayed list.
Turning On Turning Off
Auto Power-Off

DTX700 Owner’s Manual
15
Setup
Setting Up for Sound
7 Press the dial.
The cursor will zoom in on the value on the right.
8 Turn the dial to set the automatic power-off
time.
The value indicates the idle time until automatic power-off
in minutes. Settings can be made in units of 5 minutes
between 5 and 30. Furthermore, you can disable the Auto
Power-Off function by selecting “off”.
9 Press the dial.
The cursor will zoom out to select the entire row.
10 Press the [STORE] button.
11 Press the dial to store your new settings.
NOTE
• The Auto Power-Off function is set to 30 minutes by
default.
Disabling the Auto Power-Off Function at
Startup
To disable the Auto Power-Off function when turning on the
DTX700, hold down the [>/
] button when you press the
(Standby/On) button. (This action sets the AutoPower-
Off parameter to “Off”.)

Basic Operation
16
DTX700 Owner’s Manual
Playing Demo Songs
Your DTX700 comes pre-programmed with demo songs.
Played as described below, these songs allow you to fully appre-
ciate the quality of the sound produced by the built-in tone gen-
erator.
1 Press the (Standby/On) button to turn on
your DTX700.
Startup pages
2 Press the [SONG] button.
3 Press the [F3] button.
The demo song indicated on the display will start. The
[SONG] button will flash while the song is playing.
4 Press the [F3] button once again to stop the
demo song.
5 To select a different demo song, turn the dial
and repeat Steps 3 and 4.

DTX700 Owner’s Manual
17
Basic Operation
Basic DTX700 Operations
Pressing the dial
You press the dial to execute various operations and to set
new values for parameters. The cursor type (see below) can
also be toggled by pressing the dial.
Turning the dial
You turn the dial to change parameter values and to move the
cursor.
The cursor is displayed as a block of inverted text.
By turning the dial in either direction, you can change the value
at the current cursor position.
When a page contains more than one editable value, you can
press the dial to toggle between inverted text and underlined
text at the cursor position.
Example: After pressing the [SONG] button
On the page accessed with the [SONG] button, you can set both
the song number and the tempo .
By turning the dial, you can move the cursor. In this way, you
can select the value you wish to change.
Press the dial once again to switch back to the inverted-text cursor.
By turning the dial in either direction, you can change the value
at the cursor position.
Dial (with integrated button)
Changing the Cursor Value
Dial
Cursor
Moving the Cursor
Cursor
Cursor
Press the dial to
switch to the
underline cursor.
Cursor
Turn the dial to
move the
underline

Basic Operation
18
DTX700 Owner’s Manual
Basic DTX700 Operations
These buttons are used to change the currently selected value.
Press the [+/INC] button to increase the value by one; the [-/
DEC] button to decrease by one. If you hold down either button,
the value will change continuously. In the case of parameters
with a wide range of possible settings, you can increase them in
units of 10 by holding down the [SHIFT] button and pressing
the [+/INC] button or by holding down the [+/INC] button and
pressing the [-/DEC] button. Similarly, you can decrease in
units of 10 by holding down the [SHIFT] button and pressing
the [-/DEC] button or by holding down the [-/DEC] button and
pressing the [+/INC] button.
The functions that you can access by pressing the [F1], [F2],
and [F3] function buttons are displayed as inverted text at the
bottom of the display. In addition, when the symbol is
shown in the bottom right corner, you can press the [SHIFT]
button to display additional functions for each of the buttons.
To access these additional functions, hold down the [SHIFT]
button and press the corresponding button.
[-/DEC] and [+/INC] Buttons [F1], [F2] & [F3] Function Buttons
Function buttons
Kit Lock
Effects Switch
Display Mode

DTX700 Owner’s Manual
19
Basic Operation
Basic DTX700 Operations
You can use the [MASTER] knob to adjust the volume of sound
on the OUTPUT [L/MONO] and [R] channels. In addition, the
[PHONES] knob can be used to adjust the volume of head-
phones plugged into the [PHONES] jack on the rear panel. Turn
clockwise to increase the volume or counter-clockwise to
decrease it.
Using the [LCD CONTRAST] knob on the rear panel, you can
adjust the contrast level of the DTX700 display.
Adjusting the Volume
Adjusting Display Contrast
[LCD CONTRAST] knob

Basic Operation
20
DTX700 Owner’s Manual
Basic DTX700 Operations
Pages Accessed Using the [MENU] Button
The pages of your DTX700’s Menu area provide access to a wide range of highly-useful settings. To access this area, simply press
the [MENU] button. This manual introduces some of the pages from the Menu area. For a complete description, please download
the DTX700 Reference Manual from this web page:
http://www.yamaha.co.jp/manual/
Cursor operations on Menu area pages
The way in which the cursor is displayed and operated on Menu area pages differs from that of other pages.
• Navigation pages
When you turn the dial on navigation-type pages, the cursor
(i.e., the inverted text) moves in the corresponding direction.
By pressing the dial, you can move one level further into the
Menu area.
To move back one step towards the top page, press the
[EXIT] button.
NOTE
• The convention used in this manual to describe
sequences of cursor operations in the Menu area takes
the form: [MENU] m [KIT] m [COMMON].
• Parameter pages
When you turn the dial on parameter-type pages, the cursor
(i.e., the inverted text) moves up and down within the dis-
played list.
When you press the dial, the cursor will zoom in on the value
on the right.
In this condition, you can turn the dial to change the value
selected by the cursor.
When you press the dial again, the cursor will zoom out to
select the entire row.

DTX700 Owner’s Manual
21
Basic Operation
Basic DTX700 Operations
Whenever you change a DTX700 setting, the [STORE] button
will light up to remind you to store your new setting in the
instrument’s internal memory. To do so, proceed as follows.
1 Make sure that the [STORE] button is lit.
2 Press the [STORE] button.
You will be asked to confirm that you wish to proceed.
NOTE
•You can press the [EXIT] button to return to the previous
page without storing.
3 Press the dial to store your settings.
The [STORE] button will go out, confirming that your set-
tings have been permanently stored.
NOTICE
• If you turn off the DTX700 without storing any
changes you have made to settings, those changes
will be lost.
You can plug a USB memory device into the [USB TO
DEVICE] port on the side panel of your DTX700.
Precautions when using the [USB TO
DEVICE] port
Whenever connecting a USB device to your DTX700 via the
[USB TO DEVICE] port, be sure to observe the following
important precautions.
NOTICE
• Use a USB A-B cable of no more than 3 meters in
length.
NOTE
• For more details on how to use your USB memory
device, refer to the owner’s manual that came with it.
Supported USB memory devices
Flash drives and other USB-compatible, mass storage
devices may be used with the DTX700.
This instrument does not necessarily support all commer-
cially available USB memory devices, and Yamaha cannot
guarantee the operation of all such devices. Before purchas-
ing a USB device for use with this instrument, therefore,
please check with your Yamaha dealer or an authorized
Yamaha distributor, or visit this web page:
http://dtxdrums.yamaha.com/
NOTE
• Other USB devices, such as a computer keyboard or
mouse, are not supported.
Connecting a USB memory device
Before plugging in a USB memory device, ensure that its
connector matches the shape of the DTX700’s [USB TO
DEVICE] port and that both are oriented in the same direc-
tion. The [USB TO DEVICE] port supports the USB 1.1
standard; however, you can plug in and use USB 2.0 memory
devices. It should be noted that data will be transferred at the
USB 1.1 speed in such a case.
NOTE
• USB 3.0 cables cannot be connected to the DTX700.
Using a USB memory device
With a USB memory device plugged into the DTX700, you
will be able to save data that you have created and to import
settings and audio data.
Initializing a USB memory device
Certain types of USB memory device must be initialized
before they can be used with this instrument. For details on
how to do this, refer to the
Reference Manual
PDF document.
NOTICE
• When a USB memory device is initialized, all data
saved on it will be permanently erased. Before for-
matting such a device, therefore, ensure that any
important data has been copied to another location.
Write protection
Certain types of USB memory device can be write-protected
to prevent data from being accidentally erased. If your USB
memory contains important data, we suggest that you acti-
vate write protection to prevent accidental erasure. Mean-
while, if you need to save data on a USB flash-memory
device, be sure to disable its write protection.
Storing Settings Connecting a USB Memory Device

Basic Operation
22
DTX700 Owner’s Manual
Basic DTX700 Operations
NOTICE
• If using a self-powered type USB memory device,
turning it on and off repeatedly could cause your
DTX700 to freeze and stop operating. The same
applies to the frequent plugging in and unplugging of
USB cables. Such action should, therefore, be
avoided.
• Data stored on the DTX700 or within the USB mem-
ory device may be corrupted if they are disconnected
or turned off at the wrong time. Be sure, therefore, to
avoid unplugging the USB memory device from the
[USB TO DEVICE] or turning off either device while
data is being transferred.
Straight out of the box, your DTX700 already contains a wide
range of pre-programmed drum kits, instruments, and songs.
This collection of default settings – the Factory Set – can be
conveniently restored at any time if you have accidentally over-
written them or wish to delete all of your own settings. To do so,
use the Factory Set function as follows.
1 Press the [MENU] button.
2 Turn the dial to move the cursor to “Utility”.
3 Press the dial.
4 Turn the dial to move the cursor to “FactSet”.
5 Press the dial.
6 Press the [F3] button.
You will be asked to confirm that you wish to restore the
Factory Set.
If you do not wish to do so, press the [EXIT] button to
return to the previous page.
7 Press the dial to restore the Factory Set.
NOTICE
• Whenever the Factory Set is restored, any settings
you have made will be overwritten with the corre-
sponding defaults. Important user-defined data
should, therefore, be saved on a USB memory
device in advance. For full details, refer to the Refer-
ence Manual PDF document.
NOTE
• If you select the “PowerOn Auto” checkbox on the page
displayed for Step 6 above, the Factory Set will be
restored each time you turn on your DTX700.
Restoring Default Settings

DTX700 Owner’s Manual
23
Basic Operation
Playing Drum Pads
If using a three zone pad such as the XP100SD shown below,
you will be able to produce three distinct sounds (i.e., head,
open rim, closed rim) depending on where you hit it, much the
same as if you were playing an acoustic snare.
Head shot
Hitting the main surface of the pad produces a head shot
sound.
Open rim shot
Hitting the open-rim zone produces an open rim-shot sound.
Closed rim shot (Cross sticking)
Hitting the closed-rim zone produces a closed rim-shot
sound.
If using a two zone pad such as the RHH135 shown below, you
will be able to play it in the same way as an acoustic hi-hat cym-
bal.
Open/close
In addition to the foot-close sound obtained by pressing the
Hi-Hat Controller pedal, you can press the controller down
even more firmly in the closed condition to produce a tighter
closed hi-hat sound.
Bow shot
Hitting the main surface of the pad (i.e., the bow section
located between the cup and edge) produces a bow shot
sound.
Edge shot
Hitting the outside edge of the pad produces an edge shot
sound.
Hi-hat splash
Pressing the hi-hat controller pedal and then immediately
releasing it produces a hi-hat splash sound.
Snares & Toms
Closed rim shot (rim 2)
Head shotOpen rim shot (rim 1)
Hi-Hats
Edge shot Bow shot

Basic Operation
24
DTX700 Owner’s Manual
Playing Drum Pads
If using a three zone pad such as the PCY135 shown below, you
will be able to play it in the same way as an acoustic ride cym-
bal.
Bow shot
Hitting the main surface of the pad (i.e., the bow section
located between the cup and edge) produces a bow shot
sound.
Edge shot
Hitting the outside edge of the pad produces an edge shot
sound.
Bell shot
Hitting the cup produces a bell shot sound.
Choking
Grabbing the edge of a cymbal pad immediately after hitting
it will silence the sound being produced.
Muting
Hitting the pad while holding the edge will produce a muted
sound.
Cymbal
Bell shot (rim 2)
Bow shotEdge shot (rim 1)

DTX700 Owner’s Manual
25
Basic Operation
Performing on Many Different Kits
In terms of the DTX700, the word “kit” is used to refer to a col-
lection of related sounds, such as acoustic drums or percussion
instruments. By selecting different kits, you can conveniently
change the entire sound of this drum trigger module.
1 Press the [KIT] button.
2 Turn the dial to choose a new kit.
3 Play the connected pads.
NOTE
• When you select a new kit in Step 2 above, the [STORE]
button will light up. You can press the button at this time
to store your new kit selection. When you next turn on
the DTX700, therefore, this kit will be automatically
selected.
Acoustic drums
Percussion instruments
Selecting a Kit
Kit number Kit name

Basic Operation
26
DTX700 Owner’s Manual
Performing on Many Different Kits
With electronic drums, sensitivity is often set for each individ-
ual pad. However, doing so before each performance can be
extremely time consuming. As a solution, your DTX700 con-
tains a number of trigger setups that define the sensitivities of
all pads in a kit.
These trigger setups have been carefully designed to suit a range
of different playing situations and pad sets, and they can be
selected as follows.
1 Press the [KIT] button.
2 Press the [F2] button.
The Trigger Setup page will open.
3 Turn the dial to choose a trigger setup.
Playing your DTX700’s pads as you turn the dial makes it
easier to notice the differences in sensitivity levels.
4 When you have found a trigger setup you like,
press the [EXIT] button to return to the Kit
page.
5 Press the [STORE] button.
If you do not wish to store your setting, press the [EXIT]
button to return to the previous page.
6 Press the dial to store your new setting.
Selecting a Sensitivity for the
Entire Kit

DTX700 Owner’s Manual
27
Basic Operation
Performing on Many Different Kits
Your DTX700 makes it very easy to adjust the tone of drum
kits.
Selecting EQ presets
The EQ presets on your DTX700 can be used to optimize the
tone of the drum kits in order to suit your own personal pref-
erences. Simply choose different equalizer presets as
described below to see how they change your drum sounds.
NOTE
• For a full list of DTX700 EQ presets, see the Data List
document.
1 Press the [KIT] button.
2 Press the [F1] button.
The Master EQ page will open.
3 Turn the dial to choose an EQ setup.
Playing your DTX700’s pads as you turn the dial makes it
easier to notice the differences in tone.
4 When you have found an EQ setup you like,
press the [EXIT] button to return to the Kit
page.
5 Press the [STORE] button.
If you do not wish to store your setting, press the [EXIT]
button to return to the previous page.
6 Press the dial to store your new setting.
NOTE
• Changing kits has no effect on the EQ setting selected
here.
Adjusting Tone

Basic Operation
28
DTX700 Owner’s Manual
Performing on Many Different Kits
Each kit on the DTX700 is set up with reverb or another sound
effect applied by default. You can, however, easily turn off this
effect as described below.
1 Press the [KIT] button.
2 Hold down the [SHIFT] button and press the
[F2] button.
The button’s icon will become reversed
, indicating that the effect is now off.
NOTE
•You can toggle the effect on and off using the method
described in Step 2 above.
By initializing a kit as described below, you can quickly restore
its default settings.
1 Press the [KIT] button.
2 Turn the dial to select the kit you wish to ini-
tialize.
3 Press the [F3] button.
If you do not wish to initialize the kit, press the [EXIT] but-
ton to return to the previous page.
4 Press the dial to confirm that the kit is to be
initialized.
Turning Off Effects Initializing a Kit

DTX700 Owner’s Manual
29
Basic Operation
Performing on Many Different Kits
5 Press the [STORE] button.
If you do not wish to store your settings, press the [EXIT]
button to return to the previous page.
6 Press the dial to store your new settings.
Normally, your DTX700’s display shows the name of the kit
and an artist’s impression of what it might look like. As
described below, however, you can change the display mode to
show just the kit name.
1 Press the [KIT] button.
2 Hold down the [SHIFT] button and press the
[F3] button (Display).
The display mode will now change to show just the kit
name.
NOTE
• If you wish to return to the original display mode, hold
down the [SHIFT] button and press the [F3] button (Dis-
play) once again.
Switching the Display Mode

Basic Operation
30
DTX700 Owner’s Manual
Building Your Own Kit
With the DTX700, you can assign a different sound to each of
the connected pads. And once you have assembled all of the
sounds you wish to use, you can store them together. The fol-
lowing describes how to perform these operations.
[Definition] Instrument
In the context of the DTX700, the term “instru-
ment” is used to refer to each of the various per-
cussion instruments that make up a kit. Typical
examples would be snare drums, tom-toms,
cymbals, and kick drums.
1 Press the [KIT] button.
2 Turn the dial to choose the kit you wish to
edit.
3 Press the [INST] button.
4 Hit the pad that you wish to assign a new
sound to.
5 Turn the dial to select the sound you wish to
use.
NOTE
•You can use instrument categories and numbers to find
more information on different instruments in the Data
List booklet that came with your DTX700.
6 When you have found a sound you like, press
the [STORE] button.
If you do not wish to store your new setting, press the
[EXIT] button. The display will return to the previous page.
7 Press the dial to store your new setting.
NOTE
•Even if you have changed a kit’s sounds and stored your
new settings, you can perform kit initialization (page 28)
at any time to restore the original ones.
Selecting Sounds (Instruments)
Instrument category Instrument number

DTX700 Owner’s Manual
31
Basic Operation
Building Your Own Kit
1 Press the [KIT] button.
2 Turn the dial to choose the kit you wish to
edit.
3 Press the [INST] button.
4 Hit the pad whose sound you wish to adjust.
5 Press the [F1] or [F2] button.
The functions displayed at this time depend on the type of
instrument selected.
Each of these functions is described in the following table.
Functions
• Tuning: This function allows the drum to be tuned.
•Size: This function allows the size (or diameter) to
be changed for cymbals.
• Muffling: This function adjusts the degree to which a
drum’s sound is muffled.
•Sustain: This function allows the amount of sustain to
be adjusted.
•Clutch: This function adjusts the height of the hi-hat
clutch – or in other words, the height of the
top hi-hat.
• Decay: This function allows the amount of decay to
be adjusted.
6 Turn the dial to adjust the sound.
Adjusting an Instrument’s Sound
Instrument category [F1] [F2]
Kick (kick drums)
TUNING MUFFLING
Sn1 (snares 1)
Sn2 (snares 2)
Tom1 (toms 1)
Tom2 (toms 2)
Cym (cymbals) SIZE SUSTAIN
HH (hi-hats) SIZE CLUTCH
Latn (Latin percussion)
TUNING DECAY
Asia (Asian percussion)
AfAr (African percussion)
Orch (orchestral percussion)
ElPc (electronic percussion)
EFX (effect sounds)
Mldy (melodic voices)
Wave (audio files)

Basic Operation
32
DTX700 Owner’s Manual
Building Your Own Kit
7 When you have finished adjusting the sound,
press the [STORE] button.
If you do not wish to store your new setting, press the
[EXIT] button. The display will return to the previous page.
8 Press the dial to store your new setting.
NOTE
• Even if you have adjusted a kit’s sounds and stored your
new settings, you can perform kit initialization (page 28)
at any time to restore the original ones.
As described below, you can easily configure your DTX700 to
produce a kick drum sound when you operate the hi-hat control-
ler (RHH135 or HH65) plugged into the [HI-HAT CONTROL]
trigger input jack. This convenient function provides support for
double bass drumming techniques.
1 Press the [KIT] button and turn the dial to
choose a kit.
2 Press the [INST] button and then press down
once on the pedal connected to the [oKICK/
!0] trigger input jack.
The message “Kick” will be shown in the top right corner of
the display.
3 Hold down the [SHIFT] button and press the
[F2] (DBL BASS) button.
NOTE
• While this function is enabled, you will be unable to use
the hi-hat controller plugged into the [HI-HAT CON-
TROL] trigger input jack to simulate opening and closing
of the hi-hat.
1 Using a computer, place the audio files you
wish to import on a USB memory device.
NOTE
•Be sure to place the audio files in the USB memory
device’s root directory (that is, not within any folder).
•Your DTX700 can import WAV and AIFF audio files.
•Only 16-bit audio files can be used with your DTX700.
• If the audio files you wish to use have been recorded
with a different bit depth, please convert them to 16-bit in
advance using, for example, the bundled DAW software.
For details regarding the conversion method, please
refer to the instruction manual that came with your soft-
ware.
•Your DTX700 can import audio files of up to approxi-
mately 23 seconds in length (in the case of 44.1-kHz, 16-
bit audio).
•Even when the above conditions have been satisfied,
certain other factors may make audio files incompatible
with the DTX700.
2 Unplug the USB memory device from your
computer and plug it into the [USB TO
DEVICE] port on the DTX700.
3 Press the [KIT] button.
4 Turn the dial to choose the kit you wish to
edit.
5 Press the [INST] button.
Playing with a Double Bass Drum
Importing & Assigning Audio Files
USB memory device

DTX700 Owner’s Manual
33
Basic Operation
Building Your Own Kit
6 Hit the pad that you wish to assign an audio
file to.
NOTE
• If the pad in question is a two- or three-zone type, the
audio file will be assigned to all of its zones.
7 Press the [F3] button.
8 Turn the dial to select the audio file you wish
to import.
9 Press the [F3] button.
To cancel the importing of an audio file, press the [EXIT]
button. The display will return to the previous page.
10 Press the dial to start the importing pro-
cess.
NOTE
• Whenever you import an audio file, your DTX700 will
automatically store it.

Basic Operation
34
DTX700 Owner’s Manual
Building Your Own Kit
1 Press the [KIT] button.
2 Turn the dial to choose a kit that you have
built.
3 Press the [MENU] button.
4 Turn the dial to move the cursor to “Kit”.
5 Press the dial.
6 Turn the dial to move the cursor to “Com-
mon”.
7 Press the dial.
8 Turn the dial to move the cursor to the
“Name” row of the displayed list.
9 Press the dial.
10 Enter a new name for the selected kit.
A name of up to 12 characters in length can be assigned to
drum kits. Move the underline cursor to the character you
wish to change using the [F1] and [F3] buttons, and then
use either the dial or the [+/INC] and [-/DEC] buttons to
change the character.
11 When you have finished entering the name,
press the [STORE] button.
If you do not wish to store your new kit name, press the
[EXIT] button. The display will return to the previous page.
12 Press the dial to store your new kit name.
Naming an Original Kit

DTX700 Owner’s Manual
35
Basic Operation
Building Your Own Kit
With the DTX700, you can easily adjust the snare wire for the
snare pad (i.e., the pad plugged into the [qSNARE] trigger
input jack). In the case of pads featuring a pad controller, simply
turn the controller to adjust the snare wire setting.
Meanwhile, the following procedure can be used to adjust the
setting for pads not featuring a pad controller.
1 Press the [KIT] button.
2 Turn the dial to choose a kit.
3 Press the [INST] button.
4 Hit the snare pad (i.e., the pad plugged into
the [qSNARE] trigger input jack).
5 Hold down the [SHIFT] button and press the
[F2] button.
6 Turn the dial to adjust the snare wire.
Higher values correspond to tighter snare wires and vice-
versa. An “off” setting implies that the snare wire has been
fully removed from the snare.
7 Press the [STORE] button.
8 Press the dial to store your new setting.
NOTE
• The Snares function is displayed only for the pad con-
nected via the [qSNARE] trigger input jack.
Adjusting the Snare Wire
Pad controller

Basic Operation
36
DTX700 Owner’s Manual
Playing with Songs for Practice
1 Press the [SONG] button.
2 Turn the dial to select the song you wish to
play.
3 Press the [F3] button to start playing the
song.
You can stop playback by pressing the [F3] button once
again.
1 Press the [SONG] button.
2 Press the [F1] button.
3 Turn the dial to adjust the song’s playback
volume.
4 Press the [EXIT] button to return to the Song
page, and then press the [F3] button to start
the song.
If the volume is not yet correct, repeat the above process.
Playing a Song Adjusting the Song Volume

DTX700 Owner’s Manual
37
Basic Operation
Playing with Songs for Practice
Using the procedure described below, you can conveniently
adjust the volume of a song’s drum part while leaving the other
parts unchanged. This function is very useful when you wish to
play along with a song, keeping its drum part only slightly audi-
ble.
1 Press the [SONG] button.
2 Press the [F1] button.
3 Press the dial to switch to the outline cursor.
4 Turn the dial to move the cursor to the DRUM
fader, and then press the dial.
5 Turn the dial to adjust the volume.
6 Press the [EXIT] button to return to the Song
page, and then press the [F3] button to start
the song.
If the volume is not yet correct, repeat the above process.
Adjusting the Volume of a Song’s
Drums

Basic Operation
38
DTX700 Owner’s Manual
Playing with Songs for Practice
Using the procedure described below, you can conveniently
mute (i.e., silence) a song’s drum part while leaving the other
parts unchanged. This function is very useful when you wish to
drum along with a song.
1 Press the [SONG] button.
2 Press the [F2] button.
The icon will be displayed on-screen as
inverted text , indicating that the drums are
now muted. You can unmute the drums and restore the icon
to its original condition by pressing the [F2] button once
again.
Using the procedure described below, you can conveniently solo
a song’s bass part (i.e., silence all other parts). This function is
very useful when you wish to practice with just the bass play-
ing.
1 Press the [SONG] button.
2 Press the [F1] button.
3 Press the [F2] button.
All accompaniment parts other than the bass will be muted
(i.e., silenced).
4 Press the [F3] button.
The drum part will also be muted.
Muting the Drum Part Soloing the Bass Part

DTX700 Owner’s Manual
39
Basic Operation
Playing with Songs for Practice
5 Press the [EXIT] button to return to the Song
page, and then press the [F3] button to start
the song.
You should now hear only the song’s bass part.
When you select a new song, your DTX700 normally chooses
the best kit for that song automatically. You can, however, use
the Kit Lock function to prevent this if you wish to keep the cur-
rent kit when practicing with different songs.
1 Press the [KIT] button.
2 Select the kit you wish to play.
3 Hold down the [SHIFT] button and press the
[F1] button.
The lock icon will be displayed beside the kit number.
4 Press the [SONG] button.
Locking a Kit

Basic Operation
40
DTX700 Owner’s Manual
Playing with Songs for Practice
5 Turn the dial to select a new song.
NOTE
•To unlock the kit, repeat Steps 1 through 3 above. After
doing so, the lock icon will disappear from beside
the kit number.

DTX700 Owner’s Manual
41
Basic Operation
Turning On the Click-Track
1 Press the [CLICK] button.
2 Turn the dial to set the tempo.
3 Press the [ ] button.
The click-track will start playing at the selected tempo.
NOTE
• If you select a song (page 36) after setting the tempo in
this way, the selected song’s tempo will be used for the
click-track.
• Use [MENU] m [Click] m [Voice] to change the click-
track sounds. For full details, refer to the Reference
Manual PDF document.
To adjust the overall click-track volume:
Move the Click slider up and down to adjust the volume.
To fine tune individual click-track vol-
umes:
Use the following procedure to adjust the volumes of each
element of the click-track.
1 Press the [CLICK] button.
2 Press the [F1] button.
: Accent (start of measure)
:Quarter notes
: Eighth notes
: Sixteenth notes
: Eighth-note triplets
Setting the Tempo and Starting the
Click-Track
Setting the Click-Track Volume
Slider
Louder
Quieter

Basic Operation
42
DTX700 Owner’s Manual
Turning On the Click-Track
3 Turn the dial to select the click-track element
whose volume you wish to adjust.
4 Press the dial.
The selected click-track element will be displayed in
reverse.
5 Turn the dial to adjust the selected element’s
volume.
6 Press the dial.
7 To adjust the volume of other elements of the
click-track, repeat Steps 3 through 6 above.
8 Press the [STORE] button.
If you do not wish to store your new settings, press the
[EXIT] button. The display will return to the previous page.
9 Press the dial to store your new settings.

DTX700 Owner’s Manual
43
Basic Operation
Turning On the Click-Track
1 Press the [CLICK] button.
2 Press the dial.
The cursor will switch to an underline.
3 Turn the dial to move the cursor to the time
signature.
4 Press the dial.
The cursor will switch to reversed text.
5 Turn the dial to set the click-track time signa-
ture.
6 Press the dial to set the new time signature.
NOTE
• If you select a song (page 36) after setting the time sig-
nature in this way, the selected song’s time signature will
be used for the click-track.
Setting the Time Signature

Basic Operation
44
DTX700 Owner’s Manual
Turning On the Click-Track
Your DTX700’s timer can be used to specify how long the
click-track is to play. This function is useful when you want to
practice for a set period of time.
1 Press the [CLICK] button.
2 Press the [F3] button.
Each time you press this button, the timer setting increases
by 30 seconds. The longest time that can be set is 600 sec-
onds.
3 Press the [ ] button.
The timer will now begin to count down as the click-track
plays. When it reaches zero, the click-track will automati-
cally stop playing.
NOTE
• If you press the [ ] button a second time while the click-
track is playing, the click-track will stop and the timer will
be reset to zero.
1 Press the [CLICK] button.
2 Hold down the [SHIFT] button and press the
[F1] button.
3 Hit one of your pads at least three times at
the tempo you wish to set.
The new tempo will be displayed on-screen.
NOTE
• As an alternative to playing a pad, you can also press
the [F1] button at least three times to set the tempo.
• If you select a song (page 36) after setting the tempo in
this way, the selected song’s tempo will be used for the
click-track.
Using the Timer Tap Tempo – Setting the Tempo by
Playing Pads

DTX700 Owner’s Manual
45
Basic Operation
Turning On the Click-Track
Your DTX700 features three different types of training function.
• The Groove Check function can be used to examine
your playing for inaccurate or inconsistent timing.
• The Rhythm Gate function allows you to practice playing
with perfect timing.
•The Measure Break function can be used to practice
playing at a constant speed.
Groove Check – Examine inaccuracy and
inconsistency in timing
The Groove Check function allows you to visually confirm
how much your timing differs from that of the click-track.
1 Press the [CLICK] button.
2 Turn the dial to set the practice tempo.
3 Press the [F2] button.
4 Press the [F1] button to access the Groove
Check page. (You may need to press more
than once.)
5 Press the [ ] button to start the click-track.
6 Play the pads along with the click-track.
The Groove Check page
A triangle (t) is used to display the precise time at which
you played the pads.
If you are playing perfectly in time, this triangle will line up
exactly with the tempo line in the center of the display.
If the triangle is located to the left of the center line, you
struck the pad ahead of the beat (i.e., early).
If the triangle is located to the right of the center line, you
struck the pad behind the beat (i.e., late).
The larger the timing-inconsistency bar, the greater the
degree of inconsistency in your overall performance.
7 When you have finished practicing, press the
[ ] button once again.
The click-track will stop.
Using DTX700 Training Functions
Press several times
if necessary.
Average timing while using
Groove Check
Playing behind
the beat
Playing on the beatPlaying ahead
of the beat
Timing inconsistency

Basic Operation
46
DTX700 Owner’s Manual
Turning On the Click-Track
Rhythm Gate – Practice playing with per-
fect timing
The Rhythm Gate function only allows pads to produce a
sound if they are played at exactly the right time. With this
function, you can treat practice like a game, improving your
ability and having fun at the same time.
1 Press the [CLICK] button.
2 Turn the dial to set the practice tempo.
3 Press the [F2] button.
4 Press the [F1] button to access the Rhythm
Gate page. (You may need to press more than
once.)
5 Press the [F2] button to select a difficulty
level.
Three different levels are available – Easy, Normal, and Pro.
6 Press the [ ] button to start the click-track.
7 Play the pads along with the click-track.
Example of good timing
Example of poor timing
8 When you have finished practicing, press the
[ ] button once again.
The click-track will stop.
NOTE
•You can also use the Rhythm Gate function with your
DTX700’s built-in songs.
Press several times
if necessary.
Level
Yo ur timing
A sound will be produced.
Yo ur timing
No sound will be produced

DTX700 Owner’s Manual
47
Basic Operation
Turning On the Click-Track
Measure Break – Practice playing a fixed
rhythm
With the Measure Break function, you can automatically
mute and unmute the click-track for specific numbers of
measures. For example, if you were to use this function to
mute the click-track while you played a fill, you would
instantly know whether you played it too fast or too slow
when the click-track is then unmuted. As such, the Rhythm
Gate function provides a great way to practice playing com-
plete songs at a constant speed.
1 Press the [CLICK] button.
2 Turn the dial to set the practice tempo.
3 Press the [F2] button.
4 Press the [F1] button to access the Measure
Break page. (You may need to press more
than once.)
5 Set the number of measures you want the
click-track to play.
5-1 Press the dial to switch to the inverted-text cursor.
5-2 Turn the dial to set the number of measures (between 1
and 9).
5-3 Press the dial to restore the underline cursor.
6 Press the dial.
7 Set the number of measures where you want
the click-track to be silent.
7-1 Press the dial to switch to the inverted-text cursor.
7-2 Turn the dial to set the number of measures (between 1
and 9).
7-3 Press the dial to restore the underline cursor.
8 Press the [ ] button to start the click-track.
9 Play the pads along with the click-track.
10 When you have finished practicing, press
the [ ] button once again.
The click-track will stop.
Press several times
if necessary.
Measure:
Number of measures the
click-track will play.
Break:
Number of measures the
click-track will not play.

Basic Operation
48
DTX700 Owner’s Manual
Recording Your Performances
You can record your own drum performances using the
DTX700’s built-in recorder. To do so, proceed as follows.
1 Press the [REC] button.
The button will light in red.
2 Press the [>/
] button to start recording.
The [>/
] button will flash on and off in blue.
3 When you have finished playing, press the
[>/
] button once again.
The [REC] button and the [>/
] button will both turn off.
NOTE
• The built-in recorder does not store your performances
as audio files.
• Recording cannot be started while the DTX700 is
importing an audio file or exchanging audio data with a
USB memory device. Accordingly, the [REC] button will
not light up at this time.
• Once you have recorded a performance, any subse-
quent recording will result in the first one being overwrit-
ten.
1 Press the [>/
] button.
2 To stop playback, press the [>/
] button
once again.
NOTE
•You cannot record audio data from the [AUX IN] port on
your DTX700.
• If you start playback of recorded data while playing a
song, the song will stop playing. Similarly, if you start
playback of a song while playing recorded data, the play-
back of recorded data will stop.
1 Press the [REC] button.
The button will light in red.
2 Press the [>/
] button.
The [>/
] button will flash on and off in blue.
3 Press the [>/
] button once again.
The [REC] button and the [>/
] button will both turn off.
Recording a Performance
Playing a Recorded Performance
Deleting a Recorded Performance

DTX700 Owner’s Manual
49
Basic Operation
Recording Your Performances
1 Press the [SONG] button.
2 Turn the dial to select the song you wish to
play along with.
3 Press the [F2] button to mute that song’s
drum part.
The icon will switch to .
4 Press the [REC] button.
The [REC] button will light in red.
5 Press the [>/
] button to start recording.
When the [>/
] button starts to flash on and off in blue,
you are ready to begin playing.
6 Press the [F3] button to start playback of the
built-in song.
7 When you have finished playing, press the
[>/
] button once again to stop recording.
The [REC] button and the [>/
] button will both turn off.
Recording Performance & Song
Together

Basic Operation
50
DTX700 Owner’s Manual
Integrating Accessories
As described below, you can attach various accessories* to your
DTX700 for an even more enjoyable playing experience.
(*: Sold separately)
If you own an HH65 Hi-hat Controller (sold separately), you
can connect it to your DTX700’s [!2HH-KICK] trigger input
jack in order to play kick drum sounds. To do so, proceed as fol-
lows.
1 Turn off your DTX700.
The HH65 Hi-hat Controller must be connected with the
drum trigger module turned off.
2 Insert one end of the cable that came with
your HH65 into the hi-hat controller’s output
jack.
3 Insert the other end of the cable into you
DTX700’s [!2HH-KICK] trigger input jack.
4 Turn on your DTX700.
5 Select a kit and start to play.
The following describes how to expand your DTX700 with a
PCY135 Cymbal Pad (sold separately).
1 Mount your PCY135 Cymbal Pad on a cymbal
holder (sold separately) or the like and set it
up as part of your drum set.
2 Use the cable that came with your PCY135
Cymbal Pad to connect it to your DTX700. For
demonstration purposes, we will use jack !1 .
3 Turn on your DTX700.
4 Hit the newly-added cymbal pad.
5 Select the most suitable pad type.
5-1 Press the [MENU] button.
5-2 Turn the dial to select “Trigger”, and then press the
dial.
5-3 Turn the dial to select “Pad”, and then press the dial.
5-4 Turn the dial to move the cursor to the “PadType” row
of the displayed list.
5-5 Press the dial to zoom in on the pad type. Turn the dial
to select “PCY135”, and then press the dial once
again.
Using an HH65 Hi-hat Controller
as Kick Drum Pedal
OUTPUT
Expanding with a PCY135 Cymbal
Pad

DTX700 Owner’s Manual
51
Basic Operation
Integrating Accessories
6 Press the [STORE] button to store your new
setting.
If the following message is displayed, press the dial to pro-
ceed.
7 Press the [INST] button and then play the
newly-added cymbal pad.
If you have connected the pad correctly, the message
“Pad11” will be shown in the top right corner of the display.
8 Turn the dial to select a sound for your newly-
added pad.
9 Press the [STORE] button to store the
assigned sound.
If the following message is displayed, press the dial to pro-
ceed.

Basic Operation
52
DTX700 Owner’s Manual
Connecting Your DTX700 to a Computer
Although the DTX700 is exceptionally powerful and versatile
all by itself, connecting it to a computer via USB allows for
even greater convenience and flexibility. When connected in
this way, MIDI data can be freely transferred between the drum
trigger module and the computer, allowing the DTX700 to be
used as an input device for computer-based music software. In
this section, you’ll learn how to make the necessary connec-
tions.
NOTE
• As the DTX700 has no built-in speakers, you will need to
connect headphones or an external amplifier and speakers
in order to hear it. For details, see page 13.
• A USB cable is not included. In order to connect your
DTX700 to a computer, choose a USB A-B cable of no more
than 3 meters in length.
1 Using your computer, download the newest
Yamaha USB-MIDI driver from the following
web page.
After you click Download, select a convenient location for
the installation file.
http://dtxdrums.yamaha.com/downloads/
NOTE
• Information on system requirements is also provided on
the above web page.
• The USB-MIDI driver may be revised and updated with-
out prior notice. Before installing, visit the above web
page to confirm the latest related information and ensure
that you have the most up-to-date version.
2 Install the USB MIDI driver on your computer.
For instructions on installing, refer to the guide included
with the driver installer. When asked to connect your
Yamaha product and your computer, do so as shown below.
Precautions when using the [USB TO
HOST] port
If proper care is not taken when connecting your DTX700 to
a computer via the [USB TO HOST] port, either or both of
the devices may freeze or data may be corrupted or perma-
nently lost. Be sure, therefore, to observe the following pre-
cautions at this time. If your computer or DTX700 should
freeze, restart the application being used, reboot the com-
puter, or turn the drum trigger module off once and then back
on.
NOTICE
• Use a USB A-B cable of no more than 3 meters in
length.
• Before connecting to your computer via the [USB TO
HOST] port, restore it from any power-saving mode
(such as Suspend, Sleep, or Standby).
• Connect the computer via the [USB TO HOST] port
before turning on the DTX700.
• Be sure to always perform the following steps before
turning the DTX700 on or off and either plugging or
unplugging the USB cable.
• Quit all applications.
• Ensure that no data is being sent from the
DTX700. (Data is transmitted by striking the pads
or playing patterns.)
• When connected to a computer, allow at least 6
seconds to pass between turning the DTX700 on
or off and plugging or unplugging the USB cable.
Making Connections
USB TO HOST port
USB port
Computer
USB cable
DTX700

DTX700 Owner’s Manual
53
Basic Operation
Connecting Your DTX700 to a Computer
Recording Performances using a DAW
Application
[Definition] DAW Application
DAW is an abbreviation of digital audio worksta-
tion. DAW applications such as Cubase can be
used to record, edit, and mix audio and MIDI
data on a computer.
The following section will describe how to connect your
DTX700 to a computer and prepare for recording perfor-
mances using a DAW application running on it. Normally,
when playing in order to record on a computer, performance
data produced by striking the pads is first sent to the com-
puter and then returned to the instrument in order to play its
internal tone generator. If local control of the DTX700 is
turned on at this time, performance data will also be sent
directly to the tone generator, and as a result, the direct and
returned data will overlap, making it sound as if the pads are
being struck twice.
Most DAW applications allow MIDI Thru to be turned on,
and therefore, you can setup your system as shown below
with local control of the DTX700 turned off and the DAW
application returning performance data to the tone generator.
In this way, performances can be recorded in comfort with-
out each strike being heard twice.
We will now describe how to setup parameters for recording
your performances, first on the DTX700, and then within the
DAW application.
Preparing the DTX700
Using the following procedure, turn off DTX700 local con-
trol.
1 Use [MENU] m [Utility] m [MIDI] to access the
MIDI parameters, and set LocalCtrl to “off”.
2 Press the [STORE] button to store your new
setting.
With local control turned off in this way, performance data
produced by striking the pads will not be sent to the internal
tone generator.
Setting DAW-Application Parameters
Within your DAW application, turn on MIDI Thru. This set-
ting ensures that, when performance data is being recorded
on a track within your application, it is also returned to the
external MIDI system.
For example, let’s assume that performance data is being
recorded on Track 3 by your DAW application. In addition,
we’ll also assume that MIDI Channel 1 has been set for the
return of performance data. If MIDI Thru is now turned on
for Track 3, the DAW application will return the perfor-
mance data to the DTX700 on MIDI Channel 1 as it is being
recorded, and the instrument’s internal tone generator will
sound as if it is being played directly.
NOTE
• For details on how to turn on MIDI Thru, refer to the man-
ual that came with your DAW application.
• If local control on the DTX700 and MIDI Thru within your
DAW application are both turned off, no performance
data will be sent to the internal tone generator, either
directly or indirectly. As a result, no sound will be pro-
duced.
Playing the DTX700 using MIDI Data from
a DAW Application
As described below, you can setup your DTX700 to operate
as a multi-timbral tone generator for your DAW application.
In this way, you can easily integrate the instrument’s high-
quality MIDI tone generator into your music-production
setup. For details on how to connect the DTX700 to your
computer, see page 52.
1 Set each of the tracks within your DAW appli-
cation to output their MIDI data to the
DTX700.
2 Play MIDI performance data using the DAW
application.
Making Music with a Computer
Within DTX700
On
Sound is
produced
Trigger
Internal tone
generator
No sound is
produced.
Local Control Settings
Off
DTX700
Local control
LocalCtrl =“off”
Computer
MIDI Thru turned on
within DAW applica-
tion.
Tri gg er
OUT
IN
OUTIN
USB TO HOST port
Internal
tone
generator

Basic Operation
54
DTX700 Owner’s Manual
Connecting Your DTX700 to a Computer
Using a special feature, the DTX700 can operate as a remote
controller for Cubase. For example, you can operate the Cubase
transport, turn its metronome on or off, and control various
other functions from the instrument’s control panel, signifi-
cantly increasing the efficiency of your music production work-
flow.
Computer settings
When setting up Cubase remote control for the first time,
complete the following steps to configure your computer
correctly.
1 Download the latest version of the DTX700
Extension from the following web page.
Save the compressed file in a convenient location and then
expand it.
http://dtxdrums.yamaha.com/downloads/
NOTE
•Ensure that you have the latest USB MIDI driver
installed on your computer (see page 52).
• Information on system requirements is also provided on
the above web page.
• The DTX700 Extension may be revised and updated
without prior notice. Before installing, visit the above web
page to confirm the latest related information and ensure
that you have the most up-to-date version.
2 Execute the expanded DTX700 Extension to
carry out the required installation procedure.
For more details, refer to the owner’s manual included in the
downloaded package.
DTX700 settings
Whenever the Cubase Remote function is to be used, the fol-
lowing steps must be completed on the DTX700.
1 Use [MENU] m [Utility] m [MIDI] to access the
MIDI parameters, and set MIDI IN/OUT to
“USB”.
2 Ensure that the DTX700 is connected to your
computer in the correct manner, and then
launch Cubase.
For details on how to connect the DTX700 to your com-
puter, see page 52.
3 Hold down the [SHIFT] button and press the
[MENU] button.
The message “Cubase Remote” will be displayed to confirm
that the function has been activated.
NOTE
• When Cubase Remote mode has been activated, those
control-panel buttons that can be used will light up.
4 To deactivate Cubase Remote mode, again
hold down the [SHIFT] button and press the
[MENU] button.
Using remote functions
NOTE
• For details on how to use remote functions, refer to the
owner’s manual included in the downloaded package.
Setting up Cubase Remote Control

DTX700 Owner’s Manual
55
On-Screen Messages
Message Full meaning
Are you sure? This message is displayed to confirm whether or not you wish to proceed with the selected operation.
Completed. This message is displayed when loading, saving, formatting, and other similar operations have been completed.
Connecting USB device... This message is displayed when your DTX700 is busy mounting a USB memory device.
Copy protected.
This message is displayed if operations such as wave editing cannot be performed due to the digital audio source
being copy protected.
Excessive demand for USB power.
This message is displayed if the current being drawn by the USB memory device exceeds the level supported by your
DTX700.
Executing...
This message is displayed while your DTX700 is busy performing formatting or another similar management task.
Please wait until the operation is completed.
File already exists. This message is displayed if a file with the same name as the one you are about to save already exists.
File not found. This message is displayed if no file of the selected type exists.
Illegal file.
This message is displayed if the file selected for loading is unsuitable for use with your DT
X700 or is unsuitable for the
current mode.
Illegal file name. This message is displayed if the specified file name is not valid.
Illegal format.
This message is displayed if the standard MIDI file (SMF) you are attempting to import is of Format 1. Please select an
SMF of Format 0 to proceed.
Illegal selection. This message is displayed if an operation cannot be performed in accordance with the settings made.
Illegal wave data. This message is displayed if the audio file you are attempting to import is of an unsupported format.
Incompatible USB device. This message is displayed if an unsupported USB device is plugged into the instrument’s [USB TO DEVICE] port.
Invalid USB device.
This message is displayed if the plugged-in USB memory device is not usable in its current condition. As long as the
device contains no irreplaceable data, it should be formatted to make it usable.
MIDI buffer full. This message is displayed if the volume of MIDI data received is too large to process.
MIDI data error. This message is displayed if an error occurs while receiving MIDI data.
No data.
This message is displayed if you are attempting to perform a song management task even though the selected song
contains no data, or if you attempt to play recorded data when none exists.
No response from USB device. This message is displayed if the plugged-in USB memory device fails to respond.
No unused MIDI note. This message is displayed upon execution of a copy-pad operation if no unused
MIDI notes are available.
No wave data. This message is displayed if you are attempting to perform a wave management task even though no wave data exists.
Now importing...[EXIT] to cancel. This message is displayed while your DTX700 is busy importing wave data.
Now loading...[EXIT] to cancel. This message is displayed while your DTX700 is busy loading a file.
Now saving... [EXIT] to cancel. This message is displayed while your DTX700 is busy saving a file.
Now working...
This message is displayed while you r DTX700 is tidying up after importing a wave or after you press the [EXIT] button
to cancel a load or save operation.
Overwrite?
This message is displayed when saving files to confirm whether or not you wish to overwrite a file of the same name
already present on the USB memory device.
Please keep power on.
This message is displayed while your DTX700 is writing data to its flash ROM. You should never turn off the instrument
while it is in this state. If this precautio
n is not observed, user data may be lost or the internal system may be damaged,
rendering your DTX700 unable to startup normally when it is next tu rned on.
Please stop sequencer.
This message is displayed to remind you to stop the sequencer (i.e., song playback) before performing the intended
operation.
Read only file. This message is displayed if you are attempting to perform a file operation using a read-only file.
Sample is protected. This message is displayed if the selected audio file is write protected and cannot be overwritten.
Sample is too long. This message is displayed if the audio file is too long to be loaded.
Sample is too short. This message is displayed if the audio file is too short to be loaded.
Seq memory full.
This message is displayed if the instrument’s internal memory for sequence data is full, making it impossible to record
new songs, perform associated management tasks, or load data from a USB memory device. To free up some of this
sequence memory, delete unneeded User patterns.
Stored. This message is displayed to confirm that data has been successfully stored.
System memory crashed. This message is displayed if a problem occurred while writing data to the instrument’s internal flash ROM.
USB connection terminated.
This message is displayed if connection wit
h the USB memory device was interrupted by an abnormal electric current.
Unplug the USB memory device and press the dial to return.
USB device full.
This message is displayed if the USB-memory device is full and no more files can be saved on it. In such a case, use
a new USB memory device or make space by erasing unwanted data from the current device.
USB device not ready. This message is displayed if the USB memory device has not been correctly plugged into your DTX700.
USB device read/write error. This message is displayed if an error occurred during the exchange of data with the USB memory device.
USB device write protected.
This message is displayed if the USB memory device is write protected or if you are attempting to save data on a read-
only device such as a CD drive.
USB host not ready.
This message is displayed if the Cubase Remote function is turned on without first connecting the DTX700 to a com-
puter.
USB transmission error. This message is displayed if an error occurred during communication with the USB memory device.
Wave memory full.
This message is displayed if your DTX700’s wave memory is full, preventing operations such
as the importing and
loading of data.

56
DTX700 Owner’s Manual
Troubleshooting
For more troubleshooting tips, refer to the Reference Manual PDF document.
See page 5 for details on downloading this manual.
The DTX700 either produces no
sound or is unable to detect the
pads being struck.
•Ensure that the pads are correctly connected to the DTX700’s trigger input jacks.
•Ensure that the DTX700 is properly connected to headphones or an external audio system,
such as an amplifier and/or speakers. (See page 13.)
•Ensure that the amplifier and/or speakers connected to the DTX700 are turned on and are not
set to the lowest possible volume.
•Ensure that the [MASTER] knob is not turned down. (See page 19.)
•Ensure that the cables you are using are in good condition.
The DTX700 produces sound
but the sensitivity (i.e., volume)
is too low.
• If any of your pads feature a pad controller, ensure that they are turned up.
•Ensure that the sliders for the sounds in question are turned up. (See page 11.)
Double triggers are being pro-
duced.
If the pad in question features a pad controller, try turning it downward.
The DTX700 receives no switch
or trigger signals whatsoever.
Restore the default settings (i.e., the Factory Set). (See page 22.)
Sounds play endlessly and do
not stop.
Hold down the [SHIFT] button and press the [EXIT] button to silence all sounds.
The pad controller function
does not work as expected.
Ensur
e that you are using an XP100SD or another pad featuring a pad controller.
The hi-hat’s open and closed
sounds are not produced.
Ensure that the DBL BASS parameter is not turned on. (See page 32.)
The Factory Set (i.e., default set-
tings) needs to be restored.
See the instructions on page 22. They describe how to reset all internal DTX700 settings to their
default condition.
The DTX700 turns off unexpect-
edly.
Ensure that the Auto Power-Off function is not turned on. (See page 14.)
The Factory Set (i.e., default set-
tings) is restored whenever the
DTX700 is turned on.
Turn off the PowerOn Auto function. (See page 22.)
The kit changes whenever a new
song is selected.
By default, your DTX700 always chooses the best kit for each song. To prevent it from doing so,
turn on the Kit Lock function. (See page 39.)
Song parts (i.e., non-drum
parts) do not play.
Ensure that the accompaniment parts have not been muted. (See page 37.)
The click-track (or metronome)
does not play.
Certain sounds (such as snare
or kick) do not play.
Ensure that the sliders for the sounds in question are turned up. (See page 41.)
Drum kits cannot be changed by
turning the dial.
Ensure that the Kit Lock function is not turned on. (See page 39.)
Performances cannot be
r
ecorded.
Recording is not possible while the Menu area is being accessed (as a result of pressing the
[MENU] button). Ensure that you leave this area before attempting to record a performance.
Hi-hat closed sounds are not
produced.
Refer to the Reference Manual PDF document.
Cubase Remote mode cannot be
deactivated.
See page 54 of this booklet.

DTX700 Owner’s Manual
57
Specifications
* Specifications and descriptions in this owner’s manual are for information purposes only. Yamaha Corporation reserves the right to
modify products or specifications at any time without prior notice. Since specifications, equipment, and options may not be the same in
every locale, please check with your Yamaha dealer.
Tone generator Type AWM2
Maximum polyphony 64 notes
Audio data memory 100 MB (16-bit linear basis)
Voices Drum and percussion: 1268
Keyboard: 128
Drum kits 60 (all of which may be edited and overwritten)
*Includes 50 preset kits
Effects Variation: 42 types / Chorus: 6 types / Reverb: 6 types
Kit EQ: 4 band / Master EQ: 3 band
Trigger Trigger setups 20 (all of which may be edited and overwritten)
*Includes 9 preset trigger setups
Pad Song play, chase, cutoff
3 songs (max.) can be played simultaneously.
Audio files Import limit 500 files
Bit depth 16 bits
Audio-file memory 64 MB
Sample format Proprietary format, WAV, and AIFF
Sequencer Capacity 152000 sounds approx.
Note resolution 480 per quarter note
Recording method Real time replace
Songs 93 (all of which may be edited and overwritten)
*Includes 63 preset songs (2 demo songs / 44 practice songs / 17 pad
songs)
Sequence format Proprietary
SMF format 0 (load only)
Click-track Tempo
30 to 300 BPM, tap tempo sup
ported.
Time signatures 1/4 to 16/4, 1/8 to 16/8, 1/16 to 16/16
Elements Accents, quarter notes, eighth notes, sixteenth notes, and triplets
Other Display 160 x 64 dot matrix LCD (with backlight)
Jacks and terminals Trigger input jacks 1 to 11 (standard stereo audio)
[HI HAT CONTROL] jack (standard stereo audio)
[HH-KICK] jack (standard stereo audio)
OUTPUT [L/MONO] jack (standard mono audio)
OUTPUT [R] jack (standard mono audio)
[PHONES] jack (standard stereo audio)
[AUX IN] jack (mini stereo audio)
MIDI [IN] and [OUT] connectors
[USB TO HOST], [USB TO DEVICE] ports
DC IN
Power consumption 8 W
Dimensions and weight 277 x 213 x 95 mm, 1.5 kg
Package contents Bundled power adaptor (PA-150 or equivalent),
Owner’s Manual (this docu ment), Data List, module holder,
module-holder fixing screws x 4, DVD (for bundled software)

58
DTX700 Owner’s Manual
Index
Symbols
[ ] connector .......... 12, 13
[] button
.................................... 11, 41
(Standby/On) button
...........10, 13, 14
[-/DEC] button
............................... 11, 18
[+/INC] button
................................ 11, 18
[
>/
] button ................................. 11, 48
[AUX IN] (auxiliary input) jack
....... 12, 13
[CLICK] button
.............................. 11, 41
[EXIT] button
....................................... 10
[HI-HAT CONTROL] jack
.............. 12, 32
[INST] button
................................. 11, 30
[KIT] button
................................... 10, 25
[LCD CONTRAST] knob
............... 12, 19
[MASTER] knob
......................10, 14, 19
[MENU] button
.............................. 11, 20
[MIDI IN] input connector
.............. 12, 13
[MIDI OUT] output connector
........ 12, 13
OUTPUT [L/MONO] and [R] jacks
12, 13
[PHONES] jack
............................. 12, 13
[PHONES] knob
......................10, 13, 19
[REC] button
................................. 11, 48
[SHIFT] button
.............................. 11, 18
[SONG] button
.............................. 11, 36
[STORE] button
............................ 10, 21
[USB TO DEVICE] port
................. 11, 21
[USB TO HOST] port
.................... 11, 52
A
ACC (accent) ...................................... 41
Accompaniment
.................................. 37
AfAr (African percussion)
.................... 31
All Sound Off
................................. 10, 56
Asia (Asian percussion)
...................... 31
Audio effects
....................................... 28
Audio Files
.......................................... 32
Auto Power-Off
............................. 14, 56
B
Bass soloing ....................................... 38
Beat
.................................................... 43
Bell shot
.............................................. 24
Bow shot
............................................. 24
Built-in recorder
.................................. 48
Built-in song
.................................... 8, 16
C
Category ............................................. 30
Choking
............................................... 24
Click-Track
.......................................... 41
Close
................................................... 23
Closed rim shot
................................... 23
Clutch
.................................................. 31
Contrast adjustment
............................ 19
Control panel
...................................... 10
Cord clip
........................................ 12, 13
Cubase
............................................... 54
Cubase remote
................................... 54
Cursor
................................................. 17
Cym (cymbals)
.................................... 31
Cymbal
.......................................... 24, 50
D
Data list .....................................5, 27, 30
DAW application
................................. 53
DBL BASS
...........................................32
Decay
..................................................31
Dial (with integrated button)
.......... 10, 17
Display (function)
.................................29
Display (LCD)
......................... 10, 19, 29
Display mode
................................ 18, 29
Double bass drum
........................ 12, 32
E
Edge shot ..................................... 23, 24
Effect
...................................................28
Effects Switch
......................................18
EFX (effect sounds)
.............................31
Eighth note
..........................................41
Eighth-note triplet
................................41
ElPc (electronic percussion)
................31
Equalization
.........................................27
External audio devices
................. 12, 13
F
Factory Set ................................... 22, 56
Function
........................................ 10, 18
G
Groove check ......................................45
H
Head shot ............................................23
HH (hi-hats)
.........................................31
Hi-Hat
..................................................23
Hi-hat controller
...................... 12, 32, 50
Hi-hat splash
........................................23
I
Init kit ...................................................28
Initializing a kit
........................ 28, 30, 32
Instruments
............................... 8, 11, 30
Inverted display
...................................17
K
Kick (kick drums) .................................31
Kit
................................................. 10, 25
Kit Lock
......................................... 18, 39
L
Latn (Latin percussion) ........................31
Line-level output
........................... 12, 13
Local control
........................................53
LocalCtrl
..............................................53
M
Master EQ ...........................................27
Measure break
.............................. 45, 47
Menu
......................................... 5, 20, 59
Metronome
............................... 9, 11, 41
Mldy (melodic voices)
..........................31
Monitor system
....................................13
Muffling
................................................31
Mute
.............................................. 38, 56
Muting
..................................................24
O
Open ....................................................23
Open rim shot
......................................23
Orch (orchestral percussion)
...............31
P
Pad controller ......................................35
Pad expansion
.....................................50
Play
.....................................................36
Portable music player
....................12, 13
Power adaptor
.....................................13
PowerOn Auto
...............................15, 22
Preset EQ
............................................27
Q
Quarter note ........................................41
R
Recording ........................................9, 48
Recording performances
...............11, 48
Reference manual
.................... 5, 20, 59
Remote
................................................54
Reverb
.................................................28
Rhythm gate
..................................45, 46
S
Sensitivity ......................................26, 56
Side panel
...........................................11
Sixteenth note
.....................................41
Size
.....................................................31
Slider
.............................................11, 41
Sn1 (snares 1)
.....................................31
Sn2 (snares 2)
.....................................31
Snare
.............................................23, 35
Snare wire
...........................................35
Snares (function)
.................................35
Song
....................................................36
Speakers
.............................................13
Store
..............................................10, 21
Sustain
................................................31
T
Tap ......................................................44
Tap Tempo
..........................................44
Tempo
.............................................9, 41
Timer
...................................................44
Tom
.....................................................23
Tom1 (toms 1)
.....................................31
Tom2 (toms 2)
.....................................31
Training functions
................................45
Trigger
.................................................26
Trigger input jack
.................... 12, 32, 50
Trigger setup
.......................................26
Tuning
.................................................31
U
Underlined display ...............................17
USB memory device
............... 11, 21, 32
USB-MIDI driver
..................................52
V
Volume ................................... 19, 36, 41
W
Wave (audio files) ................................31
Z
Zone ....................................... 12, 23, 33

DTX700 Owner’s Manual
59
List of DTX700 Functions
For more details, refer to the Reference Manual PDF document.
See page page 5 for details on downloading this manual.
Common
Volume Kit Volume
Tempo Kit Selection Tempo
TrgSetupLink Trigger Setup Link
Name Kit Name
Icon Change Icon
Voice
VoiceCategory Voice Category
VoiceNumber Voice Number
Tune Voice Tuning
Volume Voice Volume
Pan Voice Pan
Attack Attack Time
Decay Decay Time
Release Release Time
Filter Filter
Q Q (Resonance)
VarSend(Dry) Variation Send
ChoSend Chorus Send
RevSend Reverb Send
Mono/Poly Mono/Poly
AltGroup Alternate Group
SliderSelect Slider Select
MIDI
Assign
MessageType Message Type
Mode Playing mode
Note MIDI Note
MIDI Ch MIDI Channel
GateTime Gate Time
RcvKeyOff Receive Key Off
TrgLink Trigger Link
MaskTime Mask Time
VelLimitLo Velocity Limit
VelLimitHi Velocity Limit
VelCrossFade Velocity Cross Fade
TrgVel Trigger Velocity
TrgMonoPoly Trigger Polyphony
TrgAltGrp Trigger Alternate Group
TG/MIDI Sw
TG Switch Tone Generator Switch
MIDI Switch External MIDI Switch
Kit
Other
Transmit Transmit
Volume Volume
Pan Pan
MSB Bank Select MSB
LSB Bank Select LSB
PC Program Change
VarSend(Dry) Variation Send Level
ChoSend Chorus Send Level
RevSend Reverb Send Level
CC No CC Number
CC Val CC Value
Effect
Mixier
VarReturn Variation Return
VarPan Variation Pan
VarToRev Variation to Reverb
VarToCho Variation to Chorus
ChoSend Chorus Send
ChoReturn Chorus Return
ChoPan Chorus Pan
ChoToRev Chorus to Reverb
RevSend Reverb Send
RevReturn Reverb Return
RevPan Reverb Pan
Variation
Category Variation Category
Type Variation Type
Chorus
Type Chorus Type
Reverb
Type Reverb Type
EQ
LowGain Low Gain
LowFreq Low Frequency
LowQ Low Q
LowShape Low Shape
LowMidGain Low Mid Gain
LowMidFreq Low Mid Frequency
LowMidQ Low Mid Q
HighMidGain High Mid Gain
HighMidFreq High Mid Frequency
HighMidQ High Mid Q
HighGain High Gain
HighFreq High Frequency
HighQ High Q
HighShape High Shape
MIDI

60
DTX700 Owner’s Manual
List of DTX700 Functions
Common
Loop Song Loop
Tempo Song Tempo
Name Song Name
MIDI
Transmit MIDI Transmit
Volume MIDI Volume
Pan MIDI Pan
MSB Bank Select MSB
LSB Bank Select LSB
PC Program Change
VarSend(Dry) Variation Send
ChoSend Chorus Send
RevSend Reverb Send
Job
Clear Clear Song
ClearAll Clear All Songs
Copy
Bank Copy Song (Bank)
Number Copy Song (Number)
ImprtSMF
SMF Import SMF
MemInfo
Memory Information
General
MasterVolume Master Volume
MasterTune Master Tune
PanDepth Pan Depth
AuxOutSel Auxiliary Output
PlayCount Play Count
AutoPowerOff Auto Power Off
LCD Mode LCD Mode
MasterEQ
LowGain Low Gain
LowFreq Low Frequency
LowQ Low Q
LowShape Low Shape
MidGain Mid Gain
MidFreq Mid Frequency
MidQ Mid Q
HighGain High Gain
HighFreq High Frequency
HighQ High Q
HighShape High Shape
Pad
PadFunc Pad Function
CC Ch Control Change Channel
CC Val Control Change Value
FootClosePos Foot Close Position
FootSplashSens Foot Splash Sensitivity
HH-KickVelSens HH-KICK Velocity Sensitivity
CymbalChokeRate Cymbal Choke Rate
EffectSw
Variation Variation
Chorus Chorus
Reverb Reverb
SnareBuzz Snare Buzz
Resonance Resonance
MIDI
MIDI IN/OUT MIDI In/Out
ThruPort MIDI Thru Port
LocalCtrl Local Control
MIDI Sync MIDI Sync
ClockOut Clock Out
SeqCtrl Sequencer Control
Merge MIDI Merge
Rcv10ch Channel-10 Reveive
RcvPC Program Change Receive
RcvPC10ch
Channel-10 Program Change Receive
PolyAfter Polyphonic Aftertouch Status
SendHH Send Hi-hat
DeviceNo. Device Number
FactSet
PowerOn Auto Instrument Reset
Song
Utility
Pad
PadCtrlType Pad Control Type
HH Func Hi-hat Function
HH MIDI Ch Hi-hat MIDI Channel
HH MIDI Type Hi-hat MIDI Type
SnareOn/Off Snare On/Off
SnaresAdjust Snare Adjust
SnareBuzz Snare Buzz
ResonanceLevel Resonence Level
Job
CopyPad
Pad1 Copy Pad (Pad to be copied)
Pad2 Copy Pad (Pad to be replaced)
CopyKit
Bank Copy Kit(Bank)
Number Copy Kit(Number)
ExchgPad
Pad1 Exchange Pads
Pad2
ExchgKit
Kit1 Exchange Kits
Kit2
ClearPad
Pad Clear Pad
ClearKit Clear Kit
Kit

DTX700 Owner’s Manual
61
List of DTX700 Functions
Voice
Click-track Voice
OutputSel
Click-track Output
MIDI In
Click-track MIDI In
MIDI Out
Click-track MIDI Out
MIDI NoteAcc
Click-track Beat Volume (Accents)
MIDI Note
q
Click-track Beat Volume (Notes)
Common
PlayMode Wave Playback Mode
Start Start point
Loop Loop point
End End point
Decay Decay
HHCtrlSens Hi-Hat Control Sensitivity
Name Wave Name
Job
Import
Wave Import
PadAssign Pad Assign
ImportAll Import All
Normalize
Ratio Normalize
Delete Delete
DeleteAll Delete All
Optimize Optimize Memory
MemInfo
Memory Information
Save
Type Save File (Type)
File Save File (File)
Load
Type Load File (Type)
File Load File (File)
Rename
Type Rename File (Type)
File Rename File (File)
Name Rename File (Name)
Delete
Type Delete File (Type)
File Delete File (File)
Format
Format
MemInfo
Memory Information
File
Click
Wave
Name
Name Trigger Setup Name
Pad
Curve
VelCurve Velocity Curve
PadType
PadType Pad Type
Gain Input Gain
RejectTime Reject Time
MinLevel Minimum Imput Level
MaxLevel Maximum Imput Level
MinVelocity Minimum Velocity
MaxVelocity Maximum Velocity
WaitTime Wait Time
Head/Bow Head/Bow
OpenEdgeOffset
Open Edge Offset
CloseCupOffset
Close Cup Offset
Sensitivity Sensitivity
Head/Bow Head/Bow
OpenEdge Open Edge
CloseCup Close Cup
NoiseFltrTbl Noise Filter
CrssTalk
Level Reject Level (All)
Level Reject Level
From
Job
CopyPad
Pad1 Copy Pad
Pad2
CopyTrg
Bank Copy Trigger Parameters (Bank)
Number Copy Trigger Parameters (Number)
Trigger

62
DTX700 Owner’s Manual

(standby)
OBSERVERA!
Apparaten kopplas inte ur växelströmskällan (nätet) så länge
som den ar ansluten till vägguttaget, även om själva
apparaten har stängts av.
ADVARSEL: Netspændingen til dette apparat er IKKE
afbrudt, sålænge netledningen sidder i en stikkontakt, som er
tændt — også selvom der er slukket på apparatets afbryder.
VAROITUS: Laitteen toisiopiiriin kytketty käyttökytkin ei
irroita koko laitetta verkosta.
About the accessory disk
SPECIAL NOTICE
The software included in the accessory disk and the copyrights thereof are under exclusive ownership by Steinberg Media Technologies
GmbH.
• Use of the software and this manual is governed by the license agreement which the purchaser fully agrees to upon breaking the seal of
the software packaging. (Please read carefully the Software Licensing Agreement at the end of this manual before installing the applica-
tion.)
• Copying of the software or reproduction of this manual in whole or in part by any means is expressly forbidden without the written con-
sent of the manufacturer.
• Yamaha makes no representations or warranties with regard to the use of the software and documentation and cannot be held respon-
sible for the results of the use of this manual and the software.
• This disk is NOT for audio/visual purpose. Do not attempt to play the disk on an audio
/visual CD/DVD player. Doing so may result in
irreparable damage to your player.
• Note that Yamaha does not offer technical support for the DAW software in the accessory disk.
About the DAW software in the accessory disk The accessory disk contains DAW software both for Windows and Macintosh.
NOTE
• Make sure to install DAW software under the “Administrator” account.
• In order to have continuous use of the DAW software in the accessory disk, including support and other benefits, you will need to
register the software and activate your software license by starting the software while the computer is connected to the Internet.
Click the “Register Now” button shown when the software is started, then fill in all required fields for registration. If you do not regis-
ter the software, you will be unable t
o use it after a limited period of time expires.
• If you are using a Macintosh computer, double-click the “***.mpkg” file to start installation.
For information about the minimum system requirements and latest information on the software in the disk, check the web site below.
http://www.yamahasynth.com/
About software support
Support for the DAW software in the accessory disk is provided by Steinberg on its website at the following address.
http://www.steinberg.net
Yo u can visit the Steinberg site also via the Help menu of the included DAW software. (The Help menu also includes the PDF manual and
other information on the software.)
(weee_eu)
Information for Users on Collection and Disposal of Old Equipment
This symbol on the products, packaging, and/or accompanying documents means that used electrical and electronic
products should not be mixed with general household waste.
For proper treatment, recovery and recycling of old products, please take them to applicable collection points, in accor-
dance with your national legislation and the Directives 2002/96/EC.
By disposing of these products correctly, you will help to save valuable resources and prevent any potential negative
effects on human health and the environment which could otherwise arise from inappropriate waste handling.
For more information about collection and recycling of old products, please contact your local municipality, your waste
disposal service or the point of sale where you purchased the items.
[For business users in the European Union]
If you wish to discard electrical and electronic equipment, please contact your dealer or supplier for further information.
[Information on Disposal in other Countries outside the European Union]
This symbol is only valid in the European Union. If you wish to discard these items, please contact your l
ocal authori-
ties or dealer and ask for the correct method of disposal.
The name plate of this product may be found on the bottom of
the unit. The serial number of this product may be found on or
near the name plate. You should note this serial number in
the space provided below and retain this manual as a perma-
nent record of your purchase to aid identification in the event
of theft.
Model No.
Serial No.
(bottom)

Yamaha Electronic Drums web site
http://dtxdrums.yamaha.com/
Yamaha Manual Library
http://www.yamaha.co.jp/manual/
WW02610
U.R.G., Digital Musical Instruments Division
© 2011 Yamaha Corporation
012PO***.*-01A0
For details of products, please contact your nearest Yamaha representative or the
authorized distributor listed below.
Pour plus de détails sur les produits, veuillez-vous adresser à Yamaha ou au
distributeur le plus proche de vous figurant dans la liste suivante.
Die Einzelheiten zu Produkten sind bei Ihrer unten aufgeführten Niederlassung und
bei Yamaha Vertragshändlern in den jeweiligen Bestimmungsländern erhältlich.
Para detalles sobre productos, contacte su tienda Yamaha más cercana o el
distribuidor autorizado que se lista debajo.
CANADA
Yamaha Canada Music Ltd.
135 Milner Avenue, Scarborough, Ontario,
M1S 3R1, Canada
Tel: 416-298-1311
U.S.A.
Yamaha Corporation of America
6600 Orangethorpe Ave., Buena Park, Calif. 90620,
U.S.A.
Tel: 714-522-9011
MEXICO
Yamaha de México S.A. de C.V.
Calz. Javier Rojo Gómez #1149,
Col. Guadalupe del Moral
C.P. 09300, México, D.F., México
Tel: 55-5804-0600
BRAZIL
Yamaha Musical do Brasil Ltda.
Rua Joaquim Floriano, 913 - 4' andar, Itaim Bibi, CEP
04534-013 Sao Paulo, SP. BRAZIL
Tel: 011-3704-1377
ARGENTINA
Yamaha Music Latin America, S.A.
Sucursal de Argentina
Olga Cossettini 1553, Piso 4 Norte
Madero Este-C1107CEK
Buenos Aires, Argentina
Tel: 011-4119-7000
PANAMA AND OTHER LATIN
AMERICAN COUNTRIES/
CARIBBEAN COUNTRIES
Yamaha Music Latin America, S.A.
Torre Banco General, Piso 7, Urbanización Marbella,
Calle 47 y Aquilino de la Guardia,
Ciudad de Panamá, Panamá
Tel: +507-269-5311
THE UNITED KINGDOM/IRELAND
Yamaha Music U.K. Ltd.
Sherbourne Drive, Tilbrook, Milton Keynes,
MK7 8BL, England
Tel: 01908-366700
GERMANY
Yamaha Music Europe GmbH
Siemensstraße 22-34, 25462 Rellingen, Germany
Tel: 04101-3030
SWITZERLAND/LIECHTENSTEIN
Yamaha Music Europe GmbH
Branch Switzerland in Zürich
Seefeldstrasse 94, 8008 Zürich, Switzerland
Tel: 01-383 3990
AUSTRIA
Yamaha Music Europe GmbH Branch Austria
Schleiergasse 20, A-1100 Wien, Austria
Tel: 01-60203900
CZECH REPUBLIC/SLOVAKIA/
HUNGARY/SLOVENIA
Yamaha Music Europe GmbH Branch Austria
Schleiergasse 20, A-1100 Wien, Austria
Tel: 01-602039025
POLAND/LITHUANIA/LATVIA/ESTONIA
Yamaha Music Europe GmbH
Branch Sp.z o.o. Oddzial w Polsce
ul. 17 Stycznia 56, PL-02-146 Warszawa, Poland
Tel: 022-500-2925
THE NETHERLANDS/
BELGIUM/LUXEMBOURG
Yamaha Music Europe Branch Benelux
Clarissenhof 5-b, 4133 AB Vianen, The Netherlands
Tel: 0347-358 040
FRANCE
Yamaha Musique France
BP 70-77312 Marne-la-Vallée Cedex 2, France
Tel: 01-64-61-4000
ITALY
Yamaha Musica Italia S.P.A.
Combo Division
Viale Italia 88, 20020 Lainate (Milano), Italy
Tel: 02-935-771
SPAIN/PORTUGAL
Yamaha Música Ibérica, S.A.
Ctra. de la Coruna km. 17, 200, 28230
Las Rozas (Madrid), Spain
Tel: 91-639-8888
GREECE
Philippos Nakas S.A. The Music House
147 Skiathou Street, 112-55 Athens, Greece
Tel: 01-228 2160
SWEDEN
Yamaha Scandinavia AB
J. A. Wettergrens Gata 1, Box 30053
S-400 43 Göteborg, Sweden
Tel: 031 89 34 00
DENMARK
YS Copenhagen Liaison Office
Generatorvej 6A, DK-2730 Herlev, Denmark
Tel: 44 92 49 00
FINLAND
F-Musiikki Oy
Kluuvikatu 6, P.O. Box 260,
SF-00101 Helsinki, Finland
Tel: 09 618511
NORWAY
Norsk filial av Yamaha Scandinavia AB
Grini Næringspark 1, N-1345 Østerås, Norway
Tel: 67 16 77 70
ICELAND
Skifan HF
Skeifan 17 P.O. Box 8120, IS-128 Reykjavik, Iceland
Tel: 525 5000
RUSSIA
Yamaha Music (Russia)
Room 37, bld. 7, Kievskaya street, Moscow,
121059, Russia
Tel: 495 626 5005
OTHER EUROPEAN COUNTRIES
Yamaha Music Europe GmbH
Siemensstraße 22-34, 25462 Rellingen, Germany
Tel: +49-4101-3030
Yamaha Corporation,
Asia-Pacific Sales & Marketing Group
Nakazawa-cho 10-1, Naka-ku, Hamamatsu,
Japan 430-8650
Tel: +81-53-460-2313
TURKEY/CYPRUS
Yamaha Music Europe GmbH
Siemensstraße 22-34, 25462 Rellingen, Germany
Tel: 04101-3030
OTHER COUNTRIES
Yamaha Music Gulf FZE
LOB 16-513, P.O.Box 17328, Jubel Ali,
Dubai, United Arab Emirates
Tel: +971-4-881-5868
THE PEOPLE’S REPUBLIC OF CHINA
Yamaha Music & Electronics (China) Co.,Ltd.
2F, Yunhedasha, 1818 Xinzha-lu, Jingan-qu,
Shanghai, China
Tel: 021-6247-2211
HONG KONG
Tom Lee Music Co., Ltd.
11/F., Silvercord Tower 1, 30 Canton Road,
Tsimshatsui, Kowloon, Hong Kong
Tel: 2737-7688
INDIA
Yamaha Music India Pvt. Ltd.
5F Ambience Corporate Tower Ambience Mall Complex
Ambience Island, NH-8, Gurgaon-122001, Haryana, India
Tel: 0124-466-5551
INDONESIA
PT. Yamaha Musik Indonesia (Distributor)
PT. Nusantik
Gedung Yamaha Music Center, Jalan Jend. Gatot Sub-
roto Kav. 4, Jakarta 12930, Indonesia
Tel: 021-520-2577
KOREA
Yamaha Music Korea Ltd.
8F, 9F, Dongsung Bldg. 158-9 Samsung-Dong, Kang-
nam-Gu, Seoul, Korea
Tel: 02-3467-3300
MALAYSIA
Yamaha Music (Malaysia) Sdn., Bhd.
Lot 8, Jalan Perbandaran, 47301 Kelana Jaya,
Petaling Jaya, Selangor, Malaysia
Tel: 03-78030900
PHILIPPINES
Yupangco Music Corporation
339 Gil J. Puyat Avenue, P.O. Box 885 MCPO,
Makati, Metro Manila, Philippines
Tel: 819-7551
SINGAPORE
Yamaha Music (Asia) Pte., Ltd.
#03-11 A-Z Building
140 Paya Lebor Road, Singapore 409015
Tel: 6747-4374
TAIWAN
Yamaha KHS Music Co., Ltd.
3F, #6, Sec.2, Nan Jing E. Rd. Taipei.
Taiwan 104, R.O.C.
Tel: 02-2511-8688
THAILAND
Siam Music Yamaha Co., Ltd.
4, 6, 15 and 16th floor, Siam Motors Building,
891/1 Rama 1 Road, Wangmai,
Pathumwan, Bangkok 10330, Thailand
Tel: 02-215-2622
OTHER ASIAN COUNTRIES
Yamaha Corporation,
Asia-Pacific Sales & Marketing Group
Nakazawa-cho 10-1, Naka-ku, Hamamatsu,
Japan 430-8650
Tel: +81-53-460-2313
AUSTRALIA
Yamaha Music Australia Pty. Ltd.
Level 1, 99 Queensbridge Street, Southbank,
Victoria 3006, Australia
Tel: 3-9693-5111
NEW ZEALAND
Music Works LTD
P.O.BOX 6246 Wellesley, Auckland 4680,
New Zealand
Tel: 9-634-0099
COUNTRIES AND TRUST
TERRITORIES IN PACIFIC OCEAN
Yamaha Corporation,
Asia-Pacific Sales & Marketing Group
Nakazawa-cho 10-1, Naka-ku, Hamamatsu,
Japan 430-8650
Tel: +81-53-460-2313
NORTH AMERICA
CENTRAL & SOUTH AMERICA
EUROPE
AFRICA
MIDDLE EAST
ASIA
OCEANIA
SY55 HEAD OFFICE Yamaha Corporation, Digital Musical Instruments Division
Nakazawa-cho 10-1, Naka-ku, Hamamatsu, Japan 430-8650
Tel: +81-53-460-2432
Documenttranscriptie
DRUM TRIGGER MODULE DTX700 Owner’s Manual (Setup / Basic Operation) Read on paper (see page 6 for Table of Contents) Read first Owner’s Manual (Setup / Basic Operation) : This booklet Read when necessary Data List : Separate booklet Read on your computer (PDF file) Read when Reference Manual (Detailed Operation) necessary Please download from this web page: http://www.yamaha.co.jp/manual/ EN SPECIAL MESSAGE SECTION This product utilizes batteries or an external power supply (adapter). DO NOT connect this product to any power supply or adapter other than one described in the manual, on the name plate, or specifically recommended by Yamaha. This product may also use “household” type batteries. Some of these may be rechargeable. Make sure that the battery being charged is a rechargeable type and that the charger is intended for the battery being charged. This product should be used only with the components supplied or; a cart, rack, or stand that is recommended by Yamaha. If a cart, etc., is used, please observe all safety markings and instructions that accompany the accessory product. When installing batteries, never mix old batteries with new ones, and never mix different types of batteries. Batteries MUST be installed correctly. Mismatches or incorrect installation may result in overheating and battery case rupture. SPECIFICATIONS SUBJECT TO CHANGE: Warning: Do not attempt to disassemble, or incinerate any battery. Keep all batteries away from children. Dispose of used batteries promptly and as regulated by the laws in your area. Note: Check with any retailer of household type batteries in your area for battery disposal information. The information contained in this manual is believed to be correct at the time of printing. However, Yamaha reserves the right to change or modify any of the specifications without notice or obligation to update existing units. This product, either alone or in combination with an amplifier and headphones or speaker/s, may be capable of producing sound levels that could cause permanent hearing loss. DO NOT operate for long periods of time at a high volume level or at a level that is uncomfortable. If you experience any hearing loss or ringing in the ears, you should consult an audiologist. IMPORTANT: The louder the sound, the shorter the time period before damage occurs. NOTICE: Service charges incurred due to a lack of knowledge relating to how a function or effect works (when the unit is operating as designed) are not covered by the manufacturer’s warranty, and are therefore the owners responsibility. Please study this manual carefully and consult your dealer before requesting service. ENVIRONMENTAL ISSUES: Yamaha strives to produce products that are both user safe and environmentally friendly. We sincerely believe that our products and the production methods used to produce them, meet these goals. In keeping with both the letter and the spirit of the law, we want you to be aware of the following: Battery Notice: This product MAY contain a small non-rechargeable battery which (if applicable) is soldered in place. The average life span of this type of battery is approximately five years. When replacement becomes necessary, contact a qualified service representative to perform the replacement. Disposal Notice: Should this product become damaged beyond repair, or for some reason its useful life is considered to be at an end, please observe all local, state, and federal regulations that relate to the disposal of products that contain lead, batteries, plastics, etc. If your dealer is unable to assist you, please contact Yamaha directly. NAME PLATE LOCATION: The name plate is located on the bottom of the product. The model number, serial number, power requirements, etc., are located on this plate. You should record the model number, serial number, and the date of purchase in the spaces provided below and retain this manual as a permanent record of your purchase. Model Serial No. Purchase Date PLEASE KEEP THIS MANUAL 92-BP (bottom) FCC INFORMATION (U.S.A.) 1. IMPORTANT NOTICE: DO NOT MODIFY THIS UNIT! This product, when installed as indicated in the instructions contained in this manual, meets FCC requirements. Modifications not expressly approved by Yamaha may void your authority, granted by the FCC, to use the product. 2. IMPORTANT: When connecting this product to accessories and/or another product use only high quality shielded cables. Cable/s supplied with this product MUST be used. Follow all installation instructions. Failure to follow instructions could void your FCC authorization to use this product in the USA. 3. NOTE: This product has been tested and found to comply with the requirements listed in FCC Regulations, Part 15 for Class “B” digital devices. Compliance with these requirements provides a reasonable level of assurance that your use of this product in a residential environment will not result in harmful interference with other electronic devices. This equipment generates/uses radio frequencies and, if not installed and used according to the instructions found in the users manual, may cause interference harmful to the operation of other electronic devices. Compliance with FCC regulations does not guar- antee that interference will not occur in all installations. If this product is found to be the source of interference, which can be determined by turning the unit “OFF” and “ON”, please try to eliminate the problem by using one of the following measures: Relocate either this product or the device that is being affected by the interference. Utilize power outlets that are on different branch (circuit breaker or fuse) circuits or install AC line filter/s. In the case of radio or TV interference, relocate/reorient the antenna. If the antenna lead-in is 300 ohm ribbon lead, change the lead-in to co-axial type cable. If these corrective measures do not produce satisfactory results, please contact the local retailer authorized to distribute this type of product. If you can not locate the appropriate retailer, please contact Yamaha Corporation of America, Electronic Service Division, 6600 Orangethorpe Ave, Buena Park, CA90620 The above statements apply ONLY to those products distributed by Yamaha Corporation of America or its subsidiaries. * This applies only to products distributed by YAMAHA CORPORATION OF AMERICA. (class B) COMPLIANCE INFORMATION STATEMENT (DECLARATION OF CONFORMITY PROCEDURE) Responsible Party : Address : Telephone : Type of Equipment : Model Name : Yamaha Corporation of America 6600 Orangethorpe Ave., Buena Park, Calif. 90620 714-522-9011 Drum Trigger Module DTX700 * This applies only to products distributed by YAMAHA CORPORATION OF AMERICA. 2 DTX700 Owner’s Manual This device complies with Part 15 of the FCC Rules. Operation is subject to the following two conditions: 1) this device may not cause harmful interference, and 2) this device must accept any interference received including interference that may cause undesired operation. See user manual instructions if interference to radio reception is suspected. (FCC DoC) PRECAUTIONS PLEASE READ CAREFULLY BEFORE PROCEEDING * Please keep this manual in a safe place for future reference. WARNING Always follow the basic precautions listed below to avoid the possibility of serious injury or even death from electrical shock, short-circuiting, damages, fire or other hazards. These precautions include, but are not limited to, the following: Power supply/AC power adaptor Water warning • Do not place the power cord near heat sources such as heaters or radiators, and do not excessively bend or otherwise damage the cord, place heavy objects on it, or place it in a position where anyone could walk on, trip over, or roll anything over it. • Only use the voltage specified as correct for the instrument. The required voltage is printed on the name plate of the instrument. • Use the specified adaptor (page 57) only. Using the wrong adaptor can result in damage to the instrument or overheating. • Do not expose the instrument to rain, use it near water or in damp or wet conditions, place on it any containers (such as vases, bottles or glasses) containing liquids which might spill into any openings. If any liquid such as water seeps into the instrument, turn off the power immediately and unplug the power cord from the AC outlet. Then have the instrument inspected by qualified Yamaha service personnel. • Never insert or remove an electric plug with wet hands. • Check the electric plug periodically and remove any dirt or dust which may have accumulated on it. Fire warning • Do not put burning items, such as candles, on the unit. A burning item may fall over and cause a fire. Do not open • This instrument contains no user-serviceable parts. Do not attempt to disassemble or modify the internal components in any way. If it should appear to be malfunctioning, discontinue use immediately and have it inspected by qualified Yamaha service personnel. If you notice any abnormality • When one of the following problems occur, immediately turn off the power switch and disconnect the electric plug from the outlet. Then have the device inspected by Yamaha service personnel. • The power cord or plug becomes frayed or damaged. • It emits unusual smells or smoke. • Some object has been dropped into the instrument. • There is a sudden loss of sound during use of the instrument. CAUTION Always follow the basic precautions listed below to avoid the possibility of physical injury to you or others, or damage to the instrument or other property. These precautions include, but are not limited to, the following: Power supply/AC power adaptor Location • Do not connect the instrument to an electrical outlet using a multiple-connector. Doing so can result in lower sound quality, or possibly cause overheating in the outlet. • Do not place the instrument in an unstable position where it might accidentally fall over. • When removing the electric plug from the instrument or an outlet, always hold the plug itself and not the cord. Pulling by the cord can damage it. • When setting up the product, make sure that the AC outlet you are using is easily accessible. If some trouble or malfunction occurs, immediately turn off the power switch and disconnect the plug from the outlet. Even when the power switch is turned off, electricity is still flowing to the product at the minimum level. When you are not using the product for a long time, make sure to unplug the power cord from the wall AC outlet. • Remove the electric plug from the outlet when the instrument is not to be used for extended periods of time, or during electrical storms. DMI-3 • Before moving the instrument, remove all connected cables. 1/2 DTX700 Owner’s Manual 3 • Use only the stand/rack specified for the instrument. When attaching the stand or rack, use the provided screws only. Failure to do so could cause damage to the internal components or result in the instrument falling over. Connections • Before connecting the instrument to other electronic components, turn off the power for all components. Before turning the power on or off for all components, set all volume levels to minimum. • Be sure to set the volumes of all components at their minimum levels and gradually raise the volume controls while playing the instrument to set the desired listening level. Handling caution • Do not insert a finger or hand in any gaps on the instrument. • Never insert or drop paper, metallic, or other objects into the gaps on the panel. This could cause physical injury to you or others, damage to the instrument or other property, or operational failure. • Do not rest your weight on, or place heavy objects on the instrument, and do not use excessive force on the buttons, switches or connectors. • Do not use the instrument/device or headphones for a long period of time at a high or uncomfortable volume level, since this can cause permanent hearing loss. If you experience any hearing loss or ringing in the ears, consult a physician. Yamaha cannot be held responsible for damage caused by improper use or modifications to the instrument, or data that is lost or destroyed. Always turn the power off when the instrument is not in use. Even when the power switch is in standby status, electricity is still flowing to the instrument at the minimum level. When you are not using the instrument for a long time, make sure you unplug the power cord from the wall AC outlet. NOTICE To avoid the possibility of malfunction/ damage to the product, damage to data, or damage to other property, follow the notices below. Handling and Maintenance • Do not use the instrument in the vicinity of a TV, radio, stereo equipment, mobile phone, or other electric devices. Otherwise, the instrument, TV, or radio may generate noise. • Do not expose the instrument to excessive dust or vibrations, or extreme cold or heat (such as in direct sunlight, near a heater, or in a car during the day) to prevent the possibility of panel disfiguration, damage to the internal components or unstable operation. (Verified operating temperature range: 5° – 40°C, or 41° – 104°F.) • Do not place vinyl, plastic or rubber objects on the instrument, since this might discolor the panel or keyboard. • When cleaning the instrument, use a soft, dry/dry or slightly damp cloth. Do not use paint thinners, solvents, cleaning fluids, or chemical-impregnated wiping cloths. Saving data • Saved data may be lost due to malfunction or incorrect operation. Save important data to a USB storage device/external device such as a computer. • To protect against data loss through media damage, we recommend that you save your important data onto two USB storage devices/external media. Information About copyrights • Copying of the commercially available musical data including but not limited to MIDI data and/or audio data is strictly prohibited except for your personal use. • This product incorporates and bundles computer programs and contents in which Yamaha owns copyrights or with respect to which it has license to use others’ copyrights. Such copyrighted materials include, without limitation, all computer software, style files, MIDI files, WAVE data, musical scores and sound recordings. Any unauthorized use of such programs and contents outside of personal use is not permitted under relevant laws. Any violation of copyright has legal consequences. DON’T MAKE, DISTRIBUTE OR USE ILLEGAL COPIES. About this manual • The illustrations and LCD screens as shown in this manual are for instructional purposes only, and may appear somewhat different from those on your instrument. • The company names and product names in this manual are the trademarks or registered trademarks of their respective companies. 4 DTX700 Owner’s Manual DMI-3 2/2 Welcome Thank you for purchasing the Yamaha DTX700 Drum Trigger Module. To get the most out of your new instrument, be sure to read this owner’s manual carefully. And after reading through this manual, be sure to store it in a safe place so that you can refer back to it again as needed. Using the Manuals Owner’s Manual – this booklet (Setup / Basic Operation) This paper manual describes the basic operations performed via the DTX700’s control panel. Data List The Data List contains the names of all of the DTX700’s sounds and kits, together with MIDI-related reference material. Reference Manual (Detailed Operation) *Not bundled with this product. The Reference Manual provides a description of all of the functions that can be accessed by pressing the [MENU] button on the DTX700’s control panel. This PDF manual is not bundled with the drum trigger module. If you wish to learn more about your DTX700 using the Reference Manual, please download it from the Yamaha Manual Library web page: http://www.yamaha.co.jp/manual/ * Yamaha Corp. reserves the right to modify this URL at any time without prior notice. Using PDF Manuals The Reference Manual for your DTX700 is made available in digital format as a PDF document. As such, a computer and suitable software will be required in order to read it. We recommend that Adobe Reader be used for this purpose as it allows you to quickly and easily search for keywords, to print out specific sections, and to conveniently jump from page to page by clicking embedded links. Keyword searching and link-based navigation in particular are extremely useful functions available only with digital-type documents. The most-recent version of Adobe Reader can be downloaded from the following web page. http://www.adobe.com/products/reader/ Bundled items • Power adaptor • Module holder • Owner’s Manual (this booklet) • Module-holder fixing screws x 4 • Data List • DVD-ROM (containing DAW software) Latest Firmware Version From time to time, Yamaha may update product firmware without prior notice. We recommend, therefore, that you check our web site (below) for the latest version and keep your DTX700 firmware up to date. http://dtxdrums.yamaha.com/downloads/ The content of this Owner’s Manual applies to the newest version of the firmware as of printing. Details regarding any functions added to later versions will also be made available via the above web site. Optional Pads Within this Owner’s Manual, the optional external pads that may be connected to the DTX700 are referred to by model name. Please note that these model names were up-to-date as of printing of this manual. Details regarding any subsequently released models will be made available via the following web site. http://dtxdrums.yamaha.com/downloads/ DTX700 Owner’s Manual 5 Contents Welcome ................................................................5 First Steps.................................................7 Selecting Sounds (Instruments) ................................ 30 Adjusting an Instrument’s Sound............................... 31 Playing with a Double Bass Drum ............................. 32 Importing & Assigning Audio Files............................. 32 Naming an Original Kit .............................................. 34 Adjusting the Snare Wire........................................... 35 Quick Start Guide .....................................8 Playing with Songs for Practice........................ 36 Using the Manuals ................................................5 Bundled items .......................................................5 Contents.................................................................6 Setup Component Names & Functions........................10 Control Panel............................................................. 10 Side Panel ..................................................................11 Rear Panel ................................................................ 12 Setting Up for Sound ..........................................13 Connecting the Adaptor............................................. 13 Connecting Speakers or Headphones ...................... 13 Connecting a Music Player........................................ 13 Turning On................................................................. 14 Turning Off................................................................. 14 Auto Power-Off........................................................... 14 Basic Operation Playing Demo Songs ..........................................16 Basic DTX700 Operations ..................................17 Dial (with integrated button) ....................................... 17 Changing the Cursor Value ....................................... 17 Moving the Cursor ..................................................... 17 [-/DEC] and [+/INC] Buttons ...................................... 18 [F1], [F2] & [F3] Function Buttons.............................. 18 Adjusting the Volume................................................. 19 Adjusting Display Contrast ........................................ 19 Storing Settings ......................................................... 21 Connecting a USB Memory Device........................... 21 Restoring Default Settings ......................................... 22 Playing Drum Pads..............................................23 Snares & Toms .......................................................... 23 Hi-Hats ...................................................................... 23 Cymbal ...................................................................... 24 Performing on Many Different Kits ....................25 Selecting a Kit ........................................................... 25 Selecting a Sensitivity for the Entire Kit..................... 26 Adjusting Tone........................................................... 27 Turning Off Effects ..................................................... 28 Initializing a Kit .......................................................... 28 Switching the Display Mode ...................................... 29 6 Building Your Own Kit........................................ 30 DTX700 Owner’s Manual Playing a Song .......................................................... 36 Adjusting the Song Volume ....................................... 36 Adjusting the Volume of a Song’s Drums .................. 37 Muting the Drum Part ................................................ 38 Soloing the Bass Part................................................ 38 Locking a Kit.............................................................. 39 Turning On the Click-Track ................................ 41 Setting the Tempo and Starting the Click-Track......... 41 Setting the Click-Track Volume .................................. 41 Setting the Time Signature ........................................ 43 Using the Timer ......................................................... 44 Tap Tempo – Setting the Tempo by Playing Pads...... 44 Using DTX700 Training Functions ............................. 45 Recording Your Performances .......................... 48 Recording a Performance.......................................... 48 Playing a Recorded Performance.............................. 48 Deleting a Recorded Performance ............................ 48 Recording Performance & Song Together ................. 49 Integrating Accessories..................................... 50 Using an HH65 Hi-hat Controller as Kick Drum Pedal ............................................... 50 Expanding with a PCY135 Cymbal Pad..................... 50 Connecting Your DTX700 to a Computer ......... 52 Making Connections.................................................. 52 Making Music with a Computer ................................. 53 Setting up Cubase Remote Control ........................... 54 On-Screen Messages ......................................... 55 Troubleshooting ................................................. 56 Specifications ..................................................... 57 Index .................................................................... 58 List of DTX700 Functions .................................. 59 * For details regarding these functions, refer to the Reference Manual PDF document. First Steps 1 Open the boxes to reveal their contents. • DTX700 Drum Trigger Module (main unit) • Racks such as the RS500 and RS700 • Pad sets such as the DTP700C, DTP700P, DTP750C, and DTP750P 2 Assemble your kit. • Assemble the racks. m Refer to the assembly manuals that came with your racks (RS500, RS700, etc.). • Mount the pads and the DTX700 on the racks. m Refer to the assembly manuals that came with your pad sets (DTX700K, DTX750K, etc.). 3 Connect your kit. • Connect your pads to the DTX700 using the correct cables. m Refer to the assembly manuals that came with your pad sets (DTX700K, DTX750K, etc.). • Plug the power adaptor into the DTX700 and turn it on. m See page 13 of this booklet. 4 Play your kit. • See pages 8 and 9 of this booklet for tips on getting started right away. • This booklet provides an introduction to your DTX700’s basic functions. Detailed descriptions of all functions can be found in the Reference Manual PDF document (see page 5). DTX700 Owner’s Manual 7 Quick Start Guide Choosing sounds to play (page 25 of Basic Operation) q Press the [KIT] button. w Turn the dial to select new sounds. You can also assign sounds individually to each of the pads (page 25 of Basic Operation). Playing along with a song (page 36 of Basic Operation) q Press the [SONG] button. w Turn the dial to select a new song. e Press the [F3] button to start the song. You can press the [F2] button to silence the song’s drum part (page 38 of Basic Operation). 8 DTX700 Owner’s Manual Quick Start Guide Practicing with a metronome (page 41 of Basic Operation) q Press the [CLICK] button. w Turn the dial to set the tempo. e Press the [ ] button to start the metronome. Recording your own performance (page 48 of Basic Operation) q Press the [REC] button. w Press the [>/] button to start recording. e When you have finished playing, press the [>/] button once again to stop recording. You can also use the [>/] button to start and stop playback of your recorded performance (page 48 of Basic Operation). DTX700 Owner’s Manual 9 Setup Component Names & Functions Control Panel q w e y @0 !0 o !3 !5 q [PHONES] volume knob (page 13) This knob controls the volume of audio output from the [PHONES] jack. Turn clockwise to increase the volume or counter-clockwise to decrease it. w [MASTER] knob (page 19) This knob controls the DTX700 master volume (i.e., the volume at the OUTPUT jacks). Turn clockwise to increase the volume or counter-clockwise to decrease it. e Display (page 29) This LCD screen shows information and data needed to operate the DTX700. r Dial (page 17) This dial can be both turned and pressed. • By pressing it, you can set parameter values and execute various functions such as the storing of data. • By turning it, you can move the cursor within displayed pages and change the currently selected parameter value. DTX700 Owner’s Manual u i !8 !9 !1 !2 10 t r !4 !7 !6 t (Standby/On) button (page 14) Use this switch to turn your DTX700 on and off. y [F1], [F2], and [F3] function buttons (page 18) These buttons are used to access a range of different functions depending on the page displayed. u [EXIT] button Press this button to cancel operations such as the copying and storing of data. In addition, you can immediately silence all voices at any time by holding down the [SHIFT] button and pressing the [EXIT] button. i [STORE] button (page 21) This button is used to store settings and other data in the DTX700’s internal memory. In addition, it will light up whenever parameter settings have been changed but not yet stored. o [KIT] button (page 25) This button is used to access the Kit page in order to select a drum kit. Component Names & Functions !0 [SONG] button (page 36) This button is used to access the Song page in order to select a song. !1 [MENU] button (page 20) This button is used to access the Menu area. From here, you can select various other pages in order to configure your DTX700 in many different ways. * This booklet introduces some of the basic functions available in the Menu area. For a complete description of all functions, please download the DTX700 Reference Manual from this web page: http://www.yamaha.co.jp/manual/ !2 [INST] button (page 30) This button is used to access the Instrument page in order to select instruments. [Definition] Instrument In the context of the DTX700, the term “instrument” is used to refer to each of the various percussion instruments that make up a kit. Typical examples would be snare drums, tom-toms, cymbals, and kick drums. !3 [CLICK] button (page 41) This button is used to access the Click page in order to set your DTX700’s click-track (or metronome). !4 [SHIFT] button When you press this button, the functions assigned to the [F1], [F2], and [F3] buttons will change. These functions can be accessed by holding down the [SHIFT] button and pressing the corresponding function button (see page 18). Meanwhile, a number of the buttons on the DTX700’s control panel have secondary functions, indicated just above the buttons themselves. These functions can also be accessed by holding down the [SHIFT] button and pressing the corresponding button. Setup !5 [>/] button (page 48) Use this button to start and stop the playback of performances that you have recorded on the DTX700. !6 [REC] button (page 48) Using this button, you can activate and deactivate recording of your performances. !7 [ ] (Click-track) button (page 41) The Click-track button is used to start and stop the DTX700’s click-track (or metronome). !8 [-/DEC] button (page 18) This button is used to decrease the value at the cursor position. In addition, the selected value can be decreased in units of 10 by holding down the [SHIFT] button and pressing the [-/DEC] button or by holding down the [-/DEC] button and pressing the [+/INC] button. !9 [+/INC] button (page 18) This button is used to increase the value at the cursor position. In addition, the selected value can be increased in units of 10 by holding down the [SHIFT] button and pressing the [+/INC] button or by holding down the [+/INC] button and pressing the [-/DEC] button. @0 Sliders (page 41) The sliders are used to adjust the volumes of individual parts such as the snare and toms, and also the volume of the click-track. Side Panel q q [USB TO HOST] port (page 52) This port is used to connect the DTX700 to a computer via a USB cable. w w [USB TO DEVICE] port (page 21) This port is used to plug in a USB memory device (such as a flash drive), either directly or via a USB cable. DTX700 Owner’s Manual 11 Setup Component Names & Functions Rear Panel q w !1 e !0 r o q [LCD CONTRAST] knob (page 19) This knob is used to set the display contrast for optimum legibility. w [ ] connector (page 13) Use this connector for the power adaptor that came with your DTX700. e Cord clip (page 13) Wrap the power adaptor cord around this clip to prevent accidental unplugging during operation. r MIDI [IN] and [OUT] connectors (page 13) The MIDI [IN] connector is used to receive control or performance data from another MIDI device, such as an external sequencer, via a MIDI cable. When connected in this way, you can play the DTX700’s internal tone generator and control many of its parameters using another MIDI device. Meanwhile, the MIDI [OUT] connector is used to send performance data from the DTX700 to other devices in the form of MIDI messages. t y u i i Trigger input jacks [qSNARE] to [iHI-HAT], and [!1] These trigger-input jacks are used to connect stereotype pads (two- and three-zone). They also support standard mono-output pads. In addition, these triggerinput jacks are compatible with pad controllers. o [HI-HAT CONTROL] jack This jack is used to connect an HH65 Hi-hat Controller or an RHH135 Real Hi-hat Pad via its control output. !0 Trigger input jack [oKICK/!0] This trigger-input jack is used to connect mono-type pads such as the KP65 Kick Pad. If using a KP65, furthermore, you can use the input jack on its rear surface to connect an additional mono-type pad. Meanwhile, you could also use a Y-shaped cable (sold separately) with this jack in order to connect a pair of mono-type pads. t [AUX IN] (auxiliary input) jack (page 13) External audio signals can be input via this stereo mini-jack. Using [AUX IN], you can connect a portable music player, a CD player, or another similar device to play along with your favorite tunes. y OUTPUT [L/MONO] and [R] jacks (page 13) Use these jacks to output line-level stereo mixes from your DTX700. For example, you can connect each of the jacks to the left and right inputs of an external stereo amplifier or mixer using mono audio-jack cables. For mono output, use the [L/MONO] jack only. u [PHONES] jack (page 13) Use this standard audio jack to connect a pair of stereo headphones. 12 DTX700 Owner’s Manual !1 Trigger input jack [!2HH-KICK] This jack is used to connect an HH65 Hi-hat Controller (sold separately) for use as an alternative kick pad or as part of a double bass drum configuration (page 50). Setup Setting Up for Sound Connecting the Adaptor Connecting Speakers or Headphones 1 Ensure that your DTX700 is turned off (i.e., the screen is not lit). Your DTX700 does not come with built-in speakers. In order to hear it, therefore, you will need to connect headphones or a DTX-series monitor system, such as the MS40DR. 2 Insert the power adaptor’s DC plug into the [ ] connector on the rear panel. 3 Hook the power adaptor’s cord around the cord clip to secure it in place. Connecting Speakers Connect your speakers to the OUTPUT [L/MONO] and [R] jacks (standard mono-audio). Connecting Headphones Connect your headphones to the [PHONES] jack (standard stereo-audio). The [PHONES] knob on the control panel can be used to adjust the volume of the headphones. CAUTION • Excessive bending can damage the power adaptor’s cord and create a fire hazard. Ensure, therefore, that the power cord is not bent at an extreme angle when wrapped around the clip. 4 Plug the power adaptor’s AC power cord into an AC wall socket or another electrical outlet. WARNING • Use only the power adaptor that came with your DTX700. CAUTION CAUTION • To prevent hearing loss, avoid using headphones at high volumes for extended periods of time. Connecting a Music Player You can connect a portable music player or another similar source of audio to your DTX700 via the [AUX IN] (auxiliary input) stereo mini-jack. This makes it possible to play along with your favorite songs. NOTICE • The DTX700 remains charged and draws a small amount of power even when the (Standby/On) button is set to the Standby position. For this reason, you should always unplug the power adaptor from the wall socket if the instrument will not be used for an extended period of time. • Whenever connecting other devices, ensure that the cables you use have plugs that match the input or output connectors on those devices. • Before making connections, furthermore, you should also turn the volume on the other devices fully down. • When all connections have been made, use each device’s volume controller to balance its output with that of the DTX700. Cord clip Speakers with a built-in amplifier Power adaptor cord External MIDI device MIDI IN MIDI OUT Standard mono audio cable (6.3-mm dia.) Mobile music player, etc. MIDI cable Mini stereo audio cable (3.5-mm dia.) Standard stereoaudio jack (6.3-mm dia.) DTX700 Owner’s Manual 13 Setup Setting Up for Sound Turning On Turning Off 1 Press the (Standby/On) button. The display will turn off. NOTICE • If you turn off the DTX700 without storing any changes you have made to settings, those changes will be lost. For details on how to store changed settings, see page 21. 1 Turn the [MASTER] knob fully counterclockwise to minimize the output volume. 2 Press the (Standby/On) button. The opening pages will be displayed, followed by the Kit page. Auto Power-Off If no controls are operated or no data is exchanged with external devices (such as a computer or MIDI instrument) for a predetermined length of time, your DTX700 will turn off automatically. This function is called Auto Power-Off. NOTICE • If you do not store changed settings before the Auto Power-Off function activates, your changes may be permanently lost. Be sure, therefore, to store new settings whenever you are happy with them. Setting the Auto Power-Off Function Use the following procedure to set the time until the Auto Power-Off function activates or to disable the function. 3 If you have connected any amplified speakers or other similar external devices, turn them on now. NOTE • When powering down your system, be sure to turn off external devices before the DTX700. 14 DTX700 Owner’s Manual 1 Press the [MENU] button. 2 Turn the dial to move the cursor to “Utility”. 3 Press the dial. 4 Turn the dial to move the cursor to “General”. 5 Press the dial. 6 Turn the dial to move the cursor to the “AutoPowerOff” row of the displayed list. Setting Up for Sound 7 Press the dial. 11 Setup Press the dial to store your new settings. The cursor will zoom in on the value on the right. 8 Turn the dial to set the automatic power-off time. The value indicates the idle time until automatic power-off in minutes. Settings can be made in units of 5 minutes between 5 and 30. Furthermore, you can disable the Auto Power-Off function by selecting “off”. NOTE • The Auto Power-Off function is set to 30 minutes by default. Disabling the Auto Power-Off Function at Startup 9 Press the dial. The cursor will zoom out to select the entire row. 10 To disable the Auto Power-Off function when turning on the DTX700, hold down the [>/] button when you press the (Standby/On) button. (This action sets the AutoPowerOff parameter to “Off”.) Press the [STORE] button. DTX700 Owner’s Manual 15 Basic Operation Playing Demo Songs Your DTX700 comes pre-programmed with demo songs. Played as described below, these songs allow you to fully appreciate the quality of the sound produced by the built-in tone generator. 1 4 Press the [F3] button once again to stop the demo song. 5 To select a different demo song, turn the dial and repeat Steps 3 and 4. Press the (Standby/On) button to turn on your DTX700. Startup pages 2 Press the [SONG] button. 3 Press the [F3] button. The demo song indicated on the display will start. The [SONG] button will flash while the song is playing. 16 DTX700 Owner’s Manual Basic Operation Basic DTX700 Operations Dial (with integrated button) Dial Moving the Cursor When a page contains more than one editable value, you can press the dial to toggle between inverted text and underlined text at the cursor position. Example: After pressing the [SONG] button On the page accessed with the [SONG] button, you can set both the song number and the tempo . Cursor Pressing the dial Press the dial to switch to the underline cursor. Cursor You press the dial to execute various operations and to set new values for parameters. The cursor type (see below) can also be toggled by pressing the dial. Turning the dial You turn the dial to change parameter values and to move the cursor. By turning the dial, you can move the cursor. In this way, you can select the value you wish to change. Cursor Turn the dial to move the underline Changing the Cursor Value The cursor is displayed as a block of inverted text. Cursor Press the dial once again to switch back to the inverted-text cursor. By turning the dial in either direction, you can change the value at the current cursor position. By turning the dial in either direction, you can change the value at the cursor position. DTX700 Owner’s Manual 17 Basic Operation Basic DTX700 Operations [-/DEC] and [+/INC] Buttons [F1], [F2] & [F3] Function Buttons These buttons are used to change the currently selected value. Press the [+/INC] button to increase the value by one; the [-/ DEC] button to decrease by one. If you hold down either button, the value will change continuously. In the case of parameters with a wide range of possible settings, you can increase them in units of 10 by holding down the [SHIFT] button and pressing the [+/INC] button or by holding down the [+/INC] button and pressing the [-/DEC] button. Similarly, you can decrease in units of 10 by holding down the [SHIFT] button and pressing the [-/DEC] button or by holding down the [-/DEC] button and pressing the [+/INC] button. Function buttons The functions that you can access by pressing the [F1], [F2], and [F3] function buttons are displayed as inverted text at the bottom of the display. In addition, when the symbol is shown in the bottom right corner, you can press the [SHIFT] button to display additional functions for each of the buttons. To access these additional functions, hold down the [SHIFT] button and press the corresponding button. Kit Lock Effects Switch Display Mode 18 DTX700 Owner’s Manual Basic DTX700 Operations Basic Operation Adjusting the Volume You can use the [MASTER] knob to adjust the volume of sound on the OUTPUT [L/MONO] and [R] channels. In addition, the [PHONES] knob can be used to adjust the volume of headphones plugged into the [PHONES] jack on the rear panel. Turn clockwise to increase the volume or counter-clockwise to decrease it. Adjusting Display Contrast Using the [LCD CONTRAST] knob on the rear panel, you can adjust the contrast level of the DTX700 display. [LCD CONTRAST] knob DTX700 Owner’s Manual 19 Basic Operation Basic DTX700 Operations Pages Accessed Using the [MENU] Button The pages of your DTX700’s Menu area provide access to a wide range of highly-useful settings. To access this area, simply press the [MENU] button. This manual introduces some of the pages from the Menu area. For a complete description, please download the DTX700 Reference Manual from this web page: http://www.yamaha.co.jp/manual/ Cursor operations on Menu area pages The way in which the cursor is displayed and operated on Menu area pages differs from that of other pages. • Navigation pages • Parameter pages When you turn the dial on navigation-type pages, the cursor (i.e., the inverted text) moves in the corresponding direction. When you turn the dial on parameter-type pages, the cursor (i.e., the inverted text) moves up and down within the displayed list. By pressing the dial, you can move one level further into the Menu area. To move back one step towards the top page, press the [EXIT] button. NOTE • The convention used in this manual to describe sequences of cursor operations in the Menu area takes the form: [MENU] m [KIT] m [COMMON]. 20 DTX700 Owner’s Manual When you press the dial, the cursor will zoom in on the value on the right. In this condition, you can turn the dial to change the value selected by the cursor. When you press the dial again, the cursor will zoom out to select the entire row. Basic DTX700 Operations Basic Operation Storing Settings Connecting a USB Memory Device Whenever you change a DTX700 setting, the [STORE] button will light up to remind you to store your new setting in the instrument’s internal memory. To do so, proceed as follows. You can plug a USB memory device into the [USB TO DEVICE] port on the side panel of your DTX700. 1 Make sure that the [STORE] button is lit. Precautions when using the [USB TO DEVICE] port Whenever connecting a USB device to your DTX700 via the [USB TO DEVICE] port, be sure to observe the following important precautions. NOTICE 2 • Use a USB A-B cable of no more than 3 meters in length. Press the [STORE] button. You will be asked to confirm that you wish to proceed. NOTE • For more details on how to use your USB memory device, refer to the owner’s manual that came with it. Supported USB memory devices Flash drives and other USB-compatible, mass storage devices may be used with the DTX700. NOTE • You can press the [EXIT] button to return to the previous page without storing. 3 Press the dial to store your settings. The [STORE] button will go out, confirming that your settings have been permanently stored. This instrument does not necessarily support all commercially available USB memory devices, and Yamaha cannot guarantee the operation of all such devices. Before purchasing a USB device for use with this instrument, therefore, please check with your Yamaha dealer or an authorized Yamaha distributor, or visit this web page: http://dtxdrums.yamaha.com/ NOTE • Other USB devices, such as a computer keyboard or mouse, are not supported. Connecting a USB memory device Before plugging in a USB memory device, ensure that its connector matches the shape of the DTX700’s [USB TO DEVICE] port and that both are oriented in the same direction. The [USB TO DEVICE] port supports the USB 1.1 standard; however, you can plug in and use USB 2.0 memory devices. It should be noted that data will be transferred at the USB 1.1 speed in such a case. NOTE • USB 3.0 cables cannot be connected to the DTX700. Using a USB memory device NOTICE • If you turn off the DTX700 without storing any changes you have made to settings, those changes will be lost. With a USB memory device plugged into the DTX700, you will be able to save data that you have created and to import settings and audio data. Initializing a USB memory device Certain types of USB memory device must be initialized before they can be used with this instrument. For details on how to do this, refer to the Reference Manual PDF document. NOTICE • When a USB memory device is initialized, all data saved on it will be permanently erased. Before formatting such a device, therefore, ensure that any important data has been copied to another location. Write protection Certain types of USB memory device can be write-protected to prevent data from being accidentally erased. If your USB memory contains important data, we suggest that you activate write protection to prevent accidental erasure. Meanwhile, if you need to save data on a USB flash-memory device, be sure to disable its write protection. DTX700 Owner’s Manual 21 Basic Operation Basic DTX700 Operations NOTICE • If using a self-powered type USB memory device, turning it on and off repeatedly could cause your DTX700 to freeze and stop operating. The same applies to the frequent plugging in and unplugging of USB cables. Such action should, therefore, be avoided. • Data stored on the DTX700 or within the USB memory device may be corrupted if they are disconnected or turned off at the wrong time. Be sure, therefore, to avoid unplugging the USB memory device from the [USB TO DEVICE] or turning off either device while data is being transferred. 6 Press the [F3] button. You will be asked to confirm that you wish to restore the Factory Set. Restoring Default Settings Straight out of the box, your DTX700 already contains a wide range of pre-programmed drum kits, instruments, and songs. This collection of default settings – the Factory Set – can be conveniently restored at any time if you have accidentally overwritten them or wish to delete all of your own settings. To do so, use the Factory Set function as follows. 1 Press the [MENU] button. 2 Turn the dial to move the cursor to “Utility”. 3 Press the dial. 4 Turn the dial to move the cursor to “FactSet”. 5 Press the dial. If you do not wish to do so, press the [EXIT] button to return to the previous page. 7 Press the dial to restore the Factory Set. NOTICE • Whenever the Factory Set is restored, any settings you have made will be overwritten with the corresponding defaults. Important user-defined data should, therefore, be saved on a USB memory device in advance. For full details, refer to the Reference Manual PDF document. NOTE • If you select the “PowerOn Auto” checkbox on the page displayed for Step 6 above, the Factory Set will be restored each time you turn on your DTX700. 22 DTX700 Owner’s Manual Basic Operation Playing Drum Pads Snares & Toms Hi-Hats If using a three zone pad such as the XP100SD shown below, you will be able to produce three distinct sounds (i.e., head, open rim, closed rim) depending on where you hit it, much the same as if you were playing an acoustic snare. If using a two zone pad such as the RHH135 shown below, you will be able to play it in the same way as an acoustic hi-hat cymbal. Closed rim shot (rim 2) Edge shot Open rim shot (rim 1) Bow shot Head shot Head shot Hitting the main surface of the pad produces a head shot sound. Open/close In addition to the foot-close sound obtained by pressing the Hi-Hat Controller pedal, you can press the controller down even more firmly in the closed condition to produce a tighter closed hi-hat sound. Bow shot Hitting the main surface of the pad (i.e., the bow section located between the cup and edge) produces a bow shot sound. Open rim shot Hitting the open-rim zone produces an open rim-shot sound. Edge shot Hitting the outside edge of the pad produces an edge shot sound. Closed rim shot (Cross sticking) Hitting the closed-rim zone produces a closed rim-shot sound. Hi-hat splash Pressing the hi-hat controller pedal and then immediately releasing it produces a hi-hat splash sound. DTX700 Owner’s Manual 23 Basic Operation Playing Drum Pads Cymbal Choking If using a three zone pad such as the PCY135 shown below, you will be able to play it in the same way as an acoustic ride cymbal. Grabbing the edge of a cymbal pad immediately after hitting it will silence the sound being produced. Bell shot (rim 2) Edge shot (rim 1) Bow shot Bow shot Hitting the main surface of the pad (i.e., the bow section located between the cup and edge) produces a bow shot sound. Edge shot Hitting the outside edge of the pad produces an edge shot sound. Bell shot Hitting the cup produces a bell shot sound. 24 DTX700 Owner’s Manual Muting Hitting the pad while holding the edge will produce a muted sound. Basic Operation Performing on Many Different Kits In terms of the DTX700, the word “kit” is used to refer to a collection of related sounds, such as acoustic drums or percussion instruments. By selecting different kits, you can conveniently change the entire sound of this drum trigger module. Selecting a Kit 1 Press the [KIT] button. 2 Turn the dial to choose a new kit. Acoustic drums Kit number 3 Kit name Play the connected pads. NOTE Percussion instruments • When you select a new kit in Step 2 above, the [STORE] button will light up. You can press the button at this time to store your new kit selection. When you next turn on the DTX700, therefore, this kit will be automatically selected. DTX700 Owner’s Manual 25 Basic Operation Performing on Many Different Kits Selecting a Sensitivity for the Entire Kit 4 When you have found a trigger setup you like, press the [EXIT] button to return to the Kit page. 5 Press the [STORE] button. With electronic drums, sensitivity is often set for each individual pad. However, doing so before each performance can be extremely time consuming. As a solution, your DTX700 contains a number of trigger setups that define the sensitivities of all pads in a kit. These trigger setups have been carefully designed to suit a range of different playing situations and pad sets, and they can be selected as follows. 1 2 Press the [KIT] button. If you do not wish to store your setting, press the [EXIT] button to return to the previous page. Press the [F2] button. The Trigger Setup page will open. 3 Turn the dial to choose a trigger setup. Playing your DTX700’s pads as you turn the dial makes it easier to notice the differences in sensitivity levels. 26 DTX700 Owner’s Manual 6 Press the dial to store your new setting. Performing on Many Different Kits Adjusting Tone 4 When you have found an EQ setup you like, press the [EXIT] button to return to the Kit page. 5 Press the [STORE] button. Your DTX700 makes it very easy to adjust the tone of drum kits. Selecting EQ presets Basic Operation The EQ presets on your DTX700 can be used to optimize the tone of the drum kits in order to suit your own personal preferences. Simply choose different equalizer presets as described below to see how they change your drum sounds. NOTE • For a full list of DTX700 EQ presets, see the Data List document. 1 2 Press the [KIT] button. If you do not wish to store your setting, press the [EXIT] button to return to the previous page. 6 Press the dial to store your new setting. Press the [F1] button. The Master EQ page will open. NOTE • Changing kits has no effect on the EQ setting selected here. 3 Turn the dial to choose an EQ setup. Playing your DTX700’s pads as you turn the dial makes it easier to notice the differences in tone. DTX700 Owner’s Manual 27 Basic Operation Performing on Many Different Kits Turning Off Effects Initializing a Kit Each kit on the DTX700 is set up with reverb or another sound effect applied by default. You can, however, easily turn off this effect as described below. By initializing a kit as described below, you can quickly restore its default settings. 1 Press the [KIT] button. 2 Hold down the [SHIFT] button and press the [F2] button. The button’s 1 Press the [KIT] button. 2 Turn the dial to select the kit you wish to initialize. 3 Press the [F3] button. icon will become reversed , indicating that the effect is now off. If you do not wish to initialize the kit, press the [EXIT] button to return to the previous page. NOTE • You can toggle the effect on and off using the method described in Step 2 above. 28 DTX700 Owner’s Manual 4 Press the dial to confirm that the kit is to be initialized. Performing on Many Different Kits 5 Press the [STORE] button. Basic Operation Switching the Display Mode Normally, your DTX700’s display shows the name of the kit and an artist’s impression of what it might look like. As described below, however, you can change the display mode to show just the kit name. 1 Press the [KIT] button. 2 Hold down the [SHIFT] button and press the [F3] button (Display). If you do not wish to store your settings, press the [EXIT] button to return to the previous page. 6 Press the dial to store your new settings. The display mode will now change to show just the kit name. NOTE • If you wish to return to the original display mode, hold down the [SHIFT] button and press the [F3] button (Display) once again. DTX700 Owner’s Manual 29 Basic Operation Building Your Own Kit With the DTX700, you can assign a different sound to each of the connected pads. And once you have assembled all of the sounds you wish to use, you can store them together. The following describes how to perform these operations. 5 Turn the dial to select the sound you wish to use. Instrument category Instrument number Selecting Sounds (Instruments) [Definition] Instrument In the context of the DTX700, the term “instrument” is used to refer to each of the various percussion instruments that make up a kit. Typical examples would be snare drums, tom-toms, cymbals, and kick drums. 1 NOTE • You can use instrument categories and numbers to find more information on different instruments in the Data List booklet that came with your DTX700. Press the [KIT] button. 6 2 When you have found a sound you like, press the [STORE] button. Turn the dial to choose the kit you wish to edit. If you do not wish to store your new setting, press the [EXIT] button. The display will return to the previous page. 7 3 Press the [INST] button. 4 Hit the pad that you wish to assign a new sound to. Press the dial to store your new setting. NOTE • Even if you have changed a kit’s sounds and stored your new settings, you can perform kit initialization (page 28) at any time to restore the original ones. 30 DTX700 Owner’s Manual Building Your Own Kit Adjusting an Instrument’s Sound 1 Press the [KIT] button. 2 Turn the dial to choose the kit you wish to edit. 3 4 Press the [INST] button. 5 Basic Operation Press the [F1] or [F2] button. The functions displayed at this time depend on the type of instrument selected. Each of these functions is described in the following table. Instrument category Kick (kick drums) Sn1 (snares 1) Sn2 (snares 2) Tom1 (toms 1) Tom2 (toms 2) Cym (cymbals) HH (hi-hats) Latn (Latin percussion) Asia (Asian percussion) AfAr (African percussion) Orch (orchestral percussion) ElPc (electronic percussion) EFX (effect sounds) Mldy (melodic voices) Wave (audio files) [F1] [F2] TUNING MUFFLING SIZE SIZE SUSTAIN CLUTCH TUNING DECAY Hit the pad whose sound you wish to adjust. Functions • Tuning: This function allows the drum to be tuned. • Size: This function allows the size (or diameter) to be changed for cymbals. • Muffling: This function adjusts the degree to which a drum’s sound is muffled. • Sustain: This function allows the amount of sustain to be adjusted. 6 • Clutch: This function adjusts the height of the hi-hat clutch – or in other words, the height of the top hi-hat. • Decay: This function allows the amount of decay to be adjusted. Turn the dial to adjust the sound. DTX700 Owner’s Manual 31 Basic Operation 7 Building Your Own Kit When you have finished adjusting the sound, press the [STORE] button. Importing & Assigning Audio Files 1 Using a computer, place the audio files you wish to import on a USB memory device. NOTE • Be sure to place the audio files in the USB memory device’s root directory (that is, not within any folder). • Your DTX700 can import WAV and AIFF audio files. • Only 16-bit audio files can be used with your DTX700. • If the audio files you wish to use have been recorded with a different bit depth, please convert them to 16-bit in advance using, for example, the bundled DAW software. For details regarding the conversion method, please refer to the instruction manual that came with your software. • Your DTX700 can import audio files of up to approximately 23 seconds in length (in the case of 44.1-kHz, 16bit audio). • Even when the above conditions have been satisfied, certain other factors may make audio files incompatible with the DTX700. If you do not wish to store your new setting, press the [EXIT] button. The display will return to the previous page. 8 Press the dial to store your new setting. 2 Unplug the USB memory device from your computer and plug it into the [USB TO DEVICE] port on the DTX700. NOTE • Even if you have adjusted a kit’s sounds and stored your new settings, you can perform kit initialization (page 28) at any time to restore the original ones. USB memory device Playing with a Double Bass Drum As described below, you can easily configure your DTX700 to produce a kick drum sound when you operate the hi-hat controller (RHH135 or HH65) plugged into the [HI-HAT CONTROL] trigger input jack. This convenient function provides support for double bass drumming techniques. 1 Press the [KIT] button and turn the dial to choose a kit. 2 Press the [INST] button and then press down once on the pedal connected to the [oKICK/ !0] trigger input jack. 3 Press the [KIT] button. 4 Turn the dial to choose the kit you wish to edit. 5 Press the [INST] button. The message “Kick” will be shown in the top right corner of the display. 3 Hold down the [SHIFT] button and press the [F2] (DBL BASS) button. NOTE • While this function is enabled, you will be unable to use the hi-hat controller plugged into the [HI-HAT CONTROL] trigger input jack to simulate opening and closing of the hi-hat. 32 DTX700 Owner’s Manual Building Your Own Kit 6 Hit the pad that you wish to assign an audio file to. 10 Basic Operation Press the dial to start the importing process. NOTE • If the pad in question is a two- or three-zone type, the audio file will be assigned to all of its zones. 7 Press the [F3] button. NOTE • Whenever you import an audio file, your DTX700 will automatically store it. 8 Turn the dial to select the audio file you wish to import. 9 Press the [F3] button. To cancel the importing of an audio file, press the [EXIT] button. The display will return to the previous page. DTX700 Owner’s Manual 33 Basic Operation Building Your Own Kit Naming an Original Kit 1 2 8 Turn the dial to move the cursor to the “Name” row of the displayed list. 9 Press the dial. Press the [KIT] button. Turn the dial to choose a kit that you have built. 3 Press the [MENU] button. 4 Turn the dial to move the cursor to “Kit”. 10 A name of up to 12 characters in length can be assigned to drum kits. Move the underline cursor to the character you wish to change using the [F1] and [F3] buttons, and then use either the dial or the [+/INC] and [-/DEC] buttons to change the character. 11 5 Press the dial. 6 Turn the dial to move the cursor to “Common”. Enter a new name for the selected kit. When you have finished entering the name, press the [STORE] button. If you do not wish to store your new kit name, press the [EXIT] button. The display will return to the previous page. 12 7 34 Press the dial. DTX700 Owner’s Manual Press the dial to store your new kit name. Building Your Own Kit Adjusting the Snare Wire Basic Operation 5 Hold down the [SHIFT] button and press the [F2] button. 6 Turn the dial to adjust the snare wire. With the DTX700, you can easily adjust the snare wire for the snare pad (i.e., the pad plugged into the [qSNARE] trigger input jack). In the case of pads featuring a pad controller, simply turn the controller to adjust the snare wire setting. Pad controller Higher values correspond to tighter snare wires and viceversa. An “off” setting implies that the snare wire has been fully removed from the snare. Meanwhile, the following procedure can be used to adjust the setting for pads not featuring a pad controller. 1 2 Press the [KIT] button. 7 Press the [STORE] button. 8 Press the dial to store your new setting. Turn the dial to choose a kit. 3 Press the [INST] button. 4 Hit the snare pad (i.e., the pad plugged into the [qSNARE] trigger input jack). NOTE • The Snares function is displayed only for the pad connected via the [qSNARE] trigger input jack. DTX700 Owner’s Manual 35 Basic Operation Playing with Songs for Practice Playing a Song Adjusting the Song Volume 1 Press the [SONG] button. 1 Press the [SONG] button. 2 Turn the dial to select the song you wish to play. 2 Press the [F1] button. 3 Press the [F3] button to start playing the song. 3 Turn the dial to adjust the song’s playback volume. 4 Press the [EXIT] button to return to the Song page, and then press the [F3] button to start the song. You can stop playback by pressing the [F3] button once again. If the volume is not yet correct, repeat the above process. 36 DTX700 Owner’s Manual Playing with Songs for Practice Adjusting the Volume of a Song’s Drums Basic Operation 5 Turn the dial to adjust the volume. 6 Press the [EXIT] button to return to the Song page, and then press the [F3] button to start the song. Using the procedure described below, you can conveniently adjust the volume of a song’s drum part while leaving the other parts unchanged. This function is very useful when you wish to play along with a song, keeping its drum part only slightly audible. 1 Press the [SONG] button. If the volume is not yet correct, repeat the above process. 2 Press the [F1] button. 3 Press the dial to switch to the outline cursor. 4 Turn the dial to move the cursor to the DRUM fader, and then press the dial. DTX700 Owner’s Manual 37 Basic Operation Playing with Songs for Practice Muting the Drum Part Soloing the Bass Part Using the procedure described below, you can conveniently mute (i.e., silence) a song’s drum part while leaving the other parts unchanged. This function is very useful when you wish to drum along with a song. Using the procedure described below, you can conveniently solo a song’s bass part (i.e., silence all other parts). This function is very useful when you wish to practice with just the bass playing. 1 Press the [SONG] button. 1 Press the [SONG] button. 2 Press the [F2] button. 2 Press the [F1] button. 3 Press the [F2] button. The icon will be displayed on-screen as inverted text , indicating that the drums are now muted. You can unmute the drums and restore the icon to its original condition by pressing the [F2] button once again. All accompaniment parts other than the bass will be muted (i.e., silenced). 4 Press the [F3] button. The drum part will also be muted. 38 DTX700 Owner’s Manual Playing with Songs for Practice 5 Press the [EXIT] button to return to the Song page, and then press the [F3] button to start the song. You should now hear only the song’s bass part. Basic Operation Locking a Kit When you select a new song, your DTX700 normally chooses the best kit for that song automatically. You can, however, use the Kit Lock function to prevent this if you wish to keep the current kit when practicing with different songs. 1 Press the [KIT] button. 2 Select the kit you wish to play. 3 Hold down the [SHIFT] button and press the [F1] button. The lock icon 4 will be displayed beside the kit number. Press the [SONG] button. DTX700 Owner’s Manual 39 Basic Operation 5 Playing with Songs for Practice Turn the dial to select a new song. NOTE • To unlock the kit, repeat Steps 1 through 3 above. After doing so, the lock icon will disappear from beside the kit number. 40 DTX700 Owner’s Manual Basic Operation Turning On the Click-Track Setting the Tempo and Starting the Click-Track 1 Setting the Click-Track Volume To adjust the overall click-track volume: Move the Click slider up and down to adjust the volume. Press the [CLICK] button. Louder Slider Quieter 2 Turn the dial to set the tempo. To fine tune individual click-track volumes: Use the following procedure to adjust the volumes of each element of the click-track. 3 Press the [ ] button. The click-track will start playing at the selected tempo. NOTE • If you select a song (page 36) after setting the tempo in this way, the selected song’s tempo will be used for the click-track. • Use [MENU] m [Click] m [Voice] to change the clicktrack sounds. For full details, refer to the Reference Manual PDF document. 1 Press the [CLICK] button. 2 Press the [F1] button. : : : : : Accent (start of measure) Quarter notes Eighth notes Sixteenth notes Eighth-note triplets DTX700 Owner’s Manual 41 Basic Operation Turning On the Click-Track 3 Turn the dial to select the click-track element whose volume you wish to adjust. 4 Press the dial. The selected click-track element will be displayed in reverse. 5 Turn the dial to adjust the selected element’s volume. 6 Press the dial. 7 To adjust the volume of other elements of the click-track, repeat Steps 3 through 6 above. 8 Press the [STORE] button. If you do not wish to store your new settings, press the [EXIT] button. The display will return to the previous page. 42 DTX700 Owner’s Manual 9 Press the dial to store your new settings. Turning On the Click-Track Setting the Time Signature 1 6 Basic Operation Press the dial to set the new time signature. Press the [CLICK] button. NOTE 2 Press the dial. • If you select a song (page 36) after setting the time signature in this way, the selected song’s time signature will be used for the click-track. The cursor will switch to an underline. 3 Turn the dial to move the cursor to the time signature. 4 Press the dial. The cursor will switch to reversed text. 5 Turn the dial to set the click-track time signature. DTX700 Owner’s Manual 43 Basic Operation Turning On the Click-Track Using the Timer Your DTX700’s timer can be used to specify how long the click-track is to play. This function is useful when you want to practice for a set period of time. 1 2 Tap Tempo – Setting the Tempo by Playing Pads 1 Press the [CLICK] button. 2 Hold down the [SHIFT] button and press the [F1] button. 3 Hit one of your pads at least three times at the tempo you wish to set. Press the [CLICK] button. Press the [F3] button. Each time you press this button, the timer setting increases by 30 seconds. The longest time that can be set is 600 seconds. The new tempo will be displayed on-screen. 3 Press the [ ] button. The timer will now begin to count down as the click-track plays. When it reaches zero, the click-track will automatically stop playing. NOTE • If you press the [ ] button a second time while the clicktrack is playing, the click-track will stop and the timer will be reset to zero. 44 DTX700 Owner’s Manual NOTE • As an alternative to playing a pad, you can also press the [F1] button at least three times to set the tempo. • If you select a song (page 36) after setting the tempo in this way, the selected song’s tempo will be used for the click-track. Basic Operation Turning On the Click-Track Using DTX700 Training Functions 4 Your DTX700 features three different types of training function. Press the [F1] button to access the Groove Check page. (You may need to press more than once.) • The Groove Check function can be used to examine your playing for inaccurate or inconsistent timing. • The Rhythm Gate function allows you to practice playing with perfect timing. • The Measure Break function can be used to practice playing at a constant speed. Groove Check – Examine inaccuracy and inconsistency in timing Press several times if necessary. The Groove Check function allows you to visually confirm how much your timing differs from that of the click-track. 1 2 Press the [CLICK] button. 5 Press the [ 6 Play the pads along with the click-track. Timing inconsistency Turn the dial to set the practice tempo. Playing ahead of the beat 3 ] button to start the click-track. Average timing while using Groove Check Playing on the beat Playing behind the beat Press the [F2] button. The Groove Check page A triangle (t) is used to display the precise time at which you played the pads. If you are playing perfectly in time, this triangle will line up exactly with the tempo line in the center of the display. If the triangle is located to the left of the center line, you struck the pad ahead of the beat (i.e., early). If the triangle is located to the right of the center line, you struck the pad behind the beat (i.e., late). The larger the timing-inconsistency bar, the greater the degree of inconsistency in your overall performance. 7 When you have finished practicing, press the [ ] button once again. The click-track will stop. DTX700 Owner’s Manual 45 Basic Operation Turning On the Click-Track Rhythm Gate – Practice playing with perfect timing 5 The Rhythm Gate function only allows pads to produce a sound if they are played at exactly the right time. With this function, you can treat practice like a game, improving your ability and having fun at the same time. 1 Press the [F2] button to select a difficulty level. Three different levels are available – Easy, Normal, and Pro. Press the [CLICK] button. Level 2 6 Press the [ 7 Play the pads along with the click-track. ] button to start the click-track. Turn the dial to set the practice tempo. Example of good timing Your timing 3 A sound will be produced. Press the [F2] button. Example of poor timing Your timing No sound will be produced 8 When you have finished practicing, press the [ ] button once again. The click-track will stop. NOTE 4 • You can also use the Rhythm Gate function with your DTX700’s built-in songs. Press the [F1] button to access the Rhythm Gate page. (You may need to press more than once.) Press several times if necessary. 46 DTX700 Owner’s Manual Turning On the Click-Track Measure Break – Practice playing a fixed rhythm 5 With the Measure Break function, you can automatically mute and unmute the click-track for specific numbers of measures. For example, if you were to use this function to mute the click-track while you played a fill, you would instantly know whether you played it too fast or too slow when the click-track is then unmuted. As such, the Rhythm Gate function provides a great way to practice playing complete songs at a constant speed. 1 Basic Operation Set the number of measures you want the click-track to play. Measure: Number of measures the click-track will play. Press the [CLICK] button. Break: Number of measures the click-track will not play. 5-1 Press the dial to switch to the inverted-text cursor. 5-2 Turn the dial to set the number of measures (between 1 and 9). 2 3 5-3 Press the dial to restore the underline cursor. Turn the dial to set the practice tempo. 6 Press the dial. 7 Set the number of measures where you want the click-track to be silent. Press the [F2] button. 7-1 Press the dial to switch to the inverted-text cursor. 7-2 Turn the dial to set the number of measures (between 1 and 9). 7-3 Press the dial to restore the underline cursor. 8 Press the [ 9 Play the pads along with the click-track. 10 ] button to start the click-track. When you have finished practicing, press the [ ] button once again. The click-track will stop. 4 Press the [F1] button to access the Measure Break page. (You may need to press more than once.) Press several times if necessary. DTX700 Owner’s Manual 47 Basic Operation Recording Your Performances Recording a Performance Deleting a Recorded Performance You can record your own drum performances using the DTX700’s built-in recorder. To do so, proceed as follows. 1 1 Press the [REC] button. The button will light in red. Press the [REC] button. The button will light in red. 2 2 Press the [>/] button. The [>/] button will flash on and off in blue. Press the [>/] button to start recording. The [>/] button will flash on and off in blue. 3 3 The [REC] button and the [>/] button will both turn off. When you have finished playing, press the [>/] button once again. The [REC] button and the [>/] button will both turn off. NOTE • The built-in recorder does not store your performances as audio files. • Recording cannot be started while the DTX700 is importing an audio file or exchanging audio data with a USB memory device. Accordingly, the [REC] button will not light up at this time. • Once you have recorded a performance, any subsequent recording will result in the first one being overwritten. Playing a Recorded Performance 1 Press the [>/] button. 2 To stop playback, press the [>/] button once again. NOTE • You cannot record audio data from the [AUX IN] port on your DTX700. • If you start playback of recorded data while playing a song, the song will stop playing. Similarly, if you start playback of a song while playing recorded data, the playback of recorded data will stop. 48 Press the [>/] button once again. DTX700 Owner’s Manual Recording Your Performances Basic Operation Recording Performance & Song Together 5 1 Press the [SONG] button. 6 Press the [F3] button to start playback of the built-in song. 2 Turn the dial to select the song you wish to play along with. 7 When you have finished playing, press the [>/] button once again to stop recording. Press the [>/] button to start recording. When the [>/] button starts to flash on and off in blue, you are ready to begin playing. The [REC] button and the [>/] button will both turn off. 3 Press the [F2] button to mute that song’s drum part. The 4 icon will switch to . Press the [REC] button. The [REC] button will light in red. DTX700 Owner’s Manual 49 Basic Operation Integrating Accessories As described below, you can attach various accessories* to your DTX700 for an even more enjoyable playing experience. (*: Sold separately) Using an HH65 Hi-hat Controller as Kick Drum Pedal If you own an HH65 Hi-hat Controller (sold separately), you can connect it to your DTX700’s [!2HH-KICK] trigger input jack in order to play kick drum sounds. To do so, proceed as follows. 1 Expanding with a PCY135 Cymbal Pad The following describes how to expand your DTX700 with a PCY135 Cymbal Pad (sold separately). 1 Mount your PCY135 Cymbal Pad on a cymbal holder (sold separately) or the like and set it up as part of your drum set. 2 Use the cable that came with your PCY135 Cymbal Pad to connect it to your DTX700. For demonstration purposes, we will use jack !1 . 3 Turn on your DTX700. 4 Hit the newly-added cymbal pad. 5 Select the most suitable pad type. Turn off your DTX700. The HH65 Hi-hat Controller must be connected with the drum trigger module turned off. 2 Insert one end of the cable that came with your HH65 into the hi-hat controller’s output jack. OUTPUT 3 Insert the other end of the cable into you DTX700’s [!2HH-KICK] trigger input jack. 5-1 Press the [MENU] button. 5-2 Turn the dial to select “Trigger”, and then press the dial. 5-3 Turn the dial to select “Pad”, and then press the dial. 5-4 Turn the dial to move the cursor to the “PadType” row of the displayed list. 4 5 50 Turn on your DTX700. Select a kit and start to play. DTX700 Owner’s Manual 5-5 Press the dial to zoom in on the pad type. Turn the dial to select “PCY135”, and then press the dial once again. Integrating Accessories 6 Basic Operation Press the [STORE] button to store your new setting. If the following message is displayed, press the dial to proceed. 7 Press the [INST] button and then play the newly-added cymbal pad. If you have connected the pad correctly, the message “Pad11” will be shown in the top right corner of the display. 8 Turn the dial to select a sound for your newlyadded pad. 9 Press the [STORE] button to store the assigned sound. If the following message is displayed, press the dial to proceed. DTX700 Owner’s Manual 51 Basic Operation Connecting Your DTX700 to a Computer Precautions when using the [USB TO HOST] port Making Connections Although the DTX700 is exceptionally powerful and versatile all by itself, connecting it to a computer via USB allows for even greater convenience and flexibility. When connected in this way, MIDI data can be freely transferred between the drum trigger module and the computer, allowing the DTX700 to be used as an input device for computer-based music software. In this section, you’ll learn how to make the necessary connections. NOTICE NOTE • As the DTX700 has no built-in speakers, you will need to connect headphones or an external amplifier and speakers in order to hear it. For details, see page 13. • A USB cable is not included. In order to connect your DTX700 to a computer, choose a USB A-B cable of no more than 3 meters in length. 1 Using your computer, download the newest Yamaha USB-MIDI driver from the following web page. After you click Download, select a convenient location for the installation file. http://dtxdrums.yamaha.com/downloads/ NOTE • Information on system requirements is also provided on the above web page. • The USB-MIDI driver may be revised and updated without prior notice. Before installing, visit the above web page to confirm the latest related information and ensure that you have the most up-to-date version. 2 Install the USB MIDI driver on your computer. For instructions on installing, refer to the guide included with the driver installer. When asked to connect your Yamaha product and your computer, do so as shown below. USB TO HOST port USB port DTX700 Computer USB cable 52 If proper care is not taken when connecting your DTX700 to a computer via the [USB TO HOST] port, either or both of the devices may freeze or data may be corrupted or permanently lost. Be sure, therefore, to observe the following precautions at this time. If your computer or DTX700 should freeze, restart the application being used, reboot the computer, or turn the drum trigger module off once and then back on. DTX700 Owner’s Manual • Use a USB A-B cable of no more than 3 meters in length. • Before connecting to your computer via the [USB TO HOST] port, restore it from any power-saving mode (such as Suspend, Sleep, or Standby). • Connect the computer via the [USB TO HOST] port before turning on the DTX700. • Be sure to always perform the following steps before turning the DTX700 on or off and either plugging or unplugging the USB cable. • Quit all applications. • Ensure that no data is being sent from the DTX700. (Data is transmitted by striking the pads or playing patterns.) • When connected to a computer, allow at least 6 seconds to pass between turning the DTX700 on or off and plugging or unplugging the USB cable. Connecting Your DTX700 to a Computer Making Music with a Computer Recording Performances using a DAW Application [Definition] DAW Application DAW is an abbreviation of digital audio workstation. DAW applications such as Cubase can be used to record, edit, and mix audio and MIDI data on a computer. The following section will describe how to connect your DTX700 to a computer and prepare for recording performances using a DAW application running on it. Normally, when playing in order to record on a computer, performance data produced by striking the pads is first sent to the computer and then returned to the instrument in order to play its internal tone generator. If local control of the DTX700 is turned on at this time, performance data will also be sent directly to the tone generator, and as a result, the direct and returned data will overlap, making it sound as if the pads are being struck twice. Basic Operation We will now describe how to setup parameters for recording your performances, first on the DTX700, and then within the DAW application. Preparing the DTX700 Using the following procedure, turn off DTX700 local control. 1 Use [MENU] m [Utility] m [MIDI] to access the MIDI parameters, and set LocalCtrl to “off”. 2 Press the [STORE] button to store your new setting. With local control turned off in this way, performance data produced by striking the pads will not be sent to the internal tone generator. Sound is produced Setting DAW-Application Parameters Within your DAW application, turn on MIDI Thru. This setting ensures that, when performance data is being recorded on a track within your application, it is also returned to the external MIDI system. Within DTX700 On Trigger Off For example, let’s assume that performance data is being recorded on Track 3 by your DAW application. In addition, we’ll also assume that MIDI Channel 1 has been set for the return of performance data. If MIDI Thru is now turned on for Track 3, the DAW application will return the performance data to the DTX700 on MIDI Channel 1 as it is being recorded, and the instrument’s internal tone generator will sound as if it is being played directly. Internal tone generator No sound is produced. Local Control Settings Most DAW applications allow MIDI Thru to be turned on, and therefore, you can setup your system as shown below with local control of the DTX700 turned off and the DAW application returning performance data to the tone generator. In this way, performances can be recorded in comfort without each strike being heard twice. IN • For details on how to turn on MIDI Thru, refer to the manual that came with your DAW application. • If local control on the DTX700 and MIDI Thru within your DAW application are both turned off, no performance data will be sent to the internal tone generator, either directly or indirectly. As a result, no sound will be produced. Computer USB TO HOST port DTX700 NOTE OUT OUT Internal tone generator Playing the DTX700 using MIDI Data from a DAW Application Trigger Local control LocalCtrl =“off” IN MIDI Thru turned on within DAW application. As described below, you can setup your DTX700 to operate as a multi-timbral tone generator for your DAW application. In this way, you can easily integrate the instrument’s highquality MIDI tone generator into your music-production setup. For details on how to connect the DTX700 to your computer, see page 52. 1 Set each of the tracks within your DAW application to output their MIDI data to the DTX700. 2 Play MIDI performance data using the DAW application. DTX700 Owner’s Manual 53 Basic Operation Connecting Your DTX700 to a Computer Setting up Cubase Remote Control 3 Using a special feature, the DTX700 can operate as a remote controller for Cubase. For example, you can operate the Cubase transport, turn its metronome on or off, and control various other functions from the instrument’s control panel, significantly increasing the efficiency of your music production workflow. Hold down the [SHIFT] button and press the [MENU] button. The message “Cubase Remote” will be displayed to confirm that the function has been activated. Computer settings When setting up Cubase remote control for the first time, complete the following steps to configure your computer correctly. 1 NOTE • When Cubase Remote mode has been activated, those control-panel buttons that can be used will light up. Download the latest version of the DTX700 Extension from the following web page. Save the compressed file in a convenient location and then expand it. http://dtxdrums.yamaha.com/downloads/ 4 To deactivate Cubase Remote mode, again hold down the [SHIFT] button and press the [MENU] button. NOTE • Ensure that you have the latest USB MIDI driver installed on your computer (see page 52). • Information on system requirements is also provided on the above web page. • The DTX700 Extension may be revised and updated without prior notice. Before installing, visit the above web page to confirm the latest related information and ensure that you have the most up-to-date version. 2 Execute the expanded DTX700 Extension to carry out the required installation procedure. For more details, refer to the owner’s manual included in the downloaded package. DTX700 settings Whenever the Cubase Remote function is to be used, the following steps must be completed on the DTX700. 1 Use [MENU] m [Utility] m [MIDI] to access the MIDI parameters, and set MIDI IN/OUT to “USB”. 2 Ensure that the DTX700 is connected to your computer in the correct manner, and then launch Cubase. For details on how to connect the DTX700 to your computer, see page 52. 54 DTX700 Owner’s Manual Using remote functions NOTE • For details on how to use remote functions, refer to the owner’s manual included in the downloaded package. On-Screen Messages Message Are you sure? Full meaning This message is displayed to confirm whether or not you wish to proceed with the selected operation. Completed. This message is displayed when loading, saving, formatting, and other similar operations have been completed. Connecting USB device... This message is displayed when your DTX700 is busy mounting a USB memory device. Copy protected. This message is displayed if operations such as wave editing cannot be performed due to the digital audio source being copy protected. Excessive demand for USB power. This message is displayed if the current being drawn by the USB memory device exceeds the level supported by your DTX700. Executing... This message is displayed while your DTX700 is busy performing formatting or another similar management task. Please wait until the operation is completed. File already exists. This message is displayed if a file with the same name as the one you are about to save already exists. File not found. This message is displayed if no file of the selected type exists. Illegal file. This message is displayed if the file selected for loading is unsuitable for use with your DTX700 or is unsuitable for the current mode. Illegal file name. This message is displayed if the specified file name is not valid. Illegal format. This message is displayed if the standard MIDI file (SMF) you are attempting to import is of Format 1. Please select an SMF of Format 0 to proceed. Illegal selection. This message is displayed if an operation cannot be performed in accordance with the settings made. Illegal wave data. This message is displayed if the audio file you are attempting to import is of an unsupported format. Incompatible USB device. This message is displayed if an unsupported USB device is plugged into the instrument’s [USB TO DEVICE] port. Invalid USB device. This message is displayed if the plugged-in USB memory device is not usable in its current condition. As long as the device contains no irreplaceable data, it should be formatted to make it usable. MIDI buffer full. This message is displayed if the volume of MIDI data received is too large to process. MIDI data error. This message is displayed if an error occurs while receiving MIDI data. No data. This message is displayed if you are attempting to perform a song management task even though the selected song contains no data, or if you attempt to play recorded data when none exists. No response from USB device. This message is displayed if the plugged-in USB memory device fails to respond. No unused MIDI note. This message is displayed upon execution of a copy-pad operation if no unused MIDI notes are available. No wave data. This message is displayed if you are attempting to perform a wave management task even though no wave data exists. Now importing...[EXIT] to cancel. This message is displayed while your DTX700 is busy importing wave data. Now loading...[EXIT] to cancel. This message is displayed while your DTX700 is busy loading a file. Now saving... [EXIT] to cancel. This message is displayed while your DTX700 is busy saving a file. Now working... This message is displayed while your DTX700 is tidying up after importing a wave or after you press the [EXIT] button to cancel a load or save operation. Overwrite? This message is displayed when saving files to confirm whether or not you wish to overwrite a file of the same name already present on the USB memory device. Please keep power on. This message is displayed while your DTX700 is writing data to its flash ROM. You should never turn off the instrument while it is in this state. If this precaution is not observed, user data may be lost or the internal system may be damaged, rendering your DTX700 unable to startup normally when it is next turned on. Please stop sequencer. This message is displayed to remind you to stop the sequencer (i.e., song playback) before performing the intended operation. Read only file. This message is displayed if you are attempting to perform a file operation using a read-only file. Sample is protected. This message is displayed if the selected audio file is write protected and cannot be overwritten. Sample is too long. This message is displayed if the audio file is too long to be loaded. Sample is too short. This message is displayed if the audio file is too short to be loaded. Seq memory full. This message is displayed if the instrument’s internal memory for sequence data is full, making it impossible to record new songs, perform associated management tasks, or load data from a USB memory device. To free up some of this sequence memory, delete unneeded User patterns. Stored. This message is displayed to confirm that data has been successfully stored. System memory crashed. This message is displayed if a problem occurred while writing data to the instrument’s internal flash ROM. USB connection terminated. This message is displayed if connection with the USB memory device was interrupted by an abnormal electric current. Unplug the USB memory device and press the dial to return. USB device full. This message is displayed if the USB-memory device is full and no more files can be saved on it. In such a case, use a new USB memory device or make space by erasing unwanted data from the current device. USB device not ready. This message is displayed if the USB memory device has not been correctly plugged into your DTX700. USB device read/write error. This message is displayed if an error occurred during the exchange of data with the USB memory device. USB device write protected. This message is displayed if the USB memory device is write protected or if you are attempting to save data on a readonly device such as a CD drive. USB host not ready. This message is displayed if the Cubase Remote function is turned on without first connecting the DTX700 to a computer. USB transmission error. This message is displayed if an error occurred during communication with the USB memory device. Wave memory full. This message is displayed if your DTX700’s wave memory is full, preventing operations such as the importing and loading of data. DTX700 Owner’s Manual 55 Troubleshooting For more troubleshooting tips, refer to the Reference Manual PDF document. See page 5 for details on downloading this manual. 56 The DTX700 either produces no sound or is unable to detect the pads being struck. • Ensure that the pads are correctly connected to the DTX700’s trigger input jacks. • Ensure that the DTX700 is properly connected to headphones or an external audio system, such as an amplifier and/or speakers. (See page 13.) • Ensure that the amplifier and/or speakers connected to the DTX700 are turned on and are not set to the lowest possible volume. • Ensure that the [MASTER] knob is not turned down. (See page 19.) • Ensure that the cables you are using are in good condition. The DTX700 produces sound but the sensitivity (i.e., volume) is too low. • If any of your pads feature a pad controller, ensure that they are turned up. • Ensure that the sliders for the sounds in question are turned up. (See page 11.) Double triggers are being produced. If the pad in question features a pad controller, try turning it downward. The DTX700 receives no switch or trigger signals whatsoever. Restore the default settings (i.e., the Factory Set). (See page 22.) Sounds play endlessly and do not stop. Hold down the [SHIFT] button and press the [EXIT] button to silence all sounds. The pad controller function does not work as expected. Ensure that you are using an XP100SD or another pad featuring a pad controller. The hi-hat’s open and closed sounds are not produced. Ensure that the DBL BASS parameter is not turned on. (See page 32.) The Factory Set (i.e., default settings) needs to be restored. See the instructions on page 22. They describe how to reset all internal DTX700 settings to their default condition. The DTX700 turns off unexpectedly. Ensure that the Auto Power-Off function is not turned on. (See page 14.) The Factory Set (i.e., default settings) is restored whenever the DTX700 is turned on. Turn off the PowerOn Auto function. (See page 22.) The kit changes whenever a new song is selected. By default, your DTX700 always chooses the best kit for each song. To prevent it from doing so, turn on the Kit Lock function. (See page 39.) Song parts (i.e., non-drum parts) do not play. Ensure that the accompaniment parts have not been muted. (See page 37.) The click-track (or metronome) does not play. Certain sounds (such as snare or kick) do not play. Ensure that the sliders for the sounds in question are turned up. (See page 41.) Drum kits cannot be changed by turning the dial. Ensure that the Kit Lock function is not turned on. (See page 39.) Performances cannot be recorded. Recording is not possible while the Menu area is being accessed (as a result of pressing the [MENU] button). Ensure that you leave this area before attempting to record a performance. Hi-hat closed sounds are not produced. Refer to the Reference Manual PDF document. Cubase Remote mode cannot be deactivated. See page 54 of this booklet. DTX700 Owner’s Manual Specifications Tone generator Trigger Audio files Sequencer Click-track Other Type AWM2 Maximum polyphony 64 notes Audio data memory 100 MB (16-bit linear basis) Voices Drum and percussion: 1268 Keyboard: 128 Drum kits 60 (all of which may be edited and overwritten) * Includes 50 preset kits Effects Variation: 42 types / Chorus: 6 types / Reverb: 6 types Kit EQ: 4 band / Master EQ: 3 band Trigger setups 20 (all of which may be edited and overwritten) * Includes 9 preset trigger setups Pad Song play, chase, cutoff 3 songs (max.) can be played simultaneously. Import limit 500 files Bit depth 16 bits Audio-file memory 64 MB Sample format Proprietary format, WAV, and AIFF Capacity 152000 sounds approx. Note resolution 480 per quarter note Recording method Real time replace Songs 93 (all of which may be edited and overwritten) * Includes 63 preset songs (2 demo songs / 44 practice songs / 17 pad songs) Sequence format Proprietary SMF format 0 (load only) Tempo 30 to 300 BPM, tap tempo supported. Time signatures 1/4 to 16/4, 1/8 to 16/8, 1/16 to 16/16 Elements Accents, quarter notes, eighth notes, sixteenth notes, and triplets Display 160 x 64 dot matrix LCD (with backlight) Jacks and terminals Trigger input jacks 1 to 11 (standard stereo audio) [HI HAT CONTROL] jack (standard stereo audio) [HH-KICK] jack (standard stereo audio) OUTPUT [L/MONO] jack (standard mono audio) OUTPUT [R] jack (standard mono audio) [PHONES] jack (standard stereo audio) [AUX IN] jack (mini stereo audio) MIDI [IN] and [OUT] connectors [USB TO HOST], [USB TO DEVICE] ports DC IN Power consumption 8W Dimensions and weight 277 x 213 x 95 mm, 1.5 kg Package contents Bundled power adaptor (PA-150 or equivalent), Owner’s Manual (this document), Data List, module holder, module-holder fixing screws x 4, DVD (for bundled software) * Specifications and descriptions in this owner’s manual are for information purposes only. Yamaha Corporation reserves the right to modify products or specifications at any time without prior notice. Since specifications, equipment, and options may not be the same in every locale, please check with your Yamaha dealer. DTX700 Owner’s Manual 57 Index Symbols ] connector .......... 12, 13 ] button .................................... 11, 41 (Standby/On) button ...........10, 13, 14 [-/DEC] button ............................... 11, 18 [+/INC] button ................................ 11, 18 [>/] button ................................. 11, 48 [AUX IN] (auxiliary input) jack ....... 12, 13 [CLICK] button .............................. 11, 41 [EXIT] button ....................................... 10 [HI-HAT CONTROL] jack .............. 12, 32 [INST] button ................................. 11, 30 [KIT] button ................................... 10, 25 [LCD CONTRAST] knob ............... 12, 19 [MASTER] knob ......................10, 14, 19 [MENU] button .............................. 11, 20 [MIDI IN] input connector .............. 12, 13 [MIDI OUT] output connector ........ 12, 13 OUTPUT [L/MONO] and [R] jacks 12, 13 [PHONES] jack ............................. 12, 13 [PHONES] knob ......................10, 13, 19 [REC] button ................................. 11, 48 [SHIFT] button .............................. 11, 18 [SONG] button .............................. 11, 36 [STORE] button ............................ 10, 21 [USB TO DEVICE] port ................. 11, 21 [USB TO HOST] port .................... 11, 52 [ [ A ACC (accent) ...................................... 41 Accompaniment .................................. 37 AfAr (African percussion) .................... 31 All Sound Off ................................. 10, 56 Asia (Asian percussion) ...................... 31 Audio effects ....................................... 28 Audio Files .......................................... 32 Auto Power-Off ............................. 14, 56 E Edge shot ..................................... 23, 24 Effect ...................................................28 Effects Switch ......................................18 EFX (effect sounds) .............................31 Eighth note ..........................................41 Eighth-note triplet ................................41 ElPc (electronic percussion) ................31 Equalization .........................................27 External audio devices ................. 12, 13 Factory Set ................................... 22, 56 Function ........................................ 10, 18 G Groove check ......................................45 H Head shot ............................................23 HH (hi-hats) .........................................31 Hi-Hat ..................................................23 Hi-hat controller ...................... 12, 32, 50 Hi-hat splash ........................................23 I Init kit ...................................................28 Initializing a kit ........................ 28, 30, 32 Instruments ............................... 8, 11, 30 Inverted display ...................................17 K Bass soloing ....................................... 38 Beat .................................................... 43 Bell shot .............................................. 24 Bow shot ............................................. 24 Built-in recorder .................................. 48 Built-in song .................................... 8, 16 Kick (kick drums) .................................31 Kit ................................................. 10, 25 Kit Lock ......................................... 18, 39 Category ............................................. 30 Choking ............................................... 24 Click-Track .......................................... 41 Close ................................................... 23 Closed rim shot ................................... 23 Clutch .................................................. 31 Contrast adjustment ............................ 19 Control panel ...................................... 10 Cord clip ........................................ 12, 13 Cubase ............................................... 54 Cubase remote ................................... 54 Cursor ................................................. 17 Cym (cymbals) .................................... 31 Cymbal .......................................... 24, 50 D Data list .....................................5, 27, 30 DAW application ................................. 53 DTX700 Owner’s Manual P Pad controller ......................................35 Pad expansion .....................................50 Play .....................................................36 Portable music player ....................12, 13 Power adaptor .....................................13 PowerOn Auto ...............................15, 22 Preset EQ ............................................27 Q Quarter note ........................................41 R Recording ........................................9, 48 Recording performances ...............11, 48 Reference manual .................... 5, 20, 59 Remote ................................................54 Reverb .................................................28 Rhythm gate ..................................45, 46 F B C 58 DBL BASS ...........................................32 Decay ..................................................31 Dial (with integrated button) .......... 10, 17 Display (function) .................................29 Display (LCD) ......................... 10, 19, 29 Display mode ................................ 18, 29 Double bass drum ........................ 12, 32 L Latn (Latin percussion) ........................31 Line-level output ........................... 12, 13 Local control ........................................53 LocalCtrl ..............................................53 M Master EQ ...........................................27 Measure break .............................. 45, 47 Menu ......................................... 5, 20, 59 Metronome ............................... 9, 11, 41 Mldy (melodic voices) ..........................31 Monitor system ....................................13 Muffling ................................................31 Mute .............................................. 38, 56 Muting ..................................................24 O Open ....................................................23 Open rim shot ......................................23 Orch (orchestral percussion) ...............31 S Sensitivity ......................................26, 56 Side panel ...........................................11 Sixteenth note .....................................41 Size .....................................................31 Slider .............................................11, 41 Sn1 (snares 1) .....................................31 Sn2 (snares 2) .....................................31 Snare .............................................23, 35 Snare wire ...........................................35 Snares (function) .................................35 Song ....................................................36 Speakers .............................................13 Store ..............................................10, 21 Sustain ................................................31 T Tap ......................................................44 Tap Tempo ..........................................44 Tempo .............................................9, 41 Timer ...................................................44 Tom .....................................................23 Tom1 (toms 1) .....................................31 Tom2 (toms 2) .....................................31 Training functions ................................45 Trigger .................................................26 Trigger input jack .................... 12, 32, 50 Trigger setup .......................................26 Tuning .................................................31 U Underlined display ...............................17 USB memory device ............... 11, 21, 32 USB-MIDI driver ..................................52 V Volume ................................... 19, 36, 41 W Wave (audio files) ................................31 Z Zone ....................................... 12, 23, 33 List of DTX700 Functions For more details, refer to the Reference Manual PDF document. See page page 5 for details on downloading this manual. Kit MIDI Common Volume Tempo TrgSetupLink Name Icon Kit Volume Kit Selection Tempo Trigger Setup Link Kit Name Change Icon Other Transmit Volume Pan MSB LSB PC VarSend(Dry) ChoSend RevSend CC No CC Val Voice VoiceCategory VoiceNumber Tune Volume Pan Attack Decay Release Filter Q VarSend(Dry) ChoSend RevSend Mono/Poly AltGroup SliderSelect Voice Category Voice Number Voice Tuning Voice Volume Voice Pan Attack Time Decay Time Release Time Filter Q (Resonance) Variation Send Chorus Send Reverb Send Mono/Poly Alternate Group Slider Select Effect Mixier VarReturn VarPan VarToRev VarToCho ChoSend ChoReturn ChoPan ChoToRev RevSend RevReturn RevPan Variation Category Type Chorus Type Reverb Type MIDI Assign MessageType Mode Note MIDI Ch GateTime RcvKeyOff TrgLink MaskTime VelLimitLo VelLimitHi VelCrossFade TrgVel TrgMonoPoly TrgAltGrp TG/MIDI Sw TG Switch MIDI Switch Message Type Playing mode MIDI Note MIDI Channel Gate Time Receive Key Off Trigger Link Mask Time Velocity Limit Velocity Limit Velocity Cross Fade Trigger Velocity Trigger Polyphony Trigger Alternate Group Tone Generator Switch External MIDI Switch Transmit Volume Pan Bank Select MSB Bank Select LSB Program Change Variation Send Level Chorus Send Level Reverb Send Level CC Number CC Value Variation Return Variation Pan Variation to Reverb Variation to Chorus Chorus Send Chorus Return Chorus Pan Chorus to Reverb Reverb Send Reverb Return Reverb Pan Variation Category Variation Type Chorus Type Reverb Type EQ LowGain LowFreq LowQ LowShape LowMidGain LowMidFreq LowMidQ HighMidGain HighMidFreq HighMidQ HighGain HighFreq HighQ HighShape Low Gain Low Frequency Low Q Low Shape Low Mid Gain Low Mid Frequency Low Mid Q High Mid Gain High Mid Frequency High Mid Q High Gain High Frequency High Q High Shape DTX700 Owner’s Manual 59 List of DTX700 Functions Kit Utility General Pad PadCtrlType HH Func HH MIDI Ch HH MIDI Type SnareOn/Off SnaresAdjust SnareBuzz ResonanceLevel Pad Control Type Hi-hat Function Hi-hat MIDI Channel Hi-hat MIDI Type Snare On/Off Snare Adjust Snare Buzz Resonence Level MasterVolume MasterTune PanDepth AuxOutSel PlayCount AutoPowerOff LCD Mode Master Volume Master Tune Pan Depth Auxiliary Output Play Count Auto Power Off LCD Mode MasterEQ Job CopyPad Pad1 Pad2 CopyKit Bank Number ExchgPad Pad1 Pad2 ExchgKit Kit1 Kit2 ClearPad Pad ClearKit Copy Pad (Pad to be copied) Copy Pad (Pad to be replaced) Copy Kit(Bank) Copy Kit(Number) Exchange Pads Low Gain Low Frequency Low Q Low Shape Mid Gain Mid Frequency Mid Q High Gain High Frequency High Q High Shape Exchange Kits Pad Clear Pad Clear Kit Song Loop Tempo Name Song Loop Song Tempo Song Name MIDI Transmit Volume Pan MSB LSB PC VarSend(Dry) ChoSend RevSend MIDI Transmit MIDI Volume MIDI Pan Bank Select MSB Bank Select LSB Program Change Variation Send Chorus Send Reverb Send Job Clear ClearAll Copy Bank Number ImprtSMF SMF MemInfo DTX700 Owner’s Manual PadFunc CC Ch CC Val FootClosePos FootSplashSens HH-KickVelSens CymbalChokeRate Pad Function Control Change Channel Control Change Value Foot Close Position Foot Splash Sensitivity HH-KICK Velocity Sensitivity Cymbal Choke Rate EffectSw Common 60 LowGain LowFreq LowQ LowShape MidGain MidFreq MidQ HighGain HighFreq HighQ HighShape Clear Song Clear All Songs Copy Song (Bank) Copy Song (Number) Import SMF Memory Information Variation Chorus Reverb SnareBuzz Resonance Variation Chorus Reverb Snare Buzz Resonance MIDI MIDI IN/OUT ThruPort LocalCtrl MIDI Sync ClockOut SeqCtrl Merge Rcv10ch RcvPC RcvPC10ch PolyAfter SendHH DeviceNo. MIDI In/Out MIDI Thru Port Local Control MIDI Sync Clock Out Sequencer Control MIDI Merge Channel-10 Reveive Program Change Receive Channel-10 Program Change Receive Polyphonic Aftertouch Status Send Hi-hat Device Number FactSet PowerOn Auto Instrument Reset List of DTX700 Functions Trigger Name Name Trigger Setup Name Pad Curve VelCurve PadType PadType Gain RejectTime MinLevel MaxLevel MinVelocity MaxVelocity WaitTime Head/Bow OpenEdgeOffset CloseCupOffset Sensitivity Head/Bow OpenEdge CloseCup NoiseFltrTbl CrssTalk Level Level From Velocity Curve Pad Type Input Gain Reject Time Minimum Imput Level Maximum Imput Level Minimum Velocity Maximum Velocity Wait Time Head/Bow Open Edge Offset Close Cup Offset Sensitivity Head/Bow Open Edge Close Cup Noise Filter Reject Level (All) Reject Level Job CopyPad Pad1 Pad2 CopyTrg Bank Number Copy Pad Copy Trigger Parameters (Bank) Copy Trigger Parameters (Number) Click Voice OutputSel MIDI In MIDI Out MIDI NoteAcc MIDI Note q Click-track Voice Click-track Output Click-track MIDI In Click-track MIDI Out Click-track Beat Volume (Accents) Click-track Beat Volume (Notes) Wave Common PlayMode Start Loop End Decay HHCtrlSens Name Wave Playback Mode Start point Loop point End point Decay Hi-Hat Control Sensitivity Wave Name Job Import Wave PadAssign ImportAll Normalize Ratio Delete DeleteAll Optimize MemInfo Import Pad Assign Import All Normalize Delete Delete All Optimize Memory Memory Information File Save Type File Save File (Type) Save File (File) Load Type File Load File (Type) Load File (File) Rename Type File Name Rename File (Type) Rename File (File) Rename File (Name) Delete Type File Delete File (Type) Delete File (File) Format Format MemInfo Memory Information DTX700 Owner’s Manual 61 62 DTX700 Owner’s Manual About the accessory disk SPECIAL NOTICE The software included in the accessory disk and the copyrights thereof are under exclusive ownership by Steinberg Media Technologies GmbH. • Use of the software and this manual is governed by the license agreement which the purchaser fully agrees to upon breaking the seal of the software packaging. (Please read carefully the Software Licensing Agreement at the end of this manual before installing the application.) • Copying of the software or reproduction of this manual in whole or in part by any means is expressly forbidden without the written consent of the manufacturer. • Yamaha makes no representations or warranties with regard to the use of the software and documentation and cannot be held responsible for the results of the use of this manual and the software. • This disk is NOT for audio/visual purpose. Do not attempt to play the disk on an audio/visual CD/DVD player. Doing so may result in irreparable damage to your player. • Note that Yamaha does not offer technical support for the DAW software in the accessory disk. About the DAW software in the accessory disk The accessory disk contains DAW software both for Windows and Macintosh. NOTE • Make sure to install DAW software under the “Administrator” account. • In order to have continuous use of the DAW software in the accessory disk, including support and other benefits, you will need to register the software and activate your software license by starting the software while the computer is connected to the Internet. Click the “Register Now” button shown when the software is started, then fill in all required fields for registration. If you do not register the software, you will be unable to use it after a limited period of time expires. • If you are using a Macintosh computer, double-click the “***.mpkg” file to start installation. For information about the minimum system requirements and latest information on the software in the disk, check the web site below. http://www.yamahasynth.com/ About software support Support for the DAW software in the accessory disk is provided by Steinberg on its website at the following address. http://www.steinberg.net You can visit the Steinberg site also via the Help menu of the included DAW software. (The Help menu also includes the PDF manual and other information on the software.) Information for Users on Collection and Disposal of Old Equipment This symbol on the products, packaging, and/or accompanying documents means that used electrical and electronic products should not be mixed with general household waste. For proper treatment, recovery and recycling of old products, please take them to applicable collection points, in accordance with your national legislation and the Directives 2002/96/EC. By disposing of these products correctly, you will help to save valuable resources and prevent any potential negative effects on human health and the environment which could otherwise arise from inappropriate waste handling. For more information about collection and recycling of old products, please contact your local municipality, your waste disposal service or the point of sale where you purchased the items. [For business users in the European Union] If you wish to discard electrical and electronic equipment, please contact your dealer or supplier for further information. [Information on Disposal in other Countries outside the European Union] This symbol is only valid in the European Union. If you wish to discard these items, please contact your local authorities or dealer and ask for the correct method of disposal. (weee_eu) OBSERVERA! Apparaten kopplas inte ur växelströmskällan (nätet) så länge som den ar ansluten till vägguttaget, även om själva apparaten har stängts av. ADVARSEL: Netspændingen til dette apparat er IKKE afbrudt, sålænge netledningen sidder i en stikkontakt, som er tændt — også selvom der er slukket på apparatets afbryder. The name plate of this product may be found on the bottom of the unit. The serial number of this product may be found on or near the name plate. You should note this serial number in the space provided below and retain this manual as a permanent record of your purchase to aid identification in the event of theft. Model No. VAROITUS: Laitteen toisiopiiriin kytketty käyttökytkin ei irroita koko laitetta verkosta. Serial No. (standby) (bottom) For details of products, please contact your nearest Yamaha representative or the authorized distributor listed below. Die Einzelheiten zu Produkten sind bei Ihrer unten aufgeführten Niederlassung und bei Yamaha Vertragshändlern in den jeweiligen Bestimmungsländern erhältlich. Pour plus de détails sur les produits, veuillez-vous adresser à Yamaha ou au distributeur le plus proche de vous figurant dans la liste suivante. Para detalles sobre productos, contacte su tienda Yamaha más cercana o el distribuidor autorizado que se lista debajo. NORTH AMERICA CANADA Yamaha Canada Music Ltd. 135 Milner Avenue, Scarborough, Ontario, M1S 3R1, Canada Tel: 416-298-1311 U.S.A. Yamaha Corporation of America 6600 Orangethorpe Ave., Buena Park, Calif. 90620, U.S.A. Tel: 714-522-9011 CENTRAL & SOUTH AMERICA MEXICO Yamaha de México S.A. de C.V. Calz. Javier Rojo Gómez #1149, Col. Guadalupe del Moral C.P. 09300, México, D.F., México Tel: 55-5804-0600 BRAZIL Yamaha Musical do Brasil Ltda. Rua Joaquim Floriano, 913 - 4' andar, Itaim Bibi, CEP 04534-013 Sao Paulo, SP. BRAZIL Tel: 011-3704-1377 ARGENTINA Yamaha Music Latin America, S.A. Sucursal de Argentina Olga Cossettini 1553, Piso 4 Norte Madero Este-C1107CEK Buenos Aires, Argentina Tel: 011-4119-7000 PANAMA AND OTHER LATIN AMERICAN COUNTRIES/ CARIBBEAN COUNTRIES Yamaha Music Latin America, S.A. Torre Banco General, Piso 7, Urbanización Marbella, Calle 47 y Aquilino de la Guardia, Ciudad de Panamá, Panamá Tel: +507-269-5311 EUROPE THE UNITED KINGDOM/IRELAND Yamaha Music U.K. Ltd. Sherbourne Drive, Tilbrook, Milton Keynes, MK7 8BL, England Tel: 01908-366700 GERMANY Yamaha Music Europe GmbH Siemensstraße 22-34, 25462 Rellingen, Germany Tel: 04101-3030 SWITZERLAND/LIECHTENSTEIN Yamaha Music Europe GmbH Branch Switzerland in Zürich Seefeldstrasse 94, 8008 Zürich, Switzerland Tel: 01-383 3990 AUSTRIA Yamaha Music Europe GmbH Branch Austria Schleiergasse 20, A-1100 Wien, Austria Tel: 01-60203900 CZECH REPUBLIC/SLOVAKIA/ HUNGARY/SLOVENIA Yamaha Music Europe GmbH Branch Austria Schleiergasse 20, A-1100 Wien, Austria Tel: 01-602039025 POLAND/LITHUANIA/LATVIA/ESTONIA Yamaha Music Europe GmbH Branch Sp.z o.o. Oddzial w Polsce ul. 17 Stycznia 56, PL-02-146 Warszawa, Poland Tel: 022-500-2925 THE NETHERLANDS/ BELGIUM/LUXEMBOURG Yamaha Music Europe Branch Benelux Clarissenhof 5-b, 4133 AB Vianen, The Netherlands Tel: 0347-358 040 SY55 FRANCE HONG KONG Yamaha Musique France BP 70-77312 Marne-la-Vallée Cedex 2, France Tel: 01-64-61-4000 ITALY Tom Lee Music Co., Ltd. 11/F., Silvercord Tower 1, 30 Canton Road, Tsimshatsui, Kowloon, Hong Kong Tel: 2737-7688 INDIA Yamaha Musica Italia S.P.A. Combo Division Viale Italia 88, 20020 Lainate (Milano), Italy Tel: 02-935-771 Yamaha Music India Pvt. Ltd. 5F Ambience Corporate Tower Ambience Mall Complex Ambience Island, NH-8, Gurgaon-122001, Haryana, India Tel: 0124-466-5551 SPAIN/PORTUGAL INDONESIA Yamaha Música Ibérica, S.A. Ctra. de la Coruna km. 17, 200, 28230 Las Rozas (Madrid), Spain Tel: 91-639-8888 PT. Yamaha Musik Indonesia (Distributor) PT. Nusantik Gedung Yamaha Music Center, Jalan Jend. Gatot Subroto Kav. 4, Jakarta 12930, Indonesia Tel: 021-520-2577 GREECE Philippos Nakas S.A. The Music House 147 Skiathou Street, 112-55 Athens, Greece Tel: 01-228 2160 KOREA Yamaha Music Korea Ltd. 8F, 9F, Dongsung Bldg. 158-9 Samsung-Dong, Kangnam-Gu, Seoul, Korea Tel: 02-3467-3300 SWEDEN Yamaha Scandinavia AB J. A. Wettergrens Gata 1, Box 30053 S-400 43 Göteborg, Sweden Tel: 031 89 34 00 MALAYSIA Yamaha Music (Malaysia) Sdn., Bhd. Lot 8, Jalan Perbandaran, 47301 Kelana Jaya, Petaling Jaya, Selangor, Malaysia Tel: 03-78030900 DENMARK YS Copenhagen Liaison Office Generatorvej 6A, DK-2730 Herlev, Denmark Tel: 44 92 49 00 PHILIPPINES Yupangco Music Corporation 339 Gil J. Puyat Avenue, P.O. Box 885 MCPO, Makati, Metro Manila, Philippines Tel: 819-7551 FINLAND F-Musiikki Oy Kluuvikatu 6, P.O. Box 260, SF-00101 Helsinki, Finland Tel: 09 618511 SINGAPORE NORWAY Norsk filial av Yamaha Scandinavia AB Grini Næringspark 1, N-1345 Østerås, Norway Tel: 67 16 77 70 ICELAND Skifan HF Skeifan 17 P.O. Box 8120, IS-128 Reykjavik, Iceland Tel: 525 5000 Yamaha Music (Asia) Pte., Ltd. #03-11 A-Z Building 140 Paya Lebor Road, Singapore 409015 Tel: 6747-4374 TAIWAN Yamaha KHS Music Co., Ltd. 3F, #6, Sec.2, Nan Jing E. Rd. Taipei. Taiwan 104, R.O.C. Tel: 02-2511-8688 THAILAND RUSSIA Siam Music Yamaha Co., Ltd. 4, 6, 15 and 16th floor, Siam Motors Building, 891/1 Rama 1 Road, Wangmai, Pathumwan, Bangkok 10330, Thailand Tel: 02-215-2622 Yamaha Music (Russia) Room 37, bld. 7, Kievskaya street, Moscow, 121059, Russia Tel: 495 626 5005 OTHER EUROPEAN COUNTRIES Yamaha Music Europe GmbH Siemensstraße 22-34, 25462 Rellingen, Germany Tel: +49-4101-3030 AFRICA Yamaha Corporation, Asia-Pacific Sales & Marketing Group Nakazawa-cho 10-1, Naka-ku, Hamamatsu, Japan 430-8650 Tel: +81-53-460-2313 OTHER ASIAN COUNTRIES Yamaha Corporation, Asia-Pacific Sales & Marketing Group Nakazawa-cho 10-1, Naka-ku, Hamamatsu, Japan 430-8650 Tel: +81-53-460-2313 OCEANIA AUSTRALIA Yamaha Music Australia Pty. Ltd. Level 1, 99 Queensbridge Street, Southbank, Victoria 3006, Australia Tel: 3-9693-5111 MIDDLE EAST TURKEY/CYPRUS NEW ZEALAND Yamaha Music Europe GmbH Siemensstraße 22-34, 25462 Rellingen, Germany Tel: 04101-3030 OTHER COUNTRIES Yamaha Music Gulf FZE LOB 16-513, P.O.Box 17328, Jubel Ali, Dubai, United Arab Emirates Tel: +971-4-881-5868 Music Works LTD P.O.BOX 6246 Wellesley, Auckland 4680, New Zealand Tel: 9-634-0099 COUNTRIES AND TRUST TERRITORIES IN PACIFIC OCEAN ASIA THE PEOPLE’S REPUBLIC OF CHINA Yamaha Corporation, Asia-Pacific Sales & Marketing Group Nakazawa-cho 10-1, Naka-ku, Hamamatsu, Japan 430-8650 Tel: +81-53-460-2313 Yamaha Music & Electronics (China) Co.,Ltd. 2F, Yunhedasha, 1818 Xinzha-lu, Jingan-qu, Shanghai, China Tel: 021-6247-2211 HEAD OFFICE Yamaha Corporation, Digital Musical Instruments Division Nakazawa-cho 10-1, Naka-ku, Hamamatsu, Japan 430-8650 Tel: +81-53-460-2432 Yamaha Electronic Drums web site http://dtxdrums.yamaha.com/ U.R.G., Digital Musical Instruments Division © 2011 Yamaha Corporation 012PO***.*-01A0 Yamaha Manual Library http://www.yamaha.co.jp/manual/ WW02610-
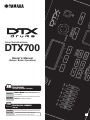 1
1
-
 2
2
-
 3
3
-
 4
4
-
 5
5
-
 6
6
-
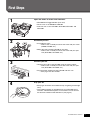 7
7
-
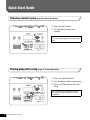 8
8
-
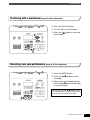 9
9
-
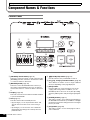 10
10
-
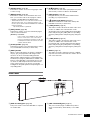 11
11
-
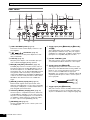 12
12
-
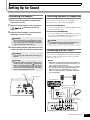 13
13
-
 14
14
-
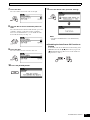 15
15
-
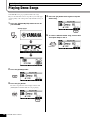 16
16
-
 17
17
-
 18
18
-
 19
19
-
 20
20
-
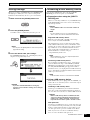 21
21
-
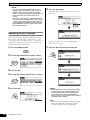 22
22
-
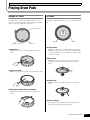 23
23
-
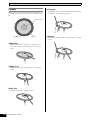 24
24
-
 25
25
-
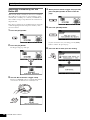 26
26
-
 27
27
-
 28
28
-
 29
29
-
 30
30
-
 31
31
-
 32
32
-
 33
33
-
 34
34
-
 35
35
-
 36
36
-
 37
37
-
 38
38
-
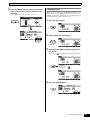 39
39
-
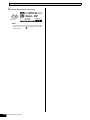 40
40
-
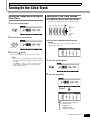 41
41
-
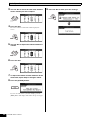 42
42
-
 43
43
-
 44
44
-
 45
45
-
 46
46
-
 47
47
-
 48
48
-
 49
49
-
 50
50
-
 51
51
-
 52
52
-
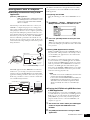 53
53
-
 54
54
-
 55
55
-
 56
56
-
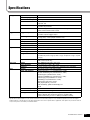 57
57
-
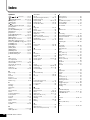 58
58
-
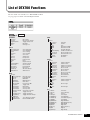 59
59
-
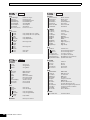 60
60
-
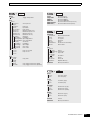 61
61
-
 62
62
-
 63
63
-
 64
64


in andere talen
- English: Yamaha DTX700 Owner's manual
- italiano: Yamaha DTX700 Manuale del proprietario
- русский: Yamaha DTX700 Инструкция по применению
- français: Yamaha DTX700 Le manuel du propriétaire
- español: Yamaha DTX700 El manual del propietario
- Deutsch: Yamaha DTX700 Bedienungsanleitung
- português: Yamaha DTX700 Manual do proprietário
- dansk: Yamaha DTX700 Brugervejledning
- suomi: Yamaha DTX700 Omistajan opas
- čeština: Yamaha DTX700 Návod k obsluze
- 日本語: Yamaha DTX700 取扱説明書
- svenska: Yamaha DTX700 Bruksanvisning
- Türkçe: Yamaha DTX700 El kitabı
- polski: Yamaha DTX700 Instrukcja obsługi
- română: Yamaha DTX700 Manualul proprietarului