
OWNER’S MANUAL

1550-07 GUS

© 2007 Gibson Guitar Corp.

To the new Gibson owner:
Congratulations on the purchase of your new Gibson electric guitar—the world’s most famous
electric guitar from the leader of fretted instruments.
Please take a few minutes to acquaint yourself with the information in this booklet regarding
materials, electronics, “how to,” care, maintenance, and more about your guitar.
And then begin enjoying a lifetime of music with your new Gibson.

The Components of the Solidbody Electric Guitar 4
Gibson Innovations 6
The History of Gibson Electric Guitars 8
DESIGN AND CONSTRUCTION
Body 13
Neck and Headstock 13
Pickups 14
Controls 15
Bridge 17
Tailpiece 18
CARE AND MAINTENANCE
Finish 19
Your Guitar on the Road 19
Things to Avoid 20
Strings 21
Install Your Strings Correctly 22
String Gauge 23
Brand of Strings 23
NEW TECHNOLOGY
The Gibson Robot Guitar 24

6
Strap
Button
Stopbar
Tailpiece
Tune-o-matic
Bridge
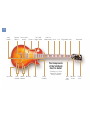
The Components
of the Solidbody
Electric Guitar
Featuring a Les Paul
Standard in Heritage
Cherry Sunburst
12th Fret
Marker/Inlay
Neck
Fret
Nut HeadstockFingerboard
Tuning
Keys
Machine
Heads
Truss
Rod
Cover
Single
Cutaway
Pickups
Body
Tone
Controls
Input Jack
Three-way
Toggle Switch
Binding
4
Volume
Controls

7
Strap
Button
Stopbar
Tailpiece
Tune-o-matic
Bridge
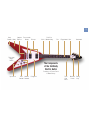
The Components
of the Solidbody
Electric Guitar
Featuring a V-Factor Faded
in Worn Cherry
12th Fret
Marker/Inlay
Neck Fret Nut HeadstockFingerboard
Tuning
Keys
Machine
Heads
Truss
Rod
Cover
Pickups
Tone
Control
Input Jack
Volume
Controls
Pickguard
Body
Three-way
Toggle
Switch
5

6
Here are just a few of the Gibson innovations that have reshaped the guitar world:
1894 – First archtop guitar
1922 – First ƒ-hole archtop, the L-5
1936 – First professional quality electric guitar, the ES-150
1947 – P-90 single-coil pickup introduced
1948 – First dual-pickup Gibson, the ES-300
1949 – First three-pickup electric, the ES-5
1949 – First hollowbody electric with pointed cutaway, the ES-175
1952 – First Les Paul guitar
1954 – Les Paul Custom and Les Paul Jr. introduced
1955 – Les Paul Special introduced
1957 – First humbucking pickup
1958 – Flying V and Explorer introduced
6

7
1958 – First semi-hollowbody guitar, the ES-335
1961 – SG body style introduced in the Les Paul line
1963 – Firebird guitars and Thunderbird basses introduced
1969 – Les Paul Personal and Professional with low-impedance pickups introduced
1979 – L.P. Artist with active electronics introduced
1982 – First solidbody acoustic, the Chet Atkins CE
1983 – Les Paul Studio introduced
1990 – Les Paul Classic introduced
1996 – Les Paul SmartWood introduced
1998 – Double-Cutaway Les Paul Standard introduced
2002 – Gibson Digital Guitar introduced
7

8
A BRIEF HISTORY OF GIBSON ELECTRIC GUITARS
Gibson’s legendary acoustic engineer, Lloyd Loar, was experimenting with electric instruments
in 1924, at the dawn of electronic amplification. However, Gibson’s struggle to dominate the
banjo market took precedence through the 1920s, and it wasn’t until the mid-1930s that the
company once again turned its attention to electric guitars. In 1935 Gibson’s Walt Fuller
designed a pickup that was introduced on the E-150, an aluminum-body lap steel. Early in
1936, the pickup was put in a midline archtop model and named the ES-150—ES for Electric
Spanish, 150 for the retail price of $150 for the guitar and amplifier set.
The original ES-150 bar pickup with its hexagonal housing is now known as the “Charlie
Christian” pickup, because it was installed on the ES-150s and ES-250s that Christian used
to establish the new concept of electric jazz guitar.
Gibson made several improvements in pickup design before World War II, although many play-
ers still consider the “Christian” pickup to be the best jazz pickup ever made. Immediately
after World War II, Gibson introduced the P-90 single-coil, with six adjustable polepieces and
a black plastic cover, usually with “dog-ear” mounting extensions. The P-90 is still in produc-
tion and still sets the industry standard for a single-coil pickup.

9
The first postwar Gibson electrics followed the prewar concept of an electric guitar as
a conventional acoustic archtop with a pickup installed on the top. Gibson added a second
pickup to the ES-300 in 1948 and then became the first company to offer a three-pickup
model with the introduction of the ES-5 in 1949.
Although the advantages of a solidbody guitar had been known to Hawaiian steel guitarists for
almost 20 years, it took the persuasive powers of Les Paul, the world’s most famous guitarist
in the early 1950s, to convince Gibson to make a “Spanish style” solidbody. Gibson designed
the new model with a carved top, not only to give it the look of a traditional archtop—a style
invented by Gibson—but also to make it difficult for other makers to copy. Les, who had been
playing a homemade solidbody guitar, nicknamed The Log, since 1941, specified a maple top
cap to increase sustain, coupled with a mahogany back to lighten the weight. Les also speci-
fied the famous “Goldtop” finish.
The Les Paul Model debuted in 1952. The bridge and tailpiece were upgraded when Gibson
introduced the patented tune-o-matic bridge in 1954, and the original single-coil pickups were
upgraded with the introduction of Gibson’s patented humbuckers in 1957. Otherwise, the orig-
inal Les Paul is essentially the same guitar today as it was when it was introduced.

10
In 1954 the growing popularity of the Les Paul Model prompted Gibson to expand the line. On
the high end, the Les Paul Custom sported an Ebony finish and low frets for fast action, and
it immediately gained two nicknames: the Black Beauty and the Fretless Wonder. On the more
affordable end, the Les Paul Jr. featured a flat “slab” top and a single pickup, and it became
the best-selling Les Paul of the 1950s.
One year after the Les Paul Jr., Gibson offered a two-pickup version of the slab-body model
called the Les Paul Special. The Special was further distinguished by its yellow-stained “TV”
finish.
The double-coil humbucking pickup, invented by Gibson engineer Seth Lover, debuted in
1957 on the Standard and Custom, introducing the sound that would shape rock 'n' roll music
in the 1960s.
In 1958, Gibson introduced more important design innovations than in any other
year in the company’s history. Gibson president Ted McCarty combined the look of an ƒ-hole
archtop with the performance of a solidbody and came up with a completely new type of gui-
tar—the semi-hollowbody ES-335. McCarty also designed two radically modern solidbody
shapes: the Flying V and Explorer.

11
The body of the Les Paul Jr. received a pair of rounded horns to become Gibson’s first double-
cutaway solidbody. And the finish color on the Les Paul Model was changed to Cherry
Sunburst, which let the grain of the maple top show through. The model name was changed
to Les Paul Standard, and the sunburst Standards from 1958-60 would become some of the
most valuable collectibles in the guitar world. All of this happened in 1958.
The new Les Paul Jr. set in motion a complete redesign of the Les Paul line. In 1959 the
Special went to the rounded-horn double-cutaway shape and was renamed the SG Special (SG
for Solid Guitar). In 1960, all four models were revamped and given a new “SG” body shape,
featuring a thinner, double-cutaway body with pointed horns. The Custom, Standard, and Jr.
retained the Les Paul designation through 1962, after which they became SG models.
Gibson’s design innovation continued into the 1960s when Ted McCarty hired legendary auto-
motive designer Ray Deitrich to design a Gibson. The result was the Firebird series, and the
companion Thunderbird bass series of 1963. The Firebirds “reversed” conventional designs,
with their elongated treble-side horn and treble-side tuners. They also introduced neck-
through-body construction and smaller “mini-humbucking” pickups to the Gibson line.

12
In response to the rising demand for 1950s-style Les Pauls, the carved-top models were rein-
troduced in 1968. A new model, the Les Paul Deluxe, featuring mini-humbucking pickups
appeared in 1969. The Special was revived in the 1970s and the Jr. reappeared in the 1980s.
The Flying V, Explorer, and Firebird were also brought back into regular production, as musi-
cal styles began to catch up with these ahead-of-their-time designs.
While the original four Les Paul models continued as the foundation of the line, Gibson offered
new variations, such as the Studio, Classic, and Double-Cut Standard, in order to give musi-
cians all the features they wanted in a Les Paul guitar. In the 50-plus years of the Les Paul,
Gibson has offered more than 100 different variations. In 2003 Gibson honored Les Paul for
his achievements as a performer, recording innovator, and guitar designer by presenting him
with a special Artist for Eternity Award.
As Gibson celebrated the 50th anniversary of the Les Paul in 2002, the company rocked the
guitar world once again by introducing the first digital electric guitar. It represents the biggest
advance in electric guitar design since the instrument was invented, and moreover, it serves
notice that Gibson electric guitars will continue to epitomize the highest levels of Quality,
Prestige and Innovation.

13
DESIGN AND CONSTRUCTION
Body. The solidbody guitar was invented to increase sustain, produce a brilliant tone, and
eliminate feedback caused by a vibrating top. These qualities are enhanced by wood with high
density, such as maple. Les Paul would have preferred for his model to have had a solid maple
body, but density translates to weight, and a solid maple Les Paul Model would have been exceed-
ingly heavy. A compromise was reached, with lighter-weight mahogany used for the main part of
the body and maple for the top cap. Most of the carved-top Les Pauls have the combination
maple/mahogany body, while the “slab” or flat top models have a solid mahogany body. Flying
V’s, Explorers, and Firebirds have a solid mahogany body.
Neck and Headstock.
Mahogany is a time-proven material for guitar necks, and the necks of most
Gibson USA models are constructed of a single piece of mahogany. The Firebird or Thunderbird
IV bass neck is made of nine-ply mahogany and walnut (or all mahogany laminates), and it
extends completely through the body. Fingerboards are of ebony or rosewood.

14
Neck Specifications.
Gibson designs its guitar necks to complement and enhance the unique
characteristics of each model. Neck profiles can be “rounded ’50s” or “slim ’60s” (or a slight
V-shape available only on the BluesHawk). Scale length (string length) is 24 3/4" on the Les
Paul, X-Factor and SG models, 25 1/2" on the Chet Atkins, Americana, and Hawk models and
34" on basses.
Pickups.
Humbucking (double-coil):
Most Les Pauls have double-coil humbucking
pickups, which were designed to do what their name says: “buck” the hum caused by fluores-
cent lights, rheostats, and other electrical interference. They accomplish this with two coils of
wire, wound in opposite directions so that they cancel out interference. Also, they produce a
powerful sound that is the foundation of rock 'n' roll music.
Gibson produces humbuckers in a variety of subtle variations, achieved by the use
of different magnets and different combinations of winding turns. In addition, some Les Pauls
have humbuckers without the metal cover pieces, which results in a hotter signal. For individ-
ual model and pickup specs, please refer to Gibson’s website, www.gibson.com.
P-90 (single-coil):
Only a few Gibsons—some Les Paul Juniors, Les Paul Specials, and Melody
Makers—have single-coil P-90 pickups. Some have the original “dog-eared” covers; those

15
without the “dog ears” are nicknamed “soapbar” because the original cream-colored plastic
covers on the 1952 Les Paul Model resembled bars of soap. When the P-90 was introduced
in 1946, it was the most powerful pickup of its kind. And it still is. Among the many exam-
ples of the P-90 sound are Carlos Santana’s Les Paul Special on Santana’s classic recordings,
Leslie West’s Les Paul Jr. with the group Mountain, and the Who’s Pete Townshend with an SG
Special on
Live at Leeds
and at Woodstock.
Pickup adjustments.
Although the pickups on each Les Paul are set to Gibson standards at the
factory, they can be adjusted. The height of the pickup can be adjusted by the two screws
found at either end of the pickup, in the mounting ring. Individual string volume can be adjust-
ed by turning the polepiece screws. Bringing the pickup or pole screw closer to the strings
makes the signal stronger or “hotter.”
Controls.
The standard Gibson electronic configuration is two pickups, four knobs, and a pick-
up selector switch. The four knobs provide individual tone and volume control for each pick-
up. Models with only three knobs provide individual volume and master tone control. Single
pickup models have only two knobs—for volume and tone control—and no pickup selector.

16
Volume controls:
The two knobs closest to the fingerboard control the volume of the pickups.
The volume knob nearest the bridge controls the “front” or neck pickup; the knob nearest the
edge of the guitar controls the “back” or bridge pickup.
Tone controls:
The knob or knobs farthest away from the fingerboard control tone. The tone
knob nearest the bridge controls the “front” or neck pickup; the knob nearest the edge of the
guitar controls the “back” or bridge pickup.
The tone controls are the “treble roll off” or “cut” variety. The tonal quality of the instrument
is darkened by the reduction of treble rather than the addition of bass. The tone control turned
all the way counterclockwise results in maximum reduction of treble and produces the “dark-
est” sound. The tone control turned clockwise to its maximum position allows the pickup’s full
harmonic frequencies to pass through, producing the guitar’s brightest sound.
Pickup selector switch:
The selector switch has three positions. The up position selects only
the “front” or neck pickup. The down position selects only the “back” or bridge pickup. The
middle position engages both pickups. The tone and volume controls will only be active when
the corresponding pickup is selected. On models with three pickups, the selector switch
activates the front pickup (front position), the middle and back pickup together (middle
position), and the back pickup (back position).

17
The Tune-o-matic Bridge.
The Tune-o-matic bridge allows for adjustment in overall bridge height
and individual string length. Height is adjustable up and down by means of thumb wheels
under the bridge at either end. Each string saddle is adjustable forward and back with a small
standard screwdriver. Action adjustment (up and down) is set at the factory to the correct
height for playing comfort and for buzz-free action. Raising the bridge will result in stiffer
action; lowering the bridge will result in faster action but may also result in fret buzz. Climatic
or humidity changes, or changes in string gauge, may necessitate a bridge adjustment.
Any change—in bridge height, string gauge, or climate—can affect the intonation and cause
a guitar to play out of tune in some fret positions. When this happens, the string length needs
to be adjusted, and this is accomplished by moving the individual saddles forward (toward the
neck) or backward (toward the tailpiece). The screw heads are on the pickup side of the bridge,
although there are many Gibsons that have the screw heads facing the tailpiece. To check into-
nation, compare the pitch of a string that is fretted at the 12th fret against the harmonic at
the 12th fret (accomplished by touching the string lightly with the left hand, without pressing
it all the way to the fret). If the fretted note is higher than the harmonic, the string should be
lengthened by moving the saddle toward the tailpiece until the two notes are the same. If the
fretted note is lower than the harmonic, the string length should be decreased.

18
The tune-o-matic bridge was designed to adjust for string changes (gauge or type) and other
physical changes but not for problems with intonation due to string wear. Should a string lose
its intonation due to wear, we strongly recommend changing the string and not the bridge
setting.
Adjustable Stopbar Tailpiece.
The stopbar tailpiece may be adjusted up or down to change the
downward pressure across the bridge. There is usually no need to adjust the stopbar unless the
strings are moving out of the saddles, in which case the stopbar should be lowered.

19
CARE AND MAINTENANCE
Finish.
A Gibson instrument always attracts attention, whether it is on a concert stage before
thousands or on a guitar stand in a home studio. After the classic body lines of a Gibson, the
finish makes the strongest impression.
Perspiration acids, heavy fingerprinting, dust, and grime from on-the-job usage are unavoid-
able. However, a minute or two spent with Gibson’s instrument care products—guitar polish,
fretboard conditioners, string cleaner/lubricant, and polishing cloth—will restore a finish to
like-new condition.
Gibson’s nitrocellulose lacquer finish not only looks great, it is also easily repairable—by a
professional. Minor scratches and dings can be fixed without completely refinishing the
instrument.
Keeping Your Guitar on the Road.
Your Gibson is a durable instrument. It is likely to outlive you—
if you take care of it. In determining whether conditions might be harmful to your guitar, the
rule of thumb is, if you are comfortable, then your guitar will be comfortable. Here are some
conditions to avoid.

20
Heat and cold:
Gibson’s nitrocellulose finish can expand or contract to adjust to extreme tem-
peratures and humidities—but not to sudden changes in temperature or humidity. Just as a
hot drink will crack a chilled glass, the finish of a Les Paul will crack if a guitar that has been
sitting in the trunk of a car in wintertime is suddenly exposed to the warm air of a heated room.
In these conditions, let the guitar warm up gradually inside the case before opening the case.
Rain:
Water wipes off the instrument’s finish easily, but if allowed to remain, it can cause ugly
water spots in the lacquer.
Sun:
Avoid direct rays of the sun on your Gibson. Direct sunlight can blister or discolor the finish.
More Things to Avoid.
When using a shoulder strap for a standing playing position, check that all
contact points and strap fasteners are secure.
Guitar stands with rubber supports that contain dye or plasticizers can “eat away” at the lac-
quer finish or leave a stain on your guitar that goes through the lacquer finish and into the
wood. These stains are permanent and this sort of damage is
not
covered under your warran-
ty. We recommend covering the rubber parts of the stand with a soft cotton cloth (such as a
guitar polishing cloth) and using a guitar stand only for temporary “storage” of your instrument.

21
Avoid sharp blows to any part of your instrument. Be particularly alert to possible blows to the
back of the headstock, machine heads (tuners), and in the neck heel area. Many headstock
breaks are the result of a guitar being knocked over or dropped while it’s still in the case, so
do not stand the case on its end.
Should major adjustments become necessary, contact your local authorized Gibson dealer or
service center.
Strings.
Fresh strings are a vital part of that “new instrument” sound. When strings begin to go
dead, a guitar loses its edge, and as the strings undergo further wear and tear they go “dead.”
Your Gibson will sound its best with new strings.
How often should you change strings?
That depends on how much you play your guitar, how
hard you play, and also on your individual body chemistry. Some professional musicians change
strings before every show in order to maintain the brightest edge on their sound. More casual
players may only need to change strings every month or two. For some players, even light per-
spiration shortens the life of their strings. The sound of the strings is the only sure way to judge
whether or not they need to be changed. And if one string needs to be changed, the others
can’t be far behind. To maintain tonal balance, change the whole set.

22
When changing strings, we recommend changing one string at a time in order to maintain ten-
sion on the neck and bridge. The pressure of the strings holds the bridge and saddles in place,
and removing all the strings could necessitate a new setup.
Use high quality strings.
The most obvious action you can take to maximize the life and per-
formance of your strings is to use high quality strings. Your Gibson comes from the factory with
a set of strings made by Gibson and designed exclusively for Gibsons. Although the string set
from the Gibson factory is suitable for virtually any style of music, Gibson offers a variety of
string styles and gauges for specialized purposes.
Install your strings correctly.
Improperly installed strings can slip, which will cause your Gibson
to constantly go out of tune. To correctly install strings:
1. Be certain the first winding of the string around the machine head stem (tuner
post) goes over the exposed tip of the new string. The rest of the winding should
then go under the exposed tip of the new string. When pressure is applied by
tightening the string to pitch, a clamping action keeps the string from slipping
around the machine head stem.

23
2. Be certain the string is wrapped around the tuner post an adequate
number of times. For unwound strings, at least five turns around the machine head
stem are necessary. For wound strings, two or three turns are adequate.
What gauge strings should be used?
Your Gibson guitar comes strung with “10s”—which
means the high-E string is .010 inches in diameter. The low-E is .046 inches in diameter. The
set is designed so that all strings are in proportion to one another, ensuring that the action and
the volume will be consistent across the entire fingerboard. Gibson offers “9s,” “11s,” and
a variety of other gauges and compositions, all of which are balanced for consistent tension.
What brand of strings should be used?
Gibson has been offering its own strings since 1907,
and Gibson has more experience than any other string maker when it comes to matching
strings to Gibson guitars. Gibson strings are manufactured to exacting standards to achieve the
highest level of quality and performance.

24
NIEUWE TECHNOLOGIE - DE GIBSON ROBOT GUITAR
Het onmogelijke is nu mogelijk.
Maak kennis met de Gibson Robot Guitar, 's werelds eerste gitaar op basis van robottechnologie.
De Robot Guitar van Gibson is de enige gitaar die momenteel beschikbaar is met het
zelfstemmingssysteen dat hierin wordt beschreven als originele uitrusting.
Uw Gibson Robot Guitar zal vooraf gekalibreerd zijn voor een standaard .010-.046-
snarenset. Als u snaardiktes wijzigt, fabrieksinstellingen herstelt, of het systeem zelf
installeert, is het best dat u de powerheads afzonderlijk kalibreert met de kalibratiemethode
die wordt beschreven in het onderdeel Set-upmodus van deze handleiding. Aangezien elke
powerhead echter zelf afgestemd wordt met een Dynamic Runtime Algorithm (DRA) die
de wijziging van runtimes overeenkomstig elke snaar garandeert, zal het systeem na
verschillende tunings zichzelf automatisch verbeteren.
Een speciaal ‘eFunction’-algoritme is voorzien in de software om het tuningproces te
ondersteunen. Wij raden aan het te gebruiken in de modus ‘ingeschakeld’.
Deze handleiding heeft als doel de functies van de Robot Guitar praktisch uit te leggen om
het meeste te kunnen halen uit de fantastische mogelijkheden die ze te bieden heeft. Indien
u vragen heeft of meer uitgebreide technische uitleg wenst, kunt u ons steeds contacteren
op 1-800-4GIBSON.

25
DE MASTER CONTROL KNOB (MCK)
De Master Control Knob is niet enkel de hoofdknop voor alle aspecten van dit fantastisch
zelfstemmend systeem, hij zal ook met u communiceren terwijl u zijn ‘taal’ aanleert. De MCK
is vrij krachtig en kan op vele manieren worden gebruikt. Wij zijn ervan overtuigd dat de
MCK-functies uw tweede natuur zullen worden zodra u ze een paar keer heeft uitgeprobeerd.
Opgelet: probeer de powerheads niet handmatig te draaien, tenzij ze uit de peghead zijn getrokken
zodat ze ontkoppeld zijn! Zoniet kunnen de powerheads beschadigd raken.
BASISWERKINGEN
De Master-Control Knob (MCK) van de Robot Guitar wordt meestal een ‘druk-/trekknop’
genoemd. In de normale stand is het een gewone volume- of toonpot, afhankelijk van welke
serie u heeft. Wanneer de MCK uitgetrokken wordt, wordt het systeem ingeschakeld.
Wanneer het systeem ingeschakeld wordt door de MCK uit te trekken, plaatst het instrument
in standaard stemmodus op A440 (tenzij u de standaardinstellingen van de tuning heeft
gewijzigd, zie page 46); er werden echter zes fabrieksinstellingen voorzien voor u. Elke
instelling kan door u naar wens worden gewijzigd, maar u kunt altijd de fabrieksinstellingen
opnieuw instellen. Dit wordt later uitgelegd in deze handleiding.

26
De LED-display van de MCK geeft verschillende symbolen en kleuren weer. Deze worden
in de verschillende bedieningsstanden uitgelegd. Tijdens het tuningproces gedragen ze zich
als volgt:
Display-acties van LED van snaren tijdens tuningoperaties:
snaar niet afgestemd = vaste rode
meetfrequentie = rood knipperende
tuning van powerhead = geel knipperend
flitssignaal = vaste blauwe
snaarfrequentie op extreem bereik = vast paars individueel
afgestemde snaar = vast groen alle
snaren afgestemd = alle LED’s knipperen 3 keer blauw
Tijdens het tuningproces zal de gitaar bijna 100 percent gedempt zijn. Nadat de MCK terug
volledig is ingedrukt, is het volume opnieuw volledig beschikbaar.

27
VOORZORGSMAATREGELEN:
• Probeer de tuningpegs op de powerheads nooit handmatig te draaien, tenzij ze ontkoppeld
zijn (uitgetrokken en weg van de peghead).
• Probeer de bedekking van de elektronica van de peghead, de powerheads, of de body
CPU niet te openen, dit kan immers uw garantie ongeldig maken.
• Druk een snaar niet op een ‘fret’ wanneer u de Robot Guitar probeert af te stemmen.
Snaren moeten ‘open’ zijn opdat het systeem goed zou kunnen functioneren, tenzij u
bezig bent met de intonatieroutine.
• Het is niet moeilijk om toon te detecteren en om elke gewenste snaar nauwkeurig en
snel te stemmen. Door de snaren zachtjes aan te slaan, verkrijgt u de beste resultaten.


30
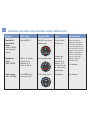
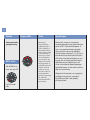
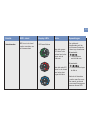
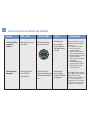
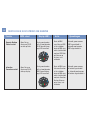
HANDLEIDING VOOR FUNCTIES EN DISPLAYMODI TIJDENS TUNINGOPERATIES
Functie MCK -stand Display-LED’s Actie Opmerkingen
Onmiddellijk
geactiveerde
tuning
(440Hz, EADGBE
is de fabrieksin-
stelling)
Regelmatige
tuning
440Hz, EADGBE
E major tuning
440Hz, EBEG#BE
Trek de MCK uit
MCK uit en volledig
gedraaid naar
beneden tot ‘0’
(tegen de klok in)
Trek de MCK uit en
draai naar E LED
Sla alle snaren
zachtjes aan
Invoeren door
eenmaal op
het display te
drukken—b, #,
en alle LED’s van
de snaren zullen
rood branden
Zie hierboven
Tijdens het aanslaan,
beginnen de powerheads
te draaien, afzonderlijke
snaren branden groen als
ze gestemd zijn, alle LED’s
knipperen drie keer blauw
wanneer het afstemmen
voltooid is. Na het knip-
peren van de blauwe
lampjes, drukt u de
MCK opnieuw in.
Zie hierboven
Zie hierboven
Alle LED’s van snaren
branden rood
b en # branden rood
E LED brandt blauw

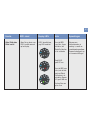
31
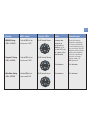
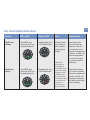
Functie MCK -stand Display-LED’s Actie Opmerkingen
DADGAD Tuning
440Hz, DADGAD
Dropped D Tuning
440Hz, DADGBE
Delta Blues Tuning
440Hz, DGDGBD
Trek de MCK uit en
draai naar A LED
Trek de MCK uit en
draai naar D LED
Trek de MCK uit en
draai naar G LED
A LED brandt blauw
D LED brandt blauw
G LED brandt blauw
Invoeren door
eenmaal op
het display te
drukken—b, #,
en alle LED’s van
de snaren zullen
rood branden
Zie hierboven
Zie hierboven
Tijdens het aanslaan,
beginnen de powerheads
te draaien, afzonderlijke
snaren branden groen als
ze gestemd zijn, alle LED’s
knipperen drie keer blauw
wanneer het afstemmen
voltooid is. Na het knip-
peren van de blauwe
lampjes, drukt u de
MCK opnieuw in.
Zie hierboven
Zie hierboven

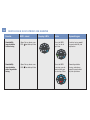
32
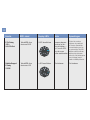
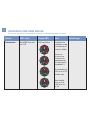
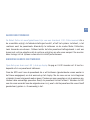
Functie MCK -stand Display-LED’s Actie Opmerkingen
E Flat Tuning
440Hz,
EbAbDbGbBbeb
Dubbele Dropped
D Tuning
DADGBD
Trek de MCK uit en
draai naar B LED
Trek de MCK uit en
draai naar e LED
B LED brandt blauw
e LED brandt blauw
Invoeren door een-
maal op het dis-
play te drukken—
b, #, en alle LED’s
van de snaren
zullen rood branden
Zie hierboven
Tijdens het aanslaan,
beginnen de powerheads
te draaien, afzonderlijke
snaren branden groen als
ze gestemd zijn, alle LED’s
knipperen drie keer blauw
wanneer het afstemmen
voltooid is. Na het knipperen
van de blauwe lampjes,
drukt u de MCK opnieuw in.
Zie hierboven
#
#

33
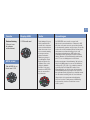
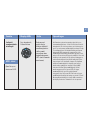
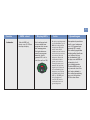
Functie Display-LED’s Actie Opmerkingen
Referentietuning
(Stem af naar
de gekozen
referentietoon)
Trek de MCK uit en
draai naar I LED
I LED brandt rood
Trek (ontkoppel) de peg
uit de powerhead die
u wenst af te stemmen
naar een referentietoon.
Stem deze snaar af om
ze in overeenstemming
te brengen met uw
gekozen referentie.
Druk de peg terug in
de ontkoppelde stand.
Begin uw gitaar af te
stemmen door op het
display te drukken.
De letter ‘I’ zal groen
branden en ALLE LED’s
van de snaren zullen
rood branden.
Sla DEZELFDE snaar aan die u zopas heeft
afgestemd op uw referentietoon. Wanneer de LED
van deze snaar met een vaste groene kleur brandt,
is zijn frequentie gemeten en opgeslagen. Sla nu alle
snaren aan en het powertunesysteem zal uw gitaar
afstemmen naar normale tuning op basis van
uw gekozen referentiesnaar. (LED’s zullen zich
op dezelfde manier gedragen als tijdens normale
tuning.) Wanneer de referentietuning werd bereikt,
zal de ‘I’ aan- en uitknipperen in het blauw.
Indien u uw nieuwe ‘referentietuning’ wilt opslaan,
draait u de MCK gewoon in een van de fabrieksin-
stellingen (E, A, D, G, B, of e) en drukt u eenmaal
op het display. De display-LED’s zullen 3 keer
blauw knipperen om aan te geven dat uw nieuwe
referentietuning werd opgeslagen in die stand en
kan opnieuw worden opgeroepen op dezelfde manier
als elke andere instelling door die stand te kiezen.
(Vergeet niet dat u uw nieuwe referentietuning
niet moet ‘opslaan’. Druk gewoon de MCK terug
in zijn normale stand en u bent klaar om van
start te gaan!)
#
#
#
MCK -stand

34
Functie Display-LED’s Actie Opmerkingen
Gepersonaliseerde
gewijzigde tuning
Trek de MCK uit en
draai naar peg-LED
Om uw eigen
‘Gepersonaliseerde
gewijzigde tuning’ te
creëren, ontkoppelt u
elke powerhead van de
vereiste snaar en stemt
u deze handmatig af
naar de door u gewen-
ste toon. Druk vervol-
gens eenmaal op het
display en de peg-LED
zal groen branden, de
snaar-LED’s zullen rood
branden. Sla nu alle
snaren een voor een
aan (niet te hard!) en
als hun frequenties
gemeten en opgeslagen
zijn, zullen hun
overeenkomende LED’s
groen branden.
Wanneer alle snaren van uw geperson-
aliseerde gewijzigde tuning geregistreerd zijn,
zullen de LED’s 3 keer blauw knipperen. U
mag nu uw gepersonaliseerde gewijzigde
tuning opslaan in een van de fabrieksin-
stellingsstanden. Selecteer E, A, D, G, B, of e,
en druk eenmaal op het display. De display-
LED’s zullen 3 keer blauw knipperen om aan
te geven dat uw nieuwe gepersonaliseerde
referentietuning werd opgeslagen in die
stand, en kan opnieuw worden opgeroepen
op dezelfde manier als elke andere instelling
door die stand te kiezen.
(Vergeet niet dat wanneer u uw aangepaste
gewijzigde tuning opslaat, u de vooraf
ingestelde stand die u heeft gekozen,
zult overschrijven.)
#
#
MCK -stand
Peg-LED brandt
rood

35
Functie MCK -stand Display-LED’s Actie Opmerkingen
Modus Snaar
omhoog
Modus Snaar
omlaag
Trek de MCK uit en
draai naar de LED van
de ronddraaiende pijl
Trek de MCK uit en
draai naar de LED van
de ronddraaiende pijl.
Ronddraaiende pijl en
# LED branden groen
Ronddraaiende pijl en
b LED branden rood
Schakel de modus
Snaar omhoog in
door 3 seconcen
op het display te
drukken.
Druk eenmaal
op het display en
het zal beginnen
overschakelen naar de
modus Snaar omlaag,
aangegeven door de
ronddraaiende pijl
die van groen naar
rood schakelt. Schakel
nu de modus Snaar
omlaag in door
3 seconden op het
display te drukken.
Powerheads zullen
de snaren beginnen
opdraaien, bijna tot
in de normale tuning.
Wanneer ze stoppen met
stemmen, schakelt u de
normale tuningmodus
in om de afstemming
van uw instrument te
beëindigen.
Powerheads beginnen
alle snaren te ontrollen.
Wanneer ze stoppen met
draaien, schroeft u de
borgmoer van elke post
los zodat u oude snaren
kunt verwijderen.
MODI SNAREN OMHOOG/SNAREN OMLAAG

36
UW ROBOT GUITAR OPNIEUW SNAREN
Zorg eerst dat alle powerheads ontkoppeld zijn door de pegs van de peghead weg te trekken.
Dit is heel belangrijk! Draai elke peg zo dat het gat in de stemschroef ruwweg overeenkomt
met elke overeenkomende snaar als ze uit de moer van uw gitaar komt.
Trek elke snaar door uw staartstuk, over het brugzadel (waar contact essentieel is), door
de moeruitsparing en vervolgens door het gat in de stemschroef, zoals u zou doen met
elke andere gitaar. Span echter een kleine hoeveelheid met de hand aan voordat u elke
borgmoer stevig vastschroeft. Knip de losse einden van elke snaar kort bij de stemschroef af
zodat ze niet in aanraking komen met andere snaren; hierdoor zal uw systeem immers niet
goed functioneren.
U kunt nu de String Up-modus inschakelen. MCK zou de groene ronddraaiende pijl moeten
weergeven, zoals omschreven op de vorige pagina. Nadat het display 3 seconden werd inge-
drukt, zullen alle snaren zichzelf opdraaien, bijna tot aan hun correcte tonen; vervolgens
moet u uw gitaar fijn afstemmen via de Normal Tuning-modus. (Wanneer alle snaren zijn
verwijderd, zorg dan dat het staartstuk niet kan bewegen want anders kan zijn connector
beschadigd raken!)

37
DE STRING UP-MODUS VOOR EEN ENKELE SNAAR INSCHAKELEN
(zoals voor het vervangen van een snaar die breekt tijdens het spelen)
Installeer de snaar zoals hierboven omschreven (vergeet niet dat zadelcontact cruciaal is!).
Selecteer gewoon de LED voor de snaar die u vervangt, draai naar de groene ronddraaiende
pijl en schakel deze van groen naar rood en terug naar groen. Druk drie seconden op het
display. De powerhead van de gekozen snaar zal beginnen opwinden tot bijna de normale
tuning, en als hij stopt, zult u klaar zijn om ze fijn af stemmen via de Normal Tuning-modus.

38
Functie MCK -stand Display-LED’s Actie Opmerkingen
Intonatiemodus Schakel de into-
natiemodus in door
3 seconden op het
display te drukken.
Sla een van
de snaren aan
tot wanneer de
overeenkomende
LED groen brandt.
Bijvoorbeeld, D.
Na 2 seconden gaat
b LED uit en # LED
branden groen
Neem dezelfde
snaar nu in de
12de fret en sla
ze aan.
I LED brandt blauw
INTONATIEMODUS (ENKEL GIBSON-MODELLEN)
Trek de MCK uit en draai
naar | LED
Voordat u van start gaat met de intonatiemodus, raden wij u aan Normal tuning 440Hz uit te voeren

39
Functie MCK -stand Display-LED’s Actie Opmerkingen
Intonatiemodus
Voor elke groene
LED draait u de
schroef een halve
draai met de
klok mee
Voor elke rode LED
draait u de schroef
een halve draai
tegen de klok in
Een gekleurde
knippercode geeft de
juiste correctie voor de
stemmingsschroef weer.
Bijvoorbeeld:
= 5 halve draaien
met de klok mee
Bijvoorbeeld:
= 6 halve draaien tegen
de klok in
Herhaal de Intonation
-modus voor elke snaar.
Een correct gestemde
snaar wordt aangegeven
door een blauwe LED.
I LED brandt blauw
MCK is nu in de stand
van de snaar die u aan
het stemmen bent.

40
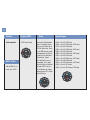
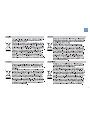
Functie Display-LED’s Actie Opmerkingen
Kalibratiemodus
Trek de MCK uit en
draai naar C LED
C LED brandt rood
Open de kalibratiemodus
door 3 seconden op het
display te drukken. De C
LED zal blauw zijn. Draai
nu de MCK om uw grond-
toonfrequentie uit de vol-
gende lijst te selecteren.
(Opmerking: tijdens
het selecteren van uw
grondtoon, zult u, door
op het display te drukken,
de rode # LED aan- en
uitschakelen; de andere
weergegeven LED’s zullen
blauw blijven.)
435Hz = C en E LED blauw
436Hz = C en E LED blauw, # LED rood
437Hz = C en A LED blauw
438Hz = C en A LED blauw, # LED rood
439Hz = C en D LED blauw
440Hz = C en D LED blauw, # LED rood
441Hz = C en G LED blauw
442Hz = C en G LED blauw, # LED rood
443Hz = C en B LED blauw
444Hz = C en B LED blauw, # LED rood
445Hz = C en e LED blauw
446Hz = C en e LED blauw, # LED rood
#
MCK -stand
#
#

41
OPMERKING:
Zodra u uw gewenste grondtoon heeft gekozen, drukt u drie seconden op het display. Kies
nu een tuning en sla de snaren aan. De Global Calibration Offset wordt toegepast op elke
geselecteerde tuning.
Om de geselecteerde Global Calibration Offset te controleren, trekt u de MCK uit en drukt u
drie seconden op LED C.
Een gekleurde knippercode geeft de grondtoon in Hz weer:
rood = honderdtallen / groen = tientallen / blauw = eenheden / geel = 0
Bijvoorbeeld 440Hz: 4 rode LED’s, pauze, 4 groene LED’s, pauze, 1 gele LED
Bijvoorbeeld 436Hz: 4 rode LED’s, pauze, 3 groene LED’s, pauze, 6 blauwe LED’s, rode
LED-rotatie (lager dan 440Hz concerttoon)
Bijvoorbeeld 445Hz: 4 rode LED’s, pauze, 4 groene LED’s, pauze, 5 blauwe LED’s, groene
LED-rotatie (hoger dan 440Hz concerttoon)

42
Functie MCK -stand Display-LED’s Actie Opmerkingen
Set-up openen Trek de MCK uit en
draai hem volledig naar
beneden tot ‘0’ (tegen
de klok in)
b en # branden rood Druk drie seconden
op het display.
Wanneer het dis-
play blauw wordt,
laat u de display-
knop los. Druk
nu opnieuw drie
seconden op het
display. Het zal
drie keer knipperen
en stoppen. De
peg-LED zal nu
een vaste witte
kleur hebben,
# en b zijn rood.
U bevindt zich
nu in de modus
Set-up.
Dit is de eerste stap om
Set-up te openen
SET-UPMODUS
De verschillende belangrijke functies in Set-up kunnen individueel geopend worden van zodra de set-upmodus is ingeschakeld. We gaan
nu beschrijven hoe u de set-upmodus kunt openen en sluiten, en wij zullen nadien de verschillende functies die zij bevat, opsommen.

43
Functie MCK -stand Display-LED’s Actie Opmerkingen
Set-up verlaten
zonder wijzigingen
op te slaan
Set-up verlaten;
wijzigingen opslaan
Druk de MCK opnieuw in
Afhankelijk van laatst
gebruikte set-upfunctie
Set-upmodus
wordt uitgeschakeld
Toegepaste set-
upfunctie
U kunt de set-upmodus
altijd verlaten
Uw set-upfunctie
is nu opgeslagen
#
Alle externe LED’s
knipperen 3 keer
blauw-groen

44
Fabrieksinstelling-
en opnieuw
instellen
Softwarerelease
weergeven
Open Set-up en draai
naar LED D
Open Set-up, draai
naar E LED en
druk op Enter
LED D brandt blauw,
peg-LED brandt wit
Peg-LED met knip-
perende sequentie geeft
softwarerelease-editie
aan
Het opnieuw instellen van de
fabrieksinstellingen houdt het
volgende in:
• Vooringestelde standen
worden ingesteld op
standaardtunings
• Runtime Correction Data
wordt standaard ingesteld
• Dynamic Runtime Correction
wordt ingeschakeld
• eFunction Correction wordt
ingeschakeld
• Tuningnauwkeurigheid
wordt ingesteld op 4 van 6
• Kalibratiegegevens zijn
opnieuw ingesteld
Rood=Major Release-nummer
Groen=Minor Release-nummer
Blauw=Controleniveau
Bijvoorbeeld, Software Release
2.3.5 zou moeten worden
weergegeven als 2 rode flitsen,
gevolgd door 3 groene flitsen,
gevolgd door 5 blauwe flitsen
#
FUNCTIES DIE IN DE SET-UPMODUS ZIJN BEGREPEN
Functie MCK -stand Display-LED’s Actie Opmerkingen
Druk eenmaal
op het display
en de fabrieksin-
stellingen worden
hersteld
Druk eenmaal
op het display.
De peg-LED begint
te knipperen

45
Functie MCK -stand Display-LED’s Actie Opmerkingen
Global Calibration
Offset aan/uit
Open Set-up, draai naar
LED C en druk eenmaal
op het display
LED C brandt blauw,
peg-LED brandt wit
Draai de MCK
naar links (tegen
de klok in) om
Global Calibration
uit te schakelen
Rode B LED
geeft UIT aan
Draai de MCK naar
links (met de klok
mee) om Global
Calibration in te
schakelen. Groene
LED geeft AAN aan
Druk op Enter om
op te slaan
Wanneer een
kalibratiemodus in
werking is, wordt uw
geselecteerde grondtoon-
frequentie toegepast op
al uw voorinstellingen

46
Functie MCK -stand Display-LED’s Actie Opmerkingen
Onmiddellijk
ingeschakelde
laatste tuning
Onmiddellijk
ingeschakelde
vooraf ingestelde
tuning
Open Set-up, draai naar
LED en druk op Enter
Open Set-up, draai naar
LED en druk op Enter
Draai de MCK
naar I en druk
op Enter
Draai de MCK
naar een van de
voorinstellingen
en druk op Enter
Laatste tuning wordt
ingeschakeld bij het
opstarten
Voorafingestelde
tuning selecteren
wordt ingeschakeld
bij het opstarten
FUNCTIES DIE IN DE SET-UPMODUS ZIJN BEGREPEN

47
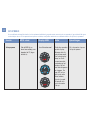
Functie Display-LED’s Actie Opmerkingen
Snelheids-/
nauwkeurigheids-
instellingen
Open Set-up en
draai naar A LED
Pegs branden wit,
A brandt blauw
Druk eenmaal
op het display.
Huidige snelheids-/
nauwkeurigheidsin-
stelling wordt
aangegeven door
knipperende groene
LED’s (zoals hieronder
omschreven)
Het Powertune-systeem kan worden afgesteld op een
toonnauwkeurigheid van .2 Cent. Dit zal echter leiden tot
tuningfuncties die iets langer duren, en in livetoepassin-
gen is een ontspannen nauwkeurigheid raadzaam. Er zijn
6 instellingsniveaus. De fabrieksinstelling zal 4 groene
knipperende LED’s weergeven die aangeven dat u een
nauwkeurigheidsinstelling gebruikt van ongeveer 1 Cent,
wat voor de meeste toepassingen de praktijk is. Door deze
instelling te ontspannen, zal het algemene tuningproces
sneller worden uitgevoerd en dit kan nuttig zijn bij live-
toepassingen. In de studio wilt u immers de maximum
meetbare nauwkeurigheid. In dergelijk geval zal het
bereik worden gewijzigd en aangepast door de MCK
te draaien. De uiterst grote nauwkeurigheid (.2 Cent)
wordt aangegeven door 6 groene LED’s. De lagere
nauwkeurigheid (d.i. grootste snelheid) wordt
aangegeven door één groene LED. Zelfs met een lagere
nauwkeurigheid bedraagt de tuning nog steeds 2,5 Cent!
Om uw gekozen instelling op te slaan, drukt u eenmaal op
het display. U verlaat zo automatisch de set-upmodus.
#
MCK -stand

48
Dynamic Runtime
Control aan/uit
eFunction
Correction aan/uit
Open Set-up,
draai naar G LED
en druk op Enter
Open Set-up en
draai naar B LED,
druk op display.
# zal groen branden
of b zal rood branden,
G LED brandt blauw,
peg-LED brandt wit
# zal groen branden
of b zal rood branden,
BLED brandt blauw,
peg-LED brandt wit
# brandt groen wanneer
DRC ingeschakeld is,
b brandt rood wanneer
DRC uitgeschakeld is
# brandt groen wanneer
eFunction ingeschakeld
is, b brandt rood wanneer
eFunction uitgeschakeld is
Functie MCK -stand Display-LED’s Actie Opmerkingen
Draai de MCK
naar links om DRC
uit te schakelen,
draai de MCK naar
rechts (met de klok
mee) om DRC Druk
op Enter om op
te slaan, in te
schakelen
Draai de MCK naar
links om eFunction
uit te schakelen,
draai de MCK naar
rechts (met de klok
mee) om eFunction
Druk op Enter om
op te slaan, in te
schakelen
FUNCTIES DIE IN DE SET-UPMODUS ZIJN BEGREPEN

49
KALIBRERENDE POWERHEADS
De Robot Guitar zal vooraf gekalibreerd zijn voor een standaard .010-.046-snarenset. Als u
de snaardiktes wijzigt, de fabrieksinstellingen herstelt, of zelf het systeem installeert, is het
raadzaam eerst de powerheads afzonderlijk te kalibreren via de modus Motor Calibration,
zoals hieronder omschreven. Onthoud echter dat elke powerhead zelfregulerend is met een
dynamisch runtime-algoritme dat de runtimes wijzigt en aan elke snaar aanpast. Na verschei-
dene tunings zal het systeem automatisch zichzelf perfectioneren.
HANDMATIGE KALIBRATIE VAN POWERHEADS
Open Set-up en draai naar LED I, druk op display. De peg en I LED’s branden wit. U kunt nu
bepaalde of al uw powerheads kalibreren.
Draai de MCK eerst naar de powerhead die u wilt kalibreren (geselecteerde snaren worden in
het blauw aangegeven) en druk eenmaal op het display. Sla de snaar aan en ze zal beginnen
schakelen tussen knipperend rood en groen. Pauzeer een paar seconden en sla ze opnieuw aan.
Herhaal deze eenvoudige procedure terwijl de powerhead zichzelf afstemt. Wanneer de LED
voor die snaar verandert naar de volgende snaar in rij, weet u dat de powerhead die u eerst heeft
geselecteerd, gedaan is. Zo eenvoudig is het.

50
LADEN EN INFORMATIE OVER BATTERIJ
De Robot Guitar wordt geleverd met een batterijpakket waarin twee heroplaadbare batterijen
zitten. Er wordt ook een speciale lader meegeleverd met het systeem.
Het laadniveau van de batterij wordt aangegeven telkens wanneer u uw systeem inschakelt,
zoals hieronder weergegeven. U kunt ongeveer 200 tunings uitvoeren tussen twee opladingen.
U moet uw gitaar niet openen om toegang te krijgen tot de laadfuncties van de batterij.
Wanneer het systeem ingeschakeld is, maar meer dan één minuut inactief is, wordt de bat-
terij automatisch uitgeschakeld. Een speciale beschermingsmodus is in het oplaadsysteem
ingebouwd; sluit uw gitaarsnoer dus steeds als laatste op de lader aan wanneer u wilt laden.
Tijdens het laden zijn korte snoeren het meest doeltreffend.
BATTERIJNIVEAU
Telkens wanneer de MCK voor het eerst wordt ingeschakeld, zal via het rood knipperende
batterijteken worden aangegeven of het nodig is om onmiddellijk te laden.

51
Laadmodus
Trek de MCK uit,
draai naar C LED en
druk op display
Uw huidige oplaad-
niveau wordt voor
ongeveer drie secon-
den weergegeven.
Het oplaadniveau-
wordt aangegeven
door het aantal
groene LED’s dat u
ziet (tussen1 en 10).
Voor optimale prestaties
heeft u een laadniveau
van 8-10 groene knip-
perende LED’s nodig.
Een volledig opgeladen
batterijpakket heeft een
vast blauw licht op
de laadeenheid; het
display van de MCK zal
automatisch uit-
geschakeld worden.
Druk de MCK terug in
zijn normale stand als
het laden voltooid is.
Een volledige oplading
mag niet langer dan
90 minuten duren.
Functie MCK -stand Display-LED's Actie Opmerkingen
Nu ziet u een knipperend
rood batterijteken op de
MCK dat aangeeft dat
uw systeem zijn lader
zoekt. Steek de AC-
stekker van uw laadeen-
heid in het stopcontact;
de lader zal ook rood
knipperen. Koppel de
laadeenheid aan de
gitaar met een stan-
daard gitaarsnoer, en
wanneer het systeem
begint op te laden, zal
de laadeenheid groen
knipperen; een display
in werking met groene
LED’s op de MCK geef
het oplaadniveau
aan. De LED van de
laadeenheid zal ook
groen knipperen.

NOODLAADMODUS
Het systeem beschikt nu over een Emergency Charge Mode (ECM) als haar interne
heroplaadbare batterij volledig leeg is of te weinig geladen is om de normale laadfunctie uit
te voeren. Plaats de MCK in de C-stand. Steek uw snoer in het laadtoestel en koppel het aan
de transformator. De lader knippert met een rode LED (zoekt een gitaar). Wanneer de LED
geel begint te knipperen, kan de lader aan de gitaar gekoppeld worden. De lader zal
voldoende opladen om de normale laadmodus op te starten. De tijdsduur om de laadmodus
te herstellen hangt af van de staat van het batterijniveau (ongeveer 10 seconden tot een paar
minuten). Nadat de ECM is voltooid, werkt het systeem in de normale laadmodus.
AUTOMATISCHE UITSCHAKELING
Als de MCK in stand ‘aan’ staat voor meer dan 120 seconden, schakelt het systeem in
de Uitschakelmodus die wordt aangegeven door een groen knipperend lampje. Na 30
minuten schakelt het systeem naar Standby-modus die wordt aangegeven door een zeer
traag knipperend geel lampje. U kunt het systeem opnieuw schakelen naar beide modi
door de MCK te draaien.
Opmerking: het is aanbevolen de gitaar niet te bewaren met de MCK uitgeschakeld omdat zo
de batterij volledig leeg zal geraken en de Emergency Charge Mode zal moeten worden
aangewend.
52

53
KORTSLUITINGSWAARSCHUWING
In het geval van een kortsluiting van negatief naar grond (snaren E of A tot D of G) zal het
witte peg-symbool knipperen. Dit kan worden veroorzaakt als de snaren niet goed zijn
bijgeknipt aan de headstock. Indien de kortsluiting van B of hoge E tot D, A of lage E loopt,
zal de peg geel knipperen. Controleer om zeker te zijn dat de snaren elkaar niet raken.

LEVENSLANG MUZIEK
Uw Gibson elektrische gitaar is een levenslange investering. Wanneer ze goed
wordt onderhouden, zal ze niet alleen haar waarde behouden als hoogkwalitatief
instrument, ze zal tevens nog generaties lang muzikale winsten boeken.
Uw investering in 's werelds fijnste elektrische gitaar wordt ondersteund door het
allerbeste Customer Service-team in de industrie van muziekinstrumenten. Om
een vertegenwoordiger van een Gibson-klantendienst te contacteren, belt u
1.800.4GIBSON of mailt u ons op [email protected].
Voor meer informatie over Gibson-producten en -accessoires,
gaat u naar www.gibson.com of belt u 1.800.4GIBSON.

55

56

57
NOTES
____________________________________________________________________________________________
__________________________________________________________________________________________________
__________________________________________________________________________________________________
__________________________________________________________________________________________________
__________________________________________________________________________________________________
__________________________________________________________________________________________________
__________________________________________________________________________________________________
__________________________________________________________________________________________________
__________________________________________________________________________________________________
__________________________________________________________________________________________________
__________________________________________________________________________________________________
__________________________________________________________________________________________________
__________________________________________________________________________________________________
__________________________________________________________________________________________________
__________________________________________________________________________________________________
__________________________________________________________________________________________________
__________________________________________________________________________________________________

58
NOTES
____________________________________________________________________________________________
__________________________________________________________________________________________________
__________________________________________________________________________________________________
__________________________________________________________________________________________________
__________________________________________________________________________________________________
__________________________________________________________________________________________________
__________________________________________________________________________________________________
__________________________________________________________________________________________________
__________________________________________________________________________________________________
__________________________________________________________________________________________________
__________________________________________________________________________________________________
__________________________________________________________________________________________________
__________________________________________________________________________________________________
__________________________________________________________________________________________________
__________________________________________________________________________________________________
__________________________________________________________________________________________________
__________________________________________________________________________________________________

59
NOTES
____________________________________________________________________________________________
__________________________________________________________________________________________________
__________________________________________________________________________________________________
__________________________________________________________________________________________________
__________________________________________________________________________________________________
__________________________________________________________________________________________________
__________________________________________________________________________________________________
__________________________________________________________________________________________________
__________________________________________________________________________________________________
__________________________________________________________________________________________________
__________________________________________________________________________________________________
__________________________________________________________________________________________________
__________________________________________________________________________________________________
__________________________________________________________________________________________________
__________________________________________________________________________________________________
__________________________________________________________________________________________________
__________________________________________________________________________________________________

60
NOTES
____________________________________________________________________________________________
__________________________________________________________________________________________________
__________________________________________________________________________________________________
__________________________________________________________________________________________________
__________________________________________________________________________________________________
__________________________________________________________________________________________________
__________________________________________________________________________________________________
__________________________________________________________________________________________________
__________________________________________________________________________________________________
__________________________________________________________________________________________________
__________________________________________________________________________________________________
__________________________________________________________________________________________________
__________________________________________________________________________________________________
__________________________________________________________________________________________________
__________________________________________________________________________________________________
__________________________________________________________________________________________________
__________________________________________________________________________________________________

7

6
309 Plus Park Boulevard Nashville, TN 37217 USA 1.800.4GIBSON www.gibson.com
-
 1
1
-
 2
2
-
 3
3
-
 4
4
-
 5
5
-
 6
6
-
 7
7
-
 8
8
-
 9
9
-
 10
10
-
 11
11
-
 12
12
-
 13
13
-
 14
14
-
 15
15
-
 16
16
-
 17
17
-
 18
18
-
 19
19
-
 20
20
-
 21
21
-
 22
22
-
 23
23
-
 24
24
-
 25
25
-
 26
26
-
 27
27
-
 28
28
-
 29
29
-
 30
30
-
 31
31
-
 32
32
-
 33
33
-
 34
34
-
 35
35
-
 36
36
-
 37
37
-
 38
38
-
 39
39
-
 40
40
-
 41
41
-
 42
42
-
 43
43
-
 44
44
-
 45
45
-
 46
46
-
 47
47
-
 48
48
-
 49
49
-
 50
50
-
 51
51
-
 52
52
-
 53
53
-
 54
54
-
 55
55
-
 56
56
-
 57
57
-
 58
58
-
 59
59
-
 60
60
-
 61
61
-
 62
62
-
 63
63
-
 64
64


in andere talen
- English: Gibson USA Owner's manual
Andere documenten
-
Yamaha SA503TVL de handleiding
-
-
-
-
-
 MaxMusic GigKit Electric Guitar Pack LP Style Dark Red de handleiding
-
 MaxMusic 173.223 de handleiding
-
-
Max 173.256 Handleiding
-
 MaxMusic GigKit Electric Guitar Pack Quilted Style de handleiding


