
MR8106
1
2
5
3
4
SPECIFICHE TECNICHE
DESCRIZIONE
ITALIANO
Rilevatore di apertura monodirezionale
per porte automatiche
1. morsettiera
2. antenna campo largo
3. antenna campo stretto
4. pulsanti
5. calotta
Tecnologia:
Frequenza emessa:
Potenza emessa:
Densità di potenza emessa:
Modo di rilevazione:
Velocità di rilevazione min.:
Tensione d’alimentazione:
Frequenza delle rete di alimentazione:
Consumo:
Uscita:
Tensione max. ai contatti:
Corrente max. ai contatti:
Potere d’interruzione max.:
Altezza di montaggio:
Grado di protezione:
Gamma di temperatura:
Dimensioni:
Angolo d’inclinazione:
Materia:
Peso:
Lunghezza del cavo:
Conformità alle norme:
iperfrequenza e microprocessore
24,150 GHz
< 20 dBm EIRP
< 5 mW/cm²
movimento
5 cm/s
12V a 24V AC ±10%; 12V a 24V DC +30% / -10%
50 a 60 Hz
< 2 W
relé (contatto di commutazione privo di potenziale)
42V AC/DC
1A (resistivo)
30W (DC) / 60VA (AC)
da 1,8 m a 4 m
IP64
-20 °C a + 55 °C
120 mm (L) x 80 mm (H) x 50 mm (P)
0° a 90° in senso verticale; -30° a +30° in senso laterale
ABS
215 g
2,5 m
R&TTE 1999/5/EC, LVD 2006/95/EC, RoHS 2 2011/65/EU
Le specifi che tecniche possono essere modifi cate senza preavviso.
Misurato in condizioni speci
fi
che.
Per i prodotti a partire dalla versione 0600.
MR8106 / FA00063M06 EAGLE ONE / 42.8535 / v2 - 10.13
Tutt’altro utilizzo del rilevatore al di là della funzione descritta non può essere garantito dal costruttore.
Il produttore non sarà ritenuto responsabile di installazioni non corrette o di regolazioni inappropriate del rilevatore.

1
2
2
3
1
APERTURA & CHIUSURA
MONTAGGIO & CABLAGGIO
Prima del fi ssaggio
Dopo il fi ssaggio
CONSIGLI
Evitate d’installare il
rilevatore in prossimità
di lampade al neon o ad
oggetti in movimento.
Non coprite il rilevatore.
Posizionate la sagoma di
montaggio.
Forate 1 buco e inserite il cavo.
Forate 2 buchi per le viti.
Posizionate il
cavo come indicato.
Fissate saldamente il
rilevatore.
Evitate le vibrazioni.Non toccate le parti
elettroniche.
APPLICAZIONI
Collegate i cavi cosi:
1 - MARRONE - ALIMENTAZIONE
2 - VERDE - ALIMENTAZIONE
3 - BIANCO - COM
4 - GIALLO - NO
5 - GIALLO - NC
Installazione a parete su porte
scorrevoli o girevoli
Installazione a soffi tto di fronte alla
porta (scorrevole, girevolo o battente)
Installazione sull’asse della porta (a
battente)
MR8106 / FA00063M06 EAGLE ONE / 42.8535 / v2 - 10.13

3
4
P
A
XXS XS S > > > > L XL XXL
1 2
>>>>>
... S,
XS, XXS
... L, XL, XXL
< 3 m > 3 m
+
CAMPO DI RILEVAZIONE
REGOLAZIONI
(con i pulsanti e/o con il telecomando)
DIMENSIONI
DIMENSIONI
FILTRO IMMUNITÀ
MODO DI
RILEVAZIONE
CONFIGURAZIONE
DELLE USCITE
bi
uni
uni
PMR
VALORI FABBRICA
normale
alto
Regolate l’angolo laterale.
Regolate l’angolo verticale.
O
RIPRISTINARE I VALORI DI FABBRICA:
A = uscita attiva (contatto NO)
P = uscita passiva (contatto NC)
4 m x 2 m (largo)
2 m x 2.5 m (stretto)
LARGHEZZAANGOLO
2,2 m
2,2 m
> 2 secondi
TEMPO DI
MANTENIMENTO
ALTEZZA DI
INSTALLAZIONE
CONTROLLO PORTA
uni
INV
PMR &
INV
auto
aperto chiuso
aperto = il rilevatore rileva di continuo. Il LED é ON.
chiuso = il rilevatore é in stand by e non rileva. Il LED é OFF.
0,5 s 1 s 2 s 3 s 4 s 5 s 6 s 7 s 8 s 9 s
basso
piú
elevato
bi = rilevazione nei due sensi, uni = rilevazione verso il rilevatore
uni PMR = rilevazione verso il rilevatore, ance di persone a mobilità
ridotta; uni INV = rilevazione invertita
MR8106 / FA00063M06 EAGLE ONE / 42.8535 / v2 - 10.13

1
1
2
3
4
5
1
2
3
1
1
1
1
2
2
1
3
3
1
2
1
Came S.p.A.- Via Martiri Della Liberta 15 - IT-31030 DOSSON DI CASIER (TV)
TEL (+39) 0422 4940 - FAX (+39) 0422 4941 - [email protected] - www.came.it
FUNZIONAMENTI SCORRETTI
Il rilevatore non è
alimentato.
Verifi cate il cavo d’alimentazione
e la tensione d’alimentazione.
La porta si apre
e si chiude
continuamente.
La LED lampeggia
velocemente dopo
un’apertura di
sessione.
Il rilevatore non
reagisce alle
impostazioni date
dal telecomando.
L’impostazione dell’uscita
è inadatta alla logica
dell’operatore.
Il rilevatore é disturbato dal
movimento della porta o
da vibrazioni causate dal
movimento della porta.
Il rilevatore ha bisogno di
un codice per sbloccare il
rilevatore.
Le batterie sono scariche o
mal inserite.
La porta si apre
senza ragioni
apparenti.
Piove e il rilevatore ‘’vede’’ il
movimento delle gocce
d’acqua.
Il telecomando non è
orientato bene.
Cambiate l’impostazione dell’uscita di ogni
rilevatore collegato all’operatore.
Assicuratevi che il rilevatore sia fi ssato correttamente.
Verifi cate che il modo di rilevazione sia unidirezionale.
Aumentate l’angolo.
Aumentate il fi ltro immunità.
Riducete la zona di rilevazione.
Cambiate l’angolo dell’antenna.
Riducete la zona di rilevazione.
Aumentate il fi ltro immunità.
Inserite il codice d’accesso.
Se ha dimenticato il codice di accesso, togliete e
ripristinate l’alimentazione. Poi cambiate o cancellate
il codice d’accesso.
Verifi cate che le batterie siano ben inserite.
Rimpiazzate le batterie.
Puntate bene il telecomando in direzione del
rilevatore.
Verifi cate che il modo di rilevazione sia unidirezionale.
Aumentate il fi ltro immunità.
Utilizzate l’ORA per proteggere meglio il rilevatore.
Nelle ambienti metallici, il
rilevatore rileva gli oggetti
fuori dal proprio campo di
rilevazione.
CODICE D’ACCESSO
Il codice d’accesso (da 1 a 4 cifre) é raccomandato per programmare dei rilevatori installati uno accanto all’altro.
SALVARE IL CODICE D’ACCESSO:
CANCELLARE IL CODICE D’ACCESSO:
Una volta salvato il codice d’accesso, dovete introdurlo sempre per sbloccare il rilevatore. Se dimenticate il codice,
togliete e ripristinate l’alimentazione. Durante 1 minuto, potete programmare il rilevatore senza introdurre il codice.
Nelle bussole, il rilevatore
«vede» il movimento
dell’altra porta.
Cambiate l’angolo dell’antenna.
Cambiate l’antenna.
Aumentate il fi ltro immunità.
Il controllo porta (F2) é
settato al valore 3 (chiuso).
Cambiate il parametro F2 al valore 1 (automatico).
La porta rimane
chiusa.
Il LED é OFF.
La porta non
reagisce come
dovrebbe.
MR8106 / FA00063M06 Traduzione delle istruzioni originali EAGLE ONE / 42.8535 / v2 - 10.13
Con la presente Came S.p.A. dichiara che MR8106 è conforme ai requisiti essenziali ed alle altre disposizioni pertinenti
stabilite dalle direttive R&TTE 1999/5/CE, LVD 2006/95/CE e RoHS 2 2011/65/UE.
Per i paesi della CE: conformemente alla direttiva 2002/96/CE sui rifi uti di apparecchiature elettriche ed elettroniche.
Originale su richiesta.
PRODOTTO COMMERCIALIZZATO

MR8106
1
2
5
3
4
TECHNICAL SPECIFICATIONS
DESCRIPTION
ENGLISH
Unidirectional opening sensor
for automatic doors
1. main connector
2. wide fi eld antenna
3. narrow fi eld antenna
4. push buttons
5. cover
Technology:
Transmitter frequency:
Transmitter radiated power:
Transmitter power density:
Detection mode:
Min. detection speed:
Supply voltage:
Mains frequency:
Max power consumption:
Output:
Max. contact voltage:
Max. contact current:
Max. switching power:
Mounting height:
Degree of protection:
Temperature range:
Dimensions:
Tilt angles:
Material:
Weight:
Cable lenght:
Norm conformity:
microwave and microprocessor
24.150 GHz
< 20 dBm EIRP
< 5 mW/cm²
motion
5 cm/s
12V to 24V AC ±10%; 12V to 24V DC +30% / -10%
50 to 60 Hz
< 2 W
relay (free of potential change-over contact)
42V AC/DC
1A (resistive)
30W (DC) / 60VA (AC)
from 1.8 m to 4 m
IP54
from -20 °C to + 55 °C
120 mm (L) x 80 mm (H) x 50 mm (W)
0° to 90° vertical; -30° to +30° lateral
ABS
215 g
2.5 m
R&TTE 1999/5/EC, LVD 2006/95/EC, RoHS 2 2011/65/EU
S
pecifi cations are subject to changes without prior notice
.
M
easured in speci
fi
c conditions.
For product version 0600 and more.
MR8106 / FA00063M06 EAGLE ONE / 42.8532 / v2 - 10.13
Other use of the device is outside the permitted purpose and can not be guaranteed by the manufacturer.
The manufacturer cannot be held responsible for incorrect installations or inappropriate adjustments of the sensor.

1
2
2
3
1
OPENING THE SENSOR
MOUNTING & WIRING
Before fi xing After fi xing
TIPS
Apply the mounting template.
Drill 1 hole for the cable and
pull it through.
Drill 2 holes for the screws.
Position the
cable as indicated.
Fix the sensor fi rmly.
Avoid proximity to neon
lamps or moving objects.
Do not cover the sensor.Avoid vibrations.Do not touch electronical
parts.
APPLICATIONS
Connect the wires accordingly:
1 - BROWN - POWER SUPPLY
2 - GREEN - POWER SUPPLY
3 - WHITE - COM
4 - YELLOW - NO
5 - YELLOW - NC
Wall mounting above sliding or
revolving door
Ceiling mounting in front of door
(sliding, revolving or swing doors)
Mounting on door axis (swing doors)
or
MR8106 / FA00063M06 EAGLE ONE / 42.8532 / v2 - 10.13

3
4
P
A
XXS XS S > > > > L XL XXL
1 2
>>>>>
... S,
XS, XXS
... L, XL, XXL
< 3 m > 3 m
+
MECHANICAL ADJUSTMENTS
SETTINGS
(by remote control or push buttons)
FIELD SIZE
FIELD SIZE
IMMUNITY FILTER
DETECTION MODE
OUTPUT
CONFIGURATION
bi = two-way detection; uni = one-way detection towards sensor
A = active output (NO-contact)
P = passive output (NC-contact)
bi uni
uni
PRM
FACTORY VALUES
low
normal
Adjust the lateral antenna
angle.
Adjust the vertical antenna
angle.
OR
RESETTING TO FACTORY VALUES:
4 m x 2 m (wide)
2 m x 2.5 m (narrow)
WIDTHANGLE
uni
AWAY
PRM &
AWAY
uni PRM = one-way detection also of people with reduced mobility
uni AWAY = one-way detection away from sensor
HOLD-OPEN TIME
MOUNTING
HEIGHT
DOOR CONTROL
0.5 s 1 s 2 s 3 s 4 s 5 s 6 s 7 s 8 s 9 s
< 3 m > 3 m
auto
open closed
open = the sensor detects constantly. The LED is ON.
closed = the sensor is in standby and does not detect. The LED is OFF.
2.2 m
2.2 m
high
> 2 seconds
2.2 m
2.2 m
highest
MR8106 / FA00063M06 EAGLE ONE / 42.8532 / v2 - 10.13

1
1
2
3
4
5
1
2
3
1
1
1
1
2
2
1
3
3
1
2
1
Came S.p.A.- Via Martiri Della Liberta 15 - IT-31030 DOSSON DI CASIER (TV)
TEL (+39) 0422 4940 - FAX (+39) 0422 4941 - [email protected] - www.came.it
TROUBLESHOOTING
The door remains
closed.
The LED is OFF.
The sensor power is off. Check the wiring and the power supply.
The door does not
react as expected.
The door opens
and closes
constantly.
The LED
fl ashes quickly
after unlocking.
The sensor does
not respond to the
remote control.
Improper output
confi guration on the sensor.
The sensor is disturbed
by the door motion or
vibrations caused by the
door motion.
The sensor needs an access
code to unlock.
Batteries in the remote
control are weak or
installed improperly.
The door opens for
no apparent reason.
It rains and the sensor
detects the motion of the
rain drops.
Remote control badly
pointed.
Change the output confi guration setting on
each sensor connected to the door operator.
Make sure the sensor is fi xed properly.
Make sure the detection mode is unidirectional.
Increase the antenna angle.
Increase the immunity fi lter.
Reduce the fi eld size.
Change the antenna angle.
Decrease the fi eld size.
Increase the immunity fi lter.
Enter the right access code.
If you forgot the code, cut and restore the power
supply to access the sensor without access code.
Change or delete the access code.
Check and change the batteries if necessary.
Point the remote control towards the sensor.
Make sure the detection mode is unidirectional.
Increase the immunity fi lter.
Install the ORA (rain accessory).
In highly refl ective
environments, the sensor
detects objects outside of its
detection fi eld.
ACCESS CODE
The access code (1 to 4 digits) is recommended to set sensors installed close to each other.
SAVING AN ACCESS CODE:
DELETING AN ACCESS CODE:
In airlock vestibules,
the sensor detects the
movement of
the opposite door.
Change the antenna angle.
Change the antenna.
Increase the immunity fi lter.
The door control setting (F2)
is set to value 3 (closed).
Change the door control setting (F2) to value 1
(automatic).
Once you have saved an access code, you always need to enter this code to unlock the sensor.
If you forget the access code, cut and restore the power supply. During 1 minute, you can access the sensor without
introducing any access code.
MR8106 / FA00063M06 Original instructions EAGLE ONE / 42.8532 / v2 - 10.13
Came S.p.A. hereby declares that MR8106 is in conformity with the basic requirements and the other relevant provisions
of the directives R&TTE 1999/5/EC, LVD 2006/95/EC, RoHS 2 2011/65/EU.
For EC countries: according to the directive 2002/96/EC for Waste Electrical and Electronic Equipment (WEEE).
Original upon request.
BUY-TO-SELL PRODUCT

MR8106
1
2
5
3
4
SPECIFICATIONS TECHNIQUES
DESCRIPTION
FRANCAIS
Détecteur d’ouverture unidirectionnel
pour portes automatiques
1. connecteur principal
2. antenne champ large
3. antenne champ étroit
4. boutons-poussoirs
5. capot
Technologie:
Fréquence émise:
Puissance émise:
Densité de puissance émise:
Mode de détection:
Vitesse min. de détection:
Tension d’alimentation:
Fréquence secteur:
Consommation:
Sortie:
Tension max. aux contacts:
Courant max. aux contacts:
Pouvoir de coupure max:
Hauteur de montage:
Indice de protection:
Plage de température:
Dimensions:
Angles d’inclinaison:
Matière du boîtier:
Poids:
Longueur du câble:
Conformité aux normes:
hyperfréquence et microprocesseur
24,150 GHz
< 20 dBm EIRP
< 5 mW/cm²
mouvement
5 cm/s
12V à 24V AC ±10%; 12V à 24V DC +30% / -10%
50 à 60 Hz
< 2 W
relais (contact inverseur libre de potentiel)
42V AC / DC
1A (résistif)
30W (DC) / 60VA (AC)
de 1,8 m à 4 m
IP54
de -20 °C à +55 °C
120 mm (L) x 80 mm (H) x 50 mm (P)
0° à 90° en vertical; -30° à +30° en latéral
ABS
215 g
2,5 m
R&TTE 1999/5/EC, LVD 2006/95/EC, RoHS 2 2011/65/EU
Les spécifi cations techniques sont susceptibles de chan
g
er sans préavis.
Mesuré dans des conditions spécifi ques
.
Pour produits à partir de la version 0600.
MR8106 / FA00063M06 EAGLE ONE / 42.8533 / v2 - 10.13
Toute autre utilisation de l’appareil est en dehors du but autorisé et ne peut pas être garantie par le fabricant.
Le fabricant ne peut être tenu pour responsable de l’installation incorrecte ou des réglages inappropriés du détecteur.

1
2
2
3
1
OUVERTURE & FERMETURE DU CAPOT
MONTAGE & CABLAGE
Avant montage Après montage
CONSEILS
Apposez le gabarit de montage.
Forez 1 trou pour le câble et
passez-le au travers.
Forez 2 trous pour les vis.
Positionnez le
câble comme indiqué.
Fixez fermement le
détecteur.
Evitez la proximité des
lampes à néon ou des objets
susceptibles de bouger.
Ne couvrez pas le
détecteur.
Evitez les vibrations.Ne touchez pas les
parties électroniques.
APPLICATIONS
Connectez les fi ls selon:
1 - BRUN - ALIMENTATION
2 - VERT - ALIMENTATION
3 - BLANC - COM
4 - JAUNE - NO
5 - JAUNE - NC/NF
Montage mural au dessus de portes
coulissantes ou tournantes
Montage au plafond en face de
portes coulissantes, tournantes ou
battantes
Montage au dessus des axes de
portes battantes
ou
MR8106 / FA00063M06 EAGLE ONE / 42.8533 / v2 - 10.13

3
4
P
A
XXS XS S > > > > L XL XXL
1 2
>>>>>
... S,
XS, XXS
... L, XL, XXL
< 3 m > 3 m
+
AJUSTEMENTS MECANIQUES
REGLAGES
(par télécommande ou boutons-poussoirs)
TAILLE DU CHAMP
TAILLE DU CHAMP
FILTRE D’IMMUNITÉ
MODE DE
DÉTECTION
CONFIGURATION
DE SORTIE
bi uni
uni
PMR
VALEURS USINE
normal
haut
Ajustez l’angle latéral de
l’antenne.
Ajustez l’angle vertical de
l’antenne.
OU
RESTAURER LES VALEURS USINE:
bi = détection dans les 2 sens, uni = détection vers le détecteur
uni PMR = détection vers le détecteur, aussi de personnes
à mobilité réduite; uni INV = détection inversée
A = sortie active (contact NO)
P = sortie passive (contact NF)
4 m x 2 m (large)
2 m x 2,5 m (étroit)
LARGEURANGLE
TEMPS DE
MAINTIEN
HAUTEUR
D’INSTALLATION
CONTRÔLE
DE PORTE
> 2 secondes
bas
uni
INV
PMR &
INV
0,5 s 1 s 2 s 3 s 4 s 5 s 6 s 7 s 8 s 9 s
auto
ouvert fermé
ouvert = le détecteur détecte continuellement. La LED reste allumée.
fermé = le détecteur est en veille et ne détecte plus. La LED reste éteinte.
le plus
haut
2,2 m
2,2 m
MR8106 / FA00063M06 EAGLE ONE / 42.8533 / v2 - 10.13

1
1
2
3
4
5
1
2
3
1
1
1
1
2
2
1
3
3
1
2
1
Came S.p.A.- Via Martiri Della Liberta 15 - IT-31030 DOSSON DI CASIER (TV)
TEL (+39) 0422 4940 - FAX (+39) 0422 4941 - [email protected] - www.came.it
FONCTIONNEMENTS INCORRECTS
La porte reste
fermée et la LED est
éteinte.
Le détecteur n’est pas
alimenté.
Vérifi ez le câble d’alimentation et la tension
d’alimentation.
La porte ne réagit
pas comme prévu.
La porte s’ouvre et
se referme
constamment.
Dans un environnement
métallique, le détecteur
détecte des objets en dehors
de son champ de détection.
La LED
clignote rapidement
après un
déverrouillage.
Le détecteur ne
répond pas aux
commandes de la
télécommande.
La confi guration de sortie
est inappropriée à la logique
de l’opérateur.
Le détecteur est perturbé
par le mouvement de la
porte ou les vibrations
causées par le mouvement
de la porte.
Le détecteur a besoin
d’un code d’accès pour se
déverrouiller.
Les piles sont déchargées
ou mal insérées.
La porte s’ouvre
sans raison
apparente.
Il pleut et le détecteur
détecte le mouvement des
gouttes d’eau.
La télécommande est mal
orientée.
Changez la confi guration de sortie de chaque
détecteur connecté à l’opérateur.
Vérifi ez que le détecteur est correctement fi xé.
Vérifi ez que le mode de détection est unidirectionnel.
Augmentez l’angle d’inclinaison.
Augmentez le fi ltre d’immunité.
Diminuez la taille du champ.
Changez l’angle de l’antenne.
Diminuez la taille du champ.
Augmentez le fi ltre d’immunité.
Entrez le bon code d’accès.
Si vous avez oublié le code, coupez et rétablissez
l’alimentation pour accéder au détecteur sans code
d’accès. Puis changez ou supprimez le code d’accès.
Vérifi ez que les piles sont bien insérées ou
remplacez les piles, si elles sont déchargées.
Pointez la télécommande en direction du
détecteur.
Vérifi ez que le mode de détection est unidirectionnel.
Augmentez le fi ltre d’immunité.
Installez un ORA (accessoire pour la pluie).
CODE D’ACCES
Une fois que vous avez sauvegardé un code d’accès, vous aurez toujours besoin de ce code d’accès pour déverrouiller le
détecteur. Si vous avez oublié le code d’accès, coupez l’alimentation et restaurez-la. Aucun code n’est nécessaire pour
déverrouiller le détecteur durant la première minute de mise sous tension.
ENREGISTRER LE CODE D’ACCESS:
SUPPRIMER LE CODE D’ACCESS:
Un code d’accès (de 1 à 4 chiffres) est recommandé pour régler les détecteurs qui sont installés les uns près des autres.
Dans un sas, le détecteur
détecte le mouvement de la
porte en face.
Changez l’angle de l’antenne.
Changez l’antenne.
Augmentez le fi ltre d’immunité.
Le réglage Contrôle de
porte (F2) est réglé sur la
valeur 3 (fermé).
Réglez le Contrôle de porte (F2) sur la valeur 1
(automatique).
MR8106 / FA00063M06 Notice originale EAGLE ONE / 42.8533 / v2 - 10.13
Par la présente, Came S.p.A. déclare que MR8106 est conforme aux exigences essentielles et aux autres dispositions
pertinentes des directives R&TTE 1999/5/CE, LVD 2006/95/CE, RoHS 2 2011/65/UE.
Pour les pays de l’UE: conforme à la directive 2002/96/CE relative aux déchets d’équipements électriques et électro-
niques.
Originale disponible sur demande.
PRODUIT COMMERCIALISÉ

MR8106
1
2
5
3
4
TECHNISCHE DATEN
BESCHREIBUNG
Richtungserkennender Öffnungssensor
für Automatiktüren
DEUTSCH
1. Anschlussklemme
2. Radarantenne für breites Feld
3. Radarantenne für schmales Feld
4. Drucktaster
5. Haube
Technologie:
Sendefrequenz:
Sendeleistung:
Dichte der Sendeleistung:
Erfassungsmodus:
Min. Erfassungsgeschwindigkeit:
Stromversorgung:
Netzfrequenz:
Leistungsaufnahme:
Ausgang:
Max. Kontaktspannung:
Max. Kontaktstrom:
Max. Schaltleistung:
Montagehöhe:
Schutzklasse:
Temperaturbereich:
Abmessungen:
Neigungswinkel:
Material:
Gewicht:
Kabellänge:
Normkonformität:
Hyperfrequenz und Mikroprozessor
24,150 GHz
< 20 dBm EIRP
< 5 mW/cm²
Bewegung
5 cm/s
12V bis 24V AC ±10%; 12V bis 24V DC +30% / -10%
50 bis 60 Hz
< 2 W
Relais (Potentialfreie Relaiskontakte)
42V AC / DC
1A (resistiv)
30W (DC) / 60VA (AC)
von 1,8 m bis 4 m
IP54
von -20 °C bis + 55 °C
120 mm (B) x 80 mm (H) x 50 mm (T)
0° bis 90° senkrecht; -30° bis +30° seitlich
ABS
215 g
2,5 m
R&TTE 1999/5/EC, LVD 2006/95/EC, RoHS 2 2011/65/EU
Ä
nderungen vorbehalten.
A
lle Werte gemessen unter bestimmten Bedingungen.
Für Produktversion ab 0600.
MR8106 / FA00063M06 EAGLE ONE / 42.8534 / v2 - 10.13
Andere Anwendungen des Geräts entsprechen nicht dem zugelassenen Zweck und können nicht vom Hersteller garantiert werden.
Der Hersteller kann die Verantwortung für mangelhafte Installationen oder Einstellungen des Sensors nicht übernehmen.

1
2
2
3
1
ÖFFNEN & SCHLIESSEN
MONTAGE & VERKABELUNG
Vor der Montage
Nach der Montage
TIPPS
Bohrschablone aufkleben.
1 Loch für das Kabel bohren
und durchziehen.
2 Löcher für die Schrauben
bohren.
Das Kabel wie
abgebildet
positionieren.
Den Sensor gut befestigen.
Vibrationen vermeiden.Berührung elektronischer
Bauteile vermeiden.
Drähte wie folgt verbinden:
1 - BRAUN - SPANNUNGSVERSORGUNG
2 - GRÜN - SPANNUNGSVERSORGUNG
3 - WEISS - COM
4 - GELB - NO - SCHLIESSER
5 - GELB - NC - ÖFFNER
Montage über Schiebe- oder
Karusselltüren
Deckenmontage vor der Tür (Schiebe-,
Karussell- oder Drehfl ügeltür)
Montage auf der Drehachse
(Drehfl ügeltüren)
ANWENDUNGEN
Nähe zu Neonlampen
oder sich bewegenden
Objekten vermeiden.
Den Sensor nicht
abdecken.
MR8106 / FA00063M06 EAGLE ONE / 42.8534 / v2 - 10.13

3
4
P
A
XXS XS S > > > > L XL XXL
1 2
>>>>>
... S,
XS, XXS
... L, XL, XXL
< 3 m > 3 m
+
MECHANISCHE EINSTELLUNGEN
EINSTELLUNGEN
(mittels Fernbedienung und/oder Drucktaster)
FELDGRÖSSE
IMMUNITÄTSFILTER
ERFASSUNGS-
MODUS
AUSGANGS-
KONFIGURATION
bi: keine Richtungserkennung; uni: Richtungserkennung zum Sensor hin
uni EM: Richtungserkennung, sogar bei Personen mit eingeschränkter
Mobilität; uni WEG: Richtungserkennung vom Sensor weg
A: Aktiv Ausgang (Öffner-Kontakt)
P: Passiv Ausgang (Schließer-Kontakt)
bi uni
uni
WEG
WERKSEINSTELLUNGEN
normal
hoch
Den seitlichen Winkel der
Antenne anpassen.
Den vertikalen Winkel der
Antenne anpassen.
ODER
AUF WERKSEINSTELLUNGEN
ZURÜCKSETZEN:
FELDGRÖSSE
niedrig
AUFHALTEZEIT
MONTAGEHÖHE
TÜRSTEUERUNG
höchster
0,5 Sek 1 Sek 2 Sek 3 Sek 4 Sek 5 Sek 6 Sek 7 Sek 8 Sek 9 Sek
4 m x 2 m
(breites Feld)
2 m x 2.5 m
(schmales Feld)
BREITEWINKEL
2,2 m
2,2 m
2,2 m
2,2 m
> 2 Sekunden
uni
EM
EM &
WEG
offen = der Sensor erfasst ununterbrochen. Die LED ist an.
geschlossen = der Sensor ist in Wartestellung und erfasst nicht. Die LED ist aus.
auto offen
ge-
schlossen
MR8106 / FA00063M06 EAGLE ONE / 42.8534 / v2 - 10.13

1
1
2
3
4
5
1
2
3
1
1
1
1
2
2
1
3
3
1
2
1
Came S.p.A.- Via Martiri Della Liberta 15 - IT-31030 DOSSON DI CASIER (TV)
TEL (+39) 0422 4940 - FAX (+39) 0422 4941 - [email protected] - www.came.it
STÖRUNGSBEHEBUNG
Die Stromversorgung ist aus. Verkabelung und Spannung der
Stromversorgung kontrollieren.
Die Tür öffnet und
schließt zyklisch.
In Metallumgebungen
erfasst der Sensor
Objekte, die sich nicht im
Erfassungsfeld befi nden.
Die LED blinkt
schnell nach dem
Entriegeln.
Der Sensor reagiert
nicht auf die
Fernbedienung.
Falsche Ausgangs-
konfi guration am Sensor
gewählt.
Der Sensor sieht die
Türbewegung oder wird
durch Vibrationen gestört.
Der Sensor braucht
einen Zugangscode zum
Entriegeln.
Die Batterien sind nicht
ausreichend geladen bzw.
korrekt eingelegt.
Die Tür öffnet sich
ohne merklichen
Grund.
Es regnet und der Sensor
erfasst die Bewegung der
Regentropfen.
Die Fernbedienung ist nicht
auf den Sensor ausgerichtet.
Die Ausgangskonfi guration aller Sensoren,
die an der Türsteuerung angeschlossen sind,
kontrollieren.
Kontrollieren ob der Sensor korrekt befestigt ist.
Kontrollieren ob der Uni-Modus gewählt ist.
Den Neigungswinkel vergrößern.
Den Immunitätsfi lter erhöhen.
Die Feldgröße verkleinern.
Den Antennenwinkel ändern.
Die Feldgröße verkleinern.
Den Immunitätsfi lter erhöhen.
Den Zugangscode eingeben.
Zugangscode vergessen? Stromversorgung aus-
und einschalten um den Sensor zu entriegeln.
Zugangscode ändern oder löschen.
Batterien kontrollieren und/oder wechseln.
Die Fernbedienung auf den Sensor ausrichten.
Kontrollieren ob der Uni-Modus gewählt ist.
Den Immunitätsfi lter erhöhen.
Einen ORA (Regenkappe) installieren.
ZUGANGSCODE
Nach Speichern eines Zugangscodes, muss dieser Code immer eingegeben werden um den Sensor zu entriegeln.
Falls Sie den Zugangscode vergessen haben, Stromversorgung aus- und einschalten. Nach dem Einschalten haben
Sie 1 Minute Zeit, um den Sensor ohne Eingabe des Zugangscodes zu entriegeln.
ZUGANGSCODE SPEICHERN:
ZUGANGSCODE LÖSCHEN:
Der Zugangscode (1 bis 4 Ziffern) wird empfohlen bei Sensoren die nah beieinander installiert sind.
Die Tür bleibt
geschlossen.
Die LED ist aus.
Die Tür reagiert
nicht wie erwartet.
Der Parameter Türsteuerung
(F2) ist auf Wert 3
(geschlossen) gestellt.
Den Parameter Türsteuerung (F2) auf Wert 1
(automatisch) stellen.
In Schleusen, erfasst der
Sensor die Bewegung der
gegenüberliegenden Tür.
Den Antennenwinkel ändern.
Die Antenne wechseln.
Den Immunitätsfi lter erhöhen.
MR8106 / FA00063M06 Originalbedienungsanleitung EAGLE ONE / 42.8534 / v2 - 10.13
Hiermit erklärt Came S.p.A., dass sich MR8106 in Übereinstimmung mit den grundlegenden Anforderungen und den
übrigen einschlägigen Bestimmungen der Richtlinien R&TTE 1999/5/EG, LVD 2006/95/EG und RoHS 2 2011/65/EU
befi ndet.
Für EU-Länder: Gemäß der Richtlinie 2002/96/EG über Elektro- und Elektronik-Altgeräte (WEEE)
Original auf Anfrage erhältlich.
ERTRIEBENES FREMDERZEUGNIS

MR8106
1
2
5
3
4
ESPECIFICACIONES TÉCNICAS
DESCRIPCIÓN
ESPANOL
Detectores de apertura monodireccional
para puertas automaticas
Tecnología:
Frecuencia emitida:
Potencia emitida:
Densidad de potencia emitida:
Modo de detección:
Velocidad min. de detección:
Voltaje de alimentación:
Frecuencia de alimentación:
Consumo de energía máx.:
Salida:
Tensión máx. en los contactos:
Intensidad máx. en los contactos:
Poder de corte máx.:
Altura de montaje:
Índice de protección:
Gama de temperatura:
Dimensiones:
Angulo de inclinación:
Material:
Peso:
Longitud del cable:
Conformidad a las normas:
hiperfrecuencia y microprocesador
24,150 GHz
< 20 dBm EIRP
< 5 mW/cm²
movimiento
5 cm/s
12V a 24V AC ±10%; 12V a 24V DC +30% / -10%
50 a 60 Hz
< 2 W
relé (contacto invertido libre de potencial)
42V AC/DC
1A (resistivo)
30W (DC) / 60VA (AC)
de 1,8 m a 4 m
IP54
de -20 °C a + 55 °C
120 mm (ancho) x 80 mm (alto) x 50 mm (profundo)
0° a 90° vertical; -30° a +30° lateral
ABS
215 g
2,5 m
R&TTE 1999/5/EC, LVD 2006/95/EC, RoHS 2 2011/65/EU
1. conector principal
2. antena campo ancho
3. antena campo estrecho
4. pulsadores
5. carcasa
Las especifi caciones técnicas pueden modifi carse sin previo aviso.
Medido en las condiciones específi cas
.
Para los productos a partir de la versión 0600.
MR8106 / FA00063M06 EAGLE ONE / 42.8536 / v2 - 10.13
Otro uso del detector está fuera del propósito permitido y no puede garantizarse por el fabricante.
El fabricante declina toda responsabilidad por instalaciones o ajustes incorrectos del detector.

1
2
2
3
1
APERTURA Y CIERRE
MONTAJE Y CABLEADO
Antes de fi jar Después de fi jar
CONSEJOS
Evitar la proximidad a
lámparas de neón o
objetos en movimiento.
Aplicar la plantilla de montaje.
Perforar 1 orifi cio para el cable
y tirarlo a través.
Perforar 2 orifi cios para los
tornillos.
Posicionar el
cable como indicado.
Fijar el detector
fi rmemente.
Evitar las vibraciones.No tocar las partes
electrónicas.
APLICACIONES
Conectar los cables en el modo
siguiente:
1 - MARRÓN - ALIMENTACIÓN
2 - VERDE - ALIMENTACIÓN
3 - BLANCO - COM
4 - AMARILLO - NO
5 - AMARILLO - NC
Montaje a pared encima de una
puerta corredera o giratoria.
Montaje en el techo en frente de la
puerta (puertas correderas, giratorias
o batientes)
Montaje en el ángulo de puerta
(puertas a batientes)
No cubrir el detector.
o
MR8106 / FA00063M06 EAGLE ONE / 42.8536 / v2 - 10.13

3
4
P
A
XXS XS S > > > > L XL XXL
1 2
>>>>>
... S,
XS, XXS
... L, XL, XXL
< 3 m > 3 m
+
ZONA DE DETECCIÓN
REGULACIONES
(con mando a distancia o pulsadores)
DIMENSIONES
DEL CAMPO
DIMENSIONES
FILTRO
INMUNIDAD
MODO DE
DETECCIÓN
CONFIGURACIÓN
DE SALIDA
bi = detección en ambas direcciones; uni = detección solamente
hacia el detector; uni PMR: detección en una dirección, también
de personas con movilidad reducida; uni INV = detección invertida
A = salida activa (contacto NO)
P = salida pasiva (contacto NC)
bi
uni
uni
PMR
VALORES DE FÁBRICA
normal
alto
Regular el ángulo lateral
de la antena.
Regular el ángulo vertical
de la antena.
O
RESTABLECER VALORES DE FÁBRICA:
4 m x 2 m (ancho)
2 m x 2.5 m (estrecho)
ANCHURAÁNGULO
> 2 segundos
TIEMPO DE
MANTENIMIENTO
ALTURA DE
MONTAJE
CONTROL DE
PUERTA
uni
INV
PMR Y
INV
auto
abierto cerrado
abierto = el detector detecta constantemente. El LED està activado.
cerrado = el detector está en «standby» y no detecta. El LED está desactivado.
0,5 s 1 s 2 s 3 s 4 s 5 s 6 s 7 s 8 s 9 s
bajo
el más
alto
MR8106 / FA00063M06 EAGLE ONE / 42.8536 / v2 - 10.13

1
1
2
3
4
5
1
2
3
1
1
1
1
2
2
1
3
3
1
2
1
Came S.p.A.- Via Martiri Della Liberta 15 - IT-31030 DOSSON DI CASIER (TV)
TEL (+39) 0422 4940 - FAX (+39) 0422 4941 - [email protected] - www.came.it
FUNCIONAMIENTOS INCORRECTOS
La alimentación del detector
está desconectada.
Verifi car el cable de alimentación y el voltaje de
alimentación.
La puerta
se abre y se cierra
constantemente.
El LED parpadea
rapidamente
después de una
apertura de sesión.
El detector no
responde a las
funciones del
telemando.
La confi gugarción de salida
del detector no es correcta.
El detector «ve» el
movimiento de la puerta
o al cerrarse la puerta
provoca vibraciones que son
detectadas por el detector.
El detector necesita un
código de acceso para
abrirse.
Las pilas están
gastadas o introducidas
incorrectamente.
La puerta se abre si
razón aparente.
Llueve y el detector «ve»
el movimiento de las gotas
de agua.
El mando a distancia está
incorrectamente orientado.
Cambiar la confi guración de salida de cada
detector conectado al operador.
Verifi car que el detector está correctamente fi jado.
Verifi car que el modo de detección es unidireccional.
Aumentar el ángulo.
Aumentar el fi ltro de inmunidad.
Reducir la zona de detección.
Cambiar el ángulo de la antena.
Reducir la zona de detección.
Aumentar el fi ltro de inmunidad.
Insertar el código de acceso.
Si ha olvidado el código de acceso, cortar y reconectar
la alimentación para acceder al detector.
Cambiar o borrar el código de acceso.
Verifi car que las pilas están bien introducidas o
sustituir las pilas.
Apuntar el mando a distancia en la dirección del
detector.
Verifi car que el modo de detección es unidireccional.
Aumentar el fi ltro de inmunidad.
Instalar el ORA (accesorio de protección contra la lluvia).
En entornos metálicos el
detector detecta objetos
fuera de su campo de
detección.
CÓDIGO DE ACCESO
Una vez que hayan eligido un código de acceso, siempre tienen que introducir este código para desbloquear el detector.
Si olvidan su código, cortar y reconectar la alimentación. Durante 1 minuto, pueden programar el detector sin
introducir un código de acceso.
SALVAR O CAMBIAR EL CÓDIGO DE ACCESO:
BORRAR EL CÓDIGO DE ACCESO:
El código de acceso (1 a 4 cifras) se recomienda para programar detectores instalados uno junto al otro.
La confi guración de control
de puerta (F2) está puesto al
valor 3 (cerrado).
Cambiar la confi guración de control de puerta (F2) al
valor 1 (automático).
En puertas esclusas
el detector detecta
el movimiento de la
puerta opuesta.
Cambiar el ángulo de la antena.
Cambiar la antena.
Aumentar el fi ltro de inmunidad.
La puerta se queda
cerrada. El LED está
desactivado.
La puerta no
reacciona como se
esperaba.
MR8106 / FA00063M06 Traducción de las instrucciones originales EAGLE ONE / 42.8536 / v2 - 10.13
Por medio de la presente Came S.p.A. declara que MR8106 cumple con los requisitos esenciales y cualesquiera otras
disposiciones aplicables o exigibles de las directivas R&TTE 1999/5/CE, LVD 2006/95/CE y RoHS 2 2011/65/UE.
Para los países de la UE: conforme a la directiva 2002/96/CE sobre aparatos eléctricos y electrónicos inservibles.
Original a petición.
PRODUCTO COMERCIALIZADO

MR8106
1
2
5
3
4
TECHNISCHE SPECIFICATIES
BESCHRIJVING
NEDERLANDS
Openingssensor met éénrichtingsdetectie
voor automatische deuren
1. hoofdconnector
2. antenne voor breed veld
3. antenne voor smal veld
4. drukknoppen
5. kap
Technologie:
Uitgezonden frequentie:
Uitgezonden vermogen:
Dichtheid van het uitgezonden vermogen:
Detectiewijze:
Minimale detectiesnelheid:
Voedingsspanning:
Netfrequentie:
Verbruik:
Uitgang:
Max. spanning bij de contacten:
Max. stroom bij de contacten:
Max. schakelvermogen:
Montagehoogte:
Beschermingsklasse:
Temperatuurbereik:
Afmetingen:
Hellingshoeken:
Materiaal:
Gewicht:
Lengte van de kabel:
Normconformiteit:
hyperfrequentie en microprocessor
24,150 GHz
< 20 dBm EIRP
< 5 mW/cm²
beweging
5 cm/s
12V tot 24V AC ±10%; 12V tot 24V DC +30% / -10%
50 tot 60 Hz
< 2 W
relais (potentiaalvrij contactpunt)
42V AC - 60V DC
1A (resistief)
30W (DC) / 60VA (AC)
van 1,8 m tot 4 m
IP54
van -20°C tot + 55°C
120 mm (B) x 80 mm (H) x 50 mm (D)
0° tot 90° verticaal; -30° tot +30° zijdelings
ABS
215 g
2,5 m
R&TTE 1999/5/EC, LVD 2006/95/EC, RoHS 2 2011/65/EU
De technische gegevens kunnen zonder kennisgeving worden gewijzigd.
zijn gemeten onder bepaalde voorwaarden
.
Voor productversie 0600 en volgende.
MR8106 / FA00063M06 EAGLE ONE / 42.8537 / v2 - 10.13
Ander gebruik van het apparaat ligt buiten het toegestane doel en kan niet door de fabrikant worden gewaarborgd.
De fabrikant kan niet aansprakelijk worden gesteld voor foutieve installaties of onjuiste instellingen van de sensor.

1
2
2
3
1
OPENEN & SLUITEN
MONTAGE & BEDRADING
Vóór installatie
Na installatie
TIPS
Vermijd installatie in de
buurt van neonlampen
en bewegende objecten.
Bedek de sensor niet.
De boormal opkleven.
1 gat boren voor de kabel en
deze erdoor trekken.
2 gaten boren voor de
schroeven.
De kabel zoals
afgebeeld positioneren.
De sensor goed
vastschroeven.
Vermijd trillingen.Raak de elektronische
onderdelen niet aan.
TOEPASSINGEN
De draden als volgt verbinden:
1 - BRUIN - VOEDING
2 - GROEN - VOEDING
3 - WIT - COM
4 - GEEL - NO
5 - GEEL - NC
Wandmontage boven schuif- of
carrouseldeuren
Plafondmontage vóór de deur
(schuif-, draai- of carrouseldeuren)
Montage op de deuras (draaideuren)
MR8106 / FA00063M06 EAGLE ONE / 42.8537 / v2 - 10.13

3
4
P
A
XXS XS S > > > > L XL XXL
1 2
>>>>>
... S,
XS, XXS
... L, XL, XXL
< 3 m > 3 m
+
DETECTIEVELD
INSTELLINGEN
(via afstandsbediening of drukknoppen)
VELDGROOTTE
VELDGROOTTE
IMMUNITEITSFILTER
DETECTIERICHTING
UITGANGS-
CONFIGURATIE
bi uni
uni
AWAY
FABRIEKSWAARDEN
laag
normaal
Pas de zijdelingse hellingshoek
van de antenne aan.
Pas de verticale hellingshoek
van de antenne aan.
OF
TERUGZETTEN
NAAR FABRIEKSWAARDEN:
A = actieve uitgang (NO-contact)
P = passieve uitgang (NC-contact)
hoog
OPENHOUDTIJD
MONTAGEHOOGTE
DEURBEDIENING
auto
open gesloten
open = de sensor detecteert voortdurend. De LED is aan.
gesloten = de sensor is in standby en detecteert niet. De LED is uit.
hoogst
uni
PBM
PBM &
AWAY
bi = tweerichtingsdetectie; uni = detectie naar de sensor toe
uni PBM = éénrichtingsdetectie, ook van personen met beperkte
mobiliteit; uni AWAY = éénrichtingsdetectie van de sensor weg
0.5 s 1 s 2 s 3 s 4 s 5 s 6 s 7 s 8 s 9 s
4 m x 2 m (breed)
2 m x 2,5 m (smal)
BREEDTEHOEK
2,2 m
2,2 m
2,2 m
2,2 m
> 2 seconden
MR8106 / FA00063M06 EAGLE ONE / 42.8537 / v2 - 10.13

1
1
2
3
4
5
1
2
3
1
1
1
1
2
2
1
3
3
1
2
1
Came S.p.A.- Via Martiri Della Liberta 15 - IT-31030 DOSSON DI CASIER (TV)
TEL (+39) 0422 4940 - FAX (+39) 0422 4941 - [email protected] - www.came.it
GESTOORDE WERKING
De sensor krijgt geen
voeding.
Controleer de bedrading en de voedingsspanning.
De deur gaat
onophoudelijk
open en dicht.
De LED
knippert snel na
ontgrendeling.
De sensor
reageert niet op de
afstandsbediening.
De uitgangsconfi guratie is
niet juist.
De sensor wordt gestoord
door de beweging van de
deur of de trillingen die de
deur maakt.
De sensor heeft een
toegangscode nodig om te
ontgrendelen.
De batterijen zijn niet juist
geplaatst of leeg.
De deur gaat open
zonder aanwijsbare
reden.
Het regent en de sensor
detecteert de beweging van
de regendruppels.
De afstandsbediening is niet
juist gericht.
Controleer en verander zo nodig de
uitgangsconfi guratie van elke sensor die
verbonden is met de bedieningseenheid.
Controleer of de sensor correct bevestigd is.
Controleer of de éénrichtingsdetectie (uni) actief is.
Vergroot de hellingshoek.
Verhoog de immuniteitsfi lter.
Verminder de veldgrootte.
Verander de hellingshoek.
Verminder de veldgrootte.
Verhoog de immuniteitsfi lter.
Geef de juiste toegangscode in.
Indien u de code vergeten heeft, verbreek en herstel
de voeding om de sensor te ontgrendelen.
Verander of verwijder de toegangscode.
Controleer de plaatsing van de batterijen of
vervang ze.
Richt de afstandsbediening op de sensor.
Controleer of de éénrichtingsdetectie (uni) actief is.
Verhoog de immuniteitsfi lter.
Installeer de ORA (regenkap).
In een omgeving met
veel metaal detecteert de
sensor objecten buiten zijn
detectieveld.
TOEGANGSCODE
Is er een toegangscode opgeslaan, moet deze altijd ingegeven worden om de sensor te ontgrendelen.
Indien u de toegangscode vergeet, verbreek en herstel de voeding. Gedurende 1 minuut heeft u toegang op de sensor
zonder toegangscode.
TOEGANGSCODE OPSLAAN:
TOEGANGSCODE WISSEN:
De toegangscode (1 tot 4 cijfers) wordt aanbevolen voor sensors die dicht bij elkaar zijn geïnstalleerd.
De deur blijft
gesloten.
De LED is uit.
De deur reageert
niet zoals verwacht.
De parameter deur-
bediening (F2) is op waarde
3 ingesteld (gesloten).
Zet de parameter deurbediening (F2) op waarde 1
(automatisch).
Verander de hellingshoek.
Verwissel de antenna.
Verhoog de immuniteitsfi lter.
In tochtsluizen detecteert
de sensor de beweging
van de tegenoverliggende
deur.
MR8106 / FA00063M06 Vertaling van de originele instructies EAGLE ONE / 42.8537 / v2 - 10.13
Hierbij verklaart Came S.p.A. dat MR8106 in overeenstemming is met de essentiële eisen en de andere relevante bepa-
lingen van de richtlijnen R&TTE 1999/5/EC, LVD 2006/95/EC en RoHS 2 2011/65/EU.
Voor EU-landen: conform de richtlijn 2002/96/EG over elektrische en elektronische oude apparaten
Origineel op aanvraag.
DOOR CAME VERKOCHT PRODUCT
Documenttranscriptie
ITALIANO MR8106 Rilevatore di apertura monodirezionale per porte automatiche Tutt’altro utilizzo del rilevatore al di là della funzione descritta non può essere garantito dal costruttore. Il produttore non sarà ritenuto responsabile di installazioni non corrette o di regolazioni inappropriate del rilevatore. DESCRIZIONE 3 4 1 2 1. 2. 3. 4. 5. 5 morsettiera antenna campo largo antenna campo stretto pulsanti calotta Tecnologia: Frequenza emessa: Potenza emessa: Densità di potenza emessa: Modo di rilevazione: Velocità di rilevazione min.: Tensione d’alimentazione: Frequenza delle rete di alimentazione: Consumo: Uscita: Tensione max. ai contatti: Corrente max. ai contatti: Potere d’interruzione max.: Altezza di montaggio: Grado di protezione: Gamma di temperatura: Dimensioni: Angolo d’inclinazione: Materia: Peso: Lunghezza del cavo: Conformità alle norme: iperfrequenza e microprocessore 24,150 GHz < 20 dBm EIRP < 5 mW/cm² movimento 5 cm/s 12V a 24V AC ±10%; 12V a 24V DC +30% / -10% 50 a 60 Hz <2W relé (contatto di commutazione privo di potenziale) 42V AC/DC 1A (resistivo) 30W (DC) / 60VA (AC) da 1,8 m a 4 m IP64 -20 °C a + 55 °C 120 mm (L) x 80 mm (H) x 50 mm (P) 0° a 90° in senso verticale; -30° a +30° in senso laterale ABS 215 g 2,5 m R&TTE 1999/5/EC, LVD 2006/95/EC, RoHS 2 2011/65/EU Le specifiche tecniche possono essere modificate senza preavviso. Misurato in condizioni specifiche. MR8106 / FA00063M06 ☜ ☞ EAGLE ONE / 42.8535 / v2 - 10.13 Per i prodotti a partire dalla versione 0600. SPECIFICHE TECNICHE 1 APERTURA & CHIUSURA Dopo il fissaggio Prima del fissaggio MONTAGGIO & CABLAGGIO CONSIGLI 2 Evitate le vibrazioni. Non coprite il rilevatore. Evitate d’installare il rilevatore in prossimità di lampade al neon o ad oggetti in movimento. APPLICAZIONI Non toccate le parti elettroniche. MR8106 / FA00063M06 ☜ ☞ EAGLE ONE / 42.8535 / v2 - 10.13 Installazione a parete su porte scorrevoli o girevoli Installazione sull’asse della porta (a battente) 1 2 Posizionate la sagoma di montaggio. Forate 1 buco e inserite il cavo. Forate 2 buchi per le viti. Collegate i cavi cosi: 1 - MARRONE - ALIMENTAZIONE 2 - VERDE - ALIMENTAZIONE 3 - BIANCO - COM 4 - GIALLO - NO 5 - GIALLO - NC Installazione a soffitto di fronte alla porta (scorrevole, girevolo o battente) 3 Posizionate il cavo come indicato. Fissate saldamente il rilevatore. CAMPO DI RILEVAZIONE 2,2 m 2,2 m ANGOLO 4 m x 2 m (largo) 2 m x 2.5 m (stretto) 1 2 Regolate l’angolo laterale. 4 REGOLAZIONI DIMENSIONI Regolate l’angolo verticale. (con i pulsanti e/o con il telecomando) XXS FILTRO IMMUNITÀ XS S basso normale MODO DI RILEVAZIONE bi uni CONFIGURAZIONE DELLE USCITE A P 1s 2s ALTEZZA DI INSTALLAZIONE <3m >3m CONTROLLO PORTA auto aperto TEMPO DI MANTENIMENTO 0,5 s > > > > L XL XXL alto > > > > > piú elevato uni PMR uni INV PMR & INV bi = rilevazione nei due sensi, uni = rilevazione verso il rilevatore uni PMR = rilevazione verso il rilevatore, ance di persone a mobilità ridotta; uni INV = rilevazione invertita A = uscita attiva (contatto NO) P = uscita passiva (contatto NC) 3s chiuso 4s 5s 6s 7s 8s 9s aperto = il rilevatore rileva di continuo. Il LED é ON. chiuso = il rilevatore é in stand by e non rileva. Il LED é OFF. VALORI FABBRICA RIPRISTINARE I VALORI DI FABBRICA: O > 2 secondi + DIMENSIONI ... S, XS, XXS ... L, XL, XXL MR8106 / FA00063M06 ☜ ☞ EAGLE ONE / 42.8535 / v2 - 10.13 LARGHEZZA 3 CODICE D’ACCESSO Il codice d’accesso (da 1 a 4 cifre) é raccomandato per programmare dei rilevatori installati uno accanto all’altro. SALVARE IL CODICE D’ACCESSO: CANCELLARE IL CODICE D’ACCESSO: Una volta salvato il codice d’accesso, dovete introdurlo sempre per sbloccare il rilevatore. Se dimenticate il codice, togliete e ripristinate l’alimentazione. Durante 1 minuto, potete programmare il rilevatore senza introdurre il codice. MR8106 / FA00063M06 ☜ Traduzione delle istruzioni originali ☞ EAGLE ONE / 42.8535 / v2 - 10.13 FUNZIONAMENTI SCORRETTI La porta rimane chiusa. Il LED é OFF. Il rilevatore non è alimentato. 1 Verificate il cavo d’alimentazione e la tensione d’alimentazione. Il controllo porta (F2) é settato al valore 3 (chiuso). 1 Cambiate il parametro F2 al valore 1 (automatico). La porta non reagisce come dovrebbe. L’impostazione dell’uscita è inadatta alla logica dell’operatore. 1 Cambiate l’impostazione dell’uscita di ogni rilevatore collegato all’operatore. La porta si apre e si chiude continuamente. Il rilevatore é disturbato dal movimento della porta o da vibrazioni causate dal movimento della porta. 1 2 3 4 5 La porta si apre senza ragioni apparenti. Piove e il rilevatore ‘’vede’’ il movimento delle gocce d’acqua. 1 Verificate che il modo di rilevazione sia unidirezionale. 2 Aumentate il filtro immunità. 3 Utilizzate l’ORA per proteggere meglio il rilevatore. Nelle ambienti metallici, il rilevatore rileva gli oggetti fuori dal proprio campo di rilevazione. 1 Cambiate l’angolo dell’antenna. 2 Riducete la zona di rilevazione. 3 Aumentate il filtro immunità. Nelle bussole, il rilevatore «vede» il movimento dell’altra porta. 1 Cambiate l’angolo dell’antenna. 2 Cambiate l’antenna. 3 Aumentate il filtro immunità. La LED lampeggia velocemente dopo un’apertura di sessione. Il rilevatore ha bisogno di un codice per sbloccare il rilevatore. 1 Inserite il codice d’accesso. 2 Se ha dimenticato il codice di accesso, togliete e ripristinate l’alimentazione. Poi cambiate o cancellate il codice d’accesso. Il rilevatore non reagisce alle impostazioni date dal telecomando. Le batterie sono scariche o mal inserite. 1 Verificate che le batterie siano ben inserite. Rimpiazzate le batterie. Il telecomando non è orientato bene. 1 Puntate bene il telecomando in direzione del rilevatore. Assicuratevi che il rilevatore sia fissato correttamente. Verificate che il modo di rilevazione sia unidirezionale. Aumentate l’angolo. Aumentate il filtro immunità. Riducete la zona di rilevazione. Came S.p.A.- Via Martiri Della Liberta 15 - IT-31030 DOSSON DI CASIER (TV) TEL (+39) 0422 4940 - FAX (+39) 0422 4941 - [email protected] - www.came.it Con la presente Came S.p.A. dichiara che MR8106 è conforme ai requisiti essenziali ed alle altre disposizioni pertinenti stabilite dalle direttive R&TTE 1999/5/CE, LVD 2006/95/CE e RoHS 2 2011/65/UE. Per i paesi della CE: conformemente alla direttiva 2002/96/CE sui rifiuti di apparecchiature elettriche ed elettroniche. Originale su richiesta. PRODOTTO COMMERCIALIZZATO ENGLISH MR8106 Unidirectional opening sensor for automatic doors Other use of the device is outside the permitted purpose and can not be guaranteed by the manufacturer. The manufacturer cannot be held responsible for incorrect installations or inappropriate adjustments of the sensor. DESCRIPTION 3 4 1 2 1. 2. 3. 4. 5. main connector wide field antenna narrow field antenna push buttons cover 5 Technology: Transmitter frequency: Transmitter radiated power: Transmitter power density: Detection mode: Min. detection speed: Supply voltage: Mains frequency: Max power consumption: Output: Max. contact voltage: Max. contact current: Max. switching power: Mounting height: Degree of protection: Temperature range: Dimensions: Tilt angles: Material: Weight: Cable lenght: Norm conformity: microwave and microprocessor 24.150 GHz < 20 dBm EIRP < 5 mW/cm² motion 5 cm/s 12V to 24V AC ±10%; 12V to 24V DC +30% / -10% 50 to 60 Hz <2W relay (free of potential change-over contact) 42V AC/DC 1A (resistive) 30W (DC) / 60VA (AC) from 1.8 m to 4 m IP54 from -20 °C to + 55 °C 120 mm (L) x 80 mm (H) x 50 mm (W) 0° to 90° vertical; -30° to +30° lateral ABS 215 g 2.5 m R&TTE 1999/5/EC, LVD 2006/95/EC, RoHS 2 2011/65/EU Specifications are subject to changes without prior notice. Measured in specific conditions. MR8106 / FA00063M06 ☜ ☞ EAGLE ONE / 42.8532 / v2 - 10.13 For product version 0600 and more. TECHNICAL SPECIFICATIONS 1 OPENING THE SENSOR Before fixing MOUNTING & WIRING TIPS 2 After fixing Avoid vibrations. Do not cover the sensor. Avoid proximity to neon lamps or moving objects. APPLICATIONS Do not touch electronical parts. MR8106 / FA00063M06 ☜ ☞ EAGLE ONE / 42.8532 / v2 - 10.13 Wall mounting above sliding or revolving door Mounting on door axis (swing doors) Ceiling mounting in front of door (sliding, revolving or swing doors) 1 2 Apply the mounting template. Drill 1 hole for the cable and pull it through. Drill 2 holes for the screws. Connect the wires accordingly: 1 - BROWN - POWER SUPPLY 2 - GREEN - POWER SUPPLY 3 - WHITE - COM 4 - YELLOW - NO or 5 - YELLOW - NC 3 Position the cable as indicated. Fix the sensor firmly. MECHANICAL ADJUSTMENTS 2.2 m 2.2 m ANGLE 4 m x 2 m (wide) 1 2 m x 2.5 m (narrow) 2 2.2 m Adjust the lateral antenna angle. 4 SETTINGS FIELD SIZE Adjust the vertical antenna angle. (by remote control or push buttons) XXS IMMUNITY FILTER XS S > > > low normal high > > DETECTION MODE bi uni OUTPUT CONFIGURATION A P 1s 2s MOUNTING HEIGHT <3m >3m DOOR CONTROL auto open HOLD-OPEN TIME 2.2 m 0.5 s uni PRM uni AWAY PRM & AWAY > L XL XXL > > > highest bi = two-way detection; uni = one-way detection towards sensor uni PRM = one-way detection also of people with reduced mobility uni AWAY = one-way detection away from sensor A = active output (NO-contact) P = passive output (NC-contact) 3s closed 4s 5s 6s 7s 8s 9s open = the sensor detects constantly. The LED is ON. closed = the sensor is in standby and does not detect. The LED is OFF. FACTORY VALUES OR RESETTING TO FACTORY VALUES: FIELD SIZE ... S, XS, XXS > 2 seconds + ... L, XL, XXL MR8106 / FA00063M06 ☜ ☞ EAGLE ONE / 42.8532 / v2 - 10.13 WIDTH 3 ACCESS CODE The access code (1 to 4 digits) is recommended to set sensors installed close to each other. SAVING AN ACCESS CODE: DELETING AN ACCESS CODE: Once you have saved an access code, you always need to enter this code to unlock the sensor. If you forget the access code, cut and restore the power supply. During 1 minute, you can access the sensor without introducing any access code. MR8106 / FA00063M06 ☜ Original instructions ☞ EAGLE ONE / 42.8532 / v2 - 10.13 TROUBLESHOOTING The door remains closed. The LED is OFF. The sensor power is off. 1 Check the wiring and the power supply. The door control setting (F2) is set to value 3 (closed). 1 Change the door control setting (F2) to value 1 (automatic). The door does not react as expected. Improper output configuration on the sensor. 1 Change the output configuration setting on each sensor connected to the door operator. The door opens and closes constantly. The sensor is disturbed by the door motion or vibrations caused by the door motion. 1 2 3 4 5 The door opens for no apparent reason. It rains and the sensor detects the motion of the rain drops. 1 Make sure the detection mode is unidirectional. 2 Increase the immunity filter. 3 Install the ORA (rain accessory). In highly reflective environments, the sensor detects objects outside of its detection field. 1 Change the antenna angle. 2 Decrease the field size. 3 Increase the immunity filter. In airlock vestibules, the sensor detects the movement of the opposite door. 1 Change the antenna angle. 2 Change the antenna. 3 Increase the immunity filter. The LED flashes quickly after unlocking. The sensor needs an access code to unlock. 1 Enter the right access code. 2 If you forgot the code, cut and restore the power supply to access the sensor without access code. Change or delete the access code. The sensor does not respond to the remote control. Batteries in the remote control are weak or installed improperly. 1 Check and change the batteries if necessary. Remote control badly pointed. 1 Point the remote control towards the sensor. Make sure the sensor is fixed properly. Make sure the detection mode is unidirectional. Increase the antenna angle. Increase the immunity filter. Reduce the field size. Came S.p.A.- Via Martiri Della Liberta 15 - IT-31030 DOSSON DI CASIER (TV) TEL (+39) 0422 4940 - FAX (+39) 0422 4941 - [email protected] - www.came.it Came S.p.A. hereby declares that MR8106 is in conformity with the basic requirements and the other relevant provisions of the directives R&TTE 1999/5/EC, LVD 2006/95/EC, RoHS 2 2011/65/EU. For EC countries: according to the directive 2002/96/EC for Waste Electrical and Electronic Equipment (WEEE). Original upon request. BUY-TO-SELL PRODUCT FRANCAIS MR8106 Détecteur d’ouverture unidirectionnel pour portes automatiques Toute autre utilisation de l’appareil est en dehors du but autorisé et ne peut pas être garantie par le fabricant. Le fabricant ne peut être tenu pour responsable de l’installation incorrecte ou des réglages inappropriés du détecteur. DESCRIPTION 3 4 1 2 1. 2. 3. 4. 5. 5 connecteur principal antenne champ large antenne champ étroit boutons-poussoirs capot Technologie: Fréquence émise: Puissance émise: Densité de puissance émise: Mode de détection: Vitesse min. de détection: Tension d’alimentation: Fréquence secteur: Consommation: Sortie: Tension max. aux contacts: Courant max. aux contacts: Pouvoir de coupure max: Hauteur de montage: Indice de protection: Plage de température: Dimensions: Angles d’inclinaison: Matière du boîtier: Poids: Longueur du câble: Conformité aux normes: hyperfréquence et microprocesseur 24,150 GHz < 20 dBm EIRP < 5 mW/cm² mouvement 5 cm/s 12V à 24V AC ±10%; 12V à 24V DC +30% / -10% 50 à 60 Hz <2W relais (contact inverseur libre de potentiel) 42V AC / DC 1A (résistif) 30W (DC) / 60VA (AC) de 1,8 m à 4 m IP54 de -20 °C à +55 °C 120 mm (L) x 80 mm (H) x 50 mm (P) 0° à 90° en vertical; -30° à +30° en latéral ABS 215 g 2,5 m R&TTE 1999/5/EC, LVD 2006/95/EC, RoHS 2 2011/65/EU Les spécifications techniques sont susceptibles de changer sans préavis. Mesuré dans des conditions spécifiques. MR8106 / FA00063M06 ☜ ☞ EAGLE ONE / 42.8533 / v2 - 10.13 Pour produits à partir de la version 0600. SPECIFICATIONS TECHNIQUES 1 OUVERTURE & FERMETURE DU CAPOT Avant montage 2 Après montage CONSEILS MONTAGE & CABLAGE Evitez les vibrations. Ne couvrez pas le détecteur. Evitez la proximité des lampes à néon ou des objets susceptibles de bouger. APPLICATIONS Ne touchez pas les parties électroniques. MR8106 / FA00063M06 ☜ ☞ EAGLE ONE / 42.8533 / v2 - 10.13 Montage mural au dessus de portes Montage au dessus des axes de coulissantes ou tournantes portes battantes 1 2 Apposez le gabarit de montage. Forez 1 trou pour le câble et passez-le au travers. Forez 2 trous pour les vis. Connectez les fils selon: 1 - BRUN - ALIMENTATION 2 - VERT - ALIMENTATION 3 - BLANC - COM 4 - JAUNE - NO ou 5 - JAUNE - NC/NF Montage au plafond en face de portes coulissantes, tournantes ou battantes 3 Positionnez le câble comme indiqué. Fixez fermement le détecteur. 3 2,2 m 2,2 m ANGLE 4 m x 2 m (large) 2 m x 2,5 m (étroit) 1 2 Ajustez l’angle latéral de l’antenne. 4 REGLAGES Ajustez l’angle vertical de l’antenne. (par télécommande ou boutons-poussoirs) XS S > > > > L XL XXL FILTRE D’IMMUNITÉ bas normal haut > > > > > le plus haut MODE DE DÉTECTION bi uni uni PMR uni INV PMR & INV CONFIGURATION DE SORTIE A P 1s 2s HAUTEUR D’INSTALLATION <3m >3m CONTRÔLE DE PORTE auto ouvert TAILLE DU CHAMP TEMPS DE MAINTIEN XXS 0,5 s bi = détection dans les 2 sens, uni = détection vers le détecteur uni PMR = détection vers le détecteur, aussi de personnes à mobilité réduite; uni INV = détection inversée A = sortie active (contact NO) P = sortie passive (contact NF) 3s fermé 4s 5s 6s 7s 8s 9s ouvert = le détecteur détecte continuellement. La LED reste allumée. fermé = le détecteur est en veille et ne détecte plus. La LED reste éteinte. VALEURS USINE RESTAURER LES VALEURS USINE: TAILLE DU CHAMP OU ... S, XS, XXS > 2 secondes + ... L, XL, XXL MR8106 / FA00063M06 ☜ ☞ EAGLE ONE / 42.8533 / v2 - 10.13 LARGEUR AJUSTEMENTS MECANIQUES CODE D’ACCES Un code d’accès (de 1 à 4 chiffres) est recommandé pour régler les détecteurs qui sont installés les uns près des autres. ENREGISTRER LE CODE D’ACCESS: SUPPRIMER LE CODE D’ACCESS: Une fois que vous avez sauvegardé un code d’accès, vous aurez toujours besoin de ce code d’accès pour déverrouiller le détecteur. Si vous avez oublié le code d’accès, coupez l’alimentation et restaurez-la. Aucun code n’est nécessaire pour déverrouiller le détecteur durant la première minute de mise sous tension. MR8106 / FA00063M06 ☜ Notice originale ☞ EAGLE ONE / 42.8533 / v2 - 10.13 FONCTIONNEMENTS INCORRECTS La porte reste fermée et la LED est éteinte. Le détecteur n’est pas alimenté. 1 Vérifiez le câble d’alimentation et la tension d’alimentation. Le réglage Contrôle de porte (F2) est réglé sur la valeur 3 (fermé). 1 Réglez le Contrôle de porte (F2) sur la valeur 1 (automatique). La porte ne réagit pas comme prévu. La configuration de sortie est inappropriée à la logique de l’opérateur. 1 Changez la configuration de sortie de chaque détecteur connecté à l’opérateur. La porte s’ouvre et se referme constamment. Le détecteur est perturbé par le mouvement de la porte ou les vibrations causées par le mouvement de la porte. 1 2 3 4 5 La porte s’ouvre sans raison apparente. Il pleut et le détecteur détecte le mouvement des gouttes d’eau. 1 Vérifiez que le mode de détection est unidirectionnel. 2 Augmentez le filtre d’immunité. 3 Installez un ORA (accessoire pour la pluie). Dans un environnement métallique, le détecteur détecte des objets en dehors de son champ de détection. 1 Changez l’angle de l’antenne. 2 Diminuez la taille du champ. 3 Augmentez le filtre d’immunité. Dans un sas, le détecteur détecte le mouvement de la porte en face. 1 Changez l’angle de l’antenne. 2 Changez l’antenne. 3 Augmentez le filtre d’immunité. La LED clignote rapidement après un déverrouillage. Le détecteur a besoin d’un code d’accès pour se déverrouiller. 1 Entrez le bon code d’accès. 2 Si vous avez oublié le code, coupez et rétablissez l’alimentation pour accéder au détecteur sans code d’accès. Puis changez ou supprimez le code d’accès. Le détecteur ne répond pas aux commandes de la télécommande. Les piles sont déchargées ou mal insérées. 1 Vérifiez que les piles sont bien insérées ou remplacez les piles, si elles sont déchargées. La télécommande est mal orientée. 1 Pointez la télécommande en direction du détecteur. Vérifiez que le détecteur est correctement fixé. Vérifiez que le mode de détection est unidirectionnel. Augmentez l’angle d’inclinaison. Augmentez le filtre d’immunité. Diminuez la taille du champ. Came S.p.A.- Via Martiri Della Liberta 15 - IT-31030 DOSSON DI CASIER (TV) TEL (+39) 0422 4940 - FAX (+39) 0422 4941 - [email protected] - www.came.it Par la présente, Came S.p.A. déclare que MR8106 est conforme aux exigences essentielles et aux autres dispositions pertinentes des directives R&TTE 1999/5/CE, LVD 2006/95/CE, RoHS 2 2011/65/UE. Pour les pays de l’UE: conforme à la directive 2002/96/CE relative aux déchets d’équipements électriques et électroniques. Originale disponible sur demande. PRODUIT COMMERCIALISÉ DEUTSCH MR8106 Richtungserkennender Öffnungssensor für Automatiktüren Andere Anwendungen des Geräts entsprechen nicht dem zugelassenen Zweck und können nicht vom Hersteller garantiert werden. Der Hersteller kann die Verantwortung für mangelhafte Installationen oder Einstellungen des Sensors nicht übernehmen. BESCHREIBUNG 3 4 1 2 1. 2. 3. 4. 5. 5 Anschlussklemme Radarantenne für breites Feld Radarantenne für schmales Feld Drucktaster Haube Technologie: Sendefrequenz: Sendeleistung: Dichte der Sendeleistung: Erfassungsmodus: Min. Erfassungsgeschwindigkeit: Stromversorgung: Netzfrequenz: Leistungsaufnahme: Ausgang: Max. Kontaktspannung: Max. Kontaktstrom: Max. Schaltleistung: Montagehöhe: Schutzklasse: Temperaturbereich: Abmessungen: Neigungswinkel: Material: Gewicht: Kabellänge: Normkonformität: Hyperfrequenz und Mikroprozessor 24,150 GHz < 20 dBm EIRP < 5 mW/cm² Bewegung 5 cm/s 12V bis 24V AC ±10%; 12V bis 24V DC +30% / -10% 50 bis 60 Hz <2W Relais (Potentialfreie Relaiskontakte) 42V AC / DC 1A (resistiv) 30W (DC) / 60VA (AC) von 1,8 m bis 4 m IP54 von -20 °C bis + 55 °C 120 mm (B) x 80 mm (H) x 50 mm (T) 0° bis 90° senkrecht; -30° bis +30° seitlich ABS 215 g 2,5 m R&TTE 1999/5/EC, LVD 2006/95/EC, RoHS 2 2011/65/EU Änderungen vorbehalten. Alle Werte gemessen unter bestimmten Bedingungen. MR8106 / FA00063M06 ☜ ☞ EAGLE ONE / 42.8534 / v2 - 10.13 Für Produktversion ab 0600. TECHNISCHE DATEN 1 ÖFFNEN & SCHLIESSEN Nach der Montage Vor der Montage 2 TIPPS MONTAGE & VERKABELUNG Vibrationen vermeiden. Nähe zu Neonlampen oder sich bewegenden Objekten vermeiden. Den Sensor nicht abdecken. ANWENDUNGEN Berührung elektronischer Bauteile vermeiden. MR8106 / FA00063M06 ☜ ☞ EAGLE ONE / 42.8534 / v2 - 10.13 Montage über Schiebe- oder Karusselltüren 1 Bohrschablone aufkleben. 1 Loch für das Kabel bohren und durchziehen. 2 Löcher für die Schrauben bohren. Montage auf der Drehachse (Drehflügeltüren) 2 Drähte wie folgt verbinden: 1 - BRAUN - SPANNUNGSVERSORGUNG 2 - GRÜN - SPANNUNGSVERSORGUNG 3 - WEISS - COM 4 - GELB - NO - SCHLIESSER 5 - GELB - NC - ÖFFNER Deckenmontage vor der Tür (Schiebe-, Karussell- oder Drehflügeltür) 3 Das Kabel wie abgebildet positionieren. Den Sensor gut befestigen. MECHANISCHE EINSTELLUNGEN 2,2 m 2,2 m WINKEL 4mx2m (breites Feld) 2 m x 2.5 m (schmales Feld) 1 2 2,2 m 2,2 m Den seitlichen Winkel der Antenne anpassen. 4 EINSTELLUNGEN FELDGRÖSSE IMMUNITÄTSFILTER XXS Den vertikalen Winkel der Antenne anpassen. (mittels Fernbedienung und/oder Drucktaster) XS S niedrig normal ERFASSUNGSMODUS bi uni AUSGANGSKONFIGURATION A P 0,5 Sek 1 Sek 2 Sek MONTAGEHÖHE <3m >3m TÜRSTEUERUNG auto offen AUFHALTEZEIT > > > hoch > > uni EM uni WEG EM & WEG > L XL XXL > > > höchster bi: keine Richtungserkennung; uni: Richtungserkennung zum Sensor hin uni EM: Richtungserkennung, sogar bei Personen mit eingeschränkter Mobilität; uni WEG: Richtungserkennung vom Sensor weg A: Aktiv Ausgang (Öffner-Kontakt) P: Passiv Ausgang (Schließer-Kontakt) 3 Sek geschlossen 4 Sek 5 Sek 6 Sek 7 Sek 8 Sek 9 Sek offen = der Sensor erfasst ununterbrochen. Die LED ist an. geschlossen = der Sensor ist in Wartestellung und erfasst nicht. Die LED ist aus. WERKSEINSTELLUNGEN AUF WERKSEINSTELLUNGEN ZURÜCKSETZEN: FELDGRÖSSE ODER ... S, XS, XXS > 2 Sekunden + ... L, XL, XXL MR8106 / FA00063M06 ☜ ☞ EAGLE ONE / 42.8534 / v2 - 10.13 BREITE 3 ZUGANGSCODE Der Zugangscode (1 bis 4 Ziffern) wird empfohlen bei Sensoren die nah beieinander installiert sind. ZUGANGSCODE SPEICHERN: ZUGANGSCODE LÖSCHEN: Nach Speichern eines Zugangscodes, muss dieser Code immer eingegeben werden um den Sensor zu entriegeln. Falls Sie den Zugangscode vergessen haben, Stromversorgung aus- und einschalten. Nach dem Einschalten haben Sie 1 Minute Zeit, um den Sensor ohne Eingabe des Zugangscodes zu entriegeln. STÖRUNGSBEHEBUNG MR8106 / FA00063M06 ☜ Originalbedienungsanleitung ☞ EAGLE ONE / 42.8534 / v2 - 10.13 Die Tür bleibt geschlossen. Die LED ist aus. Die Stromversorgung ist aus. 1 Verkabelung und Spannung der Stromversorgung kontrollieren. Der Parameter Türsteuerung (F2) ist auf Wert 3 (geschlossen) gestellt. 1 Den Parameter Türsteuerung (F2) auf Wert 1 (automatisch) stellen. Die Tür reagiert nicht wie erwartet. Falsche Ausgangskonfiguration am Sensor gewählt. 1 Die Ausgangskonfiguration aller Sensoren, die an der Türsteuerung angeschlossen sind, kontrollieren. Die Tür öffnet und schließt zyklisch. Der Sensor sieht die Türbewegung oder wird durch Vibrationen gestört. 1 2 3 4 5 Die Tür öffnet sich ohne merklichen Grund. Es regnet und der Sensor erfasst die Bewegung der Regentropfen. 1 Kontrollieren ob der Uni-Modus gewählt ist. 2 Den Immunitätsfilter erhöhen. 3 Einen ORA (Regenkappe) installieren. In Metallumgebungen erfasst der Sensor Objekte, die sich nicht im Erfassungsfeld befinden. 1 Den Antennenwinkel ändern. 2 Die Feldgröße verkleinern. 3 Den Immunitätsfilter erhöhen. In Schleusen, erfasst der Sensor die Bewegung der gegenüberliegenden Tür. 1 Den Antennenwinkel ändern. 2 Die Antenne wechseln. 3 Den Immunitätsfilter erhöhen. Die LED blinkt schnell nach dem Entriegeln. Der Sensor braucht einen Zugangscode zum Entriegeln. 1 Den Zugangscode eingeben. 2 Zugangscode vergessen? Stromversorgung ausund einschalten um den Sensor zu entriegeln. Zugangscode ändern oder löschen. Der Sensor reagiert nicht auf die Fernbedienung. Die Batterien sind nicht ausreichend geladen bzw. korrekt eingelegt. 1 Batterien kontrollieren und/oder wechseln. Die Fernbedienung ist nicht auf den Sensor ausgerichtet. 1 Die Fernbedienung auf den Sensor ausrichten. Kontrollieren ob der Sensor korrekt befestigt ist. Kontrollieren ob der Uni-Modus gewählt ist. Den Neigungswinkel vergrößern. Den Immunitätsfilter erhöhen. Die Feldgröße verkleinern. Came S.p.A.- Via Martiri Della Liberta 15 - IT-31030 DOSSON DI CASIER (TV) TEL (+39) 0422 4940 - FAX (+39) 0422 4941 - [email protected] - www.came.it Hiermit erklärt Came S.p.A., dass sich MR8106 in Übereinstimmung mit den grundlegenden Anforderungen und den übrigen einschlägigen Bestimmungen der Richtlinien R&TTE 1999/5/EG, LVD 2006/95/EG und RoHS 2 2011/65/EU befindet. Für EU-Länder: Gemäß der Richtlinie 2002/96/EG über Elektro- und Elektronik-Altgeräte (WEEE) Original auf Anfrage erhältlich. ERTRIEBENES FREMDERZEUGNIS ESPANOL MR8106 Detectores de apertura monodireccional para puertas automaticas Otro uso del detector está fuera del propósito permitido y no puede garantizarse por el fabricante. El fabricante declina toda responsabilidad por instalaciones o ajustes incorrectos del detector. DESCRIPCIÓN 3 4 1 2 1. 2. 3. 4. 5. 5 conector principal antena campo ancho antena campo estrecho pulsadores carcasa Tecnología: Frecuencia emitida: Potencia emitida: Densidad de potencia emitida: Modo de detección: Velocidad min. de detección: Voltaje de alimentación: Frecuencia de alimentación: Consumo de energía máx.: Salida: Tensión máx. en los contactos: Intensidad máx. en los contactos: Poder de corte máx.: Altura de montaje: Índice de protección: Gama de temperatura: Dimensiones: Angulo de inclinación: Material: Peso: Longitud del cable: Conformidad a las normas: hiperfrecuencia y microprocesador 24,150 GHz < 20 dBm EIRP < 5 mW/cm² movimiento 5 cm/s 12V a 24V AC ±10%; 12V a 24V DC +30% / -10% 50 a 60 Hz <2W relé (contacto invertido libre de potencial) 42V AC/DC 1A (resistivo) 30W (DC) / 60VA (AC) de 1,8 m a 4 m IP54 de -20 °C a + 55 °C 120 mm (ancho) x 80 mm (alto) x 50 mm (profundo) 0° a 90° vertical; -30° a +30° lateral ABS 215 g 2,5 m R&TTE 1999/5/EC, LVD 2006/95/EC, RoHS 2 2011/65/EU Las especificaciones técnicas pueden modificarse sin previo aviso. Medido en las condiciones específicas. MR8106 / FA00063M06 ☜ ☞ EAGLE ONE / 42.8536 / v2 - 10.13 Para los productos a partir de la versión 0600. ESPECIFICACIONES TÉCNICAS 1 APERTURA Y CIERRE Antes de fijar MONTAJE Y CABLEADO CONSEJOS 2 Después de fijar Evitar las vibraciones. No cubrir el detector. Evitar la proximidad a lámparas de neón o objetos en movimiento. APLICACIONES No tocar las partes electrónicas. MR8106 / FA00063M06 ☜ ☞ EAGLE ONE / 42.8536 / v2 - 10.13 Montaje a pared encima de una puerta corredera o giratoria. Montaje en el ángulo de puerta (puertas a batientes) 1 2 Aplicar la plantilla de montaje. Perforar 1 orificio para el cable y tirarlo a través. Perforar 2 orificios para los tornillos. Conectar los cables en el modo siguiente: 1 - MARRÓN - ALIMENTACIÓN 2 - VERDE - ALIMENTACIÓN 3 - BLANCO - COM 4 - AMARILLO - NO o 5 - AMARILLO - NC Montaje en el techo en frente de la puerta (puertas correderas, giratorias o batientes) 3 Posicionar el cable como indicado. Fijar el detector firmemente. ZONA DE DETECCIÓN ANCHURA 3 4 2 m x 2.5 m (estrecho) 1 2 Regular el ángulo lateral de la antena. Regular el ángulo vertical de la antena. REGULACIONES DIMENSIONES (con mando a distancia o pulsadores) XXS FILTRO INMUNIDAD MODO DE DETECCIÓN CONFIGURACIÓN DE SALIDA TIEMPO DE MANTENIMIENTO 0,5 s ALTURA DE MONTAJE CONTROL DE PUERTA XS S > > > > L XL XXL bajo normal alto > > > > > el más alto bi uni uni uni PMR INV PMR Y INV A P 1s 2s <3m >3m auto bi = detección en ambas direcciones; uni = detección solamente hacia el detector; uni PMR: detección en una dirección, también de personas con movilidad reducida; uni INV = detección invertida A = salida activa (contacto NO) P = salida pasiva (contacto NC) 3s 4s 5s 6s 7s 8s 9s abierto cerrado abierto = el detector detecta constantemente. El LED està activado. cerrado = el detector está en «standby» y no detecta. El LED está desactivado. VALORES DE FÁBRICA RESTABLECER VALORES DE FÁBRICA: DIMENSIONES DEL CAMPO O ... S, XS, XXS > 2 segundos + ... L, XL, XXL MR8106 / FA00063M06 ☜ ☞ EAGLE ONE / 42.8536 / v2 - 10.13 ÁNGULO 4 m x 2 m (ancho) CÓDIGO DE ACCESO El código de acceso (1 a 4 cifras) se recomienda para programar detectores instalados uno junto al otro. SALVAR O CAMBIAR EL CÓDIGO DE ACCESO: BORRAR EL CÓDIGO DE ACCESO: Una vez que hayan eligido un código de acceso, siempre tienen que introducir este código para desbloquear el detector. Si olvidan su código, cortar y reconectar la alimentación. Durante 1 minuto, pueden programar el detector sin introducir un código de acceso. MR8106 / FA00063M06 ☜ Traducción de las instrucciones originales ☞ EAGLE ONE / 42.8536 / v2 - 10.13 FUNCIONAMIENTOS INCORRECTOS La puerta se queda cerrada. El LED está desactivado. La alimentación del detector está desconectada. 1 Verificar el cable de alimentación y el voltaje de alimentación. La configuración de control de puerta (F2) está puesto al valor 3 (cerrado). 1 Cambiar la configuración de control de puerta (F2) al valor 1 (automático). La puerta no reacciona como se esperaba. La configugarción de salida del detector no es correcta. 1 Cambiar la configuración de salida de cada detector conectado al operador. La puerta se abre y se cierra constantemente. El detector «ve» el movimiento de la puerta o al cerrarse la puerta provoca vibraciones que son detectadas por el detector. 1 2 3 4 5 La puerta se abre si razón aparente. Llueve y el detector «ve» el movimiento de las gotas de agua. 1 Verificar que el modo de detección es unidireccional. 2 Aumentar el filtro de inmunidad. 3 Instalar el ORA (accesorio de protección contra la lluvia). En entornos metálicos el detector detecta objetos fuera de su campo de detección. 1 Cambiar el ángulo de la antena. 2 Reducir la zona de detección. 3 Aumentar el filtro de inmunidad. En puertas esclusas el detector detecta el movimiento de la puerta opuesta. 1 Cambiar el ángulo de la antena. 2 Cambiar la antena. 3 Aumentar el filtro de inmunidad. El LED parpadea rapidamente después de una apertura de sesión. El detector necesita un código de acceso para abrirse. 1 Insertar el código de acceso. 2 Si ha olvidado el código de acceso, cortar y reconectar la alimentación para acceder al detector. Cambiar o borrar el código de acceso. El detector no responde a las funciones del telemando. Las pilas están gastadas o introducidas incorrectamente. 1 Verificar que las pilas están bien introducidas o sustituir las pilas. El mando a distancia está incorrectamente orientado. 1 Apuntar el mando a distancia en la dirección del detector. Verificar que el detector está correctamente fijado. Verificar que el modo de detección es unidireccional. Aumentar el ángulo. Aumentar el filtro de inmunidad. Reducir la zona de detección. Came S.p.A.- Via Martiri Della Liberta 15 - IT-31030 DOSSON DI CASIER (TV) TEL (+39) 0422 4940 - FAX (+39) 0422 4941 - [email protected] - www.came.it Por medio de la presente Came S.p.A. declara que MR8106 cumple con los requisitos esenciales y cualesquiera otras disposiciones aplicables o exigibles de las directivas R&TTE 1999/5/CE, LVD 2006/95/CE y RoHS 2 2011/65/UE. Para los países de la UE: conforme a la directiva 2002/96/CE sobre aparatos eléctricos y electrónicos inservibles. Original a petición. PRODUCTO COMERCIALIZADO NEDERLANDS MR8106 Openingssensor met éénrichtingsdetectie voor automatische deuren Ander gebruik van het apparaat ligt buiten het toegestane doel en kan niet door de fabrikant worden gewaarborgd. De fabrikant kan niet aansprakelijk worden gesteld voor foutieve installaties of onjuiste instellingen van de sensor. BESCHRIJVING 3 4 1 2 1. 2. 3. 4. 5. 5 hoofdconnector antenne voor breed veld antenne voor smal veld drukknoppen kap Technologie: Uitgezonden frequentie: Uitgezonden vermogen: Dichtheid van het uitgezonden vermogen: Detectiewijze: Minimale detectiesnelheid: Voedingsspanning: Netfrequentie: Verbruik: Uitgang: Max. spanning bij de contacten: Max. stroom bij de contacten: Max. schakelvermogen: Montagehoogte: Beschermingsklasse: Temperatuurbereik: Afmetingen: Hellingshoeken: Materiaal: Gewicht: Lengte van de kabel: Normconformiteit: hyperfrequentie en microprocessor 24,150 GHz < 20 dBm EIRP < 5 mW/cm² beweging 5 cm/s 12V tot 24V AC ±10%; 12V tot 24V DC +30% / -10% 50 tot 60 Hz <2W relais (potentiaalvrij contactpunt) 42V AC - 60V DC 1A (resistief) 30W (DC) / 60VA (AC) van 1,8 m tot 4 m IP54 van -20°C tot + 55°C 120 mm (B) x 80 mm (H) x 50 mm (D) 0° tot 90° verticaal; -30° tot +30° zijdelings ABS 215 g 2,5 m R&TTE 1999/5/EC, LVD 2006/95/EC, RoHS 2 2011/65/EU De technische gegevens kunnen zonder kennisgeving worden gewijzigd. zijn gemeten onder bepaalde voorwaarden. MR8106 / FA00063M06 ☜ ☞ EAGLE ONE / 42.8537 / v2 - 10.13 Voor productversie 0600 en volgende. TECHNISCHE SPECIFICATIES 1 OPENEN & SLUITEN Na installatie Vóór installatie MONTAGE & BEDRADING TIPS 2 Vermijd trillingen. Bedek de sensor niet. Vermijd installatie in de buurt van neonlampen en bewegende objecten. TOEPASSINGEN Raak de elektronische onderdelen niet aan. MR8106 / FA00063M06 ☜ ☞ EAGLE ONE / 42.8537 / v2 - 10.13 Wandmontage boven schuif- of carrouseldeuren Montage op de deuras (draaideuren) Plafondmontage vóór de deur (schuif-, draai- of carrouseldeuren) 1 2 De boormal opkleven. 1 gat boren voor de kabel en deze erdoor trekken. 2 gaten boren voor de schroeven. De draden als volgt verbinden: 1 - BRUIN - VOEDING 2 - GROEN - VOEDING 3 - WIT - COM 4 - GEEL - NO 5 - GEEL - NC 3 De kabel zoals afgebeeld positioneren. De sensor goed vastschroeven. DETECTIEVELD 2,2 m 2,2 m HOEK 4 m x 2 m (breed) 1 2 m x 2,5 m (smal) 2 2,2 m Pas de zijdelingse hellingshoek van de antenne aan. 4 INSTELLINGEN VELDGROOTTE 2,2 m Pas de verticale hellingshoek van de antenne aan. (via afstandsbediening of drukknoppen) XXS IMMUNITEITSFILTER XS laag S > normaal hoog uni PBM > > > > uni PBM & AWAY > L XL XXL > > > hoogst bi = tweerichtingsdetectie; uni = detectie naar de sensor toe uni PBM = éénrichtingsdetectie, ook van personen met beperkte mobiliteit; uni AWAY = éénrichtingsdetectie van de sensor weg DETECTIERICHTING bi uni UITGANGSCONFIGURATIE A P 1s 2s MONTAGEHOOGTE <3m >3m DEURBEDIENING auto open gesloten open = de sensor detecteert voortdurend. De LED is aan. OPENHOUDTIJD 0.5 s AWAY A = actieve uitgang (NO-contact) P = passieve uitgang (NC-contact) 3s 4s 5s 6s 7s 8s 9s gesloten = de sensor is in standby en detecteert niet. De LED is uit. FABRIEKSWAARDEN TERUGZETTEN NAAR FABRIEKSWAARDEN: OF > 2 seconden + VELDGROOTTE ... S, XS, XXS ... L, XL, XXL MR8106 / FA00063M06 ☜ ☞ EAGLE ONE / 42.8537 / v2 - 10.13 BREEDTE 3 TOEGANGSCODE De toegangscode (1 tot 4 cijfers) wordt aanbevolen voor sensors die dicht bij elkaar zijn geïnstalleerd. TOEGANGSCODE OPSLAAN: TOEGANGSCODE WISSEN: Is er een toegangscode opgeslaan, moet deze altijd ingegeven worden om de sensor te ontgrendelen. Indien u de toegangscode vergeet, verbreek en herstel de voeding. Gedurende 1 minuut heeft u toegang op de sensor zonder toegangscode. GESTOORDE WERKING De sensor krijgt geen voeding. 1 Controleer de bedrading en de voedingsspanning. De parameter deurbediening (F2) is op waarde 3 ingesteld (gesloten). 1 Zet de parameter deurbediening (F2) op waarde 1 (automatisch). De deur reageert niet zoals verwacht. De uitgangsconfiguratie is niet juist. 1 Controleer en verander zo nodig de uitgangsconfiguratie van elke sensor die verbonden is met de bedieningseenheid. De deur gaat onophoudelijk open en dicht. De sensor wordt gestoord door de beweging van de deur of de trillingen die de deur maakt. 1 2 3 4 5 De deur gaat open zonder aanwijsbare reden. Het regent en de sensor detecteert de beweging van de regendruppels. 1 Controleer of de éénrichtingsdetectie (uni) actief is. 2 Verhoog de immuniteitsfilter. 3 Installeer de ORA (regenkap). In een omgeving met veel metaal detecteert de sensor objecten buiten zijn detectieveld. 1 Verander de hellingshoek. 2 Verminder de veldgrootte. 3 Verhoog de immuniteitsfilter. In tochtsluizen detecteert de sensor de beweging van de tegenoverliggende deur. 1 Verander de hellingshoek. 2 Verwissel de antenna. 3 Verhoog de immuniteitsfilter. De LED knippert snel na ontgrendeling. De sensor heeft een toegangscode nodig om te ontgrendelen. 1 Geef de juiste toegangscode in. 2 Indien u de code vergeten heeft, verbreek en herstel de voeding om de sensor te ontgrendelen. Verander of verwijder de toegangscode. De sensor reageert niet op de afstandsbediening. De batterijen zijn niet juist geplaatst of leeg. 1 Controleer de plaatsing van de batterijen of vervang ze. De afstandsbediening is niet juist gericht. 1 Richt de afstandsbediening op de sensor. MR8106 / FA00063M06 ☜ Vertaling van de originele instructies ☞ EAGLE ONE / 42.8537 / v2 - 10.13 De deur blijft gesloten. De LED is uit. Controleer of de sensor correct bevestigd is. Controleer of de éénrichtingsdetectie (uni) actief is. Vergroot de hellingshoek. Verhoog de immuniteitsfilter. Verminder de veldgrootte. Came S.p.A.- Via Martiri Della Liberta 15 - IT-31030 DOSSON DI CASIER (TV) TEL (+39) 0422 4940 - FAX (+39) 0422 4941 - [email protected] - www.came.it Hierbij verklaart Came S.p.A. dat MR8106 in overeenstemming is met de essentiële eisen en de andere relevante bepalingen van de richtlijnen R&TTE 1999/5/EC, LVD 2006/95/EC en RoHS 2 2011/65/EU. Voor EU-landen: conform de richtlijn 2002/96/EG over elektrische en elektronische oude apparaten Origineel op aanvraag. DOOR CAME VERKOCHT PRODUCT-
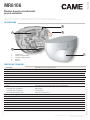 1
1
-
 2
2
-
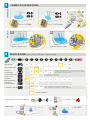 3
3
-
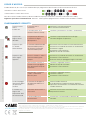 4
4
-
 5
5
-
 6
6
-
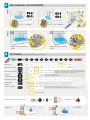 7
7
-
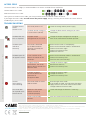 8
8
-
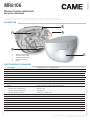 9
9
-
 10
10
-
 11
11
-
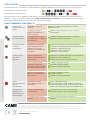 12
12
-
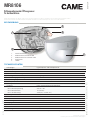 13
13
-
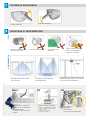 14
14
-
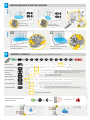 15
15
-
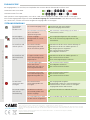 16
16
-
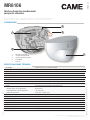 17
17
-
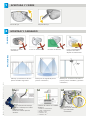 18
18
-
 19
19
-
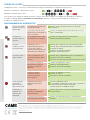 20
20
-
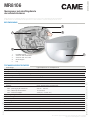 21
21
-
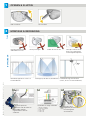 22
22
-
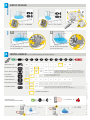 23
23
-
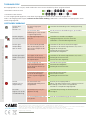 24
24


in andere talen
- English: CAME MR8106
- italiano: CAME MR8106
- français: CAME MR8106
- español: CAME MR8106
- Deutsch: CAME MR8106
Gerelateerde papieren
Andere documenten
-
D+H CDC-BS069-VFO Handleiding
-
Marantec Command 702 de handleiding
-
-
Mangar Eagle User Instructions
-
-
-
BBC Bircher Herkules 2E Handleiding
-
-
-