
DE
GB
ES
PT
FR
NL
IT
FA
BENUTZERHANDBUCH
INSTRUCTION BOOK

DE
GB
ES
PT
FR
NL
IT
FA
DE
GB
ES
PT
FR
NL
IT
FA
Vielen Dank, dass Sie sich für den AEG-Staubsauger
VX7 entschieden haben. Verwenden Sie immer Origi-
nalzubehör und Originalersatzteile, um bestmögliche
Ergebnisse zu erzielen. Dieses Produkt wurde mit
Rücksicht auf die Umwelt hergestellt. Alle Plastikteile
sind für Recyclingzwecke markiert.
Inhalt
BESCHREIBUNG DES STAUBSAUGERS . . . . . . . . . . . . . . . . . . . . . . 5
SICHERHEITSANFORDERUNG . . . . . . . . . . . . . . . . . . . . . . . . . . . . . .6
ERLÄUTERUNGEN ZU DEN VORSCHRIFTEN DER
ENERGIEEFFIZIENZKLASSE . . . . . . . . . . . . . . . . . . . . . . . . . . . . . . . . 7
WIE MAN DEN STAUBSAUGER BENUTZT . . . . . . . . . . . . . . . . . . .8
STARTENSTOPPEN SIE DEN STAUBSAUGER . . . . . . . . . . . . . . . 8
STELLEN SIEDIE SAUGLEISTUNG EIN. . . . . . . . . . . . . . . . . . . . . . .8
PARKPOSITIONEN . . . . . . . . . . . . . . . . . . . . . . . . . . . . . . . . . . . . . . . . . .8
AUSTAUSCHEN DES STAUBBEUTELS SBAG® . . . . . . . . . . . . .9
ERSETZEN DER FILTER . . . . . . . . . . . . . . . . . . . . . . . . . . . . . . . . . . . . .9
STAUBSAUGEN MIT DER UNIVERSALDÜSE . . . . . . . . . . . . . . . .10
REINIGEN DER UNIVERSALDÜSE . . . . . . . . . . . . . . . . . . . . . . . . . .10
REINIGEN DER TURBODÜSE* . . . . . . . . . . . . . . . . . . . . . . . . . . . . . .10
TIPPS, WIE SIE DIE BESTEN ERGEBNISSE ERZIELEN
KÖNNEN . . . . . . . . . . . . . . . . . . . . . . . . . . . . . . . . . . . . . . . . . . . . . . . . . . 11
FEHLERSUCHE . . . . . . . . . . . . . . . . . . . . . . . . . . . . . . . . . . . . . . . . . . . . 11
* NUR AUSGEWÄHLTE MODELLE
Gracias por elegir la aspiradora AEG VX7. Use siempre
accesorios y piezas de repuesto originales para
lograr los mejores resultados. Este producto ha sido
diseñado teniendo en cuenta el medio ambiente. Las
piezas de plástico están marcadas para su reciclaje.
Contenido
DESCRIPCIÓN DE LA ASPIRADORA . . . . . . . . . . . . . . . . . . . . . . . . 21
REQUISITO DE SEGURIDAD . . . . . . . . . . . . . . . . . . . . . . . . . . . . . . . .22
NOTAS SOBRE LA NORMATIVA
DE ETIQUETA ENERGÉTICA . . . . . . . . . . . . . . . . . . . . . . . . . . . . . . .23
CÓMO USAR LA ASPIRADORA . . . . . . . . . . . . . . . . . . . . . . . . . . . . .24
PONGA EN MARCHAPARE LA ASPIRADORA . . . . . . . . . . . . . .24
AJUSTE LA POTENCIA DE ASPIRACIÓN . . . . . . . . . . . . . . . . . . .24
POSICIONES DE ESTACIONAMIENTO . . . . . . . . . . . . . . . . . . . . . .24
CAMBIO DE LA BOLSA DE POLVO SBAG® . . . . . . . . . . . . . . . . .25
SUSTITUCIÓN DE LOS FILTROS . . . . . . . . . . . . . . . . . . . . . . . . . . . .25
ASPIRACIÓN CON LA BOQUILLA UNIVERSAL . . . . . . . . . . . . .26
LIMPIEZA DE LA BOQUILLA UNIVERSAL . . . . . . . . . . . . . . . . . .26
LIMPIEZA DE LA BOQUILLA 6TURBO* . . . . . . . . . . . . . . . . . . . . .26
CONSEJOS PARA OBTENER EL MEJOR RESULTADO . . . . . . .27
SOLUCIÓN DE PROBLEMAS . . . . . . . . . . . . . . . . . . . . . . . . . . . . . . .27
* SOLO ALGUNOS MODELOS
Thank you for choosing AEG VX7 vacuum cleaner.
Always use original accessories and spare parts to
get the best results. This product is designed with the
environment in mind. All plastic parts are marked for
recycling purposes.
Content
DESCRIPTION OF THE VACUUM CLEANER . . . . . . . . . . . . . . . . 13
SAFETY REQUIREMENTS . . . . . . . . . . . . . . . . . . . . . . . . . . . . . . . . . . 14
ENERGY LABELLING INSTRUCTIONS . . . . . . . . . . . . . . . . . . . . . . 15
HOW TO USE THE VACUUM CLEANER. . . . . . . . . . . . . . . . . . . . . 16
START AND STOP THE VACUUM CLEANER . . . . . . . . . . . . . . . . 16
REGULATING SUCTION POWER . . . . . . . . . . . . . . . . . . . . . . . . . . . 16
PARKING POSITIONS . . . . . . . . . . . . . . . . . . . . . . . . . . . . . . . . . . . . . . 16
REPLACING THE DUST BAG SBAG® . . . . . . . . . . . . . . . . . . . . . 17
REPLACING THE FILTERS . . . . . . . . . . . . . . . . . . . . . . . . . . . . . . . . . 17
VACUUMING WITH THE UNIVERSAL NOZZLE . . . . . . . . . . . . . 18
CLEANING THE UNIVERSAL NOZZLE . . . . . . . . . . . . . . . . . . . . . . 18
CLEANING THE TURBO NOZZLE* . . . . . . . . . . . . . . . . . . . . . . . . . 18
TIPS ON HOW TO GET THE BEST RESULTS . . . . . . . . . . . . . . . . 19
TROUBLESHOOTING . . . . . . . . . . . . . . . . . . . . . . . . . . . . . . . . . . . . . . 19
* SELECTED MODELS ONLY
Obrigado por ter escolhido um aspirador AEG VX7.
Para obter os melhores resultados, utilize sempre
acessórios e peças de substituição originais. Este
produto foi concebido a pensar no meio ambiente.
Todas as peças de plástico estão marcadas para
efeitos de reciclagem.
Conteúdo
DESCRIÇÃO DO ASPIRADOR . . . . . . . . . . . . . . . . . . . . . . . . . . . . . . .29
REQUISITOS DE SEGURANÇA . . . . . . . . . . . . . . . . . . . . . . . . . . . . .30
NOTAS SOBRE OS REGULAMENTOS DE ETIQUETA
DE ENERGIA . . . . . . . . . . . . . . . . . . . . . . . . . . . . . . . . . . . . . . . . . . . . . . . 31
COMO UTILIZAR O ASPIRADOR . . . . . . . . . . . . . . . . . . . . . . . . . . .32
LIGARDESLIGAR O ASPIRADOR . . . . . . . . . . . . . . . . . . . . . . . . . .32
AJUSTAR A POTÊNCIA DE SUCÇÃO . . . . . . . . . . . . . . . . . . . . . . .32
POSIÇÕES DE ESTACIONAMENTO . . . . . . . . . . . . . . . . . . . . . . . . .32
SUBSTITUIR O SACO DO ASPIRADOR SBAG® . . . . . . . . . . . . .33
SUBSTITUIR OS FILTROSS . . . . . . . . . . . . . . . . . . . . . . . . . . . . . . . . .33
ASPIRAR COM A ESCOVA UNIVERSALL . . . . . . . . . . . . . . . . . . . .34
LIMPAR A ESCOVA UNIVERSAL . . . . . . . . . . . . . . . . . . . . . . . . . . . .34
LIMPAR A ESCOVA TURBO* . . . . . . . . . . . . . . . . . . . . . . . . . . . . . . .34
SUGESTÕES PARA OBTER OS MELHORES RESULTADOS . .35
RESOLUÇÃO DE PROBLEMAS . . . . . . . . . . . . . . . . . . . . . . . . . . . . .35
* APENAS ALGUNS MODELOS

DE
GB
ES
PT
FR
NL
IT
FA
DE
GB
ES
PT
FR
NL
IT
FA
AEG VX7
61 ....................................................
62 ...........................................
63 .................................
64 ...................................
64 ........................................
64 ..........................................................
64 .....................................
65 ......................... S-BAG
65 ......................................................
66 ...........................
66 ........................................
66 ..........................................
67 ..........................
67 .............................................................
Merci d’avoir choisi l’aspirateur AEG VX7. Utilisez
toujours les accessoires et les pièces de rechange AEG
pour obtenir les performances optimales. Ce produit
est conçu dans le respect de l’environnement. Tous les
éléments en plastique sont marqués d’un symbole de
recyclage.
Contenu
DESCRIPTION DE L’ASPIRATEUR . . . . . . . . . . . . . . . . . . . . . . . . . .37
PRÉCAUTIONS DE SÉCURITÉ . . . . . . . . . . . . . . . . . . . . . . . . . . . . . .38
NOTES CONCERNANT LA RÈGLEMENTATION
RELATIVE À L'ÉTIQUETTE ÉNERGIE . . . . . . . . . . . . . . . . . . . . . . .39
COMMENT UTILISER CET ASPIRATEUR . . . . . . . . . . . . . . . . . . 40
MISE EN MARCHEARRÊT DE L’ASPIRATEUR . . . . . . . . . . . . . 40
RÉGLAGE DE LA PUISSANCE . . . . . . . . . . . . . . . . . . . . . . . . . . . . . 40
POSITIONS DE RANGEMENT . . . . . . . . . . . . . . . . . . . . . . . . . . . . . 40
REMPLACEMENT DU SAC À POUSSIÈRE, SBAG® . . . . . . . . . . 41
REMPLACEMENT DES FILTRES . . . . . . . . . . . . . . . . . . . . . . . . . . . . 41
UTILISATION DE L’ASPIRATEUR AVEC LA BROSSE . . . . . . . . .42
NETTOYAGE DE LA BROSSE . . . . . . . . . . . . . . . . . . . . . . . . . . . . . . .42
NETTOYAGE DE LA TURBOBROSSE* . . . . . . . . . . . . . . . . . . . . . .42
ASTUCES POUR UN RESULTAT IMPECCABLE . . . . . . . . . . . . . .43
EN CAS D’ANOMALIE DE FONCTIONNEMENT . . . . . . . . . . . . .43
* MODÈLES SÉLECTIONNÉS UNIQUEMENT
Grazie per aver scelto l’aspirapolvere AEG VX7. Per
ottenere i migliori risultati, utilizzare sempre gli
accessori e i ricambi originali. Questo prodotto è stato
progettato nel rispetto dell’ambiente. Tutte le parti
in plastica sono contrassegnate per consentirne il
riciclaggio.
Contenuto
DESCRIZIONE DELL'ASPIRAPOLVERE . . . . . . . . . . . . . . . . . . . . . .53
REQUISITI PER LA SICUREZZA . . . . . . . . . . . . . . . . . . . . . . . . . . . .54
NOTE SULLE NORME INERENTI ALLE
ETICHETTE ENERGETICHE . . . . . . . . . . . . . . . . . . . . . . . . . . . . . . . .55
COME UTILIZZARE L’ASPIRAPOLVERE . . . . . . . . . . . . . . . . . . . . .56
AVVIOARRESTO DELL’ASPIRAPOLVERE . . . . . . . . . . . . . . . . . .56
REGOLAZIONE DELLA POTENZA ASPIRANTE . . . . . . . . . . . . .56
POSIZIONI DI STAZIONAMENTO . . . . . . . . . . . . . . . . . . . . . . . . . . .56
SOSTITUZIONE DEL SACCHETTO, SBAG® . . . . . . . . . . . . . . . . .57
SOSTITUZIONE DEI FILTRI . . . . . . . . . . . . . . . . . . . . . . . . . . . . . . . . .57
ASPIRAZIONE CON LA SPAZZOLA COMBINATA . . . . . . . . . . .58
PULIZIA DELLA SPAZZOLA COMBINATA . . . . . . . . . . . . . . . . . .58
PULIZIA DELLA SPAZZOLA TURBO* . . . . . . . . . . . . . . . . . . . . . . .58
SUGGERIMENTI PER OTTENERE I MIGLIORI RISULTATIS . . .59
RISOLUZIONE DEI PROBLEMI . . . . . . . . . . . . . . . . . . . . . . . . . . . . . .59
* SOLO PER ALCUNI MODELLI
Gefeliciteerd met uw keuze van een AEG VX7-
stofzuiger. Gebruik altijd originele accessoires en
reserveonderdelen voor de beste resultaten. Dit
product is ontworpen om het milieu te sparen.
Alle plastic onderdelen zijn gemarkeerd voor
recyclingdoeleinden.
Inhoud
BESCHRIJVING VAN DER STOFZUIGER . . . . . . . . . . . . . . . . . . . .45
VEILIGHEIDSVEREISTE . . . . . . . . . . . . . . . . . . . . . . . . . . . . . . . . . . . 46
OPMERKINGEN OVER DE VOORSCHRIFTEN VOOR
ENERGIELABELS . . . . . . . . . . . . . . . . . . . . . . . . . . . . . . . . . . . . . . . . . .47
GEBRUIK VAN DE STOFZUIGER . . . . . . . . . . . . . . . . . . . . . . . . . . . 48
DE STOFZUIGER STARTENSTOPPEN . . . . . . . . . . . . . . . . . . . . 48
HET ZUIGVERMOGEN REGELEN . . . . . . . . . . . . . . . . . . . . . . . . . . 48
PARKEERPOSITIES . . . . . . . . . . . . . . . . . . . . . . . . . . . . . . . . . . . . . . . 48
DE STOFZUIGERZAK, SBAG®, VERVANGEN . . . . . . . . . . . . . . .49
DE FILTERS VERVANGEN . . . . . . . . . . . . . . . . . . . . . . . . . . . . . . . . . .49
STOFZUIGEN MET HET UNIVERSELE MONDSTUK . . . . . . . . .50
HET UNIVERSELE MONDSTUK REINIGEN. . . . . . . . . . . . . . . . . .50
HET TURBOMONDSTUK REINIGEN* . . . . . . . . . . . . . . . . . . . . . .50
TIPS OM DE BESTE RESULTATEN TE VERKRIJGEN . . . . . . . . 51
PROBLEEMOPLOSSING . . . . . . . . . . . . . . . . . . . . . . . . . . . . . . . . . . . . 51
* ALLEEN BEPAALDE MODELLEN

DE
GB
ES
PT
FR
NL
IT
FA
C.
Q. S.P. R.
B.
L.
E.
H.
N.
G.
D.
F.
A.
K.
M.
I.
J.
O.

DE
GB
ES
PT
FR
NL
IT
FA
VOR DER INBETRIEBNAHME
Lesen Sie dieses Handbuch sorgfältig durch.
Überprüfen Sie, ob alle beschriebenen Teile enthalten sind.
Beachten Sie insbesondere die Sicherheitshinweise
BESCHREIBUNG DES STAUBSAUGERS VOM TYP VX7
A. Display mit manueller Bedienung des Drehschalters
B. Abluftfilter
C. Parkschlitze
D. Netzkabel
E. Motorfilter
F. Motorfilterhalterung
G. s-Bag®
H. s-Bag®-Halterung
I. Abdeckung für Staubbeutelfach
J. 3in1 Multifunktionsdüse
K. Schlauch
L. Handgriff
M. Teleskoprohr
N. Parkfunktion
O. FlowMotion Düse
P. Mini-Turbodüse für Polster*
Q. Turbodüse*
R. Mini turbodüse*
S. ParkettoPro Hartbodendüse*
* Nur ausgewählte Modelle.

DE
GB
ES
PT
FR
NL
IT
FA
Sicherheitsanforderung und Warnung
Das Gerät kann von Kindern ab 8 Jahren und Personen mit eingeschränkten
physischen, sensorischen oder geistigen Fähigkeiten oder mit mangelnder
Erfahrung und/oder mangeln dem Wissen nur dann verwendet werden, wenn
sie durch eine für ihre Sicherheit zuständige Person beaufsichtigt werden oder in
die sichere Verwendung des Geräts eingewiesen wurden und die mit dem Gerät
verbundenen Gefahren verstanden haben.
WARNUNG: Turbodüsen* besitzen rotierende Bürsten, in denen sich Teile
festsetzen können. Verwenden Sie die Düsen vorsichtig und nur auf den dafür
vorgesehenen Oberfl ächen. Schalten Sie den Staubsauger aus, bevor Sie
festsitzende Teile entfernen oder die Bürsten reinigen.
Kinder müssen beaufsichtigt werden, um zu gewährleisten, dass diese
nicht mit dem Gerät spielen.Trennen Sie das Gerät vor Reinigungs- oder
Wartungsarbeiten immer vom Stromnetz.
Benutzen Sie den Staubsauger niemals ohne Filter.
Verwenden Sie immer Original-Staubbeutel vom Typ s-bag, die für
diesen Staubsauger geeignet sind. Schäden, die durch unsachgemäße
Verwendung von nicht-originalen Staubbeuteln verursacht wurden, sind
nicht durch die Garantie abgedeckt.
Vorsicht
Dieses Gerät besitzt elektrische Verbindungen:
• Keine Flüssigkeiten aufsaugen
• Zum Reinigen nicht in Flüssigkeit tauchen
• Der Schlauch ist regelmäßig zu überprüfen und darf bei Beschädigung nicht
benutzt werden.
Oben Genanntes kann den Motor ernsthaft beschädigen. Solche Schäden sind
nicht durch die Garantie abgedeckt. Dieser Staubsauger ist ausschließlich zur
Verwendung im Haushalt bestimmt.
Benutzen Sie den Staubsauger niemals ...
• In der Nähe von brennbaren Gasen und Flüssigkeiten.
• Für scharfkantige Gegenstände
• Für heiße oder kalte Asche, brennende Zigarettenkippen etc.
• Für feinen Staub, z. B. Gips, Beton oder Mehl.
• Der Einsatz des Staubsauger unter den oben genannten Bedingungen kann
zu schweren Schäden führen, diese sind nicht durch die Garantieleistung
abgedeckt.
Vorsichtsmaßnahmen hinsichtlich des Netzkabels
• Stecker und Netzkabel regelmäßig auf Beschädigungen überprüfen.

DE
GB
ES
PT
FR
NL
IT
FA
Staubsauger niemals benutzen, wenn das Netzkabel beschädigt ist.
• Wenn das Netzkabel beschädigt ist, muss es zur Vermeidung von Gefahren
von einem autorisierten AEGServicezentrum ausgetauscht werden. Schäden
am Kabel des Staubsaugers werden von der Garantie nicht abgedeckt.
• Den Staubsauger niemals am Netzkabel ziehen oder hochheben.
• Alle Wartungs- und Reparaturarbeiten müssen vom autorisierten AEG-
Kundendienst durchgeführt werden.
Staubsauger an einem trockenen Ort aufbewahren.
Verbraucherinformationen und Nachhaltigkeitsgrundsätze
AEG übernimmt keine Verantwortung für Schäden, die durch den
unsachgemäßen Einsatz des Geräts oder unbefugten Eingriff in
den Staubsauger entstehen. Nähere Einzelheiten zur Garantie sowie
Ansprechstellen für Verbraucherfragen fi nden Sie im beigelegten
Garantieheft.
Wenn Sie Fragen oder Hinweise zum Staubsauger oder zur Bedienungsanleitung
haben oder aber wenn Sie praktisches Zubehör benötigen, senden Sie uns bitte
eine E-Mail an floorcare@aeg-home.com oder rufen Sie uns an.
Nachhaltigkeitsgrundsätze
Dieses Produkt wurde mit Rücksicht auf die Umwelt hergestellt. Alle
Plastikteile sind für Recyclingzwecke markiert. Einzelheiten darüber fi nden Sie
auf unserer Website: www.aeg-home.com.
Das Verpackungsmaterial wurde mit Blick auf Umweltfreundlichkeit
ausgewählt und kann wiederverwertet werden. Recyceln Sie Materialien
mit dem Symbol . Entsorgen Sie die Verpackung in den entsprechenden
Recyclingbehältern. Recyceln Sie zum Umwelt- und Gesundheitsschutz
elektrische und elektronische Geräte.
Entsorgen Sie Geräte mit diesem Symbol nicht mit dem Hausmüll. Bringen
Sie das Gerät zu Ihrer örtlichen Sammelstelle oder wenden Sie sich an Ihr
Gemeindeamt.

DE
GB
ES
PT
FR
NL
IT
FA
WIE MAN DEN STAUBSAUGER BENUTZT
PARKPOSITIONEN
STARTEN/STOPPEN SIE DEN
STAUBSAUGER UND STELLEN SIEDIE
SAUGLEISTUNG EIN
Önen Sie die Abdeckung des Staubbehälters.
Prüfen Sie, ob der Staubbeutel (s-bag)
ordnungsgemäß eingesetzt ist.
Verwenden Sie die Parkposition der Unterseite
(A), um den Staubsauger zu transportieren und
zu lagern. An der Rückseite (B), wenn Sie eine
Pause machen (Ihren Rücken schonen).
Schieben Sie den Schlauch in den Staubsauger
(zum Entnehmen des Schlauchs drücken Sie
die Entriegelungstasten und ziehen ihn ab).
Schieben Sie den Schlauch in den Schlauchgri,
bis die Verriegelungstaste klickt (um ihn
freizugeben, drücken Sie die Verriegelungstaste
und ziehen ihn heraus).
Befestigen Sie das Teleskoprohr an der
Düse. Befestigen Sie das Teleskoprohr am
Schlauchgri (um es zu entfernen, drücken Sie
die Verriegelungstaste und ziehen es heraus).
Justieren Sie das Teleskoprohr, indem Sie die
Verriegelung mit einer Hand halten und den Gri
mit der anderen Hand ziehen.
Ziehen Sie das Netzkabel heraus und stecken Sie
es in die Netzsteckdose. Drücken Sie die EIN/AUS-
Taste, um den Staubsauger ein-/auszuschalten.
Anpassen der Saugleistung. Drehen Sie den
Drehschalter am Staubsauger oder verwenden
Sie das Luftventil am Handgri.*
Nach der Reinigung drücken Sie die
AUFROLLTASTE, um das Kabel einzurollen.

DE
GB
ES
PT
FR
NL
IT
FA
AUSTAUSCHEN DES STAUBBEUTELS (S-BAG®)
Ersetzen Sie den s-bag in folgenden Fällen:
S-BAG-Anzeige leuchtet rot auf.
Hinweis: Tauschen Sie den s-bag immer aus,
wenn die S-BAG-Anzeige leuchtet, auch wenn
der s-bag nicht voll ist (er könnte verstopft
sein). Dies gilt auch nach der Verwendung von
Teppichreinigungspulver. Für bestmögliche
Leistung verwenden Sie den Ultra Long
Performance-Beutel, der speziell für Ihren
Staubsauger entwickelt wurde. Andere
synthetische s-bags können ebenfalls verwendet
werden. Verwenden Sie keine Papierstaubbeutel!
www.s-bag.com
Ziehen Sie die S-BAG-Taste, um das
Staubbeutelfach zu önen. Ziehen Sie am Gri,
um den s-bag mit der Halterung zu entfernen.
A. Zum Herausnehmen aus dem Einsatz den
s-bag®-Staubbeutel am Kartonhalter ziehen.
Dadurch wird der s-bag® automatisch versiegelt,
und es kann kein Staub nach außen gelangen.
B. Neuen s-bag®-Staubbeutel einsetzen, indem
der Kartonhalter in das Ende der Führung im
Einsatz gedrückt wird.
Schließen Sie den Deckel. Wenn der s-bag nicht
richtig positioniert wurde oder fehlt, schließt der
Deckel nicht.
Abluftfilter bei jedem fünften Wechsel des
s-bag®-Staubbeutels wechseln/reinigen. Nur
original AEG-Filter verwenden: (AEF12W,
AFS1W) / AEFG12W. Filter herausnehmen und
die Farbe des Rahmens überprüfen: Grün: Muss
durch einen neuen Filter ersetzt werden (nicht
auswaschbarer Filter). Blau: Durch einen neuen
Filter ersetzen oder reinigen.
ERSETZEN DER FILTER
A.
B.

DE
GB
ES
PT
FR
NL
IT
FA
Spülen Sie die Innenseite (die verschmutzte
Seite) mit lauwarmem Leitungswasser aus.
Tippen Sie auf den Filterrahmen, um das Wasser
zu entfernen. Wiederholen Sie den Vorgang
viermal. (**nur waschbare Filter)
Hinweis: Verwenden Sie keine Reinigungsmittel.
Berühren Sie nicht die Filteroberfläche. Lassen
Sie den Filter vollständig trocken (min. 24 h
bei Raumtemperatur), bevor Sie ihn wieder
einsetzen! Wechseln Sie den waschbaren Filter
mindestens einmal pro Jahr oder wenn er sehr
schmutzig oder beschädigt ist.
Ersetzen Sie den Motorfilter (AF08), wenn er
verschmutzt ist oder nach jedem fünften s-bag.
Drücken Sie die Filterhalterung nach unten, und
ziehen Sie den Filter heraus. Ersetzen Sie den
Filter, und schließen Sie die Abdeckung.
STAUBSAUGEN MIT DER
UNIVERSALDÜSE
REINIGEN DER UNIVERSALDÜSE
REINIGEN DER TURBODÜSE
Ändern Sie die Düseneinstellung mit dem Pedal.
Das Symbol zeigt den empfohlenen Bodentyp.
Trennen Sie die Düse vom Rohr. Reinigen Sie mit
dem Schlauchgri.
Trennen Sie die Düse vom Rohr und entfernen
Sie verhedderte Fäden usw., indem Sie sie mit
einer Schere wegschneiden. Reinigen Sie die
Düse mit dem Schlauchgri. *
AEG behält sich das Recht vor, Produkte, Informationen und Spezifikationen ohne Vorankündigung
zu ändern.

DE
GB
ES
PT
FR
NL
IT
FA
TIPPS, WIE SIE DIE BESTEN ERGEBNISSE ERZIELEN KÖNNEN
DÜSE/ZUBEHÖR VERWENDUNG FÜR:
3-in-1-Zubehörwerkzeug* Drei Tools in einem:
1. Tool zum Staubsaugen auf harten Oberflächen (Bücherregalen, Fußleisten usw.).
2. Polsterdüse für Textilien (Gardinen, Polster usw.).
3. Fugendüse für Spalten und Nischen (hinter Heizkörpern usw.).
Turbodüse* Teppichdüse:
• Bürstet und saugt gleichzeitig
• Die Bürstenrolle wird durch den Luftstrom des Staubsaugers angetrieben.
• Nicht geeignet für Teppiche mit sehr hohem Flor und langen Fransen, rutschfeste Teppiche wie
Türmatten oder wasserfeste Teppiche. Verwenden Sie stattdessen die Universaldüse.
ParkettoPro-Düse* Hartbodendüse::
• Zur schonende Reinigung von Hartböden (Parkett, Holzböden, Fliesen usw.).
• Optimale Staubentfernung auf Hartböden mit Fugen.
PrecisionFlow-Düse*
Universaldüse:
• Für alle Bodentypen, sorgt für eine optimale Staubentfernung sowohl auf Teppichen als auch auf
Hartböden.
• Ändern Sie die Düseneinstellung mit dem Pedal. Das Symbol zeigt den empfohlenen Bodentyp.
Miniturbodüase*
Miniturbodüse:
• Bürstet und saugt gleichzeitig
• Für Polstermöbel, PKW-Sitze, Matratzen usw.
• Die Bürstenrolle wird durch den Luftstrom des Staubsaugers angetrieben.
• Nicht geeignet für Teppiche mit sehr hohem Flor und langen Fransen, da diese sich in der
rotierenden Bürstenrolle verfangen können.
Polsterdüse*
Polsterdüse:
Für Sofas, Vorhänge, leichte Stoe usw. Polsterdüse* (35) verwenden. Gegebenenfalls Saugleistung
reduzieren.
Modelle mit manueller Leistungsregelung - Für eine optimale Leistung befolgen Sie die Abbildung auf dem Staubsauger.
FEHLERSUCHE
PROBLEM SOLUTION
Der Staubsauger
startet nicht
• Stellen Sie sicher, dass das Kabel an das Stromnetz angeschlossen ist.
• Vergewissern Sie sich, dass der Stecker und das Kabel nicht beschädigt sind.
• Prüfen Sie, ob eine Sicherung durchgebrannt ist.
Die s-bag®-
Kontrolllampe
leuchtet
• Prüfen Sie, ob der s-bag® voll oder verstopft ist.
• Wenn Sie den s-bag® bereits gewechselt haben, tauschen Sie den Motorfilter aus.
Der Staubsauger
stoppt
Der Staubsauger könnte überhitzt sein: Trennen Sie ihn vom Netzstrom, und prüfen Sie, ob Düse,
Rohr, Schlauch oder Filter verstopft sind. Lassen Sie den Staubsauger 30 Minuten lang abkühlen,
bevor Sie ihn wieder am Stromnetz anschließen.
Wenn der Staubsauger immer noch nicht funktioniert, kontaktieren Sie einen autorisierten AEG-
Kundendienst.
Rückgang der
Saugleistung
im Vergleich
zur normalen
Saugleistung
• Check if the s-bag is full or blocked.
• Check if the motor filter is clogged and needs changing.
• Prüfen Sie, ob der s-bag voll oder verstopft ist.
• Prüfen Sie, ob der Motorfilter verstopft ist und ausgetauscht werden muss.
• Prüfen Sie, ob die Düse verstopft ist und gereinigt werden muss.
• Prüfen Sie, ob der Schlauch verstopft ist, indem Sie ihn vorsichtig zusammendrücken. Seien Sie
jedoch vorsichtig, falls die Verstopfung im Schlauch durch Glas oder Nadeln verursacht wurde.
Hinweis: Die Gewährleistung deckt keine Schäden am Schlauch ab, die durch dessen Reinigung
verursacht wurden.
Wasser wurde in
den Staubsauger
eingesaugt
Es ist erforderlich, den Motor von einem autorisierten AEG-Kundendienst auswechseln zu lassen.
Schäden am Motor, die durch eingedrungenes Wasser verursacht wurden, sind nicht durch die
Garantie abgedeckt.
Bei weiteren Problemen wenden Sie sich an den autorisierten AEG-Kundendienst.

DE
GB
ES
PT
FR
NL
IT
FA
DE
GB
ES
PT
FR
NL
IT
FA
DE
GB
ES
PT
FR
NL
IT
FA
C.
Q. S.P. R.
B.
L.
E.
H.
N.
G.
D.
F.
A.
K.
M.
I.
J.
O.

DE
GB
ES
PT
FR
NL
IT
FA
DE
GB
ES
PT
FR
NL
IT
FA
DE
GB
ES
PT
FR
NL
IT
FA
BEFORE STARTING
Read this manual carefully.
Check that all parts described are included.
Pay special attention to the safety precautions.
DESCRIPTION OF VX7 VACUUM CLEANER
A. Display with rotary knob manual control
B. Exhaust filter
C. Parking slots
D. Power cord
E. Motor filter
F. Motor filter holder
G. S-bag
H. S-bag holder
I. Dust compartment cover
J. 3in1 tool
K. Hose
L. Handle
M. Telescopic tube
N. Parking clip
O. FlowMotion nozzle
P. Upholstery nozzle*
Q. Turbo nozzle*
R. Mini turbo nozzle*
S. ParkettoPro nozzle*
* Certain models only.

DE
GB
ES
PT
FR
NL
IT
FA
DE
GB
ES
PT
FR
NL
IT
FA
DE
GB
ES
PT
FR
NL
IT
FA
Safety requirement and warning
This appliance can be used by children aged from 8 years and above
and persons with reduced physical, sensory or mental capabilities or
lack of experience and knowledge if they have been given supervision or
instruction concerning use of the appliance in a safe way and understand
the hazards involved.
WARNING: Turbo nozzles* have a rotating brush in which parts may
become entrapped. Please use them with caution and only on intended
surfaces. Please turn the vacuum cleaner off before removing entrapped
parts or cleaning the brush. The Turbo nozzle is not suitable for carpets
with deep piles and long fringes, anti-slip carpets like door mats or water
resistant carpets.
Children should be supervised to ensure that they do not play with the
appliance.
Cleaning and maintenance shall not be made by children without
supervision.
Always disconnect the plug from the mains before cleaning or maintaining
the appliance.
Never use the vacuum cleaner without its filters.
Always use original s-bag dust bags suitable for this particular vacuum
cleaner. Damages caused to the cleaner by incorrect use of none-original
dust bags is not covered by the warranty.
Caution
This appliance contains electrical connections:
• Never vacuum any liquid
• Do not immerse in any liquid for cleaning
• The hose should be checked regularly and must not be used if damaged.
The above can cause serious damage to the motor, which is not covered
by the warranty. This vacuum cleaner is for domestic use only.
Never use vacuum cleaner
• Close to fl ammable gases, etc.
• On sharp objects
• On hot or cold cinders, lit cigarette butts, etc.
• On fi ne dust, for instance plaster, concrete, flour.
Power cord precautions
• Never use the vacuum cleaner if the cord is damaged.

DE
GB
ES
PT
FR
NL
IT
FA
DE
GB
ES
PT
FR
NL
IT
FA
DE
GB
ES
PT
FR
NL
IT
FA
• If the cord is damaged, it must be replaced only by an authorized AEG
service centre in order to avoid a hazard. Damage to the vacuum cleaner’s
cord is not covered by the warranty.
• Never pull or lift the vacuum cleaner by the cord. All servicing and
repairs must be performed by an authorized AEG service centre. Store the
vacuum cleaner in a dry place.
Consumer information and sustainability policy
AEG declines all responsibility for all damages arising from any improper
use of the appliance or in cases of tampering with the appliance. For more
details of warranty and consumers’ contacts see the Warranty Booklet in
the packaging.
If you have any comments on the cleaner or the Operating Instructions
manual please e-mail us at [email protected].
Sustainability policy
This product is designed with the environment in mind. All plastic parts
are marked for recycling purposes.
For details see our website: www.aeg-home.com.
The packaging material is chosen to be environmentally friendly and can
be recycled.
Recycle the materials with the symbol . Put the packaging in applicable
containers to recycle it. Help protect the environment and human health
and to recycle waste of electrical and electronic appliances. Do not dispose
appliances marked with the symbol with the household waste. Return
the product to your local recycling facility or contact your municipal office.

DE
GB
ES
PT
FR
NL
IT
FA
DE
GB
ES
PT
FR
NL
IT
FA
DE
GB
ES
PT
FR
NL
IT
FA
HOW TO USE THE VACUUM CLEANER
PARKING POSITIONS
START/STOP THE VACUUM CLEANER
AND ADJUST SUCTION POWER
Open the dust compartment cover. Check
that the dust bag (s-bag) is in place.
Use parking position underneath (A) to
carry and store the cleaner. At the back (B)
when you pause (save your back).
Insert the hose into the cleaner (to remove
it, press the lock buttons and pull). Insert
the hose into the hose handle until the lock
button clicks (to release it, press the lock
button
and pull).
Attach the telescopic tube to the nozzle.
Attach the telescopic tube to the hose
handle (to remove it, press the lock button
and pull). Adjust the telescopic tube by
holding the lock with one hand and pulling
the handle with the other hand.
Pull out the power cord and plug it into the
mains. Press the ON/OFF button to turn the
cleaner on/o.
Adjust suction power. Turn the rotary knob
on the cleaner or use the air valve on the
handle.*
After cleaning, push the REWIND button to
rewind the cable.

DE
GB
ES
PT
FR
NL
IT
FA
DE
GB
ES
PT
FR
NL
IT
FA
DE
GB
ES
PT
FR
NL
IT
FA
REPLACING THE DUSTBAG, S-BAG®
Replace the s-bag when
- S-BAG indicator lights up in red
NB
: Always change the s-bag when S-BAG
indicator is illuminated even if the s-bag
is not full (it may be blocked) and after
using carpet cleaning powder. For best
possible performance, use the Ultra Long
Performance bag which is especially
developed for your cleaner. Other synthetic
s-bags can also be used. Do not use paper
dust bags! www.s-bag.com
Pushing and lifting the OPEN button to
open the dust compartment. Lift the handle
to remove the s-bag with holder.
A. Pull the cardboard to remove the s-bag®
from the insert. This automatically seals the
s-bag® and prevents dust leaking out.
B. Insert a new s-bag® by pushing the
cardboard right into the end of the groove
in the insert.
Close the lid. If the s-bag is not properly placed
or is missing, the lid will not close.
Replace/clean the exhaust filter at every
fifth replacement of the dust bag (s-bag®).
Use AEG original filters: (AEF12W, AFS1W)
/ AEFG12W. Lift out the filter and check the
color of the frame: Green: Must be replaced by
a new filter (non-washable filter). Blue: Replace
with a new filter or clean it.
REPLACING THE FILTERS
A.
B.

DE
GB
ES
PT
FR
NL
IT
FA
DE
GB
ES
PT
FR
NL
IT
FA
DE
GB
ES
PT
FR
NL
IT
FA
Rinse the inside (dirty side) in lukewarm tap
water. Tap the filter frame to remove the water.
Repeat the process four times. (*
*washable
filter only)
NB: Do not use cleaning agents. Avoid
touching the filter surface. Let the filter dry
completely (min. 24 h in room temperature)
before putting back! Change the washable
filter at least once a year or when it is very
dirty or damaged. After replacing the filter,
close the dust compartment lid until it is
clicked back into place.
Replace the motor filter (AF08) when dirty
or after every 5th s-bag. Push the filter
holder down and pull it out. Exchange the
filter and close the lid.
VACUUMING WITH THE UNIVERSAL
NOZZLE
CLEANING THE UNIVERSAL NOZZLE
CLEANING THE TURBO NOZZLE
Change nozzle setting with the pedal. Icon
illustrates recommended floor type.
Disconnect the nozzle from the tube. Clean
with the hose handle.
Disconnect the nozzle from the tube and
remove entangled threads etc by snipping
them away with scissors. Use the hose handle
to clean the nozzle.*
AEG reserves the right to change products, information and specifications without notice.

DE
GB
ES
PT
FR
NL
IT
FA
DE
GB
ES
PT
FR
NL
IT
FA
DE
GB
ES
PT
FR
NL
IT
FA
TIPS ON HOW TO GET THE BEST RESULTS
NOZZLE/ACCESSORY USE FOR:
3in1 accessory tool* 3 tools in 1:
1. Dusting tool for hard surfaces (bookshelves, skirting boards etc).
2. Upholstery tool for textiles (curtains, upholstery etc).
3. Crevice tool for narrow spaces (behind radiators etc).
Turbo nozzle* Carpet nozzle:
• Brushes and vacuums at the same time (best pick up of hair, fibres etc).
• Brush roller is driven by the airflow of the vacuum cleaner.
• Not suitable for carpets with very deep piles and long fringes, anti-slip carpets like door mats or
water resistant carpets. Use universal nozzle instead.
ParkettoPro nozzle* Hard oor nozzle:
• For gentle cleaning of hard floor (parquet, wooden floor, tiles etc).
• Best dust pick up on hard floor with crevice.
PrecisionFlow nozzle*
Universal nozzle:
• For all floor types, secures best dust pick up on both carpets and hard floors.
• Change nozzle setting with the pedal. Icon will show recommended floor type.
Mini Turbo nozzle*
Mini turbo nozzle:
• Brushes and vacuums at the same time.
• For textile furniture, car seats, mattresses etc.
• Brush roller is driven by the airflow of the vacuum cleaner.
• Not suitable for carpets with very deep pile and long fringes as it can get stuck in the rotating
brush roll.
Upholstery nozzle*
Upholstery nozzle:
Use the upholstery nozzle for sofas, curtains, lightweight fabrics etc. Reduce suction power if necessary.
Models with manual power regulation – follow graphics on cleaner for optimal performance.
TROUBLESHOOTING
PROBLEM SOLUTION
The vacuum cleaner
does not start
• Check that the cable is connected to the mains.
• Check that the plug and cable are not damaged.
• Check for a blown fuse.
The s-bag® indicator
light is illuminated
• Check if the s-bag® is full or blocked.
• If you have already changed the s-bag®, change the motor filter.
The cleaner stops
The cleaner might be overheated: disconnect it from the mains; check if the nozzle, tube, hose or filters
are blocked. Let the cleaner cool down for 30 minutes before plugging it in again.
If the cleaner still does not work, contact an authorized AEG service centre.
Reduction of suction
capacity versus
normal
• Check if the s-bag is full or blocked.
• Check if the motor filter is clogged and needs changing.
• Check if nozzle is blocked and needs to be cleared.
• Check if hose is blocked by squeezing it gently. However, be careful in case the obstruction has
been caused by glass or needles caught inside the hose.
Note: The warranty does not cover any damage to the hose caused by cleaning it.
Water has been
sucked into the
vacuum cleaner
It will be necessary to replace the motor at an authorized AEG service centre.
Damage to the motor caused by the penetration of water is not covered by the warranty.
For any further problems, contact an authorized AEG service centre.

DE
GB
ES
PT
FR
NL
IT
FA
DE
GB
ES
PT
FR
NL
IT
FA
DE
GB
ES
PT
FR
NL
IT
FA
C.
Q. S.P. R.
B.
L.
E.
H.
N.
G.
D.
F.
A.
K.
M.
I.
J.
O.

DE
GB
ES
PT
FR
NL
IT
FA
DE
GB
ES
PT
FR
NL
IT
FA
DE
GB
ES
PT
FR
NL
IT
FA
ANTES DE COMENZAR
Lea detenidamente este manual.
Compruebe que están incluidas todas las piezas descritas.
¡Preste especial atención a las precauciones de seguridad!
DESCRIPCIÓN DE LA ASPIRADORA VX7
A. Pantalla con mando de control manual giratorio
B. Tapa del filtro
C. Espacio de almacenamiento
D. Cable de alimentación
E. Filtro del motor
F. Soporte del filtro del motor
G. Bolsa S-bag®
H. Soporte de bolsas S-bag®
I. Tapa del compartimento del polvo
J. Herramienta 3 en 1
K. Manguera
L. Asa
M. Tubo telescópico
N. Clip de estacionamiento
O. Boquilla FlowMotion
P. Boquilla para tapicerías*
Q. Boquilla Turbo*
R. Boquilla Mini Turbo*
S. Boquilla ParkettoPro*
* Solo algunos modelos.

DE
GB
ES
PT
FR
NL
IT
FA
DE
GB
ES
PT
FR
NL
IT
FA
DE
GB
ES
PT
FR
NL
IT
FA
Requisito y advertencia de seguridad
Este aparato pueden utilizarlo niños de 8 años en adelante y personas
cuyas capacidades físicas, sensoriales o mentales estén disminuidas o que
carezcan de la experiencia y conocimientos sufi cientes para manejarlo,
siempre que cuenten con instrucciones o supervisión sobre el uso del
electrodoméstico de forma segura y comprendan los riesgos.
ADVERTENCIA: Las boquillas turbo* de mano auxiliares tienen un cepillo
giratorio en el que las piezas pueden quedar atrapadas. Utilícelos con
precaución y solo en las superfi cies indicadas. Apague la aspiradora antes
de extraer las piezas atrapadas o de limpiar el cepillo. El cepillo Turbo no
es apto para alfombras de pelo o flecos largos, alfombras resistentes al
agua ni alfombras antideslizantes, como los felpudos.
Se deberá controlar que los niños no jueguen con este electrodoméstico.
Desconecte siempre el enchufe de la red eléctrica antes de limpiar o hacer
cualquier labor de mantenimiento en el aparato.
No utilice nunca la aspiradora sin sus fi ltros.
Use siempre bolsas adecuadas para esta aspiradora específica. La
garantía no cubre daños provocados por el uso de bolsas que no sean
apropiadas para esta aspiradora.
Precaución
Este aparato contiene conexiones eléctricas:
• Nunca aspire líquidos.
• Para limpiarlo, no sumerja el aparato en ningún líquido.
• Debe comprobarse periódicamente el tubo fl exible y no utilizarlo si está
deteriorado.
Estas materias podrían ocasionar graves daños en el motor, que no están
cubiertos por la garantía.
La aspiradora está diseñada exclusivamente para uso doméstico.
No utilice nunca la aspiradora
• En las proximidades de gases infl amables, etc.
• Con objetos punzantes.
• Con cenizas candentes o frías, colillas de cigarro encendidas, etc.
• Con polvo fi no, por ejemplo, yeso, cemento o harina.
Precauciones con el cable de alimentación
• Compruebe periódicamente que el enchufe y los cables no están
dañados. No utilice nunca la aspiradora si el cable no está en perfectas
condiciones.

DE
GB
ES
PT
FR
NL
IT
FA
DE
GB
ES
PT
FR
NL
IT
FA
DE
GB
ES
PT
FR
NL
IT
FA
• Si el cable no está en perfectas condiciones, sólo debe ser sustituido por
un centro técnico de AEG, para evitar peligros. La garantía no cubre los
daños ocasionados al cable del aparato.
• No utilice el cable para tirar de la aspiradora o levantarla. Todos los
servicios y reparaciones deberán ser efectuados por un centro técnico
autorizado de AEG. Guarde la aspiradora en un lugar seco.
Información al consumidor y política de sostenibilidad
AEG no se hace responsable de ningún daño que pudiera derivarse del
uso incorrecto del aparato o de haber realizado manipulaciones en él. Para
obtener más detalles de la garantía y los contactos de los consumidores,
consulte el folleto de garantía de la caja.
Si desea realizar algún comentario sobre la aspiradora o sobre el manual de
instrucciones, envíenos un mensaje electrónico a [email protected].
Política de sostenibilidad
Este producto ha sido diseñado para respetar el medio ambiente. Todos
los componentes de plástico llevan el distintivo de reciclaje. Consulte
los detalles en nuestro sitio web: www.aeg-home.com. Se ha elegido un
material de embalaje que sea respetuoso con el medio ambiente y se
pueda reciclar. Recicle los materiales con el símbolo . Coloque el material
de embalaje en los contenedores adecuados para su reciclaje. Ayude a
proteger el medio ambiente y la salud pública, así como a reciclar residuos
de aparatos eléctricos y electrónicos. No deseche los aparatos marcados
con el símbolo junto con los residuos domésticos. Lleve el producto a su
centro de reciclaje local o póngase en contacto con su ofi cina municipal.
* Sólo algunos modelos.

DE
GB
ES
PT
FR
NL
IT
FA
DE
GB
ES
PT
FR
NL
IT
FA
DE
GB
ES
PT
FR
NL
IT
FA
CÓMO USAR LA ASPIRADORA
POSICIONES DE ESTACIONAMIENTO
PONGA EN MARCHA/PARE LA
ASPIRADORA Y AJUSTE LA POTENCIA
DE ASPIRACIÓN
Abra la tapa del compartimento del polvo.
Compruebe que la bolsa de polvo (s-bag) está en
el sitio correcto.
Utilice la posición de estacionamiento o de la
parte inferior (A) para transportar y guardar el
aparato. En la parte trasera (B) cuando haga una
pausa (protéjase la espalda).
Inserte la manguera en la aspiradora (para
retirarla, pulse los botones de bloqueo y tire).
Inserte la manguera en el asa de manguera hasta
que el botón de bloqueo haga clic (para liberarla,
pulse el botón de bloqueo y tire).
Una el tubo telescópico a la boquilla. Instale el
tubo telescópico en el asa de la manguera (para
retirarlo, pulse el botón de bloqueo y tire).
Ajuste el tubo telescópico sosteniendo el
bloqueo con una mano y tirando del asa con la
otra.
Tire del cable de alimentación y enchúfelo a
la red eléctrica. Pulse el botón ON/OFF para
encender o apagar el aparato.
Ajuste la potencia de aspiración: gire el mando
giratorio del aparato o use la válvula de aire del
asa.*
Tras la limpieza, pulse el botón REWIND para
recoger el cable.

DE
GB
ES
PT
FR
NL
IT
FA
DE
GB
ES
PT
FR
NL
IT
FA
DE
GB
ES
PT
FR
NL
IT
FA
CAMBIO DE LA BOLSA DE POLVO S-BAG®
Cambie la bolsa s-bag cuando el indicador S-BAG
se ilumine en rojo
NB: Cambie siempre la bolsa cuando el iluminador
S-BAG se ilumine aunque la bolsa no esté llena
(podría estar obstruida) y después de usar polvo de
limpieza de alfombras. Para un mejor rendimiento,
use la bolsa Ultra Long Performance, diseñada
especialmente para su aspiradora. Se pueden usar
también otras bolsas S-bag sintéticas. ¡No usar
bolsas de papel! www.s-bag.com
Empujando y levantando el botón OPEN para abrir
el compartimento del polvo. Levantamiento del asa
para retirar la bolsa con el soporte.
A. Tire del cartón para sacar la bolsa s-bag® del
compartimento. Esto sella automáticamente la
bolsa s-bag® y evita que se salga el polvo.
B. Introduzca una nueva bolsa para el polvo s-bag®
empujando el soporte de cartón hacia abajo hasta
el fondo de las guías del compartimento.
Cierre la tapa. Si no hay bolsa o no está bien
colocada, la tapa no se cerrará.
Sustituya o limpie el filtro cada 5 cambios de
bolsa de polvo, s-bag®. Utilice filtros originales
de AEG: (AEF12W, AFS1W) / AEFG12W. Retire el
filtro y compruebe el color del contorno: Color
verde = Se debe reemplazar por un nuevo filtro
(filtro no lavable). Color azul = Reemplazar por
un nuevo filtro o limpiarlo.
SUSTITUCIÓN DE LOS FILTROS
A.
B.

DE
GB
ES
PT
FR
NL
IT
FA
DE
GB
ES
PT
FR
NL
IT
FA
DE
GB
ES
PT
FR
NL
IT
FA
Enjuague el interior (lado sucio) con agua tibia
del grifo. Golpee ligeramente el chasis del filtro
para eliminar el agua. Repita el proceso cuatro
veces. (únicamente filtros lavables**)
NB: No use productos de limpieza. No toque la
superficie del filtro. Deje que el filtro se seque
completamente (mín. 24 horas a temperatura
ambiente) antes de colocarlo de nuevo. Cambie
el filtro lavable al menos una vez al año o cuando
esté muy sucio o dañado.
Cambie o lave el filtro del motor (AF08) cuando
esté sucio o cada 5 sustituciones de la bolsa.
Empuje el soporte del filtro hacia abajo y
extráigalo. Cambie el filtro y cierre la tapa.
ASPIRACIÓN CON LA BOQUILLA
UNIVERSAL
LIMPIEZA DE LA BOQUILLA UNIVERSAL
LIMPIEZA DE LA BOQUILLA TURBO
Cambie el ajuste de la boquilla con el pedal. El
icono ilustra un tipo de suelo recomendado.
Desconecte la boquilla del tubo. Limpie con el
asa de la manguera.
Desconecte la boquilla del tubo y recorte los
hilos, etc. enredados con unas tijeras. Use el asa
de la manguera para limpiar la boquilla. *
AEG se reserva el derecho de modificar los productos, la información y las especificaciones sin previo
aviso.

DE
GB
ES
PT
FR
NL
IT
FA
DE
GB
ES
PT
FR
NL
IT
FA
DE
GB
ES
PT
FR
NL
IT
FA
CONSEJOS PARA OBTENER EL MEJOR RESULTADO
BOQUILLA/ACCESORIO USO PARA:
Herramienta de
accesorios 3 en 1*
3 herramientas en 1:
1. Accesorio de limpieza para superficies duras (estanterías, rodapiés, etc.)
2. Accesorio de tapicerías para textiles (cortinas, tapizados, etc.)
3. Boquilla estrecha para espacios estrechos (detrás de radiadores, etc.)
Boquilla Turbo* Boquilla de alfombras:
• Cepilla y aspira al mismo tiempo
• El rodillo del cepillo es accionado por el flujo de aire de la aspiradora.
• No es apropiada para alfombras de pelo o flecos largos, alfombras resistentes al agua ni
alfombras antideslizantes, como los felpudos. Use para ello una boquilla universal.
Boquilla ParkettoPro* Boquilla para suelos duros:
• Para limpiar suelos duros (parquet, suelo de madera, baldosas, etc.)
• Óptima limpieza de suelo duro con fisuras.
Boquilla PrecisionFlow*
Boquilla Universal:
• Para todo tipo de suelos, limpia el polvo de alfombras y de suelos duros.
• Cambie el ajuste de la boquilla con el pedal. El icono mostrará el tipo de suelo recomendado
Boquilla Mini Turbo*
Boquilla Mini Turbo:
• Cepilla y aspira al mismo tiempo
• Para tapicerías de muebles, asientos de coche, colchones, etc.
• El rodillo del cepillo es accionado por el flujo de aire de la aspiradora.
• No es apropiada para alfombras de pelo o flecos largos, pues estos se pueden enredar en el rodillo
giratorio del cepillo.
Boquilla para tapicerías*
Boquilla para tapicerías
Utilice el cepillo para tapicerías* para sofás, cortinas, tejidos ligeros, etc. Reduzca la potencia de
aspiración si fuera necesario.
Modelos con regulación de potencia manual - siga los gráficos del aparato para conseguir un rendimiento óptimo.
SOLUCIÓN DE PROBLEMAS
PROBLEM SOLUTION
La aspiradora no se
pone en marcha
• Compruebe que el cable está conectado a la red eléctrica.
• Compruebe que el enchufe y el cable no están dañados.
• Compruebe si hay algún fusible fundido.
La luz indicadora de
las bolsas s-bag® se
ilumina
• Compruebe si la bolsa está llena u obstruida.
• Si ya ha cambiado la bolsa, cambie el filtro del motor.
El aparato se detiene
El aparato podría estar sobrecalentado: desconéctelo de la red eléctrica; compruebe si la boquilla, la
manguera o los filtros están obstruidos. Deje que el aparato se enfríe durante 30 minutos antes de
enchufarlo de nuevo.
Si el aparato sigue sin funcionar, póngase en contacto con un servicio técnico autorizado AEG.
Reducción de
la capacidad de
aspiración
• Compruebe si la bolsa está llena u obstruida.
• Compruebe si el filtro del motor está obstruido y necesita sustitución.
• Compruebe si la boquilla está obstruida.
• Compruebe si la manguera está obstruida apretándola suavemente. Tenga cuidado si la obstrucción
ha sido provocada por cristales o agujas atrapadas dentro de la manguera.
Nota: la garantía no cubre posibles daños provocados a la manguera al desobstruirla.
Ha entrado agua en
la aspiradora
Será necesario cambiar el motor en un servicio técnico autorizado AEG.
La garantía no cubre posibles daños en el motor por la entrada de agua.
Para otras consultas, póngase en contacto con un servicio técnico autorizado AEG.

DE
GB
ES
PT
FR
NL
IT
FA
DE
GB
ES
PT
FR
NL
IT
FA
DE
GB
ES
PT
FR
NL
IT
FA
C.
Q. S.P. R.
B.
L.
E.
H.
N.
G.
D.
F.
A.
K.
M.
I.
J.
O.

DE
GB
ES
PT
FR
NL
IT
FA
DE
GB
ES
PT
FR
NL
IT
FA
DE
GB
ES
PT
FR
NL
IT
FA
ANTES DE INICIAR
Leia este manual atentamente.
Verifique se a embalagem inclui todas as peças mencionadas.
Preste particular atenção ao capítulo “Precauções de segurança”!
DESCRIÇÃO DO ASPIRADOR VX7
A. Visor com controlo manual por botão rotativo
B. Filtro de saída
C. Ranhuras para estacionamento
D. Cabo de alimentação
E. Filtro do motor
F. Suporte do filtro do motor
G. Saco S-bag®
H. Suporte do saco S-bag®
I. Tampa do compartimento do pó
J. Acessório 3-em-1
K. Mangueira
L. Pega
M. Tubo telescópico
N. Encaixe de estacionamento
O. Escova FlowMotion
P. Bocal para sofás*
Q. Escova Turbo*
R. Escova Mini Turbo*
S. Escova ParkettoPro*
*Apenas alguns modelos.

DE
GB
ES
PT
FR
NL
IT
FA
DE
GB
ES
PT
FR
NL
IT
FA
DE
GB
ES
PT
FR
NL
IT
FA
Avisos e requisitos de segurança
Este aparelho pode ser utilizado por crianças com 8 anos ou mais e por pessoas
com capacidades físicas, sensoriais ou mentais reduzidas ou com pouca
experiência e conhecimento se tiverem recebido supervisão ou instruções
relativas à utilização do aparelho de forma segura e compreenderem os perigos
envolvidos.
AVISO: As Escovas Turbos* têm escova rotativa que pode aprisionar objectos.
Utilize-os com cuidado e apenas nas superfícies para as quais são adequados.
Desligue o aspirador antes de remover qualquer objecto que tenha fi cado
aprisionado e antes de limpar a escova. A escova Turbo năo é adequada para
alcatifas com pelo comprido e franjas longas, tapetes antiderrapantes como
capachos de portas ou tapetes resistentes ŕ água.
As crianças deverão ser supervisionadas de modo a garantir que não brincam
com o aparelho. Retire sempre a fi cha da corrente antes de limpar ou tratar da
manutenção do aparelho.
Nunca utilize o aspirador sem filtros.
Utilize sempre os sacos de aspirador s-bag originais destinados a este
aspirador. Quaisquer danos causados no aspirador por uma utilização
incorreta de sacos de pó não originais não estão cobertos pela garantia.
Atenção
Este aparelho contém ligações eléctricas:
• Não aspire líquidos
• Não o mergulhe em líquidos para limpar
• A mangueira deve ser verifi cada regularmente e não deverá ser utilizada se
estiver danifi cada.
Os procedimentos acima descritos podem causar sérios danos ao motor, não
cobertos pela garantia.
Este aspirador destina-se apenas a uso doméstico.
Nunca utilize o aspirador
• Perto de gases infl amáveis, etc.
• Em objectos aguçados
• Em cinzas quentes, pontas de cigarros acesas, etc.
• Em pó fi no, como por exemplo, gesso, cimento, farinha.
Precauções a ter com o cabo
• Verifi que regularmente se a fi cha e o cabo não estão danifi cados. Nunca
utilize o aspirador se o cabo estiver danifi cado.
• Se o cabo de alimentação estiver danifi cado, só deverá ser substituído por um

DE
GB
ES
PT
FR
NL
IT
FA
DE
GB
ES
PT
FR
NL
IT
FA
DE
GB
ES
PT
FR
NL
IT
FA
centro de assistência
AEG autorizado, de modo a evitar quaisquer perigos.
A garantia não cobre os danos provocados ao cabo do aspirador.
• Nunca puxe nem levante o aspirador pelo cabo. Toda a assistência e
reparações devem ser efectuadas por um centro de assistência AEG
autorizado. Mantenha o aspirador num local seco.
Informação ao consumidor e política de s ustentabilidade
A AEG recusa qualquer responsabilidade por todos os danos decorrentes
de um uso impróprio do aparelho ou de modifi cações ilícitas efectuadas ao
mesmo. Para obter informações mais detalhadas sobre a garantia e contactos de
consumidores, consulte o Folheto da Garantia incluído na embalagem.
Se tiver comentários a fazer sobre o aspirador ou sobre o manual de Instruções
de Funcionamento, envie-nos uma mensagem de correio electrónico para
Política de sustentatibilidade
Este produto foi concebido a pensar no ambiente. Todas as peças de plástico
estão marcadas para fi ns de reciclagem. Para obter informações detalhadas,
consulte o nosso Web site: www.aeg-home.com. Os materiais de embalagem
foram escolhidos por respeitarem o ambiente e podem ser reciclados.
Recicle os materiais que apresentem o símbolo . Coloque a embalagem nos
contentores indicados para reciclagem. Ajude a proteger o ambiente e a saúde
pública através da reciclagem de aparelhos eléctricos e electrónicos. Não elimine
os aparelhos que tenham o símbolo juntamente com os resíduos domésticos.
Coloque o produto num ponto de recolha para reciclagem local ou contacte as
suas autoridades municipais.
* Apenas determinados modelos.

DE
GB
ES
PT
FR
NL
IT
FA
DE
GB
ES
PT
FR
NL
IT
FA
DE
GB
ES
PT
FR
NL
IT
FA
COMO UTILIZAR O ASPIRADOR
POSIÇÕES DE ESTACIONAMENTO
LIGAR/DESLIGAR O ASPIRADOR E
AJUSTAR A POTÊNCIA DE SUCÇÃO
Abra a tampa do compartimento empurrando e
levantando o botão OPEN. Verifique se o saco do
aspirador (s-bag) está bem instalado.
Utilize a posição de estacionamento da parte
inferior (A) para transportar ou guardar o
aspirador. Utilize a posição da parte de trás (B)
quando pretender fazer uma pausa (descansar
as costas).
Introduza a mangueira no aspirador (para
remover, prima os botões de bloqueio e puxe).
Introduza a mangueira na respetiva pega até
o botão de bloqueio emitir um clique (para
remover, prima o botão de bloqueio e puxe).
Encaixe o tubo telescópico na escova. Encaixe
o tubo telescópico na pega da mangueira (para
remover, prima o botão de bloqueio e puxe).
Ajuste o tubo telescópico segurando o bloqueio
com uma mão e puxando a pega com a outra
mão.
Puxe o cabo de alimentação para fora e ligue-o
numa tomada elétrica. Prima o botão ON/OFF
para ligar/desligar o aspirador.
Ajuste a potência de sucção: Rode o botão
rotativo do aspirador ou utilize a válvula de ar
da pega.
Quando terminar a limpeza, prima o botão
REWIND para recolher o cabo.

DE
GB
ES
PT
FR
NL
IT
FA
DE
GB
ES
PT
FR
NL
IT
FA
DE
GB
ES
PT
FR
NL
IT
FA
SUBSTITUIR O SACO DO ASPIRADOR S-BAG®
Substitua o saco s-bag quando: o indicador S-BAG
acender a vermelho
NB: Substitua sempre o saco s-bag quando o
indicador S-BAG acender, mesmo que o saco
do pó não esteja cheio (pode estar obstruído) e
após utilizar um produto em pó para a limpeza de
carpetes. Para obter o melhor desempenho possível,
utilize o saco Ultra Long Performance que foi criado
especificamente para o seu aspirador. Pode utilizar
outros sacos s-bag sintéticos. Não utilize sacos de
aspirador em papel! www.s-bag.com
Empurrando e levantando o botão OPEN para abrir
a tampa do compartimento do pó. Elevação a pega
para remover o saco s-bag com o suporte.
A. Puxe a parte de cartão para remover o
saco s-bag® do encaixe. Esta acção fecha
automaticamente o saco s-bag® e impede o pó de
sair para o ar.
B. Insira um saco s-bag® novo puxando a parte de
cartão até ao fim da ranhura do encaixe.
Feche a tampa. Se o saco s-bag não ficar bem
posicionado ou se o aspirador não tiver s-bag, a
tampa não fecha.
Substitua/limpe o filtro de saída de ar a cada 5
substituições do saco de poeiras, s-bag®. Utilize
filtros originais da AEG: (AEF12W, AFS1W) /
AEFG12W. Retire o filtro e verifique a cor da
estrutura: Cor verde = Deve ser substituído
por um filtro novo ou limpo; consulte 6 (filtro
nonlavável). Cor azul = Substitua por um filtro
novo ou lave-o.
SUBSTITUIR OS FILTROS
A.
B.

DE
GB
ES
PT
FR
NL
IT
FA
DE
GB
ES
PT
FR
NL
IT
FA
DE
GB
ES
PT
FR
NL
IT
FA
Lave a parte interior (lado sujo) em água
corrente morna. Bata na armação do filtro para
remover a água. Repita o procedimento quatro
vezes. (**apenas no caso do filtro lavável)
NB: Não utilize produtos de lavagem. Evite
tocar na superfície do filtro. Deixe o filtro secar
totalmente (mín. 24 h à temperatura ambiente)
antes de voltar a instalá-lo! Substitua o filtro
lavável pelo menos uma vez por ano ou quando
verificar que está demasiado sujo ou danificado.
Substitua o filtro do motor (AF08) quando
estiver sujo ou após 5 substituições do s-bag.
Pressione o suporte do filtro para baixo e puxe-o
para fora. Troque o filtro e feche a tampa.
ASPIRAR COM A ESCOVA UNIVERSAL
LIMPAR A ESCOVA UNIVERSAL
LIMPAR A ESCOVA TURBO
Mude a configuração da escova com o pedal.
O ícone ilustra o tipo de piso para o qual a
configuração é recomendada.
Retire a escova do tubo. Limpe a pega da
mangueira.
Retire a escova do tubo e remova os fios que
estiverem enredados, cortando-os com uma
tesoura se for necessário. Utilize a pega da
mangueira para limpar a escova. *
A AEG tem o direito de alterar os produtos, informações e especificações sem aviso prévio.

DE
GB
ES
PT
FR
NL
IT
FA
DE
GB
ES
PT
FR
NL
IT
FA
DE
GB
ES
PT
FR
NL
IT
FA
SUGESTÕES PARA OBTER OS MELHORES RESULTADOS
NOZZLE/ACCESSORY USE FOR:
Ferramenta de cessórios
3-em-1*
3 acessórios em 1:
1. Escova para limpar o pó em superfícies rígidas (estantes, rodapés, etc.).
2. Acessório de estofos para limpar têxteis (cortinas, sofás, etc.).
3. Tubo para frestas para espaços estreitos (atrás de radiadores, etc.).
Escova Turbo* Escova para alcatifas:
• - Escova e aspira ao mesmo tempo
• - O rolo-escova é acionado pelo fluxo de ar do aspirador.
• - Não é adequada para alcatifas com pelo comprido e franjas longas, tapetes antiderrapantes,
como tapetes de porta, ou carpetes resistentes à água. Utilize a escova Universal em vez desta.
Escova ParkettoPro* Escova para piso rígido:
- Para limpar suavemente pisos rígidos (parquet, soalho, tijoleira, etc.).
- A melhor aspiração em pisos rígidos com frestas.
Escova PrecisionFlow*
Escova Universal:
- Para todos os tipos de piso, capaz da melhor aspiração tanto em carpetes como em pisos rígidos.
- Mude a configuração da escova com o pedal. O ícone indica o tipo de piso para o qual a configuração
é recomendada.
Escova Mini Turbo*
Escova Mini Turbo*
- Escova e aspira ao mesmo tempo
- Para sofás de têxteis, bancos de automóvel, colchões, etc.
- O rolo-escova é acionado pelo fluxo de ar do aspirador.
- Não é adequada para alcatifas com pelo comprido e franjas longas, porque o rolo-escova rotativo
pode aprisioná-los
Bocal para sofás*
Bocal para sofás
Utilize o bocal para sofás* para estofos, cortinas, tecidos leves etc. Reduza o poder de sucção se
necessário.
Modelos com regulação manual da potência - siga os gráficos no aspirador para obter o melhor desempenho possível.
RESOLUÇÃO DE PROBLEMAS
PROBLEM SOLUTION
O aspirador não
funciona
• Verifique se o cabo está ligado na tomada elétrica.
• Verifique se existem danos na ficha ou no cabo.
• Verifique se existe algum disjuntor desligado ou fusível queimado.
A luz indicadora
s-bag® está acesa
• Verifique se o saco s-bag® está cheio ou obstruído.
• Se já tiver substituído o saco s-bag®, substitua o filtro do motor.
O aspirador deixa de
funcionar
É possível que o aspirador tenha aquecido demasiado: desligue o aspirador da tomada elétrica;
verifique se existe alguma obstrução na escova, no tubo, na mangueira ou nos filtros. Deixe o
aspirador arrefecer durante 30 minutos antes de voltar a ligá-lo.
Se o aspirador continuar a não funcionar, contacte um Centro de Assistência Técnica AEG autorizado
Redução da
capacidade de
sucção em relação à
normal
• Verifique se o saco s-bag está cheio ou obstruído.
• Verifique se o filtro do motor está obstruído e precisa de substituição.
• Verifique se a escova está obstruída e precisa de limpeza.
• Verifique se a mangueira está obstruída apertando-a suavemente. Tenha cuidado se a obstrução
tiver sido provocada por agulhas ou vidros encravados no interior da mangueira.
Nota: A garantia não cobre quaisquer danos provocados na mangueira por qualquer tentativa de a
limpar.
O aspirador aspirou
água
Será necessário substituir o motor num Centro de Assistência Técnica AEG autorizado.
Os danos que forem causados pela entrada de água para o motor não estão cobertos pela garantia.
Em caso de qualquer outro problema, contacte um Centro de Assistência Técnica AEG autorizado.

DE
GB
ES
PT
FR
NL
IT
FA
DE
GB
ES
PT
FR
NL
IT
FA
DE
GB
ES
PT
FR
NL
IT
FA
C.
Q. S.P. R.
B.
L.
E.
H.
N.
G.
D.
F.
A.
K.
M.
I.
J.
O.

DE
GB
ES
PT
FR
NL
IT
FA
DE
GB
ES
PT
FR
NL
IT
FA
DE
GB
ES
PT
FR
NL
IT
FA
AVANT DE COMMENCER
Lisez attentivement ce manuel d’utilisation.
Assurez-vous que toutes les pièces mentionnées sont présentes dans le carton.
Prêtez tout particulièrement attention aux « Consignes de sécurité ».
DESCRIPTION DE L’ASPIRATEUR VX7
A. Variateur avec commande manuelle à bouton rotatif
B. Filtre de sortie d’air
C. Système parking
D. Câble d’alimentation
E. Filtre moteur
F. Support de filtre moteur
G. Sac à poussière s-bag®
H. Support du sac à poussière s-bag®
I. Couvercle du compartiment à poussière
J. Accessoire 3-en-1
K. Flexible
L. Poignée
M. Tube télescopique
N. Clip de rangement pour le parking horizontal ou vertical
O. Brosse FlowMotion*
P. Petit suceur pour canapés, tentures*
Q. Turbobrosse Turbo*
R. Mini Turbobrosse*
S. Brosse parquet ParkettoPro*
*Les accessoires peuvent varier d’un modèle à l’autre.

DE
GB
ES
PT
FR
NL
IT
FA
DE
GB
ES
PT
FR
NL
IT
FA
DE
GB
ES
PT
FR
NL
IT
FA
Précautions de sécurité et avertissement
Cet appareil peut être utilisé par des enfants de plus de 8 ans, ainsi que des
personnes dont les capacités physiques, sensorielles et mentales sont réduites
ou dont les connaissances et l’expérience sont insui santes, à condition d’être
surveillés ou d’avoir reçu des instructions concernant l’utilisation sécurisée
de l’appareil et de comprendre les risques encourus.
AVERTISSEMENT: Les Turbo Brosse* sont dotées d’une brosse rotative dans
laquelle des objets peuvent se coincer. Veuillez les utiliser avec précaution et
uniquement sur des surfaces adaptées. Éteignez l’aspirateur avant de retirer les
objets coincés ou de nettoyer la brosse. La Turbo brosse ne convient pas pour
les moquettes ŕ longs poils, les tapis antidérapants tels que les paillassons, et les
tapis résistants ŕ l'eau.
Les enfants doivent être surveillés, pour éviter qu’ils ne jouent avec cet appareil.
Toujours débrancher la fi che de la prise avant toute opération de nettoyage ou
d’entretien de votre aspirateur.
Ne jamais utiliser l’aspirateur sans filtres.
Utilisez des sacs à poussière d'origine adaptés à cet aspirateur. Les
dommages causés à l'aspirateur par l'utilisation de sacs à poussière
autres que les sacs d'origine ne sont pas couverts par la garantie.
Attention
Cet appareil comporte des connexions électriques:
• Ne jamais aspirer de liquide.
• Pour nettoyer l’appareil, ne le plonger dans aucun liquide.
• Le flexible doit être régulièrement vérifi é et ne doit pas être utilisé s’il est
endommagé.
Les éléments susmentionnés peuvent provoquer de graves dommages au
moteur. La garantie ne prend pas en charge ce type de dommage.
Cet aspirateur est exclusivement destiné à un usage domestique.
Ne jamais utiliser l’aspirateur:
• À proximité de gaz infl ammables, etc.
• Sur des objets pointus
• Sur des cendres chaudes ou refroidies, des mégots de cigarettes
incandescents, etc.
• Sur des particules de poussière très fi nes issues entre autres du plâtre, du
béton ou de la farine.
• Les produits en bombe aérosol peuvent être inflammables. Ne pas vaporiser
de tels produits à proximité ou sur l’aspirateur.

DE
GB
ES
PT
FR
NL
IT
FA
DE
GB
ES
PT
FR
NL
IT
FA
DE
GB
ES
PT
FR
NL
IT
FA
Précautions d’emploi du cordon d’alimentation
• Vérifi er régulièrement que la prise et le cordon ne sont pas endommagés. Ne
jamais utiliser l’aspirateur si le cordon est endommagé.
• Si le cordon d’alimentation est endommagé, il peut uniquement être remplacé
dans un Centre Service Agréé AEG, afi n d’éviter tout danger. Les dommages
portés au cordon de l’aspirateur ne sont pas couverts par la garantie.
• Ne jamais tirer ni soulever l’aspirateur par le cordon. Toutes les révisions et
réparations doivent être eectuées dans un Centre Service Agréé AEG.
Ranger l’aspirateur dans un endroit sec. Informations consommateur et fi n
de vie AEG décline toute responsabilité pour les dommages résultant d’une
utilisation incorrecte de l’appareil ou en cas de modifi cation de l’appareil. Pour
plus d’informations sur la garantie et les points de contact consommateur, voir le
livret de garantie inclus dans l’emballage.
Pour nous transmettre vos commentaires sur l’aspirateur ou sur les instructions
d’utilisation, envoyez un e-mail à l’adresse [email protected]
Appareil en n de vie
Ce produit a été conçu dans un souci de respect de l’environnement. Tous les
éléments en plastique sont marqués à des fi ns de recyclage. Pour plus de
détails, visiter notre site Web : www.aeg-home.com. Les emballages sélectionnés
sont sans danger pour l’environnement et recyclables. Recyclez les matériaux
portant le symbole . Déposez les emballages dans les conteneurs prévus à cet
eet. Contribuez à la protection de l’environnement et à votre sécurité, recyclez
vos produits électriques et électroniques. Ne jetez pas les appareils portant le
symbole avec les ordures ménagères. Emmenez un tel produit dans votre
centre local de recyclage ou contactez vos services municipaux.
* Suivant les modèles.

DE
GB
ES
PT
FR
NL
IT
FA
DE
GB
ES
PT
FR
NL
IT
FA
DE
GB
ES
PT
FR
NL
IT
FA
COMMENT UTILISER CET
ASPIRATEUR
POSITIONS DE RANGEMENT
MISE EN MARCHE/ARRÊT DE
L’ASPIRATEUR ET RÉGLAGE DE LA
PUISSANCE
Pour accéder au compartiment du sac à
poussière, pousser et soulever le bouton OPEN.
Vérifiez que le sac à poussière (s-bag) est en
bien en placé.
Utilisez la position parking au-dessous (A) pour
porter et ranger l’aspirateur. À l’arrière (B) quand
vous faites une pause (prenez soin de votre dos).
Connectez le flexible au corps de l’appareil. Pour
le retirer, pressez les boutons de verrouillage et
tirez). Insérez le flexible dans la poignée jusqu’à
ce que le bouton de verrouillage émette un clic.
Pour ôter le flexible, appuyez sur le bouton de
verrouillage et tirez).
Pour accéder au compartiment du sac à
poussière, pousser et soulever le bouton OPEN.
Vérifiez que le sac à poussière (s-bag) est en
bien en placé. Connectez le flexible au corps de
l’appareil. Pour le retirer, pressez les boutons de
verrouillage et tirez). Insérez le flexible dans la
poignée jusqu’à ce que le bouton de verrouillage
émette un clic. Pour ôter le flexible, appuyez sur
le bouton de verrouillage et tirez).
Tirez sur le câble d’alimentation et branchez la
fiche sur une prise secteur. Appuyez sur le bouton
Marche/Arrêt pour allumer ou éteindre l’appareil.
Réglage de la puissance: tournez le bouton
rotatif de l’aspirateur ou servez-vous du réglage
de débit d’air sur la poignée.
Appuyer sur la pédale enrouleur de câble pour
ranger le câble d’alimentation.

DE
GB
ES
PT
FR
NL
IT
FA
DE
GB
ES
PT
FR
NL
IT
FA
DE
GB
ES
PT
FR
NL
IT
FA
REMPLACEMENT DU SAC À POUSSIÈRE,
S-BAG®
Remplacez le sac à poussière s-bag quand:
l’indicateur de remplissage de sac s-bag s’allume en
rouge. Remarque: remplacez systématiquement le
sac à poussière s-bag si l’indicateur de remplissage
de sac ou le témoin s-bag est allumé, même si le sac
n’est pas plein (il peut être colmaté) et après avoir
utilisé une poudre de nettoyage pour moquettes.
Pour obtenir les meilleures performances, utilisez le
sac Ultra Long Performance qui a été spécialement
conçu pour l’aspirateur VX7. Néanmoins, il est
possible d’utiliser des sacs s-bag synthétiques
compatibles avec cet aspirateur. Ne jamais utiliser
de sacs à poussière en papier dans cet aspirateur!
www.s-bag.com
Pour accéder au compartiment du sac à
poussière, pousser et soulever le bouton OPEN.
Levage la poignée pour extraire le s-bag avec le
support.
A. Tirez sur la partie cartonnée pour retirer le
sac à poussière s-bag® du support de fixation.
Le sac à poussière s-bag® se ferme alors
automatiquement, ce qui empêche la poussière
de se diuser dans l’air.
B. Insérez un nouveau sac à poussière s-bag® en
poussant la partie cartonnée bien au fond du rail
du support de fixation.
Fermez le couvercle. Si le s-bag n’est pas
convenablement positionné ou s’il est
manquant, il est impossible de fermer le
couvercle.
Remplacez/nettoyez le filtre de sortie d’air
tous les cinq changements du sac à poussière
(s-bag®). Utilisez les filtres originaux AEG:
(AEF12W, AFS1W) / AEFG12W. Retirez le filtre
et vérifiez la couleur du cadre: Vert: doit être
remplacé par un filtre neuf (filtre non lavable).
Bleu: remplacez-le par un filtre neuf ou nettoyez-
le.
REMPLACEMENT DES FILTRES
A.
B.

DE
GB
ES
PT
FR
NL
IT
FA
DE
GB
ES
PT
FR
NL
IT
FA
DE
GB
ES
PT
FR
NL
IT
FA
Rincez l’intérieur (côté sale) à l’eau tiède du
robinet. Tapotez le cadre du filtre pour éliminer
l’eau superflue. Répétez cette opération quatre
fois. (**filtre lavable uniquement)
Remarque : n’utilisez pas de produit de
nettoyage. Évitez de toucher la surface du filtre.
Laissez le filtre sécher complètement (minimum
24 h à température ambiante) avant de le
remettre en place ! Remplacer le filtre lavable au
moins une fois par an, ou dès lors qu’il est sale
ou endommagé.
Remplacez le filtre moteur (AF08) si celui-ci est
sale ou lorsque le sac à poussière s-bag a été
remplacé 5 fois. Poussez la grille du filtre vers le bas
et retirez-le filtre. Remplacez le filtre et rabattre la
grille.
UTILISATION DE L’ASPIRATEUR AVEC LA
BROSSE
NETTOYAGE DE LA BROSSE
NETTOYAGE DE LA TURBOBROSSE
Modifiez le réglage de la brosse au moyen de la
pédale. L’icône illustre le type de sols conseillé.
Séparez la brosse et le tube. Nettoyez à l’aide de
la poignée du flexible.
Séparez la turbobrosse et le tube et retirez les
fils emmêlés en les coupant avec des ciseaux.
Utilisez la poignée du flexible pour nettoyer la
turbobrosse. *
AEG se réserve le droit de modifier les produits, les informations et les caractéristiques techniques,
sans préavis.

DE
GB
ES
PT
FR
NL
IT
FA
DE
GB
ES
PT
FR
NL
IT
FA
DE
GB
ES
PT
FR
NL
IT
FA
ASTUCES POUR UN RESULTAT IMPECCABLE
BROSSE/ACCESSOIRE À UTILISER POUR :
Accessoire 3 en 1* 3 accessoires en 1 :
1. Brosse meubles pour aspirer les surfaces dures (meubles, bibliothèques, plinthes, etc.).
2. Petit suceur pour aspirer les textiles (rideaux, canapés, etc.).
3. Suceur long pour aspirer les espaces étroits (arrière des radiateurs, etc.).
Turbobrosse* Brosse pour moquette :
• Brosse et aspire en même temps
• La brosse rotative est entraînée par le flux d'air de l'aspirateur.
• Cet accessoire ne convient pas pour les moquettes à poils longs, les tapis antidérapants tels que
les paillassons ou les tapis résistants à l'eau. Pour aspirer ce type de surfaces, utilisez plutôt la
brosse.
Brosse ParkettoPro* Brosse pour sols durs:
• Pour le nettoyage simple d'un sol dur (parquet, sol en bois, carrelage, etc.).
• déale pour l’aspiration des parquets.
Brosse PrecisionFlow*
Brosse :
• Pour tous les types de sols, garantit les meilleurs résultats sur les moquettes et les sols durs.
• Modifiez le réglage de la brosse au moyen de la pédale. L'icône illustrera le type de sols conseillé.
Mini turbobrosse*
Mini turbobrosse:
• Brosse et aspire en même temps
• Pour le mobilier textile, les sièges d'automobile, les matelas, etc.
• La brosse rotative est entraînée par le flux d'air de l'aspirateur.
• Ne convient pas pour les moquettes à poils longs qui peuvent se loger dans la brosse rotative.
Petit suceur pour
canapés, tentures*
Petit suceur pour canapés, tentures:
Utiliser le petit suceur* pour les canapés, les rideaux, les tissus légers, etc. Si nécessaire, réduire la
puissance d’aspiration.
Modèles à régulation manuelle de la puissance – Respectez les graphismes sur l'aspirateur pour obtenir les performances
optimales.
EN CAS D’ANOMALIE DE FONCTIONNEMENT
PROBLÈME SOLUTION
L'aspirateur ne
démarre pas
• Assurez-vous que le câble d'alimentation est branché sur le secteur.
• Vérifiez que la fiche et le câble ne sont pas endommagés.
• Vérifiez qu’aucun fusible n’a sauté.
Le témoin lumineux
du sac à poussière
s-bag® est allumé
• Vérifiez que le sac à poussière s-bag® ne soit pas plein ou colmaté.
• Si vous avez déjà remplacé le sac à poussière s-bag®, changez le filtre moteur.
L'aspirateur s'arrête
L'aspirateur a peut-être surchaué : débranchez-le du secteur ; assurez-vous que la brosse, le tube,
le flexible ou les filtres ne sont pas obstrués. Attendez 30 minutes que l'aspirateur refroidisse avant
de le rebrancher.
Si l'aspirateur ne fonctionne toujours pas, consultez le service après-vente agréé AEG.
Réduction de la
capacité d'aspiration
• Vérifiez que le sac à poussière s-bag n’est pas plein ou colmaté.
• Assurez-vous que le filtre moteur n'est pas colmaté et ne doit pas être changé.
• Assurez-vous que la brosse n'est pas obstruée et ne doit pas être nettoyée.
• Assurez-vous que le flexible n'est pas obstrué en le comprimant légèrement. Cependant, soyez
vigilants en cas d'obstruction causée par du verre ou des aiguilles coincés à l'intérieur du flexible.
Note : la garantie ne couvre pas les dommages du flexible causés lors de son nettoyage.
De l'eau a été
aspirée à l'intérieur
de l'aspirateur
Il sera nécessaire de faire remplacer le moteur par un centre de service après-vente AEG agréé.
Les dommages subis par le moteur du fait de la pénétration d'eau ne sont pas couverts par la
garantie.
Pour tout autre problème, consultez un centre de service après-vente AEG agréé.

DE
GB
ES
PT
FR
NL
IT
FA
DE
GB
ES
PT
FR
NL
IT
FA
DE
GB
ES
PT
FR
NL
IT
FA
C.
Q. S.P. R.
B.
L.
E.
H.
N.
G.
D.
F.
A.
K.
M.
I.
J.
O.

DE
GB
ES
PT
FR
NL
IT
FA
DE
GB
ES
PT
FR
NL
IT
FA
DE
GB
ES
PT
FR
NL
IT
FA
ANTES DE INICIAR
Leia este manual atentamente.
Verifique se a embalagem inclui todas as peças mencionadas.
Preste particular atenção ao capítulo “Precauções de segurança”!
BESCHRIJVING VAN VX7-STOFZUIGER
A. Display met handmatige bediening met draaiknop
B. Uitlaatfilter
C. Parkeermogelijkheden
D. Stroomkabel
E. Motorfilter
F. Motorfilterhouder
G. S-bag®
H. S-bag®-houder
I. Deksel stofcompartiment
J. 3-in-1 mondstuk
K. Slang
L. Handgreep
M. Telescopische buis
N. Opbergklem
O. FlowMotion-mondstuk
P. Mondstuk voor bekleding*
Q. Turbo-mondstuk*
R. Mini turbo-mondstuk*
S. ParkettoPro-mondstuk*
* Alleen bepaalde modellen.

DE
GB
ES
PT
FR
NL
IT
FA
DE
GB
ES
PT
FR
NL
IT
FA
DE
GB
ES
PT
FR
NL
IT
FA
Veiligheidsvereiste en waarschuwing
Dit apparaat kan worden gebruikt door kinderen van 8 jaar en ouder
en door mensen met beperkte lichamelijke, zintuiglijke of verstandelijke
vermogens of een gebrek aan ervaring en kennis, indien zij onder toezicht
staan of instructies hebben gekregen over het veilig gebruiken van het
apparaat en indien zij de eventuele gevaren begrijpen.
WAARSCHUWING: Turbomondstukaccessoires* zijn voorzien van een
roterende borstel waarin deeltjes vast kunnen komen te zitten. Let bij
het gebruik van deze accessoires goed op en gebruik ze alleen op de
bedoelde oppervlakken. Schakel de stofzuiger uit voordat u vastgelopen
deeltjes verwijdert of de borstel schoonmaakt. Het Turbo mondstuk is niet
geschikt voor tapijten met diepe polen en lange franjes, antislip tapijten
zoals deurmatten of waterbestendige tapijten.
Let op dat kinderen niet met het apparaat spelen.
Trek altijd de stekker uit het stopcontact voordat u het apparaat gaat
reinigen of onderhouden.
Gebruik de stofzuiger nooit zonder filters.
Gebruik altijd originele s-bag stofzuigerzakken die geschikt zijn voor deze
specifieke stofzuiger. Schade die wordt toegebracht aan de stofzuiger
door het verkeerde gebruik van niet-originele stofzuigerzakken wordt
niet gedekt door de garantie.
Waarschuwing
Dit apparaat bevat elektrische verbindingen.
• Zuig nooit vloeistoen op.
• Dompel het apparaat nooit in water om het schoon te maken.
• Controleer de slang regelmatig en gebruik deze niet als u
beschadigingen opmerkt.
Bovengenoemde zaken kunnen schade aan de motor veroorzaken.
Dergelijke schade valt niet onder de garantie.
De stofzuiger is uitsluitend bestemd voor huishoudelijk gebruik.
Gebruik de stofzuiger nooit in deze situaties
• In de buurt van ontvlambare gassen, enz.
• Bij scherpe voorwerpen.
• Voor hete of koude as, brandende sigarettenpeuken, enz.
• Voor fi jn stof van bijvoorbeeld gips, beton of bloem.
Voorzorgsmaatregelen betreende het elektrische snoer
• Controleer regelmatig of de stekker en het snoer niet beschadigd zijn.
Gebruik de stofzuiger nooit als het snoer beschadigd is.

DE
GB
ES
PT
FR
NL
IT
FA
DE
GB
ES
PT
FR
NL
IT
FA
DE
GB
ES
PT
FR
NL
IT
FA
• Als het snoer is beschadigd, mag dit alleen bij een erkend AEG Service
Centre worden vervangen om risico te vermijden. Schade aan het snoer
van de stofzuiger valt niet onder de garantie.
• Nooit door middel van het snoer de stofzuiger naar u toe trekken of
optillen.
Alle servicebeurten en reparaties moeten uitgevoerd worden door een
erkend AEG Service Centre. Bewaar de stofzuiger op een droge plaats.
Klantinformatie en milieubeleid
AEG wijst alle aansprakelijkheid van de hand voor schade die ontstaat als
gevolg van onjuist gebruik van het apparaat of onbevoegde aanpassingen
van het apparaat. Zie het bijgesloten garantieboekje voor meer informatie
over de garantie en contactpersonen voor klanten. Als u opmerkingen
hebt over de stofzuiger of over de handleiding, kunt u een e-mail sturen
naar [email protected].
Milieubeleid
Het ontwerp van dit product is zeer milieuvriendelijk. Alle kunststof
onderdelen kunnen worden hergebruikt. Ga voor meer informatie
naar onze website: www.aeg-home.com. Het verpakkingsmateriaal
is geselecteerd op millieuvriendelijkheid en kan worden gerecycled.
Recycle de materialen met het symbool . Gooi de verpakking in een
geschikte verzamelcontainer om het te recyclen. Help om het milieu en
de volksgezondheid te beschermen en recycle het afval van elektrische
en elektronische apparaten. Gooi apparaten gemarkeerd met het symbool
niet weg met het huishoudelijk afval. Breng het product naar het
milieustation bij u in de buurt of neem contact op met de
gemeente.
* Alleen bepaalde modellen.

DE
GB
ES
PT
FR
NL
IT
FA
DE
GB
ES
PT
FR
NL
IT
FA
DE
GB
ES
PT
FR
NL
IT
FA
GEBRUIK VAN DE STOFZUIGER
PARKEERPOSITIES
DE STOFZUIGER STARTEN/STOPPEN EN
HET ZUIGVERMOGEN REGELEN
Open het deksel van het stofcompartiment door.
Controleer of er een stofzuigerzak (s-bag) werd
geplaatst.
Gebruik de parkeerpositie of onderkant (A) om
de stofzuiger te dragen en op te bergen. Op de
achterkant (B) voor een pauze (om uw rug te
sparen).
Plaats de slang in de stofzuiger (om hem te
verwijderen, drukt u op de vergrendelknoppen
en trekt u eraan). Breng de slang in de
slanghandgreep tot de vergrendelknop klikt (om
ze te verwijderen, drukt u op de vergrendelknop
en trekt u eraan).
Bevestig de telescopische buis op het
mondstuk. Bevestig de telescopische buis op de
slanghandgreep (om ze te verwijderen, drukt u op
de vergrendelknop en trekt u eraan).
Verstel de telescopische buis door de
vergrendeling vast te houden met één hand en
met de andere hand aan de handgreep te trekken.
Trek de stroomkabel uit en sluit deze aan op
het lichtnet. Druk op de AAN/UIT-knop om de
stofzuiger in/uit te schakelen.
Het zuigvermogen regelen: Draai aan de
draaiknop op de stofzuiger of gebruik de
luchtklep op de handgreep.*
Druk na het stofzuigen op de REWIND-knop om
de kabel terug op te rollen.

DE
GB
ES
PT
FR
NL
IT
FA
DE
GB
ES
PT
FR
NL
IT
FA
DE
GB
ES
PT
FR
NL
IT
FA
DE STOFZUIGERZAK, S-BAG®, VERVANGEN
Vervang de s-bag wanneer: het S-BAG
indicatielampje rood oplicht.
NB: Vervang de s-bag altijd wanneer het
S-BAG indicatielampje brandt, ook al is de
s-bag niet vol (hij kan verstopt zijn), en na het
gebruik van reinigingspoeder voor tapijten.
Gebruik voor optimale prestaties de Ultra Long
Performance-zak, die speciaal is ontworpen voor
uw stofzuiger. U kunt ook andere synthetische
s-bags gebruiken. Gebruik geen papieren
stofzuigerzakken! www.s-bag.com
Drukken en opheen van de OPEN-knop om
het stofcompartiment te openen. Optillen aan
de handgreep om de s-bag met de houder te
verwijderen.
A. Trek aan het karton om de -bag® uit de
insteekhouder te tillen. De s-bag® wordt zo
automatisch gesloten en er kan geen stof meer
ontsnappen.
B. Breng een nieuwe s-bag® aan door het
karton tot aan het einde van de groef op de
insteekhouder te duwen.
Sluit het deksel. Als de s-bag niet goed geplaatst
is of niet is aangebracht, kan het deksel niet
worden gesloten.
Vervang/reinig het uitlaatfilter bij elke vijfde
keer dat u de stofzak/s-bag® vervangt. Gebruik
originele AEG-filters: (AEF12W, AFS1W) /
AEFG12W. Løft ut filteret, og se på fargen
på rammen: Grønn = Het filter moet worden
vervangen door een nieuwe (niet-wasbaar filter).
Blauw = Vervang door een nieuwe filter of reinig
de huidige.
DE FILTERS VERVANGEN
A.
B.

DE
GB
ES
PT
FR
NL
IT
FA
DE
GB
ES
PT
FR
NL
IT
FA
DE
GB
ES
PT
FR
NL
IT
FA
Spoel de binnenkant (vuile kant) met lauwwarm
leidingwater. Tik op het filterframe om het water
te verwijderen. Herhaal het proces vier keer.
(**uitsluitend uitwasbare filters)
NB: Gebruik geen schoonmaakmiddelen.
Vermijd de aanraking van het filteroppervlak.
Laat het filter volledig drogen (min. 24 u op
kamertemperatuur) alvorens het terug te
plaatsen! Vervang het uitwasbare filter minstens
eenmaal per jaar of wanneer het zeer vuil of
beschadigd is.
Vervang het motorfilter (AF08) wanneer het vuil
is of na iedere 5e s-bag. Druk op de filterhouder
en verwijder deze. Vervang het filter en sluit het
deksel.
STOFZUIGEN MET HET UNIVERSELE
MONDSTUK
HET UNIVERSELE MONDSTUK REINIGEN
HET TURBO-MONDSTUK REINIGEN
Wijzig de instelling van het mondstuk met de
pedaal. Het pictogram toont het aanbevolen
vloertype.
Koppel het mondstuk los van de buis. Reinig het
met de slanghandgreep.
Koppel het mondstuk los van de buis en
verwijder verstrikte draden door ze weg
te knippen met een schaar. Gebruik de
slanghandgreep om het mondstuk te reinigen. *
AEG behoudt zich het recht voor de producten, informatie en specificaties zonder kennisgeving
vooraf te wijzigen.

DE
GB
ES
PT
FR
NL
IT
FA
DE
GB
ES
PT
FR
NL
IT
FA
DE
GB
ES
PT
FR
NL
IT
FA
TIPS OM DE BESTE RESULTATEN TE VERKRIJGEN
MONDSTUK/ACCESSOIRE TE GEBRUIKEN VOOR:
3in1 ACCESSOIRE* 3 mondstukken in 1:
1. Stofzuigmondstuk voor harde oppervlakken (boekenrekken, plinten enz.).
2. Bekledingmondstuk voor stoen (gordijnen, bekledingen enz.).
3. Spleetmondstuk voor nauwe ruimtes (achter radiatoren enz.).
Turbomondstuk* Tapijtmondstuk:
• Borstelt en stofzuigt tegelijkertijd
• De borstelrol wordt aangedreven door de luchtstroom van de stofzuiger.
• Niet geschikt voor tapijten met zeer diepe polen en lange franjes, antisliptapijten zoals deurmatten
of waterbestendige tapijten. Hiervoor dient het universele mondstuk te worden gebruikt.
ParkettoPro-mondstuk* Mondstuk voor harde vloeren:
• Voor een voorzichtige reiniging van harde vloeren (parket, houten vloer, tegels enz.).
• Optimale stofopname op harde vloeren met spleten.
PrecisionFlow-
mondstuk*
Universeel mondstuk:
• Voor alle vloertypes, gegarandeerd de beste stofopname, zowel op tapijten als op harde vloeren.
• Wijzig de instelling van het mondstuk met de pedaal. Het pictogram toont het aanbevolen vloertype.
Mini Turbo-mondstuk*
Mini Turbo-mondstuk:
• Borstelt en stofzuigt tegelijkertijd
• Voor stoen meubels, autostoelen, matrassen enz.
• De borstelrol wordt aangedreven door de luchtstroom van de stofzuiger.
• Niet geschikt voor tapijten met zeer diepe polen en lange franjes, omdat de draaiende borstelrol
hierop kan vastlopen.
Mondstuk voor
bekleding*
Mondstuk voor bekleding
Gebruik het mondstuk voor bekleding* voor banken, gordijnen, lichtgewicht stoen, enz. Verminder zo
nodig de zuigkracht.
Modellen met handmatige vermogensregeling – volg de afbeeldingen op de stofzuiger voor optimale prestaties.
PROBLEEMOPLOSSING
PROBLEM SOLUTION
De stofzuiger start
niet
• Controleer of de kabel is aangesloten op het lichtnet.
• Controleer of de stekker en kabel niet beschadigd zijn.
• Controleer of er een zekering is doorgebrand.
Het s-bag®
indicatielampje
brandt
• Controleer of de s-bag® vol of verstopt is.
• Als u de s-bag® al hebt vervangen, vervang dan het motorfilter.
De stofzuiger stopt
De stofzuiger kan oververhit zijn: koppel de stofzuiger los van het lichtnet; controleer of het
mondstuk, de buis, de slang of de filters verstopt zijn. Laat de stofzuiger 30 minuten afkoelen voor u
de stekker opnieuw aansluit.
Als de stofzuiger nog steeds niet werkt, neem dan contact op met een erkend servicecentrum van AEG.
Vermindering van
zuigvermogen
• Controleer of de s-bag vol of verstopt is.
• Controleer of het motorfilter verstopt is en toe is aan vervanging.
• Controleer of het mondstuk verstopt is en moet worden vrijgemaakt.
• Controleer of de slang verstopt is door er zachtjes op te knijpen. Wees hierbij echter wel voorzichtig,
aangezien de obstructie mogelijk is veroorzaakt door in de slang vastgeklemd glas of een naald.
Opmerking: De garantie dekt geen schade aan de slang die ontstaat bij de reiniging van de slang.
De stofzuiger heeft
water opgezogen
De motor moet worden vervangen in een erkend servicecentrum van AEG.
Schade aan de motor veroorzaakt door het binnendringen van water wordt niet gedekt door de
garantie
Neem voor verdere problemen contact op met een erkend servicecentrum van AEG.

DE
GB
ES
PT
FR
NL
IT
FA
DE
GB
ES
PT
FR
NL
IT
FA
DE
GB
ES
PT
FR
NL
IT
FA
C.
Q. S.P. R.
B.
L.
E.
H.
N.
G.
D.
F.
A.
K.
M.
I.
J.
O.

DE
GB
ES
PT
FR
NL
IT
FA
DE
GB
ES
PT
FR
NL
IT
FA
DE
GB
ES
PT
FR
NL
IT
FA
PRIMA DI INIZIARE
Leggere attentamente il presente manuale.
Accertarsi che tutti i componenti descritti siano disponibili.
Prestare particolare attenzione alle norme di sicurezza.
DESCRIZIONE DELL'ASPIRAPOLVERE VX7
A. Display con manopola di controllo manuale
B. Filtro d’usicita
C. Slot per riposizionamento
D. Cavo di alimentazione
E. Filtro motore
F. Supporto del filtro motore
G. S-bag®
H. Supporto S-bag®
I. Coperchio vano raccoglipolvere
J. Accessorio 3-in-1
K. Tubo
L. Impugnatura
M. Tubo telescopico
N. Gancio per riposizionamento
O. Spazzola FlowMotion
P. Spazzola per tappezzeria*
Q. Spazzola Turbo*
R. Spazzola Mini turbo*
S. Spazzola ParkettoPro*
*Solo per alcuni modelli.

DE
GB
ES
PT
FR
NL
IT
FA
DE
GB
ES
PT
FR
NL
IT
FA
DE
GB
ES
PT
FR
NL
IT
FA
Requisiti e avvertenze per la sicurezza
Questa apparecchiatura può essere usata da bambini a partire dagli 8
anni e da adulti con limitate capacità fi siche, sensoriali o mentali o con
scarsa esperienza o conoscenza sullu’so dell’apparecchiatura, solamente se
sorvegliati o se sono stati istruiti relativamente all’uso dell’apparecchiatura
e se hanno compreso i rischi coinvolti.
AVVERTENZA: Turbo* degli accessori manuali sono dotate di una spazzola
rotante che potrebbe intasarsi.
Utilizzarle con attenzione e soltanto sulle superfi ci adatte. Spegnere
l’aspirapolvere prima di rimuovere eventuali oggetti intrappolati o pulire
la spazzola. La Turbospazzola non è adatta per tappeti a fibre e frange
lunghe o spesse, per tappeti antiscivolo come gli zerbini o tappeti
resistenti all'acqua.
Sorvegliare i bambini per evitare che giochino con l'apparecchio. Prima di
eettuare la pulizia o la manutenzione dell’apparecchio, scollegare la spina
dall’alimentazione elettrica.
Non utilizzare mai l’aspirapolvere senza filtri.
Utilizzare sempre i sacchetti s-bag adatti a questo specifico
aspirapolvere. I danni causati all'aspirapolvere da un uso non corretto di
sacchetti non originali non sono coperti dalla garanzia.
Avvertenza
L’apparecchio contiene collegamenti elettrici:
• Non aspirare mai liquidi
• Non immergere l’apparecchio in detergenti liquidi
• Controllare regolarmente lo stato del flessibile e non utilizzarlo se
danneggiato.
I casi sopracitati possono causare seri danni al motore e non sono coperti
da garanzia. L’aspirapolvere è destinato solo all’uso domestico.
Non utilizzare mai l’aspirapolvere
• In prossimità di gas infi ammabili ecc.
• Su oggetti appuntiti
• Su cenere calda o fredda, mozziconi di sigaretta accesi, ecc.
• Su polvere fi ne, ad esempio intonaco, calcestruzzo, farina.
Precauzioni per il cavo elettrico
• Controllare regolarmente che la spina e il cavo non siano danneggiati.
Non utilizzare l’aspirapolvere se il cavo è danneggiato.
• Se il cavo di alimentazione è danneggiato, deve essere sostituito da un

DE
GB
ES
PT
FR
NL
IT
FA
DE
GB
ES
PT
FR
NL
IT
FA
DE
GB
ES
PT
FR
NL
IT
FA
centro di assistenza AEG autorizzato per evitare eventuali pericoli. Gli
eventuali danni al cavo dell’aspirapolvere non sono coperti dalla garanzia.
• Non utilizzare mai il cavo per tirare o sollevare l’aspirapolvere.
Qualsiasi intervento di manutenzione e riparazione deve essere eseguito
presso un centro di assistenza autorizzato AEG. Riporre l’aspirapolvere in
un luogo asciutto. Informazioni per l’utente e politica di sostenibilità AEG
declina ogni responsabilità per tutti i danni derivanti da un uso improprio
o in caso di manomissione dell’apparecchio. Per ulteriori informazioni
sui contatti in merito a garanzia e servizio clienti, consultare l’opuscolo
relativo alla garanzia accluso nella confezione. Per commenti relativi
all’aspirapolvere o al manuale delle Istruzioni per l’uso e per informazioni
sui centri di assistenza tecnica autorizzati AEG chiamare il numero
telefonico 800 117511.
Politica della sostenibilità
Questo prodotto è progettato nel rispetto dell’ambiente. Tutte le parti in
plastica sono riciclabili. Per ulteriori dettagli, consultare il sito Web: www.
aeg-home.com Il materiale di imballaggio è ecologico e riciclabile. Riciclare
i materiali con il simbolo . Buttare l’imballaggio negli appositi contenitori
per il riciclaggio. Aiutare a proteggere l’ambiente e la salute umana e a
riciclare rifi uti derivanti da apparecchiature elettriche ed elettroniche. Non
smaltire le apparecchiature che riportano il simbolo insieme ai normali
rifi uti domestici. Portare il prodotto al punto di riciclaggio più vicino o
contattare il comune di residenza.
* Solo per alcuni modelli.

DE
GB
ES
PT
FR
NL
IT
FA
DE
GB
ES
PT
FR
NL
IT
FA
DE
GB
ES
PT
FR
NL
IT
FA
COME UTILIZZARE L’ASPIRAPOLVERE
POSIZIONI DI STAZIONAMENTO
AVVIO/ARRESTO DELL’ASPIRAPOLVERE
E REGOLAZIONE DELLA POTENZA
ASPIRANTE
Aprire il coperchio del vano raccoglipolvere.
Controllare che il sacchetto raccoglipolvere
(s-bag) sia al suo posto.
Utilizzare la posizione di parcheggio in basso
(A) per trasportare e riporre l’aspirapolvere.
Quella posteriore (B) quando ci si ferma (per far
riposare la schiena).
Inserire il tubo flessibile nell’aspirapolvere (per
estrarlo, premere i pulsanti di bloccaggio e
tirare). Inserire il tubo flessibile nella rispettiva
impugnatura fino a sentire uno scatto del
pulsante di bloccaggio (per rilasciarlo, premere il
pulsante di bloccaggio e tirare).
Collegare il tubo telescopico alla spazzola.
Collegare il tubo telescopico all’impugnatura del
tubo flessibile (per estrarlo, premere il pulsante
di bloccaggio e tirare).
Regolare il tubo telescopico tenendo l’elemento
di bloccaggio con una mano e tirando
l’impugnatura con l’altra.
Estrarre il cavo di alimentazione e collegarlo alla
rete elettrica. Premere il pulsante On/O per
accendere e spegnere l’aspirapolvere.
Regolazione della potenza di aspirazione: girare
la manopola sull’aspirapolvere o utilizzare la
valvola dell’aria sull’impugnatura.
Dopo la pulizia, premere il pulsante REWIND per
riavvolgere il cavo.

DE
GB
ES
PT
FR
NL
IT
FA
DE
GB
ES
PT
FR
NL
IT
FA
DE
GB
ES
PT
FR
NL
IT
FA
SOSTITUZIONE DEL SACCHETTO, S-BAG®
Sostituire il sacchetto s-bag quando: la spia
S-BAG si illumina di rosso.
NB: sostituire sempre il sacchetto s-bag quando
la spia S-BAG si accende anche se l’s-bag non
è pieno (potrebbe essere ostruito) e dopo aver
utilizzato del detergente in polvere per la pulizia
della moquette. Per ottenere i migliori risultati
possibili, utilizzare il sacchetto Ultra Long
Performance sviluppato specificamente per
l’aspirapolvere. Si possono utilizzare anche altri
sacchetti s-bag sintetici. Non utilizzare sacchetti
di carta! www.s-bag.com
Premendo e sollevando il pulsante OPEN per
aprire il vano raccoglipolvere. Sollevamento
l’impugnatura per estrarre l’s-bag con il
supporto.
A. Tirare il cartone per rimuovere il sacchetto
s-bag® dal supporto. In questo modo il sacchetto
s-bag® viene automaticamente sigillato evitando
la fuoriuscita di polvere.
B. Inserire un nuovo sacchetto s-bag® spingendo
il cartone lungo la scanalatura del supporto.
Chiudere il coperchio. Se l’s-bag non è inserito
correttamente o se non è stato applicato, il
coperchio non si chiude.
Sostituire/pulire il filtro di scarico ogni 5
sostituzioni del sacchetto raccoglipolvere s-bag®.
Usare filtri originali AEG: (AEF12W, AFS1W)
/ AEFG12W. Estrarre il filtro sollevandolo e
controllare il colore del telaio: Verde = Deve
essere sostituito con un filtro nuovo (filtro non
lavabile). Blu = Sostituire con un filtro nuovo o
pulito.
SOSTITUZIONE DEI FILTRI
A.
B.

DE
GB
ES
PT
FR
NL
IT
FA
DE
GB
ES
PT
FR
NL
IT
FA
DE
GB
ES
PT
FR
NL
IT
FA
Sciacquare l’interno (la parte sporca) in acqua
di rubinetto tiepida. Picchiettare sul telaio del
filtro per eliminare l’acqua. Ripetere la procedura
quattro volte. (** solo per i filtri lavabili)
NB: non utilizzare detergenti. Evitare di
toccare la superficie del filtro. Far asciugare
completamente il filtro (min. 24 ore a
temperatura ambiente) prima di applicarlo
di nuovo! Sostituire il filtro lavabile almeno
una volta l’anno o quando è molto sporco o
danneggiato.
Sostituire il filtro del motore (AF08) quando è
sporco o ogni 5 sostituzioni dell’s-bag. Premere il
supporto del filtro ed estrarlo. Sostituire il filtro e
chiudere il coperchio.
ASPIRAZIONE CON LA SPAZZOLA
COMBINATA
PULIZIA DELLA SPAZZOLA COMBINATA
PULIZIA DELLA SPAZZOLA TURBO
Cambiare l’impostazione della spazzola con il
pedale. Il simbolo indica il tipo di pavimento
consigliato.
Scollegare la spazzola dal tubo. Pulirla con
l’impugnatura del tubo flessibile.
Staccare la spazzola dal tubo e togliere eventuali
filamenti incastrati e così via tagliandoli con
le forbici. Utilizzare l’impugnatura del tubo
flessibile per pulire la spazzola.*
AEG si riserva il diritto di sostituire prodotti, informazioni e specifiche senza obbligo di preavviso.

DE
GB
ES
PT
FR
NL
IT
FA
DE
GB
ES
PT
FR
NL
IT
FA
DE
GB
ES
PT
FR
NL
IT
FA
SUGGERIMENTI PER OTTENERE I MIGLIORI RISULTATIS
SPAZZOLA/ACCESSORIO DA UTILIZZARE PER:
Accessorio 3-in-1* 3 accessori in 1:
1. Aspirapolvere per superfici dure (librerie, mensole e così via).
2. Aspirapolvere per tessuti (tende, tappezzeria e così via).
3. Accessorio per fessure per gli spazi ristretti (dietro i radiatori e così via).
Spazzola Turbo* Spazzola per moquette:
• - Spazzola e aspira contemporaneamente
• - Il rullo spazzola è controllato dal flusso di aria dell'aspirapolvere.
• - Non adatta alla moquette alta e con frange lunghe, alla moquette antiscivolo tipo zerbini e alla
moquette impermeabile. Utilizzare la spazzola combinata al suo posto.
Spazzola ParkettoPro* Spazzola per pavimenti duri:
- Per pulire delicatamente i pavimenti duri (parquet, pavimenti in legno, piastrelle e così via).
- Migliori risultati di aspirazione polvere su pavimenti duri con fessure.
Spazzola PrecisionFlow*
Spazzola combinata:
- Per tutti i tipi di pavimenti, garantisce la migliore raccolta su moquette e pavimenti duri.
- Variazione dell'impostazione della bocchetta con il pedale. Il simbolo indica il tipo di pavimento
consigliato.
Spazzola Mini Turbo*
Spazzola Mini Turbo:
- Spazzola e aspira contemporaneamente
- Per arredi in tessuto, sedili delle auto, materassi e così via
- Il rullo a spazzola è controllato dal flusso di aria dell'aspirapolvere.
-Non adatta per moquette alta e con frange lunghe perché si possono incastrare nel rullo rotante a
spazzola.
Bocchetta per
tappezzeria*
Bocchetta per tappezzeria
Utilizzare la bocchetta per imbottiti* per divani, tendaggi, tessuti leggeri, ecc. Se necessario, ridurre la
potenza di aspirazione.
Modelli con regolazione manuale della potenza - seguire i disegni sull'aspirapolvere per ottenere risultati eccellenti.
RISOLUZIONE DEI PROBLEMI
PROBLEMA SOLUZIONE
L'aspirapolvere non
si avvia
• Accertarsi che il cavo sia collegato alla rete di alimentazione.
• Accertarsi che la spina e il cavo non siano danneggiati.
• Accertarsi che non ci siano fusibili bruciati.
La spia s-bag® è
accesa
• Controllare che l's-bag® non sia pieno o bloccato.
• Se l's-bag® è già stato sostituito, sostituire il filtro del motore.
L'aspirapolvere
si spegne e non
funziona più
L'aspirapolvere potrebbe essersi surriscaldato: staccarlo dalla rete di alimentazione; controllare se
spazzola, tubo, tubo flessibile o filtri sono ostruiti. Far rareddare l'aspirapolvere per 30 minuti prima
di collegarlo di nuovo.
Se l'aspirapolvere non funziona, contattare un centro di assistenza AEG autorizzato.
Riduzione della
capacità di
aspirazione rispetto
al solito
• Controllare che l's-bag non sia pieno o bloccato.
• Controllare se il filtro del motore è ostruito e va sostituito.
• Controllare se la spazzola è ostruita e va liberata.
• Controllare se il tubo flessibile è ostruito schiacciandolo delicatamente. Tuttavia, fare attenzione nel
caso l'ostruzione sia dovuta a vetro o aghi incastrati nel tubo flessibile.
Nota: la garanzia non copre danni al tubo flessibile causati dalla pulizia.
L'aspirapolvere ha
aspirato dell'acqua
Sarà necessario sostituire il motore presso un centro assistenza autorizzato AEG.
Eventuali danni al motore causati dalla penetrazione di acqua non sono coperti dalla garanzia.
Per qualsiasi ulteriore problema, contattare un centro di assistenza autorizzato AEG.

DE
GB
ES
PT
FR
NL
IT
FA
DE
GB
ES
PT
FR
NL
IT
FA
DE
GB
ES
PT
FR
NL
IT
FA
C.
Q. S.P. R.
B.
L.
E.
H.
N.
G.
D.
F.
A.
K.
M.
I.
J.
O.

DE
GB
ES
PT
FR
NL
IT
FA
DE
GB
ES
PT
FR
NL
IT
FA
DE
GB
ES
PT
FR
NL
IT
FA
AEG VX7
VX7
A
B
C
D
E
F
S-bag® .G
S-bag H
I
J
K
L
M
N
FlowMotion O
P
Q
R
*ParkettoPro S

DE
GB
ES
PT
FR
NL
IT
FA
DE
GB
ES
PT
FR
NL
IT
FA
DE
GB
ES
PT
FR
NL
IT
FA
8
•
•
•
•
•
•
•
•
•
•

DE
GB
ES
PT
FR
NL
IT
FA
DE
GB
ES
PT
FR
NL
IT
FA
DE
GB
ES
PT
FR
NL
IT
FA

DE
GB
ES
PT
FR
NL
IT
FA
DE
GB
ES
PT
FR
NL
IT
FA
DE
GB
ES
PT
FR
NL
IT
FA
OPEN
s-bag
REWIND
A
B

DE
GB
ES
PT
FR
NL
IT
FA
DE
GB
ES
PT
FR
NL
IT
FA
DE
GB
ES
PT
FR
NL
IT
FA
A.
B.
S-BAG
®
OPEN
s-bag
®
A
s-bag
®
B
s-bag
5
AEG

DE
GB
ES
PT
FR
NL
IT
FA
DE
GB
ES
PT
FR
NL
IT
FA
DE
GB
ES
PT
FR
NL
IT
FA
24
AF08
5
AEG

DE
GB
ES
PT
FR
NL
IT
FA
DE
GB
ES
PT
FR
NL
IT
FA
DE
GB
ES
PT
FR
NL
IT
FA
1 .
2 .
3 .
•
•
•
ParkettoPro
•
•
PrecisionFlow
•
•
•
•
•
•
•
•
•
®
•
•
AEG
•
•
•
•
AEG
AEG

DE
GB
ES
PT
FR
NL
IT
FA
VISIT OUR WEBSITE TO:
Get usage advice, brochures,
trouble shooter, service information:
www.AEG.com
Register your product for better service:
www.AEG.com/productregistration
Buy Consumables & Accessories for
your appliance: www.AEG.com/shop
aeg.com/shop Electrolux Hausgeräte GmbH
Fürther Straße 246
D-90429 Nürnberg
Germany
www.aeg-home.com
s-bag® Classic
Long Performance
Ref: GR210S
Part nr: 9001684746
s-bag® Anti-odour
Ref: GR203S
Part nr: 9001684753
s-bag® Anti-allergy
Ref: GR206S
Part nr: 9001684761
s-filter®
Hygiene non-Washable
Ref: AEF12
Part nr: 9001966697
Hygiene Washable
Ref: AEF12W
Allergy Plus Washable
Part nr: 9001677690
Ref: AFS1W
Silent Parketto
Part nr: 900166741/0
Ref: AP240
Speedy Clean Illiumi
Part nr: 900168388/8
Ref: AP350
Dust Magnet
Part nr: 900166738/6
Ref: VARIO4000
CONSUMABLES & ACCESSORIES
www.AEG.com/shop
CH1400201
Documenttranscriptie
DE GB ES BENUTZERHANDBUCH INSTRUCTION BOOK PT FR NL IT FA DE GB ES PT FR NL IT FA Vielen Dank, dass Sie sich für den AEG-Staubsauger VX7 entschieden haben. Verwenden Sie immer Originalzubehör und Originalersatzteile, um bestmögliche Ergebnisse zu erzielen. Dieses Produkt wurde mit Rücksicht auf die Umwelt hergestellt. Alle Plastikteile sind für Recyclingzwecke markiert. Inhalt BESCHREIBUNG DES STAUBSAUGERS. . . . . . . . . . . . . . . . . . . . . . 5 SICHERHEITSANFORDERUNG. . . . . . . . . . . . . . . . . . . . . . . . . . . . . . 6 ERLÄUTERUNGEN ZU DEN VORSCHRIFTEN DER ENERGIEEFFIZIENZKLASSE . . . . . . . . . . . . . . . . . . . . . . . . . . . . . . . . 7 WIE MAN DEN STAUBSAUGER BENUTZT. . . . . . . . . . . . . . . . . . . 8 STARTEN/STOPPEN SIE DEN STAUBSAUGER. . . . . . . . . . . . . . . 8 STELLEN SIEDIE SAUGLEISTUNG EIN. . . . . . . . . . . . . . . . . . . . . . . 8 PARKPOSITIONEN. . . . . . . . . . . . . . . . . . . . . . . . . . . . . . . . . . . . . . . . . . 8 AUSTAUSCHEN DES STAUBBEUTELS (S-BAG®). . . . . . . . . . . . . 9 ERSETZEN DER FILTER. . . . . . . . . . . . . . . . . . . . . . . . . . . . . . . . . . . . . 9 STAUBSAUGEN MIT DER UNIVERSALDÜSE. . . . . . . . . . . . . . . . 10 REINIGEN DER UNIVERSALDÜSE. . . . . . . . . . . . . . . . . . . . . . . . . . 10 REINIGEN DER TURBODÜSE*. . . . . . . . . . . . . . . . . . . . . . . . . . . . . . 10 TIPPS, WIE SIE DIE BESTEN ERGEBNISSE ERZIELEN KÖNNEN . . . . . . . . . . . . . . . . . . . . . . . . . . . . . . . . . . . . . . . . . . . . . . . . . . . 11 FEHLERSUCHE. . . . . . . . . . . . . . . . . . . . . . . . . . . . . . . . . . . . . . . . . . . . . 11 * NUR AUSGEWÄHLTE MODELLE Gracias por elegir la aspiradora AEG VX7. Use siempre accesorios y piezas de repuesto originales para lograr los mejores resultados. Este producto ha sido diseñado teniendo en cuenta el medio ambiente. Las piezas de plástico están marcadas para su reciclaje. Contenido DESCRIPCIÓN DE LA ASPIRADORA. . . . . . . . . . . . . . . . . . . . . . . . 21 REQUISITO DE SEGURIDAD. . . . . . . . . . . . . . . . . . . . . . . . . . . . . . . . 22 NOTAS SOBRE LA NORMATIVA DE ETIQUETA ENERGÉTICA. . . . . . . . . . . . . . . . . . . . . . . . . . . . . . . 23 CÓMO USAR LA ASPIRADORA. . . . . . . . . . . . . . . . . . . . . . . . . . . . . 24 PONGA EN MARCHA/PARE LA ASPIRADORA. . . . . . . . . . . . . . 24 AJUSTE LA POTENCIA DE ASPIRACIÓN. . . . . . . . . . . . . . . . . . . 24 POSICIONES DE ESTACIONAMIENTO. . . . . . . . . . . . . . . . . . . . . . 24 CAMBIO DE LA BOLSA DE POLVO S-BAG®. . . . . . . . . . . . . . . . . 25 SUSTITUCIÓN DE LOS FILTROS. . . . . . . . . . . . . . . . . . . . . . . . . . . . 25 ASPIRACIÓN CON LA BOQUILLA UNIVERSAL . . . . . . . . . . . . . 26 LIMPIEZA DE LA BOQUILLA UNIVERSAL. . . . . . . . . . . . . . . . . . 26 LIMPIEZA DE LA BOQUILLA 6TURBO*. . . . . . . . . . . . . . . . . . . . . 26 CONSEJOS PARA OBTENER EL MEJOR RESULTADO. . . . . . . 27 SOLUCIÓN DE PROBLEMAS. . . . . . . . . . . . . . . . . . . . . . . . . . . . . . . 27 * SOLO ALGUNOS MODELOS Thank you for choosing AEG VX7 vacuum cleaner. Always use original accessories and spare parts to get the best results. This product is designed with the environment in mind. All plastic parts are marked for recycling purposes. Content DESCRIPTION OF THE VACUUM CLEANER. . . . . . . . . . . . . . . . .13 SAFETY REQUIREMENTS. . . . . . . . . . . . . . . . . . . . . . . . . . . . . . . . . . 14 ENERGY LABELLING INSTRUCTIONS. . . . . . . . . . . . . . . . . . . . . . 15 HOW TO USE THE VACUUM CLEANER. . . . . . . . . . . . . . . . . . . . . 16 START AND STOP THE VACUUM CLEANER. . . . . . . . . . . . . . . . 16 REGULATING SUCTION POWER. . . . . . . . . . . . . . . . . . . . . . . . . . . 16 PARKING POSITIONS. . . . . . . . . . . . . . . . . . . . . . . . . . . . . . . . . . . . . . 16 REPLACING THE DUST BAG (S-BAG®). . . . . . . . . . . . . . . . . . . . . 17 REPLACING THE FILTERS . . . . . . . . . . . . . . . . . . . . . . . . . . . . . . . . . 17 VACUUMING WITH THE UNIVERSAL NOZZLE. . . . . . . . . . . . . 18 CLEANING THE UNIVERSAL NOZZLE. . . . . . . . . . . . . . . . . . . . . . 18 CLEANING THE TURBO NOZZLE* . . . . . . . . . . . . . . . . . . . . . . . . . 18 TIPS ON HOW TO GET THE BEST RESULTS. . . . . . . . . . . . . . . . 19 TROUBLESHOOTING. . . . . . . . . . . . . . . . . . . . . . . . . . . . . . . . . . . . . . 19 * SELECTED MODELS ONLY Obrigado por ter escolhido um aspirador AEG VX7. Para obter os melhores resultados, utilize sempre acessórios e peças de substituição originais. Este produto foi concebido a pensar no meio ambiente. Todas as peças de plástico estão marcadas para efeitos de reciclagem. Conteúdo DESCRIÇÃO DO ASPIRADOR. . . . . . . . . . . . . . . . . . . . . . . . . . . . . . . 29 REQUISITOS DE SEGURANÇA . . . . . . . . . . . . . . . . . . . . . . . . . . . . . 30 NOTAS SOBRE OS REGULAMENTOS DE ETIQUETA DE ENERGIA. . . . . . . . . . . . . . . . . . . . . . . . . . . . . . . . . . . . . . . . . . . . . . . .31 COMO UTILIZAR O ASPIRADOR. . . . . . . . . . . . . . . . . . . . . . . . . . . 32 LIGAR/DESLIGAR O ASPIRADOR . . . . . . . . . . . . . . . . . . . . . . . . . . 32 AJUSTAR A POTÊNCIA DE SUCÇÃO . . . . . . . . . . . . . . . . . . . . . . . 32 POSIÇÕES DE ESTACIONAMENTO. . . . . . . . . . . . . . . . . . . . . . . . . 32 SUBSTITUIR O SACO DO ASPIRADOR S-BAG® . . . . . . . . . . . . . 33 SUBSTITUIR OS FILTROSS. . . . . . . . . . . . . . . . . . . . . . . . . . . . . . . . . 33 ASPIRAR COM A ESCOVA UNIVERSALL. . . . . . . . . . . . . . . . . . . . 34 LIMPAR A ESCOVA UNIVERSAL. . . . . . . . . . . . . . . . . . . . . . . . . . . . 34 LIMPAR A ESCOVA TURBO* . . . . . . . . . . . . . . . . . . . . . . . . . . . . . . . 34 SUGESTÕES PARA OBTER OS MELHORES RESULTADOS. . 35 RESOLUÇÃO DE PROBLEMAS. . . . . . . . . . . . . . . . . . . . . . . . . . . . . 35 * APENAS ALGUNS MODELOS Merci d’avoir choisi l’aspirateur AEG VX7. Utilisez toujours les accessoires et les pièces de rechange AEG pour obtenir les performances optimales. Ce produit est conçu dans le respect de l’environnement. Tous les éléments en plastique sont marqués d’un symbole de recyclage. Gefeliciteerd met uw keuze van een AEG VX7stofzuiger. Gebruik altijd originele accessoires en reserveonderdelen voor de beste resultaten. Dit product is ontworpen om het milieu te sparen. Alle plastic onderdelen zijn gemarkeerd voor recyclingdoeleinden. Contenu Inhoud DESCRIPTION DE L’ASPIRATEUR . . . . . . . . . . . . . . . . . . . . . . . . . . 37 PRÉCAUTIONS DE SÉCURITÉ. . . . . . . . . . . . . . . . . . . . . . . . . . . . . . 38 NOTES CONCERNANT LA RÈGLEMENTATION RELATIVE À L'ÉTIQUETTE ÉNERGIE. . . . . . . . . . . . . . . . . . . . . . . 39 COMMENT UTILISER CET ASPIRATEUR . . . . . . . . . . . . . . . . . . .40 MISE EN MARCHE/ARRÊT DE L’ASPIRATEUR. . . . . . . . . . . . . .40 RÉGLAGE DE LA PUISSANCE. . . . . . . . . . . . . . . . . . . . . . . . . . . . . .40 POSITIONS DE RANGEMENT. . . . . . . . . . . . . . . . . . . . . . . . . . . . . .40 REMPLACEMENT DU SAC À POUSSIÈRE, S-BAG®. . . . . . . . . . 41 REMPLACEMENT DES FILTRES. . . . . . . . . . . . . . . . . . . . . . . . . . . . 41 UTILISATION DE L’ASPIRATEUR AVEC LA BROSSE. . . . . . . . . 42 NETTOYAGE DE LA BROSSE. . . . . . . . . . . . . . . . . . . . . . . . . . . . . . . 42 NETTOYAGE DE LA TURBOBROSSE*. . . . . . . . . . . . . . . . . . . . . . 42 ASTUCES POUR UN RESULTAT IMPECCABLE. . . . . . . . . . . . . . 43 EN CAS D’ANOMALIE DE FONCTIONNEMENT . . . . . . . . . . . . . 43 * MODÈLES SÉLECTIONNÉS UNIQUEMENT BESCHRIJVING VAN DER STOFZUIGER. . . . . . . . . . . . . . . . . . . . 45 VEILIGHEIDSVEREISTE. . . . . . . . . . . . . . . . . . . . . . . . . . . . . . . . . . . . 46 OPMERKINGEN OVER DE VOORSCHRIFTEN VOOR ENERGIELABELS. . . . . . . . . . . . . . . . . . . . . . . . . . . . . . . . . . . . . . . . . . 47 GEBRUIK VAN DE STOFZUIGER. . . . . . . . . . . . . . . . . . . . . . . . . . . . 48 DE STOFZUIGER STARTEN/STOPPEN. . . . . . . . . . . . . . . . . . . . . 48 HET ZUIGVERMOGEN REGELEN. . . . . . . . . . . . . . . . . . . . . . . . . . . 48 PARKEERPOSITIES. . . . . . . . . . . . . . . . . . . . . . . . . . . . . . . . . . . . . . . . 48 DE STOFZUIGERZAK, S-BAG®, VERVANGEN. . . . . . . . . . . . . . . 49 DE FILTERS VERVANGEN. . . . . . . . . . . . . . . . . . . . . . . . . . . . . . . . . . 49 STOFZUIGEN MET HET UNIVERSELE MONDSTUK. . . . . . . . . 50 HET UNIVERSELE MONDSTUK REINIGEN. . . . . . . . . . . . . . . . . .50 HET TURBO-MONDSTUK REINIGEN*. . . . . . . . . . . . . . . . . . . . . . 50 TIPS OM DE BESTE RESULTATEN TE VERKRIJGEN . . . . . . . . 51 PROBLEEMOPLOSSING. . . . . . . . . . . . . . . . . . . . . . . . . . . . . . . . . . . . 51 * ALLEEN BEPAALDE MODELLEN Grazie per aver scelto l’aspirapolvere AEG VX7. Per ottenere i migliori risultati, utilizzare sempre gli accessori e i ricambi originali. Questo prodotto è stato progettato nel rispetto dell’ambiente. Tutte le parti in plastica sono contrassegnate per consentirne il riciclaggio. . سپاسگزاریم، را انتخاب کردیدAEG VX7 از اینکه جارو برقی همیشه از لوازم جانبی و قطعات،برای دستیابی به بهترین نتیجه این دستگاه مناسب با محیط زیست.یدکی اصل استفاده کنید تمام قطعات پالستیکی دارای نشان.طراحی شده است .بازیافت هستند Contenuto DESCRIZIONE DELL'ASPIRAPOLVERE. . . . . . . . . . . . . . . . . . . . . . 53 REQUISITI PER LA SICUREZZA . . . . . . . . . . . . . . . . . . . . . . . . . . . . 54 NOTE SULLE NORME INERENTI ALLE ETICHETTE ENERGETICHE. . . . . . . . . . . . . . . . . . . . . . . . . . . . . . . . 55 COME UTILIZZARE L’ASPIRAPOLVERE. . . . . . . . . . . . . . . . . . . . . 56 AVVIO/ARRESTO DELL’ASPIRAPOLVERE. . . . . . . . . . . . . . . . . . 56 REGOLAZIONE DELLA POTENZA ASPIRANTE. . . . . . . . . . . . . 56 POSIZIONI DI STAZIONAMENTO. . . . . . . . . . . . . . . . . . . . . . . . . . . 56 SOSTITUZIONE DEL SACCHETTO, S-BAG®. . . . . . . . . . . . . . . . . 57 SOSTITUZIONE DEI FILTRI. . . . . . . . . . . . . . . . . . . . . . . . . . . . . . . . . 57 ASPIRAZIONE CON LA SPAZZOLA COMBINATA. . . . . . . . . . . 58 PULIZIA DELLA SPAZZOLA COMBINATA . . . . . . . . . . . . . . . . . . 58 PULIZIA DELLA SPAZZOLA TURBO*. . . . . . . . . . . . . . . . . . . . . . . 58 SUGGERIMENTI PER OTTENERE I MIGLIORI RISULTATIS. . . 59 RISOLUZIONE DEI PROBLEMI. . . . . . . . . . . . . . . . . . . . . . . . . . . . . . 59 * SOLO PER ALCUNI MODELLI فهرست 61.....................................................شرح جارو برقی 62............................................ الزامات ایمنی و پایداری 63.................................. دستورالعمل برچسب زدن انرژی 64.................................... چگونگی استفاده از جارو برقی 64......................................... خاموش کردن جارو/روشن 64...........................................................تنظیم قدرت 64...................................... وضعیتهای نگهداری دستگاه 65.......................... S-BAG® ،تعویض کیسه گرد و خاک 65.......................................................تعویض فیلترها 66............................ المكنسة الكهربائية المزودة بفوهة عامة 66......................................... تمیز کردن با نازل عمومی 66........................................... تمیز کردن با نازل توربو 67...........................نکاتی در مورد دستیابی به بهترین نتایج 67.............................................................. عیبیابی DE GB ES PT FR NL IT FA DE GB C. ES PT FR NL L. IT H. FA J. G. E. F. B. M. A. O. D. K. N. I. P. Q. R. S. VOR DER INBETRIEBNAHME Lesen Sie dieses Handbuch sorgfältig durch. Überprüfen Sie, ob alle beschriebenen Teile enthalten sind. Beachten Sie insbesondere die Sicherheitshinweise DE GB ES BESCHREIBUNG DES STAUBSAUGERS VOM TYP VX7 A. Display mit manueller Bedienung des Drehschalters B. Abluftfilter C. Parkschlitze D. Netzkabel E. Motorfilter F. Motorfilterhalterung G. s-Bag® H. s-Bag®-Halterung I. Abdeckung für Staubbeutelfach J. 3in1 Multifunktionsdüse K. Schlauch L. Handgriff M. Teleskoprohr N. Parkfunktion O. FlowMotion Düse P. Mini-Turbodüse für Polster* Q. Turbodüse* R. Mini turbodüse* S. ParkettoPro Hartbodendüse* * Nur ausgewählte Modelle. PT FR NL IT FA DE GB ES PT FR NL IT FA Sicherheitsanforderung und Warnung Das Gerät kann von Kindern ab 8 Jahren und Personen mit eingeschränkten physischen, sensorischen oder geistigen Fähigkeiten oder mit mangelnder Erfahrung und/oder mangeln dem Wissen nur dann verwendet werden, wenn sie durch eine für ihre Sicherheit zuständige Person beaufsichtigt werden oder in die sichere Verwendung des Geräts eingewiesen wurden und die mit dem Gerät verbundenen Gefahren verstanden haben. WARNUNG: Turbodüsen* besitzen rotierende Bürsten, in denen sich Teile festsetzen können. Verwenden Sie die Düsen vorsichtig und nur auf den dafür vorgesehenen Oberfl ächen. Schalten Sie den Staubsauger aus, bevor Sie festsitzende Teile entfernen oder die Bürsten reinigen. Kinder müssen beaufsichtigt werden, um zu gewährleisten, dass diese nicht mit dem Gerät spielen.Trennen Sie das Gerät vor Reinigungs- oder Wartungsarbeiten immer vom Stromnetz. Benutzen Sie den Staubsauger niemals ohne Filter. Verwenden Sie immer Original-Staubbeutel vom Typ s-bag, die für diesen Staubsauger geeignet sind. Schäden, die durch unsachgemäße Verwendung von nicht-originalen Staubbeuteln verursacht wurden, sind nicht durch die Garantie abgedeckt. Vorsicht Dieses Gerät besitzt elektrische Verbindungen: • Keine Flüssigkeiten aufsaugen • Zum Reinigen nicht in Flüssigkeit tauchen • Der Schlauch ist regelmäßig zu überprüfen und darf bei Beschädigung nicht benutzt werden. Oben Genanntes kann den Motor ernsthaft beschädigen. Solche Schäden sind nicht durch die Garantie abgedeckt. Dieser Staubsauger ist ausschließlich zur Verwendung im Haushalt bestimmt. Benutzen Sie den Staubsauger niemals ... • In der Nähe von brennbaren Gasen und Flüssigkeiten. • Für scharfkantige Gegenstände • Für heiße oder kalte Asche, brennende Zigarettenkippen etc. • Für feinen Staub, z. B. Gips, Beton oder Mehl. • Der Einsatz des Staubsauger unter den oben genannten Bedingungen kann zu schweren Schäden führen, diese sind nicht durch die Garantieleistung abgedeckt. Vorsichtsmaßnahmen hinsichtlich des Netzkabels • Stecker und Netzkabel regelmäßig auf Beschädigungen überprüfen. Staubsauger niemals benutzen, wenn das Netzkabel beschädigt ist. • Wenn das Netzkabel beschädigt ist, muss es zur Vermeidung von Gefahren von einem autorisierten AEGServicezentrum ausgetauscht werden. Schäden am Kabel des Staubsaugers werden von der Garantie nicht abgedeckt. • Den Staubsauger niemals am Netzkabel ziehen oder hochheben. • Alle Wartungs- und Reparaturarbeiten müssen vom autorisierten AEGKundendienst durchgeführt werden. Staubsauger an einem trockenen Ort aufbewahren. Verbraucherinformationen und Nachhaltigkeitsgrundsätze AEG übernimmt keine Verantwortung für Schäden, die durch den unsachgemäßen Einsatz des Geräts oder unbefugten Eingriff in den Staubsauger entstehen. Nähere Einzelheiten zur Garantie sowie Ansprechstellen für Verbraucherfragen fi nden Sie im beigelegten Garantieheft. Wenn Sie Fragen oder Hinweise zum Staubsauger oder zur Bedienungsanleitung haben oder aber wenn Sie praktisches Zubehör benötigen, senden Sie uns bitte eine E-Mail an [email protected] oder rufen Sie uns an. Nachhaltigkeitsgrundsätze Dieses Produkt wurde mit Rücksicht auf die Umwelt hergestellt. Alle Plastikteile sind für Recyclingzwecke markiert. Einzelheiten darüber fi nden Sie auf unserer Website: www.aeg-home.com. Das Verpackungsmaterial wurde mit Blick auf Umweltfreundlichkeit ausgewählt und kann wiederverwertet werden. Recyceln Sie Materialien mit dem Symbol . Entsorgen Sie die Verpackung in den entsprechenden Recyclingbehältern. Recyceln Sie zum Umwelt- und Gesundheitsschutz elektrische und elektronische Geräte. Entsorgen Sie Geräte mit diesem Symbol nicht mit dem Hausmüll. Bringen Sie das Gerät zu Ihrer örtlichen Sammelstelle oder wenden Sie sich an Ihr Gemeindeamt. DE GB ES PT FR NL IT FA DE GB ES PT FR NL IT FA WIE MAN DEN STAUBSAUGER BENUTZT Öffnen Sie die Abdeckung des Staubbehälters. Prüfen Sie, ob der Staubbeutel (s-bag) ordnungsgemäß eingesetzt ist. Schieben Sie den Schlauch in den Staubsauger (zum Entnehmen des Schlauchs drücken Sie die Entriegelungstasten und ziehen ihn ab). Schieben Sie den Schlauch in den Schlauchgriff, bis die Verriegelungstaste klickt (um ihn freizugeben, drücken Sie die Verriegelungstaste und ziehen ihn heraus). Befestigen Sie das Teleskoprohr an der Düse. Befestigen Sie das Teleskoprohr am Schlauchgriff (um es zu entfernen, drücken Sie die Verriegelungstaste und ziehen es heraus). Justieren Sie das Teleskoprohr, indem Sie die Verriegelung mit einer Hand halten und den Griff mit der anderen Hand ziehen. STARTEN/STOPPEN SIE DEN STAUBSAUGER UND STELLEN SIEDIE SAUGLEISTUNG EIN Ziehen Sie das Netzkabel heraus und stecken Sie es in die Netzsteckdose. Drücken Sie die EIN/AUSTaste, um den Staubsauger ein-/auszuschalten. Anpassen der Saugleistung. Drehen Sie den Drehschalter am Staubsauger oder verwenden Sie das Luftventil am Handgriff.* Nach der Reinigung drücken Sie die AUFROLLTASTE, um das Kabel einzurollen. PARKPOSITIONEN Verwenden Sie die Parkposition der Unterseite (A), um den Staubsauger zu transportieren und zu lagern. An der Rückseite (B), wenn Sie eine Pause machen (Ihren Rücken schonen). AUSTAUSCHEN DES STAUBBEUTELS (S-BAG®) Ersetzen Sie den s-bag in folgenden Fällen: S-BAG-Anzeige leuchtet rot auf. Hinweis: Tauschen Sie den s-bag immer aus, wenn die S-BAG-Anzeige leuchtet, auch wenn der s-bag nicht voll ist (er könnte verstopft sein). Dies gilt auch nach der Verwendung von Teppichreinigungspulver. Für bestmögliche Leistung verwenden Sie den Ultra Long Performance-Beutel, der speziell für Ihren Staubsauger entwickelt wurde. Andere synthetische s-bags können ebenfalls verwendet werden. Verwenden Sie keine Papierstaubbeutel! www.s-bag.com Ziehen Sie die S-BAG-Taste, um das Staubbeutelfach zu öffnen. Ziehen Sie am Griff, um den s-bag mit der Halterung zu entfernen. DE GB ES PT FR NL IT FA B. A. A. Zum Herausnehmen aus dem Einsatz den s-bag®-Staubbeutel am Kartonhalter ziehen. Dadurch wird der s-bag® automatisch versiegelt, und es kann kein Staub nach außen gelangen. B. Neuen s-bag®-Staubbeutel einsetzen, indem der Kartonhalter in das Ende der Führung im Einsatz gedrückt wird. Schließen Sie den Deckel. Wenn der s-bag nicht richtig positioniert wurde oder fehlt, schließt der Deckel nicht. ERSETZEN DER FILTER Abluftfilter bei jedem fünften Wechsel des s-bag®-Staubbeutels wechseln/reinigen. Nur original AEG-Filter verwenden: (AEF12W, AFS1W) / AEFG12W. Filter herausnehmen und die Farbe des Rahmens überprüfen: Grün: Muss durch einen neuen Filter ersetzt werden (nicht auswaschbarer Filter). Blau: Durch einen neuen Filter ersetzen oder reinigen. DE GB ES PT FR Spülen Sie die Innenseite (die verschmutzte Seite) mit lauwarmem Leitungswasser aus. Tippen Sie auf den Filterrahmen, um das Wasser zu entfernen. Wiederholen Sie den Vorgang viermal. (**nur waschbare Filter) Hinweis: Verwenden Sie keine Reinigungsmittel. Berühren Sie nicht die Filteroberfläche. Lassen Sie den Filter vollständig trocken (min. 24 h bei Raumtemperatur), bevor Sie ihn wieder einsetzen! Wechseln Sie den waschbaren Filter mindestens einmal pro Jahr oder wenn er sehr schmutzig oder beschädigt ist. NL IT FA Ersetzen Sie den Motorfilter (AF08), wenn er verschmutzt ist oder nach jedem fünften s-bag. Drücken Sie die Filterhalterung nach unten, und ziehen Sie den Filter heraus. Ersetzen Sie den Filter, und schließen Sie die Abdeckung. STAUBSAUGEN MIT DER UNIVERSALDÜSE Ändern Sie die Düseneinstellung mit dem Pedal. Das Symbol zeigt den empfohlenen Bodentyp. REINIGEN DER UNIVERSALDÜSE Trennen Sie die Düse vom Rohr. Reinigen Sie mit dem Schlauchgriff. REINIGEN DER TURBODÜSE Trennen Sie die Düse vom Rohr und entfernen Sie verhedderte Fäden usw., indem Sie sie mit einer Schere wegschneiden. Reinigen Sie die Düse mit dem Schlauchgriff. * AEG behält sich das Recht vor, Produkte, Informationen und Spezifikationen ohne Vorankündigung zu ändern. TIPPS, WIE SIE DIE BESTEN ERGEBNISSE ERZIELEN KÖNNEN DÜSE/ZUBEHÖR VERWENDUNG FÜR: DE 3-in-1-Zubehörwerkzeug* Drei Tools in einem: 1. Tool zum Staubsaugen auf harten Oberflächen (Bücherregalen, Fußleisten usw.). 2. Polsterdüse für Textilien (Gardinen, Polster usw.). 3. Fugendüse für Spalten und Nischen (hinter Heizkörpern usw.). GB Turbodüse* Teppichdüse: • Bürstet und saugt gleichzeitig • Die Bürstenrolle wird durch den Luftstrom des Staubsaugers angetrieben. • Nicht geeignet für Teppiche mit sehr hohem Flor und langen Fransen, rutschfeste Teppiche wie Türmatten oder wasserfeste Teppiche. Verwenden Sie stattdessen die Universaldüse. ParkettoPro-Düse* Hartbodendüse:: • Zur schonende Reinigung von Hartböden (Parkett, Holzböden, Fliesen usw.). • Optimale Staubentfernung auf Hartböden mit Fugen. PrecisionFlow-Düse* Universaldüse: • Für alle Bodentypen, sorgt für eine optimale Staubentfernung sowohl auf Teppichen als auch auf Hartböden. • Ändern Sie die Düseneinstellung mit dem Pedal. Das Symbol zeigt den empfohlenen Bodentyp. Miniturbodüase* Polsterdüse* Miniturbodüse: • Bürstet und saugt gleichzeitig • Für Polstermöbel, PKW-Sitze, Matratzen usw. • Die Bürstenrolle wird durch den Luftstrom des Staubsaugers angetrieben. • Nicht geeignet für Teppiche mit sehr hohem Flor und langen Fransen, da diese sich in der rotierenden Bürstenrolle verfangen können. Polsterdüse: Für Sofas, Vorhänge, leichte Stoffe usw. Polsterdüse* (35) verwenden. Gegebenenfalls Saugleistung reduzieren. Modelle mit manueller Leistungsregelung - Für eine optimale Leistung befolgen Sie die Abbildung auf dem Staubsauger. FEHLERSUCHE PROBLEM Der Staubsauger startet nicht Die s-bag®Kontrolllampe leuchtet SOLUTION • Stellen Sie sicher, dass das Kabel an das Stromnetz angeschlossen ist. • Vergewissern Sie sich, dass der Stecker und das Kabel nicht beschädigt sind. • Prüfen Sie, ob eine Sicherung durchgebrannt ist. • Prüfen Sie, ob der s-bag® voll oder verstopft ist. • Wenn Sie den s-bag® bereits gewechselt haben, tauschen Sie den Motorfilter aus. Der Staubsauger könnte überhitzt sein: Trennen Sie ihn vom Netzstrom, und prüfen Sie, ob Düse, Rohr, Schlauch oder Filter verstopft sind. Lassen Sie den Staubsauger 30 Minuten lang abkühlen, bevor Sie ihn wieder am Stromnetz anschließen. Wenn der Staubsauger immer noch nicht funktioniert, kontaktieren Sie einen autorisierten AEGKundendienst. • Check if the s-bag is full or blocked. • Check if the motor filter is clogged and needs changing. Rückgang der • Prüfen Sie, ob der s-bag voll oder verstopft ist. Saugleistung • Prüfen Sie, ob der Motorfilter verstopft ist und ausgetauscht werden muss. im Vergleich • Prüfen Sie, ob die Düse verstopft ist und gereinigt werden muss. zur normalen • Prüfen Sie, ob der Schlauch verstopft ist, indem Sie ihn vorsichtig zusammendrücken. Seien Sie Saugleistung jedoch vorsichtig, falls die Verstopfung im Schlauch durch Glas oder Nadeln verursacht wurde. Hinweis: Die Gewährleistung deckt keine Schäden am Schlauch ab, die durch dessen Reinigung verursacht wurden. Wasser wurde in Es ist erforderlich, den Motor von einem autorisierten AEG-Kundendienst auswechseln zu lassen. den Staubsauger Schäden am Motor, die durch eingedrungenes Wasser verursacht wurden, sind nicht durch die eingesaugt Garantie abgedeckt. Bei weiteren Problemen wenden Sie sich an den autorisierten AEG-Kundendienst. Der Staubsauger stoppt ES PT FR NL IT FA DE GB C. ES PT FR NL L. IT H. FA J. G. E. F. B. M. A. O. D. K. N. I. P. Q. R. S. BEFORE STARTING Read this manual carefully. Check that all parts described are included. Pay special attention to the safety precautions. DESCRIPTION OF VX7 VACUUM CLEANER A. Display with rotary knob manual control B. Exhaust filter C. Parking slots D. Power cord E. Motor filter F. Motor filter holder G. S-bag H. S-bag holder I. Dust compartment cover J. 3in1 tool K. Hose L. Handle M. Telescopic tube N. Parking clip O. FlowMotion nozzle P. Upholstery nozzle* Q. Turbo nozzle* R. Mini turbo nozzle* S. ParkettoPro nozzle* * Certain models only. DE GB ES PT FR NL IT FA DE GB ES PT FR NL IT FA Safety requirement and warning This appliance can be used by children aged from 8 years and above and persons with reduced physical, sensory or mental capabilities or lack of experience and knowledge if they have been given supervision or instruction concerning use of the appliance in a safe way and understand the hazards involved. WARNING: Turbo nozzles* have a rotating brush in which parts may become entrapped. Please use them with caution and only on intended surfaces. Please turn the vacuum cleaner off before removing entrapped parts or cleaning the brush. The Turbo nozzle is not suitable for carpets with deep piles and long fringes, anti-slip carpets like door mats or water resistant carpets. Children should be supervised to ensure that they do not play with the appliance. Cleaning and maintenance shall not be made by children without supervision. Always disconnect the plug from the mains before cleaning or maintaining the appliance. Never use the vacuum cleaner without its filters. Always use original s-bag dust bags suitable for this particular vacuum cleaner. Damages caused to the cleaner by incorrect use of none-original dust bags is not covered by the warranty. Caution This appliance contains electrical connections: • Never vacuum any liquid • Do not immerse in any liquid for cleaning • The hose should be checked regularly and must not be used if damaged. The above can cause serious damage to the motor, which is not covered by the warranty. This vacuum cleaner is for domestic use only. Never use vacuum cleaner • Close to fl ammable gases, etc. • On sharp objects • On hot or cold cinders, lit cigarette butts, etc. • On fi ne dust, for instance plaster, concrete, flour. Power cord precautions • Never use the vacuum cleaner if the cord is damaged. • If the cord is damaged, it must be replaced only by an authorized AEG service centre in order to avoid a hazard. Damage to the vacuum cleaner’s cord is not covered by the warranty. • Never pull or lift the vacuum cleaner by the cord. All servicing and repairs must be performed by an authorized AEG service centre. Store the vacuum cleaner in a dry place. Consumer information and sustainability policy AEG declines all responsibility for all damages arising from any improper use of the appliance or in cases of tampering with the appliance. For more details of warranty and consumers’ contacts see the Warranty Booklet in the packaging. If you have any comments on the cleaner or the Operating Instructions manual please e-mail us at [email protected]. Sustainability policy This product is designed with the environment in mind. All plastic parts are marked for recycling purposes. For details see our website: www.aeg-home.com. The packaging material is chosen to be environmentally friendly and can be recycled. Recycle the materials with the symbol . Put the packaging in applicable containers to recycle it. Help protect the environment and human health and to recycle waste of electrical and electronic appliances. Do not dispose appliances marked with the symbol with the household waste. Return the product to your local recycling facility or contact your municipal office. DE GB ES PT FR NL IT FA DE GB ES PT FR NL IT FA HOW TO USE THE VACUUM CLEANER Open the dust compartment cover. Check that the dust bag (s-bag) is in place. Insert the hose into the cleaner (to remove it, press the lock buttons and pull). Insert the hose into the hose handle until the lock button clicks (to release it, press the lock button and pull). Attach the telescopic tube to the nozzle. Attach the telescopic tube to the hose handle (to remove it, press the lock button and pull). Adjust the telescopic tube by holding the lock with one hand and pulling the handle with the other hand. START/STOP THE VACUUM CLEANER AND ADJUST SUCTION POWER Pull out the power cord and plug it into the mains. Press the ON/OFF button to turn the cleaner on/off. Adjust suction power. Turn the rotary knob on the cleaner or use the air valve on the handle.* After cleaning, push the REWIND button to rewind the cable. PARKING POSITIONS Use parking position underneath (A) to carry and store the cleaner. At the back (B) when you pause (save your back). REPLACING THE DUSTBAG, S-BAG® Replace the s-bag when - S-BAG indicator lights up in red NB: Always change the s-bag when S-BAG indicator is illuminated even if the s-bag is not full (it may be blocked) and after using carpet cleaning powder. For best possible performance, use the Ultra Long Performance bag which is especially developed for your cleaner. Other synthetic s-bags can also be used. Do not use paper dust bags! www.s-bag.com Pushing and lifting the OPEN button to open the dust compartment. Lift the handle to remove the s-bag with holder. DE GB ES PT FR NL IT FA B. A. A. Pull the cardboard to remove the s-bag® from the insert. This automatically seals the s-bag® and prevents dust leaking out. B. Insert a new s-bag® by pushing the cardboard right into the end of the groove in the insert. Close the lid. If the s-bag is not properly placed or is missing, the lid will not close. REPLACING THE FILTERS Replace/clean the exhaust filter at every fifth replacement of the dust bag (s-bag®). Use AEG original filters: (AEF12W, AFS1W) / AEFG12W. Lift out the filter and check the color of the frame: Green: Must be replaced by a new filter (non-washable filter). Blue: Replace with a new filter or clean it. DE GB ES PT FR NL Rinse the inside (dirty side) in lukewarm tap water. Tap the filter frame to remove the water. Repeat the process four times. (**washable filter only) NB: Do not use cleaning agents. Avoid touching the filter surface. Let the filter dry completely (min. 24 h in room temperature) before putting back! Change the washable filter at least once a year or when it is very dirty or damaged. After replacing the filter, close the dust compartment lid until it is clicked back into place. IT FA Replace the motor filter (AF08) when dirty or after every 5th s-bag. Push the filter holder down and pull it out. Exchange the filter and close the lid. VACUUMING WITH THE UNIVERSAL NOZZLE Change nozzle setting with the pedal. Icon illustrates recommended floor type. CLEANING THE UNIVERSAL NOZZLE Disconnect the nozzle from the tube. Clean with the hose handle. CLEANING THE TURBO NOZZLE Disconnect the nozzle from the tube and remove entangled threads etc by snipping them away with scissors. Use the hose handle to clean the nozzle.* AEG reserves the right to change products, information and specifications without notice. TIPS ON HOW TO GET THE BEST RESULTS NOZZLE/ACCESSORY USE FOR: 3in1 accessory tool* 3 tools in 1: 1. Dusting tool for hard surfaces (bookshelves, skirting boards etc). 2. Upholstery tool for textiles (curtains, upholstery etc). 3. Crevice tool for narrow spaces (behind radiators etc). Turbo nozzle* Carpet nozzle: • Brushes and vacuums at the same time (best pick up of hair, fibres etc). • Brush roller is driven by the airflow of the vacuum cleaner. • Not suitable for carpets with very deep piles and long fringes, anti-slip carpets like door mats or water resistant carpets. Use universal nozzle instead. ParkettoPro nozzle* Hard floor nozzle: • For gentle cleaning of hard floor (parquet, wooden floor, tiles etc). • Best dust pick up on hard floor with crevice. PrecisionFlow nozzle* Universal nozzle: • For all floor types, secures best dust pick up on both carpets and hard floors. • Change nozzle setting with the pedal. Icon will show recommended floor type. DE GB ES PT FR NL Mini Turbo nozzle* Mini turbo nozzle: • Brushes and vacuums at the same time. • For textile furniture, car seats, mattresses etc. • Brush roller is driven by the airflow of the vacuum cleaner. • Not suitable for carpets with very deep pile and long fringes as it can get stuck in the rotating brush roll. Upholstery nozzle* Upholstery nozzle: Use the upholstery nozzle for sofas, curtains, lightweight fabrics etc. Reduce suction power if necessary. Models with manual power regulation – follow graphics on cleaner for optimal performance. TROUBLESHOOTING PROBLEM SOLUTION The vacuum cleaner does not start • Check that the cable is connected to the mains. • Check that the plug and cable are not damaged. • Check for a blown fuse. The s-bag® indicator light is illuminated • Check if the s-bag® is full or blocked. • If you have already changed the s-bag®, change the motor filter. The cleaner stops The cleaner might be overheated: disconnect it from the mains; check if the nozzle, tube, hose or filters are blocked. Let the cleaner cool down for 30 minutes before plugging it in again. If the cleaner still does not work, contact an authorized AEG service centre. Reduction of suction capacity versus normal • Check if the s-bag is full or blocked. • Check if the motor filter is clogged and needs changing. • Check if nozzle is blocked and needs to be cleared. • Check if hose is blocked by squeezing it gently. However, be careful in case the obstruction has been caused by glass or needles caught inside the hose. Note: The warranty does not cover any damage to the hose caused by cleaning it. Water has been sucked into the vacuum cleaner It will be necessary to replace the motor at an authorized AEG service centre. Damage to the motor caused by the penetration of water is not covered by the warranty. For any further problems, contact an authorized AEG service centre. IT FA DE GB C. ES PT FR NL L. IT H. FA J. G. E. F. B. M. A. O. D. K. N. I. P. Q. R. S. ANTES DE COMENZAR Lea detenidamente este manual. Compruebe que están incluidas todas las piezas descritas. ¡Preste especial atención a las precauciones de seguridad! DESCRIPCIÓN DE LA ASPIRADORA VX7 A. Pantalla con mando de control manual giratorio B. Tapa del filtro C. Espacio de almacenamiento D. Cable de alimentación E. Filtro del motor F. Soporte del filtro del motor G. Bolsa S-bag® H. Soporte de bolsas S-bag® I. Tapa del compartimento del polvo J. Herramienta 3 en 1 K. Manguera L. Asa M. Tubo telescópico N. Clip de estacionamiento O. Boquilla FlowMotion P. Boquilla para tapicerías* Q. Boquilla Turbo* R. Boquilla Mini Turbo* S. Boquilla ParkettoPro* * Solo algunos modelos. DE GB ES PT FR NL IT FA DE GB ES PT FR NL IT FA Requisito y advertencia de seguridad Este aparato pueden utilizarlo niños de 8 años en adelante y personas cuyas capacidades físicas, sensoriales o mentales estén disminuidas o que carezcan de la experiencia y conocimientos sufi cientes para manejarlo, siempre que cuenten con instrucciones o supervisión sobre el uso del electrodoméstico de forma segura y comprendan los riesgos. ADVERTENCIA: Las boquillas turbo* de mano auxiliares tienen un cepillo giratorio en el que las piezas pueden quedar atrapadas. Utilícelos con precaución y solo en las superfi cies indicadas. Apague la aspiradora antes de extraer las piezas atrapadas o de limpiar el cepillo. El cepillo Turbo no es apto para alfombras de pelo o flecos largos, alfombras resistentes al agua ni alfombras antideslizantes, como los felpudos. Se deberá controlar que los niños no jueguen con este electrodoméstico. Desconecte siempre el enchufe de la red eléctrica antes de limpiar o hacer cualquier labor de mantenimiento en el aparato. No utilice nunca la aspiradora sin sus fi ltros. Use siempre bolsas adecuadas para esta aspiradora específica. La garantía no cubre daños provocados por el uso de bolsas que no sean apropiadas para esta aspiradora. Precaución Este aparato contiene conexiones eléctricas: • Nunca aspire líquidos. • Para limpiarlo, no sumerja el aparato en ningún líquido. • Debe comprobarse periódicamente el tubo fl exible y no utilizarlo si está deteriorado. Estas materias podrían ocasionar graves daños en el motor, que no están cubiertos por la garantía. La aspiradora está diseñada exclusivamente para uso doméstico. No utilice nunca la aspiradora • En las proximidades de gases infl amables, etc. • Con objetos punzantes. • Con cenizas candentes o frías, colillas de cigarro encendidas, etc. • Con polvo fi no, por ejemplo, yeso, cemento o harina. Precauciones con el cable de alimentación • Compruebe periódicamente que el enchufe y los cables no están dañados. No utilice nunca la aspiradora si el cable no está en perfectas condiciones. • Si el cable no está en perfectas condiciones, sólo debe ser sustituido por un centro técnico de AEG, para evitar peligros. La garantía no cubre los daños ocasionados al cable del aparato. • No utilice el cable para tirar de la aspiradora o levantarla. Todos los servicios y reparaciones deberán ser efectuados por un centro técnico autorizado de AEG. Guarde la aspiradora en un lugar seco. Información al consumidor y política de sostenibilidad AEG no se hace responsable de ningún daño que pudiera derivarse del uso incorrecto del aparato o de haber realizado manipulaciones en él. Para obtener más detalles de la garantía y los contactos de los consumidores, consulte el folleto de garantía de la caja. Si desea realizar algún comentario sobre la aspiradora o sobre el manual de instrucciones, envíenos un mensaje electrónico a [email protected]. Política de sostenibilidad Este producto ha sido diseñado para respetar el medio ambiente. Todos los componentes de plástico llevan el distintivo de reciclaje. Consulte los detalles en nuestro sitio web: www.aeg-home.com. Se ha elegido un material de embalaje que sea respetuoso con el medio ambiente y se pueda reciclar. Recicle los materiales con el símbolo . Coloque el material de embalaje en los contenedores adecuados para su reciclaje. Ayude a proteger el medio ambiente y la salud pública, así como a reciclar residuos de aparatos eléctricos y electrónicos. No deseche los aparatos marcados con el símbolo junto con los residuos domésticos. Lleve el producto a su centro de reciclaje local o póngase en contacto con su ofi cina municipal. * Sólo algunos modelos. DE GB ES PT FR NL IT FA DE GB ES PT FR NL IT FA CÓMO USAR LA ASPIRADORA Abra la tapa del compartimento del polvo. Compruebe que la bolsa de polvo (s-bag) está en el sitio correcto. Inserte la manguera en la aspiradora (para retirarla, pulse los botones de bloqueo y tire). Inserte la manguera en el asa de manguera hasta que el botón de bloqueo haga clic (para liberarla, pulse el botón de bloqueo y tire). Una el tubo telescópico a la boquilla. Instale el tubo telescópico en el asa de la manguera (para retirarlo, pulse el botón de bloqueo y tire). Ajuste el tubo telescópico sosteniendo el bloqueo con una mano y tirando del asa con la otra. PONGA EN MARCHA/PARE LA ASPIRADORA Y AJUSTE LA POTENCIA DE ASPIRACIÓN Tire del cable de alimentación y enchúfelo a la red eléctrica. Pulse el botón ON/OFF para encender o apagar el aparato. Ajuste la potencia de aspiración: gire el mando giratorio del aparato o use la válvula de aire del asa.* Tras la limpieza, pulse el botón REWIND para recoger el cable. POSICIONES DE ESTACIONAMIENTO Utilice la posición de estacionamiento o de la parte inferior (A) para transportar y guardar el aparato. En la parte trasera (B) cuando haga una pausa (protéjase la espalda). CAMBIO DE LA BOLSA DE POLVO S-BAG® Cambie la bolsa s-bag cuando el indicador S-BAG se ilumine en rojo NB: Cambie siempre la bolsa cuando el iluminador S-BAG se ilumine aunque la bolsa no esté llena (podría estar obstruida) y después de usar polvo de limpieza de alfombras. Para un mejor rendimiento, use la bolsa Ultra Long Performance, diseñada especialmente para su aspiradora. Se pueden usar también otras bolsas S-bag sintéticas. ¡No usar bolsas de papel! www.s-bag.com DE GB ES PT FR NL Empujando y levantando el botón OPEN para abrir el compartimento del polvo. Levantamiento del asa para retirar la bolsa con el soporte. IT FA B. A. A. Tire del cartón para sacar la bolsa s-bag® del compartimento. Esto sella automáticamente la bolsa s-bag® y evita que se salga el polvo. B. Introduzca una nueva bolsa para el polvo s-bag® empujando el soporte de cartón hacia abajo hasta el fondo de las guías del compartimento. Cierre la tapa. Si no hay bolsa o no está bien colocada, la tapa no se cerrará. SUSTITUCIÓN DE LOS FILTROS Sustituya o limpie el filtro cada 5 cambios de bolsa de polvo, s-bag®. Utilice filtros originales de AEG: (AEF12W, AFS1W) / AEFG12W. Retire el filtro y compruebe el color del contorno: Color verde = Se debe reemplazar por un nuevo filtro (filtro no lavable). Color azul = Reemplazar por un nuevo filtro o limpiarlo. DE GB ES PT FR Enjuague el interior (lado sucio) con agua tibia del grifo. Golpee ligeramente el chasis del filtro para eliminar el agua. Repita el proceso cuatro veces. (únicamente filtros lavables**) NB: No use productos de limpieza. No toque la superficie del filtro. Deje que el filtro se seque completamente (mín. 24 horas a temperatura ambiente) antes de colocarlo de nuevo. Cambie el filtro lavable al menos una vez al año o cuando esté muy sucio o dañado. NL IT FA Cambie o lave el filtro del motor (AF08) cuando esté sucio o cada 5 sustituciones de la bolsa. Empuje el soporte del filtro hacia abajo y extráigalo. Cambie el filtro y cierre la tapa. ASPIRACIÓN CON LA BOQUILLA UNIVERSAL Cambie el ajuste de la boquilla con el pedal. El icono ilustra un tipo de suelo recomendado. LIMPIEZA DE LA BOQUILLA UNIVERSAL Desconecte la boquilla del tubo. Limpie con el asa de la manguera. LIMPIEZA DE LA BOQUILLA TURBO Desconecte la boquilla del tubo y recorte los hilos, etc. enredados con unas tijeras. Use el asa de la manguera para limpiar la boquilla. * AEG se reserva el derecho de modificar los productos, la información y las especificaciones sin previo aviso. CONSEJOS PARA OBTENER EL MEJOR RESULTADO BOQUILLA/ACCESORIO USO PARA: DE Herramienta de accesorios 3 en 1* 3 herramientas en 1: 1. Accesorio de limpieza para superficies duras (estanterías, rodapiés, etc.) 2. Accesorio de tapicerías para textiles (cortinas, tapizados, etc.) 3. Boquilla estrecha para espacios estrechos (detrás de radiadores, etc.) GB Boquilla Turbo* Boquilla de alfombras: • Cepilla y aspira al mismo tiempo • El rodillo del cepillo es accionado por el flujo de aire de la aspiradora. • No es apropiada para alfombras de pelo o flecos largos, alfombras resistentes al agua ni alfombras antideslizantes, como los felpudos. Use para ello una boquilla universal. Boquilla ParkettoPro* Boquilla para suelos duros: • Para limpiar suelos duros (parquet, suelo de madera, baldosas, etc.) • Óptima limpieza de suelo duro con fisuras. Boquilla PrecisionFlow* Boquilla Universal: • Para todo tipo de suelos, limpia el polvo de alfombras y de suelos duros. • Cambie el ajuste de la boquilla con el pedal. El icono mostrará el tipo de suelo recomendado Boquilla Mini Turbo* Boquilla para tapicerías* Boquilla Mini Turbo: • Cepilla y aspira al mismo tiempo • Para tapicerías de muebles, asientos de coche, colchones, etc. • El rodillo del cepillo es accionado por el flujo de aire de la aspiradora. • No es apropiada para alfombras de pelo o flecos largos, pues estos se pueden enredar en el rodillo giratorio del cepillo. Boquilla para tapicerías Utilice el cepillo para tapicerías* para sofás, cortinas, tejidos ligeros, etc. Reduzca la potencia de aspiración si fuera necesario. Modelos con regulación de potencia manual - siga los gráficos del aparato para conseguir un rendimiento óptimo. SOLUCIÓN DE PROBLEMAS PROBLEM La aspiradora no se pone en marcha La luz indicadora de las bolsas s-bag® se ilumina El aparato se detiene Reducción de la capacidad de aspiración Ha entrado agua en la aspiradora SOLUTION • Compruebe que el cable está conectado a la red eléctrica. • Compruebe que el enchufe y el cable no están dañados. • Compruebe si hay algún fusible fundido. • Compruebe si la bolsa está llena u obstruida. • Si ya ha cambiado la bolsa, cambie el filtro del motor. El aparato podría estar sobrecalentado: desconéctelo de la red eléctrica; compruebe si la boquilla, la manguera o los filtros están obstruidos. Deje que el aparato se enfríe durante 30 minutos antes de enchufarlo de nuevo. Si el aparato sigue sin funcionar, póngase en contacto con un servicio técnico autorizado AEG. • Compruebe si la bolsa está llena u obstruida. • Compruebe si el filtro del motor está obstruido y necesita sustitución. • Compruebe si la boquilla está obstruida. • Compruebe si la manguera está obstruida apretándola suavemente. Tenga cuidado si la obstrucción ha sido provocada por cristales o agujas atrapadas dentro de la manguera. Nota: la garantía no cubre posibles daños provocados a la manguera al desobstruirla. Será necesario cambiar el motor en un servicio técnico autorizado AEG. La garantía no cubre posibles daños en el motor por la entrada de agua. Para otras consultas, póngase en contacto con un servicio técnico autorizado AEG. ES PT FR NL IT FA DE GB C. ES PT FR NL L. IT H. FA J. G. E. F. B. M. A. O. D. K. N. I. P. Q. R. S. ANTES DE INICIAR Leia este manual atentamente. Verifique se a embalagem inclui todas as peças mencionadas. Preste particular atenção ao capítulo “Precauções de segurança”! DESCRIÇÃO DO ASPIRADOR VX7 A. Visor com controlo manual por botão rotativo B. Filtro de saída C. Ranhuras para estacionamento D. Cabo de alimentação E. Filtro do motor F. Suporte do filtro do motor G. Saco S-bag® H. Suporte do saco S-bag® I. Tampa do compartimento do pó J. Acessório 3-em-1 K. Mangueira L. Pega M. Tubo telescópico N. Encaixe de estacionamento O. Escova FlowMotion P. Bocal para sofás* Q. Escova Turbo* R. Escova Mini Turbo* S. Escova ParkettoPro* *Apenas alguns modelos. DE GB ES PT FR NL IT FA DE GB ES PT FR NL IT FA Avisos e requisitos de segurança Este aparelho pode ser utilizado por crianças com 8 anos ou mais e por pessoas com capacidades físicas, sensoriais ou mentais reduzidas ou com pouca experiência e conhecimento se tiverem recebido supervisão ou instruções relativas à utilização do aparelho de forma segura e compreenderem os perigos envolvidos. AVISO: As Escovas Turbos* têm escova rotativa que pode aprisionar objectos. Utilize-os com cuidado e apenas nas superfícies para as quais são adequados. Desligue o aspirador antes de remover qualquer objecto que tenha fi cado aprisionado e antes de limpar a escova. A escova Turbo năo é adequada para alcatifas com pelo comprido e franjas longas, tapetes antiderrapantes como capachos de portas ou tapetes resistentes ŕ água. As crianças deverão ser supervisionadas de modo a garantir que não brincam com o aparelho. Retire sempre a fi cha da corrente antes de limpar ou tratar da manutenção do aparelho. Nunca utilize o aspirador sem filtros. Utilize sempre os sacos de aspirador s-bag originais destinados a este aspirador. Quaisquer danos causados no aspirador por uma utilização incorreta de sacos de pó não originais não estão cobertos pela garantia. Atenção Este aparelho contém ligações eléctricas: • Não aspire líquidos • Não o mergulhe em líquidos para limpar • A mangueira deve ser verifi cada regularmente e não deverá ser utilizada se estiver danifi cada. Os procedimentos acima descritos podem causar sérios danos ao motor, não cobertos pela garantia. Este aspirador destina-se apenas a uso doméstico. Nunca utilize o aspirador • Perto de gases infl amáveis, etc. • Em objectos aguçados • Em cinzas quentes, pontas de cigarros acesas, etc. • Em pó fi no, como por exemplo, gesso, cimento, farinha. Precauções a ter com o cabo • Verifi que regularmente se a fi cha e o cabo não estão danifi cados. Nunca utilize o aspirador se o cabo estiver danifi cado. • Se o cabo de alimentação estiver danifi cado, só deverá ser substituído por um centro de assistência AEG autorizado, de modo a evitar quaisquer perigos. A garantia não cobre os danos provocados ao cabo do aspirador. • Nunca puxe nem levante o aspirador pelo cabo. Toda a assistência e reparações devem ser efectuadas por um centro de assistência AEG autorizado. Mantenha o aspirador num local seco. DE GB ES Informação ao consumidor e política de s ustentabilidade A AEG recusa qualquer responsabilidade por todos os danos decorrentes de um uso impróprio do aparelho ou de modifi cações ilícitas efectuadas ao mesmo. Para obter informações mais detalhadas sobre a garantia e contactos de consumidores, consulte o Folheto da Garantia incluído na embalagem. Se tiver comentários a fazer sobre o aspirador ou sobre o manual de Instruções de Funcionamento, envie-nos uma mensagem de correio electrónico para [email protected]. PT Política de sustentatibilidade Este produto foi concebido a pensar no ambiente. Todas as peças de plástico estão marcadas para fi ns de reciclagem. Para obter informações detalhadas, consulte o nosso Web site: www.aeg-home.com. Os materiais de embalagem foram escolhidos por respeitarem o ambiente e podem ser reciclados. Recicle os materiais que apresentem o símbolo . Coloque a embalagem nos contentores indicados para reciclagem. Ajude a proteger o ambiente e a saúde pública através da reciclagem de aparelhos eléctricos e electrónicos. Não elimine os aparelhos que tenham o símbolo juntamente com os resíduos domésticos. Coloque o produto num ponto de recolha para reciclagem local ou contacte as suas autoridades municipais. FA * Apenas determinados modelos. FR NL IT DE GB ES PT FR NL IT FA COMO UTILIZAR O ASPIRADOR Abra a tampa do compartimento empurrando e levantando o botão OPEN. Verifique se o saco do aspirador (s-bag) está bem instalado. Introduza a mangueira no aspirador (para remover, prima os botões de bloqueio e puxe). Introduza a mangueira na respetiva pega até o botão de bloqueio emitir um clique (para remover, prima o botão de bloqueio e puxe). Encaixe o tubo telescópico na escova. Encaixe o tubo telescópico na pega da mangueira (para remover, prima o botão de bloqueio e puxe). Ajuste o tubo telescópico segurando o bloqueio com uma mão e puxando a pega com a outra mão. LIGAR/DESLIGAR O ASPIRADOR E AJUSTAR A POTÊNCIA DE SUCÇÃO Puxe o cabo de alimentação para fora e ligue-o numa tomada elétrica. Prima o botão ON/OFF para ligar/desligar o aspirador. Ajuste a potência de sucção: Rode o botão rotativo do aspirador ou utilize a válvula de ar da pega. Quando terminar a limpeza, prima o botão REWIND para recolher o cabo. POSIÇÕES DE ESTACIONAMENTO Utilize a posição de estacionamento da parte inferior (A) para transportar ou guardar o aspirador. Utilize a posição da parte de trás (B) quando pretender fazer uma pausa (descansar as costas). SUBSTITUIR O SACO DO ASPIRADOR S-BAG® Substitua o saco s-bag quando: o indicador S-BAG acender a vermelho NB: Substitua sempre o saco s-bag quando o indicador S-BAG acender, mesmo que o saco do pó não esteja cheio (pode estar obstruído) e após utilizar um produto em pó para a limpeza de carpetes. Para obter o melhor desempenho possível, utilize o saco Ultra Long Performance que foi criado especificamente para o seu aspirador. Pode utilizar outros sacos s-bag sintéticos. Não utilize sacos de aspirador em papel! www.s-bag.com DE GB ES PT FR NL Empurrando e levantando o botão OPEN para abrir a tampa do compartimento do pó. Elevação a pega para remover o saco s-bag com o suporte. IT FA B. A. A. Puxe a parte de cartão para remover o saco s-bag® do encaixe. Esta acção fecha automaticamente o saco s-bag® e impede o pó de sair para o ar. B. Insira um saco s-bag® novo puxando a parte de cartão até ao fim da ranhura do encaixe. Feche a tampa. Se o saco s-bag não ficar bem posicionado ou se o aspirador não tiver s-bag, a tampa não fecha. SUBSTITUIR OS FILTROS Substitua/limpe o filtro de saída de ar a cada 5 substituições do saco de poeiras, s-bag®. Utilize filtros originais da AEG: (AEF12W, AFS1W) / AEFG12W. Retire o filtro e verifique a cor da estrutura: Cor verde = Deve ser substituído por um filtro novo ou limpo; consulte 6 (filtro nonlavável). Cor azul = Substitua por um filtro novo ou lave-o. DE GB ES PT FR Lave a parte interior (lado sujo) em água corrente morna. Bata na armação do filtro para remover a água. Repita o procedimento quatro vezes. (**apenas no caso do filtro lavável) NB: Não utilize produtos de lavagem. Evite tocar na superfície do filtro. Deixe o filtro secar totalmente (mín. 24 h à temperatura ambiente) antes de voltar a instalá-lo! Substitua o filtro lavável pelo menos uma vez por ano ou quando verificar que está demasiado sujo ou danificado. NL IT FA Substitua o filtro do motor (AF08) quando estiver sujo ou após 5 substituições do s-bag. Pressione o suporte do filtro para baixo e puxe-o para fora. Troque o filtro e feche a tampa. ASPIRAR COM A ESCOVA UNIVERSAL Mude a configuração da escova com o pedal. O ícone ilustra o tipo de piso para o qual a configuração é recomendada. LIMPAR A ESCOVA UNIVERSAL Retire a escova do tubo. Limpe a pega da mangueira. LIMPAR A ESCOVA TURBO Retire a escova do tubo e remova os fios que estiverem enredados, cortando-os com uma tesoura se for necessário. Utilize a pega da mangueira para limpar a escova. * A AEG tem o direito de alterar os produtos, informações e especificações sem aviso prévio. SUGESTÕES PARA OBTER OS MELHORES RESULTADOS NOZZLE/ACCESSORY USE FOR: DE Ferramenta de cessórios 3-em-1* 3 acessórios em 1: 1. Escova para limpar o pó em superfícies rígidas (estantes, rodapés, etc.). 2. Acessório de estofos para limpar têxteis (cortinas, sofás, etc.). 3. Tubo para frestas para espaços estreitos (atrás de radiadores, etc.). GB Escova Turbo* Escova para alcatifas: • - Escova e aspira ao mesmo tempo • - O rolo-escova é acionado pelo fluxo de ar do aspirador. • - Não é adequada para alcatifas com pelo comprido e franjas longas, tapetes antiderrapantes, como tapetes de porta, ou carpetes resistentes à água. Utilize a escova Universal em vez desta. Escova ParkettoPro* Escova para piso rígido: - Para limpar suavemente pisos rígidos (parquet, soalho, tijoleira, etc.). - A melhor aspiração em pisos rígidos com frestas. Escova PrecisionFlow* Escova Universal: - Para todos os tipos de piso, capaz da melhor aspiração tanto em carpetes como em pisos rígidos. - Mude a configuração da escova com o pedal. O ícone indica o tipo de piso para o qual a configuração é recomendada. Escova Mini Turbo* Bocal para sofás* Escova Mini Turbo* - Escova e aspira ao mesmo tempo - Para sofás de têxteis, bancos de automóvel, colchões, etc. - O rolo-escova é acionado pelo fluxo de ar do aspirador. - Não é adequada para alcatifas com pelo comprido e franjas longas, porque o rolo-escova rotativo pode aprisioná-los Bocal para sofás Utilize o bocal para sofás* para estofos, cortinas, tecidos leves etc. Reduza o poder de sucção se necessário. Modelos com regulação manual da potência - siga os gráficos no aspirador para obter o melhor desempenho possível. RESOLUÇÃO DE PROBLEMAS PROBLEM O aspirador não funciona A luz indicadora s-bag® está acesa O aspirador deixa de funcionar Redução da capacidade de sucção em relação à normal O aspirador aspirou água SOLUTION • Verifique se o cabo está ligado na tomada elétrica. • Verifique se existem danos na ficha ou no cabo. • Verifique se existe algum disjuntor desligado ou fusível queimado. • Verifique se o saco s-bag® está cheio ou obstruído. • Se já tiver substituído o saco s-bag®, substitua o filtro do motor. É possível que o aspirador tenha aquecido demasiado: desligue o aspirador da tomada elétrica; verifique se existe alguma obstrução na escova, no tubo, na mangueira ou nos filtros. Deixe o aspirador arrefecer durante 30 minutos antes de voltar a ligá-lo. Se o aspirador continuar a não funcionar, contacte um Centro de Assistência Técnica AEG autorizado • Verifique se o saco s-bag está cheio ou obstruído. • Verifique se o filtro do motor está obstruído e precisa de substituição. • Verifique se a escova está obstruída e precisa de limpeza. • Verifique se a mangueira está obstruída apertando-a suavemente. Tenha cuidado se a obstrução tiver sido provocada por agulhas ou vidros encravados no interior da mangueira. Nota: A garantia não cobre quaisquer danos provocados na mangueira por qualquer tentativa de a limpar. Será necessário substituir o motor num Centro de Assistência Técnica AEG autorizado. Os danos que forem causados pela entrada de água para o motor não estão cobertos pela garantia. Em caso de qualquer outro problema, contacte um Centro de Assistência Técnica AEG autorizado. ES PT FR NL IT FA DE GB C. ES PT FR NL L. IT H. FA J. G. E. F. B. M. A. O. D. K. N. I. P. Q. R. S. AVANT DE COMMENCER Lisez attentivement ce manuel d’utilisation. Assurez-vous que toutes les pièces mentionnées sont présentes dans le carton. Prêtez tout particulièrement attention aux « Consignes de sécurité ». DESCRIPTION DE L’ASPIRATEUR VX7 A. Variateur avec commande manuelle à bouton rotatif B. Filtre de sortie d’air C. Système parking D. Câble d’alimentation E. Filtre moteur F. Support de filtre moteur G. Sac à poussière s-bag® H. Support du sac à poussière s-bag® I. Couvercle du compartiment à poussière J. Accessoire 3-en-1 K. Flexible L. Poignée M. Tube télescopique N. Clip de rangement pour le parking horizontal ou vertical O. Brosse FlowMotion* P. Petit suceur pour canapés, tentures* Q. Turbobrosse Turbo* R. Mini Turbobrosse* S. Brosse parquet ParkettoPro* *Les accessoires peuvent varier d’un modèle à l’autre. DE GB ES PT FR NL IT FA DE GB ES PT FR NL IT FA Précautions de sécurité et avertissement Cet appareil peut être utilisé par des enfants de plus de 8 ans, ainsi que des personnes dont les capacités physiques, sensorielles et mentales sont réduites ou dont les connaissances et l’expérience sont insuffi santes, à condition d’être surveillés ou d’avoir reçu des instructions concernant l’utilisation sécurisée de l’appareil et de comprendre les risques encourus. AVERTISSEMENT: Les Turbo Brosse* sont dotées d’une brosse rotative dans laquelle des objets peuvent se coincer. Veuillez les utiliser avec précaution et uniquement sur des surfaces adaptées. Éteignez l’aspirateur avant de retirer les objets coincés ou de nettoyer la brosse. La Turbo brosse ne convient pas pour les moquettes ŕ longs poils, les tapis antidérapants tels que les paillassons, et les tapis résistants ŕ l'eau. Les enfants doivent être surveillés, pour éviter qu’ils ne jouent avec cet appareil. Toujours débrancher la fi che de la prise avant toute opération de nettoyage ou d’entretien de votre aspirateur. Ne jamais utiliser l’aspirateur sans filtres. Utilisez des sacs à poussière d'origine adaptés à cet aspirateur. Les dommages causés à l'aspirateur par l'utilisation de sacs à poussière autres que les sacs d'origine ne sont pas couverts par la garantie. Attention Cet appareil comporte des connexions électriques: • Ne jamais aspirer de liquide. • Pour nettoyer l’appareil, ne le plonger dans aucun liquide. • Le flexible doit être régulièrement vérifi é et ne doit pas être utilisé s’il est endommagé. Les éléments susmentionnés peuvent provoquer de graves dommages au moteur. La garantie ne prend pas en charge ce type de dommage. Cet aspirateur est exclusivement destiné à un usage domestique. Ne jamais utiliser l’aspirateur: • À proximité de gaz infl ammables, etc. • Sur des objets pointus • Sur des cendres chaudes ou refroidies, des mégots de cigarettes incandescents, etc. • Sur des particules de poussière très fi nes issues entre autres du plâtre, du béton ou de la farine. • Les produits en bombe aérosol peuvent être inflammables. Ne pas vaporiser de tels produits à proximité ou sur l’aspirateur. Précautions d’emploi du cordon d’alimentation • Vérifi er régulièrement que la prise et le cordon ne sont pas endommagés. Ne jamais utiliser l’aspirateur si le cordon est endommagé. • Si le cordon d’alimentation est endommagé, il peut uniquement être remplacé dans un Centre Service Agréé AEG, afi n d’éviter tout danger. Les dommages portés au cordon de l’aspirateur ne sont pas couverts par la garantie. • Ne jamais tirer ni soulever l’aspirateur par le cordon. Toutes les révisions et réparations doivent être effectuées dans un Centre Service Agréé AEG. Ranger l’aspirateur dans un endroit sec. Informations consommateur et fi n de vie AEG décline toute responsabilité pour les dommages résultant d’une utilisation incorrecte de l’appareil ou en cas de modifi cation de l’appareil. Pour plus d’informations sur la garantie et les points de contact consommateur, voir le livret de garantie inclus dans l’emballage. Pour nous transmettre vos commentaires sur l’aspirateur ou sur les instructions d’utilisation, envoyez un e-mail à l’adresse [email protected] Appareil en fi n de vie Ce produit a été conçu dans un souci de respect de l’environnement. Tous les éléments en plastique sont marqués à des fi ns de recyclage. Pour plus de détails, visiter notre site Web : www.aeg-home.com. Les emballages sélectionnés sont sans danger pour l’environnement et recyclables. Recyclez les matériaux portant le symbole . Déposez les emballages dans les conteneurs prévus à cet effet. Contribuez à la protection de l’environnement et à votre sécurité, recyclez vos produits électriques et électroniques. Ne jetez pas les appareils portant le symbole avec les ordures ménagères. Emmenez un tel produit dans votre centre local de recyclage ou contactez vos services municipaux. * Suivant les modèles. DE GB ES PT FR NL IT FA DE GB ES PT FR NL IT FA COMMENT UTILISER CET ASPIRATEUR Pour accéder au compartiment du sac à poussière, pousser et soulever le bouton OPEN. Vérifiez que le sac à poussière (s-bag) est en bien en placé. Connectez le flexible au corps de l’appareil. Pour le retirer, pressez les boutons de verrouillage et tirez). Insérez le flexible dans la poignée jusqu’à ce que le bouton de verrouillage émette un clic. Pour ôter le flexible, appuyez sur le bouton de verrouillage et tirez). Pour accéder au compartiment du sac à poussière, pousser et soulever le bouton OPEN. Vérifiez que le sac à poussière (s-bag) est en bien en placé. Connectez le flexible au corps de l’appareil. Pour le retirer, pressez les boutons de verrouillage et tirez). Insérez le flexible dans la poignée jusqu’à ce que le bouton de verrouillage émette un clic. Pour ôter le flexible, appuyez sur le bouton de verrouillage et tirez). MISE EN MARCHE/ARRÊT DE L’ASPIRATEUR ET RÉGLAGE DE LA PUISSANCE Tirez sur le câble d’alimentation et branchez la fiche sur une prise secteur. Appuyez sur le bouton Marche/Arrêt pour allumer ou éteindre l’appareil. Réglage de la puissance: tournez le bouton rotatif de l’aspirateur ou servez-vous du réglage de débit d’air sur la poignée. Appuyer sur la pédale enrouleur de câble pour ranger le câble d’alimentation. POSITIONS DE RANGEMENT Utilisez la position parking au-dessous (A) pour porter et ranger l’aspirateur. À l’arrière (B) quand vous faites une pause (prenez soin de votre dos). REMPLACEMENT DU SAC À POUSSIÈRE, S-BAG® Remplacez le sac à poussière s-bag quand: l’indicateur de remplissage de sac s-bag s’allume en rouge. Remarque: remplacez systématiquement le sac à poussière s-bag si l’indicateur de remplissage de sac ou le témoin s-bag est allumé, même si le sac n’est pas plein (il peut être colmaté) et après avoir utilisé une poudre de nettoyage pour moquettes. Pour obtenir les meilleures performances, utilisez le sac Ultra Long Performance qui a été spécialement conçu pour l’aspirateur VX7. Néanmoins, il est possible d’utiliser des sacs s-bag synthétiques compatibles avec cet aspirateur. Ne jamais utiliser de sacs à poussière en papier dans cet aspirateur! www.s-bag.com Pour accéder au compartiment du sac à poussière, pousser et soulever le bouton OPEN. Levage la poignée pour extraire le s-bag avec le support. B. A. A. Tirez sur la partie cartonnée pour retirer le sac à poussière s-bag® du support de fixation. Le sac à poussière s-bag® se ferme alors automatiquement, ce qui empêche la poussière de se diffuser dans l’air. B. Insérez un nouveau sac à poussière s-bag® en poussant la partie cartonnée bien au fond du rail du support de fixation. Fermez le couvercle. Si le s-bag n’est pas convenablement positionné ou s’il est manquant, il est impossible de fermer le couvercle. REMPLACEMENT DES FILTRES Remplacez/nettoyez le filtre de sortie d’air tous les cinq changements du sac à poussière (s-bag®). Utilisez les filtres originaux AEG: (AEF12W, AFS1W) / AEFG12W. Retirez le filtre et vérifiez la couleur du cadre: Vert: doit être remplacé par un filtre neuf (filtre non lavable). Bleu: remplacez-le par un filtre neuf ou nettoyezle. DE GB ES PT FR NL IT FA DE GB ES PT FR Rincez l’intérieur (côté sale) à l’eau tiède du robinet. Tapotez le cadre du filtre pour éliminer l’eau superflue. Répétez cette opération quatre fois. (**filtre lavable uniquement) Remarque : n’utilisez pas de produit de nettoyage. Évitez de toucher la surface du filtre. Laissez le filtre sécher complètement (minimum 24 h à température ambiante) avant de le remettre en place ! Remplacer le filtre lavable au moins une fois par an, ou dès lors qu’il est sale ou endommagé. NL IT FA Remplacez le filtre moteur (AF08) si celui-ci est sale ou lorsque le sac à poussière s-bag a été remplacé 5 fois. Poussez la grille du filtre vers le bas et retirez-le filtre. Remplacez le filtre et rabattre la grille. UTILISATION DE L’ASPIRATEUR AVEC LA BROSSE Modifiez le réglage de la brosse au moyen de la pédale. L’icône illustre le type de sols conseillé. NETTOYAGE DE LA BROSSE Séparez la brosse et le tube. Nettoyez à l’aide de la poignée du flexible. NETTOYAGE DE LA TURBOBROSSE Séparez la turbobrosse et le tube et retirez les fils emmêlés en les coupant avec des ciseaux. Utilisez la poignée du flexible pour nettoyer la turbobrosse. * AEG se réserve le droit de modifier les produits, les informations et les caractéristiques techniques, sans préavis. ASTUCES POUR UN RESULTAT IMPECCABLE BROSSE/ACCESSOIRE À UTILISER POUR : Accessoire 3 en 1* 3 accessoires en 1 : 1. Brosse meubles pour aspirer les surfaces dures (meubles, bibliothèques, plinthes, etc.). 2. Petit suceur pour aspirer les textiles (rideaux, canapés, etc.). 3. Suceur long pour aspirer les espaces étroits (arrière des radiateurs, etc.). Brosse pour moquette : • Brosse et aspire en même temps • La brosse rotative est entraînée par le flux d'air de l'aspirateur. • Cet accessoire ne convient pas pour les moquettes à poils longs, les tapis antidérapants tels que les paillassons ou les tapis résistants à l'eau. Pour aspirer ce type de surfaces, utilisez plutôt la brosse. Brosse pour sols durs: • Pour le nettoyage simple d'un sol dur (parquet, sol en bois, carrelage, etc.). • déale pour l’aspiration des parquets. Turbobrosse* Brosse ParkettoPro* Brosse PrecisionFlow* Mini turbobrosse* Petit suceur pour canapés, tentures* Brosse : • Pour tous les types de sols, garantit les meilleurs résultats sur les moquettes et les sols durs. • Modifiez le réglage de la brosse au moyen de la pédale. L'icône illustrera le type de sols conseillé. Mini turbobrosse: • Brosse et aspire en même temps • Pour le mobilier textile, les sièges d'automobile, les matelas, etc. • La brosse rotative est entraînée par le flux d'air de l'aspirateur. • Ne convient pas pour les moquettes à poils longs qui peuvent se loger dans la brosse rotative. Petit suceur pour canapés, tentures: Utiliser le petit suceur* pour les canapés, les rideaux, les tissus légers, etc. Si nécessaire, réduire la puissance d’aspiration. Modèles à régulation manuelle de la puissance – Respectez les graphismes sur l'aspirateur pour obtenir les performances optimales. EN CAS D’ANOMALIE DE FONCTIONNEMENT PROBLÈME L'aspirateur ne démarre pas Le témoin lumineux du sac à poussière s-bag® est allumé SOLUTION • Assurez-vous que le câble d'alimentation est branché sur le secteur. • Vérifiez que la fiche et le câble ne sont pas endommagés. • Vérifiez qu’aucun fusible n’a sauté. • Vérifiez que le sac à poussière s-bag® ne soit pas plein ou colmaté. • Si vous avez déjà remplacé le sac à poussière s-bag®, changez le filtre moteur. L'aspirateur a peut-être surchauffé : débranchez-le du secteur ; assurez-vous que la brosse, le tube, le flexible ou les filtres ne sont pas obstrués. Attendez 30 minutes que l'aspirateur refroidisse avant de le rebrancher. Si l'aspirateur ne fonctionne toujours pas, consultez le service après-vente agréé AEG. • Vérifiez que le sac à poussière s-bag n’est pas plein ou colmaté. • Assurez-vous que le filtre moteur n'est pas colmaté et ne doit pas être changé. Réduction de la • Assurez-vous que la brosse n'est pas obstruée et ne doit pas être nettoyée. capacité d'aspiration • Assurez-vous que le flexible n'est pas obstrué en le comprimant légèrement. Cependant, soyez vigilants en cas d'obstruction causée par du verre ou des aiguilles coincés à l'intérieur du flexible. Note : la garantie ne couvre pas les dommages du flexible causés lors de son nettoyage. De l'eau a été Il sera nécessaire de faire remplacer le moteur par un centre de service après-vente AEG agréé. aspirée à l'intérieur Les dommages subis par le moteur du fait de la pénétration d'eau ne sont pas couverts par la de l'aspirateur garantie. Pour tout autre problème, consultez un centre de service après-vente AEG agréé. L'aspirateur s'arrête DE GB ES PT FR NL IT FA DE GB C. ES PT FR NL L. IT H. FA J. G. E. F. B. M. A. O. D. K. N. I. P. Q. R. S. ANTES DE INICIAR Leia este manual atentamente. Verifique se a embalagem inclui todas as peças mencionadas. Preste particular atenção ao capítulo “Precauções de segurança”! BESCHRIJVING VAN VX7-STOFZUIGER A. Display met handmatige bediening met draaiknop B. Uitlaatfilter C. Parkeermogelijkheden D. Stroomkabel E. Motorfilter F. Motorfilterhouder G. S-bag® H. S-bag®-houder I. Deksel stofcompartiment J. 3-in-1 mondstuk K. Slang L. Handgreep M. Telescopische buis N. Opbergklem O. FlowMotion-mondstuk P. Mondstuk voor bekleding* Q. Turbo-mondstuk* R. Mini turbo-mondstuk* S. ParkettoPro-mondstuk* * Alleen bepaalde modellen. DE GB ES PT FR NL IT FA DE GB ES PT FR NL IT FA Veiligheidsvereiste en waarschuwing Dit apparaat kan worden gebruikt door kinderen van 8 jaar en ouder en door mensen met beperkte lichamelijke, zintuiglijke of verstandelijke vermogens of een gebrek aan ervaring en kennis, indien zij onder toezicht staan of instructies hebben gekregen over het veilig gebruiken van het apparaat en indien zij de eventuele gevaren begrijpen. WAARSCHUWING: Turbomondstukaccessoires* zijn voorzien van een roterende borstel waarin deeltjes vast kunnen komen te zitten. Let bij het gebruik van deze accessoires goed op en gebruik ze alleen op de bedoelde oppervlakken. Schakel de stofzuiger uit voordat u vastgelopen deeltjes verwijdert of de borstel schoonmaakt. Het Turbo mondstuk is niet geschikt voor tapijten met diepe polen en lange franjes, antislip tapijten zoals deurmatten of waterbestendige tapijten. Let op dat kinderen niet met het apparaat spelen. Trek altijd de stekker uit het stopcontact voordat u het apparaat gaat reinigen of onderhouden. Gebruik de stofzuiger nooit zonder filters. Gebruik altijd originele s-bag stofzuigerzakken die geschikt zijn voor deze specifieke stofzuiger. Schade die wordt toegebracht aan de stofzuiger door het verkeerde gebruik van niet-originele stofzuigerzakken wordt niet gedekt door de garantie. Waarschuwing Dit apparaat bevat elektrische verbindingen. • Zuig nooit vloeistoffen op. • Dompel het apparaat nooit in water om het schoon te maken. • Controleer de slang regelmatig en gebruik deze niet als u beschadigingen opmerkt. Bovengenoemde zaken kunnen schade aan de motor veroorzaken. Dergelijke schade valt niet onder de garantie. De stofzuiger is uitsluitend bestemd voor huishoudelijk gebruik. Gebruik de stofzuiger nooit in deze situaties • In de buurt van ontvlambare gassen, enz. • Bij scherpe voorwerpen. • Voor hete of koude as, brandende sigarettenpeuken, enz. • Voor fi jn stof van bijvoorbeeld gips, beton of bloem. Voorzorgsmaatregelen betreffende het elektrische snoer • Controleer regelmatig of de stekker en het snoer niet beschadigd zijn. Gebruik de stofzuiger nooit als het snoer beschadigd is. • Als het snoer is beschadigd, mag dit alleen bij een erkend AEG Service Centre worden vervangen om risico te vermijden. Schade aan het snoer van de stofzuiger valt niet onder de garantie. • Nooit door middel van het snoer de stofzuiger naar u toe trekken of optillen. Alle servicebeurten en reparaties moeten uitgevoerd worden door een erkend AEG Service Centre. Bewaar de stofzuiger op een droge plaats. Klantinformatie en milieubeleid AEG wijst alle aansprakelijkheid van de hand voor schade die ontstaat als gevolg van onjuist gebruik van het apparaat of onbevoegde aanpassingen van het apparaat. Zie het bijgesloten garantieboekje voor meer informatie over de garantie en contactpersonen voor klanten. Als u opmerkingen hebt over de stofzuiger of over de handleiding, kunt u een e-mail sturen naar [email protected]. Milieubeleid Het ontwerp van dit product is zeer milieuvriendelijk. Alle kunststof onderdelen kunnen worden hergebruikt. Ga voor meer informatie naar onze website: www.aeg-home.com. Het verpakkingsmateriaal is geselecteerd op millieuvriendelijkheid en kan worden gerecycled. Recycle de materialen met het symbool . Gooi de verpakking in een geschikte verzamelcontainer om het te recyclen. Help om het milieu en de volksgezondheid te beschermen en recycle het afval van elektrische en elektronische apparaten. Gooi apparaten gemarkeerd met het symbool niet weg met het huishoudelijk afval. Breng het product naar het milieustation bij u in de buurt of neem contact op met de gemeente. * Alleen bepaalde modellen. DE GB ES PT FR NL IT FA DE GB ES PT FR NL IT FA GEBRUIK VAN DE STOFZUIGER Open het deksel van het stofcompartiment door. Controleer of er een stofzuigerzak (s-bag) werd geplaatst. Plaats de slang in de stofzuiger (om hem te verwijderen, drukt u op de vergrendelknoppen en trekt u eraan). Breng de slang in de slanghandgreep tot de vergrendelknop klikt (om ze te verwijderen, drukt u op de vergrendelknop en trekt u eraan). Bevestig de telescopische buis op het mondstuk. Bevestig de telescopische buis op de slanghandgreep (om ze te verwijderen, drukt u op de vergrendelknop en trekt u eraan). Verstel de telescopische buis door de vergrendeling vast te houden met één hand en met de andere hand aan de handgreep te trekken. DE STOFZUIGER STARTEN/STOPPEN EN HET ZUIGVERMOGEN REGELEN Trek de stroomkabel uit en sluit deze aan op het lichtnet. Druk op de AAN/UIT-knop om de stofzuiger in/uit te schakelen. Het zuigvermogen regelen: Draai aan de draaiknop op de stofzuiger of gebruik de luchtklep op de handgreep.* Druk na het stofzuigen op de REWIND-knop om de kabel terug op te rollen. PARKEERPOSITIES Gebruik de parkeerpositie of onderkant (A) om de stofzuiger te dragen en op te bergen. Op de achterkant (B) voor een pauze (om uw rug te sparen). DE STOFZUIGERZAK, S-BAG®, VERVANGEN Vervang de s-bag wanneer: het S-BAG indicatielampje rood oplicht. NB: Vervang de s-bag altijd wanneer het S-BAG indicatielampje brandt, ook al is de s-bag niet vol (hij kan verstopt zijn), en na het gebruik van reinigingspoeder voor tapijten. Gebruik voor optimale prestaties de Ultra Long Performance-zak, die speciaal is ontworpen voor uw stofzuiger. U kunt ook andere synthetische s-bags gebruiken. Gebruik geen papieren stofzuigerzakken! www.s-bag.com DE GB ES PT FR NL Drukken en opheffen van de OPEN-knop om het stofcompartiment te openen. Optillen aan de handgreep om de s-bag met de houder te verwijderen. IT FA B. A. A. Trek aan het karton om de -bag® uit de insteekhouder te tillen. De s-bag® wordt zo automatisch gesloten en er kan geen stof meer ontsnappen. B. Breng een nieuwe s-bag® aan door het karton tot aan het einde van de groef op de insteekhouder te duwen. Sluit het deksel. Als de s-bag niet goed geplaatst is of niet is aangebracht, kan het deksel niet worden gesloten. DE FILTERS VERVANGEN Vervang/reinig het uitlaatfilter bij elke vijfde keer dat u de stofzak/s-bag® vervangt. Gebruik originele AEG-filters: (AEF12W, AFS1W) / AEFG12W. Løft ut filteret, og se på fargen på rammen: Grønn = Het filter moet worden vervangen door een nieuwe (niet-wasbaar filter). Blauw = Vervang door een nieuwe filter of reinig de huidige. DE GB ES PT FR Spoel de binnenkant (vuile kant) met lauwwarm leidingwater. Tik op het filterframe om het water te verwijderen. Herhaal het proces vier keer. (**uitsluitend uitwasbare filters) NB: Gebruik geen schoonmaakmiddelen. Vermijd de aanraking van het filteroppervlak. Laat het filter volledig drogen (min. 24 u op kamertemperatuur) alvorens het terug te plaatsen! Vervang het uitwasbare filter minstens eenmaal per jaar of wanneer het zeer vuil of beschadigd is. NL IT FA Vervang het motorfilter (AF08) wanneer het vuil is of na iedere 5e s-bag. Druk op de filterhouder en verwijder deze. Vervang het filter en sluit het deksel. STOFZUIGEN MET HET UNIVERSELE MONDSTUK Wijzig de instelling van het mondstuk met de pedaal. Het pictogram toont het aanbevolen vloertype. HET UNIVERSELE MONDSTUK REINIGEN Koppel het mondstuk los van de buis. Reinig het met de slanghandgreep. HET TURBO-MONDSTUK REINIGEN Koppel het mondstuk los van de buis en verwijder verstrikte draden door ze weg te knippen met een schaar. Gebruik de slanghandgreep om het mondstuk te reinigen. * AEG behoudt zich het recht voor de producten, informatie en specificaties zonder kennisgeving vooraf te wijzigen. TIPS OM DE BESTE RESULTATEN TE VERKRIJGEN MONDSTUK/ACCESSOIRE TE GEBRUIKEN VOOR: 3 mondstukken in 1: 1. Stofzuigmondstuk voor harde oppervlakken (boekenrekken, plinten enz.). 2. Bekledingmondstuk voor stoffen (gordijnen, bekledingen enz.). 3. Spleetmondstuk voor nauwe ruimtes (achter radiatoren enz.). Tapijtmondstuk: • Borstelt en stofzuigt tegelijkertijd • De borstelrol wordt aangedreven door de luchtstroom van de stofzuiger. • Niet geschikt voor tapijten met zeer diepe polen en lange franjes, antisliptapijten zoals deurmatten of waterbestendige tapijten. Hiervoor dient het universele mondstuk te worden gebruikt. 3in1 ACCESSOIRE* Turbomondstuk* ParkettoPro-mondstuk* PrecisionFlowmondstuk* Mondstuk voor harde vloeren: • Voor een voorzichtige reiniging van harde vloeren (parket, houten vloer, tegels enz.). • Optimale stofopname op harde vloeren met spleten. Universeel mondstuk: • Voor alle vloertypes, gegarandeerd de beste stofopname, zowel op tapijten als op harde vloeren. • Wijzig de instelling van het mondstuk met de pedaal. Het pictogram toont het aanbevolen vloertype. DE GB ES PT FR NL IT Mini Turbo-mondstuk* Mondstuk voor bekleding* Mini Turbo-mondstuk: • Borstelt en stofzuigt tegelijkertijd • Voor stoffen meubels, autostoelen, matrassen enz. • De borstelrol wordt aangedreven door de luchtstroom van de stofzuiger. • Niet geschikt voor tapijten met zeer diepe polen en lange franjes, omdat de draaiende borstelrol hierop kan vastlopen. Mondstuk voor bekleding Gebruik het mondstuk voor bekleding* voor banken, gordijnen, lichtgewicht stoffen, enz. Verminder zo nodig de zuigkracht. Modellen met handmatige vermogensregeling – volg de afbeeldingen op de stofzuiger voor optimale prestaties. PROBLEEMOPLOSSING PROBLEM De stofzuiger start niet Het s-bag® indicatielampje brandt SOLUTION • Controleer of de kabel is aangesloten op het lichtnet. • Controleer of de stekker en kabel niet beschadigd zijn. • Controleer of er een zekering is doorgebrand. • Controleer of de s-bag® vol of verstopt is. • Als u de s-bag® al hebt vervangen, vervang dan het motorfilter. De stofzuiger kan oververhit zijn: koppel de stofzuiger los van het lichtnet; controleer of het mondstuk, de buis, de slang of de filters verstopt zijn. Laat de stofzuiger 30 minuten afkoelen voor u de stekker opnieuw aansluit. Als de stofzuiger nog steeds niet werkt, neem dan contact op met een erkend servicecentrum van AEG. • Controleer of de s-bag vol of verstopt is. • Controleer of het motorfilter verstopt is en toe is aan vervanging. Vermindering van • Controleer of het mondstuk verstopt is en moet worden vrijgemaakt. zuigvermogen • Controleer of de slang verstopt is door er zachtjes op te knijpen. Wees hierbij echter wel voorzichtig, aangezien de obstructie mogelijk is veroorzaakt door in de slang vastgeklemd glas of een naald. Opmerking: De garantie dekt geen schade aan de slang die ontstaat bij de reiniging van de slang. De motor moet worden vervangen in een erkend servicecentrum van AEG. De stofzuiger heeft Schade aan de motor veroorzaakt door het binnendringen van water wordt niet gedekt door de water opgezogen garantie Neem voor verdere problemen contact op met een erkend servicecentrum van AEG. De stofzuiger stopt FA DE GB C. ES PT FR NL L. IT H. FA J. G. E. F. B. M. A. O. D. K. N. I. P. Q. R. S. PRIMA DI INIZIARE Leggere attentamente il presente manuale. Accertarsi che tutti i componenti descritti siano disponibili. Prestare particolare attenzione alle norme di sicurezza. DESCRIZIONE DELL'ASPIRAPOLVERE VX7 A. Display con manopola di controllo manuale B. Filtro d’usicita C. Slot per riposizionamento D. Cavo di alimentazione E. Filtro motore F. Supporto del filtro motore G. S-bag® H. Supporto S-bag® I. Coperchio vano raccoglipolvere J. Accessorio 3-in-1 K. Tubo L. Impugnatura M. Tubo telescopico N. Gancio per riposizionamento O. Spazzola FlowMotion P. Spazzola per tappezzeria* Q. Spazzola Turbo* R. Spazzola Mini turbo* S. Spazzola ParkettoPro* *Solo per alcuni modelli. DE GB ES PT FR NL IT FA DE GB ES PT FR NL IT FA Requisiti e avvertenze per la sicurezza Questa apparecchiatura può essere usata da bambini a partire dagli 8 anni e da adulti con limitate capacità fi siche, sensoriali o mentali o con scarsa esperienza o conoscenza sullu’so dell’apparecchiatura, solamente se sorvegliati o se sono stati istruiti relativamente all’uso dell’apparecchiatura e se hanno compreso i rischi coinvolti. AVVERTENZA: Turbo* degli accessori manuali sono dotate di una spazzola rotante che potrebbe intasarsi. Utilizzarle con attenzione e soltanto sulle superfi ci adatte. Spegnere l’aspirapolvere prima di rimuovere eventuali oggetti intrappolati o pulire la spazzola. La Turbospazzola non è adatta per tappeti a fibre e frange lunghe o spesse, per tappeti antiscivolo come gli zerbini o tappeti resistenti all'acqua. Sorvegliare i bambini per evitare che giochino con l'apparecchio. Prima di effettuare la pulizia o la manutenzione dell’apparecchio, scollegare la spina dall’alimentazione elettrica. Non utilizzare mai l’aspirapolvere senza filtri. Utilizzare sempre i sacchetti s-bag adatti a questo specifico aspirapolvere. I danni causati all'aspirapolvere da un uso non corretto di sacchetti non originali non sono coperti dalla garanzia. Avvertenza L’apparecchio contiene collegamenti elettrici: • Non aspirare mai liquidi • Non immergere l’apparecchio in detergenti liquidi • Controllare regolarmente lo stato del flessibile e non utilizzarlo se danneggiato. I casi sopracitati possono causare seri danni al motore e non sono coperti da garanzia. L’aspirapolvere è destinato solo all’uso domestico. Non utilizzare mai l’aspirapolvere • In prossimità di gas infi ammabili ecc. • Su oggetti appuntiti • Su cenere calda o fredda, mozziconi di sigaretta accesi, ecc. • Su polvere fi ne, ad esempio intonaco, calcestruzzo, farina. Precauzioni per il cavo elettrico • Controllare regolarmente che la spina e il cavo non siano danneggiati. Non utilizzare l’aspirapolvere se il cavo è danneggiato. • Se il cavo di alimentazione è danneggiato, deve essere sostituito da un centro di assistenza AEG autorizzato per evitare eventuali pericoli. Gli eventuali danni al cavo dell’aspirapolvere non sono coperti dalla garanzia. • Non utilizzare mai il cavo per tirare o sollevare l’aspirapolvere. Qualsiasi intervento di manutenzione e riparazione deve essere eseguito presso un centro di assistenza autorizzato AEG. Riporre l’aspirapolvere in un luogo asciutto. Informazioni per l’utente e politica di sostenibilità AEG declina ogni responsabilità per tutti i danni derivanti da un uso improprio o in caso di manomissione dell’apparecchio. Per ulteriori informazioni sui contatti in merito a garanzia e servizio clienti, consultare l’opuscolo relativo alla garanzia accluso nella confezione. Per commenti relativi all’aspirapolvere o al manuale delle Istruzioni per l’uso e per informazioni sui centri di assistenza tecnica autorizzati AEG chiamare il numero telefonico 800 117511. Politica della sostenibilità Questo prodotto è progettato nel rispetto dell’ambiente. Tutte le parti in plastica sono riciclabili. Per ulteriori dettagli, consultare il sito Web: www. aeg-home.com Il materiale di imballaggio è ecologico e riciclabile. Riciclare i materiali con il simbolo . Buttare l’imballaggio negli appositi contenitori per il riciclaggio. Aiutare a proteggere l’ambiente e la salute umana e a riciclare rifi uti derivanti da apparecchiature elettriche ed elettroniche. Non smaltire le apparecchiature che riportano il simbolo insieme ai normali rifi uti domestici. Portare il prodotto al punto di riciclaggio più vicino o contattare il comune di residenza. * Solo per alcuni modelli. DE GB ES PT FR NL IT FA DE GB ES PT FR NL IT FA COME UTILIZZARE L’ASPIRAPOLVERE Aprire il coperchio del vano raccoglipolvere. Controllare che il sacchetto raccoglipolvere (s-bag) sia al suo posto. Inserire il tubo flessibile nell’aspirapolvere (per estrarlo, premere i pulsanti di bloccaggio e tirare). Inserire il tubo flessibile nella rispettiva impugnatura fino a sentire uno scatto del pulsante di bloccaggio (per rilasciarlo, premere il pulsante di bloccaggio e tirare). Collegare il tubo telescopico alla spazzola. Collegare il tubo telescopico all’impugnatura del tubo flessibile (per estrarlo, premere il pulsante di bloccaggio e tirare). Regolare il tubo telescopico tenendo l’elemento di bloccaggio con una mano e tirando l’impugnatura con l’altra. AVVIO/ARRESTO DELL’ASPIRAPOLVERE E REGOLAZIONE DELLA POTENZA ASPIRANTE Estrarre il cavo di alimentazione e collegarlo alla rete elettrica. Premere il pulsante On/Off per accendere e spegnere l’aspirapolvere. Regolazione della potenza di aspirazione: girare la manopola sull’aspirapolvere o utilizzare la valvola dell’aria sull’impugnatura. Dopo la pulizia, premere il pulsante REWIND per riavvolgere il cavo. POSIZIONI DI STAZIONAMENTO Utilizzare la posizione di parcheggio in basso (A) per trasportare e riporre l’aspirapolvere. Quella posteriore (B) quando ci si ferma (per far riposare la schiena). SOSTITUZIONE DEL SACCHETTO, S-BAG® Sostituire il sacchetto s-bag quando: la spia S-BAG si illumina di rosso. NB: sostituire sempre il sacchetto s-bag quando la spia S-BAG si accende anche se l’s-bag non è pieno (potrebbe essere ostruito) e dopo aver utilizzato del detergente in polvere per la pulizia della moquette. Per ottenere i migliori risultati possibili, utilizzare il sacchetto Ultra Long Performance sviluppato specificamente per l’aspirapolvere. Si possono utilizzare anche altri sacchetti s-bag sintetici. Non utilizzare sacchetti di carta! www.s-bag.com DE GB ES PT FR NL Premendo e sollevando il pulsante OPEN per aprire il vano raccoglipolvere. Sollevamento l’impugnatura per estrarre l’s-bag con il supporto. IT FA B. A. A. Tirare il cartone per rimuovere il sacchetto s-bag® dal supporto. In questo modo il sacchetto s-bag® viene automaticamente sigillato evitando la fuoriuscita di polvere. B. Inserire un nuovo sacchetto s-bag® spingendo il cartone lungo la scanalatura del supporto. Chiudere il coperchio. Se l’s-bag non è inserito correttamente o se non è stato applicato, il coperchio non si chiude. SOSTITUZIONE DEI FILTRI Sostituire/pulire il filtro di scarico ogni 5 sostituzioni del sacchetto raccoglipolvere s-bag®. Usare filtri originali AEG: (AEF12W, AFS1W) / AEFG12W. Estrarre il filtro sollevandolo e controllare il colore del telaio: Verde = Deve essere sostituito con un filtro nuovo (filtro non lavabile). Blu = Sostituire con un filtro nuovo o pulito. DE GB ES PT FR Sciacquare l’interno (la parte sporca) in acqua di rubinetto tiepida. Picchiettare sul telaio del filtro per eliminare l’acqua. Ripetere la procedura quattro volte. (** solo per i filtri lavabili) NB: non utilizzare detergenti. Evitare di toccare la superficie del filtro. Far asciugare completamente il filtro (min. 24 ore a temperatura ambiente) prima di applicarlo di nuovo! Sostituire il filtro lavabile almeno una volta l’anno o quando è molto sporco o danneggiato. NL IT FA Sostituire il filtro del motore (AF08) quando è sporco o ogni 5 sostituzioni dell’s-bag. Premere il supporto del filtro ed estrarlo. Sostituire il filtro e chiudere il coperchio. ASPIRAZIONE CON LA SPAZZOLA COMBINATA Cambiare l’impostazione della spazzola con il pedale. Il simbolo indica il tipo di pavimento consigliato. PULIZIA DELLA SPAZZOLA COMBINATA Scollegare la spazzola dal tubo. Pulirla con l’impugnatura del tubo flessibile. PULIZIA DELLA SPAZZOLA TURBO Staccare la spazzola dal tubo e togliere eventuali filamenti incastrati e così via tagliandoli con le forbici. Utilizzare l’impugnatura del tubo flessibile per pulire la spazzola.* AEG si riserva il diritto di sostituire prodotti, informazioni e specifiche senza obbligo di preavviso. SUGGERIMENTI PER OTTENERE I MIGLIORI RISULTATIS SPAZZOLA/ACCESSORIO DA UTILIZZARE PER: 3 accessori in 1: 1. Aspirapolvere per superfici dure (librerie, mensole e così via). 2. Aspirapolvere per tessuti (tende, tappezzeria e così via). 3. Accessorio per fessure per gli spazi ristretti (dietro i radiatori e così via). Spazzola per moquette: • - Spazzola e aspira contemporaneamente • - Il rullo spazzola è controllato dal flusso di aria dell'aspirapolvere. • - Non adatta alla moquette alta e con frange lunghe, alla moquette antiscivolo tipo zerbini e alla moquette impermeabile. Utilizzare la spazzola combinata al suo posto. Accessorio 3-in-1* Spazzola Turbo* Spazzola per pavimenti duri: - Per pulire delicatamente i pavimenti duri (parquet, pavimenti in legno, piastrelle e così via). - Migliori risultati di aspirazione polvere su pavimenti duri con fessure. Spazzola ParkettoPro* Spazzola PrecisionFlow* Spazzola Mini Turbo* Bocchetta per tappezzeria* Spazzola combinata: - Per tutti i tipi di pavimenti, garantisce la migliore raccolta su moquette e pavimenti duri. - Variazione dell'impostazione della bocchetta con il pedale. Il simbolo indica il tipo di pavimento consigliato. Spazzola Mini Turbo: - Spazzola e aspira contemporaneamente - Per arredi in tessuto, sedili delle auto, materassi e così via - Il rullo a spazzola è controllato dal flusso di aria dell'aspirapolvere. -Non adatta per moquette alta e con frange lunghe perché si possono incastrare nel rullo rotante a spazzola. Bocchetta per tappezzeria Utilizzare la bocchetta per imbottiti* per divani, tendaggi, tessuti leggeri, ecc. Se necessario, ridurre la potenza di aspirazione. Modelli con regolazione manuale della potenza - seguire i disegni sull'aspirapolvere per ottenere risultati eccellenti. RISOLUZIONE DEI PROBLEMI PROBLEMA SOLUZIONE L'aspirapolvere non si avvia • Accertarsi che il cavo sia collegato alla rete di alimentazione. • Accertarsi che la spina e il cavo non siano danneggiati. • Accertarsi che non ci siano fusibili bruciati. La spia s-bag® è accesa • Controllare che l's-bag® non sia pieno o bloccato. • Se l's-bag® è già stato sostituito, sostituire il filtro del motore. L'aspirapolvere si spegne e non funziona più L'aspirapolvere potrebbe essersi surriscaldato: staccarlo dalla rete di alimentazione; controllare se spazzola, tubo, tubo flessibile o filtri sono ostruiti. Far raffreddare l'aspirapolvere per 30 minuti prima di collegarlo di nuovo. Se l'aspirapolvere non funziona, contattare un centro di assistenza AEG autorizzato. Riduzione della capacità di aspirazione rispetto al solito • Controllare che l's-bag non sia pieno o bloccato. • Controllare se il filtro del motore è ostruito e va sostituito. • Controllare se la spazzola è ostruita e va liberata. • Controllare se il tubo flessibile è ostruito schiacciandolo delicatamente. Tuttavia, fare attenzione nel caso l'ostruzione sia dovuta a vetro o aghi incastrati nel tubo flessibile. Nota: la garanzia non copre danni al tubo flessibile causati dalla pulizia. L'aspirapolvere ha aspirato dell'acqua Sarà necessario sostituire il motore presso un centro assistenza autorizzato AEG. Eventuali danni al motore causati dalla penetrazione di acqua non sono coperti dalla garanzia. Per qualsiasi ulteriore problema, contattare un centro di assistenza autorizzato AEG. DE GB ES PT FR NL IT FA DE GB C. ES PT FR NL L. IT H. FA J. G. E. F. B. M. A. O. D. K. N. I. P. Q. R. S. DE GB ES PT FR NL IT FA از اینکه جارو برقی AEG VX7را انتخاب کردید ،سپاسگزاریم .برای دستیابی به بهترین نتیجه، همیشه از لوازم جانبی و قطعات یدکی اصل استفاده کنید .این دستگاه مناسب با محیط زیست طراحی شده است .تمام قطعات پالستیکی دارای نشان بازیافت هستند. قبل از راهاندازی این دفترچه راهنما را با دقت بخوانید. بررسی کنید که تمام قطعات شرح داده شده ،در بستهبندی موجود باشند. به هشدارهای ایمنی توجه خاصی داشته باشید! شرح جارو برقی VX7 .A .B .C .D .E .F .G .H .I .J .K .L .M .N .O .P .Q .R .S صفحه نمایش فیلتر خروجی شیارهای نگهداری سیم برق فیلتر موتور نگهدارنده فیلتر موتور ®S-bag حامل ®S-bag درپوش محفظه گرد و خاک ابزار سه کاره شلنگ دسته لوله تلسکوپی گیره نگهداری نازل FlowMotion نازل یخچال نازل توربو* نازل توربو مینی* نازل *ParkettoPro اهلدم یخرب طقف * هدشدارها: ات ایمنی و لطفا قبل از خارج کردن قطعه و یا تمیز کردن برس ،جاروبرقی را خاموش کنید .کوچکان کم از 8سال و باال -از این آله استفاده کرده میتونستند .افراد با کاهش توانایی های جسمی، حسی یا روانی و یا کم تجربه و دانش هم از این استفاده می شود اگر آنها در استعمال این آله نظارت یا راهنمایی شود تا این آله در یک راه امنی استفاده شود و آگاهئ خطرات در استعمال این آله هم داده شود. هشدار:هنگام جارو کردن سطوح احتیاط و دقت الزم را به عمل آورید زیرا پارویی توربو دارای برس محدود است و امکان گیر کردن قطعات بزرگ در آن وجود دارد. کودکان نباید با دستگاه بازی کنند .تمیز کردن و نگهداری دستگاه نباید بدون نظارت توسط کودکان انجام شود. همیشه قبل از هرگونه اقدامی در زمینه نگهداری و تمیزکزدن جاروبرقی ابتدا دستگاه را خاموش کرده و سپس از برق درآورید. هرگز جاروبرقی را بدون فیلتر استفاده نکنید. همیشه از کیسههای گرد و خاک مناسب مخصوص این جاروبرقی استفاده کنید .آسیبهای ناشی از تمیز کردن در اثر استفاده از کیسههای گرد و خاک نامناسب یا عدم استفاده از کیسه ،تحت پوشش گارانتی نیست. احتیاط: این دستگاه دارای قطعات الکتریکی است. •هرگز سطح خیس را با جاروبرقی ،جارو نکنید و از آن جهت مکش مایعات استفاده ننمایید. • برای تمیز کردن دستگاه از شوینده ها و مایعات استفاده نکنید. •درصورت آسیب دیدن شلنگ(خرطومی) از دستگاه استفاده نکنید. موارد باال سبب آسیب جدی به موتور دستگاه می شود و شامل ضمانت نخواهد شد. این جارو برقی صرفا برای استفاده خانگی می باشد. درموار زیر از جارو برقی استفاده نکنید: •دیک به اجاق و دیگر منابع گرمازا. •اشیاء تیز. •خاکستر گرم و سرد ،ته سیگار روشن و نظایر آن. •گرد و غبار ریز ،مثل گچ ،شن و ماسه ،آرد نکات ایمنی اتصاالت برقی: •دوشاخه و پریز برق را کنترل کنید که آسیب ندیده باشند ،در صورت آسیب دیدگی سیم، هرگز از جاروبرقی استفاده نکنید. •برای جلوگیری از خطر ،درصورت آسیب دیدن سیم برق دستگاه باید توسط مرکز خدمات مجاز آ گ اتعویض گردد.آسیب دیدن سیم جاروبرقی شامل ضمانت نمی باشد. •هرگز برای حرکت دادن و بلندکردن جاروبرقی سیم آنرا نکشید. DE GB ES PT FR NL IT FA DE GB ES PT FR NL IT FA نگهداری و تعمیرات جاروبرقی فقط توسط مراکز خدمات مجاز آ ا گ انجام شود. جاروبرقی را در محل خشک نگهداری کنید. نگهداری: اطالعات مشتریان و قواعد آ ا گ هیچگونه مسئولیتی در قبال آسیب های ناشی از استفاده نادرست و دستکاری دستگاه را نمی پذیرد. برای اطالعات بیشتر درباره ضمانت و راه های تماس به لیبل ضمانتنامه چسبیده بر روی بسته بندی مراجعه فرمایید .شما می توانید هرگونه اظهار نظر درباره دستگاه و دفترچه ی راهنما را به آدرس [email protected]ایمیل نمایید. محیطی: قواعد زیست این محصول هماهنگ با محیط زیست طراحی شده است. تمامی قطعات پالستیکی دارای عالمت قابلیت بازیافت هستند. برای دریافت جزئیات بیشتر به وب سایت ما مراجعه فرمائید. www.aeg-home.com لوازم جانبی مدلهای مختلف ممکن است با هم تفاوت داشته باشند. را بازیافت کنید.بسته بندی را در ظروف مخصوص برای بازیافت قرار مواد با نماد دهید.به حفاظت از محی طزیست و سالمت انسان کمک کنید وزباله وسایل الکتریکی و را با زباله خانگی دور نریزید. الکترونیکی را بازیافت کنید.لوازم مشخص شده بانماد محصول را به مکان بازیافت محلی برگردانید یا با دفتر شهرداری خود تماس بگیرید. چگونگی استفاده از جارو برقی با فشردن دکمه OPENدرپوش محفظه گرد و خاک را باز کنید. بررسی کنید که کیسه گرد و خاک ( )s-bagدر جای خود قرار داشته باشد. شلنگ را وارد جارو برقی کنید (برای بیرون آوردن آن، دکمههای قفل را فشار داده و بکشید) .شلنگ را وارد دسته شلنگ کنید تا زمانی که دکمه قفل جا بخورد (برای آزاد کردن آن ،دکمه قفل را فشار داده و بکشید). لوله تلسکوپی را به نازل وصل کنید .لوله تلسکوپی را وارد دسته شلنگ کنید (برای بیرون آوردن آن ،دکمه قفل را فشار داده و بکشید). لوله تلسکوپی را با نگهداشتن قفل با یک دست و کشیدن دسته با دست دیگر ،تنظیم کنید. روشن/خاموش کردن جارو و تنظیم قدرت مکش سیم برق را بیرون بکشید و آن را به پریز متصل کنید. دکمه ON/OFFرا برای روشن/خاموش کردن جارو برقی فشار دهید. تنظیم قدرت مکش :دکمه چرخان روی جارو برقی را بچرخانید یا از دریچه هوا روی دسته استفاده کنید. پس از تمیز کردن ،دکمه REWINDرا فشار دهید تا سیم برق جمع شود. وضعیتهای نگهداری دستگاه برای جابجایی و نگهداری جارو برقی ،از وضعیت نگهداری روی ته ( )Aاستفاده کنید .هنگامی که دست از کار میکشید ( تا به کمرتان استراحتی بدهید) جارو را به پشت ( )Bقرار دهید. DE GB ES PT FR NL IT FA DE GB ES PT FR NL IT تعویض کیسه گرد و خاکS-BAG® ، توجه :همیشه هرگاه که نشانگر کیسه گرد و خاک روشن شد درآمد ،حتی اگر کیسه گرد و خاک بطور کامل پر نشده باشد (ممکن است مسدود شده باشد) و نیز پس از استفاده از پودر شوینده فرش ،کیسه گرد و خاک را عوض کنید. برای دستیابی به بهترین عملکرد ممکن ،از کیسههای با دوام فوقالعاده زیاد که بطور خاص برای جارو برقی شما تهیه شده ،استفاده کنید .میتوان از سایر کیسههای گرد و خاک از جنس مصنوعی نیز استفاده کرد .از کیسههای گرد و خاک کاغذی استفاده نکنید! www.s-bag.com ای باز کردن محفظه گرد و خاک ،دکمه OPENرا بکشید و بلند کردنبر .برای خارج کردن کیسه گرد و خاک به همراه نگهدارنده ،دسته را بلند کردنبر. FA .Aکارت را برای حذف ® s-bagاز درج بکشید .این به صورت اتوماتیک ® s-bagرا قفل می کند و مانع از رسیدن گرد و غبار می شود. .Bبا قرار دادن مقوا به سمت راست در انتهای شیار داخل آن ،یک s-bagجدید وارد کنید. کیسه گرد و خاک را همراه با نگهدارنده مستقیما ً در شیارهای آن وارد کنید .اطمینان حاصل کنید که کیسه گرد و خاک زیر نگهدارنده گیر نکند .در محفظه را ببندید .اگر کیسه گرد و خاک بدرستی قرار نگیرد یا وجود نداشته باشد ،در محفظه بسته نخواهد شد. تعویض فیلترها تعویض/تمیز کردن فیلتر را هنگامی انجام دهید که 5 :بار کیسه گرد و خاک را تعویض کرده باشید .از فیلترهای اصلی AEGاستفاده کنیدAEF12W AEFG12W /( : (AFS1W فیلتر را خارج نموده و با توجه به رنگ آن به شکل زیر عمل نمایید :رنگ سبز :فیلتر باید تعویض شود. رنگ آبی :فیلتر باید تمیز و یا تعویض شود. B. A. رویه داخلی (رویه کثیف) آن را با آب ولرم شیر بشویید .به بدنه فیلتر ضربه بزنید تا آب خارج شود .این کار را چهار بار تکرار کنید**( .فقط برای فیلترهای قابل شستشو) توجه :از مواد شوینده استفاده نکنید .از لمس کردن سطح فیلتر خودداری کنید .بگذارید فیلتر کامالً خشک شود (حداقل 24ساعت در دمای اتاق) سپس آن را در جای خود بگذارید! فیلتر قابل شستشو را حداقل یک بار در سال و یا وقتی خیلی کثیف یا آسیب دیده است ،تعویض کنید. پس از تعویض فیلتر ،در آنرا ببندید تا وقتی که دوباره جا بخورد. DE GB ES PT FR NL IT فیلتر موتور را ( )AF08در هنگام کثیف بودن یا بعد از 5بار تعویض کیسه گرد و خاک ،تعویض کنید .نگهدارنده فیلتر را به پایین فشار دهید و آن را بیرون بکشید .فیلتر را عوض کنید و درب را ببندید. المكنسة الكهربائية المزودة بفوهة عامة قومي بتغيير إعداد الفوهة باستخدام الدواسة .يوضح الرمز نوع األرضية الموصى به. تمیز کردن با نازل عمومی نازل را از لوله جدا کنید .تمیز کردن را با دسته شلنگ انجام دهید. تمیز کردن با نازل توربو نازل را از لوله جدا کنید و با استفاده از قیچی قسمتهای گیر کرده را جدا کنید .از دسته شلنگ برای تمیز کردن نازل استفاده کنید. AEGحق تغییر محصوالت ،اطالعات و مشخصات بدون اطالع را برای خود محفوظ میدارد. FA DE GB نکاتی در مورد دستیابی به بهترین نتایج نازل/لوازم جانبی استفاده برای: ابزار جانبی 3کاره* ابزار 3کاره: 1.ابزار گردگیری برای سطوح سخت (قفسههای کتاب ،قرنیزها و غیره). 2.ابزار مربوط به پارچهها (پردهها ،مبلها و غیره). 3.ابزار شکافدار برای فضاهای باریک (پشت رادیاتور و غیره). ES نازل توربو* نازل فرش: •همزمان برس کشیدن و مکش را انجام میدهد (بهترین راه برای جمع کردن مو ،الیاف و غیره). •غلتک برسی توسط جریان هوای جارو برقی به حرکت درمیآید. •برای فرشهای دارای پرز عمیق و ریشههای طوالنی ،فرشهای ضدلغزش مثل پادری یا فرشهای مقاوم در برابر آب مناسب نیست .بجای آن از نازل عمومی استفاده کنید. نازل *ParkettoPro نازل کفپوش سخت: •برای تمیز کردن مالیم کفپوش سخت (پارکت ،کف چوبی ،کاشی و غیره). •برای گردگیری سطوح سخت شکافدار مناسب است. نازل *PrecisionFlow نازل عمومی: PT FR NL IT •برای تمام انواع کفپوش ،بهترین گردگیری را هم برای کفپوشهای سخت و هم برای فرش انجام میدهد. •تنظیم نازل را با پدال تغییر دهید .آیکون نوع کفپوش مورد توصیه را نشان میدهد. FA نازل توربو مینی* نازل مینی توربو: •همزمان برس کشیدن و مکش را انجام میدهد (بهترین راه برای جمع کردن مو ،الیاف و غیره). •برای مبلمان پارچهای ،صندلی اتومبیل ،تشک و غیره. •غلتک برسی توسط جریان هوای جارو برقی به حرکت درمیآید. •برای فرشهای دارای پرز خیلی عمیق و ریشههای طوالنی مناسب نیست ،چرا که ممکن است در غلتک برس چرخان گیر کند. نازل یخچال* نازل یخچال: استفاده از نازل اثاثیه برای مبل ،پرده ها ،پارچه های سبک وزن و غیره .در صورت لزوم قدرت مکش را کاهش دهید. مدلهای دارای تنظیم قدرت دستی -جهت دستیابی به عملکرد بهینه ،اشکال گرافیکی روی جارو برقی را مشاهده کنید. عیبیابی مشکل راه حل جاروبرقی کار نمیکند •بررسی کنید که سیم آن به برق متصل باشد. •بررسی کنید که دوشاخه و سیم آسیب ندیده باشند. •بررسی کنید که فیوز نپریده باشد. چراغ نشانگر کیسه گرد و خاک® روشن میشود •بررسی کنید که کیسه گرد و خاک® پر یا مسدود نشده باشد. •اگر کیسه گرد و خاک® را تازه عوض کردهاید ،فیلتر موتور را عوض کنید. جارو برقی از کار ایستاده است جارو برقی از کار ایسممکن است جارو برقی بیش از اندازه گرم شده باشد :آن را از برق جدا کنید؛ بررسی کنید که نازل، لوله ،شلنگ یا فیلترها مسدود نشده باشند .قبل از زدن مجدد جارو برقی به برق ،اجازه دهید 30دقیقه خنک شود. اگر جارو برقی باز هم کار نکرد ،با مرکز سرویس AEGتماس بگیرید.تاده است کاهش ظرفیت مکش نسبت به حالت عادی •بررسی کنید که کیسه گرد و خاک پر یا مسدود نشده باشد. •بررسی کنید که فیلتر موتور مسدود نشده و نیاز به تعویض نداشته باشد. •بررسی کنید که نازل مسدود نشده و نیاز به تمیز کردن نداشته باشد. •بررسی کنید که شلنگ مسدود نشده باشد و به این منظور آن را به آرامی فشار دهید .با این حال ،مراقب باشید چون ممکن است انسداد در اثر گیر کردن شیشه یا سوزن در داخل شلنگ رخ داده باشد. توجه :ضمانت هیچگونه آسیب وارده به شلنگ ناشی از تمیز کردن آن را شامل نمیشود. آب به داخل جاروبرقی مکیده شده است الزم است موتور در یک مرکز سرویس AEGتعویض شود. آسیب وارده به موتور در اثر نفوذ آب تحت پوشش گارانتی نیست. در خصوص سایر مشکالت ،با مرکز خدمات AEGتماس بگیرید. VISIT OUR WEBSITE TO: DE Get usage advice, brochures, trouble shooter, service information: www.AEG.com Register your product for better service: www.AEG.com/productregistration Buy Consumables & Accessories for your appliance: www.AEG.com/shop GB CONSUMABLES & ACCESSORIES ES www.AEG.com/shop PT FR s-bag® Classic Long Performance Ref: GR210S Part nr: 9001684746 NL IT Silent Parketto Ref: AP240 Part nr: 900166741/0 s-bag® Anti-odour Ref: GR203S Part nr: 9001684753 FA s-bag® Anti-allergy Ref: GR206S Part nr: 9001684761 Speedy Clean Illiumi Ref: AP350 Part nr: 900168388/8 Dust Magnet Ref: VARIO4000 Part nr: 900166738/6 s-filter® Hygiene non-Washable Ref: AEF12 Part nr: 9001966697 Hygiene Washable Ref: AEF12W Allergy Plus Washable Ref: AFS1W Part nr: 9001677690 aeg.com/shop Electrolux Hausgeräte GmbH Fürther Straße 246 D-90429 Nürnberg Germany www.aeg-home.com CH1400201-
 1
1
-
 2
2
-
 3
3
-
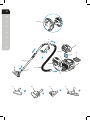 4
4
-
 5
5
-
 6
6
-
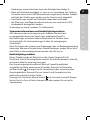 7
7
-
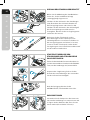 8
8
-
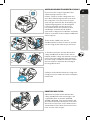 9
9
-
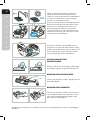 10
10
-
 11
11
-
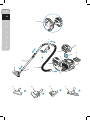 12
12
-
 13
13
-
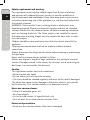 14
14
-
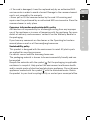 15
15
-
 16
16
-
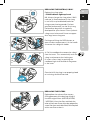 17
17
-
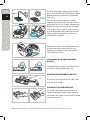 18
18
-
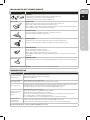 19
19
-
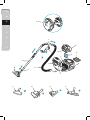 20
20
-
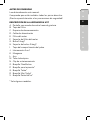 21
21
-
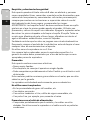 22
22
-
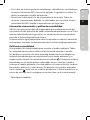 23
23
-
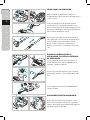 24
24
-
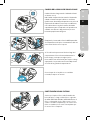 25
25
-
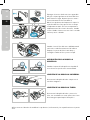 26
26
-
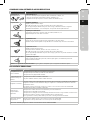 27
27
-
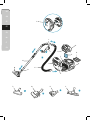 28
28
-
 29
29
-
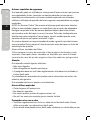 30
30
-
 31
31
-
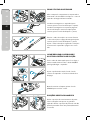 32
32
-
 33
33
-
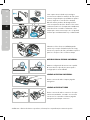 34
34
-
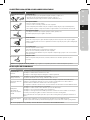 35
35
-
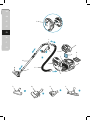 36
36
-
 37
37
-
 38
38
-
 39
39
-
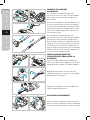 40
40
-
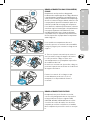 41
41
-
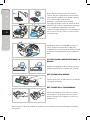 42
42
-
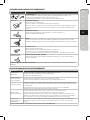 43
43
-
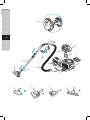 44
44
-
 45
45
-
 46
46
-
 47
47
-
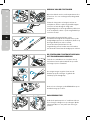 48
48
-
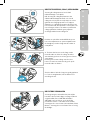 49
49
-
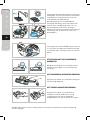 50
50
-
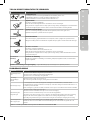 51
51
-
 52
52
-
 53
53
-
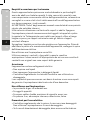 54
54
-
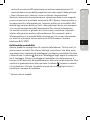 55
55
-
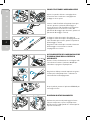 56
56
-
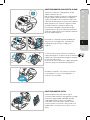 57
57
-
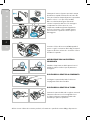 58
58
-
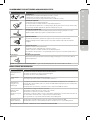 59
59
-
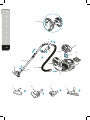 60
60
-
 61
61
-
 62
62
-
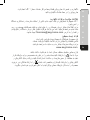 63
63
-
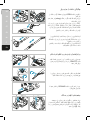 64
64
-
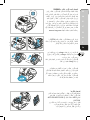 65
65
-
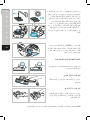 66
66
-
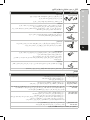 67
67
-
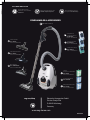 68
68


in andere talen
- English: AEG VX7-2-IW-S User manual
- italiano: AEG VX7-2-IW-S Manuale utente
- français: AEG VX7-2-IW-S Manuel utilisateur
- español: AEG VX7-2-IW-S Manual de usuario
- Deutsch: AEG VX7-2-IW-S Benutzerhandbuch
- português: AEG VX7-2-IW-S Manual do usuário
Gerelateerde papieren
Andere documenten
-
Electrolux Z3323 Handleiding
-
Aeg-Electrolux AAM6115G Handleiding
-
-
-
-
-
-
-
-