
NL
Gebruiksaanwijzing 2
EN
User manual 13
FR
Notice d'utilisation 24
Wasautomaat
Washing Machine
Lave-linge
ZWY 2120

Inhoud
Veiligheidsinformatie _ _ _ _ _ _ _ _ _ _ _ _ _ _ _ _ 2
Beschrijving van het product _ _ _ _ _ _ _ _ _ _ _ _ _ 3
Hoe voer ik een wasprogramma uit? _ _ _ _ _ _ _ _ _ 4
Dagelijks gebruik _ _ _ _ _ _ _ _ _ _ _ _ _ _ _ _ _ _ 4
Wasprogramma's _ _ _ _ _ _ _ _ _ _ _ _ _ _ _ _ _ _ 6
Onderhoud en reiniging _ _ _ _ _ _ _ _ _ _ _ _ _ _ _ 7
Problemen met de werking _ _ _ _ _ _ _ _ _ _ _ _ _ _ 8
Wasmiddelen en nabehandelingsmiddelen _ _ _ _ _ 10
Technische specificaties _ _ _ _ _ _ _ _ _ _ _ _ _ _ 10
Verbruikswaarden _ _ _ _ _ _ _ _ _ _ _ _ _ _ _ _ _ 10
Montage _ _ _ _ _ _ _ _ _ _ _ _ _ _ _ _ _ _ _ _ _ _ 11
Milieu _ _ _ _ _ _ _ _ _ _ _ _ _ _ _ _ _ _ _ _ _ _ _ 12
Wijzigingen voorbehouden
Veiligheidsinformatie
Lees deze punten zorgvuldig door voordat u de wasmachi-
ne installeert en gebruikt. Bewaar deze handleiding bij uw
wasmachine.
Algemene veiligheid
• Probeer dit apparaat niet te wijzigen. Dit levert gevaar
op voor uzelf.
• Zorg ervoor dat munten, veiligheidsspelden, broches,
schroefjes e.d. uit de kleding zijn verwijderd voordat u
een wasprogramma start. Als deze voorwerpen in het
wasgoed achterblijven, kunnen ze het apparaat ernstig
beschadigen.
• Gebruik de aanbevolen hoeveelheid wasmiddel.
• Doe kleine stukken (sokken, riemen etc.) bij elkaar in
een kleine linnen tas of kussensloop.
• Trek de stekker uit het stopcontact en sluit de kraan na-
dat u het apparaat heeft gebruikt.
• Trek altijd de stekker uit het stopcontact voordat u rei-
nigings- of onderhoudswerkzaamheden uitvoert.
• Was geen kleding met rafels, niet-afgewerkt of versle-
ten materiaal in de wasmachine.
Installatie
• Pak het apparaat uit of vraag de bezorger om het appa-
raat onmiddellijk na aflevering uit te pakken. Controleer
of de buitenkant van het apparaat op geen enkele ma-
nier beschadigd is. Meld alle transportschade aan uw
leverancier.
• Verwijder alle transportbouten en verpakking voordat u
het apparaat installeert.
• De aansluiting op de watertoevoer moet worden uitge-
voerd door een erkende loodgieter.
• Als het elektriciteitsnet in uw woning aangepast moet
worden om het apparaat op de netvoeding aan te slui-
ten, roep dan de hulp in van een erkende elektricien.
• Zorg ervoor dat het netsnoer niet onder het apparaat
komt vast te zitten na installatie.
• Als het apparaat op een vloer met vloerbedekking wordt
geïnstalleerd, zorg er dan voor dat het tapijt geen venti-
latiekanalen aan de onderkant van het apparaat afsluit.
• Het apparaat moet worden voorzien van een geaarde
netstekker die voldoet aan de voorschriften.
• Lees de instructies in het hoofdstuk "Elektrische aan-
sluiting" zorgvuldig voordat u het apparaat op de net-
voeding aansluit.
• Vervanging van het netsnoer mag uitsluitend worden
uitgevoerd door een erkende servicemonteur.
• De fabrikant is niet aansprakelijk voor enige schade die
het gevolg is van een onjuiste installatie.
Voorzorgen tegen vrieskou
Als uw apparaat wordt blootgesteld aan temperaturen on-
der 0°C, moeten de volgende voorzorgen worden geno-
men:
• Draai de kraan dicht en koppel de toevoerslang los.
• Leg het uiteinde van deze slang en de afvoerslag in een
teil op de grond.
• Selecteer het programma Pompen en laat dit tot het
eind van het programma draaien.
• Ontkoppel het apparaat van het elektriciteitsnet door de
programmakeuzeknop op "Stop" te zetten.
.
• Haal de stekker uit het stopcontact.
• Sluit de toevoerslang en de afvoerslang opnieuw aan.
Op deze manier wordt het resterende water in de slangen
weggepompt, en wordt ijsvorming voorkomen, dat uw ap-
paraat zou beschadigen.
Controleer voordat u het apparaat weer inschakelt of het
apparaat is geïnstalleerd in een ruimte waarin de tempera-
tuur niet onder het vriespunt kan dalen.
2

Gebruik
• Dit apparaat is uitsluitend bedoeld voor huishoudelijk
gebruik. Gebruik het apparaat niet voor commerciële of
industriële doeleinden, of voor enig ander doel.
• Kijk naar de wasvoorschriften op de etiketten in uw kle-
ding voordat u de stukken wast.
• Doe geen wasgoed in de wasmachine met vlekken die
verwijderd zijn met wasbenzine, alcohol, trichloorethy-
leen enz. Als u dergelijke vlekkenverwijderaars hebt ge-
bruikt, wacht dan tot het product verdampt is voordat u
de artikelen in de trommel doet.
• Maak alle zakken leeg en vouw alle artikelen open.
• Dit apparaat is niet bedoeld voor gebruik door perso-
nen (met inbegrip van kinderen) met beperkte lichame-
lijke of verstandelijke vermogens of een gebrek aan er-
varing en kennis, tenzij dit onder toezicht gebeurt van
een voor hun veiligheid verantwoordelijke persoon of
tenzij ze van een dergelijke persoon instructies hebben
ontvangen over het gebruik van het apparaat.
Houd kinderen uit de buurt om te voorkomen dat ze
met het apparaat spelen.
Beschrijving van het product
1
2
3
1 Het bedieningspaneel
2 Handgreep deksel
3 Afstelbare voetjes
Het bedieningspaneel
1
2
4
5
3
6
1 Programmakeuze 2 Knoppen en hun functies
3

3 Display
4 Controlelampje 'Sluit deksel'
5 Toets 'Start/Pauze'
6 "Startuitstel"-knop
Doseerbakje
1
2
3
4
5
1 Wasverzachter (niet vullen tot boven het teken
MAX )
2
Bleekmiddel kan worden gebruikt bij Katoen-
programma's zonder voorwas - 1/4 tot 1 glas met
bleekmiddel (niet vullen tot boven het teken MAX)
3 Wassen
4 Voorwassen
5 Overloop wasverzachter en bleekmiddel (indien te-
veel gevuld)
Hoe voer ik een wasprogramma uit?
Eerste gebruik
• Zorg ervoor dat de elektrische aansluiting en de
wateraansluiting voldoen aan de installatie-in-
structies.
• Verwijder het piepschuim blok en alle andere on-
derdelen uit de trommel.
• Voer een eerste wasprogramma op 90°C uit,
zonder wasgoed maar met wasmiddel om de wa-
tertank te reinigen.
Dagelijks gebruik
Wasgoed in de machine doen
• Open het deksel van
de machine.
• Open de trommel door
de vergrendelingsknop
A in te drukken: de
twee sluitingen wor-
den automatisch ont-
grendeld.
• Doe het wasgoed in de
machine, sluit de trommel en de klep van uw wasma-
chine.
Waarschuwing! Controleer of de trommel goed
gesloten is voordat u de klep dichtdoet van de
machine:
• Als de twee sluitingen gesloten zijn,
• staat vergrendelingsknop A omhoog.
A
Wasmiddel toevoegen
Doe de aanbevolen hoeveelheid wasmiddel in de bakjes
voor hoofdwas
en voorwas als u de functie “voor-
was” heeft gekozen Giet, indien nodig, wasverzachter in
het vakje
en bleekmiddel in het vakje (mogelijk bij
programma's voor Katoen zonder voorwas).
Het programma kiezen
Draai de programmakeuzeknop op het gewenste program-
ma. De “Start/Pauze”-knop knippert groen.
Als u de programmakeuzeknop op een ander programma
draait terwijl er een programma bezig is, dan negeert het
apparaat het nieuwe programma. "Err" en “Start/Pauze”-
knop knipperen een paar seconden rood.
De centrifugeersnelheid kiezen
Druk op ' Centrifugeren ' om de centrifugeersnelheid te
veranderen, als u wilt dat uw wasgoed op een andere snel-
4

heid wordt gecentrifugeerd dan de standaard snelheid van
het wasprogramma. U kunt ook ' Spoelstop ' selecteren.
Spoelstop
Als u deze functie kiest, wordt het laatste spoelwater niet
weggepompt om te voorkomen dat het wasgoed kreukelt.
Zie voor de maximale centrifugesnelheden 'Wasprogram-
ma's.
Als u aan het einde van het programma ' Spoelstop ' heeft
geselecteerd dan moet u een programma selecteren voor '
Centrifugeren ' of ' Pompen ' om de cyclus af te ronden en
het water weg te laten lopen.
Opties kiezen
U moet de verschillende extra functies selecteren nadat u
het programma heeft gekozen en voordat u op de “Start/
Pauze”-knop drukt (zie de “Programmatabel”). Druk de
gewenste toets(en) in; de bijbehorende lamp(jes) gaan
branden. Als u nogmaals op de toets drukt gaat het lampje
uit. Als een van de opties niet verenigbaar is met het gese-
lecteerde programma, dan knipperen de toetsen "Err" en
“Start/Pauze" rood.
“Optie Voorwas ”
Het apparaat voert een voorwas uit op max. 30°C.
“Optie Kort ”
De wastijd zal verkort worden, afhankelijk van het geselec-
teerde programma.
“Optie Extra spoelen ”
De wasmachine voegt één of meer spoelgangen toe tij-
dens de wascyclus. Deze extra functie wordt aanbevolen
voor mensen met een gevoelige huid en in gebieden met
zacht water.
"Uitgestelde start"
Deze optie laat u toe om de start van uw wasprogramma
uit te stellen met 30 minuten, 60 minuten, 90 minuten, 2
uur tot 20 uur. De gekozen tijd verschijnt gedurende enke-
le seconden op de display.
U kunt de uitgestelde starttijd op elk gewenst moment ver-
anderen of annuleren voordat u op de "Start/Pauze”-knop
drukt, door nogmaals op de knop “Uitgestelde start” (
’
geeft een directe start aan) te drukken
Als u al op de “Start/Pauze”-knop heeft gedrukt en u wilt
de uitgestelde start veranderen of annuleren, ga dan als
volgt te werk:
• Om de uitgestelde start te annuleren en het programma
onmiddellijk te starten drukt u op "Start/Pauze” en ver-
volgens op "Uitgestelde start". Druk op “Start/ Pauze”
om het programma te starten.
• Om de uitsteltijd van de timer te veranderen, moet u
naar de positie “Stop”
gaan en uw programma op-
nieuw instellen.
De klep is vergrendeld tijdens de uitgestelde starttijd. Als
u deze wilt openen, dan moet u het apparaat eerst stopzet-
ten door op de “Start/Pauze”-knop te drukken. Druk op de
“Start/Pauze”-toets nadat u de klep opnieuw hebt geslo-
ten.
Start van het programma
Druk op de knop 'Start/Pauze' om het programma te star-
ten. Het bijbehorende lampje wordt groen en het lampje '
Deur vergrendeld ' gaat branden.
Het is normaal dat de programmakeuzetoets stationair
blijft gedurende het programma. De resterende tijd ver-
schijnt op het display. Als u een uitgestelde start hebt ge-
kozen, zal de aftelling op de display verschijnen.
Een programma onderbreken
Wasgoed toevoegen gedurende de eerste 10 minuten
Als ' Sluit deksel ' brandt, kunt u wasgoed toevoegen door
de volgende stappen uit te voeren. Druk op de 'Start/Pau-
ze'-knop: het bijbehorende lampje gaat groen knipperen
terwijl het apparaat stopt. De klep kan pas 2 minuten nadat
de wasmachine tot stilstand is gekomen worden geopend.
Druk nogmaals op de 'Start/Pauze'-knop om door te gaan
met het programma.
Het lopende programma wijzigen
Voordat u veranderingen maakt in het lopende program-
ma, moet u de wasmachine stopzetten door op de 'Start/
Pauze'-knop te drukken. Als de wijziging niet mogelijk is,
zal de melding 'Err' op het display knipperen en de druk-
toets 'Start/Pauze' zal een paar seconden rood knipperen.
Als u het programma toch wilt veranderen, moet u het lo-
pende programma annuleren (zie onder).
Het programma annuleren
Als u het programma wilt annuleren draait u de program-
makeuzeknop op de 'Stop'
-positie
Einde van het programma
De wasmachine stopt automatisch; de knop 'Start/Pauze'
gaat uit en
knippert op het display. De klep kan pas 2
minuten nadat de wasmachine tot stilstand is gekomen
worden geopend. Het lampje ' Sluit deksel ' is uit. Draai
de programmakeuzeknop naar de 'Stop'
-positie Haal
het wasgoed uit de machine. Trek de stekker uit het stop-
contact en draai de kraan dicht.
5

Stand-by : zodra het programma is geëindigd, wordt na
enkele minuten het energiebesparingssysteem ingescha-
keld. De helderheid van het display wordt verminderd.
Door op een willekeurige toets te drukken haalt u het ap-
paraat uit de energiebesparende modus.
Wasprogramma's
Programma/Type wasgoed Lading Beschikbare opties
Katoen (30° - 90°) : Wit of kleur, b.v. normaal
vervuilde werkkleding, lakens, tafellakens, ondergoed,
handdoeken.
Max. centrifugesnelheid: 1200 Toeren per minuut
5,0 kg Spoelstop, Voorwas, Kort , Extra Spoelen ,
Startuitstel
Katoen Eco (40°-60°) :Wit of kleur, b.v. normaal
vervuilde werkkleding, lakens, tafellakens, ondergoed,
handdoeken.
Max. centrifugesnelheid: 1200 Toeren per minuut
5,0 kg Spoelstop, Voorwas, Extra Spoelen , Star-
tuitstel
Synthetica (30° - 60°) : Synthetische weefsels,
ondergoed, stoffen, gekleurde weefsels, kreukvrije
overhemden, blouses
Max. centrifugesnelheid: 900 Toeren per minuut
2,5 kg Spoelstop, Voorwas, Kort , Extra Spoelen ,
Startuitstel
Synthetica Eco (40°) : Synthetische weefsels, on-
dergoed, stoffen, gekleurde weefsels, kreukvrije over-
hemden, blouses
Max. centrifugesnelheid: 900 Toeren per minuut
2,5 kg Spoelstop, Voorwas, Extra Spoelen , Star-
tuitstel
Fijne was (30° - 40°) : Voor alle fijne materialen,
bijvoorbeeld gordijnen.
Max. centrifugesnelheid: 700 Toeren per minuut
2,5 kg Spoelstop, Voorwas, Kort , Extra Spoelen ,
Startuitstel
Handwas (koud - 40°): Zeer fijne stukken met het
label “handwas".
Max. centrifugesnelheid: 900 Toeren per minuut
1,0 kg Spoelstop, Uitgestelde start
Inweken (30°)
1)
: Inweken bij erg vervuilde was. De
trommel stopt vol met water.
5,0 kg Uitgestelde start
Spoelen : Met de hand gewassen stukken kunnen met
dit programma gespoeld worden.
Max. centrifugesnelheid: 1200 Toeren per minuut
5,0 kg Spoelstop, Extra Spoelen , Startuitstel
Pompen : Draait een leeg programma na een optie
Spoelstop.
5,0 kg
Centrifugeren : Een centrifugeercyclus van 500 tot
1200 na een optie spoelstop.
5,0 kg Uitgestelde start
Mini (30°) : Ideaal voor wasgoed dat alleen moet
worden opgefrist.
Max. centrifugesnelheid: 700 Toeren per minuut
2,5 kg Uitgestelde start
1) Doe het wasmiddel te doen in het vakje met .
6

Onderhoud en reiniging
Trek de stekker uit het stopcontact voordat u de machine
reinigt.
Ontkalken
Gebruik een geschikt niet-corrosief product voor wasma-
chines om het apparaat te ontkalken. Lees de verpakking
voor de aanbevolen hoeveelheden en hoe vaak u moet
ontkalken.
De buitenkant
Gebruik een warm sopje om de buitenkant van de machine
schoon te maken. Gebruik nooit alcohol, oplosmiddelen
of soortgelijke producten.
Doseerbakje
Ga als volgt te werk om het filter te reinigen:
Afvoerfilter
Reinig de afvoerfilter die zich onder de onderkant van de
trommel bevindt, regelmatig:
1
2
4
3
6
5
CLACK
CLACK
8
7
Controleer het filter dat
moet worden gekoppeld
goed voordat u de afvoer-
filter sluit om de centrale
wand omhoog of omlaag
te trekken.
Watertoevoerfilters
Ga als volgt te werk om het filter te reinigen:
7

Problemen met de werking
Uw wasmachine is uitgebreid getest voordat deze de fa-
briek heeft verlaten. Als u echter een storing opmerkt, lees
dan de onderstaande tabel voordat u contact opneemt met
de klantenservice.
Problemen Oorzaken
De machine start niet of vult
zich niet met water:
• de stekker zit niet goed in het stopcontact of de elektrische voeding werkt niet,
stroomstoring,
• de klep van uw machine en de trommel zijn niet goed gesloten,
• het startcommando voor het programma is niet goed geselecteerd,
• de watertoevoer is afgesloten, de kraan is dicht,
• de watertoevoerfilters zijn vuil (raadpleeg "Onderhoud en reiniging").
Er stroomt water in de ma-
chine maar dat loopt meteen
weer weg:
• het 180°-stuk voor de afvoer is te laag gemonteerd (zie "Montage").
De machine spoelt niet of
pompt geen water weg:
• de afvoerslang is verstopt of gebogen,
• het afvoerfilter is verstopt (zie "Onderhoud en reiniging"),
• de uit-balansdetector is geactiveerd: het wasgoed is ongelijk verdeeld in de trom-
mel,
• het programma 'Pompen' of 'Nachtcyclus' of de optie 'Spoelstop' zijn geselecteerd,
• de hoogte van het 180°-stuk voor de afvoer is niet geschikt.
De machine centrifugeert
niet:
• balansproblemen met de waslading: voeg meer wasgoed aan de machine toe of
schik het wasgoed in de trommel.
U heeft water rond de machi-
ne aangetroffen:
• te veel wasmiddel heeft ervoor gezorgd dat het schuim overstroomde,
• het wasmiddel is ongeschikt voor wassen in de machine,
• het U-stuk voor de afvoer is niet correct aangesloten,
• de watertoevoerslang lekt.
Het wasresultaat is niet be-
vredigend:
• het wasmiddel is ongeschikt voor wassen in de machine,
• er zit te veel wasgoed in de trommel,
• het wasprogramma is ongeschikt,
• er is te weinig wasmiddel gebruikt.
De machine staat te schud-
den of maakt lawaai:
• niet alle verpakkingsmateriaal is uit het apparaat verwijderd (zie "Montage"),
• het apparaat staat niet waterpas en is niet in balans (zie "Montage"),
• het apparaat staat te dicht bij de muur of tegen meubels aan,
• het wasgoed is ongelijk verdeeld in de trommel, de lading is te klein.
• het apparaat werkt, het geluid zal verdwijnen.
8

Problemen Oorzaken
Het wasprogramma duurt
veel te lang:
• de watertoevoerfilters zijn vuil (raadpleeg "Onderhoud en reiniging"),
• de stroom of de watertoevoer zijn afgesloten,
• de motoroververhittingsdetector is geactiveerd,
• de watertoevoertemperatuur is lager dan normaal,
• het veiligheidssysteem voor schuimdetectie is geactiveerd (te veel wasmiddel) en
de wasmachine is begonnen met het afvoeren van het schuim,
• de uit-balansdetector is geactiveerd: er is een extra fase toegevoegd om het was-
goed gelijkmatiger te verdelen in de trommel.
De wasmachine stopt tijdens
een wasprogramma:
• de water- of stroomtoevoer is kapot,
• er is een "Spoelstop" geselecteerd,
• de kleppen van de trommel zijn open.
De klep kan niet geopend
worden op het eind van een
programma:
• de temperatuur in de trommel is te hoog,
• de klep wordt 1-2 minuten na het eind van het programma ontgrendeld.
De foutcode ver-
schijnt op de display
1)
en de
toets “Start/Pauze” knippert
rood
2)
:
• de klep is niet goed gesloten.
De -foutcode ver-
schijnt op het display
1)
en de
toets “Start/Pauze” knippert
rood
2)
:
• het afvoerfilter is verstopt,
• de afvoerslang is verstopt of gebogen,
• de afvoerslang is te hoog bevestigd (zie "Montage"),
• de afvoerpomp is geblokkeerd,
• de standpijpen zijn verstopt.
De -foutcode ver-
schijnt op het display
1)
en de
toets “Start/Pauze” knippert
rood
2)
:
• de waterkraan is dicht,
• de watertoevoer is afgesloten.
De -foutcode ver-
schijnt op het display
1)
en de
toets “Start/Pauze” knippert
rood
2)
:
• het afvoerfilter is verstopt,
• de beveiliging tegen overstromen is geactiveerd, ga als volgt te werk:
- draai de waterkraan dicht,
- laat gedurende 2 minuten het water afvoeren voor u de stekker uittrekt,
- neem contact op met de klantenservice.
De afvoerpomp blijft werken,
zelfs als het apparaat niet is
ingeschakeld:
• de beveiliging tegen overstromen is geactiveerd, ga als volgt te werk:
- draai de waterkraan dicht,
- laat gedurende 2 minuten het water afvoeren voor u de stekker uittrekt,
- neem contact op met de klantenservice.
9

Problemen Oorzaken
De wasverzachter stroomt
meteen in de trommel als u
dit in het wasmiddelbakje
doet:
• u bent voorbij het teken MAX gegaan.
1) Bij sommige modellen klinkt er een geluidssignaal
2) Druk na het oplossen van het probleem op de toets "Start/Pauze" om het onderbroken programma opnieuw te starten.
Wasmiddelen en nabehandelingsmiddelen
Gebruik alleen wasmiddelen en nabehandelingsproducten
die bedoeld zijn voor gebruik in een wasmachine. Het
mengen van verschillende soorten wasmiddel wordt niet
aanbevolen. Dit kan het wasgoed beschadigen. Er zijn
geen beperkingen bij het gebruik van waspoeder. Vloeiba-
re wasmiddelen mogen niet worden gebruikt als er een
voorwas geselecteerd is. Voor cycli zonder voorwas, giet
het vloeibaar wasmiddel in de trommel of gebruik een
speciale doseerbol (meegeleverd door de fabrikant van het
wasmiddel). Wasmiddeltabletten of doseringen waspoeder
moeten in het wasmiddelbakje van de wasmiddellade van
de machine worden gedaan.
Technische specificaties
Afmetingen Hoogte
Breedte
Diepte
850 mm
400 mm
600 mm
NETSPANNING/FREQUENTIE
STROOMVERBRUIK
230 V / 50 Hz
2300 W
WATERDRUK Minimaal
Maximaal
0,05 MPa (0,5 bar)
0,8 MPa (8 bar)
Aansluiting op watertoevoer Type 20/27
Verbruikswaarden
Programma
1)
Energieverbruik (kWh)
2)
Waterverbruik (liter)
2)
Witte katoen 90° C 2.05 64
Katoen 60 °C 1.2 58
Katoen 40 °C 0.8 58
Synthetische stoffen 40 °C 0.65 48
Fijne was 30 °C 0.3 48
Wol 30 °C 0.4 48
Handwas 30 °C 0.4 48
1) Raadpleeg het display voor de programmatijd.
2) De consumptiegegevens die in dit overzicht worden weergegeven, zijn indicatief. De gegevens kunnen verschillen, afhankelijk van de
hoeveelheid, het type wasgoed, de temperatuur van de watertoevoer en de omgevingstemperatuur.
10

Standaardprogramma's voor de Energielabel
verbruikswaarden
De katoen 60 °C eco en katoen 40 °C eco zijn de stan-
daard katoenprogramma's voor normaal vervuilde katoe-
nen was. Ze zijn geschikt voor het wassen van normaal
vervuilde katoenen was en het zijn zeer efficiënte program-
ma's voor gecombineerd energie- en waterverbruik voor
het wassen van dat type katoenen was.
Overeenkomstig EN60456.
De daadwerkelijke watertemperatuur kan verschillen
van de vermelde cyclustemperatuur.
Montage
Verwijder alle beschermende verpakking voor transport
voordat u de machine voor het eerst gebruikt. Bewaar de
verpakking voor als u de machine nog eens moet vervoe-
ren: het vervoeren van een niet-beveiligd apparaat kan in-
terne onderdelen beschadigen en lekkages of storingen
veroorzaken. Het apparaat kan ook beschadigd raken door
fysiek contact.
Uitpakken
2
1
1
2
Verwijderen van de transportschroeven
AB
D
C
A
1
2
B
2
1
B
D
Houd de transportbouten
bij voor als u het apparaat
gaat verplaatsen.
Snijd deze plastic stukken
om het apparaat op dezelf-
de hoogte te installeren als
de andere apparatuur.
Watertoevoer
90
O
90
O
90
O
11

Als het nodig is, dient u de
toevoerslang te verplaat-
sen in de richting die
wordt getoond op de af-
beelding. Om dit te doen,
maakt u de ringmoer op de
toevoerslang los en ver-
plaatst u de toevoerslang
omlaag, zoals weergege-
ven op de afbeelding.
Span de ringmoer terug
aan en zorg dat er geen
lekken zijn.
Draai de waterkraan open.
Controleer of er geen lek-
ken zijn. De watertoe-
voerslang kan niet worden
verlengd. Als hij te kort is,
neem dan contact op met
de klantenservice.
Afvoer
Monteer het 180°-stuk op de
afvoerslang. Plaats alles in
een afvoerpunt (of in een
gootsteen) met een hoogte
tussen de 70 en 100 cm.
Zorg ervoor dat het stevig is
bevestigd. Er moet lucht in
het einde van de afvoerslang
kunnen binnenkomen om het
risico op sifoneffecten te voorkomen.
max
100 cm
min
70 cm
De afvoerslang mag nooit worden uitgerekt. Als hij te kort
is, neem dan contact op met een monteur.
Elektrische aansluiting
Deze wasmachine mag alleen worden aangesloten op een
eenfasige spanning van 230 V. Controleer de zekering: 13
A voor 230 V. Het apparaat mag niet worden aangesloten
met een verlengsnoer of een stekkerdoos met meerdere
aansluitingen. Zorg ervoor dat de stekker geaard is en dat
deze in overeenstemming is met de geldende voorschrif-
ten.
Opstelling
Plaats de machine op een vlakke en harde ondergrond in
een geventileerde ruimte. Zorg ervoor dat het apparaat niet
in contact komt met de muur of met andere meubels. Het
nauwkeurig waterpas zetten van het apparaat voorkomt
trillingen, lawaai en voorkomt dat het apparaat beweegt als
het in werking is.
Milieu
Afdanken van het apparaat
Alle materialen met het symbool zijn recycleer-
baar Gooi ze weg bij een afvalinzamelpunt (vraag in-
formatie bij uw plaatselijke kantoor) voor verzameling en
recycling. Als u de machine wegdoet, dient u alle onder-
delen te verwijderen die gevaarlijk kunnen zijn voor ande-
ren snijd het netsnoer bij de onderkant van het apparaat
door
Het symbool
op het product of op de verpakking geeft
aan dat dit product niet mag worden behandeld als huis-
houdelijk afval In plaats daarvan moet het naar een inza-
melpunt worden gebracht dat geschikt is voor het recyclen
van elektrische en elektronische apparatuur. Door ervoor
te zorgen dat dit product op de juiste wijze wordt verwij-
derd, helpt u mogelijke negatieve gevolgen door een on-
juiste afvalverwerking van dit product voor het milieu en
de volksgezondheid te voorkomen. Voor gedetailleerde in-
formatie over het verwerken van dit product dient u con-
tact op te nemen met het gemeentehuis in uw woonplaats,
de instantie die verantwoordelijk is voor het afvoeren van
huishoudelijk afval in uw gemeente of de winkel waar u
het product hebt gekocht.
Bescherming van het milieu
Om water en energie te besparen en om het milieu
te helpen beschermen, raden wij u het volgende
aan:
• Gebruik het apparaat wanneer mogelijk met een volle
trommel, en vermijd halve beladingen.
• Gebruik de voorwas- en weekprogramma's alleen voor
zeer vuile stukken.
• Gebruik de juiste hoeveelheid wasmiddel voor de hard-
heid van het water, de grootte van de belading en hoe
vuil het wasgoed is.
12

Contents
Safety Information _ _ _ _ _ _ _ _ _ _ _ _ _ _ _ _ _ 13
Product description _ _ _ _ _ _ _ _ _ _ _ _ _ _ _ _ 14
How to run a wash cycle? _ _ _ _ _ _ _ _ _ _ _ _ _ _ 15
Daily Use _ _ _ _ _ _ _ _ _ _ _ _ _ _ _ _ _ _ _ _ _ 15
Washing programmes _ _ _ _ _ _ _ _ _ _ _ _ _ _ _ 17
Care and cleaning _ _ _ _ _ _ _ _ _ _ _ _ _ _ _ _ _ 17
Operating Problems _ _ _ _ _ _ _ _ _ _ _ _ _ _ _ _ 18
Detergents and Additives _ _ _ _ _ _ _ _ _ _ _ _ _ _ 20
Technical Specifications _ _ _ _ _ _ _ _ _ _ _ _ _ _ 21
Consumption values _ _ _ _ _ _ _ _ _ _ _ _ _ _ _ _ 21
Installation _ _ _ _ _ _ _ _ _ _ _ _ _ _ _ _ _ _ _ _ 21
Environment _ _ _ _ _ _ _ _ _ _ _ _ _ _ _ _ _ _ _ _ 23
Subject to change without notice
Safety Information
Please read these points carefully before installing and
using your appliance. Keep this user manual with your ap-
pliance.
General safety
• Do not modify or attempt to modify this appliance. This
would put yourself in danger.
• Ensure that all coins, safety pins, brooches, screws etc
have been removed before starting a washing pro-
gramme. If left in washing, they can seriously damage
the appliance.
• Use the recommended quantity of detergent.
• Put small items together (socks, belts etc.) in a small
linen bag or pillow case.
• Unplug and close inlet hose tap after using appliance.
• Always disconnect the power supply from the appli-
ance before cleaning or maintenance.
• Do not machine wash clothes with ribbing, unfinished
or torn material.
Installation
• Unpack or ask for the appliance to be unpacked imme-
diately upon delivery. Check the outside of the appli-
ance is not damaged in any way. Report all transit
damage to your retailer.
• Remove all transit bolts and packaging before instal-
ling the appliance.
• Connection to the water supply must be carried out by
a qualified plumber.
• If your domestic electrical circuit needs adapting to al-
low the appliance to be plugged in, use a qualified
electrician.
• Ensure that, after installation, the power cable is not
trapped under the appliance.
• If the appliance is installed on carpeted floor, ensure
that the carpet does not obstruct any ventilation ducts
located at the base of the appliance.
• The appliance must be equipped with an earthed power
plug which conforms to regulations.
• Before connecting your appliance to the power supply,
carefully read the instructions in the chapter entitled
“Electrical connection”.
• Replacing the power cable should only be carried out
by an authorised service engineer.
• The manufacturer cannot be held responsible for any
damage resulting from incorrect installation.
Precautions to be taken against frost
If your appliance is exposed to temperatures below 0°C,
the following precautions must be taken:
• Close the tap and disconnect the inlet hose.
• Place the end of this hose and the drain hose in a basin
on the floor.
• Select the Drain programme let it run until the end of
the cycle.
• Disconnect the appliance from the power supply by
turning the programme selector to “Stop”
.
• Unplug the appliance.
• Replace the inlet hose and drain hose.
This way, the water remaining in the hoses will be drained
away, avoiding any ice formation which would damage
your appliance.
Before turning your appliance on again, ensure that it is
installed in an area where the temperature will not fall be-
low freezing.
Use
• Your appliance is intended for normal domestic use.
Do not use the appliance for commercial or industrial
purposes or for any other purpose.
13

• Refer to the instructions on the label of each item be-
fore washing.
• Do not put items into the washing machine which have
had stains removed with petrol, alcohol, trichlorethylen
etc. If such stain removers have been used, wait until
the product has evaporated before putting these items
into the drum.
• Empty pockets and unfold items.
• This appliance is not intended for use by persons (in-
cluding children) with reduced physical, sensory or
mental capabilities, or lack of experience and knowl-
edge, unless they have been given supervision or in-
struction concerning use of the appliance by a person
responsible for their safety.
Children should be supervised to ensure that they do
not play with the appliance.
Product description
1
2
3
1 The control panel
2 Lid handle
3 Adjustable levelling feet
The control panel
1
2
4
5
3
6
1 Programme selector
2 Buttons and their functions
3 Display
4 "Door locked" light
5 "Start/Pause" button
6 "Delay start" button
14

Dispenser box
1
2
3
4
5
1 Softener (do not fill above the MAX symbol)
2
Bleaching agent can be used on Cotton pro-
grammes without prewash - 1/4 to 1 glass of diluted
bleach (do not fill above the MAX symbol)
3 Wash
4 Prewash
5 Fabric softener and bleach overflow (if overfilled)
How to run a wash cycle?
Using for the first time
• Ensure the electrical and water connections com-
ply with the installation instructions.
• Remove the polystyrene insert and all other items
inside the drum.
• Run an initial wash cycle at 90°C, without any
washing but with detergent to clean the water
tank.
Daily Use
Loading washing
• Open the lid of the ap-
pliance.
• Open the drum by de-
pressing the locking
button A: The two
shutters unlock auto-
matically.
• Load the washing,
close the drum and the
lid of your washing machine.
Warning! Before closing the lid of your appliance,
ensure that the drum is properly closed :
• When the two shutters are closed,
• locking button A released.
Proportioning of detergents
Pour the amount of washing powder into the washing
and prewash compartments if you have selected the
“prewash” option. Pour fabric softener into the compart-
A
ment and bleach into the compartment if necessa-
ry (available on programmes Cotton without prewash).
Selection of desired programme
Turn the programme selector to the required programme.
The “Start/Pause” pushbutton flashes green.
If you turn the programme selector to another programme
while a cycle is in progress, the appliance will ignore the
new selected programme. “Err” flashes and the “Start/
Pause” pushbutton flashes red for a few seconds.
Selecting the spin speed
Press the “ Spin ” pushbutton to change the spin speed, if
you want your washing to be spun at a different speed to
the one selected by the appliance. You can also select
“ Rinse hold ” .
Rinse hold
By selecting this function the water of the last rinse is not
emptied out to prevent the fabrics from creasing.
For the maximum spin speeds see "Washing pro-
grammes".
15

At the end of the programme, if you have selected “ Rinse
hold ” , you then need to select a “ Spin ” or “ Drain ”
programme to finish the cycle and empty the water.
Selecting options
You must select the different options after selecting the
programme and before pressing the “Start/Pause” push-
button (see “Programme table”). Press the desired but-
ton(s) ; the corresponding lights come on. If pressed
again, the lights go out. If one of the options is not com-
patible with the selected programme, “Err” flashes on the
display and the “Start/Pause” pushbutton flashes red.
“ Prewash ” option
The appliance runs a prewash at 30°C max.
“ Super quick ” option
The washing time will be reduced depending on the pro-
gramme selected.
“ Extra rinse ” option
The washing machine will add one or more rinses during
the cycle. This option is recommended for people with
sensitive skin and in soft water areas.
“Delay start”
This option allows you to delay the start of a wash pro-
gramme by 30 minutes, 60 minutes, 90 minutes, 2 hours
to 20 hours. The selected time appears on the display for
a few seconds.
You can change or cancel the delayed start time at any
time before you press the “Start/Pause” button, by press-
ing the “Delay start” button again (
’ indicates immedi-
ate start)
If you have already pressed the “Start/Pause” button and
you want to change or cancel the delayed start, proceed as
follows :
• To cancel the delayed start and start the cycle immedi-
ately, press “Start/Pause” and then “Delay start”. Press
“Start/Pause” to start the cycle.
• To change the timer delay period, you must go through
the “Stop”
position and reprogramme your cycle.
The lid will be locked during the delayed start time. If you
need to open it, you must first pause the appliance by
pressing the “Start/Pause” button. After closing the lid
again, press the “Start/Pause” button.
Start of the programme
Press the “Start/Pause” pushbutton to start the cycle ; the
corresponding light will come on green and the “ Door
locked ” light comes on.
It is normal for the programme selector to remain station-
ary during the cycle. The remaining time appears on the
display. If a delayed start has been selected, the count-
down appears on the display.
Interrupting a programme
Adding washing during the first 10 minutes
When the “ Door locked ” light is off, you can add wash-
ing by proceeding as follows. Press the “Start/Pause”
pushbutton : the corresponding light will flash green while
the appliance is paused. The lid can only be opened
around 2 minutes after the washing machine has come to
a stop. Press the “Start/Pause” pushbutton again to con-
tinue the programme.
Modifying the programme in progress
Before making any changes to the current programme,
you need to pause the washing machine by pressing the
“Start/Pause” pushbutton. If the modification is not possi-
ble, “Err” flashes in the display and the “Start/Pause”
pushbutton flashes red for a few seconds. If you still de-
cide to change the programme, you must cancel the cur-
rent programme (see below).
Cancelling the programme
If you want to cancel the programme, turn the programme
selector to the “Stop”
position.
End of the programme
The washing machine stops automatically ; the “Start/
Pause” button goes out and
flashes on the display. The
lid can only be opened around 2 minutes after the wash-
ing machine has come to a stop. The “ Door locked ” light
is off. Turn the programme selector to the “Stop” position
. Remove washing. Unplug and close water inlet tap.
Stand by : once the programme has finished after a few
minutes the energy saving system will be enabled. The
brightness of the display is reduced. By pressing any but-
ton the appliance will come out of the energy saving sta-
tus.
16

Washing programmes
Programme / Type of washing Load Available options
Cottons (30° - 90°) : White or colour, e.g. nor-
mally soiled work clothes, bed linen, table linen, body
linen, towels.
Max. spin speed: 1200 rpm
5,0 kg Rinse hold, Prewash, Super quick , Extra
rinse , Delay start
Cotton Eco (40°-60°) : White or colour, e.g. nor-
mally soiled work clothes, bed linen, table linen, body
linen, towels.
Max. spin speed: 1200 rpm
5,0 kg Rinse hold, Prewash, Extra rinse , Delay start
Synthetics (30° - 60°) : Synthetic fabrics, body
linen, fab, coloured fabrics, non-iron shirts, blouses.
Max. spin speed: 900 rpm
2,5 kg Rinse hold, Prewash, Super quick , Extra
rinse , Delay start
Synthetics Eco (40°) : Synthetic fabrics, body lin-
en, fab, coloured fabrics, non-iron shirts, blouses.
Max. spin speed: 900 rpm
2,5 kg Rinse hold, Prewash, Extra rinse , Delay start
Delicates (30° - 40°) : For all delicate materials,
for example curtains.
Max. spin speed: 700 rpm
2,5 kg Rinse hold, Prewash, Super quick , Extra
rinse , Delay start
Handwash (cold - 40°) : Very delicate items car-
rying the “wash by hand” label.
Max. spin speed: 900 rpm
1,0 kg Rinse hold, Delay start
Soak (30°)
1)
: Soaking for very dirty washing. The
drum stops full of water.
5,0 kg Delay start
Rinses : Hand washed items can be rinsed in this
programme.
Max. spin speed: 1200 rpm
5,0 kg Rinse hold, Extra rinse , Delay start
Drain : Runs an empty cycle after a Rinse hold option. 5,0 kg
Spin : A spin cycle from 500 to 1200 after a Rinse
hold option.
5,0 kg Delay start
Miniprogramme (30°) : Ideal for laundry which only
needs freshening-up.
Max. spin speed: 700 rpm
2,5 kg Delay start
1) Put the detergent into the compartment marked .
Care and cleaning
Unplug the appliance before cleaning.
Descaling the appliance
To descale the appliance, use an appropriate non-corro-
sive product designed for washing machines. Read prod-
uct label for recommended amounts and how often desca-
ling should be carried out.
17

The exterior
Use warm soapy water to clean the exterior of the appli-
ance. Never use alcohol, solvents or similar products.
Dispenser box
To clean, proceed as follows :
Object trap
Regularly clean out the object trap which is located at the
bottom of the drum :
1
2
4
3
6
5
CLACK
CLACK
8
7
Check if the filter being
coupled well before clos-
ing the trap to pull up and
down the central wall.
Water inlet filters
To clean, proceed as follows :
Operating Problems
Numerous checks were carried out on your appliance be-
fore it left the factory. However, should you notice a mal-
function, please refer to the sections below before contact-
ing the after-sales service.
18

Problems Causes
The appliance doesn’t start or
doesn’t fill :
• the appliance isn’t plugged in correctly, the electrical installation isn’t working,
there is a power failure,
• the lid of your appliance and the drum shutters aren’t closed firmly,
• the programme start command hasn’t been properly selected,
• the water supply has been cut off, the water inlet tap is closed,
• the water inlet filters are dirty (see “Care and cleaning”).
The appliance fills but emp-
ties straight away :
• the drainage U-piece is fixed too low (see “Installation”).
The appliance doesn’t rinse
or doesn’t empty :
• the drain hose is blocked or bent,
• the object trap is obstructed (see “Care and cleaning” ),
• the out of balance detector has been activated : washing is unevenly distributed in
the drum,
• the “Drain” programme or “Night Cycle” or “Rinse hold” option have been selec-
ted,
• the height of the drainage U-piece is unsuitable.
The appliance doesn’t spin : • balance problem with the laundry load: add more laundry or manually adjust the
items in the drum.
You have found water around
the appliance :
• too much detergent has caused foam to overflow,
• the detergent is unsuitable for machine washing,
• the drainage U-piece isn’t attached correctly,
• the water inlet hose is leaking.
The washing results are not
satisfactory :
• the detergent is unsuitable for machine washing,
• there is too much laundry in the drum,
• the wash cycle is unsuitable,
• there isn’t enough detergent.
The appliance vibrates, is
noisy :
• all packaging have not been removed from the appliance (see “Installation” ),
• the appliance isn’t level and is unbalanced (see “Installation” ),
• the appliance is too close to the wall or furniture,
• washing is unevenly distributed in the drum, the load is too small.
• the appliance is in running in period, noise will disappear with time.
The wash cycle is much too
long :
• the water inlet filters are dirty (see “Care and cleaning”),
• the power or water supply has been cut off,
• the motor overheating detector has been activated,
• the water inlet temperature is lower than usual,
• the foam detection security system has been activated (too much detergent) and the
washing machine has begun draining the foam,
• the out of balance detector has been activated: an extra phase has been added to
distribute washing more evenly in the drum.
19

Problems Causes
The appliance stops during a
wash cycle :
• the water or electricity supply is defective,
• a “Rinse hold” option has been selected,
• the drum shutters are open.
The lid doesn’t open at the
end of the cycle :
• the temperature inside the drum is too high,
• the lid unlocks 1 - 2 minutes after the end of the cycle.
The error code ap-
pears in the display
1)
and the
“Start/Pause” button flashes
red
2)
:
• the lid is not closed properly.
The error code ap-
pears in the display
1)
and the
“Start/Pause” button flashes
red
2)
:
• the object trap is obstructed,
• the drain hose is blocked or bent,
• the drain hose is fixed to high (see "Installation" ),
• the drainage pump is blocked,
• the standpipes are blocked.
The error code appears
in the display
1)
and the
“Start/Pause” button flashes
red
2)
:
• the water tap is closed,
• the water supply has been cut off.
The error code ap-
pears in the display
1)
and the
“Start/Pause” button flashes
red
2)
:
• the object trap is obstructed,
• the anti-flooding security system has been activated, please proceed as follows :
- close the water inlet tap,
- empty the appliance for 2 minutes before unplugging,
- call the after-sales service.
The drainage pump runs
constantly, even when the
appliance is inactive :
• the anti-flooding security system has been activated, please proceed as follows :
- close the water inlet tap,
- empty the appliance for 2 minutes before unplugging,
- call the after-sales service.
Softener runs directly into
the drum when filling the
dispenser box:
• you have gone past the MAX indicator.
1) On some models, the audible signals can sound
2) After solving any problems, press "Start/Pause" button to restart the interrupted programme.
Detergents and Additives
Only use detergents and additives designed for use in a
washing machine. We do not recommend mixing different
types of detergents. This may spoil the washing. There are
no restrictions on the use of powder detergents. Liquid
detergents must not be used when a prewash has been se-
lected. For cycles without prewash, pour the liquid deter-
gent directly into the drum or use a special dosing device
(supplied by the detergent's manufacturer). Detergent tab-
lets or doses must be placed in the detergent compart-
ment of your appliance's dispenser box.
20

Technical Specifications
DIMENSIONS Height
Width
Depth
850 mm
400 mm
600 mm
LINE VOLTAGE /FREQUENCY
POWER CONSUMPTION
230 V / 50 Hz
2300 W
WATER PRESSURE Minimum
Maximum
0,05 MPa (0,5 bar)
0,8 MPa (8 bar)
Connection to water supply Type 20/27
Consumption values
Programme
1)
Energy consumption (KWh)
2)
Water consumption (litre)
2)
White Cottons 90 °C 2.05 64
Cottons 60 °C 1.2 58
Cottons 40 °C 0.8 58
Synthetics 40 °C 0.65 48
Delicates 30 °C 0.3 48
Wool 30 °C 0.4 48
Handwash 30 °C 0.4 48
1) Refer to the display for the programme time.
2) The consumption information shown in this chart is indicative. It can vary depending on the quantity and the type of laundry, on the
temperature of the water supply and on the ambient temperature.
Standard programmes for the Energy Label consumption
values
The cotton 60 °C economy and cotton 40 °C economy are
the standard cotton programmes for normally soiled cot-
ton laundry. They are suitable to clean normally soiled
cotton laundry and they are the most efficient programmes
in terms of combined energy and water consumption for
washing that type of cotton laundry.
They agree with EN60456.
The actual water temperature may differ from the de-
clared cycle temperature.
Installation
Remove all protective packaging for transit before using
for the first time. Keep in case needed for future transit:
Transporting a non-secured appliance may damage inter-
nal components and cause leakages and malfunctions.
The appliance can also be damaged through physical con-
tact.
Unpacking
2
1
1
2
21

Untying
AB
D
C
A
1
2
B
2
1
B
D
Keep the transit bolts for
when you move the appli-
ance.
To install the appliance at
the same level as neigh-
boring furniture, cut these
plastic pieces.
Water supply
90
O
90
O
90
O
In case of necessity move
the inlet hose in the direc-
tion shown on picture. To
make this loose the inlet
hose ring nut and position
the inlet hose downwards
as drawn on picture.
Tighten the ring nut back
and make sure there are
no leaks.
Open the water inlet tap.
Check there are no leaks.
The water inlet hose can
not be extended. If it is too
short, please contact the
after-sales service.
Drainage
Fit the U-piece on the drain-
age hose. Place everything
in a drainage point (or in a
sink) at a height of between
70 and 100 cm. Ensure it is
positioned securely. Air
must be able to enter the end
of the hose, to avoid any risk
of siphoning.
The drain hose must never be stretched. If it is too short,
contact an engineer.
Electrical connection
This washing machine must only be connected in single-
phased 230 V. Check the fuse size: 13 A for 230 V. The
appliance must not be connected with an extension lead
or multi-plug adaptor. Ensure that the plug is earthed and
that it is in accordance with current regulations.
Positioning
Position the appliance on a flat and hard surface in a ven-
tilated location. Ensure the appliance does not come into
contact with the wall or other furniture. Accurate levelling
avoids vibrations, noise and prevents the appliance from
moving when running.
max
100 cm
min
70 cm
22

Environment
Disposing of the appliance
All materials carrying the symbol are recyclable.
Dispose of them at a waste collection site (enquire
at your local council) for collection and recycling. When
disposing of your appliance, remove all parts which could
be dangerous to others: cut off the power supply cable at
the base of the appliance.
The symbol
on the product or on its packaging indi-
cates that this product may not be treated as household
waste. Instead it should be taken to the appropriate collec-
tion point for the recycling of electrical and electronic
equipment. By ensuring this product is disposed of cor-
rectly, you will help prevent potential negative consequen-
ces for the environment and human health, which could
otherwise be caused by inappropriate waste handling of
this product. For more detailed information about recy-
cling of this product, please contact your local council,
your household waste disposal service or the shop where
you purchased the product.
Protecting the environment
To save water and energy and therefore help protect
the environment, we recommend the following:
• Whenever possible, use the appliance at full capacity
and avoid partial loads.
• Only use the prewash and soak programmes for heavily
soiled items.
• Use an appropriate amount of detergent for the hard-
ness of the water, the size of the load and how soiled
the washing is.
23

Sommaire
Avertissements importants _ _ _ _ _ _ _ _ _ _ _ _ _ 24
Description de l'appareil _ _ _ _ _ _ _ _ _ _ _ _ _ _ 25
Comment effectuer un cycle de lavage ? _ _ _ _ _ _ _ 26
Utilisation Quotidienne _ _ _ _ _ _ _ _ _ _ _ _ _ _ _ 26
Programmes de lavage _ _ _ _ _ _ _ _ _ _ _ _ _ _ _ 28
Entretien et nettoyage _ _ _ _ _ _ _ _ _ _ _ _ _ _ _ 29
Problèmes de fonctionnement _ _ _ _ _ _ _ _ _ _ _ 30
Produits de lavage et additifs _ _ _ _ _ _ _ _ _ _ _ _ 32
Caractéristiques techniques _ _ _ _ _ _ _ _ _ _ _ _ 32
Valeurs de consommation _ _ _ _ _ _ _ _ _ _ _ _ _ 33
Installation _ _ _ _ _ _ _ _ _ _ _ _ _ _ _ _ _ _ _ _ 33
Environnement _ _ _ _ _ _ _ _ _ _ _ _ _ _ _ _ _ _ _ 35
Sous réserve de modifications
Avertissements importants
Veuillez lire attentivement ces remarques avant d’installer
et d’utiliser votre appareil. Conservez ce manuel à proxi-
mité de l'appareil.
Consignes générales de sécurité
• Ne tentez pas de modifier l'appareil. Cela serait dange-
reux pour vous.
• Avant de lancer un programme de lavage, vérifiez que
toutes les broches de sécurité, vis, etc. ont été retirées.
En effet, si ces éléments se trouvaient accidentellement
dans le lave-linge, cela risquerait d'endommager gra-
vement l'appareil.
• Veillez à utiliser la quantité de lessive recommandée.
• Regroupez les articles de petite taille (chaussettes,
ceintures, etc.) au sein d'un linge ou d'une taie d'oreil-
ler.
• Après toute utilisation, débranchez l'appareil et fermez
le rabat du tuyau d'arrivée d'eau.
• Vous devez systématiquement débrancher l'appareil
avant tout nettoyage ou opération de maintenance.
• Ne lavez pas à la machine des vêtements contenant des
rubans ou du tissu torsadé.
Installation
• Déballez ou faites déballer l'appareil dès sa livraison.
Vérifiez que les parois extérieures de l'appareil ne sont
pas endommagées. En cas de dommage occasionné
par le transport, signalez-le au vendeur.
• Retirez toutes les attaches de transport avant d'installer
l'appareil.
• Le raccordement à l'arrivée d'eau doit être effectué par
un plombier qualifié.
• Si votre installation électrique nécessite une adaptation
en vue du branchement de l'appareil, faites appel à un
électricien qualifié.
• Après l'installation, vérifiez que le câble d'alimentation
n'est pas bloqué sous l'appareil.
• Si l'appareil est installé sur un tapis, assurez-vous que
celui-ci n'obstrue pas les tuyaux de ventilation situés
au bas de l'appareil.
• L'appareil doit être équipé d'une prise mise à la terre
conforme à la réglementation en vigueur.
• Avant de brancher l'appareil, lisez attentivement les
instructions fournies dans le chapitre consacré au
branchement électrique.
• Le remplacement du câble d'alimentation ne doit être
effectué que par un technicien de maintenance habilité.
• Le fabricant ne pourra en aucun cas être tenu respon-
sable des dommages résultant d'une installation incor-
recte.
Précautions à prendre contre le gel
Si votre appareil est exposé à des températures inférieures
à 0 °C, prenez les précautions suivantes :
• Fermez le rabat et débranchez le tuyau d'arrivée d'eau.
• Placez l'extrémité de ce tuyau, ainsi que le tuyau de vi-
dange, dans une cuvette posée sur le sol.
• Sélectionnez le programme de vidange et laissez-le
s'exécuter jusqu'à la fin.
• Coupez l'alimentation de l'appareil en positionnant le
sélecteur de programmes sur Arrêt.
.
• Débranchez l’appareil.
• Remettez en place le tuyau d'arrivée d'eau et le tuyau
de vidange.
Cela permet à l'eau restant dans les tuyaux d'être vidan-
gée, ce qui évite toute formation de glace qui risquerait
d'endommager l'appareil.
Avant de remettre l'appareil en marche, vérifiez qu'il est
installé dans une zone non exposée au gel.
24

Utilisation
• Votre appareil est destiné à un usage domestique nor-
mal. N'utilisez pas cet appareil à des fins commerciales
ou industrielles ou pour d'autres usages.
• Avant le lavage, consultez les instructions d'entretien
de chaque article (vêtement).
• N'insérez pas dans le lave-linge des articles détachés à
l'aide d'alcool, de tricholréthylène, etc. Si des déta-
chants de ce type ont été utilisés, attendez l'évapora-
tion totale de ce produit avant de placer les articles
dans le tambour.
• Videz les poches des vêtements et dépliez-les.
• Cet appareil n’est pas destiné à être utilisé par des en-
fants ou des personnes dont les capacités physiques,
sensorielles ou mentales, ou le manque d'expérience et
de connaissances les empêchent d'utiliser l'appareil
sans risque lorsqu'ils sont sans surveillance ou en
l'absence d'instructions d'une personne responsable
qui puisse leur assurer une utilisation de l'appareil
sans danger.
Veillez à ce que les enfants ne jouent pas avec l'appa-
reil.
Description de l'appareil
1
2
3
1 Bandeau de commande
2 Poignée de couvercle
3 Pieds de mise à niveau
Le bandeau de commande
1
2
4
5
3
6
1 Sélecteur de programmes 2 Touches et leurs fonctions
25

3 Affichage
4 Voyant « Porte fermée »
5 Touche « Départ/Pause »
6 Touche « Départ différé »
Réservoir
1
2
3
4
5
1 Adoucissant (veillez à ne pas dépasser le niveau
maximal de remplissage indiqué par le symbole
MAX)
2
Un agent blanchissant peut être utilisé avec les
programmes Coton sans prélavage - 1/4 à 1 verre
d’eau de javel diluée (ne pas dépasser le repère
MAX)
3 Lavage
4 Prélavage
5 Trop-plein d'adoucissant et de javel (en cas de rem-
plissage excessif)
Comment effectuer un cycle de lavage ?
Première utilisation
• Assurez-vous que les raccordements électriques
et hydrauliques sont conformes aux instructions
d'installation.
• Retirez les éléments en polystyrène et tout autre
élément figurant dans le tambour.
• Effectuez un premier cycle de lavage à vide à
90 °C, avec lessive pour nettoyer le réservoir
d'eau.
Utilisation Quotidienne
Chargement du linge
• Ouvrez le couvercle de
l'appareil.
• Ouvrez le tambour en
appuyant sur la touche
A : les deux portillons
s'ouvrent automati-
quement.
• Chargez le linge, puis
fermez le tambour et le
couvercle de votre lave-linge.
Avertissement Avant de fermer le couvercle de
l'appareil, vérifiez que le tambour a été correctement
fermé :
• une fois que les deux portillons sont fermés,
• la touche A est libérée.
A
Quantité de produit de lavage
Verser la quantité de poudre à laver dans les comparti-
ments lavage
et prélavage si vous avez sélection-
né l'option « Prélavage ». Verser l'assouplissant textile
dans le compartiment
et l'eau de Javel dans le com-
partiment
si nécessaire (disponibles avec les pro-
grammes Coton sans prélavage).
Sélection du programme souhaité
Tournez le sélecteur de programmes sur le programme
choisi. La touche « Départ/Pause » clignote en vert.
Si vous tournez le sélecteur de programmes pour choisir
un autre programme alors qu'un cycle est en cours, le la-
ve-linge ne prend pas en compte le nouveau programme
sélectionné. « Err » clignote et la touche « Départ/Pau-
se » clignote en rouge pendant quelques secondes.
26

Choix de la vitesse d'essorage
Appuyez sur la touche « Essorage » pour modifier la vi-
tesse d’essorage, si vous souhaitez que votre linge soit
essoré à une vitesse différente de celle proposée par l'ap-
pareil. Vous pouvez également sélectionner « Arrêt cuve
pleine » .
Arrêt cuve pleine
En choisissant cette option, l’eau du dernier rinçage n’est
pas évacuée pour éviter le froissage du linge.
Reportez-vous au chapitre « Programmes de lavage » afin
de connaître les vitesses d’essorage maximales.
À la fin du programme, si vous avez sélectionné « Arrêt
cuve pleine », alors il vous faut sélectionner un program-
me d'« Essorage » ou de « Vidange » afin de terminer le
cycle et de vidanger l'eau.
Choix des options
Vous devez sélectionner les différentes options après la
sélection d'un programme et avant d'appuyer sur la tou-
che « Départ/Pause » (reportez-vous au « Tableau des
programmes »). Appuyez sur les touches souhaitées : les
voyants correspondants s'allument. Si vous appuyez une
deuxième fois, les voyants s'éteignent. Si aucune des op-
tions n'est compatible avec le programme sélectionné,
« Err » clignote sur l'écran et la touche « Départ/Pause »
clignote en rouge.
Option « Prélavage »
L'appareil effectue un prélavage à une température maxi-
male de 30 °C.
Option « Rapide »
La durée de lavage est réduite, en fonction du programme
sélectionné.
"Option « Rinçage plus »
Un ou plusieurs rinçages sont ajoutés au cours du cycle.
Cette option est recommandée pour les personnes à la
peau sensible et dans les régions où l'eau ne présente pas
un niveau élevé de dureté.
« Départ différé »
Cette option vous permet de retarder le départ d'un pro-
gramme de lavage de 30, 60, 90 minutes ou bien entre
2 heures et 20 heures. La durée sélectionnée reste affichée
pendant quelques secondes.
Vous pouvez modifier ou annuler le départ différé à tout
moment avant d'appuyer sur la touche « Départ/Pause »,
en appuyant à nouveau sur la touche « Départ différé » (
’ indique un départ immédiat)
Si vous avez déjà appuyé sur la touche « Départ/Pause »
et que vous souhaitiez modifier ou annuler le départ diffé-
ré, procédez comme suit :
• pour annuler le départ différé et lancer le cycle immé-
diatement, appuyez sur « Départ/Pause » puis sur
« Départ différé ». Appuyez sur la touche « Départ/
Pause » pour lancer le cycle.
• Pour modifier le délai du départ différé, vous devez re-
passer par la position « Arrêt »
et reprogrammer
votre cycle.
Le couvercle est verrouillé pendant le temps du départ dif-
féré. Si vous devez l'ouvrir, vous devez tout d'abord mettre
l'appareil en pause en appuyant sur la touche « Départ/
Pause ». Après avoir fermé à nouveau le couvercle, ap-
puyez sur la touche « Départ/Pause ».
Départ du programme
Appuyez sur la touche « Départ/Pause » pour lancer le
cycle ; le voyant correspondant s'allume en vert et le voy-
ant « Verrouillage couvercle » s'allume.
Il est normal que le sélecteur de programmes demeure
immobile pendant le cycle. Le temps restant s'affiche. Si
un départ différé a été sélectionné, le décompte s'affiche.
Interruption d'un programme
Ajout de linge pendant les 10 premières minutes
Quand « Verrouillage couvercle » s'éteint, vous pouvez
ajouter le linge en procédant comme suit. Appuyez sur la
touche « Départ/Pause » : le voyant correspondant cli-
gnote en vert pendant que l'appareil est en mode Pause.
Le couvercle ne peut être ouvert qu'environ 2 minutes
après l'arrêt du lave-linge. Appuyez à nouveau sur la tou-
che « Départ/Pause » pour continuer le programme.
Modification du programme en cours d'exécution
Avant d'effectuer toute modification du programme en
cours, vous devez mettre le lave-linge en mode Pause en
appuyant sur la touche « Départ/Pause ». Si cette modifi-
cation est impossible, « Err » clignote sur l'écran et la
touche « Départ/Pause » clignote en rouge pendant quel-
ques secondes. Si vous souhaitez malgré tout modifier le
programme, vous devez préalablement annuler le pro-
gramme en cours (voir ci-après).
Annulation du programme
Si vous souhaitez annuler un programme, tournez le sé-
lecteur de programmes sur la position « Arrêt »
.
Fin du programme
Le lave-linge se met à l'arrêt automatiquement ; la touche
« Départ/Pause » et
clignote sur l'écran. Le couvercle
27

ne peut être ouvert qu'environ 2 minutes après l'arrêt du
lave-linge. Le voyant « Verrouillage couvercle » est
éteint. Tournez le sélecteur de programmes sur la position
« Arrêt » . Retirez le linge. Débranchez et fermez le ro-
binet d'arrivée d'eau.
Mode Veille : une fois le programme terminé, le système
d'économie d'énergie s'active au bout de quelques minu-
tes. La luminosité de l'écran est réduite. Pour sortir du
mode d'économie d'énergie, il suffit d'appuyer sur n'im-
porte quelle touche de l'appareil.
Programmes de lavage
Programme / Type de lavage Charge Options disponibles
Cotons (30° - 90°) : Blanc ou couleur, notam-
ment les vêtements de travail, le linge de lit, le linge
de table, le linge de corps et les serviettes de toilette
normalement sales.
Vitesse d'essorage max. : 1200 tr/min
5,0 kg Arrêt cuve pleine, Prélavage, Rapide , Rinça-
ge plus , Départ différé
Coton Éco (40° - 60°) : Blanc ou couleur, notam-
ment les vêtements de travail, le linge de lit, le linge
de table, le linge de corps et les serviettes de toilette
normalement sales.
Vitesse d'essorage max. : 1200 tr/min
5,0 kg Arrêt cuve pleine, Prélavage, Rinçage plus ,
Départ différé
Synthétiques (30° - 60°) : Synthétiques, linge de
corps, tissus couleur, chemises sans repassage, che-
misiers.
Vitesse d'essorage max. : 900 tr/min
2,5 kg Arrêt cuve pleine, Prélavage, Rapide , Rinça-
ge plus , Départ différé
Synthétiques Éco (40°) : Synthétiques, linge de
corps, tissus couleur, chemises sans repassage, che-
misiers.
Vitesse d'essorage max. : 900 tr/min
2,5 kg Arrêt cuve pleine, Prélavage, Rinçage plus ,
Départ différé
Tissus délicats (30 ° - 40 °) : Pour tous les tissus
délicats, par exemple les rideaux.
Vitesse d'essorage max. : 700 tr/min
2,5 kg Arrêt cuve pleine, Prélavage, Rapide , Rinça-
ge plus , Départ différé
Lavage à la main (froid - 40°) : Pour les tissus
très délicats portant une étiquette « lavage à la
main ».
Vitesse d'essorage max. : 900 tr/min
1,0 kg Arrêt cuve pleine, Départ différé
Trempage (30 °)
1)
: Trempage des vêtements très sa-
les. Le tambour s'arrête avec la cuve pleine d'eau.
5,0 kg Départ différé
Rinçages : Ce programme permet de rincer les arti-
cles lavés à la main.
Vitesse d'essorage max. : 1200 tr/min
5,0 kg Arrêt cuve pleine, Rinçage plus , Départ dif-
féré
Vidange : Exécute un cycle à vide après l'option Arrêt
cuve pleine.
5,0 kg
Essorage : Un cycle d'essorage de 500 à 1200 après
l'option Arrêt cuve pleine.
5,0 kg Départ différé
28

Programme / Type de lavage Charge Options disponibles
Mini 30 (30°) : Idéal pour le linge qui a seulement
besoin d'être rafraîchi.
Vitesse d'essorage max. : 700 tr/min
2,5 kg Départ différé
1) Mettez le produit de lavage dans le compartiment indiqué par .
Entretien et nettoyage
Débranchez l’appareil avant de le nettoyer.
Détartrage de l’appareil
Pour détartrer l'appareil, utilisez un produit non corrosif
conçu pour les lave-linge. Lisez attentivement l'étiquette
(quantités recommandées et fréquence du détartrage).
Parois extérieures
Pour nettoyer les parois extérieures de l'appareil, utilisez
de l'eau chaude savonneuse. N'utilisez jamais d'alcool, de
produits abrasifs ou caustiques.
Réservoir
Pour le nettoyage, procédez comme suit :
Collecteur d'objets
Nettoyez régulièrement le collecteur d'objets qui est situé
dans le fond du tambour :
1
2
4
3
6
5
CLACK
CLACK
8
7
Vérifiez si le filtre est cor-
rectement inséré avant de
refermer la trappe en tirant
vers le haut ou le bas sur
la partie centrale.
Filtres de l'arrivée d'eau
Pour le nettoyage, procédez comme suit :
29

Problèmes de fonctionnement
De nombreux contrôles ont été effectués sur l'appareil
avant le départ de l'usine. Toutefois, en cas de dysfonc-
tionnement, reportez-vous aux paragraphes ci-dessous
avant de contacter le service après-vente.
Problèmes Causes
L'appareil ne démarre pas ou
ne se remplit pas :
• l'appareil n'est pas branché correctement, l'installation électrique ne fonctionne
pas, une panne de courant s'est produite,
• le couvercle et le tambour de l'appareil ne sont pas fermés correctement,
• la commande de départ programme n'a pas été correctement sélectionnée,
• l'arrivée d'eau a été coupée, le robinet d'arrivée d'eau est fermé,
• les filtres d'arrivée d'eau sont encrassés (reportez-vous au paragraphe « Entretien
et nettoyage »).
L'appareil se remplit d'eau
mais vidange immédiate-
ment :
• la pièce de vidange en forme de U est fixée trop bas (reportez-vous au chapitre
« Installation »).
L'appareil ne rince pas ou ne
se vide pas :
• le tuyau de vidange est bloqué ou déformé,
• le filtre de vidange est obstrué (reportez-vous au chapitre « Entretien et nettoya-
ge »),
• la sécurité anti-balourd a été activée : le linge n'est pas réparti de façon uniforme
dans le tambour,
• le programme de « vidange » ou les options « Nuit Silence Plus » ou « Arrêt cuve
pleine » ont été sélectionnés,
• la taille (hauteur) de la pièce de vidange en forme de U est inappropriée.
L'appareil n'essore pas : • problème d'équilibrage de la charge de linge : ajoutez du linge ou répartissez ma-
nuellement les articles dans le tambour.
Il y a de l'eau autour de l'ap-
pareil :
• une trop grande quantité de lessive a entraîné un débordement de mousse,
• la lessive utilisée n'est pas adaptée au lavage en machine,
• la pièce de vidange en forme de U n'est pas correctement fixée,
• le tuyau d'arrivée d'eau fuit.
Les résultats du lavage ne
sont pas satisfaisants :
• la lessive utilisée n'est pas adaptée au lavage en machine,
• vous avez introduit trop de linge dans le tambour,
• le cycle de lavage sélectionné n'est pas approprié,
• la quantité de lessive est insuffisante.
30

Problèmes Causes
L'appareil vibre bruyam-
ment :
• vous n'avez pas retiré tout l'emballage de l'appareil (reportez-vous au chapitre
« Installation »),
• l'appareil n'est pas à niveau et est déséquilibré (reportez-vous au chapitre « Instal-
lation »),
• l'appareil est installé trop près du mur ou d'un meuble,
• le linge n'est pas réparti de façon uniforme dans le tambour, la charge est trop
faible,
• l'appareil est neuf, le bruit va disparaître progressivement.
Le cycle de lavage est beau-
coup trop long :
• les filtres d'arrivée d'eau sont encrassés (reportez-vous au paragraphe « Entretien
et nettoyage »),
• l'alimentation électrique ou l'arrivée d'eau ont été coupées,
• le détecteur de surchauffe du moteur a été activé,
• la température d'arrivée d'eau est inférieure à la normale,
• le système de sécurité de détection de mousse a été activé (trop de lessive) et le
lave-linge vidange l'excès de mousse,
• la sécurité anti-balourd a été activée : une phase a été ajoutée pour mieux répartir
le linge dans le tambour.
L'appareil se met à l'arrêt au
cours d'un cycle de lavage :
• l'alimentation électrique ou l'arrivée d'eau sont défectueuses,
• l'option « Arrêt cuve pleine » a été sélectionnée,
• le tambour est ouvert.
Le couvercle ne s'ouvre pas
en fin de cycle
• la température à l'intérieur du tambour est trop élevée,
• le couvercle se déverrouille 1 à 2 minutes après la fin du cycle.
Le code d'erreur s'af-
fiche
1)
et la touche « Départ/
Pause » clignote en rouge.
2)
:
• le couvercle n'est pas correctement fermé.
Le code d'erreur s'af-
fiche
1)
et la touche « Départ/
Pause » clignote en rouge
2)
:
• le collecteur d'objets est obstrué,
• le tuyau de vidange est bloqué ou déformé,
• le tuyau de vidange est fixé trop haut (reportez-vous au chapitre « Installation »),
• la pompe de vidange est bloquée,
• les tuyaux d'évacuation sont bloqués.
Le code d'erreur s'affi-
che
1)
et la touche « Départ/
Pause » clignote en rouge
2)
:
• le robinet d'arrivée d'eau est fermé,
• l'arrivée d'eau a été fermée.
31

Problèmes Causes
Le code d'erreur s'af-
fiche
1)
et la touche « Départ/
Pause » clignote en rouge
2)
:
• le collecteur d'objets est obstrué,
• le système de sécurité anti-débordement a été activé ; dans ce cas, procédez com-
me suit :
- fermez le robinet d'arrivée d'eau,
- videz l'appareil et attendez 2 minutes avant de le débrancher,
- contactez votre service après-vente.
La pompe de vidange fonc-
tionne de façon constante,
même lorsque l'appareil est
inactif :
• le système de sécurité anti-débordement a été activé ; dans ce cas, procédez com-
me suit :
- fermez le robinet d'arrivée d'eau,
- videz l'appareil et attendez 2 minutes avant de le débrancher,
- contactez votre service après-vente.
L'assouplissant s'écoule di-
rectement dans le tambour
lorsque vous remplissez le
réservoir correspondant :
• vous avez dépassé la quantité maximale représentée par l'indicateur MAX.
1) Sur certains modèles, des signaux sonores peuvent retentir
2) Après la résolution du problème, appuyez sur la touche « Départ/Pause » pour relancer le programme interrompu.
Produits de lavage et additifs
Veillez à utiliser uniquement des produits de lavage et des
additifs conçus pour les lave-linge. Le mélange de diffé-
rents types de produits de lavage n'est pas recommandé.
Cela risquerait d'endommager le linge. L'utilisation de
produits de lavage en poudre ne fait l'objet d'aucune res-
triction. Les produits de lavage liquides ne doivent pas
être utilisés lorsqu'un programme de prélavage a été sé-
lectionné. Pour les cycles sans prélavage, versez le pro-
duit de lavage liquide directement dans le tambour ou uti-
lisez une doseuse spéciale (fournie par le fabricant du
produit de lavage). Les tablettes ou doses de produits de
lavage doivent être placées dans la boîte à produits de
l'appareil.
Caractéristiques techniques
DIMENSIONS Hauteur
Largeur
Profondeur
850 mm
400 mm
600 mm
TENSION DE LIGNE/FRÉQUENCE
CONSOMMATION ÉLECTRIQUE
230 V / 50 Hz
2 300 W
PRESSION DE L'EAU Minimale
Maximale
0,05 MPa (0,5 bars)
0,8 MPa (8 bars)
Connexion à l'arrivée d'eau Type 20/27
32

Valeurs de consommation
Programme
1)
Consommation d'énergie (KWh)
2)
Consommation d'eau (li-
tres)
2)
Coton blanc 90 °C 2.05 64
Coton 60 °C 1.2 58
Coton 40 °C 0.8 58
Synthétiques 40 °C 0.65 48
Délicats 30 °C 0.3 48
Laine 30 °C 0.4 48
Lavage à la main 30 °C 0.4 48
1) Consultez l'écran pour la durée du programme.
2) Les informations relatives à la consommation présentées dans ce tableau sont indicatives. Elles peuvent varier en fonction de la
quantité et du type de linge, de la température de l'alimentation en eau et de la température ambiante.
Programmes standards pour les valeurs de consommation
de l'étiquette énergétique
Les programmes Coton 60 °C ÉCO et Coton 40 °C ÉCO
sont les programmes coton standards pour le linge en co-
ton normalement sale. Ils sont adaptés au nettoyage du
linge en coton normalement sale et sont les programmes
les plus efficaces en terme de consommation d'eau et
d'énergie pour le lavage de ce type de linge en coton.
Ils sont conformes à la norme EN60456.
La température réelle de l'eau peut être différente de
la température du cycle indiquée.
Installation
Avant la première utilisation, retirez tous les emballages
utilisés pour le transport. Conservez-les en cas de dépla-
cement ultérieur. En effet, le transport d'un appareil non
sécurisé risque d'endommager les composants internes et
d'entraîner fuites et mauvais fonctionnements. Le contact
physique peut également entraîner une déterioration de
l'appareil.
Déballage
2
1
1
2
Mise à niveau
AB
D
C
A
33

1
2
B
2
1
B
D
Conservez les boulons de
transport, ils devront être
remontés pour tout autre
transport de l'appareil.
Pour que l'appareil soit
aligné aux meubles voi-
sins, découpez ces pièces
en plastique.
Arrivée d'eau
90
O
90
O
90
O
Si cela est nécessaire, dé-
placez le tuyau d'arrivée
dans le sens indiqué sur
l'image. À cet effet, des-
serrez la bague de serrage
et positionnez le tuyau
d'arrivée vers le bas com-
me illustré sur l'image.
Resserrez la bague et as-
surez-vous qu'il n'y a au-
cune fuite.
Ouvrez le robinet d'arrivée
d'eau. Assurez-vous de
l'absence de fuite. Le
tuyau d'arrivée d'eau ne
peut pas être rallongé. S'il
est trop court, contactez
votre service après-vente.
Vidange
Fixez la pièce de vidange (U)
sur le tuyau de vidange. Re-
groupez les différents élé-
ments au sein d'un point de
vidange, à une hauteur com-
prise entre 70 et 100 cm. Vé-
rifiez qu'il est correctement
positionné. L'air doit pouvoir
pénétrer au bout du tuyau,
afin d'éviter tout risque de siphonage.
Le tuyau de vidange ne doit pas être plié. S'il est trop
court, contactez un professionnel spécialisé.
Branchement électrique
Ce lave-linge ne doit être branché que sur une prise 230 V
monophasée. Vérifiez la taille du fusible : 13 A/230 V.
L'appareil ne doit pas être branché à l'aide d'une rallonge
ou d'une prise multiple. Vérifiez que la prise a été mise à
la terre conformément à la réglementation en vigueur.
Emplacement
Placez l'appareil sur une surface plane et dure dans un
endroit bien ventilé. Veillez à ce que l'appareil ne soit pas
en contact avec le mur ou avec d'autres meubles. Une mi-
se à niveau précise permet d'éviter les vibrations, le bruit
et empêche l'appareil de se déplacer au cours de son
fonctionnement.
max
100 cm
min
70 cm
34

Environnement
Mise au rebut de l'appareil
Tous les matériaux marqués par le symbole
sont recyclables. Pour leur mise au rebut, déposez-
les sur un site de collecte et de recyclage de déchets (pour
en connaître l'adresse, contactez votre mairie). Lorsque
vous mettez au rebut l'appareil, retirez tous les compo-
sants qui risqueraient d'être dangereux ; sectionnez le câ-
ble d'alimentation situé à la base de l'appareil.
Le symbole
qui figure sur le produit ou son emballage
indique que ce produit ne peut être traité comme déchet
ménager. Il doit être remis à un point de collecte et de re-
cyclage du matériel électrique et électronique. En élimi-
nant l'appareil comme il se doit, l'utilisateur contribue à
atténuer les conséquences négatives qu'une mauvaise
gestion des déchets de ce produit peut avoir sur l'environ-
nement et la santé. Pour obtenir plus de détails sur le re-
cyclage de ce produit, veuillez prendre contact avec les
services de votre commune ou le magasin où vous avez
effectué l'achat.
Protection de l’environnement
Pour économiser de l'eau et de l'énergie (et donc
contribuer à protéger l'environnement), nous vous
recommandons :
• d'utiliser l'appareil à sa capacité maximale dans la me-
sure du possible, et d'éviter les charges partielles ;
• de réserver les programmes Prélavage et Trempage aux
vêtements extrêmement sales ;
• d'utiliser la quantité de détergent appropriée à la dureté
de l'eau, à la charge et au niveau de saleté des vête-
ments.
35

www.zanussi.com/shop
192990591-A-192011
-
 1
1
-
 2
2
-
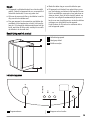 3
3
-
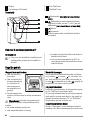 4
4
-
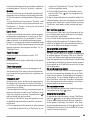 5
5
-
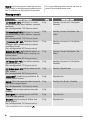 6
6
-
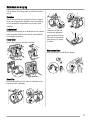 7
7
-
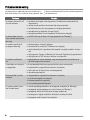 8
8
-
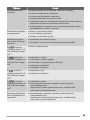 9
9
-
 10
10
-
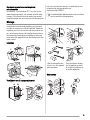 11
11
-
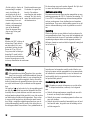 12
12
-
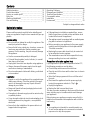 13
13
-
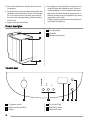 14
14
-
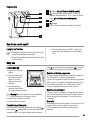 15
15
-
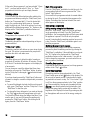 16
16
-
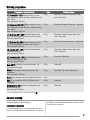 17
17
-
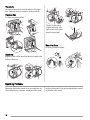 18
18
-
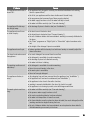 19
19
-
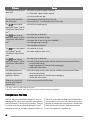 20
20
-
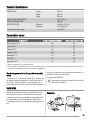 21
21
-
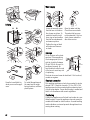 22
22
-
 23
23
-
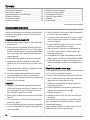 24
24
-
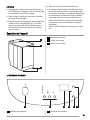 25
25
-
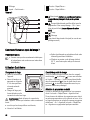 26
26
-
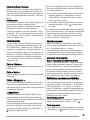 27
27
-
 28
28
-
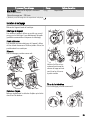 29
29
-
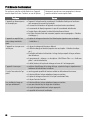 30
30
-
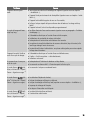 31
31
-
 32
32
-
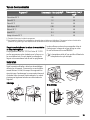 33
33
-
 34
34
-
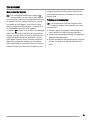 35
35
-
 36
36


in andere talen
- English: Zanussi ZWY2120 User manual
- français: Zanussi ZWY2120 Manuel utilisateur