
FR
GUIDE
D’INS
T
ALL
A
TION
ET
D’UTILISATION
GB
GUIDE
T
O
INS
T
ALL
A
TION
AND
USE
DE
EINRICHTUNGS- UND BENUTZUNGSFÜHRER
NL GIDS VAN INSTALLATIE EN GEBRUIK
Wok à induction
Induktion Wok
Induction WOK
Wok aan inductie

FR 02
GB 14
DE 26
NL 38
Chère
Cliente,
Cher
Client,
Vous
venez
d'acquérir
une
table
DE
DIETRICH
et
nous
vous
en
remer
cions.
Afin
de
vous
offrir
un
produit
d'excellence,
nos
équipes
de
recherche
ont
conçu
pour
vous
cette
nouvelle
génération
d'appareils,
qui
par
leur
qua
lité,
leur
esthétique,
leurs
fonctions
et
leurs
évolutions
technologiques
en
font
des
produits
d'exception,
révélateurs
de
notre
savoir-faire.
Vous
trouverez
également
dans
la
gamme
des
produits
DE
DIETRICH,
un
vaste
choix
de
fours,
de
fours
à
micro-ondes, de
hottes
aspirantes,
de lave-vaisselle,
et
de
réfrigérateurs
intégrables,
que
vous
pourrez
coordon
ner
à
votre
nouvelle
table
DE
DIETRICH.
Bien
entendu,
dans
un
souci
permanent
de
satisfaire
le
mieux
possible
vos exigences
vis
à
vis
de
nos
produits, notre
service
consommateurs
est
à
votre disposition
sur
notre site
DE
DIETRICH
Objets
de
valeur depuis 1864
Dans
le souci
d‟une
amélioration
constante
de
nos
produits,
nous
nous
réservons
le
droit
D‟apporter
à
leurs
caractéristiques
techniques,
fonctionnelles
ou
esthétiques
toutes
modifi
cations
liées
à
l‟évolution
technique.
Important
A
va
n
t
d
‟
i
n
s
t
a
ll
e
r
e
t
d
‟
u
t
ilis
e
r
v
o
t
r
e
a
pp
a
r
e
il
,
ve
u
ill
e
z
li
r
e
a
tt
e
n
t
i
ve
m
e
n
t
c
e
g
u
i
d
e
d
‟
i
n
s
t
a
ll
a
t
i
o
n
e
t
d
‟
u
t
ilis
a
t
i
o
n
q
u
i
v
o
u
s
p
e
r
m
e
tt
r
a
d
e
v
o
u
s
f
a
mili
a
r
is
e
r
t
r
è
s
r
a
p
i
d
e
m
e
n
t
ave
c
s
o
n
f
o
n
c
t
i
o
nn
e
m
e
n
t
.
2
www.dedietrich-electromenager.com

SOMMAIRE FR
INSTALLATION DE VOTRE APPAREIL ............................................................... 4
• Encastrement ............................................................................................... 4
• Attention ....................................................................................................... 4
• Branchement ............................................................................................... 5
• Principe de l‟induction ................................................................................. 6
• Les récipients ............................................................................................... 6
UTILISATION DE VOTRE APPAREIL ................................................................... 7
• Description de votre dessus. ...................................................................... 7
• Touches de réglage ..................................................................................... 7
• Touches sensitives ...................................................................................... 8
• Indicateur de chaleur résiduelle ................................................................. 8
• Ventilation .................................................................................................... 8
• Détection de récipient ................................................................................. 8
• Fonction Booster ......................................................................................... 9
• Fonction Minuterie ...................................................................................... 9
• Verrouillage de la commande ..................................................................... 9
• Limiteur de température ........................................................................... 10
• Auto-Stop system ....................................................................................... 10
• Protection en cas de débordement ...................................................... 10
• Sécurité “petits objets” ............................................................................. 10
• Pour les utilisateurs de stimulateurs cardiaques et implants actifs. .... 10
ENTRETIEN COURANT DE VOTRE APPAREIL ................................................. 11
• Préserver votre appareil ............................................................................ 11
• Entretenir votre appareil ........................................................................... 11
MESSAGES PARTICULIERS, INCIDENTS ........................................................ 12
SERVICE APRES-VENTE ET RELATIONS CONSOMMATEURS ....................... 13
• Interventions .............................................................................................. 13
• Relations consommateurs ........................................................................ 13
3

FR 1 / INSTALLATION DE VOTRE APPAREIL
JHG .............
Comme
le
montre
ce
logo,
les
mat
ériaux
d'emballag
e
de
ce
t
appareil
sont
recy
cla
bles.
Pa
r
ticipez
à
leur
recyclag
e
e
t
contr
ibuez
ainsi
à
la
pr
o
t
ection
de
l'en
vir
onne
ment
en
les
déposant
dans
les
cont
eneurs
municipaux
pré
vus
à
ce
t
effe
t.
Le
recyclag
e
des
appareils
q
u'organise
v
otre
fabricant
sera
ainsi
réalisé
dans
les
meilleures
conditions,
conf
or
mément
à
la
directiv
e
eur
opéenne
2002/96/CE
sur
les
déche
ts
d'éq
uipements
électr
iq
ues
e
t
électroniq
ues.
Ad
ressez
v
ous
à
v
otre
mairie
ou
à
v
otre
re
v
endeur
pour
connaître
les
points
de
collect
e
des
appareils
usag
és.
Encastrement
V
otre
table
de
cuisson
doit
être
ins
t
allée
de manière
à
ce
q
ue
la
f
i
che
de
pr
ise
de
courant
soit
accessible.
La
distance
entre
le
bor
d
de
v
otre
table
e
t
le
mur
ou
cloison
doit
être
au
minimum
de
4
cm
.
V
otre
table
peut
être
encas
trée
sans
aucune
contraint
e
au
dessus
d‟un
meuble,
d‟un
f
our
ou
d‟un
appareil
électr
oménager
encastrable. Vérifiez
seulement
q
ue
les
entrées
d‟air
e
t
sor
ties
d‟air
soient
bien
dégag
ées.
Collez le joint mousse en dessous
de votre appareil. Il assurera ainsi
une bonne étanchéité avec le plan
de travail
Attention
- Cet appareil n'est pas prévu pour une utilisation de personnes (enfants y compris) ayant des
facultés physiques, sensorielles ou mentales réduites, ou un manque d'expérience et de
connaissance, à moins qu'ils aient reçu des explications concernant l'utilisation de l'appareil
par une personne chargée de leur sûreté.
- Les enfants doivent être informées pour s'assurer qu'ils ne jouent pas avec l'appareil.
- AVERTISSANT: Si la surface vitrée est fissurée, coupez l‟alimentation de l‟appareil pour éviter
la possibilité de décharge électrique.
- Les objets métalliques tels que des couteaux, des fourchettes, des cuillères et des
couvercles ne devraient pas être placé la surface vitrée puisqu'ils peuvent devenir chauds.
4
12cm

1 / INSTALLATION DE VOTRE APPAREIL FR
Branchement
V
otre
table
doit
être
branchée
sur
le
réseau
par
l‟int
ermédiaire
d‟une
pr
ise
de
courant
conf
or
me
à
la
publication
CEI
60083
ou
d‟un
dispositif
à
coupure
omnipolaire
conf
or
me
aux
règ
les
d‟ins
tallation
en
vigueur
.
A
la
mise
sous
t
ension
de
v
otre
table,
ou
après
une
coupure
de
courant
pr
olong
ée,
un
codag
e
lumineux
s‟af
f
iche.
Ces
inf
or
mations
disparaitr
ont
après
30
secondes.
•Branchement 220-240V ~
DTI1032X
Attention
Si
le
câble
est
endommagé,
il
doit
être
remplacé
par
le
fabricant,
son
service
après-v
ente
ou
une
personne
de
qualification
similaire.
Bleu
Vert / Jaune
N L
Neutre Phase Terre
16A
Marron
5

FR 1
/
INS
T
ALL
A
T
ION
D
E
V
OTRE
APP
AREIL
N
ous
av
ons
conçu
ce
tt
e
table
de
cuisson
pour
une
utilisation
par
des
particuliers
dans
un
lieu
d‟habitation.
Ce
tt
e
table
de
cuisson
des
tinée
e
xclusiv
ement
à
la
cuisson
des
boissons
e
t
denrées
alimentaires ne
contient
aucun
com
posant
à
base
d‟amiant
e.
Principe de l‟induction
Le
principe
de
l'induction
repose
sur
un
Phénomène
magnétiq
ue.
Lorsq
ue
v
ous
posez
v
otre
récipient
sur
Une zone
de
cuisson
e
t
q
ue
v
o
us
me
tt
ez
En
mar
che,
les
circuits
électroniq
ues
De
v
otre
table de
cuisson
pr
oduisent
des
Courants
"
induits”
dans
le
f
ond
du
Récipient
q
ui
élèv
ent
ins
t
anta
nément
Sa
t
e
mpérature.
Ce
tt
e
chaleur
es
t
alors
Transmise
aux
aliments.
Les récipients
Tous les récipients ne sont pas
compatibles avec l‟induction.
Les récipients doivent être parfaitement
adaptés à la forme du verre Wok.
Utiliser le récipient Wok fourni avec
l‟appareil.
-P
our
v
é
r
i
f
ier
si
v
otre
récipient
con
vient, posez-le
sur
une
zone
de
cuisson
en
puissance
4.
-
Si
l‟af
f
i
cheur
res
t
e
f
i
x
e,
v
otre
récipient
es
t
com
patible.
-
Si le symbole U apparait
v
otre
récipient
n
‟es
t
pas
compatible
av
ec
l‟induction.
A
-
Induct
eur
B
-
Circuit
électroniq
ue
C
-
Courants
induits
A
B
C
6
6

2 / UTILISATION DE VOTRE APPAREIL FR
Description de votre dessus.
Dim
e
n
s
i
o
n
s
H
o
r
s
t
o
u
t
(
L
x
l
)
DTI1032X
:
376 x 520 mm
D
é
c
o
u
p
e
E
n
c
a
s
t
r
e
m
e
n
t
(
L
‟
x
l
‟
)
DTI1032X
:
340
x
490 mm
Touches de réglage
Ces
t
ouches
perme
tt
ent
la mise sous-
tension, l
e
rég
lage
des
paramè
tres
de
puissance,
ainsi que la
minut
er
ie
pour
de
la table de cuisson.
La
t
ouche
A
,
permet de me
ttre
en marche
ou
arrêt
er
la
zone
de
cuisson Wok.
- A : Marche / Arrêt
- B
:
V
e
rr
ouillag
e
-
dé
v
e
rr
ouillag
e
- C
:
Touche sélection [+] / [-] pour la
Puissance et pour la minuterie
- D
:
Affichage
Puissance/Minuterie
- E :
Activation
de la minuterie
En
l‟absence
d‟un
récipient
sur
la
zone
sélectionnée,
v
os
rég
lages
s
‟ef
facer
ont
aut
omatiq
uement
au
bout
de
q
uelques
ins
t
ants.

FR 2
/
UTILISATION D
E
V
OTRE
APP
AREIL JHG
Touches sensitives :
Votre appareil est équipé de touches
sensitives permettant de commander les
différentes fonctions. Un effleurage de la
touche active leur fonctionnement. Cette
activation est validée par un voyant, un
affichage et/ou par un signal sonore.
N‟appuyez que sur une seule touche à la
fois.
Indicateur de chaleur résiduelle :
Lorsque le voyant « H » s‟affiche, cela
signifie que la zone de cuisson
correspondante est chaude (la zone de
cuisson est chauffée au contact de la
casserole).
Dans ce cas il y a danger de brûlures.
Ventilation :
Le ventilateur de refroidissement a un
fonctionnement entièrement automatique. Il
se met en route à petite vitesse dès que les
calories dégagées par l‟électronique
dépassent un certain seuil. La ventilation
enclenche sa seconde vitesse lorsque la
table de cuisson est utilisée intensivement.
Le ventilateur réduit sa vitesse et s‟arrête
automatiquement dès que le circuit
électronique est suffisamment refroidi.
Détection de récipient
La détection de récipient assure une
sécurité parfaite. L‟induction ne fonctionne
pas :
Lorsqu‟il n‟y a pas de récipient sur la zone
de cuisson ou lorsque ce récipient est
inadapté à l‟induction. Dans ce cas il est
impossible d‟augmenter la puissance et
dans l‟afficheur le symbole [ U ] apparaît.
Le [ U ] disparaît lorsqu‟une casserole est
posée sur le foyer de cuisson.
Si en cours de cuisson le récipient est
enlevé de la zone de cuisson, le
fonctionnement est interrompu. Dans
l‟afficheur le symbole [ U ] apparaît. Le [ U ]
Disparaît lorsque le récipient est remis sur
le foyer de cuisson. La cuisson reprend au
niveau de puissance sélectionnée au
préalable.
8

2 / UTILISATION DE VOTRE APPAREIL FR
Fonction Booster
La fonction booster [ P ] octroie un
renforcement de puissance à la zone de
cuisson.
Si cette fonction est activée, la zone de
cuisson fonctionne pendant 10 minutes
avec une puissance nettement plus élevée.
Le booster est conçu par exemple pour
faire chauffer rapidement de grandes
quantités d‟eau, ou pour griller de la
viande…
Enclencher la fonction booster :
En position [ 9 ] ré-appuyer sur [ + ], [ P ]
s‟affiche pendant 10 mn.
Arrêter la fonction booster :
En position [ P ] appuyer sur [ - ], [ 9 ]
s‟affiche.
Fonction Minuterie
Minuterie utilisée hors cuisson :
Cette fonction permet de chronométrer
un évènement sans réaliser de cuisson.
Mise en route de la table, appuyé sur [0/I]
Appuyer sur [ ] pour activer la minuterie
Réglez le temps avec les touches C.
A la fin de votre réglage le décompte
commence.
Nota :
Vous pouvez arrêter un décompte en
cours par un appui long sur la touche [ ]
Lorsque vous démarrez avec la touche [ - ]
l‟afficheur de la minuterie indique
directement [30] minutes et ensuite
diminue ce temps.
Le voyant de contrôle clignote, puis s‟éteint
après quelques secondes, la minuterie
démarre.
Minuterie utilisée lors de la cuisson :
Cette fonction permet de chronométrer
un évènement lors de la réalisation d‟une
cuisson.
Mise en route de la table, appuyé sur [0/I]
Appuyer sur [ + ] pour activer la zone de
cuisson Wok
Appuyer sur [ ] pour activer la minuterie
Réglez le temps avec les touches C.
A la fin de votre réglage le décompte
commence.
Nota :
Vous pouvez arrêter un décompte en
cours par un appui long sur la touche [ ]
Lorsque vous démarrez avec la touche [ - ]
l‟afficheur de la minuterie indique
directement [30] minutes et ensuite
diminue ce temps.
Arrêt automatique en fin de cuisson :
Dès que le temps de cuisson sélectionné
est écoulé la minuterie affiche en
clignotant [00] et un signal sonore retentit.
Le signal sonore et le clignotement
s‟arrêtent automatiquement au bout de 2
minutes.
Sinon pour stopper le son et le
clignotement il suffit d‟appuyer sur une
touche.
Verrouillage de la commande :
Cette table de cuisson est prévue avec 2
types de verrouillages :
- Verrouillage en position [ 0 ]
- Verrouillage en position cuisson
Verrouillage en position [ 0 ]
Mise en route de la table, appuyé sur [0/I]
Appuyer sur [ ] pour verrouiller la table
Ré-appuyer sur [ ] pour déverrouiller la
table
Verrouillage en position cuisson
Mise en route de la table, appuyé sur [0/I]
Sélectionner la puissance de [ 1 ] à [ 9 ]
ou [ P ]
Appuyer sur [ ] pour verrouiller la table
Ré-appuyer sur [ ] pour déverrouiller la
table
9

FR 2
/
UTILISATION D
E
V
OTRE
APP
AREIL JHG
Limiteur de température
La zone de cuisson est équipée d‟un
capteur de sécurité qui contrôle la
température du fond du récipient. En cas
d‟oubli d‟un récipient vide sur le foyer
allumé, il limitera automatiquement la
puissance afin de prévenir la
détérioration du récipient ou de la table.
Auto-Stop system
En cas d‟oubli d‟une cuisson en cours
et selon un temps prédéfini, cette
fonction de sécurité coupe
automatiquement votre table (de 1 à 10
heures suivant la puissance).
Protection en cas de débordement
En cas de débordement d‟un liquide,
d‟un objet métallique ou d‟un chiffon
mouillé posé sur les touches de
commande, la table s‟arrête et un bip est
émis. Nettoyez ou enlevez l‟objet, puis
relancez la cuisson.
Sécurité “petits objets”
Si vous posez un objet de petites
dimensions sur un foyer (une bague,
une fourchette, etc…), la table le détecte
et ne délivre pas de puissance.
Nota :
Cependant, plusieurs petits objets en
même temps sur une zone pourraient
être identifiés comme un récipient. La
puissance sera alors délivrée par la table.
N
e
pas
poser
d‟us
t
ensiles
(cuillère,
f
ourche
tt
e,
couv
ercle...)
sur
une
zone
De
cuisson
en
f
onctionnement,
ils
s
‟échaufferaient
en
même
t
e
m
ps
q
u
e
le
récipient
:
Risq
ue
de
brûlure.
Pour les utilisateurs de stimulateurs cardiaques et implants actifs.
Votre table de cuisson est conforme aux normes de perturbations électromagnétiques en
vigueur et répond ainsi parfaitement aux exigences légales (directives 89/336/CEE).
Pour qu‟il n‟y ait pas d‟interférences entre votre table de cuisson et un stimulateur
cardiaque, il faut que ce dernier soit conçu et réglé en conformité avec la réglementation
qui le concerne. Comme nous ne pouvons garantir que la conformité de notre produit,
nous vous recommandons vivement de vous renseigner auprès du fabricant ou de votre
médecin traitant pour éviter d‟éventuelles incompatibilités.
10
NE PAS UTILISER D‟ACCESSOIRES AMOVIBLES INTERMEDIAIRES POUR FAIRE
CHAUFFER DES CASSEROLES NON ADAPTEES A L‟INDUCTION.
RISQUES DE BRULURES ET DE DETERIORATION DE LA TABLE.

3 / ENTRETIEN COURANT DE VOTRE APPAREIL FR
Préserver votre appareil
La
sur
face
v
e
rr
e
vitr
océramiq
ue
es
t
très
résis
tant
e,
mais
t
out
ef
ois
pas
incassable.
V
oici q
uelques
recommandations
pour
augmenter
sa
durée
de
vie
:
-
Evitez
les
chocs
e
t
les
fr
o
tt
ements
de
réci
pients.
-
Evitez
de
poser
un
couvercle
chaud
à
plat sur
la
table.
U
n
effe
t
„‟
v
ent
ouse
‟‟
r
isq
ue
d‟en
dommag
er
le
dessus.
-
N‟utilisez
pas
les
récipients
av
ec
des
f
onds
r
ugueux
ou
bosselés.
-
N‟utilisez
jamais
de
papier
ou
barq
u
e
tt
e
alum
inium
pour
une
cuisson.
L
‟aluminium
f
o
n
drait
e
t
endommagerait
le
dessus.
-
N‟utilisez
jamais
de
ne
tt
o
y
eur
v
apeur
pour
l‟entretien
de
v
otre
table.
-
N
e
réchauffez
jamais
direct
ement
une
boit
e
de
conser
ve.
Elle
r
isq
uerait
d‟exploser
.
Les
défauts
es
thétiq
ues,
engendrés
par
une
mauvaise
utilisation
de
v
otre
table
e
t
q
ui
n
‟en
traînent
pas
un
non
f
onctionnement,
n
‟entrent
pas
dans
le
cadre
de
la
garantie.
Et
pour
plus
de
sécur
it
é
dans
v
otre
cuisine, ne
rangez
pas
v
os
pr
oduits
d‟entretien
ou
pr
oduits
inf
lammables
dans
le
meuble
situé sous
v
otre
table
de
cuisson.
Entretenir votre appareil
T
YP
ES
D
E
S
A
L
I
SSU
R
ES
U
T
I
L
I
SE
Z
CO
MM
E
N
T
P
ROC
É
D
E
R
?
Légères.
Epong
es
sanitaires.
Bien
détrem
pez
la
zone
à
ne
tt
o
y
er
av
ec
de l‟eau
chaude,
puis
essuy
ez.
A
ccumulation
de
salissures
recuit
es.
Débordements
sucrés,
plas
tiq
ues
f
ondus.
Epong
es
sanitaires.
Racloir
spécial
ve
rr
e
.
Bien
détrem
pez
la
zone
à
ne
tt
o
y
er
av
ec
de l‟eau
chaude,
utilisez
un
racloir
spécial
v
e
rr
e
pour
dég
r
ossir
,
f
inir
av
ec
le
cô
t
é
gr
at
t
oir
d‟une
épong
e
sanitaire,
puis
essuy
ez.
Auréoles
e
t
traces
de calcaire.
V
inaigre
d‟alcool
blanc.
Appliq
uez
du
vinaigre
d‟alcool
blanc
chaud sur
la
salissure,
laissé
agir
,
essuyez
av
ec
un
chif
f
on
doux.
Colorations
métalliques
br
illant
es.
Entre
tien
hebdomadaire.
Pr
oduit
spécial
v
e
rr
e
vitr
océrami
q
ue.
Appliq
uez
sur
la
sur
face
un
pr
oduit
spécial
v
e
rr
e
vitr
océramiq
ue,
de
préférence
com
por
tant
du
silicone
(ef
fe
t
pr
o
t
ect
eur).
épong
e
sanitaire
crème
spéciale
v
aisselle
délicat
e
poudre
épong
e
abrasiv
e
11

FR 4
/
MESSAGES PARTICULIERS, INCIDENTS
•A
la
mise
en
service
VOUS
CONSTATEZ
QUE
:
LES
CAUSES
POSSIBLES
:
QUE
FAUT-IL
FAIRE
:
Un
af
f
i
chag
e
lumineux
apparaît.
F
onctionnement
nor
mal.
Rien,
l‟af
f
i
chag
e
disparaît
au
bout
de
30
secondes.
V
otre
ins
t
allation
disjonct
e
.
Le
branchement
de
v
otre
table
es
t
défectueux.
Vér
if
iez
sa
confor
mit
é.
V
oir
chapitre
branchement.
La
table
dégag
e
une
odeur
lors
des
premières
cuissons.
Appareil
neuf.
Rien.
L
‟
odeur
va
disparaî
tre
après
q
uelques
utilisa
tions.
•A
la
mise
en
marche
VOUS
CONSTATEZ
QUE
:
LES
CAUSES
POSSIBLES
:
QUE
FAUT
-IL
FAIRE
:
La
table
ne
f
onctionne
pas
e
t
les
af
f
i
cheurs
lumineux
sur
le
cla
vier
res
t
ent
ét
eints.
L
‟appareil
n'es
t
pas
aliment
é.
L‟alimentation
ou
le
raccor
de
ment
électrique
es
t
défectueux.
Inspect
ez
les
fusibles
e
t
le
disjonct
eur
électr
iq
ue.
La
table
ne
f
onctionne
pas
e
t
un autre
messag
e
s‟af
f
iche.
Le
circuit
électroniq
ue
f
onc
tionne
mal.
F
ait
es
appel
au
Service
Après-
V
ent
e.
La
table
ne
f
onctionne
pas,
l‟in
f
o
rmation
L
s‟af
f
iche.
La
table
es
t
v
e
rr
ouillée
V
oir
chapitre
utilisation
sécur
it
é
enfant
•En
cours d'utilisation
VOUS
CONSTATEZ
QUE
:
LES
CAUSES
POSSIBLES
:
QUE
FAUT
-IL
FAIRE
:
La
table
s‟es
t
arrêt
ée
de
f
onc
tionner
e
t
elle
éme
t
un
“BIP”
.
Il
y
a
eu
un
débor
dement
ou
un
obje
t
encombre
le
clavier
de commande.
N
e
tt
o
y
ez
ou
enle
v
e
z
l‟
obje
t
e
t
relancez
la
cuisson.
Les
casseroles
f
ont
du
br
uit
lors
de
la
cuisson.
V
otre
table
éme
t
un
cliq
ue
tis
lors
de
la
cuisson.
N
o
rmal
av
ec
certains
types
de
récipient.
Cela
es
t
dû
au
passag
e
de
l‟énergie
de
la
table
ve
rs
le
réci
pient.
Rien.
Il
n„y
a
pas
de
ris-
q
ue,
ni
pour
v
otre
table
de
cuisson
ni
pour
v
otre
récipient.
La
v
entilation
continue
q
uel
q
ues
minut
es
après
l'arrêt
de
v
otre
table.
Refr
oidissement
de
l‟électr
oni
q
ue.
F
onctionnement
nor
mal.
Rien.
En
cas
de
cassure,
fêlure
ou
fissure
même
légère
du
verre
vitrocéramique, et avant
toute intervention
enlevez
les
fusibles
ou
actionnez
le disjoncteur
alimentant
votre
table
pour
éviter
un
risque
de
choc
électrique.
Contactez
le
Service
Après-Vente.
12

SERVICE APRES-VENTE ET RELATIONS CONSOMMATEURS FR
INTERVENTIONS
Les
é
v
entuelles
int
e
r
v
entions
sur
v
otre
appa
reil
doivent
être
ef
fectuées
par
un
pr
ofessionnel
q
ualif
ié
dépositaire
de
la
marq
ue.
Lors
de
v
otre
appel,
mentionnez
la
référence
complèt
e
de
v
otre
appareil
(modèle,
type,
numér
o
de sér
ie).
Ces
renseignements
f
igurent
sur
la
pla
q
ue
signalétiq
ue.
PIÈCES
D‟ORIGINE
Lors
d‟une
int
er
v
e
ntion
d‟entre
tien,
deman
dez
l'utilisation
e
xclusiv
e
de
pièces
déta
chées
certifiées d‟origine.
RELATIONS CONSOMMATEURS
•Pour
en
savoir
plus
sur
tous
les
produits
de
la
marque
:
Informations,
conseils,
les
points
de
v
ent
e,
les spécialis
t
es
après-v
ent
e.
•Pour
communiquer
:
Nous
sommes
à
l'écout
e
de
t
out
es
v
os
remar
q
ues,
sugg
es
tions,
pr
opositions
aux
q
uelles
nous
v
ous
répondr
ons
personnellement.
>
Vous
pouvez
nous
écrire
:
Service
Consommateurs
De
Dietrich
BP
9526
95069
CERGY
PONTOISE
CEDEX
>
ou
nous
téléphoner
au
:
13

FR 02
GB 14
DE 26
NL 38
Dear
Customer,
You
have
just
acquired
a
DE
DIETRICH
hob
and
we
would
like
to
thank
you.
In
order
to
offer
you
an
excellent
product, our
research
teams
have
created
this
new
generation
of
appliances
for
you.
Their
quality,
appearance,
functions
and
technological
advances
make
them
exceptional
products,
showcases
of our
unique
know-how.
In
the
line
of
DE
DIETRICH
products,
you
will
also
find
a
wide
range
of
ovens,
microwaves,
ventilation
hoods,
hoods,
dishwashers,
and
refrigera
tors, all of
which
can
be
integrated
and
all of
which
can
be
coordinated with
your
new
DE
DIETRICH
hob.
Of
course,
in
our
ongoing
desire
to
ensure
our products
satisfy
your
needs
in
the
best possible
way,
our
customer
service
department
is
always
at your
disposal
at
our
site.
DE
DIETRICH
Setting
New
Values
We
are
constantly
improving
our products; for this
reason
we
reserve
the
right
to
make
all
Modifications
to
their
technical,
functional
or
aesthetic
characteristics, originating
from
tech
nical
developments.
Warning
This
product is not
foreseen
for
sale
in
the
USA
Before
installing
and
using
your
appliance
please
read
this installation
and
use
the
guide
carefully
-
it
will
help
you
familiarise
yourself
very
rapidly with
its
operation.
www.dedietrich-electromenager.com
14

CONTENT
S
GB
INSTALLING YOUR APPLIANCE ....................................................................... 16
• Installation ................................................................................................. 16
• Caution ....................................................................................................... 16
• Connection ................................................................................................. 17
• The induction principle .............................................................................. 18
• Cookware ................................................................................................... 18
USING YOUR APPLIANCE ................................................................................ 19
• Description of your top. ............................................................................. 19
• Adjustment of touch controls ................................................................... 19
• Sensitive keys ............................................................................................ 20
• Residual heat ............................................................................................. 20
• Ventilator .................................................................................................... 20
• Recipient detection ................................................................................... 20
• Booster function ........................................................................................ 21
• Timer function ............................................................................................ 21
• Lock-down systems ................................................................................... 21
• Temperature limiter ................................................................................... 22
• Auto-stop system ....................................................................................... 22
• Protection against overflow ...................................................................... 22
• Safety for “small items” ............................................................................ 22
• For users of pacemakers and active implants. ....................................... 22
MAINTAINING YOUR APPLIANCE .................................................................... 23
• Preserve your appliance ............................................................................ 23
• Maintaining your appliance ...................................................................... 23
SPECIAL MESSAGES, DIFFICULTIES .............................................................. 24
AFTER-SALES SERVICE ................................................................................... 25
15

GB 1 / INSTALLING YOUR APPLIANCE
HG.........................
As
shown
in
this
logo,
the
mat
erials
used
t
o
packag
e
this
appliance
are
no
t
recy
cla
ble.
Recy
cle
them
and
pla
y
a
r
ole
in
pr
o
t
ecting
the
en
vironment
b
y
depositing
them in
municipal
containers
pr
o
vided
for
this
purpose.
Recy
cling
of
the
appliances
organised
b
y
y
our
manufacturer
will
thus
be
undertak
e
n
in
op
timum
conditions,
in
accor
dance
with
Eur
opean
directiv
e
2002/96/CE
relating
t
o
electrical
and
electr
onic
equipment
w
a
s
t
e.
Contact
y
our
local
authority
or
retailer
for
how
t
o
ha
ve
used
appliances
collect
ed
or
collection
points.
INSTALLATION
Y
our
appliance
should
be
positioned
so
that
the
mains
switch
is
accessible.
The
distance
between
the
edg
e
of
y
our
appliance
mus
t
be
at
leas
t
f
our
centime
tres
(area
A).
Y
our
appliance
can
be
easily
int
eg
rat
e
d
abo
v
e
a
cabine
t,
an
o
v
en
or
a
build-in
household
appliance.
Simply
v
e
rify
that
the
air
intak
es and
outle
ts
are
well
clear
.
Stick
the
f
oam
gask
e
t
t
o
the
bo
tt
om
of
y
our
appliance.
This
will
allow
y
ou
t
o
achie
v
e
an
air-
tight
seal
with
the
w
o
rkt
op.
A
t
tach
the
clips
t
o
the
hob.
CAUTION
- This appliance is not intended for use by persons (including children) with reduced physical,
sensory or mental capabilities, or lack of experience and knowledge, unless they have been given
supervision or instruction concerning use of the appliance by a person responsible for their
safety.
- Children should be supervised to ensure that they do not play with the appliance.
- WARNING: If the surface is cracked, switch off the appliance to avoid the possibility of
electric shock.
- Metallic objects such as knives, forks, spoons and lids should not be placed an the hob
surface since they can get hot.
16
12cm

1 / INSTALLING YOUR APPLIANCE GB
CONNECTION
These
hobs
mus
t
be
connect
ed
t
o
the
mains
using
a
sock
e
t
in
com
pliance
with
publication
CEI 60083
or
an
all-pole
circuit-break
er
device
in
com
pliance
with
the
ins
tallation
r
ules
in
f
o
rce.
When
power
is
f
i
rs
t
supplied
t
o
y
our
hob,
or
af
t
e
r
an
e
x
t
e
nded
power
cut,
an
indicat
or
light
will
appear
on
the
contr
ol
panel.
This
inf
or
mation
will
disappear
af
t
er
30
seconds.
•Connection 220-240V ~
DTI1032X
Warning
If
the
cable
is
damaged
it
must
be
replaced
by
the
manufacturer,
its
after-sales
service
or
a
person
with
a
similar qualification
to
prevent
danger.
Blue
green / yellow
N L
Neutre Phase Ground
16A
Chestnut
t
17

GB 1
/
INSTALLING YOUR APPLIANCE
W
e
ha
v
e
designed
this
cooking
hob
for
use
b
y
privat
e
individuals
in
their
homes.
These
cooking
hobs
are
int
ended
e
xclusiv
ely
f
o
r
cooking
be
v
e
rag
es
and
f
oods
tuf
fs
and
do
no
t
contain
any
asbes
t
os-based
mater
ials.
The induction principle
The principle of induction is based on a
Magnetic effect.
When you place your cookware on a
Cooking zone and you turn it on, the
electronic circuits in your cooking hob
produce “induced” currents in the bottom
of the cookware which instantly raise its
temperature. This heat is then transmitted
to the food
To help you choose, a list of cookware is
Provided with this guide.
Cookware
All cookware recipients are not
compatible with induction.
Recipients must be perfectly
adapted to the shape of the Wok
glass. To use the Wok recipient
provided with the apparatus:
- check if your recipient is
appropriate. Place it on a cooking
zone on power 4.
- If the control panel remains
unchanged, your recipient is
compatible.
- If the U symbol appears, your
recipient is not compatible with
induction.
A
–
Induct
ion plate
B
–
E
lectronic circuit
C
–
I
nduced currents
A
B
C
18

2 / USING YOUR APPLIANCE GB
Description of your top.
Total dimensions
(
L
x
l
)
DTI1032X
:
376 x 520 mm
Recess cut-out
(
L
‟
x
l
‟
)
DTI1032X
:
340
x
490 mm
Adjustment of touch controls
These keys allow power to flow, allow
the adjustment of the parameters of
power, as well as the programming of
the timer.
Key A, makes it possible to start or stop
the Wok cooking zone.
- A :
start / stop
- B
:
Lock - unlock
- C
: Touch selection [ + ]/[ - ] for the
power and the timer
- D
: Power / Timer Display
- E
: To activate the timer
If there is no cookware on the selected zone, your adjustments will delete
automatically after a few moments.

GB 2
/
USING YOUR APPLIANCE
JHG
Sensitive keys:
Your apparatus is equipped with sensitive
keys making it possible to programme
settings. To activate the keys, touch lightly.
An indicator will light up, and/or a beeping
sound will be heard, so indicating activation
of the keys.
Press only one key at a time.
Residual heat :
After a long cooking period, the zone used
can remain hot for several minutes. An „‟H‟‟
flashes during this period.
Do not put your hand on the zone – risk of
burning!
Ventilator :
The cooling ventilator is entirely automatic.
It will begin at low speed as soon as the
electronic calories consumed exceed a
certain limit. Ventilation engages its second
speed when the cooking surface is used
intensively.
The ventilator reduces its speed and stops
automatically as soon as the electronic
circuit is sufficiently cooled.
Recipient detection
The detection of a recipient ensures
absolute safety. Induction does not function:
When there is no pan or recipient on the
cooking zone or when a recipient is not
suited to induction. In this case it is
impossible to increase the power and the
symbol [ U ] appears on the screen. The [ U ]
symbol disappears if a suitable pan is
placed in the cooking zone.
If in the course of cooking the recipient is
removed from the cooking zone, heating
operation is interrupted. The symbol [ U ]
appears. The [ U ] symbol disappears when
the recipient is returned to the cooking
zone. Cooking resumes at the last
registered power level.
20

2 / USING YOUR APPLIANCE GB
Booster Function
The booster function [P] enables extra
power in the cooking zone. If this function
is activated, the cooking zone will function
for 10 minutes at a much more powerful
level.
The booster is designed to heat large
quantities of water or to cook meat, for
example.
To engage the booster function:
In position [ 9 ] push on the [ + ] button
again. A [ P ] appears for the next 10 mins.
To stop the booster function:
In position [ P ] push on the [ - ] button. A
[ 9 ] appears.
Timer function
Timer used outside cooking time:
This function makes it possible to time an
event without actually cooking. Start-up the
table, press [0/I], then press [ ] to
activate the timer.
Select the desired time by pressing the C
key.
Once programming has ended, the
countdown begins.
NB:
You can stop a programmed countdown in
progress by holding down the [ ] button
for a few seconds. If you start by pressing
the [ - ] key, the timer panel will indicate
[30 ] minutes and then decrease.
The control indicator flashes, then dies out
after a few seconds and the timer begins.
Timer used during cooking time:
Start up the table by pressing the [ 0/I ]
button. Press the [ + ] button to activate
the Wok cooking zone.
This function makes it possible to time an
event whilst cooking.
Press the [ ] button to activate the timer.
Set the time by pressing the C key.
Once programming has ended, countdown
begins.
NB:
You can stop a programmed countdown in
progress by pressing the [ ] key for a few
seconds.
If you start by pressing the [-] key, the timer
panel will indicate [30] minutes and then
decrease.
Automatic stop at the end of cooking:
Once selected cooking time has ended the
timer panel will indicate a flashing [ 00 ]
signal and a beeping sound will be heard.
The sound and flashing [OO] will
automatically stop after 2 minutes.
Should they fail to stop, press any key.
Lock-down systems:
This cooking surface is equipped with 2
types of lock-down systems:
- Lock-down in [ 0 ] mode
- Lock-down in cooking mode
Lock-down in [ 0 ] mode
Turn on the table by pressing on [ 0/I ]
button.
Press the [ ] symbol to lock-down the
table.
Press the [ ] symbol again to unlock the
table.
Lock-down in cooking mode
Turn on the table by pressing the [ 0/I ]
button.
Select the desired power by pressing the
buttons [ 1 ] to [ 9 ] or [ P ] . Press the [ ]
button to lock-down the table .
To unlock, press the [ ] button again.
21

GB 2
/
USING YOUR APPLIANCE
JHG
Temperature limiter
Each cooking zone is equipped with a
safety sensor that constantly monitors
the temperature of the bottom of the
cookware. If you leave empty cookware
on a zone which is turned on, it will
automatically limit the power in order to
prevent damage to the cookware or hob.
Auto-Stop system
If you forget cooking is in progress, after a
predefined time, this safety function will
automatically turn off your hob (from 1 to
10 hours depending on the power
setting).
Protection against overflow
In case of overflow, or of a metallic object
or wet cloth placed on the control areas,
the hob turns itself off, the displays light
up and a beeping sound can be heard.
Clean the hob or remove the object, then
begin cooking again.
Safety for “ small items”
If you place a small object on the area (a
ring, a fork, etc), the hob will detect it and
not deliver any power. The power display
flashes.
Note:
However, several small objects placed on
a zone at the same time may be
identified as cookware. In that case,
power will be delivered by the hob.
Do not place any utensils (spoons,
forks, lids, etc) on the cooking zone being
used. They will heat up in the same way
as cookware: so causing a risk of burning.
For users of pacemakers and active implants.
The functioning of the hob conforms to current electromagnetic interference standards
and thus is in total compliance with legal requirements (89/336/EEC directives). In order
to avoid interference between your cooking hob and a pacemaker, your pacemaker must
be designed and programmed in compliance with the regulations that apply to it. As we
can guarantee the compliance only of our own products, we strongly recommend that you
refer to the maker of your device or to your doctor to avoid possible incompatibilities.
22
DO NOT USE INTERMEDIATE REMOVABLE ACCESSORIES TO HEAT PANS WHICH
ARE NOT ADAPTED TO INDUCTION.
RISKS OF BURNS AND DETERIORATION OF THE HOB.

3 / MAINTAINING YOUR APPLIANCE GB
Preserve your appliance
The vitroceramic glass surface is highly
resistant, but not unbreakable. Here
are some recommendations for
increasing its lifetime:
- Avoid banging or clattering of the
cookware.
- Avoid putting hot lids on the hob. A
suction effect may damage the
vitroceramic surface.
- Do not use cookware with bottoms
that are rough or dented.
- Do not use your cooking hob as a
work surface.
- Never use aluminium foil or paper or
aluminium scrubber to clean it. The
aluminium melts and damages the top.
- Never use a steam cleaner to clean
your hob.
- Never directly reheat a tin can. There
will be a risk of exploding.
Aesthetic faults, as a result of
mistreatment of your hob, which do not
entail malfunction, are not covered by
our guarantee.
For the safety of your kitchen, do not
place cleaning items or inflammable
objects or products in the kitchen
furniture underneath your cooking hob.
Maintaining your appliance
TYPES OF STAINS/SPOTS
USE
WHAT TO DO ?
Light.
Cleaning sponges
Thoroughly moisten the zone to be
cleaned with hot water, then wipe off.
Accumulation of baked-on
stains/dirt.
Sugar spills, melted plastics.
Cleaning sponges
Special glass
scraper.
Thoroughly moisten the zone to be
cleaned with hot water. Use a glass
scraper to remove the large bits, then
clean with the rough side of a
disinfectant sponge, and finally wipe off.
Rings and hard water residue.
White vinegar.
Apply warm white vinegar to the stain, let
stand, then wipe with a soft cloth.
Shiny metal colourings.
Weekly maintenance.
Special
vitroceramic glass
product.
Apply a cleaning agent for vitroceramic
glass (preferably one with silicon for its
protective properties) to the surface.
cleaning sponge
cream
special for delicate crockery
powder
abrasiv
e sponge
23

GB 4
/
SPECIAL MESSAGES, DIFFICULTIES
•On first use
YOU OBSERVE THAT
:
POSSIBLE CAUSES
:
WHAT SHOULD YOU DO
:
A special lamp appears.
Working normally.
Nothing, the light
disappears
after 30 seconds.
Your installation blows a
fuse.
The electrical connection of
your hob is incorrect.
Check that it is set up
properly.
See the “Electrical
Connection” section.
The hob produces an odour
during the first cooking
sessions.
New appliance
Nothing. The smell will
disappear after several
uses.
•On switching on
YOU OBSERVE THAT
:
POSSIBLE CAUSES
:
WHAT SHOULD YOU DO
:
The hob does not operate
and the indicator lights on
the control panel do not
light up.
The machine is not
connected to the power
source. The power source
or connection is defective.
Inspect the electrical
circuit breaker and fuses.
The hob is not working and
another message is displayed.
The electronic board is
malfunctioning.
poorly.
Call the After-Sales Service
Department.
The hob does not function,
the « L » is displayed.
The hob is locked
See chapter on using the
child safety system
•While in use
YOU OBSERVE THAT
:
POSSIBLE CAUSES
:
WHAT SHOULD YOU DO
:
The table has ceased
functioning and a beeping
sound can be heard.
There was an overflow or
an object is obstructing
the control panel.
Clean or remove the object
and start cooking again.
The saucepans make a
noise during cooking.
Your hob makes a
clicking sound during
cooking.
This is normal with some
types of cookware. This is
caused by the transfer of
energy from the hob to the
cookware.
Nothing. There is no risk,
neither to your hob nor to
your cookware.
The fan continues to
function a few minutes
after your hob is turned off.
Cooling of the electronic
components.
Working normally.
Nothing.
In case of breakage, cracks or even light cracks in the vitroceramic glass, take
out the fuses or turn off the circuit breaker of your hob to avoid the risk of
electrical shock.
Contact the After-Sales Service Department.
24

AFTER-SALES SERVICE GB
In the unlikely event of there being a problem with your appliances please call the
number below quoting the model number of your appliance - this can be found on
the rating plate. Our trained staff are available to advise or book a service call with
one of our authorized service agents.
For UK after sales service information please contact: www.dedietrich.co.uk
De Dietrich UK office – tel: 01256 308000
25

FR 02
GB 14
DE 26
NL 38
Sehr geehrte Kundin, sehr geehrter Kunde,
Sie haben einen DE DIETRICH Tisch gekauft, und wir danken Ihnen dafür.
Um Ihnen ein excellenceprodukt anzubieten haben unsere Forschungsteams für Sie
diese neue Generation Gerät geplant, die durch ihre Qualität, ihre Ästhetik, ihre
Funktionen und ihre technologischen Entwicklungen davon exceptionsprodukte,
kennzeichnende machen von unserem Know-How.
Sie werden ebenfalls im Bereich DE DIETRICH Produkte, eine ausgedehnte Wahl von
Öfen, von Mikrowellenöfen, strebender Eimer, der Spülmaschinen und integrierbarer
Kühlschränke finden, die Sie an Ihrem neuen DE DIETRICH Tisch koordinieren können.
Selbstverständlich in einer ständigen Bemühung, Ihre Forderungen gegenüber unseren
Produkten optimal zufriedenzustellen steht unser Dienst konsumierend zu Ihrer
Verfügung über unseren Standort
DE
DIETRICH
Die neuen Wertgegenstände
In einer konstanten Verbesserung unserer Produkte reservieren wir uns das Recht, ihren technischen,
funktionellen oder ästhetischen Eigenschaften zu bringen alle Änderungen, die mit der technischen
Entwicklung zusammenhängen.
Importiert
B
evor Sie Ihr Gerät installieren und benutzen, lesen Sie bitte aufmerksam diesen Einrichtungs- und
Benutzungsführer, der Ihnen Sie erlauben wird, sehr schnell mit seinem Funktionieren vertraut zu machen.
www.dedietrich-electromenager.com
26

VERZEICHNIS
DE
EINRICHTUNG IHRES GERÄTS ....................................................................... 28
• Einfügen ..................................................................................................... 28
• Rat .............................................................................................................. 28
• Verzweigung ............................................................................................... 29
• Grundsatz von Induktion ........................................................................... 30
• Gefäß .......................................................................................................... 30
BENUTZUNG IHRES GERÄTS .......................................................................... 31
• Beschreibung Ihrer Oberfläche................................................................. 31
• Touches de réglage Einstellungsanschläge ............................................ 31
• Empfindungsanschläge ............................................................................. 32
• Indikator von Abwärme ............................................................................. 32
• Ventilation .................................................................................................. 32
• Gefäßfeststellung ...................................................................................... 32
• Funktion Hilfsantrieb ................................................................................. 33
• Funktion Zeitmesser.................................................................................. 33
• Verriegelung von Auftrag ........................................................................... 33
• Temperaturbegrenzer................................................................................ 34
• Eigen- Stopschild system .......................................................................... 34
• Schutz bei überlaufe ................................................................................. 34
• Sicherheit "kleine Gegenstände" .............................................................. 34
• Für die Benutzer von stimulierenden Herz- und aktive Implantate. ...... 34
LAUFENDE WARTUNG IHRES GERÄTS .......................................................... 35
• Ihr Gerät bewahren.................................................................................... 35
• Ihr Gerät unterhalten ................................................................................. 35
BESONDERE, BEILÄUFIGE MITTEILUNGEN ................................................... 36
DIENST NACH- VERKAUF UND BEZIEHUNGEN VERBRAUCHER .................. 37
27

DE 1 / EINRICHTUNG IHRES GERÄTS
JHG
Wie es dieses Logo zeigt, sind diese verpackung materialien dieses Geräts
wiederverwendbar. Nehmen Sie an ihrer Wiederverwertung teil und beitragen so zum
Schutz des Umwelt, indem man sie in den zu diesem Zweck vorgesehenen
Gemeindebehältern ablegend.
Die Wiederverwertung der Geräte wird organisiert durch ihre Hersteller so unter den
besten Bedingungen gemäß der europäischen Richtlinie 2002/96/EG über die
elektrischen und elektronischen Abfälle. Schicken Sie Sie an Ihr Rathaus oder an Ihren
Wiederverkäufer, um die Punkte der Sammlung der abgenutzten Geräte zu kennen
.
Einfügen
Ihre Kochtafel muß installiert
werden, so, daß die Karte der
Steckdose zugänglich ist.
Die Distanz zwischen dem Rand Ihrer
Tafel und der Mauer oder Trennwand
muß mindestens 4cm betragen. Ihre
Tafel kann ohne Zwang über einem
Möbel, einem Ofen eingefügt werden
oder von einem Gerät encastrable
Elektrogerät. Nur prüfen Sie, daß die
Lufteingänge und Luftausgange gut
freigesetzt werden.
Kleben Sie die Fuge schäumt
unterhalb Ihres Geräts. Er wird so eine
g
ut
e
A
b
di
c
htung mit dem Arbeitsplan
gewährleisten
28
12cm

1 / EINRICHTUNG IHRES GERÄTS DE
Verzweigung
Ihre Tafel muß auf dem Netz über eine Steckdose die der Veröffentlichung die GUS 60083
entspricht oder einer Schnittvorrichtung omnipolaire entsprechendes den gültigen
Einrichtungsregeln angeschlossen werden.
Am Unterspannungsetzen Ihrer Tafel oder nach einer verlängerten Stromabschaltung schlägt
sich ein leuchtendes Kodieren an. Diese Informationen verschwinden nach 30 Sekunden.
•Verzweigung 220-240V ~
DTI1032X
Achtung
Wenn das Kabel beschädigt wird, muß er vom Hersteller, seinem Kundendienst
oder ähnlichen Qualifikationsperson ersetzt werden.
Blau
Grün / Gelb
N L
Neutral Phase Erde
16A
Kastanie
5
29

DE 1
/
EINRICHTUNG IHRES GERÄTS
Wir haben diese Kochtafel für eine Benutzung durch Privatpersonen in einem Wohnort
geplant.
Diese Kochtafel, die ausschließlich für das Kochen der Getränke und Lebensmittel
bestimmt ist, enthält keinen Bestandteil aus Asbest.
Grundsatz der Induktion
Der inductionsgrundsatz beruht auf einem
Magnetphänomen.
Wenn Sie Ihr Gefäß auf einer Kochzone
stellen und daß Sie in Gang setzen,
produzieren die elektronischen Kreisläufe
Ihrer Kochtafel Ströme " Anker "im Grund
des Gefäßes, die sofort seine Temperatur
erheben. Diese Hitze wird dann den
Nahrungsmitteln übermittelt.
Die Gefä
ß
e
Alle Gefäße sind nicht kompatibel mit
der Induktion. Die Gefäße müssen
vollkommen an die Form des Wok-
Glases angepaßt werden. Das mit dem
Gerät gelieferte Wok-Gefäß benutzen.
- Um zu prüfen, ob Ihr Gefäß sich eignet,
stellen auf einer Zone des Kochens in
Kraft 4.
- Wenn der Plakatkleber fest bleibt, ist
Ihr Gefäß kompatibel.
- Wenn das Symbol U Ihr Gefäß
erscheint ist nicht kompatibel mit der
Induktion.
A
-
Indukto
r
B
–
Elektronischer Kreislauf
C
–
Induzierte Ströme
A
B
C
54
30

2 / BENUTZUNG IHRES GERÄTS DE
Beschreibung Ihrer Oberfläche.
Dim
e
n
s
i
o
n
en insgesamt
(
L
x
l
)
DTI1032X
:
376 x 520 mm
Zerschneiden Einfügen
(
L
‟
x
l
‟
)
DTI1032X
:
340
x
490 mm
Touches de réglage
Diese Anschläge erlauben das
Unterspannungssetzen, die Einstellung
der Parameter der Kraft sowie den
Zeitmesser für Kochtafel.
Der Anschlag A erlaubt, in Gang zu
setzen oder die Kochzone Wok
festzulegen.
- A : einschalten / ausschalten
- B
:
Blockieren - Lösen
- C
: Auswahlanschlag [+]/[-] für die Kraft
und für den Zeitmesser
- D
:
Anschlag Kraft/Zeitmesser
- E :
des Zeitmessers
Mangels eines Gefäßes auf der ausgewählten Zone werden sich Ihre Einstellungen automatisch
nach einigen Momenten löschen.

DE 2
/
BENUTZUNG IHRES GERÄTS
JHG
Anschlag sensibel :
Ihr Gerät wird mit Empfindungsanschlägen
ausgestattet, die erlauben, die
verschiedenen Funktionen zu leiten. Ein
Abschleifen des Anschlages aktiviert ihr
Funktionieren. Diese Aktivierung wird
durch ein Kontrollicht, einen Anschlag
und/oder durch ein Schallsignal für
rechtsgültig erklärt. Unterstützen nur auf
nur einem Anschlag gleichzeitig.
Indikator von Abwärme:
Wenn das Kontrollicht "H" sich anschlägt,
bedeutet das, daß die entsprechende
Kochzone heiß ist (die Kochzone wird am
Kontakt des Stieltopfes geheizt).
In diesem Fall gibt es Verbrennungsgefahr.
Ventilator :
Der Abkühlventilator hat ein völlig
automatisches Funktionieren. Er stellt sich
unterwegs mit kleiner Geschwindigkeit,
sobald die durch die Elektronik
freigesetzten Kalorien eine gewisse
Schwelle überschreiten. Die Ventilation legt
ihre zweite Geschwindigkeit ein, wenn die
Kochtafel intensiv benutzt wird. Der
Ventilator reduziert seine Geschwindigkeit
und hält sich automatisch an, sobald der
elektronische Kreislauf genügend abgekühlt
wird
Gefäßfeststellung
Die Gefäßfeststellung gewährleistet eine
vollkommene Sicherheit. Die Induktion
funktioniert nicht:
Wenn es kein Gefäß auf der Kochzone gibt,
oder wenn dieses Gefäß der Induktion
unangepaßt ist. In diesem Fall ist es
unmöglich, die Kraft zu erhöhen, und im
Plakatkleber erscheint das Symbol [ U ].
[ U ], verschwindet, wenn ein Stieltopf auf
dem Kochfoyer gestellt wird.
Wenn laufend von Kochen das Gefäß von
der Kochzone weggenommen wird, wird das
Funktionieren unterbrochen. Im
Plakatkleber erscheint das Symbol [ U ].
[ U ], verschwindet, wenn das Gefäß auf
dem Kochfoyer verschoben wird. Das
Kochen nimmt bei zuerst ausgewählter
Kraft zurück.
32

2 / BENUTZUNG IHRES GERÄTS DE
Hilfsantriebsfunktion « Booster »
Die Hilfsantriebsfunktion [ P ], verleiht der
Kochzone eine Kraftverstärkung.
Wenn diese Funktion aktiviert wird,
funktioniert die Kochzone während 10
Minuten mit einer deutlich höheren Kraft.
Der Hilfsantrieb ist geplant zum Beispiel,
um große Quantitäten Wasser schnell
heizen zu lassen, oder um Fleisch zu
rösten...
Die Hilfsantriebsfunktion einlegen:
In Position [ 9 ], -unterstützen hinsichtlich
[ + ], [ P ], schlägt sich an während 10 Mn.
Die Hilfsantriebsfunktion festlegen:
In Position [ P ], zu unterstützen auf [ - ],
[ 9 ], schlägt sich an.
Zeitmesserfunktion
Zeitmesser benutzte außerhalb des Kochens :
Diese Funktion erlaubt, ein Ereignis mit der
Stoppuhr zu messen, ohne ein Kochen zu
verwirklichen. Durchführung der Tafel
unterstützt auf [ 0/I ], zu unterstützen auf
[ ], um den Zeitmesser zu aktivieren
regulieren die Zeit mit den Anschlägen C.
Zum Schluß Ihrer Einstellung beginnt die
Abrechnung.
Randbemerkung:
Sie können eine laufende Abrechnung
durch eine lange Unterstützung auf dem
Anschlag festlegen [ ], wenn Sie mit dem
Anschlag [-] starten, der Plakatkleber des
Zeitmessers angeben direkt [ 30 ] Minuten,
und danach geht diese Zeit zurück.
Das Kontrollicht blinkt auf dann löscht
nach einigen Sekunden, der Zeitmesser
startet.
Beim Kochen benutzter Zeitmesser:
Diese Funktion erlaubt, ein Ereignis bei der
Verwirklichung eines Kochens mit der
Stoppuhr zu messen.
Durchführung der Tafel unterstützt auf
[0/I], zu unterstützen auf [+], um die
Kochzone Wok drücken zu aktivieren auf
[ ],um den Zeitmesser zu aktivieren
regulieren die Zeit mit den Anschlägen C.
Zum Schluß Ihrer Einstellung beginnt die
Abrechnung.
Randbemerkung:
Sie können eine laufende Abrechnung
durch eine lange Unterstützung auf dem
Anschlag festlegen [ ], wenn Sie mit dem
Anschlag [-] starten, der Plakatkleber des
Zeitmessers angeben direkt [ 30 ] Minuten,
und danach geht diese Zeit zurück.
Automatische Abschaltung am Ende des
Kochens:
Sobald die ausgewählte Kochzeit vergeht,
schlägt der Zeitmesser an, indem er
aufblinkt [ 00 ] und ein Schallsignal ertönt.
Das Schallsignal und das Blinken halten
sich automatisch nach 2 Minuten an.
Andernfalls um den Ton und das Blinken
anzuhalten reicht es aus, auf einem
Anschlag zu unterstützen.
Verriegelung des Auftrags
Diese Kochtafel ist mit 2 Arten von
Verriegelung vorgesehen:
- Verriegelung in Position [ 0 ]
- Verriegelung in Kochposition
Verriegelung in Position [ 0 ]
Durchführung der Tafel unterstützt auf [0/I]
- Drücken auf [ ], um die Tafel zu
verriegeln
- Drücken auf [ ], um die Tafel Zu
entriegeln
Verriegelung in Position Kochen
Durchführung der Tafel unterstützt auf [
0/I ].
Die Kraft auswählen von [ 1 ] an [ 9 ], oder
[ P ].
Unterstützen auf [ ], um die Tafel zu
verriegeln.
Unterstützen auf [ ], um die Tafel zu
entriegeln.
33

DE 2
/
BENUTZUNG IHRES GERÄTS
JHG
Temperaturbegrenzer
Die Kochzone wird mit einem
Sicherheitsempfänger ausgestattet, der
die Temperatur des Grundes des
Gefäßes kontrolliert. Bei Vergessen
eines leeren Gefäßes auf dem
angezündeten Foyer wird er
automatisch die Kraft begrenzen, um
die Verschlechterung des Gefäßes oder
der Tafel zu verhindern.
Eigen- Stopschild system
Bei Vergessen eines laufenden
Kochens und nach einer vorher
bestimmten Zeit schneidet diese
Sicherheitsfunktion automatisch Ihre
Tafel (von 1 bis 10 Uhr nach der Kraft).
Schutz bei überzulauffe
Bei überzulauffe einer Flüssigkeit, eines
metallischen Gegenstands oder eines
naß gemachten Lappens, der auf den
Auftragsanschlägen, der Tafel gestellt
wurde, hält sich an, und ein Signalton
wird hervorgebracht. Reinigen Sie oder
wegnehmen den Gegenstand dann
ankurbeln das Kochen.
Sicherheit "kleine Gegenstände"
Wenn Sie einen Gegenstand von
geringem Ausmaß auf einem Foyer
stellen (ein Ring, eine Gabel usw....),
stellt die Tafel fest es und stellt keine
Kraft aus.
Randbemerkung:
Jedoch könnten mehrere kleine
Gegenstände gleichzeitig auf einer
Zone als ein Gefäß identifiziert werden.
Die Kraft wird dann durch die Tafel
ausgestellt.
Keine Arbeitsgeräte (Löffel, Gabel,
Deckel...) auf einer Zone des Kochens
in Funktionieren zu stellen, würden sie
sich zur gleichen Zeit wie das Gefäß
erhitzen: Verbrennungsrisiko.
Für die Benutzer von stimulierenden Herz- und aktive Implantate.
Ihre Kochtafel steht mit den gültigen elektromagnetischen Störungsnormen im Einklang
und entspricht so vollkommen den legalen Forderungen (Richtlinien 89/336/EWG).
Damit es keine Interferenzen zwischen Ihrer Kochtafel und einem stimulierenden gibt
Herz-, ist es notwendig, daß letztere geplant und in Übereinstimmung mit der Regelung
reguliert wird, die es betrifft. Da wir nicht garantieren können, daß die Übereinstimmung
unseres Produktes, empfehlen wir Ihnen sehr, Ihnen beim Hersteller oder Ihrem
behandelnden Arzt zu informieren, um eine mögliche Unvereinbarkeit zu vermeiden.
34
KEIN ABNEHMBARES ZWISCHENZUBEHÖR BENUTZEN UM PFANNEN DIE FUR DIE
INDUKTION NICHT ANGEPASST SIND ZU ERHITZEN.
VERBRENNUNGEN- UND ZERSTOERUNGGEFAHR DER MULDE.

3 / LAUFENDE WARTUNG IHRES GERATS DE
Ihr Gerät bewahren
Die Oberfläche glaskeramisches Glas
ist sehr widerstandsfähig, aber
allerdings nicht unzerbrechlich. Hier
einige Empfehlungen, um seine
Lebensdauer zu erhöhen:
- Vermeiden die Schocks und die
Gefäßreibungen.
- Vermeiden, einen heißen
Tellerdeckel auf der Tafel zu stellen.
Eine Wirkung `' ventouse' ' kann die
Oberfläche beschädigen.
- Benutzen nicht die Gefäße mit
rauhen oder verbeulten Fonds.
- Benutzen nie ein Papier oder kleinen
Nachen Aluminium für ein Kochen.
Das Aluminium würde die Oberfläche
schmelzen und beschädigen.
- Benutzen nie von Dampfreiniger für
die Wartung Ihrer Tafel.
Wärmen nie direkt auf hinkt von
Konserve. Sie könnte explodieren.
Die ästhetischen Fehler, die falsche
Benutzung Ihrer Tafel verursacht
wurden, und die kein
Nichtfunktionieren bewirken, gehen
nicht im Rahmen der Garantie hinein.
Und für mehr Sicherheit in Ihrer
Küche ordnen Ihre Pflegemittel oder
brennbare Produkte im Möbel nicht,
das unter Ihrer Kochtafel angesiedelt
ist.
Ihr Gerät unterhalten
SCHMUTZTYPEN
BENUTZEN
WIE VORGEHEN
Leicht.
Sanitäre Schwämme.
Weichen gut die mit heissen Wasser zu
reinigende Zone auf dann Abwischen.
Anhäufung wiedererhitzten
Schmutzes. Débordements
gesüßte, aus Plastik
zerschmolzene.
Sanitäre Schwämme.
Spezieller Glas
Kratzer
Weichen gut die mit heißem Wasser zu
reinigende Zone auf, benutzen einen
speziellen Kratzer Glas, um grob zu
bearbeiten, mit der Schabeisenseite
eines sanitären Schwammes zu
beenden dann Abwischen.
Aureolen und Spuren von
Kalkstein.
Weißer
Alkoholessig.
Wenden Sie heißen weißen Alkoholessig
auf dem Schmutz an, der wurde
handeln lassen, Abwischen mit einem
zarten Lappen.
Glänzende metallische
Färbungen.
Wöchentliche Wartung.
Spezielles
glaskeramisches
Produkt.
Wenden Sie auf der Oberfläche ein
spezielles Produkt an glaskeramisches
Glas, vorzugsweise, das Silikon
(Schutzwirkung) umfaßt.
Sahne
Sanitäre Schwämme
pulver
Schleifschwamm
35

DE 4 / BESONDERE MITTEILUNGEN, BEILÄUFIGE
•
An der Inbetriebnahmeder :
SIE STELLEN FEST DASS
DIE MÖGLICHEN URSACHEN:
DASS MAN MACHEN MUSS:
Ein leuchtender Anschlag
erscheint.
Normales Funktionieren.
Nichts verschwindet der
Anschlag nach 30
Sekunden.
Ihre Einrichtung trennt.
Die Verzweigung Ihrer
Tafel ist fehlerhaft.
Prüfen Sie seine
Übereinstimmung. Siehe
Verzweigungskapitel.
Die Tafel setzt einen Geruch
beim ersten Kochen frei.
Neues Gerät.
Nichts. Der Geruch wird
nach einigen Benutzungen
verschwinden.
•
An der Inbetriebnhame :
SIE STELLEN FEST DASS
DIE MÖGLICHEN URSACHEN:
DASS MAN MACHEN MUSS:
Die Tafel funktioniert nicht,
und die leuchtenden
Plakatkleber auf der Tastatur
bleiben gelöscht.
Die Ernährung oder die
elektrische Verbindung ist
fehlerhaft.
Untersuchen Sie die
Sicherungen und den
elektrischen Schalter.
Die Tafel funktioniert nicht,
und eine andere Mitteilung
schlägt sich an.
Der elektronische Kreislauf
funktioniert schlecht.
Gemacht Aufruf im
Kundendienst.
Die Tafel funktioniert nicht,
die Information L schlägt sich
an.
Die Tafel wird verriegelt
Siehe Kapitel Benutzung
Kindsicherheit
•
In d'utilisationskurs
:
SIE STELLEN FEST DASS
DIE MÖGLICHEN URSACHEN:
DASS MAN MACHEN MUSS:
Die Tafel hat sich angehalten
zu funktionieren, und sie
bringt einen "BIP" hervor.
Es hat débordement
gegeben, oder ein
Gegenstand überfüllt die
Auftragstastatur.
Reinigen Sie oder
wegnehmen den
Gegenstand und
ankurbeln das Kochen.
Die Stieltöpfe machen Lärm
beim Kochen. Ihre Tafel
bringt ein Rasseln beim
Kochen hervor.
Normal mit bestimmten
Gefäßtypen. Das ist auf den
Übergang der Energie des
Tisches in Richtung des
Gefäßes zurückzuführen.
Nichts. Es hat ein Risiko
weder für Ihre Kochtafel
noch für Ihr Gefäß.
Die Ventilation setzt einige
Minuten nach l'arrêt Ihrer
Tafel fort.
Abkühlen der Elektronik.
Normales Funktionieren.
Nichts.
Bei Bruch, Riß oder sogar leichtem Riß des glaskeramischen Glases und vor jeder
Intervention nehmen die Sicherungen weg oder betätigen den Schalter, der Ihre Tafel
versorgt, um ein elektrisches Schockrisiko zu vermeiden.
Kontaktieren Sie den Kundendienst.
36

DIENST NACH VERKAUF UND BEZIEHUNGEN VERBRAUCHER;;;; DE
Im unwahrscheinlichen Fall gefallen des Seins ein Problem mit Ihren Geräten Anruf die Zahl
unterhalb der Veranschlagung Modellnummer Ihres Gerätes - dieses kann auf dem
Leistungsschild gefunden werden. Unser ausgebildeter Personal ist vorhanden, einem
Wartungsbesuch mit einem unserer autorisierten Service-Mittel zu raten oder anzumelden.
37

FR 02
GB 14
DE 26
NL 38
Geachte Klant,
U hebt een kookplaat van DE DIETRICH aangeschaft. Wij willen u hier graag voor
bedanken.
Onze onderzoeksteams hebben voor u deze nieuwe generatie apparaten ontworpen die
uitzonderlijk is door de kwaliteit, de vormgeving, de functies en de technologische
vooruitgang. Hierdoor zijn het unieke producten die getuigen van onze knowhow.
In het gamma van DE DIETRICH producten vindt u ook een ruime keuze aan ovens,
magnetrons, afzuigkappen, vaatwassers en koelkasten die allemaal kunnen worden
ingebouwd en harmonisch met uw nieuwe DE DIETRICH kookplaat kunnen worden
gecombineerd.
Uiteraard wensen wij onze klanten ook na hun aankoop tevreden te houden. Onze
servicedienst staat daarom tot uw beschikking voor vragen en suggesties.
DE
DIETRICH
De nieuwe waardeobjecten
Omdat we voortdurend streven naar het verbeteren van onze producten, behouden we ons het recht voor
om wijzigingen aan te brengen aan de technische, functionele of esthetische kenmerken, om de
technische evolutie op de voet te volgen.
Belangrijk
Voor installatie en gebruik van uw apparaat deze installatie- en gebruiksgids aandachtig lezen. U zult snel
vertrouwd raken met de werking van uw toestel.
www.dedietrich-electromenager.com
38

OVERZICHT
NL
INSTALLATIE VAN HET APPARAAT .................................................................. 40
• Inbouw ........................................................................................................ 40
• Waarschuwing .............................................................................................. 40
• Aansluiting .................................................................................................. 41
• Inductieprincipe ......................................................................................... 42
• Pannen ....................................................................................................... 42
GEBRUIK VAN HET APPARAAT ....................................................................... 43
• Beschrijving van de bovenkant ................................................................ 43
• Regelingstoetsen ....................................................................................... 43
• Tiptoetsen .................................................................................................. 44
• Aanduiding restwarmte ............................................................................. 44
• Ventilatie .................................................................................................... 44
• Detectie van de pan .................................................................................. 44
• Functie Booster .......................................................................................... 45
• Functie Timer ............................................................................................. 45
• Grendeling van de bestelling .................................................................... 45
• Temperatuurbeperking ............................................................................. 46
• Auto-Stop systeem ..................................................................................... 46
• Bescherming bij overkoken ...................................................................... 46
• “Kleine voorwerpen” beveiliging .............................................................. 46
• Voor dragers van hartstimulatoren en actieve implanten ...................... 46
ALGEMEEN ONDERHOUD VAN HET APPARAAT ............................................ 47
• Uw apparaat behouden ............................................................................. 47
• Uw apparaat onderhouden ....................................................................... 47
SPECIALE MEDEDELINGEN, INCIDENTEN ..................................................... 48
SERVICE DIENST ............................................................................................. 49
39

NL 1 / INSTALLATIE VAN UW APPARAAT
JH G
Zoals dit logo aanduidt is het verpakkingsmateriaal van dit apparaat recycleerbaar.
Doe mee aan de recycling en draag bij tot de bescherming van het milieu door dit
materiaal in de hiervoor bestemde gemeentecontainers te deponeren.
De recycling van de apparaten die door uw fabrikant wordt georganiseerd wordt op
deze manier onder de beste omstandigheden uitgevoerd, overeenkomstig de
Europese richtlijn 2002/96/CE betreffende elektrisch en elektronisch afval. Informeer
bij uw gemeente of bij uw verkoper naar de dichtstbijzijnde inzamelplaats voor uw
oude apparaten.
Inbow
Het apparaat dient zo te worden geplaatst
dat het stopcontact toegankelijk blijft. De
afstand tussen de rand van het apparaat
en de muur (of wand) erachter of ernaast
moet minimaal 4 cm bedragen.
Uw apparaat kan probleemloos
ingebouwd worden boven een
keukenmeubel, een oven of een elektrisch
inbouwapparaat.
Waarschuwing
Kijk enkel na of de lucht in- en uitgangen
goed vrij zijn. Kleef de schuimrubber
onderaan uw apparaat. Dit zorgt voor een
goede afdichting met het werkblad.
- Dit toestel is niet geschikt voor gebruik door personen (inclusief kinderen) met verminderd
lichamelijke, zintuigelijke waarneming of geestelijke vermogens of gebrek aan kennis en
ervaring, tenzij zij begeleiding of instructies krijgen over het gebruik van het toestel door een
persoon, die verantwoordelijk is voor hun veiligheid.
- Kinderen moeten zodanig begeleid worden dat het zeker is dat zij niet gaan spelen met het
toestel.
- WAARSCHUWING: Als het glazen kookoppervlak gebroken is schakel het toestel uit om een
mogelijke electrische schok te voorkomen.
- Metalen voorwerpen zoals messen, vorken, lepels en deksels mogen niet geplaatst worden
op het glazen kookoppervlak omdat deze dan heet kunnen worden.
40
12cm

1 / INSTALLATIE VAN HET APPARAAT
JH
NL
Aansluiting
Het apparaat dient zo te worden geplaatst dat het stopcontact toegankelijk blijft. De afstand
tussen de rand van het apparaat en de muur (of wand) erachter of ernaast moet minimaal 4
cm bedragen. Uw apparaat kan probleemloos ingebouwd worden boven een keukenmeubel,
een oven of een elektrisch inbouwapparaat. Kijk enkel na of de lucht in- en uitgangen goed vrij
zijn. Kleef de schuimrubber onderaan uw apparaat. Dit zorgt voor een goede afdichting met het
werkblad.
•Aansluiting 220-240V ~
DTI1032X
Let op
Indien de voedingskabel beschadigd is moet deze veiligheidshalve door de
fabrikant, de
servicedienst of een andere bekwame persoon worden vervangen.
Blau
ww
Groen / Geel
N L
Nulleider Fase Aarding
16A
Bruin
41

NL 1
/
INSTALLATIE VAN HET APPARAAT
Deze kookplaat is bestemd voor particulier gebruik in een huishoudelijke omgeving. Deze
kookplaten zijn uitsluitend bestemd voor het koken van vaste of vloeibare levensmiddelen
en bevatten geen asbesthoudende onderdelen.
Inductieprincipe
Het principe van inductiekoken berust op een
magnetisch fenomeen. Zodra u uw pan op een
kookzone zet en deze inschakelt, gaan de
elektronische schakelingen van uw kookplaat
in de bodem van uw kookpan “inductie”
stromen produceren, hetgeen de temperatuur
onmiddellijk verhoogt. Deze warmte wordt dan
overgebracht op de levensmiddelen Om u bij
uw keuze van kookpannen te helpen, leveren
wij bij deze handleiding een lijst met
keukengerei.
Pannen
De meeste pannen zijn geschikt voor
inductiekoken.
Om te controleren of uw pan geschikt is,
plaats ze op een kookzone op vermogen 4.
- Als het display niet knippert, is uw pan
geschikt.
- Als het knippert, kunt u uw pan niet
gebruiken voor inductie.
A
-
Induct
or
B
–
Schakeling
C
-
Inductiestromen
A
B
C
42

2 / GEBRUIK VAN HET APPARAAT NL
Beschrijving van de bovenkant
Afmetingen totaal
(
L
x
l
)
DTI1032X
:
380 x 520 mm
Uitsnijding Inbouw (L‟ x l‟)
DTI1032X
:
340
x
490 mm
Regelingstoetsen
Deze toetsen regelen de standen voor
vermogen, schakelklok, programmatie...
De toets A, maakt het mogelijk om in
werking te zetten of de zone van koken
Wok vast te stellen.
- A : Verloop/het Arrest
- B : Grendeling – Ontgrendeling
- C : De toets selectie [+]/[-] voor de macht
and timer
- D : Display Macht / Timer
- E : Activering van Timer
Als er geen pan op de geselecteerde zone staat, zullen uw instellingen automatisch
uitgewist worden na enkele ogenblikken.
43

NL 2
/
GEBRUIK VAN HET APPARAAT
JHG
Tiptoetsen
Uw apparaat is uitgerust met tiptoetsen
waarmee u de verschillende functies kan
instellen. Het aanraken van de toets zet de
functie in werking. Deze activering wordt
weergegeven door een lichtje, een aflezing
en/of een geluidssignaal. Druk niet op
meerdere toetsen tegelijk.
Aanduiding restwarmte
Na het uitzetten van de kookzones of het
volledig uitzetten van de kookplaat zijn de
kookzones nog warm en wordt dit
aangegeven door [H]. Het symbool [H] gaat
uit wanneer de kookzones zonder
gevaar aangeraakt kunnen worden. Zolang
het indicatielampje van de restwarmte blijft
branden, de kookzones niet aanraken en
geen enkel warmtegevoelig voorwerp op de
kookzones plaatsen.
Gevaar voor brand of brandwonden!
Ventilatie :
De koelingsventilator functioneert helemaal
automatisch. Hij komt langzaam op gang
zodra de door de elektronica vrijgekomen
calorieën een bepaalde hoeveelheid
overschrijden. De ventilatie schakelt naar
de tweede snelheid over wanneer het
kookvlak intensief gebruikt wordt. De
ventilator vermindert snelheid en stopt
automatisch zodra het elektronisch circuit
voldoende is afgekoeld.
Detectie van de pan
De detectie van de pan verzekert een
optimale veiligheid :
• De inductie functioneert niet indien er
geen pan op de kookzone staat of wanneer
de pan ongeschikt is voor inductie. In dit
geval is het onmogelijk het vermogen op te
voeren en het symbool [U] verschijnt op de
display. Wanneer een pan op de kookzone
wordt geplaatst verdwijnt de [U].
• De werking wordt onderbroken wanneer
tijdens het koken de pan van de kookzone
wordt genomen. Het symbool [U] verschijnt
op de display. De [U] verdwijnt wanneer de
pan terug op het kookvlak wordt geplaatst.
Het koken gaat door op het voordien
gekozen vermogen.
44

2 / GEBRUIK VAN HET APPARAAT NL
Functie Booster
De snel opwarm functie [ P ] maakt het
mogelijk meer energie naar het
kookgedeelte te sturen. Als deze functie
(booster) geactiveerd wordt, zal het
kookgedeelte gedurende 10 minuten extra
energie krijgen en dus sneller opwarmen.
De booster functie is toegevoegd om
bijvoorbeeld grotere hoeveelheden water
of vlees te verwarmen.
De snel opwarmfunctie (booster)
inschakelen:
In stand [ 9 ] druk nog een keer op de [ + ]
knop. De letter [ P ] verschijnt op het
display gedurende 10 minuten.
Om de snel opwarmfunctie (booster) te
stoppen:
In stand [ P ] druk op de [ - ] knop. Het
cijfer [ 9 ] verschijnt op het display.
Functie Timer
Tijdklok gebruiken buiten kooktijd:
Deze functie maakt het mogelijk de tijd in
te stellen zonder kookfunctie. Schakel het
toestel aan met [ 0/I ]. Druk daarna op [ ]
om de tijdklok te activeren.
Kies de gewenste tijd door op de C knop te
drukken. Als het programmeren klaar is
begint de klok te lopen.
NB:
U kunt het lopen van de klok stoppen door
op de knop [ ] te drukken gedurende
enkele seconden.
Indien u op de knop [ - ] drukt zal de
tijdklok [ 30 ] minuten aangeven en bij
opnieuw drukken op deze knop zal de tijd
afnemen.
Het controlepaneel gaat enkele keren
aan/uit, daarna uit en de tijdklok begint te
lopen.
Tijdklok gebruiken binnen kooktijd:
Schakel het toestel aan met [ 0/I ]. Druk
daarna op de knop [ + ] om de wok
verwarming te activeren. Deze functie
maakt het mogelijk de tijd in te stellen
tijdens de kookfunctie. Druk op de [ ]
knop om de tijdklok te activeren.
Kies de gewenste tijd door op de C knop te
drukken. Als het programmeren klaar is
begint de klok te lopen.
NB:
U kunt het lopen van de klok stoppen door
op de knop [ ] te drukken gedurende
enkele seconden.
Indien u op de knop [ - ] drukt zal de
tijdklok [ 30 ] minuten aangeven en bij
opnieuw drukken op deze knop zal de tijd
afnemen.
Het controlepaneel gaat enkele keren
aan/uit, daarna uit en d e tijdklok begint te
lopen.
Automatisch stoppen na afloop verwarmen
: Als de ingestelde verwarmingstijd gestopt
is zal het indicatie paneel een knipperende
[ 00 ] aangeven. Tevens zal een
geluidssignaal hoorbaar zijn. De
knipperende [ 00 ] en het geluidssignaal
zal automatisch stoppen na 2 minuten.
Indien dit niet het geval is druk dan op een
willekeurige knop.
De grendeling van de bestelling:
Dit toestel is uitgerust met 2 soorten
beveilingen (kinderslot):
- Beveiligen in [ 0 ] stand (verwarming uit)
- Beveiligen in [ I ] stand (verwarming aan)
Beveiligen tijdens [ 0 ] stand (verwarming uit)
Schakel het toestel aan met de knop [0/I].
Druk op de knop [ ] om het toestel te
beveiligen
Druk opnieuw op de knop [ ] om de
beveiliging van het toestel op te heffen.
Beveiligen tijdens [ I ] stand (verwarming aan)
Schakel het toestel aan met de knop [0/I].
Kies de gewenste stand voor de
verwarming met [ 1 ] tot [ 9 ] of [ P ]. Druk
op de knop [ ] om het toestel te
beveiligen (kinderslot).
Druk opnieuw op de knop [ ] om de
beveiliging van het toestel op te heffen.
45

NL 2
/
GEBRUIK VAN HET APPARAAT
JHG
Temperatuurbeperking
Elke kookzone is uitgerust met een
veiligheidscaptor die de temperatuur van
de bodem van de pan controleert. Als u
een lege pan op het warme vuur vergeet,
zal deze automatisch het vermogen
beperken om schade aan de pan of de
plaat te vermijden.
Auto-Stop systeem
Als u een lopende kookcyclus vergeet en
volgens een vooraf bestemde tijd stopt
deze veiligheidsfunctie automatisch uw
plaat (van 1 tot 10 uren naargelang het
vermogen) .
Bescherming bij overkoken
Als een vloeistof overkookt, of een
vochtige doek op de bedieningstoetsen
valt, wordt de plaat afgezet, streepjes
worden vertoond en een pieptoon
weerklinkt. Reinig of verwijder het
voorwerp en start het koken opnieuw.
“Kleine voorwerpen” beveiliging
Als u een klein voorwerp (ring, vork enz...)
op een vuur plaatst merkt de plaat dit en
levert geen vermogen. De
vermogensweergave knippert.
Let op:
Verschillende kleine voorwerpen tegelijk
op een zone zouden kunnen aanzien
worden als een pan. Het vermogen zal
dan door de plaat geleverd worden.
Plaats geen gerei (lepel, vork,
deksel...) op een kookzone die aan staat;
ze zouden gelijktijdig met de pan
opwarmen:
Risico van brandwonden.
Voor dragers van hartstimulatoren en actieve implanten.
De werking van de kookplaat is overeenkomstig de geldende normen voor elektromagnetische
interferentie en beantwoordt aldus aan de wettelijke normen (richtlijnen 89/336/CEE).
Om interferentie tussen uw kookplaat en een pacemaker te vermijden, is het belangrijk dat de
pacemaker in overeenstemming met de betreffende voorschriften is ontworpen en afgesteld.
Omdat we de overeenstemming van ons product niet kunnen waarborgen, raden wij u sterk aan u
in te lichten bij de fabrikant of uw dokter om mogelijke ongeschiktheden te vermijden.
46
GEEN LOSSE ACCESSOIRES GEBRUIKEN OM POTTEN EN PANNEN, DIE NIET VOOR
INDUCTIE GESCHIKT ZIJN, OP TE WARMEN.
GEVAAR VOOR BRANDWONDEN EN BESCHADIGINGEN VAN DE KOOKPLAAT.

3 / ALGEMEEN ONDERHOUD VAN HET APPARAAT NL
Uw apparaat beschermen
Het glazen oppervlak van de
glaskeramische plaat is heel sterk, maar
niettemin niet onbreekbaar. Hier volgen
enkele raadgevingen om zijn levensduur te
verlengen:
Vermijd botsingen en wrijvingen van de
pannen.
Leg geen warm deksel plat op de kookplaat.
Een „zuignapeffect‟ zou de plaat kunnen
beschadigen.
- Gebruik geen pannen met geblutste of
ruwe bodem.
- Gebruik uw plaat niet als werkoppervlak.
- Gebruik nooit papieren of aluminium
vlootjes voor het koken. Aluminiumfolie
smelt en brengt onherstelbare schade toe
aan het apparaat.
- Gebruik nooit stoomreinigers voor het
onderhoud van uw plaat.
- Warm nooit een blik rechtstreeks op. Het
zou kunnen ontploffen.
Esthetische schade opgelopen door het
slechte gebruik van uw plaat en die geen
gebruikspanne veroorzaakt valt niet onder
de waarborg.
En voor een grotere veiligheid in uw keuken:
bewaar uw onderhoudsproducten of
ontvlambare producten niet in de kast
onder uw kookplaat.
Uw apparaat onderhouden
SOORTEN VLUK
GEBRUIK
REINIGINGSMETHODE
Licht
Huishoudsponsen.
Het te reinigen gebied met warm water
doorweken, daarna afvegen.
Ingebakken vlekken.
Overkoken van suiker,
gesmolten plastic
Huishoudsponsen.
Speciaal glaskrabbertje.
Het te reinigen gebied met warm water
doorweken, een speciaal glaskrabbertje
gebruiken om het ergste vuil te
verwijderen,, eindigenschuurzijde van een
huishoudsponsje en afvegen.
Kringen en kalkaanslag.
Witte wijnazijn.
Warme witte wijnazijn op de vlekken
aanbrengen, laten inwerken en afvegen
met een zachte doek.
Glanzende metalen
verkleuringen.
Wekelijks onderhoud.
Speciaal
glaskeramiek
product
Een speciaal product voor
glaskeramische platen aanbrengen op
de plaat, bij voorkeur met silicone
(beschermend effect).
creme
Gezondheidssponze
n
poeder
schuursons
47

NL 4
/
SPECIALE MEDEDELINGEN EN , INCIDENTS
•
Bij de inwerkingstelling
U CONSTATEERT HET VOLGENDE:
MOGELIJKE OORZAKEN:
OPLOSSINGEN:
Er verschijnt een lichtgevende
display.
Normale werking.
Niets, de weergave verdwijnt na
30 seconden.
De installatie is doorgeslagen.
Verkeerde aansluiting
van de kookplaat.
Controleer de geschiktheid.Zie
hoofdstuk aansluiting.
Bij het eerste gebruik komt er een
vreemde geur van de kookplaat af
Nieuw apparaat.
Niets. De geur zal na enkele tijd
van gebruik vanzelf verdwijnen.
•
Bij de inwerkingstelling
U CONSTATEERT HET VOLGENDE:
MOGELIJKE OORZAKEN:
OPLOSSINGEN:
De kookplaat werkt niet en de
lichtgevende displays op het
bedieningspaneel blijven uit.
Het apparaat krijgt geen
stroom. De voeding of de
aansluiting is defect.
Controleer de zekeringen en de
elektrische hoofdschakelaar.
De kookplaat werkt niet en er
verschijnt een ander bericht.
De elektronische schakeling
werkt slecht.
Neem contact op met
deServicedienst.
De kookplaat werkt niet, het
Gegeven “L” verschijnt.
De kookplaat is vergrendeld
Zie hoofdstuk
gebruikkinderbeveiliging
•
In gebruik
U CONSTATEERT HET VOLGENDE:
MOGELIJKE OORZAKEN:
OPLOSSINGEN:
De kookplaat is gestopt en geeft
ongeveer elke 10 seconden een
pieptoon af.
Er is iets overgekookt of er
ligt een voorwerp op het
bedieningspaneel.
Reinig of verwijder het
voorwerp en start het
koken opnieuw.
De pannen maken lawaai
tijdens het koken.Uw kookplaat
maakt een tikkend geluid
tijdens het koken.
Normaal voor sommige
soorten pannen. Dit is te
wijten aan de doorgang van
de energie van de plaat naar
de pan.
Niets. Er is geen gevaar, noch
voor uw kookplaat noch voor
uw pan.
De ventilator blijft enkele minuten
doorwerken na uitschakeling van
de kookplaat.
Afkoeling van het electronisch
Systeem Normale werking.
Niets
48

SERVICE DIENST NL
De eventuele ingrepen in de machine moeten worden uitgevoerd :
- of door uw vakhandelaar,
- of door een andere gekwalificeerd technicus van dit merk.
Tijdens het telefoneren, dient u de complete referentie op te geven van uw machine (model,
type, serienummer). Deze informatie staat op het typeplaatje op de machine.
49


14882/0
-
 1
1
-
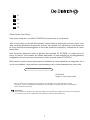 2
2
-
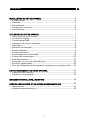 3
3
-
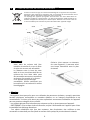 4
4
-
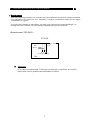 5
5
-
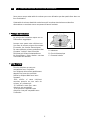 6
6
-
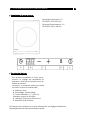 7
7
-
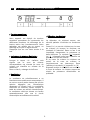 8
8
-
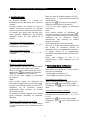 9
9
-
 10
10
-
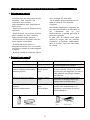 11
11
-
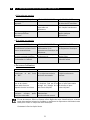 12
12
-
 13
13
-
 14
14
-
 15
15
-
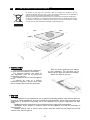 16
16
-
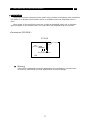 17
17
-
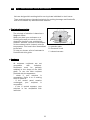 18
18
-
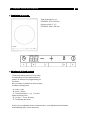 19
19
-
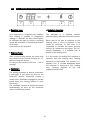 20
20
-
 21
21
-
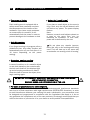 22
22
-
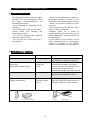 23
23
-
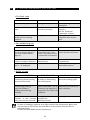 24
24
-
 25
25
-
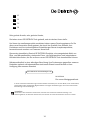 26
26
-
 27
27
-
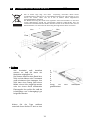 28
28
-
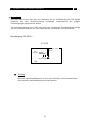 29
29
-
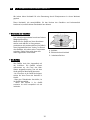 30
30
-
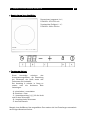 31
31
-
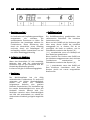 32
32
-
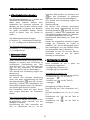 33
33
-
 34
34
-
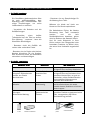 35
35
-
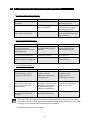 36
36
-
 37
37
-
 38
38
-
 39
39
-
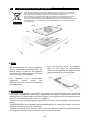 40
40
-
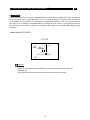 41
41
-
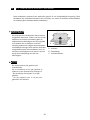 42
42
-
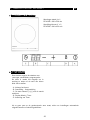 43
43
-
 44
44
-
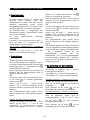 45
45
-
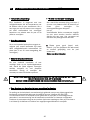 46
46
-
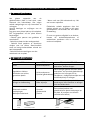 47
47
-
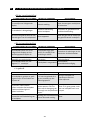 48
48
-
 49
49
-
 50
50
-
 51
51
-
 52
52


