Domo B3971 de handleiding
- Categorie
- Machines voor het maken van brood
- Type
- de handleiding

PRODUCT OF
B3971
Handleiding Broodbakmachine
Mode d’emploi Machine à pain
Gebrauchsanleitung Brotbackautomat
Instruction booklet Bread maker
Manual de instrucciones Panicadora
Istruzioni per l’uso Macchina del pane
Návod k použití Domácí pekárna
Návod na použitie Domáce pekáreň

Lees aandachtig alle instructies - bewaar deze handleiding voor latere raadpleging.
Lisez attentivement les instructions - gardez le mode d’emploi pour utilisation ultérieur.
Lesen Sie genau die Anweisungen - bewahren Sie die Gebrauchsanleitung für spätere
heranziehung.
Read all instructions carefully - save this instruction manual for future reference.
Lea detenidamente todas las instrucciones - Conserve este manual para futura referencia.
Leggere con attenzione le istruzioni - conservarle per future consultazioni
Před použitím si důkladně přečtěte tento manuál - manuál si uschovejte i pro případ
budoucího nahlédnutí.
Pred použitím si dôkladne prečítajte tento manuál - manuál si uschovajte aj pre prípad
budúceho nahliadnutie.
NL Nederlands 3
FR Français 18
DE Deutsch 33
EN English 49
ES Espagnol 64
IT Italiano 79
CZ Čeština 94
SK Slovenčina 108

3
B3971
www.domo-elektro.be
NL
GARANTIE
Geachte klant,
Al onze producten ondergaan steeds een strenge kwaliteitscontrole,
alvorens ze aan je worden aangeboden. Mocht je desondanks toch nog
problemen hebben met jouw toestel, dan betreuren wij dit ten zeerste.
In dat geval verzoeken wij je contact op te nemen met onze klantendienst.
Onze medewerkers zullen je met plezier verder helpen.
+32 14 21 71 91 [email protected]
Maandag – Donderdag : 8.30u – 12.00u en van 13.00u – 17.00u
Vrijdag : 8.30u – 12.00u en van 13.00u – 16.30u
Dit apparaat heeft een garantietermijn van 2 jaar vanaf de datum van aankoop. De garantie op
accessoires en onderdelen welke aan slijtage onderhevig zijn, bedraagt 6 maanden. Gedurende
de garantieperiode zal de distributeur volledige verantwoording op zich nemen voor gebreken die
aanwijsbaar berusten op materiaal- of constructiefouten. Wanneer dergelijke gebreken voorkomen, zal
het apparaat, indien nodig, vervangen of gerepareerd worden. De garantieperiode van 2 jaar zal op dit
moment niet terug beginnen, maar loopt verder tot 2 jaar na de aankoop van het toestel. De garantie
wordt verleend op basis van het kassaticket. Indien je apparaat defect is binnen de garantietermijn van 2
jaar, dan mag je het toestel samen met het originele kassaticket binnenbrengen in de winkel waar je het
toestel hebt aangekocht.
De garantie op accessoires en onderdelen die onderhevig zijn aan slijtage, bedraagt 6 maanden.
De garantie en verantwoordelijkheid/aansprakelijkheid van de leverancier en fabrikant vervallen
automatisch in de volgende gevallen:
· Bij het niet naleven van de instructies in deze handleiding.
· Bij verkeerde aansluiting, vb. te hoge elektrische spanning.
· Bij verkeerd, hardhandig of abnormaal gebruik.
· Bij onvoldoende of verkeerd onderhoud.
· Bij herstelling of wijziging van het toestel door de consument of niet gemachtigde derden.
· Bij gebruik van onderdelen of accessoires welke niet worden aanbevolen of geleverd door de
leverancier / fabrikant.
VEILIGHEIDSVOORSCHRIFTEN
Wanneer je elektrische toestellen gebruikt, moeten volgende veiligheidsinstructies in acht genomen
worden:
· Lees deze instructies zorgvuldig door. Bewaar deze handleiding om later te raadplegen.
· Verwijder voor het eerste gebruik alle verpakkingsmaterialen en eventuele promotionele stickers.
Zorg ervoor dat kinderen niet met de verpakkingsmaterialen spelen.
· Dit toestel is geschikt om te gebruiken in de huishoudelijke omgeving en in gelijkaardige omgevingen
zoals:
· Keukenhoek voor personeel van winkels, kantoren en andere gelijkaardige professionele
omgevingen
· Boerderijen
· Hotel- en motelkamers en andere omgevingen met een residentieel karakter
· Gastenkamers, of gelijkaardige

4
B3971
NL
· Dit toestel mag gebruikt worden door kinderen vanaf 16 jaar en personen met een fysieke of
sensoriële beperking of mensen met een beperkte mentale capaciteit of gebrek aan ervaring of
kennis, op voorwaarde dat deze personen toezicht krijgen of instructies hebben gekregen over het
gebruik van het toestel op een veilige manier en dat ze ook de gevaren kennen bij het gebruik van het
toestel. Kinderen mogen niet met het toestel spelen. Het onderhoud en de reiniging van het toestel
mogen niet door kinderen gebeuren tenzij ze ouder zijn dan 16 jaar en onder toezicht staan.
· Houd het toestel en de voedingskabel buiten het bereik van kinderen jonger dan 16 jaar.
· Opgelet: het toestel mag niet gebruikt worden met een externe timer of een aparte
afstandsbediening.
Het toestel kan warm worden tijdens het gebruik. Houd het elektrisch snoer weg van
hete onderdelen en dek het toestel niet af.
· Kijk voor gebruik na of het voltage vermeld op het toestel overeenkomt met het voltage van het
elektriciteitsnet bij je thuis.
· Laat het snoer niet op een heet oppervlak of over de rand van een tafel of aanrecht hangen.
· Gebruik het toestel nooit wanneer het snoer of de stekker beschadigd is, na een slechte werking
van het toestel of wanneer het toestel beschadigd is. Breng het toestel dan naar het dichtsbijzijnde
gekwaliceerde service center voor nazicht en reparatie.
· Het gebruik van accessoires die niet aanbevolen of verkocht worden door de fabrikant, kan brand,
elektrische schokken of verwondingen veroorzaken.
· Trek de stekker uit het stopcontact wanneer het toestel niet in gebruik is, vooraleer onderdelen te
monteren of demonteren en vooraleer het toestel te reinigen. Zet eerst alle knoppen in de ‘uit’-stand
en trek de stekker bij de stekker zelf uit het stopcontact. Trek nooit aan het snoer om de stekker uit het
stopcontact te trekken.
· Laat een werkend toestel niet zonder toezicht achter.
· Zet dit toestel nooit op of in de buurt van een gasvuur of elektrisch vuur of op een plaats waar het in
contact zou kunnen komen met een warm toestel.
· Gebruik het toestel niet buiten.
· Gebruik het toestel enkel voor het doel waarvoor het bestemd is.
· Gebruik het toestel altijd op een stevig, droog, een oppervlak.
· Gebruik het toestel alleen voor huishoudelijk gebruik. De fabrikant is niet verantwoordelijk voor
ongelukken die een gevolg zijn van verkeerd gebruik van het toestel, of het niet naleven van de regels
zoals ze vermeld zijn in deze handleiding.
· Alle herstellingen, buiten het gewone onderhoud van het toestel, moeten uitgevoerd worden door de
fabrikant of zijn dienst na verkoop.
· Dompel het toestel, het elektrisch snoer of de stekker nooit onder in water of een andere vloeistof.
· Hou het snoer uit de buurt van scherpe randen en hete onderdelen of andere warmtebronnen.
· Plaats het toestel niet in de buurt van gasbranders, elektrische ovens of andere warmtebronnen.
· Plaats het toestel niet in de buurt van ontvlambare materialen of explosieve en/of zelfontbrandende
gassen.
· Zorg ervoor dat de luchtroosters van het toestel niet bedekt zijn.
· Verlengsnoeren mogen alleen gebruikt worden als de netspanning en het vermogen hetzelfde of
hoger zijn als dat van de broodbakmachine.
· Het verlengsnoer moet zo aangesloten worden, dat niemand over het snoer kan vallen of er per
ongeluk aan kan trekken.
· Zet geen voorwerpen op het toestel en bedek het niet tijdens de werking, dit om het risico op brand te
vermijden.

5
B3971
www.domo-elektro.be
NL
· De broodbakmachine kan warm worden. Raak enkel de handvatten en de knoppen aan op het toestel
en gebruik, indien nodig, ovenwanten.
· Zorg ervoor dat het toestel volledig afgekoeld is en haal de stekker uit de wandcontactdoos, alvorens
de onderdelen in het toestel te steken of uit het toestel te halen.
· Verplaats de broodbakmachine niet als het toestel warme ingrediënten of vloeistoen bevat.
· Vermijd contact met de draaiende kneedhaak, als het toestel in werking is, dit om risico op letsel te
vermijden.
· Als het toestel niet gebruikt wordt of als het gereinigd wordt, zet het toestel dan volledig uit en trek
voor de veiligheid de stekker uit de wandcontactdoos.
· Maak het toestel niet schoon met een schuurspons. Losse onderdeeltjes van de spons kunnen in
contact komen met de elektrische onderdelen en elektrische schokken veroorzaken.
· Gebruik de machine niet om voedsel of andere voorwerpen in te drogen.
· Het totale gewicht van alle ingrediënten mag niet hoger zijn dan 1000 g.
· Gebruik nooit meer dan 715 g bloem per brood.
· Gebruik nooit meer dan 22 g verse gist of 4+1/4 theelepels korrelgist per brood.
· Gebruik nooit meer dan 460 ml water per brood.
ONDERDELEN
1. Deksel
2. Kijkvenster
3. Verdeler voor extra ingrediënten
4. Bedieningspaneel
5. Kneedhaak
6. Bakvorm
7. Behuizing
8. Maatbeker
9. Maatschepje
10. Haak voor verwijderen kneedhaak
VOOR HET EERSTE GEBRUIK
· Verwijder voor het eerste gebruik alle verpakkingsmaterialen en eventuele promotionele stickers.
· Maak de broodbakmachine, de bakvorm en de kneedhaak schoon met een vochtige doek. De
bakvorm en de kneedhaak zijn bedekt met een antiaanbaklaag, daarom mag je deze artikelen nooit
schoonmaken met agressieve schoonmaakmiddelen, een afwasborstel of een spons. Gebruik hiervoor
altijd een vochtige doek. Verwijder de beschermende lm van het display.
· De broodbakmachine kan bij het eerste gebruik wat roken, dit is volkomen normaal, kan geen kwaad
en zal vanzelf verdwijnen.
· Voor het eerste gebruik is het aanbevolen om een keer met een lege bakvorm te bakken op het
programma BAKE. Dit gedurende 10 minuten. Laat hierna alles aoelen en maak de onderdelen
opnieuw proper.
· Vet voor het eerste gebruik de antiaanbaklaag van de bakvorm en de kneedhaak in met een beetje
boter of margarine.
1
2
3
4
5
6
7
8
9
10

6
B3971
NL
GEBRUIK
BASISRECEPT
Onderstaand recept is voor een eenvoudig wit brood.
· 630 g bloem
· 370 ml water
· 5 g korrelgist
· 1 tl zout
· 1 el suiker
INGREDIËNTEN
De belangrijkste factoren voor het bakken van een geslaagd brood zijn de kwaliteit, de versheid en het
correct afwegen van de ingrediënten.
Let op: overschrijd nooit de maximumcapaciteit van de broodbakmachine (1000 g)! Gebruik daarom per
bakbeurt nooit meer dan deze maximumhoeveelheden van de volgende ingrediënten:
Bloem: max. 715 g
Gist: max. 22 g verse gist of 4+1/4 theelepels korrelgist
Water: max. 460 ml
Bloem
Bloem is het basisbestanddeel van brood. Het gewicht van de bloem verschilt van soort tot soort. Daarom
is het absoluut noodzakelijk de juiste hoeveelheid af te meten met een weegschaal.
Advies: let met het kopen van bloem op de tekst van de verpakking. Er moet op staan dat de bloem
geschikt is voor het maken van brood.
Gluten
Gluten zitten van nature in bloem en bevorderen het rijzen van het brood.
Gist
Gist is een micro-organisme dat groeit op diverse plantaardige voedingsmiddelen. Gist heeft het
vermogen om suiker om te zetten in alcohol en koolzuurgas, waardoor het zich bijzonder snel
vermeerdert. Ideaal dus om het deeg te laten rijzen en het lichter en beter verteerbaar te maken.
Wij adviseren in de broodbakmachine droge gist te gebruiken. Deze (korrel)gist is gemakkelijker te
verwerken, langer houdbaar dan verse gist en het geeft een constanter bakresultaat dan verse gist.
Zout
Zout zorgt niet alleen voor een bepaalde smaak aan het brood, maar regelt ook de activiteit van gist,
maakt het deeg stevig en vast en voorkomt dat het brood te hard rijst.
Boter/olie
Boter en olie geven een betere smaak aan het brood en maken het brood zachter. De boter of olie moet
op kamertemperatuur zijn voor je deze bij de andere ingrediënten voegt.
Suiker
Suiker is de voedingsbron voor de gist en een belangrijk bestanddeel van het rijzingsproces. Je kan
gewone witte suiker, bruine suiker, stroop of honing gebruiken. Het geeft een zekere zachtheid aan de
smaak van het brood, verhoogt de voedingswaarde en helpt het brood langer te bewaren.

7
B3971
www.domo-elektro.be
NL
Let op: gebruik geen grove suiker of suikerklontjes, voor bijvoorbeeld suikerbrood, omdat dit de
antiaanbaklaag van de bakvorm beschadigt.
Water
Wanneer de bloem vermengd wordt met het water, vormen de gluten zich en wordt de lucht afgesloten,
zodat het brood kan rijzen. Bij een normale omgevingstemperatuur gebruik je lauw water (± 20 à 25 °C)
om het brood te maken: koud water activeert de gist niet en warm water activeert de gist te sterk.
Melk
Melk doet de broodkorst bruinen, verbetert de smaak van het brood, verhoogt de voedingswaarde en
geeft een mooie romige kleur binnenin. Indien je verse melk gebruikt, dan dien je de hoeveelheid water
uiteraard te verminderen om het vochtigheidspeil in evenwicht te houden.
Opgelet: gebruik geen verse melk als je het bakproces programmeert met de uitgestelde programmering.
De melk zou zuur kunnen worden.
Andere ingrediënten
Gebruik steeds verse ingrediënten. Indien je noten, zonnebloempitten, gedroogd fruit of dergelijke
gebruikt, raden wij aan deze vooraf in water te laten weken, goed droog te deppen en dan pas aan het
deeg toe te voegen. Let er wel op dat deze ingrediënten niet te groot en te scherp zijn om mogelijke
beschadigingen aan de antiaanbaklaag te voorkomen.
BEDIENINGSPANEEL
Bediening
A. Menu: programmakeuze
B. Weight: gewicht (grootte) van brood kiezen
C. Color: bruining van de korst
D. Time +: tijd verhogen
E. Bake: sneltoets voor programma Bake
F. Knead: sneltoets voor programma kneden
G. Time -: tijd verlagen
H. Start- pauze/stop: aan/uit-toets
I. Home made: sneltoets voor programma Home made
Display
1. Gewicht (grootte) van brood kiezen
2. Programmakeuze
3. Timer
4. Programmafase: kneden
5. Programmafase: rust
6. Programmafase: rijzen
7. Programmafase: verwarmen
8. Programmafase: bakken
9. Programmafase: warmhouden
10. Programmafase: klaar
11. Programmafase: nummer van de fase
12. Resterende tijd in minuten
13. Bruining van de korst: licht, medium, donker
14. Vergrendeling van het bedieningspaneel
A
D
G
B
E
H
C
F
I
MENU
TIME +
TIME -
WEIGHT
BAKE
START
PAUZE/STOP
COLOR
KNEAD
HOME MADE
1
2
7
8
12
9
10
1411
13
6
5
4
3

8
B3971
NL
A. Menu
Deze toets gebruik je om het juiste bakprogramma te selecteren.
Elke keer je op deze toets drukt, hoor je een piep en het programmanummer verandert. Het
programmanummer en de overeenkomstige baktijd staan op het display vermeld.
B. Weight
Deze toets gebruik je om aan te geven welk gewicht van brood je wenst te maken. Je kan kiezen uit een
brood van 500 g, 750 g of 1000 g.
Tip: de totale hoeveelheid van de ingrediënten vermeld in het recept is het gewicht van het brood dat je
gaat maken.
C. Color
Deze toets gebruik je om aan te geven of je de korst licht, medium of donker wilt hebben.
Tip: indien je een recept voor de eerste maal probeert, adviseren we de korstkleur medium te kiezen.
D. Time + en G. Time -
Met deze toetsen kan je bij bepaalde programma’s kiezen voor uitgesteld starten en de timer instellen. Bij
andere programma’s kan je de programmatijd aanpassen.
E. Bake
Deze toets is een sneltoets voor het programma bakken. Druk op start-pauze/stop om het programma te
bevestigen.
F. Knead
Deze toets is een sneltoets voor het programma kneden. Druk op start-pauze/stop om het programma te
bevestigen.
H. Start- pauze/stop
Met deze toets start je het geselecteerde programma, of pauzeer/annuleer je een lopend programma.
Druk kort op deze toets om een programma te pauzeren. Druk nog eens op de knop om te hervatten. Als
je zelf een programma niet hervat binnen 3 minuten zal de werking automatisch gestopt worden.
Om een programma te beëindigen, druk je de toets een aantal seconden in totdat je een piep hoort.
I. Home made
Deze toets is een sneltoets voor het programma home made. Zie “Home made instellen” onder de rubriek
gebruik. Druk op start-pauze/stop om het programma te bevestigen.
PROGRAMMA’S
Programmatijden :
Programma 500 g 750 g 1000 g
1. Normaal (basic) 3:05 3:10 3:15
2. Frans (french) 3:35 3:40 3:45
3. Volkoren (whole wheat) 4:05 4:10 4:15
4. Zoet (sweet) 3:35 3:40 3:45
5. Rijst (rice) 2:50 2:55 3:00
6. Gluten vrij (gluten free) 3:05 3:10 3:15
7. Snel (quick) 2:10 2:15 2:20

9
B3971
www.domo-elektro.be
NL
8. Fruit 3:05 3:10 3:15
9. Cake 2:20*
10. Sandwich 3:00 3:05 3:10
11. Rozijnen/noten (raisin/nut) 3:05 3:10 3:15
12. Rogge (rye) 4:05 4:10 4:15
13. Kneden (knead) 0:08*
14. Deeg (dough) 1:30*
15. Brioche 3:35 3:40 3:45
16. Bakken (bake) 0:30*
17. Homemade -- -- --
18. Italian (Italiaans) 3:05 3:10 3:15
* Indien je één van deze programma’s kiest, kan je geen gewicht kiezen.
De tijd die op het display staat, is aangegeven in uren en minuten. Voorbeeld: programma 1, normaal, 750
gram duurt 3 uur en 10 minuten.
1. Normaal (basic)
Dit is het meest gebruikte programma voor het maken van wit brood.
2. Frans (french)
De kneedtijd en rijstijd zijn langer dan bij het normale programma. Hierdoor krijg je een krokantere korst
en een luchtigere textuur.
3. Volkoren (whole wheat)
Dit programma is het meest geschikte programma voor het maken van zware broden zoals volkoren en
meergranen brood. Het brood zal over het algemeen wat kleiner zijn dan een wit brood, omdat het meel
zwaarder is. Bij dit programma gebruik je beter geen uitgestelde programmering, aangezien dit kan
leiden tot minder goede resultaten.
4. Zoet (sweet)
Dit programma is geschikt voor het maken van onder andere rozijnenbrood, suikerbrood,
chocoladebrood,...
5. Rijst (rice)
Gebruik dit programma voor een brood op basis van rijstmeel. Na het kneden, kan het deeg rijzen
vooraleer het wordt gebakken. De korst van een rijstbrood is dunner en zachter dan een normaal brood.
6. Glutenvrij (gluten free)
Dit is het programma voor het maken van glutenvrij brood. Het deeg van een glutenvrij brood is vochtiger
en heeft de consistentie van een beslag. Hierdoor mag het deeg niet te lang kneden of rijzen. De
baktijd daarentegen is wel langer. Bij dit programma gebruik je beter geen uitgestelde programmering,
aangezien dit kan leiden tot minder goede resultaten. Alle ingrediënten voeg je best van het begin toe.
7. Snel (quick)
Voor het kneden, rijzen en bakken van brood met bakpoeder. Het resultaat is gewoonlijk een kleiner
brood met een vastere textuur. Het is aangeraden om, voor je op start duwt, de ingrediënten even met
een houten lepel om te scheppen.

10
B3971
NL
8. Fruit
Gebruik de verdeler om ingrediënten toe te voegen zoals rozijnen of andere gedroogde fruitsoorten. De
machine zal de ingrediënten zelf toevoegen vanuit de verdeler op het juiste moment. Als je graag vers of
vochtiger fruit wenst toe te voegen aan je brood, doe je dit best rechtstreeks in de bakvorm wanneer je
een signaal hoort.
9. Cake (cake)
Met dit programma kan je brood maken dat bereid wordt met bijvoorbeeld bakpoeder. Broden gebakken
met dit programma worden minder hoog en vaster van structuur. Indien je met dit programma cake wilt
maken, raden we aan de ingrediënten in de bakvorm te doen. Daarna stel je de machine in en voordat je
op start drukt, moet je even met een houten lepel de ingrediënten omscheppen. Dit bevordert namelijk
de kneding. Bij dit programma kan je het gewicht niet zelf kiezen.
10. Sandwich (sandwich)
Dit programma kan je gebruiken om een heel luchtig wit brood te maken voor onder andere sandwiches.
Let op ! Bij dit programma kan je geen korstkleur instellen, de machine doet dit zelf.
11. Rozijnen/noten brood (Raisin/nut bread)
Gebruik de verdeler om droge ingrediënten toe te voegen zoals rozijnen of noten. De machine zal de
ingrediënten zelf toevoegen vanuit de verdeler op het juiste moment.
12. Rogge (Rye)
Dit programma is ideaal voor broden met een zwaardere variant graan zoals rogge. Het brood zelf is ook
vaster en zwaarder dan een normaal brood.
13. Knead (kneden)
Met dit programma zal de machine enkel kneden, zonder bakken of rijzen. Je kan dit programma
gebruiken voor bijvoorbeeld het kneden van pizzadeeg. Met de toetsen time + en time - kan je de
werkingstijd aanpassen.
14. Deeg (dough)
Met dit programma kan je de machine alleen deeg laten kneden en laten rijzen.
15. Brioche
Dit programma is geschikt voor broden met extra ingrediënten die zorgen voor een hoog gehalte suiker,
vet en proteïnen (bvb. chocolade, suiker, ...) Deze ingrediënten zorgen voor een donkere korst. De
programmafase rijzen zal meer tijd in beslag nemen, waardoor je een licht en luchtig resultaat krijgt.
16. Bakken (bake)
Dit programma kan je gebruiken voor kant-en-klaar deeg dat je bijvoorbeeld al eerder hebt gemaakt. Je
kan het deeg met dit programma alleen aakken. Ook kan je reeds gebakken brood weer wat opwarmen.
17. Home made
Deze toets kan je programmeren met zelfgekozen tijdsinstellingen. Zie “Home made instellen” onder de
rubriek gebruik.
18. Italiaans (Italian)
Maak een lekker zuiders brood met dit programma. Je kan bij dit programma extra ingrediënten
toevoegen zoals kruiden, zongedroogde tomaten, olijven,...

11
B3971
www.domo-elektro.be
NL
GEBRUIK
1. Haal de bakvorm uit de machine door deze een kwartslag in tegenwijzerzin aan de handgreep recht
omhoog uit de machine te trekken.
2. Plaats de kneedhaak (bijgevoegd) op de as in de bakvorm. De kneedhaak moet op een juiste en
zorgvuldige manier geplaatst worden, zodat alle ingrediënten voldoende gemengd en gekneed
worden.
3. Doe de ingrediënten in de bakvorm, in de volgorde zoals hieronder beschreven.
· Water/melk
· Boter/olie
· Eventueel eieren
· Zout (aan de ene kant)
· Suiker (aan de andere kant)
· Bloem
· Gist (doe de gist in een kuiltje in het midden van de bloem)
!
Let op! De gist mag niet in aanraking komen met het water, het zout of de suiker. Dit zou de gist
kunnen activeren, alvorens de ingrediënten voldoende gemengd en gekneed zijn.
Extra ingrediënten zoals noten, kruiden, gedroogde vruchten,... kan je toevoegen aan de verdeler, of
kunnen nadien nog toegevoegd worden. Zie rubriek “Extra ingrediënten toevoegen”.
4. Verwijder alle restjes van de ingrediënten aan de buitenkant van de bakvorm. Plaats de bakvorm
weer in de machine. Draai de bakvorm met de klok mee zodat hij vastklikt.
5. Sluit het deksel.
6. Steek de stekker in het stopcontact.
7. Stel het juiste programma in door middel van de menu-toets. Elke invoer wordt bevestigd met een
piepsignaal.
8. Stel de kleur van de korst in met de color-toets. Je kan kiezen tussen licht, medium of donker. Stel de
grootte van het brood in (500 g, 750 g of 1000 g) met de weight-toets.
9. Stel eventueel de uitgestelde programmering in. (zie rubriek “uitgestelde programmering”)
10. Druk op start-pauze/stop. De dubbele punt zal nu gaan knipperen en geeft aan dat de machine
werkt. Wanneer je de uitgestelde programmering hebt ingesteld, zal het toestel pas beginnen
werken als de ingestelde tijd is verstreken.
11. Wanneer het brood klaar is, zal de machine piepen. Het display toont 0:00. Druk op start-pauze/stop
en houd deze toets enkele seconden ingedrukt. De machine zal nogmaals piepen om te bevestigen
dat je het programma hebt gestopt. Als je het programma niet beëindigd met deze toets zal de
warmhoudfunctie het brood nog 60 minuten warmhouden. Verwijder de stekker uit het stopcontact
en open het deksel van de machine. Verwijder de bakvorm met behulp van ovenhandschoenen.
12. Laat het brood in de bakvorm ca. 10 tot 15 minuten aoelen. Houd de bakvorm omgekeerd boven
het aanrecht en schud het brood lichtjes uit de vorm.
Plaats het brood en de bakvorm nooit op de buitenkant van de machine of direct op een plastic
tafelkleed. Wanneer het brood niet onmiddellijk los komt, draai dan voorzichtig aan de as aan de
onderzijde van de bakvorm totdat het brood loskomt. Gebruik nooit scherpe objecten voor het
verwijderen van het brood zodat je de antiaanbaklaag van de bakvorm niet beschadigd.
13. Indien je het brood uit de machine haalt en de kneedhaak in het brood blijft steken, verwijder deze
voorzichtig uit het brood met behulp van de meegeleverde haak. Laat het brood eventueel nog
verder aoelen op een rooster zodat je daarna de kneedhaak met je handen kan verwijderen. Let
wel goed op dat de kneedhaak goed is afgekoeld. Het is aanbevolen om het brood pas na 15-20
minuten door te snijden.

12
B3971
NL
WARMHOUDFUNCTIE
Als je bijvoorbeeld een keer niet op tijd thuis bent, verwarmt de broodbakmachine nog 60 minuten na. Dit
is niet bij de programmatijd inbegrepen. Als je deze instelling wilt onderbreken, druk dan enkele seconden
op start-pauze/stop.
Als het brood langer dan een uur in de broodbakmachine blijft zitten, wordt het vochtig. Spoel de
bakvorm onmiddellijk met warm water, nadat het brood eruit is gehaald, om ervoor te zorgen dat de
kneedhaak niet aan de as blijft kleven. Zet de broodbakmachine nog niet in werking, als de machine nog
niet afgekoeld is.
EXTRA INGREDIËNTEN TOEVOEGEN
Tijdens het kneedproces van de volgende programma’s gaat er een piepsignaal na het kneden: Normaal,
Frans, Volkoren, Zoet, Rijst, Gluten vrij, Snel, Fruit, Cake, Rozijnen/noten, Rogge, Brioche, Italiaans. Dit
piepsignaal geeft aan dat je extra ingrediënten kan toevoegen zoals: rozijnen, noten, zaden, enz. Je kan
de ingrediënten toevoegen via de verdeler of manueel.
Verdeler
Open de verdeler door het deksel naar links te schuiven. Voeg de ingrediënten toe. Sluit het deksel.
De ingrediënten in de verdeler zullen automatisch aan het brood worden toegevoegd na het kneden en
rijzen. Opgelet:
· Voeg geen vochtige, vloeibare of ingrediënten in poedervorm toe via de verdeler.
· Doe de verdeler nooit te vol.
· Grote noten hak je best jner voor je deze toevoegt aan de verdeler.
· Voor je ingrediënten toevoegt aan de verdeler, controleer dan steeds dat het klepje aan de binnenzijde
van het toestel gesloten is.
Manueel
Je kan ook manueel ingrediënten toevoegen. Pauseer het programma op het ogenblik dat je het signaal
hoort, open het deksel, voeg de extra ingrediënten toe, sluit vervolgens het deksel en druk terug op de
start-toets. Deze manuele werkwijze gebruik je best voor: vochtige of lopende ingrediënten, ingrediënten
in poedervorm, grotere hoeveelheden.
GEHEUGENFUNCTIE
Als het toestel uitvalt door een stroompanne zal de geheugenfunctie werken gedurende 10 minuten.
Je hoeft dus het programma niet opnieuw te starten wanneer de stroom terug is. Als de panne langer
duurt dan 10 minuten zal het programma geannuleerd worden.
HOME MADE INSTELLEN
De toets home made is gereserveerd voor je eigen bakprogramma. Je kan de tijd van alle
programmafasen zelf bepalen. Indien je bepaalde fasen wil overslaan, stel dan de tijd in op 0:00.
Opgelet: de instellingen van deze knop worden niet bewaard als de stekker uit het stopcontact wordt
verwijderd.
1. Druk op de Home made-toets, of kies programma 17 met de menu-toets.
2. Druk nogmaals op de Home made-toets om te beginnen met programmeren. Op het display
knippert de tijdsweergave en het icoon van de programmafase. Zie de tabel hieronder met
programmafasen en standaard tijdsinstelling.

13
B3971
www.domo-elektro.be
NL
3. Stel voor elke fase de gewenste tijd in met de toetsen Time + (tijd verhogen) en Time - (tijd
verlagen). Bevestig de gekozen tijd door op de Home made-toets te drukken.
4. Wanneer alle fasen doorlopen zijn, zie je de totale duurtijd van het programma op het display. De
standaard totale duurtijd bedraagt 3 uur. Je kan het ingestelde programma dan starten met de
start-toets. Als je al op de start-toets drukt tijdens het instellen van de fasen, zal het programmeren
vervroegd stoppen.
Indien gewenst, kan je dit programma ook uitgesteld laten starten, zie “uitgestelde programmering”.
Programmafasen Icoon Standaard instelling Aanpasbaar tijdsslot
Kneden 1
0:10 1-30 min.
Rust 1
0:03 0-30 min.
Kneden 2
0:05 0-30 min.
Rust 2
0:10 0-30 min.
Kneden 3
0:20 0-25 min.
Rijzen 1
0:42 0-60 min.
Rijzen 2
0:40 0-60 min.
Rijzen 3
0:00 0-60 min.
Bakken
0:50 0-80 min.
Warmhoudfunctie
1:00 0-60 min.
KNEEDHAAK VERWIJDEREN VOOR HET BAKKEN
Je kan de kneedhaak al verwijderen, nadat het deeg voor de laatste keer gekneed is.
1. Druk kort op de toets start-pauze/stop om het bakproces te onderbreken of trek de stekker uit het
stopcontact.
2. Open het deksel en haal de bakvorm eruit. Haal het deeg eruit met bebloemde handen en verwijder
de kneedhaak.
3. Plaats het deeg opnieuw in de bakvorm en sluit het deksel.
4. Steek de stekker opnieuw in het stopcontact en druk op start-pauze/stop. Het bakprogramma wordt
voortgezet.
UITGESTELDE PROGRAMMERING
Je kan het apparaat zodanig programmeren dat de bereiding klaar is op een zelf gekozen tijdstip.
· Bereken het tijdsverschil tussen het moment waarop je het programma start en het uur waarop je wilt
dat de bereiding klaar is. De broodbakmachine telt hier automatisch de tijdsduur van de cycli van het
programma bij op.
· Door op de toetsen time + en time - te drukken, zal de tijd met 10 minuten per keer toe- of afnemen.
· Op het display zie je het zandloper icoon.

14
B3971
NL
· Uitgesteld programmeren kan niet bij: kneden en bakken. Als je bij deze programma’s op de Time +
en Time - toetsen drukt, zal de programmatijd aangepast worden.
Voorbeeld :
Het is 9:00 uur ’s morgens en je wil om 17:00 ’s middags vers gebakken brood.
Doe alle ingrediënten in de bakvorm. Plaats de bakvorm in de broodbakmachine. Sluit het deksel en
druk op de menu-toets om het juiste programma in te stellen. Druk op de color-toets om de korstkleur
in te stellen en kies voor het gewenste gewicht van het brood. Druk op de time + toets tot er 8:00 op het
display verschijnt. Er zullen immers 8 uren voorbij gegaan zijn vanaf het moment dat je op de start-toets
gedrukt hebt tot het moment dat het brood klaar moet zijn (17:00 ’s middags).
Druk op de start toets. Het dubbele punt op het display zal gaan knipperen en het zandlopericoon is
zichtbaar. De tijd zal nu aftellen tot het tijdstip bereikt is waarop de broodbakmachine moet beginnen
met kneden. De broodbakmachine zal nu het hele ingestelde programma doorlopen zodat het brood
klaar is op het gekozen tijdstip.
Opgelet: gebruik het programma met timer niet wanneer je ingrediënten gebruikt die maar beperkt
houdbaar zijn, zoals verse melk, eieren, yoghurt, kaas, vers fruit.
TIPS
· Weeg de ingrediënten altijd zeer nauwkeurig af en let erop dat deze op kamertemperatuur zijn.
· Je kan de versheid van de gist vaststellen door de volgende test te doen: los in een half kopje lauw
water 1 theelepel suiker op en voeg aan dit mengsel 1 theelepel gist toe. Na een paar minuten moet
het geheel gaan borrelen en bruisen, pas dan weet je dat de gist vers is.
· Zout remt de werking van gist. Suiker bevordert de werking. Indien je één van deze twee ingrediënten
niet mag gebruiken vanwege een dieet, dan moet je het andere ook weglaten. Je krijgt dan brood
zonder suiker en zout.
· Het brood dat je zelf bakt, bevat geen conserveringsmiddelen en is maar beperkt houdbaar. Indien je
het brood luchtdicht verpakt, nadat je het goed hebt laten aoelen, kan je het brood een paar dagen
goed houden. Je kan het brood ook invriezen, waardoor je het langer kan bewaren.
· Vet de as in de bakvorm in met een beetje boter om ervoor te zorgen dat de kneedhaak makkelijker
loskomt.
REINIGING EN ONDERHOUD
· Zet voordat je de broodbakmachine wilt reinigen het apparaat uit, haal de stekker uit het stopcontact
en laat het volledig aoelen.
· Reinig het toestel grondig na ieder gebruik. Indien de bakvorm, de as in de bakvorm en kneedhaak
niet schoon zijn voor gebruik, kan dit de werking en levensduur van de broodbakmachine beïnvloeden.
· Droog het toestel en alle onderdelen grondig af. Laat het deksel een half uur open, zodat alle delen
voldoende droog zijn voor opbergen of nieuw gebruik.
·
!
Opgelet: dompel het toestel nooit onder in water.
BUITENKANT
Reinig de buitenkant van het apparaat en het kijkvenster met een vochtige doek of spons. Verwijder de
bakvorm alvorens te reinigen. Indien noodzakelijk kan je de buitenkant van het apparaat met behulp van
een mild afwasmiddel reinigen.

15
B3971
www.domo-elektro.be
NL
Indien nodig kan je een zacht borsteltje gebruiken om de binnenkant van de verdeler te reinigen. Wees
voorzichtig dat je de scharnieren van het klepje niet beschadigd.
BINNENKANT
De binnenkant van het apparaat kan je voorzichtig met een licht vochtige doek schoonmaken. Let op met
schoonmaken van het verwarmingselement.
BAKVORM
Haal de bakvorm uit de machine door deze een kwartslag in tegenwijzerzin aan de handgreep recht
omhoog uit de machine te trekken. De bakvorm kan je reinigen met warm water. Let hierbij op dat je de
antiaanbaklaag niet beschadigd. Indien het niet lukt om de kneedhaak uit de bakvorm te verwijderen,
laat dan de bakvorm volledig aoelen. Giet een beetje warm water in de bakvorm zodat de kneedhaak
onder water staat. Het water zal er nu voor zorgen dat de klevende deeltjes oplossen en de kneedhaak
verwijderd kan worden.
Gebruik geen schoonmaakmiddelen of afwasborstels, deze kunnen de antiaanbaklaag van de bakvorm
beschadigen. De bakvorm is niet geschikt om in de afwasmachine te reinigen.
VEELGESTELDE VRAGEN
Probleem Oplossing
Ik bekom niet het
gewenste resultaat.
· De samenstelling van het deeg is zeer belangrijk om tot een goed
resultaat te komen. Ook kunnen verschillende merken bloem voor een
verschillend resultaat zorgen. Al doende zal je met het toestel leren
werken. Wij raden aan om het basisrecept te proberen. Ook een kant-
en-klare broodmix kan hier voor de oplossing zorgen. Indien dit niet
helpt, dan neem je best contact op met onze klantendienst.
· De ingrediënten zijn niet nauwkeurig afgewogen.
· De ingrediënten zijn niet vers.
· De ingrediënten zijn niet op kamertemperatuur.
Kan ik tijdens het proces
kijken of het deeg goed
is?
Het deeg moet eruit zien als een gladde, elastische ronde bal. Open na 5
à 10 minuten (tijdens het kneden) het deksel en raak de bovenkant van
de deegbal even met je vingers aan. Het deeg moet een beetje blijven
plakken aan de vingers. Kleeft het deeg te hard aan je vingers, dan is het
te vochtig en moet je nog wat bloem toevoegen. Kleeft het deeg helemaal
niet, dan is het te droog en moet je een klein beetje water toevoegen.
Open het deksel niet tijdens het rijzen. Het brood zou hierdoor kunnen
inzakken.
Ik wil meerdere broden
na elkaar bakken.
Laat het toestel 20 minuten aoelen met het deksel open. Een
opgewarmd toestel zal er voor zorgen dat de gist te snel zal beginnen
werken, waardoor het resultaat niet goed zal zijn.

16
B3971
NL
Het brood is ingezakt. · Indien het brood ingezakt lijkt langs alle kanten, dan wil dit zeggen
dat het deeg te vochtig was. Probeer iets minder water toe te voegen.
Wanneer je geconserveerd fruit of groenten gebruikt, laat ze dan eerst
goed uitlekken en wrijf ze goed droog voordat je ze gebruikt. Ze zijn
langere tijd doordrenkt waardoor ze overtollig vocht bezitten.
· Je kan proberen om een lichtere bloemsoort te gebruiken.
· Het kan ook te veel gerezen zijn. Het deeg is zoveel gerezen dat het
deeg de rijzing niet aan kan. Probeer iets minder gist toe te voegen, 1
à 2 gram. Indien het deeg te hard gerezen is, zou het kunnen dat het
boven uit de bakvorm gelopen is. Trek de stekker uit en laat het toestel
aoelen. Reinig nadien het verwarmingselement.
Het brood is in het
midden onvol-
doende gebakken.
Indien de binnenkant van het brood onvoldoende gebakken is, kan dit aan
de gebruikte bloemsoort liggen. Dit gebeurt meestal door het gebruik van
zwaardere bloemsoorten, zoals roggebloem of volkorenbloem. Probeer
één kneedproces meer te gebruiken wanneer je deze bloemsoorten
gebruikt. Wanneer de broodbakmachine het eerste kneedproces heeft
beëindigd, zet je het apparaat stop. Stel dan het apparaat opnieuw in en
druk op start. Het apparaat zal opnieuw beginnen met kneden, er is nu een
grotere hoeveelheid lucht in het deeg opgenomen.
De bodem van het brood
is te dik.
Je hebt het brood nog wat langer met de warmhoudfunctie in het toestel
laten zitten. Het water zal verdampen, waardoor je een dikkere bodem
krijgt. Neem het brood onmiddellijk na het programma uit het toestel.
Het brood is overgelopen. · Je hebt te veel gist gebruikt.
· De gist is te hard geactiveerd geweest, door bv. te veel suiker of een te
hoge temperatuur.
· Je hebt teveel deeg gebruikt. Gebruik niet meer dan 1000 g.
H:HH verschijnt op het
display.
Het toestel is nog te warm. Laat het toestel eerst aoelen.
E:EO verschijnt op het
display.
Er is een probleem met de temperatuurvoeler. Stuur het toestel op naar
onze naverkoopdienst.
Waarom mag ik geen
extra ingrediënten
toevoegen aan het begin
van het programma?
De extra ingrediënten (zoals krenten of noten), zullen kapot gekneed
worden en het brood zal niet goed gekneed worden. Ook zal het een
invloed hebben op het rijzen. Voeg de extra ingrediënten pas toe wanneer
het toestel piept, na het kneden/rijzen.
Mag ik melk gebruiken in
plaats van water?
Dat mag! Zorg er steeds voor dat het complete volume vocht klopt. De
verhouding melk en water maakt geen verschil.
De korst is soms lichter en
soms donkerder.
Deze kan je selecteren met de “color” toets. Bereidingen met meer suiker
zullen er ook voor zorgen dat de korst donkerder is.
De broodmachine kneedt
trager dan normaal.
Dit kan gebeuren bij zware degen, waardoor de motor harder moet
draaien. Dit is echter geen probleem voor de machine. Voeg een eetlepel
vloeistof toe.
De menghaak zit vast in
de bakvorm.
Verwijder het brood uit de bakvorm. Vul vervolgens de bakvorm met
warm water en laat dit een kwartier weken. Het vastgekoekte deeg zal
loskomen.

17
B3971
www.domo-elektro.be
NL
Er zit condens aan de
binnenkant van het
kijkvenster.
Dit is normaal. Dit komt door de warmte.
Ik heb een kant-en-klare
mix gebruikt, maar het
brood is nog steeds
mislukt.
Alvorens het toestel op te sturen ter herstelling, raden wij aan om
nogmaals het basisrecept te proberen. Kant-en-klare mix kan soms ook
ingrediënten bevatten, die voor een minder resultaat zorgen.
MILIEURICHTLIJNEN
Dit symbool op het product of op de verpakking wijst erop dat dit product niet
als huishoudafval mag worden behandeld. Het moet naar een plaats worden
gebracht waar elektrische en elektronische apparatuur wordt gerecycleerd.
Als je ervoor zorgt dat dit product op de correcte manier wordt verwijderd,
voorkom je mogelijk voor mens en milieu negatieve gevolgen die zich zouden
kunnen voordoen in geval van verkeerde afvalbehandeling. Voor meer
details in verband met het recycleren van dit product, neem je best contact
op met de gemeentelijke instanties, het bedrijf of de dienst belast met de
verwijdering van huishoudafval of de winkel waar je het product hebt gekocht.
Het verpakkingsmateriaal is recycleerbaar. Behandel de verpakking
milieubewust.

18
B3971
FR
GARANTIE
Cher client,
Tous nos produits sont soumis à des contrôles qualité stricts avant
d’être proposés à la vente. Si vous deviez toutefois rencontrer
un problème avec votre appareil, nous le déplorons vivement.
Dans ce cas, nous vous invitons à prendre contact avec notre service clientèle.
Nos collaboratrices se feront un plaisir de vous aider !
+32 14 21 71 91 [email protected]
Du lundi au jeudi : 8 h 30 – 12 h et 13 h – 17 h
Vendredi : 8 h 30 – 12 h et 13 h – 16 h 30
Cet appareil est garanti 2 ans à compter de la date d’achat. La garantie sur les accessoires et pièces soumis
à usure n’est que de 6 mois. Durant la période de garantie, le distributeur assumera l’entière responsabilité
en cas de défauts de fonctionnement (matériel) ou de fabrication. Si un tel problème survient, l’appareil
sera remplacé ou réparé. La période de garantie de 2 ans ne reprend pas à zéro, mais se poursuit (jusqu’à
2 ans à compter de la date d’achat de l’appareil). La garantie est accordée sur la base du ticket de caisse.
Pour les accessoires et les éléments d’usure, une garantie de 6 mois s’applique.
La garantie et la responsabilité du fournisseur et du fabricant n’ont plus eet dans les cas suivants :
· Les instructions du manuel n’ont pas été suivies.
· Mauvais raccordement, par ex. tension électrique trop forte.
· Utilisation contraire, brutale ou anormale.
· Entretien insusant ou non conforme.
· Réparation ou modication de l’appareil par le consommateur ou un tiers non autorisé.
· Utilisation d’éléments ou d’accessoires qui ne sont pas recommandés ou fournis par le fournisseur/
fabricant.
CONSIGNES DE SÉCURITÉ
Les consignes de sécurité suivantes doivent être respectées lors de l’utilisation de tout appareil électrique:
· Lisez ces consignes très attentivement. Conservez ce mode d’emploi an de pouvoir le consulter
ultérieurement.
· Avant la première utilisation, enlevez tous les éléments d’emballage et les éventuels autocollants
promotionnels. Veillez à ce que les enfants ne jouent pas avec les matériaux d’emballage.
· Cet appareil est conçu pour être utilisé dans un environnement domestique ou dans des
environnements comparables, tels que :
· Coin-cuisine du personnel dans les commerces, les bureaux et autres environnements
professionnels comparables
· Fermes
· Chambres d’hôtel ou de motel et autres environnements à caractère résidentiel
· Chambres d’hôtes ou comparables
· Cet appareil peut être utilisé par des enfants âgés de 16 ans ou plus et par des personnes présentant
un handicap physique ou sensoriel, une capacité mentale limitée ou un manque d’expérience ou
de connaissances, à condition que ces personnes soient sous surveillance ou qu’elles aient reçu des
instructions sur la manière d’utiliser l’appareil en toute sécurité et qu’elles connaissent les dangers liés

19
B3971
www.domo-elektro.be
FR
à son utilisation. Les enfants ne peuvent pas jouer avec cet appareil. L’entretien et le nettoyage de
l’appareil ne peuvent pas être eectués par des enfants, sauf s’ils sont âgés de plus de 16 ans et sous la
surveillance d’un adulte.
· Gardez l’appareil et le cordon électrique hors de portée des enfants.
· Attention: l’appareil ne peut pas être utilisé avec une minuterie externe ou une commande à distance
séparée.
L’appareil peut chauer pendant l’utilisation. Tenez le cordon électrique à distance de
parties chaudes et ne couvrez pas l’appareil.
· Vériez avant usage si la tension indiquée sur l’appareil correspond à la tension du réseau électrique de
votre domicile.
· Ne laissez pas le cordon pendre sur une surface chaude ou sur le rebord d’une table.
· N’utilisez jamais l’appareil lorsque le cordon ou la che sont endommagés, après un mauvais
fonctionnement de l’appareil ou lorsque l’appareil est endommagé. Amenez alors l’appareil au centre
de services le plus proche pour contrôle et réparation.
· L’utilisation d’accessoires non préconisés par le fabricant peut provoquer un incendie, une
électrocution ou des blessures.
· Retirez la che de la prise lorsque l’appareil n’est pas utilisé, avant d’installer ou d’enlever des pièces et
avant de nettoyer l’appareil. Mettez tous les boutons en position « arrêt » et retirez la che de la prise.
Ne tirez jamais sur le câble pour retirer la che de la prise.
· Ne laissez jamais un appareil en service sans surveillance.
· Ne placez jamais cet appareil sur ou à proximité d’un feu au gaz ou d’un feu électrique où il pourrait
entrer en contact avec un appareil chaud.
· N’utilisez pas l’appareil à l’extérieur.
· Utilisez l’appareil uniquement dans le but auquel il est destiné.
· Utilisez toujours l’appareil sur une surface solide, sèche et plane.
· Cet appareil ne convient qu’à un usage domestique. Le fabricant décline toute responsabilité pour
des accidents qui découleraient d’un mauvais usage de l’appareil ou du non-respect des instructions
fournies dans ce manuel.
· Toutes les réparations, en dehors de l’entretien ordinaire de l’appareil, doivent être réalisées par le
fabricant ou son service après-vente.
· N’immergez jamais le cordon électrique, la che ou l’appareil lui-même dans l’eau ou tout autre milieu
liquide.
· Tenez le cordon éloigné de rebords tranchants et de pièces brûlantes ou d’autres sources de chaleur.
· Ne placez pas l’appareil à proximité de matériaux inammables ou explosifs, ou de gaz à inammation
spontanée.
· Veillez à ce que les grilles d’aération de l’appareil ne soient pas couvertes.
· Les rallonges ne peuvent être utilisées que si la tension et la puissance électriques sont les mêmes ou
plus hautes que celles de la machine à pain.
· La rallonge doit être raccordée de telle façon que personne ne puisse tomber à cause du cordon ou le
tirer par accident.
· Ne placez pas d’objet sur l’appareil et ne le couvrez pas pendant le fonctionnement, pour éviter le
risque d’incendie.
· La machine à pain peut devenir chaude. Ne touchez que les poignées et les boutons de l’appareil et
utilisez, si nécessaire, des gants de cuisine.
· Assurez-vous que l’appareil est complètement refroidi et retirez la che de la prise murale avant de
placer des éléments dans l’appareil ou d’en retirer des éléments.

20
B3971
FR
· Ne déplacez pas la machine à pain, si l’appareil contient des ingrédients ou des liquides chauds.
· Évitez le contact avec les crochets pétrisseurs tournants quand l’appareil fonctionne, pour éviter une
blessure.
· Éteignez complètement l’appareil et retirez la che électrique de la prise murale pour des raisons de
sécurité, si vous n’utilisez pas l’appareil ou si vous voulez le nettoyer.
· N’utilisez pas la machine à pain pour conserver des aliments ou des ustensiles de cuisine.
· N’utilisez pas d’éponge métallique pour nettoyer l’appareil. Les parties détachées de l’éponge
pourraient entrer en contact avec les pièces électriques occasionnant ainsi des chocs électriques.
· N’utilisez pas la machine à pain pour sécher des aliments ou d’autres objets.
· Le poids total de tous les ingrédients ne peut pas être supérieur à 1000 g.
· N’utilisez jamais plus que 715 g de farine par pain.
· N’utilisez jamais plus que 22 g de levure fraîche ou 4+1/4 petites cuillères de levure sèche par pain.
· N’utilisez jamais plus que 460 ml d’eau par pain.
PARTIES
1. Couvercle
2. Paroi vitrée
3. Distributeur pour l’ajout d’ingrédients
4. Panneau de commande
5. Crochet pétrisseur
6. Moule de cuisson
7. Boîtier
8. Verre doseur
9. Cuillère doseuse
10. Crochet d’extraction du crochet pétrisseur
AVANT LA PREMIÈRE UTILISATION
· Avant la première utilisation, enlevez tous les éléments d’emballage et les éventuels autocollants
promotionnels.
· Nettoyez la machine à pain, le crochet pétrisseur et l’extérieur de la machine à pain à l’aide d’un
chion humide. Le moule et le crochet pétrisseur sont prévus d’une couche antiadhésive; vous devez
donc toujours les nettoyer avec un chion humide et jamais avec une brosse à vaisselle, une éponge
ou des produits d’entretien. Retirez le lm protecteur de l’écran.
· Lors de la première utilisation, votre appareil peut dégager une certaine fumée. Ceci est parfaitement
normal et ne présente aucun danger. Cette fumée disparaîtra automatiquement.
· Avant d’utiliser l’appareil pour la première fois, il est recommandé d’eectuer une cuisson avec un
moule de cuisson vide et le programme BAKE (cuisson). Ceci pendant 10 minutes. Laissez ensuite
refroidir l’ensemble et nettoyez les accessoires.
· Avant la première utilisation, graissez le revêtement antiadhésif de la cuve et le crochet pétrisseur
avec un peu de beurre ou de margarine.
1
2
3
4
5
6
7
8
9
10

21
B3971
www.domo-elektro.be
FR
UTILISATION
RECETTE DE BASE
La recette ci-dessous est une recette de pain blanc classique.
· 630 g farine
· 370 ml eau
· 5 g levure sèche
· 1 c. à t. sel
· 1 c. à s. sucre
LES INGRÉDIENTS
La qualité, la fraîcheur et le dosage précis des ingrédients constituent les principaux facteurs de réussite
pour la cuisson du pain.
La qualité, la fraîcheur et le dosage précis des ingrédients constituent les principaux facteurs de réussite
pour la cuisson du pain.
Attention: ne jamais dépasser la capacité maximum de votre machine à pain (1000 g)! N’utilisez jamais
plus que ces quantités maximums des ingrédients prochains par fois:
Farine: 715 g max.
Levure: 22 g de levure fraîche ou 4+1/4 petites cuillères de levure sèche max.
L’eau: 460 ml max.
LA FARINE
La farine est l’ingrédient de base de chaque pain. Vu que le poids de la farine dière d’une variété à l’autre,
il est d’une importance capitale de peser la farine au moyen d’une balance.
Faites attention à quel type de farine vous achetez: il faut que l’emballage mentionne que la farine est
approprié à faire du pain.
LE GLUTEN
Par nature, il y a du gluten dans la farine, ce qui permet au pain de mieux lever.
LA LEVURE
La levure est un micro-organisme qui pousse dans divers produits alimentaires végétaux. La levure a la
propriété de transformer les sucres en alcool et en gaz carbonique, ce qui fait qu’elle se multiplie très vite.
Voilà donc le produit idéal pour faire lever la pâte et pour la rendre plus légère et plus facile à digérer. Nous
conseillons d’utiliser de la levure sèche dans la machine à pain Domo. La levure sèche (en grains) est plus
facile à travailler et se conserve en outre plus longtemps que la levure fraîche. Egalement, la levure sèche
donne un résultat de cuisson plus constant que la levure fraîche.
LE SEL
Le sel n’est pas seulement là pour donner du goût au pain, mais il règle aussi l’activité de la levure, il rend
la pâte ferme et compacte et il évite que le pain ne lève trop vite.
LE BEURRE/L’HUILE
Le beurre et l’huile donnent une meilleure saveur au pain et le rendent plus souple. Le beurre doit être à
température ambiante avant qu’il ne soit ajouté aux autres ingrédients.

22
B3971
FR
LE SUCRE
Le sucre est la source nutritive pour la levure et constitue un ingrédient important pour le processus du
levage de la pâte. Vous pouvez utiliser tout simplement du sucre blanc, du sucre roux, de la mélasse ou du
miel. Le sucre ajoute une certaine douceur au goût du pain, il augmente la valeur nutritive et il permet de
conserver le pain plus longtemps.
Attention : N’utilisez pas de sucre brut ou du sucre en morceaux, p.ex. pour le pain au sucre, car ce type de
sucre pourrait endommager le revêtement antiadhésif du moule à pain.
L’EAU
Quand on mélange la farine à l’eau, il y a alors formation de gluten et l’air est emprisonné, ce qui permet
au pain de lever. A température ambiante normale (± 20 à 25°C), utilisez de l’eau tiède pour faire le pain:
l’eau froide n’activera pas la levure et l’eau chaude l’activera trop.
LE LAIT
Le lait fait dorer la croûte du pain, il améliore sa saveur, il augmente la valeur nutritive et donne à
l’intérieur du pain une belle couleur crémeuse. Si vous utilisez du lait frais, diminuez alors la quantité d’eau
an d’équilibrer la teneur en humidité.
Attention : N’utilisez pas de lait frais si vous programmez la cuisson avec la minuterie à retardement. Le
lait est périssable.
D’AUTRES INGRÉDIENTS
Utilisez toujours des ingrédients frais. Si vous utilisez des noix, des graines de tournesol, des fruits secs ou
autres produits pareils, veillez à ce qu’ils ne soient pas trop gros ni trop pointus, en raison des dommages
que cela pourrait causer à la couche antiadhésive.
PANNEAU DE COMMANDE
Commande
A. Menu : sélection du programme
B. Weight : choisir le poids (la taille) du pain
C. Color : couleur de la croûte
D. Time + : augmenter le temps
E. Bake : touche rapide pour le programme Bake
F. Knead : touche rapide pour le programme Pétrissage
G. Time - : réduire le temps
H. Start-pauze/stop : touche marche/arrêt
I. Home Made : touche rapide pour le programme Home Made
A
D
G
B
E
H
C
F
I
MENU
TIME +
TIME -
WEIGHT
BAKE
START
PAUZE/STOP
COLOR
KNEAD
HOME MADE

23
B3971
www.domo-elektro.be
FR
1. Choisir le poids (la taille) du pain
2. Sélection du programme
3. Minuterie
4. Phase de programme : pétrir
5. Phase de programme : reposer
6. Phase de programme : lever
7. Phase de programme : chauer
8. Phase de programme : cuire
9. Phase de programme : tenir au chaud
10. Phase de programme : prêt
11. Phase de programme : numéro de la phase
12. Temps restant en minutes
13. Couleur de la croûte : claire, moyenne, foncée
14. Verrouillage du panneau de commande
A. Menu
Cette touche sert à sélectionner le mode de cuisson qui convient. Chaque fois que vous appuyez sur ce
bouton, vous entendrez un bip et le numéro du programme est modié. Le programme et le temps de
cuisson correspondant sont achés sur l’écran.
B. Weight
Vous utilisez cette touche an de programmer le poids désiré de votre pain: vous avez le choix entre 500,
750 et 1000 grammes. Information utile : la quantité totale des ingrédients énumérés dans la recette
constitue environ le poids du pain que vous allez faire.
C. Color
Cette fonction vous permet de déterminer le degré de cuisson de la croûte de votre pain: léger, moyen
ou foncé. Si vous essayez une certaine recette pour la première fois, il est recommandé de sélectionner la
couleur de croûte moyenne.
D. Time + et G. Time -
Ces touches servent à sélectionner le lancement diéré pour certains programmes et à régler la minuterie.
D’autres programmes autorisent la modication de la durée du programme.
E. Bake
Une touche rapide pour le programme Cuisson. Appuyez sur Start-pauze/stop pour conrmer le
programme.
F. Knead
Une touche rapide pour le programme Pétrissage. Appuyez sur Start-pauze/stop pour conrmer le
programme.
H. Start-pauze/stop
Cette touche sert à lancer le programme sélectionné ou à suspendre ou annuler un programme en cours.
Appuyez brièvement sur cette touche pour suspendre un programme. Appuyez à nouveau sur la touche
pour relancer le programme. Si vous ne relancez pas le programme dans les 3 minutes, l’appareil s’arrête
automatiquement.
1
2
7
8
12
9
10
1411
13
6
5
4
3

24
B3971
FR
Pour mettre n à un programme, maintenez la touche appuyée pendant quelques secondes jusqu’à ce que
vous entendiez un bip.
I. Home Made
Une touche rapide pour le programme Home Made. Voir « Congurer Home Made » sous la rubrique
utilisation. Appuyez sur Start-pauze/stop pour conrmer le programme.
PROGRAMMES
Temps correspondants aux programmes:
Programme 500 g 750 g 1000 g
1. Normal (basic) 3:05 3:10 3:15
2. Français (french) 3:35 3:40 3:45
3. Pain complet (whole wheat) 4:05 4:10 4:15
4. Sucré (sweet) 3:35 3:40 3:45
5. Riz (rice) 2:50 2:55 3:00
6. Sans gluten (gluten free) 3:05 3:10 3:15
7. Rapide (quick) 2:10 2:15 2:20
8. Fruits 3:05 3:10 3:15
9. Cake 2:20*
10. Sandwich 3:00 3:05 3:10
11. Pain aux raisins/noix (Raisin/nut bread) 3:05 3:10 3:15
12. Seigle (Rye) 4:05 4:10 4:15
13. Knead (pétrissage) 0:08*
14. Pâte (dough) 1:30*
15. Brioche 3:35 3:40 3:45
16. Cuisson (bake) 0:30*
17. Home Made -- -- --
18.Italien (Italian) 3:05 3:10 3:15
* Si vous choisissez un de ces programmes, vous ne pouvez pas choisir le poids.
Le temps s’ache sur l’écran en minutes et en secondes. P.ex: programme 1, normal, 750 grammes; dure 3
heures 10 minutes.
1. Normal (basic)
Voici le programme le plus souvent utilisé pour faire du pain blanc.
2. Français (french):
Le temps de pétrissage et de levage de la pâte est plus long que celui du programme “normal”. Vous
obtiendrez alors une croûte plus croquante et une texture plus légère.
3. Pain complet (whole wheat)
Ce programme convient à la préparation des pains plus lourds tels que le pain complet et le pain aux
graines multiples. En général, ces pains seront plus petits qu’un pain blanc, à cause du poids plus élevé
de la farine. Il est préférable de ne pas utiliser la fonction de démarrage diéré avec ce programme; elle
pourrait conduire à de moins bons résultats.

25
B3971
www.domo-elektro.be
FR
4. Sucré (sweet)
Ce programme est adapté à la préparation de pain aux raisins, de craquelin, de pain au chocolat, etc.
5. Riz (rice)
Utilisez ce programme pour préparer un pain à base de farine de riz. Après le pétrissage, la pâte aura le
temps de lever avant la cuisson. La croûte d’un pain au riz est plus ne et plus souple qu’un pain normal.
6. Sans gluten (gluten free)
Le programme pour préparer un pain sans gluten. La pâte du pain sans gluten est plus humide et plus
liquide. C’est pourquoi il faut éviter le pétrissage ou le levage trop long de la pâte. Le temps de cuisson, en
revanche, est plus long. Pour ce programme, il est déconseillé d’utiliser la programmation diérée, car le
résultat serait moins bon. Il est préférable d’ajouter tous les ingrédients dès le début.
7. Rapide (quick)
Pour le pétrissage, la montée de la pâte et la cuisson du pain avec levure chimique. Le résultat est un plus
petit pain, de texture plus ferme. Mélangez de préférence les ingrédients à l’aide d’une cuillère en bois
avant d’appuyer sur « Start ».
8. Fruits
Utilisez le distributeur pour l’ajout d’ingrédients comme les raisins secs ou autres fruits secs. La machine
ajoutera les ingrédients dans le distributeur au bon moment. Si vous souhaitez ajouter des fruits frais ou
plus humides, il est préférable de les verser directement dans la cuve lorsque le signal retentit.
9. Cake
Pour des pains préparés à l’aide de levure chimique. Les pains cuits avec ce programme seront plus petits
et plus compactes. Si vous désirez faire un cake, nous vous conseillons de mettre les ingrédients dans le
moule. Programmez ensuite la machine et, avant d’appuyer sur la touche ‘start/stop’, remuez d’abord un
peu les ingrédients à l’aide d’un cuiller en bois an de favoriser le pétrissage. Vous ne pouvez pas choisir le
poids. Ce programme ne permet pas de choisir le poids soi-même.
10. Sandwich
pour faire un pain blanc très léger, p.ex. pour les sandwichs. Attention: vous ne pouvez pas programmer la
couleur de la croûte, cela se fait automatiquement.
11. Pain aux raisins/noix (Raisin/nut bread)
Utilisez le distributeur pour l’ajout d’ingrédients secs comme les raisins secs ou les oléagineux. La machine
ajoutera les ingrédients dans le distributeur au bon moment.
12. Seigle (Rye)
Ce programme est idéal pour les pains à base de céréales plus lourdes comme le seigle. Le pain sera aussi
plus ferme et plus lourd qu’un pain normal.
13. Knead (pétrissage)
Ce programme sert uniquement à pétrir la pâte, sans cuisson ni levage. Utilisez ce programme pour pétrir
une pâte à pizza, par exemple. Les touches Time + et Time - servent à adapter le temps de pétrissage.
14. Pâte (dough)
Ce programme sert uniquement à pétrir la pâte et à la laisser lever.

26
B3971
FR
15. Brioche
Ce programme convient pour les pains nécessitant l’ajout d’ingrédients plus riches en sucre, en matières
grasses et en protéines (par exemple, le chocolat, le sucre, etc.) Ces ingrédients donnent une croûte plus
foncée. La phase de programme Levage prendra davantage de temps pour un résultat léger et aéré.
16. Cuisson (bake)
pour les pâtes tout prêtes, p.ex. pâtes que vous aviez déjà faites d’avance. Ce programme sert à
l’achèvement, à la cuisson de cette pâte. Vous pouvez aussi réchauer un peu du pain déjà cuit.
17. Home Made
Cette touche vous sert à congurer vous-même la durée des phases de programme. Voir « Congurer
Home Made » sous la rubrique utilisation.
18. Italien (Italian)
Avec ce programme, préparez un délicieux pain méridional. Il permet l’ajout d’ingrédients comme des
herbes, des tomates séchées, des olives, etc.
MODE D’EMPLOI
1. Enlevez le moule de la machine en tournant celui-ci un quart de tour dans le sens inverse des
aiguilles d’une montre et le retirant de la machine, en haut et par la poignée.
2. Placez le crochet pétrisseur (joint) sur l’axe du moule. Le crochet doit être installé d’une manière
correcte et minutieuse, de manière à ce que tous les ingrédients soient convenablement mélangés
et pétris.
3. Mettez les ingrédients dans le moule à pain de la manière suivante et dans l’ordre suivant:
· Eau / lait
· Beurre / huile
· Eventuellement des œufs
· Sel (mettez le sel d’une côté)
· Sucre (mettez le sucre de l’autre côté)
· Farine
· Levure (dans un petit trou au milieu)
!
Attention! Veillez à ce que la levure n’entre pas en contact avec le sel, le sucre ou l’eau, sinon la pâte
risque de ne pas lever convenablement parce que la levure risque a être activée avant que les ingrédients
ne soient susamment mélangés et pétris.
Les ingrédients supplémentaires, comme les noix, herbes, fruits secs, etc. peuvent être versés dans le
distributeur ou ajoutés par la suite. Voir la rubrique « Ajout d’ingrédients ».
4. Retirez tous les restes des ingrédients sur la surface externe du moule à pain. Placez le moule de
nouveau dans la machine. Tournez le moule de cuisson dans le sens horlogique jusqu’à ce qu’il
s’enclique.
5. Refermez le couvercle.
6. Branchez la che dans la prise de courant.
7. Réglez le programme désiré à l’aide de la touche “menu”. Chaque introduction est conrmée par un
bip sonore.
8. Utilisez la touche Color pour déterminer la couleur de la croûte. Vous avez le choix entre clair, moyen
ou foncé. Congurez la taille du pain (500 g, 750 g ou 1 000 g) avec la touche Weight.
9. Réglez éventuellement la minuterie à retardement.

27
B3971
www.domo-elektro.be
FR
10. Appuyez sur la touche ‘start-pauze/stop’. Les points doubles se mettent à clignoter, indiquant que la
machine s’est mise en marche. Quand vous avez réglé la minuterie à retardement, le programma ne
commencera qu’après que le temps de retard programmé s’est écoulé.
11. Quand le pain est prêt, la machine émet un bip. L’écran ache 0:00. Appuyez sur la touche Start-
pauze/stop et maintenez-la appuyée pendant quelques secondes. La machine émet un autre bip
pour conrmer que vous avez arrêté le programme. Si vous n’arrêtez pas le programme avec cette
touche, la fonction Maintien au chaud s’enclenchera pendant 60 minutes. Débranchez l’appareil et
ouvrez le couvercle de la machine. Retirez la cuve avec des gants de cuisine.
12. Laissez refroidir le pain dans le moule pendant 10 à 15 minutes. Maintenez le moule à pain alors à
l’envers au-dessus de la table de travail en le secouant doucement pour faire sortir le pain du moule.
Ne placez jamais le pain et le moule à pain chaud sur la surface externe de l’appareil, ni sur une
nappe ou sur une toile cirée en plastique. Si le pain ne se défait pas immédiatement, faites tourner
l’axe avec précaution sur le dessous du moule à pain jusqu’à ce que le pain se détache. N’utilisez
jamais d’objets tranchants pour retirer le pain pour éviter d’endommager le revêtement antiadhésif
de la cuve.
13. Si vous enlevez le pain de la machine et un crochet de pétrissage se détache en même temps que le
pain, faites attention pour le retirer doucement du pain. Laissez éventuellement refroidir encore un
peu, de sorte que vous puissiez après enlever le crochet avec les mains. Il est recommandé d’encore
laisser refroidir le pain pendant 15 à 20 minutes avant de le couper.
FONCTION MAINTIEN AU CHAUD
Si vous n’êtes pas à la maison à temps, la machine à pain continue à chauer pendant 60 minutes
supplémentaires. Ce temps n’est pas compris dans la durée des programmes. Si vous souhaitez
interrompre ce réglage, appuyez quelques secondes sur la touche ‘start-pauze/stop’. Si le pain reste dans
la machine à pain pendant plus d’une heure, il devient humide.
Rincez immédiatement le moule à l’eau chaude après en avoir enlevé le pain pour éviter que les crochets
pétrisseurs restent collés à l’axe. Ne remettez pas la machine à pain en marche si la machine n’est pas
encore refroidie ou si elle est chaude.
AJOUT D’INGRÉDIENTS
Pendant le processus de pétrissage des programmes suivants, un bip est émis après le pétrissage :
Normal, Français, Complet, Sucré, Riz, Sans gluten, Rapide, Fruits, Cake, Raisins/Noix, Seigle, Brioche,
Italien. Ce bip indique que vous pouvez ajouter des ingrédients tels que : raisins secs, noix, graines, etc.
Vous pouvez verser les ingrédients dans le distributeur ou les ajouter manuellement.
Distributeur
Ouvrez le distributeur en faisant glisser le couvercle vers la gauche. Ajoutez les ingrédients. Fermez le
couvercle.
Les ingrédients dans le distributeur seront automatiquement ajoutés au pain après le pétrissage et le
levage. Attention :
· Ne mettez pas d’ingrédients humides, liquides ou en poudre dans le distributeur.
· Ne remplissez jamais trop le distributeur.
· Il est préférable de hacher plus nement les grosses noix avant de les verser dans le distributeur.
· Avant de verser des ingrédients dans le distributeur, assurez-vous que la valve à l’intérieur de l’appareil
est bien fermée.

28
B3971
FR
Manuel
Vous pouvez également ajouter les ingrédients manuellement. Lorsque vous entendez le signal, mettez
le programme sur pause, ouvrez le couvercle, ajoutez les ingrédients, puis fermez le couvercle et appuyez
à nouveau sur la touche start. Cette méthode manuelle est préférable pour : les ingrédients humides ou
liquides, les ingrédients en poudre, les grandes quantités.
FONCTION MÉMOIRE
Si l’appareil s’éteint à cause d’une coupure de courant, la fonction Mémoire fonctionnera pendant 10
minutes.
Vous n’aurez donc pas besoin de redémarrer le programme lorsque le courant sera rétabli. Si la panne
dure plus de 10 minutes, le programme sera annulé.
CONFIGURER LA FONCTION HOME MADE
La touche « Home Made » est réservée pour votre programme de cuisson personnalisé. Elle vous permet
de congurer vous-même toutes les phases du programme. Si vous souhaitez sauter certaines phases,
réglez leur durée sur 0:00.
Attention : les réglages de cette touche ne seront pas sauvegardés si l’appareil est débranché.
1. Appuyez sur la touche « Home Made » ou sélectionnez le programme 17 avec la touche « Menu ».
2. Appuyez à nouveau sur la touche « Home Made » pour démarrer la programmation. L’achage du
temps de cuisson et le pictogramme de la phase de programme clignotent sur l’écran. Voir le tableau
ci-dessous pour les phases de programme et le réglage par défaut du temps de cuisson.
3. Pour chaque phase, réglez le temps souhaité en utilisant les touches Time + (augmenter le temps) et
Time - (réduire le temps). Conrmez le temps de cuisson en appuyant sur la touche « Home Made ».
4. Lorsque toutes les phases sont congurées, la durée totale du programme s’ache sur l’écran.
La durée totale standard est de 3 heures. Ensuite, vous pouvez lancer le programme conguré
en appuyant sur la touche Start. Si vous appuyez sur la touche Start pendant la conguration des
phases, la programmation sera arrêtée.
Si vous le souhaitez, vous pouvez également lancer ce programme en diéré, voir « programmation
diérée ».
Phases de programme Pictogramme Paramètres standards Plage horaire ajustable
Pétrissage 1
0:10 1-30 min.
Repos 1
0:03 0-30 min.
Pétrissage 2
0:05 0-30 min.
Repos 2
0:10 0-30 min.
Pétrissage 3
0:20 0-25 min.
Levage 1
0:42 0-60 min.
Levage 2
0:40 0-60 min.

29
B3971
www.domo-elektro.be
FR
Levage 3 0:00 0-60 min.
Cuisson
0:50 0-80 min.
Fonction Maintien au
chaud
1:00 0-60 min.
ENLEVEZ LE CROCHET DE PÉTRISSAGE AVANT LA CUISSON
Après le dernier pétrissage de la pâte, vous pouvez enlever le crochet pétrisseur.
1. Appuyez brièvement sur ‘start-pauze/stop’ pour interrompre la cuisson ou retirez la che électrique
de la prise murale.
2. Ouvrez le couvercle et retirez le moule. Retirez la pâte avec les mains enduites de farine et enlevez le
crochet pétrisseur.
3. Remettez la pâte dans le moule et fermez le couvercle.
4. Rebranchez la che électrique dans la prise murale et appuyez sur le bouton ‘start-pauze/stop’. Le
programme de cuisson continue.
UTILISATION DE LA MINUTERIE À RETARDEMENT
Vous pouvez programmer l’appareil pour que votre pain soit prêt quand vous le voulez.
· Calculez le laps de temps entre le moment où vous lancez le programme et l’heure à laquelle vous
voulez que votre pain soit prêt. La machine à pain calcule alors automatiquement la durée des cycles
du programme.
· Appuyez sur les touches pour augmenter ou diminuer le temps par tranches de 10 minutes.
· L’écran ache le pictogramme Sablier.
· La programmation diérée n’est pas possible pour le pétrissage ni pour la cuisson. Si vous appuyez sur
les touches Time + et Time - dans ces programmes, la durée du programme sera ajustée.
Exemple :
Il est 9:00 heures le matin et vous désirez du pain frais pour 17:00 heures l’après-midi.
Placez tous les ingrédients dans le moule à pain. Placez le moule dans la machine à pain. Fermez le
couvercle et appuyez sur la touche de sélection pour régler le mode (“menu”). Appuyez sur la touche
Couleur pour régler la couleur de la croûte et choisissez le poids souhaité du pain. Appuyez sur la touche
Time + jusqu’à ce que 8:00 s’ache sur l’écran. En eet, 8 heures se seront écoulées entre le moment où
vous aurez appuyé sur la touche Start et celui où le pain doit être prêt (17 h).
Appuyez sur la touche Start Le double point sur l’écran clignote et le pictogramme Sablier s’ache. Le
décompte se met en marche jusqu’à ce qu’il soit temps pour la machine à pain de lancer le pétrissage. La
machine à pain va maintenant exécuter l’ensemble du programme conguré pour que le pain soit prêt à
l’heure choisie.
Attention : n’utilisez pas le programme avec minuterie lorsque vous employez des ingrédients périssables
: lait frais, œufs, yaourt, fromage, fruits frais…
CONSEIL
· Pesez toujours avec la plus grande précision possible les ingrédients dont vous avez besoin et veillez à
ce que ceux-ci soient à température ambiante.

30
B3971
FR
· Vous pouvez facilement contrôler la fraîcheur de la levure par moyen du test suivant: laissez dissoudre
1 cuillérée à thé de sucre dans une demi-tasse d’eau tiède et ajoutez à cette mélange encore une
cuillerée à thé de levure. Si la mélange se met à bouillonner et pétiller après quelques minutes, cela
arme que la levure est fraîche.
· Le sel freine le fonctionnement de la levure et le sucre favorise ce fonctionnement. Si vous ne
pouvez pas utiliser un de ces 2 ingrédients à cause d’un régime alimentaire, vous devez également
abandonner l’autre. Vous aurez alors du pain sans sucre et sans sel.
· Le pain que vous faites vous-même ne contient aucun agent conservateur et il a donc une durée de
conservation limitée. Si vous laissez votre pain susamment refroidir et vous l’emballez ensuite
hermétiquement, vous pouvez le conserver pendant quelques jours. Il va de soi que vous pouvez
également congeler le pain, ce qui vous permet de le consommer plus tard.
· Graissez l’axe de la cuve avec un peu de beurre pour que le crochet pétrisseur se détache plus
facilement.
NETTOYAGE ET ENTRETIEN
· Avant de commencer à nettoyer, assurez-vous que la machine à pain soit bien débranchée et
entièrement refroidie et que la che de l’appareil soit retirée de la prise de courant.
· Nettoyez l’appareil en profondeur après chaque utilisation. Si la cuve, l’axe dans la cuve et le crochet
pétrisseur ne sont pas propres avant utilisation, cela risque d’aecter le fonctionnement et la durée de
vie de votre machine à pain.
· Séchez soigneusement l’appareil et tous ses éléments. Laissez le couvercle ouvert pendant une demi-
heure pour laisser sécher susamment tous les éléments et pour que l’appareil puisse être rangé ou
réutilisé.
·
!
Attention : ne jamais immerger l’appareil dans l’eau.
EXTÉRIEUR
Nettoyez l’extérieur et le couvercle de la machine à l’aide d’un chion humide ou d’une éponge. Enlevez
le moule avant le nettoyage. Si nécessaire, vous pouvez nettoyer l’extérieur de l’appareil avec un liquide
vaisselle doux.
INTÉRIEUR
Nettoyez prudemment l’intérieur de votre machine avec un chion légèrement humide. Faites attention à
l’élément de chaue en nettoyant la machine à pain.
LE MOULE À PAIN
Retirez la cuve de la machine en la tirant droit vers le haut par la poignée et en la tournant d’un quart de
tour dans le sens inverse des aiguilles d’une montre.
Vous pouvez nettoyer le moule avec de l’eau chaude. Faites attention à ne pas endommager le
revêtement antiadhésif. Si vous ne parvenez pas à retirer le crochet de pétrissage du moule à pain, laissez
alors le moule à pain complètement refroidir. Versez ensuite dans le moule une petite quantité d’eau
chaude, susante pour recouvrir le crochet. L’eau ramollira tous les résidus collants et vous pourrez alors
retirer le crochet. N’utilisez jamais des produits d’entretien ou des brosses à vaisselle, puisque ceux-ci
endommagent le moule. Le moule ne peut pas être nettoyé dans la lave-vaisselle.

31
B3971
www.domo-elektro.be
FR
QUESTIONS FRÉQUENTES
Problème Solution
Je ne parviens pas au
résultat souhaité.
· La composition de la pâte est très importante pour obtenir un bon
résultat. L’utilisation de marques de farine diérentes peut également
conduire à des résultats diérents. La pratique vous permettra
d’apprendre à utiliser l’appareil. Nous vous conseillons d’essayer la
recette de base. Une autre solution est d’utiliser un mélange pour pain
prêt à l’emploi. Si cette méthode ne fonctionne pas, le mieux est de
prendre contact avec notre service client.
· Les ingrédients n’ont pas été pesés avec précision.
· Les ingrédients ne sont pas frais.
· Les ingrédients ne sont pas à température ambiante.
Puis-je vérier si la pâte
est bonne pendant le
processus ?
La pâte doit ressembler à une boule ronde, élastique et lisse. Ouvrez le
couvercle après 5 à 10 minutes (pendant le pétrissage) et touchez avec vos
doigts la partie supérieure de la boule. Un peu de pâte doit rester collée
à vos doigts. Si la pâte colle trop fort, elle est trop humide et vous devez
ajouter un peu de farine. Si elle ne colle pas du tout, elle est trop sèche.
Ajoutez alors un petit peu d’eau. N’ouvrez pas le couvercle pendant que la
pâte lève, sans quoi votre pain risque de s’aaisser.
Je souhaite cuire plusieurs
pains l’un à la suite de
l’autre.
Laissez l’appareil refroidir 20 minutes avec le couvercle ouvert. Si l’appareil
est chaud, la levure commencera à faire eet trop vite, ce qui donnera un
mauvais résultat.
Le pain est retombé. · S’il apparaît que votre pain est retombé de tous les côtés, cela signie
que la pâte était trop humide. Diminuez la quantité d’eau ajoutée.
Lorsque vous utilisez des fruits ou légumes en conserve, laissez-les
d’abord égoutter et sécher correctement avant de les utiliser. Ils
contiennent un excédent de liquide, car ils ont trempé pendant un long
moment.
· Vous pouvez essayer d’utiliser une farine plus légère.
· Il se peut également qu’elle soit trop levée. La pâte a tellement levé
qu’elle ne peut réussir le processus de levage. Essayez de réduire la
quantité de levure ajoutée, 1 à 2grammes.
· Si la pâte levée est trop dure, il se peut qu’elle ait débordé de la plaque
à pâtisserie. Débranchez la che et laissez l’appareil refroidir. Nettoyez
ensuite l’élément chauant.
Le pain n’est pas assez
cuit au milieu.
Si l’intérieur du pain n’est pas susamment cuit, le problème peut venir du
type de farine utilisé. Ce problème survient généralement avec des farines
plus lourdes
comme la farine de seigle ou les farines complètes. Essayez d’ajouter un
processus de pétrissage supplémentaire lorsque vous utilisez ces types de
farine. Arrêtez l’appareil dès que la machine à pain a terminé le premier
processus de pétrissage. Rallumez l’appareil et appuyez sur « démarrer »
: il recommencera à pétrir, ce qui permettra à la pâte d’intégrer une plus
grande quantité d’air.

32
B3971
FR
Le fond du pain est trop
épais.
Vous avez laissé le pain trop longtemps avec la fonction de maintien de la
température dans la machine. L’eau s’évapore, donnant ainsi un fond plus
épais. Éteignez l’appareil dès que le programme est terminé.
Le pain a débordé. · Vous utilisez une trop grande quantité de levure.
· L’activation de la levure a été trop forte, par ex. en raison d’un excès de
sucre ou d’une température trop élevée.
· Vous avez utilisé trop de pâte. N’utilisez pas plus de 1 000 g.
H:HH s’ache à l’écran. L’appareil est encore trop chaud. Laissez d’abord refroidir l’appareil.
E:EO s’ache à l’écran. Il y a un problème avec la sonde de température. Renvoyez l’appareil à
notre service après-vente.
Pourquoi ne puis-je pas
ajouter d’ingrédient
supplémentaire au début
du programme ?
Les ingrédients supplémentaires (tels que des raisins ou des noix) seront
broyés et le pain ne sera pas pétri correctement. Cet ajout inuencera en
outre le levage. N’intégrez les ingrédients supplémentaires qu’au moment
où l’appareil sonne, après le pétrissage / le levage.
Puis-je remplacer l’eau
par du lait ?
Bien sûr ! Veillez toujours à ce que le volume complet de liquide soit exact.
Le rapport lait/eau ne fait aucune diérence.
La croûte est tantôt
plus claire, tantôt plus
sombre.
Vous pouvez choisir sa couleur en utilisant la touche
« color ». Les préparations plus sucrées donneront une croûte plus
sombre.
La machine à pain pétrit
plus lentement que
d’habitude.
Ce cas peut survenir si la pâte est lourde, ce qui augmente la puissance
dont le moteur a besoin pour tourner. Ce n’est toutefois pas un problème
pour la machine. Ajoutez une cuillère à soupe de liquide.
Le mélangeur est bloqué
dans la cuve.
Retirez le pain de la cuve. Remplissez ensuite la cuve d’eau chaude, puis
laissez tremper un quart d’heure. La pâte accrochée se détachera.
Il y a de la condensation à
l’intérieur du hublot.
C’est un phénomène normal. Cela est dû à la chaleur.
J’ai utilisé un mélange
prêt à l’emploi, mais j’ai
quand même raté mon
pain.
Avant d’envoyer l’appareil en réparation, nous vous conseillons de
réessayer la recette de base. Un mélange prêt à l’emploi peut parfois
contenir aussi des ingrédients qui donneront un moins bon résultat.
MISE AU REBUT
Ce symbole sur le produit ou son emballage indique que ce produit ne peut être traité
comme déchet ménager. Il doit plutôt être remis au point de ramassage concerné, se
chargeant du recyclage du matériel électrique et électronique. En vous assurant que
ce produit est éliminé correctement, vous favorisez la prévention des conséquences
négatives pour l’environnement et la santé humaine qui, sinon, seraient le résulat d’un
traitement inapproprié des déchets de ce produit. Pour obtenir plus de détails sur le
recyclage de ce produit, veuillez prendre contact avec le bureau municipal de votre
région, votre service d’éliminiation des déchets ménagers ou le magasin où vous avez
acheté le produit.
L’emballage est recyclable. Traitez l’emballage écologiquement.

33
B3971
www.domo-elektro.be
DE
GARANTIE
Sehr geehrter Kunde,
Sämtliche unserer Produkte unterliegen einer strengen Qualitätskontrolle,
bevor Sie Ihnen angeboten werden. Sollten dennoch
Probleme mit Ihrem Gerät auftreten, bedauern wir dies zutiefst.
Wir möchten Sie in diesem Fall bitten, unseren Kundenservice zu kontaktieren.
Unsere Mitarbeiter helfen Ihnen gern weiter!
+32 14 21 71 91 [email protected]
Montag – Donnerstag: 8:30 Uhr – 12:00 Uhr und von 13:00 Uhr – 17:00 Uhr
Freitag: 8:30 Uhr – 12:00 Uhr und von 13:00 Uhr – 16:30 Uhr
Dieses Gerät hat eine Garantiefrist von 2 Jahren ab dem Kaufdatum. Die Garantie für Zubehör und
Verschleißteile beträgt nur 6 Monate. Während der Garantiezeit übernimmt der Hersteller die
vollständige Verantwortung für Mängel, die nachweislich auf Material- oder Konstruktionsfehler
zurückzuführen sind. Wenn derartige Mängel auftreten, wird das Gerät wenn nötig ausgetauscht oder
repariert. Die Garantiezeit von 2 Jahren beginnt in diesem Moment nicht erneut, sondern sie läuft bis 2
Jahre nach dem Kaufdatum weiter. Die Garantie wird auf der Grundlage des Kassenbons gewährt.
Die Garantie auf Accessoires und Verschleißteile beträgt 6 Monate.
Die Garantie und die Verantwortung/Haftung des Lieferanten und Herstellers entfallen automatisch in
den folgenden Fällen:
· Bei Nichtbeachtung der Anweisungen in dieser Bedienungsanleitung.
· Bei falschem Anschluss, z.B. bei einer zu hohen Stromspannung.
· Bei falscher, grober oder abnormaler Verwendung.
· Bei unzureichender oder falscher Wartung.
· Bei vom Verbraucher oder von nicht ermächtigten Dritten vorgenommenen Reparaturen oder
Änderungen am Gerät.
· Bei der Verwendung von Ersatzteilen oder Accessoires, die nicht vom Lieferanten / Hersteller
empfohlen oder geliefert werden.
SICHERHEITSVORKEHRUNGEN
Wenn Sie elektrische Geräte verwenden, müssen folgende Sicherheitshinweise beachtet werden:
· Lesen Sie diese Hinweise sorgfältig durch. Bewahren Sie diese Bedienungsanleitung zum späteren
Nachschlagen auf.
· Entfernen Sie vor dem ersten Gebrauch alle Verpackungsmaterialien und möglichen Werbeauleber.
Sorgen Sie dafür, dass Kinder nicht mit den Verpackungsmaterialien spielen.
· Dieses Gerät eignet sich für den Einsatz im Haushalt und in ähnlichen Umfeldern, zum Beispiel in
folgenden Bereichen:
· Küchenbereich für Mitarbeiter von Geschäften, Büros und anderen ähnlichen beruichen
Umfeldern.
· Bauernhöfe
· Hotel- und Motelzimmer und andere Bereiche mit wohnungsähnlichem Charakter
· Gästezimmer oder Ähnliches

34
B3971
DE
· Diese Gerät darf von Kindern ab 16 Jahren und Menschen mit körperlichen oder sensorischen
Behinderungen oder Menschen mit eingeschränkten geistigen Fähigkeiten oder mangelnder
Erfahrung bzw. Sachkenntnis unter der Bedingung verwendet werden, dass diese Personen
beaufsichtigt werden oder sie eine Anleitung zur sicheren Verwendung des Geräts erhalten haben und
sich der Gefahren bei der Verwendung des Geräts bewusst sind. Kinder dürfen nicht mit dem Gerät
spielen. Die Wartung und Reinigung des Geräts darf nicht durch Kinder ausgeführt werden, außer
diese sind älter als 16 Jahre und werden von einem Erwachsenen beaufsichtigt.
· Achtung: das Gerät darf nicht mit einer externen Zeitschaltuhr oder Fernbedienung gebraucht
werden.
Das Gerät kann während des Gebrauchs warm werden. Das elektrische Kabel von
heißen Teilen entfernt halten und das Gerät nicht abdecken.
· Vor der Benutzung prüfen, ob die Spannung, die auf dem Gerät angegeben ist, mit der Spannung Ihres
Stromnetzes übereinstimmt.
· Lassen Sie das Netzkabel nicht über den Tisch oder die Anrichte hängen, oder in Kontakt mit heißen
Oberächen kommen.
· Benutzen Sie das Gerät niemals, wenn die Kabelschnur oder der Stecker beschädigt ist, nach
beeinträchtigtem Funktionieren des Gerätes, oder wenn das Gerät beschädigt ist. Bringen Sie in
solchen Fällen das Gerät zur nächsten qualizierten Servicestelle zur Überprüfung und/oder Reparatur.
· Die Verwendung von Zubehör, das nicht vom Hersteller empfohlen oder verkauft wird, besteht die
Gefahr von Brand, elektrischen Schlages oder von Verletzungen.
· Ziehen Sie den Stecker aus der Steckdose, wenn das Gerät nicht im Einsatz ist, Einzelteile montiert
oder demontiert werden, oder das Gerät gereinigt wird. Ziehen Sie den Stecker direkt am Stecker
selber und nicht an der Kabelschnur aus der Steckdose.
· Lassen Sie das im Betrieb bendliche Gerät nicht unbeaufsichtigt.
· Stellen Sie das Gerät nicht in der Nähe oder auf einer Gasamme, einer elektrischen Platte oder an
einer Stelle ab, auf der es in Kontakt mit einem Elektroofen oder einem anderen heißen Geräten
kommen kann.
· Benutzen Sie das Gerät nicht im Freien.
· Benutzen Sie das Gerät ausschließlich für den Zweck, für den es gedacht ist.
· Stellen Sie das Gerät immer auf eine stabile, ache und trockene Oberäche.
· Das Gerät ist nur auf den privaten Gebrauch ausgelegt. Der Hersteller ist nicht verantwortlich für
Unfälle, die als Folge von unsachgemäßem Gebrauch des Geräts oder Nichtbefolgen der in dieser
Anleitung aufgeführten Regeln entstehen.
· Sämtliche Reparaturen, abgesehen von der gewöhnlichen Pege, sind durch den Hersteller oder
dessen Kundendienst zu übernehmen.
· Das Gerät, das Kabel oder den Stecker niemals in Wasser oder in andere Flüssigkeiten tauchen.
· Netzkabel vor scharfen Kanten, heißen Gegenständen oder anderen Wärmequellen schützen.
· Das Gerät nicht in die Nähe entammbarer Materialien oder explosiver und/oder selbstzündender
Gase stellen.
· Die Lüftungsroste des Geräts dürfen nicht abgedeckt sein.
· Verlängerungskabel dürfen nur verwendet werden, wenn der Netzstrom und die Spannung gleich oder
höher als die des Brotbackautomaten sind.
· Das Verlängerungskabel sollte so angeschlossen werden, dass niemand über das Kabel stolpern kann
oder versehentlich daran ziehen könnte.
· Keine Gegenstände auf das Gerät stellen und das Gerät, während es in Betrieb ist, nicht bedecken, um
Brandgefahr zu vermeiden.

35
B3971
www.domo-elektro.be
DE
· Der Brotbackautomat kann warm werden. Nur die Handgrie und die Knöpfe am Gerät berühren und,
falls nötig, Ofenhandschuhe verwenden.
· Dafür sorgen, dass das Gerät vollständig abgekühlt ist und den Stecker aus der Steckdose entfernen,
bevor Zubehörteile im Gerät installiert oder daraus entfernt werden.
· Der Brotbackautomat nicht umstellen, wenn das Gerät warme Zutaten oder Flüssigkeiten enthält.
· Die drehenden Knethaken nicht berühren, wenn das Gerät in Betrieb ist, um Verletzungsgefahr zu
vermeiden.
· Wird das Gerät nicht verwendet oder gereinigt, ist es vollständig auszuschalten und sicherheitshalber
sollte der Stecker aus der Steckdose gezogen werden.
· Der Brotbackautomat nicht zur Auewahrung von Lebensmitteln oder Küchenbesteck verwenden.
· Das Gerät nicht mit einem Scheuerschwamm reinigen. Lose Teile des Schwammes könnten mit den
elektrischen Teilen in Kontakt kommen und Stromstösse verursachen.
· Der Automat nicht zum Trocknen von Lebensmitteln oder anderen Gegenständen verwenden.
· Das Gesamtgewicht inklusiv aller Zutaten sollte 1000 Gramm nicht überschreiten.
· Benutzen Sie nicht mehr als 715 g Mehl pro Brot.
· Benutzen Sie nicht mehr als 22 g frische Hefe oder 4+1/4 Teelöel Trockenhefe pro Brot.
· Benutzen Sie nicht mehr als max. 460 ml pro Brot.
TEILE
1. Deckel
2. Sichtfenster
3. Verteiler für zusätzliche Zutaten
4. Bedienfeld
5. Knethaken
6. Backform
7. Gehäuse
8. Messbecher
9. Messlöel
10. Haken zum Entfernen des Knethakens
VOR DER ERSTEN INBETRIEBNAHME
· Entfernen Sie vor dem ersten Gebrauch alle Verpackungsmaterialien und möglichen Werbeauleber.
· Machen Sie dem Brotbackautomaten, die Backform und den Knethaken mit einem feuchten Tuch
sauber. Die Backform und der Knethaken sind mit einer Anti-Anbackschicht bedeckt, darum dürfen
Sie diese Artikel niemals mit Reinigungsmitteln, einer Abwaschbürste oder einem Schwamm säubern.
Verwenden Sie hierfür immer ein feuchtes Tuch. Das reicht aus, um das Gerät sauber zu halten. Die
Schutzfolie vom Display entfernen.
· Ihr Brotbackautomat kann bei der ersten Verwendung etwas rauchen, das ist vollkommen normal,
schadet nichts und wird von selbst verschwinden.
· Es wird empfohlen, vor der ersten Benutzung einmal mit einer leeren Backform mit dem Programm
BAKE (Backen) zu backen. Dies 10 Minuten lang. Danach alle Teile abkühlen lassen und erneut
reinigen.
1
2
3
4
5
6
7
8
9
10

36
B3971
DE
· Vor dem ersten Gebrauch die Antihaftbeschichtung der Backform und des Knethakens mit etwas
Butter oder Margarine einfetten.
GEBRAUCH
GRUNDREZEPT
Bei dem unten stehenden Rezept handelt es sich um ein Rezept für ein einfaches Weißbrot.
· 630 g Mehl
· 370 ml Wasser
· 5 g Trockenhefe
· 1 tl Salz
· 1 el Zucker
DIE BESTANDTEILE
Die wichtigsten Faktoren für das Backen eines gelungenen Brotes sind die Qualität, die Frische und das
korrekte Abwägen ihrer Bestandteile. Achtung: Überschreiten Sie nicht die maximale Füllmenge Ihrem
Brotbackautomaten! (1000 g) Benutzen Sie deshalb pro Backprozess nicht mehr als die angegebenen
maximalen Mengenangaben der folgenden Zutaten:
Mehl: max. 715 g
Hefe: 22 g frische Hefe oder 4+1/4 Teelöel Trockenhefe
Wasser: max. 460 ml
MEHL
Mehl ist der Grundbestandteil von Brot. Das Gewicht des Mehls unterscheidet sich von Sorte zu Sorte.
Darum ist es absolut erforderlich, die richtige Menge mit einer Waage abzumessen.
Tipp: Achten Sie beim Kaufen von Mehl auf den Text auf der Verpackung. Auf ihr muss stehen, dass das
Mehl unter anderem für das Brotmachen geeignet ist.
GLUTEN
Gluten bendet sich von Natur aus in die meiste Mehl und fördern das Aufgehen des Brotes.
HEFE
Hefe ist ein Mikroorganismus, der auf verschiedenen panzlichen Nahrungsmitteln wächst. Hefe hat die
Fähigkeit, Zucker in Alkohol und Kohlensäuregas (Kohlendioxid) umzusetzen, wodurch sie sich besonders
schnell vermehrt. Auch ideal, um den Teig aufgehen zu lassen und ihn leichter und besser verdaulich
zu machen. Wir empfehlen, in dem DOMO-Brotbackautomaten Trockenhefe zu verwenden. Diese
(körnige) Hefe ist einfacher zu verarbeiten, ist länger haltbar als Frischhefe und ergibt ein konstanteres
Backergebnis als Frischhefe.
SALZ
Salz sorgt nicht nur für einen bestimmten Geschmack im Brot, sondern regelt auch die Aktivität von Hefe,
macht den Teig solide und fest und verhindert, dass das Brot zu hart aufgeht.
BUTTER/ÖL
Butter und Öl ergeben einen besseren Geschmack des Brotes und machen das Brot weicher. Die Butter
oder das Öl müssen auf Zimmertemperatur sein, bevor Sie die andere Zutaten hinzufügen.

37
B3971
www.domo-elektro.be
DE
ZUCKER
Zucker ist die Nahrungsquelle für die Hefe und ein wichtiger Bestandteil für das Aufgehen des Teiges. Sie
können normalen weißen Zucker, braunen Zucker, Sirup oder Honig verwenden. Das gibt dem Geschmack
des Brotes eine sichere Mürbe, erhöht den Nahrungswert und trägt dazu bei, das Brot länger zu erhalten.
Achtung: Verwenden Sie keinen groben Zucker oder Würfelzucker, für zum Beispiel Sauerbrot, da dieses
die Anti-Anbackschicht der Backform beschädigt.
WASSER
Wenn das Mehl mit Wasser vermischt wird, bildet sich der Gluten und wird die Luft abgesättigt, so dass
das Brot steigen kann. Bei normaler Umgebungstemperatur verwenden Sie lauwarmes Wasser (±20 à
25°C), um das Brot zu machen: kaltes Wasser aktiviert die Hefe nicht und warmes Wasser aktiviert die
Hefe zu stark.
MILCH
Milch bringt die Brotkruste zum Bräunen, verbessert den Geschmack des Brotes, erhöht den Nährwert
und verleiht seinem Inneren eine schöne sahnige Farbe. Wenn Sie Frischmilch verwenden, dann müsse Sie
die Wassermenge natürlich senken, um das Niveau der Flüssigkeit im Gleichgewicht zu halten.
Achtung: Verwenden Sie keine Frischmilch, wenn Sie den Backprozess mit der Zeitverzögerungsfunktion
programmieren. Die Milch könnte sauer werden.
ANDERE ZUTATEN
Verwenden Sie immer frische Zutaten. Wenn Sie Nüsse, Sonnenblumenkerne, getrocknete Früchte oder
dergleichen verwenden, empfehlen wir Ihnen, diese vorher in Wasser einweichen zu lassen, gut trocken
zu tupfen und erst dann dem Teig hinzuzufügen. Achten Sie gut darauf, dass diese Zutaten nicht zu groß
und zu scharf sind, um mögliche Beschädigungen der Anti-Anbackschicht zu vermeiden.
BEDIENFELD
Bedienung
A. Menu: Programmauswahl
B. Weight: Wählen Sie Gewicht (Größe) des Brotes
C. Color: Bräunung der Kruste
D. Time +: Zeit erhöhen
E. Bake: Schnelltaste für das Programm Backen
F. Knead: Schnelltaste für das Programm Kneten
G. Time -: Zeit reduzieren
H. Start- Pause/Stop: Ein-/Aus-Taste
I. Home made: Schnelltaste für das Programm Home made
A
D
G
B
E
H
C
F
I
MENU
TIME +
TIME -
WEIGHT
BAKE
START
PAUZE/STOP
COLOR
KNEAD
HOME MADE

38
B3971
DE
Display
1. Wählen Sie Gewicht (Größe) des Brotes
2. Programmauswahl
3. Timer
4. Programmphase: Kneten
5. Programmphase: Ruhen
6. Programmphase: Gehen
7. Programmphase: Heizen
8. Programmphase: Backen
9. Programmphase: Warmhalten
10. Programmphase: Bereit
11. Programmphase: Nummer der Phase
12. Verbleibende Zeit in Minuten
13. Bräunung der Kruste: hell, mittel, dunkel
14. Verriegelung des Bedienfeldes
A. Programmwahl (Menu)
Diese Taste verwenden Sie, um das richtige Backprogramm auszuwählen. Jedes Mal, wenn Sie auf diese
Taste drücken, hören Sie einen Piepton, und die Programmnummer ändert sich. Das Programm steht auf
dem Display.
B. Größe (Weight)
Diese Taste verwenden Sie, um anzugeben, Brot von welchem Gewicht Sie in diesem Augenblick machen
möchten. Sie können ein Brot von 500, 750 g oder 1000 g wählen.
Tipp: Die Gesamtmenge der im Rezept angegebenen Zutaten ist ungefähr das Gewicht des Brotes, das
Sie machen wollen.
C. Krustenbräune (Color)
Diese Taste verwenden Sie, um anzugeben, ob Sie die Kruste hell, mittel oder dunkel haben möchten.
Tipp: Wenn Sie ein Rezept zum ersten Male ausprobieren, empfehlen wir Ihnen, die mittlere Krustenfarbe
zu wählen.
D. Time + und G. Time -
Mit diesen Tasten können Sie einen verzögerten Start auswählen und den Timer für bestimmte
Programme einstellen. Bei anderen Programmen können Sie die Programmzeit anpassen.
E. Bake
Diese Taste ist eine Schnelltaste für das Programm Backen. Drücken Sie Start- Pause/Stop, um das
Programm zu bestätigen.
F. Knead
Diese Taste ist eine Schnelltaste für das Programm Kneten. Drücken Sie Start- Pause/Stop, um das
Programm zu bestätigen.
H. Start- Pause/Stop
Mit dieser Taste starten Sie das gewählte Programm oder pausieren bzw. brechen ein laufendes
Programm ab. Drücken Sie kurz auf diese Taste, um ein Programm zu pausieren. Drücken Sie die Taste
erneut, um fortzufahren. Wenn Sie ein Programm nicht innerhalb von 3 Minuten wieder aufnehmen, wird
der Vorgang automatisch beendet.
1
2
7
8
12
9
10
1411
13
6
5
4
3

39
B3971
www.domo-elektro.be
DE
Um ein Programm zu beenden, drücken Sie die Taste einige Sekunden lang, bis Sie einen Piepton hören.
I. Home made
Diese Taste ist eine Schnelltaste für das Programm Home made. Siehe „Home made einrichten“ unter
dem Abschnitt Verwendung. Drücken Sie Start- Pause/Stop, um das Programm zu bestätigen.
PROGRAMME
Programmzeiten:
Programme 500 g 750 g 1000 g
1. Normal (basic) 3:05 3:10 3:15
2. Französisch (french) 3:35 3:40 3:45
3. Vollkorn (whole wheat) 4:05 4:10 4:15
4. Süßes (sweet) 3:35 3:40 3:45
5. Reis (rice) 2:50 2:55 3:00
6. Glutenfrei (gluten free) 3:05 3:10 3:15
7. Schnell (Quick) 2:10 2:15 2:20
8. Fruit 3:05 3:10 3:15
9. Rührkuchen (Cake) 2:20*
10. Sandwich 3:00 3:05 3:10
11. Rosinen-/Nussbrot (Raisin/nut bread) 3:05 3:10 3:15
12. Roggen (Rye) 4:05 4:10 4:15
13. Kneten (knead) 0:08*
14. Teig (dough) 1:30*
15. Brioche 3:35 3:40 3:45
16. Backen (bake) 0:30*
17. Home made -- -- --
18. Italienisch (Italian) 3:05 3:10 3:15
* Wenn Sie eines dieser Programme wählen, können Sie kein Gewicht wählen.
Die Zeit, die auf dem Display steht, ist in Stunden und Minuten angegeben. Beispiel: Programm 1 ,
Normal, 750 g dauert 3 Stunden 10 Minuten.
1. Normal (basic)
Dieses ist das am meisten verwendete Programm zum Herstellen von Weißbrot.
2. Französisch (french)
Die Knetzeit und die Aufgehzeit sind länger als bei dem normalen Programm. Dadurch werden eine
knusprigere Kruste und eine luftigere Textur erzielt.
3. Vollkorn (whole wheat)
Dieses Programm ist das geeignetste Programm für das Herstellen von Schwarzbroten wie Vollkorn und
Mehrkornbrot. Das Brot wird im Allgemeinen etwas kleiner sein als ein Weißbrot, da das Mehl schwerer
ist. Bei diesem Programm sollte die Zeitvorwahl besser nicht benutzt werden, da dies zu weniger guten
Ergebnissen führen kann.
4. Süßes (sweet)
Dieses Programm ist geeignet für die Herstellung von Rosinenbrot, Zuckerbrot, Schokoladenbrot, ...

40
B3971
DE
5. Reis (rice)
Verwenden Sie dieses Programm für Brote auf der Basis von Reismehl. Nach dem Kneten kann der Teig
gehen, bevor er gebacken wird. Die Kruste eines Reisbrotes ist dünner und weicher als die eines normalen
Brotes.
6. Glutenfrei (gluten free)
Dies ist das Programm zum Herstellen von glutenfreiem Brot. Der Teig eines glutenfreien Brotes ist
feuchter und hat eine dicküssige Konsistenz. Deshalb sollte der Teig nicht zu lange geknetet werden
oder gehen. Die Backzeit hingegen ist länger. Bei diesem Programm ist es besser, keinen verzögerten
Start zu verwenden, da dies zu weniger guten Ergebnissen führen kann. Es ist am besten, alle Zutaten von
Anfang an hinzuzufügen.
7. Schnell (Quick)
Für das Kneten, Aufgehen und Backen von Brot mit Backpulver. Das Ergebnis ist in der Regel ein kleineres
Brot mit einer festeren Textur. Es wird empfohlen, die Zutaten vor dem Drücken der Starttaste mit einem
Holzlöel umzurühren.
8. Fruit
Verwenden Sie den Verteiler, um Zutaten wie Rosinen oder andere Trockenfrüchte hinzuzufügen. Die
Maschine fügt die Zutaten vom Verteiler zum richtigen Zeitpunkt selbst hinzu. Wenn Sie Ihrem Brot
frisches oder feuchtes Obst beifügen möchten, tun Sie dies am besten direkt in der Backform, wenn Sie
ein Signal hören.
9. Rührkuchen (Cake)
Mit diesem Programm können Sie Brot machen, das zum Beispiel mit Backpulver zubereitet wird. Mit
diesem Programm gebackene Brote werden weniger hoch und fester von Struktur. Wenn Sie mit diesem
Programm Rührkuchen machen möchten, empfehlen wir Ihnen, die Zutaten in die Backform zu tun.
Danach stellen Sie den Automaten ein, und bevor Sie auf ‘Start/Stop’ drücken, müssen Sie noch kurz mit
einem Holzlöel die Zutaten umrühren. Das fördert nämlich das Kneten. Bei diesem Programm können
Sie das Gewicht nicht selbst wählen.
10. Sandwich
Dieses Programm können Sie verwenden, um ein ganz luftiges Weißbrot zu machen, zum Beispiel für
Sandwich. Achtung! Bei diesem Programm können Sie keine Krustenfarbe einstellen, der Automat tut
dieses von selbst.
11. Rosinen-/Nussbrot (Raisin/nut bread)
Verwenden Sie den Verteiler, um trockene Zutaten wie Rosinen oder Nüsse hinzuzufügen. Die Maschine
fügt die Zutaten vom Verteiler zum richtigen Zeitpunkt selbst hinzu.
12. Roggen (Rye)
Dieses Programm ist ideal für Brote mit einer schwereren Getreideart wie Roggen. Auch das Brot selbst ist
fester und schwerer als normales Brot.
13. Kneten (knead)
Mit diesem Programm wird die Maschine nur kneten, ohne zu backen oder das Brot gehen zu lassen. Sie
können dieses Programm z.B. zum Kneten von Pizzateig verwenden. Mit den Tasten time + und time -
können Sie die Betriebszeit einstellen.

41
B3971
www.domo-elektro.be
DE
14. Teig (dough)
Mit diesem Programm können Sie die Maschine den Teig nur kneten und gehen lassen.
15. Brioche
Dieses Programm eignet sich für Brote mit zusätzlichen Zutaten, die einen hohen Gehalt an Zucker,
Fett und Proteinen aufweisen (z.B. Schokolade, Zucker, ...) Diese Zutaten bilden eine dunkle Kruste. Die
Programmphase „Gehen“ nimmt mehr Zeit in Anspruch, sodass Sie ein leichtes und luftiges Ergebnis
erhalten.
16. Backen (bake)
Dieses Programm können Sie für Fertigteig verwenden, den Sie zum Beispiel schon früher gemacht
haben. Sie können den Teig mit diesem Programm allein backen. Sie können auch bereits gebackenes
Brot wieder etwas aufwärmen.
17. Home made
Diese Taste kann mit selbstgewählten Zeiteinstellungen programmiert werden. Siehe „Home made
einrichten“ unter dem Abschnitt Verwendung.
18. Italienisch (Italian)
Machen Sie mit diesem Programm ein leckeres südländisches Brot. Sie können zusätzliche Zutaten wie
Kräuter, sonnengetrocknete Tomaten, Oliven etc. hinzufügen.
VERWENDUNGSWEISE
1. Holen Sie die Backform dadurch aus dem Automaten, dass Sie diese um eine Vierteldrehung gegen
den Uhrzeigersinn drehen und am Gri direkt aus dem Automaten ziehen.
2. Den Knethaken (Zubehör) auf die Achse in der Backform anbringen. Der Knethaken sollte richtig
und sorgfältig befestigt werden, so dass alle Zutaten ausreichend vermischt und geknetet werden.
3. Geben Sie die Zutaten auf die folgende Weise und Reihenfolge in die Backform:
· Wasser/Milch
· Butter/Öl
· Eventuell Eier
· Salz (tun Sie das Salz an eine Seite)
· Zucker (tun Sie den Zucker an die andere Seite)
· Mehl
· Hefe (tun Sie die Hefe in eine kleine Vertiefung in die Mitte)
!
Achtung! Die Hefe darf nicht mit dem Salz, Zucker oder Wasser in Berührung kommen. Die
Möglichkeit besteht, dass dann die Hefe aktiviert wird, bevor die Zutaten ausreichend vermischt und
geknetet sind.
Zusätzliche Zutaten wie Nüsse, Kräuter, Trockenfrüchte etc. können in den Verteiler gegeben oder
nachträglich hinzugefügt werden. Siehe Abschnitt „Zusätzliche Zutaten hinzufügen“.
4. Entfernen Sie alle Reste der Zutaten an der Außenseite der Backform. Setzen Sie die Form wieder in
den Automaten. Die Backform im Uhrzeigersinn drehen, bis sie einrastet.
5. Schließen Sie den Deckel.
6. Stecken Sie den Stecker in die Steckdose.
7. Stellen Sie mit der ‘menu’-Taste das richtige Programm ein. Jede Eingabe wird mit einem
akustischen Signal bestätigt.
8. Stellen Sie die Farbe der Kruste mit der Color-Taste ein. Sie können zwischen hell, mittel und dunkel
wählen. Stellen Sie die Größe des Brotes (500 g, 750 g oder 1000 g) mit der Weight-Taste ein.

42
B3971
DE
9. Stellen Sie eventuell die Zeitverzögerung ein.
10. Drücken Sie auf die ‘Start-Pauze/Stop‘ Taste. Der Doppelpunkt wird nun blinken und gibt an, dass
der Automat arbeitet. Wenn Sie eine Zeitverzögerung eingestellt haben, beginnt das Gerät erst nach
dem eingestellten Zeitpunkt zu arbeiten.
11. Wenn das Brot fertig ist, piept das Gerät. Auf dem Display wird 0:00 angezeigt. Halten Sie Start-
Pause/Stop einige Sekunden lang gedrückt. Das Gerät piept erneut, um zu bestätigen, dass Sie das
Programm gestoppt haben. Wenn Sie das Programm nicht mit dieser Taste beenden, wird das Brot
noch weitere 60 Minuten warmgehalten. Ziehen Sie den Stecker aus der Steckdose und önen Sie
die Maschinenabdeckung. Entfernen Sie die Backform mit Ofenhandschuhen.
12. Lassen Sie das Brot in der Backform ca. 10 bis 15 Minuten lang abkühlen, halten Sie die Backform
umgekehrt über der Anrichte und schütten Sie leicht das Brot aus der Form Legen Sie das Brot und
die Backform niemals auf die Außenseite des Automaten oder direkt auf ein Plastiktischtuch. Wenn
sich das Brot nicht sofort löst, drehen Sie vorsichtig an der Achse an der Unterseite der Backform, bis
sich das Brot löst. Verwenden Sie zum Herausnehmen des Brotes niemals scharfe Gegenstände, um
die Antihaftbeschichtung der Backform nicht zu beschädigen.
13. Wenn Sie das Brot aus dem Automaten holen und ein Knethaken im Brot stecken bleibt, nehmen
Sie ihn vorsichtig aus dem Brot. Lassen Sie das Brot eventuell auf einem Rost noch weiter abkühlen,
so dass Sie danach den Knethaken mit Ihren Händen herausnehmen können. Achten Sie darauf,
dass der Knethaken gut abgekühlt ist. Es ist zu empfehlen, das Brot erst nach 15-20 Minuten zu
schneiden.
WARMHALTEFUNKTION
Wenn Sie zum Beispiel einmal nicht rechtzeitig zu Hause sind, heizt der Brotbackautomat noch 60
Minuten nach. Dieses ist nicht in der Programmzeit inbegrien. Soll diese Einstellung unterbrochen
werden, einige Sekunden auf die ‘Start-Pauze/Stop‘-Taste drücken. Bleibt das Brot länger als eine Stunde
im Brotbackautomaten, wird es feucht.
Die Backform sofort mit warmem Wasser ausspülen, nachdem das Brot daraus entfernt wurde, so dass
die Knethaken nicht an der Achse kleben bleiben.
Der Brotbackautomat noch nicht einschalten, wenn die Maschine noch nicht abgekühlt oder aufgewärmt
ist.
ZUSÄTZLICHE ZUTATEN HINZUFÜGEN
Während des Knetvorgangs der folgenden Programme ertönt nach dem Kneten ein Signalton: Normal,
Französisch, Vollkornweizen, Süß, Reis, Glutenfrei, Schnell, Obst, Kuchen, Rosinen/Nüsse, Roggen,
Brioche, Italienisch. Dieser Signalton zeigt an, dass Sie zusätzliche Zutaten wie Rosinen, Nüsse, Samen
usw. hinzufügen können. Sie können die Zutaten über den Verteiler oder manuell hinzufügen.
Verteiler
Önen Sie den Verteiler, indem Sie den Deckel nach links schieben. Fügen Sie die Zutaten hinzu.
Schließen Sie den Deckel.
Die Zutaten im Verteiler werden dem Brot nach dem Kneten und Aufgehen automatisch hinzugefügt.
Achtung:
· Fügen Sie keine feuchten, üssigen oder pulverförmigen Zutaten über den Verteiler hinzu.
· Überfüllen Sie den Verteiler nicht.
· Es ist am besten, große Nüsse feiner zu hacken, bevor Sie in den Verteiler gegeben werden.
· Bevor Sie Zutaten in den Verteiler geben, vergewissern Sie sich immer, dass der Deckel auf der
Innenseite des Geräts geschlossen ist.

43
B3971
www.domo-elektro.be
DE
Manuell
Sie können Zutaten auch manuell hinzufügen. Wenn Sie das Signal hören, unterbrechen Sie das
Programm, önen Sie den Deckel, fügen Sie die zusätzlichen Zutaten hinzu, schließen Sie dann den
Deckel und drücken Sie erneut die Starttaste. Diese manuelle Methode eignet sich am besten für feuchte
oder üssige Zutaten, Zutaten in Pulverform und größere Mengen.
SPEICHERFUNKTION
Wenn das Gerät aufgrund eines Stromausfalls ausfällt, funktioniert die Speicherfunktion 10 Minuten lang.
So müssen Sie das Programm nicht neu starten, wenn der Strom wieder da ist. Wenn der Ausfall länger als
10 Minuten dauert, wird das Programm abgebrochen.
HOME MADE EINRICHTEN
Die Taste Home made ist für Ihr eigenes Backprogramm reserviert. Sie können die Zeit aller
Programmphasen selbst bestimmen. Wenn Sie bestimmte Phasen überspringen möchten, setzen Sie die
Zeit auf 0:00.
Achtung: Die Einstellungen dieser Taste werden nicht gespeichert, wenn das Stecker gezogen wird.
1. Drücken Sie die Taste Home made, oder wählen Sie Programm 17 mit der Menütaste.
2. Drücken Sie die Taste Home made erneut, um mit der Programmierung zu beginnen. Die
Zeitanzeige und das Programmphasensymbol blinken auf dem Display. Siehe untenstehende
Tabelle mit Programmphasen und Standardzeiteinstellung.
3. Stellen Sie die gewünschte Zeit für jede Phase mit den Tasten Time + (Zeit erhöhen) und Time - (Zeit
reduzieren) ein. Bestätigen Sie die gewählte Zeit durch Drücken der Taste Home made.
4. Wenn alle Phasen abgeschlossen sind, sehen Sie die Gesamtdauer des Programms auf dem Display.
Die Standard-Gesamtdauer beträgt 3 Stunden. Anschließend können Sie das eingestellte Programm
mit der Starttaste beginnen. Wenn Sie bereits während der Einstellung der Phasen die Starttaste
drücken, wird die Programmierung vorzeitig beendet.
Falls gewünscht, können Sie diesen Programmstart auch verzögern lassen, siehe „Verzögerte
Programmierung“.
Programmphasen Symbol Standard-Einstellung Einstellbare Zeitsperre
Kneten 1
0:10 1-30 Min.
Ruhen 1
0:03 0-30 Min.
Kneten 2
0:05 0-30 Min.
Ruhen 2
0:10 0-30 Min.
Kneten 3
0:20 0-25 Min.
Gehen 1
0:42 0-60 Min.
Gehen 2
0:40 0-60 Min.
Gehen 3
0:00 0-60 Min.

44
B3971
DE
Backen 0:50 0-80 Min.
Warmhaltefunktion
1:00 0-60 Min.
KNETHAKEN VOR DEM BACKEN ENTFERNEN
Der Knethaken kann entfernt werden, nachdem der Teig zum letzten Mal geknetet wurde.
1. Kurz auf den Knopf ‘Start-Pauze/Stop‘ drücken, um den Backvorgang zu unterbrechen und den
Stecker aus der Steckdose ziehen.
2. Den Deckel önen und die Backform herausnehmen. Den Teig mit mehligen Händen herausnehmen
und den Knethaken entfernen.
3. Den Teig wieder in die Backform geben und den Deckel schließen.
4. Den Stecker wieder in die Steckdose stecken und auf den Knopf ‘Start-Pauze/Stop‘ drücken. Das
Backprogramm wird fortgesetzt.
ZEITVORWAHLTASTE
Sie können das Gerät so programmieren, dass die Zubereitung zu einem selbst bestimmten Zeitpunkt
fertig ist.
· Berechnen Sie die Zeitdierenz zwischen dem Zeitpunkt, zu dem Sie das Programm starten und dem
Zeitpunkt, zu dem die Zubereitung fertig sein soll. Der Brotbackautomat addiert automatisch die
Dauer der Programmzyklen.
· Durch Betätigen der Tasten wird die Zeit um jeweils 10 Minuten verlängert oder verkürzt.
· Auf dem Display sehen Sie das Sanduhr-Symbol.
· Eine verzögerte Programmierung ist nicht möglich bei: Kneten und Backen. Wenn Sie bei diesen
Programmen die Tasten Time + und Time - drücken, wird die Programmzeit angepasst.
Beispiel:
Es ist 9:00 Uhr morgens und Sie möchten um 17:00 Uhr nachmittags frisch gebackenes Brot.
Geben Sie alle Zutaten in die Backform. Setzen Sie die Backform in den Brotbackautomaten.
Schließen Sie den Deckel und drücken Sie auf die Programmwahltaste, um das richtige Programm
einzustellen. Drücken Sie die Color-Taste, um die Krustenfarbe einzustellen und das gewünschte Gewicht
des Brotes zu wählen. Drücken Sie die Taste Time + bis 8:00 auf dem Display erscheint. Es werden immer
8 Stunden zwischen dem Zeitpunkt liegen, an dem Sie die Starttaste gedrückt haben und dem Zeitpunkt,
an dem das Brot fertig sein soll (17:00 Uhr).
Drücken Sie die Starttaste. Der Doppelpunkt auf dem Display blinkt und das Sanduhr-Symbol ist sichtbar.
Die Zeit wird nun heruntergezählt, bis der Zeitpunkt erreicht ist, an dem die Brotbackmaschine mit dem
Kneten beginnen wird. Die Brotbackmaschine wird nun das gesamte eingestellte Programm durchlaufen,
sodass das Brot zum gewählten Zeitpunkt fertig ist.
Achtung: Verwenden Sie das Programm mit Timer nicht, wenn Sie Zutaten verwenden, die nur begrenzt
haltbar sind, wie frische Milch, Eier, Joghurt, Käse oder frisches Obst.

45
B3971
www.domo-elektro.be
DE
TIPPS
· Wägen Sie die Zutaten immer sehr genau ab und achten Sie darauf, dass sie auf Zimmertemperatur
sind.
· Sie können die Frische der Hefe mit dem folgenden Test feststellen: Lösen Sie in einer halben Tasse lau
warmem Wasser 1 Teelöel Zucker auf und fügen Sie dieser Mischung 1 Teelöel Hefe hinzu. Nach ein
paar Minuten muss das Ganze blubbern und sprudeln, erst dann wissen Sie, dass die Hefe frisch ist.
· Salz hemmt die Wirkung von Hefe und Zucker fördert ihre Wirkung. Wenn Sie eine dieser beiden
Zutaten auf Grund einer Diät nicht verwenden dürfen, dann müssen Sie die andere ebenfalls
weglassen. Sie erhalten dann ein Brot ohne Zucker und Salz.
· Das Brot, dass Sie selber backen, enthält also keine Konservierungsmittel und ist daher auch nur
beschränkt haltbar. Wenn Sie das Brot luftdicht verpacken, nachdem Sie es gut abkühlen ließen,
können Sie das Brot ein paar Tage lang gut auewahren. Natürlich können Sie das Brot auch
einfrieren, wodurch Sie es später verwenden können.
· Fetten Sie die Achse in der Backform mit etwas Butter ein, damit sich der Teighaken leichter lösen
lässt.
REINIGUNG UND WARTUNG
· Schalten Sie vor dem Reinigen Ihres Brotbackautomaten das Gerät aus, ziehen Sie den Stecker aus der
Steckdose und lassen Sie das Gerät vollständig abkühlen.
· Reinigen Sie das Gerät nach jedem Gebrauch gründlich. Wenn die Backform, die Achse in der
Backform und der Teighaken vor dem Gebrauch nicht sauber sind, kann dies den Betrieb und die
Lebensdauer der Brotbackmaschine beeinträchtigen.
· Trocknen Sie das Gerät und alle Teile gründlich. Lassen Sie den Deckel eine halbe Stunde lang
geönet, damit alle Teile für die Lagerung oder den erneuten Gebrauch vollständig trocken sind.
·
!
Achtung: Tauchen Sie das Gerät niemals in Wasser ein.
ÄUSSERES
Die Außenseite des Automaten und der Deckel mit einem feuchten Tuch oder Schwamm reinigen.
Nehmen Sie die Backform vor dem Reinigen heraus. Falls erforderlich, können Sie das Äußere des Gerätes
mit Hilfe eines milden Spülmittels reinigen.
INNERES
Das Innere des Gerätes können Sie vorsichtig mit einem leicht feuchten Tuch säubern. Passen Sie beim
Säubern des Heizelementes auf!
BACKFORM
Entnehmen Sie die Backform aus der Maschine, indem Sie sie mit dem Gri eine Vierteldrehung gegen
den Uhrzeigersinn gerade nach oben ziehen.
Die Backform könne Sie mit warmem Wasser reinigen. Achten Sie hierbei darauf, dass Sie die Anti-
Anbackschicht nicht beschädigen. Wenn es nicht gelingt, den Knethaken aus der Backform zu nehmen,
müssen Sie die Backform vollständig abkühlen lassen. Danach gießen Sie ein bisschen warmes Wasser
in die Backform, so dass der Knethaken unter Wasser steht. Das Wasser wird nun dafür sorgen, dass sich
die klebenden Teilchen auösen und der Knethaken herausgenommen werden kann. Verwenden Sie
keine Reinigungsmittel oder Abwaschbürsten, denn diese können die Anti-Anbackschicht der Backform
beschädigen. Die Backform ist nicht für die Geschirrspülmaschine geeignet.

46
B3971
DE
HÄUFIG GESTELLTE FRAGEN
Problem Lösung
Ich erhalte nicht das
gewünschte Ergebnis.
· Die Zusammensetzung des Teigs ist für ein gutes Ergebnis sehr
wichtig. Auch die verschiedenen Mehlsorten können zu einem
abweichenden Ergebnis führen. Im Laufe der Zeit lernen Sie das Gerät
kennen. Wir empfehlen Ihnen, das Grundrezept zu probieren. Auch
eine gebrauchsfertige Brotmischung kann dazu verwendet werden.
Hilft dies nicht, kontaktieren Sie am besten unseren Kundendienst.
· Die Zutaten sind nicht genau abgewogen.
· Die Zutaten sind nicht frisch.
· Die Zutaten haben keine Zimmertemperatur.
Kann ich während des
Prozesses nachsehen, ob
der Teig gut ist?
Der Teig muss wie eine glatte, elastische, runde Kugel aussehen. Sie
önen nach 5 bis 10 Minuten (während des Knetens) den Deckel und
berühren mit den Fingern die Oberseite der Teigkugel. Der Teig muss ein
bisschen an den Fingern kleben. Klebt der Teig zu sehr an den Fingern,
dann ist er zu feucht und Sie müssen noch etwas Mehl hinzufügen. Klebt
der Teig überhaupt nicht, ist er zu trocken. Fügen Sie dann noch etwas
Wasser hinzu. Önen Sie den Deckel nicht während des Aufgehens. Ihr
Brot könnte dadurch zusammenfallen.
Ich möchte mehrere
Brote nacheinander
backen.
Lassen Sie das Gerät mit geönetem Deckel während 20 Minuten
abkühlen. Bei einem erwärmten Gerät beginnt die Hefe zu schnell zu
arbeiten. Dadurch wird das Ergebnis weniger gut.
Das Brot ist
zusammengefallen
· Wenn das Brot an allen Seiten zusammenfällt, war der Teig zu
feucht. Versuchen Sie, etwas weniger Wasser zu verwenden. Wenn
Sie konserviertes Obst oder Gemüse verwenden, lassen Sie dieses
zunächst gut abtropfen und reiben Sie es vor der Verwendung trocken.
Sie wurden längere Zeit getränkt, sodass sie überschüssige Flüssigkeit
enthalten.
· Sie können versuchen, eine leichtere Mehlsorte zu verwenden.
· Es kann auch zu stark aufgegangen sein. Der Teig ist so stark
aufgegangen, dass der Teig das Aufgehen nicht aushält. Versuchen Sie,
etwas weniger Hefe, etwa 1 bis 2 Gramm, zu verwenden.
· Wenn der Teig zu schnell aufgegangen ist, ist es möglich, dass er
über die Backform geossen ist. Ziehen Sie den Netzstecker aus
der Steckdose und lassen Sie das Gerät abkühlen. Reinigen Sie
anschließend das Heizelement.

47
B3971
www.domo-elektro.be
DE
Das Brot ist in der Mitte
nicht
ausreichend gebacken.
Wenn das Brot im Inneren nicht ausreichend durchgebacken ist, kann
dies an der verwendeten Mehlsorte liegen. Dies geschieht meist bei der
Verwendung von schwereren
Mehlsorten wie Roggenmehl oder Vollkornmehl. Versuchen Sie, einen
Knetprozess mehr durchzuführen, wenn Sie diese Mehlsorten verwenden.
Wenn das Brotbackgerät den ersten Knetprozess beendet hat, schalten
Sie das Gerät aus. Schalten Sie das Gerät anschließend erneut ein und
drücken Sie auf Start: Das Gerät startet das Kneten erneut und jetzt wird
vom Teig mehr Luft aufgenommen.
Der Boden des Brotes ist
zu dick.
Sie haben das Brot etwas länger mit der Warmhaltefunktion im Gerät
liegen lassen. Das Wasser verdampft, sodass ein dickerer Boden entsteht.
Nehmen Sie den Behälter unmittelbar nach dem Programm aus dem
Gerät.
Das Brot ist übergelaufen. · Sie haben zu viel Hefe verwendet.
· Die Hefe war entweder durch zu viel Zucker oder durch eine zu hohe
Temperatur zu stark aktiviert.
· Sie haben zu viel Teig verwendet. Verwenden Sie nicht mehr als 1000 g.
H:HH erscheint auf dem
Display.
Das Gerät ist noch zu warm. Lassen Sie das Gerät zuerst abkühlen.
E:EO erscheint auf dem
Display.
Es gibt ein Problem mit dem Temperaturfühler. Schicken Sie unserem
Kundendienst das Gerät.
Warum kann ich zu
Beginn des Programms
keine weiteren Zutaten
hinzufügen?
Die zusätzlichen Zutaten (wie Rosinen oder Nüsse) gehen durch den
Knetvorgang kaputt und das Brot wird nicht gut geknetet. Dies beeinusst
auch das Aufgehen. Geben Sie die weiteren Zutaten erst hinzu, wenn das
Gerät piept, nach dem Kneten und Aufgehen.
Kann ich Milch statt
Wasser verwenden?
Das ist möglich! Sie müssen stets dafür sorgen, dass die gesamte
Flüssigkeitsmenge stimmt. Das Verhältnis von Milch und Wasser ist dabei
unbedeutend.
Die Kruste ist oft leichter
und manchmal dunkler.
Diese können Sie über die Taste „Color“ auswählen. Zubereitungen mit
mehr Zucker sind ebenfalls dafür verantwortlich, dass die Kruste dunkler
ist.
Der Brotbackautomat
knetet langsamer als
normalerweise.
Dies kann bei schweren Teigen passieren. Der Motor muss dadurch härter
arbeiten. Dies stellt jedoch kein Problem für das Gerät dar. Fügen Sie
einen Esslöel Flüssigkeit hinzu.
Der Knethaken klemmt
im Behälter.
Entfernen Sie das Brot aus dem Behälter. Füllen Sie den Behälter mit
warmem Wasser und lassen Sie es eine Viertelstunde einweichen. Der
getrocknete Teig löst sich.
Es hat sich
Kondensüssigkeit am
Sichtfenster gebildet.
Dies ist normal. Dies passiert wegen der Wärme.

48
B3971
DE
Ich habe eine
gebrauchsfertige
Backmischung
verwendet, doch das Brot
ist trotzdem misslungen.
Bevor Sie das Gerät zum Hersteller zurücksenden, empfehlen wir
Ihnen, nochmals das Grundrezept zu probieren. Gebrauchsfertige
Backmischungen können manchmal auch Zutaten enthalten, die für ein
weniger gutes Ergebnis verantwortlich sind.
ENTSORGEN
Dieses Symbol auf dem Produkt oder seiner Verpackung weist darauf hin, dass
dieses Produkt nicht als normaler Haushaltsabfall zu behandeln ist, sondern
an einem Sammelpunkt für das Recyling von elektrischen und elektronischen
Geräten abgegeben werden muss. Durch Ihren Beitrag zum korrekten
Entsorgen dieses Produkts schützen Sie die Umwelt und die Gesundheit Ihrer
Mitmenschen. Umwelt und Gesundheit werden durch falsches Entsorgen
gefährdet. Weitere Informationen über das Recycling dieses Produkts
erhalten Sie von Ihren Rathaus, Ihrer Müllabfuhr oder dem Geschäft, in dem
Sie das Produkt gekauft haben.
Das Verpackungsmaterial ist wiederverwertbar. Entsorgen Sie die Verpackung
umweltgerecht und führen Sie sie der Wertstosammlung zu.

49
B3971
www.domo-elektro.be
EN
WARRANTY
Dear client ,
All of our products are always submitted to a strict quality control before they are sold to you.
Should you nevertheless experience problems with your device, we sincerely regret this.
In that case, we kindly request you to contact our customer service.
Our sta will gladly assist you.
+32 14 21 71 91 [email protected]
Monday – Thursday: 8.30 – 12.00 and 13.00 – 17.00
Friday: 8.30 – 12.00 and 13.00 – 16.30
This appliance has a two year warranty period. The warranty on accessories and components that are
liable to wear-and-tear is only 6 months. During this period the manufacturer is responsible for any
failures that are the direct result of construction failure. When these failures occur the appliance will be
repaired or replaced if necessary. The warranty will not be valid when the damage to the appliance is
caused by wrong use, not following the instructions or repairs executed by a third party. The guarantee is
issued with the original till receipt. All parts, which are subject to wear, are excluded from the warranty.
If your device breaks down within the 2-year warranty period, you can return the device together with
your receipt to the shop where you purchased it.
The guarantee on accessories and components that are liable to wear-and-tear is only 6 months.
The guarantee and responsibility of the supplier and manufacturer lapse automatically in the following
cases:
· If the instructions in this manual have not been followed.
· In case of incorrect connection, e.g., electrical voltage that is too high.
· In case of incorrect, rough or abnormal use.
· In case of insucient or incorrect maintenance.
· In case of repairs or alterations to the device by the consumer or non-authorised third parties.
· If the customer used parts or accessories that are not recommended or provided by the supplier /
manufacturer.
SAFETY INSTRUCTIONS
When using electrical appliances, basic safety precautions should always be taken, including the
following:
· Read all instructions carefully. Keep this manual for future reference.
· Make sure all packaging materials and promotional stickers have been removed before using the
appliance for the rst time. Make sure children cannot play with the packaging materials.
· This appliance is intended to be used in household and similar applications such as:
· sta kitchen areas in shops, oces and other working environments;
· farm houses;
· by clients in hotels, motels and other residential type environments;
· bed and breakfast type environments.
· Children should be supervised to ensure that they do not play with the appliance.

50
B3971
EN
· This appliance can be used by children aged from 16 years and above and persons with reduced
physical, sensory or mental capabilities or lack of experience and knowledge if they have been given
supervision or instruction concerning use of the appliance in a safe way and understand the hazards
involved. Children shall not play with the appliance. Cleaning and user maintenance shall not be made
by children unless they are older than 16 and supervised.
· Keep the appliance and its cord out of reach of children younger than 16 years.
· Attention: This appliance cannot be used with an external timer or a separate remote control.
The appliance can become hot during use. Keep the power cord away from hot parts
and don’t cover the appliance.
· Before use, check if the voltage stated on the appliance corresponds with the voltage of the power net
at your home.
· Do not let the cord hang on a hot surface or on the edge of a table or counter top.
· Never use the appliance when the cord or plug is damaged, after malfunction or when the appliance
itself is damaged. In that case, take the appliance to the nearest qualied service center for check-up
and repair.
· The use of accessories that are not recommended or sold by the manufacturer can cause re, electrical
shock or injuries.
· Unplug the appliance when it is not in use, before assembling or disassembling any parts and before
cleaning the appliance. Put all buttons and knobs into the ‘o’ position and unplug the appliance by
grasping the plug. Never unplug by pulling the cord.
· Do not leave a working appliance unattended.
· Never place this appliance near a gas stove or electrical stove or in a place where it may come into
contact with a warm appliance.
· Do not use the appliance outdoors.
· Only use the appliance for its intended use.
· Always use the appliance on a steady, dry and level surface.
· Only use the appliance for domestic use. The manufacturer can not be held responsible for accidents
that result from improper use of the appliance or not following the instructions described in this
manual.
· All repairs should be carried out by the manufacturer or its aftersales service.
· Never immerse the appliance, the cord or the plug in water or any other liquid.
· Keep the cord away from sharp edges and hot parts or other heat sources.
· Do not place the appliance near inammable materials or explosive and/or self-igniting gasses.
· Make sure the holes of the appliance are not covered.
· You can only use an extension cord when the electrical rating (check on label) is higher than or equal to
that of the bread maker.
· Plug in the extension cord in a way no one can trip over the cord or accidentally pull it.
· Do not place objects on the appliance and do not cover it, when it’s activated, to reduce the risk of re.
· The bread maker can become warm. Only touch the handles and buttons of the appliance and use, if
necessary, oven mitts.
· Make sure the appliance is fully cooled down and pull the plug out of the wall socket, before adding or
taking out the parts from the appliance.
· Do not move the bread maker, if the appliance contains warm ingredients or liquids.
· Avoid contact with the rotating kneading paddles, when the appliance is activated, to reduce the risk
of injury.

51
B3971
www.domo-elektro.be
EN
· Please turn o the appliance and remove the plug from the socket, when you want to clean the
appliance or when it’s not in use.
· Do not use the bread maker as storage for food or kitchen utensils.
· Do not clean the appliance with a cleaning sponge. Small parts of the sponge can get in touch with the
electrical parts and cause electrical shocks.
· Do not use the bread maker to dry food or other objects.
· The total weight of all the ingredients cannot be higher than 1000 g.
· Never use more than 715 g of our per bread.
· Never use more than 22 g of fresh yeast or 4+1/4 teaspoons of dry yeast per bread.
· Never use more than 460 ml of water per bread.
PARTS
1. Lid
2. Viewing window
3. dispenser for additional ingredients
4. Control panel
5. Kneading paddle
6. Bread pan
7. Housing
8. Measuring cup
9. Measuring spoon
10. Hook for removing the kneading paddle
BEFORE THE FIRST USE
· Make sure all packaging materials and promotional stickers have been removed before using the
appliance for the rst time.
· Clean your bread maker, bread pan and kneading paddle with a damp cloth. The bread pan and
the kneading paddle both have a non-stick coating to prevent dough from sticking to it. You must
therefore never clean these parts with cleaning products, a sponge or a dishwashing brush. A damp
cloth will do to clean them. Remove the protective lm from the display.
· It is perfectly common and harmless for your appliance to emit a bit of smoke when you use it for the
rst time.
· Before the rst use it is recommended to rst bake with an empty bread pan with the program BAKE.
This for 10 minutes. Afterwards, let everyting cool down and clean the parts again.
· Before using for the rst time, grease the non-stick coating of the loaf tin and the kneading paddle
with a little butter or margarine.
1
2
3
4
5
6
7
8
9
10

52
B3971
EN
USE
BASIC RECIPE
The recipe below is for a loaf of simple white bread.
· 630 g our
· 370 ml water
· 5 g of dried yeast
· 1 tsp salt
· 1 tbsp sugar
INGREDIENTS
Baking a great bread will largely depend on 3 main factors: quality, freshness and correct measurement of
quantities.
Caution: never exceed the maximum capacity of your bread maker! (1000 g) Never use more than these
maximum quantities of the following ingredients for 1 baking session:
Flour: 715 g max.
Yeast: 22 g fresh yeast or 4+1/4 teaspoons dry yeast max.
Water: 460 ml max.
FLOUR
Flour is the basic component of bread. The weight of the our varies, depending on the type of our used.
It is therefore absolutely neccesary that you weigh the right quantity on a pair of scales. Please make sure
you buy a variety of our which is suitable for bread making. Check the packaging.
GLUTEN
Gluten is a natural ingredient of our and stimulates the bread to rise.
YEAST
Yeast is a micro-organism found on several vegetable foodstus. Yeast converts sugars into alcohol and
carbon dioxide. This ability is ideal for the bread to rise and to make it lighter and easier to digest. We
recommend the use of dry yeast for this bread maker. This (granular) yeast is easier to work with, keeps
for a longer time than fresh yeast and generally gives you a better result as well.
SALT
Salt does not only lend the bread a certain avour but equally regulates the activity of the yeast,
strengthens the dough and prevents the bread from rising too hard.
BUTTER / OIL
Butter and oil improve the general taste of the bread and equally soften it. Butter or oil should both be at
room temperature when you add them to the other ingredients.
SUGAR
Sugar is the nutritional source for the yeast and is of great importance for the bread’s rising process. You
can use plain white sugar, brown sugar, syrup or honey. Sugar lends the bread a certain soft and delicate
avour, increases its nutritional value and also renders the bread less perishable. Attention: you should
not use unrened sugar or sugar lumps, when you want to make e.g. cinnamon bread, for they can
damage the non-stick coating of the bread pan.

53
B3971
www.domo-elektro.be
EN
WATER
When the our mixes with the water, the gluten will form and air can no longer enter, thus enabling the
bread to rise. At normal temperature you should use tepid water (± 20 à 25 °C) to make bread: cold water
will not activate the yeast and warm water will achieve the opposite result.
MILK
Milk adds greatly to the color of the bread (brown for the crust, creamy on the inside), improves the
overall taste of the bread and increases its nutritional value. Should you choose to use fresh milk, do not
forget to reduce the amount of water, in order to maintain the right level of humidity.
Attention: do not use fresh milk if you are going to choose the baking program with the time delay
function, for the milk could turn sour.
OTHER INGREDIENTS
Always use fresh ingredients. When you want to use nuts, sunower seeds, dried fruit or similar
ingredients, we recommend that they be soaked in water and dried before adding them to the dough.
Always ensure these ingredients are not too large, for they may damage the non-stick coating.
CONTROL PANEL
Controller
A. Menu: program selection
B. Weight: choose weight (size) of bread
C. Color: how brown the crust is
D. Time +: increase time
E. Bake: button for the Bake program
F. Knead: button for the Knead program
G. Time – : decrease time
H. Start-pause/stop: on/o button
I. Home made: button for the Home made program
Display
1. Choose weight (size) of bread
2. Menu
3. Timer
4. Program phase: kneading
5. Program phase: resting
6. Program phase: rising
7. Program phase: heating
8. Program phase: baking
9. Program phase: warming
10. Program Phase: ready
11. Program phase: number of the phase
12. Time remaining in minutes
13. Browning of the crust: light, medium, dark
14. Locking the control panel
A
D
G
B
E
H
C
F
I
MENU
TIME +
TIME -
WEIGHT
BAKE
START
PAUZE/STOP
COLOR
KNEAD
HOME MADE
1
2
7
8
12
9
10
1411
13
6
5
4
3

54
B3971
EN
A. ‘Menu’ button
This button is used to select the desired baking program. With every touch of this button, you will
hear a bleeping signal, thus indicating a change in the selected type. The selected program and the
corresponding baking time will appear on the display.
B. ‘Weight’ button
You use this button to select the weight of the bread you wish to make, either 500, 750 or 1000 g. Do bear
in mind that the added sum of the ingredients listed in the recipe is about the weight of the bread you are
about to make.
C. ‘Color’ button
You use this button to determine whether you want a light, medium or dark crust.
For recipes you try out for the rst time, we advise you to choose the medium crust color.
D. Time + and G. Time –
You can select delayed start and set the timer for certain programs using these buttons. You can adjust
the program time for the other programs.
E. Bake
This button is for the Bake program. Press start-pause/stop to conrm the program.
F. Knead
This button is for the Knead program. Press start-pause/stop to conrm the program.
H. Start-pause/stop
You start the selected program, or pause/cancel a running program using this button. Press briey to
pause a program. Press the button again to resume. If you do not resume a program within 3 minutes, the
operation will automatically stop.
To end a program, press the button for a few seconds until you hear a beep.
I. Home made
This button is for the Home made program. See ‘Set up Home made’ under the Use section. Press start-
pause/stop to conrm the program.
PROGRAMS
Program times:
Program 500 g 750 g 1000 g
1. Basic 3:05 3:10 3:15
2. French 3:35 3:40 3:45
3. Whole wheat 4:05 4:10 4:15
4. Sweet 3:35 3:40 3:45
5. Rice 2:50 2:55 3:00
6. Gluten free 3:05 3:10 3:15
7. Quick 2:10 2:15 2:20
8. Fruit 3:05 3:10 3:15
9. Cake 2:20*
10. Sandwich 3:00 3:05 3:10

55
B3971
www.domo-elektro.be
EN
11. Raisin/nut 3:05 3:10 3:15
12. Rye 4:05 4:10 4:15
13. Knead 0:08*
14. Dough 1:30*
15. Brioche 3:35 3:40 3:45
16. Bake 0:30*
17. Homemade -- -- --
18. Italian 3:05 3:10 3:15
*Programs that do not allow you to choose the weight of the bread.
The time on the display is indicated in hours and minutes. Example: program 1, basic, making a bread of
750 g should take 3 hours 10 minutes.
1. Basic
This is the program most commonly used to make a regular white loaf of bread.
2. French
With this type of baking program, the time to knead and to rise will be longer than this of the rst
program. The result is a crisper crust and a lighter texture.
3. Whole wheat
This program is most suitable for the confection of heavier types of bread, such as wholemeal bread or
multi-grain bread. Generally, these types of bread tend to be slightly smaller than regular white bread,
due to the bigger weight of the our. It is best not to use the time delay function with this program, since
the results might not be as good.
4. Sweet
This program is suitable for making raisin bread, sugar bread, chocolate bread, etc.
5. Rice
Use this program for a bread based on rice our. After kneading, the dough can rise before being baked.
The crust of a rice bread is thinner and softer than a normal bread.
6. Gluten free
This is the program for making gluten free bread. The dough of a gluten free bread is moister and has the
consistency of a batter. Therefore, the dough should not be kneaded or allowed to rise for too long. The
baking time, on the other hand, is longer. It is better not to use delayed programming with this program,
as this can lead to results that are not as good. It is best to add all the ingredients at the beginning.
7. Quick
For kneading, rising and baking bread with baking soda or baking powder. The result usually is a smaller
bread with a denser texture. It is recommended that you briey stir the ingredients with a wooden spoon
before you press start.
8. Fruit
Use the dispenser to add ingredients such as raisins or other dried fruits. The machine will add the
ingredients itself from the dispenser at the right time. If you would like to add fresh or juicier fruit to your
bread, it is best to do so directly in the loaf tin when you hear a beep.

56
B3971
EN
9. Cake
This program allows you to make bread that is confected with e.g. baking powder. With this type of
baking program, your loaf of bread will be less high and more solid. If you use this program to bake a cake,
we recommend that you put the ingredients in the bread pan, program the bread maker and briey stir
the ingredients with a wooden spoon before pressing the ‘start-pauze/stop‘ button. You can’t choose the
weight yourself if using this program.
10. Sandwich
Select this program to make a very light white dough suitable for e.g. little bread rolls. Please note! With
this program you cannot set a crust color, the machine will do so itself.
11. Raisin/nut bread
Use the dispenser to add ingredients such as raisins or nuts. The machine will add the ingredients itself
from the dispenser at the right time.
12. Rye
This program is ideal for loaves with a heavier variety of grain such as rye. The bread itself is also rmer
and heavier than normal bread.
13. Knead
The machine will only knead the dough during this program; it won’t bake it or let it rise. You can use
this program to knead pizza dough, for example. You can adjust the operation time using the Time + and
Time – buttons.
14. Dough
You can only have the machine knead the dough and let it rise with this program.
15. Brioche
This program is suitable for breads with additional ingredients that have a high sugar, fat, and protein
content (e.g. chocolate, sugar, etc.). These ingredients create a darker crust. The rising program phase will
take more time, giving you a light and airy result.
16. Bake
For ready-made dough which you perhaps had already made in advance. This program can only be used
for the nal stage of the baking process. Program 12 also allows you to reheat bread that you had already
baked.
17. Home made
This button can be programmed with your personalised time settings. See ‘Set up Home made’ under the
Use section.
18. Italian
Make a tasty Mediterranean bread with this program. You can add additional ingredients such as herbs,
sun-dried tomatoes, olives, etc.

57
B3971
www.domo-elektro.be
EN
OPERATING INSTRUCTIONS
1. Take the bread pan out of the bread maker, by turning it a quarter of a turn to the right. You can lift
the bread pan out, straight up, by pulling the handle.
2. Place the kneading paddle on the axis in the bread pan. Please position the kneading paddle
carefully and appropriately, so all ingredients can be suciently mixed and kneaded.
3. When putting the ingredients into the bread pan, please do so in the following manner and order:
· Water / milk
· Butter / oil
· Eggs (optional)
· Salt (salt on one side)
· Sugar (put the sugar on the opposite side)
· Flour
· Yeast (concentrate the yeast in a little hole in the middle)
!
Make sure the yeast is kept away from the sugar, salt and water, for the yeast might be activated
before all ingredients have been properly blended and kneaded.
Additional ingredients, such as nuts, herbs, dried fruits, etc., can be added to the dispenser or can be
added afterwards. See the ‘Adding additional ingredients’ section.
4. Remove all remnants of the ingredients on the outside of the bread pan. Put the bread pan back in
the bread maker. Turn the bread pan clockwise so it locks into place.
5. Close the lid.
6. Plug in the appliance.
7. Select the program you require, using the ‘menu’ button. Each input is conrmed by a bleeping
signal.
8. Set the color of the crust using the Color button. You can choose between light, medium, or dark.
Set the size of the bread (500 g, 750 g, or 1000 g) with the Weight button.
9. Program the time delay function, if so desired.
10. Press the ‘start-pauze/stop’ button. The colon will start ashing, which indicates the bread maker
has started the process. When you have programmed the time delay function, the program will start
after the programmed time delay has expired.
11. The machine will beep when the bread is ready. The display shows 0:00. Press and hold start-pause/
stop for a few seconds. The machine will beep again to conrm that you have stopped the program.
If you do not stop the program with this button, the bread will be kept warm for another 60 minutes
thanks to the warming function. Remove the plug from the socket and open the machine lid.
Remove the loaf tin using oven mitts.
12. Allow the bread to cool down for approximately 10 minutes. Turn the bread pan upside down above
the sink and gently shake it to remove the bread. Please make sure the bread and the bread pan
are never placed on the exterior of the appliance. Nor must they ever be placed directly on a plastic
table-cloth. Should you have diculty removing the bread from the bread pan, carefully turn the
kneading paddle at the bottom of the bread pan until the bread comes loose. Never use sharp
objects to remove the bread so as not to damage the non-stick coating of the loaf tin.
13. If a kneading paddle should get stuck in the bread, try and remove it as gently as you can. If
necessary, you can allow the bread to cool down a little more so you can remove the kneading
paddle with your hands afterwards. Beware that you only touch the kneading paddle with your
hands if it has suciently cooled down. We recommend that you wait 15 to 20 minutes before
cutting the bread.

58
B3971
EN
WARMING FUNCTION
In case you should not make it home in time, the bread maker will continue
to heat the bread for another 60 minutes. This additional time is not included in the
program time. Press the ‘start-pauze/stop’ button for a few seconds, if you want to interrupt this part of
the process. If you leave the bread in the bread maker for more than an hour, it will become moist.
Rinse the bread pan immediately with warm water, after you’ve taken out the bread, to make sure the
kneading paddles don’t keep stuck to the axle.
Do not activate the bread maker, if the appliance hasn’t cooled down or warmed up yet.
ADDING ADDITIONAL INGREDIENTS
During the kneading process of the following programs, there will be a beep after kneading: Normal,
French, Whole Wheat, Sweet, Rice, Gluten free, Fast, Fruit, Cake, Raisins/Nuts, Rye, Brioche, Italian. This
beep indicates that you can add additional ingredients such as raisins, nuts, seeds, etc. You can add the
ingredients through the dispenser or manually.
Dispenser
Open the dispenser by sliding the lid to the left. Add the ingredients. Close the lid.
The ingredients in the dispenser will automatically be added to the bread after kneading and rising.
Caution:
· Do not add moist, liquid, or powdered ingredients through the dispenser.
· Never overll the dispenser.
· It is best to chop large nuts into ner pieces before adding them to the dispenser.
· Before adding ingredients to the dispenser, make sure that the valve on the inside of the appliance is
closed.
Manual
You can also add ingredients manually. When you hear the beep, pause the program, open the lid, add
the additional ingredients, then close the lid and press the start button again. This manual method is best
used for moist, runny, or powdered ingredients or larger quantities.
MEMORY FUNCTION
If the appliance fails due to a power failure, the memory function will work for 10 minutes.
This way, you do not have to restart the program when the power is back. If the outage lasts longer than
10 minutes, the program will be cancelled.
SETTING HOME MADE
The Home made button is reserved for your own baking program. You can determine the time for all
program phases yourself. If you want to skip certain phases, set the time to 0:00.
Attention: the settings of this button will not be saved when the power cord is unplugged.
1. Press the Home made button or select program 17 using the Menu button.
2. Press the Home made button again to start programming. The time and the program phase icon will
ash on the display. See the table of program phases and default time settings below.
3. Set the desired time for each phase using the Time + (increase time) and Time – (decrease time)
buttons. Conrm the selected time by pressing the Home made button.

59
B3971
www.domo-elektro.be
EN
4. When all phases have been completed, you will see the total duration of the program on the display.
The standard total duration is 3 hours. You can then start the set program by pressing the Start
button. If you press the start button while setting the phases, the programming will stop early.
If desired, you can also have this program start delayed; see ‘Delayed programming’.
Program phases Icon Default setting Adjustable time lock
Knead 1
0:10 1-30 min.
Rest 1
0:03 0-30 min.
Knead 2
0:05 0-30 min.
Rest 2
0:10 0-30 min.
Knead 3
0:20 0-25 min.
Rise 1
0:42 0-60 min.
Rise 2
0:40 0-60 min.
Rise 3
0:00 0-60 min.
Bake
0:50 0-80 min.
Warming function
1:00 0-60 min.
REMOVING THE KNEADING PADDLE BEFORE BAKING
You can remove the kneading paddle, after the dough has been kneaded for the last time.
1. Shortly press the ‘start-pauze/stop’ button to interrupt the baking process or disconnect the plug
from the power socket.
2. Open the lid and take out the bread pan. Take out the dough with oured hands and remove the
kneading paddle.
3. Place the dough back in the bread pan and close the lid.
4. Insert the plug into the power socket and press the ‘start-pauze/stop’ button. The program will be
continued.
TIME DELAY FUNCTION
You can program the machine so that the preparation will be completed at a time of your choice.
· Calculate the time dierence between the time you start the program and the time you want the
preparation to be ready. The bread maker will automatically add the duration of the program cycles to
this.
· By pressing the keys, the time will increase or decrease by 10 minutes at a time.
· You will see the hourglass icon on the display.
· Delayed programming is not possible with kneading and baking. The program time will be adjusted if
you press the Time + and Time – buttons with these programs.

60
B3971
EN
Example:
The time is 9 am and you want your bread to be ready by 5 pm. Put all ingredients in the bread pan.
Place the bread pan in your bread maker. Close the lid and select the program using the MENU button.
Press the Color button to set the crust color and choose the desired weight of the bread. Press the Time +
button until 8:00 appears on the display. After all, 8 hours will have passed from the moment you pressed
the start button to the moment the bread should be ready (5 p.m.).
Press the start button. The colon will start ashing on the display and the hourglass icon will be visible.
The time will now count down until the time is reached when the bread maker has to start kneading. The
bread maker will now run through the entire set program so that the bread is ready at the chosen time.
Caution: Do not use the timer program if you are using ingredients that have a limited shelf life, such as
fresh milk, eggs, yoghurt, cheese and fresh fruit.
TIP
· Please make sure your ingredients are at room temperature and that they are carefully weighed.
· You can verify the freshness of your yeast by submitting it to the following test: dissolve 1 teaspoonful
of sugar in half a cup of lukewarm water and subsequently add the yeast to this mixture. If the
substance starts bubbling and boiling after a few minutes, you can be sure that you are using fresh
yeast.
· Salt breaks the eect of the yeast and sugar exactly does the opposite. If you are not allowed to use
either sugar or salt for dietary reasons, you must not add the other ingredient either. Your bread will
not contain sugar or salt.
· Home-made bread, made with this bread maker, does not contain any preservatives and is therefore
perishable. If you wrap the bread in a vacuum package after cooling down, you will be able to keep it
for a few days. Of course you can also freeze the bread.
· Grease the axle in the loaf tin with a little butter to ensure that the kneading paddle comes o easier.
CLEANING AND MAINTENANCE
· Before cleaning your bread maker, please make sure it’s no longer activated, it has suciently cooled
down and the plug has been disconnected from the power socket.
· Clean the appliance thoroughly after each use. If the loaf tin, axle in the loaf tin, and kneading paddle
are not clean before use, this may aect the operation and service life of the bread maker.
· Thoroughly dry the appliance and all parts. Leave the lid open for half an hour so that all parts are
suciently dry before storage or reuse.
·
!
Attention: Never submerge the appliance in water.
EXTERIOR
Clean the outside of the appliance and the lid with a damp cloth or sponge. Take out the bread pan before
you start cleaning. If necessary, you can clean the outside of the appliance using a mild detergent.
INSIDE
The inside of the device can be carefully cleaned with a slightly damp cloth. Be careful when cleaning the
heater element.

61
B3971
www.domo-elektro.be
EN
LOAF TIN
Remove the loaf tin from the machine by turning it a quarter turn counter-clockwise using the handle
and lifting straight up. The loaf tin can be cleaned with warm water. Make sure that you do not damage
the non-stick coating. If it is not possible to remove the dough hook from the loaf tin, let the tin cool
completely. Pour a little warm water into the loaf tin so that the dough hook is under water. The water will
now ensure that the sticky particles dissolve and the dough hook can be removed.
Do not use detergents or washing up brushes as they can damage the non-stick coating of the loaf tin.
The loaf tin is not suitable for cleaning in the dishwasher.
FREQUENTLY ASKED QUESTIONS
Problem Solution
I am not getting the
desired result.
· The composition of the dough is very important to achieve a good
result. Also, dierent brands of our can give dierent results. The best
way to learn to use the device is to use it. We recommend that you
try the basic recipe. A ready-made bread mix is another great way to
get started. If this does not help, please contact our customer service
department.
· The ingredients have not been accurately weighed.
· The ingredients are not fresh.
· The ingredients are not at room temperature.
Can I check whether the
dough is working during
the process?
The dough should look like a smooth, elastic round ball. After 5 to 10
minutes (during kneading), open the lid and touch the top of the dough
ball with your ngers. The dough should stick to your ngers a little. If the
dough is too sticky, it is too moist and you need to add some our. If the
dough does not stick at all, it is too dry and you need to add a little water.
Do not open the lid while rising. This could cause the bread to collapse.
I want to bake several
loaves of bread one after
the other.
Allow the appliance to cool for 20 minutes with the lid open. A heated
device will cause the yeast to start working too quickly, which will harm
the result.
The bread has collapsed. · If the bread seems to have collapsed on all sides, this means that
the dough was too moist. Try adding a little less water. When using
preserved fruit or vegetables, drain it well and rub dry before using.
It has been soaked for a long time, meaning it will contain excess
moisture.
· You can try using a lighter our variety.
· It may also have risen too much. The dough has risen so much that it
cannot cope with the rising. Try to add a little less yeast (1 to 2 grams).
If the dough has risen too fast, it may have risen out of the loaf tin at
the top. Unplug the device and let it cool o. Then clean the heating
element.

62
B3971
EN
The inside of the loaf is
not ready.
If the bread is too soft in the middle, this may be due to the type of our
used. This is usually the result of using heavier ours, such as rye our or
wholemeal our. Try using one more kneading process when using these
types of ours. When the bread maker has nished the rst kneading
process, stop the machine. Then reset the unit and press Start. The
machine will start kneading again; there will now be a larger amount of air
in the dough.
The bottom of the bread
is too thick.
You left the bread in the appliance a bit longer with the warming function
on. The water will evaporate, giving you a thicker bottom. Remove the
bread from the appliance immediately after the program.
The bread has
overowed.
· You used too much yeast.
· The yeast has been too strongly activated, e.g. by too much sugar or
too high a temperature.
· You used too much dough. Do not use more than 1000 g.
H:HH appears on the
display.
The unit is still too hot. Allow the appliance to cool rst.
E:EO appears on the
display.
There is a problem with the temperature sensor. Send the device to our
after-sales service.
Why can’t I add extra
ingredients at the start of
the program?
The extra ingredients (such as currants or nuts), will be kneaded to pieces
and the bread will not be kneaded properly. It will also aect the rising.
Only add the extra ingredients once the appliance beeps, after kneading/
rising.
Can I use milk instead of
water?
Yes! Always make sure that the complete volume of moisture is correct.
The ratio of milk and water makes no dierence.
The crust is sometimes
lighter and sometimes
darker.
These can be selected with the ‘Color’ button. Preparations with more
sugar will also make the crust darker.
The bread machine is
kneading slower than
normal.
This can happen with heavy ours, causing the engine to work harder.
However, this is not a problem for the machine. Add a tablespoon of liquid.
The kneading paddle
is stuck in the baking
mould.
Remove the bread from the mould. Fill the mould with warm water and
leave to soak for 15 minutes. The stuck dough will come loose.
There is condensation
on the inside of the
inspection window.
This is normal. This is due to the heat.
I used a ready-made mix,
but the bread still came
out wrong.
Before sending the device in for repair, we recommend that you try
the basic recipe again. Ready-made mixes can sometimes also contain
ingredients that produce poor results.

63
B3971
www.domo-elektro.be
EN
ENVIRONMENTAL GUIDELINES
This symbol on the product or on its packaging indicates that this product
may not be treated as household waste. Instead it must be brought to
the applicable collection point for recycling of electrical and electronic
equipment. By ensuring this product is disposed of correctly, you will help
prevent potential negative consequences for the environment and human
health, which could otherwise be caused by inappropriate waste handling of
this product. For more detailed information about recycling of this product,
please contact your local city oce, your household waste disposal service or
the shop where you purchased the product.
The packaging is recyclable. Please treat the packaging ecologically.

64
B3971
ES
GARANTIA
Este aparato tiene un periodo de garantía de 2 años a partir de la fecha de compra. Tenga en cuenta que
la garantía de accesorios y piezas sujetas a desgaste, es de 6 meses. Durante el periodo de garantía,
el distribuidor será completamente responsable de los defectos directamente asignables a errores del
material y fabricación. Cuando se detecten este tipo de errores, y siempre que se estime necesario, el
aparato se sustituirá o reparará. A partir de ese momento, el periodo de garantía de 2 años no volverá a
iniciarse, sino que seguirá siendo de 2 años a partir del momento de compra. La garantía se concede sobre
la base del recibo de caja.
La garantía de los accesorios y componentes sujetos a desgaste es de 6 meses.
La garantía y la responsabilidad/imputabilidad del proveedor y el fabricante expiran automáticamente en
los siguientes casos:
· Cuando no se cumplan las instrucciones que aparecen en este manual.
· En el caso de una conexión inadecuada, por ejemplo, a una tensión eléctrica demasiado alta.
· En caso de uso incorrecto, brusco o anormal.
· En caso de insuciente o incorrecto mantenimiento.
· Si el consumidor o un tercero no autorizado realizan reparaciones o modicaciones en el aparato.
· Si se usan componentes o accesorios que no están recomendados o que no son suministrados por el
proveedor/fabricante.
INSTRUCCIONES DE SEGURIDAD
Cuando utilice aparatos eléctricos, se deben seguir las instrucciones de seguridad mencionadas a
continuación:
· Lea detenidamente estas instrucciones. Conserve este manual para consultarlo posteriormente.
· Antes del primer uso retire todos los materiales de embalaje y etiquetas promocionales. Asegúrese de
que los niños no puedan jugar con el material de embalaje.
· Este aparato es adecuado para su uso en el ámbito doméstico y entornos similares como:
· Zona de cocina para el personal de tiendas, ocinas y otros entornos profesionales similares.
· Granjas.
· Habitaciones de hoteles y moteles, y otros entornos de carácter residencial.
· Habitaciones de invitados o similares.
· Supervise en todo momento a los niños para que no jueguen con el aparato.
· Este aparato puede ser utilizado por niños de 16 años o más, personas con discapacidad física o
sensorial, o personas con capacidad mental limitada o falta de experiencia o conocimiento, siempre,
y en tanto en cuanto, dichas personas estén vigiladas o hayan recibido instrucciones sobre el uso del
aparato de manera segura y conozcan los peligros del uso del mismo. Los niños no deben jugar con el
ventilador. El mantenimiento y la limpieza del dispositivo no deben ser realizados por niños, a menos
que tengan 16 años o más y estén supervisados por un adulto.
· Mantenga el aparato fuera del alcance de los niños.
· Atención: el aparato no puede ser utilizado con un temporizador externo o un mando a distancia
separado.
El aparato puede calentarse durante el uso. Mantenga el cable eléctrico lejos de las
piezas calientes y no cubra el aparato.
· Antes de utilizarlo, compruebe si el voltaje indicado en el aparato corresponde al voltaje de la
electricidad de su casa.

65
B3971
www.domo-elektro.be
ES
· No permita que el cable cuelgue sobre una supercie o el borde de una mesa o encimera.
· No utilice nunca el aparato si el cable o el enchufe están dañados, después de un mal funcionamiento
de la unidad o si están dañados. Lleve el aparato al distribuidor autorizado más cercano centro para la
inspección y reparación.
· El uso de accesorios no recomendados o vendidos por el fabricante puede causar incendios, descargas
eléctricas o lesiones.
· Desenchufe la toma de corriente cuando no se usa, para montar o desmontar piezas y antes de
limpiarlo. Ponga todos los botones en posición desconectado (“o”) y desconecte el enchufe de la
toma de corriente. Nunca tire del cable para desenchufarlo.
· No deje que el aparato funcione sin supervisión.
· No encienda nunca el aparato cerca de una estufa de gas o eléctrica, ni en un lugar donde pueda entrar
en contacto con un horno eléctrico o con otro aparato caliente.
· No utilice el aparato en el exterior.
· Utilice el aparato sólo para el n para el que se ha fabricado.
· Coloque siempre el aparato sobre una supercie rme, horizontal y seca.
· Utilice el aparato sólo para uso doméstico. El fabricante no es responsable de los accidentes que
resulten del uso incorrecto del aparato, ni del incumplimiento de las normas establecidas en este
manual.
· Todas las reparaciones aparte del mantenimiento ordinario de la unidad deben ser efectuadas por el
fabricante o por su servicio post-venta.
· No sumerja nunca el aparato, el cable o el enchufe en agua o cualquier otro líquido.
· Mantenga el cable alejado de bordes alados y piezas calientes u otras fuentes de calor.
· No coloque el aparato cerca de objetos que generen calor, como cocinas y hornos eléctricos.
· No coloque el aparato cerca de materiales inamables o de encendido automático.
· Asegúrese de que los oricios del aparato no estén cubiertos.
· Conecte el aparato a un enchufe toma tierra y compruebe que la tensión es la misma que la de su casa.
· No doble bruscamente el cable para evitar que se dañe.
· Para evitar que alguien tropiece con el cable porque es demasiado largo, la máquina viene con un
cable más corto.
· Compruebe el estado del cable. Si el cable está dañado, debe ser reemplazado por el fabricante o una
persona cualicada.
· Mantenga el aparato fuera del alcance de los niños.
· Este aparato cumple con las normas generales de seguridad.
· No coloque objetos sobre el aparato ni lo cubra cuando está en funcionamiento.
· La máquina de pan se calienta cuando está funcionando. Tocar sólo las manijas y botones del aparato
y utilizar manoplas si es necesario.
· Asegúrese de que el aparato esté completamente frío y desenchúfelo antes de agregar o sacar las
piezas.
· No mueva la máquina si contiene ingredientes calientes o líquidos.
· Evite el contacto con las paletas giratorias de amasado, cuando el aparato está en funcionamiento,
para reducir el riesgo de lesiones.
· Apague el aparato pulsando el botón “Start/Stop” durante unos segundos.
· A continuación, desenchufe el aparato sin tirar del cable.
· Apague el aparato y desenchúfelo para proceder a su limpieza.
· No utilice la máquina para guardar alimentos o utensilios de cocina.
· No sumerja la máquina en agua u otros líquidos.
· No utilice la máquina para otro tipo de uso que no sea doméstico.
· No utilice la máquina para secar alimentos u otros objetos.

66
B3971
ES
· No utilice la máquina en exteriores.
· No utilice piezas que no vienen con el producto o que no son recomendadas por el fabricante.
· El peso total de todos los ingredientes no puede ser superior a 1000 g.
· Nunca use más de 715 g de harina por pan.
· Nunca use más de 22 g de levadura fresca o 4+1/4 cucharaditas de levadura en grano por pan.
· Nunca use más de 460 ml de agua por pan.
PIEZAS
1. Tapa
2. Mirilla
3. Distribuidor para ingredientes adicionales
4. Panel de control
5. Gancho amasador
6. Molde
7. Carcasa
8. Vaso graduado
9. Cuchara de medida
10. Gancho para quitar el gancho amasador
ANTES DEL PRIMER USO
· Antes del primer uso retire todos los materiales de embalaje y etiquetas promocionales.
· Limpie la máquina de pan, el molde y las palas de amasado con un paño húmedo.El molde y las palas
tienen un recubrimiento antiadherente para evitar que la masa se pegue al fondo. Por lo tanto, nunca
se deben limpiar estas piezas con productos de limpieza abrasivos. Utilice un paño húmedo. Retire la
película protectora de la pantalla.
· Antes del primer uso es aconsejable hornear una vez con un molde vacío en el programa BAKE
(hornear) durante 10 minutos. Después se deja enfriar todo y se limpian las piezas de nuevo.
· La calidad del pan horneado dependerá de toda una serie de factores. Por favor asegúrese de
que todos los ingredientes estén a temperatura ambiente y ponga la cantidad correcta de cada
ingrediente, como se indica en las recetas.
· Antes de usarlo por primera vez, engrase la capa antiadherente del molde y el gancho de masa con un
poco de mantequilla o margarina.
USO
RECETA BÁSICA
La siguiente receta es para elaborar un pan blanco simple.
· 630 g de harina
· 370 ml de agua
· 5 g de levadura en grano
· 1 cucharadita de sal
· 1 cucharada de azúcar
1
2
3
4
5
6
7
8
9
10

67
B3971
www.domo-elektro.be
ES
INGREDIENTES
Obtener un gran pan dependerá en gran medida de 3 factores principales: la calidad, la frescura y la
correcta medición de las cantidades.
¡Atención: ¡No exceda la capacidad máxima de su máquina de hacer pan! (1000 g) Por lo tanto para cada
hornada no exceda nunca las cantidades máximas de los siguientes ingredientes:
Nunca use más de 715 g de harina por pan.
Nunca use más de 22 g de levadura fresca o 4+1/4 cucharaditas de levadura en grano por pan.
Nunca use más de 460 ml de agua por pan.
HARINA
La harina es el componente básico del pan. El peso de la harina varía, dependiendo del tipo de harina
utilizada. Por tanto, es absolutamente necesario que usted pese la cantidad adecuada en una balanza. Por
favor, asegúrese de comprar una variedad de harinas que sean adecuadas para la preparación del pan.
GLUTEN
El gluten es un ingrediente natural de la harina y estimula el aumento del pan.
LEVADURA
La levadura es un microorganismo que se encuentra en varios alimentos vegetales. La levadura convierte
los azúcares en alcohol y dióxido de carbono. Esta capacidad es ideal para que el pan suba y para que sea
más ligero y fácil de digerir. Recomendamos el uso de levadura seca para esta máquina. Esta levadura (en
polvo) es más fácil de trabajar y se conserva por un tiempo más largo que la levadura fresca y en general
da un mejor resultado.
SAL
La sal no sólo le da sabor al pan, sino que regula la actividad de la levadura, fortalece la masa y evita que el
pan suba demasiado.
MANTEQUILLA / ACEITE
La mantequilla y el aceite mejoran el sabor del pan en general y lo hacen más blando. La mantequilla o el
aceite deben estar a temperatura ambiente.
AZÚCAR
El azúcar es el nutriente del que se alimenta la levadura y es de gran importancia para el proceso de subida
del pan. Puede utilizar azúcar blanco, azúcar moreno, jarabe o miel. El azúcar da al pan un cierto sabor
suave y delicado, aumenta su valor nutricional y también hace el pan menos perecedero.
Cuidado: No se debe utilizar el azúcar sin renar o terrones de azúcar cuando se quiera hacer, por
ejemplo, pan de canela, ya que pueden dañar la capa antiadherente del recipiente para el pan.
AGUA
Cuando la harina se mezcla con el agua, se forma el gluten y ya no podrá entrar aire, lo que permitirá
que el pan suba. El agua debe esta tibia (± 20 à 25°C), ya que el agua fría no activará la levadura y el agua
caliente lograría el resultado opuesto.
LECHE
La leche determina en gran medida el colour del pan (el marrón de la corteza, y lo cremoso del interior),
mejora el sabor del pan en general y aumenta su valor nutricional. Si decide usar leche fresca, no se olvide
de reducir la cantidad de agua, con el n de mantener el nivel adecuado de humedad.

68
B3971
ES
Cuidado: No utilice leche fresca si usted va a elegir el programa de cocción con la función de retardo de
tiempo, la leche puede pasarse y dar un sabor amargo.
OTROS INGREDIENTES
Utilice siempre ingredientes frescos. Si desea utilizar nueces, pipas de girasol, frutos secos o
ingredientes similares, se recomienda que se empapen en agua y se sequen antes de añadirlos a la masa.
Asegúrese siempre de que estos ingredientes no sean demasiado grandes, ya que pueden dañar la capa
antiadherente del molde.
PANEL DE CONTROL
Control
A. Menu (menú): selección del programa
B. Weight (peso): selección del peso (tamaño) del pan
C. Color: tostado de la corteza
D. Time (tiempo) +: aumentar el tiempo
E. Bake (hornear): tecla de acceso rápido para el programa Bake
F. Knead (amasar): tecla de acceso rápido para el programa Knead
G. Time (tiempo) -: reducir el tiempo
H. Inicio-pausa/parada: tecla de encendido/apagado
I. Home made (elaboración casera): tecla de acceso rápido para el programa Home made
Pantalla
1. Seleccionar el peso (tamaño) del pan
2. Selección del programa
3. Temporizador
4. Fase del programa: amasar
5. Fase del programa: reposo
6. Fase del programa: fermentación
7. Fase del programa: calentar
8. Fase del programa: hornear
9. Fase del programa: mantener caliente
10. Fase del programa: preparado
11. Fase del programa: número de la fase
12. Tiempo restante en minutos
13. Tostado de la corteza: claro, medio, oscuro
14. Bloqueo del panel de control
A. Menu: selección del programa
Este botón se utiliza para seleccionar el programa de cocción deseado. Con cada toque de este botón, se
escuchará un pitido, que indicará un cambio en el tipo seleccionado.
El programa seleccionado y el tiempo de cocción correspondiente aparecerán en la pantalla.
B. Weight: peso (tamaño)
Utilice este botón para seleccionar el peso del pan, ya sea 500, 750 o 1000 gr. Esta opción no se puede
utilizar con los programas rápido, masa, mermelada, pastel y hornear. Tenga en cuenta que la suma de los
ingredientes que guran en la receta es el peso del pan que está a punto de hacer.
A
D
G
B
E
H
C
F
I
MENU
TIME +
TIME -
WEIGHT
BAKE
START
PAUZE/STOP
COLOR
KNEAD
HOME MADE
1
2
7
8
12
9
10
1411
13
6
5
4
3

69
B3971
www.domo-elektro.be
ES
C. Color: dorado de la corteza
Utilice este botón para determinar si desea una corteza suave, media u oscura. Para recetas de prueba, le
recomendamos que elija el colour de la corteza media.
D. Time + y G. Time -
Con estas teclas se puede seleccionar el inicio aplazado de ciertos programas y también se puede ajustar
el temporizador. En otros programas puede ajustar el tiempo del programa.
E. Bake (hornear)
Esta tecla es una tecla de acceso rápido para el programa de horneado. Pulse inicio-pausa/parada para
conrmar el programa.
F. Knead (amasar)
Esta tecla es una tecla de acceso rápido para el programa de amasado. Pulse inicio-pausa/parada para
conrmar el programa.
H. Inicio-pausa/parada
Con esta tecla se inicia el programa seleccionado, o se pausa/cancela un programa en curso. Pulse esta
tecla brevemente para pausar un programa. Vuelva a pulsar el botón para reanudar el programa. Si no
reanuda el programa en 3 minutos, el aparato se apagará automáticamente.
Para nalizar un programa, pulse la tecla durante unos segundos hasta que se escuche un pitido.
I. Home made (elaboración casera)
Esta tecla es una tecla de acceso rápido para el programa Home made. Consulte “Ajustar Home made” en
la sección Uso. Pulse inicio-pausa/parada para conrmar el programa.
PROGRAMAS
Tiempos del programa:
Programa 500 g 750 g 1000 g
1. Básico (basic) 3:05 3:10 3:15
2. Francés (french) 3:35 3:40 3:45
3. Integral (whole wheat) 4:05 4:10 4:15
4. Sweet (dulce) 3:35 3:40 3:45
5. Rice (arroz) 2:50 2:55 3:00
6. Sin gluten (gluten free) 3:05 3:10 3:15
7. Rápido (Quick) 2:10 2:15 2:20
8. Fruta 3:05 3:10 3:15
9. Cake 2:20*
10. Sandwich 3:00 3:05 3:10
11. Pan con pasas/nueces (Raisin/nut) 3:05 3:10 3:15
12. Centeno (Rye) 4:05 4:10 4:15
13. Knead (amasar) 0:08*
14.Masa (dough) 1:30*
15. Brioche 3:35 3:40 3:45
16. Bake 0:30*
17. Home made (elaboración casera) -- -- --
18. Italiano (Italian) 3:05 3:10 3:15

70
B3971
ES
* Estos programas no permiten elegir el peso del pan.
El tiempo en la pantalla se indica en horas y minutos. Ejemplo: Programa 1, básico, haciendo un pan de
750 g, dura 3 horas 10 minutos.
1. Básico (Basic)
Este es el programa más utilizado para hacer un pan blanco normal.
2. Francés (French)
Con este programa el tiempo para amasar y subir el pan será más largo que el del primer programa. Esto
creará una corteza más crocante y una textura más ligera.
3. Integral (Whole wheat)
Este programa es el más adecuado para la confección de los tipos de pan más pesados, como el pan
integral. En general, estos tipos de pan tienden a ser ligeramente más pequeños que el pan blanco
normal, debido al mayor peso de la harina. En este programa es mejor no utilizar el ajuste de tiempo, ya
que esto puede conducir a resultados inferiores.
4. Sweet (dulce)
Este programa es adecuado para elaborar pan de pasas, pan de azúcar, pan de chocolate, etc.
5. Rice (arroz)
Use este programa para elaborar un pan a base de harina de arroz. Después de amasar, la masa se puede
fermentar antes de hornearla. La corteza de un pan de arroz es más na y blanda que la de un pan normal.
6. Sin gluten (gluten free)
Este es el programa para elaborar pan sin gluten. La masa de un pan sin gluten es más húmeda y tiene la
consistencia de una pasta. Por lo tanto, esta masa no se puede amasar o fermentar durante demasiado
tiempo. Además, el tiempo de horneado de un pan sin gluten es más largo. Con este programa es mejor
no utilizar la programación aplazada, ya que esto podría ofrecer peores resultados. Es mejor añadir todos
los ingredientes al principio.
7. Rápido (Quick)
Para amasar, inar y hornear pan con levadura en polvo. El resultado es generalmente un pan más
pequeño con una textura más rme. Antes de presionar el botón de inicio, se recomienda remover los
ingredientes con una cuchara de madera.
8. Fruta
Utilice el distribuidor para añadir ingredientes como pasas u otros frutos secos. La máquina añadirá
automáticamente los ingredientes desde el distribuidor en el momento adecuado. Si desea añadir fruta
fresca o húmeda a su pan, es mejor hacerlo directamente en el molde cuando se escuche una señal.
9. Cake
Con este programa la barra de pan será menos alta y más sólida. Si utiliza este programa para hacer un
pastel le recomendamos que ponga los ingredientes en el molde, seleccione el programa de la máquina
y agite brevemente los ingredientes con una cuchara de madera antes de pulsar el botón “Start-Pauze/
Stop”. En este programa no es posible elegir el peso por su cuenta.

71
B3971
www.domo-elektro.be
ES
10. Sandwich
Seleccione este programa para hacer una masa blanca muy ligera, adecuada por ejemplo, para panecillos
pequeños. ¡Atención! Con este programa no se puede establecer un color de corteza, la máquina lo hará
automáticamente.
11. Pan con pasas/nueces (Raisin/nut bread)
Utilice el distribuidor para añadir ingredientes como pasas o nueces. La máquina añadirá
automáticamente los ingredientes desde el distribuidor en el momento adecuado.
12. Centeno (Rye)
Este programa es ideal para panes con una variedad de cereal más pesada, como el centeno. El pan
también es más rme y pesado que el pan normal.
13. Knead (amasar)
Con este programa, la máquina solo amasará, sin hornear ni fermentar. Puede usar este programa
para amasar masa de pizza, por ejemplo. Con las teclas time + y time - puede ajustar el tiempo de
funcionamiento.
14. Masa (dough)
Con este programa la máquina solo amasa y fermenta la masa.
15. Brioche
Este programa es adecuado para panes con ingredientes adicionales que aportan un alto contenido de
azúcar, grasa y proteínas (por ejemplo, chocolate, azúcar, etc.) Estos ingredientes hacen que la corteza
sea más oscura. En la fase de programa, la fermentación tardará más tiempo, ofreciendo un resultado
ligero y esponjoso.
16. Bake
Para la masa ya preparada con antelación. Este programa sólo se puede utilizar para la etapa nal del
proceso de horneado. El programa 11 también le permite recalentar el pan que ya ha sido horneado.
17. Home made (elaboración casera)
Con esta tecla puede programar con ajustes de tiempo que usted mismo elija. Consulte “Ajustar Home
made” en la sección Uso.
18. Italiano (Italian)
Con este programa podrá elaborar un buen pan al estilo del sur. Puede añadir ingredientes adicionales,
como hierbas aromáticas, tomates secados al sol, aceitunas, etc.
INSTRUCCIONES DE USO
1. Tome el molde de la máquina de pan, girándolo un cuarto de vuelta hacia la derecha. También puede
sacar el molde tirando del asa.
2. Coloque la paleta de amasado en el eje del molde cuidadosamente y de manera adecuada, para que
todos los ingredientes se mezclen y se amasen bien.

72
B3971
ES
3. Al poner los ingredientes en el molde, hágalo de la siguiente manera y en este orden:
· Agua / leche
· Mantequilla / aceite
· Huevos (opcional)
· Sal (poner el azúcar en un lado del molde)
· Azúcar (poner en el lado opuesto)
· Harina
· Levadura (concentrar la levadura en un pequeño agujero en el centro).
!
Asegúrese de que la levadura se mantenga lejos del sal, azúcar y del agua. El agua puede activar la
levadura antes de que todos los ingredientes estén bien mezclados y amasados.
Los ingredientes adicionales como nueces, hierbas aromáticas, frutas deshidratadas, etc. se pueden
añadir en el distribuidor o se pueden añadir después. Consulte la sección “Añadir ingredientes
adicionales”.
4. Retire los restos que hayan quedado de la parte exterior del molde. Coloque el molde en la máquina.
Gire el molde en sentido horario hasta que encaje haciendo clic.
5. Cierre la tapa.
6. Conecte el aparato.
7. Seleccione el programa que desee, utilizando el botón “Menú”. Cada entrada se conrma con un
pitido.
8. Ajuste el color de la corteza con la tecla de color. Puede elegir entre un color claro, medio u oscuro.
Ajuste el tamaño del pan (500 g, 750 g o 1000 g) con la tecla Weight (peso).
9. Programa para la función de retardo de tiempo, si así lo desea.
10. Presione el botón “Start-Pauze/Stop”. Los dos puntos comienzan a parpadear, lo que indica que
la máquina ha iniciado el proceso. Cuando haya programado la función de retardo de tiempo, el
programa se iniciará después que el retardo de tiempo programado haya expirado.
11. Cuando el pan esté preparado, la máquina emitirá un pitido. La pantalla muestra 0:00. Mantenga
pulsado inicio-pausa/parada durante unos segundos. La máquina volverá a emitir un pitido
para conrmar que ha detenido el programa. Si no naliza el programa con esta tecla, el pan se
mantendrá caliente durante otros 60 minutos. Retire el enchufe de la toma de corriente y abra la
tapa de la máquina. Retire el molde con unos guantes para el horno.
12. Deje que el pan se enfríe durante aproximadamente 10 minutos. Gire el molde al revés y agítelo
suavemente para que salga el pan. Asegúrese de no colocar ni el pan ni el molde en el exterior del
aparato. Tampoco debe colocarlos directamente sobre un mantel de plástico. Si tiene dicultades
para retirar el pan del molde, gire cuidadosamente la pala de amasar por la parte inferior del molde
hasta que el pan se suelte. Para no dañar la capa antiadherente del molde nunca debe usar objetos
alados para retirar el pan.
13. Si la pala se ha quedado enganchada en el pan, trate de sacarla lo más suavemente posible. Si es
necesario, deje que el pan se enfríe un poco más para poder sacar la pala. Le recomendamos que
espere de 15 a 20 minutos antes de cortar el pan.
FUNCIÓN PARA MANTENER CALIENTE
En caso de que no pueda llegar a casa a tiempo, la máquina de pan seguirá calentando el pan durante 60
minutos más. Este tiempo adicional no se incluye en el tiempo del programa. Pulse el botón “Start-Pauze/
Stop” durante unos segundos si desea interrumpir esta parte del proceso. Si deja el pan en la máquina
durante más de una hora, se quedará húmedo.
Enjuague el molde inmediatamente con agua tibia después de haber sacado el pan, para que la pala de
amasado no se peguen al eje.

73
B3971
www.domo-elektro.be
ES
AÑADIR INGREDIENTES ADICIONALES
Durante el proceso de amasado de los siguientes programas sonará un pitido después del amasado:
normal, francés, integral, dulce, arroz, sin gluten, rápido, fruta, bizcocho, pasas/nueces, centeno, brioche,
italiano. Este pitido indica que puede añadir ingredientes adicionales como: pasas, nueces, semillas, etc.
Puede añadir los ingredientes a través del distribuidor o manualmente.
Distribuidor
Abra el distribuidor deslizando la tapa hacia la izquierda. Añada los ingredientes. Cierre la tapa.
Los ingredientes del distribuidor se añadirán automáticamente al pan después de amasarlo y fermentarlo.
Atención:
· No añada ingredientes húmedos, líquidos o en polvo a través del distribuidor.
· Nunca llene demasiado el distribuidor.
· Es mejor cortar las nueces grandes en trozos antes de añadirlas al distribuidor.
· Antes de añadir los ingredientes al distribuidor, asegúrese de que la tapa del interior del aparato está
cerrada.
Manualmente
También puede añadir ingredientes manualmente. Cuando escuche la señal, pause el programa, abra la
tapa, añada los ingredientes adicionales y, a continuación, cierre la tapa y vuelva a pulsar la tecla de inicio.
Este método manual es mejor para: ingredientes húmedos o líquidos, ingredientes en polvo, cantidades
mayores.
FUNCIÓN DE MEMORIA
Si el aparato se apaga por un corte de energía, la función de memoria funcionará durante 10 minutos.
Por lo tanto, no tendrá que reiniciar el programa cuando vuelva la energía. Si la avería dura más de 10
minutos, el programa se cancelará.
La tecla Home made está reservada para su propio programa de horneado. Puede determinar usted
mismo el tiempo de todas las fases del programa. Si quiere saltarse ciertas fases, ajuste el tiempo en 0:00.
Atención: los ajustes de este botón no se guardarán cuando se desenchufe el cable de alimentación.
1. Presione la tecla de Home made o seleccione el programa 17 con la tecla del menú.
2. Vuelva a pulsar la tecla Home made para empezar con la programación. En la pantalla parpadearán
el tiempo y el icono de la fase de programa. Consulte la siguiente tabla para ver las fases del
programa y el ajuste de tiempo por defecto.
3. Ajuste el tiempo deseado para cada fase con los botones Time + (aumentar el tiempo) y Time -
(reducir el tiempo). Conrme el tiempo seleccionado pulsando en la tecla Home made.
4. Cuando se hayan completado todas las fases verá la duración total del programa en la pantalla. La
duración total por defecto es de 3 horas. En ese caso puede iniciar el programa establecido con la
tecla de inicio. Si presiona la tecla de inicio mientras ajusta las fases, la programación se detendrá
antes.
Si lo desea, también puede aplazar el inicio de este programa, consulte “programación aplazada”.

74
B3971
ES
Fases del programa Icono Ajuste por defecto Bloqueador de tiempo
ajustable
Amasar 1
0:10 1-30 min.
Reposo 1
0:03 0-30 min.
Amasar 2
0:05 0-30 min.
Reposo 2
0:10 0-30 min.
Amasar 3
0:20 0-25 min.
Fermentar 1
0:42 0-60 min.
Fermentar 2
0:40 0-60 min.
Fermentar 3
0:00 0-60 min.
Hornear
0:50 0-80 min.
Función para mantener
caliente
1:00 0-60 min.
QUITE EL GANCHO AMASADOR ANTES DE HORNEAR
Puede quitar la pala después del último amasado.
1. Pulse brevemente el botón “Start-Pauze/Stop” para interrumpir el proceso de cocción o desenchufe
la máquina.
2. Abra la tapa y extraiga el molde. Saque la masa con las manos juntas y quite las palas.
3. Coloque la masa de nuevo en el molde y cierre la tapa.
4. Enchufe de nuevo y pulse el botón “Start-Pauze/Stop”. La máquina continuará con el programa.
TECLA DE AJUSTE DE TIEMPO
Puede programar el aparato de tal manera que la elaboración esté preparada a una hora determinada.
· Calcule la diferencia horaria entre el momento en el que se inicia el programa y la hora en la cual desea
que la elaboración esté preparada. La panicadora cuenta automáticamente la duración de los ciclos
del programa.
· Al pulsar las teclas, el tiempo aumenta o disminuye 10 minutos cada vez.
· En la pantalla aparece el icono del reloj de arena.
· No es posible la programación aplazada en: amasar y hornear. Si presiona los botones Time + y Time -
con estos programas, se ajustará el tiempo del programa.
Ejemplo:
Son las 09:00 y usted quiere que el pan esté listo a las 17:00. Ponga todos los ingredientes en el molde.
Coloque el molde en la panicadora. Cierre la tapa y seleccione el programa.
Pulse la tecla del color para ajustar el color de la corteza y elegir el peso deseado del pan. Pulse la tecla
time + hasta que en la pantalla aparezca 8:00. Habrán pasado 8 horas desde el momento en el cual pulsó

75
B3971
www.domo-elektro.be
ES
la tecla de inicio hasta el momento en el cual el pan debería estar preparado (a las 17:00 horas).
Pulse la tecla de inicio. El punto doble de la pantalla parpadeará y el icono del reloj de arena será visible.
El tiempo empezará a contar hasta que llegue el momento en el que la panicadora tenga que empezar
a amasar. La panicadora pasará ahora a través de todo el programa establecido para que el pan esté
preparado a la hora seleccionada.
Atención: no use el programa con el temporizador cuando use ingredientes que tengan una vida útil
limitada, como leche fresca, huevos, yogur, queso y fruta fresca.
SUGERENCIAS PRÁCTICAS:
· Asegúrese de que los ingredientes estén a temperatura ambiente y péselos cuidadosamente.
· Puede comprobar la frescura de la levadura con la siguiente prueba: disolver 1 cucharadita de azúcar
en media taza de agua tibia y luego añadir la levadura a la mezcla. Si la sustancia se hace efervescente
al cabo de unos minutos, usted puede estar seguro de que está utilizando levadura fresca.
· La sal detiene el efecto de la levadura y el azúcar hace exactamente lo contrario. Si no puede usar
azúcar o sal por razones dietéticas, no añada tampoco el otro ingrediente. El pan no contendrá ni
azúcar ni sal.
· El pan casero hecho con esta máquina no contiene ningún tipo de conservantes y por lo tanto es
perecedero. Si envasa el pan al vacío después de haberse enfriado, podrá conservarlo durante unos
días. Por supuesto, también puede congelar el pan.
· Engrase el eje del molde con un poco de mantequilla para que el gancho de amasar se aoje más
fácilmente.
LIMPIEZA Y MANTENIMIENTO
· Antes de limpiar la máquina asegúrese de que ya no está funcionando, se ha enfriado lo suciente y
esta desenchufada.
· Limpie bien el aparato después de cada uso. En el caso de que el molde, el eje del molde y el gancho
de amasar no estén limpios antes de su uso, esto podría afectar al funcionamiento y a la vida útil de la
panicadora.
· Seque completamente el aparato y todas las piezas. Deje la tapa abierta durante media hora para que
todas las piezas estén sucientemente secas antes de su almacenamiento o nuevo uso.
·
!
Atención: nunca sumerja el aparato en agua.
EXTERIOR
Limpie el exterior del aparato y la tapa con un paño húmedo o una esponja. Saque el molde antes de
empezar la limpieza. Si es necesario, puede limpiar el exterior del aparato con un lavavajillas suave.
INTERIOR
Puede limpiar suavemente el interior del aparato con un paño ligeramente húmedo. Preste atención a la
limpieza del elemento calentador.
MOLDE
Retire el molde de la máquina tirando del mango hacia arriba un cuarto de vuelta en sentido contrario a
las agujas del reloj. Puede limpiar el molde con agua caliente. Al hacerlo, tenga cuidado para no dañar
la capa antiadherente. Si no es capaz de sacar el gancho amasador del molde, deje que éste se enfríe
completamente. Vierta un poco de agua caliente en el molde para que el gancho amasador quede

76
B3971
ES
sumergido en agua. El agua se ocupará de que las partículas adhesivas se disuelvan para poder retirar el
gancho amasador.
No utilice productos de limpieza ni cepillos para lavar platos, ya que podrían dañar la capa antiadherente
del molde. El molde no es apto para lavarlo en el lavavajillas.
PREGUNTAS FRECUENTES
Problema Solución
No he obtenido el
resultado deseado.
· La composición de la masa es muy importante para lograr un buen
resultado. Las diferentes marcas de harina pueden proporcionar un
resultado diferente. Aprenderá a trabajar con el aparato practicando.
Le recomendamos que intente preparar la receta básica. Una mezcla
de pan ya preparada puede ser una solución. Si esto no ayuda, póngase
en contacto con nuestro servicio al cliente.
· Los ingredientes no se pesan con precisión.
· Los ingredientes no están frescos.
· Los ingredientes no están a temperatura ambiente.
¿Puedo comprobar si la
masa está bien durante el
proceso?
La masa debe ser similar a una bola redonda y lisa, elástica. Abra la tapa
cuando hayan transcurrido entre 5 y 10 minutos (durante el amasado) y
toque suavemente con sus dedos la parte superior de la bola de masa. La
masa debe adherirse un poco a los dedos. Si la masa se adhiere demasiado
a los dedos, esto signica que la masa está demasiado húmeda y que,
por lo tanto, debe añadir un poco más de harina. Si la masa no se adhiere
en absoluto, esto signica que la masa está demasiado seca y que debe
añadir un poco más de agua. No abra la tapa durante la fermentación.
Esto podría hacer que su pan se quiebre.
Quiero hornear varios
panes de forma sucesiva.
Deje que el aparato se enfríe durante 20 minutos con la tapa abierta. Un
aparato caliente hará que la levadura actúe con rapidez, por lo que el
resultado no será bueno.
El pan se ha quebrado. · Si su pan se ha quebrado por todos los lados, esto quiere decir que
la masa estaba demasiado húmeda. Intente añadir un poco menos
de agua. Cuando utilice frutas o verduras en conserva, primero debe
escurrirlas y secarlas bien antes de utilizarlas. Han estado sumergidas
en un líquido durante mucho tiempo, por lo que tienen un exceso de
humedad.
· Puede intentar utilizar un tipo de harina más ligera.
· También es posible que la masa haya subido demasiado. La masa ha
subido tanto que no puede fermentar. Intente añadir un poco menos
de levadura, de 1 a 2 gramos. Si la masa ha subido demasiado, es
posible que haya salido por encima del molde. Desenchufe el aparato
y deje que el aparato se enfríe. A continuación, limpie el elemento
calentador.

77
B3971
www.domo-elektro.be
ES
La parte central
del pan no está lo
sucientemente hecha.
Si el interior del pan está crudo, esto se puede deber al tipo de harina
utilizada. Normalmente, esto ocurre por usar tipos de harina más pesados,
como la harina de centeno o la harina integral. Intente usar un proceso
más de amasado cuando utilice esta harina. Cuando la panicadora
haya terminado el primer proceso de amasado, detenga el aparato.
A continuación, reinicie el dispositivo y presione en inicio. El aparato
empezará a amasar de nuevo y se incorporará una mayor cantidad de aire
a la masa.
La corteza inferior del pan
es demasiado gruesa.
Ha dejado el pan demasiado tiempo en el aparato con la función para
mantenerlo caliente. El agua se evaporará, por lo que obtendrá una
corteza inferior más gruesa. Saque inmediatamente el pan del aparato en
cuanto haya acabado el programa.
El pan se ha salido del
aparato.
· Ha usado demasiada levadura.
· La levadura se ha activado demasiado, por ejemplo, por usar
demasiado azúcar o por usar una temperatura demasiado alta.
· Ha usado demasiada masa. No use más de 1000 g.
H:HH aparece en la
pantalla.
El aparato todavía está demasiado caliente. Deje que el aparato se enfríe
primero.
E:EO aparece en la
pantalla.
Hay un problema con el sensor de temperatura. Envíe el aparato a nuestro
servicio postventa.
¿Por qué no puedo
añadir ingredientes
adicionales al comienzo
del programa?
Los ingredientes adicionales (como uvas pasas o frutos secos) se
romperían y el pan no se amasaría bien. Además, inuirían en la
fermentación del pan. Solo debe añadir los ingredientes adicionales
cuando el dispositivo emita un sonido, después de amasar/fermentar.
¿Puedo utilizar leche en
lugar de agua?
¡Sí, es posible! Siempre debe asegurarse de que todo el volumen de uido
es correcto. La proporción de leche y agua no hace ninguna diferencia.
La corteza es a veces
más clara y a veces más
oscura.
Esto se puede seleccionar con el botón “color”. Las preparaciones que
contienen más azúcar también harán que la corteza sea más oscura.
La panicadora amasa
más lento de lo normal.
Esto puede ocurrir con masas pesadas, haciendo que el motor deba
funcionar con más fuerza. Sin embargo, esto no es un problema para la
máquina. Añada una cucharada de líquido.
El gancho de amasar se
ha quedado atascado en
la cubeta.
Retire el pan de la cubeta. A continuación, llene la cubeta con agua
caliente y deje en remojo durante un cuarto de hora. La masa incrustada
se podrá retirar.
Se produce condensación
en el interior de la
ventana de visualización.
Es algo normal. Esto se debe al calor.
He utilizado una mezcla
ya preparada, pero el pan
sigue sin hacerse bien.
Antes de enviar el aparato para su reparación, le recomendamos que
lo intente de nuevo con la receta básica. En algunos casos, las mezclas
preparadas también pueden contener ingredientes que hagan que el
resultado no sea tan bueno.

78
B3971
ES
DIRECTRICES MEDIOAMBIENTALES
El símbolo en el producto o en el embalaje indica que este producto no puede
ser tratado como residuo doméstico. Se debe llevar a un lugar en el que se
reciclan equipos eléctricos y electrónicos. Si se asegura de que este producto
se desecha correctamente, usted ayudará a evitar posibles consecuencias
negativas para las personas y el medio ambiente que serían causadospor
un tratamiento de residuos inadecuado. Para obtener información más
detallada sobre el reciclaje de este producto, póngase en contacto con su
ayuntamiento, o con la empresa o departamento responsable del servicio de
recogida de basura doméstica, o con la tienda donde adquirió el producto.
El material de embalaje es reciclable. Trate el embalaje de una manera
medioambientalmente responsable.

79
B3971
www.domo-elektro.be
IT
GARANZIA
La garanzia dell’apparecchio è valida per 2 anni a partire dalla data di acquisto. La garanzia sugli accessori
e sui componenti soggetti a usura è di 6 mesi. Durante il periodo di validità della garanzia, il dispensere
si assume la piena responsabilità dei difetti dei materiali o di quelli di fabbricazione. In caso di presenza
di tali difetti, se necessario, si procederà alla sostituzione o alla riparazione dell’apparecchio. Il periodo
di garanzia di 2 anni non ricomincia in quel momento, ma continua per 2 anni dalla data di acquisto
dell’apparecchio. Per la garanzia fa fede la data riportata sullo scontrino. Se l’apparecchio si rivela
difettoso nel periodo di validità della garanzia, cioè 2 anni, potete portarlo, insieme allo scontrino, nel
negozio dove l’avete acquistato.
La garanzia sugli accessori e sui componenti soggetti a usura è di 6 mesi.
La garanzia e la responsabilità del negoziante e del produttore decadono automaticamente nei seguenti
casi:
· mancata osservanza delle istruzioni contenute nel presente manuale;
· errato collegamento, per esempio con tensione elettrica troppo alta;
· uso errato, anormale e manesco;
· manutenzione insuciente o errata;
· riparazione o modiche all’apparecchio eseguite dal cliente o da terzi non autorizzati;
· uso di accessori o componenti non raccomandati o forniti dal negoziante o dal produttore.
INDICAZIONI DI SICUREZZA
Quando si utilizzano dispositivi elettrici, è necessario tenere presenti le seguenti istruzioni di sicurezza:
· Leggere con attenzione le presenti istruzioni. Conservare le istruzioni per possibili future consultazioni.
· Prima di utilizzare il prodotto, togliere tutti gli imballi e gli eventuali adesivi promozionali. Assicurarsi
che i bambini non giochino con gli imballaggi.
· Questo apparecchio è destinato unicamente all’uso domestico e in ambienti analoghi, quali:
· angoli cottura riservati al personale nei negozi, negli uci e in altri ambienti professionali
· Fattorie
· Camere di alberghi, motel e altre strutture ricettive residenziali
· Camere per vacanze o ambienti analoghi
· L’apparecchio può essere utilizzato da bambini di età superiore a 16 anni e da persone con ridotte
capacità siche, sensoriali o mentali, o con mancanza di esperienza o conoscenza, solo se sorvegliati
o se hanno ricevuto istruzioni sull’uso sicuro dell’apparecchio e ne comprendono i rischi. I bambini
non possono giocare con l’apparecchio. Le operazioni di pulizia e di manutenzione non devono essere
eettuate dai bambini di età inferiore a 16 anni e senza sorveglianza.
· Tenere l’apparecchio fuori dalla portata dei bambini di età inferiore a 16 anni.
· Attenzione: l’apparecchio non è stato progettato per essere utilizzato con un timer esterno o un
sistema di telecomando separato.
L’apparecchio potrebbe surriscaldarsi durante il normale utilizzo. Tenere il cavo di
alimentazione lontano da superci calde e non coprire l’apparecchio.
· Prima dell’uso, controllare che il voltaggio riportato sull’apparecchio corrisponda a quello della rete
elettrica domestica.
· Non lasciare mai il cavo appoggiato su una supercie calda o penzolante dal bordo di un tavolo o della
cucina.
· Non utilizzare mai l’apparecchio se il cavo di alimentazione o la spina sono danneggiati, dopo un

80
B3971
IT
malfunzionamento o quando è danneggiato. In caso di guasto, portare l’apparecchio presso il centro di
assistenza clienti più vicino, in modo che sia controllato e riparato.
· L’utilizzo di accessori non consigliati o non venduti dal produttore può causare incendi, scosse
elettriche o lesioni.
· Togliere la spina dalla presa quando l’apparecchio non è in funzione, prima di montarne o smontarne
i componenti e prima di pulirlo. Mettere tutti gli interruttori in posizione “o” e aerrare la spina per
staccarla dalla presa di corrente. Non tirare mai il cavo o l’apparecchio per estrarre la spina dalla presa
di corrente.
· Non mettere in funzione l’apparecchio senza sorveglianza.
· Non posizionare mai l’apparecchio sopra o vicino a un fornello a gas o elettrico oppure in luoghi in cui
possa venire a contatto con apparecchi a elevate temperature.
· Non utilizzare l’apparecchio all’aperto.
· Utilizzare l’apparecchio solo per lo scopo previsto.
· Utilizzare sempre l’apparecchio su una supercie stabile, asciutta e in piano.
· L’apparecchio è inteso solo per uso domestico. Il produttore non è responsabile di incidenti causati
da uso improprio dell’apparecchio o dalla mancata osservanza delle istruzioni riportate nel presente
manuale.
· Le riparazioni diverse dalla normale manutenzione dell’apparecchio devono essere eettuate dal
produttore o dal suo servizio assistenza.
· Non immergere mai l’apparecchio, il cavo elettrico o la spina in acqua o in altri liquidi.
· Tenere il cavo lontano da spigoli e bordi taglienti, da oggetti a elevata temperatura o da altre fonti di
calore.
· Non posizionare l’apparecchio vicino a fornelli a gas, forni elettrici o altre fonti di calore.
· Non posizionare mai l’apparecchio vicino a materiali inammabili o a gas esplosivi o soggetti ad
autocombustione.
· Assicurarsi che le aperture di ventilazione dell’apparecchio non siano coperte.
· È possibile utilizzare prolunghe solo se la tensione di rete e la potenza sono uguali o superiori a quelle
della macchina del pane.
· La prolunga deve essere collegata in modo che nessuno possa cadere sul cavo o lo possa
accidentalmente tirare.
· Non appoggiare oggetti sull’apparecchio e non coprirlo mentre è in funzione, per evitare il rischio di
incendi.
· La macchina per il pane può riscaldarsi molto. Toccare solo le impugnature e i tasti dell’apparecchio; se
necessario, utilizzare guanti da forno.
· Assicurarsi che l’apparecchio sia completamente freddo e togliere la spina dalla presa di corrente
prima di estrarre o inserire gli elementi nell’apparecchio.
· Non spostare la macchina del pane se contiene ingredienti o liquidi caldi.
· Evitare il contatto con il gancio per impastare quando è in movimento, per evitare il rischio di lesioni.
· Quando l’apparecchio non è in uso o quando viene sottoposto a pulizia, spegnerlo completamente e,
per sicurezza, togliere la spina dalla presa di corrente.
· Non pulire mai l’apparecchio con spugne abrasive. Le particelle della spugna potrebbero entrare in
contatto con le componenti elettriche e causare scosse.
· Non utilizzare l’apparecchio per asciugare alimenti o altri oggetti.
· Il peso totale di tutti gli ingredienti non deve mai superare i 1000 g.
· Non utilizzare mai più di 715 g di farina per ogni pane.
· Non utilizzare mai più di 22 g di lievito di birra fresco o 4 cucchiaini + 1/4 di lievito di birra secco per
ogni pane.
· Non utilizzare mai più di 460 ml d’acqua per ogni pane.

81
B3971
www.domo-elektro.be
IT
COMPONENTI
1. Coperchio
2. Apertura di osservazione
3. Distributore di ingredienti supplementari
4. Pannello di controllo
5. Gancio per impastare
6. Stampo
7. Contenitore
8. Misurino
9. Cucchiaio misurino
10. Attrezzo per togliere il gancio per impastare
PRIMA DELL’USO
· Prima di utilizzare il prodotto, togliere tutti gli imballi e gli eventuali adesivi promozionali.
· Pulire la macchina del pane, lo stampo e il gancio per impastare con un panno umido. Lo stampo e il
gancio per impastare sono rivestiti da uno strato antiaderente e non devono quindi mai essere lavati
con detergenti aggressivi, spazzole o spugne. Utilizzare sempre un panno umido. Togliere la pellicola
protettiva dal display.
· Al momento del primo utilizzo, la macchina del pane potrebbe emettere un po’ di fumo; è normale,
non si tratta di un guasto e scompare da solo.
· Prima di utilizzare la macchina del pane la prima volta, si consiglia di utilizzare lo stampo a vuoto con il
programma BAKE. Farla funzionare per 10 minuti. Lasciare quindi rareddare tutto e pulire di nuovo i
componenti.
· Prima del primo utilizzo, imburrare con del burro o della margarina lo strato antiaderente dello stampo
e il gancio per impastare.
UTILIZZO
RICETTA BASE
La ricetta che segue serve per preparare un semplice pane bianco.
· 630 g farina
· 370 ml acqua
· 5 g lievito di birra secco
· 1 cucchiaino di sale
· 1 cucchiaio di zucchero
INGREDIENTI
I fattori più importanti per preparare un buon pane sono la qualità, la freschezza e le corrette proporzioni
degli ingredienti.
Attenzione: non superare mai la capacità massima della macchina del pane (1000 g)! Non utilizzare quindi
mai più delle seguenti quantità massime di ingredienti per ogni singola preparazione:
1
2
3
4
5
6
7
8
9
10

82
B3971
IT
Farina: max. 715 g
Lievito: max. 22 g lievito di birra fresco o+ 4 cucchiaini + 1/4 di lievito di birra secco
Acqua: max. 460 ml
Farina
La farina è l’ingrediente base del pane. Il peso della farina varia secondo i tipi. È quindi assolutamente
necessario pesare con una bilancia precisa la quantità di farina da utilizzare.
Consiglio: leggere quanto riportato sulla confezione della farina. Deve essere riportato che la farina è
adatta per la preparazione del pane.
Glutine
Il glutine è un elemento naturale della farina e favorisce la lievitazione del pane.
Lievito
Il lievito è un microorganismo presente in vari alimenti vegetali. Il lievito trasforma lo zucchero in alcool
e in anidride carbonica e quindi si moltiplica molto in fretta. È quindi ideale per far crescere la pasta e
renderla più leggera e meglio digeribile.
Con la macchina del pane, consigliamo di utilizzare il lievito di birra secco. È più facile da lavorare, si
conserva più a lungo del lievito di birra fresco e dà risultati più costanti.
Sale
Il sale assicura non solo il sapore al pane, ma regola anche l’attività del lievito, rende l’impasto più stabile
ed evita che il pane lieviti troppo.
Burro / Olio
Il burro e l’olio migliorano il sapore del pane e lo rendono più morbido. Il burro o l’olio devono essere a
temperatura ambiente prima di aggiungerli agli altri ingredienti.
Zucchero
Lo zucchero è una fonte di nutrimento per il lievito e un elemento importante per il processo di
lievitazione. È possibile utilizzare zucchero bianco, zucchero di canna, melassa o miele. Conferisce un
sapore dolciastro al pane, ne aumenta il valore nutritivo e il periodo di conservazione.
Attenzione: non utilizzare zucchero grezzo o zollette per fare il pane, perché danneggiano il rivestimento
antiaderente dello stampo.
Acqua
Quando la farina viene mescolata all’acqua, si forma il glutine, fuoriesce l’aria e quindi il pane può lievitare.
Con temperatura ambiente normale, utilizzare acqua tiepida (da + 20 a + 25 °C) per fare il pane: l’acqua
fresca non attiva il lievito e l’acqua calda lo attiva troppo.
Latte
Il latte fa scurire la crosta del pane, ne migliora il sapore, aumenta il valore nutritivo e conferisce un bel
color crema all’interno. Se si utilizza latte fresco, è necessario naturalmente ridurre la quantità di acqua
per mantenere in equilibrio il livello di umidità.
Attenzione: non utilizzare latte fresco se viene selezionato il processo di cottura con la programmazione
ritardata. Il latte potrebbe inacidirsi.

83
B3971
www.domo-elektro.be
IT
Altri ingredienti
Utilizzare sempre ingredienti freschi. Se si decide di utilizzare noci, semi di girasole, frutta secca o
ingredienti simili, consigliamo di lasciarli ammorbidire in acqua e di asciugarli bene prima di aggiungerli
all’impasto. Assicurarsi che questi ingredienti non siano troppo grossi e appuntiti, per evitare che
danneggino lo strato antiaderente.
PANNELLO DI CONTROLLO
Controllo
A. Menu: selezione del programma
B. Weight: selezione del peso (grandezza) del pane
C. Color: imbrunimento della crosta
D. Time +: incremento del tempo
E. Bake: tasto di scelta rapida per il programma Bake (cuocere)
F. Knead: tasto di scelta rapida per il programma di impastatura
G. Time +: riduzione del tempo
H. Start- pauze/stop: tasto di accensione/spegnimento
I. Home made: tasto di scelta rapida per il programma Home made
Display
1. Selezione del peso (grandezza) del pane
2. Selezione del programma
3. Timer
4. Fase di programma: impastare
5. Fase di programma: riposare
6. Fase di programma: lievitare
7. Fase di programma: riscaldare
8. Fase di programma: riscaldare
9. Fase di programma: tenere in caldo
10. Fase di programma: pronto
11. Fase di programma: numero della fase
12. Tempo restante in minuti
13. Imbrunimento della crosta: chiara, media, scura
14. Blocco del pannello di controllo
A. Menu
Utilizzare questo tasto per selezionare il corretto programma di cottura.
Ogni volta che si preme il tasto, si sente un segnale sonoro e cambia il numero del programma. Il numero
del programma e il corrispondente tempo di cottura sono visualizzati sul display.
B.Weight
Utilizzare questo tasto per selezionare il peso del pane che si desidera preparare. È possibile scegliere tra
un pane di 500, 750 g o di 1000 g.
Suggerimento: la quantità totale degli ingredienti riportata nella ricetta è il peso del pane che verrà
preparato.
A
D
G
B
E
H
C
F
I
MENU
TIME +
TIME -
WEIGHT
BAKE
START
PAUZE/STOP
COLOR
KNEAD
HOME MADE
1
2
7
8
12
9
10
1411
13
6
5
4
3

84
B3971
IT
C. Color
Utilizzare questo tasto per selezionare se si desidera la crosta chiara, media o più scura.
Suggerimento: quando si esegue una ricetta per la prima volta, consigliamo di selezionare la doratura
media.
D. Time + e G. Time -
Con questi tasti in determinati programmi è possibile scegliere l'avvio ritardato e regolare il timer. Negli
altri programmi è possibile regolare il tempo del programma.
E. Bake
Questo è un tasto di scelta rapida per il programma di cottura. Premere "start-pauze/stop" per
confermare il programma
F. Knead
Questo è un tasto di scelta rapida per il programma di impastatura. Premere "start-pauze/stop" per
confermare il programma
H. Start-pauze/stop
Questo tasto consente di avviare il programma selezionato oppure mettere in pausa/annullare il
programma in corso. Premere brevemente questo tasto per mettere in pausa un programma. Premere di
nuovo il tasto per riavviare il programma. Se non si riavvia il programma entro 3 minuti, il processo verrà
interrotto.
Per terminare un programma, premere il tasto per alcuni secondi n quando si udirà un segnale acustico.
I. Home made
Questo è un tasto di scelta rapida per il programma Home made. Vedere “Impostazione di Home made”
nella sezione Utilizzo. Premere "start-pauze/stop" per confermare il programma
PROGRAMMI
Tempistica dei programmi:
Programma 500 g 750 g 1000 g
1. Normale (basic) 3:05 3:10 3:15
2. Francese (french) 3:35 3:40 3:45
3. Integrale (whole wheat) 4:05 4:10 4:15
4. Dolce (sweet) 3:35 3:40 3:45
5. Riso (rice) 2:50 2:55 3:00
6. Senza glutine (gluten free) 3:05 3:10 3:15
7. Rapido (Quick) 2:10 2:15 2:20
8. Fruit 3:05 3:10 3:15
9. Cake 2:20*
10. Panini (Sandwich) 3:00 3:05 3:10
11. Pane con uvette/noci (Raisin/nut) 3:05 3:10 3:15
12. Segale (Rye) 4:05 4:10 4:15
13. Impastare (knead) 0:08*
14. Impasto (dough) 1:30*
15. Brioche 3:35 3:40 3:45
16. Cuocere (Bake) 0:30*

85
B3971
www.domo-elektro.be
IT
17. Home made -- -- --
18. Italiano (Italian) 3:05 3:10 3:15
* Se viene selezionato uno di questi programmi, è possibile non scegliere nessun peso.
Il tempo visualizzato dal display è espresso in ore e minuti. Esempio: programma 1, normale, 750 grammi,
durata 3 ore e 10 minuti.
1. Normale (Basic)
È il programma più utilizzato per fare il pane bianco.
2. Francese (French)
Il tempo di preparazione e di lievitazione sono più lunghi rispetto al programma normale. La crosta sarà
più croccante e il pane sarà più friabile e leggero.
3. Integrale (whole wheat)
È il programma più adatto per la preparazione di pane nero, integrale e multicereali. Il pane sarà in
generale più piccolo del pane bianco, perché la farina è più pesante. Con questo programma non è
possibile selezionare la programmazione ritardata perché i risultati possono essere meno soddisfacenti.
4. Dolce (sweet)
Questo programma è adatto per realizzare tipi di pane quali pane con uvette, pane dolce, pane al
cioccolato ecc.
5. Riso (rice)
Utilizzare questo programma per pane a base di farina di riso. Una volta impastato, l'impasto può lievitare
prima di essere utilizzato. La crosta del pane a base di farina di riso è più sottile e morbida del pane
normale.
6. Senza glutine (gluten free)
Questo programma consente di fare pane senza glutine. L'impasto del pane senza glutine è più umido e
ha una consistenza più pastosa. Per questo l'impasto non deve essere impastato né fatto lievitare troppo
a lungo. Il tempo di cottura è invece più lungo. Si sconsiglia di utilizzare l'avvio ritardato con questo
programma, poiché potrebbe portare a risultati meno soddisfacenti. È preferibile aggiungere tutti gli
ingredienti dall'inizio.
7. Rapido (Quick)
Per impastare, far lievitare e cuocere il pane con lievito articiale. Il risultato è in genere un pane più
piccolo con una struttura più solida. Prima di iniziare, consigliamo di miscelare gli ingredienti con un
cucchiaio di legno.
8. Fruit
Utilizzare il distributore per aggiungere ingredienti come uvette o altri tipi di frutta secca. La macchina
aggiungerà gli ingredienti dal distributore al momento giusto. Se di desidera aggiungere al pane della
frutta fresca o più umida, è meglio farlo direttamente nello stampo quando viene emesso un segnale
acustico.

86
B3971
IT
9. Cake
Con questo programma è possibile preparare per esempio il pane con il lievito in polvere. Il pane cotto con
questo programma è meno alto e presenta una struttura più solida. Se si desidera cuocere un dolce con
questo programma, vi consigliamo di mettere gli ingredienti nello stampo. Impostare la macchina e prima
di premere il tasto START mescolare gli ingredienti con un cucchiaio di legno. Questa operazione rende
più facile l’impastatura. In questo programma non è possibile scegliere il peso.
10. Panini (Sandwich)
È possibile utilizzare questo programma per preparare un pane bianco molto leggero, ottimo per i panini.
Attenzione! Con questo programma non è necessario impostare la doratura della crosta, perché lo fa la
macchina automaticamente.
11. Pane con uvette/noci (Raisin/nut bread)
Utilizzare il distributore per aggiungere ingredienti secchi come uvette o noci. La macchina aggiungerà gli
ingredienti dal distributore al momento giusto.
12. Segale (Rye)
Questo programma è ideale per del pane a base di cereali più consistenti come la segale. Anche il pane
stesso è più denso e consistente rispetto al pane normale.
13. Impastare (knead)
Con questo programma la macchina esegue solo l'impastatura, senza la cottura e la lievitazione. Questo
programma può essere utilizzato ad esempio per fare dell'impasto per pizza. Con i tasti time + e time - è
possibile regolare il tempo di lavorazione.
14. Impasto (dough)
Con questo programma la macchina esegue solo l'impastatura e la lievitazione.
15. Brioche
Questo programma è adatto per pane con ingredienti supplementari che apportano un'elevata quantità
di zucchero, grasso e proteine (ad es., cioccolata, zucchero ecc.). Questi ingredienti danno una crosta più
scura. La fase di lievitazione durerà più a lungo, garantendo un risultato leggero e soce.
16. Cuocere (Bake)
È possibile utilizzare questo programma per cuocere un impasto preparato in precedenza. Con questo
programma è possibile solo fare la cottura nale dell’impasto. È possibile anche riscaldare del pane già
cotto.
17. Home made
Questo tasto può essere programmato per tempi di preparazione di propria scelta. Vedere “Impostazione
di Home made” nella sezione Utilizzo.
18. Italiano (Italian)
Questo programma consente di fare del delizioso pane di tipo mediterraneo. In questo programma è
possibile aggiungere ingredienti quali spezie, pomodori secchi, olive ecc.

87
B3971
www.domo-elektro.be
IT
UTILIZZO
1. Togliere lo stampo dalla macchina aerrandolo per la maniglia e ruotandolo per un quarto di giro in
senso antiorario.
2. Sistemare il gancio per impastare (incluso) nell’asse dello stampo. Il gancio per impastare deve
essere sistemato in modo corretto e con cura, anché tutti gli ingredienti siano mescolati e
impastati a sucienza.
3. Mettere gli ingredienti nello stampo, nell’ordine descritto sotto.
· Acqua/latte
· Burro/olio
· Eventualmente uova
· Sale (su un lato)
· Zucchero (sull’altro lato)
· Farina
· Lievito (aggiungere il lievito facendo un buco nel mezzo della farina)
!
Attenzione! Il lievito non deve venire a contatto con l’acqua, il sale o lo zucchero. In caso contrario, il
lievito si attiva prima che gli ingredienti siano sucientemente mescolati e impastati.
Ingredienti supplementari come noci, spezie, frutta secca ecc. possono essere aggiunti nel distributore o
in seguito. Vedere la sezione “Aggiunta di ingredienti supplementari”.
4. Eliminare tutti i residui degli ingredienti sul lato esterno dello stampo. Rimettere lo stampo nella
macchina. Ruotare lo stampo in senso orario no a sentire un clic.
5. Chiudere il coperchio.
6. Inserire la spina nella presa di corrente.
7. Impostare il programma corretto con il tasto “MENU”. Ogni inserimento viene confermato da un
segnale sonoro.
8. Scegliere il colore della crosta con il tasto "color". È possibile scegliere tra chiara, media o scura.
Selezionare la grandezza del pane (500 g, 750 g o 1.000 g) con il tasto "peso".
9. Impostare eventualmente la programmazione ritardata. (Si veda alla voce “Programmazione
ritardata”).
10. Premere il tasto “start-pauze/stop”. I due punti lampeggiano: la macchina inizia a funzionare. Se è
stata impostata la programmazione ritardata, la macchina si metterà in funzione solo dopo che è
trascorso l’orario impostato.
11. Quando il pane sarà pronto, la macchina emetterà un segnale acustico. Sul display è riportato
0:00. Premere il tasto "start-pauze/stop" e tenerlo premuto per alcuni secondi. La macchina
emetterà nuovamente un segnale acustico per confermare che il programma è stato interrotto. Se
il programma non viene terminato con questo tasto, la funzione di tenuta in caldo terrà il pane in
caldo per altri 60 minuti. Rimuovere la spina dalla presa elettrica e aprire il coperchio della macchina.
Rimuovere lo stampo indossando dei guanti da forno.
12. Lasciare rareddare il pane nello stampo per 10-15 minuti, quindi capovolgere lo stampo e togliere
delicatamente il pane dallo stampo.
Non mettere mail né il pane né lo stampo sulla parte esterna della macchina o su tovaglie in plastica.
Se il pane non si stacca subito, ruotare con attenzione l’asse sulla parte inferiore dello stampo
no a quando non si separa. Non utilizzare mai oggetti alati per estrarre il pane, al ne di non
danneggiare lo strato antiaderente dello stampo.
13. Se il pane non viene tolto dalla macchina e il gancio per impastare rimane nel pane, toglierlo con
attenzione utilizzando l’attrezzo fornito. Lasciare rareddare ulteriormente il pane su una griglia in
modo da poter togliere il gancio per impastare con le mani. Assicurarsi che il gancio per impastare
sia completamente freddo. Si consiglia di tagliare il pane solo dopo 15-20 minuti.

88
B3971
IT
FUNZIONE DI TENUTA IN CALDO
Se non arrivate a casa in tempo, la macchina del pane continua a riscaldarsi per circa 60 minuti. Questa
funzione non è compresa nel tempo di programmazione. Se si desidera interrompere questa funzione,
premere per alcuni secondo il tasto “start-pauze/stop”.
Se il pane rimane più di un’ora all’interno della macchina, si inumidisce. Sciacquare immediatamente con
acqua calda dopo aver tolto il pane, anché il gancio per impastare non rimanga attaccato all’asse. Non
mettere in funzione la macchina del pane, perché non è ancora completamente fredda.
AGGIUNTA DI INGREDIENTI SUPPLEMENTARI
Durante il processo di impastatura dei seguenti programmi, al termine dell'impasto viene emesso un
segnale acustico: Normale, Francese, Integrale, Dolce, Riso, Senza glutine, Frutta, Cake, Uvette/noci,
Segale, Brioche, Italiano. Il segnale acustico indica che è possibile aggiungere ingredienti supplementari
come: uvette, noci, semi ecc. Gli ingredienti possono essere aggiunti mediante il distributore o
manualmente.
Distributore
Aprire il distributore spostando il coperchio verso sinistra. Aggiungere gli ingredienti. Chiudere il
coperchio.
Gli ingredienti nel distributore saranno aggiunti automaticamente al pane dopo l'impastatura e la
lievitazione. Attenzione:
· Non aggiungere ingredienti umidi, liquidi o in polvere mediante il distributore.
· Non riempiere mai eccessivamente il distributore.
· Si consiglia di tagliuzzare le noci di grandi dimensioni prima di inserirle nel distributore.
· Prima di inserire ingredienti nel distributore, controllare sempre che lo sportellino all'interno
dell'apparecchio sia chiuso.
Aggiunta manuale
È inoltre possibile aggiungere manualmente degli ingredienti. Mettere in pausa il programma non appena
viene emesso il segnale acustico. aprire il coperchio, aggiungere gli ingredienti, richiudere il coperchio e
premere di nuovo il tasto "start". Questa operazione manuale è meglio indicata per ingredienti umidi o
liquidi, ingredienti in polvere e grandi quantità.
FUNZIONE MEMORIA
Se l'apparecchio si spegne in seguito a un guasto all'alimentazione, la funzione memoria rimane attiva per
10 minuti.
Pertanto non è necessario riavviare il programma quando ritorna l'alimentazione. Se l'assenza di
alimentazione dura più di 10 minuti, il programma viene annullato.
IMPOSTAZIONE DI HOME MADE
Il tasto "Home made" è riservato ai programmi di cottura personali dell'utente. È possibile stabilire i tempi
di tutte le fasi di programma. Per saltare determinate fasi, impostare il tempo su 0:00.
Attenzione: le impostazioni di questo tasto non vengono memorizzate se si rimuove la spina dalla presa
elettrica.
1. Premere il tato "Home made" o scegliere il programma 17 mediante il tasto "menu".

89
B3971
www.domo-elektro.be
IT
2. Preme nuovamente il tasto "Home made" per cominciare a programmare. Sul display lampeggiano
l'indicazione del tempo e l'icona della fase di programma. Vedere la seguente tabella con le fasi di
programma e le impostazioni di tempo standard.
3. Impostare per ogni fase il tempo desiderato mediante i tasti Time + (incremento del tempo) e Time -
(riduzione del tempo). Confermare il tempo selezionato premendo il tasto "Home made".
4. Una volta percorse tutte le fasi, sul display compare la durata complessiva del programma. La durata
complessiva standard è 3 ore. A questo punto è possibile avviare il programma impostato premendo
il tasto "start". Se si preme il tasto "start" durante l'impostazione delle fasi, la programmazione
termina anticipatamente.
Se lo si desidera, con questo programma può essere selezionato l'avvio ritardato, vedere "Avvio ritardato".
Fasi di programma Icona Impostazione
standard
Intervallo temporale
regolabile
Impastare 1
0:10 1-30 min.
Riposo 1
0:03 0-30 min.
Impastare 2
0:05 0-30 min.
Riposo 2
0:10 0-30 min.
Impastare 3
0:20 0-25 min.
Lievitare 1
0:42 0-60 min.
Lievitare 2
0:40 0-60 min.
Lievitare 3
0:00 0-60 min.
Cuocere
0:50 0-80 min.
Tenere in caldo
1:00 0-60 min.
TOGLIERE IL GANCIO PER IMPASTARE PRIMA DI CUOCERE
È possibile togliere il gancio dopo aver terminato il processo di impastatura.
1. Premere brevemente il tasto “start-pauze/stop” per fermare il processo di cottura o togliere la spina
dalla presa di corrente.
2. Aprire il coperchio ed estrarre lo stampo. Togliere l’impasto con le mani infarinate e staccare il
gancio per impastare.
3. Rimettere l’impasto nella stampo e chiudere il coperchio.
4. Inserire nuovamente la spina nella presa di corrente e premere il tasto “start-pauze/stop”. Il
programma di cottura riprende.
PROGRAMMAZIONE RITARDATA
È possibile programmare la macchina in modo che il pane sia pronto all’ora stabilita.
· Calcolare la dierenza tra l’ora a cui si avvia il programma e l’ora a cui si desidera che la preparazione
sia pronta. La macchina del pane conta automaticamente la durata del ciclo del programma.

90
B3971
IT
· Premendo questi tasti, si riduce o si aumenta di 10 minuti alla volta l’ora a cui il pane sarà pronto.
· Sul display compare l'icona della clessidra.
· La programmazione ritardata non è possibile per: impastare e cuocere. Se per questi programmi si
premono i tasti Time + e Time -, il tempo del programma verrà modicato.
Esempio
Sono le 9.00 del mattino e si desidera che il pane sia pronto alle 17.00.
Mettere tutti gli ingredienti nello stampo. Sistemare lo stampo nella macchina del pane. Chiudere il
coperchio e premere il tasto MENU per impostare il programma corretto. Premere il tasto "color" per
impostare l'imbrunimento della crosta e scegliere il peso desiderato per il pane. Premer il tasto "time +"
no a far comparire 8:00 sul display. Trascorreranno 8 ore dal momento in cui si preme il tasto "start" a
quando il pane dovrà essere pronto (alle 17:00).
Premere il tasto "start". I due punti sul display lampeggiano e compare l'icona della clessidra. A questo
punto il timer comincia a contare no al momento in cui la macchina del pane deve iniziare a impastare.
La macchina del pane esegue quindi tutto il programma impostato in modo che il pane sia pronto all'ora
scelta.
Attenzione: Non selezionare il programma con il timer in caso di utilizzo di ingredienti con conservazione
limitata come latte fresco, uova, yogurt, formaggio, frutta fresca.
SUGGERIMENTI
· Pesare sempre con cura gli ingredienti e utilizzarli a temperatura ambiente.
· È possibile stabilire il grado di freschezza del lievito eseguendo il test seguente: sciogliere in mezza
tazza di acqua tiepida un cucchiaino di zucchero e aggiungere quindi un cucchiaino di lievito. Dopo
qualche minuto, se la miscela inizia a formare schiuma signica che il lievito è fresco.
· Il sale limita l’eetto del lievito. Lo zucchero, al contrario, lo favorisce. Se non è possibile utilizzare uno
di questi due ingredienti a causa per esempio di una dieta, evitare di aggiungerli. Il pane sarà senza
sale e senza zucchero.
· Il pane preparato non contiene conservanti e ha quindi una conservazione limitata. Se il pane viene
messo sottovuoto dopo averlo fatto rareddare completamente, sarà possibile conservarlo qualche
giorno. Il pane può anche essere congelato e quindi essere conservato più a lungo.
· Imburrare leggermente l'asse nello stampo in modo che il gancio per impastare si estragga facilmente.
PULIZIA E MANUTENZIONE
· Prima di pulire la macchina del pane, è necessario spegnerla, togliere la spina dalla presa di corrente e
lasciarla rareddare completamente.
· Pulire bene l'apparecchio dopo ogni utilizzo. La mancata pulizia dello stampo, dell'asse nello stampo e
del gancio per impastare prima dell'utilizzo può deteriorare il funzionamento e ridurre la durata della
macchina del pane.
· Asciugare bene l'apparecchio e tutti i componenti. Lasciare il coperchio aperto per mezz'ora in modo
che tutte le parti siano sucientemente asciutte per riporre o riutilizzare l'apparecchio.
·
!
Attenzione: non immergere mai l'apparecchio in acqua.
PARTE ESTERNA
Pulire la parte esterna della macchina e l’apertura di osservazione con un panno umido o una spugna.
Estrarre lo stampo prima di pulirlo. Se necessario, è possibile pulire la parte esterna della macchina
utilizzando un detergente neutro.

91
B3971
www.domo-elektro.be
IT
PARTE INTERNA
La parte interna della macchina deve essere pulita con attenzione utilizzando un panno leggermente
inumidito. Prestare particolare attenzione quando si pulisce l’elemento riscaldante.
STAMPO
Per estrarre lo stampo dalla macchina, aerrarlo per la maniglia, ruotarlo per un quarto di giro in senso
antiorario e sollevarlo. Lo stampo può essere lavato con acqua calda. Attenzione a non danneggiare lo
strato antiaderente. Se non si riesce a togliere il gancio per impastare dallo stampo, lasciare rareddare
completamente lo stampo. Mettere un po’ di acqua calda nello stampo in modo da ricoprire il gancio per
impastare. L’acqua farà in modo che lo sporco attaccato si sciolga e che il gancio per impastare possa
essere tolto.
Non utilizzare detergenti o spazzole abrasive, poiché potrebbero danneggiare lo strato antiaderente dello
stampo. Lo stampo non può essere lavato in lavastoviglie.
DOMANDE PIÙ FREQUENTI
Problema Soluzione
Non ottengo il risultato
desiderato.
· La composizione dell’impasto è molto importante per
ottenere buoni risultati. Inoltre, il risultato può dipendere
anche dai diversi marchi di farina utilizzata. Mano a mano
che la si utilizza, si impara a conoscere la macchina del
pane. Consigliamo di provare prima di tutto le ricette base.
È possibile anche usare una miscela già pronta. In caso di
problemi persistenti, è possibile mettersi in contatto con il
nostro servizio clienti.
· Gli ingredienti non sono stati pesati con cura.
· Gli ingredienti non solo freschi.
· Gli ingredienti non sono a temperatura ambiente.
Posso controllare durante il
processo che l’impasto sia
corretto?
L’impasto deve apparire come una palla elastica e liscia. Dopo
5-10 minuti (durante l’impastatura), aprire il coperchio e
toccate con le dita la parte esterna dell’impasto. L’impasto deve
attaccarsi leggermente alle dita. Se si attacca troppo, signica
che è troppo umido ed è necessario aggiungere della farina. Se
non si attacca per niente, signica che è troppo asciutto e che è
necessario aggiungere un po’ d’acqua. Non aprire il coperchio
Voglio cuocere più pani uno dopo
l’altro.
Lasciare rareddare per 20 minuti la macchina con il coperchio
aperto. Se la macchina è troppo calda, il lievito inizia a lavorare
troppo presto e il risultato non sarà ottimale.

92
B3971
IT
Il pane si è sgonato. · Se il pane si è sgonato su tutti i lati, signica che l’impasto
era troppo umido. Provare ad aggiungere meno acqua. Se
si utilizza frutta o verdura conservate, è necessario farle
sgocciolare bene e asciugarle prima di utilizzarle. Sono
rimaste impregnate più a lungo e quindi sono eccessivamente
umide.
· Provare a utilizzare un tipo di farina più leggero.
· L’impasto può anche essere lievitato troppo. L’impasto è
lievitato troppo. Provare a mettere meno lievito (1-2 grammi
solamente). Se l’impasto è lievitato troppo, è possibile che
sia uscito dallo stampo. Togliere la presa dalla spina e lasciare
rareddare l’apparecchio. Pulire l’elemento riscaldante.
Il pane nel mezzo non è cotto a
sucienza.
Se la parte interna del pane non è cotta a sucienza, è possibile
che sia a causa del tipo di farina utilizzata. In genere questo
succede quando si utilizzano tipi di farina più pesanti, come
quella di segale o quella integrale. Provare a utilizzare più di un
solo processo di impastatura con questi tipi di farina. Quando la
macchina del pane ha concluso il primo processo di impastatura,
spegnere l’apparecchio. Impostare di nuovo la macchina e
premere il tasto START. La macchina inizia di nuovo a impastare e
c’è una maggiore quantità di aria nell’impasto.
Il fondo del pane è troppo spesso. Il pane è stato lasciato troppo a lungo nell’apparecchio con la
funzione di mantenimento del calore. L’acqua evapora e quindi
il fondo si inspessisce troppo. Togliere immediatamente il pane
dall’apparecchio dopo il termine del programma.
Il pane è uscito dallo stampo. · È stato utilizzato troppo lievito.
· Il lievito è stato attivato troppo, per esempio perché c’era
troppo zucchero o a causa della temperatura elevata.
· È stato usato troppo impasto. Non usare più di 1.000 g.
Sul display compare H:HH. La macchina è ancora troppo calda. Lasciarla rareddare
completamente.
Sul display compare E:EO. C’è un problema con il sensore di temperatura. L’apparecchio
deve essere inviato al nostro servizio di assistenza post vendita.
Perché non è possibile aggiungere
ingredienti extra all’inizio del
programma?
Gli ingredienti extra (come le noci o l’uvetta) verrebbero triturati
e il pane non sarebbe impastato nel modo corretto. L’aggiunta
di ingredienti extra potrebbe inuenzare anche la lievitazione.
Gli ingredienti extra devono essere aggiunti solo quando
l’apparecchio emette il segnale sonoro, dopo l’impastatura o la
lievitazione.
È possibile utilizzare il latte al
posto dell’acqua?
Sì, certo! Bisogna però prima assicurarsi che il volume di umidità
corrisponda. Il rapporto tra quantità di acqua e quantità di latte
non è importante.
La crosta è talvolta più chiara e
talvolta più scura.
Il grado di doratura può essere selezionato con il tasto “COLOR”.
Le preparazioni con più zucchero daranno una crosta più scura.

93
B3971
www.domo-elektro.be
IT
La macchina del pane impasta più
lentamente del normale.
Può capitare in caso di impasti pesanti, che causano un
rallentamento del motore. Non è un problema per la macchina.
Aggiungere un cucchiaio di liquido.
Il gancio per impastare è sso nello
stampo.
Togliere il pane dallo stampo. Riempirlo con acqua calda e
lasciarlo ferma per un quarto d’ora. L’impasto attaccato si
scioglierà.
Si è formata della condensa sulla
parte interna dell’apertura di
osservazione.
È normale. È dovuta al calore.
È stata utilizzata una miscela
pronta all’uso, ma il pane non è
riuscito.
Prima di inviare l’apparecchio in riparazione, consigliamo di
provare a realizzare le ricette base. Le miscele pronte all’uso
talvolta possono contenere ingredienti che causano risultati non
soddisfacenti.
MISURE AMBIENTALI
Il simbolo sul prodotto o sulla confezione indica che esso non deve essere
trattato come riuto domestico. Deve, al contrario, essere conferito al
punto di raccolta predisposto per il riciclo delle apparecchiature elettriche
ed elettroniche. Facendo in modo che questo prodotto venga smaltito
correttamente aiuterete a prevenire potenziali conseguenze negative per
l’ambiente e la salute dell’uomo, che potrebbero essere causate da uno
smaltimento non corretto. Per maggiori informazioni sul riciclo di questo
prodotto, consultare le autorità comunali, l’azienda o il servizio responsabili
della raccolta dei riuti domestici o il negozio in cui il prodotto è stato
acquistato.
Il materiale di imballaggio è riciclabile. Lo smaltimento dell’imballaggio deve
avvenire al ne di tutelare l’ambiente.

94
B3971
CZ
ZÁRUKA
Práva a povinnosti prodávajícího a kupujícího ohledně práv z vadného plnění se řídí příslušnými obecně
závaznými předpisy dle občanského zákoníku.
1. Trvání záruky: 2 roky. Na příslušenství a součásti které podléhají opotřebení běžným provozem
je záruka jen 6 měsíců.
2. Záruka se nevztahuje
a) na mechanické poškození
b) nesprávné používání v rozporu s návodem k použití
3. Záruka zaniká:
- při použití spotřebiče jinak než v je uvedeno v manuálu (nesprávným postupem)
- při provádění opravy nebo změny na spotřebiči osobou jinou než pověřenou naším servisem
Prodávající odpovídá kupujícímu, že zboží při převzetí nemá vady. Zejména prodávající odpovídá
kupujícímu, že v době, kdy kupující zboží převzal:
· má zboží takové vlastnosti, které výrobce v tomto návodu popisuje,
· se zboží hodí k účelu, ke kterému výrobce uvádí,
· zboží odpovídá jakostí nebo provedením smluvenému vzorku nebo předloze, byla-li jakost nebo
provedení určeno podle smluveného vzorku nebo předlohy,
· zboží vyhovuje požadavkům právních předpisů.
Projeví-li se vada v průběhu šesti měsíců od převzetí, má se za to, že zboží bylo vadné již při převzetí.
Pokud není u výrobku uvedeno jinak, činí záruční doba 24 měsíců. Záruční doba počíná běžet od převzetí
věci kupujícím.
Práva z vadného plnění uplatňuje kupující u prodávajícího na adrese jeho provozovny, v níž je přijetí
reklamace možné s ohledem na sortiment prodávaného zboží, případně i v sídle nebo místě podnikání. Za
okamžik uplatnění reklamace se považuje okamžik, kdy prodávající obdržel od kupujícího reklamované
zboží.
Reklamaci lze také uplatnit v servisním středisku na adrese DOMO-elektro s.r.o., Na Kobyle 783, 345 06
Pro rychlé a bezproblémové vyřízení reklamace doporučujeme přiložit k reklamaci doklad o koupi a průvodní
dopis s popisem závady a zpáteční adresou s telefonickým kontaktem.
pravidla:
· Pečlivě si přečtěte tyto informace a manuál nechte i pro pozdější nahlédnutí.
· Ujistěte se, že před použitím odlepíte a odstraníte veškeré reklamní a ochranné fólie.
· Děti si s ochrannými ani reklamními polepy nesmí hrát.
· Přístroj je určen pro používání v domácnostech a podobných prostředích, tak jako je:
· kuchyňky v obchodech, kancelářích atd.
· chaty, chalupy
· hotely, penziony a jiné dočasné ubytování

95
B3971
www.domo-elektro.be
CZ
· Dohlédněte, aby si děti nehrály s přístrojem.
· Tento spotřebič mohou používat děti ve věku 16 let a starší a osoby se sníženými fyzickými,
smyslovými nebo mentálními schopnostmi, nebo nedostatkem zkušeností a znalostí pokud jsou
pod neustálým dozorem nebo byly poučeny o používání spotřebiče bezpečným způsobem a rozumí
případným nebezpečím. Děti si s přístrojem nesmějí hrát. Čištění a údržbu prováděnou uživatelem
nesmějí provádět děti bez dozoru.
· Čistění a běžnou údržbu smí provádět pouze osoby starší 16 let a při tom být pod dohledem.
· Přístroj a jeho el. kabel skladujte mimo dosah dětí.
· Pozor: Tento přístroj je zakázáno používat s externím časovačem nebo jiným dálkovým ovládáním.
Přístroj může být během používání horký. Dbejte na to, aby se přívodní kabel nedotýkal
jeho horkých částí a přístroj ničím nepřikrývejte.
· Předtím, než přístroj připojíte k elektrické síti, se ujistěte, že napětí uvedené na přístroji odpovídá
napětí Vaší elektrické sítě.
· Nedovolte, aby se přívodní kabel dotýkal horkých ploch a aby nebyl ohnutý přes ostré hrany stolů,
nebo pracovních pultů.
· Přístroj nepoužívejte pokud má poškozený přívodní kabel, zástrčku, nebo je přístroj sám jinak
poškozený, pokud netěsní, nebo Vám upadl na zem. Nechte přístroj vždy zkontrolovat v odborném
servisu, nebo proškoleným opravářem, abyste předešli riziku zranění elektrickým proudem a jiným
zraněním.
· Nikdy nenechávejte spuštěný přístroj bez dozoru.
· Přístroj nestavte do blízkosti jiných tepelných zdrojů, jako jsou sporáky, plotýnky či kamna.
· Přístroj není určen pro použití ve venkovním prostředí.
· Přístroj používejte pouze k účelům, ke kterým je určený.
· Stavte pouze na rovné, pevné a stabilní místo.
· Přístroj je určen pouze pro domácí použití. Výrobce, dovozce ani prodejce nenese odpovědnost za
vzniklá rizika z nedodržení zde popsaných pravidel k použití.
· Veškeré opravy přístroje smí provádět pouze autorizovaný servis nebo odborně proškolený technik.
· Abyste zabránili úrazu elektrickým proudem, nesmíte nikdy potápět kabel, síťovou zástrčku nebo
samotný přístroj do vody nebo jiných tekutin.
· Přívodní kabel držte bezpečně daleko od ostrých hran a předmětů, aby se nepoškodil.
· Přístroj neumisťujte do blízkosti hořlavých ani vznětlivých látek (plynů).
· Větrací otvory přístroje nezakrývejte, tak aby byla zaručena dostatečná cirkulace vzduchu.
· Pokud je nutné, můžete použít prodlužovačku přívodního kabelu, ale jen za podmínky, že je bude
prodlužovačka silnější (více dimenzovaná) než přívodní kabel.
· Při zapojení prodlužovacího kabelu jej umístěte a zajistěte tak, aby ho nikdo omylem nemohl
vytáhnout nebo o něj zakopnout.
· Na zapojený přístroj nestavte žádné předměty. Jinak hrozí riziko jejich spadnutí nebo dokonce riziko
požáru.
· Pekárna se během činnosti zahřívá a některé její části jsou horké, proto s ní manipulujte opatrně a
používejte pouze tlačítka a rukojeti k tomu určená.
· Před rozebíráním, čistěním nebo skládáním musí být pekárna vychladlá a vždy ji před tím vypojte z
elektrické sítě.
· S naplněnou pekárnou nikdy nemanipulujte.
· Pokud je pekárna zapnutá, tak se nikdy nesnažte dotýkat hnětacích háků.
· Před čištěním nebo při dlouhodobém nepoužívání vždy přístroj vypněte a vypojte z el. sítě.
· Nepoužívejte pekárnu jako úschovnu/skladovací místo potravin.

96
B3971
CZ
· Na čištění nepoužívejte houbičku s delšími vlákny. Vlákna by se mohla omylem dostat dovnitř přístroje
a způsobit elektrický šok nebo zkrat.
· Pekárnu nikdy nepoužívejte na sušení potravin ani jiných věcí.
· Maximální množství všech surovin nesmí být větší, než 1000g.
· Nikdy nepoužívejte více než 715 g mouky na jeden chléb.
· Nikdy nedávejte více než 22 g čerstvých kvasnic, nebo 4+1/4 lžiček kvasnic sušených.
· Nikdy nepoužívejte více než 460 ml vody na jeden chléb.
1. Víko
2. Průhledové okénko
3. Automatický podavač extra přísad
4. Ovládací panel
5. Pečící nádoba
6. Hnětací hák
7. Vnější plášť přístroje
8. Pohárek s odměrkou
9. Lžícová odměrka
10. Hák pro vytahování hnětače z chleba
· Ujistěte se, že před použitím odlepíte a odstraníte veškeré reklamní a ochranné fólie.
· Všechny části přístroje očistěte navlhčeným hadříkem – zejména části, které přijdou do styku s
potravinami. Pečící nádoba a hnětací hák jsou opatřeny nepřilnavým povrchem. Nikdy tyto plochy
nečistěte hrubými nástroji ani agresivními čistícími prostředky. Tyto plochy můžete čistit pouze
papírovou kuchyňskou utěrkou, nebo jemným navlhčeným hadříkem. Pokud jste tak ještě neučinili,
odstraňte ochranou fólii z displeje.
· Je naprosto v pořádku, pokud se při prvním použití projeví lehký kouř z přístroje. To se jen vypálí
případné nečistoty či maziva z výroby.
· Před prvním použitím je potřeba jako první spustit na prázdno program pečení „BAKE“. Program
nechte proběhnout 10 minut. Poté nechejte pekárnu vychladnout a znovu očistěte pečící nádobu a
hnětací hák.
· Před prvním použitím je nejlepší vymazat pečící nádobu i hnětací hák máslem nebo margarinem.
Níže vypsaný recept je vhodný na přípravu jednoho bochníku bílého chleba.
· 630 g hladké mouky
· 370 ml vlažné vody
· 5 g sušených kvasnic
· 1 lžička soli
· 1 lžíce cukru
1
2
3
4
5
6
7
8
9
10

97
B3971
www.domo-elektro.be
CZ
SUROVINY
MOUKA
Mouka je základní součást chleba. Váha mouky se liší druh od druhu. Proto je absolutně nutné její
množství správně odvážit. Při nákupu mouky si všimněte i textu na obalu. Musí tam stát, že mouka je
mimo jiné vhodná na pečení chleba.
LEPEK
Lepek se nachází přirozeně téměř v každé mouce a podporuje kynutí chleba. V tzv.
chlebové mouce je lepku však nejvíce.
Droždí je mikroorganismus, který roste na různých rostlinných potravinách. Má schopnost přeměnit cukr
v alkohol a v kysličník uhličitý, přičemž velmi rychle nabývá. Je to ideální, aby mohlo těsto vykynout a
bylo lépe stravitelné. Doporučujeme používat sušené droždí. Zpracování tohoto (zrnovitého) droždí je
jednodušší, a také je trvanlivější než droždí čerstvé a vykazuje stálejší výsledky..
Sůl nezabezpečuje pouze určitou chuť chleba, nýbrž reguluje také aktivitu droždí, zpevňuje těsto a
zabraňuje tomu, aby chléb příliš vykynul.
MÁSLO / OLEJ
Máslo a olej dávají chlebu lepší chuť a zvláčňují ho. Před použitím musí mít máslo i olej pokojovou teplotu.
CUKR
Cukr je zdroj obživy pro droždí a důležitá součást kynutí těsta. Můžete použít normální bílý cukr, hnědý
cukr, sirup nebo med. Cukr dodává chlebu jistou křehkost, zvyšuje výživovou hodnotu a přispívá k tomu,
že chléb déle vydrží. Pozor: Nepoužívejte hrubý cukr nebo cukr kostkový, např. pro kvasný chléb, protože
to poškozuje ochrannou vrstvu pečící formy.
VODA
Když se promíchá mouka s vodou, vytvoří se lepek, vzduch se nasytí , takže chléb může nabývat. Při
normální pokojové teplotě použijte vlažnou vodu, protože studená voda neaktivizuje droždí a horká by
byla zase příliš.
MLÉKO
Chlebová kůrka díky mléku zhnědne, zlepší se chuť chleba, zvýší se výživná hodnota a vnitřek chleba má
krásnou smetanovou barvu. Když použijete čerstvé mléko, musíte adekvátně snížit množství vody, aby
množství tekutin zůstalo v rovnováze.
V kuchařkách můžete najít recepty, které vyžadují koření, ořechy, rozinky, ovoce nebo zeleninu aj.
Používejte vždy čerstvé přísady. Když používáte ořechy, slunečnicová semínka, sušené ovoce apod.,
nechte je předem namočené ve vodě, aby změkly, dobře osušené lehce pokropte a teprve pak je přidejte
do těsta. Dávejte pozor, aby tyto ingredience nebyly příliš velké a ostré, aby nepoškodily ochrannou
vrstvu formy.

98
B3971
CZ
A. MENU: výběr pečícího programu
B. WEIGHT: výběr velikosti chleba
C. COLOR: výběr propečení kůrky chleba
D. TIME+ : navyšování času
E. BAKE: tlačítko pouze pro „pečení“
F. KNEAD: tlačítko pouze pro „hnětení“
G. TIME- : ponížení času
H. START-PAUSE/stop: hlavní vypínač on/o
I. HOME MADE: tlačítko pro program „domácího chleba“
Displej
1. Výběr velikosti chleba
2. Menu
3. Časovač
4. Fáze programu: hnětení
5. Fáze programu: odpočinutí těsta
6. Fáze programu: kynutí
7. Fáze programu: předehřátí
8. Fáze programu: pečení
9. Fáze programu: udržení tepla
10. Fáze programu: chléb je hotový
11. Fáze programu: počet (pořadí) fází v
programu
12. Zbývající čas do konce programu (v
minutách)
13. Propečení kůrky: světlá, středně, tmavá
14. Uzamčení ovládacího panelu
A. Tlačítko „MENU“
Toto tlačítko použijte, když chcete zvolit správný pečící program. Pokaždé, když stisknete toto tlačítko,
uslyšíte signál a číslo programu se na displeji změní. Dle vybraného programu se bude také měnit
přednastavený čas.
B. „WEIGHT “ – tlačítko
Toto tlačítko použijte,když chcete udat váhu chleba, který máte v úmyslu upéci. Můžete volit v rozmezí
500, 750 g a 1000 g. Mějte na paměti, že celkové množství přísad uvedených v receptu je váha chleba,
který chcete upéci.
C. „COLOR“ – tlačítko
Tímto tlačítkem si volíte stupeň propečení kůrky. Možný výběr je světlá/střední nebo tmavá.
Když zkoušíte nějaký recept poprvé, doporučujeme vám, abyste si vybrali barvu kůrky střední.
D. Time+ a (G) Time-
Pomocí těchto tlačítek můžete nastavit odložené spuštění (časovač) pro programy. Pro některé programy
lze upravit jejich celkový čas.
A
D
G
B
E
H
C
F
I
MENU
TIME +
TIME -
WEIGHT
BAKE
START
PAUZE/STOP
COLOR
KNEAD
HOME MADE
1
2
7
8
12
9
10
1411
13
6
5
4
3

99
B3971
www.domo-elektro.be
CZ
E. Bake = pečení
Tímto tlačítkem vyberete program samotného pečení. Spuštění potvrdíte stiskem START-PAUSE/stop.
F. Hnětení
Tímto tlačítkem vyberete program samotného hnětení. Spuštění potvrdíte stiskem START-PAUSE/stop.
H. START-PAUSE/stop
Tímto tlačítkem potvrdíte a spustíte vybraný program. Nebo již spuštěný program pozastavíte/spustíte.
Krátkým stisknutím program pozastavíte. Pro pokračování stiskněte tlačítko znovu. Pokud do 3 minut
program neobnovíte, tak se program automaticky trvale přeruší .
Pro ukončení (zastavení) programu stiskněte tlačítko na několik sekund, dokud neuslyšíte pípnutí.
I. Home made = domácí chléb
Tlačítko slouží pro výběr při pečení (vlastního) doma zadělávaného těsta. Program a jeho fáze lze
individuálně nastavit. Více se dočtete v kapitole „Nastavení vlastního domácího programu“. Takto
nastavený a vybraný program spustíte tlačítkem „start-pause/stop“.
PROGRAMY
Program 500 g 750 g 1000 g
1. Základní (basic) 3:05 3:10 3:15
2. Francouzský (french) 3:35 3:40 3:45
3. Celozrnný (whole wheat) 4:05 4:10 4:15
4. Sladký (sweet) 3:35 3:40 3:45
5. Rýžový, rýže (rice) 2:50 2:55 3:00
6. Bezlepkový (gluten free) 3:05 3:10 3:15
7. Rychlý (quick) 2:10 2:15 2:20
8. Ovoce 3:05 3:10 3:15
9. Koláč (cake) 2:20*
10. Sendvič (Sandwich) 3:00 3:05 3:10
11. Hrozinky / ořechový chléb (raisin/nut) 3:05 3:10 3:15
12. Žitný, žito (rye) 4:05 4:10 4:15
13. Hnětení (knead) 0:08*
14. Těsto (dough) 1:30*
15. Brioška (brioche) 3:35 3:40 3:45
16. pečení (bake) 0:30*
17. Domácí vlastní chléb (homemade) -- -- --
18. Italský chléb (Italian) 3:05 3:10 3:15
* Pokud si zvolíte jeden z těchto programů, nemůžete volit hmotnost nebo dobu pečení.
1. Basic = základní
Nejvíce používaný program pro pečení klasického chleba.
2. French = francouzský
Doba hnětení a kynutí je delší než u základního

100
B3971
CZ
3. Whole wheat = celozrnný
Nejvhodnější program pro pečení tmavého chleba, jako je chléb celozrnný nebo vícezrnný. Chléb může
být o něco menší než bílý chléb, protože mouka je těžší. S tímto programem se nedoporučuje používat
odložený start – výsledky pečení by mohly být výrazně horší.
4. Sladký = sweet
Program je vhodný na přípravu sladkého chleba – typ vánočky nebo čokoládový
5. Rýžový, rýže = rice
Tento program použijte pro chléb zadělaný z rýžové mouky. Po hnětení je totiž potřeba, aby těsto před
pečením dostatečně vykynulo. Kůrka z rýžového chleba je tenčí a měkčí než normální chléb.
6. Bezlepkový – gluten free
Program vhodný pro pečení bezlepkového chleba. Těsto bezlepkového chleba je vlhké a má jinou
konzistenci těsta. Těsto by proto nemělo být dlouho hněteno ani příliš dlouhé kynutí. Doba pečení je
naproti tomu delší. S tímto programem není vhodné používat odložený start. Prodleva při odloženém
startu může znehodnotit těsto a výsledek pečení nebude dobrý. Nejlepší je vložit všechny ingredience
najednou a na začátku.
7. Quick = rychlý
Pro hnětení, kynutí a pečení chleba s jedlou sodou nebo pečícím práškem. Výsledkem je obvykle menší
chléb s hustší strukturou.
8. Ovoce -přísady
Pomocí automatického dávkovače můžete přidávat přísady, jako jsou rozinky nebo jiné sušené
ovoce. Přístroj přidá přísady sám z automatu ve správný čas. Pokud chcete do svého chleba přidat
čerstvé a šťavnaté ovoce, je nejlepší je přidat přímo do pečící nádoby (při pípnutí). Čerstvé ovoce by v
automatickém zásobníku do doby přidání ztratilo čerstvost a šťáva by vytekla.
9. Cake = koláč: Pomocí tohoto programu můžete upéci chleba, který je připraven
např. s práškem do pečiva. Tímto programem upečené chleby nejsou tak vysoké a pevné.
Pokud chcete pomocí tohoto programu udělat třený koláč, vložte přísady do formy. Potom přístroj
nastavte a před zapnutím musíte ještě přísady zamíchat dřevěnou lžící. To pomáhá hnětení.
Pokud používáte tento program, nemůžete si sami vybrat (změnit) váhu.
10. Sandwich = sendvič
Program pro přípravu lehkého bílého těsta vhodného pro přípravu např. malých chlebových houstiček.
11. Hrozinky / ořechový chléb
Pomocí dávkovače přidejte přísady, jako jsou hrozinky nebo ořechy. Stroj přidá přísady sám z automatu ve
správný čas.
12. Žitný, žito = „rye“
Tento program je ideální pro chleby s těžší moukou jako jako je např. žitná. Chléb je sám o sobě pevnější,
hutnější a těžší než normální chléb.

101
B3971
www.domo-elektro.be
CZ
13. Hnětení = kneading
Během tohoto programu přístroj pouze hněte (zadělá těsto). Nebude ho nechávat kynout ani péct. Tento
program můžete použít například k hnětení těsta na pizzu. Pomocí tlačítek „Time+“ a „Time-“ můžete
upravit dobu hnětení.
14. Těsto = dough
Program vhodný na zadělání a kynutí těsta. Přístroj prohněte těsto a nechá ho vykynout.
15. Brioška = brioche
Tento program je vhodný pro chleby s dalšími přísadami, které mají vysoký obsah cukru, tuku a bílkovin
(např. čokoláda, cukr atd.). Tyto přísady vytvářejí tmavší kůru. Fáze kynutí při tomto programu je delší a
výsledkem je nadýchanější chléb.
16. Bake = pečení
Program na upečení již hotového těsta. Tento program může být použit k dokončení chleba či rozehřátí
chleba již dříve hotového.
17. Domácí vlastní chléb = home made
Tento program si můžete nastavit dle vlastních potřeb, aby vyhovoval vašemu těstu. Více o nastavení se
dočtete níže v kapitole „Nastavení vlastního domácího programu“
18. Italský chléb = Italian
Tímto programem si upečete chutný středomořský chléb. Můžete přidat další přísady, jako jsou bylinky,
sušená rajčata, olivy atd.
1. Mírným pootočením doprava a tažením nahoru vyjměte z pekárny pečící nádobu.
2. Na osičku uprostřed nádoby nasaďte hnětací hák(přiložený). Hnětač musí být nasazen správným a
pečlivým způsobem, aby se neviklal a všechny přísady mohly být dostatečně promíchány.
3. Suroviny do formy doporučujeme vkládat následujícím způsobem a v tomto pořadí:
· voda / mléko
· máslo / olej
· eventuelně vejce
· mouka
· cukr (nasypte cukr na jednu stranu)
· sůl (sůl nasypte na opačnou stranu)
· droždí ( droždí vložte do důlku uprostřed)
!
Pozor! Droždí nesmí přijít do styku s vodou, cukrem a solí. Mohlo by se stát, že voda droždí zaktivizuje,
dříve než se přísady dostatečně promísí a prohnětou.
Pomocí dávkovače můžete ve správný čas nechat přidat další přísady, jako jsou ořechy, byliny, sušené
ovoce atd., Nebo mohou být přidány později. Viz část „Přidávání dalších složek“.
4. Odstraňte všechny zbytky přísad z vnější strany formy. Vložte formu opět do přístroje seshora na ni
zatlačte a pootočte.
5. Uzavřete víko.
6. Dejte zástrčku do zásuvky
7. Nastavte tlačítkem „menu“ správný program.

102
B3971
CZ
8. Pomocí tlačítka propečení (color) nastavte stupeň propečení kůrky. Můžete si vybrat mezi světlou,
středí nebo tmavou. Tlačítkem hmotnosti (weight) nastavte velikost chleba (500g, 750g nebo 1000g).
9. Nastavte eventuálně funkci vlastního naprogramování odloženého startu.
10. Stiskněte START. Dvojtečka bude nyní blikat a tím udává, že přístroj pracuje. Pokud máte nastaveno
oddálení programu, program spustí až po uplynutí nastaveného času.
11. Jakmile bude chléb hotový, tak se ozve zvukový signál a na displeji se zobrazí 0:00. Stiskněte a
chvilku přidržte „START-PASUSE/stop“. Zařízení opět zapípá, aby se potvrdilo, že jste program
zastavili. Pokud program takto nezastavíte, chléb bude díky funkci přihřívání udržován v teple
dalších 60 minut. Po vypnutí vypojte z elektrické sítě a otevřete víko. Opatrně vyjměte chléb z
náboby. Pozor: nádoba je horká, použijte kuchyňské chňapky.
12. Chléb nechte ochladit ve formě asi 10 – 15 minut, pak formu obraťte a vyklopte chléb z formy. Nikdy
nepokládejte chléb ani formu na vnější stranu přístroje nebo přímo na plastikový ubrus. Když se
chléb hned neuvolní, otáčejte osou na spodní straně formy, dokud se chléb neuvolní Když chléb
vyndáte z přístroje a hnětač zůstane uvnitř v chlebu, tak ho můžete vyndat pomocí vytahovací háku
ven. Nebo nechte chleba ještě vychladit na roštu, takže pak můžete hnětač vytáhnout rukama.
Dávejte pozor, aby byl hnětač dobře vychlazený. Je doporučeno krájet chléb teprve po 15 – 20
minutách.
Na vyjmutí chleba nikdy nepoužívejte ostré kovové předměty, abyste nepoškodili nepřilnavou
vrstvu.
Pokud nejste včas doma a neslyšíte ukončení programu, tak berte na vědomí, že pekárna ještě 60 minut
po ukončení pečení hřeje. Tato doba není zahrnuta v programovacím čase.
Pro přerušení takového dohřívání stačí podržet tlačítko START/STOP na několik vteřin. Pokud necháte
hotový chléb v pekárně déle než hodinu, tak se chléb může zapařit a zvlhnout.
Doporučujeme mýt nádoby vždy ihned po vyndání chleba, jedině takto zajistíte, že se hnětač nepřilepí k
ose nádoby.
Nikdy znovu nepouštějte ještě teplou pekárnu.
Během hnětení v následujících programech zazní zvukový signál: normální, francouzský, celozrnný,
sladký, rýžový, bezlepkový, rychlý, s ovocem, koláč, hrozinky/ořechy, žitný, brioška, italský. Toto pípnutí
značí, že je správný čas přidat další přísady, jako jsou hrozinky, ořechy, sem atd. Přísady můžete přidat
prostřednictvím automatu nebo ručně.
Otevřete posuvné víko dávkovače, vložte ingredience a víko opět uzavřete. Dávkovač automaticky zajistí
přidání ingrediencí ve správný čas – po hnětení a kynutí. POZOR:
· Přes dávkovač (do něj) nepřidávejte tekutiny ani suroviny v prášku.
· Dávkovací komoru nikdy nepřeplňujte.
· Pokud přidáváte ořechy, je lepší je před tím rozdrtit na menší kousky.
· Před vložením ingrediencí do dávkovače se ujistěte, aby byl zespodu (píst) uzavřen tak jak má být.
Příměsi můžete vložit jen ručně. Jakmile se ozve zvukový signál, tak program pozastavte (pause), otevřete
horní víko pekárny, nasypte přísady, víko opět uzavřete a tlačítkem „start“ opět program spusťte. Ruční
přidání surovin je vhodné hlavně pro tekuté nebo sypké přísady. Ručním přidáváním lze přidat i více
surovin než je možnost přes dávkovač.

103
B3971
www.domo-elektro.be
CZ
Pokud dojde k výpadku napájení z důvodu výpadku proudu, tak je zde paměťová funkce na 10min
Pokud se do té doby napájení rozběhne, tak program bude pokračovat tam kde skončil. Pokud výpadek
trvá déle než 10 minut, tak se celý program přerušil a je potřeba ho potom ručně nastavit / spustit znovu.
Tlačítko „Home made“ je určeno pro předvolení a nastavení vlastního programu. Tímto lze nastavit
jakoukoli fázi pečení, hnětení atd.. Pokud chcete nějakou fázi zcela vynechat, tak u ní nastavte 0:00.
POZOR: Nastavení tlačítka (vlastního programu) není trvale uloženo. Při vypnutí přístroje z elektrické sítě
se program vyresetuje.
1. Stiskněte tlačítko „Home made“ nebo tlačítkem menu vyberte program 17.
2. Opětovným stiskem tlačítka „Home made“ potvrdíte a začnete program nastavovat. Na displeji vždy
budou blikat kontrolka aktuální fáze programu a čas. Při nastavení koukněte do tabulky níže, kde
jsou uvedené přednastavené základní hodnoty a rozmezí co lze nastavit.
3. U každé fáze nastavte požadovaný čas. Time+ je navyšování a Time- je ponižování času. Navolený
čas vždy potvrďte tlačítkem „Home made“.
4. Jakmile máte všechny fáze programu nastaveny, tak na displeji uvidíte celkový čas programu.
Standartně by celková doba měla být přibližně 3 hodiny. Tlačítkem START už můžete rovnou
program spustit. Pokud byste tlačítko stiskli během programování fází, tak se programování přeruší.
Pokud je potřeba, tak můžete nastavit i odložený spuštění programu. Viz popis tohoto nastavení v
kapitole „Nastavení odloženého startu“.
Ikona Rozmezí
Hnětení 1
0:10 1-30 min.
Odpočinek 1
0:03 0-30 min.
Hnětení 2
0:05 0-30 min.
Odpočinek 2
0:10 0-30 min.
Hnětení 3
0:20 0-25 min.
Kynutí 1
0:42 0-60 min.
Kynutí 2
0:40 0-60 min.
Kynutí 3
0:00 0-60 min.
Pečení
0:50 0-80 min.
Udržení tepla
1:00 0-60 min.

104
B3971
CZ
Pokud chcete celistvý chléb, je možné vyjmout hnětací hák z těsta před jeho pečením. Vyjmout se musí až
po posledním hnětení před nálním kynutím.
1. Pokud to takto chcete zkusit, tak pekárnu vypněte stiskem tlačítka start/stop nebo na chvíli vypojte z
elektrické sítě. Paměťová funkce pekárny si pamatuje průběh programu cca do 10 min od přerušení,
proto musí tato operace vyjmutí háku být poměrně rychlá a bez zbytečných prodlev
2. Otevřete víko, rukama od mouky vyjměte hroudu těsta i s hnětačem. Hák z těsta vyjměte a do
pekárny vložte jen samotné těsto.
3. Pekárnu opět zavřete.
4. Přístroj opětovně zapojte do el. sítě a znovu stiskněte tlačítko start/stop, aby mohl program dále
pokračovat.
Pokud chcete tuto funkci použít, musíte ji nastavit, dříve než stisknete START.
· Při odloženém startu počítáte a zadáváte čas mezi zapnutím programu a času dokončení/dopečení
chleba. Přístroj si automaticky započte dobu potřebnou pro samotný proces pečení.
· Tlačítkem pro nastavení, každým jeho stiskem přidáte 10 min odloženého startu.
· Na displeji se zobrazí ikona přesýpacích hodin.
· Odložený start nelze nastavit u samostatného hnětení ani kynutí. Stiskem tlačítek Time+ / Time-
budete u těchto programů nastavovat jejich dobu trvání.
Příklad: Je 9:00 ráno a vy byste chtěli mít odpoledne v 17:00 čerstvě upečený chléb.
Musíte tedy naprogramovat celkový čas na 8 hodin, což bude odpovídat dopečení přesně v 17:00.
Do pekárny vložte všechny potřebné suroviny. Tlačítkem menu vyberte příslušný program.
Stisknutím tlačítka Color (propečení) nastavte stupeň propečení kůrky a následně vyberte požadovanou
hmotnost chleba. Tlačítkem Time+ navyšujte čas dokud se na displeji nezobrazí 8:00. Chléb bude upečený
za 8 hodin od potvrzení vaší volby (tlačítkem Start). Zobrazený čas obsahuje i dobu potřebnou pro
samotné pečení. Chléb tedy bude hotov v 5 hodin odpoledne.
Stiskněte tlačítko Start. Dvojtečka na displeji začne blikat a rozsvítí se ikona přesýpacích hodin. Začne
se odpočítávat čas až do doby, kdy má pekárna začít spustit program a hníst. Chléb bude nyní procházet
celým nastaveným programem, aby byl chléb připraven ve zvolený čas.
Důležité: tuto funkci nepoužívejte, pokud mají některé suroviny uvnitř pekárny podléhají rychlejší zkáze
(například čerstvé mléko, jogurt nebo čerstvé ovoce).
· Vždy všechny přísady přesně odvažte a dbejte na to, aby měly pokojovou teplotu.
· Jestli je droždí čerstvé, můžete zjistit následujícím testem: V polovině šálku vlažné vody rozmíchejte 1
kávovou lžičku cukru a pak přidejte 1 kávovou lžičku droždí. Po několika minutách bude směs bublat a
kypět
· Sůl omezuje účinek droždí a cukr ho naopak povzbuzuje. Pokud na základě diety nesmíte použít jednu
z těchto přísad, pak musíte rovněž vynechat i tu druhou. Pak získáte chléb bez cukru a soli.
· Chléb, který pečete sami z vlastních surovin, neobsahuje žádné konzervační prostředky, a je proto také
omezeně trvanlivý. Když chléb necháte dobře vychladnout a pak ho neprodyšně zabalíte, můžete ho
několik dní kvalitně uchovat. Můžete ho samozřejmě také nechat zmrazit a spotřebovat ho později.
· Osu hnětacího háku i samotný hák namažte máslem. Tak se zajistí, že půjde hák krásně sundat z osy a
vyjmout z pečeného chleba.

105
B3971
www.domo-elektro.be
CZ
· Před čištěním pekárnu vypněte, vytáhněte zástrčku ze zásuvky a nechte pekárnu úplně vychladnout.
· Po každém použití spotřebič důkladně očistěte. Pokud je některá s částí znečištěna, tak to může
ovlivnit výslednou chuť i tvar chleba a nebo dokonce zkrátit životnost přístroje.
· Po vyčištění přístroj a všechny jeho části důkladně osušte. Před uskladněním nechte alespoň půl
hodiny otevřené víko, aby vyschl i vnitřek přístroje. .
·
!
Upozornění: Nikdy přístroj ani přívodní kabel neponořujte do vody.
Zevnějšek přístroje a průhledové okénko setřete vlhkým hadrem nebo houbou. Před čistěním ještě
vyjměte pečící nádobu ven. Pokud by bylo nutné, můžete zevnějšek přístroje vyčistit jemným mycím
prostředkem, tak abyste povrch nepoškrábali.
Vnitřek lze pečlivě vyčistit mírně navlhčeným hadříkem. Buďte opatrní při čištění topného tělesa.
Nádobu s chlebem vyjměte z přístroje, tak že ji pootočíte o čtvrt otáčky proti směru hodinových ručiček a
vytáhnete ji nahoru. Formu a hnětač je možné mýt teplou vodou a vlhkým jemným hadříkem.
Dávejte pozor, abyste nepoškodili ochrannou vrstvu. Když se vám nepodaří vyndat hnětač z formy ven,
musíte nechat formu úplně vychladnout. Potom do formy nalijte trochu teplé vody tak, aby hnětač byl
pod vodou. Voda pomůže tomu, že přilepené části se uvolní a hnětač půjde dobře vyjmout.
Nepoužívejte žádné čistící prostředky nebo kartáče, protože by mohly poškodit ochrannou vrstvu formy.
Pečící forma není vhodná do myčky nádobí.
Problém Možné řešení
Stále nejsem spokojen s výsledným produktem. · Doporučovali bychom vám udělat chléb
pomocí hotové chlebové směsi. Do těchto
směsí stačí dodat jen vodu a máslo. Je-li
výsledek dobrý, znamená to, že je váš přístroj
v pořádku a vy musíte zkontrolovat čerstvost
normálních přísad. Je-li výsledek špatný, pak se
obraťte na naši zákaznickou nebo technickou
službu a poraďte se, jak postupovat dál.
· Ingredience nejsou přesně naváženy.
· Ingredience nejsou čerstvé.
· Ingredience neměly pokojovou teplotu.

106
B3971
CZ
Můžu nějak poznat i během procesu, zda je těsto
správně zadělané a zda správně vykyne?
Těsto by mělo být hladké, elastické a vytvarované
do úhledné kuličky. 5-10 min po začátku (během
hnětení) můžete zkusit těsto lehce stisknout prsty.
Mělo by mírně lepit. Pokud lepí moc, je příliš vlhké
a je potřeba přidat mouku. Pokud téměř nelepí, je
suché a vy musíte přidat mírně vody. Neotevírejte
víko během kynutí.
Co když si chci upéct více chlebů najednou? Mezi jednotlivými pečeními se doporučuje nechat
přístroj vychladnout 20 minut. Nechte otevřené
víko. Pokud by byla pekárna teplá, tak kvasnice
kynou rychleji, což není dobré pro nální výsledek.
Chléb je propadlý/deformovaný. Pravděpodobně bylo použito moc vody a těsto
bylo moc vlhké. Chléb byl ponechán v pečící formě
příliš dlouhou dobu po upečení.
Chléb je uvnitř nedopečený a vlhký. Je-li chléb uprostřed příliš měkký, může to
být způsobeno typem použité mouky. Takový
výsledek většinou způsobuje použití těžších mouk,
jako je žitná nebo celozrnná mouka. Při použití
těchto druhů mouky zkuste přidat ještě jeden
způsob hnětení. Po dokončení prvního hnětení
pekárnu vypněte. Potom přístroj resetujte a opět
spusťte zvolený program. Stroj začne znovu
hnětat = těsto bude více vzdušné.
Spodní část chleba je velmi tuhá. · Již upečený chléb jste nechali v pekárně příliš
dlouho. Funkce udržování tepla a následné
akumulované teplo spodní část chleba
„vysuší“.
· Nejlepší je vyndavat chléb co nejdříve po
dopečení.
· Použili jsme příliš mnoho těsta. Nepoužívejte
více než 1000g najednou.
Chléb překynul a překypěl. · Použili jsme příliš moc kvasnic.
· Kvasnice byly aktivovány více než je nutné =
použili jste moc cukru nebo příliš teplou vodu.
Na displeji svítí chybové hlášení: „H:HH“ Přístroj je stále teplý. Nechte ho dostatečně
vychladnout.
Na displeji svítí chybové hlášení: „E:EO“ Takové hlášení oznamuje vadný senzor teploty.
Pekárnu nechte překontrolovat a opravit v
autorizovaném servise.
Proč nemohu přidat extra ingredience hned po
startu programu.
Extra ingredience (jako jsou ořechy) budou
rozmělněny na s kousky a těsto nebude
prohněteno správně. To může velmi ovlivnit i
kynutí chleba. Doplňkové přísady přidávejte až
poté, kdy spotřebič pískne (po hnětení).

107
B3971
www.domo-elektro.be
CZ
Mohu použít místo vody i mléko? Ano. Vždy musí být dodržet celkový objem
tekutiny.
Horní kůrka chleba je někdy světlejší a někdy
tmavší.
Propečení si lze nastavit v nastavení pekárny.
Rozdíl však způsobuje i množství použitého cukru.
Více cukru = tmavší kůrka.
Pekárna hněte pomaleji než obvykle. Může být způsobeno použitím těžší mouky.
Nebo je těsto příliš hutné. Pokud tomu tak je, tak
přidejte lžičku vody.
Hnětací hák se zapekl do těsta ne nejde moc
dobře vyndat.
Hák i s okolním těstem vyjměte. Celou hrudku
těsta s hákem ponořte pod vodu a nechte 15
minut odpučet a následně očistěte.
Na skleněném průhledovém okénku kondenzuje
voda/pára.
Tento jev je zcela normální a děje se díky zahřívání
uvnitř přístroje.
Používám již koupenou a namíchanou směs na
chléb, ale i přesto mám stále nepovedený chléb.
Ještě před reklamováním pekárny doporučujeme
zkusit po domácky připravený základní recept.
Je možné, že koupená směs není čerstvá a to
ovlivňuje výsledek pečení.
Symbol na přístroji či na jeho obalu znamená, že s tímto výrobkem
není možno nakládat jako s běžným domovním odpadem, nýbrž musí
být odevzdán na místech určených ke sběru a likvidaci elektrických a
elektronických zařízení. Dodržením tohoto doporučení chráníte životní
prostředí a zdraví spoluobčanů. Více informací o možnostech likvidace
nebezpečného odpadu obdržíte na obecních nebo městských úřadech,
sběrných dvorech nebo v prodejně, kde jste přístroj zakoupili.
Obalové materiály jsou recyklovatelné, nakládejte s nimi podle předpisů pro
životní prostředí.

108
B3971
SK
ZÁRUKA
Práva a povinnosti predávajúceho a kupujúceho ohľadom práv z chybného plnenia sa riadi príslušnými
všeobecne záväznými predpismi podľa občianskeho zákonníka.
1. Trvanie záruky: 2 roky. Na príslušenstvo a súčasti ktoré podliehajú opotrebovaniu bežnou
prevádzkou je záruka len 6 mesiacov.
2. Záruka sa nevzťahuje
a) na mechanické poškodenie
b) nesprávne používanie v rozpore s návodom na použitie
3. Záruka zaniká:
- pri použití spotrebiča inak ako v je uvedené v manuále (nesprávnym postupom)
- pri vykonávaní opravy alebo zmeny na spotrebiči osobou inou než poverenou naším servisom
Predávajúci zodpovedá kupujúcemu, že tovar pri prevzatí nemá vady. Najmä predávajúci zodpovedá
kupujúcemu, že v čase, keď kupujúci tovar prevzal:
· má tovar také vlastnosti, ktoré výrobca v tomto návode popisuje,
· sa tovar hodí k účelu, ku ktorému výrobca uvádza,
· tovar zodpovedá kvalitou alebo prevedením dohovorené vzorky alebo predlohe, ak bola akosť alebo
prevedenie určené podľa dohodnutého vzorky alebo predlohy,
· tovar vyhovuje požiadavkám právnych predpisov.
Ak sa prejavia vada v priebehu šiestich mesiacov od prevzatia, má sa za to, že tovar bol chybný už pri
prevzatí.
Pokiaľ nie je pri výrobku uvedené inak, je záručná doba 24 mesiacov. Záručná doba začína plynúť od
prevzatia veci kupujúcim.
Práva z chybného plnenia uplatňuje kupujúci u predávajúceho na adrese jeho prevádzky, v ktorej je
prijatie reklamácie možné s ohľadom na sortiment predávaného tovaru, prípadne aj v sídle alebo mieste
podnikania. Za okamih uplatnenia reklamácie sa považuje okamih, kedy predávajúci dostal od kupujúceho
reklamovaný tovar.
Reklamáciu možno tiež uplatniť v servisnom stredisku na adrese DOMO-elektro s.r.o., Na Kobyle 783,
Pre rýchle a bezproblémové vybavenie reklamácie odporúčame priložiť k reklamácii doklad o kúpe a
sprievodný list s popisom závady a spiatočnou adresou s telefonickým kontaktom.
· Pri používaní jakkéhokoli el. spotrebiče dbajte na zvýšenú opatrnosť a dodržujte určitá bezpečnostné
pravidlá:
· Starostlivo si prečítajte tieto informácie a manuál nechajte aj k neskoršiemu nahliadnutiu.
· Uistite sa, že pred použitím odlepíte a odstránite všetky reklamné a ochranné fólie.
· Deti sa s ochrannými ani reklamnými polepy nesmie hrať.
· Prístroj je určený pre používanie v domácnostiach a podobných prostrediach, tak ako je:
· kuchynky v obchodoch, kanceláriách atď.
· chaty, chalupy
· hotely, penzióny a iné dočasné ubytovanie

109
B3971
www.domo-elektro.be
SK
· Dohliadnite, aby sa deti nehrali s prístrojom.
· Tento spotrebič môžu používať deti vo veku 16 rokov a staršie a osoby so zníženými fyzickými,
zmyslovými alebo mentálnymi schopnosťami, alebo nedostatkom skúseností a znalostí ak sú pod
neustálym dozorom alebo boli poučené o používaní spotrebiča bezpečným spôsobom a rozumejú
prípadným nebezpečenstvám. Deti si s prístrojom nesmú hrať. Čistenie a údržbu vykonávanú
používateľom nesmú vykonávať deti bez dozoru.
· Čistenie a bežnú údržbu môžu vykonávať len osoby staršie ako 16 rokov a pri tom byť pod
dohľadom.
· Prístroj a jeho el. kábel skladujte mimo dosahu detí.
Pozor: Tento prístroj je zakázané používať s externým časovačom alebo iným diaľkovým ovládaním.
Prístroj môže byť počas používania horúci. Dbajte na to, aby sa prívodný kábel
nedotýkal jeho horúcich častí a prístroj ničím neprikrývajte.
· Predtým, než prístroj pripojíte k elektrickej sieti, sa uistite, že napätie uvedené na prístroji zodpovedá
napätiu Vašej elektrickej siete.
· Nedovoľte, aby sa prívodný kábel dotýkal horúcich plôch a aby nebol ohnutý cez ostré hrany stolov,
alebo pracovných pultov.
· Prístroj nepoužívajte ak má poškodený prívodný kábel, zástrčku, alebo je prístroj sám inak poškodený,
pokiaľ netesní, alebo Vám spadol na zem. Nechajte prístroj vždy skontrolovať v odbornom servise,
alebo preškoleným opravárom, aby ste predišli riziku zranenia elektrickým prúdom a iným zraneniam.
· Nikdy nenechávajte spustený prístroj bez dozoru.
· Prístroj nestavajte do blízkosti iných tepelných zdrojov, ako sú sporáky, platničky či kachle.
· Prístroj nie je určený pre použitie vo vonkajšom prostredí.
· Prístroj používajte iba na účely, na ktoré je určený.
· Stavajte len na rovné, pevné a stabilné miesto.
· Prístroj je určený iba pre domáce použitie. Výrobca, dovozca ani predajca nenesie zodpovednosť za
vzniknuté riziká z nedodržania tu popísaných pravidiel na použitie.
· Všetky opravy prístroja smie vykonávať iba autorizovaný servis alebo odborne preškolený technik.
· Aby ste zabránili úrazu elektrickým prúdom, nesmiete nikdy potápať kábel, sieťovú zástrčku alebo
samotné zariadenie do vody alebo iných tekutín.
· Prívodný kábel držte bezpečne ďaleko od ostrých hrán a predmetov, aby sa nepoškodil.
· Prístroj neumiestňujte do blízkosti horľavých ani zápalných látok (plynov).
· Vetracie otvory prístroja nezakrývajte, tak aby bola zaručená dostatočná cirkulácia vzduchu.
· Pokiaľ je nutné, môžete použiť predlžovačku prívodného kábla, ale len za podmienky, že ich bude
predlžovačka silnejšia (viac dimenzovaná) ako prívodný kábel.
· Pri zapojení predlžovacieho kábla ho umiestnite a zaistite tak, aby ho nikto omylom nemohol
vytiahnuť alebo oň zakopnúť.
· Na zapojený prístroj nestavajte žiadne predmety. Inak hrozí riziko ich spadnutie alebo dokonca riziko
požiaru.
· Pekáreň sa počas činnosti zahrieva a niektoré jej časti sú horúce, preto s ňou manipulujte opatrne a
používajte iba tlačidlá a rukoväte na to určená.
· Pred rozoberaním, čistením alebo skladaním musia byť pekáreň vychladnutá a vždy ju pred tým
vypojte z elektrickej siete.
· S naplnenou pekárňou nikdy nemanipulujte.
· Ak je pekáreň zapnutá, tak sa nikdy nesnažte dotýkať hnetacích hákov.
· Pred čistením alebo pri dlhodobom nepoužívaní vždy prístroj vypnite a vypojte z el. siete.
· Nepoužívajte pekáreň ako úschovňu / skladovacie miesto potravín.

110
B3971
SK
· Na čistenie nepoužívajte hubku s dlhšími vláknami. Vlákna by sa mohla omylom dostať dovnútra
prístroja a spôsobiť elektrický šok alebo skrat.
· Pekáreň nikdy nepoužívajte na sušenie potravín ani iných vecí.
· Maximálne množstvo všetkých surovín nesmie byť väčšia, než 1000g.
· Nikdy nepoužívajte viac ako 715 g múky na jeden chlieb.
· Nikdy nedávajte viac ako 22 g čerstvých kvasníc, alebo 4 + 1/4 lyžičiek kvasníc sušených.
· Nikdy nepoužívajte viac ako 460 ml vody na jeden chlieb.
1. Veko
2. Priezor
3. Automatický podávač extra prísad
4. Ovládací panel
5. Nádoba na pečenie
6. Hnetací hák
7. Vonkajší plášť prístroje
8. Pohárik s odmerkou
9. Lyžicový odmerka
10. Hák pre vyťahovanie hnetače z chleba
· Uistite sa, že pred použitím odlepíte a odstránite všetky reklamné a ochranné fólie.
· Všetky časti prístroja očistite navlhčenou handričkou - najmä časti, ktoré prídu do styku s potravinami.
Rúry nádoba a háky sú opatrené nepriľnavým povrchom. Nikdy tieto plochy nečistite hrubými
nástrojmi ani agresívnymi čistiacimi prostriedkami. Tieto plochy môžete čistiť iba papierovou
kuchynskou utierkou, alebo jemným navlhčenou handričkou. Ak ste tak ešte neurobili, odstráňte
ochrannú fóliu z displeja.
· Je úplne v poriadku, ak sa pri prvom použití prejaví ľahký dym z prístroja. To sa len vypáli prípadné
nečistoty či maziva z výroby.
· Pred prvým použitím je potrebné ako prvý spustiť na prázdno program pečenia “BAKE”. Program
nechajte prebehnúť 10 minút. Potom nechajte pekáreň vychladnúť a znovu očistite nádobu na pečenie
a hnetacie hák.
· Pred prvým použitím je najlepšie vymazať nádobu na pečenie aj hnetací hák maslom alebo
margarínom.
1
2
3
4
5
6
7
8
9
10

111
B3971
www.domo-elektro.be
SK
Základný recept:
Nižšie vypísaný recept je vhodný na prípravu jedného bochníka bieleho chleba.
· 630 g hladkej múky
· 370 ml vlažnej vody
· 5 g sušených kvasníc
· 1 lyžička soli
· 1 lyžica cukru
SUROVINY
MÚKA
Múka je základná súčasť chleba. Váha múky sa líši druh od druhu. Preto je absolútne nutné jej množstvo
správne odvážiť. Pri nákupe múky si všimnite aj textu na obale. Musí tam stáť, že múka je mimo iného
vhodná na pečenie chleba.
LEPOK
Lepok sa nachádza prirodzene takmer v každej múke a podporuje kysnutie chleba. V tzv.
chlebové múke je lepku však najviac.
Droždie je mikroorganizmus, ktorý rastie na rôznych rastlinných potravinách. Má schopnosť premeniť
cukor v alkohol a v kysličník uhličitý, pričom veľmi rýchlo nadobúda. Je to ideálne, aby mohlo cesto
vykysnúť a bolo lepšie stráviteľné. Odporúčame používať sušené droždie. Spracovanie tohto (zrnovitého)
droždie je jednoduchšie, a tiež je trvácnejšie ako droždie čerstvé a vykazuje stálejšie výsledky.
Soľ nezabezpečuje len určitú chuť chleba, ale reguluje tiež aktivitu droždia, spevňuje cesto a zabraňuje
tomu, aby chlieb príliš vykysol.
MASLO / OLEJ
Maslo a olej dávajú chlebu lepšiu chuť a zvláčňujú ho. Pred použitím musí mať maslo aj olej izbovú teplotu.
CUKOR
Cukor je zdroj obživy pre droždie a dôležitá súčasť kysnutie cesta. Môžete použiť normálne biely cukor,
hnedý cukor, sirup alebo med. Cukor dodáva chlebu istú krehkosť, zvyšuje výživovú hodnotu a prispieva
k tomu, že chlieb dlhšie vydrží. Pozor: Nepoužívajte hrubý cukor alebo cukor kockový, napr. Pre kvasný
chlieb, pretože to poškodzuje ochrannú vrstvu formy na pečenie.
VODA
Keď sa premieša múka s vodou, vytvorí sa lepok, vzduch sa nasýti, takže chlieb môže nadobúdať. Pri
normálnej izbovej teplote použite vlažnú vodu, pretože studená voda neaktivizuje droždie a horúca by
bola zase príliš.
MLIEKO
Chlebová kôrka vďaka mlieku zhnedne, zlepší sa chuť chleba, zvýši sa výživná hodnota a vnútro chleba
má krásnu smotanovú farbu. Keď použijete čerstvé mlieko, musíte adekvátne znížiť množstvo vody, aby
množstvo tekutín zostalo v rovnováhe.

112
B3971
SK
V kuchárskych knihách môžete nájsť recepty, ktoré vyžadujú korenie, orechy, hrozienka, ovocie alebo
zeleninu a i. Používajte vždy čerstvé prísady. Keď používate orechy, slnečnicové semienka, sušené ovocie
a pod., Nechajte ich vopred namočené vo vode, aby zmäkli, dobre osušené zľahka pokropte a až potom
ich pridajte do cesta. Dávajte pozor, aby tieto ingrediencie neboli príliš veľké a ostré, aby nepoškodili
ochrannú vrstvu formy.
A. MENU: výber programu pečenia
B. WEIGHT: výber veľkosti chleba
C. COLOR: výber prepečenia kôrky chleba
D. TIME +: navyšovanie času
E. BAKE: tlačidlo iba pre "pečenie"
F. Knead: tlačidlo iba pre "miesenie"
G. TIME-: poníženie času
H. START-PAUSE / stop: hlavný vypínač on / o
I. HOME MADE: tlačidlo pre program "domáceho chleba"
Displej
1. Výber veľkosti chleba
2. Menu
3. Časovač
4. Fáza programu: hnetenie
5. Fáza programu: odpočinutie cesta
6. Fáza programu: kysnutie
7. Fáza programu: predhriatie
8. Fáza programu: pečenie
9. Fáza programu: udržanie tepla
10. Fáza programu: chlieb je hotový
11. Fáza programu: počet (poradie) fáz v
programe
12. Zostávajúci čas do konca programu (v
minútach)
13. Prepečenia kôrky: svetlá, stredne, tmavá
14. Uzamknutie ovládacieho panela
A. Tlačidlo “MENU”
Toto tlačidlo použite, keď chcete zvoliť správny program pečenia. Zakaždým, keď stlačíte toto tlačidlo,
budete počuť signál a číslo programu sa na displeji zmení. Podľa vybraného programu sa bude tiež meniť
prednastavený čas.
B. “WEIGHT” - tlačidlo
Toto tlačidlo použite, keď chcete udať váhu chleba, ktorý máte v úmysle upiecť. Môžete voliť v rozmedzí
500, 750 g a 1000 g. Majte na pamäti, že celkové množstvo prísad uvedených v recepte je váha chleba,
ktorý chcete upiecť.
A
D
G
B
E
H
C
F
I
MENU
TIME +
TIME -
WEIGHT
BAKE
START
PAUZE/STOP
COLOR
KNEAD
HOME MADE
1
2
7
8
12
9
10
1411
13
6
5
4
3

113
B3971
www.domo-elektro.be
SK
C. “COLOR” - tlačidlo
Týmto tlačidlom si volíte stupeň prepečenia kôrky. Možný výber je svetlá / stredná alebo tmavá.
Keď skúšate nejaký recept prvýkrát, odporúčame vám, aby ste si vybrali farbu kôrky strednej.
D. Time+ a (G) Time-
Pomocou týchto tlačidiel môžete nastaviť odložené spustenie (časovač) pre programy. Pre niektoré
programy možno upraviť ich celkový čas.
E. Bake = pečenie
Týmto tlačidlom vyberiete program samotného pečenia. Spustenie potvrdíte stlačením START-PAUSE/
stop.
F. Hnetenie
Týmto tlačidlom vyberiete program samotného miesenie. Spustenie potvrdíte stlačením START-PAUSE/
stop.
H. START-PAUSE/stop
Týmto tlačidlom potvrdíte a spustíte vybraný program. Alebo už spustený program pozastavíte / spustíte.
Krátkym stlačením program pozastavíte. Pre pokračovanie stlačte tlačidlo znova. Pokiaľ do 3 minút
program neobnovíte, tak sa program automaticky natrvalo preruší.
Pre ukončenie (zastavenie) programu stlačte tlačidlo na niekoľko sekúnd, kým nebudete počuť pípnutie.
I. Home made = domáci chlieb
Tlačidlo slúži na výber pri pečení (vlastného) doma zadělávaného cesta. Program a jeho fázy možné
individuálne nastaviť. Viac sa dočítate v kapitole "Nastavenie vlastného domáceho programu". Takto
nastavený a vybraný program spustíte tlačidlom "start-pause / stop".
PROGRAMY
Program 500 g 750 g 1000 g
1. základné (basic) 3:05 3:10 3:15
2. francúzsky (french) 3:35 3:40 3:45
3. celozrnný (whole wheat) 4:05 4:10 4:15
4. Sladký (sweet) 3:35 3:40 3:45
5. Ryžový, ryža (rice) 2:50 2:55 3:00
6. Bezlepkový (gluten free) 3:05 3:10 3:15
7. Rýchly (quick) 2:10 2:15 2:20
8. Ovocie -přísady (Fruit) 3:05 3:10 3:15
9. Koláč (cake) 2:20*
10. Sendvič (sandwich) 3:00 3:05 3:10
11. Hrozienka / orechový chlieb (raisin/nut) 3:05 3:10 3:15
12. Žitný, raž (rye) 4:05 4:10 4:15
13. Miesenie (knead) 0:08*
14. Cesto (dough) 1:30*
15. Brioška (brioche) 3:35 3:40 3:45
16. Pečenie (bake) 0:30*
17. Domáce vlastný chlieb (homemade) -- -- --
18. Taliansky chlieb (italian) 3:05 3:10 3:15

114
B3971
SK
* Ak si zvolíte jeden z týchto programov, nemôžete voliť hmotnosť alebo dobu pečenia.
1. Basic = základné
Najviac používaný program pre pečenie klasického chleba.
2. French = francúzsky
Čas miesenia a kysnutia je dlhší ako u základného
3. Whole wheat = celozrnný
Najvhodnejší program pre pečenie tmavého chleba, ako je chlieb celozrnný alebo viaczrnný. Chlieb môže
byť o niečo menšia ako biely chlieb, pretože múka je ťažšie. S týmto programom sa neodporúča používať
odložený štart - výsledky pečenia by mohli byť výrazne horšie.
4. Sladký = sweet
Program je vhodný na prípravu sladkého chleba - typ vianočky alebo čokoládový
5. Ryžový, ryža = rice
Tento program použite pre chlieb zamiesené z ryžovej múky. Po hnetenie je totiž potrebné, aby cesto
pred pečením dostatočne vykysol. Kůrka z ryžového chleba je tenší a mäkší ako normálny chlieb.
6. Bezlepkový - glutén free
Program vhodný pre pečenie bezlepkového chleba. Cesto bezlepkového chleba je vlhké a má inú
konzistenciu cesta. Cesto by preto nemalo byť dlho hnetenie ani príliš dlhé kysnutie. Doba pečenia
je naproti tomu dlhšia. S týmto programom nie je vhodné používať odložený štart. Oneskorenie pri
odloženom štarte môže znehodnotiť cesto a výsledok pečenia nebude dobrý. Najlepšie je vložiť všetky
ingrediencie naraz a na začiatku.
7. Quick = rýchly
Pre miesenie, kysnutie a pečenie chleba s jedlou sódou alebo pečenie práškom. Výsledkom je zvyčajne
menší chlieb s hustejšou štruktúrou.
8. Ovocie -přísady
Pomocou automatického dávkovača môžete pridávať prísady, ako sú hrozienka alebo iné sušené ovocie.
Prístroj pridá prísady sám z automatu v správny čas. Pokiaľ chcete do svojho chleba pridať čerstvé a
šťavnaté ovocie, je najlepšie je pridať priamo do nádoby na pečenie (pri pípnutie). Čerstvé ovocie by v
automatickom zásobníku do doby pridanie stratilo čerstvosť a šťava by vytiekla.
9. Cake = koláč
Pomocou tohto programu môžete upiecť chlieb, ktorý je pripravený
napr. s práškom do pečiva. Týmto programom upečené chleby nie sú tak vysoké a pevné.
Pokiaľ chcete pomocou tohto programu urobiť trený koláč, vložte prísady do formy. Potom prístroj
nastavte a pred zapnutím musíte ešte prísady zamiešať drevenou lyžicou. To pomáha miesenie.
Ak používate tento program, nemôžete si sami vybrať (zmeniť) váhu.
10. Sandwich = sendvič
Program pre prípravu ľahkého bieleho cesta vhodného na prípravu napr. Malých chlebových houstiček.

115
B3971
www.domo-elektro.be
SK
11. Hrozienka / orechový chlieb
Pomocou dávkovača pridajte prísady, ako sú hrozienka alebo orechy. Stroj pridá prísady sám z automatu
v správny čas.
12. Žitný, raž = "rye"
Tento program je ideálny pre chleby s ťažšie múkou ako ako je napr. ražná. Chlieb je sám o sebe pevnejšie,
hutnejšie a ťažšie ako normálny chlieb.
13. Miesenie = kneading
Počas tohto programu prístroj iba hnetie (zamiesi cesto). Nebude ho nechávať kysnúť ani piecť. Tento
program môžete použiť napríklad na miesenie cesta na pizzu. Pomocou tlačidiel "Time +" a "Time-"
môžete upraviť dobu miesenie.
14. Cesto = dough
Program vhodný na cestom a kysnutie cesta. Prístroj prehnite cesto a nechá ho vykysnúť.
15. Brioška = brioche
Tento program je vhodný pre chleby s ďalšími prísadami, ktoré majú vysoký obsah cukru, tuku a bielkovín
(napr. Čokoláda, cukor atď.). Tieto prísady vytvárajú tmavšie kôru. Fáza kysnutie pri tomto programe je
dlhšia a výsledkom je nadýchanejšiu chlieb.
16. Bake = pečenie
Program na upečenie už hotového cesta. Tento program môže byť použitý na dokončenie chleba či
rozohriatie chleba už skôr hotového.
17. Domáce vlastný chlieb = home made
Tento program si môžete nastaviť podľa vlastných potrieb, aby vyhovoval vášmu cestu. Viac o nastavení
sa dočítate nižšie v kapitole "Nastavenie vlastného domáceho programu"
18. Taliansky chlieb = Italian
Týmto programom si upečiete chutný stredomorský chlieb. Môžete pridať ďalšie prísady, ako sú bylinky,
sušené paradajky, olivy atď.
1. Miernym pootočením doprava a ťahaním hore vyberte z pekárne nádobu na pečenie.
2. Na osku uprostred nádoby nasaďte hnetací hák (priložený). Hnetač musí byť nasadený správnym a
starostlivým spôsobom, aby sa neviklal a všetky prísady mohli byť dostatočne premiešané.
3. Suroviny do formy odporúčame vkladať nasledujúcim spôsobom a v tomto poradí:
· voda / mlieko
· maslo / olej
· eventuálne vajcia
· múka
· cukor (nasypte cukor na jednu stranu)
· soľ (soľ nasypte na opačnú stranu)
· droždia (droždie vložte do jamky uprostred)
!
Pozor! Droždie nesmie prísť do styku s vodou, cukrom a soľou. Mohlo by sa stať, že voda droždie
zaktivizuje, skôr než sa prísady dostatočne premieša a premiesime.

116
B3971
SK
Pomocou dávkovača môžete v správny čas nechať pridať ďalšie prísady, ako sú orechy, byliny, sušené
ovocie atď., Alebo môžu byť pridané neskôr. Pozrite "Pridávanie ďalších zložiek".
4. Odstráňte všetky zvyšky prísad z vonkajšej strany formy. Vložte formu opäť do prístroja zhora na ňu
zatlačte a pootočte.
5. Uzatvorte veko.
6. Dajte zástrčku do zásuvky
7. Nastavte tlačidlom “menu” správny program.
8. Pomocou tlačidla prepečenia (color) nastavte stupeň prepečenia kôrky. Môžete si vybrať medzi
svetlú, stredia alebo tmavú. Tlačidlom hmotnosti (weight) nastavte veľkosť chleba (500g, 750g alebo
1000g).
9. Nastavte eventuálne funkciu vlastného naprogramovanie odloženého štartu.
10. Stlačte START. Dvojbodka bude teraz blikať a tým udáva, že prístroj pracuje. Pokiaľ máte nastavené
oddialenie programu, program spustí až po uplynutí nastaveného času.
11. Akonáhle bude chlieb hotový, tak sa ozve zvukový signál a na displeji sa zobrazí 0:00. Stlačte a
chvíľku pridržte "START-PASUSE/stop". Zariadenie opäť zapípa, aby sa potvrdilo, že ste program
zastavili. Ak program takto nezastavíte, chlieb bude vďaka funkcii prihrievanie udržovaný v teple
ďalších 60 minút. Po vypnutí vypojte z elektrickej siete a otvorte veko. Opatrne vyberte chlieb z
náboby. Pozor: nádoba je horúca, použite kuchynské chňapky.
12. Chlieb nechajte ochladiť vo forme asi 10 - 15 minút, potom formu obráťte a vyklopte chlieb z formy.
Nikdy nepokladajte chlieb ani formu na vonkajšiu stranu prístroja alebo priamo na plastikový obrus.
Keď sa chlieb hneď neuvoľní, otáčajte osou na spodnej strane formy, kým sa chlieb neuvoľní. Na
vybratie chleba nikdy nepoužívajte ostré kovové predmety, aby ste nepoškodili nepriľnavú vrstvu.
13. Keď chlieb vyberiete z prístroja a hnetač zostane vnútri v chlebe, tak ho môžete vybrať pomocou
vyťahovacie háku von. Alebo nechajte chleba ešte vychladiť na rošte, takže potom môžete hnetač
vytiahnuť rukami. Dávajte pozor, aby bol hnetač dobre vychladený. Je doporučené krájať chlieb až
po 15 - 20 minútach.
Ak nie ste včas doma a nepočujete ukončenie programu, tak berte na vedomie, že pekáreň ešte 60 minút
po ukončení pečenia hreje. Táto doba nie je zahrnutá v programovacom čase.
Pre prerušenie takého dohrievanie stačí podržať tlačidlo START / STOP na niekoľko sekúnd. Ak necháte
hotový chlieb v pekárni dlhšie ako hodinu, tak sa chlieb môže zapariť a zvlhnúť.
Odporúčame umývať nádoby vždy ihneď po vybratí chleba, jedine takto zaistíte, že sa hnetač neprilepí k
osi nádoby.
Nikdy znova nepúšťajte ešte teplú pekáreň.
Počas miesenia v nasledujúcich programoch zaznie zvukový signál: normálne, francúzsky, celozrnný,
sladký, ryžový, bezlepkový, rýchly, s ovocím, koláč, hrozienka / orechy, žitný, brioška, taliansky. Toto
pípnutie značí, že je správny čas pridať ďalšie prísady, ako sú hrozienka, orechy, sem atď. Prísady môžete
pridať prostredníctvom automatu alebo ručne.
Otvorte posuvné veko dávkovača, vložte ingrediencie a veko opäť uzavrite.
Dávkovač automaticky zaistí pridanie ingrediencií v správny čas - po miesenie a kysnutie.
POZOR:
· Cez dávkovač (do neho) nepridávajte tekutiny ani suroviny v prášku.

117
B3971
www.domo-elektro.be
SK
· Dávkovacie komoru nikdy neprepĺňajte.
· Ak pridávate orechy, je lepšie ich pred tým rozdrviť na menšie kúsky.
· Pred vložením ingrediencií do dávkovača sa uistite, aby bol zospodu (piest) uzavretý tak ako má byť.
Prímesi môžete vložiť len ručne. Akonáhle sa ozve zvukový signál, tak program pozastavte (pause),
otvorte horné veko pekárne, nasypte prísady, veko opäť uzavrite a tlačidlom "štart" opäť program
spustite. Ručné pridanie surovín je vhodné hlavne pre tekuté alebo sypké prísady. Ručným pridávaním
možno pridať aj viac surovín než je možnosť cez dávkovač.
Pokiaľ dôjde k výpadku napájania z dôvodu výpadku prúdu, tak je tu pamäťová funkcia na 10min
Ak sa do tej doby napájania rozbehne, tak program bude pokračovať tam kde skončil. Ak výpadok trvá
dlhšie ako 10 minút, tak sa celý program prerušil a je potreba ho potom ručne nastaviť / spustiť znova.
NASTAVENIE PRE DOMÁCE VLASTNÉ CHLIEB
Tlačidlo "Home made" je určené pre prednastavené a nastavenie vlastného programu. Týmto je možné
nastaviť akúkoľvek fázu pečenia, miesenie atď .. Ak chcete nejakú fáze úplne vynechať, tak u nej nastavte
0:00.
POZOR: Nastavenie tlačidla (vlastného programu) nie je trvalo uložené. Pri vypnutí prístroja z elektrickej
siete sa program vyresetuje.
1. Stlačte tlačidlo "Home made" alebo tlačidlom menu vyberte program 17.
2. Opätovným stlačením tlačidla "Home made" potvrdíte a začnete program nastavovať. Na displeji
vždy budú blikať kontrolka aktuálnej fázy programu a čas. Pri nastavení pozrite do tabuľky nižšie,
kde sú uvedené prednastavené základné hodnoty a rozmedzie čo možno nastaviť.
3. V každej fáze nastavte požadovaný čas. Time + je navyšovanie a Time- je ponižovanie času.
Navolený čas vždy potvrďte tlačidlom "Home made".
4. Akonáhle máte všetky fázy programu nastavené, tak na displeji uvidíte celkový čas programu.
Štandardne by celková doba mala byť približne 3 hodiny. Tlačidlom START už môžete rovno
program spustiť. Ak by ste tlačidlo stlačili počas programovania fáz, tak sa programovanie preruší.
Ak je potreba, tak môžete nastaviť aj odložený spustenie programu. Pozri opis tohto nastavenia v kapitole
"Nastavenie odloženého štartu".
Ikona Rozmedzie
Hnetenie 1
0:10 1-30 min.
Odpočinok 1
0:03 0-30 min.
Hnetenie 2
0:05 0-30 min.
Odpočinok 2
0:10 0-30 min.
Hnetenie 3
0:20 0-25 min.
Kysnutie 1
0:42 0-60 min.

118
B3971
SK
Kysnutie 2 0:40 0-60 min.
Kysnutie 3
0:00 0-60 min.
Pečenie
0:50 0-80 min.
Udržanie tepla
1:00 0-60 min.
Pokiaľ chcete celistvý chlieb, je možné vybrať háky z cesta pred jeho pečením. Vyňať sa musí až po
poslednom miesení pred nálnym kysnutím.
1. Ak to takto chcete skúsiť, tak pekáreň vypnite stlačením tlačidla štart / stop alebo na chvíľu vypojte
z elektrickej siete. Pamäťová funkcia pekárne si pamätá priebeh programu cca do 10 min od
prerušenia, preto musí táto operácia vybratie háku byť pomerne rýchla a bez zbytočných prieťahov
2. Otvorte veko, rukami od múky vyberte hrudu cesta aj s hnetačom. Hák z cesta vyberte a do pekárne
vložte len samotné cesto.
3. Pekáreň opäť zavrite.
4. Prístroj opätovne zapojte do el. siete a znovu stlačte tlačidlo štart / stop, aby mohol program ďalej
pokračovať.
Ak chcete túto funkciu použiť, musíte ju nastaviť, skôr ako stlačíte START.
· Pri odloženom štarte počítate a zadávate čas medzi zapnutím programu a času dokončenia /
dopečenie chleba. Prístroj si automaticky započíta dobu potrebnú pre samotný proces pečenia.
· Tlačidlom pre nastavenie, každým jeho stlačením pridáte 10 min odloženého štartu.
· Na displeji sa zobrazí ikona presýpacích hodín.
· Odložený štart nie je možné nastaviť u samostatného miesenia ani kysnutia. Stlačením tlačidiel Time +
/ Time- budete u týchto programov nastavovať ich trvanie.
Príklad:
Je 9:00 ráno a vy by ste chceli mať popoludní v 17:00 čerstvo upečený chlieb.
Musíte teda naprogramovať celkový čas na 8 hodín, čo bude zodpovedať dopečení presne v 17:00.
Do pekárne vložte všetky potrebné suroviny. Tlačidlom menu vyberte príslušný program.
Stlačením tlačidla Color (prepečenia) nastavte stupeň prepečenia kôrky a následne vyberte požadovanú
hmotnosť chleba. Tlačidlom Time + navyšujte čas kým sa na displeji nezobrazí 8:00. Chlieb bude upečený
za 8 hodín od potvrdenia vašej voľby (tlačidlom Štart). Zobrazený čas obsahuje aj dobu potrebnú pre
samotné pečenie. Chlieb teda bude hotový v 5 hodín popoludní.
Stlačte tlačidlo Štart. Dvojbodka na displeji začne blikať a rozsvieti sa ikona presýpacích hodín. Začne
sa odpočítavať čas až do doby, kedy má pekáreň začať spustiť program a hniesť. Chlieb bude teraz
prechádzať celým nastaveným programom, aby bol chlieb pripravený vo zvolený čas.
Dôležité: túto funkciu nepoužívajte, ak majú niektoré suroviny vnútri pekárne podliehajú rýchlejšej skaze
(napríklad čerstvé mlieko, jogurt alebo čerstvé ovocie).

119
B3971
www.domo-elektro.be
SK
· Vždy všetky prísady presne odvážte a dbajte na to, aby mali izbovú teplotu.
· Ak je droždie čerstvé, môžete zistiť nasledujúcim testom: V polovici šálke vlažnej vody rozmiešajte 1
kávovú lyžičku cukru a potom pridajte 1 kávovú lyžičku droždia. Po niekoľkých minútach bude zmes
bublať a kypět
· Soľ obmedzuje účinok droždie a cukor ho naopak povzbudzuje. Ak na základe diéty nesmiete použiť
jednu z týchto prísad, potom musíte tiež vynechať aj tú druhú. Potom získate chlieb bez cukru a soli.
· Chlieb, ktorý pečiete sami z vlastných surovín, neobsahuje žiadne konzervačné prostriedky, a je preto
tiež obmedzene trvanlivý. Keď chlieb necháte dobre vychladnúť a potom ho nepriedušne zabalíte,
môžete ho niekoľko dní kvalitne uchovať. Môžete ho samozrejme tiež nechať zmraziť a spotrebovať
ho neskôr.
· Os hnetacieho háku aj samotný hák namažte maslom. Tak sa zabezpečí, že pôjde hák krásne zložiť z
osi a vyňať z pečeného chleba.
· Pred čistením prekáreň vypnite, vytiahnite zástrčku zo zásuvky a nechajte pekáreň úplne vychladnút.
· Po každom použití spotrebič dôkladne očistite. Ak je niektorá s časťou znečistená, tak to môže
ovplyvniť výslednú chuť aj tvar chleba a alebo dokonca skrátiť životnosť prístroja.
· Po vyčistení prístroj a všetky jeho časti dôkladne osušte. Pred uskladnením nechajte aspoň pol hodiny
otvorené veko, aby vyschol aj vnútro prístroja. .
·
!
Upozornenie: Nikdy prístroj ani prívodný kábel neponárajte do vody.
Zovňajšok prístroja a priezor zotrite vlhkou handrou alebo špongiou. Pred čistením ešte vyberte nádobu
na pečenie von. Ak by bolo nutné, môžete zovňajšok prístroja vyčistiť jemným čistiacim prostriedkom, tak
aby ste povrch nepoškriabali.
VNÚTRO PEKÁRNE
Vnútro možno starostlivo vyčistiť mierne navlhčenou handričkou. Buďte opatrní pri čistení vykurovacieho
telesa.
Nádobu s chlebom vyberte z prístroja, tak že ju pootočíte o štvrť otáčky proti smeru hodinových ručičiek a
vytiahnete ju nahor. Formu a miesič je možné umývať teplou vodou a vlhkou jemnou handričkou.
Dávajte pozor, aby ste nepoškodili ochrannú vrstvu. Keď sa vám nepodarí vybrať hnetač z formy von,
musíte nechať formu úplne vychladnúť. Potom do formy nalejte trochu teplej vody tak, aby hnetač bol
pod vodou. Voda pomôže tomu, že prilepené časti sa uvoľní a hnetač pôjde dobre vybrať.
Nepoužívajte žiadne čistiace prostriedky alebo kefy, pretože môžu poškodiť ochrannú vrstvu formy.
Forma na pečenie nie je vhodná do umývačky riadu.

120
B3971
SK
Problém Možné riešenie
Stále nie som spokojný s výsledným produktom. · Odporúčali by sme vám urobiť chlieb pomocou
hotové chlebovej zmesi. Do týchto zmesí stačí
dodať len vodu a maslo. Ak je výsledok dobrý,
znamená to, že je váš prístroj v poriadku a vy
musíte skontrolovať čerstvosť normálnych
prísad. Ak je výsledok zlý, potom sa obráťte
na našu zákaznícku alebo technickú službu a
poraďte sa, ako postupovať ďalej.
· Ingrediencie nie sú presne navážené.
· Ingrediencie nie sú čerstvé.
· Ingrediencie nemali izbovú teplotu.
Môžem nejako spoznať aj počas procesu, či je
cesto správne zamiesenej a či správne vykysne?
Cesto by malo byť hladké, elastické a vytvarované
do úhľadnej guľôčky. 5-10 min po začiatku (počas
miesenia) môžete skúsiť cesto zľahka stlačiť
prstami. Malo by mierne lepiť. Ak lepí moc, je príliš
vlhké a je potrebné pridať múku. Pokiaľ takmer
nelepí, je suché a vy musíte pridať mierne vody.
Neotvárajte veko počas kysnutia.
Čo keď si chcem upiecť viac chlebov naraz? Medzi jednotlivými pečením sa odporúča nechať
prístroj vychladnúť 20 minút. Nechajte otvorené
veko. Ak by bola pekáreň teplá, tak kvasnice kysnú
rýchlejšie, čo nie je dobré pre nálny výsledok.
Chlieb je prepadnutý / deformovaný. Pravdepodobne bolo použité moc vody a cesto
bolo moc vlhké. Chlieb bol ponechaný v pečenie
forme príliš dlhú dobu po upečení.
Chlieb je vnútri nedopečený a vlhký. Ak je chlieb uprostred príliš mäkký, môže to byť
spôsobené typom použitej múky. Takýto výsledok
väčšinou spôsobuje použitie ťažších múk, ako je
ražná alebo celozrnná múka. Pri použití týchto
druhov múky skúste pridať ešte jeden spôsob
hnetenie. Po dokončení prvého hnetenie pekáreň
vypnite. Potom prístroj resetujte a opäť spustite
zvolený program. Stroj začne znovu miesiť = cesto
bude viac vzdušné.
Spodná časť chleba je veľmi tuhá. · Už upečený chlieb ste nechali v pekárni príliš
dlho. Funkcia udržiavania tepla a následné
akumulované teplo spodná časť chleba
“vysuší”.
· Najlepšie je vyťahovať chlieb čo najskôr po
dopečení.

121
B3971
www.domo-elektro.be
SK
Chlieb překynul a prekypeli. · Použili sme príliš moc kvasníc.
· Kvasnice boli aktivované viac ako je nutné =
použili ste moc cukru alebo príliš teplú vodu.
· Použili sme príliš veľa cesta. Nepoužívajte viac
ako 1000g naraz.
Na displeji svieti chybové hlásenie: „H:HH“ Prístroj je stále teplý. Nechajte ho dostatočne
vychladnúť.
Na displeji svieti chybové hlásenie: „E:EO“ Takéto hlásenie oznamuje chybný senzor teploty.
Pekáreň nechajte prekontrolovať a opraviť v
autorizovanom servise.
Prečo nemôžem pridať extra ingrediencie hneď po
štarte programu.
Extra ingrediencie (ako sú orechy) budú zriedili
na s kúskami a cesto nebude prehnetení správne.
To môže veľmi ovplyvniť aj kysnutia chleba.
Doplnkové prísady pridávajte až po tom, keď
spotrebič odpíska (po miesenie).
Môžem použiť namiesto vody aj mlieko? Áno. Vždy musí byť dodržať celkový objem
tekutiny.
Horná kôrka chleba je niekedy svetlejšie a niekedy
tmavšie.
Prepečenia si možno nastaviť v nastavení pekárne.
Rozdiel však spôsobuje aj množstvo použitého
cukru. Viac cukru = tmavšie kôrka.
Pekáreň hnetie pomalšie ako obvykle. Môže byť spôsobené použitím ťažšie múky. Alebo
je cesto príliš hutné. Ak tomu tak je, tak pridajte
lyžičku vody.
Hnetací hák sa zapiekol do cesta nie nejde moc
dobre vybrať.
Hák aj s okolitým cestom vyberte. Celú hrudku
cesta s hákom ponorte pod vodu a nechajte 15
minút odpučet a následne očistite.
Na sklenenom priehľadovom okienku kondenzuje
voda / para.
Tento jav je úplne normálny a deje sa vďaka
zahrievanie vnútri prístroja.
Používam už kúpenú a namiešanú zmes na chlieb,
ale aj napriek tomu mám stále nevydarený chlieb.
Ešte pred reklamováním pekárne odporúčame
skúsiť po domácky pripravený základný recept.
Je možné, že kúpená zmes nie je čerstvá a to
ovplyvňuje výsledok pečenia.

122
B3971
SK
Symbol na prístroji alebo na jeho obale znamená, že s týmto výrobkom
nie je možné nakladať ako s domovým odpadom, ale musí byť odovzdaný
na miestach určených na zber a likvidáciu elektrických a elektronických
zariadení. Dodržaním tohto odporúčania chránite životné prostredie a zdravie
spoluobčanov. Viac informácií o možnostiach likvidácie nebezpečného
odpadu obdržíte na obecných alebo mestských úradoch, zberných dvoroch
alebo v predajni, kde ste prístroj zakúpili.
Obalové materiály sú recyklovateľné, nakladajte s nimi podľa predpisov pre
životné prostredie.

123
B3971
www.domo-elektro.be
SK

LINEA 2000 BV - Dompel 9 - 2200 Herentals - Belgium - Tel: +32 14 21 71 91 - Fax: +32 14 21 54 63
BESTEL
de originele
Domo-accessoires
en -onderdelen
online via:
of scan hier:
COMMANDEZ
d’authentiques
accessoires et
pièces Domo en
ligne sur:
ou scannez ici:
BESTELLEN SIE
die Domo
Original-Zubehör
und -Ersatzteile
online über:
oder hier scannen:
ORDER
the original
Domo
accessories and
parts online at:
or scan here:
webshop.domo-elektro.be
Webshop
Documenttranscriptie
B3971 Handleiding Broodbakmachine Mode d’emploi Machine à pain Gebrauchsanleitung Brotbackautomat Instruction booklet Bread maker Manual de instrucciones Panificadora Istruzioni per l’uso Macchina del pane Návod k použití Domácí pekárna Návod na použitie Domáce pekáreň PRODUCT OF Lees aandachtig alle instructies - bewaar deze handleiding voor latere raadpleging. Lisez attentivement les instructions - gardez le mode d’emploi pour utilisation ultérieur. Lesen Sie genau die Anweisungen - bewahren Sie die Gebrauchsanleitung für spätere heranziehung. Read all instructions carefully - save this instruction manual for future reference. Lea detenidamente todas las instrucciones - Conserve este manual para futura referencia. Leggere con attenzione le istruzioni - conservarle per future consultazioni Před použitím si důkladně přečtěte tento manuál - manuál si uschovejte i pro případ budoucího nahlédnutí. Pred použitím si dôkladne prečítajte tento manuál - manuál si uschovajte aj pre prípad budúceho nahliadnutie. NL Nederlands 3 FR Français 18 DE Deutsch 33 EN English 49 ES Espagnol 64 IT Italiano 79 CZ Čeština 94 SK Slovenčina 108 NL GARANTIE Geachte klant, Al onze producten ondergaan steeds een strenge kwaliteitscontrole, alvorens ze aan je worden aangeboden. Mocht je desondanks toch nog problemen hebben met jouw toestel, dan betreuren wij dit ten zeerste. In dat geval verzoeken wij je contact op te nemen met onze klantendienst. Onze medewerkers zullen je met plezier verder helpen. +32 14 21 71 91 [email protected] Maandag – Donderdag : 8.30u – 12.00u en van 13.00u – 17.00u Vrijdag : 8.30u – 12.00u en van 13.00u – 16.30u Dit apparaat heeft een garantietermijn van 2 jaar vanaf de datum van aankoop. De garantie op accessoires en onderdelen welke aan slijtage onderhevig zijn, bedraagt 6 maanden. Gedurende de garantieperiode zal de distributeur volledige verantwoording op zich nemen voor gebreken die aanwijsbaar berusten op materiaal- of constructiefouten. Wanneer dergelijke gebreken voorkomen, zal het apparaat, indien nodig, vervangen of gerepareerd worden. De garantieperiode van 2 jaar zal op dit moment niet terug beginnen, maar loopt verder tot 2 jaar na de aankoop van het toestel. De garantie wordt verleend op basis van het kassaticket. Indien je apparaat defect is binnen de garantietermijn van 2 jaar, dan mag je het toestel samen met het originele kassaticket binnenbrengen in de winkel waar je het toestel hebt aangekocht. De garantie op accessoires en onderdelen die onderhevig zijn aan slijtage, bedraagt 6 maanden. De garantie en verantwoordelijkheid/aansprakelijkheid van de leverancier en fabrikant vervallen automatisch in de volgende gevallen: · Bij het niet naleven van de instructies in deze handleiding. · Bij verkeerde aansluiting, vb. te hoge elektrische spanning. · Bij verkeerd, hardhandig of abnormaal gebruik. · Bij onvoldoende of verkeerd onderhoud. · Bij herstelling of wijziging van het toestel door de consument of niet gemachtigde derden. · Bij gebruik van onderdelen of accessoires welke niet worden aanbevolen of geleverd door de leverancier / fabrikant. VEILIGHEIDSVOORSCHRIFTEN Wanneer je elektrische toestellen gebruikt, moeten volgende veiligheidsinstructies in acht genomen worden: · Lees deze instructies zorgvuldig door. Bewaar deze handleiding om later te raadplegen. · Verwijder voor het eerste gebruik alle verpakkingsmaterialen en eventuele promotionele stickers. Zorg ervoor dat kinderen niet met de verpakkingsmaterialen spelen. · Dit toestel is geschikt om te gebruiken in de huishoudelijke omgeving en in gelijkaardige omgevingen zoals: · Keukenhoek voor personeel van winkels, kantoren en andere gelijkaardige professionele omgevingen · Boerderijen · Hotel- en motelkamers en andere omgevingen met een residentieel karakter · Gastenkamers, of gelijkaardige www.domo-elektro.be B3971 3 NL · · · Dit toestel mag gebruikt worden door kinderen vanaf 16 jaar en personen met een fysieke of sensoriële beperking of mensen met een beperkte mentale capaciteit of gebrek aan ervaring of kennis, op voorwaarde dat deze personen toezicht krijgen of instructies hebben gekregen over het gebruik van het toestel op een veilige manier en dat ze ook de gevaren kennen bij het gebruik van het toestel. Kinderen mogen niet met het toestel spelen. Het onderhoud en de reiniging van het toestel mogen niet door kinderen gebeuren tenzij ze ouder zijn dan 16 jaar en onder toezicht staan. Houd het toestel en de voedingskabel buiten het bereik van kinderen jonger dan 16 jaar. Opgelet: het toestel mag niet gebruikt worden met een externe timer of een aparte afstandsbediening. Het toestel kan warm worden tijdens het gebruik. Houd het elektrisch snoer weg van hete onderdelen en dek het toestel niet af. · · · · · · · · · · · · · · · · · · · · 4 Kijk voor gebruik na of het voltage vermeld op het toestel overeenkomt met het voltage van het elektriciteitsnet bij je thuis. Laat het snoer niet op een heet oppervlak of over de rand van een tafel of aanrecht hangen. Gebruik het toestel nooit wanneer het snoer of de stekker beschadigd is, na een slechte werking van het toestel of wanneer het toestel beschadigd is. Breng het toestel dan naar het dichtsbijzijnde gekwalificeerde service center voor nazicht en reparatie. Het gebruik van accessoires die niet aanbevolen of verkocht worden door de fabrikant, kan brand, elektrische schokken of verwondingen veroorzaken. Trek de stekker uit het stopcontact wanneer het toestel niet in gebruik is, vooraleer onderdelen te monteren of demonteren en vooraleer het toestel te reinigen. Zet eerst alle knoppen in de ‘uit’-stand en trek de stekker bij de stekker zelf uit het stopcontact. Trek nooit aan het snoer om de stekker uit het stopcontact te trekken. Laat een werkend toestel niet zonder toezicht achter. Zet dit toestel nooit op of in de buurt van een gasvuur of elektrisch vuur of op een plaats waar het in contact zou kunnen komen met een warm toestel. Gebruik het toestel niet buiten. Gebruik het toestel enkel voor het doel waarvoor het bestemd is. Gebruik het toestel altijd op een stevig, droog, effen oppervlak. Gebruik het toestel alleen voor huishoudelijk gebruik. De fabrikant is niet verantwoordelijk voor ongelukken die een gevolg zijn van verkeerd gebruik van het toestel, of het niet naleven van de regels zoals ze vermeld zijn in deze handleiding. Alle herstellingen, buiten het gewone onderhoud van het toestel, moeten uitgevoerd worden door de fabrikant of zijn dienst na verkoop. Dompel het toestel, het elektrisch snoer of de stekker nooit onder in water of een andere vloeistof. Hou het snoer uit de buurt van scherpe randen en hete onderdelen of andere warmtebronnen. Plaats het toestel niet in de buurt van gasbranders, elektrische ovens of andere warmtebronnen. Plaats het toestel niet in de buurt van ontvlambare materialen of explosieve en/of zelfontbrandende gassen. Zorg ervoor dat de luchtroosters van het toestel niet bedekt zijn. Verlengsnoeren mogen alleen gebruikt worden als de netspanning en het vermogen hetzelfde of hoger zijn als dat van de broodbakmachine. Het verlengsnoer moet zo aangesloten worden, dat niemand over het snoer kan vallen of er per ongeluk aan kan trekken. Zet geen voorwerpen op het toestel en bedek het niet tijdens de werking, dit om het risico op brand te vermijden. B3971 De broodbakmachine kan warm worden. Raak enkel de handvatten en de knoppen aan op het toestel en gebruik, indien nodig, ovenwanten. Zorg ervoor dat het toestel volledig afgekoeld is en haal de stekker uit de wandcontactdoos, alvorens de onderdelen in het toestel te steken of uit het toestel te halen. Verplaats de broodbakmachine niet als het toestel warme ingrediënten of vloeistoffen bevat. Vermijd contact met de draaiende kneedhaak, als het toestel in werking is, dit om risico op letsel te vermijden. Als het toestel niet gebruikt wordt of als het gereinigd wordt, zet het toestel dan volledig uit en trek voor de veiligheid de stekker uit de wandcontactdoos. Maak het toestel niet schoon met een schuurspons. Losse onderdeeltjes van de spons kunnen in contact komen met de elektrische onderdelen en elektrische schokken veroorzaken. Gebruik de machine niet om voedsel of andere voorwerpen in te drogen. Het totale gewicht van alle ingrediënten mag niet hoger zijn dan 1000 g. Gebruik nooit meer dan 715 g bloem per brood. Gebruik nooit meer dan 22 g verse gist of 4+1/4 theelepels korrelgist per brood. Gebruik nooit meer dan 460 ml water per brood. · · · · · · · · · · NL · ONDERDELEN 1. 2. 3. 4. 5. 6. 7. 8. 9. 10. Deksel Kijkvenster Verdeler voor extra ingrediënten Bedieningspaneel Kneedhaak Bakvorm Behuizing Maatbeker Maatschepje Haak voor verwijderen kneedhaak 8 9 1 3 4 2 5 6 7 10 VOOR HET EERSTE GEBRUIK · · · · · Verwijder voor het eerste gebruik alle verpakkingsmaterialen en eventuele promotionele stickers. Maak de broodbakmachine, de bakvorm en de kneedhaak schoon met een vochtige doek. De bakvorm en de kneedhaak zijn bedekt met een antiaanbaklaag, daarom mag je deze artikelen nooit schoonmaken met agressieve schoonmaakmiddelen, een afwasborstel of een spons. Gebruik hiervoor altijd een vochtige doek. Verwijder de beschermende film van het display. De broodbakmachine kan bij het eerste gebruik wat roken, dit is volkomen normaal, kan geen kwaad en zal vanzelf verdwijnen. Voor het eerste gebruik is het aanbevolen om een keer met een lege bakvorm te bakken op het programma BAKE. Dit gedurende 10 minuten. Laat hierna alles afkoelen en maak de onderdelen opnieuw proper. Vet voor het eerste gebruik de antiaanbaklaag van de bakvorm en de kneedhaak in met een beetje boter of margarine. www.domo-elektro.be B3971 5 NL GEBRUIK BASISRECEPT Onderstaand recept is voor een eenvoudig wit brood. · 630 g bloem · 370 ml water · 5 g korrelgist · 1 tl zout · 1 el suiker INGREDIËNTEN De belangrijkste factoren voor het bakken van een geslaagd brood zijn de kwaliteit, de versheid en het correct afwegen van de ingrediënten. Let op: overschrijd nooit de maximumcapaciteit van de broodbakmachine (1000 g)! Gebruik daarom per bakbeurt nooit meer dan deze maximumhoeveelheden van de volgende ingrediënten: Bloem: max. 715 g Gist: max. 22 g verse gist of 4+1/4 theelepels korrelgist Water: max. 460 ml Bloem Bloem is het basisbestanddeel van brood. Het gewicht van de bloem verschilt van soort tot soort. Daarom is het absoluut noodzakelijk de juiste hoeveelheid af te meten met een weegschaal. Advies: let met het kopen van bloem op de tekst van de verpakking. Er moet op staan dat de bloem geschikt is voor het maken van brood. Gluten Gluten zitten van nature in bloem en bevorderen het rijzen van het brood. Gist Gist is een micro-organisme dat groeit op diverse plantaardige voedingsmiddelen. Gist heeft het vermogen om suiker om te zetten in alcohol en koolzuurgas, waardoor het zich bijzonder snel vermeerdert. Ideaal dus om het deeg te laten rijzen en het lichter en beter verteerbaar te maken. Wij adviseren in de broodbakmachine droge gist te gebruiken. Deze (korrel)gist is gemakkelijker te verwerken, langer houdbaar dan verse gist en het geeft een constanter bakresultaat dan verse gist. Zout Zout zorgt niet alleen voor een bepaalde smaak aan het brood, maar regelt ook de activiteit van gist, maakt het deeg stevig en vast en voorkomt dat het brood te hard rijst. Boter/olie Boter en olie geven een betere smaak aan het brood en maken het brood zachter. De boter of olie moet op kamertemperatuur zijn voor je deze bij de andere ingrediënten voegt. Suiker Suiker is de voedingsbron voor de gist en een belangrijk bestanddeel van het rijzingsproces. Je kan gewone witte suiker, bruine suiker, stroop of honing gebruiken. Het geeft een zekere zachtheid aan de smaak van het brood, verhoogt de voedingswaarde en helpt het brood langer te bewaren. 6 B3971 NL Let op: gebruik geen grove suiker of suikerklontjes, voor bijvoorbeeld suikerbrood, omdat dit de antiaanbaklaag van de bakvorm beschadigt. Water Wanneer de bloem vermengd wordt met het water, vormen de gluten zich en wordt de lucht afgesloten, zodat het brood kan rijzen. Bij een normale omgevingstemperatuur gebruik je lauw water (± 20 à 25 °C) om het brood te maken: koud water activeert de gist niet en warm water activeert de gist te sterk. Melk Melk doet de broodkorst bruinen, verbetert de smaak van het brood, verhoogt de voedingswaarde en geeft een mooie romige kleur binnenin. Indien je verse melk gebruikt, dan dien je de hoeveelheid water uiteraard te verminderen om het vochtigheidspeil in evenwicht te houden. Opgelet: gebruik geen verse melk als je het bakproces programmeert met de uitgestelde programmering. De melk zou zuur kunnen worden. Andere ingrediënten Gebruik steeds verse ingrediënten. Indien je noten, zonnebloempitten, gedroogd fruit of dergelijke gebruikt, raden wij aan deze vooraf in water te laten weken, goed droog te deppen en dan pas aan het deeg toe te voegen. Let er wel op dat deze ingrediënten niet te groot en te scherp zijn om mogelijke beschadigingen aan de antiaanbaklaag te voorkomen. BEDIENINGSPANEEL Bediening A. Menu: programmakeuze B. Weight: gewicht (grootte) van brood kiezen C. Color: bruining van de korst D. Time +: tijd verhogen E. Bake: sneltoets voor programma Bake F. Knead: sneltoets voor programma kneden G. Time -: tijd verlagen H. Start- pauze/stop: aan/uit-toets I. Home made: sneltoets voor programma Home made Display 1. Gewicht (grootte) van brood kiezen 2. Programmakeuze 3. Timer 4. Programmafase: kneden 5. Programmafase: rust 6. Programmafase: rijzen 7. Programmafase: verwarmen 8. Programmafase: bakken 9. Programmafase: warmhouden 10. Programmafase: klaar 11. Programmafase: nummer van de fase 12. Resterende tijd in minuten 13. Bruining van de korst: licht, medium, donker 14. Vergrendeling van het bedieningspaneel www.domo-elektro.be A B C MENU WEIGHT COLOR D E F TIME + BAKE KNEAD G H I START HOME MADE TIME - PAUZE/STOP 1 2 3 7 4 8 5 9 6 10 12 11 13 14 B3971 7 NL A. Menu Deze toets gebruik je om het juiste bakprogramma te selecteren. Elke keer je op deze toets drukt, hoor je een piep en het programmanummer verandert. Het programmanummer en de overeenkomstige baktijd staan op het display vermeld. B. Weight Deze toets gebruik je om aan te geven welk gewicht van brood je wenst te maken. Je kan kiezen uit een brood van 500 g, 750 g of 1000 g. Tip: de totale hoeveelheid van de ingrediënten vermeld in het recept is het gewicht van het brood dat je gaat maken. C. Color Deze toets gebruik je om aan te geven of je de korst licht, medium of donker wilt hebben. Tip: indien je een recept voor de eerste maal probeert, adviseren we de korstkleur medium te kiezen. D. Time + en G. Time Met deze toetsen kan je bij bepaalde programma’s kiezen voor uitgesteld starten en de timer instellen. Bij andere programma’s kan je de programmatijd aanpassen. E. Bake Deze toets is een sneltoets voor het programma bakken. Druk op start-pauze/stop om het programma te bevestigen. F. Knead Deze toets is een sneltoets voor het programma kneden. Druk op start-pauze/stop om het programma te bevestigen. H. Start- pauze/stop Met deze toets start je het geselecteerde programma, of pauzeer/annuleer je een lopend programma. Druk kort op deze toets om een programma te pauzeren. Druk nog eens op de knop om te hervatten. Als je zelf een programma niet hervat binnen 3 minuten zal de werking automatisch gestopt worden. Om een programma te beëindigen, druk je de toets een aantal seconden in totdat je een piep hoort. I. Home made Deze toets is een sneltoets voor het programma home made. Zie “Home made instellen” onder de rubriek gebruik. Druk op start-pauze/stop om het programma te bevestigen. PROGRAMMA’S Programmatijden : Programma 1. Normaal (basic) 2. Frans (french) 3. Volkoren (whole wheat) 4. Zoet (sweet) 5. Rijst (rice) 6. Gluten vrij (gluten free) 7. Snel (quick) 8 B3971 500 g 3:05 3:35 4:05 3:35 2:50 3:05 2:10 750 g 3:10 3:40 4:10 3:40 2:55 3:10 2:15 1000 g 3:15 3:45 4:15 3:45 3:00 3:15 2:20 NL 8. Fruit 3:05 3:10 3:15 9. Cake 2:20* 10. Sandwich 3:00 3:05 3:10 11. Rozijnen/noten (raisin/nut) 3:05 3:10 3:15 12. Rogge (rye) 4:05 4:10 4:15 13. Kneden (knead) 0:08* 14. Deeg (dough) 1:30* 15. Brioche 3:35 3:40 3:45 16. Bakken (bake) 0:30* 17. Homemade -- -- -18. Italian (Italiaans) 3:05 3:10 3:15 * Indien je één van deze programma’s kiest, kan je geen gewicht kiezen. De tijd die op het display staat, is aangegeven in uren en minuten. Voorbeeld: programma 1, normaal, 750 gram duurt 3 uur en 10 minuten. 1. Normaal (basic) Dit is het meest gebruikte programma voor het maken van wit brood. 2. Frans (french) De kneedtijd en rijstijd zijn langer dan bij het normale programma. Hierdoor krijg je een krokantere korst en een luchtigere textuur. 3. Volkoren (whole wheat) Dit programma is het meest geschikte programma voor het maken van zware broden zoals volkoren en meergranen brood. Het brood zal over het algemeen wat kleiner zijn dan een wit brood, omdat het meel zwaarder is. Bij dit programma gebruik je beter geen uitgestelde programmering, aangezien dit kan leiden tot minder goede resultaten. 4. Zoet (sweet) Dit programma is geschikt voor het maken van onder andere rozijnenbrood, suikerbrood, chocoladebrood,... 5. Rijst (rice) Gebruik dit programma voor een brood op basis van rijstmeel. Na het kneden, kan het deeg rijzen vooraleer het wordt gebakken. De korst van een rijstbrood is dunner en zachter dan een normaal brood. 6. Glutenvrij (gluten free) Dit is het programma voor het maken van glutenvrij brood. Het deeg van een glutenvrij brood is vochtiger en heeft de consistentie van een beslag. Hierdoor mag het deeg niet te lang kneden of rijzen. De baktijd daarentegen is wel langer. Bij dit programma gebruik je beter geen uitgestelde programmering, aangezien dit kan leiden tot minder goede resultaten. Alle ingrediënten voeg je best van het begin toe. 7. Snel (quick) Voor het kneden, rijzen en bakken van brood met bakpoeder. Het resultaat is gewoonlijk een kleiner brood met een vastere textuur. Het is aangeraden om, voor je op start duwt, de ingrediënten even met een houten lepel om te scheppen. www.domo-elektro.be B3971 9 NL 8. Fruit Gebruik de verdeler om ingrediënten toe te voegen zoals rozijnen of andere gedroogde fruitsoorten. De machine zal de ingrediënten zelf toevoegen vanuit de verdeler op het juiste moment. Als je graag vers of vochtiger fruit wenst toe te voegen aan je brood, doe je dit best rechtstreeks in de bakvorm wanneer je een signaal hoort. 9. Cake (cake) Met dit programma kan je brood maken dat bereid wordt met bijvoorbeeld bakpoeder. Broden gebakken met dit programma worden minder hoog en vaster van structuur. Indien je met dit programma cake wilt maken, raden we aan de ingrediënten in de bakvorm te doen. Daarna stel je de machine in en voordat je op start drukt, moet je even met een houten lepel de ingrediënten omscheppen. Dit bevordert namelijk de kneding. Bij dit programma kan je het gewicht niet zelf kiezen. 10. Sandwich (sandwich) Dit programma kan je gebruiken om een heel luchtig wit brood te maken voor onder andere sandwiches. Let op ! Bij dit programma kan je geen korstkleur instellen, de machine doet dit zelf. 11. Rozijnen/noten brood (Raisin/nut bread) Gebruik de verdeler om droge ingrediënten toe te voegen zoals rozijnen of noten. De machine zal de ingrediënten zelf toevoegen vanuit de verdeler op het juiste moment. 12. Rogge (Rye) Dit programma is ideaal voor broden met een zwaardere variant graan zoals rogge. Het brood zelf is ook vaster en zwaarder dan een normaal brood. 13. Knead (kneden) Met dit programma zal de machine enkel kneden, zonder bakken of rijzen. Je kan dit programma gebruiken voor bijvoorbeeld het kneden van pizzadeeg. Met de toetsen time + en time - kan je de werkingstijd aanpassen. 14. Deeg (dough) Met dit programma kan je de machine alleen deeg laten kneden en laten rijzen. 15. Brioche Dit programma is geschikt voor broden met extra ingrediënten die zorgen voor een hoog gehalte suiker, vet en proteïnen (bvb. chocolade, suiker, ...) Deze ingrediënten zorgen voor een donkere korst. De programmafase rijzen zal meer tijd in beslag nemen, waardoor je een licht en luchtig resultaat krijgt. 16. Bakken (bake) Dit programma kan je gebruiken voor kant-en-klaar deeg dat je bijvoorbeeld al eerder hebt gemaakt. Je kan het deeg met dit programma alleen afbakken. Ook kan je reeds gebakken brood weer wat opwarmen. 17. Home made Deze toets kan je programmeren met zelfgekozen tijdsinstellingen. Zie “Home made instellen” onder de rubriek gebruik. 10 18. Italiaans (Italian) Maak een lekker zuiders brood met dit programma. Je kan bij dit programma extra ingrediënten toevoegen zoals kruiden, zongedroogde tomaten, olijven,... B3971 NL GEBRUIK 1. Haal de bakvorm uit de machine door deze een kwartslag in tegenwijzerzin aan de handgreep recht omhoog uit de machine te trekken. 2. Plaats de kneedhaak (bijgevoegd) op de as in de bakvorm. De kneedhaak moet op een juiste en zorgvuldige manier geplaatst worden, zodat alle ingrediënten voldoende gemengd en gekneed worden. 3. Doe de ingrediënten in de bakvorm, in de volgorde zoals hieronder beschreven. · Water/melk · Boter/olie · Eventueel eieren · Zout (aan de ene kant) · Suiker (aan de andere kant) · Bloem · Gist (doe de gist in een kuiltje in het midden van de bloem) ! Let op! De gist mag niet in aanraking komen met het water, het zout of de suiker. Dit zou de gist kunnen activeren, alvorens de ingrediënten voldoende gemengd en gekneed zijn. Extra ingrediënten zoals noten, kruiden, gedroogde vruchten,... kan je toevoegen aan de verdeler, of kunnen nadien nog toegevoegd worden. Zie rubriek “Extra ingrediënten toevoegen”. 4. Verwijder alle restjes van de ingrediënten aan de buitenkant van de bakvorm. Plaats de bakvorm weer in de machine. Draai de bakvorm met de klok mee zodat hij vastklikt. 5. Sluit het deksel. 6. Steek de stekker in het stopcontact. 7. Stel het juiste programma in door middel van de menu-toets. Elke invoer wordt bevestigd met een piepsignaal. 8. Stel de kleur van de korst in met de color-toets. Je kan kiezen tussen licht, medium of donker. Stel de grootte van het brood in (500 g, 750 g of 1000 g) met de weight-toets. 9. Stel eventueel de uitgestelde programmering in. (zie rubriek “uitgestelde programmering”) 10. Druk op start-pauze/stop. De dubbele punt zal nu gaan knipperen en geeft aan dat de machine werkt. Wanneer je de uitgestelde programmering hebt ingesteld, zal het toestel pas beginnen werken als de ingestelde tijd is verstreken. 11. Wanneer het brood klaar is, zal de machine piepen. Het display toont 0:00. Druk op start-pauze/stop en houd deze toets enkele seconden ingedrukt. De machine zal nogmaals piepen om te bevestigen dat je het programma hebt gestopt. Als je het programma niet beëindigd met deze toets zal de warmhoudfunctie het brood nog 60 minuten warmhouden. Verwijder de stekker uit het stopcontact en open het deksel van de machine. Verwijder de bakvorm met behulp van ovenhandschoenen. 12. Laat het brood in de bakvorm ca. 10 tot 15 minuten afkoelen. Houd de bakvorm omgekeerd boven het aanrecht en schud het brood lichtjes uit de vorm. Plaats het brood en de bakvorm nooit op de buitenkant van de machine of direct op een plastic tafelkleed. Wanneer het brood niet onmiddellijk los komt, draai dan voorzichtig aan de as aan de onderzijde van de bakvorm totdat het brood loskomt. Gebruik nooit scherpe objecten voor het verwijderen van het brood zodat je de antiaanbaklaag van de bakvorm niet beschadigd. 13. Indien je het brood uit de machine haalt en de kneedhaak in het brood blijft steken, verwijder deze voorzichtig uit het brood met behulp van de meegeleverde haak. Laat het brood eventueel nog verder afkoelen op een rooster zodat je daarna de kneedhaak met je handen kan verwijderen. Let wel goed op dat de kneedhaak goed is afgekoeld. Het is aanbevolen om het brood pas na 15-20 minuten door te snijden. www.domo-elektro.be B3971 11 NL WARMHOUDFUNCTIE Als je bijvoorbeeld een keer niet op tijd thuis bent, verwarmt de broodbakmachine nog 60 minuten na. Dit is niet bij de programmatijd inbegrepen. Als je deze instelling wilt onderbreken, druk dan enkele seconden op start-pauze/stop. Als het brood langer dan een uur in de broodbakmachine blijft zitten, wordt het vochtig. Spoel de bakvorm onmiddellijk met warm water, nadat het brood eruit is gehaald, om ervoor te zorgen dat de kneedhaak niet aan de as blijft kleven. Zet de broodbakmachine nog niet in werking, als de machine nog niet afgekoeld is. EXTRA INGREDIËNTEN TOEVOEGEN Tijdens het kneedproces van de volgende programma’s gaat er een piepsignaal na het kneden: Normaal, Frans, Volkoren, Zoet, Rijst, Gluten vrij, Snel, Fruit, Cake, Rozijnen/noten, Rogge, Brioche, Italiaans. Dit piepsignaal geeft aan dat je extra ingrediënten kan toevoegen zoals: rozijnen, noten, zaden, enz. Je kan de ingrediënten toevoegen via de verdeler of manueel. Verdeler Open de verdeler door het deksel naar links te schuiven. Voeg de ingrediënten toe. Sluit het deksel. De ingrediënten in de verdeler zullen automatisch aan het brood worden toegevoegd na het kneden en rijzen. Opgelet: · Voeg geen vochtige, vloeibare of ingrediënten in poedervorm toe via de verdeler. · Doe de verdeler nooit te vol. · Grote noten hak je best fijner voor je deze toevoegt aan de verdeler. · Voor je ingrediënten toevoegt aan de verdeler, controleer dan steeds dat het klepje aan de binnenzijde van het toestel gesloten is. Manueel Je kan ook manueel ingrediënten toevoegen. Pauseer het programma op het ogenblik dat je het signaal hoort, open het deksel, voeg de extra ingrediënten toe, sluit vervolgens het deksel en druk terug op de start-toets. Deze manuele werkwijze gebruik je best voor: vochtige of lopende ingrediënten, ingrediënten in poedervorm, grotere hoeveelheden. GEHEUGENFUNCTIE Als het toestel uitvalt door een stroompanne zal de geheugenfunctie werken gedurende 10 minuten. Je hoeft dus het programma niet opnieuw te starten wanneer de stroom terug is. Als de panne langer duurt dan 10 minuten zal het programma geannuleerd worden. HOME MADE INSTELLEN De toets home made is gereserveerd voor je eigen bakprogramma. Je kan de tijd van alle programmafasen zelf bepalen. Indien je bepaalde fasen wil overslaan, stel dan de tijd in op 0:00. Opgelet: de instellingen van deze knop worden niet bewaard als de stekker uit het stopcontact wordt verwijderd. 1. 2. 12 Druk op de Home made-toets, of kies programma 17 met de menu-toets. Druk nogmaals op de Home made-toets om te beginnen met programmeren. Op het display knippert de tijdsweergave en het icoon van de programmafase. Zie de tabel hieronder met programmafasen en standaard tijdsinstelling. B3971 4. Stel voor elke fase de gewenste tijd in met de toetsen Time + (tijd verhogen) en Time - (tijd verlagen). Bevestig de gekozen tijd door op de Home made-toets te drukken. Wanneer alle fasen doorlopen zijn, zie je de totale duurtijd van het programma op het display. De standaard totale duurtijd bedraagt 3 uur. Je kan het ingestelde programma dan starten met de start-toets. Als je al op de start-toets drukt tijdens het instellen van de fasen, zal het programmeren vervroegd stoppen. NL 3. Indien gewenst, kan je dit programma ook uitgesteld laten starten, zie “uitgestelde programmering”. Standaard instelling Aanpasbaar tijdsslot Kneden 1 Programmafasen Icoon 0:10 1-30 min. Rust 1 0:03 0-30 min. Kneden 2 0:05 0-30 min. Rust 2 0:10 0-30 min. Kneden 3 0:20 0-25 min. Rijzen 1 0:42 0-60 min. Rijzen 2 0:40 0-60 min. Rijzen 3 0:00 0-60 min. Bakken 0:50 0-80 min. Warmhoudfunctie 1:00 0-60 min. KNEEDHAAK VERWIJDEREN VOOR HET BAKKEN Je kan de kneedhaak al verwijderen, nadat het deeg voor de laatste keer gekneed is. 1. Druk kort op de toets start-pauze/stop om het bakproces te onderbreken of trek de stekker uit het stopcontact. 2. Open het deksel en haal de bakvorm eruit. Haal het deeg eruit met bebloemde handen en verwijder de kneedhaak. 3. Plaats het deeg opnieuw in de bakvorm en sluit het deksel. 4. Steek de stekker opnieuw in het stopcontact en druk op start-pauze/stop. Het bakprogramma wordt voortgezet. UITGESTELDE PROGRAMMERING Je kan het apparaat zodanig programmeren dat de bereiding klaar is op een zelf gekozen tijdstip. · Bereken het tijdsverschil tussen het moment waarop je het programma start en het uur waarop je wilt dat de bereiding klaar is. De broodbakmachine telt hier automatisch de tijdsduur van de cycli van het programma bij op. · Door op de toetsen time + en time - te drukken, zal de tijd met 10 minuten per keer toe- of afnemen. · Op het display zie je het zandloper icoon. www.domo-elektro.be B3971 13 NL · Uitgesteld programmeren kan niet bij: kneden en bakken. Als je bij deze programma’s op de Time + en Time - toetsen drukt, zal de programmatijd aangepast worden. Voorbeeld : Het is 9:00 uur ’s morgens en je wil om 17:00 ’s middags vers gebakken brood. Doe alle ingrediënten in de bakvorm. Plaats de bakvorm in de broodbakmachine. Sluit het deksel en druk op de menu-toets om het juiste programma in te stellen. Druk op de color-toets om de korstkleur in te stellen en kies voor het gewenste gewicht van het brood. Druk op de time + toets tot er 8:00 op het display verschijnt. Er zullen immers 8 uren voorbij gegaan zijn vanaf het moment dat je op de start-toets gedrukt hebt tot het moment dat het brood klaar moet zijn (17:00 ’s middags). Druk op de start toets. Het dubbele punt op het display zal gaan knipperen en het zandlopericoon is zichtbaar. De tijd zal nu aftellen tot het tijdstip bereikt is waarop de broodbakmachine moet beginnen met kneden. De broodbakmachine zal nu het hele ingestelde programma doorlopen zodat het brood klaar is op het gekozen tijdstip. Opgelet: gebruik het programma met timer niet wanneer je ingrediënten gebruikt die maar beperkt houdbaar zijn, zoals verse melk, eieren, yoghurt, kaas, vers fruit. TIPS · · · · · Weeg de ingrediënten altijd zeer nauwkeurig af en let erop dat deze op kamertemperatuur zijn. Je kan de versheid van de gist vaststellen door de volgende test te doen: los in een half kopje lauw water 1 theelepel suiker op en voeg aan dit mengsel 1 theelepel gist toe. Na een paar minuten moet het geheel gaan borrelen en bruisen, pas dan weet je dat de gist vers is. Zout remt de werking van gist. Suiker bevordert de werking. Indien je één van deze twee ingrediënten niet mag gebruiken vanwege een dieet, dan moet je het andere ook weglaten. Je krijgt dan brood zonder suiker en zout. Het brood dat je zelf bakt, bevat geen conserveringsmiddelen en is maar beperkt houdbaar. Indien je het brood luchtdicht verpakt, nadat je het goed hebt laten afkoelen, kan je het brood een paar dagen goed houden. Je kan het brood ook invriezen, waardoor je het langer kan bewaren. Vet de as in de bakvorm in met een beetje boter om ervoor te zorgen dat de kneedhaak makkelijker loskomt. REINIGING EN ONDERHOUD · · · · Zet voordat je de broodbakmachine wilt reinigen het apparaat uit, haal de stekker uit het stopcontact en laat het volledig afkoelen. Reinig het toestel grondig na ieder gebruik. Indien de bakvorm, de as in de bakvorm en kneedhaak niet schoon zijn voor gebruik, kan dit de werking en levensduur van de broodbakmachine beïnvloeden. Droog het toestel en alle onderdelen grondig af. Laat het deksel een half uur open, zodat alle delen voldoende droog zijn voor opbergen of nieuw gebruik. ! Opgelet: dompel het toestel nooit onder in water. BUITENKANT Reinig de buitenkant van het apparaat en het kijkvenster met een vochtige doek of spons. Verwijder de bakvorm alvorens te reinigen. Indien noodzakelijk kan je de buitenkant van het apparaat met behulp van een mild afwasmiddel reinigen. 14 B3971 NL Indien nodig kan je een zacht borsteltje gebruiken om de binnenkant van de verdeler te reinigen. Wees voorzichtig dat je de scharnieren van het klepje niet beschadigd. BINNENKANT De binnenkant van het apparaat kan je voorzichtig met een licht vochtige doek schoonmaken. Let op met schoonmaken van het verwarmingselement. BAKVORM Haal de bakvorm uit de machine door deze een kwartslag in tegenwijzerzin aan de handgreep recht omhoog uit de machine te trekken. De bakvorm kan je reinigen met warm water. Let hierbij op dat je de antiaanbaklaag niet beschadigd. Indien het niet lukt om de kneedhaak uit de bakvorm te verwijderen, laat dan de bakvorm volledig afkoelen. Giet een beetje warm water in de bakvorm zodat de kneedhaak onder water staat. Het water zal er nu voor zorgen dat de klevende deeltjes oplossen en de kneedhaak verwijderd kan worden. Gebruik geen schoonmaakmiddelen of afwasborstels, deze kunnen de antiaanbaklaag van de bakvorm beschadigen. De bakvorm is niet geschikt om in de afwasmachine te reinigen. VEELGESTELDE VRAGEN Probleem Oplossing Ik bekom niet het gewenste resultaat. · · · · De samenstelling van het deeg is zeer belangrijk om tot een goed resultaat te komen. Ook kunnen verschillende merken bloem voor een verschillend resultaat zorgen. Al doende zal je met het toestel leren werken. Wij raden aan om het basisrecept te proberen. Ook een kanten-klare broodmix kan hier voor de oplossing zorgen. Indien dit niet helpt, dan neem je best contact op met onze klantendienst. De ingrediënten zijn niet nauwkeurig afgewogen. De ingrediënten zijn niet vers. De ingrediënten zijn niet op kamertemperatuur. Kan ik tijdens het proces kijken of het deeg goed is? Het deeg moet eruit zien als een gladde, elastische ronde bal. Open na 5 à 10 minuten (tijdens het kneden) het deksel en raak de bovenkant van de deegbal even met je vingers aan. Het deeg moet een beetje blijven plakken aan de vingers. Kleeft het deeg te hard aan je vingers, dan is het te vochtig en moet je nog wat bloem toevoegen. Kleeft het deeg helemaal niet, dan is het te droog en moet je een klein beetje water toevoegen. Open het deksel niet tijdens het rijzen. Het brood zou hierdoor kunnen inzakken. Ik wil meerdere broden na elkaar bakken. Laat het toestel 20 minuten afkoelen met het deksel open. Een opgewarmd toestel zal er voor zorgen dat de gist te snel zal beginnen werken, waardoor het resultaat niet goed zal zijn. www.domo-elektro.be B3971 15 NL Het brood is ingezakt. · · · Het brood is in het midden onvoldoende gebakken. Indien de binnenkant van het brood onvoldoende gebakken is, kan dit aan de gebruikte bloemsoort liggen. Dit gebeurt meestal door het gebruik van zwaardere bloemsoorten, zoals roggebloem of volkorenbloem. Probeer één kneedproces meer te gebruiken wanneer je deze bloemsoorten gebruikt. Wanneer de broodbakmachine het eerste kneedproces heeft beëindigd, zet je het apparaat stop. Stel dan het apparaat opnieuw in en druk op start. Het apparaat zal opnieuw beginnen met kneden, er is nu een grotere hoeveelheid lucht in het deeg opgenomen. De bodem van het brood is te dik. Je hebt het brood nog wat langer met de warmhoudfunctie in het toestel laten zitten. Het water zal verdampen, waardoor je een dikkere bodem krijgt. Neem het brood onmiddellijk na het programma uit het toestel. Het brood is overgelopen. · · · 16 Indien het brood ingezakt lijkt langs alle kanten, dan wil dit zeggen dat het deeg te vochtig was. Probeer iets minder water toe te voegen. Wanneer je geconserveerd fruit of groenten gebruikt, laat ze dan eerst goed uitlekken en wrijf ze goed droog voordat je ze gebruikt. Ze zijn langere tijd doordrenkt waardoor ze overtollig vocht bezitten. Je kan proberen om een lichtere bloemsoort te gebruiken. Het kan ook te veel gerezen zijn. Het deeg is zoveel gerezen dat het deeg de rijzing niet aan kan. Probeer iets minder gist toe te voegen, 1 à 2 gram. Indien het deeg te hard gerezen is, zou het kunnen dat het boven uit de bakvorm gelopen is. Trek de stekker uit en laat het toestel afkoelen. Reinig nadien het verwarmingselement. Je hebt te veel gist gebruikt. De gist is te hard geactiveerd geweest, door bv. te veel suiker of een te hoge temperatuur. Je hebt teveel deeg gebruikt. Gebruik niet meer dan 1000 g. H:HH verschijnt op het display. Het toestel is nog te warm. Laat het toestel eerst afkoelen. E:EO verschijnt op het display. Er is een probleem met de temperatuurvoeler. Stuur het toestel op naar onze naverkoopdienst. Waarom mag ik geen extra ingrediënten toevoegen aan het begin van het programma? De extra ingrediënten (zoals krenten of noten), zullen kapot gekneed worden en het brood zal niet goed gekneed worden. Ook zal het een invloed hebben op het rijzen. Voeg de extra ingrediënten pas toe wanneer het toestel piept, na het kneden/rijzen. Mag ik melk gebruiken in plaats van water? Dat mag! Zorg er steeds voor dat het complete volume vocht klopt. De verhouding melk en water maakt geen verschil. De korst is soms lichter en soms donkerder. Deze kan je selecteren met de “color” toets. Bereidingen met meer suiker zullen er ook voor zorgen dat de korst donkerder is. De broodmachine kneedt trager dan normaal. Dit kan gebeuren bij zware degen, waardoor de motor harder moet draaien. Dit is echter geen probleem voor de machine. Voeg een eetlepel vloeistof toe. De menghaak zit vast in de bakvorm. Verwijder het brood uit de bakvorm. Vul vervolgens de bakvorm met warm water en laat dit een kwartier weken. Het vastgekoekte deeg zal loskomen. B3971 NL Er zit condens aan de binnenkant van het kijkvenster. Dit is normaal. Dit komt door de warmte. Ik heb een kant-en-klare mix gebruikt, maar het brood is nog steeds mislukt. Alvorens het toestel op te sturen ter herstelling, raden wij aan om nogmaals het basisrecept te proberen. Kant-en-klare mix kan soms ook ingrediënten bevatten, die voor een minder resultaat zorgen. MILIEURICHTLIJNEN Dit symbool op het product of op de verpakking wijst erop dat dit product niet als huishoudafval mag worden behandeld. Het moet naar een plaats worden gebracht waar elektrische en elektronische apparatuur wordt gerecycleerd. Als je ervoor zorgt dat dit product op de correcte manier wordt verwijderd, voorkom je mogelijk voor mens en milieu negatieve gevolgen die zich zouden kunnen voordoen in geval van verkeerde afvalbehandeling. Voor meer details in verband met het recycleren van dit product, neem je best contact op met de gemeentelijke instanties, het bedrijf of de dienst belast met de verwijdering van huishoudafval of de winkel waar je het product hebt gekocht. Het verpakkingsmateriaal is recycleerbaar. Behandel de verpakking milieubewust. www.domo-elektro.be B3971 17 GARANTIE FR Cher client, Tous nos produits sont soumis à des contrôles qualité stricts avant d’être proposés à la vente. Si vous deviez toutefois rencontrer un problème avec votre appareil, nous le déplorons vivement. Dans ce cas, nous vous invitons à prendre contact avec notre service clientèle. Nos collaboratrices se feront un plaisir de vous aider ! +32 14 21 71 91 [email protected] Du lundi au jeudi : 8 h 30 – 12 h et 13 h – 17 h Vendredi : 8 h 30 – 12 h et 13 h – 16 h 30 Cet appareil est garanti 2 ans à compter de la date d’achat. La garantie sur les accessoires et pièces soumis à usure n’est que de 6 mois. Durant la période de garantie, le distributeur assumera l’entière responsabilité en cas de défauts de fonctionnement (matériel) ou de fabrication. Si un tel problème survient, l’appareil sera remplacé ou réparé. La période de garantie de 2 ans ne reprend pas à zéro, mais se poursuit (jusqu’à 2 ans à compter de la date d’achat de l’appareil). La garantie est accordée sur la base du ticket de caisse. Pour les accessoires et les éléments d’usure, une garantie de 6 mois s’applique. La garantie et la responsabilité du fournisseur et du fabricant n’ont plus effet dans les cas suivants : · Les instructions du manuel n’ont pas été suivies. · Mauvais raccordement, par ex. tension électrique trop forte. · Utilisation contraire, brutale ou anormale. · Entretien insuffisant ou non conforme. · Réparation ou modification de l’appareil par le consommateur ou un tiers non autorisé. · Utilisation d’éléments ou d’accessoires qui ne sont pas recommandés ou fournis par le fournisseur/ fabricant. CONSIGNES DE SÉCURITÉ Les consignes de sécurité suivantes doivent être respectées lors de l’utilisation de tout appareil électrique: · Lisez ces consignes très attentivement. Conservez ce mode d’emploi afin de pouvoir le consulter ultérieurement. · Avant la première utilisation, enlevez tous les éléments d’emballage et les éventuels autocollants promotionnels. Veillez à ce que les enfants ne jouent pas avec les matériaux d’emballage. · Cet appareil est conçu pour être utilisé dans un environnement domestique ou dans des environnements comparables, tels que : · Coin-cuisine du personnel dans les commerces, les bureaux et autres environnements professionnels comparables · Fermes · Chambres d’hôtel ou de motel et autres environnements à caractère résidentiel · Chambres d’hôtes ou comparables · Cet appareil peut être utilisé par des enfants âgés de 16 ans ou plus et par des personnes présentant un handicap physique ou sensoriel, une capacité mentale limitée ou un manque d’expérience ou de connaissances, à condition que ces personnes soient sous surveillance ou qu’elles aient reçu des instructions sur la manière d’utiliser l’appareil en toute sécurité et qu’elles connaissent les dangers liés 18 B3971 FR · · à son utilisation. Les enfants ne peuvent pas jouer avec cet appareil. L’entretien et le nettoyage de l’appareil ne peuvent pas être effectués par des enfants, sauf s’ils sont âgés de plus de 16 ans et sous la surveillance d’un adulte. Gardez l’appareil et le cordon électrique hors de portée des enfants. Attention: l’appareil ne peut pas être utilisé avec une minuterie externe ou une commande à distance séparée. L’appareil peut chauffer pendant l’utilisation. Tenez le cordon électrique à distance de parties chaudes et ne couvrez pas l’appareil. · · · · · · · · · · · · · · · · · · · · · Vérifiez avant usage si la tension indiquée sur l’appareil correspond à la tension du réseau électrique de votre domicile. Ne laissez pas le cordon pendre sur une surface chaude ou sur le rebord d’une table. N’utilisez jamais l’appareil lorsque le cordon ou la fiche sont endommagés, après un mauvais fonctionnement de l’appareil ou lorsque l’appareil est endommagé. Amenez alors l’appareil au centre de services le plus proche pour contrôle et réparation. L’utilisation d’accessoires non préconisés par le fabricant peut provoquer un incendie, une électrocution ou des blessures. Retirez la fiche de la prise lorsque l’appareil n’est pas utilisé, avant d’installer ou d’enlever des pièces et avant de nettoyer l’appareil. Mettez tous les boutons en position « arrêt » et retirez la fiche de la prise. Ne tirez jamais sur le câble pour retirer la fiche de la prise. Ne laissez jamais un appareil en service sans surveillance. Ne placez jamais cet appareil sur ou à proximité d’un feu au gaz ou d’un feu électrique où il pourrait entrer en contact avec un appareil chaud. N’utilisez pas l’appareil à l’extérieur. Utilisez l’appareil uniquement dans le but auquel il est destiné. Utilisez toujours l’appareil sur une surface solide, sèche et plane. Cet appareil ne convient qu’à un usage domestique. Le fabricant décline toute responsabilité pour des accidents qui découleraient d’un mauvais usage de l’appareil ou du non-respect des instructions fournies dans ce manuel. Toutes les réparations, en dehors de l’entretien ordinaire de l’appareil, doivent être réalisées par le fabricant ou son service après-vente. N’immergez jamais le cordon électrique, la fiche ou l’appareil lui-même dans l’eau ou tout autre milieu liquide. Tenez le cordon éloigné de rebords tranchants et de pièces brûlantes ou d’autres sources de chaleur. Ne placez pas l’appareil à proximité de matériaux inflammables ou explosifs, ou de gaz à inflammation spontanée. Veillez à ce que les grilles d’aération de l’appareil ne soient pas couvertes. Les rallonges ne peuvent être utilisées que si la tension et la puissance électriques sont les mêmes ou plus hautes que celles de la machine à pain. La rallonge doit être raccordée de telle façon que personne ne puisse tomber à cause du cordon ou le tirer par accident. Ne placez pas d’objet sur l’appareil et ne le couvrez pas pendant le fonctionnement, pour éviter le risque d’incendie. La machine à pain peut devenir chaude. Ne touchez que les poignées et les boutons de l’appareil et utilisez, si nécessaire, des gants de cuisine. Assurez-vous que l’appareil est complètement refroidi et retirez la fiche de la prise murale avant de placer des éléments dans l’appareil ou d’en retirer des éléments. www.domo-elektro.be B3971 19 · · Ne déplacez pas la machine à pain, si l’appareil contient des ingrédients ou des liquides chauds. Évitez le contact avec les crochets pétrisseurs tournants quand l’appareil fonctionne, pour éviter une blessure. Éteignez complètement l’appareil et retirez la fiche électrique de la prise murale pour des raisons de sécurité, si vous n’utilisez pas l’appareil ou si vous voulez le nettoyer. N’utilisez pas la machine à pain pour conserver des aliments ou des ustensiles de cuisine. N’utilisez pas d’éponge métallique pour nettoyer l’appareil. Les parties détachées de l’éponge pourraient entrer en contact avec les pièces électriques occasionnant ainsi des chocs électriques. N’utilisez pas la machine à pain pour sécher des aliments ou d’autres objets. Le poids total de tous les ingrédients ne peut pas être supérieur à 1000 g. N’utilisez jamais plus que 715 g de farine par pain. N’utilisez jamais plus que 22 g de levure fraîche ou 4+1/4 petites cuillères de levure sèche par pain. N’utilisez jamais plus que 460 ml d’eau par pain. FR · · · · · · · · PARTIES 1. 2. 3. 4. 5. 6. 7. 8. 9. 10. Couvercle Paroi vitrée 1 Distributeur pour l’ajout d’ingrédients Panneau de commande 2 Crochet pétrisseur Moule de cuisson Boîtier Verre doseur Cuillère doseuse Crochet d’extraction du crochet pétrisseur 8 9 3 4 5 6 7 10 AVANT LA PREMIÈRE UTILISATION · · · · · 20 Avant la première utilisation, enlevez tous les éléments d’emballage et les éventuels autocollants promotionnels. Nettoyez la machine à pain, le crochet pétrisseur et l’extérieur de la machine à pain à l’aide d’un chiffon humide. Le moule et le crochet pétrisseur sont prévus d’une couche antiadhésive; vous devez donc toujours les nettoyer avec un chiffon humide et jamais avec une brosse à vaisselle, une éponge ou des produits d’entretien. Retirez le film protecteur de l’écran. Lors de la première utilisation, votre appareil peut dégager une certaine fumée. Ceci est parfaitement normal et ne présente aucun danger. Cette fumée disparaîtra automatiquement. Avant d’utiliser l’appareil pour la première fois, il est recommandé d’effectuer une cuisson avec un moule de cuisson vide et le programme BAKE (cuisson). Ceci pendant 10 minutes. Laissez ensuite refroidir l’ensemble et nettoyez les accessoires. Avant la première utilisation, graissez le revêtement antiadhésif de la cuve et le crochet pétrisseur avec un peu de beurre ou de margarine. B3971 UTILISATION RECETTE DE BASE FR La recette ci-dessous est une recette de pain blanc classique. · 630 g farine · 370 ml eau · 5 g levure sèche · 1 c. à t. sel · 1 c. à s. sucre LES INGRÉDIENTS La qualité, la fraîcheur et le dosage précis des ingrédients constituent les principaux facteurs de réussite pour la cuisson du pain. La qualité, la fraîcheur et le dosage précis des ingrédients constituent les principaux facteurs de réussite pour la cuisson du pain. Attention: ne jamais dépasser la capacité maximum de votre machine à pain (1000 g)! N’utilisez jamais plus que ces quantités maximums des ingrédients prochains par fois: Farine: 715 g max. Levure: 22 g de levure fraîche ou 4+1/4 petites cuillères de levure sèche max. L’eau: 460 ml max. LA FARINE La farine est l’ingrédient de base de chaque pain. Vu que le poids de la farine diffère d’une variété à l’autre, il est d’une importance capitale de peser la farine au moyen d’une balance. Faites attention à quel type de farine vous achetez: il faut que l’emballage mentionne que la farine est approprié à faire du pain. LE GLUTEN Par nature, il y a du gluten dans la farine, ce qui permet au pain de mieux lever. LA LEVURE La levure est un micro-organisme qui pousse dans divers produits alimentaires végétaux. La levure a la propriété de transformer les sucres en alcool et en gaz carbonique, ce qui fait qu’elle se multiplie très vite. Voilà donc le produit idéal pour faire lever la pâte et pour la rendre plus légère et plus facile à digérer. Nous conseillons d’utiliser de la levure sèche dans la machine à pain Domo. La levure sèche (en grains) est plus facile à travailler et se conserve en outre plus longtemps que la levure fraîche. Egalement, la levure sèche donne un résultat de cuisson plus constant que la levure fraîche. LE SEL Le sel n’est pas seulement là pour donner du goût au pain, mais il règle aussi l’activité de la levure, il rend la pâte ferme et compacte et il évite que le pain ne lève trop vite. LE BEURRE/L’HUILE Le beurre et l’huile donnent une meilleure saveur au pain et le rendent plus souple. Le beurre doit être à température ambiante avant qu’il ne soit ajouté aux autres ingrédients. www.domo-elektro.be B3971 21 FR LE SUCRE Le sucre est la source nutritive pour la levure et constitue un ingrédient important pour le processus du levage de la pâte. Vous pouvez utiliser tout simplement du sucre blanc, du sucre roux, de la mélasse ou du miel. Le sucre ajoute une certaine douceur au goût du pain, il augmente la valeur nutritive et il permet de conserver le pain plus longtemps. Attention : N’utilisez pas de sucre brut ou du sucre en morceaux, p.ex. pour le pain au sucre, car ce type de sucre pourrait endommager le revêtement antiadhésif du moule à pain. L’EAU Quand on mélange la farine à l’eau, il y a alors formation de gluten et l’air est emprisonné, ce qui permet au pain de lever. A température ambiante normale (± 20 à 25°C), utilisez de l’eau tiède pour faire le pain: l’eau froide n’activera pas la levure et l’eau chaude l’activera trop. LE LAIT Le lait fait dorer la croûte du pain, il améliore sa saveur, il augmente la valeur nutritive et donne à l’intérieur du pain une belle couleur crémeuse. Si vous utilisez du lait frais, diminuez alors la quantité d’eau afin d’équilibrer la teneur en humidité. Attention : N’utilisez pas de lait frais si vous programmez la cuisson avec la minuterie à retardement. Le lait est périssable. D’AUTRES INGRÉDIENTS Utilisez toujours des ingrédients frais. Si vous utilisez des noix, des graines de tournesol, des fruits secs ou autres produits pareils, veillez à ce qu’ils ne soient pas trop gros ni trop pointus, en raison des dommages que cela pourrait causer à la couche antiadhésive. PANNEAU DE COMMANDE Commande A. Menu : sélection du programme B. Weight : choisir le poids (la taille) du pain C. Color : couleur de la croûte D. Time + : augmenter le temps E. Bake : touche rapide pour le programme Bake F. Knead : touche rapide pour le programme Pétrissage G. Time - : réduire le temps H. Start-pauze/stop : touche marche/arrêt I. Home Made : touche rapide pour le programme Home Made 22 B3971 A B C MENU WEIGHT COLOR D E F TIME + BAKE KNEAD G H I START HOME MADE TIME - PAUZE/STOP 1 2 7 FR Affichage 1. Choisir le poids (la taille) du pain 2. Sélection du programme 3. Minuterie 4. Phase de programme : pétrir 3 5. Phase de programme : reposer 6. Phase de programme : lever 4 7. Phase de programme : chauffer 8. Phase de programme : cuire 5 9. Phase de programme : tenir au chaud 10. Phase de programme : prêt 6 11. Phase de programme : numéro de la phase 12. Temps restant en minutes 13. Couleur de la croûte : claire, moyenne, foncée 14. Verrouillage du panneau de commande 8 12 9 10 11 13 14 A. Menu Cette touche sert à sélectionner le mode de cuisson qui convient. Chaque fois que vous appuyez sur ce bouton, vous entendrez un bip et le numéro du programme est modifié. Le programme et le temps de cuisson correspondant sont affichés sur l’écran. B. Weight Vous utilisez cette touche afin de programmer le poids désiré de votre pain: vous avez le choix entre 500, 750 et 1000 grammes. Information utile : la quantité totale des ingrédients énumérés dans la recette constitue environ le poids du pain que vous allez faire. C. Color Cette fonction vous permet de déterminer le degré de cuisson de la croûte de votre pain: léger, moyen ou foncé. Si vous essayez une certaine recette pour la première fois, il est recommandé de sélectionner la couleur de croûte moyenne. D. Time + et G. Time Ces touches servent à sélectionner le lancement différé pour certains programmes et à régler la minuterie. D’autres programmes autorisent la modification de la durée du programme. E. Bake Une touche rapide pour le programme Cuisson. Appuyez sur Start-pauze/stop pour confirmer le programme. F. Knead Une touche rapide pour le programme Pétrissage. Appuyez sur Start-pauze/stop pour confirmer le programme. H. Start-pauze/stop Cette touche sert à lancer le programme sélectionné ou à suspendre ou annuler un programme en cours. Appuyez brièvement sur cette touche pour suspendre un programme. Appuyez à nouveau sur la touche pour relancer le programme. Si vous ne relancez pas le programme dans les 3 minutes, l’appareil s’arrête automatiquement. www.domo-elektro.be B3971 23 FR Pour mettre fin à un programme, maintenez la touche appuyée pendant quelques secondes jusqu’à ce que vous entendiez un bip. I. Home Made Une touche rapide pour le programme Home Made. Voir « Configurer Home Made » sous la rubrique utilisation. Appuyez sur Start-pauze/stop pour confirmer le programme. PROGRAMMES Temps correspondants aux programmes: Programme 500 g 750 g 1000 g 1. Normal (basic) 3:05 3:10 3:15 2. Français (french) 3:35 3:40 3:45 3. Pain complet (whole wheat) 4:05 4:10 4:15 4. Sucré (sweet) 3:35 3:40 3:45 5. Riz (rice) 2:50 2:55 3:00 6. Sans gluten (gluten free) 3:05 3:10 3:15 7. Rapide (quick) 2:10 2:15 2:20 8. Fruits 3:05 3:10 3:15 9. Cake 2:20* 10. Sandwich 3:00 3:05 3:10 11. Pain aux raisins/noix (Raisin/nut bread) 3:05 3:10 3:15 12. Seigle (Rye) 4:05 4:10 4:15 13. Knead (pétrissage) 0:08* 14. Pâte (dough) 1:30* 15. Brioche 3:35 3:40 3:45 16. Cuisson (bake) 0:30* 17. Home Made -- -- -18.Italien (Italian) 3:05 3:10 3:15 * Si vous choisissez un de ces programmes, vous ne pouvez pas choisir le poids. Le temps s’affiche sur l’écran en minutes et en secondes. P.ex: programme 1, normal, 750 grammes; dure 3 heures 10 minutes. 1. Normal (basic) Voici le programme le plus souvent utilisé pour faire du pain blanc. 2. Français (french): Le temps de pétrissage et de levage de la pâte est plus long que celui du programme “normal”. Vous obtiendrez alors une croûte plus croquante et une texture plus légère. 3. Pain complet (whole wheat) Ce programme convient à la préparation des pains plus lourds tels que le pain complet et le pain aux graines multiples. En général, ces pains seront plus petits qu’un pain blanc, à cause du poids plus élevé de la farine. Il est préférable de ne pas utiliser la fonction de démarrage différé avec ce programme; elle pourrait conduire à de moins bons résultats. 24 B3971 5. Riz (rice) Utilisez ce programme pour préparer un pain à base de farine de riz. Après le pétrissage, la pâte aura le temps de lever avant la cuisson. La croûte d’un pain au riz est plus fine et plus souple qu’un pain normal. FR 4. Sucré (sweet) Ce programme est adapté à la préparation de pain aux raisins, de craquelin, de pain au chocolat, etc. 6. Sans gluten (gluten free) Le programme pour préparer un pain sans gluten. La pâte du pain sans gluten est plus humide et plus liquide. C’est pourquoi il faut éviter le pétrissage ou le levage trop long de la pâte. Le temps de cuisson, en revanche, est plus long. Pour ce programme, il est déconseillé d’utiliser la programmation différée, car le résultat serait moins bon. Il est préférable d’ajouter tous les ingrédients dès le début. 7. Rapide (quick) Pour le pétrissage, la montée de la pâte et la cuisson du pain avec levure chimique. Le résultat est un plus petit pain, de texture plus ferme. Mélangez de préférence les ingrédients à l’aide d’une cuillère en bois avant d’appuyer sur « Start ». 8. Fruits Utilisez le distributeur pour l’ajout d’ingrédients comme les raisins secs ou autres fruits secs. La machine ajoutera les ingrédients dans le distributeur au bon moment. Si vous souhaitez ajouter des fruits frais ou plus humides, il est préférable de les verser directement dans la cuve lorsque le signal retentit. 9. Cake Pour des pains préparés à l’aide de levure chimique. Les pains cuits avec ce programme seront plus petits et plus compactes. Si vous désirez faire un cake, nous vous conseillons de mettre les ingrédients dans le moule. Programmez ensuite la machine et, avant d’appuyer sur la touche ‘start/stop’, remuez d’abord un peu les ingrédients à l’aide d’un cuiller en bois afin de favoriser le pétrissage. Vous ne pouvez pas choisir le poids. Ce programme ne permet pas de choisir le poids soi-même. 10. Sandwich pour faire un pain blanc très léger, p.ex. pour les sandwichs. Attention: vous ne pouvez pas programmer la couleur de la croûte, cela se fait automatiquement. 11. Pain aux raisins/noix (Raisin/nut bread) Utilisez le distributeur pour l’ajout d’ingrédients secs comme les raisins secs ou les oléagineux. La machine ajoutera les ingrédients dans le distributeur au bon moment. 12. Seigle (Rye) Ce programme est idéal pour les pains à base de céréales plus lourdes comme le seigle. Le pain sera aussi plus ferme et plus lourd qu’un pain normal. 13. Knead (pétrissage) Ce programme sert uniquement à pétrir la pâte, sans cuisson ni levage. Utilisez ce programme pour pétrir une pâte à pizza, par exemple. Les touches Time + et Time - servent à adapter le temps de pétrissage. 14. Pâte (dough) Ce programme sert uniquement à pétrir la pâte et à la laisser lever. www.domo-elektro.be B3971 25 FR 15. Brioche Ce programme convient pour les pains nécessitant l’ajout d’ingrédients plus riches en sucre, en matières grasses et en protéines (par exemple, le chocolat, le sucre, etc.) Ces ingrédients donnent une croûte plus foncée. La phase de programme Levage prendra davantage de temps pour un résultat léger et aéré. 16. Cuisson (bake) pour les pâtes tout prêtes, p.ex. pâtes que vous aviez déjà faites d’avance. Ce programme sert à l’achèvement, à la cuisson de cette pâte. Vous pouvez aussi réchauffer un peu du pain déjà cuit. 17. Home Made Cette touche vous sert à configurer vous-même la durée des phases de programme. Voir « Configurer Home Made » sous la rubrique utilisation. 18. Italien (Italian) Avec ce programme, préparez un délicieux pain méridional. Il permet l’ajout d’ingrédients comme des herbes, des tomates séchées, des olives, etc. MODE D’EMPLOI 1. Enlevez le moule de la machine en tournant celui-ci un quart de tour dans le sens inverse des aiguilles d’une montre et le retirant de la machine, en haut et par la poignée. 2. Placez le crochet pétrisseur (joint) sur l’axe du moule. Le crochet doit être installé d’une manière correcte et minutieuse, de manière à ce que tous les ingrédients soient convenablement mélangés et pétris. 3. Mettez les ingrédients dans le moule à pain de la manière suivante et dans l’ordre suivant: · Eau / lait · Beurre / huile · Eventuellement des œufs · Sel (mettez le sel d’une côté) · Sucre (mettez le sucre de l’autre côté) · Farine · Levure (dans un petit trou au milieu) ! Attention! Veillez à ce que la levure n’entre pas en contact avec le sel, le sucre ou l’eau, sinon la pâte risque de ne pas lever convenablement parce que la levure risque a être activée avant que les ingrédients ne soient suffisamment mélangés et pétris. Les ingrédients supplémentaires, comme les noix, herbes, fruits secs, etc. peuvent être versés dans le distributeur ou ajoutés par la suite. Voir la rubrique « Ajout d’ingrédients ». 4. Retirez tous les restes des ingrédients sur la surface externe du moule à pain. Placez le moule de nouveau dans la machine. Tournez le moule de cuisson dans le sens horlogique jusqu’à ce qu’il s’enclique. 5. Refermez le couvercle. 6. Branchez la fiche dans la prise de courant. 7. Réglez le programme désiré à l’aide de la touche “menu”. Chaque introduction est confirmée par un bip sonore. 8. Utilisez la touche Color pour déterminer la couleur de la croûte. Vous avez le choix entre clair, moyen ou foncé. Configurez la taille du pain (500 g, 750 g ou 1 000 g) avec la touche Weight. 9. Réglez éventuellement la minuterie à retardement. 26 B3971 11. 12. 13. Appuyez sur la touche ‘start-pauze/stop’. Les points doubles se mettent à clignoter, indiquant que la machine s’est mise en marche. Quand vous avez réglé la minuterie à retardement, le programma ne commencera qu’après que le temps de retard programmé s’est écoulé. Quand le pain est prêt, la machine émet un bip. L’écran affiche 0:00. Appuyez sur la touche Startpauze/stop et maintenez-la appuyée pendant quelques secondes. La machine émet un autre bip pour confirmer que vous avez arrêté le programme. Si vous n’arrêtez pas le programme avec cette touche, la fonction Maintien au chaud s’enclenchera pendant 60 minutes. Débranchez l’appareil et ouvrez le couvercle de la machine. Retirez la cuve avec des gants de cuisine. Laissez refroidir le pain dans le moule pendant 10 à 15 minutes. Maintenez le moule à pain alors à l’envers au-dessus de la table de travail en le secouant doucement pour faire sortir le pain du moule. Ne placez jamais le pain et le moule à pain chaud sur la surface externe de l’appareil, ni sur une nappe ou sur une toile cirée en plastique. Si le pain ne se défait pas immédiatement, faites tourner l’axe avec précaution sur le dessous du moule à pain jusqu’à ce que le pain se détache. N’utilisez jamais d’objets tranchants pour retirer le pain pour éviter d’endommager le revêtement antiadhésif de la cuve. Si vous enlevez le pain de la machine et un crochet de pétrissage se détache en même temps que le pain, faites attention pour le retirer doucement du pain. Laissez éventuellement refroidir encore un peu, de sorte que vous puissiez après enlever le crochet avec les mains. Il est recommandé d’encore laisser refroidir le pain pendant 15 à 20 minutes avant de le couper. FR 10. FONCTION MAINTIEN AU CHAUD Si vous n’êtes pas à la maison à temps, la machine à pain continue à chauffer pendant 60 minutes supplémentaires. Ce temps n’est pas compris dans la durée des programmes. Si vous souhaitez interrompre ce réglage, appuyez quelques secondes sur la touche ‘start-pauze/stop’. Si le pain reste dans la machine à pain pendant plus d’une heure, il devient humide. Rincez immédiatement le moule à l’eau chaude après en avoir enlevé le pain pour éviter que les crochets pétrisseurs restent collés à l’axe. Ne remettez pas la machine à pain en marche si la machine n’est pas encore refroidie ou si elle est chaude. AJOUT D’INGRÉDIENTS Pendant le processus de pétrissage des programmes suivants, un bip est émis après le pétrissage : Normal, Français, Complet, Sucré, Riz, Sans gluten, Rapide, Fruits, Cake, Raisins/Noix, Seigle, Brioche, Italien. Ce bip indique que vous pouvez ajouter des ingrédients tels que : raisins secs, noix, graines, etc. Vous pouvez verser les ingrédients dans le distributeur ou les ajouter manuellement. Distributeur Ouvrez le distributeur en faisant glisser le couvercle vers la gauche. Ajoutez les ingrédients. Fermez le couvercle. Les ingrédients dans le distributeur seront automatiquement ajoutés au pain après le pétrissage et le levage. Attention : · Ne mettez pas d’ingrédients humides, liquides ou en poudre dans le distributeur. · Ne remplissez jamais trop le distributeur. · Il est préférable de hacher plus finement les grosses noix avant de les verser dans le distributeur. · Avant de verser des ingrédients dans le distributeur, assurez-vous que la valve à l’intérieur de l’appareil est bien fermée. www.domo-elektro.be B3971 27 FR Manuel Vous pouvez également ajouter les ingrédients manuellement. Lorsque vous entendez le signal, mettez le programme sur pause, ouvrez le couvercle, ajoutez les ingrédients, puis fermez le couvercle et appuyez à nouveau sur la touche start. Cette méthode manuelle est préférable pour : les ingrédients humides ou liquides, les ingrédients en poudre, les grandes quantités. FONCTION MÉMOIRE Si l’appareil s’éteint à cause d’une coupure de courant, la fonction Mémoire fonctionnera pendant 10 minutes. Vous n’aurez donc pas besoin de redémarrer le programme lorsque le courant sera rétabli. Si la panne dure plus de 10 minutes, le programme sera annulé. CONFIGURER LA FONCTION HOME MADE La touche « Home Made » est réservée pour votre programme de cuisson personnalisé. Elle vous permet de configurer vous-même toutes les phases du programme. Si vous souhaitez sauter certaines phases, réglez leur durée sur 0:00. Attention : les réglages de cette touche ne seront pas sauvegardés si l’appareil est débranché. 1. 2. 3. 4. Appuyez sur la touche « Home Made » ou sélectionnez le programme 17 avec la touche « Menu ». Appuyez à nouveau sur la touche « Home Made » pour démarrer la programmation. L’affichage du temps de cuisson et le pictogramme de la phase de programme clignotent sur l’écran. Voir le tableau ci-dessous pour les phases de programme et le réglage par défaut du temps de cuisson. Pour chaque phase, réglez le temps souhaité en utilisant les touches Time + (augmenter le temps) et Time - (réduire le temps). Confirmez le temps de cuisson en appuyant sur la touche « Home Made ». Lorsque toutes les phases sont configurées, la durée totale du programme s’affiche sur l’écran. La durée totale standard est de 3 heures. Ensuite, vous pouvez lancer le programme configuré en appuyant sur la touche Start. Si vous appuyez sur la touche Start pendant la configuration des phases, la programmation sera arrêtée. Si vous le souhaitez, vous pouvez également lancer ce programme en différé, voir « programmation différée ». Phases de programme 28 Paramètres standards Plage horaire ajustable Pétrissage 1 0:10 1-30 min. Repos 1 0:03 0-30 min. Pétrissage 2 0:05 0-30 min. Repos 2 0:10 0-30 min. Pétrissage 3 0:20 0-25 min. Levage 1 0:42 0-60 min. Levage 2 0:40 0-60 min. B3971 Pictogramme 0:00 0-60 min. Cuisson 0:50 0-80 min. Fonction Maintien au chaud 1:00 0-60 min. FR Levage 3 ENLEVEZ LE CROCHET DE PÉTRISSAGE AVANT LA CUISSON Après le dernier pétrissage de la pâte, vous pouvez enlever le crochet pétrisseur. 1. Appuyez brièvement sur ‘start-pauze/stop’ pour interrompre la cuisson ou retirez la fiche électrique de la prise murale. 2. Ouvrez le couvercle et retirez le moule. Retirez la pâte avec les mains enduites de farine et enlevez le crochet pétrisseur. 3. Remettez la pâte dans le moule et fermez le couvercle. 4. Rebranchez la fiche électrique dans la prise murale et appuyez sur le bouton ‘start-pauze/stop’. Le programme de cuisson continue. UTILISATION DE LA MINUTERIE À RETARDEMENT Vous pouvez programmer l’appareil pour que votre pain soit prêt quand vous le voulez. · Calculez le laps de temps entre le moment où vous lancez le programme et l’heure à laquelle vous voulez que votre pain soit prêt. La machine à pain calcule alors automatiquement la durée des cycles du programme. · Appuyez sur les touches pour augmenter ou diminuer le temps par tranches de 10 minutes. · L’écran affiche le pictogramme Sablier. · La programmation différée n’est pas possible pour le pétrissage ni pour la cuisson. Si vous appuyez sur les touches Time + et Time - dans ces programmes, la durée du programme sera ajustée. Exemple : Il est 9:00 heures le matin et vous désirez du pain frais pour 17:00 heures l’après-midi. Placez tous les ingrédients dans le moule à pain. Placez le moule dans la machine à pain. Fermez le couvercle et appuyez sur la touche de sélection pour régler le mode (“menu”). Appuyez sur la touche Couleur pour régler la couleur de la croûte et choisissez le poids souhaité du pain. Appuyez sur la touche Time + jusqu’à ce que 8:00 s’affiche sur l’écran. En effet, 8 heures se seront écoulées entre le moment où vous aurez appuyé sur la touche Start et celui où le pain doit être prêt (17 h). Appuyez sur la touche Start Le double point sur l’écran clignote et le pictogramme Sablier s’affiche. Le décompte se met en marche jusqu’à ce qu’il soit temps pour la machine à pain de lancer le pétrissage. La machine à pain va maintenant exécuter l’ensemble du programme configuré pour que le pain soit prêt à l’heure choisie. Attention : n’utilisez pas le programme avec minuterie lorsque vous employez des ingrédients périssables : lait frais, œufs, yaourt, fromage, fruits frais… CONSEIL · Pesez toujours avec la plus grande précision possible les ingrédients dont vous avez besoin et veillez à ce que ceux-ci soient à température ambiante. www.domo-elektro.be B3971 29 · FR · · · Vous pouvez facilement contrôler la fraîcheur de la levure par moyen du test suivant: laissez dissoudre 1 cuillérée à thé de sucre dans une demi-tasse d’eau tiède et ajoutez à cette mélange encore une cuillerée à thé de levure. Si la mélange se met à bouillonner et pétiller après quelques minutes, cela affirme que la levure est fraîche. Le sel freine le fonctionnement de la levure et le sucre favorise ce fonctionnement. Si vous ne pouvez pas utiliser un de ces 2 ingrédients à cause d’un régime alimentaire, vous devez également abandonner l’autre. Vous aurez alors du pain sans sucre et sans sel. Le pain que vous faites vous-même ne contient aucun agent conservateur et il a donc une durée de conservation limitée. Si vous laissez votre pain suffisamment refroidir et vous l’emballez ensuite hermétiquement, vous pouvez le conserver pendant quelques jours. Il va de soi que vous pouvez également congeler le pain, ce qui vous permet de le consommer plus tard. Graissez l’axe de la cuve avec un peu de beurre pour que le crochet pétrisseur se détache plus facilement. NETTOYAGE ET ENTRETIEN · · · · Avant de commencer à nettoyer, assurez-vous que la machine à pain soit bien débranchée et entièrement refroidie et que la fiche de l’appareil soit retirée de la prise de courant. Nettoyez l’appareil en profondeur après chaque utilisation. Si la cuve, l’axe dans la cuve et le crochet pétrisseur ne sont pas propres avant utilisation, cela risque d’affecter le fonctionnement et la durée de vie de votre machine à pain. Séchez soigneusement l’appareil et tous ses éléments. Laissez le couvercle ouvert pendant une demiheure pour laisser sécher suffisamment tous les éléments et pour que l’appareil puisse être rangé ou réutilisé. ! Attention : ne jamais immerger l’appareil dans l’eau. EXTÉRIEUR Nettoyez l’extérieur et le couvercle de la machine à l’aide d’un chiffon humide ou d’une éponge. Enlevez le moule avant le nettoyage. Si nécessaire, vous pouvez nettoyer l’extérieur de l’appareil avec un liquide vaisselle doux. INTÉRIEUR Nettoyez prudemment l’intérieur de votre machine avec un chiffon légèrement humide. Faites attention à l’élément de chauffe en nettoyant la machine à pain. LE MOULE À PAIN Retirez la cuve de la machine en la tirant droit vers le haut par la poignée et en la tournant d’un quart de tour dans le sens inverse des aiguilles d’une montre. Vous pouvez nettoyer le moule avec de l’eau chaude. Faites attention à ne pas endommager le revêtement antiadhésif. Si vous ne parvenez pas à retirer le crochet de pétrissage du moule à pain, laissez alors le moule à pain complètement refroidir. Versez ensuite dans le moule une petite quantité d’eau chaude, suffisante pour recouvrir le crochet. L’eau ramollira tous les résidus collants et vous pourrez alors retirer le crochet. N’utilisez jamais des produits d’entretien ou des brosses à vaisselle, puisque ceux-ci endommagent le moule. Le moule ne peut pas être nettoyé dans la lave-vaisselle. 30 B3971 Problème Solution Je ne parviens pas au résultat souhaité. · · · · Puis-je vérifier si la pâte est bonne pendant le processus ? La composition de la pâte est très importante pour obtenir un bon résultat. L’utilisation de marques de farine différentes peut également conduire à des résultats différents. La pratique vous permettra d’apprendre à utiliser l’appareil. Nous vous conseillons d’essayer la recette de base. Une autre solution est d’utiliser un mélange pour pain prêt à l’emploi. Si cette méthode ne fonctionne pas, le mieux est de prendre contact avec notre service client. Les ingrédients n’ont pas été pesés avec précision. Les ingrédients ne sont pas frais. Les ingrédients ne sont pas à température ambiante. FR QUESTIONS FRÉQUENTES La pâte doit ressembler à une boule ronde, élastique et lisse. Ouvrez le couvercle après 5 à 10 minutes (pendant le pétrissage) et touchez avec vos doigts la partie supérieure de la boule. Un peu de pâte doit rester collée à vos doigts. Si la pâte colle trop fort, elle est trop humide et vous devez ajouter un peu de farine. Si elle ne colle pas du tout, elle est trop sèche. Ajoutez alors un petit peu d’eau. N’ouvrez pas le couvercle pendant que la pâte lève, sans quoi votre pain risque de s’affaisser. Je souhaite cuire plusieurs Laissez l’appareil refroidir 20 minutes avec le couvercle ouvert. Si l’appareil pains l’un à la suite de est chaud, la levure commencera à faire effet trop vite, ce qui donnera un l’autre. mauvais résultat. Le pain est retombé. · · · · Le pain n’est pas assez cuit au milieu. www.domo-elektro.be S’il apparaît que votre pain est retombé de tous les côtés, cela signifie que la pâte était trop humide. Diminuez la quantité d’eau ajoutée. Lorsque vous utilisez des fruits ou légumes en conserve, laissez-les d’abord égoutter et sécher correctement avant de les utiliser. Ils contiennent un excédent de liquide, car ils ont trempé pendant un long moment. Vous pouvez essayer d’utiliser une farine plus légère. Il se peut également qu’elle soit trop levée. La pâte a tellement levé qu’elle ne peut réussir le processus de levage. Essayez de réduire la quantité de levure ajoutée, 1 à 2grammes. Si la pâte levée est trop dure, il se peut qu’elle ait débordé de la plaque à pâtisserie. Débranchez la fiche et laissez l’appareil refroidir. Nettoyez ensuite l’élément chauffant. Si l’intérieur du pain n’est pas suffisamment cuit, le problème peut venir du type de farine utilisé. Ce problème survient généralement avec des farines plus lourdes comme la farine de seigle ou les farines complètes. Essayez d’ajouter un processus de pétrissage supplémentaire lorsque vous utilisez ces types de farine. Arrêtez l’appareil dès que la machine à pain a terminé le premier processus de pétrissage. Rallumez l’appareil et appuyez sur « démarrer » : il recommencera à pétrir, ce qui permettra à la pâte d’intégrer une plus grande quantité d’air. B3971 31 Vous avez laissé le pain trop longtemps avec la fonction de maintien de la température dans la machine. L’eau s’évapore, donnant ainsi un fond plus épais. Éteignez l’appareil dès que le programme est terminé. Le pain a débordé. · · FR Le fond du pain est trop épais. · Vous utilisez une trop grande quantité de levure. L’activation de la levure a été trop forte, par ex. en raison d’un excès de sucre ou d’une température trop élevée. Vous avez utilisé trop de pâte. N’utilisez pas plus de 1 000 g. H:HH s’affiche à l’écran. L’appareil est encore trop chaud. Laissez d’abord refroidir l’appareil. E:EO s’affiche à l’écran. Il y a un problème avec la sonde de température. Renvoyez l’appareil à notre service après-vente. Pourquoi ne puis-je pas ajouter d’ingrédient supplémentaire au début du programme ? Les ingrédients supplémentaires (tels que des raisins ou des noix) seront broyés et le pain ne sera pas pétri correctement. Cet ajout influencera en outre le levage. N’intégrez les ingrédients supplémentaires qu’au moment où l’appareil sonne, après le pétrissage / le levage. Puis-je remplacer l’eau par du lait ? Bien sûr ! Veillez toujours à ce que le volume complet de liquide soit exact. Le rapport lait/eau ne fait aucune différence. La croûte est tantôt plus claire, tantôt plus sombre. Vous pouvez choisir sa couleur en utilisant la touche « color ». Les préparations plus sucrées donneront une croûte plus sombre. La machine à pain pétrit plus lentement que d’habitude. Ce cas peut survenir si la pâte est lourde, ce qui augmente la puissance dont le moteur a besoin pour tourner. Ce n’est toutefois pas un problème pour la machine. Ajoutez une cuillère à soupe de liquide. Le mélangeur est bloqué dans la cuve. Retirez le pain de la cuve. Remplissez ensuite la cuve d’eau chaude, puis laissez tremper un quart d’heure. La pâte accrochée se détachera. Il y a de la condensation à l’intérieur du hublot. C’est un phénomène normal. Cela est dû à la chaleur. J’ai utilisé un mélange prêt à l’emploi, mais j’ai quand même raté mon pain. Avant d’envoyer l’appareil en réparation, nous vous conseillons de réessayer la recette de base. Un mélange prêt à l’emploi peut parfois contenir aussi des ingrédients qui donneront un moins bon résultat. MISE AU REBUT Ce symbole sur le produit ou son emballage indique que ce produit ne peut être traité comme déchet ménager. Il doit plutôt être remis au point de ramassage concerné, se chargeant du recyclage du matériel électrique et électronique. En vous assurant que ce produit est éliminé correctement, vous favorisez la prévention des conséquences négatives pour l’environnement et la santé humaine qui, sinon, seraient le résulat d’un traitement inapproprié des déchets de ce produit. Pour obtenir plus de détails sur le recyclage de ce produit, veuillez prendre contact avec le bureau municipal de votre région, votre service d’éliminiation des déchets ménagers ou le magasin où vous avez acheté le produit. L’emballage est recyclable. Traitez l’emballage écologiquement. 32 B3971 GARANTIE Sehr geehrter Kunde, Sämtliche unserer Produkte unterliegen einer strengen Qualitätskontrolle, bevor Sie Ihnen angeboten werden. Sollten dennoch Probleme mit Ihrem Gerät auftreten, bedauern wir dies zutiefst. Wir möchten Sie in diesem Fall bitten, unseren Kundenservice zu kontaktieren. Unsere Mitarbeiter helfen Ihnen gern weiter! [email protected] DE +32 14 21 71 91 Montag – Donnerstag: 8:30 Uhr – 12:00 Uhr und von 13:00 Uhr – 17:00 Uhr Freitag: 8:30 Uhr – 12:00 Uhr und von 13:00 Uhr – 16:30 Uhr Dieses Gerät hat eine Garantiefrist von 2 Jahren ab dem Kaufdatum. Die Garantie für Zubehör und Verschleißteile beträgt nur 6 Monate. Während der Garantiezeit übernimmt der Hersteller die vollständige Verantwortung für Mängel, die nachweislich auf Material- oder Konstruktionsfehler zurückzuführen sind. Wenn derartige Mängel auftreten, wird das Gerät wenn nötig ausgetauscht oder repariert. Die Garantiezeit von 2 Jahren beginnt in diesem Moment nicht erneut, sondern sie läuft bis 2 Jahre nach dem Kaufdatum weiter. Die Garantie wird auf der Grundlage des Kassenbons gewährt. Die Garantie auf Accessoires und Verschleißteile beträgt 6 Monate. Die Garantie und die Verantwortung/Haftung des Lieferanten und Herstellers entfallen automatisch in den folgenden Fällen: · Bei Nichtbeachtung der Anweisungen in dieser Bedienungsanleitung. · Bei falschem Anschluss, z.B. bei einer zu hohen Stromspannung. · Bei falscher, grober oder abnormaler Verwendung. · Bei unzureichender oder falscher Wartung. · Bei vom Verbraucher oder von nicht ermächtigten Dritten vorgenommenen Reparaturen oder Änderungen am Gerät. · Bei der Verwendung von Ersatzteilen oder Accessoires, die nicht vom Lieferanten / Hersteller empfohlen oder geliefert werden. SICHERHEITSVORKEHRUNGEN Wenn Sie elektrische Geräte verwenden, müssen folgende Sicherheitshinweise beachtet werden: · Lesen Sie diese Hinweise sorgfältig durch. Bewahren Sie diese Bedienungsanleitung zum späteren Nachschlagen auf. · Entfernen Sie vor dem ersten Gebrauch alle Verpackungsmaterialien und möglichen Werbeaufkleber. Sorgen Sie dafür, dass Kinder nicht mit den Verpackungsmaterialien spielen. · Dieses Gerät eignet sich für den Einsatz im Haushalt und in ähnlichen Umfeldern, zum Beispiel in folgenden Bereichen: · Küchenbereich für Mitarbeiter von Geschäften, Büros und anderen ähnlichen beruflichen Umfeldern. · Bauernhöfe · Hotel- und Motelzimmer und andere Bereiche mit wohnungsähnlichem Charakter · Gästezimmer oder Ähnliches www.domo-elektro.be B3971 33 · DE · Das Gerät kann während des Gebrauchs warm werden. Das elektrische Kabel von heißen Teilen entfernt halten und das Gerät nicht abdecken. · · · · · · · · · · · · · · · · · · · 34 Diese Gerät darf von Kindern ab 16 Jahren und Menschen mit körperlichen oder sensorischen Behinderungen oder Menschen mit eingeschränkten geistigen Fähigkeiten oder mangelnder Erfahrung bzw. Sachkenntnis unter der Bedingung verwendet werden, dass diese Personen beaufsichtigt werden oder sie eine Anleitung zur sicheren Verwendung des Geräts erhalten haben und sich der Gefahren bei der Verwendung des Geräts bewusst sind. Kinder dürfen nicht mit dem Gerät spielen. Die Wartung und Reinigung des Geräts darf nicht durch Kinder ausgeführt werden, außer diese sind älter als 16 Jahre und werden von einem Erwachsenen beaufsichtigt. Achtung: das Gerät darf nicht mit einer externen Zeitschaltuhr oder Fernbedienung gebraucht werden. Vor der Benutzung prüfen, ob die Spannung, die auf dem Gerät angegeben ist, mit der Spannung Ihres Stromnetzes übereinstimmt. Lassen Sie das Netzkabel nicht über den Tisch oder die Anrichte hängen, oder in Kontakt mit heißen Oberflächen kommen. Benutzen Sie das Gerät niemals, wenn die Kabelschnur oder der Stecker beschädigt ist, nach beeinträchtigtem Funktionieren des Gerätes, oder wenn das Gerät beschädigt ist. Bringen Sie in solchen Fällen das Gerät zur nächsten qualifizierten Servicestelle zur Überprüfung und/oder Reparatur. Die Verwendung von Zubehör, das nicht vom Hersteller empfohlen oder verkauft wird, besteht die Gefahr von Brand, elektrischen Schlages oder von Verletzungen. Ziehen Sie den Stecker aus der Steckdose, wenn das Gerät nicht im Einsatz ist, Einzelteile montiert oder demontiert werden, oder das Gerät gereinigt wird. Ziehen Sie den Stecker direkt am Stecker selber und nicht an der Kabelschnur aus der Steckdose. Lassen Sie das im Betrieb befindliche Gerät nicht unbeaufsichtigt. Stellen Sie das Gerät nicht in der Nähe oder auf einer Gasflamme, einer elektrischen Platte oder an einer Stelle ab, auf der es in Kontakt mit einem Elektroofen oder einem anderen heißen Geräten kommen kann. Benutzen Sie das Gerät nicht im Freien. Benutzen Sie das Gerät ausschließlich für den Zweck, für den es gedacht ist. Stellen Sie das Gerät immer auf eine stabile, flache und trockene Oberfläche. Das Gerät ist nur auf den privaten Gebrauch ausgelegt. Der Hersteller ist nicht verantwortlich für Unfälle, die als Folge von unsachgemäßem Gebrauch des Geräts oder Nichtbefolgen der in dieser Anleitung aufgeführten Regeln entstehen. Sämtliche Reparaturen, abgesehen von der gewöhnlichen Pflege, sind durch den Hersteller oder dessen Kundendienst zu übernehmen. Das Gerät, das Kabel oder den Stecker niemals in Wasser oder in andere Flüssigkeiten tauchen. Netzkabel vor scharfen Kanten, heißen Gegenständen oder anderen Wärmequellen schützen. Das Gerät nicht in die Nähe entflammbarer Materialien oder explosiver und/oder selbstzündender Gase stellen. Die Lüftungsroste des Geräts dürfen nicht abgedeckt sein. Verlängerungskabel dürfen nur verwendet werden, wenn der Netzstrom und die Spannung gleich oder höher als die des Brotbackautomaten sind. Das Verlängerungskabel sollte so angeschlossen werden, dass niemand über das Kabel stolpern kann oder versehentlich daran ziehen könnte. Keine Gegenstände auf das Gerät stellen und das Gerät, während es in Betrieb ist, nicht bedecken, um Brandgefahr zu vermeiden. B3971 Der Brotbackautomat kann warm werden. Nur die Handgriffe und die Knöpfe am Gerät berühren und, falls nötig, Ofenhandschuhe verwenden. Dafür sorgen, dass das Gerät vollständig abgekühlt ist und den Stecker aus der Steckdose entfernen, bevor Zubehörteile im Gerät installiert oder daraus entfernt werden. Der Brotbackautomat nicht umstellen, wenn das Gerät warme Zutaten oder Flüssigkeiten enthält. Die drehenden Knethaken nicht berühren, wenn das Gerät in Betrieb ist, um Verletzungsgefahr zu vermeiden. Wird das Gerät nicht verwendet oder gereinigt, ist es vollständig auszuschalten und sicherheitshalber sollte der Stecker aus der Steckdose gezogen werden. Der Brotbackautomat nicht zur Aufbewahrung von Lebensmitteln oder Küchenbesteck verwenden. Das Gerät nicht mit einem Scheuerschwamm reinigen. Lose Teile des Schwammes könnten mit den elektrischen Teilen in Kontakt kommen und Stromstösse verursachen. Der Automat nicht zum Trocknen von Lebensmitteln oder anderen Gegenständen verwenden. Das Gesamtgewicht inklusiv aller Zutaten sollte 1000 Gramm nicht überschreiten. Benutzen Sie nicht mehr als 715 g Mehl pro Brot. Benutzen Sie nicht mehr als 22 g frische Hefe oder 4+1/4 Teelöffel Trockenhefe pro Brot. Benutzen Sie nicht mehr als max. 460 ml pro Brot. · · · · · · · · · · · DE · TEILE 1. 2. 3. 4. 5. 6. 7. 8. 9. 10. Deckel Sichtfenster Verteiler für zusätzliche Zutaten Bedienfeld Knethaken Backform Gehäuse Messbecher Messlöffel Haken zum Entfernen des Knethakens 8 9 1 3 4 2 5 6 7 10 VOR DER ERSTEN INBETRIEBNAHME · · · · Entfernen Sie vor dem ersten Gebrauch alle Verpackungsmaterialien und möglichen Werbeaufkleber. Machen Sie dem Brotbackautomaten, die Backform und den Knethaken mit einem feuchten Tuch sauber. Die Backform und der Knethaken sind mit einer Anti-Anbackschicht bedeckt, darum dürfen Sie diese Artikel niemals mit Reinigungsmitteln, einer Abwaschbürste oder einem Schwamm säubern. Verwenden Sie hierfür immer ein feuchtes Tuch. Das reicht aus, um das Gerät sauber zu halten. Die Schutzfolie vom Display entfernen. Ihr Brotbackautomat kann bei der ersten Verwendung etwas rauchen, das ist vollkommen normal, schadet nichts und wird von selbst verschwinden. Es wird empfohlen, vor der ersten Benutzung einmal mit einer leeren Backform mit dem Programm BAKE (Backen) zu backen. Dies 10 Minuten lang. Danach alle Teile abkühlen lassen und erneut reinigen. www.domo-elektro.be B3971 35 · Vor dem ersten Gebrauch die Antihaftbeschichtung der Backform und des Knethakens mit etwas Butter oder Margarine einfetten. GEBRAUCH DE GRUNDREZEPT Bei dem unten stehenden Rezept handelt es sich um ein Rezept für ein einfaches Weißbrot. · 630 g Mehl · 370 ml Wasser · 5 g Trockenhefe · 1 tl Salz · 1 el Zucker DIE BESTANDTEILE Die wichtigsten Faktoren für das Backen eines gelungenen Brotes sind die Qualität, die Frische und das korrekte Abwägen ihrer Bestandteile. Achtung: Überschreiten Sie nicht die maximale Füllmenge Ihrem Brotbackautomaten! (1000 g) Benutzen Sie deshalb pro Backprozess nicht mehr als die angegebenen maximalen Mengenangaben der folgenden Zutaten: Mehl: max. 715 g Hefe: 22 g frische Hefe oder 4+1/4 Teelöffel Trockenhefe Wasser: max. 460 ml MEHL Mehl ist der Grundbestandteil von Brot. Das Gewicht des Mehls unterscheidet sich von Sorte zu Sorte. Darum ist es absolut erforderlich, die richtige Menge mit einer Waage abzumessen. Tipp: Achten Sie beim Kaufen von Mehl auf den Text auf der Verpackung. Auf ihr muss stehen, dass das Mehl unter anderem für das Brotmachen geeignet ist. GLUTEN Gluten befindet sich von Natur aus in die meiste Mehl und fördern das Aufgehen des Brotes. HEFE Hefe ist ein Mikroorganismus, der auf verschiedenen pflanzlichen Nahrungsmitteln wächst. Hefe hat die Fähigkeit, Zucker in Alkohol und Kohlensäuregas (Kohlendioxid) umzusetzen, wodurch sie sich besonders schnell vermehrt. Auch ideal, um den Teig aufgehen zu lassen und ihn leichter und besser verdaulich zu machen. Wir empfehlen, in dem DOMO-Brotbackautomaten Trockenhefe zu verwenden. Diese (körnige) Hefe ist einfacher zu verarbeiten, ist länger haltbar als Frischhefe und ergibt ein konstanteres Backergebnis als Frischhefe. SALZ Salz sorgt nicht nur für einen bestimmten Geschmack im Brot, sondern regelt auch die Aktivität von Hefe, macht den Teig solide und fest und verhindert, dass das Brot zu hart aufgeht. BUTTER/ÖL Butter und Öl ergeben einen besseren Geschmack des Brotes und machen das Brot weicher. Die Butter oder das Öl müssen auf Zimmertemperatur sein, bevor Sie die andere Zutaten hinzufügen. 36 B3971 WASSER Wenn das Mehl mit Wasser vermischt wird, bildet sich der Gluten und wird die Luft abgesättigt, so dass das Brot steigen kann. Bei normaler Umgebungstemperatur verwenden Sie lauwarmes Wasser (±20 à 25°C), um das Brot zu machen: kaltes Wasser aktiviert die Hefe nicht und warmes Wasser aktiviert die Hefe zu stark. MILCH Milch bringt die Brotkruste zum Bräunen, verbessert den Geschmack des Brotes, erhöht den Nährwert und verleiht seinem Inneren eine schöne sahnige Farbe. Wenn Sie Frischmilch verwenden, dann müsse Sie die Wassermenge natürlich senken, um das Niveau der Flüssigkeit im Gleichgewicht zu halten. Achtung: Verwenden Sie keine Frischmilch, wenn Sie den Backprozess mit der Zeitverzögerungsfunktion programmieren. Die Milch könnte sauer werden. DE ZUCKER Zucker ist die Nahrungsquelle für die Hefe und ein wichtiger Bestandteil für das Aufgehen des Teiges. Sie können normalen weißen Zucker, braunen Zucker, Sirup oder Honig verwenden. Das gibt dem Geschmack des Brotes eine sichere Mürbe, erhöht den Nahrungswert und trägt dazu bei, das Brot länger zu erhalten. Achtung: Verwenden Sie keinen groben Zucker oder Würfelzucker, für zum Beispiel Sauerbrot, da dieses die Anti-Anbackschicht der Backform beschädigt. ANDERE ZUTATEN Verwenden Sie immer frische Zutaten. Wenn Sie Nüsse, Sonnenblumenkerne, getrocknete Früchte oder dergleichen verwenden, empfehlen wir Ihnen, diese vorher in Wasser einweichen zu lassen, gut trocken zu tupfen und erst dann dem Teig hinzuzufügen. Achten Sie gut darauf, dass diese Zutaten nicht zu groß und zu scharf sind, um mögliche Beschädigungen der Anti-Anbackschicht zu vermeiden. BEDIENFELD Bedienung A. Menu: Programmauswahl B. Weight: Wählen Sie Gewicht (Größe) des Brotes C. Color: Bräunung der Kruste D. Time +: Zeit erhöhen E. Bake: Schnelltaste für das Programm Backen F. Knead: Schnelltaste für das Programm Kneten G. Time -: Zeit reduzieren H. Start- Pause/Stop: Ein-/Aus-Taste I. Home made: Schnelltaste für das Programm Home made www.domo-elektro.be A B C MENU WEIGHT COLOR D E F TIME + BAKE KNEAD G H I START HOME MADE TIME - PAUZE/STOP B3971 37 DE Display 1. Wählen Sie Gewicht (Größe) des Brotes 2. Programmauswahl 3. Timer 4. Programmphase: Kneten 5. Programmphase: Ruhen 6. Programmphase: Gehen 7. Programmphase: Heizen 8. Programmphase: Backen 9. Programmphase: Warmhalten 10. Programmphase: Bereit 11. Programmphase: Nummer der Phase 12. Verbleibende Zeit in Minuten 13. Bräunung der Kruste: hell, mittel, dunkel 14. Verriegelung des Bedienfeldes 1 2 3 7 4 8 5 9 6 10 12 11 13 14 A. Programmwahl (Menu) Diese Taste verwenden Sie, um das richtige Backprogramm auszuwählen. Jedes Mal, wenn Sie auf diese Taste drücken, hören Sie einen Piepton, und die Programmnummer ändert sich. Das Programm steht auf dem Display. B. Größe (Weight) Diese Taste verwenden Sie, um anzugeben, Brot von welchem Gewicht Sie in diesem Augenblick machen möchten. Sie können ein Brot von 500, 750 g oder 1000 g wählen. Tipp: Die Gesamtmenge der im Rezept angegebenen Zutaten ist ungefähr das Gewicht des Brotes, das Sie machen wollen. C. Krustenbräune (Color) Diese Taste verwenden Sie, um anzugeben, ob Sie die Kruste hell, mittel oder dunkel haben möchten. Tipp: Wenn Sie ein Rezept zum ersten Male ausprobieren, empfehlen wir Ihnen, die mittlere Krustenfarbe zu wählen. D. Time + und G. Time Mit diesen Tasten können Sie einen verzögerten Start auswählen und den Timer für bestimmte Programme einstellen. Bei anderen Programmen können Sie die Programmzeit anpassen. E. Bake Diese Taste ist eine Schnelltaste für das Programm Backen. Drücken Sie Start- Pause/Stop, um das Programm zu bestätigen. F. Knead Diese Taste ist eine Schnelltaste für das Programm Kneten. Drücken Sie Start- Pause/Stop, um das Programm zu bestätigen. 38 H. Start- Pause/Stop Mit dieser Taste starten Sie das gewählte Programm oder pausieren bzw. brechen ein laufendes Programm ab. Drücken Sie kurz auf diese Taste, um ein Programm zu pausieren. Drücken Sie die Taste erneut, um fortzufahren. Wenn Sie ein Programm nicht innerhalb von 3 Minuten wieder aufnehmen, wird der Vorgang automatisch beendet. B3971 Um ein Programm zu beenden, drücken Sie die Taste einige Sekunden lang, bis Sie einen Piepton hören. I. Home made Diese Taste ist eine Schnelltaste für das Programm Home made. Siehe „Home made einrichten“ unter dem Abschnitt Verwendung. Drücken Sie Start- Pause/Stop, um das Programm zu bestätigen. PROGRAMME DE Programmzeiten: Programme 500 g 750 g 1000 g 1. Normal (basic) 3:05 3:10 3:15 2. Französisch (french) 3:35 3:40 3:45 3. Vollkorn (whole wheat) 4:05 4:10 4:15 4. Süßes (sweet) 3:35 3:40 3:45 5. Reis (rice) 2:50 2:55 3:00 6. Glutenfrei (gluten free) 3:05 3:10 3:15 7. Schnell (Quick) 2:10 2:15 2:20 8. Fruit 3:05 3:10 3:15 9. Rührkuchen (Cake) 2:20* 10. Sandwich 3:00 3:05 3:10 11. Rosinen-/Nussbrot (Raisin/nut bread) 3:05 3:10 3:15 12. Roggen (Rye) 4:05 4:10 4:15 13. Kneten (knead) 0:08* 14. Teig (dough) 1:30* 15. Brioche 3:35 3:40 3:45 16. Backen (bake) 0:30* 17. Home made -- -- -18. Italienisch (Italian) 3:05 3:10 3:15 * Wenn Sie eines dieser Programme wählen, können Sie kein Gewicht wählen. Die Zeit, die auf dem Display steht, ist in Stunden und Minuten angegeben. Beispiel: Programm 1 , Normal, 750 g dauert 3 Stunden 10 Minuten. 1. Normal (basic) Dieses ist das am meisten verwendete Programm zum Herstellen von Weißbrot. 2. Französisch (french) Die Knetzeit und die Aufgehzeit sind länger als bei dem normalen Programm. Dadurch werden eine knusprigere Kruste und eine luftigere Textur erzielt. 3. Vollkorn (whole wheat) Dieses Programm ist das geeignetste Programm für das Herstellen von Schwarzbroten wie Vollkorn und Mehrkornbrot. Das Brot wird im Allgemeinen etwas kleiner sein als ein Weißbrot, da das Mehl schwerer ist. Bei diesem Programm sollte die Zeitvorwahl besser nicht benutzt werden, da dies zu weniger guten Ergebnissen führen kann. 4. Süßes (sweet) Dieses Programm ist geeignet für die Herstellung von Rosinenbrot, Zuckerbrot, Schokoladenbrot, ... www.domo-elektro.be B3971 39 5. Reis (rice) Verwenden Sie dieses Programm für Brote auf der Basis von Reismehl. Nach dem Kneten kann der Teig gehen, bevor er gebacken wird. Die Kruste eines Reisbrotes ist dünner und weicher als die eines normalen Brotes. DE 6. Glutenfrei (gluten free) Dies ist das Programm zum Herstellen von glutenfreiem Brot. Der Teig eines glutenfreien Brotes ist feuchter und hat eine dickflüssige Konsistenz. Deshalb sollte der Teig nicht zu lange geknetet werden oder gehen. Die Backzeit hingegen ist länger. Bei diesem Programm ist es besser, keinen verzögerten Start zu verwenden, da dies zu weniger guten Ergebnissen führen kann. Es ist am besten, alle Zutaten von Anfang an hinzuzufügen. 7. Schnell (Quick) Für das Kneten, Aufgehen und Backen von Brot mit Backpulver. Das Ergebnis ist in der Regel ein kleineres Brot mit einer festeren Textur. Es wird empfohlen, die Zutaten vor dem Drücken der Starttaste mit einem Holzlöffel umzurühren. 8. Fruit Verwenden Sie den Verteiler, um Zutaten wie Rosinen oder andere Trockenfrüchte hinzuzufügen. Die Maschine fügt die Zutaten vom Verteiler zum richtigen Zeitpunkt selbst hinzu. Wenn Sie Ihrem Brot frisches oder feuchtes Obst beifügen möchten, tun Sie dies am besten direkt in der Backform, wenn Sie ein Signal hören. 9. Rührkuchen (Cake) Mit diesem Programm können Sie Brot machen, das zum Beispiel mit Backpulver zubereitet wird. Mit diesem Programm gebackene Brote werden weniger hoch und fester von Struktur. Wenn Sie mit diesem Programm Rührkuchen machen möchten, empfehlen wir Ihnen, die Zutaten in die Backform zu tun. Danach stellen Sie den Automaten ein, und bevor Sie auf ‘Start/Stop’ drücken, müssen Sie noch kurz mit einem Holzlöffel die Zutaten umrühren. Das fördert nämlich das Kneten. Bei diesem Programm können Sie das Gewicht nicht selbst wählen. 10. Sandwich Dieses Programm können Sie verwenden, um ein ganz luftiges Weißbrot zu machen, zum Beispiel für Sandwich. Achtung! Bei diesem Programm können Sie keine Krustenfarbe einstellen, der Automat tut dieses von selbst. 11. Rosinen-/Nussbrot (Raisin/nut bread) Verwenden Sie den Verteiler, um trockene Zutaten wie Rosinen oder Nüsse hinzuzufügen. Die Maschine fügt die Zutaten vom Verteiler zum richtigen Zeitpunkt selbst hinzu. 12. Roggen (Rye) Dieses Programm ist ideal für Brote mit einer schwereren Getreideart wie Roggen. Auch das Brot selbst ist fester und schwerer als normales Brot. 40 13. Kneten (knead) Mit diesem Programm wird die Maschine nur kneten, ohne zu backen oder das Brot gehen zu lassen. Sie können dieses Programm z.B. zum Kneten von Pizzateig verwenden. Mit den Tasten time + und time können Sie die Betriebszeit einstellen. B3971 14. Teig (dough) Mit diesem Programm können Sie die Maschine den Teig nur kneten und gehen lassen. 16. Backen (bake) Dieses Programm können Sie für Fertigteig verwenden, den Sie zum Beispiel schon früher gemacht haben. Sie können den Teig mit diesem Programm allein backen. Sie können auch bereits gebackenes Brot wieder etwas aufwärmen. DE 15. Brioche Dieses Programm eignet sich für Brote mit zusätzlichen Zutaten, die einen hohen Gehalt an Zucker, Fett und Proteinen aufweisen (z.B. Schokolade, Zucker, ...) Diese Zutaten bilden eine dunkle Kruste. Die Programmphase „Gehen“ nimmt mehr Zeit in Anspruch, sodass Sie ein leichtes und luftiges Ergebnis erhalten. 17. Home made Diese Taste kann mit selbstgewählten Zeiteinstellungen programmiert werden. Siehe „Home made einrichten“ unter dem Abschnitt Verwendung. 18. Italienisch (Italian) Machen Sie mit diesem Programm ein leckeres südländisches Brot. Sie können zusätzliche Zutaten wie Kräuter, sonnengetrocknete Tomaten, Oliven etc. hinzufügen. VERWENDUNGSWEISE 1. Holen Sie die Backform dadurch aus dem Automaten, dass Sie diese um eine Vierteldrehung gegen den Uhrzeigersinn drehen und am Griff direkt aus dem Automaten ziehen. 2. Den Knethaken (Zubehör) auf die Achse in der Backform anbringen. Der Knethaken sollte richtig und sorgfältig befestigt werden, so dass alle Zutaten ausreichend vermischt und geknetet werden. 3. Geben Sie die Zutaten auf die folgende Weise und Reihenfolge in die Backform: · Wasser/Milch · Butter/Öl · Eventuell Eier · Salz (tun Sie das Salz an eine Seite) · Zucker (tun Sie den Zucker an die andere Seite) · Mehl · Hefe (tun Sie die Hefe in eine kleine Vertiefung in die Mitte) ! Achtung! Die Hefe darf nicht mit dem Salz, Zucker oder Wasser in Berührung kommen. Die Möglichkeit besteht, dass dann die Hefe aktiviert wird, bevor die Zutaten ausreichend vermischt und geknetet sind. Zusätzliche Zutaten wie Nüsse, Kräuter, Trockenfrüchte etc. können in den Verteiler gegeben oder nachträglich hinzugefügt werden. Siehe Abschnitt „Zusätzliche Zutaten hinzufügen“. 4. Entfernen Sie alle Reste der Zutaten an der Außenseite der Backform. Setzen Sie die Form wieder in den Automaten. Die Backform im Uhrzeigersinn drehen, bis sie einrastet. 5. Schließen Sie den Deckel. 6. Stecken Sie den Stecker in die Steckdose. 7. Stellen Sie mit der ‘menu’-Taste das richtige Programm ein. Jede Eingabe wird mit einem akustischen Signal bestätigt. 8. Stellen Sie die Farbe der Kruste mit der Color-Taste ein. Sie können zwischen hell, mittel und dunkel wählen. Stellen Sie die Größe des Brotes (500 g, 750 g oder 1000 g) mit der Weight-Taste ein. www.domo-elektro.be B3971 41 9. 10. 11. DE 12. 13. Stellen Sie eventuell die Zeitverzögerung ein. Drücken Sie auf die ‘Start-Pauze/Stop‘ Taste. Der Doppelpunkt wird nun blinken und gibt an, dass der Automat arbeitet. Wenn Sie eine Zeitverzögerung eingestellt haben, beginnt das Gerät erst nach dem eingestellten Zeitpunkt zu arbeiten. Wenn das Brot fertig ist, piept das Gerät. Auf dem Display wird 0:00 angezeigt. Halten Sie StartPause/Stop einige Sekunden lang gedrückt. Das Gerät piept erneut, um zu bestätigen, dass Sie das Programm gestoppt haben. Wenn Sie das Programm nicht mit dieser Taste beenden, wird das Brot noch weitere 60 Minuten warmgehalten. Ziehen Sie den Stecker aus der Steckdose und öffnen Sie die Maschinenabdeckung. Entfernen Sie die Backform mit Ofenhandschuhen. Lassen Sie das Brot in der Backform ca. 10 bis 15 Minuten lang abkühlen, halten Sie die Backform umgekehrt über der Anrichte und schütten Sie leicht das Brot aus der Form Legen Sie das Brot und die Backform niemals auf die Außenseite des Automaten oder direkt auf ein Plastiktischtuch. Wenn sich das Brot nicht sofort löst, drehen Sie vorsichtig an der Achse an der Unterseite der Backform, bis sich das Brot löst. Verwenden Sie zum Herausnehmen des Brotes niemals scharfe Gegenstände, um die Antihaftbeschichtung der Backform nicht zu beschädigen. Wenn Sie das Brot aus dem Automaten holen und ein Knethaken im Brot stecken bleibt, nehmen Sie ihn vorsichtig aus dem Brot. Lassen Sie das Brot eventuell auf einem Rost noch weiter abkühlen, so dass Sie danach den Knethaken mit Ihren Händen herausnehmen können. Achten Sie darauf, dass der Knethaken gut abgekühlt ist. Es ist zu empfehlen, das Brot erst nach 15-20 Minuten zu schneiden. WARMHALTEFUNKTION Wenn Sie zum Beispiel einmal nicht rechtzeitig zu Hause sind, heizt der Brotbackautomat noch 60 Minuten nach. Dieses ist nicht in der Programmzeit inbegriffen. Soll diese Einstellung unterbrochen werden, einige Sekunden auf die ‘Start-Pauze/Stop‘-Taste drücken. Bleibt das Brot länger als eine Stunde im Brotbackautomaten, wird es feucht. Die Backform sofort mit warmem Wasser ausspülen, nachdem das Brot daraus entfernt wurde, so dass die Knethaken nicht an der Achse kleben bleiben. Der Brotbackautomat noch nicht einschalten, wenn die Maschine noch nicht abgekühlt oder aufgewärmt ist. ZUSÄTZLICHE ZUTATEN HINZUFÜGEN Während des Knetvorgangs der folgenden Programme ertönt nach dem Kneten ein Signalton: Normal, Französisch, Vollkornweizen, Süß, Reis, Glutenfrei, Schnell, Obst, Kuchen, Rosinen/Nüsse, Roggen, Brioche, Italienisch. Dieser Signalton zeigt an, dass Sie zusätzliche Zutaten wie Rosinen, Nüsse, Samen usw. hinzufügen können. Sie können die Zutaten über den Verteiler oder manuell hinzufügen. Verteiler Öffnen Sie den Verteiler, indem Sie den Deckel nach links schieben. Fügen Sie die Zutaten hinzu. Schließen Sie den Deckel. Die Zutaten im Verteiler werden dem Brot nach dem Kneten und Aufgehen automatisch hinzugefügt. Achtung: · Fügen Sie keine feuchten, flüssigen oder pulverförmigen Zutaten über den Verteiler hinzu. · Überfüllen Sie den Verteiler nicht. · Es ist am besten, große Nüsse feiner zu hacken, bevor Sie in den Verteiler gegeben werden. · Bevor Sie Zutaten in den Verteiler geben, vergewissern Sie sich immer, dass der Deckel auf der Innenseite des Geräts geschlossen ist. 42 B3971 Manuell Sie können Zutaten auch manuell hinzufügen. Wenn Sie das Signal hören, unterbrechen Sie das Programm, öffnen Sie den Deckel, fügen Sie die zusätzlichen Zutaten hinzu, schließen Sie dann den Deckel und drücken Sie erneut die Starttaste. Diese manuelle Methode eignet sich am besten für feuchte oder flüssige Zutaten, Zutaten in Pulverform und größere Mengen. SPEICHERFUNKTION HOME MADE EINRICHTEN Die Taste Home made ist für Ihr eigenes Backprogramm reserviert. Sie können die Zeit aller Programmphasen selbst bestimmen. Wenn Sie bestimmte Phasen überspringen möchten, setzen Sie die Zeit auf 0:00. Achtung: Die Einstellungen dieser Taste werden nicht gespeichert, wenn das Stecker gezogen wird. 1. 2. 3. 4. DE Wenn das Gerät aufgrund eines Stromausfalls ausfällt, funktioniert die Speicherfunktion 10 Minuten lang. So müssen Sie das Programm nicht neu starten, wenn der Strom wieder da ist. Wenn der Ausfall länger als 10 Minuten dauert, wird das Programm abgebrochen. Drücken Sie die Taste Home made, oder wählen Sie Programm 17 mit der Menütaste. Drücken Sie die Taste Home made erneut, um mit der Programmierung zu beginnen. Die Zeitanzeige und das Programmphasensymbol blinken auf dem Display. Siehe untenstehende Tabelle mit Programmphasen und Standardzeiteinstellung. Stellen Sie die gewünschte Zeit für jede Phase mit den Tasten Time + (Zeit erhöhen) und Time - (Zeit reduzieren) ein. Bestätigen Sie die gewählte Zeit durch Drücken der Taste Home made. Wenn alle Phasen abgeschlossen sind, sehen Sie die Gesamtdauer des Programms auf dem Display. Die Standard-Gesamtdauer beträgt 3 Stunden. Anschließend können Sie das eingestellte Programm mit der Starttaste beginnen. Wenn Sie bereits während der Einstellung der Phasen die Starttaste drücken, wird die Programmierung vorzeitig beendet. Falls gewünscht, können Sie diesen Programmstart auch verzögern lassen, siehe „Verzögerte Programmierung“. Programmphasen Standard-Einstellung Einstellbare Zeitsperre Kneten 1 0:10 1-30 Min. Ruhen 1 0:03 0-30 Min. Kneten 2 0:05 0-30 Min. Ruhen 2 0:10 0-30 Min. Kneten 3 0:20 0-25 Min. Gehen 1 0:42 0-60 Min. Gehen 2 0:40 0-60 Min. Gehen 3 0:00 0-60 Min. www.domo-elektro.be Symbol B3971 43 Backen 0:50 0-80 Min. Warmhaltefunktion 1:00 0-60 Min. DE KNETHAKEN VOR DEM BACKEN ENTFERNEN Der Knethaken kann entfernt werden, nachdem der Teig zum letzten Mal geknetet wurde. 1. Kurz auf den Knopf ‘Start-Pauze/Stop‘ drücken, um den Backvorgang zu unterbrechen und den Stecker aus der Steckdose ziehen. 2. Den Deckel öffnen und die Backform herausnehmen. Den Teig mit mehligen Händen herausnehmen und den Knethaken entfernen. 3. Den Teig wieder in die Backform geben und den Deckel schließen. 4. Den Stecker wieder in die Steckdose stecken und auf den Knopf ‘Start-Pauze/Stop‘ drücken. Das Backprogramm wird fortgesetzt. ZEITVORWAHLTASTE Sie können das Gerät so programmieren, dass die Zubereitung zu einem selbst bestimmten Zeitpunkt fertig ist. · Berechnen Sie die Zeitdifferenz zwischen dem Zeitpunkt, zu dem Sie das Programm starten und dem Zeitpunkt, zu dem die Zubereitung fertig sein soll. Der Brotbackautomat addiert automatisch die Dauer der Programmzyklen. · Durch Betätigen der Tasten wird die Zeit um jeweils 10 Minuten verlängert oder verkürzt. · Auf dem Display sehen Sie das Sanduhr-Symbol. · Eine verzögerte Programmierung ist nicht möglich bei: Kneten und Backen. Wenn Sie bei diesen Programmen die Tasten Time + und Time - drücken, wird die Programmzeit angepasst. Beispiel: Es ist 9:00 Uhr morgens und Sie möchten um 17:00 Uhr nachmittags frisch gebackenes Brot. Geben Sie alle Zutaten in die Backform. Setzen Sie die Backform in den Brotbackautomaten. Schließen Sie den Deckel und drücken Sie auf die Programmwahltaste, um das richtige Programm einzustellen. Drücken Sie die Color-Taste, um die Krustenfarbe einzustellen und das gewünschte Gewicht des Brotes zu wählen. Drücken Sie die Taste Time + bis 8:00 auf dem Display erscheint. Es werden immer 8 Stunden zwischen dem Zeitpunkt liegen, an dem Sie die Starttaste gedrückt haben und dem Zeitpunkt, an dem das Brot fertig sein soll (17:00 Uhr). Drücken Sie die Starttaste. Der Doppelpunkt auf dem Display blinkt und das Sanduhr-Symbol ist sichtbar. Die Zeit wird nun heruntergezählt, bis der Zeitpunkt erreicht ist, an dem die Brotbackmaschine mit dem Kneten beginnen wird. Die Brotbackmaschine wird nun das gesamte eingestellte Programm durchlaufen, sodass das Brot zum gewählten Zeitpunkt fertig ist. Achtung: Verwenden Sie das Programm mit Timer nicht, wenn Sie Zutaten verwenden, die nur begrenzt haltbar sind, wie frische Milch, Eier, Joghurt, Käse oder frisches Obst. 44 B3971 · · · · · Wägen Sie die Zutaten immer sehr genau ab und achten Sie darauf, dass sie auf Zimmertemperatur sind. Sie können die Frische der Hefe mit dem folgenden Test feststellen: Lösen Sie in einer halben Tasse lau warmem Wasser 1 Teelöffel Zucker auf und fügen Sie dieser Mischung 1 Teelöffel Hefe hinzu. Nach ein paar Minuten muss das Ganze blubbern und sprudeln, erst dann wissen Sie, dass die Hefe frisch ist. Salz hemmt die Wirkung von Hefe und Zucker fördert ihre Wirkung. Wenn Sie eine dieser beiden Zutaten auf Grund einer Diät nicht verwenden dürfen, dann müssen Sie die andere ebenfalls weglassen. Sie erhalten dann ein Brot ohne Zucker und Salz. Das Brot, dass Sie selber backen, enthält also keine Konservierungsmittel und ist daher auch nur beschränkt haltbar. Wenn Sie das Brot luftdicht verpacken, nachdem Sie es gut abkühlen ließen, können Sie das Brot ein paar Tage lang gut aufbewahren. Natürlich können Sie das Brot auch einfrieren, wodurch Sie es später verwenden können. Fetten Sie die Achse in der Backform mit etwas Butter ein, damit sich der Teighaken leichter lösen lässt. DE TIPPS REINIGUNG UND WARTUNG · · · · Schalten Sie vor dem Reinigen Ihres Brotbackautomaten das Gerät aus, ziehen Sie den Stecker aus der Steckdose und lassen Sie das Gerät vollständig abkühlen. Reinigen Sie das Gerät nach jedem Gebrauch gründlich. Wenn die Backform, die Achse in der Backform und der Teighaken vor dem Gebrauch nicht sauber sind, kann dies den Betrieb und die Lebensdauer der Brotbackmaschine beeinträchtigen. Trocknen Sie das Gerät und alle Teile gründlich. Lassen Sie den Deckel eine halbe Stunde lang geöffnet, damit alle Teile für die Lagerung oder den erneuten Gebrauch vollständig trocken sind. ! Achtung: Tauchen Sie das Gerät niemals in Wasser ein. ÄUSSERES Die Außenseite des Automaten und der Deckel mit einem feuchten Tuch oder Schwamm reinigen. Nehmen Sie die Backform vor dem Reinigen heraus. Falls erforderlich, können Sie das Äußere des Gerätes mit Hilfe eines milden Spülmittels reinigen. INNERES Das Innere des Gerätes können Sie vorsichtig mit einem leicht feuchten Tuch säubern. Passen Sie beim Säubern des Heizelementes auf! BACKFORM Entnehmen Sie die Backform aus der Maschine, indem Sie sie mit dem Griff eine Vierteldrehung gegen den Uhrzeigersinn gerade nach oben ziehen. Die Backform könne Sie mit warmem Wasser reinigen. Achten Sie hierbei darauf, dass Sie die AntiAnbackschicht nicht beschädigen. Wenn es nicht gelingt, den Knethaken aus der Backform zu nehmen, müssen Sie die Backform vollständig abkühlen lassen. Danach gießen Sie ein bisschen warmes Wasser in die Backform, so dass der Knethaken unter Wasser steht. Das Wasser wird nun dafür sorgen, dass sich die klebenden Teilchen auflösen und der Knethaken herausgenommen werden kann. Verwenden Sie keine Reinigungsmittel oder Abwaschbürsten, denn diese können die Anti-Anbackschicht der Backform beschädigen. Die Backform ist nicht für die Geschirrspülmaschine geeignet. www.domo-elektro.be B3971 45 DE HÄUFIG GESTELLTE FRAGEN Problem Lösung Ich erhalte nicht das gewünschte Ergebnis. · · · · Kann ich während des Prozesses nachsehen, ob der Teig gut ist? Der Teig muss wie eine glatte, elastische, runde Kugel aussehen. Sie öffnen nach 5 bis 10 Minuten (während des Knetens) den Deckel und berühren mit den Fingern die Oberseite der Teigkugel. Der Teig muss ein bisschen an den Fingern kleben. Klebt der Teig zu sehr an den Fingern, dann ist er zu feucht und Sie müssen noch etwas Mehl hinzufügen. Klebt der Teig überhaupt nicht, ist er zu trocken. Fügen Sie dann noch etwas Wasser hinzu. Öffnen Sie den Deckel nicht während des Aufgehens. Ihr Brot könnte dadurch zusammenfallen. Ich möchte mehrere Brote nacheinander backen. Lassen Sie das Gerät mit geöffnetem Deckel während 20 Minuten abkühlen. Bei einem erwärmten Gerät beginnt die Hefe zu schnell zu arbeiten. Dadurch wird das Ergebnis weniger gut. Das Brot ist zusammengefallen · · · · 46 Die Zusammensetzung des Teigs ist für ein gutes Ergebnis sehr wichtig. Auch die verschiedenen Mehlsorten können zu einem abweichenden Ergebnis führen. Im Laufe der Zeit lernen Sie das Gerät kennen. Wir empfehlen Ihnen, das Grundrezept zu probieren. Auch eine gebrauchsfertige Brotmischung kann dazu verwendet werden. Hilft dies nicht, kontaktieren Sie am besten unseren Kundendienst. Die Zutaten sind nicht genau abgewogen. Die Zutaten sind nicht frisch. Die Zutaten haben keine Zimmertemperatur. B3971 Wenn das Brot an allen Seiten zusammenfällt, war der Teig zu feucht. Versuchen Sie, etwas weniger Wasser zu verwenden. Wenn Sie konserviertes Obst oder Gemüse verwenden, lassen Sie dieses zunächst gut abtropfen und reiben Sie es vor der Verwendung trocken. Sie wurden längere Zeit getränkt, sodass sie überschüssige Flüssigkeit enthalten. Sie können versuchen, eine leichtere Mehlsorte zu verwenden. Es kann auch zu stark aufgegangen sein. Der Teig ist so stark aufgegangen, dass der Teig das Aufgehen nicht aushält. Versuchen Sie, etwas weniger Hefe, etwa 1 bis 2 Gramm, zu verwenden. Wenn der Teig zu schnell aufgegangen ist, ist es möglich, dass er über die Backform geflossen ist. Ziehen Sie den Netzstecker aus der Steckdose und lassen Sie das Gerät abkühlen. Reinigen Sie anschließend das Heizelement. Wenn das Brot im Inneren nicht ausreichend durchgebacken ist, kann dies an der verwendeten Mehlsorte liegen. Dies geschieht meist bei der Verwendung von schwereren Mehlsorten wie Roggenmehl oder Vollkornmehl. Versuchen Sie, einen Knetprozess mehr durchzuführen, wenn Sie diese Mehlsorten verwenden. Wenn das Brotbackgerät den ersten Knetprozess beendet hat, schalten Sie das Gerät aus. Schalten Sie das Gerät anschließend erneut ein und drücken Sie auf Start: Das Gerät startet das Kneten erneut und jetzt wird vom Teig mehr Luft aufgenommen. Der Boden des Brotes ist zu dick. Sie haben das Brot etwas länger mit der Warmhaltefunktion im Gerät liegen lassen. Das Wasser verdampft, sodass ein dickerer Boden entsteht. Nehmen Sie den Behälter unmittelbar nach dem Programm aus dem Gerät. Das Brot ist übergelaufen. · · · Sie haben zu viel Hefe verwendet. Die Hefe war entweder durch zu viel Zucker oder durch eine zu hohe Temperatur zu stark aktiviert. Sie haben zu viel Teig verwendet. Verwenden Sie nicht mehr als 1000 g. H:HH erscheint auf dem Display. Das Gerät ist noch zu warm. Lassen Sie das Gerät zuerst abkühlen. E:EO erscheint auf dem Display. Es gibt ein Problem mit dem Temperaturfühler. Schicken Sie unserem Kundendienst das Gerät. Warum kann ich zu Beginn des Programms keine weiteren Zutaten hinzufügen? Die zusätzlichen Zutaten (wie Rosinen oder Nüsse) gehen durch den Knetvorgang kaputt und das Brot wird nicht gut geknetet. Dies beeinflusst auch das Aufgehen. Geben Sie die weiteren Zutaten erst hinzu, wenn das Gerät piept, nach dem Kneten und Aufgehen. Kann ich Milch statt Wasser verwenden? Das ist möglich! Sie müssen stets dafür sorgen, dass die gesamte Flüssigkeitsmenge stimmt. Das Verhältnis von Milch und Wasser ist dabei unbedeutend. Die Kruste ist oft leichter und manchmal dunkler. Diese können Sie über die Taste „Color“ auswählen. Zubereitungen mit mehr Zucker sind ebenfalls dafür verantwortlich, dass die Kruste dunkler ist. Der Brotbackautomat knetet langsamer als normalerweise. Dies kann bei schweren Teigen passieren. Der Motor muss dadurch härter arbeiten. Dies stellt jedoch kein Problem für das Gerät dar. Fügen Sie einen Esslöffel Flüssigkeit hinzu. Der Knethaken klemmt im Behälter. Entfernen Sie das Brot aus dem Behälter. Füllen Sie den Behälter mit warmem Wasser und lassen Sie es eine Viertelstunde einweichen. Der getrocknete Teig löst sich. Es hat sich Kondensflüssigkeit am Sichtfenster gebildet. Dies ist normal. Dies passiert wegen der Wärme. www.domo-elektro.be DE Das Brot ist in der Mitte nicht ausreichend gebacken. B3971 47 Ich habe eine gebrauchsfertige Backmischung verwendet, doch das Brot ist trotzdem misslungen. Bevor Sie das Gerät zum Hersteller zurücksenden, empfehlen wir Ihnen, nochmals das Grundrezept zu probieren. Gebrauchsfertige Backmischungen können manchmal auch Zutaten enthalten, die für ein weniger gutes Ergebnis verantwortlich sind. ENTSORGEN DE Dieses Symbol auf dem Produkt oder seiner Verpackung weist darauf hin, dass dieses Produkt nicht als normaler Haushaltsabfall zu behandeln ist, sondern an einem Sammelpunkt für das Recyling von elektrischen und elektronischen Geräten abgegeben werden muss. Durch Ihren Beitrag zum korrekten Entsorgen dieses Produkts schützen Sie die Umwelt und die Gesundheit Ihrer Mitmenschen. Umwelt und Gesundheit werden durch falsches Entsorgen gefährdet. Weitere Informationen über das Recycling dieses Produkts erhalten Sie von Ihren Rathaus, Ihrer Müllabfuhr oder dem Geschäft, in dem Sie das Produkt gekauft haben. Das Verpackungsmaterial ist wiederverwertbar. Entsorgen Sie die Verpackung umweltgerecht und führen Sie sie der Wertstoffsammlung zu. 48 B3971 WARRANTY Dear client , All of our products are always submitted to a strict quality control before they are sold to you. Should you nevertheless experience problems with your device, we sincerely regret this. In that case, we kindly request you to contact our customer service. Our staff will gladly assist you. +32 14 21 71 91 [email protected] This appliance has a two year warranty period. The warranty on accessories and components that are liable to wear-and-tear is only 6 months. During this period the manufacturer is responsible for any failures that are the direct result of construction failure. When these failures occur the appliance will be repaired or replaced if necessary. The warranty will not be valid when the damage to the appliance is caused by wrong use, not following the instructions or repairs executed by a third party. The guarantee is issued with the original till receipt. All parts, which are subject to wear, are excluded from the warranty. If your device breaks down within the 2-year warranty period, you can return the device together with your receipt to the shop where you purchased it. The guarantee on accessories and components that are liable to wear-and-tear is only 6 months. EN Monday – Thursday: 8.30 – 12.00 and 13.00 – 17.00 Friday: 8.30 – 12.00 and 13.00 – 16.30 The guarantee and responsibility of the supplier and manufacturer lapse automatically in the following cases: · If the instructions in this manual have not been followed. · In case of incorrect connection, e.g., electrical voltage that is too high. · In case of incorrect, rough or abnormal use. · In case of insufficient or incorrect maintenance. · In case of repairs or alterations to the device by the consumer or non-authorised third parties. · If the customer used parts or accessories that are not recommended or provided by the supplier / manufacturer. SAFETY INSTRUCTIONS When using electrical appliances, basic safety precautions should always be taken, including the following: · Read all instructions carefully. Keep this manual for future reference. · Make sure all packaging materials and promotional stickers have been removed before using the appliance for the first time. Make sure children cannot play with the packaging materials. · This appliance is intended to be used in household and similar applications such as: · staff kitchen areas in shops, offices and other working environments; · farm houses; · by clients in hotels, motels and other residential type environments; · bed and breakfast type environments. · Children should be supervised to ensure that they do not play with the appliance. www.domo-elektro.be B3971 49 · · · This appliance can be used by children aged from 16 years and above and persons with reduced physical, sensory or mental capabilities or lack of experience and knowledge if they have been given supervision or instruction concerning use of the appliance in a safe way and understand the hazards involved. Children shall not play with the appliance. Cleaning and user maintenance shall not be made by children unless they are older than 16 and supervised. Keep the appliance and its cord out of reach of children younger than 16 years. Attention: This appliance cannot be used with an external timer or a separate remote control. The appliance can become hot during use. Keep the power cord away from hot parts and don’t cover the appliance. · EN · · · · · · · · · · · · · · · · · · · · · · 50 Before use, check if the voltage stated on the appliance corresponds with the voltage of the power net at your home. Do not let the cord hang on a hot surface or on the edge of a table or counter top. Never use the appliance when the cord or plug is damaged, after malfunction or when the appliance itself is damaged. In that case, take the appliance to the nearest qualified service center for check-up and repair. The use of accessories that are not recommended or sold by the manufacturer can cause fire, electrical shock or injuries. Unplug the appliance when it is not in use, before assembling or disassembling any parts and before cleaning the appliance. Put all buttons and knobs into the ‘off’ position and unplug the appliance by grasping the plug. Never unplug by pulling the cord. Do not leave a working appliance unattended. Never place this appliance near a gas stove or electrical stove or in a place where it may come into contact with a warm appliance. Do not use the appliance outdoors. Only use the appliance for its intended use. Always use the appliance on a steady, dry and level surface. Only use the appliance for domestic use. The manufacturer can not be held responsible for accidents that result from improper use of the appliance or not following the instructions described in this manual. All repairs should be carried out by the manufacturer or its aftersales service. Never immerse the appliance, the cord or the plug in water or any other liquid. Keep the cord away from sharp edges and hot parts or other heat sources. Do not place the appliance near inflammable materials or explosive and/or self-igniting gasses. Make sure the holes of the appliance are not covered. You can only use an extension cord when the electrical rating (check on label) is higher than or equal to that of the bread maker. Plug in the extension cord in a way no one can trip over the cord or accidentally pull it. Do not place objects on the appliance and do not cover it, when it’s activated, to reduce the risk of fire. The bread maker can become warm. Only touch the handles and buttons of the appliance and use, if necessary, oven mitts. Make sure the appliance is fully cooled down and pull the plug out of the wall socket, before adding or taking out the parts from the appliance. Do not move the bread maker, if the appliance contains warm ingredients or liquids. Avoid contact with the rotating kneading paddles, when the appliance is activated, to reduce the risk of injury. B3971 · Please turn off the appliance and remove the plug from the socket, when you want to clean the appliance or when it’s not in use. Do not use the bread maker as storage for food or kitchen utensils. Do not clean the appliance with a cleaning sponge. Small parts of the sponge can get in touch with the electrical parts and cause electrical shocks. Do not use the bread maker to dry food or other objects. The total weight of all the ingredients cannot be higher than 1000 g. Never use more than 715 g of flour per bread. Never use more than 22 g of fresh yeast or 4+1/4 teaspoons of dry yeast per bread. Never use more than 460 ml of water per bread. · · · · · · · PARTS Lid Viewing window dispenser for additional ingredients 1 Control panel 2 Kneading paddle Bread pan Housing Measuring cup Measuring spoon Hook for removing the kneading paddle 3 4 5 EN 1. 2. 3. 4. 5. 6. 7. 8. 9. 10. 6 7 8 9 10 BEFORE THE FIRST USE · · · · · Make sure all packaging materials and promotional stickers have been removed before using the appliance for the first time. Clean your bread maker, bread pan and kneading paddle with a damp cloth. The bread pan and the kneading paddle both have a non-stick coating to prevent dough from sticking to it. You must therefore never clean these parts with cleaning products, a sponge or a dishwashing brush. A damp cloth will do to clean them. Remove the protective film from the display. It is perfectly common and harmless for your appliance to emit a bit of smoke when you use it for the first time. Before the first use it is recommended to first bake with an empty bread pan with the program BAKE. This for 10 minutes. Afterwards, let everyting cool down and clean the parts again. Before using for the first time, grease the non-stick coating of the loaf tin and the kneading paddle with a little butter or margarine. www.domo-elektro.be B3971 51 USE BASIC RECIPE The recipe below is for a loaf of simple white bread. · 630 g flour · 370 ml water · 5 g of dried yeast · 1 tsp salt · 1 tbsp sugar EN INGREDIENTS Baking a great bread will largely depend on 3 main factors: quality, freshness and correct measurement of quantities. Caution: never exceed the maximum capacity of your bread maker! (1000 g) Never use more than these maximum quantities of the following ingredients for 1 baking session: Flour: 715 g max. Yeast: 22 g fresh yeast or 4+1/4 teaspoons dry yeast max. Water: 460 ml max. FLOUR Flour is the basic component of bread. The weight of the flour varies, depending on the type of flour used. It is therefore absolutely neccesary that you weigh the right quantity on a pair of scales. Please make sure you buy a variety of flour which is suitable for bread making. Check the packaging. GLUTEN Gluten is a natural ingredient of flour and stimulates the bread to rise. YEAST Yeast is a micro-organism found on several vegetable foodstuffs. Yeast converts sugars into alcohol and carbon dioxide. This ability is ideal for the bread to rise and to make it lighter and easier to digest. We recommend the use of dry yeast for this bread maker. This (granular) yeast is easier to work with, keeps for a longer time than fresh yeast and generally gives you a better result as well. SALT Salt does not only lend the bread a certain flavour but equally regulates the activity of the yeast, strengthens the dough and prevents the bread from rising too hard. BUTTER / OIL Butter and oil improve the general taste of the bread and equally soften it. Butter or oil should both be at room temperature when you add them to the other ingredients. SUGAR Sugar is the nutritional source for the yeast and is of great importance for the bread’s rising process. You can use plain white sugar, brown sugar, syrup or honey. Sugar lends the bread a certain soft and delicate flavour, increases its nutritional value and also renders the bread less perishable. Attention: you should not use unrefined sugar or sugar lumps, when you want to make e.g. cinnamon bread, for they can damage the non-stick coating of the bread pan. 52 B3971 WATER When the flour mixes with the water, the gluten will form and air can no longer enter, thus enabling the bread to rise. At normal temperature you should use tepid water (± 20 à 25 °C) to make bread: cold water will not activate the yeast and warm water will achieve the opposite result. MILK Milk adds greatly to the color of the bread (brown for the crust, creamy on the inside), improves the overall taste of the bread and increases its nutritional value. Should you choose to use fresh milk, do not forget to reduce the amount of water, in order to maintain the right level of humidity. Attention: do not use fresh milk if you are going to choose the baking program with the time delay function, for the milk could turn sour. OTHER INGREDIENTS Always use fresh ingredients. When you want to use nuts, sunflower seeds, dried fruit or similar ingredients, we recommend that they be soaked in water and dried before adding them to the dough. Always ensure these ingredients are not too large, for they may damage the non-stick coating. Controller A. Menu: program selection B. Weight: choose weight (size) of bread C. Color: how brown the crust is D. Time +: increase time E. Bake: button for the Bake program F. Knead: button for the Knead program G. Time – : decrease time H. Start-pause/stop: on/off button I. Home made: button for the Home made program Display 1. Choose weight (size) of bread 2. Menu 3. Timer 4. Program phase: kneading 5. Program phase: resting 6. Program phase: rising 7. Program phase: heating 8. Program phase: baking 9. Program phase: warming 10. Program Phase: ready 11. Program phase: number of the phase 12. Time remaining in minutes 13. Browning of the crust: light, medium, dark 14. Locking the control panel www.domo-elektro.be A B C MENU WEIGHT COLOR D E F TIME + BAKE KNEAD G H I START HOME MADE TIME - PAUZE/STOP EN CONTROL PANEL 1 2 3 7 4 8 5 9 6 10 12 11 13 14 B3971 53 A. ‘Menu’ button This button is used to select the desired baking program. With every touch of this button, you will hear a bleeping signal, thus indicating a change in the selected type. The selected program and the corresponding baking time will appear on the display. B. ‘Weight’ button You use this button to select the weight of the bread you wish to make, either 500, 750 or 1000 g. Do bear in mind that the added sum of the ingredients listed in the recipe is about the weight of the bread you are about to make. C. ‘Color’ button You use this button to determine whether you want a light, medium or dark crust. For recipes you try out for the first time, we advise you to choose the medium crust color. EN D. Time + and G. Time – You can select delayed start and set the timer for certain programs using these buttons. You can adjust the program time for the other programs. E. Bake This button is for the Bake program. Press start-pause/stop to confirm the program. F. Knead This button is for the Knead program. Press start-pause/stop to confirm the program. H. Start-pause/stop You start the selected program, or pause/cancel a running program using this button. Press briefly to pause a program. Press the button again to resume. If you do not resume a program within 3 minutes, the operation will automatically stop. To end a program, press the button for a few seconds until you hear a beep. I. Home made This button is for the Home made program. See ‘Set up Home made’ under the Use section. Press startpause/stop to confirm the program. PROGRAMS Program times: Program 500 g 750 g 1000 g 1. Basic 3:05 3:10 3:15 2. French 3:35 3:40 3:45 3. Whole wheat 4:05 4:10 4:15 4. Sweet 3:35 3:40 3:45 5. Rice 2:50 2:55 3:00 6. Gluten free 3:05 3:10 3:15 7. Quick 2:10 2:15 2:20 8. Fruit 3:05 3:10 3:15 9. Cake 2:20* 10. Sandwich 3:00 3:05 3:10 54 B3971 11. Raisin/nut 3:05 3:10 3:15 12. Rye 4:05 4:10 4:15 13. Knead 0:08* 14. Dough 1:30* 15. Brioche 3:35 3:40 3:45 16. Bake 0:30* 17. Homemade -- -- -18. Italian 3:05 3:10 3:15 *Programs that do not allow you to choose the weight of the bread. The time on the display is indicated in hours and minutes. Example: program 1, basic, making a bread of 750 g should take 3 hours 10 minutes. 1. Basic This is the program most commonly used to make a regular white loaf of bread. EN 2. French With this type of baking program, the time to knead and to rise will be longer than this of the first program. The result is a crisper crust and a lighter texture. 3. Whole wheat This program is most suitable for the confection of heavier types of bread, such as wholemeal bread or multi-grain bread. Generally, these types of bread tend to be slightly smaller than regular white bread, due to the bigger weight of the flour. It is best not to use the time delay function with this program, since the results might not be as good. 4. Sweet This program is suitable for making raisin bread, sugar bread, chocolate bread, etc. 5. Rice Use this program for a bread based on rice flour. After kneading, the dough can rise before being baked. The crust of a rice bread is thinner and softer than a normal bread. 6. Gluten free This is the program for making gluten free bread. The dough of a gluten free bread is moister and has the consistency of a batter. Therefore, the dough should not be kneaded or allowed to rise for too long. The baking time, on the other hand, is longer. It is better not to use delayed programming with this program, as this can lead to results that are not as good. It is best to add all the ingredients at the beginning. 7. Quick For kneading, rising and baking bread with baking soda or baking powder. The result usually is a smaller bread with a denser texture. It is recommended that you briefly stir the ingredients with a wooden spoon before you press start. 8. Fruit Use the dispenser to add ingredients such as raisins or other dried fruits. The machine will add the ingredients itself from the dispenser at the right time. If you would like to add fresh or juicier fruit to your bread, it is best to do so directly in the loaf tin when you hear a beep. www.domo-elektro.be B3971 55 9. Cake This program allows you to make bread that is confected with e.g. baking powder. With this type of baking program, your loaf of bread will be less high and more solid. If you use this program to bake a cake, we recommend that you put the ingredients in the bread pan, program the bread maker and briefly stir the ingredients with a wooden spoon before pressing the ‘start-pauze/stop‘ button. You can’t choose the weight yourself if using this program. 10. Sandwich Select this program to make a very light white dough suitable for e.g. little bread rolls. Please note! With this program you cannot set a crust color, the machine will do so itself. EN 11. Raisin/nut bread Use the dispenser to add ingredients such as raisins or nuts. The machine will add the ingredients itself from the dispenser at the right time. 12. Rye This program is ideal for loaves with a heavier variety of grain such as rye. The bread itself is also firmer and heavier than normal bread. 13. Knead The machine will only knead the dough during this program; it won’t bake it or let it rise. You can use this program to knead pizza dough, for example. You can adjust the operation time using the Time + and Time – buttons. 14. Dough You can only have the machine knead the dough and let it rise with this program. 15. Brioche This program is suitable for breads with additional ingredients that have a high sugar, fat, and protein content (e.g. chocolate, sugar, etc.). These ingredients create a darker crust. The rising program phase will take more time, giving you a light and airy result. 16. Bake For ready-made dough which you perhaps had already made in advance. This program can only be used for the final stage of the baking process. Program 12 also allows you to reheat bread that you had already baked. 17. Home made This button can be programmed with your personalised time settings. See ‘Set up Home made’ under the Use section. 18. Italian Make a tasty Mediterranean bread with this program. You can add additional ingredients such as herbs, sun-dried tomatoes, olives, etc. 56 B3971 OPERATING INSTRUCTIONS Take the bread pan out of the bread maker, by turning it a quarter of a turn to the right. You can lift the bread pan out, straight up, by pulling the handle. 2. Place the kneading paddle on the axis in the bread pan. Please position the kneading paddle carefully and appropriately, so all ingredients can be sufficiently mixed and kneaded. 3. When putting the ingredients into the bread pan, please do so in the following manner and order: · Water / milk · Butter / oil · Eggs (optional) · Salt (salt on one side) · Sugar (put the sugar on the opposite side) · Flour · Yeast (concentrate the yeast in a little hole in the middle) ! Make sure the yeast is kept away from the sugar, salt and water, for the yeast might be activated before all ingredients have been properly blended and kneaded. Additional ingredients, such as nuts, herbs, dried fruits, etc., can be added to the dispenser or can be added afterwards. See the ‘Adding additional ingredients’ section. 4. Remove all remnants of the ingredients on the outside of the bread pan. Put the bread pan back in the bread maker. Turn the bread pan clockwise so it locks into place. 5. Close the lid. 6. Plug in the appliance. 7. Select the program you require, using the ‘menu’ button. Each input is confirmed by a bleeping signal. 8. Set the color of the crust using the Color button. You can choose between light, medium, or dark. Set the size of the bread (500 g, 750 g, or 1000 g) with the Weight button. 9. Program the time delay function, if so desired. 10. Press the ‘start-pauze/stop’ button. The colon will start flashing, which indicates the bread maker has started the process. When you have programmed the time delay function, the program will start after the programmed time delay has expired. 11. The machine will beep when the bread is ready. The display shows 0:00. Press and hold start-pause/ stop for a few seconds. The machine will beep again to confirm that you have stopped the program. If you do not stop the program with this button, the bread will be kept warm for another 60 minutes thanks to the warming function. Remove the plug from the socket and open the machine lid. Remove the loaf tin using oven mitts. 12. Allow the bread to cool down for approximately 10 minutes. Turn the bread pan upside down above the sink and gently shake it to remove the bread. Please make sure the bread and the bread pan are never placed on the exterior of the appliance. Nor must they ever be placed directly on a plastic table-cloth. Should you have difficulty removing the bread from the bread pan, carefully turn the kneading paddle at the bottom of the bread pan until the bread comes loose. Never use sharp objects to remove the bread so as not to damage the non-stick coating of the loaf tin. 13. If a kneading paddle should get stuck in the bread, try and remove it as gently as you can. If necessary, you can allow the bread to cool down a little more so you can remove the kneading paddle with your hands afterwards. Beware that you only touch the kneading paddle with your hands if it has sufficiently cooled down. We recommend that you wait 15 to 20 minutes before cutting the bread. www.domo-elektro.be B3971 EN 1. 57 WARMING FUNCTION In case you should not make it home in time, the bread maker will continue to heat the bread for another 60 minutes. This additional time is not included in the program time. Press the ‘start-pauze/stop’ button for a few seconds, if you want to interrupt this part of the process. If you leave the bread in the bread maker for more than an hour, it will become moist. Rinse the bread pan immediately with warm water, after you’ve taken out the bread, to make sure the kneading paddles don’t keep stuck to the axle. Do not activate the bread maker, if the appliance hasn’t cooled down or warmed up yet. ADDING ADDITIONAL INGREDIENTS EN During the kneading process of the following programs, there will be a beep after kneading: Normal, French, Whole Wheat, Sweet, Rice, Gluten free, Fast, Fruit, Cake, Raisins/Nuts, Rye, Brioche, Italian. This beep indicates that you can add additional ingredients such as raisins, nuts, seeds, etc. You can add the ingredients through the dispenser or manually. Dispenser Open the dispenser by sliding the lid to the left. Add the ingredients. Close the lid. The ingredients in the dispenser will automatically be added to the bread after kneading and rising. Caution: · Do not add moist, liquid, or powdered ingredients through the dispenser. · Never overfill the dispenser. · It is best to chop large nuts into finer pieces before adding them to the dispenser. · Before adding ingredients to the dispenser, make sure that the valve on the inside of the appliance is closed. Manual You can also add ingredients manually. When you hear the beep, pause the program, open the lid, add the additional ingredients, then close the lid and press the start button again. This manual method is best used for moist, runny, or powdered ingredients or larger quantities. MEMORY FUNCTION If the appliance fails due to a power failure, the memory function will work for 10 minutes. This way, you do not have to restart the program when the power is back. If the outage lasts longer than 10 minutes, the program will be cancelled. SETTING HOME MADE The Home made button is reserved for your own baking program. You can determine the time for all program phases yourself. If you want to skip certain phases, set the time to 0:00. Attention: the settings of this button will not be saved when the power cord is unplugged. 1. 2. 3. 58 Press the Home made button or select program 17 using the Menu button. Press the Home made button again to start programming. The time and the program phase icon will flash on the display. See the table of program phases and default time settings below. Set the desired time for each phase using the Time + (increase time) and Time – (decrease time) buttons. Confirm the selected time by pressing the Home made button. B3971 4. When all phases have been completed, you will see the total duration of the program on the display. The standard total duration is 3 hours. You can then start the set program by pressing the Start button. If you press the start button while setting the phases, the programming will stop early. If desired, you can also have this program start delayed; see ‘Delayed programming’. Icon Default setting Adjustable time lock Knead 1 0:10 1-30 min. Rest 1 0:03 0-30 min. Knead 2 0:05 0-30 min. Rest 2 0:10 0-30 min. Knead 3 0:20 0-25 min. Rise 1 0:42 0-60 min. Rise 2 0:40 0-60 min. Rise 3 0:00 0-60 min. Bake 0:50 0-80 min. Warming function 1:00 0-60 min. EN Program phases REMOVING THE KNEADING PADDLE BEFORE BAKING You can remove the kneading paddle, after the dough has been kneaded for the last time. 1. Shortly press the ‘start-pauze/stop’ button to interrupt the baking process or disconnect the plug from the power socket. 2. Open the lid and take out the bread pan. Take out the dough with floured hands and remove the kneading paddle. 3. Place the dough back in the bread pan and close the lid. 4. Insert the plug into the power socket and press the ‘start-pauze/stop’ button. The program will be continued. TIME DELAY FUNCTION You can program the machine so that the preparation will be completed at a time of your choice. · Calculate the time difference between the time you start the program and the time you want the preparation to be ready. The bread maker will automatically add the duration of the program cycles to this. · By pressing the keys, the time will increase or decrease by 10 minutes at a time. · You will see the hourglass icon on the display. · Delayed programming is not possible with kneading and baking. The program time will be adjusted if you press the Time + and Time – buttons with these programs. www.domo-elektro.be B3971 59 Example: The time is 9 am and you want your bread to be ready by 5 pm. Put all ingredients in the bread pan. Place the bread pan in your bread maker. Close the lid and select the program using the MENU button. Press the Color button to set the crust color and choose the desired weight of the bread. Press the Time + button until 8:00 appears on the display. After all, 8 hours will have passed from the moment you pressed the start button to the moment the bread should be ready (5 p.m.). Press the start button. The colon will start flashing on the display and the hourglass icon will be visible. The time will now count down until the time is reached when the bread maker has to start kneading. The bread maker will now run through the entire set program so that the bread is ready at the chosen time. Caution: Do not use the timer program if you are using ingredients that have a limited shelf life, such as fresh milk, eggs, yoghurt, cheese and fresh fruit. TIP EN · · · · · Please make sure your ingredients are at room temperature and that they are carefully weighed. You can verify the freshness of your yeast by submitting it to the following test: dissolve 1 teaspoonful of sugar in half a cup of lukewarm water and subsequently add the yeast to this mixture. If the substance starts bubbling and boiling after a few minutes, you can be sure that you are using fresh yeast. Salt breaks the effect of the yeast and sugar exactly does the opposite. If you are not allowed to use either sugar or salt for dietary reasons, you must not add the other ingredient either. Your bread will not contain sugar or salt. Home-made bread, made with this bread maker, does not contain any preservatives and is therefore perishable. If you wrap the bread in a vacuum package after cooling down, you will be able to keep it for a few days. Of course you can also freeze the bread. Grease the axle in the loaf tin with a little butter to ensure that the kneading paddle comes off easier. CLEANING AND MAINTENANCE · · · · Before cleaning your bread maker, please make sure it’s no longer activated, it has sufficiently cooled down and the plug has been disconnected from the power socket. Clean the appliance thoroughly after each use. If the loaf tin, axle in the loaf tin, and kneading paddle are not clean before use, this may affect the operation and service life of the bread maker. Thoroughly dry the appliance and all parts. Leave the lid open for half an hour so that all parts are sufficiently dry before storage or reuse. ! Attention: Never submerge the appliance in water. EXTERIOR Clean the outside of the appliance and the lid with a damp cloth or sponge. Take out the bread pan before you start cleaning. If necessary, you can clean the outside of the appliance using a mild detergent. INSIDE The inside of the device can be carefully cleaned with a slightly damp cloth. Be careful when cleaning the heater element. 60 B3971 LOAF TIN Remove the loaf tin from the machine by turning it a quarter turn counter-clockwise using the handle and lifting straight up. The loaf tin can be cleaned with warm water. Make sure that you do not damage the non-stick coating. If it is not possible to remove the dough hook from the loaf tin, let the tin cool completely. Pour a little warm water into the loaf tin so that the dough hook is under water. The water will now ensure that the sticky particles dissolve and the dough hook can be removed. Do not use detergents or washing up brushes as they can damage the non-stick coating of the loaf tin. The loaf tin is not suitable for cleaning in the dishwasher. Problem Solution I am not getting the desired result. · · · · The composition of the dough is very important to achieve a good result. Also, different brands of flour can give different results. The best way to learn to use the device is to use it. We recommend that you try the basic recipe. A ready-made bread mix is another great way to get started. If this does not help, please contact our customer service department. The ingredients have not been accurately weighed. The ingredients are not fresh. The ingredients are not at room temperature. Can I check whether the dough is working during the process? The dough should look like a smooth, elastic round ball. After 5 to 10 minutes (during kneading), open the lid and touch the top of the dough ball with your fingers. The dough should stick to your fingers a little. If the dough is too sticky, it is too moist and you need to add some flour. If the dough does not stick at all, it is too dry and you need to add a little water. Do not open the lid while rising. This could cause the bread to collapse. I want to bake several loaves of bread one after the other. Allow the appliance to cool for 20 minutes with the lid open. A heated device will cause the yeast to start working too quickly, which will harm the result. The bread has collapsed. · · · www.domo-elektro.be EN FREQUENTLY ASKED QUESTIONS If the bread seems to have collapsed on all sides, this means that the dough was too moist. Try adding a little less water. When using preserved fruit or vegetables, drain it well and rub dry before using. It has been soaked for a long time, meaning it will contain excess moisture. You can try using a lighter flour variety. It may also have risen too much. The dough has risen so much that it cannot cope with the rising. Try to add a little less yeast (1 to 2 grams). If the dough has risen too fast, it may have risen out of the loaf tin at the top. Unplug the device and let it cool off. Then clean the heating element. B3971 61 The inside of the loaf is not ready. If the bread is too soft in the middle, this may be due to the type of flour used. This is usually the result of using heavier flours, such as rye flour or wholemeal flour. Try using one more kneading process when using these types of flours. When the bread maker has finished the first kneading process, stop the machine. Then reset the unit and press Start. The machine will start kneading again; there will now be a larger amount of air in the dough. The bottom of the bread is too thick. You left the bread in the appliance a bit longer with the warming function on. The water will evaporate, giving you a thicker bottom. Remove the bread from the appliance immediately after the program. The bread has overflowed. · · EN · 62 You used too much yeast. The yeast has been too strongly activated, e.g. by too much sugar or too high a temperature. You used too much dough. Do not use more than 1000 g. H:HH appears on the display. The unit is still too hot. Allow the appliance to cool first. E:EO appears on the display. There is a problem with the temperature sensor. Send the device to our after-sales service. Why can’t I add extra ingredients at the start of the program? The extra ingredients (such as currants or nuts), will be kneaded to pieces and the bread will not be kneaded properly. It will also affect the rising. Only add the extra ingredients once the appliance beeps, after kneading/ rising. Can I use milk instead of water? Yes! Always make sure that the complete volume of moisture is correct. The ratio of milk and water makes no difference. The crust is sometimes lighter and sometimes darker. These can be selected with the ‘Color’ button. Preparations with more sugar will also make the crust darker. The bread machine is kneading slower than normal. This can happen with heavy flours, causing the engine to work harder. However, this is not a problem for the machine. Add a tablespoon of liquid. The kneading paddle is stuck in the baking mould. Remove the bread from the mould. Fill the mould with warm water and leave to soak for 15 minutes. The stuck dough will come loose. There is condensation on the inside of the inspection window. This is normal. This is due to the heat. I used a ready-made mix, but the bread still came out wrong. Before sending the device in for repair, we recommend that you try the basic recipe again. Ready-made mixes can sometimes also contain ingredients that produce poor results. B3971 ENVIRONMENTAL GUIDELINES This symbol on the product or on its packaging indicates that this product may not be treated as household waste. Instead it must be brought to the applicable collection point for recycling of electrical and electronic equipment. By ensuring this product is disposed of correctly, you will help prevent potential negative consequences for the environment and human health, which could otherwise be caused by inappropriate waste handling of this product. For more detailed information about recycling of this product, please contact your local city office, your household waste disposal service or the shop where you purchased the product. EN The packaging is recyclable. Please treat the packaging ecologically. www.domo-elektro.be B3971 63 GARANTIA Este aparato tiene un periodo de garantía de 2 años a partir de la fecha de compra. Tenga en cuenta que la garantía de accesorios y piezas sujetas a desgaste, es de 6 meses. Durante el periodo de garantía, el distribuidor será completamente responsable de los defectos directamente asignables a errores del material y fabricación. Cuando se detecten este tipo de errores, y siempre que se estime necesario, el aparato se sustituirá o reparará. A partir de ese momento, el periodo de garantía de 2 años no volverá a iniciarse, sino que seguirá siendo de 2 años a partir del momento de compra. La garantía se concede sobre la base del recibo de caja. La garantía de los accesorios y componentes sujetos a desgaste es de 6 meses. La garantía y la responsabilidad/imputabilidad del proveedor y el fabricante expiran automáticamente en los siguientes casos: · Cuando no se cumplan las instrucciones que aparecen en este manual. · En el caso de una conexión inadecuada, por ejemplo, a una tensión eléctrica demasiado alta. · En caso de uso incorrecto, brusco o anormal. · En caso de insuficiente o incorrecto mantenimiento. · Si el consumidor o un tercero no autorizado realizan reparaciones o modificaciones en el aparato. · Si se usan componentes o accesorios que no están recomendados o que no son suministrados por el proveedor/fabricante. ES INSTRUCCIONES DE SEGURIDAD Cuando utilice aparatos eléctricos, se deben seguir las instrucciones de seguridad mencionadas a continuación: · Lea detenidamente estas instrucciones. Conserve este manual para consultarlo posteriormente. · Antes del primer uso retire todos los materiales de embalaje y etiquetas promocionales. Asegúrese de que los niños no puedan jugar con el material de embalaje. · Este aparato es adecuado para su uso en el ámbito doméstico y entornos similares como: · Zona de cocina para el personal de tiendas, oficinas y otros entornos profesionales similares. · Granjas. · Habitaciones de hoteles y moteles, y otros entornos de carácter residencial. · Habitaciones de invitados o similares. · Supervise en todo momento a los niños para que no jueguen con el aparato. · Este aparato puede ser utilizado por niños de 16 años o más, personas con discapacidad física o sensorial, o personas con capacidad mental limitada o falta de experiencia o conocimiento, siempre, y en tanto en cuanto, dichas personas estén vigiladas o hayan recibido instrucciones sobre el uso del aparato de manera segura y conozcan los peligros del uso del mismo. Los niños no deben jugar con el ventilador. El mantenimiento y la limpieza del dispositivo no deben ser realizados por niños, a menos que tengan 16 años o más y estén supervisados por un adulto. · Mantenga el aparato fuera del alcance de los niños. · Atención: el aparato no puede ser utilizado con un temporizador externo o un mando a distancia separado. El aparato puede calentarse durante el uso. Mantenga el cable eléctrico lejos de las piezas calientes y no cubra el aparato. · 64 Antes de utilizarlo, compruebe si el voltaje indicado en el aparato corresponde al voltaje de la electricidad de su casa. B3971 · · · · · · · · · · · · · · · · · · · · · · · · · · · · · · · · No permita que el cable cuelgue sobre una superficie o el borde de una mesa o encimera. No utilice nunca el aparato si el cable o el enchufe están dañados, después de un mal funcionamiento de la unidad o si están dañados. Lleve el aparato al distribuidor autorizado más cercano centro para la inspección y reparación. El uso de accesorios no recomendados o vendidos por el fabricante puede causar incendios, descargas eléctricas o lesiones. Desenchufe la toma de corriente cuando no se usa, para montar o desmontar piezas y antes de limpiarlo. Ponga todos los botones en posición desconectado (“off”) y desconecte el enchufe de la toma de corriente. Nunca tire del cable para desenchufarlo. No deje que el aparato funcione sin supervisión. No encienda nunca el aparato cerca de una estufa de gas o eléctrica, ni en un lugar donde pueda entrar en contacto con un horno eléctrico o con otro aparato caliente. No utilice el aparato en el exterior. Utilice el aparato sólo para el fin para el que se ha fabricado. Coloque siempre el aparato sobre una superficie firme, horizontal y seca. Utilice el aparato sólo para uso doméstico. El fabricante no es responsable de los accidentes que resulten del uso incorrecto del aparato, ni del incumplimiento de las normas establecidas en este manual. Todas las reparaciones aparte del mantenimiento ordinario de la unidad deben ser efectuadas por el fabricante o por su servicio post-venta. No sumerja nunca el aparato, el cable o el enchufe en agua o cualquier otro líquido. Mantenga el cable alejado de bordes afilados y piezas calientes u otras fuentes de calor. No coloque el aparato cerca de objetos que generen calor, como cocinas y hornos eléctricos. No coloque el aparato cerca de materiales inflamables o de encendido automático. Asegúrese de que los orificios del aparato no estén cubiertos. Conecte el aparato a un enchufe toma tierra y compruebe que la tensión es la misma que la de su casa. No doble bruscamente el cable para evitar que se dañe. Para evitar que alguien tropiece con el cable porque es demasiado largo, la máquina viene con un cable más corto. Compruebe el estado del cable. Si el cable está dañado, debe ser reemplazado por el fabricante o una persona cualificada. Mantenga el aparato fuera del alcance de los niños. Este aparato cumple con las normas generales de seguridad. No coloque objetos sobre el aparato ni lo cubra cuando está en funcionamiento. La máquina de pan se calienta cuando está funcionando. Tocar sólo las manijas y botones del aparato y utilizar manoplas si es necesario. Asegúrese de que el aparato esté completamente frío y desenchúfelo antes de agregar o sacar las piezas. No mueva la máquina si contiene ingredientes calientes o líquidos. Evite el contacto con las paletas giratorias de amasado, cuando el aparato está en funcionamiento, para reducir el riesgo de lesiones. Apague el aparato pulsando el botón “Start/Stop” durante unos segundos. A continuación, desenchufe el aparato sin tirar del cable. Apague el aparato y desenchúfelo para proceder a su limpieza. No utilice la máquina para guardar alimentos o utensilios de cocina. No sumerja la máquina en agua u otros líquidos. No utilice la máquina para otro tipo de uso que no sea doméstico. No utilice la máquina para secar alimentos u otros objetos. www.domo-elektro.be B3971 ES · · 65 · · · · · · No utilice la máquina en exteriores. No utilice piezas que no vienen con el producto o que no son recomendadas por el fabricante. El peso total de todos los ingredientes no puede ser superior a 1000 g. Nunca use más de 715 g de harina por pan. Nunca use más de 22 g de levadura fresca o 4+1/4 cucharaditas de levadura en grano por pan. Nunca use más de 460 ml de agua por pan. PIEZAS 1. 2. 3. 4. 5. 6. 7. 8. 9. 10. Tapa Mirilla Distribuidor para ingredientes adicionales Panel de control Gancho amasador Molde Carcasa Vaso graduado Cuchara de medida Gancho para quitar el gancho amasador 8 9 1 4 5 6 7 10 ES ANTES DEL PRIMER USO · · · · · Antes del primer uso retire todos los materiales de embalaje y etiquetas promocionales. Limpie la máquina de pan, el molde y las palas de amasado con un paño húmedo.El molde y las palas tienen un recubrimiento antiadherente para evitar que la masa se pegue al fondo. Por lo tanto, nunca se deben limpiar estas piezas con productos de limpieza abrasivos. Utilice un paño húmedo. Retire la película protectora de la pantalla. Antes del primer uso es aconsejable hornear una vez con un molde vacío en el programa BAKE (hornear) durante 10 minutos. Después se deja enfriar todo y se limpian las piezas de nuevo. La calidad del pan horneado dependerá de toda una serie de factores. Por favor asegúrese de que todos los ingredientes estén a temperatura ambiente y ponga la cantidad correcta de cada ingrediente, como se indica en las recetas. Antes de usarlo por primera vez, engrase la capa antiadherente del molde y el gancho de masa con un poco de mantequilla o margarina. USO RECETA BÁSICA La siguiente receta es para elaborar un pan blanco simple. · 630 g de harina · 370 ml de agua · 5 g de levadura en grano · 1 cucharadita de sal · 1 cucharada de azúcar 66 3 2 B3971 INGREDIENTES Obtener un gran pan dependerá en gran medida de 3 factores principales: la calidad, la frescura y la correcta medición de las cantidades. ¡Atención: ¡No exceda la capacidad máxima de su máquina de hacer pan! (1000 g) Por lo tanto para cada hornada no exceda nunca las cantidades máximas de los siguientes ingredientes: Nunca use más de 715 g de harina por pan. Nunca use más de 22 g de levadura fresca o 4+1/4 cucharaditas de levadura en grano por pan. Nunca use más de 460 ml de agua por pan. HARINA La harina es el componente básico del pan. El peso de la harina varía, dependiendo del tipo de harina utilizada. Por tanto, es absolutamente necesario que usted pese la cantidad adecuada en una balanza. Por favor, asegúrese de comprar una variedad de harinas que sean adecuadas para la preparación del pan. GLUTEN El gluten es un ingrediente natural de la harina y estimula el aumento del pan. SAL La sal no sólo le da sabor al pan, sino que regula la actividad de la levadura, fortalece la masa y evita que el pan suba demasiado. ES LEVADURA La levadura es un microorganismo que se encuentra en varios alimentos vegetales. La levadura convierte los azúcares en alcohol y dióxido de carbono. Esta capacidad es ideal para que el pan suba y para que sea más ligero y fácil de digerir. Recomendamos el uso de levadura seca para esta máquina. Esta levadura (en polvo) es más fácil de trabajar y se conserva por un tiempo más largo que la levadura fresca y en general da un mejor resultado. MANTEQUILLA / ACEITE La mantequilla y el aceite mejoran el sabor del pan en general y lo hacen más blando. La mantequilla o el aceite deben estar a temperatura ambiente. AZÚCAR El azúcar es el nutriente del que se alimenta la levadura y es de gran importancia para el proceso de subida del pan. Puede utilizar azúcar blanco, azúcar moreno, jarabe o miel. El azúcar da al pan un cierto sabor suave y delicado, aumenta su valor nutricional y también hace el pan menos perecedero. Cuidado: No se debe utilizar el azúcar sin refinar o terrones de azúcar cuando se quiera hacer, por ejemplo, pan de canela, ya que pueden dañar la capa antiadherente del recipiente para el pan. AGUA Cuando la harina se mezcla con el agua, se forma el gluten y ya no podrá entrar aire, lo que permitirá que el pan suba. El agua debe esta tibia (± 20 à 25°C), ya que el agua fría no activará la levadura y el agua caliente lograría el resultado opuesto. LECHE La leche determina en gran medida el colour del pan (el marrón de la corteza, y lo cremoso del interior), mejora el sabor del pan en general y aumenta su valor nutricional. Si decide usar leche fresca, no se olvide de reducir la cantidad de agua, con el fin de mantener el nivel adecuado de humedad. www.domo-elektro.be B3971 67 Cuidado: No utilice leche fresca si usted va a elegir el programa de cocción con la función de retardo de tiempo, la leche puede pasarse y dar un sabor amargo. OTROS INGREDIENTES Utilice siempre ingredientes frescos. Si desea utilizar nueces, pipas de girasol, frutos secos o ingredientes similares, se recomienda que se empapen en agua y se sequen antes de añadirlos a la masa. Asegúrese siempre de que estos ingredientes no sean demasiado grandes, ya que pueden dañar la capa antiadherente del molde. PANEL DE CONTROL ES A B Control MENU WEIGHT A. Menu (menú): selección del programa B. Weight (peso): selección del peso (tamaño) del pan D E C. Color: tostado de la corteza TIME + BAKE D. Time (tiempo) +: aumentar el tiempo E. Bake (hornear): tecla de acceso rápido para el programa Bake G H F. Knead (amasar): tecla de acceso rápido para el programa Knead G. Time (tiempo) -: reducir el tiempo START TIME PAUZE/STOP H. Inicio-pausa/parada: tecla de encendido/apagado I. Home made (elaboración casera): tecla de acceso rápido para el programa Home made Pantalla 1. Seleccionar el peso (tamaño) del pan 2. Selección del programa 3. Temporizador 4. Fase del programa: amasar 5. Fase del programa: reposo 6. Fase del programa: fermentación 7. Fase del programa: calentar 8. Fase del programa: hornear 9. Fase del programa: mantener caliente 10. Fase del programa: preparado 11. Fase del programa: número de la fase 12. Tiempo restante en minutos 13. Tostado de la corteza: claro, medio, oscuro 14. Bloqueo del panel de control C COLOR F KNEAD I HOME MADE 1 2 3 7 4 8 5 9 6 10 12 11 13 14 A. Menu: selección del programa Este botón se utiliza para seleccionar el programa de cocción deseado. Con cada toque de este botón, se escuchará un pitido, que indicará un cambio en el tipo seleccionado. El programa seleccionado y el tiempo de cocción correspondiente aparecerán en la pantalla. B. Weight: peso (tamaño) Utilice este botón para seleccionar el peso del pan, ya sea 500, 750 o 1000 gr. Esta opción no se puede utilizar con los programas rápido, masa, mermelada, pastel y hornear. Tenga en cuenta que la suma de los ingredientes que figuran en la receta es el peso del pan que está a punto de hacer. 68 B3971 C. Color: dorado de la corteza Utilice este botón para determinar si desea una corteza suave, media u oscura. Para recetas de prueba, le recomendamos que elija el colour de la corteza media. D. Time + y G. Time Con estas teclas se puede seleccionar el inicio aplazado de ciertos programas y también se puede ajustar el temporizador. En otros programas puede ajustar el tiempo del programa. E. Bake (hornear) Esta tecla es una tecla de acceso rápido para el programa de horneado. Pulse inicio-pausa/parada para confirmar el programa. F. Knead (amasar) Esta tecla es una tecla de acceso rápido para el programa de amasado. Pulse inicio-pausa/parada para confirmar el programa. H. Inicio-pausa/parada Con esta tecla se inicia el programa seleccionado, o se pausa/cancela un programa en curso. Pulse esta tecla brevemente para pausar un programa. Vuelva a pulsar el botón para reanudar el programa. Si no reanuda el programa en 3 minutos, el aparato se apagará automáticamente. Para finalizar un programa, pulse la tecla durante unos segundos hasta que se escuche un pitido. ES I. Home made (elaboración casera) Esta tecla es una tecla de acceso rápido para el programa Home made. Consulte “Ajustar Home made” en la sección Uso. Pulse inicio-pausa/parada para confirmar el programa. PROGRAMAS Tiempos del programa: Programa 500 g 750 g 1000 g 1. Básico (basic) 3:05 3:10 3:15 2. Francés (french) 3:35 3:40 3:45 3. Integral (whole wheat) 4:05 4:10 4:15 4. Sweet (dulce) 3:35 3:40 3:45 5. Rice (arroz) 2:50 2:55 3:00 6. Sin gluten (gluten free) 3:05 3:10 3:15 7. Rápido (Quick) 2:10 2:15 2:20 8. Fruta 3:05 3:10 3:15 9. Cake 2:20* 10. Sandwich 3:00 3:05 3:10 11. Pan con pasas/nueces (Raisin/nut) 3:05 3:10 3:15 12. Centeno (Rye) 4:05 4:10 4:15 13. Knead (amasar) 0:08* 14.Masa (dough) 1:30* 15. Brioche 3:35 3:40 3:45 16. Bake 0:30* 17. Home made (elaboración casera) -- -- -18. Italiano (Italian) 3:05 3:10 3:15 www.domo-elektro.be B3971 69 * Estos programas no permiten elegir el peso del pan. El tiempo en la pantalla se indica en horas y minutos. Ejemplo: Programa 1, básico, haciendo un pan de 750 g, dura 3 horas 10 minutos. 1. Básico (Basic) Este es el programa más utilizado para hacer un pan blanco normal. 2. Francés (French) Con este programa el tiempo para amasar y subir el pan será más largo que el del primer programa. Esto creará una corteza más crocante y una textura más ligera. 3. Integral (Whole wheat) Este programa es el más adecuado para la confección de los tipos de pan más pesados, como el pan integral. En general, estos tipos de pan tienden a ser ligeramente más pequeños que el pan blanco normal, debido al mayor peso de la harina. En este programa es mejor no utilizar el ajuste de tiempo, ya que esto puede conducir a resultados inferiores. 4. Sweet (dulce) Este programa es adecuado para elaborar pan de pasas, pan de azúcar, pan de chocolate, etc. ES 5. Rice (arroz) Use este programa para elaborar un pan a base de harina de arroz. Después de amasar, la masa se puede fermentar antes de hornearla. La corteza de un pan de arroz es más fina y blanda que la de un pan normal. 6. Sin gluten (gluten free) Este es el programa para elaborar pan sin gluten. La masa de un pan sin gluten es más húmeda y tiene la consistencia de una pasta. Por lo tanto, esta masa no se puede amasar o fermentar durante demasiado tiempo. Además, el tiempo de horneado de un pan sin gluten es más largo. Con este programa es mejor no utilizar la programación aplazada, ya que esto podría ofrecer peores resultados. Es mejor añadir todos los ingredientes al principio. 7. Rápido (Quick) Para amasar, inflar y hornear pan con levadura en polvo. El resultado es generalmente un pan más pequeño con una textura más firme. Antes de presionar el botón de inicio, se recomienda remover los ingredientes con una cuchara de madera. 8. Fruta Utilice el distribuidor para añadir ingredientes como pasas u otros frutos secos. La máquina añadirá automáticamente los ingredientes desde el distribuidor en el momento adecuado. Si desea añadir fruta fresca o húmeda a su pan, es mejor hacerlo directamente en el molde cuando se escuche una señal. 9. Cake Con este programa la barra de pan será menos alta y más sólida. Si utiliza este programa para hacer un pastel le recomendamos que ponga los ingredientes en el molde, seleccione el programa de la máquina y agite brevemente los ingredientes con una cuchara de madera antes de pulsar el botón “Start-Pauze/ Stop”. En este programa no es posible elegir el peso por su cuenta. 70 B3971 10. Sandwich Seleccione este programa para hacer una masa blanca muy ligera, adecuada por ejemplo, para panecillos pequeños. ¡Atención! Con este programa no se puede establecer un color de corteza, la máquina lo hará automáticamente. 11. Pan con pasas/nueces (Raisin/nut bread) Utilice el distribuidor para añadir ingredientes como pasas o nueces. La máquina añadirá automáticamente los ingredientes desde el distribuidor en el momento adecuado. 12. Centeno (Rye) Este programa es ideal para panes con una variedad de cereal más pesada, como el centeno. El pan también es más firme y pesado que el pan normal. 13. Knead (amasar) Con este programa, la máquina solo amasará, sin hornear ni fermentar. Puede usar este programa para amasar masa de pizza, por ejemplo. Con las teclas time + y time - puede ajustar el tiempo de funcionamiento. 15. Brioche Este programa es adecuado para panes con ingredientes adicionales que aportan un alto contenido de azúcar, grasa y proteínas (por ejemplo, chocolate, azúcar, etc.) Estos ingredientes hacen que la corteza sea más oscura. En la fase de programa, la fermentación tardará más tiempo, ofreciendo un resultado ligero y esponjoso. ES 14. Masa (dough) Con este programa la máquina solo amasa y fermenta la masa. 16. Bake Para la masa ya preparada con antelación. Este programa sólo se puede utilizar para la etapa final del proceso de horneado. El programa 11 también le permite recalentar el pan que ya ha sido horneado. 17. Home made (elaboración casera) Con esta tecla puede programar con ajustes de tiempo que usted mismo elija. Consulte “Ajustar Home made” en la sección Uso. 18. Italiano (Italian) Con este programa podrá elaborar un buen pan al estilo del sur. Puede añadir ingredientes adicionales, como hierbas aromáticas, tomates secados al sol, aceitunas, etc. INSTRUCCIONES DE USO 1. 2. Tome el molde de la máquina de pan, girándolo un cuarto de vuelta hacia la derecha. También puede sacar el molde tirando del asa. Coloque la paleta de amasado en el eje del molde cuidadosamente y de manera adecuada, para que todos los ingredientes se mezclen y se amasen bien. www.domo-elektro.be B3971 71 ES 3. Al poner los ingredientes en el molde, hágalo de la siguiente manera y en este orden: · Agua / leche · Mantequilla / aceite · Huevos (opcional) · Sal (poner el azúcar en un lado del molde) · Azúcar (poner en el lado opuesto) · Harina · Levadura (concentrar la levadura en un pequeño agujero en el centro). ! Asegúrese de que la levadura se mantenga lejos del sal, azúcar y del agua. El agua puede activar la levadura antes de que todos los ingredientes estén bien mezclados y amasados. Los ingredientes adicionales como nueces, hierbas aromáticas, frutas deshidratadas, etc. se pueden añadir en el distribuidor o se pueden añadir después. Consulte la sección “Añadir ingredientes adicionales”. 4. Retire los restos que hayan quedado de la parte exterior del molde. Coloque el molde en la máquina. Gire el molde en sentido horario hasta que encaje haciendo clic. 5. Cierre la tapa. 6. Conecte el aparato. 7. Seleccione el programa que desee, utilizando el botón “Menú”. Cada entrada se confirma con un pitido. 8. Ajuste el color de la corteza con la tecla de color. Puede elegir entre un color claro, medio u oscuro. Ajuste el tamaño del pan (500 g, 750 g o 1000 g) con la tecla Weight (peso). 9. Programa para la función de retardo de tiempo, si así lo desea. 10. Presione el botón “Start-Pauze/Stop”. Los dos puntos comienzan a parpadear, lo que indica que la máquina ha iniciado el proceso. Cuando haya programado la función de retardo de tiempo, el programa se iniciará después que el retardo de tiempo programado haya expirado. 11. Cuando el pan esté preparado, la máquina emitirá un pitido. La pantalla muestra 0:00. Mantenga pulsado inicio-pausa/parada durante unos segundos. La máquina volverá a emitir un pitido para confirmar que ha detenido el programa. Si no finaliza el programa con esta tecla, el pan se mantendrá caliente durante otros 60 minutos. Retire el enchufe de la toma de corriente y abra la tapa de la máquina. Retire el molde con unos guantes para el horno. 12. Deje que el pan se enfríe durante aproximadamente 10 minutos. Gire el molde al revés y agítelo suavemente para que salga el pan. Asegúrese de no colocar ni el pan ni el molde en el exterior del aparato. Tampoco debe colocarlos directamente sobre un mantel de plástico. Si tiene dificultades para retirar el pan del molde, gire cuidadosamente la pala de amasar por la parte inferior del molde hasta que el pan se suelte. Para no dañar la capa antiadherente del molde nunca debe usar objetos afilados para retirar el pan. 13. Si la pala se ha quedado enganchada en el pan, trate de sacarla lo más suavemente posible. Si es necesario, deje que el pan se enfríe un poco más para poder sacar la pala. Le recomendamos que espere de 15 a 20 minutos antes de cortar el pan. FUNCIÓN PARA MANTENER CALIENTE En caso de que no pueda llegar a casa a tiempo, la máquina de pan seguirá calentando el pan durante 60 minutos más. Este tiempo adicional no se incluye en el tiempo del programa. Pulse el botón “Start-Pauze/ Stop” durante unos segundos si desea interrumpir esta parte del proceso. Si deja el pan en la máquina durante más de una hora, se quedará húmedo. Enjuague el molde inmediatamente con agua tibia después de haber sacado el pan, para que la pala de amasado no se peguen al eje. 72 B3971 AÑADIR INGREDIENTES ADICIONALES Durante el proceso de amasado de los siguientes programas sonará un pitido después del amasado: normal, francés, integral, dulce, arroz, sin gluten, rápido, fruta, bizcocho, pasas/nueces, centeno, brioche, italiano. Este pitido indica que puede añadir ingredientes adicionales como: pasas, nueces, semillas, etc. Puede añadir los ingredientes a través del distribuidor o manualmente. Distribuidor Abra el distribuidor deslizando la tapa hacia la izquierda. Añada los ingredientes. Cierre la tapa. Los ingredientes del distribuidor se añadirán automáticamente al pan después de amasarlo y fermentarlo. Atención: · No añada ingredientes húmedos, líquidos o en polvo a través del distribuidor. · Nunca llene demasiado el distribuidor. · Es mejor cortar las nueces grandes en trozos antes de añadirlas al distribuidor. · Antes de añadir los ingredientes al distribuidor, asegúrese de que la tapa del interior del aparato está cerrada. Manualmente También puede añadir ingredientes manualmente. Cuando escuche la señal, pause el programa, abra la tapa, añada los ingredientes adicionales y, a continuación, cierre la tapa y vuelva a pulsar la tecla de inicio. Este método manual es mejor para: ingredientes húmedos o líquidos, ingredientes en polvo, cantidades mayores. ES FUNCIÓN DE MEMORIA Si el aparato se apaga por un corte de energía, la función de memoria funcionará durante 10 minutos. Por lo tanto, no tendrá que reiniciar el programa cuando vuelva la energía. Si la avería dura más de 10 minutos, el programa se cancelará. AJUSTAR EL MODO HOME MADE (ELABORACIÓN CASERA) La tecla Home made está reservada para su propio programa de horneado. Puede determinar usted mismo el tiempo de todas las fases del programa. Si quiere saltarse ciertas fases, ajuste el tiempo en 0:00. Atención: los ajustes de este botón no se guardarán cuando se desenchufe el cable de alimentación. 1. 2. 3. 4. Presione la tecla de Home made o seleccione el programa 17 con la tecla del menú. Vuelva a pulsar la tecla Home made para empezar con la programación. En la pantalla parpadearán el tiempo y el icono de la fase de programa. Consulte la siguiente tabla para ver las fases del programa y el ajuste de tiempo por defecto. Ajuste el tiempo deseado para cada fase con los botones Time + (aumentar el tiempo) y Time (reducir el tiempo). Confirme el tiempo seleccionado pulsando en la tecla Home made. Cuando se hayan completado todas las fases verá la duración total del programa en la pantalla. La duración total por defecto es de 3 horas. En ese caso puede iniciar el programa establecido con la tecla de inicio. Si presiona la tecla de inicio mientras ajusta las fases, la programación se detendrá antes. Si lo desea, también puede aplazar el inicio de este programa, consulte “programación aplazada”. www.domo-elektro.be B3971 73 ES Fases del programa Icono Ajuste por defecto Bloqueador de tiempo ajustable Amasar 1 0:10 1-30 min. Reposo 1 0:03 0-30 min. Amasar 2 0:05 0-30 min. Reposo 2 0:10 0-30 min. Amasar 3 0:20 0-25 min. Fermentar 1 0:42 0-60 min. Fermentar 2 0:40 0-60 min. Fermentar 3 0:00 0-60 min. Hornear 0:50 0-80 min. Función para mantener caliente 1:00 0-60 min. QUITE EL GANCHO AMASADOR ANTES DE HORNEAR Puede quitar la pala después del último amasado. 1. Pulse brevemente el botón “Start-Pauze/Stop” para interrumpir el proceso de cocción o desenchufe la máquina. 2. Abra la tapa y extraiga el molde. Saque la masa con las manos juntas y quite las palas. 3. Coloque la masa de nuevo en el molde y cierre la tapa. 4. Enchufe de nuevo y pulse el botón “Start-Pauze/Stop”. La máquina continuará con el programa. TECLA DE AJUSTE DE TIEMPO Puede programar el aparato de tal manera que la elaboración esté preparada a una hora determinada. · Calcule la diferencia horaria entre el momento en el que se inicia el programa y la hora en la cual desea que la elaboración esté preparada. La panificadora cuenta automáticamente la duración de los ciclos del programa. · Al pulsar las teclas, el tiempo aumenta o disminuye 10 minutos cada vez. · En la pantalla aparece el icono del reloj de arena. · No es posible la programación aplazada en: amasar y hornear. Si presiona los botones Time + y Time con estos programas, se ajustará el tiempo del programa. Ejemplo: Son las 09:00 y usted quiere que el pan esté listo a las 17:00. Ponga todos los ingredientes en el molde. Coloque el molde en la panificadora. Cierre la tapa y seleccione el programa. Pulse la tecla del color para ajustar el color de la corteza y elegir el peso deseado del pan. Pulse la tecla time + hasta que en la pantalla aparezca 8:00. Habrán pasado 8 horas desde el momento en el cual pulsó 74 B3971 la tecla de inicio hasta el momento en el cual el pan debería estar preparado (a las 17:00 horas). Pulse la tecla de inicio. El punto doble de la pantalla parpadeará y el icono del reloj de arena será visible. El tiempo empezará a contar hasta que llegue el momento en el que la panificadora tenga que empezar a amasar. La panificadora pasará ahora a través de todo el programa establecido para que el pan esté preparado a la hora seleccionada. Atención: no use el programa con el temporizador cuando use ingredientes que tengan una vida útil limitada, como leche fresca, huevos, yogur, queso y fruta fresca. SUGERENCIAS PRÁCTICAS: · · · · · Asegúrese de que los ingredientes estén a temperatura ambiente y péselos cuidadosamente. Puede comprobar la frescura de la levadura con la siguiente prueba: disolver 1 cucharadita de azúcar en media taza de agua tibia y luego añadir la levadura a la mezcla. Si la sustancia se hace efervescente al cabo de unos minutos, usted puede estar seguro de que está utilizando levadura fresca. La sal detiene el efecto de la levadura y el azúcar hace exactamente lo contrario. Si no puede usar azúcar o sal por razones dietéticas, no añada tampoco el otro ingrediente. El pan no contendrá ni azúcar ni sal. El pan casero hecho con esta máquina no contiene ningún tipo de conservantes y por lo tanto es perecedero. Si envasa el pan al vacío después de haberse enfriado, podrá conservarlo durante unos días. Por supuesto, también puede congelar el pan. Engrase el eje del molde con un poco de mantequilla para que el gancho de amasar se afloje más fácilmente. · · · · Antes de limpiar la máquina asegúrese de que ya no está funcionando, se ha enfriado lo suficiente y esta desenchufada. Limpie bien el aparato después de cada uso. En el caso de que el molde, el eje del molde y el gancho de amasar no estén limpios antes de su uso, esto podría afectar al funcionamiento y a la vida útil de la panificadora. Seque completamente el aparato y todas las piezas. Deje la tapa abierta durante media hora para que todas las piezas estén suficientemente secas antes de su almacenamiento o nuevo uso. ! Atención: nunca sumerja el aparato en agua. ES LIMPIEZA Y MANTENIMIENTO EXTERIOR Limpie el exterior del aparato y la tapa con un paño húmedo o una esponja. Saque el molde antes de empezar la limpieza. Si es necesario, puede limpiar el exterior del aparato con un lavavajillas suave. INTERIOR Puede limpiar suavemente el interior del aparato con un paño ligeramente húmedo. Preste atención a la limpieza del elemento calentador. MOLDE Retire el molde de la máquina tirando del mango hacia arriba un cuarto de vuelta en sentido contrario a las agujas del reloj. Puede limpiar el molde con agua caliente. Al hacerlo, tenga cuidado para no dañar la capa antiadherente. Si no es capaz de sacar el gancho amasador del molde, deje que éste se enfríe completamente. Vierta un poco de agua caliente en el molde para que el gancho amasador quede www.domo-elektro.be B3971 75 sumergido en agua. El agua se ocupará de que las partículas adhesivas se disuelvan para poder retirar el gancho amasador. No utilice productos de limpieza ni cepillos para lavar platos, ya que podrían dañar la capa antiadherente del molde. El molde no es apto para lavarlo en el lavavajillas. PREGUNTAS FRECUENTES Problema Solución No he obtenido el resultado deseado. · · · · La masa debe ser similar a una bola redonda y lisa, elástica. Abra la tapa cuando hayan transcurrido entre 5 y 10 minutos (durante el amasado) y toque suavemente con sus dedos la parte superior de la bola de masa. La masa debe adherirse un poco a los dedos. Si la masa se adhiere demasiado a los dedos, esto significa que la masa está demasiado húmeda y que, por lo tanto, debe añadir un poco más de harina. Si la masa no se adhiere en absoluto, esto significa que la masa está demasiado seca y que debe añadir un poco más de agua. No abra la tapa durante la fermentación. Esto podría hacer que su pan se quiebre. Quiero hornear varios panes de forma sucesiva. Deje que el aparato se enfríe durante 20 minutos con la tapa abierta. Un aparato caliente hará que la levadura actúe con rapidez, por lo que el resultado no será bueno. El pan se ha quebrado. · ES ¿Puedo comprobar si la masa está bien durante el proceso? · · 76 La composición de la masa es muy importante para lograr un buen resultado. Las diferentes marcas de harina pueden proporcionar un resultado diferente. Aprenderá a trabajar con el aparato practicando. Le recomendamos que intente preparar la receta básica. Una mezcla de pan ya preparada puede ser una solución. Si esto no ayuda, póngase en contacto con nuestro servicio al cliente. Los ingredientes no se pesan con precisión. Los ingredientes no están frescos. Los ingredientes no están a temperatura ambiente. B3971 Si su pan se ha quebrado por todos los lados, esto quiere decir que la masa estaba demasiado húmeda. Intente añadir un poco menos de agua. Cuando utilice frutas o verduras en conserva, primero debe escurrirlas y secarlas bien antes de utilizarlas. Han estado sumergidas en un líquido durante mucho tiempo, por lo que tienen un exceso de humedad. Puede intentar utilizar un tipo de harina más ligera. También es posible que la masa haya subido demasiado. La masa ha subido tanto que no puede fermentar. Intente añadir un poco menos de levadura, de 1 a 2 gramos. Si la masa ha subido demasiado, es posible que haya salido por encima del molde. Desenchufe el aparato y deje que el aparato se enfríe. A continuación, limpie el elemento calentador. La parte central del pan no está lo suficientemente hecha. Si el interior del pan está crudo, esto se puede deber al tipo de harina utilizada. Normalmente, esto ocurre por usar tipos de harina más pesados, como la harina de centeno o la harina integral. Intente usar un proceso más de amasado cuando utilice esta harina. Cuando la panificadora haya terminado el primer proceso de amasado, detenga el aparato. A continuación, reinicie el dispositivo y presione en inicio. El aparato empezará a amasar de nuevo y se incorporará una mayor cantidad de aire a la masa. La corteza inferior del pan Ha dejado el pan demasiado tiempo en el aparato con la función para es demasiado gruesa. mantenerlo caliente. El agua se evaporará, por lo que obtendrá una corteza inferior más gruesa. Saque inmediatamente el pan del aparato en cuanto haya acabado el programa. · · H:HH aparece en la pantalla. El aparato todavía está demasiado caliente. Deje que el aparato se enfríe primero. E:EO aparece en la pantalla. Hay un problema con el sensor de temperatura. Envíe el aparato a nuestro servicio postventa. ¿Por qué no puedo añadir ingredientes adicionales al comienzo del programa? Los ingredientes adicionales (como uvas pasas o frutos secos) se romperían y el pan no se amasaría bien. Además, influirían en la fermentación del pan. Solo debe añadir los ingredientes adicionales cuando el dispositivo emita un sonido, después de amasar/fermentar. ¿Puedo utilizar leche en lugar de agua? ¡Sí, es posible! Siempre debe asegurarse de que todo el volumen de fluido es correcto. La proporción de leche y agua no hace ninguna diferencia. La corteza es a veces más clara y a veces más oscura. Esto se puede seleccionar con el botón “color”. Las preparaciones que contienen más azúcar también harán que la corteza sea más oscura. La panificadora amasa más lento de lo normal. Esto puede ocurrir con masas pesadas, haciendo que el motor deba funcionar con más fuerza. Sin embargo, esto no es un problema para la máquina. Añada una cucharada de líquido. El gancho de amasar se ha quedado atascado en la cubeta. Retire el pan de la cubeta. A continuación, llene la cubeta con agua caliente y deje en remojo durante un cuarto de hora. La masa incrustada se podrá retirar. Se produce condensación en el interior de la ventana de visualización. Es algo normal. Esto se debe al calor. He utilizado una mezcla ya preparada, pero el pan sigue sin hacerse bien. Antes de enviar el aparato para su reparación, le recomendamos que lo intente de nuevo con la receta básica. En algunos casos, las mezclas preparadas también pueden contener ingredientes que hagan que el resultado no sea tan bueno. · www.domo-elektro.be Ha usado demasiada levadura. La levadura se ha activado demasiado, por ejemplo, por usar demasiado azúcar o por usar una temperatura demasiado alta. Ha usado demasiada masa. No use más de 1000 g. ES El pan se ha salido del aparato. B3971 77 DIRECTRICES MEDIOAMBIENTALES El símbolo en el producto o en el embalaje indica que este producto no puede ser tratado como residuo doméstico. Se debe llevar a un lugar en el que se reciclan equipos eléctricos y electrónicos. Si se asegura de que este producto se desecha correctamente, usted ayudará a evitar posibles consecuencias negativas para las personas y el medio ambiente que serían causadospor un tratamiento de residuos inadecuado. Para obtener información más detallada sobre el reciclaje de este producto, póngase en contacto con su ayuntamiento, o con la empresa o departamento responsable del servicio de recogida de basura doméstica, o con la tienda donde adquirió el producto. ES El material de embalaje es reciclable. Trate el embalaje de una manera medioambientalmente responsable. 78 B3971 GARANZIA La garanzia dell’apparecchio è valida per 2 anni a partire dalla data di acquisto. La garanzia sugli accessori e sui componenti soggetti a usura è di 6 mesi. Durante il periodo di validità della garanzia, il dispensere si assume la piena responsabilità dei difetti dei materiali o di quelli di fabbricazione. In caso di presenza di tali difetti, se necessario, si procederà alla sostituzione o alla riparazione dell’apparecchio. Il periodo di garanzia di 2 anni non ricomincia in quel momento, ma continua per 2 anni dalla data di acquisto dell’apparecchio. Per la garanzia fa fede la data riportata sullo scontrino. Se l’apparecchio si rivela difettoso nel periodo di validità della garanzia, cioè 2 anni, potete portarlo, insieme allo scontrino, nel negozio dove l’avete acquistato. La garanzia sugli accessori e sui componenti soggetti a usura è di 6 mesi. La garanzia e la responsabilità del negoziante e del produttore decadono automaticamente nei seguenti casi: · mancata osservanza delle istruzioni contenute nel presente manuale; · errato collegamento, per esempio con tensione elettrica troppo alta; · uso errato, anormale e manesco; · manutenzione insufficiente o errata; · riparazione o modifiche all’apparecchio eseguite dal cliente o da terzi non autorizzati; · uso di accessori o componenti non raccomandati o forniti dal negoziante o dal produttore. Quando si utilizzano dispositivi elettrici, è necessario tenere presenti le seguenti istruzioni di sicurezza: · Leggere con attenzione le presenti istruzioni. Conservare le istruzioni per possibili future consultazioni. · Prima di utilizzare il prodotto, togliere tutti gli imballi e gli eventuali adesivi promozionali. Assicurarsi che i bambini non giochino con gli imballaggi. · Questo apparecchio è destinato unicamente all’uso domestico e in ambienti analoghi, quali: · angoli cottura riservati al personale nei negozi, negli uffici e in altri ambienti professionali · Fattorie · Camere di alberghi, motel e altre strutture ricettive residenziali · Camere per vacanze o ambienti analoghi · L’apparecchio può essere utilizzato da bambini di età superiore a 16 anni e da persone con ridotte capacità fisiche, sensoriali o mentali, o con mancanza di esperienza o conoscenza, solo se sorvegliati o se hanno ricevuto istruzioni sull’uso sicuro dell’apparecchio e ne comprendono i rischi. I bambini non possono giocare con l’apparecchio. Le operazioni di pulizia e di manutenzione non devono essere effettuate dai bambini di età inferiore a 16 anni e senza sorveglianza. · Tenere l’apparecchio fuori dalla portata dei bambini di età inferiore a 16 anni. · Attenzione: l’apparecchio non è stato progettato per essere utilizzato con un timer esterno o un sistema di telecomando separato. IT INDICAZIONI DI SICUREZZA L’apparecchio potrebbe surriscaldarsi durante il normale utilizzo. Tenere il cavo di alimentazione lontano da superfici calde e non coprire l’apparecchio. · · · Prima dell’uso, controllare che il voltaggio riportato sull’apparecchio corrisponda a quello della rete elettrica domestica. Non lasciare mai il cavo appoggiato su una superficie calda o penzolante dal bordo di un tavolo o della cucina. Non utilizzare mai l’apparecchio se il cavo di alimentazione o la spina sono danneggiati, dopo un www.domo-elektro.be B3971 79 · · · · · · · · · · · · · · · IT · · · · · · · · · · · · 80 · malfunzionamento o quando è danneggiato. In caso di guasto, portare l’apparecchio presso il centro di assistenza clienti più vicino, in modo che sia controllato e riparato. L’utilizzo di accessori non consigliati o non venduti dal produttore può causare incendi, scosse elettriche o lesioni. Togliere la spina dalla presa quando l’apparecchio non è in funzione, prima di montarne o smontarne i componenti e prima di pulirlo. Mettere tutti gli interruttori in posizione “off” e afferrare la spina per staccarla dalla presa di corrente. Non tirare mai il cavo o l’apparecchio per estrarre la spina dalla presa di corrente. Non mettere in funzione l’apparecchio senza sorveglianza. Non posizionare mai l’apparecchio sopra o vicino a un fornello a gas o elettrico oppure in luoghi in cui possa venire a contatto con apparecchi a elevate temperature. Non utilizzare l’apparecchio all’aperto. Utilizzare l’apparecchio solo per lo scopo previsto. Utilizzare sempre l’apparecchio su una superficie stabile, asciutta e in piano. L’apparecchio è inteso solo per uso domestico. Il produttore non è responsabile di incidenti causati da uso improprio dell’apparecchio o dalla mancata osservanza delle istruzioni riportate nel presente manuale. Le riparazioni diverse dalla normale manutenzione dell’apparecchio devono essere effettuate dal produttore o dal suo servizio assistenza. Non immergere mai l’apparecchio, il cavo elettrico o la spina in acqua o in altri liquidi. Tenere il cavo lontano da spigoli e bordi taglienti, da oggetti a elevata temperatura o da altre fonti di calore. Non posizionare l’apparecchio vicino a fornelli a gas, forni elettrici o altre fonti di calore. Non posizionare mai l’apparecchio vicino a materiali infiammabili o a gas esplosivi o soggetti ad autocombustione. Assicurarsi che le aperture di ventilazione dell’apparecchio non siano coperte. È possibile utilizzare prolunghe solo se la tensione di rete e la potenza sono uguali o superiori a quelle della macchina del pane. La prolunga deve essere collegata in modo che nessuno possa cadere sul cavo o lo possa accidentalmente tirare. Non appoggiare oggetti sull’apparecchio e non coprirlo mentre è in funzione, per evitare il rischio di incendi. La macchina per il pane può riscaldarsi molto. Toccare solo le impugnature e i tasti dell’apparecchio; se necessario, utilizzare guanti da forno. Assicurarsi che l’apparecchio sia completamente freddo e togliere la spina dalla presa di corrente prima di estrarre o inserire gli elementi nell’apparecchio. Non spostare la macchina del pane se contiene ingredienti o liquidi caldi. Evitare il contatto con il gancio per impastare quando è in movimento, per evitare il rischio di lesioni. Quando l’apparecchio non è in uso o quando viene sottoposto a pulizia, spegnerlo completamente e, per sicurezza, togliere la spina dalla presa di corrente. Non pulire mai l’apparecchio con spugne abrasive. Le particelle della spugna potrebbero entrare in contatto con le componenti elettriche e causare scosse. Non utilizzare l’apparecchio per asciugare alimenti o altri oggetti. Il peso totale di tutti gli ingredienti non deve mai superare i 1000 g. Non utilizzare mai più di 715 g di farina per ogni pane. Non utilizzare mai più di 22 g di lievito di birra fresco o 4 cucchiaini + 1/4 di lievito di birra secco per ogni pane. Non utilizzare mai più di 460 ml d’acqua per ogni pane. B3971 COMPONENTI 1. 2. 3. 4. 5. 6. 7. 8. 9. 10. Coperchio Apertura di osservazione Distributore di ingredienti supplementari 1 Pannello di controllo 2 Gancio per impastare Stampo Contenitore Misurino Cucchiaio misurino Attrezzo per togliere il gancio per impastare 8 9 3 4 5 6 7 10 · · · · · Prima di utilizzare il prodotto, togliere tutti gli imballi e gli eventuali adesivi promozionali. Pulire la macchina del pane, lo stampo e il gancio per impastare con un panno umido. Lo stampo e il gancio per impastare sono rivestiti da uno strato antiaderente e non devono quindi mai essere lavati con detergenti aggressivi, spazzole o spugne. Utilizzare sempre un panno umido. Togliere la pellicola protettiva dal display. Al momento del primo utilizzo, la macchina del pane potrebbe emettere un po’ di fumo; è normale, non si tratta di un guasto e scompare da solo. Prima di utilizzare la macchina del pane la prima volta, si consiglia di utilizzare lo stampo a vuoto con il programma BAKE. Farla funzionare per 10 minuti. Lasciare quindi raffreddare tutto e pulire di nuovo i componenti. Prima del primo utilizzo, imburrare con del burro o della margarina lo strato antiaderente dello stampo e il gancio per impastare. IT PRIMA DELL’USO UTILIZZO RICETTA BASE La ricetta che segue serve per preparare un semplice pane bianco. · 630 g farina · 370 ml acqua · 5 g lievito di birra secco · 1 cucchiaino di sale · 1 cucchiaio di zucchero INGREDIENTI I fattori più importanti per preparare un buon pane sono la qualità, la freschezza e le corrette proporzioni degli ingredienti. Attenzione: non superare mai la capacità massima della macchina del pane (1000 g)! Non utilizzare quindi mai più delle seguenti quantità massime di ingredienti per ogni singola preparazione: www.domo-elektro.be B3971 81 Farina: max. 715 g Lievito: max. 22 g lievito di birra fresco o+ 4 cucchiaini + 1/4 di lievito di birra secco Acqua: max. 460 ml Farina La farina è l’ingrediente base del pane. Il peso della farina varia secondo i tipi. È quindi assolutamente necessario pesare con una bilancia precisa la quantità di farina da utilizzare. Consiglio: leggere quanto riportato sulla confezione della farina. Deve essere riportato che la farina è adatta per la preparazione del pane. Glutine Il glutine è un elemento naturale della farina e favorisce la lievitazione del pane. Lievito Il lievito è un microorganismo presente in vari alimenti vegetali. Il lievito trasforma lo zucchero in alcool e in anidride carbonica e quindi si moltiplica molto in fretta. È quindi ideale per far crescere la pasta e renderla più leggera e meglio digeribile. Con la macchina del pane, consigliamo di utilizzare il lievito di birra secco. È più facile da lavorare, si conserva più a lungo del lievito di birra fresco e dà risultati più costanti. Sale Il sale assicura non solo il sapore al pane, ma regola anche l’attività del lievito, rende l’impasto più stabile ed evita che il pane lieviti troppo. IT Burro / Olio Il burro e l’olio migliorano il sapore del pane e lo rendono più morbido. Il burro o l’olio devono essere a temperatura ambiente prima di aggiungerli agli altri ingredienti. Zucchero Lo zucchero è una fonte di nutrimento per il lievito e un elemento importante per il processo di lievitazione. È possibile utilizzare zucchero bianco, zucchero di canna, melassa o miele. Conferisce un sapore dolciastro al pane, ne aumenta il valore nutritivo e il periodo di conservazione. Attenzione: non utilizzare zucchero grezzo o zollette per fare il pane, perché danneggiano il rivestimento antiaderente dello stampo. Acqua Quando la farina viene mescolata all’acqua, si forma il glutine, fuoriesce l’aria e quindi il pane può lievitare. Con temperatura ambiente normale, utilizzare acqua tiepida (da + 20 a + 25 °C) per fare il pane: l’acqua fresca non attiva il lievito e l’acqua calda lo attiva troppo. Latte Il latte fa scurire la crosta del pane, ne migliora il sapore, aumenta il valore nutritivo e conferisce un bel color crema all’interno. Se si utilizza latte fresco, è necessario naturalmente ridurre la quantità di acqua per mantenere in equilibrio il livello di umidità. Attenzione: non utilizzare latte fresco se viene selezionato il processo di cottura con la programmazione ritardata. Il latte potrebbe inacidirsi. 82 B3971 Altri ingredienti Utilizzare sempre ingredienti freschi. Se si decide di utilizzare noci, semi di girasole, frutta secca o ingredienti simili, consigliamo di lasciarli ammorbidire in acqua e di asciugarli bene prima di aggiungerli all’impasto. Assicurarsi che questi ingredienti non siano troppo grossi e appuntiti, per evitare che danneggino lo strato antiaderente. PANNELLO DI CONTROLLO Controllo A. Menu: selezione del programma B. Weight: selezione del peso (grandezza) del pane C. Color: imbrunimento della crosta D. Time +: incremento del tempo E. Bake: tasto di scelta rapida per il programma Bake (cuocere) F. Knead: tasto di scelta rapida per il programma di impastatura G. Time +: riduzione del tempo H. Start- pauze/stop: tasto di accensione/spegnimento I. Home made: tasto di scelta rapida per il programma Home made B C MENU WEIGHT COLOR D E F TIME + BAKE KNEAD G H I START HOME MADE TIME - PAUZE/STOP 1 2 7 8 12 9 10 11 13 IT Display 1. Selezione del peso (grandezza) del pane 2. Selezione del programma 3. Timer 4. Fase di programma: impastare 5. Fase di programma: riposare 3 6. Fase di programma: lievitare 7. Fase di programma: riscaldare 4 8. Fase di programma: riscaldare 9. Fase di programma: tenere in caldo 5 10. Fase di programma: pronto 11. Fase di programma: numero della fase 6 12. Tempo restante in minuti 13. Imbrunimento della crosta: chiara, media, scura 14. Blocco del pannello di controllo A 14 A. Menu Utilizzare questo tasto per selezionare il corretto programma di cottura. Ogni volta che si preme il tasto, si sente un segnale sonoro e cambia il numero del programma. Il numero del programma e il corrispondente tempo di cottura sono visualizzati sul display. B.Weight Utilizzare questo tasto per selezionare il peso del pane che si desidera preparare. È possibile scegliere tra un pane di 500, 750 g o di 1000 g. Suggerimento: la quantità totale degli ingredienti riportata nella ricetta è il peso del pane che verrà preparato. www.domo-elektro.be B3971 83 C. Color Utilizzare questo tasto per selezionare se si desidera la crosta chiara, media o più scura. Suggerimento: quando si esegue una ricetta per la prima volta, consigliamo di selezionare la doratura media. D. Time + e G. Time Con questi tasti in determinati programmi è possibile scegliere l'avvio ritardato e regolare il timer. Negli altri programmi è possibile regolare il tempo del programma. E. Bake Questo è un tasto di scelta rapida per il programma di cottura. Premere "start-pauze/stop" per confermare il programma F. Knead Questo è un tasto di scelta rapida per il programma di impastatura. Premere "start-pauze/stop" per confermare il programma H. Start-pauze/stop Questo tasto consente di avviare il programma selezionato oppure mettere in pausa/annullare il programma in corso. Premere brevemente questo tasto per mettere in pausa un programma. Premere di nuovo il tasto per riavviare il programma. Se non si riavvia il programma entro 3 minuti, il processo verrà interrotto. Per terminare un programma, premere il tasto per alcuni secondi fin quando si udirà un segnale acustico. I. Home made Questo è un tasto di scelta rapida per il programma Home made. Vedere “Impostazione di Home made” nella sezione Utilizzo. Premere "start-pauze/stop" per confermare il programma IT PROGRAMMI 84 Tempistica dei programmi: Programma 500 g 750 g 1000 g 1. Normale (basic) 3:05 3:10 3:15 2. Francese (french) 3:35 3:40 3:45 3. Integrale (whole wheat) 4:05 4:10 4:15 4. Dolce (sweet) 3:35 3:40 3:45 5. Riso (rice) 2:50 2:55 3:00 6. Senza glutine (gluten free) 3:05 3:10 3:15 7. Rapido (Quick) 2:10 2:15 2:20 8. Fruit 3:05 3:10 3:15 9. Cake 2:20* 10. Panini (Sandwich) 3:00 3:05 3:10 11. Pane con uvette/noci (Raisin/nut) 3:05 3:10 3:15 12. Segale (Rye) 4:05 4:10 4:15 13. Impastare (knead) 0:08* 14. Impasto (dough) 1:30* 15. Brioche 3:35 3:40 3:45 16. Cuocere (Bake) 0:30* B3971 17. Home made -- -- -18. Italiano (Italian) 3:05 3:10 3:15 * Se viene selezionato uno di questi programmi, è possibile non scegliere nessun peso. Il tempo visualizzato dal display è espresso in ore e minuti. Esempio: programma 1, normale, 750 grammi, durata 3 ore e 10 minuti. 1. Normale (Basic) È il programma più utilizzato per fare il pane bianco. 2. Francese (French) Il tempo di preparazione e di lievitazione sono più lunghi rispetto al programma normale. La crosta sarà più croccante e il pane sarà più friabile e leggero. 3. Integrale (whole wheat) È il programma più adatto per la preparazione di pane nero, integrale e multicereali. Il pane sarà in generale più piccolo del pane bianco, perché la farina è più pesante. Con questo programma non è possibile selezionare la programmazione ritardata perché i risultati possono essere meno soddisfacenti. 4. Dolce (sweet) Questo programma è adatto per realizzare tipi di pane quali pane con uvette, pane dolce, pane al cioccolato ecc. 6. Senza glutine (gluten free) Questo programma consente di fare pane senza glutine. L'impasto del pane senza glutine è più umido e ha una consistenza più pastosa. Per questo l'impasto non deve essere impastato né fatto lievitare troppo a lungo. Il tempo di cottura è invece più lungo. Si sconsiglia di utilizzare l'avvio ritardato con questo programma, poiché potrebbe portare a risultati meno soddisfacenti. È preferibile aggiungere tutti gli ingredienti dall'inizio. IT 5. Riso (rice) Utilizzare questo programma per pane a base di farina di riso. Una volta impastato, l'impasto può lievitare prima di essere utilizzato. La crosta del pane a base di farina di riso è più sottile e morbida del pane normale. 7. Rapido (Quick) Per impastare, far lievitare e cuocere il pane con lievito artificiale. Il risultato è in genere un pane più piccolo con una struttura più solida. Prima di iniziare, consigliamo di miscelare gli ingredienti con un cucchiaio di legno. 8. Fruit Utilizzare il distributore per aggiungere ingredienti come uvette o altri tipi di frutta secca. La macchina aggiungerà gli ingredienti dal distributore al momento giusto. Se di desidera aggiungere al pane della frutta fresca o più umida, è meglio farlo direttamente nello stampo quando viene emesso un segnale acustico. www.domo-elektro.be B3971 85 9. Cake Con questo programma è possibile preparare per esempio il pane con il lievito in polvere. Il pane cotto con questo programma è meno alto e presenta una struttura più solida. Se si desidera cuocere un dolce con questo programma, vi consigliamo di mettere gli ingredienti nello stampo. Impostare la macchina e prima di premere il tasto START mescolare gli ingredienti con un cucchiaio di legno. Questa operazione rende più facile l’impastatura. In questo programma non è possibile scegliere il peso. 10. Panini (Sandwich) È possibile utilizzare questo programma per preparare un pane bianco molto leggero, ottimo per i panini. Attenzione! Con questo programma non è necessario impostare la doratura della crosta, perché lo fa la macchina automaticamente. 11. Pane con uvette/noci (Raisin/nut bread) Utilizzare il distributore per aggiungere ingredienti secchi come uvette o noci. La macchina aggiungerà gli ingredienti dal distributore al momento giusto. 12. Segale (Rye) Questo programma è ideale per del pane a base di cereali più consistenti come la segale. Anche il pane stesso è più denso e consistente rispetto al pane normale. 13. Impastare (knead) Con questo programma la macchina esegue solo l'impastatura, senza la cottura e la lievitazione. Questo programma può essere utilizzato ad esempio per fare dell'impasto per pizza. Con i tasti time + e time - è possibile regolare il tempo di lavorazione. IT 14. Impasto (dough) Con questo programma la macchina esegue solo l'impastatura e la lievitazione. 15. Brioche Questo programma è adatto per pane con ingredienti supplementari che apportano un'elevata quantità di zucchero, grasso e proteine (ad es., cioccolata, zucchero ecc.). Questi ingredienti danno una crosta più scura. La fase di lievitazione durerà più a lungo, garantendo un risultato leggero e soffice. 16. Cuocere (Bake) È possibile utilizzare questo programma per cuocere un impasto preparato in precedenza. Con questo programma è possibile solo fare la cottura finale dell’impasto. È possibile anche riscaldare del pane già cotto. 17. Home made Questo tasto può essere programmato per tempi di preparazione di propria scelta. Vedere “Impostazione di Home made” nella sezione Utilizzo. 18. Italiano (Italian) Questo programma consente di fare del delizioso pane di tipo mediterraneo. In questo programma è possibile aggiungere ingredienti quali spezie, pomodori secchi, olive ecc. 86 B3971 UTILIZZO Togliere lo stampo dalla macchina afferrandolo per la maniglia e ruotandolo per un quarto di giro in senso antiorario. 2. Sistemare il gancio per impastare (incluso) nell’asse dello stampo. Il gancio per impastare deve essere sistemato in modo corretto e con cura, affinché tutti gli ingredienti siano mescolati e impastati a sufficienza. 3. Mettere gli ingredienti nello stampo, nell’ordine descritto sotto. · Acqua/latte · Burro/olio · Eventualmente uova · Sale (su un lato) · Zucchero (sull’altro lato) · Farina · Lievito (aggiungere il lievito facendo un buco nel mezzo della farina) ! Attenzione! Il lievito non deve venire a contatto con l’acqua, il sale o lo zucchero. In caso contrario, il lievito si attiva prima che gli ingredienti siano sufficientemente mescolati e impastati. Ingredienti supplementari come noci, spezie, frutta secca ecc. possono essere aggiunti nel distributore o in seguito. Vedere la sezione “Aggiunta di ingredienti supplementari”. 4. Eliminare tutti i residui degli ingredienti sul lato esterno dello stampo. Rimettere lo stampo nella macchina. Ruotare lo stampo in senso orario fino a sentire un clic. 5. Chiudere il coperchio. 6. Inserire la spina nella presa di corrente. 7. Impostare il programma corretto con il tasto “MENU”. Ogni inserimento viene confermato da un segnale sonoro. 8. Scegliere il colore della crosta con il tasto "color". È possibile scegliere tra chiara, media o scura. Selezionare la grandezza del pane (500 g, 750 g o 1.000 g) con il tasto "peso". 9. Impostare eventualmente la programmazione ritardata. (Si veda alla voce “Programmazione ritardata”). 10. Premere il tasto “start-pauze/stop”. I due punti lampeggiano: la macchina inizia a funzionare. Se è stata impostata la programmazione ritardata, la macchina si metterà in funzione solo dopo che è trascorso l’orario impostato. 11. Quando il pane sarà pronto, la macchina emetterà un segnale acustico. Sul display è riportato 0:00. Premere il tasto "start-pauze/stop" e tenerlo premuto per alcuni secondi. La macchina emetterà nuovamente un segnale acustico per confermare che il programma è stato interrotto. Se il programma non viene terminato con questo tasto, la funzione di tenuta in caldo terrà il pane in caldo per altri 60 minuti. Rimuovere la spina dalla presa elettrica e aprire il coperchio della macchina. Rimuovere lo stampo indossando dei guanti da forno. 12. Lasciare raffreddare il pane nello stampo per 10-15 minuti, quindi capovolgere lo stampo e togliere delicatamente il pane dallo stampo. Non mettere mail né il pane né lo stampo sulla parte esterna della macchina o su tovaglie in plastica. Se il pane non si stacca subito, ruotare con attenzione l’asse sulla parte inferiore dello stampo fino a quando non si separa. Non utilizzare mai oggetti affilati per estrarre il pane, al fine di non danneggiare lo strato antiaderente dello stampo. 13. Se il pane non viene tolto dalla macchina e il gancio per impastare rimane nel pane, toglierlo con attenzione utilizzando l’attrezzo fornito. Lasciare raffreddare ulteriormente il pane su una griglia in modo da poter togliere il gancio per impastare con le mani. Assicurarsi che il gancio per impastare sia completamente freddo. Si consiglia di tagliare il pane solo dopo 15-20 minuti. www.domo-elektro.be B3971 IT 1. 87 FUNZIONE DI TENUTA IN CALDO Se non arrivate a casa in tempo, la macchina del pane continua a riscaldarsi per circa 60 minuti. Questa funzione non è compresa nel tempo di programmazione. Se si desidera interrompere questa funzione, premere per alcuni secondo il tasto “start-pauze/stop”. Se il pane rimane più di un’ora all’interno della macchina, si inumidisce. Sciacquare immediatamente con acqua calda dopo aver tolto il pane, affinché il gancio per impastare non rimanga attaccato all’asse. Non mettere in funzione la macchina del pane, perché non è ancora completamente fredda. AGGIUNTA DI INGREDIENTI SUPPLEMENTARI Durante il processo di impastatura dei seguenti programmi, al termine dell'impasto viene emesso un segnale acustico: Normale, Francese, Integrale, Dolce, Riso, Senza glutine, Frutta, Cake, Uvette/noci, Segale, Brioche, Italiano. Il segnale acustico indica che è possibile aggiungere ingredienti supplementari come: uvette, noci, semi ecc. Gli ingredienti possono essere aggiunti mediante il distributore o manualmente. IT Distributore Aprire il distributore spostando il coperchio verso sinistra. Aggiungere gli ingredienti. Chiudere il coperchio. Gli ingredienti nel distributore saranno aggiunti automaticamente al pane dopo l'impastatura e la lievitazione. Attenzione: · Non aggiungere ingredienti umidi, liquidi o in polvere mediante il distributore. · Non riempiere mai eccessivamente il distributore. · Si consiglia di tagliuzzare le noci di grandi dimensioni prima di inserirle nel distributore. · Prima di inserire ingredienti nel distributore, controllare sempre che lo sportellino all'interno dell'apparecchio sia chiuso. Aggiunta manuale È inoltre possibile aggiungere manualmente degli ingredienti. Mettere in pausa il programma non appena viene emesso il segnale acustico. aprire il coperchio, aggiungere gli ingredienti, richiudere il coperchio e premere di nuovo il tasto "start". Questa operazione manuale è meglio indicata per ingredienti umidi o liquidi, ingredienti in polvere e grandi quantità. FUNZIONE MEMORIA Se l'apparecchio si spegne in seguito a un guasto all'alimentazione, la funzione memoria rimane attiva per 10 minuti. Pertanto non è necessario riavviare il programma quando ritorna l'alimentazione. Se l'assenza di alimentazione dura più di 10 minuti, il programma viene annullato. IMPOSTAZIONE DI HOME MADE Il tasto "Home made" è riservato ai programmi di cottura personali dell'utente. È possibile stabilire i tempi di tutte le fasi di programma. Per saltare determinate fasi, impostare il tempo su 0:00. Attenzione: le impostazioni di questo tasto non vengono memorizzate se si rimuove la spina dalla presa elettrica. 1. 88 Premere il tato "Home made" o scegliere il programma 17 mediante il tasto "menu". B3971 2. 3. 4. Preme nuovamente il tasto "Home made" per cominciare a programmare. Sul display lampeggiano l'indicazione del tempo e l'icona della fase di programma. Vedere la seguente tabella con le fasi di programma e le impostazioni di tempo standard. Impostare per ogni fase il tempo desiderato mediante i tasti Time + (incremento del tempo) e Time (riduzione del tempo). Confermare il tempo selezionato premendo il tasto "Home made". Una volta percorse tutte le fasi, sul display compare la durata complessiva del programma. La durata complessiva standard è 3 ore. A questo punto è possibile avviare il programma impostato premendo il tasto "start". Se si preme il tasto "start" durante l'impostazione delle fasi, la programmazione termina anticipatamente. Se lo si desidera, con questo programma può essere selezionato l'avvio ritardato, vedere "Avvio ritardato". Icona Impostazione standard Intervallo temporale regolabile Impastare 1 0:10 1-30 min. Riposo 1 0:03 0-30 min. Impastare 2 0:05 0-30 min. Riposo 2 0:10 0-30 min. Impastare 3 0:20 0-25 min. Lievitare 1 0:42 0-60 min. Lievitare 2 0:40 0-60 min. Lievitare 3 0:00 0-60 min. Cuocere 0:50 0-80 min. Tenere in caldo 1:00 0-60 min. IT Fasi di programma TOGLIERE IL GANCIO PER IMPASTARE PRIMA DI CUOCERE È possibile togliere il gancio dopo aver terminato il processo di impastatura. 1. Premere brevemente il tasto “start-pauze/stop” per fermare il processo di cottura o togliere la spina dalla presa di corrente. 2. Aprire il coperchio ed estrarre lo stampo. Togliere l’impasto con le mani infarinate e staccare il gancio per impastare. 3. Rimettere l’impasto nella stampo e chiudere il coperchio. 4. Inserire nuovamente la spina nella presa di corrente e premere il tasto “start-pauze/stop”. Il programma di cottura riprende. PROGRAMMAZIONE RITARDATA È possibile programmare la macchina in modo che il pane sia pronto all’ora stabilita. · Calcolare la differenza tra l’ora a cui si avvia il programma e l’ora a cui si desidera che la preparazione sia pronta. La macchina del pane conta automaticamente la durata del ciclo del programma. www.domo-elektro.be B3971 89 · · · Premendo questi tasti, si riduce o si aumenta di 10 minuti alla volta l’ora a cui il pane sarà pronto. Sul display compare l'icona della clessidra. La programmazione ritardata non è possibile per: impastare e cuocere. Se per questi programmi si premono i tasti Time + e Time -, il tempo del programma verrà modificato. Esempio Sono le 9.00 del mattino e si desidera che il pane sia pronto alle 17.00. Mettere tutti gli ingredienti nello stampo. Sistemare lo stampo nella macchina del pane. Chiudere il coperchio e premere il tasto MENU per impostare il programma corretto. Premere il tasto "color" per impostare l'imbrunimento della crosta e scegliere il peso desiderato per il pane. Premer il tasto "time +" fino a far comparire 8:00 sul display. Trascorreranno 8 ore dal momento in cui si preme il tasto "start" a quando il pane dovrà essere pronto (alle 17:00). Premere il tasto "start". I due punti sul display lampeggiano e compare l'icona della clessidra. A questo punto il timer comincia a contare fino al momento in cui la macchina del pane deve iniziare a impastare. La macchina del pane esegue quindi tutto il programma impostato in modo che il pane sia pronto all'ora scelta. Attenzione: Non selezionare il programma con il timer in caso di utilizzo di ingredienti con conservazione limitata come latte fresco, uova, yogurt, formaggio, frutta fresca. SUGGERIMENTI · · · IT · · Pesare sempre con cura gli ingredienti e utilizzarli a temperatura ambiente. È possibile stabilire il grado di freschezza del lievito eseguendo il test seguente: sciogliere in mezza tazza di acqua tiepida un cucchiaino di zucchero e aggiungere quindi un cucchiaino di lievito. Dopo qualche minuto, se la miscela inizia a formare schiuma significa che il lievito è fresco. Il sale limita l’effetto del lievito. Lo zucchero, al contrario, lo favorisce. Se non è possibile utilizzare uno di questi due ingredienti a causa per esempio di una dieta, evitare di aggiungerli. Il pane sarà senza sale e senza zucchero. Il pane preparato non contiene conservanti e ha quindi una conservazione limitata. Se il pane viene messo sottovuoto dopo averlo fatto raffreddare completamente, sarà possibile conservarlo qualche giorno. Il pane può anche essere congelato e quindi essere conservato più a lungo. Imburrare leggermente l'asse nello stampo in modo che il gancio per impastare si estragga facilmente. PULIZIA E MANUTENZIONE · · · · Prima di pulire la macchina del pane, è necessario spegnerla, togliere la spina dalla presa di corrente e lasciarla raffreddare completamente. Pulire bene l'apparecchio dopo ogni utilizzo. La mancata pulizia dello stampo, dell'asse nello stampo e del gancio per impastare prima dell'utilizzo può deteriorare il funzionamento e ridurre la durata della macchina del pane. Asciugare bene l'apparecchio e tutti i componenti. Lasciare il coperchio aperto per mezz'ora in modo che tutte le parti siano sufficientemente asciutte per riporre o riutilizzare l'apparecchio. ! Attenzione: non immergere mai l'apparecchio in acqua. PARTE ESTERNA 90 Pulire la parte esterna della macchina e l’apertura di osservazione con un panno umido o una spugna. Estrarre lo stampo prima di pulirlo. Se necessario, è possibile pulire la parte esterna della macchina utilizzando un detergente neutro. B3971 PARTE INTERNA La parte interna della macchina deve essere pulita con attenzione utilizzando un panno leggermente inumidito. Prestare particolare attenzione quando si pulisce l’elemento riscaldante. STAMPO Per estrarre lo stampo dalla macchina, afferrarlo per la maniglia, ruotarlo per un quarto di giro in senso antiorario e sollevarlo. Lo stampo può essere lavato con acqua calda. Attenzione a non danneggiare lo strato antiaderente. Se non si riesce a togliere il gancio per impastare dallo stampo, lasciare raffreddare completamente lo stampo. Mettere un po’ di acqua calda nello stampo in modo da ricoprire il gancio per impastare. L’acqua farà in modo che lo sporco attaccato si sciolga e che il gancio per impastare possa essere tolto. Non utilizzare detergenti o spazzole abrasive, poiché potrebbero danneggiare lo strato antiaderente dello stampo. Lo stampo non può essere lavato in lavastoviglie. DOMANDE PIÙ FREQUENTI Problema Soluzione Non ottengo il risultato desiderato. · Posso controllare durante il processo che l’impasto sia corretto? L’impasto deve apparire come una palla elastica e liscia. Dopo 5-10 minuti (durante l’impastatura), aprire il coperchio e toccate con le dita la parte esterna dell’impasto. L’impasto deve attaccarsi leggermente alle dita. Se si attacca troppo, significa che è troppo umido ed è necessario aggiungere della farina. Se non si attacca per niente, significa che è troppo asciutto e che è necessario aggiungere un po’ d’acqua. Non aprire il coperchio durante la lievitazione. Il pane potrebbe sgonfiarsi. Voglio cuocere più pani uno dopo l’altro. Lasciare raffreddare per 20 minuti la macchina con il coperchio aperto. Se la macchina è troppo calda, il lievito inizia a lavorare troppo presto e il risultato non sarà ottimale. www.domo-elektro.be B3971 IT · · · La composizione dell’impasto è molto importante per ottenere buoni risultati. Inoltre, il risultato può dipendere anche dai diversi marchi di farina utilizzata. Mano a mano che la si utilizza, si impara a conoscere la macchina del pane. Consigliamo di provare prima di tutto le ricette base. È possibile anche usare una miscela già pronta. In caso di problemi persistenti, è possibile mettersi in contatto con il nostro servizio clienti. Gli ingredienti non sono stati pesati con cura. Gli ingredienti non solo freschi. Gli ingredienti non sono a temperatura ambiente. 91 Il pane si è sgonfiato. · · · Il pane nel mezzo non è cotto a sufficienza. Se la parte interna del pane non è cotta a sufficienza, è possibile che sia a causa del tipo di farina utilizzata. In genere questo succede quando si utilizzano tipi di farina più pesanti, come quella di segale o quella integrale. Provare a utilizzare più di un solo processo di impastatura con questi tipi di farina. Quando la macchina del pane ha concluso il primo processo di impastatura, spegnere l’apparecchio. Impostare di nuovo la macchina e premere il tasto START. La macchina inizia di nuovo a impastare e c’è una maggiore quantità di aria nell’impasto. Il fondo del pane è troppo spesso. Il pane è stato lasciato troppo a lungo nell’apparecchio con la funzione di mantenimento del calore. L’acqua evapora e quindi il fondo si inspessisce troppo. Togliere immediatamente il pane dall’apparecchio dopo il termine del programma. Il pane è uscito dallo stampo. · · IT · 92 Se il pane si è sgonfiato su tutti i lati, significa che l’impasto era troppo umido. Provare ad aggiungere meno acqua. Se si utilizza frutta o verdura conservate, è necessario farle sgocciolare bene e asciugarle prima di utilizzarle. Sono rimaste impregnate più a lungo e quindi sono eccessivamente umide. Provare a utilizzare un tipo di farina più leggero. L’impasto può anche essere lievitato troppo. L’impasto è lievitato troppo. Provare a mettere meno lievito (1-2 grammi solamente). Se l’impasto è lievitato troppo, è possibile che sia uscito dallo stampo. Togliere la presa dalla spina e lasciare raffreddare l’apparecchio. Pulire l’elemento riscaldante. È stato utilizzato troppo lievito. Il lievito è stato attivato troppo, per esempio perché c’era troppo zucchero o a causa della temperatura elevata. È stato usato troppo impasto. Non usare più di 1.000 g. Sul display compare H:HH. La macchina è ancora troppo calda. Lasciarla raffreddare completamente. Sul display compare E:EO. C’è un problema con il sensore di temperatura. L’apparecchio deve essere inviato al nostro servizio di assistenza post vendita. Perché non è possibile aggiungere ingredienti extra all’inizio del programma? Gli ingredienti extra (come le noci o l’uvetta) verrebbero triturati e il pane non sarebbe impastato nel modo corretto. L’aggiunta di ingredienti extra potrebbe influenzare anche la lievitazione. Gli ingredienti extra devono essere aggiunti solo quando l’apparecchio emette il segnale sonoro, dopo l’impastatura o la lievitazione. È possibile utilizzare il latte al posto dell’acqua? Sì, certo! Bisogna però prima assicurarsi che il volume di umidità corrisponda. Il rapporto tra quantità di acqua e quantità di latte non è importante. La crosta è talvolta più chiara e talvolta più scura. Il grado di doratura può essere selezionato con il tasto “COLOR”. Le preparazioni con più zucchero daranno una crosta più scura. B3971 La macchina del pane impasta più lentamente del normale. Può capitare in caso di impasti pesanti, che causano un rallentamento del motore. Non è un problema per la macchina. Aggiungere un cucchiaio di liquido. Il gancio per impastare è fisso nello stampo. Togliere il pane dallo stampo. Riempirlo con acqua calda e lasciarlo ferma per un quarto d’ora. L’impasto attaccato si scioglierà. Si è formata della condensa sulla parte interna dell’apertura di osservazione. È normale. È dovuta al calore. È stata utilizzata una miscela pronta all’uso, ma il pane non è riuscito. Prima di inviare l’apparecchio in riparazione, consigliamo di provare a realizzare le ricette base. Le miscele pronte all’uso talvolta possono contenere ingredienti che causano risultati non soddisfacenti. MISURE AMBIENTALI Il materiale di imballaggio è riciclabile. Lo smaltimento dell’imballaggio deve avvenire al fine di tutelare l’ambiente. www.domo-elektro.be B3971 IT Il simbolo sul prodotto o sulla confezione indica che esso non deve essere trattato come rifiuto domestico. Deve, al contrario, essere conferito al punto di raccolta predisposto per il riciclo delle apparecchiature elettriche ed elettroniche. Facendo in modo che questo prodotto venga smaltito correttamente aiuterete a prevenire potenziali conseguenze negative per l’ambiente e la salute dell’uomo, che potrebbero essere causate da uno smaltimento non corretto. Per maggiori informazioni sul riciclo di questo prodotto, consultare le autorità comunali, l’azienda o il servizio responsabili della raccolta dei rifiuti domestici o il negozio in cui il prodotto è stato acquistato. 93 ZÁRUKA Práva a povinnosti prodávajícího a kupujícího ohledně práv z vadného plnění se řídí příslušnými obecně závaznými předpisy dle občanského zákoníku. 1. Trvání záruky: 2 roky. Na příslušenství a součásti které podléhají opotřebení běžným provozem je záruka jen 6 měsíců. 2. Záruka se nevztahuje a) na mechanické poškození b) nesprávné používání v rozporu s návodem k použití 3. Záruka zaniká: - při použití spotřebiče jinak než v je uvedeno v manuálu (nesprávným postupem) - při provádění opravy nebo změny na spotřebiči osobou jinou než pověřenou naším servisem CZ Prodávající odpovídá kupujícímu, že zboží při převzetí nemá vady. Zejména prodávající odpovídá kupujícímu, že v době, kdy kupující zboží převzal: · má zboží takové vlastnosti, které výrobce v tomto návodu popisuje, · se zboží hodí k účelu, ke kterému výrobce uvádí, · zboží odpovídá jakostí nebo provedením smluvenému vzorku nebo předloze, byla-li jakost nebo provedení určeno podle smluveného vzorku nebo předlohy, · zboží vyhovuje požadavkům právních předpisů. Projeví-li se vada v průběhu šesti měsíců od převzetí, má se za to, že zboží bylo vadné již při převzetí. Pokud není u výrobku uvedeno jinak, činí záruční doba 24 měsíců. Záruční doba počíná běžet od převzetí věci kupujícím. Práva z vadného plnění uplatňuje kupující u prodávajícího na adrese jeho provozovny, v níž je přijetí reklamace možné s ohledem na sortiment prodávaného zboží, případně i v sídle nebo místě podnikání. Za okamžik uplatnění reklamace se považuje okamžik, kdy prodávající obdržel od kupujícího reklamované zboží. Reklamaci lze také uplatnit v servisním středisku na adrese DOMO-elektro s.r.o., Na Kobyle 783, 345 06 Kdyně, Česká republika, tel. (+420) 379 422 550, [email protected] Pro rychlé a bezproblémové vyřízení reklamace doporučujeme přiložit k reklamaci doklad o koupi a průvodní dopis s popisem závady a zpáteční adresou s telefonickým kontaktem. BEZPEČNOSTNÍ POKYNY Při používání jakkéhokoli el. spotřebiče dbejte zvýšené opatrnosti a dodržujte určitá bezpečnostní pravidla: · Pečlivě si přečtěte tyto informace a manuál nechte i pro pozdější nahlédnutí. · Ujistěte se, že před použitím odlepíte a odstraníte veškeré reklamní a ochranné fólie. · Děti si s ochrannými ani reklamními polepy nesmí hrát. · Přístroj je určen pro používání v domácnostech a podobných prostředích, tak jako je: · kuchyňky v obchodech, kancelářích atd. · chaty, chalupy · hotely, penziony a jiné dočasné ubytování 94 B3971 · · · · · Dohlédněte, aby si děti nehrály s přístrojem. Tento spotřebič mohou používat děti ve věku 16 let a starší a osoby se sníženými fyzickými, smyslovými nebo mentálními schopnostmi, nebo nedostatkem zkušeností a znalostí pokud jsou pod neustálým dozorem nebo byly poučeny o používání spotřebiče bezpečným způsobem a rozumí případným nebezpečím. Děti si s přístrojem nesmějí hrát. Čištění a údržbu prováděnou uživatelem nesmějí provádět děti bez dozoru. Čistění a běžnou údržbu smí provádět pouze osoby starší 16 let a při tom být pod dohledem. Přístroj a jeho el. kabel skladujte mimo dosah dětí. Pozor: Tento přístroj je zakázáno používat s externím časovačem nebo jiným dálkovým ovládáním. · · · · · · · · · · · · · · · · · · · · · · · Předtím, než přístroj připojíte k elektrické síti, se ujistěte, že napětí uvedené na přístroji odpovídá napětí Vaší elektrické sítě. Nedovolte, aby se přívodní kabel dotýkal horkých ploch a aby nebyl ohnutý přes ostré hrany stolů, nebo pracovních pultů. Přístroj nepoužívejte pokud má poškozený přívodní kabel, zástrčku, nebo je přístroj sám jinak poškozený, pokud netěsní, nebo Vám upadl na zem. Nechte přístroj vždy zkontrolovat v odborném servisu, nebo proškoleným opravářem, abyste předešli riziku zranění elektrickým proudem a jiným zraněním. Nikdy nenechávejte spuštěný přístroj bez dozoru. Přístroj nestavte do blízkosti jiných tepelných zdrojů, jako jsou sporáky, plotýnky či kamna. Přístroj není určen pro použití ve venkovním prostředí. Přístroj používejte pouze k účelům, ke kterým je určený. Stavte pouze na rovné, pevné a stabilní místo. Přístroj je určen pouze pro domácí použití. Výrobce, dovozce ani prodejce nenese odpovědnost za vzniklá rizika z nedodržení zde popsaných pravidel k použití. Veškeré opravy přístroje smí provádět pouze autorizovaný servis nebo odborně proškolený technik. Abyste zabránili úrazu elektrickým proudem, nesmíte nikdy potápět kabel, síťovou zástrčku nebo samotný přístroj do vody nebo jiných tekutin. Přívodní kabel držte bezpečně daleko od ostrých hran a předmětů, aby se nepoškodil. Přístroj neumisťujte do blízkosti hořlavých ani vznětlivých látek (plynů). Větrací otvory přístroje nezakrývejte, tak aby byla zaručena dostatečná cirkulace vzduchu. Pokud je nutné, můžete použít prodlužovačku přívodního kabelu, ale jen za podmínky, že je bude prodlužovačka silnější (více dimenzovaná) než přívodní kabel. Při zapojení prodlužovacího kabelu jej umístěte a zajistěte tak, aby ho nikdo omylem nemohl vytáhnout nebo o něj zakopnout. Na zapojený přístroj nestavte žádné předměty. Jinak hrozí riziko jejich spadnutí nebo dokonce riziko požáru. Pekárna se během činnosti zahřívá a některé její části jsou horké, proto s ní manipulujte opatrně a používejte pouze tlačítka a rukojeti k tomu určená. Před rozebíráním, čistěním nebo skládáním musí být pekárna vychladlá a vždy ji před tím vypojte z elektrické sítě. S naplněnou pekárnou nikdy nemanipulujte. Pokud je pekárna zapnutá, tak se nikdy nesnažte dotýkat hnětacích háků. Před čištěním nebo při dlouhodobém nepoužívání vždy přístroj vypněte a vypojte z el. sítě. Nepoužívejte pekárnu jako úschovnu/skladovací místo potravin. www.domo-elektro.be B3971 CZ Přístroj může být během používání horký. Dbejte na to, aby se přívodní kabel nedotýkal jeho horkých částí a přístroj ničím nepřikrývejte. 95 · Na čištění nepoužívejte houbičku s delšími vlákny. Vlákna by se mohla omylem dostat dovnitř přístroje a způsobit elektrický šok nebo zkrat. Pekárnu nikdy nepoužívejte na sušení potravin ani jiných věcí. Maximální množství všech surovin nesmí být větší, než 1000g. Nikdy nepoužívejte více než 715 g mouky na jeden chléb. Nikdy nedávejte více než 22 g čerstvých kvasnic, nebo 4+1/4 lžiček kvasnic sušených. Nikdy nepoužívejte více než 460 ml vody na jeden chléb. · · · · · ČÁSTI 1. 2. 3. 4. 5. 6. 7. 8. 9. 10. Víko Průhledové okénko Automatický podavač extra přísad Ovládací panel Pečící nádoba Hnětací hák Vnější plášť přístroje Pohárek s odměrkou Lžícová odměrka Hák pro vytahování hnětače z chleba 8 9 1 3 4 2 5 6 7 10 PŘED PRVNÍM POUŽITÍM · · · CZ · · Ujistěte se, že před použitím odlepíte a odstraníte veškeré reklamní a ochranné fólie. Všechny části přístroje očistěte navlhčeným hadříkem – zejména části, které přijdou do styku s potravinami. Pečící nádoba a hnětací hák jsou opatřeny nepřilnavým povrchem. Nikdy tyto plochy nečistěte hrubými nástroji ani agresivními čistícími prostředky. Tyto plochy můžete čistit pouze papírovou kuchyňskou utěrkou, nebo jemným navlhčeným hadříkem. Pokud jste tak ještě neučinili, odstraňte ochranou fólii z displeje. Je naprosto v pořádku, pokud se při prvním použití projeví lehký kouř z přístroje. To se jen vypálí případné nečistoty či maziva z výroby. Před prvním použitím je potřeba jako první spustit na prázdno program pečení „BAKE“. Program nechte proběhnout 10 minut. Poté nechejte pekárnu vychladnout a znovu očistěte pečící nádobu a hnětací hák. Před prvním použitím je nejlepší vymazat pečící nádobu i hnětací hák máslem nebo margarinem. POUŽITÍ ZÁKLADNÍ RECEPT: 96 Níže vypsaný recept je vhodný na přípravu jednoho bochníku bílého chleba. · 630 g hladké mouky · 370 ml vlažné vody · 5 g sušených kvasnic · 1 lžička soli · 1 lžíce cukru B3971 SUROVINY MOUKA Mouka je základní součást chleba. Váha mouky se liší druh od druhu. Proto je absolutně nutné její množství správně odvážit. Při nákupu mouky si všimněte i textu na obalu. Musí tam stát, že mouka je mimo jiné vhodná na pečení chleba. LEPEK Lepek se nachází přirozeně téměř v každé mouce a podporuje kynutí chleba. V tzv. chlebové mouce je lepku však nejvíce. DROŽDÍ Droždí je mikroorganismus, který roste na různých rostlinných potravinách. Má schopnost přeměnit cukr v alkohol a v kysličník uhličitý, přičemž velmi rychle nabývá. Je to ideální, aby mohlo těsto vykynout a bylo lépe stravitelné. Doporučujeme používat sušené droždí. Zpracování tohoto (zrnovitého) droždí je jednodušší, a také je trvanlivější než droždí čerstvé a vykazuje stálejší výsledky.. SŮL Sůl nezabezpečuje pouze určitou chuť chleba, nýbrž reguluje také aktivitu droždí, zpevňuje těsto a zabraňuje tomu, aby chléb příliš vykynul. MÁSLO / OLEJ Máslo a olej dávají chlebu lepší chuť a zvláčňují ho. Před použitím musí mít máslo i olej pokojovou teplotu. CUKR Cukr je zdroj obživy pro droždí a důležitá součást kynutí těsta. Můžete použít normální bílý cukr, hnědý cukr, sirup nebo med. Cukr dodává chlebu jistou křehkost, zvyšuje výživovou hodnotu a přispívá k tomu, že chléb déle vydrží. Pozor: Nepoužívejte hrubý cukr nebo cukr kostkový, např. pro kvasný chléb, protože to poškozuje ochrannou vrstvu pečící formy. MLÉKO Chlebová kůrka díky mléku zhnědne, zlepší se chuť chleba, zvýší se výživná hodnota a vnitřek chleba má krásnou smetanovou barvu. Když použijete čerstvé mléko, musíte adekvátně snížit množství vody, aby množství tekutin zůstalo v rovnováze. CZ VODA Když se promíchá mouka s vodou, vytvoří se lepek, vzduch se nasytí , takže chléb může nabývat. Při normální pokojové teplotě použijte vlažnou vodu, protože studená voda neaktivizuje droždí a horká by byla zase příliš. OSTATNÍ PŘÍSADY V kuchařkách můžete najít recepty, které vyžadují koření, ořechy, rozinky, ovoce nebo zeleninu aj. Používejte vždy čerstvé přísady. Když používáte ořechy, slunečnicová semínka, sušené ovoce apod., nechte je předem namočené ve vodě, aby změkly, dobře osušené lehce pokropte a teprve pak je přidejte do těsta. Dávejte pozor, aby tyto ingredience nebyly příliš velké a ostré, aby nepoškodily ochrannou vrstvu formy. www.domo-elektro.be B3971 97 OVLÁDACÍ PANEL Ovládací panel A. MENU: výběr pečícího programu B. WEIGHT: výběr velikosti chleba C. COLOR: výběr propečení kůrky chleba D. TIME+ : navyšování času E. BAKE: tlačítko pouze pro „pečení“ F. KNEAD: tlačítko pouze pro „hnětení“ G. TIME- : ponížení času H. START-PAUSE/stop: hlavní vypínač on/off I. HOME MADE: tlačítko pro program „domácího chleba“ Displej 1. Výběr velikosti chleba 2. Menu 3. Časovač 4. Fáze programu: hnětení 5. Fáze programu: odpočinutí těsta 6. Fáze programu: kynutí 7. Fáze programu: předehřátí 8. Fáze programu: pečení 9. Fáze programu: udržení tepla 10. Fáze programu: chléb je hotový 11. Fáze programu: počet (pořadí) fází v programu 12. Zbývající čas do konce programu (v minutách) 13. Propečení kůrky: světlá, středně, tmavá 14. Uzamčení ovládacího panelu A B C MENU WEIGHT COLOR D E F TIME + BAKE KNEAD G H I START HOME MADE TIME - PAUZE/STOP 1 2 3 7 4 8 5 9 6 10 12 11 13 14 CZ A. Tlačítko „MENU“ Toto tlačítko použijte, když chcete zvolit správný pečící program. Pokaždé, když stisknete toto tlačítko, uslyšíte signál a číslo programu se na displeji změní. Dle vybraného programu se bude také měnit přednastavený čas. B. „WEIGHT “ – tlačítko Toto tlačítko použijte,když chcete udat váhu chleba, který máte v úmyslu upéci. Můžete volit v rozmezí 500, 750 g a 1000 g. Mějte na paměti, že celkové množství přísad uvedených v receptu je váha chleba, který chcete upéci. C. „COLOR“ – tlačítko Tímto tlačítkem si volíte stupeň propečení kůrky. Možný výběr je světlá/střední nebo tmavá. Když zkoušíte nějaký recept poprvé, doporučujeme vám, abyste si vybrali barvu kůrky střední. D. Time+ a (G) TimePomocí těchto tlačítek můžete nastavit odložené spuštění (časovač) pro programy. Pro některé programy lze upravit jejich celkový čas. 98 B3971 E. Bake = pečení Tímto tlačítkem vyberete program samotného pečení. Spuštění potvrdíte stiskem START-PAUSE/stop. F. Hnětení Tímto tlačítkem vyberete program samotného hnětení. Spuštění potvrdíte stiskem START-PAUSE/stop. H. START-PAUSE/stop Tímto tlačítkem potvrdíte a spustíte vybraný program. Nebo již spuštěný program pozastavíte/spustíte. Krátkým stisknutím program pozastavíte. Pro pokračování stiskněte tlačítko znovu. Pokud do 3 minut program neobnovíte, tak se program automaticky trvale přeruší . Pro ukončení (zastavení) programu stiskněte tlačítko na několik sekund, dokud neuslyšíte pípnutí. I. Home made = domácí chléb Tlačítko slouží pro výběr při pečení (vlastního) doma zadělávaného těsta. Program a jeho fáze lze individuálně nastavit. Více se dočtete v kapitole „Nastavení vlastního domácího programu“. Takto nastavený a vybraný program spustíte tlačítkem „start-pause/stop“. PROGRAMY CZ Program 500 g 750 g 1000 g 1. Základní (basic) 3:05 3:10 3:15 2. Francouzský (french) 3:35 3:40 3:45 3. Celozrnný (whole wheat) 4:05 4:10 4:15 4. Sladký (sweet) 3:35 3:40 3:45 5. Rýžový, rýže (rice) 2:50 2:55 3:00 6. Bezlepkový (gluten free) 3:05 3:10 3:15 7. Rychlý (quick) 2:10 2:15 2:20 8. Ovoce 3:05 3:10 3:15 9. Koláč (cake) 2:20* 10. Sendvič (Sandwich) 3:00 3:05 3:10 11. Hrozinky / ořechový chléb (raisin/nut) 3:05 3:10 3:15 12. Žitný, žito (rye) 4:05 4:10 4:15 13. Hnětení (knead) 0:08* 14. Těsto (dough) 1:30* 15. Brioška (brioche) 3:35 3:40 3:45 16. pečení (bake) 0:30* 17. Domácí vlastní chléb (homemade) -- -- -18. Italský chléb (Italian) 3:05 3:10 3:15 * Pokud si zvolíte jeden z těchto programů, nemůžete volit hmotnost nebo dobu pečení. 1. Basic = základní Nejvíce používaný program pro pečení klasického chleba. 2. French = francouzský Doba hnětení a kynutí je delší než u základního www.domo-elektro.be B3971 99 3. Whole wheat = celozrnný Nejvhodnější program pro pečení tmavého chleba, jako je chléb celozrnný nebo vícezrnný. Chléb může být o něco menší než bílý chléb, protože mouka je těžší. S tímto programem se nedoporučuje používat odložený start – výsledky pečení by mohly být výrazně horší. 4. Sladký = sweet Program je vhodný na přípravu sladkého chleba – typ vánočky nebo čokoládový 5. Rýžový, rýže = rice Tento program použijte pro chléb zadělaný z rýžové mouky. Po hnětení je totiž potřeba, aby těsto před pečením dostatečně vykynulo. Kůrka z rýžového chleba je tenčí a měkčí než normální chléb. 6. Bezlepkový – gluten free Program vhodný pro pečení bezlepkového chleba. Těsto bezlepkového chleba je vlhké a má jinou konzistenci těsta. Těsto by proto nemělo být dlouho hněteno ani příliš dlouhé kynutí. Doba pečení je naproti tomu delší. S tímto programem není vhodné používat odložený start. Prodleva při odloženém startu může znehodnotit těsto a výsledek pečení nebude dobrý. Nejlepší je vložit všechny ingredience najednou a na začátku. 7. Quick = rychlý Pro hnětení, kynutí a pečení chleba s jedlou sodou nebo pečícím práškem. Výsledkem je obvykle menší chléb s hustší strukturou. 8. Ovoce -přísady Pomocí automatického dávkovače můžete přidávat přísady, jako jsou rozinky nebo jiné sušené ovoce. Přístroj přidá přísady sám z automatu ve správný čas. Pokud chcete do svého chleba přidat čerstvé a šťavnaté ovoce, je nejlepší je přidat přímo do pečící nádoby (při pípnutí). Čerstvé ovoce by v automatickém zásobníku do doby přidání ztratilo čerstvost a šťáva by vytekla. CZ 9. Cake = koláč: Pomocí tohoto programu můžete upéci chleba, který je připraven např. s práškem do pečiva. Tímto programem upečené chleby nejsou tak vysoké a pevné. Pokud chcete pomocí tohoto programu udělat třený koláč, vložte přísady do formy. Potom přístroj nastavte a před zapnutím musíte ještě přísady zamíchat dřevěnou lžící. To pomáhá hnětení. Pokud používáte tento program, nemůžete si sami vybrat (změnit) váhu. 10. Sandwich = sendvič Program pro přípravu lehkého bílého těsta vhodného pro přípravu např. malých chlebových houstiček. 11. Hrozinky / ořechový chléb Pomocí dávkovače přidejte přísady, jako jsou hrozinky nebo ořechy. Stroj přidá přísady sám z automatu ve správný čas. 12. Žitný, žito = „rye“ Tento program je ideální pro chleby s těžší moukou jako jako je např. žitná. Chléb je sám o sobě pevnější, hutnější a těžší než normální chléb. 100 B3971 13. Hnětení = kneading Během tohoto programu přístroj pouze hněte (zadělá těsto). Nebude ho nechávat kynout ani péct. Tento program můžete použít například k hnětení těsta na pizzu. Pomocí tlačítek „Time+“ a „Time-“ můžete upravit dobu hnětení. 14. Těsto = dough Program vhodný na zadělání a kynutí těsta. Přístroj prohněte těsto a nechá ho vykynout. 15. Brioška = brioche Tento program je vhodný pro chleby s dalšími přísadami, které mají vysoký obsah cukru, tuku a bílkovin (např. čokoláda, cukr atd.). Tyto přísady vytvářejí tmavší kůru. Fáze kynutí při tomto programu je delší a výsledkem je nadýchanější chléb. 16. Bake = pečení Program na upečení již hotového těsta. Tento program může být použit k dokončení chleba či rozehřátí chleba již dříve hotového. 17. Domácí vlastní chléb = home made Tento program si můžete nastavit dle vlastních potřeb, aby vyhovoval vašemu těstu. Více o nastavení se dočtete níže v kapitole „Nastavení vlastního domácího programu“ 18. Italský chléb = Italian Tímto programem si upečete chutný středomořský chléb. Můžete přidat další přísady, jako jsou bylinky, sušená rajčata, olivy atd. POUŽITÍ PŘÍSTROJE Mírným pootočením doprava a tažením nahoru vyjměte z pekárny pečící nádobu. Na osičku uprostřed nádoby nasaďte hnětací hák(přiložený). Hnětač musí být nasazen správným a pečlivým způsobem, aby se neviklal a všechny přísady mohly být dostatečně promíchány. 3. Suroviny do formy doporučujeme vkládat následujícím způsobem a v tomto pořadí: · voda / mléko · máslo / olej · eventuelně vejce · mouka · cukr (nasypte cukr na jednu stranu) · sůl (sůl nasypte na opačnou stranu) · droždí ( droždí vložte do důlku uprostřed) ! Pozor! Droždí nesmí přijít do styku s vodou, cukrem a solí. Mohlo by se stát, že voda droždí zaktivizuje, dříve než se přísady dostatečně promísí a prohnětou. Pomocí dávkovače můžete ve správný čas nechat přidat další přísady, jako jsou ořechy, byliny, sušené ovoce atd., Nebo mohou být přidány později. Viz část „Přidávání dalších složek“. 4. Odstraňte všechny zbytky přísad z vnější strany formy. Vložte formu opět do přístroje seshora na ni zatlačte a pootočte. 5. Uzavřete víko. 6. Dejte zástrčku do zásuvky 7. Nastavte tlačítkem „menu“ správný program. www.domo-elektro.be B3971 CZ 1. 2. 101 8. 9. 10. 11. 12. Pomocí tlačítka propečení (color) nastavte stupeň propečení kůrky. Můžete si vybrat mezi světlou, středí nebo tmavou. Tlačítkem hmotnosti (weight) nastavte velikost chleba (500g, 750g nebo 1000g). Nastavte eventuálně funkci vlastního naprogramování odloženého startu. Stiskněte START. Dvojtečka bude nyní blikat a tím udává, že přístroj pracuje. Pokud máte nastaveno oddálení programu, program spustí až po uplynutí nastaveného času. Jakmile bude chléb hotový, tak se ozve zvukový signál a na displeji se zobrazí 0:00. Stiskněte a chvilku přidržte „START-PASUSE/stop“. Zařízení opět zapípá, aby se potvrdilo, že jste program zastavili. Pokud program takto nezastavíte, chléb bude díky funkci přihřívání udržován v teple dalších 60 minut. Po vypnutí vypojte z elektrické sítě a otevřete víko. Opatrně vyjměte chléb z náboby. Pozor: nádoba je horká, použijte kuchyňské chňapky. Chléb nechte ochladit ve formě asi 10 – 15 minut, pak formu obraťte a vyklopte chléb z formy. Nikdy nepokládejte chléb ani formu na vnější stranu přístroje nebo přímo na plastikový ubrus. Když se chléb hned neuvolní, otáčejte osou na spodní straně formy, dokud se chléb neuvolní Když chléb vyndáte z přístroje a hnětač zůstane uvnitř v chlebu, tak ho můžete vyndat pomocí vytahovací háku ven. Nebo nechte chleba ještě vychladit na roštu, takže pak můžete hnětač vytáhnout rukama. Dávejte pozor, aby byl hnětač dobře vychlazený. Je doporučeno krájet chléb teprve po 15 – 20 minutách. Na vyjmutí chleba nikdy nepoužívejte ostré kovové předměty, abyste nepoškodili nepřilnavou vrstvu. FUNKCE UDRŽENÍ TEPLÉHO CHLEBA Pokud nejste včas doma a neslyšíte ukončení programu, tak berte na vědomí, že pekárna ještě 60 minut po ukončení pečení hřeje. Tato doba není zahrnuta v programovacím čase. Pro přerušení takového dohřívání stačí podržet tlačítko START/STOP na několik vteřin. Pokud necháte hotový chléb v pekárně déle než hodinu, tak se chléb může zapařit a zvlhnout. Doporučujeme mýt nádoby vždy ihned po vyndání chleba, jedině takto zajistíte, že se hnětač nepřilepí k ose nádoby. Nikdy znovu nepouštějte ještě teplou pekárnu. PŘIDÁNÍ PŘÍMĚSÍ CZ Během hnětení v následujících programech zazní zvukový signál: normální, francouzský, celozrnný, sladký, rýžový, bezlepkový, rychlý, s ovocem, koláč, hrozinky/ořechy, žitný, brioška, italský. Toto pípnutí značí, že je správný čas přidat další přísady, jako jsou hrozinky, ořechy, sem atd. Přísady můžete přidat prostřednictvím automatu nebo ručně. 102 Automatický dávkovač příměsí Otevřete posuvné víko dávkovače, vložte ingredience a víko opět uzavřete. Dávkovač automaticky zajistí přidání ingrediencí ve správný čas – po hnětení a kynutí. POZOR: · Přes dávkovač (do něj) nepřidávejte tekutiny ani suroviny v prášku. · Dávkovací komoru nikdy nepřeplňujte. · Pokud přidáváte ořechy, je lepší je před tím rozdrtit na menší kousky. · Před vložením ingrediencí do dávkovače se ujistěte, aby byl zespodu (píst) uzavřen tak jak má být. Manuální přidání Příměsi můžete vložit jen ručně. Jakmile se ozve zvukový signál, tak program pozastavte (pause), otevřete horní víko pekárny, nasypte přísady, víko opět uzavřete a tlačítkem „start“ opět program spusťte. Ruční přidání surovin je vhodné hlavně pro tekuté nebo sypké přísady. Ručním přidáváním lze přidat i více surovin než je možnost přes dávkovač. B3971 PAMĚŤOVÁ FUNKCE Pokud dojde k výpadku napájení z důvodu výpadku proudu, tak je zde paměťová funkce na 10min Pokud se do té doby napájení rozběhne, tak program bude pokračovat tam kde skončil. Pokud výpadek trvá déle než 10 minut, tak se celý program přerušil a je potřeba ho potom ručně nastavit / spustit znovu. NASTAVENÍ PRO DOMÁCÍ VLASTNÍ CHLÉB Tlačítko „Home made“ je určeno pro předvolení a nastavení vlastního programu. Tímto lze nastavit jakoukoli fázi pečení, hnětení atd.. Pokud chcete nějakou fázi zcela vynechat, tak u ní nastavte 0:00. POZOR: Nastavení tlačítka (vlastního programu) není trvale uloženo. Při vypnutí přístroje z elektrické sítě se program vyresetuje. 1. 2. 3. 4. Stiskněte tlačítko „Home made“ nebo tlačítkem menu vyberte program 17. Opětovným stiskem tlačítka „Home made“ potvrdíte a začnete program nastavovat. Na displeji vždy budou blikat kontrolka aktuální fáze programu a čas. Při nastavení koukněte do tabulky níže, kde jsou uvedené přednastavené základní hodnoty a rozmezí co lze nastavit. U každé fáze nastavte požadovaný čas. Time+ je navyšování a Time- je ponižování času. Navolený čas vždy potvrďte tlačítkem „Home made“. Jakmile máte všechny fáze programu nastaveny, tak na displeji uvidíte celkový čas programu. Standartně by celková doba měla být přibližně 3 hodiny. Tlačítkem START už můžete rovnou program spustit. Pokud byste tlačítko stiskli během programování fází, tak se programování přeruší. Základní nastavení Rozmezí Hnětení 1 Fáze programu 0:10 1-30 min. Odpočinek 1 0:03 0-30 min. Hnětení 2 0:05 0-30 min. Odpočinek 2 0:10 0-30 min. Hnětení 3 0:20 0-25 min. Kynutí 1 0:42 0-60 min. Kynutí 2 0:40 0-60 min. Kynutí 3 0:00 0-60 min. Pečení 0:50 0-80 min. Udržení tepla 1:00 0-60 min. www.domo-elektro.be Ikona CZ Pokud je potřeba, tak můžete nastavit i odložený spuštění programu. Viz popis tohoto nastavení v kapitole „Nastavení odloženého startu“. B3971 103 VYJMUTÍ HNĚTAČE JEŠTĚ PŘED PEČENÍM Pokud chcete celistvý chléb, je možné vyjmout hnětací hák z těsta před jeho pečením. Vyjmout se musí až po posledním hnětení před finálním kynutím. 1. Pokud to takto chcete zkusit, tak pekárnu vypněte stiskem tlačítka start/stop nebo na chvíli vypojte z elektrické sítě. Paměťová funkce pekárny si pamatuje průběh programu cca do 10 min od přerušení, proto musí tato operace vyjmutí háku být poměrně rychlá a bez zbytečných prodlev 2. Otevřete víko, rukama od mouky vyjměte hroudu těsta i s hnětačem. Hák z těsta vyjměte a do pekárny vložte jen samotné těsto. 3. Pekárnu opět zavřete. 4. Přístroj opětovně zapojte do el. sítě a znovu stiskněte tlačítko start/stop, aby mohl program dále pokračovat. POUŽITÍ ODLOŽENÉHO STARTU Pokud chcete tuto funkci použít, musíte ji nastavit, dříve než stisknete START. · Při odloženém startu počítáte a zadáváte čas mezi zapnutím programu a času dokončení/dopečení chleba. Přístroj si automaticky započte dobu potřebnou pro samotný proces pečení. · Tlačítkem pro nastavení, každým jeho stiskem přidáte 10 min odloženého startu. · Na displeji se zobrazí ikona přesýpacích hodin. · Odložený start nelze nastavit u samostatného hnětení ani kynutí. Stiskem tlačítek Time+ / Timebudete u těchto programů nastavovat jejich dobu trvání. Příklad: Je 9:00 ráno a vy byste chtěli mít odpoledne v 17:00 čerstvě upečený chléb. Musíte tedy naprogramovat celkový čas na 8 hodin, což bude odpovídat dopečení přesně v 17:00. Do pekárny vložte všechny potřebné suroviny. Tlačítkem menu vyberte příslušný program. Stisknutím tlačítka Color (propečení) nastavte stupeň propečení kůrky a následně vyberte požadovanou hmotnost chleba. Tlačítkem Time+ navyšujte čas dokud se na displeji nezobrazí 8:00. Chléb bude upečený za 8 hodin od potvrzení vaší volby (tlačítkem Start). Zobrazený čas obsahuje i dobu potřebnou pro samotné pečení. Chléb tedy bude hotov v 5 hodin odpoledne. Stiskněte tlačítko Start. Dvojtečka na displeji začne blikat a rozsvítí se ikona přesýpacích hodin. Začne se odpočítávat čas až do doby, kdy má pekárna začít spustit program a hníst. Chléb bude nyní procházet celým nastaveným programem, aby byl chléb připraven ve zvolený čas. Důležité: tuto funkci nepoužívejte, pokud mají některé suroviny uvnitř pekárny podléhají rychlejší zkáze (například čerstvé mléko, jogurt nebo čerstvé ovoce). CZ TIPY K PŘÍPRAVĚ: · · · · · 104 Vždy všechny přísady přesně odvažte a dbejte na to, aby měly pokojovou teplotu. Jestli je droždí čerstvé, můžete zjistit následujícím testem: V polovině šálku vlažné vody rozmíchejte 1 kávovou lžičku cukru a pak přidejte 1 kávovou lžičku droždí. Po několika minutách bude směs bublat a kypět Sůl omezuje účinek droždí a cukr ho naopak povzbuzuje. Pokud na základě diety nesmíte použít jednu z těchto přísad, pak musíte rovněž vynechat i tu druhou. Pak získáte chléb bez cukru a soli. Chléb, který pečete sami z vlastních surovin, neobsahuje žádné konzervační prostředky, a je proto také omezeně trvanlivý. Když chléb necháte dobře vychladnout a pak ho neprodyšně zabalíte, můžete ho několik dní kvalitně uchovat. Můžete ho samozřejmě také nechat zmrazit a spotřebovat ho později. Osu hnětacího háku i samotný hák namažte máslem. Tak se zajistí, že půjde hák krásně sundat z osy a vyjmout z pečeného chleba. B3971 ČIŠTĚNÍ A ÚDRŽBA · · · · Před čištěním pekárnu vypněte, vytáhněte zástrčku ze zásuvky a nechte pekárnu úplně vychladnout. Po každém použití spotřebič důkladně očistěte. Pokud je některá s částí znečištěna, tak to může ovlivnit výslednou chuť i tvar chleba a nebo dokonce zkrátit životnost přístroje. Po vyčištění přístroj a všechny jeho části důkladně osušte. Před uskladněním nechte alespoň půl hodiny otevřené víko, aby vyschl i vnitřek přístroje. . ! Upozornění: Nikdy přístroj ani přívodní kabel neponořujte do vody. ZEVNĚJŠEK, VÍKO A VNITŘEK PEKÁRNY Zevnějšek přístroje a průhledové okénko setřete vlhkým hadrem nebo houbou. Před čistěním ještě vyjměte pečící nádobu ven. Pokud by bylo nutné, můžete zevnějšek přístroje vyčistit jemným mycím prostředkem, tak abyste povrch nepoškrábali. VNITŘEK PEKÁRNY Vnitřek lze pečlivě vyčistit mírně navlhčeným hadříkem. Buďte opatrní při čištění topného tělesa. PEČÍCÍ FORMA A HNĚTACÍ HÁK Nádobu s chlebem vyjměte z přístroje, tak že ji pootočíte o čtvrt otáčky proti směru hodinových ručiček a vytáhnete ji nahoru. Formu a hnětač je možné mýt teplou vodou a vlhkým jemným hadříkem. Dávejte pozor, abyste nepoškodili ochrannou vrstvu. Když se vám nepodaří vyndat hnětač z formy ven, musíte nechat formu úplně vychladnout. Potom do formy nalijte trochu teplé vody tak, aby hnětač byl pod vodou. Voda pomůže tomu, že přilepené části se uvolní a hnětač půjde dobře vyjmout. Nepoužívejte žádné čistící prostředky nebo kartáče, protože by mohly poškodit ochrannou vrstvu formy. Pečící forma není vhodná do myčky nádobí. Problém Možné řešení Stále nejsem spokojen s výsledným produktem. · · · · www.domo-elektro.be Doporučovali bychom vám udělat chléb pomocí hotové chlebové směsi. Do těchto směsí stačí dodat jen vodu a máslo. Je-li výsledek dobrý, znamená to, že je váš přístroj v pořádku a vy musíte zkontrolovat čerstvost normálních přísad. Je-li výsledek špatný, pak se obraťte na naši zákaznickou nebo technickou službu a poraďte se, jak postupovat dál. Ingredience nejsou přesně naváženy. Ingredience nejsou čerstvé. Ingredience neměly pokojovou teplotu. B3971 CZ ČASTO KLADENÉ DOTAZY 105 Můžu nějak poznat i během procesu, zda je těsto správně zadělané a zda správně vykyne? Těsto by mělo být hladké, elastické a vytvarované do úhledné kuličky. 5-10 min po začátku (během hnětení) můžete zkusit těsto lehce stisknout prsty. Mělo by mírně lepit. Pokud lepí moc, je příliš vlhké a je potřeba přidat mouku. Pokud téměř nelepí, je suché a vy musíte přidat mírně vody. Neotevírejte víko během kynutí. Co když si chci upéct více chlebů najednou? Mezi jednotlivými pečeními se doporučuje nechat přístroj vychladnout 20 minut. Nechte otevřené víko. Pokud by byla pekárna teplá, tak kvasnice kynou rychleji, což není dobré pro finální výsledek. Chléb je propadlý/deformovaný. Pravděpodobně bylo použito moc vody a těsto bylo moc vlhké. Chléb byl ponechán v pečící formě příliš dlouhou dobu po upečení. Chléb je uvnitř nedopečený a vlhký. Je-li chléb uprostřed příliš měkký, může to být způsobeno typem použité mouky. Takový výsledek většinou způsobuje použití těžších mouk, jako je žitná nebo celozrnná mouka. Při použití těchto druhů mouky zkuste přidat ještě jeden způsob hnětení. Po dokončení prvního hnětení pekárnu vypněte. Potom přístroj resetujte a opět spusťte zvolený program. Stroj začne znovu hnětat = těsto bude více vzdušné. Spodní část chleba je velmi tuhá. · · CZ · 106 Již upečený chléb jste nechali v pekárně příliš dlouho. Funkce udržování tepla a následné akumulované teplo spodní část chleba „vysuší“. Nejlepší je vyndavat chléb co nejdříve po dopečení. Použili jsme příliš mnoho těsta. Nepoužívejte více než 1000g najednou. Chléb překynul a překypěl. · · Na displeji svítí chybové hlášení: „H:HH“ Přístroj je stále teplý. Nechte ho dostatečně vychladnout. Na displeji svítí chybové hlášení: „E:EO“ Takové hlášení oznamuje vadný senzor teploty. Pekárnu nechte překontrolovat a opravit v autorizovaném servise. Proč nemohu přidat extra ingredience hned po startu programu. Extra ingredience (jako jsou ořechy) budou rozmělněny na s kousky a těsto nebude prohněteno správně. To může velmi ovlivnit i kynutí chleba. Doplňkové přísady přidávejte až poté, kdy spotřebič pískne (po hnětení). B3971 Použili jsme příliš moc kvasnic. Kvasnice byly aktivovány více než je nutné = použili jste moc cukru nebo příliš teplou vodu. Mohu použít místo vody i mléko? Ano. Vždy musí být dodržet celkový objem tekutiny. Horní kůrka chleba je někdy světlejší a někdy tmavší. Propečení si lze nastavit v nastavení pekárny. Rozdíl však způsobuje i množství použitého cukru. Více cukru = tmavší kůrka. Pekárna hněte pomaleji než obvykle. Může být způsobeno použitím těžší mouky. Nebo je těsto příliš hutné. Pokud tomu tak je, tak přidejte lžičku vody. Hnětací hák se zapekl do těsta ne nejde moc dobře vyndat. Hák i s okolním těstem vyjměte. Celou hrudku těsta s hákem ponořte pod vodu a nechte 15 minut odpučet a následně očistěte. Na skleněném průhledovém okénku kondenzuje voda/pára. Tento jev je zcela normální a děje se díky zahřívání uvnitř přístroje. Používám již koupenou a namíchanou směs na chléb, ale i přesto mám stále nepovedený chléb. Ještě před reklamováním pekárny doporučujeme zkusit po domácky připravený základní recept. Je možné, že koupená směs není čerstvá a to ovlivňuje výsledek pečení. OHLED NA ŽÍVOTNÍ PROSTŘEDÍ Symbol na přístroji či na jeho obalu znamená, že s tímto výrobkem není možno nakládat jako s běžným domovním odpadem, nýbrž musí být odevzdán na místech určených ke sběru a likvidaci elektrických a elektronických zařízení. Dodržením tohoto doporučení chráníte životní prostředí a zdraví spoluobčanů. Více informací o možnostech likvidace nebezpečného odpadu obdržíte na obecních nebo městských úřadech, sběrných dvorech nebo v prodejně, kde jste přístroj zakoupili. CZ Obalové materiály jsou recyklovatelné, nakládejte s nimi podle předpisů pro životní prostředí. www.domo-elektro.be B3971 107 ZÁRUKA Práva a povinnosti predávajúceho a kupujúceho ohľadom práv z chybného plnenia sa riadi príslušnými všeobecne záväznými predpismi podľa občianskeho zákonníka. 1. Trvanie záruky: 2 roky. Na príslušenstvo a súčasti ktoré podliehajú opotrebovaniu bežnou prevádzkou je záruka len 6 mesiacov. 2. Záruka sa nevzťahuje a) na mechanické poškodenie b) nesprávne používanie v rozpore s návodom na použitie 3. Záruka zaniká: - pri použití spotrebiča inak ako v je uvedené v manuále (nesprávnym postupom) - pri vykonávaní opravy alebo zmeny na spotrebiči osobou inou než poverenou naším servisom Predávajúci zodpovedá kupujúcemu, že tovar pri prevzatí nemá vady. Najmä predávajúci zodpovedá kupujúcemu, že v čase, keď kupujúci tovar prevzal: · má tovar také vlastnosti, ktoré výrobca v tomto návode popisuje, · sa tovar hodí k účelu, ku ktorému výrobca uvádza, · tovar zodpovedá kvalitou alebo prevedením dohovorené vzorky alebo predlohe, ak bola akosť alebo prevedenie určené podľa dohodnutého vzorky alebo predlohy, · tovar vyhovuje požiadavkám právnych predpisov. Ak sa prejavia vada v priebehu šiestich mesiacov od prevzatia, má sa za to, že tovar bol chybný už pri prevzatí. Pokiaľ nie je pri výrobku uvedené inak, je záručná doba 24 mesiacov. Záručná doba začína plynúť od prevzatia veci kupujúcim. Práva z chybného plnenia uplatňuje kupujúci u predávajúceho na adrese jeho prevádzky, v ktorej je prijatie reklamácie možné s ohľadom na sortiment predávaného tovaru, prípadne aj v sídle alebo mieste podnikania. Za okamih uplatnenia reklamácie sa považuje okamih, kedy predávajúci dostal od kupujúceho reklamovaný tovar. Reklamáciu možno tiež uplatniť v servisnom stredisku na adrese DOMO-elektro s.r.o., Na Kobyle 783, 345 06 Kdyně, Česká republika, tel. (+420) 379 422 550, [email protected] Pre rýchle a bezproblémové vybavenie reklamácie odporúčame priložiť k reklamácii doklad o kúpe a sprievodný list s popisom závady a spiatočnou adresou s telefonickým kontaktom. BEZPEČNOSTNÉ POKYNY SK · 108 · · · · Pri používaní jakkéhokoli el. spotrebiče dbajte na zvýšenú opatrnosť a dodržujte určitá bezpečnostné pravidlá: Starostlivo si prečítajte tieto informácie a manuál nechajte aj k neskoršiemu nahliadnutiu. Uistite sa, že pred použitím odlepíte a odstránite všetky reklamné a ochranné fólie. Deti sa s ochrannými ani reklamnými polepy nesmie hrať. Prístroj je určený pre používanie v domácnostiach a podobných prostrediach, tak ako je: · kuchynky v obchodoch, kanceláriách atď. · chaty, chalupy · hotely, penzióny a iné dočasné ubytovanie B3971 · · Dohliadnite, aby sa deti nehrali s prístrojom. Tento spotrebič môžu používať deti vo veku 16 rokov a staršie a osoby so zníženými fyzickými, zmyslovými alebo mentálnymi schopnosťami, alebo nedostatkom skúseností a znalostí ak sú pod neustálym dozorom alebo boli poučené o používaní spotrebiča bezpečným spôsobom a rozumejú prípadným nebezpečenstvám. Deti si s prístrojom nesmú hrať. Čistenie a údržbu vykonávanú používateľom nesmú vykonávať deti bez dozoru. · Čistenie a bežnú údržbu môžu vykonávať len osoby staršie ako 16 rokov a pri tom byť pod dohľadom. · Prístroj a jeho el. kábel skladujte mimo dosahu detí. Pozor: Tento prístroj je zakázané používať s externým časovačom alebo iným diaľkovým ovládaním. · · · · · · · · · · · · · · · · · · · · · · · Predtým, než prístroj pripojíte k elektrickej sieti, sa uistite, že napätie uvedené na prístroji zodpovedá napätiu Vašej elektrickej siete. Nedovoľte, aby sa prívodný kábel dotýkal horúcich plôch a aby nebol ohnutý cez ostré hrany stolov, alebo pracovných pultov. Prístroj nepoužívajte ak má poškodený prívodný kábel, zástrčku, alebo je prístroj sám inak poškodený, pokiaľ netesní, alebo Vám spadol na zem. Nechajte prístroj vždy skontrolovať v odbornom servise, alebo preškoleným opravárom, aby ste predišli riziku zranenia elektrickým prúdom a iným zraneniam. Nikdy nenechávajte spustený prístroj bez dozoru. Prístroj nestavajte do blízkosti iných tepelných zdrojov, ako sú sporáky, platničky či kachle. Prístroj nie je určený pre použitie vo vonkajšom prostredí. Prístroj používajte iba na účely, na ktoré je určený. Stavajte len na rovné, pevné a stabilné miesto. Prístroj je určený iba pre domáce použitie. Výrobca, dovozca ani predajca nenesie zodpovednosť za vzniknuté riziká z nedodržania tu popísaných pravidiel na použitie. Všetky opravy prístroja smie vykonávať iba autorizovaný servis alebo odborne preškolený technik. Aby ste zabránili úrazu elektrickým prúdom, nesmiete nikdy potápať kábel, sieťovú zástrčku alebo samotné zariadenie do vody alebo iných tekutín. Prívodný kábel držte bezpečne ďaleko od ostrých hrán a predmetov, aby sa nepoškodil. Prístroj neumiestňujte do blízkosti horľavých ani zápalných látok (plynov). Vetracie otvory prístroja nezakrývajte, tak aby bola zaručená dostatočná cirkulácia vzduchu. Pokiaľ je nutné, môžete použiť predlžovačku prívodného kábla, ale len za podmienky, že ich bude predlžovačka silnejšia (viac dimenzovaná) ako prívodný kábel. Pri zapojení predlžovacieho kábla ho umiestnite a zaistite tak, aby ho nikto omylom nemohol vytiahnuť alebo oň zakopnúť. Na zapojený prístroj nestavajte žiadne predmety. Inak hrozí riziko ich spadnutie alebo dokonca riziko požiaru. Pekáreň sa počas činnosti zahrieva a niektoré jej časti sú horúce, preto s ňou manipulujte opatrne a používajte iba tlačidlá a rukoväte na to určená. Pred rozoberaním, čistením alebo skladaním musia byť pekáreň vychladnutá a vždy ju pred tým vypojte z elektrickej siete. S naplnenou pekárňou nikdy nemanipulujte. Ak je pekáreň zapnutá, tak sa nikdy nesnažte dotýkať hnetacích hákov. Pred čistením alebo pri dlhodobom nepoužívaní vždy prístroj vypnite a vypojte z el. siete. Nepoužívajte pekáreň ako úschovňu / skladovacie miesto potravín. www.domo-elektro.be B3971 SK Prístroj môže byť počas používania horúci. Dbajte na to, aby sa prívodný kábel nedotýkal jeho horúcich častí a prístroj ničím neprikrývajte. 109 · Na čistenie nepoužívajte hubku s dlhšími vláknami. Vlákna by sa mohla omylom dostať dovnútra prístroja a spôsobiť elektrický šok alebo skrat. Pekáreň nikdy nepoužívajte na sušenie potravín ani iných vecí. Maximálne množstvo všetkých surovín nesmie byť väčšia, než 1000g. Nikdy nepoužívajte viac ako 715 g múky na jeden chlieb. Nikdy nedávajte viac ako 22 g čerstvých kvasníc, alebo 4 + 1/4 lyžičiek kvasníc sušených. Nikdy nepoužívajte viac ako 460 ml vody na jeden chlieb. · · · · · ČASTI 1. 2. 3. 4. 5. 6. 7. 8. 9. 10. Veko Priezor Automatický podávač extra prísad Ovládací panel Nádoba na pečenie Hnetací hák Vonkajší plášť prístroje Pohárik s odmerkou Lyžicový odmerka Hák pre vyťahovanie hnetače z chleba 1 3 4 2 5 6 7 8 9 10 PRED PRVÝM POUŽITÍM · · · · SK · Uistite sa, že pred použitím odlepíte a odstránite všetky reklamné a ochranné fólie. Všetky časti prístroja očistite navlhčenou handričkou - najmä časti, ktoré prídu do styku s potravinami. Rúry nádoba a háky sú opatrené nepriľnavým povrchom. Nikdy tieto plochy nečistite hrubými nástrojmi ani agresívnymi čistiacimi prostriedkami. Tieto plochy môžete čistiť iba papierovou kuchynskou utierkou, alebo jemným navlhčenou handričkou. Ak ste tak ešte neurobili, odstráňte ochrannú fóliu z displeja. Je úplne v poriadku, ak sa pri prvom použití prejaví ľahký dym z prístroja. To sa len vypáli prípadné nečistoty či maziva z výroby. Pred prvým použitím je potrebné ako prvý spustiť na prázdno program pečenia “BAKE”. Program nechajte prebehnúť 10 minút. Potom nechajte pekáreň vychladnúť a znovu očistite nádobu na pečenie a hnetacie hák. Pred prvým použitím je najlepšie vymazať nádobu na pečenie aj hnetací hák maslom alebo margarínom. 110 B3971 POUŽITIE Základný recept: Nižšie vypísaný recept je vhodný na prípravu jedného bochníka bieleho chleba. · 630 g hladkej múky · 370 ml vlažnej vody · 5 g sušených kvasníc · 1 lyžička soli · 1 lyžica cukru SUROVINY MÚKA Múka je základná súčasť chleba. Váha múky sa líši druh od druhu. Preto je absolútne nutné jej množstvo správne odvážiť. Pri nákupe múky si všimnite aj textu na obale. Musí tam stáť, že múka je mimo iného vhodná na pečenie chleba. LEPOK Lepok sa nachádza prirodzene takmer v každej múke a podporuje kysnutie chleba. V tzv. chlebové múke je lepku však najviac. DROŽDIE Droždie je mikroorganizmus, ktorý rastie na rôznych rastlinných potravinách. Má schopnosť premeniť cukor v alkohol a v kysličník uhličitý, pričom veľmi rýchlo nadobúda. Je to ideálne, aby mohlo cesto vykysnúť a bolo lepšie stráviteľné. Odporúčame používať sušené droždie. Spracovanie tohto (zrnovitého) droždie je jednoduchšie, a tiež je trvácnejšie ako droždie čerstvé a vykazuje stálejšie výsledky. SOĽ Soľ nezabezpečuje len určitú chuť chleba, ale reguluje tiež aktivitu droždia, spevňuje cesto a zabraňuje tomu, aby chlieb príliš vykysol. MASLO / OLEJ Maslo a olej dávajú chlebu lepšiu chuť a zvláčňujú ho. Pred použitím musí mať maslo aj olej izbovú teplotu. VODA Keď sa premieša múka s vodou, vytvorí sa lepok, vzduch sa nasýti, takže chlieb môže nadobúdať. Pri normálnej izbovej teplote použite vlažnú vodu, pretože studená voda neaktivizuje droždie a horúca by bola zase príliš. MLIEKO Chlebová kôrka vďaka mlieku zhnedne, zlepší sa chuť chleba, zvýši sa výživná hodnota a vnútro chleba má krásnu smotanovú farbu. Keď použijete čerstvé mlieko, musíte adekvátne znížiť množstvo vody, aby množstvo tekutín zostalo v rovnováhe. www.domo-elektro.be B3971 SK CUKOR Cukor je zdroj obživy pre droždie a dôležitá súčasť kysnutie cesta. Môžete použiť normálne biely cukor, hnedý cukor, sirup alebo med. Cukor dodáva chlebu istú krehkosť, zvyšuje výživovú hodnotu a prispieva k tomu, že chlieb dlhšie vydrží. Pozor: Nepoužívajte hrubý cukor alebo cukor kockový, napr. Pre kvasný chlieb, pretože to poškodzuje ochrannú vrstvu formy na pečenie. 111 OSTATNÉ PRÍSADY V kuchárskych knihách môžete nájsť recepty, ktoré vyžadujú korenie, orechy, hrozienka, ovocie alebo zeleninu a i. Používajte vždy čerstvé prísady. Keď používate orechy, slnečnicové semienka, sušené ovocie a pod., Nechajte ich vopred namočené vo vode, aby zmäkli, dobre osušené zľahka pokropte a až potom ich pridajte do cesta. Dávajte pozor, aby tieto ingrediencie neboli príliš veľké a ostré, aby nepoškodili ochrannú vrstvu formy. OVLÁDACÍ PANEL Ovládací panel A. MENU: výber programu pečenia B. WEIGHT: výber veľkosti chleba C. COLOR: výber prepečenia kôrky chleba D. TIME +: navyšovanie času E. BAKE: tlačidlo iba pre "pečenie" F. Knead: tlačidlo iba pre "miesenie" G. TIME-: poníženie času H. START-PAUSE / stop: hlavný vypínač on / off I. HOME MADE: tlačidlo pre program "domáceho chleba" Displej 1. Výber veľkosti chleba 2. Menu 3. Časovač 4. Fáza programu: hnetenie 5. Fáza programu: odpočinutie cesta 6. Fáza programu: kysnutie 7. Fáza programu: predhriatie 8. Fáza programu: pečenie 9. Fáza programu: udržanie tepla 10. Fáza programu: chlieb je hotový 11. Fáza programu: počet (poradie) fáz v programe 12. Zostávajúci čas do konca programu (v minútach) 13. Prepečenia kôrky: svetlá, stredne, tmavá 14. Uzamknutie ovládacieho panela A B C MENU WEIGHT COLOR D E F TIME + BAKE KNEAD G H I START HOME MADE TIME - PAUZE/STOP 1 2 3 7 4 8 5 9 6 10 12 11 13 14 SK A. Tlačidlo “MENU” Toto tlačidlo použite, keď chcete zvoliť správny program pečenia. Zakaždým, keď stlačíte toto tlačidlo, budete počuť signál a číslo programu sa na displeji zmení. Podľa vybraného programu sa bude tiež meniť prednastavený čas. 112 B. “WEIGHT” - tlačidlo Toto tlačidlo použite, keď chcete udať váhu chleba, ktorý máte v úmysle upiecť. Môžete voliť v rozmedzí 500, 750 g a 1000 g. Majte na pamäti, že celkové množstvo prísad uvedených v recepte je váha chleba, ktorý chcete upiecť. B3971 C. “COLOR” - tlačidlo Týmto tlačidlom si volíte stupeň prepečenia kôrky. Možný výber je svetlá / stredná alebo tmavá. Keď skúšate nejaký recept prvýkrát, odporúčame vám, aby ste si vybrali farbu kôrky strednej. D. Time+ a (G) TimePomocou týchto tlačidiel môžete nastaviť odložené spustenie (časovač) pre programy. Pre niektoré programy možno upraviť ich celkový čas. E. Bake = pečenie Týmto tlačidlom vyberiete program samotného pečenia. Spustenie potvrdíte stlačením START-PAUSE/ stop. F. Hnetenie Týmto tlačidlom vyberiete program samotného miesenie. Spustenie potvrdíte stlačením START-PAUSE/ stop. H. START-PAUSE/stop Týmto tlačidlom potvrdíte a spustíte vybraný program. Alebo už spustený program pozastavíte / spustíte. Krátkym stlačením program pozastavíte. Pre pokračovanie stlačte tlačidlo znova. Pokiaľ do 3 minút program neobnovíte, tak sa program automaticky natrvalo preruší. Pre ukončenie (zastavenie) programu stlačte tlačidlo na niekoľko sekúnd, kým nebudete počuť pípnutie. I. Home made = domáci chlieb Tlačidlo slúži na výber pri pečení (vlastného) doma zadělávaného cesta. Program a jeho fázy možné individuálne nastaviť. Viac sa dočítate v kapitole "Nastavenie vlastného domáceho programu". Takto nastavený a vybraný program spustíte tlačidlom "start-pause / stop". PROGRAMY www.domo-elektro.be SK Program 500 g 750 g 1000 g 1. základné (basic) 3:05 3:10 3:15 2. francúzsky (french) 3:35 3:40 3:45 3. celozrnný (whole wheat) 4:05 4:10 4:15 4. Sladký (sweet) 3:35 3:40 3:45 5. Ryžový, ryža (rice) 2:50 2:55 3:00 6. Bezlepkový (gluten free) 3:05 3:10 3:15 7. Rýchly (quick) 2:10 2:15 2:20 8. Ovocie -přísady (Fruit) 3:05 3:10 3:15 9. Koláč (cake) 2:20* 10. Sendvič (sandwich) 3:00 3:05 3:10 11. Hrozienka / orechový chlieb (raisin/nut) 3:05 3:10 3:15 12. Žitný, raž (rye) 4:05 4:10 4:15 13. Miesenie (knead) 0:08* 14. Cesto (dough) 1:30* 15. Brioška (brioche) 3:35 3:40 3:45 16. Pečenie (bake) 0:30* 17. Domáce vlastný chlieb (homemade) -- -- -18. Taliansky chlieb (italian) 3:05 3:10 3:15 B3971 113 * Ak si zvolíte jeden z týchto programov, nemôžete voliť hmotnosť alebo dobu pečenia. 1. Basic = základné Najviac používaný program pre pečenie klasického chleba. 2. French = francúzsky Čas miesenia a kysnutia je dlhší ako u základného 3. Whole wheat = celozrnný Najvhodnejší program pre pečenie tmavého chleba, ako je chlieb celozrnný alebo viaczrnný. Chlieb môže byť o niečo menšia ako biely chlieb, pretože múka je ťažšie. S týmto programom sa neodporúča používať odložený štart - výsledky pečenia by mohli byť výrazne horšie. 4. Sladký = sweet Program je vhodný na prípravu sladkého chleba - typ vianočky alebo čokoládový 5. Ryžový, ryža = rice Tento program použite pre chlieb zamiesené z ryžovej múky. Po hnetenie je totiž potrebné, aby cesto pred pečením dostatočne vykysol. Kůrka z ryžového chleba je tenší a mäkší ako normálny chlieb. 6. Bezlepkový - glutén free Program vhodný pre pečenie bezlepkového chleba. Cesto bezlepkového chleba je vlhké a má inú konzistenciu cesta. Cesto by preto nemalo byť dlho hnetenie ani príliš dlhé kysnutie. Doba pečenia je naproti tomu dlhšia. S týmto programom nie je vhodné používať odložený štart. Oneskorenie pri odloženom štarte môže znehodnotiť cesto a výsledok pečenia nebude dobrý. Najlepšie je vložiť všetky ingrediencie naraz a na začiatku. 7. Quick = rýchly Pre miesenie, kysnutie a pečenie chleba s jedlou sódou alebo pečenie práškom. Výsledkom je zvyčajne menší chlieb s hustejšou štruktúrou. SK 8. Ovocie -přísady Pomocou automatického dávkovača môžete pridávať prísady, ako sú hrozienka alebo iné sušené ovocie. Prístroj pridá prísady sám z automatu v správny čas. Pokiaľ chcete do svojho chleba pridať čerstvé a šťavnaté ovocie, je najlepšie je pridať priamo do nádoby na pečenie (pri pípnutie). Čerstvé ovocie by v automatickom zásobníku do doby pridanie stratilo čerstvosť a šťava by vytiekla. 9. Cake = koláč Pomocou tohto programu môžete upiecť chlieb, ktorý je pripravený napr. s práškom do pečiva. Týmto programom upečené chleby nie sú tak vysoké a pevné. Pokiaľ chcete pomocou tohto programu urobiť trený koláč, vložte prísady do formy. Potom prístroj nastavte a pred zapnutím musíte ešte prísady zamiešať drevenou lyžicou. To pomáha miesenie. Ak používate tento program, nemôžete si sami vybrať (zmeniť) váhu. 10. Sandwich = sendvič Program pre prípravu ľahkého bieleho cesta vhodného na prípravu napr. Malých chlebových houstiček. 114 B3971 11. Hrozienka / orechový chlieb Pomocou dávkovača pridajte prísady, ako sú hrozienka alebo orechy. Stroj pridá prísady sám z automatu v správny čas. 12. Žitný, raž = "rye" Tento program je ideálny pre chleby s ťažšie múkou ako ako je napr. ražná. Chlieb je sám o sebe pevnejšie, hutnejšie a ťažšie ako normálny chlieb. 13. Miesenie = kneading Počas tohto programu prístroj iba hnetie (zamiesi cesto). Nebude ho nechávať kysnúť ani piecť. Tento program môžete použiť napríklad na miesenie cesta na pizzu. Pomocou tlačidiel "Time +" a "Time-" môžete upraviť dobu miesenie. 14. Cesto = dough Program vhodný na cestom a kysnutie cesta. Prístroj prehnite cesto a nechá ho vykysnúť. 15. Brioška = brioche Tento program je vhodný pre chleby s ďalšími prísadami, ktoré majú vysoký obsah cukru, tuku a bielkovín (napr. Čokoláda, cukor atď.). Tieto prísady vytvárajú tmavšie kôru. Fáza kysnutie pri tomto programe je dlhšia a výsledkom je nadýchanejšiu chlieb. 16. Bake = pečenie Program na upečenie už hotového cesta. Tento program môže byť použitý na dokončenie chleba či rozohriatie chleba už skôr hotového. 17. Domáce vlastný chlieb = home made Tento program si môžete nastaviť podľa vlastných potrieb, aby vyhovoval vášmu cestu. Viac o nastavení sa dočítate nižšie v kapitole "Nastavenie vlastného domáceho programu" 18. Taliansky chlieb = Italian Týmto programom si upečiete chutný stredomorský chlieb. Môžete pridať ďalšie prísady, ako sú bylinky, sušené paradajky, olivy atď. POUŽITIE PRÍSTROJA Miernym pootočením doprava a ťahaním hore vyberte z pekárne nádobu na pečenie. Na osku uprostred nádoby nasaďte hnetací hák (priložený). Hnetač musí byť nasadený správnym a starostlivým spôsobom, aby sa neviklal a všetky prísady mohli byť dostatočne premiešané. 3. Suroviny do formy odporúčame vkladať nasledujúcim spôsobom a v tomto poradí: · voda / mlieko · maslo / olej · eventuálne vajcia · múka · cukor (nasypte cukor na jednu stranu) · soľ (soľ nasypte na opačnú stranu) · droždia (droždie vložte do jamky uprostred) ! Pozor! Droždie nesmie prísť do styku s vodou, cukrom a soľou. Mohlo by sa stať, že voda droždie zaktivizuje, skôr než sa prísady dostatočne premieša a premiesime. www.domo-elektro.be B3971 SK 1. 2. 115 Pomocou dávkovača môžete v správny čas nechať pridať ďalšie prísady, ako sú orechy, byliny, sušené ovocie atď., Alebo môžu byť pridané neskôr. Pozrite "Pridávanie ďalších zložiek". 4. Odstráňte všetky zvyšky prísad z vonkajšej strany formy. Vložte formu opäť do prístroja zhora na ňu zatlačte a pootočte. 5. Uzatvorte veko. 6. Dajte zástrčku do zásuvky 7. Nastavte tlačidlom “menu” správny program. 8. Pomocou tlačidla prepečenia (color) nastavte stupeň prepečenia kôrky. Môžete si vybrať medzi svetlú, stredia alebo tmavú. Tlačidlom hmotnosti (weight) nastavte veľkosť chleba (500g, 750g alebo 1000g). 9. Nastavte eventuálne funkciu vlastného naprogramovanie odloženého štartu. 10. Stlačte START. Dvojbodka bude teraz blikať a tým udáva, že prístroj pracuje. Pokiaľ máte nastavené oddialenie programu, program spustí až po uplynutí nastaveného času. 11. Akonáhle bude chlieb hotový, tak sa ozve zvukový signál a na displeji sa zobrazí 0:00. Stlačte a chvíľku pridržte "START-PASUSE/stop". Zariadenie opäť zapípa, aby sa potvrdilo, že ste program zastavili. Ak program takto nezastavíte, chlieb bude vďaka funkcii prihrievanie udržovaný v teple ďalších 60 minút. Po vypnutí vypojte z elektrickej siete a otvorte veko. Opatrne vyberte chlieb z náboby. Pozor: nádoba je horúca, použite kuchynské chňapky. 12. Chlieb nechajte ochladiť vo forme asi 10 - 15 minút, potom formu obráťte a vyklopte chlieb z formy. Nikdy nepokladajte chlieb ani formu na vonkajšiu stranu prístroja alebo priamo na plastikový obrus. Keď sa chlieb hneď neuvoľní, otáčajte osou na spodnej strane formy, kým sa chlieb neuvoľní. Na vybratie chleba nikdy nepoužívajte ostré kovové predmety, aby ste nepoškodili nepriľnavú vrstvu. 13. Keď chlieb vyberiete z prístroja a hnetač zostane vnútri v chlebe, tak ho môžete vybrať pomocou vyťahovacie háku von. Alebo nechajte chleba ešte vychladiť na rošte, takže potom môžete hnetač vytiahnuť rukami. Dávajte pozor, aby bol hnetač dobre vychladený. Je doporučené krájať chlieb až po 15 - 20 minútach. FUNKCIE UDRŽANIE TEPLÉHO CHLEBA Ak nie ste včas doma a nepočujete ukončenie programu, tak berte na vedomie, že pekáreň ešte 60 minút po ukončení pečenia hreje. Táto doba nie je zahrnutá v programovacom čase. Pre prerušenie takého dohrievanie stačí podržať tlačidlo START / STOP na niekoľko sekúnd. Ak necháte hotový chlieb v pekárni dlhšie ako hodinu, tak sa chlieb môže zapariť a zvlhnúť. Odporúčame umývať nádoby vždy ihneď po vybratí chleba, jedine takto zaistíte, že sa hnetač neprilepí k osi nádoby. Nikdy znova nepúšťajte ešte teplú pekáreň. PRIDANIE PRÍMESÍ SK Počas miesenia v nasledujúcich programoch zaznie zvukový signál: normálne, francúzsky, celozrnný, sladký, ryžový, bezlepkový, rýchly, s ovocím, koláč, hrozienka / orechy, žitný, brioška, taliansky. Toto pípnutie značí, že je správny čas pridať ďalšie prísady, ako sú hrozienka, orechy, sem atď. Prísady môžete pridať prostredníctvom automatu alebo ručne. 116 Automatický dávkovač prímesou Otvorte posuvné veko dávkovača, vložte ingrediencie a veko opäť uzavrite. Dávkovač automaticky zaistí pridanie ingrediencií v správny čas - po miesenie a kysnutie. POZOR: · Cez dávkovač (do neho) nepridávajte tekutiny ani suroviny v prášku. B3971 · · · Dávkovacie komoru nikdy neprepĺňajte. Ak pridávate orechy, je lepšie ich pred tým rozdrviť na menšie kúsky. Pred vložením ingrediencií do dávkovača sa uistite, aby bol zospodu (piest) uzavretý tak ako má byť. Manuálne pridanie Prímesi môžete vložiť len ručne. Akonáhle sa ozve zvukový signál, tak program pozastavte (pause), otvorte horné veko pekárne, nasypte prísady, veko opäť uzavrite a tlačidlom "štart" opäť program spustite. Ručné pridanie surovín je vhodné hlavne pre tekuté alebo sypké prísady. Ručným pridávaním možno pridať aj viac surovín než je možnosť cez dávkovač. PAMÄŤOVÉ FUNKCIE Pokiaľ dôjde k výpadku napájania z dôvodu výpadku prúdu, tak je tu pamäťová funkcia na 10min Ak sa do tej doby napájania rozbehne, tak program bude pokračovať tam kde skončil. Ak výpadok trvá dlhšie ako 10 minút, tak sa celý program prerušil a je potreba ho potom ručne nastaviť / spustiť znova. NASTAVENIE PRE DOMÁCE VLASTNÉ CHLIEB Tlačidlo "Home made" je určené pre prednastavené a nastavenie vlastného programu. Týmto je možné nastaviť akúkoľvek fázu pečenia, miesenie atď .. Ak chcete nejakú fáze úplne vynechať, tak u nej nastavte 0:00. POZOR: Nastavenie tlačidla (vlastného programu) nie je trvalo uložené. Pri vypnutí prístroja z elektrickej siete sa program vyresetuje. 1. 2. 3. 4. Stlačte tlačidlo "Home made" alebo tlačidlom menu vyberte program 17. Opätovným stlačením tlačidla "Home made" potvrdíte a začnete program nastavovať. Na displeji vždy budú blikať kontrolka aktuálnej fázy programu a čas. Pri nastavení pozrite do tabuľky nižšie, kde sú uvedené prednastavené základné hodnoty a rozmedzie čo možno nastaviť. V každej fáze nastavte požadovaný čas. Time + je navyšovanie a Time- je ponižovanie času. Navolený čas vždy potvrďte tlačidlom "Home made". Akonáhle máte všetky fázy programu nastavené, tak na displeji uvidíte celkový čas programu. Štandardne by celková doba mala byť približne 3 hodiny. Tlačidlom START už môžete rovno program spustiť. Ak by ste tlačidlo stlačili počas programovania fáz, tak sa programovanie preruší. Fáza programu Základné nastavenie Rozmedzie Hnetenie 1 0:10 1-30 min. Odpočinok 1 0:03 0-30 min. Hnetenie 2 0:05 0-30 min. Odpočinok 2 0:10 0-30 min. Hnetenie 3 0:20 0-25 min. Kysnutie 1 0:42 0-60 min. www.domo-elektro.be Ikona SK Ak je potreba, tak môžete nastaviť aj odložený spustenie programu. Pozri opis tohto nastavenia v kapitole "Nastavenie odloženého štartu". B3971 117 Kysnutie 2 0:40 0-60 min. Kysnutie 3 0:00 0-60 min. Pečenie 0:50 0-80 min. Udržanie tepla 1:00 0-60 min. VYBRATIE MIESIČ EŠTE PRED PEČENÍM Pokiaľ chcete celistvý chlieb, je možné vybrať háky z cesta pred jeho pečením. Vyňať sa musí až po poslednom miesení pred finálnym kysnutím. 1. Ak to takto chcete skúsiť, tak pekáreň vypnite stlačením tlačidla štart / stop alebo na chvíľu vypojte z elektrickej siete. Pamäťová funkcia pekárne si pamätá priebeh programu cca do 10 min od prerušenia, preto musí táto operácia vybratie háku byť pomerne rýchla a bez zbytočných prieťahov 2. Otvorte veko, rukami od múky vyberte hrudu cesta aj s hnetačom. Hák z cesta vyberte a do pekárne vložte len samotné cesto. 3. Pekáreň opäť zavrite. 4. Prístroj opätovne zapojte do el. siete a znovu stlačte tlačidlo štart / stop, aby mohol program ďalej pokračovať. POUŽITIE ODLOŽENÉHO ŠTARTU Ak chcete túto funkciu použiť, musíte ju nastaviť, skôr ako stlačíte START. · Pri odloženom štarte počítate a zadávate čas medzi zapnutím programu a času dokončenia / dopečenie chleba. Prístroj si automaticky započíta dobu potrebnú pre samotný proces pečenia. · Tlačidlom pre nastavenie, každým jeho stlačením pridáte 10 min odloženého štartu. · Na displeji sa zobrazí ikona presýpacích hodín. · Odložený štart nie je možné nastaviť u samostatného miesenia ani kysnutia. Stlačením tlačidiel Time + / Time- budete u týchto programov nastavovať ich trvanie. SK Príklad: Je 9:00 ráno a vy by ste chceli mať popoludní v 17:00 čerstvo upečený chlieb. Musíte teda naprogramovať celkový čas na 8 hodín, čo bude zodpovedať dopečení presne v 17:00. Do pekárne vložte všetky potrebné suroviny. Tlačidlom menu vyberte príslušný program. Stlačením tlačidla Color (prepečenia) nastavte stupeň prepečenia kôrky a následne vyberte požadovanú hmotnosť chleba. Tlačidlom Time + navyšujte čas kým sa na displeji nezobrazí 8:00. Chlieb bude upečený za 8 hodín od potvrdenia vašej voľby (tlačidlom Štart). Zobrazený čas obsahuje aj dobu potrebnú pre samotné pečenie. Chlieb teda bude hotový v 5 hodín popoludní. Stlačte tlačidlo Štart. Dvojbodka na displeji začne blikať a rozsvieti sa ikona presýpacích hodín. Začne sa odpočítavať čas až do doby, kedy má pekáreň začať spustiť program a hniesť. Chlieb bude teraz prechádzať celým nastaveným programom, aby bol chlieb pripravený vo zvolený čas. 118 Dôležité: túto funkciu nepoužívajte, ak majú niektoré suroviny vnútri pekárne podliehajú rýchlejšej skaze (napríklad čerstvé mlieko, jogurt alebo čerstvé ovocie). B3971 TIPY NA PRÍPRAVU: · · · · · Vždy všetky prísady presne odvážte a dbajte na to, aby mali izbovú teplotu. Ak je droždie čerstvé, môžete zistiť nasledujúcim testom: V polovici šálke vlažnej vody rozmiešajte 1 kávovú lyžičku cukru a potom pridajte 1 kávovú lyžičku droždia. Po niekoľkých minútach bude zmes bublať a kypět Soľ obmedzuje účinok droždie a cukor ho naopak povzbudzuje. Ak na základe diéty nesmiete použiť jednu z týchto prísad, potom musíte tiež vynechať aj tú druhú. Potom získate chlieb bez cukru a soli. Chlieb, ktorý pečiete sami z vlastných surovín, neobsahuje žiadne konzervačné prostriedky, a je preto tiež obmedzene trvanlivý. Keď chlieb necháte dobre vychladnúť a potom ho nepriedušne zabalíte, môžete ho niekoľko dní kvalitne uchovať. Môžete ho samozrejme tiež nechať zmraziť a spotrebovať ho neskôr. Os hnetacieho háku aj samotný hák namažte maslom. Tak sa zabezpečí, že pôjde hák krásne zložiť z osi a vyňať z pečeného chleba. ČISTENIE A ÚDRŽBA · · · · Pred čistením prekáreň vypnite, vytiahnite zástrčku zo zásuvky a nechajte pekáreň úplne vychladnút. Po každom použití spotrebič dôkladne očistite. Ak je niektorá s časťou znečistená, tak to môže ovplyvniť výslednú chuť aj tvar chleba a alebo dokonca skrátiť životnosť prístroja. Po vyčistení prístroj a všetky jeho časti dôkladne osušte. Pred uskladnením nechajte aspoň pol hodiny otvorené veko, aby vyschol aj vnútro prístroja. . ! Upozornenie: Nikdy prístroj ani prívodný kábel neponárajte do vody. ZOVŇAJŠOK, VEKO A VNÚTRO PEKÁRNE. Zovňajšok prístroja a priezor zotrite vlhkou handrou alebo špongiou. Pred čistením ešte vyberte nádobu na pečenie von. Ak by bolo nutné, môžete zovňajšok prístroja vyčistiť jemným čistiacim prostriedkom, tak aby ste povrch nepoškriabali. VNÚTRO PEKÁRNE Vnútro možno starostlivo vyčistiť mierne navlhčenou handričkou. Buďte opatrní pri čistení vykurovacieho telesa. FORMA NA PEČENIE A HNETACÍ HÁK SK Nádobu s chlebom vyberte z prístroja, tak že ju pootočíte o štvrť otáčky proti smeru hodinových ručičiek a vytiahnete ju nahor. Formu a miesič je možné umývať teplou vodou a vlhkou jemnou handričkou. Dávajte pozor, aby ste nepoškodili ochrannú vrstvu. Keď sa vám nepodarí vybrať hnetač z formy von, musíte nechať formu úplne vychladnúť. Potom do formy nalejte trochu teplej vody tak, aby hnetač bol pod vodou. Voda pomôže tomu, že prilepené časti sa uvoľní a hnetač pôjde dobre vybrať. Nepoužívajte žiadne čistiace prostriedky alebo kefy, pretože môžu poškodiť ochrannú vrstvu formy. Forma na pečenie nie je vhodná do umývačky riadu. www.domo-elektro.be B3971 119 ČASTO KLADENÉ OTÁZKY Problém Možné riešenie Stále nie som spokojný s výsledným produktom. · · · · Môžem nejako spoznať aj počas procesu, či je cesto správne zamiesenej a či správne vykysne? Cesto by malo byť hladké, elastické a vytvarované do úhľadnej guľôčky. 5-10 min po začiatku (počas miesenia) môžete skúsiť cesto zľahka stlačiť prstami. Malo by mierne lepiť. Ak lepí moc, je príliš vlhké a je potrebné pridať múku. Pokiaľ takmer nelepí, je suché a vy musíte pridať mierne vody. Neotvárajte veko počas kysnutia. Čo keď si chcem upiecť viac chlebov naraz? Medzi jednotlivými pečením sa odporúča nechať prístroj vychladnúť 20 minút. Nechajte otvorené veko. Ak by bola pekáreň teplá, tak kvasnice kysnú rýchlejšie, čo nie je dobré pre finálny výsledok. Chlieb je prepadnutý / deformovaný. Pravdepodobne bolo použité moc vody a cesto bolo moc vlhké. Chlieb bol ponechaný v pečenie forme príliš dlhú dobu po upečení. Chlieb je vnútri nedopečený a vlhký. Ak je chlieb uprostred príliš mäkký, môže to byť spôsobené typom použitej múky. Takýto výsledok väčšinou spôsobuje použitie ťažších múk, ako je ražná alebo celozrnná múka. Pri použití týchto druhov múky skúste pridať ešte jeden spôsob hnetenie. Po dokončení prvého hnetenie pekáreň vypnite. Potom prístroj resetujte a opäť spustite zvolený program. Stroj začne znovu miesiť = cesto bude viac vzdušné. Spodná časť chleba je veľmi tuhá. · SK 120 Odporúčali by sme vám urobiť chlieb pomocou hotové chlebovej zmesi. Do týchto zmesí stačí dodať len vodu a maslo. Ak je výsledok dobrý, znamená to, že je váš prístroj v poriadku a vy musíte skontrolovať čerstvosť normálnych prísad. Ak je výsledok zlý, potom sa obráťte na našu zákaznícku alebo technickú službu a poraďte sa, ako postupovať ďalej. Ingrediencie nie sú presne navážené. Ingrediencie nie sú čerstvé. Ingrediencie nemali izbovú teplotu. · B3971 Už upečený chlieb ste nechali v pekárni príliš dlho. Funkcia udržiavania tepla a následné akumulované teplo spodná časť chleba “vysuší”. Najlepšie je vyťahovať chlieb čo najskôr po dopečení. Chlieb překynul a prekypeli. · · · Použili sme príliš moc kvasníc. Kvasnice boli aktivované viac ako je nutné = použili ste moc cukru alebo príliš teplú vodu. Použili sme príliš veľa cesta. Nepoužívajte viac ako 1000g naraz. Prístroj je stále teplý. Nechajte ho dostatočne vychladnúť. Na displeji svieti chybové hlásenie: „E:EO“ Takéto hlásenie oznamuje chybný senzor teploty. Pekáreň nechajte prekontrolovať a opraviť v autorizovanom servise. Prečo nemôžem pridať extra ingrediencie hneď po štarte programu. Extra ingrediencie (ako sú orechy) budú zriedili na s kúskami a cesto nebude prehnetení správne. To môže veľmi ovplyvniť aj kysnutia chleba. Doplnkové prísady pridávajte až po tom, keď spotrebič odpíska (po miesenie). Môžem použiť namiesto vody aj mlieko? Áno. Vždy musí byť dodržať celkový objem tekutiny. Horná kôrka chleba je niekedy svetlejšie a niekedy tmavšie. Prepečenia si možno nastaviť v nastavení pekárne. Rozdiel však spôsobuje aj množstvo použitého cukru. Viac cukru = tmavšie kôrka. Pekáreň hnetie pomalšie ako obvykle. Môže byť spôsobené použitím ťažšie múky. Alebo je cesto príliš hutné. Ak tomu tak je, tak pridajte lyžičku vody. Hnetací hák sa zapiekol do cesta nie nejde moc dobre vybrať. Hák aj s okolitým cestom vyberte. Celú hrudku cesta s hákom ponorte pod vodu a nechajte 15 minút odpučet a následne očistite. Na sklenenom priehľadovom okienku kondenzuje voda / para. Tento jav je úplne normálny a deje sa vďaka zahrievanie vnútri prístroja. Používam už kúpenú a namiešanú zmes na chlieb, ale aj napriek tomu mám stále nevydarený chlieb. Ešte pred reklamováním pekárne odporúčame skúsiť po domácky pripravený základný recept. Je možné, že kúpená zmes nie je čerstvá a to ovplyvňuje výsledok pečenia. SK Na displeji svieti chybové hlásenie: „H:HH“ www.domo-elektro.be B3971 121 OHĽAD NA ŽIVOTNÉ PROSTREDIE Symbol na prístroji alebo na jeho obale znamená, že s týmto výrobkom nie je možné nakladať ako s domovým odpadom, ale musí byť odovzdaný na miestach určených na zber a likvidáciu elektrických a elektronických zariadení. Dodržaním tohto odporúčania chránite životné prostredie a zdravie spoluobčanov. Viac informácií o možnostiach likvidácie nebezpečného odpadu obdržíte na obecných alebo mestských úradoch, zberných dvoroch alebo v predajni, kde ste prístroj zakúpili. SK Obalové materiály sú recyklovateľné, nakladajte s nimi podľa predpisov pre životné prostredie. 122 B3971 SK www.domo-elektro.be B3971 123 Webshop BESTEL de originele Domo-accessoires en -onderdelen online via: COMMANDEZ d’authentiques accessoires et pièces Domo en ligne sur: BESTELLEN SIE die Domo Original-Zubehör und -Ersatzteile online über: ORDER the original Domo accessories and parts online at: webshop.domo-elektro.be of scan hier: ou scannez ici: oder hier scannen: or scan here: LINEA 2000 BV - Dompel 9 - 2200 Herentals - Belgium - Tel: +32 14 21 71 91 - Fax: +32 14 21 54 63-
 1
1
-
 2
2
-
 3
3
-
 4
4
-
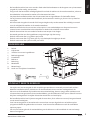 5
5
-
 6
6
-
 7
7
-
 8
8
-
 9
9
-
 10
10
-
 11
11
-
 12
12
-
 13
13
-
 14
14
-
 15
15
-
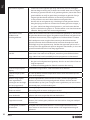 16
16
-
 17
17
-
 18
18
-
 19
19
-
 20
20
-
 21
21
-
 22
22
-
 23
23
-
 24
24
-
 25
25
-
 26
26
-
 27
27
-
 28
28
-
 29
29
-
 30
30
-
 31
31
-
 32
32
-
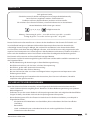 33
33
-
 34
34
-
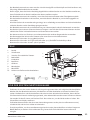 35
35
-
 36
36
-
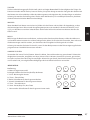 37
37
-
 38
38
-
 39
39
-
 40
40
-
 41
41
-
 42
42
-
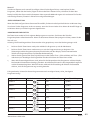 43
43
-
 44
44
-
 45
45
-
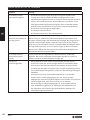 46
46
-
 47
47
-
 48
48
-
 49
49
-
 50
50
-
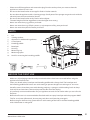 51
51
-
 52
52
-
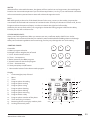 53
53
-
 54
54
-
 55
55
-
 56
56
-
 57
57
-
 58
58
-
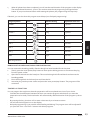 59
59
-
 60
60
-
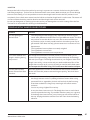 61
61
-
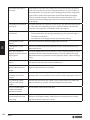 62
62
-
 63
63
-
 64
64
-
 65
65
-
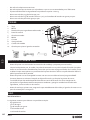 66
66
-
 67
67
-
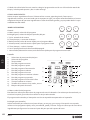 68
68
-
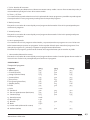 69
69
-
 70
70
-
 71
71
-
 72
72
-
 73
73
-
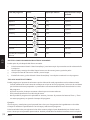 74
74
-
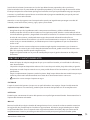 75
75
-
 76
76
-
 77
77
-
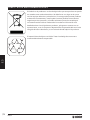 78
78
-
 79
79
-
 80
80
-
 81
81
-
 82
82
-
 83
83
-
 84
84
-
 85
85
-
 86
86
-
 87
87
-
 88
88
-
 89
89
-
 90
90
-
 91
91
-
 92
92
-
 93
93
-
 94
94
-
 95
95
-
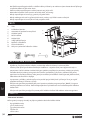 96
96
-
 97
97
-
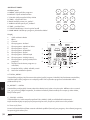 98
98
-
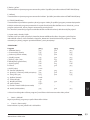 99
99
-
 100
100
-
 101
101
-
 102
102
-
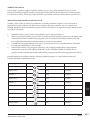 103
103
-
 104
104
-
 105
105
-
 106
106
-
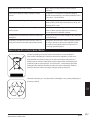 107
107
-
 108
108
-
 109
109
-
 110
110
-
 111
111
-
 112
112
-
 113
113
-
 114
114
-
 115
115
-
 116
116
-
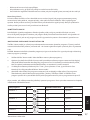 117
117
-
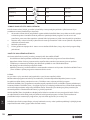 118
118
-
 119
119
-
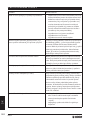 120
120
-
 121
121
-
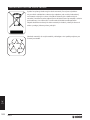 122
122
-
 123
123
-
 124
124


Domo B3971 de handleiding
- Categorie
- Machines voor het maken van brood
- Type
- de handleiding
in andere talen
- English: Domo B3971 Owner's manual
- italiano: Domo B3971 Manuale del proprietario
- français: Domo B3971 Le manuel du propriétaire
- español: Domo B3971 El manual del propietario
- Deutsch: Domo B3971 Bedienungsanleitung
- slovenčina: Domo B3971 Návod na obsluhu
- čeština: Domo B3971 Návod k obsluze
Gerelateerde papieren
Andere documenten
-
Redmond RBM-M1907-E de handleiding
-
Princess 152007 Homemade Deluxe de handleiding
-
-
-
Moulinex EW PAIN DORE 1kg O de handleiding
-
Electrolux EBM8000 de handleiding
-
 RIVIERA&BAR QMP660 NO GLUTEN & CO de handleiding
-
 RIVIERA&BAR MP570A NO GLUTEN & CO de handleiding
-
 RIVIERA&BAR QMP660 NO GLUTEN & CO de handleiding
-
 RIVIERA&BAR QD794A de handleiding


