GYS PNEUMATIC ALUMINIUM DUST EXTRACTOR (ATEX) de handleiding
- Type
- de handleiding

73502_V1_17/03/2021
FR
EN
DE
NL
IT
RU
PL
CN
2 / 3 - 8
2 / 9 - 13
2 / 14 - 18
2 / 19 - 23
2 / 19 - 23
2 / 19 - 23
2 / 19 - 23
2 / 19 - 23
Aspirateur pneumatique professionnel
Professional pneumatic vacuum cleaner
Professioneller pneumatischer Staubsauger
Aspirador profesional neumático
Professionele pneumatische stofzuiger
Aspiratore professionale pneumatico
Профессиональный пневматический
пылесос
Profesjonalny odkurzacz pneumatyczny
专业气动吸尘器
ES
2 / 24 - 28

2
Aspirateur pneumatique professionnel
1 3
6 9
7
4
10
8 11
1
3
5
10
2
4
6
7
8
9
11
2
5
A
B
C
Øi≥ 10mm²

3
Aspirateur pneumatique professionnel
1 3
6 9
7
4
10
8 11
1
3
5
10
2
4
6
7
8
9
11
2
5
A
B
C
Øi≥ 10mm²

4
Aspirateur pneumatique professionnel
FR
CONTRÔLE DU CONTENU DE L’EMBALLAGE
L’emballage contient:
- n ° 1 pneumatic aspirator
- n ° 1 dust collection bag in polyester media
Pour se débarrasser des éléments formant l’emballage, suivre les dispositions en vigueur dans le lieu de
mise en service de la machine, en tenant compte des règlements sur le tri sélectif si celui-ci est prévu.
AVERTISSEMENTS GÉNÉRAUX
Mesures de sécurité et de prévention des accidents.
- Mesures de sécurité et de prévention des accidents la machine ne doit être utilisée que par du personnel spécialement
formé et chargé de l’utiliser, par conséquent la machine ne doit pas être utilisée par des enfants ou des personnes pré-
sentant des capacités physiques, sensorielles ou mentales réduites;
- l’opérateur doivent être informés, éduqués et formés à l’utilisation de l’équipement et les substances qui doivent être
utilisés, y compris la méthode sécuritaire de l’enlèvement et l’élimination des matières recueillies;
- il est nécessaire de fournir un apport d’air frais approprié dans le local si l’air d’évacuation y retourne. Il est nécessaire
de se reporter aux réglementations nationales;
- l’environnement doit avoir une température entre 10 ° C et 35 ° C avec un pourcentage d’humidité entre 50% et 90%;
- l’inclinaison du plan d’appui de la machine ne doit pas dépasser 10 degrés;
- ne pas exposer la machine à la pluiepas et les températures bases;
- il est interdit de lever ou de transporter la machine en l’accrochant par la poignée à un outil de levage.
Danger d’explosion ou d’incendie
- Il est interdit d’aspirer des poussières inammables ou explosives (par ex. de magnésium, d’aluminium, etc.);
- il est interdit d’aspirer les poussières de polissage de surfaces traitées avec des peintures n’ayant pas achevé leur cycle
de catalyse;
- ne pas aspirer les étincelles ou les copeaux chauds;
- si des poussières s’échappent de l’aspirateur, débrancher immédiatement l’aspirateur du réseau d’alimentation;
- il est interdit d’aspirer des liquides inammables (par ex. essence, diluants, etc.);
- il est interdit d’aspirer des liquides ou des substances agressives (par ex. acides, bases, solvants, etc.)
Version ATEX
La machine est conforme à la directive ATEX 2014/34/EU et aux normes harmonisées gurant dans la déclaration de
conformité en tant qu’appareil de catégorie 3D. À proximité de la zone d’utilisation de la machine, d’opportunes indica-
tions de possibilité de présence d’atmosphères explosibles (comme indiqué par la directive ATEX 2014/34/EU) doivent
être appliquées.
L’intérieur de la machine contient des dépôts de poussière et des atmosphères potentiellement explosives. L’opérateur
doit en particulier éviter d’introduire à proximité ou à l’intérieur de la machine ou dans le seau des tout élément pouvant
déclencher une explosion, de type ammes, gaz ou surfaces chaudes, composants électriques, charges électrostatiques,
étincelles mécaniques.
L’étiquette, les caractéristiques et le marquage ATEX se trouvent sur le panneau arrière.
Attention ! Lire toutes les mises en gade pour la sécurité et les indications. JBDC S.p.A. décline toute res-
ponsabilité pour dommages directs ou indirects dus à la nonobservation des indications gurant dans ce
manuel.
Utilisation conformes à l’usage prévu
Cette machine est conforme aux normes de référence EN60335-2-69 pour applications industrielles. Machine adaptée
aux poussières à concentration maximale autorisée sur le poste de travail ≥ 0.1 [mg/m³] et aux poussières de bois
(Classe M – Médium HAZARD).
Versions “M”
L’aspiration de poussières, dont la valeur Kst > à 200 (bar*m/s) et/ou l’énergie d’inammation supérieure à 10 mJ, n’est
pas autorisée. Veuillez respecter les réglementations locales.
Se référer à toutes les règles de sécurité applicables aux matériaux traités.

5
Aspirateur pneumatique professionnel
FR
PARTIES DE LA MACHINE
1 - Avion de soutien
2 - Châssis de l’aspirateur
3 - Poignée
4 - Soupape d’allumage
5 - Raccordement outil pneumatique
6 - Crochet
7 - Pince de mise à la terre
8 - Filtre
9 - Sac à poussières
10 - Raccord aspiration
11 - Roues pivotantes
12 - Entrée de l’alimentation en air comprimé
INSTALLATION DE LA MACHINE
La machine doit être placée sur une surface plane solide et à niveau. Vérier que dans la zone de travail il est possible de
relier la pince métallique de l’aspirateur au circuit de terre du lieu de travail.
Brancher à l’aspirateur le manchon pneumatique fourni (voir gure 3), en particulier :
- le raccord rapide à la prise pneumatique présente sur le côté avant droit de l’aspirateur
- le manchon d’aspiration à l’embout de l’aspirateur
Enlever la tête de l’aspirateur en agissant sur les deux crochets métalliques (voir gure 4-5).
Placer à l’intérieur du tronc le sac à poussières en le xant correctement à la bride de l’embout (voir gure 6).
Placer la tête de l’aspirateur au dessous du tronc de façon correcte et la xer avec les crochets métalliques prévus à cet
eet.
Branchement au réseau pneumatique
Important: Il est indispensable de n’utiliser que de l’air ltré et sec.
Vérier que le robinet d’alimentation de l’aspirateur est fermé.
Brancher au robinet d’alimentation un tube ayant un diamètre interne de 10 mm (voir gure 7).
Régler la pression d’alimentation sur 6.5 bar.
Brancher l’outil pneumatique au raccord présent sur le manchon et le tube d’aspiration à la prise présente sur l’outil
pneumatique.
Attention, pour fonctionner correctement, l’aspirateur nécessite une alimentation en air comprimé pouvant
fournir 1500l / min à une pression de 6bar. Assurez-vous que le réseau d’air comprimé est capable d’ali-
menter l’unité.
Branchement au circuit de terre
Brancher la pince métallique prévue à cet eet à une partie du lieu de travail reliée au circuit de terre de
l’installation. (voir gure 9).
ATTENTION : L’appareil doit TOUJOURS être branché au circuit de terre de l’installation par l’intermédiaire
de la pince métallique, en particulier durant l’utilisation de l’aspirateur, pendant les opérations de vidange
du sac à poussières et de remplacement de celui-ci.
Une fois les branchements eectués, faire un premier court essai de fonctionnement des outils en suivant les instruc-
tions qui les accompagnent.
Contrôles préalables
- Vérier que le sac à poussières est monté dans le récipient, et que le ltre est monté sur la tête;
- vérier si le manchon d’aspiration est correctement xé et s’il ne gêne pas la manoeuvre des outils;
- vérier qu’il n’y ait pas de fuite au niveau de l’installation d’alimentation en air comprimé.
UTILISATION DE LA MACHINE
La machine peut fonctionner en mode automatique ou manuel: sélectionner le mode choisi en tournant l’interrupteur
vers la droite (automatique) ou vers la gauche (manuel) (g. 10).
Fonctionnement en automatique (A)
Par fonctionnement en automatique nous entendons que l’aspirateur se mette en fonction dès que l’outil électrique ou
pneumatique se met en marche pour travailler. Après avoir éteint l’outil, l’aspirateur s’éteint automatiquement avec un
retard.
Fonctionnement manuel (M)
Par fonctionnement manuel nous entendons que la machine fonctionne de façon continue.

6
Aspirateur pneumatique professionnel
FR
ENTRETIEN
Quand l’utilisateur eectue l’entretien, il doit démonter, nettoyer et réviser l’appareil, dans la mesure du
possible, sans provoquer de risques pour le personnel d’entretien et les autres personnes. Se reporter aux
réglementations locales relatives aux conditions de ventilation ltrée de
l’air d’évacuation dans le local dans lequel l’appareil est démonté, la protection du personnel et le nettoyage
de la zone dans laquelle a lieu l’entretien.
Contrôles ordinaires
- Contrôler l’état des manchons d’aspiration des poussières;
- vérier périodiquement le sac de récupération des poussières : ne pas dépasser les limites de poids et de volume
indiquées!
Si le sac enlevé présente des déchirures pouvant provoquer la sortie des poussières, faire contrôler et le cas échéant
remplacer les ltres par un Centre d’Assistance agréé;
- vérier périodiquement l’état des ltres, les remplacer si nécessaire.
Si le ltre est endommagé, déchiré ou présente une anomalie, conez la machine à un centre de service agréé.
Ne pas aspirer quand l’élément de ltrage n’est pas installé!
Remplacement des sachets
Durant les opérations suivantes, veiller à ne pas soulever les poussières !
Enler un masque anti-poussières;
Sac en polyester (code 130.1108 / C):
- libérer la tête du récipient en agissant sur les crochets (g. 4 et 5);
- retirer le sac usagé (g. 6);
- poser le nouveau sac en insérant la bride sur le raccord d’aspiration comme illustré (g. 6);
- placez la tête sur le bac à poussière en vous assurant qu’elle est orientée dans le bon sens (g.5)
- xer la tête avec les deux crochets métalliques.
N’utilisez que des sacs JBDC comme pièces de rechange. Les sacs de remplacement doivent être stockés
dans un endroit sec! Pour l’élimination, procédez conformément à la loi.
Remplacement des ltres
Durant les opérations suivantes, veiller à ne pas soulever les poussières !
Porter un masque anti-poussière approprié.
- décrocher la tête du récipient en agissant sur les crochets (g. 4-5);
- renverser la tête en l’appuyant sur le récipient (g. 11);
- enlever les ltres usés (g. 11) et les enfermer dans un sachet spécial pour les éliminer;
- placer les nouveaux ltre (cod. 076.1613) dans le châssis et remonter le châssis sur la tête.
Utiliser exclusivement les pièces de rechange JBDC. Pour toute information sur les codes des pièces de
rechange et les Centres d’Assistance agréés consulter le site internet.
JBDC Spa décline toute responsabilité en cas de dommages directs ou indirects provoqués par le non-respect des indi-
cations de ce manuel.

7
Aspirateur pneumatique professionnel
FR
EFFETS, CAUSES, REMEDES
EFFETS CAUSES REMEDES
L’aspirateur ne démarre pas
Manque d’air comprimé
Vériez le raccordement au système
d’air comprimé
Tuyau d’alimentation défectueux ou
inapproprié
S’adresser à un Service Après-vente
autorisé
La capacité d’aspiration est insu-
sante
Sac trop plein Vérier le sac de ltrage
Un des tubes ou des accessoires est
bouché
Contrôler le tube exible et les acces-
soire
Filtres bouché Vériez les ltres
Fuites de poussières du conduit
d’échappement
Filtre à cartouche déchiré
S’adresser à un Service Après-vente
autorisé
Perte de puissance avec les outils
pneumatiques
Alimentation en air comprimé insuf-
sante
Vérier les passages d’air
DONNÉES TECHNIQUES UNITÉ D’ASPIRATION
Marquage
II 3 D c T 50°C
Consommation d’air comprimé [L/min] * 700
Débit d’air maximal [m
3
/h] * 140
Vide maximum [mbar] * 190
Section du tuyau d’alimentation [mm
2
] Øi≥ 10mm²
Pression d’alimentation [bar] 6 - 8
Surface ltrante [m
2
] 1
Capacité du conteneur [L] 30
Outils connectables [n] 1
Niveau de pression sonore [dB] 68
Raccord d’aspiration [mm] 1x50mm/1x44mm/1x34mm
Dimensions [A x B x C] - [cm] 80 x 44 x 45
Dimensions de l’emballage [A x B x C] - [cm] 100 x 77 x 57
Poids [kg] 20
Poids d’emballage [kg] 30
Démarrage Manuel
* pression de service 6 [bar]

8
Professional pneumatic vacuum cleaner
EN
INSPECTION OF PACKAGE CONTENTS
The package contains:
- n ° 1 aspirateur pneumatique
- n ° 1 sac de collecte de poussière en matière polyester
For packaging waste disposal attain to local regulations in force, including recycling disposal if requested.
WARNINGS
Safety and accident prevention instructions
- This machine can only be operated by trained people in charge; machine no intended to be operated by kids or men-
tal-sensorial defective people;
- before use, users should be provided with information, instruction and training for the use of the appliance and the
pollutant it is used for, including the right method for the safe removal and disposal of the substances collected;
- it is necessary to provide an adequate air change rate in the room if the exhaust air is returned in the room. Reference
to National Regulations is necessary;
- the temperature of the work area must be between 10°C and 35°C with humidity between 50% and 90%;
- the surface on which the machine rests must not exceed a maximum 10 degree gradient;
do not expose the machine to rain and low temperatures;
do not lift and transport the machine by the handle with a lifting device.
Explosion or re hazard
- Do not vacuum ammable or explosive dust;
- do not vacuum sanding dust from surfaces treated with paints that have not completed the catalyst cycle;
- do not vacuum sparks or white hot shavings;
- immediately disconnect the vacuum from the electrical mains if dust is ejected from air outlet;
- do not vacuum ammable or explosive liquids (i.e. petrol, thinners, etc.);
- do not vacuum aggressive liquids or substances(i.e. acids , bases, solvents, etc.).
ATEX Version
The machine complies with the ATEX 2014/34/EU Directive and the harmonized standards contained in the Declaration
of Conformity as a Category 3D device.
Appropriate indications of possible explosive atmospheres (as specied by the ATEX 2014/34/EU Directive) must be
applied near the area of use of the device.
The device contains dust deposits and potentially explosive atmospheres. In particular, the operator must avoid introdu-
cing sources of ignition in the vicinity or inside the unit or in the bucket such as: ames, gases or hot surfaces, electrical
parts, electrostatic charges, mechanical sparks.
The label, technical data, and ATEX marking are located on the rear panel.
Warning! Read all safety notes and directions. JBDC Spa assumes no responsibility for direct or indirect
damages resulting from non-compliance with this manual.
Use according to purposes
This machine complies with the EN60335-2-69 reference standards for industrial applications. Machine suitable for dust
with a maximum workplace concentration ≥ 0.1 [mg/m³] and wood dusts (Class M - Medium HAZARD).
“M” Version
Extracting dust with a Kst value > 200 (bar*m/s) and/or an ignition energy < 10 mJ is not permitted. Please observe
local regulations.
Refer to any safety regulations applicable to the treated materials

9
Professional pneumatic vacuum cleaner
EN
PARTS OF MACHINE
1 - Plane support
2 - Vacuum cleaner frame
3 - Handle
4 - Supply valve
5 - pneumatic tool plug
6 - Hook
7 - Grounding pliers
8 - Filter
9 - Dust bag
10 - Suction connection
11 - Castor wheels
12 - Supply compressed air inlet
INSTALLATION OF MACHINE
Place the machine on a stable and level surface. Verify that it is possible to connect the metal suction cleaner pliers to
the grounding system of the working area.
Connect the suction cleaner to the pneumatic sleeve supplied (see gure 3) with the machine and connect:
- The quick coupling to the pneumatic sleeve on the front right side of the suction cleaner
- The suction head to the pipe union of the suction cleaner
Disconnect the supply pipe from the vacuum head using the quick tting, then remove the vacuum head using the two
metal hooks (see gure 4-5).
Place the dust bag inside the drum and rmly x it to the sleeve (see gure 6).Place the vacuum head in the correct
position above the drum and x it using the metal hooks supplied.
Connection to the pneumatic supply
Please note: use ltered and dry air only.
Verify that the supply faucet of the suction cleaner is closed.
Connect the supply faucet to a pipe with an internal diameter of 10 mm (see gure 7).
Adjust the supply pressure at 6.5 bar.Connect the pneumatic tool to the tting on the sleeve and the suction pipe to
the socket on the pneumatic tool.
Warning, in order to function properly, the vacuum cleaner requires 1500l/min compressed air supply at a
pressure of 6bar. Make sure that the compressed air network is able to feed correctly the unit.
Connection to the grounding system
Connect the metal pliers to a part of the area that is connected to the grounding system of the plant. (see
gure 9)
CAUTION: ALWAYS connect the machine to the grounding system of the plant using the metal pliers, spe-
cically during the use of the suction cleaner, the emptying of the dust bag and its replacement.
Check the tool functioning as indicated on their instructions manual.
Preliminary checks
- Check that the dust collection bag has been tted in the container and that the lters have been tted on the head;
- check that the vacuum hose is properly xed and does not hinder tool movement;
- check that there are no leaks in the compressed air supply system.
MACHINE USE
The machine can operates in manual or automatic mode: to select the mode, turn the switch to the right (automatic
mode) or to the left (manual mode) (pic. 10).
Using the machine in automatic mode (A)
Automatic operations means that the vacuum starts when an electrical or pneumatic tool is turned on.
The vacuum will automatically turn o after the tool is turned o.
Using the machine in manual mode (M)
Manual operations means that the vacuum runs continuously.
Power on the front panel outlet socket is permanently active during manual running.

10
Professional pneumatic vacuum cleaner
EN
MAINTENANCE
For user servicing, the appliance must be dismantled, cleaned and serviced, as far as it is reasonably prac-
ticable, without causing risk to the maintenance sta and others. Suitable precautions include, decontami-
nation before dismantling, provision for local ltered exhaus ventilation where the appliance is dismantled
(according to local regulations), cleaning of the maintenance area and suitable personal protection.
Ordinary check operations
- check the vacuum hose conditions;
- check the power cord, plug and outlet socket conditions: in case contact an authorized service centre for replacement;
- check lter cartridge condition. In case of lacerations or perforations contact an authjorized service centre for repla-
cement.
Do not use the appliance without the full lter set tted!
Bags replacement
Do not spread dust during dust bag replacement!
wear an adeguate dust mask ;
Polyester bag (code 130.1108 / C):
- release the head from the container by acting on the hooks (g. 4 and 5);
- remove the used bag (g. 6);
- lay the new bag by inserting the ange on the suction tting as illustrated (g. 6);
- place the head on the dust container making sure it is facing in the correct direction (g. 5)
- x the head with the two metal hooks.
Use only JBDC bags as spare parts. Replacement bags must be stored in a dry place! For disposal proceed
according to the law.
Filter replacement
Do not spread dust during lter replacement!
Wear adequate lter mask.
- detach the vacuum head pushing the side hooks (pic.4-5);
- turn the vacuum head upside down (pic.11);
- remove the lter cartdridge (pic. 11) and t them into a sealed disposal bag;
- t new lter (cod. 076.1613) cartridges in the lter frame (pic.18) and reassemble it on the vacuum head.
Use genuine JBDC spare parts only.
Refer to site for parts code and authorized service centre
JBDC Spa. will not be held responsible for direct or indirect damages resulting from noncompliance with the require-
ments of this manual.

11
Professional pneumatic vacuum cleaner
EN
TROUBLESHOOTING AND SOLUTION
Eects Causes Solutions
The motor will not start
Lack of compressed air
Check the connection to the com-
pressed air system
Defective or unsuitable supply hose Contact an authorised service centre
Vacuum ow is insucient
Bag full Check the lter bag
One the hoses or accessories is
clogged
Check the exible hose and the
accessories
Clogges lters check the lters cartridges
Dust from the exhaust Filter cartridge torn ripped Contact an authorised service centre
Insucient power for pneumatic tool Insucient compressed air feeding Check air passage
TECHNICAL DATA SUCTION UNIT
Marking
II 3 D c T 50°C
Compressed Air Consumption [L/min] * 700
Maximum air ow [m
3
/h] * 140
Maximum vacuum [mbar] * 190
Supply pipe section [mm
2
] Øi≥ 10mm²
Supply pressure [bar] 6 - 8
Filter surface [m
2
] 1
Container capacity [L] 30
Connectable tools [n] 1
Sound pressure level [dB] 68
Suction connection [mm] 1x50mm/1x44mm/1x34mm
Dimensions [A x B x C] - [cm] 80 x 44 x 45
Packaging Dimensions [A x B x C] - [cm] 100 x 77 x 57
Weight [kg] 20
Packing Weight [kg] 30
Start-up mode Manual
* operating pressure 6 [bar]

12
Professioneller pneumatischer Staubsauger
DE
ÜBERPRÜFUNG DES VERPACKUNGSINHALTS
Die Verpackung enthält:
- pneumatischer Aspirator Nr. 1
- Nr. 1 Staubsammelbeutel aus Polyestermaterial
Folgendes ist bei der Entsorgung der Verpackungskomponenten zu beachten: Die gültigen Vorschriften des
Ortes, an der die Maschine betrieben wird, müssen beachtet werden. Geltende Abfalltrennungsvorschriften
müssen eingehalten werden.
ALLGEMEINE HINWEISE
Sicherheits- und Unfallverhütungsvorschriften.
- Diese Maschine darf nur durch Menschen bedient werden, die auf die Nutzung dieser Maschine ausgebildet sind. Die
Maschine ist nicht für die Bedienung durch Kinder oder Personen mit Mental-sensorischen Störungen konzipiert und
hergestellt;
- vor Benutzung des Gerätes, muss sich der Anwender alle notwendigen Informationen, Anweisungen und die nötige
Ausbildung für die Bedienung des Gerätes und den im Einsatz entstehenden Schadstoen verschaen. Inklusive der
richtigen Verfahren für die sichere Entsorgung und Beseitigung der aufgefangenen Substanzen;
- es ist erforderlich dafür zu sorgen dass ein ausreichender Luftaustausch im Raum stattndet, wenn die die ausströ-
mende Luft in den Raum zurück strömt. Die nationalen Gesetzgebungen sind stets einzuhalten;
- die Temperatur am Arbeitsplatz muss zwischen 10° und 35° liegen, die relative Luftfeuchtigkeit zwischen 50% und
90%;
- die Auageäche der Maschine darf nicht um mehr als 10 Grad geneigt sein;
die Maschine weder regen noch niedrigen temperaturen ausstzen;
- die Maschine darf nicht von einem Hebeapparat an den Grien angehoben oder transportiertwerden.
Explosions- oder Brandgefahr
- Es dürfen keine entzündbaren oder explosiven Pulver abgesaugt werden (z. B. Magnesium, Aluminium, Asbest usw.);
- es dürfen keine Pulver von lackierten Oberächen abgesaugt werden, deren Lack noch nicht vollständig ausgehärtet
ist;
- saugen Sie keine Funken oder weiß glühende Späne ein;
- tritt Staub aus dem Absauger, ist dieser sofort vom Netz zu trennen;
- es dürfen keine entzündbaren oder explosiven Flüssigkeiten abgesaugt werden (z. B. Benzin, Verdünnungsmittel usw);
- es dürfen keine aggressiven Flüssigkeiten oder Substanzen abgesaugt werden (z.B. Säuren, Basen, Lösungsmittel
usw.).
ATEX Ausführung
Die Maschine entspricht der ATEX-Richtlinie 2014/34/EG und den in der Konformitätserklärung aufgeführten harmoni-
sierten Normen als Geräte der Kategorie 3D.
In der Nähe des Einsatzbereiches des Gerätes sind geeignete Hinweise auf das Vorhandensein explosionsfähiger Atmos-
phären (gemäß ATEX-Richtlinie 2014/34/EG) anzubringen.
Das Gerät enthält Staubablagerungen und explosionsfähige Atmosphären. Insbesondere muss der Betreiber in der
Nähe oder im Gerät und dem Behälter, mögliche Zündquellen vermeiden, wie: Flammen, Gase oder heiße Oberächen,
elektrische Teile, elektrostatische Auadungen, mechanische Funken.
Das Etikett, die technischen Daten und die ATEX Kennzeichnung benden sich an der Hinterseite.
Achtung! Alle Sicherheitshinweise und Angaben lesen. JBDC Spa übernimmt keine Verantwortung für direkte
oder indirekte Schäden, die sich aus der Nichtbeachtung der in diesem Handbuch angegebenen Hinweise
ergeben.
Nutzung nach Verwendungszweck
Diese Maschine entspricht den Normen EN60335-2-69 für industrielle Anwendungen. Geeignet für Stäube mit maximal
zulässiger Konzentration am Arbeitsplatz von ≥ 0.1 [mg/m³] und Holzstaub (Klasse M - Medium HAZARD).
“M”-Ausführung
Das Saugen von Stäuben mit einem Kst-Wert> 200 (bar*m/s) und/oder einer Zündenergie < 10 mJ ist nicht zulässig.
Beachten Sie locale Bestimmungen.

13
Professioneller pneumatischer Staubsauger
DE
Beachten Sie die Sicherheitsbestimmungen für die behandelten Materialien
MASCHINENKOMPONENTEN
1 - Unterstützungsebene
2 - Absaugerrahmen
3 - Gri
4 - Einschaltventil
5 - Anschlusse pneumatische Werkzeug
6 - Haken
7 - Erdungsklemme
8 - Filter
9 - Staubfangsack
10 - Sauganschluss
11 - Freidrehende Räder
12 - Eingang Druckluftzufuhr
INSTALLATION DER MASCHINE
Die Maschine muss auf einer festen und ebenen Fläche aufgestellt werden. Vergewissern Sie sich, dass es im Arbeitsbe-
reich möglich ist, die Metallklemme des Absaugers an den Erdanschluss des Arbeitsplatzes anzuschließen.
Den in der Lieferung enthaltenen Pneumatikschlauch an den Absauger anschließen und insbesondere (siehe Abb. 3):
- den Schnellanschluss an den Pneumatikanschluss auf der rechten Vorderseite des Absaugers
- den Absaugschlauch an den Stutzen des Absaugers
Den Absaugkopf entfernen, indem die beiden Metallhaken gelöst werden (siehe Abb. 4-5) .
Im Inneren des Behälters den Staubbeutel positionieren und korrekt am Flansch des Stutzens befestigen (siehe Abb. 6)
Den Absaugkopf korrekt über dem Behälter positionieren und mit den dafür vorgesehenen Metallhaken befestigen.
Anschluss an die Luftversorgung
Wichtig: Es darf ausschließlich gelterte und getrocknete Luft verwendet werden. Überprüfen, ob der Versorgungshahn
des Absaugers geschlossen ist.
An den Versorgungshahn einen Schlauch mit einem Innendurchmesser von 10 mm anschließen (siehe Abb. 7).
Den Versorgungsdruck auf 6.5 bar einstellen. Das pneumatische Werkzeug an den Anschluss auf dem Schlauch an-
schließen und den Absaugschlauch an den Anschluss auf dem pneumatischen Werkzeug.
Warnung: Um ordnungsgemäß zu funktionieren, benötigt der Staubsauger eine Druckluftversorgung, die
1500 l / min bei einem Druck von 6 bar liefern kann. Stellen Sie sicher, dass das Druckluftnetz das Gerät
mit Strom versorgen kann.
Anschluss an den Erdleiter
Die entsprechende Metallklemme an einen Teil des Arbeitsplatzes anschließen, der an den Erdleiter der
Anlage angeschlossen ist. (siehe Abb. 9)
ACHTUNG: Das Gerät muss STETS mittels der Metallklemme an den Erdleiter der Anlage angeschlossen
sein, insbesondere während des Betriebs des Absaugers, der Vorgänge zum Entleeren des Staubbeutels
und beim Auswechseln desselben.
Überprüfen Sie das Werkzeug anhand der Bedienungsanleitung des Werkzeuges.
Vorangehende Kontrollen
- es muss sichergestellt werden, dass im Behälter ein Staubfangsack und am Kopf ein Filter montiert worden ist;
- es muss überprüft werden, dass der Absaugschlauch richtig befestigt ist und die Werkzeughandhabung nicht behin-
dert;
- es muss überprüft werden, dass an der Versorgungsanlage für die Druckluft keine Verluste auftreten..
BENUTZUNG DER MASCHINE
Das Gerät kann in manuellem oder automatischen Modus betrieben werden: Für die Auswahl des Modus, drehen Sie den
Schalterin die rechte Position (Automatik-Modus) oder in die linke Position (Manuell-Modus) (Bild. 10).
Automatikbetrieb (A)
Unter Automatikbetrieb versteht man, dass bei Einschalten des elektrischen Werkzeugs gleichzeitig auch der Absauger
in Betrieb genommen wird. Dieses Gerät schaltet automatisch mit einer Verzögerung.

14
Professioneller pneumatischer Staubsauger
DE
Manueller Betrieb M
“Manueller Betrieb” bedeutet, dass die Maschine ständig läuft. Die Stromversorgung an der Gerätesteckdose ist ständig
gegeben, solange das Gerät im manuellen Modus arbeitet.
INSTANDHALTUNG
Für die Wartung von Seiten des Benutzers muss das Gerät zerlegt, gesäubert und überholt werden, soweit
dies angemessen ist, ohne dass Risiken für das Wartungspersonal und andere Personen entstehen. Be-
ziehen Sie sich auf die lokalen Bestimmungen hinsichtlich der gelterten Belüftungsbedingungen der Abluft
in dem Raum, in dem das Gerät zerlegt wird, des Schutzes des Personals und der Reinigung des Bereichs,
in dem die Wartung erfolgt.
Regelmäßig durchzuführende Prüfungen
Überprüfen Sie den Zustand des Absaugschlauches;
- prüfen Sie den Filterbeutel: Überschreiten Sie auf keinen Fall die vorgegebene Menge in Gewicht oder Volumen!
Im Falle eines zerrissenen oder beschädigten Filterbeutel kontaktieren Sie einen autorisierten Service-Partner für den
Tausch des Filterbeutel;
Überprüfen Sie regelmäßig den Zustand der Filter und ersetzen Sie sie gegebenenfalls. Wenn der Filter beschädigt ist,
zerrissen ist oder eine Anomalie aufweist, bringen Sie das Gerät zum autorisierten Servicecenter.
Benutzen Sie nie den Staubsauger ohne das komplette Filtersystem (Filterbeutel und Filterkassette).
Tausch Filterbeutel
Atmen Sie keinen Staub während des Tausches des Filterbeutels ein.
eine Staubmaske anlegen.
Polyesterbeutel (Code 130.1108 / C):
- Lösen Sie den Kopf aus dem Behälter, indem Sie auf die Haken einwirken (Abb. 4 und 5).
- Entfernen Sie den gebrauchten Beutel (Abb. 6).
- Legen Sie den neuen Beutel, indem Sie den Flansch wie abgebildet auf die Saugarmatur setzen (Abb. 6).
- Legen Sie den Kopf auf den Staubbehälter und achten Sie darauf, dass er in die richtige Richtung zeigt (Abb. 5).
- Befestigen Sie den Kopf mit den beiden Metallhaken.
Verwenden Sie nur JBDC-Taschen als Ersatzteile. Ersatzbeutel müssen an einem trockenen Ort aufbewahrt
werden! Zur Entsorgung vorschriftsmäßig vorgehen.
Filter auswechseln
Atmen Sie keinen Staub während des Wechsels der Filterbeutel ein.
Tragen Sie entsprechende Staub-Filtermasken.
- lösen Sie das Motorgehäuse durch die seitlichen Halteklammern (Bild. 4-5);
- legen Sie das Motorgehäuse umgekehrt ab (Bild. 11);
- entfernen Sie die Filterkassetten (Bild. 11) und entsorgen Sie diese in einem verschließbaren Beutel;
- legen Sie die neuen Filterkassetten (cod. 076.1613) in den Halterahmen ein und bauen Sie den Filterrahmen wieder
in das Motorgehäuse ein.
Benutzen Sie nur originale Ersatzteile von JBDC. Entsprechende Ersatzteillisten und autorisierte Service-
Das Unternehmen JBDC Spa übernimmt keinerlei Haftung für direkte oder indirekte. Schäden, die aus der Nicht-
beachtung der in diesem Handbuch angegebenen Hinweise entstehen.

15
Professioneller pneumatischer Staubsauger
DE
EVENTUELLE STÖRUNGEN UND IHRE BEHEBUNG
WIRKUNG URSACHE BEHEBUNG
Die Turbine läuft nicht an
Druckluftmangel
Überprüfen Sie die Verbindung zum
Druckluftsystem
Defekter oder ungeeigneter Versor-
gungsschlauch
Kundendienst benachrichtigen
Die Ansaugleistung ist ungenügend
Sack zu voll Sack ersetzen
Einer der Schläuche oder die Zu-
behörteile sind verstopft
Den Schlauch oder die Zubehörteile
kontrollieren
Filter verstopft Kundendienst benachrichtigen
Aus dem Auslass der Turbine tritt
Staub aus
Filter gerisse Kundendienst benachrichtigen
Beim Einstellen des Druckminderers
ändert sich die Anzeige des Manome-
ters nicht
Druckminderer defekt oder Anlage
verliert Luft
Kundendienst benachrichtigen
TECHNISCHE DATENSAUGGERÄT
Markierung
II 3 D c T 50°C
Druckluftverbrauch [L/min] * 700
Maximaler Luftstrom [m
3
/h] * 140
Maximales Vakuum [mbar] * 190
Versorgungsrohrabschnitt [mm
2
] Øi≥ 10mm²
Versorgungsdruck [bar] 6 - 8
Filteräche [m
2
] 1
Containerkapazität [L] 30
Anschließbare Werkzeuge [n] 1
Schalldruckpegel [dB] 68
Sauganschluss [mm] 1x50mm/1x44mm/1x34mm
Abmessungen [A x B x C] - [cm] 80 x 44 x 45
Verpackungsabmessungen [A x B x C] - [cm] 100 x 77 x 57
Gewicht [kg] 20
Packgewicht [kg] 30
Maschinenstart Manual
* Betriebsdruck 6 [bar]

16
Aspirador profesional neumático
ES
CONTROL DEL CONTENIDO DEL EMBALAJE
El embalaje contiene:
- 1 aspirador neumático
- 1 bolsa de recogida de polvo de poliéster
Para eliminar los componentes del embalaje, atenerse a las disposiciones vigentes en el lugar donde se
ponga en servicio la máquina, teniendo en la debida consideración las normas para la recogida selectiva
cuando esté prevista dicha forma de recogida.
ADVERTENCIAS GENERALES
Normas de seguridad y prevención de accidentes.
- La máquina debe ser utilizada sólo por el personal adiestrado encargado del uso. La máquina no debe ser utilizada por
niños o personas con capacidades físicas, sensoriales o mentales reducidas;
- el operador deberá estar informados, educados y entrenados en el uso de los equipos y las sustancias que deben
serutilizados, incluyendo el método seguro de retirada y eliminación del material recogido;
es necesario asegurar un recambio de aire adecuado en el local si el aire de salida retorna al mismo local. Consultar los
reglamentos nacionales;
- en el ambiente de trabajo debe haber una temperatura comprendida entre 10°C y 35°C con un porcentaje de humedad
entre el 50% y el 90%;
- la supercie de apoyo de la máquina no debe superar un declive máximo de 10 grados.
- no exponer la máquina a la lluvia y las bajas temperaturas;
no levantar ni transportar la máquina enganchándola del asa con un aparato de elevación.
Peligro de explosión o incendio
- No se deben aspirar polvos inamables o explosivos (por ej. magnesio, aluminio, etc.);
- no se deben aspirar polvos de pulido de supercies tratadas con pinturas que no han terminado su ciclo de catalización;
- no aspirar chispas ni virutas calientes;
- en caso de salida de polvo del aspirador, desconectarlo inmediatamente de la red de alimentación;
- no se deben aspirar líquidos inamables o explosivos (por ej. bencina, diluyentes, etc.);
- no se deben aspirar líquidos o sustancias agresivas (por ej. ácidos , bases, disolventes, etc.).
Versión ATEX
La máquina se ajusta a la Directiva ATEX 2014/34/EU y a las normas armonizadas que guran en la declaración de
conformidad como aparato de categoría 3 D. En las proximidades de la zona de utilización del aparato deben aplicarse
las oportunas indicaciones acerca de la posible presencia de atmósferas explosivas (como indica la Directiva ATEX
2014/34/EU). El aparato contiene en su interior depósitos de polvo y atmósferas potencialmente explosivas. En parti-
cular, el operador debe evitar introducir en las inmediaciones o en el interior del aparato o en el cubo posibles fuentes
de ignición como: llamas, gas o supercies calientes, partes eléctricas, cargas electrostáticas, chispas mecánicas. Es
necesario que el operador ejecute el vaciado del cubo, asegurándose de desconectar y volver a conectar el cable del
circuito de tierra al cubo para evitar la acumulación de cargas electrostáticas en el mismo. La etiqueta, los datos técnicos
y el marcado ATEX están colocados en el panel trasero.
¡Atención! Leer todas las advertencias para la seguridad y las indicaciones. JBDC Spa no asume ninguna
responsabilidad por daños directos o indirectos derivados del incumplimiento de lo indicado en el presente
manual.
Utilización conforme a los nes
Questa macchina è conforme alle norme di riferimento EN60335-2-69 per applicazioni industriali. Macchina adatta per
polveri con una concentrazione massima consentita sul posto di lavoro≥ 0.1 [mg/m³] e alle polveri di legno (Classe M
- Medium HAZARD).
Esta máquina se ajusta a las normas de referencia EN60335-2-69 para aplicaciones industriales. Máquina apta para
polvos con una concentración máxima permitida en el puesto de trabajo ≥ 0.1 [mg/m³] y para polvos de madera (Clase
M - Medium HAZARD.
Versione “M”
No se permite la aspiración de polvo con valor Kst > 200 (bar*m/s) y/o energía de cebado< 10 mJ. Cumplir las dispo-
siciones locales en vigor.

17
Aspirador profesional neumático
ES
Cumplir todas las normas de seguridad aplicables a los materiales tratados.
PARTES DE LA MÁQUINA
1 - Plano de apoyo
2 - Bastidor de soporte
3 - Asa
4 - Interruptor de encendido
5 - Conexión rápida de la herramienta neumática
6 - Gancho del cabezal
7 - Pinza de puesta a tierra
8 - Filtro
9 - Bolsa de recogida de polvo
10 - Empalme de aspiración
11 - Ruedas giratorias con freno
12 - Entrada de alimentación de aire comprimido
INSTALACIÓN DE LA MÁQUINA
La máquina debe colocarse en un plano sólido y nivelado. Asegurarse de que en la zona de trabajo sea posible conectar
la pinza metálica del aspirador al circuito de tierra del lugar de trabajo.
Conectar el manguito neumático al aspirador (ver gura 3), en concreto:
- La conexión rápida a la toma neumática presente en el lado frontal del aspirador
- El manguito de aspiración a la toma del aspirador
Retirar el cabezal del aspirador actuando en los dos ganchos metálicos (ver gura 4, 5). Colocar en el tanque la bolsa
de polvo, jándola correctamente al empalme de aspiración (ver gura 6). Colocar el cabezal del aspirador encima del
tanque de la manera correcta y jarlo con los ganchos metálicos especícos.
Conexión a la red neumática
Importante: se debe utilizar exclusivamente aire ltrado y secado. Asegurarse de que la llave de alimentación del aspira-
dor esté cerrada. Conectar a la llave de alimentación un tubo con un diámetro interno de 10mm (ver gura 7). Regular
la presión de alimentación a 6,5 [bar]. Conectar la herramienta neumática al enganche presente en el manguito y el
tubo de aspiración a la toma de la herramienta neumática.
Atención: para que el aspirador funcione correctamente, requiere una alimentación de aire comprimido que
pueda suministrar 1500l/min con una presión de 6 [bar]. Asegurarse de que la red de aire comprimido sea
capaz de alimentar la unidad.
Controles preliminares
Conectar la pinza metálica especíca a una parte del lugar de trabajo conectada al circuito de tierra de la
instalación (ver gura 9).
Atención: el aparato debe estar siempre conectado al circuito de tierra de la instalación con la pinza metálica,
en concreto, durante el uso del aspirador, las operaciones de vaciado de la bolsa de polvo y el cambio de
la misma.
Después de realizar la conexión, hacer una breve prueba de funcionamiento de las herramientas, siguiendo las instruc-
ciones en dotación con las mismas.
Controles preliminares
- Comprobar que en el recipiente esté montada la bolsa de recogida de polvo y que el ltro esté montado en el cabezal;
- comprobar que el manguito de aspiración esté jado adecuadamente y no obstaculice la maniobra de las herramientas;
- comprobar que no haya fugas en el sistema de alimentación de aire comprimido.
USO DE LA MÁQUINA
La máquina puede funcionar en modo automático o manual: seleccionar el modo elegido girando el interruptor hacia
(automático) o hacia (manual) (gura 10).
Funcionamiento en modo automático (AUT)
El funcionamiento en modo automático consiste en que, con el encendido de la herramienta conectada, se ponga en
funcionamiento el aspirador automáticamente.
Al apagar la herramienta, el aspirador se apaga.

18
Aspirador profesional neumático
ES
Funcionamiento en modo manual (MAN)
Con el funcionamiento en modo manual la máquina funciona de forma continua.
MANTENIMIENTO
Para el mantenimiento por parte del usuario, el aparato debe desmontarse, limpiarse y revisarse, en la
medida de lo posible razonablemente, sin causar riesgos para el personal de mantenimiento y los demás.
Cumplir las normativas locales en materia de condiciones de ventilación ltrada del aire de descarga en el
local donde se desmonte el aparato, protección del personal y limpieza de la zona de realización del mante-
nimiento.
Controles ordinarios
- Revisar el estado de los manguitos de aspiración del polvo;
revisar periódicamente la bolsa de recogida del polvo: ¡no superar los límites de peso y volumen indicados! En caso de
que la bolsa retirada presente roturas que provoquen la salida del polvo, pedir la revisión y, si es necesario, la sustitución
de los ltros en un Centro de Asistencia Autorizado;
- revisar periódicamente el estado del ltro. Si es necesario, sustituirlo. En caso de que el ltro resulte dañado, roto o
presente cualquier anomalía, llevar la máquina al Centro de Asistencia Autorizado.
¡No aspirar sin el elemento de ltrado instalado!
Cambio de bolsas
¡Al realizar las operaciones siguientes intentar no levantar polvo!
Llevar una mascarilla antipolvo adecuada;
Bolsa de poliéster (cód. 130.1108/C):
- desenganchar el cabezal del recipiente utilizando los ganchos (g.4 y 5);
- retirar la bolsa usada (g. 6);
- colocar la nueva bolsa introduciendo la brida en el empalme de aspiración como se muestra (g.6);
- colocar el cabezal en la bolsa de polvo asegurándose de que esté orientada en la dirección correcta (g.5);
- jar el cabezal con dos ganchos metálicos.
Utilizar como recambio exclusivamente bolsas JBDC. ¡Las bolsas de recambio se deben conservar en un
lugar seco! Para la eliminación, proceder siguiendo las normas vigentes.
Cambio del ltro
¡Al realizar las operaciones siguientes intentar no levantar polvo!
Llevar una mascarilla antipolvo adecuada.
- desenganchar el cabezal del recipiente utilizando los ganchos (g. 4-5);
- volcar el cabezal colocándolo sobre el recipiente (g. 11);
- retirar el ltro usado (g. 11) y cerrarlo en una bolsa especíca para su eliminación;
- colocar el nuevo ltro (cód. 076.1613) en el bastidor y volver a montar el bastidor en el cabezal.
Utilizar única y exclusivamente piezas de recambio JBDC. Para más información sobre los códigos de las
piezas de recambio y los Centros de Asistencia Autorizados, consultar la página web.
JBDC Spa no se hace responsable por daños directos o indirectos derivados del incumplimiento de lo indicado en el
presente manual.

19
Aspirador profesional neumático
ES
EVENTUALES ANOMALÍAS Y SU ELIMINACIÓN
Efectos Causas Soluciones
El aspirador no se pone en marcha
Falta de aire comprimido
Revisar la conexión a la instalación
del aire comprimido
Tubo de alimentación defectuoso o
inadecuado
Acudir a un Centro de Asistencia
autorizado
La capacidad de aspiración es insu-
ciente
Bolsa demasiado llena Revisar la bolsa de ltrado
Manguito exible obstruido o defec-
tuoso
Revisar el manguito exible y los
accesorios
Filtros obstruidos Revisar los ltros
Sale polvo por la salida de descarga Filtro de cartucho roto
Acudir a un Centro de Asistencia
autorizado
Pérdida de potencia con la herra-
mienta neumática conectada
Alimentación de aire comprimido
insuciente
Revisar los pasos de aire
DATOS TÉCNICOS DEL ASPIRADOR
Marcado
II 3 D c T 50°C
Consumo de aire comprimido [L/min]* 700
Caudal de aire máximo [m³/h]* 140
Depresión máxima [mbar]* 190
Sección del tubo de alimentación [mm
2
] Øi≥ 10mm²
Presión de alimentación [bar] 6 - 8
Supercie de ltrado [m
2
] 1
Capacidad del recipiente [L] 30
Herramientas con conexión [n] 1
Nivel de presión acústica [dB] 68
Empalme de aspiración [mm] 1x50mm/1x44mm/1x34mm
Dimensiones [A x B x C] - [cm] 80 x 44 x 45
Dimensiones embalaje [A x B x C] - [cm] 100 x 77 x 57
Peso [kg] 20
Peso embalaje [kg] 30
Puesta en marcha Manual
* presión operativa 6 [bar]

20
Professionele pneumatische stofzuiger
NL
DE INHOUD VAN DE VERPAKKING CONTROLEREN
De verpakking bevat:
- 1 pneumatische stofzuiger
- 1 polyester stofzak
Ten aanzien van het weggooien van het verpakkingsmateriaal moet u zich aan de voorschriften houden die
op de plaats gelden waar de machine in bedrijf gesteld wordt, waarbij de voorschriften voor de gescheiden
afvalverwerking, indien van toepassing, in acht genomen moeten worden.
ALGEMENE WAARSCHUWINGEN
Veiligheids- en ongevalpreventievoorschriften.
- Dit apparaat moet alleen bedient worden door getraind personeel; zorg altijd voor toezicht en laat het apparaat niet
bedienen door ongeautoriseerde personen en kinderen;
- de gebruiker dient te zijn geïnformeerd, opgeleid en getraind voor het gebruik van het apparaat en voor de hantering
van de stoen waarvoor het gebruikt moet worden en dient eveneens te worden voorgelicht over een veilige werkwijze
voor het verwijderen en afvoeren van het verzamelde materiaal;
- de ruimte waarin het apparaat werkt dient voldoende te worden geventileerd indien de uitlaatlucht wordt tergu
geblazen in de ruimte. Verwijzing naar nationale verordeningen is noodzakelijk;
- de temperatuur in de werkomgeving moet tussen de 10°C en de 35°C zijn en het vochtigheidspercentage tussen de
50% en de 90%;
- het oppervlak waar de machine op neergezet moet worden mag niet meer overhellen 10 graden;
- de machine mag niet in de regen gezet worden;
- de machine mag niet opgehesen worden en vervoerd worden door de machine met het handvat aan een hijswerktuig
vast te maken.
Explosie- en brandgevaar
- Er mogen geen ontvlambare of explosieve stoen (bijv. magnesium, aluminium, asbest enz.) opgezogen worden;
- er mag geen schuurstof van geverfde oppervlakken opgezogen worden die hun katalysecyclus nog niet voltooid
hebben;
- zuig geen gloeiend hete spaanders en andere stoen op;
- als er stof uit de stofzuiger komt dan moet de stofzuiger onmiddellijk van het elektriciteitsnet afgekoppeld worden;
- er mogen geen ontvlambare of explosieve vloeistoen (bijv. benzine, verdunners enz.) opgezogen worden;
- er mogen geen agressieve vloeistoen of stoen (bijv. zuren, basen, oplosmiddelen enz.) opzogen worden.
ATEX-versie
De machine voldoet als apparaat van de categorie 3 D aan de ATEX-richtlijn 2014/34/EU en aan de geharmoniseerde
normen, vermeld in de verklaring van overeenstemming. In de buurt van de zone waar het apparaat wordt gebruikt,
moeten indicaties aangebracht worden om aan te duiden dat het mogelijk is dat explosiegevaarlijke atmosferen aanwe-
zig zijn (zoals voorgeschreven door de ATEX-richtlijn 2014/34/EU). Het apparaat bevat stofafzettingen en explosie-
gevaarlijke atmosferen. De bediener moet vooral vermijden dat mogelijke ontstekingsbronnen in de buurt van het
apparaat of in het apparaat terecht komen. vlammen, gas of warme oppervlakken, elektrische delen, elektrostatische
ladingen, mechanische vonken. Als de bediener de bak leegt moet hij de kabel van het aardingscircuit afsluiten en weer
aan de bak aansluiten om accumulatie van elektrostatische ladingen te vermijden.
Het etiket, de technische gegevens en de ATEX-markering zijn aanwezig op het paneel aan de achterkant.
Let op! Lees alle aanwijzingen in verband met de veiligheid en de indicaties. JBDC Spa kan niet aansprakelijk
gesteld worden voor directe of indirecte schade, te wijten aan het niet in acht nemen van de aanwijzingen
in deze handleiding.
Beoogd gebruik
Deze machine voldoet aan de referentienormen EN60335-2-69 voor industriële toepassingen. Machine die geschikt
is voor het aanzuigen van stof met een toegelaten maximumconcentratie op de werkplek ≥ 0.1 [mg/m³] en houtstof
(Klasse M - Medium HAZARD.
“M” versies
Het is niet toegestaan om stof met een waarde van Kst > 200 (bar-m/s) en/of ontstekingsenergie < 10 mJ op te zuigen.
Volg de lokale regelgeving die van kracht is.

21
Professionele pneumatische stofzuiger
NL
Raadpleeg alle veiligheidsvoorschriften die op de behandelde materialen van toepassing zijn.
ONDERDELEN VAN DE MACHINE
1 - Steunplank
2 - Steunframe
3 - Handgreep
4 - Stroomschakelaar
5 - Snelkoppeling pneumatisch gereedschap
6 - Haak hoofdeinde
7 - Aardingsklem
8 - Filter
9 - Stofzak
10 - Beluchtingssleufje
11 - Draaibare wielen met rem
12 - Ingang persluchttoevoer
DE MACHINE INSTALLEREN
De machine moet op een stevig en genivelleerd vlak worden geplaatst. Zorg ervoor dat in het werkgebied de metalen
klem van de stofzuiger op het aardingscircuit van de werkplek kan worden aangesloten.
Sluit de pneumatische slang aan op de stofzuiger (zie afbeelding 3), in het bijzonder:
- De snelkoppeling aan de pneumatische aansluiting aan de voorzijde van de stofzuiger
- De zuigslang aan de stofzuigeraansluiting
Verwijder de kop van de stofzuiger door middel van de twee metalen haken (zie afbeelding 4, 5). Plaats de stofzak in de
trommel door deze correct op de stofzuigeraansluiting te bevestigen (zie afbeelding 6). Plaats de kop van de stofzuiger
correct boven de trommel en bevestig deze met de bijbehorende metalen haken.
Aansluiting op het pneumatisch netwerk
Belangrijk: er mag alleen gelterde en gedroogde lucht worden gebruikt. Controleer of de toevoerkraan van de stofzui-
ger gesloten is. Sluit een leiding met een inwendige diameter van 10 mm op de toevoerkraan aan (zie afbeelding 7).
Stel de vermogensdruk af op 6,5 [bar]. Sluit het pneumatische gereedschap aan op de koppeling op de slang en de
aanzuigleiding op het stopcontact op het pneumatische gereedschap.
Waarschuwing: de stofzuiger heeft om goed te functioneren een persluchttoevoer nodig die 1500 l/min kan
leveren onder druk van 6 [bar]. Zorg ervoor dat het persluchtnetwerk de eenheid van stroom kan voorzien.
Aansluiting op het aardingscircuit
Sluit de bijbehorende metalen klem aan op een deel van de werkplek dat is aangesloten op het aardingscir-
cuit van de installatie (zie afbeelding 9).
Let op: het apparaat moet altijd met behulp van de metalen klem op het aardingscircuit van de installatie
zijn aangesloten; vooral tijdens het gebruik van de stofzuiger, tijdens het legen van de stofzak en het ver-
vangen ervan.
Voer na de aansluiiting een korte test uit van de werking van het gereedschap, volgens de meegeleverde instructies.
Voorafgaande controles
- Controleer of de stofzak in de container is gemonteerd en of het lter op de kop is gemonteerd;
- Controleer of de zuigslang goed is vastgezet en de beweging van het gereedschap niet belemmert;
- Controleer of er geen lekken zijn in het persluchttoevoersysteem.
GEBRUIK VAN DE MACHINE
De machine kan in de automatische of handmatige modus werken: selecteer de gekozen modus door de schakelaar te
draaien, of naar (automatisch) of naar (handmatig) (afbeelding 10).
Automatische werking (AUT)
Met automatische werking wordt bedoeld dat de stofzuiger gelijktijdig met het ontsteken van het aangesloten gereed-
schap in gebruik wordt genomen.
Nadat het gereedschap is uitgeschakeld wordt de stofzuiger automatisch uitgeschakeld.
Handmatige werking (MAN)
Met handmatige werking wordt bedoeld dat de machine continu draait.

22
Professionele pneumatische stofzuiger
NL
ONDERHOUD
Voor onderhoud door de gebruiker moet het apparaat worden gedemonteerd, gereinigd en gereviseerd,
voor zover redelijkerwijs van toepassing, zonder dat dit risico voor onderhoudspersoneel en anderen met
zich meebrengt. Raadpleeg de plaatselijke voorschriften met betrekking tot de voorwaarden voor gelterde
ventilatie van de afvoerlucht in de ruimte waarin het apparaat wordt gedemonteerd, bescherming van het
personeel en reiniging van het gebied waarin het onderhoud wordt uitgevoerd.
Reguliere besturingselementen
- Controleer de status van de zuigslangen van het stof;
- controleer regelmatig de stofzak: niet meer dan het aangegeven gewicht en volume! Als de verwijderde zak scheu-
ren heeft, waardoor het stof lekt, laat dan de lters controleren en laat ze eventueel door een Erkend Servicecentrum
vervangen;
- controleer regelmatig de status van het lter, zo nodig vervangen. Als het lter beschadigd, gescheurd is of een afwij-
king heeft breng dan de machine naar het Bevoegde Servicecentrum.
Niet stofzuigen zonder geïnstalleerd lterelement!
Zakken vervangen
Probeer om bij het uitvoeren van deze handelingen het stof niet op te heen!
Draag een geschikt stofmasker;
Polyester zak (code 130.1108/C):
- maak de kop van de houder door middel van de haken los (afb.4 en 5);
- verwijder de gebruikte zak (afb. 6);
- leg de nieuwe zak neer door de ens op de aanzuigopening aan te brengen, zoals afgebeeld (afb.6);
- plaats de kop op de stofemmer, zorg ervoor dat het in de juiste richting is gericht (afb.5)
- zet de kop met de twee metalen haken vast.
Gebruik voor vervanging uitsluiten zakken van JBDC. De reservezakken moeten op een droge plaats worden
opgeslagen!
Ga voor het afvoeren volgens de wettelijke regels te werk.
Filter vervangen
Probeer om bij het uitvoeren van deze handelingen het stof niet op te heen!
Draag een geschikt stofmasker.
maak de kop van de houder door middel van de haken los (afb.4-5);
- keer de kop om en laat het op de houder rusten (afb. 11);
- verwijder het gebruikte lter (afb. 11) en sluit het in een speciale zak voor het afvoeren;
- plaats het nieuwe lter (code 076.1613) in het frame en monteer het frame op de kop.
Gebruik uitsluitend reserveonderdelen van JBDC. Raadpleeg voor informatie over reserveonderdelen en
bevoegde Servicecentra de website.
JBDC Spa aanvaardt geen enkele aansprakelijkheid voor directe of indirecte schade als gevolg van het niet in acht
nemen van hetgeen in deze handleiding staat aangegeven.

23
Professionele pneumatische stofzuiger
NL
EVENTUELE GEBREKEN EN OPLOSSING
Gevolgen Oorzaak Oplossing
De stofzuiger start niet
Geen perslucht
Controleer de aansluiting op het
persluchtsysteem
Toevoervoerleiding defect of onges-
chikt
Neem contact op met een erkend
servicecentrum.
De zuigcapaciteit is onvoldoende
Stofzak vol Stofzak vervangen
Slang verstopt of defect Controleer de slang en toebehoren
Filterreinigingssysteem defect Luchtdruk controleren
Er komt stof uit de afvoer van de
turbine
Filter gescheurd
Contact opnemen met een erkend
servicecentrum
Als alle pneumatische gereedschp-
pen aangesloten zijn dan neemt het
vermogen af
Persluchttoevoer onvoldoende De luchtdoorlaten controleren
TECHNISCHE GEGEVENS STOFZUIGER
Markering
II 3 D c T 50°C
Persluchtverbruik [L/min]* 700
Maximale luchtstroom [m
3
/h]* 140
Maximale neergang [mbar]* 190
Doorsnede toevoerleiding [mm
2
] Øi≥ 10mm²
Toevoerdruk [bar] 6 - 8
Filteroppervlak [m
2
] 1
Opvangvolume [L] 30
Aan te sluiten instrumenten [n] 1
Geluidsdrukniveau [dB] 68
Beluchtingssleufje [mm] 1x50mm/1x44mm/1x34mm
Afmetingen [A x B x C] - [cm] 80 x 44 x 45
Afmetingen verpakking [A x B x C] - [cm] 100 x 77 x 57
Gewicht [kg] 20
Gewicht verpakking [kg] 30
In werking stellen Manual
* bedrijfsdruk 6 [bar]

24
Aspiratore professionale pneumatico
IT
CONTROLLO DEL CONTENUTO DELL’IMBALLO
L’imballo contiene:
- n° 1 aspiratore pneumatico
- n° 1 sacco raccolta polvere in materiale poliestere
Per lo smaltimento dei componenti formanti l’imballo, attenersi alle disposizioni in vigore nel luogo di messa
in servizio della macchina, tenendo nel dovuto conto le regole per la raccolta dierenziata qualora prevista.
AVVERTENZE GENERALI
Norme per la sicurezza e la prevenzione degli infortuni.
- La macchina deve essere utilizzata solo da persone addestrate ed incaricate del suo utilizzo, pertanto la macchina non
è destinata a essere usata da bambini o persone le cui capacità siche, sensoriali o mentali siano ridotte;
- l’operatore deve essere informato, istruito ed addestrato all’uso dell’apparecchio e alle sostanze per cui deve essere
usato, incluso il metodo sicuro di rimozione ed eliminazione del materiale raccolto;
è necessario fornire un adeguato ricambio d’aria nel locale se l’aria di scarico ritorna nel locale stesso. È necessario fare
riferimento alle regolamentazioni nazionali;
- l’ambiente deve avere una temperatura tra i 10° C e i 35°C con una percentuale di umidità tra 50% e 90%;
- il piano di appoggio della macchina non deve superare una pendenza massima di 10 gradi;
- non esporre la macchina alla pioggia e alle basse temperature;
- non sollevare e trasportare la macchina agganciandola all’impugnatura con un apparecchio di sollevamento.
Pericolo di esplosione o incendio
- Non devono essere aspirate polveri inammabili o esplosive;
- non devono essere aspirate polveri di levigatura di superci trattate con vernici che non hanno completato il ciclo di
catalizzazione;
- non aspirare scintille o trucioli caldi;
- in caso di fuoriuscita di polvere dall’aspiratore, scollegare immediatamente l’aspiratore dalla rete di alimentazione;
- non devono essere aspirati liquidi inammabili o esplosivi (ad es. benzina, diluenti, ecc.);
- non devono essere aspirati liquidi o sostanze aggressive (ad es. acidi, basi, solventi, ecc.).
Versione ATEX
La macchina è conforme alla direttiva ATEX 2014/34/EU ed alle norme armonizzate riportate nella dichiarazione di
conformità come apparecchio di categoria 3D. In prossimità della zona di utilizzo dell’apparecchio devono essere appli-
cate opportune indicazioni di possibile presenza di atmosfere esplosive (come indicato dalla direttiva ATEX 2014/34/
EU). L’apparecchio contiene al suo interno depositi di polvere ed atmosfere potenzialmente esplosive. in particolare
l’operatore deve evitare di introdurre nelle vicinanze o all’interno dell’apparecchio o nel secchio possibili sorgenti di
innesco come: amme, gas o superci calde, parti elettriche, cariche elettrostatiche, scintille meccaniche. L’etichetta, i
dati tecnici e la marcatura ATEX sono posti sul pannello posteriore.
Attenzione! leggere tutte le avvertenze per la sicurezza e le indicazioni. JBDC spa non assume alcuna res-
ponsabilità per danni diretti o indiretti derivanti dall’inosservanza di quanto indicato nel presente manuale.
Utilizzo conforme agli scopi
Questa macchina è conforme alle norme di riferimento EN60335-2-69 per applicazioni industriali. Macchina adatta per
polveri con una concentrazione massima consentita sul posto di lavoro≥ 0.1 [mg/m³] e alle polveri di legno (Classe M
- Medium HAZARD).
Versione “M”
Non è consentita l’aspirazione di polveri con valore Kst > 200 (bar*m/s) e/o energia di innesco< 10 mJ. Attenersi alle
disposizioni locali in vigore.
Fare riferimento ad ogni regolamento di sicurezza applicabile ai materiali trattati.

25
Aspiratore professionale pneumatico
IT
PARTI DELLA MACCHINA
1 - Ripiano di appoggio
2 - Telaio di supporto
3 - Maniglia
4 - Interruttore di accensione
5 - Attacco rapido utensile pneumatico
6 - Gancio testata
7 - Pinza messa a terra
8 - Filtro
9 - Sacchetto di raccolta polvere
10 - Raccordo di aspirazione
11 - Ruote pivotanti con freno
12 - Ingresso di alimentazione aria compressa
INSTALLAZIONE DELLA MACCHINA
La macchina deve essere posizionata su un piano solido e livellato. Assicurarsi che nell’area di lavoro sia possibile colle-
gare la pinza metallica dell’aspiratore al circuito di terra del luogo di lavoro.
Collegare all’aspiratore la manichetta pneumatica (vedi gura 3), in particolare:
- L’innesto rapido alla presa pneumatica presente sul lato frontale dell’aspiratore
- La manichetta di aspirazione alla presa dell’aspiratore
Rimuovere la testata dell’aspiratore agendo sui due ganci metallici (vedi gura 4, 5). Posizionare all’interno del fusto il
sacco polvere ssandolo correttamente al raccordo di aspirazione (vedi gura 6). Posizionare la testata dell’aspiratore
sopra il fusto nel modo corretto e ssarla con gli appositi ganci metallici.
Collegamento alla rete pneumatica
Importante: deve essere usata esclusivamente aria ltrata ed essiccata.
Vericare che il rubinetto di alimentazione dell’aspiratore si chiuso. Collegare al rubinetto di alimentazione un tubo di
diametro interno 10mm (vedi gura 7). Regolare la pressione di alimentazione a 6.5bar. Collegare l’utensile pneumatico
all’innesto presente sulla manichetta ed il tubo di aspirazione alla presa presente sull’utensile pneumatico.
Avvertenza l’aspiratore per funzionare correttamente richiede una alimentazione di aria compressa che
possa fornire 1500l/min alla pressione di 6bar. Assicurarsi che la rete di aria compressa sia in grado di ali-
mentare l’unità.
Collegamento al circuito di terra
Collegare l’apposita pinza metallica ad una parte del luogo di lavoro collegata al circuito di terra dell’impianto
(vedi gura 9).
Attenzione: l’apparecchio deve essere sempre collegato al circuito di terra dell’impianto tramite la pinza
metallica, in particolare durante l’utilizzo dell’aspiratore, durante le operazioni di svuotamento del sacco
polvere e cambiamento dello stesso.
Dopo aver eettuato i collegamenti eettuare una prima breve prova di funzionamento degli utensili seguendo le istru-
zioni a corredo degli stessi.
Controlli preliminari
- vericare che nel contenitore sia montato il sacco raccolta polvere e che il ltro sia montato sulla testata;
- vericare che la manichetta di aspirazione sia adeguatamente ssata e non ostacoli la manovra degli utensili;
- vericare che nell’impianto di alimentazione di aria compressa non vi siano perdite.
USO DELLA MACCHINA
La macchina può funzionare in modalità automatico o manuale: selezionare la modalità prescelta ruotando l’interruttore
o verso (automatico) o verso (manuale) (gura 10).
Funzionamento in automatico (AUT)
Per funzionamento in automatico si intende che, con l’accensione dell’utensile collegato, avvenga la contemporanea
messa in funzione dell’aspiratore. Dopo aver spento l’utensile, l’aspiratore si spegne automaticamente.
Funzionamento in manuale (MAN)
Per funzionamento in manuale si intende che la macchina funziona in modo continuo.

26
Aspiratore professionale pneumatico
IT
MANUTENZIONE
Per la manutenzione da parte dell’utilizzatore, l’apparecchio deve essere smontato, pulito e revisionato, per
quanto ragionevolmente applicabile, senza causare rischi al personale di manutenzione e agli altri. Fare
riferimento alle normative locali in merito alle condizioni di ventilazione ltrata dell’aria di scarico nel locale
in cui l’apparecchio viene smontato, protezione del personale e pulizia dell’area in cui viene eettuata la
manutenzione.
Controlli ordinari
- Controllare lo stato delle manichette di aspirazione delle polveri;
- vericare periodicamente il sacco raccolta polvere: non superare i limiti di peso e volume indicati! Qualora il sacco
rimosso presentasse lacerazioni tali da provocare la fuoriuscita delle polveri, far controllare ed eventualmente sostituire
i ltri da un Centro di Assistenza Autorizzato;
- vericare periodicamente lo stato del ltro, se necessario provvedere alla loro sostituzione. Qualora il ltro risulti dan-
neggiato, lacerato o presenti qualsiasi anomalia, portare la macchina presso il Centro Assistenza Autorizzato.
Non aspirare senza elemento ltrante installato!
Sostituzione Sacchetti
Nello svolgere le seguenti operazioni cercare di non sollevare le polveri!
Indossare una mascherina antipolvere idonea ;
Sacco in poliestere (cod. 130.1108/C):
- sganciare la testata dal contenitore agendo sui ganci (g.4 e 5);
- rimuovere il sacco usato (g. 6);
- adagiare il nuovo sacco inserendo la angia sul raccordo di aspirazione come illustrato (g.6);
- posizionare la testata sul secchio polvere assicurandosi che sia rivolta nella direzione corretta (g.5)
- ssare la testata con i due ganci metallici.
Utilizzare come ricambio esclusivamente sacchi JBDC.
I sacchi di ricambio vanno conservati in luogo asciutto!
Per lo smaltimento procedere secondo le norme di legge.
Sostituzione Filtro
Nello svolgere le seguenti operazioni cercare di non sollevare le polveri!
Indossare una mascherina antipolvere idonea.
- sganciare la testata dal contenitore agendo sui ganci (g. 4-5);
- capovolgere la testata appoggiandola sul contenitore (g. 11);
- rimuovere il ltro usato (g. 11) e richiuderlo in un apposito sacchetto per lo smaltimento;
- collocare il nuovo ltro (cod. 076.1613) nel telaio e rimontare il telaio sulla testata.
Utilizzare solo esclusivamente ricambi JBDC.
Per informazioni su codici ricambi e Centri Assistenza autorizzati consultare il sito internet.
La JBDC Spa non assume alcuna responsabilità per danni diretti o indiretti derivanti dall’inosservanza di quanto indicato
nel presente manuale.

27
Aspiratore professionale pneumatico
IT
EVENTUALI ANOMALIE E LORO ELIMINAZIONE
Eetti Cause Rimedi
L’aspiratore non si avvia
Mancanza aria compressa
Vericare collegamento all’impianto
dell’aria compressa
Tubo di alimentazione difettoso o non
idoneo
Rivolgersi ad un Centro Assistenza
autorizzato
La capacità di aspirazione è insu-
ciente
Sacco troppo pieno Vericare il sacco ltrante
Manichetta essibile otturata o difet-
tosa
Controllare la manichetta essibile e
gli accessori
Filtri intasati Vericare i ltri
Fuoriescono polveri dall’uscita di
scarico
Filtro a cartuccia lacerato
Rivolgersi ad un Centro Assistenza
autorizzato
Perdita di potenza con l’utensile
pneumatico collegato
Insuciente alimentazione d’aria
compressa
Vericare i passaggi d’aria
DATI TECNICI ASPIRATORE
Marcatura
II 3 D c T 50°C
Consumo Aria Compressa [L/min]* 700
Portata d’aria massima [m
3
/h]* 140
Depressione massima [mbar]* 190
Sezione Tubo di alimentazione [mm
2
] Øi≥ 10mm²
Pressione di alimentazione [bar] 6 - 8
Supercie ltrante [m
2
] 1
Capacità contenitore [L] 30
Utensili collegabili [n] 1
Livello di pressione acustica [dB] 68
Raccordo di Aspirazione [mm] 1x50mm/1x44mm/1x34mm
Dimensioni [A x B x C] - [cm] 80 x 44 x 45
Dimensioni Imballo [A x B x C] - [cm] 100 x 77 x 57
Peso [kg] 20
Peso Imballo [kg] 30
Avviamento Manuel
*pressione operativa 6 [bar]

28
Профессиональный пневматический пылесос
RU
ПРОВЕРКА СОДЕРЖИМОГО УПАКОВКИ
В упаковке содержится следующее:
- пневматический аспиратор №1
- n ° 1 мешок для сбора пыли из полиэстера
Утилизация упаковочных материалов, включая возможную сдачу для вторичной переработки, должна
производиться в соответствии с действующими местными правилами.
ПРЕДУПРЕЖДЕНИЯ
Инструкции по технике безопасности и указания по предотвращению несчастных случаев.
- К эксллуатации данного устройства должны допускаться только лица, прошедшие соответствующее обучение;
устройство не предназначено для эксплуатации детьми и людьми с отклонениями в психике.
- Перед работой пользователи должны пройти инструктаж и обучение методам работы с данным устройством,
а также получить информацию о характере загрязняющего вещества, для удаления которого оно используется,
включая сведения о надлежащих способах безопасного удаления и утилизации собранных веществ.
- Если отработанный воздух остается в помещении, необходимо обеспечить, чтобы помещение хорошо
проветривалось. Уровень воздухообмена должен соответствовать принятым в стране нормативам.
- Температура в зоне выполнения работ должна быть в пределах от 10 °C до 35 °C, влажность - от 50 до 90%.
- Уклон поверхности, на которой установлено устройство, не должен превышать 10 градусов.
- Не следует подвергать устройство воздействию осадков и низких температур.
- При использовании какого-либо подъемного приспособления не следует производить подъем и транспортировку
устройства за ручку.
Угроза взрыва или пожара
- В случае если пыль состоит из легковоспламеняющихся или взрывоопасных веществ (магний, алюминий и т.п.),
удалять ее пылесосом не следует.
- Не следует чистить пылесосом содержащие шлифовальную пыль поверхности, обработанные красящими
материалами, катализаторный цикл которых не был завершен.
- Не следует удалять пылесосом искры или раскаленные стружки.
- При выбрасывании пыли из воздуховыпускного отверстия следует незамедлительно отключить пылесос от сети
электропитания.
- Не следует удалять пылесосом легковоспламеняющиеся или взрывоопасные жидкости (бензин, разбавители и
т.п.).
- Не следует удалять пылесосом агрессивные жидкости или вещества (кислоты, щелочи, растворители и т.п.).
Версия ATEX
Данная установка соответствует требованиям директивы ATEX 2014/34/EU и гармонизирующим нормам,
указанным в декларации соответствия как оборудование категории 3 D.
В непосредственной близости к участку применения установки следует установить соответствующие
предупредительные символы и таблички, уведомляющие о возможном присутствии взрывоопасных атмосфер (в
соответствии с указаниями директивы ATEX 2014/34/EU).
Установка содержит внутри скопления пыли и потенциально взрывоопасных атмосфер. В частности, работающий
с установкой персонал должен избегать присутствия на участке поблизости от установки и в самой установке
источников возгорания, как то: открытого пламени, газов, горячих поверхностей, электрических частей,
электростатических разрядов, механической искры.
Табличка, технические данные и маркировка ATEX нанесены на заднюю стенку установки.
Внимание! Внимательно ознакомиться с правилами техники безопасности и инструкциями по
эксплуатации. JBDC Spa не несет никакой ответственности за возможный прямой или косвенный
ущерб, причиненный в результате несоблюдения указаний и инструкций данного руководства.
Применение по назначению
Данное оборудование соответствует базовым нормам EN60335-2-69 для промышленного назначения. Данная
установка предназначена для аспирации пыли при максимально разрешенной концентрации на рабочем месте
≥ 0,1 [мг/м³] и древесной пыли (Класс M - Средний уровень опасности).

29
Профессиональный пневматический пылесос
RU
Версии “M”
Всасывание пыли со значением Kst> 200 (бар*м/с) и/или энергией воспламенения < 10 мДж не разрешается.
Соблюдайте местные предписания.
См. Все правила техники безопасности, применимые к обрабатываемым материалам.
ЧАСТИ МАШИНЫ
1 - самолет поддержки
2 - корпус пылесоса
3 - Ручка
4 - клапан запуска
5 - муфта сцепления пневматического инструмента
6 - крюк
7 - зажим для заземления
8 - фильтр
9 - мешок для пыли
10 - Всасывающий патрубок
11 - поворотные колеса
12 - патрубок подвода сжатого воздуха
МОНТАЖ МАШИНЫ
Машина должна быть установлена на твердой и ровной поверхности. Убедиться, что в рабочей зоне возможно
подсоединить металлический зажим пылесоса к контуру заземления на рабочем месте.
Подсоединить к пылесосу приложенный пневматический шланг (смотри рисунок 3), в частности:
- быстроразъёмное соединение к пневматическому сцеплению с правой стороны передней части пылесоса
- всасывающий шланг к патрубку пылесоса
удалить головную часть пылесоса, воздействуя на две металлические защелки (смотри рисунок 4-5).
Установить во внутренней части бидона пылесборный мешок, закрепив его должным образом на фланце патрубка
(смотри рисунок 6).
Установить должным образом головную часть пылесоса на бидоне и закрепить с помощью соответствующих
металлических защелок.
Подсоединение к пневматической сети
Важно: Должен использоваться исключительно сухой и отфильтрованный воздух.
Проверить, что кран питания пылесоса закрыт.
Подсоединить к питающему крану трубу с внутренним диаметром 10 мм (смотри рисунок 7).
Отрегулировать давление подачи на 6.5 Бар.
Подсоединить пневматический инструмент к быстроразъемному соединению на шланге и всасывающую трубу к
разъему, имеющемуся на пневматическом инструменте.
Предупреждение: для правильной работы пылесоса требуется подача сжатого воздуха мощностью
1500 л / мин при давлении 6 бар. Убедитесь, что сеть сжатого воздуха может питать агрегат.
Подсоединение к контуру заземления
Подсоединить соответствующий металлический зажим к одной из неподвижных частей, соединенных
с контуром заземления на рабочем месте (смотри рисунок 9).
ВНИМАНИЕ: Оборудование должно быть ПОСТОЯННО подсоединено к контуру заземления линии с
помощью металлического зажима, в частности, во время эксплуатации пылесоса, во время операций
по опорожнению пылесборного мешка и при его замене.
Убедитесь в том, что характер функционирования пневмоинструмента соответствует сведениям, приведенным в
инструкции по его эксплуатации.
Предварительная проверка
- Убедитесь в том, что пылесборный мешок установлен в контейнер, а фильтры установлены в вакуумную головку.
- Убедитесь в том, что вакуумный шланг должным образом зафиксирован и не затрудняет перемещение
устройства.
- Проверьте герметичность системы подачи сжатого воздуха.

30
Профессиональный пневматический пылесос
RU
ИСПОЛЬЗОВАНИЕ УСТРОЙСТВА
Устройство может работать в ручном и в автоматическом режиме: чтобы выбрать режим, поверните переключатель
вправо (автоматический режим) или влево (ручной режим) (рис. 10).
Автоматический режим (А) работы устройства
В режиме автоматической работы запуск пылесоса осуществляется при включении электро- или
пневмоинструмента. после выключения инструмента пылесос автоматически отключается.
Ручной режим (М) работы устройства
Ручной режим работы означает, что пылесос работает постоянно.
ОБСЛУЖИВАНИЕ
В рамках обслуживания устройства пользователем производится разборка, чистка и обслуживание
устройства; при этом следует соблюдать разумные
предосторожности, чтобы не подвергать опасности обслуживающий персонал и других лиц. К
необходимым предосторожностям относится очистка устройства от загрязнения перед разборкой,
обеспечение помещения, в котором производится разборка, системой вытяжной вентиляции,
снабженной фильтрами (в соответствии с действующими правилами), чистка зоны обслуживания и
соответствующие средства защиты персонала.
Обычная проверка
- Проверьте состояние вакуумного шланга.
- Проверьте пылесборный мешок: не превышайте рекомендованный вес и объем. В случае разрыва или прокола
пылесборного мешка проверьте состояние фильтрующего элемента и обратитесь в авторизованный сервисный
центр для замены.
- Проверьте состояние фильтрующих элементов. в случае их разрыва или прокола обратитесь в авторизованный
центр технического обслуживания для замены.
Не следует использовать устройство с неполным набором фильтрующих элементов.
Замена пылесборного мешка
Не встряхивайте пылесборный мешок во время его замены!
Используйте пылезащитный респиратор.
Сумка из полиэстера (код 130.1108 / C):
- высвободите головку из контейнера, взявшись за крючки (рис. 4 и 5);
- снимите использованный мешок (рис. 6);
- уложите новый мешок, вставив фланец на всасывающий патрубок, как показано на рисунке (рис. 6);
- поместите головку на контейнер для пыли, убедившись, что она обращена в правильном направлении (рис. 5)
- закрепите голову двумя металлическими крючками.
В качестве запасных частей используйте только сумки JBDC. Сменные пакеты необходимо хранить в
сухом месте! Для утилизации действуйте в соответствии с законом.
Замена фильтра
Не встряхивайте пылесборный мешок во время его замены!
Используйте защитную маску.
Освободив боковые защелки, отсоедините вакуумную головку (рис. 4-5).
- Переверните головку (рис. 11).
- Извлеките фильтрующие элементы (рис. 11) и поместите их в запечатанный пакет для отходов.
- Установите новые фильтрующие (код 076.1613) элементы в раму фильтра и установите раму в вакуумную
головку.

31
Профессиональный пневматический пылесос
RU
Используйте только фирменные сменные элементы JBDC. Сведения о кодах запасных частей и
авторизованных центрах технического обслуживания можно найти на сайте www.JBDC. com.
Компания JBDC S.p.a. не несет ответственности за прямой или косвенный ущерб, возникший в результате
несоблюдения требований, содержащихся в данной инструкции.
ПОИСК И УСТРАНЕНИЕ НЕИСПРАВНОСТЕЙ
ЯВЛЕНИЯ ПРИЧИНЫ СПОСОБЫ УСТРАНЕНИЯ
Двигатель не запускается
Недостаток сжатого воздуха
Проверьте подключение к системе
сжатого воздуха
Неисправный или неподходящий
шланг подачи
Обратитесь в авторизованный
центр технического обслуживания
Производительность насоса
недостаточна
Мешок заполнен Проверьте мешочный фильтр
Засорение одного из шлангов или
принадлежностей
Проверьте состояние гибкого
шланга и принадлежностей
Засорение фильтров Проверьте фильтрующие элементы
Появление пыли из выпускного
отверстия
Разрыв фильтрующего элемента
Обратитесь в авторизованный
центр технического обслуживания
Недостаточная мощность для
пневмоинструмента
Недостаточная подача сжатого
воздуха
Проверьте воздушный канал
ТЕХНИЧЕСКИЕ ХАРАКТЕРИСТИКИ ВСАСЫВАЮЩЕГО БЛОКА
Маркировка
II 3 D c T 50°C
Расход сжатого воздуха [л/мин] * 700
Максимальный расход воздуха [м
3
/ч] * 140
Максимальный вакуум [мбар] * 190
Сечение подающей трубы [мм
2
] Øi≥ 10mm²
Давление подачи [бар] 6 - 8
Площадь фильтра [м
2
] 1
Емкость контейнера [л] 30
Подключаемые инструменты [n] 1
Уровень звукового давления [дБ] 68
Всасывающий патрубок [мм] 1x50mm/1x44mm/1x34mm
Размеры [A x B x C] - [см] 80 x 44 x 45
Размеры упаковки [A x B x C] - [см] 100 x 77 x 57
Вес [кг] 20
Вес упаковки [кг] 30
Sапуск машины Manuel
* рабочее давление 6 [бар]

32
PL
Profesjonalny odkurzacz pneumatyczny
SPRAWDZENIE ZAWARTOŚCI OPAKOWANIA
Opakowanie zawiera:
- 1 odkurzacz pneumatyczny
- 1 worek na pył z poliestru
W kwestii usuwania elementów opakowaniowych należy postępować zgodnie z normami obowiązującymi w
kraju używania urządzenia, mając na uwadze konieczność stosowania segregacji odpadów.
OSTRZEŻENIA OGÓLNE
Normy w zakresie bezpieczeństwa i zapobiegania wypadkom.
- Maszyna może być obsługiwana wyłącznie przez odpowiednio przeszkolonych pracowników, ponadto nie może być
obsługiwana przez osoby małoletnie i osoby o ograniczonych zdolnościach zycznych, sensorycznych lub psychicznych.
- operator musi być poinformowany, pouczony i przeszkolony w zakresie użytkowania urządzenia i substancji, do których
jest przeznaczony, jak również w zakresie bezpiecznego usuwania i likwidowania zebranego materiału;
- w miejscu używania maszyny zapewnić odpowiednią wymianę powietrza, jeśli powietrze z odkurzacza powraca do
pomieszczenia. Odnieść się do odpowiednich lokalnych regulacji prawnych.
- temperatura otoczenia musi mieścić się w zakresie od 10°C do 35°C, a wilgotność względna od 50% do 90%
- nachylenie podłoża, na którym jest ustawiony odkurzacz przemysłowy, nie może przekraczać 10 stopni;
nie wystawiać urządzenia na deszcz i chronić je przed działaniem niskiej temperatury;
- nie podnosić i transportować urządzenia zaczepiając podnośniki do odpowiednich uchwytów.
Niebezpieczeństwo eksplozji lub wybuchu pożaru.
- Nie mogą być zasysane pyły łatwopalne lub wybuchowe;
- nie mogą być zasysane pyły pochodzące ze szlifowania powierzchni pomalowanych farbami, które nie zakończyły cyklu
katalizowania;
- nie zasysać iskier lub gorących wiórów;
- w przypadku wydostania się pyłu z odkurzacza, należy natychmiast odłączyć urządzenie od sieci zasilania;
- nie mogą być zasysane ciecze łatwopalne lub wybuchowe (np. benzyna, rozcieńczalniki, itp.);
- nie mogą być zasysane ciecze lub substancje agresywne (np. kwasy, zasady, rozpuszczalniki, itp.).
Wersja ATEX
Urządzenie jest zgodne z dyrektywą ATEX 2014/34/UE i zharmonizowanymi normami wskazanymi w deklaracji zgodności
jako urządzenie kategorii 3 D. W pobliżu obszaru użytkowania urządzenia należy umieścić stosowne znaki wskazujące
możliwość występowania atmosfer wybuchowych (tak jak wskazano w dyrektywie ATEX 2014/34/UE). Wewnątrz
urządzenia gromadzą się pyły i atmosfery potencjalnie wybuchowe. Operator musi unikać zbliżania lub wprowadzania
do wnętrza urządzenia / pojemnika źródeł zapłonu, np. płomienia, gazu, gorących powierzchni, części elektrycznych,
ładunków elektrostatycznych, iskier mechanicznych. Operator ma obowiązek opróżniać pojemnik i upewnić się, że podc-
zas wykonywania tej czynności wcześniej odłączył, a następnie podłączył przewód obwodu uziemienia do pojemnika,
aby zapobiec gromadzeniu się na nim ładunków elektrostatycznych. Tabliczka, dane techniczne i oznakowanie ATEX
znajdują się na tylnej ściance urządzenia.
Uwaga! Należy zapoznać się z wszystkimi wskazówkami i ostrzeżeniami dotyczącymi bezpieczeństwa. JBDC
Spa nie ponosi odpowiedzialności za szkody pośrednie i bezpośrednie wynikające z braku stosowania się do
wskazań podanych w poniższej instrukcji obsługi.
Użytkowanie zgodne z przeznaczeniem
Opisane urządzenie przeznaczone do użytku przemysłowego spełnia wymogi zastosowanych norm EN60335-1 i EN60335-
2-69. Urządzenie nadaje się do wychwytywania pyłów z maksymalnym, dopuszczalnym stężeniem w miejscu pracy ≥ 0,1
[mg/m³] i pyłów drewnianych (klasa M – Medium HAZARD).
Wersje „M”
Zabrania się odsysania pyłu o wartości Kst> 200 (bar * m / s) i/lub energii zapłonu <10 mJ. Prosimy przestrzegać prze-
pisów obowiązujących w danym kraju.
Stosować się do przepisów BHP dotyczących zasysanych materiałów.

33
PL
Profesjonalny odkurzacz pneumatyczny
CZĘŚCI MASZYNY
1 – Pokrywa
2 - Obudowa
3 - Uchwyt
4 - Wyłącznik zasilania
5 - Szybkozłączka narzędzia pneumatycznego
6 - Uchwyt głowicy
7 - Zacisk uziemienia
8 - Filtr
9 - Worek na pył
10 – Króciec ssawny
11 - Kółka obrotowe z hamulcem
12 - Wlot podawania sprężonego powietrza
MONTAŻ MASZYNY
Ustawić maszynę na wytrzymałej i płaskiej posadzce. Upewnić się, że w obszarze roboczym można podłączyć metalowe
szczypce odkurzacza do obwodu uziemienia obecnego w miejscu pracy.
Podłączyć do odkurzacza wąż ssawny (patrz rysunek 3):
- szybkozłączka do wtyczki pneumatycznej znajdującej się na przodzie odkurzacza
- wąż ssawny do wtyczki odkurzacza
Wyjąć głowicę odkurzacza, używając dwóch metalowych haczyków (patrz rysunek 4.5). Włożyć worek na kurz do bębna,
mocując go prawidłowo do złącza ssawnego (patrz rysunek 6). Umieścić głowicę odkurzacza nad bębnem w odpowiedni
sposób i zabezpieczyć ją metalowymi haczykami.
Podłączenie do sieci zasilania pneumatycznego
Ważne: stosować tylko osuszone i przeltrowane powietrze. Sprawdzić czy kurek na odkurzaczu jest zamknięty. Podłączyć
kurek do rury o wewnętrznej średnicy 10 mm (patrz rysunek 7). Ustawić ciśnienie podawania na 6.5 bar. Podłączyć
narzędzie pneumatyczne do złączki znajdującej się na wężu oraz włożyć rurę ssawną do gniazda narzędzia pneumaty-
cznego.
Odkurzacz do prawidłowego funkcjonowania wymaga podawania sprężonego powietrza w ilości 1500l/min
pod ciśnieniem 6 bar. Upewnić się, że instalacja sprężonego powietrza jest w stanie spełnić to wymaganie.
Podłączenie do uziemienia
Podłączyć specjalny zacisk metalowy do części stanowiska pracy podłączonej do obwodu uziemiającego
(patrz rysunek 9).
Uwaga: urządzenie musi być zawsze podłączone do uziemienia za pomocą metalowego zacisku,
zwłaszcza w trakcie używania odkurzacza, podczas opróżniania worka na kurz czy wymiany worka.
Po podłączeniu wykonać krótką próbę funkcjonowania narzędzi, stosując się do załączonych do nich instrukcji.
Kontrole wstępne
- sprawdzić czy w zbiorniku znajduje się worek na pył oraz czy ltr jest zamontowany na głowicy;
- sprawdzić czy wąż ssawny jest właściwie zamocowany i nie ma przeszkód uniemożliwiających prawidłowe manewro-
wanie urządzeniem.
- sprawdzić czy w instalacji dostarczającej sprężone powietrze nie ma wycieków.
UŻYWANIE MASZYNY
Maszyna może funkcjonować zarówno w trybie automatycznym jak i ręcznym: wybrać odpowiedni tryb obracając
wyłącznik albo w kierunku (automatycznym) albo w kierunku (ręcznym) (rysunek 10).
Praca w trybie automatycznym (AUT)
Pod pojęciem pracy w trybie automatycznym rozumie się sytuację, gdy wraz z włączeniem podłączonego narzędzia
włącza się również odkurzacz.
Po wyłączeniu narzędzia, automatycznie wyłącza się również odkurzacz.
Praca w trybie ręcznym (MAN)
Za funkcjonowanie w trybie ręcznym uważa się pracę maszyny w sposób ciągły.

34
PL
Profesjonalny odkurzacz pneumatyczny
KONSERWACJA
W celu konserwacji przez użytkownika, urządzenie musi zostać rozmontowane, oczyszczone i poddane
przeglądowi, o ile jest to uzasadnione i nie powoduje zagrożenia dla personelu konserwującego i innych
osób. Zapoznać się z lokalnymi przepisami dotyczącymi warunków ltrowanej wentylacji powietrza wwiew-
nego do pomieszczenia, w którym demontowane jest urządzenie, warunków ochrony personelu i czyszcze-
nia obszaru, w którym przeprowadzana jest konserwacja.
Kontrole codzienne
Sprawdzić stan węży ssawnych pyłu;
Okresowo sprawdzać stan worka na pył: nie przekraczać poziomu napełnienia worka i jego ciężaru! Jeśli wyjęty worek
jest rozerwany, co mogło skutkować wydostawaniem się pyłu, należy oddać urządzenie do autoryzowanego centrum
serwisowego celem sprawdzenia i ewentualnej wymiany ltrów.
- okresowo sprawdzać stan ltra a w razie konieczności pamiętać o jego wymianie. Jeśli ltr będzie nosił ślady uszkodze-
nia, rozerwania lub innych nieprawidłowości, oddać urządzenie do autoryzowanego centrum serwisowego.
Nie używać odkurzacza bez elementu ltrującego!
Wymiana worków
Podczas wykonywania czynności uważać, aby nie podnosić pyłu!
Założyć odpowiednią maskę przeciwpyłową.
Worek poliestrowy (kod. 130.1108/C):
- odczepić głowicę od zbiornika, posługując się odpowiednimi zaczepami (rys. 4 i 5);
- wyjąć zużyty worek (rys. 6);
- włożyć nowy worek, umieszczając kołnierz na króćcu ssawnym jak widać na rysunku (rys.6);
- umieścić głowicę na worku, upewniając się, że jest ustawiona w odpowiednim kierunku (rys.5)
- zamocować głowicę za pomocą dwóch metalowych haków.
Stosować wyłącznie oryginalne worki JBDC. Przechowywać worki na wymianę w suchym pomieszczeniu!
Usuwać zużyte worki zgodnie z obowiązującymi normami prawnymi.
Wymiana ltra
Podczas wykonywania czynności uważać, aby nie podnosić pyłu!
Założyć odpowiednią maskę przeciwpyłową.
- odczepić głowicę od zbiornika, posługując się odpowiednimi zaczepami (rys. 4-5);
- obrócić głowicę opierając ją o zbiornik (rys. 11);
- wyjąć zużyty ltr (rys. 11) i umieścić go w odpowiednim worku;
- założyć nowy ltr (kod. 076.1613) na obudowie i zamontować obudowę na głowicy.
Stosować tylko oryginalne części zamienne JBDC. Dodatkowe informacje odnośnie kodów części zamien-
nych i autoryzowanych punktów serwisowych znajdą państwo na stronie internetowej.
Firma JBDC Spa nie ponosi odpowiedzialności za szkody pośrednie i bezpośrednie wynikające z braku stosowania się do
wskazań podanych w poniższej instrukcji obsługi.

35
PL
Profesjonalny odkurzacz pneumatyczny
EWENTUALNE NIEPRAWIDŁOWOŚCI I ICH USUWANIE
Skutki Przyczyny Środki zaradcze
Odkurzacz nie uruchamia się
Brak sprężonego powietrza
Sprawdzić przyłącze do instalacji
sprężonego powietrza
Uszkodzona lub niewłaściwa rura
doprowadzająca
Skontaktować się z autoryzowanym
centrum serwisowym
Niedostateczna moc zasysania
Przepełniony worek Sprawdzić worek ltracyjny
Uszkodzony lub zatkany wąż elasty-
czny
Sprawdzić elastyczny wąż i akcesoria
Zatkane ltry Sprawdzić ltry
Pył wydostaje się z otworu wylo-
towego
Kurz wydostaje się z otworu wylo-
towego
Dziurawy ltr z wkładem
Utrata mocy z podłączonym
narzędziem pneumatycznym
Nieprawidłowe podawanie
sprężonego powietrza
Sprawdzić przeloty powietrza
DANE TECHNICZNE ODKURZACZA
Oznaczenie
II 3 D c T 50°C
Zużycie sprężonego powietrza [L/min]* 700
Maksymalne natężenie przepływu powietrza [m
3
/h]* 140
Maksymalne podciśnienie [mbar]* 190
Przekrój rury podającej [mm
2
] Øi≥ 10mm²
Ciśnienie zasilania [bar] 6 - 8
Powierzchnia ltrująca [m
2
] 1
Pojemność zbiornika [L] 30
Narzędzia do podłączenia [n] 1
Poziom ciśnienia akustycznego [dB] 68
Złącze ssące [mm] 1x50mm/1x44mm/1x34mm
Wymiary [A x B x C] - [cm] 80 x 44 x 45
Wymiary opakowania [A x B x C] - [cm] 100 x 77 x 57
Masa [kg] 20
Masa opakowania [kg] 30
Uruchamianie Manuel
* Ciśnienie robocze 6 [bar]

36
专业气动吸尘器
CN
检查包装的物品
包装包括:
- 1个气动吸尘器
- 1个聚酯集尘袋
对于处置构成包装的组件,请遵守机器调试时有效的规定,并适当考虑单独收集废物的规则(如果适用)。
般警告
安全和事故预防规则
- 机器只能由经过培训并负责使用的人使用,因此,该机器不适用于儿童或身体,感官或心理能力下降的人使用;
必须就设备及其必须使用的物质的使用情况向操作人员进行告知,指导和培训,包括安全的方法来清除和处置所收集的
材料;
- 如果排气返回到房间本身,则必须在房间内提供足够的空气交换。有必要参考国家法规;
- 环境温度必须在10°C至35°C之间,湿度百分比在50%至90%之间;
-机器支撑表面的最大倾斜度不得超过10度;
-请勿将机器暴露在雨淋和低温下;
请勿通过吊具将其挂在手柄上,以提起和运输机器。
爆爆爆爆爆爆爆爆
-请勿吸入易燃或易爆粉尘
-不得从未完成固化周期的油漆处理过的砂纸表面上吸走灰尘
-不要吸取火花或热刨花;
-如果灰尘从吸尘器中漏出,请立即断开吸尘器与电源的连接;
-不得吸入易燃或易爆液体(例如汽油,稀释剂等);
-禁止吸入液体或腐蚀性物质(例如酸,碱,溶剂等)。
ATEX版本
机器符合ATEX 2014/34/EU指令以及合规声明内提及的关于3D类设备的标准。
在设备使用区域附近,必须添加适当的爆炸气体疑似存在说明(如ATEX 2014/34/EU指令)。
设备内部含有堆积粉末和潜在爆炸性的气体。尤其要说的是,操作员必须避免在设备附近或内部,或者在可能产生以下
情况的桶内:火焰、热气体或表面、电气部件、静电荷、机械火苗。
操作员需要清空桶,确保地线断开并重新连接桶,从而避免上面蓄积静电荷。
标签、技术数据和ATEX铭牌都在后端面板上。
注意!阅读一切关于安全和说明的警告。JBDC Spa不会为违反本手册的直接或间接损失负责。
符合规定用途的使用
本机器符合工业应用的EN60335-1和EN60335-2-69参考标准。该机器适合工作岗位最大允许浓度 ≥ 0.1 [mg/m³]的粉末
以及木屑(M-中等危险级别)。
“M”版本
不能抽吸数值Kst > 200 (bar*m/s)和/或触发能量< 10 mJ的粉尘。遵守现行当地规定
参考任何处理材料适用的安全规范;
机器的部件
1 - 支撑隔板
2 - 支撑框架
3 - 手柄
4 - 开关
5 - 气动刀具的快速接口
6 - 头部钩子
7 - 接地夹钳
8 - 过滤器
9 - 集尘袋
10- 抽吸接头
11 - 含制动的枢转轮
12 - 压缩气源的入口

37
专业气动吸尘器
CN
机器的安装
机器必须置于坚固水平的平面上确保工作区域内可以将吸尘器的金属夹钳连接到工作地点的接地回路上。
将吸尘器连接气动套管(见图 3),尤其是:
- 将快速插头连接到吸尘器前端的启动插销上
- 将抽吸套管连接到吸尘器插销上
通过两个金属挂钩来移除吸尘器头部(见图4、5)。将集尘袋安置在筒内,将其正确固定在抽吸接头上(见图6)。将
吸尘器头部正确安置在桶上面,利用适当的金属挂钩将其固定。
气动网络的连接
须知:只能使用已过滤的干燥气体。确认吸尘器气源旋塞已经关闭。将供气旋塞联通内径10mm的管子(见图7)。将供
气压力调节至6.5 [bar]。将气动刀具联通套管上的接头,将抽吸管连接到气动刀具上的插销。
警告 :为了正确运行,吸尘器需要压力为6 [bar],气流为1500l/min的压缩气源。确保压缩气网络能够给
单元供气。
接地回路连接
将专门的金属夹钳连接到工作地点内联通设备地线回路的部分 (参见图9)
注意:设备必须一直通过金属夹钳联通设备的地线回路。
尤其要说的是,在使用吸尘器、情况集尘袋和更换集尘袋期间。
在执行了连接后,需要按照配套的说明,对刀具进行首次短暂的功能测试。
初步检查
- 确认容器内安装了集尘袋,而过滤器被安装在头上。
- 确认抽吸套管是否适当固定,且不阻碍刀具的操作;
- 确认压缩气设备内不存在损失。
机器的使用
机器可以自动或手动运行:通过将开关转向(自动)或转向(手动)来选择预选模式(图10)。
自动运行(AUT)
自动模式下的运行就是指在打开连接刀具时,会同时试运吸尘器。
在关闭刀具后,吸尘器会自动关闭。
手动运行 (MAN)
手动运行就是指机器在持续模式下运行。
维护
为了让用户进行维护,设备必须以合理适用的方式进行拆卸、清洁和校正,避免给维护人员和其他人员造
成风险。参考拆卸机器的房间内排气的已过滤通风条件、人员保护和维护区域清洁的相关规范。
日常检查
- 检查粉尘抽吸套管的状态;
- 定期检查粉尘收集袋:不得超过说明的重量和体积限制!一旦被移除的袋子出现了撕裂,造成了粉尘外溢,需要让获
授权的协助中心检查并替换过滤器;
- 定期检查过滤器的状态, 如果必要的话,就要进行替换。一旦过滤器破损,撕裂或者存在异常,需要将机器送往获授
权的协助中心。
严禁在未安装过滤元件时抽吸!

38
专业气动吸尘器
CN
袋子的替换
在开展以下操作时,避免扬起粉尘!
穿戴适当的防尘面具;
聚酯袋(编号130.1108/C):
- 通过挂钩,让头部和容器脱钩(图4和5);
- 移除废旧袋子(图6);
- 如图平放新袋子,将法兰插入抽吸接头(图6);
- 将头部置于粉尘桶内,确保朝向正确(图5)
- 用两个金属挂钩固定头部。
只能使用JBDC的袋子作为备件。备件袋子必须保存在干燥处!
为了处置,需要依据法规办事。
过滤器的替换
在开展以下操作时,避免扬起粉尘!
穿戴适当的防尘面具
- 通过挂钩,让头部和容器脱钩(图4-5);
- 倒转头部,将其靠在容器上(图11);
- 移除用过的过滤器(图11),将其关闭在适当袋子里,用于处置;
将新过滤器(编号076.1613) 放在框架内,并移除头部上的框架。
只能使用JBDC的备件。欲知关于备件编号和获授权协助中心的信息,需要查阅网站。
JBDC Spa不会为违反本手册的直接或间接损失负责。
任何异常现象及其消除
特效 原因 补救措施
提取器无法启动
压缩空气不足 检查与压缩空气系统的连接
供给软管不良或不合适 与授权服务中心联系
吸力不足
麻袋太饱 检查滤袋
软管堵塞或损坏 检查软管和附件
过滤器堵塞 检查过滤器
灰尘从排气口排出 滤筒撕裂 与授权服务中心联系
连接气动工具后断电 压缩空气供应不足 检查空气通道

39
专业气动吸尘器
CN
吸尘器技术数据
标识
II 3 D c T 50°C
吸尘器消耗量 [L/min]*
700
最大气流量 [m
3
/h]*
140
最大去压 [mbar]*
190
供气管截面 [mm
2
]
Øi≥ 10mm²
供源压力 [bar]
6 - 8
过滤表面 [m
2
]
1
容器容量 [L]
30
可连接刀具 [n]
1
声压级 [dB]
68
抽吸接头 [mm]
1x50mm/1x44mm/1x34mm
尺寸 [A x B x C] - [cm]
80 x 44 x 45
包装尺寸 [A x B x C] - [cm]
100 x 77 x 57
重量 [kg]
20
包装重量 [kg]
30
启动
Manual
* 最大压力 6 [bar]

40
Professional pneumatic vacuum cleaner
Veuillez lire toutes ces instructions avant de mettre en marche le produit.
Read all of these instructions before operating this product.
Alle diese Anweisungen lesen, bevor man das Produkt in Betrieb nimmt.
Leer todas estas instrucciones antes de accionar el presente producto.
Lees aandachtig alle instructies alvorens het apparaat in werking te stellen.
Перед эксплуатацией оборудования внимательно ознакомиться с данным
руководством.
Leggere tutte queste istruzioni prima di aziona to.
Przed uruchomieniem urządzenia należy zapoznać się z całą treścią poniższej
instrukcji.
在操作本产品之前阅读这些说明。
Indications importantes pour la sécurité de l’utilisateur.
Important safety information for the user.
Wichtige Hinweise zur Sicherheits des Nutzers.
Indicaciones importantes para la seguridad del usuario.
Belangrijk veiligheidsadvies voor de gebruiker.
Важные указания по технике безопасности для пользователя.
Indicazioni importanti per la sicurezza dell’utilizzatore.
Ważne wskazówki dotyczące bezpieczeństwa użytkownika.
用户安全的重要说明。
Utiliser un équipement de protection pour les voies respiratoires.
Wear a respiratory protection device!
Atemschutzausrüstung tragen!
¡Llevar puesto un dispositivo de protección para las vías respiratorias!
Draag een beschermingsmiddel voor de luchtwegen
Использовать устройство для защиты дыхательных путей!
Indossare una mascherina antipolvere idonea
Stosować ochronę dróg oddechowych!
穿戴合适的呼吸道保护装置。
ATTENTION! Danger de décharge électrostatique
Adopter les mesures nécessaires pour les composants sensibles aux décharges
électrostatiques.
CAUTION: Danger of electrostatic discharge
Take the necessary measures for components that are sensitive to electrostatic
discharge.
VORSICHT: Gefahr der elektrostatischen Entladung
Treen Sie die erforderlichen Maßnahmen für elektrostatisch gefährdete Bauele-
mente.
PRECAUCIÓN: Peligro de descarga electrostática
Tome las medidas necesarias para los componentes sensibles a las descargas
electrostáticas.
LET OP: Gevaar van elektrostatische ontlading
Neem de nodige maatregelen voor onderdelen die gevoelig zijn voor elektrosta-
tische ontlading.
ВНИМАНИЕ: Опасность электростатического разряда
Принять необходимые меры для компонентов, чувствительных к
электростатическому разряду.
ATTENZIONE: Pericolo di scariche elettrostatiche
Prendete le misure necessarie per i componenti che sono sensibili alle scariche
elettrostatiche.
UWAGA: Niebezpieczeństwo wyładowań elektrostatycznych
Podejmij niezbędne działania w przypadku komponentów wrażliwych na
wyładowania elektrostatyczne.
注意:静电放电的危险
对静电敏感的元件采取必要的措施。
- Ce matériel fait l’objet d’une collecte sélective selon la directive européenne 2012/19/UE. Ne pas jeter dans une poubelle domestique !
- This hardware is subject to waste collection according to the European directives 2002/96/UE. Do not throw away in a household bin!
- Für die Entsorgung Ihres Gerätes gelten besondere Bestimmungen (sondermüll) gemäß europäische Bestimmung 2012/19/EU. Es darf nicht mit dem Hausmüll ent-
sorgt werden.
- Este material requiere una recogida de basuras selectiva según la directiva europea 2012/19/UE. ¡No tirar este producto a la basura doméstica!
- Afzonderlijke inzameling vereist volgens de Europese richtlijn 2012/19/UE. Gooi het apparaat niet bij het huishoudelijk afval !
- Это оборудование подлежит переработке согласно директиве Евросоюза 2012/19/UE. Не выбрасывать в общий мусоросборник!
- Questo dispositivo è oggetto di raccolta dierenziata secondo la direttiva europea 2012/19/UE. Non smaltire con i riuti domestici.
- Ten sprzęt podlega selektywnej zbiórce zgodnie z Dyrektywą Europejską 2012/19/EU. Nie wyrzucać do odpadów domowych!
- 根据欧盟指令2012/19/EU,该设备需单独收集。请勿丢弃在生活垃圾中!
- Matériel conforme aux directives européennes. La déclaration UE de conformité est disponible sur notre site (voir à la page de couverture).
- Device complies with Europeans directives. The EU Declaration of Conformity is available on our website (see cover page).
- Die Geräte entsprechen die europäischen Richtlinien. Die Konformitätserklärung nden Sie auf unsere Webseite.
- Aparato conforme a las directivas europeas. La declaración de conformidad UE está disponible en nuestra página web (dirección en la portada).
- Устройство соответствует директивам Евросоюза. Декларация UE о соответствии доступна для просмотра на нашем сайте (ссылка на обложке).
- Apparaat in overeenstemming met de Europese richtlijnen. De E.U. verklaring van overeenstemming kunt u downloaden op onze website (adres vermeld op de oms-
lag).
- Dispositivo conforme alle direttive europee La dichiarazione UE di conformità è disponibile sul nostro sito internet (vedere alla pagina di copertina).
- Materiał zgodny z dyrektywami europejskimi. Deklaracja zgodności UE jest dostępna na naszej stronie internetowej (patrz strona tytułowa).
- 材料符合欧洲指令。欧盟符合性声明可在我们的网站上找到(见封面页)。
- Produit recyclable qui relève d’une consigne de tri.
- This product should be recycled appropriately
- Recyclingprodukt, das gesondert entsorgt werden muss.
- Producto reciclable que requiere una separación determinada.
- Этот аппарат подлежит утилизации.
- Product recyclebaar, niet bij het huishoudelijk afval gooien.
- Prodotto riciclabile soggetto a raccolta dierenziata.
- Produkt nadający się do recyklingu, który podlega instrukcji sortowania.
- 遵循分类指令的可回收产品
- Marque de conformité EAC (Communauté économique Eurasienne).
- EAEC Conformity marking (Eurasian Economic Community).
- EAC-Konformitätszeichen (Eurasische Wirtschaftsgemeinschaft)
- Marca de conformidad EAC (Comunidad económica euroasiática).
- Знак соответствия EAC (Евразийское экономическое сообщество).
- EAC (Euraziatische Economische Gemeenschap) merkteken van overeenstem-
ming
- Marchio di conformità EAC (Comunità economica Eurasiatica).
- Znak zgodności EAC (Euroazjatyckiej Wspólnoty Gospodarczej).
- EAC(欧亚经济共同体)合格标志
- Matériel conforme aux exigences britanniques. La déclaration de conformité britannique est disponible sur notre site (voir à la page de couverture).
- Equipment in compliance with British requirements. The British Declaration of Conformity is available on our website (see home page).
- Das Gerät entspricht den britischen Richtlinien und Normen. Die Konformitätserklärung für Grossbritannien ist auf unserer Internetseite verfügbar (siehe Titelseite).
- Equipo conforme a los requisitos británicos. La Declaración de Conformidad Británica está disponible en nuestra página web (véase la portada).
- Материал соответствует требованиям Великобритании. Заявление о соответствии для Великобритании доступно на нашем веб-сайте (см. главную страницу).
- Materiaal conform aan de Britse eisen. De Britse verklaring van overeenkomt is beschikbaar op onze website (zie omslagpagina).
- Materiale conforme alla esigenze britanniche. La dichiarazione di conformità britannica è disponibile sul nostro sito (vedere pagina di copertina).
- Materiał zgodny z wymogami brytyjskimi. Brytyjska Deklaracja Zgodności jest dostępna na naszej stronie internetowej (patrz strona tytułowa).
- 材料符合英国要求。英国的符合性声明可在我们的网站上找到(见封面页)
JBDC
134 bd des loges
53941 Saint-Berthevin
France
Documenttranscriptie
Aspirateur pneumatique professionnel Professional pneumatic vacuum cleaner Professioneller pneumatischer Staubsauger Aspirador profesional neumático Professionele pneumatische stofzuiger Aspiratore professionale pneumatico Профессиональный пневматический пылесос Profesjonalny odkurzacz pneumatyczny 专业气动吸尘器 FR 2 / 3 - 8 ES 2 / 24 - 28 RU 2 / 19 - 23 EN 2 / 9 - 13 NL 2 / 19 - 23 PL 2 / 19 - 23 DE 2 / 14 - 18 IT 2 / 19 - 23 CN 2 / 19 - 23 73502_V1_17/03/2021 Aspirateur pneumatique professionnel 1 3 A 4 C B 2 1 3 5 2 4 6 7 8 9 10 11 2 5 Aspirateur pneumatique professionnel 6 9 7 10 Øi≥ 10mm² 8 11 3 Aspirateur pneumatique professionnel FR CONTRÔLE DU CONTENU DE L’EMBALLAGE L’emballage contient: - n ° 1 pneumatic aspirator - n ° 1 dust collection bag in polyester media Pour se débarrasser des éléments formant l’emballage, suivre les dispositions en vigueur dans le lieu de mise en service de la machine, en tenant compte des règlements sur le tri sélectif si celui-ci est prévu. AVERTISSEMENTS GÉNÉRAUX Mesures de sécurité et de prévention des accidents. - Mesures de sécurité et de prévention des accidents la machine ne doit être utilisée que par du personnel spécialement formé et chargé de l’utiliser, par conséquent la machine ne doit pas être utilisée par des enfants ou des personnes présentant des capacités physiques, sensorielles ou mentales réduites; - l’opérateur doivent être informés, éduqués et formés à l’utilisation de l’équipement et les substances qui doivent être utilisés, y compris la méthode sécuritaire de l’enlèvement et l’élimination des matières recueillies; - il est nécessaire de fournir un apport d’air frais approprié dans le local si l’air d’évacuation y retourne. Il est nécessaire de se reporter aux réglementations nationales; - l’environnement doit avoir une température entre 10 ° C et 35 ° C avec un pourcentage d’humidité entre 50% et 90%; - l’inclinaison du plan d’appui de la machine ne doit pas dépasser 10 degrés; - ne pas exposer la machine à la pluiepas et les températures bases; - il est interdit de lever ou de transporter la machine en l’accrochant par la poignée à un outil de levage. Danger d’explosion ou d’incendie - Il est interdit d’aspirer des poussières inflammables ou explosives (par ex. de magnésium, d’aluminium, etc.); - il est interdit d’aspirer les poussières de polissage de surfaces traitées avec des peintures n’ayant pas achevé leur cycle de catalyse; - ne pas aspirer les étincelles ou les copeaux chauds; - si des poussières s’échappent de l’aspirateur, débrancher immédiatement l’aspirateur du réseau d’alimentation; - il est interdit d’aspirer des liquides inflammables (par ex. essence, diluants, etc.); - il est interdit d’aspirer des liquides ou des substances agressives (par ex. acides, bases, solvants, etc.) Version ATEX La machine est conforme à la directive ATEX 2014/34/EU et aux normes harmonisées figurant dans la déclaration de conformité en tant qu’appareil de catégorie 3D. À proximité de la zone d’utilisation de la machine, d’opportunes indications de possibilité de présence d’atmosphères explosibles (comme indiqué par la directive ATEX 2014/34/EU) doivent être appliquées. L’intérieur de la machine contient des dépôts de poussière et des atmosphères potentiellement explosives. L’opérateur doit en particulier éviter d’introduire à proximité ou à l’intérieur de la machine ou dans le seau des tout élément pouvant déclencher une explosion, de type flammes, gaz ou surfaces chaudes, composants électriques, charges électrostatiques, étincelles mécaniques. L’étiquette, les caractéristiques et le marquage ATEX se trouvent sur le panneau arrière. Attention ! Lire toutes les mises en gade pour la sécurité et les indications. JBDC S.p.A. décline toute responsabilité pour dommages directs ou indirects dus à la nonobservation des indications figurant dans ce manuel. Utilisation conformes à l’usage prévu Cette machine est conforme aux normes de référence EN60335-2-69 pour applications industrielles. Machine adaptée aux poussières à concentration maximale autorisée sur le poste de travail ≥ 0.1 [mg/m³] et aux poussières de bois (Classe M – Médium HAZARD). Versions “M” L’aspiration de poussières, dont la valeur Kst > à 200 (bar*m/s) et/ou l’énergie d’inflammation supérieure à 10 mJ, n’est pas autorisée. Veuillez respecter les réglementations locales. Se référer à toutes les règles de sécurité applicables aux matériaux traités. 4 Aspirateur pneumatique professionnel FR PARTIES DE LA MACHINE 1 2 3 4 5 6 - Avion de soutien Châssis de l’aspirateur Poignée Soupape d’allumage Raccordement outil pneumatique Crochet 7 - Pince de mise à la terre 8 - Filtre 9 - Sac à poussières 10 - Raccord aspiration 11 - Roues pivotantes 12 - Entrée de l’alimentation en air comprimé INSTALLATION DE LA MACHINE La machine doit être placée sur une surface plane solide et à niveau. Vérifier que dans la zone de travail il est possible de relier la pince métallique de l’aspirateur au circuit de terre du lieu de travail. Brancher à l’aspirateur le manchon pneumatique fourni (voir figure 3), en particulier : - le raccord rapide à la prise pneumatique présente sur le côté avant droit de l’aspirateur - le manchon d’aspiration à l’embout de l’aspirateur Enlever la tête de l’aspirateur en agissant sur les deux crochets métalliques (voir figure 4-5). Placer à l’intérieur du tronc le sac à poussières en le fixant correctement à la bride de l’embout (voir figure 6). Placer la tête de l’aspirateur au dessous du tronc de façon correcte et la fixer avec les crochets métalliques prévus à cet effet. Branchement au réseau pneumatique Important: Il est indispensable de n’utiliser que de l’air filtré et sec. Vérifier que le robinet d’alimentation de l’aspirateur est fermé. Brancher au robinet d’alimentation un tube ayant un diamètre interne de 10 mm (voir figure 7). Régler la pression d’alimentation sur 6.5 bar. Brancher l’outil pneumatique au raccord présent sur le manchon et le tube d’aspiration à la prise présente sur l’outil pneumatique. Attention, pour fonctionner correctement, l’aspirateur nécessite une alimentation en air comprimé pouvant fournir 1500l / min à une pression de 6bar. Assurez-vous que le réseau d’air comprimé est capable d’alimenter l’unité. Branchement au circuit de terre Brancher la pince métallique prévue à cet effet à une partie du lieu de travail reliée au circuit de terre de l’installation. (voir figure 9). ATTENTION : L’appareil doit TOUJOURS être branché au circuit de terre de l’installation par l’intermédiaire de la pince métallique, en particulier durant l’utilisation de l’aspirateur, pendant les opérations de vidange du sac à poussières et de remplacement de celui-ci. Une fois les branchements effectués, faire un premier court essai de fonctionnement des outils en suivant les instructions qui les accompagnent. Contrôles préalables - Vérifier que le sac à poussières est monté dans le récipient, et que le filtre est monté sur la tête; - vérifier si le manchon d’aspiration est correctement fixé et s’il ne gêne pas la manoeuvre des outils; - vérifier qu’il n’y ait pas de fuite au niveau de l’installation d’alimentation en air comprimé. UTILISATION DE LA MACHINE La machine peut fonctionner en mode automatique ou manuel: sélectionner le mode choisi en tournant l’interrupteur vers la droite (automatique) ou vers la gauche (manuel) (fig. 10). Fonctionnement en automatique (A) Par fonctionnement en automatique nous entendons que l’aspirateur se mette en fonction dès que l’outil électrique ou pneumatique se met en marche pour travailler. Après avoir éteint l’outil, l’aspirateur s’éteint automatiquement avec un retard. Fonctionnement manuel (M) Par fonctionnement manuel nous entendons que la machine fonctionne de façon continue. 5 Aspirateur pneumatique professionnel FR ENTRETIEN Quand l’utilisateur effectue l’entretien, il doit démonter, nettoyer et réviser l’appareil, dans la mesure du possible, sans provoquer de risques pour le personnel d’entretien et les autres personnes. Se reporter aux réglementations locales relatives aux conditions de ventilation filtrée de l’air d’évacuation dans le local dans lequel l’appareil est démonté, la protection du personnel et le nettoyage de la zone dans laquelle a lieu l’entretien. Contrôles ordinaires - Contrôler l’état des manchons d’aspiration des poussières; - vérifier périodiquement le sac de récupération des poussières : ne pas dépasser les limites de poids et de volume indiquées! Si le sac enlevé présente des déchirures pouvant provoquer la sortie des poussières, faire contrôler et le cas échéant remplacer les filtres par un Centre d’Assistance agréé; - vérifier périodiquement l’état des filtres, les remplacer si nécessaire. Si le filtre est endommagé, déchiré ou présente une anomalie, confiez la machine à un centre de service agréé. Ne pas aspirer quand l’élément de filtrage n’est pas installé! Remplacement des sachets Durant les opérations suivantes, veiller à ne pas soulever les poussières ! Enfiler un masque anti-poussières; Sac en polyester (code 130.1108 / C): - libérer la tête du récipient en agissant sur les crochets (fig. 4 et 5); - retirer le sac usagé (fig. 6); - poser le nouveau sac en insérant la bride sur le raccord d’aspiration comme illustré (fig. 6); - placez la tête sur le bac à poussière en vous assurant qu’elle est orientée dans le bon sens (fig.5) - fixer la tête avec les deux crochets métalliques. N’utilisez que des sacs JBDC comme pièces de rechange. Les sacs de remplacement doivent être stockés dans un endroit sec! Pour l’élimination, procédez conformément à la loi. Remplacement des filtres Durant les opérations suivantes, veiller à ne pas soulever les poussières ! Porter un masque anti-poussière approprié. - décrocher la tête du récipient en agissant sur les crochets (fig. 4-5); renverser la tête en l’appuyant sur le récipient (fig. 11); enlever les filtres usés (fig. 11) et les enfermer dans un sachet spécial pour les éliminer; placer les nouveaux filtre (cod. 076.1613) dans le châssis et remonter le châssis sur la tête. Utiliser exclusivement les pièces de rechange JBDC. Pour toute information sur les codes des pièces de rechange et les Centres d’Assistance agréés consulter le site internet. JBDC Spa décline toute responsabilité en cas de dommages directs ou indirects provoqués par le non-respect des indications de ce manuel. 6 FR Aspirateur pneumatique professionnel EFFETS, CAUSES, REMEDES EFFETS CAUSES REMEDES Manque d’air comprimé Vérifiez le raccordement au système d’air comprimé Tuyau d’alimentation défectueux ou inapproprié S’adresser à un Service Après-vente autorisé Sac trop plein Vérifier le sac de filtrage Un des tubes ou des accessoires est bouché Contrôler le tube flexible et les accessoire Filtres bouché Vérifiez les filtres Fuites de poussières du conduit d’échappement Filtre à cartouche déchiré S’adresser à un Service Après-vente autorisé Perte de puissance avec les outils pneumatiques Alimentation en air comprimé insuffisante Vérifier les passages d’air L’aspirateur ne démarre pas La capacité d’aspiration est insuffisante DONNÉES TECHNIQUES UNITÉ D’ASPIRATION Marquage II 3 D c T 50°C Consommation d’air comprimé [L/min] * 700 Débit d’air maximal [m /h] * 140 3 Vide maximum [mbar] * 190 Section du tuyau d’alimentation [mm ] Øi≥ 10mm² Pression d’alimentation [bar] 6-8 Surface filtrante [m2] 1 Capacité du conteneur [L] 30 Outils connectables [n] 1 Niveau de pression sonore [dB] 68 Raccord d’aspiration [mm] 1x50mm/1x44mm/1x34mm Dimensions [A x B x C] - [cm] 80 x 44 x 45 Dimensions de l’emballage [A x B x C] - [cm] 100 x 77 x 57 Poids [kg] 20 Poids d’emballage [kg] 30 Démarrage Manuel 2 * pression de service 6 [bar] 7 Professional pneumatic vacuum cleaner EN INSPECTION OF PACKAGE CONTENTS The package contains: - n ° 1 aspirateur pneumatique - n ° 1 sac de collecte de poussière en matière polyester For packaging waste disposal attain to local regulations in force, including recycling disposal if requested. WARNINGS Safety and accident prevention instructions - This machine can only be operated by trained people in charge; machine no intended to be operated by kids or mental-sensorial defective people; - before use, users should be provided with information, instruction and training for the use of the appliance and the pollutant it is used for, including the right method for the safe removal and disposal of the substances collected; - it is necessary to provide an adequate air change rate in the room if the exhaust air is returned in the room. Reference to National Regulations is necessary; - the temperature of the work area must be between 10°C and 35°C with humidity between 50% and 90%; - the surface on which the machine rests must not exceed a maximum 10 degree gradient; do not expose the machine to rain and low temperatures; do not lift and transport the machine by the handle with a lifting device. Explosion or fire hazard - Do not vacuum flammable or explosive dust; do not vacuum sanding dust from surfaces treated with paints that have not completed the catalyst cycle; do not vacuum sparks or white hot shavings; immediately disconnect the vacuum from the electrical mains if dust is ejected from air outlet; do not vacuum flammable or explosive liquids (i.e. petrol, thinners, etc.); do not vacuum aggressive liquids or substances(i.e. acids , bases, solvents, etc.). ATEX Version The machine complies with the ATEX 2014/34/EU Directive and the harmonized standards contained in the Declaration of Conformity as a Category 3D device. Appropriate indications of possible explosive atmospheres (as specified by the ATEX 2014/34/EU Directive) must be applied near the area of use of the device. The device contains dust deposits and potentially explosive atmospheres. In particular, the operator must avoid introducing sources of ignition in the vicinity or inside the unit or in the bucket such as: flames, gases or hot surfaces, electrical parts, electrostatic charges, mechanical sparks. The label, technical data, and ATEX marking are located on the rear panel. Warning! Read all safety notes and directions. JBDC Spa assumes no responsibility for direct or indirect damages resulting from non-compliance with this manual. Use according to purposes This machine complies with the EN60335-2-69 reference standards for industrial applications. Machine suitable for dust with a maximum workplace concentration ≥ 0.1 [mg/m³] and wood dusts (Class M - Medium HAZARD). “M” Version Extracting dust with a Kst value > 200 (bar*m/s) and/or an ignition energy < 10 mJ is not permitted. Please observe local regulations. Refer to any safety regulations applicable to the treated materials 8 Professional pneumatic vacuum cleaner EN PARTS OF MACHINE 1 2 3 4 5 6 - Plane support Vacuum cleaner frame Handle Supply valve pneumatic tool plug Hook 7 - Grounding pliers 8 - Filter 9 - Dust bag 10 - Suction connection 11 - Castor wheels 12 - Supply compressed air inlet INSTALLATION OF MACHINE Place the machine on a stable and level surface. Verify that it is possible to connect the metal suction cleaner pliers to the grounding system of the working area. Connect the suction cleaner to the pneumatic sleeve supplied (see figure 3) with the machine and connect: - The quick coupling to the pneumatic sleeve on the front right side of the suction cleaner - The suction head to the pipe union of the suction cleaner Disconnect the supply pipe from the vacuum head using the quick fitting, then remove the vacuum head using the two metal hooks (see figure 4-5). Place the dust bag inside the drum and firmly fix it to the sleeve (see figure 6).Place the vacuum head in the correct position above the drum and fix it using the metal hooks supplied. Connection to the pneumatic supply Please note: use filtered and dry air only. Verify that the supply faucet of the suction cleaner is closed. Connect the supply faucet to a pipe with an internal diameter of 10 mm (see figure 7). Adjust the supply pressure at 6.5 bar.Connect the pneumatic tool to the fitting on the sleeve and the suction pipe to the socket on the pneumatic tool. Warning, in order to function properly, the vacuum cleaner requires 1500l/min compressed air supply at a pressure of 6bar. Make sure that the compressed air network is able to feed correctly the unit. Connection to the grounding system Connect the metal pliers to a part of the area that is connected to the grounding system of the plant. (see figure 9) CAUTION: ALWAYS connect the machine to the grounding system of the plant using the metal pliers, specifically during the use of the suction cleaner, the emptying of the dust bag and its replacement. Check the tool functioning as indicated on their instructions manual. Preliminary checks - Check that the dust collection bag has been fitted in the container and that the filters have been fitted on the head; - check that the vacuum hose is properly fixed and does not hinder tool movement; - check that there are no leaks in the compressed air supply system. MACHINE USE The machine can operates in manual or automatic mode: to select the mode, turn the switch to the right (automatic mode) or to the left (manual mode) (pic. 10). Using the machine in automatic mode (A) Automatic operations means that the vacuum starts when an electrical or pneumatic tool is turned on. The vacuum will automatically turn off after the tool is turned off. Using the machine in manual mode (M) Manual operations means that the vacuum runs continuously. Power on the front panel outlet socket is permanently active during manual running. 9 Professional pneumatic vacuum cleaner EN MAINTENANCE For user servicing, the appliance must be dismantled, cleaned and serviced, as far as it is reasonably practicable, without causing risk to the maintenance staff and others. Suitable precautions include, decontamination before dismantling, provision for local filtered exhaus ventilation where the appliance is dismantled (according to local regulations), cleaning of the maintenance area and suitable personal protection. Ordinary check operations - check the vacuum hose conditions; - check the power cord, plug and outlet socket conditions: in case contact an authorized service centre for replacement; - check filter cartridge condition. In case of lacerations or perforations contact an authjorized service centre for replacement. Do not use the appliance without the full filter set fitted! Bags replacement Do not spread dust during dust bag replacement! wear an adeguate dust mask ; Polyester bag (code 130.1108 / C): - release the head from the container by acting on the hooks (fig. 4 and 5); - remove the used bag (fig. 6); - lay the new bag by inserting the flange on the suction fitting as illustrated (fig. 6); - place the head on the dust container making sure it is facing in the correct direction (fig. 5) - fix the head with the two metal hooks. Use only JBDC bags as spare parts. Replacement bags must be stored in a dry place! For disposal proceed according to the law. Filter replacement Do not spread dust during filter replacement! Wear adequate filter mask. - detach the vacuum head pushing the side hooks (pic.4-5); turn the vacuum head upside down (pic.11); remove the filter cartdridge (pic. 11) and fit them into a sealed disposal bag; fit new filter (cod. 076.1613) cartridges in the filter frame (pic.18) and reassemble it on the vacuum head. Use genuine JBDC spare parts only. Refer to site for parts code and authorized service centre JBDC Spa. will not be held responsible for direct or indirect damages resulting from noncompliance with the requirements of this manual. 10 EN Professional pneumatic vacuum cleaner TROUBLESHOOTING AND SOLUTION Effects Causes Solutions Lack of compressed air Check the connection to the compressed air system Defective or unsuitable supply hose Contact an authorised service centre Bag full Check the filter bag One the hoses or accessories is clogged Check the flexible hose and the accessories Clogges filters check the filters cartridges Dust from the exhaust Filter cartridge torn ripped Contact an authorised service centre Insufficient power for pneumatic tool Insufficient compressed air feeding Check air passage The motor will not start Vacuum flow is insufficient TECHNICAL DATA SUCTION UNIT Marking II 3 D c T 50°C Compressed Air Consumption [L/min] * 700 Maximum air flow [m /h] * 140 Maximum vacuum [mbar] * 190 Supply pipe section [mm ] Øi≥ 10mm² Supply pressure [bar] 6-8 Filter surface [m2] 1 Container capacity [L] 30 Connectable tools [n] 1 Sound pressure level [dB] 68 Suction connection [mm] 1x50mm/1x44mm/1x34mm Dimensions [A x B x C] - [cm] 80 x 44 x 45 Packaging Dimensions [A x B x C] - [cm] 100 x 77 x 57 Weight [kg] 20 Packing Weight [kg] 30 Start-up mode Manual 3 2 * operating pressure 6 [bar] 11 Professioneller pneumatischer Staubsauger DE ÜBERPRÜFUNG DES VERPACKUNGSINHALTS Die Verpackung enthält: - pneumatischer Aspirator Nr. 1 - Nr. 1 Staubsammelbeutel aus Polyestermaterial Folgendes ist bei der Entsorgung der Verpackungskomponenten zu beachten: Die gültigen Vorschriften des Ortes, an der die Maschine betrieben wird, müssen beachtet werden. Geltende Abfalltrennungsvorschriften müssen eingehalten werden. ALLGEMEINE HINWEISE Sicherheits- und Unfallverhütungsvorschriften. - Diese Maschine darf nur durch Menschen bedient werden, die auf die Nutzung dieser Maschine ausgebildet sind. Die Maschine ist nicht für die Bedienung durch Kinder oder Personen mit Mental-sensorischen Störungen konzipiert und hergestellt; - vor Benutzung des Gerätes, muss sich der Anwender alle notwendigen Informationen, Anweisungen und die nötige Ausbildung für die Bedienung des Gerätes und den im Einsatz entstehenden Schadstoffen verschaffen. Inklusive der richtigen Verfahren für die sichere Entsorgung und Beseitigung der aufgefangenen Substanzen; - es ist erforderlich dafür zu sorgen dass ein ausreichender Luftaustausch im Raum stattfindet, wenn die die ausströmende Luft in den Raum zurück strömt. Die nationalen Gesetzgebungen sind stets einzuhalten; - die Temperatur am Arbeitsplatz muss zwischen 10° und 35° liegen, die relative Luftfeuchtigkeit zwischen 50% und 90%; - die Auflagefläche der Maschine darf nicht um mehr als 10 Grad geneigt sein; die Maschine weder regen noch niedrigen temperaturen ausstzen; - die Maschine darf nicht von einem Hebeapparat an den Griffen angehoben oder transportiertwerden. Explosions- oder Brandgefahr - Es dürfen keine entzündbaren oder explosiven Pulver abgesaugt werden (z. B. Magnesium, Aluminium, Asbest usw.); - es dürfen keine Pulver von lackierten Oberflächen abgesaugt werden, deren Lack noch nicht vollständig ausgehärtet ist; - saugen Sie keine Funken oder weiß glühende Späne ein; - tritt Staub aus dem Absauger, ist dieser sofort vom Netz zu trennen; - es dürfen keine entzündbaren oder explosiven Flüssigkeiten abgesaugt werden (z. B. Benzin, Verdünnungsmittel usw); - es dürfen keine aggressiven Flüssigkeiten oder Substanzen abgesaugt werden (z.B. Säuren, Basen, Lösungsmittel usw.). ATEX Ausführung Die Maschine entspricht der ATEX-Richtlinie 2014/34/EG und den in der Konformitätserklärung aufgeführten harmonisierten Normen als Geräte der Kategorie 3D. In der Nähe des Einsatzbereiches des Gerätes sind geeignete Hinweise auf das Vorhandensein explosionsfähiger Atmosphären (gemäß ATEX-Richtlinie 2014/34/EG) anzubringen. Das Gerät enthält Staubablagerungen und explosionsfähige Atmosphären. Insbesondere muss der Betreiber in der Nähe oder im Gerät und dem Behälter, mögliche Zündquellen vermeiden, wie: Flammen, Gase oder heiße Oberflächen, elektrische Teile, elektrostatische Aufladungen, mechanische Funken. Das Etikett, die technischen Daten und die ATEX Kennzeichnung befinden sich an der Hinterseite. Achtung! Alle Sicherheitshinweise und Angaben lesen. JBDC Spa übernimmt keine Verantwortung für direkte oder indirekte Schäden, die sich aus der Nichtbeachtung der in diesem Handbuch angegebenen Hinweise ergeben. Nutzung nach Verwendungszweck Diese Maschine entspricht den Normen EN60335-2-69 für industrielle Anwendungen. Geeignet für Stäube mit maximal zulässiger Konzentration am Arbeitsplatz von ≥ 0.1 [mg/m³] und Holzstaub (Klasse M - Medium HAZARD). “M”-Ausführung Das Saugen von Stäuben mit einem Kst-Wert> 200 (bar*m/s) und/oder einer Zündenergie < 10 mJ ist nicht zulässig. Beachten Sie locale Bestimmungen. 12 Professioneller pneumatischer Staubsauger DE Beachten Sie die Sicherheitsbestimmungen für die behandelten Materialien MASCHINENKOMPONENTEN 1 2 3 4 5 6 - Unterstützungsebene Absaugerrahmen Griff Einschaltventil Anschlusse pneumatische Werkzeug Haken 7 - Erdungsklemme 8 - Filter 9 - Staubfangsack 10 - Sauganschluss 11 - Freidrehende Räder 12 - Eingang Druckluftzufuhr INSTALLATION DER MASCHINE Die Maschine muss auf einer festen und ebenen Fläche aufgestellt werden. Vergewissern Sie sich, dass es im Arbeitsbereich möglich ist, die Metallklemme des Absaugers an den Erdanschluss des Arbeitsplatzes anzuschließen. Den in der Lieferung enthaltenen Pneumatikschlauch an den Absauger anschließen und insbesondere (siehe Abb. 3): - den Schnellanschluss an den Pneumatikanschluss auf der rechten Vorderseite des Absaugers - den Absaugschlauch an den Stutzen des Absaugers Den Absaugkopf entfernen, indem die beiden Metallhaken gelöst werden (siehe Abb. 4-5) . Im Inneren des Behälters den Staubbeutel positionieren und korrekt am Flansch des Stutzens befestigen (siehe Abb. 6) Den Absaugkopf korrekt über dem Behälter positionieren und mit den dafür vorgesehenen Metallhaken befestigen. Anschluss an die Luftversorgung Wichtig: Es darf ausschließlich gefilterte und getrocknete Luft verwendet werden. Überprüfen, ob der Versorgungshahn des Absaugers geschlossen ist. An den Versorgungshahn einen Schlauch mit einem Innendurchmesser von 10 mm anschließen (siehe Abb. 7). Den Versorgungsdruck auf 6.5 bar einstellen. Das pneumatische Werkzeug an den Anschluss auf dem Schlauch anschließen und den Absaugschlauch an den Anschluss auf dem pneumatischen Werkzeug. Warnung: Um ordnungsgemäß zu funktionieren, benötigt der Staubsauger eine Druckluftversorgung, die 1500 l / min bei einem Druck von 6 bar liefern kann. Stellen Sie sicher, dass das Druckluftnetz das Gerät mit Strom versorgen kann. Anschluss an den Erdleiter Die entsprechende Metallklemme an einen Teil des Arbeitsplatzes anschließen, der an den Erdleiter der Anlage angeschlossen ist. (siehe Abb. 9) ACHTUNG: Das Gerät muss STETS mittels der Metallklemme an den Erdleiter der Anlage angeschlossen sein, insbesondere während des Betriebs des Absaugers, der Vorgänge zum Entleeren des Staubbeutels und beim Auswechseln desselben. Überprüfen Sie das Werkzeug anhand der Bedienungsanleitung des Werkzeuges. Vorangehende Kontrollen - es muss sichergestellt werden, dass im Behälter ein Staubfangsack und am Kopf ein Filter montiert worden ist; - es muss überprüft werden, dass der Absaugschlauch richtig befestigt ist und die Werkzeughandhabung nicht behindert; - es muss überprüft werden, dass an der Versorgungsanlage für die Druckluft keine Verluste auftreten.. BENUTZUNG DER MASCHINE Das Gerät kann in manuellem oder automatischen Modus betrieben werden: Für die Auswahl des Modus, drehen Sie den Schalterin die rechte Position (Automatik-Modus) oder in die linke Position (Manuell-Modus) (Bild. 10). Automatikbetrieb (A) Unter Automatikbetrieb versteht man, dass bei Einschalten des elektrischen Werkzeugs gleichzeitig auch der Absauger in Betrieb genommen wird. Dieses Gerät schaltet automatisch mit einer Verzögerung. 13 Professioneller pneumatischer Staubsauger DE Manueller Betrieb M “Manueller Betrieb” bedeutet, dass die Maschine ständig läuft. Die Stromversorgung an der Gerätesteckdose ist ständig gegeben, solange das Gerät im manuellen Modus arbeitet. INSTANDHALTUNG Für die Wartung von Seiten des Benutzers muss das Gerät zerlegt, gesäubert und überholt werden, soweit dies angemessen ist, ohne dass Risiken für das Wartungspersonal und andere Personen entstehen. Beziehen Sie sich auf die lokalen Bestimmungen hinsichtlich der gefilterten Belüftungsbedingungen der Abluft in dem Raum, in dem das Gerät zerlegt wird, des Schutzes des Personals und der Reinigung des Bereichs, in dem die Wartung erfolgt. Regelmäßig durchzuführende Prüfungen Überprüfen Sie den Zustand des Absaugschlauches; - prüfen Sie den Filterbeutel: Überschreiten Sie auf keinen Fall die vorgegebene Menge in Gewicht oder Volumen! Im Falle eines zerrissenen oder beschädigten Filterbeutel kontaktieren Sie einen autorisierten Service-Partner für den Tausch des Filterbeutel; Überprüfen Sie regelmäßig den Zustand der Filter und ersetzen Sie sie gegebenenfalls. Wenn der Filter beschädigt ist, zerrissen ist oder eine Anomalie aufweist, bringen Sie das Gerät zum autorisierten Servicecenter. Benutzen Sie nie den Staubsauger ohne das komplette Filtersystem (Filterbeutel und Filterkassette). Tausch Filterbeutel Atmen Sie keinen Staub während des Tausches des Filterbeutels ein. eine Staubmaske anlegen. Polyesterbeutel (Code 130.1108 / C): - Lösen Sie den Kopf aus dem Behälter, indem Sie auf die Haken einwirken (Abb. 4 und 5). - Entfernen Sie den gebrauchten Beutel (Abb. 6). - Legen Sie den neuen Beutel, indem Sie den Flansch wie abgebildet auf die Saugarmatur setzen (Abb. 6). - Legen Sie den Kopf auf den Staubbehälter und achten Sie darauf, dass er in die richtige Richtung zeigt (Abb. 5). - Befestigen Sie den Kopf mit den beiden Metallhaken. Verwenden Sie nur JBDC-Taschen als Ersatzteile. Ersatzbeutel müssen an einem trockenen Ort aufbewahrt werden! Zur Entsorgung vorschriftsmäßig vorgehen. Filter auswechseln Atmen Sie keinen Staub während des Wechsels der Filterbeutel ein. Tragen Sie entsprechende Staub-Filtermasken. - lösen Sie das Motorgehäuse durch die seitlichen Halteklammern (Bild. 4-5); - legen Sie das Motorgehäuse umgekehrt ab (Bild. 11); - entfernen Sie die Filterkassetten (Bild. 11) und entsorgen Sie diese in einem verschließbaren Beutel; - legen Sie die neuen Filterkassetten (cod. 076.1613) in den Halterahmen ein und bauen Sie den Filterrahmen wieder in das Motorgehäuse ein. Benutzen Sie nur originale Ersatzteile von JBDC. Entsprechende Ersatzteillisten und autorisierte ServiceDas Unternehmen JBDC Spa übernimmt keinerlei Haftung für direkte oder indirekte. Schäden, die aus der Nichtbeachtung der in diesem Handbuch angegebenen Hinweise entstehen. 14 DE Professioneller pneumatischer Staubsauger EVENTUELLE STÖRUNGEN UND IHRE BEHEBUNG WIRKUNG Die Turbine läuft nicht an Die Ansaugleistung ist ungenügend Aus dem Auslass der Turbine tritt Staub aus URSACHE BEHEBUNG Druckluftmangel Überprüfen Sie die Verbindung zum Druckluftsystem Defekter oder ungeeigneter Versorgungsschlauch Kundendienst benachrichtigen Sack zu voll Sack ersetzen Einer der Schläuche oder die Zubehörteile sind verstopft Den Schlauch oder die Zubehörteile kontrollieren Filter verstopft Kundendienst benachrichtigen Filter gerisse Kundendienst benachrichtigen Beim Einstellen des Druckminderers Druckminderer defekt oder Anlage ändert sich die Anzeige des Manomeverliert Luft ters nicht Kundendienst benachrichtigen TECHNISCHE DATENSAUGGERÄT Markierung II 3 D c T 50°C Druckluftverbrauch [L/min] * 700 Maximaler Luftstrom [m /h] * 140 3 Maximales Vakuum [mbar] * 190 Versorgungsrohrabschnitt [mm ] Øi≥ 10mm² Versorgungsdruck [bar] 6-8 Filterfläche [m2] 1 Containerkapazität [L] 30 Anschließbare Werkzeuge [n] 1 Schalldruckpegel [dB] 68 Sauganschluss [mm] 1x50mm/1x44mm/1x34mm Abmessungen [A x B x C] - [cm] 80 x 44 x 45 Verpackungsabmessungen [A x B x C] - [cm] 100 x 77 x 57 Gewicht [kg] 20 Packgewicht [kg] 30 Maschinenstart Manual 2 * Betriebsdruck 6 [bar] 15 Aspirador profesional neumático ES CONTROL DEL CONTENIDO DEL EMBALAJE El embalaje contiene: - 1 aspirador neumático - 1 bolsa de recogida de polvo de poliéster Para eliminar los componentes del embalaje, atenerse a las disposiciones vigentes en el lugar donde se ponga en servicio la máquina, teniendo en la debida consideración las normas para la recogida selectiva cuando esté prevista dicha forma de recogida. ADVERTENCIAS GENERALES Normas de seguridad y prevención de accidentes. - La máquina debe ser utilizada sólo por el personal adiestrado encargado del uso. La máquina no debe ser utilizada por niños o personas con capacidades físicas, sensoriales o mentales reducidas; - el operador deberá estar informados, educados y entrenados en el uso de los equipos y las sustancias que deben serutilizados, incluyendo el método seguro de retirada y eliminación del material recogido; es necesario asegurar un recambio de aire adecuado en el local si el aire de salida retorna al mismo local. Consultar los reglamentos nacionales; - en el ambiente de trabajo debe haber una temperatura comprendida entre 10°C y 35°C con un porcentaje de humedad entre el 50% y el 90%; - la superficie de apoyo de la máquina no debe superar un declive máximo de 10 grados. - no exponer la máquina a la lluvia y las bajas temperaturas; no levantar ni transportar la máquina enganchándola del asa con un aparato de elevación. Peligro de explosión o incendio - No se deben aspirar polvos inflamables o explosivos (por ej. magnesio, aluminio, etc.); - no se deben aspirar polvos de pulido de superficies tratadas con pinturas que no han terminado su ciclo de catalización; - no aspirar chispas ni virutas calientes; - en caso de salida de polvo del aspirador, desconectarlo inmediatamente de la red de alimentación; - no se deben aspirar líquidos inflamables o explosivos (por ej. bencina, diluyentes, etc.); - no se deben aspirar líquidos o sustancias agresivas (por ej. ácidos , bases, disolventes, etc.). Versión ATEX La máquina se ajusta a la Directiva ATEX 2014/34/EU y a las normas armonizadas que figuran en la declaración de conformidad como aparato de categoría 3 D. En las proximidades de la zona de utilización del aparato deben aplicarse las oportunas indicaciones acerca de la posible presencia de atmósferas explosivas (como indica la Directiva ATEX 2014/34/EU). El aparato contiene en su interior depósitos de polvo y atmósferas potencialmente explosivas. En particular, el operador debe evitar introducir en las inmediaciones o en el interior del aparato o en el cubo posibles fuentes de ignición como: llamas, gas o superficies calientes, partes eléctricas, cargas electrostáticas, chispas mecánicas. Es necesario que el operador ejecute el vaciado del cubo, asegurándose de desconectar y volver a conectar el cable del circuito de tierra al cubo para evitar la acumulación de cargas electrostáticas en el mismo. La etiqueta, los datos técnicos y el marcado ATEX están colocados en el panel trasero. ¡Atención! Leer todas las advertencias para la seguridad y las indicaciones. JBDC Spa no asume ninguna responsabilidad por daños directos o indirectos derivados del incumplimiento de lo indicado en el presente manual. Utilización conforme a los fines Questa macchina è conforme alle norme di riferimento EN60335-2-69 per applicazioni industriali. Macchina adatta per polveri con una concentrazione massima consentita sul posto di lavoro≥ 0.1 [mg/m³] e alle polveri di legno (Classe M - Medium HAZARD). Esta máquina se ajusta a las normas de referencia EN60335-2-69 para aplicaciones industriales. Máquina apta para polvos con una concentración máxima permitida en el puesto de trabajo ≥ 0.1 [mg/m³] y para polvos de madera (Clase M - Medium HAZARD. Versione “M” No se permite la aspiración de polvo con valor Kst > 200 (bar*m/s) y/o energía de cebado< 10 mJ. Cumplir las disposiciones locales en vigor. 16 Aspirador profesional neumático ES Cumplir todas las normas de seguridad aplicables a los materiales tratados. PARTES DE LA MÁQUINA 1 2 3 4 5 6 - Plano de apoyo Bastidor de soporte Asa Interruptor de encendido Conexión rápida de la herramienta neumática Gancho del cabezal 7 - Pinza de puesta a tierra 8 - Filtro 9 - Bolsa de recogida de polvo 10 - Empalme de aspiración 11 - Ruedas giratorias con freno 12 - Entrada de alimentación de aire comprimido INSTALACIÓN DE LA MÁQUINA La máquina debe colocarse en un plano sólido y nivelado. Asegurarse de que en la zona de trabajo sea posible conectar la pinza metálica del aspirador al circuito de tierra del lugar de trabajo. Conectar el manguito neumático al aspirador (ver figura 3), en concreto: - La conexión rápida a la toma neumática presente en el lado frontal del aspirador - El manguito de aspiración a la toma del aspirador Retirar el cabezal del aspirador actuando en los dos ganchos metálicos (ver figura 4, 5). Colocar en el tanque la bolsa de polvo, fijándola correctamente al empalme de aspiración (ver figura 6). Colocar el cabezal del aspirador encima del tanque de la manera correcta y fijarlo con los ganchos metálicos específicos. Conexión a la red neumática Importante: se debe utilizar exclusivamente aire filtrado y secado. Asegurarse de que la llave de alimentación del aspirador esté cerrada. Conectar a la llave de alimentación un tubo con un diámetro interno de 10mm (ver figura 7). Regular la presión de alimentación a 6,5 [bar]. Conectar la herramienta neumática al enganche presente en el manguito y el tubo de aspiración a la toma de la herramienta neumática. Atención: para que el aspirador funcione correctamente, requiere una alimentación de aire comprimido que pueda suministrar 1500l/min con una presión de 6 [bar]. Asegurarse de que la red de aire comprimido sea capaz de alimentar la unidad. Controles preliminares Conectar la pinza metálica específica a una parte del lugar de trabajo conectada al circuito de tierra de la instalación (ver figura 9). Atención: el aparato debe estar siempre conectado al circuito de tierra de la instalación con la pinza metálica, en concreto, durante el uso del aspirador, las operaciones de vaciado de la bolsa de polvo y el cambio de la misma. Después de realizar la conexión, hacer una breve prueba de funcionamiento de las herramientas, siguiendo las instrucciones en dotación con las mismas. Controles preliminares - Comprobar que en el recipiente esté montada la bolsa de recogida de polvo y que el filtro esté montado en el cabezal; - comprobar que el manguito de aspiración esté fijado adecuadamente y no obstaculice la maniobra de las herramientas; - comprobar que no haya fugas en el sistema de alimentación de aire comprimido. USO DE LA MÁQUINA La máquina puede funcionar en modo automático o manual: seleccionar el modo elegido girando el interruptor hacia (automático) o hacia (manual) (figura 10). Funcionamiento en modo automático (AUT) El funcionamiento en modo automático consiste en que, con el encendido de la herramienta conectada, se ponga en funcionamiento el aspirador automáticamente. Al apagar la herramienta, el aspirador se apaga. 17 Aspirador profesional neumático ES Funcionamiento en modo manual (MAN) Con el funcionamiento en modo manual la máquina funciona de forma continua. MANTENIMIENTO Para el mantenimiento por parte del usuario, el aparato debe desmontarse, limpiarse y revisarse, en la medida de lo posible razonablemente, sin causar riesgos para el personal de mantenimiento y los demás. Cumplir las normativas locales en materia de condiciones de ventilación filtrada del aire de descarga en el local donde se desmonte el aparato, protección del personal y limpieza de la zona de realización del mantenimiento. Controles ordinarios - Revisar el estado de los manguitos de aspiración del polvo; revisar periódicamente la bolsa de recogida del polvo: ¡no superar los límites de peso y volumen indicados! En caso de que la bolsa retirada presente roturas que provoquen la salida del polvo, pedir la revisión y, si es necesario, la sustitución de los filtros en un Centro de Asistencia Autorizado; - revisar periódicamente el estado del filtro. Si es necesario, sustituirlo. En caso de que el filtro resulte dañado, roto o presente cualquier anomalía, llevar la máquina al Centro de Asistencia Autorizado. ¡No aspirar sin el elemento de filtrado instalado! Cambio de bolsas ¡Al realizar las operaciones siguientes intentar no levantar polvo! Llevar una mascarilla antipolvo adecuada; Bolsa de poliéster (cód. 130.1108/C): - desenganchar el cabezal del recipiente utilizando los ganchos (fig.4 y 5); - retirar la bolsa usada (fig. 6); - colocar la nueva bolsa introduciendo la brida en el empalme de aspiración como se muestra (fig.6); - colocar el cabezal en la bolsa de polvo asegurándose de que esté orientada en la dirección correcta (fig.5); - fijar el cabezal con dos ganchos metálicos. Utilizar como recambio exclusivamente bolsas JBDC. ¡Las bolsas de recambio se deben conservar en un lugar seco! Para la eliminación, proceder siguiendo las normas vigentes. Cambio del filtro ¡Al realizar las operaciones siguientes intentar no levantar polvo! Llevar una mascarilla antipolvo adecuada. - desenganchar el cabezal del recipiente utilizando los ganchos (fig. 4-5); volcar el cabezal colocándolo sobre el recipiente (fig. 11); retirar el filtro usado (fig. 11) y cerrarlo en una bolsa específica para su eliminación; colocar el nuevo filtro (cód. 076.1613) en el bastidor y volver a montar el bastidor en el cabezal. Utilizar única y exclusivamente piezas de recambio JBDC. Para más información sobre los códigos de las piezas de recambio y los Centros de Asistencia Autorizados, consultar la página web. JBDC Spa no se hace responsable por daños directos o indirectos derivados del incumplimiento de lo indicado en el presente manual. 18 ES Aspirador profesional neumático EVENTUALES ANOMALÍAS Y SU ELIMINACIÓN Efectos Causas Soluciones Falta de aire comprimido Revisar la conexión a la instalación del aire comprimido Tubo de alimentación defectuoso o inadecuado Acudir a un Centro de Asistencia autorizado Bolsa demasiado llena Revisar la bolsa de filtrado Manguito flexible obstruido o defectuoso Revisar el manguito flexible y los accesorios Filtros obstruidos Revisar los filtros Sale polvo por la salida de descarga Filtro de cartucho roto Acudir a un Centro de Asistencia autorizado Pérdida de potencia con la herramienta neumática conectada Alimentación de aire comprimido insuficiente Revisar los pasos de aire El aspirador no se pone en marcha La capacidad de aspiración es insuficiente DATOS TÉCNICOS DEL ASPIRADOR Marcado II 3 D c T 50°C Consumo de aire comprimido [L/min]* 700 Caudal de aire máximo [m³/h]* 140 Depresión máxima [mbar]* 190 Sección del tubo de alimentación [mm ] Øi≥ 10mm² Presión de alimentación [bar] 6-8 Superficie de filtrado [m2] 1 Capacidad del recipiente [L] 30 Herramientas con conexión [n] 1 Nivel de presión acústica [dB] 68 Empalme de aspiración [mm] 1x50mm/1x44mm/1x34mm Dimensiones [A x B x C] - [cm] 80 x 44 x 45 Dimensiones embalaje [A x B x C] - [cm] 100 x 77 x 57 Peso [kg] 20 Peso embalaje [kg] 30 Puesta en marcha Manual 2 * presión operativa 6 [bar] 19 Professionele pneumatische stofzuiger NL DE INHOUD VAN DE VERPAKKING CONTROLEREN De verpakking bevat: - 1 pneumatische stofzuiger - 1 polyester stofzak Ten aanzien van het weggooien van het verpakkingsmateriaal moet u zich aan de voorschriften houden die op de plaats gelden waar de machine in bedrijf gesteld wordt, waarbij de voorschriften voor de gescheiden afvalverwerking, indien van toepassing, in acht genomen moeten worden. ALGEMENE WAARSCHUWINGEN Veiligheids- en ongevalpreventievoorschriften. - Dit apparaat moet alleen bedient worden door getraind personeel; zorg altijd voor toezicht en laat het apparaat niet bedienen door ongeautoriseerde personen en kinderen; - de gebruiker dient te zijn geïnformeerd, opgeleid en getraind voor het gebruik van het apparaat en voor de hantering van de stoffen waarvoor het gebruikt moet worden en dient eveneens te worden voorgelicht over een veilige werkwijze voor het verwijderen en afvoeren van het verzamelde materiaal; - de ruimte waarin het apparaat werkt dient voldoende te worden geventileerd indien de uitlaatlucht wordt tergu geblazen in de ruimte. Verwijzing naar nationale verordeningen is noodzakelijk; - de temperatuur in de werkomgeving moet tussen de 10°C en de 35°C zijn en het vochtigheidspercentage tussen de 50% en de 90%; - het oppervlak waar de machine op neergezet moet worden mag niet meer overhellen 10 graden; - de machine mag niet in de regen gezet worden; - de machine mag niet opgehesen worden en vervoerd worden door de machine met het handvat aan een hijswerktuig vast te maken. Explosie- en brandgevaar - Er mogen geen ontvlambare of explosieve stoffen (bijv. magnesium, aluminium, asbest enz.) opgezogen worden; - er mag geen schuurstof van geverfde oppervlakken opgezogen worden die hun katalysecyclus nog niet voltooid hebben; - zuig geen gloeiend hete spaanders en andere stoffen op; - als er stof uit de stofzuiger komt dan moet de stofzuiger onmiddellijk van het elektriciteitsnet afgekoppeld worden; - er mogen geen ontvlambare of explosieve vloeistoffen (bijv. benzine, verdunners enz.) opgezogen worden; - er mogen geen agressieve vloeistoffen of stoffen (bijv. zuren, basen, oplosmiddelen enz.) opzogen worden. ATEX-versie De machine voldoet als apparaat van de categorie 3 D aan de ATEX-richtlijn 2014/34/EU en aan de geharmoniseerde normen, vermeld in de verklaring van overeenstemming. In de buurt van de zone waar het apparaat wordt gebruikt, moeten indicaties aangebracht worden om aan te duiden dat het mogelijk is dat explosiegevaarlijke atmosferen aanwezig zijn (zoals voorgeschreven door de ATEX-richtlijn 2014/34/EU). Het apparaat bevat stofafzettingen en explosiegevaarlijke atmosferen. De bediener moet vooral vermijden dat mogelijke ontstekingsbronnen in de buurt van het apparaat of in het apparaat terecht komen. vlammen, gas of warme oppervlakken, elektrische delen, elektrostatische ladingen, mechanische vonken. Als de bediener de bak leegt moet hij de kabel van het aardingscircuit afsluiten en weer aan de bak aansluiten om accumulatie van elektrostatische ladingen te vermijden. Het etiket, de technische gegevens en de ATEX-markering zijn aanwezig op het paneel aan de achterkant. Let op! Lees alle aanwijzingen in verband met de veiligheid en de indicaties. JBDC Spa kan niet aansprakelijk gesteld worden voor directe of indirecte schade, te wijten aan het niet in acht nemen van de aanwijzingen in deze handleiding. Beoogd gebruik Deze machine voldoet aan de referentienormen EN60335-2-69 voor industriële toepassingen. Machine die geschikt is voor het aanzuigen van stof met een toegelaten maximumconcentratie op de werkplek ≥ 0.1 [mg/m³] en houtstof (Klasse M - Medium HAZARD. “M” versies Het is niet toegestaan om stof met een waarde van Kst > 200 (bar-m/s) en/of ontstekingsenergie < 10 mJ op te zuigen. Volg de lokale regelgeving die van kracht is. 20 Professionele pneumatische stofzuiger NL Raadpleeg alle veiligheidsvoorschriften die op de behandelde materialen van toepassing zijn. ONDERDELEN VAN DE MACHINE 1 2 3 4 5 6 - Steunplank Steunframe Handgreep Stroomschakelaar Snelkoppeling pneumatisch gereedschap Haak hoofdeinde 7 - Aardingsklem 8 - Filter 9 - Stofzak 10 - Beluchtingssleufje 11 - Draaibare wielen met rem 12 - Ingang persluchttoevoer DE MACHINE INSTALLEREN De machine moet op een stevig en genivelleerd vlak worden geplaatst. Zorg ervoor dat in het werkgebied de metalen klem van de stofzuiger op het aardingscircuit van de werkplek kan worden aangesloten. Sluit de pneumatische slang aan op de stofzuiger (zie afbeelding 3), in het bijzonder: - De snelkoppeling aan de pneumatische aansluiting aan de voorzijde van de stofzuiger - De zuigslang aan de stofzuigeraansluiting Verwijder de kop van de stofzuiger door middel van de twee metalen haken (zie afbeelding 4, 5). Plaats de stofzak in de trommel door deze correct op de stofzuigeraansluiting te bevestigen (zie afbeelding 6). Plaats de kop van de stofzuiger correct boven de trommel en bevestig deze met de bijbehorende metalen haken. Aansluiting op het pneumatisch netwerk Belangrijk: er mag alleen gefilterde en gedroogde lucht worden gebruikt. Controleer of de toevoerkraan van de stofzuiger gesloten is. Sluit een leiding met een inwendige diameter van 10 mm op de toevoerkraan aan (zie afbeelding 7). Stel de vermogensdruk af op 6,5 [bar]. Sluit het pneumatische gereedschap aan op de koppeling op de slang en de aanzuigleiding op het stopcontact op het pneumatische gereedschap. Waarschuwing: de stofzuiger heeft om goed te functioneren een persluchttoevoer nodig die 1500 l/min kan leveren onder druk van 6 [bar]. Zorg ervoor dat het persluchtnetwerk de eenheid van stroom kan voorzien. Aansluiting op het aardingscircuit Sluit de bijbehorende metalen klem aan op een deel van de werkplek dat is aangesloten op het aardingscircuit van de installatie (zie afbeelding 9). Let op: het apparaat moet altijd met behulp van de metalen klem op het aardingscircuit van de installatie zijn aangesloten; vooral tijdens het gebruik van de stofzuiger, tijdens het legen van de stofzak en het vervangen ervan. Voer na de aansluiiting een korte test uit van de werking van het gereedschap, volgens de meegeleverde instructies. Voorafgaande controles - Controleer of de stofzak in de container is gemonteerd en of het filter op de kop is gemonteerd; - Controleer of de zuigslang goed is vastgezet en de beweging van het gereedschap niet belemmert; - Controleer of er geen lekken zijn in het persluchttoevoersysteem. GEBRUIK VAN DE MACHINE De machine kan in de automatische of handmatige modus werken: selecteer de gekozen modus door de schakelaar te draaien, of naar (automatisch) of naar (handmatig) (afbeelding 10). Automatische werking (AUT) Met automatische werking wordt bedoeld dat de stofzuiger gelijktijdig met het ontsteken van het aangesloten gereedschap in gebruik wordt genomen. Nadat het gereedschap is uitgeschakeld wordt de stofzuiger automatisch uitgeschakeld. Handmatige werking (MAN) Met handmatige werking wordt bedoeld dat de machine continu draait. 21 Professionele pneumatische stofzuiger NL ONDERHOUD Voor onderhoud door de gebruiker moet het apparaat worden gedemonteerd, gereinigd en gereviseerd, voor zover redelijkerwijs van toepassing, zonder dat dit risico voor onderhoudspersoneel en anderen met zich meebrengt. Raadpleeg de plaatselijke voorschriften met betrekking tot de voorwaarden voor gefilterde ventilatie van de afvoerlucht in de ruimte waarin het apparaat wordt gedemonteerd, bescherming van het personeel en reiniging van het gebied waarin het onderhoud wordt uitgevoerd. Reguliere besturingselementen - Controleer de status van de zuigslangen van het stof; - controleer regelmatig de stofzak: niet meer dan het aangegeven gewicht en volume! Als de verwijderde zak scheuren heeft, waardoor het stof lekt, laat dan de filters controleren en laat ze eventueel door een Erkend Servicecentrum vervangen; - controleer regelmatig de status van het filter, zo nodig vervangen. Als het filter beschadigd, gescheurd is of een afwijking heeft breng dan de machine naar het Bevoegde Servicecentrum. Niet stofzuigen zonder geïnstalleerd filterelement! Zakken vervangen Probeer om bij het uitvoeren van deze handelingen het stof niet op te heffen! Draag een geschikt stofmasker; Polyester zak (code 130.1108/C): - maak de kop van de houder door middel van de haken los (afb.4 en 5); - verwijder de gebruikte zak (afb. 6); - leg de nieuwe zak neer door de flens op de aanzuigopening aan te brengen, zoals afgebeeld (afb.6); - plaats de kop op de stofemmer, zorg ervoor dat het in de juiste richting is gericht (afb.5) - zet de kop met de twee metalen haken vast. Gebruik voor vervanging uitsluiten zakken van JBDC. De reservezakken moeten op een droge plaats worden opgeslagen! Ga voor het afvoeren volgens de wettelijke regels te werk. Filter vervangen Probeer om bij het uitvoeren van deze handelingen het stof niet op te heffen! Draag een geschikt stofmasker. maak de kop van de houder door middel van de haken los (afb.4-5); - keer de kop om en laat het op de houder rusten (afb. 11); - verwijder het gebruikte filter (afb. 11) en sluit het in een speciale zak voor het afvoeren; - plaats het nieuwe filter (code 076.1613) in het frame en monteer het frame op de kop. Gebruik uitsluitend reserveonderdelen van JBDC. Raadpleeg voor informatie over reserveonderdelen en bevoegde Servicecentra de website. JBDC Spa aanvaardt geen enkele aansprakelijkheid voor directe of indirecte schade als gevolg van het niet in acht nemen van hetgeen in deze handleiding staat aangegeven. 22 NL Professionele pneumatische stofzuiger EVENTUELE GEBREKEN EN OPLOSSING Gevolgen Oorzaak Oplossing Geen perslucht Controleer de aansluiting op het persluchtsysteem Toevoervoerleiding defect of ongeschikt Neem contact op met een erkend servicecentrum. Stofzak vol Stofzak vervangen Slang verstopt of defect Controleer de slang en toebehoren Filterreinigingssysteem defect Luchtdruk controleren Er komt stof uit de afvoer van de turbine Filter gescheurd Contact opnemen met een erkend servicecentrum Als alle pneumatische gereedschppen aangesloten zijn dan neemt het vermogen af Persluchttoevoer onvoldoende De luchtdoorlaten controleren De stofzuiger start niet De zuigcapaciteit is onvoldoende TECHNISCHE GEGEVENS STOFZUIGER Markering II 3 D c T 50°C Persluchtverbruik [L/min]* 700 Maximale luchtstroom [m /h]* 140 3 Maximale neergang [mbar]* 190 Doorsnede toevoerleiding [mm ] Øi≥ 10mm² Toevoerdruk [bar] 6-8 Filteroppervlak [m2] 1 Opvangvolume [L] 30 Aan te sluiten instrumenten [n] 1 Geluidsdrukniveau [dB] 68 Beluchtingssleufje [mm] 1x50mm/1x44mm/1x34mm Afmetingen [A x B x C] - [cm] 80 x 44 x 45 Afmetingen verpakking [A x B x C] - [cm] 100 x 77 x 57 Gewicht [kg] 20 Gewicht verpakking [kg] 30 In werking stellen Manual 2 * bedrijfsdruk 6 [bar] 23 Aspiratore professionale pneumatico IT CONTROLLO DEL CONTENUTO DELL’IMBALLO L’imballo contiene: - n° 1 aspiratore pneumatico - n° 1 sacco raccolta polvere in materiale poliestere Per lo smaltimento dei componenti formanti l’imballo, attenersi alle disposizioni in vigore nel luogo di messa in servizio della macchina, tenendo nel dovuto conto le regole per la raccolta differenziata qualora prevista. AVVERTENZE GENERALI Norme per la sicurezza e la prevenzione degli infortuni. - La macchina deve essere utilizzata solo da persone addestrate ed incaricate del suo utilizzo, pertanto la macchina non è destinata a essere usata da bambini o persone le cui capacità fisiche, sensoriali o mentali siano ridotte; - l’operatore deve essere informato, istruito ed addestrato all’uso dell’apparecchio e alle sostanze per cui deve essere usato, incluso il metodo sicuro di rimozione ed eliminazione del materiale raccolto; è necessario fornire un adeguato ricambio d’aria nel locale se l’aria di scarico ritorna nel locale stesso. È necessario fare riferimento alle regolamentazioni nazionali; - l’ambiente deve avere una temperatura tra i 10° C e i 35°C con una percentuale di umidità tra 50% e 90%; - il piano di appoggio della macchina non deve superare una pendenza massima di 10 gradi; - non esporre la macchina alla pioggia e alle basse temperature; - non sollevare e trasportare la macchina agganciandola all’impugnatura con un apparecchio di sollevamento. Pericolo di esplosione o incendio - Non devono essere aspirate polveri infiammabili o esplosive; - non devono essere aspirate polveri di levigatura di superfici trattate con vernici che non hanno completato il ciclo di catalizzazione; - non aspirare scintille o trucioli caldi; - in caso di fuoriuscita di polvere dall’aspiratore, scollegare immediatamente l’aspiratore dalla rete di alimentazione; - non devono essere aspirati liquidi infiammabili o esplosivi (ad es. benzina, diluenti, ecc.); - non devono essere aspirati liquidi o sostanze aggressive (ad es. acidi, basi, solventi, ecc.). Versione ATEX La macchina è conforme alla direttiva ATEX 2014/34/EU ed alle norme armonizzate riportate nella dichiarazione di conformità come apparecchio di categoria 3D. In prossimità della zona di utilizzo dell’apparecchio devono essere applicate opportune indicazioni di possibile presenza di atmosfere esplosive (come indicato dalla direttiva ATEX 2014/34/ EU). L’apparecchio contiene al suo interno depositi di polvere ed atmosfere potenzialmente esplosive. in particolare l’operatore deve evitare di introdurre nelle vicinanze o all’interno dell’apparecchio o nel secchio possibili sorgenti di innesco come: fiamme, gas o superfici calde, parti elettriche, cariche elettrostatiche, scintille meccaniche. L’etichetta, i dati tecnici e la marcatura ATEX sono posti sul pannello posteriore. Attenzione! leggere tutte le avvertenze per la sicurezza e le indicazioni. JBDC spa non assume alcuna responsabilità per danni diretti o indiretti derivanti dall’inosservanza di quanto indicato nel presente manuale. Utilizzo conforme agli scopi Questa macchina è conforme alle norme di riferimento EN60335-2-69 per applicazioni industriali. Macchina adatta per polveri con una concentrazione massima consentita sul posto di lavoro≥ 0.1 [mg/m³] e alle polveri di legno (Classe M - Medium HAZARD). Versione “M” Non è consentita l’aspirazione di polveri con valore Kst > 200 (bar*m/s) e/o energia di innesco< 10 mJ. Attenersi alle disposizioni locali in vigore. Fare riferimento ad ogni regolamento di sicurezza applicabile ai materiali trattati. 24 Aspiratore professionale pneumatico IT PARTI DELLA MACCHINA 1 2 3 4 5 6 - Ripiano di appoggio Telaio di supporto Maniglia Interruttore di accensione Attacco rapido utensile pneumatico Gancio testata 7 - Pinza messa a terra 8 - Filtro 9 - Sacchetto di raccolta polvere 10 - Raccordo di aspirazione 11 - Ruote pivotanti con freno 12 - Ingresso di alimentazione aria compressa INSTALLAZIONE DELLA MACCHINA La macchina deve essere posizionata su un piano solido e livellato. Assicurarsi che nell’area di lavoro sia possibile collegare la pinza metallica dell’aspiratore al circuito di terra del luogo di lavoro. Collegare all’aspiratore la manichetta pneumatica (vedi figura 3), in particolare: - L’innesto rapido alla presa pneumatica presente sul lato frontale dell’aspiratore - La manichetta di aspirazione alla presa dell’aspiratore Rimuovere la testata dell’aspiratore agendo sui due ganci metallici (vedi figura 4, 5). Posizionare all’interno del fusto il sacco polvere fissandolo correttamente al raccordo di aspirazione (vedi figura 6). Posizionare la testata dell’aspiratore sopra il fusto nel modo corretto e fissarla con gli appositi ganci metallici. Collegamento alla rete pneumatica Importante: deve essere usata esclusivamente aria filtrata ed essiccata. Verificare che il rubinetto di alimentazione dell’aspiratore si chiuso. Collegare al rubinetto di alimentazione un tubo di diametro interno 10mm (vedi figura 7). Regolare la pressione di alimentazione a 6.5bar. Collegare l’utensile pneumatico all’innesto presente sulla manichetta ed il tubo di aspirazione alla presa presente sull’utensile pneumatico. Avvertenza l’aspiratore per funzionare correttamente richiede una alimentazione di aria compressa che possa fornire 1500l/min alla pressione di 6bar. Assicurarsi che la rete di aria compressa sia in grado di alimentare l’unità. Collegamento al circuito di terra Collegare l’apposita pinza metallica ad una parte del luogo di lavoro collegata al circuito di terra dell’impianto (vedi figura 9). Attenzione: l’apparecchio deve essere sempre collegato al circuito di terra dell’impianto tramite la pinza metallica, in particolare durante l’utilizzo dell’aspiratore, durante le operazioni di svuotamento del sacco polvere e cambiamento dello stesso. Dopo aver effettuato i collegamenti effettuare una prima breve prova di funzionamento degli utensili seguendo le istruzioni a corredo degli stessi. Controlli preliminari - verificare che nel contenitore sia montato il sacco raccolta polvere e che il filtro sia montato sulla testata; - verificare che la manichetta di aspirazione sia adeguatamente fissata e non ostacoli la manovra degli utensili; - verificare che nell’impianto di alimentazione di aria compressa non vi siano perdite. USO DELLA MACCHINA La macchina può funzionare in modalità automatico o manuale: selezionare la modalità prescelta ruotando l’interruttore o verso (automatico) o verso (manuale) (figura 10). Funzionamento in automatico (AUT) Per funzionamento in automatico si intende che, con l’accensione dell’utensile collegato, avvenga la contemporanea messa in funzione dell’aspiratore. Dopo aver spento l’utensile, l’aspiratore si spegne automaticamente. Funzionamento in manuale (MAN) Per funzionamento in manuale si intende che la macchina funziona in modo continuo. 25 Aspiratore professionale pneumatico IT MANUTENZIONE Per la manutenzione da parte dell’utilizzatore, l’apparecchio deve essere smontato, pulito e revisionato, per quanto ragionevolmente applicabile, senza causare rischi al personale di manutenzione e agli altri. Fare riferimento alle normative locali in merito alle condizioni di ventilazione filtrata dell’aria di scarico nel locale in cui l’apparecchio viene smontato, protezione del personale e pulizia dell’area in cui viene effettuata la manutenzione. Controlli ordinari - Controllare lo stato delle manichette di aspirazione delle polveri; - verificare periodicamente il sacco raccolta polvere: non superare i limiti di peso e volume indicati! Qualora il sacco rimosso presentasse lacerazioni tali da provocare la fuoriuscita delle polveri, far controllare ed eventualmente sostituire i filtri da un Centro di Assistenza Autorizzato; - verificare periodicamente lo stato del filtro, se necessario provvedere alla loro sostituzione. Qualora il filtro risulti danneggiato, lacerato o presenti qualsiasi anomalia, portare la macchina presso il Centro Assistenza Autorizzato. Non aspirare senza elemento filtrante installato! Sostituzione Sacchetti Nello svolgere le seguenti operazioni cercare di non sollevare le polveri! Indossare una mascherina antipolvere idonea ; Sacco in poliestere (cod. 130.1108/C): - sganciare la testata dal contenitore agendo sui ganci (fig.4 e 5); - rimuovere il sacco usato (fig. 6); - adagiare il nuovo sacco inserendo la flangia sul raccordo di aspirazione come illustrato (fig.6); - posizionare la testata sul secchio polvere assicurandosi che sia rivolta nella direzione corretta (fig.5) - fissare la testata con i due ganci metallici. Utilizzare come ricambio esclusivamente sacchi JBDC. I sacchi di ricambio vanno conservati in luogo asciutto! Per lo smaltimento procedere secondo le norme di legge. Sostituzione Filtro Nello svolgere le seguenti operazioni cercare di non sollevare le polveri! Indossare una mascherina antipolvere idonea. - sganciare la testata dal contenitore agendo sui ganci (fig. 4-5); capovolgere la testata appoggiandola sul contenitore (fig. 11); rimuovere il filtro usato (fig. 11) e richiuderlo in un apposito sacchetto per lo smaltimento; collocare il nuovo filtro (cod. 076.1613) nel telaio e rimontare il telaio sulla testata. Utilizzare solo esclusivamente ricambi JBDC. Per informazioni su codici ricambi e Centri Assistenza autorizzati consultare il sito internet. La JBDC Spa non assume alcuna responsabilità per danni diretti o indiretti derivanti dall’inosservanza di quanto indicato nel presente manuale. 26 IT Aspiratore professionale pneumatico EVENTUALI ANOMALIE E LORO ELIMINAZIONE Effetti L’aspiratore non si avvia Cause Rimedi Mancanza aria compressa Verificare collegamento all’impianto dell’aria compressa Tubo di alimentazione difettoso o non Rivolgersi ad un Centro Assistenza idoneo autorizzato Sacco troppo pieno Verificare il sacco filtrante Manichetta flessibile otturata o difettosa Controllare la manichetta flessibile e gli accessori Filtri intasati Verificare i filtri Fuoriescono polveri dall’uscita di scarico Filtro a cartuccia lacerato Rivolgersi ad un Centro Assistenza autorizzato Perdita di potenza con l’utensile pneumatico collegato Insufficiente alimentazione d’aria compressa Verificare i passaggi d’aria La capacità di aspirazione è insufficiente DATI TECNICI ASPIRATORE Marcatura II 3 D c T 50°C Consumo Aria Compressa [L/min]* 700 Portata d’aria massima [m /h]* 140 3 Depressione massima [mbar]* 190 Sezione Tubo di alimentazione [mm ] Øi≥ 10mm² Pressione di alimentazione [bar] 6-8 Superficie filtrante [m2] 1 Capacità contenitore [L] 30 Utensili collegabili [n] 1 Livello di pressione acustica [dB] 68 Raccordo di Aspirazione [mm] 1x50mm/1x44mm/1x34mm Dimensioni [A x B x C] - [cm] 80 x 44 x 45 Dimensioni Imballo [A x B x C] - [cm] 100 x 77 x 57 Peso [kg] 20 Peso Imballo [kg] 30 Avviamento Manuel 2 *pressione operativa 6 [bar] 27 Профессиональный пневматический пылесос RU ПРОВЕРКА СОДЕРЖИМОГО УПАКОВКИ В упаковке содержится следующее: - пневматический аспиратор №1 - n ° 1 мешок для сбора пыли из полиэстера Утилизация упаковочных материалов, включая возможную сдачу для вторичной переработки, должна производиться в соответствии с действующими местными правилами. ПРЕДУПРЕЖДЕНИЯ Инструкции по технике безопасности и указания по предотвращению несчастных случаев. - К эксллуатации данного устройства должны допускаться только лица, прошедшие соответствующее обучение; устройство не предназначено для эксплуатации детьми и людьми с отклонениями в психике. - Перед работой пользователи должны пройти инструктаж и обучение методам работы с данным устройством, а также получить информацию о характере загрязняющего вещества, для удаления которого оно используется, включая сведения о надлежащих способах безопасного удаления и утилизации собранных веществ. - Если отработанный воздух остается в помещении, необходимо обеспечить, чтобы помещение хорошо проветривалось. Уровень воздухообмена должен соответствовать принятым в стране нормативам. - Температура в зоне выполнения работ должна быть в пределах от 10 °C до 35 °C, влажность - от 50 до 90%. - Уклон поверхности, на которой установлено устройство, не должен превышать 10 градусов. - Не следует подвергать устройство воздействию осадков и низких температур. - При использовании какого-либо подъемного приспособления не следует производить подъем и транспортировку устройства за ручку. Угроза взрыва или пожара - В случае если пыль состоит из легковоспламеняющихся или взрывоопасных веществ (магний, алюминий и т.п.), удалять ее пылесосом не следует. - Не следует чистить пылесосом содержащие шлифовальную пыль поверхности, обработанные красящими материалами, катализаторный цикл которых не был завершен. - Не следует удалять пылесосом искры или раскаленные стружки. - При выбрасывании пыли из воздуховыпускного отверстия следует незамедлительно отключить пылесос от сети электропитания. - Не следует удалять пылесосом легковоспламеняющиеся или взрывоопасные жидкости (бензин, разбавители и т.п.). - Не следует удалять пылесосом агрессивные жидкости или вещества (кислоты, щелочи, растворители и т.п.). Версия ATEX Данная установка соответствует требованиям директивы ATEX 2014/34/EU и гармонизирующим нормам, указанным в декларации соответствия как оборудование категории 3 D. В непосредственной близости к участку применения установки следует установить соответствующие предупредительные символы и таблички, уведомляющие о возможном присутствии взрывоопасных атмосфер (в соответствии с указаниями директивы ATEX 2014/34/EU). Установка содержит внутри скопления пыли и потенциально взрывоопасных атмосфер. В частности, работающий с установкой персонал должен избегать присутствия на участке поблизости от установки и в самой установке источников возгорания, как то: открытого пламени, газов, горячих поверхностей, электрических частей, электростатических разрядов, механической искры. Табличка, технические данные и маркировка ATEX нанесены на заднюю стенку установки. Внимание! Внимательно ознакомиться с правилами техники безопасности и инструкциями по эксплуатации. JBDC Spa не несет никакой ответственности за возможный прямой или косвенный ущерб, причиненный в результате несоблюдения указаний и инструкций данного руководства. Применение по назначению Данное оборудование соответствует базовым нормам EN60335-2-69 для промышленного назначения. Данная установка предназначена для аспирации пыли при максимально разрешенной концентрации на рабочем месте ≥ 0,1 [мг/м³] и древесной пыли (Класс M - Средний уровень опасности). 28 Профессиональный пневматический пылесос RU Версии “M” Всасывание пыли со значением Kst> 200 (бар*м/с) и/или энергией воспламенения < 10 мДж не разрешается. Соблюдайте местные предписания. См. Все правила техники безопасности, применимые к обрабатываемым материалам. ЧАСТИ МАШИНЫ 1 2 3 4 5 6 - самолет поддержки корпус пылесоса Ручка клапан запуска муфта сцепления пневматического инструмента крюк 7 - зажим для заземления 8 - фильтр 9 - мешок для пыли 10 - Всасывающий патрубок 11 - поворотные колеса 12 - патрубок подвода сжатого воздуха МОНТАЖ МАШИНЫ Машина должна быть установлена на твердой и ровной поверхности. Убедиться, что в рабочей зоне возможно подсоединить металлический зажим пылесоса к контуру заземления на рабочем месте. Подсоединить к пылесосу приложенный пневматический шланг (смотри рисунок 3), в частности: - быстроразъёмное соединение к пневматическому сцеплению с правой стороны передней части пылесоса - всасывающий шланг к патрубку пылесоса удалить головную часть пылесоса, воздействуя на две металлические защелки (смотри рисунок 4-5). Установить во внутренней части бидона пылесборный мешок, закрепив его должным образом на фланце патрубка (смотри рисунок 6). Установить должным образом головную часть пылесоса на бидоне и закрепить с помощью соответствующих металлических защелок. Подсоединение к пневматической сети Важно: Должен использоваться исключительно сухой и отфильтрованный воздух. Проверить, что кран питания пылесоса закрыт. Подсоединить к питающему крану трубу с внутренним диаметром 10 мм (смотри рисунок 7). Отрегулировать давление подачи на 6.5 Бар. Подсоединить пневматический инструмент к быстроразъемному соединению на шланге и всасывающую трубу к разъему, имеющемуся на пневматическом инструменте. Предупреждение: для правильной работы пылесоса требуется подача сжатого воздуха мощностью 1500 л / мин при давлении 6 бар. Убедитесь, что сеть сжатого воздуха может питать агрегат. Подсоединение к контуру заземления Подсоединить соответствующий металлический зажим к одной из неподвижных частей, соединенных с контуром заземления на рабочем месте (смотри рисунок 9). ВНИМАНИЕ: Оборудование должно быть ПОСТОЯННО подсоединено к контуру заземления линии с помощью металлического зажима, в частности, во время эксплуатации пылесоса, во время операций по опорожнению пылесборного мешка и при его замене. Убедитесь в том, что характер функционирования пневмоинструмента соответствует сведениям, приведенным в инструкции по его эксплуатации. Предварительная проверка - Убедитесь в том, что пылесборный мешок установлен в контейнер, а фильтры установлены в вакуумную головку. - Убедитесь в том, что вакуумный шланг должным образом зафиксирован и не затрудняет перемещение устройства. - Проверьте герметичность системы подачи сжатого воздуха. 29 Профессиональный пневматический пылесос RU ИСПОЛЬЗОВАНИЕ УСТРОЙСТВА Устройство может работать в ручном и в автоматическом режиме: чтобы выбрать режим, поверните переключатель вправо (автоматический режим) или влево (ручной режим) (рис. 10). Автоматический режим (А) работы устройства В режиме автоматической работы запуск пылесоса осуществляется при включении пневмоинструмента. после выключения инструмента пылесос автоматически отключается. электро- или Ручной режим (М) работы устройства Ручной режим работы означает, что пылесос работает постоянно. ОБСЛУЖИВАНИЕ В рамках обслуживания устройства пользователем производится разборка, чистка и обслуживание устройства; при этом следует соблюдать разумные предосторожности, чтобы не подвергать опасности обслуживающий персонал и других лиц. К необходимым предосторожностям относится очистка устройства от загрязнения перед разборкой, обеспечение помещения, в котором производится разборка, системой вытяжной вентиляции, снабженной фильтрами (в соответствии с действующими правилами), чистка зоны обслуживания и соответствующие средства защиты персонала. Обычная проверка - Проверьте состояние вакуумного шланга. - Проверьте пылесборный мешок: не превышайте рекомендованный вес и объем. В случае разрыва или прокола пылесборного мешка проверьте состояние фильтрующего элемента и обратитесь в авторизованный сервисный центр для замены. - Проверьте состояние фильтрующих элементов. в случае их разрыва или прокола обратитесь в авторизованный центр технического обслуживания для замены. Не следует использовать устройство с неполным набором фильтрующих элементов. Замена пылесборного мешка Не встряхивайте пылесборный мешок во время его замены! Используйте пылезащитный респиратор. Сумка из полиэстера (код 130.1108 / C): - высвободите головку из контейнера, взявшись за крючки (рис. 4 и 5); - снимите использованный мешок (рис. 6); - уложите новый мешок, вставив фланец на всасывающий патрубок, как показано на рисунке (рис. 6); - поместите головку на контейнер для пыли, убедившись, что она обращена в правильном направлении (рис. 5) - закрепите голову двумя металлическими крючками. В качестве запасных частей используйте только сумки JBDC. Сменные пакеты необходимо хранить в сухом месте! Для утилизации действуйте в соответствии с законом. Замена фильтра Не встряхивайте пылесборный мешок во время его замены! Используйте защитную маску. 30 Освободив боковые защелки, отсоедините вакуумную головку (рис. 4-5). - Переверните головку (рис. 11). - Извлеките фильтрующие элементы (рис. 11) и поместите их в запечатанный пакет для отходов. - Установите новые фильтрующие (код 076.1613) элементы в раму фильтра и установите раму в вакуумную головку. RU Профессиональный пневматический пылесос Используйте только фирменные сменные элементы JBDC. Сведения о кодах запасных частей и авторизованных центрах технического обслуживания можно найти на сайте www.JBDC. com. Компания JBDC S.p.a. не несет ответственности за прямой или косвенный ущерб, возникший в результате несоблюдения требований, содержащихся в данной инструкции. ПОИСК И УСТРАНЕНИЕ НЕИСПРАВНОСТЕЙ ЯВЛЕНИЯ ПРИЧИНЫ СПОСОБЫ УСТРАНЕНИЯ Недостаток сжатого воздуха Проверьте подключение к системе сжатого воздуха Неисправный или неподходящий шланг подачи Обратитесь в авторизованный центр технического обслуживания Мешок заполнен Проверьте мешочный фильтр Засорение одного из шлангов или принадлежностей Проверьте состояние гибкого шланга и принадлежностей Засорение фильтров Проверьте фильтрующие элементы Появление пыли из выпускного отверстия Разрыв фильтрующего элемента Обратитесь в авторизованный центр технического обслуживания Недостаточная мощность для пневмоинструмента Недостаточная подача сжатого воздуха Проверьте воздушный канал Двигатель не запускается Производительность насоса недостаточна ТЕХНИЧЕСКИЕ ХАРАКТЕРИСТИКИ ВСАСЫВАЮЩЕГО БЛОКА Маркировка II 3 D c T 50°C Расход сжатого воздуха [л/мин] * 700 Максимальный расход воздуха [м /ч] * 140 Максимальный вакуум [мбар] * 190 Сечение подающей трубы [мм ] Øi≥ 10mm² Давление подачи [бар] 6-8 Площадь фильтра [м2] 1 Емкость контейнера [л] 30 Подключаемые инструменты [n] 1 Уровень звукового давления [дБ] 68 Всасывающий патрубок [мм] 1x50mm/1x44mm/1x34mm Размеры [A x B x C] - [см] 80 x 44 x 45 Размеры упаковки [A x B x C] - [см] 100 x 77 x 57 Вес [кг] 20 Вес упаковки [кг] 30 Sапуск машины Manuel 3 2 * рабочее давление 6 [бар] 31 Profesjonalny odkurzacz pneumatyczny PL SPRAWDZENIE ZAWARTOŚCI OPAKOWANIA Opakowanie zawiera: - 1 odkurzacz pneumatyczny - 1 worek na pył z poliestru W kwestii usuwania elementów opakowaniowych należy postępować zgodnie z normami obowiązującymi w kraju używania urządzenia, mając na uwadze konieczność stosowania segregacji odpadów. OSTRZEŻENIA OGÓLNE Normy w zakresie bezpieczeństwa i zapobiegania wypadkom. - Maszyna może być obsługiwana wyłącznie przez odpowiednio przeszkolonych pracowników, ponadto nie może być obsługiwana przez osoby małoletnie i osoby o ograniczonych zdolnościach fizycznych, sensorycznych lub psychicznych. - operator musi być poinformowany, pouczony i przeszkolony w zakresie użytkowania urządzenia i substancji, do których jest przeznaczony, jak również w zakresie bezpiecznego usuwania i likwidowania zebranego materiału; - w miejscu używania maszyny zapewnić odpowiednią wymianę powietrza, jeśli powietrze z odkurzacza powraca do pomieszczenia. Odnieść się do odpowiednich lokalnych regulacji prawnych. - temperatura otoczenia musi mieścić się w zakresie od 10°C do 35°C, a wilgotność względna od 50% do 90% - nachylenie podłoża, na którym jest ustawiony odkurzacz przemysłowy, nie może przekraczać 10 stopni; nie wystawiać urządzenia na deszcz i chronić je przed działaniem niskiej temperatury; - nie podnosić i transportować urządzenia zaczepiając podnośniki do odpowiednich uchwytów. Niebezpieczeństwo eksplozji lub wybuchu pożaru. - Nie mogą być zasysane pyły łatwopalne lub wybuchowe; - nie mogą być zasysane pyły pochodzące ze szlifowania powierzchni pomalowanych farbami, które nie zakończyły cyklu katalizowania; - nie zasysać iskier lub gorących wiórów; - w przypadku wydostania się pyłu z odkurzacza, należy natychmiast odłączyć urządzenie od sieci zasilania; - nie mogą być zasysane ciecze łatwopalne lub wybuchowe (np. benzyna, rozcieńczalniki, itp.); - nie mogą być zasysane ciecze lub substancje agresywne (np. kwasy, zasady, rozpuszczalniki, itp.). Wersja ATEX Urządzenie jest zgodne z dyrektywą ATEX 2014/34/UE i zharmonizowanymi normami wskazanymi w deklaracji zgodności jako urządzenie kategorii 3 D. W pobliżu obszaru użytkowania urządzenia należy umieścić stosowne znaki wskazujące możliwość występowania atmosfer wybuchowych (tak jak wskazano w dyrektywie ATEX 2014/34/UE). Wewnątrz urządzenia gromadzą się pyły i atmosfery potencjalnie wybuchowe. Operator musi unikać zbliżania lub wprowadzania do wnętrza urządzenia / pojemnika źródeł zapłonu, np. płomienia, gazu, gorących powierzchni, części elektrycznych, ładunków elektrostatycznych, iskier mechanicznych. Operator ma obowiązek opróżniać pojemnik i upewnić się, że podczas wykonywania tej czynności wcześniej odłączył, a następnie podłączył przewód obwodu uziemienia do pojemnika, aby zapobiec gromadzeniu się na nim ładunków elektrostatycznych. Tabliczka, dane techniczne i oznakowanie ATEX znajdują się na tylnej ściance urządzenia. Uwaga! Należy zapoznać się z wszystkimi wskazówkami i ostrzeżeniami dotyczącymi bezpieczeństwa. JBDC Spa nie ponosi odpowiedzialności za szkody pośrednie i bezpośrednie wynikające z braku stosowania się do wskazań podanych w poniższej instrukcji obsługi. Użytkowanie zgodne z przeznaczeniem Opisane urządzenie przeznaczone do użytku przemysłowego spełnia wymogi zastosowanych norm EN60335-1 i EN603352-69. Urządzenie nadaje się do wychwytywania pyłów z maksymalnym, dopuszczalnym stężeniem w miejscu pracy ≥ 0,1 [mg/m³] i pyłów drewnianych (klasa M – Medium HAZARD). Wersje „M” Zabrania się odsysania pyłu o wartości Kst> 200 (bar * m / s) i/lub energii zapłonu <10 mJ. Prosimy przestrzegać przepisów obowiązujących w danym kraju. Stosować się do przepisów BHP dotyczących zasysanych materiałów. 32 Profesjonalny odkurzacz pneumatyczny PL CZĘŚCI MASZYNY 1 2 3 4 5 6 – Pokrywa - Obudowa - Uchwyt - Wyłącznik zasilania - Szybkozłączka narzędzia pneumatycznego - Uchwyt głowicy 7 - Zacisk uziemienia 8 - Filtr 9 - Worek na pył 10 – Króciec ssawny 11 - Kółka obrotowe z hamulcem 12 - Wlot podawania sprężonego powietrza MONTAŻ MASZYNY Ustawić maszynę na wytrzymałej i płaskiej posadzce. Upewnić się, że w obszarze roboczym można podłączyć metalowe szczypce odkurzacza do obwodu uziemienia obecnego w miejscu pracy. Podłączyć do odkurzacza wąż ssawny (patrz rysunek 3): - szybkozłączka do wtyczki pneumatycznej znajdującej się na przodzie odkurzacza - wąż ssawny do wtyczki odkurzacza Wyjąć głowicę odkurzacza, używając dwóch metalowych haczyków (patrz rysunek 4.5). Włożyć worek na kurz do bębna, mocując go prawidłowo do złącza ssawnego (patrz rysunek 6). Umieścić głowicę odkurzacza nad bębnem w odpowiedni sposób i zabezpieczyć ją metalowymi haczykami. Podłączenie do sieci zasilania pneumatycznego Ważne: stosować tylko osuszone i przefiltrowane powietrze. Sprawdzić czy kurek na odkurzaczu jest zamknięty. Podłączyć kurek do rury o wewnętrznej średnicy 10 mm (patrz rysunek 7). Ustawić ciśnienie podawania na 6.5 bar. Podłączyć narzędzie pneumatyczne do złączki znajdującej się na wężu oraz włożyć rurę ssawną do gniazda narzędzia pneumatycznego. Odkurzacz do prawidłowego funkcjonowania wymaga podawania sprężonego powietrza w ilości 1500l/min pod ciśnieniem 6 bar. Upewnić się, że instalacja sprężonego powietrza jest w stanie spełnić to wymaganie. Podłączenie do uziemienia Podłączyć specjalny zacisk metalowy do części stanowiska pracy podłączonej do obwodu uziemiającego (patrz rysunek 9). Uwaga: urządzenie musi być zawsze podłączone do uziemienia za pomocą metalowego zacisku, zwłaszcza w trakcie używania odkurzacza, podczas opróżniania worka na kurz czy wymiany worka. Po podłączeniu wykonać krótką próbę funkcjonowania narzędzi, stosując się do załączonych do nich instrukcji. Kontrole wstępne - sprawdzić czy w zbiorniku znajduje się worek na pył oraz czy filtr jest zamontowany na głowicy; - sprawdzić czy wąż ssawny jest właściwie zamocowany i nie ma przeszkód uniemożliwiających prawidłowe manewrowanie urządzeniem. - sprawdzić czy w instalacji dostarczającej sprężone powietrze nie ma wycieków. UŻYWANIE MASZYNY Maszyna może funkcjonować zarówno w trybie automatycznym jak i ręcznym: wybrać odpowiedni tryb obracając wyłącznik albo w kierunku (automatycznym) albo w kierunku (ręcznym) (rysunek 10). Praca w trybie automatycznym (AUT) Pod pojęciem pracy w trybie automatycznym rozumie się sytuację, gdy wraz z włączeniem podłączonego narzędzia włącza się również odkurzacz. Po wyłączeniu narzędzia, automatycznie wyłącza się również odkurzacz. Praca w trybie ręcznym (MAN) Za funkcjonowanie w trybie ręcznym uważa się pracę maszyny w sposób ciągły. 33 Profesjonalny odkurzacz pneumatyczny PL KONSERWACJA W celu konserwacji przez użytkownika, urządzenie musi zostać rozmontowane, oczyszczone i poddane przeglądowi, o ile jest to uzasadnione i nie powoduje zagrożenia dla personelu konserwującego i innych osób. Zapoznać się z lokalnymi przepisami dotyczącymi warunków filtrowanej wentylacji powietrza wwiewnego do pomieszczenia, w którym demontowane jest urządzenie, warunków ochrony personelu i czyszczenia obszaru, w którym przeprowadzana jest konserwacja. Kontrole codzienne Sprawdzić stan węży ssawnych pyłu; Okresowo sprawdzać stan worka na pył: nie przekraczać poziomu napełnienia worka i jego ciężaru! Jeśli wyjęty worek jest rozerwany, co mogło skutkować wydostawaniem się pyłu, należy oddać urządzenie do autoryzowanego centrum serwisowego celem sprawdzenia i ewentualnej wymiany filtrów. - okresowo sprawdzać stan filtra a w razie konieczności pamiętać o jego wymianie. Jeśli filtr będzie nosił ślady uszkodzenia, rozerwania lub innych nieprawidłowości, oddać urządzenie do autoryzowanego centrum serwisowego. Nie używać odkurzacza bez elementu filtrującego! Wymiana worków Podczas wykonywania czynności uważać, aby nie podnosić pyłu! Założyć odpowiednią maskę przeciwpyłową. Worek poliestrowy (kod. 130.1108/C): - odczepić głowicę od zbiornika, posługując się odpowiednimi zaczepami (rys. 4 i 5); - wyjąć zużyty worek (rys. 6); - włożyć nowy worek, umieszczając kołnierz na króćcu ssawnym jak widać na rysunku (rys.6); - umieścić głowicę na worku, upewniając się, że jest ustawiona w odpowiednim kierunku (rys.5) - zamocować głowicę za pomocą dwóch metalowych haków. Stosować wyłącznie oryginalne worki JBDC. Przechowywać worki na wymianę w suchym pomieszczeniu! Usuwać zużyte worki zgodnie z obowiązującymi normami prawnymi. Wymiana filtra Podczas wykonywania czynności uważać, aby nie podnosić pyłu! Założyć odpowiednią maskę przeciwpyłową. - odczepić głowicę od zbiornika, posługując się odpowiednimi zaczepami (rys. 4-5); obrócić głowicę opierając ją o zbiornik (rys. 11); wyjąć zużyty filtr (rys. 11) i umieścić go w odpowiednim worku; założyć nowy filtr (kod. 076.1613) na obudowie i zamontować obudowę na głowicy. Stosować tylko oryginalne części zamienne JBDC. Dodatkowe informacje odnośnie kodów części zamiennych i autoryzowanych punktów serwisowych znajdą państwo na stronie internetowej. Firma JBDC Spa nie ponosi odpowiedzialności za szkody pośrednie i bezpośrednie wynikające z braku stosowania się do wskazań podanych w poniższej instrukcji obsługi. 34 PL Profesjonalny odkurzacz pneumatyczny EWENTUALNE NIEPRAWIDŁOWOŚCI I ICH USUWANIE Skutki Przyczyny Środki zaradcze Brak sprężonego powietrza Sprawdzić przyłącze do instalacji sprężonego powietrza Uszkodzona lub niewłaściwa rura doprowadzająca Skontaktować się z autoryzowanym centrum serwisowym Przepełniony worek Sprawdzić worek filtracyjny Uszkodzony lub zatkany wąż elastyczny Sprawdzić elastyczny wąż i akcesoria Zatkane filtry Sprawdzić filtry Pył wydostaje się z otworu wylotowego Kurz wydostaje się z otworu wylotowego Dziurawy filtr z wkładem Utrata mocy z podłączonym narzędziem pneumatycznym Nieprawidłowe podawanie sprężonego powietrza Sprawdzić przeloty powietrza Odkurzacz nie uruchamia się Niedostateczna moc zasysania DANE TECHNICZNE ODKURZACZA Oznaczenie II 3 D c T 50°C Zużycie sprężonego powietrza [L/min]* 700 Maksymalne natężenie przepływu powietrza [m /h]* 140 Maksymalne podciśnienie [mbar]* 190 3 Przekrój rury podającej [mm ] Øi≥ 10mm² Ciśnienie zasilania [bar] 6-8 Powierzchnia filtrująca [m2] 1 Pojemność zbiornika [L] 30 Narzędzia do podłączenia [n] 1 Poziom ciśnienia akustycznego [dB] 68 Złącze ssące [mm] 1x50mm/1x44mm/1x34mm Wymiary [A x B x C] - [cm] 80 x 44 x 45 Wymiary opakowania [A x B x C] - [cm] 100 x 77 x 57 Masa [kg] 20 Masa opakowania [kg] 30 Uruchamianie Manuel 2 * Ciśnienie robocze 6 [bar] 35 专业气动吸尘器 CN 检查包装的物品 包装包括: - 1个气动吸尘器 - 1个聚酯集尘袋 对于处置构成包装的组件,请遵守机器调试时有效的规定,并适当考虑单独收集废物的规则(如果适用)。 般警告 安全和事故预防规则 - 机器只能由经过培训并负责使用的人使用,因此,该机器不适用于儿童或身体,感官或心理能力下降的人使用; 必须就设备及其必须使用的物质的使用情况向操作人员进行告知,指导和培训,包括安全的方法来清除和处置所收集的 材料; - 如果排气返回到房间本身,则必须在房间内提供足够的空气交换。有必要参考国家法规; - 环境温度必须在10°C至35°C之间,湿度百分比在50%至90%之间; -机器支撑表面的最大倾斜度不得超过10度; -请勿将机器暴露在雨淋和低温下; 请勿通过吊具将其挂在手柄上,以提起和运输机器。 爆炸或着火的危险 -请勿吸入易燃或易爆粉尘 -不得从未完成固化周期的油漆处理过的砂纸表面上吸走灰尘 -不要吸取火花或热刨花; -如果灰尘从吸尘器中漏出,请立即断开吸尘器与电源的连接; -不得吸入易燃或易爆液体(例如汽油,稀释剂等); -禁止吸入液体或腐蚀性物质(例如酸,碱,溶剂等)。 ATEX版本 机器符合ATEX 2014/34/EU指令以及合规声明内提及的关于3D类设备的标准。 在设备使用区域附近,必须添加适当的爆炸气体疑似存在说明(如ATEX 2014/34/EU指令)。 设备内部含有堆积粉末和潜在爆炸性的气体。尤其要说的是,操作员必须避免在设备附近或内部,或者在可能产生以下 情况的桶内:火焰、热气体或表面、电气部件、静电荷、机械火苗。 操作员需要清空桶,确保地线断开并重新连接桶,从而避免上面蓄积静电荷。 标签、技术数据和ATEX铭牌都在后端面板上。 注意!阅读一切关于安全和说明的警告。JBDC Spa不会为违反本手册的直接或间接损失负责。 符合规定用途的使用 本机器符合工业应用的EN60335-1和EN60335-2-69参考标准。该机器适合工作岗位最大允许浓度 ≥ 0.1 [mg/m³]的粉末 以及木屑(M-中等危险级别)。 “M”版本 不能抽吸数值Kst > 200 (bar*m/s)和/或触发能量< 10 mJ的粉尘。遵守现行当地规定 参考任何处理材料适用的安全规范; 机器的部件 36 1 2 3 4 5 6 - 支撑隔板 支撑框架 手柄 开关 气动刀具的快速接口 头部钩子 7 - 接地夹钳 8 - 过滤器 9 - 集尘袋 10- 抽吸接头 11 - 含制动的枢转轮 12 - 压缩气源的入口 专业气动吸尘器 CN 机器的安装 机器必须置于坚固水平的平面上确保工作区域内可以将吸尘器的金属夹钳连接到工作地点的接地回路上。 将吸尘器连接气动套管(见图 3),尤其是: - 将快速插头连接到吸尘器前端的启动插销上 - 将抽吸套管连接到吸尘器插销上 通过两个金属挂钩来移除吸尘器头部(见图4、5)。将集尘袋安置在筒内,将其正确固定在抽吸接头上(见图6)。将 吸尘器头部正确安置在桶上面,利用适当的金属挂钩将其固定。 气动网络的连接 须知:只能使用已过滤的干燥气体。确认吸尘器气源旋塞已经关闭。将供气旋塞联通内径10mm的管子(见图7)。将供 气压力调节至6.5 [bar]。将气动刀具联通套管上的接头,将抽吸管连接到气动刀具上的插销。 警告 :为了正确运行,吸尘器需要压力为6 [bar],气流为1500l/min的压缩气源。确保压缩气网络能够给 单元供气。 接地回路连接 将专门的金属夹钳连接到工作地点内联通设备地线回路的部分 (参见图9) 注意:设备必须一直通过金属夹钳联通设备的地线回路。 尤其要说的是,在使用吸尘器、情况集尘袋和更换集尘袋期间。 在执行了连接后,需要按照配套的说明,对刀具进行首次短暂的功能测试。 初步检查 - 确认容器内安装了集尘袋,而过滤器被安装在头上。 - 确认抽吸套管是否适当固定,且不阻碍刀具的操作; - 确认压缩气设备内不存在损失。 机器的使用 机器可以自动或手动运行:通过将开关转向(自动)或转向(手动)来选择预选模式(图10)。 自动运行(AUT) 自动模式下的运行就是指在打开连接刀具时,会同时试运吸尘器。 在关闭刀具后,吸尘器会自动关闭。 手动运行 (MAN) 手动运行就是指机器在持续模式下运行。 维护 为了让用户进行维护,设备必须以合理适用的方式进行拆卸、清洁和校正,避免给维护人员和其他人员造 成风险。参考拆卸机器的房间内排气的已过滤通风条件、人员保护和维护区域清洁的相关规范。 日常检查 - 检查粉尘抽吸套管的状态; - 定期检查粉尘收集袋:不得超过说明的重量和体积限制!一旦被移除的袋子出现了撕裂,造成了粉尘外溢,需要让获 授权的协助中心检查并替换过滤器; - 定期检查过滤器的状态, 如果必要的话,就要进行替换。一旦过滤器破损,撕裂或者存在异常,需要将机器送往获授 权的协助中心。 严禁在未安装过滤元件时抽吸! 37 CN 专业气动吸尘器 袋子的替换 在开展以下操作时,避免扬起粉尘! 穿戴适当的防尘面具; 聚酯袋(编号130.1108/C): - 通过挂钩,让头部和容器脱钩(图4和5); - 移除废旧袋子(图6); - 如图平放新袋子,将法兰插入抽吸接头(图6); - 将头部置于粉尘桶内,确保朝向正确(图5) - 用两个金属挂钩固定头部。 只能使用JBDC的袋子作为备件。备件袋子必须保存在干燥处! 为了处置,需要依据法规办事。 过滤器的替换 在开展以下操作时,避免扬起粉尘! 穿戴适当的防尘面具 - 通过挂钩,让头部和容器脱钩(图4-5); - 倒转头部,将其靠在容器上(图11); - 移除用过的过滤器(图11),将其关闭在适当袋子里,用于处置; 将新过滤器(编号076.1613) 放在框架内,并移除头部上的框架。 只能使用JBDC的备件。欲知关于备件编号和获授权协助中心的信息,需要查阅网站。 JBDC Spa不会为违反本手册的直接或间接损失负责。 任何异常现象及其消除 特效 原因 补救措施 压缩空气不足 检查与压缩空气系统的连接 供给软管不良或不合适 与授权服务中心联系 麻袋太饱 检查滤袋 软管堵塞或损坏 检查软管和附件 过滤器堵塞 检查过滤器 灰尘从排气口排出 滤筒撕裂 与授权服务中心联系 连接气动工具后断电 压缩空气供应不足 检查空气通道 提取器无法启动 吸力不足 38 CN 专业气动吸尘器 吸尘器技术数据 标识 II 3 D c T 50°C 吸尘器消耗量 [L/min]* 700 最大气流量 [m /h]* 140 最大去压 [mbar]* 190 供气管截面 [mm ] Øi≥ 10mm² 供源压力 [bar] 6-8 过滤表面 [m2] 1 容器容量 [L] 30 可连接刀具 [n] 1 声压级 [dB] 68 抽吸接头 [mm] 1x50mm/1x44mm/1x34mm 尺寸 [A x B x C] - [cm] 80 x 44 x 45 包装尺寸 [A x B x C] - [cm] 100 x 77 x 57 重量 [kg] 20 包装重量 [kg] 30 启动 Manual 3 2 * 最大压力 6 [bar] 39 Professional pneumatic vacuum cleaner Veuillez lire toutes ces instructions avant de mettre en marche le produit. Read all of these instructions before operating this product. Alle diese Anweisungen lesen, bevor man das Produkt in Betrieb nimmt. Leer todas estas instrucciones antes de accionar el presente producto. Lees aandachtig alle instructies alvorens het apparaat in werking te stellen. Перед эксплуатацией оборудования внимательно ознакомиться с данным руководством. Leggere tutte queste istruzioni prima di aziona to. Przed uruchomieniem urządzenia należy zapoznać się z całą treścią poniższej instrukcji. 在操作本产品之前阅读这些说明。 Indications importantes pour la sécurité de l’utilisateur. Important safety information for the user. Wichtige Hinweise zur Sicherheits des Nutzers. Indicaciones importantes para la seguridad del usuario. Belangrijk veiligheidsadvies voor de gebruiker. Важные указания по технике безопасности для пользователя. Indicazioni importanti per la sicurezza dell’utilizzatore. Ważne wskazówki dotyczące bezpieczeństwa użytkownika. 用户安全的重要说明。 Utiliser un équipement de protection pour les voies respiratoires. Wear a respiratory protection device! Atemschutzausrüstung tragen! ¡Llevar puesto un dispositivo de protección para las vías respiratorias! Draag een beschermingsmiddel voor de luchtwegen Использовать устройство для защиты дыхательных путей! Indossare una mascherina antipolvere idonea Stosować ochronę dróg oddechowych! 穿戴合适的呼吸道保护装置。 ATTENTION! Danger de décharge électrostatique Adopter les mesures nécessaires pour les composants sensibles aux décharges électrostatiques. CAUTION: Danger of electrostatic discharge Take the necessary measures for components that are sensitive to electrostatic discharge. VORSICHT: Gefahr der elektrostatischen Entladung Treffen Sie die erforderlichen Maßnahmen für elektrostatisch gefährdete Bauelemente. PRECAUCIÓN: Peligro de descarga electrostática Tome las medidas necesarias para los componentes sensibles a las descargas electrostáticas. LET OP: Gevaar van elektrostatische ontlading Neem de nodige maatregelen voor onderdelen die gevoelig zijn voor elektrostatische ontlading. ВНИМАНИЕ: Опасность электростатического разряда Принять необходимые меры для компонентов, чувствительных к электростатическому разряду. ATTENZIONE: Pericolo di scariche elettrostatiche Prendete le misure necessarie per i componenti che sono sensibili alle scariche elettrostatiche. UWAGA: Niebezpieczeństwo wyładowań elektrostatycznych Podejmij niezbędne działania w przypadku komponentów wrażliwych na wyładowania elektrostatyczne. 注意:静电放电的危险 对静电敏感的元件采取必要的措施。 - Ce matériel fait l’objet d’une collecte sélective selon la directive européenne 2012/19/UE. Ne pas jeter dans une poubelle domestique ! - This hardware is subject to waste collection according to the European directives 2002/96/UE. Do not throw away in a household bin! - Für die Entsorgung Ihres Gerätes gelten besondere Bestimmungen (sondermüll) gemäß europäische Bestimmung 2012/19/EU. Es darf nicht mit dem Hausmüll entsorgt werden. - Este material requiere una recogida de basuras selectiva según la directiva europea 2012/19/UE. ¡No tirar este producto a la basura doméstica! - Afzonderlijke inzameling vereist volgens de Europese richtlijn 2012/19/UE. Gooi het apparaat niet bij het huishoudelijk afval ! - Это оборудование подлежит переработке согласно директиве Евросоюза 2012/19/UE. Не выбрасывать в общий мусоросборник! - Questo dispositivo è oggetto di raccolta differenziata secondo la direttiva europea 2012/19/UE. Non smaltire con i rifiuti domestici. - Ten sprzęt podlega selektywnej zbiórce zgodnie z Dyrektywą Europejską 2012/19/EU. Nie wyrzucać do odpadów domowych! - 根据欧盟指令2012/19/EU,该设备需单独收集。请勿丢弃在生活垃圾中! - Matériel conforme aux directives européennes. La déclaration UE de conformité est disponible sur notre site (voir à la page de couverture). - Device complies with Europeans directives. The EU Declaration of Conformity is available on our website (see cover page). - Die Geräte entsprechen die europäischen Richtlinien. Die Konformitätserklärung finden Sie auf unsere Webseite. - Aparato conforme a las directivas europeas. La declaración de conformidad UE está disponible en nuestra página web (dirección en la portada). - Устройство соответствует директивам Евросоюза. Декларация UE о соответствии доступна для просмотра на нашем сайте (ссылка на обложке). - Apparaat in overeenstemming met de Europese richtlijnen. De E.U. verklaring van overeenstemming kunt u downloaden op onze website (adres vermeld op de omslag). - Dispositivo conforme alle direttive europee La dichiarazione UE di conformità è disponibile sul nostro sito internet (vedere alla pagina di copertina). - Materiał zgodny z dyrektywami europejskimi. Deklaracja zgodności UE jest dostępna na naszej stronie internetowej (patrz strona tytułowa). - 材料符合欧洲指令。欧盟符合性声明可在我们的网站上找到(见封面页)。 - Produit recyclable qui relève d’une consigne de tri. This product should be recycled appropriately Recyclingprodukt, das gesondert entsorgt werden muss. Producto reciclable que requiere una separación determinada. - Этот аппарат подлежит утилизации. - Product recyclebaar, niet bij het huishoudelijk afval gooien. - Prodotto riciclabile soggetto a raccolta differenziata. - Produkt nadający się do recyklingu, który podlega instrukcji sortowania. - 遵循分类指令的可回收产品 - Marque de conformité EAC (Communauté économique Eurasienne). EAEC Conformity marking (Eurasian Economic Community). EAC-Konformitätszeichen (Eurasische Wirtschaftsgemeinschaft) Marca de conformidad EAC (Comunidad económica euroasiática). Знак соответствия EAC (Евразийское экономическое сообщество). - EAC (Euraziatische Economische Gemeenschap) merkteken van overeenstemming - Marchio di conformità EAC (Comunità economica Eurasiatica). - Znak zgodności EAC (Euroazjatyckiej Wspólnoty Gospodarczej). - EAC(欧亚经济共同体)合格标志 - Matériel conforme aux exigences britanniques. La déclaration de conformité britannique est disponible sur notre site (voir à la page de couverture). Equipment in compliance with British requirements. The British Declaration of Conformity is available on our website (see home page). Das Gerät entspricht den britischen Richtlinien und Normen. Die Konformitätserklärung für Grossbritannien ist auf unserer Internetseite verfügbar (siehe Titelseite). Equipo conforme a los requisitos británicos. La Declaración de Conformidad Británica está disponible en nuestra página web (véase la portada). Материал соответствует требованиям Великобритании. Заявление о соответствии для Великобритании доступно на нашем веб-сайте (см. главную страницу). Materiaal conform aan de Britse eisen. De Britse verklaring van overeenkomt is beschikbaar op onze website (zie omslagpagina). Materiale conforme alla esigenze britanniche. La dichiarazione di conformità britannica è disponibile sul nostro sito (vedere pagina di copertina). Materiał zgodny z wymogami brytyjskimi. Brytyjska Deklaracja Zgodności jest dostępna na naszej stronie internetowej (patrz strona tytułowa). 材料符合英国要求。英国的符合性声明可在我们的网站上找到(见封面页) JBDC 134 bd des loges 53941 Saint-Berthevin France 40-
 1
1
-
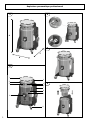 2
2
-
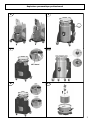 3
3
-
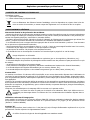 4
4
-
 5
5
-
 6
6
-
 7
7
-
 8
8
-
 9
9
-
 10
10
-
 11
11
-
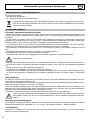 12
12
-
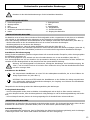 13
13
-
 14
14
-
 15
15
-
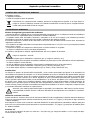 16
16
-
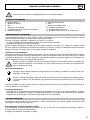 17
17
-
 18
18
-
 19
19
-
 20
20
-
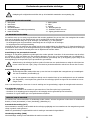 21
21
-
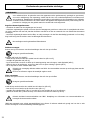 22
22
-
 23
23
-
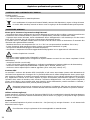 24
24
-
 25
25
-
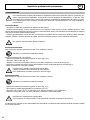 26
26
-
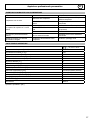 27
27
-
 28
28
-
 29
29
-
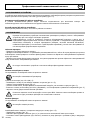 30
30
-
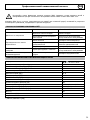 31
31
-
 32
32
-
 33
33
-
 34
34
-
 35
35
-
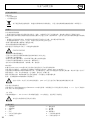 36
36
-
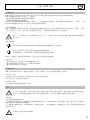 37
37
-
 38
38
-
 39
39
-
 40
40


GYS PNEUMATIC ALUMINIUM DUST EXTRACTOR (ATEX) de handleiding
- Type
- de handleiding
in andere talen
- English: GYS PNEUMATIC ALUMINIUM DUST EXTRACTOR (ATEX) Owner's manual
- italiano: GYS PNEUMATIC ALUMINIUM DUST EXTRACTOR (ATEX) Manuale del proprietario
- русский: GYS PNEUMATIC ALUMINIUM DUST EXTRACTOR (ATEX) Инструкция по применению
- français: GYS PNEUMATIC ALUMINIUM DUST EXTRACTOR (ATEX) Le manuel du propriétaire
- español: GYS PNEUMATIC ALUMINIUM DUST EXTRACTOR (ATEX) El manual del propietario
- Deutsch: GYS PNEUMATIC ALUMINIUM DUST EXTRACTOR (ATEX) Bedienungsanleitung
- polski: GYS PNEUMATIC ALUMINIUM DUST EXTRACTOR (ATEX) Instrukcja obsługi
