Brother QC-1000 Referentie gids
- Categorie
- Naaimachines
- Type
- Referentie gids
Pagina wordt geladen...

Refer to the operation manual for detailed instruction.
Also, there are differences in the keys and screens depending on the display language. In this guide,
English screens are used for basic explanations.
Einzelheiten entnehmen Sie bitte der Bedienungsanleitung.
Je nachdem, welche Sprache für die Bildschirmanzeigen gewählt wurde, ergeben sich im Hinblick
auf Tasten Schirmbilder eventuell Unterschiede.
Die grundlegende Bedienung der Maschine ist in dieser Anleitung am Beispiel von Schirmbildern
mit englischem Text erklärt.
Pour les instructions détaillées, voir le mode d’emploi.
Par ailleurs, il y a des différences dans les touches et les écrans en fonction de la langue d’affichage.
Dans ce guide, les explications de base utilisent les écrans anglais.
Zie de gebruiksaanwijzing voor gedetailleerde instructies.
Er zijn verschillen in de toetsen en schermen afhankelijk van de ingestelde taal.
In de beschrijvingen in deze beknopte handleiding worden de Engelse schermen gebruikt.
Fare riferimento al manuale di impiego per istruzioni dettagliate.
Inoltre, ci sono differenze nei tasti e nelle schermate a seconda della lingua visualizzata.
In questa guida, le schermate in inglese sono usate per le spiegazioni basilari.
Consulte el manual de instrucciones para ver más detalles.
Además, dependiendo del idioma visualizado algunos botones y pantallas podrán ser diferentes.
En esta guía, para las explicaciones básicas se emplean pantallas en inglés.
Более подробная информация представлена в руководстве по эксплуатации.
Кроме того, в зависимости от языка сообщений на ЖК-дисплее названия кнопок и другая
информация на экранах могут иметь некоторые различия. В настоящем справочнике основные
пояснения даются на примере экранов с информацией на английском языке.
<English display>
<Englische Bildversion>
<Affichage en Anglais>
<Engels scherm>
<Schermata in inglese>
<Visualización en inglés>
<Экран: английский язык>
<Example: French>
<Beispiel: Französisch>
<Exemple : Français>
<Voorbeeld: Frans>
<Esempio: Francese>
<Ejemplo: Francés>
<Пример: французский язык>
Contents
Outstanding Features ................................................... 2
I) Pivoting .................................................................. 2
II) Automatic Fabric Sensor System ............................. 2
III) Automatic Drop Feed (Free-motion Mode) ............. 3
Free-motion quilting foot “C”......................................... 3
Free-motion open toe quilting foot “O” ......................... 4
Free-motion echo quilting foot “E” ................................ 5
IV) Back to Beginning Key ............................................ 6
V) Initial Stitch Page .................................................... 6
Winding the Bobbin ..................................................... 7
Inserting the Bobbin..................................................... 7
Upper Threading .......................................................... 8
Selecting Stitch Patterns............................................... 9
Utility Stitches ............................................................... 9
Character/Decorative Stitches ....................................... 9
Others ......................................................................... 10
Summary of Stitch Patterns ........................................ 11
Utility Stitches ............................................................. 11
Character/Decorative Stitches ..................................... 12
Inhalt
Hervorragende Funktionen .......................................... 2
I) Drehen ................................................................... 2
II) Automatisches Stoffsensorsystem ............................ 2
III) Automatischer Untertransport (Freihandmodus) ...... 3
Quiltfuß „C“ zum Freihand-Quilten ............................... 3
Klarsicht-Quiltfuß „O“ zum Freihand-Quilten................ 4
Quiltfuß „E“ zum Freihand-Quilten ............................... 5
IV) Taste „Zurück zum Anfang“ .................................... 6
V) Anfangsstichbildschirm ........................................... 6
Aufspulen des Unterfadens .......................................... 7
Einsetzen der Unterfadenspule .................................... 7
Einfädeln des Oberfadens ............................................ 8
Wahl des Nähmusters .................................................. 9
Nutzstiche ..................................................................... 9
Zeichenstichmuster/Dekorative Stichmuster .................. 9
Sonstige ...................................................................... 10
Nähmuster-Übersicht ................................................. 11
Nutzstiche ................................................................... 11
Zeichenstichmuster/Dekorative Stichmuster ................ 12

1
Содержание
Уникальныефункции .............................................. 2
I) Поворотматериала.............................................. 2
II)
Системаавтоматическогодатчикаматериала
.... 2
III)
Автоматическоеопусканиегребеноктранспортера
(режимсвободнойподачиматериала)
.................... 3
Стегальнаялапка“C”длясвободнойподачиматериала
.... 4
Стегальнаялапкасоткрытыммыском“O”
длясвободнойподачиматериала ............................. 4
Стегальнаялапка“E”дляфигурноговыстегивания
сосвободнойподачейматериала ............................. 5
IV) Кнопкавозвратакначалу .................................... 6
V) Начальнаястраницастрочек .............................. 6
Намоткашпульки ..................................................... 7
Установкашпульки .................................................. 7
Заправкаверхнейнити ........................................... 8
Выборрисунковстрочек ........................................ 9
Обычныестрочки ....................................................... 9
Знаки/декоративныестрочки ..................................... 9
Прочее ....................................................................... 10
Рисункистрочек ..................................................... 11
Обычныестрочки ..................................................... 11
Знаки/декоративныестрочки ................................... 12
Table des matières
Fonctions exceptionnelles ............................................ 2
I) Pivotement ............................................................. 2
II) Système de capteur de tissu automatique ............... 2
III) Entraînement par griffe automatique
(mode en mouvement libre).................................... 3
Pied pour quilting en mouvement libre « C » ................ 3
Pied pour quilting ouvert en mouvement libre « O » ..... 4
Pied pour quilting en écho en mouvement libre « E » ... 5
IV) Retour à la touche de début.................................... 6
V) Page de point initial ................................................ 6
Bobinage de la canette ................................................. 7
Insertion de la canette ................................................. 7
Enfilage supérieur ........................................................ 8
Sélection des configurations de point .......................... 9
Points utilitaires ............................................................ 9
Caractères/points décoratifs .......................................... 9
Autres ......................................................................... 10
Sommaires des motifs de point .................................. 11
Points utilitaires .......................................................... 11
Caractères/points décoratifs ........................................ 12
Contenido
Funciones excepcionales .............................................. 2
I) Función de giro ...................................................... 2
II) Sensor automático de tela....................................... 2
III) Selector automático de dientes de arrastre
(Modo de costura libre) .......................................... 3
Pie para acolchado libre “C” ......................................... 4
Pie para acolchado libre de punta abierta “O” .............. 4
Pie para acolchado repetido libre “E” ............................ 5
IV) Tecla Volver al principio ........................................ 6
V) Pantalla inicial de puntadas .................................... 6
Devanado de la bobina ................................................ 7
Colocación de la bobina .............................................. 7
Hilo superior ................................................................ 8
Selección de tipos de puntada ..................................... 9
Puntadas utiles .............................................................. 9
Puntadas de letras/decorativas ...................................... 9
Otros ........................................................................... 10
Resumen de tipos de puntada .................................... 11
Puntadas utiles ............................................................ 11
Puntadas de letras/decorativas .................................... 12
Inhoudsopgave
Speciale functies .......................................................... 2
I) Stof draaien ............................................................ 2
II) Automatische stofsensor ......................................... 2
III) Transporteur automatisch omlaag (vrij-modus) ....... 3
Vrije quiltvoet “C” ......................................................... 3
Vrije open quiltvoet “O” ................................................ 4
Vrije echoquiltvoet “E” .................................................. 5
IV) Terug naar begintoets ............................................. 6
V) Beginsteekscherm ................................................... 6
Spoel opwinden ........................................................... 7
De spoel plaatsen ......................................................... 7
Inrijgen van de bovendraad ......................................... 8
Kiezen van de steekpatronen ....................................... 9
Naaisteken .................................................................... 9
Letter/decoratieve steken ............................................... 9
Overige ....................................................................... 10
Overzicht van de steekpatronen ................................ 11
Naaisteken .................................................................. 11
Letter/decoratieve steken ............................................. 12
Indice
Caratteristiche importanti ............................................ 2
I) Rotazione sugli angoli ............................................ 2
II) Sistema di rilevamento automatico del tessuto ....... 2
III) Alimentatore automatico (modalità Moto libero) .... 3
Piedino per trapuntatura a moto libero “C” ................... 4
Piedino a punta aperta per trapuntatura
a moto libero “O” .......................................................... 4
Piedino per trapuntatura a eco a moto libero “E” .......... 5
IV) Tasto Torna all’inizio .............................................. 6
V) Pagina iniziale dei punti ......................................... 6
Avvolgimento della spolina .......................................... 7
Inserimento della spolina ............................................. 7
Infilatura superiore ....................................................... 8
Selezione degli schemi punto ....................................... 9
Punti utili ...................................................................... 9
Punti per caratteri/decorazioni ...................................... 9
Altro ............................................................................ 10
Sommario degli schemi punto .................................... 11
Punti utili .................................................................... 11
Punti per caratteri/decorazioni .................................... 12

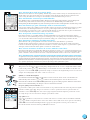
◆ II) Automatic Fabric Sensor System
The thickness of the fabric is automatically detected and the presser foot pressure is automatically adjusted with an
internal sensor while sewing, so the fabric can be fed smoothly. This function is useful for sewing over thick seams, or
quilting with feed dogs raised. The Automatic Fabric Sensor System works continuously while sewing.
◆ II) Automatisches Stoffsensorsystem
Während des Nähens wird die Stärke des Stoffes mit einem internen Sensor automatisch erfasst und der Nähfußdruck für
einen weichen Stofftransport automatisch angepasst. Diese Funktion ist nützlich beim Nähen über dicke Säume oder
beim Quilten mit angehobenem Transporteur. Das automatische Stoffsensorsystem ist während des Nähens laufend aktiv.
◆ II) Système de capteur de tissu automatique
L’épaisseur du tissu est automatiquement détectée et la pression du pied-de-biche est automatiquement réglée via un
capteur interne pendant la couture. Ainsi, le tissu peut être entraîné librement. Cette fonction est utile lors de la couture
sur des bords épais ou du quilting avec les griffes d’entraînement relevées. Le système de capteur de tissu automatique
fonctionne en continu pendant la couture.
◆ II) Automatische stofsensor
De dikte van de stof wordt automatisch gedetecteerd en de druk van de persvoet wordt tijdens het naaien automatisch
geregeld met een interne sensor zodat de stof soepel wordt doorgevoerd. Deze functie is handig om over dikke naden te
naaien of voor quilten met de transporteur omhoog. Automatische stofsensor werkt voortdurend tijdens het naaien.
◆ II) Sistema di rilevamento automatico del tessuto
Un sensore interno rileva automaticamente lo spessore del tessuto regolando automaticamente la pressione del piedino
premistoffa durante la cucitura in modo che il tessuto possa venire alimentato in modo uniforme. Questa funzione è utile
per la cucitura di tessuti spessi o la trapuntatura con la griffa di trasporto sollevata. Il sistema di rilevamento automatico
del tessuto è attivo per l’intera durata della cucitura.
◆ II) Sensor automático de tela
El grosor de la tela se detecta automáticamente y la presión del pie prensatela se ajusta de forma automática con un sensor
interno durante la costura, para que la tela avance fácilmente. Esta función resulta útil para coser encima de costuras gruesas o
para el acolchado con los dientes de arrastre subidos. El sensor automático de tela funciona permanentemente durante la costura.
◆ II) Системаавтоматическогодатчикаматериала
Чтобы обеспечить плавную подачу материала, во время шитья автоматически определяется толщина материала и давление
прижимной лапки автоматически регулируется при помощи встроенного датчика. Эта функция полезна при прошивке толстых
швов и выстегивании с поднятыми гребенками транспортера. Во время шитья система датчика материала работает непрерывно.
2
Outstanding Features Hervorragende Funktionen
Fonctions exceptionnelles Speciale functies
Caratteristiche importanti Funciones excepcionales
Уникальныефункции
◆ I) Pivoting
The function is useful when changing the sewing direction. The machine stops with the needle lowered (in the fabric)
and the presser foot is automatically raised to an appropriate height when the “Start/Stop” button is pressed. From the
setting screen, the presser foot can be adjusted to one of three heights (3.2 mm, 5.0 mm and 7.5 mm).
◆ I) Drehen
Diese Funktion ist nützlich zum Ändern der Nährichtung. Die Maschine hält mit abgesenkter Nadel (im Stoff) an und der
Nähfuß wird nach dem Drücken der Taste „Start/Stopp“ automatisch auf eine geeignete Stellung angehoben. Im
Einstellungsbildschirm können für den Nähfuß drei Stellungen ausgewählt werden (3,2 mm, 5,0 mm und 7,5 mm).
◆ I) Pivotement
Cette fonction est utile lors du changement du sens de la couture. La machine s’arrête, l’aiguille abaissée (dans le tissu),
et le pied-de-biche se relève automatiquement à une hauteur appropriée lorsque la touche « Marche/Arrêt » est enfoncée.
Le pied-de-biche peut être réglé sur l’une des trois hauteurs (3,2 mm, 5,0 mm et 7,5 mm) à partir de l’écran de réglages.
◆ I) Stof draaien
De functie is nuttig wanneer u van naairichting verandert. De machine stopt met de naald omlaag (in de stof) en de
persvoet wordt automatisch op de juiste hoogte gezet wanneer u op de start/stoptoets drukt. In het instellingenscherm
kunt u de persvoet afstellen op drie niveaus (3,2 mm, 5,0 mm en 7,5 mm).
◆ I) Rotazione sugli angoli
La funzione è utile per cambiare la direzione di cucitura. La macchina si arresta con l’ago abbassato (nel tessuto) e il
piedino premistoffa si solleva automaticamente all’altezza appropriata quando si preme il pulsante “Avvio/stop”. Dalla
schermata delle impostazioni, è possibile regolare il piedino premistoffa a una delle tre altezze (3,2 mm, 5,0 mm e
7,5 mm).
◆ I) Función de giro
Esta función resulta útil cuando se cambia la dirección de costura. La máquina se detiene con la aguja en posición baja
(dentro de la tela) y el pie prensatela se eleva automáticamente hasta una altura adecuada cuando se pulsa el botón de
“inicio/parar”. El pie prensatela se puede ajustar en una de tres alturas (3,2 mm, 5,0 mm o 7,5 mm) en la pantalla de
ajustes.
◆ I) Поворотматериала
Эта функция полезна при изменении направления шитья. Если эта функция включена, при нажатии кнопки
“Пуск/Стоп” машина останавливается с опущенной в материал иглой, а прижимная лапка поднимается до
настроенной высоты. На экране настроек можно выбрать одно из трех значений высоты подъема прижимной
лапки (3,2 мм, 5,0 мм или 7,5 мм).

3
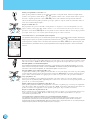
◆ III) Automatic Drop Feed (Free-motion Mode)
This function is useful for free-motion quilting. Touch the drop feed key and the feed dogs are automatically lowered so
that the fabric can be moved freely. The presser foot height is raised and the upper thread tension is adjusted for free
motion sewing. In addition, the feed dogs are automatically lowered when button sewing is selected.
◆ III) Automatischer Untertransport (Freihandmodus)
Diese Funktion eignet sich zum Freihand-Quilten. Wenn Sie die Untertransport-Taste drücken, wird der Transporteur
automatisch abgesenkt, damit der Stoff frei bewegt werden kann. Die Nähfußstellung wird erhöht und die
Fadenspannung für Freihand-Quilten eingestellt. Der Transporteur wird auch beim Knopfannähen automatisch abgesenkt.
◆ III) Entraînement par griffe automatique (mode en mouvement libre)
Cette fonction est utile pour le quilting en mouvement libre. Appuyez sur la touche d’entraînement par griffe et les griffes
d’entraînement sont automatiquement abaissées de façon à pouvoir déplacer librement le tissu. Pour la couture en
mouvement libre, le pied-de-biche se relève et la tension du fil supérieur est ajustée. En outre, les griffes d’entraînement
sont automatiquement abaissées lorsque la couture de boutons est sélectionnée.
◆ III) Transporteur automatisch omlaag (vrij-modus)
Deze functie is handig voor vrij quilten. Druk op de transporteurhendeltoets om de transporteur automatisch omlaag te
zetten, zodat u de stof vrij kunt bewegen. De persvoet wordt hoger gezet en de spanning van de bovendraad wordt aangepast
voor vrij naaien. Bovendien wordt de transporteur automatisch omlaag gezet, wanneer u knopen aanzetten selecteert.
◆ III) Alimentatore automatico (modalità Moto libero)
Questa funzione è utile per la trapuntatura a moto libero. Premere il tasto dell’alimentatore per abbassare
automaticamente la griffa di trasporto in modo da poter spostare liberamente il tessuto. Per la cucitura a moto libero,
l’altezza di sollevamento del piedino premistoffa è aumentata e la tensione del filo superiore è regolata. Inoltre, la griffa
di trasporto si abbassa automaticamente quando si seleziona la cucitura bottoni.
◆ III) Selector automático de dientes de arrastre (Modo de costura libre)
Esta función resulta útil para el acolchado libre. Pulse la tecla de dientes de arrastre y estos se bajarán automáticamente para
que pueda mover la tela en cualquier dirección. Se aumenta la altura del pie prensatela y se ajusta la tensión del hilo superior
para la costura libre. Además, los dientes de arrastre se bajan automáticamente cuando se selection la costura de botones.
◆ III)
Автоматическое опускание гребенок транспортера (режим свободной подачи материала)
Эта функция полезна при выстегивании со свободной подачей материала. При нажатии кнопки автоматического опускания
гребенок транспортера гребенки автоматически опускаются, чтобы можно было свободно перемещать материал. При этом
прижимная лапка поднимается, а натяжение верхней нити регулируется для шитья со свободной подачей материала. Кроме
того, гребенки транспортера автоматически опускаются при выборе режима пришивания пуговиц.
Free-motion quilting foot “C”
This presser foot is used for free-motion sewing using a straight stitch. Be sure to select a straight stitch with the middle
(center) needle position (
or ). When starting to sew, the internal sensor detects the thickness of the fabric, and
the presser foot is raised to the height specified in the setting screen. Increase the height that the presser foot is raised, for
example, when sewing highly elastic fabric, so that it is easier to sew.
Quiltfuß „C“ zum Freihand-Quilten
Dieser Nähfuß wird zum Freihand-Quilten mit Geradstich verwendet. Achten Sie darauf, dass Sie einen Geradstich mit
mittlerer Nadelposition auswählen (
oder ). Wenn Sie mit dem Nähen beginnen, erfasst der interne Sensor die
Stoffstärke und der Nähfuß wird in die im Einstellungsbildschirm angegebene Stellung angehoben. Wählen Sie zum leichteren
Nähen eine höhere Nähfußstellung, zum Beispiel, wenn Sie hochelastischen Stoff nähen.
Pied pour quilting en mouvement libre « C »
Ce pied-de-biche est utilisé pour la couture en mouvement libre avec un point droit. Veillez à sélectionner un point droit, l’aiguille
positionnée au milieu (
ou ). Lorsque vous commencez à coudre, le capteur interne détecte l’épaisseur du tissu et le
pieddebiche se relève à la hauteur spécifiée sur l’écran de réglages. Augmentez la hauteur à laquelle le pied-de-biche est relevé,
par exemple lorsque vous cousez des tissus très élastiques, pour faciliter la couture.
Vrije quiltvoet “C”
Deze persvoet gebruikt u voor vrij naaien met een rechte steek. Selecteer een rechte steek met de middelste naaldstand
(
of ). Wanneer u begint met naaien, detecteert de interne sensor de dikte van de stof; de persvoet wordt omhoog
gezet naar het niveau dat in het instellingenscherm is opgegeven. Verhoog het niveau van de persvoet wanneer u
bijvoorbeeld elastische stof naait, zodat het gemakkelijker te naaien is.

Free-motion open toe quilting foot “O”
This presser foot is used for free-motion quilting with zigzag or decorative stitches or for free-motion quilting of straight lines on fabric
with an uneven thickness. (NOTE: Free Motion Foot Height setting is not applicable when using the Free motion open toe foot “O”.)
Klarsicht-Quiltfuß „O“ zum Freihand-Quilten
Dieser Nähfuß wird zum Freihand-Quilten mit Zickzack- oder Dekorstichen oder zum Freihand-Quilten von geraden
Linien auf Stoffen mit ungleicher Stärke verwendet. (HINWEIS: Die Nähfußeinstellung für Freihand-Quilten ist nicht
anwendbar, wenn der Klarsicht-Quiltfuß „O“ zum Freihand-Quilten verwendet wird.)
Pied pour quilting ouvert en mouvement libre « O »
Ce pied-de-biche est utilisé pour le quilting en mouvement libre avec des points zigzag ou décoratifs, ou pour le quilting
en mouvement libre de lignes droites sur un tissu d’épaisseur inégale. (REMARQUE : le paramètre de hauteur du pied
pour la couture en mouvement libre ne s’applique pas à la couture avec le pied ouvert « O » pour mouvement libre.)
Vrije open quiltvoet “O”
Deze persvoet gebruikt u voor vrij quilten met zigzagsteken of decoratieve steken of voor het vrij quilten van rechte
lijnen op stof van ongelijkmatige dikte. (Opmerking: Het voetniveau voor vrij naaien is niet van toepassing wanneer u de
open voet “O” voor vrij naaien gebruikt.)
Piedino a punta aperta per trapuntatura a moto libero “O”
Questo piedino premistoffa si utilizza per la trapuntatura a moto libero con punti zig-zag o decorativi per la trapuntatura
a moto libero di linee diritte su tessuti dallo spessore irregolare. (NOTA: l’impostazione dell’altezza di sollevamento del
piedino a moto libero non è applicabile se si usa il piedino a punta aperta “O” per cucitura a moto libero.)
Pie para acolchado libre de punta abierta “O”
Este pie prensatela sirve para el acolchado libre con puntadas decorativas o de zigzag o para el acolchado libre de líneas rectas
en tela con un grosor irregular. (NOTA: El ajuste de altura del pie para costura libre no puede utilizarse con el pie para
acolchado libre de punta abierta “O”.)
Стегальная лапка с открытым мыском “O” для свободной подачи материала
Эта прижимная лапка используется для выстегивания со свободной подачей материала со строчкой “зигзаг” или с
декоративными строчками или для выстегивания со свободной подачей материала прямых линий на материале с
неравномерной толщиной. (ПРИМЕЧАНИЕ. При использовании лапки с открытым мыском “O” для свободной подачи
материала параметр “Высота лапки при свободной подаче” недоступен.)
4
Piedino per trapuntatura a moto libero “C”
Questo piedino premistoffa si utilizza per la cucitura a moto libero con un punto diritto. Selezionare un punto diritto
(centrale) con la posizione centrale dell’ago (
o ). Quando si inizia a cucire, il sensore interno rileva lo spessore
del tessuto e il piedino premistoffa si solleva all’altezza specificata nella schermata delle impostazioni. Aumentare
l’altezza di sollevamento del piedino premistoffa, per esempio, quando si eseguono cuciture su tessuti molto elastici, in
modo che la cucitura risulti più semplice.
Pie para acolchado libre “C”
Este pie prensatela sirve para la costura libre con una puntada recta. Asegúrese de seleccionar una puntada recta con la
aguja en el medio (centro) (
o ). Cuando comience a coser, el sensor interno detectará el grosor de la tela y el pie
prensatela se elevará hasta la altura especificada en la pantalla de ajustes. Aumente la altura de elevación del pie prensatela,
por ejemplo, cuando vaya a coser en tela de gran elasticidad, para que la costura sea más fácil.
Стегальная лапка “C” для свободной подачи материала
Эта прижимная лапка используется для выполнения прямой строчки со свободной подачей материала. Необходимо
выбрать прямую строчку со средним (центральным) положением иглы (
или ). При начале шитья внутренний
датчик определяет толщину ткани, а стегальная лапка поднимается на высоту, указанную на экране настроек. Для
облегчения шитья увеличивайте высоту подъема прижимной лапки, например при работе с очень эластичными
тканями.
Pagina wordt geladen...

6
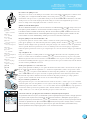
◆ IV) Back to Beginning Key
If sewing of a combined stitch pattern has stopped, press this key to restart sewing from the beginning of the pattern. (In
this example, sewing begins from “W”.)In addition, if this key is pressed when sewing is stopped, patterns can be added
at the end of a combined stitch pattern. (In this example, “!” is added.)
◆ IV) Taste „Zurück zum Anfang“
Drücken Sie diese Taste, nachdem das Nähen eines kombinierten Stichmusters angehalten hat, um das Muster wieder
vom Anfang an erneut zu nähen. (In diesem Beispiel beginnt das Nähen bei „W“.) Außerdem können mit dieser Taste
nach dem Nähen am Ende des ursprünglichen kombinierten Stichmusters weitere Muster hinzugefügt werden. (In diesem
Beispiel wird „!“ hinzugefügt.)
◆ IV) Retour à la touche de début
Si la couture d’un motif de point combiné s’est arrêtée, appuyez sur cette touche pour recommencer la couture à partir du
début du motif. (Dans cet exemple, la couture commence à partir de « W »). En outre, si vous appuyez sur cette touche
lorsque la couture est arrêtée, des motifs peuvent être ajoutés à la fin du motif de point combiné. (Dans cet exemple, « ! »
est ajouté).
◆ IV) Terug naar begintoets
Als het naaien van een gecombineerd steekpatroon is gestopt, drukt u op deze toets om opnieuw vanaf het begin van het
patroon te gaan naaien. (In dit voorbeeld begint het naaien bij “W”.) Als u op deze toets drukt wanneer u stopt met
naaien, kunt u bovendien patronen toevoegen aan het eind van een gecombineerd steekpatroon. (In dit voorbeeld wordt
“!” toegevoegd.)
◆ IV) Tasto Torna all’inizio
Se la cucitura di un disegno/punto combinato si arresta, premere questo tasto per riprendere a cucire dall’inizio del
disegno. (In questo esempio, la cucitura inizia da “W”.) Inoltre, premendo questo tasto quando si arresta la cucitura, è
possibile aggiungere i disegni alla fine del disegno/punto combinato iniziale. (In questo esempio, è aggiunto “!”.)
◆ IV) Tecla Volver al principio
Si se ha detenido la costura de un patrón combinado, pulse esta tecla para volver a comenzar la costura desde el
principio. (En este ejemplo, la costura comienza en “W”). Además, si se pulsa esta tecla con la costura detenida, se
pueden añadir patrones al final de un patrón combinado. (En este ejemplo, se ha añadido “!”).
◆ IV) Кнопкавозвратакначалу
В случае остановки вышивания комбинированного рисунка строчки нажмите эту кнопку, чтобы начать шитье с
начала рисунка строчки. (В показанном примере шитье начинается с вышивания буквы “W”.) Кроме того, если
эту кнопку нажать после остановки вышивания, можно добавить рисунки в конец комбинированного рисунка
строчки. (В показанном примере добавляется знак “!”.)
◆ V) Initial Stitch Page
Select whether the screen containing quilting stitches or utility stitches is the first screen that is displayed.
◆ V) Anfangsstichbildschirm
Wählen Sie, ob der Bildschirm mit Quiltstichen oder der Bildschirm mit Nutzstichen zuerst angezeigt werden
soll.
◆ V) Page de point initial
Indiquez si vous souhaitez que l’écran contenant les points quilting ou les points de couture courants s’affiche en
premier.
◆ V) Beginsteekscherm
Selecteer of het scherm met quiltsteken of naaisteken als eerste scherm moet verschijnen.
◆ V) Pagina iniziale dei punti
Selezionare l’opzione che consente di stabilire se la schermata contenente punti per trapuntatura o punti utili
sarà la prima schermata visualizzata.
◆ V) Pantalla inicial de puntadas
Seleccione si la pantalla que contiene las puntadas de acolchado o las puntadas de utilidad va a ser la primera
pantalla que se muestre.
◆ V) Начальнаястраницастрочек
Выберите экран, который будет отображаться первым: экран со стегальными строчками или основными
строчками
.
Hervorragende Funktionen
Speciale functies
Funciones excepcionales
Outstanding Features
Fonctions exceptionnelles
Caratteristiche importanti
Уникальныефункции

7
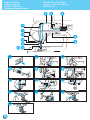
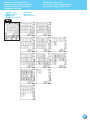
Using the Supplemental Spool Pin
Verwendung des zusätzlichen Garnrollenstifts
Utilisation du porte-bobine supplémentaire
Gebruik van de klospen
Utilizzo del portarocchetto supplementare
Uso del portacarrete suplementario
Использование дополнительного стержня для катушки
1
2
3
5 6 7
8
2
3 4
5 3 4
2
6
8
7
1
5 6
2 43
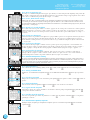
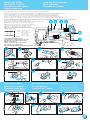
Follow the numbered steps below in order. Refer to the operation manual for detailed instruction.
Führen Sie die folgenden Schritte in der angegebenen Reihenfolge aus. Ausführliche Hinweise finden Sie in der Bedienungsanleitung.
Suivez les étapes numérotées ci-dessous dans l’ordre. Consultez le manuel d’instructions pour des procédures détaillées.
Voer de genummerde stappen uit in de juiste volgorde. Uitvoerige aanwijzingen vindt u in de bedieningshandleiding.
Seguire i passaggi numerati nell’ordine riportato di seguito. Fare riferimento al manuale d’istruzioni per le istruzioni dettagliate.
Realice los siguientes pasos numerados en el orden indicado. Para obtener instrucciones detalladas, consulte el manual de instrucciones.
Выполните приведенные ниже операции в порядке их нумерации. Более подробная информация представлена в руководстве по эксплуатации.
Use only the enclosed bobbin or bobbins of the same type.
Verwenden Sie nur die im Lieferumfang enthaltene Spule oder Spulen vom selben Typ.
N’utilisez que la canette fournie ou des canettes du même type.
Gebruik alleen de bijgeleverde spoel of spoelen van hetzelfde type.
Utilizzare solo la spolina inclusa o spoline dello stesso tipo.
Utilice sólo la bobina incluida o bobinas del mismo tipo.
Применяйте только прилагаемые к машине шпульки или
шпульки того же типа.
11.5 mm (approx. 7/16 inch)
11,5 mm (ca. (7/16 Zoll)
(env. 7/16 de pouce)
(ca. 7/16 inch)
(circa 7/16 in.)
(aprox. 7/16 pulg.)
11,5 мм
Refer to the operation manual for detailed instruction.
Einzelheiten hierzu entnehmen Sie bitte der Bedienungsanleitung.
Pour les instructions détaillées, voir le mode d’emploi.
Zie de gebruiksaanwijzing voor gedetailleerde instructies.
Fare riferimento al manuale di impiego per istruzioni dettagliate.
Consulte el manual de instrucciones para ver más detalles.
Подробная информация: см. в руководстве по эксплуатации
Inserting the Bobbin Einsetzen der Unterfadenspule
Insertion de la canette De spoel plaatsen
Inserimento della spolina Colocación de la bobina
Установка шпульки
1
Winding the Bobbin Aufspulen des Unterfadens
Bobinage de la canette Spoel opwinden
Avvolgimento della spolina Devanado de la bobina
Намотка шпульки

8
6
7
a
0
9
8
5 4
2
bc
7
0
c
8 9
a
64 5
32
b
1
3
Upper Threading Einfädeln des Oberfadens
Enfilage supérieur Inrijgen van de bovendraad
Infilatura superiore Hilo superior
Заправкаверхнейнити

9
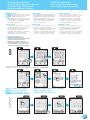
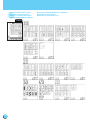
Selecting Stitch Patterns Wahl des Nähmusters
Sélection des configurations de point
Kiezen van de steekpatronen
Selezione degli schemi punto Selección de tipos de puntada
Выборрисунковстрочек
Piecing / Zusammenfügen / Assemblage /
Stukken stof aan elkaar zetten / Rammendo / Remiendos / Стачивание
◆Utility Stitches
When switching on machine, the screen
will display the opening screen. Touch the
screen to display the utility stitch.
Depending on the setting, “Q-01 Piecing
stitch (Middle)”, “1-01 Straight stitch (Left)”
or “1-03 Straight stitch (Middle)” is
automatically selected.
◆Nutzstiche
Nach dem Einschalten der Maschine wird
der Startbildschirm angezeigt. Berühren Sie
den Bildschirm zur Anzeige der Nutzstiche.
Je nach Vorwahl wird entweder „Q-01
Patchwork-Stich (Mitte)“, „1-01 Geradstich
(links)“ oder „1-03 Gerad stitch (Mitte)“
automatisch eingestellt.
◆Points utilitaires
Lorsque vous mettez la machine sous
tension, l’écran d’accueil s’affiche. Touchez
l’écran pour afficher le point de couture
courant. Selon le réglage, « Q-01 Point
d’assemblage (milieu) », « 1-01 Point droit
(gauche) » ou « 1-03 Point droit (milieu) »
est automatiquement sélectionné.
◆Naaisteken
Wanneer u de machine aanzet, verschijnt
het openingsscherm. Druk op het scherm
om de naaisteek weer te geven. Naar
gelang de instelling wordt “Q-01
Verbindingssteek (midden)”,”1-01 Rechte
steek (links)” of “1-03 Rechte steek
(midden)” automatisch geselecteerd.
◆Punti utili
Accendendo la cucitura a macchina, viene
visualizzata la schermata di apertura.
Sfiorare lo schermo per visualizzare il punto
utile. A seconda dell’impostazione, viene
selezionato automaticamente “Q-01 Punto
rammendo (centrale)”,”1-01 Punto diritto
(sinistra)” o “1-03 Punto diritto (centrale)”.
◆Puntadas utiles
Cuando se enciende la máquina, aparece la
pantalla de presentación. Toque la pantalla
para mostrar la puntada de utilidad. En
función del ajuste seleccionado, se
seleccionará automáticamente “Q-01 Puntada
para remendar (medio)”, “1-01 Puntada recta
(izquierda)” o “1-03 Puntada recta (medio)”.
◆Обычныестрочки
Привключениимашинынадисплее
отображаетсяначальныйэкран.Дляотображения
основнойстрочкикоснитесьэкрана.В
зависимостиоттекущейнастройкибудет
автоматическивыбранастрочка“Q-01:Стачная
строчка(посередине)”,“1-01:Прямаястрочка
(слева)”или“1-03:Прямаястрочка(посередине)”.
◆Character/Decorative Stitches ◆Zeichenstichmuster/Dekorative Stichmuster
◆Caractères/points décoratifs ◆Letter/decoratieve steken
◆Punti per caratteri/decorazioni ◆Puntadas de letras/decorativas
◆Знаки/декоративныестрочки
Pagina wordt geladen...

11
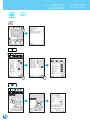
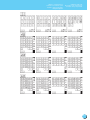
Summary of Stitch Patterns Nähmuster-Übersicht
Sommaires des motifs de point Overzicht van de steekpatronen
Sommario degli schemi punto Resumen de tipos de puntada
Рисункистрочек
◆Utility Stitches ◆Nutzstiche
◆Points utilitaires ◆Naaisteken
◆Punti utili ◆Puntadas utiles
◆Обычныестрочки
Pagina wordt geladen...

13
Nähmuster-Übersicht
Overzicht van de steekpatronen
Resumen de tipos de puntada
Summary of Stitch Patterns
Sommaires des motifs de point
Sommario degli schemi punto
Рисунки строчек
Pagina wordt geladen...
Documenttranscriptie
Refer to the operation manual for detailed instruction. Also, there are differences in the keys and screens depending on the display language. In this guide, English screens are used for basic explanations. Einzelheiten entnehmen Sie bitte der Bedienungsanleitung. Je nachdem, welche Sprache für die Bildschirmanzeigen gewählt wurde, ergeben sich im Hinblick auf Tasten Schirmbilder eventuell Unterschiede. Die grundlegende Bedienung der Maschine ist in dieser Anleitung am Beispiel von Schirmbildern mit englischem Text erklärt. Pour les instructions détaillées, voir le mode d’emploi. Par ailleurs, il y a des différences dans les touches et les écrans en fonction de la langue d’affichage. Dans ce guide, les explications de base utilisent les écrans anglais. Zie de gebruiksaanwijzing voor gedetailleerde instructies. Er zijn verschillen in de toetsen en schermen afhankelijk van de ingestelde taal. In de beschrijvingen in deze beknopte handleiding worden de Engelse schermen gebruikt. Fare riferimento al manuale di impiego per istruzioni dettagliate. Inoltre, ci sono differenze nei tasti e nelle schermate a seconda della lingua visualizzata. In questa guida, le schermate in inglese sono usate per le spiegazioni basilari. Consulte el manual de instrucciones para ver más detalles. Además, dependiendo del idioma visualizado algunos botones y pantallas podrán ser diferentes. En esta guía, para las explicaciones básicas se emplean pantallas en inglés. Более подробная информация представлена в руководстве по эксплуатации. Кроме того, в зависимости от языка сообщений на ЖК-дисплее названия кнопок и другая информация на экранах могут иметь некоторые различия. В настоящем справочнике основные пояснения даются на примере экранов с информацией на английском языке. <English display> <Englische Bildversion> <Affichage en Anglais> <Engels scherm> <Schermata in inglese> <Visualización en inglés> <Экран: английский язык> <Example: French> <Beispiel: Französisch> <Exemple : Français> <Voorbeeld: Frans> <Esempio: Francese> <Ejemplo: Francés> <Пример: французский язык> Contents Inhalt Outstanding Features.................................................... 2 Hervorragende Funktionen........................................... 2 I) Pivoting................................................................... 2 II) Automatic Fabric Sensor System.............................. 2 III) Automatic Drop Feed (Free-motion Mode).............. 3 Free-motion quilting foot “C”......................................... 3 Free-motion open toe quilting foot “O”.......................... 4 Free-motion echo quilting foot “E”................................. 5 IV) Back to Beginning Key............................................. 6 V) Initial Stitch Page..................................................... 6 Winding the Bobbin...................................................... Inserting the Bobbin..................................................... Upper Threading........................................................... Selecting Stitch Patterns............................................... Utility Stitches................................................................ 9 Character/Decorative Stitches........................................ 9 Others.......................................................................... 10 Quiltfuß „C“ zum Freihand-Quilten................................ 3 Klarsicht-Quiltfuß „O“ zum Freihand-Quilten................ 4 Quiltfuß „E“ zum Freihand-Quilten................................ 5 IV) Taste „Zurück zum Anfang“..................................... 6 V) Anfangsstichbildschirm............................................ 6 7 7 8 9 Summary of Stitch Patterns......................................... 11 Utility Stitches.............................................................. 11 Character/Decorative Stitches...................................... 12 I) Drehen.................................................................... 2 II) Automatisches Stoffsensorsystem............................. 2 III) Automatischer Untertransport (Freihandmodus)....... 3 Aufspulen des Unterfadens........................................... Einsetzen der Unterfadenspule..................................... Einfädeln des Oberfadens............................................. Wahl des Nähmusters................................................... Nutzstiche...................................................................... 9 Zeichenstichmuster/Dekorative Stichmuster................... 9 Sonstige....................................................................... 10 7 7 8 9 Nähmuster-Übersicht.................................................. 11 Nutzstiche.................................................................... 11 Zeichenstichmuster/Dekorative Stichmuster................. 12 Table des matières Inhoudsopgave Fonctions exceptionnelles............................................. 2 Speciale functies........................................................... 2 I) Pivotement.............................................................. 2 II) Système de capteur de tissu automatique................ 2 III) Entraînement par griffe automatique (mode en mouvement libre).................................... 3 Pied pour quilting en mouvement libre « C »................. 3 Pied pour quilting ouvert en mouvement libre « O »...... 4 Pied pour quilting en écho en mouvement libre « E ».... 5 Bobinage de la canette.................................................. Insertion de la canette.................................................. Enfilage supérieur......................................................... Sélection des configurations de point........................... Points utilitaires............................................................. 9 Caractères/points décoratifs........................................... 9 Autres.......................................................................... 10 Vrije quiltvoet “C”.......................................................... 3 Vrije open quiltvoet “O”................................................. 4 Vrije echoquiltvoet “E”................................................... 5 IV) Terug naar begintoets.............................................. 6 V) Beginsteekscherm.................................................... 6 IV) Retour à la touche de début.................................... 6 V) Page de point initial................................................. 6 I) Stof draaien............................................................. 2 II) Automatische stofsensor.......................................... 2 III) Transporteur automatisch omlaag (vrij-modus)........ 3 7 7 8 9 Sommaires des motifs de point................................... 11 Spoel opwinden............................................................ De spoel plaatsen.......................................................... Inrijgen van de bovendraad.......................................... Kiezen van de steekpatronen........................................ Naaisteken..................................................................... 9 Letter/decoratieve steken................................................ 9 Overige........................................................................ 10 7 7 8 9 Overzicht van de steekpatronen................................. 11 Points utilitaires........................................................... 11 Caractères/points décoratifs......................................... 12 Naaisteken................................................................... 11 Letter/decoratieve steken.............................................. 12 Indice Contenido Caratteristiche importanti............................................. 2 Funciones excepcionales............................................... 2 I) Rotazione sugli angoli............................................. 2 II) Sistema di rilevamento automatico del tessuto........ 2 III) Alimentatore automatico (modalità Moto libero)..... 3 Piedino per trapuntatura a moto libero “C”.................... 4 Piedino a punta aperta per trapuntatura a moto libero “O”........................................................... 4 Piedino per trapuntatura a eco a moto libero “E”........... 5 IV) Tasto Torna all’inizio............................................... 6 V) Pagina iniziale dei punti.......................................... 6 Avvolgimento della spolina........................................... Inserimento della spolina.............................................. Infilatura superiore........................................................ Selezione degli schemi punto........................................ Punti utili....................................................................... 9 Punti per caratteri/decorazioni....................................... 9 Altro............................................................................. 10 7 7 8 9 Sommario degli schemi punto..................................... 11 Punti utili..................................................................... 11 Punti per caratteri/decorazioni..................................... 12 I) Función de giro....................................................... 2 II) Sensor automático de tela....................................... 2 III) Selector automático de dientes de arrastre (Modo de costura libre)........................................... 3 Pie para acolchado libre “C”.......................................... 4 Pie para acolchado libre de punta abierta “O”............... 4 Pie para acolchado repetido libre “E”............................. 5 IV) Tecla Volver al principio......................................... 6 V) Pantalla inicial de puntadas..................................... 6 Devanado de la bobina................................................. Colocación de la bobina............................................... Hilo superior................................................................. Selección de tipos de puntada...................................... Puntadas utiles............................................................... 9 Puntadas de letras/decorativas....................................... 9 Otros............................................................................ 10 7 7 8 9 Resumen de tipos de puntada..................................... 11 Puntadas utiles............................................................. 11 Puntadas de letras/decorativas..................................... 12 Содержание Уникальные функции............................................... 2 I) Поворот материала.............................................. 2 II) Система автоматического датчика материала..... 2 III) Автоматическое опускание гребенок транспортера (режим свободной подачи материала)..................... 3 Стегальная лапка “C” для свободной подачи материала..... 4 Стегальная лапка с открытым мыском “O” для свободной подачи материала.............................. 4 Стегальная лапка “E” для фигурного выстегивания со свободной подачей материала.............................. 5 IV) Кнопка возврата к началу..................................... 6 V) Начальная страница строчек............................... 6 Намотка шпульки...................................................... Установка шпульки................................................... Заправка верхней нити............................................ Выбор рисунков строчек......................................... Обычные строчки........................................................ 9 Знаки/декоративные строчки...................................... 9 Прочее........................................................................ 10 7 7 8 9 Рисунки строчек...................................................... 11 Обычные строчки...................................................... 11 Знаки/декоративные строчки.................................... 12 1 Outstanding Features Fonctions exceptionnelles Caratteristiche importanti Уникальные функции Hervorragende Funktionen Speciale functies Funciones excepcionales ◆ I) Pivoting The function is useful when changing the sewing direction. The machine stops with the needle lowered (in the fabric) and the presser foot is automatically raised to an appropriate height when the “Start/Stop” button is pressed. From the setting screen, the presser foot can be adjusted to one of three heights (3.2 mm, 5.0 mm and 7.5 mm). ◆ I) Drehen Diese Funktion ist nützlich zum Ändern der Nährichtung. Die Maschine hält mit abgesenkter Nadel (im Stoff) an und der Nähfuß wird nach dem Drücken der Taste „Start/Stopp“ automatisch auf eine geeignete Stellung angehoben. Im Einstellungsbildschirm können für den Nähfuß drei Stellungen ausgewählt werden (3,2 mm, 5,0 mm und 7,5 mm). ◆ I) Pivotement Cette fonction est utile lors du changement du sens de la couture. La machine s’arrête, l’aiguille abaissée (dans le tissu), et le pied-de-biche se relève automatiquement à une hauteur appropriée lorsque la touche « Marche/Arrêt » est enfoncée. Le pied-de-biche peut être réglé sur l’une des trois hauteurs (3,2 mm, 5,0 mm et 7,5 mm) à partir de l’écran de réglages. ◆ I) Stof draaien De functie is nuttig wanneer u van naairichting verandert. De machine stopt met de naald omlaag (in de stof) en de persvoet wordt automatisch op de juiste hoogte gezet wanneer u op de start/stoptoets drukt. In het instellingenscherm kunt u de persvoet afstellen op drie niveaus (3,2 mm, 5,0 mm en 7,5 mm). ◆ I) Rotazione sugli angoli La funzione è utile per cambiare la direzione di cucitura. La macchina si arresta con l’ago abbassato (nel tessuto) e il piedino premistoffa si solleva automaticamente all’altezza appropriata quando si preme il pulsante “Avvio/stop”. Dalla schermata delle impostazioni, è possibile regolare il piedino premistoffa a una delle tre altezze (3,2 mm, 5,0 mm e 7,5 mm). ◆ I) Función de giro Esta función resulta útil cuando se cambia la dirección de costura. La máquina se detiene con la aguja en posición baja (dentro de la tela) y el pie prensatela se eleva automáticamente hasta una altura adecuada cuando se pulsa el botón de “inicio/parar”. El pie prensatela se puede ajustar en una de tres alturas (3,2 mm, 5,0 mm o 7,5 mm) en la pantalla de ajustes. ◆ I) Поворот материала Эта функция полезна при изменении направления шитья. Если эта функция включена, при нажатии кнопки “Пуск/Стоп” машина останавливается с опущенной в материал иглой, а прижимная лапка поднимается до настроенной высоты. На экране настроек можно выбрать одно из трех значений высоты подъема прижимной лапки (3,2 мм, 5,0 мм или 7,5 мм). ◆ II) Automatic Fabric Sensor System The thickness of the fabric is automatically detected and the presser foot pressure is automatically adjusted with an internal sensor while sewing, so the fabric can be fed smoothly. This function is useful for sewing over thick seams, or quilting with feed dogs raised. The Automatic Fabric Sensor System works continuously while sewing. ◆ II) Automatisches Stoffsensorsystem Während des Nähens wird die Stärke des Stoffes mit einem internen Sensor automatisch erfasst und der Nähfußdruck für einen weichen Stofftransport automatisch angepasst. Diese Funktion ist nützlich beim Nähen über dicke Säume oder beim Quilten mit angehobenem Transporteur. Das automatische Stoffsensorsystem ist während des Nähens laufend aktiv. ◆ II) Système de capteur de tissu automatique L’épaisseur du tissu est automatiquement détectée et la pression du pied-de-biche est automatiquement réglée via un capteur interne pendant la couture. Ainsi, le tissu peut être entraîné librement. Cette fonction est utile lors de la couture sur des bords épais ou du quilting avec les griffes d’entraînement relevées. Le système de capteur de tissu automatique fonctionne en continu pendant la couture. ◆ II) Automatische stofsensor De dikte van de stof wordt automatisch gedetecteerd en de druk van de persvoet wordt tijdens het naaien automatisch geregeld met een interne sensor zodat de stof soepel wordt doorgevoerd. Deze functie is handig om over dikke naden te naaien of voor quilten met de transporteur omhoog. Automatische stofsensor werkt voortdurend tijdens het naaien. ◆ II) Sistema di rilevamento automatico del tessuto Un sensore interno rileva automaticamente lo spessore del tessuto regolando automaticamente la pressione del piedino premistoffa durante la cucitura in modo che il tessuto possa venire alimentato in modo uniforme. Questa funzione è utile per la cucitura di tessuti spessi o la trapuntatura con la griffa di trasporto sollevata. Il sistema di rilevamento automatico del tessuto è attivo per l’intera durata della cucitura. ◆ II) Sensor automático de tela El grosor de la tela se detecta automáticamente y la presión del pie prensatela se ajusta de forma automática con un sensor interno durante la costura, para que la tela avance fácilmente. Esta función resulta útil para coser encima de costuras gruesas o para el acolchado con los dientes de arrastre subidos. El sensor automático de tela funciona permanentemente durante la costura. ◆ II) Система автоматического датчика материала Чтобы обеспечить плавную подачу материала, во время шитья автоматически определяется толщина материала и давление прижимной лапки автоматически регулируется при помощи встроенного датчика. Эта функция полезна при прошивке толстых швов и выстегивании с поднятыми гребенками транспортера. Во время шитья система датчика материала работает непрерывно. 2 ◆ III) Automatic Drop Feed (Free-motion Mode) This function is useful for free-motion quilting. Touch the drop feed key and the feed dogs are automatically lowered so that the fabric can be moved freely. The presser foot height is raised and the upper thread tension is adjusted for free motion sewing. In addition, the feed dogs are automatically lowered when button sewing is selected. ◆ III) Automatischer Untertransport (Freihandmodus) Diese Funktion eignet sich zum Freihand-Quilten. Wenn Sie die Untertransport-Taste drücken, wird der Transporteur automatisch abgesenkt, damit der Stoff frei bewegt werden kann. Die Nähfußstellung wird erhöht und die Fadenspannung für Freihand-Quilten eingestellt. Der Transporteur wird auch beim Knopfannähen automatisch abgesenkt. ◆ III) Entraînement par griffe automatique (mode en mouvement libre) Cette fonction est utile pour le quilting en mouvement libre. Appuyez sur la touche d’entraînement par griffe et les griffes d’entraînement sont automatiquement abaissées de façon à pouvoir déplacer librement le tissu. Pour la couture en mouvement libre, le pied-de-biche se relève et la tension du fil supérieur est ajustée. En outre, les griffes d’entraînement sont automatiquement abaissées lorsque la couture de boutons est sélectionnée. ◆ III) Transporteur automatisch omlaag (vrij-modus) Deze functie is handig voor vrij quilten. Druk op de transporteurhendeltoets om de transporteur automatisch omlaag te zetten, zodat u de stof vrij kunt bewegen. De persvoet wordt hoger gezet en de spanning van de bovendraad wordt aangepast voor vrij naaien. Bovendien wordt de transporteur automatisch omlaag gezet, wanneer u knopen aanzetten selecteert. ◆ III) Alimentatore automatico (modalità Moto libero) Questa funzione è utile per la trapuntatura a moto libero. Premere il tasto dell’alimentatore per abbassare automaticamente la griffa di trasporto in modo da poter spostare liberamente il tessuto. Per la cucitura a moto libero, l’altezza di sollevamento del piedino premistoffa è aumentata e la tensione del filo superiore è regolata. Inoltre, la griffa di trasporto si abbassa automaticamente quando si seleziona la cucitura bottoni. ◆ III) Selector automático de dientes de arrastre (Modo de costura libre) Esta función resulta útil para el acolchado libre. Pulse la tecla de dientes de arrastre y estos se bajarán automáticamente para que pueda mover la tela en cualquier dirección. Se aumenta la altura del pie prensatela y se ajusta la tensión del hilo superior para la costura libre. Además, los dientes de arrastre se bajan automáticamente cuando se selection la costura de botones. ◆ III) Автоматическое опускание гребенок транспортера (режим свободной подачи материала) Эта функция полезна при выстегивании со свободной подачей материала. При нажатии кнопки автоматического опускания гребенок транспортера гребенки автоматически опускаются, чтобы можно было свободно перемещать материал. При этом прижимная лапка поднимается, а натяжение верхней нити регулируется для шитья со свободной подачей материала. Кроме того, гребенки транспортера автоматически опускаются при выборе режима пришивания пуговиц. Free-motion quilting foot “C” This presser foot is used for free-motion sewing using a straight stitch. Be sure to select a straight stitch with the middle (center) needle position ( or ). When starting to sew, the internal sensor detects the thickness of the fabric, and the presser foot is raised to the height specified in the setting screen. Increase the height that the presser foot is raised, for example, when sewing highly elastic fabric, so that it is easier to sew. Quiltfuß „C“ zum Freihand-Quilten Dieser Nähfuß wird zum Freihand-Quilten mit Geradstich verwendet. Achten Sie darauf, dass Sie einen Geradstich mit mittlerer Nadelposition auswählen ( oder ). Wenn Sie mit dem Nähen beginnen, erfasst der interne Sensor die Stoffstärke und der Nähfuß wird in die im Einstellungsbildschirm angegebene Stellung angehoben. Wählen Sie zum leichteren Nähen eine höhere Nähfußstellung, zum Beispiel, wenn Sie hochelastischen Stoff nähen. Pied pour quilting en mouvement libre « C » Ce pied-de-biche est utilisé pour la couture en mouvement libre avec un point droit. Veillez à sélectionner un point droit, l’aiguille positionnée au milieu ( ou ). Lorsque vous commencez à coudre, le capteur interne détecte l’épaisseur du tissu et le pieddebiche se relève à la hauteur spécifiée sur l’écran de réglages. Augmentez la hauteur à laquelle le pied-de-biche est relevé, par exemple lorsque vous cousez des tissus très élastiques, pour faciliter la couture. Vrije quiltvoet “C” Deze persvoet gebruikt u voor vrij naaien met een rechte steek. Selecteer een rechte steek met de middelste naaldstand ( of ). Wanneer u begint met naaien, detecteert de interne sensor de dikte van de stof; de persvoet wordt omhoog gezet naar het niveau dat in het instellingenscherm is opgegeven. Verhoog het niveau van de persvoet wanneer u bijvoorbeeld elastische stof naait, zodat het gemakkelijker te naaien is. 3 Piedino per trapuntatura a moto libero “C” Questo piedino premistoffa si utilizza per la cucitura a moto libero con un punto diritto. Selezionare un punto diritto (centrale) con la posizione centrale dell’ago ( o ). Quando si inizia a cucire, il sensore interno rileva lo spessore del tessuto e il piedino premistoffa si solleva all’altezza specificata nella schermata delle impostazioni. Aumentare l’altezza di sollevamento del piedino premistoffa, per esempio, quando si eseguono cuciture su tessuti molto elastici, in modo che la cucitura risulti più semplice. Pie para acolchado libre “C” Este pie prensatela sirve para la costura libre con una puntada recta. Asegúrese de seleccionar una puntada recta con la aguja en el medio (centro) ( o ). Cuando comience a coser, el sensor interno detectará el grosor de la tela y el pie prensatela se elevará hasta la altura especificada en la pantalla de ajustes. Aumente la altura de elevación del pie prensatela, por ejemplo, cuando vaya a coser en tela de gran elasticidad, para que la costura sea más fácil. Стегальная лапка “C” для свободной подачи материала Эта прижимная лапка используется для выполнения прямой строчки со свободной подачей материала. Необходимо выбрать прямую строчку со средним (центральным) положением иглы ( или ). При начале шитья внутренний датчик определяет толщину ткани, а стегальная лапка поднимается на высоту, указанную на экране настроек. Для облегчения шитья увеличивайте высоту подъема прижимной лапки, например при работе с очень эластичными тканями. Free-motion open toe quilting foot “O” This presser foot is used for free-motion quilting with zigzag or decorative stitches or for free-motion quilting of straight lines on fabric with an uneven thickness. (NOTE: Free Motion Foot Height setting is not applicable when using the Free motion open toe foot “O”.) Klarsicht-Quiltfuß „O“ zum Freihand-Quilten Dieser Nähfuß wird zum Freihand-Quilten mit Zickzack- oder Dekorstichen oder zum Freihand-Quilten von geraden Linien auf Stoffen mit ungleicher Stärke verwendet. (HINWEIS: Die Nähfußeinstellung für Freihand-Quilten ist nicht anwendbar, wenn der Klarsicht-Quiltfuß „O“ zum Freihand-Quilten verwendet wird.) Pied pour quilting ouvert en mouvement libre « O » Ce pied-de-biche est utilisé pour le quilting en mouvement libre avec des points zigzag ou décoratifs, ou pour le quilting en mouvement libre de lignes droites sur un tissu d’épaisseur inégale. (REMARQUE : le paramètre de hauteur du pied pour la couture en mouvement libre ne s’applique pas à la couture avec le pied ouvert « O » pour mouvement libre.) Vrije open quiltvoet “O” Deze persvoet gebruikt u voor vrij quilten met zigzagsteken of decoratieve steken of voor het vrij quilten van rechte lijnen op stof van ongelijkmatige dikte. (Opmerking: Het voetniveau voor vrij naaien is niet van toepassing wanneer u de open voet “O” voor vrij naaien gebruikt.) Piedino a punta aperta per trapuntatura a moto libero “O” Questo piedino premistoffa si utilizza per la trapuntatura a moto libero con punti zig-zag o decorativi per la trapuntatura a moto libero di linee diritte su tessuti dallo spessore irregolare. (NOTA: l’impostazione dell’altezza di sollevamento del piedino a moto libero non è applicabile se si usa il piedino a punta aperta “O” per cucitura a moto libero.) Pie para acolchado libre de punta abierta “O” Este pie prensatela sirve para el acolchado libre con puntadas decorativas o de zigzag o para el acolchado libre de líneas rectas en tela con un grosor irregular. (NOTA: El ajuste de altura del pie para costura libre no puede utilizarse con el pie para acolchado libre de punta abierta “O”.) Стегальная лапка с открытым мыском “O” для свободной подачи материала Эта прижимная лапка используется для выстегивания со свободной подачей материала со строчкой “зигзаг” или с декоративными строчками или для выстегивания со свободной подачей материала прямых линий на материале с неравномерной толщиной. (ПРИМЕЧАНИЕ. При использовании лапки с открытым мыском “O” для свободной подачи материала параметр “Высота лапки при свободной подаче” недоступен.) 4 Outstanding Features Fonctions exceptionnelles Caratteristiche importanti Уникальные функции Hervorragende Funktionen Speciale functies Funciones excepcionales ◆ IV) Back to Beginning Key If sewing of a combined stitch pattern has stopped, press this key to restart sewing from the beginning of the pattern. (In this example, sewing begins from “W”.)In addition, if this key is pressed when sewing is stopped, patterns can be added at the end of a combined stitch pattern. (In this example, “!” is added.) ◆ IV) Taste „Zurück zum Anfang“ Drücken Sie diese Taste, nachdem das Nähen eines kombinierten Stichmusters angehalten hat, um das Muster wieder vom Anfang an erneut zu nähen. (In diesem Beispiel beginnt das Nähen bei „W“.) Außerdem können mit dieser Taste nach dem Nähen am Ende des ursprünglichen kombinierten Stichmusters weitere Muster hinzugefügt werden. (In diesem Beispiel wird „!“ hinzugefügt.) ◆ IV) Retour à la touche de début Si la couture d’un motif de point combiné s’est arrêtée, appuyez sur cette touche pour recommencer la couture à partir du début du motif. (Dans cet exemple, la couture commence à partir de « W »). En outre, si vous appuyez sur cette touche lorsque la couture est arrêtée, des motifs peuvent être ajoutés à la fin du motif de point combiné. (Dans cet exemple, « ! » est ajouté). ◆ IV) Terug naar begintoets Als het naaien van een gecombineerd steekpatroon is gestopt, drukt u op deze toets om opnieuw vanaf het begin van het patroon te gaan naaien. (In dit voorbeeld begint het naaien bij “W”.) Als u op deze toets drukt wanneer u stopt met naaien, kunt u bovendien patronen toevoegen aan het eind van een gecombineerd steekpatroon. (In dit voorbeeld wordt “!” toegevoegd.) ◆ IV) Tasto Torna all’inizio Se la cucitura di un disegno/punto combinato si arresta, premere questo tasto per riprendere a cucire dall’inizio del disegno. (In questo esempio, la cucitura inizia da “W”.) Inoltre, premendo questo tasto quando si arresta la cucitura, è possibile aggiungere i disegni alla fine del disegno/punto combinato iniziale. (In questo esempio, è aggiunto “!”.) ◆ IV) Tecla Volver al principio Si se ha detenido la costura de un patrón combinado, pulse esta tecla para volver a comenzar la costura desde el principio. (En este ejemplo, la costura comienza en “W”). Además, si se pulsa esta tecla con la costura detenida, se pueden añadir patrones al final de un patrón combinado. (En este ejemplo, se ha añadido “!”). ◆ IV) Кнопка возврата к началу В случае остановки вышивания комбинированного рисунка строчки нажмите эту кнопку, чтобы начать шитье с начала рисунка строчки. (В показанном примере шитье начинается с вышивания буквы “W”.) Кроме того, если эту кнопку нажать после остановки вышивания, можно добавить рисунки в конец комбинированного рисунка строчки. (В показанном примере добавляется знак “!”.) ◆ V) Initial Stitch Page Select whether the screen containing quilting stitches or utility stitches is the first screen that is displayed. ◆ V) Anfangsstichbildschirm Wählen Sie, ob der Bildschirm mit Quiltstichen soll. oder der Bildschirm mit Nutzstichen zuerst angezeigt werden ◆ V) Page de point initial Indiquez si vous souhaitez que l’écran contenant les points quilting premier. ou les points de couture courants s’affiche en ◆ V) Beginsteekscherm Selecteer of het scherm met quiltsteken of naaisteken als eerste scherm moet verschijnen. ◆ V) Pagina iniziale dei punti Selezionare l’opzione che consente di stabilire se la schermata contenente punti per trapuntatura sarà la prima schermata visualizzata. o punti utili ◆ V) Pantalla inicial de puntadas Seleccione si la pantalla que contiene las puntadas de acolchado pantalla que se muestre. o las puntadas de utilidad va a ser la primera ◆ V) Начальная страница строчек Выберите экран, который будет отображаться первым: экран со стегальными строчками строчками 6 . или основными Winding the Bobbin Bobinage de la canette Avvolgimento della spolina Намотка шпульки Aufspulen des Unterfadens Spoel opwinden Devanado de la bobina Follow the numbered steps below in order. Refer to the operation manual for detailed instruction. Führen Sie die folgenden Schritte in der angegebenen Reihenfolge aus. Ausführliche Hinweise finden Sie in der Bedienungsanleitung. Suivez les étapes numérotées ci-dessous dans l’ordre. Consultez le manuel d’instructions pour des procédures détaillées. Voer de genummerde stappen uit in de juiste volgorde. Uitvoerige aanwijzingen vindt u in de bedieningshandleiding. Seguire i passaggi numerati nell’ordine riportato di seguito. Fare riferimento al manuale d’istruzioni per le istruzioni dettagliate. Realice los siguientes pasos numerados en el orden indicado. Para obtener instrucciones detalladas, consulte el manual de instrucciones. Выполните приведенные ниже операции в порядке их нумерации. Более подробная информация представлена в руководстве по эксплуатации. Use only the enclosed bobbin or bobbins of the same type. Verwenden Sie nur die im Lieferumfang enthaltene Spule oder Spulen vom selben Typ. N’utilisez que la canette fournie ou des canettes du même type. Gebruik alleen de bijgeleverde spoel of spoelen van hetzelfde type. Utilizzare solo la spolina inclusa o spoline dello stesso tipo. Utilice sólo la bobina incluida o bobinas del mismo tipo. Применяйте только прилагаемые к машине шпульки или шпульки того же типа. 11.5 mm (approx. 7/16 inch) 11,5 mm (ca. (7/16 Zoll) (env. 7/16 de pouce) (ca. 7/16 inch) (circa 7/16 in.) (aprox. 7/16 pulg.) 11,5 мм 65 3 4 2 Using the Supplemental Spool Pin Verwendung des zusätzlichen Garnrollenstifts Utilisation du porte-bobine supplémentaire Gebruik van de klospen Utilizzo del portarocchetto supplementare Uso del portacarrete suplementario Использование дополнительного стержня для катушки 1 2 7 3 5 8 6 4 7 2 3 1 8 Inserting the Bobbin Insertion de la canette Inserimento della spolina Установка шпульки 1 Einsetzen der Unterfadenspule De spoel plaatsen Colocación de la bobina 2 3 5 Refer to the operation manual for detailed instruction. Einzelheiten hierzu entnehmen Sie bitte der Bedienungsanleitung. Pour les instructions détaillées, voir le mode d’emploi. Zie de gebruiksaanwijzing voor gedetailleerde instructies. Fare riferimento al manuale di impiego per istruzioni dettagliate. Consulte el manual de instrucciones para ver más detalles. Подробная информация: см. в руководстве по эксплуатации 4 6 7 Upper Threading Enfilage supérieur Infilatura superiore Заправка верхней нити Einfädeln des Oberfadens Inrijgen van de bovendraad Hilo superior 6 5 4 7 a 0 2 9 3 8 bc 1 2 3 4 5 6 7 8 9 0 a b c 8 Selecting Stitch Patterns Sélection des configurations de point Selezione degli schemi punto Выбор рисунков строчек Wahl des Nähmusters Kiezen van de steekpatronen Selección de tipos de puntada ◆Utility Stitches ◆Nutzstiche When switching on machine, the screen will display the opening screen. Touch the screen to display the utility stitch. Depending on the setting, “Q-01 Piecing stitch (Middle)”, “1-01 Straight stitch (Left)” or “1-03 Straight stitch (Middle)” is automatically selected. Nach dem Einschalten der Maschine wird der Startbildschirm angezeigt. Berühren Sie den Bildschirm zur Anzeige der Nutzstiche. Je nach Vorwahl wird entweder „Q-01 Patchwork-Stich (Mitte)“, „1-01 Geradstich (links)“ oder „1-03 Gerad stitch (Mitte)“ automatisch eingestellt. ◆Naaisteken ◆Punti utili Wanneer u de machine aanzet, verschijnt het openingsscherm. Druk op het scherm om de naaisteek weer te geven. Naar gelang de instelling wordt “Q-01 Verbindingssteek (midden)”,”1-01 Rechte steek (links)” of “1-03 Rechte steek (midden)” automatisch geselecteerd. Accendendo la cucitura a macchina, viene visualizzata la schermata di apertura. Sfiorare lo schermo per visualizzare il punto utile. A seconda dell’impostazione, viene selezionato automaticamente “Q-01 Punto rammendo (centrale)”,”1-01 Punto diritto (sinistra)” o “1-03 Punto diritto (centrale)”. ◆Points utilitaires Lorsque vous mettez la machine sous tension, l’écran d’accueil s’affiche. Touchez l’écran pour afficher le point de couture courant. Selon le réglage, « Q-01 Point d’assemblage (milieu) », « 1-01 Point droit (gauche) » ou « 1-03 Point droit (milieu) » est automatiquement sélectionné. ◆Puntadas utiles Cuando se enciende la máquina, aparece la pantalla de presentación. Toque la pantalla para mostrar la puntada de utilidad. En función del ajuste seleccionado, se seleccionará automáticamente “Q-01 Puntada para remendar (medio)”, “1-01 Puntada recta (izquierda)” o “1-03 Puntada recta (medio)”. ◆Обычные строчки При включении машины на дисплее отображается начальный экран. Для отображения основной строчки коснитесь экрана. В зависимости от текущей настройки будет автоматически выбрана строчка “Q-01: Стачная строчка (посередине)”, “1-01: Прямая строчка (слева)” или “1-03: Прямая строчка (посередине)”. Piecing / Zusammenfügen / Assemblage / Stukken stof aan elkaar zetten / Rammendo / Remiendos / Стачивание ◆Character/Decorative Stitches ◆Caractères/points décoratifs ◆Punti per caratteri/decorazioni ◆Знаки/декоративные строчки ◆Zeichenstichmuster/Dekorative Stichmuster ◆Letter/decoratieve steken ◆Puntadas de letras/decorativas 9 Summary of Stitch Patterns Sommaires des motifs de point Sommario degli schemi punto Рисунки строчек ◆Utility Stitches ◆Points utilitaires ◆Punti utili ◆Обычные строчки Nähmuster-Übersicht Overzicht van de steekpatronen Resumen de tipos de puntada ◆Nutzstiche ◆Naaisteken ◆Puntadas utiles 11 Summary of Stitch Patterns Sommaires des motifs de point Sommario degli schemi punto Рисунки строчек Nähmuster-Übersicht Overzicht van de steekpatronen Resumen de tipos de puntada 13-
 1
1
-
 2
2
-
 3
3
-
 4
4
-
 5
5
-
 6
6
-
 7
7
-
 8
8
-
 9
9
-
 10
10
-
 11
11
-
 12
12
-
 13
13
-
 14
14
-
 15
15
-
 16
16


Brother QC-1000 Referentie gids
- Categorie
- Naaimachines
- Type
- Referentie gids
in andere talen
- English: Brother QC-1000 Reference guide
- italiano: Brother QC-1000 Guida di riferimento
- русский: Brother QC-1000 Справочное руководство
- français: Brother QC-1000 Guide de référence
- español: Brother QC-1000 Guia de referencia
- Deutsch: Brother QC-1000 Referenzhandbuch
Gerelateerde papieren
-
Brother Innov-is 4750D Handleiding
-
-
-
-
Brother DreamWeaver„ VQ3000 Referentie gids
-
-
-
-
Brother INNOV-IS 4000 Installatie gids
-