Hendi 232026 Handleiding
- Categorie
- Accessoires voor het maken van koffie
- Type
- Handleiding

You should read this user manual carefully before
using the appliance
Alvorens de apparatuur in gebruik te nemen dient
u deze gebruiksaanwijzing aandachtig te lezen
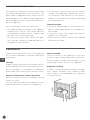
REFRIGERATOR COUNTER
WITH THREE DOORS
KITCHEN LINE
User manual
Gebruiksaanwijzing
Item: 232026

Keep this manual with the appliance.
Bewaar deze handleiding bij het apparaat.
For indoor use only.
Alleen voor gebruik binnenshuis.
CONTENT
1. SAFETY INSTRUCTIONS .................................................... 3
2. INTRODUCTION .................................................................. 4
3. OPERATING THE APPLIANCE ............................................ 5
4. CONTROL UNIT .................................................................. 5
5. HANDLING ......................................................................... 5
6. INSTALLATION ................................................................... 5
7. CONNECTION TO POWER SUPPLY..................................... 6
8. MAINTENANCE .................................................................. 6
9. TROUBLESHOOTING .......................................................... 7
10. INSTRUCTION MANUAL ................................................... 7
11. TECHNICAL PARAMETERS .............................................. 9
12. ENVIRONMENTAL CONCERNS ........................................ 10

3
EN
Dear Customer,
Thank you for purchasing this Hendi appliance. Please read this manual carefully before connecting the
appliance in order to prevent damage due to incorrect use. Read the safety regulations in particular very
carefully.
1. SAFETY INSTRUCTIONS
• Improper operation or use may cause serious
damage to the appliance or injuries.
• The appliance can be used only as intended.
• The manufacturer and the seller shall not be li-
able for any damage caused by improper opera-
tion or use of the appliance.
• During the service life, protect the appliance and
the power plug from contact with water and other
liquids. If the appliance is accidentally dropped
into water, immediately remove the plug from
the mains and have the appliance checked by
a specialist. Failure to follow this instruction
may result in a threat to human life.
• Never open the appliance enclosure on your own.
• Do not insert any objects into the appliance
enclosure.
• Do not touch the power cable plug with wet hands.
• Check the condition of the plug and the cable on
a routine basis. If any damage to the plug or the
cable is found, have them repaired at a special-
ised repair shop.
• If the appliance falls down or is damaged in an-
other way, always have the appliance checked
and, if necessary, repaired by a specialised repair
shop before continued use.
• Never repair the appliance on your own. This may
result in a threat to human life.
• Secure the cable so that it does not come into
contact with sharp or hot objects. Keep it away
from open fl ame. To disconnect the appliance
from the mains, always pull the cable by the plug.
• Secure the cable (or extension cord) against ac-
cidental unplugging or anyone stumbling over it.
• Keep monitoring the appliance during operation.
• Children are unaware of hazards created operat-
ing electrical equipment. Never allow children to
handle electrical equipment.
• After a longer idle period and always before
cleaning, disconnect the appliance from the pow-
er source by unplugging it.
• Caution! The appliance is energised as long as
it is plugged.
• Turn the appliance off before unplugging it.
• Never pull the power cable.
• Use only the accessories supplied with the
appliance.
• The appliance must be connected to a socket
whose current and frequency are consistent with
the data on the name plate.
• Avoid overloading.
• After fi nished operation, disconnect the appli-
ance by removing the plug from the socket.
• Prior to cleaning, always disconnect the plug
from the socket.
• The electrical installation must comply with na-
tional and local regulations.
• The appliance must not be used by persons (in-
cluding children) of impaired physical, sensory or
mental abilities, or those who lack appropriate
knowledge and experience.

4
EN
1.2 PRIOR TO STARTUP
• Make sure the appliance is undamaged. In case
of any damage, immediately contact your supplier.
DO NOT use the appliance.
• Remove the entire packaging and protecting foil
(if applicable).
• Clean the appliance with lukewarm water and a soft
cloth.
• Position the appliance on a fl at and stable sur-
face, unless recommended otherwise.
• Provide suffi cient space around the appliance to
ensure ventilation.
• Position the appliance appropriately to ensure
good access to the plug at all times.
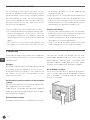
1.3 INTENDED USE
The appliance is designed for short-time storage
of food products such as lettuce, vegetables, fruit,
meat, etc. at a lower temperature.
NOTE: Products put in the cooling counter must be
already pre-cooled. Otherwise, moisture evaporat-
ing while cooling food products can condensate in-
side the cooling compartment, which is natural and
does not indicate any malfunction of the appliance.
Do not use the cooling counter to store medical
products.
Operating the appliance for any other purpose
means misuse of the appliance.
2. INTRODUCTION
This manual provides all necessary information on:
• operation of the cooling counter
• technical data
• installation and use
• guidance and indications for operators
• maintenance
This manual is an integral part of the appliance.
Keep the manual in a secure place for future
reference.
NOTE
The manufacturer and/or seller accepts no liability for:
• Improper installation (inconsistent with guide-
lines provided in the manual)
• Improper operation of the appliance
• Power failures
• Improper maintenance
• Unauthorised changes or alterations of the appliance
• Use of non-genuine spare parts
• Partial or complete failure to follow the manual
All electrical equipment may pose a health hazard.
It is mandatory to observe valid standards and legal
requirements during installation and operation of
the appliance.

5
EN
3. OPERATING THE APPLIANCE
The cooling counter is used for storage of fresh
food with a short best before date. The counter is
equipped with a built-in refrigerating unit.
Operating temperature in cooling mode:
• approx. +2 °C to +8 °C, ambient temperature +43 °C,
relative humidity 60%;
4. CONTROL UNIT
The electronical control panel and power switch
are located in the front side of the counter. The
switch is used to power on/off the appliance.
If the read LED is on, it indicates that the appli-
ance is powered and working. No active red LED
means that the appliance is disconnected and
stopped. The control panel is used to confi gure all
parameters necessary for proper operation of the
appliance. It is required to learn about the param-
eters described in the manual supplied with the
digital control panel. The controller manual is part
of this manual, it is very important if the appliance
must be serviced.
5. HANDLING
The counter is supplied in PET foil packaging and
a cardboard box on a wooden pallet.
The counter must be transported and handled
carefully to avoid any risk to persons or property.
Never place the cooling counter with a built-in re-
frigerating unit on its side or upside down as this
may damage the refrigerating unit. The manufac-
turer and the seller shall not be liable for direct or
indirect damage or faults due to improper handling
or failure to comply with the following guidelines.
Follow OH&S rules while transporting and/or han-
dling the appliance.
6. INSTALLATION
• Position the cooling counter in the coolest and
best ventilated part of the room. Do not install
the counter in the vicinity of heat sources or ex-
posed to direct sunlight.
• Remove protective straps on the cardboard box.
• Remove the cardboard sheet.
• Remove the protective foil.
• Wash the cooling counter with a mild agent. Dry
up using a soft cloth.

6
EN
7. CONNECTION TO POWER SUPPLY
The connection to the power source must be made
by trained and qualifi ed service technicians. The
power cable is supplied with the cooling counter. A
thermomagnetic circuit breaker (fi eld supply) must
be installed between the socket and the power ca-
ble of the appliance.
Prior to making the connection, make sure:
• The supply voltage corresponds to the appliance
voltage of 230 V / 50 Hz / 1 ph. Proper operation
of the appliance requires that the voltage should
be within ± 6% of the rated voltage.
• The electrical system used to power the appli-
ance must be suitable for rated parameters of
the appliance to be installed.
• The electronic system connected to the counter
complies with applicable requirements. Electri-
cal connections and installation of the thermo-
magnetic circuit-breaker have been performed
by a qualifi ed person.
Connection stages:
• Install the thermomagnetic circuit breaker suit-
able for rated output power of the appliance to
be installed.
• Connect the counter to the output on the thermo-
magnetic circuit breaker.
• Make sure the counter is operational (signalled
by an indicator lamp).
8. MAINTENANCE
Proper functioning and service life of the appliance
are essentially dependent on proper and routine
maintenance.
Cleaning
Regular monthly cleaning of the cooling counter is
recommended. Observe the following instructions.
Prior to cleaning, it is mandatory to unplug the
power cable of the cooling counter from the mains.
External cleaning of the counter top surface
Wash the cooling counter with a mild agent.
Dry up
using a soft cloth.
Do not use abrasive and/or caustic products as they
may damage external surfaces of the appliance.
Internal cleaning
Clean the interior of the appliance at least once
a month, using an agent approved for food contact.
Do not use abrasive and/or caustic products as they
may damage internal surfaces of the appliance.
Evaporator cleaning
In order to ensure good functioning of the appli-
ance, regular cleaning of the condenser about
every 4 months is recommended. Use a dry brush
or vacuum cleaner.

7
EN
9. TROUBLESHOOTING
Problem Cause Solution
Cooling turns off
(the LED goes off)
The appliance is located too close to
a heat source
Make sure the plug is properly inserted
in the socket
Check the switch on the appliance
Check power supply
Temperature of
the appliance is rising
The condenser is dirty Move the appliance or the heat source
away
The condenser is dirty Clean the condenser
10. INSTRUCTION MANUAL
1.
Before use, a new cooling counter should be ope-
ned
and aired. Next, clean the inside of the ap-
pliance with warm water.
2. Once connected to the power source, press the
power button to turn on the control panel – the
red LED will light up. The cooling/freezing coun-
ter will start up. The microcomputer controller
installed in the control panel has a function of
automatic temperature range adjustment. The
principle of the smart digital controller is as fol-
lows: if the temperature rises and reaches the
setpoint, the compressor is started; in turn, the
compressor shuts down when the temperature
reaches the set value again.
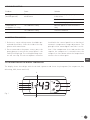
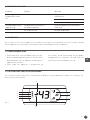
10.1 DESCRIPTION OF THE DIGITAL CONTROLLER
The display shows three digits with the decimal separator and shows six pictograms (for compressor, fan,
defrosting, AUX, alarm and clock)
Fig. 1
5
17
8
9
2
3
4
6
AUX

8
EN
Description concerning each pictogram:
1. COMPRESSOR – the pictogram is visible when
the compressor works.
It blinks when the start of compressor is delayed
by protective procedure.
It blinks cyclically: “two blinks – break” when
continuous working mode is active.
2. FA N - the pictogram is visible when the fans of
evaporator work.
It blinks when the start of fan is delayed due to
external shut-off or when the other procedure is
in progress.
3. DEFROSTING - the pictogram is visible when the
defrosting mode is active (switched on).
It blinks when the start of defrosting is delayed
due to external shut-off or when the other proce-
dure is in progress.
4. AUX - the pictogram is visible when the addition-
al output is activated (only for service).
5. CLOCK - the pictogram is visible when the clock
is on (the clock was activated using “tEn”) or
when the one of time limits is active.
After turning on this pictogram is visible only for
few seconds as the information about availability
of the clock function (only for service).
6. ALARM - the pictogram is visible when the alarm
is active.
7. UP/ON OFF
During normal operation: press the button more
than 3 seconds to change status the controller
ON / OFF; pressed together with button DOWN
more than 3 seconds activates or disables func-
tion of continuous operation (the display will
show the symbols “CC”)
In setting parameters mode allows you to pass to
the next parameter setting.
During setting the parameter value: causes in-
creasing the value of the parameter.
8. SET/MUTE
During normal operation: disable alarm; pressed
for longer than 1 second shows set point;
pressed for longer than 3 seconds cause enter
the setting menu;
pressed at the same time with button down dur-
ing powering on the controller cause return to
the parameter default values (the display will
show the symbols “CF”).
The mode parameter settings:
pressed for more than 3 seconds. will save the
set parameters.
During setting the parameter value:
pressed will save the entered value parameter.
9. DOWN/DEFROST
During normal operation: pressed for more than
3 seconds Cause enable / disable manual mode
defrost;
pressed at the same time the UP button will ac-
tivate or deactivate the continuous operation (the
display will show the symbols “CC”)
Pressed during powering on, will bring up the
software version;
pressed during powering on at the same time
with the SET button cause return to factory set-
tings of parameters (the display will show the
symbols “CF”).
Enable to pass to the previous parameter set-
tings. During setting a parameter value: decreas-
es
the set value.
10.2 INSTRUCTION ON CHANGING TEMPERATURE IN THE COUNTER COMPARTMENT
• After the counter is connected to power supply, the
digital display shows current temperature in the
compartment.
• Press SET for over 1 second (however, no longer
than 3 seconds): the display shows the set-point
temperature.
• The temperature value can be changed up by
pressing “7”
and down by pressing “9”
.
• After the required value is set, confi rm the change
by pressing “8” .
• Defrosting shall activate automatically. However,
if required, it can be turned on by pressing “9” for
min. 5 seconds .

9
EN
10.3 PROCEDURE OF RESTORING DEFAULT SETTINGS
In order to restore default settings:
• switch the controller off
• switch the power back on, simultaneously pressing SET and DOWN.
IMPORTANT: this action shall delete all changes made to the parameter settings.
NOTE:
All products were precisely configured before
shipment from the manufacturing plant. The
user is not allowed to change parameters of the
microcomputer controller on their own to prevent
damage to the compressor or other malfunctions.
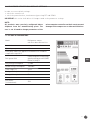
11. TECHNICAL PARAMETERS
Model Refrigerator counter
with three doors Kitchen Line
Intended use storage of foodstuffs
Operating temperature chilled
Heavy-duty cabinet, the appliance intended for use in ambient
temperatures up to 40°C
Refrigerant fluid
name/refrigerant charge in kg/
global warming potential (GWP)
R600a / 0,26 kg / 3
Daily Energy Consumption 3,7 kWh
Annual Energy Consumption 1350 kWh
Temp. range [°C] +2/+8
Energy efficiency class D
Energy efficiency index 55
Climate class 4
Net volume
(chilled volume)
254 l

10
EN
12. ENVIRONMENTAL CONCERNS
When decommissioning the appliance, the product
must not be disposed of with other household
waste. Instead, it is your responsibility to dispose
of your waste equipment by handing it over to a
designated collection point. Failure to follow this
rule may be penalised in accordance with appli-
cable regulations on waste disposal. The separate
collection and recycling of your waste equipment
at the time of disposal will help conserve natural
resources and ensure that it is recycled in a man-
ner that protects human health and the environ-
ment. For more information about where you can
drop off your waste for recycling, please contact
your local waste collection company. The manufac-
turers and importers do not take the responsibility
for recycling, treatment and ecological disposal,
either directly or through a public system.

11
EN

12
NL
INHOUDSOPGAVE
1. VEILIGHEIDSVOORSCHRIFTEN ................................................13
2. INLEIDING ................................................................................. 14
3. HET APPARAAT GEBRUIKEN .................................................... 15
4. HET APPARAAT BEDIENEN ......................................................15
5. BEHANDELING .........................................................................15
6. INSTALLATIE .............................................................................15
7. AANSLUITING OP HET LICHTNET ............................................16
8. ONDERHOUD.............................................................................16
9. PROBLEMEN OPLOSSEN .......................................................... 17
10. ONDERHOUD ........................................................................... 17
11. GEBRUIKSAANWIJZING ......................................................... 17
12. TECHNISCHE PARAMETERS................................................... 19
13. ZORG VOOR HET MILIEU ......................................................... 20

13
NL
Geachte klant,
Voordat u dit apparaat aansluit, dient u de gehele handleiding zorgvuldig door te lezen om schade als gevolg
van onjuist gebruik te voorkomen. Het is erg belangrijk om de veiligheidsvoorschriften door te nemen.
1. VEILIGHEIDSVOORSCHRIFTEN
• Onjuist gebruik kan ernstige schade aan het ap-
paraat of letsel veroorzaken.
• Het apparaat mag alleen worden gebruikt zoals
bedoeld.
• De fabrikant en de verkoper zijn niet aansprake-
lijk voor eventuele schade als gevolg van onjuist
gebruik van het apparaat.
• Tijdens de levensduur moeten het apparaat en
de stekker beschermd worden tegen contact met
water of andere vloeistoffen. Als het apparaat
per ongeluk in het water valt, haal dan onmid-
dellijk de stekker uit het stopcontact en laat het
apparaat nakijken door een specialist. Het niet
opvolgen van dit voorschrift kan leiden tot een
levensgevaarlijke situatie.
• Open de behuizing van het apparaat nooit zelf.
• Steek geen voorwerpen in de behuizing van het
apparaat.
• Raak de stekker van het netsnoer niet aan met
natte handen.
• Controleer de staat van de stekker en het netsnoer
regelmatig. Als er schade aan de stekker of het
netsnoer wordt geconstateerd, laat ze dan repare-
ren bij een gespecialiseerde reparatiewerkplaats.
• Als het apparaat is gevallen of op een andere ma-
nier is beschadigd, laat het dan altijd nakijken en,
indien nodig, repareren door een gespecialiseer-
de reparatiewerkplaats voordat u het apparaat
weer gebruikt.
• Repareer het apparaat nooit zelf. Dit kan tot een
levensgevaarlijke situatie leiden.
• Zet het netsnoer zo vast, dat het niet in contact
kan komen met scherpe of warme voorwerpen.
Houd het uit de buurt van open vlammen. Als u
het apparaat wilt loskoppelen van het lichtnet,
trek dan altijd aan de stekker van het netsnoer.
• Zet het netsnoer (of verlengsnoer) vast, zodat de
stekker niet per ongeluk uit het stopcontact kan
schieten en er niemand over het netsnoer kan
struikelen.
• Houd toezicht op het apparaat tijdens gebruik.
• Kinderen zijn zich niet bewust van de gevaren die
het gebruik van elektrische apparatuur met zich
meebrengt. Laat kinderen nooit gebruik maken
van de elektrische apparaat.
• Haal de stekker altijd uit het stopcontact voordat
u het apparaat reinigt of als het apparaat voor
een lange periode niet wordt gebruikt.
• Let op! Het apparaat wordt gevoed zolang de
stekker in het stopcontact zit.
• Schakel het apparaat uit voordat u de stekker uit
het stopcontact haalt.
• Trek nooit aan het netsnoer.
• Gebruik alleen de accessoires die zijn meegele-
verd met het apparaat.
• Het apparaat moet worden aangesloten op een
stopcontact waarvan de stroom en frequentie
overeenkomen met de gegevens op het typepla-
tje van het apparaat.
• Vermijd overbelasting.
• Haal de stekker na gebruik uit het stopcontact.
• Haal de stekker altijd uit het stopcontact alvo-
rens reinigingshandelingen uit te voeren.
• De elektrische installatie moet voldoen aan de
nationale en lokale regelgeving.
• Het apparaat mag niet worden gebruik door
personen (inclusief kinderen) met verminderde
lichamelijke, zintuigelijke of geestelijke vermo-
gens, of door personen met een gebrek aan ken-
nis en ervaring.

14
NL
1.2 ALVORENS HET APPARAAT WORDT INGESCHAKELD
• Controleer of het apparaat onbeschadigd is. In
geval van schade, neem onmiddellijk contact op
met uw leverancier. Gebruik het apparaat NIET.
• Verwijder de gehele verpakking en het bescher-
mende folie (indien van toepassing).
• Reinig het apparaat met lauw water en een zach-
te doek.
• Plaats het apparaat op een vlakke en stabiele on-
dergrond, tenzij anders wordt geadviseerd.
• Zorg voor voldoende ruimte rond het apparaat
om voor goede ventilatie te zorgen.
• Plaats het apparaat op de juiste wijze om ervoor
te zorgen dat u de stekker altijd eenvoudig kunt
bereiken.
1.3 BEOOGDE GEBRUIK
Het apparaat is ontworpen voor de kortstondige
opslag van levensmiddelen, zoals sla, groenten,
fruit, vlees, etc. bij een lagere temperatuur.
OPMERKING: Producten die in de koelwerkbank
worden geplaatst moeten al voorgekoeld zijn. An-
ders kan vocht dat verdampt tijdens het koelen van
voedingsmiddelen in de koelruimte condenseren,
wat niet natuurlijk is en niet duidt op een defect
van het apparaat.
Gebruik de koelwerkbank niet om medische pro-
ducten op te slaan.
Het is misbruik om het apparaat voor andere
doeleinden te gebruiken.
2. INLEIDING
Deze handleiding bevat alle benodigde informatie
over:
• de werking van de koelwerkbank
• technische gegevens
• installatie en gebruik
• begeleiding en indicaties voor gebruikers
• onderhoud
Deze handleiding is een integraal onderdeel van
het apparaat. Bewaar de handleiding op een veilige
plek voor toekomstige referentie.
OPMERKING
De fabrikant en/of verkoper aanvaarden geen aan-
sprakelijkheid voor:
• Onjuiste installatie (in strijd met de richtlijnen in
de handleiding)
• Onjuist gebruik van het apparaat
• Stroomstoringen
• Onjuist onderhoud
• Ongeautoriseerde wijzigingen of aanpassingen
van het apparaat
• Het gebruik van niet-originele reserveonderdelen
• Het gedeeltelijke of volledig niet opvolgen van de
instructies in de handleiding
Alle elektrische apparatuur kan een gevaar voor de
gezondheid opleveren. Het is verplicht om alle gel-
dende normen en wettelijke voorschriften in acht
te nemen tijdens de installatie en het gebruik van
het apparaat.

15
NL
3. HET APPARAAT GEBRUIKEN
De koelwerkbank wordt gebruikt voor de opslag
van vers voedsel met een korte houdbaarheidsda-
tum. De werkbank is uitgerust met een ingebouw-
de koelinstallatie.
De bedrijfstemperatuur in de koelmodus:
• ca. +2 °C
tot +8 °C, omgevingstemperatuur +43 °C,
relatieve luchtvochtigheid 60%;
4. HET APPARAAT BEDIENEN
Het elektronische bedieningspaneel en de po-
wer-schakelaar zitten aan de voorkant, in het la-
ger deel van de werkbank. De schakelaar wordt
gebruikt om het apparaat aan/uit te zetten. Als
de rode LED aan is, geeft dit aan dat het appa-
raat wordt gevoed en werkt. Als de rode LED niet
brandt, betekent dit dat het apparaat is losgekop-
peld en niet werkt. Het bedieningspaneel wordt
gebruikt om alle parameters te confi gureren die
nodig zijn voor juist gebruik van het apparaat. Het
is belangrijk om de parameters die beschreven zijn
in de meegeleverde handleiding met het digitale
bedieningspaneel te bestuderen. De handleiding
van de bediening is onderdeel van deze handleiding
en is erg belangrijk als het apparaat moet worden
onderhouden.
5. BEHANDELING
De werkbank wordt geleverd in een verpakking van
PET-folie en een kartonnen doos op een houten
pallet.
De werkbank moet voorzichtig worden getrans-
porteerd en behandeld om eventuele risico’s voor
personen en eigendommen te voorkomen. Plaats
de koelwerkbank met ingebouwde koelinstallatie
nooit op zijn kant of ondersteboven, omdat dit de
koelinstallatie kan beschadigen. De fabrikant en
verkoper zijn niet aansprakelijk voor directe of indi-
recte schade of defecten door onjuiste behandeling
of het niet opvolgen van de volgende richtlijnen.
Volg de Arbo-regelgeving tijdens het transporteren
en/of behandelen van het apparaat.
6. INSTALLATIE
• Plaats de koelwerkbank in het koelste en best
geventileerde deel van de ruimte. Installeer de
werkbank niet in de nabijheid van warmtebron-
nen of blootgesteld aan direct zonlicht.
• Verwijder de beschermende banden van de kar-
tonnen doos.
• Verwijder de vellen karton.
• Verwijder het beschermende folie.
• Was de koelwerkbank met een mild reinigings-
middel. Droog vervolgens met een zachte doek.

16
NL
7. AANSLUITING OP HET LICHTNET
De aansluiting op het lichtnet moet door een ge-
trainde en gekwalifi ceerde onderhoudstechnicus
worden gemaakt. Het netsnoer is meegeleverd met
de koelwerkbank. Er moet een thermomagneti-
sche stroomonderbreker (niet meegeleverd) wor-
den geïnstalleerd tussen het stopcontact en het
netsnoer van het apparaat.
Zorg er voordat u de aansluiting maakt voor dat:
• De voedingsspanning overeenkomt met de span-
ning van het apparaat: 230 V / 50 Hz / 1 ph. Voor
een goede werking van het apparaat moet de
spanning binnen ± 6% van de nominale spanning
liggen.
• Het elektrisch systeem dat wordt gebruikt om
het apparaat te voeden moet geschikt zijn voor
de nominale parameters van het apparaat dat
wordt geïnstalleerd.
• Het elektronisch systeem dat wordt aangesloten
op de werkbank voldoet aan de geldende eisen.
Elektrische aansluitingen en de installatie van de
thermomagnetische stroomonderbreker zijn uit-
gevoerd door een gekwalifi ceerd persoon.
Stappen aansluiting:
• Installeer de thermomagnetische stroomonder-
breker geschikt voor het nominale vermogen van
het apparaat dat wordt geïnstalleerd.
• Sluit de werkbank aan op de uitgang van de ther-
momagnetische stroomonderbreker.
• Zorg ervoor dat de werkbank operationeel is (dit
wordt aangegeven met een indicatielampje).
8. ONDERHOUD
Een goede werking en levensduur van het apparaat
zijn voornamelijk afhankelijk van juist en regelma-
tig onderhoud.
Reinigen
Het wordt aanbevolen de koelwerkband elke maand
te reinigen. Neem de volgende instructies in acht.
Voorafgaand aan het reinigen, is het verplicht om
de stekker van de koel-/vrieswerkbank uit het
stopcontact te halen.
De buitenkant van het werkblad van de werkbank
reinigen
Was de koelwerkbank met een mild reinigingsmid-
del. Drogen met een zachte doek.
Gebruik geen schurende en/of bijtende middelen
omdat deze de externe oppervlakken van het appa-
raat kunnen beschadigen.
De binnenkant reinigen
Reinig de binnenkant van het apparaat ten minste
één keer per maand, met behulp van een reini-
gingsmiddel goedgekeurd voor contact met voe-
dingsmiddelen. Gebruik geen schurende en/of
bijtende middelen omdat deze de interne opper-
vlakken van het apparaat kunnen beschadigen.
De verdamper reinigen
Om ervoor te zorgen dat het apparaat goed functi-
oneert, wordt aanbevolen de verdamper ongeveer
elke 4 maanden te reinigen. Gebruik een droge
borstel of stofzuiger.

17
NL
9. PROBLEMEN OPLOSSEN
Probleem Oorzaak Oplossing
Koelen wordt uitgescha-
keld (de LED schakelt
uit)
Stroomstoring Zorg ervoor dat de stekker goed in het
stopcontact zit
Controleer de schakelaar op het apparaat
Controleer de voeding
De temperatuur van het
apparaat stijgt
Het apparaat is te dicht bij een
warmtebron geplaatst
Plaats het apparaat of de warmtebron
verder weg
De condensor is vuil Reinig de condensator
10. ONDERHOUD
Als u technische assistentie nodig heeft, neem dan contact op met een erkend servicecenter en/of de verkoper
van het apparaat en vermeld het serienummer en de aankoopdatum van het apparaat.
11. GEBRUIKSAANWIJZING
1. Een nieuwe koel-/vrieswerkbank moet vóór ge-
bruik worden geopend en gelucht. Daarna moet
de binnenkant van het apparaat worden gerei-
nigd met warm water.
2. Druk, nadat het apparaat is aangesloten op
het lichtnet, op de Power-knop om het bedie-
ningspaneel in te schakelen – de rode LED licht
op. De koel-/vrieswerkbank start op.
11.1 BESCHRIJVING VAN DIGITALE BEDIENING.
Het scherm toont drie cijfers met een decimaalscheiding en zes pictogrammen (compressor, ventilator, ont-
dooien, AUX, alarm en klok).
Fig. 1
5
17
8
9
2
3
4
6
AUX

18
NL
Beschrijving van elk pictogram:
1. COMPRESSOR – het pictogram is zichtbaar
wanneer de compressor in bedrijf is.
Het knippert wanneer het starten van de com-
pressor wordt voorkomen door een beveiliging.
Het knippert in het patroon “tweemaal aan -
pauze” wanneer de compressor in continube-
drijf is.
2. VENTILATOR – het pictogram is zichtbaar wan-
neer de ventilator van de verdamper in bedrijf is.
Het knippert wanneer het starten van de venti-
lator wordt voorkomen door externe uitschake-
ling of er een ander proces wordt uitgevoerd.
3. ONTDOOIEN – het pictogram is zichtbaar wan-
neer de ontdooistand actief is (ingeschakeld).
Het knippert wanneer het starten van de on-
tdooistand wordt voorkomen door externe
uitschakeling of er een ander proces wordt
uitgevoerd.
4. AUX – het pictogram is zichtbaar wanneer de
aanvullende uitvoer ingeschakeld is (alleen voor
onderhoud en reparatie).
5. KLOK – het pictogram is zichtbaar wanneer de
klok is ingeschakeld (d.m.v. “tEn”) of wanneer
een tijdslimiet is ingesteld.
Na inschakelen is dit pictogram een paar se-
conden zichtbaar als informatie voor technici
over de werking van de klok (alleen voor on-
derhoud en reparatie).
6. ALARM – het pictogram is zichtbaar wanneer er
een alarm is ingesteld.
7. OMHOOG/AAN UIT
Tijdens normaal gebruik: Langer dan 3 secon-
den ingedrukt houden voor AAN/UIT.
Tegelijk met OMLAAG langer dan 3 seconden
ingedrukt houden voor continubedrijf in- of
uitschakelen (Het scherm toont de symbolen
“CC”).
Tijdens het navigeren van het instellingen
menu: naar de volgende instelling in het menu
navigeren.
Tijdens het wijzigen van een instelling: verhoogt
de waarde van de huidige instelling.
8. SET/MUTE
Tijdens normaal gebruik: alarm uitschakelen.
1 seconde
ingedrukt houden toont het ingestel-
de punt. 3 seconden ingedrukt houden opent het
instellingen menu.
Tegelijk met OMLAAG ingedrukt houden bij het
inschakelen van het apparaat zet alle instel-
lingen terug naar de standaardwaarden (Het
scherm toont de symbolen “CF”).
Tijdens het navigeren van het instellingen
menu: 3 seconden of langer ingedrukt houden
om de ingestelde waarden op te slaan.
Tijdens het wijzigen van een instelling: de inge-
stelde waarde opslaan.
9. OMLAAG/ONTDOOIEN
Tijdens normaal gebruik: Langer dan 3 seconden
ingedrukt houden om handmatig de ont-
dooistand te activeren of deactiveren.
Tegelijk met OMHOOG langer dan 3 seconden
ingedrukt houden voor continubedrijf in- of
uitschakelen (Het scherm toont de symbolen
“CC”).
Ingedrukt houden tijdens inschakelen van het
apparaat: toont de software versie.
Tegelijk met SET/MUTE ingedrukt houden bij
het inschakelen van het apparaat zet alle in-
stellingen terug naar de standaardwaarden (Het
scherm toont de symbolen “CF”).
Tijdens het navigeren van het instellingen menu:
naar de vorige instelling in het menu navigeren.
Tijdens het wijzigen van een instelling: verlaagt
de waarde van de huidige instelling.

19
NL
11.2 INSTRUCTIES VOOR HET WIJZIGEN VAN DE TEMPERATUUR IN HET KOELCOMPARTIMENT
• Als de werkbank is aangesloten op het lichtnet
zal het display de huidige temperatuur in het
koelcompartiment tonen.
• Druk meer dan een seconde op ‘SET’ (maar niet
langer dan 3 seconden): het display zal de inge-
stelde temperatuur tonen.
• Om de temperatuur naar boven aan te passen druk
op “7” om naar beneden aan te passen druk
op “9” .
• Nadat de gewenste waarde is ingesteld, bevestig
de wijzing door te drukken op “8” .
• Het ontdooien wordt automatisch gestart. Indien
gewenst kan ontdooien ook gestart worden door
minimaal 5 seconden te drukken op “9” .
11.3 FABRIEKSINSTELLINGEN HERSTELLEN
Om de fabrieksinstellingen te herstellen:
• schakel de controller uit
• schakel de stroom weer aan en druk tegelijkertijd op ‘SET’ & ‘DOWN’.
BELANGRIJK: deze actie zal alle wijzigingen aan de instellingen verwijderen.
OPMERKING:
Alle producten zijn vóór transport vanuit de fabriek
juist geconfigureerd. De gebruiker mag niet zelf
de parameters van de microprocessor-controller
aanpassen om schade aan de compressor of an-
dere defecten te voorkomen.
12. TECHNISCHE PARAMETERS
Model Saladette drie deurs
Beoogd gebruik opslag van voedingsmiddelen
Temperatuurbereik [°C] koelen
Kast voor hoge belasting apparaat ontworpen voor gebruik
in omgevingstemperatuur tot 40 °C
Koelmiddel
naam/koelmiddel lading/global
warming potentieel (GWP)
R600a / 0,26 kg / 3
Dagelijks energieverbruik 3,7 kWh
Jaarlijks energieverbruik 1350 kWh
Temp. bereik [°C] +2/+8
Energieklasse D
Efficiëntie index 55
Klimaatklasse 4
Netto inhoud
(koeling inhoud)
254 l
OPMERKING: De fabrikant behoudt zich het recht voor om technische gegevens te wijzigen zonder vooraf-
gaande kennisgeving.

20
NL
13. ZORG VOOR HET MILIEU
Bij de buitengebruikstelling van het apparaat, mag
het niet met het overige huisafval worden verwij-
derd. In plaats daarvan is het uw verantwoordelijk-
heid om uw afgedankte apparatuur in te leveren bij
een daartoe aangewezen inzamelpunt. Het niet op-
volgen van deze regel kan worden bestraft in over-
eenstemming met de geldende voorschriften voor
afvalverwerking. De gescheiden inzameling en re-
cycling van uw afgedankte apparatuur ten tijde van
buitengebruikstelling helpt bij de instandhouding
van natuurlijke hulpbronnen en waarborgt dat de
apparatuur wordt gerecycled op een manier die de
volksgezondheid en het milieu beschermt. Voor
meer informatie over waar u uw afval kunt inle-
veren voor recycling kunt u contact opnemen met
uw lokale afvalverwerkingsbedrijf. De fabrikant
en importeurs nemen geen verantwoordelijkheid
voor de recycling, behandeling en ecologische ver-
wijdering, hetzij rechtstreeks of via een openbaar
systemen.

21
NL

22


Hendi B.V.
Steenoven 21
3911 TX Rhenen, The Netherlands
Tel: +31 (0)317 681 040
Fax: +31 (0)317 681 045
Email: [email protected]
Find Hendi on internet:
www.hendi.eu
www.facebook.com/HendiFoodServiceEquipment
www.linkedin.com/company/hendi-food-service-equipment-b.v.
www.youtube.com/HendiEquipment
- Changes, printing and typesetting errors reserved.
- Wijzigingen en drukfouten voorbehouden.
© 2016 Hendi BV Rhenen - The Netherlands
(ver. 2016/08/19/MD)
-
 1
1
-
 2
2
-
 3
3
-
 4
4
-
 5
5
-
 6
6
-
 7
7
-
 8
8
-
 9
9
-
 10
10
-
 11
11
-
 12
12
-
 13
13
-
 14
14
-
 15
15
-
 16
16
-
 17
17
-
 18
18
-
 19
19
-
 20
20
-
 21
21
-
 22
22
-
 23
23
-
 24
24


Hendi 232026 Handleiding
- Categorie
- Accessoires voor het maken van koffie
- Type
- Handleiding
in andere talen
- English: Hendi 232026 User manual
